BlueStacks Not Installing: 6 Ways to Get it Working Again

BlueStacks is one of the best emulators for Windows and allows users to run apps developed for Android. However, many reported that BlueStacks is not installing, a problem that’s affected a large bunch of users.

In many cases, the installer thew the message, There was an error while trying to download BlueStacks. However, the problem is usually easily fixable, and we will walk you through the solutions that work for others.

Why is BlueStacks 5 not installing on my PC?

Here are the most common reasons BlueStacks is not installing properly:

  • Compatibility issues – If your PC doesn’t meet the minimum requirements for BlueStacks, it will lead to trouble installing the app.
  • Apps conflicting with the installation – Several third-party apps can conflict with the installation of BlueStacks, and the setup would, as a result, throw errors.
  • Critical features not enabled – BlueStacks requires Virtualization support, and if the feature is not enabled, it won’t install.

What can I do if BlueStacks is not installing?

Before we head to the slightly complex solutions when BlueStacks is not installing, let’s first try a few quick ones:

  • Make sure your computer fulfills the minimum requirements for BlueStacks. It would be even better if the PC matches the recommended requirements.
  • Restart the computer and then try installing BlueStacks.
  • Disable any third-party antivirus or other security software installed on the computer. If that works, we recommend you switch to a friendlier antivirus.
  • Check your connection and make sure you are suffering from a slow Internet speed.

If none of these work, head to the solutions listed next.

1. Delete the current installer and download a fresh one

  1. Navigate to the location where the installer is stored, select it, and hit Del.installer
  2. Choose the appropriate response in case a confirmation prompt pops up.
  3. Now, go to BlueStacks’ official website, and download the installer.download to fix bluestacks not installing
  4. Once done, launch the setup and proceed with the installation.installer

There were cases when the downloaded installer itself was corrupt, and BlueStacks was not installing as a result. Simply clearing the temporary files and getting a new installer should fix things.

2. Try a different emulator

If you’re having issues installing BlueStacks, perhaps a different Android emulator might be a good choice. LDPlayer is a great alternative to BlueStacks since it’s completely optimized for gaming.

With this emulator, you can enjoy in Android games with your keyboard and mouse. The software supports multitasking, so you can have multiple games open at the same time.

There’s also multi-instance sync, allowing you to control multiple games simultaneously. Of course, the software offers a great FPS and lag-free experience, so you can enjoy in gaming without stuttering.

LDPlayer is a great Android emulator, and if you’re having issues with BlueStacks, be sure to try it out.

Other great features:

  • Simple to use
  • Support for keyboard and mouse
  • A wide array of supported games and apps
  • Support for macros
  • Multitasking support

⇒ Get LDPlayer

3. Get the offline installer

  1. Download the BlueStacks’ offline installer.
  2. Navigate to the location the installer is downloaded, type cmd in the address bar, and then hit Enter.cmd
  3. Now, paste either of the two commands to get the relevant version of BlueStacks and hit Enter:
    • Nougat – BlueStacksFullInstaller_5.9.410.1001_amd64_native.exe --defaultImageName Nougat64 --imageToLaunch Nougat64 --defaultImageName Nougat64 --imageToLaunch Nougat64
    • Pie – BlueStacksFullInstaller_5.9.410.1001_amd64_native.exe --defaultImageName Nougat64 --imageToLaunch Nougat64 --defaultImageName Pie64 --imageToLaunch Pie64command to fix bluestacks not installing
  4. Once done, wait for the installation to complete.installer

4. Use the dedicated uninstaller

  1. Download the BlueStacks Cleaner tool.
  2. Now, press Windows + R to open Run, type %temp% in the text field, and hit Enter.temp folder
  3. Press Ctrl + A to select all the files here, and then hit Del.delete temporary files to fix bluestacks not installing
  4. Now, launch the BlueStacks Cleaner tool that you downloaded.cleaner tool to fix bluestacks not installing
  5. Click Yes in case a UAC prompt appears.
  6. Once you see the Process has been finished message, get the BlueStacks installer from the official website, and try installing it.uninstallation complete

This method works when BlueStacks claims that a version of it is already present on the computer and is subsequently not installing when you try. Alternatively, you could use a third-party uninstaller tool for the job.

5. Run the installer in compatibility mode

  1. Navigate to the folder where the BlueStacks installer is stored, right-click on it, and select Properties.bluestacks
  2. Navigate to the Compatibility tab, tick the checkbox for Run this program in compatibility mode for, choose an earlier iteration of Windows from the dropdown menu, and click on OK to save the changes.compatibility mode to fix bluestacks not installing
  3. Now, try running the setup and installing BlueStacks.

Running the installer in compatibility mode can fix things when BlueStacks is not working or installing in Windows.

It can also help you fix issues like error code 2004 on BlueStacks. To learn more about the error and what causes it, read this guide.

6. Update the graphics driver

  1. Press Windows + R to open Run, type devmgmt.msc, and then hit Enter.device manager
  2. Expand Display adapters, right-click on the graphics adapter, and select Update driver.update driver to fix bluestacks not installing
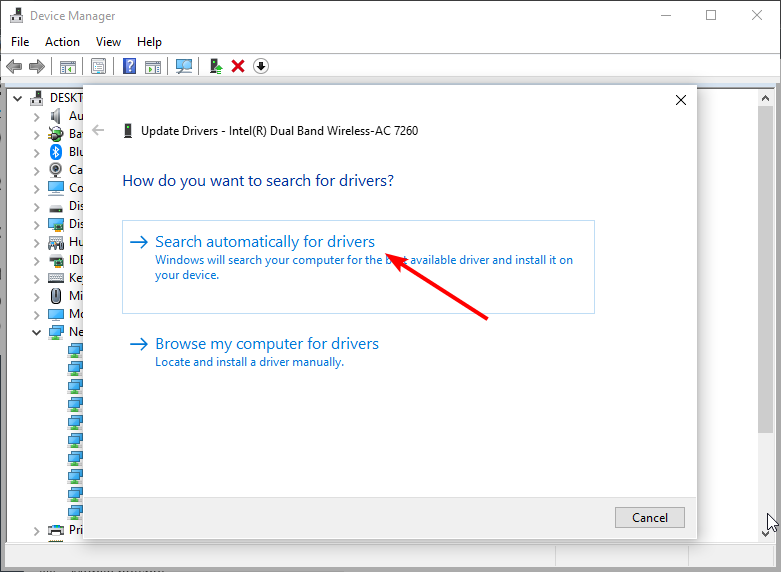
  3. Click on Search automatically for drivers and wait for Windows to install the best available one on the PC.search automatically for drivers

In many cases, updating the graphics driver did the trick when BlueStacks was not installed in Windows. Sometimes, Windows won’t be able to find a better version, and that’s when manually updating the driver comes into the picture.

Alternatively, you can use driver updater software to update all the drivers simultaneously!

⇒ Get Outbyte Driver Updater

The problem should be resolved by now, and BlueStacks should be up and running the way it should. Though some users reported that BlueStacks is stuck on loading, that, too, is easily fixable.

If you have any queries or fixed things using a different solution, drop them in the comments section below.

How to Fix League Of Legends DirectX Errors (4 Ways)

A few players have experienced DirectX problems in League of Legends. So let us address it in this guide.

League of Legends (LoL) is an enthralling multiplayer battle arena game for Windows 10. However, some players can’t start LoL when a DirectX error message pops up. The LoL DirectX error message states:

An unknown DirectX error has occurred and League of Legends cannot start. Please make sure your video card is using the latest video drivers from the manufacturer.

This is how you can fix the League of Legends DirectX error if that same error message pops up on your Windows desktop or laptop.

What causes DirectX errors in League of Legends?

There are a few causes for this error. First, from user experiences, we gather that the top triggers include the following:

  • Driver issues – If the graphics card driver is outdated, corrupted, or bad, it may trigger this error.
  • Antivirus issues – These, in many cases, are compatibility issues that make the antivirus block the game from starting up.
  • Issues with .Net Framework – Microsoft NET Framework is an essential prerequisite for DirectX, so you might need to repair your NET Framework setup.

These are the leading causes to look out for. That said, let us discuss some of the better solutions.

How can I fix DirectX errors in League of Legends?

1. Delete the Game.cfg File

  1. Press Windows + E to open File Explorer.
  2. Navigate to the following path:
    C:/Riot Games/League of Legends/Config
  3. Alternatively, right-click your League of Legends shortcut and select Open file location.
    directx league of legends
  4. After, right-click the game.cfg file in the Config subfolder.
  5. Then, click Delete.

Some League of Legends players has fixed the DirectX error by deleting the game.cfg file. That’s a straightforward resolution that is worth a shot.

Another reader deleted the Config folder, and the game worked perfectly fine. However, it would be best to delete only the game.cfg file.

2. Update your graphics card driver

2.1 Manually upgrade the driver

  1. Press Windows Key + X on your keyboard to open the Power User menu and select Device Manager from the list.
    directx league of legends
  2. When Device Manager opens, expand your Display adapters, locate the driver you want to update, right-click it and choose Update driver.
  3. Select Search automatically for drivers and let Windows 10 download the appropriate driver.

The LoL error message suggests that your video card uses the manufacturer’s latest video drivers. So, that’s a pretty big clue for a potential fix!

2.2 Update your drivers automatically

If you don’t want to spend time and search for the GPU drivers yourself, you can use a dedicated third-party tool that does that for you.

Our top recommendation that’s easy to use and uses very few resources is Fortect Driver Updater.

3. Delete the League of Legends subfiles

  1. First, open the game’s Config folder by entering the following in File Explorer’s folder path bar: C:Riot/Games/League of Legends/Config
  2. Select the game.cfg and input files in the Config subfolder, and delete them.
    directx league of legends
  3. Then open the RADS subfolder within the League of Legends subfolder, select the lol_game_client and lol_game_client_en_us subfolders, and then delete them.
  4. Open the League of Legends launch window, and click the ? button to open a Help window that includes four options.
    directx league of legends
  5. Press the Repair button on the Help window to fix corrupt files.

Some LoL players have fixed the DirectX error by deleting a few subfiles and subfolders and then running a repair with the game’s Repair option.

4. Repair the NET Framework

  1. Download the NET Framework Repair Tool.
  2. Open the NET Framework Repair Tool and press Next to apply the recommendations.
  3. Alternatively, you can also uninstall your NET Framework and reinstall it.

Those resolutions for the DirectX error will probably kick-start League of Legends so you can play the game again.

We encourage you to give us some feedback in the comment section below.

5 Best GoPro Black Friday & Cyber Monday Deals to Get Now

GoPros are amazing high-quality cameras used by everyone nowadays. They are small and can be attached to helmets, vests, and other equipment. This way, you can record your journeys and activities without worrying about holding cameras.

The cameras on our phones are decent, but they don’t offer the same quality and features as action cameras. If you want to record any kind of video, you need a GoPro.

The best time to buy a brand new camera is during sales when you will find all kinds of different GoPros to choose from. We will help you with an informative list of the best deals available on Amazon.

Note: All the prices and offers in this article are subject to change, so be sure to check the official product page to get the latest deal. If the product or offer you’re looking for is no longer available, you can try to find it on its official manufacturer page or get another one from our list.

Which is the best GoPro on a budget?

AKASO EK7000

  • 4K videos at 25FPS,
  • 2.7K videos at 30FPS, 1080p videos at 60FPS
  • 12MP photos
  • Built-in Wi-Fi with up to 10 meters range, and an HDMI port
  • Each battery lasts up to 90 mins recording in 1080p or 60 mins recording in 4K/2K
  • Waterproof case that can withstand pressure up to 98FT/30M
  • No image stabilization

The best budget choice on our list is AKASO EK7000. The camera has everything you need for amateur video shots, on both 4k and 1080p resolutions. Moreover, it comes with a bundle of accessories, such as a bicycle stand, waterproof case, battery, camera mount, and a lens cloth.

The camera also comes with a handy remote control that can take pictures and start/stop the video recording from a distance. You can also strap the remote to your wrists for easy access.

In conclusion, this product is the best choice for those who are just starting out with video recording. It is one of the cheaper GoPros out there. If you are just an amateur looking for a camera to casually record your life, the AKASO EK7000 is more than enough.

GoPro HERO9 Black

  • 20MP plus SuperPhoto, with improved HDR and RAW photo capture
  • Up to 8x Slow-motion and image stabilization with HyperSmooth 3.0
  • Fully functional front screen and touch-enabled rear screen
  • 5k video capturing at 30FPS
  • 4K/2K video capturing at 60FPS
  • 1080p video capturing at 60FPS
  • Camera mods need to be bought separately

The GoPro HERO9 Black is the best action camera on the market. It brings customization to another level with its foldable mounting fingers which allow you to swap mounts quickly.

Take selfies easier now using the improved and larger front display. Furthermore, the camera comes with HyperSmooth 3.0, which offers incredible and customizable image stabilization. The digital lenses allow you to toggle between different picture modes and TimeWrap 3.0 allows for slow-motion recording.

You can Livestream in 1080p on social media thanks to HyperStabilization. The camera also has a 3.5mm microphone adapter in case you want to connect a high-quality microphone.

AKASO V50 Elite

  • Records 4K at 60/30FPS, 2.7K at 60/30FPS, and 1080p at 120FPS
  • Can take up to 20MP pictures
  • Built-in advanced Electronic Image Stabilization (EIS)
  • Optional view angles such as Wide, Medium, and Narrow
  • Waterproof camera case up to 131FT/40M
  • Camera quality decreases in low light

AKASO V50 Elite is another great choice for the amount of money you spend since it comes with the same accessories as the previous, budget-oriented AKASO action camera. In addition, the remote control can be activated by voice.

The camera‘s case is made out of rubber-like plastic and it has one screen on the back that has excellent viewing angles. In addition, the screen is really bright so you can see clearly even when exposed to intense sunlight.

There are many action cameras on the market, and trying to find the best one for you can get quite frustrating.

The previously mentioned cameras should be diverse enough in price and features to help you make de right decision.

Don’t hesitate to share your suggestions or personal experiences with us by using the comment section below.

Adblock Not Working On Twitch: Solved

Many Windows 10 users reported getting ads on Twitch even with Adblock. Even if this is an unusual problem, it seems like several users are sometimes facing it.

You should first remember that you can use AdBlock to stop ads on Twitch and similar video streaming sites.

If your AdBlock is not working on Twitch, make sure you read this guide completely and discover the best solutions to fix it.

Before getting into our main subject, let’s have a look at some reasons why you should definitely use an ad-blocker for Twitch.

Why doesn’t AdBlock work on Twitch?

If your AdBlock doesn’t work on Twitch, it’s possible that your extension is out of date, and it needs to be updated in order to work, or maybe you need to use a different ad block extension.

Modifying certain hidden settings of your browser can help you with this and many other problems on Twitch.

Do ad blockers still work on Twitch?

Yes, ad blockers do work on Twitch, but some might be more efficient than others. If your current one doesn’t work, be sure to update it.

Alternatively, you can switch to a different ad block extension and check if it works. Keep in mind that this issue affects all browsers, and users reported that Adblock is not working on Twitch in Firefox and Chrome alike.

Why should I use an ad-blocker for Twitch?

Twitch is notorious for serving a lot of ads, and if a viewer experiences a long ad break, there are reports of them being served up to 9 adverts in a row.

Users consider this a total nightmare. In some countries, the same ad will play repeatedly at regular intervals – literally driving them mad.

So, using an efficient ad-blocker for Twitch will definitely let you enjoy a complete experience, without being bothered by external notifications while streaming.

Now, let’s see what you can do if AdBlock can not stop ads on Twitch.

How can I fix the Twitch AdBlock not working?

1. Try a different browser

One way to deal with this issue is to try out a different browser. Unlike many other options on the market, Opera GX comes with a built-in ad-blocker, so it will block all ads, even the ones on Twitch.

We should mention that this browser is built on Chromium, so all extensions that you use in Chrome will work in Opera GX as well.

In addition, there’s a malware scanner so you’ll be warned if you visit a malicious website or if you download a malicious file.

If you’re looking for a browser that is focused heavily on making your life as a gamer and a fan of streaming a whole lot easier, then Opera GX is the web browser for you.

In addition, if you choose to use it, you won’t have to worry again about not being able to stop ads on Twitch with AdBlocker.

Check out some other Opera GX great features:

  • Free VPN
  • Dedicated to streaming apps
  • Safe and easy to use
  • CPU, RAM, and Network limiters

Opera GX

A built-in VPN, an adblocker, network limiters, and the power to control RAM use for lag-free browsing.

2. Update your Adblock extensions

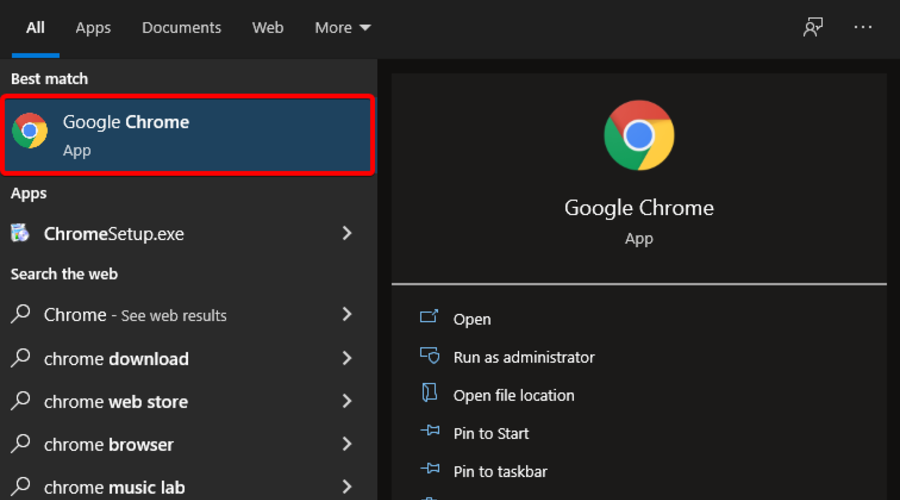
  1. 1. Hit the Windows key, type your browser’s name, then open the first result (In this case, we’re giving the Chrome example).

    twitch-wont-load-chrome
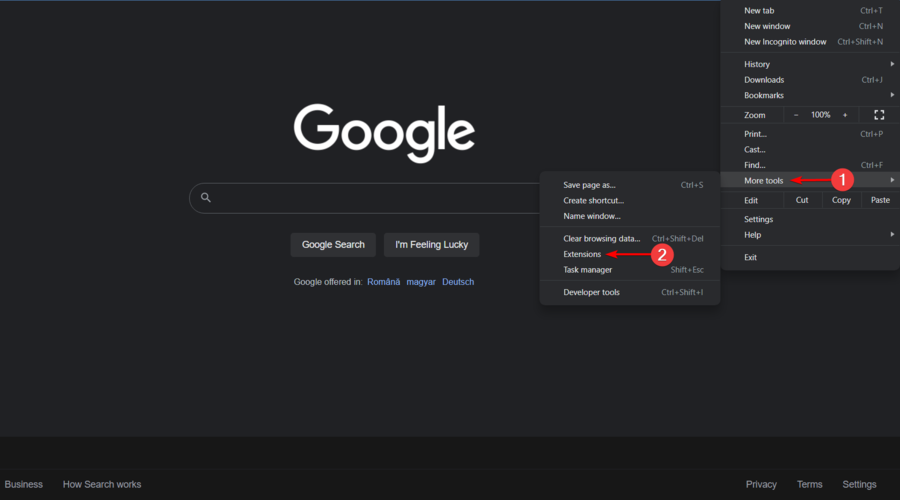
  2. 2. Now, click on the 3 vertical dots from the right-top corner of the window to open the Chrome General menu.

    go to settings chrome
  3. 3. Hover the mouse over More tools, then click on Extensions.

    go to extensions chrome
  4. 4. From the right-top corner of the page, tick the Developer mode check box to enable this function.

    enable developer mode
  5. 5. Click on the Update button.

    update chrome extensions
  6. 6. Restart your browser and check if the problem is still there.

  7. You should know that browser extensions usually update themselves just fine as new versions are released.

    However, if your AdBlock isn’t working on Twitch, making sure it’s up-to-date is a good first step in troubleshooting.

    After doing that check if the Twitch Adblock in Chrome is working.

3. Change advanced settings

  1. Hit the Windows key, type Chrome, then open the first result.
  2. In the address bar enter this line: chrome://flags/#network-service
  3. Type Enable network logging to file in the search box, then set it to Disabled.
  4. Restart Chrome and check if the problem is resolved.

4. Try Alternate Player for Twitch.TV

  1. If you have problems with ads on Twitch try using Alternate Player for Twitch.TV extension.
  2. Download the extension from the following links:

What are the best AdBlockers for Twitch?

1. TTV LOL

TTV LOL is a popular Ad-Block for Twitch, that many people on Reddit recommend. You can get it for Firefox or Chrome. It is extremely popular, being downloaded over 30,000 times, and has 4.2 stars in Chrome Store.

It is designed to block Livestream ads without affecting video quality and without causing the purple screen of death.

A reliable Ad-Block that seems to be working excellently for the time being, and that I can highly recommend to any Twitch user. 

2. Video ad-block

This is another popular ad block that is designed to remove pesky ads on Twitch. It is also available for both Chrome and Firefox.

It works by replacing ads with a low-quality stream (between 1080p and 480p) for the duration of the ads, before switching you back onto the high-quality stream (when the ad is over).  

3. Purple Ads Blocker

Purple Ad-block is recommended for Twitch users by several experts, being available both for Chrome and Firefox.

It works by proxying M3U8 playlist files from Twitch to provide a server-side signature that allows videos to play without ads. It only works on the official Twitch website, so do not try it on alternate sites. 

4. TTV AdEraser

TTV AdEraser promises not only to remove ads but also to improve your twitch experience by giving you some extra features (such as hovering over channel icons to preview a stream). It works by playing Twitch videos through a custom embedded player.

Twitch Adblock Opera, Opera GX Twitch Adblock

Opera and Opera GX have built-in ad blockers, so they can easily block ads on Twitch. Just enable this option from the settings and you’re good to go.

If you encounter any issues, you can always use third-party Adblock extensions on Opera. You can even use Chrome extensions since the browser is based on the Chromium engine.

There you go, four simple solutions that might help you if you’re still getting ads on Twitch. In most cases, you just need to update your extensions and you’re good to go.

Keep in mind that this isn’t the only problem that you can encounter, and many reported Twitch network error 2000, but we already covered it in a separate guide.

Twitch error 3000 is another common playback issue that you can encounter, but we already tackled it in a separate guide.

Besides Adblock, BetterTTV for Firefox is another must-have extensions for Twitch, so don’t miss it.

If you found our solutions helpful for fixing the AdBlock not working on Twitch issue, let us know in the comments section below.

VirtualBox Won’t Show 64-bit: How to Fix It in 5 Steps?

Wondering why Virtualbox is not showing a 64-bit option when creating a new virtual machine? Well, there could be several reasons for the same. 

In this guide, we will discuss the potential reasons along with the fixes to resolve the problem.

What causes VirtualBox won’t show 64-bit guest OS in Windows?

Spotting the exact reason the issue is occurring can be difficult, as there can be several reasons. However, we have listed some of the popular ones here: 

  • Virtualization Disabled – If Virtualization is disabled from the BIOS utility, the issue can occur.
  • Hyper V – Hyper V is a  hardware virtualization product that allows you to create a virtual machine. However, it could conflict with VirtualBox and hence the issue. It needs to be disabled.
  • Core Isolation – Core Isolation protects against viruses and attacks by separating computer processes from your OS and device. However, this could cause problems in running a virtual machine. Therefore, it needs to be disabled.
  • VM platforms  – If you have another VM software on your PC, conflict could arise when using resources, causing the problem.
  • Device Guard and Credential Guard– Apps like Device Guard provide hardware security and only let those apps run, defined in Windows code integrity policies. This can also cause problems. 

How can I fix VirtualBox won’t show 64-bit?

Before moving to the detailed troubleshooting steps, make sure you try these quick fixes:

  • Ensure your computer supports x64 bit.
  • Uninstall and reinstall Oracle VirtualBox.
  • Make sure you are using the latest version of VirtualBox.
  • Restart your computer
  • Make sure you have Microsoft C++ 2019 Redistributable package installed.

1. Disable Hyper V

  1. Press Windows + R to open the  Run command window.Windows Features
  2. Type optionalfeatures.exe and press Enter to open the Windows Features window.
  3. Locate and remove the checkmark beside Hyper V and click OK.Windows Features Hyper V
  4. Restart your PC.

2. Enable Intel Virtualization Technology

  1. Press Windows + I to get Settings.
  2. Go to System, then click Recovery.System - Recovery Windows 11
  3. Now locate Advanced Startup and click Restart Now.Recovery Advanced Startup -Virtualbox won't show 64 bit
  4. On Choose an option screen, click Troubleshoot.Choose an option - Troubleshoot
  5. Now select Advanced Options.Advanced options
  6. Select UEFI Firmware Settings and click Restart.UEFI 2
  7. Now the screen will present options; choose the one to enter BIOS.
  8. Click Configuration, then Virtualization Technology, and mark it Enabled.Virtualization
  9. Go to the Exit menu and choose Save changes and Exit.

Note: For AMD processors, ensure AMD SVM(Secure Virtual Machine) is enabled.

3. Disable Core Isolation

  1. Press Windows + I to get Settings.Privacy & Security - Windows Security
  2. Go to Privacy & Settings, then click Windows Security.
  3. Click Open Windows Security.Windows Security Open
  4. Go to Device Security, then Core isolation, and click on Core isolation details.Device Security - Core isolation
  5. Toggle off the switch under Memory Integrity. Core Integrity
  6. Restart your PC.

4. Disable Device Guard & Credential Guard

4.1 Use Group Policy Editor to disable Device Guard 

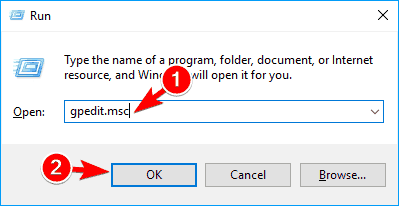
  1. Press Windows + R to get the Run window. GPEDIT RUN COMMAND
  2. Type gpedit.msc and press Enter. 
  3. Copy and paste the following path: Computer Configuration\Administrative Templates\System\Device GuardTurn On Virtualization Based Security
  4. Double-click on Turn On Virtualization Based Security and set it as Disabled. Disabled
  5. Click Apply and then OK. 

4.2 Use Registry Editor & Command Prompt to Disable Credential Guard

  1. Press Windows + R to get the Run window. REGEDIT RUN COMMAND
  2. Type Regedit and hit Enter.
  3. Copy and paste these paths one by one in the address bar—Right-click on LsaCfgFlags, EnableVirtualizationBasedSecurity, and RequirePlatformSecurityFeatures keys and select Delete. HKEY_LOCAL_MACHINE\System\CurrentControlSet\Control\LSA\LsaCfgFlags HKEY_LOCAL_MACHINE\Software\Policies\Microsoft\Windows\DeviceGuard\EnableVirtualizationBasedSecurity HKEY_LOCAL_MACHINE\Software\Policies\Microsoft\Windows\DeviceGuard\RequirePlatformSecurityFeatures
  4. Now, press the Windows key, type CMD, and click Run as administrator.DOS COmmand Prompt
  5. Copy and paste these commands mentioned below one by one and press Enter after every command mountvol X: /s copy %WINDIR%\System32\SecConfig.efi X:\EFI\Microsoft\Boot\SecConfig.efi /Y bcdedit /create {0cb3b571-2f2e-4343-a879-d86a476d7215} /d "DebugTool" /application osloader bcdedit /set {0cb3b571-2f2e-4343-a879-d86a476d7215} path "\EFI\Microsoft\Boot\SecConfig.efi" bcdedit /set {bootmgr} bootsequence {0cb3b571-2f2e-4343-a879-d86a476d7215} bcdedit /set {0cb3b571-2f2e-4343-a879-d86a476d7215} loadoptions DISABLE-LSA-ISO bcdedit /set {0cb3b571-2f2e-4343-a879-d86a476d7215} device partition=X: mountvol X: /d
  6. Click Yes to the UAC prompt asking to disable Windows Defender Credential Guard.
  7. Restart your computer.

5. Uninstall other VM apps

  1. Press Windows + R to open the Run box.APPWIZ RUN COMMAND
  2. Type appwiz.cpl and press Enter.
  3. Go to the installed apps, select other VM apps, and click Uninstall.Uninstall Apps
  4. Restart your PC.

So, these steps you need to follow to resolve VirtualBox won’t show 64-bit. Try them and let us know which methods worked for you in the comments section below.

5 Best Mini Laptops On Sale

If you’re in the market for a new laptop for school or for your business, Cyber Monday may be the ideal time of the year to get the best bargains on laptop computers. This year, perhaps more than any other, you need to react fast!

While the majority of individuals are required to transport bulky and huge personal computers, you could use a mini laptop to take advantage of the extra space while still getting your work done.

Wouldn’t it be convenient to have all of your programs and documents in one little, portable device that you could carry with you everywhere you go?

This appears to be one of the most sought-after pieces this season, so you may want to act quickly and get your hands on one while the offer is still available.

Allow us to begin by looking at some of the irresistible deals that are currently on the market.

Note: All the prices and offers in this article are subject to change, so be sure to check the official product page to get the latest deal. If the product or offer you’re looking for is no longer available, you can try to find it on its official manufacturer page or get another one from our list.

What is the best mini laptop brand?

All these items have special prices.

Aside from the obvious reason that you can take it with you wherever you go and that it is already on sale at a discounted price, they come with incredible features that you simply cannot afford to miss out on.

This type of computer is becoming increasingly popular for both recreational and professional applications. For the most part, unlike other compact electronic devices, such as netbooks or tablets, the micro laptop does not lose computational capability in the pursuit of portability.

Most mini-computers won’t take up much more space than a business folio or an academic binder, which is ideal for traveling.

Additionally, they are extremely efficient despite their small size. Depending on how you use them, a fully charged battery can last anywhere from 7 to 12 hours.

Many of them come with fast-charge cables, which allow you to recharge the battery in less than an hour.

Plus, they can function as a hybrid tablet and laptop, with smooth touchscreen surfaces, writing pens and accessories, multiple folding configurations, and removable keyboards. Don’t write off their size as a result of a lack of functionality.

Have you already bought a mini laptop? If not, don’t miss out!

Volume Button Not Working on Windows 10: Solved

Sound problems are common in almost every version of Windows, including Windows 10 and 11. But this time, we have something a little different. It turns out that the Windows 10 volume control is not working from the Taskbar.

Some users reported online that they cannot open the Sound Control bar from the Taskbar in Windows 10, so we prepared a couple of solutions for this issue to help everyone who’s facing this problem.

What problems related to volume control can appear on Windows 10?

Sometimes issues with sound and the taskbar volume icon can occur. Speaking of cases, these are some of the problems that we’ll address in this article:

  • Taskbar volume icon won’t open – One common problem you can experience is the inability to open the controls. This is a common problem, but you should be able to fix it with one of our solutions.
  • Windows 10 volume slider not working – Several users reported that they could not adjust their volume. According to them, their volume slider isn’t working at all.
  • Volume mixer won’t open Windows 10 – Another common problem that can appear on Windows 10. This is an annoying problem since you won’t be able to adjust your audio volume at all.
  • Volume icon not working Windows 10 – Many Windows 10 users reported that their volume icon isn’t working. Due to this problem, you’ll have to use your speaker knob to change the volume.
  • Keyboard volume control not working Windows 10 – Many keyboards allow you to control your volume using dedicated volume buttons. However, users reported that volume control buttons aren’t working for them.
  • The volume icon is not showing in Taskbar – This is another common problem with Volume Control. Fortunately, this isn’t a serious error, and you should be able to fix it with one of our solutions.
  • The volume control program is not installed – Certain audio devices require dedicated software to control your volume. If the software is missing, you might get this error message.
  • Taskbar volume icon greyed out Windows 10 – Several users reported that the Volume Control icon is grayed out. This can be an annoying problem; in most cases, it’s caused by your audio drivers.

Why is my volume button not working on Windows 10?

You will find multiple user reports where users have claimed they cannot launch volume control via the taskbar.

We dug up the internet and created a list of reasons, some of the most common causes that trigger this problem on Windows 10 PC.

  • The volume control may fail to open intermittently because of a faulty process.
  • There are chances that some important system file is missing or got corrupted.
  • The SndVol.exe process is experiencing some issues.
  • Due to some reason, the Windows Audio service isn’t working.
  • There might be some hardware or software-related issues with your sound card.
  • The sound driver is outdated.

Now that you know the common reasons preventing volume control from opening from the taskbar in Windows 10 let us check out the solutions.

Why is my volume slider on the Taskbar not working?

If your Taskbar volume control is not working, it might due to some glitches with the Audio Service. Restarting this service should fix the issue in this case.

Another known cause of the problem is an outdated sound driver. Updating or reinstalling your drivers should restore normalcy. We will show you how to do all these in detail in the ensuing section of this guide.

How can I fix the Windows 10 volume control not working?

1. Install new Sound Drivers

  1. Right-click the speaker icon in your taskbar, and go to Playback devices.
    Volume Control won't open playback devices
  2. Double-click on your default playback device.
    Windows 10 volume slider not working speakers sound settings
  3. Under Controller information, click Properties.
    Volume mixer won't open Windows 10 default playback device properties
  4. Now, go to Change Settings, and go to the Driver tab.
    Volume icon not working Windows 10 default playback device audio driver
  5. Click on Update Driver. If the sound driver is unavailable, search online for the appropriate driver for your sound card, and install it.
  6. Restart your computer.

This solution only applies if, besides dysfunctional Sound Control, you also can’t hear any sound from your computer. If that’s the case, the sound driver is probably missing or corrupted.

1.1 Update your drivers automatically

Issues with your audio devices most often stem from problems with their respective drivers, either because they are broken, outdated, or missing altogether, in which case you need to do something.

Although manually updating them is a choice, it takes time, and there is a high chance you end up installing the wrong driver or one that isn’t the latest. That is when an excellent third-party tool can become helpful.

2. Reset the Audio Service

  1. Open the Start menu.
  2. Type services.msc, and open Services.
    Keyboard volume control not working Windows 10 open Services
  3. Locate Windows Audio, right-click on it, and go to Properties.
    Volume Control is not showing in Taskbar windows audio service properties
  4. First, make sure that the Startup type is set to Automatic.
    Volume Control program is not installed set Windows Audio Properties Startup type to Automatic
  5. Then, click on Stop, and wait for the process to stop.
    Volume Control greyed out Windows 10 stop Windows Audio service temporarily
  6. Now, click Start again.
    Volume Control won't open start Windows Audio service
  7. Restart your computer, and check if the issue is resolved.

Some users who experienced this issue in previous versions of Windows told us that simply restarting the audio service does the trick, so that’s what we’re going to do here. To restart your Audio service, do the following:

3. Use a third-party audio enhancer

Another way to access your audio’s volume is using a substitute for volume control. Therefore, we present great sound-enhancing software that can do it, with many other capabilities.

Those apps enhance all the audio from your PC, including movies, music, recordings, game sounds, random systems sounds and alerts, and audio.

We’re talking about a good revolution here, with tremendous and feature-rich audio enhancer software. You won’t hear the same after using any of it. The volume control and other features are easy to use and accessible and can surprise you.

4. Perform an SFC scan

  1. Open the Start menu.
  2. Type Command Prompt and open it as an administrator.
  3. Type the following command and press Enter: sfc/scannow
  4. The SFC scan will now start.
  5. The scan can take 10-15 minutes, so don’t interrupt it.

If the taskbar volume icon is not working, you might be able to fix it by performing an SFC scan. Sometimes your files might get corrupted, preventing the volume icon from working correctly.

After the SFC scan is finished, your files will be repaired, and the taskbar volume icon should start working again.

5. Run Hardware and Devices troubleshooter

  1. Press Win + I to open the Settings app.
  2. Click on Update & security.
  3. Select Troubleshoot from the menu on the left. In the right pane, select Hardware and Devices
  4. Click the Run the troubleshooter button.
  5. The troubleshooter will now start and check for problems.

Sometimes you can fix this problem simply by running a Hardware and Devices troubleshooter. For example, if the volume icon on the taskbar is not working, you might be able to fix it by following these steps:

After the troubleshooter is finished, check if the problem still appears.

6. Reinstall audio drivers

  1. Open the Start menu.
  2. Select Device Manager.
  3. Right-click on your sound device.
  4. Choose Uninstall device from the menu.
    Keyboard volume control not working Windows 10 uninstall audio device
  5. Click on the Uninstall button to remove it.
    Volume Control is not showing in Taskbar uninstall audio device

Sometimes the taskbar volume icon isn’t working due to your drivers. Your drivers can become corrupted; the best way to fix them is to reinstall them.

Users suggest uninstalling the Speaker Audio device from the Audio inputs and outputs section and your audio device from the Sound, video, and game controllers section.

After that, you can click on Scan for hardware changes icon or restart your PC to reinstall the drivers. Once your drivers are reinstalled, the problems with the taskbar volume icon should be resolved entirely.

7. Check if your Audio Manager is enabled

  1. Press Ctrl + Shift + Esc to start Task Manager.
  2. Switch to the Startup tab.
  3. Look for Audio Manager on the list.
  4. Right-click it and choose Enable from the menu.
    Volume Control greyed out Windows 10 enable startup
  5. Restart your PC.

Sometimes you might experience problems with audio because your driver software isn’t running. For example, if the taskbar volume icon is not working on your PC, you might want to check if your Audio Manager is enabled.

Once your PC restarts, check if the issue still appears. Remember that some audio devices don’t require Audio Manager to work, so if you can’t find Audio Manager on the list, this solution doesn’t apply to you.

8. End the SndVol.exe process

  1. Open Task Manager.
  2. Locate SndVol.exe or Volume Mixer.
  3. Right-click it and choose End Task.
    Volume Control won't open end task in task manager
  4. Close Task Manager.

Many users reported that the SndVol.exe process could cause the issue. However, if the volume icon is not working on your PC, you might be able to solve the problem simply by ending the SndVol.exe process.

After ending the complex process, the issue should be resolved, and Volume Control will start working. However, remember this is just a workaround, so you’ll have to repeat it whenever this issue occurs.

9. Change the font size

  1. Press the Win + I buttons to open the Settings app.
  2. Navigate to the System section.
    Windows 10 volume slider not working system settings
  3. Set Change the text, apps and other items’ size to any other value.
    Volume mixer won't open Windows 10 change scaling
  4. Now you just have to log off and log back into your account.

According to users, this problem can appear due to your text size. However, your taskbar volume icon should start working again after applying the solution. Then, repeat the same steps and change the text size to the original value.

10. Disable or uninstall your antivirus

Many users reported that their antivirus software caused this issue. To fix the problem, you need to disable or uninstall your antivirus. If disabling the antivirus doesn’t help, you might have to uninstall it.

The best way to do that is to download a dedicated uninstaller tool and use it to remove your antivirus altogether.

Those specialized remover toolkits make uninstalling your software a piece of the cake. In addition, you will no longer need to search and uninstall the program through the Control Panel because the app will find and list every program you have.

In addition, it will ensure there are no leftover files that will clog your computer for no reason. Finally, you’ll be left with no program traces after the uninstallation, thus completely removing it from your computer.

After removing the antivirus, check if the issue is resolved. Many users reported that this problem was caused by Norton antivirus, but other antivirus tools can also cause this issue.

11. Restart the Windows Explorer process

  1. Open Task Manager.
  2. Locate Windows Explorer.
  3. Right-click and choose Restart from the menu.
    Volume icon not working Windows 10 restart windows explorer

If the taskbar volume icon is still unavailable, you might be able to fix it with this workaround. According to users, you can fix this problem simply by restarting Windows Explorer.

After Windows Explorer restarts, the problem should be resolved. However, remember that this is just a workaround, so if the problem reappears, you’ll have to repeat this solution.

Bonus: Windows 10 volume control is not working for headphones

While the volume control icon not working can affect everything sound-related, a few users reported this issue only affected their headphones.

If that’s also your case, you might want to try these troubleshooting steps to isolate the issue. Here it goes!

  1. First, you need to ensure that your headphones are enabled on your PC.
  2. To do that, open the Settings app.
  3. Go to System and Sound.
  4. Click the Manage sound devices link in the Sound Settings panel.
  5. Next, have a look at the Disabled section. If your headphones are listed here, select the entry and click Enable.
  6. You might also want to check that the Bluetooth service is running.
  7. Press Win + R to open the Run dialogue.
  8. Type services.msc and press Enter.
  9. Locate the Bluetooth Support service and press Start if it is not currently set as such.

What can I do if the volume control is not working on Windows 11?

1. Disable audio enhancements

  1. Press Win + I to open Settings.
  2. Select System from the left side.
  3. Click on Sound.
  4. Click More sound settings.
  5. Select your primary audio device and click Properties.
  6. Go to the Enhancements tab.
  7. Check the Disable all enhancements option.
  8. Click Apply, then OK.

2. Run the audio troubleshooter

  1. Press the Start button.
  2. Open the Settings app.
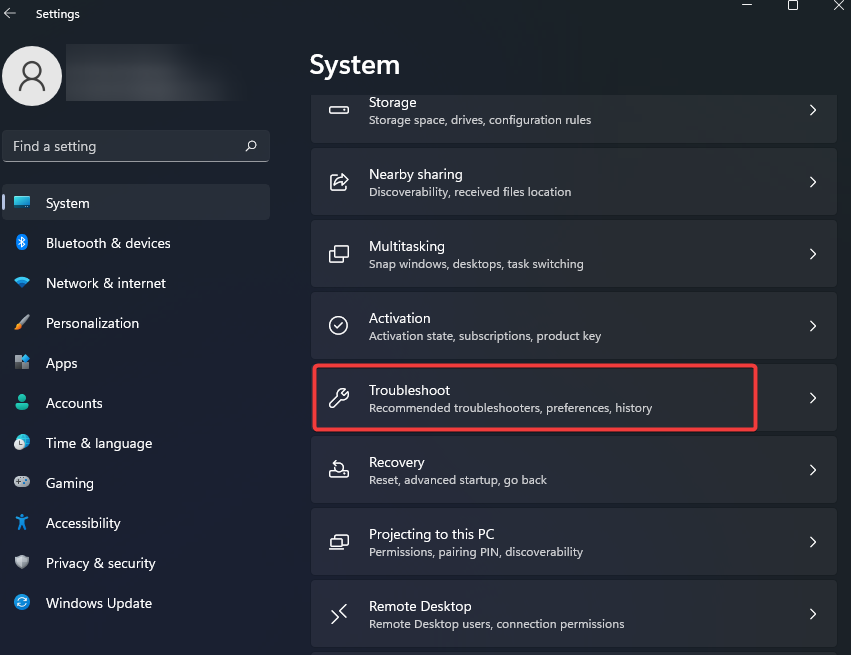
  3. Select Troubleshoot on the System tab.Windows update high CPU
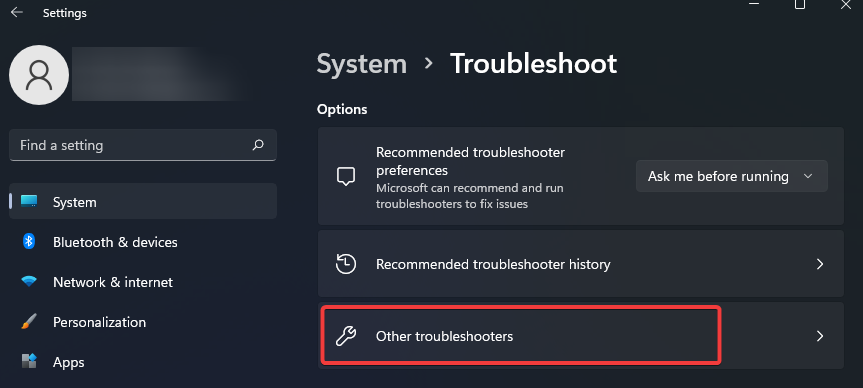
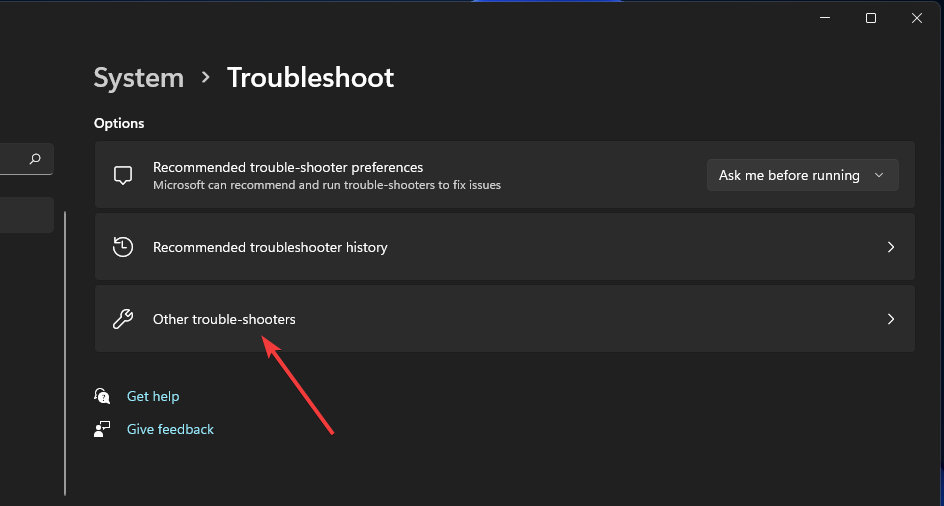
  4. Select Other troubleshooters.
  5. Click the Run button for the Play Audio troubleshooter.
  6. After that, wait for the Play Audio troubleshooter that opens to detect and fix issues. Then, apply any potential resolutions it might suggest.

For more solutions on the volume control not working on Windows 11, you can check out our dedicated guide to help you resolve the problem.

How do I get the volume buttons to work on my laptop?

1. Enable HID

  1. Open the Start menu.
  2. Search for services and open them.
  3. Locate Human Interface Device service.
  4. Right-click on it and select Properties.
  5. Select the Startup type to Automatic.
  6. Click Start.
  7. Press Apply and OK.

2. Reinstall the keyboard driver

  1. Open Device manager.
  2. Expand the Keyboards section.
  3. Right-click on your keyboard and select Uninstall device.
  4. Right-click on the Keybaord section.
  5. Select Scan hardware for changes.

That’s about it; we hope these solutions helped you to solve the Windows 10 volume slider issue.

While the long list of solutions might discourage some users from trying to fix this problem by themselves, rest assured that the instructions are clear and easy to follow.

We’re sure you’ll manage to the volume button not working in Windows 10 issue quickly and enjoy a clear and pristine audio experience on Windows 10.

Also, if you have any comments, questions, or suggestions, reach out to the comment section below, and we’ll surely assist you further.

Steam VR Error 436: Solved For Good

When attempting to start the SteamVR app, some VR headset users reportedly encounter the SteamVR error 436.

The error is occurring on headsets connected to Windows 10 systems. A quick search in the Steam forum shows that this error has been troubling several users.

Let’s take a closer look at the most frequent issues our readers report so that you know exactly what you’re up against.

What causes the SteamVR error 436?

We researched online and found a few of the most common reasons why you would come across SteamVR Display Connection error 436 on your Windows system.

  • Because of loose connection.
  • You have installed incompatible add-ins.
  • Some essential add-ons are blocked.
  • The graphic driver isn’t up to date.
  • Corrupt SteamVR software installation.
  • Your integrated GPU is interfering with the dedicated GPU.

Where does the SteamVR error 436 occur?

  • Valve index display connection trouble
  • HTC Vive display connection trouble, error 436 (Another particularly frustrating HTC Vive error is 208, but you should be able to fix it by updating your drivers).
  • Your graphics card cannot successfully connect to your HMD.
  • SteamVR error your GPU is having trouble communicating with your HMD.
  • Steam VR lost connection to the display.
  • Unexpected SteamVR error.
  • Error starting SteamVR.
  • SteamVR error 203, 303, 306, 435 (SteamVR error 306 is an interesting case as the issue can be triggered by SteamVR updates. Fortunately, we prepared a complete list of tested and safe fixes for you to try out).

This is the guide you need if you own a VR headset and have encountered this error. In addition, we have listed a few troubleshooting steps to diagnose and fix the problem with ease.

How do I fix the SteamVR 436 error?

1. Update GPU drivers

  1. Click the Start button, type device manager, and open it.
  2. Expand the Display adapters section, right-click on the graphics adapter, and select Update driver.
  3. Click on Search automatically for drivers.
  4. If there are any new drivers, Windows will install them shortly. If you already have the best one installed, click on Search for updated drivers on Windows Update.
  5. Hit the Check for updates button and let the system install them.
  6. Select View optional updates.
  7. Click the Driver updates section to expand it, check the box for any graphics drivers and click the Download and install button below.

Outdated and corrupted graphics drivers can also affect SteamVR operation and result in an error, and as you can see, it’s a pretty time-consuming task.

However, you may solve this problem a lot easier using a dedicated tool called Outbyte Driver Updater.

Outbyte Driver Updater is a popular Windows utility that allows you to update outdated and missing drivers on your Windows system with a few clicks. You can choose to update a single or all the obsolete drivers recommended by the tool at once.

With lightning-fast scan and included driver manager, managing driver updates is easy. It also comes with a schedule manager that allows for automatic scans, updates, and backup of drivers.

Key features of Outbyte Driver Updater:

  • Huge driver database of over 1.8 million files
  • Built-in download manager and schedule manager
  • Driver backup feature to automatically create driver backup

Outbyte Driver Updater

Easily resolve the SteamVR error 436 by using this powerful software.
Free trial Download

2. Check for a loose connection

SteamVR uses a tether cable to connect the headset to your PC. If the tether cable is not connected properly, it may lead to a connection error. So, ensure the cable used to connect the device is firmly connected.

Some VR headsets like the HTC Vive require the users to firmly plug in the cable as they tend to have resistance levels before it is connected, offering a firm connection.

Check if the cables at both ends are firmly connected before you move on to the other fixes below. Then, make to relaunch the SteamVR client after inspecting the connection issues.

3. Unblock SteamVR add-ons

  1. Disconnect your VR headset from the computer. Also, disconnect any other controllers or VR accessories that you may have connected to the PC.
  2. After disconnecting the devices, click the SteamVR icon in the taskbar and select Settings.
  3. In the Settings menu, open Startup / Shutdown and select Manage SteamVR Add-Ons from the startup option.
  4. Click the Unblock All button under the Manage SteamVR Add-Ons section.
  5. Scroll through the list of add-ons to see if they are blocked. Then, click the Unblock button manually if required.
  6. Close the SteamVR app and reconnect your VR headset and accessories to the computer.
  7. Relaunch SteamVR and check if the error code 436 is resolved.

If you have third-party SteamVR add-ons installed, check if they are blocked. At times, the add-ons that SteamVR is relied on to offer additional features can get blocked due to system crashes.

To fix the problem, you should unblock all the add-ons affected by the crash. Several users have reported that unblocking SteamVR add-ons has helped resolve the issue.

4. Reinstall SteamVR

  1. Press the Windows + R keys to open Run.
  2. Type appwiz.cpl and click OK to open Control Panel. It will list all the installed apps on your PC.
  3. Select and right-click on the Steam app and select Uninstall. Next, confirm the action by clicking on Yes when prompted by UAC.
  4. Repeat the steps for all the Steam and VR-related applications.
  5. Once the app is uninstalled, restart your computer and wait for it to startup.
  6. Visit the official Steam Download Page and download the latest version of Steam.
  7. Launch the installer, and follow the on-screen instructions to install the app.
  8. Once installed, launch Steam and download SteamVR.
  9. Connect the VR headset to your computer and launch SteamVR. Check if the problem is resolved.

5. Remove HTC Vive from SteamVR

Note icon NOTE
Skip these steps if you don’t have an HTC Vive Pro VR headset.
  1. Turn off your HTC Vive Pro headset. Also, disconnect the USB and DisplayPort / HDMI cables connected to the PC.
  2. Launch SteamVR on your PC, click the drop-down menu, and select Settings.
  3. In the Settings menu, open the Developer tab from the left pane.
  4. Scroll down to the Reset section and click the Remove all SteamVR USB Devices button.
  5. Click Yes to confirm the action and wait for SteamVR to remove all the devices.
  6. Restart your computer.
  7. Connect the HTC Vivo Pro headset and other cables to your PC.
  8. Launch SteamVR and set up the device if required. Check for any improvements.

6. Disable the integrated GPU

Note icon NOTE
Skip these steps if you don’t have a dedicated GPU on your PC.
  1. Press the Windows+R to open Run.
  2. Type devmgmt.msc and click OK to open Device Manager.
  3. In Device Manager, expand the Display Adapters section.
  4. Right-click on the Intel HD Graphics device and select Disable device.
  5. Click Yes to confirm the action when prompted by UAC.
  6. Once the integrated graphics is disabled, restart your computer.
  7. After the restart, launch SteamVR and check for any improvements.

The integrated GPU triggers the error in computers with both dedicated and integrated graphics. Disabling the integrated GPU seems to have fixed the SteamVR error 436 display connection trouble.

We hope that by following our guide, you managed to fix the SteamVR error 436 display connection trouble, and now you can use the app again.

You might also read our guide on how to fix the SteamVR error 306, which is similar to this one and might provide more information.

How do I reset SteamVR?

  1. Close Steam and SteamVR applications on your PC.
  2. Navigate to the below paths and delete the following files:
    C:\Program Files (x86)\Steam\steamapps\common\SteamVR\resources\settings\default.vrsettings
    C:\Program Files (x86)\Steam\config\steamvr.vrsettings
    C:\Program Files (x86)\Steam\config\lighthouse\lighthousedb.json
  3. Right-click on your SteamVR tool from the Steam library.
  4. Select Uninstall.
  5. Follow the on-screen prompts to complete the uninstallation.
  6. Once installed, launch Steam and download SteamVR.

Fortunately, the SteamVR error 436 is a common issue, and it’s easy to fix, but if you have any other questions, don’t hesitate to use the comments section below.

Epic Games Logging Errors: Why & How to Fix

While trying to access the game, a few users have encountered the error message there was an error logging you into Epic Games. Let us explore this error.

Epic Games is one of the biggest game distribution platforms on the market, rivaling services like Steam and GOG. As such, the owners developed their client called the Epic Games Launcher.

You can use the Epic Games launcher to purchase and download games and chat with other users. More so, you can manage your game library and read up on the latest news regarding the Epic Store.

Your information is secured via logging in with an account and password, which you must first create. However, some users have reported that they have problems with the process.

Why does There was an error logging you in Epic Games message appear?

There are many reasons for this problem; from feedback gathered from users, we figured that the top leading causes include the following:

  • Wrong credentials – If your Epic Games account is not found, it’s possible that you didn’t enter your credentials correctly. It’s also possible that your account was compromised.
  • Network problems – If you use Google or Facebook to log in, check your network connection and login data.
  • Server issues – Many users reported being offline because they can’t sign in to Epic Games. This is most likely due to server issues. This may even affect the Epic launcher.
  • Multiple connected devices – If you are connected to more than one device, it may trigger this error on a fresh login attempt.

Quick Tip:

If your login credentials are correct, you may be interrupted by a request sent to Epic Games. Therefore, we recommend that you log in using Opera GX with the VPN that can change your location.

Furthermore, because it’s a gaming browser, you may use bandwidth limiters when accessing Epic Games for a more stable connection when you log in or download anything.

Opera GX

Get a different location with the in-built VPN and access Epic Games.

How can I fix the There was an error logging you into Epic Games?

Before you try these fixes, ensure to do the following:

  • Check the Epic servers – If the servers are down, there is nothing you can do aside from waiting it out. The Epic servers in your area might be down, but that doesn’t mean they are offline worldwide. Using a VPN such as PIA, you can check if that’s the case.
  • Make sure you’re not logged in on another PC – If you are logged into other devices, you must log out first, as this may be the cause of the error.

1. Make sure that your credentials are valid

  1. Open your Epic Games Launcher and go to the log-in section.
  2. Select Sign in with Epic Games.
  3. Then, select Forgot Your Password.
  4. Next, in the Email Address field, type in the mail associated with your account.
  5. Click Send Email.
  6. Follow the instructions in the mail to reset your password.

If you are facing other issues like Install Failed error code: II-E1003 while downloading game files on Epic Launcher, we suggest you check out this guide for easy solutions.

Note icon NOTE
If you recently performed a password reset or a password change, it can take some time until the changes take effect. As such, wait a bit longer before trying to log in again.

2. Delete the launcher’s web cache

  1. First, exist the Epic Games Launcher.
  2. Press the Windows key + R and type in %localappdata%, then press Enter.
  3. Open the Epic Games Launcher folder.
  4. Then, open the Saved folder.
  5. Next, right-click on the webcache folder, then select Delete.
  6. If you find a folder called webcache_4147, delete it as well.
  7. Then, restart your device.

This solution can also help with other problems, such as Epic Games Launcher api-ms-win-downlevel-kernel32 error message.

3. Repair your Epic Games launcher

  1. Press the Windows key + R, type in appwiz.cpl, and hit Enter.
  2. Select Epic Store Launcher.
  3. Right-click it and choose Repair.
  4. Follow the instructions.
  5. After the repair, restart your device.

Your Epic Games launcher might have some errors, so it is best to reinstall the software. This will likely fix the problem.

That’s about it. Now you know how to fix Epic Games launcher log-in problems. The solutions detailed above are straightforward and comprehensive.

The solutions will come in handy if there is an error logging you into Epic Games Ubisoft or your Epic Games account is not found.

If you’re having additional problems, you can always visit our Epic Store not working guide for more in-depth solutions.

One common login error is Request could not be completed during Epic Games login, so don’t miss our dedicated guide on it to see how to fix it.

Please let us know in the comments section below if you have other troubleshooting tips.

7 Best Cyber Monday Bluetooth Earbuds [Deals, Sales]

Recent trend shifts in the mobile industry have led to the massive adoption of wireless headphones and earbuds. Some people like technology, and some people buy just because they have to, but this is the era of wireless devices.

If you haven’t gone wireless yet, now’s the right time. Simply because the prices of wireless earbuds are lower this time of year. So, why not take advantage of it? That’s why we’ve created this small list of the best wireless earbuds deals available – to help you save time and some money.

So, if you’re in the market for a new pair of Bluetooth earbuds, just check out the list below, and pick your favorite.

Note: All the prices and offers in this article are subject to change, so be sure to check the official product page to get the latest deal. If the product or offer you’re looking for is no longer available, you can try to find it on its official manufacturer page or get another one from our list.

What are the best Bluetooth earbuds on the market?

Samsung Galaxy Buds+

  • Ambient Aware mode
  • 11hrs of nonstop playtime
  • Android & iOS compatible
  • Concerns about customer privacy when using the dedicated app

These earbuds offer excellent sound quality for the money. Use the Ambient Aware option to control how much you want to still hear from the surroundings when listening to your favorite music.

Plus, the battery can last up to 11hrs, which is amazing for Bluetooth earbuds. A 3-minute recharge will give you one hour of playtime.

The carrying case is included.

TOZO T6

  • IPX8 Waterproof
  • Touch control
  • Charging case + 3 extra sets of ear tips
  • Issues with volume control

Here is a great offer you shouldn’t miss.

These are full waterproof earbuds for a secure, comfortable fit, with 3 extra pairs of tips that should fit any ear form.

They deliver powerful deep bass and Hi-Fi stereo, sound quality. Also, they include an integrated microphone with a 6mm large-size speaker driver.

They’re ideal for gym and sports in general since you can sweat all you like and take the sure-deserving shower afterward without taking them out.

You can find these earbuds in 5 color options.

Echo Buds (2nd Gen) | True wireless earbuds

  • Noise reduction
  • Alexa integration
  • 5hrs playtime per charge
  • IPX4 water resistant

The Alexa integration is one big plus for these earbuds: you just have to activate Alexa and then you’re OK to go hands-free to stream music, make calls, listen to audiobooks, or get directions.

Support for other assistants such as Siri or Google Assistant is possible as well.

They use the Bose Active Noise Reduction Technology and sealed in-ear design for a seamless experience. 

Powerbeats Pro Totally

  • Integrated with Siri
  • Up to 9hrs of independent playtime
  • Secure-fit ear hooks
  • Quite a price tag

One thing is for sure: whether you’re exercising, walking, or just sitting at your desk, these earbuds won’t fall off. The secure ear hook will keep them attached so you can fit them back just in case.

They feature the Apple H1 headphone chip and Class 1 Bluetooth for extended range and fewer dropouts.

Each earbud conveniently has a volume control button; besides, touching the side of the gadget ensures play/pause/forward/backward control.

You can pair them with chip-enabled Beats headphones or AirPods to simultaneously share your audio with someone.

Bose QuietComfort Noise Cancelling Earbuds-Bluetooth Wireless Earphones

  • Noise-canceling earbuds
  • 12 hours and charges via the included USB-C cable
  •  Bluetooth 5.1 with connection to your device within 30 feet.
  • Qi-certified charging mat not included

This is yet another pair of noise-canceling earbuds with  full transparency mode that allows you to eliminate distractions.

Also, it comes with some additional features such as a unique acoustic architecture that brings music, podcasts, and videos to life, while volume-optimized active EQ keeps sounding clear and balanced at every level.

Get up to 6 hours of playback on a single charge. The charging case provides an additional 12 hours of use and can be charged wirelessly via the included USB-C cable or using a Qi-certified charging mat (not included).

That’s about it. We certainly hope you picked a pair of wireless earbuds that suits both your wallet and your needs. Also, don’t hesitate to share your pick with us in the comments below.

Install Windows 11 on Legacy Bios: no TPM and Secure Boot

By now, it is no secret that we need TPM 2.0 and Secure Boot to install Windows 11, but we already know that we can enable them from the UEFI BIOS Mode.

However, things get a little complicated if you have a Legacy BIOS because switching to UEFI might get you in trouble and erase your disk, so you might not be OK with that.

And even if you do so, you might still be unable to enable TPM 2.0 because you don’t have the chip on your motherboard.

However, we have a workaround to help you install Windows 11 on Legacy BIOS without TPM 2.0 and Secure Boot checks.

Before starting the procedure, back up all important data on your drive and check the BIOS mode. Although this shouldn’t affect your files, it’s a recommended step before any such tweaking.

Can Windows 11 install without UEFI?

A publicly published standard called the Unified Extensible Firmware Interface details the software protocol for communication between an OS and the platform’s firmware.

The UEFI is an integral element in the new OS, and it is officially required for a smooth installation of Windows 11.

However, to install Windows 11, even if your PC or laptop doesn’t have the necessary hardware specs, TPM UEFI Secure Boot and CPU requirements may be avoided, even though booting from a CSM or legacy bios isn’t officially allowed in Windows 11.

Hence, the answer to the above question is yes. Installation of Windows 11 on a PC with a legacy BIOS is as simple as preparing a USB false drive and the Windows 11 installation ISO file.

How can I install Windows 11 on Legacy BIOS?

1. Use a third-party tool

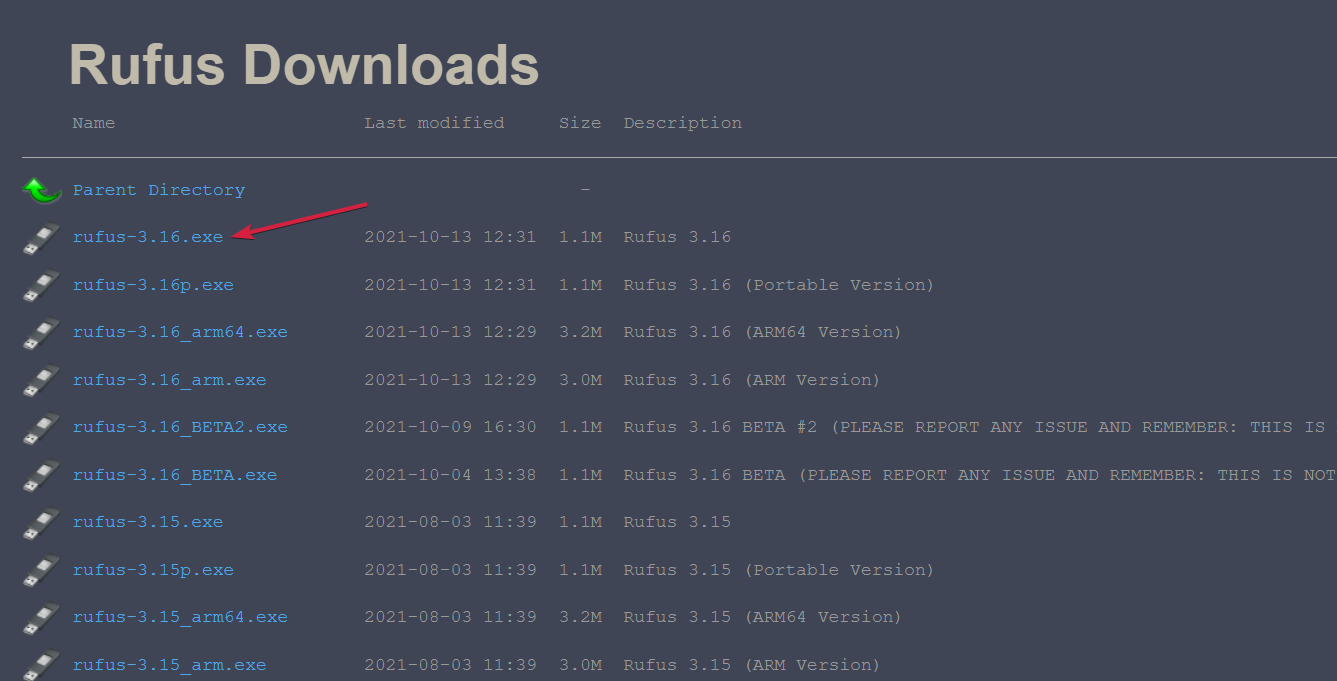
  1. Download Rufus. Starting with version 3.16, this tool has a unique selection to create a Windows 11 boot media without TPM and Secure Boot checks.
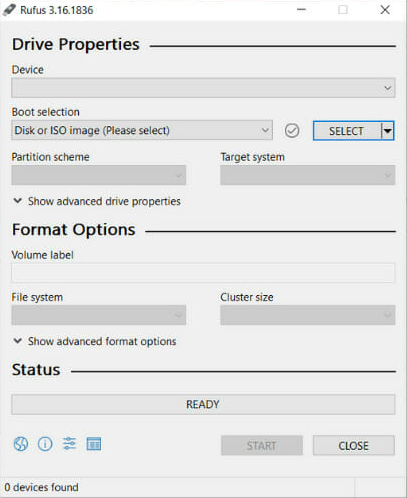
  2. Run the installer and open the software. You can also download the 3.16p version, which is portable, so you don’t need to install it.windows 11 legacy bios
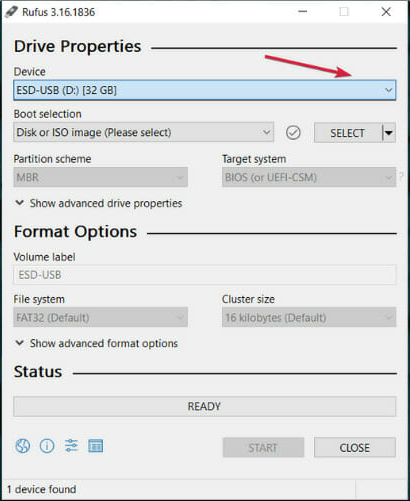
  3. Connect your USB drive, then select the drive from the drop-down menu. If you only have one, it will detect it automatically.windows 11 legacy bios
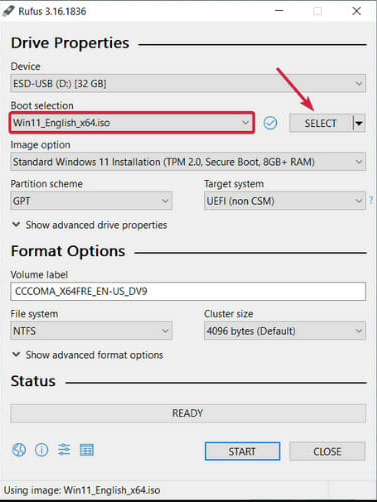
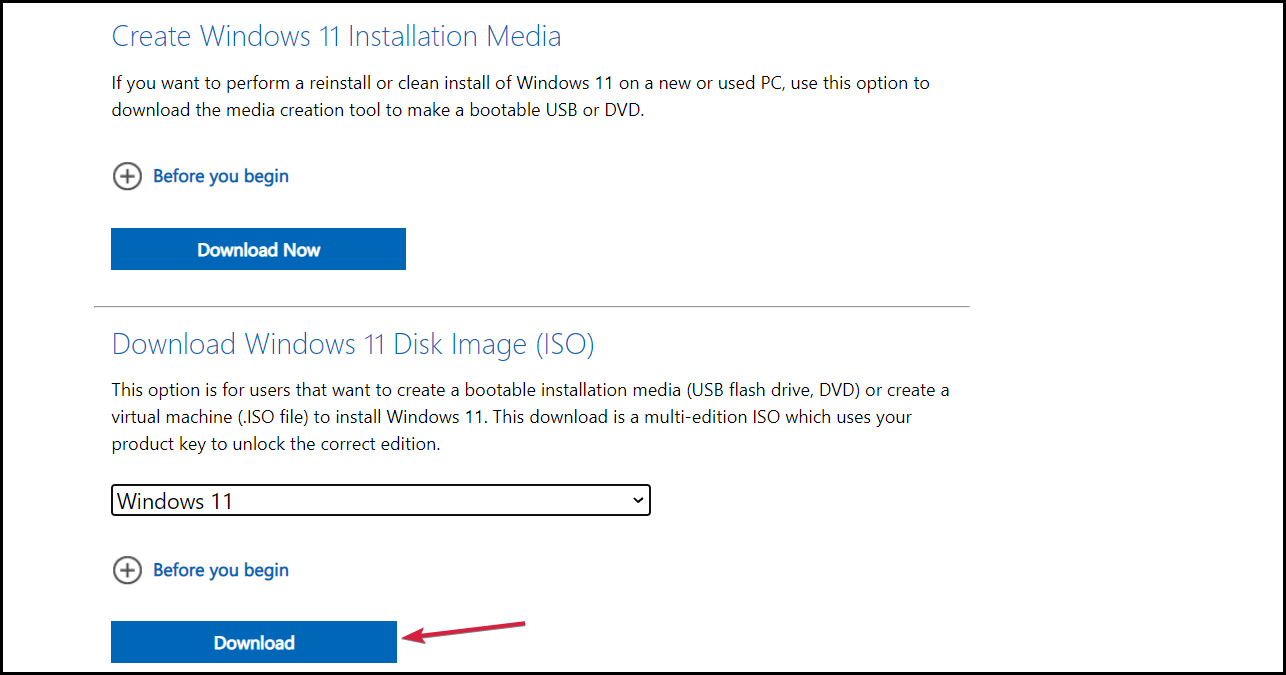
  4. Now click the SELECT button and browse for the Windows 11 ISO file on your PC. You can get it from the dedicated Microsoft Download page if you don’t have one.windows 11 legacy bios
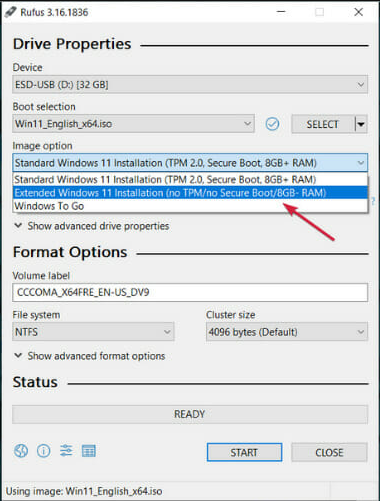
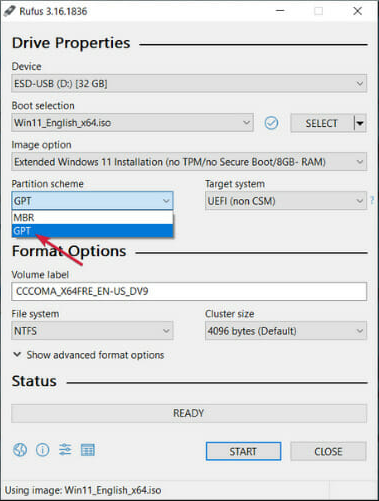
  5. In the Image option, click the drop-down menu, and select the Extended Windows Installation (no TPM/no Secure Boot).windows 11 legacy bios
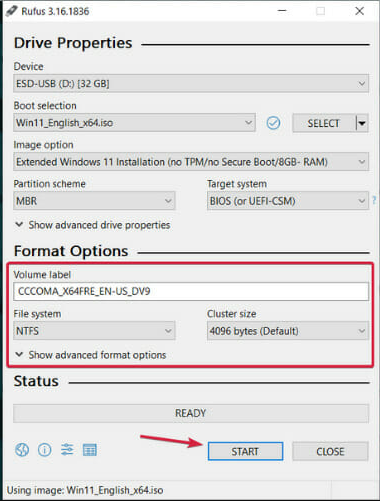
  6. If you have a Legacy BIOS, you must change the Partition scheme to MBR. If you have UEFI, select GPT.windows 11 legacy bios
  7. Now, you can also change the volume label and partition system but if you’re unsure what to do, leave the options as they are. Hit the START button at the end.windows 11 legacy bios
  8. The tool will create a bootable USB drive that you can use to install Windows 11 on your Legacy BIOS without TPM and Secure Boot checks.

Also, don’t forget to use these Rufus settings for Windows 11 if you want to run it on a legacy machine.

This is the easiest method to install Windows 11 on your Legacy BIOS PC because this tool has the simple option to create the bypass for TPM and Secure Boot checks.

2. Modify your Windows 11 ISO manually

Note icon NOTE
For this solution, you will need a bootable Windows 10 USB drive. If you don’t have one, check out our article on how to create one.
  1. Download the Windows 11 ISO from Microsoft’s dedicated Download page. If you already have one, ignore this step.
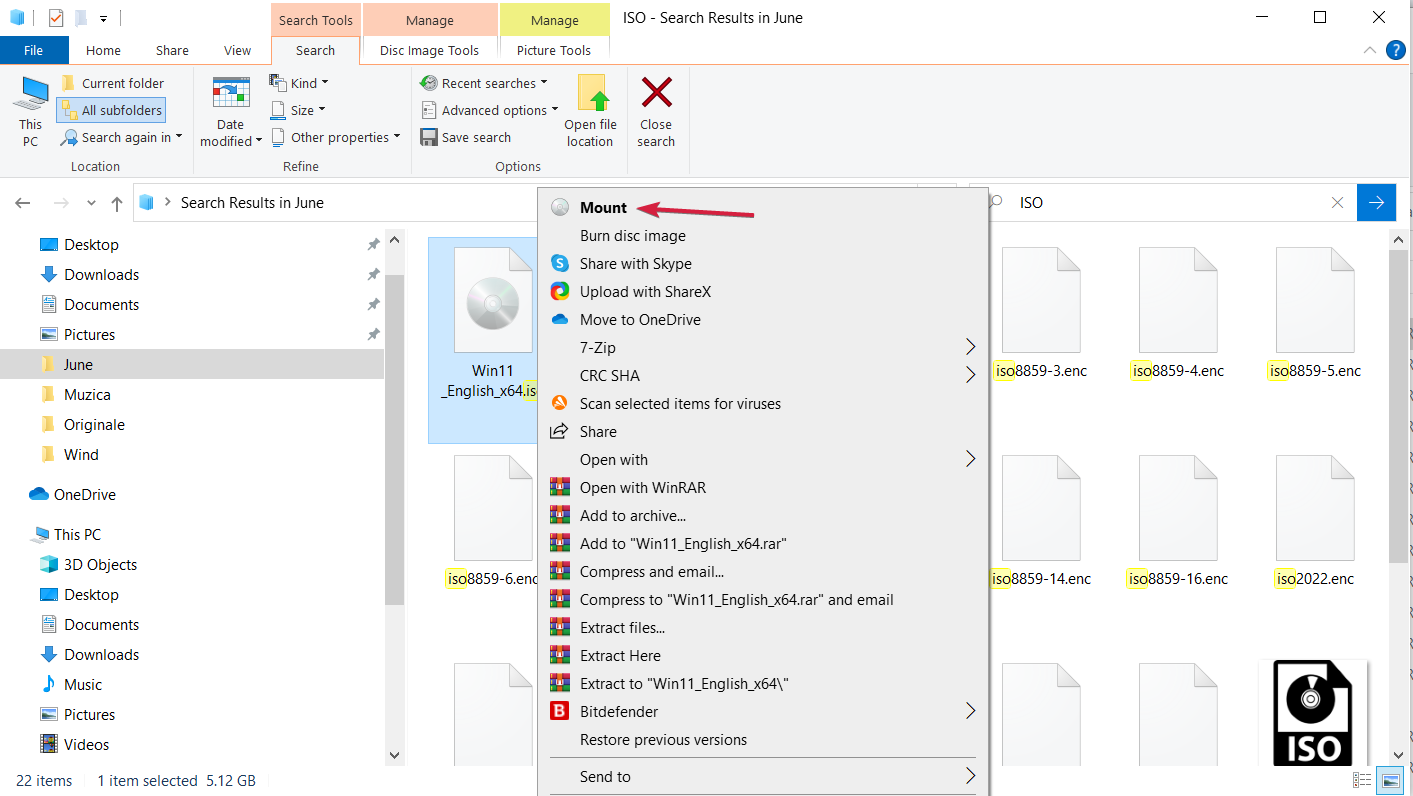
  2. Press the Windows key + E to start File Explorer, look for the Windows 11 ISO file, right-click it, and select Mount.
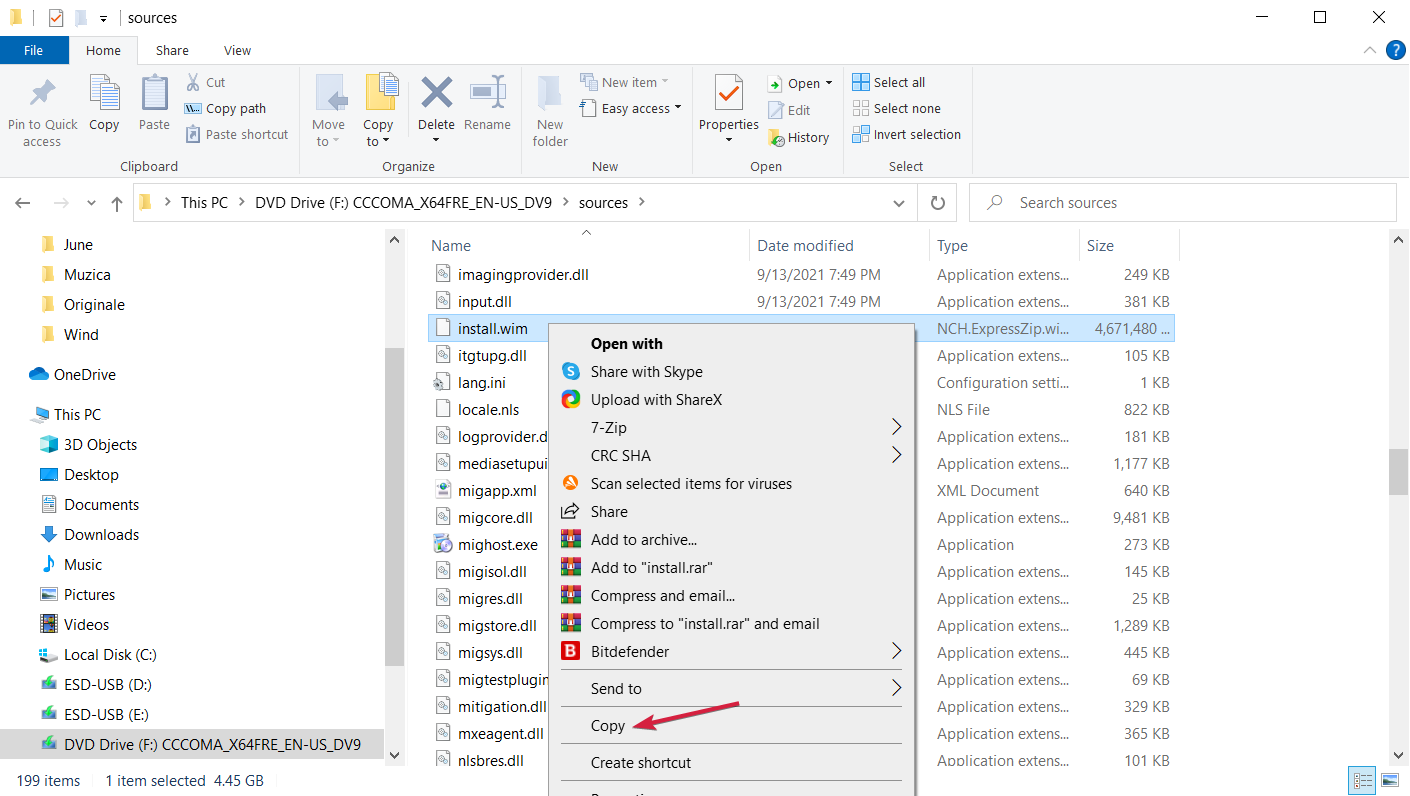
  3. Browse the new virtual drive, get to the sources folder, right-click on the install.wim file, and select Copy.
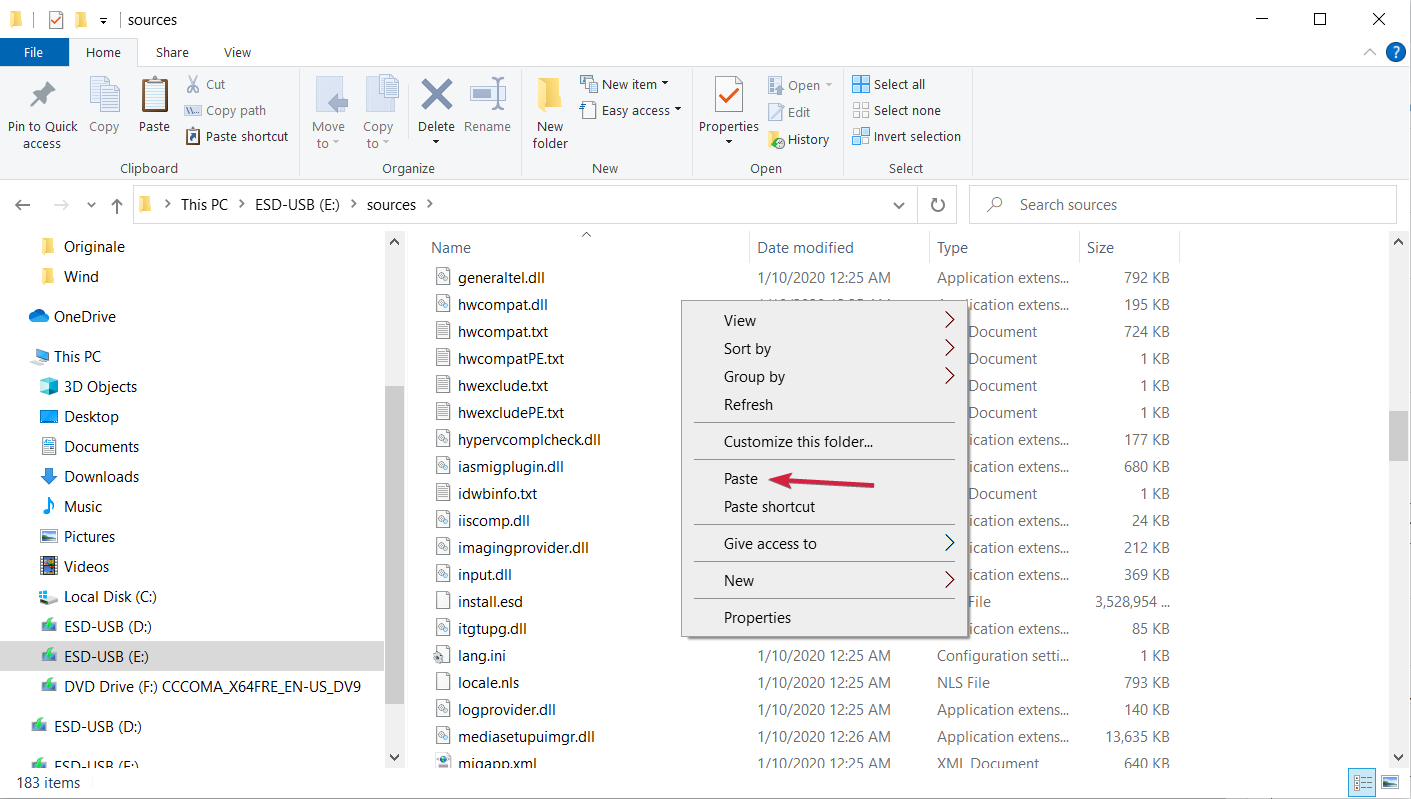
  4. Connect your Windows 10 USB drive, browse its sources folder, right-click anywhere, and select Paste from the context menu.
  5. Replace the file in the destination folder, restart your PC, and boot with the Windows 10 drive. Don’t worry; by replacing the wim file, you transformed the drive into a Windows 11 kit.

You won’t need any other modification for this solution because Windows 10 doesn’t check for TPM 2.0 or Secure Boot, so you should be good to go.

3. Bypass TPM 2.0 and Secure Boot checks from the Windows 11 setup

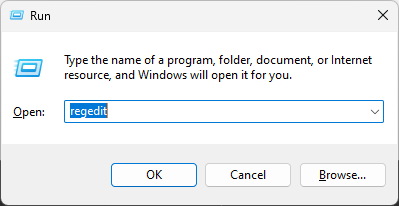
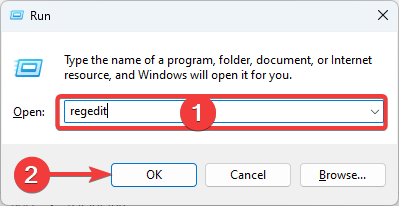
  1. Press the Windows key + R to start Run, type regedit, and press Enter or click OK.windows 11 legacy bios
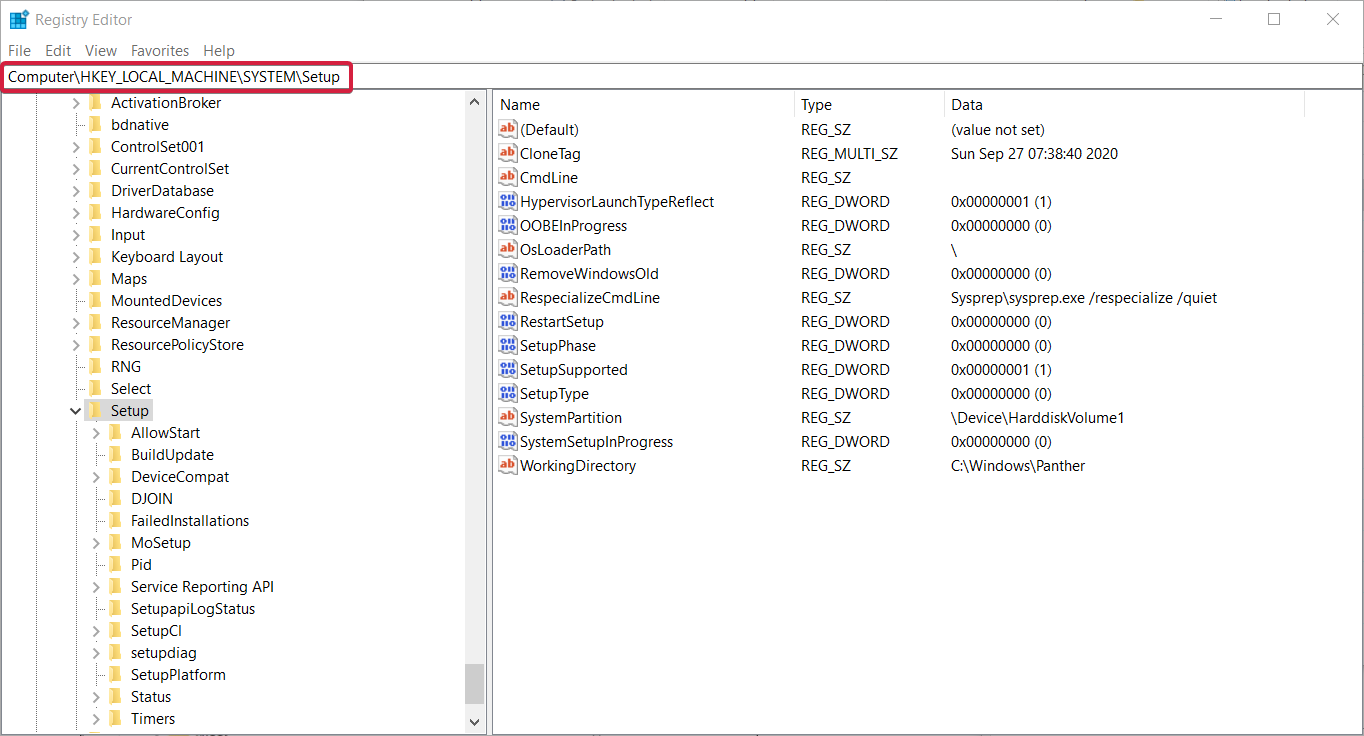
  2. Navigate to the following directory:
    Computer\HKEY_LOCAL_MACHINE\SYSTEM\Setup
  3. Right-click on the right pane, select New, then pick Key and name it LabConfig.
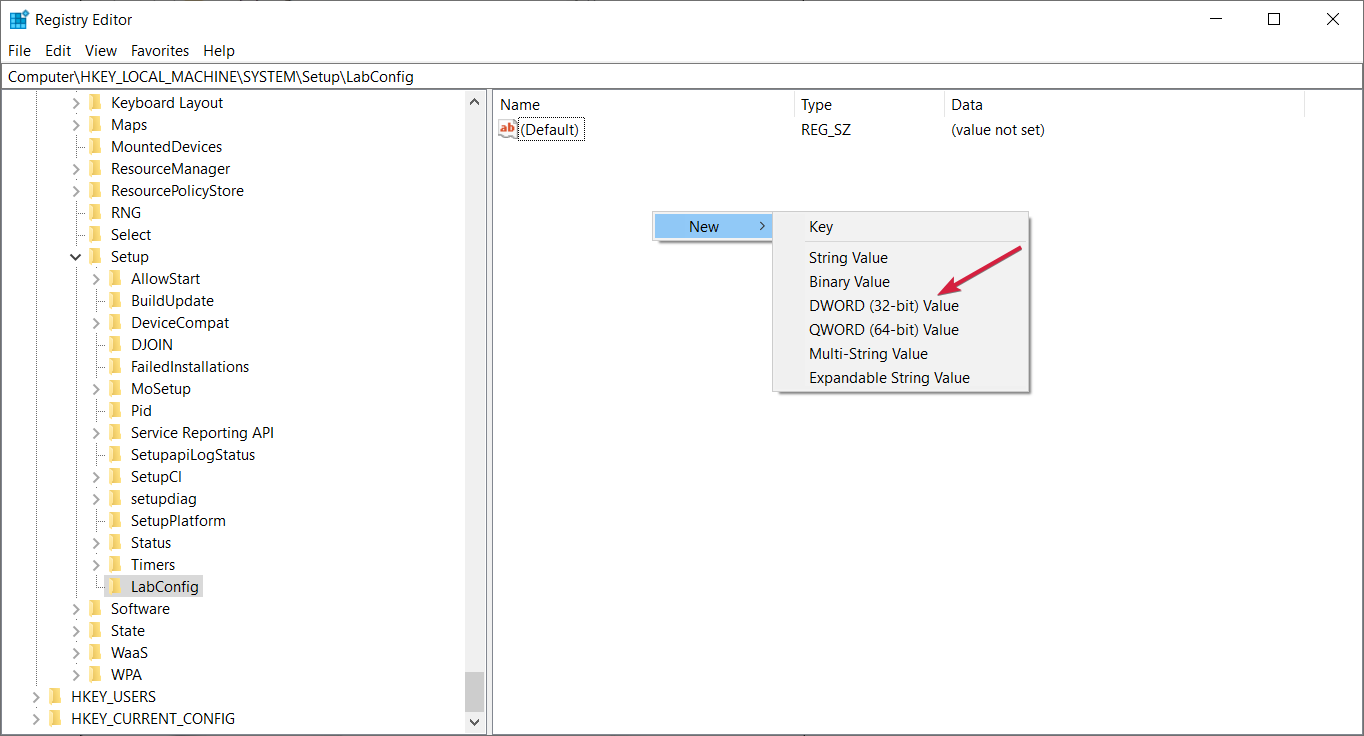
  4. Access the new key, right-click in the right pane, and select New, then DWORD (32-bit) Value.
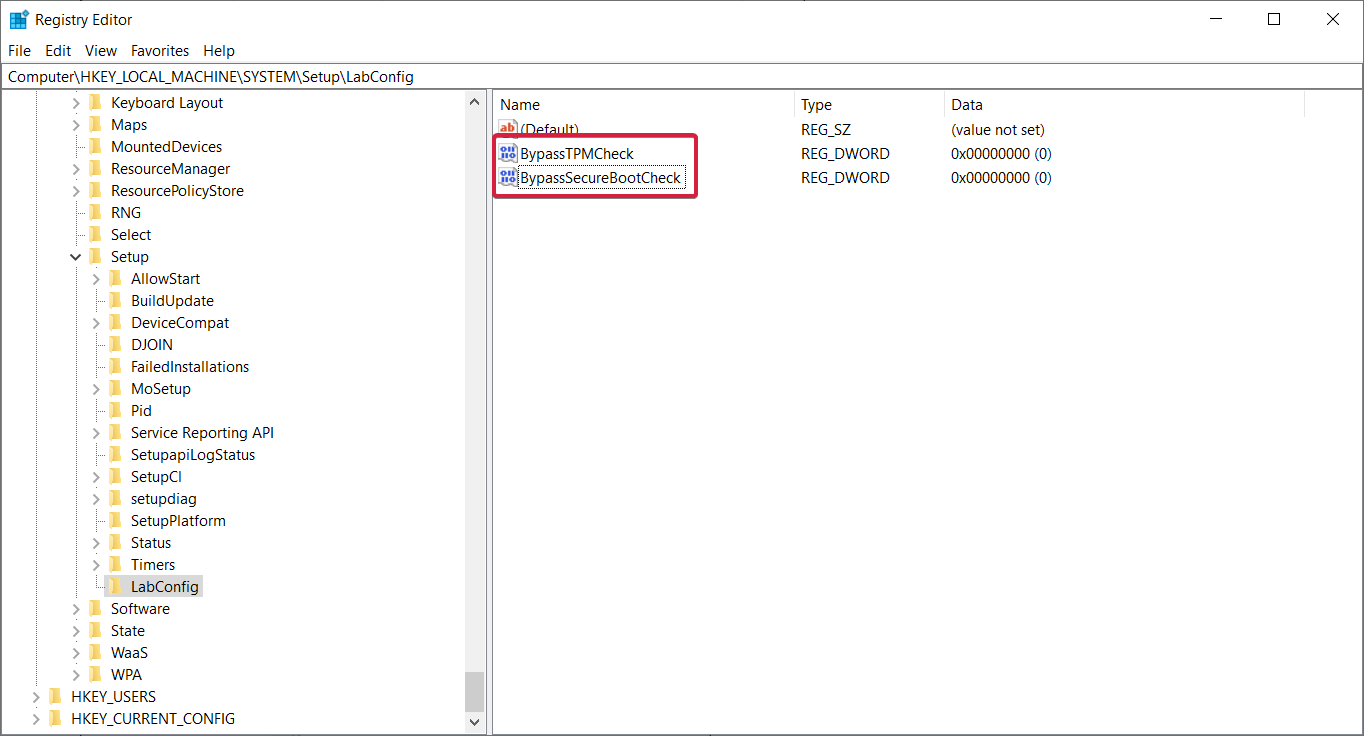
  5. Name it BypassTPMCheck, create another DWORD (32-bit) Value, and name it BypassSecureBootCheck.
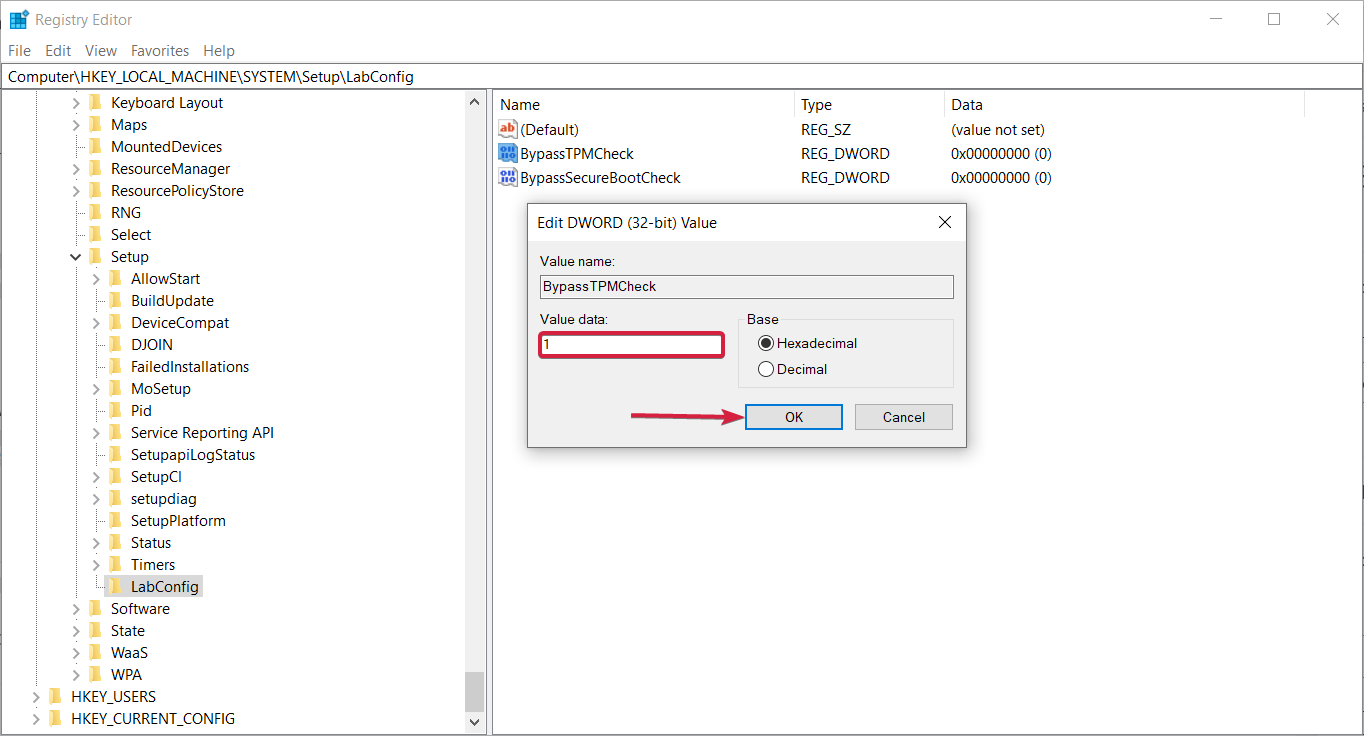
  6. Double-click each of the keys, type 1 in the value field to both, then click OK.
  7. Restart your PC and try running the Windows 11 installer.

This should bypass the TPM and Secure Boot checks but will still not get you over the Legacy BIOS problem.

You can overcome that only by creating a booting drive for MBR, just like we did in the first solution using Rufus.

So, this is how you can install Windows 11 without UEFI BIOS and avoid the TPM and Secure Boot checks simultaneously.

We remind you that some of the methods provided here can offer you a clean installation of Windows 11 that will delete all your data on the drive.

Many users prefer setting up Windows 11 without linking a Microsoft account, especially when privacy or offline use is a concern. If you want a step-by-step method, you can follow this guide on how to install Windows 11 without Microsoft account, which also shows you how to bypass the account requirement during setup.

History has taught us that anything can happen during an update or installation, so it’s essential to perform a data backup before starting anything. Just use the best backup software in that regard.

If you don’t have a Legacy BIOS, we also have an excellent guide on installing Windows 11 without TPM that will surely help you.

For any other information or suggestions, you can confidently use the comments section below and write us all about it.

Fix: A Required CD/DVD Drive Device Driver is Missing Error

The CD/DVD Device Driver error occurs when you’re trying to install Windows 7 or upgrade it to another OS through either a DVD or USB device. This is only one error that can occur with upgrading the OS.

Updating to Windows 10, for example, has its own set of challenges. But the trickiness of the CD/DVD error warrants its own solutions, such as going into BIOS.

What is causing the device driver missing error?

According to Microsoft, there are three leading causes behind the driver error. We’re going to a couple more on top of that, so all bases are covered.

  • CD/DVD Drive may not compatible with Windows 7: It may be hard to believe people still use drivers, but with Windows 7, it’s possible. You’ll have to replace the drive in this instance.
  • The drive may not work with the Microsoft AHCHI driver: To fix this, you’ll have to go into BIOS on Windows 7.
  • The physical disk used for installing Windows 7 is dirty: The solution for this is pretty easy. Just clean it and insert it back.
  • USB flash drives are prone to this error: We recommend using a different USB drive to install the operating system if the first one doesn’t work.
  • The USB 3.0 port doesn’t recognize the drive: This is actually a fairly common error. We recommend reinstalling the USB 3.0 drivers to fix this.

How do I address the missing driver error?

Solutions for this error can range from incredibly easy to pretty tricky, as you’ll have to go into your computer’s BIOS.

  • Plug the USB drive that has Windows 7 into another port. Doing this solves the problem a majority of the time.
  • Conversely, unplug the drive and plug it back into the same drive. It’s that simple.
  • If there is one, update your computer’s drivers to the latest version. Unfortunately, Windows 7 is no longer officially supported, so this may be tricky.
  • And if all else fails, contact your computer’s manufacturer for support.

1. Disable AHCI Mode

  1. Press the F2 key on your keyboard. If you have to enter BIOS, restart your computer and try again.
  2. Using the arrow keys, move to the Advanced tab and find the Local Bus IDE adapter.
  3. Highlight it, press Enter on your keyboard, and set the adapter to Primary in the new window.
  4. Press F10 on your keyboard to exit and return to the installation wizard.
  5. AHCI stands for Advanced Host Controller Interface and can get in the way of installing Windows 7.

2. Reinstall USB 3.0 drivers

  1. Click Start, type device manager, and open it from the list.
  2. Expand Other devices and Universal Serial Bus controllers to see if any drivers have a yellow icon next to them.
  3. Right-click the entry with the yellow icon and select Update Driver Software.
  4. Click Search automatically for update driver software to install the drivers in the new window that appears.
  5. If the computer can’t install the update because of missing files, go to the Intel USB 3.0 driver page for Windows 7 on Lenovo’s website.
  6. Click the download icon to the right of the page to get the USB 3.0 drivers.
  7. Return to the Device Manager and update the drivers again.
  8. Click Uninstall in the Device Manager context menu to remove the drivers if the problem persists.
  9. Reboot your computer and go back to Device Manager to update again. It should work this time.

As an automated alternative to the manual procedure, you can try using a dedicated tool, such as Outbyte Driver Updater. This program scans your device for all outdated drivers and automatically updates them with brand-new versions from its repository.

Outbyte Driver Updater

Prevent various errors from appearing on your computer and maintain your drivers updated with Outbyte Driver Updater.
Free Trial Download now

3. Adjust Registry Editor

  1. Close all programs on your Windows 7 computer if you have any open.
  2. Click the Start menu and type in regedit.
  3. Select the entry that appears to bring up the Registry Editor.
  4. Select Yes if a User Account Control window asks if you want to make changes.
  5. Expand HKEY_LOCAL_MACHINE and then select SYSTEM.
  6. Click CurrentControlSet.
  7. Afterward, select services to enter another set of entries.
  8. Scroll down until you find the msahci folder.
  9. We recommend backup the registry folder if something goes wrong and you must go back. Right-click the folder and select Export.
  10. Find a location for the registry file on your computer.
  11. Please give it a name and hit the Save button.
  12. Go to the file’s location and click File in the upper left-hand corner to restore the registry.
  13. Select Import and open the saved registry.
  14. Right-click Start in the right-hand menu and select Modify once you’re done creating the backup.
  15. Set the value data to “0” and hit the OK button to exit.
  16. Some Windows 7 computers may not have msahci. Look for lastorV instead and perform the same steps.
  17. Go to File in the Registry Editor and click Exit.

Are there other fixes for Windows 7 that I should know about?

A particular Bluetooth driver called BCM20702A0 had been reported missing, causing specific hardware components to malfunction. We strongly recommend getting this fixed.

Fortunately, it’s easy to do. All you have to do is go to the manufacturer’s website and download it from there. You should also look into getting a register cleaner to boost your computer’s performance.

And the best part is it’s done automatically. Some of our favorites include CCleaner and Iolo System Mechanic.

Feel free to comment below if you have questions about other video game problems or bugs. And please tell us if there’s a specific guide for a game that you’d like to see.

Steam Needs to Be Online to Update: 8 Methods to Use

Many Windows 10 users use Steam regularly, but a few reported an error message saying that Steam needs to be online to update. It seems like this can happen on both Windows 10 and 11.

This strange problem will prevent you from playing your favorite games, so we understand how annoying it can be.

Fortunately, a few solutions are available, and we’re discussing them below. Before discovering them, we consider properly presenting some of the most common causes that can lead to the problem.

Why does Steam needs to be online to update error appear?

Different user experiences show a few common reasons for encountering this issue. Ranking on the top of this list are the following:

  • Local client connection issues – If Steam fails to connect with the local client, you might get an error message regarding your Internet connection.
  • Restricted online components – Another issue that users reported is Unable to initialize Steam API, and if this happens, it means that certain online components aren’t accessible to you.
  • Access rights – Sometimes you might have permission errors, and if that happens, you’ll encounter this Steam access denied error; however, all these issues can be easily resolved.

With these significant triggers in mind, some solutions have proven effective.

How can I fix Steam needs to be online to update error?

1. Run Steam in Compatibility mode

  1. Right-click the Steam shortcut and select Properties.steam needs to be online to update
  2. Go to the Compatibility tab, then checkmark the Run this program in compatibility mode for box.steam needs to be online to update
  3. Now, choose Windows 8 from the list of options.steam needs to be online to update
  4. Check Run this program as an administrator option.steam needs to be online to update
  5. Try starting Steam again.

2. Disable the Windows Firewall

  1. Press the Windows + S keys, type firewall, and select Windows Defender Firewall from the result list.steam needs to be online to update
  2. Click on Turn Windows Defender Firewall on or off.steam needs to be online to update
  3. Select Turn off Windows Firewall (not recommended) for private and public network settings.
  4. Click OK to save the changes.

Disabling the firewall isn’t recommended, so after you’ve updated Steam, turn on Windows Firewall again.

To prevent data Internet connection-related errors in Steam, it’s also advised to see if Windows Firewall is blocking a port or program.

3. Delete files from the Steam folder

  1. Right-click on your Steam shortcut, then choose to Open file location.
    steam needs to be online to update
  2. There, delete all files except these: Steam.exe and Steamapps folder.
    steam needs to be online to update
  3. Restart your computer.
  4. After your computer boots, go to Steam’s installation directory and run Steam.exe.

4. Use the Registry Editor

  1. Open the Windows Run dialog box by pressing Windows + R combination.
  2. Type regedit, then click on OK.steam needs to be online to update
  3. Go to the following key: HKEY_CURRENT_USER\Software\Valve\Steam
  4. In the right pane, click on Offline DWORD.
  5. If not available, right-click the right pane choose New, and select DWORD (32-bit) Value.
  6. Set the name to Offline, then double-click on it.
  7. Set its Value Data to 0 and save the changes.
  8. Close the Registry Editor, restart your computer, and check if the problem is resolved.

5. Temporarily disable your antivirus

If you’re using Norton, visit our uninstall guide for Norton Antivirus for more information.

In case you’re running McAfee, read our guide on how to remove McAfee antivirus for more information.

For those who are unsure how to perform the process in your particular case, we recommend visiting the manufacturer’s official website for info regarding this subject.

We suggest using the best antivirus software to avoid potential Steam problems.

6. Copy the Steam files from another computer

  1. Connect a flash drive on a working PC and copy all files from Steam’s installation directory except the Steamapps folder.
  2. Connect the USB flash drive to the initial PC and paste all the files to your Steam installation directory.
  3. When asked to overwrite files, click on the option to replace them.
  4. Run Steam.exe to check if the issue is resolved.

7. Add the -tcp parameter to the Steam shortcut

  1. Locate the Steam shortcut and right-click it. Choose Properties from the menu.
    steam needs to be online to update
  2. Go to the Shortcut tab and, in the Target section, add -tcp after the quotation marks.
  3. Click Apply and OK to save the changes.
  4. Go to the Compatibility tab and check Run this program as administrator.
    steam needs to be online to update
  5. Run the shortcut and check if the issue is resolved.

8. Turn off your Proxy

  1. Use the following hotkey to open Windows Settings: Windows + I
  2. Now, go to the Network & Internet section.
  3. Select Proxy from the left pane, and in the right pane, disable all options.

If you’re unfamiliar with proxy and how it works, read our proxy vs. VPN guide to learn more about it.

The Steam needs to be online to update error can cause lots of problems with your gaming, but we hope that our solutions were helpful to you.

Note that these solutions for Steam needs to be online to update will also work on a school computer.

If you’re aware of an alternative solution, leave it in the comments below. Also, leave any other questions, and we’ll check them out.

Best Cable Modem for Gaming to Buy [Cyber Monday]

If you play games online, you know how important is to have a stable network connection.

In order to do that, you’ll need a proper modem, and in today’s article, we’ll show you the best cable modems for gaming.

Note: All the prices and offers in this article are subject to change, so be sure to check the official product page to get the latest deal. If the product or offer you’re looking for is no longer available, you can try to find it on its official manufacturer page or get another one from our list.

What is the best gaming cable modem?

TP-Link TC-W7960

  • Wi-Fi speeds up to 300 Mbps
  • Up to 343 Mbps download and 143 Mbps upload speeds
  • Up to 8 downstream and 4 upstream channels
  • 2-year warranty
  • 4x Gigabit LAN Ports
  • Can be slow sometimes

TP-Link TC-W7960 uses DOCSIS 3.0 standard and it provides download speeds of up to 343 Mbps and up to 143 Mbps for upload. The modem fully supports both IPv4 and IPv6 protocols.

Regarding compatibility, this device is compatible with Comcast, Spectrum, Time Warner Cable, Cox, and Bright House ISPs.

The modem has 4 LAN ports and an integrated Wi-Fi router so you don’t need a separate router.

ARRIS SURFboard SBG6950AC2

  • 16 download and four upload DOCSIS 3.0 channels
  • Compatible with most U.S. cable ISPs
  • Four 1Gbps Ethernet ports
  • Dual-band AC1900 Wi-Fi
  • LEDs can be too bright for some users
  • It can get hot after a while

This cable modem comes with 16 download and 4 upload DOCSIS 3.0 channels and it supports both IPv4 and IPv6 standards.

This device works best with cable Internet plans up to 300Mbps, and it’s fully compatible with Cox, Spectrum, Xfinity, and other major U.S. cable providers.

The modem has four 1Gbps Ethernet ports, as well as dual-band AC1900 built-in Wi-Fi.

NETGEAR Cable Modem CM600

  • Compatible with Xfinity, Comcast, COX, and Spectrum ISPs
  • Works with plans up to 400 Mbps
  • 24×8 channel bonding, DOCSIS 3.0
  • Single 1Gbps Ethernet port
  • Minor issues with Spectrum and firmware

This modem is compatible with Xfinity, Comcast, COX, and Spectrum ISPs, and it can work with provider plans for up to 400Mbps. This model has 24×8 channel bonding and support for DOCSIS 3.0 standard.

The modem is incredibly simple to set up and it works with all Wi-Fi routers. The device has a single 1Gbps Ethernet port that you can use to connect to your PC or any other network hardware.

Asus AC2900

  • 11AC MU-MIMO technology for data transfer speeds up to 2900 Mbps
  • 1.8GHz Dual-core Processor
  • Dual-band AC2900 Wi-Fi
  • Four Gigabit Ethernet ports
  • Supports download speeds up to 1.3Gbps
  • Random reboots and crashes for some users

Asus Modem Router Combo is certified by Comcast Xfinity and Spectrum, and it supports 11AC MU-MIMO technology for up to 2.9 Gbps transfer speeds.

In addition, there’s a built-in dual-band AC2900 Wi-Fi, so won’t need any additional hardware.

Regarding connectivity, the device has four Gigabit Ethernet ports, one USB 3.0 port, and one USB 2.0 port.

There you go, these are the best cable modems for gaming, so be sure to consider them all and pick the best one according to your needs.

If you have any additions or suggestions, leave them in a comment below.

Best Bitdefender Premium Vpn Deals

Bitdefender is among the most notable cybersecurity companies, providing up-to-standard antivirus tools, cloud security, VPN solutions, and more.

The company provides a powerful VPN service with over a thousand servers across the globe, enabling users to have a secure and fast connection.

If you are looking for a stable VPN provider that will help you surpass all ISP and geographical restrictions, this Christmas is the perfect time to get it at a special price.

How much is Bitdefender VPN per year?

This year, Bitdefender VPN prepared a 57% off deal for users that want to buy the 1-year subscription plan.

The subscription typically costs $69.99/ year but is now available at a discount price of $29.99/year. If you get the offer you will get top-level VPN services for as low as $2.5/month.

Bitdefender Premium VPN

Watch your favorite shows, surpass ISP restrictions, and keep all your information private with unlimited encrypted traffic.

One subscription covers up to 10 different devices. The software is compatible with Windows, macOS, Android, and iOS devices.

Bitdefender Premium VPN key features:

  • High geographical coverage with over 1, 300 servers worldwide
  • Split tunneling to prioritize specific online activities
  • Internet Kill switch that temporarily suspends all traffic in case the VPN connection drops
  • Provides unlimited access to streaming platforms across the globe
  • Public Wi-Fi security
  • No traffic logs
  • Support for OpenVPN, L2TP/IPsec, and IKEv2 (new) VPN protocols

There is no risk in taking advantage of this offer, as the company provides a 30-day money-back guarantee for users that are not satisfied with the product.

So, what are you still waiting for? Remember that these Bitdefender Cyber Monday 2022 offers are not going to last forever, so you really need to be quick.

Note: Deals are subject to change. Sometimes, some of the deals listed in our guides may no longer be available by the time you hit the buy button. So, hurry up and grab them while they’re hot.

What bargains are you hunting for this season? Let us know in the comments section below.

How to Remove Bloatware From Windows 10: 4 Ways to do it

One of the many struggles of Windows 10 is a certain amount of so-called bloatware. These bloatware programs use your hard disk and your computer harder to use.

It gets even worse when there are issues with uninstalling these bloatware programs, but this is another case that we go in-depth on in another article.

So we created this article to help you better understand this unwanted piece of software and avoid (and remove) it as much as possible.

What is the bloatware in Windows 10?

Bloatware is a program that comes preinstalled with your system and some other software. Its purpose is sometimes to make extra money for its partners, but it can be helpful to you.

However, you might not find them useful most times, and they take up high and valuable disk space.

The best example of bloatware is McAfee antivirus, which comes with many programs, like Adobe products. You probably won’t install it in the first place, but it could be of some service since you have it.

If you want to remove these preinstalled apps and others that are part of your downloaded software, proceed to the next section of this guide.

How do I remove bloatware from Windows 10?

1. Uninstall programs from Start Menu

  1. Press the Windows key and right-click the bloatware you want to remove.
  2. Select the Uninstall option.
    uninstall option how to remove bloatware from windows 10
  3. Finally, click the Uninstall button to complete the process.
    uninstall button

The quickest way to remove bloatware from your Windows 10 laptop is via the Start Menu. Unfortunately, thisapp might not be available in the App and features section.

Thus, removing it at first sight in the Start Menu is essential.

2. Using PowerShell

  1. Press the Windows key + X and select Windows PowerShell (Admin).
    powershell how to remove bloatware from windows 10
  2. Type the command below and hit Enter to get the name of all the apps on your PC: Get-AppxPackage | Select Name, PackageFullNameget select name
  3. Now, copy the PackageFullName of the bloatware app you want to remove.
  4. Type the command below and press Enter to remove the app. Note that you need to replace the PackageFullName with the name you copied in Step 3: Get-AppxPackage PackageFullName | Remove-AppxPackageget remove
  5. To remove the bloatware from all user accounts, use the command below instead: Get-AppxPackage -allusers PackageFullName | Remove-AppxPackageallusers
  6. Now, close the Windows PowerShell.

The Get-AppxPackage command is an effective method for removing bloatware from your PC for good. This command has the advantage of not allowing the app to reinstall itself.

If you need the app again, you can run a few commands to get them back yourself.

3. Remove using Settings

  1. Press the Windows key + I and select the Apps option.
    apps how to remove bloatware from windows 10
  2. Select the app you want to remove and click the Uninstall button.
    uninstall app
  3. Now, follow the onscreen instructions to complete the removal process.

All apps are listed under the Apps and Features section of the Settings app. While some bloatware apps might not appear here, you can still find the ones you need to remove here.

Alternatively, you can complete this process using a Windows bloatware removal tool in CCleaner. CCleaner digs deep into your PC to remove any unwanted apps and files taking up valuable space.

It also removes all these apps’ components and ensures no leftovers on your PC. This tool might be all you need to never worry about bloatware on your PC again.

4. Using a bloatware removal script

  1. Download the Windows10Debloater from Github.
    download
  2. Right-click the downloaded Zip file and select the Extract files… option to extract its contents.
    extract files
  3. Now, right-click the Windows10DebloaterGUI file and select the Run with PowerShell option.
    run with
  4. Finally, click the REMOVE ALL BLOATWARE option to remove the unwanted files.
    remove all

If removing these unwanted programs one after the other is proving difficult; then you can use a bloatware removal utility tool for Windows 10. This tool is an automated script that searches and removes all bloatware on your PC.

If you want to know how to remove bloatware from Windows 10 for all users, this tool is your best option to rid your OS of all additional programs.

Bloatware takes up valuable space and can slow down your PC with time. But with the methods in this guide, you have everything you need to know about how to remove bloatware on Windows 10.

Additionally, check our guide about removing software leftovers to keep your computer completely clean.

Feel free to let us know if you encounter any problems removing the unwanted apps on your PC.

What are Hard Faults Per Second & How to Reduce Them?

If you have opened the Performance tab on Task Manager, navigated to Resource Monitor to find the Memory tab showing hundreds of hard faults per second, and wondering what it is? Then, you are at the right place!

This guide will discuss hard faults and how to reduce them to keep your computer up and running. 

What are hard faults per second?

Hard Faults, previously known as Page faults, occur when the operating system retrieves memory pages from the disk rather than from the in-memory pages that the memory manager maintains.

Usually, most hard faults are like normal background processes in your Windows, which go unnoticed. However, an invalid hard fault tries to access a memory address that doesn’t exist. And when the program can’t locate the new address, the OS might terminate it, resulting in a crash.

What causes hard faults?

The main reason for the increased number of hard faults is insufficient RAM. However, there could be various causes as well. Here we have listed some of them: 

  • Memory address of a program is changed: If the address memory of a program has been switched to the main paging file instead of the main memory slot, it could cause an issue.
  • Virtual memory is overused: If your hard drive is overworked due to swapping information between virtual memory and system memory, it could result in hard faults.
  • Running more programs: If you run multiple programs on your computer simultaneously, you can experience the issue.

How can I reduce hard faults?

1. Disable and Enable Page.sys

  1. Press Windows + E to open Windows Explorer.
  2. Right-click on This PC and select Properties.THIS PC properties - hard faults per second
  3. Click Advanced system settings.System About
  4. On the next window, go to the Advanced tab, under Performance, and select Settings.SystemPropertiesAdvancedhard faults per second
  5. Now, go to the Advanced tab and under Virtual Memory, click Change.SYM PROP hard faults per second
  6. Uncheck the Automatically manage paging file size for all drives.
  7. Now click the radio button beside the No paging file option.No paging file
  8. Click Set, then OK, and choose Yes on the following prompt.
  9. Now, go to the Virtual Memory window again and select a drive from the list.
  10. Choose the Custom size and enter the same value for the Initial and Maximum size fields in MB.Customize size
  11. Now click Set, then OK. Finally, restart your computer to let the changes take effect.

2. End Task using Resource Monitor

  1. Press Windows + R to get the Run console.
  2. Type taskmgr and hit Enter to get Task Manager.Taskmgr Run command
  3. Go to the Performance tab, click on the three dots from the upper right corner, and select Resource Monitor.Resource Monitor
  4. Go to the Memory tab, and check the Hard Faults column.
  5. Locate the process slowing down your computer, right-click on it, and choose End Process Tree.TASKMGR 2

3. Extend RAM on your computer

If none of those mentioned above helped you, it seems time to extend your computer’s physical RAM. You can check the RAM available on your PC via System Configuration, and if it doesn’t meet the recommended requirements to run OS, you should buy additional RAM or extend the one you have. 

So, this was our guide to help you understand what hard faults per second are and how to reduce them when they increase excessively. Try these methods and let us know which worked for you in the comments below.

9 Best Windows Laptops for Any Budget [Cyber Monday]

If you were considering and waging on a new laptop for a long time but waiting for the right pricing, this is that time of the year.

Windows laptops and 2-in-1 hybrids are getting substantial discounts and we made sure to provide you with a helping hand. In this guide, we’ll enlist some of the best bang-for-the-buck laptops powered by Microsoft’s Windows 10.

The list below contains 9 crazy hot laptops so make sure to check them out. Think it through and make a move while stocks last. Happy shopping!

Note: All the prices and offers in this article are subject to change, so be sure to check the official product page to get the latest deal. If the product or offer you’re looking for is no longer available, you can try to find it on its official manufacturer page or get another one from our list.

What are the best Windows 10 laptops right now?

Microsoft Surface Book 2

  • 512 GB of storage, 16 GB RAM
  • Up to 17 hours of video playback
  • Vibrant PixelSense Display
  • Pricey

Other specs:

  • Intel Core i7, 16GB RAM, 512GB – 15″
  • VIDIA GeForce GTX 1060 discrete GPU w/6GB GDDR5 graphics memory
  • Four modes of use

Microsoft Surface Pro 7, 12.3″

  • Ultra-fast 10th Gen Intel Core i5
  • USB-C and USB-A ports
  • Up to 10.5 hours of battery life
  • No support for HDR, HDR+, or 4k apps

Other specs:

  • 8 RAM + 128GB SSD (Latest model)
  • 12.80 x 2.68 x 9.21 inches

Acer Aspire R 15 2-in-1, 15.6″

  • USB 3.1 & USB 2.0 ports
  • 802.11ac powerful Wi-Fi signal
  • Up to 7.5 hours of battery life
  • Runs on Windows 10 S

Other specs:

  • Full HD IPS display
  • AMD Ryzen 3 3200U Dual Core Processor (Up to 3.5GHz)
  • 4GB DDR4 SDRAM, 128GB SSD

Asus L406 14”

  • 1 year Microsoft 365 Personal subscription included
  • 14-inch display with ASUS NanoEdge Bezel technology
  • Superfast Wi-Fi 5 connection
  • Comes with Windows 10 Home S mode (although it's upgradable to Windows 10 Home)

Other specs:

  • Intel Celeron N4000 processor (uo to 2.6 GHz)
  • 4GB RAM, 64GBeMMC storage 
  • 0.7” thin

Lenovo Flex 15 2-in-1 Convertible Laptop

  • Convertible (laptop, stand, table, tent)
  • Superfast boot time
  • 1080p touchscreen
  • Users reported lines appearing on the screen

Other specs:

  • 15.6-inch FHD Touchscreen Display, Intel Core i7-8550U, NVIDIA GeForce 940MX, 16GB RAM, 512GB SSD, Onyx Black
  • Backlit keys

ASUS ZenBook 13 UX331UA Ultra-Slim Laptop 13.3”

ASUS ZenBook 13 UX331UA Ultra-Slim Laptop
  • Specs: Full HD WideView Display, 8th gen Intel Core i7-8550U Processor, 8GB LPDDR3, 256GB SSD, Windows 10, Backlit Keyboard, Fingerprint, Icicle Gold.

⇒ Buy it from Amazon

Dell XPS9560-5000SLV-PUS 15.6″

Dell XPS9560-5000SLV-PUS
  • Specs: Ultra-thin and light laptop with 4K Touch Display, 7th Gen Core i5 ( up to 3.5 GHz), 8GB, 256GB SSD, Nvidia Gaming GTX 1050, Aluminum Chassis.

⇒ Buy it from Amazon

Lenovo ThinkPad X1 Carbon Laptop

  • Specs: High-Performance Windows Laptop, Intel Core i7, 16 GB RAM, 512GB SSD, Windows 10 Pro.

⇒ Buy it from Amazon

Lenovo 14″ ThinkPad X1 Yoga

best laptops 2-in-1
  • Specs: 3rd Gen Touchscreen LCD 2 in 1 Ultrabook Intel Core i7 (8th Gen) i7-8665U 16GB LPDDR3 512GB SSD Windows 10 Pro 64-bit (English) Black.

⇒ Buy it from Amazon

So, have you made up your mind? Which laptop are you going to buy? Let us know in the comments below.

How to Transfer Windows 10 & 11 License to a New Computer

Transferring a Windows license from one computer to another can be pretty simple once you know all the steps involved. Also, you will need to keep some legality issues in mind, so be sure to keep reading to find out what types of licenses can be transferred and how to do it.

Recently, I managed to part ways with my old and trusty laptop, which was rapidly reaching the end of its days, and move on to a brand new Satellite Pro with more up-to-date hardware under its hood. But as I was installing Windows 10 and all the other software I usually work with, I noticed that my Windows serial key didn’t want to work on the new device since it was already in use on the old laptop (kinda’ obvious now that I think about it).

After doing some digging, I found out a few things about how to transfer a Windows 10 license to a new computer. I figured I could share my findings so that others in a similar situation could quickly find the necessary information. The process is pretty simple, but you will have to take notice of a few aspects and install a small piece of software.

How to transfer Windows 10 or 11 license to a new computer?

Transferring the Windows 10 license to a new PC is relatively simple, and in this article, we’re going to cover the following topics:

  • Transfer Windows 10 & 11 license to a new computer – If you have a new computer, you should know that you can easily transfer your Windows 10 license to it by following the instructions from this article.
  • Transfer Windows license to new machine, between computers – Transferring a Windows license to a new machine or between computers is possible. Still, you should keep in mind that you need to deactivate your license first before you can transfer it to another PC.
  • Transfer Windows OEM license – OEM licenses are related to your hardware, and if your PC came preinstalled with Windows 10, you will likely have an OEM license. As a result, you won’t be able to transfer that license to a new device.

1. Is your license Retail or OEM?

This is very important, as OEM licenses cannot be (legally) transferred to another computer. If you don’t know which type of Windows license you have, here’s a simple way to find out: if your laptop / PC came with Windows pre-installed, then it’s OEM. If you’ve bought the license yourself (either online or at your local computer shop), then that license is Retail. Pretty simple, right?

After moving on, I will repeat this. Transferring an OEM Windows license is prohibited, so do it at your own risk.

You can also find out what type of Windows license you have by opening a Command Prompt or PowerShell as Admin and running a single command. To do that, follow these steps:

  1. Press Windows Key + X and to open Win + X menu. Select Command Prompt (Admin) or PowerShell (Admin) from the list.
    Transfer Windows 10 license to new computer
  2. When Command Prompt opens, enter slmgr /dlv and press Enter to run it.
    Transfer Windows license between computers
  3. Locate the Description row and check your license type.

After you find out your license type, you can proceed to the next step.

2. Find out your Product key

You can skip this step if you have a DVD with your Windows product key printed on it. However, if you’ve bought your Windows license as a digital download and somehow deleted/lost the email receipt, you will need to obtain your product from the depths of your computer’s registries.

Plenty of tools will fish out your registry key, which you can later use to activate Windows 10 on another computer. From personal experience, I can recommend:

  • Belarc Advisor, which shows you a ton of information about your computer after you run the tool, but it does have the downside of taking a bit longer to gather all that information. and after it finishes, it opens an HTML file with all the information and you have to find your Windows key under the “Manage all your software licenses…” block.
  • Magical Jelly Bean Keyfinder, a tool which delivers on its promise of simplicity and shows you a clean and easy to read window with all your installed products and corresponding serial numbers. 

Both these tools are free, and after you run them, you will have your Windows 10 product key ready to move to your new computer. But before we do that, there’s one more thing to do on the old device.

3. Uninstall / Deactivate Your Windows Product Key

Now that you have retrieved your Windows serial key and noted it somewhere safe, you can uninstall it from the old computer. As you can imagine, if you don’t do this, inputting your serial key on the new computer will prompt you that the key is already in use on another device and return an ugly “invalid key” error.

To uninstall your Windows product key, you need to do the following:

  1. Start Command Prompt or PowerShell as an administrator. We showed you how to do that in Step 1, so be sure to check it out.
  2. When Command Prompt starts, enter slmgr.vbs /upk (or if that does not work on your version, try using slmgr.vbs -upk). and press Enter.
    Transfer Windows 10 license to new computer

If all goes well, you should see a prompt appear on your screen that informs you that the product key has been successfully uninstalled.

You can also deactivate your Windows by formatting your hard drive. If you don’t plan to use your PC anymore or want to sell it, formatting your hard drive might be the best choice; just be sure to back up your important files beforehand.

4. Add the Product Key to the new Computer

Now that you have successfully deactivated your serial number from the old computer, you can add it to your new device. This can be done by right-clicking This PC and selecting Properties, and at the bottom of the screen, you will see a link that says “Activate Windows“. Following the wizard will allow you to activate your Windows 10 with the same product key you had on your own computer.

You can also activate your Windows via Command Prompt or PowerShell. To do that, do the following:

  1. Start Command Prompt as administrator.
  2. When Command Prompt opens, enter slmgr /ipk XXXXX-XXXXX-XXXXX-XXXXX-XXXXX command and run it. Keep in mind that you need to enter your actual serial number instead of Xs.
    Transfer Windows license to new machine

If you are experiencing problems with your Windows activation, you can choose Phone activation and have a chat with the Microsoft support staff which will sort things out for you. To do that, follow these steps:

  1. Press Windows Key + R and enter slui.exe 4. Press Enter or click OK. If the slui.exe 4 command doesn’t work, you can use slui instead.
    Transfer Windows OEM license
  2. Now select your country and follow the instructions on the screen to contact Microsoft support.

As you can see, transferring your Windows 10 license to a new PC is possible, as long you don’t have the OEM version, and you should be able to do it easily by following our instructions.

If you’re wondering about the number of times you can use a Windows 11 key, the highlighted guide will provide the answer.

Leave a note in the comments section below if you have further questions.

Best Portable Blu Ray Players To Get Now

You may think DVD players are outdated but they are a staple in this fast-moving dynamic world where technology is evolving every day. If you have a knack for that good old Blu-Ray DVD player, there isn’t a better time than now to get yourself one.

Winter deals all over are doing a good job at helping you secure things on your wish list and the Blu-Ray DVDs available should be part of that list given the features. 

If you are yet to make up your mind on whether this is a good idea, some of the advantages of scooping one of the deals include High Definition quality.

You can sit back and relax while enjoying your favorite movies in the greatest image clarity with vivid pictures. The finer details are what matter for the ultimate viewing experience.

This is not your ordinary DVD picture quality so standby to be dazzled with the amazing clarity of 1080P.

The versatility of the Blu-Ray player allows you to switch between Blu-ray discs and USB connectivity. Both are supported and support standard discs too. There is also HDMI and AV output support so you won’t need to spend an extra cent.

What is most exciting about the Blu-Ray player is the richness in the color spectrum and the realness in texture. The tones in the images are said to be true to life; you will almost think you are watching the scenes in real life.

Which brand for Blu-Ray player is best?

The items listed below are discounted:

The less tech-savvy people will enjoy this Blu-Ray player given that a majority of them are portable so they can carry their viewing content anywhere and everywhere they go.

Other enjoyable features you are bound to enjoy from these Blu-ray players include:

  • Digital audio with Dolby support
  • Anti-shock
  • Slow-motion playback
  • Built-in Wi-Fi
  • Streaming capabilities

All these functions are dependent on the product you select but rest assured you will be spoilt for choice.

Amazing deals can be found on Amazon and they are fast running out. Be sure to check out the wide range of Blu-Ray players available and get yourself one today.

Note: All the prices and offers in this article are subject to change, so be sure to check the official product page to get the latest deal. If the product or offer you’re looking for is no longer available, you can try to find it on its official manufacturer page or get another one from our list.

Which one of the players above have caught your interest? Share your thoughts in the comment section below.

5 Fixes for Internet Randomly Disconnects for a few Seconds

The internet connection randomly disconnects for a few seconds, which many users experience. Like the internet connection is limited issue, this problem also prevents you from accessing the web for some time.

This can be pretty annoying but is not impossible to fix. This guide will show you how to regain your connection stability quickly.

Why does my Internet randomly cut out for a few seconds?

There are a few reasons your Internet randomly stops working for a few seconds. Below are some of the notable ones reported by users:

  • Outdated or faulty driver: If your network driver is defective or not up-to-date, you can face the Internet randomly dropping for a few seconds issue while using the Ethernet. The solution here is to reinstall or update the driver.
  • Wrong power setting: Sometimes, your power setting might not work at maximum with your wireless network. You must alter this in the power options to regain internet stability.
  • Glitches with the connection: In some situations, it might be challenging to pinpoint the source of the Internet randomly disconnecting for a few seconds issue. To rectify this, you need to run the network adapter troubleshooter.
  • Wrong frequency: If you’ve set a 5GHz band instead of 2.4GHz, your 5G WiFi may keep dropping either because of incompatible devices or insufficient bandwidth.
  • Wrong network adapter power setting: If your network adapter is set to be turned off to save power, your ethernet might disconnect randomly when your computer needs more power. You can fix this by deactivating the power management feature.

How can I fix the Internet if it randomly disconnects for a few seconds?

1. Run the Network troubleshooter

  1. Press the Windows key + I to open the Settings app and select Update & Security.
    update and internet randomly disconnects for a few seconds
  2. Select Troubleshoot in the left pane and click Additional troubleshooters.
    troubleshoot internet randomly disconnects for a few seconds
  3. Now, select Network Adapter and click Run the troubleshooter.
    run troubleshooter

The Network Adapter troubleshooter on Windows 10 is an effective tool for fixing various connection issues. For example, many users have found it helpful to resolve the issue of internet disconnects for a few seconds or after 30 minutes.

Thus, it should be the first thing you try. Also, it will help if the Internet disconnects when playing games.

2. Change the network adapter power setting

  1. Press the Windows key + X and select Device Manager.
    device manager
  2. Double-click the Network adapters option to expand it and right-click on your network device.
  3. Now, select the Properties option.
    properties internet randomly disconnects for a few seconds
  4. Click the Power Management tab at the top and uncheck the box for Allow the computer to turn off this device to save power.
  5. Finally, click the OK button.
    power mgmt

Your computer does everything to save power. This includes turning off some devices when the need arises.

Suppose this feature is enabled for your network adapter; even your Spectrum internet disconnects or drops randomly for a few seconds. Applying the steps above should help you restore normalcy.

3. Update the driver

  1. Press the Windows key + X and select the Device Manager option.
    device manager
  2. Expand the Network adapters option and right-click your network device.
  3. Choose the Update driver option.
    update driver
  4. Now, select Search automatically for drivers and install the available updates.
    search auto
  5. If this does not fix the issue, right-click your network device again and select Uninstall device.
    uninstall device internet randomly disconnects for a few seconds
  6. Finally, click the Uninstall button and restart your PC.
    uninstall button

If updating your driver with the built-in updater does not fix the Internet randomly disconnects for a few seconds issue, you can go to the manufacturer’s website to download the latest drivers.

Alternatively, you can use a third-party tool such as Outbyte Driver Updater to download and install the missing drivers automatically.

The product not only updates your drivers but also fixes the ones that need repairs and installs the ones that are missing.

Outbyte Driver Updater

Safely update your internet drivers in a matter of moments with this great tool.
Free Trial Download now

4. Change Power settings

  1. Press the Windows key, type power plan, and choose Edit power plan.
    edit power internet randomly disconnects for a few seconds
  2. Select the Change advanced power settings option.
    change advanced
  3. Click the + sign next to the Wireless Adapter Settings option to expand it and do the same for the Power Saving Mode option under it.
    wireless
  4. Now, click the dropdowns before the On battery and Plugged in options and set them to Maximum Performance.
  5. Finally, click the Apply button, followed by OK to save the changes.
    wok internet randomly disconnects for a few seconds

If your wireless internet connection randomly disconnects for a few seconds, it might be because the power setting is not optimized to deliver top performance.

Changing the power setting to Maximum performance should supply the needed power to make it run effectively.

5. Reset network settings

  1. Press the Windows key + I and select the Network & Internet option.
    network and internet
  2. Click on Network reset.
    network reset
  3. Now, click on the Reset now button.
    reset now

If you still can’t fix the internet connection randomly disconnects for a few seconds issue, you might need to reset your network and reconnect it again. This should eliminate all temporary files and glitches causing the issue.

Having your internet disconnect after a few seconds can be pretty annoying. However, it is an issue that can be easily fixed, as shown in this guide. Just make sure you follow the instructions to the letter, and things should be back to normal.

While still on connectivity issues, check our detailed guide for surefire fixes if your PC won’t stay connected to WiFi.

Feel free to let us know the solution that solved the problem for you in the comments below.

Top 3 USB-C Monitors to Buy [Black Friday & Cyber Monday]

USB Type-C technology is a relatively new product on the market since the first version of it was available in mid-2014.

This should make us a little thought because the vast majority of the devices nowadays are equipped with an older generation of USB and it would be hard to suddenly change this.

But the device manufacturers see this new technology as a step forward in product development because it provides a higher transfer rate and can be used also for charging.

The best example is that Intel, the company that laid the foundation for Thunderbolt technology, announced that the new Thunderbolt 3 will come equipped with a port of this kind and this solved the problem of connectivity for Apple monitors.

It is estimated that the new port USB Type C will replace the older generations in the coming years because top developers like Dell, Philips, Acer, and many others have started to create devices that work with this technology.

In this article, we will talk about the best monitors available on the market nowadays that have a USB Type-C port.

Note: All the prices and offers in this article are subject to change, so be sure to check the official product page to get the latest deal. If the product or offer you’re looking for is no longer available, you can try to find it on its official manufacturer page or get another one from our list.

What are the best USB-C monitor Black Friday & Cyber Monday deals?

LG 27UD88-W 4K USB-C monitor

1


If you are searching for a monitor compatible with a MacBook, then your options are pretty limited. There are very few manufacturers of displays that have products to satisfy this demand and many of them are not optimized to meet this requirement.

To not lose time and money searching for the ideal product, we recommend a 4K monitor from LG.

LG 27UD88-W is a 27″ display equipped with a USB Type-C port that will allow MacBook users to connect through a single cable. The best part of this monitor is that data transfer and charging are done through the same cable.

This monitor is able to display with a 4K resolution (3840 x 2160 pixels) at a refresh rate of 60 Hz. For a MacBook owner, the 4K experience has the best performance with a 30 Hz refresh rate, unless you are the owner of a patch for 60 Hz.

➡️ Connectivity is not a problem

If you think that this monitor is constructed to be compatible only with MacBook, well you are wrong.

It is true that the main reason for buying this device is to bind with that kind of laptop, but it can be connected to a wide range of other devices because it comes equipped with an HDMI port, a Display Port, and a pair of USB 3.0 ports. So we can say that the Type C USB port brought him more of a bonus.

➡️ Attractive design

The display is primarily built with plastic, which is not up to the standards of a Thunderbolt display but gives it a modern and elegant design.

The bezel has 3 sides which have a width of up to half an inch, and the bottom side reaches almost 1 inch. Its outer side is trimmed in an aluminum-look plastic layer which is combining well with the ArcLine curved stand and gives it a high level of stability.

The monitor can be tilted in an arc of -3 up to 20 degrees, and the height can be raised up to 110 mm. Unfortunately, if you want to turn the device, you must move the entire base because it does not have an axis for this operation.

An interesting feature of this display is that you can raise it to the maximum height and you can rotate it 90 degrees clockwise to switch to portrait mode. This is useful for certain games that require this function and also for specialty applications.

➡️ Sound and display

With an IPS display with a resolution of 4K, we expect extraordinary picture quality, which is so because the colors are vibrant, the text is sharp and there is no delay. Monitor also provides a viewing angle of up to 178 degrees.

For the sound chapter, the monitor does not have any built-in speakers but comes equipped with a jack for connecting headphones and a controller for the volume and sound quality playback through an external device.

➡️ Control Interface

The screen control interface will be easily recognizable to users of LG monitors, but that does not mean that other buyers will have problems with its use because it is not much different from another interface of this kind.

It has basic settings such as brightness, contrast, and multiple versions for dividing the screen.

You also have the PBP mode, which allows you to display content from 2 different sources side-by-side. This is a helpful feature for testing and doing different reviews for products that feature an HDMI output.

In conclusion, this model is a viable solution because through a single cable you can connect the laptop to the monitor, change the display and assure data transfer.

The main disadvantage is that the older MacBook models can get refresh rates up to 30 Hz and the 2016 models need a workaround to obtain a refresh rate of 60 Hz. But it is an irrelevant aspect in comparison with all the monitor has to offer.

⇒ Buy it now on Amazon

Z-Edge U32I4K 32 Inch 4K Monitor

We all know that an auxiliary monitor can increase our productivity in most circumstances, especially if this monitor is easy to connect to any device and has plenty of screen for all your work.

Thanks to HDR10 technology, the monitor delivers vivid image quality, revealing deep blacks and bright whites, making it easy to spot every detail in the darkest and brightest scenes. Total immersion with incredible image accuracy.

The high-end IPS panel built into the monitor greatly expands your viewing angle, offering a 178° panoramic viewing angle, making it easier for you to work and share content. The IPS panel ensures consistent, accurate and vivid colors for videos and images from any viewing angle.

➡️ Design

The stock screen weighs about 800 grams with dimensions of 14.9 x 9.26 x 0.26 inches, much thinner than many displays nowadays. The Plastic metal look from the back of the device makes us think of a premium product.

The front and the sides are made from a thick matte plastic which gives it a modern but elegant aspect.

Under the screen, you can find the buttons for adjusting its settings, the start and stop buttons, and the USB Type-C port an the other ports through which the device is powered and performs the data transfer are on the lower back of the back panel.

➡️ Connectivity is not a problem

If you are using another external monitor, you might have already installed the needed software, so you do not have to install them again.

Once you have ensured that all drivers have been installed, connect the monitor to your computer and it should light up.

Windows users can synchronize and adjust the other existing monitors with the portable monitor by right-clicking on the operating system interface and selecting Screen Resolution.

➡️ High-quality images

The Z-Edge U32I4K can reproduce ultra-high-quality images, the colors are vibrant and the text is sharp and easy to read. All these are possible thanks to the 4K IPS screen which also offers a fairly large viewing angle compared to devices of this kind.

It also comes equipped with different features for a professional rendering of images no matter what activity are you performing.

Even if you surf the internet, play games, or use it for office work, the monitor will give a pleasant experience every time.

⇒ Buy it now on Amazon

Acer H277HU

h277hu-3

Acer H277U is a model that incorporates the quality, appearance, and performance of a single product.

The eye-pleasing brushed-metal stand, zero-frame technology, superior audio quality, and fast transfer rate are the result of a long period of development of a single product to meet the needs of the most exigent users.

➡️ High-performance facilities

The 27 inches monitor has a WQHD resolution of up to 2560 x 1440 pixels with an anti-glare membrane which also provides a surface resistant to dust and fingerprints.

The 3W speakers ensure high-quality sound playback with a minor disadvantage as poor quality of bass, but it is understandable because the system is a built-in monitor.

The stand has a metal polished structure with an anodized surface that cannot be adjusted. The base is also very slim to allow the alignment of multiple monitors without causing space problems.

➡️ Varied connectivity

In the connectivity area, this monitor can be connected to any device due to a large variety of slots. So, if you own a Windows system or a MacBook, you can connect it via a USB Type-C slot for a faster data transfer rate.

If you want to acquire the device for normal use you will be pleased to hear that it comes equipped with two USB 3.1 slots, an HDMI slot, and a DisplayPort slot.

Unfortunately, this display also has no headphone jack and no internet cable slot, so we will consider this a disadvantage.

On the bottom right edge, you can find a set of buttons with which you can start the settings menu and adjust brightness, contrast, color, and even volume.

⇒ Buy it now on Amazon

OneDrive Constantly Syncing: 7 Easy Solutions to Stop it

Microsoft’s OneDrive stores and sync documents and settings across Windows 10 users’ devices. However, the app does not work as intended, with some users complaining that OneDrive is constantly syncing.

This might be due to OneDrive’s sync settings on your PC or some other factors. Whatever the cause, we have prepared the solutions to help you fix the issue in this guide.

Why is OneDrive continuously syncing?

The reasons OneDrive is constantly syncing are not far-fetched. Below are some of the common ones listed by users:

  • Unstable internet connection: If OneDrive is constantly syncing or shows sync pending, it might be because of weak internet strength. The app needs a strong and active network to sync effectively. Hence, you need to switch to another network if your internet connection is limited.
  • Insufficient cloud storage: Depending on your package, there is a limit to the size of the folder you can sync to OneDrive. If you are trying to upload a file that is above the memory storage, it might be stuck at syncing. You can either use more storage space or switch to another cloud storage for Windows 10.
  • Issues with the app: Sometimes, OneDrive keeps syncing the same files due to glitches within the app. In this case, you need to restart the app or uninstall it with dedicated uninstaller software.

How can I fix OneDrive if it’s constantly syncing?

Before exploring our fixes and making changes to your PC, we recommend trying the preliminary troubleshooting steps below:

  • Ensure that your internet connection is solid and active
  • Check that you are connected to your Microsoft account.
  • Disconnect and reconnect your internet

1. Pause and resume syncing

  1. Right-click the Cloud icon on the Taskbar and click the Gear icon in the top right corner.
  2. Click the Pause syncing option and select the duration to pause it.
    pause onedrive constantly syncing
  3. Now, wait a few minutes, repeat Step 1, and choose Resume syncing.
    resume

In some cases, the OneDrive constantly syncing issue is down to hiccups encountered by the app during the sync. Pausing and resuming the process should clear this up.

2. Restart OneDrive

  1. Press the Windows key + X and select the Task Manager option.
    task manager
  2. Right-click the Microsoft OneDrive option and select End task.
    end
  3. Now, click the Start icon and search for OneDrive to restart the app.
    start menu

Sometimes, it is just minor in-app glitches that are causing the OneDrive constantly syncing issue. Restarting the app from Taskbar solves this and other matters like OneDrive processing changes.

3. Check storage

  1. Right-click the OneDrive icon on the Taskbar and click the Gear icon.
  2. Choose the Settings option.
    settings onedrive constantly syncing
  3. Click the Account tab at the top and check your available storage.
  4. Finally, click the Get more storage option and select your preferred plan.
    get more

OneDrive has varying storage capacities depending on your package. If you do not have enough storage space to sync the files you are trying to upload, you might face the OneDrive constantly syncing issue.

In this case, you can purchase additional space to sync your files.

4. Choose folders to sync

  1. Right-click OneDrive on Taskbar and click the Gear icon.
  2. Select the Settings option.
  3. Choose the Backup tab at the top and click the Manage backup button.
    manage backup onedrive constantly syncing
  4. Now, unmark the folders you don’t want to sync and click the Start backup button.
    start backup

At times, you might be trying to sync too many heavy folders at a time. This can lead to the OneDrive constantly syncing issue. In this case, you must remove unnecessary folders and sync the important ones first.

5. Run the Windows Store Apps troubleshooter

  1. Press the Windows key + I and select the Update & Security option.
    update and security
  2. Click Troubleshoot in the left pane and select Additional troubleshooters.
    troubleshoot
  3. Now, select the Windows Store Apps option and click Run the troubleshooter.
    run trouble onedrive constantly syncing
  4. Finally, apply any recommended fixes and restart OneDrive

The Microsoft Store Apps troubleshooter helps diagnose issues with Microsoft apps and others downloaded from the Store. This tool helped fix the OneDrive constantly fixing issues for some users. So, it would be best if you tried it too.

6. Unlink the account

  1. Click the OneDrive icon on the notification area of your Taskbar and click the Gear icon in the top left corner.
  2. Select the Settings option.
    settings onedrive constantly syncing
  3. Now, select the Unlink this PC option.
    unlink this PC onedrive constantly syncing
  4. Click the Unlink account button to confirm the action.
    unlink account
  5. Finally, relaunch OneDrive from the Start Menu and follow the onscreen instructions to set up your account again.
    start menu

Another effective fix for the OneDrive constantly syncing issue is to unlink your account. With this, you will be able to set up your account again and hopefully clear any roadblocks preventing your apps from syncing.

7. Uninstall and reinstall OneDrive

  1. Press the Windows key + I and select the Apps option.
    apps onedrive constantly syncing
  2. Choose the Microsoft OneDrive option and click the Uninstall button.
    uninstall
  3. Follow the onscreen instructions to complete the removal process.
  4. Finally, download and install the app from official sources.

If all the fixes above fail to solve the OneDrive constantly syncing problem, you might need to go for the jugular and reinstall the app. This should give a clean installation that is devoid of issues.

There you have it: The steps you need to follow if OneDrive is constantly syncing on your PC. All that is left for you is to follow them carefully, and you will be able to sync your files again.

In the same vein, if you need a list of the best cloud storage apps for Windows PC as an alternative to OneDrive, check our detailed guide for the security options you can use today.

Feel free to let us know the fix that helped you solve this problem in the comments below.

Microsoft delays Outlook REST API deprecation until 2023

We’re sure that some of you remember that, back in November 2020, Microsoft announced that it is deprecating the Outlook REST API beta and Outlook REST API v2.0 endpoints.

As the company mentioned, this would be a two-year process as a part of Microsoft’s regular service deprecation policy.

Here we are, at the end of this two-year period, and Microsoft has now announced that it is delaying this deprecation indefinitely.

Outlook REST API deprecation will happen in 2023

Since we are talking about Outlook, just know that if the app won’t open, we have some solutions that will help you fix the situation.

You will also find the assistance you need if your Outlook is running slow, so you don’t need to look any further for answers.

Circling back to the matter at hand, the tech giant actually cited customer and partner feedback as the reasons behind its decision.

From what we can see, users of the API are not ready to let go of it completely and switch to Microsoft Graph, an action that would require somewhat major changes to current applications and use cases.

Note that Microsoft has cautioned customers to not get too comfortable with this delay or think that it’s a long-term option.

Even though the deprecation has been delayed indefinitely, Microsoft has emphasized that it will still happen in 2023 and that users will be given a six-month notice ahead of the deadline.

If you weren’t already aware, the Outlook REST API is being used by developers in applications that manage mailbox data, Calendars, Contacts, push notifications, and more.

The Redmond-based tech company has considered it a legacy surface since 2020 and has been encouraging customers to migrate to Microsoft Graph.

As you might have expected, once the Outlook REST API is inevitably deprecated, developers will no longer have access to the endpoint and the creation of new applications based on the API will be disabled.

Since nobody knows, it remains to be seen what the deprecation date ends up being next year and the kind of impact it would have on current use cases and scenarios.

What is your take on this entire situation? Share your thoughts and opinions with us in the comments section below.

How To Disable Driver Signature Enforcement in Windows 10

In this guide, you’ll learn four safe and tested ways to disable Driver Signature Enforcement on Windows.

Whether you’re dealing with unsigned device drivers or troubleshooting specific hardware compatibility, this step-by-step guide will help you do it right, without leaving your system exposed.

How do I disable enforcement signature?

1. Change the Startup settings

    This is the simplest way to disable driver signature enforcement on Windows 10 but bear in mind that this method will only disable driver signature temporarily.

    After you restart your computer driver signature enforcement will automatically turn itself on.

    To disable driver signature enforcement do the following:

  1. 1. Press and hold the Shift key on your keyboard and click the Restart button.

  2. 2. Choose Troubleshoot > Advanced options > Startup Settings and click the Restart button.

  3. 3. When your computer restarts you’ll see a list of options. Press F7 on your keyboard to select Disable driver signature enforcement.

  4. 4. Your computer will now restart and you’ll be able to install unsigned drivers.

Bear in mind that this method only temporarily disables driver signature enforcement, so be sure to install all the unsigned drivers as soon as you can.

You can automatically install the drivers you need by using dedicated software that installs all of your out-of-date and missing drivers for you.

2. Disable driver signing code

Another solution is to use the Local Group Policy Editor. Keep in mind that you have to be careful while messing with the Policy Editor, and don’t modify anything else.

To disable the driver signing code, follow the steps:

  1. On your PC open Local Group Policy Editor: press the Win+R hotkeys and in the Run box enter gpedit.msc.
  2. In Local Group Policy Editor, from the left panel, click on User Configuration.
  3. Then, from the main window double-click on Administrative Templates.
  4. From the menu that will open double-click on System and then go to Driver Installation.
  5. Select the Code signing for device drivers entry.
  6. Select Enabled and from the dropdown located beneath, change to Ignore.
  7. Click Ok and apply your changes.
  8. Restart your Windows 10 system in the end.

3. Put Windows in test mode

If you don’t want to disable driver signing permanently, you can choose to enter the Windows 10 test mode.

In test mode, you can install any drivers you want without experiencing any problems. Don’t forget to go to normal Windows 10 mode after you solve your problem:

  1. Open an elevated command prompt window on your PC: right-click on the Windows Start icon and select Command prompt (Admin).
  2. In cmd type:bcdedit /set TESTSIGNING OFF
  3. Close the cmd window and restart your computer.
  4. Install your drivers.
  5. Revert back to normal mode: open elevated cmd, enter this command and restart your Windows 10 system:
    bcdedit /set TESTSIGNING ON

4. Disable driver signature enforcement Windows 10 permanently

The previous solution will only disable driver signature enforcement temporarily. But if you want to disable it permanently, follow these steps:

  1. Press Windows Key + X to open Power User Menu. Select Command Prompt (Admin) from the menu.
    driver-signature-enforcement-admin
  2. Once the Command Prompt opens, enter this command and press Enter: bcdedit.exe /set nointegritychecks on
  3. driver-signature-enforcement-off
  4. Optional: To enable driver signature enforcement back again, open the Command Prompt as administrator and enter:bcdedit.exe /set nointegritychecks offdriver-signature-enforcement-on

Alternatively, you can disable driver signature enforcement by using these steps:

  1. Start Command Prompt as administrator.
  2. When Command Prompt starts, enter the following lines:
    • bcdedit.exe -set loadoptions DISABLE_INTEGRITY_CHECKS
      driver-signature-enforcement-disable-1
    • bcdedit.exe -set TESTSIGNING ON
      driver-signature-enforcement-disable-2
  3. Close Command Prompt and restart your PC.
  4. Optional: To enable driver signature enforcement open Command Prompt as administrator and enter the following:
    • bcdedit -set loadoptions ENABLE_INTEGRITY_CHECKS
      driver-signature-enforcement-enable-1
    • bcdedit -set TESTSIGNING OFF
      driver-signature-enforcement-enable-2

Bear in mind that using this solution will disable driver signature enforcement permanently, thus making your computer somewhat vulnerable.

Driver signature enforcement is a useful feature that provides extra protection, but sometimes extra protection can cause problems when installing certain drivers.

We hope that you now understand how driver signature enforcement works and how to disable it in Windows 10.

Issues such as Windows cannot verify digital signature – Code 52 will require you to disable signature enforcement, and this is safe to do, as long as you download drivers from official and trusted sources.

So if you encounter The driver has been blocked from loading the message, disabling the signature enforcement might be helpful.

For a more detailed walkthrough tailored to Windows 11, check out this step-by-step guide on disabling driver signature enforcement.

Do you know of any other workarounds? Feel free to share them in the comments section below.

5 Best 144hz Monitor Black Friday Deals [IPS, 1080p, 1440p]

Put in simple terms, a monitor’s refresh rate is the number of times in a second that it updates its buffer. This translates to a smoother gameplay experience, and a high value is great for action games or competitive games where every millisecond counts.

Of course, when buying a gaming monitor, there are other aspects you should look for, but in terms of how it can help your performance, a high refresh rate is one of the key factors you should take into consideration, and 144Hz is considered to be a very good value.

There are plenty of monitors and brands out there that have a refresh rate of 144Hz or even higher. As such, we’ve compiled a list of the top 5 best ones you can buy, so making a choice will now be a lot easier.

Note: All the prices and offers in this article are subject to change, so be sure to check the official product page to get the latest deal. If the product or offer you’re looking for is no longer available, you can try to find it on its official manufacturer page or get another one from our list.

What 144Hz monitor should I buy?

AOC G2490VX

  • With AMD FreeSync for ultra-smooth competitive gameplay
  • Rapid 1ms response time (MPRT) and 144Hz refresh rate
  • The 3-sided frameless design with ultra-narrow borders
  • 125.95% sRGB & 92.85% DCI-P3 color gamut coverage
  • 1920x1080 Full HD Resolution VA Panel
  • You have volume settings on the monitor, but no speakers

144Hz monitors are all about gaming because you need fast refresh rates to keep up with ultra-fast online gaming.

Well, you’ll have all that and more if you go with the AOC G2490VX since this monitor will transform the way you view everything on your PC.

The 3-sided frameless design allows better immersion into what you are watching, while the crystal-clear image quality will let you see every detail in all of your games, movies, pictures, and more.

Samsung Odyssey G5 Series

  • Express 144Hz refresh rate on VA panel
  • HDR400 Flat
  • 27 inches with WQHD resolution and QLED display
  • 1000R panel curvature and minimal eye strain
  • Extremely fast 1ms response time
  • No adjustable stand

In order to have an unparalleled device optimized for gaming purposes, this valuable monitor offers you immersive graphics with 144Hz and QHD resolution for a crystal-clear looking.

The Samsung G5 monitor is entirely built for gaming in terms of hardware resources. Hence, it provides you with AMD Freesync adaptative that will reduce game lag and stuttering for all your games.

So you can enjoy cutting-edge features that will highly improve your gaming world due to leading monitor performance.

Acer Predator XB273K

  • 120Hz (overclocking to 144Hz) using DisplayPort
  • Optimize colors with Quantum dot technology
  • Widescreen IPS display with Nvidia G SYNC
  • 27-inch UHD 4K (3840 x 2160) resolution
  • Response time: 4ms
  • The very heavy price tag

The Acer Predator XB273K is a virtual monster in the gaming battlefield thanks to the Ultra HD display with 4K resolution and no compromises on gaming performance, color, or speed.

This massive 27-inch (3840 x 2160) monitor includes an IPS panel that supports a blazing-fast 144Hz refresh rate alongside the Nvidia G-SYNC technology that makes gaming feel all the more smooth.

AOC C24G1

  • 24-inch class monitor out of which 23. 6 inches are viewable
  • 144Hz refresh rate with AMD Free Sync
  • 1920 x 1080 Full HD resolution
  • Rapid 1ms response times
  • 3-sided frameless design
  • 1500R curvature
  • May present brightness inconsistencies

The AOC C24G1 is a 24-inch class curved gaming monitor that ensures a stutter-free and tear-free gaming experience at any frame rate, regardless of how intense the match is.

It comes equipped with a curved 23.6-inch VA panel, and the super-detailed full HD resolution (1920×1080 pixels) and 144 Hz refresh rate will make your games feel immersive without sacrificing responsiveness.

Sceptre E255B-1658A

  • Features AMD FreeSync with FreeSync technology,
  • Has Anti-Flicker technology
  • 165Hz Refresh Rate
  • 1ms response times
  • Some users reported inconsistencies with the screen’s coloring

The Sceptre E255B-1658A pushes beyond the standard 144Hz, as the 165Hz gives gamers an edge in visibility as frames transition instantly, for an extra competitive edge in gaming.

Of course, this is just one of the many great features this monitor displays, as we can also mention the 24.5-inch diagonal, 16:9 widescreen aspect ratio, and great 1920 x 1080 resolution.

We believe that when you are in an online match, having skill is the most important aspect above all, but we’d be lying if we’d say that getting help from your hardware isn’t also important.

While a high refresh rate is just one aspect of what makes a gaming monitor good, it is indeed one of the most important, as split-second mistakes can mean the difference between life and (virtual) death.

As such, take care when choosing the right monitors, and try to balance out the price, and all the other features it has to offer.

It also helps if the monitor has built-in image sync software, such as those that have AMD Sync.

Windows SUbsystem for Linux is now available on the Microsoft Store

For those of you that remember, over a year ago, Microsoft brought Windows Subsystem for Linux (WSL) to the Microsoft Store on Windows 11 in a preview state.

Windows Subsystem for Linux is a very useful capability that Microsoft added to Windows 10 in 2017, which enables developers to run GNU/Linux environments directly in Windows without requiring virtual machines (VMs) or dual-boot configurations.

You will be extra pleased to learn that today, Microsoft has made WSL generally available in the Microsoft Store for both Windows 10 and Windows 11.

WSL is no longer just a Preview on the Microsoft Store

That being said, with the release of version 1.0.0 of WSL, Microsoft has ditched the previous Preview tag it had for the software.

Furthermore, it has made this variant of WSL the default experience for people who run the wsl –install or wsl –update commands.

The tech giant also mentioned several advantages of installing the Store version of WSL., which include faster updates, better error printing, WSLg and WSL packed in a single package, and the ability to opt-in for systemd support, among other things.

Some of the other improvements introduced by backporting the Microsoft Store version of WSL to Windows 10 and making it the default experience on both OSes also include:

  • wsl.exe –install will now automatically install the Store version of WSL, and will no longer enable the Windows Subsystem for Linux optional component, or install the WSL kernel or WSLg MSI packages as they are no longer needed (The Virtual machine platform optional component will still be enabled, and by default Ubuntu will still be installed).
  • wsl.exe –install` also now includes:
    • –inbox Installs WSL using the optional Windows component instead of using the Microsoft Store
    • –enable-wsl1 Enables WSL 1 support during the install of the Microsoft Store version by also enabling the Windows Subsystem for Linux optional component
    • –no-distribution Do not install a distribution when installing WSL
    • –no-launch Do not automatically launch the distro after install
    • –web-download Download the most recent version of WSL from the internet instead of the Microsoft Store.
  • wsl.exe –update will now check for and apply updates for the WSL MSIX package from the Microsoft Store, rather than updating the WSL kernel MSI
  • When running WSL using the Windows optional component version, once a week we will show a message on start up indicating that you can upgrade to the Store version by running wsl –update.

We should also inform you that there is a known issue in the Microsoft Store release though, which is that WSL may fail to start if you are running in a session 0 session.

For the time being, this new experience of WSL is only available to seekers, but it will be rolled out automatically to everyone by mid-December 2022.

If you didn’t know, the seeker process involves checking for Windows updates and then installing KB5020030 if you’re on Windows 10, or KB5019157 if you’re on Windows 11.

Note that you can then run the wsl –install (new users) or wsl –update (existing users) commands to get the Microsoft Store version of WSL, or just manually install the latest release from GitHub.

Please keep in mind that if you’re running a WSL 1 distro, you still need to manually install the Windows Subsystem for Linux optional component.

More importantly, the built-in Windows version of WSL will only receive critical bug fixes moving forward, new features will be exclusive to the Microsoft Store version.

And remember that you can download Windows Subsystem for Linux from the Microsoft Store here whenever you choose.

Have you tried out the new version of Windows Subsystem for Linux? Share your experience with us in the comments section below.

Microsoft Whiteboard set to get Copy/Paste support for Loop Components

According to the Microsoft 365 Roadmap, Microsoft is adding a new capability across multiple Whiteboard clients, that is, Whiteboard for the web, Whiteboard app in Teams, and Whiteboard for Windows. The feature tagged 98161, will let users copy/paste live Loop components from other Microsoft 365 apps.

Microsoft already added Loop Components in Microsoft Teams Chat. The feature is designed to provide users with a unique way that allows them to think, plan, and create together, regardless of their location, especially with the rise in hybrid work.

The feature lets users send out components such as tables or task lists, then everyone with access can make edits as well as view the changes that have already been made. In turn, this makes it easier for people to work together on projects, exchange ideas, and make decisions.

According to Microsoft:

Users will be able to copy/paste, view and edit live Loop components in Whiteboard. This functionality is controlled by the Create and view Loop files in Microsoft apps that support Loop OCPS policy, which applies to all Microsoft apps that support Loop components.

This feature is expected to start rolling out in early December and hit general availability by late December. However, it is worth noting that those using Whiteboard on their mobile devices will only be able to view and edit Loop components. Although Microsoft has indicated that it will be adding the capability to copy/paste Loop Components in a future update.

The Callisto Protocol, Need for Speed Unbound and more coming to Xbox next week

As the holidays draw near things are definitely heating up when it comes to new Xbox releases. Next week’s lineup is looking pretty sweet with some pretty high-profile titles set to release on Xbox One and Series X|S consoles (as well as Windows PCs) between November 28th and December 2nd. Let’s have a look at everything Xbox gamers have to look forward to next week in the way of new titles.

The Callisto Protocol – December 2

The Callisto Protocol – December 2 – Optimized for Xbox Series X|S

In this narrative-driven, third-person survival horror game set 300 years in the future, the player will take on the role of Jacob Lee – a victim of fate thrown into Black Iron Prison, a maximum-security penitentiary located on Jupiter’s moon, Callisto. When inmates begin to transform into monstrous creatures, the prison is thrown into chaos. To survive, Jacob must battle his way to safety to escape Black Iron Prison, while uncovering the dark and disturbing secrets buried beneath the surface of Callisto. Using a unique blend of shooting and close-quarters combat, Jacob will need to adapt his tactics to combat the rapidly evolving creatures while scavenging to unlock new weapons, gear, and abilities to outrun the growing threat and escape the horrors of Jupiter’s Dead Moon.

Marvel’s Midnight Suns – December 2

Marvel’s Midnight Suns – December 2 – Optimized for Xbox Series X|SWhen the demonic Lilith and her fearsome horde unite with the evil armies of Hydra, it’s time to unleash Marvel’s dark side. As The Hunter, your mission is to lead an unlikely team of seasoned heroes and dangerous supernatural warriors to victory. Can legends such as Doctor Strange, Iron Man, and Blade put aside their differences in the face of a growing apocalyptic threat? If you’re going to save the world, you’ll have to forge alliances and lead the team into battle as the legendary Midnight Suns.


Need for Speed Unbound – December 2

Need for Speed Unbound – December 2

The world is your canvas in Need for Speed™ Unbound. Prove you have what it takes to win The Grand, Lakeshore’s ultimate street racing challenge. Across four intense weeks of racing, earn enough cash to enter weekly qualifiers, beat the competition, and make your mark on the street racing scene while outdriving and outsmarting the cops. Pack your garage with precision-tuned, custom rides and light up the streets with your unique style, exclusive fits, and a vibrant global soundtrack led by A$AP Rocky and AWGE that bumps in every corner of the world. Express yourself to the fullest with the freshest new art styles and signature tags that represent what you’re all about. With separate single and multiplayer campaigns, this latest edition in the Need for Speed™ franchise from Criterion Games™ delivers hours of electric, adrenaline-pumping action.


While it may be a shorter roster of new releases than what we are used to seeing, it is definitely a matter of quality over quantity with next week’s new Xbox games. Which of these new releases has got you pumped? Tell us in the comments.


Microsoft adds new process mining capabilities to Power Automate

Back in March, Microsoft acquired Minit, a leader in process mining technology that helps businesses revolutionize the way they analyze and optimize their processes. Microsoft’s motive behind this acquisition was to assist its customers to “digitally transform and drive operational excellence by creating a complete picture of their business processes, enabling every process to be easily and automatically analyzed and improved”.

Building upon this premise, Microsoft has announced the preview of new process mining capabilities from Minit that will be availed to users via the process advisor within Microsoft Power Automate. As such, “Microsoft customers can now harness deeper insights to identify bottlenecks in processes to drive optimization and efficiencies with low-code automation”.

The process advisor is now powered by Minit, which now incorporates several templates that are designed to enable clients to easily push impactful business process insights from cloud flows in Power Automate as well as insights from Microsoft Power Virtual Agents and other systems of records like SAP. In turn, this will place businesses at a better standing point because they will be able to understand, enhance and adapt their processes in the ever-evolving market.

Besides the fact that the process advisor can be used by analysts to understand how the processes are run and uncover the root cause analysis, business users can also make use of the tool’s process mining dashboards to evaluate how the business is progressing in real-time and even allow them to identify opportunities that will promote both efficiency and effectiveness.

What’s more, with the newly added capabilities within Power Automate, customers will be able to identify bottlenecks in their processes and reduce complexity and costs. The capabilities incorporate include:

  • Templates to drive optimization with low-code automation
  • Business insights by pulling from cloud flows in Power Automate, Power Virtual Agents, and other systems of records such as SAP
  • Automatically identifying repeating activities across processes, pinpointing the root cause and impact of rework and eliminating it
  • Easily customizable and shareable reports that can be published to workspaces with Power BI Premium

Be sure to visit Microsoft’s blog to get more information about these capabilities and how to make the most out of them. To access these features and more, you’ll need a Power Automate license since the Process advisor is licensed as part of Power Automate per-user licenses. Alternatively, you can use the Power Automate trial.

Best Deals On Rode Microphones

Microphones are a critical piece of equipment when it comes to recording stuff. And, it becomes all the more important for bloggers or those in the field of recording.

Therefore, we come forth to you with the best deals on Rode microphones this year.

These microphones offer both quality and extended life, over their competitors in the market. So, if you have been planning to purchase one for either personal or professional use, Rode microphones are the answer.

Depending on the exact environment in which you plan on using your microphone, your choice will need to have specific features.

In case you’re going to use it as a lavalier, then the device should be easy to clip on clothes and light, while if you’re planning on using it for singing, it is recommended that you choose an option with a condenser.

But, before you proceed, do identify your requirements and choose the ones that cater to all of them.

What are the best Rode mic Cyber Monday deals?

All these items have special prices.

Note: All the prices and offers in this article are subject to change, so be sure to check the official product page to get the latest deal. If the product or offer you’re looking for is no longer available, you can try to find it on its official manufacturer page or get another one from our list.


These are the best deals on Rode microphones you can grab this year. Do not forget to check out our collection of the best 360° microphones to buy, in case that’s what you are looking for.

Also, check the compatibility and warranty for the product on Amazon along with the customer reviews.

Let’s know which Rode microphone you purchased from the list, or drop in your recommendations in the comments section below.

5 Best 144 Hz Monitors to Buy [Black Friday & Cyber Monday]

Have you been eyeing the dual monitor? Well, there is no time like the present. Amazon has amazing deals on dual monitors this year. Definitely, there is something for you here.

Apart from the fact that a dual monitor allows gamers to multitask while playing their favorite video games, the extra screen can serve as a desktop for video streaming, web browsing, or displaying walkthroughs.

Having an extra screen also provides you with other great features, like being able to play games while using streaming tools, coding while seeing the preview of the website or app that you’re building, etc.

Besides, another advantage that gamers will surely appreciate is the ability of the dual monitor setup to embrace immersive gameplay. All this time, leaving you with an extra monitor to cater to all your other needs.

Note: All the prices and offers in this article are subject to change, so be sure to check the official product page to get the latest deal. If the product or offer you’re looking for is no longer available, you can try to find it on its official manufacturer page or get another one from our list.

What are the best deals on dual monitors?

All these items have special prices.

However, before you settle on the dual monitor that you have always desired you should consider the following features:

  • Screen size
  • Computer connectivity
  • Mounts and adjustments
  • Bezels width

The above features will help you narrow down your choices from the wide array of products that are on sale. With the amazing Cyber Monday deals available on Amazon you might end up being spoilt for choice.

We made sure to include a variety of offers found by researching the subject in-depth, so we hope that you will find the perfect fit for your circumstances.

Which of the above-listed products did you settle on? We’d love to hear from you. Share your thoughts with us in the comment section below.

The Xbox Black Friday Sale features hundreds of games at huge discounts

Black Friday is just around the corner, and Xbox gamers aren’t being left out of the great deals going on for this year’s Black Friday event. Xbox is having a huge sale with literally hundreds of games available at big discounts. So there has never been a better time to grab those games you’ve always wanted at awesome prices. There is way too much for us to go into here, so let’s just check out some of the highlights of the Xbox Black Friday Sale.

  • Deathloop: 67% off at $19.79
  • Assassin’s Creed: Valhalla: Deluxe Edition: 67% off at $26.39
  • Red Dead Redemption 2: 67% off at $19.79
  • Sekiro: Shadows Die Twice—GOTY Edition: 50% off at $29.99
  • Far Cry 6 Game of the Year Edition: 50% off at $59.99
  • Cyberpunk 2077: 50% $29.99
  • Borderlands 3: 75% off at $14.99
  • Skyrim Anniversary Edition + Fallout 4 G.O.T.Y. Bundle: 60% off at $31.99
  • Resident Evil Village: 25% off at $29.99
  • Soul Calibur 6: 85% off at $8.99
  • The Crew 2: Gold Edition: 80% off at $17.99
  • The Elder Scrolls Online: 70% off at $5.99
  • The Witcher 3: Wild Hunt—Game of the Year Edition: 80% off at $9.99
  • Tiny Tina’s Wonderlands: 50% off at $29.99

Xbox Black Friday

As stated, the above is just a few of the highlights from the massive Xbox Black Friday Sale. there are hundreds more games at huge discounts like the ones above, from some of the hottest franchises in gaming. And there are plenty of classic titles included in the sale, too, as well as great deals on DLC. These Black Friday deals are available through November 29th, so be sure to grab them up while they last.

And you may recall that the Xbox Series S is available for $50 off the standard retail price of $299.99 for the Black Friday season.

Xbox Series S
Xbox Series S
Developer:
Unknown
Price:
$299.99

You really can’t get much better than that for next gen gaming! Check out that awesome deal on the Microsoft Store.


The UK’s CMA investigation into cloud gaming and browsers could be an opening for Microsoft

A new investigation into cloud gaming and browser support for UK consumers may favor Microsoft’s plan to open up a competing mobile gaming app platform, if it can get close its Activision Blizzard deal.

According to a press release from Gov.UK, “The CMA has launched a market investigation into cloud gaming and mobile browsers after receiving widespread support for its proposals first published in June.”

The investigation into how pivotal a role browsers will play in the proliferation of mobile gaming comes on the heels of a Mobile Ecosystem Market Study report that’s eyeing the Google and Apple duopoly in mobile ecosystems as a potential consumer harm in the future.

Responses to the consultation, which have been published today, reveal substantial support for a fuller investigation into the way that Apple and Google dominate the mobile browser market and how Apple restricts cloud gaming through its App Store. Many of those came from browser vendors, web developers, and cloud gaming service providers who say that the status quo is harming their businesses, holding back innovation, and adding unnecessary costs.

Specifically, the CMA is looking into how Google may or may not be violating existing competition laws with how it handles in-app payments for certain digital goods by users. Apple will also face scrutiny as the CMA crowdsources data points from developers who can speak to engine preferences for browsers, Apple’s “underinvestment in its browser technology,” and stagnation in web app support.

Enter Microsoft, who has made reference to an attempt to leverage its bid for Activision Blizzard as a way to offer its own mobile gaming alternative to Apple and Google’s app store duopoly.

Per Microsoft’s own filings with the UK’s Competiton & Markets Authority, “Building on Activision Blizzard’s existing communities of gamers, Xbox will seek to scale the Xbox Store to mobile, attracting gamers to a new Xbox Mobile Platform. Shifting consumers away from the Google Play Store and App Store on mobile devices will, however, require a major shift in consumer behavior. Microsoft hopes that by offering well-known and popular content, gamers will be more inclined to try something new.”

Presumably Microsoft will use titles such as Call of Duty Mobile, Candy Crush, Bubble Witch Saga, and more to lure users to its own 3rd party mobile game store.

Microsoft’s acquisition bid for Activision Blizzard is still being scrutinized by the EU, UK and Chinese regulatory authorities currently and isn’t expected to have a final conclusion until mid 2023, but if all goes according to the company’s plan, a web-based mobile gaming store could be viable alternative for gamers internationally.

Xbox and PlayStation cross-play comes to Rainbow Six Siege

The Rainbow Six Siege video game is finally set to get cross-play support for both Xbox and PlayStation players next month in its latest update on December 6th.

Once live, the new cross-play feature will essentially merge the Xbox and PlayStation playerbases in matches, increasing the number of players on individual servers significantly. Player progression will also sync between all platforms via connected Ubisoft Connect accounts which should allow those who own both a PlayStation and Xbox console to alternate between consoles, Windows PC, and cloud devices without losing progress or stats.

A chart detailing exactly what kind of information will sync between platforms has been published on the Ubisoft website.

Rainbow Six Siege is available on the last gen Xbox One and PlayStation 4 consoles and the current-gen Xbox Series X and PlayStation 5 console families. Depending on how you look at it, this could be interpreted as cross-play being added to four console platforms.

Unfortunately, while cross-progression for player data is across the board, cross-play between Xbox and PlayStation and the cloud streaming and Windows PC versions of the game will not be supported. At least for now.

To clarify, cross-platform will allow the saving of data across all platforms. Cross-play will allow Xbox and PlayStation players to play together in console matches while Windows PC and cloud players can play together.

Rainbow Six Siege launched on Xbox One consoles way back in late-2015. While the Xbox One version was playable on Xbox Series X consoles, a native current-gen version of Rainbow Six Siege eventually launched in late-2020 that added a variety of visual and gameplay improvements to take advantage of the modern hardware.