9 Ways to Fix the Paradox Launcher when It’s Not Working

Is Paradox Launcher not working on your computer? If yes, we have the solutions to fix the most common PDX Launcher issues. This article will describe them one by one.

This game launcher is required to play some specific games from Paradox Interactive. It doesn’t matter from where you have purchased such titles; you will need PDX Launcher to run them. If you are interested, you can read the Paradox Launcher review.

The problem begins when you face issues while opening or using the Paradox Launcher. Don’t worry. After doing some analysis, we have found some of the most common problems with this application.

This article contains the most effective solutions for each of these problems.

Why is Paradox Launcher not working?

PDX Launcher may not work correctly for various reasons. It includes the following:

  • Active background process running a different version of this launcher: Such processes often conflict with the launcher, so check for these and terminate the process.
  • Third-party service or application: Some third-party programs are found to prevent the Paradox Launcher from running.
  • Firewall or antivirus program: Your third-party antivirus or firewall or firewall could be blocking the attempts by Paradox Launcher.
  • Corrupted components: If the relevant files required to run the installer or the ones that provide the optimal environment are missing, you may encounter issues running the Paradox launcher.

How do I fix Paradox Launcher when it’s not working?

1. Paradox Launcher V2 installer is no longer responding

1.1 Exit a background process

  1. Press CTRL + Alt + Del on the keyboard and go to Task Manager.
  2. Click on the Paradox Launcher process and then click on End task.ending pdx launcher process task manager

1.2 Restart your PC

  1. Open the Start Menu.
  2. Click on the power icon and then choose Restart.restarting windows 11

1.3 Redownload the installer file

  1. Go to the PDX Launcher download page.downloading paradox launcher v2
  2. Download the correct installer.
  3. Try to install it again.

2. Paradox Launcher v2 not installing

2.1 Restart computer

A restart is a good way to fix common issues on a computer. To do this, do not hesitate to follow the steps of method 1.2.

2.2 Install in clean boot mode

  1. Open the Start Menu, type MSConfig and hit Enter.
  2. Go to the Services tab.
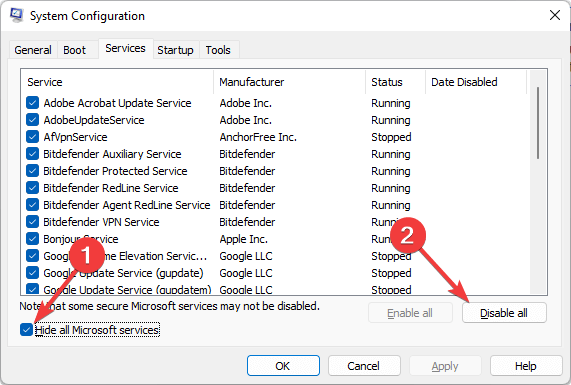
  3. Check Hide all Microsoft services and click on Disable all.disabling all services except microsoft services msconfig
  4. Click on Apply and OK.
  5. Restart your computer.
  6. Try to install the Paradox Launcher V2.

After installation, undo the changes you have made.

3. Paradox Launcher V2 not opening

3.1 Close any other active game/launcher

If you have games or other launchers running in the background, that may prevent Paradox Launcher from working properly. So, before opening this app, you should close any other game launchers and games.

3.2 End PDX Launcher-related background process

If there are existing background processes related to this launcher, you may have difficulties opening it. So, make sure no related services are actively running in the background.

To stop any services, follow the same steps as shown n method 1.1.

3.3 Uninstall any games that contain PDX Launcher built-in

  1. Open any game launchers like Steam.
  2. Right-click on the installed game and choose Uninstall.uninstalling game steam

If you have games on other platforms like Steam that have a PDX launcher built-in, keep in mind that that version of the launcher is different. However, if that has an active process in the background, the main PDX Launcher will show you various problems.

So, to fix Paradox Launcher not opening or working, you should uninstall these games.

4. Paradox Launcher V2 no longer responding

If the PDX Launcher is no longer responding, you should restart your computer and see if it helps. Also, consider opening it in the clean boot mode as shown in method 2.2 If necessary, you also can re-install the game with the latest version.

5. Paradox Launcher can’t find games

5.1 Sign out and sign in again

  1. Open the Paradox Launcher.
  2. Click on the My account.
  3. Choose Sign out.signing out paradox launcher
  4. Now, Sign in again.

5.2 Verify if the games are there on the web

  1. Go to this Paradox login page and sign in with your credentials.
  2. Now, in the Games tab, you should see all the games. If not, there is something wrong.paradox web my games

If you don’t see your games on the PDX web, it may be because you are using a different account. Try to check it. You can contact the Paradox Launcher support team if it is the same account.

5.3 Wait

Sometimes, newly purchased games may not appear in both the launcher app and the web. You may need to wait for 24 hours if the server is busy. So, keep patience and see what happens.

6. Paradox Launcher can’t update

6.1 Restart the application

If update-related problems appear on PDX Launcher, the first thing is to close the launcher. Then, open it again. Then, try to update and see if it helps.

6.2 Disable Firewall

  1. Open the Start Menu, search for Windows Security or Windows Defender Security and open it.
  2. Go to Firewall & network protection tab.going firewall network protection in Windows security app
  3. Go to Private network.
  4. Turn off the Firewall as shown in the screenshot.turning off Microsoft Defender Firewall Windows
  5. Go back and do the same for the Public network as well.

6.3 Re-install with the latest version

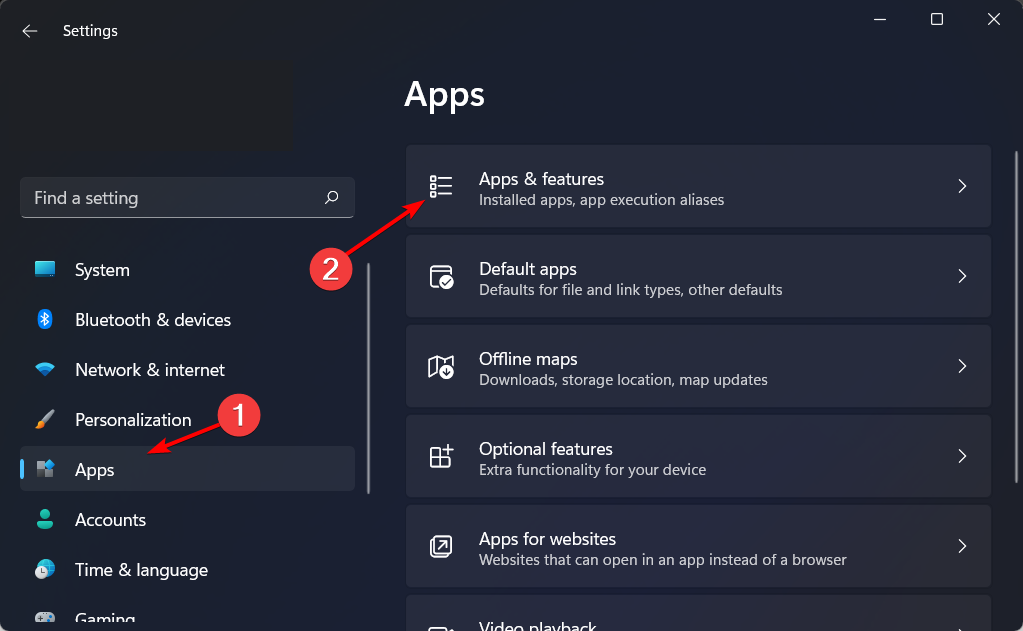
  1. Press Win + I to open the Windows Settings.
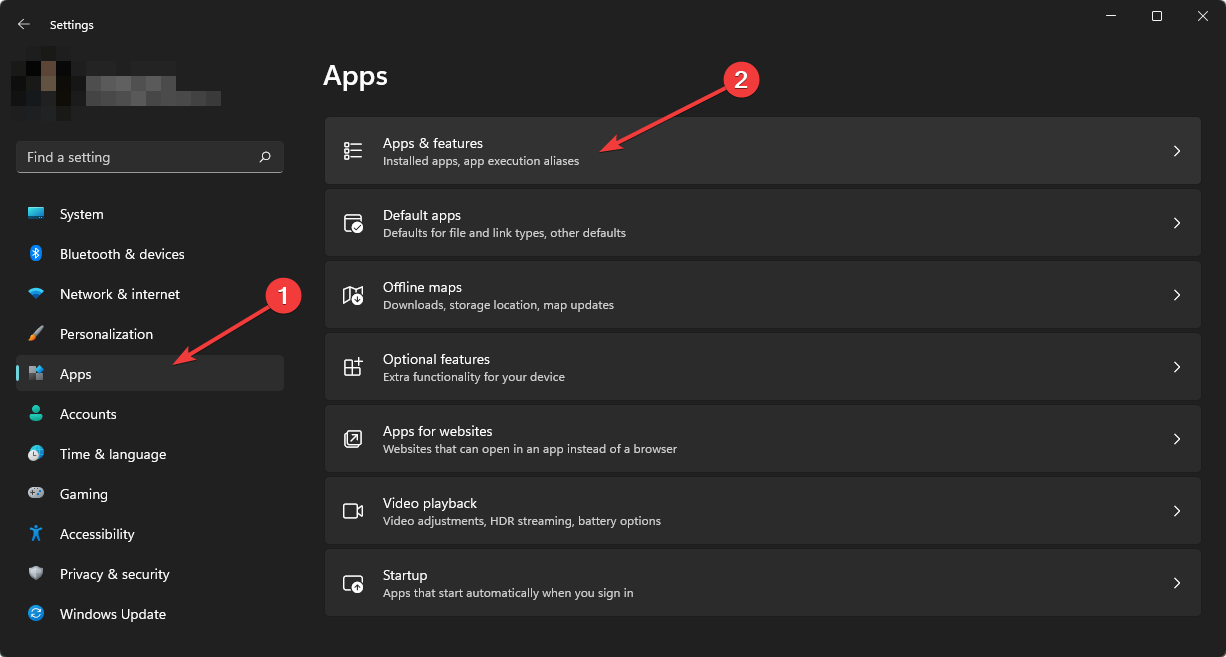
  2. Go to Apps and click on Apps & features.going apps & features Microsoft windows 11
  3. Search for the Paradox Launcher.
  4. Click on the three vertical dots and then choose Uninstall.uninstalling paradox launcher
  5. Now, download and install the latest PDX Launcher as shown in method 1.3.

To uninstall Paradox Launcher completely and remove any leftovers, we suggest you use CCleaner. It can do even more things like fixing the registry, removing temporary files, and boosting PC performance.

7. Paradox Launcher freezing

7.1 Update

  1. Open Paradox Launcher.
  2. Go to Settings.going paradox launcher settings
  3. The update should start automatically.
  4. After the process is done, click on Restart to finalize the update.

If you face a problem updating this app, you can follow the steps shown in method 2. Updating will fix any known bugs that will solve the freezing issue.

7.2 Try in clean boot mode

Often third-party services may interfere with the update process. So, trying to update in clean boot mode may help. For details, you can follow method 2.2

7.3 Re-install

If the problem persists, you can consider re-installing the launcher with the latest version.

8. Paradox Launcher update is being downloaded

This problem is similar to the problem mentioned in method 6. So, the steps shown in that method also apply to this problem. In addition, you can disable the Firewall.

9. Paradox launcher uncaught exception

If an uncaught exception occurs in Paradox Launcher, we suggest you re-install it with the latest version. However, make sure to uninstall any games installed with this launcher before proceeding.

How do I bypass Paradox Launcher?

If you want to play games on Steam or other platforms by not opening the Paradox Launcher, it is possible by following some technical steps.

To bypass Paradox Launcher, you need to follow specific steps for specific games. But, the first thing is to uninstall the PDX Launcher from your PC.

After that, you can browse the game folder, create a batch file, and input specific commands there. To such a file, you can create a new text file and change the file extension. For example, file.txt to file.bat.

The batch file name should match the game name for your convenience. This command may vary for different games. Usually, the command may be like the following:

game.bat %command%

You must replace the game.exe with the game file name like Cities.bat, Aftermath64.bat, etc.

Once you are done, you must integrate the batch file with Steam. The whole process may seem very complicated, but it’s not.

And, before you leave, check some quick tips and tricks to optimize Windows for gaming and get the best experience.

If you have any opinions, let us know in the comment box.
4 Ways to Fix Silhouette Studio keeps working/responding

You have found this article because Silhouette Studio is not responding. Sadly, you are not alone, as many users have reported that Silhouette Studio keeps freezing when they try to work with this software.

This issue can prevent you from fully accessing your projects and stop you from creating new ones. This can be highly frustrating, especially if you are pressured by a deadline.

For the reasons mentioned above, in this article, we will explore some of the best troubleshooting methods to deal with Silhouette Studio freezing while in use.

Additionally, the solutions below will help if Silhouette Studio keeps crashing in Windows 10 or 11, so read on.

Why does Silhouette Studio keep not responding?

Like any other app, Silhouette Studio can suffer from varying problems. A few triggers for Silhouette Studio not responding are incomplete installation, missing files, and compatibility issues.

There can also be the case of file corruption or simply that it wasn’t updated to the latest version for some reason.

Luckily, our guide below will tackle all the possible causes and provide you with the proper solutions to fix them.

If you face the error message Silhouette Studio has encountered an error and must quit, Silhouette Studio is stuck on processing, Silhouette Studio 4.4 problems, or Silhouette Studio crashing on startup; you will find these solutions helpful.

Please follow the steps presented in this article in the order that they were written to avoid any unnecessary complications.

How do I fix Silhouette Studio not responding?

1. Run Silhouette Studio in Compatibility mode

  1. Right-click on the Silhouette icon on your desktop and select Properties.
  2. Inside the properties window, click on the Compatibility tab.
  3. Select the box for the Run this program in compatibility mode for and click on Windows 7 from the drop-down menu.
  4. Click Apply and try rerunning Silhouette.

If Silhouette Studio is not working on Windows 10, running it in Compatibility mode should do the trick and make the app run again.

This solution can also be helpful if Silhouette Studio is running slow, although there are many other possible causes for that problem.

2. Update to the latest version of Silhouette Studio

  1. Visit the official Silhouette Studio website
  2. Click on the Download Silhouette Studio button.
  3. Run and follow the on-screen instructions to install the software on your PC.
  4. Run Silhouette and see if the app keeps freezing.

Normally, Silhouette Studio should automatically download new updates, so you don’t need to do this manually, as we explained above.

However, this solution will work even if it doesn’t do that.

3. Clear Silhouette Studio preferences

  1. Make sure that Silhouette Studio is closed.
  2. Press the Windows + R keys on your keyboard.
  3. In the Run window, type in %appdata% and press Enter or click OK.
  4. Search for the folder named com.aspexsoftware.Silhouette_Studio, and delete it, including all subfolders.
  5. Empty Recycle Bin.
  6. Try to see if the issue persists by opening Silhouette Studio again.

This solution is also great if Silhouette Studio won’t open, so follow the easy steps above to finish it in no time.

4. Restore your Silhouette Studio to factory settings

Note icon NOTE
Note: Please make sure to back up your library and files to an external drive before attempting this, as this option will delete all the data you stored.
  1. Open Silhouette Studio.
  2. Inside the Edit menu, select Preferences.
  3. In the options window, select Advanced.
  4. Click on the Restore Factory Defaults button and confirm your choice.
  5. Check to see if the issue persists after this process is completed.

Why won’t my Silhouette studio open on my computer?

If you can not get the program to open on your computer, the Program file may be corrupted. You may have to get a fresh copy and reinstall it. Alternatively, you may run an SFC scan on the command prompt.

Also, you may have too many programs already running on your computer. This will make your computer very slow or responsive. It would help if you waited for it to start responding; then, you must shut down some programs or force-end them from the Task Manager.

Furthermore, there are situations when a program won’t launch because a previous instance is still active and improperly exited in the background.

How to fix Silhouette Studio issues on Windows 11?

Luckily, all the solutions we applied for Windows 10 above will also work on the new OS. Therefore, the software looks the same, and you will find that the menus are identical.

The only differences will appear in the design of the windows but not in their placement or location so that you will find them easily.

The only notable distinction is the File Explorer, which you will need to use in Solution 3 from this guide, and it looks a bit different.

How to set up the auto-update option in Silhouette Studio?

  1. Click on Edit from the top menu and select Preferences.
  2. Navigate to the Updates tab.
  3. Click on the Check for Updates tab and set it to Daily from the list of options.
  4. Now hit the Apply and OK buttons to confirm the setting.

If the update recurrence was set to Never, that most likely means you are running an old version that obviously can cause all sorts of issues.

As we’ve mentioned, the app has a built-in auto-update feature, but if that is not working, you may be stuck with an old version that can cause problems.

That’s why we need to ensure that the function works correctly, and we’ve shown you how to do that.

This article explored some of the best troubleshooting methods for dealing with Silhouette Studio not responding. Furthermore, the solutions should work for freezing, crashing, and not opening issues.

We hope our solutions helped you fix the app, and now you are running it on Windows 10 or Windows 11 seamlessly.

Also, we hope you follow the guide from the first solution since we have prepared them according to what should be most effective.

Lastly, please let us know if this guide worked for you by using the comment section found below this article.

Microsoft Cloud could reach $100 Billion annual revenues this year

Our friends over at Cloud Wars recently posted an interesting prediction about Microsoft’s cloud growth in 2022 with the belief it could “top $100 billion,” by the end of the year.

During its earnings call last quarter, Microsoft missed its own lofty projections of revenue growth by a hair, and while most investors still seemed relatively pleased with the net results, other bullish ones were quick to point out the slowing growth the company’s cloud division was experiencing year over year.

The cloud services market hasn’t reached saturation just yet, but competition is calcifying among a handful of known players that includes AWS, Google, Microsoft, Oracle, and IBM, and the range between unincumbered competitor growth is shrinking.

The folks over at Cloud Wars monitor the minutia of the cloud industry and believe that Microsoft could finish the calendar year of 2022 with a 25% larger cloud business than its next closest rival Amazon.

Before the pedantic crowd starts crowing, Amazon is still the largest cloud services provider in the sector. Author Bob Evans, is distinguishing the company’s predicted growth between calendar year and fiscal year for Microsoft which normally runs from July 1 and ends June 30.

Evans lays out a simple and feasible plan that could lead Microsoft to a $100 billion plus year with the following:

  • For the quarter ended March 31 (Microsoft’s FY22 Q3), its cloud revenue was $23.4 billion, up 32%; and

  • For the quarter ended June 30 (FY22 Q4), cloud revenue was $25 billion, up 28%.

That adds up to $48.4 billion for the first half of calendar 2022, meaning Microsoft has to generate second-half cloud revenue of $51.6 billion to reach $100 billion for the year. That’s an average of $25.8 billion per quarter. While it would be foolish to say that achieving such volume is in the bag, I do not recall Microsoft’s cloud revenue going down in sequential quarters for the past handful of years. So, the fact that Microsoft hit $25 billion in the second calendar quarter means it has a very good chance of bumping that up to at least $25.8 billion in each of the next two quarters.

As mentioned, Cloud Wars does keep a meticulous eye on the cloud sector and Evans backs up his claims with additional details outlined in seven primary factors that have already leading to revenue growth by Microsoft’s cloud services that include an expanding product line, aggressive end-to-end security solutions, commitments to low-code/no-code developer tools, existing and future multi-year and multi-billion dollar contracts and growing collaborative and customer-centric ethos at the company.

There is still plenty of room for cloud services growth in the general market, but with its relatively late start, the revenue gains Microsoft continues to clock quarter over quarter is still fairly impressive and bodes well for the company’s diversified product portfolio.

3 Ways to Fix the Kindle PC App When it’s Not Syncing

Many reported that the Kindle PC app is not syncing for them, and that can be a problem since you won’t be able to access your books or continue where you left off.

Luckily, a couple of solutions might be able to help you with this problem, so be sure to keep reading.

Why is my Kindle not syncing with my computer?

Firstly, Kindle can’t sync books that aren’t purchased from Amazon, so if you try to do that, the sync feature won’t work. Also, you can sync collections that you made on your PC.

Other issues can be related to temporary glitches with the sync feature.

What can I do if the Kindle PC app is not syncing?

1. Sync manually

  1. Close the book that you’re reading.
  2. Next, click on Sync. Do that while on Wi-Fi.
  3. Switch to the device that you want to sync to and make sure you’re connected to Wi-Fi.
  4. Tap on Sync.
  5. Open the book and you should be able to continue where you left off.

Sometimes you will have to use Sync feature several times in order for it to work properly.

2. Use the Send to Kindle option

  1. Visit the Send to Kindle page.
  2. Log in to use the web form or select your platform from the side.
  3. Follow the instructions on the screen to complete the process.

3. Activate Whispersync

  1. Open the Kindle app and select Tools located at the top of the bar.
  2. Select Manage Your Content and Devices in the context menu that appears.
  3. Sign into your Amazon account if asked on the web browser.
  4. Select Preferences at the top bar.
  5. Scroll down until you see Device Synchronization (Whispersync Settings).
  6. Click the arrow on the far right side.
  7. You will a button for Whispersync Device Synchronization. Turn the feature on if it was off.
  8. Close the browser and return to the Kindle app. It should be synchronized at this point.

Why is my Kindle app not syncing to the furthest page read?

There are several reasons for this, most likely temporary sync glitches. If Whispersync isn’t enabled, you can also experience this issue.

If the Kindle PC app is not syncing, ensure you’re trying to sync only content you’ve bought from Amazon. Also, don’t forget that collections can’t be synced. In most cases, these problems can be fixed with manual sync.

To prevent these issues, it’s also advised to update the Kindle app on Windows. Sadly, this isn’t the only issue you can encounter, and many reported that the Kindle app is not working at all.

Feel free to leave a comment below if you have any questions regarding the above process. Also, do not hesitate to comment about guides you’d like to see or information about any other app on whichever platform.

How to quickly check if you have eSIM support on Windows 10 and Windows 11

An eSIM allows you to connect to the internet using a cellular data connection. An eSIM profile is the software you must download to your device to access the carrier’s mobile network.

But eSIM profiles and eSIMs are not new technologies, Windows 10 (and Windows 11) has had eSIM support for quite some time.

In this guide, we will show you how to check if you Windows PC has an eSIM in it to use to connect to the internet when the Wi-Fi is poor.

Does my device have eSIM support?

If you want to see if your device has eSIM, here’s what you need to do.

1. Open Settings
2. Go to Network & internet > Cellular

3a. On Windows 10 (Version 1703 or later): Under Cellular, if you see a Manage eSIM profiles setting, then your PC has an eSIM.

3b. On Windows 11: Under Cellular, look for the Use this SIM for cellular data with a dropdown menu. Click the dropdown menu to see if an eSIM is an option; eSIM may also be labeled as SIM 1 or SIM 2.

esim

Some devices, like the Lenovo ThinkPad x13s support both an eSIM and using a physical SIM card. If you missed it, here’s our review of the best Windows on ARM laptop in ages.

Some people may be wondering if their device has eSIM support on their device, but you can also check cellular settings in Windows. Another clear indication that your device doesn’t have eSIM support is that you don’t even have a “Cellular” option available in Settings.

Windows 11 Remote Assistance: How to Enable & Use

Remote Assistance for Windows is a feature that enables users to request assistance from other users when they’re having trouble with their computers. 

It can help fix problems or assist when a user needs to perform a task on another computer. On the recipient’s side, they only need to accept your help. Remote assistance is enabled by default, but it’s easy to turn off if you don’t need it.

Quick Assist and Remote Assistance are similar Windows features that can help you troubleshoot a PC or get support from someone else. They all use the RDP protocol so it would help if you enable Remote Desktop.

How do I send a remote assistance invitation in Windows 11? 

You can send an invitation to someone you want to help you with your computer. They will receive a link that allows them to connect via the Remote Assistance tool.

To do so, follow the steps below:

  1. Hit the Windows + R keys simultaneously to open the Run command.
  2. Type in msra in the dialog box and press Enter.
  3. Select Invite someone you trust to help you.
  4. Click on Use e-mail to send an invitation.
  5. The other party will receive an email invitation to join.

How do I enable or disable Windows Remote Assistance? 

    1. Enable or disable Windows Remote Assistance via Run

    The first recommended method to try out if you want to manage Windows Remote Assistance is to access it through the Run feature. It is built-in on your Windows device and safe to use.rnrnThrough a simple command inserted in the Run dialog, you can allow or prevent Remote Assistance connections to your PC.

  1. 1. Hit theu003cspanu003e u003c/spanu003eu003ckbdu003eWindowsu003c/kbdu003eu003cspanu003e u003c/spanu003e+u003cspanu003e u003c/spanu003eu003ckbdu003eRu003c/kbdu003eu003cspanu003e u003c/spanu003ekeys simultaneously to open theu003cspanu003e u003c/spanu003eu003cstrongu003eRunu003c/strongu003eu003cspanu003e u003c/spanu003ecommand.

  2. 2. u003cspanu003eType u003c/spanu003eu003cemu003eSystemPropertiesAdvancedu003c/emu003eu003cspanu003e in the dialog box then press u003c/spanu003eu003ckbdu003eEnteru003c/kbdu003eu003cspanu003e or click on u003cstrongu003eOKu003c/strongu003e.u003c/spanu003e

    systempropertiesadvanced command in run
  3. 3. u003cspanu003eNavigate to the u003c/spanu003eu003cstrongu003eRemoteu003cspanu003e u003c/spanu003eu003c/strongu003eu003cspanu003etab.u003c/spanu003e

    navigate to the remote tab
  4. 4. u003cspanu003eUnder u003c/spanu003eu003cemu003eRemote Assistanceu003c/emu003eu003cspanu003e, you can choose whether you want to enable or disable this feature on your Windows PC.u003c/spanu003ernrnu003cspanu003eCheck u003c/spanu003eu003cstrongu003eAllow Remote Assistance Connections to this computeru003c/strongu003eu003cspanu003e to enable the setting.u003c/spanu003e

    enable or disable remote assistance windows
  5. 5. Uu003cspanu003encheck it to disable Remote Assistance.u003c/spanu003e

  6. 6. u003cspanu003eAfter you make your selection, pressu003c/spanu003eu003cemu003eu003cspanu003e u003c/spanu003eApplyu003c/emu003eu003cspanu003e and u003c/spanu003eu003cstrongu003eOKu003c/strongu003eu003cspanu003e to save the changes.u003c/spanu003e

2. Use Control Panel to manage Remote Assistance settings

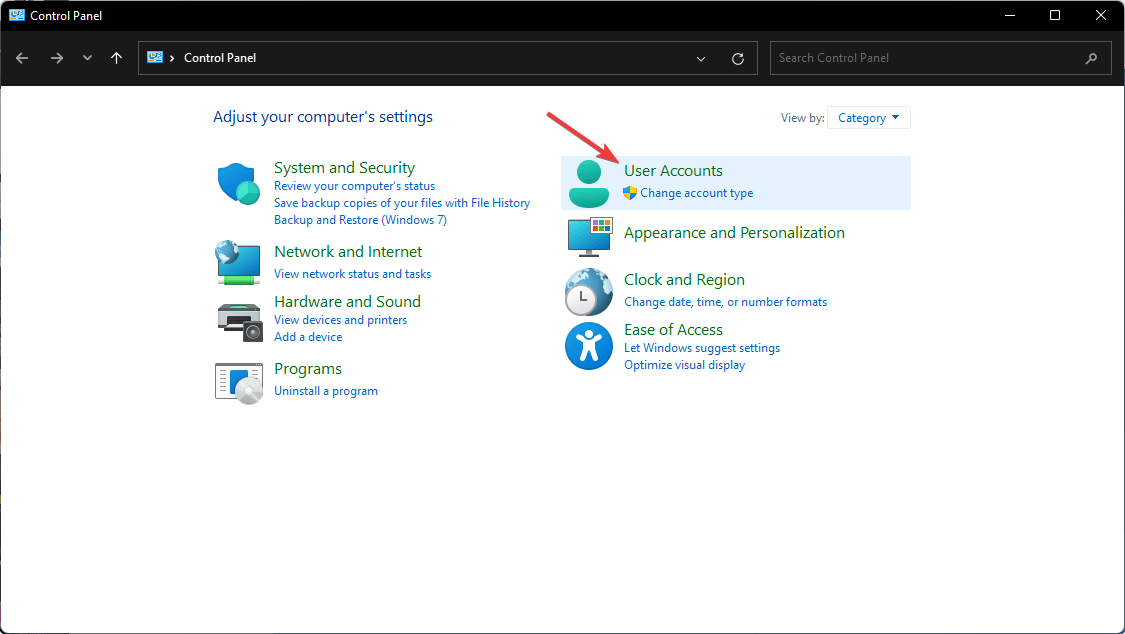
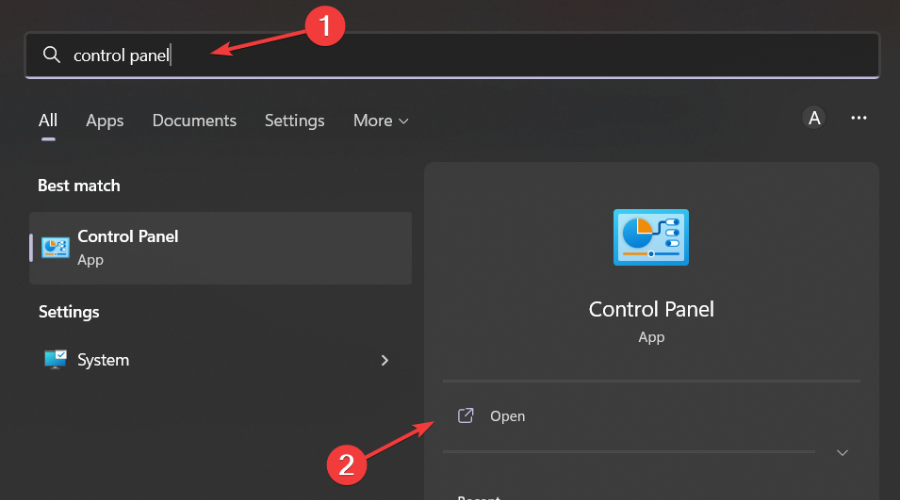
  1. Hit the Windows key, type in Control Panel in the search bar and click Open.control panel
  2. Navigate to System and Security.windows firewall
  3. Click on Allow remote access.
  4. Navigate to the Remote tab.
  5. Under Remote Assistance, check Allow Remote Assistance Connections to this computer to enable and uncheck to disable then press Apply and OK to save changes.

3. Tweak the Registry to allow or prevent Remote Assistance connections

  1. Hit the Windows + R keys simultaneously to open the Run command.
  2. Type regedit in the dialog box then hit Enter.
  3. Navigate to the following location: HKEY_LOCAL_MACHINESYSTEMCurrentControlSetControlRemote Assistance
  4. Double click on fAllowToGetHelp to edit the DWORD and change its Value Data to 1 to enable and 0 to disable.

What is the difference between Remote Assistance and Remote Desktop? 

Remote assistance is a feature that allows you to share your screen with another person so they can assist you in troubleshooting a problem. It is a feature included in Windows that allows another user to view your screen and control your mouse and keyboard. 

Windows 11 Remote Assistance uses the Remote Desktop Protocol (RDP) to connect to the remote computer. This feature can be useful when troubleshooting problems with your PC or helping users navigate around Windows.

Remote Desktop is another technology that allows you to connect to a computer remotely. However, with Remote Desktop, you have complete access to the remote system, including full access to all files and programs on that system.

Windows 11 has a built-in Remote Desktop, but if you prefer more features and functionality, you can install Remote Desktop software.

Remember, when using RDP connections, your IP address is exposed to cyber criminals, and your system could be vulnerable to attacks if you have a weak password. It is essential to use a VPN with Remote Desktop to secure your connection and mask your identity.

You will also need an efficient antivirus program if you frequently use Remote Desktop and Remote Assistance.

If you need a simpler tool, we have a guide on how to download Quick Assist, so don’t hesitate to use it. Keep in mind that Quick Assist is not working properly for some users, but we have a guide that can help you address that.

Let us know your experience with Remote Assistance if you have used it in the comment section below.

5 Ways to Fix the Canon Printer won’t Scan in Windows 10/11

Some of our readers told us that their all-in-one Canon printers don’t scan after they upgrade to Windows 10.

One of the readers said that when he accesses the scan preview, it works fine, but when he clicks the Scan button, the scanner gets to 28% of the process and stops.

If your Canon printer & scanner don’t scan after upgrading to Windows 10, these resolutions might fix it.

How to fix Canon printer scanning issues?

1. Check the scanner’s Windows 10 compatibility

A Canon all-in-one printer and scanner won’t work if it’s not compatible with your platform.

If you’ve never done any scanning with the Canon scanner in Windows 10 before, check the printer’s compatibility with the platform.

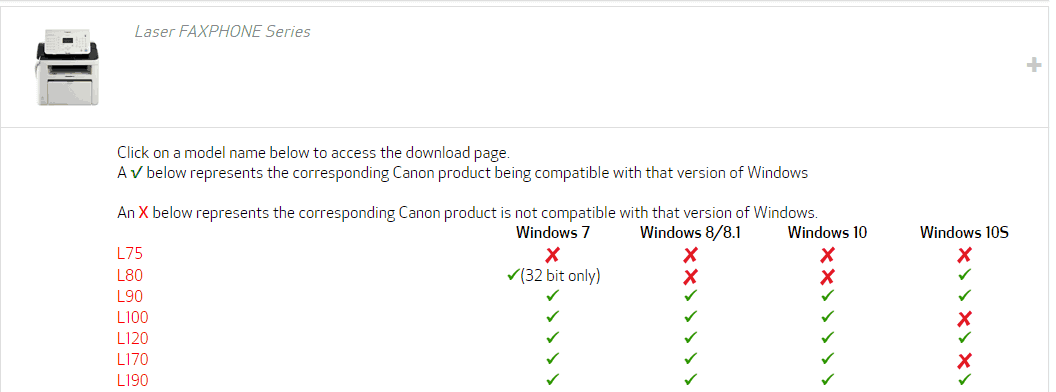
You can check Windows 10 compatibility for a range of Canon printers and scanners on this page. There you can click your printer’s series to expand its list of models as in the snapshot directly below.

Note that the model lists include Windows 10 and Windows 10 S columns. Canon printer models are generally compatible with Windows 10 but not Windows 10 S.

Thus, some Windows 10 S users might need to switch to an alternative Windows 10 edition to scan with Canon printers.

2. Use the Printer troubleshooter

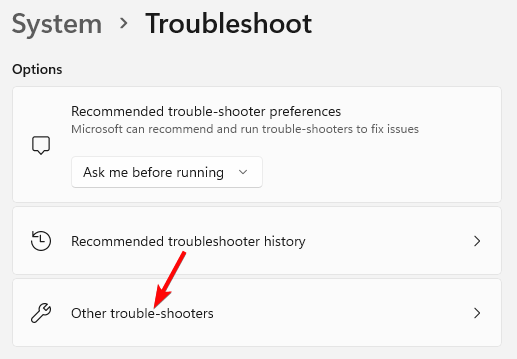
  1. Click the Start button type troubleshooter and click on Troubleshoot settings.
  2. Now, select Aditional troubleshooters.
  3. Select Printer and click on Run the troubleshooter.
  4. Follow the instructions on the screen to fix any printer and scanner issues.

Windows includes the Printer troubleshooter that might fix an all-in-one Canon printer that isn’t scanning.

3. Update the printer driver

Canon users have also confirmed that driver updates for their devices fixed mid-scan hangs. So, updating the driver for your Canon printer/scanner might also get it scanning.

We have a comprehensive guide on how to update the drivers on Windows 10 and 11 that provides further details for updating device drivers. Besides, we have a dedicated guide for the Canon MF3010 driver.

You can also quickly update drivers with the Canon Drivers Update utility. Click Download on this webpage and open the utility’s installer to add the software to Windows.

Then open the utility’s window and press the Start Scan button. The utility will list outdated Cannon drivers and the most updated ones, which you can then install by clicking Install.

Tip icon Tip
You can also choose and use an automatic solution. This can ease and finish the process successfully.
Outbyte Driver Updater is a specialized tool that scans your PC and provides you with a thorough report of your drivers. After that, it offers the latest updates for your drivers and keeps them updated constantly.
⇒ Get Outbyte Driver Updater

4. Select the Power Saver option

  1. Enter power saver in the Windows Search box and select Choose a power plan.
  2. Then you can select the Power saver option. Alternatively, you might also find the printer scans when you unplug your laptop.

Some users (with laptops) have fixed Canon printers that hang when scanning by selecting the Power saver option in Windows 10.

5. Scan documents with the MF Toolbox 4.9

  1. Download Canon MF Toolbox 4.9, unarchive it, and double-click its executable file to install.
  2. After finishing the installation, right-click its exe file or desktop shortcut and select Properties to open the window shown directly below.
  3. Select the Compatibility tab, then slick the Run this program in compatibility mode for check box.
  4. Select Windows 8 from the platform drop-down menu.
  5. Press the Apply button to confirm the new settings, and then click OK to close the window.
  6. Then open the MF Toolbox toolbar and click Scan-1 to scan.

The MF Toolbox 4.9 is a Canon alternative to the Windows Fax and Scan utility.

Some Canon printer users have stated in forums that their printers scanned when they utilized MF Toolbox 4.9 instead of Windows Fax and Scan.

So, that’s how you can fix an all-in-one Canon printer that doesn’t scan. Canon PIXMA MP160 users can also check this article for further scanner fixes.

We also do recommend trying some manipulation to be sure the problem is fixed. You can also try to use scanner software in order to maximize the tests.

Don’t hesitate to use the comments section below for any questions or other suggestions to fix the problem.

Get started with Microsoft Launcher – Supercharge your Android Phone

Launchers essentially let you change how Android feels on the phone without needing to root or go through complex settings. Today we take a closer look at Microsoft Launcher, focused on productivity and integration with their other products.

Get Started with Microsoft Launcher

Immediately after installing Microsoft Launcher, the wallpaper menu greets us. You can either keep it default or go with the Bing wallpapers. Select the latter and get new wallpapers delivered daily to your phone.

Afterward comes the login through a Microsoft account, which is optional but would be good to sync every service. Sign in and synchronize calendars, sticky notes, etc., across all your Microsoft-based devices, primarily focusing on Windows.

What stands outs

Let us shed some light on a few of the Microsoft launcher’s features that stand out.

  1. Universal Search

    Swipe down, and the search bar appears along with the keyboard on the screen. You will find this feature on Xiaomi’s MIUI and some iterations of the ColorOS by Oppo. It lets you use the smartphone with a single hand.

    This comes in handy when phone displays keep getting bigger and becoming difficult to use with one hand. The search is faster than the Google search widget on our tested phones.

    Universal search in MS launcher

    The search displays result from web search, apps, settings, sticky notes, contacts, calendar, launcher, and system settings. Toggle the filters to show results from specific categories. Like Google lens, you can search for objects through the photo search button powered by Bing. 

    Tap on web results, and it will search in the preferred browser through the selected search engine. It is set to Bing by default but can be changed to one of the dozen options and includes Google, Baidu, DuckDuckGo, etc.

  2. Productivity Panel

    Microsoft offers a customized feed when you swipe right from the left side of the screen. It houses glance with customizable panels and a personalized news feed. The Glance feed contains sticky notes, calendars, to-do lists, documents from OneDrive, and the most used apps. 

    Sticky notes have seamless synchronization across all Microsoft devices. Jot down something important on your Windows PC, and later go out, access it by swiping right on the phone’s home screen.

    You can shuffle between calendars from Google, Outlook, Microsoft 365, and the phone’s default variant. Make sure to select the correct email account for adding an event, reminder, or task to the calendar. 

    Calendar in MS Launcher

    The screen time app in the panel stands out. It takes data directly from Digital Wellbeing and briefly shows all the stats on the panel. Tap to find more information, such as average time between screen unlock, daily usage pattern, and other stats. Screen time has a widget that you can anywhere on the home screen.

    Screentime Widet

  3. Pin Searches

    Do you frequent search engines to search for particular things? It can be upcoming dates for an event, the status of a flight booked last month, or anything found only through an internet search.

    Pinned Search in MS Launcher

    Pin these frequent search terms to the launcher box and tap them to perform the search in the preferred browser. Tap on the upward arrow to turn on search engine suggestions and select one to open them in the browser.

  4. One Tap Wallpaper Change

    Looking at the same wallpaper every day becomes monotonous and boring. We change them through settings or via a third-party app. Do one better through a single tap on the launcher’s widget button and change it instantly.

    Wallpaper widget

    All the wallpapers are sourced from Bing’s endless photos library, and you can select from the set of a dozen, refreshed daily. It changes both the home screen and lock screen simultaneously.

What could be better

Everything looks good but there is always room for improvement. Here is how Microsoft launcher can get even better.

  1. Pinned Apps

    The frequently used app is a good touch but sometimes feels inadequate. There are a few apps, such as authenticator, and password managers, while essential but used occasionally. Just like searches, the launcher could use pinned apps as the home screen gets crowded over time.

  2. Dark mode can be improved

    We tried the launcher on three phones, one budget, one mid-range, and a flagship. Two of them had text visibility issues in dark mode, which could be solved by tweaking. Dark mode users are growing, and Microsoft should address this minor issue as a priority.


You can now collaborate in Microsoft Teams meetings with Excel Live

Earlier this year, during Microsoft Inspire 2022, Microsoft launched Excel Live, a feature that lets Microsoft Teams meeting attendees collaborate on Excel workbooks in real time. With this feature in place, the user will no longer need to share their screen during meetings which at times disrupts the orientation.

With Excel Live now generally available, Teams users will now be able to collaborate on Excel files directly within the meeting window as it supports Sheet Views. “The workbook loads for each participant at the optimized zoom level with flexibility to adjust zoom based on their preferences”.

However, Excel Live comes with three known limitations. First up, the feature can only be used in meetings with up to 25 attendees and they must all come from the same organization. Secondly, recordings can only be made in audio format, you cannot make Excel Live meeting video recordings. And finally, Web support to start sharing will work only in Public Preview, it will not be available for general release.

To access the feature, launch Microsoft Teams and join the meeting, select the Share option, then head on over to the Excel Live section. From this point, select the spreadsheet you want to share with meeting attendees. And finally, click on the Share button to share the spreadsheet. You will however need to have full sharing permissions.

In other related news, Microsoft launched Teams Rooms Pro which is designed to provide an integrated experience and bridge the gap between physical and digital workspaces. Microsoft Teams will soon let users view the entire chat thread in search results.

Microsoft Viva Engage’s Storyline feature reaches general availability

During Inspire 2022, Microsoft Viva expanded with a new Engage module designed to build community and connections. The module also featured Storyline and Stories, both integral parts of the platform, in place to help users express themselves and inform people more about themselves.

Microsoft has announced that the Storyline feature is now widely available across Teams, Outlook, Yammer, and Microsoft Viva. With this feature, communication is enhanced across your organization, in that both employers and employees get to share real-time updates and experiences.

To access the feature, admins will have to enable it by choosing the Manage storyline option either on Yammer.com or the Viva Engage app. Then, internal users will gain access to the feature, allowing them to see, react, and respond to others’ storyline posts. However, guest users will not have access to Storyline. As for the Stories feature, it is also set to reach public preview soon.

Best Ethernet Settings For Gaming: Get Fast Speed and Low Ping

In this guide we’ll show you the best Ethernet settings so you no longer have to deal with constant lagging when you play games online. Even if you don’t have the best gaming PC or the fastest network, you can optimize what you have.

How do I optimize my Ethernet settings for gaming?

1. Disable IPv6

  1. Right-click on the network icon on your taskbar.
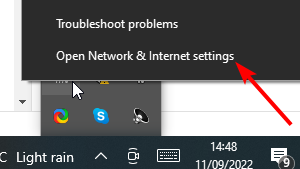
  2. Select Open Network & Internet settings.
    open network settings best ethernet settings for gaming
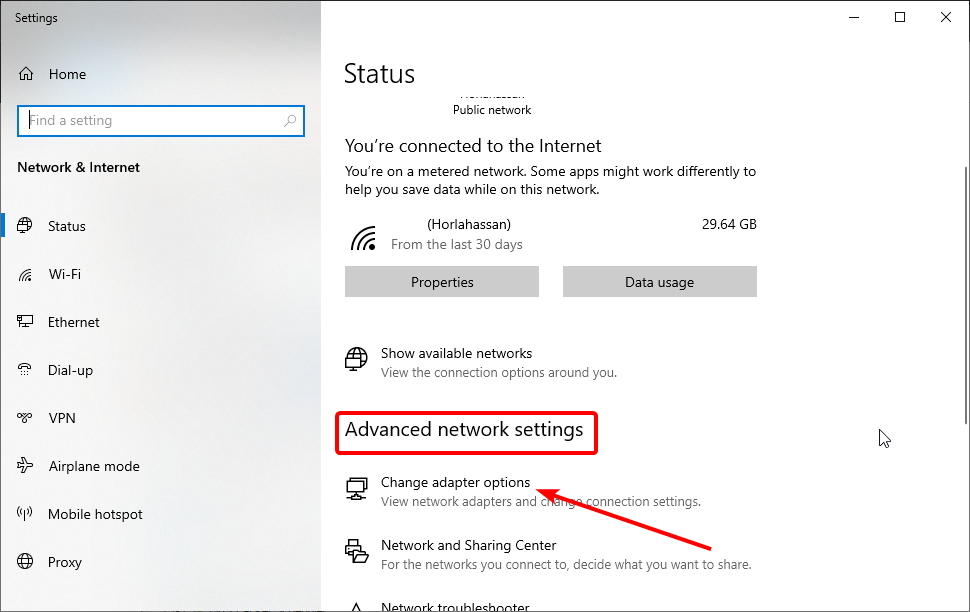
  3. Click on Change adapter options under the Advanced network settings section.
    change adapter
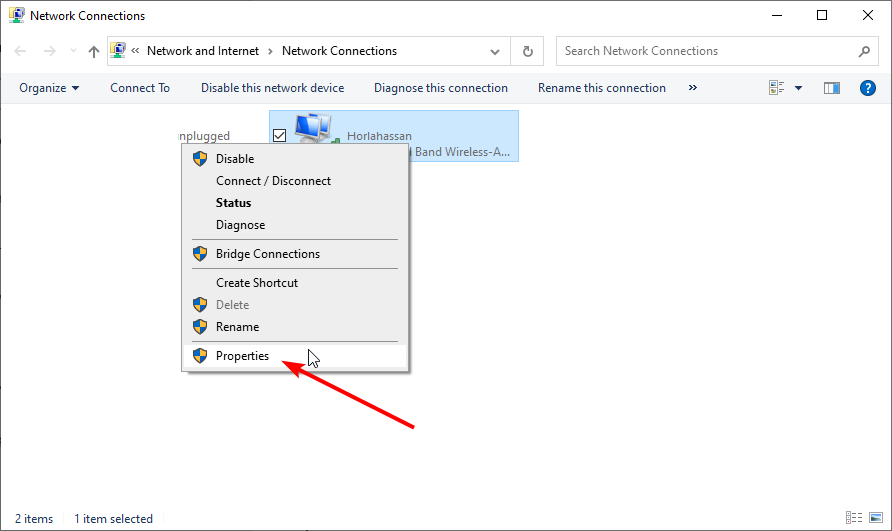
  4. Right-click on your Ethernet connection and select Properties.
    properties
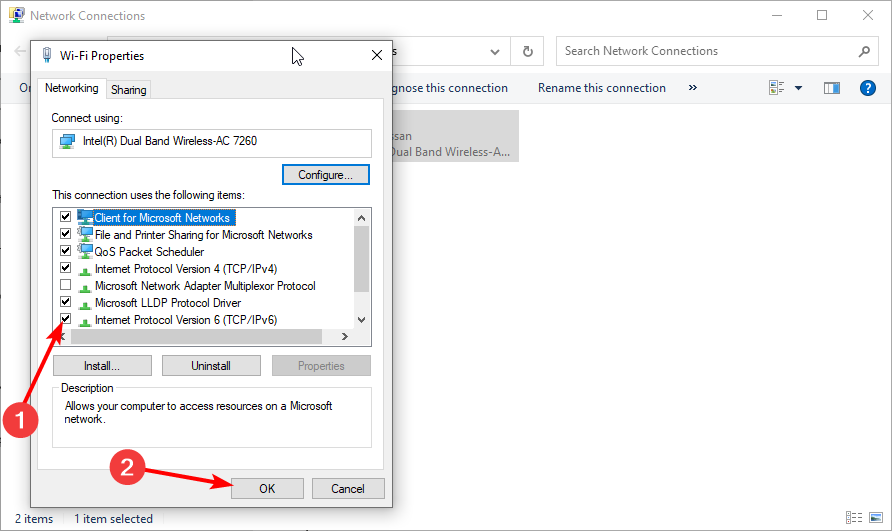
  5. Unmark the Internet Protocol Version 6 (TCP/IPv6) option.
  6. Hit the OK button.
    internet protocol settings best ethernet settings for gaming

Disabling IPv6 is one of the best Ethernet adapter network settings for optimizing your gaming performance to the maximum on Windows 10/11. With this feature disabled, you should notice improved performance.

2. Disable Ethernet adapter components

  1. Right-click on the network connection icon on your taskbar.
  2. Click on the Open Network & Internet Settings button.
    open network settings best ethernet settings for gaming
  3. Select Change adapter options.
    change adapter
  4. Right-click on the connection you want to modify.
  5. Select Properties from the context menu.
    properties
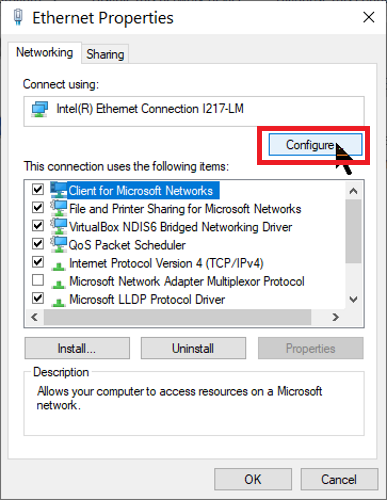
  6. Click on the Configure button.
    best-ethernet-settings-for-gaming-configure-adapter
  7. Switch to the Advanced tab.
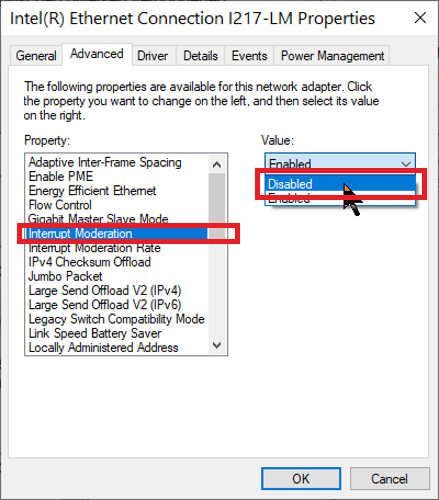
  8. Find and click on Interrupt Moderation from the list here.
  9. Disable the selected option from the dropdown under Value on the right-hand side of the screen.
    best-ethernet-settings-for-gaming-adapter-properties
  10. Repeat steps 8 and 9 for the following options:
    • Flow Control.
    • Receive Side Scaling.
    • TCP Checksum Offload (IPv4).
    • UDP Checksum Offload (IPv4).

3. Ethernet advanced settings gaming optimization

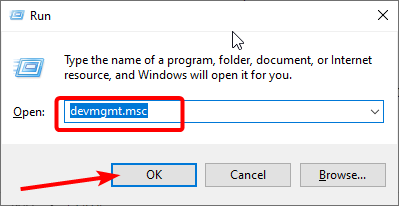
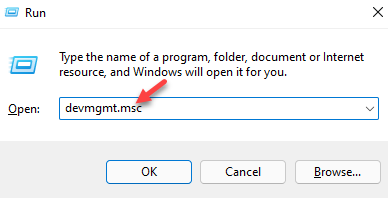
  1. Press the Windows key + R and type devmgmt.msc in the run box.
  2. Click the OK button to open Device Manager.
    devmgt
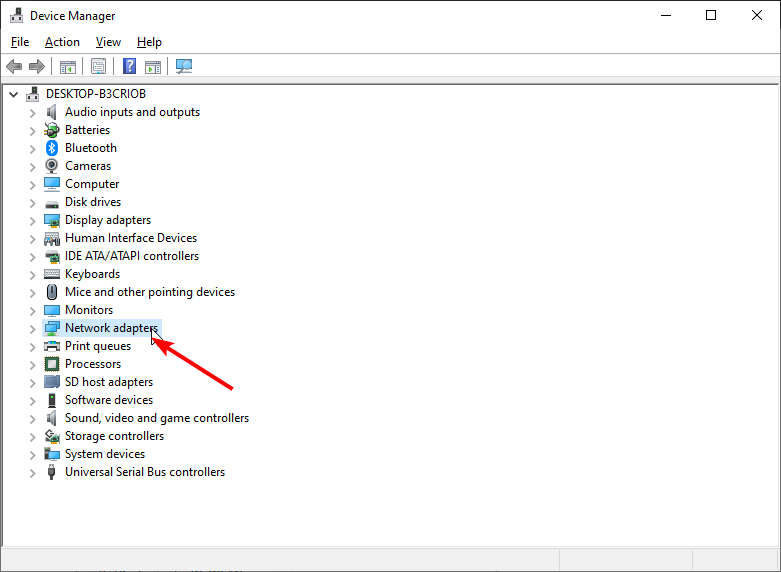
  3. Double-click the Network adapters option to expand it.
    network best ethernet settings for gaming
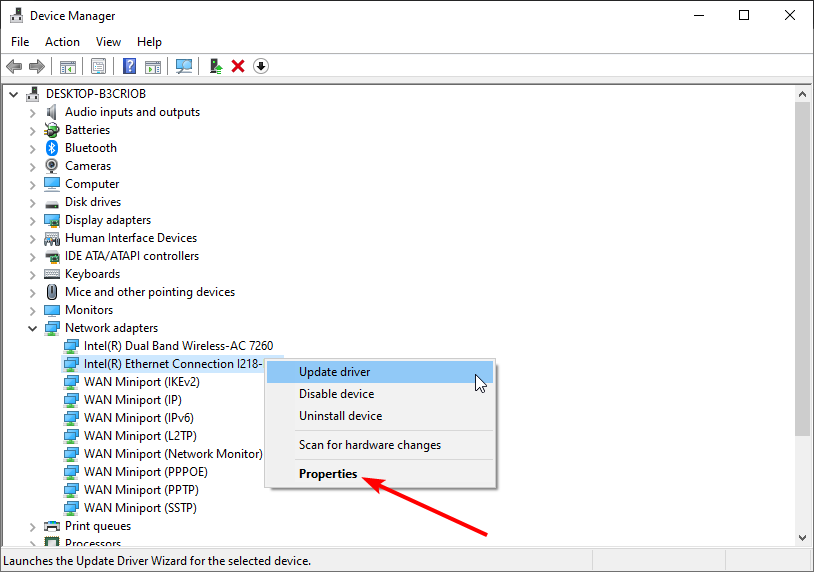
  4. Right-click on your network adapter and select Properties.
    properties device
  5. Switch to the Advanced tab.
    advanced tab best ethernet settings for gaming
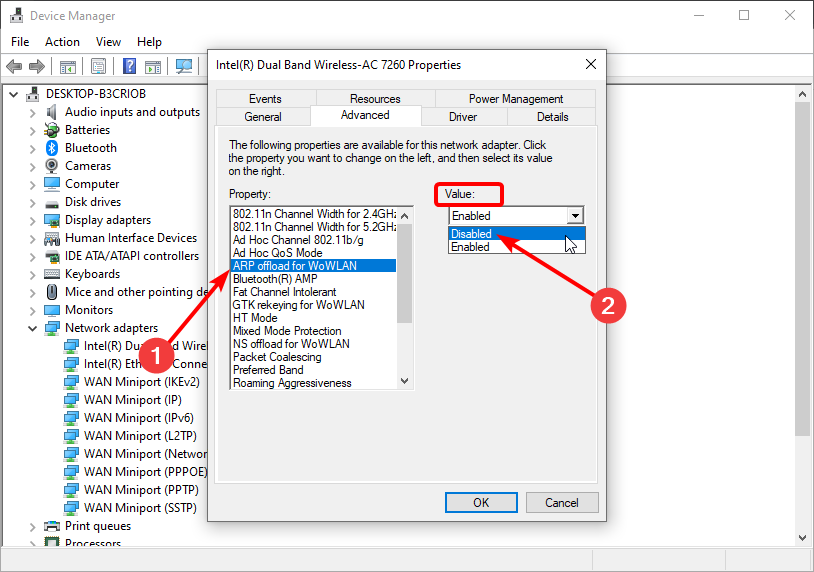
  6. Select the ARP offload for WoWLAN option.
  7. Now, click the dropdown under Value and select Disabled.
    disable arp
  8. Select the properties below and disable them too:
    • NS offload for WoWLAN.
    • Interrupt Moderation.
    • Flow Control.
    • Receive Side Scaling.
    • Adaptive Inter-Frame Spacing.
    • Enable PME.
    • Packet Priority & VLAN.
    • Jumbo Packet.

In addition to these settings, you can also ensure that your PC isn’t running on Power Saving mode. You want to use all your resources for the game.

4. Disable power saving for the network adapter

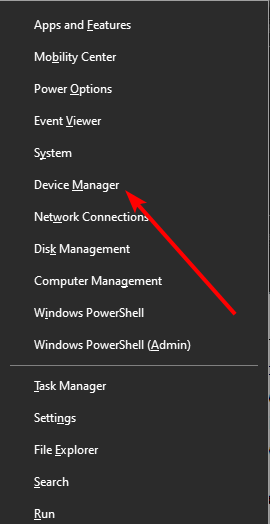
  1. Click the Windows key + X and select Device Manager.
    device manager
  2. Double-click the Network adapters option to expand it.
    network best ethernet settings for gaming
  3. Right-click on your Ethernet adapter and select Properties.
    properties device
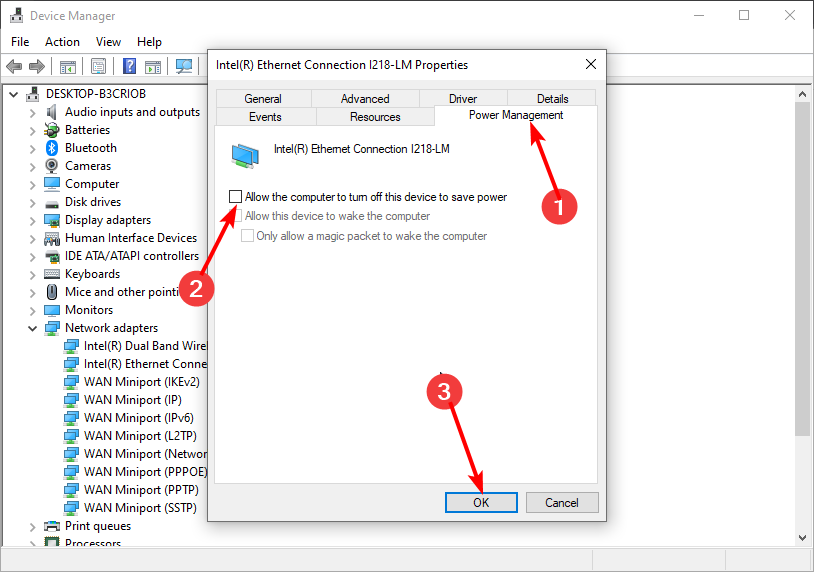
  4. Click the Power Management tab.
  5. Uncheck the Allow the computer to turn off this device to save power option.
  6. Click on the OK button.
    power best ethernet settings for gaming

The power management settings help to save energy on your PC. However, it can cause your game to slow down by turning off your driver when it needs to save power. Disabling this feature allows your network drivers to work constantly.

Sometimes the network drivers can cause issues with your Ethernet connection. You can keep them in check with the help of specialized driver updaters.

Should I disable Energy Efficient Ethernet for gaming?

Energy Efficient Ethernet reduces the power consumption of some components in times of low link utilization. This helps to save energy on your PC.

However, this affects your gaming as the primary aim is to save energy. So, you should disable this setting to optimize gaming.

Wrapping up

These are the best Ethernet settings for gaming and improving your network throughput. However, ensure that your network drivers are updated. Running outdated network drivers will take a toll on your gaming performance.

We also have a complete guide on how to set up your PC for gaming with more settings to speed up your computer.

If you’ve followed all of the steps in this guide but still experience lagging when you game, disable your antivirus.

Feel free to let us know if the tips above helped optimize your gaming in the comments below.

FAQs

How do I make my Ethernet faster for gaming?

Disable energy-saving and offloading features, switch to 1.0 Gbps full duplex, and use a low-latency DNS.

What are the best Ethernet adapter settings for gaming on Realtek?

Turn off Interrupt Moderation, Large Send Offload, and Green Ethernet. Set Speed & Duplex to 1 Gbps Full Duplex.

Is Ethernet better than Wi-Fi for gaming?

Yes. Ethernet provides lower latency, less packet loss, and more consistent speeds, especially during online gaming.

What Ethernet speed is ideal for gaming?

1 Gbps is more than enough. Prioritize low ping and stable latency, not just download speed.

9 Best RGB Controller Software to Use in 2026

If you’re looking for a way to add some personality and flair to your PC setup, RGB lighting can go a long way. To unlock the potential of your hardware, you need good tools to sync lights. Whether you’re on Windows 10 or Windows 11, choosing the best RGB software can make all the difference.

With so many options available, from RGB software for Gigabyte to the best universal RGB software, finding one that fits your setup can feel overwhelming.

But here ends your search because we looked into it and found the best options.

What is the best RBG software to control PC lighting?

1. Corsair iCUE – Wide range of features

Corsair iCUE - Best PC Lighting Software

With Corsair iCUE, you can regulate fan speed, keyboard key function, mouse DPI settings, and lighting.

There are numerous preset lighting effects by default. You may also set complex keys, manage key mapping, and create profiles for particular programs. You can handle all Corsair items from this program.

The primary disadvantage is that this software can only control Corsair devices such as Corsair keyboards. Besides this, it’s a fantastic app to use.

⇒ Get Corsair iCUE

2. OpenRGB SDK – Best for customization

OpenRGB SDK - Best PC Lighting Software

OpenRGB is compatible with all RGB devices because it is independent of the manufacturer’s software.

Your RGB can all be controlled by third-party software thanks to OpenRGB’s network-based Software Development Kit.

This makes it possible to integrate games, visualize the music, change the lighting, and do anything else you can think of. The wide functionality of OpenRGB is one of its benefits.

⇒ Get OpenRGB SDK

3. Signal RGB – Best for immersion by synchronizing

Signal RGB

SignalRGB supports numerous games, creating a more immersive experience. This includes Forza Horizon 5, Halo, and Apex Legends.

It is available in two versions from WhirlwindFX. The free version offers complete hardware compatibility, lighting effects, and mouse CPI control.

SignalRGB is meant to allow adding lighting effects to supported hardware straightforwardly. So, open the app, find a pleasing effect, install it, and use it with your compatible hardware. It’s that simple!

⇒ Get Signal RGB

4. MSI Mystic Light – Consistent performance

MSI Mystic Light - Best PC Lighting Software

MSI Mystic Light provides a consistent RGB performance that no other app can match, making it one of the best PC lighting software.

Your RGB keyboard, CPU cooler, GPU, motherboard, case fans, and RAMs may all be synced up via Mystic Light.

However, this app does not support a wide range of components. Before using this software, please confirm which devices support MSI Mystic Light.

⇒ Get MSI Mystic Light

5. ASUS Aura Sync – Best for full control

ASUS aura sync

The most well-liked and frequently downloaded program by those who enjoy showcasing their lit computers with RGB effects is ASUS Aura Sync.

A full RGB gaming setup also has neon lighting, much like in the film Tron: Legacy.

If you’re an RGB fanatic, you might want to use the aura sync app to control every RGB light in your home.

However, this very popular RGB controlling program has some limitations too. Only motherboards that offer ASUS Aura Sync are compatible with this app.

⇒ Get ASUS Aura Sync

6. JackNet RGB – Simple and effective

JackNet RGB - Best PC Lighting Software

JackNet RGB is a free app that’s great for managing all of the RGB devices in one location. It can identify every RGB component, which is more practical for users.

This program is simple to install, and its streamlined user interface makes it easy to handle any RGB device. It allows you to apply numerous RGB effects and synchronize them with various devices. 

Additionally, you can give effects to specific components. To utilize this app, you must install and launch the manufacturer’s software.

⇒ Get JackNet RGB

7. Razer Chroma – Best for multiple color support

Razer Chroma

Razer Synapse software incorporates Razer Chroma, the company’s RGB software platform.

The company’s mice, keyboards, headphones, laptops, mousepads, microphones, speakers, and external GPU enclosures come in Razer Chroma. Additionally, certain non-Razer peripherals have it.

The range of colors supported by Razer Chroma is up to 16.8 million, making it one of the best PC lighting software.

This has a more striking sound, but it has about the same number of colors as RGB lighting environments.

⇒ Get Razer Chroma

8. HyperX NGenuity – Best for its lighting system

NGeunity - Best PC Lighting Software

HyperX’s RGB lighting system is named NGenuity, one of the best PC lighting software. On HyperX mice, keyboards, headphones, and memory modules, you can get NGenuity.

Although it has been more popular recently, HyperX’s lighting technology isn’t as prevalent because it competes in fewer categories than well-known brands like Razer or SteelSeries. 

A spectrum of up to 16.8 million colors is supported by the HyperX NGenuity lighting system, which puts it roughly on par with most of the competition.

It also supports game profiles, macros, per-key customization, and lighting preset sharing. 

⇒ Get NGenuity

9. Logitech Lightsync – Best for multiple device support

Lightsync

The RGB lighting system used by Logitech G is known as Lightsync and can be used on Logitech G mice, keyboards, headphones, and speakers. Logitech G Lightsync provides a spectrum of up to 16.8 million colors. 

It enables sharing your lighting settings, per-game profiles, macros, and per-key customization just like NGeunity does. It is both affordable and comfortable to use. 

⇒ Get Logitech Lightsync

You might also be interested in our list of the best fan speed controllers to buy and customize your PC. In case you don’t want to use third-party software, you might want to try Dynamic Lighting feature on Windows 11.

From RGB software that controls everything to more focused solutions like addressable RGB software and RGB fan control software for PC, there’s something here for every kind of build. Prefer open tools? We’ve also included the best open source RGB control software to give you full flexibility.

Have you tried any of these? If not, feel free to try one of them, and then let us know about your experience in the comments section below.

How to Update the Kindle App on Windows 10 & 11

The Amazon Kindle app for PC is a great way to read your favorite digital books. You have access to a massive library that houses every kind of genre imaginable.

And as with any desktop app, there will be a software update every now and again which tends to happen automatically. But sometimes the update doesn’t download automatically and you’ll have to do it manually.

This guide will show you how to update the Kindle app on both Windows 10 and Windows 11.

Is Kindle for PC no longer available?

Actually, there is a Kindle app available for PC and Mac computers. This question refers to the old Kindle app that was discontinued back in October 2016.

download kindle app page

Amazon got rid of the old app and replaced it with the current version. It’s also possible that people may be thinking of the Kindle on Windows 7. On that particular OS, Kindle is no longer receiving official support.

Instead, Amazon is focusing its resources on the Windows 10 and 11 versions of Kindle which will be covered here in this guide. The process is the same on both operating systems, although the windows may look slightly different.

    How do I update the Kindle app on Windows?

    Most of the time, the Kindle app for PC will update automatically. But in case there was some error or you simply want to do it manually, you can accomplish this via the official Kindle website.

    What you need to do is download the latest version from the website. This ensures that your Kindle app is completely safe and secure, and will run the best it can with the latest updates.

  1. 1. Go to the Kindle download app webpage.

  2. 2. Click on the Download for PC button.

    download kindle app for windows
  3. 3. Save the file that you download and go to its location on your computer.

  4. 4. A small window will appear in the middle of your screen. It will tell you that it’s set up.

    get started with kindle
  5. 5. Updates will be installed. Kindle will finish with a What’s New? window informing you of any and all new features.

    kindle-what-is-new-prompt

Can you read Kindle books on a PC without the app?

Yes, you can read books with Kindle Cloud Reader, and you can also follow this step by step guide to read Kindle on PC for offline access and customization.

All you have to do is go to the Kindle Cloud Reader website, sign in with your Amazon account, and you’re ready to read.

Feel free to leave a comment below if you have any questions regarding the above process. Also, do not hesitate to comment about guides you’d like to see or information about any other app on whichever platform.

7 Ways To Stop Vodafone From Blocking IPTV

Are you one of those who think it’s your right to decide what you want to see? Are you tired of Vodafone blocking websites?

Currently, Vodafone is deciding what content it thinks you should see (Yes, they are blocking some content like IPTV).

This might not bother you if you are not interested in watching that specific content, but it’s time to find ways to solve this problem if they are blocking your favorite show.

Does Vodafone block some websites?

Vodafone has been in the internet business for a long time. They use a specific algorithm called DPI filtering to detect and block specific types of traffic.

This includes specific protocols like BitTorrent and P2P, as well as IPTV services. Vodafone services are available in the following countries.

What are the countries where Vodafone provides IPTV?

However, in some regions, IPTV is blocked by Vodafone at certain times (and in some regions, the ban is permanent).

Vodafone services are available in the following regions.

  • Africa: Egypt, Ghana, Kenya, DR Congo, Tanzania
  • Asia: India, Turkey
  • Europe: UK, Spain, Romania, Albania, Greece

In most cases, Vodafone blocks websites because it has incorrectly flagged them as malicious or inappropriate. It is also possible that Vodafone is deliberately blocking a website that violates its terms of service.

Here are the 7 best ways to unblock a site on Vodafone.

How do I unblock a site on Vodafone?

1. Use a VPN to unblock the content

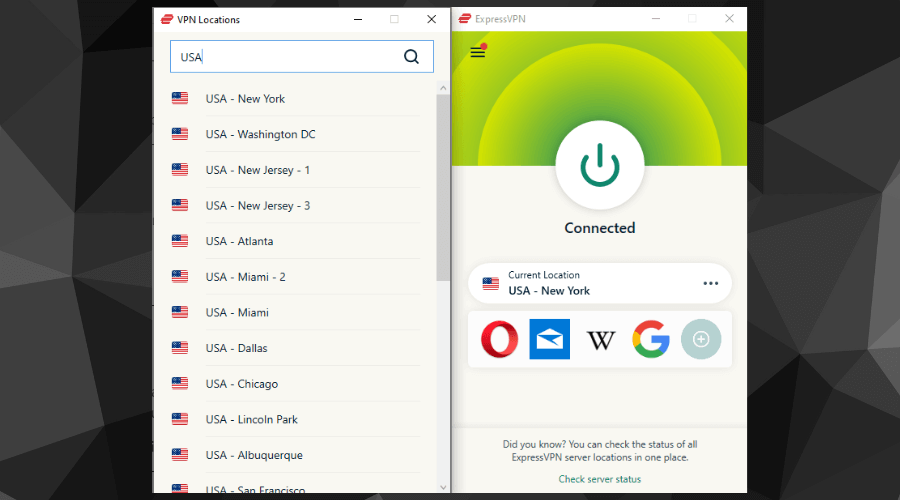
  1. Download and install ExpressVPN solution.
expressvpn us servers windows
  1. Run the app, choose a location where Vodafone is not blocking IPTV, and turn the VPN to ON.

This is the simplest and most effective way to unblock a site on Vodafone is to use a VPN because it encrypts your traffic and routes it through a server in another country, making it appear like you are accessing the internet from that location.

ExpressVPN

Enjoy all online content without being restricted to country-specific websites and videos.
Check Price Visit Website

This allows you to bypass Vodafone’s filters and access blocked websites.

2. Use a proxy server

  1. Click the Start button, type internet options and click on Internet Options from the results.
  2. Click on the link that says Open your computer’s proxy settings under the System label after scrolling down the page. The Internet Properties dialog box appears.
  3. Click on the Connections tab in the dialog box.
  4. On the connections page, click on the LAN settings button.
  5. You can use a proxy server for your LAN by checking the Use a proxy server for your LAN label.
  6. Enter the address and port of the proxy server you wish to use and save the settings by clicking OK!

That’s all! Your proxy server has been configured. You can now access the internet anonymously. 

A proxy is similar to a VPN but does not encrypt your traffic. This means that it is not as private or secure as a VPN but faster and easier to set up.

Another advantage of using a proxy is that it can bypass Vodafone’s filters without having to route your traffic through another country.

3. Change your DNS

  1. Click on the Start button and select Settings.
  2. Next, select Network & Internet.
  3. Click Change adapter options. This can be found under Advanced network settings.
  4. Select Properties from the menu.
  5. The next step is to select Internet Protocol Version 4 (TCP/IPv4). If you don’t see this option, use your mouse to scroll up and down.  
  6. After that, click Properties.
  7. Replace the Preferred DNS server with 8.8.8.8 and the Alternate DNS server with 8.8.8.4.
  8. Finally, click OK to save the settings.

DNS is a protocol that converts website addresses (like www.windowsreport.com) into IP addresses (like 74.125.239.16).

By changing your DNS settings, you can force Vodafone to use a different DNS server that does not block the website that you want to access.

In this case, the Google server addresses work pretty good but if you have any others in mind, do try them.

4. Use a browser with a built-in VPN

  1. Simply download and install Opera One.
  2. Then go to Settings, choose Features, and enable the VPN from the Enable VPN toggle button.

Once enabled, you can choose a virtual location from three major continents. Select a region where IPTV services are not blocked, such as America.

5. Install a browser extension

  1. Go to the Chrome Web Store.
  2. Find the extension that you want and select it. For instance, we tried Zenmate, and it worked pretty well.
  3. If certain permissions or data are needed, some extensions will notify you. Click the Add to Chrome button to approve it and you are good to go.

Several browser extensions can bypass Vodafone’s filters and allow you to access blocked websites. The most popular ones are Hola, UltraSurf, and ZenMate.

The benefit of using a browser extension is that it is easy to set up and does not slow down your connection like Tor Browser or proxy.

6. Load the website from the cache

  1. Start by searching for the page you are looking for on Google.
  2. Click on the three dots next to the URL of the site in the search results.
  3. Then select Cached. You will see the cached version of the page.

A web cache is a copy of a website that is stored on a server. When you access a website, your browser first checks if there is a cached version of the site before it sends a request to the server.

If the website is cached, your browser will load the cached version instead of the live site.

This can be useful for accessing a blocked website because the cached version is usually not blocked. You can use Google’s cache: operator to find a cached website version.

For example, if you want to access the cached version of www.windowsreport.com, you will enter cache:www.windowsreport.com in Google’s search bar.

This way, you can easily access Vodafone-blocked websites and enjoy your content.

7. Unblock the streaming address from Windows Firewall

  1. Click on the Start button type control panel and then select Control Panel from the results.
  2. Then, click on the Windows Firewall option.
  3. Click on Advanced settings.
  4. First, click on Outbound Rules in the left-side panel and then click on New Rules on the right-side panel.
  5. Click on Custom and press the Next button.
  6. Check These IP addresses and click the Next button.
  7. After adding the address, click Add and press Next.
  8. Check Allow the connection if it is secure and press Next.
  9. Put any name and press Finish.

You are good to go now because there is a possibility that Windows Firewall is blocking your service, not Vodafone.

How do I check if my ISP is blocking streaming?

There are many reasons why an internet provider might block a website. One possibility is if it breaks the law, but this can vary by country, so check before trying anything illegal on your network.

Some websites also get censorship from large corporations, which prevents users from accessing certain sites without permission.

Due to their content being considered unfit for public consumption or opposed political views (depending upon who runs them).

ISP could be another big reason you cannot stream videos on your phone or desktop. It’s worth checking if your ISP is blocking streaming traffic on specific ports that services like Netflix use.

To check this, we recommend using Port Check Tool. This website will tell you if your testing port is open or closed. If it’s closed, that means your ISP is likely blocking it.

Here are the ports that widespread streaming services use:

  • Netflix: TCP 80, 443
  • Hulu: TCP 80, 443
  • Amazon Prime Video: TCP 80, 443
  • Sling TV: TCP 5001-5999, 6001-6009, 8080
  • YouTube: TCP 80, 443, 8080, 8443

You can use many methods to access Vodafone-blocked websites; a good VPN like Express VPN will help you stream your favorite videos without interruption and let you enjoy the internet with no restrictions.

Now that you have unblocked IPTV, why not check our guide on the best IPTV UK providers and find one that works for you? Besides, if you are getting Vodafone Error 69, change the SMSC number.

Ensure you are not trying to access any illegal website using a VPN or unblocking service.

For any suggestions or questions, feel free to use our comments section and let us know about them.

How to Enable or Disable the Adaptive Brightness on Steam Deck

Do you know the steps to use the Steam Deck adaptive brightness feature? This article will help you with this.

Steam Deck is the newest edition in the game console world. With a lot of potential, it is probably going to dominate the market. There are already many Steam Deck verified games available.

As it is a new product, you may not know the usage of many of its features well.

The adaptive brightness feature is one of them. It helps to give you a convenient gaming experience on Steam Deck.

But, in some cases, you may want to keep it disabled for your convenience. So, this article will help to know how you can enable or disable this feature.

What happens when adaptive brightness is enabled?

When you enable the adaptive brightness on Steam Deck, it helps to see contents better by lowering or increasing brightness based on the light intensity in your environment.

If your room or surrounding has too much light, you will need more brightness on the screen to see the content correctly. In a dark room, too much brightness can hurt your eyes.

Even though you can increase or decrease the level manually, it will happen automatically when adaptive brightness is enabled.

    How do I enable or disable adaptive brightness on my Steam Deck?

    You can manage the settings for adaptive brightness via your Steam Deck’s built-in Display Options. From there, you can toggle adaptive brightness on and off with a simple click.

  1. 1. Press the Steam button to open the Menu.

    pressing steam key steam deck
  2. 2. Go to Settings.

  3. 3. Navigate to Display.

    navigate to the display settings section steam deck
  4. 4. Now, toggle the switch on or off next to the Enable Adaptive brightness to enable or disable it.

    enable or disable adaptive brightness steam deck toggle
  5. 5. If you don’t like the setting you just chose, you can simply press again on the toggle button to change it.

In display settings, there are other related options, like Night Mode, Display Scaling, etc.

You can tweak these as well to adjust settings according to your comfort. You can do even more, like changing resolution when Steam Deck is docked or undocked.

Should I turn on adaptive brightness on the Steam Deck?

The answer depends on the situation. If you mostly play in indoors on a steady brightness level, you can disable this feature to avoid unwanted interruption.

However, suppose you often go outside and use Steam Deck. In that case, the adaptive brightness feature comes in handy as the level of brightness is dynamic outside, and you may feel uncomfortable when there is too much light, but the screen brightness is very low or vice versa.

But, for best, we suggest you test this feature and determine if it is useful for you or not. Then, you will understand whether you should turn on adaptive brightness on Steam Deck or not.

There are other interesting features you can use on Steam Deck, such as playing games offline on it. If you want to find out more about this, check out our dedicated guide on using the Offline Mode in Steam Deck.

What can I do if Steam Deck adaptive brightness is not working?

If you notice that the brightness level is not changing depending on the ambient brightness even after the feature is enabled, it means there is something wrong.

This problem may come due to a hardware fault or a software bug. If the sensor is faulty, the problem may appear. In this type of situation, check for software updates, and restart the Steam Deck.

If nothing fixes the Steam Deck adaptive brightness not working issue, you can go and claim your warranty.

This article has explained how you can use the Steam Deck adaptive brightness feature. If you have any opinions, let us know in the comments box.
Omegle Asking For Captcha Every Time: 5 Ways To Stop it

Yes, having to constantly enter a Captcha every time you visit a website can get extremely frustrating really quickly.

But, as you surely know, this doesn’t only happen on Omegle, and it can basically happen on every website out there.

Before we get into solving this issue, since we are talking about Omegle, we can also show you to fix your VPN not working on Omegle.

Furthermore, we can also assist if Omegle has an error connecting to the server, or if you are looking for the best browsers for Omegle.

Now, circling back to why we’re here, when you are visiting Omegle, the website is always going to require you to deal with Captcha, so we’re going to show you what to do in this case.

Why is Omegle always asking for Captcha?

Well, you should know that Omegle, like other websites, primarily uses CAPTCHAs to limit bot access to its site. 

Website creators strongly believe that bot interactions aren’t in the best interest of the user experience, and try to prevent them. 

As you know, bots are software that runs automated tasks such as spamming random text, and sending the same messages over and over again, often used by scammers to send you links to phishing websites.

So, each time you see a captcha appear on Omegle, it means that the computer program is confused about whether you’re a real person or a bot.

Thus, if Omegle keeps asking for Captcha every time, we recommend following the guide below for a quick fix.

How do I stop Omegle from always asking for Captcha?

1. Restart your router

One of the most effective, and at the same time simplest solutions that we can offer you for this annoying problem is to actually reset the Internet router.

You might go thinking that such a simple measure couldn’t have the desired effect, but in fact, users have reported it doing the trick.

So, before we get further into it, make sure that this is the first thing you try when Omegle keeps asking for Captcha.

2. Clear the browser’s Cookies and Cache

  1. Open Chrome.
  2. Click on the Customize and Control Google Chrome button, then select History.chrome history
  3. Click the Clear browsing data button.history
  4. Select Cookies and other site data and Cached images and files, then select Always, and press Clear data.clear history

3. Scan your PC

  1. Search for Virus & threat protection and open the app.virus and threat
  2. Select Scan options.scan options
  3. Choose Full Scan, then click the Scan now button.full scan

4. Use a VPN

  1. Download and install Private Internet Access.
  2. Open the VPN app.
  3. Select the desired region.PIA region
  4. Start the VPN service.PIA on
  5. Access Omegle.

PIA is a trusted VPN provider that offers multiple layers of protection from online threats. It has built-in anti-malware, keeps no logs with a no-logs policy, and is one of the fastest VPNs on the market.

Private Internet Access

Your own web companion to aid web surfing and protect you against any threats.
Free Trial Visit Website

5. Contact the Omegle staff

When all else fails, the time has come for you to finally contact the staff over at Omegle and let them know you have this problem.

Users that haven’t managed to solve this issue any other way have reported success after bringing the problem to the staff’s attention.

So, as the last step, we recommend that this be the course of action you take against this Omegle captcha problem.

Is Captcha necessary on Omegle?

Yes, it actually is. It’s a rule that site developers have agreed on enforcing in order to try and limit the number of fictitious accounts.

That being said, there are services out there that let users bypass the Captcha. This service integrates a bot into your browser’s code so you can automatically bypass Captcha easily every time.

And, since Captcha was created to filter out bots from humans, the above process is actually similar to cheating because you’re letting software integrated into your browser code to help you bypass this security feature.

There you have it! There isn’t much to it for those situations when Omegle keeps asking for ReCaptcha, and now you know all you have to do.

Was this article helpful to you? We would appreciate it if you would let us know in the comments section located below.

3 Ways to Fix Lag, Stuttering & FPS Drops on MapleStory

There are so many video games out there that will surely satisfy all needs and demands of everyone that is even remotely into gaming.

From pixelated old-school arcade games to the latest triple-A titles with enhanced graphics, all you have to do is want to play something and you will surely find what you are looking for.

But, as all gamers will tell you, video games can sometimes drive us to the brink of insanity, as they can be full of bugs, laggy, or incompatible with the right we are trying to play on.

That’s why, in order to help you have a more pleasant experience, we can show you the best browsers for gaming.

Also, seeing how not all gaming is done on PCs and laptops, make sure to check out what is happening in the console gaming market.

Now, coming back to why we are here, we’re going to show you how to improve your MapleStory experience, in case it is laggy, or has FPS drops.

If you are playing MapleStory, the 64-bit version, and you have lag, what you need to do can be found in the rows below.

Why am I having FPS drops on MapleStory?

In general, FPS drops can occur if you have problems with your connection or the servers are too busy, or it might also be some system configuration issues.

That’s why, whenever you start experiencing, you will first need to check if everything is running optimally, and then gradually move on to updating drivers.

So, in case your MapleStory is stuttering, or your MapleStory has lag when attacking, this guide will show you what you need to do.

How do I fix lag & FPS drops on MapleStory?

1. Check system requirements

First of all, when we are dealing with video games, we first need to ensure that the specific title can run properly on your PC.

If your rig isn’t powerful enough to run MapleStory, you will start experiencing lag, stuttering, or major FPS drops.

We’re going to have a look at the system requirements for MapleStory, so you can make sure that you can play it properly.

2. Update video driver

  1. Search for Device Manager and open the app. device manager
  2. Expand Display adapters, right-click on the one you are using and select Update driver.display
  3. Select Search automatically for drivers.auto

Updating your drivers manually can be a bit challenging, therefore a specialized tool, such as Fortect Driver Updater can perform this process in a much easier and safer way.

⇒ Get Fortect Driver Updater

3. Switch to a wired connection

Taking into consideration that MapleStory is a free-to-play, 2D, side-scrolling massively multiplayer online role-playing game, a steady and reliable Internet connection is a must.

We’re not saying that a wireless connection is not good for playing your favorite game, but we strongly recommend switching to a wired connection for online games.

Having slow internet can cause stuttering, lag, and FPS issues, so keep that in mind the next time you are in such a predicament.

Thus, in case of MapleStory is stuttering, or lags on Windows 10/11, make sure you go through the troubleshooting process above.

Has this guide been useful to you? Make sure to let us know in the comments section located below.

5 Ways to Fix your Webcam When It’s Not Working on Streamlabs

If you are a professional who loves to use Streamlabs for content creation, and your webcam is not working, it can be frustrating.

Previously known as the Streamlabs OBS, the Streamlabs desktop is a free and open-source streaming software that allows you to stream Twitch, YouTube, and Facebook in a jiffy.

However, like any other tool, it’s prone to common issues and one of them is the webcam not showing up on the Streamlabs app.

But, if it’s an issue with the OBS Studio where the virtual camera is not showing up, we have some quick solutions for you in our detailed post here.

Why is my camera not working on Streamlabs?

Webcam not working on Streamlabs OBS is nothing new and it usually shows up due to the below reasons:

  • Outdated Webcam drivers
  • More than one Webcam Source in your editor
  • Inaccurate Settings
  • The app does not have camera access permission
  • An antivirus software blocking the program

However, we have got you covered here with some quick workarounds below that can help you fix the issue in the blink of an eye.

But, before you proceed with the below fixes, make sure that you allow apps to access your camera, or try disabling and enabling the camera as explained in our detailed post here.

At the same time, check if the Webcam is not being used by any other apps apart from Streamlabs. This is one of the major reasons why it may fail to work.

This will not just help the Webcam to work again but will also fix the issue if the Streamlabs Webcam goes black.

How do I get my webcam to work on Streamlabs?

1. Update or re-install the camera driver

1.1 Update the camera driver

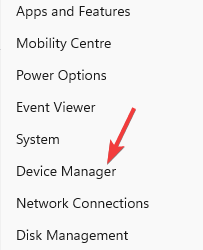
  1. Right-click on Start and select Device Manager. right click on Start and select Device Manager
  2. Expand the Cameras section, right-click on Integrated Webcam and select Update driver. update Integrated Webcam
  3. Next, in the Update Drivers window, click on Search automatically for drivers. Search automatically for drivers
  4. Now, wait till Windows detects the latest driver and applies the update automatically.

Once done, close the device manager and check if the webcam in Streamlabs is working now.

1.2 Re-install the camera driver

  1. Go to Start, right-click on it and click on Device Manager. right click on Start and select Device Manager
  2. In the Device Manager window, go to Cameras, right-click on Integrated Webcam and select Uninstall device. uninstall Integrated Webcam
  3. Click on Uninstall again in the Uninstall Device pop-up to confirm. press uninstall to confirm
  4. Once the device is completely uninstalled, close Device Manager and restart your PC.
  5. You can then head over to the manufacturer’s website and download & install the latest webcam driver.

Now, open Streamlabs OBS and check if the webcam not working issue is resolved.

2. Make sure your device supports custom resolution settings

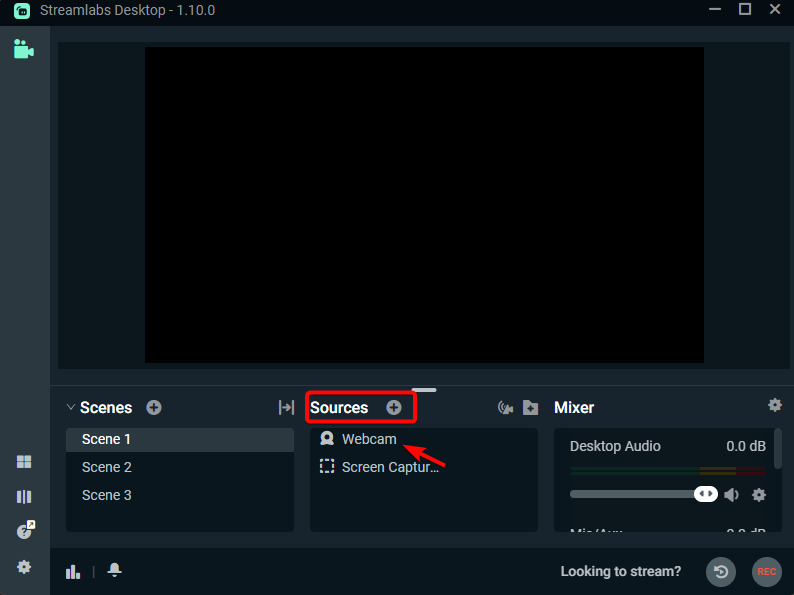
  1. Open Streamlabs and double-click on the Video Capture Device/Webcam under Sources. double click on webcam
  2. Now, in the Settings window, set the configuration to Custom anda make sure to enter the correct settings for your webcam. Here’s an example below for the Logitech c920 webcam:match the settings
  3. Below is another example of correct settings for the Logitech c922 webcam:match the settings

However, if you are using any other brand of webcam, or if you don’t know the correct settings of your webcam, you can refer to its manual, or visit the manufacturer’s webpage to get the details.

Incorrect settings may trigger the webcam issue in the Streamlabs OBS app.

3. Deactivate OBS scenes

  1. Launch Streamlabs, navigate to Scenes, and select the first scene.select 1st scene
  2. Double-click on the webcam under Sources to open its settings. double click on webcam
  3. Under the Settings window, check the Deactivate When Not Showing option. Deactivate When Not Showing
  4. Repeat steps 1 to 3 for all the others scenes in the app, and make sure that you turn on this option on your other sources also.

Now, check if the webcam is back up and running for the Streamlabs OBS.

4. Change the webcam video format

  1. Open the Streamlabs OBS app, go to Sources, and double-click on the webcam to open its Settings window. double click on webcam
  2. Here, scroll down towards the bottom and click on Video Format.
  3. Now, from the drop-down, select MJPEG.video format - mjpeg

You can now check if the web camera is working. Besides, this method is also applicable if the camera is lagging on Streamlabs.

5. Change the FPS settings

  1. Launch Streamlabs and click on Settings (gear icon) on the bottom left. streamlabs settings
  2. Click on Video on the left. streamlabs video settings
  3. Next, on the right, check the Common FPS Values field where it’s set at 60fps. Common FPS Values
  4. Click on Done to exit the Settings window.
  5. Now, double-click on the Webcam to open its Settings page. double click on webcam
  6. Here, go to FPS and set it to 30. change FPS settings to 30

Close the window and the Webcam not working issue on your Streamlabs app should be fixed. This method also works if the Streamlabs camera zoom is not working.

Where are the camera settings on Streamlabs?

If you want to choose the best Streamlabs camera settings for an enhanced experience, here’s what you can do:

  1. Launch Streamlabs Desktop and select the 1st Scene under the Scenes tab. select 1st scene
  2. Now, go to Sources, and double-click on Webcam to open the open Settings for Video Capture Device. double click on webcam
  3. Here, you can select the Device, and set the Resolution Type, FPOS, Video Format, etc. change camera settings

Alternatively, you can also remove any duplicate webcam sources or any other webcam sources from any other scenes.

It may also be possible that antivirus software on your PC may be blocking the webcam and hence, it’s not working on Streamlabs.

In such a case, you can either try and remove the block from the antivirus settings, or turn off the software temporarily.

If none of the above methods work, you can uninstall the Streamlabs OBS and reinstall it to check if it helps fix the issue.

But, if you are using the OBS app and it keeps crashing, you can follow our detailed guide on how to fix the issue on Windows 10 & 11.

If you have more queries on the Streamlabs OBS app, you can leave a message in the comments box below.

How to Add & Set Up Your Printer by IP Address in Windows 11

Printers have unique IP address numbers for connecting to networks. Users can set up wireless printers with those IP addresses for network printing.

Windows 11 has a WSD (Windows Service Demand) port for connecting printers, which can be unreliable. Some users may prefer to set up printers with IP addresses in Windows 11.

Can you add a printer by IP address?

Setting up a printer in Windows 11 with its IP address is relatively straightforward. Here, we’ll look at how to add a printer by IP address on Windows 11 PCs.

You can set up a printer by IP address with Windows 11’s Add Printer wizard as outlined in the instructions below.

That wizard includes an option for adding printers with TCP/IP protocols, so read on to find out more.

What is my IP address?

Many printers have small LCD screens on which you can find their IP address details. Look through the network setup section in your printer’s display screen to find the IP address.

If your printer doesn’t have a display screen, try printing its configuration page, which includes the IP address.

You can often print such pages by holding the printer’s power buttons for a few seconds. Read the instructions in the manual to find out how to print the test page.

How do I add a printer by IP in Windows 11?

  1. 1. Press the Windows + I key combination to open Settings.

  2. 2. Select Bluetooth & devices and choose Printers & scanners.

  3. 3. Click the Add device button.

    add device printers and scanners
  4. 4. Then click the Add manually link to bring up the wizard.

    add option printers and scanners
  5. 5. Select the Add a printer using an IP address or hostname option and click Next to view IP settings.

    add printer using ip address windows 11
  6. 6. Click the TCP/IP Device option on the Device type drop-down menu.

    ip device options
  7. 7. Input your printer’s IP address within the Hostname or IP address box.

  8. 8. Enter the same IP address in the Port name field.

  9. 9. Make sure the Query the printer checkbox is selected.

    query printing options
  10. 10. Click Next for Windows to locate the printer.

  11. 11. Then you’ll see a message informing you that you’ve added the printer. You can change the printer’s name in the text box or leave it as it is.

  12. 12. Press Next to view printer sharing options.

  13. 13. If you want the printer shared with other devices on your network, select the Share this printer option. If not, click the Do not share radio button.

    share this printer option
  14. 14. Select Next again to reach a Print test page button, which you can click if you wish.

    print test page windows 11
  15. 15. Press the Add Printer wizard’s Finish button to complete the setup.

  16. You can add a printer by IP address via Printers & scanners settings, with the Add Printer wizard. This option is recommended if your printer is not automatically detected.

    After you add your printer, you can customize its name and other settings. Moreover, you can press the Windows Update button in the wizard to select your printer’s brand and model for driver installation.

How can I set up a printer on a network?

To share a printer on a home network, Windows 11’s network discovery and printer sharing features need to be enabled. This is how you can set up a network printer for sharing:

1. Enable network discovery

  1. Press Run’s Windows + R key combo and input this text in the Open box: control.exe /name Microsoft.NetworkAndSharingCenter
  2. Click OK to open the Network and Sharing Center.
  3. Select the Change advanced sharing settings navigation option.
    Change advanced sharing settings option windows 11 add printer by ip
  4. Then select the Turn on network discovery radio button if that option is disabled.
    The Turn on network discovery option windows 11 add printer by ip
  5. Click the Turn on file and printer sharing option.
  6. Press the Save changes button.

2. Select a printer to share

  1. When you’ve enabled network discovery and printer sharing, type printers and scanners in the Start menu’s search box. Select Printers and scanners to open the Settings page.
  2. Select a printer to share.
  3. Click the Printer properties option.
    Printer properties option windows 11 add printer by ip
  4. Select the Share this printer checkbox on the Sharing tab.
    Share this printer checkbox windows 11 add printer by ip
  5. Press Apply to share the printer.

After adding a printer with an IP address, you can start printing from any device on your network. Further, to improve your workflow, you can go ahead and rename your printer for easier identification.

Note that the guidelines here apply to Windows 10 since that has the same Add Printer wizard. So, you can add printers by IP addresses and share them in Windows 10 much the same.

Fix: Epson Event Manager Button Settings Are Not Available

Epson as a brand name for printers needs no introduction. It’s one of the world’s biggest manufacturers of computer printers and shows no sign of slowing down.

But like with a lot of tech out there, Epson printers are often victims of some kind of error or malfunction. Be it paper getting stuck, the ink not coming out correctly, or in the case of this guide, scanning problems.

There have been reports of the Event Manager button setting not working properly. This guide will help you troubleshoot and fix those problems.

Why can’t I get my Epson printer to scan to my computer?

Well, there is a multitude of reasons why your Epson printer won’t scan your computer. According to Epson itself, there may be a problem with one of the cables not being properly connected to either the computer or printer.

In other cases, it could be that Epson Scan isn’t selected in the scanning problem. It’s also entirely possible that the printer is in some kind of power-saving mode like Sleep or Standby. In that case, wake up the printer and restart it.

All that said, follow these instructions if you’d like to know how to fix your Epson printer not scanning.

What can I do if Epson Event Manager button settings are not available?

1. Update drivers

  1. The first thing you should immediately do is update your drivers.
  2. Open the search bar on your Windows computer and search for the Device Manager. Click the first entry you see.
  3. In the Device Manager, click Printers.
  4. Right-click the Epson printer that appears and selects Update drivers in the window that appears.
  5. In the new window, select Search automatically for drivers.
  6. Your computer will automatically install Epson printer drivers. If the drivers are already installed, the window will let you know.

Updating drivers manually is a good option, but sometimes, doing this by yourself can be challenging. In this case, we feel like an automatic driver monitoring tool is much easier.

2. Check Windows Image Acquisition

  1. Click on the search bar and type in Services.
  2. Click the Services entry that appears.
  3. In Services, scroll down to Windows Image Acquisition (WIA).
  4. Right-click it and select Properties.
  5. Ensure that the Startup type is set to Automatic.
  6. Make sure that the Service status reads Running. You can activate it by clicking the Start button.
  7. Click Apply on the bottom, then select OK.

3. Add permissions to Windows Defender Firewall

  1. In the Windows Search bar, bring up the Windows Defender Firewall.
  2. Click on the entry as shown in the image.
  3. Click Allow an app or feature through Windows Defender Firewall in the new window.
  4. Click Change settings in this new window.
  5. Click Allow another app.
  6. Click Browse.
  7. Search for the Epson Event Manager app. Click Add.
  8. The Event Manager app now has Firewall permissions.

How can I configure event buttons?

Epson has a set of instructions on its Support website that we highly recommend that you check out if you’d like to learn how to configure buttons on Epson printers.

But the short end of it is that you’ll have to assign the program that you want to configure in the Epson Event Manager. You select the action that you’d want to assign to the button. Click Close and you’re done.

Feel free to leave a comment below if you have any questions. Also, leave comments about guides you’d like to see in the near future.

Microsoft news recap: new Home UI coming to Xbox next year, redesigned Smart Campaigns experience for Microsoft Advertising, and more

Microsoft news recap is a weekly feature highlighting the top Microsoft news stories of the past week. Sit back, grab some coffee, and enjoy the read!

Xbox to launch brand new Home UI in 2023

A new Home UI is being worked on, due for launch in 2023, on Xbox consoles. A random set of Xbox Insiders who are part of the Alpha Skip-Ahead Ring have started testing the new UI this week, so that feedback can be collected on the experience.

US Army to take delivery of first batch of HoloLens 2 based “combat goggles”

The US Army is to accept delivery of its first batch of HoloLens 2-based combat goggles, from Microsoft, following a mostly successful test, after the programme was originally placed on hold.

US Army to take delivery of first batch of HoloLens 2 based "combat goggles" - OnMSFT.com - September 7, 2022

PlayStation CEO Jim Ryan says Xbox Call of Duty offer is “inadequate on many levels”

CEO of PlayStation, Jim Ryan, has weighed in on Microsoft’s acquisition of Activision Blizzard, claiming that Microsoft’s offer to keep Call of Duty on PlayStation is “inadequate on many levels.”

Microsoft Advertising launches a newly redesigned Smart Campaigns experience to help SBMs optimize their operations

A new Smart Campaigns experienced has been released to Microsoft Advertising in the US, making it efficient and reliable for small and medium businesses to get up and running with online advertising, and now also assists in setting up ads across multiple platforms.

Microsoft Advertising launches a newly redesigned Smart Campaigns experience to help SBMs optimize their operations - OnMSFT.com - September 8, 2022

That’s it for this week. We will be back next week with more Microsoft news.

How to Force Windows 11 Widgets to Open in Default Browser

Usually, Windows 11 Widgets will open links in the default browser, which is Microsoft Edge. However, not everyone enjoys Edge as their default browser. This is especially annoying if you prefer another browser, like Firefox, Opera One, or Chrome. 

Windows 11 widgets are cool. They help you do things like research flights, check your calendar, and send emails right from a panel on your Windows desktop.

If you don’t have a use for them, you can disable widgets, but if they make your life easier, this article is for you to help open them in your browser of choice.

Why aren’t Windows 11 widgets opening in my browser? 

If you click on your widgets but are always directed to a blank page, below are some possible causes:

  • Firewall/Antivirus – If you use a firewall or anti-virus program, it might have blocked access to the web pages where your widgets are hosted. Check that any antivirus software on your PC isn’t blocking access by temporarily disabling it.
  • Outdated browser – You may have an outdated version of your browser installed on your computer that needs to be updated.
  • Incompatibility issues – Windows 11 widgets are compatible with only certain browsers. If you use any other browser, the widget might not open properly or get stuck on a blank page. 
  • You have pop-up blockers enabled – If you want to open widgets in your browser, you’ll need to allow pop-ups.

If you encounter any of the above issues, there is a way to open widgets in your favorite browser, as detailed below.

Quick Tip:

Since we use more and more add-ons and extensions in our browsers, using additional widgets might create issues and make them open in Windows’s default browser, Edge.

Switching to a different browser that has most features you use already installed can be just the right solution. Opera One has already built-in things like VPN, Ad Blocker, AI, social media and messaging apps.

Opera One

With all the built-in apps, Opera One is ideal for your day-to-day browsing!
Free Download Visit website

How do I change the default browser for widgets in Windows 11? 

1. Set your preferred browser as the default

When you download and install a new browser, you will always get a prompt asking you to set it as your default browser.

This is useful if you’re trying out a new browser and want to use it for all your browsing without changing anything manually. 

2. Disable Microsoft Edge

Disabling an app is a way of preventing the app from running on your PC. It is different from uninstalling or deleting it. This is useful if you want to remove an app causing problems on your device.

When you disable an app, it won’t be able to access your location or other information and features. It can temporarily remove it from your device without deleting it. This will not affect any of your data or information stored within the app, and you can enable it again at any time.

3. Use MSEdgeRedirect

  1. 1. Navigate to your browser and download MSEdgeRedirect.

  2. 2. Double-click on the downloaded file to start the installation wizard, then click on Install.

    how to install msedge redirect on pc
  3. 3. Click on I accept this license then hit Next to continue with the installation.

    accept terms for msedge redirect
  4. 4. Select Service Mode then click on Next.

    select mode msedge
  5. 5. Launch the app, then click on Start Service Mode With Windows and Windows Store Apps, then hit Install.

    select start service mode msedge redirect
  6. If your Windows 11 widgets keep getting redirected from your default browser to Microsoft Edge, it might be time to use a third-party app to stop this from happening.

    We recommend MSEdge Redirect, which is an open-source tool available for free on Github. The tool will ensure your widgets use the browser you set as default, instead of Edge, via Settings.

4. Change the browser manually

  1. Hit the three horizontal ellipses next to your selected widget.
  2. At the bottom, you will see Powered by Weather (In this case the weather widget).
  3. Now proceed to Settings, select Apps then click on Default Apps.going default apps windows 11 settings
  4. Select a browser of your choice as the default.

Since each widget is related to an app or service, you first need to find the app and then manually set the default browser to your preferred one.

What is the default browser in Windows 11 widget?

The default browser in Windows 11 widgets is Microsoft Edge, and though it can be switched for some, the changes don’t really reflect in all widgets and some links in the Settings app.

A few of these will always open in Edge, no matter what you do, which is Microsoft’s way of pushing the browser.

Will uninstalling Microsoft Edge cause problems? 

Microsoft Edge is a web browser built into Windows 11, but it’s not the only browser available. The most common reason people want to uninstall Microsoft Edge is that they don’t like it. 

If you’re unhappy with how Microsoft Edge works or looks, then there’s no point in keeping it on your computer, and you can switch to Opera One or Chrome. You may find that there are better browsers available that do everything that you want them to do in a more efficient manner. 

Uninstalling applications from your system can cause problems because they use parts of your operating system and other applications installed on your computer. 

When you remove an application, these components may remain on your system and cause issues with other programs or even prevent them from working properly.

While all browsers have their advantages, there are some built-in OS functions and features that are exclusive to Microsoft Edge on Windows 11. If you uninstall this browser, you may lose access to these functions.

This is just one of the facts that prove Windows 11 is not user-friendly. Instead of uninstalling, you can also opt to disable Microsoft Edge.

Hopefully, you have found at least one or more ways to open your widgets in your favorite browser. 

In case you want to also open apps in a browser of your choice, you can do so by changing your default browser in Windows 11.

What’s your default browser, and what are your reasons for choosing it? Just let us know in the comments section below.

5 Ways to Fix YouTube TV when It Shows Error Code 3

YouTube TV is an excellent option for watching TV series on compatible platforms such as Android, smart TVs, Xbox gaming consoles, etc.

The best part is that users do not require a cable set-up box to watch TV episodes or channels.

Many people are now experiencing this issue while attempting to watch YouTube TV on their devices. When they tried to start YouTube TV, it displayed the error code 3 on the device’s screen.

They were unable to stream any of the videos nor open the app. Some users who could launch YouTube TV got playback errors on their devices.

Why does my YouTube TV keep saying error 3?

When our readers attempted to start YouTube TV on a compatible device, it failed to launch correctly, and they could not watch any content.

Instead, error code 3 appears on the screen. Some reasons why YouTube TV keeps displaying error 3 are listed below.

  • An issue with the YouTube TV app – Restarting the YouTube TV app many times may help
  • Poor Internet connection – An inconsistent Internet connection may be the cause of this error.
  • The YouTube TV app server is down – The YouTube TV app server may be temporarily unavailable during maintenance; waiting a couple of minutes may solve the issue.
  • A problem with the device – If the device is damaged due to some obvious reasons, this could lead to errors discussed above
  • Your device is unsupported – The YouTube TV app and its content are available on compatible devices such as Smart TVs and PC web browsers; such issues emerge when a user attempts to launch the YouTube TV app on an unsupported device.

Don’t worry if you’re experiencing a similar problem! Here are some ideas to get you started.

How do I fix YouTube TV error code 3?

1. Check the Internet connection

When users have an unreliable internet connection, it frequently causes the issues mentioned above and problems.

After removing the internet connection from the system, we recommend that users restart the router. Wait a few minutes before reconnecting the connection to the system.

If you use an Ethernet connection, please detach it by removing its cable wire from the system and reconnecting it after some time.

Even after this, if your internet connection is inconsistent, contact your internet service provider to acquire a steady connection!

2. YouTube TV app technical glitch

Because of a technical problem related to the YouTube TV app, this error can occur on any system.

It is simple to fix, just relaunching the application after shutting it. Restarting the device on which the user is attempting to stream the YouTube TV app is also recommended.

3. Close the background apps

  1. Press the Ctrl + Shift + Esc keys simultaneously to open the Task Manager window.
  2. Click the Processes tab, right-click on the unnecessary application that is currently running, which might be causing this error, and choose End task from the context menu.
  3. Now repeat the same procedure to end all the unwanted apps listed under Background Processes.
  4. Once done, you may close the Task Manager window and try to open the YouTube TV app to see if you have any errors.

4. Clear the browsing history and other data

  1. Open the Chrome browser on the system.
  2. In a new tab, type the following line in the address bar and press Enter key:chrome://settings/privacy
  3. Under the Privacy and security page, click Clear browsing data.
  4. Now, select Browsing history, Cookies and other site data, and Cached images and files checkboxes and hit the Clear data button.
  5. This starts clearing all the browsing history and other data selected for the Chrome browser.
  6. You can do the same with other major web browsers to clear browsing data and cache.

5. Check if the YouTube TV server is down

These issues are unavoidable when the YouTube TV app server is turned off. YouTube TV has regular maintenance tasks, during which the server will be unavailable.

In addition, the server is shut down due to many requests from millions of users. This may be determined by checking the status of YouTube TV.

Why won’t my YouTube connect to my TV anymore?

The reason why YouTube cannot connect to the TV is that the YouTube TV app might be outdated, or the TV needs a software upgrade. It could also be possible that the TV is not connected to the Internet.

If you are annoyed by the ads coming up on your TV, here is the guide on how to block the ads on a smart TV.

We also have a new guide on Playback error: This video requires payment to watch in YouTube TV, so don’t miss it.

Did you find this article helpful? Please share your thoughts in the comments box below.

How to Download & Install Google Play Games on Your Windows PC

Google Play Games is an online multiplayer gaming service that allows you to compete against other players on your device or computer. 

The service allows you to save your progress from one device and continue it on another, and it offers achievements, leaderboards, and cloud saves for all games.

Although Windows 11 has a decent collection of games, Android games are far more popular. If you’re going to play games on Windows, you’ll have to use the Microsoft Store.

Android is the most popular mobile operating system in the world. And it’s also the most versatile one. It, therefore, doesn’t come as a surprise that gaming fanatics would want to play Android games on Windows PCs.

Can you download Google Play Games on Windows 10? 

Unfortunately, there is no official version of Google Play Games for Windows 10 because the developers made it for Android and iOS devices. So if you want to use it on a PC, you’ll need to find alternative ways to install it.

Using an Android emulator is one of the most efficient ways to download Android apps on your PC.  This is because you can run Android apps directly without needing to root your device or install anything else on your phone or tablet.

How do I download and install Google Play Games on my PC? 

Use an Android emulator

  1. Download or launch your favorite emulator (in this case Bluestacks).
  2. Navigate to your browser and download Google Play Games.
  3. Go to the download folder, locate the file and select Open with Bluestacks.
  4. Open the app.

How can I download Android games on a PC? 

There are many methods available through which you can download any kind of app or game on your PC but not all are safe or secure. You can use Google Play Store, but it’s not always possible because there are some countries where Google Play Store is not available.

In such cases, you can install a VPN that will mask your IP address and allow you to select another region where the application is allowed.

Another safe method to download Android games on your PC by using an Android emulator. An Android emulator is software that allows you to run Android apps on your computer. 

What are Google Play Games PC system requirements?

The system requirements for Google Play Games are not strict, but there are some things that you need to take into account before installing the app on your computer. Here is what you need:

  • A Windows 10 (v2004) or later operating system
  • At least 8GB of RAM
  • An SSD with at least 10GB of available storage space
  • Intel UHD Graphics 630 processor or comparable

You can check for the detailed minimum system requirements from the official page to ensure your PC is compatible.

As always, remember to install an antivirus program when downloading applications from third-party sites. They could come bundled up with malware and put your system at risk.

If you want to play old games on your Windows PC, check out our expert article on how to navigate around the issue.

We also have a huge selection of games that you can play without downloading or installing anything if you are running low on storage space.

Let us know of any additional thoughts you may have on this topic down below.

Windows 11 Multiple Users Simultaneously: Easy Setup

Windows 11 has several features that make it easier to share your PC with family members or co-workers. One of the most useful ones is that you can set up multiple users on a single PC. 

If you’ve got a lot of family members who need to get on your computer, setting up Windows for each person can be a pain, especially with the high cost of new PCs that meet the stringent Windows 11 system requirements.

As such, creating different accounts for every user comes in handy. This can keep them from accessing your files and settings, which will protect your privacy and prevent them from accidentally deleting or modifying important information. 

Does Windows 11 allow multiple users? 

Yes, Windows 11 allows multiple users. One of the biggest changes in Windows 11 is that you can now have several profiles on the same computer. The new features allow you to have different accounts for different people and even create separate accounts for kids.

You can set up different accounts for each family member, friend, or employee who uses it. Each account will have its own unique login details and settings, so you can customize the experience for each person.

The default user is called Administrator. As the administrator, you can change the name of your main user to anything you want. You’ll also be able to create additional users with different privileges so that you can share your computer with other people without worrying about them messing things up.

Can two users use the same computer at the same time?

Yes, two users can use the same computer at the same time. A virtual desktop is a tool that allows you to use a Windows 11 multi user environment. These virtual desktops can be accessed from any device that has internet access, including phones, tablets, and laptops.

You can also use this program if you want to share your computer with someone else or if you have multiple monitors and want to share them with other users as well.

If your activities are not extensive, the built-in TaskView will do but if you are looking for more features such as syncing and overall security, you are better off installing Virtual Desktop software.

Some companies allow employees to work from home while they are logged in to an office computer. This means that they would have access to the same files and programs that other employees would use if they were in the office.

Each desktop can have its own wallpaper, background music, and even different programs running on it. In addition, you will also need the Remote Desktop feature such that each user will have a separate monitor to access their desktop.

    How do I set up multiple users at the same time on Windows 11? 

    In order to add multiple users to a single Windows 11 device, all you need to do is manually create them from the User Accounts menu.

    You may add as many local users as you want to a device, each with their own separate account.

  1. 1. Hit the Windows + R keys to open the Run command.

  2. 2. Type netplwiz and press Enter.

    netplwiz run command
  3. 3. Click Add in the User Accounts window.

  4. 4. Select Sign in without a Microsoft account (not recommended).

    sign in without microsoft account
  5. 5. Click on the Local account button.

  6. 6. Enter a username and password (optional) for the new user account, and a hint, in case you set a password. Once done, click on Next.

    add local account windows 11
  7. 7. Click on Finish to create the Local account.

    click Finish to create local user account windows 11
  8. 8. You can repeat these steps until you have created as many users as you wish on your PC.

  9. 9. Now select a virtual desktop to use and get started.

How many simultaneous users can access a Windows computer at a single time? 

The number of simultaneous users who can connect to the main computer depends on the remote desktop software you are using and the server configuration. Most of them have a limit on the number of simultaneous users that can connect to a single computer.

Some require that you purchase a Pro or Premium account to increase the limit. In case you are using the built-in Remote Desktop feature, you can connect only one user at a time.

We have a rich collection of free Remote Desktop software if you are in the market for one. As a precaution, always switch off your Remote Desktop when not in use to prevent cyber criminals from accessing your data.

It is also recommended to keep your OS updated, limit the number of users who can access Remote Desktop, and use a reliable VPN service.

Have you set up multiple accounts on your Windows PC? What is your experience? Let us know in the comment section below.

3 Ways to Fix Your Webcam if It’s Not Working with a USB Hub

When using a USB hub to connect your USB devices like a webcam with your computer, you realize that it’s not working.

This is a common situation and apparently, it may occur due to corrupt or outdated USB drivers. You may also encounter this issue if you are not using a powered hub.

Also, because certain external hard drives like webcams or flash drives are high-powered devices, they would need a powered hub. Otherwise, they may fail to work.

But if there’s a power surge in the USB port that’s preventing the webcam to work, you can follow our detailed guide for more details.

Why is my webcam not being detected through a USB hub?

If you are using a USB webcam and you realize that it’s not being recognized by the USB hub, then it could be because:

  • the USB webcam/USB hub is not connected properly
  • the camera/USB drivers are corrupt/outdated
  • you are not using a powered USB hub
  • There’s a glitch in the OS or with the USB port itself

So, if your webcam is not working with the USB hub, we have some effective tips on how to fix the issue.

What can I do if my webcam is not working with a USB hub?

1. Disconnect & reconnect USB devices

  1. Disconnect the webcam from the computer. disconnect webcam
  2. Now restart your PC without the USB devices.
  3. Once the PC has restarted, attach the webcam back.

Now, check if the webcam is working with the USB hub and if you are facing any other issues.

2. Update and reinstall the webcam software & USB drivers

  1. Press the Win + R keys simultaneously to launch the Run console.
  2. In the search bar, type devmgmt.msc and hit Enter. write devmgmt.msc in the run command and press enter
  3. Expand the Universal Serial Bus controllers section, right-click on the USB device, and select Update driver. update usb device
  4. Next, in the new window, click on Search automatically for drivers. Now, wait till Windows detects and installs the latest drivers automatically. Search automatically for drivers
  5. Now, expand the Cameras section and repeat steps 3 and 4 for the Integrated Webcam as well. update integrated webcam

Once done, exit Device Manager and restart your PC for the changes to be effective. Now, the webcam is not working with the USB hub issue should be fixed.

This method is also effective if your USB camera is not detected on your computer.

Note icon NOTE
You can also uninstall the device, and then visit the manufacturer’s website to reinstall the latest software and check if it resolves the issue.

Another option you should try is using specialized software because it scans your entire PC and searches for any error that could be an impediment to its performance. After it founds the issue, it can automatically repairs or replaces the damage.

3. Run the built-in camera troubleshooter

  1. Press the Win + I keys together to launch the Windows Settings app.
  2. Click on System on the left of the Settings window. system settings
  3. Now, on the right, click on Troubleshoot. windows troubleshooter
  4. Next, under Options, click on Other trouble-shooters. Other trouble-shooters
  5. On the right, under the Other section, go to Camera and click on Run. run the camera troubleshooter
  6. Now, wait for the troubleshooter to detect and fix the issue automatically.

You can now restart your machine and check if the webcam not working issue with the USB Hub is resolved.

How do I know if my USB hub is powered?

To check if your USB hub is powered, you can confirm the power output of USB ports as shown below:

  1. Press the Win + R hotkeys to open the Run console.
  2. Type devmgmt.msc in the search field and hit Enter. Type devmgmt.msc in Run console and press Enter
  3. Next, expand Universal Serial Bus controller, right-click on USB Root Hub, and click on Properties.usb hub root properties
  4. Select the Details tab and in the Property field, select Power data. 
  5. Under Value, you will see something like D0.
  6. The higher the number, the lower the power output of your USB Device. For example, here we see D2, which is somewhere in the middle. power data value D2

Do I need a powered USB hub for a webcam?

While the powered USB hubs draw their power from an electrical outlet, the non-powered USB hubs draw their power from the computer connection.

USB hubs are perfect for low-powered devices like mice and keyboards. But for high-powered devices like webcams and flash drives, it may not work properly.

You can also use multiple webcams with powered USB hubs, and divide the available bandwidth across three cameras.

However, if none of the above methods work, you can create a system restore point on Windows 11 and perform a system restore to go revert your PC to a previous working state.

If this does not help, you can also reset your Windows 11 PC and check if this helps fix the webcam not working with the USB hub issue.

For any other queries related to the webcam or the USB hub, you can leave a message in the comments box below.

5 Ways to Fix The Unable to Connect Error on The Kindle App for PC

The Kindle app for PC unable to connect is one of the recurring errors most users have encountered when trying to use it for reading.

Reading is an activity we all engage in daily, and it can be annoying not to gain access to ebooks to read. However, reading ebooks online sometimes requires downloading or purchasing some from online bookstores. Hence, you may need an app like Kindle to access your purchases.

The kindle app is free software that allows you to download ebooks from Amazon and then read them.

It is available on different operating systems like macOS, Windows, and Android. However, it is the best app to download and read digital books from Amazon.

These issues can come in different ways, like the inability to sign into the Kindle app and the Kindle book not opening on a PC.

However, this article will discuss the Kindle app for PC unable to connect and how users can quickly fix the problem.

Why does my Kindle say Unable to connect?

  • Network connection issues: The Kindle app can encounter several issues while connecting to the PC network. The Kindle app requires a stable and fast network to work correctly. However, it will be impossible for Kindle to establish a connection or sign if there’s a network error, likewise if you are connected to the internet through a cable network connection. It slows down the Internet connection and can make it unstable.
  • Outdated Kindle app: When the Kindle app is obsolete, it can cause it to malfunction. It indicates that the version of the app running on your PC doesn’t have the necessary patches and updates it needs.
  • Outdated Windows: Running an outdated Windows version on your computer can be detrimental. It can prompt the Kindle book not opening on PC error. Likewise, it means your computer doesn’t have the needed updates to help it run some apps. The above causes are the most common among all. However, we’ll discuss how to fix them later in this article.

Why is the Kindle app not opening on my PC?

Outdated system drivers are a culprit for the Kindle app not opening on PC. Every app on the computer requires one or more drivers to run it. However, if the drivers are outdated, it can cause difficulties in the case of the Kindle app.

How do I fix my Kindle app for PC if it’s unable to connect to my device?

1. Check if Airplane Mode is On

  1. Go to the Taskbar.
  2. Select the Network icon.
  3. Click on Airplane Mode and toggle Off the switch if it’s On.

Turning Off the Airplane Mode on your computer allows it to connect to the internet.

2. Check your network connection

The easiest way to fix your network issues is to perform a power cycle on your router. Also, switch to a wireless network connection if your connection is through a cable.

3. Restart your computer

  1. Click Start on your screen.
  2. Select Power from the drop-down.
  3. Click on Restart, then OK.

Restarting your computer will automatically relaunch Kindle and fix any issues with it.

4. Update Windows

  1. Click on Start.
  2. Select Settings from the options.
  3. Click on Windows Update, then select Check for updates.

Windows will automatically search and download updates if there are any available.

5. End unnecessary programs

  1. Click on Taskbar and select Task manager.
  2. Select the CPU and Memory usage.
  3. Click on apps you aren’t using, then click on End task.

Repeat the steps for all the programs to end and restart your computer. After this, the Kindle app for PC unable to connect problem should be fixed.

How do I check my Kindle software version?

  1. Launch the Kindle software.
  2. Click on Menu.
  3. Click on Settings.
  4. Scroll to the bottom of the screen, and you’ll see the current version of your software.

How do I update my Kindle software?

  1. Launch the Kindle software.
  2. Click the Menu button.
  3. Select Settings.
  4. Click the Menu button and tap Update Your Kindle.
  5. Click OK to update.

These are the best fixes for the Kindle app for PC unable to connect problem. Any of the solutions should fix the problem for you if they are followed accordingly.

Nevertheless, we recommend you read through our guide about how to fix your computer cannot find Kindle errors.

Leave your feedback and suggestions in the comments section. We’d love to hear from you.

Microsoft Teams is Stuck on Loading: 6 Tested Ways to Fix

When you launch Microsoft Teams, it may get stuck when the Teams logo or the loading text appears.

It might get stuck on loading with a white screen, or on loading your accounts, etc. Corrupt passwords cache, temporary data, incorrect date and time, or a server problem.

What can I do if Microsoft Teams is stuck on loading?

1. Restart MS Teams

  1. Close Microsoft Teams if possible.
  2. Press CTRL + ALT + Del on the keyboard and open Task Manager.
  3. Find the Microsoft Teams process and end it.ending microsoft teams process windows task manager
  4. Relaunch the Teams.

It should fix Microsoft Teams’ not loading problem on Windows 11 or 10.

2. Run in compatibility mode

  1. Right-click on MS Teams and go to Properties.
  2. Go to the Compatibility tab.
  3. Check Run this program in compatibility mode for: and select Windows 7 from the list.enabling compatibility mode microsoft teams
  4. Click on Apply and OK.

3. Delete the credential files

  1. Open the Start Menu, type Control Panel, and hit Enter.opening control panel win11
  2. Go to User Accounts.going user accounts control panel
  3. Go to Credential Manager.going credential manager
  4. Select Windows Credentials.
  5. Find and delete Microsoft Teams credentials.removing microsoft teams credentials
  6. Now, launch the Teams.

Deleting credentials works when Microsoft Teams is stuck on the Continue option.

4. Delete the app cache

  1. Press Win + R on the keyboard to open Run.
  2. Type the following command and hit Enter: %appdata%\Microsoft\teams
  3. Delete the content from the following folders: Blob_storage, Cache, Databases, GPUCache, IndexedDB, Local Storage, and tmp.Microsoft Teams local data folder
  4. Relaunch the Teams.

If Microsoft Teams is taking forever to load, clearing the app cache should do the trick. Besides, deleting the cache also works on Android devices and iPhones.

5. Re-install Microsoft Teams

5.1 Uninstall Microsoft Teams

  1. Press Win + I on the keyboard to open the Windows Settings.
  2. Go to Apps and click on Apps & features.going apps & features Microsoft windows 11
  3. Search for Microsoft Teams.
  4. Click on the three vertical dots and choose Uninstall.uninstalling microsoft teams

To make sure that Microsoft Teams leaves no roots or broken files behind, you can use software to ensure that there are no junk files left on your PC. CCleaner is a tool that scans and cleans your computer of any unnecessary files left.

5.2 Install again

  1. Go to the download page and download the app.downloading microsoft teams
  2. Install on your computer.

You also can find this app on Microsoft Store.

6. Disable hardware acceleration

  1. Open Microsoft Teams.
  2. Click on your profile picture and select Manage Account.manage microsoft teams account
  3. Select the General tab.ms teams settings general tab
  4. Under the Application section, check the box next to Disable GPU Hardware Acceleration.ms teams disable gpu acceleration
  5. Restart Teams and see if the issue persists.

How do you run the troubleshooter for Teams?

Microsoft Teams is available on both Microsoft Store as well as on Microsoft’s website as a standalone installer. Even though both are very similar, there are differences.

If you use the non-store version, you can do the suggested things given above to troubleshoot.

However, if you have the store version, you can do the following things to troubleshoot Microsoft Teams.

  1. Go to Windows Settings.
  2. Go to Troubleshoot under the System tab.going system and troubleshoot windows 11 settings
  3. Click on Other troubleshooters.clicking other troubleshooter windows 11 settings
  4. Scroll down until you find Windows Store apps, and click on Run next to it.clicking run windows store apps troubleshooter
  5. Follow the on-screen instructions.

Alternatively, you can right-click on the Teams app icon and go to Apps settings. Then, you can reset/repair the app.

These are the ways to fix the Microsoft Teams stuck on loading issue. In addition, you can verify if the time and date are correct on your PC or not. Also, make sure you have a stable Internet connection. However, if you keep getting the problem, you can consider using Microsoft Teams Web.

If you have any other methods that may help others, let us know in the comments box.

Microsoft Edge Built-In VPN: How to Install, Use, and Alternatives [2026]

Known as Microsoft Edge Secure Network, Edge’s built-in VPN transforms your browser into a more secure one. However, it’s not pre-installed, you have to configure it yourself.

It allows users to browse freely across restricted sites. Today we’ll show you how to install and use it, talk more about its features and safety, and touch on alternatives that might suit better some of you.

Let’s get to it.

How do I enable VPN on Edge?

    Microsoft Edge’s VPN settings allow you to enable the built-in VPN. To accomplish this, you need to toggle the Secure Network service on.rnrnYou can navigate to these settings through the Edge browser in a few clicks. Moreover, if you are not satisfied with the built-in VPN, you can easily turn it back off from the same menu.

  1. 1. Launch the Microsoft Edge browser.

  2. 2. Click on the Menu button, and then select the Settings and more option.

  3. 3. Choose Secure Network from the drop-down.

    click on secure network
  4. 4. On the new tab, sign in to your Microsoft account (Create a new Microsoft Account if you don’t have one).

  5. 5. Click on the shield icon in the browser frame and  toggle Microsoft Edge’s Secure Network ON.

    toggle network protection on

How Safe Is Microsoft Edge’s VPN?

Microsoft Edge is a highly secure browser with an advanced security and protection system. It provides a reliable and safe online browsing experience.

However, Microsoft Edge’s VPN is safe and reliable. It operates on the integrated VPN service known as Microsoft Edge Secure Network.

Moreover, many benefits come with this VPN. Some benefits are an encrypted connection that protects user data from online threats and private location access to several servers. Likewise, it is free to use and does not require any subscriptions.

Likewise, it offers all the usual benefits associated with a VPN service.

By the way, it can be beneficial for users to read more about Edge’s VPN launch. So, we recommend that you check our article about Edge having its own integrated VPN service.

Third-party VPN alternatives for Edge

One of the best VPNs on the market that’s very easy to add on Edge is ExpressVPN.

Not only does it have a compatible extension, but it also offers a full-fledged app that can encrypt and protect all the traffic on your device.

Main features include:

  • servers in 105 countries
  • unlimited bandwidth
  • cross-platform support
  • AES-256-bit encryption (the most secure in the world)

The tool is premium-tier, so you’ll have to get a subscription, but you can get a refund in the first 30 days if you’re not happy with the purchase.

ExpressVPN

Add ExpressVPN to Edge for fast connections, safe browsing and uncensored access to pages from the whole world!
Check price Visit website

For more in-depth protection of an entire system, we suggest to manually set up a VPN on Windows 11.

We hope you find our article helpful. If you encounter any difficulties or have any questions, let us know in the comments section below.

Fix: Windows 11 Mouse Gets Stuck When Using Multiple Monitors

Many users are tempted to use multiple monitors with their PC. Most of the time people are clearly thinking about multitasking, while others just like the design.

Whatever your motivation is, we are here to help you when situations such as these happen. Just know that Windows 11 is still a young operating system, and there is still a lot to fix.

If you need to know how to turn off Auto Enhance on Windows 11, or information on how to move the taskbar to the top or side on Windows 11, you came to the right place.

Today, however, we are going to help you fix your mouse getting stuck when using multiple monitors on your Windows 11 device.

Why does my mouse get stuck between monitors?

You should know that, depending on the arrangement of the two monitors in you’re monitor settings and how exactly they align with each other, you might have to move your pointer up or down in order to get to the other monitor.

This is even more true if the two monitors you are using don’t have the same resolution, but it can be the case with the same resolution as well.

So, in the guide below, we’re going to look at how to solve these problems with Windows 11 mouse problems on multiple monitors.

How do I fix my windows 11 mouse if it gets stuck with multiple monitors?

  1. Press Win + I to access Settings.
  2. Select the System tab, then click on Display.displays
  3. Under Multiple displays, switch the monitors around.windows 11 displays

You might have thought that this problem had a more complicated solution, but it really doesn’t. As simple as this seems, it is just as effective.

There have also been cases where the monitors, as you see them in the picture above, will be one above the other.

All you need to do is switch the monitors around, but make sure to keep your main monitor as the blue one.

Keep this in mind next time you or one of your friends is in a situation where the Windows mouse keeps getting stuck between monitors

Is there a limit to how many monitors I can have on Windows 11?

You might have expected us to say 5, or 8, but in truth, Windows 11 lets you use as many monitors as you want as long as your graphic processor can handle it.

Also, keep in mind that there are next to zero risks in using more than one monitor, so it really comes down to what you have to work with.

But, if your mouse gets stuck on the secondary monitor on windows 10/11, look for guidance above and you will soon be done with this.

A lot of users have actually reported that their Windows 10/11 mouse cursor gets stuck in the screen’s corner, so we decided to make this article, especially for you.

Has this guide helped you fix this annoying problem? Share your experience with us in the comments section below.

10 Best Monitor Brightness Control Software

If you are looking to adjust the screen brightness on your Windows PC, there are several ways that you can do it. The first method is by using the Windows Settings app and the second is through screen brightness software.

Windows 10 & 11 have a built-in brightness setting that can be used to change the brightness of your computer screen. It adjusts the amount of light emitted by the computer’s display, to make it easier on the eyes. When you’re using your computer, it can be difficult to find the right brightness setting especially if the brightness slider is missing.

You may have to adjust it frequently if you’re working with different types of content or if there are different people in the room. Screen brightness software can help you get the most out of your screen by allowing you to set a brightness level that works for you.

What is the best screen brightness software for Windows 11?

DimScreen – Lightweight app

DimScreen is a free and lightweight utility that allows you to adjust the brightness of your monitor in Windows. The software provides a simple slider that enables you to adjust the brightness from 0% to 100%.

Non-techies will enjoy this software as it does not need installation. You can easily adjust your computer’s brightness at the click of a button. The program is very easy to use and can be customized to suit your needs.

Additional features:

  • No need for installation
  • Has keyboard shortcuts
  • Night-mode feature
  • Supports multiple monitors

⇒ Get DimScreen

 RedshiftGUI – Feature-packed app

RedShiftGUI is a feature-rich program for managing your screen brightness. The GUI lets you set a schedule for the screen brightness to automatically change during the day and manually adjust it at any time. 

You can also select from various predefined color temperature presets designed to match different lighting conditions. 

This helps you sleep better by reducing the impact of artificial light at night. It’s also helpful if you have a laptop that needs to run on battery power because it doesn’t use much energy. One downside is that it has been over a decade since it was last updated but luckily, it still functions.

Additional features:

  • Lightweight on your PC
  • Detects your location automatically
  • Supports multiple operating systems

⇒ Get RedShiftGUI

CareUEyes – Health-focused app

CareUEyes has a simple yet feature-rich user interface which makes it easy to use even for new users. It comes with some predefined presets that you can use as per your need.

For example, you can set the brightness level to low when you are working in the office, but then increase it when you go home or at night.

CareUEyes also includes a timer that turns off your monitor after a certain period of time so that you don’t have to worry about leaving it on all day. 

Additional features:

  • Has a break reminder to help you remain productive
  • Focus feature for reading area
  • Has color temperature presets
  • Supports multiple operating systems

⇒ Get CareUEyes

F.lux – Intuitive app

F.lux is a popular software that adjusts the color of your display based on the time of day and your location, in order to help you sleep better.

It uses your device’s location and current room settings to determine when sunrise and sunset occur and also takes into account the amount of daylight that is expected for that time of year. 

In this program, you can select how long after sunset you want f.lux to turn on, as well as how long it should stay on before turning it off again. 

You can also make the app automatically adjust your screen brightness based on how much light is in your room — great for when you’re working late at night or early in the morning when it’s dark outside but still pretty bright inside.

Additional features:

  • Auto-adjust feature to the app you are using
  • Easy to use
  • Color temperature control

⇒ Get F.lux

Desktop Lighter – Visually impaired approved app

Desktop Lighter is a free screen brightness software for Windows. The application’s interface is simple and doesn’t take up much space on your desktop.

Users can easily adjust the brightness level by clicking on their desired value or by using the slider bar located below the main window in order to make it easier for them to make changes without having to struggle with too many options at once.

Additional features:

  • Can work with hotkeys
  • Free to download
  • Can enlarge parts of the screen

⇒ Get Desktop Lighter

Gamma Panel – Most advanced app

Gamma Panel is a tool that lets you change the gamma setting of your display. It also has some other features, such as inverting colors, but most people will likely be interested in the gamma control. 

Gamma control allows you to adjust your screen brightness so that it’s more comfortable for your eyes, especially if you’re working at night or in a dark room.

Additional features:

  • You can create your own color profiles
  • Can assign hotkeys
  • Has lots of advanced features

⇒ Get Gamma Panel

PangoBright – Non-intrusive app

PangoBright is a simple and effective program that allows you to change the brightness of your monitor with the press of a button. The program has a simple interface with a single button that changes the brightness level.

This program works by creating a shortcut on your desktop. When you click on this shortcut, it will open up PangoBright and change the brightness level of your monitor immediately.

Additional features:

  • Lightweight on your PC
  • Runs from the system tray
  • Has a simple interface

⇒ Get PangoBright

ClickMonitorDDC – Unobtrusive app

ClickMonitorDDC is a really good tool for those who want to make sure that their screens are always at maximum brightness or at least medium brightness.

The tool monitors the brightness level of your monitor, and when it detects that the brightness is low, it will prompt you to change it. 

Additional features:

  • Supports Hotkeys
  • Stays in the system tray
  • Allows multiple profiles

⇒ Get ClickMonitorDDC

iBrightness – Portable app

iBrightness is a tiny and lightweight tool that allows you to adjust the screen brightness of your Windows PC. You can use it to change the screen brightness value in real-time without having to open any settings page.

The best thing about iBrightness is that it’s completely free and portable, so you can download it without worrying about anything else.

Additional features:

  • Touch-sensitive and suitable for tablets and phones
  • Stays in the system tray
  • Portable

⇒ Get iBrightness

Twinkle Tray – Best screen dimmer app

Twinkle tray is one of the best tools available out there in the market that helps you in changing the screen brightness level of your computer quickly and easily. 

This tool gives you access to multiple options such as increasing or decreasing the brightness level, saving battery life, and more. An advantageous feature is that it automatically adjusts to your chosen Windows theme.

Additional features:

  • Adjusts brightness according to time of day
  • Supports multiple languages
  • Can enable Hotkeys

⇒ Get Twinkle Tray

Is there a way to make my screen brighter?

Windows has a built-in option that you can use to adjust the brightness of your screen. To make your screen brighter, you can use the Settings app to adjust the brightness level. You can also use third-party apps to make your screen brighter or dimmer than it usually is.

The problem with depending on Windows 11 in-built brightness settings is that it’s not always easy to find the right setting.

Some users prefer to have their displays set at maximum brightness because it makes their screens easier to see in bright environments. However, this can also drain your battery faster than you’d expect – especially if you’re using an older laptop with a smaller battery.

Can I control monitor brightness from a PC?

Yes, you can control monitor brightness from your PC. You can change the brightness of your monitor via a keyboard shortcut. This will only be effective if your keyboard has a dedicated key for this purpose. Otherwise, you will have to go to display settings and choose an option that is fit for you.

Windows has a very useful feature called Night Light. The Night Light is a blue light filter that decreases the amount of blue light your screen emits. This helps reduce eye strain and makes it easier to fall asleep after using your PC or laptop at night.

If you find this to be cumbersome or the Night Light is not turning off, you can opt for automatic screen brightness adjusters as detailed above so that if you forget to switch certain features on, they can do it for you.

These tools can also be used if the brightness button is not working on your PC, so don’t hesitate to give them a try. Before you go, you should check our guide on the best brightness and contrast settings for a monitor.

Let us know if you use screen brightness software and your favorite so far in the comments section below.

How to Change the User Account in Windows 11 Widgets

Windows 11 widgets is a system tool that allows you to add some functionality to the Windows desktop and taskbar. The main feature of this tool is that it provides an easy way to access your most used applications and tools, such as a calculator and notepad.

The user account in Windows 11 widgets is the account that you use to sign into Windows. This can be your personal account, or it can be a work account. In Windows, you can create multiple user accounts for different purposes. 

For example, having one account for personal use and another for work is possible. This is useful if you have different needs for each profile, such as having a separate email address and login password for work.

You can also use widgets without signing in. If you use a guest account, the computer has no personalization information. But, sometimes, you need to sync some activities, such as your meetings to get reminders.

What user account does Windows 11 widgets use? 

Installing Windows 11 widgets creates a shortcut on your desktop and adds an icon to the system tray. For these icons to work properly, Windows 11 widgets must run under a user account.

Usually, Windows 11 widgets will use the same user account you signed in with. If you have more than one user account on your computer, then Windows 11 widgets will use the default account created during installation. 

If you’re signed in with your Microsoft account, any changes you make to Windows 11 widgets will automatically sync across all of your devices. 

The widget will ask to create an account for you if there’s no existing profile associated with your device. You can ignore this option if you don’t want to sign in. 

Once the user account has been created, it will remain active until closed or shut down by Windows 11 or when you decide to delete it.

How do I change the account for widgets in Windows 11? 

1. Change the sign-in options

  1. 1. Hit the Windows key on your keyboard.

  2. 2. Click on Settings from the menu that opened.

    settings windows 11
  3. 3. Select Accounts from the left pane, then click on Your info.

    accounts your info windows 11 settings
  4. 4. Click on Stop signing in to all Microsoft apps automatically.

    stop signing in to microsoft apps setting
  5. 5. Now go back to widgets and sign in with your desired user account.

  6. The first and easiest method to change your user account is via Windows 11’s built-in Settings. What you need to do is change the sign-in options so that your PC no longer signs in to Microsoft accounts automatically.

    This change will allow you to sign-in using a different user account of your choice the next time you access widgets.

2. Reset the Mail app 

  1. Hit the Windows key and click on Settings.settings windows 11
  2. Go to Apps.apps-features where is the chrome menu button
  3. Find the Mail and Calendar app and click on Advanced options. advanced options mail windows 11
  4. Hit the Reset button.reset mail and calendar settings
  5. Now go back to widgets and sign in with your desired user account.

3. Delete user account online

  1. Navigate to your web browser to log in to your Microsoft account. 
  2. Go to Devices to find all connected PCs associated with your account.Microsoft devices windows 11
  3. Click on Remove device to unlink the account.remove device confirm
  4. Now go back to widgets and sign in with your desired user account.

Since most of these solutions involve removing your account, remember to back up all your files using backup software to avoid losing any important information.

Can I use multiple accounts with Windows 11 widgets? 

Yes, you can use multiple accounts with Windows 11 widgets. However, you cannot use two or more accounts simultaneously. This can be useful if you share a computer with others and want to keep your personal data separate from theirs.

For example, if you want to use two different accounts but still want to use the same laptop, you need to log off from one account before logging in to another. You can switch between accounts quickly by selecting the profile picture from the Start menu or taskbar.

And you can also sign out all other users in Windows 11 without logging into the individual profiles.

It is also important to note that setting up multiple accounts on a single computer will require more space on your hard drive or SSD drive because each account has its own folder that stores its user files and programs.

In this case, you need to install a RAM cleaner to get rid of temporary and unnecessary files to avoid running out of space.

Should you face any other related problems, such as Windows 11 widgets not working, feel free to check out our detailed guide on how to fix the issue.

We also have the top clock widgets to help you keep track of your time and stay on top of things.

Let us know of any additional thoughts you may have on this topic in the comment section below.

How to Watch French TV in the US & Anywhere [Live Streaming]

Watching French TV in the USA or any other country is possible if you’re equipped with the appropriate tools.

It depends on which TV channel you’re attempting to watch, if it can be accessed online from anywhere in the world without geo-restrictions, or if you need to bypass geoblocks.

If you’re a French citizen who is living or traveling in the USA or an American who wants to learn the French language, you can easily watch French TV on your desktop, laptop, smartphone, or tablet. You just need to know where to look.

Where to watch French TV?

You can find numerous French television channels with diverse content. Thus, simply discover comedy, arts, or politics on French live TV using a reliable VPN for unavailable content.

This is what you can watch by using a VPN that offers access to French streaming services in the USA:

✅ TV5Monde channel

✅ France24

✅ TF1

✅ Eurosport

✅ France2

That being said, these French TV channels in the USA can be available for public use with the help of streaming-optimized tools.

How to watch TV5Monde in the USA?

How can I get TV5Monde in the USA?

  1. Download ExpressVPN
  2. Install the software on your PC.
  3. In the main window, click on the three dots.
  4. Find and select France*.
  5. Click on the power button to connect to the French VPN server.
  6. Using your web browser, visit TV5Monde Direct TV (see our selection of the best web browsers for streaming).
  7. Press the play button and start watching TV5Monde.

*If the France VPN server is unavailable, you can also try Belgium or Switzerland.

the TV5Monde error code 232403

Note: TV5Monde live streaming is available online for free for France, Belgium, and Switzerland.

If you’re trying to access it from anywhere else, then you will receive the 232403 error code unless you connect to a VPN server from one of the three countries.

5 best French TV channels in the USA (with live french streaming service in USA)

  • TV5Monde for all-around content (watch online with VPN).watch TV5Monde live streaming
  • France 24 for multilingual news (watch online without VPN).watch France 24 live streaming
  • Eurosport 1 and 2 for sports (watch online with Mobdro, no VPN).watch Eurosport FR live streaming
  • TF1 for French and American TV shows (watch online with Mobdro, no VPN).watch TF1 live streaming
  • France2 for news, culture, TV shows, and movies (watch online with VPN).watch France2 live streaming

How to get French TV in the US (For children)

  1. Log in to your ExpressVPN account.
  2. Launch the software on your PC.
  3. In the main window, click on the three dots.
  4. Look up France and select this entry.
  5. Press the power button to connect to the French VPN server.
  6. Using your web browser, visit Gulli Direct (check out the best web browsers for streaming).
  7. Press the play button and start watching Gulli*.watch Gullli live streaming

*Besides live streaming, your kids can also watch reruns of cartoons, shows, movies, and TV series on Gulli (for some content, you don’t need a VPN).

NOTE: If your children are interested in watching French TV in USA, you can also explore other TV channels for kids apart from Gulli. Check out BoingTV, Canal J, TiJi, TiVi5 Monde, and Télétoon+. If you’re a Netflix subscriber, you can watch French TV on Netflix, including content for children.

Everything you need to know about watching French TV outside France

In case you’re wondering if you can watch French TV online, yes. You can definitely watch French TV online. There are numerous websites that support French TV channels and live streaming content.

Many users may ask themselves if they can watch French TV on Netflix. Yes, you can watch French TV on Netflix with a VPN.

More so, if somebody wants to know how to watch Quebec TV in the USA, you can watch Quebec TV live in the USA in your web browser. It doesn’t have geo-restrictions, so you don’t need special tools.

? Does Amazon Prime have French TV?

Yes, there is French TV content on this streaming platform, and it brings a high range of French shows you can watch when you please.

? Does Hulu have French TV?

Sadly, no. You don’t have French content on Hulu streaming because it’s not available in France at the moment.

? Can I get TV5MONDE on Roku?

You can watch this French channel on Roku indeed. You only need a subscription to this platform and you’re good to go.

? Does Chromecast have any French channels?

Unfortunately, you don’t have French channels on the Chromecast list for the moment so it’s not possible to access them.

There are tons of quality French TV channels you can watch online in the USA or any other country.

Whether you’re interested in news, culture, politics, sports, TV shows, movies, series, or children’s programs. Some of them are available for free while others require paid subscriptions.

Discover what else you can do with Mobdro by joining our Mobdro section. Plus, you can visit our Streaming hub for more cool guides and quick-fix articles.

War Thunder Packet Loss: What is It and How to Fix It?

War Thunder is a free-to-play, cross-platform military MMO game. It gained a lot of traction and is one of the most-played games on Steam. You can fly warplanes, drive tanks, and wreak havoc on your enemies.

You can play this game entirely for free, making it even more appealing for players worldwide.

Therefore, it’s easy to see why it’s so popular and why sometimes the game servers get overcrowded.

As a result, some unwanted phenomena might occur in the form of high ping/latency, jitter, and packet loss.

Usually, you can’t tell the difference, but take our word on this: packet loss is one of the worst things you could encounter in live-action games.

What is packet loss?

To put it briefly, whenever you send or receive data online, some packets might never reach their destination. We refer to this as packet loss. Now, packet loss can take two forms:

  • Outbound packet loss – affects data flow that goes from your PC toward the destination servers
  • Inbound packet loss – traffic that comes from the destination server toward your PC

Whenever this happens, you might notice some quite familiar yet annoying behavior. Namely, Rubberbanding, high latency/ping, connection timeouts, or game crash.

If you still have no idea what we’re talking about, picture this: you’re shooting at an enemy vehicle, but it seems it’s not taking damage. Suddenly, the vehicle is out of sight, and you’ve missed your chance to pulverize it.

Hence, there are more players who experience game issues on War Thunder and these are as follows:

  • War Thunder high packet loss
  • War Thunder high ping and packet loss
  • War Thunder low ping high packet loss
  • War Thunder operation timed out
  • War Thunder is not loading
  • War Thunder connection to server lost

That’s what packet loss implies regarding your game and what you should first know about this connection issue.

So, does using a VPN improve packet loss? Sometimes, when your ISP throttles your bandwidth and/or leaks packets, you can use a VPN to reduce packet loss and improve ping.

You may also wonder if using a VPN improves your ping. You can improve your War Thunder in-game ping by using a VPN. Here are our best VPNs to improve ping and gameplay.

Why is my packet loss so high in War Thunder?

There are many reasons you might experience packet loss in War Thunder. For instance, you might leak packets if you have an old, chewed-up, flaky Ethernet cable between you and your router.

More so, if there are many users on your network, you might experience network congestion. This, in turn, leads to packet loss.

The good news is that packet loss rarely occurs because of you. If you have never had this issue, chances are slim that you’re what’s causing it to begin with. Therefore, network congestion is still our usual suspect in this case.

However, sometimes, your ISP might throttle your bandwidth to minimize costs. Or the War Thunder server might take a massive blow from all the simultaneous connections.

All of these can be the cause of your packet loss situation.

How can I fix packet loss on War Thunder?

1. Use a VPN

  1. Download ExpressVPN to your PC.
  2. Install it on your system.
  3. Launch it and log into your account.
  4. Connect to the server of your choice.
  5. Launch War Thunder and check if you’re still leaking packets.

A VPN often helps with packet loss, and ExpressVPN is an excellent all-around VPN tool from Kape Technologies. It can help you protect your privacy and secure your connection.

Plus, it can unblock geo-restricted content, and reduce packet loss with its high-speed servers. It also has 24/7 live chat support.

ExpressVPN

Leaking packets in War Thunder? This software can lend you a helping hand.
Check price Visit website

However, it’s worth mentioning that using a VPN won’t work 100% in all cases. In order for this fix to work, the packet leak must occur on your ISP’s side of the connection.

Thus, if you or the game server leak packets, using a VPN connection won’t work.

2. Troubleshoot your connection manually

  1. Use our guide on packet loss to run a complete ping/packet loss testPacket loss analysis Windows with tracert and pathping
  2. Locate the hops where the ping spikes
  3. Depending on your findings, take appropriate actions

You might notice high ping/packet leaks in the following locations:

  • Your home network
  • ISP’s network
  • The servers of the network distribution company
  • War Thunder game servers

Therefore, you can try one of our suggestions below to fix packet loss in War Thunder:

  • Check if the devices on your network function properly (cables, PCs, routers)
  • Talk to your ISP about the issue
  • Ask your ISP to talk to the network distribution company
  • Contact the War Thunder support team if the issue is on their side

War Thunder server ping & packet loss test

Testing your packet loss or high ping levels on your game is quite intuitive. The step-by-step process goes like this:

  1. Connect to your VPN using another server location.
  2. Go online and see if your Internet connection is improved.
  3. If it works, it means that your ISP may throttle your network.
  4. In case it doesn’t work, the cause can be your cables or router distance.

Many players are wondering how to fix War Thunder packet loss. So you can utilize ExpressVPN, but only if you’re sure that your ISP leaks the packets or troubleshoots your connection.

It’s not exactly challenging to fix packet loss in War Thunder if you know where to start and understand what packet loss is.

There are a lot of causes for leaking packets, and as a result, there are also a lot of potential fixes.

You can check out the best VPNs for gamers that can improve your ping. Visit the Gaming hub to discover more reviews and guides.

However, remember that packet loss usually comes and goes, and the best way to tackle it is to wait it out. If you notice a pattern or the issue doesn’t fix itself after a while, you can step in and try some of our suggested fixes.

Remember always to keep your game updated; otherwise, you’ll run into the incompatible server version error.

Disable Laptop Keyboard When Using an External One

For some, this might seem like a dumb question to ask, but it has a serious basis – if your laptop already comes with a built-in keyboard, should you use a separate one?

We provide our sincere opinion below, right after we show you how to disable the built-in laptop keyboard and use the external one only.

Can I disable my internal laptop keyboard but not the external one?

The answer is yes, you can disable only one of the two. Basically, you do not disable the keyboard feature altogether from your laptop.

You can remove the usage of every separate device on your laptop via Settings, as you will see from the guide below.

    How to disable the laptop keyboard when an external is plugged in?

    If you want to use an external keyboard on your laptop, instead of its internal one, you can configure your Settings so that the latter is disabled.

    To do so, you need to access Device Manager and manually uninstall the internal keyboard, which will be removed along with its associated driver.

  1. 1. Press the Windows on your keyboard or the Start button on your taskbar to open the Windows search box.

  2. 2. Type device manager in the search box and press Enter to open the tool.

  3. 3. Navigate to the Keyboard section and click on it to expand it. A list with the installed keyboards on your laptop will appear.

    uninstall keyboard driver
  4. 4. Right-click on the internal keyboard to open a menu with multiple options.

  5. 5. Select Uninstall, then click on Yes to confirm the decision.

This is, however, a temporary fix, because your PC will automatically try to search for a driver for the internal keyboard as soon as you reboot.

How can I prevent my laptop from re-enabling the internal keyboard?

disable automatic driver installation
  1. Open Start Menu and type gpedit.msc.
  2. Hit Enter to open Local Group Policy Editor.
  3. Go to Computer Configuration > Administrative Templates > System > Device Installation > Device Installation Restrictions. A window on the right will open with more details.
  4. Search for Prevent installation of Devices not described by other policy settings. Right-click on it.
  5. Click on the Enable option, apply and save the changes.

Reboot your computer and the device driver will not install automatically and the internal keyboard will remain disabled. You can continue using your external keyboard.

Please note that in case your external keyboard uses the same generic device drivers, then this will not solve your issue. Uninstalling that driver will disable both of them.

Can I manually re-enable the internal keyboard?

Looking to re-enable the keyboard of your laptop? Open gpedit.msc via Run and follow the same steps, only this time make sure you disable the option.


What are the advantages of using an external laptop keyboard?

incorrect posture laptop

Recently, I finally bought a wireless keyboard and mouse for my Windows 10 laptops and have been using them for a few days now.

The reason why I have bought a separate keyboard for my laptop is because of concerns related to my health.

Working for so many hours almost every day in front of my computer is affecting my health because I don’t maintain a healthy posture. And yes, relying on a laptop’s keyboard to write and work is a big cause of that. Let me explain.

Have a look at the picture above. As you can see, your spinal cord is bent mainly because the display is somewhat lower situated than the eyesight, despite the fact that the desktop PC comes with a separate keyboard.

Now, in the below image, you can see that when you’re relying on your laptop‘s built-in keyboard to write, your incline your back and keep it like that for hours.use correct laptop posture

A separate laptop keyboard improves your health

Now, if you would get a separate keyboard, a wireless one, especially, so that you wouldn’t be tied to a cord, first of all, the distance between the screen and your eyes will be reduced.

Secondly, you will now be able to try and adopt a correct spinal cord posture, as your hands won’t be as close to the laptop as they were before. It’s just as simple as that.

Of course, when you are traveling and taking the laptop with you, it might not seem like such a great idea to take an extra keyboard with you.

Do use the keyboard if you don’t have a desktop PC and your laptop is your main working tool. You will be surprised at how big the effect will be on your health.

Interested in keeping yourself healthy? Check out our 6 best Windows 10 fitness apps.

You can customize your external keyboard

And there’s also another major advantage to buying a separate keyboard — you can pick one that really suits your needs. Your built-in laptop keyboard is pretty standard.

On the other hand, you can often customize your separate keyboard: you can choose its color (you may purchase a themed keyboard), select a particular key orientation design, and much more.

So, as you can see, a separate keyboard brings at least two important advantages in terms of keeping a healthy posture and choosing your own keyboard design.

We hope you found this guide useful and managed to disable your laptop’s keyboard when an external one is plugged in. Let us know your thoughts about this article in the comments section below.

Windows 10/11 VPN not Working after Update [Full Guide]

The presence of VPN solutions in the current state of computing technologies reached its peak. And since Windows 10 is one of the most used operative systems, a large chunk of the Virtual Private Networks run on Microsoft’s Windows.

Although they mostly work well, reports say that VPN is not working after Windows 10 updates, especially after the major Windows Updates.

These issues are quite common after every new major release and we decided to provide you with a list of possible solutions that should help you address them.

If you’re suddenly stroke with a plethora of VPN issues after a Windows update, make sure to check them out below.

Can’t connect to any VPN after today’s Windows Updates Windows 10?

This occurring error on Windows 10 affects all users that install a specific Patch Tuesday update. This can interfere with the built-in VPN and prevent connecting to the network.

You may encounter this issue and it’s better to have the knowledge. This is how other similar users describe this VPN problem:

  • Forticlient VPN not connecting Windows 10 (a network error prevented updates from being downloaded)
  • Cisco VPN not working after the Windows 10 update
  • Windows 10 update breaks L2TP VPN- the L2TP connection attempt failed because the security layer encountered a processing error
  • The service profile is damaged. reinstall the service profile
  • The remote access service IP configuration is unusable
  • Windows 10 built-in VPN not connecting
  • VPN connection not showing in Network Connections Windows 10
  • Windows 10 VPN not working after sleep
  • Windows 11 update breaks VPN

These are the most reported issues by users regarding this update error. Therefore, let’s tackle the subject and see how to resolve it.

How can I fix VPN issues on Windows 10 after updates?

1. Use a proper VPN client

In order to avoid issues and errors, we strongly recommend choosing a reliable and compatible VPN.

Our VPN of choice is ExpressVPN, a world-class VPN that brings all those professional privacy and security-oriented features to the table but without you having to break the bank to acquire a subscription. It’s actually very affordable.

Crafted for the Windows 10 architecture, it will seamlessly blend with your system and grant you the security you seek.

Kape Technologies-owned ExpressVPN has OpenVPN, PPTP, IPSEC/L2TP, and SOCKS5 (Proxy) technologies.

In fact, the industry-standard OpenVPN offers you the highest level of encryption via secure VPN tunnels.

Speaking about tunneling technology, the VPN uses a global VPN Tunnel Network powered by multiple gateways with worldwide access and unlimited bandwidth.

ExpressVPN

Install the latest Windows 10 updates without fearing privacy breaches. Team up with this authorized VPN!
Check price Visit website

2. Update Windows 10

  1. Press Windows key + I to summon the Settings app.windows 10 vpn not working after update
  2. Select Updates & Security.
  3. Select Windows Update from the left pane.
  4. Click on the Check for updates button.windows 10 vpn not working after update

It seems that the Windows 10 Updates function, more or less, in the same sequence. Microsoft provides a major update in order to bring improvements, a large variety of bugs appear, and they then, overwhelmed by the large community backlash, end up pushing appropriate fixes as soon as possible.

That’s how it basically works. Since this is a widespread problem and it mostly occurred after some updates, they provided the resolution soon.

A lot of users who experienced issues with VPN after an update, get things sorted out after some time by updating Windows 10.

So, make sure that you have all available updates installed and try running the VPN again. In case you’re unable to make it work regardless, make sure to move to alternative steps.

Here’s how to check for available updates in Windows 10:

If you want to avoid VPN issues triggered by Windows Update, the obvious solution is to simply block the updates.

Keep in mind that not installing the latest security patches may pose a threat to your PC. Therefore, use this method only in extreme cases where you really need your VPN.

3. Reinstall drivers

  1. Right-click on Start and select Device Manager from the PowerUser menu.windows 10 vpn not working after update
  2. Expand the Network adapters section.
  3. Right-click on every individual WAN Miniport driver and uninstall it.windows 10 vpn not working after update
  4. Restart your PC and open Device Manager again.
  5. Navigate to Network Adapters, right-click every individual Miniport, and install it.
  6. Try running the VPN again.

Certain users resolved the issue by completely uninstalling all Network adapters, but you can settle for reinstalling WAN Miniport drivers.

Either way, we all know how notoriously Windows 10 manages drivers and how the generic and mandatory drivers can have an illicit effect on system performance and stability.

In order to avoid this, you can reinstall drivers changed by the last update and let them reinstall on their own. Also, secondary drivers provided by a third-party VPN are better than the ones Windows Update provides.

So, you can also uninstall them and the VPN, and then just obtain them by reinstalling your VPN from scratch.

Here’s how to reinstall WAN Miniport network drivers in Windows 10:

Update drivers automatically (suggested)

After you have uninstalled your drivers, we recommend reinstalling/updating them automatically.

Downloading and installing drivers manually is a process that carries the risk of getting the wrong driver installed, which may lead to serious malfunctions in your system.

The safer and easier way to update drivers on a Windows computer is by using a professional tool.

It will automatically identify each device on your computer and matches it with the latest driver versions from an extensive online database.

⇒ Get Outbyte Driver Updater

4. Edit registry

  1. In the Windows Search bar, type regedit and open regedit from the list of the results.windows 10 vpn not working after update
  2. Backup your registry.
  3. Navigate to this location:
    • ComputerHKEY_LOCAL_MACHINESYSTEMCurrentControlSetServicesPolicyAgent
  4. Right-click on the blank area in the right window and select New > DWORD.
  5. Name the new DWORD input
    AssumeUDPEncapsulationContextOnSendRulewindows 10 vpn not working after update
  6. Change its value to 2 and save it.
  7. Close Registry Editor and restart your PC.

As some tech-savvy users noted, this error can have roots in the Policy Editor. This is the main part of the Windows platform and it regulates the security and access policy for all individual users on one machine.

In order to address this possible instigator of the problem with VPN, we’ll need to change the policy settings by inserting an exception for UDP. Now, the best way to do so is to use Registry Editor.

Of course, with this tool we’re roaming in the dangerous area, so make sure to act with caution and don’t delete anything while there.

Follow these instructions to access Registry Editor and create a new input which should re-enable VPN in Windows 10:

5. Reinstall VPN

  1. In the Windows Search bar, type Control and open Control Panel from the list of results.windows 10 vpn not working after update
  2. From the Category view, click Uninstall a program under Programs.windows 10 vpn not working after update
  3. Right-click on your VPN solution and Uninstall it.
  4. Use CCleaner or any other third-party uninstaller to clean all remaining files and registry entries the VPN has made.
  5. Restart your PC.
  6. Download the latest version of the VPN of your choice and install it.

Since the update-inflicted issues can affect both third-party VPNs and built-in Windows VPN, respectively, we decided to cover both.

Regarding the former, if you’re sure that everything was running smoothly before the update and then things suddenly went south, we advise you to reinstall the client you use.

Reinstallation is also the re-integration of the VPN into changed system surroundings, so this just might help. Also, while we’re at it, don’t forget to acquire the latest version of your VPN of choice.

We make sure to showcase the whole procedure, and decided to use TunnelBearVPN as the example, but this applies to all VPN solutions in general. Make sure to follow the instructions we provided below:

6. Disable antivirus

  1. In the Windows Search bar, type Allow and select Allow an app through Windows Firewall.
  2. Click on the Change settings button.
  3. Find your VPN on the list and check the box beside it. Also, make sure that both Public and Private networks are enabled.
  4. Confirm changes and try connecting through a VPN again.

Another possible reason for this error can lie in the third-party antivirus or some of its subsidiaries. Contemporary antivirus solutions often come in suits that include third-party Firewall security measures.

They do come in handy, especially if you’re knowledgeable enough to customize them, but are, on the other hand, known for conflicting with Windows services.

If you run a VPN through a Windows 10 antivirus provided by Microsoft, make sure to disable the third-party firewall before doing so.

Or even better, for the sake of troubleshooting, disable the antivirus completely and move from there.

Also, make sure that your native Windows Firewall isn’t preventing VPN from accessing the remote servers. Here’s how to add an exception to Windows Firewall in a few simple steps:

7. Disable IPv6

  1. Type Control in the Windows Search bar and open Control Panel from the list of results.windows 10 vpn not working after update
  2. Open Network and Internet and then Network and Sharing Center.
  3. Select Change adapter settings from the left pane.windows 10 vpn not working after update
  4. Right-click on VPN network adapter and open Properties.
  5. Uncheck the box beside IPv6 and confirm changes.windows 10 vpn not working after update
  6. Try running a VPN afterward.

Connection issues, with or without VPN, are rather common after every new major update. Major updates tend to make certain changes to your adapter settings, making it unusable in the process.

Now, in step 7 we’ll try to address all-around connection settings, but this step concerns only IPv6. Namely, for users with the older configuration, the problem might occur due to conflict with the Internet Protocol.

Most users who found this step helpful disabled IPv6, but you can try disabling IPv4 and stick with IPv6, too.

If you’re not sure how to disable IPv6 (or IPv4, its older variation), follow the steps below:

If this method didn’t work, you should enable IPv6 back on. Check out this complete step-by-step guide to do that.

8. Troubleshoot your connection

We don’t want to point fingers at the VPN until we eliminate all possible connection issues.

In other words, make sure that you can connect without a VPN in the first place. If that’s not the case, we advise you to perform standard troubleshooting steps and move from there.

If you’re caught in the middle and unsure what to do, here are some actions that you should consider:

  • Reset your router and/or modem.
  • Flush DNS.
  • Restart related services.
  • Run dedicated Connection troubleshooter.
  • Disable the router’s firewall.
  • Update the router’s firmware.
  • Reset router/modem to factory settings.

9. Reset your PC to factory settings

  1. In the Windows Search bar, type Recovery and open Recovery options.
  2. Under the Reset this PC section, click on the Get started button.windows 10 vpn not working after update
  3. Select whether you’ll preserve or delete your files from the system partition and click Next.
  4. Follow the instructions until the system is fully restored to factory values.windows 10 vpn not working after update
  5. Install VPN again and the update-inflicted problem should be gone.

Finally, if none of the solutions proved helpful, we recommend resetting your PC to its factory values.

If you’re not sure how to reset your Windows 10 machine to default values and refresh it in the process, follow the instructions we provided below:

Which Windows Update is causing VPN issues?

There are multiple Windows 10 updates that can affect your VPN, so you should be aware. More exactly, the specific updates that can break your VPN are KB5009543 and KB5009566.

Besides that, you can encounter other Windows update versions such as 1903, 20h2, 2004, 1909, 2022

How do I uninstall a Windows update?

  1. In the Start Menu, click on Settings.
  2. Now, click on the Windows Update section.
  3. Press the Update history button.
  4. Scroll down and click on Uninstall updates.
  5. Find the broken updates and uninstall them.

This should conclude it. In case you’re still unable to use your VPN on Windows 10 after an update, make sure to send a ticket to both Microsoft and your VPN provider.

Also, if you’re having issues with the business network, contact your network administrator. At least one should give you the helping hand, and chances are that the paid VPN service provider will be the one.

Either way, make sure to tell us if you have an alternative solution or a question regarding the ones we provided above.