How to use Apple Notes app on Windows 10 [Quick Guide]

A lot of us use iPhone but prefer Windows 10 when it comes to PC. However, this preference can become an issue if you use the Apple Notes app on your iOS device extensively.

Users have been wondering whether they can get the Apple Notes app on Windows 10.

There is no official version of the Apple Notes app for Windows 10 yet, and, we don’t see Apple porting its iOS or macOS apps to Windows 10 in the near future, but there is a workaround that we’ll explore in this guide.

How to access Apple Notes in Windows 10?

    You can use Apple Notes on your PC by creating a browser application for it. The Notes app will function as a PWA (progressive web app). You can do this using your Chrome or Microsoft Edge Chromium browser.

  1. 1. Launch your preferred browser. In our guide, we will use Chrome.

  2. 2. Go to iCloud and login to your account.

    Apple notes for Windows
  3. 3. Open the Notes app.

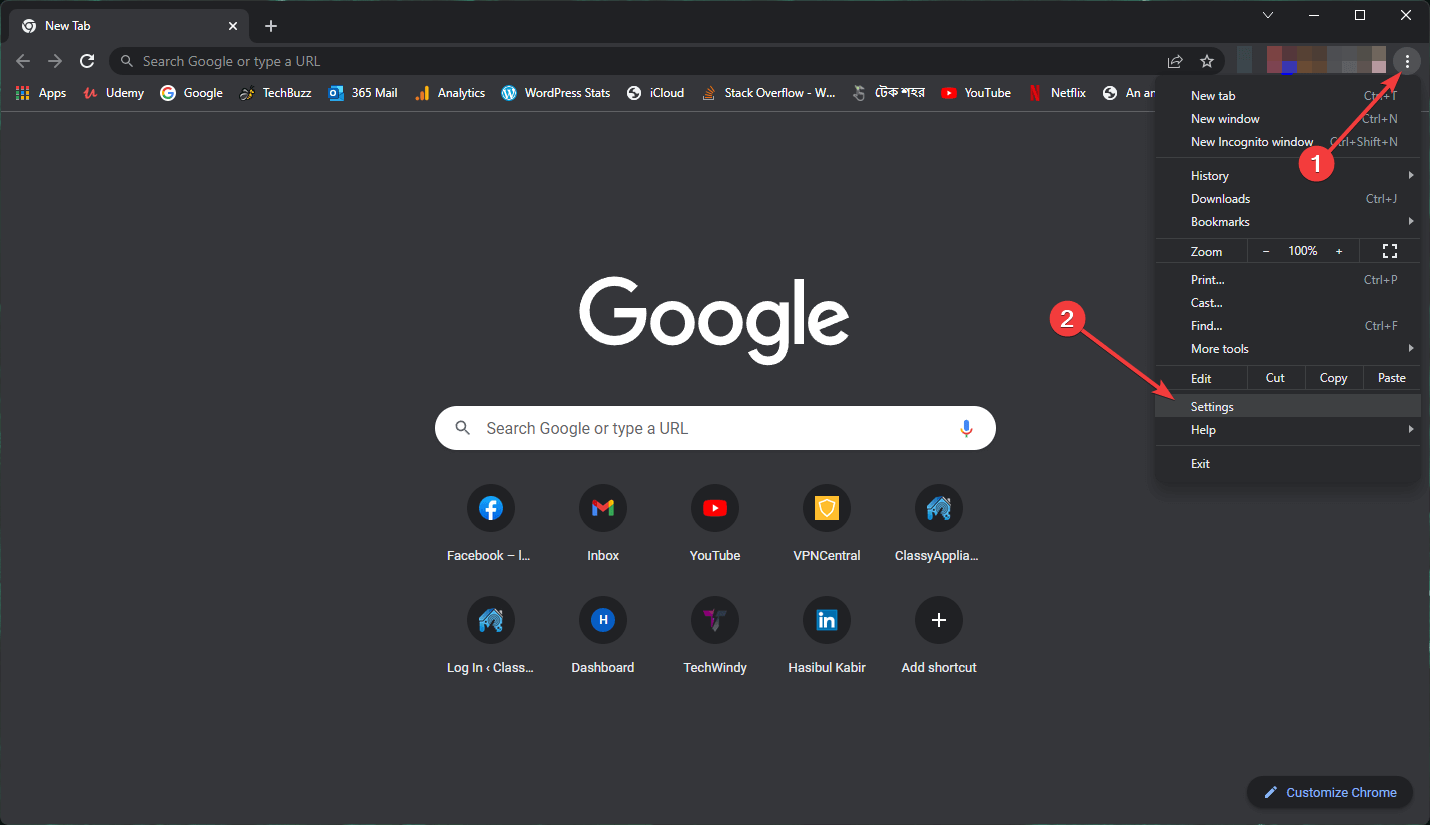
  4. 4. Click the More button (three dots) top right corner of your browser.

    Apple notes for Windows
  5. 5. Select More Tools > Create a Shortcut.

  6. 6. In a new tab, type chrome://apps/ and hit Enter.

  7. 7. Right-click on the newly created Notes shortcut.

  8. 8. Select Open as Window.

    Apple notes for Windows
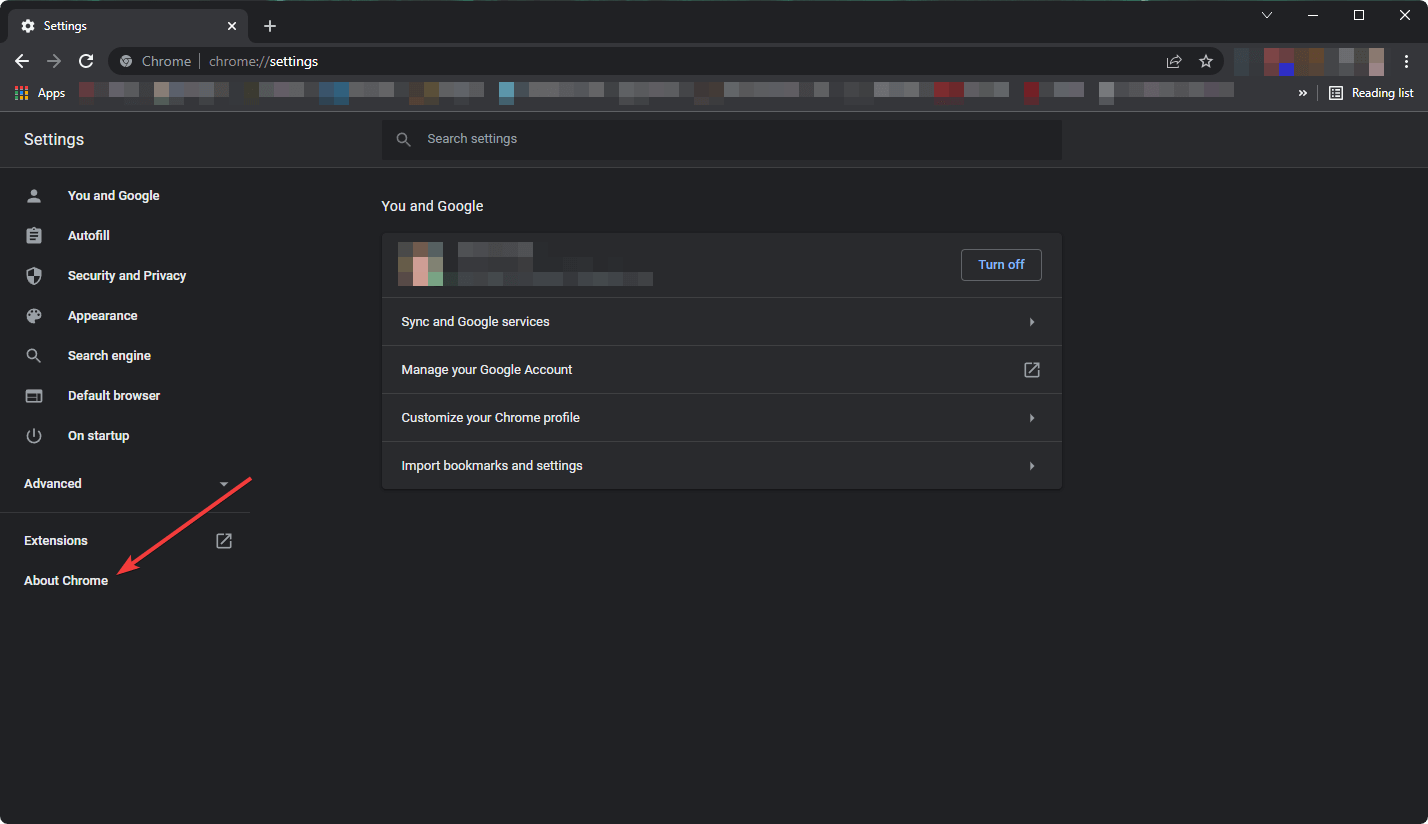
  9. 9. Right-click on the Notes shortcut again, and select Create Shortcuts.

    Apple notes for Windows
  10. 10. Give your shortcut a name, then click on Create. This will add the Notes app shortcut to your Start menu and Taskbar.

Once done, you can open the Notes app from the Start menu or taskbar like normal apps. Even though the app will still open Google Chrome, it will open in a separate window.

Note: For this article, we are using Google Chrome. But you can use other Chromium-based browsers like Edge to achieve the same results.

The fact that Apple has not given third-party developers access to its Notes app means it will remain unavailable for Windows 10 to be downloaded as a standalone app for now.

Check out other alternatives to replace your Apple Notes app.

If you like this article, explore more such articles by visiting our How-To hub.

Also, check out our dedicated Software section to find productivity software for Windows 10.

By following the steps in the article, you can get the Apple Notes app working on Windows 10. While this may be a workaround, it works fine as long as you are comfortable using Google Chrome.

How to Turn Off Windows 11 Animations [2 Different Ways]

Windows 11 comes with a lot of new features and, even though it doesn’t look that different from its predecessor, the new OS has some pretty nice graphic goodies.

Microsoft’s latest operating system uses animation effects for controls and elements by default. However, some of you may not be that impressed with these changes and would like to turn them off, for whatever reason.

We will show you exactly how you can do this, using two very simple methods.

How can I turn off the animation effect in Windows 11?

1. Using the Settings app

  1. Press the Windows key + I to open the settings menu.
  2. Select the Accessibility category and then click on Visual Effects.animation effect 1
  3. Turn the Animation effects On/Off.animation effect 2

2. Using the Control Panel

    Control Panel comes in handy when it comes to turning off the animations in Windows 11. From the Ease of Access Center, you can manually toggle unnecessary animations off.

  1. 1. Open the Start menu, search for Control Panel and open the app.

    search for control panel
  2. 2. From the top right corner of the window, set the View by option to Large icons.

    view by control panel
  3. 3. Click on Ease of Access Center.

    ease of access centre
  4. 4. Click on the Make the computer easier to see option.

    make the computer easier to see
  5. 5. Check the box for Turn off all unnecessary animations (when possible).

    how to turn off animations in windows 11 toggle

Pretty simple, right? These are the steps you need to go through if you decided to turn the Windows 11 animations off, or maybe even back on.

This will only take up a couple of minutes of your time and doesn’t require a high level of technical knowledge.

While you’re still here, check out how to liven up your email messages by adding GIFs to your Outlook emails.


Was this article helpful to you? Let us know in the comments section below.

Move the Windows 11 Taskbar Back to the Left in 6 Quick Steps

Most of us have been using Windows 10 for quite some time now and, naturally, we’ve grown accustomed to a certain layout of the UI.

Although the change brought forth by the whole system redesign, as a part of the new Windows 11 OS, is not that major, some are finding it a bit hard to adjust to this recent arrangement.

Well, rest assured knowing that Microsoft has foreseen this and, therefore, allowed the tweaking of the position of certain UI elements, such as the Start menu and taskbar icons.

You might have also noticed a new icon added to the Windows 11 taskbar, labeled Widgets in the operating system.

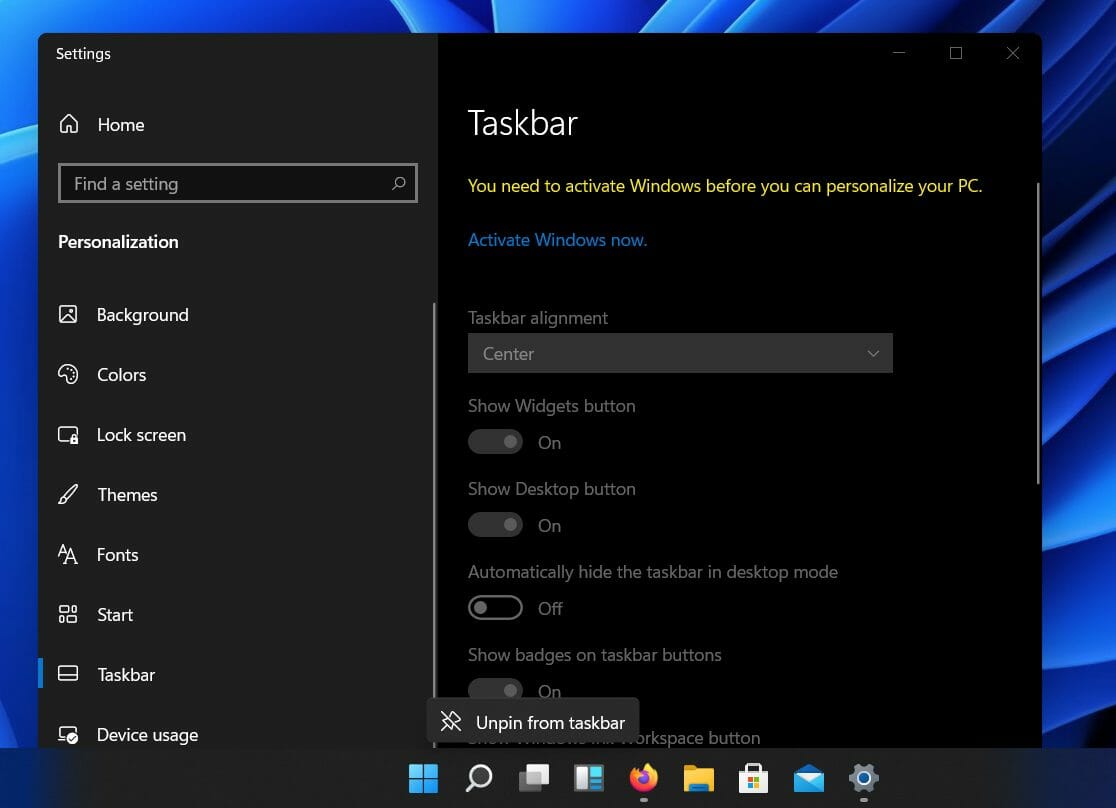
Activate your Windows before you move your taskbar

windows 11 taskbar

It should be noted that users can only customize the position of the taskbar on their devices if they are using activated versions of Windows. Therefore, in order to move the taskbar to the left side, you need to activate Windows 11 first.

If you can’t activate Windows 11, check out our article and find out how to solve the issue.

How do I move the taskbar back to the left side?

Don’t panic by thinking that this will take up a long portion of your time, as this process is fairly easy and only takes one minute to perform.

    You can quickly move your taskbar to the left side through the built-in Settings on your device. In just a few clicks, you can set up a new position for your taskbar.

  1. 1. Press Windows key +I to bring up the Settings menu.

  2. 2. Select Personalization, then scroll down to the Taskbar section.

    taskbar settings windows 11
  3. 3. Click on Taskbar behaviors, in order to access the dropdown menu.

    move taskbar settings behaviour
  4. 4. Next to Taskbar alignment, click on the dropdown menu.

    taskbar alignment settings windows 11
  5. 5. Here you will have two options: Left and Center. Choose Left.

  6. 6. Now your Taskbar is on the left side of the screen.

If you are looking to move your Windows 11 taskbar to the side or to the top, check out our dedicated article.

Is it necessary to revert the taskbar’s position to the left?

Upon reading information that suggested the ability to actually revert the changes that Windows 11 brings to the taskbar and its featured apps and menus, users were not really impressed, to say the least.

 Can’t say I care much about the start menu either way.

For me, the real pain point is the lack of group policy and windows update control. It is a level of paternalism that MS needs to stop with. But MS does not know the full local situation of the computer being used.

By following a trending Reddit thread, we can deduce the vast majority of users, that are keeping themselves informed about everything related to Windows, were actually expecting other, more significant improvements.

Many of them still feel like this is just Windows 10, with a different, more modern skin. It could seem so, for the moment, as the version that was leaked is far from being full.

Most likely, many opinions will change when Microsoft actually releases the full, working version of this highly anticipated operating system.

If you are more into personalizing your Windows desktop, we have a great guide to customizing the Start menu layout.

We hope that our guide helped you move the position of your taskbar. Let us know in the comments section below if you have any questions.

Windows 11 Dark Mode: How to Enable or Force it

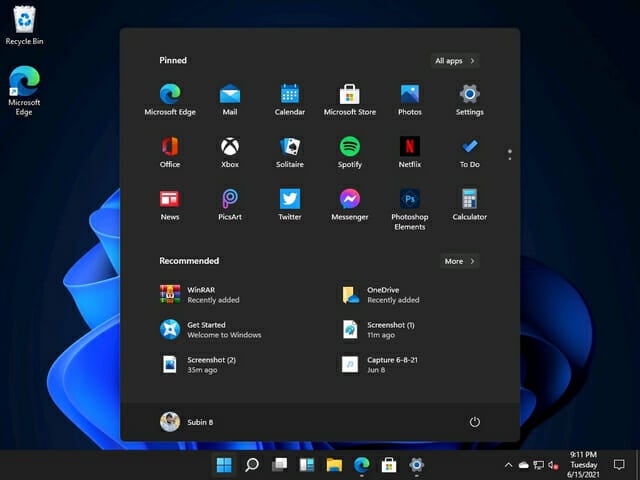
Since the launch of Windows 11, people have been actively checking out all the features that are available with it, and trying to point out the good and the bad.

One of the features that had many curious is Dark Mode. After seeing the finished product, users are smiling, as it looks pretty good.

The Dark Mode is a great way to cope with spending so many hours in front of the PC, as it is easier on the eyes.

How do I enable Dark Mode in Windows 11?

You don’t have to worry at all, because activating this feature on the new operating system is just as easy as it was on the previous version.

    Dark Mode on Windows 11 can be easily enabled through the built-in Personalization menu. You can choose the desired theme you want on your device in just a few clicks.

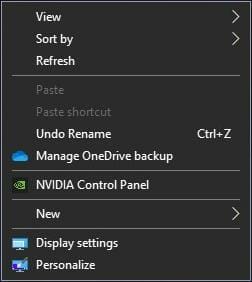
  1. 1. Right-click on any free space on your desktop. This will open a menu with options.

  2. 2. Select the last option available, which is Personalize.

    how to enable dark mode in windows 11 personalize
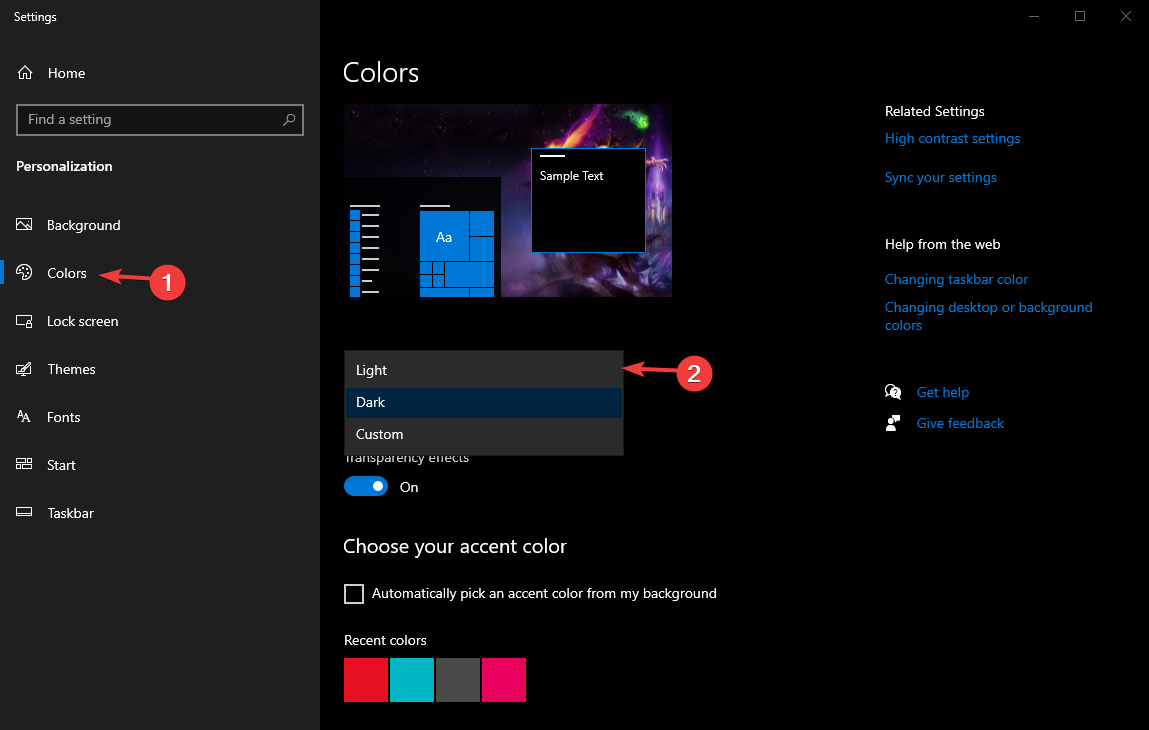
  3. 3. The next step is to click on the Colors tab from the menu on the left.

    enable dark mode on windows 11 select
  4. 4. Select the dropdown menu on the right, which contains the three available theme possibilities, such as Light, Dark and Custom.

  5. 5. Choose the Dark theme.

  6. 6. All that is left now is for you to exit the Settings menu and enjoy your PCs new look.

    windows 11 dark mode activate

Note that you can also get to the Personalization menu by pressing Windows key + I, which will open the Settings menu, from which you can then select Personalization.

For those curious to find out how to enable Dark Mode in Windows 10, we have a special guide.

We also have a complete guide on how to schedule Dark Mode in Windows and plan in advance.

Are you enjoying your new Windows 11 Dark Mode? Tell us all about it in the comments section below.

How to capture still images from videos on Windows 10 / 11

Users have been wanting to make a screen capture from a movie or video file on their Windows 10 devices.

This feature comes in very handy if you want to create the perfect thumbnail for a video, or to add some effects to your website, and why not, set them as your background image.

How can I capture pictures and photos from videos?

You can capture pictures from videos by using one of the methods written below. Some include built-in programs, while others require a third-party tool.

1. Use a third-party video editor

The most obvious choice when it comes to extracting content out of a video is through the use of a video editor since you are essentially interested in a particular frame from it.

That being said, no video editor is better for the job than Adobe’s very own Premiere Pro, an industry-standard in the world of video editors.

Since it is used by both common users and within the movie industry to create Hollywood-level content, we highly recommend it for any video editing purposes.

The interface is simplistic, following the traditional timeline-based arrangement, so even casual users will know how to get around this app.

More so, the program comes with all the tools one may ever need in order to edit a video, including extracting a single frame from it and using it as a screenshot.

Adobe Premiere Pro

Take a picture from any of your videos with industry-leading software when it comes to video editing.
Free trial Visit website

2. Use your video player

Most video players nowadays come with a few video editing tools themselves, most of which are used to adjust the image of the video as you are watching it.

Curiously enough, the ability to capture a certain frame at any given time from within a video is a trait that is quite common.

In some video players such as VLC, all you need to do is right-click the image while the video is playing, and simply select an option that usually looks like Capture frame.

Of course, not all video players are the same, but you can easily find a similar option if you look for a bit.

    3. Take a screenshot of your video

    The easiest method to capture a still image of a video is to use the built-in Snipping Tool or any other screen-recording software. All you need to do is navigate to the section of the video you want to take a picture of, then screenshot it.

  1. 1. Play your video on any video player.

  2. 2. Pause it at the moment where there is an image you want to capture.

    capture photo from video windows 10 pause
  3. 3. Press Shift + Windows key + S at the same time. Alternatively, press any key that you bound your screenshot function to, if you customized its hotkey using a screenshot tool.

  4. 4. Select the area you want to capture. The image will be stored in the clipboard.

  5. 5. Open Paint.

  6. 6. Paste the image onto your Paint canvas.

    capture still image from video paste
  7. 7. Save the image to your PC. You can configure the location you want to save it to, as well as the file’s name.

If all options fail for some reason, a screen recorder is your next best solution and it can be used in almost any video player you may have already installed on your PC.

By following these steps, you should be able to capture a photo or image of any video and use it for whatever purpose you see fit.

Let us know if our guide was useful by leaving us a message in the comments section below. 

Create a Windows 10 ISO image from an existing installation

When Microsoft releases a new Windows 10 build to Insiders on the Fast ring, it is usually only available through Windows Update.

This means you can’t find an ISO file of that build, and install it manually while it’s still available on the Fast ring only.

Microsoft usually releases Windows 10 ISO files for commercial versions, or when a certain build enters the Slow ring.

You can download official ISO files for the Anniversary Updates, and for different Windows builds, but you can’t download an ISO file of the latest build released.

However, if you can’t wait for Microsoft to officially release an ISO file, and have a good reason to download it, and create an installation media, it’s actually possible to do that.

There’s a way to create a ISO file of basically any Windows 10 Preview build you want, but it’s not an official way, approved by Microsoft. So, here’s what you need to do.

ISO files, also called ISO images, represent a single file of an entire DVD or CD. In other words, it is a virtual version of a disc.

This is why ISO files are very useful, eliminating the need to carry data on a piece of hardware. Also, for Windows 10 builds, the ISO format may play an important role.

It is easier for Microsoft to release ISO files for updates, but it happens that you can’t download the official ISO file of the latest build.

How to create an ISO file of your current Windows 10 build

When you need to install a new version of Windows 10, or download a new build, Microsoft delivers it to you through a new ESD (Electronic Software Delivery) image format.

This image is known as install.ESD, and Windows 10 downloads it on your computer, every time you install a new Windows 10 release. 

To create our custom ISO file, we’re going to take advantage of the install.ESD file. This file is usually stored the hidden $WINDOWS.~BT folder, there’s an easy way to find.

Once you’ve found the install.ESD file, you’re going to need a program called ESD Decrypter, to create your own ISO file.

But first, we have to mention that this utility is a third-party program, so you’ll be using it on your own risk.

    In order to create an ISO file from an existing Windows 10 installation, you need to use the ESD Decrypter tool on your install.ESD file. This file contains a copy of the current installation of the OS on your PC.

  1. 1. Download the ESD Decrypter and extract it anywhere on your computer.

  2. 2. Press the Windows + I keys simultaneously to open the Settings app.

  3. 3. Navigate to Updates & security.

  4. 4. Click on Check for updates.

    create an iso of my current system windows 10 updates
  5. 5. Wait for Windows Update to download and install the new build.

    how to make iso file from installed windows 10 updates
  6. 6. Once the build is installed, DON’T restart your computer.

  7. 7. Instead, go to File Explorer and then navigate to This PC.

  8. 8. Open a partition on which your system is installed (usually C:)

  9. 9. Click the View tab on File Explorer, and check Hidden items option.

  10. 10. The $WINDOWS.~BT folder will now be visible. Open it.

  11. 11. Look for the Sources folder inside $WINDOWS.~BT.

  12. 12. Inside the Sources folder, right click on the Install.ESD file, and choose Copy.

  13. 13. Paste the Install.ESD file in the folder where you extracted the ESD Decrypter utility files.

    create windows 10 iso image from existing installation files
  14. 14. Right-click the decrypt.cmd file, and select Run as Administrator.

  15. 15. In the ESD Decrypter Script user interface, type 2 to select the Create full ISO with Compressed install.esd option.

  16. 16. Press Enter to begin the process.

    create windows 10 iso image from existing installation esd decrypt
  17. 17. Once the process completes, the ISO file will be created, and ready for mounting.

That’s pretty much it, once you’ve created a ISO file using this method, you can mount it on a USB flash drive, using a tool like Rufus, and install it on your PC, or a virtual machine.

If you have an old USB flash drive and do not know what to do with it, check out our article to find out our recommendations.

If you have any questions, and comments, please let us know in the comment section below.

RELATED STORIES YOU NEED TO CHECK OUT:

How to boot from USB in Windows 10

Every time you boot your Windows PC, the default boot location is usually your hard drive where the operation system is installed. However, there are times when you may want to boot your PC from a USB drive.

However, this isn’t something that is very well-known but, even if users do know how to do it, they surely don’t know all the methods to do it.

That is precisely why we’ve compiled this step-by-step guide, to show you how to boot your Windows 10 PC from a USB drive.

How can I boot from a USB flash drive in Windows 10?

Note: If you have fast boot or ultra fast boot enabled in your UEFI firmware settings, then you will need to temporarily disable them to be able to boot from a USB.

1. Boot from a USB from within Windows 10

    The Advanced Startup menu allow users to choose from which drive to boot their PCs. All you need to do is enter this menu upon booting, then manually configure the PC to boot from your USB drive.

  1. 1. Connect your USB drive into one of the PC’s ports.

  2. 2. Press the key that allows you to enter Advanced Startup Options. On some PCs, for example, this key is F11.

  3. 3. You are now in the Advanced Startup menu.

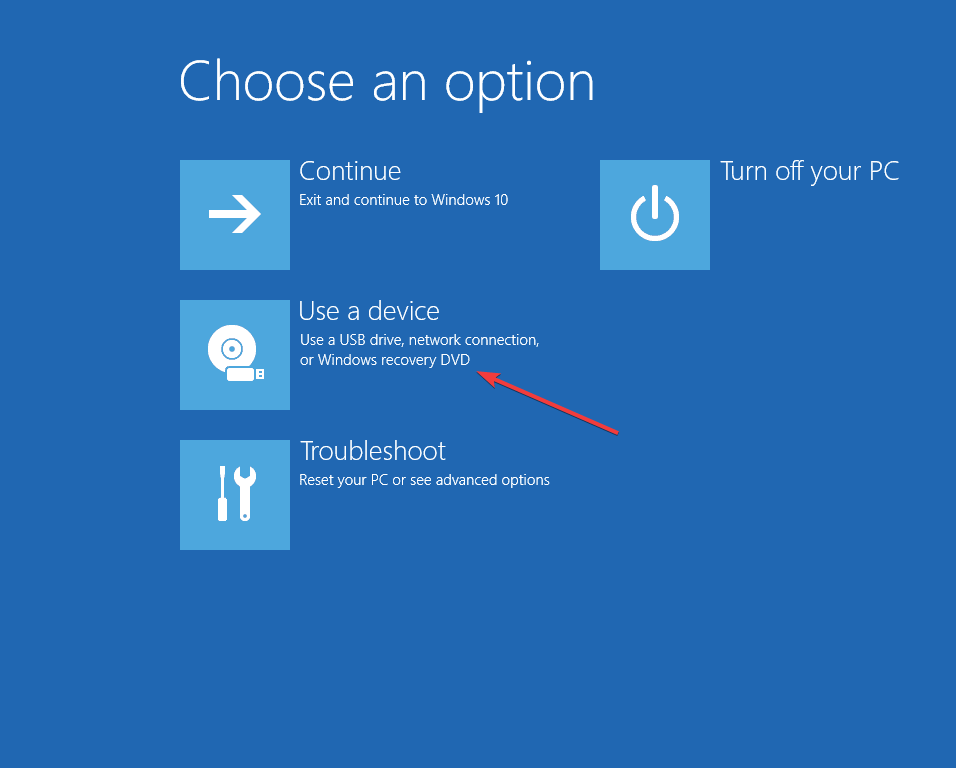
  4. 4. Select Use a device.

    how to boot from usb windows 10 use a device
  5. 5. Choose the USB drive you want to boot from.

  6. 6. The PC will now restart and boot from that particular USB drive.

Having problems accessing the Advanced Startup menu? Check out our guide that will show you how to make accessing it easier.

2. Boot from a USB drive at boot in a Windows 10 PC

  1. Connect a USB drive into one of the PC’s ports
  2. During a computer boot, enter the Boot Menu
    • This process varies from PC to PC, so check out your PC manufacturer’s specifications based on your needs
  3. In the Boot Menu, select the USB drive you want to boot from
    • This process depends on the PC that you have
      • You can either move the USB drive up the priority list using the F4 or F5 keys
      • You can also select to boot from it straight from the menu
boot menu

3. Boot from a USB drive on a Surface device

  1. While the surface device is turned off, connect a USB device
  2. Hold the volume-up button
  3. Press and release the power button
  4. Hold the volume-up button pressed until the Surface or Windows logo disappears
  5. The Surface Boot UEFI should appear
  6. Select Configure Alternate System Boot Order
  7. Rearrange the order so that the USB drive is the top pick
  8. Disable Secure Boot Control
  9. Restart the Surface device

By following any of the steps below, you should be able to easily boot both a Windows 10 PC and a Surface device from a USB drive.

Keep note that this will not affect the device’s ability to boot normally. If it boots without any bootable USB drive connected, it will switch back to booting from the system drive.

Let us know if you want to read about more boot options by commenting in the section below.

How to Find Instagram Account by Phone Number | 2026 Guide

It’s possible to find someone’s Instagram using their phone number because Instagram users link their accounts to the number during registration.

In the past, it was easier to find Instagram accounts from their phone numbers.

Instagram provided a separate page called Contacts, which lists your contacts who are on Instagram.

With recent Instagram updates, it’s become trickier to find someone’s Instagram account by phone number.

However, the technique you are about to learn will work, even though it’s not as straightforward as the past methods.

How can I find someone on Instagram by phone number?

At the time, there is only one viable method of finding someone’s Instagram account using their phone number.

Note: This guide is solely for informational purposes and doesn’t endorse stalking Instagram users.

Now that if have addressed the elephant in the room, let’s dig straight into it and see how to find an Instagram account by phone number.

    Find Instagram account by phone number using the Suggestions page

    The only way you can find someone on Instagram by phone number is through the Suggestions page.

    You need to make sure you have that person’s phone number saved on your smartphone, then connect your contacts list to Instagram.

    The app will then give you a list of all the people who registered on it using a phone number that is on your contacts list.

  1. 1. Save the phone number of the person you want to find to your contact list on your smartphone.

  2. 2. Open the Instagram app on the device on which you saved the phone number.

  3. 3. Go to your profile page on the bottom right corner.

  4. 4. Tap on the hamburger icon (three dashes stacked) at the top right-hand corner of the screen.

    instagram hamburger menu
  5. 5. Select Discover people.

    instagram settings discover people
  6. 6. Click on Connect contacts.

  7. 7. Choose the ALLOW option to let the Instagram app access your contacts.

  8. 8. Instagram users suggested from your contact list will be marked as Suggested for you. Scroll through the list and find the person you are looking for.

If you’ve used this method in the past, you skip steps 5 and 6. At this point, you will see a list of contacts in the All suggestions screen.

The users on this page either follow you, are new to Instagram, share a mutual friend with you, are friends with you on Facebook, or have their number in your phone’s contact list.

It’s up to you to scroll through the list and find the person you are looking for.

If the person didn’t verify their Instagram account using the specific phone number you have on your contact list, you may not find them in the suggestions.

You’ll also not find them if they blocked you on Instagram.

We hope that our solution helped you find the person you were looking for on Instagram. Let us know what you think about this article and whether you have any questions in the comments section.

Uninstall Programs on Windows 10 That Cannot be Uninstalled

Chances are that you’re here because you were unable to uninstall a program in Windows 10. No need to worry. It’s a frequent problem that is most likely caused by minor file corruption issues.

Many Windows users report having this problem. In this article, we’re going to show you the most used and the most reliable methods, including using dedicated uninstaller tools.

What programs cannot be uninstalled?

A software category that is especially difficult to remove from a Windows PC is antivirus and anti-malware tools.

Other apps that will resist uninstallation are those that contain malicious scripts. They are specifically built to resist uninstallation and you will need to follow a special procedure to remove them.

Tech experts advise us to check our computer applications every once in a while. This is to pinpoint unnecessary apps that only take up space without benefiting us in any way.

Not only that, but you can also see if there are any suspicious apps within our system and remove them as soon as possible.

Don’t know how to force uninstall a program in Windows 10? We’re here to help, so check our recommendations below.

Why can’t I uninstall a program on Windows 10?

Uninstalling an application is a simple task that does not require much effort. Unfortunately, when you encounter apps that won’t uninstall, things become a little more tricky.

Most frequent reasons why you can’t uninstall apps include:

➡️ Corrupt application files

➡️ Uninstaller wizard is missing

➡️ Problematic registry entries

➡️ Files with malicious scripts

Nowadays, most programs include their own uninstall wizards. You can access them either directly from the app’s user interface, or find them in the app’s specific folder in Program Files.

Due to some errors within app scripts or because of file corruption, some apps don’t contain these uninstallers, which means you will not be able to remove them as you normally would.

A frequent scenario is when you uninstall the app and parts of it are removed, thus you cannot use it anymore, but there are some leftovers.

This means that the app will still show up in your programs list in the Add or remove programs, but its folders in Program Files are gone.

In most cases, this indicates that there are still traces of the app somewhere on your PC, most likely within the registry.

If you have a malware application that won’t be removed, the process is similar. You can remove its registry entries and use Windows settings to uninstall it.

However, in this case, it’s advised you use antivirus software because many malicious applications do clone themselves once they attack your computer.

Even if you successfully delete one of them, it can still be on your computer under a different name.

    How to uninstall programs on Windows 10 that cannot be uninstalled?

    If you tried the traditional methods to uninstall a program and they did not work, you should perform a force uninstall using Command Prompt.

    Manually uninstalling programs using CMD is a safe and reliable method that ensures the programs are completely deleted from your computer.

  1. 1. Press the Windows key on your keyboard and type cmd in the search box that opens.

  2. 2. Click on the first result to open the Command Prompt app.

    cmd open
  3. 3. Input the following command line: powershell Get-AppxPackage -AllUsers

  4. 4. Press Enter to execute the command. This will generate a list of all the applications on your PC. Use it to find the correct name of your app.

    cmd command get app
  5. 5. Type the following command and replace the Package line with the complete name of the app you want to remove: powershell Remove-AppxPackage

    cmd remove app
  6. 6. Press Enter to run it and finish removing the program from your device.

How to uninstall programs on Windows 10?

1. Use Programs and Features

  1. Go to search and type Control Panel.
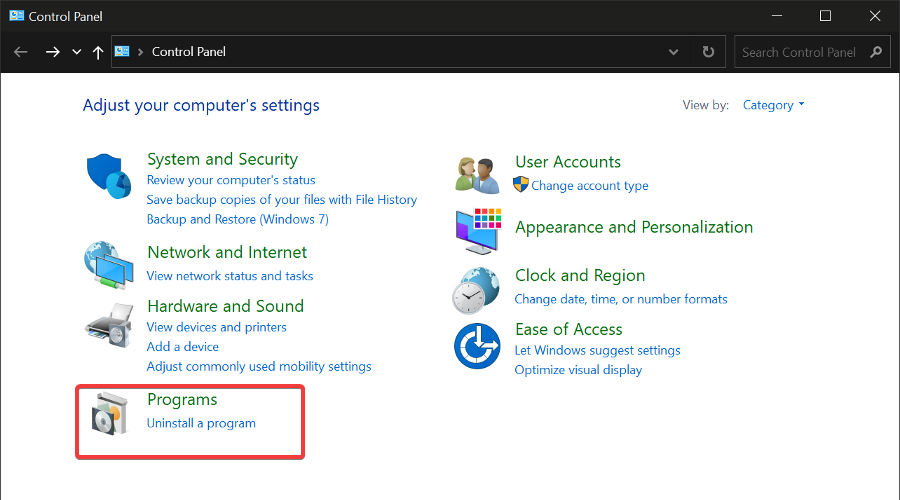
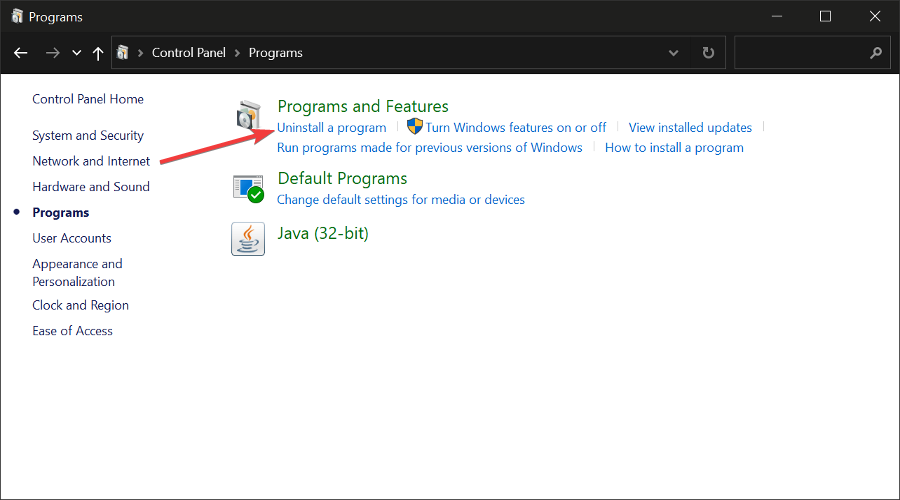
  2. Open the panel and then click on Programs to open Programs and Features. uninstall programs that won't uninstall unable to uninstall
  3. Click on Uninstall a program. unable to uninstall program windows 10 11 app won't uninstall
  4. Find your application in the list and double-click on it. A confirmation prompt that will ask if you are sure you want to uninstall may appear. Select Yes. Wait for the process to complete.uninstall app software won't uninstall unable to remove app

Programs and Features is a built-in Windows utility. It helps you manage your applications and features. It is probably one of the best for removing unwanted programs with just a few clicks.

As you can see, the process is very simple. You can also use this tool for adding or removing certain features of Windows 10 (like Internet Explorer or .NET Framework, for example).

Just go to Turn Windows features on or off, and choose which features you want to add or remove. For more information on this matter, check our guide on how you can turn Windows Features on/off. 

2. Use third-party software

If you don’t want to waste your time using Programs and Features to uninstall your programs, you can always use some third-party software.

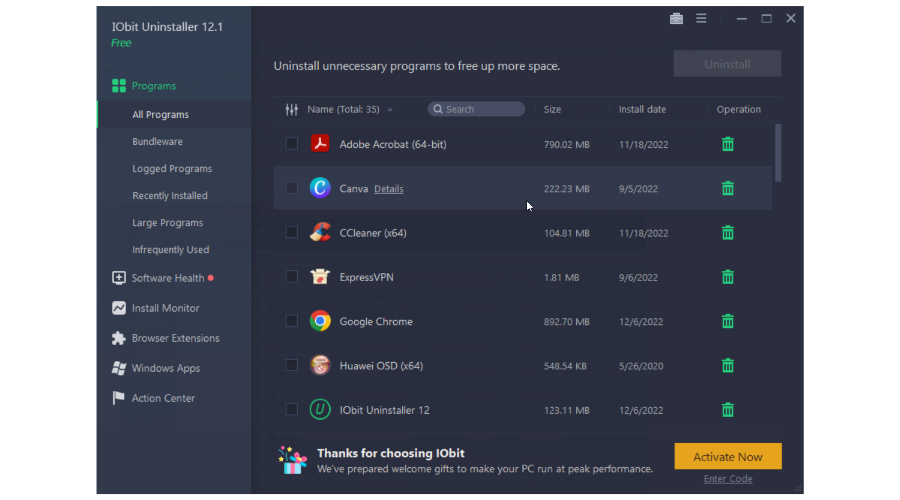
There are tons of software tools for uninstalling programs in Windows, but we strongly recommend IObit Uninstaller this time.

It’s very easy to use and it displays a list of all your programs from where you can pick the unwanted apps and easily delete them.

To uninstall an app with IObit Uninstaller:

  1. Open the IObit Uninstaller application and go to Programs.
  1. Select the preferred subcategory.
  2. Browse the list to find the app you want to remove.
  3. Select it and click on the trash icon. Wait for the process to complete.

At this point, you will have your picked programs successfully uninstalled without any leftovers or any other associated files left behind.

IObit Uninstaller

Completely uninstall unwanted apps and remove any corresponding leftover files.

3. From the Start Menu

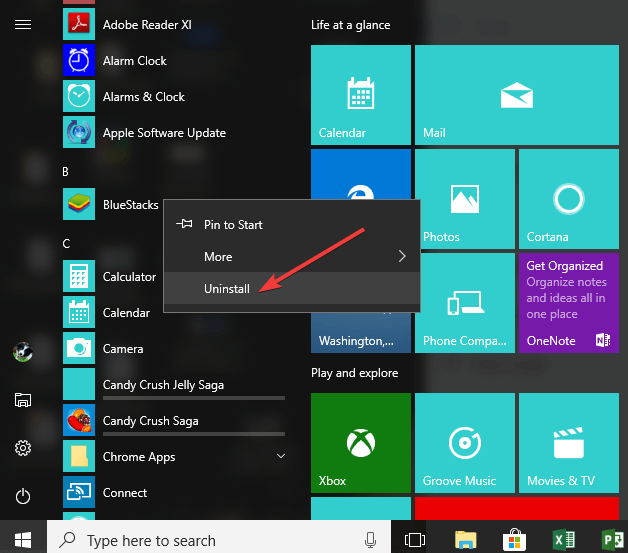
You can also remove programs and software from the Start menu. All you need to do is right-click on the respective program and then simply select uninstall.

Here’s a screenshot to help you in the process.

uninstall program start menu windows 10

4. Delete apps from the Settings page

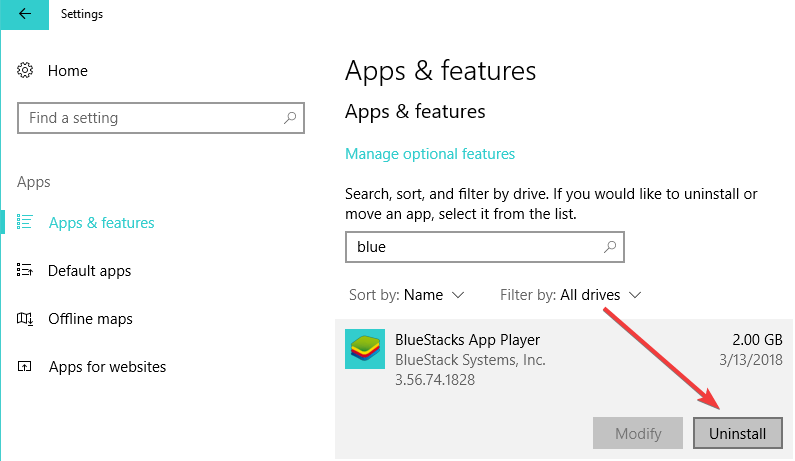
  1. Go to Settings > Apps > Apps & Features.
  2. Use the search box to find the app that you want to delete.
  3. Select it > Uninstall it.
uninstall windows 10 app settings

You can also uninstall your Windows 10 apps from the Settings page. Now all Windows 10 apps will be removed from your Start Menu.

If you upgraded your OS, check our guide on how to uninstall apps in Windows 11.

What do you think of the above procedures? They may be applied when for Windows 10 preinstalled programs that can be uninstalled, so let us know your opinion.

Let us know in the comments section below if you found this guide helpful and managed to get rid of unwanted programs on your device.

How to Create a Windows 11 Bootable USB Installation Media

While you can get Windows 11 as an update, what if you want to create a bootable drive and install Windows 11 on a different PC?

That is also possible, and in today’s guide, we’re going to show you how to properly make a Windows 11 bootable USB drive.

How can I make a Windows 11 bootable drive?

1. Check the requirements

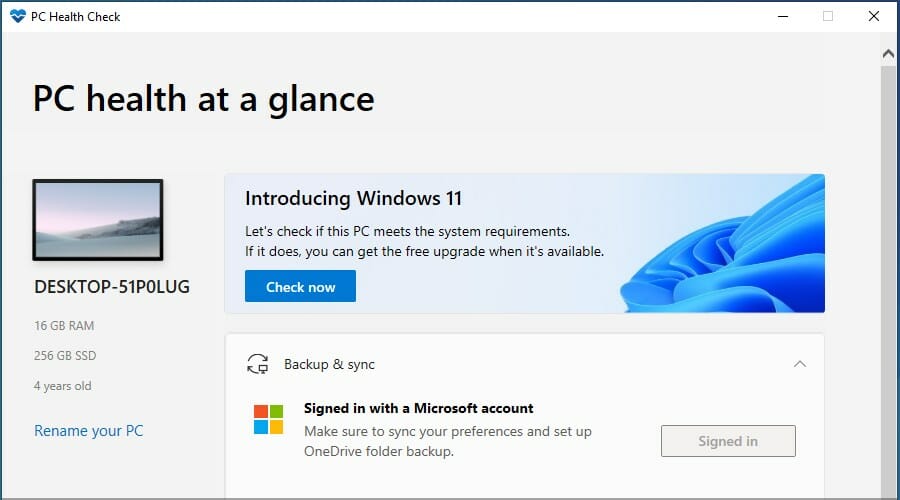
To create a Windows 11 bootable USB drive, you’ll need a flash drive that is at least 8GB in size. However, a larger flash might be a better choice in case anything goes wrong.

Lastly, you need to check the official Windows 11 requirements and make sure that your PC can handle this OS. Now that everything is ready, you just need the proper software to create a bootable drive.

2. Use the Media Creation Tool

    If you want to create a Windows 11 bootable USB, you can easily do this using the Media Creation Tool. This is a Microsoft tool that allows users to download and store the install file for Windows 11, so that they can later use it to reinstall the OS.

  1. 1. Connect your USB flash drive to the PC.

  2. 2. Go to the Windows 11 download page.

  3. 3. You will see multiple options. Navigate to Create Windows 11 Installation Media section and click on the Download Now button.

    create windows 11 bootable usb media creation tool
  4. 4. Once the software is downloaded, run it.

  5. 5. Accept the terms of service.

    create windows 11 bootable usb terms of service
  6. 6. Make sure you have the correct edition selected. Click Next to proceed.

    create windows 11 bootable usb language and edition
  7. 7. Now select USB flash drive and click Next.

    windows 11 bootable usb flash drive
  8. 8. Pick your flash drive and choose Next.

    windows 11 usb tool
  9. 9. Wait for the process to finish.

  10. 10. You have created a Windows 11 bootable USB.

Arm64 Windows devices can hit a known limitation with the Media Creation Tool; review this guide to fixing Media Creation Tool not working on Arm64 before you start.

3. Download Windows ISO

  1. Visit the Windows 11 download page.
  2. Click the Download button in the Download Windows 11 Disk Image section.
  3. Select the desired language and click on Confirm.
  4. Click on 64-bit Download button.
  5. Wait for the ISO file to download.

4. Use dedicated software

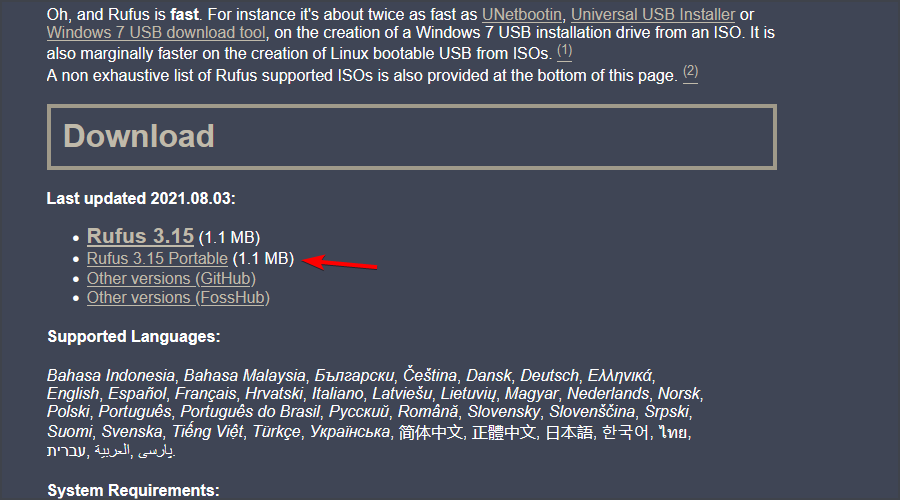
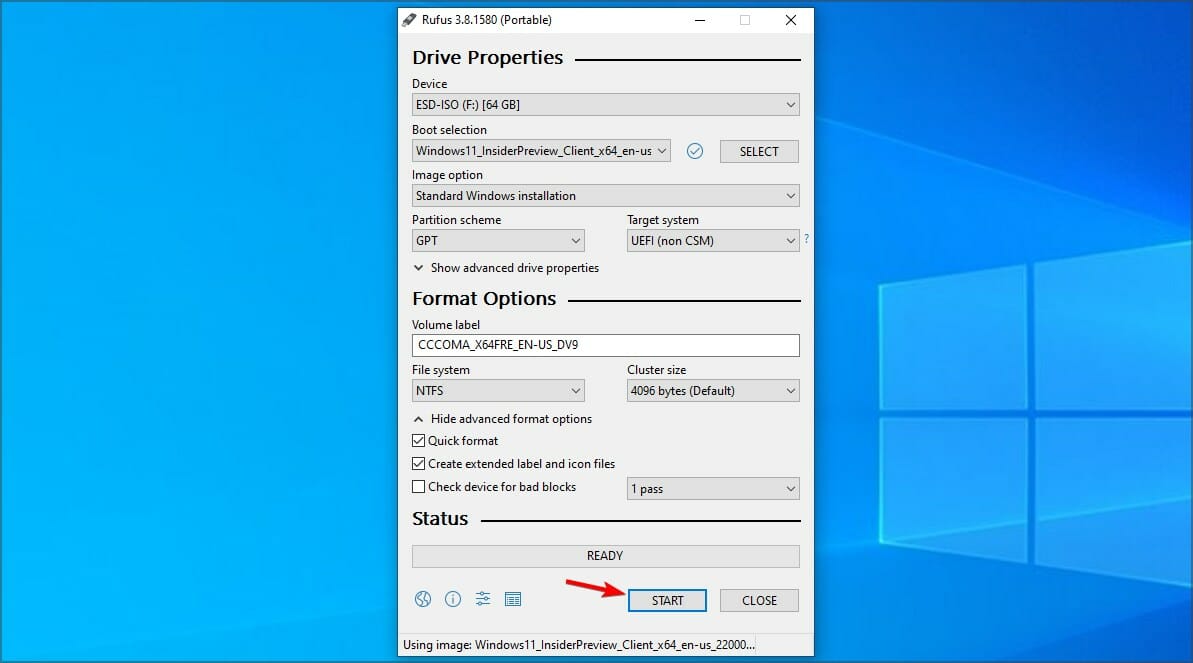
  1. Download Rufus.
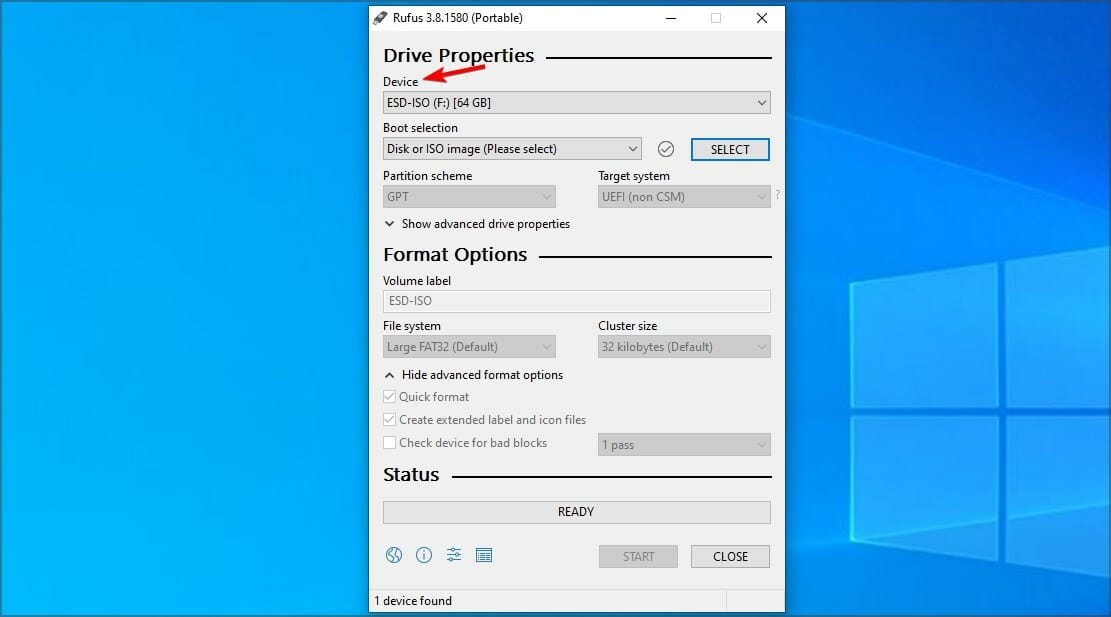
  2. Make sure that the correct device is selected. This is especially important if you have multiple USB storage devices connected to the PC.
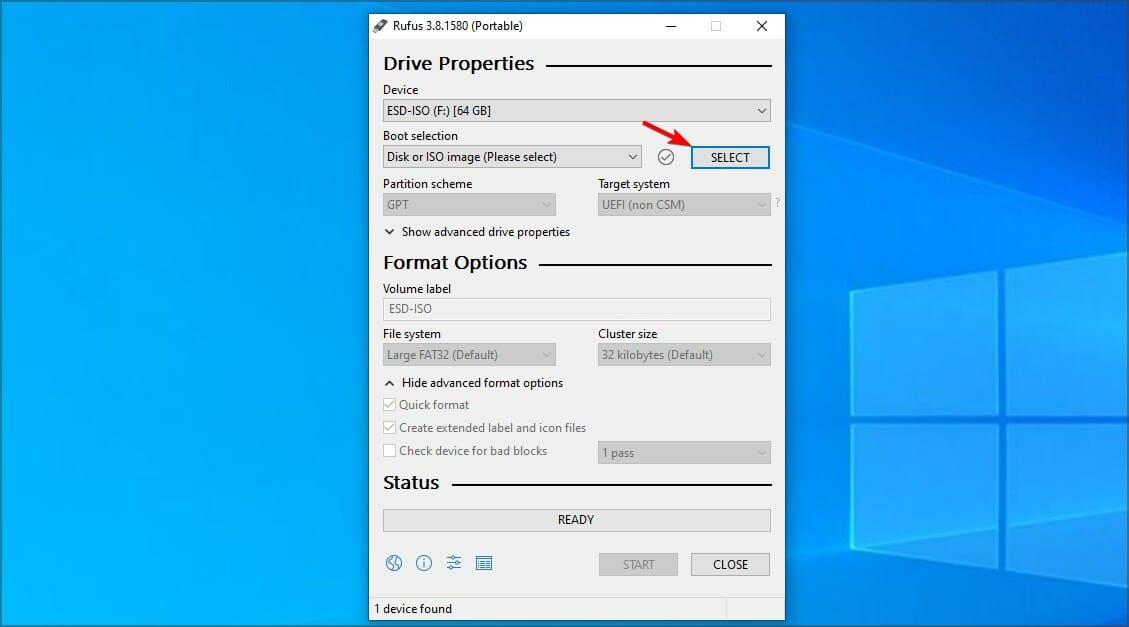
  3. Make sure that Boot selection is set to Disk or ISO image. Now click the Select button.
  4. Select the Windows 11 bootable ISO file.
  5. Set Image option to Standard Windows installation. Now set your Partition scheme to GPT.
  6. After doing that, click on Start.
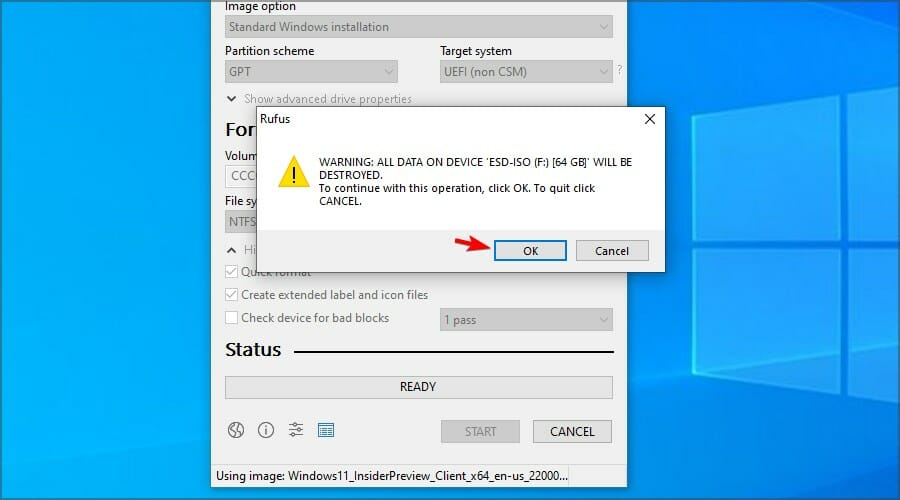
  7. A warning window will appear asking you to confirm that you want to format your flash drive. Select OK.
  8. Wait for the process to finish.

Also, don’t forget to use the Rufus settings for Windows 11 if you want to have a smooth and error-free installation.

Learn how to use Win32 Disk Imager to create bootable USB drives from ISO files: How to Use Win32 Disk Imager.

How can I upgrade to Windows 11?

  1. Press Windows Key + I to open the Settings app.
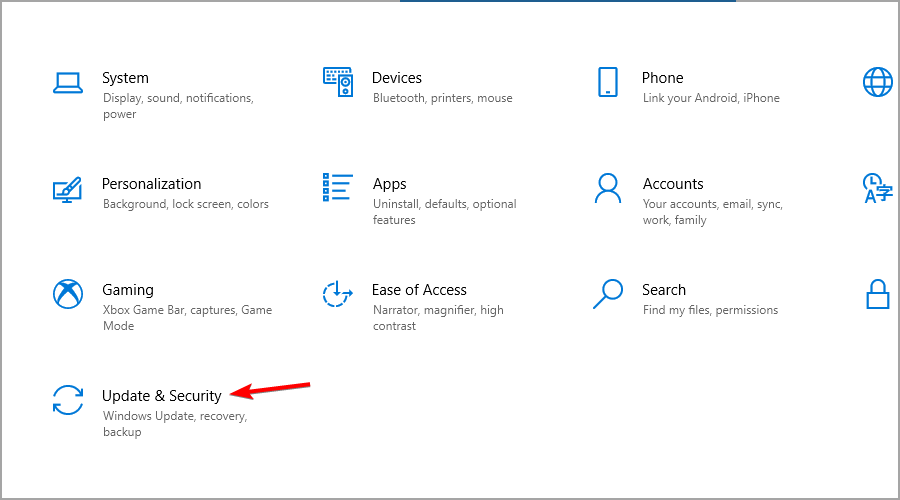
  2. Now head over to the Update & Security section.
  3. Click the Download and install button.
  4. Follow the instructions on the screen.

What are Windows 11’s requirements?

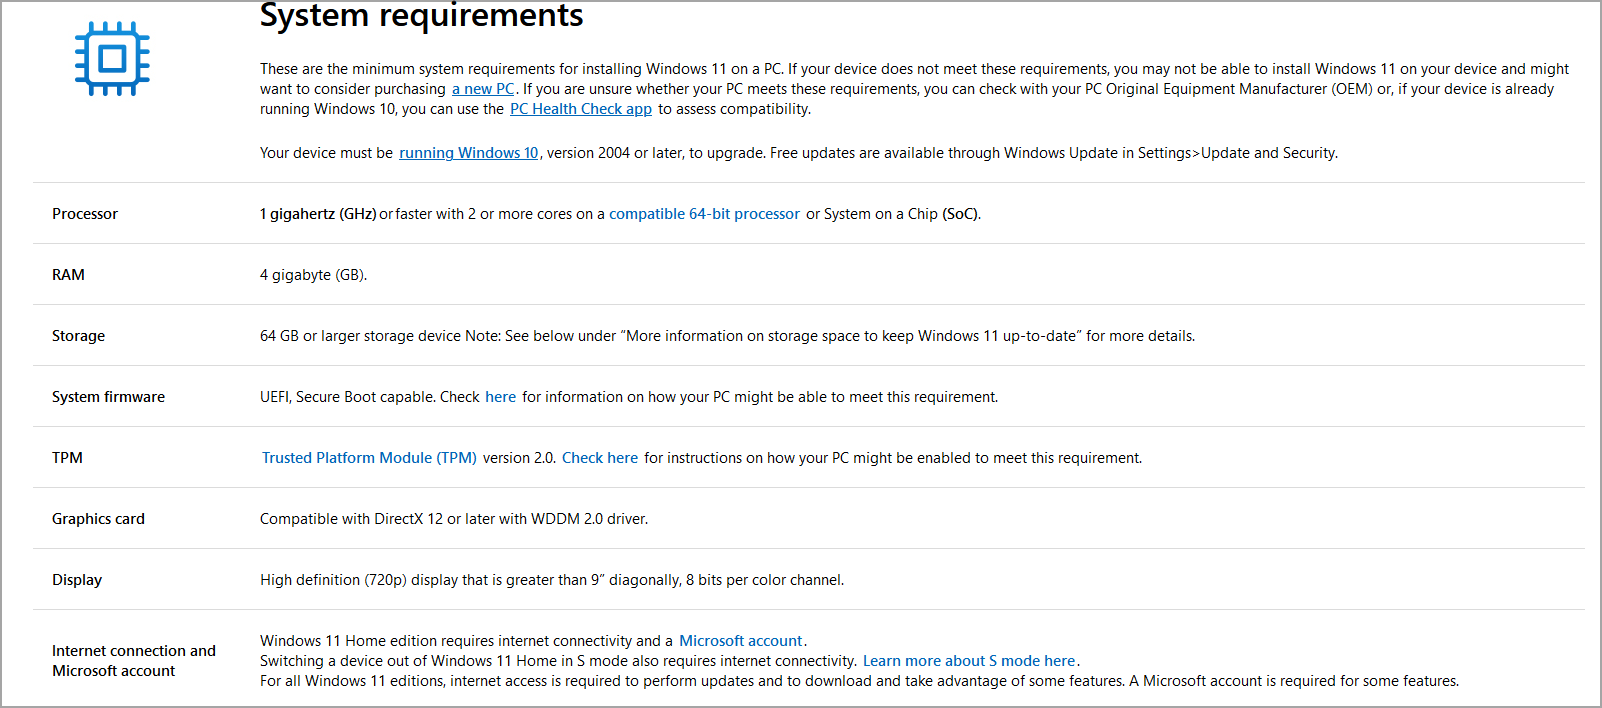
windows 11 requirements
  • CPU: Compatible 64-bit processor
  • RAM: 4GB
  • Storage: 64GB
  • TPM: TPM 2.0

The requirements are slightly higher compared to the previous version, but if your CPU is on the list of supported devices, you won’t have any problems installing the update.

One big issue for some users is the TPM, and to learn more about it, visit our Windows 11 and TPM guide for more information.

Can I download Windows 11 for free?

Yes, just like the previous OS, Windows 11 is available as a free download. You can enjoy it as a free system update and install it.

If you prefer to make a clean install, we’re happy to inform you that you can download the ISO file completely free as well and use it to install Windows 11 on your PC.

Is it better to upgrade or clean install Windows 11?

Usually, it’s better to upgrade to Windows 11 since this is the best method to use if you want to keep all your files and applications.

However, if any issues occur after upgrading, you might want to try performing a clean install. By doing so, you’ll remove all files from your system drive, and you’ll start fresh.

Before doing that, we strongly recommend that you back up all important files, in order to prevent data loss.

FAQs

What do I need to create Windows installation media?

A blank USB drive of at least 8 GB, a stable internet connection, a compatible PC, and (optional) your Windows 10/11 product key.

How do I make a bootable USB with Microsoft’s tool?

Download the Media Creation Tool from Microsoft, run it, choose Create installation media, pick language/edition/architecture, select USB flash drive, and let it finish.

Will creating media erase my USB and my PC files?

The USB will be wiped during creation; back it up first. Installing Windows can keep files if you choose Keep personal files, but always back up the PC beforehand.

How do I install Windows from the USB?

Insert the USB, restart, open the boot menu (F12/F9/ESC varies), choose the USB drive, then follow setup. For UEFI systems, use GPT partitioning and Secure Boot if supported.

Creating a Windows 11 bootable drive is simple, and you can do it by following the steps mentioned in this guide. In case you’re not sure if you should switch, visit our Windows 11 vs Windows 10 guide for more information.

You can use any method that you like, but for most, it would be the simplest to use the Media Creation Tool. If you’re a more advanced user, you can download the ISO file manually and then create a bootable drive.

Setting up a brand new PC with no operating system? Follow this step by step guide to install Windows 11 from your USB: install Windows 11 on a new PC without OS.

We hope that you found this guide useful and that you managed to create your bootable drive. What is your favorite method in that regard? Let us know in the comments below.

Turn Windows Features on or off on Windows 10

Windows 10 is a great operating system, but it also comes with several hidden features that you might not know about.

All these features are listed in the Turn Windows features on or off section, and in today’s article, we’ll show you how you can enable or disable them.

    How do I turn on or off optional Windows features?

    You can easily configure optional Windows features from the Control Panel. From there, you can manually select which features you want to turn on or off.

  1. 1. Press the Windows key and type control panel in the search box.

  2. 2. Click on the first result to open Control Panel.

  3. 3. Navigate to Programs.

  4. 4. Now select Turn Windows features on or off.

    turn windows features on or off programs
  5. 5. A list of features will now appear.

  6. 6. Check the feature you want to install or uncheck the one you want to remove and click OK.

    turn windows features on or off selection
  7. 7. Restart your PC in order to apply the changes.

If you want to access this feature quickly, you can use the following method:

  1. Press Windows Key + R to open the Run window.
  2. Now enter optionalfeatures and press Enter or click OK.
    optional features run window how to turn windows features on

Want to unlock secret Windows 10 features? Here’s how to do it like a pro!


What features are available to be installed?

what windows 10 optional features are available

There are about 30+ optional features available to be installed, but we’re going to focus on several most important ones.

  • .NET Framework 3.5 (includes .NET 2.0 and 3.0) and .NET Framework 4.6 Advanced Services – These two features are required in order to run applications created using the .NET Framework 3.5 or 4.6.
  • Hyper-V – Microsoft’s virtualization technology that lets you run virtual machines on your PC without third-party software.
  • Internet Explorer 11 – If you still need to use Internet Explorer on your PC, you should know it’s still available on Windows 10.
  • Media Features – This includes Windows Media Player and other multimedia components.
  • Microsoft Print to PDF – A feature that lets you “print” your documents straight to PDF files instead of an actual printer.
  • Windows PowerShell 2.0 – Command Line interface similar to the Command Prompt, but more advanced.
  • Windows Subsystem for Linux (Beta) – This feature gives you access to the Ubuntu command line and it allows you to use the same commands you’d use on a Linux system.

These are some of the most notable features that you can enable/disable, but there are a lot more available. To explore all the optional features available in Windows 10, visit Windows Optional Features for a detailed guide and how-to steps.

There you go, a quick and easy guide on how to use Turn Windows Features on or off on your PC.

As you can see, most of the features available here are made for advanced users, and you most likely won’t have to enable or disable them on your own anytime soon.

We hope you found this article informative and that you now have a better understanding of optional Windows Features.

How to Change Language in Waze with a Few Steps [Voice]

If you’re new to Waze and want to know how to change the guiding voice in your app, then you came to the right place.

Waze has always been about the community. That’s why wazers are able to add speed traps, police, accidents, and much more to the map.

This creates an environment in which drivers can interact with each other and offer important information about driving conditions and hazards.

Furthermore, Waze also lets you customize the guiding voices and even add your own voice.

How to manage my Waze voice language?

    1. How to change Waze voice language

    If you want to switch your Waze voice language to another one, you can easily do this through the app’s settings.

    In the Voice & sound settings, you’ll be able to turn alerts On or Off, change the Waze voice and the Voice typing, and adjust the volume.

  1. 1. Open the Waze app on your device.

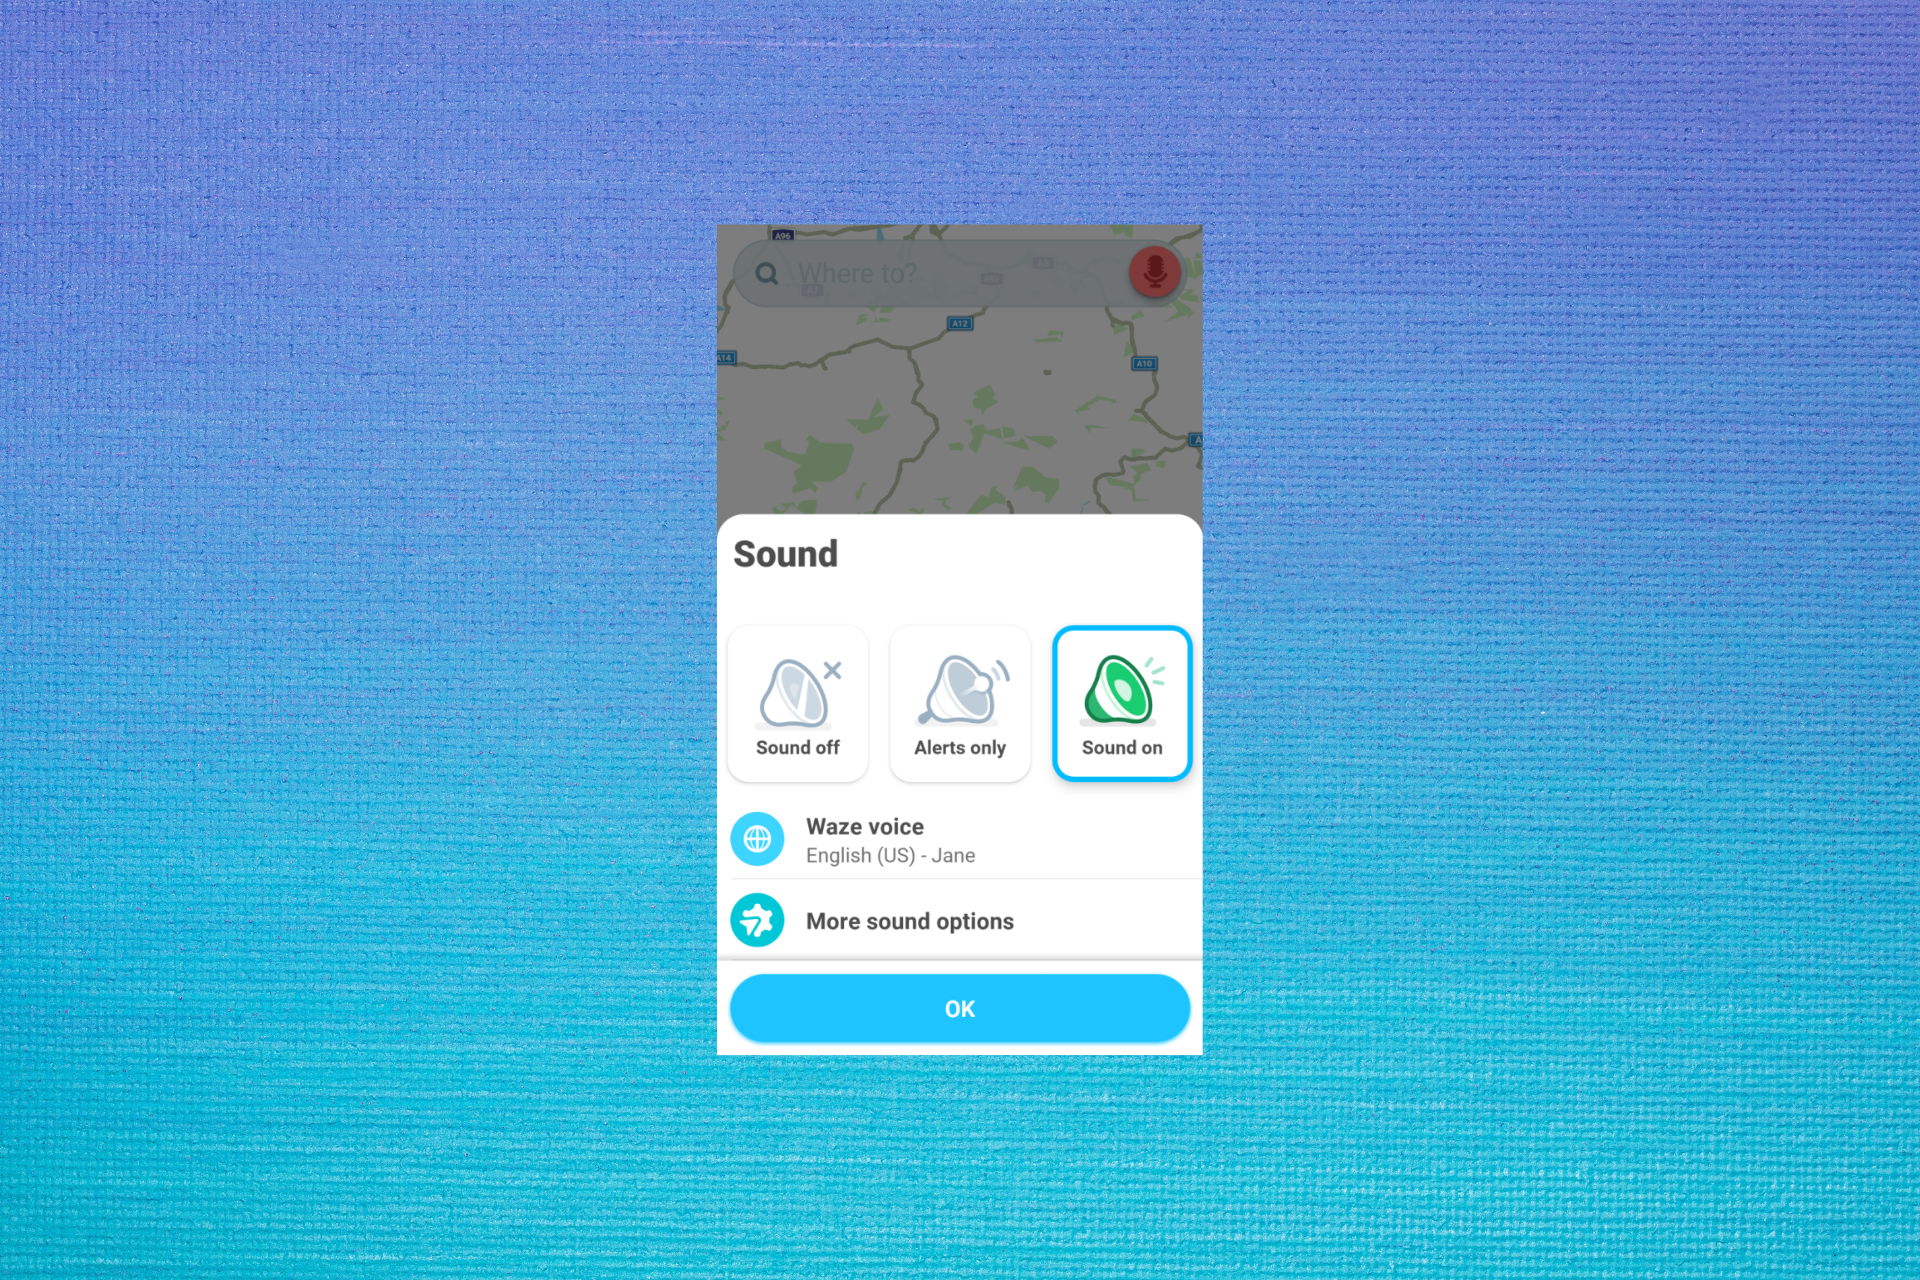
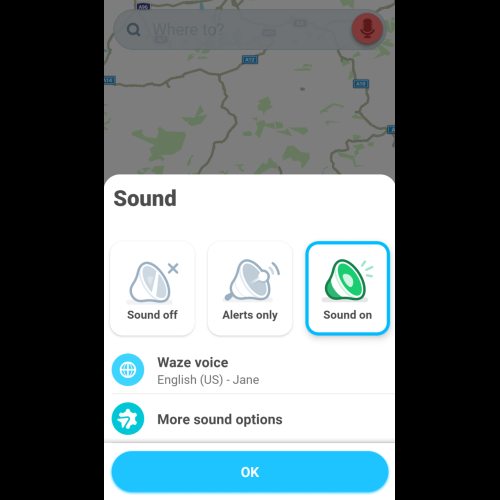
  2. 2. In the bottom-right of your screen you’ll see a speaker icon. Tap on it.

  3. 3. Select Waze voice.

  4. 4. Now a list of voices will appear. Tap on the one that you want to use.

  5. 5. If you also want street name instructions, choose only the voices that have the Including street name option under the voice name.

  6. 6. For more audio settings, after step 2, tap on More sound options.

2. How to create your own Waze voices

  1. Open the Waze app on your device.
  2. In the bottom-right of your screen, you’ll see a speaker icon. Tap on it.
  3. Select Waze voice.
  4. Now tap on Record new voice.
  5. A warning pop-up will appear that will advise you to be very clear when you record your voice, as it will be used for driving instructions.
  6. After that, a permissions pop-up will ask you to allow Waze to record audio. Tap on Allow.
  7. Now you’ll see a complete list of phrases. Tap on any of them to start recording.
  8. A new window with a record and play button will appear. Tap on the record button, say the phrase, and tap on the stop button.
  9. Tap on the Play button if you want to listen to the recording and make sure that it sounds right.
  10. If everything is ok, select Save.
  11. After all the phrases have been recorded, tap on the Done button in the upper-right corner.

Keep in mind that any of the phrases that haven’t been recorded will automatically use the default voice. Also, you’ll have time limits from 3 to 6 seconds for recordings.

You won’t be able to change the voice of Waze to Morgan Freeman, but your voice or the one of a family member should suffice.

As a reminder, make sure that your recordings are clear and accurate, as they are used for guidance instructions. Safety comes first.

If you have any other suggestions or questions, feel free to reach for the comments section below.

How to recover Notepad documents in Windows 10

Recovering Notepad documents isn’t as complicated as people think, and in most cases, you just need to know where to search for your documents.

If you’re not familiar with document recovery, today we’ll show you how to easily recover Notepad documents on your PC.

Have you lost a previously saved Notepad (.txt) document? There are various circumstances in which a text file might get accidentally deleted, perhaps by yourself or third-party programs.

Nevertheless, there’s still a chance you can recover deleted .txt files. As such, here are a few tips for Notepad document recovery in Windows 10.

How do I recover an unsaved Notepad file?

  1. Check the Recycle Bin
  2. Don’t save anything new
  3. Restore lost text documents with Recovery Software
  4. Back up files with File History in Windows 10
  5. Check the AppData folder

1. Check the Recycle Bin

The Recycle Bin is the first place to check for deleted documents. If you haven’t configured Windows to automatically bypass the bin, you can probably recover deleted documents from there.

  1. First, click the Recycle Bin icon on your desktop to open the window below.
    recycle bin notepad document recover
  2. Now have a look for more specific .txt files in there. If you find anything, select the document. Alternatively, you can select multiple items by holding the Ctrl key.
  3. Press the Restore the selected items button.
  4. Open the folder that originally included the text document. You’ll find it restored in that folder.

2. Don’t save anything new

The text document is effectively deleted if isn’t in the Recycle Bin. However, that doesn’t mean the file is entirely erased.

Deleting a document removes it from the file system database and sets the file to be overwritten.

There’s still a good chance of recovering the document so long as you haven’t saved lots of other files that might overwrite the original data.

Don’t save more files after the document’s deletion and you’ll have a better chance of restoring the document.

3. Restore lost text documents with the free edition of EaseUS Data Recovery

So long as you haven’t saved lots of files since the text document’s deletion, you can probably restore it with file recovery software.

One of them is the free edition of EaseUS Data Recovery.

  1. First, press the Free Download button to save the EaseUS Data Recovery Free Edition setup wizard to Windows. Open the setup wizard to add the software to Windows.
  2. Open the EaseUS window and select a location to scan for the text document. If you can recall either roughly or exactly where you saved the file, it’s better to select a more specific location to scan.
    easeUS Data Recovery Wizard notepad document recovery
  3. Press the Scan button to search for the document. The software will run a quick and sector-by-sector scan.
  4. When the software presents the scan results to you, click Document to list text files only. Then, browse through the documents listed in the middle of the window to find the deleted .txt file.
  5. Select the text document to retrieve and press the Recover button.
  6. If you can, select to save the restored document to a USB drive or other external device.
  7. Now, open the restored text document in Notepad.

4. Back up files with File History in Windows 10

Backing up files isn’t going to help you recover text documents that are already deleted. However, keeping backups from now on will ensure you can restore documents if their originals are ever deleted.

This is how you can enable and back up files with File History in Windows 10.

  1. First, press the Cortana button and enter ‘back up’ in the search box. Select Backup Settings to open the window below.
    file history notepad document recovery
  2. Insert a USB drive into the laptop or desktop and then select to back up to that drive by clicking Add a drive. An Automatically back up my files setting will then appear in the Settings window.
  3. Now select More options, and click Add a folder to select to back up folders where you would usually save text files.
    backup options notepad document recovery
  4. Windows will now back up files in the selected folders whenever you insert the USB drive. So, now you can easily open backup copies of any Notepad documents that mysteriously disappear.

If the File History is not working, we have an article with fixes for it.

5. Check the AppData folder

    If you need to recover a Notepad document, you can do that from the AppData folder. This folder holds temporary files, and it’s possible that your file is stored in it.

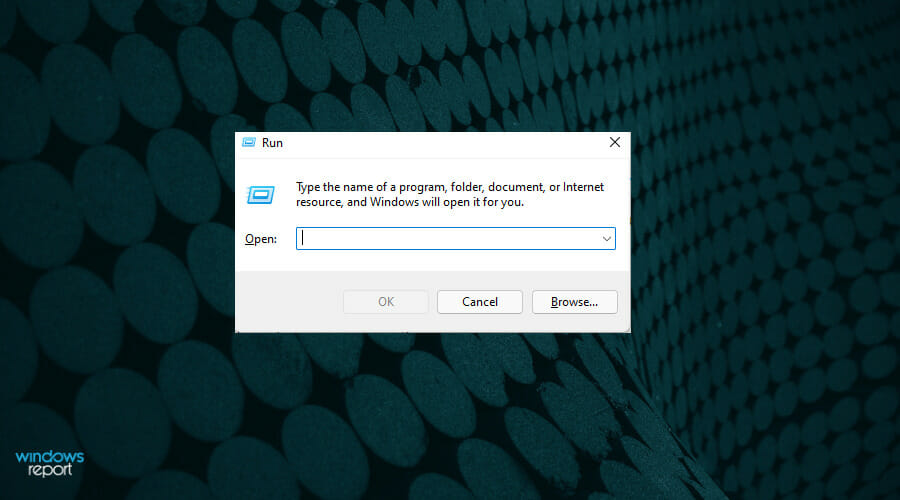
  1. 1. Press the Windows Key + R on your keyboard.

  2. 2. The Run dialog will now open.

    open run
  3. 3. Type %appdata% in the box, then press Enter or click OK.

  4. 4. The AppData folder will open.

  5. 5. Now in the search bar in the top right corner, enter the name of the Notepad file you want to recover.

  6. 6. Check the list of results, and you should be able to see your file.

  7. 7. Select the file and copy it to your PC.

If you regularly back up your Notepad documents, you’ll never need any file recovery software.

However, EaseUS is one of the numerous utilities you can restore deleted files with. Check this Windows Report guide for further details on some other great recovery software.

We hope that our solutions helped you recover your Notepad files. If you have any questions, write them in the comments section.

Sleipnir Web Browser: What do you need to know?

When it comes to web browsers, the most popular choices are the ones that are intended for the global market.

However, there are many less popular browsers, such as Sleipnir, and speaking of which, in today’s article we’re going to see what Sleipnir can do.

Just keep on reading the lines below.

Is Sleipnir a good browser?

You might not actually know this, but Sleipnir has proven to be a stable and fast web browser that comes with a lot of innovative functions and various customization possibilities.

And, the extra security features, paired with smartphone and web app linking are functionalities that make it a viable alternative to its more popular competitors put there.

It goes without saying that it won’t compete closely with the likes of Opera One, Chrome, Edge, or Safari, but it still remains a worthwhile choice.

Who created Sleipnir browser?

You want a little background information on this software, and that is only natural. You see, Sleipnir was originally developed by Yasuyuki Kashiwagi.

And, as an interesting tidbit, the PC containing Sleipnir’s source code was stolen back in November 2004, and many thought that would be the end.

However, in 2005, Kashiwagi established Fenrir & Co. to start the development of a new version of the Sleipnir browser.

What is the Sleipnir browser and should I use it?

1. What is the Sleipnir browser?

sleipnir browser page

Sleipnir browser is developed by a Japanese company, Fenrir Inc, and it was introduced way back in 2004.

Just like many web browsers at the time, Sleipnir had the ability to change the layout engine as needed.  The browser had support for two engines, Trident and Gecko.

However, with the added support for the WebKit engine, the support for Gecko was dropped. As for other features, the browser has support for tab grouping as well as mouse gestures.

The newer versions of the browser also offer better text rendering, similar to the one on Mac OS. Speaking of which, the browser fully supports Retina displays.

The browser is fast, and it even has support for Chrome extensions. As for availability, you can get this browser on all major desktop and mobile platforms.

You can download the browser from the official website, but the website is in Japanese, so you might have a bit of trouble using it if you don’t speak Japanese.

→ Download Sleipnir Browser

2. Are there any Sleipnir alternatives?

Although Sleipnir offers unique features, it still lacks some features in the safety department, and this is why Opera One might be a better choice.

Opera One has tracking protection that will speed up webpage loading by blocking tracking scripts and cookies. The browser also has crypto protection, which will surely come in handy.

Additional features include a built-in ad blocker and a free VPN with unlimited bandwidth for extra privacy and native AI.

The browser also has instant messenger and Instagram integration, a built-in screenshot tool, not to mention the ability to organize tabs into workspaces.

On top of everything, it is based on the Chromium engine, it supports Chrome extensions, and it’s available on all desktop and mobile platforms, so feel free to try it out.

Opera One

Looking for an alternative to the Sleipnir browser? If you haven’t already, don’t hesitate to install Opera One!
Free Download Visit website

Sleipnir is a solid browser with some unique features, but if you want a secure and reliable browser, you should stick with a browser such as Opera One.

However, if you are interested in a Sleipnir browser download, you will find all the resources you need in this article.

And yes, there are also Sleipnir browser download links for Mac, just in case you don’t want to use Microsoft’s operating systems.

Let us know you final choice in the comments section below.

Temporary Internet Files on Windows 10: How to Delete Them

The Windows 10 Temporary Internet Files folder stores all the websites you have visited online for easy reference the next time you revisit the same site.

If you want to reset the Temporary Internet Files location to default, you can do so by following our handy guide.

What are temporary Internet files?

The common name of the Temporary Internet Files is the cache. These are files saved by the device from the web.

This file is saved on your hard drive and contains vital information that reduces the time in rendering web pages you have visited before.

Your browser may store HTML, multimedia, videos, and images in this file. You should know that this file becomes bulky over time and can consume a considerable part of your storage. This means that it may slow down your computer’s performance.

Where are my temporary Internet files?

The location of this file depends on the browser you use. Below are a few popular browsers and the path of their cache:

  • Google Chrome – C:\Users{username}\AppData\Local\Google\Chrome\User Data\Default\Cache
  • Microsoft Edge – C:\Users{username}\AppData\Local\Microsoft\Edge\User Data\Default\Cache
  • Mozilla Firefox – C:\Users{username}\AppData\Local\Mozilla\Firefox\Profiles{profile folder}\cache2\entries

Do Temporary Internet Files slow down computer?

Yes, these files can slow down your devices, but it depends on the amount of storage space they take, the specific browser you use, and the number of stored files.

On older computers, a reduction in performance will be faster and more easily noticed. For top performing computers. This may never be noticed. However, from time to time, it may be good practice to empty the cache.

How can I delete Temporary Internet Files on Windows 10?

    1. Delete Temporary Internet Files from Internet Options

    You can easily open and view your Temporary Internet Files by accessing Internet Settings. The Website Data Settings contain a shortcut to the folder location of the temporary files.

  1. 1. Launch Internet Explorer. You can do that simply by typing Internet Explorer in the search bar and pressing enter.

    internet options control panel
  2. 2. Click on the Tools icon. It is located along the top right corner and has the shape of a cog wheel.

  3. 3. Next, select Internet Options.

  4. 4. In the Internet Options window, under the General tab (shows by default) and Browsing History, click on the Setting tab.

    browsing history settings windows 10
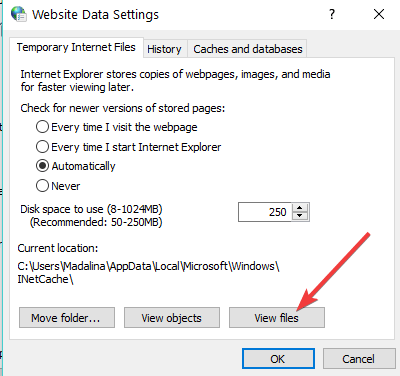
  5. 5. This will launch the Website Data Setting window. There, along the bottom right is the View Files button.

    view files website data settings
  6. 6. Click on View files. You will be led to a new window containing all the files pertaining to the websites you have visited before you had last deleted all your browsing history. You may now delete these.

Also, since the content of the Temporary Internet Files folder still occupies disk space and hence can impact performance, it does make sense to get rid of those files if not needed.

Most users don’t know what to do when the Windows search box goes missing. Don’t worry; we will show you how to return it in just a few steps.

2. Delete Temporary Internet Files using Disk Cleanup

  1. Type Disk cleanup in the taskbar search box and select the same from the search results shown.
    temporary internet files windows 10
  2. Select your primary disk and hit OK.
    temporary internet files windows 10
  3. Select the Temporary Internet Files option. temporary internet files windows 10
  4. Finally, press OK, and that’s it. All your temporary internet files will be removed from your system.

Is it safe to delete Temporary Internet Files in Windows 10?

Yes, deleting the Temporary Internet Files is safe for Windows 10. It comes with a few benefits, including the following:

  • Performance improvement – As discussed earlier, having so much on your computer may slow it down; hence you may expect a boost after deleting these files.
  • Freeing up space – After removing these files, you have more space for other things on your computer.
  • Privacy protection – Since these files can contain some sensitive information, deleting them is a way to guarantee that your data is secure.

Deleting temporary files in Windows 10 is as easy as it can get using the Disk Cleanup utility. Nevertheless, problems find a way of creeping in.

If the tool suddenly decides to act out, you can stop the Disk Cleanup from crashing with a few simple tips.

That is how you gain access to the Temporary Internet Files Folder in Windows 10 or delete the same if not needed.

As always, for more suggestions or questions, feel free to reach out by using the comments section below.

5 Best Online Typing Games to Master Fast Typing

Typing is not fun and can get boring if you have to repeat the words again and again. That said, typing faster can help you finish your work quicker and become more productive with your time.

At this age, learning to type quickly and accurately is essential whether a veteran or beginner; excelling at touch typing requires lots of practice, which can get boring over time.

Online typing games employ game mechanics, such as being able to shoot the objects by successfully typing out the word or competing with the AI, to make the learning experience fun.

In this article, we explore some of the best typing games online that feature both speed typing and word games to improve your accuracy.

Note that you will get the best out of these games using any of the best browsers for gaming.

Where can I practice typing?

There are a lot of online resources for you to practice your typing. A few include:

This is in no way an exhaustive list of options; however, you may also want to try out any of the best software to learn how to type faster.

Of course, all the games listed in this article are also great ways to practice typing and include some free online typing games.

Quick tip:

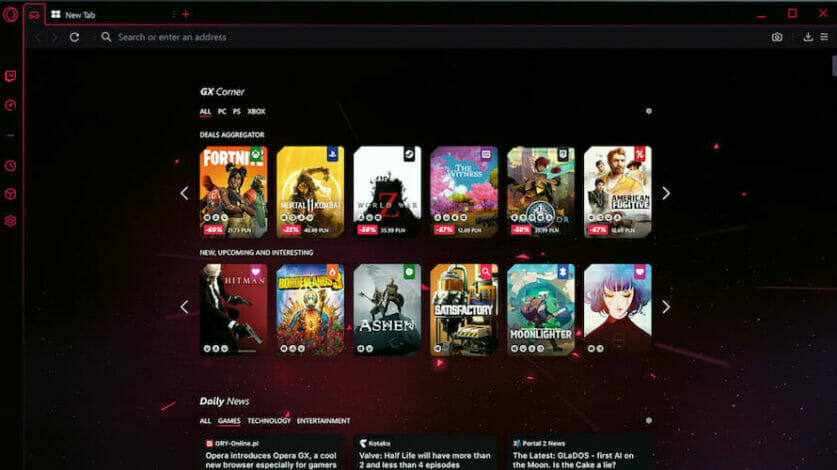
If you play online games frequently, consider installing a gaming browser such as Opera GX.

With the browser, you can set limits on RAM, CPU, and network usage. Finally, you can customize the browser to access the frequently used apps from the sidebar.

Opera GX

This browser offers you incredible browsing speed and adds gaming features to the mix.

What is the best online typing game?

Typing Attack – Space shooting game

typing games online

Here is a great example of online typing games for PC. Typing Attack from TypingGames Zone is a fun space shooting type game. You control a spaceship to attack enemy targets by typing the correct word.

The spaceship fires a bullet for each correctly typed letter. The game has multiple levels, with objectives changing every few levels.

If you type too many letters wrong, the enemy target will explode, destroying your spaceship. It is a good example of speed typing games for adults and kids.

Important features:

  • Nice graphics
  • Excellent soundtracks
  • Difficulty levels

⇒ Play Typing Attack

Desert Typing Racer – Car racing game

Desert Typing Racer uses racing game mechanics to improve your typing. Type the word or group of letters above the car. Only cars in the middle of the road can hit you.

You can avoid obstacles using the space bar to jump. Also, the repair trucks allow you to repair your car, and jumper trucks are useful for jumping more.

You can select from over 30 lessons. Each lesson has been designed to help you improve a particular skill like working on the home row, left hand and right side, etc.

Important features:

  • Multiple typing lessons
  • Great game graphics
  • Difficulty levels

⇒ Play Desert Typing Racer

Typing Wars – Space-themed game

typing games online

Typing Wars is a Star Wars-inspired game where you must stop the evil galactic empire with your fingers. The rebel fighter is equipped with a keyboard.

Type the word or group of letters above the alien fighter to fend off the enemy attack. Also, watch out for the galactic battle star, as it can be hard to stop.

Pressing the space bar activates photon torpedoes to escape from tight spots. Similar Desert Typing, Typing Wars also offers multiple lessons emphasizing different sections of the keyboard layout.

Important features:

  • Different difficulty modes
  • Many game lessons
  • Cool soundtracks

⇒ Play Typing Wars

City of Grendale – Typing adventure

typing games online

Free the city of Grendale from evil CandleFinger by using your keyboard. The City of Grendale is a beautiful adventure where you can find treasures and secret areas to score more points.

City of Grendale is a WebGL-based game and uses the non-conventional EFKJ keys to move the character. Use the space bar to attack and the S key to navigate through the doors.

It is a good example of typing adventure games for kids.

Important features:

  • Easy controls
  • Nice storyline
  • Cool graphics

⇒ Play City of Grendale

Keyboard Ninja – Fruit Ninja-themed typing

typing games online

If you have played Fruit Ninja on your smartphone, you will feel at home with Keyboard Ninja. You can take multiple lessons to master the home row, top row, bottom row, number pad, and all letters.

If you want to save your progress, create a free account. In the game, you will see fruit objects appearing on the screen.

You must press the letter associated with the fruit before it falls to score points.

However, to make it challenging, the game also throws some explosives randomly; entering the associated letter will cause an explosion ending the game.

Important features:

  • Progress registration
  • Leaderboard
  • Nice game soundtracks

⇒ Play Keyboard Ninja

Typing games are an excellent source for learning to type quickly and accurately. These games take away the boring part of the typing tools by employing fun game mechanics while also helping you to improve your typing skills.

Let us know which of the games on this list you have enjoyed the most.

What is Lavasoft Web Companion & Should You Delete it?

Unwanted applications can be a problem, and one potently unwanted application that users reported is Lavasoft Web Companion.

In this guide, we’re going to take a closer look at this software, see what it actually does, and show you how to remove it from your PC once and for all.

What is Web Companion from Lavasoft & how to remove it?

Web Companion from Lavasoft is an application that is usually installed automatically with Adaware Antivirus software.

The only way to prevent that is to manually choose not to install it during the setup.

The application is designed as a browser extension that will protect you against malicious websites and protect your privacy at the same time.

Is Web Companion good or bad?

Many are concerned that the Lavasoft Web Companion is a virus, but that’s not the case.

However, users have reported that Web Companion will change your default search engine in the browser, which is can be concerning.

Although this software isn’t a virus, it still does more harm than good, so it’s advised that you remove it. In the following section, we’ll show you how to perform a full Lavasoft Web Companion uninstall.

    How to remove Lavasoft Web Companion

    The best and most efficient way to remove Lavasoft Web Companion from your PC is to manually uninstall it from Control Panel.

    All you need to do is search for the app in the list of apps and programs on your PC and select the uninstall option for it.

  1. 1. Press the Windows Key and type settings in the search box.

  2. 2. Click on the result to open the Settings app.

  3. 3. In the Settings app,  go to the Apps section.

    settings apps section
  4. 4. Now select Web Companion from the list of apps and click on Uninstall.

    uninstall apps
  5. 5. Lavasoft Web Companion is now uninstalled from your computer.

What to do if you can’t uninstall Lavasoft Web Companion?

In case Lavasoft Web Companion won’t uninstall using the regular method, it’s advised to use uninstaller software to leave a fresh start for another install.

Such software can perform a complete uninstall of every application and will remove all files and registry entries associated with it.

By doing so, you’ll ensure that there are no leftover files that can cause additional problems.

These applications are simple to use, and they work with regular and Universal apps. They monitor system changes automatically, and it will scan your system for any existing leftover files.

Uninstaller tools are useful when the software would not normally remove, which happens more often than you think, or when you think that a program did not completely uninstall.

Some uninstaller applications boost the overall program uninstall process by doing tasks such as monitoring the installation process to ensure a complete uninstall when you’re ready.

It provides rapid removal options to programs via the right-click menu, and much more.

Lavasoft Web Companion is considered an unwanted application, but hopefully, you managed to remove it from your PC by using the methods mentioned in this guide.

3 Fixes for Web Browser Does Not Support Opening Excel Files

You found this article because your browser does not support Excel file opening; here is all you need to know.

Windows users can open a variety of files in native external applications instead of opening within browser pages, which is convenient in many ways.

However, some users have reported that they get an error from a web browser that does not support opening excel files while trying to open Excel files.

The error often reads – To open this workbook, your computer must have a version of Microsoft Excel installed, and your Web browser must support opening files directly from Excel.

This article will show you the best ways to navigate this error.

Why can’t I open Excel in Chrome?

A few things can hinder Excel from opening in your chrome browser. First, at the top of the list is a large Excel file size.

We already know that Chrome is a resource-intensive browser; hence opening a huge excel file on the browser may be too taking on your computer.

Other reasons could include old browser data and even an outdated browser.

Whatever the reason is, we will walk you through the most recommended ways to fix the issue.

How do I open Excel files directly from Chrome?

1. Use a different browser

This may be the case if you are trying to open a large file. Google Chrome is known for its intensive resource use. An alternative is the Opera One browser.

The ad blocker in Opera One may reduce page load times by up to 90% while blocking all sorts of advertisements. Ads are blocked at the web engine level by Opera One’s built-in ad blocker. Consequently, it uses fewer resources and provides a quicker page load time.

It comes with an AI already built-in and features a modular AI-ready design that allows the integration of current and future AI technologies.

Opera One

My Flow in this web app is organizing the way you open any file formats and saves them accordingly.
Free Download Visit website

2. Use Plugin for Firefox and Chrome

IE Tab Extension For Chrome 

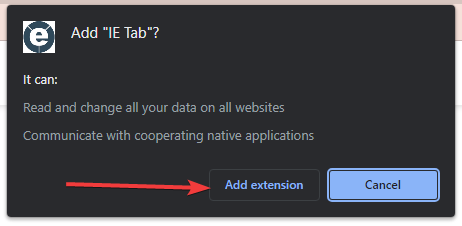
  1. Launch Chrome and open the IE Tab extension page.
  2. Click on the Add to Chrome button.
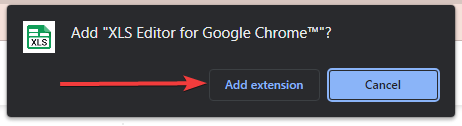
  3. Select the Add extension button.
    browser does not support excel file
  4. Wait for the plugin to download and install, and restart Chrome if needed.
  5. Now click the IE Tab icon to invoke the action, which should help resolve the browser that does not support opening Excel files issue in Chrome.

If you cannot open an Excel file from a website, adding this extension will be a helpful solution.

3. Delete the browser cache

  1. Launch the Chrome browser.
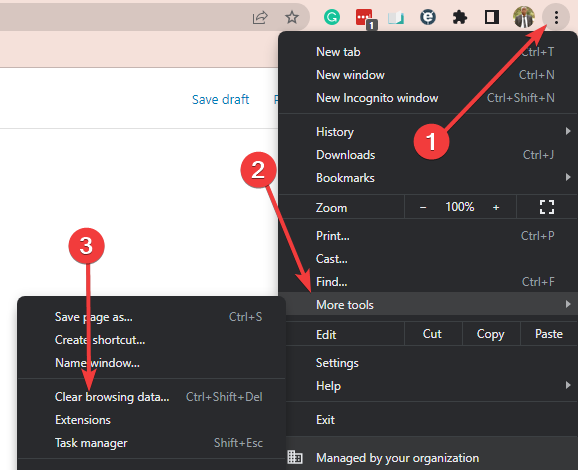
  2. Click on the menu, select More tools, then Clear browsing data.
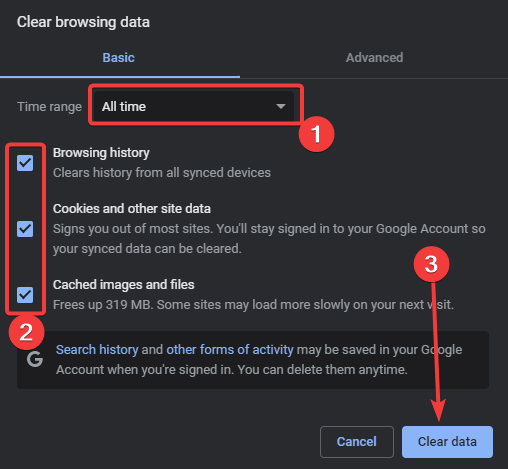
  3. Select All time from the time range, tick the checkboxes for Browsing history, Cookies and other site data, and Cached images and files, then select Clear data.

If Chrome is not downloading Excel files, you should clear your browser data. Old data can make the browser non responsive to links and some websites.

How do I open an XLSX file in Chrome?

  1. Navigate to the XLS Editor for Google Chrome extension page.
  2. Click on Add to Chrome.
    browser does not support excel file
  3. Click on Add extension button.
    browser does not support excel file
  4. Select the extension icon and then click on the Add spreadsheet button.
    browser does not support excel file

You should try this extensions if the browser does not support excel files with encryption.

If your browser does not support opening any Excel file, the solutions in this article should come in handy. However, if none of the three fixes works as a last resort, you may consider resetting your browser. The downside is that you may lose some important browser data.

This article is helpful if your prefer to open an Excel file in browser instead of performing a file download.

Let us know in the comments if these solutions worked for you.


4 Tested Ways to Fix the Netflix Audio out of Sync Issue

Many Windows users reported experiencing an issue regarding the audio & video sync on Netflix. It seems that videos start ok, but after a while, they slow down, leaving Netflix audio out of sync. Here is all you need to know about this problem.

While this can be annoying, there are a few ways to resolve the issue. However, since users have noticed the problem more often when they use Netflix on a browser, we will work you through the best browser fixes.

Also, note that downloading and using the Netflix app is recommended as a quick fix, but if you prefer the browser experience, then read on.

Please note that users have experienced the Netflix audio out-of-sync issue on Samsung TV, Firestick, and Roku TV as well.

Why is Netflix audio out of sync?

There are a few things that may trigger this issue. Often it is simple settings on Netflix, and sometimes it could be because of Settings on your Windows OS. That said, here are the main culprits:

  1. Slow or bad internet
  2. An overclocked PC, or too many open browser tabs
  3. HD video streaming on Netflix
  4. PC’s hardware acceleration

Whichever is the case, here are our recommended fixes.

Quick Tip:

If you can’t resolve this problem in any other way, it would be best to switch to a different browser. If you want a fast, reliable, and secure browser for multimedia, feel free to try Opera One.

Opera One focuses extensively on user safety and privacy. It also comes with a free, built-in VPN which you can use to connect to Netflix and see content available exclusively to other countries. Opera One also features a native AI.

Opera One

Free VPN to unblock geo-restricted content and experience fast, error-free browsing with Opera.
Free Download Visit website

What can I do if Netflix audio is out of sync?

1. Verify your Internet connection

  1. Launch your browser and navigate to the internet speed test site.
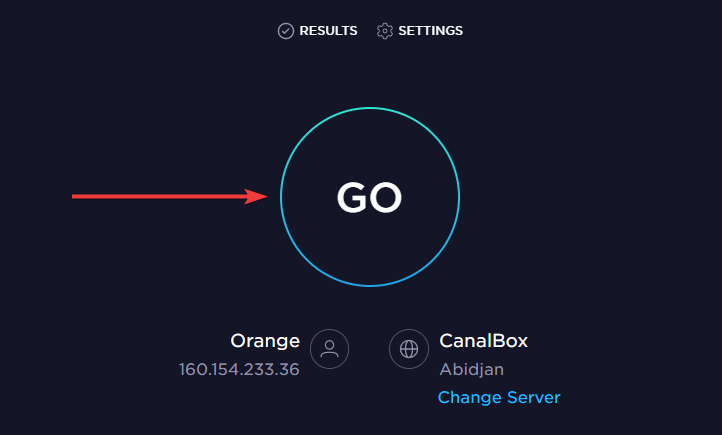
  2. Click on the GO button.
    netflix audio out of sync
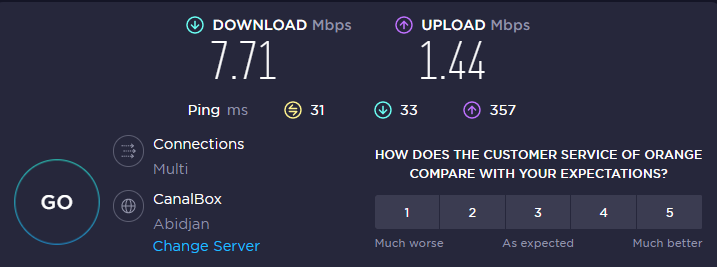
  3. Wait for your internet speed result to come back.
    netflix audio out of sync
  4. If your internet speed is low, you may try using a wired connection, restating your router, or changing your ISP.

Here are the required internet speed recommendations for Netflix:

Video QualityNetflix Speed Recommendation
Standard Definition (480p)3 Mbps
High Definition (720p)5 Mbps
Ultra HD/4K (2160p)25 Mbps

When Netflix audio is out of sync on a laptop, or your Windows 10 or 11 devices, you may want to start by verifying your connection runs ok.

2. Turn off HD streaming

  1. Launch your browser and navigate to your Netflix account.
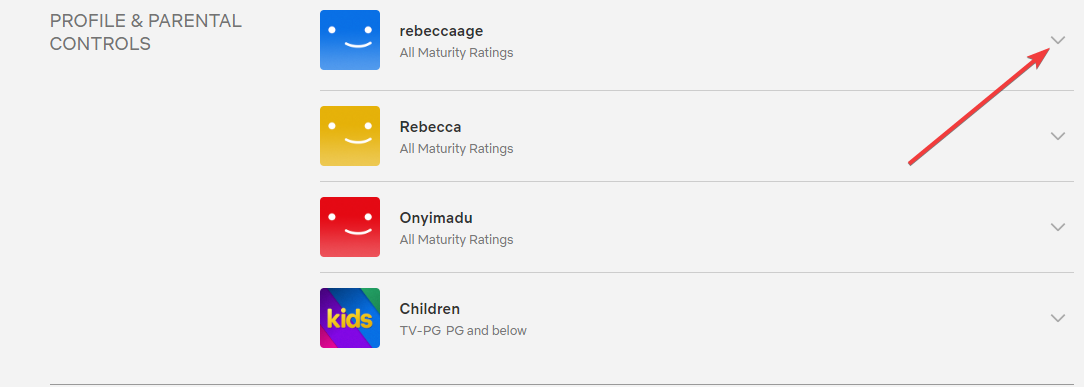
  2. Expand your profile under Profile and parental controls.
    netflix audio out of sync
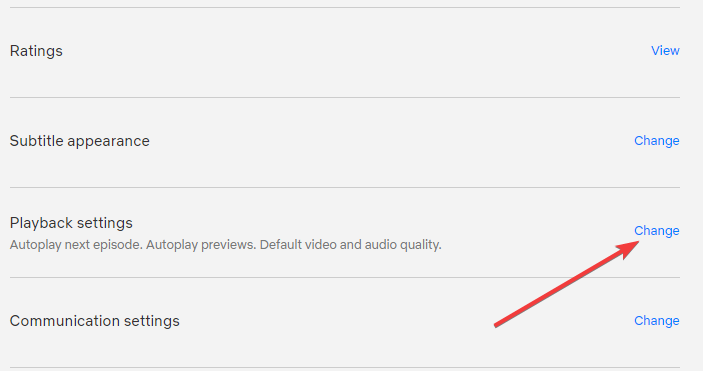
  3. Click Change under the Playback settings option.
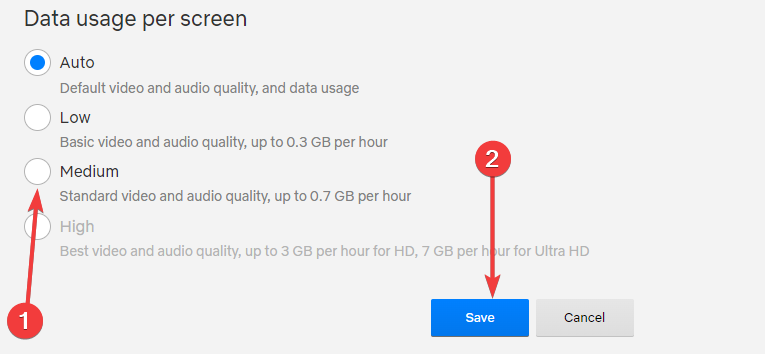
  4. Select Medium quality and click Save.
  5. Try loading a video to see if it works. If it doesn’t try changing the quality to Low and see if it works.

3. Clear the browser cache

  1. Launch the browser.
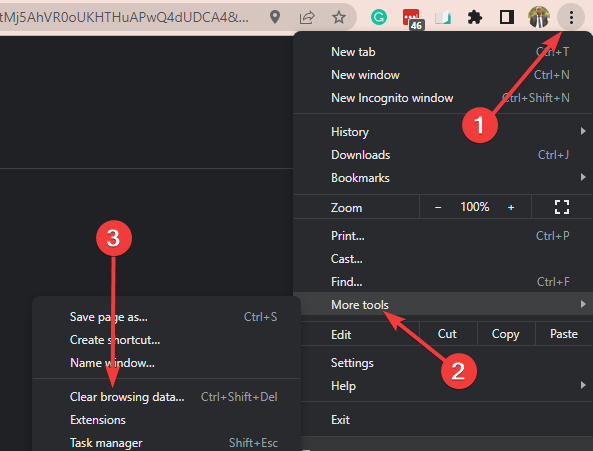
  2. Click on the three dots menu icon, select More tools, and Clear browser data.
    netflix audio out of sync
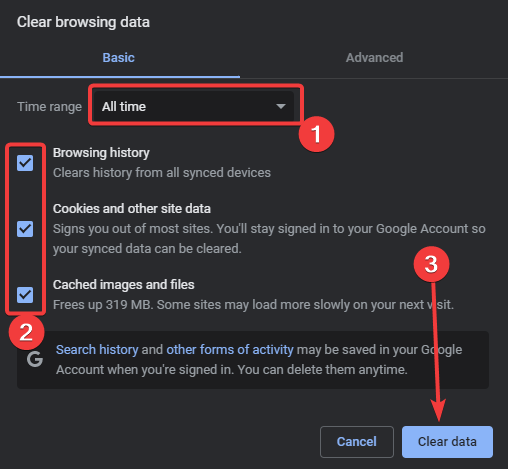
  3. Select All time from the time range, tick the checkboxes for Browsing history, Cookies and other site data, and Cached images and files, then select Clear data.

This is an important fix when Netflix audio is out of sync on your Chrome browser.

4. Disable hardware acceleration

  1. Launch your browser.
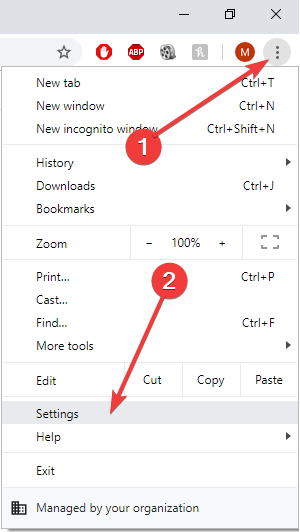
  2. Click the three dots icon in the top right corner of Google Chrome and select Settings.
    settings chrome netflix audio out of sync
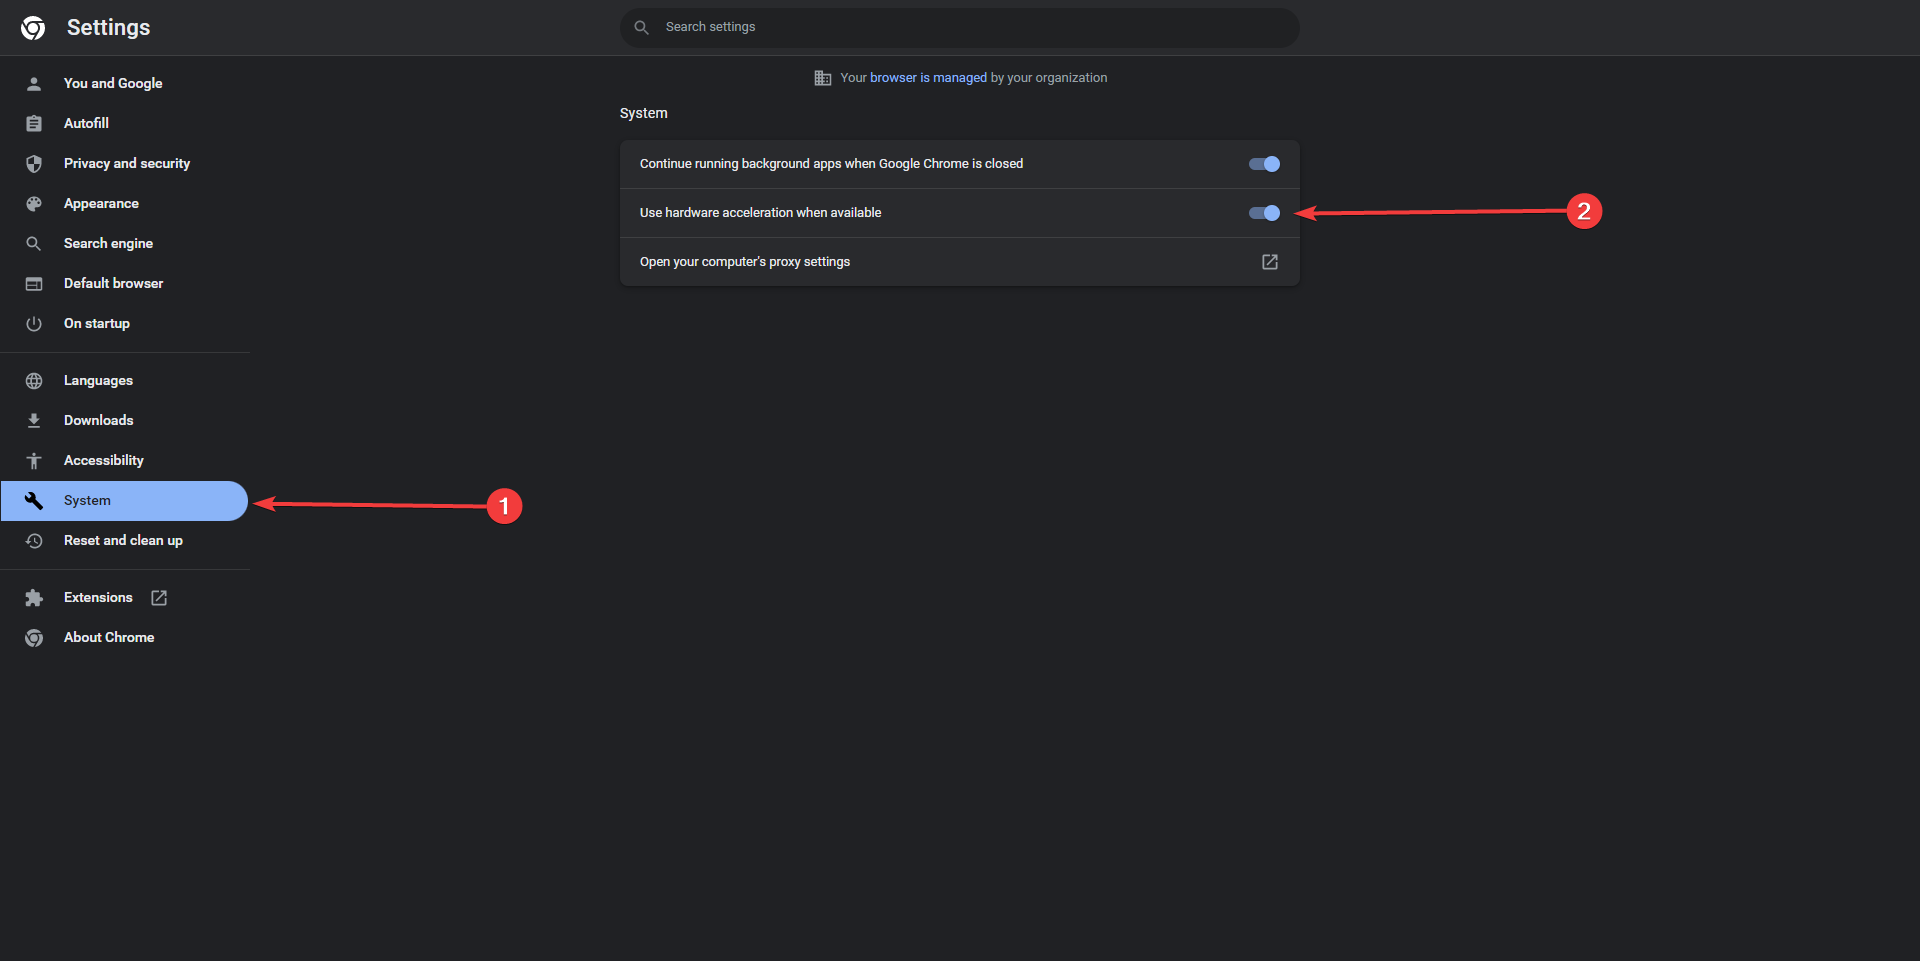
  3. On the left pane, click System and disable the option for Use hardware acceleration when available.
    netflix audio out of sync
  4. Restart Google Chrome and see if this fixed the issue.

If you have read to this point, we hope that at least one of our solutions helped you fix the Netflix sound delay. This is not a complicated problem to fix, and you should be back streaming as usual in a few clicks.

Lastly, if you get fed up with the Netflix service, you could try other movie apps for Windows.

If you found this article to be of help, leave a comment in the comment section below.

Escape From Tarkov Packet Loss: 6 Ways to Fix it

Escape from Tarkov is an online tactical first-person multiplayer shooter from the house of Battlestate Games.

The game takes place between two military companies in the fictional region of the Norvinsk region. You can go either solo or in groups.

You need to defeat the enemies and other non-player characters to reach the escape. Escape from Tarkov allows you to sell unwanted loot to traders and get the equipment or in-game accessories.

Recently, several reports have brought to light the packet loss issue in Escape from Tarkov. Users have reported being disconnected from the game frequently, just after a few seconds into the game.

This frustrating issue does not let the players play the Escape from Tarkov game. While this is mostly the issue from the game’s official server, there are a few things that you can do from your end to fix the problem.

In this guide, we will show you some effective solutions that will help you fix the packet loss issue with the Escape from Tarkov game. Let us check them out.

Why am I suddenly getting packet loss in Escape from Tarkov?

Packet loss is a common issue related to online games or games that rely on the internet to function.

Escape from Tarkov is also another online game that does not seem to be immune from the packet loss issue.

After some research, we have prepared a list of common reasons why you would suddenly come across packet loss error in the Escape from Tarkov game:

  • There is some issue with your internet connection
  • The official game server is having an outage
  • Because of the presence of in-game bugs
  • There could be a malicious virus or malware attack on your network that is slowing things down
  • Your PC isn’t up to date
  • You are using a VPN
  • The network drivers aren’t up to date
  • High CPU utilization

For any of the above reasons, which are some of the most common ones, you will come across the packet loss issue with the Escape from Tarkov game.

Let us check out the solutions that will help you mitigate the problem at hand, and allow you to get back to gaming.

Can high CPU usage cause packet loss?

As mentioned in the above list of common reasons, yes, high CPU utilization could very well cause packet loss problems with programs.

The packet loss issue is more evident when you overclock your CPU, which many of us do while gaming on our PCs for smoother gameplay.

If your PC is overwhelmed and is really trying to juice out every bit of performance from the CPU, then it could fail to focus on other tasks, i.e., communication with the network drivers, and throw up such errors.

How do you fix packet loss in Escape from Tarkov?

1. Use a reliable VPN

  1. Choose an ExpressVPN subscription.
  2. Enter your account credentials and log into ExpressVPN.
  3. Select the closest server to your location so you can get faster performance.
  4. Try to launch Escape from Tarkov again.
  5. Verify if packet loss still occurs.

A safe choice for solving packet loss would be ExpressVPN. It can help you reduce ping, resolve ISP throttling, and lower latency for a better gaming experience.

It also has a well-developed split tunneling feature that allows you to which programs and devices you prefer to route your connection over the VPN server and which ones you don’t.

Another substantial feature is its strong encryption and security that keeps your data safe. Aside from hiding your IP address and mixing your traffic with that of other users, this VPN encrypts your traffic between secure VPN servers and your PC, which means your data and communications are safe from being read by third parties.

ExpressVPN

Top-notch VPN service with various features that help you improve your online activity.
Check price Visit website

2. Check the server status

The first thing that you should do is to check if the official servers are facing any outages or not. You can take the help of websites such as Downdetector or Tarkovserverstatus, and check if the server is facing any issues or not.

You can also keep a check on the official Twitter handle of Escape from Tarkov and the official community forum to know about any issues with servers.

There are chances that the server is facing congestion because of thousands of players online at the same time, or it has been kept down because of some bug fixes or an update.

3. Restart your router

  1. Power off your router or unplug it.
  2. Wait for about 10-20 seconds.
  3. Plug your modem back on or power it on.
  4. Wait for it to connect to the network.
  5. Check if this fixes the issue or not.

If you think there is an issue with your internet connection, then you can try restarting the router. Restarting the router gives it a breather to connect properly with the servers.

4. Change the server manually

  1. Launch the Escape from Tarkov launcher.
  2. Click on the Change server option on the homepage.
  3. A new window with the list of all available servers will show up. Untick the Use automatic server selection (OCE) option at the bottom.
  4. Instead of allowing the game to automatically pick the servers, click on the server you would like to connect to.

5. Check in with your VPN

You can either take the help of a VPN to connect to a server located in a different region with low ping, or disable the VPN. Both effectively solve the packet loss error in the Escape from Tarkov game.

If you are experiencing issues with your local server, you can use a free or paid VPN and connect to it. Because Escape from Tarkov is highly sensitive to ping fluctuations or low latency, make sure the VPN of your choice has low ping.

On the other hand, because of issues with the network connected via a VPN, you will also come across this issue. So, in this case, turn off any VPN that you are using and check if this fixes the issue or not.

6. Close unwanted apps

  1. Open the Start menu.
  2. Search for Resource monitor and open it.
  3. You will be presented with a list of programs accessing your network.
  4. Right-click on the programs, you believe are unnecessary and won’t break your system, and select End process. It could be your browser, background steam, a download, etc.

You can also run a quick system scan of your PC to detect and remove malware or viruses. Try clearing the temporary folder on your PC as well, because corrupted temporary files can cause multiple issues.

How do I make Escape from Tarkov run better?

Here are a few tips to make Escape from Tarkov run better:

  • Tweak the graphics settings
    • V-sync box: Unticked
    • Screen mode: Enable fullscreen
    • Overall graphics quality: Set it to low
    • Texture: Medium
    • Shadows: Medium
    • Visibility: 1000
    • Anti-aliasing: TAA
    • HBAO: Off
    • SSR: Off
    • Z-blur: Unchecked
    • Chromatic abbreviations: Unchecked
  • Update graphics and network drivers
  • Keep the game up to date
  • Keep your PC free from malware and virus

Unfortunately, this isn’t the only issue you can encounter, and we recently wrote about Cannot find template with ID Tarkov error, so don’t miss it.

You can check out our dedicated list of some of the best online multiplayer shooting games for your Windows PC if Tarkov experiences frequent server issues.

We hope that this guide helped you fix the packet loss issue with the Escape from Tarkov game. Let us know in the comments below which one of the methods resolved your problem.

3 Quick and Easy Ways to Play Browser Party Games

You hopefully want to get the party going with some brilliant browser games. Here is what you should know.

Playing games with friends can be incredibly fun, and with the development of technology, you can now play games with friends around the world.

As browser tech has evolved, so has the number and kind of games adapted to browsers increased. From card games to role-playing, there is not a scarcity of thrills.

Today’s article will show you how to play party games with your friends from your web browser.

What are good free party games?

There a numerous options, and below, we give a snippet of some that we love:

  • Gartic Phone – This is a reincarnation of the Telephone Game, albeit a more modern version.
  • Among Us – It became popular during the Covid -19 lockdown and is the perfect whodunnit game.
  • Skribbl – With friends who love arts, you can together unleash your inner Picasso while playing this game.
  • Psych! – If you are great at bluffing, you should try this one out with your friends.

This does not do justice to the available options since the list is endless. Many of these are online games to play with friends on different computers.

But now, let us now show you what you need to play browser party games.

How do I play party games in my browser?

1. Play games on a gaming browser

Remember that not all multiplayer games allow you to invite your friends. Now that you know you can easily play games in your browser, do you have the right browser for this task?

Not all browsers offer the same features when it comes to gaming, and this is where Opera GX comes into play.

This browser allows you to allocate your hardware resources. Doing so will ensure you have enough resources for your system and apps to work correctly.

Opera GX also supports heavy customization, allowing you to pick different themes, wallpapers, and highlight colors.

An integrated messenger can also help organize gaming sessions.

Additional features include Twitch integration, a built-in ad blocker, and a free VPN that offers unlimited bandwidth.

Opera GX

Play your favorite games without worrying about errors that may get in the way. Try the best gaming browser now!

2. JigsawPuzzles.io

  1. Visit the JigsawPuzzles.io website.
  2. Now select the puzzle that you want to play.
    jigsawpuzzles.io browser party games
  3. Click the Invite button to invite your friends to join.
    jigsawpuzzles.io invite browser party games
  4. Send them the link and wait for them to join the game.

3. Gartic.io

  1. Visit the Gartic.io website.
  2. Click on Rooms.
    garticio rooms browser party games
  3. Select New room.
    gratacio new room browser party games
  4. Pick a theme and click on New Room.
  5. Copy the link and send it to your friends.

Are browser games still a thing?

As browsers have evolved, the amount and tech behind browser games have improved. In today’s world, you can play most of the console games you love on your browsers, making this game niche very appealing to gaming enthusiasts.

It is a vast, sought-after niche, and we do not see it slowing down soon. Also, the niche is even broken down into browser games for groups, free browser party games, multiplayer browser games, etc. So there is something for everyone.

Now that you know how to play party games in your web browser, invite your friends and organize a game night. We also recommend these ten browser games to play with friends.

Let us know in the comments section below if you have other suggestions and recommendations.

Fix: Browser is Not Configured to Accept Session Cookies

Many users have reported that they received the error message – This website requires that your browser accept session cookies. This happens when your browser is not configured to accept session cookies or is unable to accept cookies.

Browsers are an essential kind of software that gives you access to the internet, and although they have evolved over the years, you still encounter the occasional errors and troubles.

They use cookies to remember your site preferences and improve the general browsing experience. When you have any errors with your cookies, it will directly affect the quality of your browsing sessions.

Let us discuss all you need to know about your browser cookies configuration error.

What does Your browser is not configured to accept session cookies mean?

Session cookies are server-specific cookies that can only be used by the machine that created them. These cookies enable the browser to authenticate itself once again to the same single server that the client has previously used.

Once you receive this message, in most cases, it means that you have turned off the session cookies settings of your browser.

Cookie sessions don’t save personal data and are solely needed to keep your web session active. Once the online session ends and you shut down the browser, your session cookies are permanently deleted.

Why do I have to accept cookies on every website?

The ePrivacy Directive and the GDPR (General Data Protection Regulation) are two laws that were approved in Europe. Both rules are privacy legislation the European Union passed intending to assist in safeguarding users’ online data. 

In addition, California implemented a similar statute known as the CCPA law, and other states, including Illinois, are contemplating doing the same.

Companies have used data more than ever in the most recent years. These laws were designed to assist people in regaining control because businesses can access a wealth of user data. 

You may decide what websites use your data by visiting each website individually and selecting to accept each one’s cookie policy.

Quick Tip:

If you have configured your browser to block cookies and not accept them, there’s a high chance that you are concerned about security and privacy.

It comes with a built-in Adblocker and VPN which will make the pages load faster and help you bypass any nasty geo-restrictions. Plus, it features a native AI and a modular AI-ready design.

Opera One

Privacy-focused browser with clear, easy-to-use and set cookies and tracking protection.
Free Download Visit website

How to configure major browsers to accept session cookies

1. Mozilla Firefox

  1. Open the Mozilla Firefox browser.
  2. Click on the menu button (the three horizontal lines) and then select Settings.
    your browser is not configured to accept session cookies
  3. Choose the Privacy & Security option.
    your browser is not configured to accept session cookies
  4. Scroll to the History section and set the Firefox will option to Use custom settings for history.
    your browser is not configured to accept session cookies

2. Google Chrome

  1. Launch the Chrome browser.
  2. Type the link below and hit Enter.
    chrome://settings/content
  3. Scroll down and click Cookies and site data.
  4. Finally, select the Allow all cookies option.

Following these steps, you should successfully enable cookies in Chrome.

3. Microsoft Edge

  1. Launch the Edge browser.
  2. Type in the path below in the Address bar and click Enter.
    edge://settings/content/cookies
  3. Lastly, toggle on the option for Allow sites to save and read cookie data.
    your browser is not configured to accept session cookies

Should we accept cookies or not?

Cookies are not a security risk as they cannot spread malware or access information on your computer, but they can pose some risks when it comes to personal data privacy.

Cookies collect information about your online activity that is then used to profile you. Other than that, they pose no real security threat.

That said, as long as you trust the site and are sure your data will be handled with utmost privacy, then you can accept cookies.

On any of these browsers, if your browser is not configured to accept session cookies, by following the steps we have given, you should have successfully been able to enable cookies in the browser.

Let us know if this has worked for you, and note that on most other browsers, by searching for cookies under the settings, you should see the option to accept all cookies.

5 Best VPNs for Windows XP in 2026: Free and Paid

Looking for a VPN client for your Windows XP PC? Even though the OS is outdated, it’s still used in some parts of the world, and privacy remains essential.

A VPN hides your IP and encrypts your traffic, keeping you anonymous online. If you’ve moved on to Windows 7, you might also want solid VPN software for Windows 7.

What are the best VPN client software options for Windows XP?

Private Internet Access – Best privacy features

Private Internet Access is one of the most reliable VPN clients in the cyber world. It is mostly known for its overall flexibility with a wide range of platforms, including Windows XP.

Developed by Kape Technologies, this VPN is based in the United States. Are you worried about it being under the jurisdiction of authorities in the country?

You shouldn’t be since it has an explicit no-logging policy confirmed by users and companies worldwide.

Moreover, if you want unlimited bandwidth and data transfer, these shouldn’t be a problem, just like changing your mind is allowed with that generous 30-day money-back guarantee.

Take a quick look at these Private Internet Access key features:

  • Real IP address masking
  • Industry-leading encryption protocols (OpenVPN included)
  • Security even while using public Wi-Fi
  • Fast connections for higher-speed browsing
  • Powerful enough to cover 10 connections with 1 subscription
  • Competitive subscription prices

Private Internet Access

Have a go with PIA as your top VPN software for Windows XP. Currently available at a major discount!
Check price Visit website

NordVPN – Widest server network

After several tests, our team concluded that NordVPN would be one of the best VPNs to fit on a Windows XP computer.

This Tefincom & Co. VPN offers multiple ways to protect your connection: DNS leak protection, kill switch, double-hop, and auto-connect (user favorite connection).

You can use it on multiple devices besides your own PC, though it can be slower than other VPNs because of its extra security features.

However, you’ll be delighted with the security level provided.

Here are some of the most notable features:

  • Allowing HD streaming without slowing down your connection
  • Over 200 servers at your disposal
  • 6 device usage for 1 license
  • Double data protection (passing it through 2 servers)

NordVPN

Are you still using Windows XP? You’d better get behind a secure VPN such as NordVPN right away.
Check price Visit website

ExpressVPN – Fastest server network

ExpressVPN is one of the fastest VPN services available most especially for the Windows XP system.

Owned by Express VPN International Ltd., this VPN client software uses an SSL-secured network with 256-bit encryption. Moreover, it utilizes unlimited bandwidth and Internet speed.

An interesting feature is that it uses multiple servers from 94 countries, hence an express network, as its name suggests.

You also benefit from one click-away protection against digital fraud or sensitive data tracking due to advanced VPN technology.

More exactly, you have a kill switch functionality to protect data from permanent loss, unrestricted content anywhere in the world, TrustedServer protocol, lightning speed, and so on.

Other key features include:

  • Unlimited bandwidth, server switches, and speed
  • It uses OpenVPN(TCP, UDP), L2TP-IPsec, SSTP, and PPTP protocols
  • Masked network traffic
  • Synchronized connections on up to 3 systems

ExpressVPN

Need a sturdy VPN for your Windows XP computer? This pick should be the one.
Check price Visit website

ProtonVPN – Most compatible with different devices

ProtonVPN is the best free VPN for Windows XP that offers complex security of your internet activity.

ProtonVPN can guarantee you reliable privacy without tracking any log data from your browsing activity. Plus, you’re protected with a considerable server network worldwide.

This VPN solution is quite smart because it includes a great connection speed of 10 Gbps and support from VPN accelerator technologies.

You also must know that you have completely free VPN support without any conditions. This subsidized version is offered to the public without any requirements, so you can secure your Windows PC for free.

It’s essential to note that you can navigate on your streaming platforms without limits using the speedy server connection of ProtonVPN.

Here are some of the most notable features:

  • Secure Core defending tools
  • Open-source software
  • Extremely speed connection
  • Netshield DNS filter against malware
  • Highest encryption (AES-256 support)
  • Secure protocols like OpenVPN, IKEv2, and WireGuard

ProtonVPN

Fully secure your browsing activity with innovative VPN tools and quick connection on a Windows XP PC.
Check price Visit website

IPVanish – Best for home online safety

As its name suggests, IPVanish makes your IP address disappear, making you anonymous online on your Windows XP device.

This VPN client software utilizes its own cryptographic encryption technology to protect your data and information.

If you want to be virtually everywhere online, it is possible because this StackPath, LLC VPN solution has access to over 40,000+ shared IPs, and 500+ VPN servers in 60+ countries.

Other key features of IPVanish include:

  • 256-bit AES encryption
  • Unlimited bandwidth and anonymous torrenting
  • Zero traffic logs
  • OpenVPN, PPTP, and L2TP/IPsec VPN protocols
  • Up to 5 simultaneous connections on multiple devices
  • 24/7 customer support

IPVanish

IPVanish can help you anonymize your connection, and it works great even on Windows XP.
Check price Visit website

How do I set up a VPN on Windows XP?

Given the fact that Microsoft stopped the support for this Windows version, you can greatly use a VPN connection for better privacy or security on your PC.

➡️Hence, you can set up a VPN connection on your Windows XP PC using Private Internet Access:

  1. Sign up for a Private Internet Access subscription plan.
  2. Download and install the software to your PC.
  3. After the installation is complete, open the program.
  4. Log in to your account.
  5. Click on the power button to connect to a server.

➡️ In case you need to configure the in-build VPN from your Windows XP, you can perform it using the following steps:

  1. Go to Control Panel and from the Start Menu.
  2. Click on Network Connections.
  3. Select the Create a new connection option and click Next.
  4. Now select the Connect to the network at my workplace option.
  5. After that, pick the Use my Internet connection (VPN) option.
  6. Give it an intuitive connection name.
  7. Click Finish to launch the Connect window.

How we picked the best VPNs for Windows XP

When choosing the best VPNs for Windows XP, we focused on features that matter most for this older system:

  • Low system impact — VPNs that don’t slow down your PC
  • Easy access — quick and simple connection whenever you need it
  • Server options — plenty of servers without sacrificing speed
  • IP masking — strong protection for your real IP address
  • Simple interface — user-friendly design without complicated settings

Every VPN on our list meets these criteria so you can pick the one that fits your XP setup perfectly.

Can you use a VPN on Windows XP?

Yes, it is possible to use a VPN if you’re using the Windows XP OS with the help of software that still supports VPN for Windows XP 32-bit.

You can also configure a VPN connection on your computer from your Windows settings, which requires more time and a little know-how.

In any case, there are dedicated software like those mentioned in the list below that still work on Windows XP. So, you can install them and instantly secure your PC.

Is there a free unlimited VPN for Windows XP?

The answer is yes, you can get a completely free VPN for Windows XP devices and higher OS editions as well.

For example, you have a VPN option to look for regarding unlimited data usage for free, and that is ProtonVPN.

Wrapping up

If you’re using Windows XP, choosing the right VPN is just one part of keeping your system secure and efficient. For a smoother experience, check out the best browsers for Windows XP, essential software recommendations, plus reliable antivirus, antimalware, and PC optimization tools tailored specifically for XP users.

Do share with us your experience in using any of the VPN client software for Windows XP we mentioned above.

Krunker not Loading? 11 Confirmed Fixes to Pick from

Krunker is a free-to-play online multiplayer first-person shooter game available for Android, iOS, macOS, Windows, etc.

You need to shoot through 12 rotation maps to earn rewards in the game. The game has a very highly still best unique movement system. With its robust modding and mapping tools, there are no limits to what you can create and experience in the game.

But recently, many players have been facing some issues while playing Krunker. One of the most common issues is Krunker not loading or opening, which many users have reported.

Below we have compiled a list of some troubleshooting methods to help you fix this issue.

Why is my Krunker frozen?

A few things can freeze Krunker, and these reasons may not even be particular to the game.

First on the list is having too many open tabs. If you use a browser like Chrome and you have many tabs open, it tasks your system resources and will freeze Krunker or crash your computer.

A bad internet connection is the second culprit. In this case, you will have to restart your browser or change your ISP.

Quick Tip:

Krunken multiplayer online game is best played using Opera GX, the finest browser for gaming sessions. When you have too many tabs open, the hot tabs killer in Opera GX is extremely beneficial.

The free built-in proxy VPN is your sidekick when you have network connection issues. Furthermore, the chat integrations in the sidebar enable a smoother gaming session, without lags or impediments.

Opera GX

Shoot another one in Opera GX, the best gaming browser ever made.

How can I fix Krunker not loading or opening?

Krunker not loading on Chrome

1. Restart Chrome

Before getting started with complex troubleshooting methods to fix Krunker not loading on Chrome, restart the Chrome browser, this can resolve minor bugs and errors like these in no time.

2. Clear Chrome Cache and Cookies

  1. Open Google Chrome, click on the three vertical dots at the top right corner, then click on Settings.
  2. Navigate to Privacy and Security and click on Clear Browsing Data on the right pane.
    Chrome privacy and security
  3. Check the options for Cookies and other site data and Cached images and files, and once done, click on Clear Data.
    Krunker not loading on Chrome

If Chrome’s cache data gets corrupt or full, it can cause Krunker not loading issues. Clear Chrome’s cache data and cookies, then check if the error gets fixed.

3. Turn on JavaScript

  1. Open Google Chrome and click on three vertical dots at the top right corner, then click on Settings.
  2. Navigate to Privacy and Security and click on Site Settings.
  3. Scroll down and click on JavaScript.
    Krunker not loading with script
  4. Select the option Sites can use JavaScript.
    krunker not loading with script

Online games need access to JavaScript to run smoothly on browsers. Enable JavaScript and try rerunning Krunker.

Krunker not loading on Firefox

1. Restart Firefox

Before getting started with different methods to fix Krunker not loading on Firefox, restart the browser. As expected, this can quickly resolve minor bugs and errors.

2. Clear Cache Data

  1. Open Firefox and click on the hamburger icon at the top right corner, then click on Settings.
    Krunker not Loading
  2. Navigate to Privacy & Security, then in the Cookies and Site Data section, click on Clear Data.
  3. Now click on Clear to confirm the process.
    Krunker not Loading

Krunker not loading can occur on other browsers as well. Corrupt cache data and an unstable Internet connection are responsible for this issue on any web browser.

However, several other issues are also known to cause this error. The steps mentioned above are common for most browsers.

Krunker not loading on Steam

1. Verify Integrity of Game Files

  1. Open Steam and click on Library, right-click on Krunker from the list, and then click on Properties.
    Krunker not loading
  2. Click on Local Files, then on the right pane, click on Verify Integrity of Game Files.
    Verify Integrity of Steam Files
  3. Restart Steam and check if Krunker opens.

Corrupted game files can also be the reason behind the Krunker hub not loading on Steam; verify the integrity of game files on Steam to fix this issue.

Several users complain that they cannot verify the integrity of game files on Steam. Rest assured that our guide shows you what to do in case that happens.

2. Check your Internet connection

As Krunker is an online multiplayer, it needs a stable Internet connection to run efficiently. Check your internet connection by performing a speed test.

Try switching to mobile data if using a Wi-Fi connection and check if the game runs on your device. Also, disable your VPN if you’re using one.

3. Run Krunker as an Administrator

  1. Right-click on the Krunker.exe file on your PC.
  2. Click on Properties.
    Right click on Krunker exe file
  3. Select the Compatibility tab, then under the Settings menu, tick Run this program as an administrator, then click on OK.
    krunker not loading

Running Krunker as an administrator will make sure the game doesn’t crash due to a lack of permissions.

4. Update Krunker to its latest version

  1. Open Steam and click on Library, right-click on Krunker from the list, and then click on Properties.
    Krunker not loading
  2. Navigate to the Updates tab and click on Always keep this game updated.
    Always keep Klunker updated
  3. Once done, Steam will automatically update the game if any updates are available.

You might face Krunker not loading with script issues if you haven’t updated it to the latest version. However, it’s always recommended to keep the game updated.

5. Disable Third-Party Antivirus

Any third-party antivirus software installed on your PC can be the reason behind Krunker not loading on Chrome and PC.

Disable any third-party antivirus installed on your system and check if it fixes the error. If not, uninstall the antivirus software temporarily and review for the same.

Make sure to enable Windows Security when you do this so that you don’t leave your device wholly unprotected. TotalAV is an excellent third-party solution that is unintrusive and won’t interfere with Krunker.

6. Reinstall Krunker

  1. Open Steam on your system.
  2. Click on the Library, right-click on Krunker, select Manage and click on Uninstall.
    Uninstall Krunker
  3. Now follow the instructions on the screen to complete the uninstallation process.
  4. Restart your system to remove any remaining files.
  5. Relaunch Steam and install Krunker in your existing account and check if the Krunker hub not loading issue is resolved.

If none of the steps mentioned above could help you, reinstall Krunker on the Steam Client. Sometimes the problem lies within the game’s core files that cannot be repaired manually. Reinstalling Krunker will fix issues that cannot be resolved manually.

How do I fix Krunker connection error?

When you constantly have connection errors, we advise you to follow a few of the steps mentioned in this article. These few fixes should work:

  • Restart or change your internet connection.
  • Clear your browser cache

Additionally, it would help if you uninstalled extensions as they may not be compatible and will interfere with the Krunker connection.

The most common reason for Krunker not loading is an unstable Internet connection: however, many players articulated that verifying the integrity of game files also worked for them.

Well, that’s all from our side on how to fix Krunker not loading or opening. Follow the steps mentioned above to fix Krunker not loading on Windows and not only. If the troubleshooting methods mentioned above could not help you, try updating Windows to its latest version.

If this guide was helpful, do let us know in the comments below.

How to add tables in Microsoft Access

Microsoft Access is a database management system from Microsoft. It is being used by companies worldwide to store information. The data is stored using Tables, which can be customized.

A table is a database that holds information. It’s formed by fields of information into which you enter the records of the table. A field is a column from a table, consisting of one category of information. Lastly, a record is a collection of related fields that describe a single item, contained in a row from a certain table.

How can I create a table in Access?

    The process of creating a new table in MS Access is very simple. All you need to do is launch the app and use the built-in menu to add a new table to an existing or new sheet.

  1. 1. Download and install Microsoft Access. If you already have it installed, skip to step 2.

    The setup of Microsoft Access Database Engine 2010
  2. 2. Launch Microsoft Access on your computer.

  3. 3. Click on the Create tab from the menu.

    add a table to access menu create
  4. 4. Select Table from the menu that just opened. This will add a new table to your sheet.

  5. 5. Add the desired fields to your Table.

  6. 6. Save the file.

What is the Add Tables feature?

Navigating tables and queries to establish relationships is the tricky part of Access. The Add Tables feature in Microsoft Access increases your productivity when you’re developing and viewing relationships and providing a better querying experience.

Furthermore, this feature is very important, because the whole database system in Access revolves around tables.

Use the Add Tables feature

  1. Launch Microsoft Access.
  2. Navigate to Database Tools > Relationships.
  3. The Add Tables pane should appear to the right of the screen. If it does not, right-click and select Show Tables, and it will appear.
how to use new Access

Field Data Types you can add to Tables

  • AutoNumber: This should be the first field in a table because it assigns a unique numeric ID to all records from the table.
  • Short text: You can enter text or a combination of text and numbers of 255 characters maximum.
  • Long Text: Here, the maximum length is 65, 535 characters.
  • Number: Can contain only numbers for calculations. If you want to input phone numbers or zip codes, those should be set as text.
  • Date/Time: Contains a date or time code. Useful for Date/Time calculations.
  • Currency: It’s similar to the Number data type, but it uses fixed-point calculation, which is faster than the floating-point calculation used in Number fields.
  • Yes/No: Only stores logical data types like Yes/No, On/Off, True/False, and -1/0.
  • OLE Object (in desktop ver.): Connects to objects in Windows applications. For example, you can use it for ActiveX objects, pictures, calendars, and other types of files.
  • Hyperlink: That one is pretty obvious. You populate it with WWW links.
  • Attachment (in desktop ver.): You can attach images, or spreadsheets, for instance. This is for attaching many types of support types.
  • Image (only in the web app): Used to store picture data. Only used in web apps.
  • Calculated: The calculated field will contain a value that is derived by performing a function on other fields using an expression that you create. It’s a result field.
  • Lookup Wizard…: You can set up a lookup field, which will then contain values from another table, query, or values that you enter manually.

If you say database, you think of Microsoft Access. Read everything about it in our Microsoft Access category.

For more information, get yourself up to speed with our latest guides and tools for Microsoft Office. To take your Access knowledge to a new level, don’t miss our guide on how to convert ACCDB to PDF.

We hope that our guide helped you add one or more tables in Access. Please drop us a line in the comments with your thoughts or questions about this topic.

Fix: Microsoft Defender Antivirus Service High Memory Usage

Having antivirus software on your PC is the need of the hour since your personal and private data is always at risk when you are connected to the internet.

While many go all out and get a subscription for the best antivirus software, many keep their faith in the built-in Microsoft Defender.

Microsoft Windows Defender is antivirus software that keeps your PC protected from viruses and malware. It also scans any file that you download or any program that you install on your PC.

However, often it has been spotted eating up high memory, CPU usage, and disk usage. You will find several user reports complaining about Microsoft Defender antivirus service high memory issue.

If you are also facing an issue with the Microsoft Defender antivirus, then this guide will help you fix the problem.

Because here we will give you a list of solutions that will help you fix the Microsoft Defender antivirus service high memory issue. Let us take a look at them.

Why is Windows Defender taking up so much memory?

MsMpEng.exe is the file that is responsible for checking your PC for threats, stopping them, and keeping the antivirus definition up to date. It is an important component of Windows Security or Windows Defender.

Using this MsMpEng.exe file, Windows Defender continuously monitors your computer for threats and provides real-time protection.

In this process, it keeps running in the background, and most commonly this would take around 50% of your PC’s RAM, while Windows Defender performs a real-time scan, full system scan, or updating virus definition.

Until these background tasks aren’t completed, you will see Microsoft Defender service eating high memory. This error has been reported in different forms, as mentioned below, but they are all the same:

  • Microsoft Defender antivirus service has high memory usage
  • Windows Defender antivirus service has high RAM usage
  • Microsoft Defender antivirus service has high memory in Windows 11
  • Antimalware service executable high memory in Windows 10

Let us now take a look at the solutions that will help you fix the above problems on your PC.

Quick Tip:

Unscheduled scans and virus check-ups might take up lots of memory at very inconvenient times. To avoid high resource usage, switching to a lightweight antivirus should save you the pain.

TotalAV is a simple yet powerful antivirus that can detect all kinds of threats, even ones that are not in its database. It was built to keep the system protected all around the clock so its memory usage is very optimized.

TotalAV

Ultimate protection for all data with this amazingly built antivirus.
Free Trial Visit Website

How do I stop Microsoft Defender antivirus service from using memory?

1. Disable real-time protection

  1. Open the Start menu.
  2. Search for Windows Security and open it.Windows Security to fix sd card not recognized windows 11
  3. Click on Virus & threat protection.virus and threat protection steam error e502 l3
  4. Select Manage settings.
  5. Turn off the Real-time protection.

Real-time protection is one of the components of the Microsoft Defender antivirus that generally triggers the high memory usage issue.

While it is nice to have a background check continuously going on your PC, if high memory usage is really troubling you, you can try turning it off and then check if this fixes the issue or not.

2. Disable Windows Defender tasks

  1. Open the Start menu.
  2. Search for Task Scheduler and open it.
  3. Now navigate to Task Scheduler Library > Microsoft > Windows > Windows Defender.
  4. On the right pane, you will see all Microsoft Defender tasks running in the background including:
    • Windows Defender Cache Maintenance
    • Windows Defender Cleanup
    • Microsoft Windows Defender Scheduled Scan
    • Microsoft Windows Defender Verification.
  5. One by one, close all the Microsoft Defender tasks that are mentioned above by clicking on the task and selecting Disable.

You can try disabling all the Microsoft Windows Defender tasks from the Task Scheduler since they are the reason you are getting the high memory usage error.

3. Run SFC Scan

  1. Press the Win + R buttons to open the Run dialogue.
  2. Type the below and hit Enter. cmd
  3. Enter the below command in the Command Prompt and press Enter. sfc /scannowRun SFC scan to fix windows 11 error recovery
  4. You will see a message pop up saying Verification 100% complete.
  5. Now run the below command and press Enter. DISM /Online /Cleanup-Image /CheckHealthCan't move the folder because there is a folder in the same location that can't be redirected
  6. Restart your PC and check if this fixes the issue or not.

The SFC Scan or System File Checker is an in-built tool in Microsoft Windows that helps you repair the corrupt system files, if any, on your PC.

DISM (Deployment Image Servicing and Management) repairs the system files that SFC Scan fails to repair or replace. It is an administrator line tool.

4. Add Antimalware Service Executable to the exclusion list

  1. Press Ctrl + Alt + Del to open the Task Manager.
  2. Locate Antimalware Service Executable and right-click on it.
  3. Click on Open file location.
  4. Copy the file location.
  5. Press Win + R to open the Run dialogue.
  6. Type the below command and press Enter. windowsdefender://threat/
  7. Scroll down and select Manage settings under Virus & threat protection settings.
  8. Click on Add or remove exclusions.
  9. Select Add an exclusion and then click on Process.
  10. Paste the full path of the Antimalware Service Executable location.
  11. Click on Add.
  12. Restart your PC.

5. Try another antivirus software

If none of the above solutions fixed the Microsoft Defender service high memory usage problem for you, then it is time for you to switch over to different antivirus software and disable the Microsoft Defender.

Are you confused about which antivirus software to go for? Do not worry, we have a dedicated guide that lists down some of the best antivirus software that you can try on your Windows OS PC.

Chances are that because of a bug, the Microsoft Defender service is having high memory issue. You can easily avoid it by switching over to trusted antivirus software.

Is it OK to disable the antimalware service executable?

Yes. It is completely okay to disable the antimalware service executable and even Microsoft Defender. These built-in tools, although beneficial, can trigger multiple problems. And in such cases, you can disable it.

However, make sure that you have alternate antivirus software installed on your PC to avoid putting your personal data or privacy at risk.

We also covered a similar issue in our Msmpeng.exe high memory usage guide, so don’t miss it.

We hope the above guide helped you fix the Microsoft Defender service high memory issue. Let us know in the comments below if you applied a different solution to solve this problem.

Windows 11 Customization: 6 Best Apps & Mods to Use

There are many reasons to rave about Windows 11. The redesigned Taskbar, its new Start menu, and the modified Settings app are just a few improved elements to excite you.

Like Oliver Twist, you may need more and want to improve on a great product. This article will explore some of the best Windows 11 applications to enhance your experience.

We will dig into the newly designed Microsoft Store and recommend some of our favorite apps for enhanced productivity, media playback, and more. We will also explore some apps around the internet that are must-haves on Windows 11.

Can you customize Windows 11?

Customization is one of the most endearing features of the latest Windows operating system. Windows 11 already has built-in functions to customize the looks, features, and other functionalities, for instance, disabling transparency effects or changing the taskbar’s alignment.

Also, you can download apps from the Microsoft Store to customize your PC better. So, there is no limit to the options available to you.

Is it safe to add functionality to Windows 11 with 3rd-party applications?

Microsoft verifies all applications on the Microsoft Store. This means they adhere to content, privacy, and security rules. You are assured that they are not viruses or malware.

If you choose to download apps from other locations, you must do your research. We suggest reading the app’s reviews, as this, more often than not, will show both sides of the user experience.

With that in mind, adding customization to Windows 11 is purely yours and should be a safe process as long as you are sure of the apps you have chosen to download.

What are the best apps to customize my Windows 11 PC?

FeedLab – Best content aggregator app

best windows 11 extensions

For busy professionals and curious minds using Windows 11, FeedLab is the app that gets you all your important content in one place. It is an RSS reader and content aggregator.

With this tool, you will effectively monitor articles that have been read and those that have not. It has a Save for later feature to save unread content that you find interesting for a later time.

What you may find most intriguing is its offline feature. With this feature, you would not require an internet connection to read your favorite articles. This is particularly interesting if you travel through places with poor internet signals.

This tool is based on Feedly and would require a Feedly account to unlock all the features. It is a free app on the Microsoft Store.

Additional features:

  • Color customization for categories
  • Automatic settings synchronization on devices

FeedLab

If you’re looking for the best content aggregator for Windows 11, try FeedLab.
Download Free

Start11 – Start Menu customizer

best windows 11 extensions

Start11 on Windows 11 offers many Start menu functions on the new operating system. It allows you to select from various start menu designs, move the Taskbar to the bottom or top of the screen, and even alter the menu color.

It also restores the taskbar context menu to the Windows 11 Start menu, among other things. Start11 includes page support for Start menu layouts, improved search options, and a feature for creating shortcut links.

This app also works on Windows 10 and will transfer your Windows 10 Start menu to a Windows 11-styled Start menu.

Additional features:

  • Start menu position switching
  • Taskbar to the top of the screen
  • Tiled interface

⇒ Get Start11

Files App – Modern file manager

best windows 11 extensions

For Windows 11, the native File Explorer received a slight upgrade, but this is far from being overhauled. Files App is a modern-looking third-party file manager. It may be used with a mouse, a touchpad, or a keyboard. 

The software available for Windows 10 received a huge update for Windows 11 and promised a file explorer experience that is more contemporary and compatible with Windows 11. 

It has a fluent design, a tabbed interface, and several useful features.

This tool can be downloaded and installed for free.

Additional features:

  • File previews
  • Detection of cloud drive
  • Tags for labeling files
  • Multiple tabs

⇒ Get Files App

RoundedTB – Stunning taskbar customizer

roundedtb

This Windows 11 program allows you to customize your taskbars with rounded edges, margins, and segments! Without making permanent system modifications or altering any system files, you may customize the appearance of the Windows taskbar.

Adding a corner and margin radius is the simplest method to utilize this app. RoundedTB is located in the system tray, and you can access all of its options by right-clicking on its icon.

It contains sophisticated options for further customization, albeit these functions may have a learning curve.

In the advanced settings, you may configure the margin for every side of the Taskbar using its Independent Margins option. You may decide to apply negative values to hide rounded edges on specific sides of the display. This feature allows you to anchor the Windows 11 taskbar to the respective sides of your screen.

Additional feature:

  • Split Mode
  • Show system tray on hover
  • Fill Taskbar when maximized

⇒ Get RoundedTB

BeWidgets – Top-notch widget creator

bewidget

In Windows 11, Microsoft included a Widgets panel, but it leaves much to be desired, and you will rather use BeWidgets. 

BeWidgets is the software for Windows 11 if you’re a widget aficionado. BeWidgets is a desktop widget creator that lets you build entirely customized, personalized widgets.

With this app, you may customize the time, weather, cryptos, stock market, and app shortcuts. In addition, it transforms your desktop into something useful, customized, and one-of-a-kind.

It is much better because it features a highly user-friendly interface with an easy learning curve.

There are constant additions to its functionality. For example, you can expect widgets for RSS feeds, text, and widgets for music that can incorporate music streaming and local media.

The app is available for free on the Microsoft Store.

Additional features:

  • Light and dark theme
  • Switch between layouts

⇒ Get BeWidgets

Lively Wallpaper – Aesthetic wallpapers

lively wallpaper extensions

Windows 11 offers some exciting wallpapers, but you may want more since they may get boring.

If you want your desktop to have a little more personality, we recommend Lively Wallpaper. It may be downloaded for free from the Microsoft Store.

This app isn’t your typical wallpaper software; it’s one-of-a-kind, allowing Windows 11 users to set webpages, videos, and GIFs as their desktop backgrounds. You may also add dynamic backgrounds to your desktop to improve the look and feel.

Furthermore, after finding a backdrop you like, you may customize it to fit your style. For example, you may change the speed, brightness, overlay color, zoom, and more in only a few clicks.

Additional features:

  • Support for multiple displays of varying aspect ratio
  • Changes based on system audio
  • Dark and Light theme

⇒ Get Lively Wallpaper

How do I change app icons on Windows 11?

  1. Right-click on the shortcut of the app you want to change the icon.
  2. Select Properties.
    properties
  3. Click the Shortcut tab at the top.
  4. Click the Change icon… button.
    change icon
  5. Finally, select the icon you want and click the OK button.

Customizing an operating system has a lot of advantages. But, most of all, it feels more like your own creation and a valuable way to optimize your work or play.

This list has been made in no particular order, and the best Windows 11 extensions would depend on your likes and preferences. It also comes in handy if you’ve not activated Windows and keep getting the you need to activate Windows before you can personalize your PC.

You can add more customization by using Android apps on Windows 11. Our guide on the best Android apps on Windows 11 will be a useful resource.

To take your customization even further, try using one of the best software tools that auto change wallpaper on Windows 11. They’re a simple way to give your desktop a fresh look that matches your personal style.

We are curious to know which of these apps you find most interesting. Please leave us your picks in the comments.

How to Adjust Volume Levels in Windows 10, 7

Adjusting volume levels and calling the on-screen Windows 10 Volume UI is as easy as it was with Windows 7.

In previous Windows versions, most of the users knew exactly where to find the Volume Control icon (located in the System Tray) and where to go if they wanted to adjust settings in a more advanced way.

In Windows 10 locating the volume control might be puzzling at first. With the advent Metro interface, users trying to locate these features have been faced with a little bit of a dilemma.

How to turn the volume up on the computer?

1. Use Keyboard Buttons

    Users who prefer to turn the volume up using their keyboard can easily do this by hitting the hardware volume buttons. However, this option only applies to those who actually have media keys on their laptop or keyboard.

  1. 1. Open your PC.

  2. 2. Ensure that its keyboard is connected and working properly.

  3. 3. Check the keyboard for multimedia keys that have a speaker on top of them. They are usually on the top row.

    In our example, they are F3 (for turning the volume up) and F4 (for turning the volume down).

    how to turn volume up on computer with keyboard multimedia keys
  4. 4. Locate the Fn key on your keyboard. It should be in the lower left side.

    how to turn volume up on computer with keyboard fn key
  5. 5. To turn the volume up, you need to simultaneously press the Fn + F3 keys. Depending on which is your multimedia key for turning the volume up, you can replace the F3 here with that key.

    Volume control not opening
  6. 6. If you want to lower the volume, press the Fn + F4 keys at the same time. Here, you can replace F4 with whatever key corresponds to the multimedia key that turns the volume down.

If you own a Windows laptop or an Ultrabook you might find on your keyboard a Mute button. Activating that button will have the same effect described above – the Volume overlay will appear on your screen and you can slide the volume level with your mouse pointer.

2. Use the Volume Control icon

Another way to adjust volume levels on your PC is to use a Volume Control icon. This is probably one of the simplest and fastest ways to adjust the volume. To change the volume using the Volume Control icon, you just need to do the following:

  1. Click the Volume Control icon in the bottom right corner.
    Adjust volume levels windows 10 greyed out
  2. Now you’ll see a new window that allows you to adjust your volume. Simply click the volume bar to set your volume to a desired level. If you want to fine-tune your volume level, you can also use your mouse wheel to gradually adjust the volume.
    Volume control keys not working

As you can see, this is one of the simplest and fastest ways to adjust the volume on your PC. Even though this method is simple, it doesn’t allow you to adjust the volume for individual apps.

3. Use Volume Mixer

If you want to adjust volume levels for individual apps, you can do so using the Volume Mixer. This is a great feature because it allows you to adjust the volume for individual apps on your PC.

As a result, you can lower the volume in your favorite game and increase the volume in Skype to hear your friends better. Of course, you can adjust the volume on the entire PC using the Volume Mixer. To access the Volume Mixer, just do the following:

  1. Right-click the Volume Control icon in the bottom right and choose Open Volume Mixer from the menu.
    Windows 10 Volume Control disappeared
  2. Now you’ll see the list of open applications along with their sound levels. If needed, you can adjust the sound level for each individual application on your PC. All sound levels are independent so changing the volume in one application won’t affect other apps. If needed, you can also mute a specific application instantly right from the Volume Mixer.
    Windows 10 Volume Control missing

This is the most advanced method that you can use to adjust the volume on your PC. This method might not be as fast as the previous one, but it allows you to change the volume for each app individually, so we recommend you try it out.

4. Use a dedicated equalizer

If you cannot adjust the volume of your PC after using all the solutions above, use third-party equalizer software. We recommend you Boom 3D for Windows 10. This tool’s primary purpose is to clean and enhance the sound of your laptop or PC. By using its advanced features, you will be able to adjust your volume.

First of all, you have a powerful equalizer that can be easily used by everyone. You will find a bank of presets that you can use or you can create your own preset from scratch. This feature is very useful, especially when you don’t have a clear sound. Moreover, you can add special effects to the presets so the sound will be just as you wish.

Another important feature that could help you in this situation is choosing your output device. You can choose what kind of headphones you have and adapt the sound to their construction. This feature is not necessary for normal speakers as you can do it easily from the equalizer.

We strongly recommend you check this software on your PC and let us know how had you adjusted your sound using it.

⇒ Get Boom3D

5. Use your driver software

Users often use third-party software to adjust the volume on their PCs. Many audio drivers and sound cards will install their volume control software that you can use to adjust your volume.

Third-party software works similarly to the Volume Mixer, so you won’t have any issues adjusting to it. It’s worth mentioning that third-party software also supports various volume enhancements, so you can easily add various effects if you like. In addition, these tools also have built-in equalizers so you can fine-tune your volume.

You can even save various equalizer and sound settings and switch between them with a single click. Third-party solutions are perfect if you’re an advanced user and if you want to fine-tune your sound.

However, for most average users Volume Mixer should provide more than enough control over their volume levels.

As you can see, there are many different methods that you can use to adjust the volume levels on your PC. The quickest method is to use dedicated multimedia keys on your keyboard, but not all keyboards support this feature.

You can always use the Volume Control icon, but if you want to adjust the sound volume for individual apps, we highly recommend using Volume Mixer.

Errors you might encounter while adjusting the volume

Adjusting the volume on your PC is important, but users reported various issues while trying to adjust volume levels on their PC:

  • Windows 10 Volume Control missing, disappeared – Many users reported that the Volume Control option is missing from their PC. This most likely isn’t a serious problem, but it will prevent you from adjusting your sound volume.
  • Adjust volume levels Windows 10 greyed out – Several users reported that volume levels are grayed out on their PC. This can be a big problem and prevent you from changing the volume level on your PC.
  • Volume control keys not working – Many users use their keyboard keys to adjust the volume on their PC, but sometimes they don’t work properly. This is usually caused by outdated or corrupted drivers.
  • Volume control not opening, not showing – This is another common problem that can occur with Volume Control. Users reported that Volume Control won’t show or open on their PC.

To learn more about volume, don’t miss our guide on enabling and disabling Loudness Equalization in Windows 10.

Let us know in the comments section below if you have any questions about this topic.

4 Fixes for BlueStacks Animal Crossing Not Compatible Error

Animal Crossing is one of the best Nintendo Switch games that have made their way to Android devices and emulators.

However, many users are having issues running Animal Crossing on BlueStacks. Users reported Animal Crossing not compatible message while trying to run the game in BlueStacks.

In today’s guide, we’ll show you how to fix this problem once and for all.

Can you play Animal Crossing on BlueStacks?

Animal Crossing started as a Nintendo Switch game. Fortunately, it is now available on Android devices.

However, it still does not have a PC version. So, to play it on your PC, you need an Android emulator like BlueStacks. Thankfully, it is one of the games available on the platform.

How do I make my device compatible with Animal Crossing?

Some of the latest Animal Crossing games have requirements that your device must meet. For example, the newest Pocket Camp version requires you to be running Android OS in 64-bit.

To know if your device meets this criterion, you can download the 64-bit app checker from the Google Play Store.

How can I fix the Animal Crossing not compatible error?

1. Change the engine settings

  1. Open Bluestacks.
  2. Click on Settings, and select Performance.
  3. Set the number of cores to 4, and change the memory to a minimum of 3GB (the value cannot exceed the actual memory you have on your device).
  4. Now click on Graphics from the left pane and check the Compatibility box under the Graphics engine mode.
  5. Click the Save changes button and check if that solves your problem.

Sometimes you might get a Device not compatible message in Bluestacks due to your settings, and this can prevent you from running certain applications and games.

However, you can fix this problem simply by making some adjustments. Just follow the above steps to solve this issue quickly.

2. Install a high-quality emulator software

There are instances when the Animal Crossing not compatible BlueStacks error will appear. Many users have reported that even after trying some fixes, this error did not disappear.

If you have also encountered this situation, another emulator software might greatly help you run Animal Crossing and other games without issues.

The tool recommended below is a professional gaming emulator for PC. It allows you to recreate an Android gaming platform on your computer.

Use it to benefit from powerful game optimization and enjoy a superior gaming experience. This software offers exclusive emulator features such as high FPS, multi-instance, smart keymapping, and macro support.

If you want to play popular games developed for mobile platforms using your keyboard and mouse, give this solution a try.

LDPlayer

Use LDPlayer, an Android emulator that offers the highest performance and supports the most popular games and apps.
Free Trial Visit Website

3. Install Animal Crossing on PC from the Play Store

  1. Visit Google Play Store on your PC.
  2. Select Animal Crossing game and click Install.
    play store install
  3. Select the destination device.
  4. After installing it, try to run it.

This is a simple workaround, but it might help if you’re getting Animal Crossing not compatible message in Bluestacks.

4. Use an Android device

The BlueStacks Animal Crossing error should be solved quickly when using an Android device. This isn’t an ideal workaround, but sometimes it’s the only thing you can do.

You have another alternative, and this involves reinstalling BlueStacks. Try updating and reinstalling the application and check if that helps.

Why do some games not work on BlueStacks?

If some of your games are not working on BlueStacks, it might be because of some bug on your PC.

The issue can also be down to running an outdated version of BlueStacks. Simply updating the emulator should solve the problem in this case.

The BlueStacks Animal Crossing not compatible error can give you a lot of headaches, but hopefully, you managed to fix it using our solutions.

We recommend you try another emulator with this game, install a VPN, or install the game from Google Play Store.

Try out our solutions and write us about your experience using them in the comments below.

4 Best Browsers with Parental Controls for Online Safety

You need a reliable parental control browser if your kids are using the internet. Using a dedicated browser for kids’ protection gives a parent some control over what their kids are doing online.

Your kids are at risk of visiting the sites you use. Their activities can spring some children’s unethical or illegal areas. But with the right browser, parents can stay in control.

So, it’s possible to screen, restrict, or outrightly block any unwanted sites from their kids or wards. This article presents the best browsers for parental controls.

How do I monitor my child’s browsing?

The best answer we can give you is to use specialized software for doing so unless you want to spend all your time behind them.

If you need some help with this matter, we can recommend the best parental control software for Windows 10/11 in 2022.

These software solutions will significantly simplify your life regarding managing your offspring’s browsing activity.

Which browser has the best parental controls?

Opera One – Secured and private connections

Opera One is a popular security-oriented browser that offers parental controls via its extensive options. You may either utilize the native settings or the extensions to get additional control over what your youngster accesses online.

In terms of parental control extensions in Opera One, Disconnect, an add-on that bans any sites you select, is one of the finest. While it was not designed specifically for parental control, the ability to utilize it as such is rather convenient.

It also prevents over 2,000 third-party websites from tracking your child’s online activity. Under Opera One, you may also block all photos or specify site exceptions for images in Privacy Settings.

Adult Blocker is another excellent Opera One addon that filters your search results from potentially hazardous websites. This plugin also allows you to manually blacklist domains and prevent advertisements.

The Opera One browser has a free, unrestricted proxy VPN service that anonymizes browsing data and prevents websites from monitoring online behavior. The built-in ad blocker is also a feature that protects your kid’s activity online.

Opera One

Vast settings for parental controls, privacy protection, and extensions for the most secured connections.

UR Browser – The most popular

UR Browser presents users with a resourceful, easy-to-use, and user-friendly browser with features to help secure the user experience.

UR Browser, one of the best browsers for parental controls, includes its VPN, ad-tracker, and virus-scanning features.

With these features and more, the UR browser can unblock any site, keep your kid’s activities safe from malware and phishing, and go unnoticed by third-party users.

Incorporating these features does not take away from the performance you know other browsers have. But it is an added advantage to give you a secure and better browsing experience.

With UR, you enjoy the Ninja mode for your data security, 4 x faster downloads, and more. It is built on Chromium technology; hence you want the same benefits with more features this time.

Visit the Chrome Web Store to download and install the parental control extensions and keep your kids safe.

UR Browser

Prevention-oriented browser with fewer security features, but reliable and fast.

Qustodio Browser – The best app for the job

Qustudio browser best browser for parental controls

Qustodio is an exciting and innovative design that can stand as the best browser for parental controls with its array of features.

Qustodio works across multiple devices and platforms on Windows and even your smart devices to help filter your kid’s online presence. In addition, it offers free and paid versions.

Parents can determine time schedules, and restrictions, and block certain unwanted sites. The paid versions offer better protection, SMS monitoring, social media controls, and monitoring per app.

It also filters HTTPS for unsupported browsers and tracks your kid’s location. The best browser for parental controls cannot replace the parent in securing and guiding the child’s online experience.

However, most browsers offer features to restrict or create privacy levels online and can be accessed from browser settings.

Qustodio

Specifically designed for parental control and to keep your child’s activity monitored.

Google’s Kiddle – Effective browser

Kiddle browser for parental control

Kiddle by Google is an innovative browser with parental controls. It presents one of the children-friendly browsers that aid their home research but require parents’ supervision.

Kiddle offers suggestions with relevance to the kids when they conduct searches using the browser. It provides responses that are closer to the kids’ language rather than what would be relevant to adults.

However, there are additional steps to take to further restrict your kid’s access to more unwanted sites than just using Kiddle search.

You might need to download and install extensions and or manage Chrome access to keep children within limits.

⇒ Get Kiddle

How do I protect my kids on a browser?

There are many ways you can achieve that. However, the easiest ones are monitoring your child’s activity the whole time and using specialized software.

You can also apply restrictions, preventing certain websites or content from being accessed by children while using the PC/tablet/phone.

That being said, we’re pretty sure that after exploring all of the above information, you will find it easier to keep your family safe from unwanted online content.

The best measures still include installing extensions and relying on other privacy features, VPNs, and more to restrict children’s online activities. And that’s what UR browser offers all in one package.

Thus, refer to one of the solutions mentioned in this guide for the best parental control for web browsing.

Parental control for internet usage is a must nowadays since there is so much stuff that you don’t want kids of a certain age to see or learn.

You can also implement parental control for Google Chrome, so don’t worry, the possibilities are many when it comes to online safety.

Please let us know which one you prefer in a comment below, or if you use another browser that we should include in this list.

5 Best VPN for Dell Laptops to Reinforce Your Online Privacy

A VPN connects your home with your workplace so that you can remotely use your company’s resources in LAN. But a VPN is also a must-have tool for privacy-concerned users who want to stay safe from cyber-criminals.

With the aid of a virtual private network solution, you can view restricted content on the Internet, defeat government censorship, and safely connect to public hotspots while traveling.

However, not all VPNs are equal, so it’s essential to find the right fit. If you have a Dell laptop computer, check out the 5 best VPNs that grant you total Internet freedom while strengthening your device’s security.

How to connect to VPN on a Dell laptop?

  1. Decide on a VPN service. We use Private Internet Access because it has a large server network, unlimited bandwidth, and very easy-to-use apps.
  2. Download and install the VPN to your Dell PC.download-pia
  3. Launch the app and log in with your credentials.
  4. Click on the power button in the main UI Window to automatically connect to a VPN server.

Now your device is completely secured and you can browse safely and privately without the risk of leaking any type of private data.

What are the best VPNs for my Dell laptop computer?

Private Internet Access – best overall

Made by Kape Technologies, Private Internet Access (PIA) is the best VPN for your Dell notebook, thanks to a wide network of high-speed VPN servers and top-notch security options.

You can use static and dynamic IP addresses, enable port forwarding, protect up to 10 devices at the same time, and quickly access streaming or torrenting VPN servers.

The VPN client can be installed on all major platforms.

Moreover, you can easily set up this VPN on an Arris modem or any other router, thanks to the fact that it has VPN manual configuration mode for OpenVPN, PPTP, and L2TP.

What else you should know about PIA:

  • +3,300 VPN servers in 48 countries
  • Exclusive DNS
  • No logs
  • 30-day money-back guarantee (no free trial)

If you need any assistance with the tool, you can resort to its 24/7 live chat support.

Private Internet Access

Use PIA to protect your Internet traffic on your Dell laptop.
Check price Visit website

NordVPN – most advanced privacy features

Operated by Tefincom & Co., NordVPN is a top-ranked VPN for your Dell notebook, which is indispensable for your journeys.

You can use it to unblock streaming services easily.

NordVPN has numerous security features, such as Onion-over-VPN and obfuscated servers. You can use it to access websites that typically reject VPN connections, as well as make Windows 10 auto-connect to the VPN at startup.

It uses OpenVPN to encrypt your data traffic and supports 6 simultaneous connections.

But you can also install NordVPN on your router to provide VPN access to all nearby devices. It’s one of the few VPNs that can stop Verizon throttling.

What else you should know about NordVPN:

  • +5,100 VPN servers in 59 countries
  • Exclusive and custom DNS servers
  • No logs

NordVPN is a subscription-based VPN with a 30-day money-back guarantee.

NordVPN

Get unrestricted website access on your Dell laptop by using this top-rated VPN.
Check price Visit website

Surfshark – best budget-friendly VPN

Created by Surfshark LTD, Surfshark is another excellent VPN for Dell notebooks while traveling.

It’s the most budget-friendly service on this list, as well as one of the best VPNs for laptops on Windows 10.

Furthermore, compared to the other apps here, Surfshark allows an unlimited number of devices to connect to the VPN using the same account.

But you can install it on your router, too, if required. And you can even change your GPS location with this VPN.

Surfshark supports a variety of VPN protocols, including OpenVPN and WireGuard.

What else you should know about Surfshark:

  • +1,700 VPN servers in +63 countries
  • Private DNS on each VPN server
  • No logs
  • 30-day money-back guarantee (no free trial)

You can also make Windows connect to L2TP VPN, use obfuscated servers, protect your browsing sessions with a malware blocker, and set up split-tunneling mode.

Surfshark VPN

Protect your Dell notebook online while traveling abroad by connecting to the secure servers of this VPN.
Check price Visit website

CyberGhost VPN – easy VPN configuration

Also owned by Kape Technologies, CyberGhost VPN is the best free VPN for Dell laptops.

In fact, it’s one of the few free virtual private network providers you should trust with your browsing traffic.

With the help of CyberGhost VPN, you can safely access files through VPN, defend your router from hackers, and protect your banking information when connecting to unencrypted Wi-Fi networks.

It allows 7 simultaneous connections.

Additionally, you can set up split tunneling, a smart feature that helps manage your Internet traffic on limited bandwidths.

What else you should know about CyberGhost VPN:

  • +6,500 VPN servers in 89 countries
  • Private DNS
  • No data logs
  • 45-day money-back guarantee (1-day free trial)

The app supports the OpenVPN protocol and has a super-intuitive UI for casual users.

Cyberghost VPN

Keep your Dell laptop’s safety in check by turning to this trustworthy VPN.
Free trial Visit website

Express VPN – very fast servers

ExpressVPN is another reliable VPN that has native applications for plenty of devices, including Windows-operated Dell laptops.

The VPN is very easy to set up, you just have to install the application, enter your credentials, and connect at the press of a button.

The best VPN server location for your configuration is automatically detected so you get to enjoy high-speed and secure internet without having to guess.

Alternatively, if you have your own preferences, you can also manually pick a server location by just clicking it from a comprehensive list of all options available.

ExpressVPN has 160 server locations in 94 countries and uses powerful privacy features to let you access geo-restricted content across the globe.

It is proven to work well with video-on-demand services, allowing users to enjoy buffer-free shows and movies.

Other key features of ExpressVPN include:

  • IP address masking
  • 24/hur live chat support
  • Compatible with all major devices
  • Split tunneling
  • Private DNS
  • Secure Killswitch

ExpressVPN is a subscription-based VPN service with a 30-day money-back guarantee.

Express VPN

Connect in just one click and enjoy anonymous and secure internet browsing.
Check price Visit website

To summarize, you can use a VPN to protect your Dell laptop when you’re on the move, whether you’re interested in streaming, browsing, gaming, torrenting, shopping, or online banking.

All you have to do is get equipped with the right VPN for the job. However, if you can’t decide between those 5 options we presented above, we suggest going with PIA.

Join our Dell section to keep track of this company’s products and services.

Return to our Traveling Hub to see how to improve your journeys with a VPN.

How to Open Advanced System Settings on Windows 11 & Optimization Tips

Today, we’ll show you how to access Windows 11 Advanced System Settings. With them, you can fine-tune your system, but they’re a bit difficult to access.

Let’s explore where to find these settings from sysdm.cpl and discuss how they can improve your OS.

How can I open Advanced System Settings?

Below are 2 quick ways to open the Advanced System Properties/ Settings in Windows:

1. Using the Run Dialog Box

    Before you can use Advanced System Settings to tweak and speed up your device, you need to know how to access this menu. A quick method is through the Run dialog.

  1. 1. Press the Windows + R keys on your keyboard to open the Run dialog.

  2. 2. Type sysdm.cpl in the text box.

    open advanced system settings run dialog
  3. 3. Press Enter on your keyboard.

  4. 4. The System Properties menu will open.

  5. 5. Navigate to the Advanced tab.

    advanced system settings windows 11 menu
  6. 6. You are now in the Advanced System Settings menu.

2. From Control Panel

  1. Type Control Panel in the Windows search bar and open it.control panel
  2. Locate the System section.system section in control panel
  3. Click on the Advanced System settings link.advanced system settings

How to Speed up your PC using Advanced System Settings

  1. Open the Windows Search function and type in View advanced system settings. Click on the topmost result.view-advanced-settings advanced system settings in windows 11
  2. Here, you will be provided with Performance settings, User Profiles settings, and Startup & recovery settings.system-properties advanced system settings in windows 11
  3. Inside the Performance settings, you can tweak your visual elements which can slow down your computer sometimes. By adjusting your settings for the best performance, you will be able to have a better and faster user experience.performance advanced system settings in windows 11
  4. Under the User Profile settings, you will be able to see your profiles and copy them or change their type.user-profiles advanced system settings in windows 11
  5. Inside the Startup and Recovery settings section, you can change what your PC will do after a system failure, such as automatically restarting itself.startup-settings-view advanced system settings in windows 11

Wrapping up

Check out an easy tip on your Taskbar that will make your operating system swifter and more responsive. We know what a sluggish computer can feel like.

For users that haven’t upgraded yet, we also have a new guide on how to view advanced system settings on Windows 7, and how to view it in Windows 10 so don’t miss them.

Was this guide useful to you? Let us know by leaving a comment in the section below. Thanks for reading!

Easily Connect Metamask to Decentraland by Following These Steps

If you have a problem like Decentraland not connecting to MetaMask wallet, you are at the right place. This article will give you the appropriate troubleshooting guide with practical methods to overcome this problem.

MetaMask is the best way to experience Decentraland. Even though there are other ways to log into this virtual world, MetaMask can help you get the smoothest experience. But, That doesn’t mean you will not encounter any problems.

Recently, Many people have reported that Decentraland was not connecting with this wallet properly. Here, you will know the solutions to this trouble you may have faced.

In some other cases, users have reported that even though they managed to log into their Metamask account, the tokens were not being displayed.

Before that, you should know more about this unexpected issue to understand better its principles and what causes it to appear.

Why won’t my MetaMask connect to Decentraland?

Many factors can cause problems with the MetaMask, and Decentraland may not be able to communicate with this wallet. 

The followings are the most significant factors that can cause this problem.

  • Internal problem with the browser
  • Faulty network connection
  • Extension or add-on problem
  • Problem with Decentraland

Fortunately, you can apply some practical solutions to get rid of this MetaMask wallet issue with Decentraland.

Do I need MetaMask for Decentraland?

No. You do not need MetaMask to enjoy Decentraland. You can connect it with other wallets as well. Even there is a guest login option. However, MetaMask wallet is officially recommended by the Decentraland authority.

It works great with this virtual world. However, with guest mode, you will lose your progress if you uninstall the browser/game or change the device. But, Signing in with MetaMask ensures you can sync the progress on any other devices.

So, you may not need MetaMask for Decentraland. But, to get the best experience, you must need it.

Quick Tip:

MetaMask is great and very safe, but sometimes the issue can’t be solved in any way. So, the only option is to log into Decentraland using another wallet.

While using more apps can be annoying, Opera GX comes with its own Ethereum-based crypto wallet integrated into the gaming browser, making it capable of exploring Web 3.0.

Opera GX

Protect yourself within Decentraland with a built-in tracker blocker and a free VPN.

How can I fix Decentraland not connecting to Metamask?

1. Update browser

1.1 Update Chrome

  1. Open Google Chrome.
  2. Click on three vertical dots on the top right corner and click on Settings.going settings chrome
  3. Go to About Chrome.going about chrome
  4. Google Chrome will check for updates for itself and install them automatically.
  5. Relaunch Chrome.

1.2 Update Firefox

  1. Click on three vertical lines and then on help.going to help of Firefox
  2. Click on About Firefox.clicking about firefox
  3. It will open the about page and update the browser automatically.

Any browser that uses Chromium as the main engine will have a similar updating process to Chrome. And for Firefox-based browsers, it’s all identical to the Mozilla Firefox updating process.

2. Update MetaMask extension

2.1 Update chrome extensions

  1. Open Chrome.
  2. Type the following address in the address bar and hit enter. chrome://extensions/
  3. Toggle on the switch to turn on developer mode and click on Update.updating chrome extensions

2.2 Update Firefox add-ons

  1. Open Mozilla Firefox.
  2. Type the following address in the address bar and press enter: about:add-ons
  3. Click on the gear icon and then click on Check for updates.update firefox extensions

If the current version of the MetaMask extension or add-on is not compatible, updating it will fix any issue that prevents Metamask from being used in Decentraland.

3. Change site access preference for MetaMask

  1. Right-click on the MetaMask extension icon on your browser.going manage extension metamask chrome
  2. Change site access preference to On all sites.allowing metamask for all sites

If you cannot use MetaMask on Decentraland’s website, doing the above will help.

4. Change DNS

4.1 Change DNS Server for Ethernet connections

  1. Press Win + I on the keyboard to open Windows Settings.
  2. Go to Network & Internet.clicking network internet win11 settings
  3. Click on Ethernet.
  4. Click on the Edit button next to the DNS server assignment.clicking edit dns win11
  5. Next, Type your preferred DNS server addresses. Usually, 8.8.8.8 and 8.8.4.4 (Google DNS) is best for all-purpose.
  6. Click on Save.saving dns settings win11

4.2 Change DNS for Wi-Fi

  1. Open Windows settings like before.
  2. Go to Network & Internet like before.
  3. Click on Wi-Fi.clicking wifi settings win11
  4. Go to Hardware Properties.clicking hardware properties
  5. Click on Edit next to the DNS server assignment.clicking edit dns assignment
  6. Set DNS Settings from Automatic to Manual.setting dns menual win11
  7. Enable IPv4 or IPv6, depending on your preference.enabling ipv4 dns win11
  8. Input the preferred DNS addresses.
  9. Click on Save.

4.3 Flush DNS

  1. Open Start Menu, type cmd, and enter to open the command prompt.opening command prompt windows 11
  2. Please type the following command and press enter to execute it.ipconfig /flushdnsipconfig flushdns cmd

After doing the above things, log in to Decentraland using MetaMask. Then, you should no longer face the problem if DNS was the main culprit.

5. Use a different browser

Try another one if you encounter Decentraland not connecting to MetaMask on a browser. Because, in some cases, the problem may be related to the web browser or the extension available for that specific browser.

For example, if you use Chrome and face the problem, try Mozilla Firefox or Microsoft Edge, or Opera instead to get rid of this problem. For the best experience, you can look at these best browsers for Decentraland.

6. Use VPN

If something is wrong with the Internet network you are using; you may encounter this problem. For example, it may be related to your ISP. In this case, using a premium VPN can help.

For Decentraland, We recommend Private Internet Access (PIA). This VPN hides your original IP and passes your internet traffic within its network so you can easily access any type of content.

If your IP address or ISP’s IP range has issues with either Decentraland or MetaMask server, you may notice that Decentraland is not connecting to MetaMask. In this case, using PIA can help you.

Why you should not play Decentraland using the guest login

There are multiple ways to sign in to Decentraland. You can log in using MetaMask, Formatic, WalletConnet, and the Guest login. But, It is not recommended to play this Metaverse game as a guest.

The guest mode is appropriate if you want to explore the game for a while. But, If you want to take Decentraland seriously, then the wallet login is ideal.

Because, If you clear your browser data or run this game into another browser or device, playing as a guest will not sync your data and progress. As a result, you may lose the progress achieved by hard work.

Also, Decentraland is a great game to earn NFTs and cryptocurrencies. Using a wallet, particularly the MetaMask, will help save progress, sync between devices, and make money.

After considering these facts, you can understand that guest login is not ideal for most users and is just a waste of your time. However, according to the Decentraland official website, MetaMask is the most recommended way to play this virtual world game.

How to buy MANA on MetaMask?

  1. Go to MetaMask and click on Import Tokens.
  2. Search for MANA.selecting mana token metamask
  3. Select one and click on Next.
  4. Click on Import Tokens.importing decentraland mana metamask
  5. Now, you can swap your other currency for MANA.

Ignore the first four steps if you have already added MANA on MetaMask. For example, if you are already playing Decentraland, MANA is probably added to your MetaMask.

You can directly buy MANA from any exchange and import it to MetaMask. Alternatively, it is also possible to buy Ethereum or other supported currency to swap it for MANA.


These methods mentioned in this article effectively fix Decentraland not connecting to MetaMask error. Do not hesitate to comment if you know a better way to get rid of this issue.

Easily Rip Wii Games on PC with These Software Options

If you are still rocking your Nintendo Wii console or trying to get your hands on the classics, it is better to have a rip of Wii games on PC.

Having a rip of Wii games on PC allows you to keep the original game discs safe from accidental scratches.

Wii is traditionally a closed system, and to backup Wii games on a PC, you require a few third-party tools like Homebrewed Channel and Clean Rip to create game ISO.

In this article, we explore how to copy Wii discs on a PC running Windows 10 to help you keep your valuable classics safe.

Quick Tip:

Every aspect that creates a smooth game experience is important for gamers. Making the best out of every gaming session is what we all want.

Opera GX provides us with a gaming environment inside the browser. Play games right from the browser, and see the latest deals and the newest releases with Opera’s GX Corner.

Opera GX

A powerful browser that creates a controlled environment for gamers.

Can I rip Wii games on PC?

Yes, you can easily rip Wii games a PC, using a bunch of dedicated third-party software. This saves you the cost of purchasing a console to play these games.

The process to dump Wii games on a PC is slightly complex, but it’s worth the effort if you are a fan of the titles on the gaming console.

Is there a Wii emulator for PC?

Yes, you would find a bunch of Wii emulators for PC, but most users go with the Dolphin Emulator, as it’s a far more simpler and convenient option.

It offers compatibility with all major operating systems and controllers. New updates are released regularly with patches for previously known bugs. In case you have been wondering how to rip Wii games to PC for Dolphin, check the next section.

How do I back up Wii games on Windows 10 PC?

1. Backup using  GameBackupSystem

GameBackupSystem offers a complete backup solution for your Windows, Wii, Xbox, and PlayStation games.

Using the tool, you can make perfect copies and backups of your games.

The GBS allows you to make a 1:1 copy of virtually any game on most of the popular console platforms.

It eliminates the fear of scratching your expensive Wii game collection by having to use the game CD to play the game.

⇒ Get GameBackupSystem

2. Dump to a PC over the network

backup Wii games on PC

You can dump the Wii game ISO to your PC over the network. For this, we need a few tools such as Homebrew Channel installed on your Wii and a DVD Dump tool. Here’s how to use it.

Note icon NOTE
Homebrew Channel installation is safe, but there is a risk of bricking your console. Proceed at your own risk.

Prepare Homebrew installation (Wii Menu version 4.2 and older)

  1. Make sure you have an SD card formatted with FAT16 or FAT32.
  2. Open the Bannerbom page to download the package – for Wii Menu version 4.2 / Wii Menu version 3.0 – 4.1.
  3. Download the abd6wa v200.zip or aad1f v108.zip file to your computer.
  4. Extract the downloaded file to the formatted SD card.
  5. Download the HackMii Installer from the Bannerbom page.
  6. Copy the installer.elf file to the root of the SD card, and then rename it as boot.elf.

Install Homebrew

  1. Turn on Wii.
  2. Open the Wii menu, and then select Wii.
  3. Select Data Management.
    backup Wii games on PC
  4. Open the Channels tab from the top left.
  5. Open the SD Card tab.
  6. Next, insert the SD card into Wii.
  7. If prompted to load dol/elf, click Yes.
  8. When the loading screen appears, press 1 when the installer prompts, and then select Continue.

  9. Select Install the Homebrew channel option.
    backup Wii games on PC
  10. Select Continue again and then press A.
  11. Once the installation is complete, press A.
  12. Select Exit and then press A.
  13. Press the Home button your Wii remote and then select Exit to enter the Wii menu.

Now you can see the Homebrew Channel listed as one of your channels.

Install the DVD Dump Tool

backup Wii games on PC
  1. Download the DVD Dump Tool.
  2. Extract the DVD Dump Tool and put it in the apps folder on your SD card.
  3. Insert your SD card into your Wii.
  4. Launch the DVD Dump Tool from the Homebrew Channel on Wii.
  5. Press the Right button on the d-pad ad then press A.
  6. Choose the disc that you want to copy, such as Wii Single-Layer Disc or Wii Dual-Layer Disc, and then press A.
  7. Now insert the game disc to your Wii console.
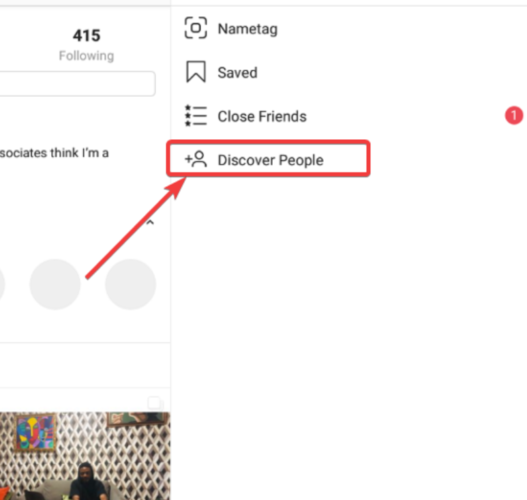
    backup Wii games on PC
  8. Note down the Wii URL/IP Address shown on the screen.

  9. Open a web browser on your computer and then type the URL shown on Wii, and then hit Enter.
  10. On the Wii DVD Dumper page, click on Click here to download RSPP.iso.
  11. Your PC will start downloading the ISO to your computer.

The transfer speed could be much slower, so you may have to wait for hours, depending on the game size.

3. Backup using Clean Rip

Backup Wii games ISO

For this method, we need an SD card or USB driver with at least 4.7 GB of free space. If you are dumping a dual-layer disc, then use a 9.4 GB (minimum) SD card.

Make sure you have followed the steps above to install Homebrew Channel before proceeding with these.

  1. Make sure the SD Card is formatted with FAT16 or FAT32.
  2. Download the Clean Rip zip file.
  3. Extract the CleanRip zip file and then put it in the \apps folder of your SD card.
  4. Insert your SD card into Wii and then launch CleanRip from Homebrew Channel.
  5. Select your device that you want to dump the game to your USB or SD card.
    Rip Wii disc ISO
  6. Click Yes in the next step.
  7. Insert the Wii game that you want to back up into the Wii console.
    Rip Wii disc ISO
  8. If you are dumping a dual-layer disc, then set Dual Layer to Yes. You can find out which game has a dual-layer disc with a little search on the internet using the game title.
  9. Press A to continue.

    Rip Wii disc ISO
  10. CleanRip will start dumping the disc to your SD card or USB drive.

The dumping process may take some time, so wait till it is finished. Once done, you can move the ISO file to your computer and save it as a backup.

4. Use the Dolphin Emulator

If you have the ISO file, the Dolphin Emulator would be a great way to play Wii games on your computer. It’s one of the best emulators available and perfectly does the job.

Just go to the Dolphin Emulator’s official website, download the software, and extract it using 7-Zip or any other similar tool. Once done, you just have to add the path to the folder with the ISO files for the Wii games, and these should run without any issues.

In case the banners are missing, you would have to run the games at least once, relaunch the Dolphin Emulator software, and these would appear.

Yes, the Dolphin Emulator software is completely legal and perfectly safe to use. However, how you obtain the ISO for games running on the emulator is what’s critical here.

If the copies acquired are pirated, you could run into issues. But if you are running from the original disc, things should be just fine.

That’s it. By following any of the methods above, you can easily backup and copy programs for Wii games to your PC. Do note that these steps will only work on Wii consoles running Wii Menu version 4.2 or below.

Now when you know how to rip games, go ahead and download the Dolphin emulator to play them.

Also, find out how the best free online platforms for multiplayer games.

If you have any other queries, drop a comment in the section below.

Browser Doesn’t Supply the Credentials Required [Fix Easily]

While trying to access some websites, users have reported seeing this error message: This server could not verify that you are authorized to access the document requested. Either you supplied the wrong credentials (e.g., bad password), or your browser doesn’t understand how to supply the credentials required.

Seeing this error message means you can’t use your favorite browser to access the information on the website (s) you subscribed to by using the fast log-in method with either a Gmail or Facebook account, amongst others. Microsoft Edge users mostly encountered the error.

Here are a few platforms you may come across the error on:

  • This server could not verify that you are authorized to access the document requested on Apache
  • WordPress – This server could not verify that you are authorized to access the document requested

In this article, we will explore how to bypass 401 Unauthorized and fix the Your browser doesn’t understand how to supply the credentials required error message so that you can log into your preferred services without any issues. Read on to find out how.

What can I do if my browser doesn’t supply the required credentials?

1. Try a different browser

To eliminate this problem, try logging in with a different browser. Opera One is a fast and secure browser, and unlike other solutions, it doesn’t collect any personal information about you.

In fact, Opera One’s primary focus is user privacy and security, which is achieved thanks to the built-in VPN.

Plus, you get way more than a simple browser by deciding to use Opera One. With just one single app, you can eliminate the clutter and stress of running third-party software for each and every one of your digital needs.

Opera One covers pretty much all of them, from safe, anonymous browsing and unblocking geo-restricted content through its in-built VPN tool to taking snapshots without ever leaving the browser.

Its most powerful features focus on the user and were designed specifically with the end user’s browsing experience in mind. That is why features like the adblocker or the integrated workflows and floating video windows were injected into Opera One during its latest transformation.

Let’s quickly look at its key features:

  • It also comes with support for VR Players
  • Standard security protocols
  • Integrated ad-blocker
  • New readers, battery saver mode
  • Countless customization options

Opera One

This stand-alone web app can surely change the way you manage credentials supplying.

2. Clear browser cache and install the latest updates

  1. Launch the browser, and press Ctrl + Shift + Del to open the Clear browsing data utility.
  2. Select All time from the Time range dropdown menu.your browser doesn't understand how to supply the credentials required
  3. Now, select the checkboxes for all the options here and click on the Clear data button.clear data to fix your browser doesn't understand how to supply the credentials required

A cluttered cache may cause some issues within your browser. Thankfully, clearing the cache is a pretty straightforward process for most browsers, and it should fix the Microsoft Edge Basic Authentication error.

Once done, verify if the Your browser doesn’t understand how to supply the credentials required error is eliminated, and you can sign in. In case the problem persists, you can use a reliable third-party cleaner tool.

Award-winning CCleaner is both powerful and fast, allowing you to clean up your computer in literally seconds.

Packed with advanced features, this PC optimization tool frees up space, clears your online tracks, including your browsing history and cache, and speeds up your system.

The best part is that you can test its excellent capacities for free since the Pro version also includes a general free trial.

Here’s how to use it:

  1. Download and install CCleaner.
  2. Open the software -> select the Custom Clean button.
  3. Select which of your browser’s caches you want to clear by ticking the appropriate boxes.
  4. Click on Run Cleaner and wait for the process to complete.

3. Verify that the username and password are valid

Make sure that your password is correct while logging in. In many cases, users received the Your browser doesn’t understand how to supply the credentials required error when entering invalid credentials.

If you’re certain that the password is correct, contact the website administrator, or use the account recovery options available. If Edge is still not prompting for credentials, head to the next method.

4. Check if an error occurred on the server-side

Check if this error appears for other users. This error can happen on the server of any website, even websites that don’t require you to log in at all.

A good way to find out if others too are facing issues accessing the website is to use a platform like Downdetector. Enter the address for the website throwing the Your browser doesn’t understand how to supply the credentials required error, and it will display the results.

If Edge basic authentication is still not working, head to the final method.

5. Make sure the link you’re using to access the website is valid

Another reason for causing this error could be that you don’t have the appropriate link to access the site or are trying to access a premium or restricted part of the website.

Try and check the web address to make sure this is not the case. Or, you could access the website through a search engine.

In this article, we explored the best solutions for the Your browser doesn’t understand how to supply the credentials required error.

In case the error still doesn’t go away, you could crosscheck the Edge Policies from edge://policy, and disable the extensions installed on the browser.

Also, find out what to do if Microsoft Edge is running slow.

Let us know if the solutions were of help to you by reaching for the comments section below.

Microsoft Dev Box has finally reached Public Preview

Die-hard Microsoft users will surely remember that Microsoft announced Dev Box three months ago, a tool that enables developers to take advantage of pre-configured environments to write code without worrying about architecture.

That being said, you will also remember that back then this service was only available in private preview with a waitlist.

All that is about to change, however, as Microsoft’s Dev Box has finally hit public preview today, and we’re about to check it out.

What can we do with Microsoft’s Dev Box?

Just in case you missed it at the time, the general idea behind Dev Box is to offer developer-ready workstations hosted in the cloud.

Of course, these integrate with Azure Deployment Environments, Intune, and Endpoint Manager, so users can get up and running in no time with existing project templates.

By using this tool, developers can actually focus on writing the code only they can write instead of trying to get a working environment that can build and run the code.

All the dev boxes are ready-to-code and preconfigured by the team with all the tools and settings developers need for their projects and tasks.

Furthermore, just in case you were wondering about this, developers can create their own dev boxes whenever they need to quickly switch between projects.

This also works when they need to experiment on a proof-of-concept or kick off a full build in the background while they move on to the next task.

Yes, we’ve anticipated your next question and we have the answer. Access to these Dev Boxes can be controlled with Azure Active Directory (AAD).

Needless to say, different devices can be spun up for various use cases, and start from 4 vCPUs/16GB RAM and go up to 32 vCPUs/128GB RAM.

Developer flexibility and productivity can’t come at the expense of security or compliance. Microsoft Dev Box builds on Windows 365, making it easy for IT administrators to manage dev boxes together with physical devices and Cloud PCs through Microsoft Intune and Microsoft Endpoint Manager.

That means that IT admins can set conditional access policies if they want to ensure users only access dev boxes from compliant devices while keeping dev boxes up to date.

This can be done using expedited quality updates to deploy zero-day patches across the organization and quickly isolate compromised devices.

Also keep in mind that, since this is a managed service with a pay-as-you-go (PAYG) model, the pricing is based on hourly usage and is highly dependent on your resource consumption.

Of course, automation can be implemented to warm up a Dev Box at the start of the day and have it be halted when it’s idle near the end of the day.

So, that being said, know that with Dev Box now being available in public preview, interested organizations can head over to Azure Portal to download their preferred environments.

Were you waiting on the opportunity to use Microsoft’s Dev Box? Share your thoughts and opinions with us in the comments section below.