What do you do when you’re starting a business, or you’re self employed and can’t afford an accountant? You find the best small business accounting software to meet your budget and needs.
In this article, we will present you the best software for accounting for those who are self employed.
Best software to manage finances as a self employed person
FreshBooks
FreshBooks is an accounting software package developed by 2ndsite and it offers cloud-based accounting tools that manage invoices, expenses and time management.
The interface is quite simple, and you can easily access invoices, estimates, customers, expenses, projects, and time tracking.
From the main page, you can also view pending entries, total profit, expenses, and access advanced reports from the main page.
Additional information such as your profile, company profile, app, and bank additions are also available and the service also allows you to manage multiple businesses.
The Invoice section of the allows you to view past invoices as well as invoices sent to you or from you. This feature also allows you to view the status of each invoice which is quite useful. However, this service doesn’t offer double-entry accounting.
FreshBooks client information is easily accessible from the dashboard and you can view customer contact details through what looks like digital business cards.
When you add a new customer you can add their email address, company name, and phone number. In addition, you can view all interactions with that client from this section.
Even if it does not have the functionality, such as double entry, which larger companies may need, this does not mean it should be overlooked.
Ease of use alone should be an important factor to consider when deciding which accounting platform is right for your business.
FreshBooks offers a 30-day free trial so users can try it before engaging in a monthly package.
QuickBooks Online is geared towards small and medium-sized businesses and it offers local and cloud-based solutions. The platform includes sales, payroll, expenses, reports, invoices, and taxes.
The interface is quite simple and you can see the company name, logo, invoices, expenses, bank accounts, sales, profits and losses from the main screen.
If needed, you can choose to hide any financial information displayed. QuickBooks also has a convenient tip feature that drives you to start billing, pay employees, track time, connect with an accountant, and view profits. Of course, you can disable this feature if you want.
As for available information, you can access banking, sales, expenses, workers, reports, taxes, and accounting from the left side of the dashboard.
QuickBooks offers a wide range of reports, and all reports are divided into several categories, so you can easily manage them. If needed, you can also create favorite reports in order to access them quickly.
Sales transactions are also easily accessible. These include estimates, non-invoiced, expired activities, open invoices, and payments in the last 30 days.
Once you have finished editing the invoice, you can preview it or print it. Invoices can be sent immediately or saved to be sent later. You can also create periodic invoices.
It’s worth mentioning that invoices also support customization, and you can add the payroll to the package for an additional monthly fee.
With its well-structured dashboard and easy-to-use features, QuickBooks is an excellent accounting solution for small businesses, so feel free to try it out.
Xero is another great service for small business and just like our previous entries, it’s available on the majority of platforms, both desktop, and mobile.
The service supports invoicing allowing you to create personalized and professional invoices. If needed, you can also create repeating invoices or send multiple invoices simultaneously. The service also has an inventory feature allowing you to keep track of all your items.
Xero has bank connections feature allowing you to access your bank information and get a better view of your transactions. The service also has a powerful dashboard allowing you to quickly view important information.
It’s worth mentioning that this service offers multiple layers of security, so you can choose which data you want to show. Of course, two-step authentication is also available. To make sure that your data is secured, all the information stored by Xero is encrypted, so users without a password won’t be able to view it.
Another great feature is the ability to pay bills directly from Xero, and you can monitor your expenses and receipts online with ease.
Overall, Xero is a great service, so you might want to try it out.
Do you get an error message saying Sorry we’re having trouble linking your Microsoft account whenever you want to play a Steam game? You are not the only one having this issue.
This error can be extremely frustrating if it pops up constantly whenever you want to play your favorite games on Steam. It is usually produced by a loss of connectivity while signing up to your Microsoft account, a power outage, or even system file corruption in some cases. This error has been taken into account by Microsoft, but an official fix hasn’t been released yet.
For the reasons mentioned above, in this article, we will explore some of the best ways to deal with this annoying error, and get you back to your favorite games in no time. Read on to find out more.
Whenever I try to link my account it gives me an error. Anybody able to help me out?
Error message:
Sorry! We are having trouble linking your Microsoft account. If you continue to see this error please go to www.rockstargames.com/support.
How to fix Sorry we’re having trouble linking your Microsoft account Steam error
1. Make sure you’re connected to the Internet
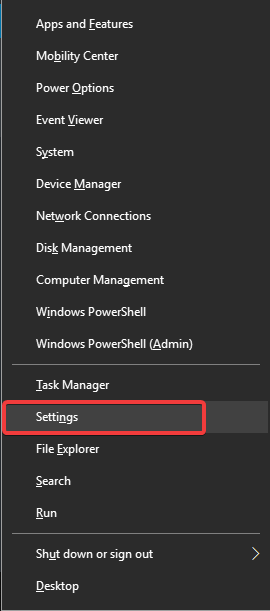
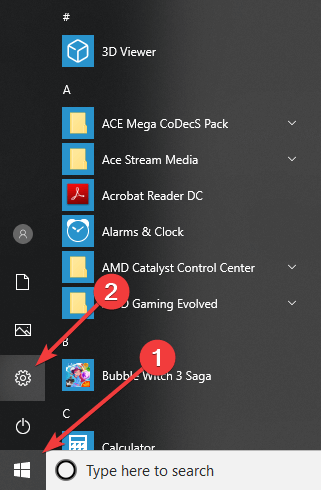
Press Win + X keys on your keyboard, and select Settings.
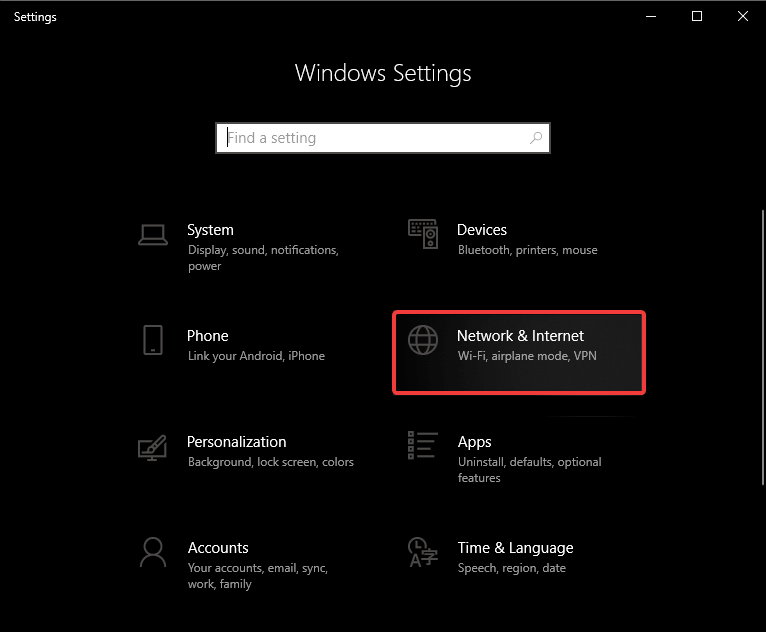
Inside the settings window, choose Network and Internet.
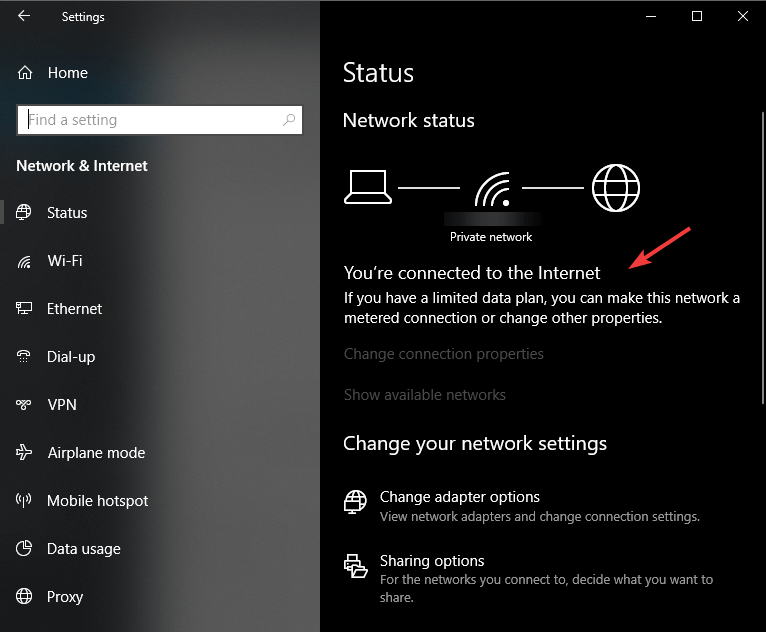
In the Status tab, you will see a message telling you if you are connected or not. If you’re not connected, start troubleshooting your connection.
2. Check for game maintenance
Check if the game you’re trying to run has any issues.
Visit the developer’s forums or social media page and check for any maintenance or issues.
If the problem is related to the game itself, you’ll have to wait for developers to address it.
In this article, we explored some fixes regarding the Having trouble linking your Microsoft account error message when trying to play a game on Steam. This issue is caused by a faulty update between your Microsoft account and Steam account.
Please feel free to let us know if this article helped you in any way, by using the comment section found below.
The action-adventure genre gets a new title, namely A Plague Tale: Innocence, and in this article, we’ll show you how to fix Plague Tale: Innocence Bugs on your Windows 10 PC.
Players have reported random crashes, black screens, and ultra-wide settings issues while playing the game. But here are a few solutions that might help you with these problems.
How to fix A Plague Tale: Innocence issues?
1. Ultra-wide fix
Use a Hex Editor to open the Game.exefile.
Replace the one of the values depending on your resolution:
39 8E E3 3F with the 8E E3 18 40 for the 3440×1440 resolution
8E E3 18 40 to 26 B4 17 40 for the 2560×1080
8E E3 18 40 to 9A 99 19 40 for the 3840×1600 screen resolution.
2. Black screen fix
Start the game in Windowed Mode.
Alternatively set your resolution to 1080p.
You can also press Alt + Enter to go into the Windowed mode.
Select 3D Settings, then turn off the Dynamic Super Sampling.
When faced with FPS drops, try lowering the image quality, change your graphics quality to Medium from High.
Or alternatively you can try this:
Go to your Nvidia Control Panel.
Select Manage 3D Settings and select A Plague Tale from the Program Settings and set the Power Management to Prefer Maximum Power.
Save your changes and exit.
4. Memory fix
Go to Control Panel and select System and Security and then click on System.
Now you’re going to click on Advanced System Settings, select the Virtual Memory window, uncheck Automatically manage paging file size for all drives.
Now enter the custom values and save the changes.
5. Launch fix
Open up your Steam client.
Within the Library section, right-click on the A Plague Tale: Innocence game and click on Properties from the menu.
Now select the Localfiles tab and click on the Verify integrity of game files.
After this is complete, try running the game again.
There you go, 5 simple solutions that should fix common A Plague Tale: Innocence bugs on your PC. Feel free to try them all and let us know which solutions worked for you.
It doesn’t matter whether you are a professional working in an office space or a home user, a good router is a must.
And, while the majority of routers will work with Windows 10, there’s always a good reason to keep up with the technology standards and switch to something faster, more reliable, and capable.
Especially if you need a good router for gaming on or have a multitude of devices that crave a stable connection, even over distance.
Today, we bring you a list of the best routers in 5 different categories that are fully compatible with Windows 10. Learn more about them and make an informed choice.
For homes with high levels of traffic, the Linksys AC1900 should be the best overall router that works with Windows 10.
The Linksys AC1900 offers the best router for multiple users to connect a maximum of 12 devices without causing latency or decreasing speed.
With a dual-band, wireless router users can easily connect multiple devices even for high-rise building aided by beamforming technology.
Other exceptional features the Linksys AC1900 router offers include faster speed streaming while using MIMO (multiple users) technologies.
The dual-band is set at 2.4GHZ and 5 GHz bands delivering approximately 600 Mbps and 1300 Mbps respectively. And with Amazon’s Alexa functionality user gets any question answered instantly.
The ASUS AC3100 T-C88U is arguably the best gaming-oriented router that works with Windows 10. Every gamer should appreciate the ruggedness of this router built on the WTFast game accelerator for the best gaming.
Gaming requires a lot of bandwidth but especially low latency. The ASUS 8 LAN ports, 8 Gigabit Ethernet ports, 3.0 and 2.0 standard ports make data transfer fast and efficient.
Using a 1.4 GHz dual-core processor, a 512 MB memory there is no limit to what a gamer can achieve.
And to provide convenience the ASUS AC3100 T-AC88U allows the user to work from anywhere within the home or office. It can extensively cover up to 5,000 square feet.
It has a secure network using Artificial intelligence for network protection and Mesh Wi-Fi systems to keep user data safe always.
Netgear is the best wider coverage router, a reliable brand offering an assortment of the top Wide Coverage Wi-Fi routers money can buy. It provides users with bundles of exciting Wi-Fi-powered features.
Additionally, it has an easy-to-install setup, and the Netgear Orbi provides a Wi-Fi Router and Satellite Extender in one single product.
Its MESH technology works with a tri-band system to improve signal reach and maintain signal consistency anywhere. Other unique benefits include its extended reach of 4,000 square feet with room for further extension.
The Netgear Orbi works perfectly with the dual-band coverage at 2.4GHZ and 5GHZ. The Guest capability allows for guests to access your Wi-Fi network without the need to share and compromise your password.
Also, it comes with built-in antivirus powered by Bitdefender for real-time protection against all threats.
Streaming with the Netgear Nighthawk X10 on 820.11ac, with quad streaming and Wave 2, Wi-Fi connectivity becomes a lot more fun.
We’re looking at the best router that works with Windows 10 that allows for multiple 4K streaming at top speed.
This is made possible with the quad-core processor of 1.7GHz Quad-core transferring as much as 7,2Gbps. The Netgear X10 uses QoS0 priority technology to determine bandwidth and data allocation for each device or application.
QoS system ensures 1.7 GHz quad-core provides faster signals for streaming. The Mu-MIMO technology (Multiple-user, multiple-input, multiple-output systems) also aids better live streaming using upload without buffering.
Also, the Nighthawk X10 works perfectly for small and larger home or office settings. With the Nighthawk app installing the device is rather easy.
It also incorporates a user interface for managing internet activities – access, checking internet speed, etc. The user also can enjoy additional media operations and storage for other accessories and the 8 Ethernet ports.
If you’re looking for the best overall router that won’t deplete your budget, look no further than TP-Link AC1200 Archer C50.
This dual-band router maintains a stable network at 867 Mbps at 5GHz and 300 Mbps at 2.4GHz using Signal Sustain Technology throughput.
Its network is strong enough with low latency to guarantee reliable streaming for most regular users.
The TP-Link Tether app allows you to control and easily set up AC1200, while Alexa compatibility provides you with voice-control capabilities.
Additionally, the TP-Link AC1200 Archer C50 comes with one USB 2.0 port, removable antennas, four Gigabit Ethernet ports, plus a bandwidth controller (IP-based).
While it might not necessarily be the best product on the market, it does offer a pocket-friendly option to surf the web, stream videos, and gaming.
Which one of these routers is the perfect fit for you? Do you happen to know of another great product that we should include in the list? Please let us know in the comment section below.
New versions of Windows bring various changes, and many are wondering if Windows 10 Enterprise can join a domain.
This is a valid question, especially because many reported that the join domain option is missing on their PC. Join us while we take a closer look at this feature and explain what it does.
Which versions of Windows 10 can join a domain?
The following versions of Windows 10 support domain join:
Pro
Education
Pro for Workstations
Enterprise
Can Windows 10 Enterprise or Pro join a domain?
Can Windows 10 Pro join a domain?
Yes, Windows 10 Pro comes with the Domain feature and allows you to join a domain in multiple ways. Here is how to do it:
Click on Start and select Settings.
Click on System.
Open the About tab.
Under About, click on the Join a Domain button.
Next, provide the Domain name and click Next.
It will ask you to enter the user credentials to join the domain. If you don’t have the login details, ask your administrator for the same. Enter the details and click OK.
Click on Next.
Windows will ask you to restart the PC to apply the changes. Click on Restart now.
After the reboot enter the login details provided by the administrator to log in and access the domain.
To be able to Join a domain, the administrator must add you as the user first to the domain.
Can Windows 10 Enterprise join a domain?
Yes, similar to Windows 10 Pro, the Enterprise edition users can also join the Windows Active Directory. During the initial setup, make sure you select the Join a domain option. If not, follow the steps given for Windows 10 Pro to join a domain manually.
If the Join a Domain option is missing in Windows 10 Enterprise, follow these steps to join a domain instead:
Click on Start and select Settings.
Open Accounts.
Click on Access work or school tab.
Click on the Connect button.
Enter the domain name and click Next.
Now you can set up the account and join the domain.
Make sure you restart the system before trying to login to the user account again.
After doing that, you should be able to join the domain without issues.
Microsoft provides the join a domain option on three versions of Windows 10: Windows 10 Pro, Windows Enterprise, and Windows 10 Education.
If you are running the Windows 10 Education version on your computer, you should be able to join a domain. Follow the steps given for the Enterprise or Pro version above to join a domain.
As you can see, all versions of Windows 10 except the Home version. However, this doesn’t mean that domains don’t experience issues. We covered error occurred while attempting to join the domain in our previous guide, so be sure to check it out.
Do you use domains on Windows 10? Let us know in the comments below.
Microsoft stopped including the Windows Live Essentials suite with the Windows 10 OS and retired some of the bundled software in 2017. However, interested users can still install Windows Live Essentials on their Windows 10 computer. That said, some users have reported that Windows Live Essentials does not install on Windows 10 for some reason.
One user shared concerns about the problem at hand.
“Hi Team, Unable to install Windows Live 2012 into Windows 10 & Windows 8.1(Error-0X800C0006) Looking solution for this.”
Learn how to solve this by following the instructions below.
How to install Windows Live Essentials on Windows 10?
1. Install US Language Pack
Click on Start and select Settings.
Click on Time and Language.
From the left pane click on the Language tab.
Click on Add a Langauge.
Type and select the English United States and click Next.
Check “Install language pack and set as my Windows display language” option and click on Install.
Wait for the Windows to download and install the language packs on your system.
Once successfully installed, reboot the system. After the restart check if the English US is installed.
Now try to run the Windows Live Essentials installer and check for any improvements.
2. Install Windows Live Essential from the Offline Installer
On your browser go to Windows Live Essential Archive link, here.
Wait for the download to finish.
After the download is complete, open the folder where the installer is saved.
Right-click on the Windows Essentials Installer and select Run as Administrator.
If the error was due to a corrupted installer, this should help you install the suite successfully.
3. Uninstall Live Essentials
Press Windows Key + R to open Run.
Type control and press OK to open the Control Panel.
Go to Programs > Programs and Features.
Find Live Essentials and other related programs like Windows Live Messenger etc.
Uninstall all the programs related to the Windows Essentials and Live Essentials.
Now run the Windows Live Essentials installer once again and check if the error is resolved.
If the issue persists, try to clean the Junk/Leftover Essentials files using a software uninstaller.
4. Delete the Windows Live Folder
Open “File Explorer”.
Navigate to the following location: C: -> Program Files (x86) -> Windows Live
Right-click on the Windows Live Mail folder and select delete.
Windows Live Mail comes as a part of Live Essentials. So, if you have the older folder undeleted, it will create issues with the installation.
5. Install .NET Framework 3.5
Press Windows Key + R to open Run.
Type Control and press OK to open the Control Panel.
Go to Programs > Programs and Features.
Click on “Turn Windows features on or off”.
In the Windows Features window, select “.NET Framework 3.5“.
Click OK. If prompted to confirm the action, click Yes.
Restart your Windows computer and run the Windows Live Essentials installer and check for any improvements.
6. Other Solutions to Try
Before the installation, disconnect the WiFi and make sure you are not connected to the internet and try again.
Go to Start > Settings > Windows Update and Security > Windows Security > Firewall and Network Protection. Click on the Active Network and Turn Off Windows Firewall.
Your Registry Editor is one of the most powerful utilities on Microsoft Windows OS. This makes it quite a pickle when regedit is not saving.
However, you are not alone; many Windows 10 users have complained of the same problem. Let us help you through it this article.
Why won’t regedit save changes?
If regedit is not saving, the below factors are likely to have caused the problem:
Permissions – Like many other powerful Windows utilities, the Registry Editor requires administrative privileges. So, if you are logged in with a regular account, you may now be able to use the tool successfully.
Corrupted registry – Even with the correct permissions, if you log into a corrupted registry, you cannot carry out many functions, including saving changes made.
System protection – You may have enabled system protection on your device, which means you cannot change the registry.
GP Settings – Group policy controls many things on computers and networks. It is possible that a setting is restricting the modification of registry values.
Antivirus software – This software is essential for system protection but can restrict certain computer activities.
We will now show you a few essential solutions to get through regedit not saving.
What can I do if regedit is not saving?
1. Update permissions
Press the Windows key + R, type regedit, and hit Enter.
If you get a User Account Control dialog box, select OK.
Open the location of the key you want to change in the Registry Editor.
Right-click on the key and select Permissions...
Select Advanced.
If your user is not the owner, choose Change.
Type your user name in the Enter the object name to select box, click Check Names, and press OK.
Now you should have your name displayed as owner.
If you want to take ownership of the subkeys, check the box next to Replace owner on subcontainers and objects, and select Apply.
Press the Disable inheritance button if it is available, then click Add.
Click Select a principal in the Permission Entry window.
In the Enter the object name to select, enter your name, select Check names, and click OK.
In the Permission Entry window under Basic permission, check the box next to Full control, then click OK.
If you want to apply the same permission rules to all the subkeys, check the box next to Replace all child object permissions with inheritable permissions from this object and click OK.
If you remove your permission, uncheck the Full control box or remove your name from the Group or user namesbox.
After the permissions are updated, you can save entries or changes to the Registry Editor.
2. Run an SFC scan
Press Windows + R, type CMD and hit Ctrl + Shift + Enter.
Type the script below and hit Enter. SFC /scannow
Wait for the scan to complete and check that the problem has been fixed.
As an alternative, you can always use a dedicated solution to repair this Registry issue and solve it once and for all.
3. Disable antivirus
Click on the hidden access arrow in the Taskbar.
Click on your antivirus icon, hover over Avast shields Control and select Disable for 10 minutes (This step varies for different antivirus software).
Try changing and saving a regedit key to see if the fix worked.
As you can see, this problem, like most registry issues, can be fixed with a few clicks. Note that we have not written the solutions in any particular order, and we expect that you try what seems most appropriate to your situation.
We hope that our article helped you to solve the saving issues. If you found this article useful, please comment in the comment section below.
Do you constantly get the BS Player cannot save configuration file error when trying to watch a movie, or listen to music using BS Player? You are not alone. A wide range of users has reported having the same issue.
Here’s what one affected user had to say on the dedicated forum.
I had a recent virus infection on my computer, and at the time it started, I started getting the same message when I start bsplayer, during playback, and when I close bsplayer: Can’t Save Configuration File! Please reinstall with default settings or choose folder with write permission.
Learn how to resolve this error with the two solutions we provided below.
What to do if BS Player is unable to save configuration file?
1. Allow BS Player to write Configuration files
Open up the Windows Explorer, and navigate to the installation folder of your BS Player (usually found in C: >Program Files x86 folder).
Scroll through the list of folders, and find the folder called Webteh.
Right-click on it, and select Properties.
Check the Write box in the General tab.
In the Properties window, select the Security tab.
Modify the permissions for all users of your PC to allow Full control.
Click Ok.
2. Reinstall BS Player
In the Windows Search bar, type Control and open Control Panel.
Choose Uninstall a program.
Uninstall BS Player.
Navigate to C: > Program Files (x86) and delete the Webteh folder. You’ll need the administrative permission to do this.
Navigate to the Webteh website, here, and download BS Player again.
Run the installer as admin and check for improvements.
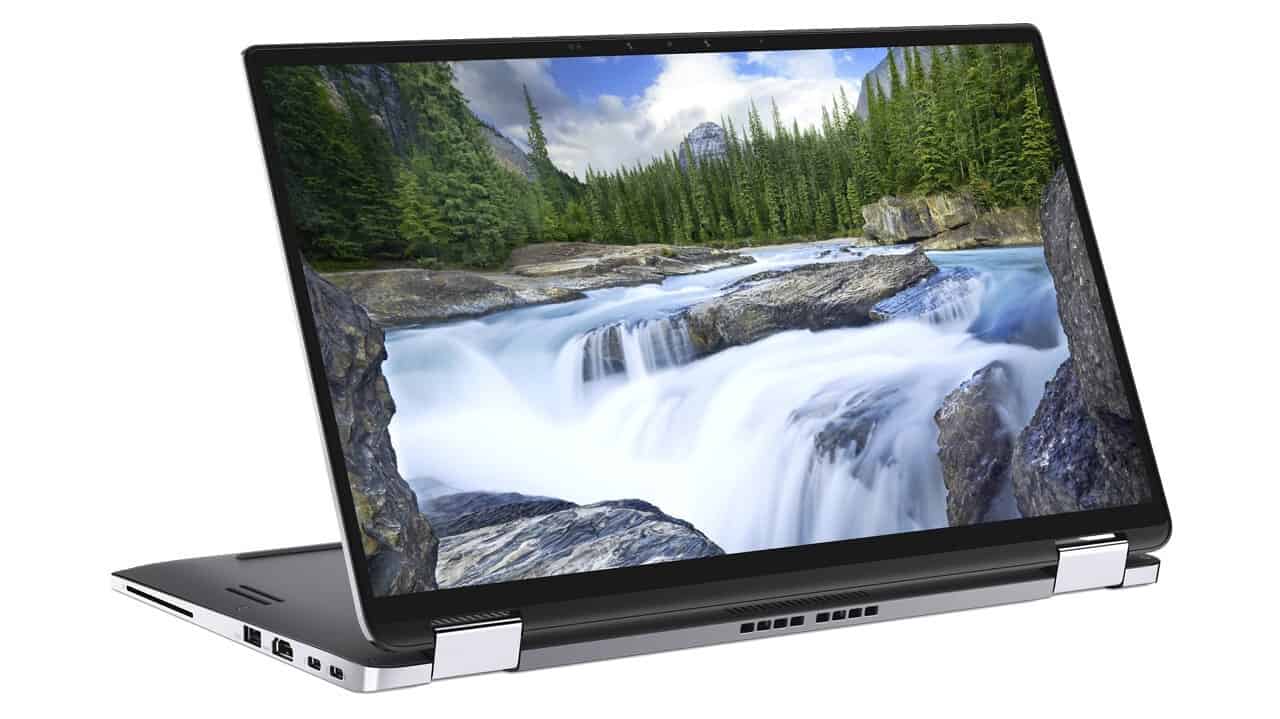
In a press conference in New Delhi, Dell launched Latitude 7400 2-in-1, the world’s smallest commercial 14-inch 2-in-1 laptop, in India. The laptop was unveiled earlier this year at CES 2019.
Incidentally, 2019 is the year Latitude, the company’s portfolio of enterprise notebooks, celebrates 25 years. The company claims that with Latitude 7400 2-in-1, it has re-imagined the 7000 series for Latitude in terms of design, technology, and legacy.
The new Latitude 7400 2-in-1 is the world’s first PC to use a proximity sensor enabled by Intel Context Sensing Technology. It features ExpressSign-in which detects user presence, wakes the system, and immediately scans for facial recognition to log in with Windows Hello. When the user steps away, the Latitude locks itself to preserve battery life and ensure security.
There’s also ExpressConnect that links the device to the best Wi-Fi available and provide faster data transfer than a conventional antenna. With ExpressCharge, users can recharge the battery life to 80% in just one hour while the laptop offers up to 24 hours on a single charge.
The Latitude 7400 2-in-1 sports a drop-hinge design with a 4-sided narrow border Full HD 14-inch display. It’s finished in a new Titan Gray machined aluminum with a hairline brushed design and diamond-cut edges. The magnesium alloy bottom cover is coated in soft-touch paint that feels great to carry.
The new Dell Latitude 7400 2-in-1 is now available for enterprise customers with prices starting at INR 135,000.
While journalists debate the livelihood of Microsoft’s UWP development platform, it seems real-world users and developers are still seeing benefit from it, for the time being.
A developer by the name of Sergio Pedri just unveiled his new UWP Reddit client, via his Twitter handle @SergioPedri.
Presenting Legere, a brand new Reddit client built from scratch in UWP. It's the result of 5 months of hard work and I'm super excited to be finally able to share it with everyone! I hope you guys will enjoy using it! Get it here: https://t.co/o3s8IJQ9to#fluentfriday#Windows10pic.twitter.com/yW1OrlKqLV
The app dubbed Legere appears to make full use of the user-facing feature set for both Windows 10 and Reddit by including:
multiple user profiles
background notifications
live tiles
Windows Timeline integration
Jump List support
markdown syntax highlight
live tile preview
MyTube compact overlay mode integration for videos and more…
With only a brief hands-on experience, the app feels swift, well thought and makes very good use of animations, overlays and acrylic highlights in its windowed presentation. The settings options are relatively extensive putting the user in control of NSFW filters, theme colors, how web links are rendered, user tag searches, wallpapers, and more.
As some of the original Reddit clients are left seemingly development abandoned or showing their age, I would recommend giving this new client a few minutes of your time.
As E3 2019 is right around the corner, Google tried to get ahead of everyone else by opening up pre-orders for the Stadia Founder’s Edition yesterday. The game streaming service will launch in November 14 in 14 markets, and early adopters will be able to play Destiny 2 and all of its content on the next-gen gaming platform right at launch
Stadia is Google’s first big foray into gaming, and the company really faces an uphill battle. However, with years of experience with Google Play games, YouTube, and other cloud services, Google definitely has the chops to succeed in this new game streaming revolution.
For now, though, Stadia and other game streaming services may only be targeting a niche market as the bandwidth requirements are quite high. To access Stadia, you’ll need at least 10Mbps down to enjoy a 720p stream at 60 FPS, 20Mbps for 1080p with HDR and 5.1 surround sound, and 35Mbps to reach 4K quality. PC Gamer recently did the math, and it looks like playing Stadia games in 4K will use up to 1TB of data in 65 hours, which is a lot.
It’s still early days for game streaming technology
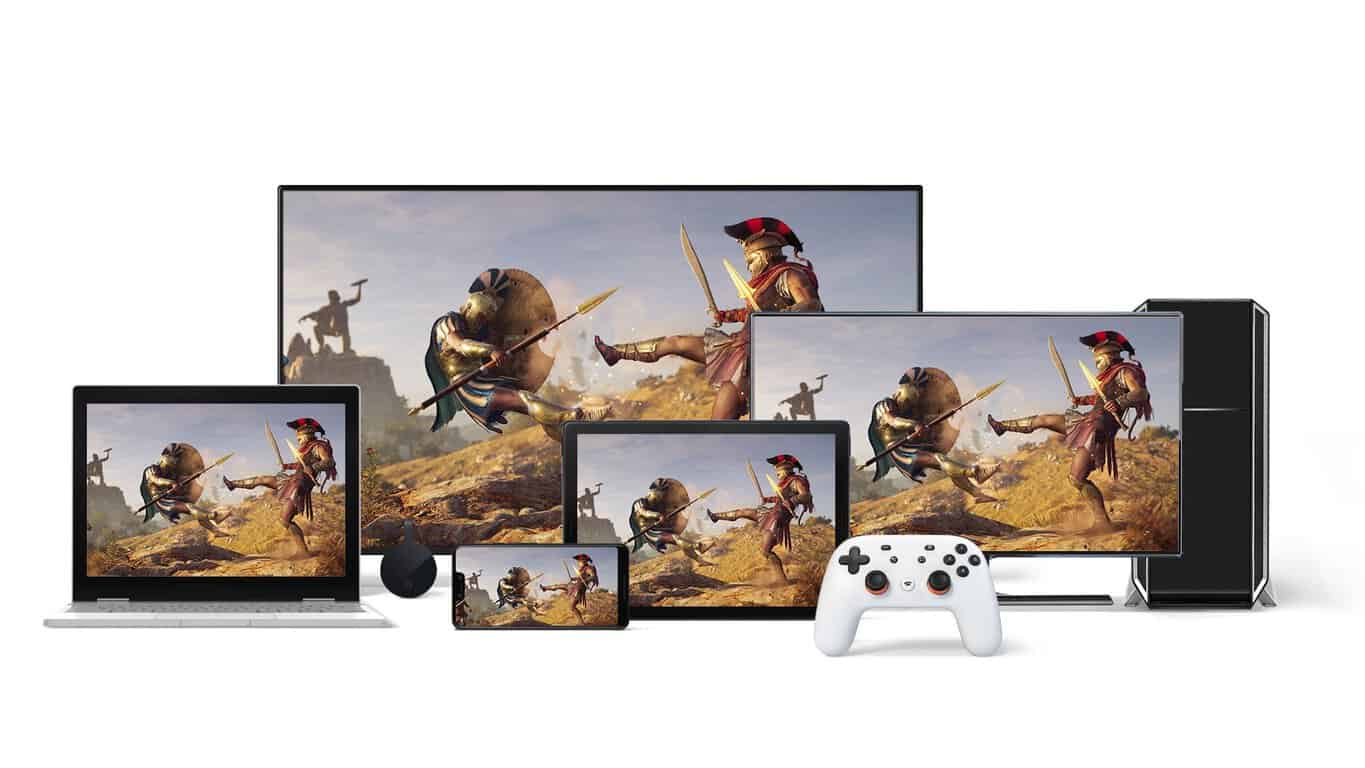
To be clear, Stadia won’t be the first game streaming service on the market this year: There are already competent solutions such as Shadow, NVIDIA Geforce Now, or even Sony’s PlayStation Now. However, Google wants to make Stadia available on any devices including smartphones, and the service will also have deep synergies with YouTube, which should become a great marketing tool for Stadia.
As Microsoft, Amazon, and even Verizon are also planning to launch their own game streaming services, Google couldn’t really afford not to be in this market. It’s still early days for game streaming: despite launching in 2015 (with an open beta starting in 2014), Sony recently revealed that PlayStation Now currently has 700,000 subscribers worldwide, with existing capacity investments only supporting a 5 million subscriber base.
If many people expected Stadia to be a subscription service a la Netflix, the service’s business model is slightly more complex and interesting than that. This year, early adopters will have to ways to try Stadia:
By subscribing to Stadia Pro ($9.99/month), which will provide access to Destiny 2 and a catalog of older games playable in 4K at 60FPS with 5.1 Surround sound.
By purchasing the $129 Stadia Founder’s Edition, which includes a Chromecast Ultra to access the service on a TV, Google’s Stadia controller, and three months of subscription to Stadia Pro.
The Stadia’s Founder edition will include Google’s Stadia Controller and a Chromecast Ultra.
It’s still not clear what other games will be included in the Stadia Pro subscription except Destiny 2, but other AAA games such as Assassin’s Creed: Odyssey will be available for purchase separately. Yes, Stadia will have its own digital game store, and Google explained yesterday that all purchased games will remain playable once a Stadia Pro subscription has ended.
Next year, Google also plans to make Stadia free for everyone with “Stadia Base,” a free tier allowing gamers to play all purchased games in the Stadia Store at 1080p 60FPS with stereo sound. This was one of the big surprises from yesterday’s Stadia Connect event, and this will pretty much make Stadia an open platform where everyone can buy games and stream them on a TV with a Chromecast Ultra, a PC with Google Chrome, or mobile devices (Google will only support its latest Pixel devices at launch).
Stadia is the first next-gen gaming platform
If we often used “next-gen” to qualify the Xbox One and PlayStation 4 consoles, these devices aren’t really next gen. The truth is, there are still way too many games on consoles that are locked to 30FPS, even on the more powerful Xbox One X and PlayStation 4 Pro consoles. 4K was probably the wrong target for this console generation, as most gamers probably prefer to play at a solid 60FPS at 1080p than at 4K with a frustrating 30FPS cap.
Current consoles also still using slow hard drives, and game updates can take forever if you have a slow Internet connection. With Stadia, all your games will be running in the cloud, no installation or updates required, so you’ll be able to play your games instantly. More interesting, Stadia will make it possible to start playing on a device and then pick up where you left off on another device, which is pretty much Xbox Play Anywhere pushed to the next level.
In terms of hardware specs, Stadia will be the first true next-gen gaming platform with more than 10 teraflops of computing power (the Xbox One X only delivers six teraflops), making it possible to play all Stadia games in 4K at 60 FPS. Stadia will also offer the ability to play games in local multiplayer, and the platform will also support crossplay with other platforms. Yesterday, we learned that Destiny 2, a launch title for Stadia, will also offer cross-save support with PC, Xbox One, and PS4.
On paper, it looks like Microsoft’s Project xCloud will offer an “inferior” gaming experience compared to Google Stadia. For now, Microsoft is just putting existing Xbox One consoles in server blades, and it looks like the software giant is currently using the ageing Xbox One S console for xCloud, and not the more powerful Xbox One X, as seen in the video below.
“We’ve architected a new customizable blade that can host the component parts of multiple Xbox One consoles, as well as the associated infrastructure supporting it. We will scale those custom blades in datacenters across Azure regions over time,” explained Kareem Choudhry, Corporate Vice President, Gaming Cloud at Microsoft. Using existing Xbox consoles to build the Project xCloud infrastructure will make the service compatible with all existing Xbox One games, but the problem with that approach is that games running on xCloud will likely run exactly like their console versions, with 30FPS caps and 900p resolution here and there.
Stadia will have some pretty good games at launch
With Nintendo succeeding to get many developers to port their games on the relatively underpowered Nintendo Switch, it wasn’t clear if Google would be able to do the same with Stadia, which is a Linux-based platform. However, Google exceeded our expectations by announcing several recent AAA games for Stadia such as Borderlands 3 and Metro: Exodus, two games that are timed-exclusives on the Epic Games Store on PC. You can add Mortal Kombat 11 and Rage 2 to the list of recent games, in addition to the upcoming Wolfenstein: Young Blood and the fighting game Samurai Showdown.
When you add Destiny 2 and all of its content to the mix, it’s clear that Stadia will have a better selection of games than what Epic Games currently has on its Epic Games Store on PC. For Mac or Linux users, Stadia should be a great solution for playing games that may never be released on these platforms.
Google already announced many high-profile parters for Stadia.
Of course, there are still some big omissions such as Minecraft, Fortnite, PUBG, Rocket League, Call of Duty, or GTA V, but Google already managed to get many publishers on board including Bethesda, Ubisoft, EA, Capcom, and Rockstar Games. Google said that they will frequently share updates about new games coming to the Stadia Store and the Stadia Pro catalog, and you can expect regular “Stadia Connect” events just like Microsoft has its own Inside Xbox monthly livestreams.
Microsoft may need a free tier for Project xCloud
We still don’t know what business model Microsoft is planning for Project xCloud, but the Redmond giant may really need an answer to the free “Stadia Base” tier coming next year. As a matter of fact, maybe the upcoming launch of Project xCloud is a good opportunity for Microsoft to revamp its various Xbox subscription services.
A regular point of criticism I’ve seen during this console generation is that online multiplayer on consoles still requires an online subscription. On Xbox One, Microsoft also requires an Xbox Live Gold subscription to play free-to-play games like Fortnite, something that Sony doesn’t require on the PlayStation 4 (online multiplayer was also free on PlayStation 3). This may well be one of the reasons why the PS4 managed to outsell Microsoft’s Xbox One by quite a wide margin during this console generation.
If Microsoft’s Project xCloud service requires an additional Xbox Live Gold subscription to play multiplayer games, I think this would be a huge mistake. I’d say it’s time for Microsoft to finally make Xbox Live multiplayer free for everyone, as there’s no reason to make Xbox users pay for something that’s now free on other platforms, including Windows 10, and of course Google Stadia.
Microsoft is expected to open public trials for Project xCloud later this year, and we hope to hear more details during the Xbox media briefing this Sunday, June 9 at E3. We all remember the disastrous Xbox One launch, with Microsoft asking $500 for the OG Xbox One with its bundled Kinect, while in reality the console was slightly underpowered compared to the cheaper PlayStation 4. Microsoft may have a superior global cloud infrastucture with Azure, as well as more content to offer on xCloud compared to the competition, but this won’t matter if the service isn’t as accessible as Google Stadia and its free tier launching next year.
Do you think Project xCloud could be dead on arrival if there’s no free option to stream your already purchased games, like on Google Stadia? Sound off in the comments below.
Starting today, you can get great deals on games available on Xbox One. On Twitter, Larry Hryb, Xbox’s Major Nelson, announced the E3 2019 sale begins today, June 7 and lasts until June 17, 2019. With E3 2019 just around the corner, this sale is dubbed as “the greatest Xbox deals of the year,” you can save big on Xbox One games, controllers, and even get $100 off the Xbox One X.
To celebrate #E32019, from 07 to 17 June, Xbox is having the greatest Xbox deals of the year, where you’ll find discounts on hundreds of games, accessories, and console bundles. I'll post the complete list of digital titles on sale when they go live https://t.co/YFfpkAHhLQpic.twitter.com/DJaD10fyrG
— Larry Hryb ????????☁ (@majornelson) June 3, 2019
As noted in a post on his blog, Major Nelson details over 500 Xbox games and DLC that is available in the E3 2019 sale. Every day, a new Xbox game, Xbox One accessory, or even an Xbox One console will get a massive price cut. Today, you can pick up Call of Duty®: Infinite Warfare – Digital Deluxe Edition for 50% off. Regularly priced at $99.99, the Xbox One game deal includes two games: Call of Duty: Infinite Warfare and Call of Duty: Modern Warfare Remastered for Xbox One.
Other featured Xbox One games in today’s sale include Call of Duty: Black Ops 4, The Witcher 3: Wild Hunt, and KINGDOM HEARTS III for savings of up to 70% off. These deals are too good to pass up!
Users have reported situations in which Gmail cannot send emails and instead displays the Delivery incompleteerror message.
This automated reply shows a message saying, There was a temporary problem delivering your message with various self-explanatory errors following. It also lists the response from the remote server, but all this information is usually not helpful.
So, keep reading to find the solutions!
How do I fix incomplete delivery in Gmail?
Before we start with the slightly trickier ones, here are a few quick solutions:
Sign out of Gmail and then log back in.
Try again in a few hours if the Gmail server or the recipient’s email service provider is down. You can use Downdetector to verify the same.
Make sure the credentials entered are correct. Sometimes, the Delivery incomplete message in Gmail appears when users enter their address instead of the recipient.
If none work, move to the fixes listed next.
1. Avoid batch messages
Avoiding batch messages to a multitude of recipients also causes this error. The server might determine this is spam mail and prevent sending it. This will lead to the Delivery incomplete error in Gmail due to the quota being over.
To avoid this, we suggest limiting the number of recipients in a batch.
If this causes the error, you’ll see the Recipient server did not accept our requests.This means that, most likely, their server prevents the delivery, recognizing the message as spam.
2. Check the external email storage space
Alternatively, you should check your external email storage space, which is obvious if you get the Space Shortage error. If you are redirecting emails from an external email account, ensure it has enough storage space.
After clearing some space, the redirecting should work as intended and without further issues.
3. Remove attachments and suspicious links from your emails
Confirm that there are no suspicious links and attachments, especially when sending a batch of emails to different recipients.
This also occasionally invokes the Recipient server did not accept our requestsfor possible spam.
Verifying the email address, checking the server status, limiting the number of recipients, and removing suspicious links or attachments are all solutions to the Delivery incomplete error in Gmail.
Before you leave, check some quick tips to speed up Gmail if it’s running slow.
Tell us which fix worked for you in the comments section below.
Do you get the Server execution failed Outlook Applicationerror on your Windows 10 PC every time you want to run Outlook? You are not the only one experiencing issues in this area. A big number of users have reported this error in the past few years, and nobody seems to know why it happens for sure.
Some of them shared their concerns with others.
One of our client get the error “Server execution failed” while sending emails from our application. I guess it is happenning when it is issuing CreateObject(“Outlook.Application”). They says that it happens since they move the application to another server. Do anybody have an idea?
Learn why the error occurs and how to fix it below.
Why does Outlook keep showing Server execution failed on start?
1. What causes the Server execution failed error in Outlook
Even though different users have believed that they found out the exact source of this problem, it is hard to pinpoint what causes the Server execution failed Outlook Applicationerror when starting Outlook.
Some users believe what causes it is simple incompatibility problem between the version of Outlook and the Windows version you’re using, and others believe it is running a Virtual Studio as admin when accessing Outlook.
2. Check if your Microsoft Office Suite is updated
Open any Office application, and click on Account
This will open up a new window, in which you will be able to see the exact version of the software and any recently performed updates
3. Check to see if your version of Outlook is compatible with Windows 10
Outlook 2010 is not compatible with Windows 10, and this results in the error message we mentioned above. If you are using the Windows 10 operating system, we suggest that you update it to Outlook 2013.
This seems to be a resolution for some users.
4. Reinstall Office on your PC or server
Click on Cortana search bar, type in ‘Add or remove programs’, and select the top result.
In the newly opened window, search for the Microsoft Office Suite, select it and click Uninstall
After that, download the latest Office version from the official website and install it on your PC.
The Windows Time service is a Microsoft service that provides clock synchronization for the Windows OS. If your device is showing wrong time and you are sure that it is not a time zone issue you may want to make sure that the Windows Time Service is working correctly before applying any fixes.
The Windows Time Service (W32Time) is implemented in the W32Time.dll file. At times, the service may stop working, leaving you wondering if the issue is with your computer or it is a network issue.
In this article, we are going to list a couple of tips to diagnose the Windows time service so you’ll be able to confirm whether the service is working as intended or not.
Steps to check if Windows Time service is running
1. Check Windows Time Service Running
First thing you should do to diagnose the Windows Time service is to check if the Windows Time service is running in the Services window. Here is how to do it:
Press Windows Key + R to open Run.
Type services.msc and click OK to open Services.
In the services window, locate Windows Time service.
Right-click on Windows Time service and select Properties.
Click on the Stop button.
Now click on the Start button.
Click Apply > OK to save the changes.
Close the Services window and proceed to check the Regional, time and date format.
2. Check Regional Time and Date
To check if Windows time service is working on your Windows system, open the Times Settings page and try to match the data with your region and date. Here is how to do it:
Click on Start and select Settings.
Click on Time and Language.
Click on Date and Time.
Scroll down to Related Settings section.
Click on Date, time, and regional formatting option.
Now go through the Region, Regional Format and Regional Format data.
If the Time service is working correctly, the Regional format data should match your region’s calendar and time data.
Printing errors are common and many reported Error processing command on their printer. This can be a big problem and prevent you from printing documents.
This isn’t the only issue and many reported error printing message on Windows, but we covered that in a separate guide, so you’re welcome to visit it.
Today we’re going to show you how to fix this problem, so let’s get started, shall we?
What causes an Error processing command on the printer?
Pending printer tasks can interfere with the process and that can result in this error.
Issues with your printer drivers can cause various errors to appear.
In some rare cases, a damaged Windows installation can be the culprit.
How do I fix error processing command on my printer?
1. Close pending printer tasks
Press the Windows key + R on your keyboard and type services.msc in the Run box and press Enter.
Search for the Print Spooler service in the right pane, right-click on it, and select Stop. After that, right-click on it again and select Start.
Close the Services Window.
Open the Control Panel and select View By Large icons.
Click on Devices and Printers.
Open your printing device, and if you have any pending documents, select them and delete.
Close all the open windows and restart your PC to see if this fixed the issue.
2. Reinstall the printer drivers
Open the Control Panel and select View By Large icons.
Click on Devices and Printers.
Right-click on your printer and select Remove device.
Confirm the device removal and restart your computer.
After the PC reboots, it should automatically detect and install your printer, if not, unplug it and plug it back again.
After doing that, check if the error message is gone.
Many users reported You do not have privileges to delete the printer error, and in today’s article, we’ll show you how to fix this problem once and for all. While this problem won’t prevent you from printing, it can be an inconvenience, so let’s see how to fix it.
How can I fix You do not have privileges to delete the printer error?
1. Cancel printing process
From your Start Menu look for Printers & Scanners.
Select your printer‘s icon, and then click See what’s printing on the command bar.
From the Printer menu, click on Cancel All Documents.
You can now proceed in removing your printer.
2. Disable your Spooler Service
From your Start Menu, open the Run.
Now type services.msc and press Enter.
Now look for the Spooler Service in the list, and double click on it.
Once the Properties tab is open, click on Stop, and then press OK.
Look for the printer you wish to remove and click on Uninstall Device.
Click on Uninstall button to confirm.
Restart your machine, and see if this solves the problem.
You do not have privileges to delete the printer error can cause some inconvenience, but you should be able to fix the problem once and for all by using our solutions.
Destiny 2 developer Bungie has just announced some major news for the game after recently breaking free from publisher Activision. Now in full control of the game’s destiny (no pun intended), the developer has announced the game’s new major expansion named Shadowkeep, as well as a free-to-play edition launching in September.
Destiny 2: New Light is the name of the free version of the game that will be available on Xbox One, PlayStation 4 and PC on September 17, and it will include “all of its foundational modes, activities, and rewards.” The PC version of the game will also move away from the Battle.net launcher to join Steam, a change that should be welcomed by most PC gamers.
Interestingly, Bungie is also dumping its marketing deal with Sony, which means that there will no longer be timed-exclusive content on the PlayStation 4 version of the game. Another blockbuster news is the game’s upcoming release on Google Stadia, and Bungie will also launch a cross-save functionality this Fall that will allow players to play all of their Guardians on their platform of choice.
This cross-save feature will work between Xbox One, Steam, Google Stadia, and even the PlayStation 4 version of the game. According to a report from Kotaku, Sony agreed just yesterday to support cross-save on PS4, and it’s safe to assume the former crossplay opponent probably dodged another bullet by joining the party.
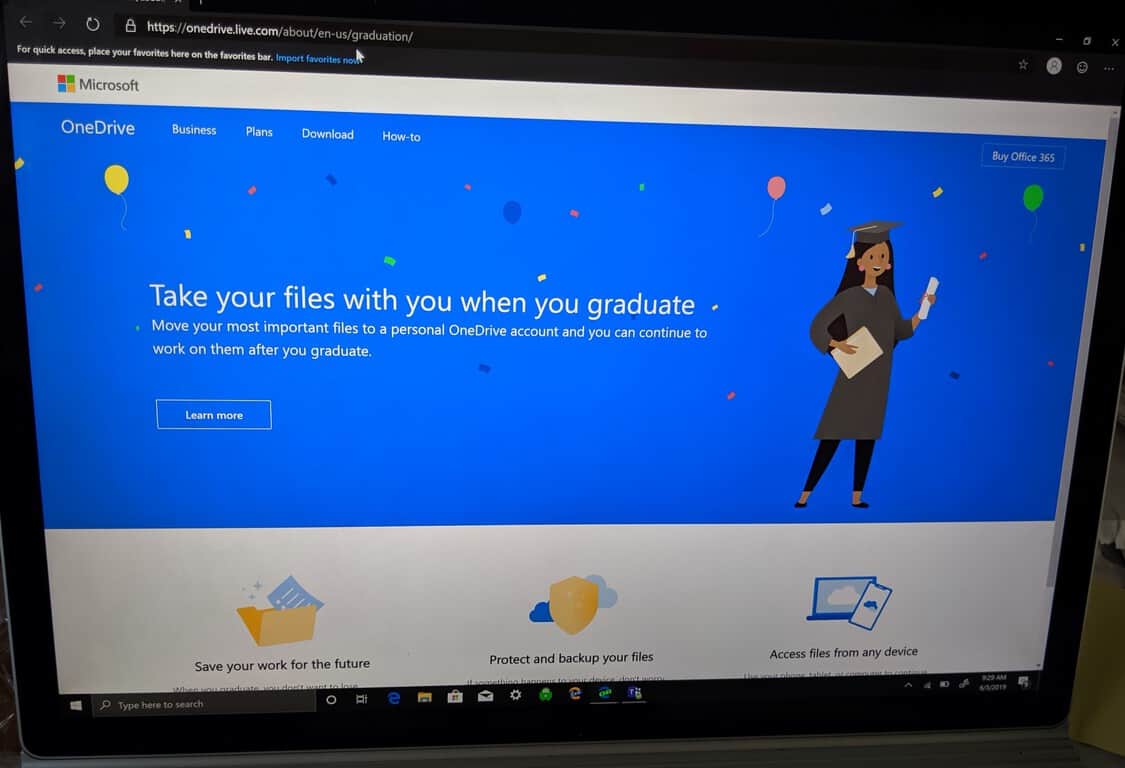
It’s coming up to graduation time, which means many students will soon lose access to their school-provided Office 365 accounts. If you’re currently using Office 365 at your school, you should consider how you’ll offload your files to a personal account. Microsoft has provided a plan of action for you, in its recently-published “Take your files with you when you graduate” guide.
Files
You’ll have been storing your school files in the OneDrive cloud storage which comes with your educational Office 365. The easiest way to keep these accessible in the cloud is to move them all to a personal OneDrive account.
Get started by making sure all your school files have synced to your PC. In the system tray, the white OneDrive icon represents your personal account, while the blue one is your school Office 365 account. If you see blue sync arrows, files may still be downloading from the cloud.
If you haven’t added your school OneDrive to your PC (you don’t see the blue icon), right-click the white one and choose “Settings.” Switch to the “Account” tab in the popup which appears. Press the “Add an account” button and enter the login details for your school Office 365. You’ll be asked which folders you’d like to synchronise; make sure to select them all if you want to retain everything in your account. Now wait until the sync process has finished, when the blue arrows disappear from the OneDrive tray icon.
With all your school files available on your PC, it’s time to move them to your personal OneDrive. Double click the personal (white) OneDrive icon to open your OneDrive folder. Create a new folder and name it “School Files,” or a name of your choice.
Next, double-click your school (blue) OneDrive icon to open the contents of your school OneDrive. From here, simply copy and paste (Ctrl+C then Ctrl+V) the files into your personal account. You’ll need to wait while the files are uploaded to your own OneDrive; again, when the sync arrows disappear from the OneDrive icon, everything is complete.
That’s all there is to it. Naturally, you could also copy your files to any other destination on your PC – you don’t have to use OneDrive. However, keeping them in the cloud ensures they’re still accessible from all of your devices. Login to OneDrive on each PC or phone you use to see your files.
Email
You may also have school emails which you’d like to retain copies of. The simplest method to keep these is to import them all into your own email account.
Login to Outlook.com on the web. Click the Settings cog icon in the top-right and then press the “View all Outlook settings” link at the bottom of the pane.
In this popup, click the “Sync email” button in the navigation bar. Under “Connected accounts,” click “Other email accounts” and provide the details for your school email account. Give the account a display name of “School” and enter your school Office 365 email address and password.
You can choose whether to import your school emails directly into your inbox, or to keep them within a new sub-folder. The choice is yours, although we recommend sticking with the default and creating a new folder – this will keep your school email separated from your personal messages.
Press the “OK” button to start the import process.
OneNote notebooks
Finally, you’ll need to copy any OneNote notebooks separately to your regular files. The OneDrive sync client won’t automatically download OneNote notebooks, so you’ll have to use the OneNote web app.
Login to onenote.com with your school email. When the OneNote interface loads, find the notebook you want to save using the tabs at the top of the menu. Right-click the notebook you want to use and press “Save a copy.”
In the dialogue which appears, click “Save to a Microsoft account” and enter your personal account details. The notebook will then be copied to your personal OneDrive – it should show up in OneNote next time you login with your own account.
You can also download notebooks directly from OneDrive using OneDrive.com – navigate to the folder containing the notebook, click it and delete it.
Migrating away from your school email isn’t too complicated, provided you’ve got a plan for handling it. If you get stuck at any point, you may find it helpful to consult Microsoft’s own graduation guidance. Alternatively, contact your school’s Office 365 administration team, who should be able to help you archive your data – including any files created within school SharePoint sites that you might want to retain.
The Microsoft Cloud Accelerator Program will expand to include women-led cloud startups. Presented at the third annual GeekWire Cloud Summit on June 5, 2019, and backed by CEO Satya Nadella, the Microsoft Cloud Accelerator Program will include support from Microsoft for women-led cloud companies.
The Seattle-based organization, Women in Cloud will lead the accelerator program, which is aimed at giving women a resource to compete in a male-dominated field. Gretchen O’Hara, vice president for go-to-market strategy of One Commercial Partner at Microsoft and a co-founder of Women in Cloud, addressed the challenges women in tech face, from the beginning of their career to founding startups.
“At the end of the day, if we’re not getting them set up to succeed from a technology perspective, if we’re not allowing women access to cloud and AI technology of the future and we’re not giving them access to capital and they’re not able to get the corporate contracts, those businesses go under. If we’re not helping them actually build a sustainable business over time, then we’re just pouring investment in the top and we’re not actually seeing growth out of the bottom. When we can start to build the right talent pool in our technical base, they attract more of the same in that technical base. And so our goal is to continue to shift the numbers through the new hiring and training externally as well.”
The Women in Cloud accelerator program will allow women-led cloud startups with access to Microsoft technologly, mentorship, networking, and other opportunities. The Women in Cloud Accelerator Program will be implemented in the following countries: United Kingdom, Canada, France, Germany, India, Kenya, South Africa, and the United Arab Emirates. In the US, Microsoft will start the program first in Seattle, Washington, with programs being added in New York City and Chicago later in Fall 2019.
Microsoft’s database management system has been with us for some time, but many users reported SQL Server query execution failed for dataseterror keeps shooting off. What do we do now? It’s an issue related to permissions, but worry not, we’ve got a few solutions for you.
Hi
I have created a report using SQL Server Data Tool for Visual Studio 2012, but when viewing reports from Project Web App, I get the following error.
An error has occurred during report processing. (rsProcessingAborted)
Query execution failed for dataset ‘ ‘. (rsErrorExecutingCommand)
For more information about this error navigate to the report server on the local server machine, or enable remote errors
My reports are created in Native Mode, as I am deploying reports on Project Online
Can anyone suggest the way out..
What to do if SQL Server query execution fails?
1. Permission solution
Access your Management Studio and right click on the faulty database.
Now select Properties, next you’re going to add this line for the user section: NT AUTHORITYNETWORK SERVICE.
Allow permission to the user string you just created.
Now click on OK, and try accessing your database once again.
2. Convert date parameters
For this solution, you should do a conversion of your date and time parameter, from the SQL Server and the report in question.
Try setting your date and time parameters to a String type in your report.
3. Remove custom date classes
Try heading over to the dataset’s properties and remove the custom data classes.
Then proceed by removing any embedded SQL ‘s in the report with the use of the Microsoft Report Builder.
4. Check your connection
For this instance, you need to make sure that you are connected to the correct datasource. Namely, the one that has the tables you need and you have the permission to access that datasource in question.
Remember to directly run the data you’re loading from the database, to avoid getting any other errors.
If you’re getting SQL Server query execution failed for dataseterror on your PC, be sure to try one of our solutions to fix this problem once and for all.
The PC version of Metro Exodus, which launched exclusively on the Epic Games Store back in February, may be coming soon to the Windows 10 Microsoft Store. The store listing for the game was discovered by WalkingCat earlier today, and it currently indicates a June 9 release date.
The PC release of Metro Exodus caused quite a controversy as the game became an Epic Games Store exclusive after becoming available to pre-order on Steam. If all prior sales of the game on Steam have been fulfilled, publisher Deep Silver announced back in February that the game would only be able to return to other stores (including Steam) once the Epic Games exclusivity deals ends after February 14, 2020.
It’s not clear why Metro Exodus is now showing up on the Microsoft Store with a June 9 release date, which is also the day when Microsoft will hold its E3 2019 press briefing. Interestingly, Metro Exodus publisher Deep Silver is one of the partners that Microsoft announced for its Xbox Game Pass for PC subscription, so we could well hear more details the event. It would be really surprising if the Epic Games exclusivity deal ended earlier than expected, but we now won’t have to wait much longer to know what’s really happening.
We all love playing our favorite games on our Xbox console, but sometimes we might encounter You do not have the necessary privileges to access Xbox Live Gameplay error. This can be extremely stressful, as it means that you are not able to play your favorite game in online multi-player mode.
For these reasons, in this article, we will explore some of the best-proven methods that can help you with this situation, and et you back to playing online multiplayer games in no time. Read on to find out how to do it.
On tuesday i tried to get onto to multiplayer for ghost recon and couldnt get on. I am getting a message saying You do not have the necessary privileges to access Xbox LIVE gameplay. I went through some fourms and saw to check my parental settings but nothing had changed, it was still on adult. My internet connection is fine, i also tested it to be sure, its a wired connection.
What to do if you don’t have necessary privileges to access Xbox Live Gameplay
1. Check your Internet connection
Check if your connection is working properly by trying to open other services.
Try other devices and make sure that you can access the web without any issues.
If there are any problems, try restarting your router.
2. Log into Xbox Live Gold
Try logging in to your Xbox Live Gold account.
If you’re unable to log in, it means that issue is related to your Xbox Live Gold account.
3. Log out of your Xbox account, and then log back in
Log out of your Xbox account.
Wait for a few moments and log back again. Be sure to do this if you just bought the Gold Pack for your Xbox Live account
4. Deactivate Parental Controls from Xbox Settings
Navigate to your Xbox Livesettings, and deactivate Parental Controls.
After disabling Parental Controls, check if the problem is resolved.
In this article, we explored some of the best-proven methods to deal with the ‘You do not have the necessary privileges to access Xbox Live Gameplay’ error.
Please make sure the follow the steps presented in this list in the order that they were written to avoid any other issues.
Feel free to let us know if this article helped you in any way, by using the comment section below.
Adding custom Registry keys is useful when trying to troubleshoot system issues or modify system settings. However, many reported that registry changes revert after reboot.
This can be caused due to corrupt registry, so it’s important to fix the issue as soon as possible.
Join us while we take a closer look at this problem in order to learn how to fix it.
Why do registry changes revert after reboot?
Registry change is the wrong hive.
Some hives aren’t available after boot, so they can’t be accessed.
What can I do if registry changes revert after reboot?
Make the changes in the correct hive
Press the Windows logo key + R on your keyboard and type regedit in the Run box and press Enter to open the Registry Editor.
Go to Computer\HKEY_LOCAL_MACHINE\Software
Right-click the Software folder and expand New . Lastly, click Key
Right-click the newly created folder and expand New and select DWORD.
Make the desired settings for your key in this location and close the Registry Editor
Restart your computer and check to see if the key was saved.
Does resetting Windows restore registry?
Resetting Windows does the following:
Removes all files from your system drives.
It will remove all installed applications.
Resets settings to the default values.
Since many system settings are stored in the registry, resetting Windows also restores the registry to the default state.
No, rebooting your PC after the registry change is unnecessary. Most software changes will be applied automatically. On the other hand, a restart might be needed for hardware changes.
If you’re having further problems, our guide on broken registry items might be able to help you out, so be sure not to miss it.
We hope our tutorial helped you fix the issue with registry changes that revert after reboot. If you liked this article, comment in the comment section below.
Avid Media Composer is a popular video editing software used by the entertainment industry to edit and create videos. While the software works fine most of the time, at times users may experience an error while installing the video editor. The full error message reads Your system does not support this version of Media Composer while installing the software. Clicking OK will abort the installation.
This debilitating installation issue was reported online.
Cannot get Media Composer First to install. Everything will install untill it the application manager. Then it will get a popup error: “Your system does not support this version of Media Composer. Please consult the Specification information …..”. My system is running Windows 10 Pro 64-bit and has 16 GB of memory. All drivers are current (as far as I can tell). Need some help on getting this to install.
Learn how to avoid the error and successfully install Avid Media Composer with the solutions below.
What to do if your Media Composer is not supported
Check the system requirement/specification PDF document required to run the Avid Media Composer.
If your PC does not meet the minimum required specifications, you may need to upgrade your hardware.
Alternatively, try to run the older version ( older than 8.3) version of the Media Composer.
2. Check AMD Process for the SSE4.1 Support
Download CPU-Z, here, and install it on your computer.
After the installation, run CPU-Z from the desktop.
In the CPU tab, look for the Instructions section.
In the Instruction section, look if SSE4.1 is listed along with other instructions.
If your CPU does not support SSE4.1, then you won’t be able to install Avid Media Composer without upgrading the CPU.
If your CPU support SSE4.1 Instruction, try other solutions listed below.
The 8th generation of Intel CPUs does support the SSE4.1 instruction set. Although it should also be supported by the older generation CPUs (released after 2008), it may or may not support instruction set. Run the CPU-Z software to check if your CPU is compatible with Avid Media Composer or not.
3. Run the Installer as Administrator
Open the File Explorer.
Navigate to the following location: (or where you have downloaded the Media Composer 8.3)C: -> Media_Composer_8.3.0_Win -> MediaComposer -> Installers -> MediaComposer
Right-click on Setup.exe and select “Run as Administrator“.
If the UAC prompt appears, click on Yes.
Check if the Avid Media Composer now installs without any error.
Players have widely discussed a Forbidden Windows Kernel Modification Detected error on numerous game forums.
This issue is responsible for Steam games not launching and many other launch issues with various games.
However, there is a way to fix this issue, and in today’s guide, we will show you how to do it.
What causes Forbidden Windows Kernel Modification Detected error?
Incompatibly between Windows Insider Program and the anti-cheat software.
Issues with your Windows installation.
How can I fix the Forbidden Windows Kernel Modification error?
1. Leave the Windows Insider Program
Press the Settings button on the Start menu.
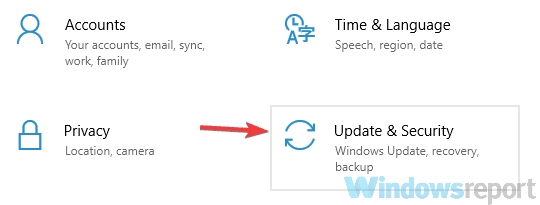
Select Update & Security in Settings.
Then click Windows Insider Program to open WIP options.
Press the Stop Insider Preview builds option.
Select the Keep giving me builds until the next Windows release option. Then users will need to wait until the next public Windows build version release to leave the Insider Program.
Alternatively, users can select the Roll me back to the last Windows release option to return to the latest public version of Windows and exit the Insider Program with more immediate effect.
Select the Confirm option.
Then click Restart now to restart Windows.
2. Set Up a CMD File
Enter Notepad in the Type here to search box, and click Notepad to open that text editor.
Then copy the text below with the Ctrl + C hotkey. DEL "%windir%\system32\drivers\oem-drv64.sys" DEL "%windir%\system32\xNtKrnl.exe" DEL "%windir%\system32\xOsLoad.exe" DEL "%windir%\System32\ru-RU\xOsLoad.exe.mui" DEL "%windir%\System32\en-US\xOsLoad.exe.mui" %windir%\System32\BCDEDIT.exe /set {current} path \Windows\system32\winload.exe %windir%\System32\BCDEDIT.exe /deletevalue {current} kernel %windir%\System32\BCDEDIT.exe /deletevalue {current} nointegritychecks %windir%\System32\BCDEDIT.exe /deletevalue {current} custom:26000027 REG DELETE HKLM\SYSTEM\CurrentControlSet\services\oem-drv64 /va /f
Paste that text into Notepad with the Ctrl + V hotkey.
ClickFile and select the Save As option.
Select All Files on the Save as type drop-down menu.
Enter 1.cmd in the File name box.
Select to save the file on the desktop.
Press the Save button.
Right-click the 1.cmd file on the desktop and select Run as administrator.
Some players have said they’ve fixed the Forbidden Windows Kernal error by reinstalling their game launcher software (such as Epic Games Launcher or Steam) and games. So that’s also worth a shot.
After using this script, check if the error message is gone.
If you’re dealing with You do not have access rights to logical disk manager error, you’re not alone. The error mainly occurs when you’re trying to access a flash drive using the Computer Management on a remote server.
Leftover Windows files and wrong settings are the main culprits here. Follow the steps below to fix it.
How can I fix You do not have access rights to logical disk manager?
Press the Windows key + R, type dcomcnfg, and hit Enter.
Navigate to the path below in the left pane: Console Root > Component Services > Computers > My Computer
Right-click My Computer and select Properties.
In the COM Security tab, under the Access Permissions area, click on Edit Limits.
Inside the Access Permission window, scroll down and select ANONYMOUS LOGON, then check the box to Allow Remote Access.
Click the OK button twice to save and apply the changes.
Finally, restart your PC.
After changing the components services setup, this error should disappear, and you should be able to access your flash drive easily.
In this article, we explored the best way to deal with the error You do not have access rights to the logical disk manager.
This error can be caused by a corrupted file that deals with your User Account Admin, having some leftover files from a previously installed Windows, or when trying to shrink an older partition.
Even though all these situations seem to be unconnected, there is only one viable solution that you can try. And we have detailed it above.
If you are facing other issues like Disk Management not opening, check our detailed guide to fix it resoundingly.
Feel free to let us know if our solution helped you get rid of the error in the comments below.
One thing is for certain when it comes to Windows 10’s UI: even though it’s not always intuitive, it looks great aesthetically. One of the features that’s not essential but impacts the overall impression must be Microsoft Spotlight.
For you that don’t know, Microsoft Spotlight basically automatically switches wallpapers for your Lock Screen. It uses Bing gallery photos from the whole world and changes them every time you log out.
It’s a great way to brighten up your initial screen while you stare in awe in the beautiful and unique parts of the globe.
How can I fix Spotlight on Windows 10? The easiest way to fix it is by restarting the service manually. In most cases, the problem is triggered by the lack of internet connection or some process bugs. If that doesn’t do the job, clean the Spotlight’s download folder and then reassign its service.
The first step you should take is to check the connection. The Spotlight feature is dependable on the internet connection and without it, you won’t be able to get yourself that special nature scenery.
When you start your PC, you should see the connection signal or LAN notification on your Lock Screen. If it’s not there, make sure to troubleshoot your connection before we proceed to the next steps.
On the other hand, if your connection is functioning as intended and the Spotlight is still stuck/unresponsive, you’ll need to put more effort in the trouble at hand.
Another step you can take is to restart the Spotlight feature manually. Since this is a built-in system process, you can only perform standard enable/disable procedure instead of standard switching off. And this is how to do it:
Right-click on the desktop and click Personalize.
Select the Lock Screen tab.
In Background panel, switch from Windows Spotlight to a Picture or the Slideshow.
Click OK to confirm the selection.
Log off and log in.
Navigate to Lock screen and enable Windows Spotlight again.
If the photos still won’t load or you’re seeing the same picture every time, move down to the next steps.
Solution 3 – Clean the Spotlight’s download folder
Additionally, you can clean the content from the download folder where the Spotlight photos are stored. That resolved the issue for some users, so it’s worth a try.
This is how to find and delete image files from the folder:
Right-click on the desktop and open Personalize.
Open the Lock Screen tab.
Under Background, switch from Windows Spotlight to a Picture or the Slideshow.
As we already said, Spotlight is an integrated feature and can’t be reinstalled or disabled in the standard way. But, at least, it can be reassigned and thus restored to default settings.
This procedure has two parts that can be used as two distinctive workarounds. But we’ll unite them here. Now, these are not exactly the easiest steps to perform, so follow the instructions closely:
Right-click anywhere on Desktop and open Personalize.
Open Lock screen tab and change the Background from Windows Spotlight to Slideshow or Picture.
It seems like Microsoft is aware of the problem and as some users reported, newer Windows 10 updates solved the issue without any additional steps. So make sure that you have the latest Windows 10 updates installed.
That should wrap it up. As you can see, there are some easy solutions, and some more complicated ones. Try them in the order above to see what works for you.
In case you have any questions or an alternative solution, be so good to share it with other readers in the comments section below.
Microsoft Office is one of the best-known Office tools, but many users reported Microsoft Office encountered error during setuperror. This error will prevent you from installing and running Office on your system, so, in today’s article we’ll show you how to fix it properly.
I had an office 2013 installation before, I uninstalled it for a certain reason, I downloaded another Office 2013 Professional Plus with SP1 from my MSDN Subscription, when I try to install it, during the installation, I get a message saying “Office has encountered an error during setup”
Here is how fix Microsoft Office encountered an error during setup message?
1. Use Task Scheduler
Click on Cortana search bar in your Windows 10 Taskbar, type in Task Scheduler, and select the top result.
Click on the Task Scheduler library button to activate the drop-down menu.
Right-click on the Microsoft folder, and select Delete.
Retry installing Microsoft Office like you normally would
In this article, we explored some quick methods you want to try out if you get the annoying Office encountered error during setup process error. Be sure to try all of our solutions and let us know which solution worked for you.
Please make sure to let us know if this article solved your problem by using the comment section found below.
Microsoft has just announced a partnership with Oracle to enable cloud interoperability between the tech giant’s Azure and Oracle’s Cloud hosting solution. Customers of the services from both companies can now take advantage of being able to migrate and run their data workloads between Azure and Oracle Cloud.
Microsoft’s blog post explains that users will be able to connect certain services of Azure to those of Oracle cloud, giving them the best experiences from both providers for enhanced optimization. Oracle, which faces stiff competition from other larger-name cloud providers including AWS, Google Cloud, and its new partner Azure, will be able to focus what it is best known for while allowing organizations to offset much of their workload in Azure.
“As the cloud of choice for the enterprise, with over 95% of the Fortune 500 using Azure, we have always been first and foremost focused on helping our customers thrive on their digital transformation journeys,” said Scott Guthrie, executive vice president of Microsoft’s Cloud and AI division. “With Oracle’s enterprise expertise, this alliance is a natural choice for us as we help our joint customers accelerate the migration of enterprise applications and databases to the public cloud.”
Customers will be able to run Oracle’s various packaged applications—JD Edwards EnterpriseOne, E-Business Suite, PeopleSoft, Oracle Retail, Hyperion—on either Azure with one of its databases—RAC, Exadata, Autonomous Database—which Microsoft says will be certified to run in Azure with Oracle databases in Oracle Cloud. Additionally, Oracle Database will also continue to be certified to run on either Windows Server or Linux in Azure.
Customers will be able to seamlessly connect the two cloud companies’ services together, although in the meantime this functionality is limited to Azure’s US East datacenter along with Oracle’s Ashburn servers in North America, with additional regions planned further down the road. They will also be able to take advantage of a single sign-on experience and automated user provisioning for managing resources across both platforms.
NVIDIA users have reported a rather strange error while using the dedicated graphics. When they select the NVIDIA card over the integrated one, the You do not have the privilege to select the graphics processor in this menu error appears.
The problem is common and affects the overall experience, sometimes leading to a poor gaming experience. Keep reading to find out the fixes!
Press Windows + R to open Run, type msconfig, and click OK.
Go to the Boot tab, and underBoot Options, check Safe Boot.
Click on Apply and OK, and then restart the computer.
1.3 Run DDU
Run the DDU.exe file and extract the package.
Open the DDU folder and run the Display Driver Uninstaller.exe file.
Select the Device Type as GPU and GPU as Intel from the dropdown menu, and then click the Clean and do not restart button.
Next, select GPU as NVIDIA and click on Clean and restart.
After the restart, install the Intel Display driver first and then proceed with installing the NVIDIA graphics driver.
When you can’t select a graphics processor in Windows, it’s often incompatible drivers or corrupt driver files to blame. And once you have reinstalled the drivers, the You don’t have the privilege to select the graphics processor in this menu error shouldn’t appear anymore.
2. Change the UAC setting
Tip
Disabling UAC will expose your system to potential threats, as any program can run with administrative access without the user’s consent. Follow this only if you know what software you install on your system.
Press Windows + R to open Run, type control, and press Enter.
Click on User Accounts.
Again, click User Accounts.
Click on Change User Account Control Settings.
Now drag the slider to the Never notify, and click OK to save the changes.
Reboot the system and try to change the graphics card for the game, and it should accept the NVIDIA GPU without any error.
One of these solutions will fix the You don’t have the privilege to select the graphics processor in this menu error. We recommend you use DDU to reinstall the driver and only disable UAC as a last resort.
Alexa is a popular cloud-based voice service available on over 100 million devices. However, many reported that Alexa for Windows 10 is not available.
We covered a similar subject in our Cortana isn’t available guide, but since this is a third-party application, the methods we’re going to use have to different, so let’s get started.
Why can’t I download Alexa on Windows?
It’s possible that the app isn’t available for your country yet.
Glitches and issues with Microsoft Store cache.
Date and time aren’t correct on your PC.
What can I do if Alexa for Windows 10 is not available?
1. Check for availability
The first thing you should do is check if the app is available in your country. Open the Microsoft Store and type Get Alexa in the search box, or simply go to the Alexa Microsoft Store page.
If the download page says Alexa is currently not available, it means the app is not available for your country yet.
Follow the next step to download and install the app manually.
2. Download the Alexa app manually
Go to the Alexa app page Copy the app URL from the address bar.
Paste in the link the address bar. Click the drop-down button next to the URL field and select Retail.
Click on the Checkmark button.
Now download both .appxbundle as well the .eappxbundle of the app by clicking on the link. (Refer the image for more).
This should help you install Alexa on your Windows 10 computer. If required, try to change the region on your computer to the US or UK to get it to work.
Check if the date and time on your computer are correct.
If not, turn off Set time automatically and Set time zone automatically.
Now click on Change button under Change date and time.
Set correct time and data. Make sure you enable Set time automatically and Set time zone automatically after setting the correct time.
Launch the Microsoft Store and check for any improvements.
These are just a couple of solutions if you can’t download the Alexa app on Windows 10.
Sadly, this isn’t the only Alexa issue, and many reported that Alexa won’t connect to WiFi, so you might want to check this guide as well. And if you need to stop Alexa from disconnecting, this dedicated article will surely help.
What method did you use to fix this problem? Let us know in the comments section below.
The Windows Live Mail allows the users to store their contact book and all the other details in the client. This helps with more effortless synchronization of the contact book between the devices. However, some users have reported that their contacts have disappeared from the Windows Live Mail or the Mail app, despite being visible on the email account on the web.
The problem was reported online on multiple instances by affected users.
“Hi, Opened my windows live mail account today as normal. Everything as it should be but all my contact have disappeared. Any ideas?”
Learn how to retrieve your contacts by following the steps below.
How can I fix Windows Live Mail contacts disappeared?
1. Stop Signing in to Windows Live Account
Launch the Windows Mail app on your computer.
Wait for Windows Mail app to fetch any pending email from the server.
When the syncing is complete, click on File.
Select Options and then click on Mail.
In the Options dialogue box, click on the Connection tab.
Under ” Connecting to Windows Live Services” group, click the Stop signing in button.
Click OK or Yes to confirm the action.
Click Apply > OK to save the changes.
Close the Windows Live Mail app and shut down the system.
Wait for a few minutes and then restart the computer and open the Live Mail app. Check the contact to see if the error is resolved.
2. Recover Deleted Contacts
Close Windows Live Mail if running.
Download LiveContactView, here, onto your computer and install it. It is a lightweight utility that allows you to view the details of all contacts in Windows Live Messenger.
Now you need to locate the *.edb files from your AppData folders.
Open File Explorer and navigate to the following location C: -> Users -> tashreef -> AppData -> Local -> Microsoft
Now search for .edb filesin the Microsoft folder.
Now open Live Contacts View. The utility should display all the .edb files.
If the .edb file is not displayed, drag and drop each .edb file into the Live Contact View work area.
Once all the files are moved to the Live Contacts View, select all the files by pressing Ctrl + A.
Click on File > Save Select Items > Save As.
Select “Comma Delimited Text File” for the Save as Type. Make sure you give the file a name and click Save.
Now you need to open the saved CSV file and do the mapping.
Once the Mapping is done, open Live Mail and go to Import > Command Separated File and import the file. Also, do the mapping as per your preference.
Note: This method is only helpful if the contacts have disappeared from both your Live Mail client as well as the Web email account.
The latest Geekbench results confirmed the Windows 10 May 2019 Update enhances single-core performance by 5%.
We can see that the latest Windows 10 build is all set to overtake Linux. However, in terms of performance, Ubuntu 19.04 is currently better than the Windows 10 May 2019 Update with a difference of around 8%.
Windows 10 v1903 slightly improved the benchmark for x264 multi-threaded video encoding. Still, Windows 10 is lagging behind Linux in terms of performance.
Geekbench separates the performance of single-core and multi-core. The tool is currently available for almost all platforms including Windows, Android, macOS, iOS and Linux.
Geekbench 4 uses a scoring system against a 4000 baseline score. The existing version also deals with areas such as computer vision and image processing to calculate GPU performance.
Microsoft still needs to focus on performance issues
Windows 10 users were quick to respond to this piece of news. One Reddit user opened a discussion by creating a new post on Reddit. The OP highlighted the fact that Microsoft needs to work on its kernel.
Gonna need a major kernal rework for windows to get better. I hope they’re planning on it.
Windows 10 has a bad reputation as far as the bugs are concerned. Many users are now concerned about various performance issues affecting Windows 10.
As a matter of fact, today Microsoft is focusing more on introducing brand new features. The company only addresses major issues that exist in the operating system.
As a quick reminder, Microsoft is currently working on integrating a real Linux kernel on Windows 10 very soon. The upcoming kernel is not going to replace the existing Windows kernel. Alternatively, Windows 10 is going to use VM to run the Linux kernel.
Microsoft should not ignore the fact that the gaming community is using different versions of Windows 10. If the company doesn’t work to bring new hardware support for games, players may look for an alternative platform.
Update not working when attempting to download the latest Windows 10 version? You’re not alone in experiencing this problem. Many folks are, but there are certain issues that are quite more interesting than others.
We came across some Windows 10 users who have been complaining that the Windows Update section within the Settings area, is 100% blank.
It’s quite strange for anyone to experience a problem where the Windows Update section is just a blank slate. This can cause folks to just want to revert back to Windows 7 because things are a lot simpler there seeing as Windows 7 is very mature.
Now, if you’ve attempted everything above, then we suggest performing a reset of your PC. That should fix most underlying problems. However, if not, then reinstalling Windows 10 completely might be the only option.
The Windows 10 Update tool allows the user to automatically download and install the latest version of Windows 10 (or any other version) on their computers.
Few users know they can use this file to install the latest Windows 10 version on other PCs as well, but finding the location of the download folder for some Windows 10 versions is a bit tricky.
Actually, the Windows 10 Update tool is a stub installer, which means it doesn’t require much space on your computer’s memory. Once you launch it, it automatically downloads all the latest Windows update files.
In order to use the Windows 10 Update tool on more than one computer, you must first find where its default download folder is. This action requires making a few changes in File Explorer, but you’ll eventually find the folder.
Speaking of the installation process of the Windows 10 versions, the Media Creation tool is the final solution users can resort to in case they encounter installation issues.
The bad news is that even this tool can break, leaving users with almost no option to complete the upgrade. Still, you can check out this guide on what to do if Windows 10 updates won’t install.
In case the Media Creation Tool doesn’t work, and you’re in desperate need for a fix to resume the upgrade to the latest version of Windows 10, you can also check the workarounds available in this fix article.