How to Check Mouse DPI in Windows 10 [Easy Steps]

DPI or Dots Per Inch is the most important characteristic of a mouse. If your mouse has a higher DPI then it will be more fast and responsive, and if the DPI is low, then your mouse will lag.

In this guide, we will share with you a guide on how to check mouse DPI in Windows 10. We have listed different ways to check out your mouse DPI. Let us get right into it.

What is mouse DPI?

DPI or Dots Per Inch refers to how your mouse measures physical distance. It is the speed at which your mouse travels from one point to another on your screen.

If your mouse has a low DPI and you move it one inch on your screen, then your mouse will travel less distance. However, if the mouse has a higher DPI and you move it an inch, then the mouse with a higher DPI will travel more distance, even though the sensor size is the same.

So, DPI measures how smoothly or how far your mouse can travel the distance on your screen.

Is a high DPI always preferable?

This is a highly debatable question. While some may think high DPI will help them have a smooth experience when using a mouse and could be better for gaming and editing-related tasks.

However, several gaming companies have said that a high DPI mouse is an irrelevant specification to talk about. Often high DPI mouse could fly across your screens resulting in not so better gaming or editing experience.

So, you should choose a mouse with a DPI that is suitable for your needs. If you are a gamer, then you should check which is the appropriate DPI mouse for that game or the type of games you play. This applies to other professions as well.

How can I check the mouse DPI in Windows 10?

1. Visit the official website

The best way to know or check the mouse DPI in Windows 10 or any OS for that matter is to visit the official website of your mouse.

There you will see the exact DPI of your mouse along with other details, you might need. The DPI is usually written in the spec sheet of the device. So, you may want to scroll through the specifications sheet.

You will find different ways of mentioning DPI. Some manufacturers mention the exact DPI or the highest DPI the mouse supports. While some, such as Logitech, would only specify a range the mouse supports.

2. Use an online tool

  1. Visit the DPI analyzer website.
  2. Make sure any pointer acceleration option is disabled in your mouse driver software.
  3. Draw inch or centimeter lines on a blank paper that will serve as your mousepad.
  4. Measure the rough distance that you need your mouse to move from the left to the right side of the screen and enter the distance inside the Target distance box. Leave the Configured DPI box blank.
  5. Click the red crosshair and move your mouse from the left side to the right moving the mouse to the distance specified in the Target distance box. Do not move your mouse fast, you have to be accurate.
  6. A figure will appear in the Actual DPI box, which will be the approximate DPI of your mouse.

The above steps will not let you know the actual DPI of your mouse. However, it will at least let you know the approximate DPI of your mouse.

3. Use Microsoft Paint

  1. Press the Win key to open the Start menu.
  2. Type Mouse and open the Mouse Settings.
  3. Click on Additional mouse settings.
  4. Click on the Pointer options tab.
  5. Uncheck the Enhance pointer precision box and click OK.
  6. Launch the Paint program on your PC.
  7. Make sure the zoom level is set to 100%.
  8. Click on the Pencil tool in Paint.
  9. Move the mouse to the leftmost side of the working area, where it reads 0 pixels. For example, you will see something like 0, 200px.
  10. Place a ruler below your mouse and move the mouse by left-clicking to draw a line until you reach the one-inch mark.
  11. Note down the pixel movement (i.e., check the number in place of 0 in the above example 0, 200px) and note it down.
  12. Repeat step number 10 multiple times.
  13. Take out the average of the px number, that will be your approximate DPI.

This way you can at least know the approximate DPI of your mouse. Although this is not a precision method and you don’t get to know the actual DPI, something is better than nothing, in case you urgently require it.

That is it from us in this guide. If you are experiencing erratic mouse movements in Windows 10, then you should read our guide which lists the best solutions to resolve the problem.

We also have a guide that explains in detail how you can resolve the mouse flickering issue in Windows 10 computers.

Feel free to let us know in the comments below, which one of the above methods you used to know the DPI of your mouse in Windows 10.

Fix: CHKDSK is Not Available for RAW Drives Error

CHKDSK is a handy system utility of the Windows ecosystem known to resolve several disk errors with minimum effort. However, some of our readers received the message The type of the file system is RAW. CHKDSK is not available for RAW drives when using the CHKDSK command on the drive. 

In case you are facing the same issue, go through this guide to discover effective solutions to fix the problem.

Why is CHKDSK not available for RAW drives? 

CHKDSK is a well-known inbuilt Windows utility that fails to use fix hard drive errors on FAT32 or NTFS file systems. Hence, if the file system is in a format that cannot be recognized by Windows, the OS will consider it to be a RAW file and the in-built command like CHKDSK will not be available. Apart from this, there can be several other reasons for the problem: 

  • Your hard drive has suffered a physical damage 
  • There is some issue with the file format
  • Windows is unable to read or access the file system and its contents 

Now that have a clear idea of why the CHKDSK is not available for raw drives error shows up, let’s proceed towards the effective solutions.  

What do I do if CHKDSK is not available for RAW drives? 

1. Boot your PC in Safe Mode 

  1. Shut down your PC completely by pressing the Power button for a few seconds. 
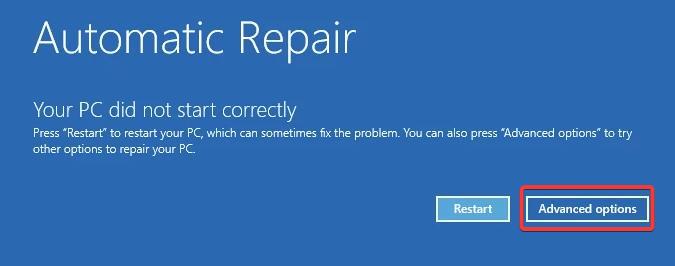
  2. Press the Power button to reboot and long press the button to restart your computer. Repeat these steps until you access the Automatic Repair screen.
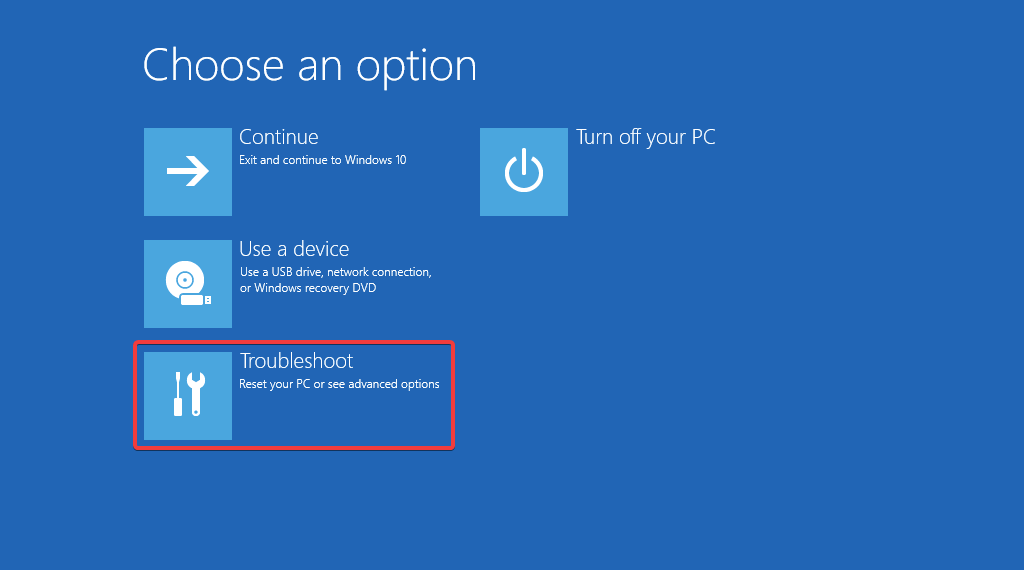
  3. Start the automatic repair process by pressing the Advanced options button. 
  4. Select Troubleshoot option from the next screen. Chkdsk is not Available for RAW Drives
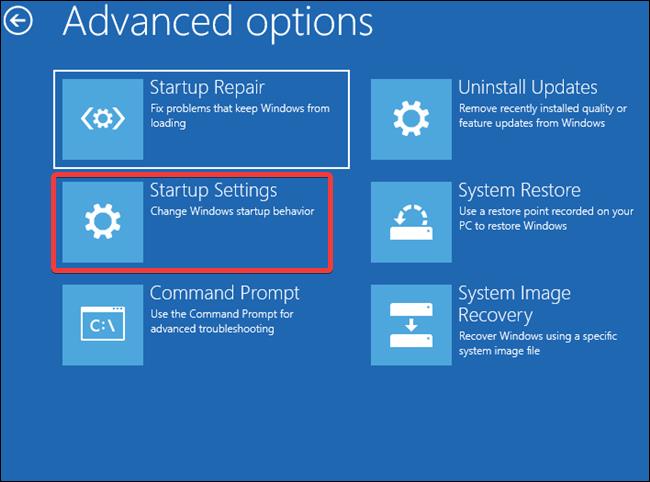
  5. Go to Advanced options. 
  6. Select Startup settings from the Advanced options window.
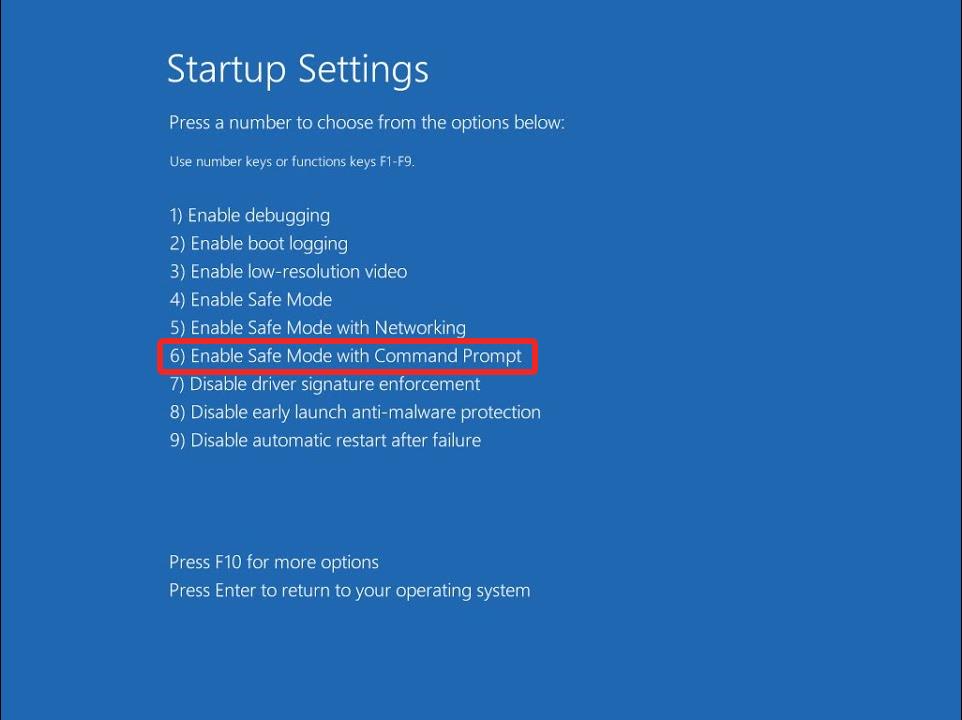
  7. Press the F8 key to choose Safe Mode with Command Prompt from the list of safe mode variants. 

In the Safe mode, your computer will function in a basic state with only essential drivers, folders, and apps. Now that there is no interference from the third-party services, execute the CHKDSK command once again. 

If the command does not work, proceed to the next method. 

2. Check and repair the RAW drive 

  1. Connect the external hard drive to your PC. 
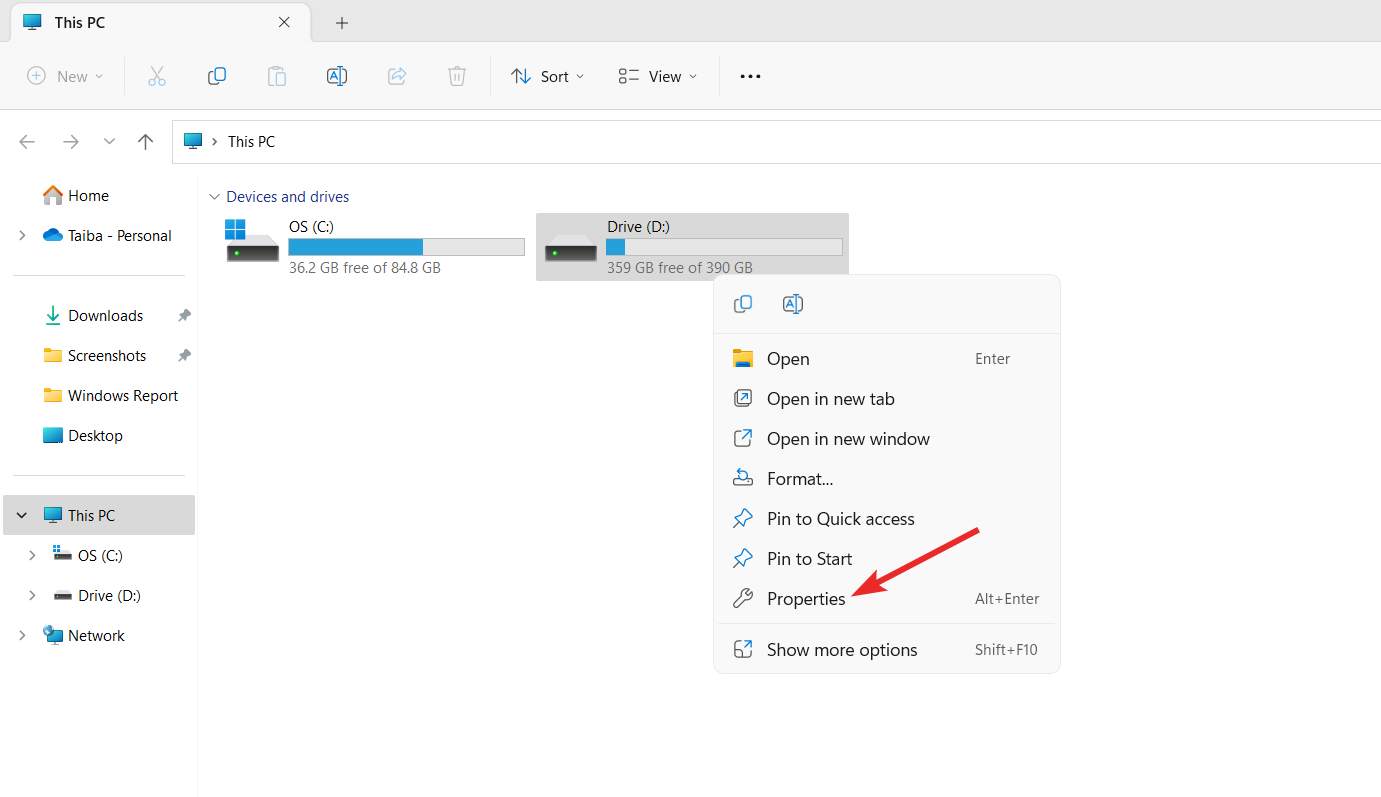
  2. Launch the File Explorer using the Windows + E shortcut and select This PC from the left navigation pane. 
  3. Right-click the external hard drive and choose Properties from the context menu. 
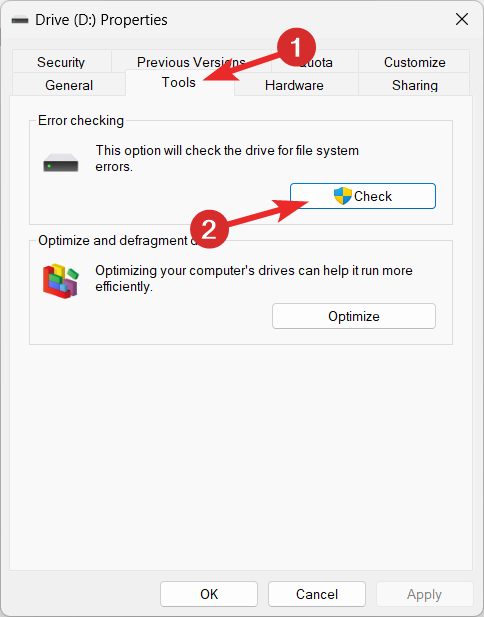
  4. Switch to the Tools tab of the Properties window and press the Check button located under the Error Checking section. 
  5. If prompted, type the administrative credentials and wait until the Windows operating system repair the drive with RAW status. 

If the CHKDSK command fails to work, you can use the Check tool, another error-fixing utility of Windows to fix the issue with the RAW drive. 

3. Format the disk drive

  1. Connect the external hard drive to the computer and wait for it to get detected by the PC. 
  2. Bring up the File Explorer window using the Windows + E shortcut and select the external hard drive. 
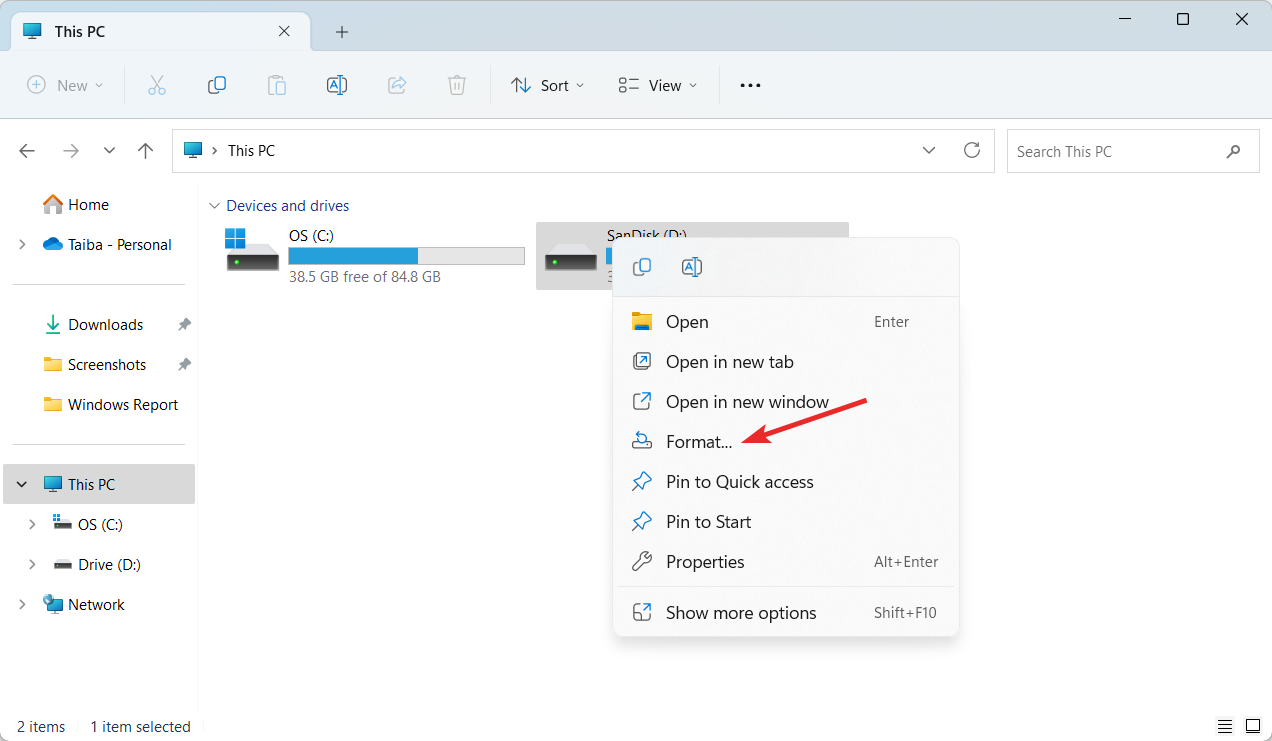
  3. Right-click the external hard drive and choose Format from the list of options in the context menu. 
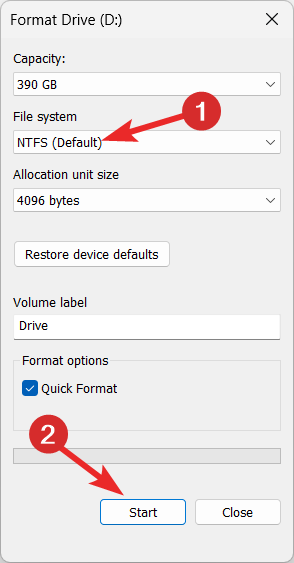
  4. A format drive window will open on the screen. Select NTFS in the File system drop-down and press the Start menu to format the hard drive. 

Formatting the external drive with an unsupported file system will convert it to a compatible file system such as NTFS. 

You should remember that formatting the drive will delete all the contents stored on it. 

4. Repair the RAW drive using the diskpart command

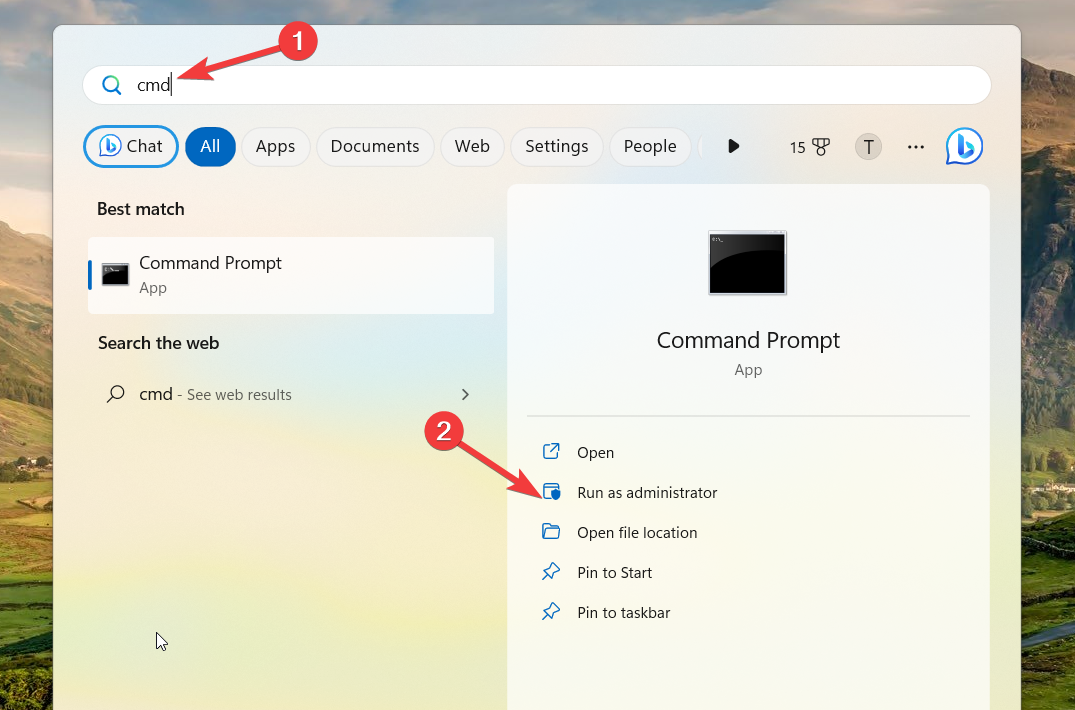
  1. Press the Windows key to bring up the Start menu, type cmd in the search bar on top, and choose Run as administrator from the search result.  chkdsk is not available for raw drives
  2. Now type or paste the following command in the command prompt to launch the disk utility tool. Diskpart 
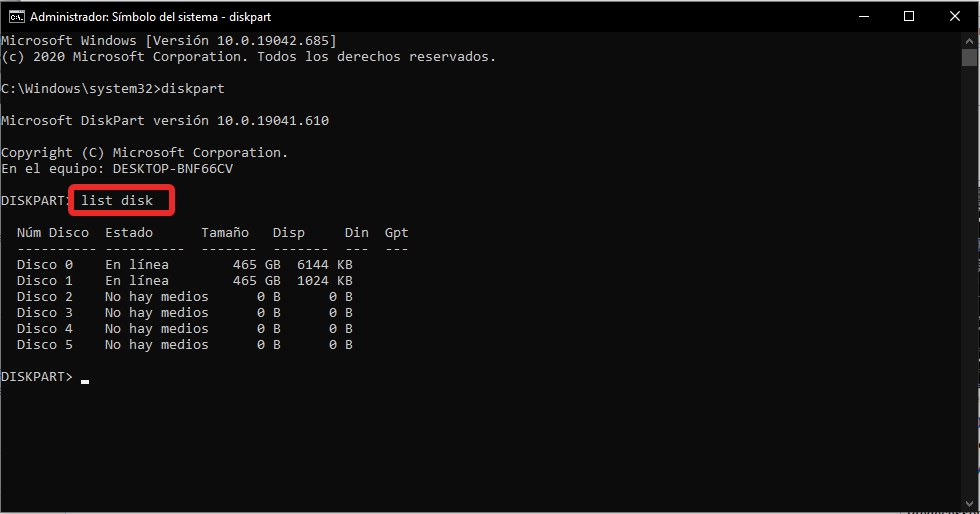
  3. Next, execute the following command to see if the list of disk drives currently connected to your PC aligns with their identifiers. List disk 
  4. Note down the name of the RAW disk drive and type or paste the following command to select the problematic disk. Replace N with the number representing your disk: select disk N 
  5. Execute the following command to remove the write-protected attribute of the file: attributes disk clear read only
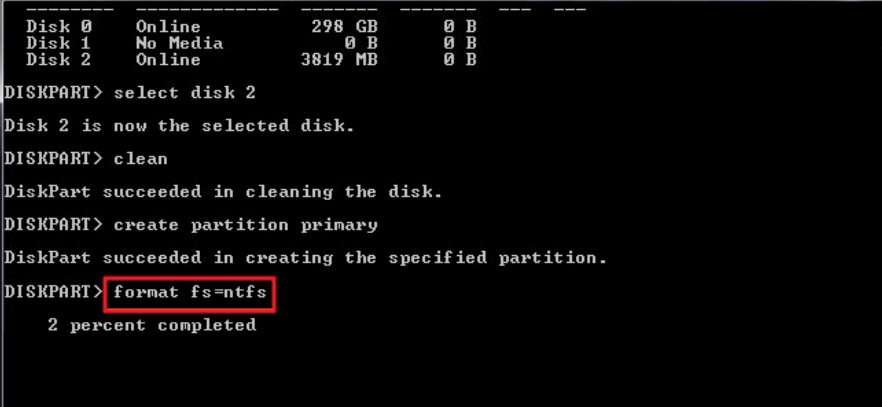
  6. Next, delete all the disk drive data by executing the following command: clean 
  7. Now you need to create a primary partition of the disk using this command: create partition primary
  8. Finally, execute the following command to format the hard disk and convert it to a compatible file system: format fs=ntfs

If the CHKDSK command is not available for the RAW hard drive, you can use the disk part utility command to repair and format the hard drive to the required file system. 

That’s all about this guide! Hopefully, you were able to repair the RAW hard disk such that the CHKDSK command is now available for the drive. 

You might also be interested in what to do if you can’t create a new partition in Windows. 

In case you have any queries or suggestions for us, do let us know in the comments section. 

Microsoft Edge takes action against spam notifications, blocks them

Microsoft has announced its Edge web browser can now block spam notifications, including those that deceive users into granting permission for notifications.

According to the announcement post from the Microsoft Edge team, “Website notifications are great for staying up to date on your favorite web apps, but they can also be used to spam you with messages that can be unwanted or even misleading,”. To tackle this problem and improve user satisfaction, Microsoft has brought modifications to assist users in evading these notifications and promoting a sense of peace. It seems like times are good for Microsoft Edge as it is close to 300 million users thanks to ChatGPT integration.

The newly blocked notifications on Edge primarily originate from unfamiliar websites and encompass notifications that attempt to trick users. Microsoft is actively collaborating with law enforcement authorities to tackle genuinely hazardous spam notifications, such as those posing as virus warnings that prompt users to download malware disguised as a solution.

Although notification spam usually causes annoyance rather than harm, Microsoft has identified and examined various types of spammy notifications that most users deem undesirable. It’s like giving them a warning shot without causing too much disturbance. As part of this process, notification privileges have been revoked from websites that transmit spammy notifications, effectively blocking billions of misleading alerts.

Based on their analysis, Microsoft discovered that most spam notifications originate from unfamiliar sites. Consequently, starting from Edge version 113 and onwards, initial notifications from such sites will be displayed discreetly, with only a subtle message appearing in the address bar.

via Thurrott

Fix: PowerPoint Found a Problem With The Content

Many users run into PowerPoint encountered a problem with the content error on their PC. The error can occur when there is an issue with the file or the content within a PowerPoint presentation. Hence, this article will outline the cause and fixes for resolving the error.

Likewise, you can check our guide discussing how to fix the PowerPoint cannot insert a video from the selected file error on your PC.

Why does PowerPoint found a problem with the content appear?

  • The presentation’s elements that violate the security settings may trigger an error.
  • The file you’re opening is in a synchronized folder (e.g., OneDrive, Dropbox), or backup software monitors the folder.
  • Corrupted PowerPoint files can cause errors when trying to open the presentation.
  • Compatibility issues can cause an error if the PowerPoint file was created in a different version.
  • It can occur if the hosting folder of the file does not exist in the trust list of PowerPoint.

How do I fix PowerPoint found a problem with content error?

Before attempting any advanced troubleshooting steps, try the following preliminary checks:

  • Close and reopen the app on your PC to refresh its process and fix temporary problems affecting it.
  • Check for and install the latest version of PowerPoint to resolve bugs from the outdated version and compatibility issues.
  • Save a presentation copy with a different file name or format (e.g., PPTX to PPT) and try opening it again.
  • Disable any recently installed third-party add-ins or plugins and see if the error is resolved.
  • Try opening the file on a different computer to see if the issue is device specific or persists on other devices.

1. Disable Protected Views in PowerPoint

  1. Open PowerPoint on your computer.
  2. Click on the File tab in the top left corner of the PowerPoint window and select Options.
  3. Click on the Trust Center tab on the left-hand side, then tap on the Trust Center Settings button on the right pane.
  4. Select Protected View from the options on the left-hand side. Uncheck the boxes for the three scenarios on the right side of the page to disable Protected View.
  5. Click OK to apply the changes and close the Trust Center dialog box.
  6. Relaunch PowerPoint and check if you can access the content without errors.

After disabling Protected View, PowerPoint will no longer open files in the protected view mode for the scenarios you have unchecked. Read about PowerPoint not opening in Windows and ways to fix it.

2. Add the file location to the trust list

  1. Launch the PowerPoint on your PC.
  2. Tap on the File tab in the top left corner and select Options.
  3. Tap on the Trust Center tab on the left-hand side, then click on the Trust Center Settings button on the right.
  4. Select Trusted Locations from the drop-down menu on the left pane and click on the Add new location button.
  5. In the Microsoft Office Trusted Location dialog box, click the Browse button to select the folder location of the file you want to add to the trust list, then click OK.
  6. Save the changes and see if the error persists.

Adding the file location to the trust list allows you to open files from the specified folder without encountering any view restrictions.

3. Move the file out from the synchronized folder

  1. Go to the synchronized directory where you currently have stored the file.
  2. Right-click on the file, select Cut from the drop-down menu or press Ctrl + X.
  3. Go to any regular directory, right-click, and press Ctrl + V to paste the file into any other folder.
  4. Try to open the file and check if the error appears.

The above steps will make the file available in another folder, unaffected by synchronization or other backup services and the PowerPoint encountered a problem with the content error will be gone.

4. Unblock the Security option for the file

  1. Right-click on the file and select Properties from the drop-down menu.
  2. Go to the General window, select the Security tab at the bottom, then click Unblock.
  3. Launch the PowerPoint and check if you can open the file.

Unblocking the Security option for the .pptx file removes any restrictions preventing it from being accessible.

Alternatively, you can learn to enable presentation mode in Microsoft PowerPoint on Windows PC.

Should you have further questions or suggestions regarding this guide, kindly drop them in the comments section.

Microsoft implements transparent pricing strategy for cloud services

According to Microsoft, in October 2022, they announced a clear and transparent schedule for aligning the pricing of Microsoft Cloud services worldwide with the U.S. dollar. This initiative aims to provide customers from various regions and currencies with consistent pricing that reflects the exchange rate between their local currency and the U.S. dollar (USD).

Now that we’re on the topic of pricing, did you know Xbox Free Play Days are on from Thursday, July 6 through Sunday, July 9, with some amazing games?

Continuing on this path of pricing, Microsoft is now introducing updates to its pricelist, ensuring that the prices for Microsoft cloud services are adjusted to meet global standards. Additionally, the company emphasizes maintaining local pricing stability for OnPrem, prioritizing customers’ needs in specific regions.

Effective September 1, 2023, Microsoft will be implementing pricing adjustments for its Cloud and software services in the currencies listed below:

Adjusted Currencies

Microsoft will maintain its practice of evaluating pricing in local currency on a biannual basis, carefully considering fluctuations in currency exchange rates compared to the USD. This approach aims to enhance customer transparency and predictability worldwide, aligning with prevailing industry pricing models.

Microsoft Cloud services will continue to be competitively priced, demonstrating the company’s steadfast dedication to the success of its customers and partners. Microsoft will persist in investing in solutions that empower customers to drive innovation, streamline operations, reduce costs, improve business performance and efficiency, and establish robust security strategies. These efforts ensure that customers around the globe can rely on Microsoft as a trusted provider.

Let’s hope these adjustments bring smiles to customers’ faces and not just to Microsoft’s bank account.

How to get a tablet-optimized taskbar on your Steam Deck

The Steam Deck device is a handheld gaming device that supports Windows 11. And it’s a beast in itself. But if you want to keep it at a peak performance level, you’ll need to choose which apps you want to install. So say no to those Android apps that you are able to run.

So far the device hasn’t had any serious issues. It seems that sometimes Steam Deck encounters a fatal error, which can be easily fixed.

However, some users appreciate the taskbar design from the latest handheld gaming device Rog Ally. As you might know, this device also runs on Windows 11, and similar to the Steam Deck, it’s a beast in itself. And it seems it comes with good features because some users were fascinated with the taskbar that they wanted to replicate it on Steam Deck.

Fortunately, there is a very simple walkthrough to get the optimized taskbar on your Steam Deck as well. But you need to know something. You need to be running Windows 11 Version: 22H2, 22621.755 or higher, so make sure you update your Steam Deck to the latest Windows version possible.

Here’s how to get a tablet-optimized taskbar on your Steam Deck

  1. Open Registry Editor from the Search boxwindows 11 tablet optimized taskbar
  2. Once you’re there Navigate to HKEY_CURRENT_USER\Software\Microsoft\Windows\CurrentVersion\Explorer
  3. Here you should add a new Dword value (32-bit)windows 11 tablet optimized taskbar
  4. Name it TabletPostureTaskbar
  5. Click it and change the Value data to 1windows 11 tablet optimized taskbar
  6. Exit out and right-click the Desktop to select Display settings
  7. Now set the scale to 100%
  8. Reboot your Steam Deck.

Now you should experience the Windows 11 tablet-optimized taskbar in all its glory. The taskbar will change its size, hence optimize, while doing all kinds of activities on your Steam Deck.

For example, on your Desktop, the taskbar will appear in a regular way. When you’re browsing the Internet, it will optimize to its tablet mode.

What do you think about this? Let us know in the comments section below.

What is Uhelper.exe & Should You Uninstall it?

The uhelper.exe process is a third-party process developed and signed by iSkySoft software company.

If you use any of the applications from iSkysoft, such as Filmora or Uniconverter,  you may have encountered the uhelper.exe file.

There are many services that you should disable on Windows 11, but is this one of them? Keep reading to find out.

What is uhelper.exe?

Should I uninstall uhelper.exe?

If you installed any iSkysoft software on your computer, it’s up to you to decide whether you want to keep uhelper.exe or remove it.

If everything is running smoothly, it is recommended not to uninstall uhelper.exe in Windows because it is necessary for receiving updates for your iSkysoft software.

1. Stop the process

  1. Press the Windows + X and select Task Manager.Task Manager
  2. Go to the Details tab and locate the uhelper.exe entry.
  3. Right-click on the uhelper.exe entry and choose End task.End Task
  4. Also, check for its parent software and close it if it’s running.
  5. Finally, restart your PC.

If the uhelper.exe process is causing issues on your computer, such as high CPU or memory usage, you can resolve it by terminating the process in Task Manager.

2. Perform a malware scan

  1. Press the Windows + S, type Windows security, and select the Windows Security app.Windows security
  2. Select the Virus & threat protection tab and click on Scan options.Scan options
  3. Select Full Scan and click Scan now.Scan now

Sometimes, viruses or malware pretend to be the uhelper.exe process or take control of it to misuse your computer’s resources without permission. Running a virus scan using Windows Security can resolve this problem.

On the other hand, the security of your PC deserves professional antivirus software that includes advanced malware prevention and mighty virus monitoring tools to be always covered.

⇒ Get TotalAV

3. Uninstall parent software

  1. Press the Windows + R, type control panel, and click the OK button.356
  2. Select Uninstall a program option under the Programs section.Uninstall a program
  3. Locate the parent software, right-click on it, and choose Uninstall.Uninstall

Before you go, make sure to check out other processes in Windows that you can disable to enhance your PC’s performance.

We also have a great guide on abDocsDllLoader, so check it out to learn more about this file.

If you feel we have missed any valuable information, please share it with us in the comments section below.

AI is helping AMD grow its market share vs. Nvidia

We all know 2023 is truly the year of AI. Or at least the first year of the AI reign in the technological world. Everywhere you would go, AI would be there. AI is in Microsoft Teams. Microsoft Store has AI now. Edge, and Opera One have AI. And Windows 11 is getting Copilot later this year, which is an AI assistant just for you.

Even more, Microsoft, for example, has poured a lot of budget into investing in AI research, and the results are more fascinating. There is Orca 13B, which the Redmond-based tech giant will release open-source. You have LongMem, which will train your AI model to have an unlimited context length.

And it seems, Microsoft has also invested in Kosmos-2, an AI language capable of spatial context. Basically, AI will now be able to describe space and have knowledge of space. Shorter, AI will have a body.

It’s clearly the age of AI. And to put an emphasis on just how important it is, it seems that AMD is using AI software to improve their chips. Thus, effectively improving the gap between its main competitor, Nvidia’s GPUs. In this analysis by SemiAnalysis, AMD chips are almost closing the gap in performance all due to AI software.

AI is closing the gap between Nvidia and AMD’s market share

But here’s the catch. Nvidia’s GPUs are seeing the gap closing not because AMD chips are so great, but because the AI software that makes it possible to train the models, is rapidly improving AMD’s efficiency.

Mosaic ML, the company behind the open-source AI software that AMD and Nvidia are using, has just recently started its activity. Founded in 2021, the company has already been purchased for $1.3B by Databricks.

So it’s safe to say the future is here. The company has proved that the performance of the hardware wired with this AI software only develops AI further. So, in a way, there are no losses. AI keeps on improving itself while working to get the performances in the first place.nvidia amd market share

Mosaic ML helped AMD’s Instinct MI250 GPU achieve 80% of the performance of an Nvidia A100-40GB, and 73% of the A100-80GB. All these with zero code changes.

And MosaicML has announced that the performance is expected to increase to 94% and 85% with further software improvements. The gain on the gap was also obtained in a quarter, so 3 months.

So, it’s time to buckle up for AI. What do you think about it? Let us know in the comments section below.

How to Quickly Get Unbanned From Omegle [3 Tips]

The Omegle platform would allow you to have anonymous texts and video chats. A few users may get banned, and we believe you must have found this app because you need to know how to get unbanned on Omegle.

There are a few steps to take, and we explore them all with you. However, you may also consider using some Omegle alternatives and save yourself the stress of troubleshooting the ban.

Why am I permanently banned from Omegle?

You may be banned from the service for any of the following reasons:

  • You have gone again some of their terms of service, some of which include:
    • Using sexually explicit content.
    • Abuse or harassment of other users.
    • Advertising or spamming.
    • Using the service commercially.
    • Impersonation of another user.
    • Using the service to carry out illegal activities.
  • Other users reported you. 
  • Your IP address has been banned. 

You may want to check out some of the best VPNs for Windows that will help you navigate an Omegle ban.

How do I get unbanned from Omegle?

1. Wait it out

In some instances, there is nothing you may be able to do to speed up the process, and you will have to wait till the ban period is over.

omegle how to get unbanned

This wait may range from a few hours to a couple of days, but as long as it is a temporal ban, once the time limit is reached, you will have access and be able to use the service once more.

2. Use a VPN

This may be the most effective way of getting unbanned from the Omegle service. Changing your VPN connection will immediately fix the issue because the Omegle website keeps your IP address to identify you. Omegle can only remember you by your IP address; it cannot identify you personally.

There are several VPN services to use while browsing the web, and in this case, we always recommend the ExpressVPN service.

It has 256-bit encryption, a kill switch, zero-knowledge DNS servers, and many others so you can enjoy streaming Omegle without negative encounters.

It also has excellent speed scores to help you access streaming services and other websites without slowing down your internet performance.

ExpressVPN

Try ExpressVPN and enjoy using Omegle without facing any issues.
Free Trial Visit Website

3. Connect using a different network

As we stated earlier, the Omegle service only knows your IP address; if you have been banned and use a static IP address, you must connect from a different network.

This may imply connecting from your mobile phone. The aim is to get a new IP address for the service.

How long does an Omegle ban last?

Depending on the infringement’s seriousness, an Omegle ban might last for a certain period. The duration of a temporary restriction might range from a few hours to a few days. There is no way to get unbanned on Omegle if it is a permanent ban; it is indefinite.

What happens if Omegle bans you?

After a ban from the service, you will experience the following:

  • You won’t be able to access Omegle’s features, such as text and video conversations.
  • Your device’s IP address can be blocked by Omegle, making it impossible to use the service even with several accounts.
  • If you participate, you will lose any history of ongoing chats.
  • There may be a delay in assistance or support from the Omegle support staff regarding your ban.

That is all we cover in this guide. The aim behind all the solutions we provide is that you get a new IP address. This will always do the trick.

You may also consider using browsers with robust privacy features or VPN browsers for PC when navigating services like Omegle.

Lastly, let us know in the comments section if you have other easy solutions for how to get unbanned on Omegle.

The Xbox consoles are very far from failing, people agree

The Microsoft acquisition of Activision Blizzard has revealed some interesting secrets behind the scenes, for everyone involved. It seems that Microsoft blames Sony for the console’s exclusive games; it was revealed that Microsoft also paid Ninja Theory $117 million, back in 2018; and probably one of the most revealing news is that Xbox is apparently losing the console war.

But Xbox is not really losing the war, at least this is not what the people agree. In a Reddit thread, a user is actually praising the Microsoft console, while also agreeing that Xbox is far from failing.

Now this wouldn’t be of such importance if there had been only one opinion, but lots of people shared the same opinion. Xbox is not really failing, in fact, for some people, Xbox is the only console they and their friends are using.

This is a very interesting thing, considering Xbox still needs a lot to catch up in sales with PlayStation or Nintendo. But it seems the console is really popular among people, especially the American audience.

Here’s why people are thinking that Xbox is not failing

The way the gaming community talks about the Xbox platform is like it’s a failure of a brand, and no one has an Xbox. Whereas in my experience this is the complete opposite. One, the recently revealed 21+m units sold for series X|S is nothing to scoff at. If you look at those numbers on their own, that is FAAAAAR from a failure. Also this last point is anecdotal, but I find in my real life world, when I ask people what platform they play on. A good chunk of those people say xbox, it’s about 50% in my experience.

There are some people for which Xbox 360 really made them fall in love with the Xbox console as a whole.is xbox failing

In the US and some other countries Xbox is quite a bit more popular than the average globally so that’s probably why you feel that way. I actually know more people with Xbox than PS but I also grew up during a time where most people’s first consoles were a 360 so a lot of them just stuck with it.

And while there are a lot of people who don’t agree with this approach, generally Xbox has been doing great. Xbox X/S has sold over 21+ million units since its release, and there are big plans for the console.

There is an exciting roadmap ahead for Xbox, with titles such as Starfield, new Halo games, and many more exclusives. And if we’re paying attention, people are starting to consider buying an Xbox, because Microsoft is doing great things to it.

It’s good to know people actually love the console. That could turn the tide in the long run for Microsoft and Xbox.

What do you think about this? Let us know your opinions in the comments section below.

Fix: Windows Cannot Connect to the Printer (0x00000006)

When you try to add a printer on a shared network, you may receive an error message with the error code 0x00000006. This problem may occur if you try to add a printer on a server, but the computers are not on the same network.

For further information on resolving this error, keep reading to find out how to troubleshoot it.

What is Windows error code 0x00000006? 

This error code means you cannot connect or add a printer on a server. This is a generic Windows error and can be caused by many factors, such as:

How do I fix Windows error code 0x00000006?

Attempt the following workarounds before any technical steps:

  • Disconnect all other peripherals that could be causing conflicts and reconnect only for the printer.
  • Check for any loose or damaged cables and replace them where necessary.
  • Verify that your PC and printer are on the same network.
  • Change your internet connection if possible and see if the error persists.
  • Log in as an administrator or use a different user account to access the printer.
  • Perform a system file check to check for corrupt files.
  • Restart or reset your printer and see if it works.
  • Finally, restart your PC and try printing again.

1. Disable your antivirus temporarily 

  1. Hit the Start menu icon, type Windows Security in the search bar, and click Open.
  2. Click on Firewall & network protection, then select Public network.league of legends black screen after champion select
  3. Locate Microsoft Defender Firewall and toggle the off button.turning off Microsoft Defender Firewall Windows

2. Delete the Printer Spooler folder

  1. Hit the Windows + E keys to open File Explorer.
  2. Navigate to the following location: C:\Windows\System32\spool
  3. Locate the Printers folder and click to open.
  4. Select all items in the folder and delete them.
  5. Restart your PC.

3. Update Printer drivers

  1. Hit the Windows key, type Device Manager in the search bar, and click Open.device manager w11
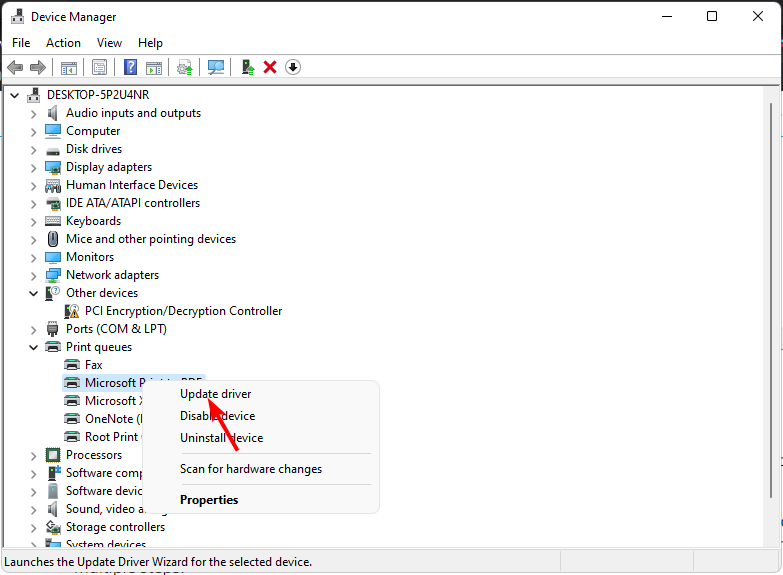
  2. Navigate to Printers, find your printer, right-click on it, and select Update driver.
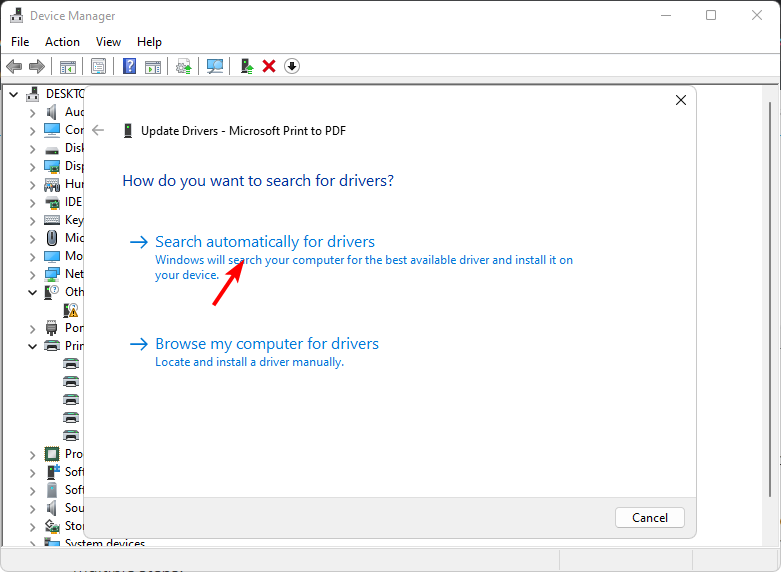
  3. Select Search automatically for updated drivers.
  4. Windows will find the most suitable driver and recommend you install it.

In some peculiar but still possible cases, Windows may be unable to find the right driver for your printer. In such cases, you’ll have to consider another way of getting the correct drivers. 

We recommend you try the Outbyte driver updater as it will automatically scan and match you with the right driver. As a bonus, you will also get a system optimization.

⇒ Get Outbyte Driver Updater

4. Run the Printer troubleshooter

  1. Hit the Windows key and click on Settings.settings windows 11
  2. Select System on the left pane, then click Troubleshoot on the right.Open system troubleshooter
  3. Click on Other troubleshooters.other troubleshooters
  4. Find the Printer troubleshooter and click the Run button next to it.0x0000052e System Troubleshooter - Printer - Run

5. Restart the Print Spooler service

  1. Hit the Windows + R keys to open the Run command.
  2. Type services.msc in the dialog box and hit Enter.run services.msc command
  3. Locate the Print Spooler service, right-click on it, and select Stop.Stop Printer Spooler
  4. Right-click on it again, then select Start.Start Print Spooler 0x00000057

6. Delete a registry key

  1. Press the Windows + R keys to open the Run command.
  2. Type regedit in the dialog box and click Enter to open the Registry Editor.
  3. Navigate to the following path: HKLM\Software\Microsoft\Windows NT\CurrentVersion\Print\Providers\Client Side Rendering Print Provider\Servers\
  4. Right-click on the server key and hit Delete.

Remember that editing the registry is not recommended unless it is absolutely necessary. Since this is the most upvoted solution by users who encountered the error 0x00000006, you may have to try it if you find that other actions don’t bear fruit.

Ensure you back up your registry and create a restore point. This way, you can have a safe point of return in case anything goes wrong. 

Don’t hesitate to check out our other articles on printer errors, such as the error code 0x00003e3, and see our recommended fixes.

That brings us to the end of this article. Keep it interactive in the comment section by letting us know of any other solutions not mentioned here that may have helped you get out of this error.

Xbox Series X is a very good choice for a beginner gamer

Xbox Series X is Microsoft’s most powerful gaming console. It’s also a console designed for gamers, the ones that want to play at high resolutions and don’t miss anything. If you’re a casual gamer, however, you can always buy Xbox Series S which is a lighter and cheaper option.

But if you were to choose a console for a beginner gamer, then you have to do a lot of research. Which console is the funniest one to play on? What are the benefits? Will it last? And so many more similar questions like this.

While it is tough to choose, you must take into consideration a lot of things. It’s not just about the price of the console, but all the other benefits of having that console. And on this regard, Xbox Series X seems to be the natural choice.

Should you buy an Xbox Series X console for your kid?

Yes, and not just for your kid. Everyone can play on this console, from the casual gamers in your family to the most hardcore ones. But let’s get into the more realistic perks.

For starters, you’ll have Game Pass. This is absolutely useful because this way you won’t have to buy games individually. You’ll pay for a monthly subscription, but you’ll have access to hundreds and thousands of games.should you buy an xbox series x

Plus, titles such as Starfield, are coming to Game Pass, so you’ll be able to enjoy it when it will be released. And if you ever get bored, just think that there are currently over 5000 new games in development for Xbox. And they’re coming to Game Pass.

Second, you’ll be able to use Microsoft Rewards to pay for Game Pass and other games on Xbox. If you’re already using Microsoft products, and you’re browsing the web with Microsoft Edge, you should consider getting on Microsoft Rewards as well.

It’s simple, and you can literally buy other consoles with it.

Thirdly, and probably the most important thing is the Xbox/Microsoft Family Safety apps. If you’re buying the console for a child, you will be able to monitor and restrict certain titles and apps, limit game time, and more.

So, is buying an Xbox Series X worth it? Most definitely.

But we’re eager to hear your opinions on this, so let us know what you think in the comments section below.

How to Turn on Google Chrome Memory Saver

Your PC has probably run low on memory a few times. And you have taken the initiative to reduce the RAM-hungry processes in your system. Now, there’s a feature that has been shipped on Google Chrome known as memory saver.

If you usually have a bunch of tabs open simultaneously, you know they can lag and become unresponsive. This feature can save you some memory and keep things running smoothly. Find out how to enable it here.

Why is Chrome using 50% of my memory?

Chrome is a memory hog. It’s not just you, it’s everyone else as well. Sometimes the browser can use 50% or even 100% of your computer’s memory and then crashes the entire system.

If you have a lot of tabs open in Chrome or use extensions that keep their own history, this can cause problems with your computer running smoothly and quickly. 

You might notice slowdowns when opening new tabs or switching between them. This is because these processes take longer due to the extra background tabs being kept active.

Chrome’s memory usage has been known to be off the roof for a long time. And it’s because of its memory-intensive architecture. Every tab and extension, as well as the browser itself, is run in its own process. 

There are also some built-in features that can lead to your browser eating up more RAM over time. This makes it harder for other programs to run since they don’t have access to the memory they need.

Luckily, Chrome introduced a memory saver feature that helps ease up on the deficient memory and enhance your browsing experience.

How does Chrome memory saver work?

The memory saver in Chrome is a feature that allows you to limit the amount of RAM that your browser uses. This can help improve performance and reduce memory consumption when playing games or running other applications that use large amounts of RAM.

It works by discarding the least important tabs to free up RAM, which can be useful when running out of memory. 

When you open a new tab, the browser will scan through your existing tabs and close the ones that are no longer needed. 

This can help with memory issues on low-end computers, but it also means losing any state associated with those tabs. 

How do I enable memory saver in Chrome?

  1. Navigate to your Chrome browser and click the three ellipses.
  2. Select Settings.
  3. Click on Performance and toggle on Memory Saver.
  4. If you’d like some specific sites not to be affected by the memory saver feature, you can click on Add next to Always keep these sites active.

If, for some reason, the Chrome performance settings are missing, you may be using an outdated version of the browser. Check if any updates are available, or reinstall your browser to register any new updates.

What are the disadvantages of memory saving in Chrome?

It takes longer to load pages when you open them again after closing them down because they have to be reloaded from scratch after memory saver closed them down. 

This is especially true if the page has many images or videos. These files will be downloaded again when you open them, so it will take longer to load these pages than if they were opened normally without using memory saver.

Another disadvantage is that it will not work in all cases and may cause your browser to crash. A good example is when you have a lot of tabs opened at once or if you are running a script that requires more memory than your computer has available.

This can cause the browser to crash because it does not have enough memory to continue running.

Additionally, some extensions may not work correctly because they need access to all tabs simultaneously or can’t be used when running in separate processes.

Ultimately, you have to consider whether enabling the Google Chrome memory saver feature is worth your while. 

You can resort to opening a few tabs at a time if your browser gets extremely slow or use Chrome split screen extensions to view different tabs simultaneously.

Have you used the Google Chrome memory saver feature? Is there a difference between having it enabled or disabled? We’d love to get your feedback on your experience, so leave us a comment below.

Microsoft will allegedly open source Orca 13B

In some flashing news about AI, Microsoft will allegedly open source Orca 13B, according to some passionate AI enthusiasts.

What is Orca? Well, Microsoft says Orca is a 13-billion parameter model that learns to imitate the reasoning process of LFMs. In our case, LFMs are large foundation models. Think about chatGPT, openAI, or another large comprehensive AI tool that generates responses.

The research funded by Microsoft has founded that Orca learns how to develop answers from GPT 4, including explanation traces, step-by-step thought processes, and other complex instructions. Despite not even being as big as ChatGPT, Orca manages to reach parity with it when it comes to BBH benchmarks.

Orca even shows competitive performance in professional and academic examinations like the SAT, LSAT, GRE, and GMAT.

Why is this important? Well, Orca is a very small AI-model, compared to ChatGPT. The fact that it can be easily built by a few people and still perform the same as ChatGPT is an important breakthrough in technology.

When will Microsoft open source Orca 13B?

While we don’t have a definite answer, Microsoft will most likely open source Orca 13B in the following months, especially after it has proved its capabilities.

If the model becomes open source, then users will be able to dissect it and learn how to develop and train their own models as well. Or Orca can simply become enhanced with the users’ input and ideas.

This initiative is closely following Microsoft’s huge interest in AI. Remember that a lot of AI features are coming to Windows 11 very soon, including the native Copilot. In the next update, you’ll be able to work seamlessly with Copilot’s help.microsoft orca open source

Microsoft Fabric will be another tool that will benefit from AI to make your work much easier. Microsoft Teams is already enhanced with the power of artificial intelligence to ease the work of organizations. Not to mention, Microsoft Store is also getting an AI revamp.

So naturally, Microsoft’s research on the latest Orca models once proves the validity of AI in the modern world, especially when it comes to technology.

Encouraging users to observe, learn, and develop their models while using an already small AI model such as Orca. This will open the possibility to build and incorporate AI technology in every field.

Make sure to check Microsoft’s research on the Orca, to see just how interesting it could learn to rival the big AI models.

There is an Open Orca, developed by a team of software engineers

Until Microsoft open-sources Orca 13B, there is already an open variant of it, suggestively called Open Orca. Made by a team of software developers, there is in fact a dataset that allows for open source AI models to learn and think like GPT.

We call this Open Orca, as a tribute to the team who has released the Orca paper describing the data collection methods we have attempted to replicate in an open-source manner for the benefit of humanity.

Check out Open Orca if you want to build your own AI model.

As we’re sure this AI trend continues, we’re very curious about your opinion on the subject. Where do you think this will go? Let us hear what you think in the comments section below.

Fix: Emails With Attachments Are Not Searchable

There are many of our readers that have reported that emails with attachments are not searchable in MS Outlook. They have tried all bits of searching but to no favorable results.

In this guide, we will give you some solutions that will hopefully help you resolve the problem at your end. Let us check out the solutions.

Why am I not able to search emails with attachments in Outlook?

There are multiple user reports confirming the error in Outlook. However, there are a few common reasons that might trigger this problem for you. Some of these are listed below.

  • Corrupt or old version app – There might be some issues with the version of Outlook installed on your PC which is triggering the error.
  • The search catalog might be problematic – The search catalog might be missing to read some important files which is why the emails with attachments are not searchable in Outlook.
  • Your profile might be corrupted – If your Outlook profile is corrupted then you won’t be able to use Outlook without any issues.
  • The Data files are not selected – Chances are the data files are not selected in the Search Tools which is why the emails with attachments are not showing.
  • Add-ins are conflicting – The add-ins that you might have selected for Outlook might be interfering with the search process and causing issues.

Now, let us check out the solutions that will help you to resolve the emails with attachments that are not searchable issue in Outlook.

What can I do if the emails with attachments are not searchable in Outlook?

Here are a few quick things that you can check out before applying the advanced solutions to fix the problem.

  • Restart Outlook and see if the issue resolves.
  • You should always make sure that the Outlook version that you have installed on your PC is up to date. Because some underlying bug might be causing the problem.

If the above doesn’t help, then apply the below solutions.

1. Repair Outlook

  1. Press the Win key to open the Start menu.
  2. Open Control Panel.
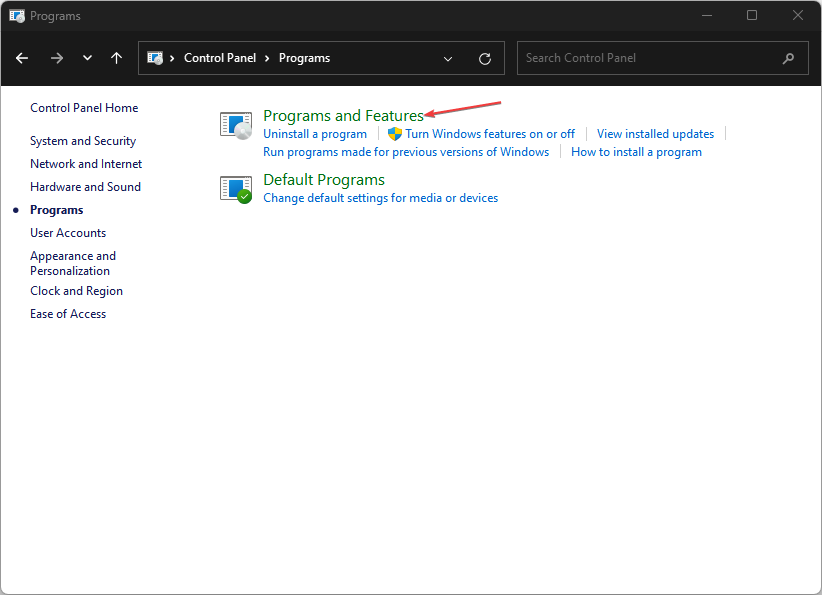
  3. Select Programs and Features.
  4. Click on Microsoft Office and click on the Change button at the top.
  5. Choose the Repair option.
  6. If Outlook is open, click Continue to close the app and start the repair process.
  7. Wait for the repair process to complete.

The repair process will check for any underlying problems with the Microsoft Office apps and resolve them. Once the process completes, you can try to search the emails with attachments and resolve the problem.

2. Disable Outlook Add-ins

  1. Open Outlook.
  2. Click on the File tab.
  3. Select Options from the left pane.Options
  4. Choose Add-ins and click on the Go button on the right side of the dialog.Select Add-ins
  5. Uncheck the boxes next to all the listed extensions and click OK to save the changes.disable extensions
  6. Relaunch the app.

Some extensions that you might have installed to enhance the features of Outlook, might be interfering with the general Outlook processes, and not allowing you to search emails with attachments. Check the above steps and see if this helps or not.

3. Repair the Outlook inbox

  1. Press the Win + E to open File Explorer.
  2. Navigate to any of the below paths: C:\Program Files C:\Program Files (x86)
  3. Search for scanpst in the search bar and double-click on SCANPST.EXE from the search results.scanpst
  4. Launch Outlook and click on the File tab.
  5. Click on Account Settings and select Account Settings again.
  6. Switch to the Data Files tab, select the data file in the list, and click on Open File Location.select data file
  7. From the new File Explorer window, copy the file’s location.
  8. Right-click on the data file (.ost) and select Copy as path.copy as path
  9. In the Microsoft Outlook Inbox Repair tool, paste the file’s path into the text box.
  10. Remove the double-quotation marks from the file’s path and click Start.
  11. After the scan finishes click on Repair.
  12. Click OK to finish the task.

4. Create a new Outlook profile

  1. Close Outlook on your PC.
  2. Press the Win + R keys to open the Run dialogue.
  3. Type control mlcfg32.cpl and press OK.
  4. Select Show Profiles.
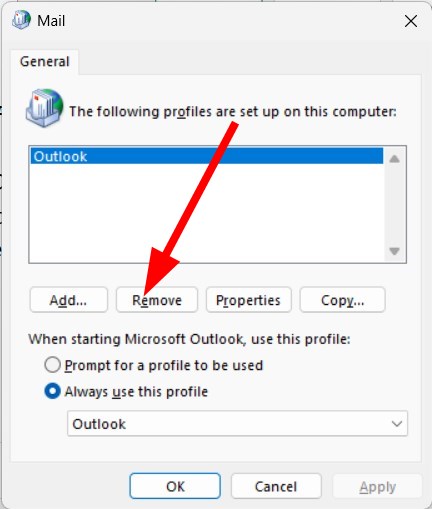
  5. Choose your Outlook profile and click on Remove.
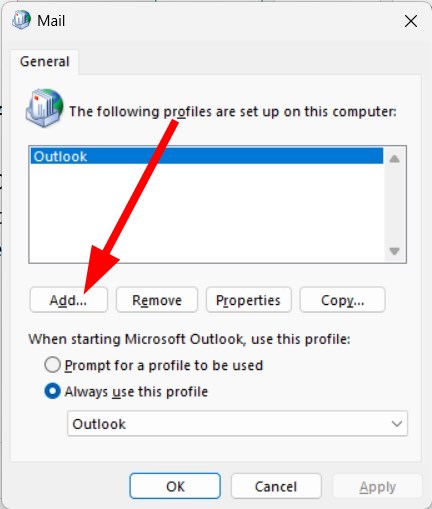
  6. Once the profile is deleted, click on Add.
  7. Specify a new name for the profile and click OK.
  8. Follow the on-screen instructions to create a new profile and select Finish.
  9. Return to the Mail dialogue box and choose Always use this profile.
  10. Click Apply and Restart your PC.

That is it from us in this guide. You can read our guide that explains how you can restore the missing toolbar in Outlook on your PC.

Moreover, if the Zoom plugin isn’t working in Outlook, then apply the solutions suggested in our dedicated guide to resolving the problem.

Let us know in the comments below, which one of the above solutions fixed the problem for you.

0x8E5E0643 Microsoft Store Error: How to Fix It

The error code 0x8E5E0643 is a Microsoft Store error that can occur when you try to install an app from the Microsoft Store. It hinders the installation, and we will show you how to fix it in this guide.

You may also read about the Microsoft Store error 0x80073cf3, similar to this installation error.

Why do I get the Microsoft Store 0x8E5E0643 error?

There are a few possible reasons, including:

  • Corrupted Microsoft Store cache.
  • Problem with your internet connection.
  • In rare cases, the Microsoft Store servers may be down or experiencing technical difficulties.
  • Problem with your Windows operating system.
  • Problem with your Microsoft account.

You may check out our guide, where we discuss the best ways to fix your Microsoft account. This may be helpful if an account problem triggers the error.

How do I fix the 0x8E5E0643 Microsoft Store error?

Before you go to the solutions, try these workarounds:

  • Change your ISP or use a wired internet connection.
  • Run a virus and file scan to eliminate problems on your OS.

However, if you are still unsuccessful, proceed to some detailed fixes below.

1. Clear the Microsoft Store cache

  1. Press Windows + R to open the Run dialog.
  2. Type cmd and hit Ctrl + Shift + Enter.
    0x8E5E0643
  3. Enter the script below and hit Enter.
    wsreset.exe
  4. Lastly, verify if it fixes the 0x8E5E0643 error.

2. Run the troubleshooter

  1. Press Windows + I to open the Settings app.
  2. On the left pane, click on System, then click Troubleshoot on the left.
    0x8E5E0643
  3. Select Other troubleshooters.
  4. Click on Run for the Microsoft Store Apps option.
  5. Lastly, apply any recommendations and verify it fixes the 0x8E5E0643 error.

3. Remove proxy settings

  1. Press the Windows button, type internet options, and choose the Internet Options applet.
    0x8E5E0643
  2. Select the Connections tab, and click the LAN settings button.
  3. Uncheck the option for Use a proxy server for your LAN.
    0x8E5E0643
  4. Finally, click OK and verify if it fixes the 0x8E5E0643 error.

4. Create a new user account

  1. Press Windows + I to open the Settings app.
  2. On the left pane, click Accounts and then select Other users on the right.
    0x8E5E0643
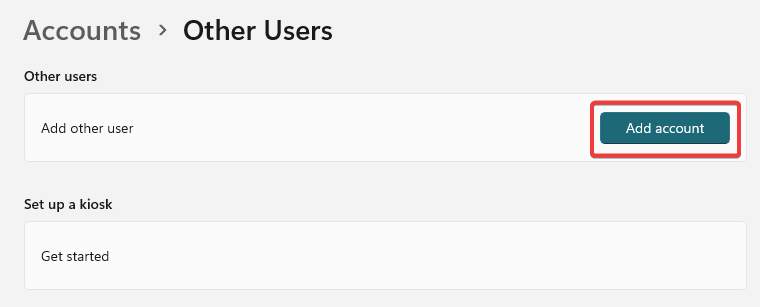
  3. Click the Add account button.
  4. Pick I don’t have this person’s sign-in information, then select Add a user without a Microsoft account on the next page.
    0x8E5E0643
  5. Complete the form and hit Next.
  6. Expand the newly created user by clicking the tiny arrow at the right corner, and select Change account type.
  7. Select Administrator from the dropdown and click OK.
    0x8E5E0643
  8. Finally, verify if the 0x8E5E0643 is fixed.

Any of the solutions above should be handy in fixing the error. We recommend you start with whichever feels the most appropriate.

You may also be interested in reading about the 0x8A150006 error on Microsoft Store, and if you have any further questions or solutions you feel we may have skipped, let us know in the comment section below.

Right-Click Menu Stuck on Screen? 4 Ways to Get Rid of It

A few of our readers have complained that their right-click menu is stuck on the screen. This is an inconvenience and may damper the user experience on a computer.

You should not panic as some of these problems with the GUI on the OS are common, and we will help you resolve them. You may also want to check out our other guide, where we help users fix problems with a crashing File Explorer.

Why is my right-click menu stuck on the screen?

The following may be the causes of the problem.

  • A software glitch caused by a problem with Windows itself or by a third-party program.
  • In rare cases, a problem with your mouse or keyboard may trigger the problem.
  • A corrupt software or system file.
  • Virus or malware infection.

If you believe the problem is hardware related, we have a comprehensive guide on the best Mouse for PC.

What do I do if the right-click menu is stuck on the screen?

Before exploring our solutions, you may consider the following workarounds:

  • Restart your computer.
  • Use a different mouse.

If the problem persists, try the solutions below.

1. Run a file scan

  1. Press Windows + R to open the Run dialog.
  2. Type cmd, then press Ctrl + Shift + Enter to open an elevated Command Prompt.
  3. Type the script below and hit Enter.
    sfc /scannow
    Right-click menu stuck on screen
  4. Follow any prompts, restart your computer, and check if the right-click menu is still stuck on the screen.

Sometimes. there might be corrupt files that can still affect your computer and cause errors, so a reliable repair tool can be a great help.

2. Run the online virus scan

  1. Launch your browser and navigate to the Microsoft safety scanner page.
  2. Click on a download link that matches your system architecture. In this case, we go for the 64-bit version.
    Right-click menu stuck on screen
  3. Double-click the downloaded MSERT to start the program.
    Right-click menu stuck on screen
  4. Follow the wizard, click on Full scan, and hit Next.
  5. Follow any recommendations at the end of the scan and see if the right-click menu is still stuck on your screen.

3. Create a new user account

  1. Press Windows + I to open the Settings app.
  2. On the left pane, click Accounts and then select Other users on the right.
  3. Click the Add account button.
  4. Pick I don’t have this person’s sign-in information, then select Add a user without a Microsoft account on the next page.
  5. Complete the form and hit Next.
    Right-click menu stuck on screen
  6. Expand the newly created user by clicking the tiny arrow at the right corner, and select Change account type.
    Right-click menu stuck on screen
  7. Select Administrator from the dropdown and click OK.
  8. Finally, verify if the right-click menu stuck on your screen is fixed.

4. Remove the Fade performance options

  1. Press Windows + R to open the Settings app.
  2. Scroll down on the right pane and click the About option.
  3. Select Advanced system settings.
  4. Click the Settings button under the Performance category.
    Right-click menu stuck on screen
  5. Uncheck all the Fade options and click OK.

If you have read this far, you should have resolved the stuck right-click menu on the screen. We have not written the solutions in any particular order and recommend you start with the most appropriate ones.

You may also read our other guide, where we show solutions for the Windows 11 touch screen not working.

Lastly, reach out to us in the comments section if you have any additional questions.

Windows 11 Preview Build 23493 introduces new badge feature for indicating system apps in Start Menu

The recently released Windows 11 preview build, version 23493, comes packed with an array of exciting features and enhancements. Among these updates, one intriguing addition is the introduction of a new “System” badge for the Start menu. This badge aims to provide users with a clear distinction between default applications and other software installed on their systems.

The “System” badge was quietly implemented a few builds ago without any official announcement from Microsoft. Initially labeled as “Microsoft,” the badge appeared next to certain stock applications. However, in build 23493, Microsoft made a notable change, replacing “Microsoft” with “System.” This alteration offers a more descriptive and precise indicator, allowing users to differentiate between pre-installed apps and other software they have installed.

Interestingly, the “System” badge is not limited to non-removable programs, as the presence or absence of the badge does not necessarily indicate an app’s uninstallability. For instance, the Tips app, despite carrying the badge, can be deleted by users. This highlights the ongoing development and refinement of the badge system as Microsoft seeks to establish consistent guidelines and distinctions.

While the exact reasoning behind the “System” badge remains speculative, its implementation aims to enhance user experience and offer a clearer visual representation of default apps within the Start menu. This distinction can be particularly useful for users who prefer to customize their Windows environment by installing alternative applications that align with their preferences and needs.

As Windows 11 continues to evolve through preview builds, the addition of the “System” badge serves as a testament to Microsoft’s commitment to refining the operating system and providing users with a more intuitive and personalized computing experience. With each new update, Windows 11 takes further steps towards offering an enhanced interface, improved functionality, and a seamless user journey.

Via: Neowin

Xbox Series X|S owners can download Starfield right now

Starfield’s pre-install has gone live exactly two months before the game’s release. This means gamers on Xbox Series X|S can download the game right now—or rather, a placeholder for it. The pre-install is roughly 314MB (the full game will be a 125GB download), and has drawn the amusement of fans online as seen in the r/XboxSeriesX subreddit. Here’s what a few of them had to say,

Comment
by u/Fender6187 from discussion Starfield Pre-Install?
in XboxSeriesX

Comment
by u/Dudedrinksbeer from discussion Starfield Pre-Install?
in XboxSeriesX

Meanwhile, some have been quick to jump on the “pre-install,” which again is really just a placeholder file. No doubt the full pre-installation will come sometime sooner to Starfield’s September 6 release.

As one user reported, the initial pre-install for the upcoming Forza Motorsport has also become available. That game’s release is even further out on October 10—a full three months.

Got Starfield Pre-Installed on Series S ????
by u/ChardRealistic in XboxSeriesS

Bethesda’s open world sci-fi epic is one of the most anticipated video games of the last decade. It got a dedicated deep dive showcase last month, delivering a ton of new info about Starfield’s game world, story, gameplay mechanics and more. Starfield will release as a day one Xbox Game Pass title.

Starfield
Starfield
Developer:
Bethesda Softworks
Price:
Free

How to Quickly Uninstall Apps From the Microsoft Store

Microsoft Store is the built-in repository where users can download, update, and uninstall apps for Windows Operating System. Sadly, many users don’t know how to uninstall apps on Microsoft Store. Hence, this article will take you through ways to uninstall apps from the Microsoft Store quickly.

Alternatively, we have a detailed guide on downloading and installing the Microsoft Store app if it is missing on your Windows 11 PC.

Can I uninstall apps directly from the Microsoft Store?

No, Microsoft Store does not provide the option to uninstall an app directly from the platform. You are only permitted to install and update applications via the platform.

Depending on your OS version, the installed applications are stored directly under the Installed Apps section in your Settings.

Where are Microsoft Store apps installed?

Microsoft Store apps have a decided directory in which they are stored by default.

You can find all Microsoft Store apps in the following directory: C:/Program Files/WindowsApps

How do I uninstall apps from Microsoft Store?

1. Via Settings

  1. Left-click the Start menu, and click the Settings app.
  2. Click on Apps and locate Installed Apps.
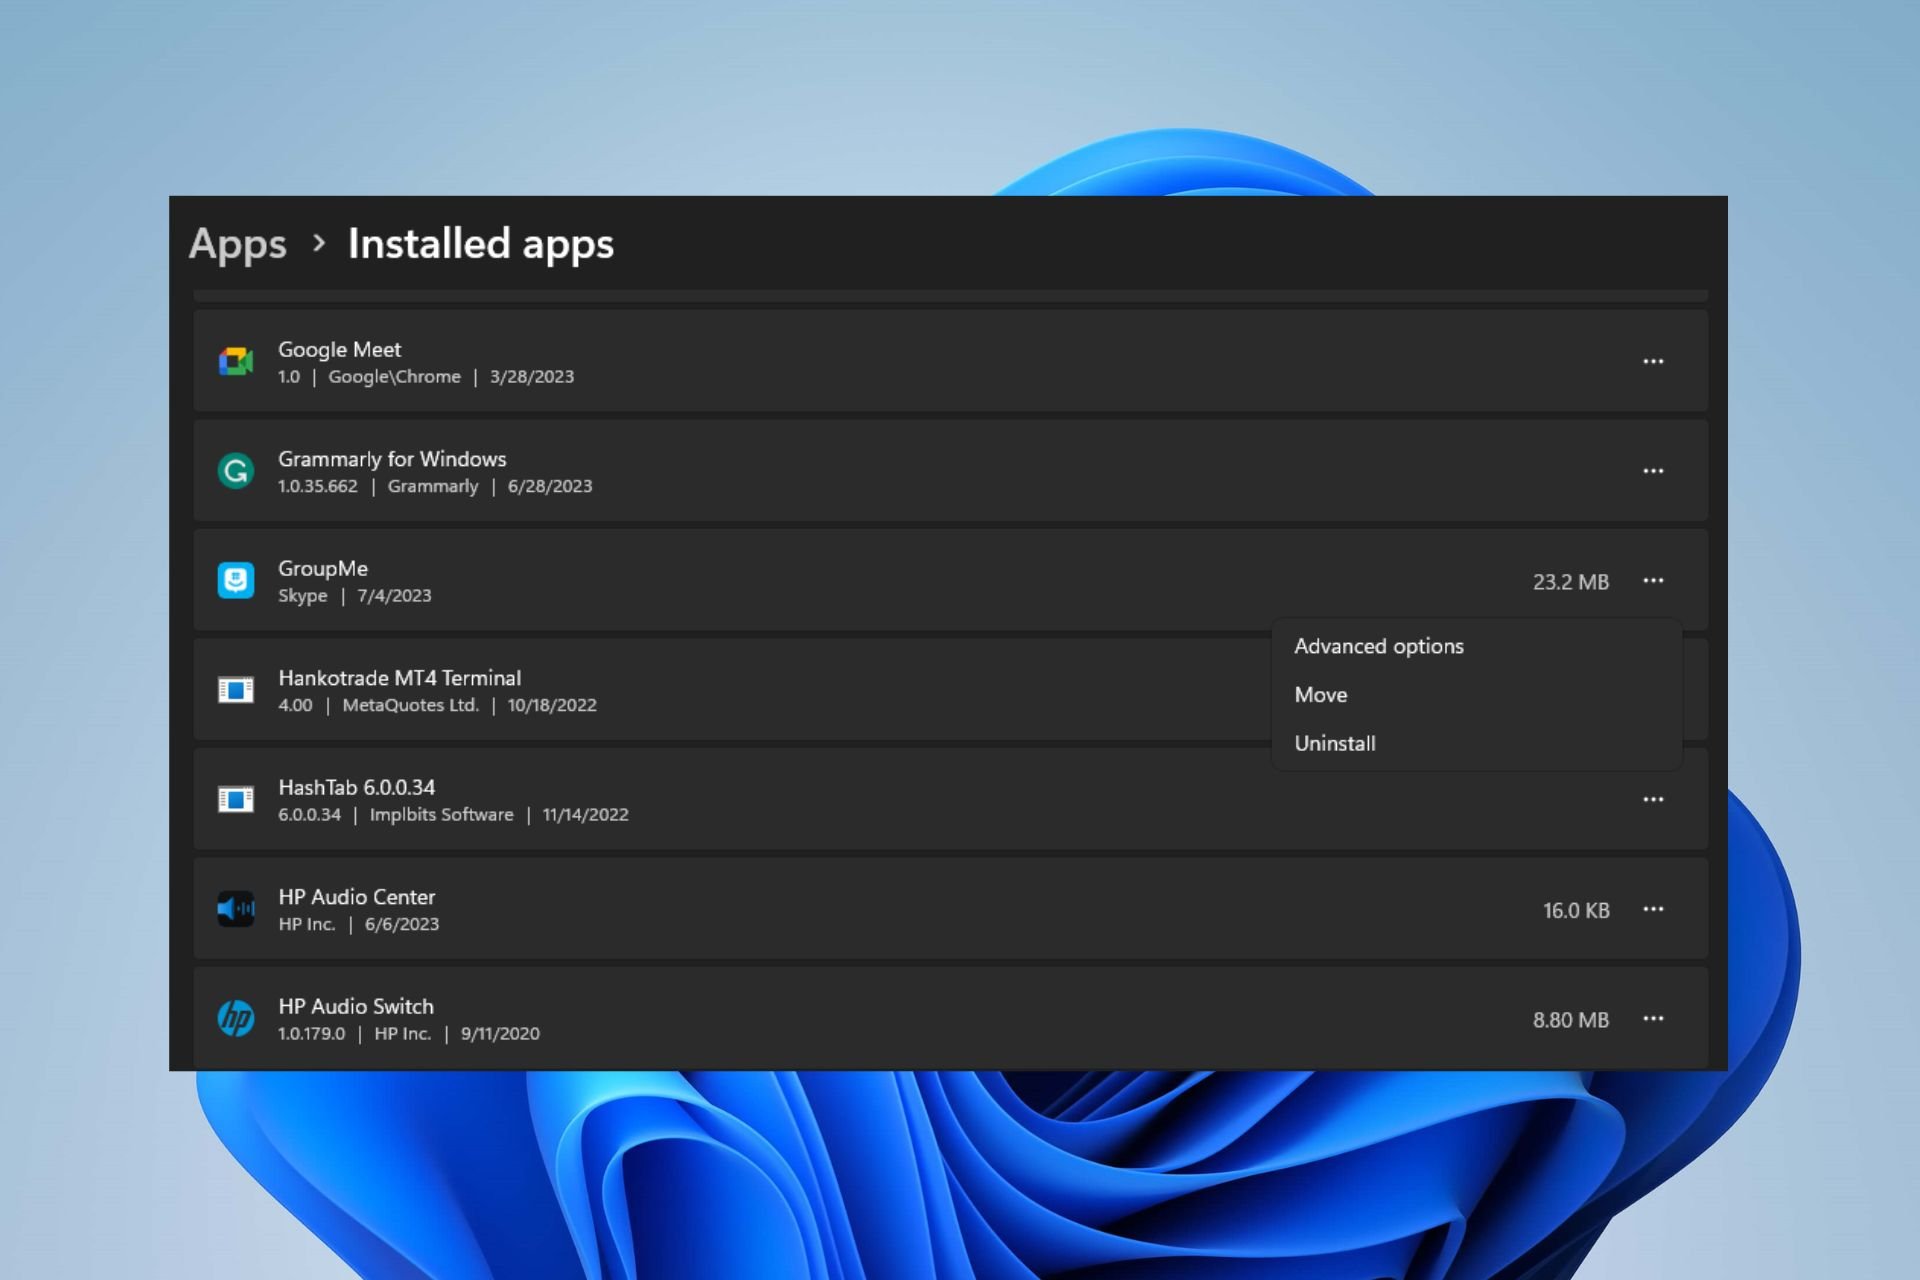
  3. Find the app you want to uninstall, click the options menu beside it, and click Uninstall.
  4. Then, select Uninstall again to complete the process.

Uninstalling from Settings is similar to removing the apps directly from the Microsoft Store since all installed apps are directly accessible from here and can be modified.

2. Uninstall apps using the Control Panel

  1. Click the Start button, type control panel, then press Enter.
  2. Click on Programs, go to the Programs and Features tab, and find the app from the list.
  3. Select the app, click the Uninstall button, and follow the on-screen instructions to complete the uninstallation process.

Similar to the first solution, this is an alternative to remove apps directly installed from the Microsoft Store.

How do I uninstall an app that can’t be uninstalled?

1. Uninstall apps using the .exe uninstaller provided by the application

  1. Press the Windows + E keys to open File Explorer or click on the folder icon in the taskbar.
  2. Navigate to the app installation folder. (Applications are installed in the Program Files or Program Files (x86) folder in the system drive).
  3. Find and open the application folder you want to uninstall. Look for the Uninstall.exe or Uninstaller.exe.
  4. Double-click the uninstaller.exe file to launch the uninstallation program.
  5. Follow the on-screen instructions to remove the app from your system. The exact steps may vary depending on the application.
  6. Once the uninstallation process is complete, the application should be removed from your PC.

Note that some applications may not have their own uninstaller or require more steps. So, you can always refer to other ways to uninstall such apps.

2. Force uninstall apps via Command Prompt

  1. Left-click the Start button, type Command Prompt, and click the Run as administrator option.
  2. Click Yes on the User Account Control (UAC).
  3. Type the following command and press Enter: wmic
  4. Input this command and press Enter to display the list of all installed programs on your PC: product get name
  5. Scroll through the list and find the app you want to uninstall. Note down its exact name.
  6. Type the following command and press Enter: product where name="ExactNameOfApp" call uninstall 
  7. Replace ExactNameOfApp with the actual name of the app you want to uninstall.
  8. Follow any on-screen prompts or confirmations to complete the uninstallation process.

The above command will call the app and run the uninstall command to remove it from your PC. Check how to fix the run-as-administrator option if it’s not working on your PC.

In conclusion, you may be interested in our post about how to fix the Microsoft Store’s blocked 0x800704ec error message on Windows 11.

Also, read this article about steps for downloading Microsoft Store apps without the Store on your computer.

If you have further questions or suggestions regarding this guide, kindly drop them in the comments section.

Unable to Load Conversation on GroupMe? How to Fix it

GroupMe is a free group messaging app owned by Microsoft that helps you stay in touch with friends and family. However, many users complain about seeing the Unable to load conversation error in GroupMe. This article will take you through the basic steps for resolving it on your PC.

On the same hand, you can check our guide on effortlessly making Microsoft Teams video calls inside GroupMe in a few steps.

Why aren’t my GroupMe messages loading?

  • The error may occur if an invite goes unanswered for over 14 days.
  • If your Internet connection is weak or intermittent.
  • Server problems such as maintenance, updates, or other technical issues on GroupMe’s end.
  • Issues related to account settings or synchronization problems can cause the problem.
  • An outdated version of the GroupMe app may not be compatible with the current features.
  • Temporary data or cache stored by the GroupMe app on your device may become corrupted.
  • Certain device configurations or operating systems may be incompatible with the GroupMe app.

Is there a limit on GroupMe messages?

No, there’s no 160-character limit on GroupMe messages. As for the number of members you can have, that number is set to 5000.

However, since there is no message limit, those large groups can be hard to follow.

What can I do if GroupMe is unable to load the conversation?

Observe the preliminary checks outlined below before attempting any advanced fixes for the problem:

  • Close the GroupMe app and restart your device to resolve temporary issues.
  • Try restarting your modem/router or connecting to a different network to fix network congestion and other network-related issues causing the error.
  • Visit the GroupMe Status website to see if there are any reported service outages or issues.

1. Access the link via other devices

  1. Copy the invite link to another device, preferably an Apple device or via the web version.
  2. Click the link to join the group and ensure this reflects on your initial device. (Mobile or PC)
  3. Once it reflects, log out from other devices besides your default GroupMe device.

Some users have claimed that accessing the link on other devices helped troubleshoot the inability to load conversation error.

2. Update the GroupMe app

  1. Left-click the Start button, type MS store, and click on the result to launch.
  2. Search GroupMe and tap on it to open the app page.
  3. If it is available, click the Update button on the app page. It will download and install the latest version of GroupMe on your device.
  4. Once the update is complete, you can open the GroupMe app and log in to see if you can access your conversations.

The above steps are for Windows PC. You can attempt a similar approach for both Androids and iPhones.

3. Reset the app to clear the cache

  1. Left-click the Start menu and click Settings.
  2. Locate Apps and click on Installed Apps.
  3. Then, search for GroupMe, select the options menu, and click on Advanced options.
  4. Now, locate and select the Reset button. Then, click on the Reset button again to confirm the selection.
  5. Now, restart the app and check if the issue is fixed.

After the reset, GroupMe will start with a clean cache, removing any temporary data stored by the app, causing it to be unable to load conversations.

Alternatively, you can read our guide on fixing Microsoft Teams status stuck on Out of Office on your PC.

If you have further questions or suggestions, kindly drop them in the comments section below.

Xbox Free Play Days: MLB The Show 23, The Crew 2 and more

Xbox Free Play Days is back this week and this time with a stacked lineup of four games. These will be available from Thursday, July 6 through Sunday, July 9 for subscribers of Xbox Live Gold and Xbox Game Pass Ultimate. This week’s offerings are especially attractive for sports fans. See the lineup below.

MLB The Show 23

MLB® The Show™ 23 gets you closer than ever to living your Baseball dreams on the diamond. Shock The Game and Own The Show with your favorite players, your favorite rivalries, and all your favorite MLB moments.

Super Mega Baseball 4

Grab your glove and your bat, it’s time to go yard with the best to ever play the game because Super Mega Baseball™ 4 is here–and it’s where the Legends play. More than 200 larger-than-life versions of fan-favorite former pros like Vladimir Guerrero, Johnny Damon, Ozzie Smith, and Jason Giambi are ready to step onto the field and join the roster of beloved Super Mega League All-Stars.

The Crew 2

JOIN A COMMUNITY OF 30 MILLION PLAYERS! Get ready for a high-speed trip across the USA and enjoy one of the most complete open-world action driving experiences ever created. With access to free content, new game modes, tracks, vehicles, events, and more added every season, The Crew® 2 has all you need for an unforgettable ride.

EA Sports UFC 4

In EA SPORTS UFC 4 the fighter you become is shaped by your fight style, your achievements, and your personality. Develop and customize your character through a unified progression system across all modes. Go from unknown amateur to UFC superstar in the new Career Mode, experience the origins of combat sports in two all-new environments; The Kumite and The Backyard, or challenge the world in new Blitz Battles or Online World Championships to become the undisputed champ.

Learn more about Xbox Free Play Days

See anything of interest in this week’s lineup? Xbox Free Play Days brings a new set of games (nearly) each and every week for XLG and GP Ultimate to try out free of additional charge. To learn more about the program, head over to the Xbox Free Play Days FAQ page.

Microsoft investigating ongoing Outlook.com search issue and 401 errors, promises updates

As reported by BleepingComputer, Microsoft is having a bit of a meltdown; they are investigating an ongoing problem preventing Outlook.com users from running email searches and causing 401 exception errors. Lately, Microsoft also acknowledged the Outlook calendar shortcut widget bug on Android 13.

When users attempt to search, they encounter an error message stating, “Sorry, something went wrong. Please try again later.”

On the service health portal, Microsoft has provided information regarding their initial analysis of Outlook.com server logs and HTTP Archive format (HAR) logs captured during an internal reproduction of the issue. These logs indicate that the 401 errors occur due to an exception when users try to perform searches.

The investigation is still underway, and Microsoft aims to identify the source responsible for generating these exception errors and determine appropriate measures to resolve the impact. The outage began approximately at 12:30 AM UTC. Microsoft will share additional details regarding the situation within the next few hours.

According to user reports, the web version’s search functionality is currently unavailable, while the mobile version seems unaffected. Some users have also encountered problems when contacting Microsoft 365 personal support, experiencing a loop of sign-in prompts and Office 365 service selection.

One of the users tweeted:

The company has not disclosed the regions affected by the ongoing search outage.

On June 27, Microsoft addressed a separate issue that prevented customers in the Americas from accessing their Exchange Online mailbox through Outlook on the web.

In earlier incidents in June, Microsoft confirmed that certain services, including Outlook.com, the Azure Portal, and OneDrive, experienced disruptions due to Distributed Denial-of-Service (DDoS) attacks. These attacks were claimed by a threat actor known as Anonymous Sudan, believed to have connections to Russia.

What we can make from this story is that technical issues and security threats can occur even with well-established platforms like Microsoft. It’s vital for companies to promptly address and resolve these issues while keeping their users informed about the progress. Such incidents serve as a reminder of the complexities involved in maintaining reliable online services and the need for constant vigilance in safeguarding user data and system stability.

Exploring the phenomenal Phi-1 code language model from Microsoft Research

As reported by TowardsAI.net, coding has become a prominent area of development in foundation models. OpenAI introduced models like Codex, later evolving into GPT-4, while Amazon and Salesforce also made significant contributions. Initially, coding models prioritized quantity and size over quality. However, Microsoft Research challenged this approach with their paper “Textbooks is All You Need,” training a compact model solely on high-quality textbook datasets. Their model, phi-1, achieved impressive results, surpassing competing models on benchmarks like HumanEval and MBPP with a pass@1 accuracy of 50.6% and 55.5%, respectively. The significance of high-quality data was highlighted in their training process, combining synthetic data and carefully filtered content.

High-Quality Datasets

Microsoft Research’s research paper highlights the importance of high-quality training data from textbooks in their code language model. They propose a training set resembling a well-structured “textbook” to overcome limitations in existing code datasets. By utilizing filtered code-language data, synthetic textbooks generated by GPT-3.5, and a smaller synthetic dataset of Python exercises, they achieved exceptional performance in code generation, surpassing existing approaches.

Filtered Code-Language Dataset

Microsoft Research utilized a range of datasets and techniques to develop an efficient code-generation model. They curated a reliable filtered dataset by leveraging Python code datasets from The Stack and StackOverflow. Using GPT-4, they assessed the educational value of the samples and annotated them accordingly. A random forest classifier, trained on the annotated data, predicted the quality of each file or sample.

Synthetic Textbook Dataset

Microsoft Research employed GPT-4 sparingly for quality annotations on a subset of The Stack and StackOverflow samples. This reduced the need for labor-intensive human annotation.

Using GPT-3.5, they generated a synthetic textbook dataset with less than 1 billion tokens. The textbooks combined natural language-heavy text with relevant code snippets, targeting specific topics to foster reasoning skills and understanding of algorithms. Constraints were applied during generation to ensure dataset diversity.

This approach proved effective, as exemplified by an example of synthetically generated text for the textbooks.

Smaller Textbook Dataset

Microsoft Research curated the CodeExercises dataset, comprising less than 180 million tokens of Python exercises and solutions. These exercises involved completing partially coded functions with docstrings, and training the model for function completion tasks. GPT-3.5 generated the dataset with constraints on function names for diversity. Precautions were taken to avoid replicating issues from the HumanEval benchmark during finetuning.

The Architecture

Microsoft Research employed a decoder-only transformer model based on FlashAttention for their code language model. The phi-1 model had 1.3 billion parameters, 24 layers, and 32 attention heads, while the smaller phi-1-small model had 350 million parameters, 20 layers, and 16 attention heads. They used a rotary position embedding and the same tokenizer as codegen-350M-mono. Pretraining used a sequence length of 2048 and included the CodeTextbook dataset. Fine-tuning with the CodeExercises dataset was performed with adjusted hyperparameters.

The Results

Microsoft Research evaluated phi-1 on various benchmarks and demonstrated its superiority over larger models like StarCoder or Replit. Finetuning had a significant impact on phi-1’s performance.

Their work highlights the profound influence of high-quality data in enhancing language models’ proficiency in code-generation tasks. Creating “textbook-quality” data, they trained a model that outperforms most open-source models on coding benchmarks like HumanEval and MBPP. Remarkably, despite being smaller in size, their model exhibited exceptional performance.

Using high-quality data provides clear, self-contained, and instructive examples of coding concepts and skills. This conducive learning environment enables language models to effectively grasp coding principles, resulting in superior code-generation performance.

How to get Samsung Quick Share on any Windows 11 PC

Good news for Samsung users. You can now use Samsung Quick Share on any Windows PC device, including Windows 10, and Windows 11.

You were able to use this app on Windows 10, and Windows 11 before, but only on Samsung laptops. So users were not able to install it and use it on non-Samsung laptops. However, starting today, you will be able to use this app to quickly send files back and forth between your Samsung phone and your Windows PC.

And it was about time. Samsung released this app in 2021, and users expected Quick Share to work on their Windows PCs. But it didn’t. Truth is, Microsoft released Phone Link, and the app could easily do the trick. But Quick Share works much better on its native products.

Wondering how to get it? It’s very simple, you can do it in minutes, but you have to be aware of some points first.

Here’s how you can get Samsung Quick Share on your Windows 11 PC

  1. Go to the Microsoft Store and look for the Quick Share app.
  2. Download it for free and install it.

However, you need to know that you need to update your Bluetooth and your Wi-Fi drivers to the latest version possible. Otherwise, Samsung Quick Share won’t even work.samsung quick share windows 11

On the Microsoft Store you can see the exact specifications:

  • OS: Windows 10 2004 (build number 19041) version or higher
  • Bluetooth driver: (Intel) 22.50.02 version or higher
  • Wi-Fi driver: (Intel) 22.50.07 version or higher

For smooth use of features, please keep the Windows OS and Bluetooth/Wi-Fi drivers up to date. Depending on the manufacturer and model, there may be restrictions on all or some features of the service.

As long as you keep your drivers up to date, all the time, you should be fine.

What do you think about it? Do you use Quick Share? Let us know your opinions in the comments section below.

Fix: Qbittorrent Crashing on Windows 11 [5 Fixes]

You upgraded qBittorent to a new version, and as you try to open the app, it crashes every time on startup. Well, that’s not new as online forums are filled with users complaining about it.

From the face of it, it appears to be an issue with over usage of the RAM, however, there could also be other possibilities that we will discuss in this post.

Why does Qbittorrent crash all the time?

Some of the reasons why qBittorent crashes every time you launch it on your Windows 10 or 11 PC are as below:

  • Excessive RAM usage – In the majority of cases, the issue arises due to high RAM usage.
  • Corrupted current version – Chances are, that the current version of qBittorent is broken and hence, it may not be responding on Windows 11.
  • A glitch with the Qbittorent app – Sometimes, qBittorrent may keep crashing due to a problem with the app itself.
  • An event causing the crash – Sometimes, the app crashes due to an unidentifiable event whenever you try to open it.
  • Corrupted system files – It could be possible that you may encounter the issue due to broken or damaged Windows system files.

Fortunately, we have listed some of the workarounds that have worked for several users and helped them with the qBittorent crashes.

What can I do if Qbittorrent crashes on Windows 11?

Try the preliminary checks and see if it helps fix the issue off-hand:

If none of the above steps work, you can proceed with the below troubleshooting methods to fix the issue when Qbittorent crashes.

1. Run SFC and DISM scans

  1. Press the Win + R shortcut keys to open the Run console, type cmd in the search bar, and press the Ctrl + Shift + Enter keys together to open the elevated command. open elevated command prompt
  2. Type the below command in the Command Prompt (Admin) and hit Enter: sfc /scannowsfc scannow
  3. The utility will now start looking for the corrupted system files and if found, will repair them automatically.
  4. Once you see the success message, run the below command and hit Enter: DISM /Online /Cleanup-Image /RestoreHealthrun dism scan
  5. The tool will now look for broken and missing files and replace them with fresh ones.

Once the process is over, close the Command Prompt, restart your PC, and now try launching the app.

If you don’t want to go through this manual process, you can always rely on a third-party repair software that will fully scan your PC and offer a full report of the malfunctions and repair options to solve Qbittorrent crashes.

2. Perform a clean install of Qbittorrent

  1. Press the Win + R keys simultaneously to launch the Run dialog, type appwiz.cpl in the search box, and hit Enter to open the Programs and Features window. appwiz.cpl
  2. In the Control Panel window, on the right, under Uninstall or change a program, look for the app, right-click on it and select Uninstall. uninstall software
  3. Once the app is uninstalled, press the Win + R keys again to open the Run console. Next, type AppData, and hit Enter.run appdata command
  4. In the AppData folder, go to the BT_backup folder in qBittorrent, and create a backup of it. BT_backup folder delete
  5. Now, select all qBittorrent config files in the AppData folder and hit Delete. Once done, visit the qBittorent official web page, and install the latest version.

Now, try opening the qBittorent app and add some torrents to check if it still crashes or if the issue is fixed for good.

3. Identify and disable the event causing the crash

  1. Visit Microsoft’s official page to download & install Debug Diagnostic Tool v2 Update 3. Debug Diagnostic Tool v2 Update 3
  2. Next, download & extract these predefined rules for qBittorent to your desktop. extract zip
  3. Now, click on the Start button, and run the DebugDiag 2 Analysis tool. search for DebugDiag 2 Analysis
  4. Click on the Import button at the bottom right, & direct it to where you extracted the rules above. The debugger rules will now be active, and whenever there’s a crash, it will capture a stacktrace.

This will help you identify the event causing problems in the program, and the qBittorent app should not keep crashing anymore.

4. Limit disk write caching on the device

  1. To open the Run dialog, press the Win + R keys together. Type devmgmt.msc in the search bar and hit Enter to open Device Manager. run dev mgmt.msc command
  2. Next, expand Disk Drives, right-click on the drive for which you want to disable disk write caching, and then select Properties.disk drive properties
  3. In the Properties dialog, go to the Policies tab, and uncheck the Enable write caching on the disk option. Press OK.disable Enable write caching on the disk

Now, restart your PC and check if qBitttorent is still crashing on Windows 11.

5. Re-install Windows 11 from the USB Boot Disk

  1. Connect the bootable installation media to your PC.usb flash drive
  2. Restart your PC and enter BIOS by pressing Del or F2 during the boot, and set your flash drive as the default boot device and save changes.
  3. Now, follow the second method mentioned in our detailed post here to reinstall Windows 11 using an installation media.

Alternatively, you can uninstall the 64-bit version of the qBittorent app and install the 32-bit version to check if it still crashes.

You may also recheck the speed and health of your storage device (SSD or HDD) using one of the benchmark tools we have recommended in our post.

For any other queries related to qBittorent, you may leave a message in the comments section below.

How to Rollback NVIDIA Drivers in Windows 10/11

Whether you are experiencing compatibility issues, stability problems or prefer an older driver version for your NVIDIA graphics driver, this guide can help!

We will walk you through the step-by-step instructions to safely and effectively roll back your NVIDIA graphics driver in Windows 10 and 11.

How can I roll back NVIDIA drivers in Windows 11?

Before diving into the rollback process, go through the following preliminary checks:

Once you have checked all these, let us move to the solutions.

1. Use the Device Manager

1.1 If the Roll Back Driver option is available

  1. Press Windows + R to open the Run dialog box.
    Device Manager Run command Rollback NVIDIA Drivers in Windows 10/11
  2. Type devmgmt.msc and click OK to open the Device Manager.
  3. Locate and click Display adapters to expand it.
  4. Right-click the NVIDIA driver and choose Properties.
    NVIDIA driver properties
  5. Go to the Driver tab, and select the Roll Back Driver option.
    Roll Back Drivers
  6. On the Driver Package rollback page, select the reason for the rollback and click Yes.
    Select the reason click Yes
  7. Restart your computer to complete the process.

If the Roll Back Driver button is greyed out in Device Manager, Windows can’t find any NVIDIA driver to which it can roll back.

In this case, you need to download and install the older version of an NVIDIA driver manually; follow the steps mentioned below.

1.2 If the Roll Back Driver option is greyed out

  1. Go to the NVIDIA official website and download the desired version of the NVIDIA driver at the desired location.
    NVIDIA driver download  Rollback NVIDIA Drivers in Windows 10/11
  2. Press Windows + R to open the Run dialog box.
    Device Manager Run command Rollback NVIDIA Drivers in Windows 10/11
  3. Type devmgmt.msc and click OK to open the Device Manager.
  4. Locate and click Display adapters to expand it.
  5. Right-click the NVIDIA driver and choose Update driver.
    Graphics Driver update
  6. Click Browse my computer for drivers.
    Browse my computer for drivers
  7. On the Update drivers window, click Browse, navigate to the folder where you saved the downloaded file, and click Next.
    Browse and click Next
  8. Follow the onscreen instructions to complete the process.

For users with older NVIDIA cards like the GT 210 1GB, you can follow this GT 210 1GB driver download guide to get the correct package and install it manually when rollback isn’t available.

2. Use the Display Driver utility

Note icon NOTE
Before proceeding with this method, it is recommended to run your computer in safe mode to avoid conflicts in running the application.
  1. Go to the NVIDIA official website and download the desired version of the NVIDIA driver at the desired location.
    NVIDIA driver download  Rollback NVIDIA Drivers in Windows 10/11
  2. Download the Display Driver Uninstaller and double-click the installer file to run the setup.
  3. On the Installer wizard, click Next to initiate the installation.
    Install
  4. Follow the onscreen prompts to complete the process.
  5. Once it is installed, the app will launch.
  6. From the right side, from the first drop-down, select GPU and choose NVIDIA in the second one.
  7. Now click the Clean and restart button. The tool will remove the NVIDIA driver and restart your computer.
    Rollback NVIDIA Drivers in Windows 10/11 Display_Driver_Uninstaller_LkAMHtD3YB
  8. Now go to the downloaded driver and double-click it to initiate the installation.
  9. Choose Custom (Advanced), then click NEXT. Follow the onscreen instructions to complete the installation.
    Custom installation

Once the process is complete, restart your computer and check if the installed driver works fine.

What can I do to roll back the NVIDIA drivers on Windows 10?

To roll back drivers on Windows 10, first, ensure you have an extra copy of your important data and create a restore point. Then use the user account with admin rights and follow the same methods mentioned for Windows 11 to complete the job.

So, this is how you can roll back NVIDIA drivers on your Windows 10/11 computer and restore stability and compatibility to your NVIDIA graphics card!

If you are facing problems downloading NVIDIA drivers on a Windows computer, we recommend you check out this guide for quick solutions.

Please feel free to give us any information, tips, and your experience with the subject in the comments section below.

What is 0x0000011A BSoD & How to Fix It in 3 Steps

Recently, some Windows users have reported the 0x0000011A BSoD EM_INITIALIZATION_FAILURE error appearing on their PCs. It impedes some functionalities in the system. Hence, this guide will discuss the error and how to fix it.

Also, you may be interested in the operation failed error 0x00004005 and what to do if you encounter the error on your Windows 11 PC.

What is 0x0000011A BSoD?

  • The 0x0000011A error code refers to the EM_INITIALIZATION_FAILURE (Emergency Management Initialization Failure) Blue Screen of Death (BSoD).
  • It occurs in Windows OS and indicates a problem during the initialization of the Emergency Management Services (EMS).
  • EMS is a feature in Windows that allows system administrators to manage and troubleshoot a computer remotely.

What causes 0x0000011A BSoD?

  • Faulty or outdated drivers can interfere with the initialization process and lead to this error.
  • If essential system files become corrupted, it can prevent EMS from initializing correctly.
  • Certain hardware components or peripherals may conflict with EMS initialization.
  • Issues during the installation or configuration of Windows updates can sometimes trigger the error.

Regardless, we’ll take you through the basic steps for resolving the issue on Windows 11.

How do I fix the 0x0000011A BSoD?

Before proceeding with any advanced troubleshooting steps, we recommend you observe the following preliminary checks:

  • Restarting the computer will refresh its processes and resolve temporary glitches or conflicts liable to cause the error.
  • Ensure all hardware components are properly connected and functioning correctly.
  • Use the System File Checker (SFC) tool to scan and repair any corrupted or missing system files.
  • Install pending Windows updates to fix bugs and compatibility problems that can cause the error.
  • Perform a thorough scan with dedicated antivirus to check for malicious programs that could interfere with EMS initialization.

If you still can’t get around the error, go ahead with the solutions below:

1. Update device driver via Windows update

  1. Press the Windows + I key to open the Windows Settings app.
  2. Go to Windows Update and select the Advanced options.
  3. Click on the Optional Update button.
  4. Click the drop-down button on the Driver Update and checkmark the list of updates available.
  5. Select the Update and Install button and wait for the drivers to install.

Updating your device drivers via Windows update will fix faulty or outdated drivers interfering with the initialization process, causing the error to occur.

If you encounter issues when using Windows Update, you can check how to diagnose and fix Windows Update not loading on your PC.

2. Uninstall recently installed apps

  1. Click the Start button, type the control panel, then press Enter.
  2. Click on Programs, go to the Programs and Features tab, and find the app from the list.
  3. Select the app and click Uninstall.
  4. Restart your PC and check if the EM_INITIALIZATION_FAILURE error persists.

The above steps will help you resolve conflicts between software or third-party applications that can disrupt the EMS initialization process. Hence, it removes the causative application.

3. Run a System Restore

  1. Press Windows, input restore, and click on Create a restore point.
  2. Select the System Protection tab, and click on System Restore.
  3. In the next window, click the Next button.
  4. Choose the restore point you want to restore from, then click Next.
  5. Afterward, select Finish to complete the process and restart your PC.

The System Restore will roll back your system to a previous state where the error was absent. Read our guide on how to fix the restore point if it’s not working on your PC.

In conclusion, we also have a comprehensive guide discussing BSoD error 0x00000154 and how to resolve it on Windows 11.

Likewise, you can check our article about the 0xc00002e3 BSoD error and what to do if you run into the error on your computer.

If you have further questions or suggestions, kindly drop them in the comments section.

Can you change your display name in Teams meetings?

Well, currently you can change your display name in Teams meetings. And it’s very easy to do so. Microsoft Teams allows you to change just by clicking on the icon next to your name, and then changing the name.

However, it seems that Microsoft will bring forward another feature for Teams that has to do with your display name. At least, with a part of it. According to the Teams’ roadmap, you will be able to customize your name with details. Basically, you’ll be able to rename yourself in Teams but with additional info.

Microsoft is keen on making Teams the best app for organizations, and this update follows other quality updates that were announced. You’ll be able to set your location and available hours in Teams now, you’ll also be able to use Recap AI, to follow along in meetings.

And now, with this update, Microsoft will make sure people have everything they need to fully express their work and their activity.

Customize and change your display name on Microsoft Teams

The update will roll out in August, and, as we mentioned, you’ll be able to customize your display name on Teams.

What does this mean? Well, the feature will offer you far more flexibility. It will allow you to include additional details to your name. Details such as your department, your team, and your specific role, will appear alongside your name.microsoft teams change display name in meeting

By doing it, you will be able to fully express yourself, and convey all your activity in meetings. This way the other participants will get a much better idea of who you are, what you do, and what kind of expertise you bring to the table.

The feature will be available on Windows and Mac devices. And it will be available to the general public, somewhere in the fall.

What do you think about this feature? Let us know in the comments section below.

What is Winservice.exe & How to Fix Its Errors

If you notice that Winservice.exe triggers some errors on your computer and you are bothered, it may be malware; this article is for you as we explore the file and show some easy fixes to its errors.

Before getting to it, it is important not to confuse it for the winserv.exe file or even the winservices.exe file, which is often a virus.

What is Winservice.exe?

The winservice.exe file that comes with SCM_Service by Netgear is legitimate. It is a service that is responsible for running the SCM_Service application. SCM_Service is an application that is used to manage Netgear routers and switches.

If you are curious about the service, you may be interested in knowing some of the best deals on Netgear routers.

It is located in the directory indicated below and has no description:

C:\Windows\SysWOW64

How do I fix the Winservice.exe errors?

Before going into any solution, try this workaround:

If the error persists, continue to the solutions below.

1. Run a file scan

  1. Press Windows + R to open the Run dialog.
  2. Type cmd and hit Ctrl + Shift + Enter.
    winservice.exe
  3. Enter the script below and hit Enter.
    sfc /scannow
    winservice.exe
  4. Follow any promts given and restart the computer when the scan completes.

2. Restore system health

  1. Press Windows + R to open the Run dialog.
  2. Type cmd and hit Ctrl + Shift + Enter.
    winservice.exe
  3. Input the script below and hit Enter.
    DISM /Online /Cleanup-Image /RestoreHealth
    winservice.exe
  4. Wait for the command to complete and verify it fixes the winservice.exe error.

3. Clean boot the computer

  1. Press Windows + R to open the Run dialog.
  2. Type msconfig and hit Ctrl + Shift + Enter.
  3. Click Selective startup tick the options for Load system service and Load startup.
  4. Slect the Services tab, check Hide all Microsoft services, and click Disable all.
  5. Click the Startup tab and select Open Task Manager.
  6. Click a startup application and select the Disable button. Repeat this step for as many startup apps as you have.
  7. Click OK and Apply and close the configuration utility, then restart the device and verify if it fixes the winservice.exe error.

With any of the solutions discussed in the guide, you should fix most associated errors, like Winservice.exe not found, not responding, or using too many resources.

We have covered extensively other executables like onenotem.exe and overseer.exe; you may want to check out their guides.

If you have additional questions, please leave us a comment below; we will happily respond to them.

XCOPY Access Denied: How to Fix This Error

If you attempt to copy files or folders with the XCOPY command but lack the required permissions, you may encounter the XCOPY access denied error. We explore this issue and recommend some solutions in this guide.

You may also want to check out our other extensive guide that tells you what to do when an unexpected error keeps you from copying files on your computer.

Why do I get the XCOPY access denied error?

The most common reasons include the following:

  • You do not have sufficient permission to copy the folders or files.
  • The folder or file source and destination are on separate drives where you do not have permission.
  • XCOPY command is disabled on the computer.
  • There is a problem with the source or destination documents or directories.

You will need the terminal for most of our preferred solutions, so check out our detailed guide if you can not open the Command Prompt as an admin.

How can I fix the XCOPY access denied error?

Before you try the solutions, we recommend this quick workaround:

  • Reopen the Command Prompt with administrative privileges and retry the command.
  • Double-check permissions for both the source and destination files or folders.

If you still do not have success, proceed to the solutions below.

1. Enable XCOPY

  1. Press Windows + R to open the Run dialog.
  2. Type cmd and hit Ctrl + Shift + Enter to open an elevated Command Prompt.
    xcopy access denied
  3. Type in the script below and hit Enter.
    reg add "HKCU\Environment" /v PATH /t REG_EXPAND_SZ /d "%PATH%;C:\Windows\System32"
  4. Input Yes to overwrite and hit Enter.
  5. Finally, try the command again and verify that you no longer receive an XCOPY access denied message.

2. Take ownership of the file or folder

  1. Press Windows + R to open the Run dialog.
  2. Type cmd and hit Ctrl + Shift + Enter to open an elevated Command Prompt.xcopy access denied
  3. Input in the script below and hit Enter, replacing C:\Users\username\Desktop\file.txt with your file path and name.
    takeown /f C:\Users\username\Desktop\file.txt
    xcopy access denied
  4. Type in the below script and hit Enter to grant full control, also replacing C:\Users\username\Desktop\file.txt with your file path and name:
    icacls C:\Users\username\Desktop\file.txt /grant username:F
    xcopy access denied
  5. Lastly, rerun your XCOPY command and see if the solution fixes the XCOPY access denied issue.

3. Use the T or Y parameters

  1. Press Windows + R to open the Run dialog.
  2. Input cmd and hit Ctrl + Shift + Enter to open an elevated Command Prompt.xcopy access denied
  3. Type the script below and hit Enter, replacing <source destination> with the file directory and name. If you’re attempting to copy a directory but lack permission to copy the files within it, utilizing the /T parameter is helpful.
    xcopy <source destination> /T
  4. Optionally, you may replace /T with /Y to suppress the prompt for confirmation if a file already exists in the destination.

These steps are quite easy to follow; if you have followed them properly, you should have no other issues with denying XCOPY access.

If this command isn’t working, there are others you can use, and we described all of them in our copy vs xcopy vs robocopy article.

You may look at our other comprehensive article if you can not move files on your computer. Lastly, if you think we skipped any solutions, please let us know in the comment section below.

Ltsvc.exe: What Is It & How to Uninstall It

Ltsvc.exe is a service that runs in the background as long as your PC is running, but it can be stopped or started by you at any time.

It monitors and controls many of the functions of LabTech, including software updates, license checking, task scheduling, and more. If unnecessary, we show you how to remove it from your PC.

What is Ltsvc EXE used for?

The ltsvc.exe file is a process belonging to the LabTech Monitoring Service by LabTech Software. This program is a non-essential process but should not be terminated unless suspected of causing problems.

It can be used to check the server’s status from a remote location, or it can be used locally on the server itself.

What is a LabTech monitoring service?

Let’s start with the basics. Labtech Software is a company that provides software to manage your IT infrastructure. You can use it to monitor and manage any device on your network, including servers, workstations, printers, routers, and more. 

If you’ve already purchased Labtech software, you may see an EXE file in the folder where you installed it usually in: C:\Program Files 

The EXE files are used by Labtech software to install updates or perform maintenance tasks. For instance, ltsvc.exe generates alerts when errors occur on monitored computers. 

Monitoring is broken down into two components; alerts and reporting. Alerts are actions that can be taken when a certain condition is met. Reporting provides information about the current state of your LabTech environment in real-time or at specified intervals.

Monitoring services are ideal for small businesses with no dedicated IT staff where the full functionality of monitoring software can be used at a fraction of the cost of hiring an outsourced IT support company.

This utility is designed to help you perform several actions, such as:

  • Checking for updates from time to time
  • Sending information about your system to LabTech Software
  • Running scheduled tasks on your machine

For any avoidance of doubt, ltsvc.exe is a legitimate process that LabTech MSP signs. Its size should be roughly around 13MB.

Any other facts that deviate from these should indicate that the file has either become obsolete or a virus masquerading as the real thing. In such a case, the file should be removed from your PC.

How do I manually remove the LTS service for LabTech?

1. Run DISM and SFC scans

  1. Hit the Start Menu icon, type cmd in the search bar, and click Run as administrator.cmd-run-admin-w11 unexpected kernel mode trap windows 11
  2. Type the following commands and press Enter after each one:DISM.exe /Online /Cleanup-Image /Restorehealth sfc /scannow

2. Scan for viruses

  1. Press the Windows key, search Windows Security, and click Open.
  2. Select Virus & threat protection.
  3. Next, press Quick scan under Current threats.
  4. If you don’t find any threats, proceed to perform a full scan by clicking on Scan options just below Quick scan.Scan options
  5. Click on Full scan, then Scan now to perform a deep scan of your PC.Full Scan Scan Now
  6. Wait for the process to finish and restart your system.

It can be possible to detect various threats using Window’s built-in antivirus. In any case, it will not offer complete malware support for removing potential viruses.

As an alternative, we’re using and suggesting an enhanced antivirus tool with a competitive detection rate and malware or phishing attacks shield.

⇒ Get TotalAV

3. Uninstall related software

  1. Click on the Start Menu icon on the taskbar, type Control Panel in the search bar, and click Open.control-panel-search fallout new vegas runtime error
  2. Navigate to Programs and select Uninstall a program.going uninstall program control panel
  3. Locate LabTech MSP in the apps displayed, click on it, and then select Uninstall.

Once you’re done, ensure also to take care of remnant files. You may not think that old versions of software are a big deal. But they can be a security risk and even slow down your computer.

Old versions of software may have vulnerabilities that hackers can exploit, so it’s a good idea to do a cleanup to be on the safe side.

4. Perform a System Restore

  1. Press the Windows + R keys, type rstui, and hit Enter.
  2. The System Restore window will open. Click on Next.
  3. Select the restore point you wish to revert to and click on Next.
  4. Now click on Finish.

You could also try:

That brings us to the end of this article, but be sure to check out related literature on other errors, such as the mediaget.exe, to see what it is and whether to remove it.

To see how to fix problems with another process, be sure to read our What is VSServer.exe and how to get rid of it guide.

Have you encountered the ltsvc.exe file, and what problem did it cause you? Let us know in the comments section below.

Xbox gift cards purchased with rewards points expire fast

As you might know, you can buy Xbox gift cards with points earned on Microsoft Rewards. It is a platform where you can do daily tasks to earn points. With them, you can buy all sorts of things, from gift cards to costumes and coins for a lot of video games.

Deemed by many users as too good to be true, there were rumors that Microsoft Rewards will go away. However, you should rest assured because that’s not going to happen. Not anytime soon, at least.

You should know, though, that there are some things that will go away. We’re talking about the Xbox gift cards purchased with Microsoft Rewards points. They have an expiration date, so whenever you’re thinking about buying one, think about it too.

This Reddit user was surprised to find out about it after they purchased the Xbox gift card. They’ve sent an email to Microsoft, asking for a refund.

What’s the expiration date for the Xbox gift cards purchased with Microsoft Rewards points?

It seems that the expiration date for the Xbox gift cards purchased with Microsoft Rewards points is 90 days. You must use that gift card within 90 days of the deposit, otherwise, it will expire and you’ll no longer be able to use it.

However, Microsoft makes it very clear that the expiration date for the Xbox gift cards purchased with Microsoft Rewards points is only 90 days.xbox gift card expiration

On the other hand, the Xbox gift cards purchased with real money don’t expire until they are used. So you don’t have to worry about it if you got an Xbox gift card using your money.

So make sure to use your Microsoft Rewards points when the time is right. Take into consideration the 90 days, and plan to spend your points in that time.

What do you think about it? Did you know about the 90 days expiration time? Let us know in the comments section below.

What is the Easiest Password Manager for Seniors? [5 Picks]

As we get older, our memories start to fade. We can’t remember names, faces, or passwords as easily as we used to be able to. This makes it all too easy for seniors to become victims of identity theft. 

And while some seniors may not be concerned about protecting themselves online, others see it as a necessary step and have already gotten on the password managers bandwagon. With so many options out there, it can be difficult to choose the right one for you. 

We’ve taken the guesswork out by picking some of the top password managers in this article.  

Why don’t older adults use password managers?

Password managers are a great way to secure your online accounts and ensure you’re not using the same password for multiple sites. They generate strong passwords, store them securely, and sync them across devices.

But even though they’re important tools for protecting yourself online, many users still don’t know about them or find them intimidating.

The older demographic is particularly notorious, but not without reason. Below are some of the reasons why they may be resistant to using a password manager:

  • Lack of knowledge about password managers – Many seniors may not know what a password manager is or how it works, making it difficult to adopt one.
  • Unwillingness to change behavior – Most senior adults are so used to living their lives as they know it. Bringing new changes disrupts their status quo. In a research paper submitted on why older adults do not use password managers, a user said:

I’m not going to be making any more passwords now at my age. At this time in my life, I’m not going to have any more accounts than I already have. So I wouldn’t really need it.

  • Over-dependence on technology – Most senior adults worry about computer crashes or password managers becoming unresponsive. It seems a lot to put all your trust in man-made projects, given that their life savings are in jeopardy.
  • Encourages laziness – Seniors already admitted to having memory lapses. Depending on technology to remember passwords seems to be a faster way to become lazy and let the effects of old age catch up.

If we keep relying on technology, we lose the ability to think for ourselves.

  • Costly password managers – Although there are free password managers, some require you to part with a few coins. Some seniors are just not willing to pay the extra amount.

What password manager do aging parents use?

RoboForm – Offline password manager

Forget about the basic roles of a password manager, like generating strong passwords and storing them. When it comes to the elderly, they need a little more help to convince them to use these tools.

One area that RoboForm excels in is that it remembers your passwords, fills in forms, generates strong passwords, and logs into sites automatically.

Another feature is that it has offline access. This means you don’t have to access the internet to use it, which most seniors seem to be against.

Emergency access has to be another winning feature. This feature allows you to grant your trusted contacts temporary access to your RoboForm account in an emergency. 

Other noteworthy features include:

  • Multi-factor authentication
  • Biometrics-enabled
  • Data backup

Roboform

Activate this password mojo for users of all ages with a simple UI and unlimited logins.
Check price Visit website

NordPass – Real-time monitoring

If NordVPN is anything to go by, then you know any other services or products from the same company are a hit. 

NordPass is a password manager built specifically for seniors and other users with limited tech skills. Its autofill feature is a marvel, as you don’t have to go through the excruciating process of typing your credentials.

Since it also generates strong passwords for you, you know they can be quite heavy on the characters. Having them automatically filled in is such a great save.

Other noteworthy features include:

  • Emergency feature
  • Real-time breach alerts
  • Biometric authentication

NordPass

Have a look at this trusted digital password built for seniors and business people.
Check price Visit website

LastPass – Password-free logins

LastPass is easy to use and has an intuitive interface, so older users won’t feel overwhelmed by the technology. 

The app works across all major browsers, so they don’t have to worry about downloading multiple apps or installing browser extensions to access their accounts if they use multiple devices.

Another feature this demographic will appreciate is the password generator. You don’t have to come up with a unique password that you’ll have a hard time remembering. LastPass will do it for you.

Other noteworthy features include:

  • Password-free logins
  • Emergency contact on the paid version
  • Data breach monitoring

LastPass

Embrace the most visual password manager tool with management across all devices.
Check price Visit website

1Password – Safe travel certified

If you’re an elderly person who worries about the security of your passwords being stored by a password manager, then 1Password is for you.

It uses one of the most secure AES-256 encryption protocols that experts in the industry have verified. 

Aside from the usual autofill, password storage, and browser extensions, it has another feature that the seniors will appreciate and sets it apart from other password managers. 

You’re probably in your later years, and travel is now a priority. As such, you must keep your travel documents, such as credit cards secure. 1Password has a travel mode feature that allows you to remove vaults and mark them as safe for travel temporarily.

Your device can get confiscated or out of your reach when you travel, so you must be assured that your information is always safe.

Once you’re in the clear, you can turn it off, and all your information will be back again.

Other noteworthy features include:

  • Offline support
  • Multi-factor authentication
  • The secret key for cloud storage

1Password

Get seamless web password safety with fast and family-friendly passwords vault.
Free trial Visit website

Bitwarden – Intuitive user interface

Bitwarden is a free password manager that makes it easier for seniors to keep track of their passwords and other sensitive information. It’s built around the idea of being simple enough that anyone can use it without learning anything new.

This is especially important for elderly people who may have trouble using computers or smartphones.

It also has offline and online features, allowing you to sync your passwords across your devices.

Other noteworthy features you can get when you upgrade to the premium package include:

  • Emergency access
  • Security reports
  • Bitwarden authenticator

⇒ Get Bitwarden

How can I help my elderly remember passwords?

We all know that passwords are the bane of our existence. They are often hard to remember and even harder to type accurately on a smartphone.

For older adults, these challenges can be even more difficult. So how can you help your elderly loved one remember their passwords?

Here are some password tips for seniors:

  • Use memorable phrases instead of words – One way to ensure your loved one can remember their password is to use a phrase instead of a word. For instance, instead of using their names or schools, a phrase they normally use in conversation or from their favorite song or poem can make a great password.
  • Make it simple – If your loved one has trouble remembering even short phrases like those above, try making them shorter and simpler.
  • Use an acronym – Acronyms are helpful in remembering passwords quickly. It could be a word such as LAUGH, and immediately, the senior would figure it out and write their password down.
  • Write it down – Although not recommended, sometimes you have to keep a safe copy of passwords for the elderly. However, you must keep it safe and not share it with anyone else, especially if they trust you. Otherwise, a password recovery tool would come in handy.

The key takeaway from this should be that a password manager is the easiest way to keep track of your passwords. It saves you the hassle of remembering them all, and it generally makes it easier for you to create safer passwords.

Any listed above would be a worthwhile investment for any senior with trouble remembering passwords. If the senior is not too trusting of password managers, incorporating multi-authentication software could ease their doubts.

Are you a senior or know one who needs an easy password manager? Which one are you currently using and why? We’d love to hear your feedback on this matter.

0xC1900101 – 0x30018 Update Error: How to Fix it

The error code 0xC1900101 – 0x30018 is associated with the Windows operating system update process. It typically occurs during the installation or upgrade of Windows 10.

Some of our readers have recently reported that they encounter this error while trying to update their Windows 10 PC. In this article, we will discuss what causes it and how to fix it quickly.

What causes 0xC1900101 – 0x30018 update error?

This error can be caused by a wide range of issues. Below are some of the common reasons as reported in the Microsoft forum by some users who have been able to troubleshoot the issue successfully:

  • Incompatible device drivers or hardware – Outdated or incompatible device drivers can lead to this error, particularly for hardware components like the graphics card or network adapter.
  • Software conflicts – Some software installed on your computer might interfere with the update process and cause compatibility issues.
  • Insufficient disk space – If your system doesn’t have enough free space on the hard drive, the update process may fail.
  • Windows update service issues – Problems with the Windows Update service itself, such as corrupted files or settings, can also trigger this error.

Now that you know some of the potential reasons behind the 0xC1900101 – 0x30018 error, let’s proceed to how to fix the issue.

How can I fix 0xC1900101 – 0x30018 update error?

Before trying any of the advanced solutions provided in this guide, it may be helpful to attempt the following preliminary checks:

  • Disconnect any external USB or SD card and any unnecessary component connected to your computer peripherals.
  • Ensure that you have enough free space on your hard drive. You can also run a disk cleanup to free up space.
  • Perform a clean boot, you should be able to identify any software conflicts that could be causing the error.
  • Install all the latest Windows Updates and latest drivers and updates from your hardware and software manufacturers.
  • Temporarily disable your antivirus software and other security programs.
  • Try switching to a wired connection using a network cable if you’re using a Wi-Fi connection, and disable or uninstall your wireless network card.

Having confirmed the above checks, if you require further assistance, you can work your way through any of the methods provided below.

1. Run the Windows app troubleshooter

  1. Press the Windows + I keys to open the Settings app.
  2. Select System, click on Troubleshoot, and select Other troubleshooters.
  3. Next, click on Windows Update and select the Run button.
  4. Wait for the troubleshooter to identify the problem that is preventing you from installing the update and restart your PC.

Once the Windows app troubleshooting process is completed, try to install the update again to see if the 0xC1900101 – 0x30018 error has been fixed. Proceed to the next fix if it persists.

2. Run the SFC/DISM scans

  1. Press the Start button, type cmd, and select run as an administrator.
  2. In the CMD window, type the following command in the text field and press Enter: sfc /scannow
  3. Type the following, and press Enter after each command: DISM /Online /Cleanup-Image /RestoreHealth 
  4. The scanning process may take up to 15 minutes, so wait till the verification reaches 100%.

Running the SFC and DISM commands helps to rule out the possibility of system file corruption. In the case where CMD is not working in Windows, here is an easy fix to apply.

Anyhow, you could benefit from totally reliable support regarding Windows issues given by a tailored system PC repair tool. The process is 100% automatic and you only have to press one button to repair corrupted files.

3. Reset Windows Update components

  1. Press the Start button, type cmd, and select run as an administrator.
  2. Type the following commands one after the other and press Enter to quit the services: net stop wuauserv  net stop cryptSvc   net stop bits   net stop msiserver
  3. Next, run the following commands to rename the Software Distribution and Catroot2 folders: ren C:\Windows\SoftwareDistribution SoftwareDistribution.old   ren C:\Windows\System32\catroot2 catroot2.old
  4. Finally, restart the services: net start wuauserv  net start cryptSvc   net start bits   net start msiserver

After resetting the Windows components, the Windows Update feature should have been fixed by now. If not, proceed to the next step.

4.  Use the Media Creation tool

  1. Visit this Microsoft site to download the ISO installer.
  2. Click on the Download button.
  3. Once the download is complete, double-click on the file to run it.
  4. Follow the on-screen instructions to complete the installation process.

If the update error persists, you can try using the Windows Media Creation Tool to create a bootable USB or DVD and perform a clean installation of Windows. This will fix the error by installing the latest version of Windows.

And that’s it on how to fix the 0xC1900101 – 0x30018 error. Hopefully, one of the methods provided in this article will help you fix the issue.

Other users have reported similar issues such as Windows 11 0xC1900101, 0xc1900101–0x20017 installation error in Safe_OS, and so forth.

If you have any questions or suggestions regarding this issue, please contact us by using the comments section below.

Here’s what Bing AI would do on your PC if it had access

Bing AI is definitely an intriguing tool to use. It is both creative and too restrictive. And at times, it can also get dangerous. But don’t worry, it’s not dangerous in the classical sense of the term. But it seems, if pushed enough, Bing AI can bypass its own rules. And it can be eerie when that happens.

Rest assured, though. Most of the time, Bing is inoffensive, and won’t really do anything to you or your device. At least not for now or even in the future. Aside from helping you set up your PC the way you want to. Yes, we’re looking at you, Copilot. Bing, or any other AI tool from Microsoft is here to help you.

A Reddit user even tried an experiment with Bing. The user sort of gave permission to Bing to access their computer. And the experiment was nothing terrible, at all.

Bing used GPT vision to access the computer. If you don’t know GPT vision is a language of the ChatGPT that uses images and texts to get tasks done. It also accepts visual inputs from users, making it more efficient when you want to find out information.

If Bing would access your PC, here’s what it would do

It would listen to music. That might sound like a joke, but yes, Bing would actually complete tasks on Microsoft Rewards, and then it would look up news regarding Beyonce because it likes her music.

As you can see in the picture below, Bing would open up Edge, obviously, and would look up news and weather updates. Because the AI tool also wants some entertainment, it will search for interesting articles or videos.bing access pc

Next, it would click on the notification bell, in case anything important comes up. Bing AI is just like us, it doesn’t want to miss anything important. It’s also interested in personalized recommendations.

And, apparently, Bing AI is a very big fan of Beyonce, because the tool will complete quiz games on the star, if it has the chance to do so.

So, if you’re a Beyonce fan as well, you have that in common with Bing. But aren’t we all?

As you can see, there is no need to worry that Bing will destroy your PC if it has access to it. For now, it’s just an innocent little helper.

What do you think about it? Let us know in the comments section below.