What is Mdnsnsp.dll and how to Remove it

The mdnsnsp.dll is a DLL file developed by Apple Inc. It is utilized by Windows to facilitate Apple-based services. However, if the file isn’t used, it can use up memory and slow down your PC.

If you’re not using the mdnsnsp.dll, removing it from your PC is better. In this article, we’ll walk you through the best steps to help you remove the mdnsNSP.dll file from your PC.

What is mdnsnsp.dll?

The mdnsNSP.dll is a Dynamic Link Library file that belongs to the Bonjour Namespace Provider Process. It comes with the Bonjour software and is developed by Apple.

Bonjour is utilized by iTunes for tasks like music streaming, web browsing, etc. The mdnsNSP.dll is not a Windows essential file but is still utilized by several Apple-based applications. 

Should I remove mdnsnsp.dll?

Most Windows users are skeptical about removing DLL files, but they usually cause no problems to your PC when removed. 

If you do not need the mdnsNSP.dll file, you’re free to remove it without worrying about breaking your PC. This is because the mdnsNSP.dll file is not a Windows essential file.

How can I remove mdnsnsp.dll?

The following are a couple of ways you can remove the mdnsnsp.dll file from your PC:

1. Uninstall the parent software from Root folder

  1. Press the Windows key + E to open File Explorer.
  2. In the Explorer window, navigate to the following path: C:\Windows\Apple\Bonjour
  3. Once you’re in the directory, locate the mdnsNSP.dll_uninstall.dll file.
  4. Double-click the file to run the Uninstaller and follow the onscreen instructions to complete the uninstallation.

Software on your PC is usually with a standalone uninstaller that you can use to remove the application. Running this installer will remove every of the app’s data from your PC.

2. Uninstall the associated app from settings

  1. Press the Windows key + I to open the Settings app.
  2. In the Settings app, click on Apps and select Installed apps.
  3. Then, click on the search bar on the right pane, and type mdnsNSP.dll or Bonjour to locate the software.
  4. Click on it and select the Uninstall option to remove the mdnsNSP.dll from your PC.

If the parent software doesn’t have an Uninstaller, you can delete the app from the Windows Settings. You can also check out some alternative ways to uninstall apps on Windows 11. 

3. Disable the process from the Task Manager

  1. Right-click the Start button and click the Task Manager.
  2. Then, navigate to the Details tab and locate the mdnsnsp.dll. Click on it and select End Task.
  3. Close the Task Manager.

If you’ve tried removing the mdnsnsp.dll file, but you’re unable to uninstall the software, you’re left with disabling the process in the Task Manager. Further, this temporarily stops the service from operating and helps free up your resources.

Also, DLL files are critical to the functionality of your OS. However, if a DLL file is not in use, you’d be better off removing it because it tends to use up memory.

If you’re not using the mdnsnsp.dll file, you can follow the steps in this guide to remove the file.

Riched20.dll Missing: How to Fix or Download it Again

A series of applications and games utilize the Riched20.dll file. While trying to launch such applications, users have reported that the riched20.dll is missing.

If the riched20.dll is missing on your PC, this article will show you quick ways to resolve the error. 

What is riched20.dll?

The Riched20.dll is a Dynamic Link Library file developed by Microsoft. Unlike third-party DLLs like Twitter.dll, the riched20.dll is a system file that contains a series of instructions and procedures that is utilized by Windows.

The file is responsible for critical Windows functions. Hence, if the file is missing on Windows 11, it can lead to several errors for applications relying on it.

What causes a missing riched20.dll?

The riched20.dll file is usually caused by the following:

  • Corrupt System Files – If there are corrupt system files in OS, errors like riched20.dll not found are bound to occur.
  • Viruses and Malware – A PC infected with viruses tend to operate abnormally. If infected, your PC can delete DLL files and trigger the riched20.dll error.
  • Damaged Registry – The Windows registry contains specific instructions that help your PC operate properly. If there are broken registry items, it can lead to missing DLL errors.

How can I fix a missing riched20.dll?

1. Apply a DLL Repair Tool

Windows-based DLL files like riched20.dll are critical Windows components, hence can be resolved 100% using a DLL repair tool.

However, you can use dedicated DLL fixing tools to repair the missing DLL file. They will resolve incompatibility issues due to third-party DLLs and the operating system.

2. Reinstall Microsoft Office

  1. Press the Windows key to open the Start Menu, type Control Panel, and hit Enter.
  2. In the Control Panel window, click Programs and Features.
  3. Select Microsoft Office in the next window, and click the Uninstall button.
  4. Follow the onscreen instructions to complete the uninstallation.
  5. Visit the official website to download and reinstall Microsoft Office.

The riched20.dll missing error is usually associated with Microsoft Office applications; reinstalling the app can help delete corrupt app files and data and restore the app to it’s default state. 

3. Scan for Viruses

  1. Press the Windows key, type in Windows Security, and hit Enter.
  2. Then, click on Virus & Threat Protection, and click Scan Options under the Current Threats option.
  3. Then, select Full Scan and click the Scan Now button to initiate the virus scan.
  4. Wait for the scan to complete, restart your PC and check if the error is fixed.

4. Update Windows 

  1. Press the Windows key + I to open the Settings app.
  2. Then, click on the Windows Update tab, and click on Check for Updates to see if there are any available updates.
  3. Click Download and Install to update your Windows OS if any updates are available.
  4. Repeat this step until there are no available updates to install.

In some cases, you might run into errors if your PC is running an outdated version of its OS; updating the OS can help you fix missing DLL errors.  If the Window Update isn’t working, check our guide on how to fix it. 

5. Run an SFC Scan

  1. In the Windows search bar, type in Command Prompt, right-click on the app and select Run as Administrator.
  2. On the user account control prompt, click Yes.
  3. In the popup window, enter the following command: SFC /scannow
  4. Wait for the scan to finish and restart your PC.

Running an SFC scan is one of the most efficient methods of resolving Windows errors. If the SFC scan isn’t working, you’ll be unable to fix the riched20.dll missing error. 

That’s it; fixing missing DLL errors is simple. Hopefully, you’ve successfully resolved the missing riched20.dll issue by implementing the fixes listed in this guide.

Similarly, if you experience the msvcr120.dll error, check out our detailed guide on how to fix the error.

Rgss104e.dll not Found: How to Fix or Download it Again

Rgss104e.dll is a third-party Dynamic Link Library file published by Degica. The file is crucial to running certain games; if it is missing or corrupt, it will cause several errors with the game/software.

In this article, we’ll briefly explain some of the common causes of the error and list effective solutions to help you resolve the error rgss104e.dll not found.

What is rgss104e.dll?

The rgss104e.dll is a Dynamic Link Library file commonly used by RPG Maker XP 1.04. Further, it was developed by Degica and is considered a Win32 DLL file. 

Also, it is a critical component that ensures that the programs that rely on it operate without issues. 

Why is rgss104e.dll not found?

Here are some of the most common reasons triggering the rgss104e.dll not found error:

  • Corrupt System Files -DLL errors are usually triggered by corrupt system files; it could be the reason behind the rgss104e.dll not found error.
  • Incorrect Software Installation – Applications not installed correctly tend to cause errors on your PC. If the error is recent, perhaps the app did not install completely.
  • Viruses and Malware – A PC infected with a virus tends to operate strangely – it can also delete crucial files like DLLs, thereby triggering the missing DLL error.
  • Registry Issues – The Windows registry contains instructions in the form of machine codes that control your PC. If the registry is broken or corrupt, it can lead to missing DLL errors.

How can I fix rgss104e.dll not found?

Before we proceed to troubleshoot this error, ensure that:

  • Ensure your PC is up-to-date to the latest version.
  • Uninstall recent applications.
  • Restart your PC.

If you’ve taken those precautions, proceed with the fixes below:

1. Use a Dedicated Tool

There are many good DLL repair tools you can use to help you fix missing DLL errors. Also, these tools fix missing DLL errors by scanning your PC to identify the missing files and replacing or repairing the missing files.

2. Scan for Malware

  1. Press the Windows key, type in Windows Security, and hit Enter.
  2. Then, click on Virus & Threat Protection, and click Scan Options under the Current Threats option.
  3. Then, select Full Scan and click the Scan Now button to initiate the virus scan.
  4. Now, wait for the scan to complete, restart your PC.

Viruses are some of the most common causes of Windows errors; scanning your PC using a standard antivirus tool can help resolve the rgss104e.dll not found error. 

3. Perform a system restore

  1. Left-click the Start menu, type restore and click Create a restore point.
  2. Then, select System Properties and choose System Restore button.
  3. In the Restore Files and Settings box, click Next.
  4. In the next window, select the Restore Point that you wish to restore your PC to, and click Next.
  5. Then, click Finish to complete the system restore.

A system restore creates a functional backup of your PC and can be used to restore the PC to an earlier state free of errors. Also, you can utilize the feature to restore your PC to a version which was free of the rgss104e.dll error. 

4. Run an SFC Scan

  1. Press the Windows key, type in CMD, right-click on the displayed result, and select Run as Administrator.
  2. Then, click Yes to grant the app administrative access in the User Account Control window.
  3. Now, type the following, and hit Enter: sfc /scannow
  4. Wait till the scan is complete, and restart your PC to check if the error persists.

The system file checker is a critical Windows tool that helps identify and repair corrupt system files. If you run into a Windows resource error while running an SFC scan, do well to read our guide. 

Further, fixing missing DLL errors involves little to no technicality; any of the solutions should resolve the error. Attempt all the steps to ensure that the error is fixed.

Feel free to share your suggestions on which of the methods helped you resolve the error. 

You’ve probably missed this Windows 11 22H2 configuration update

You surely remember that we’ve recently talked about the latest Moment 3 update for the Windows 11 operating system.

Well, there’s probably a detail you’ve missed, as Microsoft has deliberately kept the new software a secret from everyone.

Let’s get right into it and discover what exactly the Redmond-based tech company has prepared for all of us.

Before we begin though, we want to remind you that we can show you what you need to do if you want to unlock OneDrive capacity view.

Check out all the new features for Windows 11

As we mentioned, Microsoft quietly released a Configuration update for Windows 11 version 22H2 last week as it delivered the latest Moment 3 feature update.

Know that this configuration update is a part of Microsoft’s Continuous Innovation and is released via the Controlled Feature Rollout (CFR) approach.

And, the reason why we are all here right now is to discuss the fact that the update brings the latest feature sooner to Windows 11 22H2 users.

In truth, this new software will also add live captions for the following languages:

  • Chinese (Simplified and Traditional)
  • French (France, Canada)
  • German
  • Italian
  • Japanese
  • Portuguese (Brazil, Portugal)
  • Spanish
  • Danish
  • English (Ireland, other English dialects)
  • Korean

Please keep in mind that you can quickly access this feature either with the Win + Ctrl + L keyboard shortcut, or through the Quick Settings accessibility flyout menu.

When you turn it on for the first time, the OS will ask you to download the required speech recognition support.

Another important detail is that speech recognition support might not be available in your preferred language, or you might want support in other languages.

Furthermore, this update redesigns the in-app voice access command help page, and every command now has a description and examples of its variations.

Let’s also mention that the search bar allows you to quickly find commands. The new categories provide further guidance.

Of course, the above-mentioned update adds voice access command support for the following English dialects:

  • English (United Kingdom)
  • English (India)
  • English (New Zealand)
  • English (Canada)
  • English (Australia)

We also received a VPN status icon, a small shield, to the system tray. It displays when you are connected to a recognized VPN profile.

Don’t forget that you can now choose to display seconds in the clock on the system tray, and you can also right-click the taskbar to quickly get to taskbar settings.

Microsoft also spoke of a copy button for you to quickly copy two-factor authentication (2FA) codes. These are in notification toasts you get from installed apps or from phones linked to your PC. 

The changelog also speaks of an access key shortcut to File Explorer’s context menu. An access key is a one-keystroke shortcut.

Note that you can use it to quickly run a command in a context menu using your keyboard. Each access key corresponds to a letter in the display name of the menu item.

If you are an administrator, you can specify the apps that can run on a device, while other apps will not run at all.

You can also block certain functionalities. You can configure distinct types of access and apps to run for different users on one device in Multi-app kiosk mode.

There’s a lot more to be known about this latest software, so we encourage you to check out the entire changelog and discover everything.

Have you discovered any issues after downloading and installing this recent update? Share your experience with us in the comments section below.

Device Descriptor Request Failed: How to Fix this USB Error

Have you ever plugged a  USB device into your PC, but it was unresponsive? It could be anything from a mouse, headphones, keyboard, or flash drive. You might get a device descriptor request failed error message to that effect.

Your computer failing to recognize your USB device is not new and can easily be fixed. Since this error is in the same jurisdiction, let’s look at how we can address it.

What does device descriptor request failed mean?

The device descriptor request failed error usually occurs when connecting an external storage device to your computer. When you connect a new external storage device, Windows checks if any devices need to be initialized. 

If there are none, it proceeds without any errors. However, if Windows finds any uninitialized devices, it will try to initialize them. This is how you end up with the request for the USB device descriptor failed error.

This is a common problem with USB devices, especially if you are using a USB hub. Some of the common reasons this happens include:

  • Outdated/corrupt drivers – You may have outdated drivers for your USB device, which need to be updated for compatibility purposes.
  • Damaged USB hub – If you are not connecting a device directly to your computer, the problem is most likely due to a bad USB hub. It may be that it is not working correctly.
  • Hardware malfunction – Sometimes, hardware malfunctions can cause this problem as well.
  • Faulty USB port – Your USB device may be throwing the device descriptor failure message if there is something wrong with the port.
  • Incompatible USB device – If you are using an unsupported USB device, then your PC might not be able to recognize it hence throwing the unknown USB device descriptor request failed error.
  • Damaged USB device – If you notice the device isn’t working properly anymore, it might be broken or damaged.

How do I fix USB device descriptor failure in Windows?

A few workarounds that may be able to settle this issue include:

  • Unplug all peripherals to isolate the issue.
  • Try connecting your device to another computer to ensure it is not damaged.
  • Test your ports by plugging some other devices into them and see if they work or not. 
  • Ensure your USB ports are not blocked by an antivirus or an administrator.

1. Turn off fast Startup 

  1. Hit the Windows key, type Control Panel in the search bar, and click Open.control-panel-search fallout new vegas runtime error
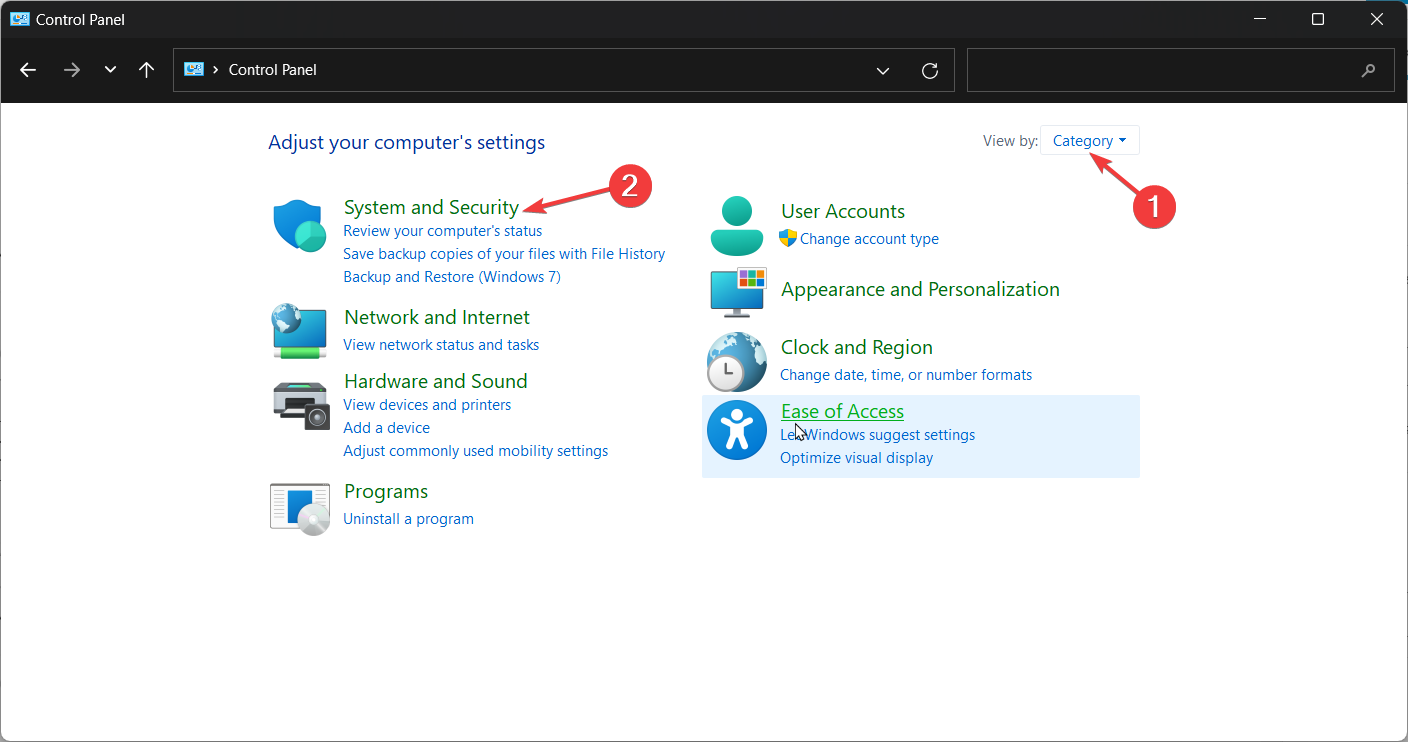
  2. Click on System and Security.Security and System
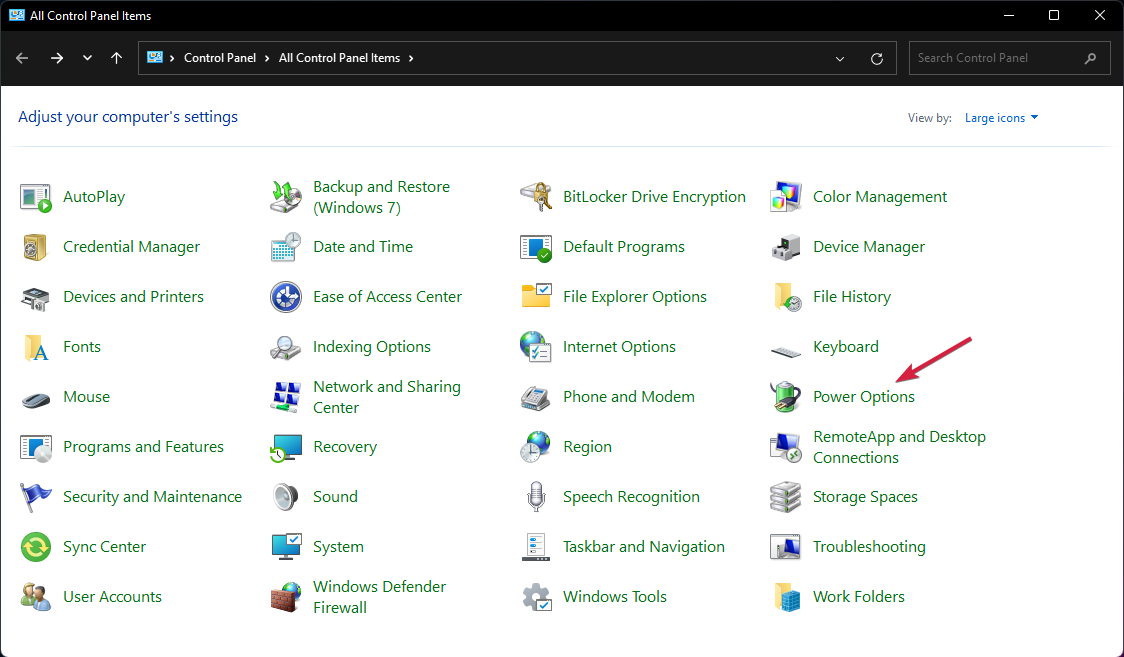
  3. Next, select Power Options.
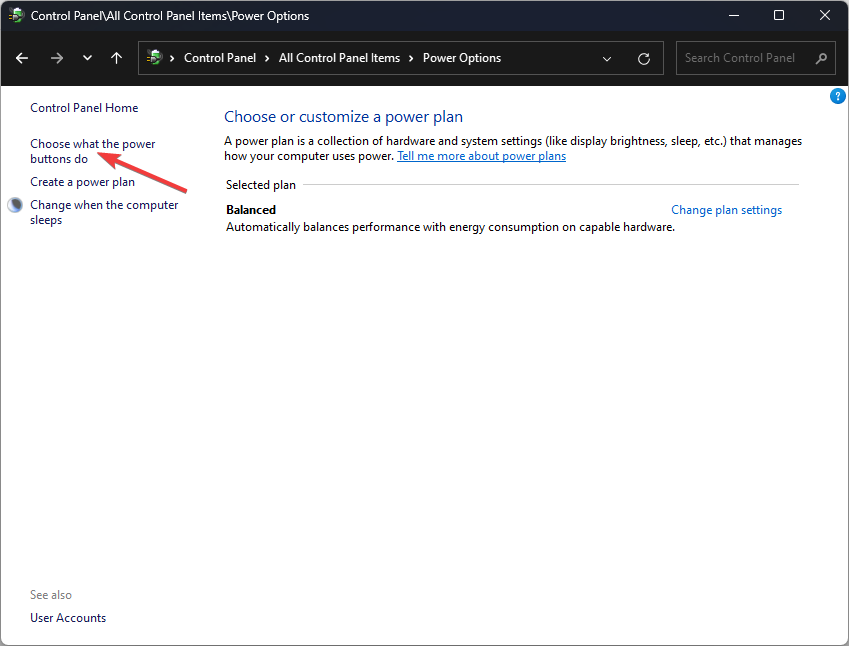
  4. Click on Choose what the power buttons do from the list of options on the left.
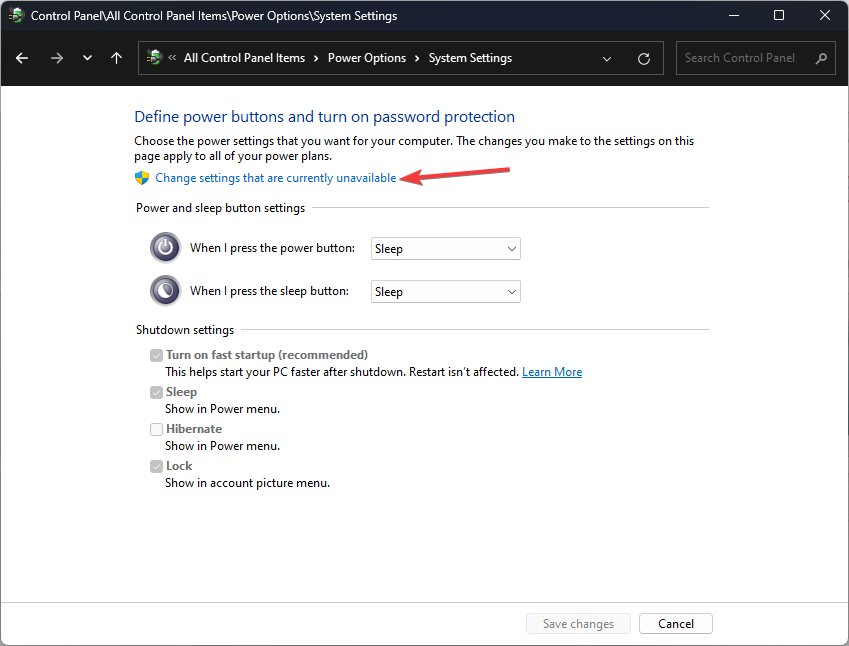
  5. Press on Change settings that are currently unavailable.
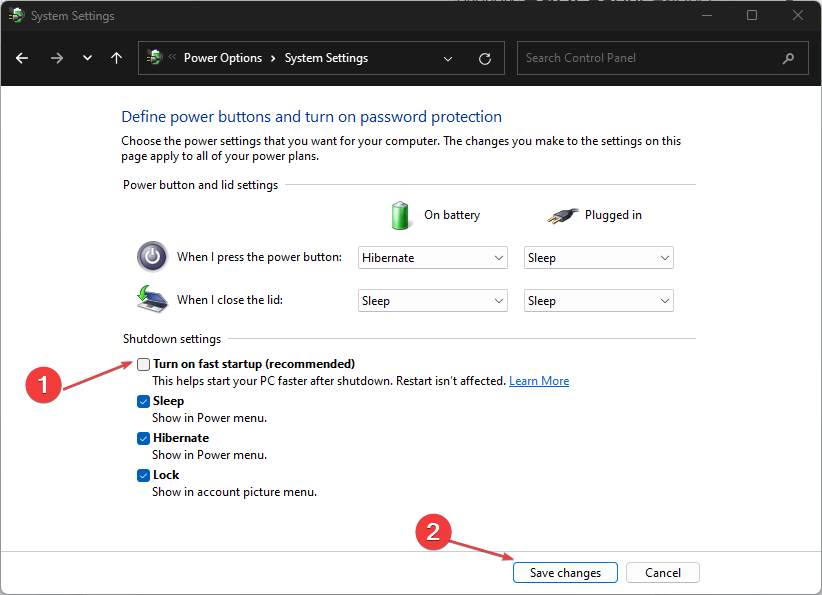
  6. Uncheck the Turn on fast startup box and then click on Save changes.

2. Reinstall the USB driver 

  1. Click on the Windows button, type Device Manager in the search bar, and click Open.device manager w11
  2. Navigate to Universal Serial Bus controllers and click to expand, right-click on your USB drive and select Uninstall device.
  3. Restart your PC, and the drivers will automatically be reinstalled.

3. Update USB drivers

  1. Click on the Windows button, type Device Manager in the search bar, and click Open.device manager w11
  2. Navigate to Universal Serial Bus controllers and click to expand, right-click on your USB drive and select Update driver.update-usb hardware device error code 45
  3. Select Search automatically for drivers.

Another straightforward way would be to install a driver updater utility that can do all this automatically.

Outbyte Driver Updater is the magic tool. It scans, detects, downloads, and installs outdated, damaged, and incompatible drivers, then replaces them with the correct ones.

4. Check for Windows updates 

  1. Hit the Windows key and click on Settings.settings windows 11
  2. Select Windows Update and click on Check for updates.check-updates-w11 windows 11 blue screen
  3. Download and install if available.

5. Run the Hardware and Devices troubleshooter

  1. Hit the Windows key, type cmd, and select Run as administrator.cmd-run-admin-w11 unexpected kernel mode trap windows 11
  2. Type the following command and hit Enter: msdt.exe -id DeviceDiagnostic
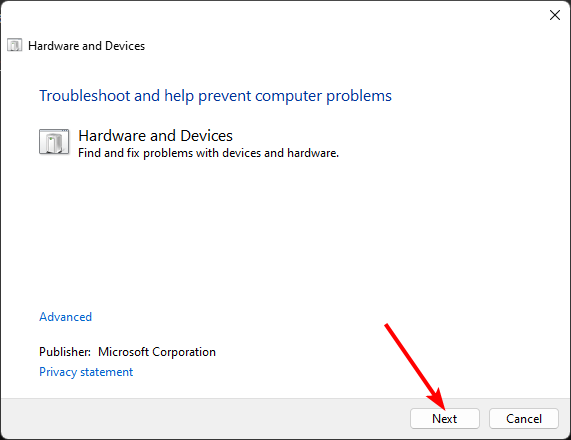
  3. In the Hardware and Devices dialog that appears, click Next.
  4. The tool will start scanning for any problems with your hardware and recommend a fix. After it is done, try again with Windows update and check if the error persists.

6. Disable USB selective suspend settings

  1. Hit the Windows key, type Edit power plan in the search box, and click Open.
  2. Click on Change advanced power settings.windows-11-not-recognizing-usb
  3. Select Change Plan Settings.
  4. In the Power Options dialog box that opens, click on USB settings to expand.Adjust USB settings to fix Windows 11 not turning off display.
  5. Click on USB selective suspend setting, and in the drop-down menu, select Disabled.

And that’s how to quickly address the device descriptor request failed error. If your USB device is the culprit and appears incompatible, you don’t have to throw it away. What if we told you there are a handful of things you can do with your old USB device?

Hurry up and run to our insightful article to find out. We also have a list of the best USB drives that offer excellent storage solutions if you prefer new ones.

That’s it for this article, but if you have any other interesting solution under your sleeves, share it with us in the comment section below.

Mouse Cursor Flickering in Windows 10: How to Fix

While working on your PC, it can get a bit frustrating when the cursor starts to flicker. It is very unpleasant to the eyes and can entirely prevent you from using your computer till the error is resolved. 

If you’re struggling with mouse cursor flickering on your PC, stick around. This article will provide you with the necessary steps to help you resolve the error. 

Why is the mouse cursor flickering in Windows 10?

  • Outdated Drivers – If you’re connecting an external mouse to your PC, you need the corresponding driver for the device to function correctly. If the driver is outdated or faulty, it can cause the mouse cursor to flicker in Windows 10. 
  • Antivirus Software – In some cases, the operations of antivirus software can conflict with the normal functionality of Windows. Also, if your antivirus software detects anomalies with your mouse driver or hardware, it can indirectly restrict it from functioning, which can cause cursor flickering.
  • Windows Update – Many Windows users have reported errors after updating their OS because the update might not be compatible with their PC. If you notice the mouse cursor flickering after running a Windows update, you’ll need to uninstall or roll back the update.
  • File Explorer Error – File Explorer is often utilized as software to manage files, folders, and network connections. However, it also contains certain audio and video playback features. Further, if the File Explorer is in an error state, it can cause the mouse cursor to flicker. 
  • Biometrics – Biometric devices facilitate quick and easy login on Windows. However, the device might occasionally clash with the OS, leading to the mouse cursor flickering in Windows 10. 

How can I fix a flickering mouse cursor in Windows 10?

Before we proceed with more advanced solutions, here are a couple of quick fixes you can attempt:

  • Disconnect and reconnect the external mouse.
  • Restart your PC.

If the error persists after attempting the above solutions, the following are a couple of advanced troubleshooting steps to help you fix the error:

1. Restart File Explorer

  1. Right-click on the Start menu on the Desktop and select Task Manager.
  2. Now, locate Windows Explorer from the list of Processes, and select End task.
  3. Now, click on the File Menu at the top left corner of the window and select Run New Task.
  4. In the task window, type explore.exe, and hit the OK button
  5. Then, close the Task Manager and check if the error is fixed. 

Windows Explorer is Windows’ primary file management tool, but it also has some audio and visual features that most likely have no use in file management. Restarting File Explorer can help you fix the blinking cursor issue. 

2. Update Mouse & Keyboard drivers

  1. Press the Windows key, type Device Manager in the Windows search bar, and hit Enter.
  2. Then, locate Mice and other pointing devices, right-click the option in the drop-down menu, and select Update driver.
  3. In the next window, select Search automatically for the updated device, and follow the on-screen instructions to complete the update.
  4. Restart your PC and check if the error persists. 

External devices like mice and keyboards require functional drivers to operate. If such drivers are outdated, it can cause the device to malfunction. If you run into the unable to update drivers error, ensure to read our guide on how to fix the error. 

Moreover, it’s possible to manage all your drivers automatically and update old files with their latest official version. The application will scan the system in 5 minutes and update the drivers securely.

⇒ Get Outbyte Driver Updater

3. Temporarily disable antivirus software

  1. Press Windows + I to open the Settings app
  2. In the Settings app, click Update and Security, and select the Windows Security tab. 
  3. Then, click on Virus and Threat Protection and click Manage Settings.
  4. Then, click the toggle button next to Real-Time Protection to turn off the feature. (You can also disable more options in this tab).
  5. Close the Windows Security window and restart your PC to check if the error is resolved. 

Antivirus software protects your PC from harmful files and applications but can also infringe on the normal functionality of Windows. You can temporarily disable your antivirus software to check if it’ll fix the mouse flickering issue.

4. Disable the Biometrics feature

  1. Press the Windows key, type Device Manager in the Windows search bar, and hit Enter.
  2. In the Device Manager window, locate the Biometric devices, right-click Validity Sensor, and select Disable device. 
  3. Then, click Yes to confirm your actions, and close the Device Manager once you’re done.
  4. Then, restart your PC and check if the error is resolved. 

Biometrics is a very useful addition to Windows PCs, but its operation can sometimes conflict with Windows’ functionality which can lead to errors. Disabling the feature can help resolve mouse flickering in Windows 10.

If you attempt to disable Biometrics but can’t find it in the Device Manager, here is a detailed guide showing how to fix Biometric devices not showing in Device Manager. 

Further, mouse cursor flickering is an annoying Windows anomaly that can frustrate you if you don’t fix the error. The error can be triggered by several reasons ranging from viruses, Windows updates, and corrupt drivers. 

Irrespective of the error, if you apply the steps in this article, you should be able to fix the mouse cursor flickering in Windows 10. 

Fix: No Advanced Display Settings in Windows 10

After the Windows 10 Fall Creators update dropped, many users reported that they couldn’t find their Advanced Display Settings option on their PCs. This prevents them from adjusting their computer’s text sizes, colors, and resolution.

If you’re experiencing this error, this article will provide a comprehensive guide to the best ways to help you fix this error.

Why are there no advanced display settings in Windows 10?

Here are some of the most common reasons why there are no advanced display settings in Windows 10:

  • Windows Update – The most common cause of this error is updating the Windows 10 Fall Creators. If you installed this Windows 10 update, it’s most likely the cause of the error.
  • Faulty Windows Installation – In some cases, the advanced display settings might be missing if your Windows installation was faulty. A faulty installation can be caused by a lack of storage space, corrupt installation media, etc.
  • Bad Video Drivers – Graphics cards (integrated or dedicated) are responsible for managing your PC’s Display. If you have bad video drivers, it can cause some display settings to malfunction.
  • Conflicts between Graphics Drivers – If you have an integrated and dedicated graphics card installed on your PC, they will inevitably clash. Conflicts between Graphics drivers can cause lead to Windows display errors.

How can I fix the no advanced display settings in Windows 10?

The following are a couple of ways to fix no advanced display settings in Windows 10:

1. Access the display settings via display adapter properties

  1. Press the Windows key + I to open the Settings app.
  2. In the Settings window, click System, and select Display from the left pane.
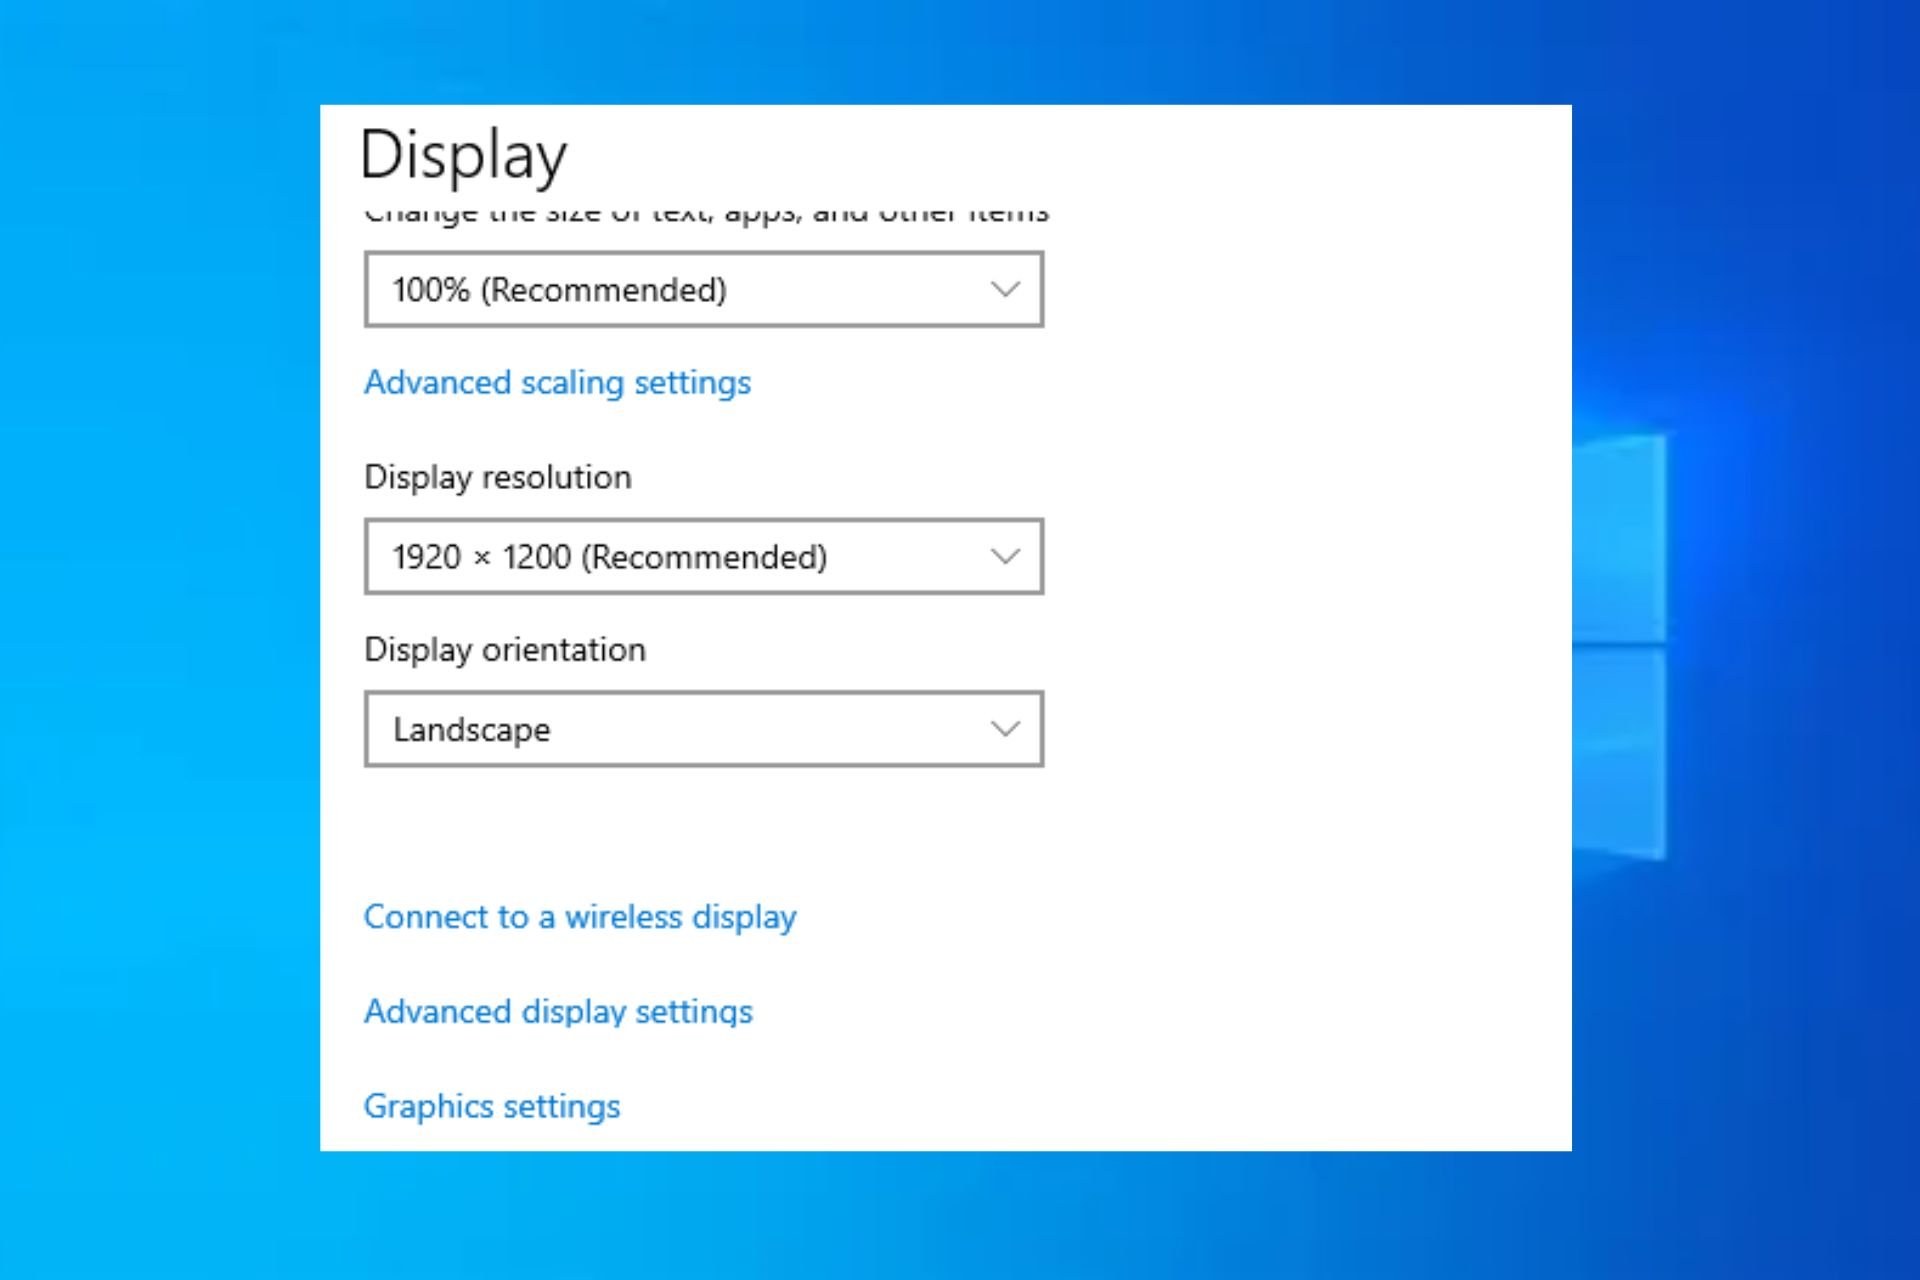
  3. Click on Advanced scaling settings or Scale and Layout to change the size of text and apps.
  4. To change your screen’s resolution, click on the drop-down menu under Screen Resolution and select the desired resolution.

If the  Advanced Display Settings goes missing after a Windows update or for whatever reason, you can access its functionalities using the Display Adapter Properties. This will provide you with the same options and configurations in the Advanced Display Settings.

2. Disable the inbuilt graphics card

  1. Press the Windows key + R, type devmgmt.msc in the dialogue box, and hit Enter to open the Device Manager.
  2. In the Device Manager window, navigate to the Display Adapters tab, right-click on the onboard graphics card, and select Disable device.
  3. Restart your PC to check if the error persists.

Most times, PCs with onboard and dedicated graphics cards installed tend to conflict with each other because both drivers perform the same function, which can lead to errors.

Disabling the integrated graphics card is one way to fix the missing Advanced Display Settings.

3. Update your graphics card

  1. Press the Windows key, type Device Manager in the Windows search bar, and hit Enter.
  2. In the Device Manager window, locate Display Adapters, right-click on your graphics card in the drop-down, and select Update driver.
  3. In the next window, click search automatically for updated driver software, and wait for Windows to scan your PC’s Driver for available updates. 
  4. If there are available updates, they’ll be installed automatically.

If Windows doesn’t locate an update, you can visit the website of your Driver’s manufacturer (Nvidia or AMD) to download and install the Driver manually.

4. Run the hardware and device troubleshooter

  1. Press the Windows key, type Control Panel, and hit Enter.
  2. In the Control Panel window, locate the Troubleshooting tab and click it.
  3. Click Hardware and Sound and select Next in the popup window.
  4. Windows will start searching for hardware problems and fix them if it finds any. You might also need to restart your PC to apply the fix.

Windows has a hardware troubleshooter which helps detect issues with your current OS. Running the troubleshooter can help resolve the missing Advanced Display Settings error.

If you’ve recently updated your OS with the Windows 10 Fall Creators update and your advanced display settings are missing, you can fix the error by following the solutions listed in this guide.

Fix: Windows 10 Microphone Boost Missing

Microphone Boost is a built-in Windows functionality that is utilized by voice-over-IP services to increase the volume while using the service. If your PC’s volume is low, the microphone boost can help you recover the lost audio quality.

However, if this feature is completely missing, it can reduce your PC’s sound quality. In this article, we’ll discuss some of the common reasons why the microphone boost is missing and provide steps to fix the error.

Why is the Windows 10 microphone boost missing?

  • Outdated Driver – Microphones are hardware devices that require software in the form of drivers to function correctly. If the audio driver is outdated, it can cause issues with the microphone boost.
  • Wrong Port Connection – External microphones need to be connected via USB to function. If you connect the mic to the wrong or faulty port, you’ll experience problems with the microphone’s audio.
  • Unsupported Hardware – In some cases, the microphone you’re attempting to connect to your PC is incompatible with your OS.
  • Incorrect Audio Settings – Like most devices, the microphone needs to be configured according to your PC specs to function correctly. If the device’s configuration is not correct, it can lead to problems with the microphone.

What can I do if the Windows 10 microphone boost is missing?

The following are a couple of ways to fix the Windows 10 missing microphone boost error:

1. Connect to a Different Port

In some cases, users have reported that using a different port helped resolve problems with the microphone boost. Plugging your microphone into an incorrect USB port can cause problems with the Microphone boost option.

Most modern PCs have limited ports with some having as little as one single port. However, if your PC has multiple USB ports, you can connect your microphone to a different port to check if it’ll fix the microphone boost error.

2. Run the Audio Troubleshooter

  1. Type Troubleshoot in the Windows search field and hit Enter.
  2. Then, select Additional Troubleshooters.
  3. Scroll down and locate Speech and select it and click Run the troubleshooter.
  4. Wait till the scan completion and apply the suggestions.

Troubleshooters are excellent tools that help diagnose and repair Windows errors including sound issues. Running the audio troubleshooter can help resolve such errors.

3. Update the Microphone Driver 

  1. Press the Windows key, type Device Manager in the Windows search bar, and hit Enter.
  2. In the Device Manager window, locate the Sound, video, and game controllers options, right-click on the specific audio device, and select Update driver.
  3. In the next window, select Search automatically for an updated driver, and follow the on-screen instructions to finalize the update.
  4. Restart your PC to take effect.

Sometimes, the microphone boost option might be missing due to outdated audio drivers. Ensure you update your Drivers regularly to prevent further errors.

If the microphone driver fails to install, here is a detailed guide showing you how to fix unable to install drivers on Windows. 

Then again, another valid method to update drivers 100% automatically is with a dedicated application designed for driver updates.

⇒ Get Outbyte Driver Updater

4. Reinstall audio drivers

  1. Right-click on Start and select Device Manager.
  2. Expand the Sound, video, and game controllers option in the Device Manager window. Right-click on your sound driver and select Uninstall device.
  3. In the pop-up window, mark the Delete driver software for this device option and click Uninstall.
  4. Restart your PC and check if the error is fixed.

If the Microphone boost is missing, it’s likely your audio driver is incompatible or corrupt. Ensure you get the best audio drivers before installing them on your PC.

If the microphone boost is missing, you’ll experience low sound quality on your PC, especially on VoIP apps and services.

If you’ve previously encountered the missing microphone boost on your PC and you successfully fixed it using alternative means, you can let us know in the comments below.

Fix: Esc key stopped working in Excel 365

Several users have complained in the Microsoft forums about Esc key stop working in Excel 365. If the Esc key stops working in Excel 365, you may have trouble closing dialogs and making use of specialized keyboard shortcuts.

In this article, we will discuss some of the possible reasons behind this error and what to do to fix the issue.

Why did Esc key stop working in Excel 365?

Users who have encountered a series of problems with their keyboard have narrowed down possible reasons behind the Esc key stop working in Excel 365 error. Below are some of the likely reasons:

  • Grammarly app is locking the Esc key – If you are using Grammarly (an app that provides writers with suggestions that help to improve their writing) in Excel, many users have confirmed that it stops the Esc key from working.
  • Driver issues – In most cases, an outdated or corrupted driver can affect some keys or the entire keyboard on your computer.
  • Hardware failure – It is also possible that the keyboard itself is faulty. This could be the case if your keyboard is fairly old and needs to be replaced.
  • Add-ins or extensions – Add-ins can occasionally interfere with Excel’s keyboard shortcuts. Try disabling any installed add-ins to see whether it fixes the problem.

Whatever the case is, we have gathered some potential fixes to troubleshoot the issue seamlessly.

What can I do if the Esc key stop working in Excel 365?

Before trying any of the advanced tweaks provided in this guide, users should ensure they perform the following preparatory checks:

  • Try using the on-screen keyboard.
  • Run Excel in Safe Mode.
  • Try to open Excel 365 on another computer and try to use the Esc key to close dialogs.

If after attempting the above checks the Esc key still does not work, you can try the steps provided below.

1. Disable Grammarly in Excel 365

  1. Open your Excel app.
  2. Right-click on the Grammarly icon and click on the Settings gear.
  3. Now choose to turn it off indefinitely or for thirty minutes.

This method enables users to disable Grammarly for a specific period and re-enable it whenever they want. However, if the Esc key stop working in Excel and the error persists, consider uninstalling Grammarly.

2. Uninstall the Grammarly app

  1. Press the Start button, type the control panel in the Search box, and launch it.
  2. Navigate to Programs and Features.
  3. Next, right-click on Grammarly for Excel 365 and select Uninstall.
  4. Restart your computer and check if the Esc key now works.

If the first method doesn’t work, uninstalling the Grammarly app should fix the issue.

And that’s it on how to fix the Esc key stop working in Excel 365 error. Since this issue is said to be caused by Grammarly, you can contact Grammarly Support if you do not desire to disable the writing app.

If you have any questions or suggestions, do not hesitate to use the comments section below.

Discord Stuck on RTC Connecting? How to Fix It in 3 Steps

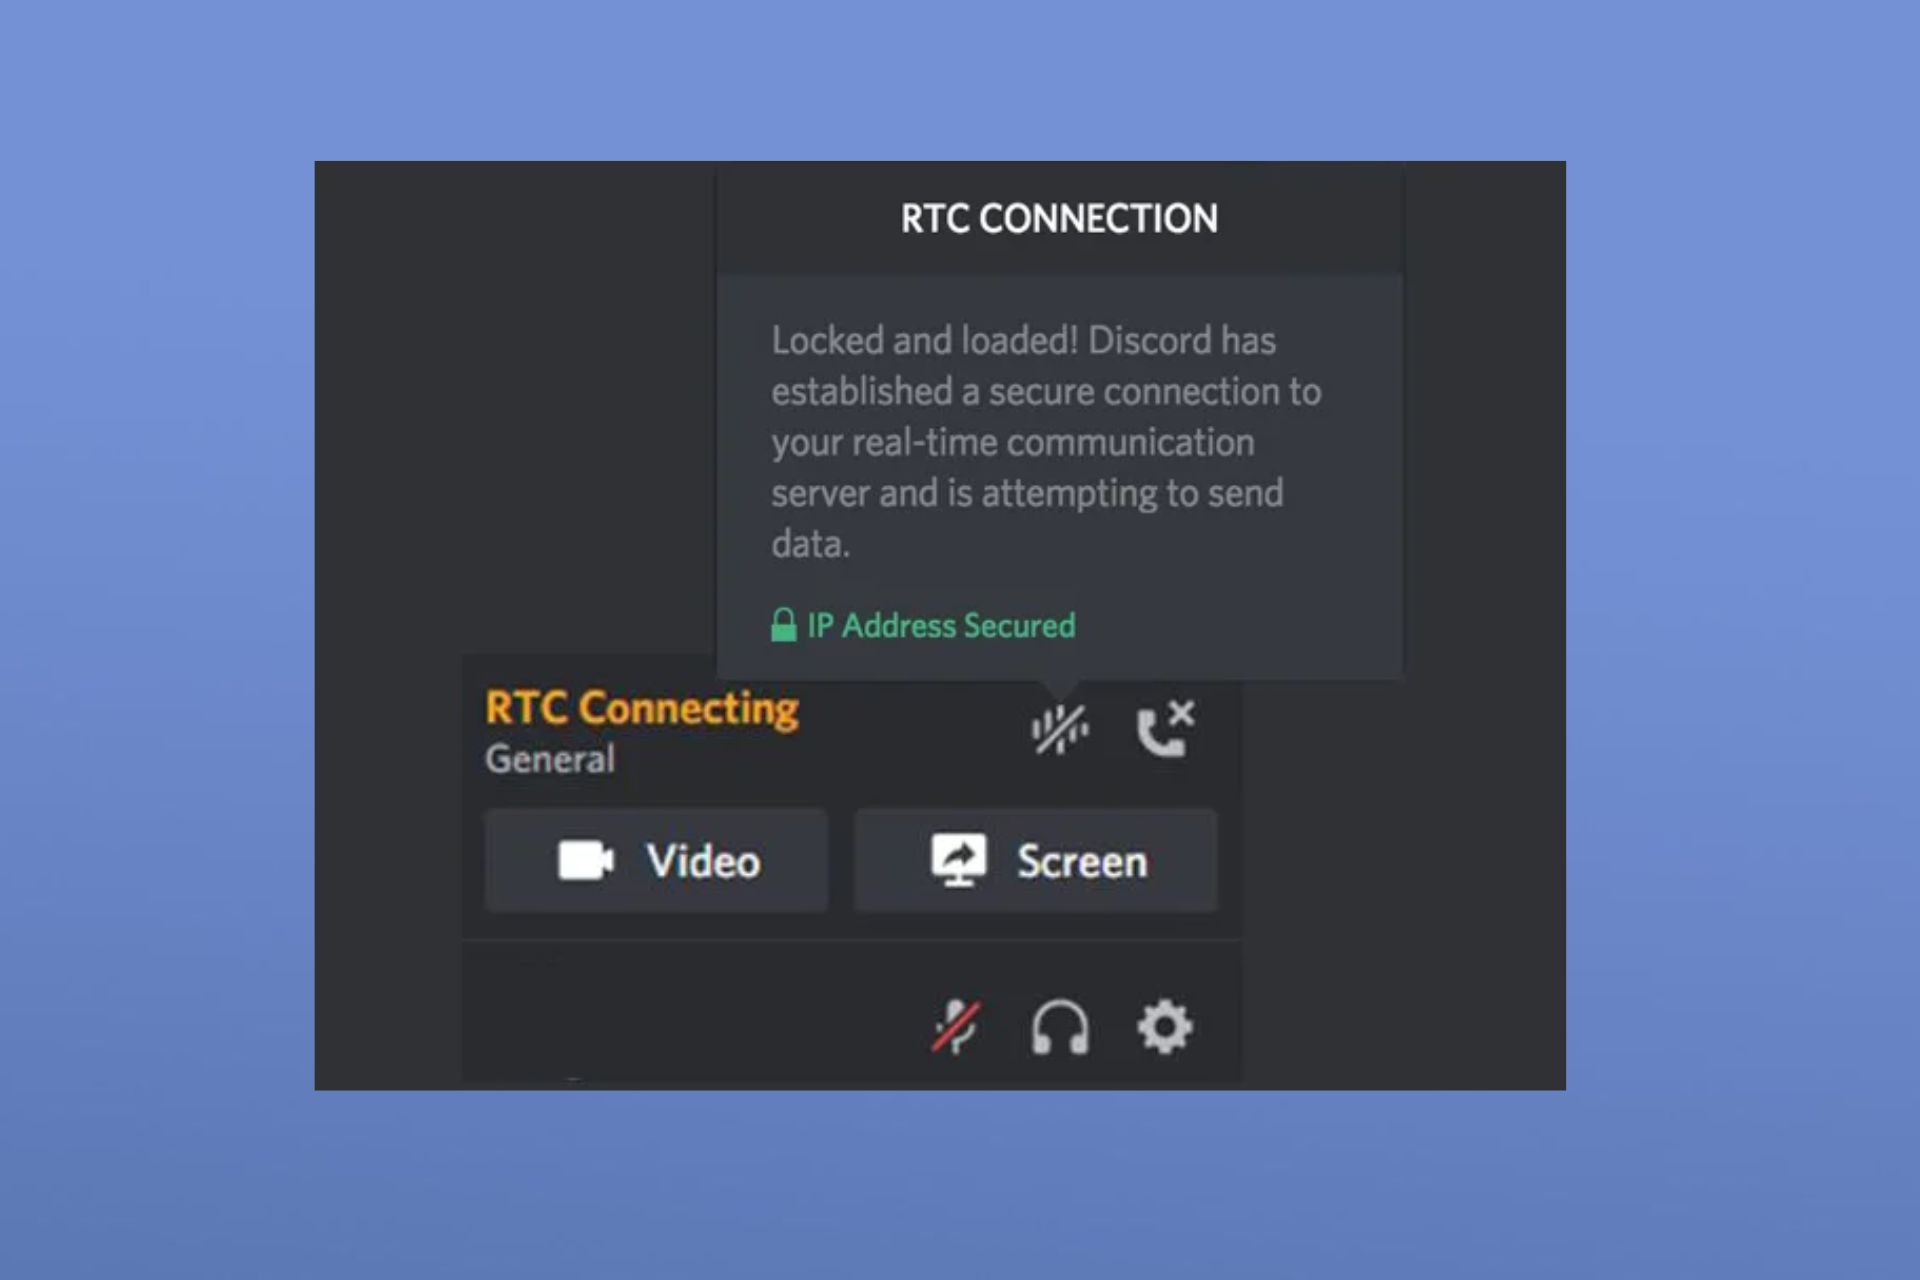
Several complaints have been received from Discord users about Discord Stuck on RTC Connecting. RTC stands for Real-time Chat protocol and Discord relies on it since that is what enables users to communicate with other people.

Whenever Discord gets stuck on RTC Connecting, it means users won’t be able to use the voice chat feature on the platform, and that can be quite frustrating. But you don’t have to worry as we will take you through detailed steps on how to fix the issue in this guide.

Why is Discord Stuck on RTC Connecting?

Before trying to fix the issue, you should be aware of the factors responsible for the Discord Stuck on RTC Connecting error. Here are several reasons for this error. Below are some of them:

  • Network issues – Discord requires a stable and strong internet connection to work properly. If there are any network issues, like slow internet speed or a weak connection, it may cause Discord to get Stuck on RTC Connecting.
  • Discord server issues – Sometimes, Discord’s servers may experience issues that can cause the RTC connection to fail. You can visit the Discord Status page to confirm this.
  • Hardware or software issues – In some cases, Discord and the internet connection may not be the problem. It may be the case of hardware or software failure wherein the microphone or camera is not working. To rule out this possibility, run a test in WebRTC Troubleshooter.

Now that you know some of the factors responsible for Discord getting stuck on RTC Connecting, the next section will provide you with simplified steps to fix the issue.

What can I do if Discord is Stuck on RTC Connecting?

I understand the urgency in the need to get the Discord Stuck on RTC Connecting error fixed, but there are some preliminary checks that you should consider performing before the advanced solutions:

  • To ensure it’s not a temporary glitch, restart the Discord app and your PC.
  • Make sure the date and time on your computer is correct.
  • Restart your router or modem to refresh the network connection.
  • Disable any active VPN service.

If after attempting the precautionary steps above the problem persists, you can now apply the advanced fixes.

1. Clear the DNS cache

  1. Press the Start button, type cmd in the Windows search box, and select Run as administrator from the menu.
  2. Type the following in the text field and press Enter: ipconfig /flushdns
  3. Restart your PC and Discord app.

Clearing your DNS means all records of previously stored IP addresses and DNS will be deleted. The device will now have to do a fresh fetch of the DNS address which should help ensure a stable connection and resultantly, a better WebRTC communication.

2. Upgrade to a better DNS Server

  1. Press the Windows + I keys to open the Settings app.
  2. Click on Network & Internet and navigate to Wi-Fi on the left pane.
  3. Then, click on your Wi-Fi connection.
  4. Under IP settings, click on the Edit button.
  5. Then, change the IP settings from Automatic (DHCP) to Manual.
  6. Now, toggle on IPv4 or IPv6 depending on the connection supported by your router or ISP. Then, type 8.8.8.8 in the space provided for Preferred DNS and 8.8.4.4 for Alternate DNS. Click Save.
  7. Restart your PC and Discord app.

Now check if the problem is fixed. Upgrading to a better DNS server will make the data load faster which is expected to fix the RTC Connecting problem.

3. Disable Windows Defender Firewall

  1. Press the Start button and type Firewall in the search box. Open Firewall and Network Protection from the search results.
  2. Now, click on the Public connection that has (active) next to it.
  3. Then, under Microsoft Defender Firewall, click on the toggle switch to disable Firewall.
  4. Uncheck the box beside the Blocks for all incoming connections, including those in the list of allowed apps option.
  5. You can repeat the same steps for the Private connection.

There is a possibility of a Firewall blocking or restricting Discord. But, when it is disabled, that should eliminate that possibility and allow Discord to function. You can follow the steps provided to enable Firewall if it turns out it is not a threat.

And that’s it on how to fix Discord Stuck on RTC Connecting. Make sure you work your way through the solutions provided one after the other.

In case you can’t hear anyone in Discord or you are facing other issues such as Discord Audio keeps cutting, or Discord keeps freezing check our detailed guides for the quick fixes to apply.

If you have any other questions or suggestions, please leave them in the comments section below.

Illegal System DLL Relocation: 4 Ways to Fix It

According to some users in the Microsoft forum, the Illegal System DLL Relocation issue frequently occurs in Windows XP when a program attempts to load a DLL file that has been moved from its expected location in memory.

Whenever this happens, you won’t be able to run any apps on your computer as a result of this error prompt, and occasionally the system will keep rebooting by itself. We will discuss how to fix the issue in this article.

What causes Illegal System DLL Relocation?

Since other users have encountered similar problems, we have narrowed down some of the possible reasons behind the Illegal System DLL Relocation error. Below are some of them:

  • Damaged or missing system files – The major reason behind this error is due to a fault or deletion of original and important DLL files which are necessary to the operation of Windows. If any of these files get damaged, deleted, or removed, the system will no longer work correctly.
  • Malware or virus infection – Malware or viruses can sometimes cause DLL files to be relocated in memory, potentially leading to system instability or security vulnerabilities. Running a full system scan using reputable antivirus software should fix this problem.
  • Incompatible software – Some software applications may be incompatible with certain versions of Windows or other installed software. Running these apps can lead to DLL files being relocated to incorrect memory locations.
  • Hardware failure or system corruption – In some cases, hardware failures or system corruption may cause DLL files to become displaced. To fix this, perform a system restore or reinstall the operating system entirely.

Now that you know some of the potential reasons behind Illegal System DLL Relocation errors, let’s proceed to how to fix the issue.

How can I fix Illegal System DLL Relocation?

Before using any of the advanced solutions provided below, you should consider performing the following preliminary checks:

  • Regularly back up your important data to prevent data loss.
  • Try to reinstall the faulty software.
  • Use reputable antivirus software to scan and fix the issue.
  • Roll back your Windows update.

Having confirmed the above checks if the problem persists, you can explore the advanced solutions provided below to know what works for you.

1. Run the System File Checker tool

  1. Press the Windows key, type Command Prompt in the Windows search bar, and click on Run as administrator on the right pane.
  2. Next, type the following in the text field and press Enter: sfc /scannow
  3. Wait till the verification is complete.
  4. Once completed, restart your PC and this should fix any corruption found.

If you have issues running the SFC scanner on normal boot, try it from Safe Mode. Once the scanning process is complete, it should repair corrupted system files.

However, you could handle any DLL issues with a dedicated DLL fixer that can quickly detect broken files and replace them with official DLL files.

2. Use the Windows Security Scanner

  1. Press the Windows key to open the Start menu. Type Windows Security in the search box and open it.
  2. Click on Virus & threat protection and click on Scan options.
  3. Select Full scan and choose Scan now.
  4. Follow the on-screen instructions to remove the virus or malware, if found.

The Windows in-built antivirus software will help detect viruses or malware in your system. Although it can be less effective at times, you can use some of the best antivirus tools that are designed to track and eliminate viruses from your computer.

3. Roll back your Windows Update

  1. Press the Windows + I keys to open the Settings app.
  2. Navigate to the System section and click on Recovery.
  3. Under the Go back to the previous version of Windows, click on the Get Started button.
  4. After returning to the previous operating system, you may need to reinstall older programs.

By rolling back your Operating system you would have gotten rid of the problem. Another method to apply is found in our Windows 10 Update broke your PC post.

4. Use System Restore

  1. Press the Start button and type restore point in the Search box, then, click Create a restore point.
  2. Next, select System Protection and click the System Restore button.
  3. Then click Next in the new windows.
  4. Select the restore point and click on Next.
  5. Wait for the process to complete and click Finish.

If you have created a restore point before the error, the System Restore will revert your system to the last restore point before the Illegal System DLL Relocation error.

And that’s it on how to fix the Illegal System DLL Relocation error. Hopefully, the solutions provided will help you to fix the problem.

Sometimes a faulty Windows update or software installation can also cause system DLLs to be moved to a different location in memory. Use any of the methods provided in this article to troubleshoot the issue.

If you have any questions or suggestions, please let us know by using the comments section below.

Fix: The File is too Large For The Target File System

There are times when Windows will refuse to move a file because the size is too big, not minding if the destination has enough storage space. Whenever an attempt is made, users get a message that the file is too large for the target file system.

If you’re experiencing similar issues, it means that you are trying to transfer a file that is larger than 4GB to your USB flash drive or any other storage device. We will work you through how to resolve this issue in this article.

How can I fix the file is too large for the target file system?

1. Format FAT32 to NTFS in Windows

  1. Connect your USB flash drive to the computer.
  2. Press the Windows + E keys to open File Explorer.
  3. Locate your drive, right-click on the USB drive or the external hard drive, and select Format from the menu.
  4. In the Format window, select NTFS from the File System drop-down menu.
  5. Click on the Start button and wait for the format process to complete.

Once the process is complete, now try to copy a file larger than 4GB to the USB drive or external hard drive. However, make sure you back up your USB drive or external hard drive before formatting it to avoid data loss.

2. Split the file using Windows built-in compressor

  1. Right-click on the folder or file that you wish to split and compress. Select Add to Archive from the options.
  2. Under the General tab, locate Split to volumes, bytes (the option that allows you to split a file or folder).
  3. Click on the drop-down icon to select from the preset profiles or input your desired maximum size of the output file.
  4. Click on OK to start compressing the source file.

This might not be the best solution, but it is one of the ways to circumvent the 4GB file limitation. Hence, to split large files, you can use tools such as WinRAR.

⇒ Download WinRAR

3. Format the USB drive to NTFS using Disk Management

  1. Press the Windows + R keys to open the Run command dialog. Type diskmgmt.msc in the dialog box and press Enter.
  2. In Disk Management, right-click on the USB drive or the hard drive and choose Format.
  3. From the dialog box that appears, choose NTFS in the File System box.
  4. Tick the Quick Format checkbox and click on OK.

The Disk Management tool is another effective method to use to format the USB or hard drive.

4. Change the file system using Command Prompt

  1. Press the Windows + X keys to open the Quick Settings menu and select Command Prompt (Admin).
  2. Type the following in the text field and press Enter: convert C: /FS:ntfs (Make sure to replace C with the assigned drive letter) 
  3. Once the conversion process is completed, check if the storage device is converted and if all your files are intact.
  4. If everything is in order, try to transfer the large file again.

By using the Command Prompt, you will be able to change the file system without having to format your USB drive or external hard drive. If you have issues running Command Prompt as an administrator, check our expert guide to fix the issue.

Why do I get file too large for the target file system?

Users who have encountered similar problems have narrowed down possible reasons why the file is too large for the target file system. Below are some of the likely reasons:

  • Incompatible file format – If the destination drive is not formatted to cope with large files, even if you have sufficient storage space to save the file, the error will remain persistent.
  • Transferring large files to a FAT16 file system – For a FAT16 USB flash drive, the maximum file size is 2GB. Sending individual files more than 2GB will trigger the error.
  • Transferring large files to a FAT32 file system – If your USB flash drive or the hard drive of your OS is formatted with FAT32 file system and you transfer files bigger than 4GB to it you will inevitably encounter the file is too large for the target file system error message.

Now that you know some of the potential reasons behind the file is too large for the target file system, let’s proceed to how to fix the issue.

And that’s it on how to fix the file is too large for the target file system error. Make sure you work your way through any of the methods provided in this article. Other related errors like 0x80070299 can also be fixed with some of these solutions.

If you have any questions or suggestions, do not hesitate to use the comments section below.

How to Reinstall DirectX on Windows 11

DirectX is one of the most important software libraries for Windows 11. It boosts and ensures higher performance in graphics and sound while gaming or watching videos on your computer.

The software also allows users to monitor real-time GPU usage and run graphic-related diagnostics. Some of our readers have therefore requested to know how to reinstall DirectX on Windows 11 to fix problems with graphics-requiring apps or games.

When do you need to reinstall DirectX on Windows 11?

Typically, the DirectX tool is automatically installed and updated by Windows. But, seeking to reinstall DirectX on Windows 11 means there are some errors. Below are some of the possible reasons why you need to reinstall DirectX:

  • DirectX installation is corrupted – If your DirectX installation becomes corrupted, probably as a result of malware or hardware failures, you may need to reinstall DirectX to fix the issue.
  • Graphical issues in games – DirectX monitors real-time GPU usage to ensure higher performance in both audio and video while playing games. If you notice unusual graphic changes, the first option should be to reinstall DirectX on Windows 11.
  • Upgrading or reinstalling Windows 11 – If you upgrade or reinstall Windows 11 on your computer, you may need to reinstall DirectX as well. This is because DirectX is tightly integrated with the operating system, and a fresh installation may overwrite or remove some of its components.
  • Corrupted game files – There’s a possibility that your game files are damaged, or the essential files have been deleted. Trying to fix the game or uninstalling it to install a new version should fix the issue.

Hence, let’s proceed to the steps to reinstall DirectX on Windows 11.

How can I reinstall DirectX on Windows 11?

Before attempting any of the advanced solutions provided below, users should ensure they perform the following preliminary checks before reinstalling DirectX:

  • Check for outdated drivers.
  • Check for damaged game/system files.

Follow the steps provided below to reinstall DirectX on Windows 11 PC.

1. Download the DirectX standalone installer

  1. Open your preferred web browser and visit Microsoft’s official website to download the DirectX End-User Runtime Web Installer.
  2. Once downloaded, run the setup and accept the license agreement, then click on the Next button.
  3. Make sure you are still connected to the internet, as any modules that need to be installed will be retrieved now.
  4. The installation may take between a few seconds and an hour depending on the missing component.
  5. After installation, restart your computer.

By reinstalling DirectX via the official Windows installer, the Runtime Installer should have fixed any DirectX-related issues automatically.

2. Update the graphics driver

  1. Press the Windows + I keys to open the Settings app.
  2. Click on the Windows Update from the left pane and click on Advanced Options from the right sidebar to continue.
  3. Click on Optional Updates.
  4. Next, check the box next to graphics, then click on the Download & Install button.
  5. Follow the on-screen instructions to complete the installation process.
  6. Now, restart your PC.

An outdated graphics card can cause issues such as improper information display because the graphics-related process uses DirectX. Hence the need to update your graphics drivers.

And that’s it on how to reinstall DirectX on Windows 11 PC. You can also explore our detailed guide on Windows 11 DirectX errors and possible solutions to apply for additional information.

If you can’t install DirectX in Windows 10, there are seven different ways provided in one of our posts to fix the issue seamlessly.

If you have any questions or suggestions, or probably an alternative solution, do not hesitate to use the comments section below.

Activation Error 0xc004f069: Use These 3 Ways to Fix it

Many have encountered error 0xc004f069 when trying to activate Windows, and this can be a major problem, but luckily, there are few solutions that can help you fix this.

What is 0xC004F069 product SKU not found?

This error occurs if the license has expired or if it’s not signed properly.

How do I fix activation error 0xC004F069?

Before we start, ensure that you have the key for the right edition of Windows.

1. Change your Windows edition

  1. Hit the Windows key, type cmd in the search bar, and click Run as administrator.cmd run as administrator
  2. Type the following command and hit Enter. Remember to replace xxx with the standard edition product key (this is your retail key): DISM /Online /Set-Edition:ServerStandard /ProductKey: xxx
  3. You’ll then be prompted to restart your system, so press Y to proceed.
  4. Start Command Prompt as administrator again.
  5. Type the following command and hit Enter. Remember to replace the last part with your actual product key: slmgr /ipk your_product_keyslmgr /ipk your_product_key
  6. Lastly, run slmgr /ato
  7. You should get an Installed product key successfully message.

Keep in mind that you can use any edition in Step 2, so you’re not limited to ServerStandard.

2. Use a generic key

  1. Try to activate Windows again using a generic key.
  2. After that, restart your PC.
  3. Once the PC boots, try to activate it again with a genuine key.

3. Use Changepk.exe

  1. Start Command Prompt as administrator.
  2. Run the following command, but be sure to use your product key: Changepk.exe /ProductKey <Product Key>changepk exe
  3. Close Command Prompt.

And that’s how to resolve the error 0xc004f069. You may also come across another activation error dubbed activation error 0x87e10bc6, so don’t hesitate to check out our detailed article on how to deal with it.

We also have a guide on what to do if the Windows product key is not working. Before you leave, don’t miss our guide on how to find the Windows product key.

For any further comments, leave them in the comment box below.

Microsoft PDF Printer: 6 Ways to Reinstall or Add it Back

Microsoft PDF printer is a tool in newer versions of Windows that comes already shipped. You, therefore, don’t have to install it. However, some situations necessitate reinstalling it, such as when the Microsoft PDF printer is not working or has some glitches.

If you are in a similar predicament, we show you how to reinstate it to your PC in a few easy steps.

What is Microsoft PDF printer? 

Microsoft PDF printer is a free built-in program in newer versions of Windows that allows you to print documents in PDF format. You can use this program if you do not have Adobe Acrobat or other programs that allow you to convert files into PDF format.

Microsoft PDF printer is not a printer per se, as you cannot send documents and expect a printout. 

It is more of a virtual printer that allows you to create PDF files from any Windows application. You can also use it when you want to print web pages but first convert them to PDF format. 

It’s much more convenient than using the Print command in your application because it allows you to save the document as a PDF file without leaving the application.

Other benefits of this program include:

  • Creating PDF files is quick and simple
  • You can convert any file type into a PDF file 
  • The Microsoft PDF Printer does not require any special software installed 
  • Updated regularly as Windows updates are installed

How do I install a Microsoft PDF printer?

Before you proceed to restore the Microsoft PDF printer, ensure the following are in place:

  • Verify that your copy of Windows is genuine and activated.
  • Ensure you’re running an updated version of your Windows.
  • Check that you have updated all your drivers.

1. Re-enable the Microsoft PDF Printer

  1. Hit the Windows + R keys to open the Run command.
  2. Type optionalfeatures in the dialog box and hit Enter.
  3. Scroll down and locate Microsoft Print to PDF, check the box next to it if unchecked. 
  4. If checked, uncheck, press OK, restart your PC, then repeat steps 1 to 2, then this time check it again. 

2. Reinstall the printer driver

  1. Hit the Windows key, type Device Manager in the search bar, and click Open.device manager w11
  2. Navigate to the Print queues section, locate Microsoft Print to PDF, right-click on it, and select Uninstall device.
  3. Click on Uninstall in the next command to confirm the uninstallation.
  4. Restart your PC, and the drivers will automatically be reinstalled.

3. Use the Command Prompt

  1. Hit the Windows key, type cmd in the search bar, and click Run as administrator.cmd-run-admin-w11 unexpected kernel mode trap windows 11
  2. Type in the following command and hit Enter to disable: dism /Online /Disable-Feature /FeatureName:"Printing-PrintToPDFServices-Features" /NoRestart
  3. Allow the command to complete before typing in the next one to enable: dism /Online /Enable-Feature /FeatureName:"Printing-PrintToPDFServices-Features" /NoRestart

4. Use Powershell

  1. Hit the Windows key, type Powershell in the search bar, and click Run as administrator.Powershell
  2. Type in the following command and hit Enter to disable: Disable-WindowsOptionalFeature -Online -FeatureName "Printing-PrintToPDFServices-Features"
  3. Type in the following command and hit Enter to enable: Enable-WindowsOptionalFeature -online -FeatureName Printing-PrintToPDFServices-Features

5. Re-add it manually

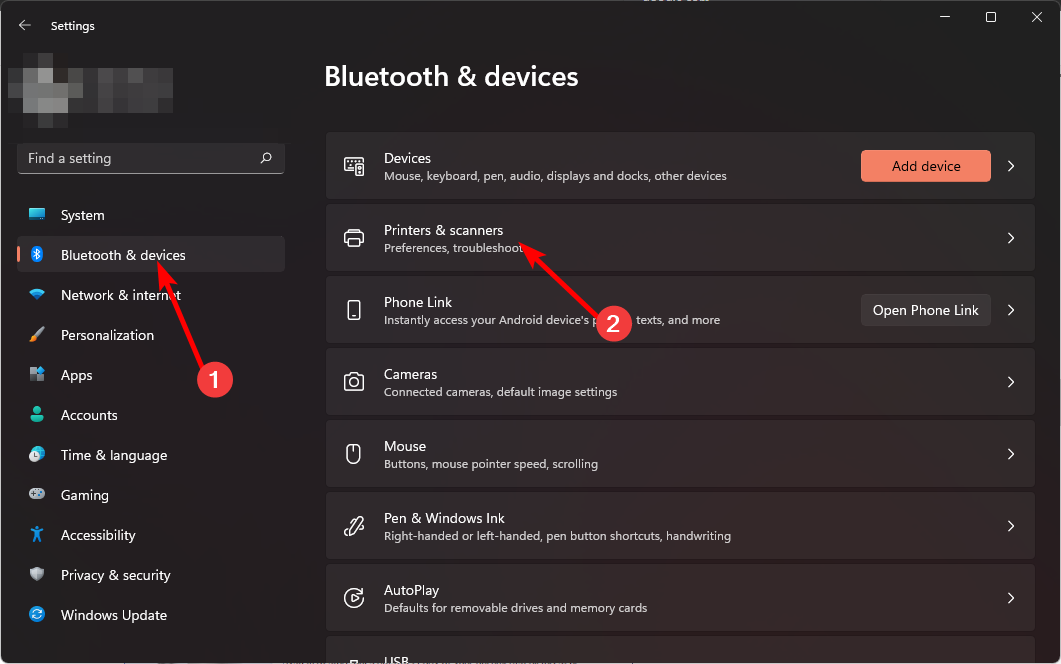
  1. Hit the Windows key and click on Settings.settings windows 11
  2. Navigate to Bluetooth & devices, then click on Printers & scanners.
  3. Click on Add a printer or scanner.
  4. Hit Add manually.
  5. A new prompt will pop up. Click on Add a local printer or network printer with the manual settings option, then click Next.
  6. On the next page, check the box next to Use an existing port then click the drop-down menu and select PORTPROMPT: (Local Port), then hit Next.

6. Perform a System Restore

  1. Press the Windows + R keys, type rstui, and hit Enter.
  2. The System Restore window will open. Click on Next.
  3. Select the restore point you wish to revert to and click on Next.
  4. Now click on Finish.

If by any chance the feature is missing, or you’re unable to reinstall it using any of the above methods, you can restore your PC to an earlier time when it was working perfectly.

Hopefully, you have been able to reinstall the Microsoft Print to PDF tool and are back to using it. While you’re still here, we recommend printer management software so you can have full control over who uses your printer.

Leave any additional thoughts about this topic in the comment box.

Microsoft to launch UET Insights dashboard for Microsoft ads

Microsoft Advertising is constantly innovating to provide advertisers with powerful tools and features to optimize their campaigns and drive better results. With a focus on understanding user engagement and delivering improved ad performance, Microsoft has announced the launch of UET Insights for advertising, a valuable new dashboard that will help advertisers gain insights and leverage data signals for enhanced targeting and conversions.

Scheduled to roll out on a rolling basis starting from July 3, 2023, UET Insights will automatically enable itself for existing UET tags, empowering advertisers with a range of new data collection capabilities. By unlocking these insights, businesses can make informed decisions, improve website performance, and optimize their advertising strategies.

What is UET Tag

The Microsoft Advertising UET tag has long been a trusted tool for advertisers, enabling conversion tracking, remarketing, and automated bidding strategies. With the introduction of UET Insights, advertisers can now take their campaigns to new heights by leveraging additional data signals to gain deeper visibility into web traffic and enhance campaign performance.

Key Features of UET Insights

UET Insights introduces a robust website dashboard that provides advertisers with powerful insights into user engagement, helping them improve their web pages and optimize targeting for increased conversions. Key data available on the built-in dashboard includes:

  1. Total visits to your website and number of visits per page: Gain a comprehensive overview of your website’s traffic and understand which pages are attracting the most visitors.
  2. Session breakdown by country and device: Analyze user behavior across different geographical locations and device types to tailor your campaigns for maximum impact.
  3. Quick backs: Identify users who leave your website quickly, enabling you to address any potential issues and improve the user experience.
  4. Time spent on your website: Measure user engagement by tracking the time visitors spend on your website, allowing you to identify areas where users may be losing interest.

Enabling UET Insights is a hassle-free process that requires no coding from the advertisers’ end. Existing UET tags will be automatically updated on the back end, and all new tags created in the future will come pre-enabled with UET Insights.

How to disable Suggested actions in Windows 11

Microsoft remains busy at work pushing updates to Windows 11 in a bid to enhance its user experience, ultimately promoting productivity. As is the case with the “Suggested actions” feature.

When you have the Suggested actions feature enabled on your device, an inline menu will pop up, through which you can schedule an event and even place a phone call every time you copy a date, time, or phone number to the clipboard.

For instance, when you copy a phone number to your clipboard, the feature will automatically suggest that you place a call using Microsoft Teams or any other app with calling support installed on your device.

The same also applies to copied dates, the flyout will suggest creating a calendar event using your default calendar app. Once you select the app, the event will automatically be created with all the required information filled in.

And while this is a neat feature that will help enhance your efficiency and effectiveness, there are some users who find it redundant and would prefer to have it disabled. There are some instances where you might just want to quickly copy a date or phone number and use it elsewhere without placing a call or scheduling an event.

Turn off Suggested actions in Windows 11

Here’s what you need to do to disable Suggested actions in Windows 11:

  1. Launch the Settings app and click on System on the left pane.
  2. Next, scroll down the right pane and select Clipboard.
  3. Finally, scroll down the window and click on the toggle switch next to the Suggested actions option to disable the feature.suggested actions button

From this point, you can proceed to restart your device and check whether the suggested actions have been disabled.

Note: This feature is only available to users running Windows 11 build 25115 and higher releases. Suggested actions is expected to ship with version 23H2 to general availability in the next couple of months.

Stay in your flow

Hopefully, this tip helped you get rid of those annoying flyouts that pop up each time you copy a date or phone number to your clipboard. Be sure to also check out our separate post that better defines the feature and how you can use it on your Windows PC.

Do you use the feature to enhance your productivity in Windows 11? Share your thoughts with us below.

Feature Image via Bing Image Creator

MediaTek and Nvidia to partner on new Windows on Arm chips

Nvidia is reportedly working closely with MediaTek and could be getting ready to ship the next-generation flagship mobile as early as next year. This partnership will also contribute to the enhancement of AI capabilities as well as gaming functionalities for MediaTek’s application processors,

Sources familiar with the matter further disclosed that aside from the new enhancements, Nvidia and MediaTek will also be working together in a bid to develop Windows on Arm (WOA) platform products for notebook applications.

And while Nvidia’s earnings in the fourth quarter that ended earlier this year in January indicate that the company took a 21% decline, supply for large-volume orders continues to remain steady specifically for A100/H100 chips as well as A800/H800 GPUs.

Building on this premise, sources with close links to Taiwan’s semiconductor supply chain have also indicated that the company continues to receive steady orders for its A100/H100 and A800/H800 chips. The chips are in place to help it make use of its 7/5nm production capacity.

With this new partnership, both Nvidia and MediaTek are more likely to make their way through the notebook market courtesy of their Windows on Arm platform products. The sources also indicated that MediaTek is also going to transition from the production of midrange notebooks and compete with other key players in the industry on an even playing field with the Windows on Arm platform products.

It’s worth noting that MediaTek’s main focus at the moment is entry-level Chromebooks which currently stand at 20% of the market share. However, per estimates made, there’s going to be a shift in global shipments for Chromebooks approximating to 20 million units in 2023.

via DigiTimes

Dotnetfx35setup.exe: What Is It & How to Fix Its Errors?

The .NET Framework is a software platform for Windows operating systems that can be used for developing applications. Dotnetfx35setup.exe is part of a process belonging to the Microsoft .NET Framework 3.5.

It therefore makes it an part of an essential kit for developers. However, like most programs, this application can also have errors that may prevent it from functioning properly on your computer so here’s how to solve them.

What is the dotnetfx35 exe?

The dotnetfx35.exe is the executable file for Microsoft .NET Framework 3.5. It is used to install the files needed for the .NET Framework 3.5. 

The .NET Framework is a set of tools for building and running applications that have been developed using the .NET Framework programming language and run on Microsoft’s operating systems, such as Windows XP and later operating system versions.

The dotnetfx35setup.exe process is considered safe and non-malicious. However, it can generate errors when it fails to work properly for several reasons.

These can range from file corruption or deletion from your system’s hard drive, or if there are missing files in its directory due to malware infections or other threats, you might have encountered online before installing this program on your computer’s hard drive.

It can also cause issues on your computer if it’s not running properly or doesn’t have the proper permissions to execute.

Some of the problems related to the dotnetfx35.exe file include:

  • dotnetfx35setup.exe is not running
  • Windows failed to start – dotnetfx35setup.exe
  • dotnetfx35setup.exe could not be started 
  • The file dotnetfx35setup.exe is missing or corrupt
  • dotnetfx35setup.exe failed to initialize properly 
  • Error starting program: dotnetfx35setup.exe
  • dotnetfx35setup.exe is not a valid Win32 application 
  • Cannot find dotnetfx35setup.exe
  • dotnetfx35setup.exe has encountered a problem and needs to close. We are sorry for the inconvenience 
  • Faulting Application Path: dotnetfx35setup.exe
  • dotnetfx35setup.exe could not be launched. Class not registered
  • dotnetfx35setup.exe – Bad Image
  • dotnetfx35setup.exe Application Error
  • dotnetfx35setup.exe could not be installed
  • dotnetfx35setup.exe could not be found

These errors can prevent you from performing certain tasks on your computer or cause issues when you attempt to run programs that require the .NET Framework 3.5. To fix these errors, follow the steps below.

How can I solve dotnetfx35setup.exe errors?

1. Uninstall the associated program

  1. First, you have to find the related program. Search for the dotnefx35setup.exe file and find its location.
  2. The folder name must be the software package name.
  3. Now, hit the Windows key, type Control Panel in the search bar, and click Open.control-panel-search fallout new vegas runtime error
  4. Click on Uninstall a program under Programs.going uninstall program control panel
  5. Locate the program you discovered in 2 above, then click on it to uninstall.

To ensure your system is clean from traces of this file, ensure you remove any software leftovers.

2. Run DISM and SFC scans

  1. Hit the Start Menu icon, type cmd in the search bar, and click Run as administrator.cmd-run-admin-w11 unexpected kernel mode trap windows 11
  2. Type the following commands and press Enter after each one:DISM.exe /Online /Cleanup-Image /Restorehealth sfc /scannow

If applying the steps above didn’t help you with this issue, you may consider a more effective solution to detect and repair damaged files on your PC. You may use a complete system repair tool tailored to fix such issues on Windows devices.

3. Scan for viruses

  1. Press the Windows key, search Windows Security, and click Open.
  2. Select Virus & threat protection.
  3. Next, press Quick scan under Current threats.
  4. If you don’t find any threats, proceed to perform a full scan by clicking on Scan options just below Quick scan.Scan options
  5. Click on Full scan, then Scan now to perform a deep scan of your PC.Full Scan Scan Now
  6. Wait for the process to finish and restart your system.

Although dotnetfx35setup.exe is not considered a virus, you may find that a similar file with the same name has hijacked the legitimate file. This could mean your system is at risk of infection by malware if it hasn’t already.

Since Windows Defender may not be as comprehensive as third-party antiviruses, we recommend performing another scan, but this time, use ESET NOD32 to catch those stubborn viruses and malware.

4. Perform a System Restore

  1. Press the Windows + R keys, type rstui, and hit Enter.
  2. The System Restore window will open. Click on Next.
  3. Select the restore point you wish to revert to and click on Next.
  4. Now click on Finish.

In most cases, the dotnetfx35setup.exe errors are caused due to outdated versions of .NET Framework 3.5 and its components.

They could also easily be caused conflicts between different versions of Windows or other software installed on your computer which you may have installed unintentionally while installing some other software.

This should serve as a warning to stay vigilant, especially when downloading programs from the internet. Some developers usually sneak in malicious code in their apps, so you must be careful.

That’s a wrap from us for this article, but be sure to let us know if you have been able to resolve this issue in the comment section.

0xc00002e2 Boot Error: How to Fix It

Depending on your operating system version, you may run into the error code 0xc00002e2 in Windows Server when the Domain controller fails to restart or does not display the login screen.

This issue causes a BSoD crash which displays an error message- Your PC ran into a problem and needs to restart. We’re just collecting some error info, and then we’ll restart for you. (0% complete). If you’d like to know more, you can search online later for this error: 0xc00002e2).

Why do I get the 0xc00002e2 boot error in Windows Server? 

The 0xc00002e2 code is an indication that the Active Directory Domain Services role was removed from a domain controller without first demoting it. There are multiple reasons why you encounter this boot error which also include the following: 

  • File deletion – The directoryServices-DomainController role was deleted using the Dism.exe, Pkgmgr.exe, or Ocsetup.exe tool. 
  • Old restore point – The restoration point is older than 30 days (Tombstone) which may create problems with the restoration process. 
  • Incomplete system restauration – The Active Directory Domain Services (AD DS) data is spread across multiple drives, and only the system drive was restored successfully. 
  • Unusable device – The domain controller (DC) is linked to a specific hardware driver and is unable to use that device during the boot process. 
  • Data corruption – The ADS database suffers data corruption or data loss due to power failure. 

Now that we know about the possible causes for the 0xc00002e2 boot error, let’s check out the solution to fix the problem. 

How do I fix the Windows Server 0xc00002e2 boot error? 

1. Validate the Active Directory Domain Services role

1.1 In Windows Server 2008 R2 or Windows Server 2008

  1. Restart your Windows PC and hold the Shift+F8 key until the boot menu appears on the screen. 
  2. Use the arrow keys to select Directory Services Restore Mode (DSRM), and then log into the DRM account by providing the DSRM password created during the Domain Controller promotion process to access the system. 0xc00002e2
  3. Now you need to validate that the Active Directory Domain Services role was removed from a domain controller. To do so in Windows Server 2008 R2, type or paste the following command and press Enter. dism.exe /online /get-features 0xc00002e2
  4. Now that the Active Directory Domain Services is removed successfully, you need to re-add the DirectoryServices-DomainController role back to the server. For this, you need to execute the following command. dism.exe /online /enable-feature/featurename:DirectoryServices-DomainController
  5. Now restart normally and use the Shift + F8 key combination to access the boot menu once again. 
  6. Log into the Directory Services Restore Mode by providing the password as you did previously. 
  7. Type or paste the following command to remove the remove Active Directory Domain Services from the domain controller. dcpromo.exe /forceremoval

1.2 Windows Server 2012 and later versions

  1. Reboot your computer and hold down the Shift key. Now, keep pressing the F8 key until the boot menu appears on the screen. 
  2. Next, select Troubleshoot from the Choose an option menu. 0xc00002e2
  3. Select Advanced Options.
  4. Choose Startup Settings from the next screen. 0xc00002e2
  5. Click the Restart button.
  6. Select Directory Services Repair Mode (DSRM), and provide the DSRM password created during the Domain Controller promotion process to log in successfully. 
  7. Type or paste the following command and press the Enter key to validate that the Active Directory Domain Services role was removed successfully. dism.exe /online /get-features 0xc00002e2
  8. Next, execute the following command to add the DirectoryServices-DomainController role back to the server. dism.exe /online /enable-feature/featurename:DirectoryServices-DomainController
  9. Now restart your PC normally and use the Shift+F8 key combination to access the boot menu once again. Log into the Directory Services Rest Mode by providing the password as you did previously. 
  10. Press the Windows key, type powershell in the search bar on top, and choose Run as administrator from the search result.
  11. Type or paste the following command and press the Enter key to remove Active Directory Domain Services from the domain controller. Uninstall-AddsDomaincontroller -ForceRemoval 

After validating the Active Directory Domain Services role, you need to remove the domain controller metadata; the steps for which are described below. 

Note icon NOTE
The above method assumes that other working domain controllers are currently present on your server and you only wish to remove Active Directory Domain Services. In case, other working domain controllers are not present, and this is the only domain controller in the domain, restoring an earlier system state backup is required. 

2. Remove the Domain Controller Metadata

  1. Use the Windows + R shortcut to launch the Run command, type cmd in the search bar on top and choose Run as administrator from the search result. 0xc00002e2
  2. Type or paste the following command and press Enter to execute it. ntdsutil.exe
  3. Execute the following command to enable the ntds instance: activate instance ntds
  4. Now, execute the following: Files
  5. Now type the following command and hit the Enter key. Make sure that the folder here is C:\Windows\NTDS: Info
  6. After this, type the following command and press Enter. compact to
  7. Now, you need to copy the file Ntds.dit in the temp folder to replace the old instance in NTDS. 
  8. Finally, delete all the log files (.log) in this location and reboot your PC normally. Now restart your Windows Server, and you will no longer encounter the error code 0xc00002e2, indicating the Domain controller failed to start. 

That’s all in this guide! Hopefully, we are successful in resolving the 0xc00002e2 boot error in Windows Server by performing the troubleshooting steps listed above. 

You may want to check out this guide to learn the different ways to force sync Windows Server when the time is currently out of sync.

In case you need further assistance in this regard, feel free to reach out to us in the comments section. 

Chromebook Not Charging Beyond 1%? How to Fix it

Many of our readers have reported that their Chromebook is not charging beyond 1%. Their Chromebook battery dies and when the charger is plugged in, it gets stuck at 1%.

In this guide, we will give you some solutions and possibly try to resolve the problem. Let us get right into it.

Why is my Chromebook not charging beyond 1%?

Troubleshooting Chromebook battery issues won’t be a problem as all branded Chromebook run ChromeOS. Here are a few common reasons why your Chromebook isn’t charging:

  • The battery is malfunctioning – The best possibility is that the battery on your Chromebook is problematic or almost on the verge of it and causing issues.
  • ChromeOS issue – Some software issues with ChromeOS can also trigger multiple problems with your device, including the one with Chromebook not charging beyond 1%.
  • The charging port is damaged – Your Chromebook’s charging port is damaged which is why your laptop’s battery isn’t getting charged.
  • Chromebook isn’t receiving power properly – If you’re not using its original charger, your device will not charge properly.

Let us check out the general as well as advanced solutions and check if this fixes the issue or not.

What can I do if my Chromebook is not charging beyond 1%?

Here are some quick fixes that you can apply and possibly fix the problem.

  • Restart your Chromebook and check if you can charge your device or not.
  • Turn off your Chromebook completely and charge it in this state.
  • Check the power cable and charging port condition and make sure everything is OK.

If these measures didn’t fix the problem, let us apply the advanced solutions and resolve this Chromebook not charging beyond 1% issue.

1. Hard reset your Chromebook

1.1 Method 1

  1. Power off your Chromebook.
  2. Press the Refresh and Power buttons together until the device reboots.
  3. When your Chromebook is booting up, release the Refresh button.

This is the most usual way of hard resetting a Chromebook. However, if your Chromebook is of a different brand, for example, Samsung or Asus, then we would suggest you check out the second method below.

1.2 Method 2

  1. Power off your Chromebook.
  2. Unplug the power cable from the socket.
  3. Remove the battery from your Chromebook and wait for some time.
  4. Reconnect the battery and plug in the charging cable.

2. Change your Chromebook to Recovery Mode

  1. Turn off your Chromebook.
  2. Press Esc + Refresh + Power buttons simultaneously to put your Chromebook into Recovery Mode.
  3. Attach the power cable to your Chromebook and close the lid.
  4. Wait for the charging to complete.
  5. When the battery indicator shows fully charged, open the lid and restart Chromebook.

Many of our readers have reported that putting the Chromebook in the Recovery mode and then charging the laptop helped them resolve the Chromebook not charging beyond 1% issue. We would suggest that you should also give this a try and hopefully fix the issue at hand.

3. Check your battery health

  1. Plug your Chromebook to charging and turn it on.
  2. Press Ctrl + Alt + T to open the Chrome OS terminal.
  3. Type the below command and press Enter. battery_test 1
  4. Crosh will take some moments to diagnose the battery levels.
  5. Look at the Battery is charging line. If you see Battery is discharging, then there is some issue with your battery.

When you see Battery is discharging line in the Crosh terminal, then you can try to change the power cable and see if this fixes the Chromebook not charging beyond 1% issue. Else, it is time for you to take your Chromebook to a repair shop and get the battery replaced.

4. Update Chromebook

  1. Open the Search box.
  2. Type Update and open the Check for update search result.
  3. Below the Google Chrome OS heading, click on the Check for updates button.
  4. If there is a new update available, install it and reboot your Chromebook.

Often some underlying software glitch or bug can disrupt the smooth performance of your device. Chances are some bug is causing your Chromebook not to charge beyond 1%.

Update your Chromebook to the latest version and check if this helps resolve the Chromebook not charging beyond 1% issue.

That is it from us in this guide. We have compared Chrome OS vs Windows 11 and explained which one is better if you are confused between the two.

We also have a great guide on how to turn on a battery saver on a Chromebook, so don’t miss it.

Let us know in the comments below, which one of the above solutions resolved the problem for you.

How to Take a Scrolling Screenshot on Windows 11

While Windows comes with the ability to take screenshots built-in, you won’t get other options, such as scrolling screenshots. For that, you have to rely on browsers that offer scrolling screenshot options, which will be restricted to only web pages.

For a specific window or Windows app, you need to take the help of third-party screenshot-taking apps. In this guide, we will explain the different ways of taking scrolling screenshots on your Windows 11 PC. Let us get right into it.

What are the benefits of taking scrolling screenshots?

Before you jump ahead and start taking scrolling screenshots, first, let us understand some of the benefits of taking scrolling screenshots over normal screenshots.

  • It saves time as you don’t have to take multiple screenshots of a single page.
  • Capturing the entire page lets you explain things in continuity.
  • Content that expands along the window or page can be captured in one go with scrolling screenshots.

So, taking a scrolling screenshot lets you save time and capture more in just a few or a single click.

How to take scrolling screenshots in Windows 11?

1. Capture scrolling screenshot in the web browser

1.1. Microsoft Edge

  1. Open Microsoft Edge.
  2. Click on the 3-dot menu icon.
  3. Select Web Capture.
  4. Click on the Capture full page icon at the top.

The scrolling screenshot will be captured by Microsoft Edge. However, do note that only the active tab will be captured. You can make use of different editing tools or the inbuilt screenshot editor to edit the screenshot.

1.2. Google Chrome

  1. Open Google Chrome.
  2. Navigate to the Google Chrome web store.
  3. Type GoFullPage in the search bar and click on Add to Chrome.
  4. Click on the extensions toolbar at the top of Google Chrome.
  5. Select the GoFullPage extension icon.
  6. A scrolling screenshot of the currently active webpage will be taken automatically.

The best part about this extension, or any other Google Chrome extension for that matter, is that you can use it on Microsoft Edge as well.

1.3. Mozilla Firefox

  1. Launch Mozilla Firefox.
  2. Click on the 3-line icon.
  3. Choose More tools.
  4. Select Customize Toolbar.
  5. Locate the Screenshot icon and drag it to your Firefox toolbar.
  6. Visit the webpage of which you wish to take a scrolling screenshot.
  7. Click on the Screenshot icon.
  8. Select Save full page.

2. Capture scrolling screenshots for Windows apps

2.1. ShareX

  1. Download ShareX on your PC.
  2. Install it.
  3. Launch ShareX.
  4. Click on Capture on the left pane.
  5. Click on Scrolling capture.
  6. Navigate to the webpage or Windows app of which you wish to take a scrolling screenshot.
  7. Hit the Start scrolling capture button.

ShareX is brilliant software available for free and lets you take different types of screenshots, including scrolling screenshots. Apart from screenshots, you can also record videos with them.

It is a nice tool that lets you capture scrolling screenshots of a webpage and any Windows app.

2.2. Tweakshot

  1. Download Tweakshot on your PC.
  2. Install it on your Windows 11 PC.
  3. Launch Tweakshot.
  4. Click on the fourth icon to take a scrolling screenshot.
  5. Open the page or window on which you wish to take a scrolling screenshot.
  6. The app will automatically start taking the scrolling screenshot.

The captured screenshot will open in the built-in editor of the Tweakshot app, which you can use to highlight or add text, or basically do anything with the image.

Tweakshot also offers different options such as taking normal screenshots, full-screen screenshots, capturing Windows apps, video recording, screen color picker, and much more.

2.3. PicPick

  1. Download the PicPick software.
  2. Install the program.
  3. Launch PicPick on your Windows 11 PC.
  4. Click on the Scrolling Window option.
  5. Left-click on the area of which you wish to take a scrolling screenshot.
  6. PicPick will automatically take the scrolling screenshot.
  7. In order to stop the scrolling screenshot, all you need to do is right or left-click on the screen.
  8. The screenshot opens in the editor for you to edit the image.

One thing is clear, to capture scrolling screenshots of Windows apps, you need to make use of various third-party screenshot-taking tools. Our dedicated guide lists some of the best screenshot-taking tools you can opt for.

Popular browsers such as Firefox, Microsoft Edge, etc., let you take scrolling screenshots inbuilt. For those who make use of Google Chrome, you can easily download an extension as shown above and take scrolling screenshots.

We also have a guide that properly explains how to disable the PrintScr button on your keyboard. You can disable the PrintScr button and map it to perform something else with different keyboard mapping tools.

You can also check out the different methods to add text in the Snipping Tool, the default screenshot and video recording tool on Windows 11.

Feel free to let us know in the comments below which one of the above methods you utilized to take scrolling screenshots on Windows 11.

ERR_HTTP2_INADEQUATE_TRANSPORT_SECURITY [Fix]

Google Chrome is indeed a robust and secure web browser. However, users often run into website crashes and error codes like ERR_HTTP2_INADEQUATE_TRANSPORT_SECURITY.

This error code mostly arises on Windows Server installations when a security-related issue prevents you from connecting to a Certificate Authority server configured with HTTPS. 

Why do I get ERR_HTTP2_INADEQUATE_TRANSPORT_SECURITY error? 

The error ERR_HTTP2_INADEQUATE_TRANSPORT_SECURITY indicates incompatibility between Chrome’s security protocols and improper data flow between the Windows server and Chrome using the revised network protocol, HTTP/2. The possible causes for this problem are listed below:

  • Outdated Chrome version – An outdated version of Google Chrome may lack the security features required to set up the CA server connection. 
  • HTTP/2 is Enabled – HTTP/S offers better security but has rigid requirements which if not fulfilled, the OS using Windows Server 2016 will try to switch to HTTP/1.1, triggering this error.  
  • Conflicting browser cookies – The cookies stored in your browser may interrupt the connection between the CA server via HTTPS, forcing Google Chrome to throw the ERR_HTTP2_INADEQUATE_TRANSPORT_SECURITY error.
  • Weak ciphers – If the Windows server is using insecure protocols and weak cipher suites, issues with HTTPS errors are likely to occur.
  • Corrupt cache files – Lastly, if the cache data maintained by the browser becomes corrupt, you are likely to experience a slew of error codes. 

Now that we know what we’re dealing with, let’s solve this problem with the solutions below.

How do I fix the ERR_HTTP2_INADEQUATE_TRANSPORT_SECURITY error? 

Try these simple workarounds before you implement the solutions listed below. 

If these methods do not help, move on to the fixes listed below.

1. Clear browser cookies and cache 

  1. Launch the Chrome browser on your PC. 
  2. Click the Menu icon (three dots) located in the top-right corner and choose Settings from the drop-down menu. ERR_HTTP2_INADEQUATE_TRANSPORT_SECURITY
  3. Access Privacy and security settings from the left navigational panel. ERR_HTTP2_INADEQUATE_TRANSPORT_SECURITY
  4. Click Clear browsing data located on the right. ERR_HTTP2_INADEQUATE_TRANSPORT_SECURITY
  5. In the pop-up window that appears, enable the checkboxes for Browsing History, Cookies and other site data along with Cached images and files, and hit the Clear Data button. ERR_HTTP2_INADEQUATE_TRANSPORT_SECURITY
  6. Wait for the browser to expunge all the stored data. Once done, relaunch the browser and try visiting the erroneous website once again. 

4. Disable or Uninstall Extensions

  1. Launch the Chrome browser on your Windows PC and click the Menu icon (three dots) on the top right corner to bring up the browser menu. 
  2. Choose More tools from the drop-down followed by Extensions from the sub-menu. ERR_HTTP2_INADEQUATE_TRANSPORT_SECURITY
  3. The list of all the installed extensions will appear on a new window. Locate a recently installed Chrome extension or one that you think may be the culprit and press the Remove button. ERR_HTTP2_INADEQUATE_TRANSPORT_SECURITY
  4. A confirmation prompt will appear. Press the Remove button once again to perform the action. 

Google Chrome supports a huge variety of extensions all of which are not safe and sometimes even affect the browser’s functionality. Disabling such shady extensions might be of some help in troubleshooting this security-related error code. 

3. Disable HTTP/2 on Windows Server 

Note icon NOTE
Edit the registry files with extreme caution and avoid making wrong changes that can damage your computer. 
  1. Use the Windows + R shortcut to launch the Run dialog box. 
  2. Type the following command in the text field and use the Ctrl + Shift + Enter shortcut combination to launch Notepad with administrative privileges. notepad ERR_HTTP2_INADEQUATE_TRANSPORT_SECURITY
  3. Now copy the code given below and paste it into the Notepad file. 
    • Windows Registry Editor Version 5.00
      “EnableHttp2Tls”=dword:00000000
      “EnableHttp2Cleartext”=dword:00000000
      ERR_HTTP2_INADEQUATE_TRANSPORT_SECURITY
  4. Next, click the File option located on the menu bar and choose Save As from the drop-down.
  5. Assign a meaningful name to the file, such as http2, and then add the .reg file extension to save it as a Registration Entry file. 
  6. Select All Files in the Save as type drop-down and then hit the Save button. ERR_HTTP2_INADEQUATE_TRANSPORT_SECURITY
  7. Now, navigate to the location where you saved the Registration Entry file and then choose Run as administrator from the context menu. 
  8. Click the Yes button on the User Action Control prompt that appears. 
  9. Once completed, reboot your Windows PC and re-launch the Chrome browser. You will no longer get the ERR_HTTP2_INADEQUATE_TRANSPORT_SECURITY error code upon visiting the websites running on the CA server. 

If HTTP/2 is enabled on Windows Server and you are using an older version of Google Chrome, there are high chances for an overflow of data between the browser and Windows Server. As inferred, HTTP/2 is not compatible with versions 40 and earlier and may cause crowded communication. Thus, disabling HTTP/2 is a viable solution to resolve the incompatibility causing the inadequate transport security error. 

4. Reset Chrome to the original settings 

  1. Launch the Chrome browser on your computer. 
  2. Click the Menu icon (three dots) present in the top right corner and choose Settings from the drop-down menu. ERR_HTTP2_INADEQUATE_TRANSPORT_SECURITY
  3. Choose the Reset settings option from the left navigation pane. ERR_HTTP2_INADEQUATE_TRANSPORT_SECURITY
  4. Click the Restore settings to their original defaults options located under the Reset settings section. ERR_HTTP2_INADEQUATE_TRANSPORT_SECURITY
  5. A warning pop-up will appear in front of you. Click the Reset settings button to reset Chrome settings to the default value. 

Misconfigured privacy and security-related settings in the Chrome browser often prevent the website from loading successfully. So, instead of changing each browser setting manually, Resetting the Chrome settings with a button click will suffice. 

That’s all about it! Hopefully, you could get around the error code ERR_HTTP2_INADEQUATE_TRANSPORT_SECURITY by implementing the solutions presented in this comprehensive guide. 

Refer to this guide for help if you encounter the Something went wrong while displaying the webpage Chrome error.

Which of these workarounds did the trick? Do let us know in the comments. 

Fileinfo.sys BSOD: 6 Ways to Fix It for Good

The Blue Screen of Death errors lists on the Windows OS are endless. Another one of these notorious issues troubling users is the fileinfo.sys BSOD, which is related to the FileInfo Filter Driver files.

While this issue is not complicated, it can lead to serious problems if left unattended. In this guide, we will show you how to fix this blue screen error effortlessly on your PC.

Why does the fileinfo.sys error occur?

Below are some of the reasons you are getting the fileinfo.sys error with the dreaded Blue Screen of Death:

  • Outdated PC: If your PC is outdated, you don’t need to look too far for the cause of this error. An outdated operating system is prone to different security and software issues. Hence, you need to keep your OS up-to-date.
  • Corrupt system files: Faulty system files are known to be among the leading causes of BSOD errors, including this one. As always, you need to repair these files to solve this problem.
  • Outdated or faulty drivers: Another potential cause of this error is corrupt system drivers. Updating the required drivers should get the job done here.

How can I fix the fileinfo.sys BSOD error?

1. Update your PC

  1. Press the Windows key + I to open the Settings app and select Windows Update.
  2. Click the Check for updates button.
    check for fileinfo.sys
  3. Now, download and install all available updates.

When your PC is outdated, you are likely to get BSOD errors such as fileinfo.sys. This is why you need to update your OS from time to time.

2. Repair system files

  1. Press the Windows + S key, type cmd, and select Run as administrator under Command Prompt.
    cmd admin fileinfo.sys
  2. Type the command below and press Enter: DISM /online /cleanup-image /restorehealthdism restore
  3. After the command above finishes running, run the command below: sfc /scannowsfc scannow
  4. Finally, wait for the command to finish running and restart your PC.

System file corruption is another prominent cause of file information.sys error. Running the SFC and DISM scans should restore normal service here.

If you don’t want to go through the stress of running multiple commands, we recommend using a dedicated system repair tool. Such software can also repair system_service_exception and 0x00000154 BSoD errors.

3. Update drivers

  1. Press the Windows key + X and select the Device Manager option.
    device manager
  2. Click the arrow next to the Display adapters section to expand it, and right-click each of the devices there.
  3. Now, choose the Update driver option.
    update driver
  4. Click the Search automatically for drivers option and install all available updates.
    search auto fileinfo.sys
  5. Finally, repeat Steps 2 to 4 for the Chipset and Network adapter drivers.

The fileinfo.sys file is related to your PC drivers. So, when some important drivers are outdated, they can trigger this BSOD. Following the steps above or going to the manufacturer’s website to update your drivers should do the trick here.

4. Run the Memory Diagnostic tool

  1. Press the Windows key + R, type mdsched.exe, and click OK.
    mdsched.exe
  2. Select Restart now and check for problems (recommended).
    restart
  3. Finally, wait for your PC to restart, and the check will start automatically.

Some users have found the fileinfo.sys issue to be due to memory issues. You can rectify this by running the Memory Diagnostic tool on your PC.

5. Scan for malware

  1. Press the Windows key, type virus, and click Virus & threat protection.
    virus fileinfo.sys
  2. Now, select Scan options.
    scan options
  3. Finally, choose the ideal scan option and click Scan now at the bottom of the page.
    scan now

Malware messes with your PC and can be the reason for a hardware malfunction. This, in turn, causes the fileinfo.sys blue screen error. The solution is to run a full system scan to eliminate the malware.

6. Perform a system restore

  1. Press the Windows key + R, type rstrui.exe, and click the OK button.
    rstrui fileinfo.sys
  2. Click Next on the page that opens.
    next
  3. Now, choose your ideal restore point and click the Next button.
    restore point
  4. Finally, click Finish and follow the onscreen instructions to complete the process.
    finish fileinfo.sys

Suppose you are finding it hard to track the cause of the fileinfo.sys BSOD error, the best thing to do is to perform a system restore. With this, you can restore your PC to a point where it works without issues.

We can conclude this guide on fixing the fileinfo.sys Blue Screen of Death issue. Hopefully, you are able to get rid of this dreadful error before exhausting the solutions in this article.

If you are facing a similar issue in navagio.sys BSOD, check our guide on how to fix it. And more useful tips can be found in our Cldft.sys BSoD error fix: Step-by-step guide or l1c63x64.sys as well.

Feel free to let us know the solution that helped you fix this issue in the comments below.

Fix: Restoring your Previous Version of Windows Boot Loop

Restoring your previous version of Windows loop during boot usually occurs due to failed upgrade. The frustrating aspect of this issue is that it prevents users from booting into their PCs.

While the error might look complicated and scary, it is not the most difficult to fix, as we will show in this detailed guide.

What does restoring the previous version of Windows mean?

Restoring your previous version of Windows loop during boot means that something interrupted the system upgrade process. Below are some of the causes of this issue:

  • Corrupt boot files: When there is a problem with your upgrade process, it might cause damage to your boot files. You need to repair the files and restart your PC.
  • Issues with external devices: In some cases, the external devices connected to your PC might cause issues with the upgrade process leading to this problem. The solution to this is to disconnect the connected devices.

How do I fix restoring your previous version of Windows error?

Below are a couple of preliminary troubleshooting steps to try before delving into the more complex solutions:

  • Wait it out.
  • Let your PC cool down.
  • Remove unnecessary external devices.

If this endless loop continues, you can now proceed to the fixes below:

1. Restart the PC multiple times

  1. Press the power button for some time to shut down your PC forcibly.
  2. Now, restart your PC and shut it down forcibly again when the manufacturer’s logo shows up.
  3. Repeat the Steps above twice. On the third trial, keep pressing F8 when you power on your PC.
  4. This should take you to the login page directly.
    login

Oftentimes, restoring your previous version of Windows endless loop during boot on Windows 10 or 11 is due to minor issues. Many users have been able to fix this issue by restarting their PC, following the steps above.

2. Repair boot configuration

  1. Shut down your PC forcibly by holding the power button, and restart it. Now, shut it down forcibly when the manufacturer’s logo shows up and power it on again. Repeat this twice to bring up the Advanced startup window.
  2. Now, select Troubleshoot.
    troubleshoot
  3. Choose Advanced options.
    advanced options restoring your previous version of windows boot loop
  4. Next, select the Command Prompt option.
    command prompt
  5. Type the following commands and press Enter after each: bootrec.exe bootrec.exe /fixmbr bootrec.exe /fixboot bootrec.exe /scanos bootrec.exe /rebuildbcd
  6. Finally, wait for the command to finish running and restart your PC.

An incomplete upgrade process can lead to issues with your boot files leading to restoring your previous version of Windows loop during boot. The only way around this is to fix these files by running the commands above.

3. Use the Startup Repair

  1. Repeat Steps 1 to 3 in Solution 2.
  2. Click the Startup Repair option.
    startup repair
  3. Finally, follow the onscreen instructions to complete the process.

At times, this issue might be due to issues with the startup process. Thankfully, a dedicated Startup Repair tool can help you fix this automatically.

4. Perform a system restore

  1. Repeat Steps 1 to 3 in Solution 2 to bring up the Advanced options.
  2. Select the System Restore option.
    system restore
  3. Now, enter your login details, select your preferred restore point, and click Next.
    restore point
  4. Finally, click the Finish button and follow the onscreen instructions to complete the process.
    finish restoring your previous version of windows boot loop

Restoring your previous version of Windows loop during boot can occur due to changes made to your PC. Performing a system restore to a point when your device was working well should fix this.

5. Reset your PC

  1. Repeat Steps 1 and 2 in Solution 2.
  2. Now, select the Reset this PC option.
    reset this pc restoring your PC to previous windows version boot loop
  3. Finally, choose the Keep my files option and follow the onscreen instructions to complete the process.
    keep or remove

A simple system restore might not be enough to get rid of restoring your previous version of Windows loop during boot. In this case, you need to reset your PC to default.

The good thing about this is that it allows you to keep your files. But if you know you don’t need those files, the ideal option is to wipe them off.

6. Perform a clean install

If you still can’t get rid of restoring your previous version of Windows error loop during boot, you have no choice but to perform a clean install. While this will wipe off your files and apps, it is your only bet of salvaging your PC.

A clean install will give you a fresh Windows installation without these nagging issues.

With this, we can conclude this excellent guide on fixing this endless error loop. Hopefully, you can fix this issue before getting to the last solution on this list.

Did any of the solutions in this guide help you fix this issue? Let us know in the comments below.

Wsock32.dll Missing: How to Fix or Download it Again

Many users are looking for ways to resolve the Wsock32.dll missing error that appears on their computers. The error prevents apps from running. However, this guide will discuss some basic steps for fixing it.

Alternatively, you can read about the causes of missing DLL files on Windows computers and ways to fix them.

What is Wsock32.dll?

Wsock32.dll has the description Windows Socket 32-Bit DLL. It is a Win32-type category DLL (Dynamic link library) file that Microsoft Corporation developed to develop the Microsoft Windows Operating System.

Additionally, Wsock32.dll contains the Windows Sockets API used by network applications to support network connections. It is an essential Windows system file, and its process is needed for your PC to work properly.

Why is Wsock32.dll missing?

Some factors liable to be responsible for the Wsock32.dll file missing are:

  • Recently installed or uninstalled app – When you uninstall apps from your system, it can delete some DLL files from their directories. Likewise, installing the new apps can override some DLL files, subduing and sometimes removing them from the PC.
  • Corrupt system files – The file can also be deleted from your PC if you have corrupted the system files, making them unavailable when required.
  • File in the wrong directory – If the DLL file is not in the proper directory, it becomes inaccessible for the programs meant to use it.

These causes can vary for different users. Regardless, we will take you through fixes to resolve the Wsock32.dll on your computer.

How can I fix a missing Wsock32.dll?

Go through the following preliminary checks before trying any advanced troubleshooting steps:

  • Re-register the file via Command Prompt – If you have the file on your device but are unsure about the error, re-register the DLL file using the regsvr32 [the name of the DLL file] in CMD.
  • Reinstall the app/program causing the error – Sometimes, you may need to disable the antivirus and reinstall the software to overwrite the present data.
  • Perform a System restore – Backdating your system to an earlier point when it last worked perfectly might help resolve the error.  Check what to do if the Restore Point is not working on your PC.

If you’re unable to resolve the DLL missing error, proceed with the fixes below:

1. Use a DLL fixing tool

Dealing with DLL errors can be annoying as it can affect the functionality of some apps on the computer. So, repairing the DLL file is important to ensure the system runs properly. Sadly, repairing these files is difficult if you’re not tech-savvy.

However, you can employ dedicated DLL fixing tools to repair the DLL files. They fix 100% of DLL issues and restore them to a healthy state.

2. Change the file directory

  1. Press the Windows + E keys to open the File Explorer.
  2. Navigate through the following path: C:\Windows\System32\dllcache
  3. Then, select the Wsock32.dll file, right-click on it, and click Copy from the drop-down.
  4. Go to the following directory and paste the file: C:\Windows\System32
  5. Close your File Explorer and try to check if the error still persists.

A wrongfully placed DLL file will automatically cause an issue for the programs that needs it since they can’t access it. Placing it in the correct directory makes it accessible and fixes the Wsock.dll missing error.

3. Run the SFC scan

  1. Firstly, reboot your PC.
  2. Now, left-click on the Start button, type CMD, and click Run as administrator.
  3. Click Yes on the UAC prompt.
  4. Then, input the following and click Enter: Sfc /scannow
  5. Wait for the process to complete and close the Command Prompt.

The users who have claimed this solution worked for them state that it is essential for you to reboot the PC before running the SFC scan.

4. Perform an in-place upgrade

  1. Download Windows 11 Disk Image (ISO) and select Windows 11 (multi-edition ISO).
  2. After downloading, right-click on ISO, select Mount, and then click Setup.exe.
  3. In the Install Windows 11 dialog, click Next.
  4. Now, click on Accept in the license agreement window.
  5. When it prompts the Ready to Install page, check Keep personal files and apps option, and click Install.
  6. Windows 11 will reboot your device several times, leading you to the lock screen.

Running an in-place upgrade is often the last resort to fix this issue. It will resolve issues affecting the previous OS and restore the default health of your system.

Read about ways to resolve Windows Installer Service could not be accessed if you ran into the error.

Conclusively, you can check our guide about installing and fixing missing DLL files on Windows 11. Our latest guide shows you what to do if ws2_32.dll is missing, so feel free to check it out for more solutions.

For further questions or suggestions concerning this guide, kindly drop them in the comments section.

Eax.dll Missing: How to Fix or Download it Again

We have recently received several complaints from users about the Eax.dll missing error. It occurs when trying to start a program or game, preventing the apps from launching. Hence, we’ll take you through some fixes for resolving the error.

Alternatively, you can go through our article about ways to install and fix missing DLL files on Windows 11.

What is Eax.dll?

Eax.dll is a Dynamic Link Library (DLL) file for the EAX (Environmental Audio eXtensions) technology. It is developed to run on Windows PCs by Creative Lab Technology Ltd. It is used for audio processing, enhancing the 3D audio effect in games and other programs.

Furthermore, it contains codes and other information used by the Eax technology. It is an essential Windows component that ensures that its programs function correctly. In short, you can experience difficulties running programs associated with the Eax.dll file if missing.

Why is Eax.dll missing?

Many factors may be responsible for the Eax.dll file missing. Some notable ones are:

  • Corrupt Eax.dll file – It is common for DLL files to go missing or be removed by antivirus software when corrupt. Hence, the file can be missing if it is corrupt.
  • Wrongful placement of the DLL file – Sometimes, the DLL file may be placed in the wrong path or directory, making it difficult for the app to access it when needed.

These factors can vary on different computers. Nonetheless, we’ll discuss detailed steps to help fix the Eax.dll missing error.

How can I fix the missing Eax.dlI?

Before trying any advanced troubleshooting steps, go through the following:

  • Reinstall the app prompting the error – Reinstalling the software might download the DLL file alongside its app package.
  • Create an account on MPlayer and let it update Rogue Spear – Having an account on Player will automatically give you access to updates and patches that could fix these errors.
  • Perform a System Restore – The System Restore will backdate the system, removing recent changes causing the Eax.dll to be missing. Check how to fix Restore Point if it’s not working on your PC.

If the Eax.dll missing error persists, go ahead with the solutions highlighted below:

1. Use a dedicated DLL repair tool

DLL errors can be challenging to fix and affect the functionality of some apps using the file. Hence, repairing the DLL file is essential to help the apps run correctly. Sadly, it is not easy to repair these files if you lack tech knowledge.
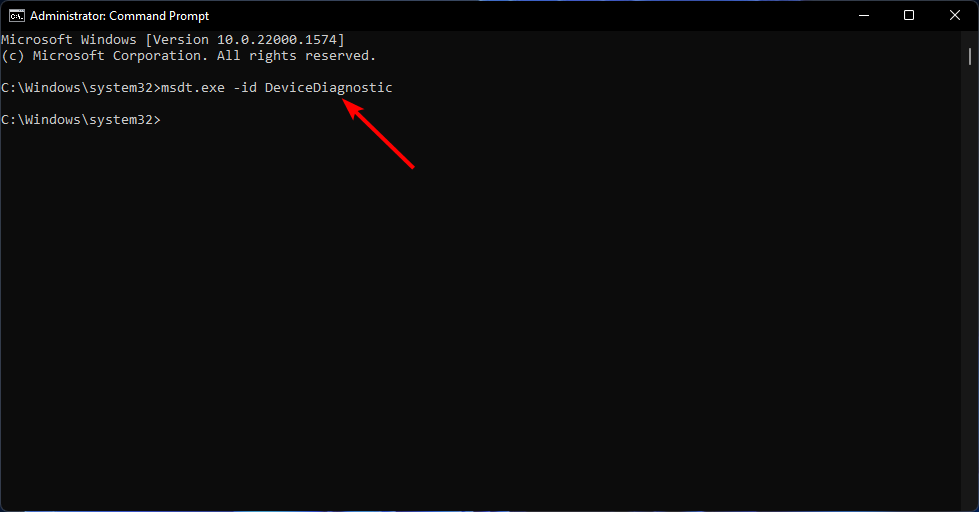
Fortunately, users can employ dedicated DLL fixing tools to repair problematic DLL files. These tools fix incompatibility issues due to third-party DLLs and the operating system.

2. Change the DLL file location

  1. Right-click the game icon and click on Open file location.
  2. Locate the Eax.dll inside the GOG version file of the game and copy it.
  3. Then go back to the main BG&E folder where the .exe files are, then paste the DLL file.
  4. Now, restart the game/app to check if the error is fixed.

Depending on the game prompting this error, you should quickly locate the main folder and paste the DLL file. Users have confirmed this process works effectively.

3. Manually install EAXUnified in the folder

  1. Right-click the game icon and click on Open file location.
  2. Locate the EAXUnified.exe, right-click on it, and run as administrator.
  3. Click Yes when the UAC prompt appears.
  4. Then follow the installation prompts till you finish the installation process.

This solution is effective for users who encounter this error when opening Rogue Spear. However, you can also download the Creative EAXUnified and run the installer.

Registering Eax.dll will add it to the Windows registry, allowing it to be accessed by other programs needing it.

Conclusively, you can read about the causes of missing DLL files on Windows PC and ways to fix them.

Galaxy64.dll not Found: How to Fix or Download it Again

The Galaxy64.dll file is an integral part of the GOG Galaxy game. It plays an important part in the smooth running of the game.

However, some users report that this DLL file is missing in their game. If you also face this issue, this guide will show you how to restore the file without breaking a sweat.

Why is galaxy64.dll not found on my PC?

Different potential factors can cause the galaxy64.dll not found error. Listed below are some of the well-known causes:

  • Presence of malware: If there are viruses on your PC, you might get this error message while trying to run your game. You need to run a full malware scan with your antivirus software to fix this.
  • Faulty system files: In some cases, this issue can be due to missing or broken system files. You only need to repair these files to get past the error.
  • Too many changes to settings: If you started noticing this issue after making changes to your PC, the changes might have triggered it. Your best bet here is to perform a system restore.

How can I fix galaxy64.dll if it is not found?

1. Use a dedicated DLL fixer

Galaxy64.dll is one of the crucial non-system DLL files installed by third-party software. But with these files comes a persistent compatibility issue, leading to various error messages like this one.

Thankfully, you can rectify this by using a dedicated DLL repair tool. With such special tool, you are sure that all compatibility issues between your PC and any third-party DLL file will be fixed without stress.

2. Download from a third-party website

  1. Visit a third-party website like DLL files.com.
  2. Now, click the Download link.
    download galaxy64.dll
  3. Next, unzip the downloaded file and move the clr.dll file to the path below on a 32-bit PC:C:\Windows\System32
  4. If you are using a 64-bit PC, move it to the path below instead:C:\Windows\SysWOW64
  5. Finally, restart your PC.

In some cases, the galaxy64.dll not found error might appear because the file is missing on your PC. To rectify this, you need to download the file and place it in your system file.

If this does not work, you need to place the file in the GOG Galaxy game file. However, ensure you scan the file and ensure it is safe before installing it.
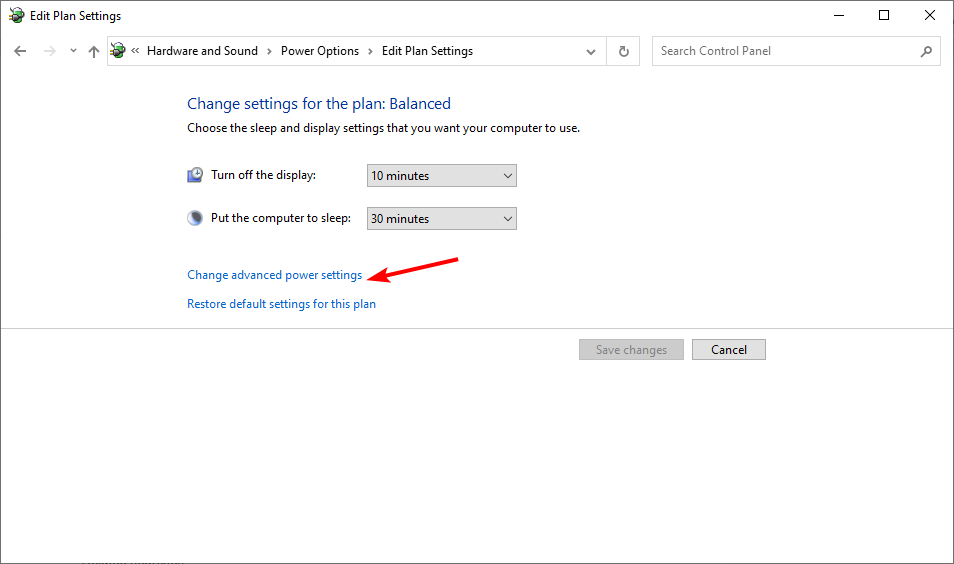
3. Run an SFC scan

  1. Press the Windows key, type cmd, and choose Run as administrator under Command Prompt.
    cmd admin
  2. Type the command below and hit Enter to run it:sfc /scannow
  3. Finally, wait for the command to finish running and restart your PC.

If some of your system files are broken or missing, you are likely to get this galaxy64.dll not found error. The only way around this is to repair these files by running the command above and restarting your PC.

4. Scan for malware

  1. Press the Windows key, type virus, and select the Virus & threat protection option.
    virus galaxy64.dll
  2. Choose Scan options.
    scan options
  3. Now, select your preferred scan option and click the Scan now button.
    scan now

Sometimes, the galaxy64.dll not found error might be a false alert caused by viruses on your PC. To get t past the error message, you need to perform a deep virus scan.

Another option is to use the excellent TotalAV antivirus software to remove even the most stubborn malware on your PC.

This software scans your PC thoroughly for viruses and removes any traces of malware before they can cause problems.

5. Perform a system restore

  1. Press the Windows key + R, type rstrui.exe, and press Enter.
    rstrui galaxy64.dll
  2. Click Next on the page that pops up.
    next
  3. Now, select your preferred restore point and click Next.
    restore point
  4. Finally, click the Finish button and follow the onscreen instructions to complete the process.
    finish galaxy64.dll

If you started noticing the galaxy64.dll not found error after downloading an app or making some changes to your device, you should perform a system restore.

We have reached the end of this guide on fixing the galaxy64.dll not found issue. With the info in this guide, you should now be able to fix the problem without fuss.

If you are dealing with similar DLL problems in opencl.dll missing, check our detailed guide to fix it effortlessly.

Feel free to let us know the solution that helped you solve the problem in the comments below.

Rpcrt4.dll Was Not Found: How to Quickly Fix it

We have received several complaints about the rpcrt4.dll was not found error popping up on Windows PCs.

The error is said to appear in different instances like during startup, after a recent update, after installing new software, etc. However, we’ll discuss the basic steps for fixing the problem.

Also, you may be interested in our article about ways to install and fix missing DLL files on Windows 11.

What is rpcrt4.dll?

Rpcrt4.dll is a Dynamic Link Library (DLL) file associated with Windows computers’ Remote Procedure Call Runtime programs. Microsoft developed the file for Microsoft Windows Operating System.

It is used by some Windows apps for network and Internet connections, allowing computers and devices to communicate with one another.

Furthermore, Rpcrt4.dll is an essential Windows file and is needed for the system to run efficiently. It stores codes, information, and instructions for executable files to follow.

Why is rpcrt4.dll not found?

Numerous factors may be responsible for the Rpcrt4.dll not found error. Some are:

  • Corrupt system files – The file can also be deleted from your PC if you have corrupted the system files, making them unavailable when required.

However, the causes may vary for different users depending on the circumstances. As we go into this article, we’ll take you through tested steps to resolve the error.

How can I fix rpcrt4.dll not found?

Go through the following preliminary checks before trying any advanced troubleshooting steps:

  • Install Windows updates – Updating Windows will fix bugs from the outdated version. Also, it’ll add new features and components to improve system stability.
  • Run System Restore – Read our guide on how to fix the restore point if it’s not working on your PC.

If you’re unable to resolve the DLL missing error, proceed with the fixes below:

1. Use a DLL fixing tool

DLL errors can sometimes be fatal as they can affect the functionality of some apps on the PC. So, repairing the DLL file is important to help the system run properly. Unfortunately, most users can repair the files because they are not tech-savvy.

However, some dedicated DLL repair tools help automatically repair the DLL files. It can fix 100% of DLL issues and restore them.

2. Move the file from the System32 folder and run an SFC scan

  1. Press the Windows + R keys to open the File Explorer.
  2. Go to the C:\Windows\System32
  3. Select the rpcrt4.dll file, right-click it, and cut it.
  4. Then paste it to any other folder, like the Desktop.
  5. Left-click the Start button, type Command Prompt, and click the Run as administrator option.
  6. Click Yes on the User Account Control (UAC) prompt.
  7. Type the following and press Enter: sfc /scannow
  8. Restart your PC and check if the error persists.

Running an SFC scan will find and repair corrupt system files causing the error and restore disk health. Check our article on fixing SFC scannow not working on your PC.

Alternatively, you can read about the causes of missing DLL files on Windows PC and ways to fix them. Also, we have a comprehensive article about DLL hijacking and how to stop it safely.

Feel free to leave your suggestions, or if you have a different solution that works for you, kindly drop them in the comments section.

0x87e50007 Xbox Error: How to Quickly Fix it

The 0x87e50007 error is one of the common errors users encounter while trying to play games on Xbox. This error usually has to do with an incomplete or broken update.

Irrespective of the cause of this issue, the solutions in this guide will help you fix it for good.

Why am I getting the error 0x87e50007 on Xbox?

The Xbox error 0x87e50007 is related to update issues with the faulty game or your console. Below are some of the known causes of the error:

  • Faulty Mac address cache: Sometimes, when the Mac cache is corrupt, it can cause this frustrating error. What you need to do to get past the error is to clear the Mac cache.
  • Outdated game: If you are getting the 0x87e50007 Xbox error on FIFA22, it might be because the game is outdated. The quickest way to fix this is to update the game.
  • Corrupt storage cache: If your cache is corrupt, you will likely get this error on your console. Clearing the cache should do the trick here.

How do I fix the error code 0x87e50007 on Xbox?

1. Update games

  1. Press the Xbox button and choose My games & apps.
  2. Select the See all option.
  3. Now, click the Updates option in the left pane. You will see the available game updates here.
    updates 0x87e50007 xbox error
  4. You can also try to update your console by pressing the Xbox button and following the path Profile & system > Settings > System > Updates.
  5. Finally, you will see Console update available under Updates if your Xbox needs an update.

The first thing you need to do if you are getting the 0x87e50007 Xbox error is to check if there is an available update for the game giving the error.

You should also check for possible updates for your console to ensure that this is not the cause of the error.

2. Clear Mac address

  1. Select the Settings option on the home page.
    settings
  2. Choose General in the left pane and select Network settings in the right pane.
    network settings
  3. Now, choose Advanced settings.
    advanced settings 0x87e50007 Xbox Error
  4. Select Alternative MAC address.
    alternate
  5. Finally, click the CLEAR button and restart your console when prompted.
    clear

Some users have found this 0x87e50007 Xbox error to be due to a faulty Mac address. The solution to this is to clear the address and restart your console.

3. Clear storage cache

  1. Click the Settings option on the home page.
  2. Select the Devices & connections option in the left pane.
  3. Now, choose Blu-ray.
    blu ray 0x87e50007 Xbox Error
  4. Choose the Persistent storage.
    persistent storage
  5. Finally, click the Clear option to clear the cache.

Sometimes, the 0x87e50007 Xbox error can be due to the accumulation of corrupt storage cache. Clearing the cache and restarting your console should do the trick here.

4. Uninstall the game

  1. Press the Xbox button and select My apps & games.
  2. Highlight the game you want to remove and press the Menu button on your controller.
  3. Now, choose Uninstall option.
    uninstall

If you are experiencing the 0x87e50007 Xbox error on a particular game, you might need to uninstall it to fix this issue. You can reinstall the game after some time and check if the issue is fixed.

5. Reset your console

  1. Press the Xbox button and select the Profile & system option.
  2. Now, choose the Settings option.
    profile and info
  3. Next, select System on the left pane.
  4. Choose Console info on the right pane.
    console info  0x87e50007 Xbox Error
  5. From here, choose the Reset console option.
    reset console
  6. On the Reset your console page, you will be provided the option to wipe everything or to keep your games and apps.
  7. Select Reset and keep my games & apps.
    reset and keep
  8. Finally, if the issue persists, you might have to go with the option to wipe everything instead.

If everything you have tried to fix the 0x87e50007 Xbox error fails, you must reset your console. You have the option of keeping your games or removing everything.

You should try to keep everything first and only opt to wipe your file if you have no option.

We have reached the end of this guide on how to fix the 0x87e50007 Xbox error. Provided you carefully follow the instructions above, the issue should now be history.

If you are facing the for this game, you need to be online error. Check our comprehensive guide on the topic to fix it. Many users recently reported Xbox error code 80151912, but we covered it in one of our recent guides.

In the comments below, let us know the solution that helped you fix this issue.

Fix: Windows Movie Maker Not Showing Video

Movie Maker was a built-in video editing software bundled with Windows and used by amateurs and professionals. It was discontinued on January 10, 2017, though you can still download Movie Maker. Besides, some users report that Windows Movie Maker has no video.

The problem is not new, and there were widespread accounts of Windows Movie Maker not showing video earlier before the software was discontinued. So what caused a black screen in Movie Maker? Let’s find out along with the solutions that work!

Why is video not showing in Movie Maker?

Here are a few reasons Windows Movie Maker is black:

  • Running unsupported formats: The most common reason users encounter the error is when using unsupported formats. While Movie Maker supports a wide range of these, some formats are incompatible or require specific codecs.
  • Outdated graphics driver: When facing issues with any program that relies on graphics, an incompatible or outdated driver could be the underlying cause.
  • Missing codecs: Various formats require a dedicated codec to be installed, and when the latter is missing, Windows Movie Maker will have no video.
  • Issues with Movie Maker itself: For a few users, the problem was with the app itself. It could be missing or corrupt files or an improper installation to blame.

What can I do if Windows Moves Maker has no video?

Before we head to the slightly complex solutions, here are a few quick ones to try:

  • Restart the computer.
  • If the file size is too large, divide it into multiple parts or use a video compressor tool.
  • Convert the video to MP4 format using any software and check whether Windows Movie Maker still has no video.
  • Download all the critical codecs for Windows, restart the computer, and then check for issues.
  • Install the latest Windows updates, if any are available.

If none move, move to the fixes listed next.

1. Run Movie Maker in compatibility mode

  1. Press Windows + E to open File Explorer, paste the following path in the address bar, and hit Enter:C:\Program Files (x86)\Windows Live\Photo Gallerypath
  2. Right-click on the MovieMaker.exe file and select Properties.properties
  3. Navigate to the Compatibility tab, tick the checkbox for Run this program in compatibility mode for, and select a previous iteration from the dropdown menu.compatibility mode to fix windows movie maker no video
  4. Once done, click on Apply and OK to save the changes.

The primary change to make when Windows Movie Maker shows no video is to run the program in compatibility mode with a previous iteration of the OS, since it could have issues with the newer ones.

2. Disable Video Stabilization

  1. Select the video that isn’t playing properly in from the storyboard, and click on Edit.edit
  2. Now, click on Video Stabilization and choose None.set to none
  3. Once done, relaunch the program, and the affected video should play seamlessly.

The fix that worked for maximum users was to disable Video Stabilization when the video wasn’t showing in Movie Maker.

3. Update the graphics driver

  1. Press Windows + X to open the Power User menu, and select Device Manager from the list.device manager
  2. Expand Display adapters, right-click on the graphics adapter, and select Update driver.update driver to fix windows movie maker no video
  3. Now, choose Search automatically for drivers and wait for Windows to install the best one available on the PC.search automatically for drivers
  4. Once done, restart the computer for the change to apply.

If it’s the graphics to blame when Windows Movie Maker has no video, updating the graphics driver should do the trick. Remember that Device Manager only looks for newer versions available locally, so you may head to the manufacturer’s website and manually install the latest driver.

Here are direct links to download pages for the major manufacturers:

4. Repair Windows Movie Maker

  1. Press Windows + R to open Run, type appwiz.cpl in the text field, and hit Enter.appwiz.cpl
  2. Select Windows Essentials from the list of programs, and click on Uninstall/Change.repair to fix windows movie maker no video
  3. Click Yes in the UAC prompt.
  4. Now, choose Repair all Windows Essentials programs.repair all
  5. Wait for the repair to complete, and then restart the computer for the changes to apply.repair

When you have a black screen with no video in Windows Movie Maker, repairing Windows Essentials might do the trick. And while doing this, it’s best that you repair all programs under it.

5. Perform a system restore

  1. Press Windows + S to open the Search menu, type Create a restore point, and click on the relevant search result.create a restore point
  2. Click on System Restore.system restore to fix windows movie maker no video
  3. Select Choose a different restore point, and then click Next to proceed.restore point
  4. Pick a restore point from the list, one created before the error first appeared, and click Next.restore to fix windows movie maker no video
  5. Check the restore details, and click on Finish.start restore

When nothing else works, it could be a recent change to the PC leading to no video available in Windows Movie Maker. And a quick solution for that is to perform a system restore. It will revert the PC to a stable state and get rid of the error.

If the problem persists, you can try a recommended video editing software for Windows.

For any queries or to share what worked for you, drop a comment below.

There Has Been a Critical Error on Your Website [Error Fix]

Also known as the white screen of death, there has been a critical error on your website is one of the most dreadful errors site owners encounter on WordPress.

What makes this issue frustrating is that it does not reveal much detail about the potential cause. Fortunately, there are proven fixes that will you eliminate the error for good.

What causes a critical error on my website?

Below are some of the potential causes of there has been a critical error on your website:

  • Malware infection: One of the prominent causes of this error is the infection of your core site files. You need to perform a deep malware scan to eliminate these viruses to fix this issue.
  • Issues with themes and plugins: If your themes or plugins are faulty, you are likely to encounter this issue. You can fix this by using the default theme and resolving the plugin’s conflicts.
  • Low PHP memory limit: When the memory limit you set for PHP is low, you can face different issues. Raising the memory limit should help you solve the problem.

How do I fix there has been a critical error on your website?

Listed below are some basic troubleshooting steps to try before moving to the sophisticated solutions in this section:

  • Clear site cache.
  • Upgrade the PHP version if it is lower than 7.4.
  • Scan files for malware.
  • Check error logs for crash reports.
  • Rollback site with backup.

If you still can’t eliminate this error, proceed to the fixes below:

1. Enable debugging on WordPress

  1. Sign into your FTP account.
  2. Locate the wp-config.php in the root WordPress directory.
  3. Now, add the following lines of code to the line before the final message: define( 'WP_DEBUG', true ); define( 'WP_DEBUG_DISPLAY', false ); define( 'WP_DEBUG_LOG', true );debug

There has been a critical error on your website can be fixed using the debugging feature of WordPress. After enabling it, your WordPress website should now display debugging information.

After debugging, ensure to remove the code from your PHP file.
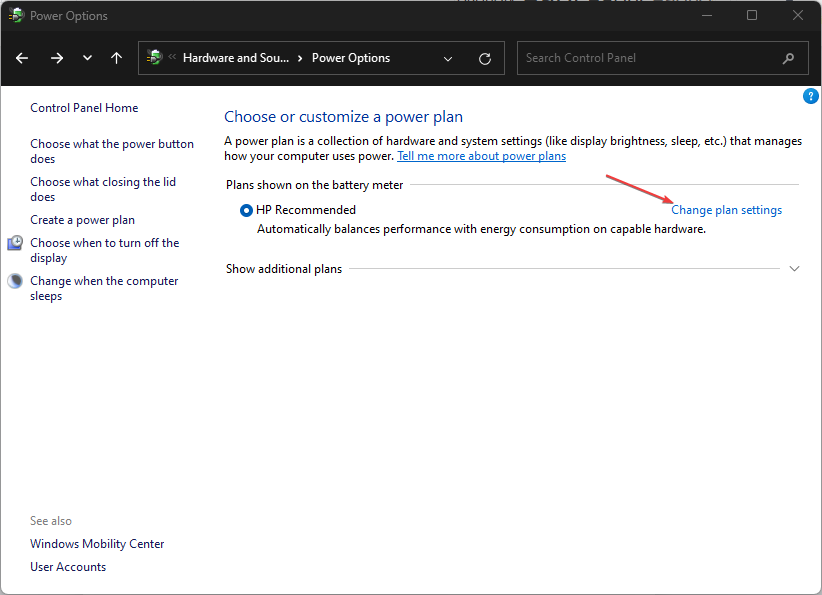
2. Switch to the default theme

  1. Visit the WordPress.org theme directory and download one of the default themes like Twenty Twenty-Three.
  2. Now, extract the file on your PC.
  3. Login to your FTP account and navigate to the wp-content/themes folder.
  4. Next, download all the theme folders on your PC as a backup.
    download there has been a critical error on your website
  5. Now, delete the original theme folders.
    delete
  6. Finally, upload the default theme folder you downloaded, and your WP site should have a default theme.

If you are not using the default theme, problems, like there has been a critical error on your website, can occur. The easiest way around this is to revert to a default theme.

3. Disable Plugins

  1. Access your site with FTP and double-click the wp-content folder to open it.
  2. Now, rename the plugins folder to plugins_old. Alternatively, you can open the folder and add _old to the individual plugin files.
  3. You should now be able to get into your WordPress site, where you can enable the plugins one after the other.

In some cases, this issue can be due to plugin conflict. To solve it, you need to disable all the plugins and reactivate them one after the other.

4. Increase the PHP memory limit

  1. Log in to your site via FTP, right-click wp-config.php, and select Edit to open it.
  2. Now, insert the command below before the last line of your PHP command: define( 'WP_MEMORY_LIMIT', '128M' );limit there has been a critical error on your website
  3. Finally, save the code.

There has been a critical error on your website that can occur if your server can not run PHP because of insufficient resources. The solution to this is to increase the PHP memory limit.

Note that you shouldn’t overly increase your PHP memory limit unless a plugin specifically requires it. And in this case, increasing it to 265M should do.

With this, we can now conclude this detailed guide on how to fix there has been a critical error on your website. Just ensure you follow the instructions therein, and you should be able to access your WordPress website.

If you are facing security issues on your WordPress website, check our detailed guide to fix it.

Feel free to let us know the solution that helped you fix this issue in the comments below.

3 Ways to Rotate a Video in Windows Media Player

Many applications work for video play on Windows 11. However, you may want to perform extra video manipulation. For example, a few readers have wondered if a video rotate option exists in Windows Media Player.

We have looked into it, and this guide will show you all the best ways to achieve it on the player.

Can I rotate a video on Windows Media Player?

Before exploring the topic, it is important to answer the question: can you rotate videos in Windows Media Player? Well, even though the tool is robust and powerful, the answer is no.

The media player does not have any native ways of performing this function. However, there may be a few workarounds, and we will study them in this article. Most will bother using third-party tools and importing the video to the media player.

How do I rotate a video in Windows Media Player?

1. Use Windows Movie Maker

  1. Visit the store to download and install Movie Maker.
  2. Click on the Rotate video icon.
    rotate video in windows media player
  3. Select the video you need to rotate.
    rotate video in windows media player
  4. Click on the Rotate right or Rotate left icons at the bottom of the interface.
    rotate video in windows media player
  5. Finally, save the video and upload it to Windows Media Player.

2. Use online services

  1. Navigate to the Clideo service.
  2. Click the Choose file button.
  3. Select the video you need to rotate.rotate video in windows media player
  4. Rotate it using the rotate icons, then hit Export.
    rotate video in windows media player
  5. Finally, download the file and import it to Windows Media Player, and it will display rotated.

3. Use the VLC player

  1. First, download and install VLC from the official website. Or launch the app if you already have it on your device.
  2. Navigate Media, then Open File.
  3. Select the video you need to rotate.rotate video in windows media player
  4. Now, select Tools then click Effects and Filters.
    rotate video in windows media player
  5. Click on the Video Effects tab and select the Geometry option.
  6. Tick the Transform checkbox and select an option from the dropdown list.
    rotate video in windows media player
  7. Once again, click the Media and select Convert/Save.
    rotate video in windows media player
  8. Finally, Import the rotated video into Windows Media Player.

Any of these three workarounds may get the job done. Since Windows Media Player does not natively provide the rotate option, your only alternatives are these workarounds using third-party apps.

Also, you may need to read this detailed article if you have difficulty opening the media player.

With a lot of changes in Microsoft products, maybe one day we will see this inclusion in the media player, but till then, we would like to know what other workaround you may have tried. Please tell us in the comments section below.

Update Your ASUS Mainboard BIOS Without Risk (Windows 10/11)

In this guide, we’ll walk you through how to update the BIOS on your ASUS motherboard using Windows 10 or 11.

Whether you’re building a new PC or keeping your system up to date, installing the latest BIOS version helps improve hardware compatibility, system performance, and security.

It’s easier than you think, and we’ll show you step by step.

How do I update my ASUS BIOS?

Tip icon Tip
Check your BIOS version first to see if you need an update before proceeding to the next section of this guide.

1. Using EZ Flash 3 Utility

1.1. Extract the BIOS Update file

  1. Visit the official ASUS download center and search for your motherboard’s model name.
  2. Click the Driver and Utility option.
    search update bios asus
  3. Now, select the BIOS & FIRMWARE tab.
  4. Next, download the BIOS and right-click the downloaded file.
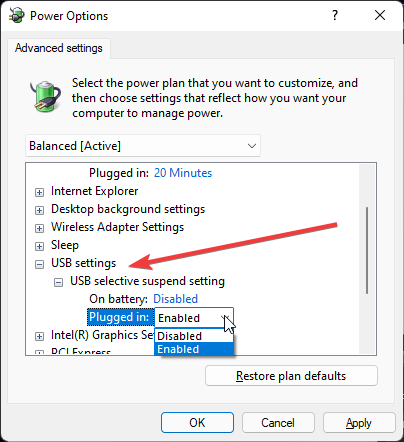
    firmware
  5. Choose the Extract files option.
  6. Finally, copy the extracted file with the largest size to a USB size. Ensure the USB drive is formatted to FAT32 format before using it.

The EZ Flash feature is a unique feature of the ASUS motherboard. It is built into the UEFI BIOS and can be used to update your ASUS BIOS with a USB or online.

Only motherboards with the ASUS EZ Flash 3 feature built-in can use the feature. If you want to use a USB flash drive, follow the steps above to prepare the BIOS file.

1.2. Employing the EZ Flash Utility

  1. Shut down your PC. Now, power it on again and keep pressing the BIOS key (F2 or Del) to enter BIOS.
  2. When you enter the BIOS, click the Advanced Mode option at the bottom of the page.
    advanced mode
  3. Click the Tool tab at the top.
  4. Now, select the ASUS EZ Flash Utility option in the left pane. If you have the ASUS EZ Flash 2 Utility, you can only use USB for the update, while ASUS Flash 3 can use both USB and the internet.
    tool ez update bios asus
  5. To use the USB drive:
    • Select via Storage Device on the next page and click Next.
      via storage
    • Now, choose the USB drive created above and select the BIOS update file you extracted.
    • Click the Yes button when the confirmation page to read the drive pops up.
      yes
    • Lastly, click the Yes button again to confirm the update, and your PC will restart when the process is complete.
  6. If you have ASUS EZ Flash 3 and want to use the internet (note that you can only use a wired connection):
    • Select the via Internet option in Step 4.
      via internet
    • Choose the DHCP option and click OK when the download confirmation page shows up.
    • Next, click the Yes button when prompted to confirm the BIOS update.
    • Wait for the process to complete, and your PC will restart.
  7. Finally, note that you must not press any key or allow your PC to power off when it restarts after the BIOS update.

With the above steps, you should be able to update your ASUS BIOS using the EZ Flash Utility. To confirm the success of the process, you can check your BIOS version.

2. Using AI Suite

  1. Download the AI Suite 3 app from the Download Center and extract the files.
    ai update bios asus
  2. Double-click the AsusSetup.exe file to run it. Follow the onscreen instructions to complete the process and restart your PC.
  3. Next, download and extract the BIOS update file on your PC.
  4. Now, launch the AI Suite 3 app and click the More button (three horizontal dots) in the top left corner.
  5. Choose the EZ Update option in the left pane.
    ez left
  6. To download the update online:
    • Click the Check Now! button.
      check now
    • Now, click the Connect button to connect to the Internet and check for updates.
      connect
    • If there is an update available, click the Update button.
      update update bios asus
    • Click the OK button when prompted to restart your PC.
      ok
    • When your PC restarts, the EZ Update will be loaded automatically to complete the process.
  7. To use the update file extracted on your PC:
    • Click the three horizontal dots under the Manually update Boot logo or BIOS.
      manual update bios asus
    • Choose the update file you extracted in Step 3 above.
    • Now, click the Update button in the bottom right corner.
      update bottom
    • Click the Flash button and confirm the BIOS file.
    • Finally, click the OK button and wait for the process to complete.
      flash

If you want to update your ASUS BIOS with the update file available locally on your PC, the AI Suite is your go-to option.

Some ASUS laptops also include the MyASUS utility, which supports BIOS updates directly within Windows. To learn how it works and what other features it offers, see How to Use MyASUS.

If you want to update your ASUS BIOS with the update file available locally on your PC, the AI Suite is your go-to option. You can also update your ASUS motherboard drivers to ensure all components stay fully compatible and optimized after the BIOS update.

3. Using the Flashback USB

Tip icon Tip
Note that this method only applies to motherboards that support using Flashback USB for BIOS updates. These types of PCs usually have a USB port with flashback written next to it.
  1. Download the BIOS update file and extract its content.
  2. Double-click the BIOSRenamer.exe file to run it.
    biosrenamer update bios asus
  3. The BIOS update file will be renamed automatically (.cap will be added to the name). Press any key on the command page to end the renaming process.
    .cap update bios asus
  4.  Now, copy the renamed update file to the root file of an empty USB flash drive that is formatted in the FAT32 file format.
    copy
  5. Next, insert the USB drive in the Flashback USB port. Note that this port is usually marked with a flashback near it on the I/O panel. In some cases, it will simply be a USB port with a colored outline.
  6. Now, locate the flashback button on the I/O pane. Press and hold this button for about three seconds till you notice a LED light blinking.
    button
  7. Finally, don’t press anything on your PC, nor let it shut down till the LED light stops blinking.

This method of updating your ASUS BIOS is especially useful if your PC is not detecting the CPU for some reason. But as mentioned earlier, not all motherboards support this option.

We have reached the end of this detailed guide on updating your ASUS BIOS. You should now be able to perform the update effortlessly, provided you follow the above steps carefully.

FAQs

How do I know if my ASUS BIOS needs an update?

You can check your current BIOS version by entering the BIOS setup (press F2 or Del during startup). Then, visit the ASUS support website, search for your motherboard model, and compare the latest BIOS version listed there with your current one.

Is it safe to update the BIOS from Windows?

Yes, updating through the ASUS AI Suite or MyASUS utility is safe if you follow the instructions carefully. Avoid interrupting the process or powering off your PC during the update to prevent potential damage.

What happens if I lose power during a BIOS update?

Losing power mid-update can corrupt the BIOS and make your system unbootable. To prevent this, use a reliable power source or an uninterruptible power supply (UPS) during the update.

Can I revert to an older BIOS version on my ASUS motherboard?

Yes, many ASUS motherboards allow you to downgrade the BIOS using EZ Flash or USB Flashback. However, only do this if a newer update causes instability or compatibility issues.

It should be reiterated that you need to be careful when updating your BIOS, as any mistake can damage your PC.

Updating BIOS can help if the VGA card is not supported by UEFI driver, so be sure to try that by following these steps.

For more tips, check out how to update your BIOS without a USB or follow our guide for updating BIOS on the Acer Swift 3.

If you want to know how to update the BIOS if your PC won’t boot, check our dedicated guide to do it quickly. We also have a guide on how to update BIOS using ASUS Armoury Crate, so don’t miss it.

Feel free to let us know if you encounter any problems while applying the steps above.

How do I Add Thumbnails in Chrome [Easy Ways]

Thumbnails in Google Chrome are a great feature. They let you see what to expect from a site or how a web page looks like without leaving your current tab so that you don’t have to click back and forth between tabs. 

However, not everyone knows how to use this feature on their computers. If you’re one of those people, then you’ll want to learn how to enable it so that you can benefit from it. In this article, we show you how to do so in your Chrome browser.

How do I add thumbnails on the Google Chrome homepage?

1. Add automatically

  1. Open your Google Chrome browser, click on the three ellipses at the top right corner, and click on Settings.Settings CHrome
  2. Click on Privacy and security, then select Clear browsing data.
  3. Check Cookies and other site data and Cached images and files, then hit Clear data.Clear data
  4. Restart Chrome and click on Customize Chrome.
  5. Check the Most visited sites checkbox to allow Chrome to curate a thumbnail shortcut list for you.
  6. Next, visit the site you want to add as a thumbnail on Google Chrome’s homepage.
  7. Close and reopen Chrome again, and your site will be added to your thumbnails. 
  8. Repeat these steps until you’ve hit the maximum number of thumbnails or are satisfied with the sites you’ve added.

The essence of clearing cookies is to delete any saved pages that may have been automatically added to your thumbnails owing to the frequency with which you visit the said site.

The same method applies if you want to know how to add thumbnails to Google Chrome homepage on your mobile. Unfortunately, there’s no way to add sites manually for mobile devices.

2. Add manually

  1. Open your Google Chrome browser and click to open a new tab which will lead you to the homepage.
  2. Below the Google search box, you’ll find thumbnails of sites you visit frequently or the default ones if this is your first time using Chrome.
  3. When you hover your mouse over each thumbnail, you’ll reveal three horizontal ellipses that allow you to remove it if you don’t like its position.
  4. To add one, click on an empty icon.
  5. You’ll be prompted to enter the name and site address. Chrome homepage
  6. Once you’re done, the thumbnail of the site will appear.

3. Add Chrome tab thumbnail preview

  1. Open your Google Chrome browser and open a new tab.
  2. In the address bar, type and navigate to the following location: chrome://flags/ 
  3. You’ll be directed to the Experiments tab.
  4. In the search bar, type and enter Tab Hover Cards.
  5. Click on the drop-down menu next to Tab Hover Cards and select Enabled.
  6. Next, click on the Relaunch button that appears at the bottom of Chrome, which will prompt a browser restart.
  7. When you open a few tabs and hover over the non-active ones, you can see a thumbnail displayed.

Aside from adding thumbnails on your homepage, you can also create a preview of the open tabs in your Chrome browser. This is useful so that you don’t have to keep clicking from tab to tab when all you have to do is hover your mouse over an open tab.

Why are my tab thumbnails not showing in Chrome?

If your thumbnails are not showing in Chrome, it could be because of one or more of the following reasons:

  • You don’t have the most recent version of Chrome installed – Tab thumbnails are a feature available in the latest version. If you don’t already, you need to check for the latest updates and download them as soon as possible. If it’s still not working, you may need to reinstall Chrome.
  • Your tabs aren’t open – Tabs must be open for their corresponding thumbnails to show up on Chrome’s New Tab page. If you’re using a different browser or your tabs are closed, they won’t appear.
  • Tab thumbnails aren’t turned on – If you don’t have Tab Thumbnails turned on in your settings, they won’t appear on the New Tab page. Check the steps above on how to turn this feature on.

Now that you know how to add thumbnails on both the homepage and browser tabs in Chrome, your browsing experience should be elevated. Should they go missing, you can easily get your missing Google Thumbnails back with these methods.

If you encounter an error where your Chrome’s most visited sites section is not showing, check out our guide for additional help.

Let us know if you have been able to follow through with this article and successfully create some thumbnails.

No Applicable App Licenses Found: 5 Ways to Fix This Error

The no applicable app licenses found error is an issue users encounter when launching games like Minecraft and Forza Horizon 5. This error is made all the more frustrating because it prevents users from accessing their games.

If you are also facing this issue, there is good news for you as it can be fixed. And we will show you how to do it in this detailed guide.

Why does the no applicable app licenses found error occur?

Several potential factors can cause the no applicable app licenses found error. Below are some of the known causes:

  • Outdated OS: Sometimes, this issue can be caused by an outdated operating system. Hence, you need to install the latest patches on your PC to eliminate this error message.
  • Issues with Windows Store: This error is usually related to Microsoft Store apps, and it can mean there is a problem with the Windows Store. To get past this error message, you need to reset the Microsoft Store cache and run the troubleshooter.
  • Problems with the game launcher: At times, this problem can be due to problems with your game launcher. Uninstalling the program and reinstalling it from the Windows Store should do here.

How can I fix the no applicable app licenses found error?

Before proceeding to the detailed solutions in this section, try the following preliminary troubleshooting steps:

  • Update your PC.
  • Reinstall the game launcher.
  • Log out and log in on the Xbox app.

If you still can’t fix this issue with the steps above, you can delve into the solutions below:

1. Reset the Windows Store cache

  1. Press the Windows key, type cmd, and select the Run as administrator option under Command Prompt.
    cmd admin no applicable app licenses found
  2. Type the command below and hit Enter to run it: wsreset.exewsreset
  3. Finally, wait for a Command Prompt window to open, and the Windows Store app will open automatically.

A corrupt Windows Store cache can be the cause of the no applicable app licenses found error on Xbox game pass and games like Halo Infinite and Back 4 Blood. Resetting the Store cache should help restore normalcy here.

2. Repair the Xbox app

  1. Press the Windows key + I to open the Settings app and select the Apps option in the left pane.
  2. Choose the Apps & features option in the right pane.
    app and
  3. Now, scroll down and click the three vertical dots before the Xbox option.
  4. Next, select Advanced options.
    advanced options no applicable app licenses found
  5. Finally, click the Repair button on the Xbox page and wait for the process to complete.
    repair

If you dealing with the no applicable app licenses found error on the Xbox game pass only, it might due to minor issues with the app. You need to repair the Xbox app to eliminate the error message.

3. Install the Windows Store update

  1. Launch the Windows Store app and select the Library option on the left pane.
    library
  2. Now, click the Get updates button in the top right corner.
  3. Finally, click the Update all option and wait for the pending updates to be installed, including the Microsoft Store app update.
    update all no applicable app licenses found

If the Windows Store is outdated, the apps dependent on it might encounter different issues, including this no applicable app licenses found error. So, you need to update it and other outdated apps.

4. Re-register Windows Store apps

  1. Press the Windows key + S, type powershell, and click Run as administrator under Windows PowerShell.
    powershell no applicable app licenses found
  2. Click Yes when the UAC prompt shows up.
  3. Now, copy and paste the command below and hit Enter to run it: Get-AppXPackage | Foreach {Add-AppxPackage -DisableDevelopmentMode -Register "$($_.InstallLocation)\AppXManifest.xml"}command
  4. Finally, wait for the command to finish running and restart your PC.

If you can’t get past the no applicable app licenses found error message, you need to re-register the Windows Store apps. This will clear the potential causes of this issue and restart all the apps.

5. Run the Windows Store Apps troubleshooter

  1. Press the Windows key + I to open the Settings app and select the Troubleshoot option in the right pane.
    troubleshoot
  2. Select Other troubleshooters.
    other trouble no applicable app licenses found
  3. Finally, click the Run button before the Windows Store Apps option and follow the onscreen instructions.
    run store

In some cases, the no applicable app licenses found error can be down to the failure of multiple processes. The best thing to do here is to run the Windows Store Apps troubleshooter.

This will help you clear the glitches and restart the required services and processes.

With this, we can now conclude this guide on fixing the no applicable app licenses found error. While the error can be annoying, the carefully-curated solutions in this guide should help you fix it.

If you are dealing with the no applicable licenses error on Total War Warhammer 3 only, check our comprehensive guide to fix it for good.

Were you able to fix this issue? Feel free to let us know the solution that helped you in the comments below.