The Pages file format in Apple is what Microsoft Word is to Windows users. Given that these are two different operating systems, opening Page files in Windows can be a bit of a hassle. However, that doesn’t make it impossible, as you see below.
Can you open a Pages document on a computer? you might be wondering. Yes, you can odo so and the best way is to use the Pages app on your Mac or iOS device. But what happens when you receive such a file on a Windows device?
Pages files cannot open natively in Windows. Without an application to open the file, you’ll have a hard time viewing it. It would be easier for the sender to convert it to a Windows-based file format because Microsoft Word is the world’s most widely used and most compatible word-processing software. Since the Pages file format is incompatible with Windows, you’ll need to convert Apple pages to Word.
How do I open a Pages file in Windows?
1. Compress the file
First, create another copy of the Pages file before compressing it.
Right-click on the file and select the Rename icon.
Replace the .pages extension to .zip.
Extract the compressed folder using one of your compression tools.
After extraction, once you open it, the Pages file will be saved as a PDF file, and you can open it.
Upload the file to your drive if you did not receive it via Googe Drive.
Right-click on the Page file and select Open with then click on CloudConvert. If CloudConvert is not on the list, you’ll have to first install it from Google Workspace Marketplace.
If you already have an account with CloudConvert, you can proceed but if not, you’ll be redirected to create one first.
Allow CloudConvert to access your files.
Locate the Pages file, click Convert to, and select a Word format.
Check the Save output files to Google Drive box if you want to save the converted copy to Google Drive, then click on Convert.
Once finished, click on the Download icon, and the file will be saved to your PC in Word format and you can open it.
Enter your Apple ID and Password credentials to sign in.
Click on the upload icon.
Select the Pages file you’d like to convert from your Windows PC.
Click on the three ellipses at the bottom of the document and select Download a copy.
A prompt will appear asking you to Choose a download format. Select Word.
4. Use a third-party tool
File opener tools are in plenty; you must select one that meets your needs. You can also use a third-party app such as Adobe to convert a Pages file to PDF and later to Word.
Most of these tools are also available online, so you don’t have to worry about space constraints as there’s no need to download the apps.
And that’s how to open Pages files on your Windows device. You may also be interested in viewing Apple photos on Windows, so don’t hesitate to check our guide on how to go about it.
If you’re having issues with a similar format, our dedicated guide will help you discover solutions for opening .Pages files on Windows.
Share with us your most preferred method to open Pages files in Windows below.
FirewallAPI.dll is a DLL made by Microsoft and it’s known as the Windows Defender Firewall API file. It is mostly used by Microsoft Office Access 2010 but many of our readers complained about the multiple errors caused by FirewallAPI.dll. Here, you will find out all about this DLL file and how to fix its errors.
What is FirewallAPI.dll and what errors is it causing?
As we mentioned above, FirewallAPI.dll is a DLL file that stores information and instructions for executable (EXE) files. It was created so that multiple apps have the right memory allocation and make your PC more efficient when running them.
Cannot start Microsoft Office Access 2010. A required component is missing: FirewallAPI.dll. Please install Microsoft Office Access 2010 again.
The application has failed to start because FirewallAPI.dll was not found.
This application failed to start because FirewallAPI.dll was not found.
Our readers also encountered the errors FirewallAPI.dll 80201, 80202, 80204, 80205, and 80206.
All of these errors are caused by missing or corrupt FirewallAPI.dll. The causes for this problem range from accidental deletion, virus, or malware infection to corrupt system files and apps that are using the file.
How do I fix FirewallAPI.dll errors?
Before going to more complicated solutions, perform the following prerequisite methods:
Make sure to install all the OS and software updates possible, especially for the affected app.
Try reinstalling the app that triggers the error, such as Microsoft Office Access 2010.
If these workarounds were not efficient, start performing the solutions below.
1. Use a DLL fixer
Manually reinstalling the FirewallAPI.dll is a risky endeavor so, in this case, we strongly recommend using a DLL fixer.
2. Run an SFC scan
Click the Search button on your taskbar, type cmd, and select Run as administrator from the results.
Now, type or paste the following command and press Enter to run it: sfc /scannow
Wait for the scan to finish, then restart your PC and see if the FirewallAPI.dll error is fixed.
System File Checker is an effective Windows tool that detects and repairs the corrupt system file so it can be very efficient for fixing the FirewallAPI.dll error.
3. Perform a full virus scan
Click the Search icon, type windows security, and open the app from the results.
Select Virus & threat protection.
Next, select Scan options.
Check the Full scan box and hit the Scan now button below.
If your PC is infected with a virus or malware, they could mess with the system files and FirewallAPI.dll.
Scanning your PC using Windows Defender might be effective, but we recommend scanning your system with a more powerful third-party antivirus.
4. Perform System Restore
NOTE
This solution will turn your system back in time so if you installed any software after that instance, it will no longer be available.
Click the Search icon, type create a restore point, and click the app from the results.
Now, click on the System Restore button.
Next, select a restore point that has a date before this problem happened and hit Next.
Acknowledge your choice to perform the restoration.
System Restore is like a time capsule for your PC and will turn back your system to a previous point in time before the FirewallAPI.dll error ever happened so it will fix the problem.
These are the most effective solutions to fix FirewallAPI.dll errors and we hope that your PC and apps are functioning correctly now.
Error Code 34 is one of the most common Device Manager errors in Windows that has to do with faults around the USB devices and communication ports. The Code 34 Windows error is accompanied by the error message:
Windows cannot determine the settings for this device. Consult the documentation that came with this device and use the Resource tab to set the configuration. (Code 34).
Further, this error can be resolved by using some manual tweaks. In this article, we will take you through detailed steps to fix the error.
What causes error Code 34 on Windows?
The Code 34 Windows error can be triggered for several reasons. Below are some of the potential reasons for the Code 34 error:
Your device is wrongly configured – The Code 34 Windows error is mainly triggered by incorrect configurations made in the system settings. Also, you should rather use the Resources tab in Device Manager to configure the resource settings in Windows after you might have configured the device itself.
There is a resource conflict in your device driver – Many Windows-based devices use resources to carry out their intended tasks. Further, Windows can identify the resource for each of these devices automatically, but in case it doesn’t, you get an error Code 34.
The above are some of the potential reasons behind the Code 34 Windows error. Now, let’s proceed to how you can fix the problem.
How can I fix the error Code 34 on Windows?
Before trying any of the advanced troubleshooting or settings tweaks, users should ensure they perform the following preparatory checks:
Unplug all external devices connected to your PC.
Restart your computer and connect the external devices to your computer.
Now, check if the problem is fixed.
Having confirmed the above checks, and none of them fixes the Code 34 Windows error, you can work your way through any of the advanced solutions provided below.
1. Configure the device
Press the Windows + R keys to open the Run command dialog box, type devmgmt.msc in the text field, and press Enter to open Device Manager.
Now, expand the Universal Serial Bus controllers section, right-click on USB Root Hub (3.0), and click on Properties.
Then, navigate to the Power Management tab and check the box with Allow the computer to turn off this device to save power. Click on OK.
Now, locate the problematic device from the list of devices on the Device Manager page and open its Properties page.
Then, go to the Resources tab and enable the Automatic Settings option.
From the Settings, choose an appropriate hardware configuration for the device.
Save the changes and check if the problem is fixed.
The computer automatically configures most devices upon installation. But if you are facing Code 34 Windows error with any device, it may require some manual configuration work.
2. Reinstall the device drivers
Press the Windows + R keys to open the Run command dialog box, type devmgmt.msc, and press Enter to open Device Manager.
Locate the device that has the Code 24 error, right-click on it and select Uninstall device instead.
Then, click Uninstall to confirm the process.
Then, unplug the device, restart your PC, and plug the device back in.
The system will detect the device and automatically install a driver for it.
On the other hand, you can also choose the faster and more effective method to install the right drivers. How? Using a dedicated application designed to fix any driver matters.
And that’s it on how to fix the error Code 34 in Windows PC. Make sure you work your way through the methods provided in this article to fix the issue.
If you have any questions or suggestions, do not hesitate to use the comments section below.
In case you are experiencing this issue, you don’t have to worry as it is just an indication of what went wrong. Hence, we’ll discuss what can be the cause and how to fix it.
What causes this device is not present error?
If any device is not working or if you’re constantly receiving this device is not present (Code 24) error message, there can be several reasons behind it. Below are some of the potential reasons for the error:
The device is not properly installed – If there is a fault in the installation package or during the installation of the device you’re trying to use, it can trigger the This device is not present (Code 24) error message.
Faulty hardware – This error message can also appear if the device has developed a hardware failure such as a wear and tear in the cable, or the device itself is damaged. Also, the cable may have been connected incorrectly.
Corrupted or outdated driver – Incompatibility issues such as a corrupted or outdated can also trigger this error message.
The device has been prepared for removal – Another possible reason for this error is that the device has been prepared for removal. After removing the device, the error should disappear.
Now that you know some of the potential reasons behind the error, let’s proceed to how you can fix the problem.
How can I fix error 24: This device is not present?
Before engaging in any of the advanced solutions provided in this guide, you should consider performing the following preliminary checks:
Restart your PC and see if the problem persists.
If you’re using a device with a power button such as a printer, try to restart it.
Check your hardware components and make sure they are properly connected to the computer.
Try testing the device triggering the error code 24 on another computer and see if it works.
Make sure you uninstall a device that you’ve prepared for removal from your Device Manager.
Install the latest Windows updates.
If you keep getting the This device is not present (Code 24) error message after conducting the above checks, try the solutions provided below.
1. Perform hardware and device troubleshoot
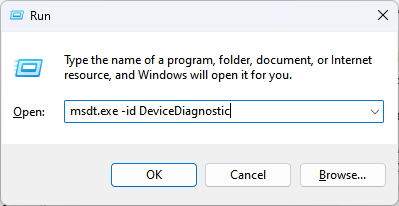
Press the Windows + R to open the Run command, type msdt.exe -id DeviceDiagnostic, and press Enter to open Hardware and Devices troubleshooter.
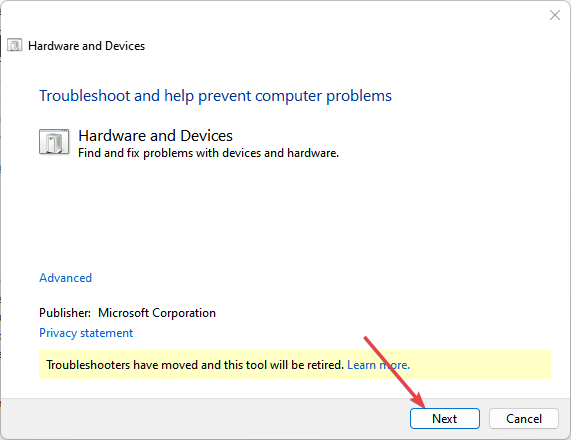
Then, click Next to run Hardware and Devices troubleshooter.
Follow the on-screen instructions to complete the troubleshooting process.
The hardware and devices troubleshooter will help to detect which of the devices is triggering the Code 24 error message and provide steps to fix it. However, if this doesn’t work, consider updating the device driver.
2. Update the device drivers
Press the Windows + R keys to open the Run command dialog box, type devmgmt.msc, and press Enter to open Device Manager.
Locate the device that has the Code 24 error, right-click on it and select Update driver.
Choose Search automatically for drivers.
If there’s any new driver for the device, the system will install it automatically.
Restart your PC.
After updating the driver through the Device Manager, check if the Code 24 error has been fixed. If it persists, reinstall the device drivers.
Press the Windows + R keys to open the Run command dialog box, type devmgmt.msc, and press Enter to open Device Manager.
Locate the device that has the Code 24 error, right-click on it and select Uninstall device instead.
Then, click Uninstall to confirm the process.
Unplug the device, restart your PC, and plug the device back in.
The system will detect the device and automatically install a driver for it.
There’s no harm in reinstalling a device driver if the problem is persistent. However, if your system fails to reinstall the drivers for the device automatically you can visit the official manufacturer’s website to download the drivers and install them manually.
And that’s it on how to fix the This device is not present (Code 24) error message.
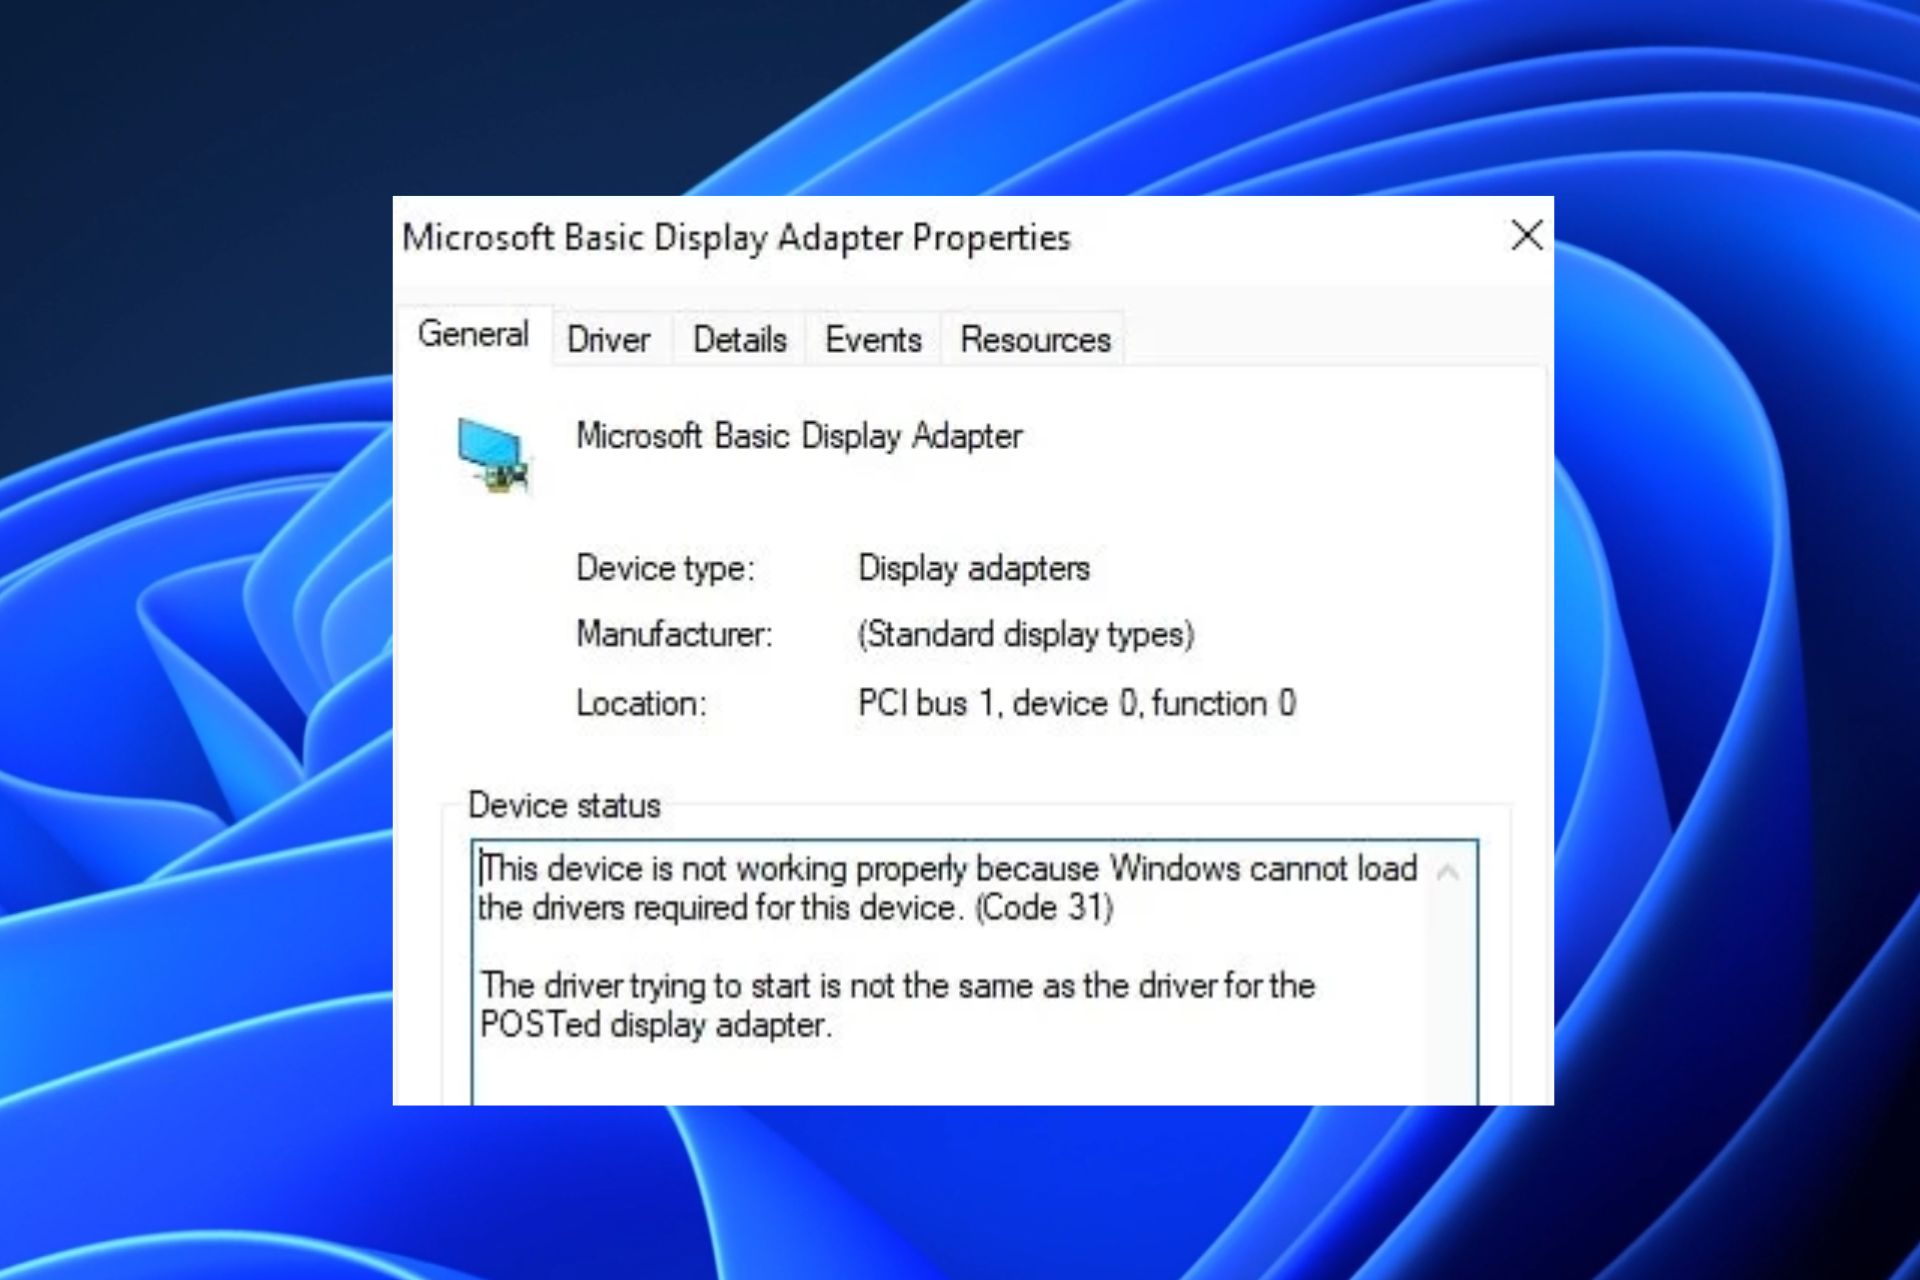
Some of our readers have recently reported that their Graphics card shows as Microsoft basic display adapter in the Display adapters category instead of the name of their PC’s Graphics card model (AMD, NVIDIA, Intel HD, etc).
Whenever this happens, it downgrades the visual quality of your computer’s screen and affects the performance of your PC. In this article, we will discuss what triggers this error and the possible fixes to apply.
Why did Graphics Card show as Microsoft Basic Display Adapter?
There can be several reasons why your Graphics card shows as Microsoft basic display adapter in the Display adapters category instead of your installed Graphics card. Below are some of the potential reasons behind this change:
Driver Issues – The most common reason behind this change is that the manufacturer’s drivers for the graphics card have not been installed or have become corrupted. In this case, your system uses the default Microsoft Basic Display Adapter graphics driver as a replacement.
Faulty System Upgrade– Some users also reported that they encountered this replacement after attempting to upgrade the operating system on their computers.
Hardware Issues – Faulty hardware, such as a damaged graphics card or motherboard, can also cause the graphics card to show as a Microsoft Basic Display Adapter.
Now that you know some of the potential reasons why the Graphics card shows as a Microsoft basic display adapter, let’s proceed to how to fix the issue.
How can I fix Graphics Card shows as Microsoft Basic Display Adapter?
Before trying any of the advanced troubleshooting or settings tweaks provided in this guide, you should consider performing the following preliminary checks:
Restart your PC to flush the buffer.
Try to clean your internal cooling system from dust.
Having confirmed the above checks and if you still require further assistance, you can explore the advanced solutions provided below.
1. Perform Windows Update
Press the Windows + I keys to open the Settings app.
Navigate to the Windows Update tab and select Check for updates. Now install any available update.
Restart your PC for the updates to take effect.
Windows update should provide you with a compatible and right graphics driver to fix the issue. If the Graphics card still shows as Microsoft basic display adapter in place of your current graphics card driver, then try the next fix.
2. Manually install the Graphics card drivers
Visit the official Intel, AMD, or Nvidia official website and download the driver support.
Double-click the downloaded file, then select the Next button.
Follow the on-screen instructions to complete the driver installation process.
Restart your PC.
If the Windows Update does not fix the issue, you can download the original driver from the official manufacturer site for your graphics card and install the drivers manually.
However, it would be more efficient to find available drivers for your PC with a standalone tool specialized in driver installation or updates. Consider it to fix graphics card issues
3. Replace your graphics driver
If updating the graphics card driver does not resolve the issue, you should consider replacing the current graphics card as it might have become obsolete.
It is advisable to upgrade to a more advanced display driver which is certified to support Windows Display Driver Model 1.2 or higher. Alternatively, users can also try the next fix.
Press the Windows + I keys to open the Settings app.
Navigate to the System settings and click the Recovery tab.
Next, click on the Get Started button under the Go back to an earlier build header.
After returning to the previous operating system, you may need to reinstall older programs.
Before using this fix, make sure your important files and applications are already backed up in case the process isn’t successful or satisfactory. Alternatively, you can perform a factory reset and check if that fixes the issue.
And that’s it on how to fix Graphics Card shows as Microsoft basic display adapter. If you’re unable to fix this issue yourself, seek professional assistance from an expert to fix the issue.
Some Microsoft users reported that there is no checkbox to manage this feature in the netplwiz property window. This is happening because Microsoft’s passwordless sign-in feature, like Windows Hello, is enabled.
When this feature is active, the system no longer uses passwords for login, so the option to require a username and password is hidden. Here’s how to get it back:
What can I do if there is no checkbox in netplwiz?
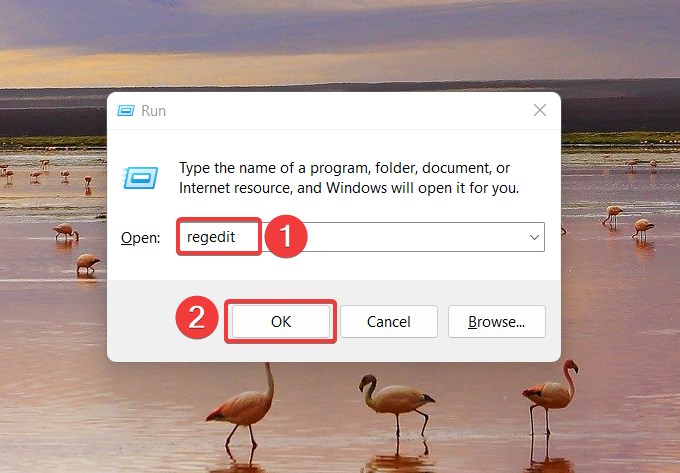
Use the Windows + R shortcut key to launch the Run dialog box.
Type the following command in the text box and press OK to execute it. regedit
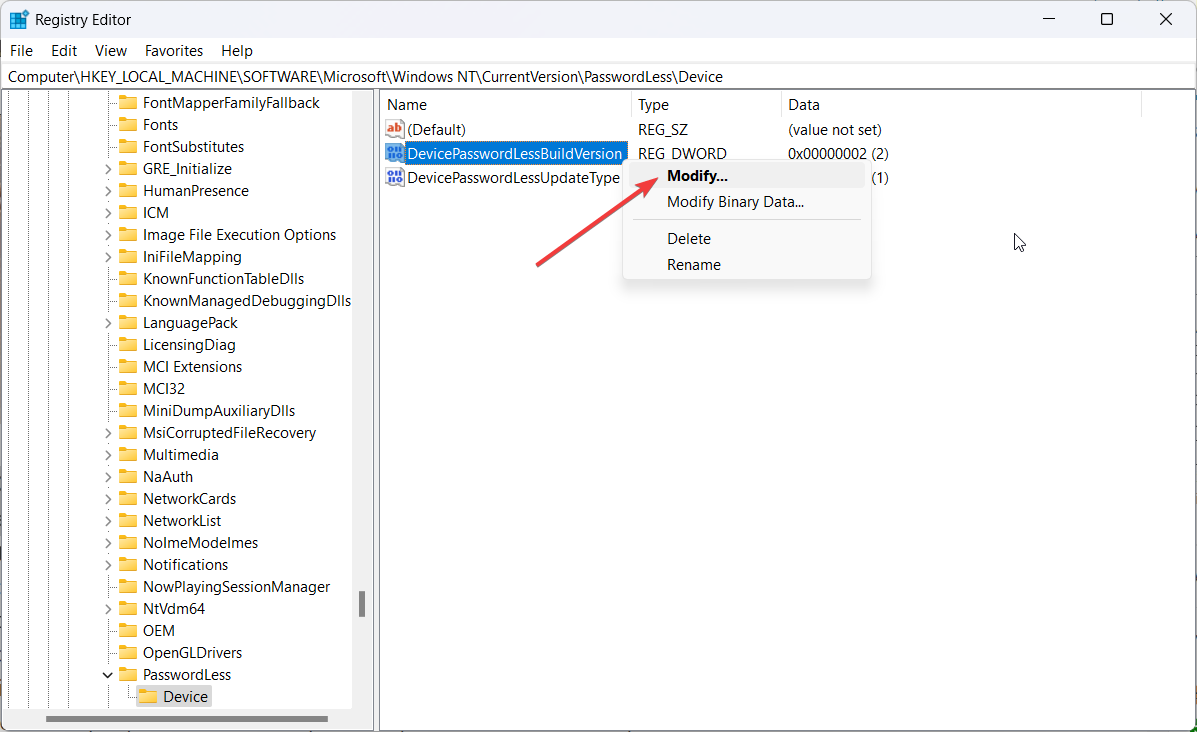
Navigate to the following location in the registry editor window: HKEY_LOCAL_MACHINE\SOFTWARE\Microsoft\Windows NT\CurrentVersion\PasswordLess\Device
Look for the DevicePasswordLessBuildVersion key in the right section. If not found, right anywhere and select the New option from the context menu followed by DWORD (32-bit) value.
Rename the newly created DWORD (32-bit) as DevicePasswordLessBuildVersion.
Right-click DevicePasswordLessBuildVersion and choose Modify from the context menu.
Assign 0 in the Value data field and press OK to save the changes.
Now close the Registry Editor to reboot your computer so that the changes can take effect.
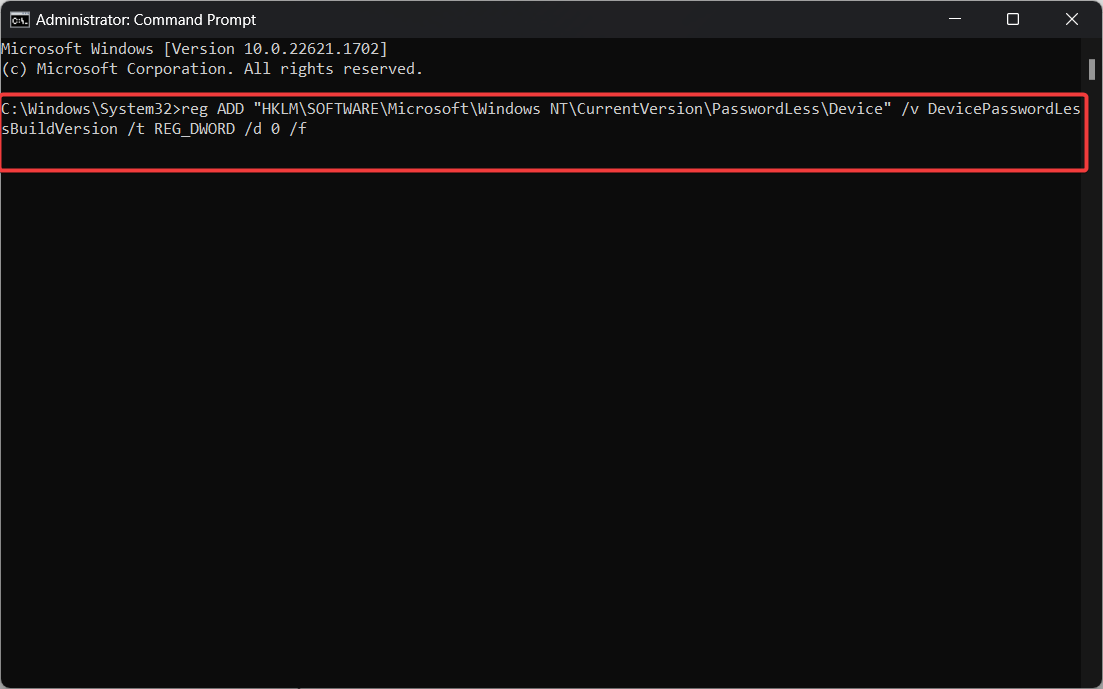
If you don’t want to alter the key on your own, you can run these commands and get the same result.
1.2 Via Command Prompt
Launch the Start menu, type cmd in the search bar on top, and choose the Run as administrator option from the search results.
Click Yes on the User Action Control (UAC) prompt to launch Command Prompt with elevated permissions.
Type or paste the following command and press Enter to execute it. reg ADD “HKLM\SOFTWARE\Microsoft\Windows NT\CurrentVersion\PasswordLess\Device” /v DevicePasswordLessBuildVersion /t REG_DWORD /d 0 /f
After executing the command, exit the command prompt window and reboot your PC.
Now access the user account settings window using the netplwiz command and look for the missing checkbox.
In the Run field, type control userpasswords2 and hit Enter.
In the User Accounts dialog box, check the box for Users must enter a user name and password to use this computer.
Click Apply, then OK.
Restart your computer and check if netplwiz now shows the check box.
3. Disable Windows Hello sign-in
Launch the Settings app using the Windows + I shortcut.
Choose Accounts from the left navigation panel and select Sign-in options from the right section.
Look for the For improved security, only allow Windows Hello sign-in for Microsoft accounts on this device option under Additional settings and move the toggle next to it in the Off position. If this option is not present, look for the Make your device passwordless option and disable it.
4. Disconnect the work or school accounts
Launch the Settings window using the Windows + I shortcut.
Choose Accounts from the left navigational menu and click the Access work or school option listed under Account settings.
Look for any accounts currently added for work or school. If you find any click the expand the settings and press the Remove button.
Disconnecting the work or school accounts from your Windows PC will ensure that the missing Users must enter a user name and password checkbox is now visible in the netplwiz user settings window.
That’s it! We’re sure you could easily resolve the no checkbox issue in the netplwiz window by trying the workarounds recommended in this guide.
A business needs a strong brand reputation to build loyalty, increase customers’ confidence and succeed in this highly competitive market. One effective way to improve it is by gathering customer feedback and using that feedback to improve the business.
That’s where the SurveySparrow app comes in. Let’s check out what more the app can offer.
Why do I need a reputation management solution?
A positive brand reputation retains existing customers and attracts new ones. On the other hand, a negative brand reputation can drive customers away and harm your business.
To keep track of your reputation, you need reputation management solutions. Some of the advantages of using it are:
Protects your brand image – Monitor and track what people say about your brand online, which helps you address negative comments and take necessary steps to protect the image.
Increasing customer trust – The tool can help build trust with potential customers by highlighting positive reviews & feedback, thereby showcasing your commitment to customer satisfaction.
Gaining valuable insights – It provides valuable insights into what customers are saying about your brand, which can be used to improve products, services, and overall customer experience.
Staying ahead of the competition – Helps you build and maintain a positive brand image that sets you apart from competitors, making you stand out in a crowded marketplace.
Therefore, it is essential to have a robust solution like SurveySparrow to build a good reputation, improve search engine rankings and maintain a competitive edge.
What are the best features of SurveySparrow?
1. Customized surveys
The tool comes with many customization features and different survey styles, including conversational, chat, NPS, offline, and 360 feedback.
You can customize it with different themes and design buttons, fonts, text, questions, etc.
The most popular is the conversational style, as it is more engaging, easier for respondents, and increases the response rate.
The conditional logic feature helps create a personalized survey that changes based on how respondents answer previous questions. Thereby providing you with more accurate and relevant data.
Another key feature is the Executive Dashboard, which provides an overview of their survey results, including completion rates, response rates, and average time to complete in a single, easy-to-read format.
This dashboard is designed to give you a high-level view of your survey data and help you quickly identify trends, patterns, and areas that need attention.
It includes a range of visualizations, such as graphs, charts, and tables, which help you quickly understand your survey data.
The dashboard is highly customizable and updates in real-time, meaning you can see new survey responses as they come in. This allows you to monitor response rates and identify emerging trends and patterns.
3. Real-time Reports & Analysis
SurveySparrow’s real-time reports and analysis feature provides users immediate insights into their survey data.
The Automated Reports feature allows you to schedule reports to be generated automatically and sent to your inbox regularly.
The data visualization tools help you to analyze your survey data quickly. You can use charts, graphs, and other visual aids to promptly identify trends, patterns, and areas that require further attention.
You can export your survey data in various formats, including Excel, CSV, and PDF, which makes it easy to share your survey data with other stakeholders and integrate it with applications.
SurveySparrow Reputation Management
Unlock the power of feedback to transform your business reputation and stand ahead in the competition.
SurveySparrow is a powerful tool with an easy-to-use interface and a range of features that make it the top choice for businesses looking to gather valuable customer feedback.
If you’re still unsure whether SurveySparrow is right for your business, you can try it out with the 14-day free trial. So, why not try SurveySparrow today and see how it can help boost your business’s brand reputation?
For some time now, YouTube removed the Dislike button and changed its UI in order to secure content creators from dislike counts.
As you may know, not every user was happy with this decision and they required the return of the dislike button. The officials from YouTube communicated that the Dislike button will remain suspended from their API and it won’t be brought back even with browser add-ons.
However, there is a browser extension whose purpose is to activate the YouTube dislike button for anyone to use today. The issue is that Return YouTube Dislike is not working on multiple browsers. So, how does it work?
? How does Return YouTube Dislike work?
In a simple manner, the extension YouTube Dislike works due to its algorithms that activate YouTube API data to collect information about people that pressed the button on the video-sharing platform.
? Is Return Youtube Dislike safe?
Generally, this YouTube extension is indeed safe because it uses its API to make the dislike button appear again.
So, you don’t have to worry about viruses or unwanted software if you’re using the extension on your browser.
Why is Return YouTube Dislike not working?
There can be many culprits behind the Return YouTube Dislike not working issue, such as:
Corrupted browser files
The extension is outdated
Conflicting extensions on your browsers
Browser update issues
You can face issues with this browser extension due to any of these factors, so start by verifying them to fix it. Otherwise, if you need to bring back the YouTube Dislike button effortlessly, using Opera is the right move.
Besides its reliable navigation tools and enhanced privacy, you can put its extensive add-on library to good use and pick a dedicated extension to bring back Dislikes in YouTube in no time.
How do I enable YouTube dislikes again?
1. Check if the extension is turned on
The easiest way to fix the problem is by turning on the extension in case it’s disabled in your browser. This is how to do it and get the YouTube Dislike extension on Firefox and Chrome as well.
1.1 Return YouTube Dislike in Firefox:
On the browser homepage, click on the puzzle icon.
Go to the Extensions tab.
If the extension is added, it will appear there.
Enable the extension in case it’s turned off.
1.2 Return YouTube Dislike in Google Chrome:
Open the browser and click on the three dots.
Select More Tools and click on Extensions.
In this window, make sure the YouTube Dislike is on.
Close the window and check the platform again.
2. Verify the Internet connection
Go to Settings and select Network & Internet.
Search for Network troubleshooter in the search bar.
On Other troubleshooters, choose Internet Connection and click on Run.
Follow the steps and see the diagnostic for your Internet.
3. Make sure the browser is updated
Open your browser and go to Settings. (e.g Chrome)
Scroll down to the bottom and select About Chrome.
In this pane, you can choose to update the browser.
Afterward, relaunch the browser to finish.
In addition, you could try this method to repair YouTube keeps buffering in Chrome as well, as it may be a cause for buffering videos on the platform.
Then again, we advise you to apply this method to other browsers. For instance, you can quickly fix various YouTube bugs on Firefox at the same time.
4. Erase the browser cache & cookies
Start on the Settings page and click on Privacy and Security tab.
Select the Clear browsing data option.
On Basic, select the time range you want to use. (ex. 4 weeks)
Check the Cache images and files and cookies boxes.
Press the Clear data button and you’re done.
Applying this method can solve the issue because it removes browsing data that may interfere and block the YouTube dislike extension, so it is worth a try. Also, that may help you solve other issues like Chrome sound being too low on YouTube.
? Will YouTube bring back the Dislike button?
There is not a definitive answer to this point, yet the YouTube board announced the decision will not be changed soon.
Regardless, the opinions are divided as the YouTube CEO agrees with the removal of the dislike button, while the co-founder declared it was a poor decision.
In the end, we hope that you solved the issue by now and it’s possible to see the dislike button again on YouTube.
Do you have other suggestions or need additional help on this topic? Feel free to comment below and we’ll provide more useful advice.
A few of our readers have complained about a connection error that throws the notification: an attempt was made to access a socket in a way forbidden by its access permissions.
We have taken the time to investigate the problem. So, in this guide, we will explore the likely triggers and some practical solutions.
Why am I getting an attempt was made to access a socket in a way forbidden by its access permissions?
From our findings, we conclude that any of the following may trigger the error:
VPN conflicts – If you use a VPN, it may block important localhost connections or occupy the specified port and will trigger the Bind error.
Firewall or security software – Sometimes, specific programs cannot connect to the network or listen on specific ports due to firewall or security settings.
Port already in use – It’s possible that another application or process is currently using the network socket. Each socket needs a distinct IP address and port number combination to establish a connection.
IP address or network configuration – If you encounter access permission or Bind error, it may be because the IP address is incorrectly assigned or clashes with another device on the network.
How do you fix an attempt was made to access a socket in a way forbidden by its access permissions?
It would be best to try the following workarounds before continuing to more detailed fixes.
Disable your firewall or antivirus – If you have a very restrictive antivirus, you should disable it, as this may fix the issue and save you further troubleshooting.
Restart your computer – If a minor glitch causes the problem, a restart may force the problematic process to stop and resolve the error.
Uninstall VPN – If you use a 3rd-party VPN, uninstall it. We recommend using only the most compatible Windows 11 VPNs to avoid conflicts.
However, if these two pre-solutions do not work, continue to our fixes below.
1. Reset Internet Information Service (IIS)
Press Windows + R to open the Run dialog.
Type cmd and hit Ctrl + Shift + Enter.
Input the script below and hit Enter. iisreset
Once you have reset the service, restart your system and verify if the error persists.
2. Disable Internet Connection Sharing
Press Windows + R to open the Run dialog.
Type services.msc and hit Enter.
Double-click Internet Connection Sharing.
Set the Startup type to Disabled.
Click Apply and OK, then restart the computer and verify if it fixes an attempt was made to access a socket in a way forbidden by its access permissions.
3. Allow the problematic app through your firewall
Press Windows + R to open the Run dialog.
Type firewall.cpl and hit Enter.
Click Allow an app or feature through Windows Defender Firewall on the left pane.
Click the Change Settings button, and grant the problematic app Public and Private rights.
Apply your changes and close the windows, then verify it fixes an attempt was made to access a socket in a way forbidden by its access permissions.
4. Restore the computer
Press Windows + R, type rstrui, and hit Enter.
Click the Next button.
Select a restore point and hit the Next button.
Lastly, click the Finish button and wait for the process to complete.
An attempt was made to access a socket in a way forbidden by its access permissions is not a highly complex issue. With these simple solutions, the error is quickly resolved.
Some users may have to reset Windows OS, but note that this may make you lose some valuable data.
This is as much s we shall go through in this guide.
If you open your Task Manager and navigate to the Processes tab, you’ll notice that multiple svchost.exe instances are running simultaneously. If the Process continues running, it can lead to high CPU usage.
This article discusses some common causes of the svchost.exe high CPU usage and provides steps to help you fix the error.
What causes svchost.exe high CPU usage?
The following are some of the most common causes of svchost.exe high CPU usage:
Viruses and Malware – The svchost.exe is a legit Windows Process, but hackers can also use it to hide corrupt files. You’ll have to scan the file using antivirus software to ensure it isn’t a virus.
Windows updates – According to Microsoft, users might trigger the svchost.exe high CPU usage error while checking for Windows updates. You should uninstall or roll back an update to help fix the error.
Background applications – Too many opened background applications can severely drain your PC’s RAM and CPU. If you have too many opened apps, it can trigger high CPU usage by svchost.exe
How can I fix svchost.exe high CPU usage?
Before we proceed with more advanced solutions, here are a couple of quick fixes you can attempt to help you resolve the error:
Restart your PC.
Close unnecessary applications.
If the error remains unfixed after attempting the above quick fixes, here are more advanced solutions for you to try:
1. Check for viruses
Press the Windows key, type in Windows Security, and hit Enter.
In the next window, click on Virus & Threat Protection, and click Scan Options under the Current Threats option.
Select Full Scan and click the Scan Now button to initiate the virus scan.
Wait for the scan to complete, restart your PC and check if the error is fixed.
In most cases, high CPU usage errors are triggered due to the presence of viruses. Therefore, running an antivirus scan using the Windows security tool or a third-party antivirus tool can help fix the error.
2. Disable services that might trigger high CPU usage
Right-click the Start menu and select Task Manager.
Navigate to the Details tab. Right-click the svchost.exe, and select Go to Services.
In the next popup window, right-click on any of the Processes, and click Stop.
Repeat the process until you locate the faulty Process triggering the error.
Once you locate the problematic Process, right-click and select Open Services button.
In the Services window, right-click on the Process name triggering the error, e.g., Windows Update, and click Properties.
Change the Startup Type to Disable, and click OK.
Restart your PC to check if the error is fixed.
Sometimes, high CPU usage can be triggered by faulty Windows services. If such Services remain operational, you’ll experience the svchost.exe high CPU usage error.
3. Clear Event Viewer Log
Press the Windows key + R to open the dialog box, type eventvwr, and hit Enter.
On the left pane in the popup window, click Application under the Windows Logos directory, and click Clear Logs.
Repeat the process to clear the Security,Setup, and System logs.
Restart your PC to check if the error is fixed.
In some cases, the Windows Event Viewer could log large files for extended periods, leading to high CPU usage. You must clear the Event Viewer’s log to fix the error.
4. Diagnose and troubleshoot Windows Updates
Press the Windows key + R, type services.msc in the dialog box, and hit Enter.
In the Services window, locate Windows Update, right-click on it, and click Stop.
Press the Windows key + E to open File Explorer, and navigate path C:\Windows.
Locate the SoftwareDistribution folder, right-click on it, and select Delete.
Restart your PC, and check for Windows Updates.
Many users have reported high CPU usage while using the Windows Update tool, and Microsoft confirmed it to be true.
If you’re experiencing high CPU usage while checking for Windows updates, you can run the Troubleshooter. The Troubleshooter can also fix the Windows Update won’t work error.
Press the Windows key, type in CMD, and select Run as Administrator.
Click Yes to grant the app administrative access in the User Account Control window.
Once the command prompt opens, type the following and hit Enter: sfc /scannow
Wait till the scan is complete, and restart your PC to check if the error persists.
In some cases, high CPU usage errors are usually triggered due to corrupt system files. Running an SFC scan is one of the best ways to repair corrupt files and fix the svchost.exe high CPU usage.
In most cases, a virus or malware triggers a virus, or malware triggers the svchost.exe high CPU usage. However, as we’ve seen in this article, it can also be started by several secondary factors.
For a deeper look at how this background process works, check our svchost.exe guide to learn more.
Resolving the error isn’t a complex task and can be done by simply following our guide. If you have any questions regarding the svchost.exe, please let us know by leaving a comment.
Microsoft Management Console (MMC) is a Windows app that provides a programming framework for management tools to operate. Sometimes, snap-ins may not work correctly due to a broken registry.
If the snap-in fails to initialize, you’ll trigger the following error message MMC could not create the snap-in. In this article, we’ll briefly discuss some of the reasons why MMC can’t generate a snap-in and also provide you with X steps to help you resolve the error.
Why couldn’t MMC create the snap-in?
Here are some of the reasons why MMC can’t create the snap-in:
Broken Registry Entries – The Windows registry houses critical instructions utilized by virtually every app and service in an OS. If the registry is broken or contains incorrect entries, it can cause errors like the inability to create a snap-in.
Corrupt System Files – Windows is made up of several files that help the OS to function correctly. If any such files are corrupt, it prevents Windows from operating correctly and can cause several errors.
How can I fix MMC could not create the snap-in-error?
The following are advanced troubleshooting solutions that can resolve the could not create the snap-in-error:
1. Rename the MMC.exe File
Press the Windows key + E to open the File Explorer.
In the Explorer window, navigate to the path C:\Windows\System32, locate and right-click the mmc.exe file, and select Rename.
Rename the file to mmc.exe.old, and hit Enter to confirm the operation.
Close the File Explorer and check if the error is fixed.
Renaming the mmc file in the System32 folder is one of the easiest ways to resolve the snap-in error, but it isn’t the most efficient.
2. Reinstall Microsoft C++ Redistributable
Press the Windows key, type Control Panel in the search bar, and hit Enter.
Click on Uninstall a program under the Programs section.
In the next window, locate Microsoft Visual C++ Redistributable Package, click on it, and select Uninstall.
On the website, select the file that corresponds with your PC’s architecture, and click the Download button.
Double-click the .exe file to run the installer and follow the prompts to install.
The Microsoft C++ Redistributable Package is a critical Windows component of several applications and services. If the file is corrupted, you’ll have to reinstall it to fix the MMC could not create the snap-in error.
3. Enable or turn on .NET Framework
Press the Windows key, type Control Panel in the search bar, and hit Enter.
In the Control Panel window, click on Uninstall a Program under the Programs option.
Select Turn Windows features on or off from the left pane in the next window.
In the Windows Features tab, select Microsoft .NET Framework 3.5.
You’ll need to select the .NET framework components according to your needs; click on each box to turn on the required features.
Click OK and Restart your PC.
In some cases, you might have the latest version of the .NET framework installed, but the feature is turned off; this prevents the program from functioning and can lead to system errors.
4. Run the SFC/ DISM scans
Press the Windows key, type in CMD, and select Run as Administrator.
Click Yes in the User Account Control window.
Input the following and press Enter: sfc /scannow
Then, enter the last command: DISM /Online /Cleanup-Image /RestoreHealth
Wait till the scan is complete, and restart your PC to check if the error persists.
The System File checker scans and identifies corrupt system files in your PC. Further, a DISM scan serves the same purpose as an SFC scan.
However, a DISM scan can help fix core computer file corruption and ensure an SFC scan runs appropriately. To fix the inability to create a snap-in error, perform a DISM scan also.
Press the Windows key + R to open the Run window, type regedit, and hit Enter to open the Registry Editor.
In the Registry Editor, navigate to the following path: HKEY_LOCAL_MACHINE\SOFTWARE\Microsoft\MMC\SnapIns
Double-click on the Snapins folder and locate a folder named after the error message specified as CLSID.
Once you’ve located the folder, right-click on it, and select Delete.
You can choose to backup the Registry key into a .reg file by right-clicking on the key FX:{b05566ad-fe9c-4363-be05-7a4cbb7cb510, and select Export.
In the confirmation box, click Yes to delete the registry key.
Close the Registry key and restart your PC.
Once your PC restarts, Windows will automatically generate the required registry configuration for the error.
The registry helps manage and operate your computer by ensuring access to critical resources and essential programs. If the registry is broken or contains incorrect entries, it can lead to errors like the MMC could not create a snap-in.
Ensure you have a working backup of your OS before tampering with the registry so you can quickly revert your changes without file loss.
Users who have experienced the inability to create snap-in errors agree that it is tricky as it has no universal fixes. You need specific solutions to help you resolve the error.
Luckily, by the end of our guide, you should have the steps needed to help you fix the MMC could not create the snap-in error.
It seems Microsoft will skip the Windows 11 22625 and will release the Windows 11 22H22263, or KB5027397.
It will come as a general availability for everyone with new functions, starting next week, on May 23rd.
The beta will see the development of the Windows 11 Moment 4, which is due later this year, most probably in October.
Still an internal function, but there is a small update (KB5027397) that will be sufficient to turn the 22624 into the 22631. After this, you can add an update and you will be able to see and try for yourself the Moment 4 features.
22631.1825 – KB5026440 (internal)
22631 enablement package: KB5027397
Could 23H2 be a servicing style/enablement package update after all?
For those who want the velocity feature, it'll *likely* be MTestUx15, 42105254 https://t.co/pTz3eaXUZP
KB5027397: What are the new features coming up with Moment 4?
While we don’t have any insider peek of any features coming up with Moment 4, there is a high probability they could improve the overall experience of Windows 11.
This update adds live captions for the following languages: Chinese (Simplified and Traditional), French (France, Canada), German, Italian, Japanese, Portuguese (Brazil, Portugal), Spanish, Danish, English (Ireland, other English dialects), and Korean. You can download speech recognition support from Settings > Time & Language > Language & region.
Voice Access
This update redesigns the in-app voice access command help page. Every command now has a description and examples of its variations. The search bar allows you to quickly find commands. The new categories provide further guidance. You can access the command help page on the voice access bar from Help > View all commands or use the voice access command “what can I say?”
This update adds voice access command support for the following English dialects: English (United Kingdom), English (India), English (New Zealand), English (Canada), and English (Australia).
This Moment 3 update adds new text selection and editing voice access commands. Some examples are: To do this “Select a range of text in the text box,” say “Select from [text 1] to [text 2]”, e.g., “Select from have to voice access.” To do this “Apply bold, underline, or italic formatting for the selected text or the last dictated text,” say “Delete all.” To do this “Delete all the text in a text box,” say “Bold that,” “Underline that,” “Italicize that.”
Taskbar
This update adds a VPN status icon, a small shield, to the system tray. It displays when you are connected to a recognized VPN profile. The VPN icon will be overlayed in your system’s accent color over the active network connection.
You can now choose to display seconds in the clock on the system tray from the Taskbar settings page.
This update provides a copy button for you to copy two-factor authentication (2FA) codes quickly. These are in notification toasts you get from apps installed on your PC or from phones linked to your PC. Note that this feature only works for English.
File Explorer
This update adds access key shortcuts to File Explorer’s context menu. An access key is a one-keystroke shortcut. You can use it to quickly run a command in a context menu using your keyboard. Each access key corresponds to a letter in the display name of the menu item.
Kiosk multi-mode
This update adds multi-app kiosk mode, which is a lockdown feature. If you are an administrator, you can specify the apps that can run on a device. Other apps will not run. You can also block certain functionalities. You can configure distinct types of access and apps to run for different users on one device. Multi-app kiosk mode is ideal for scenarios in which multiple people use the same device. Some examples are frontline workers, retail, education, and test-taking. Some lockdown customizations include: Limiting access to Settings, except certain pages (such as Wi-Fi and screen brightness), showing only the apps that are allowed on the Start menu, and blocking certain toasts and pop-up windows.
Currently, you can enable multi-app kiosk mode using PowerShell and WMI Bridge.
Task Manager live kernel memory dump
This update introduces live kernel memory dump (LKD) collection from Task Manager. Using LKD, you can gather data to troubleshoot an issue while the OS continues to work. This reduces downtime when you must investigate an unresponsive program or high-impact failures.
Input
This update replaces the settings for “Show the touch keyboard when there’s no keyboard attached.” These are located at Settings > Time & language > Typing > Touch keyboard. A new dropdown menu gives you three options to control whether tapping an edit control should open the touch keyboard. The options are: Never, When no keyboard attached, and Always.
This update improves the cloud suggestion and the integrated search suggestion. This helps you to easily type popular words in Simplified Chinese using the Input Method Editor (IME).
Display
This update enables Content Adaptive Brightness Control (CABC) to run on laptops and 2-in-1 devices. This feature dims or brightens areas of a display based on the content. It tries to strike a balance between saving battery life and providing a good visual experience. You can adjust the feature setting from Settings > System > Display > Brightness & color. The drop-down menu gives you three options: Off, Always, and On Battery Only. For battery-powered devices, the default is On Battery Only. Because the device manufacturer must enable CABC, the feature might not be on all laptops or 2-in-1 devices.
USB4 hubs and devices settings
This update adds a “USB4 hubs and devices” settings page. You can find it at Settings > Bluetooth & devices > USB > USB4 Hubs and Devices. This new page provides information about the system’s USB4 capabilities and the attached peripherals on a system that supports USB4. This information helps with troubleshooting when you need manufacturer or system administrator support. Some features include: You can view the tree of the connected USB4 hubs and devices, and you can copy details to the clipboard to share them.
If your system does not support USB4 with the Microsoft USB4 Connection Manager, this page will not appear. On systems that support USB4, you will see USB4 Host Router in Device Manager.
Presence sensing settings
This update adds a presence sensor privacy setting in Settings > Privacy & security > Presence sensing. If you have a device that has compatible presence sensors, you can now choose the apps that can access those sensors. You can also choose the apps that do not have access. Microsoft does not collect images or metadata. The device hardware processes your information locally to maximize privacy.
Other Settings updates
This update improves the performance of search within Settings.
This update changes the default print screen (prt scr) key behavior. Pressing the print screen key opens the Snipping Tool by default. You can turn off this setting from Settings > Accessibility > Keyboard.
This update introduces a limit of 20 most recent tabs in Settings > Multitasking. This affects the number of tabs that appear when you use ALT + TAB and Snap Assist.
In addition, the Windows 11 build 22621.1776 comes with these fixes:
This update provides the full amount of storage capacity of all your OneDrive subscriptions. It also displays the total storage on the Accounts page in the Settings app.
Addresses an issue that affects Narrator. It now announces text attributes correctly for words, such as “misspelled”, “deletion change,” and “comment”.
Addresses an issue that affects exe. It stops working after you sign out. This issue occurs after you upgrade your machine to Windows 11 Azure Virtual Desktop (AVD) and sign in to that machine.
Addresses an issue that affects Server Message Block (SMB). You cannot access the SMB shared folder. The errors are, “Not enough memory resources” or “Insufficient system resources”.
The update addresses an issue that sends unexpected password expiration notices to users. This occurs when you set up an account to use “Smart Card is Required for Interactive Logon” and set “Enable rolling of expiring NTLM secrets”.
Addresses an issue that affects the Local Security Authority Subsystem Service (LSASS). It stops working. This occurs when you use Azure Virtual Desktop (AVD).
Addresses an issue that affects the Storage Spaces Direct (S2D) cluster. It might not come online.
This occurs after a periodic password rollover. The error code is 1326.
Addresses an issue that affects access to Tab settings for IE mode sites.
Addresses an issue that affects dot sourcing. It fails files that contain class definition in Windows PowerShell.
Addresses an issue that affects the use of Event Viewer. The issue limits the number of event sources that users who are not administrators can access.
Addresses an Event Viewer issue. It affects the rendering of a forwarded event log.
Addresses a memory leak. It occurs every time you print a rich text document.
Addresses an issue that affects a computer when it renders a halftone bitmap. The computer stops working.
Addresses an issue that affects devices that have multiple, discreet GPUs. You cannot choose the high-performance GPUs from the default graphics settings page.
Addresses an issue that stops your device from working when it resumes from Modern Standby. The error is 0x13A KERNEL_MODE_HEAP_CORRUPTION.
Addresses an issue that affects applications that perform certain actions in a callback. The applications might stop working. These actions include closing a Window (WM_CLOSE).
This update changes the support phone number for Microsoft India for Windows activation.
This update changes the international mobile subscriber identity (IMSI) ranges for certain mobile providers.
Addresses an issue that affects the Windows Firewall. The firewall drops all connections to the IP address of a captive portal. This occurs when you choose the Captive Portal Addresses option.
Addresses a multi-function label printer issue. It affects the installation of some of them.
Addresses an issue that affects devices that are joined to Azure Active Directory (Azure AD). The Windows Firewall cannot apply the correct domain and profile for them.
Addresses an issue that affects audio playback. It fails on devices that have certain processors.
Addresses an issue that affects the touch keyboard. It shows the wrong layout for the French-Canadian language.
Addresses an issue that affects Windows Defender Application Control (WDAC). It might create audit events that you do not need. This occurs when you choose the Disabled: Script Enforcement option.
Addresses an issue that affects the touch keyboard. Sometimes, it does not show the correct layout based on the current input scope.
Addresses an issue that affects the Chinese and Japanese Input Method Editor (IME). When you search the Emoji Panel (Windows key + period ( . ), search might fail for some of you.
Addresses an issue that affects the Chinese and Japanese Handwriting Panel. It does not show text prediction candidates or stops responding. This occurs when you select a word from the candidate list of the Handwriting Panel.
Addresses an issue that affects the runas It stops working. The device behaves as if you did not sign in to your account.
Addresses an issue that might affect a large reparse point. You might get a stop error when you use NTFS to access it. This issue occurs after a canceled FSCTL Set operation changes the reparse tag.
Addresses a known issue that might affect some speech recognition apps. They might have sporadic speech recognition, expressive input, and handwriting issues. This occurs when the display language is Chinese or Japanese. The apps might not recognize certain words. They might not receive any input from speech recognition or affected input types. This issue is more likely to occur when the apps use offline speech recognition. For app developers, this issue only affects speech recognition that uses Speech Recognition Grammar Specification (SRGS) in Media.SpeechRecognition. This issue does not affect other types of speech recognition.
It’s safe to say Moment 4 will bring more features of this kind to Windows 11. And by the end of this year, we will get to experience them, most probably.
Are you excited about the KB5027397 update? What are your thoughts about Moment 3 updates and fixes? Let us know in the comments section below.
Microsoft is reportedly pushing for its Rewards initiative for Xbox users on their Home UI. People are, simply, not having it.
As spotted from the release note from the Alpha Skip-Ahead ring of Xbox insiders (Build 2308.230515-2200), a select group of users will notice a convenient update that allows them to view their Rewards points balance directly from the Home screen.
That means, you don’t have to search too far either—it will be located in the top corner where you usually find your Xbox Gamertag.
Depending on your account, you might see your points balance as the information cycles, or you might spot it alongside your Gamerscore.
People aren’t happy with Microsoft Rewards on Xbox Home UI
This wasn’t the first time that the Redmond tech giant attempts to push for Microsoft Rewards to a new extent.
Not too long ago, we reported that insiders on Edge Canary are seeing a toggle that automatically detects NGOs that allow them to donate with Rewards points. Canary is the experimental channel of the Microsoft Edge browser.
Microsoft also launched an initiative that rewards users for using Edge. To put it simply, for each search you perform on Bing in Microsoft Edge on PC or mobile, you can earn from 5 up to 20 points a day (around 150 to 600 points a month).
Some users, however, have been loudly expressing their frustration with the introduction of these promotions. They have requested a more streamlined browsing experience.
Microsoft, if you are reading this, stop putting new crap in a fairly good browser!!
They further expressed their dissatisfaction, asserting that they do not want to see Microsoft Rewards promotions integrated into their browsing experience.
The user’s plea urged Microsoft to keep the browser lean and mean, or at least clean, suggesting that they offer extensions or alternative methods to access additional features without forcing them upon users.
What do you think about Microsoft adding Rewards to the Home UI of Xbox? Let us know in the comments!
Many Windows users have reported high CPU usage while the Remote Procedure Call (RPC) service runs. This causes the user’s PC to hang and prevents it from functioning correctly.
If you’re experiencing a remote procedure called high CPU usage, this article will provide steps to help you fix the error.
What causes a remote procedure call high CPU?
Here are some of the most common causes of the remote procedure call high CPU usage:
Corrupt system files – Corrupt System files are one of the most common causes of Windows errors. If your PC has corrupt system files, you’ll trigger several errors, e.g., high CPU usage.
Windows Update – Windows Update is a critical Windows component, but while checking for updates, the feature takes up a lot of memory, leading to high CPU usage.
How can I fix a remote procedure call high CPU?
Before we proceed with more advanced solutions, here are a couple of quick fixes you can attempt:
If the error persists after applying the above steps, the following are more advanced solutions to help you fix the error:
1. Disable OneDrive
Press the Windows key, type Control Panel, and hit Enter.
Click Uninstall a Program under the Programs section in the Control Panel window.
Locate OneDrive from the list of programs, right-click on it, and select Uninstall.
Once it is uninstalled, restart your PC to check if the high CPU usage is resolved.
OneDrive is known to cause high CPU usage in many cases as it constantly syncs with the cloud server, which uses up a lot of Disk memory. Uninstalling the app is one way to fix high CPU usage.
2. Disable Windows Update
Press the Windows key + I to open the Settings app.
Click Windows Update and click the Pause Update for 1 Week.
This will temporarily pause Windows updates for a week and let you determine if Windows updates cause high CPU usage.
Windows Updates often run in the background of your OS and can take up a lot of memory depending on the update being installed, leading to high CPU usage.
Press the Windows key, type in CMD, and select Run as Administrator.
Then, click Yes to grant the app administrative access in the User Account Control window.
Once the command prompt opens, type the following and hit Enter: sfc /scannow
Then, run the following command: DISM /Online /Cleanup-Image /RestoreHealth
Wait till the scan is complete, and restart your PC to check if the error persists.
The system file checker and DISM scans is a critical Windows tool that helps identify and repair corrupt system files. If the high CPU usage error is triggered by corrupt system files, running an SFC scan can help resolve the error.
You can make this process easier by using specialized repair software. These tools have automated the process of preparing your broken system files by scanning and repairing anything within a couple of clicks.
4. Disable Windows Defender
Press the Windows key + R to open the Run window, type gpedit.msc, and hit Enter.
Click Computer Configuration on the homepage. Go to Administrative Templates, then locate Windows Components, and click on the Microsoft Defender Antivirus option.
Then, double-click on the Turn-off Microsoft Defender Antivirus policy to edit its settings.
Click on the radio button next to Enabled, and click on Apply to effect your changes. Click OK and close the Group Policy editor.
Restart your PC and check if the error is fixed.
Windows Defender Microsoft’s built-in antivirus software offers protection from viruses and malware.
However, this service takes up a lot of memory in the background and can cause high CPU usage. Disabling the feature is one of the ways to resolve Remote Procedure Call High CPU Usage.
High CPU usage is one of the most common issues for most Windows users. Luckily, resolving this error is pretty easy and straightforward. All you need to do is follow our guide, and you should get your PC up and running in no time.
When you try to launch Valorant on Windows 11, you might face the problem of this build of Vanguard is out of compliance. This error is usually caused by an outdated game version or unauthorized modifications. If you’re running the game for the first time, check out the minimum requirements for Valorant.
We recommend to undo any modifications you have made to the game, if any and uninstall any apps that might conflict or use same resources as Riot Vanguard.
How do I fix this build of Vanguard is out of compliance error?
If you have no success after these workarounds, please continue to the fixes below.
1. Update your OS
Press Windows + I to open the Settings app.
On the right pane, click Windows update, then on the left, select Check for updates.
Click the Download & Install all button if any updates are discovered.
Finally you may be required to reboot the computer for the update to take effect.
2. Activate Secure Boot
Press Windows + I to open the Settings app.
Navigate to System and Recovery, then click the Advanced startup’sRestart now button.
Click Troubleshoot and select Advanced Options.
Select UEFI Firmware Settings and choose Restart.
Here navigate to the Security option and enable Secure Boot.
Finally, save the modifications made, reboot your device, and verify if it resolves the issue.
3. Run Valorant in compatibility mode
Right-click on your Valorant launcher and select Properties.
Navigate to the Compatibility tab, tick the Run this program in compatibility mode for checkbox.
Finally, click the Apply and OK buttons to save the changes made.
4. Repair the game files
Launch your Riot client.
Click your profile icon and select the Settings option.
Click on Valorant and select Repair.
Verify it fixes this build of Vanguard is out of compliance.
5. Reinstall Vanguard
Press Windows + R to open the Run dialog.
Type appwiz.cpl and hit Enter.
Click on Valorant from the app list and select the Uninstall button, then follow the wizard to complete the process.
Finally, download and install a new copy on the official website.
A reinstallation can also fix the Valorant error code 57. If you have run through these steps, you should no longer get this build of Vanguard is out of compliance notification.
Also, you may want to run a virus scan with robust antivirus because, on some rare occasions, viruses have been known to trigger errors in the game.
Finally, in the comments section below, please tell us what worked for you.
ERR_CONTENT_DECODING_FAILED is a common browser error that usually pops up while attempting to load a particular website or migrate to a new server. The error prevents you from accessing the web page’s contents and persists even after refreshing the page.
If you’re currently facing the ERR_CONTENT_DECODING_FAILED error, this article will briefly discuss some of the most common reasons triggering the error and offer solutions you can apply to fix the error.
What causes ERR_CONTENT_DECODING_FAILED?
Browser Cookies/Cache – Cookies and Caches can get corrupted over time and then conflict with the normal operations of the browser.
VPN Software – You utilize VPN software to help increase internet security and bypass geolocation blocks. However, a proxy or a VPN can trigger problems during the decoding and prevent the web page from loading properly.
DNS Configuration – Over time, the stored DNS will become corrupted and interfere with the browser’s normal operations.
False Encoding – In some cases, the HTTP header might claim that the content of a web page is gzip encoded when it is not. This can lead to conflicts during the decoding process and further trigger errors like the ERR_CONTENT_DECODING_FAILED.
Press the Windows key, type Chrome in the search bar, and hit Enter.
In the browser window, navigate to this page on the Chrome Web Store. Click the Add to Chrome button and select Add Extension.
Press Ctrl + T to open a new tab, and click the Extension icon at the window’s top right corner.
Click the blank space under the Request Header and type in the following command: accept-encoding
Type the following command in the Value section: gzip;q=0,deflate;q=0
This will disable the G-zip encoding, refresh the page, and check if the error persists.
G-Zip encoding is an essential browser feature but can lead to problems while decoding a webpage.
Most browsers don’t offer the level of customization needed to disable this feature. Instead, you’ll need to download and install a third-party extension to help you resolve the error.
2. Clear Browser Cookies and Cache
Launch the Chrome browser, click on the three vertical dots at the top-right corner of the window, and select Settings.
In the next window, click on Privacy and Security on the left pane, and select Clear Browsing data on the right pane.
In the popup window, check the boxes next to Browsing History, Cookies, and Cache data, and click Clear Data.
Wait until the data is cleared, exit the Browser, and check if the error is fixed.
The Browser cookies and cache are excellent browser functionalities that can personalize your browsing experience and make you surf websites faster.
However, if the data gets corrupted, it can lead to browser errors. Clearing the browser data is one of the best ways to resolve the ERR_CONTENT_DECODING_FAILED error.
Press the Windows key + I to open the Settings app.
Click on Network and Internet option and select Proxy from the left pane.
Click the Use a Proxy toggle button to turn off the feature.
Close the Settings app and check if the error persists.
If your internet connection is facilitated by a Proxy or VPN, it might affect your connection to some sites, and the decoding process might not run smoothly. In such cases, you must disable the Proxy or your VPN software to fix the decoding error.
4. Flush the Socket Pools
Launch the Chrome browser using the steps above.
In the search bar, enter the following command and press Enter: chrome://net-internals
In the next window, click on the Sockets option in the left pane and select the Flush Socket Pools option, and check to see if the error persists.
Similar to your DNS, the Socket Pools stored by the browser can also be corrupted. If this happens, you must flush the socket pools to fix the ERR_CONTENT_DECODING_FAILED error.
5. Reset Winsock
Press the Windows key, type cmd, and select Run as Administrator.
In the command prompt window, type the following and press Enter: netsh Winsock reset
By running the netsh command, you can restore these configurations to their default state and fix the ERR_CONTENT_DECODING_FAILED error.
6. Flush your DNS
Press the Windows key, type cmd, and select Run as Administrator.
In the Command Prompt window, type in the following command and hit Enter: ipconfig /flushdns
Wait for the process to be completed and check if the error persists.
If the DNS configuration is corrupted, it can lead to several connection errors. In this case, flushing the DNS is the best way to resolve the error.
7. Disable Firewall
Press the Windows key, type Control Panel in the search bar, and hit Enter.
In the Control Panel, click on the System Security tab and select Windows Defender Firewall.
In the next window, click the Turn Windows Firewall On or Off on the left pane.
Then, click Turn off Windows Firewall (not recommended) under the Public Network Settings section.
Click OK to confirm your changes and exit the Control Panel.
The Firewall is a critical Windows component that protects your PC from unknown connections. If the Firewall detects an anomaly in your browser, it can prevent it from accessing certain websites. You can temporarily disable the feature to check if it can fix the error.
The ERR_CONTENT_DECODING_FAILED error is a typical browser error that occurs when attempting to access some sites. It can be primarily attributed to corrupt browser data and connection issues.
Resolving the error is pretty straightforward. If you follow the steps outlined in this guide, you should be able to get your browser up and running quickly.
Global Accessibility Awareness Day happens to be today, a special date that’s in place to help focus on “digital access and inclusion for the more than one billion people alive today who live with disabilities or impairments.” It happens to fall on the third Thursday of May every year.
A little over 7 months ago, Microsoft debuted the Xbox Ambassador program, a program designed to provide a safe space for gamers, where each member is celebrated and the gaming experience is elevated. And in a bid to enhance instances where gamers get to learn more about accessibility, the Xbox team debuted the Xbox Ambassador Accessibility Explorer Path.
The Xbox Ambassador Accessibility Explorer Path not only provides gamers with insightful information about accessibility but also provides them with first-hand experiences with the feature.
Ever since its debut, a little over 7 months ago, more than 110 quests have been incorporated into the platform. To date, ambassadors have been able to complete over 1 million accessibility-focused missions.
New accessibility updates making their way to Xbox
First up, Xbox will be updating its accessibility support pages to now cover more than 150 accessibility controls across PC and console. This builds on, Xbox’s redesigned and overhauled navigate support hub.
The new support pages can be accessed via the accessibility tab on Xbox App on PC, Xbox.com. Xbox further added that the feature will be coming to Game Bar soon.
Next up, Xbox unveiled a new accessibility settings menu in the Xbox App on PC back in March. The settings menu was categorized into two: Disable background images and Disable animations.
These settings were put in place to help gamers establish more control over visual components to reduce instances where they encounter irritation, confusion, and more.
What’s more, Microsoft also shipped a new update for the Microsoft Store on Xbox.com. As such, the new experience caters to gamers with disabilities, in that, they are able to filter their searches while incorporating their “accessibility needs and preferences, as well as search for games based on their Supported Language, with over 17 supported languages.”
Additionally, Xbox has made enhancements to its Microsoft Game Accessibility Testing Service. It launched this program with the objective to help publishers and developers validate the accessibility of their games.
Xbox has since made improvements to the program by adding more information detailing how developers can validate Accessibility Feature Tags in their games. And to further build on this premise, the Team has further included 119 more test steps as well as 124 examples to its Accessibility Feature Tags platform.
The company has provided more insights on its dedication to this cause that you can catch up on over at its blog post. Share your thoughts with us in the comments below.
MPR.dll is accountable for delivering network-related services and features in Windows. The functions and resources provided are designed to efficiently manage network connections, authentication, and mapping of network resources.
We consider the best solutions to adopt if this DLL is missing on your computer. But let us first look at possible causes.
Why is MPR.dll not Found?
There are a few reasons why this DLL may be missing, including the following:
Incorrect file path or location – It’s possible for the MPR.dll file to become inaccessible if it has been relocated from its original location. This can occur due to a user mistake, improper software installation, or as a result of a third-party program.
File deletion or corruption – The MPR.dll file may have been deleted or damaged due to user error, software installation, or malware. This can happen when the file is mistakenly deemed unnecessary or when a malware attack targets and alters the DLL file.
Software conflict – MPR.dll file issues can arise due to conflicts between software components or misconfigurations. This problem may occur if the file is replaced with an incompatible version or removed during a software update.
What should I do if MPR.dll is missing?
Before attempting any complex solutions, it is advisable to attempt these simple pre-solutions:
Uninstall recent apps – To prevent additional troubleshooting, it can be helpful to uninstall an application that may be causing conflicts.
Run a virus scan – If a virus has infected the system and deleted or altered crucial files, running a scan can help eliminate the malware and potentially restore the DLL.
If the workarounds did not work, you can now move on to more advanced troubleshooting steps.
1. Use specialized repair tools
Using specialized DLL repair tools is our recommended solution because these tools do all the heavy lifting for you. Such tools are suitable for fixing a missing MPR.dll because the DLL is native to the Windows OS, and it offers a 100% fix for such DLLs.
2. Repair system files
Press Windows + R to open the Run dialog.
Type cmd and hit Ctrl + Shift + Enter.
Input the script below and hit the Enter key: sfc /scannow
Lastly, after completing the process, it is recommended that you restart your computer to verify if the MPR.dll error has been resolved.
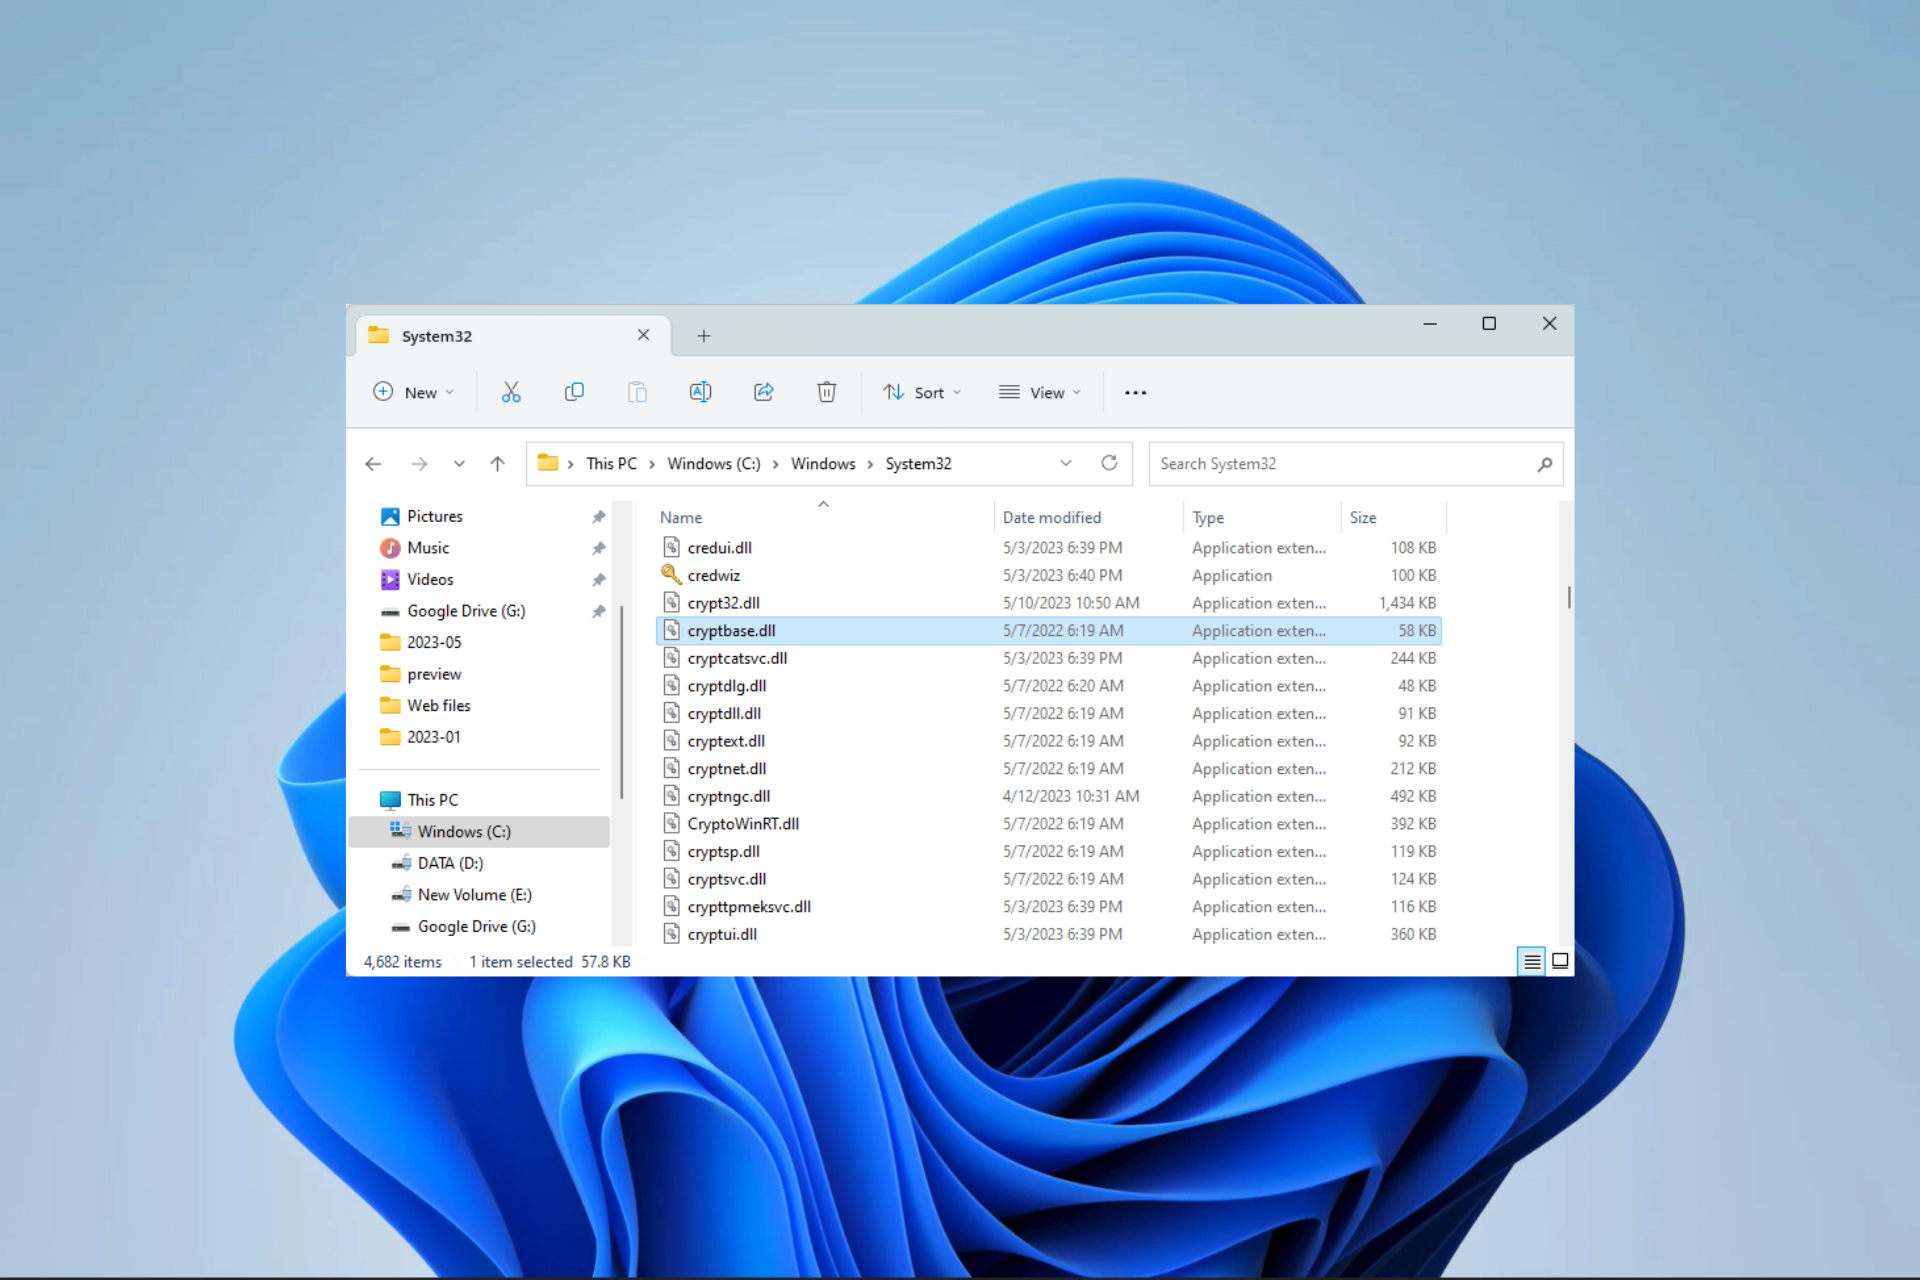
Dynamic Link Libraries (DLLs) have the important function of assisting in reading and executing specific functions. When some of these DLL files go missing, like the cryptbase.dll, you will expect the computer to throw some errors.
This guide takes you through the best fixes for the missing cryptbase.dll and the easiest way to download it on your computer.
Why is cryptbase.dll missing?
Here are a few reasons why the DLL may be missing:
Corruption or deletion – It is possible that the cryptbase.dll file was unintentionally removed or damaged by a user, a software installation, or a malware infection.
System errors – Loss or corruption of DLL files may occur due to system errors, such as disk corruption or a malfunctioning hard drive. If the cryptbase.dll file is located in a damaged sector of the hard drive, it may not be found and appear as missing.
Software conflict – Sometimes, the cryptbase.dll file may get replaced or deleted altogether by certain software installations or updates.
Malware infection – DLL files, such as cryptbase.dll, are crucial parts of the operating system and can be vulnerable to attacks by malware or viruses. We recommend using a robust antivirus.
How do I fix a missing cryptbase.dll?
Before you proceed with any elaborate solutions, you should try these workarounds:
Run a virus scan – Since malware is known to delete or alter important system files, a scan may remove the virus and restore the DLL.
Uninstall recent apps – Removing an application that may cause conflicts may also be an efficient way to avoid further troubleshooting.
Now you may proceed to further troubleshooting if the workarounds are not effective.
1. Manually download and replace the DLL
The easiest solution for the missing cryptbase.dll is to replace the missing file in the dedicated folder. You could get it from another PC or download it from a trusted source. Ensure that the downloaded file is placed in the path below:
C:\Windows\System32
Alternatively, you could paste the file into the app’s dedicated directory. It’s important to remember that when a DLL needs to be loaded, it will be searched for in the program’s directory first. The System32 folder will be checked next if it’s not found there.
Also, a solution can be achieved using specialized DLL repair software, which automatically fixes the issue with 100% accuracy.
2. Use a file repair utility
Press Windows + R to open the Run dialog.
Type cmd and hit Ctrl + Shift + Enter.
Type the script below and hit Enter: sfc /scannow
This process may take a while to execute, but once it is completed, restart your computer and verify if the cryptbase.dll error is resolved.
Are you looking to maximize your professional potential and make great connections? Then creating a LinkedIn profile is the key.
In today’s professional landscape, having a strong online presence is crucial for career success. And when it comes to establishing your professional brand, LinkedIn takes center stage. Whether you’re a recent graduate entering the job market or an experienced professional looking to expand your network, creating and optimizing your LinkedIn profile can be a game-changer.
In this comprehensive guide, we will walk you through the step-by-step process of creating a LinkedIn profile that will grab attention, impress potential employers, and open doors to exciting opportunities. From choosing the right profile picture to crafting a compelling summary, we will cover every essential element that goes into building a stellar LinkedIn presence.
Let’s begin!
Part 1: Understand the Purpose of Your LinkedIn Profile
Before you start creating your LinkedIn profile, it is important to clearly understand why you are doing so. Your profile should reflect who you are and what you do in order to stand out from the crowd and elevate yourself as a professional. It can also be a powerful tool for networking, keeping track of industry trends, and staying up to date with the latest business developments.
Therefore, your profile should be informative and engaging, highlighting your unique qualifications and showcasing your abilities in a way that resonates with potential employers.
1. Define Your Professional Goals
Before you create your LinkedIn profile, it is important to clearly define your professional goals. Do you aim to build a strong online presence? Reach out to potential employers? Expand your network? This will help guide the content and design of your profile in order to make sure it meets your needs and expectations.
If you are looking for inspiration, consider researching successful LinkedIn profiles and taking note of their strategies. This will provide valuable insights into the elements that should be included in your profile.
For example, some professionals post regular updates on relevant topics to build visibility and stay top-of-mind with potential employers. Others feature a portfolio of work samples or online courses to demonstrate their expertise.
2. Identifying Your Target Audience
Figuring out who you are targeting with your profile is also critical for its success. Are you looking to connect with recruiters, employers, industry peers, or other professionals? This information can help inform the tone and style of your profile.
3. Tailoring Your Profile Accordingly
Once you have an idea of what your goals are, who you are targeting, and what type of content resonates with them, it is time to start crafting a profile that stands out. Pay attention to the language used in job postings or other industry-related resources to get a better understanding of the kind of skills employers are looking for. This will help you tailor your profile accordingly and make sure it meets their expectations.
By understanding the purpose of your profile, defining your goals, targeting an audience, and tailoring your content accordingly, you can create an impressive LinkedIn profile that will open doors to exciting opportunities.
Now, let’s move on to the next step!
Part 2: Sign Up on LinkedIn
Now that you have some direction, it’s time to get started on the actual profile-building process.
Launch your web browser and navigate to linkedin.com to begin the sign-up process.
On LinkedIn’s homepage, click the Join now button at the top-right.
On the next page, enter the Email or phone number and create a strong, unique password. Select Agree & Join button to continue. You can also sign up using your Google account. Click the Continue with Google button for that.
Next, enter your first and last name. Click the Continue button.
Select your Country/Region, City/District, and click Next.
Enter your most recent job title, or if you are a student, select the I’m a Student option.
Next, select Employment type and Most recent company.
Finally, you will be asked to verify your email. LinkedIn will send you the email with the verification code. Enter the verification code to verify the email.
Part 3: Build Your LinkedIn Profile
Now that you have a clear idea of what your profile should look like, it is time to start building! Here are some key elements you will want to ensure are included in your profile.
1. Set a Profile Picture
Your profile picture is one of the first things employers will notice when viewing your profile. Choose an image that looks professional yet still reflects your personality and style. Also, ensure to use a 1.91:1 ratio (1200 (w) x 627(h) pixels).
Here is how to do that:
On your LinkedIn profile, click the profile picture section.
Now, either use your device camera or upload the profile picture from your device.
Select the profile picture that best represents you. It doesn’t need to be too professional. Just select a clear picture.
2. Set a Background Photo
The background photo is the large image behind your profile picture. It sets the tone for your page and can help employers learn more about you in an instant. According to LinkedIn, the background photo must be 1584 (w) x 396 (h) pixels.
Follow these steps to change/add a background photo on LinkedIn:
On LinkedIn, click the “camera icon” on the Background photo section.
Now, select a background photo from your device by clicking Edit profile background.
Select an image that best reflects your brand. It can be a professional headshot or even a scenic photo that conveys the message you want to send.
Once you have selected an image, adjust its settings, crop if necessary, and filter if you like. Finally, click Apply.
3. Add a Professional Headline
Your professional headline is the phrase that appears just below your name and serves as a description of who you are and what you do. It should be professional yet also reflect your unique style. Aim to make it no longer than one or two sentences.
Here is how to add/edit the headline on LinkedIn:
Under your LinkedIn profile, click the “pencil icon” next to your name and headline.
Scroll down and look for the Headline section. In the text box, write a brief yet impactful headline that describes who you are and the skills or services you offer. You can also add where you are working currently.
Finally, click the Save button at the bottom right.
4. List Your Professional Experience
Now it’s time to list your professional experience. This should include all of the companies you have worked for, the roles you held in those companies, and any projects or accomplishments you achieved.
Follow these steps to add professional experience on LinkedIn:
Under your LinkedIn profile, click the Add profile section.
Select the Add position option.
Now, add your company name, job title, and location. You can also select the dates of employment or choose to make them unspecified.
In the Description section, write a brief yet detailed summary of your role in the company and any accomplishments or projects you worked on.
Further, you can also Add Skills and Media, for example, your Author Link, if you are a writer.
Finally, click Save at the bottom right.
Ready to complement your profile with a downloadable CV? Follow this step-by-step guide on how to upload a resume on LinkedIn to add it to Featured or use it with Easy Apply.
5. List Education and Certification
Now list any education and certification you have received. Be sure to include the college or university’s name, the degree program, dates attended, and any honors or awards you achieved.
Follow these steps to add/edit your Education on LinkedIn:
Under your profile page, click the Add profile section.
Then select Add education from the menu that appears.
Now, add the name of your college or university, major/degree, and the dates attended.
Lastly, click Save at the bottom right.
These are the key elements for creating an effective LinkedIn profile. Once you have completed all these steps, you can start connecting with relevant contacts and adding more content, such as work samples or courses, to your profile to make it stand out from others in the industry.
Summing Up
In today’s digital era, having a strong LinkedIn profile is crucial for achieving professional success. Creating and maintaining a professional presence on LinkedIn is a great way to build your online reputation, demonstrate your expertise, and land new opportunities. It’s important to understand the steps involved in creating and maintaining an impressive profile on this platform.
This guide provided an overview of how to create an effective LinkedIn profile. Following these steps can help you maximize the impact of your profile and make it work for you.
While most professionals focus on building and optimizing their profile, others may decide that the platform no longer serves their goals. In that case, you can follow this guide on how to delete your LinkedIn account if you ever want to close it permanently.
FAQs
What should I include in my LinkedIn profile?
Your LinkedIn profile should include an up-to-date headshot, a compelling summary statement, a comprehensive work history, a list of skills and accomplishments, as well as any awards or recognitions you have received. Additionally, be sure to regularly update it with any new experiences and achievements you have achieved.
How often should I update my LinkedIn profile?
For best results, we recommend updating your LinkedIn profile regularly to ensure it is current and reflects your most relevant work experience. Aim to add any new job positions or promotions as soon as they arise, and don’t forget to update your profile with any new certifications, courses, or programs you have completed.
How can I engage with my connections on LinkedIn?
Staying actively engaged with your connections is a great way to strengthen existing relationships and expand your professional network. This involves regularly commenting on their posts, congratulating them on their milestones, and actively participating in discussions. Additionally, consider writing posts or articles to share your thought leadership and industry expertise with your connections.
Did you encounter the DHCP error 0x79? It means an error indicates that the computer has a preassigned IP address, which has been allocated to another device. The error is similar to DHCP unavailability for ethernet connections.
In the guide, we walk you through the most practical solutions and introduce you to likely causes so that you may avoid a repeat occurrence.
What causes the DHCP error 0x79?
If you encounter the DHCP error 0x79, which is commonly referred to as the DHCP server could not be contacted error, it is usually attributed to one of the following reasons:
Network connectivity issues – It’s possible that the device’s network connection isn’t stable, which could be why it can’t reach the DHCP server.
DHCP server unavailable – The DHCP server may be offline or facing problems, which could be why it cannot respond to the request for the device’s IP address.
IP address conflicts – The device may be having trouble obtaining its desired IP address because another device on the network may have already been assigned that address.
Misconfigured DHCP client settings – It’s possible that the device’s DHCP client settings are not configured correctly, which can cause issues when requesting an IP address.
Firewall or security software interference – The communication with the DHCP server may be blocked by firewalls or security software installed on the device, which can result in an error.
How do I fix DHCP error 0x79?
We encourage you to start with the following preliminary solutions:
Check your network connection – You may need to switch ISP or try a wired connection to rule out the possibility of the error due to a bad network.
Verify DHCP server availability – Verify if the DHCP server is online and operational. It is recommended to contact your network administrator or service provider for assistance.
Disable your firewall – You may temporarily turn off the firewall or antivirus program or check if a firewall is blocking a connection.
At the same time, it’s advisable to solve the DHCP server error using efficient VPN software that can help you fix this protocol by changing the IP address and accessing the web from different locations.
Now you may proceed to the more complex solutions below.
1. Reset the TCP/IP values
Press Windows + R, type cmd, then hit Ctrl + Shift + Enter to open an elevated Command Prompt.
Type the script below and hit Enter to reset the WINSOCK values: netsh winsock reset catalog
Reset your IPv4 TCP/IP stack by running the script below: netsh int ipv4 reset reset.log
Lastly, type the script below and hit Enter to reset the IPv6 TCP/IP stack: netsh int ipv6 reset reset.log
Reboot the computer.
2. Reconfigure the DHCP Client service
Press Windows + R.
Type services.msc and hit Enter.
Double-click the DHCP Client service.
Set the Startup type value to Automatic and click on the Start button.
Finally, click Apply and OK, then verify if it fixes the DHCP error 0x79.
Click on the Start menu, type view network, and select the View network connections option.
Right-click on your network connection and select Properties.
Click on Internet Protocol Version 4 (TCP/IPv4) and hit the Properties button.
Pick the options for Obtain an IP address automatically and Obtain DNS server address automatically, then hit the OK button.
4. Disable IPV6
Click on the Start menu, type view network, and select the View network connections option.
Right-click on your network connection and select Properties.
Uncheck the Internet Protocol Version 6 (TCP/IPv6) option, hit the OK button, then verify if it fixes the DHCP error 0x79.
5. Run the Network Adapter troubleshooter
Press Windows + I to open the Settings app.
On the right pane, click on Troubleshoot.
Select Other troubleshooters.
Scroll down to Network Adapter and click on its Run button.
Select All network adapters and click the Next button.
Follow the wizard and apply the recommended fixes.
That is as much as we explore in this guide. We recommend you start with the easy workarounds and then follow through, starting with any of the more complex solutions that feel the most applicable.
Please reach out to us in the comments section below and let us know what worked for you.
If you’re a Windows 11 user who wants to take advantage of the Mica effect, a feature that enhances the appearance of buttons and menus by adding a transparent layer, you may be wondering how to enable it.
While the Mica effect comes enabled by default in many applications, some programs require manual activation. That includes Microsoft’s very-own natively built-in browser, Edge.
In a recent development, as spotted by the enthusiast, the latest Edge Canary build has incorporated the Mica Alt effect as the default setting. However, it has been confirmed that this change stems from upstream Chromium.
Compared to the standard Mica effect, Mica alt features a more pronounced tinting effect of the user’s desktop background color. This visual enhancement option can be applied to the backdrop of applications, particularly those incorporating a tabbed title bar, to create a stronger visual hierarchy.
You might recall, as we’ve previously reported, that Microsoft has also made efforts to implement the feature on Chrome, a competitor of Edge. The roll-out has been observed by members of the community, developers, and insiders using the Chrome Canary channel. However, it may take a while longer for it to be available to the general public.
Although the Mica effect on Edge is not yet accessible to the general public, you can still activate it and enhance your browsing experience with a few minor adjustments. Here’s how you can do it.
How to activate the Mica effect on Microsoft Edge.
1. Open your Edge browser.
2. Right click on Edge’s icon on the taskbar.
3. Right click again on Microsoft Edge and click Properties.
4. Add the code –enable-features=msVisualRejuvMica to the Target column at the end of the text string C:\Program Files (x86)\Microsoft\Edge\IFEO\msedge.exe. If there are any preceding command line flags, you should remove them.
5. Click Apply and OK.
6. Go to Settings ➜ Appearance.
7. Look for a toggle switch labeled Adds Mica effect and click on it. After doing so, you will need to restart the browser.
However, keep in mind that this feature is still in Preview and may have some bugs, but Microsoft is working to improve the experience.
If you’ve tried using the Mica effect on Microsoft Edge in Windows 11, feel free to share your thoughts in the comments section.
Ever since the year began Microsoft has been busy at work, and to this end, it has already released its first major feature drop from Windows 11, the Moment 2 update. The update featured AI capabilities alongside Phone Link support for iOS which is now available for everyone.
And matching the beat of the drums, Microsoft is now getting ready to ship its Moment 3 update in the next couple of weeks. We delve deeper into details about this in a separate post, so be sure to also check that out for more information about the improvements and new features on the way.
In retrospect, before the debut of Moment feature updates, users had to wait for the annual Windows feature update to take place in the fall. These updates are essentially designed to help deliver ‘continuous innovation’ to Windows 11 users throughout the lifecycle of the product.
Microsoft dropped its first major feature update last year in September, the Windows 11 2022 update which featured a tabbed File Explorer. Microsoft further highlighted its intentions to shift to a new update cadence for Windows 11 designed to bring new features and improvements to users on a regular basis.
Ideally, Microsoft should ship three major feature drops to users this year. The first one already dropped and the second one is in the works and ready to ship at any moment now. And as it happens, the third and final release (Moment 4) could be in the works and ready to drop later this year as spotted by @PhantomofEarth on Twitter with Windows Central’s Zac Bowden reiterating the same sentiments.
This pretty much confirms that Windows 11 version 23H2 coming later this year will be a CU release, not a full build upgrade, as 23H2 is based on the same platform release as version 22H2.
Next major version of the Windows platform is still on track to launch in the second half… https://t.co/6yrkbNqEsL
The Moment 4 update is expected to bump up the OS version from 22H2 to 23H2. To this end, there’s little to go on about what Microsoft has in store for users in the future. But we already know that the company will no longer ship feature updates to Windows 10 which is slated to hit its end-of-support on October 14, 2025.
Keeping in mind, Microsoft’s intent to start shipping major versions of the Windows client every three years. this might not be as farfetched. However, Microsoft has remained silent on the matter.
Microsoft has announced that Gears 5 and other Xbox titles will be made available on Nvidia GeForce Now, Nvidia’s cloud gaming platform for PCs. As of today (May 18) Xbox Game Studios’ third-person tactical shooter Gears 5 is already available for Nvidia GeForce Now members in the U.S., U.k., and E.U to stream.
The announcement post over on Xbox Wire states that is the first fruit of Microsoft’s partnership with Nvidia.
This is just the beginning stage of our forward-thinking 10-year partnership with NVIDIA to make PC games from Xbox Game Studios and Bethesda available to their GeForce NOW members. Together, we’re accelerating access to players around the globe by letting them choose how and when they game.
Starting today, NVIDIA GeForce Now members can stream Gears 5! With Deathloop, Grounded & Pentiment on May 25. Just the first step in our commitment to making our PC games globally available through a variety of cloud gaming services. More on the blog: https://t.co/BYmEqFqGOkpic.twitter.com/l2WDTldLUv
Earlier this year the two parties agreed to bring Xbox Games Studios titles to Nvidia’s platform for the next 10 years, not to mention those from Activision Blizzard (including Call of Duty) if Microsoft’s efforts to merge with the latter prove successful. Similar deals have been inked with cloud gaming platforms Boosteroid and Ubitus as well as Nintendo, and a 10-year deal was also offered to Sony.
Three more Xbox titles will be released for GeForce Now on Thursday, May 25: Deathloop, Grounded, and Pentiment. The announcement suggests that further release dates will be unveiled via “GFN Thursday updates.”
The initial slate of launch games spans our catalog, providing players high-quality, immersive titles with a little something for everyone–single player campaigns, story-driven experiences, and opportunities to play with friends and family through multiplayer. Following this initial release, we’ll continue to add more content from our portfolio on a regular basis to ensure players can always find a new and exciting game.
Anyone who plays games or does a lot of video editing can tell you what a good graphics card can do and why it is extremely essential. The integrated GPU is okay, but a dedicated GPU is the way to go if you’re looking for excellent performance.
Regarding dedicated GPUs, the igfxpers.exe file is closely associated with these graphics cards. The igfxpers.exe is software that Intel Graphics uses to maintain the graphics card settings, but is it really necessary? Find out here.
What does the Intel persistence module do?
The persistence module, also known as igfxpers.exe, is an executable file belonging to the Intel Graphics Accelerator Driver for Windows, a driver for Intel HD or NVIDIA graphics cards.
It is designed to speed up everything from games to web browsers, as well as any other application you might use on your computer.
This is achieved by changing how the graphics card handles data to process information faster. You will notice a significant increase in your computer’s overall performance when using GPU-intensive programs.
Since the process was designed to help improve your computer’s performance, you’re more likely to run into this file if you’re using a dedicated GPU.
Although it has been said to improve your GPU’s performance, due to its nature, this program can cause some problems if it isn’t working properly or if it has been infected with malware.
Do I need Igfxpers.exe?
You can find the igfxpers.exe file in the C:\Windows\System32 folder, which implies it is a genuine Windows file. However, not all genuine Windows files must run at all times, especially if they consume system resources.
The only circumstances that may necessitate this file are if you have a lower-end or older graphics card.
Such graphic cards may be worn out or are just not powerful enough hence need a little boost to restore the display resolution after a shutdown, restart, or hibernation.
However, if you’re using a discrete GPU, you won’t need it because it can perform these tasks independently without additional software.
Since this file runs on startup, it can slow your PC boot. As such, disabling it is the only way to improve the boot time.
Another reason could be hackers who have found a way to sneak in a malicious file with a similar name to igfxpers.exe file into your system. In such cases, it should be treated as a virus and removed.
How do I remove Igfxpers.exe from Windows?
1. Remove the program from Startup
Hit the Windows key, type msconfig in the search bar, and click Open.
Navigate to the Startup tab, find Intel common User Interface, and uncheck it.
Click on Apply then OK to save the changes.
2. Scan for viruses
Press the Windows key, search Windows Security, and click Open.
Select Virus & threat protection.
Next, press Quick scan under Current threats.
If you don’t find any threats, proceed to perform a full scan by clicking on Scan options just below Quick scan.
Click on Full scan, then Scan now to perform a deep scan of your PC.
Wait for the process to finish and restart your system.
If you are concerned that Igfxpers.exe may contain malware and needs to be removed, it’s more efficient to scan for malware with strong antivirus software.
The main reasons for using antivirus tools instead of standard threat protection are enhanced security against complex digital threats or a higher detection rate.
Click the Search icon, type Device Manager in the search bar, and click Open.
Navigate to Display adapters to expand, right-click on your graphics card and select Disable.
This step should only be used under two circumstances. You have a dedicated graphics driver, and your integrated GPU can withstand your activities. When you disable your dedicated graphics card, your computer will use its integrated graphics processor.
The integrated graphics processor is built into your computer’s motherboard and is not as powerful as a dedicated graphics card. However, modern-day GPUs are strong, so you should be fine if your activities are not GPU-intensive.
Alternatively, if the igfxpers.exe file is consuming too many resources but you do not feel like disabling it, you can upgrade your CPU so that it is powerful enough to handle the tasks. A multi-core processor would be better so that your GPU is not exhausted.
For any additional thoughts or queries, drop us a comment down below. If you want to learn about other Intel processes, visit our guide on Jhi_Service.exe.
The latest Xbox update preview is available for the Xbox Insider Program’s Alpha Skip-Ahead ring. As usual, the update will bring plenty of bug fixes and minor background improvements. There are also a few known issues with this latest update that Xbox Insiders should be aware of.
Intermittent issues with audio across the dashboard, games, and apps.
An issue in which titles in the My Games & Apps section incorrectly appear with a “trial” tag.
TV may display at the incorrect resolution upon booting up the Xbox console.
Users should use Report a problem to give feedback if they encounter these issues. Xbox Insiders can also make use of the community subreddit to find support.
Alpha #XboxInsiders can expect a new 2306 update (2306.230515-2200) to be available at 2:00 p.m. PT today. More info on what's new can be found in the blog post linked below: https://t.co/2TYJ7O8ESL
View Microsoft Rewards points balance right on the Home screen
Undoubtedly the most exciting new feature this update will bring allows users to see their Microsoft Rewards points right on the Xbox dashboard’s Home screen, instead of having to navigate to it. As per the release notes published on Xbox Wire,
Starting today, a random subset of users will see their Rewards points balance right from the Home screen! To find it, look no further than the top corner where you typically find your Xbox gamertag. Some users will see the balance as the information cycles, while others will see it alongside their gamerscore.
Bear in mind that this update is currently only available in preview for the Xbox Insiders Alpha Skip-Ahead ring. If you are interested in enrolling in the Xbox Insiders Program, you can do so here. You can also learn more about it over on the Xbox Insiders FAQ page.
If you’ve ever been browsing on the Internet and you opened a page only to be redirected to another, then you are well aware of browser hijacking. It seems that ib.adnxs.com is the latest browser hijacking scheme, as it keeps popping up.
While we all try to be careful while browsing, you never know what site could set you off and bring along these unwanted pop-ups. If you’ve been a victim of this annoying ad pop-up, we share how to get rid of it.
Is ib.adnxs.com a virus?
A quick search on the Internet to visit the ib.adnxs.com site at the time of writing this article does not yield any results. This leads us to believe it is a deceptive site or the domain doesn’t exist.
On the question of whether Ib.adns.com is a virus, we can’t rule out the possibility, but it can be categorized as a Potentially Unwanted Application (PUA).
It may display advertisements on the Internet or redirect you to potentially dangerous sites where your system may pick up adware and virus infections.
These ads may appear on any website you visit when using your browser, so it may be difficult to pinpoint the site that brought about the ib.adnxs.com ad.
However, a question that is on everyone’s mind is how it found its way to your PC. We were able to come up with some possible reasons:
Suspicious sites – You may knowingly or unknowingly clicked on a video or link that redirected you to the ib.adnxs.com site. Sometimes, closing the pop-up works, but if it is constantly popping up, your system may already be compromised.
Browser extensions – We all love how browser plugins enhance functionality, but not all are for the good of your system. Some actually contain malicious code that have the ability to change your browser settings.
Downloading software from unknown sources – You may have downloaded an app from third-party sites such as torrent sites. Sometimes, looking for additional apps brings something extra that is not so welcome.
How do you remove ib.adnxs.com?
1. Scan for viruses
Press the Windows key, search Windows Security, and click Open.
Select Virus & threat protection.
Next, press Quick scan under Current threats.
If you don’t find any threats, proceed to perform a full scan by clicking on Scan options just below Quick scan.
Click on Full scan, then Scan now to perform a deep scan of your PC.
Wait for the process to finish and restart your system.
If you’re still experiencing the ib.adnxs.com pop-up after a full scan, Windows security was probably insufficient to remove the adware. Removing adware is not always a simple task. Especially if the software has already installed itself on your computer.
In such cases, you’ll need reinforcement from a stronger fighter. We recommend TotalAV. It has strong antivirus features and offers protection against phishing attacks and malicious websites.
The program also scans all web pages for suspicious code and blocks them if necessary so that no damage can be done to your PC when browsing online or downloading applications from unknown sources.
For this step, it will depend on the browser you’re using. In our case, we shall be using Chrome.
Launch your Chrome browser and click on the three vertical ellipses at the top right corner.
Select Settings.
Next, click on Reset and cleanup, then select Restore settings to their original defaults.
Confirm Reset settings in the next dialog box.
Hopefully, these steps will help you rid your browser of the ib.adnxs.com pop-up. If persistent, you may have to perform a System Restore or clean install Windows.
In the future, to prevent such occurrences, ensure that:
Don’t click on links in emails from unfamiliar senders
Be careful when visiting a website that isn’t reputable
If you see the error message winbio.dll file is missing or winbio.dll was not found, a crucial component of the Windows Biometric Framework (WBF) is deleted, corrupted, or inaccessible.
The winbio.dll missing error can occur during system startup, biometric authentication, application launch, or driver installation/update.
What is winbio.dll?
Winbio.dll file, also known as Windows Biometrics Client API, is a dynamic library developed by Microsoft for the Windows Operating system. It contains the necessary functions and resources for implementing and utilizing the Windows Biometric Framework (WBF) on Windows.
It allows developers to interact with biometric devices and implement biometric authentication features in their applications using the Windows Biometrics Client API. Here are some possible causes winbio.dll missing error :
File corruption or deletion: The winbio.dll file may have been accidentally deleted or corrupted by a user, a software installation, or a malware infection, which can trigger the missing DLL error.
Malware or virus infection: Malicious software can sometimes target system files, including winbio.dll, leading to its deletion or corruption.
Software conflict: Conflicts between different software applications or incompatible drivers can result in the deletion or corruption of the winbio.dll file.
Hardware issues: Problems with the hardware components associated with biometric authentication, such as fingerprint scanners or facial recognition cameras, can lead to the winbio.dll missing error.
Incorrect registry entries: Improper modifications or changes in the Windows Registry related to the winbio.dll file can prevent it from being recognized or cause it to go missing.
How can I fix the winbio.dll missing or not found error?
Before diving into more complex solution, try these prerequisite solutions:
Restart your computer: Sometimes, a simple restart can fix temporary glitches or issues.
Update Windows: Make sure your Windows operating system is up to date. Windows updates often include fixes for known issues and can replace missing or corrupted system files.
1. Reinstall The Microsoft Visual C ++ Redistributable Package
Select the vc_redist.X64.exe option and click Next. For the 32-bit operating system, select vc_redist.X86.exe.
Once the file is downloaded, run the EXE file and follow the instructions to re-install the package.
Then, reboot your computer.
2. Manually download the DLL file
Visit the official software websites or trusted DLL file repositories like DLL-Files.com.
Download the DLL file that corresponds to the version of your operating system (either 32-bit or 64-bit).
Perform a thorough antivirus or anti-malware scan on the downloaded DLL file for safety.
Place the DLL file in the appropriate directory.
For 32-bit DLL, place it in the following folder:C:\Windows\System32
For 64-bit DLL, paste in the following location: C:\Windows\SysWOW64\
Restart your computer and check if the error is fixed.
In case the steps above are taking too long or it seem too complicated, there is a useful alternative for it.
Thus, you can employ a tailored system repair solution that fixes DLL issues automatically and finds missing files from its rich database of authorized DLL files.
3. Re-register the DLL file
Press Windows + R to open the Run dialog box, type cmd, and press Ctrl + Shift + Enter to open the Command prompt in administrator mode.
Click on Yes on the User Account Control (UAC) prompt window.
Type the following command and press Enter:regsvr32 winbio.dll
Press the Windows key, type command prompt, and select Run as administrator.
Click Yes to the User Account Control (UAC) prompt.
Enter the following command and press Enter:sfc /scannow
Wait for the scan to complete, then run the following command one after the other:DISM /Online /Cleanup-Image /ScanHealthDISM /Online /Cleanup-Image /RestoreHealth
Then, reboot your PC.
5. Perform a system restore
Open the Windows Start menu, type restore,and click Create a restore point.
In the System Properties window and click the System Restore button.
Then, select Choose a different restore point, and click Next.
In the next window, select the restore point, and click Next.
Then, click Finish to start the system restore process.
If none of these steps resolve the issue, you may need to consider more advanced troubleshooting, such as performing a Windows reset or reinstalling the Windows.
If you have any questions or suggestions, feel free to leave them in the comments section below.
Minecraft is a popular game played by users worldwide and is available on several platforms. While downloading Minecraft doesn’t seem like a hassle, the errors you encounter certainly do. One such that affected many is You need to authenticate to Microsoft services.
Since Minecraft made it mandatory for users to sign in with a Microsoft account, errors like these are common. But it isn’t always an issue at your end to blame. Keep reading to find out all about the problem!
What does authenticate to Microsoft services mean on Minecraft?
The error indicates that Minecraft couldn’t reach Microsoft services, which resulted in an authentication issue. And since it’s mandatory now, you can’t run the game without completing the authentication.
Here are a few reasons users get the You need to authenticate to Microsoft services error:
Issues with the Internet connection: For most users, it was a slow Internet connection to blame. So make sure you check that.
Misconfigured network settings: Even misconfigured network settings or security policies set over the connection can lead to the error.
Missing administrative privileges: When the launcher is missing administrative privileges, the error may appear for many users.
How do I fix Minecraft You need to authenticate to Microsoft services?
Before we move to the slightly complex solutions, try these quick tricks:
Check for any issues with the Minecraft servers using the dedicated status page or from a reliable real-time service like Downdetector. In case of downtime, try again in a few hours.
Restart the computer.
For You need to authenticate to Microsoft services in Minecraft on Xbox, press the power button on the console to turn it off, disconnect the power cord for a minute, then reconnect it and turn on the console.
Re-sign into Minecraft on the device, and make sure you use the Microsoft account credentials this time.
Connect to a different network. For instance, if you are currently using Wi-Fi, switch to Ethernet or mobile hotspot and check whether the You need to authenticate to Microsoft services Windows 10 error disappears.
Locate the bedrock_server.exe file, right-click on it, and select Properties.
Navigate to the Compatibility tab, tick the checkbox for Run as this program as an administrator, and click OK to save the changes.
Once done, restart the computer and then launch Minecraft.
For the You need to authenticate to Microsoft services issue on Minecraft Bedrock, a quick solution is to run the executable file with administrative privileges.
2. Enable the firewall
Press Windows + S to open Search, type Windows Defender Firewall in the text field, and click on the relevant search result.
Click on Turn Windows Defender Firewall on or off from the left.
Now, select Turn on Windows Defender Firewall under both Private network settings and Public network settings, then click on OK to save the changes.
For some users, the You need to authenticate to Microsoft services Windows error appeared due to a disabled firewall, and enabling it worked.
3. Change the server properties
Navigate to the dedicated directory, and open the server.properties file using a text editor.
Locate the online-mode entry, and set it to false.
4. Set the correct date and time
Press Windows + I to open Settings, select Time & language from the navigation pane, and click on Date & time.
Enable to toggle for Set time automatically.
You may get the error if there’s a mismatch between the actual date and time and that set on the PC. Also, while looking at it, check the set time in Minecraft settings. Besides, correcting the date and time will also work in the case of You need to authenticate to Microsoft services on PS4.
Press Windows + R to open Run, type appwiz.cpl in the text field, and hit Enter.
Select Minecraft from the list of installed programs, and click Uninstall.
Follow the on-screen instructions to complete the process.
Once done, restart the computer, then install Minecraft all over again.
When nothing else works, it could have been a problem with the app installation that triggered the You need to authenticate to Microsoft services realms error. Uninstalling the program and then downloading it from scratch should do the trick.
We often see apps not opening, and the message accompanying the issue lists the underlying cause and helps with the troubleshooting. But that doesn’t always work, as is the case with The instruction at 0x000000000 referenced memory at 0x00000000. The memory could not be written error.
The referenced memory could not be written error can be encountered while launching programs, running games or graphics-intensive apps, or even shutting down the PC. Keep reading to find out all about it!
Why reference memory could not be written?
The error states that the address where the critical information is stored on the RAM is inaccessible to the software, or changes can’t be made to it. The problem can arise due to hardware and software issues, though it’s generally the latter to blame.
Here are a few reasons you get the error:
Issues with the RAM: There’s a good chance that high RAM usage or issues with the memory module is triggering the error.
Corrupt system files: For a few users, it was the corrupt system files that led to the problem, and replacing these did the trick.
Problems with the app files: When the problem was limited to a specific app, it could be missing or corrupt files for that app to blame.
Outdated graphics drivers: In some cases, users reported that an outdated graphics driver led to The instruction at 0x000000000 referenced memory at 0x00000000. The memory could not be written error.
How do I fix the instruction at referenced memory could not be written error?
Before we move to the slightly complex ones, here are a few quick tricks to try:
Restart the computer, in case it’s the high-resource consumption to blame.
Check for Windows updates and install any available ones. Then, verify whether the memory could not be written error in Windows 11 is fixed.
Disable any third-party antivirus or security software installed on the PC.
Make sure you don’t have the taskbar hidden in Windows. Though strange, unhiding the taskbar did do the trick for a few users.
If none work, head to the fixes listed next.
1. Run the DISM and SFC scans
Press Windows + R to open Run, type cmd, and then hit Ctrl + Shift + Enter.
Click Yes in the UAC prompt.
Paste the following commands individually and then hit Enter after each for DISM:DISM /Online /Cleanup-Image /CheckHealthDISM /Online /Cleanup-Image /ScanHealthDISM /Online /Cleanup-Image /RestoreHealth
Now, run the following command for the SFC scan:sfc /scannow
Once done, restart the computer for the changes to apply.
These will replace the corrupt files with the cached copy stored on the PC and get rid of The instruction at 0x000000000 referenced memory at 0x00000000. The memory could not be written error.
Moreover, you can try dedicated third-party repair software to make sure you erase not only corrupt system files but other Windows stability issues as well.
2. Update the graphics driver
Press Windows + X to open the Power User menu, and select Device Manager.
Expand the Display adapters entry, right-click on the graphics adapter, and then select Update driver.
Now, choose Search automatically for drivers and wait for Windows to install the best one available locally.
A corrupt, incompatible, or outdated one can trigger a range of errors, and updating the graphics driver will take care of it all. Besides, if Windows can’t find one locally, you can always manually install the latest driver from the manufacturer’s website.
3. Increase the virtual memory
Press Windows + S to open Search, type View advanced system settings, and click on the relevant search result.
In the Advanced tab, click on Settings.
Now, navigate to the Advanced tab, and then click on Change under Virtual memory.
Untick the checkbox for Automatically manage paging file size for all drives, select No paging file, and click Set.
Now, choose Custom size and enter the paging file size based on the available RAM using the following formula:
Initial size: 1.5 x (Physical RAM in MB)
Maximum size: 3 x (Physical RAM in MB)
For instance, if the physical RAM is 4 GB, the initial and maximum sizes become 6144 MB (1.5 x 4 x 1042) and 12288 MB (3 x 3 x 1024), respectively.
Once done, click Set and OK to save the changes.
When running out of RAM, a quick solution is to increase the virtual memory in Windows. This part of the disk acts as RAM by temporarily storing files. While it functions the same way as the RAM, it’s not as fast. So, adding virtual memory can’t be a permanent solution.
Press Windows + I to open Settings, go to Apps from the navigation pane, and click on Installed apps.
Click on the ellipsis next to the app throwing the error, and select Uninstall.
Again, click Uninstall to confirm the change.
Once done, restart the computer, then download the app from an official source, say the developer’s website or Microsoft Store.
As pointed out on many forums, the error also appears due to an improper app installation or missing files. And in this case, uninstalling the program and getting it from scratch does the trick.
Also, for users getting The instruction at 0x000000000 referenced memory at 0x00000000. The memory could not be written error with Firefox, downloading the 32-bit version of the browser works.
Press Windows + R to open Run, type rstrui.exe in the text field, and click OK.
Select Choose a different restore point, and click Next.
Now, select a restore point, one created before the error first appeared, and click Next.
Verify the restore details, and click Finish to start the process.
In case the previous solutions didn’t help, you could perform a system restore and revert any recent changes on the PC that might be triggering the error. This will get rid of any software-related issues.
6. Check for memory issues
When nothing works, it could be a memory-related problem that leads to the error. For that, we have the built-in Windows Memory Diagnostic to help identify and eliminate common problems with the RAM.
Also, for a more comprehensive scan, you can use Memtest86+, an open-source memory testing tool that finds even the minutest and most complex issues with the RAM.
Since the tool takes a few hours, it’s best to run it overnight. And if any problems are found, replace the affected RAM module.
By now, you should have fixed The instruction at 0x000000000 referenced memory at 0x00000000. The memory could not be written error encountered when running apps.
Microsoft is definitely thinking about Android users. Windows Subsystem for Android has been getting a lot of quality updates lately.
You don’t have to worry about viruses and malware anymore, because now every app will be automatically scanned by anti-virus software. You can also assign the RAM memory however you like, according to the recent updates.
However, there are a lot of people wondering if you can access the SD card on WSA. On the official Microsoft forum, there is a thread on this topic, with one user asking if it’s possible.
I have successfully installed the Windows Subsystem for Android (WSA), and also successfully installed several applications from the Amazon App Store. I am using a Microsoft Surface Go 3 tablet with a SD Card installed. I’ve been unable to save files from Android applications to the SD Card. The SD Card does not even show up in the Android File explorer. Just the “Subsystem for Android”. Is it possible to mount an SD Card so that Android apps can access?
The answer, unfortunately, is negative, so far at least. There isn’t any official info on how to access the SD card on WSA, but if we talk about the recent love Microsoft has shown to WSA, you might be able to enjoy this feature soon.
The latest WSA update release is here
Speaking of updates, Microsoft released the 2304.40000.5.0 WSA update for Windows 11. It will focus on adding package verification, improved reliability, and AppLink support.
Below you can see see all the changes:
Package verification for apps on WSA: Android apps are scanned using anti-virus software installed on Windows prior to app installation.
Ability for users to configure how much memory to assign to Android.
Android apps will be launched when a user opens the supported app link from any app (Android AppLink support).
Linux kernel updated to 5.15.94
WSA reliability and performance improvements
With that being said, Microsoft is also open to feedback for WSA. In the Feedback Hub, which you can access by typing Windows + F, you can write your ideas and suggestions and submit them to the Redmond tech giant.
And if you’re thinking about accessing the SD card on WSA, make sure to let them know. It will be most likely implemented in the near future if there is enough feedback on this issue. Either way, we will pay close attention, and if anything comes up about it, we will let you know.
Would you like to see this feature on Windows Subsystem for Android? Let us know in the comments section below.
We have all come across app errors on PC, be it with the built-in ones or other programs not launching. And while most of these are due to a missing DLL, a few are rather complex in nature. One such is the File system error (-1073740791).
Usually encountered when running apps that require administrative privileges, the Exit code -1073740791 affects a wide range of system apps and often leads to Windows crashing or the PC becoming unresponsive. So, let’s find out all about it!
What is File system error (-1073740791)?
The File system error (-1073740791) arises due to a problem with the OS or the disk. And based on our research, there isn’t much users can do other than reset or reinstall Windows. The reason, most users are unable to run Command Prompt as administrator, which is vital to the troubleshooting process.
Here are a few reasons users get the error message:
Issues with the disk: The File system error (-1073740791) could result from Windows being unable to read data from the disk, mostly due to a corrupt or damaged sector.
Malware or virus infection: A few users reported that the error appeared after malware infected the PC, so you will need to check for that.
Missing app files: If the problem is limited to a specific app, chances are that its files are missing, corrupt, or unreadable.
How do I fix File system error (-1073740791)?
Before we head to the slightly complex ones, here are a few quick solutions to try:
Restart the computer.
Install the pending Windows updates.
Disable any third-party antivirus on the PC.
If none work, move to the fixes listed next.
Tip
You must run Command Prompt with administrative privileges for some solutions here. If you cannot do so, we recommend booting Windows into Safe Mode and then performing the steps. For users facing issues with that as well, the other solutions will surely help.
1. Run the DISM and SFC scans
Press Windows + R to open Run, type cmd, and hit Ctrl + Shift + Enter.
Click Yes in the UAC prompt.
Paste the following commands individually and hit Enter after each for DISM:DISM /Online /Cleanup-Image /CheckHealthDISM /Online /Cleanup-Image /ScanHealthDISM /Online /Cleanup-Image /RestoreHealth
Next, run the SFC scan:sfc /scannow
Once done, restart the computer.
In case the File system error (-1073740791) with Task Manager appeared out of the blue, it could be the system files to blame. And in this case, running the DISM tool and SFC scan should help.
Besides that, it’s also helpful to utilize dedicated repair software created by experts to diagnose your Windows OS and repair damaged system files in minutes.
2. Scan for malware
Press Windows + S to open Search, type Windows Security in the text field, and click on the relevant search result.
Click on Virus & threat protection.
Click on Scan options.
Choose Full scan and then click on Scan now.
Wait for the scan to complete.
If the File system error (-1073740791) with Registry Editor appeared after you downloaded a file or installed an app from an unreliable source, it’s most likely a malware or virus behind it. Run a full system scan to find any. Also, you could use an effective antivirus solution for a thorough scan.
3. Check for disk errors
Press Windows + S to open Search, type Command Prompt, and click on Run as administrator.
Click Yes in the prompt.
Paste the following command and hit Enter:chkdsk /r /f
If asked to confirm running the scan the next time your PC boots, press Y and then hit Enter.
Restart the computer.
When the problem lies with the disk, the built-in Check Disk utility comes to the aid. Run it and wait for any identified problems to be eliminated. Then verify whether the File system error (-1073740791) while installing programs is fixed.
Press Windows + I to open Settings, go to Windows Update from the navigation pane, and click on Update history.
Scroll down and click on Uninstall updates.
Click on Uninstall next to the recently installed update.
Again, click Uninstall in the confirmation prompt.
5. Create a new user account
Press Windows + R to open Run, type netplwiz, and hit Enter.
Click on Add.
Now, click on Sign in without a Microsoft account.
Select Local account.
Enter the user name, and password (if required), then click on Next.
Click on Finish to create a new account.
Select the account you just created, and click Properties.
Navigate to the Group Membership tab, choose Administrator, and click OK to save the changes.
For some, a corrupt user profile triggered the File system error (-1073740791). Often the simplest solution here is to create a new user account, set it as administrator, and transfer the data using a USB drive.
6. Perform a system restore
Press Windows + R to open Run, type rstrui.exe in the text field, and click OK.
Select Choose a different restore point, and click Next.
Pick a restore point from the list, one created before the error first appeared, and click Next.
Click Finish to start the process.
Wait for the restore process to complete.
In case you can’t identify what’s triggering the error, another option is to perform a system restore using a restore point created prior to the date you first encountered the error. Remember, you may lose some apps, but the personal files remain unaffected.
7. Do an in-place upgrade
NOTE
The steps here are to perform an in-place upgrade on Windows 11. For Windows 10 users, download the Media Creation Tool, and run the setup to do a repair upgrade.
Now, click Accept to agree to Microsoft’s notices and license terms.
Verify that the setup reads, Keep personal files and apps, then click on Install to perform an in-place upgrade.
When other solutions fail to work against File system error (-1073740791), you can perform an in-place upgrade, wherein the Windows installation is repaired and any issues resolved without affecting the stored files or apps. The process may take a few hours.
Advanced PC users use Command Prompt to perform commands quickly, but many reported an Invalid MS DOS function error while trying to do that.
In case you’re not familiar with this feature, we have a great guide that will explain what DOS Command Prompt is, so be sure to check it out.
To tackle this issue, it’s important to understand what causes it, so keep reading to find out everything you need to know.
Why does an Invalid MC DOS function message appear?
There are several reasons for this issue, but the most common are the following:
File corruption – Corrupted system files or corrupted data might cause this issue to appear.
Registry configuration – If your registry isn’t configured properly, you might encounter this error.
How do I fix Invalid MS DOS function?
Fixing this issue is relatively simple, but before we do that, make sure you try the following:
Use Safe Mode –Access Safe Mode on your PC and check if this problem appears. If not, it means there’s an issue with your settings or user profile.
1. Run the SFC command
Press Windows key + X and choose Windows Terminal (Admin).
Run the following command: sfc /scannow
Wait for the process to finish.
Once the command is finished, check if the problem is still there. In case you’re not able to run SFC or if it didn’t fix the issue, run these two commands as well:
DISM.exe /Online /Cleanup-image /Scanhealth
DISM.exe /Online /Cleanup-image /Restorehealth
2. Run chkdsk scan
Right-click the Start button and choose Windows Terminal (Admin) from the menu.
Now enter the following command, and be sure to replace X with the letter that matches the drive that is giving you this error: chkdsk X: /f
Wait for the scan to finish.
After the scan is finished, check if Invalid MS DOS function error is gone.
Press Windows key + R and enter regedit. Click OK.
Navigate to the following path: HKEY_LOCAL_MACHINE\SOFTWARE\Policies\Microsoft\Windows\System
Right-click the right pane and choose New. Next, select DWORD (32-bit Value).
Name the new key CopyFileBufferedSynchronousIo and double-click it.
Change the Value data to 1 and save the changes.
Restart your PC.
These are just some of the solutions that can help you fix an Invalid MS DOS function error on your PC. In most cases, the issue is related to file corruption.
Sometimes, you cannot access specific websites, which can be caused by ssl_error_handshake_failure_alert error.
This isn’t the only type of error you can encounter, and many reported Handshake failed returned SSL error code 1 error as well. Luckily, we covered that issue in a separate guide. To learn more about this error message and how to fix it, be sure to keep reading.
What causes SSL handshake failure?
There are several reasons for this error, with the following ones being the most common:
Protocol mismatch – The server may be using an older security protocol, which can sometimes cause the issue to appear.
Expired certificate – If the certificate you’re using has expired, you won’t be able to access the website before you renew it.
How can I fix ssl_error_handshake_failure_alert?
First, contact the server administrators. he servers may be using outdated security protocols, which can cause ssl_error_handshake_failure_alert to appear. Website administrators can only fix this.
1. Change Firefox settings
Copy the hostname that is giving you trouble.
In Firefox, in the address bar enter about:config and press Enter.
Locate security.tls.insecure_fallback_hosts and click the Edit button.
Next, enter the address of the website and save the changes.
After doing that, check if ssl_error_handshake_failure_alert error is resolved.
2. Delete certificates
Click the Menu button and go to Settings.
Navigate to the Privacy & Security. Choose View Certificates.
Select the desired certificate and choose Delete or Distrust.
Lastly, select the certificate and click OK.
These are just a couple of solutions that can help you if you’re having problems with ssl_error_handshake_failure_alert error in your browser.
If you are unable to access some websites and stuck with an SSL_ERROR_BAD_CERT_DOMAIN error; we have a separate guide on the issue.
As of today, INNOCN is relatively unknown brand to many. Perhaps, for gamers and artists in the “known” the INNCON brand resonates but for most, it’s seemingly another random monitor manufacturer who just might be able to pull an Insignia or Vizio level of brand cache with products such as the INNOCN 27G1S.
OnMSFT got a review sample of the INNOCN 27GS1 which boasts both HDR and G-SYNC out of the box at QHD 1440P resolution and a 240Hz refresh rate panel for around $469.
Size
27″
Resolution
2560 x 1440p
Refresh Rate
240Hz
Panel Type
VA
Aspect Ratio
16:9
Contrast Ratio
2500:1 (Typ)
Color Gamut
99% sRGB
Colors
16.7M
HDR
HDR10
Response Time
1ms
Connectivity
HDMI 2.1 (2) + DisplayPort 1.4 (2)
GamePlus
Yes
Stand
Height / Titl / Swivel / Pivot Adjustable
VESA Support
Yes (75*75mm)
PIP/PBP
Yes
Weight
9.35lb without stand, 12.87lbs with stand
Look and Feel
The INNOCN 27G1S is instantly recognizable among a sea of black gaming monitors with its distinct dual LED back panel adorned with right RGB lighting accents as well as two lit notches that sit at the base of the screen. Predictably, the lights come on when the monitor is in use and power off when it is not, so each gaming or production set gets a little bit of mood lighting out of the box.
The screen of the 27G1S sits in the middle of the standing desk mount and is about 10-inches from the base bottom. The included stand, when attached, allows for a 90-degree pivot for a longer viewing experience, a 5-degree forward tilt and 20-degree backward tilt, as well as a 30-degree swivel to either side.
Aside from enabling a bit of motion for the monitor the stand does triple duty of also servicing as a headset holder with a kickout flap on the back and as cable organizer near the bottom of the device.
Everything except for the RGB accents is plastered in a matte black finish.
Unfortunately, the port design for the 27G1S is frustratingly similar to the rest of the industry where they are tucked up and underneath the base of the monitor, and present a familiar struggle to identify exact selections when the view of the back of the monitor is obstructed.
There is also a tactile power on and power off menu selection toggle on the back of the monitor to help adjust some of the out of the box settings that tend to mute the colors and flatten the range of HDR for the 27G1S. The menu toggle is a bit frustrating due to its sensitivity as well as the it helps navigate the unintuitive settings menu.
Any slight brushes against the toggle will shut down the monitor and the click to select an item is practically identical to the action taken to shut the monitor off.
The bezels surrounding 27G1S are nice and thin, making way for a gorgeous 2560 x 1440 resolute pane with 240Hz refresh rate and 1ms FreeSync and G-Sync support.
Performance
The 27G1S performed as well as other monitors in this class that include Dell’s Alienware AW2723DF Gaming monitor, AOC C27G2Z Curved Frameless, ASUS ROG Swift 360Hz monitor and others. The monitor seamlessly switches between 60, 144, and 240Hz refresh rates depending on the content being displayed with is a nice addition that helps content creators save a bit of time calibrating the monitor for each specific use case.
The Blue Light reduction feature is pretty handy when working or gaming in dimly lit rooms as well as Flicker Free assistance which helps from exhausting a user’s retina over time.
In the box, the 27G1S comes with support for HDMI 2.1 and DisplayPort 1.4 interfacing which helps reduce motion blur as well supporting various versions of Anti-Aliasing in games.
As a moderate gamer, I spent much of my time with productivity and content creation tasks such as podcast recording, video, audio and graphics editing and general Office 365 usage. The 27G1S handled all of the tasks easily and efficiently. The 99-percent sRGB color gamut combined with the high resolution and VA panel for wide viewing angles meant not having to swivel the monitor as much when replicating images during Photoshop or Premiere sessions.
The 27-inch screen and high DPI also meant being able to take advantage of Windows 3 paneled window snapping arrangement and having enough room to read the content of those windows without squinting. As someone who utilizes a single monitor and laptop screen for a dual windowed setup, it’s nice to be able to rely on the 27G1S to match the performance of my laptop’s high end spec display.
Summary
As I mentioned up top, the INNOCN greatest weakness is its branding. When it comes to monitors and other high-end purchases, people tend to support the brands they know will support them if anything goes wrong or they’re looking to upgrade. Right now, INNOCN is relative unknown and someone might need customer support for rare issue, they might find going with a Samsung, Vizio, LG or Sony monitor is just more convenient, despite the 27G1S delivering a feature packed monitor for a competitive price.
Functionally speaking, the 27G1S is sound, I didn’t run into any artifacting while playing visually demanding games, the speakers were good, VESA mounting was pretty straightforward and the design of the monitor was sleek and modern with a few playful accents. Most people couldn’t ask for more from a display package like the 27G1S.
Between the color accuracy, fast refresh panel that automatically switches, almost 2K resolution and HDMI 2.1 support, the 27G1S is a recommend for moderate gamers, content creators and tasks processors alike.
The Vmwp.exe is an executable file that is related to the Hyper-V in a Windows PC. It is an official Microsoft file that is required for the smooth functioning of Hyper-V.
If you get errors like Hyper-V failed to change state, you might want to stop the Vmwp.exe process. Doing so isn’t that straightforward because it can block the GUI of the virtual machine.
Today, we’ll explain how to safely stop the Vmwp.exe process.
How can I disable Vmwp.exe on my PC?
1. Disable the Hyper-V Windows feature
Press the Win key to open the Start menu.
Type Control Panel and open it.
Click on Programs and Features.
Choose Turn Windows features on or off.
Uncheck the Hyper V box.
Click OK to disable Hyper-V on your system and restart your PC.
2. Disable Hyper-V using PowerShell
Open the Start menu by pressing the Win key.
Type PowerShell and open the top result as an admin.
Type the below command and press Enter. Disable-WindowsOptionalFeature -Online -FeatureName Microsoft-Hyper-V-Hypervisor
Type the below command and press Enter. bcdedit /set hypervisorlaunchtype off
Reboot your PC to apply the changes.
4. Disable the Vmwp.exe process
Press Ctrl + Alt + Esc to open Task Manager.
Locate Vmwp.exe under the Processes tab.
Right-click on it and select End Task.
When you end the Vmwp.exe process, it will disable Hyper-V till the next time you restart your PC. This is a safe way to disable the Vmwp.exe process on your PC.
Open the VM settings for the problematic virtual machine.
Select the virtual hard drive options.
Copy the path to the virtual hard disk file. It would be something like below. C:\VMs\Ubuntu Hyper-V\Virtual Hard Disks\Ubuntu Hyper-V.vhdx
Launch Process Explorer.
Press Ctrl + F and paste the path into the field and hit the Search button. This will list all the processes that are being used by the VHDX file.
Locate Vmwp.exe, right-click, and select Kill Process.
Using Process Explorer, you can easily kill the Vmwp.exe process for the problematic Virtual Machine by following the above steps.
That is it from us in this guide. If you are coming across Hyper-V Error applying hard drive changes, then you should refer to our guide that will help you resolve the problem quickly.