10 Best Touchscreen Laptops to Buy on Cyber Monday

Besides Apple’s iPad and a few others, tablets on their own are not that popular these days. However, the same can’t be said about the nifty crossover called hybrid laptops.

With the touchscreen and a standard keyboard, you have the best of two worlds. The reliability of a laptop and the compactness of a tablet.

That’s why so many professionals are deciding on 2-in-1 devices and that’s why they’re probably selling in numbers.

Some users might be interested in laptops that will run Windows 11, while others are not so keen on making the OS change just yet.

Also, that’s why we conducted small research and found the best deals for you today. Check it out and buy before the stock depletes.

Note: All the prices and offers in this article are subject to change, so be sure to check the official product page to get the latest deal. If the product or offer you’re looking for is no longer available, you can try to find it on its official manufacturer page or get another one from our list.

Which laptop is best in touch screen?

LG Gram 14T90P

  • 1920 x 1200 Touch display
  • i7-1165G7 CPU
  • 16 GB RAM
  • 1 TB SSD
  • Thunderbolt 4
  • Expensive

The LG Gram 14T90P is one of the best laptops on the market this year, offering you access to a crystal-clear 1920 x 1200 touch display that’s 14 inches in size.

This device uses an i7 1165G7 CPU, making it more than capable of dealing with any task you want to expose it to, while the 16GB of RAM ensures that you can run multiple applications at the same time without worrying about lagging.

The 1TB SSD offers you enough space to store all your files while also showing incredibly fast reading and writing speeds, thanks to the PCIe M.2 NVMe interface.

This lightweight and ultra-portable laptop, weighing only 2.8 lbs, offers you around 24.5 hours of usage with one charge, even though this exact value will depend on how it is used in that time.

Razer Blade 15 Base

  • 15.5 inches FHD display
  • i7-10750H CPU
  • Nvidia GeForce GTX 1660 Ti GPU
  • 16 GB RAM
  • 256 GB SSD
  • CNC aluminum body
  • Low storage space

Even though the amount of storage space found on this device could not be enough for some users, the Razer Blade 15 was designed with gaming in mind, supported perfectly by the i7-10750H CPU and the Nvidia GeForce GTX 1660 Ti GPU.

To be able to run the latest games, while also allowing you to multitask by opening multiple apps at the same time, this device comes with 16GB RAM.

The CNC aluminum body ensures durability while also making this laptop feel great to the touch.

Lenovo IdeaPad Flex 5

  • 14-inches Full HD touch-screen display
  • AMD Ryzen 7 4700U CPU
  • AMD Radeon GPU
  • Webcam
  • Fingerprint reader
  • 16 GB RAM
  • 512 GB SSD
  • GPU is not very powerful

The great display on the IdeaPad Flex 5, and the double hinge make this device a sight to behold, while also ensuring that you can take full advantage of the 14-inches touch display.

The AMD Ryzen 7 4700U CPU ensures that your laptop’s processing power will be enough to deal with any task you want to expose it to, while the AMD Radeon GPU will be able to tackle some of the tasks without problems.

Even though this laptop was not designed for gaming, it still provides a great experience, and the 16GB RAM ensures that you can also use it for multitasking.

You also get a 512GB SSD, which could be enough to store all your data like movies, documents, music, and applications without worrying too much about this.

Dell Inspiron 14 5406

  • 14-inches touch-screen display
  • i7-1165G7 CPU
  • Iris Xe GPU
  • 12 GB RAM
  • 512 GB SSD
  • Sub-par GPU, but worth the price for digital media

As another 2-in-1 contender, we have the Dell Inspiron 14 5406, which, even though is not capable of running the latest games, still has enough power for everyday usage, while also providing you with a full touch-screen experience.

The i7-1165G7 CPU is powerful, allowing you to run almost any application without any lagging, while the Iris Xe GPU and 12GB RAM support it perfectly.

This device comes with a 512 GB SSD, which could be enough for some users, but you always have the capability of using an external SSD or HDD to extend it further.

HP Pavilion x360 14

  • 14-inches touch-screen display
  • i5-1135G7 CPU
  • 8 GB RAM
  • 256 GB SSD
  • Long battery life
  • Low amount of storage space

The HP Pavilion x360 14 features a double-hinged 14-inch touch-screen display, powered by a decent i5-1135G7 CPU, which will surely be able to accommodate any sort of task you want to use it for.

The 8GB RAM is enough to run multiple apps at the same time, and even though not as capable of multitasking, still provides a great experience for everyday usage.

The storage space for this device is a 256 GB SSD, which has great reading and writing speeds, thus making the booting times and data processing happen in an instant.

Lenovo Yoga 910 Business

  • Easy to convert between laptop and tablet mode
  • Impressive power given its size
  • Sleek and modern design
  • Long battery life
  • The keyboard is non-standard

Lenovo Yoga 910 Business main specs:

  • CPU: 7th Gen Intel Core i7-7500U mobile processor
  • GPU: Integrated Intel HD Graphics 620
  • Display: 14″ Full HD 10-point multitouch LED screen
  • RAM: 8 GB
  • HDD: 256 GB SSD
  • OS: Windows 10

Lenovo Yoga 910 is a reliable sturdy device with a 360° flip-and-fold design and its LED multitouch screen makes working on it quite a joyful experience.

This machine comes in a dark grey color and a modern chassis design.

Lenovo 14″ ThinkPad X1 Yoga 4th Gen

  • The crystal-clear screen makes it great for movies
  • Easy to convert between tablet and laptop mode
  • Elegant black design
  • Ultra-fast processor
  • The screen may be sensitive to shocks

Lenovo 14″ ThinkPad X1 Yoga 4th Gen main specs:

  • CPU: Intel i7-8665u Quad-core (1 Core) 1.9GHz
  • GPU: Integrated Intel UHD Graphics 620
  • Display: 14-inch 2560 x 1440 Touchscreen LCD
  • RAM: 8 GB LPDDR3_SDRAM
  • HDD: 512GB SSD
  • OS: Windows 10 Pro-64-bit

Lenovo ThinkPad Yoga series is at the top of the Ultrabook and Hybrid 2-in-1 market for a good reason.

This 14″ ultrabook grants you a great laptop/tablet combo with powerful specs, great battery autonomy, and a vivid 14″ touchscreen display.

ASUS Zenbook 13.3

  • Intel Core m3-6Y30 CPU
  • Intel HD Graphics 515 GPU
  • 13.3-Inch Touchscreen FHD display
  • 8 GB RAM
  • 265 GB SSD
  • Low storage space

This lightweight and slim 2-in-1 hybrid laptop checks all the necessary boxes. The anti-glare display and spectacular audio output from the speaker are just some traits you’ll notice immediately.

The battery is usual for a mid-range device, but the charging speeds are exceptional. All in all, worthy of acquisition if you decide to buy it.

Lenovo Chromebook C330

  • This convertible laptop is less than 1-inch thin and is very lightweight
  • Easy to use, offers built-in virus protection, and has a long battery life
  • Has an 11-inch touchscreen display that's perfect for day-to-day computing
  • Boots up in seconds and features easy-to-use Chrome OS
  • Sleek, stylish, and secure
  • Not too much storage space

Touchscreen laptops are the epitome of what it means for a device to be sleek, slim, delicate, and modern, and that’s pretty much the definition of the Lenovo Chromebook C330.

Using it in either laptop or tablet mode is incredibly easy, all thanks to the 360-degree hinges, and the screen is big enough to make watching movies and working worthwhile.

Additionally, the entire device is built to not be a burden at all, occupying as little space as possible, and being no heavier than a book.

Samsung Notebook 9 Pro

  • Intel Core i7-7500U CPU
  • NVIDIA GeForce 940MX GPU
  • 15.6-inch Full HD touchscreen
  • 16GB RAM
  • 512GB SSD
  • GPU could be better

Even though Samsung’s laptop department is mostly focusing on an amazing set of Chromebooks, their Windows options are not falling far behind.

Notebook 7 Spin is one of those 2-in-1 hybrids with everything you need with the flip-and-fold design and top-of-the-line LED display.

Tell us a bit about your choice and how you rate suggested touchscreen laptops in the comments section below.

4 Best Plants vs Zombies Cyber Monday Deals & Sales

When players first laid their eyes on Plants vs Zombies, they probably looked at it with amusement and played it for its outrageous plot.

Well, it seems that this franchise has grown to become one of EA’s biggest moneymakers, continuing to captivate the mind of players even after several new entries.

Speaking of making money, EA is just about to make even more money because they just reduced the cost of all Plants vs Zombies games to celebrate the winter holidays.

Note: All the prices and offers in this article are subject to change, so be sure to check the official product page to get the latest deal. If the product or offer you’re looking for is no longer available, you can try to find it on its official manufacturer page or get another one from our list.

All Plants vs Zombies games are now up for grabs

It doesn’t matter if you want to play the original Plants vs Zombies, or if you have a beefy PC that can handle the latest game, Plants vs Zombies: Garden Warfare 2, you can get them all with discount prices reaching up to 60%.

The games are extremely fun and addictive, so paying a few dollars for tens of hours of entertainment is more than a bargain.

That being said, get the best deals on the games from this franchise by checking out the links below:

⇒ Plants vs Zombies

⇒ Plants vs Zombies: Garden Warfare

⇒ Plants vs Zombies: Garden Warfare 2

⇒ Plants vs Zombies: Battle for Neighbourville

Plants vs Zombies isn’t the only franchise that is getting a lot of love during the holidays, but we figured that since it is so popular, it definitely deserves to be showcased.

Let us know what other Christmas deals are worth mentioning and e will cover them as soon as possible.

No WiFi Networks Found in Windows 11 (Quick Fix Guide)

If you’re seeing no WiFi networks found in Windows 11, even though you’re sure they’re available, the issue could stem from your system settings, drivers, or the network adapter itself. Here’s how to fix WiFi in Windows 11 and get reconnected fast.

Why Is My WiFi Not Showing Available Networks?

Several reasons may cause this issue:

  • Missing or corrupted WiFi drivers
  • Disabled or unrecognized wireless adapter
  • Airplane mode enabled
  • Software conflicts or recent updates
  • Hardware issues or incorrect BIOS settings

In some cases, your system may show WiFi connected but not working, which could be caused by misconfigured DNS settings or a malfunctioning adapter. You can troubleshoot such cases using this guide for WiFi connected but not working.

Alternatively, issues with the network interface may come from a miscommunication between the wireless adapter and the access point, especially on dual-band routers or after OS changes.


How to Fix WiFi in Windows 11

1. Enable WiFi Services

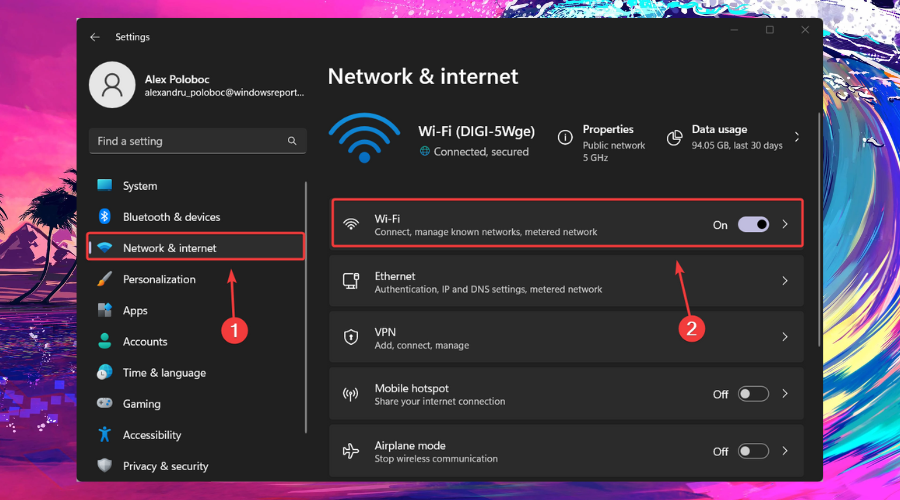
  1. Press Windows + I to open Settings.
  2. Go to Network & Internet > WiFi.wifi settings
  3. Ensure WiFi is turned On and Airplane Mode is off.

2. Restart the WLAN AutoConfig Service

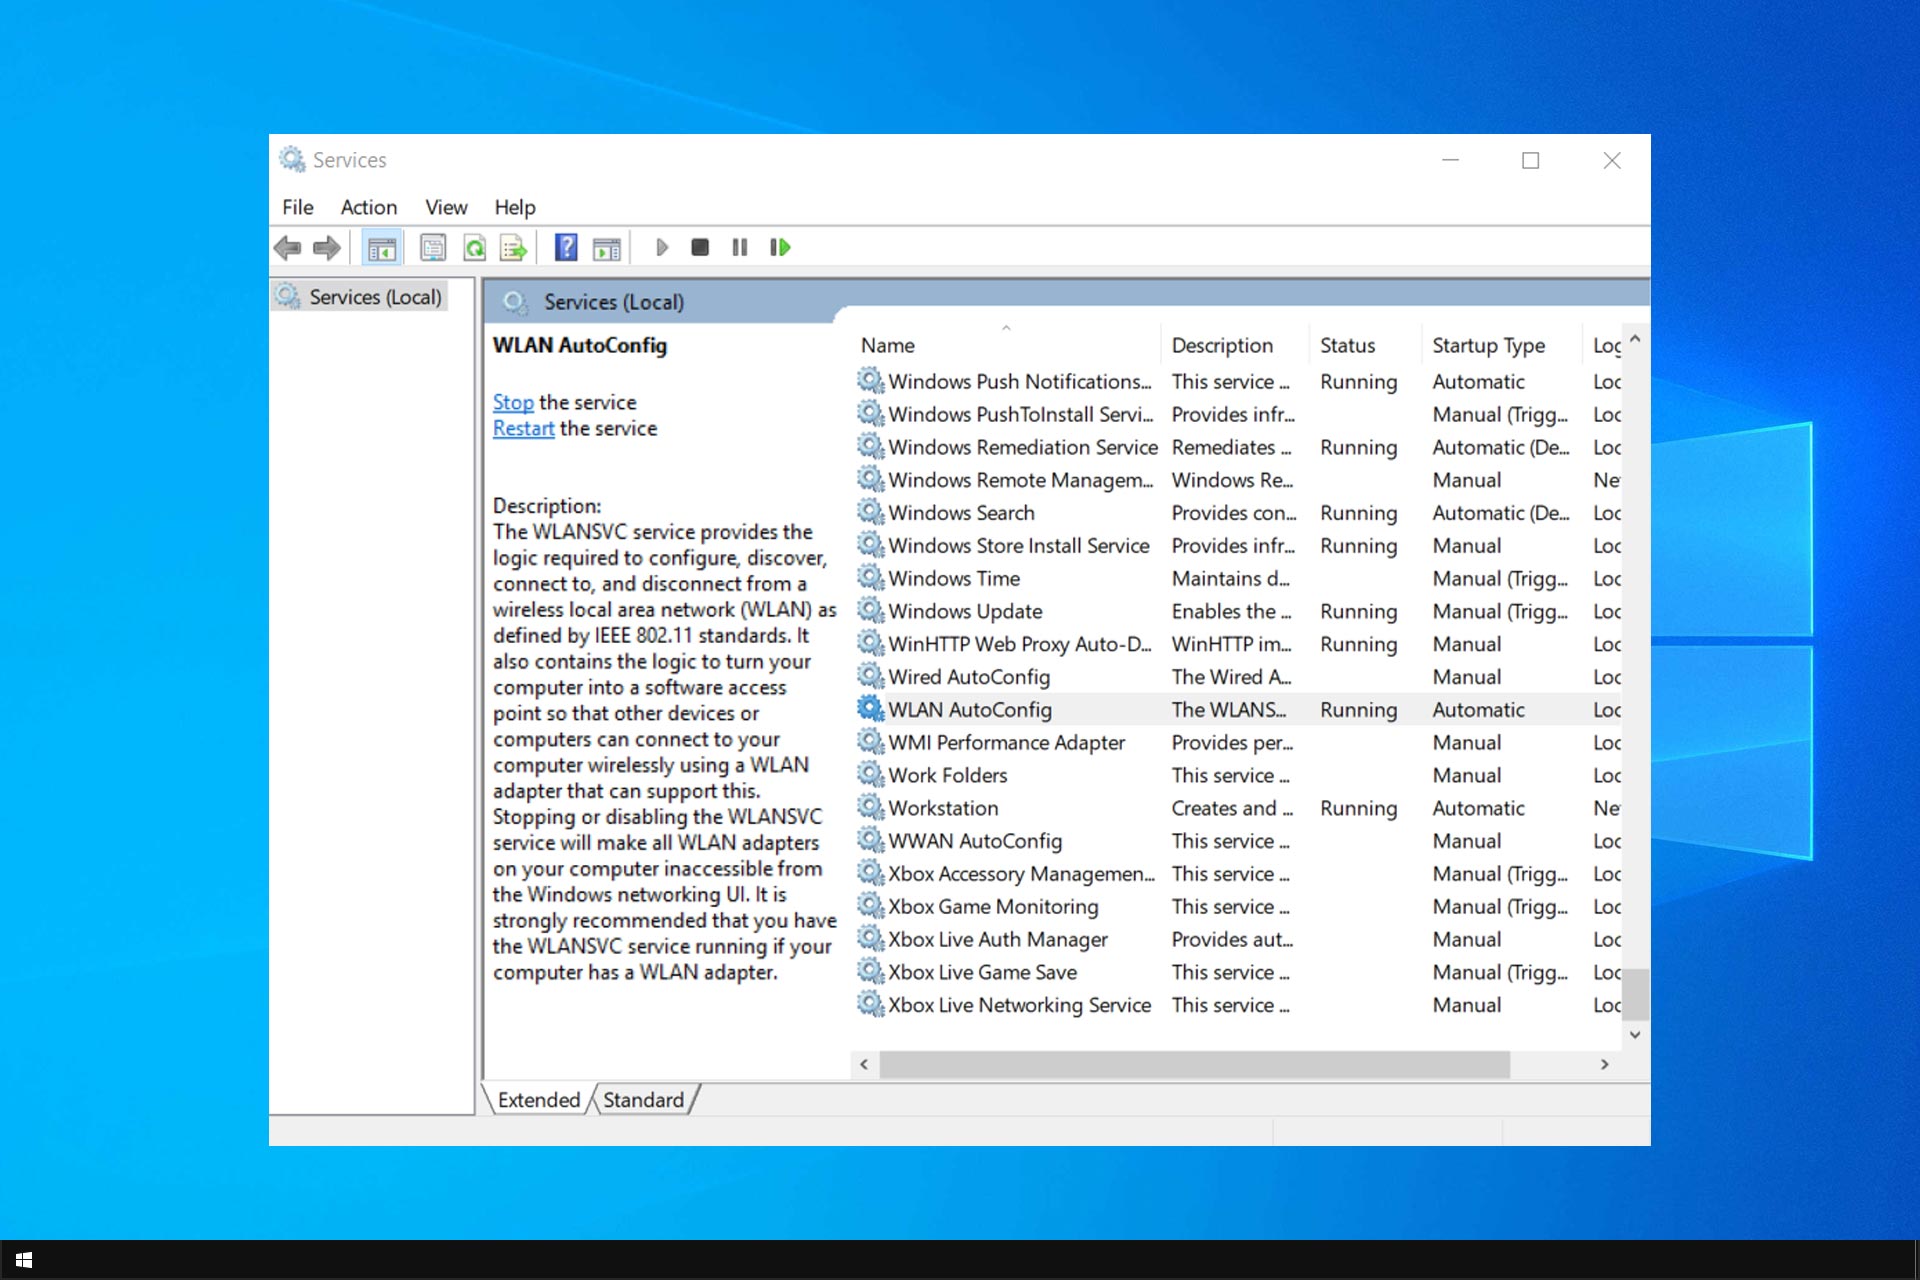
  1. Press Windows + R, type services.msc, and hit Enter.
  2. Scroll to WLAN AutoConfig, right-click it, and choose Restart.WLAN Autoconfig Service Keeps Stopping
  3. Set the Startup Type to Automatic.

If WiFi still won’t show up, you might be dealing with a more serious hardware issue. You can follow this fix for a WiFi adapter not working in Windows 10, which also applies to newer builds of Windows 11.

3. Reinstall the WiFi Driver in Windows 11

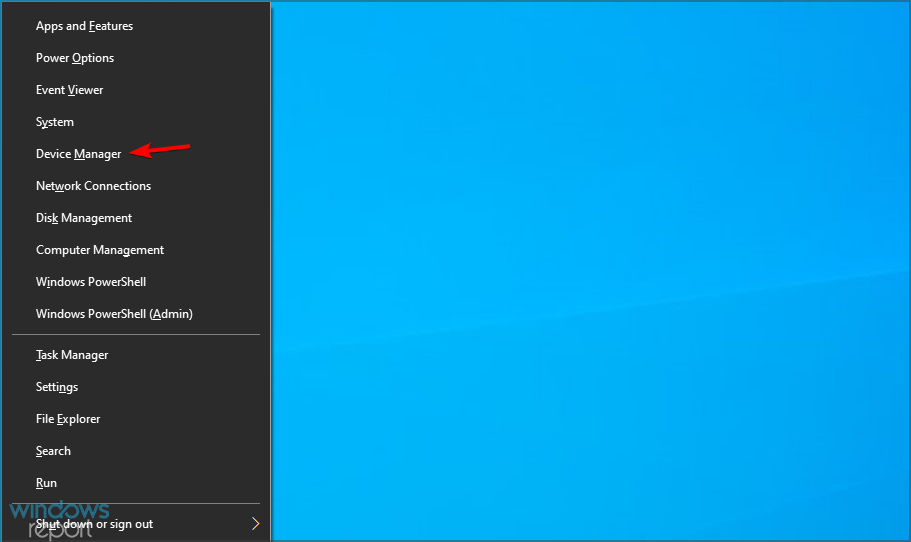
  1. Open Device Manager with Windows + X.
  2. Expand Network adapters, right-click your WiFi adapter, and uninstall it.network adapters in device manager
  3. Restart your PC so Windows reinstalls it automatically.

This step often helps if your WiFi network adapter is failing to detect networks or randomly disconnects. If the issue is consistent, check for possible WiFi not working on a laptop due to power-saving features or preinstalled OEM tools.

4. Scan for Hardware Changes

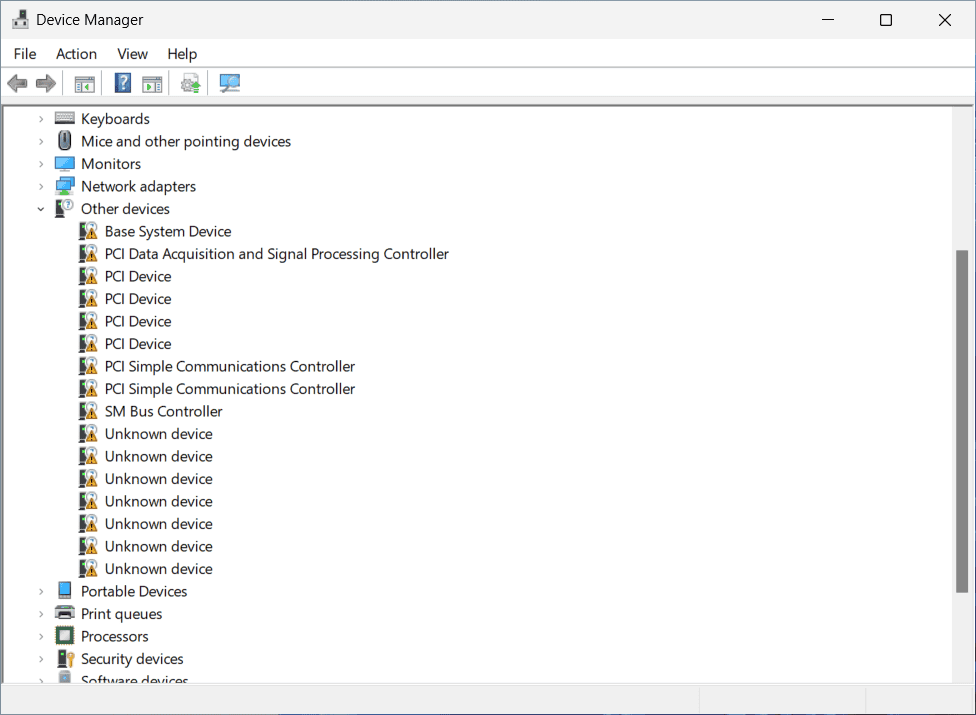
  1. In Device Manager, go to Action > Scan for hardware changes.
  2. This can detect any missing network devices or newly installed hardware.

5. Install WiFi Adapter Drivers Manually

If your WiFi option vanished after a system update or reset, it may indicate a missing driver. This issue is common when WiFi has disappeared in Windows 11, particularly after major OS changes.

Also, if you’re using any tunneling software, check whether a VPN is affecting your WiFi connection. Some VPNs disable native WiFi adapters temporarily or prevent network discovery.

6. Reset Network Settings

  1. Go to Settings > Network & Internet > Advanced network settings.
  2. Click Network reset, then select Reset now.
  3. Restart and reconnect to WiFi.

If you’re troubleshooting in Safe Mode with Networking, note that Safe Mode with networking in Windows 11 may lack internet access due to driver limitations.

7. Additional Fixes to Try

  1. Look out for system flags like WiFi Action Needed on Windows 10 if your device fails to authenticate on a public or secured network.
  2. More universal steps are outlined in this WiFi won’t work on Windows 10 fix, which includes flushing DNS, renewing IPs, and checking adapter settings.

FAQs

Why did my WiFi suddenly disappear in Windows 11?

Your wireless adapter may have been disabled, corrupted, or affected by a Windows update.

How do I install a WiFi adapter in Windows 11?

Use a compatible USB WiFi dongle or internal card and install drivers through Device Manager or the manufacturer’s website.

Why is my WiFi not detecting networks?

The issue may stem from a disabled adapter, outdated driver, interference from VPN software, or services like WLAN AutoConfig being stopped.

Video Scheduler Internal Error: 6 Easy Fixes

If you have been experiencing the Video Scheduler Internal Error coupled with the Blue Screen of Death, you should know that this is a common issue faced by Windows users.

The Windows PC will freeze for a few minutes when this issue occurs, especially when restarting. The stop code Video Scheduler Internal Error happens due to errors associated with the graphics card.

Luckily, we have compiled solutions for solving these problems on your Windows PC, no matter whether you are using Windows 10 or Windows 11. The solutions apply to both operating systems and can be safely used.

What causes the Windows Video Scheduler Internal Error?

You might see the Video Scheduler Internal Error because of faulty or missing drivers. You can fix this quickly by updating your drivers manually or with a dedicated tool.

Another known cause of the issue is corrupt system files. Using the built-in system repair tools can help fix this effectively.

If you get the Video Scheduler Internal Error using an Nvidia GPU, there might be something wrong with its drivers or the card itself.

In some instances, recently installed software may somehow interfere with your graphics card, so be sure to check that.

What do I do if the Video Scheduler Internal Error appears when starting the game?

Download the latest drivers from the manufacturer

  1. Visit your GPU manufacturer’s driver page. In our case, we went to Nvidia’s website page.
  2. Select your model on the list and click Start Search.
  3. Locate your model and click on Get download.
  4. Once the download is finished, install the downloaded file.

The Video Scheduler Internal Error is a driver error similar to Error code 43 on Nvidia and Intel GPUs. Remember that this is a blue screen error, similar to Acpi Driver Internal error in Windows, so be sure to check your hardware and remove overclock settings.

How do I fix the Video Scheduler Internal Error on Windows 11?

1. Run a full system scan

  1. Open the Start menu and type defender. Select Windows Defender from the list.
  2. In the left-hand panel of the Windows Defender program, select Virus & threat protection. Now click the Scan options.
  3. Check the Full Scan option and click on Scan now.

The Video Scheduler Internal Error on boot on a laptop may be caused by virus or malware infections. These bugs may cause several issues related to the Video Scheduler Internal Error.

To fix it, use the built-in antivirus, or if you prefer, you can use third-party antivirus software in ESET NOD32. This top-notch software protects your PC online and offline with some of the latest cutting-edge technologies.

It just about ticks all the right boxes in modern antivirus software.

2. Repair your installation

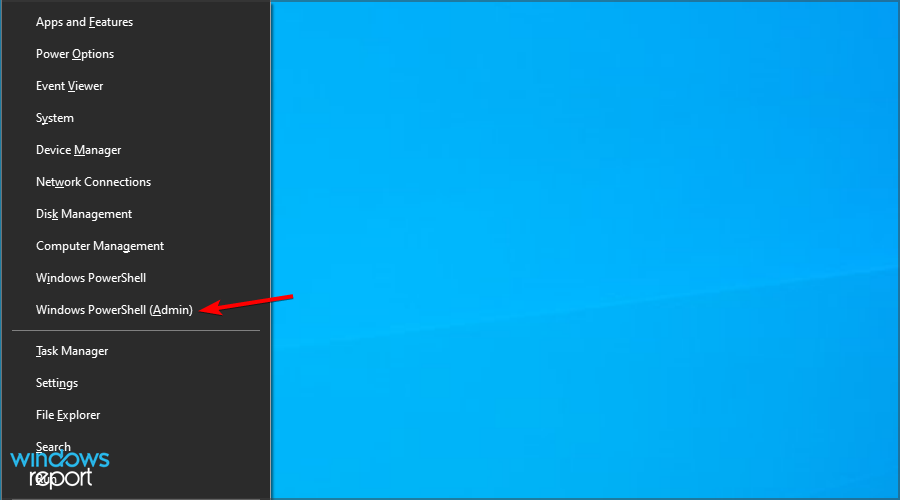
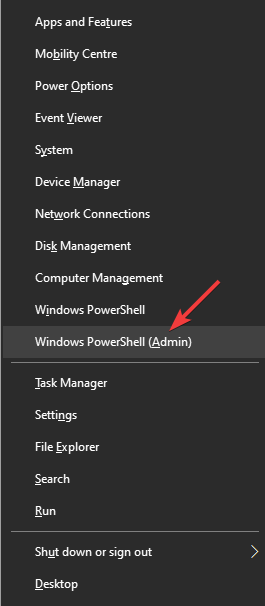
  1. Press the Windows key + X and choose Windows PowerShell (Admin).
  2. Now type the following, then hit Enter: sfc/scannow
  3. Wait for the scanning process to complete, and then restart your computer to repair all corrupted files.

If this command didn’t fix your problem, we suggest using a specialized BSoD repair software to fix the problem.

3. Update the video driver

3.1. Update the driver manually

  1. Press the Windows key + R to launch the Run window.
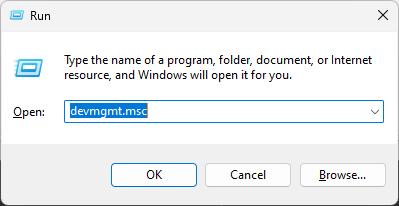
  2. In the Run windows, type devmgmt.msc and click OK.
  3. Locate your graphics card, right-click it, and choose Update driver.
  4. Select Search automatically for drivers and wait for the process to finish.

Sometimes, you can get the Video Scheduler Internal Error when loading popular games like League of Legends. In this case, it is most likely an outdated driver causing the issue.

Updating your display drivers should help restore normalcy.

3.2. Update your drivers automatically

Instead of going through the stress of updating your video drivers manually to fix the Scheduler Internal Error, you can automate the process with a dedicated tool in Outbyte Driver Updater.

Outbyte Driver Updater is a top-notch driver updater that automatically scans for outdated drivers. It then recommends an original driver from trusted manufacturers worldwide from its database.

And with a whopping million drivers above in its database, you sure know Outbyte Driver Updater has everything to take care of your driver needs.

4. Reinstall the video card drivers

  1. Press the Windows key + X and select Device Manager from the list.
  2. Locate your driver, right-click it and choose Uninstall device.
  3. Check Delete the driver software for this device and click on Uninstall.
  4. Restart your PC.

If the Video Scheduler Internal Error leads to a blue screen on your PC, you might need to remove the driver and uninstall it.

To ensure that your drivers are removed completely, you might want to read our guide on how to use Display Driver Uninstaller.

Once the driver is removed, all you have to do is to install the latest graphics drivers, and that’s it.

5. Uninstall the latest installed software

  1. Press the Windows key + I to open the Settings app.
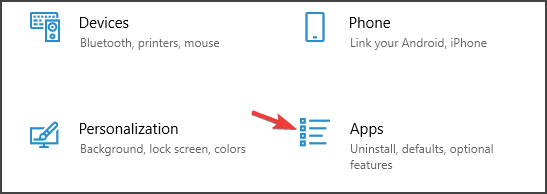
  2. Now go to the Apps section.
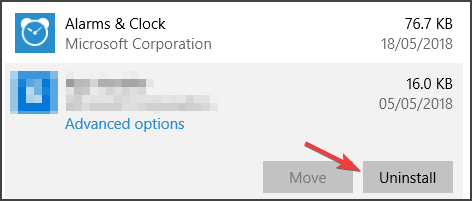
  3. Select the app you want to remove and click on Uninstall.
  4. Follow the instructions on the screen to complete the process.

To ensure that the application is completely removed, you can always use uninstaller software to remove all its files and registry entries.

6. Update your Windows OS

  1. Press Windows key + I and navigate to Update & Security.
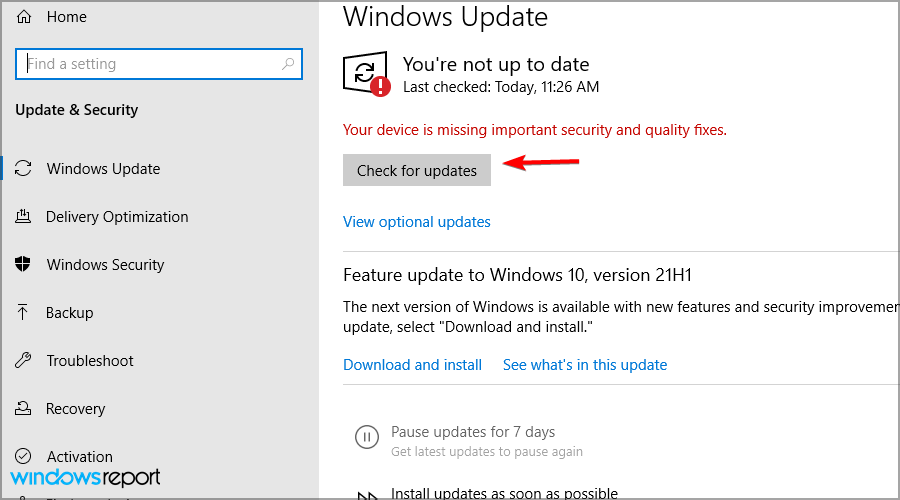
  2. Click on Check for updates and download any available updates.
  3. After the update is complete, restart your Windows PC.

A great way to solve this Video Scheduler Internal error is by updating your Windows OS to the latest version.

Most noteworthy, Microsoft constantly releases Windows updates to improve the system’s stability and fix various issues, so be sure to download them.

Why am I getting the Video scheduler internal error on Nvidia GPU?

If you are getting the video scheduler internal error with the Nvidia GPU, it might be because of outdated drivers. It might also be because your graphics driver is faulty.

Another known cause of the issue is faulty installation. We have shown how to fix them all in the solution section above.

Can the Video Scheduler Internal Error damage my PC?

Yes, in some instances, this error can cause damage to your PC, most notably your graphics card. If the issue is created by faulty hardware, you need to find it and replace it.

If the problem is software-related, there won’t be any permanent damage to your computer, but you’ll experience random crashes that will disrupt your workflow.

How do I fix video memory on my computer?

The video memory management internal error, like the scheduler error, can cause BSoD on your PC. It is usually caused by outdated or faulty display drivers.

You can quickly fix this error by updating your drivers or running the program that gives the error in compatibility mode. Check our articles for a detailed guide on how to fix the video memory management internal error on Windows 10 and Windows 11.

This error message can be problematic, but we hope our solutions helped you fix the problem on your PC.

If you need more solutions, we have another guide that can help you fix Video Scheduler Internal Error on Windows 10, so be sure to check it out.

Did you find an alternative solution for this issue? If you have, feel free to share it with us in the comments section below.

Alienware Area-51m R2 is $770 Cheaper During Cyber Monday

Dell is one of the biggest PC component manufacturers in the world, and the quality of its products is well-known, especially since it extends to its gaming subsidiaries as well, Alienware.

Well, Dell doesn’t shy away from participating in the annual shopping season, and they are surprising their customers and fans with some outstanding discounts.

The world’s most powerful gaming laptop is now up to $600 off

While not the only product in their holiday shopping season catalog, the
Alienware x17 R2 gaming laptop is the one with the biggest discount, amounting to $600.

However, this laptop is not just a bargain in terms of price and discounts, it is also a monster in terms of sheer processing power since it features the latest NVIDIA or AMD GPUs, and up to 12th Gen Intel® Core™ i9 processors.

Of course, the much finer details, such as the memory, storage space, and more can be customized to fit your needs, and thus the price can vary greatly.

  • Windows 11 OS
  • Up to 12th Gen Intel® Core i9 12900H
  • 16 GB, 2 x 8 GB, DDR5, 4800 MHz, dual-channel
  • 14 cores, 20 threads, up to 5.00 GHz Turbo
  • Up to NVIDIA GeForce RTX 3070 Ti, 8 GB GDDR6
  • 1 TB, M.2, PCIe NVMe, SSD
  • Would be very expensive if not for the discount

Besides the actual monetary discount, don’t forget that you also get $50 back on all Alienware purchases through Dell’s Rewards system. With Rewards, all purchases qualify for free expedited shipping.

If you’re excited about getting the world’s most powerful laptop, just go ahead and visit their website, press the Build Yours button, and start creating the perfect laptop for your need.

What’s your take on this fantastic deal that Alienware is offering?

Let us know if it makes you consider buying a new laptop by leaving us your opinions in the comments section below.

Bitlocker Keeps Asking for Recovery Key on Windows 11 [Fix]

BitLocker is a Windows feature that allows you to encrypt the device. For users with Windows 11 asking for a BitLocker recovery key at startup, the following instructions may assist you in locating the 48-digit key that you’ll require to unlock the device.

The problem is intricate, but you should be able to get the thing running in a short while, though in some cases, a clean reinstall of Windows 11 is the only option if the BitLocker recovery key is lost.

Why is BitLocker asking for a recovery key every time Windows 11?

Here are some of the reasons BitLocker is asking for a recovery key in Windows 11:

  • Bitlocker is configured on the PC – If you have BitLocker set up, it might ask for the key.
  • A buggy update was installed – Several users reported the error after updating Windows, and it was a faulty update that automatically enabled BitLocker.
  • Issues with the BIOS – An outdated BIOS can also lead to the problem, and updating it should work.
  • Hardware changes – If you recently made changes to the hardware, mainly the motherboard, BitLocker may have trouble recognizing and asking for the recovery key before it grants access.

The error is usually encountered on the following devices:

  • ASUS BitLocker recovery key in Windows 11 – Many Asus users running the Pro or Enterprise edition of the OS reported the error.
  • HP BitLocker recovery key in Windows 11 – The issue is just as prevalent on HP devices.
  • Lenovo BitLocker recovery key in Windows 11 – Lenovo device users reported the error after updating to Windows 11.
  • Dell BitLocker recovery key in Windows 11 – The underlying cause is usually the same, and the solutions below should work.

What can I do if Bitlocker keeps asking for a recovery key at startup on Windows 11?

Before you take things into your hand and try the complex solutions, here are a few things that might help:

  • If you manually set up BitLocker, it must have displayed a recovery key and provided the option to copy it to a drive or take a printout. If you have either, use that to access the OS.
  • Some users reported that BitLocker encryption was enabled on their PC by an administrator (it could be the organization you work for), and they were able to provide the key. So, make sure to check with them.
  • The manufacturer or seller may have the key if it’s a new computer that came with BitLocker enabled. So, check with them as well.
  • If you don’t remember enabling BitLocker and the computer has multiple user profiles with administrative privileges, check with the others for the recovery key.

If you couldn’t get the recovery key, check the solutions below.

1. Check your Microsoft Account for the recovery key

  1. Head to Microsoft’s login page and sign in with your linked email address and password.sign in to microsft account
  2. You should now see the recovery key for the Windows 11 device. If there are multiple entries here, use the Key ID to identify them.view bitlocker recovery key in windows 11
  3. Enter the BitLocker recovery key on the Windows 11 device asking for it, and complete the verification.

You can easily bypass the issue using the BitLocker recovery key. And it shouldn’t take more than a minute. Also, as stated earlier, the recovery key might as well be uploaded to the other Microsoft accounts used to sign into the computer.

If you don’t have any recovery keys uploaded to the Microsoft account, head to the following method.

2. Uninstall Windows 11 updates

Note icon NOTE
From the BitLocker screen at startup, press Esc and see whether it takes you to Recovery options. If that’s the case, head directly to the third step below. Otherwise, follow the steps in the listed sequence.
  1. Create a Windows 11 bootable USB drive on another PC, connect it to the affected computer, and boot it.
  2. When the setup launches, follow the on-screen instructions and then click on Repair your computer.repair your computer to fix bitlocker recovery key windows 11
  3. Now, select Troubleshoot.troubleshoot
  4. Click on Advanced options.advanced options
  5. Choose Uninstall Updates here.uninstall updates to fix bitlocker recovery key windows 11
  6. Now, follow the on-screen instructions to uninstall the last Windows update.

You can uninstall updates from the Recovery Mode in Windows 11 and get BitLocker to stop asking for a key. If this doesn’t work, head to the following method.

3. Update the BIOS

Another solution that worked for many was updating the BIOS on Windows 11. You will have to manually locate the update on the manufacturer’s website and download and install it.

Since the process is different for each manufacturer, we recommend checking the manual that came along with the computer, looking it up in the support section on the official website, or getting in touch with a professional.

4. Reinstall Windows

If nothing has worked, your last option is to install Windows 11 all over again. And for that, the bootable USB you created earlier would come in handy.

Remember that a clean install of the OS would delete all files, apps, and configured settings on the PC. But that’s the only option left now!

BitLocker asking for a recovery key in Windows 11 is an intricate problem with few solutions, and users usually end up reinstalling the OS to fix things. Even more, we have a guide dedicated to those interested in obtaining the BitLocker Recovery Key via Command Prompt.

Once you have resolved the problem, find out how to disable BitLocker in Windows 11. Then, if you want to continue with it, save the key.

Was this guide helpful for you? Then, tell us in the comments section below whether you have more solutions.

DISM Failed on a Windows PC? 9 Quick Fixes

The DISM command comes in very handy when it comes to repairing your Windows PC. For example, if your Windows 10 installation is corrupt, you can usually fix it using the built-in SFC /scannow command, followed by DISM.

However, the DISM can fail. In this case, you cannot use it to repair your PC, and the problems will not be fixed.

If DISM failed on your device, we will show you how to fix the tool in this guide and return to keeping your PC in top shape.

What causes the DISM failed issue?

There are various reasons for the DISM command not working on your Windows PC. Below are some of the variations of the DISM error and the causes:

  • DISM failed no operation was performed – This is a relatively common problem with DISM. However, you might be able to fix the problem by performing the DISM can using the Windows ISO file. The full error message reads: DISM failed. no operation was performed. for more information, review the log file.
  • DISM failed to load the provider, unload offline registry, flush file buffers, set the windows directory, and mount the image – These are some common problems you can encounter with DISM scan. However, you should be able to fix most of them using our solutions.
  • DISM failed 0x8000ffff, 0x800f0954, 0x800f081f, 0x800f0827 – If you’re getting any of these errors, try copying the install.wim file from Windows 10 ISO and use it to perform a DISM scan.
  • DISM failed while processing command cleanup-image, add-package – These are some common problems with DISM, but they can be solved using one of our solutions.
  • DISM failure when attempting to copy boot files – This is another common problem with DISM, but you might be able to fix it by cleaning up system image components.
  • Dism.exe failed validating command line to load wim manager – If you’re having any of these problems, restart Windows update components and check if that helps.
  • DISM failed error 0x800f0905 – This is the case when users try running the DISM tool on encountering the 0x800f0905 update error.
  • DISM failed no operation was performed Windows 11 – The DISM tool often fails with this error message in the latest iteration of Windows as well. The solution from above should do the trick.
  • Dism /online /cleanup-image /restorehealth not working – While the other commands work, this one is not working for some users.

How can I fix the DISM not working issue?

1. Check your antivirus

In some rare instances, the DISM command not working issue can be caused by your antivirus. Your antivirus can interfere with your system and cause this problem.

If DISM failed on your system, you might be able to fix the problem simply by disabling certain antivirus features or the app. You also try to remove the antivirus software if disabling it does not solve the problem.

Should this fix the problem, you might need to consider one of the best modern antivirus software in ESET NOD 32.

This software uses cutting-edge technology to keep your PC secure without causing errors. What’s more, it provides both offline and online security and ensures your privacy. So, let it take care of your security while you worry about other things.

2. Enter the correct location of Install.wim file

If DISM is giving you the Can’t find source files message, you need to mount Windows 10 ISO file and specify the location of the Install.wim file.

To specify the location of the file, type the following command in Command Prompt and press Enter to run it: DISM /Online /Cleanup-Image /RestoreHealth /source:WIM:X:SourcesInstall.wim:1 /LimitAccess

Remember that you need to replace X with the letter that matches the drive where Windows 10 ISO file is mounted.

3. Copy the Install.wim file

Few users suggested that you can fix this problem by copying the Install.wim to the root directory of your hard drive.

To get Install.wim file, download Windows 10 ISO, mount it, and locate Install.wim file.

After copying the Install.wim file, be sure to enter the correct location of the Install.wim file before running the DISM scan.

Also, remember that the DISM command is case sensitive, and users reported entering install.wim instead of Install.wim caused the DISM to fail. Therefore, enter the correct file name before starting the DISM scan.

Few users also reported that DISM doesn’t support spaces in the source location. So, be sure that the containing folder doesn’t have any spaces in its name.

4. Clean up system image components

  1. 1. Open Command Prompt as administrator.

  2. 2. Type the command below and press Enter. Dism.exe /online /Cleanup-Image /StartComponentCleanup

    startcomponentcleanup command
  3. 3. Wait for the process to finish.

  4. 4. Try to perform the DISM scan again after running these commands.

  5. 5. In addition, if DISM still isn’t working, you can also run the following commands:

    DISM /Online /Cleanup-Image /StartComponentCleanup

    DISM /Online /Cleanup-Image /AnalyzeComponentStore

    Dism.exe /online /Cleanup-Image /StartComponentCleanup

    Dism.exe /online /Cleanup-Image /StartComponentCleanup /ResetBase

  6. If you’re facing DISM error 193, 740, 14098, 3017, and similar variations, you might be able to fix those problems by cleaning up the system image components.

    This is simple, provided you follow the steps above. All you need is to run Command Prompt as an administrator and run a few commands with privileges.

There are many repair tools for Windows that can be used to fix broken or corrupted files. Check out our dedicated article to find out which are the best.

5. Run the Windows Update troubleshooter

  1. Press the Windows key + I to open the Settings app.
  2. Select the Update & Security option.
    Dism.exe failed validating command line
  3. Choose Troubleshoot from the menu on the left.
  4. Select Windows Update and click Run the troubleshooter.
    DISM failed to load the provider
  5. Follow the instructions on the screen to complete the troubleshooter.

According to users, sometimes DISM problems can occur due to Windows Update issues.

If DISM failed to complete or run on your system, you might be able to fix the problem by running the Windows Update troubleshooter.

Once the troubleshooter is finished, try to rerun the DISM scan, and it should be able to complete.

6. Reset Windows Update services

  1. Open Command Prompt as an administrator.
  2. When Command Prompt starts, run the following commands: net stop wuauserv cd %systemroot%SoftwareDistribution ren Download Download.old net start wuauserv net stop bits net start bits net stop cryptsvc cd %systemroot%system32 ren catroot2 catroot2old net start cryptsvc

If DISM failed to complete, showing a DISM does not support servicing on Windows PC, the problem might be Windows Update services.

However, you can fix the problem simply by resetting Windows Update services. After these commands are executed, Windows Update components should restart, and the issue will be resolved.

7. Disable proxy

  1. Open the Settings app.
  2. Choose the Network & Internet option.
    DISM failed no operation was performed
  3. Select Proxy from the menu on the left. In the right pane, disable all settings.
    DISM failed no operation was performed

If DISM failed to complete or run on your PC, the problem might be your proxy. Many users use proxy to protect their privacy online, but sometimes your proxy can interfere with your system and lead to this and other issues.

After disabling your proxy, check if the problem is resolved. Although a proxy is a great way to protect your privacy online, many users prefer using a VPN over a proxy.

If you want to protect your privacy online and you’re looking for a good VPN, we strongly suggest you consider PIA.

8. Make sure that your .wim isn’t set to read-only

  1. Locate install.wim file on your hard drive, right-click it, and choose Properties.
    DISM failed while processing command cleanup-image
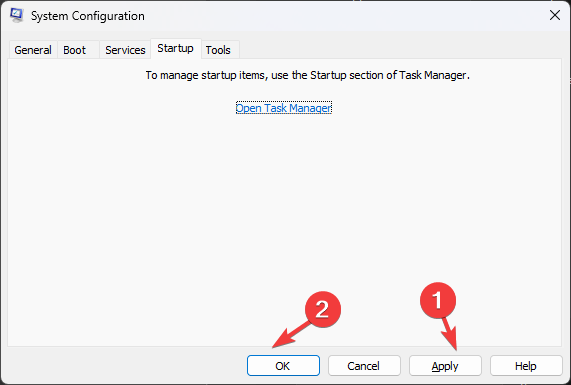
  2. When the Properties window opens, make sure to uncheck the Read-only option. Now click Apply and OK to save changes.
    DISM failure when attempting to copy boot files

Many users copy the install.wim file from Windows 10 installation ISO to run the DISM scan offline.

However, several users reported that DISM is not working because of the install.wim file was set as a read-only file.

If that happens, your PC won’t be able to write anything to the install.wim file and the DISM scan won’t complete. So, changing the properties of install.wim file should solve the issue in this case.

After making these changes, try to rerun the DISM scan.

9. Perform an in-place upgrade

  1. Download and run Media Creation Tool.
  2. Now select the Upgrade this PC now option.
  3. The setup will prepare the necessary files, so you’ll need to wait.
  4. Select Download and install updates (recommended) and click Next.
  5. Wait while the updates are downloaded.
  6. Follow the instructions on the screen. On the Ready to install screen, click the Change what to keep option.
  7. Select Keep personal files and apps and click Next.
  8. Follow the instructions on the screen to complete the in-place upgrade process.

If the DISM scan failed to complete on your PC, your final solution might be an in-place upgrade. This process will reinstall Windows 10 and force it to upgrade to the latest version.

Unlike reinstallation, this process will keep all your files and installed applications, so you can continue where you left off.

How do you know if DISM is working?

DISM does not take much time to scan your PC for errors. It is usually around 10 to 30 minutes but can sometimes take hours.

Users sometimes report that it hangs at around the 20% progress mark. But that does not mean it is not working, as this is normal. So far, it is showing progress, but the command is still working.

What can I do if DISM failed on Windows 11?

If you’ve upgraded to the new OS, you know by now that it’s not so different from Windows 10 apart from some new features and improved design.

And yes, DISM can fail on Windows 11 as often as on the older OSes, so you have to be prepared for this.

Luckily, all the solutions we listed above will work seamlessly on the new OS, and it will be even more accessible. For step by step repair instructions tailored to the latest system, check our full DISM commands guide for Windows 11.

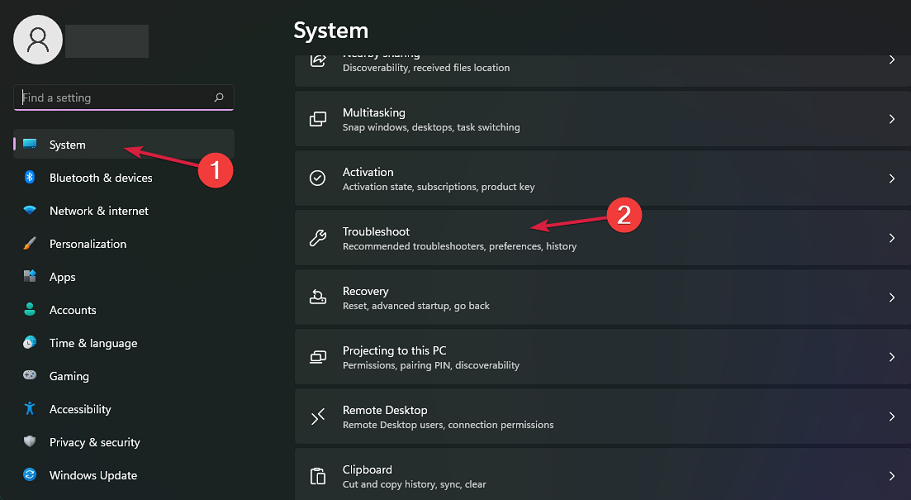
In Windows 11, it’s easier to access the Troubleshooter

As you can see from our screenshot above, in Windows 11, the Troubleshoot option is right in the System settings, will be fewer clicks to access.

Does DISM delete files?

DISM works basically to repair broken and corrupt files on a PC. It keeps a log of the errors found on your PC, and the fixes applied.

It does not delete your files, app, or data. So you don’t have anything to worry about. DISM cannot harm your computer.

The DISM failed on Windows 10 or Windows 11 error can deprive you of an essential built-in tool to repair your PC for free. But with the fixes in this guide, you should be able to get it working again.

Are you facing other errors like the DISM error 2 on Windows 10? Then, check our guide to solve the problem quickly.

To learn more about DISM, we have a guide on DismHost.exe, so don’t miss it for more information. We also have a guide on Elevated permissions are required to run DISM message, so don’t miss it.

Feel free to let us know if you were able to get DISM working again on Windows in the comments below.

Claim the Latest Cyber Monday Deals on Acer Curved Monitors

Typically, the official Cyber Monday sales start after Thanksgiving. Things are different this year and you can enjoy great prices on must-have products such as curved monitors from Acer right away.

Such monitors provide a much more immersive viewing experience than flat-panel displays and reduce eye fatigue, so they are ideal for graphic designers, gamers, and not only.

On top of that, if you just want the very best curved monitor deals from this company, you can already find them listed below.

Note: All the prices and offers in this article are subject to change, so be sure to check the official product page to get the latest deal. If the product or offer you’re looking for is no longer available, you can try to find it on its official manufacturer page or get another one from our list.

Which Acer curved monitor is best?

Predator Z35P Z271 Bmiphz

  • Response time of 4 ms GTG
  • Solid gaming performance
  • Nvidia G-Sync enabled
  • Plenty of useful settings
  • Highly adjustable stand
  • Questionable out-of-the-box color accuracy

As expected from Acer’s monitors, the Predator line offers high-end, feature-packed options and you can now enjoy one of their products at the most affordable price ever.

The Predator Z35P Bmiphz 35-inch gaming monitor uses a curved screen, with minimal bezels, so you can easily take into consideration a multi-monitor setup and put two or even more monitors side by side.

Even more, do note that it includes a host of eye care technologies to ease eye fatigue caused by long gaming sessions, assuming that’s also your intention.

AOPEN 27HC5R Pbiipx

  • AMD FreeSync Premium Technology
  • BlueLight Filter & Flickerless Technology
  • Fantastic 165Hz refresh rate
  • Bluelight technology
  • Zero Frame design
  • Vertical adjustment stand issues

Another great curved monitor coming from Acer is precisely the AOPEN 27HC5R Pbiipx 27″ 1500R one. Crisp colors come alive with the amazing 1920 x 1080 resolution.

That’s your chance to enjoy High-Definition entertainment in the comfort of your home. Colors are easily adjusted in real-time to ensure the best visual experience.

Moreover, with AOPEN Eye Protection, eye strain is reduced even if you tend to play games or watch YouTube videos all day long.

Acer XR342CK

  • Great vertical height (over 3440x1440)
  • AMD FreeSync Technology
  • Two speakers at 7 watts
  • Blue-light Filtering Technology
  • Solid build quality and professional look
  • No higher Hz options

With the Acer XR XR342CK Bmijqphuzx curved monitor, you can only expect to get solid performance, courtesy of speedy refresh rates and FreeSync and Adaptive-Sync technologies.

Well, they immediately match the refresh rate of your monitor with your graphics card to provide the smoothest gaming experience.

Moreover, you’re about to enjoy plenty of curved screen real estate and a cinematic 21:9 aspect ratio for epic gaming sessions.

If you’re worried about getting your Christmas gifts, rest assured that you aren’t the only one. You can make the most of early sales online, so let us know if one of these Acer curved monitor deals is perfect for you.

How to Uninstall the Bluetooth Driver in Windows 10

Bluetooth is critical in connecting various devices, be it headphones, speakers, or printers. But, often, when there are issues with a device, you will need to uninstall the Bluetooth driver.

This works in many cases, especially when you see the error message, Please uninstall the current Bluetooth installation before continuing. So, let’s find out how to uninstall the Bluetooth driver on the PC.

Can Bluetooth be removed?

Yes, Bluetooth can be removed in Windows in many ways. Also, you can draw a particular device, the relevant drivers, or the Bluetooth functionality. Here are some of the ways you can do that:

  • Remove the Bluetooth adapter – If you have an external Bluetooth adapter connected, the ideal way would be to disconnect it.
  • Disable the Bluetooth adapter – You can also disable the Bluetooth adapter via Device Manager and get things up and running.
  • Uninstall the drivers – Even without drivers, Bluetooth would be disabled. So, this also works perfectly.

How do I uninstall Bluetooth drivers entirely?

1. Uninstall the driver via Device Manager

  1. Press Windows + R to open Run, type devmgmt.msc in the text field, and hit Enter.devmgtm.msc
  2. Expand the Bluetooth entry, right-click on the Bluetooth adapter, and select Uninstall device.uninstall device
  3. Now, tick the checkbox for Attempt to remove the driver for this device, and click on Uninstall.attempt to remove the driver for this device to uninstall bluetooth driver

That’s it! The Bluetooth driver is now successfully uninstalled. Though remember that it will be automatically installed once you restart the computer. So, you would have to repeat the process each time.

2. Use a third-party uninstaller

The easiest way to uninstall the Bluetooth driver is to use a reliable driver uninstaller software. It will completely remove the driver and delete any associated files.

The best part is that it would also help get the latest drivers for every connected device, not just the Bluetooth adapter.

3. Disable the adapter

  1. Press Windows + X to open the Power User menu and select Device Manager.device manager
  2. Expand the Bluetooth entry, right-click on the adapter, and select Disable device.disable device to uninstall bluetooth driver
  3. Click on Yes in the confirmation prompt.yes
  4. Once done, the Bluetooth functionality on the computer will be disabled.

It can be done without uninstalling the drivers if you want to disable Bluetooth. And the process is far more seamless.

4. Clean your registry

If you keep getting the Please uninstall the current Bluetooth installation before continuing message, the issue might be related to your registry files. Specific entries in your registry can get corrupted and mess up your OS.

Since cleaning your registry files manually is risky, especially for those who don’t know much about computers, software that automatically cleans and repairs the registry files for you will be handy.

These are all the ways you can uninstall the Bluetooth driver in Windows. And in most cases, it would help resolve Bluetooth connection issues.

And once you have resolved the problem, do not forget to find out how to boost the performance in Windows 10.

If you have any other queries, drop a comment below, and we will get back soon.

Windows Update Error 0x8007139f: 7 Methods to Use

Keeping Windows up to date is quite important, but sometimes you might encounter Windows Update error 0x8007139f while trying to download updates. For some users, while Windows shows it’s up-to-date, the update history lists the error code.

Apart from that, some users reported the error when updating an app via the Microsoft Store, and the solutions presented here would work in that case. So, let’s get straight to it.

What causes the 0x8007139f Windows Update error?

Here are some of the reasons behind the 0x8007139f update error in Windows:

  • A conflict between antiviruses – In most cases, the error arises when there is a conflict between the built-in Windows Defender and a third-party antivirus installed on the PC.
  • Corrupt update components – In this case, Windows Update would throw errors, and resetting the update script is the ideal way to go.
  • Problems with the OS – This is usually due to corrupt system files, but other issues, too, can lead to the 0x8007139f error.

How can I fix Windows Update error 0x8007139f?

Before you try the slightly intricate solutions, here are a few common ones that would work:

  • Restart the computer and check if Windows automatically installs the update throwing the error.
  • Disable any third-party antivirus or other security software installed on the computer. In case that works out, uninstall the app for the antivirus.

If these two don’t work, head to the ones listed next.

1. Check your antivirus

The leading cause for error 0x8007139f can sometimes be your antivirus. Of course, having a good antivirus is essential, but sometimes your antivirus can interfere with your system and prevent you from downloading updates.

To fix this issue, it’s advised to disable certain antivirus features temporarily. In addition, you might want to disable your antivirus and check if that solves your problem. Finally, in the error message is still there, we advise you to uninstall your antivirus.

Windows 10 comes with its antivirus in the form of Windows Defender, so you’ll have at least some protection even if you remove your antivirus.

If removing the antivirus solves your issue, you might consider switching to a different antivirus solution.

There are many great antivirus applications on the market; some offer maximum protection and won’t interfere with your system.

⇒ Get TotalAV

2. Make sure the correct date and time are set

  1. Press Windows + I to open Settings, select Time & language from the navigation pane, and then click on Date & time.date & time
  2. Next, click on the Change button to Set date & time manually. If the option is greyed out, disable the toggle for Set time automatically.change to fix 0x8007139f
  3. Finally, choose the correct time from the dropdown menus, and click on Change.change

3. Run a third-party PC repair utility

Sometimes using native solutions just doesn’t cut it anymore, and you can’t always use the exact solutions on Windows 7, 8, and 10 since they differ.

However, you can use a third-party tool that runs a complete scan and performs a full system repair of your PC without limitations on your OS.

4. Reset Windows Update components

  1. Press Windows + R to open Run, type cmd, and hit Ctrl + Shift + Enter.cmd to fix 0x8007139f
  2. Click Yes in the UAC prompt.
  3. Now, paste the following commands one at a time, and hit Enter after each:

net stop wuauserv
net stop cryptSvc
net stop bits
net stop msiserver
Ren C:WindowsSoftwareDistribution SoftwareDistribution.old
Ren C:WindowsSystem32catroot2 Catroot2.old
net start wuauserv
net start cryptSvc
net start bits
net start msiserver

4. Once done, restart the computer and check if you can install the update.

Resetting the Windows update components can help fix various issues, including 0x8007139f 0x90019 in Windows. If it doesn’t work, head to the following method.

5. Manually install the update

  1. Copy the KB (Knowledge Base) number for the update throwing the error, then go to the Microsoft update catalog and locate it using the search box at the top-right corner.microsoft update catalog
  2. Now, click the Download button next to the one that best matches the system architecture.download update to fix 0x8007139f
  3. Click on the link here to start the download process.download
  4. After it’s downloaded, launch the setup, and follow the on-screen instructions to complete the installation process.

That’s it! You can always use the Microsoft Update Catalog if an update cannot be installed automatically. In addition, every update released is available here and can be easily downloaded.

6. Create a new user account

  1. Press Windows + R to open Run, type netplwiz in the text field, and click OK.netplwiz
  2. Now, click on Add.add
  3. If you have another Microsoft-linked account, enter the email address and proceed with the instructions to complete the process.create account to fix 0x8007139f
  4. You can create a local account by clicking on Sign in without a Microsoft account.sign in without a microsft account
  5. Now, choose Local account.local account
  6. Fill out all the fields here, and follow the on-screen instructions to create a new account.field

After you have created a new account, check if you can install the updates on it. If that works, move the files on the previous account to the new one. A simple way to do this would be to use an external hard drive or a USB stick, whatever works best for you.

7. Perform an in-place upgrade

  1. Go to Microsoft’s official website, choose the appropriate options from the dropdown menus, and download the ISO file for Windows 11. You will also find the media creation tool for Windows 10, in case that’s the iteration you are running.download
  2. Now, open the downloaded file, and run setup.exe.setup.exe to fix 0x8007139f
  3. Click on Open.open
  4. Click Next in the setup.next
  5. Now, choose Accept to agree to the license terms.agree
  6. Finally, ensure the setup lists Keep personal files and apps, and then click on Install.install to fix 0x8007139f

If nothing previously worked, you can always perform an in-place upgrade and almost every issue with the OS, including the 0x8007139f Windows Update error. And in this case, you would lose any files stored on the computer.

Also, find out how to fix any Windows Update error in Windows 11 and seamlessly eliminate any that appear.

Please tell us which fix worked for you in the comments section below.

USB Microphone Not Working on Windows: Fixed

Upgrading the operating system might hurt your peripherals. For instance, many users reported that the USB microphone is not working in Windows 10 and Windows 11.

Though upgrade is not the only cause here, it’s one of the prominent ones. But you don’t have to revert to the previous iteration just yet. Instead, several solutions will help get things up and running.

This guide will walk you through the issues leading to the microphone not working on Windows and its solutions.

Why is my USB mic not working?

Not all microphones are compatible with the audio jack of a laptop or desktop computer. Although the audio jack is the most widely utilized port for a wide range of audio devices, specific devices use the USB port as a secondary port.

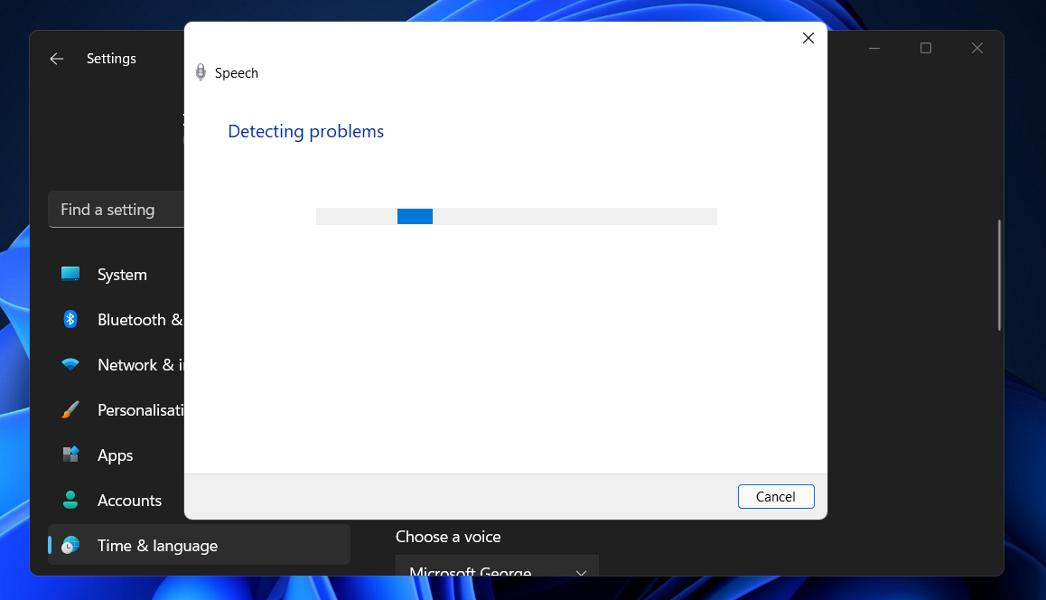
speech usb microphone not working windows 11

Devices that connect to a computer via USB are simple to operate. Drivers for them are typically general, and they are already present, allowing the device to be used immediately.

Compared to microphones that connect via an audio jack, these microphones are not any less capable. Moreover, several of them have the superior sound quality to the competition.

Accordingly, if your USB microphone is not working, or if you have connected a microphone via an audio jack to a USB adapter and the microphone is not being identified, try the fixes listed below to troubleshoot your situation.

Users have faced different forms of this error including:

  • Microphone not working on Windows 11 Realtek
  • USB mic not working on Windows 10
  • Microphone array not working on Windows 11
  • Windows 10 USB microphone driver download issues
  • Windows 11 teams microphone not working
  • Fifine microphone not working
  • CMTECK microphone not working

Regardless of the exact issue you have, the solutions below will get it fixed.

How can I fix the USB microphone not working issue?

1. Reinstall the drivers

    Your USB microphone might work again after the sound drivers have been reinstalled. Here is a step-by-step guide to assist you in doing this effectively.

  1. 1. Unplug your USB microphone from the Windows 10 device, and then plug them back in.

  2. 2. Press Windows + R to open Run, type devmgmt.msc, and click OK.

    devmgmt.msc
  3. 3. Locate the problematic microphone, right-click on it, and select Uninstall device.

    uninstall device to fix usb microphone not working windows 10
  4. 4. Again, click Uninstall in the confirmation prompt.

    uninstall
  5. 5. Similarly, uninstall the driver for the USB port that microphone was plugged into under the Universal Serial Bus controllers entry.

    uninstall
  6. 6. Unplug the microphone and restart the computer.

  7. 7. When the computer restart, Windows will automatically install the drivers.

Once done, verify if the USB headset microphone that was not working is functional. In case the problem persists, head to the following method.

Also, find out what to do if Windows doesn’t install the drivers after you restart the computer.

2. Run the Hardware and Sound troubleshooter

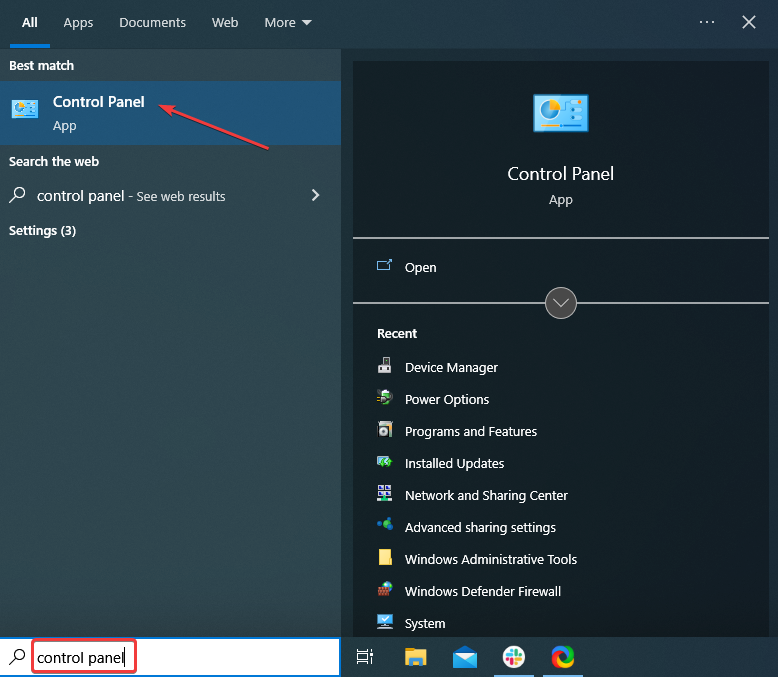
  1. Type Control Panel in the Search bar, and click on the relevant search result.control panel
  2. Now, click on the View by dropdown menu, and select Large icons.large icons
  3. Locate and select Troubleshooting.troubleshooting
  4. Now, click on the Troubleshoot audio recording option under Hardware and Sound.troubleshoot audio recording to fix usb microphone not working windows 10
  5. Follow the on-screen instructions to complete the troubleshooting process.troubleshooter

The built-in troubleshooters are pretty effective if the USB microphone doesn’t work in Windows. You may also try running the other troubleshooters about the microphone in case this one doesn’t work.

Once done, check if the USB headset microphone is not working in Windows 10 or Windows 11 problem is resolved.

3. Update your microphone drivers

Also, look at the drivers you have installed for your USB microphone. If they are not compatible with your Windows version, you will have to look on the manufacturer’s website for the correct version and update the drivers manually. This should fix the USB mic not recognized issue quite fast.

However, there is a more straightforward method. You can update your drivers automatically by using a dedicated driver updating third-party app. This will save you the time and effort of manually searching and downloading the latest driver versions.

4. Update the app accessing your microphone

If you are facing a problem with the USB microphone not showing up or not working in Windows 10 or Windows 11 on a specific app, the problem lies with the app itself. In this case, you should check for compatibility.

Check the system requirements to verify if the app is meant for your device. Also, if an updated version of the app is available, download and install it right away.

5. Additional solutions

If your USB microphone is still not working correctly, maybe the following workaround will prove helpful:

  • Update your audio drivers from the Device Manager
  • Install the latest Windows updates: Keep in mind that Microsoft regularly rolls out updates to fix various issues reported by users. The latest updates may bring dedicated microphone fixes that will help you solve the problem.
  • Remove all USB devices: Some users confirmed that unplugging absolutely all USB devices and restarting their computers fixed the problem.

How do I fix the USB microphone not working on Windows 11?

If the USB microphone is not working in Windows 11, you first must verify that the desired microphone has been configured in the audio settings.

Also, check the connections, and verify that the port and the cable are not damaged. In this case, the USB microphone will not be recognized. You may update the microphone drivers as well.

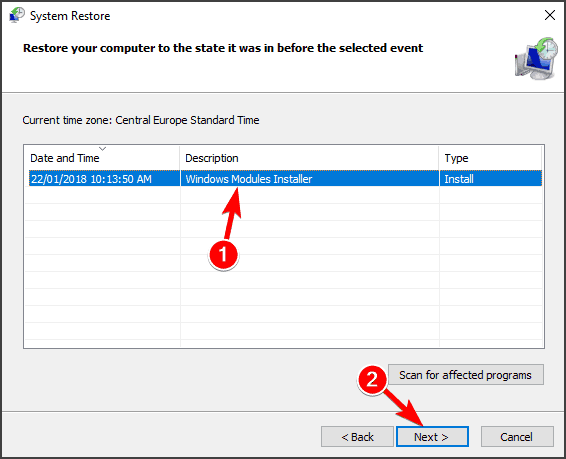
Besides, if the problem started recently, it could be misconfigured system settings or applications installed in the past. So here, instead of identifying the problem manually, a simple solution would be to perform a System Restore.

Does a USB mic need a driver?

Yes, the USB microphone will need a driver to function on a Windows device. Though, you might not have to download it manually.

When you plug in the microphone, Windows looks through its database for the dedicated driver and installs it automatically.

So, as long as you use a microphone manufactured by a reputed brand, the installation of drivers should be automatic. Details regarding it would be listed on the product’s description page.

That’s it! By the time you reach this part of the guide, you should have things up and running if the USB microphone is not working in Windows 10 or 11.

Also, determine what to do if the microphone’s volume is too low in Windows.

Use the comments section below to let us know if these methods worked for you or if you need any further assistance on this issue.

DPC Latency in Windows 10: How to Fix It in 5 Steps?

High DPC latency could be a contributor to your Windows 10 slow performance. It can cause stuttering audio, video playback, erratic mouse movement, slow response of the keyboard, etc. 

This guide will discuss some of the best methods to fix audio dropouts, popping, and distortion in no time. Let’s begin! 

What causes DPC latency on Windows 10?

For various reasons, spotting the exact error that caused DPC latency on Windows is tricky. However, some of the most common reasons are: 

  • Outdated/Incompatible audio drivers – When your audio and graphics drivers are obsolete, you might face DPC latency issues and need to update the drivers.
  • Change your Power Plan – If the computer’s power options are not set to Balanced (Active), a recommended setting, it could cause the problem.
  • Check Windows Updates – Pending Windows updates can cause latency issues; ensure your computer is updated.
  • Problem with network components: If Windows network components are not working fine, it could cause an issue. It is advised to use a TCP optimizer to modify network settings.

How can I fix DPC latency on Windows 10?

Before diving into detailed steps, let us check out the easy fixes first: 

If you tried the instant fixes and you still are facing the DPC latency issue on Windows 10, try these methods: 

1. Update Drivers

1.1 Use Device Manager

  1. Press the Windows key and type Device Manager, and press Enter.DEVICE MANAGER
  2. Go to Sound, video, and game controllers and expand it.
  3. Double-click on the drivers from the tree and click on Update driver one by one.DRIVER UPDATE
  4. Follow the on-screen prompts to complete.

1.2 Use a third-party tool

  1. Download and install Outbyte Driver Updater.
  2. Once launched, the tool will scan your computer for outdated drivers.
  3. Click Update for Sound and audio-related drivers from the list of drivers.Outbyte Driver Updater 2
  4. The utility will download the selected driver. Once done, click Install.
  5. Follow the on-screen instructions to complete.

Now that Outbyte Driver Updater located the latest updates to your driver, you should be able to enjoy an error-free PC experience.

Outbyte Driver Updater

Prevent DPC latency and let Outbyte Driver Updater help you maintain your drivers updated with the most recent versions.
Free Trial Download now

2. Use Command Prompt

  1.  Press the Windows key and type CMD and click Run as administrator. 
  2. Type the following command and press Enter sfc/scannow
  3. Paste the following commands on the CMD window and press Enter after every command DISM /Online /Cleanup-Image /CheckHealth DISM /Online /Cleanup-Image /ScanHealth DISM /Online /Cleanup-Image /RestoreHealthCMD SFC
  4. Restart your computer.

3. Use Registry Editor

3.1 Change values for some DWORDs

  1. Press Windows + R to the Run console.Regedit
  2. Type regedit and press Enter to open Registry Editor.
  3. Navigate to the following path:  HKEY_LOCAL_MACHINE\SYSTEM\CurrentControlSet\Control\Video\{DEB039CC-B704-4F53-B43E-9DD4432FA2E9}\0000]
  4. Right-click on 0000 and select New, then DWORD (32-bit) Value.
  5. Rename it as PerfLevelSrc and double-click it to change its Value data to 3322.
  6. Repeat step 4 and create three new DWORD values, naming them PowerMizerEnable, PowermizerLevel, and PowermizerLevelAC.
  7. For PowermizerLevel, and PowermizerLevelAC, modify the Value data to 1.Modify value data
  8. For PowerMizerEnable, change the Value data to 0.

3.2 Disable Windows Defender

  1. Go to Registry Editor using the method mentioned in the above steps.
  2. Copy and paste this path into the address bar:  HKEY_LOCAL_MACHINE\SYSTEM\CurrentControlSet\Services\MpsSvc
  3. Locate and double-click on DWORD Start. Disable Windows DEFENDER
  4. Change the Value data to 4 and click OK.
  5. Restart your computer.

4. Disabling the dynamic ticking

  1. Press the Windows key, type CMD, and click Run as administrator.DOS COmmand Prompt
  2. Type the following command and hit Enter BCDEDIT /SET DISABLEDYNAMICTICK YESCMD DISABLE DYNAMIC TICKING
  3. Paste and copy the command below and hit Enter to know the status BCDEDIT 

5. Turn off D0 Packet Coalescing

  1. Press Windows + R to get the Run console.
  2. Type ncpa.cpl and press Enter.ncpa.cpl
  3. Locate your wireless device, right-click on it, and select Properties.NETWORK Properties
  4. Now click Configure.Configure
  5. On the following dialog box, go to the Advanced tab.
  6. Under Property, locate D0 Packet Coalescing or Packet Coalescing and under Value, select Disabled from the drop-down.Disabled
  7. Click OK.

So, these are steps to resolve DPC latency issues on your Windows computer. However, if nothing worked for you, we recommend you reinstall Windows on your computer.

Try these methods and let us know what worked for you in the comments section below.

Microsoft’s Cyber Monday deal on Surface Laptop 3 [$300 OFF]

Microsoft, just like several other popular brands, is prepared to hold an amazing Holiday sale this year. Some of the offers have been revealed and they include Surface Laptop 3 too.

You can enjoy today one of Microsoft’s most popular products.

Note: All the prices and offers in this article are subject to change, so be sure to check the official product page to get the latest deal. If the product or offer you’re looking for is no longer available, you can try to find it on its official manufacturer page or get another one from our list.

What’s Surface Laptop 3 all about?

As a reminder, Surface Laptop 3 has been redesigned from the inside out to increase users’ productivity. This slim and elegant laptop is available in both 13.5” and 15” touchscreen options.

Even more, Surface Laptop 3 is up to two times faster than Surface Laptop 2 and gets its power from the latest 10th Gen Intel Core processor.

Since it is a reliable business laptop option, rest assured that there are no problems when it comes to running the business apps your company depends on all day long. That’s a mission easy to accomplish thanks to those 11.5 hours of battery life per charge.

Moreover, its USB-C and USB-A ports are ideal for connecting to docking stations and displays with ease. That’s why you’ll eventually end up seeing this laptop as the perfect combination of performance and comfort.

  • Two touchscreen size options
  • Latest 10th Gen Intel Core processor
  • All-day power on the go
  • Clean, stylish design
  • High portability
  • Random USB C hub issues

To prepare potential buyers like you for what’s to come, Microsoft constantly announces fresh deals. We’ll keep an eye on them and return with fresh into.

Server Rack Savings: Best Deals on Data Center Solutions

Irrespective of whether you’re setting up a complete data center or simply need to organize a cluttered corner of your office supply room, the best server racks will not only help to keep all of your networking equipment organized, but will also ensure that everything is well-ventilated.

It’s also worth noting that these racks aren’t simply for servers. Routing and switching equipment, as well as telecommunications and audio equipment, can all be mounted on them.

The best, most durable, and most robust server racks have been included in the following list, which you should check right now!

Note: All the prices and offers in this article are subject to change, so be sure to check the official product page to get the latest deal. If the product or offer you’re looking for is no longer available, you can try to find it on its official manufacturer page or get another one from our list.

What are the best server racks up for sale?

All these items have special prices.


Initially, you may believe that server racks are a type of equipment that is only required by huge enterprise organizations.

In the end, they conjure up images of sprawling data centers, complete with endless rows of servers and other networking equipment, and there’s no doubt that organizations that employ this kind of equipment require a way to keep it all effectively organized.

It is true that even small organizations can profit from a good server rack because it has the potential to keep your equipment properly organized and uncluttered while also ensuring the safety and security of your equipment.

Good server racks will provide enough space for the equipment that you require while keeping both your equipment and the cables that connect it out of harm’s way.

A server rack is an excellent investment if you have been keeping your networking equipment stashed away in a corner of your photocopying room and attempting to act as if it doesn’t exist.

However, even if you do not have a rack-mountable server or network switch, a smaller enclosure with shelves remains a more effective way of keeping things organized and out of the way.

Hurry up and take advantage of these wonderful bargains while you still can!

9 Best HDMI Cables For Your TV or Monitor [Cyber Monday]

HDMI cables replaced old VGA and DVI cables completely, and almost every device has an HDMI output or input.

HDMI cables are a necessity, if you’re looking to buy new HDMI cables, you might want to check out some of these cables.

Note: All the prices and offers in this article are subject to change, so be sure to check the official product page to get the latest deal. If the product or offer you’re looking for is no longer available, you can try to find it on its official manufacturer page or get another one from our list.

Which brand of HDMI cable is best?

Cable Matters 3 Pack High Speed HDMI Cables

  • Compatible with all HDMI devices
  • Features: Audio Return Channel (ARC), HDMI Ethernet Channel (HEC), 48 Bit Deep Color, 32 channel audio, HDCP, and 3D video
  • Supported resolution: 4Kx2K (UHD), 3840×2160, 2560×1600, 2560×1440, 1920×1200, and 1080p
  • Audio: 5.1 and 7.1 Dolby True HD and DTS-HD Master Audio
  • Gold-plated connectors, bare copper conductors, foil and braid shielding
  • Length: 3 feet
  • Doesn't work with Dell U2718Q 4K monitor

Cable Matters 3 Pack High-Speed HDMI Cables offer support for 4K resolution as well as a number of additional features that you might need.

These cables are fully compatible with all HDMI devices, and each cable comes with a different color so you can easily differentiate your devices.

AmazonBasics Braided HDMI Cable

  • Compatibility with Blu-ray players, TV boxes, consoles, computers, all other HDMI devices
  • Nylon-braided
  • 15 feet long
  • 4K video at 60 Hz, 2160p, 48-bit/px color depth
  • Ethernet, 3D, 4K video, and Audio Return Channel (ARC)
  • Struggles at times with 4k image

AmazonBasics Braided HDMI Cable supports a wide range of features, and with the ability to share the Internet connection, you won’t have to use a separate Ethernet cable.

Although this device supports the latest standards, it’s fully compatible with older standards as well, so you won’t have to worry about compatibility.

Lastly, this cable is 15 feet long which should be more than enough for most users.

Rankie HDMI Cable

  • Compatibility: Compatible with Blu-ray players, HDTVs, and all other HDMI devices
  • 6 feet long
  • 4Kx2K (UHD) at 30 Hz, 48 bit/px color depth
  • Ethernet, 3D, 4K video and Audio Return Channel (ARC)
  • Copper wire and braided foil, gold-plated connectors
  • Could see some issues with the picture

Rankie HDMI Cable offers a durable and corrosion-resistant design, and with support for 4Kx2K video, it should be perfect for all types of multimedia.

The cable also supports Ethernet which is quite useful if you don’t want to use additional cables. With a length of 6 feet, it will be perfect for all hard-to-reach devices.

SecurOMax HDMI Cables

  • Compatible with HDTVs, Blu-Ray players, consoles, and all other HDMI devices
  • HD 2K @ 1080p, QHD @ 1440p, UHD 4k @ 2160p (up to 60 Hz over HDMI 2.0)
  • 3D, Ethernet & Audio Return Channel
  • 100% pure copper
  • Length: 1.5 feet
  • Could appear some quality issues

SecurOMax HDMI Cables provide 4K video at 60Hz if you’re using HDMI 2.0 connection. Additional features include Ethernet and an Audio return channel, so you won’t have to use any additional cables.

The cables are fully compatible with older HDMI standards and devices, but due to their length, these cables might not be perfect for those hard-to-reach devices.

Aurum Ultra Series High Speed HDMI Cable

  • Compatible with consoles, media players, HDTVs, UHD TVs
  • Construction: 28AWG pure copper conductors, triple shielding
  • Features: 3D video, UHD, Audio Return Channel (ARC), HDMI Ethernet Channel (HEC), 48 Bit Deep Color and more.
  • Resolution: 4Kx2K, 1440p, 1080p, 1080i, 720p, 480p, and 480i
  • Length: 25 feet
  • Mid-level cable quality

Aurum Ultra Series High-Speed HDMI Cable provides amazing length, so you’ll be able to reach any HDMI device without issues.

The cable is quite durable and with support for 4K video and audio return and Ethernet, it’s perfect for all users that need a long high-quality HDMI cable.

SecurOMax HDMI Cable 15 FT

  • Compatibility: Compatible with all HDMI devices, and HDMI ports v2.0, v1.4, and v1.3 standards
  • Video: UHD 4k @ 2160p, 2K HD @ 1080p, QHD @ 1440p, HD 720p
  • Features: 3D, Ethernet and Audio return channel
  • Construction: Trippe-shielded 100% pure oxygen-free bare copper, 24K gold-plated connectors
  • Length: 15 feet
  • Only for Android

SecurOMax HDMI Cable 15 FT shares many similarities with the previous SecurOMax entry on our list.

Although the previous SecurOMax wasn’t quite long, this cable makes up for its shortcomings with a length of 15 feet which should be more than enough for most users.

Monoprice 121510 Premium HDMI Cable

black friday hdmi cable deals

Monoprice 121510 Premium HDMI Cable specifications:

  • Compatibility: Compatible with all HDMI devices
  • Resolution: 4K resolution at 60Hz
  • Features: 3D, multi-view video, dual streams, 28 AWG, 18Gbps bandwidth
  • Length: 25 feet

If you’re looking for a premium HDMI cable, then this model might be perfect for you. This cable offers a 4K resolution at 60Hz, so it’s perfect for all your multimedia needs.

In addition, there’s support for dual streams that some users might find useful. The cable is 25 feet long, which should be more than enough even for advanced users.

⇒ Check price

C&E High Speed HDMI Cable

black friday hdmi cable deals

C&E High-Speed HDMI Cable specifications:

  • Compatibility: HDMI 2.0/1.4a/1.4/1.3c/1.3b devices
  • Construction: Gold plated connectors and full shield
  • Features: Ethernet and Audio Return Channel, 3D, 10.2Gbps bandwidth
  • Resolution: 4K resolution @24Hz, 1080p
  • Length: 60 feet

C&E High-Speed HDMI Cable offers solid design and compatibility along with Ethernet and Audio return channels.

The cable can handle 4K resolution, but it’s limited to 24Hz which is its only flaw. On the other hand, this cable is 60 feet long, so it’s designed for extreme users that need to transfer HD signals over long distances.

⇒ Check price

Monoprice 109170 High Speed HDMI Cable

black friday hdmi cable deals

Monoprice 109170 High Speed HDMI Cable specifications:

  • Compatibility: All HDMI devices
  • Features: 10.2 Gbps bandwidth, 28AWG
  • Length: 30 feet

Monoprice 109170 High-Speed HDMI Cable is a solid HDMI cable that is 30 feet long, which makes it perfect for advanced and extreme users.

We have to mention that this is a directional cable, so if you connect it the wrong way, you won’t get a single until you connect your cables properly.

⇒ Check price

5 Best External Hard Drives for Video Editing [Cyber Monday]

Even though SSDs took over from HDD as the most convenient storage devices, hard drives are still alive and kicking. Mostly because of their more affordable price. But it’s that time of the year again, and these prices are even lower now!

So, if you’re looking to buy a new external HDD for your computer this Christmas, we created a list of the best deals to get right now. So, you can pick what you like.

Note: All the prices and offers in this article are subject to change, so be sure to check the official product page to get the latest deal. If the product/offer you’re looking for is no longer available, you can try to find it on its official manufacturer page or get another one from our list.

What is the best external hard drive for video editing?

  • WD 8TB Elements
  • Seagate Portable 5TB
  • Western Digital 4TB Black My Passport
  • LaCie (LAC9000633) Rugged Mini 4TB External Hard Drive
  • Seagate Expansion 1TB

Now let’s take a look at the pros and cons of each HDD.

WD 8TB Elements

  • 8TB storage space
  • USB 3.0
  • Compatible with Mac, PC, PS4, Xbox
  • 2-year warranty
  • Can be bulky for some users

If additional storage space for your PC is what you’re looking for, look no further than WD Elements.

This massive external hard drive offers 8TB of storage space, along with fast data transfers through USB 3.0.

Of course, this is the least portable hard drive on the list, as it’s the size of a bigger mini-PC.

Seagate Portable 5TB

  • 5TB storage capacity
  • Cross-platform compatibility
  • Plug and play
  • USB 3.0
  • 1-year warranty
  • Simple design

This is a great deal for Cyber Monday that can be found on Amazon. The price/memory space ratio is just awesome.

This external HDD has instant plug-and-play and the USB 3.0 port is backward compatible with USB 2.0.

Move easily your files by dragging and dropping them on/from this external HDD.

Western Digital 4TB Black My Passport

  • WD Backup Software included
  • USB 3.0 and USB 2.0 ports
  • Cross-platform compatibility
  • Hardware encryption
  • Requires drive formatting before installation

Western Digital offers an elegant-looking external hard drive, with a massive 4TB of storage.

My Passport also offers some additional handy features, like WD Backup technology, password protection, hardware encryption, and USB 3.0/2.0 support.

LaCie (LAC9000633) Rugged Mini 4TB External Hard Drive

  • 4TB storage space
  • USB 3.0 and USB 2.0 compatible
  • Sturdy build designed to take shocks without damage
  • Dust and rain resistant
  • Compatible with a variety of system types
  • Design is not for everyone

Boasting a massive storage capacity of 4TB all wrapped up in an ultra-compact, portable design, the LaCie Rugged Mini is one external HDD you can trust.

And it will stay with you for a long time too, thanks to its waterproof and shockproof material.

Data transfer rates are also impressive reaching up to 130MB/s and you can put its USB 3.0 interface to good use and enjoy a seamless connection.

Seagate Expansion 1TB

  • Generous storage capacity (1TB)
  • Portable and compact design
  • Plug and play feature
  • Work with Windows or Mac computers
  • Reformatting may be required for Mac

Ultra-portable Seagate Expansion offers 1TB of storage and a slim design that lets you put this HD even in a bigger pocket.

The drive also supports SuperSpeed USB 3.0 for fast file transfer and is compatible with both USB 3.0 and USB 2.0.

That’s about it. As you can see, there are hard drives that suit everyone’s needs, and we’re sure you’ve found something you like already.

So, why don’t you share that with us in the comments below?

Best Laptop Deals & Sales of the Moment

If you are in the market for a brand-new laptop, we have some good news we want to share with you. You can still find what you’re looking for and pay a lot less.

Yes, we are talking about some of the early deals already out there, so if you were really planning for this purchase, now would be a great time.

We’re about to show you what alternatives you have before the great discount event even starts, later this month.

It really all comes down to what you need, more than anything else. But with so many deals out there, you are surely bound to find whatever it is you are looking for.

We can assume that you might be searching for a device that is also compatible with Windows 11 since the new OS is the talk of the town these days.

So, without further ado, let’s look at some of the offers you can jump on right away.

Note: All the prices and offers in this article are subject to change, so be sure to check the official product page to get the latest deal. If the product or offer you’re looking for is no longer available, you can try to find it on its official manufacturer page or get another one from our list.

What are the best deals on laptops?

Microsoft Surface Pro 7

Let’s start things off with a brand-new device from the Redmond company itself.

If you had your eyes on this bad boy, know that you can get it for $650.99, instead of its regular price of $899.

It features a 12.3″ display, an Intel Core i5 CPU, 8GB of RAM, and a 128GB SSD Platinum. Besides this, you will also get a Black Surface Pro Signature Type Cover.

Microsoft Surface Pro 7

At your desk, on the couch, or in the yard, get more done your way with Surface Pro 7, featuring a laptop-class Intel Core processor, all-day battery, and HD cameras.

Lenovo Ideapad L340 Gaming Laptop

If gaming laptops are your thing, then this deal will surely interest you. Instead of paying $969.99 for a brand-new Lenovo Ideapad L340, you can head over to Amazon and cop it for just $624.98.

But you better hurry if this is what you want. because there aren’t many left and you might not find any if you wait too long.

This laptop has a 15.6” Full HD display, an Intel Core i5-9300H processor, 8GB of DDR4 RAM, 512GB Nvme SSD, and features an NVIDIA GeForce GTX 1650 GPU.

Lenovo Ideapad L340 Gaming Laptop

With 9th generation Intel Core i5 processors, the IdeaPad L340 gaming has the power you need to outshoot, outrun, and outsmart anyone.

Apple MacBook Pro 16”

Were you searching for a new MacBook for your office or your home, but are a bit short on cash? You can put all those negative thoughts behind you because these discounts will bring your smile back.

Harness the power of a 10‑core CPU and 16‑core GPU, 16GB RAM, and 512GB SSD, together with optimized thermal architecture for groundbreaking performance.

If you act on this offer right now, you can save $500 on your purchase, Yes, we know, that’s a lot of money that can remain in your pocket, provided you take advantage of this sale.

Apple MacBook Pro 16”

Expand your view of everything on MacBook Pro thanks to a larger 16″ Retina display with sharper pixel resolution and support for millions of colors.

Apple MacBook Pro 13″

Choosing this laptop also means spending $500 less on it, so a definite win at the end of the day. Whether you buy it for yourself or as a gift, this will indeed be a magnificent present.

We don’t know how many of you are in the habit of gifting MacBooks, but if you haven’t tried it, now’s the perfect time to start.

Apple MacBook Pro 13″

A backlit Magic Keyboard and Touch ID, with fast integrated graphics, and the versatile Touch Bar for more ways to be productive.

Lenovo Yoga 7i 2-in-one

Meet the Yoga 7i, which features the Intel Evo platform’s perfect combination of responsiveness, long-lasting battery life, and stunning visuals.

This 16-inch 2-in-1 laptop offers versatility, portability, and performance. Enjoy a superior audiovisual experience and smart AI conveniences. 

It comes with Windows 11, so you don’t have to worry about upgrading to Microsoft’s new operating system anymore.

Lenovo Yoga 7i 2-in-1

Crafted from sandblasted anodized metal in classic Slate Grey or sophisticated Dark Moss, the Yoga 7i’s subtly rounded edges are designed to feel comfortable in your hands.

Acer Nitro 5

Here’s another gaming laptop that might be to your liking, and it’s a steal for just $779.99. If this is indeed what you want, in order to spruce up your gaming den, you can save up some big bucks on it.

Target has it on sale right now, for the above-mentioned price, and you would be saving $354.

Its graphics are powered by an Nvidia GeForce GTX 1050 GPU, so you will definitely enjoy some quality gaming.

Modern, light, and designed with gaming in mind, the Nitro 5 offers you an experience you are not likely to forget very soon.

HP Laptop with Windows 11 Home

This lightweight portable PC was built to keep you productive and entertained from anywhere. The HP 15″ diagonal laptop features reliable performance and an expansive display, so your weekends can be full of streaming, surfing, and speeding through tasks from sun up to sundown.

The good news is that Target has it on sale for just $339.99, instead of its regular price of $539.99. Needless to say that this is a great offer, considering you just saved $200.

And it comes preloaded with the Home edition of Windows 11, so you can conduct business as usual, but in much more modern surroundings.

HP 15” Laptop

Stay connected to what matters most with long-lasting battery life for a full day of work and a thin, portable, micro-edge bezel design that makes traveling light easy.

HP Victus Gaming Laptop

This ultra-modern gaming laptop has surely been on a lot of people’s wishlists lately, and now it’s time for those dreams to actually come true.

Why pay $1049.99 for this awesome portable gaming station, when you can save $50, and only pay $999.99? Yes, you heard correctly, this laptop is also on sale.

It’s also eligible for a free Windows 11 upgrade, so we can understand why a lot of gamers really want this beast on their desks.

HP Victus Gaming Laptop

It’s got epically long battery life, super-fancy Danish audio, a massively fast display, and an all-purpose gaming keyboard that goes clickety-clack.

Samsung Galaxy Book Pro Intel Evo

On the off-chance you are into Galaxy Books, check out this awesome deal that Amazon has cooked up. It’s only the beginning of November and you can already save $260.36.

Instead of the usual $1099.99, early bargain hunters can secure this Samsung Galaxy Book Pro for just $839.63. It’s got a 15.6″ AMOLED screen, 11th Gen Intel Core i5 Processor, 8GB of memory, a 512GB SSD, and a long-lasting battery.

Samsung Galaxy Book Pro Intel Evo

PC power that’s smartphone thin. The Galaxy Book Pro comes in under two pounds and is designed on the Intel Evo platform, so it’s the perfect mix of portability and productivity.

HP Chromebook 11

Now $60 off, the 2021 HP Chromebook 11 is compact, durable, and fast. It packs an 11.6-inch HD display and a 2.0-GHz MediaTek MT8183 8-core CPU paired with 4GB of RAM.

MediaTek Integrated graphics and 64GB of eMMC storage round out its specs list. The HP Chromebook 11 is a suitable option if you’re looking for a kid’s starter laptop or a secondary, basic machine. 

If you want to get your hands on this laptop you better hurry because Walmart is giving it away for only $169.

HP Chromebook 11

Keep up from anywhere with the compact size and familiarity of this HP Chromebook 11 notebook. Battery life that lasts all day lets you disconnect from the cord while staying connected to the world so your office can be anywhere. 

As we previously said, it’s not even sales season and there are still some amazing deals that you can take advantage of, so make sure you don’t miss your chance.

There are, of course, a lot of other deals going on right now, we just brought you some of the best out there at this moment. We will constantly update this article, so make sure you bookmark this page.

We will keep you posted and share the most convenient deals with you so that you don’t have to search on your own.

The Code Execution Cannot Proceed: 4 Tested Solutions

The code execution cannot proceed dll was not found error appears when something is wrong with the DLL file of an app.

Identifying the problematic DLL file will help a lot with troubleshooting and help you pinpoint the exact app that cannot be executed.

How to fix the code execution cannot proceed because dll was not found error?

1. Reinstall the associated program

    The code execution cannot proceed error message prompts users to reinstall the affected programs that triggered it.

    You can easily uninstall any program on your PC via Settings, from the Apps section. After you uninstall the program, the issue should be fixed.

  1. 1. Type settings in the Windows Search box.

  2. 2. Click on the first result to open the Settings app.

  3. 3. Go to the Apps section.

    apps section
  4. 4. Locate the application you want to remove in the list.

  5. 5. Select Uninstall.

    select uninstall
  6. 6. Follow the instructions on the screen to remove it.

  7. 7. Once the application is uninstalled, check if the Code execution cannot proceed because DLL was not found error is still there.

2. Update Windows drivers

  1. Right-click on the Start menu, then select Device Manager.
    the code execution cannot proceed
  2. Expand any of the categories. In this case, we expand Network Adapter, then right-click on your network adapter and select Update Driver.
    the code execution cannot proceed
  3. Next, click Search automatically for drivers and see if the system finds a new one.
  4. Restart your PC

Keeping all the drivers updated is key to ensuring that all the software works without error.

3. Use specialized software

When missing, restoring the DLL file is the first step in solving the error and ensuring the full functionality of the associated software.

Making sure the file is restored correctly is essential; therefore, using dedicated software is recommended.

4. Use System Restore

  1. On the keyboard, press the Windows key + R to launch the Run dialog, and type in rstrui, then hit Enter.
  2. Click on Next.
  3. Choose a date to restore Windows 10, one before the DLL error appeared.
  4. Finally, click Next and then Finish.

Why is my laptop not connecting to Wi-Fi?

Your laptop may have problems connecting to a wireless network for various reasons. Here are a few of the most typical issues:

  • You’re using the wrong Wi-Fi password
  • Your device is off or in airplane mode, which disables Wi-Fi
  • The Wi-Fi network your device is joining doesn’t support it
  • Your router isn’t working
  • Your laptop and router are too far apart

And, of course, you could have DLL errors that will stop the laptop’s Wi-Fi from working. Some iterations of DLL issues are as follows:

  • The code execution cannot proceed because u2ec.dll was not found
  • U2ec.dll was not found
  • The code execution cannot proceed because DLL was not found
  • The code execution cannot proceed because dokancc3758.dll was not found
  • System error the code execution cannot proceed
  • U2ec.dll is missing

Solving the code execution cannot proceed because DLL was not found can be time-consuming, and you could create more damage unless you know exactly what you need to do.

Follow the steps indicated in this guide to solve the DLL error message correctly.

In the comments section below, let us know which solution worked best for you.

WDF01000.sys High Latency Fix: 7 Ways to Lower It Down

If your LatencyMon tool is showing high ISR and DPC routine execution times due to WDF01000.sys (Kernel Mode Driver Framework Runtime), don’t worry.

This guide will walk you through troubleshooting steps to resolve this latency issue and ensure smooth audio performance.

What causes the WDF01000.sys High Latency?

There could be a lot of reasons behind the audio stuttering issue caused by WDF01000.sys, some of which are listed here: 

  • Outdated drivers: If the drivers installed are not compatible or obsolete, you might encounter problems while recording audio on the computer.
  • Missing System files: Sometimes, when the system files are missing, this could cause an issue.
  • Incompatible devices: The issue might occur if the device connected to your computer is incompatible.
  • Virus or malware infection: Sometimes, when your PC is infected, it could be the reason behind the problem. It is recommended to run a scan using a reliable antivirus tool.

How do I fix WDF01000.sys High Latency?

Before we go into detailed troubleshooting steps, let us try some easy fixes:

  • First, check the power plan and optimize it for the best performance.
  • Ensure no Windows updates are pending.
  • Shut down your PC and check the external peripherals to ensure the connections are proper. Then, restart and check for the error.
  • Ensure you have a proper internet connection.
  •  Check for BIOS version upgrade. 
  • Go back to the Last known good configuration using System Restore.
  • Try using Windows troubleshooter to resolve the issue.

If you tried all the quick fixes, but the issue persists, try these troubleshooting steps: 

1. Use Device Manager to disable High Precision event timer

  1. Press Windows + R to open the Run console.DEVICE MANAGER
  2. Type devmgmt.msc and hit Enter to open Device Manager.
  3. Go to System devices and expand it. Look for a High precision event timer and right-click on it. Choose Disable device.HIGH PRECISION

2. Use Command Prompt for system checks

  1. Press the Windows key and type CMD and click Run as administrator. 
  2. Copy and paste the command mentioned and press Enter after every command. cleanmgr /sageset:1  cleanmgr /sagerun:1CMD CLEAN
  3. Type the following command and press Enter. sfc/scannow
  4. Copy and paste the following commands and press Enter after every command: DISM /Online /Cleanup-Image /CheckHealth DISM /Online /Cleanup-Image /ScanHealth DISM /Online /Cleanup-Image /RestoreHealthCMD SFC
  5. Type the command and press Enter chkdsk c: /b 
  6. Restart your PC.

3. Update Drivers

3.1 Use Device Manager 

  1. Press Windows + R to open the Run console.DEVICE MANAGER
  2. Type devmgmt.msc and hit Enter to open Device Manager. 
  3. Go to Sound, video and game controllers and click on it to Expand.
  4.  Look for the Realtek Audio device, right-click on it and select Uninstall device.Uninstall Driver
  5. Now download Realtek High-Definition (HD) Audio Driver.
  6. Follow the on-screen instructions to reinstall the driver.

3.2 Use third-party driver updater

  1. Download and install Fortect Driver Updater.
  2. Launch it and click on Scan.
  3. Once the scan is complete, select the driver, and click on Update. 
  4. The driver updater will download the driver. Once done, click Install.
  5. Now, follow the on-screen instructions to complete.

4. Re-Register the Wdf01000.Sys File

  1. Press the Windows key and type CMD and click Run as administrator. 
  2. Type the following command and press Enter: regsvr32 C:\Windows\system32\drivers\wdf01000.sysCMD device MaNAGER
  3. Restart your computer.

5. Reset Windows

  1. Press Windows + I to get Settings.
  2. Click System, then Recovery.Recovery
  3. Now Click Reset this PC.RESET
  4. Under Choose an option, select Keep my files.Reset this PC
  5. Now, click Cloud Download under How would you like to reinstall Windows.Reset 2
  6. Follow the on-screen instructions to complete the process. Your computer may restart several times.

6. Verify your hardware

If possible, test your audio setup with different hardware to rule out hardware-specific issues.

Also, check for device manager conflicts. Look for any devices with warning symbols in Device Manager and address any conflicts.

device manager warning signs

7. Adjust interrupt moderation settings

  1. Open Device Manager.
  2. Expand Network adapters and right-click your network adapter.network adapters in device manager
  3. Select Properties, go to the Advanced tab.network adapter properties advanced tab
  4. Look for Interrupt Moderation or Interrupt Moderation Rate.Set it to Disabled or Off.disable interrupt moderation

Some network adapters have Interrupt Moderation settings that can impact system latency. Adjusting these settings may help.

So these are the methods to fix WDF01000.sys latency issues. Try them and get rid of audio-cracking noises when using audio equipment. 

If you have any more questions or concerns about latency, feel free to mention them in the comments below.

Fix: Atiadlxx.dll is Either not Designed Error on Windows 10

Many users report that the atiadlxx.dll is either not designed to run on Windows or contains an error message.

This can be concerning as the Atiadlxx.dll DLL file, like any other missing DLL, is important to the smooth running of Windows 10. However, it is not the most challenging issue to fix, and we will show you how to do it in this guide.

What does atiadlxx.dll is either not designed to run on error mean?

The atiadlxx.dll is either not designed to run error on Windows 10 means that the DLL file is either damaged or unavailable. Below are some of the factors that can cause the error:

  • Corrupt DLL file: You can get this error if your DLL file is faulty or missing. You will need to restore these files to get them working again.
  • Faulty video card driver: In some cases, the atiadlxx.dll error can be down to an outdated video card driver. The solution here is to update your drivers to the latest version.
  • Damaged system files: Sometimes, this error might be due to problems with some of your system files. Running the DISM and SFC scans or using a dedicated system file fixer to repair these files should solve this quickly.

How can I fix the atiadlxx.dll error in Windows 10?

Before applying the sophisticated fixes in this section, you can try to copy the atiadlxx.dll file from a working PC and use it to replace yours. First, however, ensure you back up the file to another location in case of problems.

If this does not work, you can now proceed to the fixes below:

1. Restore the file with specialized software

Since a reason for the atiadlxx.dll is either not designed to run error can be related to the file being deleted, then restoring it is the first thing to try.

Ensuring that the atiadlxx.dll file is restored correctly on your device is crucial for the associated software to work properly, and using specialized software makes the process simpler.

2. Use the System File Checker

  1. Press the Windows key + S, type cmd, and select Run as administrator under Command Prompt.
    cmd atiadlxx.dll is either not designed
  2. Type the command below and hit Enter: sfc / scannowsfc scannow atiadlxx.dll is either not designed
  3. Wait for the scan process to complete.
  4. If the SFC scan fails, type the command below and hit Enter: DISM /Online /Cleanup-image /Restorehealthdism restore atiadlxx.dll is either not designed
  5. You can now rerun the SFC command after the DISM scan completes.

File corruption can cause atiadlxx.dll is either not designed to run on Windows or contains an error message appear. So, it would be best to use the built-in file system repairers to fix them.

3. Update video card driver

  1. Press the Windows key + X and select Device Manager.
    device manager
  2. Double-click the Display adapters option to expand it and right-click the driver there.
  3. Now, choose the Update driver option.
    update driver
  4. Finally, select Search automatically for drivers and install any available update.
    search auto

Some users have found their video card drivers to be the cause of the atiadlxx.dll is either not designed error. In this case, updating the drivers with the built-in driver updater or from the manufacturer’s website should do the trick.

However, performing this operation manually is error-prone and tasking. Hence, you should update your drivers automatically with Outbyte Driver Updater.

4. Clean install Windows 10

If all the solutions above prove futile in solving the atiadlxx.dll is either not designed error, you might need to risk and clean install Windows 10.

For the requirements and varieties of ways to do this without losing your files, check our detailed guide on how to reinstall Windows 10.

The atiadlxx.dll is an un-designed error that can make some features on your PC unusable. But you can quickly fix it with the solutions in this guide.

Do you want to know how to fix the missing VCOMP140.dll error on Windows 10? Then, check our excellent guide to do it effectively.

Please, feel free to let us know the solution that helped you fix this issue in the comments below.

Fix: Please Insert the Last Disk of the Multi-Volume Set

Windows Explorer is reportedly displaying a, please insert the last disk of the multi-volume set error when the user tries to open the app or perform a search.

While this is not the same across the board, users who have encountered it have had difficulty fixing the problem.

If you are also struggling with this error, Let us explore some of the most known causes and the most effective solutions users have applied.

Why does the Please insert the last disk of the multi-volume set keep popping up?

Just like many other computing problems, a few things have been known to trigger this error. On top of this list are the following:

Users have experienced variations to this error, including:

  • Please insert the last disk of the multi-volume set sd card – This is another variation of the error associated with plugged-in SD cards.
  • Compressed (zipped) folders please insert the last disk Windows 10 – On your Windows 10, this may happen on a flash drive with corrupted data. And would require a total data transfer or wipe of the device.
  • Please insert the last disk of the multi-volume set USB – This is also associated with external drives and, in most cases, will stop if the drive is detached.

While these are the top culprits, the solutions gathered here will work in almost all instances of this error.

How do I fix Please insert the last disk of the multi-volume set error?

  1. Format the USB Drive
  2. Remove Hidden Folder from the Drive
  3. Update or Reinstall the USB Controllers
  4. Run Windows Troubleshooter

1. Format the USB Drive

  1. First, move all the files in the USB drive to your PC or any other storage device.
  2. Connect your USB drive to the PC, and click on This PC.
  3. Right-click on your connected storage device and select Format from the options.
  4. In the Format USB Drive window, ensure File System is set to FAT32, check the Quick Format option, click on Start and wait for the format to be completed.
    please insert the last disk of the multi-volume set

If the error occurs after connecting your USB flash drive to the computer, you may need to format the USB flash drive again with FAT32 to fix the error.

To avoid the error message in the future, make sure you click on the USB icon in the taskbar and select the eject media option.

2. Remove the hidden folder from the drive

  1. Connect the USB drive to your Computer.
  2. Press Windows + E to open File Explorer.
  3. Click on the View tab in the top ribbon and then check the Hidden items box under the show/hide section.
    please insert the last disk of the multi-volume set
  4. Open the drive with the error and look for files that end with the .zip extension. If you haven’t added that file yourself, delete it.
  5. Repeat the steps with all the drives with the error and delete all the files with the .zip extension.
  6. Reboot the system and check for any improvements.

Another reason you are facing this error can be hidden zip folders in the drive that may have been added when the USB drive was connected to another system.

3. Update or Reinstall the USB Controllers

3.1 Updating USB driver

  1. Press Windows + X and select Device Manager to open it.
    please insert the last disk of the multi-volume set
  2. In the Device Manager window, scroll down and expand Universal Serial Bus Controllers.
  3. Right-click on the Intel USB host controller and select Update driver.
  4. Next, click on Search automatically for updated driver software.
  5. Device Manager will search for any pending update for the driver and download and install it automatically.
  6. Once the driver is installed, restart the system and check for any improvements.

Besides performing this manually, you can try a quicker method, which is using an automated tool like Outbyte Driver Updater that scans your PC for outdated drivers and ultimately find them the latest updates in no time.

3.2 Reinstalling USB drivers

  1. Press Windows + X and select Device Manager to open it.
    please insert the last disk of the multi-volume set
  2. In the Device Manager window, scroll down and expand Universal Serial Bus Controllers.
  3. Select your USB driver and click Uninstall device.
    Uninstall Intel Host Controller Device Manager
  4. Click OK when asked to confirm.
  5. Restart the system, and Windows will automatically reinstall the Host Controller drivers after the restart.

4. Run Windows Troubleshooter

  1. Press Windows + I to open the Settings app.
  2. Open Update & Security.
  3. From the left pane, click on Troubleshoot, click on Search and Indexing from the right pane, and press the Run the Troubleshooter button.
    please insert the last disk of the multi-volume set

If you get the error message, please insert the last disk of the multi-volume set; these are the best ways to resolve it.

None of these fixes have been written in any particular order. Still, we recommend you try USB formatting before jumping into other fixes, as it has proven very effective for many users.

Please let us know what has worked for you in the comments below.

Diablo 3 Issues on Windows 10: Easiest Fixes That You Can Use

Diablo series is probably one of the best-known action RPG series on the Windows platform. Many Windows 10 users are fans of Diablo 3, but unfortunately, it has specific issues on Windows 10.

In this guide, we will address users’ prevalent issues and proffer working solutions to fix them.

What are common Diablo 3 issues on PC?

Diablo 3 issues on Windows 10 cover different areas and scopes. Below are some of the common ones:

  • Diablo 3 no sound in Windows 10: This can be caused by third-party apps like Sonic Studio or MSI Nahimic. Removing these apps with a software uninstaller should restore your sound quickly. 
  • Diablo 3 not responding in Windows 10: If Diablo 3 is not responding on Windows 10, it could be due to your graphics driver. The solution here is to reinstall or update the drivers.
  • The Diablo 3 D3D error in Windows 10: It can show up if your PC does not support the settings with which you are running the game.
  • Diablo 3 crashing in Windows 10: If Diablo 3 is crashing, it could be because your PC does not meet the requirements to run the game. Also, it might be because of outdated drivers or PCs. So, you must update everything to get the game running smoothly.
  • Diablo 3 freezing Windows 10: This is another issue that can be due to an outdated graphics driver. Updating it should do here, too.

How can I fix Diablo 3 issues on Windows 10?

Before delving into the fixes we have prepared in this section, make sure your PC meets the requirements to run Diablo 3. This is because the game will always encounter issues if the system requirements are not fulfilled.

➡ Diablo 3 crashing, freezing, and not responding

1. Update video card driver

  1. Press the Windows key + X and select Device Manager.
    device manager diablo 3 windows 10
  2. Double-click the Display adapters option and right-click the driver there.
  3. Select Update driver.
    update driver diablo 3 windows 10
  4. Finally, choose the Search automatically for drivers option.
    search auto

Outdated video drivers can cause Diablo 3 crashes; therefore, if you’re experiencing any issues with Diablo 3, we strongly urge you to update your drivers first.

We recommend using a dedicated driver updater tool, such as Outbyte Driver Updater, to download all outdated drivers on your PC automatically.

This tool will prevent file loss and help you to avoid permanent damage to your PC caused by downloading and installing the wrong driver versions.

Outbyte Driver Updater

Avoid significant damage to your PC and let Outbyte Driver Updater pick the correct drivers from its substantial database.
Free Trial Download now

2. Run the game in compatibility mode

  1. Right-click the Diablo 3 shortcut and select the Properties option.
    properties
  2. Once the Diablo 3 Properties window opens, navigate to the Compatibility tab.
  3. Check Run this program in compatibility mode for and select Windows 7 from the list of options.
    compatibilty tab diablo 3 windows 10
  4. Now, check the box for Run this program as an administrator.
  5. Finally, click Apply and OK and try rerunning the game.
    run as admin

After you’ve set Diablo 3 to run in Windows 7 compatibility mode, you’ll have to repeat the same steps for Diablo 3 Launcher.

According to users, you can fix the black screen issues with Diablo 3 by setting Diablo 3 and Diablo 3 Launcher to run in Windows 7 compatibility mode.

3. Repair game files

  1. Launch the Blizzard.net app and select Diablo 3 in the left pane.
  2. Click the Options dropdown and select the Scan and Repair option.
    scan and repair
  3. Finally, click the Begin Scan button and wait for the scan to complete.
    begin scan diablo 3 windows 10

Sometimes, the game files might be causing Diablo 3 to crash issues on Windows 10 or become unresponsive. The steps above should help you fix them effectively.

4. Delete the game cache file

  1. Press Ctrl + Shift + Esc to open Task Manager.
  2. Now, right-click all Blizzard.net processes and select the End Task option.
    end task
  3. Press the Windows key + R, type %ProgramData%, and hit Enter.
  4. Right-click both the Blizzard Entertainment and Battle.net folders and select Delete.
    delete diablo 3 windows 10

An excessive game cache is also why you are dealing with Diablo 3 freezing issues on Windows 10. Deleting the cache file and restarting your game should solve the problem in this case

5. Reset game settings

  1. Open the Blizzard Battle.net app and click the Blizzard icon in the top left corner.
  2. Choose Settings from the options.
    blizzard settings
  3. Now, click the Game Settings option in the left pane and select Reset In-Game Options.
    game setting
  4. From here, click the Reset button when prompted.
    reset diablo 3 windows 10
  5. Finally, click the Done button when the repair is complete.
    done

Another viable option if you are having problems with Diablo 3 on Windows 10 is to reset the game settings to default. This will override any changes you have made that make the game freeze or crash.

➡ Diablo 3 D3D error Windows 10

1. Use the default refresh rate

  1. Press the Windows key + I to open the Settings app and select the System option.
    system diablo 3 windows 10
  2. Select the Advanced display option under the Multiple displays section.
    advanced display
  3. Now, choose Display adapter properties for Display 1.
    display adpater
  4. Click the Monitor tab and click the dropdown under Screen refresh rate.
  5. Finally, choose your default resolution (mostly 60Hz) and click Apply, followed by OK.
    refresh rate diablo 3 windows 10

The primary cause of the Diablo 3 D3D on Windows 10 is running the game with settings your PC is uncomfortable with. Hence, changing your PC resolution to get a better experience can cause problems.

2. Disable Game DVR

  1. Press the Windows key + I to open the Settings app and select Gaming.
    gaming
  2. Toggle the switch under Xbox Game Bar backward to disable it.
    game bar
  3. Now, restart your game.

The Xbox Game Bar helps you to record your screen while gaming. However, it might be putting too much strain on your PC. This leads to the Diablo 3 D3D error on Windows 10. Thus, you need to disable this feature to restore normalcy.

➡ Diablo 3 has no sound Windows 10

1. Remove problematic app

  1. Press the Windows key + I and select the Apps option.
    apps diablo 3 windows 10
  2. Choose the app interfering with your game sound and click the Uninstall button.
    uninstall sonic
  3. Now, follow the onscreen instructions to complete the removal.

Some sound-controlling apps like Sonic Studio or MSI Nahimic mess with Diablo 3 on Windows 10. However, removing them has fixed the sound issue for many users. So, it would be best if you tried to remove them too.

2. Uninstall and reinstall the game

  1. Press the Windows key + I to open the Settings app and choose Apps.
    apps diablo 3 windows 10
  2. Select the Battle.net option and click Uninstall.
    uninstall battle net
  3. Follow the onscreen instructions to complete the process.
  4. Finally, download and install the app again from official sources.

If Windows 10 sound works on all other apps aside from Diablo 3, the problem might be with the game’s installation. However, reinstalling the game should give you a clean version devoid of the problem.

There you have it: Encompassing solutions for the most common Diablo 3 issues on Windows 10. It must be mentioned that some of the fixes above, like reinstalling the app and running the game in compatibility mode, can fix multiple issues.

So, be free to try them as you wish. Similarly, if you face issues like the Battle.net client crashing on your PC, check our detailed guide to fix it effectively. If you’re a Diablo 4 player, you might be interested in our Diablo 4 error code 395002 and Data Retrieval error guides.

Another common error that has been plaguing users recently is Diablo 3 Code 1 error, but we have covered it in a separate guide.

Feel free to let us know the Diablo 3 issue you are facing and how you fixed it in the comments below.

The Hunter Call of the Wild Crashing [FIXED]

theHunter: Call of the Wild is a challenging hunting game that will put your patience to the test. And by patience, we mean the ability to stay still and wait for animals to enter your cross hairs as well as the patience to fix the various technical issues that you may encounter.

If you’re experiencing crashes in theHunter: Call of the Wild, you’ve come to the right place. In this article, we’re going to list a few workarounds to solve this problem.

First, let’s see how players describe this issue:

I played 16 hours smooth and without any crash or freeze, and suddenly i saw stuck picture and noisy sound reapeted. Ok i though “first crash, not so bad” but, drom that time i have nothing more from game than only this freezes, i can play max 5 minutes and bang! out of nowhere freeze, which i cant just close with 3 saint buttons or alt + F4, no i have to restart my PC.

Fix theHunter: Call of the Wild random crashes

First things first, make sure your computer meets the game’s system requirements. Then, update your drivers by downloading either NVIDIA GeForce Experience or ATI Catalyst Control Center.We recommend a third-party tool (100% safe and tested by us) to automatically download all the outdated drivers on your PC.

⇒ Get Fortect Driver Updater

As a quick reminder, the latest NVIDIA driver fixes a series of GPU-related game crashes. If this action doesn’t eliminate crashes, follow the steps listed below:

1. Disable Steam Overlay, VR mode, and SSAO

Click on the game, go to Properties > General > uncheck the Steam overlay, VR mode, and SSAO. This solution is not a permanent fix, but it will significantly reduce the number of crashes.

2. Activate borderless windowed mode

First, make sure the game is closed. Then, right-click on the game in your Steam library, select Properties, click on Set launch options, then type in: /borderless. Start your game again to enable borderless windowed mode.

The two solutions listed above won’t permanently fix theHunter: Call of the Wild’s crashes, but will at least reduce their frequency. If you’ve come across other workarounds to fix these crashes, feel free to list the troubleshooting steps in the comment section below.

RELATED STORIES YOU NEED TO CHECK OUT:

[Fixed] Windows Image Acquisition High CPU Usage: 6 Ways

If the Windows Image Acquisition service is causing high CPU usage, the chances are there are problems with imaging hardware or some malfunction in your computer. But don’t worry; it can be fixed.

This guide will talk about all the possible ways to eliminate the problem. But first, let’s look at the causes of the issue. 

What causes Windows Image Acquisition High CPU Usage?

Pinpointing the cause of the WIA’s high CPU usage can be difficult as there could be a handful of reasons that could lead to the problem. However, some of the potential ones are listed below: 

  • Virus or malware on your computer: If your PC is infected with malware, there are chances that it is disguising as a WIA service and hence causing the issue. You can run a scan using a reliable antivirus tool to know for sure.
  • Conflicting hardware: If hardware connected to your computer has pending jobs or has encountered some error, it can cause the issue. 
  • Windows Image Acquisition is corrupt: If Windows Image Acquisition is corrupt, it will not work correctly, thereby causing the issue.
  • Windows Image Acquisition API misconfigured: If the WIA service is stuck at some point, your computer might face a high CPU and disk utilization issue.

How do I fix Windows Image Acquisition High CPU Usage?

Before diving into the detailed troubleshooting steps, let us try these easy fixes:

  •  Run the Memory diagnostic tool, and Windows will resolve the issue.
  • Check whether your computer’s RAM is sufficient to run your Windows 10/11 computer.
  • Make sure there are no pending Windows Updates.
  • Unplug and replug the imaging hardware.
  • Disable Superfetch.
  • Run a deep scan using your Antivirus tool.

1. Clean boot

  1. Press Windows + R to open the Run window.
  2. Type msconfig and hit Enter to open System Configuration.Windows Image Acquisition
  3. Go to the Services tab, and place a checkmark beside Hide all Microsoft Services. Now click Disable All.Clean BOOT 2
  4. Next, go to the Startup tab, and click Open Task Manager.CLEAN BOOT 3
  5. Go to each Enabled startup item, right-click on it, and select Disable.Clean BOOT 4
  6. Close Task Manager. On the System Configuration window, click Apply and OK.CLEAN BOOT 5
  7. Restart your computer.

 2. Set the PC to the best performance

  1. Press Windows and Pause/Break keys to open the System About page.
  2. Click Advanced system settings.System About
  3. On the Advanced tab, under Performance, click Settings.SystemPropertiesAdvanced
  4. Go to the Visual Effects tab, and click on the radio button beside Adjust for best performance.SystemPropertiesAdvanced Visual Effects
  5. Click Apply and OK.

3. Restart the WIA service

  1. Press Windows + R to get the Run console.Servicesmsc
  2. Type services.msc and press Enter to open the Services window.
  3. On the next screen, locate and double-click on Windows Image Acquisition.WIA service
  4. On the WIA Properties window, click on Stop under Service status.WIA SERVICES STATUS
  5. If the service restarts, change the Startup type to Disabled.

4. Update Drivers

4.1 Use Device Manager

  1. Press the Windows key and type Device Manager. Click Open.DEVICE MANAGER
  2. Go to the graphics driver, and right-click on it to get the Update Driver option.Update driver
  3. Follow the on-screen prompts to complete the process.

4.2 Use a third-party tool

  1. Download and Install Outbyte Driver Updater.
  2. The tool will scan and look for outdated drivers.
  3. From the list of drivers, select the drivers and click Update.Outbyte Driver Updater 2
  4. The utility will download compatible drivers.
  5. Once done, click Install.
  6. Now follow the on-screen prompts.

Outbyte Driver Updater

Have all your drivers updated quickly and safe with just a few clicks.
Free Trial Download Now

5. Run System File Checker 

  1. Press the Windows key and type CMD and click Run as administrator.
  2. Type the following command and press Enter: SFC/scan
  3. Copy and paste these commands one by one and press Enter after every command: DISM /Online /Cleanup-Image /CheckHealth DISM /Online /Cleanup-Image /ScanHealth DISM /Online /Cleanup-Image /RestoreHealthCMD
  4. Restart your computer.

6. Restart Background Intelligent Transfer Service

  1. Press Windows + R to get the  Run console.
  2. Type services.msc and press Enter.Servicesmsc
  3. Navigate to Background Intelligent Transfer Service and double-click on it. BITS
  4. Go to Service status, and click Stop.
  5. For the Startup type, select Disabled from the drop-down menu.BITS services w
  6. Click Apply.
  7. To restart the service, go to Service status again and click on Start.
  8. Now for the Startup type, set it to Automatic (Delayed Start). BITS services WS
  9. Click Apply and OK
  10. Restart your PC to let the changes take effect.

So, these are steps to eliminate the Windows Image Acquisition High CPU usage problem. Try them and let us know which method worked for you in the comment section below.

Windows 11 VPN Indicator: How to Turn it On & Off

It’s always exciting to see what new features or improvements the Redmond-based tech giant comes with for its latest operating system.

And, if you are a Dev Channel Insider on the front lines of testing, you have a lot to work with after the latest cumulative update.

Today, we’re about to look at the interesting new VPN indicator that popped up in the Windows 11 notifications area.

And, speaking of Windows 11, know that it is also supported by the new VMware Workstation 17.0 Pro, just in case you didn’t know.

New VPN indicator shipped with Windows 11 Build 25247?

Know that we have already reported several features hidden in the latest Windows 11 build 25247, so you might want to check that out.

That being said, the latest update keeps users on their toes, after they have discovered that the software also contains a new VPN indicator in the notification area.

This will make checking if your computer is connected to a VPN something as natural as looking at the clock at the bottom right of your screen.

However, it is also worth pointing out that the new feature’s current state looks quite a bit half-baked for the time being.

You can only observe the new VPN indicator when you use a wired Internet connection, so there will be no changes for those using Wi-Fi.

Keep in mind that the operating system cannot recognize third-party VPN applications, so the network indicator will remain unchanged if you access a VPN using its dedicated app.

Thus, you will need to manually set up a VPN connection in the Settings app to see this new VPN indicator in action.

Also, some VPN services provide guides about connecting using Windows’ built-in networking tools, so you should check your provider’s website for more instructions.

Another important factor to take into consideration is that the updated network icon in Windows 11 build 25247 is a work in progress.

That means that you can expect Microsoft to polish it a bit more before unveiling it to Windows Insiders, and maybe add support for Wi-Fi).

How do I activate the VPN indicator for Windows 11?

  1. Download ViveTool from GitHub and unpack the files.
  2. Search for Command Prompt and open the app as an administrator.
  3. Navigate to the download’s location by using the following command: CD C:\Vive
  4. Type the following command, then press Enter: vivetool /enable /id:38113452
  5. Replace /enable with /disable if you want to revert the feature to its original state.
  6. Restart your computer.

Have you tested this new feature? Share your experience with us in the dedicated comments section located just below.

How to Fix Laptop Screen Flickering in Windows

The laptop screen flickering issue is one of the many display-related problems on Windows PC. This issue can be due to hardware issues or problems with an app. It could happen on any type of laptop, including Surface Pros.

This guide will show you how to fix this problem effectively, just like we did with the screen flashing on Windows 10 issue.

How can I fix the laptop screen flickering?

Before you get down to applying the fixes in this section, press the Ctrl + Shift + Esc keys to launch the Task Manager. If your screen flickers on the Task Manager window, the problem is likely due to your display driver.

If it does not, it is probably due to an incompatible app. You can apply the suitable fixes below:

1. Reinstall the display driver in Safe Mode

1.1. Enable Safe Mode

  1. Press the Windows key + I and click Update & Security.
    update and security laptop screen flickering
  2. Select Recovery from the left pane and click the Restart now button under Advanced startup.
    restart now
  3. When your PC restarts, select Troubleshoot > Advanced options.
    advanced options
  4. Select the Startup Settings option.
    startup settings laptop screen flickering
  5. Now, click the Restart button.
    restart
  6. Press 5 or F5 to Enable Safe Mode with Networking.
    safe networkin laptop screen flickering

Safe mode starts your computer with limited files and drivers, but Windows will still run. This is the first step in solving the laptop screen flickering issues.

Note that you should select the Safe Mode with Networking option because you will need an internet connection to download your driver.

1.2. Uninstall the display driver

  1. Right-click the Start icon and select Device Manager.
    device manager
  2. Double-click the Display adapters option to expand it and right-click the driver there.
  3. Select Uninstall device.
    uninstall device
  4. Now, choose Delete the driver software for this device and click the Uninstall button.
    uninstall button laptop screen flickering
  5. Finally, reboot your computer.

1.3. Install the latest driver with the Windows update

  1. Press the Windows key + I and select Update & Security.
    update and security laptop screen flickering
  2. Click the Check for updates button.
    check for l
  3. Now, install updates, including the optional ones.

The last step towards fixing the laptop screen flickering issue is to update the display driver using Windows update. Another option is to go to your driver manufacturer’s website to download and install the latest version.

If you need more ways to do this manually, check our detailed guide on updating drivers on Windows 10. Alternatively, you can simplify the process by using a driver update tool.

2. Uninstall incompatible apps

  1. Press the Windows key + I and select the Apps option.
    app laptop screen flickering
  2. Select the faulty app and click the Uninstall button.
    uninstall
  3. Now, follow the onscreen instructions to complete the process.

If your laptop screen is not flickering in Task Manager, you need to remove the apps that might be causing the problem. Some users have found Norton Antivirus, iCloud, and IDT Audio to cause this issue.

Another option is to update these apps or contact the manufacturers to report the problem.

3. Change screen resolution and refresh rate

  1. Press the Windows key + I and select the System option.
    system laptop screen flickering
  2. Click the Advanced display settings option under the Multiple displays section.
    advanced display
  3. Now, click Display adapter properties for Display 1.
    display adapter laptop screen flickering
  4. From here, click List All Modes.
    list all modes
  5. Finally, select a suitable resolution and refresh rate for your screen and click OK.
    refresh

There is a recommended resolution and refresh rate for your screen and display adapter. However, your laptop screen might flicker if you set it to a higher value than your device can handle. Thus, using the default value or a lower one is recommended.

4. Disable Windows Desktop Manager

  1. Press the Windows key + R, type services.msc, and click OK.
    services
  2. Double-click the Desktop Window Manager Session Manager service to open its properties.
  3. Set the Startup type to Disabled.
  4. Click the Stop button, followed by OK, to save the changes.

Why does screen flickering occur on a laptop?

The laptop screen flickering black or pink issue can be traced to different factors. Below are some of the causes of the problem:

  • Faulty driver: The First thing to look at if your HP laptop or other product screen is flickering in BIOS is to check your display driver. The solution here is to uninstall and reinstall your display drivers.
  • Incompatible app: Another cause of this problem is an outdated or incompatible third-party app. You must uninstall the app using a dedicated remover software or update it from the manufacturer’s website.
  • Issues with screen refresh rate: At times, you might have set your refresh rate or resolution to a value higher than what your display is compatible with. You must select the resolution and refresh rate or set it to a lower value to solve the problem of the laptop screen flickering lines.

You can also read our guide on part of laptop screen flickering to learn how to fix cases where only one section of the display is affected.

Some users have also pinpointed the laptop screen flickering issue to the Windows Desktop Manager. Disabling this service and restarting your PC should solve the problem.

With this, we have reached the end of this guide. It might not be a software issue if your laptop screen is still flickering, especially when moved.

In this case, you must take your laptop to a technician to check the hardware.

Similarly, if vertical and horizontal lines are messing with your screen, check our detailed guide to fix the issue quickly.

If your display dims unexpectedly, shifts to the right, or briefly goes black, you’re not alone—check out our guides on the computer screen dimming issue, screen shifting to the right, Windows 11 screen dimming, and when your screen goes black for a second then comes back.

Let us know the solution that helped you fix the problem in the comments below.

File Finder Software: 12 Best We Tested [2026 List]

The latest Windows 10 versions brought better file finder functionality. However, there are still limitations to the built-in tool, and third-party tools have picked up this crack.

To help make sure you are always able to find your files quickly, we have gathered a list of the best file-finder software you can use on Windows 10 for you in this guide.

How do I search my computer for a file?

There are a few ways to find your files on your PC. Below are some of the options available to you:

  • Windows Search: This is the file finder software available on Windows 10. It is easy to use, as you only need to click the Search icon on the Taskbar or press the Windows key + S. From here, you can search for any file or folder you want. In addition, you can check our guide on how to use Cortana Search on Windows 10 to get the best out of the built-in feature.
  • Using specialized software: Third-party apps have made excellent strides to make up for the shortcomings of Windows Search. As a result, you can use superb software, with some even helping you remove duplicate files. We have curated the best of them in the next section of this article.

What is the best file finder software for Windows 10?

WinZip – Overall best file finder for Windows 10

winzip file finder

Although not a file finder tool, WinZip serves several purposes, mainly file compressing. In addition, it includes a convenient search function to browse through the whole archive.

The software is trusted by millions of businesses worldwide, boosting productivity and keeping all the information private.

WinZip offers services for today’s most popular platforms and devices, allowing users to exchange files through cloud storage, email, and social media.

And don’t forget that WinZip is more than a file-finder software. Use it for file compression, duplicate file detection, and file protection tool.

All these make for a great file management tool that should be a staple in every system’s computer, regardless of whether it’s used for recreational purposes or work.

Once you install the tool (we recommend using the button below), you have several options to look for a file.

  1. Search in All files in Zip
    • In the View tab, go to the Show drop-down and select All files in Zip
    • Enter the file name and hit OK.
  2. Search in folder
    • Open a folder and go to the Search option
    • Enter the file name and hit OK.
  3. Search for a set of files
    • type part of the filename plus a wildcard and click OK.

Now, let’s have a look at the software’s main features:

  • A plethora of compatible file types
  • Compression/Decompression
  • Encryption
  • Backup & Sharing
  • PDF
WinZip

WinZip

Find, compress, share, protect, and backup all your important files with this popular tool for Windows.
Check priceVisit website

Copernic Desktop Search – Keyword map feature

copernic

Copernic Desktop Search is a reliable file finder app that searches your computer files and emails. Outlook files and emails, office files, different systems, and engine files.

One of the most notable features is that it creates a keyword map that helps you to search through unstructured data, making it probably one of the best file finder software you can get today.

This is not all Copernic Desktop Search can do on your PC, but we will let you unlock all other features that make this software great for over 4 million users worldwide.

Copernic offers the industry’s most user-friendly, straightforward, and accurate search. You can find your files, no matter how hidden they are.

Even better, the program comes with a free trial, so you can try it out for free and see if you enjoy the experience.

From all its features, here are the most important for your daily search processes:

  • Image text recognition based on OCR technology (new feature!)
  • Over 150 file types to index (the free version has around 120, the paid version – all of them)
  • Simultaneous multiple drive search
  • Showing results right as you start typing
  • Refine fields allow you to create deep searches in your system
  • Right-click to see the context menu (it works as a normal right-click in Windows)
  • Search operators: and, or, not, near
  • Low computer resource usage
Copernic Desktop Search

Copernic Desktop Search

The fastest way to find any type of document in the myriad of files on your device.
Free trialVisit website

Aten File Finder – Fast software

aten

Aten File Finder is a program that provides a highly efficient interface that will quickly locate your files. It is beneficial, especially when you don’t know the exact file name you want to find.

It also comes in handy if you own a vast collection of unorganized files, including movies, music, images, or source code.

The drawback of the program is its lack of more advanced features, such as searching for files with specific extensions or sizes. However, you can try out this software if you are looking for a search utility that is always on top.

Regarding pricing, the program has fixed monthly fees, so you must pay the monthly subscription and benefit from all of its tools.

All in all, this is an excellent alternative to the default Windows file search system. In addition, Aten File Finder actually has an improved search engine.

The program offers more functions to convince you to switch from the standard Windows search feature. Here are its primary features:

  • No installation required
  • CTRL+C/V/X shortcuts
  • Compact mode for advanced users
  • It runs on all Windows versions
  • Command line options for customization

⇒ Get Aten File Finder

Everything – Free file finder for Windows

everything file finder

Everything is a free file search tool for Windows that you can download easily. In addition, it features a clean program interface that supports loads of unique features.

You can use the program to search files from the Windows right-click context menu and find files across several NTSV drives simultaneously, both internal and external.

After you begin searching, the results will show up instantly, and there is no need to wait or press Enter.

The newly modified and added files will be added to the program in real-time, so you will not have to manually re-index the database; it takes just one second to index around a million files.

Everything features a toggle in the program’s setting that you can use to exclude any system, custom, or hidden files and folders from your search results to narrow down your searches.

The program also includes an HTTP and FTP server to access the files of networked computers that have the program installed.

The program is free for commercial use and includes a portable download option. In addition, everything lets you save searches as bookmarks for easier recall.

⇒ Get Everything

FileFinder by Ikiru People – Cloud search tool

filefinder

FileFinder Anywhere is the leading Cloud Executive Search tool used by various search companies, according to the developers.

The web-based CRM is used by over 1,600 companies from over 70 countries and helps every one of them execute their projects much better.

You’ll be able to work on your search assignments and update your database without leaving your Outlook inbox on your device.

The software can leverage the power of the web and social media to quickly source information on people and companies far beyond internally sourced information.

The program manages your search and business development efforts and monitors performance via an array of KPIs.

The program generates excellent client reports, including the ability to export data straight to Word, Excel, and more.

The software will allow your team to work on virtually any device. And it comes in two versions of FileFinder Anywhere:

  • FileFinder Anywhere Essentials: this is a simple browser-based Web app boasting integration with Microsoft Outlook.
  • FileFinder Anywhere Premium: it’s designed to meet the needs of more demanding companies with all the benefits of Essentials plus an added Desktop app featuring more functionality such as KPI management and report writing.

⇒ Get FileFinder by Ikiru People

Wise JetSearch – User-friendly interface

wisejet

Wise JetSearch is another free file finder software and search utility that you can use to search for files on any attached Windows drive without using many resources.

The program includes a straightforward and user-friendly interface that lets all users run it, regardless of their previous experience with computers.

All you have to do is to select the partition you want to search and input the keywords of interest and after that, just hit the Search button.

The results come in the form of a list featuring details such as item name, path, size, and the date when it was last modified.

The search results come up very fast, and a little panel will display how many items were found, and the exact time it took for the operation.

The software provides online Help content and supports more languages such as Chinese, Greek, Hungarian, and Thai.

In addition, the only drawback of the program is that it can only locate exact matches and not partial ones.

Another disadvantage might be that it does not include filters to help you narrow your search.

⇒ Get Wise JetSearch

Ashisoft’s Duplicate File Finder – Duplicate file remover

duplicate

Duplicate File Finder is a free app to help you find and remove duplicate files. It also supports an unlimited number of files, folders, and drives.

Duplicate files can get into your system in various ways. For example, it will find duplicate photos, songs, documents, MP3 files, spreadsheets, and more.

The program’s interface is easy to use, and your files and folders are fully protected. It can also export a list of duplicate files to CSV, HTML, and TXT.

By removing duplicate files, you can free up some space on your hard drive and avoid confusion when looking for a particular file.

After it finds the duplicates, the program will delete them for you with your approval. Most users found the software a fast, accurate, and excellent solution for wasted disk space.

On the other hand, some users draw attention to the fact that it’s best to buy the Pro version instead of the free one due to more features that come with it.

⇒ Get Duplicate File Finder

Ava Find – Simple file finder

ava find file finder

Ava Find is a more straightforward file search tool that is limited in most of its capabilities. Still, it will offer instant search and quick indexes.

The Shift-Esc keyboard shortcut can quickly open Ava Find when it is minimized to the notification center, making it easy to start a brand-new search.

You will have the option to copy the path to a file, delete files, and view the properties of a file, but these can only be accessed in the professional version and not in the free one, which may be minus this tool.

Sorting through search results in Ava Find is not as intuitive as most of the other apps we have discussed on this list, which happens because you have to use the menu items to do so.

There aren’t dedicated buttons like the ones featured in similar apps for searching files, but it’s just a minor oversight.

The UI is not that pretty and basic, but it does its job, and you will understand every piece of information.

⇒ Get Ava Find

Agent Ransack – Variety of filters

agent ransack

Agent Ransack may not have such a friendly user interface as the other programs mentioned, but its features and search parameters are very detailed.

Before you start a specific search, you can define different filters, and the program will only show the customized results.

These filters include specified file size, modified date, created date, and last accessed date.

DOS and Boolean expressions are also accepted, so you can search for various keywords, use wildcards, exclude file types, and exclude specific words from a search.

Furthermore, the program supports context menu integration and can export search results. The software can save search criteria for more repeated searches.

The software works on all the different Windows versions, including Windows 7, 8, and the latest one, Windows 10, so compatibility isn’t a problem.

⇒ Get Agent Ransack

Autosofted Fast File Finder – Easy to use

autosofted

Fast File Finder is a free tool to search your whole system for a specified file quickly. Unfortunately, the process can be pretty slow when using your computer’s folder explorer.

This will make your computer freeze sometimes in the middle of the search process due to the limits of your machine’s searching power.

The Fast File Finder can search through all files in typically 30 seconds, and in most cases, it can scan all results in only 20 seconds.

The program is very straightforward, and you must enter your search term and click on search.

The tool is entirely free, and once you download it, it’s all yours to use for as long as you want to.

Moreover, compared to this tool, other file-finding software usually features more buttons/fields everywhere, making it more cluttered and confusing to figure out precisely what to do.

⇒ Get Fast File Finder

Quick Search – File indexer

quick file finder

Quick Search is a free search utility provided by the Glarysoft software company. The files are indexed quickly with Quick Search.

After opening the program, a minimized version of the full program will be displayed at the bottom of the screen.

When you look for files from the search area, the results will be shown in a tiny pop-up screen for quick access.

The search bar will be displayed or hidden if you press the Ctrl key.

You can also open the entire program, and you will be able to select an easy filter option to only show folders, shortcuts, documents, videos, pictures, or music from the result page.

The program indexes files and folders from all attached drives. This means you can search all the drives to find precisely what you are looking for.

Most users have found this search tool compelling, allowing you to locate the files almost instantly right from your desktop.

⇒ Get Quick Search

TextCrawler – Tool for searching files by content

TextCrawler

TextCrawler is slightly different from most standard file search tools as it focuses on text. You can use TextCrawler in commercial and non-commercial settings.

Instead of looking for a file by a particular name or date, the search is performed to find text inside a file.

The program is practically a file search program. However, it is essential to know that the search is based on the file’s content, not its name.

You can extract and replace text within the files. Also, you can run batch commands against files.

Additionally, you can easily see a preview of the text found in a file before you open that particular file.

Overall, TextCrawler is a fantastic tool for everyone who works with any text file and has to do minutious searches for more extended periods.

⇒ Get TextCrawler

Finally, this is the point where our list ends. If you feel that Windows navigation and searching aren’t good enough for you, then you should try out one or more of the file finder software listed above.

If you need a list of the best tools to find and remove duplicate files on Windows 10, check our guide for the top options that are currently available.

Feel free to let us know the file finder tool you enjoy using and why in the comments below.

5 Best Gaming Monitor Deals To Get Now

Gaming monitors, like all the other professional gaming equipment, are traditionally pretty expensive because they have several embedded technologies like G-Sync for instance, or other personalized gaming features that make them better.

Gaming monitors have a fast response time from 4 ms to 1 ms, high refresh rates, and come with the latest, fastest connectors.

However, we located all the best deals for gaming monitors to help you in your search for more affordable devices.

Note: All the prices and offers in this article are subject to change, so be sure to check the official product page to get the latest deal. If the product or offer you’re looking for is no longer available, you can try to find it on its official manufacturer page or get another one from our list.

Which is the No 1 gaming monitor in the world?

SAMSUNG 49-inch Odyssey G9

  • 49-inch display, 5,120 x 1,440 resolution
  • 1000R curvature
  • QLED
  • 240Hz refresh rate
  • HDR 1000
  • Minor driver issues

This is a 49-monitor with 1000R curvature, allowing users to have full immersion. The device offers QHD resolution and a 240Hz refresh rate, so you won’t ever miss a single frame.

To achieve amazing picture quality, this monitor is using Samsung QLED with Quantum Dot technology for more vivid colors.

HDR 1000 is available, delivering higher details during the gameplay sessions. The response time is 1ms, and with support for G-Sync and FreeSync Premium Pro, you won’t ever experience screen tearing.

SAMSUNG 49-inch Odyssey G9 also comes with Infinity Core Lightning that is fully customizable, giving your setup a unique look. Overall, this is a high-end monitor, perfect for all types of gamers and advanced users alike.

ASUS ROG Swift 27 PG279QM

  • 27-inch IPS monitor
  • 2560×1400 resolution
  • 240Hz refresh rate
  • G-SYNC support
  • HDR 400
  • Minor issues with anti-glare coating
  • The contrast could be better

This 27-inch IPS monitor comes with a 2560 x 1440 resolution and a 240Hz refresh rate, so it is perfect for gamers and users that enjoy high-paced multimedia.

G-SYNC is fully supported meaning no screen tearing even when playing high-intensity games. If you want to measure your latency, there’s an NVIDIA Reflex Latency Analyzer feature that you can use.

The monitor has a 1ms response rate, and a DisplayHDR 400 certification, thus delivering amazing color contrast.

It’s important to mention that there is Flicker-free and Blue-Light protection available that will help you reduce eye strain.

ASUS ROG Swift 27 PG279QM is a great monitor, and with its high refresh rate, it’s a great choice for all gamers.

LG 27GN750-B

  • 27-inch IPS display
  • 1920×1080
  • 240Hz refresh rate
  • NVIDIA G-SYNC
  • HDR 10, sRGB 99%
  • Minor issues with HDR
  • Headphone audio quality could be better

This 27-inch IPS display comes with full HD resolution, 240Hz refresh rate, and a 1ms response time, so it’s perfect for action-packed gaming.

Speaking of which, NVIDIA G-SYNC is present, so you’ll never experience any screen tearing while gaming.

Color accuracy is great on this model thanks to the IPS display with sRGB 99% and for more immersion, better colors, and contrast, there’s HDR10 support.

The monitor has an ultra-thin bezel on three sides, and you can easily adjust its tilt, height, and pivot as you want.

LG 27GN750-B is a great monitor, and it will be perfect for every gamer or user that just wants to experience multimedia.

Alienware AW2720HF

  • 27-inch IPS display
  • 1920×1080
  • 240Hz refresh rate
  • 1ms response time, AMD FreeSync
  • Extensive connectivity options
  • Ghosting with certain settings
  • Minor issues with G-SYNC

This is a 27-inch IPS monitor, and it comes with a 1920×1080 resolution, and 240Hz refresh rate, making it a perfect choice for high-intensity gaming.

The response time is 1ms and thanks to the AMD FreeSync technology, you won’t notice any distortions or screen tearing while gaming.

Regarding connectivity, there’s a USB upstream, two USB 3.1 Gen, USB 3.1 Gen 1 with power charging, a regular USB 3.1 Gen 1, two HDMI ports, a Display port, headphones, and an audio jack.

Overall Alienware AW2720HF is a solid monitor, it offers great features, so it’s a great choice for any type of multimedia.

SAMSUNG Odyssey G7

  • 27-inch device
  • WQHD resolution
  • 1000R rating
  • 240Hz
  • Nvidia G-SYNC and FreeSync support
  • Stand doesn’t feel stable
  • Minor issues with sleep mode

SAMSUNG Odyssey G7 is a 27-inch device and it comes with WQHD resolution allowing you to experience high-detailed images.

The display is curved with a 1000R rating, so you’ll be completely immersed in your multimedia. The refresh rate is 240Hz, which is more than enough for all types of high-intensity gameplay sessions.

Of course, NVIDIA G-SYNC and FreeSync are available, so no screen tearing or missing frames during gaming.

Infinity Core Lighting is also present, and it’s customizable giving your setup a unique look and feel. SAMSUNG Odyssey G7 offers amazing performance, and it’s a great choice for any gamer.

How did we choose the best deals on gaming monitors?

Our team of expert testers, with a combined experience of 15 years, has tackled a variety of testing tasks for any device you could imagine.

Their experience comes into play as a very important element when choosing the products we described in this guide, and a large variety of factors have been taken into consideration.

The options that have been chosen offer great quality and cover the entire spectrum of price ranges, thus enabling everybody to find something that fits their needs both financially and otherwise.

Those are some of the more noteworthy game monitor deals that you can get today. Remember, however, that prices are subject to change and that the above monitors might not be discounted beyond November.

What is your monitor of choice? Let us know in the comments section below.

5 Best Printers for Medium Office [Cyber Monday]

There are already plenty of great deals available at online retailers. In this guide, we’re going to focus our attention on printers.

So, if you’re looking to buy a new printer, here are some of the best deals you can take advantage of right now.

Note icon NOTE
Deals are subject to change. Sometimes, some of the deals listed in our guides may no longer be available when you hit the buy button. So, hurry up and grab them while they’re hot.

What is the best printer for a medium-sized business?

Canon MX492

  • Fully integrated Auto Document Feeder
  • Free Canon PRINT app
  • Google Cloud Print and AirPrint
  • Optional XL ink cartridge
  • Noisy when printing

Fortunately, today’s printers are no longer really heavy and bulky pieces of equipment. Thanks to technology advancements, printer size has significantly been reduced.

Canon MX492 is a small yet powerful printer that’s a great choice if you need to save space — be it at home or at the office.

Brother Compact

  • Print speeds of up to 32 pages per minute
  • 250-sheet paper capacity
  • Flexible printing
  • USB interface
  • No Ethernet plug

This Brother printer is perfect if you’ve got a small office desk. At the same time, it’s highly efficient as it can print around 30 pages per minute.

It comes with a 250-sheet paper capacity so that you spend as little time as possible refilling trays.

Epson XP-7100

  • 30-page auto document feeder
  • Auto 2 sided Print/copy/scan
  • Multiple media feeds
  • 4.3 inches touchscreen
  • Noisy when printing

This Epson printer is very versatile and you can use it for a plethora of tasks.

Thanks to the ultimate wireless Plus Ethernet technology you can print photos and documents directly from your tablet or smartphone. Also includes Wi-Fi Direct for network-free printing.

Thanks to the Dash Replenishment feature, your printer will let you know when ink is running low.

Canon PIXMA

  • 5 Color Individual Ink System
  • IFTTT (IF This Then That) support
  • Connectivity Technology: USB, Bluetooth
  • Built in scanner
  • Some USB port issues

The Canon Pixma TS6220 wireless inkjet all-in-one home printer is perfect for your everyday printing needs. You can quickly print all your documents, party invitations, and photos without inconvenience.

Just set up your printer right from your smartphone or tablet. It relies on USB and Bluetooth technology for connectivity.

HP DeskJet 3755

  • Copy, scan, wireless printing, AirPrint, Instant Ink ready
  • HP Smart app
  • Ink delivered to your home
  • Seven segment plus LCD display
  • HP Scroll Scan
  • Printing delay

If you’re looking for a reliable printer with good looks, then the HP DeskJet 3755 is the right choice for you but for an all-in-one option, the HP Deskjet 4155e is a good option.

You can print, scan, copy, print wirelessly, and more. It supports the following page formats: Letter, legal, 4×6 in, 5×7 in, 8×10 in, and No. 10 envelopes.

So, which one are you going to purchase? Do let us know in the comments section below.
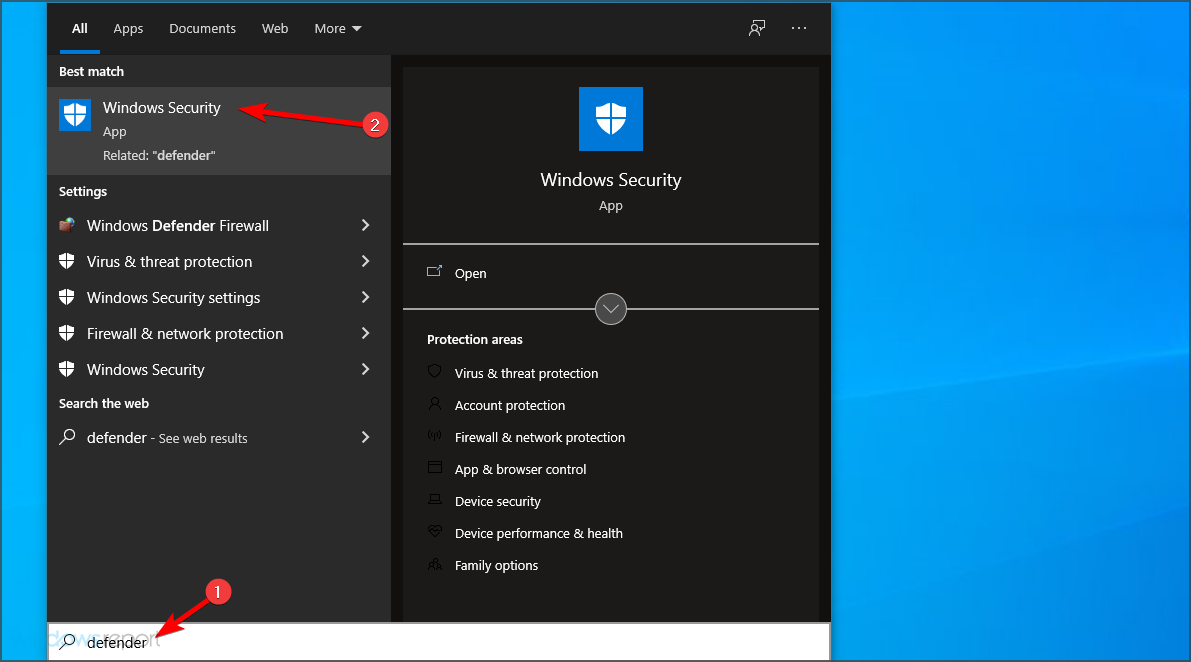
Microsoft set to “hard block” OneDrive and SharePoint on Internet Explorer 11 in January 2023

Microsoft has announced that it will blocking access to SharePoint Online and OneDrive from Internet Explorer 11 and Edge IE. The company further urges users to upgrade to a “modern broswer”such as Microsoft Edge which has been receiving tons of updates as well as enhancements this year.

This change is expected to begin rolling out in mid-January 2023, meaning users will not be able to access either OneDrive and SharePoint via IE11. At the moment, if you want to access either OneDrive or SharePoint using IE 11, you’ll be redirected to a screen with the following message: It’s time to upgrade your browser. The hard block once in full swing will cause connection requests to fail.

Last year in August, Microsoft announced that Microsoft 365 services no longer support Internet Explorer 11 as part of the company’s plans to phase out the browser. Then, in June this year, Microsoft ended its support for Internet Explorer though there were some indications that it was still lurking in some Windows 11 PCs. As a result, the company updated its IE mode in Edge to mitigate some of the setbacks that came with this move.

Share your thoughts with us in the comment section below.

Via: Petri.com

How to Enter BIOS on Windows 11

Want to access BIOS on Windows 11? Whether you’re troubleshooting hardware, enabling virtualization, or changing the boot order, entering BIOS (or UEFI) is the first step.

Note icon NOTE
For a more visual guide, we’ve inserted a video at the end of this article

✅ Step 1 – Use the Settings Menu

  1. Press Win + I to open Settings.
  2. Go to System > Recovery.
  3. Under Advanced startup, click Restart now.
  4. After reboot, choose Troubleshoot > Advanced options > UEFI Firmware Settings.
  5. Click Restart to enter BIOS.

✅ Step 2 – Use a Special Key at Boot

  1. Shut down your PC.
  2. Turn it on and immediately press the BIOS key repeatedly.
    • Common keys: F2, F10, F12, Esc, Del
    • Depends on brand:
      • HP – Esc or F10
      • Dell – F2
      • ASUS – Del or F2
      • Acer – F2 or Del

You can learn the exact key for your device by checking this detailed guide on how to get the BIOS key, which helps you identify the correct shortcut for your PC.

✅ Step 3 – Command Prompt Method (Advanced)

  1. Press Win + S, search for Command Prompt, and run as administrator.
  2. Type: shellCopyEditshutdown /r /fw
  3. Hit Enter, and your PC will reboot into BIOS.

🧠 Quick Tip

If you’re using a modern PC, you’re likely accessing UEFI, not the old BIOS. The steps are nearly identical.

Short Video Explainer

8 Best Wireless Charging Pads To Buy

Wireless charging is not as exclusive as it was before. Almost all smartphone flagship OEMs are going for it these days, with the slick glass-back design and fast wireless charging support. It’s quite a convenient way to charge your device, avoiding cables in the process.

But it’s hard to find first-party wireless charging pads, so third-party manufacturers are where you should look. And what’s a better time to look for tech products than now?

We made sure to list the top deals and ease up on that wireless pad hunt. If you’re not sure where to start, the list below should be a good place.

Note: All the prices and offers in this article are subject to change, so be sure to check the official product page to get the latest deal. If the product or offer you’re looking for is no longer available, you can try to find it on its official manufacturer page or get another one from our list.

What are the best wireless chargers deals & sales?

Belkin Boost Up Wireless Charging Stand 10W

  • Covers most Qi-compatible devices
  • Fastest charging speed for iPhone at 7. 5W and Samsung at 9W
  • Charges in both portrait and landscape mode
  • Sleek, compact design
  • Does not support fast charging for Google Pixel 3

If you were looking for wireless fast charger Flack Friday deals, then our number one product fits the bill perfectly.

For a fairly affordable price, you get a Belkin product known as a pioneer in technology and innovation for over 35 years.

The Boost Up Bold Wireless Charging Pad 10W offers optimal wireless charging for all the latest iPhone models and some of the most popular Qi-enabled devices from Samsung, Sony, LG, and more.

As for those premium shielding and precision resistors, they minimize interference and protect your smartphone’s functionality while charging.

Anker Wireless Charger, PowerWave Stand

  • Most Qi-compatible devices are a go, including iPhone and Samsung flagships
  • Twin charging coils let you watch videos in landscape orientation, or stand in portrait mode
  • Delivers charging power directly through cases up to 5 mm thick
  • Compatibility: 10W Fast Charge Mode and 5W Standard Charge Mode
  • Sleek and easy to use
  • Does not support vertical charging for iPhone 12 Mini/13 Mini

Top-notch charging speeds and a great design – are both elements that make this wireless charging pad a steal.

Let us tell you from the start that a high-efficiency chipset provides 10W high-speed charging for Samsung Galaxy devices.

Even more, iPhones get a boosted 5W charge at 10% faster than other wireless chargers. So, you just need to place your phone on the center of the PowerWave Stand to ensure stable charging.

When it comes to the actual charging, it can take place in landscape orientation while web browsing, or in portrait mode for messaging.

TOZO W1 Wireless Charger Ultra Thin Aviation

  • Ultra-slim chassis and minimalistic design check all the aesthetic boxes
  • Supports all Qi-Certified and compatible devices
  • Can charge your phone even with the casing on
  • A few color variants besides the standard black
  • Anti-slip rubber at the top makes sure the phone stands firmly
  • Could charge a bit faster

Small and efficient, this is the most affordable wireless charging pad TOZO, a true leader in this field. It brings a slick design and reliability which is, considering the pricing, quite a bargain.

The pad is safe and reliable, has protection against overheating and overcharging, and the LED indicator will change lights once the charge is complete.

Yootech Wireless Charger, Qi-Certified 10W

  • High charging speed
  • Two coils offer a wider charging area than the general round wireless charging pads
  • Exclusive Multifunctional Intelligent Protect Technology
  • Thin and reliable
  • Doesn’t come with a USB type-C connector

This slim wireless charger is one of a kind and it comes with many great features that will make you happy to have purchased it.

The charger is very easy to use and has a slip-friendly design. All you need to do is place the mobile on top and then it will start to charge it.

Its green LED Indicator will flash for 3s if the power source is connected, then turn on for 16s if recognizes your smartphone.

Besides all these, the Exclusive Multifunctional Intelligent Protect Technology provides temperature control, surge protection, as well as short-circuit prevention. 

Yootech Wireless Charger Qi-Certified 7.5W

  • Comes with 3 charging modes (5W, 7.5W, and 10W), and in that way, it covers all Qi-Certified devices
  • Samsung owners can utilize the 10W Fast Charging and cut the charging time to half
  • The quality could be improved

Quite a tasteful design and smart protective features are the selling points of Yootech’s wireless charger. It won’t overheat and it has surge short-circuit prevention.

The smart LED is sleep-friendly so it won’t blink while charging overnight and it can charge with the case on, if it’s 4mm or thinner.

Vebach Fast Wireless Charger, 15W

  • Compatible with Samsung Note 20, Note 10+, and prior models, along with the latest iOS system
  • Smart chip provides temperature control and surge protection
  • On-slip rubber ring prevents the device from slipping off easily
  • Ultra-slim & user-friendly design
  • It gets hot while charging

If a model that supports charging through phone cases up to 5mm thick and comes with a LED indicator that allows you to easily check the charging status of your device is what you have in mind, look no further.

This affordable Vebach fast wireless charger can quickly identify external attachments such as metal, magnet, and credit cards which will cause charging to stop.

Moreover, the new USB-C input (MAX 12V) is used in wireless chargers and will be 30 minutes faster than a normal micro-USB.

Add an ultra-slim, stylish design and reliability to the package and we get a charger worthy of your consideration.

Belkin Boost Up Wireless Charging Pad 7.5W

  • Provides fastest charging speed for Apple iPhone at 7.5W, Samsung at 9W and all other Qi-enabled devices up to 10W
  • Can charge through lightweight plastic cases, but it’s still suggested to remove them while charging
  • Beautiful design and it comes in 3 colors: black, white, and pink
  • 3-year warranty with registration.
  • Can make a bit of sound when charging

Belkin’s Boost Up is a wireless charging pad that made them the best-selling OEM in the field. If you’re considering buying a wireless charging pad, this just might be the right choice for you.

It comes with great features and provides standard 5W charging for your device. Just give it a try!

Mophie – Wireless Charge Pad

  • Specially optimized for supported Apple products due to Mophie’s collaboration with the tech giant
  • Up to a 7.5W fast charge, capable to reach the fastest charging speeds in the market
  • The durable, 360-degree non-slip TPU coating provides anti-scratch and anti-slip protection
  • Slow charging time

Top-rated on various retailer websites, the Mophie 4116_WRLS-CHGPAD-AC-BLK-NA – Wireless Charge pad might be the best third-party charger yet. At least, if we consider the pricing and all the goodies it brings to the table.

The pad is simple to use. Just place the device and the LED indicator will inform you when it’s fully charged. It has a compact size (3.8 x 3.8 x 0.5 inches) and a minimalistic design.

How we chose the best wireless charging pad

Our team of expert testers, with a combined experience of 15 years, has tackled a variety of testing tasks for any device you could imagine.

Their experience comes into play as a very important element when choosing the products we described in this guide, and a large variety of factors have been taken into consideration.

The options that have been chosen offer great quality and cover the entire spectrum of price ranges, thus enabling everybody to find something that fits their needs both financially and otherwise.

If you’re interested in the best wireless chargers for multiple devices, our choices might surprise you. Most of them protect your device from overheating and short-circuiting and are compatible with both iOS and Android devices.

Have you picked your favorite wireless charging pad already? If so, don’t hesitate to let us know in the comments section below.

Task Scheduler not Running: 5 Methods to Enable it Again

Is the Task Scheduler not running? Read on to learn all you must know about this problem.

The Task Scheduler is invaluable for scheduling software, scripts, and other tools to run at specified times.

So, this can come in handy for scheduling updates and other maintenance scans. However, the Task Scheduler isn’t helpful if the scheduled tasks aren’t running as they should.

Let us discuss some triggers and solutions.

Why is Task Scheduler not running?

When you are faced with this problem, a few things may have caused it. On top of the list are the following:

  • Disabled settings – In some rare cases, the Task Scheduler may have been disabled.
  • Corrupted registry entries – If registry entries connected with the Task Scheduler are corrupted, you may expect a few problems.
  • Permission issues – The current user account may not have the privilege right to run the Task Scheduler.

While these are the top issues, there may be more. And the problem could also come in variations. Speaking of which, these are some of the common Task Scheduler problems that users reported:

  • Task Scheduler not working Windows 10 – Many users reported issues with Task Scheduler on their Windows 10 PC; we already covered a similar topic in our Task Scheduler not running article, so be sure to check it out for detailed solutions.
  • Windows Task Scheduler does not start task at next run time – Task Scheduler is a complex tool, and sometimes your task might not start at the scheduled time; to fix the issue, check if the task trigger is configured correctly.
  • Scheduled task runs manually but not automatically – This is another common problem with Task Scheduler; if you encounter this problem, check if your conditions are correctly configured.
  • Windows scheduled tasks not running when logged off, after log off – Sometimes, specific tasks won’t run on your PC if you’re not logged on; however, you can fix that issue by enabling Run whether the user is logged on.

Here are some solutions to fix Task Scheduler tasks that aren’t running. Hopefully, one of them will work for you.

How can I fix Windows Task Scheduler if it’s not running?

1. Check if the scheduled task is enabled

  1. Press Windows + R, then type taskschd.msc and hit Enter.
    task scheduler not running
  2. Click on a task and select the Properties option.
  3. Select the Triggers tab, and verify that the task is enabled; if not, press the Edit button.
    Windows scheduled tasks not running after log off
  4. Finally, select the Enabled check box and press the OK button.
    Task Scheduler not running exe

First, you should check the triggers for the task. For example, it might be the case that the task isn’t enabled, in which case it won’t run. You can check the triggers by following the above steps.

If you are looking for ways to enable Task Scheduler History to check information related to tasks, including the date and time of execution, or status of the task, check out this guide.

2. Manually start the Task Scheduler

  1. Press Windows + R, then type services.msc and hit Enter.
    task scheduler not running
  2. Right-click on the Task Scheduler service and select Properties.
    task scheduler not running
  3. Set the Startup type to Automatic and make sure the process is started.
  4. Lastly, click Apply and Ok, then restart the PC.

This has helped in cases where the Task Scheduler is not running a Python script automatically or after a restart.

3. Fix registry files

  1. Press Windows + R, then type regedit and hit Enter.
  2. Navigate to the path below:
    HKEY_LOCAL_MACHINE\SYSTEM\CurrentControlSet\Services\Schedule
    task scheduler not running
  3. Right-click on any black space on the left pane, select New and click on DWORD (32-bit) Value.
  4. Name it Start, then make the Value data 2.
  5. Lastly, close your Registry and reboot your computer.

4. Change the Service Configuration

  1. Click on the Start menu, type control, right-click on the control panel option, and select Run as administrator.
    task scheduler not running
  2. Type the script below and click Enter.
    SC Config schedule start= auto
  3. Finally, close the command prompt and restart the computer.

5. Start the scheduler using the command prompt

  1. Click on the Start menu, type control, right-click on the control panel option, and select Run as administrator.
    task scheduler not running
  2. Type the script below and click Enter.
    net start task scheduler
  3. Finally, close the command prompt and restart the computer.

These tips could fix any Task Scheduler tasks that aren’t running. In most cases, a scheduled task not running will probably have more to do with its Task Scheduler settings.

If you are facing a similar issue, like Task Scheduler failed to launch an action, we advise you to check out this detailed guide for solutions.

Lastly, if you have any other questions or suggestions for us, please write us a comment below.

DISM Source Files Could not be Found: 3 Ways to Fix it

Some users have reported that their DISM process has failed with the error message The source files could not be found after they used the DISM /Online /Cleanup-Image /RestoreHealth command inside Command Prompt or PowerShell.

This means some routine servicing of the Windows OS will be impossible. We help you skip this situation by showing you the most trusted solutions in this guide.

What causes the DISM source files could not be found error?

For users who have encountered this error, there are a few known causes. These include:

  • Internet issues – If the DISM service can not establish an internet connection, you should expect the command to fail and trigger some error codes.
  • Corrupted system files – If, for instance, your install.wim file is bad or corrupted, you will have issues running the DISM command.
  • File duplicates – Once again, the install.wim file duplicated in the exact location may trigger this error. You will need to do some house cleaning to get rid of it.

Even though the main body of this error message is the same, the code for the error might differ: Here are a few possible options:

  • 0x800f081f – In this instance, the OS has been unable to locate the .NET source file needed for an installation to proceed.
  • 0x800f0906 – The DISM command cannot locate files needed to fix other harmful files.
  • 0x800f0907 – It implies some system files critical to an update are missing.

Now let us discuss some of the best methods to solve this issue once and for all.

How do I fix the DISM source not found issue?

1. Use Windows Repair Upgrade to fix the issue

1.1 Download the Windows Repair tool

  1. Visit the official page and click on Download to get the Windows Media Creation tool.
    dism source files could not be found
  2. Run the installer and accept the License Terms.
  3. Click the Upgrade this PC now option and then press Next.
    dism source files could not be found
  4. Wait for the process to be completed.

1.2 Start the Windows repair process

  1. Press the Windows + X keys and select Windows PowerShell(Admin) or Command Prompt(Admin).
    Windows PowerShell - dism failed the source files could not be found
  2. Copy-paste and run the following commands (in the same order), hitting Enter after each script:
    DISM /Online /Cleanup-Image /StartComponentCleanup
    Dism /Online /Cleanup-Image /RestoreHealth
    sfc /scannow
  3. Restart the PC.

If your administrator account is disabled in Windows 10, find out how you can enable it in this helpful guide.

2. Clean and perform analysis of the WinSXS folder

  1. Press the Windows + X keys and select Windows PowerShell(Admin) or Command Prompt(Admin).Windows PowerShell - dism failed the source files could not be found
  2. Copy-paste and run the following commands (in the same order), hitting Enter after each script:
    DISM /Online /Cleanup-Image /StartComponentCleanup
    sfc /scannow
    DISM /Online  /Cleanup-Image /AnalyzeComponentStore
    sfc /scannow
  3. Restart the computer, then rerun the DISM restore Health script:
    DISM /Online /Cleanup-Image /RestoreHealth

3. Use an alternative repair source in DISM

Tip icon Tip
To try this method out, you will need the install.wim or the install.esd file from a Windows installation media (USB, ISO, or DVD). The Windows installation media needs to have the same version, edition, and language as the operating system you’re currently using.

3.1 Find out the Index value of your Windows OS:

  1. Connect the USB device containing the Windows installation (or mount the ISO image) to your PC.
  2. Open Windows Explorer and navigate to the drive that you just mounted.
  3. Open the Sources folder and check if an install.wim or install.esd file is present at that location.
  4. Press the Windows + X keys and select Windows PowerShell(Admin) or Command Prompt(Admin).
  5. Copy-paste either of the following commands (depending on the file format found inside the Sources folder), and hit Enter:
    dism /Get-WimInfo /WimFile:X:sourcesinstall.wim
    dism /Get-WimInfo /WimFile:X:sourcesinstall.esd
    dism source files could not be found

Note: After completing the process, note the Index value from the results.

3.2 Start the repair process for Windows:

  1. If you have the install.wim file, copy-paste the script below and hit Enter.
    DISM /Online /Cleanup-Image /RestoreHealth /Source:WIM:X:sourcesinstall.wim:IndexNumber /LimitAccess
  2. If you have the install.esd file, copy-paste the script below, and hit Enter.
    DISM /Online /Cleanup-Image /RestoreHealth /Source:ESD:X:sourcesinstall.esd:IndexNumber /LimitAccess
    Note: Replace the X inside the above-mentioned commands with the letter corresponding to the drive, and also replace IndexNumber with the results of the process completed earlier.
  3. After the process, you see the message Operation is completed successfully. Now run the following script inside the Command Prompt window:
    sfc /scannow

If you can’t run the /sfc runnow command successfully inside Command Prompt, find out how to fix it by checking out this helpful guide.

In today’s guide, we compiled the best methods available that should solve your issue once and for all. Furthermore, we chose to present the methods in such a way that allows you to try out the minor invasive actions first and the most complicated/intrusive ones at the end.

These solutions will come in handy if DISM source files cannot be found in WIM, on your iso, or if you get a NetFx3 error.

Before you leave, find out how to convert Windows install.wim file to install.esd.

If you want to share your experience with us, don’t hesitate to contact our team. You can do so by using the comment section below.

Invalid Data Access Trap in Windows 11: 3 Ways to Fix it

While trying to upgrade to Microsoft’s new Windows 11, some users encountered the Invalid Data Access Trap error, at a certain percentage, during the installation process.

This often will cause the PC to roll back to Windows 10. For example, it has happened when installing Windows 11 through a bootable USB drive or updating the Windows version from the Settings app.

The following sections will guide you through causes and practical solutions.

What causes Invalid Data Access Trap on Windows 11?

A few things on the new OS may trigger the Invalid data access trap. So, on top of this list, we have:

  • System requirements problems – One of the most common reasons the Windows 11 installation fails is that your PC doesn’t meet the minimum hardware requirements and is incompatible.
  • Third-party antivirus solutions – Microsoft has blocked updates to Windows 11 for some users who have antivirus tools running on their systems from top cybersecurity firm Avast, and its subsidiary AVG.
  • Outdated drivers – Driver updates for Windows and many devices, such as network adapters, monitors, and printers, are automatically downloaded and installed through Windows Update. However, you sometimes need to check their state and update them, if necessary manually.
  • Corrupted files – This problem is sometimes triggered when a computer’s critical files are corrupted.

Here are some solutions you must apply. Note the fixes will come in handy if you have an invalid data access trap on a Windows 11 install, upgrade, or update process.

How can I fix the Invalid Data Access Trap error in Windows 11?

Before proceeding with these solutions, you should unplug any peripherals, as in some cases, this minor oversight might hinder the process.

1. Run a CHKDSK scan

  1. Click on the Start menu, type control, right-click on the control panel option, and select Run as administrator.
  2. Type or paste the following command and press Enter: chkdsk c: /f /r /x
    chkdsk command  invalid data access trap windows 11

Specific physical issues on the drive can also bring forth the Invalid Data Access Trap error. After the process is done, reboot the PC and proceed to install Windows 11.

2. Download the Windows 11 ISO

  1. Access Microsoft’s dedicated webpage, select Windows 11 from the menu, and click the Download button.
    download windows 11 iso apps option invalid data access trap windows 11
  2. You will be prompted to select the product language, then click the Confirm button.
    select language apps option invalid data access trap windows 11
  3. Click the 64-bit Download button.
    64 bit windows 11  invalid data access trap windows 11
  4. Wait for the ISO file to download, then press the Windows key + E to start File Explorer.
    windows explorer  invalid data access trap windows 11
  5. Before installing, disconnect from the Internet and temporarily disable any third-party antivirus you may have installed.
    turn wifi off  invalid data access trap windows 11
  6. At the start of the installation, you may be asked if you want to install other updates; choose No.
  7. Please navigate to the file’s location, right-click, and select Mount.
    mount option  invalid data access trap windows 11
  8. Click on the created virtual DVD Drive and the setup file to start the Windows 11 installation.
    setup dvd drive  invalid data access trap windows 11

Once the installation is done, you can reenable the antivirus and connect to the Internet without further issues.

3. Update device drivers

Note icon NOTE
When downloading a driver update from the manufacturer support website, it’s recommended to use their instructions instead of the general steps outlined below.
  1. Click the Start button, then tap on the Settings icon.
    open settings windows 10 invalid data access trap windows 11
  2. Once the Settings panel opens, click on Update & Security.
    update and security  invalid data access trap windows 11
  3. Click on Windows Update in the left panel.
    windows update  invalid data access trap windows 11
  4. Tap on the View optional updates option.
    optional updates  invalid data access trap windows 11
  5. Select the drivers to update, one by one, then click the Download and install option.
    download and install drivers  invalid data access trap windows 11

Once you complete the steps above, the driver update should resolve any errors preventing the installation of Windows 11. For automatic scans of outdated drivers, we strongly recommend a dedicated tool such as Outbyte Driver Updater.

Outbyte Driver Updater

Prevent your PC from experiencing various errors and keep your drivers updated with Outbyte Driver Updater.
Free Trial Download now

Hopefully, you are now enjoying Microsoft’s Windows 11, but if you find out that your PC doesn’t meet the install requirements or any other error persists, you can try the OS on a virtual machine and test it.

Alternatively, you can try out other solutions to common errors during Windows 11’s installation.

Please share in the comments below how your experience with Windows 11 is going so far and which solution worked best for you.

Support for the Microsoft Surface Go with LTE ending

The Surface Go is the smallest 2-in-1 device in Microsoft’s Surface lineup.  Support for the original Surface Go Advanced with LTE is ending today.  The device debuted in November 2018.  Microsoft promises a minimum of four years of device support for all Surface devices, though some devices have been given an exception such as the Surface Pro 3 which was supported for almost eight years.

If you own the first Surface Go, remember Windows updates and firmware updates are handled separately.  Your device will continue to receive Windows 10 updates and new features as long as Microsoft supports the operating system.  Windows 10 support is currently scheduled to end in 2025.  The original Surface Go with LTE is not compatible with Windows 11.

It’s worth noting that if you’re not ready to upgrade you can continue using your device without Microsoft support.

Via Neowin