How to Check if a Folder/Directory Exists With PowerShell

PowerShell is an incredibly powerful tool, but many are wondering how to check if a directory exists in PowerShell.

This is pretty simple to do, and this article will discuss verifying if a directory exists on your system and the steps for creating new folders.

What are directories in PowerShell?

In PowerShell, directories are folders that can store files and other directories. They are similar to directories in other operating systems, such as Windows folders or Unix-based systems directories.

  • Directories are essential for organizing and managing files and data on your computer.
  • You can navigate, create, delete, and manipulate directories in PowerShell.
  • Further, some of the various commands, like cd (Change-Location), mkdir (New-Item), rmdir (Remove-Item), and others, are used to tweak directories.
  • Your user folder is your home directory, and the desktop is a subdirectory within your user folder. In other words, the desktop is located within your user directory.

How do I test if a directory exists in PowerShell?

Use the Test-Path cmdlet

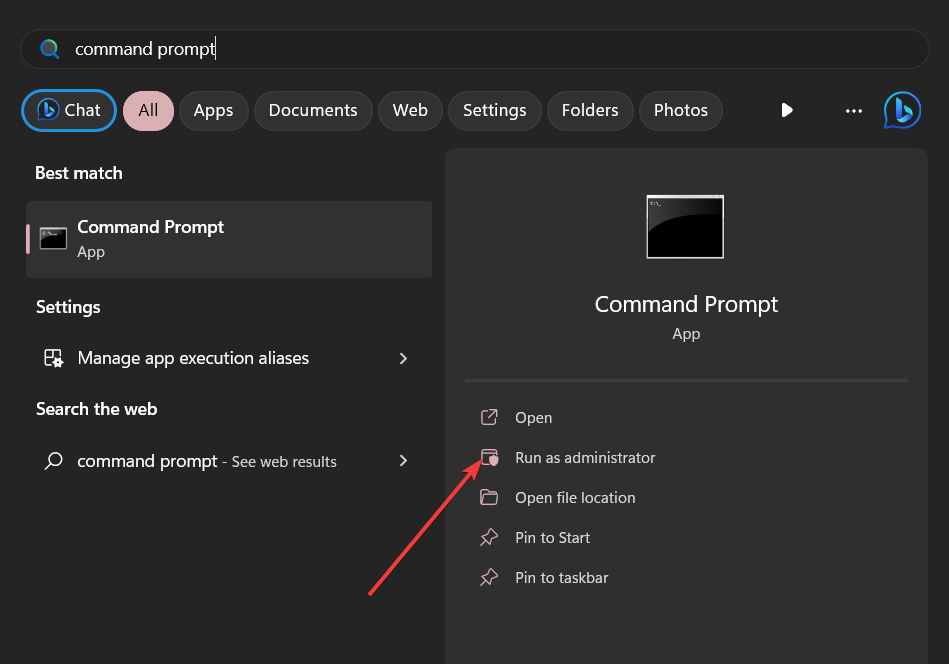
  1. Left-click the Start button, type PowerShell, and click Run as administrator.
  2. Click Yes on the User Account Control prompt.
  3. Copy and paste the following command lines and press Enter:

$directoryPath = "C:\path\to\your\directory"
if (Test-Path $directoryPath -PathType Container) {
Write-Host "The directory exists."
} else {
Write-Host "The directory does not exist."
}

Replace the dummy path in our script with the actual path of the directory you want to check. The Test-Path cmdlet with the parameter -PathType Container checks if the given path points to an existing directory (folder).

If the directory exists, it will print The directory exists. Otherwise, it will print The directory does not exist. As you can see, it’s pretty simple to check if a directory exists in PowerShell.

How can I create a directory with PowerShell?

Use the New-Item cmdlet with the -ItemType parameter set to Directory

  1. Left-click the Start button, type PowerShell, and click Run as administrator.
  2. Click Yes on the User Account Control prompt.
  3. Copy and paste the following command lines and press Enter:

$directoryPath = "C:\path\to\your\directory"
if (-Not (Test-Path $directoryPath -PathType Container)) {
New-Item -ItemType Directory -Path $directoryPath | Out-Null
Write-Host "The directory has been created."
} else {
Write-Host "The directory already exists."
}

Replace the dummy path with the path where you want the new directory to be created. In the above command, the Test-Path cmdlet with the parameter -PathType Container checks if the directory already exists.

In cases where the directory does not exist, the New-Item cmdlet with -ItemType Directory creates it. The Out-Null part is used to suppress the output effect to the console when the directory is created.

However, depending on the situation, the script will print The directory that has been created or The output already exists.

In conclusion, you may be interested in our guide on how to copy files to Remote Computers with PowerShell on Windows 11. Also, we have a detailed guide about PowerShell not showing the full output and some fixes to get it working on Windows 11.

Should you have further questions or suggestions, kindly drop them in the comments section.

Microsoft 365 Roadmap: a better search box is coming to Outlook

Microsoft has announced a new update on their Microsoft 365 roadmap for Outlook. The upcoming improvement aims to enhance the search experience by making it more prominent and easier to discover. This will be achieved through higher colour contrast on the input area, border, and font. Additionally, fine-tuning will be applied to all themes and light and dark modes.

The new feature, ID 151024, was added to the roadmap on July 20, 2023, and last modified on July 27, 2023. The rollout will begin in September 2023 for Outlook users across various platforms, including the web.

The update will be available for Outlook users worldwide, including the following cloud instances: Worldwide (Standard Multi-Tenant), GCC High, GCC, and DoD. Once implemented, we hope this enhancement will contribute to a more user-friendly and efficient search experience for Outlook users.

Microsoft launches Entra ID Protection: Advanced solution to safeguard digital identities

Microsoft has unveiled its latest identity protection solution, Microsoft Entra ID Protection, to tackle the increasing threats to digital identities. The company acknowledges the rising sophistication and frequency of attacks targeting identities, necessitating a different approach to safeguarding and rapidly responding to emerging threats.

The newly renamed Entra ID Protection, and fans did not like the new name at first, boasts several key enhancements designed to prevent attacks before they occur. Among these upgrades is a brand-new dashboard, serving as a central hub for identity administrators and IT practitioners to better understand their organization’s security posture and facilitate effective protection against identity compromises.

The dashboard provides valuable insights with clear visualizations and actionable recommendations. Key metrics with monthly trends are now available, allowing organizations to gauge the effectiveness of their deployed protections. Furthermore, a new attack graphic illustrates common identity-based attack patterns detected within the past 30 days, along with the number of blocked and remediated attacks.

Microsoft Entra ID Protection also introduces two high-fidelity detections: verified threat actor ID and attacker in the middle. The former leverages threat intelligence from Microsoft’s security teams to assign real-time sign-in risk to known nation-state actors and cyber-crime groups. The latter detects phishing attacks that compromise users and subsequently applies risk to affected sign-ins and users.

Entra ID Protection now provides real-time Azure AD threat intelligence detections to tackle emerging identity-based attacks. These detections rapidly issue new, real-time responses to identified attack patterns, enabling customers to leverage risk-based conditional access policies to protect identities during sign-in.

Another significant development is the integration of Entra ID Protection with Microsoft 365 Defender, now generally available. This integration allows Entra ID Protection alerts to be surfaced in Microsoft 365 Defender, facilitating efficient investigation and a comprehensive understanding of end-to-end attacks.

Microsoft Entra ID Protection aims to provide customers with best-in-class identity security. The company encourages users to follow best practices and recommendations, deploy risk-based conditional access policies, and utilize the new detections for automatic protection and remediation.

Cash App not Working? Here’s How to Fix it

Purchasing or paying online can be frustrating when the finance app isn’t working correctly, irrespective of the cause. This has been the case with several of our readers who have complained the Cash App is not working for their online purchases or cash sharing.

However, you can experience the problem in numerous instances, making it difficult to pinpoint the exact cause. Hence, this guide will discuss why Cash App is not working and some ways to troubleshoot it.

Why is my Cash App not working?

  • Poor internet connectivity or network congestion on your device can prevent the app from connecting to its servers.
  • If Cash App’s servers are down due to maintenance or technical problems, you may experience issues with the app not working or the error 503.
  • Running an outdated Cash App on your device might result in compatibility issues and malfunctions.
  • Like other software, Cash App can encounter glitches or software bugs that can disrupt its functionality.
  • If Cash App detects suspicious activity or potential security breaches, it may temporarily block the account, resulting in the app not working.
  • Cash App may have certain geographical restrictions, causing some features or services unavailable.

What can I do if my Cash App is not working?

Before proceeding with any advanced troubleshooting steps, we recommend you:

  • Close the Cash App and reopen it to resolve minor glitches or temporary issues affecting it.
  • If restarting the app didn’t work, try restarting your device to fix other app processes and glitches impeding Cash App’s functionality.
  • Connect to another internet network or power cycle your router/modem to fix network-related issues.
  • Check the Cash App server status or their social media accounts for updates to identify current problems with the platform and to know the status of their repair.
  • Use the Cash App web app to see if it works and ensure the problem is limited to only the mobile app.

If the above steps can’t fix the Cash App not working on your Android, iOS, or web app, go ahead with these solutions:

1. Update the Cash App on your device

  1. Open the app store on your mobile device (Google Play Store for Android or App Store for iOS).
  2. Search for the Cash App you want to update.
  3. If an update is available, tap on the Update button.
  4. The app store will begin downloading and installing the latest version of the app.

Updating the Cash App client on your computer will install updates and patches for fixing compatibility issues liable to cause it not to work.

2. Clear the app cache and reinstall the Cash App

2.1 Android

  1. Open the Settings app on your Android device.
  2. Navigate to Apps (the exact wording may vary depending on your device’s manufacturer).
  3. Find and select the Cash App.
  4. Look for the Storage or Storage & cache option, then click the Clear cache option to delete the app’s cache files.
  5. Click the Uninstall button and click OK to confirm the uninstallation process.
  6. Go to the Google Play Store and search for Cash App. Download and install the app.
  7. Try using it to see if the issue persists.

2.2 iPhone

Note icon NOTE
Clearing app caches is not directly possible on iOS devices. However, uninstalling and reinstalling will remove the app and its associated data, including the cache.
  1. Open the Settings app on your iPhone.
  2. Go to General from the menu and click on iPhone Storage.
  3. Scroll through the list of Apps and click on the Cash App client.
  4. Select the Remove App button and tap the Remove App prompt to confirm the process.
  5. Go to the App Store and search for Cash App. Download and install the app.
  6. Try using it to see if it works correctly.

After reinstalling it, it will start fresh without the corrupt app data, causing Cash App not to work. Also, it troubleshoots faulty installation issues affecting its performance. This isn’t the only issue you can encounter, and many reported Cash App Error 400 on their devices.

Moreover, the steps above are tested and confirmed to be effective for fixing Cash App problems. Nevertheless, you may be interested in our article about the best Virtual credit cards.

If you have any questions or suggestions regarding this guide, please drop them in the comments section.

Microsoft brings Clipchamp video tool to Microsoft 365 commercial customers

Microsoft announces that its popular video creation tool, which last year rebranded and released a fancy Fluent-design inspired logo, Clipchamp, will now be available to Microsoft 365 commercial customers through the Targeted release program. Previously only accessible with personal Microsoft accounts, this expansion aims to enhance business productivity and creativity.

Clipchamp offers a user-friendly web-based interface, empowering users to create professional-looking videos without prior experience. Similar to how Microsoft Word and PowerPoint revolutionized document creation and presentations, Clipchamp aims to make video production accessible to everyone.

The integration of Clipchamp into Microsoft 365 means users can seamlessly create, edit, and share videos within their existing workflow. It allows easy importing of media from OneDrive, webcam, and screen recording, eliminating the need for additional downloads.

The video editor features a drag-and-drop interface and a multitrack editing timeline, enabling precise video, images, text, and audio adjustments. Clipchamp supports centralized security and controls to ensure the safety of user data and organization.

Clipchamp allows users to personalize their videos for professional and engaging presentations by incorporating filters, effects, text overlays, and transitions. The green screen filter also enables users to customize backgrounds per their context and environment.

Clipchamp’s forthcoming availability for commercial customers in the Targeted release program is scheduled for the end of August 2023. IT administrators can opt-in for their organizations to access this feature. Microsoft encourages users to provide feedback during this release phase to further improve the Clipchamp experience.

With this update, Microsoft is committed to streamlining video creation for professionals, opening new possibilities for marketing, client presentations, employee training, and effective business communication.

Jlink 32” Curved Gaming Monitor Review – a great gaming/viewing experience that can also be your daily driver

This latest offering from display and link technology company Jlink presents an enticing option for gamers in particular. Especially gamers looking for a more budget friendly 240Hz curved monitor option relative to similar offerings from high-profile brands like Dell and Samsung.

The unit featured here (which arrived super-fast, by the way) was a 32” one. Setting it up is a fairly hassle-free process, and the instruction manual does a respectable job of showing you what to do. Most will probably be able to assemble the base and stand, and have the monitor connected in ten minutes or less.

Monitor Specs and features

This super-curved 1500R frameless monitor features a 32” LCD display with VA panel. The monitor is tilt-able from -5° to 15°, though it lacks height adjustability which may be an annoyance for some. Note that users will need either headphones or an external audio device for this monitor, as it lacks an internal audio output source. The display features an OSD with various customizable settings, which is accessed via a rocker button on the monitor’s back panel.

Img 20230731 165417 Edit

Dimensions 29.9 x 5.9 x 20 in.
Weight 17.89lbs
Display size 32 in.
Refresh rate 240 Hz
Resolution  1920 x 1080 FHD
sRGB color gamut 123%
Dispersion range 16.7M
Contrast ratio 4000:1
Ports 2xHDMI; 1xDisplayPort; 1×3.5mm audio; 1xUSB; 1xDC

Other Features

  • HDR support
  • Freesync support
  • G-sync compatible
  • 1ms MPRT rapid response
  • Low blue light
  • VESA mountable

Packaging contents included a power cable, power adapter, HDMI cable, user manual, monitor base/stand, and the monitor.

The Verdict

Whether this is the right option for you probably comes down to how you feel about curved monitors. They are all the rage right now with gamers, and for good reason, with a list of advantages over traditional flat displays (learn more on this topic here).

Img 20230731 160149 Edit

Curved screens provide a more immersive viewing experience, with a greater sense of depth not to mention a wider field of view. Also, curved screens mitigate peripheral color distortion. If there is any disadvantage with curved displays it is that they can catch light from more angles, so if glare is an issue in your setup environment, then it’s something to take into account.

With all that said, if you’ve decided on a curved gaming monitor, then as curved gaming monitors go I think you’ll be well-pleased with this one. I would particularly recommend it to someone who plays a lot of competitive online multiplayer titles like Fortnite, Overwatch 2, League of Legends and so on, who wants that 240Hz without breaking the bank on a solid gaming monitor.

Img 20230730 184929 Edit

It is also more than serviceable as your primary display (especially if you go for the 32” model or bigger), for everything from web surfing and watching videos to doing work-related tasks. The display is crisp, and the viewing experience on this monitor is a pleasure be it games or video.

Cons

  • No internal speakers/Need external audio device or headphones for audio

Pros

  • Good picture quality
  • Suitable as a primary display in addition to 240Hz gaming
  • Overall nice feature set, especially for a monitor in this price range

The Jlink 32” curved gaming monitor is currently available on Amazon for $269.99.

File Explorer Keeps Resetting Sort Order? How to Stop it

Many Windows users have complained that File Explorer keeps resetting sort order even after setting it several times. This issue makes navigating folders difficult, and it can take time to reselect sort preferences each time.

However, the pressing question for several of our readers is how to stop Windows 11 from reverting folder sort order. Hence, this article will discuss the steps for fixing the issue.

Why did my Windows go back to the default sort order?

  • Issues or misconfiguration in the Windows registry, which stores system settings, can sometimes cause File Explorer settings to reset.
  • Some folders in File Explorer can have unique view settings, and changes to the view may not apply to them, resulting in inconsistent sorting.
  • Changes to the User Account Control (UAC) settings can sometimes affect the Windows File Explorer’s behavior.
  • Corrupt files due to disk errors or improper system shutdowns can cause various File Explorer problems.

Nevertheless, we’ll take you through some detailed steps for fixing the issue as you read further into this article.

How do I stop Windows 11 from reverting to default sort settings?

Before trying any troubleshooting steps for the File Explorer that keeps resetting sort order, apply the following:

  • Ensure your Windows 11 installation is up-to-date to install bug fixes and improvements.
  • Uninstall any recently installed third-party file management or customization software.
  • Ensure you have the necessary permissions or Administrative access to modify settings in File Explorer.

We recommend you proceed with the solutions highlighted below if the issue persists:

1. Increase the BagMRU size in the Registry Editor

  1. Press Windows + R key to open the Run dialog box, type regedit, and press Enter to open the Registry Editor.
  2. Locate and then click the following registry subkey: HKEY_CURRENT_USER\Software\Classes\Local Settings\Software\Microsoft\Windows\Shell
  3. In the right-side pane, right-click and select New from the drop-down menu, click on DWORD (32-bit) Value, and name the new value BagMRU Size.
  4. Right-click the new BagMRU Size and select from Modify the drop-down menu.
  5. Select Decimal and type 10000 (or in the Hexadecimal base type 2710).
  6. Click the OK button and restart your computer to check if the File Explorer resetting sort order issue persists.

The above steps will increase the folder type view settings and allow Windows to remember the settings for more than 10,000 folders.

Keep in mind that changing certain settings can cause crashes, so be sure to check our guide on File Explorer crashing on your computer.

2. Reset the folder type view settings

  1. Press the Windows + E keys to open File Explorer.
  2. Click on the View tab at the top bar, then tap on Options to open the Folder Options dialog box.
  3. Go to the View tab within the Folder Options dialog box and click the Reset Folders button.
  4. Restart your computer to save and effect the changes.
  5. Open File Explorer and set the sort preferences to save and apply to your folders.
  6. Relaunch the File Explorer and check if the issue persists.

Resetting the folder type view settings will return previous settings to their default form and clear any changes reverting the sort order to default.

3. Select Apply to folders

  1. Press the Windows + E keys to open File Explorer.
  2. Go to the drive or folder where you want to apply the sort folder settings and select the View tab.
  3. In the Layout section, select a desired View option.
  4. In the View tab, click the Options key on the right side to open the Folder Options dialog box.
  5. Go to the View tab within the Folder Options dialog box, then click the Apply to Folders option.
  6. Restart your PC to save the settings and confirm if the system can withhold the sort order settings.

These steps will apply the settings to the concerned folder and prevent the folder from resetting its sort order.

How do I turn off auto-sort in Windows 11?

  1. Press the Windows + E keys to open File Explorer.
  2. Navigate to the folder you want to turn off auto-sorting.
  3. Click on the View tab, select Sort by, choose Group by, and select None from the menu.

It will disable any automatic sorting in the folder on Windows 11.

Alternatively, you may be interested in our guide for fixing the File Explorer preview pane not working on Windows PCs.

We also have a useful guide on how to sort files and folders together in Windows 11, so don’t miss it for more useful information.

This isn’t the only issue you can encounter, and many reported that sort by date modified is not working in Windows 11, but we already covered that in another guide.

Should you have further questions or suggestions, kindly drop them in the comments section.

How to Fix Greyed Out Background Apps in Windows 11

If background apps are grayed out on your Windows 10 PC, they’re basically blocked from running, which can cause apps to stop updating or working properly.

This usually happens due to permission restrictions, power-saving settings, or policies set by your network admin. Sometimes, system glitches or incompatible apps are to blame too.

This guide will help you understand what’s causing the problem and how to fix it for smoother app performance.

1. Check app permissions

  1. Press the Windows + I key to open the Settings app.
  2. Click on Privacy, then select the Background apps option.
  3. Ensure the toggle switch for Let apps run in the background is on.
  4. Scroll down to the list of apps and ensure the app you want to run in the background has its toggle switch enabled.

After this process, you should troubleshoot the background app grayed out issue on Windows 10. Should the permissions be grayed, apply the following solution and retry.

2. Update your graphics driver

  1. Press Windows + R keys to prompt the Run window, type devmgmt.msc, and click OK.
  2. Click on the Display adapters entry, right-click the driver, then click Update driver.
  3. Then, select the Search automatically for drivers option.
  4. Restart your PC and check if the background application is still grayed out.

Updating your graphics driver will fix bugs causing the problem and install patches to improve the driver’s performance. Also, it resolves graphics issues by blacking out the background app.

Check our article about other steps for updating graphics drivers on Windows 11 if you have any issues with the steps above.

3. Enable background apps via Group Policy Editor

  1. Press Windows + R key to open the Run dialog box and type gpedit.msc, then press Enter to open the Group Policy Editor.
  2. Navigate to the following path: Computer Configuration\Administrative Templates\Windows Components\App Privacy
  3. Find the Let Windows apps run in the background option on the right pane, then double-click on it.
  4. Tick the radio button for Enabled. On the Default for all apps window, select User is in control from the drop-down. Click the OK button to save the changes.
  5. Press Windows + R keys, type cmd, then press the Ctrl + Shift + Enter keys.
  6. Type the following command and press Enter: gpupdate /force
  7. Restart your computer and check if you can access your background apps.

These steps will enable your background apps using the Group Policy Editor and run the force update command to effect the changes.

4. Reset app preferences

  1. Press Windows + I key to open the Settings app.
  2. Click on Apps from the menu, then select Apps and features from the left pane.
  3. Scroll down and find the problematic app, click on it, and choose Advanced options.
  4. Click the Reset button to reset the app’s settings to default.

Resetting the app will troubleshoot any app settings causing the issue.

Alternatively, you can check our guide on how to fix apps not opening on Windows 11. Likewise, we have an article about what to do if too many background processes run on Windows PCs.

For more on background app issues, check out our guides on background apps in Windows 11 and Windows 11 background apps missing.

If you have further questions or suggestions regarding this guide, kindly drop them in the comments section.

Xbox Series is the second best-selling Xbox in Japan now

Microsoft vs FTC case revealed some internal secrets from the Microsoft and Xbox executives, including that Xbox is seemingly losing the console war. While it’s true that Xbox hasn’t sold as much as PlayStation or Nintendo have, Xbox is still a very popular console.

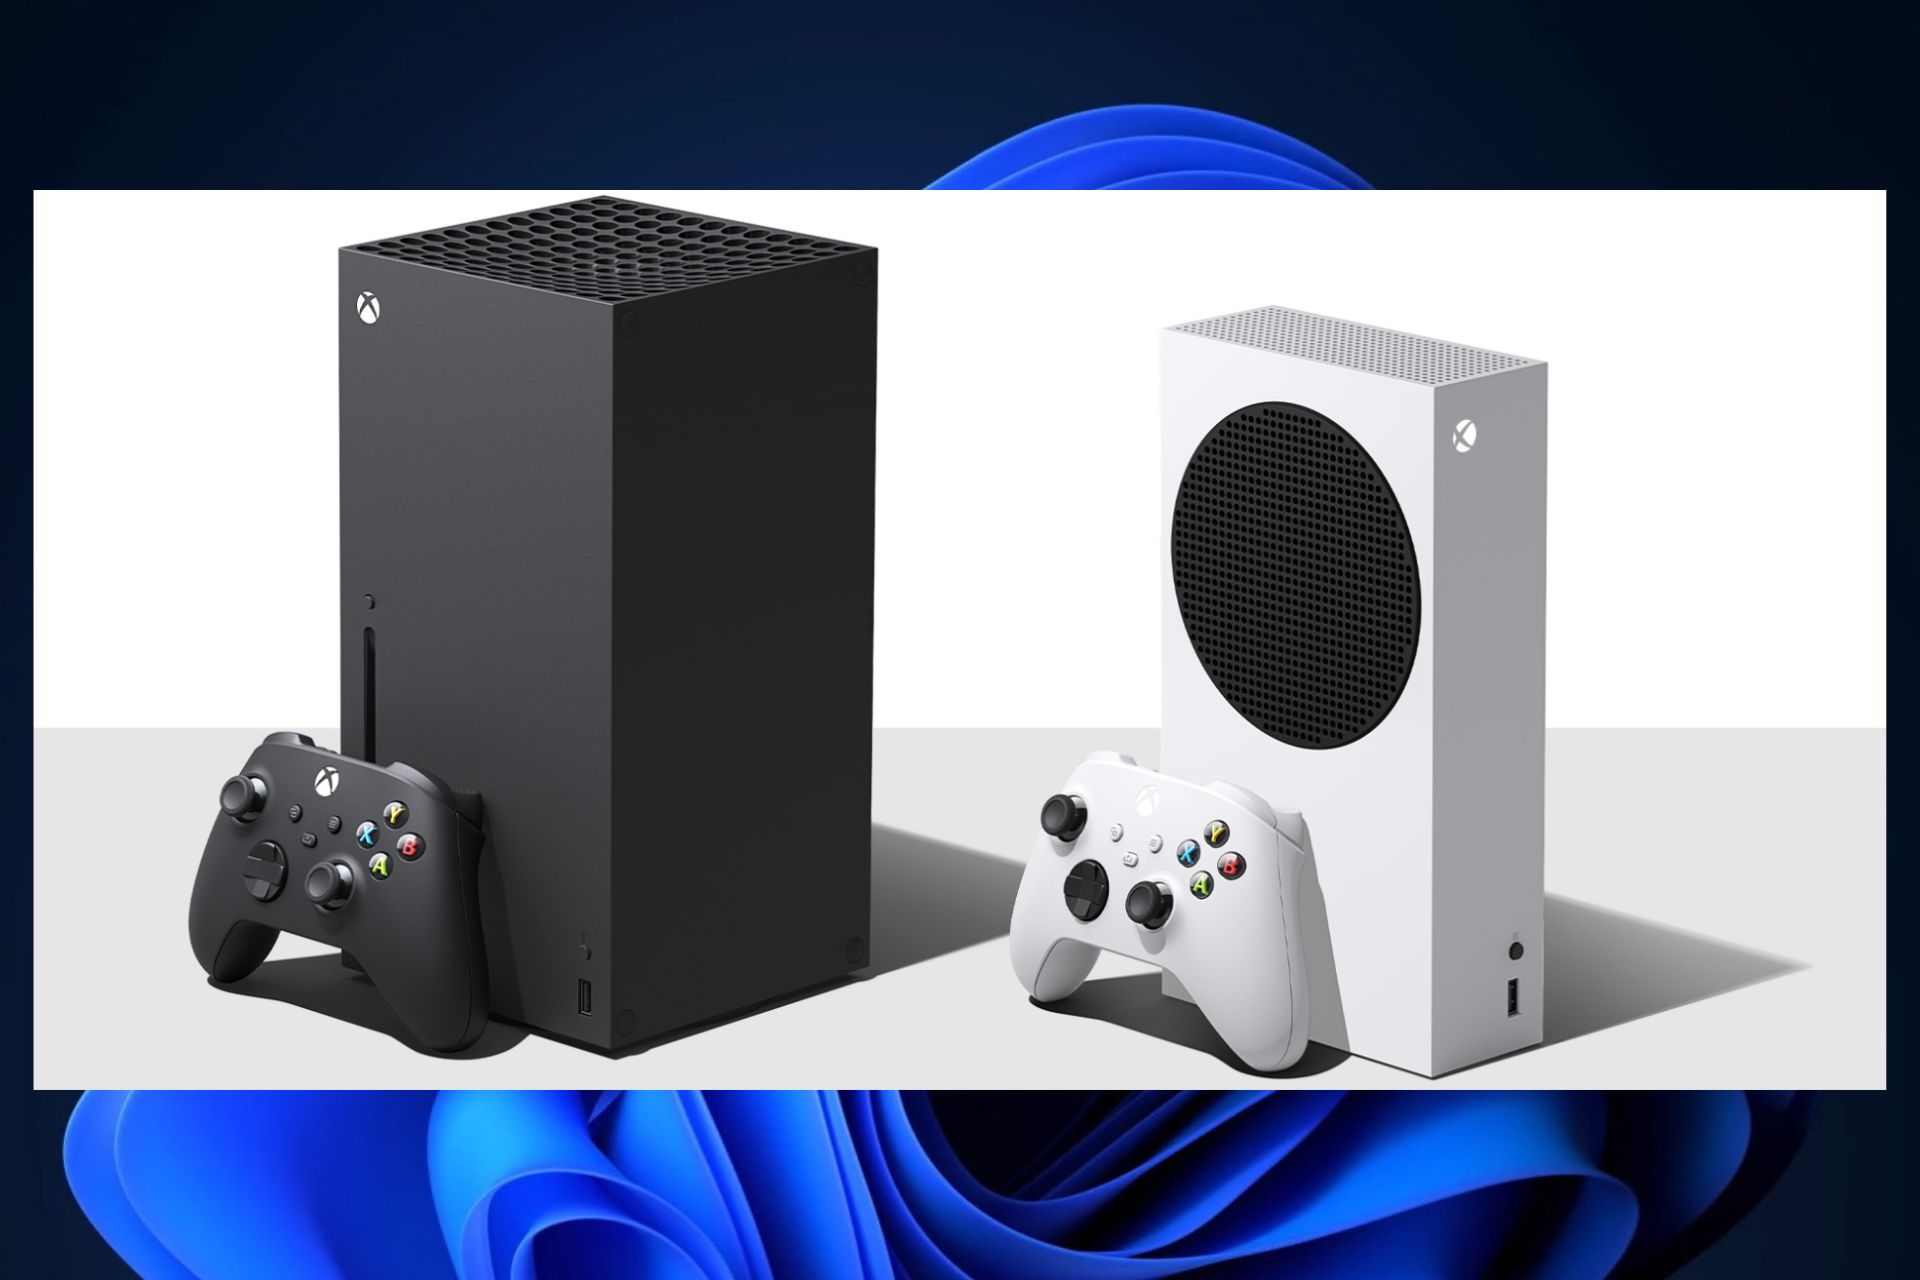
In the US, for example, Xbox is the dominant console, and it’s very popular among gamers there. With the latest Xbox consoles, Microsoft wanted to cater to both the regular gamer and the hardcore gamer too. Xbox S is a great console to have if you’re a casual player. While Xbox X is good for your gaming sessions.

Plus, in this specific region, Xbox is a console that never loses its attraction. That’s partly due to Microsoft’s involvement too. For example, Xbox Series consoles were recently sold out due to Microsoft fixing the old Call of Duty matchmaking servers. This prompted people to buy both the old games and the Xbox consoles, causing a spike in sales.

However, it seems that Xbox Series are also popular in Japan, the land of Nintendo and PlayStation. According to the latest statistics from Game Data Library, Xbox Series is the second best-selling Xbox in Japan now.

Does Xbox sell in Japan? Yes, it does. And it matters a lot, especially when we’re thinking about the console war.

Xbox does sell in Japan, and this is important

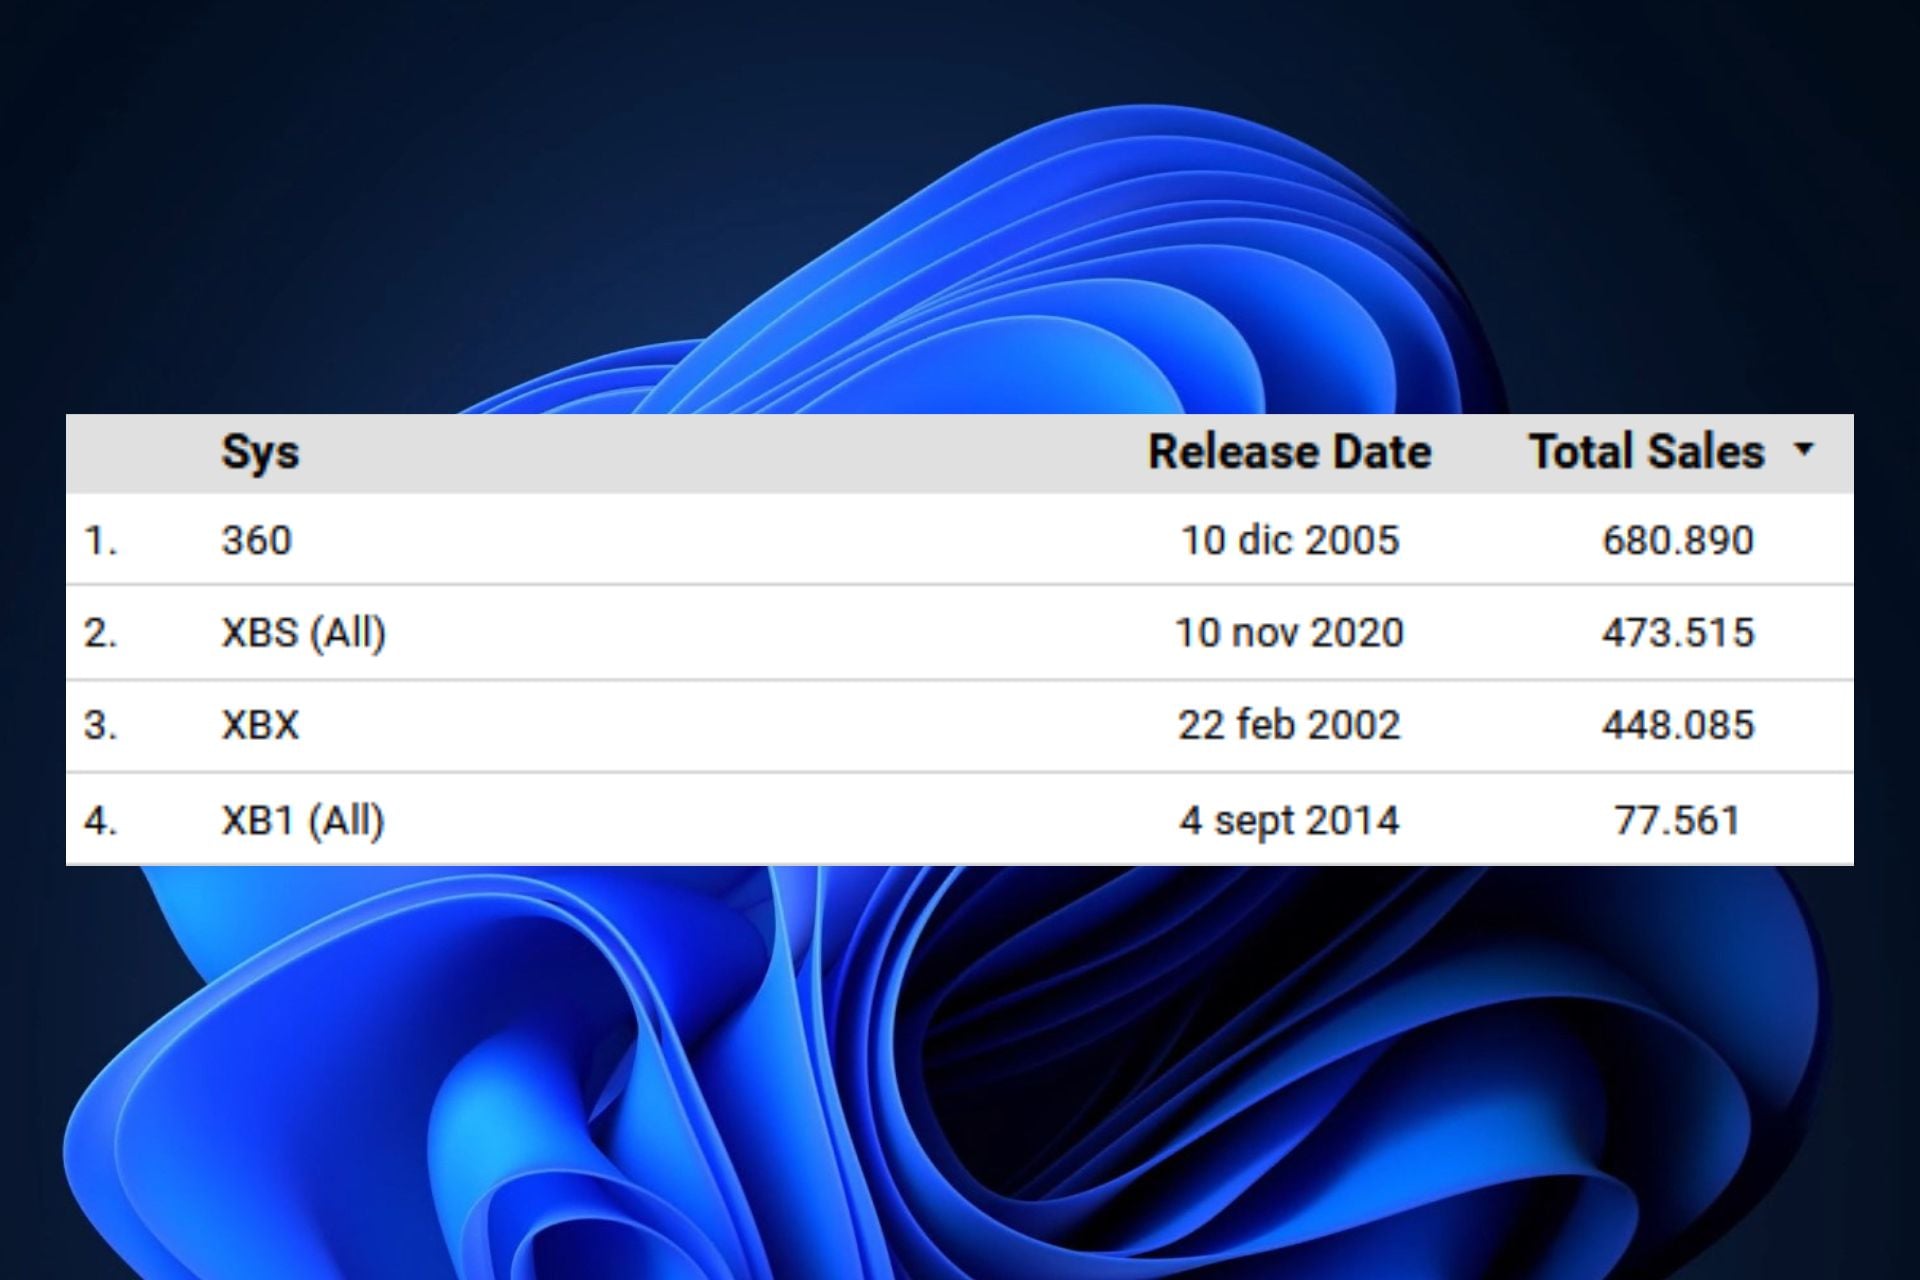
According to the statistics, Xbox Series has sold 473.515 units in Japan, since 2020. In comparison, the original Xbox has sold 448.085 units since its launch in 2002, while Xbox 360 has sold 680.890 units since 2005.does xbox sell in japan

So as you can see, Xbox Series is doing exceptionally well in a country where PlayStation and Nintendo rule the market.

Why is this important? Well, the fact the Xbox does sell in Japan, means that Microsoft has managed to make the console popular there.

As we all know, consoles in Japan are almost a cultural phenomenon. PlayStation has brought the Japanese gaming industry into the spotlight, and it has created some memorable franchises.

This way Microsoft can create a sizeable community there, which will change the way Xbox is regarded in Japan. By coming up with Xbox exclusives, such as Starfield, in Japan, Microsoft can actually become as important as PlayStation and Nintendo.

What do you think about this? Let us know in the comments section below.

Fix: ChatGPT Authorization Error Accessing Plugins

By now, we have all accustomed ourselves to the various AI software available and have even gotten comfortable enough to add plugins. However, users have taken to community platforms complaining of the Authorization error accessing plugins error.

As of this morning when I try to use GPT4, with plugins – I receive the following error ! Authorization error accessing plugins and nothing can be processed.

Plugins come in handy when you want to add functionality, so you can imagine what a breeze it is to have the two programs working together. So what can you do when you encounter such an error? Here’s how to go about it.

Why are GPT plugins not working?

If you’ve recently enabled ChatGPT browser extensions, you know just how efficient and effective they are when it comes to getting work done easily and faster. However, this efficiency may be short-lived when you discover you cannot process anything.

If you only have one plugin enabled, you can conclude it is the cause of the issue, but with several extensions, it will have to be a guessing game to find out the culprit. So why are your GPT plugins not working? Below are some possible causes:

  • Corrupt plugin – It is not uncommon for certain plugins to have issues. If this is the case, you will be unable to generate anything on ChatGPT. In fact, according to a user on the ChatGPT forum, one particular plugin being active was the cause of the Authorization error accessing plugins issue.

I’m having the exact same problem with ScholarAI. If that plugin is active, then I get the error “Authorization error accessing plugins” regardless of what I ask ChatGPT.

  • Outdated browser – If you’re using an outdated version of a browser, it may be incompatible with the latest version of the plugin you’re using hence the miscommunication.
  • Corrupt cache – It is also possible that you have some corrupt cache that’s interfering with how your browser works.
  • Server issues – Sometimes, it’s not the plugin that has a problem but the server. If your ChatGPT is up to capacity or having issues, then it is possible for the plugin not to work.
  • Geo-restriction – If you’re trying to access content on a geo-restricted location, the plugin may fail because it has been blocked. You’ll have to bypass the ChatGPT is not available in your country issue first.

How can I fix the Authorization error accessing plugins?

We recommend the following fixes before trying out any technical troubleshooting:

  • Try refreshing your browser.
  • Log out, then log back into your ChatGPT account.
  • Verify from the developer that the plugin is operational.
  • Ensure your browser is up-to-date.
  • Verify that the ChatGPT service status is up and running.
  • Wait it out. Some users said the plugin worked when they tried them a little later.

1. Clear browser cache and cookies 

  1. For this step, we shall be using the Chrome browser.
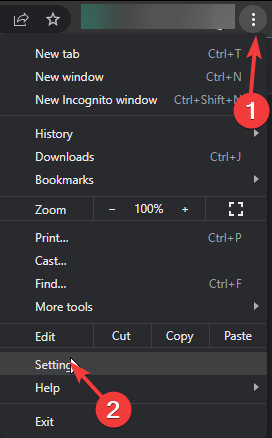
  2. Launch your Chrome browser and click the three vertical ellipses in the top right corner.
  3. Select Settings.Settings CHrome
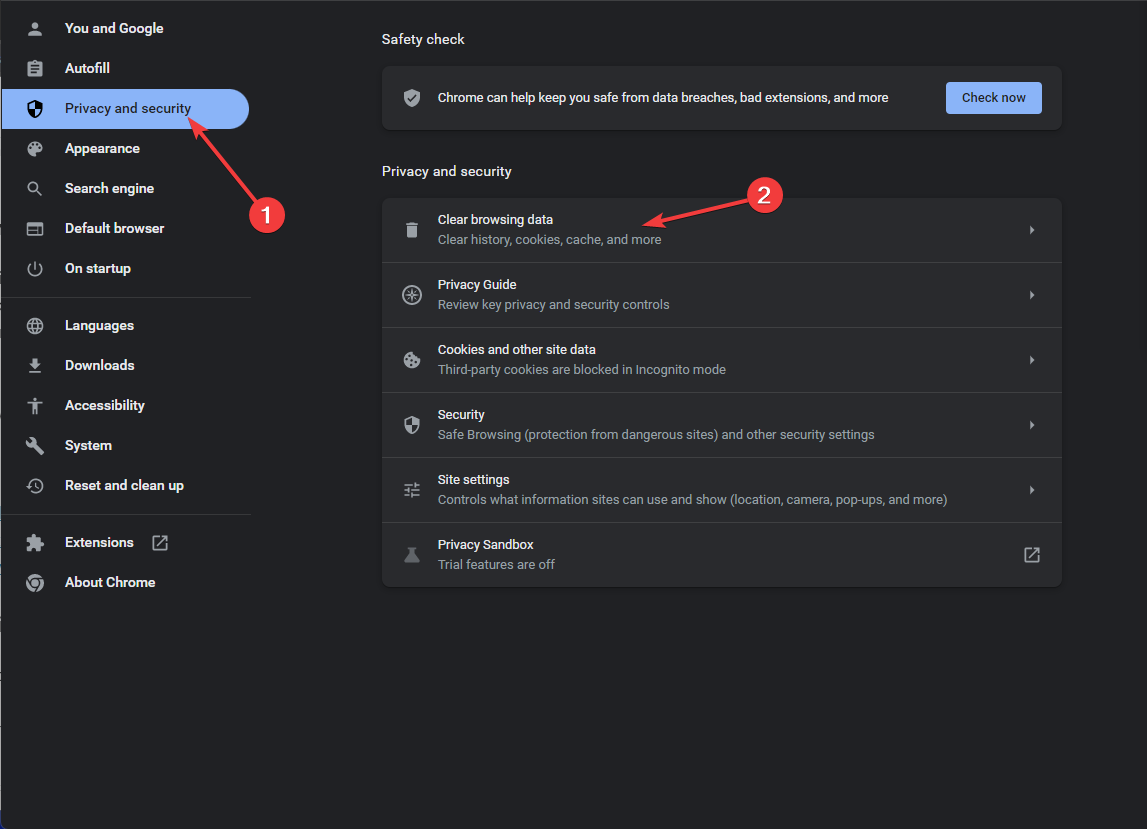
  4. Click on Privacy and security, then select Clear browsing data.
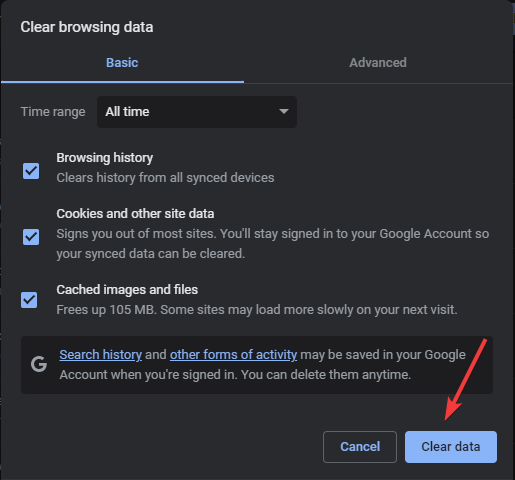
  5. Check Cookies and other site data and Cached images and files, then hit Clear data.Clear data

2. Uninstall and reinstall the ChatGPT plugin

  1. Go to OpenAI official site from your browser and log in to your account using your email and password.
  2. Click on the Plugins button.
  3. Navigate to the Plugin store.
  4. In the store, go to the Installed tab. Find the problematic plugin and click the Uninstall button.
  5. Reload ChatGPT and install the plugin to see if it works correctly.

ScholarAI and chatwithPDF are the most common plugins experiencing the Authorization error accessing plugins issue.

3. Disable VPN 

  1. Click on the Start Menu icon on the taskbar and select Settings.settings windows 11
  2. Next, select Network & internet and click on VPN in the right-side menu.
  3. Select the VPN connection you want to disable, click on the drop-down, and select Remove.remove VPN

If you’re in a location where ChatGPT is restricted, you will have to enable your VPN and select a different location that allows you to access the service.

Hopefully, you have been able to resolve the Authorization error accessing plugins issue on ChatGPT. If not, you can try a different browser, but if the issue persists, contact ChatGPT customer support.

Luckily, this problem doesn’t affect all ChatGPT plugins, and given the variety of extensions available, you’re bound to find an alternative to the problematic one.

Still on ChatGPT issues, check out what to do when it is experiencing an exceptionally high demand error, or better yet, try out their ChatGPT professional version.

That sums up our article, but if you have any other solution missing from our list, chat with us in the comment section and let us know.

Fix: Sales Copilot Not Connecting to Dynamics 365

Every salesperson knows just how important it is to keep track of your sales to improve cash flow. If you do not take charge of your inventory, you could easily make losses. 

And while there is a host of software that does this, it just makes sense to have a built-in add-in that simplifies the whole process. This is where Sales Copilot and Dynamics 365 come in. However, you may find that the former is not connecting to Dynamics 365. 

If this sounds like something you have encountered, this article will cover the bases to help you reconnect.

What is Sales Copilot?

Sales Copilot is a Microsoft Teams add-in that helps salespeople track and manage their sales pipeline. It provides an easy-to-use dashboard and customizable reports so that you can see your progress at a glance.

The add-in integrates seamlessly with Dynamics 365 CRM. Integrating the two applications means that all data is shared automatically, so you don’t have to worry about manually entering information into Sales Copilot or updating it in Dynamics 365.

Because data is shared, security is top-notch. That’s why both have the two-factor authentication option enabled. 

The issue now arises when there’s a miscommunication between the two because either the two-factor authentication feature is enabled or disabled. 

If one of them has the feature enabled and the other doesn’t, one will be locked out because it is considered an untrusted app and hence blocked.

However, this is not the only reason that may block the connection. Others include:

  • You may have entered an incorrect username or password for the Sales Copilot account in Dynamics 365. 
  • The connection between Sales Copilot and Dynamics 365 is blocked by a firewall or proxy server.
  • You might have missed some core steps while configuring Sales Copilot. If this is the case, then it may result in connection failure.

How can I fix Sales Copilot not connecting to Dynamics 365?

A few basic routine checks to perform include:

  • Double-check that you are using the correct credentials for your Sales Copilot account in Dynamics 365.
  • Check to ensure you’re not facing any network connection issues.
  • Resolve any network congestion issues that may be limiting your ability to access the Internet.
  • If you have an older version of Sales Copilot installed, uninstall it and then download and install the latest version.

1. Disable your antivirus temporarily 

  1. Hit the Start menu icon, type Windows Security in the search bar, and click Open.
  2. Click on Firewall & network protection, then select Public network.league of legends black screen after champion select
  3. Locate Microsoft Defender Firewall and toggle the off button.turning off Microsoft Defender Firewall Windows

2. Enable/Disable two-factor authentication in Microsoft Teams

  1. Login to your Microsoft account.
  2. Go to Security settings.
  3. Under Ways to prove who you are, go to Additional security and select Turn on in Two-step verification.
  4. Click on Next.
  5. Note down your recovery code somewhere safe and hit Next.
  6. Hit Finish.
  7. You’ll be taken to the first page and here you can see that the two-factor authentication feature has been turned on.

If Dynamics 365 two-factor authentication is disabled, proceed with the above steps to turn off Microsoft Teams’ two-factor authentication feature too.

We would, however, advise you against disabling this feature as it protects your accounts from vulnerability attacks. Security is of utmost significance, given that you manage a lot of private information on these platforms.

3. Enable/Disable two-factor authentication in Dynamics 365

  1. Go to the Microsoft 365 admin center.
  2. Click on All services to expand, then click on the Azure Active Directory Admin Center.
  3. Select Azure Active Directory.
  4. Click on Properties.
  5. Select Manage Security defaults.
  6. Toggle the Yes option under Enable Security defaults, and then hit Save.

4. Disable Proxy 

  1. Press the Start Menu icon and select Settings.settings windows 11
  2. Click on Network & Internet on the left pane, then scroll down and click Proxy on the right pane.Network proxy settings
  3. Select Edit next to Use a proxy server option in the Manual proxy setup section, toggle off Use a proxy server and click on Save.Disable proxy server

Hopefully, this post has been helpful in diagnosing the problem and finding a potential solution to get your Sales Copilot and Dynamics 365 connected again.

If you like, you can also try out other CRM software and compare features to ensure you’re getting the most out of these apps.

Should you have any questions or encounter further issues, don’t hesitate to reach out. We’re always happy to help.

Fix: This Add-in Could Not be Started Error in Outlook

Using Outlook means you have at your disposal some of the best Office add-ins that make your work easier. However, these add-ins can sometimes malfunction and fail to start. For instance, users have been bombarded with the Outlook add-in error could not be started message.

It could be a temporary glitch or a more serious issue. We take an in-depth look at what this error means and possible resolutions.

Why does we couldn’t start this add-in in Outlook error happen?

The add-in model is the feature that allows Outlook to interact with third-party applications and services. There are many developers who have created these add-ins, so you can expect that they will experience issues from time to time.

It’s also important to note that this error is not docked on the Outlook app and can happen in other Office programs, such as Microsoft Word or Excel.

A user on the Microsoft community platform had this to say:

I can’t start any Office add-ins. All add-ins result in This add-in could not be started error. Add-ins are obtained from the Microsoft app-source site.

  • Incorrect/incomplete installation – This error can occur if the add-in was not installed properly or damaged during installation.
  • Multiple Outlook versions – If you have multiple instances of Outlook installed on your PC, it is possible for these add-ins to create conflict.
  • Disabled add-in – This can happen if you have multiple copies of Outlook on your computer or if you’ve tried to install an add-in on a computer with an incompatible version of Office.
  • Outdated OS – If your Windows is not updated, you’ll get this error when you try to install an add-in that uses a newer version of Outlook.
  • Insufficient permissions – Some add-ins are admin-managed and hence require explicit permissions to launch and use them. 

How do I fix the Outlook add-in error?

Attempt the following basic workarounds before any advanced technical solutions:

  • Wait it out. Sometimes, it’s just a temporary glitch and after a while, the add-in works normally.
  • Check the add-in permissions and ask your administrator to enable them, then try again.
  • Verify that the selected app meets the system requirements for your Windows version.
  • Ensure you’re using the latest version of the add-in.
  • Verify that your Office is up-to-date.
  • Disable and re-enable the add-in.
  • Ensure you’re not experiencing any Outlook connection issues.
  • Restart Outlook.
  • Try to restart Windows in Safe Mode and check if the issue persists.
  • Check for Windows updates.

1. Start Outlook in Safe mode 

  1. Press Windows+ R to open the Run dialog box. 
  2. Type Outlook.exe /safe and click OK to open Outlook in safe mode.OUTLOOK SAFE MODE

2. Clear Outlook cache

  1. Press the Windows + R keys to open the Run dialog box.
  2. Type %LOCALAPPDATA%\Microsoft\Outlook\ in the dialog box, then click OK.
  3. Right-click the RoamCache folder, select Copy, then paste it into another folder.
  4. Double-click the RoamCache folder, select all the items in the folder, or press Ctrl + A, then press the Delete key.
  5. Restart your PC.

Clearing the cache may help get rid of any corrupt files that are preventing the add-in from starting.

3. Repair Microsoft Office

  1. Hit the Windows key, type Control Panel in the search bar, and click Open.control-panel-search fallout new vegas runtime error
  2. Navigate to Uninstall a program under Programs.going uninstall program control panel
  3. Locate Microsoft Office and click on Change.Change OFfice 0x80040610
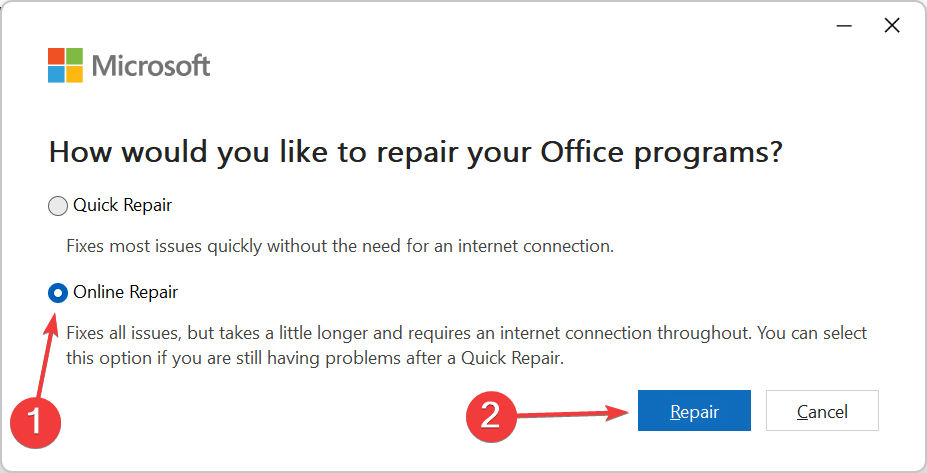
  4. Select the Online Repair option and wait for the process to finish before trying again.online repair to fix 78754 failure outlook

If running repair does not work, you can try a third-party repair tool that is more thorough in fixing such issues.

4. Reinstall the add-in

  1. Open the Outlook application, click the File tab, and select Options on that tab.
  2. Select the Add-ins tab on the window that opens.
  3. Under the Manage drop-down menu, go to COM Add-ins and press the Go button.
  4. Select the select add-in and then click the Remove button.
  5. Click the OK button.
  6. Now go to the Outlook add-ins page to reinstall it.

5. Reinstall Microsoft Office

  1. Hit the Windows key and click on Settings.settings windows 11
  2. On the right pane, click on Apps, then on the left, Apps & features.
  3. Scroll to Microsoft Office, click the three ellipses, and select Advanced options.
  4. Click Uninstall under the Uninstall menu.
  5. Confirm your choice and follow the wizard to complete the process.
  6. Download a fresh copy of Microsoft Office.

And that’s how to fix the add-in could not be started error in Outlook. If none of these work for you, try using the web version of Outlook or switch to another email client.

There you have it. If you found this article helpful or have any questions regarding Outlook, please leave a comment below, and we will do our best to address your query.

Will Microsoft ever develop an Xbox console for kids?

Microsoft’s Xbox consoles are very popular among gamers. These consoles are built for gamers, but casual gamers and even children can play on them too. The Redmond-based tech giant specifically thought about it when developing Xbox Series S, which is an Xbox designed for casual players. Its big brother, the X, is more suited for gaming veterans.

Overall, the Xbox consoles are popular, but globally speaking, people prefer other consoles, such as PlayStation or Nintendo. However, in the US, Xbox consoles are more popular than the other ones, and Microsoft is the dominant player in this specific region.

They can buy the Xbox S for a casual gaming time, and Xbox X for a more specific gaming activity. In this sense, Microsoft caters to all kinds of audiences. Maybe that’s why some people are wondering if Microsoft will ever develop an Xbox console for kids.

Other consoles, such as Nintendo, created an image of a kid-friendly console with Nintendo Switch. Why wouldn’t Microsoft ever try to develop such a console?

While there isn’t an Xbox made for kids, there are a lot of Xbox children’s games on the console

One answer is that Microsoft just doesn’t find it convincing enough to make an Xbox console exclusively designed for kids.xbox children's games

Recently, however, following all the engagement the Barbie film generated online, Microsoft released a Barbie-designed Xbox. This would be the closest Microsoft has ever been to developing an Xbox for children.

However, there are a lot of games made specifically for kids. And while you don’t have to buy an Xbox X for them, the Xbox S, which is, again, a console made for casual gamers, kids included, can also support them.

Among these Xbox children’s games, we mention Minecraft, which is one of the most popular and useful games that a kid can play. And there are other similar games on Xbox, that are perfect for kids.

Secondly, and it’s important to know, Microsoft released Xbox for a specific audience. In the US, for example, the Xbox is also known as the FPS console, due to the majority of Xbox games being FPSs. The Redmond-based tech giant simply hasn’t marketed the Xbox consoles for kids.

Ultimately, if there is to be an Xbox console for kids, it would probably not be called Xbox. Who knows, maybe in the future, Microsoft will think of it, but for now, chances are slim.

What do you think about this? Would you like an Xbox for kids, or Xbox children’s games are enough? Let us know in the comments section below.

How to Close Background Apps on Your Microsoft Surface

Surface tablets are powerful devices, but they still need to conserve battery life at the end of the day. Closing background apps can help you squeeze more time out of your Surface and keep it running smoothly throughout the day.

If you’ve ever used a Windows phone, this article will be an easy sail through because the Microsoft Surface is similar. Now, how do you close background apps on your Microsoft Surface? Easy. Here’s how to do it.

What’s the purpose of closing background apps?

Surface devices have an incredible amount of power and versatility, but sometimes that means there are a lot of apps running in the background. While this can be convenient, it can also be problematic for your battery life and performance.

Closing background apps is a great way to improve your experience on your device. But there’s more to it. Are the benefits worth it? Yes, and here are some of them:

  • Saves battery life – If you want to get more usage out of your Surface device, the trick is to get the battery running for a long time. And the only way to achieve this is to conserve battery life by closing unnecessary apps that run in the background.
  • Free up memory – Nobody likes clicking on an app and waiting for it to launch. If your Surface device does this a lot, it’s because there’s not enough memory to hasten this process. When you get rid of these background apps, your apps will launch a little faster.
  • Saves data – We all love free Wi-Fi, but during those times we have to use our own data, and we need to be careful not to waste it on unnecessary things. If you have lots of background apps, they could easily consume all your data and sometimes lead to overcharges. However, with limited background apps, this doesn’t have to be you.
  • Improve performance – Closing background apps can also improve performance on your device. Sometimes when too many things are running at once on a single device, this will cause some lag or slow down in response time.

How do I close background apps on my Surface?

1. Drag and drop

Depending on your Windows Surface device, you can easily close background apps by swiping in from the left edge of the screen, then tapping and holding the app you want to close.

On some devices, you have to bring up the list of open apps and then drag it to the taskbar to close. For others, you select the running application and swipe it to your right.

This method is for when you want to clear some quick memory and make other apps run faster. In essence, the apps you’ve closed may still have some instances running in the background.

2. Use Privacy settings

  1. Tap on the Search button on your Surface device, type Privacy Settings, and select the appropriate option from the results.
  2. Tap on Background Apps from the list, then toggle off the button for each app you want to disable.
  3. Restart your Surface device.

Alternatively, if you have a long list of apps, this can be a tedious exercise having to toggle them off one after the other. You can choose to toggle off the Let apps run in the background option.

The only downside to this is that it is a blanket option and disables all apps that run in the background, including the essential ones.

3. Use battery-saver mode

  1. Click on the battery icon on your taskbar to open battery saver mode.
  2. Find the Battery saver option and check the Turn battery saver automatically on if my battery falls below box. The trick here is to adjust the toggle battery percentage to a higher percentage so that it works even when you’re at full charge.

Again, the limitation of using this method is that it will limit all background apps, so you may have to go in again to enable permissions for special apps.

It also only works with apps you’ve downloaded from the official Microsoft Store, so any sideloaded apps may still consume memory and battery unless you limit them manually.

4. Use the Task Manager

  1. Press the Windows and Power button simultaneously. (This will depend on your Surface device and the Windows version installed).
  2. From the pop-up menu that appears, select the Task Manager.
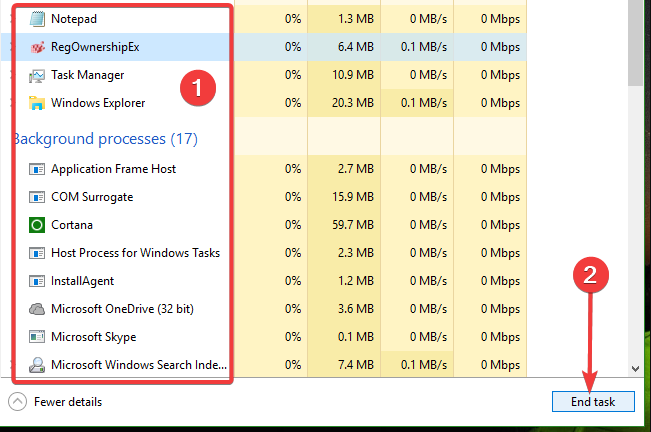
  3. Select all apps you wish to disable from the list, and one by one, tap on End task.windows 10 processes you don't need

Over time, your Surface device may disable unused apps. It can be a while before it does this, so the above steps should help you close unused background apps to reclaim your memory and battery life and enhance performance. 

Keep in mind that with any Windows device, there will be instability when you run a bunch of apps in the background. And if your device is low on memory, or if one program crashes, it causes all the other apps to close too.

Another point to remember is that there are some system apps that keep your device running optimally. These are some of the apps you should let run in the background on your Windows 11 device.

There are also others that are intertwined. Therefore, closing one background app could lead to another not working. Be sure to double-check what each app does before closing it.

If you’re still struggling with performance even after disabling these background apps, it may be time to upgrade your Surface device. To that effect, we have curated a list of the best Surface Pro devices that may have the hardware requirements you’re looking for.

Let us know in the comment section which of our recommended methods you find the most efficient when it comes to closing background apps on your Windows Surface device.

These Xbox Statistics You Won’t Believe at First

With cross-platform integration, an extensive game library, and a thriving gaming community, Xbox is one of the most popular gaming consoles by Microsoft available in the market today.

The first video game console by the company was released in North America in November 2001 and released globally the following year.

Microsoft has released four other consoles Xbox 360, Xbox One, Xbox Series X, & Xbox Series S. Along with the consoles, Xbox also comes with a vast game library, Xbox Cloud Gaming (streaming service), and online services like Xbox network and Xbox Game Pass.

Since its inception, the brand has revolutionized the gaming industry, become a significant player, and given gaming enthusiasts something to look forward to.

In this comprehensive report, we will discuss Xbox’s performance in the industry, including sales, revenues, game and userbase statistics.

Xbox Sales Statistics

With the pandemic taking over our lives, people took solace in different things; for some, it was reading; for others, health became a priority, and some revived their old love for gaming.

With people restricted to their homes, there was an increased interest in gaming, which boosted the sales for Xbox and other gaming consoles in 2020. Around 3.5 million Xbox Series X and Series S units were sold in 2020.

Xbox Sales Statistics -

Microsoft recently revealed the number of copies of Xbox Series X and S the company sold, i.e., 21 million consoles. It also announced that 58 million Xbox One consoles have been sold.

The Xbox has active users of about 15.6 million subscribers per month, making it one of the most preferred platforms.

PC distribution opportunity Xbox Sales Statistics

According to the report, there are 248.6 million Windows-based gaming PCs globally and 168.3 M monthly Windows Store visitors.

If you want to compare Xbox and PlayStation in terms of sales and competition, we recommend you check this detailed guide.

Xbox Revenue Statistics

Microsoft Global Revenue Xbox Statistics

With the number of Xbox enthusiasts increasing rapidly, there is also a spike in revenue. According to Gitnux, in 2021, Microsoft’s revenue related to Xbox content and services increased by 40% Y/Y.

As per the latest report by Microsoft, for the fiscal year 2023, there has been an increase of 5% compared to the last fiscal year.

If we refer to Xbox account stats, the growth is mainly due to first-party and third-party game releases and Xbox Game Pass memberships.

However, the hardware revenue decreased by 13%, and gaming revenue was up by 1% year-over-year, which according to Windows Central, was an improvement compared to figures in the last fiscal report.

Xbox gaming software sales revenue

In 2018, the Xbox gaming software sales revenue was USD 5791.4 M worldwide, dropping to USD 4539 M the following year.

However, since the pandemic, there has been a rise in number; in 2020, it rose to USD 4793.6 M, and the next year, a significant increase of USD 1552.7 M was witnessed.

Since then, the sales revenue has been increasing and is projected to reach USD 8,549.9 M in 2023, 8,667.6 M in 2024, and 8566.6 M in 2025.

Xbox Games Statistics

26 games out of the 200 top games are for Xbox Series X and Series S, including Fortnite, Call of Duty, Modern Warfare II/WarZone2.0, Grand Theft Auto V, & Minecraft, being the most popular games.

2022 was not a great year for game releases, as only a few major ones, including Horizon Forbidden West, Elden Rings, and God of War Ragnarök, are scheduled.

Xbox Games Statistics

As reported by Statista, Grand Theft Auto V became the best-selling game on Xbox One, with over 8.72 million copies sold worldwide.

Xbox User Statistics

Xbox User Statistics

There are more than 3.09 billion gamers globally, out of which 120 million players use Xbox Live, the gaming service by Microsoft.

According to a report, the majority of Xbox One gamers are between the ages of 25 to 34, followed by the 35 to 44 age group bracket.

A survey of 2000 Xbox One owners revealed that 56% of the Xbox owners are married or living with a partner, 10% live alone, and 23% live with their parents.

Also, according to the same survey, 58% of Xbox owners were male, and 42% were females.

Exciting Facts About Xbox:

  • The concept of Xbox was conceived first in 1998, and within two years, the first Xbox was out in the market.
  • It was initially supposed to be named DirectX Box but was changed to Xbox.
  • Microsoft co-founder Bill Gates designed the original Xbox controller.
  • Since the Xbox’s inception, Microsoft has sold over 150 million Xbox consoles from 2001 to 2022.
  • Halo 2 is the best-selling game for the original Xbox, with 8 million copies sold worldwide.
  • Xbox Series X and Series S are the hot-selling consoles. Even after ten months of release, Xbox Series X remained out of stock worldwide.
  • Gamers played Xbox Game Studios games for 1.66 billion hours till Oct 2020.
  • Xbox One can be controlled through hand gestures using an inbuilt Kinect, the world’s fastest-selling consumer electronics.
  • Call of Duty: Modern Warfare 3 is the best-selling game for the Xbox 360, with 14.23 million copies sold globally.
  • Xbox Games with Gold Live subscription service can be accessed in 41 countries, including Australia, Switzerland, and New Zealand.
  • Xbox One has a more extensive server network with 300,000 servers.

Since its release to the present day, Xbox has been responsible for some revolutionary changes in the offline & online gaming industry. With powerful hardware, a growing community of gamers, and riveting gameplay experiences, it has always been consistent.

The number of sales, games, monthly users, revenue markers, and other factors will keep increasing and decreasing with time, but with Microsoft’s persistent nature, it is safe to say Xbox is here to stay and will be there for long.

If you are wondering how you can check the most followers on Xbox or most gamerscore on Xbox, you can check these guides to find the answers.

What do you think? Please mention your thoughts in the comments section below.

Memory Management BSOD in Valorant: A Way to Fix it

Experiencing a Blue Screen of Death (BSOD) frequently while playing games like Valorant, which most gamers complain about, can be frustrating. A fatal error in the Windows operating system forces your PC to stop, prompting a blue screen with an error message.

However, the disturbing question remains how do I fix Valorant’s BSOD memory management problem and get my game running again? This guide will detail the problem and how to fix it.

Why do I get BSOD every time I play Valorant?

  • Outdated or corrupted drivers frequently cause BSOD while playing games with high graphics usage, like Valorant.
  • Faulty or overheating hardware components, such as the CPU, or RAM, can trigger BSOD.
  • The Blue Screen of Death can occur in Valorant if your system doesn’t meet the minimum system requirements for the game.
  • Conflicts between different software running on your system and the game can result in BSOD errors.
  • CPU or GPU overclocking attempts may result in instability during intensive gaming tasks.
  • Low system resources or inadequate memory allocation can cause crashes while playing Valorant.
  • Issues with the operating system, such as corrupted system files, can cause this issue.

Nevertheless, we have put together several reliable solutions for fixing the Valorant BSOD memory management problems.

How do I fix Valorant BSOD memory management?

Before attempting any advanced fixes for the BSOD memory management stop code in Valorant, observe the following preliminary checks:

  • Close the game and restart your computer to troubleshoot temporary system errors.
  • Check to see if your computer meets the minimum requirements for the game.
  • If the issue is specific to only Valorant, use Steam or Riot Games’ client, and verify the integrity of game files.
  • Update your Windows operating system and device drivers to fix bugs and install patches to improve the game’s performance.
  • Run a Memory Diagnostic Tool. In case any issues appear we have a guide if Memory Diagnostic Tool gets stuck.
  • If your system is overclocked, revert to default clock speeds to see if the memory-related BSOD errors persist.
  • Try disabling XMP (Intel) or DOCP (AMD) profiles for your RAM in BIOS and run your RAM at default settings to see if the issue persists.

Disable fast startup

  1. Right-click the Start button in the taskbar, type control panel, and click OK.
  2. Select power options.
  3. Locate and click on Choose what the power buttons do from the left sidebar.
  4. Click on the Change settings that are currently unavailable link.
  5. Then, scroll down to the Shutdown settings section, then uncheck the box for the Turn on fast startup (recommended) option.
  6. Click the Save Changes button to apply the settings, then restart your computer to see if the BSOD error persists when playing Valorant.

Fast Startup is a Windows feature that helps your computer boot up faster by saving the kernel session to the hibernation file.

However, it can cause issues with hardware configurations, memory processing, or dual-boot setups. So, disabling it can resolve the problem.

In conclusion, you may be interested in our comprehensive guide on fixing Valorant not working on Windows 11. Also, you can go through some effective solutions for Valorant not updating on your PC.

If you have further questions and suggestions, kindly drop them in the comments section.

Leidos and Microsoft partner for public sector AI transformation

Leidos and Microsoft have formed a strategic collaboration to expedite the implementation of artificial intelligence (AI) solutions for the public sector. The partnership aims to capitalize on their respective strengths in the market to drive AI transformation for new and existing customers.

One of the immediate focuses of this collaboration is co-developing generative AI solutions that will enhance organizational efficiency, boost productivity, and facilitate cross-domain applications.

Steve Hull, Executive Vice President of Enterprise and Cyber Solutions Operation at Leidos, emphasized that the agreement would enable co-innovation using the latest cloud and AI technologies.

Leidos successfully migrated 20 critical support applications from an on-premise data center to Microsoft’s Azure Government cloud environment to support the U.S. Navy. This migration, part of Leidos’ contribution to the Department of the Navy’s Next Generation Enterprise Network (NGEN) Service Management, Integration, and Transport (SMIT) program, improved the monitoring, maintenance, and security of the Navy and Marine Corps Intranet (NMCI) without compromising security.

Speaking of collaborations meant to improve both company and users interest, last week, Google, Microsoft, and OpenAI formed the ‘Frontier Model Forum for safe generative AI development.

Both Leidos and Microsoft are committed to building a robust partner ecosystem that can identify customer challenges and collaborate responsibly and efficiently to find effective solutions.

via FedScoop

Can’t Add Funds on PlayStation Wallet? Here’s What to Do

PS4 users have reported difficulties when trying to fund their PlayStation wallet to make purchases or pay for other services. The issue can be damning to users as it prevents any activities that require payment.

Hence, users are curious about what to do if they can’t add funds to their PlayStation wallet. We recommend you go through this guide to the end to read about potential fixes for the problem.

Why can’t I add a card to my PlayStation account?

  • If you enter incorrect payment details, including the card number, expiration date, CVV code, and billing address, PlayStation can’t add funds.
  • Network congestion and unstable internet can also affect the payment method and prevent the payment method from working.
  • There might not be enough funds on the credit/debit card to fund your PS4 wallet, making it seem like the payment method isn’t working.
  • Issues with your PSN account, such as a suspension or a hold on your wallet funds, can affect your payment method.
  • Temporary server issues or outages on the PlayStation Network may affect payment processing.
  • Some payment methods may not work if they are from a different country than the PSN account.
  • The bugs from the outdated PS4 system software can sometimes cause payment issues.
  • If the payment method is associated with a child account or sub-account, there might be restrictions on using specific payment methods.

The above causes are general and likely vary on different PlayStation devices depending on the circumstances. Regardless, you can resolve the payment issues by following the troubleshooting steps discussed in the next section.

What can I do if I can’t add funds to my PlayStation wallet?

Go through the following preliminary checks before anything:

  • Power cycle your router or modem and connect to a stable internet network.
  • Ensure you have entered the correct payment information, including the card number, expiration date, security code, and billing address.
  • Ensure your payment method has enough funds or credit to cover the funding.
  • Double-check if the PlayStation Network supports the payment method because different regions may have specific supported options.
  • Check the PlayStation Network (PSN) status on Sony’s official website or social media to see if there are any ongoing server problems.
  • Use the Master Account or update the parental control settings.
  • Contact your bank to ensure they are not blocking the payment or flagging it as a potential scam.

You can proceed with the troubleshooting steps provided below if the preliminary checks above can’t fix the issue:

1. Add funds via the console

  1. Launch the PlayStation Settings from the Home Menu.
  2. Navigate to the Account Management option.
  3. Go to Account Information and select the Wallet tab.
  4. Click the Add Funds button.
  5. Then, choose an option from the available list of payment methods.
  6. Select the amount of funds to be added and hit Continue.
  7. Click Yes on the confirmation screen to proceed with the funding process.

Most users have reported that funding their PlayStation 4 wallets using the console has fixed the problem. So, connect your console to a stable network and try making the payment on it to see if it helps.

2. Change payment method

  1. Consider using an alternative payment method, like a different credit/debit card or PayPal.
  2. Double-check the expiration date and other information on the card.
  3. Ensure that your account is working properly before trying this method.

In conclusion, we have a detailed guide about PS4’s this content cannot be selected at this time error and some methods to fix it.

Should you have further questions or suggestions, kindly drop them in the comments section.

How to enable Microsoft Copilot for Microsoft 365

Microsoft has been at the forefront of incorporating AI solutions into work collaboration and communication after branching out its partnership with Open AI. Microsoft Copilot, developed using the latest OpenAI LLM technology, is a prime example of this evolution. The AI assistant is designed to aid users across the Microsoft 365 productivity suite, from Word, Excel, and PowerPoint to the Teams collaboration platform, enhancing workflow efficiency.

Since Copilot was introduced, Microsoft hasn’t taken its foot off the pedal, intending to extend its functionality into all its resources. Here’s a guide to help you understand and enable the AI assistant, Microsoft Copilot, for Microsoft 365 and Teams.

What is Microsoft Copilot?

Microsoft Copilot is an exceptional AI assistant that enhances productivity. It is widely recognized as one of the most advanced productivity tools available worldwide and operates in two primary ways. Firstly, it assists users using popular daily applications such as Word, Excel, PowerPoint, Outlook, and the Power Platform. Secondly, through LLM technology, Microsoft has integrated ‘Business Chat,’ which allows users to initiate actions across all Microsoft 365 applications using natural language prompts.

Here are some of the things Copilot can do for you:

  • Word: Assists in drafting, revising, summarizing, and generating documents.
  • Excel: Helps users spot patterns and create striking data visualizations.
  • PowerPoint: Transforms ideas into comprehensive presentations.
  • Outlook: Helps manage your inbox, summarizes conversations, and suggests responses.
  • Power Platform: Supports developers to prototype and create low-code applications.
  • Business Chat: A useful tool for content creation, work planning, and keeping track of important dates.

How to Enable Microsoft Copilot on Microsoft Apps?

While Microsoft Copilot is already integrated into Microsoft 365 apps for some users, others may need to update their Microsoft applications to access these features. If you’re a beta channel member with Microsoft, you might not have instant access to Copilot as the company rolls out the solution gradually to gather insightful feedback.

To activate Microsoft 365 Copilot, simply click on the Copilot icon on the ribbon menu of any integrated Microsoft app. This feature is only available to those who have access to Microsoft 365 Copilot. Once activated, Copilot can enhance your creativity, boost productivity, and help you improve your skills.

How To Get Ready For Microsoft 3

Microsoft Copilot for Teams

Teams users can take advantage of Microsoft Copilot to boost collaboration and communication. This feature enhances meeting effectiveness by offering real-time summaries and action items. Additionally, if a team member forgets to take notes during a meeting, they can request a conversation summary from Copilot, which will provide a comprehensive document containing important decisions and task assignments. Users can also ask Copilot to critique meetings, allowing for more productive future conversations. Teams also include the Business Chat solution, which provides new capabilities across all applications and data.

How to Enable Microsoft Copilot in Teams?

Similar to other Microsoft Copilot features, the Teams solution is currently only accessible to specific users. If you are part of the Microsoft 365 Copilot Early Access program, you can activate Copilot directly from the Teams meeting tab. Admins may need to enable Copilot from the Teams settings page, but once it is activated, you will notice a new icon at the bottom right corner of your channel or team chat. By clicking on the button, you will open a chat window with Copilot.

Microsoft has announced that Copilot is now available for Teams Phone and Teams Chat. This has made Teams the first UCaaS solution to offer generative AI for phone calls. Also, the AI tool can be used for both PTSN and VoIP calls, providing real-time summarizations and notes. Additionally, for chat, the AI can outline conversations, create summaries, and extract important points.

In conclusion, Microsoft Copilot is a powerful, AI-powered assistant designed to streamline workflows and boost productivity within the Microsoft ecosystem. The enabling process might currently be exclusive, but it promises to usher in a new paradigm of work, collaboration, and communication soon.

Can You be Hacked by a QR Code? [Prevention Guide]

QR codes have taken the world by storm in the last few years. And the over-reliance on smartphones sure added to their success. We can now scan QR codes from anywhere. Domains they find application in are on the rise. But can you be hacked by a QR code?

This question bothers us all, whether it be an expert in the field of technology or someone who just got their first smart device. The answer may come as a surprise and will probably make you think twice before scanning the next QR code. Keep reading to find out!

Can a QR code get you hacked?

Yes, a QR code can get you hacked and lead to the loss of personal data, even login credentials and banking information. We generally use our phones to scan QR codes, and these devices store all kinds of vital details, which makes them all the more attractive to hackers.

When QR codes were first invented in 1994, there were safe, and the trend continued for another decade or so. But since then, the landscape has changed dramatically, things taking a turn for the worse. QR codes aren’t safe anymore!

They can be used to infiltrate a device, steal data, modify critical parameters, make payments without the user’s explicit consent, and in the worst case, render the device unusable. Though most of you are unlikely to come across a similar situation, it’s always better to be prepared!

How can attackers use QR codes?

To understand this, let’s first find out how QR codes function. A QR code is basically an upgrade over a barcode, storing a vast amount of information and providing devices with the instructions to follow when it’s scanned.

This could be something as simple as opening a cafe’s menu or redirecting to a website, an advertisement, or even making payments. QR codes now find increased application in online contact-free payments, making them the perfect target of hackers.

Say, you scan a QR code that redirects you to a website. You browse through it and then terminate the session. Nothing suspicious as of now, right?

What unsuspecting users don’t realize is that these websites can download stuff without seeking explicit approval. And these files will compromise security and send critical data back to hackers.

Besides, there have been cases where huge sums were deducted from the user’s bank account by simply scanning a QR code. How does this work? The QR code specifies a set of commands instructing the device to transfer the amount.

While there are security measures in place, both in the phone and the banking application, there are also loopholes to exploit. And hackers somehow usually find these!

How do I protect against malicious QR codes?

1. Do not scan every QR code you see

What’s the best prevention against malicious QR codes? Don’t scan them. Go with other secure ways unless you have verified their authenticity and the fact the QR code has not been tampered with in any way.

Hackers usually replace the QR code in cafes with their bugged ones. Or create too-good-to-true advertisements to entice users. Whenever you see one, think twice before scanning it. Because once that part is done, it wouldn’t be long before the data is compromised.

2. Check the URL the QR code is redirecting to

Most QR codes redirect to a website. And even a remotely secure device will first list the link before actually heading to the webpage. And this is your chance to verify whether the QR code is legit or hacked.

Check whether the QR code redirects to the same website that it should. Remember, when a QR code is hacked, hackers put in special effort to create a webpage that resembles the original one, both in terms of web address and interface.

So you will have to inspect the link carefully. Look for any anomalies, additional characters, hyphens, or forward slashes. These are changes that often go unnoticed. And a few seconds of effort here could save your phone from being hacked by a QR code.

3. Never share banking or private details

If you scan a QR code and it redirects you to a webpage that asks for private or critical information, never share these. For banking purposes, never rely on QR codes, and use the bank’s official app or website.

Some hackers design a webpage that looks surprisingly similar to the login page of a social network platform. And any information you provide here will be sent directly to the hacker, leading to your account being compromised.

4. Use a safe QR code scanner

Ever since QR code scams became a problem that directly affected the masses, many popular antivirus solutions have developed a dedicated QR scanner app for mobile phone users.

While the Norton Snap QR Code Reader is out of support, several reliable options are still available in the App Store on iOS and Play Store on Android.

5. Make sure the device is protected

As soon as an exploit is identified in the OS, developers usually release a patch for it in the subsequent updates. And in a world where you could be hacked by a QR code, device security is a must.

So, always keep the device updated! Regularly check for any patches or upgrades and install them the first chance you get.

6. Format the device when compromised

If your device is already hacked or compromised by malware injected through a QR code, the best course of action is to format it.

You may lose some photos and files, but a quick response here will save a ton of valuable data, including login details and banking information.

Now that you know how QR codes can be used to hack into devices, there certainly will be a change in pattern on your end. And there should be!

Before you leave, find out all about QR codes and their application.

Do share your experience with QR codes in the comments section.

Final Fantasy XIV Online to hit Xbox Series X|S in Spring 2026

There has been a lot of hay made recently over the relationship between Xbox and storied Japanese video game publisher Square Enix,  or rather, lack thereof. The historic role playing (RPG) maven’s support for Xbox has been pretty meager as of late, with seemingly almost every Square Enix title foregoing an Xbox release, with Octopath Traveler II being among the latest example.

During regulatory investigations into Microsoft’s big to acquire Activision it was also revealed in court documents that blockbuster Square Enix titles such as Final Fantasy 7 Remake and Final Fantasy XVI will not be coming to Xbox at any point thanks to exclusivity deals between Square Enix and Sony.

With that being said, the announcement of Final Fantasy XIV Online coming to Xbox was all the more surprising for gamers and fans over the weekend. If you are unfamiliar, Final Fantasy XIV Online is a massive multiplayer online role playing game (MMORPG) with around 27 million active players, and filled with Final Fantasy‘s distinct characters, magic and lore.

No specific release date has been set, though the full Xbox Series X|S release is expected to launch sometime in the spring of 2024. Leading up to that presumed release there will be an open beta as confirmed in the announcement post, as well as an extended free trial coming “very soon indeed!”

Featured image via Xbox Wire. 

Fix: LSA Database Contains an Internal Inconsistency

When working with drive mapping and network sharing, a lot can go wrong. Wireless networks aren’t as reliable as their wired counterparts. And an error that has been bugging users is The local security authority database contains an internal inconsistency.

This affects all network drives, and users cannot access one or connect to it. The error also creates issues with network shares via Samba to Linux and other stations.

In some cases, users come across the message, Drive is not accessible. You might not have permission to use this network resource. The local security authority database contains an internal inconsistency. Keep reading to find out all about the problem!

Why is the network drive not accessible?

Here are a few reasons the network drive stopped working suddenly:

  • Missing permissions: Often, the problem arises due when accessing the network using an account with insufficient privileges, usually a local account.
  • Corrupt user profile: For a few users, the user profile was corrupt, and as a result, they kept seeing, The local security authority database contains an internal inconsistency error on the Microsoft Windows network.
  • Third-party apps affect the connection: Third-party apps are just as likely to reconfigure the network settings, maybe adding a restriction or two, which, subsequently, triggers the error.
  • Installed a buggy Windows update: In some cases, the problem appeared after updating Windows, which points to a bug in the latest version.

What can I do if the LSA database contains an internal inconsistency?

Before we move to the slightly tricky solutions, here are a few quick ones to try:

  • Restart all the devices on the network, including the NAS (Network Attached Storage).
  • Disable any third-party firewalls or security software configured on the PC.
  • Scan your PC for malware using a reliable antivirus solution. For a few users, The local security authority database contains an internal inconsistency error gets triggered when the lsass.exe file is affected by the CryptoWall malware.

If none work, head to the fixes listed next.

1. Add ACL support to Samba

The solution is specific to cases where you worked out the network share using Samba and recently got ACL support. A user shared that adding the following parameter to the smb.conf file should fix things:[myshare]
nt acl support = yes

Once done, make sure to restart the Samba service and reboot the connected devices for the changes to come into effect.

2. Clear your profile from HP ProtectTools

Tip icon Tip
The solution is specific to HP devices that have the HP ProtectTools installed. In case you are using another computer, skip this and head to the next one.

When facing issues accessing the network drive or logging into Windows, a quick solution is to remove the user profile from HP ProtectTools.

Just head to the dedicated section, clear the user profile, save the changes, and restart the computer. Most users managed to fix The local security authority database contains an internal inconsistency error by deleting the profile in HP ProtectTools.

3. Uninstall conflicting applications

  1. Press Windows + R to open Run, type appwiz.cpl in the text field, and click OK.appwiz.cpl
  2. Select the application that was installed or updated around the same time the error first appeared, and click Uninstall.uninstall to fix local security authority database contains an internal inconsistency
  3. Follow the on-screen instructions to complete the process.

A third-party application with permission to modify the user credentials or network settings can often cause issues while accessing mapped drives. Based on our research, we found these two to commonly trigger the error:

  • HP ProtectTools
  • Dell Data Protection

4. Create a new user account

  1. Press Windows + R to open Run, type netplwiz in the text field, and hit Enter.
  2. Click the Add button.add
  3. Click on Sign in without a Microsoft account.
  4. Select the Local account option.local account
  5. Fill out the profile details, username and password, then click on Next to proceed.local account to fix local security authority database contains an internal inconsistency
  6. After creating the profile, select it, and click on Properties.properties
  7. Navigate to the Group membership tab, select Administrator, and click on OK to save the changes.administrator
  8. Once done, restart the computer, sign in with the new user account, and check whether you can access the network drive.

Several users reported that creating a new user account fixed things when they kept getting The local security authority database contains an internal inconsistency while signing into Windows. Just make sure to create an administrator account.

5. Uninstall recent Windows updates

  1. Press Windows + I to open Settings, go to Windows Update from the navigation pane, and click on Update history.update history
  2. Scroll down to the bottom and click on Uninstall updates.
  3. Locate the problematic update, and click the Uninstall option next to it.uninstall updaet to fix local security authority database contains an internal inconsistency
  4. Again, click Uninstall in the confirmation prompt.

When the problem first appeared after updating Windows, uninstalling that particular update should fix things as well. You may have to remove a few updates before actually identifying the culprit.

6. Perform a factory reset

If none of the solutions presented here work, it’s likely a tricky issue triggering The local security authority database contains an internal inconsistency error. Here, the only viable option is to factory reset Windows.

Remember, this will delete the stored files (we recommend choosing the option for high effectiveness), so make sure you create a backup beforehand. Also, after the reset, you will have to reconfigure the network setting and map the network drive, but it will get things running!

Before you leave, find out how to use your PC as a Wi-Fi extender and save quite a few bucks on purchasing the actual hardware.

For any queries or to share the solution that worked for you, drop a comment below.

How to Use RSAT: Complete Step-by-Step Guide

IT administrators know the importance of RSAT, or Remote Server Administration Tools, as it’s a valuable service employed to remotely manage roles and features in Windows Server from a client machine. And they must know how to use RSAT.

Still, for everyone else, we’ll start with an introduction to what RSAT can do. Then, we’ll walk you through the entire process of enabling the service and using it effectively. Ready? Let’s get right into it!

What is RSAT?

Remote Server Administration Tools (RSAT) is a powerful collection of Windows Server management tools that allow administrators to remotely manage and control Windows servers from a client computer.

In other words, you can use it for remote management of other Windows PCs.

Keep in mind that the RSAT feature is only available for the Pro and Enterprise versions of the Windows operating system. So, if you’re using the Home edition and want to make use of the collection of tools, you’ll first need to upgrade to either Windows Pro or Windows Enterprise.

Here’s what you can do with RSAT:

  • Add and remove roles, role services, and features on remote devices
  • Customize different security settings
  • Manage event logs
  • Install security updates

How does RSAT work?

As we established, RSAT is a collection of tools developed by Microsoft. It includes two types of packages: one for roles and one for features. The former entails access management to your server. This includes services such as the Active Directory services, Certification Authority snap-in, Dynamic Host Configuration Protocol (DHCP) servers, NIS Server tools, etc.

The latter allows you to control other features on the server, e.g., Group Policy Management Tools, Network Load Balancing Tools, Storage Manager Windows System Resource Manager Tools, etc.

Here are its primary features at a glance:

This was just an overview of the RSAT tools. You can view the complete list on Microsoft’s dedicated page.

How do I run RSAT on Windows 11?

1. Enable RSAT

  1. Press Windows + I key to open Settings. Click on Apps from the left-hand side.install-optional-features
  2. Choose Optional features on the right.optional-features-rsat
  3. Click on the blue View features button next to the Add an optional feature option.install-features-windows
  4. Type rsat in the search box. Select all the tools you want to enable (preferably, that’d be all the tools from the list) and click Install to proceed.enable-rsat-windows
  5. Wait for the installation process to finish and restart your PC.

As you can see, installing RSAT on Windows 11 is simple – all you need to do is enable it as an additional feature. That’s the easiest way to enable the tool on your PC.

Though, sometimes, RSAT isn’t available as an optional feature. That generally happens if your OS is outdated, your Windows edition isn’t compatible with the administrative tool, or the service isn’t available in your geographic region.

If that’s the case, or if you encounter any difficulties installing RSAT, you might want to look for other options, e.g., using Windows PowerShell or modifying the Registry to get it on your PC.

Keep in mind that you can’t download the RSAT installer on your Windows 11. The RSAT download version is only available for Windows 10 devices.

2. Connect to a remote server

  1. Open the RSAT tool you want to use by typing it in the Start menu or using the Run dialog.
  2. Say you want to launch Active Directory Users and Computers. Press Windows + R key and type the following command and hit Enter: dsa.mscactive-directory-users-computers
  3. Go to File and select Connect. Enter the server’s name.
  4. Choose the appropriate auth method and provide your credential to connect. Click OK.

Now that you’ve installed RSAT and its necessary tools are enabled, you need to perform one last thing before you can run it on your PC. The second step is to establish a connection to a remote server.

Tip icon Tip
Don’t forget to disconnect from the remote server after you finish your admin tasks.

3. Employ RSAT tools

3.1. Active Directory Tools

Create and manage user accounts, groups, organizational units, or objects. You can also reset passwords, manage group policies, monitor directories, etc. Active Directory tools make life easier by combining all those tools into one interface while increasing security simultaneously.

active-directory-rsat

Admin privileges and rights, user configuration, PC control, and domain resources are centralized into one repository. If you’ve already enabled RSAT, as per the tutorial above, you should also have the AD tool active on your computer.

You can check that by opening your Start menu and looking for the Administrative Tools folder (this will contain the Active Directory Users and Computers information).

This is one of the most important and used features, so if your Active Directory Users and Computers tool is missing, you must learn how to fix it quickly.

3.2. Dynamic Host Configuration Protocol

Dynamic Host Configuration Protocol (DHCP) is a tool with the primary purpose of automatically assigning dynamic IP addresses to your device. You can also use it to configure other aspects of network information, e.g., DNS server data, subnet masks, and default getaways.

dhcp-rsat

Dynamic IP addresses are more flexible, comprehensive, and easier to manage. With RSAT, you can manage DHCP servers, configure IP settings, and troubleshoot DHCP issues.

The RSAT DHCP service can be enabled through the Optional features method listed above. However, you can also learn how to connect your PC to a DHCP server and what to do if you encounter any difficulties along the way.

3.3. Domain Name System

The Domain Name System (DNS) server is crucial to internet access, as it’s used to communicate with origin servers and access website information. RSAT helps you manage DNS servers and resources. You can delete records, configure conditions, and resolve related issues.

dns-rsat

The RSAT feature can be enabled through the Optional features method. However, there are several issues you may face when trying to use to service itself. For example, you may find that your DNS server isn’t available on Windows 11, or the DNS server might not be responding at all.

This will prevent you from accessing the web and hinder any admin attempts to manage servers and resources. Keep in mind that the ability to diagnose & fix the most common DNS issues is of utmost importance to your IT admin efforts.

3.4. Hyper-V

Hyper-V is a Windows-native virtualization product. With it, you can run a software version of a computer (virtual machine). Virtual machines act like ordinary PCs, running an OS and using specific programs.

hyper-v-manager-rsat

However, they do this in an isolated space, meaning your physical computer is protected from any software issues you might encounter while on your VM.

Thanks to RSAT, you can easily manage virtual machines, monitor their performance, and control their storage, network, and capabilities.

3.5. Remote Desktop

The Remote Desktop service allows you to manage user sessions, monitor performances, troubleshoot network issues, configure sessions, etc. In other words, you can control another computer or device from a distant location.

remote-desktop-rsat

Learn all the different ways to enable & use the remote desktop service on your Windows 11 PC. Once you’ve allowed it on your computer, you can use the RSAT feature by enabling it through the Optional features method.

Once you enabled RSAT and connected to a server, you can start using the collection of tools now available. These were just some examples of its most popular features and what you can do with them.

So, that’s how to use RSAT on your Windows PC. We hope this information proved itself valuable to your IT admin efforts.

Before you go, you might want to check out what to do if RSAT frequently crashes or all the additional ways to enable RSAT on Windows.

Keep in mind that RSAT isn’t available on all platforms, and if you can’t use RSAT on Windows 11 ARM at the moment.

Do you have any questions or suggestions, need further assistance, or want to share what proved most useful to you? Reach out to us in the comment section below, and we’ll get back to you.

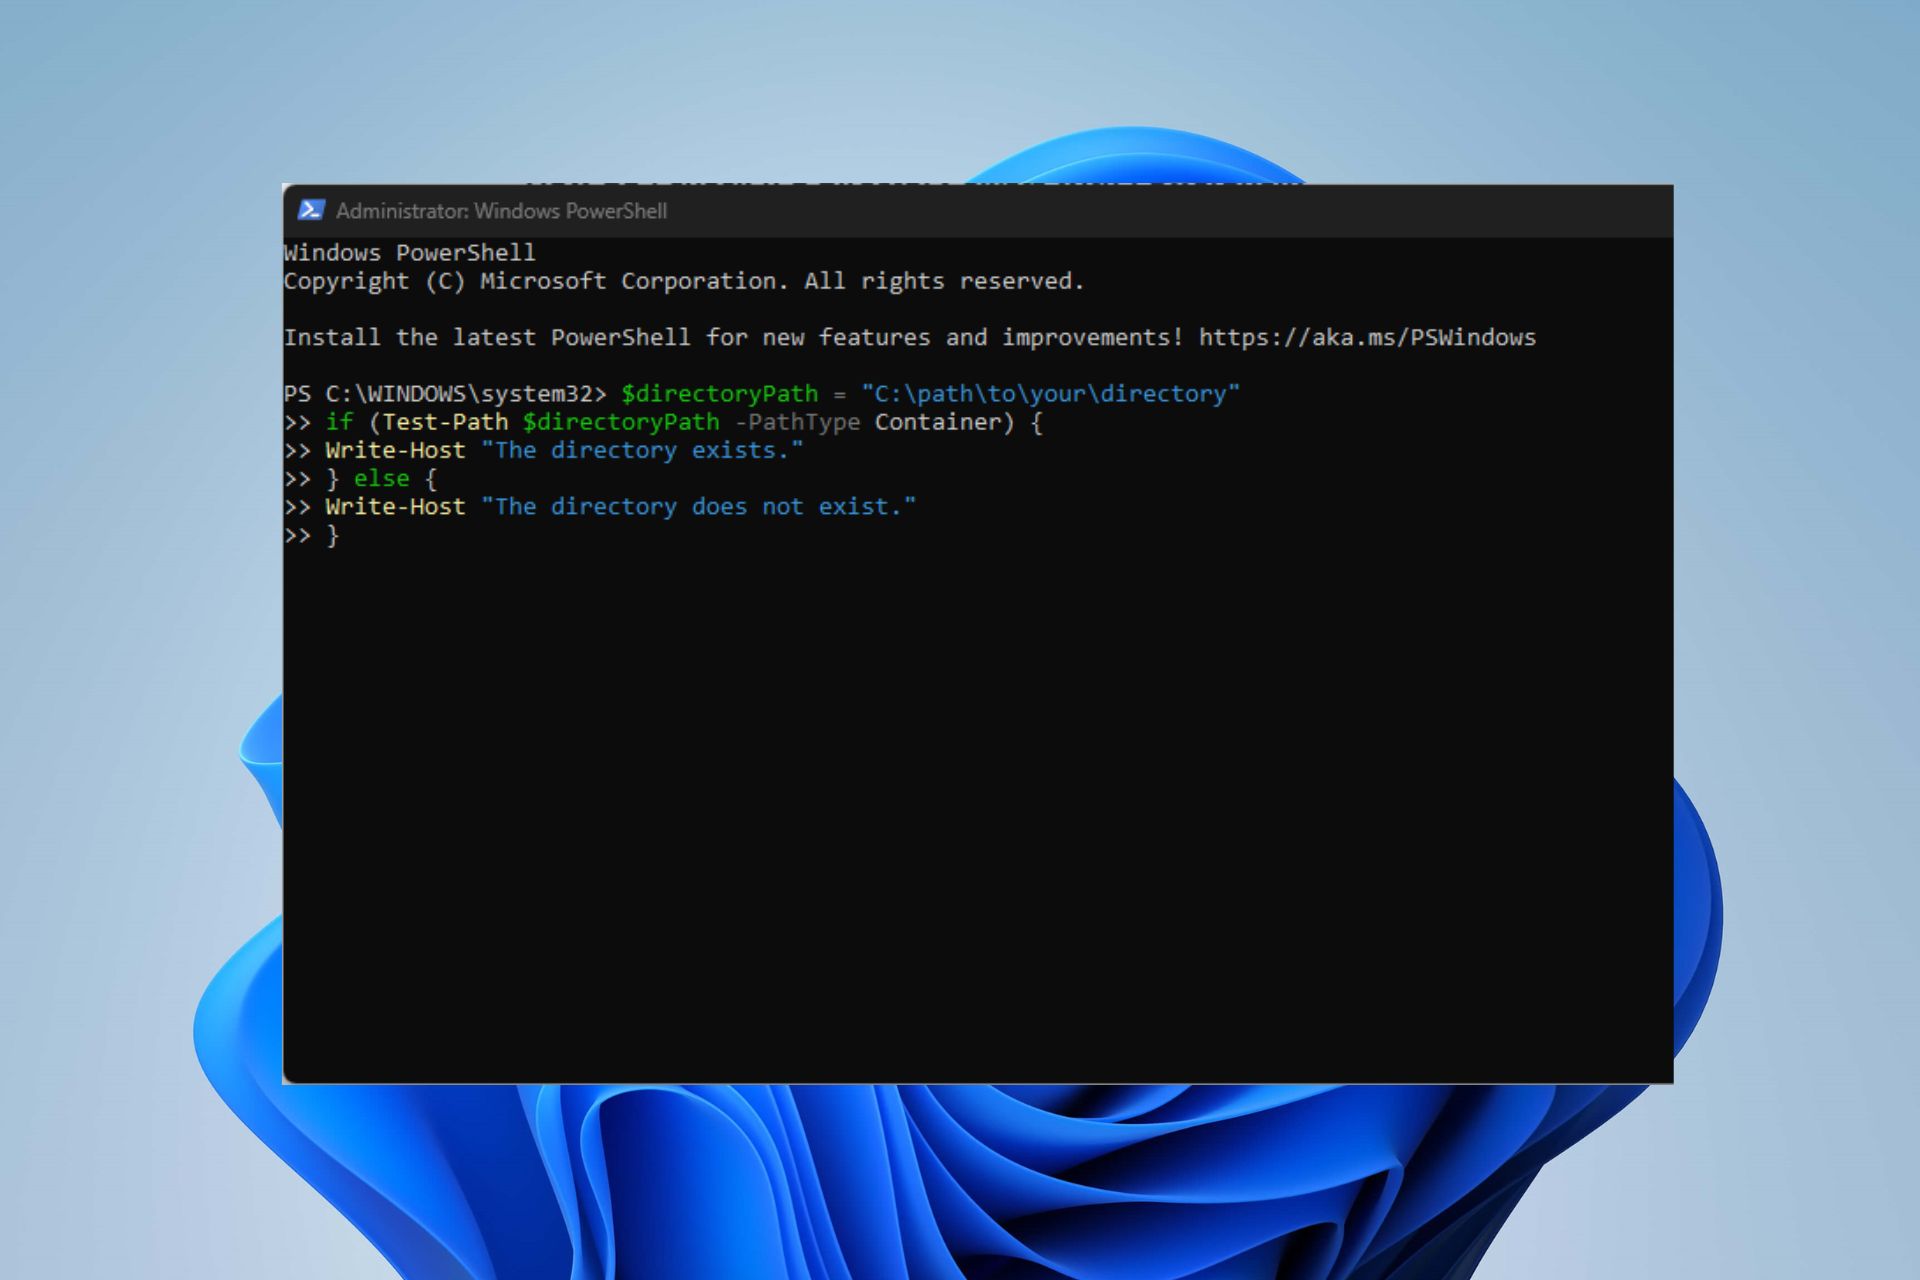
GPU Not Showing up in Task Manager? Here’s What to do

With the Task Manager, you can view the real-time updates of GPU usage of different processes. However, many users have reported that they weren’t able to view the GPU information in the Task Manager.

In this guide, we will give you multiple solutions that will help you fix the GPU not showing up in the Task Manager problem. Let us get right into it.

Why is my GPU not showing up in Task Manager?

There are many reasons why the GPU may not be showing up in the Task Manager. It can be pretty frustrating as you wouldn’t know the GPU usage of the culprit program.

Some of the different reasons why the GPU usage is not showing up in Task Manager are:

  • GPU not being installed properly – Chances are the graphics card driver is uninstalled from your PC or hasn’t been updated because of which the GPU usage isn’t showing up in the Driver tab of the Task Manager.
  • Corrupted system files – Missing or corrupt system files can often cause multiple issues on your PC including the GPU performance not showing up in the Driver tab of the Task Manager.
  • Hardware components failure – Lose connection of the GPU and its related hardware components can also cause multiple issues. The onboard GPU will take over in this situation.

Let us now take a look at the different solutions that will help you resolve the problem.

How do I fix GPU not showing up in Task Manager?

1. Reset the performance counters

  1. Press the Win key to open the Start menu.
  2. Type the command prompt and open it as an administrator.
  3. Type the below command and press Enter. lodctr/R
  4. Check if the issue is resolved or not.

You can fix the GPU driver not showing up in the dialogue box problem by simply running the above command.

Notably, the above command, according to Microsoft, basically helps restore counter registry settings and explanatory text from current registry settings and cached performance files related to the registry.

2. Update the graphics driver

  1. Open the Start menu by pressing the Win key.
  2. Type Device Manager and open the top result.
  3. Expand the Display adapters section.
  4. Double-click on your graphics driver to open it.
  5. Switch to the Driver tab.
  6. Hit the Update driver option.
  7. Choose Search automatically for drivers option to fix the faulty display adapter driver.

You should make sure that you are running the latest version of the graphics chipset driver software in order to stay away from bugs and enjoy the latest features.

We have a guide that explains all the different methods that you can follow to update the graphics driver on your Windows 11 PC.

3. Fix corrupt system files

  1. Press the Win key to open the Start menu.
  2. Type the command prompt and open it as an administrator.
  3. Type the below command and press Enter. sfc /scannowsfc scan
  4. Wait for the command to fix the corrupt system files.
  5. Execute the below commands to restore your system files health. Dism /Online /Cleanup-Image /CheckHealth Dism /Online /Cleanup-Image /ScanHealth Dism /Online /Cleanup-Image /RestoreHealthdism restore

Fixing corrupt system files will not only help you resolve the graphics driver issue at hand, but it will also help you mitigate multiple other problems.

In case, the SFC Scan is not working, we would suggest you apply the solutions mentioned in our dedicated guide.

4. Check the version of the faulty chipset driver

  1. Press the Win + R keys to open the Run dialogue.
  2. Type dxdiag and hit the OK button.
  3. In the DirectX Diagnostic Tool, click on the Display tab.
  4. If the Driver Model shows up as WDDM 2.0 or higher, then the feature is available with your current Display Adapter (GPU) Driver. In case the the Driver Model shows up as WDDM 1.3 or lower, then the feature is not available with the current Drivers.

Often, we look for features that aren’t available for the chipset driver software or hardware component that we are using. You can check the version of the GPU and cross-check whether it supports the feature or not.

5. Update the BIOS

5.1 Check the BIOS version

  1. Open the Start menu by pressing the Win key.
  2. Type System Information and open the top result.
  3. Locate BIOS Version/Date section on the right side.
  4. Note down the BIOS version that you are running.

5.2 Format the USB drive to FAT32

  1. Insert the USB flash drive into your PC.
  2. Press Win + E to open the File Explorer.
  3. Right-click on your USB drive and choose Format.
  4. Select FAT32 from the File system dropdown menu.
  5. Click on the Start button.

3.3 Update the BIOS

  1. Visit the official website of the motherboard manufacturer and download the BIOS file.
  2. Place the BIOS file into the FAT32 formatted USB drive.
  3. Insert the USB drive containing the BIOS update file into any USB port on your PC.
  4. Restart your PC and when it is booting up enter the BIOS menu by pressing the Del key.
  5. Select the Update BIOS option.
  6. Locate the BIOS update file and select it.
  7. Start the BIOS update process.
  8. Save & Exit and reboot your PC.

Why is my second GPU not showing up in Task Manager?

There can be several reasons why the second GPU is not detected by your PC. Chances are the second GPU chipset driver software isn’t updated, there could be incompatibility issues with the motherboard, etc.

For your help, we have a dedicated guide that explains the different methods that will help you to fix the second GPU not detected issue.

You can also try uninstalling the recently installed Windows update as it might be carrying an underlying bug that is causing the issue.

That is it from us in this guide. We have a guide that will help you in resolving one of the most common GPU issues where the PC is not detecting the graphics driver.

Many of our readers have also reported that on their PCs the GPU is not detected but the fan is spinning issue. You can learn the solutions to resolve the problem in our guide.

Feel free to let us know in the comments below, which one of the above solutions resolved the GPU usage not showing problem in your computer. 

Threads App is Not Working? 3 Things You Can do to Fix it

Threads, the latest offering from Meta, has been a huge success initially, with the platform hitting 100 million users quickly. However, the active user count has been dropping exponentially. A reason behind it could be the Threads app not working.

The number of users complaining about the issue is increasing daily, and since the app is in its infancy, a few problems are bound to appear. But if the underlying cause lies at your end, a few quick solutions may help. Keep reading to find out!

Why is my Threads app not working?

Here are a few reasons the Threads app is not working properly:

  • Threads is not available: The Threads app is not available to everyone. The app is being gradually rolled out, and if you somehow managed to install it using a workaround, problems may appear.
  • Geographical restrictions: Due to privacy concerns, threads is currently unavailable in the EU. So users from the region may encounter the Not permitted error in Threads.
  • Issues with the Internet connection: For many users, a slow Internet connection led to the Threads app not working.
  • Problems with the server: Though rare, there’s always the likelihood of a server outage, be it worldwide or limited to a region. It’s also often the reason behind Southwest Error: 500120309.
  • Improper installation: This is highly unlikely to be the case with Threads, but an improper installation has been found to affect several apps.

How can I fix the Threads app if it’s not working?

Before we head to the slightly trickier ones, here are a few quick solutions to try:

  • Terminate the Threads app and relaunch it. In newer models of iPhone, swipe upwards from the bottom of the screen, locate Threads, and then swipe it up again.
  • If you reside in the EU, wait for Threads to be released.
  • Restart the mobile phone.
  • If you are using mobile data, switch to Wi-Fi and vice-versa. Also, move closer to the router for better signal strength for Wi-Fi.
  • Verify that the Threads servers are not down. You can use Downdetector for this.
  • Disable any active VPNs on the device.
  • Sign out of your Threads account and log in again.
  • Use Threads on a different mobile phone to identify whether the problem lies with the platform or the previous device.
  • Make sure the device has enough free storage. If you run out of space, clear a few files or uninstall other apps.

If none work, move to the fixes listed next.

1. Clear the app data

  1. Open Settings, and go to Apps.
  2. Locate and tap on Threads.
  3. Now, locate the Storage entry and tap on it.storage
  4. Tap on the Clear data and Clear cache buttons.clear data to fix threads app not working

When the Threads app is not working in Android, we can clear the app cache and data, which usually fixes the problem. Remember, this also works against the Vinted server error.

But, if Threads is not working on iPhone, you must employ the Offload app feature. It will delete the cache and uninstall the app, though the app data is stored in the archive and will be accessible when you reinstall Threads.

2. Update the app

  1. Open the App Store (iOS) or the Play Store (Android), search for Threads, and select the relevant result.
  2. If an update is available for the app, download it.update threads

When faced with the issue, a quick solution is to update the app. Newer versions tend to introduce stability and help the app perform better. And it’s all the more important for apps released recently.

3. Reinstall Threads

  1. Locate the Threads app on your phone, long-tap the icon, and select Remove app.remove to fix threads app not working
  2. Tap on Delete App in the confirmation prompt.delete app
  3. Now, head back to the App Store, search for Threads, and tap on Get to download the app.download threads

When all else fails to work and the Threads app is still not working, an easy solution would be to reinstall the app. Any issues with the previous installation or problems with the app files are eliminated when you do that.

Before you leave, find out how to delete Threads without deleting the Instagram account, a concern shared by many who, in haste, registered on the new app.

For any queries or to share what worked for you, comment below.

How to Show the Internet Speed on Taskbar [Easy steps]

Internet speed is a vital parameter that decides how the online experience turns out. Be it file downloads or uploads or simply browsing the web, we need a decent Internet connection. And that’s why users look for ways to display Internet speed on the taskbar.

Having the network speed show up in the Taskbar allows users to monitor things quickly, no matter the task at hand. The Taskbar is always visible unless you are in full-screen mode. But Windows doesn’t offer a native option to show the Internet speed in the Taskbar.

That’s why you need would need a third-party tool. Keep reading to find out all about the best options!

How do I run a speed test in Windows command line?

  1. Press Windows + R to open Run, type powershell, and hit Ctrl + Shift + Enter.powershell
  2. Click Yes in the UAC prompt.
  3. Paste the following command and hit Enter:Get-NetAdapter | select interfaceDescription, name, status, linkSpeed
  4. The network adapter’s speed will now be listed under the LinkSpeed column.command

A quick PowerShell command allows users to check the network adapter’s speed. Remember, the better a network adapter performs in the test, the better will be the Internet connection when on a high-speed plan.

Want to measure your actual internet speed on Windows 10? Follow this step by step guide: How to test internet speed on Windows 10.

How do I show Internet speed on Windows 11 taskbar?

Tip icon Tip
As discussed earlier, there are no built-in ways to show the Internet speed in the Taskbar. So, we will be relying on third-party tools. These are safe to the best of our knowledge.

1. Use Net Speed Meter

  1. Go to the official Microsoft Store page for Net Speed Meter and click the Get in Store app button.get in store app
  2. Click on Open Microsoft Store in the confirmation prompt.
  3. Click the Get button to download the app.download to Display Internet Speed on Taskbar
  4. Once done, open the app.
  5. You will now find the Internet speed displayed near the top right of the desktop.net speed monitor
  6. To show the Internet speed in the taskbar, right-click on the gauge, and then select Keep in Taskbar from the context menu. Alternatively, you could simply drag and drop to position Net Speed Meter in the taskbar.change settings to Display Internet Speed on Taskbar

Net Speed Meter is a free tool that allows users to display Internet speed in the taskbar on Windows 10 and the latest iteration. The tool’s simple user interface and style of functioning make it the primary choice for many.

For those who want to explore other paid features, download Net Speed Meter Plus. It comes with a range of additional options, offers a free trial, and is priced at $6.99.

2. Use Net Speed Monitor

  1. Open Microsoft Store, search for Net Speed Monitor, and then click on Free trial to install the app.net speed monitor
  2. Once downloaded, click on Open to run it.
  3. You will now have Net Speed Monitor running in the corner. It will display the download and upload Internet speed.download and upload speed
  4. To move it to the Taskbar, simply drag and drop the gauge there. Besides, you can position it anywhere.

The Net Speed Monitor is another great tool to display Internet speed on the taskbar in Windows 11. Though priced at $0.99, there’s a free trial for users to check it out and identify whether it meets their requirements.

In case it does, there’s also a Net Speed Monitor Pro priced at $6.99, which offers a wide array of features and is meant for extensive application.

Looking at the user reviews, Net Speed Meter is a better choice. But it all boils down to what works best for you. We recommend trying them both out, checking the free and paid features, identifying how accurate the results are over time, and then making a decision.

That’s it! You now know how to show the Internet speed in the taskbar on both Windows 11 and the previous iteration. So, start using one of the apps today!

Before you leave, find out to increase the Internet speed in Windows when it’s running slow.

For any queries or to share your recommendation of similar tools, drop a comment below.

How to Quickly Add Error Bars in Excel [Standard, Custom]

Microsoft Excel is part of the famous Microsoft suite used for statistical calculation, charts, graphs, and data analysis. However, adding an error bar in Excel has challenged most users because they can’t measure variability on a graphical representation.

Moreover, adding an error bar in Excel is complex to understand without proper guidance, so we have compiled this article. Thus, we will explicitly discuss an error bar and how to add it in Excel.

What are error bars In MS Excel?

  • The error bar in Excel is the exact measurement of data variability on a graphical representation.
  • The precise lines drawn on a graph give you a comprehensive view and illustrate complicated statistical tests easily.
  • Errors are the uncertainty level between two statistical measurement groups.
  • Adding the error margins provide information about data accuracy in both positive and negative extents.

There are different types of error bars that you can use in Excel:

  • Standard error indicates the deviation between the mean and the total population.
  • Percentage Error shows the negative and positive sides.
  • Standard Deviation shows the proximity of the mean or average to the total population.

Having given insight into this, we will show you step-by-step details of inserting it in Microsoft Excel.

How do I insert error bars in Excel?

1. Add an error bar using the Ribbon

  1. Open the MS Excel app, create a graph on the spreadsheet, and click on it.
  2. Click the + Add Chart Element drop-down arrow at the bottom left corner of the Ribbon and select Error Bars from the menu.
  3. Select the desired error bar from the sub-context menu to add the error line to your graph.

The Ribbon provides a simple means to insert error bars in Excel.

2. Add a standard error bar

  1. Select anywhere on the chart
  2. Click the + Chart Element button on the right-hand side of the graph.
  3. Click the arrow next to the Error Bars and select the Standard error.

Adding standard error bars in Excel gives straightforward and well-represented variability data.

3. Add a custom error bar

  1. Click on the graph and click the + Chart Element button on the right-hand side of the graph.
  2. Then, click the Error Bar Arrow and select More Options from the sub-context menu.
  3. Click the chart icon to go to the Error Bar Options on the Format Error Bar context menu.
  4. Navigate to the Error Amount category, click the Custom radio button, and select the Specify Value button to open a Custom Error Bar dialog box.
  5. Click on the Positive Error Value and input your value.
  6. Select the Negative Error Value field and enter your figures accordingly.
  7. Select the OK button to display the Error Bar on your chart.

Adding a custom error bar in Excel allows you to select specific data variability and have tailored error representation.

In conclusion, you can read our detailed guide about how to fix Excel is not opening with easy steps. Also, we have a complete guide about quick ways to fix Excel running slow on Windows devices.

Should you have further questions or suggestions, please drop them in the comments section below.

Microsoft news recap: strict stance on using emulators, PayPal Pay Later and Venmo coming to Microsoft Store, and more

Microsoft news recap is a weekly feature highlighting the top Microsoft news stories of the past week. Sit back, grab some coffee, and enjoy the read!

Xbox Takes Strict Measures Against Emulation

Following a discovery of a workaround to run emulators on Xbox in retail mode, Microsoft has fought back by issuing 15-day console bans to discourage their use. Instructions for emulating games on Xbox in retail mode were being sold for $2.

Samsung and Microsoft Launch Advanced Mobile Security Solution

Samsung and Microsoft have teamed up to create a cutting-edge mobile security solution for businesses. This solution is the first of its kind, providing on-device, mobile hardware-backed device attestation for both company and personal devices. By combining the power of Samsung Galaxy devices with Microsoft Intune protection, enterprises can rest assured that their sensitive data is safe from compromised devices.

PayPal and Microsoft Team Up for Enhanced Payment Solutions

PayPal and Microsoft have announced a major integration of PayPal’s Pay Later solution in several countries, including the U.S., U.K., Australia, Germany, France, Spain, and Italy. Additionally, U.S. customers will soon be able to pay with Venmo, a PayPal subsidiary, in the Microsoft Store, as is already possible on Xbox. These new integrations aim to provide customers with more flexible payment options and increase customer loyalty.

Microsoft to Provide Japan’s Government with ChatGPT AI Technology

Microsoft is set to provide the Japanese government with its ChatGPT generative AI technology to assist with clerical work and analysis. This includes the ability to generate draft responses to parliamentary queries. Microsoft has installed high-processing power equipment at its data centres in Tokyo and Osaka to handle confidential information. This marks the first deployment of this technology in Asia.

chatgpt

That’s it for this week. We will be back next week with more Microsoft news.

File System Error (-1073741819): How to Fix it

Many Windows users have complained about the inability to install programs or utilize administrative privileges. The problem usually accompanies a file system error (-1073741819) indicating user access issues.

As a result, users are bothered with questions regarding resolving the error code (-1073741819). Thus, this guide will outline the steps for troubleshooting the problem on Windows PCs.

What is error level 1073741819?

  • This is known as the Access Violation error.
  • It occurs when a program attempts to access memory that it does not have permission to access.
  • If the registry values and keys for the User Account Control settings are changed or missing for some reason, it can cause the error to occur.
  • It can occur if the system files are corrupted or compromised, prompting file system errors.

We have a comprehensive guide on the administrator access denied error message and ways to fix it on your computer.

How do I fix the file system error (-1073741819)?

Before attempting any advanced troubleshooting steps, we recommend you observe the following preliminary checks:

  • Restart your computer to fix temporary issues and glitches likely to cause the error.
  • Update your device drivers and install the latest updates for your Windows operating system to resolve bugs and problems affecting it.
  • Try the built-in Windows utility Check Disk (chkdsk) to scan and repair disk-related issues.
  • If the error occurs when running a specific program, try reinstalling or updating that application.

Try these advanced steps if the file system error code (-1073741819) persists.

1. Disable UAC remotely and uninstall Symantec

  1. Press Windows + R key to open the Run dialog box, type regedit, and press Enter to open the Registry Editor.
  2. Locate and then click the following registry subkey: HKEY_LOCAL_MACHINE\SOFTWARE\Microsoft\Windows\CurrentVersion\Policies\System
  3. If the LocalAccountTokenFilterPolicy registry entry doesn’t exist, go to the Edit menu, select New, and then select DWORD Value from the context menu.
  4. Type LocalAccountTokenFilterPolicy, and then press Enter.
  5. Right-click LocalAccountTokenFilterPolicy, and then select Modify from the drop-down menu.
  6. In the Value data box, type 1, and then select OK to save the changes.
  7. Exit Registry Editor.
  8. Press Windows + R key to open the Run dialog box, type regedit, and press Enter to open the Registry Editor.
  9. Navigate to the following locations: HKEY_LOCAL_MACHINE\SOFTWARE\Microsoft\Windows\CurrentVersion\Uninstall\
  10. Check the Uninstall subkeys in the left pane, then check the values in the right pane to find the uninstallation keys for Symantec Endpoint Protection.
  11. Copy the uninstallation key and close the Registry Editor.
  12. Press Windows + R key to open the Run dialog box, type cmd, and press Enter.
  13. Type the following and press Enter to run the command: msiexec /X {product uninstall key}

Many users have confirmed fixing the file system error (-1073741819) by disabling the User Access Control remotely and uninstalling the Symantec Endpoint Protection.

2. Run an SFC scan

  1. Left-click the Start button, type Command Prompt, and click the Run as administrator option.
  2. Click Yes on the User Account Control prompt.
  3. Type the following and press Enter: sfc /scannow
  4. Restart your PC and check if the error persists.

Running an SFC scan will detect and repair corrupt system files causing the system to prompt the error. You may be interested in our article about fixing the run-as-administrator option if it’s not working on your PC.

The above solutions will help you troubleshoot file system error (-1073741819) on your Windows computer.

However, you may be interested in our article discussing what to do if you can’t install anything on your PC.

Should you have further questions or suggestions, kindly drop them in the comments section.

Can’t Close the Calculator App? 4 Ways to Force it

The calculator app on the Windows operating system is an essential tool for all users. However, people reported that they can’t close the Calculator app.

Thus, we will answer why this issue occurs and how to turn off the calculator properly. And provide a detailed troubleshooting guide to fix can’t close calculator apps on Windows.

Why does the calculator app keep opening?

  • A faulty calculator hotkey on your keyboard can launch the app accidentally.
  • A virus or malware attack on your computer can cause undesirable behavior, such as app opening.
  • Having a scheduled task or script programmed can launch the app periodically.
  • Setting the calculator.exe file to a Windows startup access can cause the app to open automatically.
  • Third-party Software conflicts with the Windows OS can trigger the app to open.
  • A corrupted user profile leads to unusual behavior on the computer.

The reasons stated above vary on different scenarios and PCs. Thus, we will work you through step-by-step details on resolving your issue if the calculator app can’t close.

How to turn off the calculator app?

There are different ways to turn off the calculator app on Windows. Some of the processes are:

  • Click on the X button at the top right corner of the calculator Window.
  • Press the Alt + F4 hotkey to close the app.

What do I do if I can’t close the Calculator app?

Try the following preliminary checks before proceeding with advanced troubleshooting.

  • Restart your PC to refresh it and close all background apps that can interfere.
  • Update Windows OS to download the security requirements and patch your computer to function effectively.
  • Perform an antivirus scan with Command Prompt to remove all malware activities.
  • Restore your system to an earlier restore point to undo recent changes causing the error. Read about fixing system restore not working on Windows if you have difficulty with it.

1. Run Windows Store troubleshooter

  1. Left-click the Windows icon and select Settings.
  2. Then, click System, select Troubleshooting, and click Other troubleshooters.
  3. Navigate to the Windows Store App, click on it, and select the Run button.
  4. Wait for the process to complete, close the Settings window and restart your device.

You can further check our detailed guide on how to run Windows Update Troubleshooter on your system. This guide will help remove all hardware issues that may stop you from closing the calculator app

2. End the calculator process

  1. Left-click the Windows icon, type Task Manager and press the Enter key to open it.
  2. Then, click on the Process tab, right-click the Calculator, and select End Task from the context menu.
  3. Close the Task Manager and restart your computer.

Ending the calculator process in the Task Manager will fix issues will the app is not responding. You can read our guide about fixing Task Manager not responding/opening on Windows.

3. Repair or reset calculator

  1. Right-click the Windows icon and select Installed Apps.
  2. Navigate to the Calculator app, select the options icon, and select the Advanced option.
  3. Then, click the Repair button. Wait for the repair process to complete and check if the error persists.
  4. Click on the Reset button on the same Window if the error persists.

Repair and reset is an in-built function that helps troubleshoot issues with specific Windows PC apps.

4. Uninstall and install the calculator

  1. Left-click the Windows icon, type PowerShell, and click on Run as administrator to open it.
  2. Then, copy and paste the following command into the terminal and press Enter to uninstall the calculator app: Get-AppxPackage *windowscalculator* | Remove-AppxPackage 
  3. Close the PowerShell Window.
  4. Then, press the Windows key, type Microsoft Store, and press Enter to open it.
  5. Click on the search bar from the Microsoft Store app and type in Calculator.
  6. Select the Calculator app from the search results and click Get to start downloading and installing.

Uninstalling and installing the calculator will download the recent app; fix the can’t close calculator app. Check our complete guide on downloading the Windows calculator app code from GitHub.

In conclusion, you can read how to fix the calculator not working on Windows. Also, we have a detailed guide about the best calculator apps to download on Windows.

Should you have further questions or suggestions regarding this guide, kindly drop them in the comment section.

How to Fix IPTV Not Showing TV Guide: 3 Ways

A common issue with IPTV is it’s not showing TV guides.

It could be due to network congestion, server issues, expired subscriptions, app incompatibility, or ISP restrictions like blocks from Sky or Orange. Region restrictions and outdated EPG data may also cause issues.

Here’s what you have to do to force IPTV to show TV guide.

How can I fix the IPTV not showing the TV guide issue?

1. Clear IPTV cache data

  1. Open the dashboard and click the Gear icon to enter settings.
  2. In the new window, select general settings.
  3. Check the box for the Auto Clear Cache and click on Clear Now.
  4. Confirm the process and click Yes.

Deleting the cache will resolve any interference causing the issue due to corrupt files. In addition, it will remove all video addons that may impact performance. Further, you can also clear the cache data on your mobile device.

2. Update your IPTV software

  1. Launch the IPTV app on your computer.
  2. Check for the Check Update option within the app’s menu or settings. Some IPTV apps may have an automatic update feature or a manual update option.
  3. If an update is available, follow the on-screen instructions to download and install the latest version of the app. Note that the steps may vary on various versions of your IPTV app.
  4. After the update is complete, run the updated version of the IPTV app on your computer.

The above steps will resolve compatibility and outdated software issues causing the TV guide not to show on IPTV.

3. Uninstall and reinstall the app

  1. Left-click the Start menu, type the control panel and launch.
  2. Select Uninstall a program under Programs.
  3. Then, locate the IPTV app, click on it, and select Uninstall.
  4. After the uninstallation, go to the manufacturer’s website, download and reinstall the app.

Uninstalling and reinstalling the application has proven to be helpful for some users. Hence, you should try it out also.

How to clear the cache on my IPTV device?

This depends on the app you’re using, but the general instructions are the following:

  1. Open the app and navigate to Settings.
  2. Next, locate the cache settings and select the option to clear it.
  3. Confirm that you want to clear it.

Remember that these are just general guidelines, and the actual steps might differ depending on the app you use.

Occasionally, IPTV guide data can take some time, especially if there are many channels or during EPG data updates. Give it a few minutes to see if the guide populates.

Conclusively, you can check our detailed article about the best IPTV software for Windows PCs. See our guide on what to do if the ISP is blocking IPTV.

If your IPTV is not working, it could be due to anything from a poor connection to server issues. Some users also experience trouble with IPTV not working over Wi-Fi, which may point to network configuration problems.

You might also run into specific errors like IPTV error code 401 (unauthorized access) or IPTV error code 403 (forbidden request), both of which have dedicated fixes.

If you have further questions or suggestions, kindly drop them in the comments section.

How toUse Your Phone as a Keyboard for Smart TV: Step by Step

If you use a phone as a keyboard for smart TV, you can effortlessly search for content, enter login details, and interact with apps. It eliminates the need for tedious on-screen typing using a remote control.

Below, we’ll walk you through the exact steps to connect your phone and use it as a keyboard on Android TV, Google TV, Amazon Fire TV, Apple TV, and Roku.

How can I use my phone as a keyboard for the TV?

For Android TV

  1. Go to the Google Play Store and search for Android TV Remote Control.
  2. Click on Install to get the app.
  3. Connect your Android phone to the same Wi-Fi network as your Android TV for them to communicate.
  4. Open the Android TV Remote Control app on your phone.
  5. Select your TV or set-top box from the list and enter the PIN which appears on your TV.
  6. Once your phone connects with your Android TV, you can use it as a virtual keyboard or for speech.

When you need to type something on your Android TV, open the app on your phone, and a virtual keyboard will appear. You can use this mini keyboard on your phone to type on the Android TV just as you would with a physical keyboard.

This is a great way to use the phone as a keyboard for TV, so be sure to try it.

In addition, you can also explore our guide on why you should use the Opera browser for your Android TV.

For Google TV

  1. Go to the Google Play Store for Android or App Store for iOS and search for the Google TV app.
  2. Install the Google TV companion app.
  3. Connect your phone to the same Wi-Fi network as your Google TV.
  4. Launch the Google TV companion app on your phone.
  5. The welcome screen will appear, and then the app will prompt you to choose your preferred streaming services.
  6. Select an option and tap on Done.
  7. Once on the app’s home screen, access the TV Remote option in the bottom right sidebar.
  8. Click the Allow option when the Google TV app requests location permission.
  9. Choose your TV from the list of available devices listed on the screen.
  10. Enter the pairing code displayed in your Google TV app to complete the pairing process, then click the Pair.
  11. If you wish to switch remote controls, tap on the three-dot icon in the upper right corner of the screen. Then, select D-pad Control from the options available.

Once the pairing is successful, your device should serve as a remote control for your Google TV via the phone keyboard. It includes navigation, playback control, and volume adjustment.

If you ever wanted to use a phone as a TV’s keyboard, try this method.

Further, you should check out the best browsers for Google TV here.

For Amazon Fire TV

  1. Go to the Google Play Store, and search for the Amazon Fire TV Remote app or any other third-party remote app that supports Fire TV.
  2. Install the app on your mobile device.
  3. Set up the app with your Amazon Fire TV.
  4. Open the Amazon Fire TV Remote app and sign in using your Amazon account’s email and password.
  5. Choose your Fire TV Stick from the available devices.
  6. Launch the remote app on your device.
  7. The app should automatically detect your Fire TV device on the same Wi-Fi network. If not, follow the on-screen instructions to connect it.

After the connection, clicking the screen keyboard icon should trigger your phone as a controller for Amazon Fire TV.

If the Amazon Fire TV stick is not connecting, we have a detailed guide to help troubleshoot it.

For Apple TV

  1. Go to the Settings app on your iOS device and click the Control Center.
  2. In the Control Center, tap the + sign to add the Apple TV Remote from the more controls section.
  3. Swipe down and open the Control Center to check if the remote icon is added.
  4. Tap on it to launch the Apple TV Remote App.
  5. Click on Choose a TV and select your Apple TV.
  6. Input the four-digit code that appears on Apple TV into the app.
  7. A push notification will pop up on the smartphone, open it, and the keyboard will appear.

The above steps will connect your iPhone to your Apple TV, allowing keyboard access and mouse control.

Apple is the most straightforward if you want to use the phone as a keyboard for TV since it requires no additional software.

In case you’re having issues with Apple TV, we have a great guide on what to do if Apple TV keeps buffering.

For Roku

  1. Go to the Google Play Store on your phone or tablet and search for Roku Remote Control.
  2. Download and install the app.
  3. Open the Roku remote app on your smartphone. Navigate to Control, click Connect, and select your Roku device.
  4. Once your phone is paired with Roku, you will the control. To get the virtual keyboard, click the Keyboard icon.

These steps may vary depending on your chosen app, as different apps might have slightly different interfaces and pairing methods.

After doing that, you can use your phone as a keyboard for TV without issues.

In addition, we have outlined the best browsers for Roku TV to increase your user experience.

Other devices

Additionally, other devices, such as MI products and Samsung smart TVs, can be controlled using your smartphone.

You only need a Xiaomi/MI smartphone for your MI TV. It is because it comes with an IR blaster (Infrared blaster) that helps it connect with devices from the same manufacturer.

Basic controls with tips & tricks to improve user experience

  • Take advantage of gesture control in navigating and controlling TV functions from your phone, as supported by some apps.
  • Use the quick launch button to access your favorite events on the TV.
  • If supported, try to explore the screen mirroring controls.
  • Also, some apps offer voice control in the keyboard menu of your mobile device. Try to use that for faster control of the TVs.
  • Ensure you perform software updates consistently for improved functionalities and the latest features.
  • Downloading the corresponding app from your TV manufacturer to enhance your typing experience is essential.
  • Also, connect the phone and the TV to the same Wi-Fi network to avoid a terrible experience.

These are some basic tips you can explore when using your phone as a TV controller. Further, with similar, simple apps, you can turn your smartphone into a keyboard too.

Alternatively, you can go through our detailed guide about using your PC as a TV remote control for easy access. Further, you can check out some of the best remote control software.

In case you prefer physical devices, we have a great guide on the best wireless keyboards with touchpads for your TV. You can also use iPhone as webcam on Windows 11, and it only takes a few minutes to set up.

If you have further questions or suggestions regarding this guide or further hacks to improve usage, kindly drop them in the comments section.

0x80040e14 SQL Server Error: How to Fix It

Sometimes, you may be unable to perform a sync on the server. Maybe you’re trying to sync a resource that doesn’t exist, or maybe you’ve got too much data and not enough space. The SQL server error 0x80040e14 occurs when you attempt to sync.

You should have enough memory for the operation, but this is sometimes overlooked. Still, it is not the only cause of this error, so let’s look at what this means.

What is error code 0x80040e14?

The SQL Server error code 0x80040e14 is a generic message indicating that the server could not perform the requested action. It can occur when syncing or even during a backup process.

Below are some common reasons you need to pay attention to:

  • Connection time out – SQL Server connection time out occurs when the client application fails to connect with the server within a specified period. It may happen because of network issues or because the server is down.
  • Server authentication error – This type of error occurs when the user account information provided by the client application does not match the user account information stored on SQL Server. A wrong username/password or an invalid login type could cause it.
  • Incorrect firewall settings – Firewall settings must be enabled for SQL Server to connect successfully.
  • Insufficient memory –  It is possible that the SQL Server was unable to allocate memory from the system. This can happen when the server has too many connections or if there is not enough memory on the server.

How do I fix the SQL Server connection error?

Ensure the following are in check before moving to the slightly advanced solutions:

  • Ensure your firewall allows connections from all clients or disable the firewall temporarily if you cannot configure it for SQL Server connections.
  • Verify that the user credentials match those on the SQL server.

1. Use an SQL analyzer

Microsoft has its own SQL analyzer, which can be helpful in this situation. It can detect any corruption in your database file that may prevent syncing.

Instead of trying to figure out the cause of the error by looking at the SQL error log and tracing the process from a large data set, this is a more straightforward and time-saving trick.

If no errors are reported there, then it means that the issue is not with your database or query.

2. Restart the SQL Server

  1. Open a terminal and enter the following command to stop the SQL Server:systemctl mysql stop
  2. To check the status of the SQL Server, type the following command and press Enter:status mysql.service
  3. Now restart the SQL Server by performing the following command in the terminal:restart mysql.service

If the problem persists after restarting the service, you may need to reconfigure your SQL Server.

3. Reconfigure the SQL server

  1. Open your SQL Server and click on Memory under Server Properties.
  2. In the Maximum server memory (in MB) option, enter the highest number possible then click on OK.

Some users had this issue after recently moving or upgrading servers. If your server has been recently moved or upgraded, it’s possible that some settings in place were not configured correctly.

Your SQL Server running out of memory leaves it scrambling for limited resources to function properly. You’ll need to reconfigure your SQL server to utilize more memory resources from your system by adjusting the maximum Server Memory option in SQL Server Configuration Manager.

This appears to work for many users, so hopefully, you’ll be among the lucky ones. We also cover another similar problem when you encounter error 0x80131904, so check out our article.

Many have reported Arithmetic overflow error converting expression to data type int error when working with larger values, but we have ways to fix this error.

To learn more, we have a great article on how to print error messages in SQL Server that should help you debug your server in the future.

Our solutions may not be exhaustive, but if you have any other that may have helped you in a similar situation, let us know in the comment section.

Web Page Element Not Found: How to Fix it

The element not found is a familiar error that appeared on Windows 10. It has resurfaced, but this time, it is taking on browsers. You might come across the web page element not found error when trying to access a website.

This error occurs when your browser is looking for an element in the code of the web page, but it cannot find it. If refreshing your browser doesn’t do it for you, keep reading to find other ways to resolve this issue.

Why does the web page element not found error occur?

Web pages are complex and contain many elements, such as images, text, videos, and links. For it to load successfully, all these elements must load for the page to be accessible. Failure to which you may receive a web page element not found error.

So what causes these elements not to load? Below are some possible reasons:

  • Incorrect URL – The site you’re visiting may have changed its address since the last time you visited hence no longer valid.
  • Broken link – If you copied and pasted the URL, you may have missed some parts, and the link is incomplete. 
  • Slow network connection – If your computer is connected via Wi-Fi and your Internet connection isn’t very fast, you may experience this issue because your browser takes too long to load web pages.
  • Outdated browser – If you’re using an older version of your browser, it may be incompatible with some sites. This can result in the web page element not found error.
  • URL has been moved – It is also possible that the web page you’re trying to access has moved. The one you’re visiting may direct you to an old version of the page.
  • Server problems – All sites have encountered downtime or became temporarily unavailable for maintenance. This could be an issue with the server or web host.
  • Firewall restrictions – You may have visited a website blocked by your firewall or antivirus software.

How can I fix the web page element not found error?

Try the following basic workarounds before any advanced troubleshooting:

  • Check whether your computer or device is connected to the Internet. 
  • Switch to an Ethernet cable and ensure other people’s devices don’t overload your router. 
  • Verify that you have entered the correct URL into your address bar, and try refreshing the page if necessary.
  • Check for any browser updates.
  • Try using a mobile hotspot if you’re getting an intermittent connection from your ISP provider.

1. Clear the browser cache

  1. Launch your browser, and for this step, we shall be using Google Chrome.
  2. Click the three horizontal dots and select Settings.Settings CHrome
  3. Go to Privacy and security and click Clear browsing data.
  4. Select Browsing history, Cookies and other site data, & Cached images and files, then click Clear data.

2. Disable the browser extensions

  1. Launch your Chrome browser, and in a new tab, enter the following address:chrome://extensions/
  2. Peruse through your extensions and toggle the Disable button for any suspicious-looking ones.
  3. Repeat this step until you find the culprit.

3. Reset your browser 

  1. Open your Chrome browser and click on the three vertical ellipses at the top right corner.
  2. Select Settings.
  3. Next, click on Reset and cleanup, then select Restore settings to their original defaults.
  4. Confirm Reset settings in the next dialog box.

4. Disable your antivirus temporarily 

  1. Hit the Start menu icon, type Windows Security in the search bar, and click Open.
  2. Click on Firewall & network protection, then select Public network.league of legends black screen after champion select
  3. Locate Microsoft Defender Firewall and toggle the off button.turning off Microsoft Defender Firewall Windows

Should the above solutions fail to fix the web page element not found error, try switching to another browser. Some sites work better on select browsers.

We also have an answer to when you come across your browser does not support audio element error, so check out our article on the same.

And that’s a wrap from us, but keep the conversation going in the comment section. We’d love to hear what solutions worked for you and any other thoughts.

How to Screen Share Through WhatsApp Web

Recently, the voice & video messaging app has introduced a new feature, Screen Share on WhatsApp Web, iOS, and Android, wherein you can see each other’s screens during video calls.

This could be helpful, especially in meetings, as it will make presenting your desktop or phone screen easy.

In this guide, we will discuss step-by-step instructions to start a WhatsApp screen share during a video call.

Can I share my screen on WhatsApp?

Yes, you can share your screen on WhatsApp using your Android, Windows, and iOS devices over a video call.

WhatsApp has rolled out the screen-sharing feature for Windows and some Android phones, but if your device still doesn’t have it, check if it has the updated version of the app.

If that’s not the case, it has not been rolled out for your device yet; therefore, you need to install WhatsApp beta to access it on your Android or iOS device.

How do I share my screen on WhatsApp on Windows?

Before proceeding with any steps to enable screen sharing, go through the following preliminary checks:

  • Install the latest version of the WhatsApp app on your Windows computer to use the feature on your PC.
  • Both parties in the call must have the updated WhatsApp or the WhatsApp Beta app versions.

Once you are through these steps, move to the step-by-step instructions.

  1. Press the Windows key, type whatsapp and click Open.whatsapp open WhatsApp Screen Sharing
  2. On the WhatsApp app, click the Video button to start a video call with the person you want to share the screen with.Video call
  3. Once the call is initiated, go to the bottom navigation bar, and click the screen sharing option.Screen sharing option
  4. Now, you will be prompted to start the screen share.
  5. You can also choose the screen from the drop-down you want the person on the other end to see.start the screen share choose the option

If the WhatsApp desktop app is not opening on your Windows 11, we suggest you read this informative guide to find solutions.

How do I become a WhatsApp Beta Tester?

1. Check the availability

  1. Launch Google Play Store, and go to your profile.Manage apps and devices  WhatsApp Screen Sharing
  2. Tap Manage apps & device.
  3. Go to Manage, locate WhatsApp Messenger, and click it to open the official download page.
  4. Scroll down and check if an option exists to become a beta tester. If the program is full, you will see the Beta program is full message, then wait for some time before performing the steps in the next section.Beta program is full  WhatsApp Screen Sharing

This option might not appear on the devices; therefore, you can skip this step and start with the next one.

2. Enroll into the Beta program

  1. Download the WhatsApp Messenger on your smartphone if you don’t have it already.
  2. Back up your WhatsApp account.
  3. Ensure you use the same email that you use for PlayStore to sign in on your browser.
  4. Go to the WhatsApp Beta Tester website and tap the Become A Tester option.Become A Tester  WhatsApp Screen Sharing
  5. After some time, you will be enrolled in the program. Sometimes, the process may take a few minutes to 24 hours, so you must be patient.
  6. You can check if you are rolled by clicking on the same link. If it is complete, you will see You are now a tester instead of Become A Tester option.You are now a tester

3. Check if you are a beta tester

  1. Launch Google PlayStore on your Android device.
  2. Go to your profile, and tap Manage apps & device.Manage apps and devices  WhatsApp Screen Sharing
  3. Tap Manage, and locate WhatsApp Messenger; tap on it to open the official download screen.
  4. If you see Beta attached to the name, like WhatsApp Messenger (Beta).WhatsApp Messenger (Beta). WhatsApp Screen Sharing
  5. Tap on Update to get the latest beta version. At the time of writing, it was 2.23.16.8.

Becoming a beta tester has its perks; it lets you use all the new features of WhatsApp even before the official release, there are more regular updates, and issues reported are sorted on priority.

However, the beta versions are still under testing, which could cause the app to crash frequently, and bugs could affect the device’s performance.

How can I share the screen in WhatsApp using CrankWheel?

  1. Go to this website, enter your email address, and click Continue.Step 1 enter your email address and click Continue WhatsApp Screen Sharing
  2. Go to your mailbox and click Continue signup.Step 2 Continue signup
  3. Enter your display name and click Continue.Step 3 Click Continue
  4. You will be prompted to Add it to Chrome.Step 4 Add it to Chrome
  5. On the browser extension page, click Add to Chrome, then select Add to extension. Add to Chrome, then select Add to extension
  6. Once registered, sign in to your email account.
  7. Enter the PIN and click Continue.Enter the PIN and click Continue
  8. Launch CrankWheel on your browser or extension. Click Start screen sharing.Start screen sharing
  9. You will get four options: Browser tab, Program window, Fullscreen, and Webcam. Now select a specific page or tab and click Share.Browser tab, Program window, Fullscreen, and Webcam
  10. On the next screen, you can enter the phone number to send the link and click Share or Copy a link instead. We will choose the latter.Copy the link
  11. There will be a link, and click Copy.chrome_Copy WhatsApp Screen Sharing
  12. Go to the person’s chat you want to share the screen with and paste the link to start the screen sharing.

This is how you can share screens on WhatsApp voice or video calls on your Android, iOS, or Windows app.

How can I share my screen in WhatsApp using an iOS device?

Before moving to the steps, ensure you have WhatsApp version 2.23.14.79 to use the screen-sharing feature on Android; otherwise, get the latest beta version of the app on your Android 2.23.16.8. For iOS devices, you need to be enrolled in WhatsApp’s Beta program.

1. On Android

  1. Launch the WhatsApp app.
  2. Go to the person with whom you want to share your screen and click on the Video icon from the top of the screen to place a video call. Once on a call, go to the call control view and choose the screen sharing option.Video icon  WhatsApp Screen Sharing
  3. Select the Share Screen icon.Share Screen WhatsApp
  4. Next, tap Start Now on Allow WhatsApp to record or cast your screen pop-up.Start Now on Allow WhatsApp to record or cast your screen
  5. Once the screen sharing is initiated, the person on the other end can access your device’s screen.WhatsApp Screen Sharing

2. On iOS

  1. From your Home screen, launch the WhatsApp app.
  2. Locate the person with whom you want to start the screen sharing and tap the Video icon from the top right corner to start a video call.Screen Share option WhatsApp
  3. Tap on the screen, and locate the Screen Share option on the right side.
  4. Once the screen sharing starts, the person on the other end will see your phone’s screen.

What are the limitations of mobile screen sharing?

Mobile screen sharing can be useful for collaboration or viewing things on another person’s phone but has platform limitations.

It can also be resource-intensive & could slow your device, and as mobile screens are smaller, it is not easy to display presentations or multi-task while sharing screens.

You might also have to turn off notifications and close private messages & pictures that you don’t want the other person to see.

There could also be a network connection, audio issues, and rapid battery draining, as screen sharing consumes much power.

So, these are the steps you can use the screen share feature on the WhatsApp app on your mobile device or computer.

If you are encountering issues like the WhatsApp web app not working, we advise you to check out this guide to find ways to fix it.

Did you find the information useful? Please mention your thoughts in the comments section below.

Fix: LSA is Unable to Obtain an RPC Connection

Connecting and establishing trust between two Domain Controllers is a popular practice. However, some users are reporting a Local Service Authority is unable to obtain an RPC connection error after entering the Domain FQDN or NetBIOS name.

While this issue can be pretty annoying, it is not the most difficult to fix, as it only requires minor tweaks most times. In this guide, we will show you the steps to follow to fix this issue and establish trust relationships between your servers.

Why is Local Security Authority unable to obtain an RPC connection?

Below are some of the potential causes that can cause LSA to be unable to obtain an RPC connection:

  • Firewall interference – One of the first things to check if you are getting this error is Windows Defender Firewall is not blocking the connection. You might need to disable the firewall on the two servers temporarily to fix the issue.
  • Issues with Shared folder on VMware – If you are using VMware, this problem might be due to the shared folder. Uninstalling it has proved effective for most users.
  • Incorrect time – If the time on the two servers you are trying to connect does not match, you are likely to get the Local Security Authority unable to obtain an RPC connection error.

Now that we know what can cause this issue, let’s fix it by using the solutions below.

What do I do if LSA is unable to obtain an RPC connection error?

Before delving into the fixes in this section, try the following troubleshooting steps:

  • Check if the time on the two servers is in sync
  • Ensure the passwords of both administrators in different domains are in sync
  • Disconnect and reconnect to the domain network

If this does not work, proceed to the solutions below:

1. Disable the firewall temporarily

  1. Press the Windows key, type firewall, and select Windows Defender Firewall.
    firewall local security authority is unable to obtain an rpc connection
  2. Select Turn Windows Defender Firewall on or off.
    turn windows
  3. Now, tick the radio buttons for the Turn off Window Defender Firewall button for both the Public and Private network settings.
  4. Finally, click the OK button.
    turn off

If the firewall on either of the servers or DCs is active, it might be stopping you from creating trust relationships. This leads to the Local Security Authority is unable to obtain an RPC connection error.

The solution to this is to disable the firewall temporarily and retry the connection.

2. Add a forwarder

  1. If you have added the DNS of the server (say D2) you want to create trust with to your source server (say D1), you need to remove it.
  2. Now, open the DNS console under Administrative Tools.
    tools
  3. Right-click on the DNS server node and choose the Properties option.
    properties local security authority is unable to obtain an rpc connection
  4. Next, click the Forwarders or Forwarding tab at the top, depending on your server.
  5. Click the New or Edit button under the DNS domain section and enter the name of the domain you want your name server to forward to (e.g., domain2.com).
    forwarders
  6. Type the forwarder IP address (the remote site’s DNS, which is also the DC for that site), and click the Apply button followed by OK.
  7. From here, press the Windows key, type cmd, and select Run as administrator under Command Prompt.
  8. Finally, type the command below and hit Enter to run it: ipconfig/flushdnsipconfig local security authority is unable to obtain an rpc connection

According to some users, you can eliminate the Local Security Authority is unable to obtain an RPC connection error by adding a forwarder IP address to your connection.

3. Try net use

  1. Press the Windows key + R, type \\domain.com\c$, and click the OK button.
    domain
  2. Now, type your username and password and check what the \\domain.com\c$ opens.
  3. Finally, try creating trust again with FQDN and not NetBIOS.

4. Uninstall the Shared folder on VMware

  1. Press the Windows key, type control, and select Control Panel.
    control panel
  2. Select Uninstall a program under the Programs option.
    uninstall a  local security authority is unable to obtain an rpc connection
  3. Now, right-click VMware Tools and select Change.
  4. Click the Next button.
  5. Finally, untick the box for Shared Folders and reboot your machine.

If you are getting the Local Security Authority is unable to obtain an RPC connection error while trying to establish trust between your Domain Controllers, it might be due to the Shared Folders feature of VMware.

Note that the steps above are for uninstalling the feature on Windows 2003, which is the common version users face this error.

There you have everything you need to get rid of the Local Security Authority is unable to obtain an RPC connection while trying to establish trust between your Domain Controllers. You should now be able to fix this issue provided you follow the steps above.

If you are dealing with a similar error in Local Security Authority cannot be contacted, check our detailed guide to fix it.

Feel free to let us know the solution that helped you fix this issue in the comments below.