Kiosk Software For Windows: 6 Best to Use in 2026

Kiosk software, or visitor management software, are tools that electronically monitor information by identifying and tracking visitors for an office, hotel, or other buildings.

If you want to track incoming, outgoing, and regular visits, you can use kiosk software, which is an intuitive tool that stores such information from a centralized management database for referencing.

Why do I need kiosk software?

It is ideal for security purposes because you need to know who walks in and out of your building, and whether they are approved, or they’re on a security watchlist.

In hotel settings, your tenants can easily be notified that their guests have arrived, making it easier to plan ahead.

In this article, we’ll take a look at the best kiosk software for Windows 10.

Some of the main areas to note in kiosk software tools are deployment, facilitation of check-in and guest verification, as well as regular collection and documentation of visitor information.

Most of these are easily integrated with many major apps and are easy to use and install without the need for programming skills.

What is the best kiosk software for Windows 10 & 11?

Scalefusion – Best zero-touch device enrollment app

With Scalefusion, you can turn any device into kiosk mode in a matter of minutes and with just a few clicks.

And the app has dedicated versions for Windows, Mac, iOS, and Android so it’s basically available on the most important platforms.

With this tool, not only you will be able to restrict the access of the users, but you will also have granular control over your devices.

You won’t need to tweak each device from the store because you can enroll devices over the air and configure application policies for all of them right from your dashboard.

And speaking of the dashboard, Scalefusion comes with a clean, modern UI where you can easily find detailed information about all the managed devices.

You can even control them remotely or cast an announcement or a promotion to incite the customers to buy the products.

Scalefusion is the best kiosk software on our list but you don’t need to take our word for it because it’s available for a free trial.

Let’s see some of its best features:

  • Clean, modern UI
  • Enroll devices over the air
  • Cast announcements or promotions
  • Available for Windows, Mac, iOS, and Android

⇒ Get Scalefusion

Mobile Device Manager Plus – Best kiosk monitoring and management

Mobile Device Manager Plus - Best monitoring and management tool

ManageEngine Mobile Device Manager Plus is a complete management tool that comes with a Kiosk Monitoring feature to monitor and control the kiosks from a central location.

This software has a wide range of security features, including password policies, remote wipe, device encryption, and antivirus protection to secure your devices and corporate data from security threats.

It enables you to guide the users through an app installation or troubleshoot an issue remotely. You can lock down your Android into a single or multi-app mode to perform certain operations.

This tool provides reports and analytics on security events, device usage, and app usage that helps you monitor performance, optimize usage and identify potential security threats.

It allows you to manage and distribute content, like documents, videos, and images, in an enterprise environment.

With its various enrollment options, including QR code, email, and SMS, you can easily add devices to the management console.

For a uniform user experience, it lets you set the app layout, arrange apps, organize them in folders, and change wallpapers.

Here are the important features of this solution:

  • Seamless kiosk profile association and automated installation of apps and updates without interruption
  • Manages kiosk settings, including screen timeout, volume, and screen brightness
  • Sends you alerts and notifications when a kiosk is offline or experiencing issues
  • Can create and deploy in-house apps, manage app licenses, and enforce app usage policies across devices
  • Allows you to track the location of mobile devices to monitor usage and find them if stolen

Mobile Device Manager Plus

Manage your kiosks and control them over the air casting announcements and promotions safely.
Free Trial Visit Website

FrontFace – Great for interactive terminals

This kiosk software is easy to install and use and is highly professional for use in touch-screen kiosk terminals.

It is equally useful in hotels, museums, and other tourist sites, interactive information systems, media control and presentation systems, and digital product catalogs for retail shops, self-service, field services, and trade shows.

It is compatible with Windows 10, 11, and standard PC, or touchscreen hardware.

FrontFace is a fast, affordable, flexible, and easy-to-use on-premise solution, for you to create touch-enabled graphical UI for kiosk systems, and interactive information terminals to present any kind of media or content with no need for programming skills.

Benefits include multi-language support, easy printing of content and email to devices, photo integration, customizable branding, easy use with Office programs, instant content deployment to kiosk system, and cost-effectiveness.

These are some of its key features:

  • Very easy to use
  • Create touch-enabled graphical UI
  • Present any kind of media on the screen
  • Compatible with Windows 10, 11, and standard PC, or touchscreen hardware

⇒ Get FrontFace

Traction Guest – Reat-time visitor experience

With this best kiosk software for Windows 10, you can transform your visitor welcome lobby with an easy and secure guest registration, which is not only memorable but also safe.

Capture real-time visitor information from different locations, all integrated into one cloud-based platform.

Features include admin and customization designed to provide visitors with an efficient and secure sign-in process at events and workplaces, with great customizability, and adaptability to diverse use cases.

User features such as user roles to grant access levels based on business requirements, a central admin console, an experience editor based on the visitor and their reason for visiting, arrival notifications, single sign-on plus select from a growing list of languages for a customized visitor experience.

Security features include watchlists to screen visitors against internal lists or third-party databases, visual identification, digital signature, offline mode, and alerts, all on the Heroku platform backed by leading cloud computing security and privacy policy standards.

It integrates with most major apps including Slack, DocuSign, Active Directory, Google Drive, EventBrite, and Pictatic among others.

⇒ Get Traction Guest

SiteKiosk – Great browser kiosk features

This is one of the best kiosk software for Windows 10 operating system.

It is a lockdown browser and kiosk software for safeguarding public access on internet PCs, displays, and tablets against manipulations.

Features include Chrome Engine support making it adaptable to future changes in browser technology, a start screen generator for easy drag and drop design, a configuration tool (no need for programming skills), and session reset after idle time.

It also includes an Internet content filter to eliminate inappropriate content in real-time, a customizable user interface, on-screen keyboard, digital signage, and payment devices so you can charge for using the computer with support for various cash acceptors.

To use SiteKiosk, you need Windows 10 32/64 bit, Windows 10 IoT Enterprise, Internet Explorer 10 or higher browser, at least 2GB RAM memory (4GB recommended), New Technology File System, Intel or AMD x86 CPU processor, and 1024×768 resolution or higher.

⇒ Get SiteKiosk

Kioware – Ideal for mobile device management

As its name implies, it is a kiosk software whose features include a kiosk mode solution, mobile device management, video conferring, digital signage, and browser lockdown.

This interactive kiosk software lets you secure your Windows computer or device into a self-service kiosk, and you can manage your account or secure your device to permitted websites and browser-based apps, on a rebuilt user interface.

The main features include blocking popups, domain/page lists, file downloads, and dialogs.

Kiosk security provides browser and OS lockdown as well as basic authentication and keyboard filtering.

You can also clear private browser data and create an attractive screen management interface for users with custom toolbar skins, provide a virtual keyboard, and tabbed browsing.

With KioCall, you can add video conferencing to your kiosks so your users can initiate or receive video chats.

⇒ Get Kioware

This concludes our selection of the best kiosk software for Windows 10 and 11 that will help you manage your devices.

Some of them have simple and basic features to limit user access while others offer full remote access and management features.

You might also be interested in our list including the best remote control software for Windows 10/11 and find even more suggestions.

Which of these best kiosk software for Windows 10 & 11 sounds great for your needs? Share with us your favorite in the comments section below.
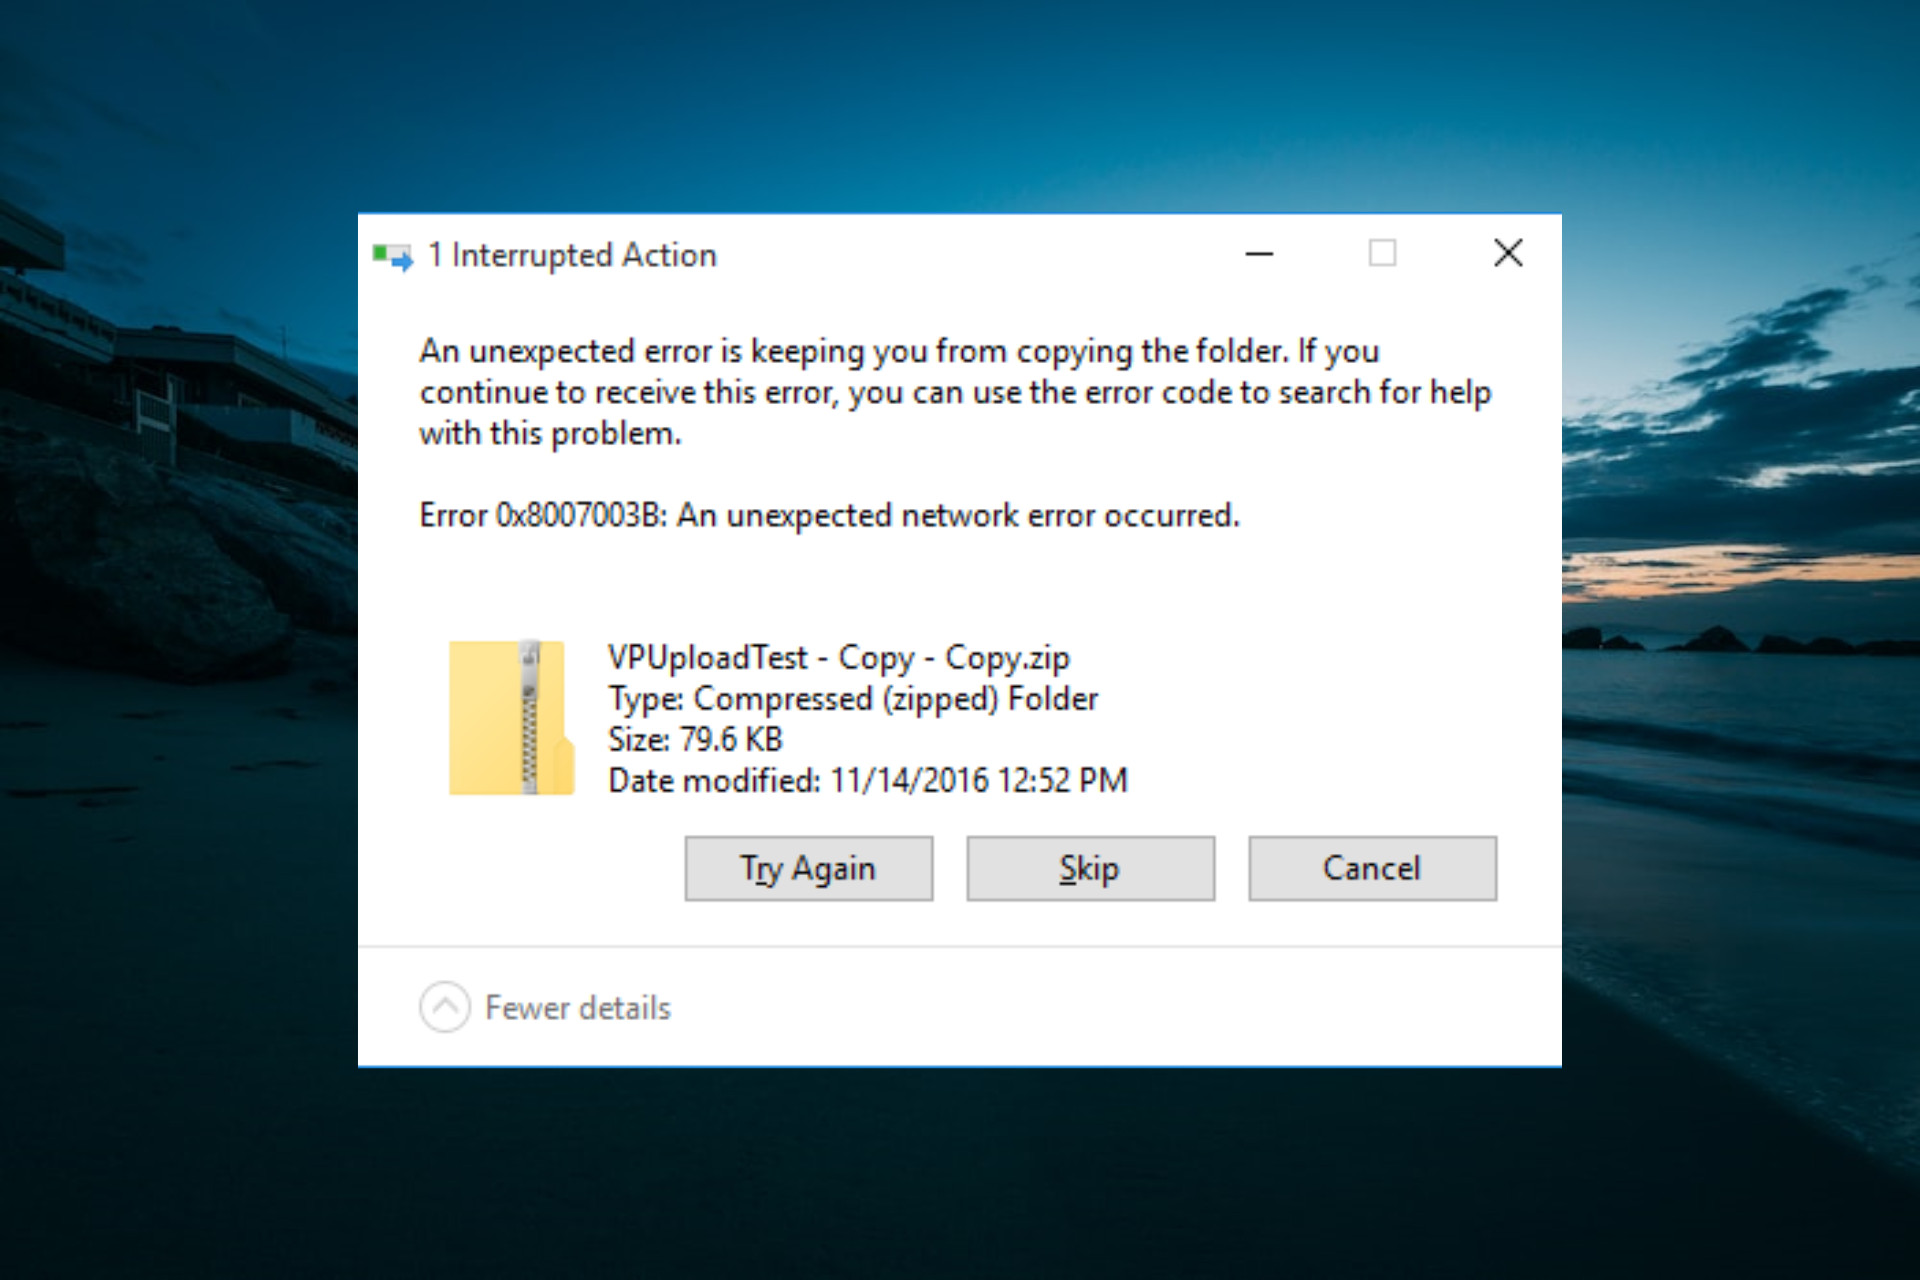
7 Quick Fixes for 0x8007003b Network Error on Windows 10

Error code 0x8007003b is a network issue that some Windows 10 users have encountered when attempting to transfer large files from a network drive to a desktop or laptop.

This error message window states, 0x8007003B: An unexpected network error occurred. Consequently, you will be unable to transfer all files across your VPNs.

While some users could fix this issue by simply restarting their router, the issue persisted for others. In this guide, we will take you through the surefire fixes to solve this problem convincingly.

What is network error 0x8007003b?

The error appears due to an unstable network connection and affects device sharing. Here are a few reasons you are getting the error:

  • Malware or virus: A common reason users encounter the error is when the PC is infected with malware or virus.
  • Security software conflicting with the process: In many cases, it was the antivirus that triggered the error, be it the built-in Windows Security or a third-party antivirus.
  • Firewall or VPN is active: The firewall or configured VPN can also modify the network properties or block certain elements, which affects the PC’s ability to interact with other devices.

How do I fix the 0x8007003b error on Windows 10?

1. Scan for Malware

  1. Press the Windows key + S, type virus, and select the Virus & threat protection option.
    virus error code 0x8007003b
  2. Select Scan options.
    scan option
  3. Now, choose the Full Scan option and click the Scan now button.
    scan now

If you are trying to figure out how to fix error 0x8007003b, your primary approach should be to scan for malware since this is a common underlying cause. You can utilize Windows Defender to scan for malware since it’s already built-in.

However, for more advanced and accurate results, we recommend trying third-party antimalware software for Windows 10.

2. Temporarily Switch off Anti-Virus Software

  1. Press the Windows key, type virus, and click Virus & threat protection.
    virus error code 0x8007003b
  2. Click the Manage settings option.
    manage error code 0x8007003b
  3. Finally, toggle the switch for the Real-time protection option backward to disable it.
    real time

If a malware scan didn’t fix the network error code 0x8007003b issue, temporarily disable your third-party antivirus software. The antivirus software could be interfering with the file transfer.

If it is a third-party antivirus, you can switch it off by right-clicking its system tray icon and selecting a disable option on its context menu.

3. Switch the Windows Firewall off

  1. Click the Start icon, type firewall, and click Windows Defender Firewall.
    windows defender
  2. Click Turn Windows Firewall on or off in the left pane.
    turn windows  error code 0x8007003b
  3. Now, tick the Turn off Windows Firewall radio buttons for both the Private and Public options.
  4. Finally, click the OK button and restart your PC.
    turn off error code 0x8007003b

Users have also reported error 0x8007003b over VPN and Windows Firewall, which can get in the way of file transfers. It is, after all, a network wall of sorts. So switching that firewall off or disabling the VPN could fix An unexpected network error occurred while copying file.

4. Disable the Windows Search service

  1. Press the Windows key + R, type services.msc, and click the OK button.
    services error code 0x8007003b
  2. Right-click the Windows Search service.
  3. Now, select the Stop option.
    stop

According to some users, the Windows Search service can also cause the error 0x8007003b with a small file. You should temporarily disable the service and try sending your files again.

5. Check the Destination Hard Drive’s Format

  1. Launch File Explorer and right-click your hard drive.
  2. Select the Properties option.
    properties network error code 0x8007003b
  3. Now, check the File system type.
    file system

Another thing to note is if the destination hard drive for the file is FAT32 formatted. You can’t transfer files larger than 4 GB to a FAT32 hard drive.

If your hard drive’s file system is FAT32, you’ll need to split up any file larger than 4 GB to copy it to the PC. You can split files up with third-party tools. This will help prevent the network error code 0x8007003b.

For details on how to split files on Windows 10, check our detailed guide.

6. Scan Files With the System File Checker

  1. Press the Windows key, type cmd, and select Run as administrator under Command Prompt.
    cmd admin
  2. Type the command below and hit Enter: sfc/scannowsfc scan
  3. Finally, wait for the command to finish running.

Windows 10’s System File Checker might also come in handy for fixing network error code 0x8007003b. A wide variety of Windows issues can be due to corrupted system files. So, you need to repair and restore these files to restore normalcy.

7. Perform a system restore

  1. Press the Windows key + R, type rstrui.exe, and click OK.
    rstrui error code 0x8007003b
  2. Click the Next button on the window that pops up.
    next network error code 0x8007003b
  3. Now, choose your desired restore point and click the Next button.
    restore point
  4. Finally, click the Finish button to confirm the action and follow the onscreen instructions.
    finish network error code 0x8007003b

It might be the case that a recently installed program has interfered with Windows settings. If that’s the case, restoring the platform to a previous date might also fix the error code 0x8007003b.

The System Restore tool will remove all third-party software installed after a selected restore point and undo system changes. This is how you can utilize System Restore.

With this, we can conclude this article on how to fix the network error code 0x8007003b. You now have everything you need to get past the issue. Hence, what is left is for you to follow the instructions keenly.

If you are facing a similar issue in error code 0x800704cf, check our detailed guide to fix it quickly.

Feel free to let us know the solution that helped you fix this issue in the comments below.

Microsoft to launch ChatGPT-4 next week

Microsoft has remained at the forefront of Artificial Intelligence technology, and it looks like that trend is continuing with the imminent release of ChatGPT 4, the language module that powers the popular AI tool ChatGPT. The update is expected to be released by the technology giant sometime next week, potentially reigniting interest in the much-talked-about AI tool.

Microsoft Germany CTO Andreas Braun announced at an AI kickoff event that the new ChatGPT 4 language model would introduce “multimodal models,” which will offer new possibilities. As cited by Heise, Braun specified that the model would have the capacity to create AI-generated videos based on textual prompts. “We will introduce GPT-4 next week … we will have multimodal models that will offer completely different possibilities — for example, videos,” he asserted.

The technologist highlighted the potential of Large Language Models such as GPT, deeming it a “game changer” due to its capacity to comprehend “natural language” and deliver conversational responses. GPT-4 could likely be utilized to enhance ChatGPT and Microsoft services powered by Bing AI, as we had already reported last month.

At present, ChatGPT is restricted to responding to user queries in text format. However, an upcoming update is expected to bring a new interactive experience. Also, the report from Heise indicates that “multimodal AI” such as GPT-4 could actually surpass standard text-to-image translation and be utilized to create music and videos with minimal input.

Microsoft has yet to further affirm the unveiling of GPT-4 next week, though the company is planning a virtual gathering concerning the “Future of Work Reinventing Productivity with AI” with CEO Satya Nadella on March 16.

Currently, there is no confirmed information on what ChatGPT-4 can offer, however, we will keep you in the loop should any information become available. In the meantime, please feel free to share your opinions in the comment section below.

Via Digital Trends

How to Invert PDF Colors Using Adobe, Photoshop & Chrome

You may want to invert colors on PDF files for many reasons – from reading them in dim light to just wanting them to look better. When inverting PDF colors, it will replace every color with its exact opposite.

Instead of downloading software for modifying PDF files, we only included tools you probably already use. Also, you can invert colors in PDF with Adobe Reader. It is not merely a PDF opener but a great PDF color inverter that lets you invert colors and carry out other crucial operations, such as merging PDF files.

Regardless of why you want to retouch the PDF, this guide will show you how to do it easily.

How to invert PDF colors guide for Adobe Reader, Photoshop, and Chrome?

1. Invert PDF colors with Adobe Reader

  1. Right-click on the PDF document for which you want to invert its colors, go to Open with, and choose Adobe Acrobat Reader.
  2. Click on the Edit menu.
  3. Select Preferences.
  4. Choose Accessibility from the left-hand pane.
  5. Mark the Replace Document Colors checkbox.
  6. Select the Custom Color radio option.
  7. Click on the checkboxes for Page Background and Document Text, and for each of these options, select your preferred color.pdf viewer
  8. Hit OK to save your new color preferences.
Tip icon Tip
This method of inverting colors on PDF works on all editions of Adobe Acrobat Reader. Also, the color change is only for your viewing. You’ll have the original colors if you open the PDF with a different reader or print the document.

2. Invert PDF colors with Photoshop

  1. Download Photoshop.
  2. Click on the File menu.
  3. Select Open.
  4. Browse and choose the PDF file that you want to edit.
  5. Click on the Pages radio button.
  6. Select the page that you wish to edit.
  7. Hit the OK button.
    invert-colors-pdf-select-page-photoshop
  8. Press the Ctrl + I and then click on the File menu.
  9. Select the Save As… option.
  10. Click the dropdown menu next to Save as type and choose Photoshop PDF.

However, Photoshop handles your PDF as an image. You can invert the PDF colors with Photoshop, but on saving the file as a PDF, it loses PDF characteristics. With Photoshop, you may have to invert the page individually, then save them in PDF format instead of PSD, and combine them.

3. Invert PDF colors using Google Chrome

  1. Right-click on the PDF document.
  2. Go to Open with and select Google Chrome.
  3. Press Shift + Ctrl + I to open the console.
  4. Make sure that you’re on the Console tab.
  5. Copy the following code, paste it into the console, and hit Enter:

var cover = document.createElement("div");
let css = `
position: fixed;
pointer-events: none;
top: 0;
left: 0;
width: 100vw;
height: 100vh;
background-color: white;
mix-blend-mode: difference;
z-index: 1;
`
cover.setAttribute("style", css);
document.body.appendChild(cover);

6. After you hit Enter, you will see the PDF content changing color.

It’s up to you to pick a method that suits your goals to invert PDF colors for printing. If you want to flip the colors on the PDF permanently and don’t mind doing it one page at a time, then Photoshop will suffice. Otherwise, you can invert PDF colors on Chrome or the useful Adobe Reader application.

Also, several websites and tools to invert colors in PDF online for free. So, you can check them out, too. While you are here, check the best PDF viewers for a better experience.

Feel free to share your experience with us using the comment section below.

System 53 Error in Windows: 4 Easy Ways to Fix It In No Time

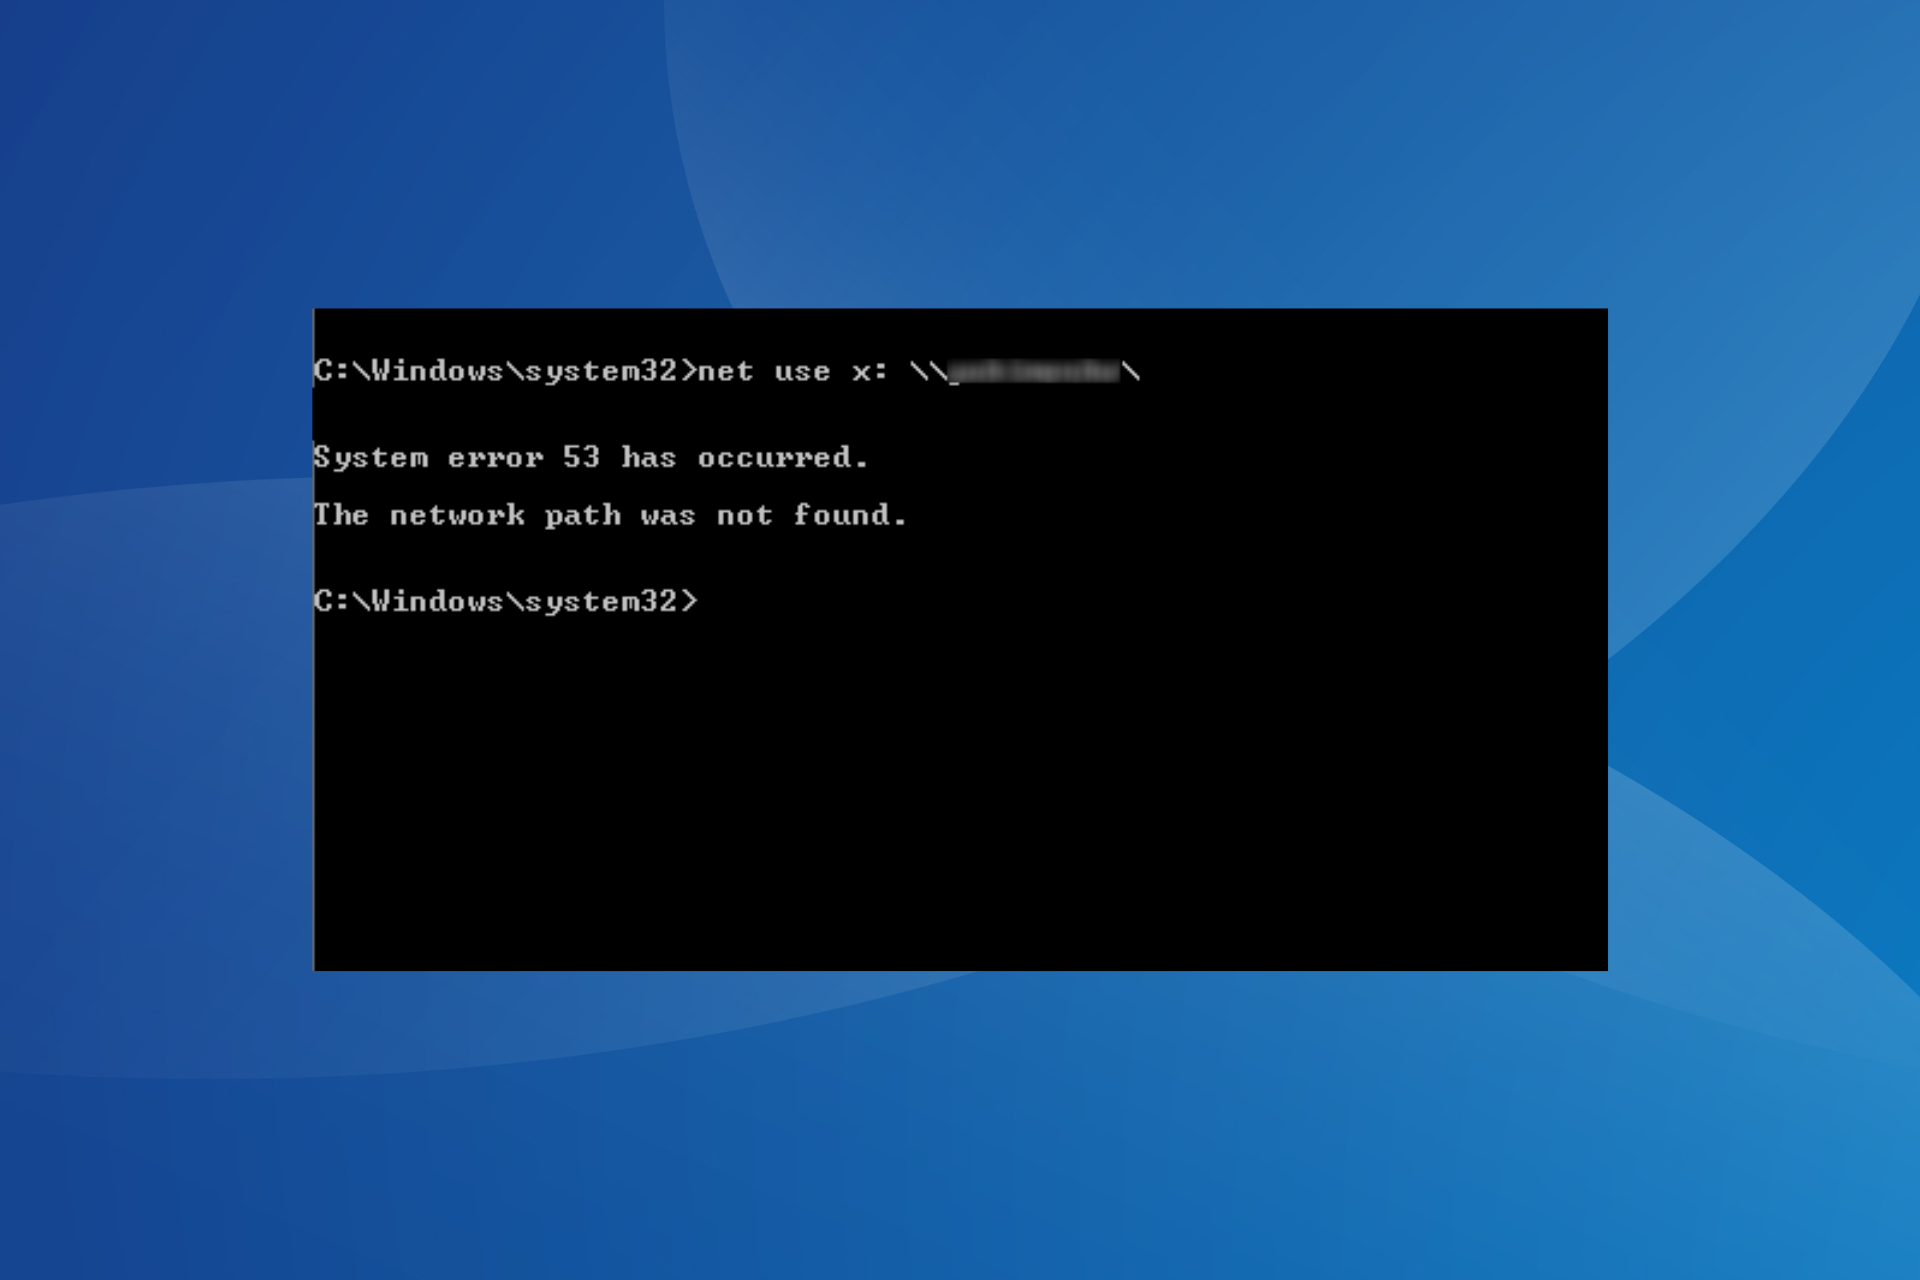
Accessing a physical resource on your network is no rocket science, yet you sometimes end up getting the System error 53 has occurred. The network path was not found message.

The error generally appears on older iterations of Windows when connecting to another PC. But System error 53 in Windows 10 could also appear when mapping a drive. No matter the case, it’s easy to fix, and we will tell you how.

What does System error 53 mean?

If you were wondering what is system error 53, it points to an issue, usually a trivial one, that prevents the connection between devices on the same network. It’s been there for a long time and can arise due to any of the following reasons:

  • Inputting the wrong command: When getting the error, your primary approach should be to verify whether the command is correct. Because, more often than not, this turns out to be the underlying cause.
  • Misconfigured network settings: Certain network settings are critical to accessing devices on the network, and if these are disabled, you may get an error when mapping the drive or connecting to another PC.
  • Third-party apps triggering conflicts: Many users reported that their antivirus, firewall, or security software were directly conflicting with the network or changed settings critical to the process.

What can I do when getting System 53 error has occurred?

Before we start making major changes, check these quick tips first:

  • Ensure both devices are on the same network. The System 53 error net use may appear when the devices are on different networks.
  • Make sure the command is input correctly. For instance, verify that the shared folder is placed between double quotes in the command. Also, check for spacing. In case of issues with it, you may get the System 53 error Path not found message.
  • Run a ping test using and check for losses. If there are any, it’s likely a network issue, and necessary steps have to be taken to resolve the situation.
  • Disable any third-party antivirus or firewall installed on the PC, and check whether that works. In case it does, we recommend you switch to a more reliable antivirus and a Windows-friendly firewall.

If these don’t work, move to the solutions listed next.

1. Enable File and Printer Sharing for Microsoft Networks

  1. Press Windows + R to open Run, type ncpa.cpl, and hit Enter.network and connections
  2. Right-click on the active network adapter, and then choose Properties.Properties
  3. Now, tick the checkbox for File and Printer Sharing for Microsoft Networks, and click OK to save the changes.enable to fix System 53 error

One of the recommended fixes that seemed to do the trick when you get a System 53 error is to enable File and Printer Sharing for Microsoft Networks in the adapter properties.

2. Turn on network discovery

  1. Press Windows + S to open Search, type Control Panel in the text field, and click on the relevant search result.control panel
  2. Click on Network and Internet.network and internet
  3. Now, click Network and Sharing Center.network and sharing center
  4. Click on Change advanced sharing settings from the navigation pane.change advanced sharing settings to fix System 53 error
  5. Select the Turn on network discovery option under Private network.turn on network discovery to fix System 53 error
  6. Similarly, select Turn on network discovery under Guest network, and click on Save changes.turn on network discovery

3. Turn on the NetBIOS protocol

  1. Press Windows + X to open the Power User menu, and choose Network Connections.network connections
  2. Click on Change adapter options.change adapter options
  3. Right-click on the active adapter and select Properties.properties
  4. Now, select Internet Protocol Version 4 (TCP/IPv4), and click Properties.IPv4 properties to fix System 53 error
  5. Click the Advanced button.advanced
  6. Navigate to the WINS tab, select the Enable NetBIOS over TCP/IP option, and click OK.enable netbios to fix System 53 error
  7. Click OK on all previous windows to save the changes.

Another quick way to fix the System 53 error is to enable NetBIOS for IPv4 in the adapter properties, and things should be up and running. If this, too, doesn’t work, head to the last solution.

4. Change node type to Hybrid

  1. Press Windows + R to open Run, type cmd, and hit Ctrl + Shift + Enter.command prompt
  2. Click Yes in the UAC prompt.
  3. Paste the following command and hit Enter: ipconfig /allipconfig /all to fix System 53 error
  4. Check if the Node Type reads Peer to Peer. If yes, we’ll change it to Hybrid.check node type
  5. Again, press Windows + R, enter regedit, and click OK to open Registry Editor.registry
  6. Paste the following path in the address bar and hit Enter:HKEY_LOCAL_MACHINE/SYSTEM/CurrentControlSet/Services/NetBT/Parameterspath
  7. Right-click on the empty portion, hover the cursor over New, choose DWORD (32-bit) Value, and name it NodeType.DWORD to fix System 53 error
  8. Double-click the NodeType DWORD you just created.DWORD
  9. Enter 8 under Value data, and click OK to save the changes.change to fix System 53 error
  10. Once done, restart the computer, and you should be able to access the network resources.

That’s it! One of these solutions should have helped fix the System 53 error in Windows when accessing the shared resources on the network.

Also, find out the best network performance management software for effective monitoring and eliminating issues.

If you have any other queries or want to share another solution, comment below.

Calendar App not Working in Windows 10: 6 Ways to Fix It Now

The Calendar, a built-in app in Windows, has long been a popular choice amongst users, but many complain that Windows 10 Calendar is not working.

For some users, the Calendar app opens with a white screen and then crashes after a few seconds, or it’s not opening at all. The problem was recently widely reported, but we have a few solutions that will work in the long run.

What can I do if Windows 10 Calendar is not working?

1. Open Calendar from the Mail app

  1. Type Mail in the Search bar, and click on the relevant search result.mail
  2. Now, click on the Calendar icon in the Mail app.calendar

A few users shared this quick workaround to open the Calendar app when it’s not working in Windows 10. So, give it a try. Although remember, that it’s just a temporary measure to access Windows Calendar, and until a concrete fix is available.

2. Update the Calendar app

  1. Press Windows + S to open Search, type Microsoft Store, and click on the relevant result.microsoft store to fix windows 10 calendar not working
  2. Click on the Library icon in the left corner.library
  3. Now, click on the Get updates button.Get updates to fix windows 10 calendar not working
  4. If an update is listed for Mail and Calendar, download it.

When several users recently reported that Windows 10 Calendar app was not working, Microsoft was quick to release a patch for the bug that caused the problem. Downloading the latest version of Mail and Calendar fixed things for most users.

Updating the may also work when Windows Calendar is not showing events.

3. Reset the Mail and Calendar app

  1. Press Windows + I to open Settings, and click on Apps.apps
  2. Now, select Mail and Calendar in the Apps & features tab, and then click on Advanced options.advanced options to fix windows 10 calendar not working
  3. Click on the Reset button.reset to fix windows 10 calendar not working
  4. Again, click Reset in the confirmation prompt.reset

Many keep wondering how do I reset my calendar on my laptop Windows 10. You could easily do it from within the Mail and Calendar app settings, and the reset should take more than a minute.

4. Uninstall recent updates

  1. Press Windows + I to open Settings, and click on Update & Security.update & security
  2. Now, click on View update history.view update history
  3. Click on Uninstall updates.uninstall updates to fix windows 10 calendar not working
  4. Select the update last installed, after which the error appeared, and click Uninstall.uninstall to fix windows 10 calendar not working
  5. Click Yes in the confirmation prompt.uninstall

For many users, the Windows 10 Calendar was not working after an update, and uninstalling it fixed things in no time. Just make sure to restart the computer once done for the changes to come into effect.

5. Do a system restore

  1. Press Windows + R to open Run, type rstrui.exe, and hit Enter.rstrui.exe
  2. Select Choose a different restore point, if available, and click Next.choose
  3. Choose a restore point created before the problem first appeared from the list, and click on Next.system restore to fix windows 10 calendar not working
  4. Verify the details, and click on Finish to start the restore process.restore

Performing a system restore has also helped a few users. But remember, it’s critical to choose a restore point created before the problem first emerged on the PC. Also, this solution would help even when Windows 11 calendar app is not working.

6. Perform an in-place upgrade

  1. Go to Microsoft’s official website, and click Download now to get the Media Creation Tool for Windows 10.media creation tool
  2. Once downloaded, run the setup, and click Yes in the UAC prompt.
  3. Wait for the setup to initialize and get things ready.getting ready
  4. Click on Accept to agree to the license terms.accept
  5. Select Upgrade this PC now, and click Next.upgrade this PC now to fix windows 10 calendar not working
  6. Wait for the download to complete, and then let the setup install a fresh copy of Windows 10.in-place upgrade to fix windows 10 calendar not working

That’s it! If nothing previously worked and you still have Windows 10 calendar not working, an in-place upgrade should be the ideal fix. It will reinstall the OS without affecting the apps or files on the PC.

The methods listed here will also help eliminate issues behind the taskbar calendar not opening in Windows 11.

Besides, if, like many others, you, too, are looking for a reliable alternative, check our curated list of the best Calendar apps for Windows.

Tell us which fix worked for you in the comments section below.

ESO Unexpected Internal Error: Fix It in 2 Simple Ways

The Elder Scroll Online (ESO) is a stunning MMORPG game that combines creativity with competitiveness. It offers superb gameplay, making it one of the most played games since its release.

However, it is not free from issues. It sometimes suffers from latency spikes, but you can solve this by using the best VPNs for ESO to reduce high ping.

Now, it is the unexpected internal error preventing gamers from logging into the game. This guide will show you quick and effective ways to fix this issue and get back to competing with other gamers.

What is the unexpected internal error on ESO? 

The unexpected internal error on ESO prevents users from logging in on the game client. The potential causes are widespread, which sometimes makes it frustrating.

Below are some of the well-known ones:

  • Outdated game client: If you haven’t updated the game client in a while, it’s likely the reason the error keeps appearing.
  • Issues with Steam: If you are facing the ESO Unexpected Internal Error on Steam, it could be that the Steam installation didn’t go through properly or certain critical files were deleted
  • Corrupt game files: The problem could also lie with the game or the game files, usually a corruption of some sort. But there’s a built-in option to verify the game files.
  • Overloaded server: When too many players are active on the server, it might cause overloading, and as a result, you will see the error.

How can I fix the ESO Unexpected Internal Error?

Before we head to the slightly complex solutions, do these quick checks:

  • The first line of action when facing the Unexpected Internal Error on ESO is to check if the game has server downtime. The Service Alerts page or the official Twitter Support is the best place to look.
  • Terminate Steam and related processes from the Task Manager, relaunch it, and check whether the error is gone.

If these don’t work, head to the solutions listed next.

1. Switch Megaservers

  1. Open the ESO Launcher and select the SERVER option at the top left corner of the login page.
    server option eso unexpected internal error
  2. When prompted, select a server to connect to (EU or NA).
    select server
  3. Wait for the process to complete with an announcement indicating the server change before logging in.

Megaserver overload is one of the prominent causes of the unexpected internal error ESO. There are only two Megaservers to choose from – the European (EU) and North American (NA).

When either of them is overwhelmed with requests, it can lead to all sorts of issues. So, changing to the less strained one should resolve the problem.

2. Repair the ESO Launcher

  1. Click the GAME OPTIONS dropdown in the NEWS section.
  2. Select the Repair option.
    repair
  3. Wait for the process to finish.

Corrupt ESO Launcher files can lead to unexpected internal errors in the client. If all the fixes above fail to solve the problem, you should try to repair the launcher. Restart the ESO Launcher after the repair to sync the repair made.

The unexpected internal error on ESO can quickly dent your gaming spirit, as it denies you access to the game. Although server issues are the major reasons behind it, you shouldn’t rule out other possibilities we have shown.

If you are looking for the best Windows 10/11 RPG games to play, check our article on the topic for excellent options.

Feel free to let us know the fix that helped restore normalcy to your game in the comments below.

How to Install the .Net Framework in Windows 10

Depending on the type of application being used in the Windows 10 operating system, you might get an error message regarding the .NET Framework. And this is why you must know how to install the .NET Framework on Windows 10 to get things up and running.

.NET Framework is a proprietary software framework developed by Microsoft and used by developers to build apps for the Windows ecosystem.

If you have been receiving errors regarding it, here’s how you can install the .NET Framework on Windows 10.

Do you need to install .NET Framework on Windows 10?

Yes, you must install .NET Framework to run applications and programs developed on it. If it’s not installed, applications may throw errors when you launch them. The error message usually lists the required .NET Framework version, thus simplifying things a bit.

Also, remember that your Windows 10 PC may already have the .NET Framework since it’s included with the OS. So unless you get a specific error while running an application, there’s no need to manually install the .NET Framework.

How can I install .NET Framework on my Windows 10 device?

    You can easily install .net framework on your Windows 10 PC using the built-in Command Prompt as an admin. All you need to do is input the installation command input in cmd, then the tool will install .net framework for you.

  1. 1. First, you will need to connect the system with the boot CD/DVD or external hard drive with Windows 10 installation media on it.

  2. 2. Now, double click on This PC on the desktop or in the Start menu.

  3. 3. You will need to identify and jot down the drive letter of the CD/DVD Windows 10 installation media.

  4. 4. Type Command Prompt in the Search bar, and click on Run as administrator on the right.

    command prompt to how to install .net framework on Windows 10
  5. 5. Click Yes in the UAC prompt that appears.

  6. 6. Now, paste the following command, replace E with the hard drive letter in your case, and hit Enter :Dism /online /enable-feature /featurename:NetFX3 /All /Source:E:sourcessxs /LimitAccess 

    cmd dism
  7. 7. The installation of the .NET Framework on to your Windows 10 system should start.

  8. 8. When you see the The operation completed successfully message, close the Command Prompt and reboot the system.

  9. 9. After the device boots up again, verify if you have the .NET Framework installed.

Usually, when you have issues with an app, it will ask you to download and install the .NET Framework from the Internet, but you can also do it directly from the Windows 10 CD/DVD, as described above.

You may also try other ways to install the .NET Framework. If you encounter problems after .NET Framework’s installation, especially if missing, fixing things shouldn’t take much time. 

Also, if you have any additional thoughts on this subject, please let us know in the comments section of this page.

Best Bandwidth Monitor Tools for Windows 10 & 11 [2026]

If you’re using a limited connection to access the Internet on your Windows 10/11 PC, you should definitely keep a close eye on your bandwidth.

Exceeding your bandwidth limit can be charged extra by your ISP, and in order to avoid that you should use a bandwidth monitoring tool. But before we dive in, let’s start with the basics.

What can bandwidth monitor software tools do?

Bandwidth monitors are small tools that monitor your Internet connection while providing you with a detailed report on how much bandwidth you use.

These tools are a necessity for all users with limited connections, and today we have several bandwidth monitors for Windows 10 and 11 that we want to recommend to you.

What are the best bandwidth monitors for Windows 10 & 11?

Site24x7 – Best bandwidth monitor

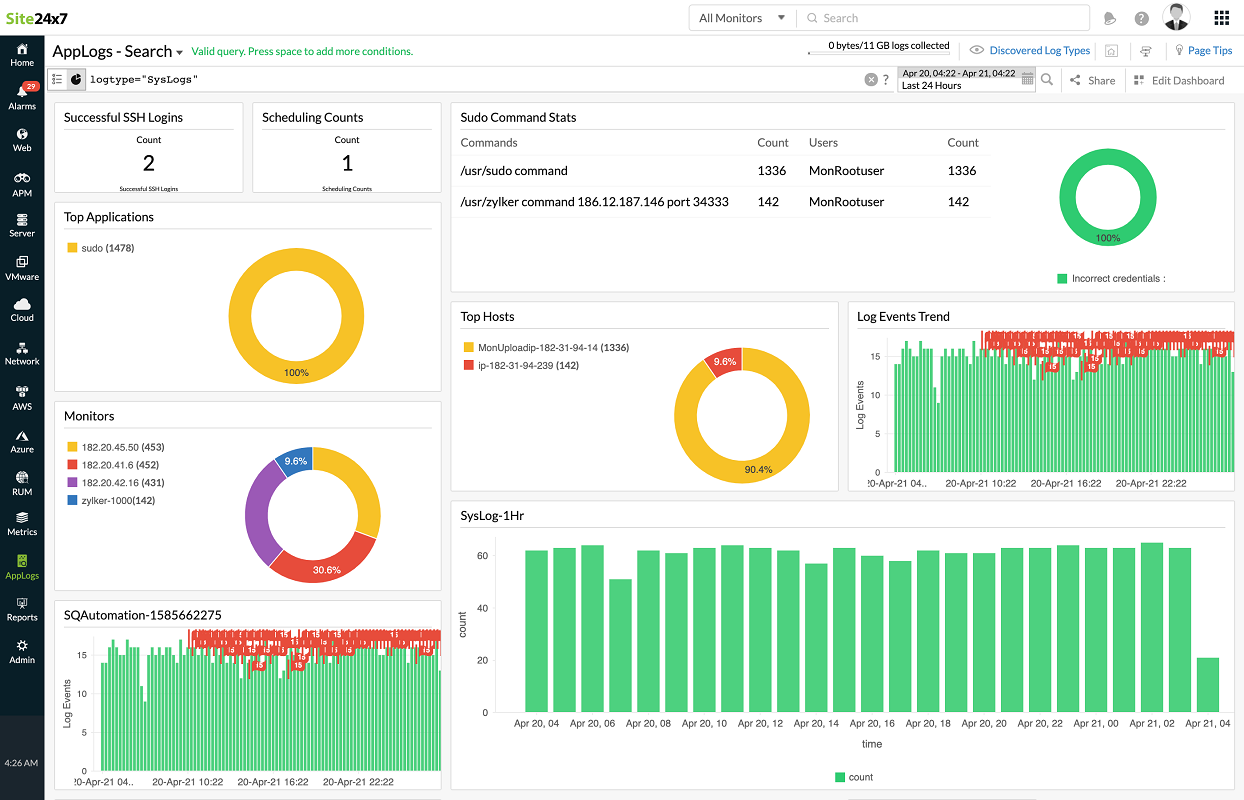
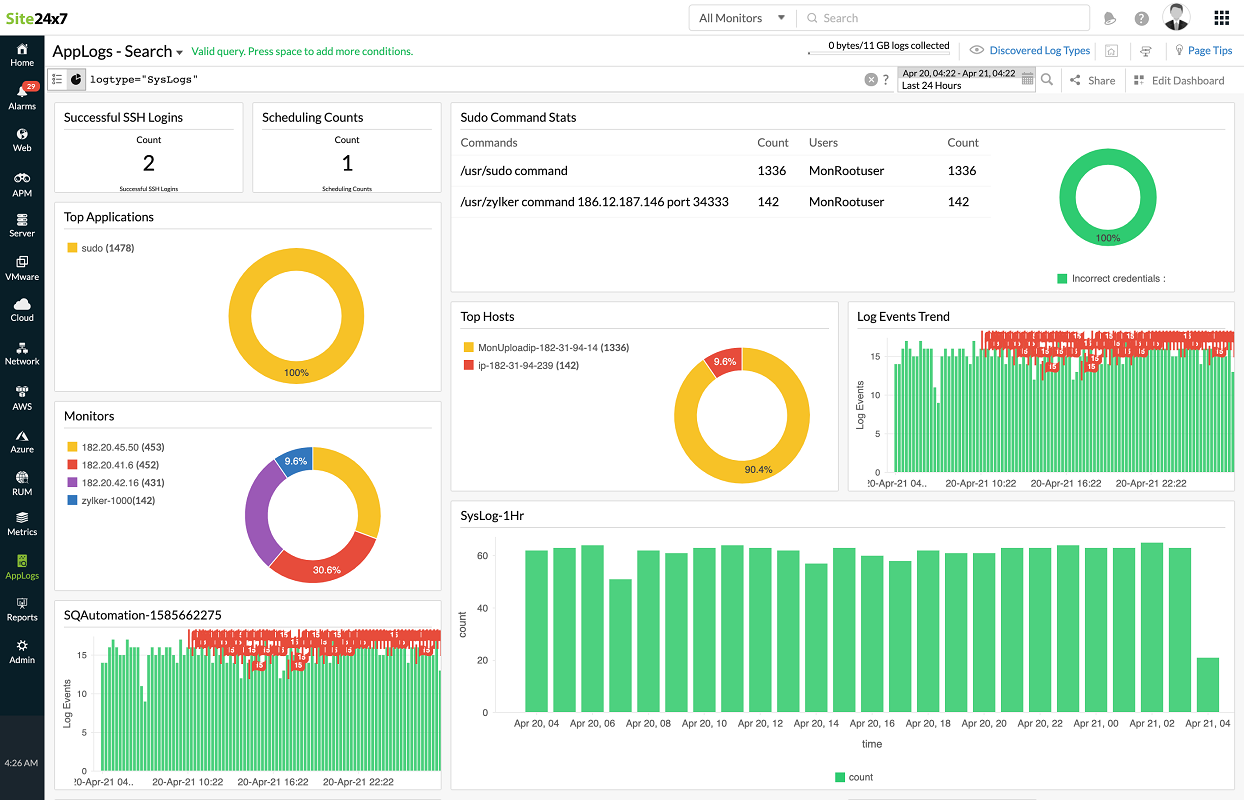
If you’re searching for the best bandwidth monitor, Site24x7 is just what you’re looking for but you will discover that it’s much more than that.

This tool helps you supervise your entire network infrastructure, including up to ten servers, and all other devices that identify themselves with an IP.

In fact, bandwidth is just one of the 60+ performance metrics and comprehensive inventory reports that you will have access to.

The data includes load average, thread and handle count of processes, and a lot more, all displayed in a single cloud-based dashboard whatever systems you’re running.

After you include all devices you want to monitor, you will get detailed and charted syslogs that can be presented or shared with your colleagues.

Site24x7 is a complex and powerful tool that offers an extensive array of tools designed to prevent and warn you of any possible problems with your bandwidth and gives you the chance to fix them before anyone notices.

The solution also comes with a free trial version so you will be able to test it before making any purchase decision.

Site24x7 best features:

  • Monitors all the devices on your network with over 60 performance metrics, including bandwidth
  • Apache, MySQL and Nagios plugin integrations
  • Cloud-based dashboard that can be even accessed on the go
  • Comprehensive graphical reports
  • Manage customer accounts and endpoints securely

Site24x7

Monitor your bandwidth accurately and all the network devices with a professional-level solution.
Free trial Visit website

NetFlow Analyzer – Complete network management

NetFlow Analyzer brandishes itself as a complete traffic analytics tool that uses advanced technology to provide you with real-time monitoring capabilities over the use of your network. It works great on both Windows 10 and 11 operating systems.

Gain better control over your bandwidth use and traffic patterns, as well as detailed information about each user using it, allowing better decision-making when it comes to limiting or providing access.

For example, you can monitor voice, video, and data effectively thanks to key-performance metrics that help boost connectivity with minimal traffic use.

The solution offers customized reports containing specific bandwidth usage details such as applications, IP addresses, hostnames, protocols, and more.

Thanks to the use of its Continuous Stream Mining Engine technology, NetFlow Analyzer can better detect internal and external security threats and stop them before they propagate even further.

This software may also be used as a bandwidth limiter. You can set up thresholds and if they are passed, you will get alerted instantly to apply specific actions.

NetFlow Analyzer best features:

  • Monitors all key performance metrics
  • Continuous Stream Mining Engine technology
  • External threat detection
  • Network traffic analysis and network flow monitoring
  • Accurate trend over extended historic periods

NetFlow Analyzer

Know everything that is happening within a given network and better manage the way your bandwidth is being used with NetFlow Analyzer!
Free trial Visit website

PRTG Network Monitor – Very easy to use

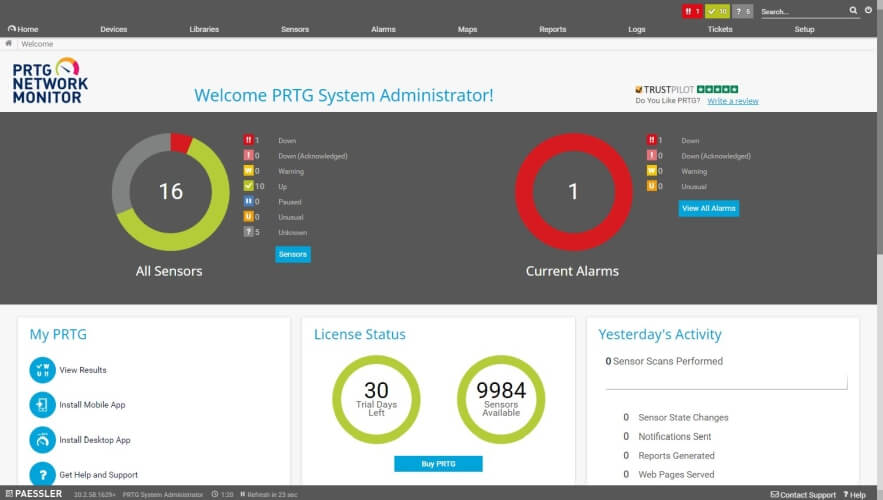
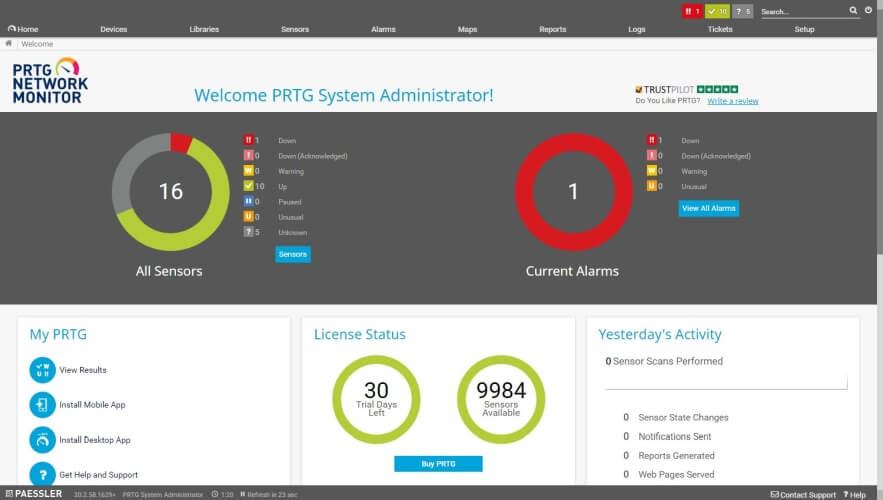
PRTG is an excellent tool for analyzing your network bandwidth when using a Windows 10 and 11 device. It analyses and lists a series of bandwidth parameters that offer you a clear image of your network’s performance.

You’ll be able to quickly detect bandwidth overloads and take the necessary measures in order to bring your network to a normal functioning state.

Supported features include SNMP, WMI, Packet Sniffing, and NetFlow. PRTG is great for both personal and professional usage. It scans your IP address and detects all devices connected to it.

Private users can run speed tests to see if their Internet connection is running at a top-notch performance or not, check DSL bandwidth, and more.

Professional users can use this tool to eliminate bandwidth hogs that reduce employee productivity leading to potential drops in sales or other KPI issues.

PRTG Network Monitor best features:

  • Bandwidth overloads detection
  • SNMP, WMI, Packet Sniffing, and NetFlow features
  • IP scanning and detection
  • Runs speed tests
  • Easy to implement
PRTG Network Monitor

PRTG Network Monitor

Monitoring the ins and outs of your local network and limiting access will be much easier once you use PRTG Network Monitor.
Free trial Visit website

Obkio Network Performance Monitoring – Accurate measurements

best bandwidth monitors for Windows 10/11

Obkio is the easiest network performance monitoring software to deploy and help users monitor end-to-end network performance, measure bandwidth usage, and all other important network metrics that can impact the end-user experience.

The tool continuously measures network performance using synthetic traffic to provide you with a detailed overview of your network’s performance and health.

Synthetic traffic creates a negligible load on your network and requires no packet capture.

You can monitor network devices like firewalls, routers, and switches to quickly detect bandwidth overloads and high bandwidth usage, especially for Windows 10 and 11 PCs.

Obkio will automatically alert you of any existing and past issues and provide you with all the information you need to find and fix network problems before they affect end users.

They run speed tests to see if their Internet connection is as it should be, monitor Internet connection performance, and bandwidth usage, and measure other network metrics such as throughput, jitter, latency, and MOS Score.

Collect historical data to create a performance baseline and troubleshoot past issues.

Users can leverage Obkio to eliminate bandwidth hogs that can reduce employee productivity and lead to serious network performance degradation.

Obkio Network Performance Monitoring best features:

  • Traceroute and speed test
  • Network Device Monitoring (SNMP)
  • Live notifications
  • Measures throughput, jitter, latency, and MOS Score
  • Bandwidth overload detection

Obkio

Are you looking for the very best bandwidth monitor for all your network devices? Just try Obkio Bandwith Monitor for free!
Free trial Visit website

GlassWire – Great filtering

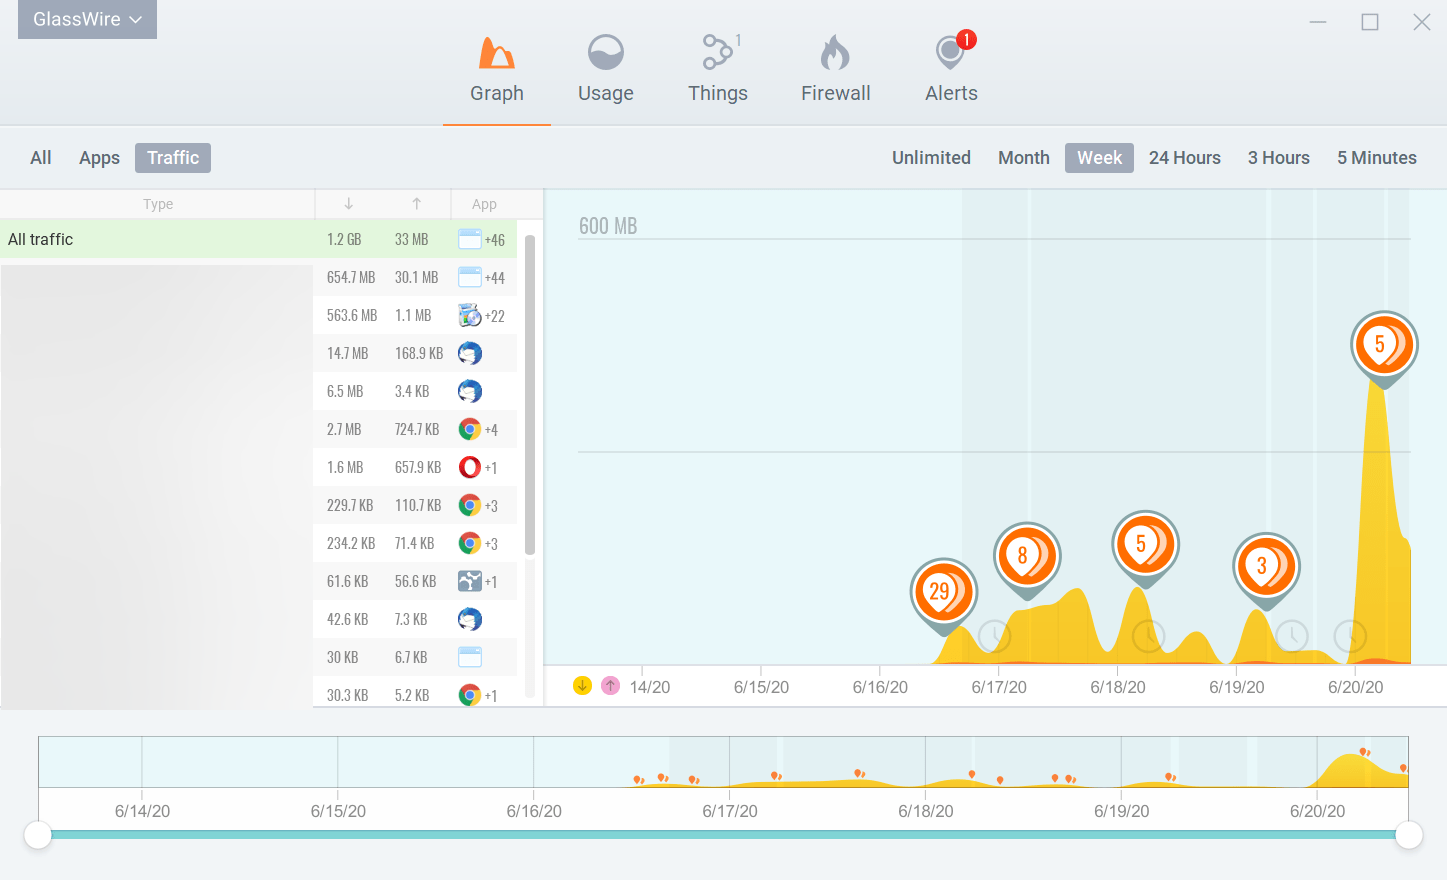
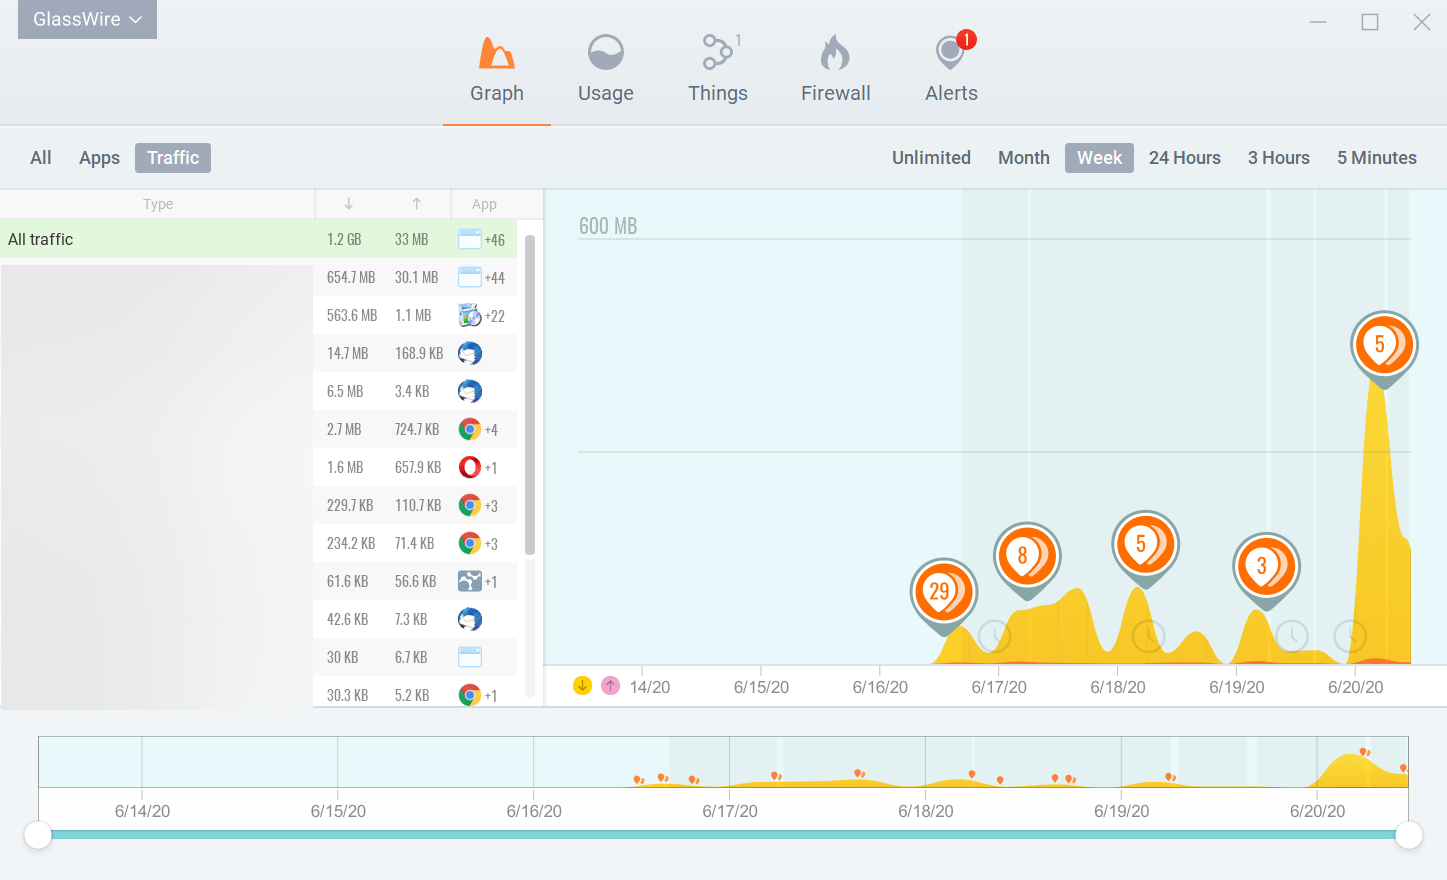
GlassWire’s network monitor allows you to consult your network activity by your geo-location, application, and traffic, using easy-to-read graphs for Windows 10 and 11.

You will be able to see your computer’s traffic back to 30 days, analyze the cause of a casual spike in your network activity and try to avoid them in the future.

The app alerts you about hosts that are known threats, unexpected network system file changes, spikes, ARP spoofs, DNS changes to take immediate action.

If you are not in front of your computer, GlassWire allows you to remotely monitor and block suspect activity on the computers or servers that you need to take care of.

Its firewall is a great tool to anticipate network threats and stop them before they can damage your system.

GlassWire’s firewall helps you detect what current and past servers your PC is communicating with so you can get rid of potential threats.

GlassWire best features:

  • Consult your network activity by your geo-location, application, and traffic
  • Threat allerts on network system file changes, spikes, ARP spoofs, DNS changes
  • Remote monitoring
  • Built-in firewall
  • Monitors all communication between network components

⇒ Get GlassWire

Solarwinds Network Bandwidth Analyzer – Extensive toolset

One of the system tools required for performance, configuration, traffic, bandwidth utilization, and much more is a Network Traffic Analyzer that covers data transmission detectors for both Windows 10 and 11.

SolarWinds offers over 30 products in a variety of categories, including virtualization, storage, databases, systems management, network security, and more.

Note that it has been the unchallenged global leader in network monitoring for the past 16 years. Network Performance Monitor and NetFlow Traffic Analyzer are included in this pack.

The network performance monitor is advanced software that reduces network outages and improves performance.

It provides support for Cisco ACI devices, allowing you to observe members on your Cisco ACis and analyze APIC member health scores in Performance Analysis Dashboards.

You can also use this tool to block or restrict Wi-Fi users from your network. This can help prevent data theft and also improve overall network performance.

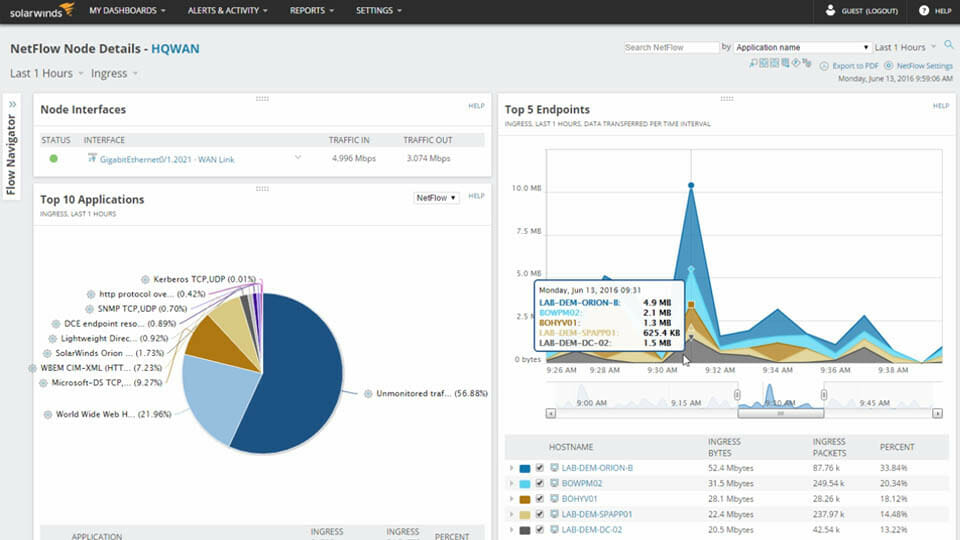
The NetFlow Traffic Analyzer captures data from continuous streams of network traffic and converts those raw figures into easy-to-understand charts and tables.

This quantifies exactly how, by whom, and for what purpose the corporate network is being utilized.

It includes a bandwidth monitor that analyzes Cisco NetFlow, Juniper J-Flow, sFlow, Huawei NetStream, and IPFIX flow data to identify the applications and protocols that consume the most bandwidth.

Solarwinds Network Bandwidth Analyzer Pack best features:

  • Block or restrict Wi-Fi users from your network
  • Cisco NetFlow, Juniper J-Flow, sFlow, Huawei NetStream, and IPFIX flow data analisys
  • Retrieves data from continuous streams of network traffic
  • Charted data and table reports
  • Cisco ACI devices support

⇒ Get Solarwinds Network Bandwidth Analyzer Pack

Auvik Bandwidth Monitor – Great performance measurements

best bandwidth monitors for Windows 10/11

Auvik is a software as a service (SaaS), that simplifies maintenance and accelerates the release of new features.

It offers network monitoring tools to assist you in monitoring the health and reliability of your network on Windows 10 and 11.

Note that it also concentrates on LAN and smaller WAN devices, rather than data centers. In comparison to other sophisticated systems such as Solarwinds, Auvik provides a complete, easy, plug-and-play, and moderate approach.

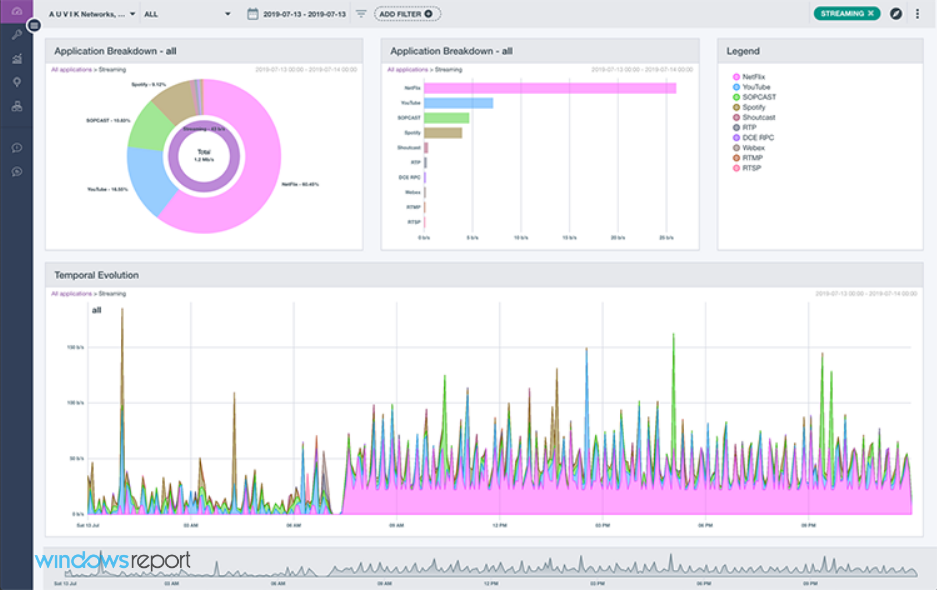
TrafficInsights from Auvik is particularly useful in the data center of your networks and devices because it is where high bandwidth is directed and where it is critical to know exactly what is going on at all times.

It displays network bandwidth usage without the need for costly, in-line traffic decryption, which is a significant benefit to the projects now in the works at Auvik.

Because fiber optics are the backbone of everything in the data center, TrafficInsights can also reveal where the system is having performance challenges.

This tool will also notify you when a certain percentage of a device’s or network’s capacity has been reached. This is critical since it can significantly improve network performance overall.

TrafficInsights’ downside is that it uses Simple Network Management Protocol in its discovery and data collection methods.

However, it does not presently support SNMP collection, thus you cannot have your infrastructure devices send alarms to Auvik. And it is a significant element that we would like to see from Auvik in the near future.

Auvik Bandwidth Monitor best features:

  • SNMP ready
  • Built-in network monitoring tool
  • Notifies about any network performance modifications
  • Easily identify who’s on the network
  • IP address management

⇒ Get Auvik Bandwidth Monitor

BitMeter OS – Simple and friendly interface

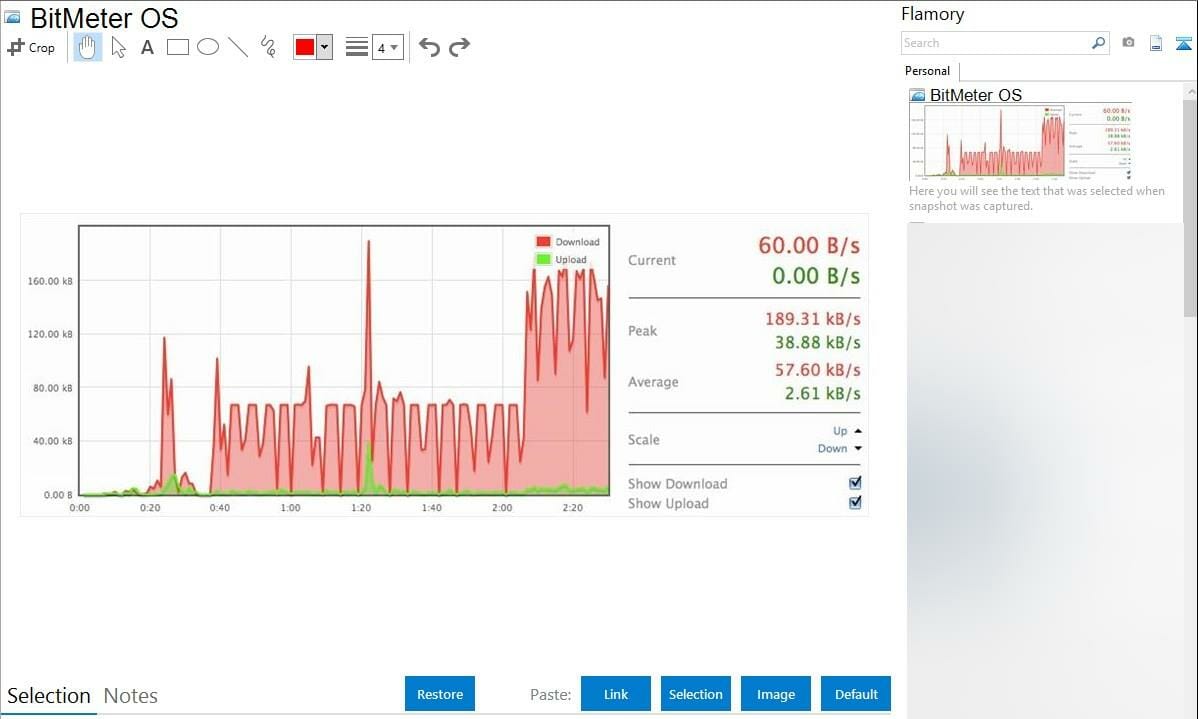
BitMeter OS is an open-source Windows bandwidth monitor that runs in the background whenever you start your Windows 10 or Windows 11 PC.

In order to view bandwidth consumption, it’s easy to use your web browser or a command-line interface.

This tool can show you your current bandwidth usage or your bandwidth usage over the past days and weeks.

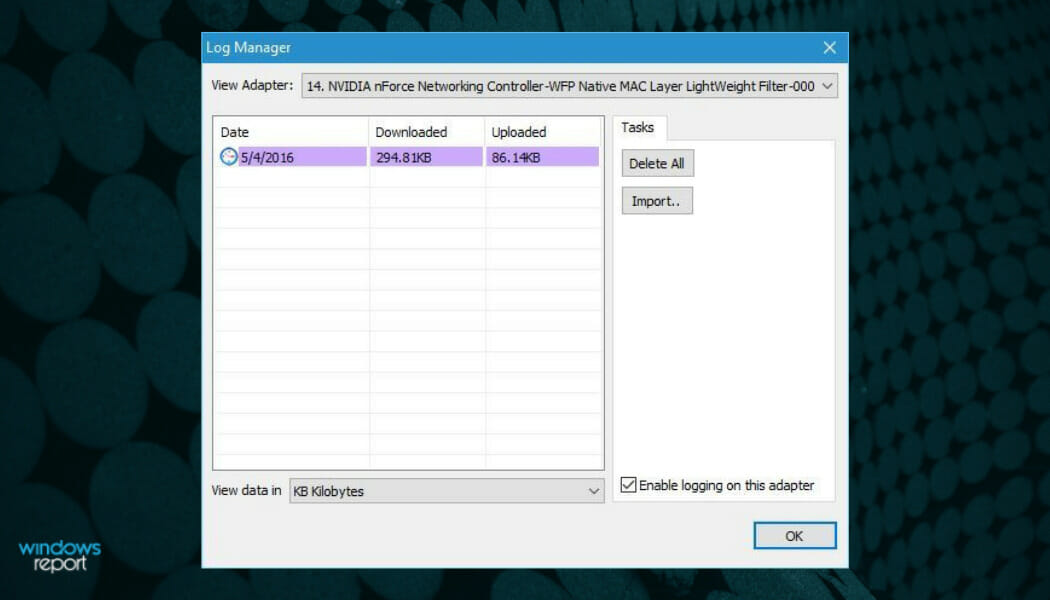
In addition, you have access to the summary for the current day, month, or year. If you wish, you can also get a summary of specific days and export reports in CSV format.

If you have a bandwidth limit, just set an alert to trigger once you exceed a certain threshold.

BitMeter OS is a simple tool, and although it doesn’t offer any advanced features, it should be perfect for basic users that just want to keep a close eye on their bandwidth usage.

BitMeter OS best features:

  • Simple and friendly interface
  • Export reports in CSV format
  • Open-source software
  • Bandwidth usage monitoring

⇒ Get BitMeter OS

FreeMeter – Minimalistic tool

best bandwidth monitors for Windows 10/11

FreeMeter is a free light bandwidth monitor tool for Windows 10, as well as Windows 11. The first thing you’ll notice about this app is its humble interface that consists of a live graph that shows your current network usage.

If you don’t want the graph to appear at all times, simply minimize it, and the live graph will remain active in your Taskbar.

Regarding the graph, you can customize its update frequency, scale, color, and transparency.

By double-clicking the graph you’ll open a report that shows you your weekly, daily, or monthly bandwidth consumption.

In addition, you may set alerts if you want to be notified once you’ve exceeded certain limits.

FreeMeter best features:

  • Customizable dashboard
  • Live graph display
  • Light on resource usage
  • Simple and intuitive usage

⇒ Get FreeMeter

Rokario Bandwidth Monitor – Live graph usage

Rokario Bandwidth Monitor is a simple tool for Windows 10 and 11 PCs, which comes with a live graph that shows bandwidth usage in real-time.

You can customize the graph with a wide range of themes, and create your own themes with this tool.

We have to admit that Rokario Bandwidth Monitor lacks certain features such as alerts. As for the report log, it doesn’t allow you to see your monthly or weekly bandwidth usage.

Instead, you only have access to your bandwidth usage on a daily basis which is not ideal for professional usage.

Rokario Bandwidth Monitor best features:

  • Customizable graphs
  • Live graph display
  • Simple and easy commands

⇒ Get Rokario Bandwidth Monitor

If you’ve observed a significant decrease in Internet speed, it’s possible that a device on your network is consuming the resources.

A bandwidth limiter for Windows 10 and 11 can level the playing field by ensuring that each computer receives sufficient bandwidth.

This prevents pages from loading slowly when someone else on the network of your home or office is downloading music, films, or other large files.

A bandwidth limiter may also be used on its own to restrict bandwidth consumption for a specific device and therefore increase Internet flow for another that shares the same network.

FAQs

What does bandwidth monitor software do?

Bandwidth monitor tools track your Internet usage in real time, generate detailed reports, and help you avoid exceeding data limits set by your ISP.

What is the best bandwidth monitor for Windows 10 and 11?

Site24x7 and PRTG Network Monitor are top picks for detailed analytics, while BitMeter OS and FreeMeter are lightweight options for everyday users.

Can bandwidth monitors also detect security issues?

Yes. Tools like GlassWire and NetFlow Analyzer can alert you to suspicious traffic patterns, DNS changes, or unknown devices on your network.

Do bandwidth monitors work with limited connections?

Absolutely. Bandwidth monitors are especially useful for limited data plans, since they alert you when usage nears or exceeds your set threshold.

If you have any other questions or suggestions, don’t hesitate to leave them in the comments section below.

How to Fix DirectX Not Installing in Windows 10 [6 Tested Ways]

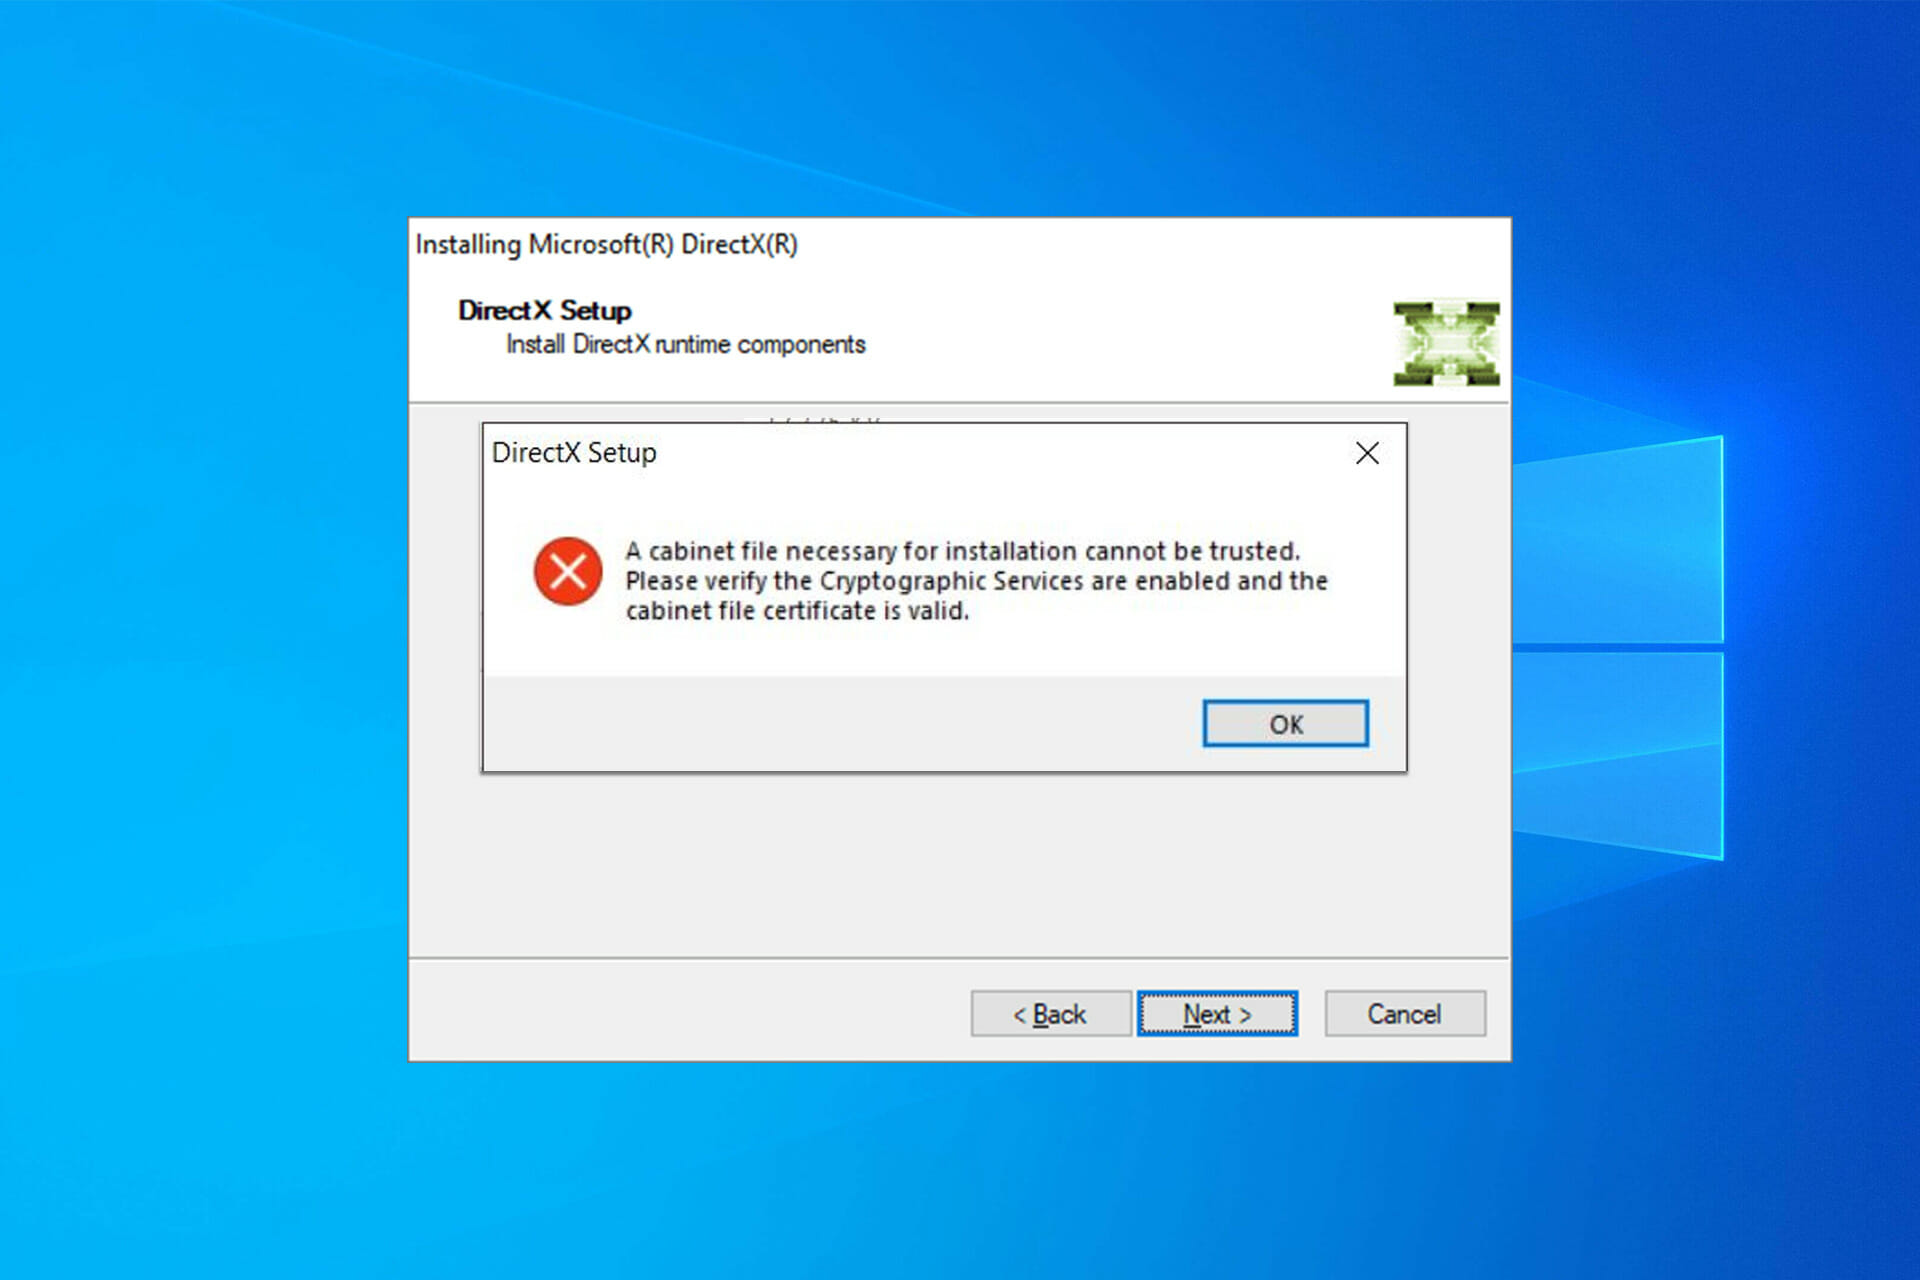
DirectX is a crucial component required by many multimedia applications, but some users complain that they can’t install DirectX in Windows 10.

This might be due to some DirectX errors on Windows 10. Thankfully, you can solve them. Today we’re going to show all the different ways to do it.

Here’s a quick video summary. Find more in-depth details below if you’re unable to complete DirectX setup.

1. Reinstall your graphics card drivers

  1. Press Windows Key + X and choose Device Manager.
    device-manager
  2. When Device Manager starts, go to Display Adapters section and locate your graphic card driver.
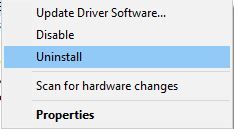
  3. Right-click the driver and choose Uninstall.
    uninstall-driver
  4. Check Remove the driver software for this device and click OK.
    confirm-uninstall-driver
  5. After you’ve uninstalled the driver, restart your computer.
  6. After your computer restarts, go to your graphic card manufacturer’s website and download the latest drivers for your graphic card.
  7. Install the downloaded drivers.

2. Reinstall one of the previous updates

  1. Open the Settings app and go to Update & Security.
  2. Go to Windows Update section and click on Advanced options.
    advanced-options-windows-update
  3. Click View your update history.
    view-your-update-history
  4. Click on Uninstall updates.
    uninstall-updates
  5. Before uninstalling an update you have to do some research and find which of these updates is a DirectX update.
  6. Uninstall that update and restart your computer.

Sometimes previously installed updates can cause issues with DirectX; if that’s the case, you might have to uninstall these updates.

If you’re having trouble opening the Setting app, take a look at this article to solve the issue. Find out if a specific update is installed or not with the help of this guide.

3. Download Visual C++ Redistributables

  1. Download the package.
  2. Run the setup.
  3. Follow the instructions and install the Visual c++ Redistributables.

Few users reported that installing Visual C++ Redistributables has fixed DirectX errors. Make sure you install the whole package or a specific version. Downloading the missing Visual C++ Redistributables will do the trick when you can’t install Directx in Windows 11.

4. Download the missing .dll files

Few users report that you can fix DirectX errors on Windows 10 simply by downloading the missing .dll files and moving them to the WindowsSystem32 or WindowsSysWOW64 folder.

This solution might not be the safest if you download these missing files manually, so keep that in mind. Alternatively, you can copy the missing .dll files from another computer you use.

Note icon NOTE
This solution can lead to potential system instability, so use it at your own risk.

Use a third-party .DLL fixer

You can restore. DLL files if you use a specialized program that can download missing system files and restore corrupted ones.

A tool like this can also keep you safe by performing periodic scans and checks to make sure your computer is healthy and unaffected by malware or spyware.

  1. Open the Windows search bar.
  2. Type in dxdiag and select it.
  3. In the System tab, check to see your RAM and CPU model.
  4. In the Display tab, check to see your GPU model.

I know it’s probably unlikely, but if you’re using an older computer, you might want to check if it meets the minimum system requirements for running DirectX. Here are the minimum system requirements for DirectX 12:

  1. Windows 7 32 bit or 64 bit
  2. DirectX 12 compatible graphics card
  3. .NET Framework 4
  4. 1 GB RAM
  5. 2 GHz Duo Core CPU

6. Install .NET Framework using the Command Prompt

  1. Go to the Search, type cmd, and open Command Prompt as Administrator.
  2. Type the following command and press Enter: DISM /Online /Enable-Feature /FeatureName:NetFx3 /All /LimitAccess /Source:D:sourcessxs
  3. Wait for the process to finish.
  4. Restart your computer.

To install the .NET Framework, you must use the good old DISM (Deployment Image Servicing and Management) service. If DSIM fails, quickly fix it with this step-by-step guide.

However, we’re not going to use the whole tool, but just a part that will allow us to install the .NET Framework.

Is there a way to reinstall DirectX?

While there’s no reliable and dedicated uninstaller software to remove DirectX and then manually install it, you can always reinstall DirectX through several methods.

Since updates for DirectX are released alongside Windows Update in the newer iterations, checking for these should get you the latest version, and the OS will reinstall it over the previous one.

DirectX is an integral part of all Windows operating systems, therefore, any DirectX problems can cause your favorite applications to stop working.

If you have any DirectX problems on Windows 10, feel free to try some of our solutions. For more suggestions or questions, reach out to the comments section below.

Folder Access Denied Windows 11: How to Get Full Permissions

The Windows 11 Access is denied error prevents you from uninstalling applications or accessing particular directories on your computer. The reasons for the error vary from issues with your PC to permission and setting problems.

Fortunately, it is not the most challenging problem to solve, requiring just a few tweaks on your PC.

Why do I keep getting access denied?

You can get the Access is denied error on Windows 11 for various reasons. Below are some of the factors that can cause it:

  • Lack of permission – If a folder or external hard drive shows the Access is denied prompt on Windows 11, it might be because you lack permission to view or open the file. You need to take complete control of the folder to circumvent this.
  • Lack of ownership – This error can also show up if you don’t have ownership rights to the folder. So, you must take ownership of the folder or file and restart your PC to fix this.
  • Encryption – If a folder is encrypted on one user account, you can’t open it from another. So, you need to change your account to admin or provide the admin password to access it.
  • Antivirus interference – Sometimes, your antivirus might deem a safe folder or file as dangerous due to some of its properties. This can lead to this error. You need to disable or remove the security software and switch to one of the best antiviruses for Windows 11.

How do I fix the Access denied error in Windows 11?

Before making changes to your PC, here are a few quick things to do:

  • It is advised to disable your antivirus temporarily. This is because it might be flagging the folder or file, preventing it from opening.
  • Ensure the file you are opening is not corrupt or problematic, say, lesser than the intended size. Check that, and if that turns out to be the case, restore the file from another PC or download it from the web.

If this does not solve the issue, you can now proceed to the fixes below:

1. Use the Registry Editor

  1. Press the Windows key + R, type regedit, and click the OK button.
    regedit
  2. Navigate to the path below in the left pane: HKEY_LOCAL_MACHINE/SYSTEM/CurrentControlSet/Services/LanmanWorkstation/Parameterspath
  3. Now, right-click on any space in the right pane, select New, and then DWORD (32-Bit) Value.
    new
  4. Enter AllowInsecureGuestAuth as the name of the new entry.
    allow
  5. Finally, double-click the new entry, set the Value data to 1, and click OK.
    value data

If you are getting the Windows 11 Access denied as administrator, the steps above will help remove all restrictions that might be causing the issue.

2. Use Computer Management

  1. Right-click on the Start button and choose Computer Management.
    comp management windows 11 lock screen slideshow not working
  2. Expand Local Users and Groups, then open the Users folder.
    local users windows 11 lock screen slideshow not working
  3. Right-click on Administrator, then tap on Properties.
    admin prop windows 11 lock screen slideshow not working
  4. Uncheck the box next to Account is disabled and press the Apply and the OK button on the bottom side.
    disabled acc windows 11 lock screen slideshow not working
  5. Click on the Groups folder on the left side, right-click on Administrator, then tap on Properties.
    group admin windows 11 lock screen slideshow not working
  6. Click on the Add button.
    add windows 11 lock screen slideshow not working
  7. Enter the word test in the opened window, click on Check Names, then press the Apply and the OK button in the current window as well as in the Properties window.
    test windows 11 lock screen slideshow not working

3. Set your account as administrator

  1. Press the Windows key + R then enter control userpasswords2. Lastly, click the OK button.
    control userpassword windows 11 lock screen slideshow not working
  2. The User Accounts window will now appear. Check the box next to Users must enter a user name and password to use this computer, then select your account and click on the Properties button below it.
    user prop windows 11 lock screen slideshow not working
  3. Navigate to the Group Membership tab. Select Administrator and click Apply and OK.
    admin choice windows 11 lock screen slideshow not working

Restart your computer once you’ve completed the procedures outlined above to determine whether or not the external hard drive access denied in Windows 11 problem has been resolved.

4. Check your permissions

  1. Locate the problematic directory, right-click on it, and choose Properties from the menu.
    new properties windows 11 lock screen slideshow not working
  2. Next, navigate to the Security tab and click the Edit button.
    security tab  windows 11 lock screen slideshow not working
  3. Select your user name from the list and make sure that you check the box next to Full control for Allow column in the Permissions sections, then click OK.
    allow permission  windows 11 lock screen slideshow not working

This is a rather simple solution when the destination folder access is denied in Windows 11. But if your user name isn’t on the list, you’ll have to add it manually and then change its permissions.

5. Enable the hidden Administrator account

  1. Press the Windows key + S, type in cmd, and right-click on the most relevant result to Run as administrator.
    run as admin windows 11 lock screen slideshow not working
  2. When Command Prompt starts, run the command below. By doing so you’ll unlock the administrator account:net user administrator /active: yes
    net user addmin windows 11 lock screen slideshow not working
  3. Now log off of your account and switch to the newly enabled Administrator account. From there you should be able to access your files without any problems.
  4. After you’re done using the Administrator account, go back to your main account and start Command Prompt as administrator again as we did in the first step. Now enter this command to disable the Administrator account: net user administrator /active: no 
    net user addmin no windows 11 lock screen slideshow not working

Remember that after switching back to your main account, the Windows 11 Access is denied issue might persist.

If needed, you can use the Administrator account to make the necessary changes to your system and fix things when you have Drive is not accessible Access is denied error in Windows 11.

6. Take ownership of the file

6.1. Take ownership via Properties

  1. Locate the problematic folder, right-click on it, and choose Properties from the menu.
    new properties windows 11 lock screen slideshow not working
  2. Navigate to the Security tab and click the Advanced button.
    advanced secuirty windows 11 lock screen slideshow not working
  3. Locate the Owner section at the top and click on Change.
    change owner windows 11 lock screen slideshow not working
  4. In the Enter the object name to select field, enter Administrators or enter your user name.
  5. Now, click the Check Names button, then tap the OK button to save the changes made.
  6. Check the box next to Replace all child object permission entries with inheritable permission entries from this object and click Apply and OK to save changes.
    replace all child windows 11 lock screen slideshow not working

After applying these steps, the Windows 11 Access is denied error should be solved.

6.2. Take ownership via Command Prompt

  1. Press the Windows key + S in then enter cmd, and click on the most relevant result.
    cmd search   access denied windows 11
  2. Type or paste the following commands and press Enter after each. Note that you need to replace the path_to_folder in the commands with the correct path of the inaccessible folder.
    takeown /f "path_to_folder" /r /d y icacls "path_to_folder" /grant administrators:F /T
    takeown cmd    access denied windows 11

If you were trying to find out how to remove access denied in CMD, reconfiguring the permissions by using the icacls command should do the trick.

After running these two commands, you should have full access to them. Reboot your computer once you’ve completed the procedures outlined above to determine whether or not the problem has been resolved.

If nothing else works, you might consider resetting your Windows 11 to factory defaults. It’s not ideal, but it’s a last-resort solution that will wipe the ownership settings and let you access the folder.

The Windows 11 Access is denied error can be frustrating as it can stop you from opening important files. It can also happen to the Temp folder denying you access to delete junk files. However, with the fixes in this guide, you should be able to fix it for good.

Many reported this error while trying to access the user folder from an old hard drive, but that’s not the only instance.

In the same vein, if you want to know how to fix Error 5 Access is denied on Windows 11, check our detailed guide for the steps to follow. We also recommend checking our guide on how to assign read/write permissions properly and avoid future issues. Additionally, we can help you out if you encounter a pop-up saying “Unable to execute file in the temporary directory.“

Let us know which procedure worked for you in the comments area below.

NSIS Error on Windows 11: How to Get Rid of It

Third-party programs form a critical part of our work or student life. You are required to install various programs, such as editing software, learning apps, data collection, and storage tools. But, while doing so, users encountered the NSIS error in Windows 11.

NSIS (Nullsoft Scriptable Install System) is an open-source tool that facilitates the creation of installers for Windows. When you encounter the error, it indicates a problem with the installer or an unfavorable situation preventing it from running.

If the setup continues to run despite the NSIS error, the installed software may be damaged and wouldn’t work as designed. To prevent this, you should identify the issues causing the problem and eliminate them.

There are many reasons behind the NSIS error in Windows 11, each having a specific fix. We have discussed them in the later sections for you to understand and resolve the problem.

Why do I get NSIS error?

Issues that lead to the NSIS error in Windows, both about the installer setup and the system, are listed below:

  • Some files of the program to be installed are missing – When important program files are missing, any future program activity will be hindered.
  • Downloaded files are modified – Modified data means modified system information which will cause miscommunication across the program.
  • System infected with malware – By performing a system scan, you may eliminate any existing malware.
  • Corrupt system files – Corrupt system files significantly contribute to many Windows errors, including this one.
  • Installation media is damaged – For those trying to figure out what causes NSIS error, damaged installation media is a likely underlying cause.

Now that you have a fair understanding of the error and the underlying causes, let’s walk you through the methods to eliminate it.

How can I fix the NSIS error in Windows 11?

Before we start with the complex changes, here are a few quick things to check:

  • Restart the computer
  • If you have a RAM disk or drive (space on RAM used as a storage drive) set up, ensure the Temp is not full. A user pointed this out and reported that clearing some files there fixed things when there was an NSIS error launching the installer when uninstalling.

If these don’t work, head to the fixes listed next.

1. Rename the installer setup

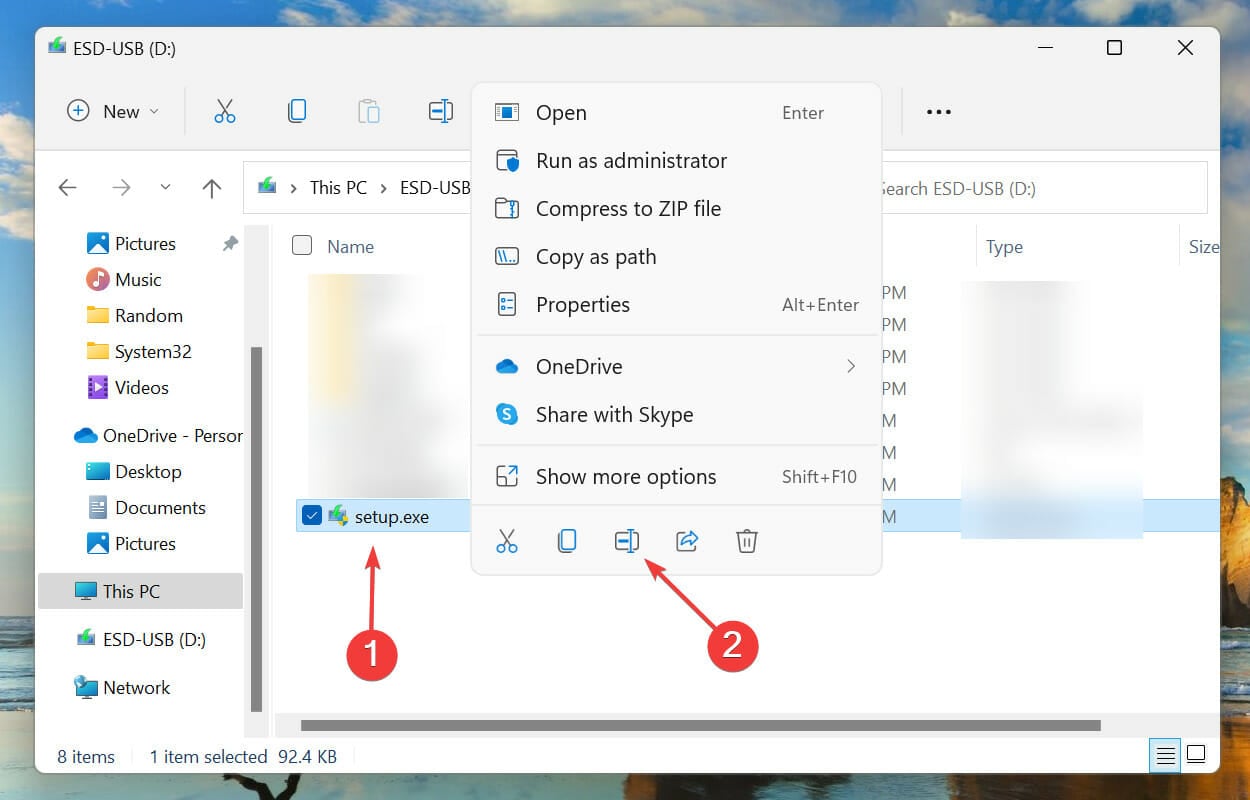
  1. Locate the downloaded files for the program, right-click on the installer setup, and select the Rename icon from the context menu. Alternatively, you can select the setup file and hit F2.Rename file to fix NSIS error in Windows 11
  2. Change the name to one word and try to keep it simple. Also, avoid using special characters or non-English alphabets since they are known to cause problems running the setup. The NSIS Error launching installer will be solved afterward.

This is, undoubtedly, the simplest and quickest method to fix the NSIS error in Windows 11. However, you may encounter trouble running it if the setup file name is long or has special characters that the OS fails to recognize. Hence, it’s recommended that you use a simple name for it.

2. Move installer setup to another folder

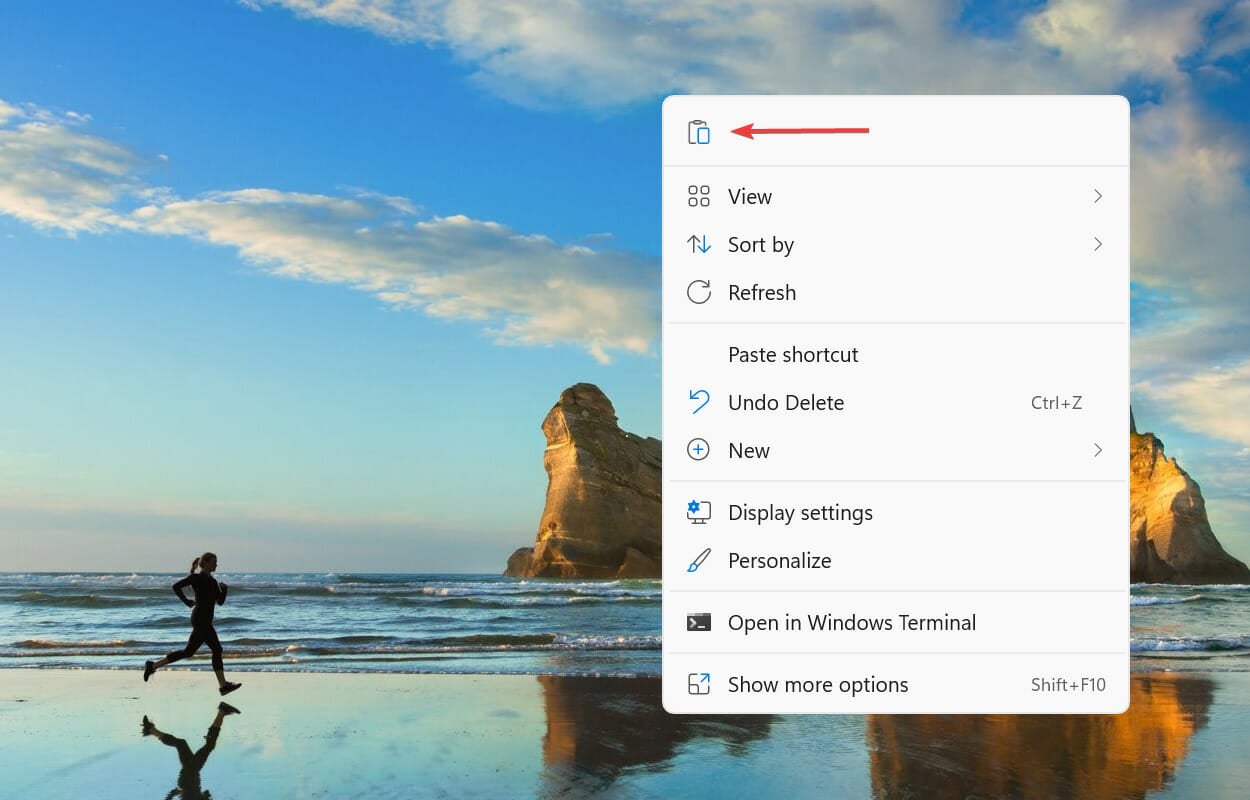
  1. Locate the program installer, right-click, and select the Copy icon from the context menu.Copy the setup
  2. Now, go to the desktop, right-click on the empty portion, and select the Paste icon from the context menu. The NSIS error while uninstalling the program will be fixed.Paste the file

In some instances, the file path caused the NSIS error in Windows 11. Hence, it’s recommended that you change the location of the file and check whether the NSIS error during uninstall or install goes away.

3. Use a third-party repair software

To resolve the TeamViewer NSIS error in Windows 11 and others, you may need to perform a search for corrupted or damaged Windows files.

The best part is that you won’t have to seek a needle in a haystack; all of this and more can be accomplished with an automated repair solution.

4. Run a malware scan

  1. Press Windows + S to launch the Search menu. Enter Windows Security in the text field at the top, and click on the relevant search result.Launch Windows Security to fix NSIS error in Windows 11
  2. Next, click on Virus & threat protection from the listed options.Virus & threat protection
  3. Click on Scan options.Scan options
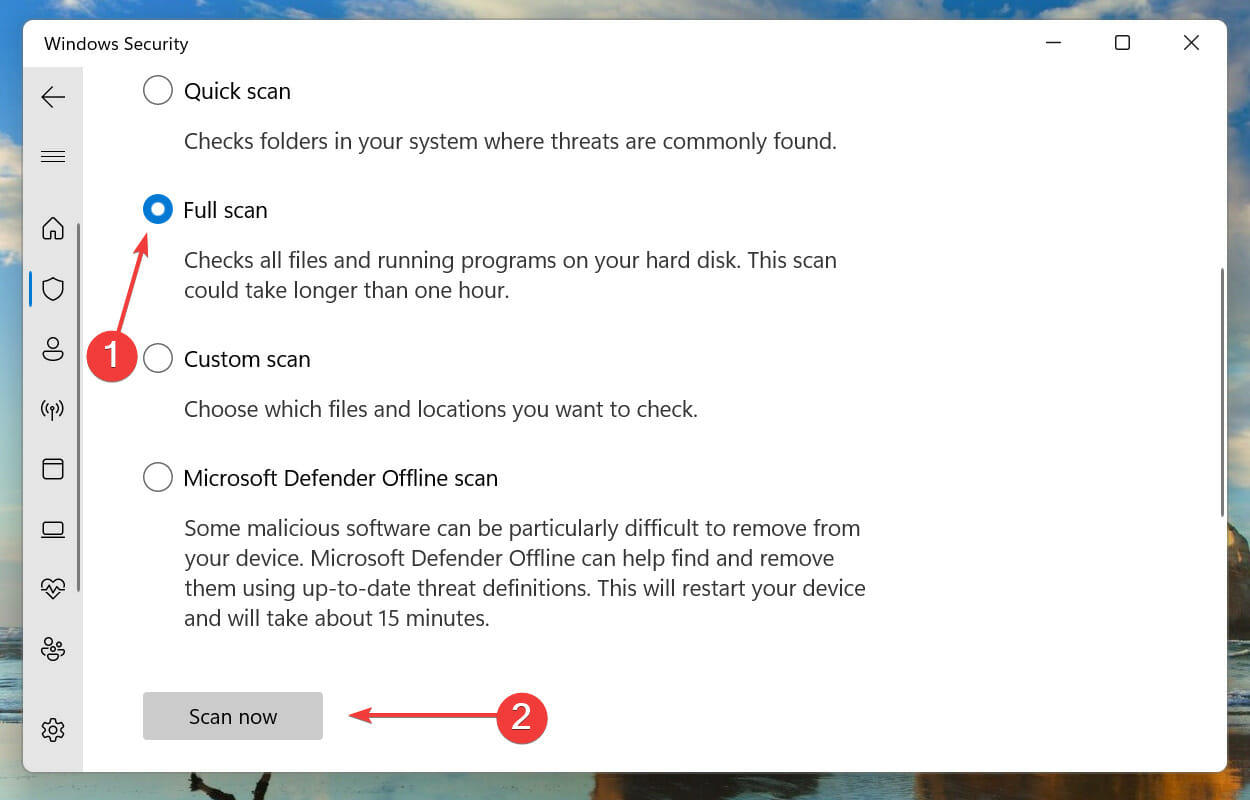
  4. Now, select the Full scan option and click on the Scan now button under it.Scan for malware to fix NSIS error in Windows 11

Running a malware scan can fix the NSIS error in Windows 10 and the previous iterations as well.

We also recommend you a third-party antivirus like Malwarebytes. Due to its advanced security options, it can detect and remove risky malware immediately. Thus, you ensure your constant protection from different forms of online threats.

5. Update Windows 11

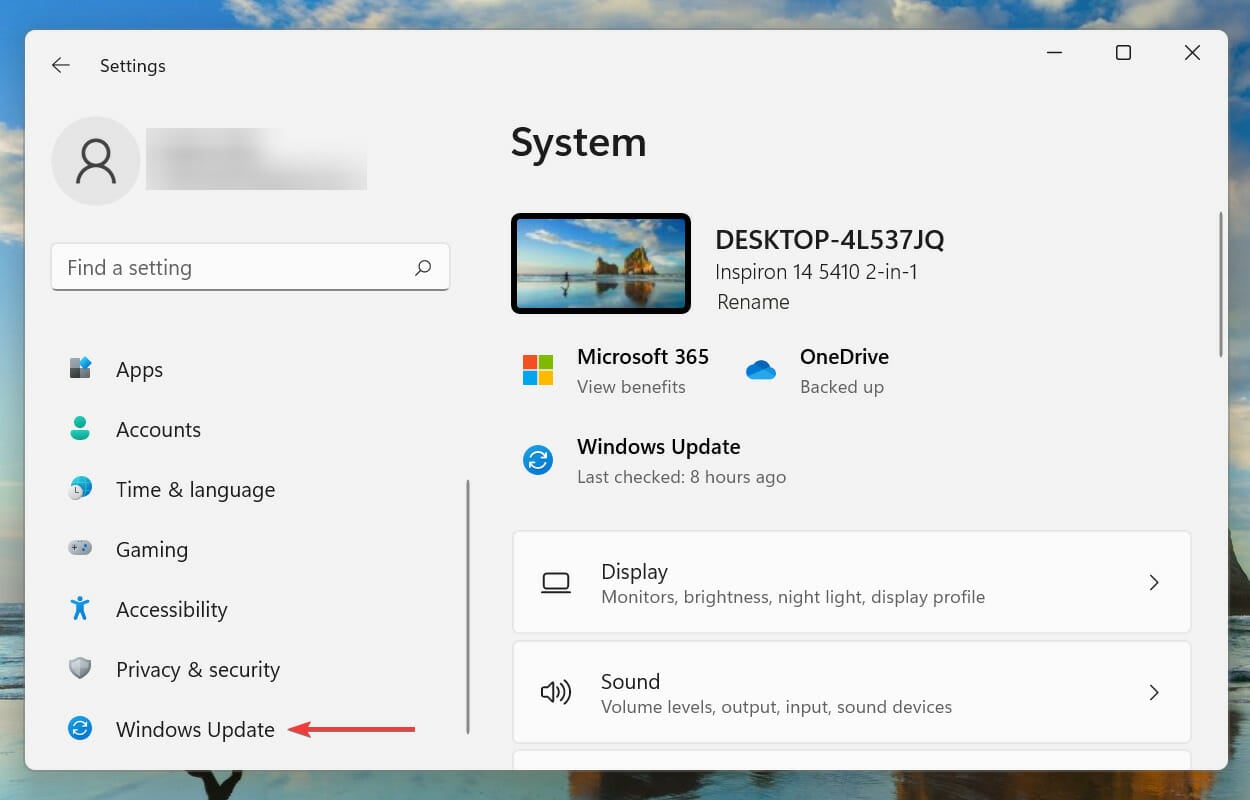
  1. Press Windows + I to launch the Settings app and select Windows Update from the list of tabs in the navigation pane on the left.Windows Update
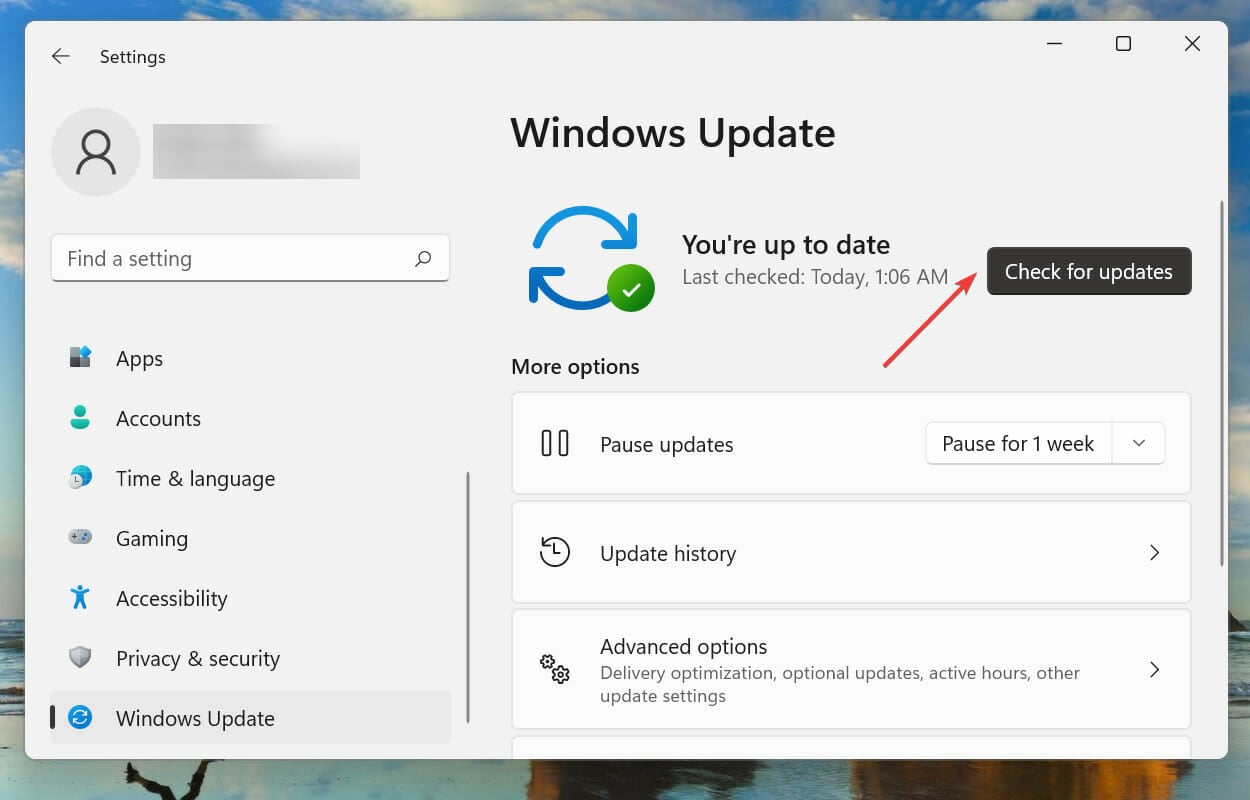
  2. Click on Check for updates to scan for any available newer versions of Windows.Check for updates to fix NSIS error in Windows 11
  3. If any are available, download and install them.

Updating the OS can also fix things in the event you have an NSIS error launching installer in Windows 7.

If you encounter the 0x80070643, 0x80070422, or 0x800f0831 Windows 11 installation error, click on the relevant linked guide and fix it in no time.

Also, if you are facing trouble launching the Settings app, learn how to eliminate the problem.

6. Change system language

  1. Press Windows + S to launch the Search menu, enter Control Panel in the text field at the top, and click on the relevant search result.Launch Control Panel to fix NSIS error in Windows 11
  2. Click on Clock & Region.Clock & Region
  3. Next, click on Region.Region
  4. Navigate to the Administrative tab from the top, and click on the Change system locale button.Change system locale
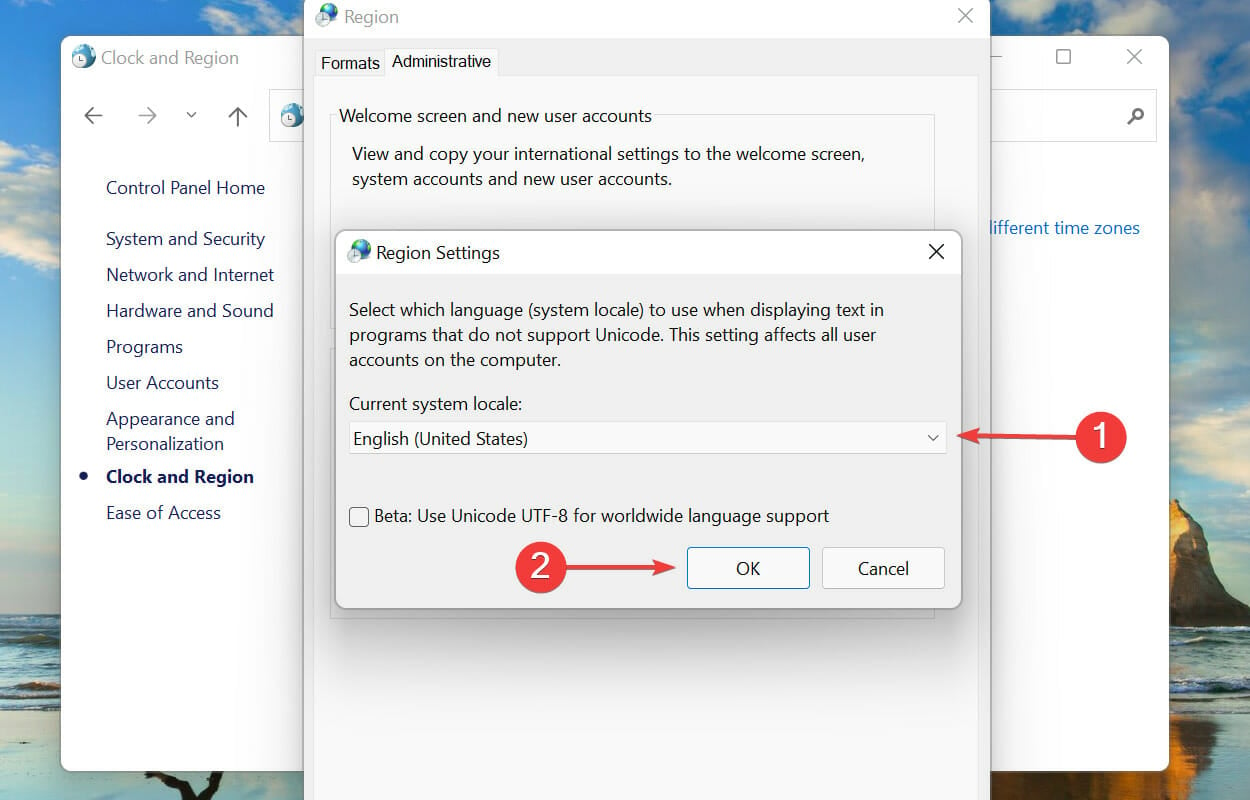
  5. Click on the dropdown menu, select an appropriate language that matches the installer’s, and click OK to save the changes.Change system language to fix NSIS error in Windows 11

7. Perform a quick SFC scan

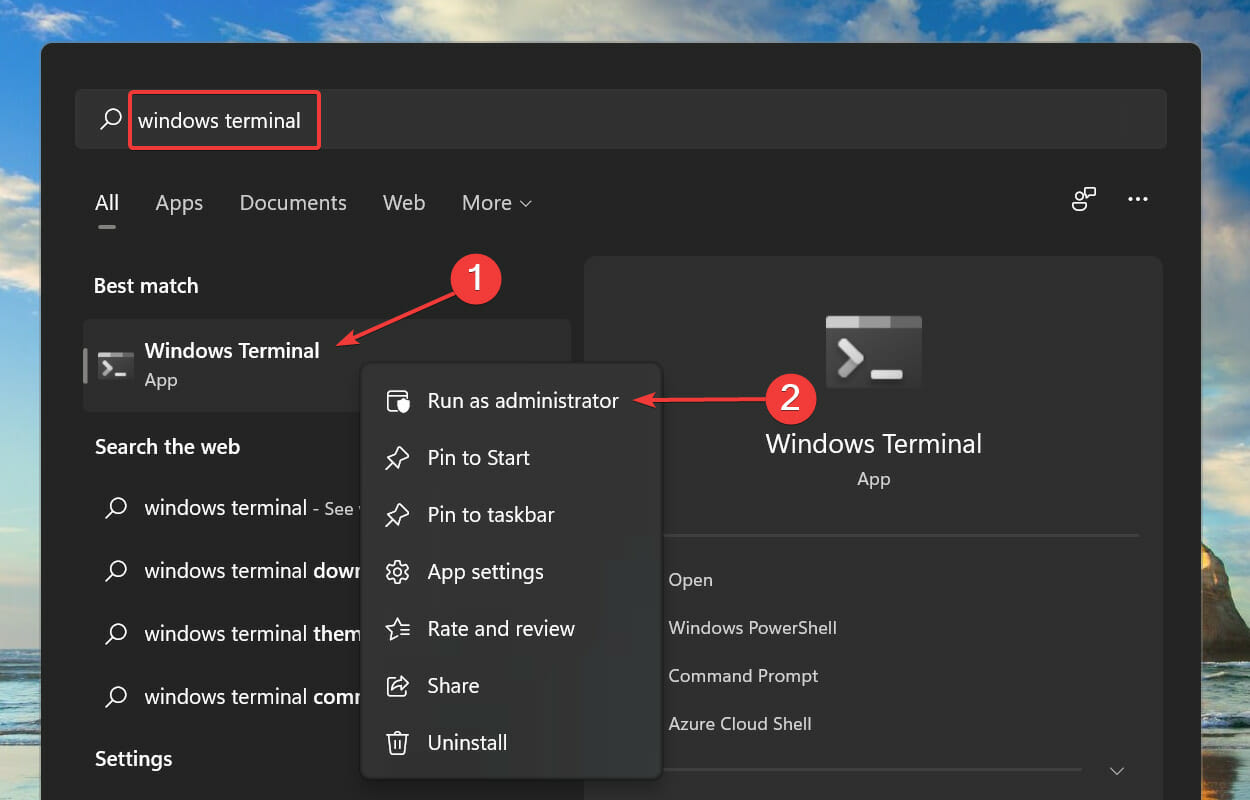
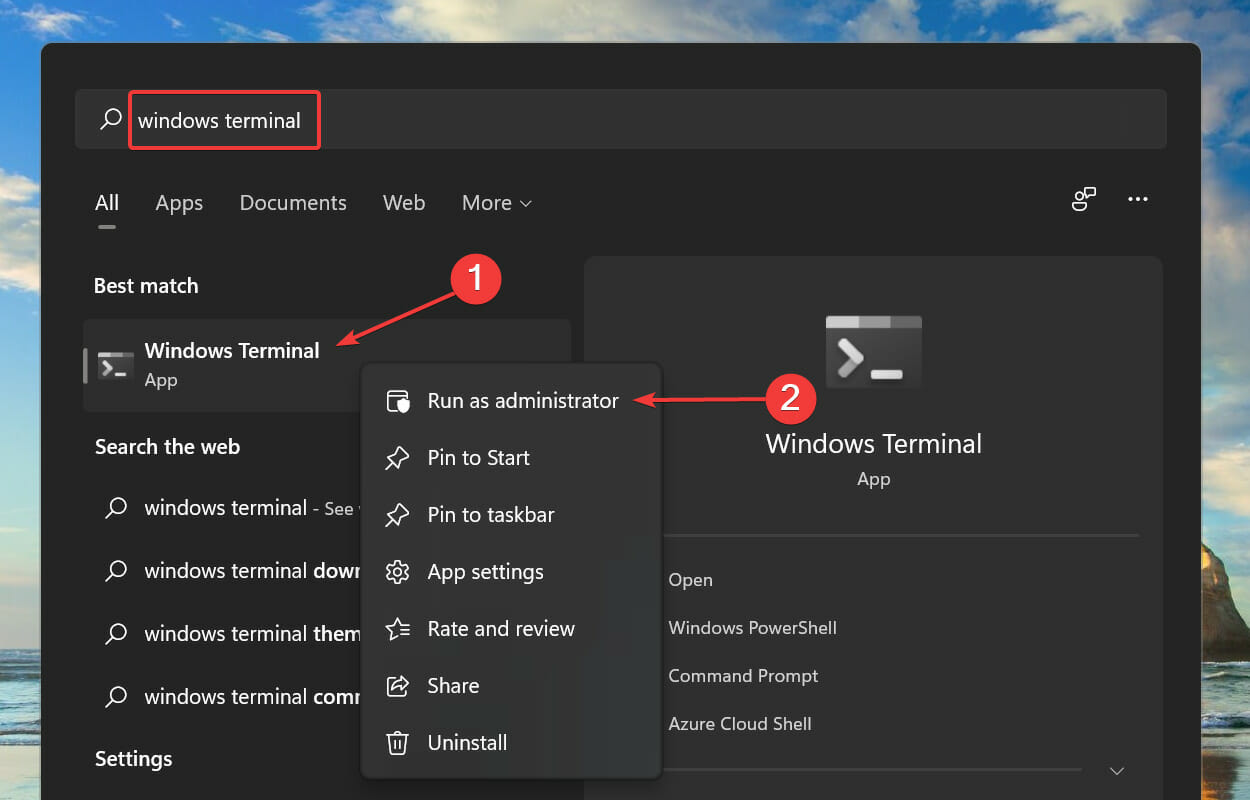
  1. Press Windows + S to launch the Search menu. Enter Windows Terminal in the text field at the top, right-click on the relevant search result, and select Run as administrator from the context menu.Launch Elevated Windows Terminal to fix NSIS error in Windows 11
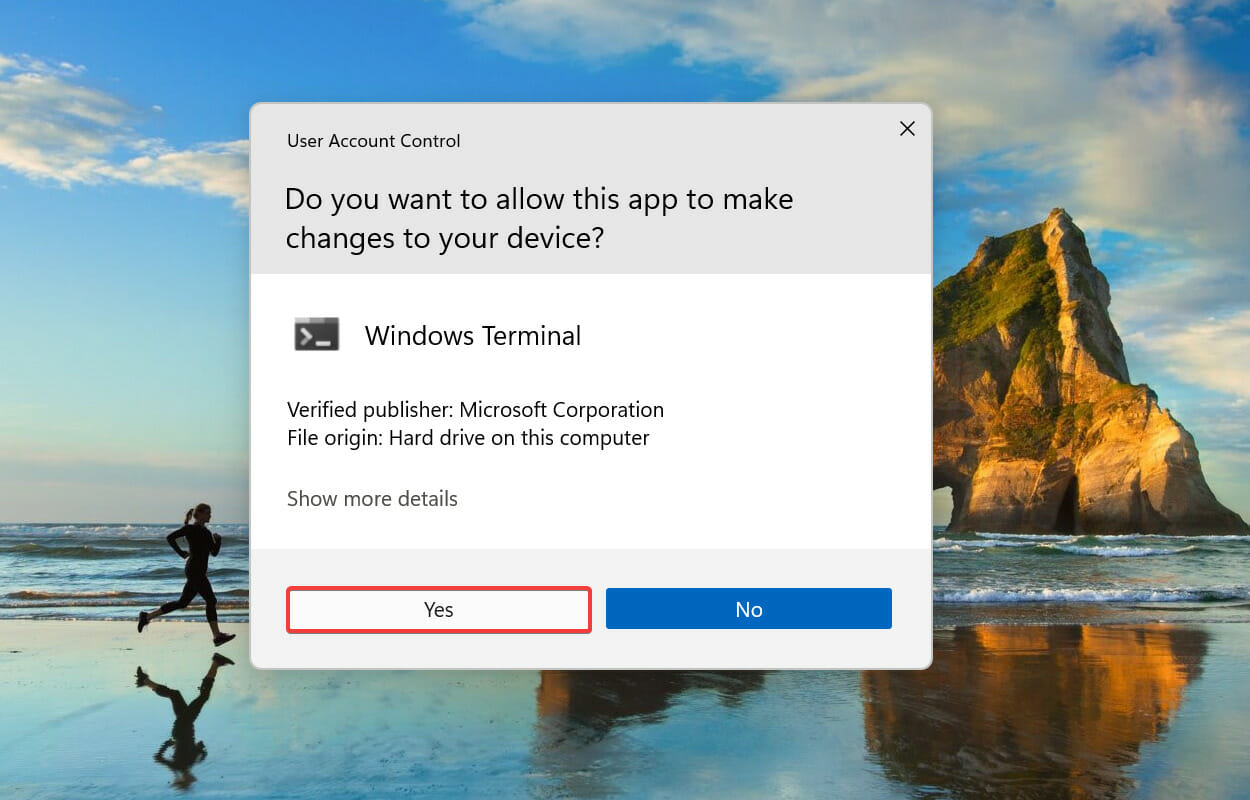
  2. Click Yes on the UAC (User Account Control) prompt.Click Yes
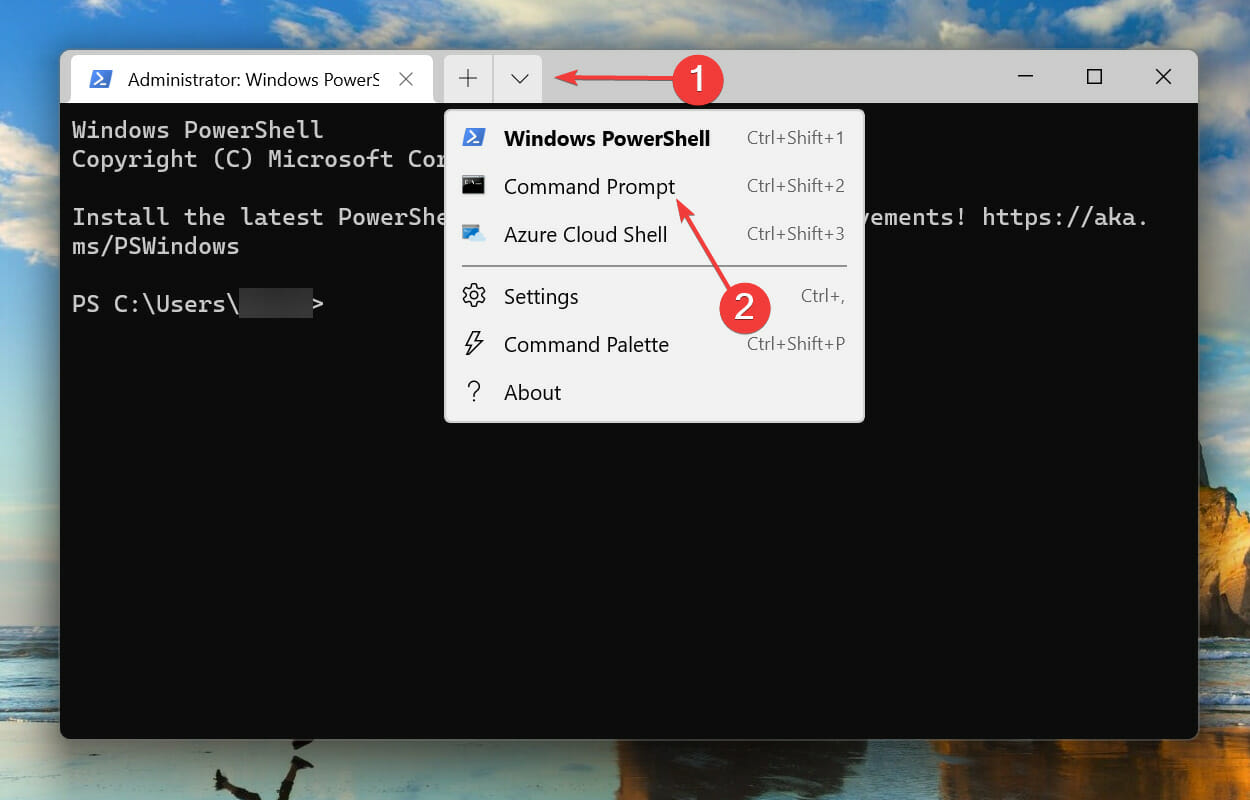
  3. Click on the downward arrow at the top, and select Command Prompt. Alternatively, you can press Ctrl + Shift + 2 to launch the tab.Launch Command Prompt tab
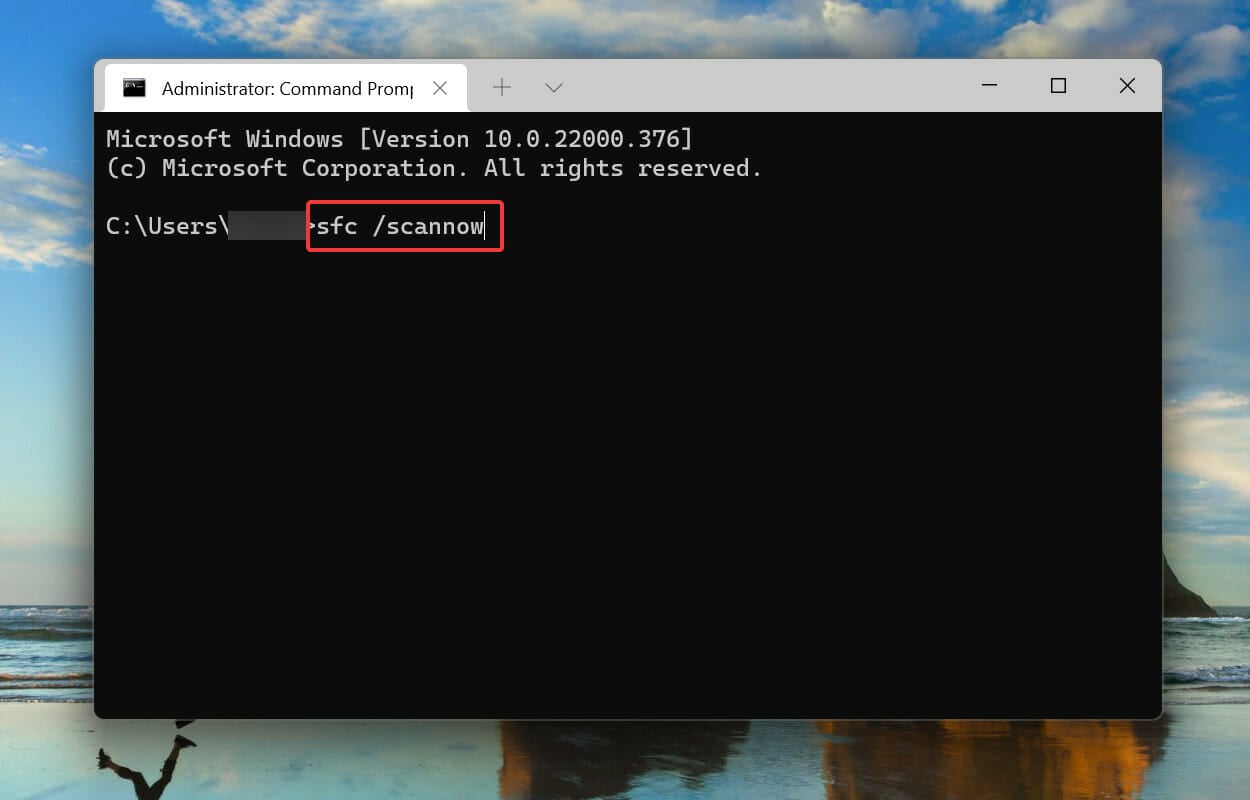
  4. Type/paste the following command and hit Enter to run the SFC scan. The NSIS writing temporary file error will be solved:sfc /scannowrun SFC scan to fix NSIS error in Windows 11

The SFC (System File Checker) scan identifies corrupt system files and replaces them with their cached copy stored on the system. So, if you are trying to find out how to fix NSIS error in Windows 11 and it’s the corrupt system files to blame, performing the scan should do.

8. Install program via Command Prompt

  1. Press Windows + S to launch the Search menu, enter Windows Terminal in the text field at the top, right-click on the relevant search result, and select Run as administrator from the context menu.Launch Elevated Windows Terminal to fix NSIS error in Windows 11
  2. Click Yes on the UAC (User Account Control) prompt that appears.Click Yes
  3. Click on the downward-facing arrow at the top, and select Command Prompt from the list of options. Alternatively, you can press Ctrl + Shift + 2 to launch the Command Prompt tab.Launch Command Prompt tab
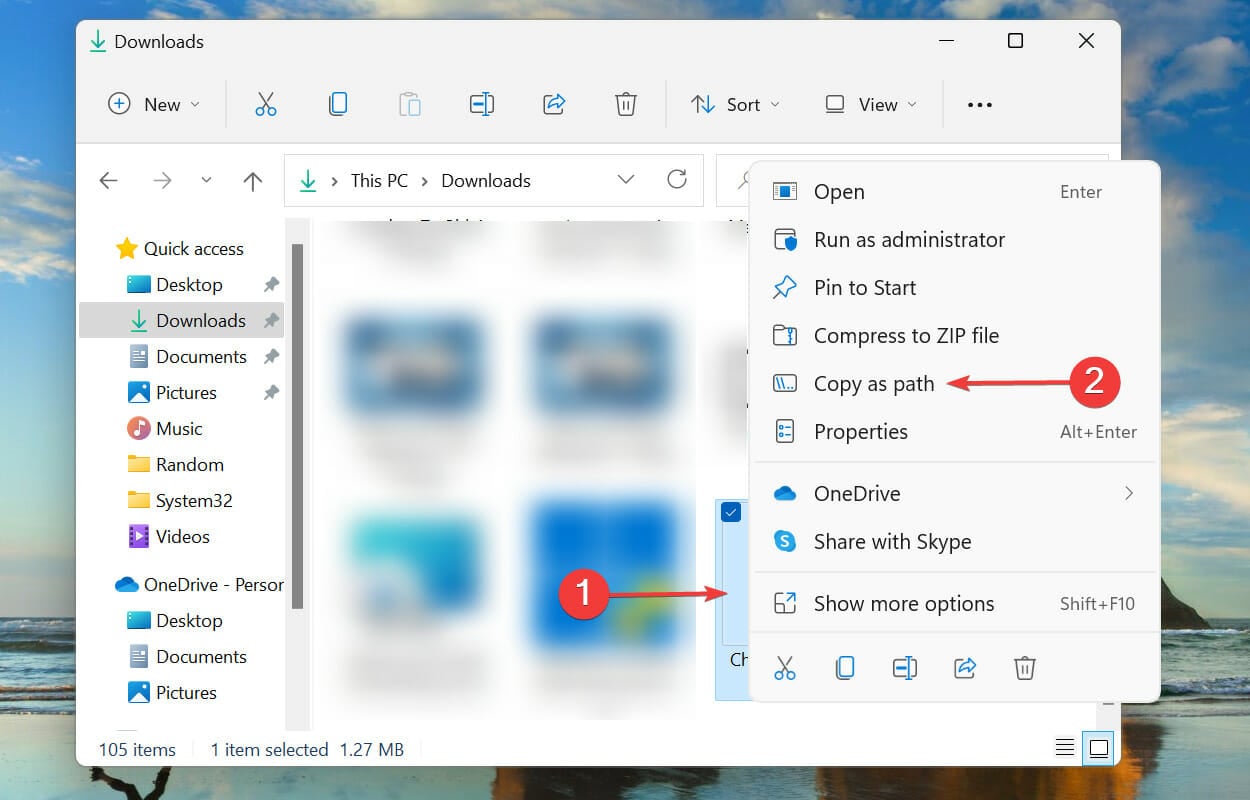
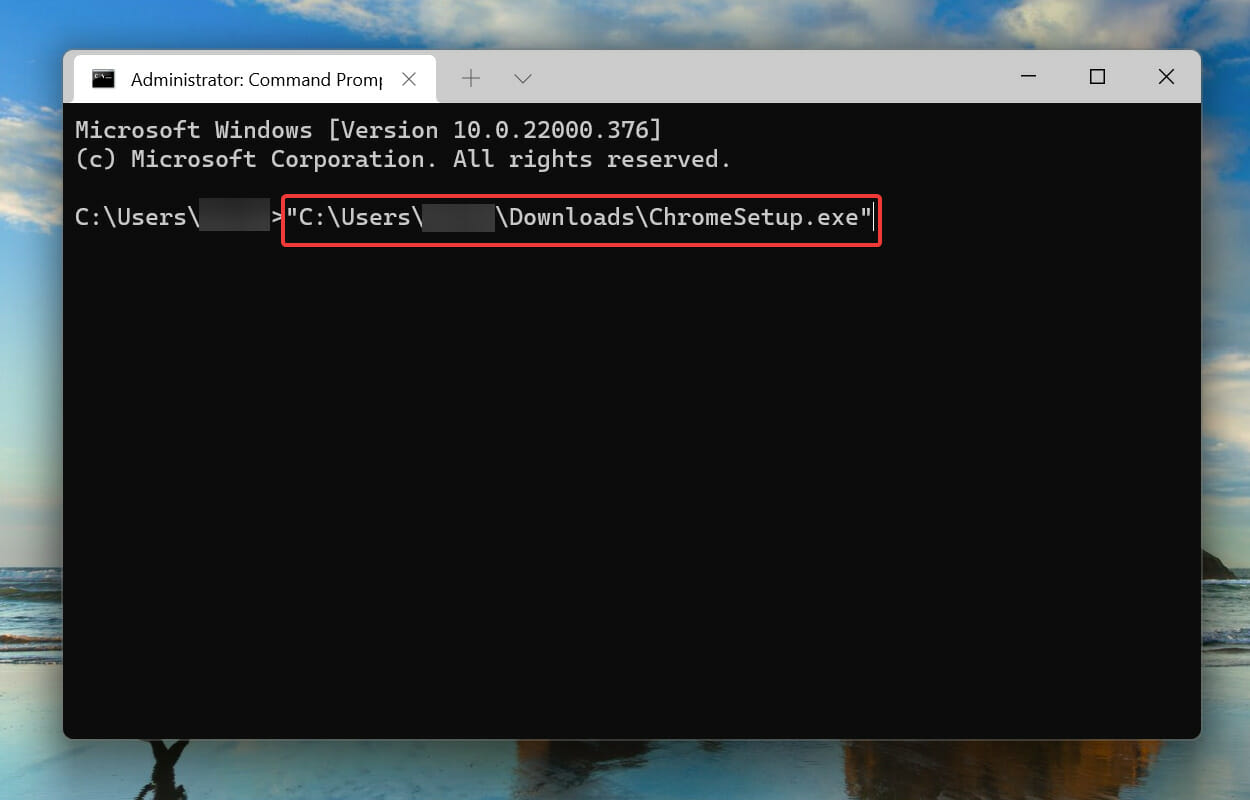
  4. Now, please navigate to the folder where the installation setup is saved, right-click on it and select Copy as path from the context menu. Copy setup path to fix NSIS error in Windows 11
  5. Go to Windows Terminal and press Ctrl + V to paste the path.Paste path
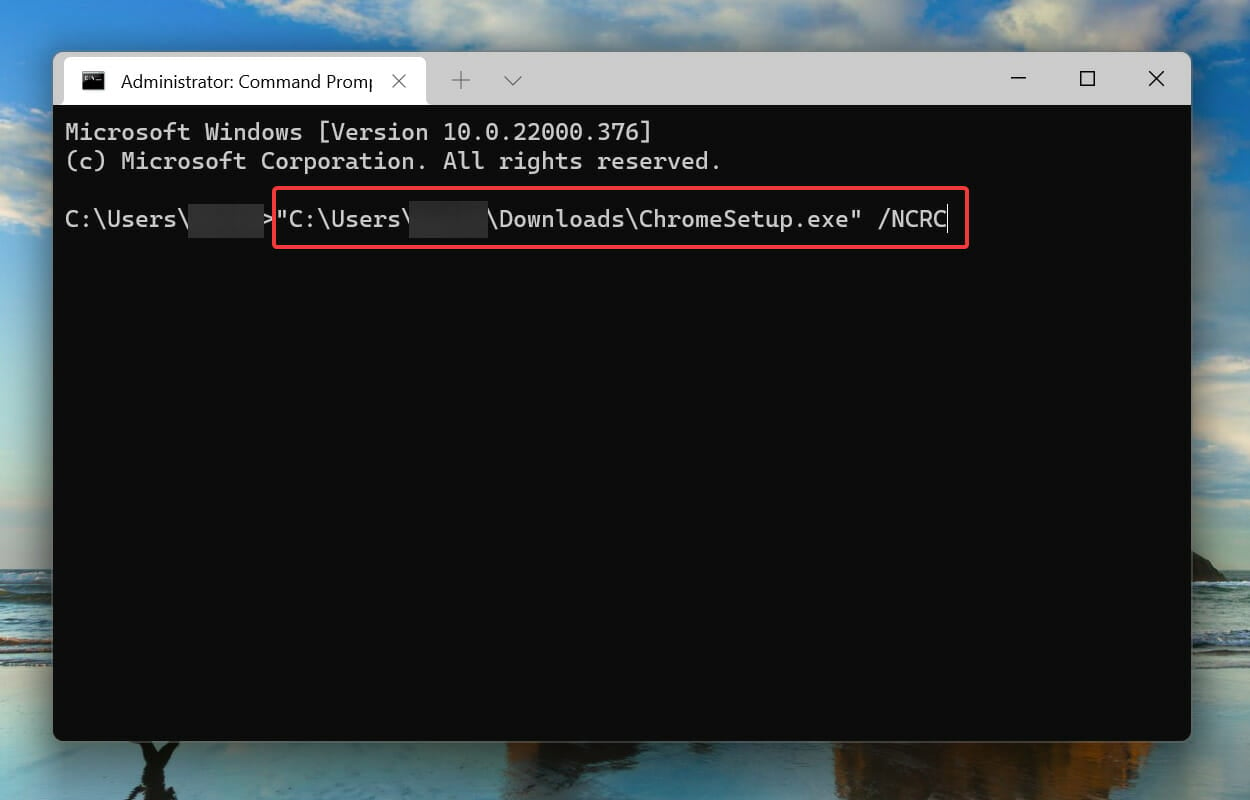
  6. Next, hit the Spacebar key to add space, type the following command, and hit Enter to run the installer:/NCRCRun installer
  7. Once the setup launches, follow the on-screen instructions to complete the installation process.

With this method, the installer will bypass any corruption check and run anyway. But, if there’s a major underlying issue, there could be problems with the installed programs. Therefore, we recommend it as the last fix.

Is NSIS a virus?

No, it isn’t a virus. You have access to the NSIS source code and may verify its accuracy. However, some people use this to spread malware, so make sure not to download any unknown NSIS packages from random websites.

Although most contemporary antivirus vendors are familiar with extracting files from NSIS installers and scanning them, some continue to build signatures on the installer stub itself rather than the files included within it.

How can I prevent the NSIS error in Windows 11?

By now, you already know why the NSIS error is encountered and its most effective fixes. But wouldn’t it be much simpler if you could prevent it in the first place?

To do that, make sure you download the program installer setup from the official website, and in case that’s not possible at least a reliable source. This ensures that all the files are downloaded in a single go with no corruption or missing files.

These are all the ways you can resolve the NSIS error in Windows 11. Some users also reported encountering the NSIS error launching installer for AMD drivers, so learn how to fix it.

The methods listed above should also solve the NSIS error launching the installer when uninstalling a program if that’s the issue you are facing.

Let us know which fix worked for you, along with your experience of Windows 11 thus far, in the comments section below.

Microsoft Word makes editing easier with paste text only shortcut

If you often interact with Microsoft Word in your day-to-day activities, then you’ll be happy to learn that the platform is getting a neat tool that will make editing tasks easier.

Previously, when you copied and pasted text from a website, you’d be required to make extensive edits to get rid of the formats. A daunting task that negatively impacted productivity. Though this will now be a thing of the past.

Microsoft announced that it is debuting the Paste Text Only shortcut in Word for Windows and Mac users. With this new feature, you’ll now be able to just copy and paste text from a website into Word your document and not have to worry about making edits to get rid of the source formatting like font size, type, or background color.

Animation of pasting text only using a shortcut

All you need to do is to source information from the web and select the segment that you want to incorporate into your Word document. Next, head back to your Word document and place the cursor when you want to add the selected content, and hit the Ctrl + Shift + V keyboard shortcut.

The new capability is shipping for M365 Home and M365 Business Standard Beta Channel users running on Windows: Version 16.0.15831.20174 or later or Mac: Version 16.67.1113.0 or later.

The new capability has also prompted some changes since other keyboard shortcuts have been affected. It is possible to restore previous shortcut settings if you’re not pleased with the new changes.

In related news, Microsoft PowerToys v0.68.0 recently shipped with a similar utility dubbed Paste as Plain Text. It is designed to let users paste content from the clipboard without formatting on Windows. Microsoft 365 is also set to get an accessibility assistant that’s designed to promote readability.

Grammarly launches generative AI tool to expand its capabilities beyond proofreading

If you spend your day writing articles and creating content, you might be conversant with Grammarly. It is a writing assistant tool that checks your grammar, spelling, clarity, etc.

In a press release, Grammarly announced its plans to further expand its capabilities with generative AI.  The tool will now feature GrammarlyGO, “an on-demand, contextually aware assistant powered by generative AI”.

The tool is designed to enhance communication by enhancing productivity where writing happens. It will provide users with on-demand communication assistance throughout the writing process and even provide revisions to pieces that have already been completed.

According to Rahul Roy-Chowdhury, Grammarly’s global head of product:

It will uniquely offer relevant, contextually aware suggestions that account for personal voice and brand style while staying true to our augmented intelligence philosophy to keep customers in control of their experience. GrammarlyGO will enable customers to save time, enhance their creativity, and get more done—helping individuals achieve their potential and enterprises transform how they work.

With the generative AI tool, users will be able to rewrite text to be more concise and align with the tone that they want it to. It allows you to personalize your voice to ensure that the flow of communication is seamless. Additionally, it can now compose high-quality content thus helping you communicate effectively and efficiently.

What’s more, you can use it to create ideas and unlock your creativity. Furthermore, you can also leverage its capabilities to send out email replies as the tool understands the context within emails allowing it to come up with drafts.

Grammarly is now transitioning to a platform that provides more than just editing capabilities. The company has also assured users that despite the incorporation of the new tool into the legacy, it will still maintain high standards for enterprise data security, user privacy, and responsible AI.

The new tool is expected to start rolling out in beta in April to all users with Grammarly Premium, Grammarly Business, and Grammarly for Education subscriptions. It will also be rolling out to users with Grammarly’s free plan in the US, Canada, UK, Australia, New Zealand, Germany, Poland, and Ukraine.

We’ve also seen Microsoft take up a similar approach by highlighting its plan to debut an accessibility assistant. A  new feature designed to help content creators make their work more accessible with less effort in Microsoft 365. It will help make content more readable across multiple platforms like Microsoft Editor and more.

Fix: Edge cookies get deleted after restarting

Microsoft has been paying more and more attention to its often-overlooked web browser Edge. Not only did it integrate the ChatGPT-powered Bing search engine into the browser’s ecosystem, but the tech giant also launched a reward initiative to keep people engaged.

But what’s going to happen if your cookies on Edge get immediately cleared every time you restart the browser?

It can be an annoying experience. After all, we rely on these cookies to store our data on the internet and let it remember our information temporarily so we don’t lose track every time we want to revisit the site again.

Moreover, if your cookies get deleted, you’ll need to re-enter all login credentials (like username and password) each time you visit a new website. While it may be good for your privacy especially if you’re using a public desktop, it can be irritating if you’re working on a personal PC.

If you relate to this situation, say less. Here, we’ve prepared three simple workarounds you can try,

How to fix Edge cookies getting deleted after restarting

1. Reset

1. With your Edge browser open, click on the three dots on your upper right ➜ Settings.

2. Click Reset settings ➜ Reset.

2. Enable third-party cookies

1. With your Edge browser open, click on the three dots on your upper right ➜ Settings.

2. Go to Cookies and site permissions ➜ Manage and delete cookies and site data.

3. Make sure the Block third-party cookies option remains unticked.

3. Disable automatic browsing data deletion

1. With your Edge browser open, click on the three dots on your upper right ➜ Settings.

2. Go to Privacy, search, and services ➜ Choose what to clear every time you close the browser.

3. Make sure the Cookies and other site data option remains unticked.

Have you ever had this problem before? If you do, feel free to let us know in the comments!

Twitter Error 467: How to Quickly Fix It

Twitter is one of the most popular social media platforms and encountering errors while using the platform is more common than you think. One such error is Twitter Error Code 467. This issue occurred when the user tried to click links in tweets to third-party websites.

Due to this issue, Twitter is down globally, and users cannot access social networking sites.

The error is an HTTP response status code that implies that the request was denied as the user account is restricted or locked. In this guide, we will discuss workarounds to fix the issue. Let’s get started! 

What causes Twitter error 467? 

There could be various reasons behind the error code; some of the common ones are mentioned here: 

  • Account suspended – Your user account can be suspended if you have not abided by Twitter’s terms of service. Ask your friends, if they can see your account or posts to check if the account is suspended
  • Account locked – If you are getting is error code, chances are your user account is locked due to suspicious activities. 
  • Twitter server down – If Twitter is down, you won’t be able to access the platform. Wait for a few hours for Twitter to resolve the issue.

What can I do to fix Twitter error 467? 

  1. Restart your computer.
  2. Go to the Twitter website and log in to your user account.
    Twitter login twitter error 467
  3. If this doesn’t work, use a different browser and try to log in again.
  4. Check your mailbox to see if you can find a suspension notification email.
  5. Still can’t access your account, wait a few hours and try to log in again.
  6. Keep a check on the Twitter Support handle to stay updated.

If none of these things worked for you, then the problem might be on Twitter’s end. It would be best if you waited for the company to fix the issue.

Having trouble signing in too? Follow these focused steps to get back into your account: Twitter X not logging in.

Still running into odd behavior after resolving the error? Related UI issues can also block interactions. See our guide on Twitter Show Button Not Working for additional fixes.

If you have questions or concerns, please mention them in the comments section below.

WiFi Keeps Disconnecting on Windows 11: How to Stop It

Many users faced issues when upgrading from Windows 10 to Windows 11. One of the most common ones is the WiFi keeps disconnecting issue. This guide will explain the expert-recommended methods to fix the problem after discussing the causes. Let’s get started! 

What causes the WiFi to keep disconnecting on Windows 11? 

There could be various reasons for WiFi not connecting issues; some of the common ones are: 

  • Network interference – WiFi signals can be interfered with by other devices with the same frequencies, and network inconsistency could cause the issue. You can fix it by using the Internet connection troubleshooter.
  • Outdated network driver – You can face this issue if you have an outdated or old network driver. To fix it, you can update the network driver. 
  • Inconsistent network parameters – If you usually switch between WiFi devices, you may have conflicting data collected due to HCP and TCP/IP parameters. 
  • Corrupted system files – If your system files are damaged or corrupted, then you might face this issue. You need to repair the system files. 
  • Network adapter glitch – If there is an inconsistency with the adapter you are using to establish the WiFi connection, you might have this issue. 
  • DNS consistency – You may face this issue if the DNS is inconsistent. You can fix the issue by flushing DNS. 

What can I do if the WiFi keeps disconnecting on Windows 11?

Before moving to the actual troubleshooter steps, you can go through these preliminary checks: 

  • Restart your router.
  • Turn off and on the Airplane mode. 
  • Forget and reconnect the WiFi network.

1. Network Reset

  1. Press Windows + I to open the Settings app. 
  2. Go to Network & Internet, and click Advanced network settings.Network & Internet - Additional network - wifi keeps disconnecting windows 11
  3. Now click Network reset.Network Reset
  4. Under Network Reset, select Reset now. Reset now
  5. Follow the onscreen instructions to complete the process. 

2. Run a troubleshooter 

2.1 Run Internet connections troubleshooters

  1. Press Windows + I to open Settings. 
  2. Go to System, and click Troubleshoot.System - Troubleshoot wifi keeps disconnecting windows 11
  3. Now click Other troubleshooters. Other troubleshooters
  4. Locate, click Internet connections, and click Run. Internet Connections
  5. Follow the onscreen prompts to complete the process. 
  6. If this doesn’t work, follow the next method. 

2.2 Reset Network 

  1. Press the Windows key, type CMD, and click Run as administrator. CMD elevated  wifi keeps disconnecting windows 11
  2. Copy and paste the following commands one by one and press Enter after every command: netsh winsock reset ipconfig /release ipconfig /renew ipconfig /flushdns
  3. Restart your computer and check if the issue persists. 

3. Reset TCP/IP and DHCP parameters

  1. Press the Windows key, type CMD, and click Run as administrator. 
  2. Type the following commands and press Enter: netsh int ip reset c:\resetlog.txtcmd_wifi keeps disconnecting windows 11
  3. Then, reboot your computer and check if the issue persists. 

4. Reinstall the Network adapter 

  1. Press Windows + R to open the Run dialog box. Device Manager RUN COMMAND
  2. Type devmgmt.msc and click OK to open Device Manager. 
  3. Locate and double-click the Network adapters to expand it.
  4. Select, right-click the adapter, and click Uninstall driver. Uninstall device wifi keeps disconnecting windows 11
  5. Once done, click Action, then select Scan for hardware changes. Scan for hardware - Action
  6. Restart your computer to confirm the changes. 

5. Check the WiFi power management setting

  1. Press Windows + R to open the Run dialog box.
  2. Type devmgmt.msc and press Enter to open Device Manager. 
  3. Locate and double-click Network adapters to expand it. 
  4. Right-click on the adapter and select Properties. Network Adapters - Properties - wifi keeps disconnecting windows 11
  5. Switch to the Power Management tab, and place a checkmark next to Allow the computer to turn off this device to save power. Power Management tab
  6. Click OK. 

6. Connect automatically to the WiFi network

  1. Press Windows + A to open the Action Centre. 
  2. Click on the arrow icon next to WiFi.WIFI connect -wifi keeps disconnecting windows 11
  3. Right-click the network and open Properties. Properties
  4. On the WiFi settings page, place a checkmark next to Connect automatically when in range. Network profile type
  5. Also, select Private network as the Network profile type. 

7. Use the Services

  1. Press the Windows + R to open the Run console.Services.msc wifi keeps disconnecting windows 11
  2. Type services.msc and press Enter to open Services. 
  3. Locate and double-click the WLAN AutoConfig service.WLAN auto -wifi keeps disconnecting windows 11
  4. For Startup type, choose Automatic, and Services status, click the Start button. 
  5. Click Apply and OK.

7. Perform in-place upgrade 

  1. Go to Windows 11 download page. Locate Download Windows 11 Disk Image (ISO) for x64 devices, and select Windows 11 (multi-edition ISO).Download-Windows-11 wifi keeps disconnecting windows 11
  2. Click Download.
  3. Choose the product language option, select English or your preferred language, and click Confirm.Confirm wifi keeps disconnecting windows 11 
  4. Click Download. 
  5. Locate and right-click the downloaded file, and click Mount. Mount
  6. Double-click Setup.exe to run.setup
  7. Click Yes on UAC if prompted.
  8. On the Install Windows 11 wizard, click Next.
  9. Now on the next page, click Next.
  10. Wait for the program to check for available space. On the Ready to install screen, choose Keep personal files and apps.
  11. Click Install and follow the onscreen instructions to complete the process. Your computer will restart a few times, eventually leading you to the lock screen.

So, these are the methods you follow to fix the WiFi keeps disconnecting issue on Windows 11. You may also come across a similar issue where your Wi-Fi connection drops when using a second monitor, so do not hesitate to check out our expert article on the same.

Don’t forget to let us know what worked in the comments section below. 

Rtwlane6.sys: How to Fix This Blue Screen Error

The rtwlane6.sys blue screen error is one of the common BSOD errors on Windows OS. This error is associated with the Realtek wireless driver, which is responsible for managing wireless network connections on a computer.

When the driver encounters a problem, it can cause the system to crash, hence the BSOD error.

This guide will discuss some available methods to troubleshoot and resolve the issue right after examining the causes. 

What causes the rtwlane6.sys blue screen error?

This blue screen of death error occurs due to various reasons; some of the common ones are: 

  • Outdated drivers – If the wireless Lan device driver is corrupted or outdated, it can cause this BSOD error. You need to update the device drivers to fix it.
  • Third-party software interference – If there is a conflict between different drivers or software, you might face this error. To fix the problem, you might have to uninstall third-party software.
  • Hardware issues – If the hardware component of your computer is damaged, especially the wireless LAN card, you might face this issue.
  • Malware infection – If your computer is infected with malware or viruses, then you might get a lot of errors, including a BSOD error. You need to run a malware scan to find and remove virus from the computer.

What can I do to fix the rtwlane6.sys blue screen error?

Before moving to the troubleshooting steps, make sure you go through these preliminary checks: 

1. Update/Reinstall the device drivers 

1.1 Update drivers 

  1. Press Windows + R to open the Run console.
    Device Manager RUN COMMAND
  2. Type devmgmt.msc and press Enter to open Device Manager.
  3. Go to the Network adapters and select the Wireless LAN driver.
    Update driver Network Adapter rtwlane6.sys
  4. Right-click on it and select the Update driver. 
  5. Click Search automatically for drivers.
    Update driver 2
  6. Follow the onscreen instructions to complete the process. Restart your computer. 

If you’re looking to ease this procedure even more, you can use an automatic program to detect all outdated or faulty drivers and update them with the newest options from its database.

⇒ Get Outbyte Driver Updater

1.2 Reinstall drivers 

  1. If updating the drivers didn’t help, then go to Device Manager.
  2. Expand the Network adapter, right-click the Wireless LAN card, and select Uninstall driver. 
    Uninstall Network driver rtwlane6.sys
  3. Go to Action and click Scan hardware for changes. 
    Action scan for hardware changes
  4. Follow the onscreen instructions to complete the process. 

2. Run a memory diagnostic tool

  1. Press the Windows + R to open the Run command. 
    memory-diag-tool 1
  2. Type mdsched.exe and press Enter to open the Windows Memory Diagnostic tool.
  3. Click Restart now and check for problems. 
    memory-diag-tool 3 rtwlane6.sys
  4. The diagnostic tool will run, and your computer will restart. 
    memory-diag-tool

3. Use the Command Prompt

  1. Press the Windows key, type CMD, and click Run as administrator. 
    DOS COmmand Prompt
  2. Type the following command to repair system files and press Enter: sfc /scannow 
  3. Copy and paste the following command one by one and press Enter after every command: DISM /Online /Cleanup-Image /CheckHealth DISM /Online /Cleanup-Image /ScanHealth DISM /Online /Cleanup-Image /RestoreHealth
    CMD DISM & SFC rtwlane6.sys
  4. Restart your computer.

4. Run Error checking on the disk

  1. Press Windows + E to open Windows Explorer. 
  2. Go to This PC, select and right-click the drive, and choose Properties. 
    Properties Scan rtwlane6.sys
  3. On the Tools tab, under Error checking, click Check.
    Error checking
  4. Click Scan drive. 
    Scan drive
  5. Follow the onscreen instructions to complete the process. 

5. Restore your system to the previous version

  1. Press the Windows key, type Control panel, and click Open.
    Control Panel
  2. Select View as Large icons and click Recovery.
    Recovery Control Panel rtwlane6.sys
  3. Click Open System Restore. 
    Open system restore
  4. Select Choose a different restore point in the System Restore window and click Next.
    Next Choose a different restore point
  5. Select the restore point and click Next.
    Choose a point
  6. Click Finish to let your system restore to its previous version. 
    Finish Restore point

6. Create a user account profile

  1. Open Command Prompt with admin rights using the steps in method 3.
    netuser rtwlane6.sys
  2. Type the following commands one by one and press Enter: net user "account name" /add  net localgroup administrators "account name" /add
  3. Close the Command Prompt and log out the current user.
  4. Now select the newly created user account and log in.

7. Perform the in-place upgrade  

  1. Go to Windows 11 download page. Download Windows 11 ISO and select Windows 11 (multi-edition ISO).
    Download Windows 11 rtwlane6.sys
  2. Select the product language option, choose English or your preferred language, and click Confirm.
    Confirm
  3. Click Download.
  4. Select and right-click the downloaded file, and click Mount.
    Mount
  5. Click Setup.exe.
    setup rtwlane6.sys
  6. Click Yes on UAC if prompted.
  7. On Install Windows 11 dialog box, click Next.
  8. On the next page, click Next.
  9. Wait for the program to check for available space. On the Ready to install page, select Keep personal files and apps.
  10. Click Install and follow the onscreen instructions to complete the process. Your computer will restart a few times, eventually leading you to the lock screen.

So, these are the methods to follow to fix the rtwlane6.sys blue screen error. Try them and let us know what worked in the comments section below.

How to Defrag Windows 10 & Improve Your PC’s Performance

As you use your computer, files become fragmented and scattered across the hard drive, which makes it hard for your PC to access them quickly. This is one of the most common reasons for a slow-running computer.

Fortunately, you can use defragmentation to rearrange fragmented data and improve your PC’s performance. In this guide, we’ll show you how to defrag Windows 10 to keep it running smoothly.

How can I defrag Windows 10 and improve PC performance?

1. Use the Command Prompt

  1. Go to the search bar, type CMD, and click Run as administrator.Command Prompt Run as administrator how to defrag windows 10
  2. Click Yes on the UAC prompt.
  3. Type the following command, replace C with the drive you want to defrag, and press Enter: defrag C:

2. Use the Disk Defragmentation tool

2.1 Defrag manually

  1. Go to the search bar, type Control Panel, and click Open.Control Panel - Seacrh bar how to defrag windows 10r -
  2. Select View by Category and click System and Security. System & Security how to defrag windows 10
  3. Go to Administrative tools.Administrative Tools how to defrag windows 10
  4. Click Defragment and Optimize Drives to open it. Defragment & Optimize devices
  5. Choose the disk drive you want to optimize.
  6. Select the Optimize button.Optimize
  7. Follow the onscreen instructions if prompted.

2.2 Run defrag automatically

  1. You can also schedule the disk optimization for the future; open Defragment and Optimize Devices, and click Change settings on the Optimize Drives window.Change Settings how to defrag windows 10
  2. Select the Frequency, and for Drives, Click Choose.Frequency Drives
  3. Choose the Drives from the next window.Drives
  4. Click OK. 

3. Use the Safe Mode

  1. Press the Windows key + R to open the Run dialog box.System Configuration how to defrag windows 10
  2. Type msconfig and click OK to open System Configuration.
  3. Go to the Boot tab, locate Boot options, and place a checkmark next to Safe boot. Safe boot Minimal how to defrag windows 10
  4. Select the Minimal option, click Apply, and OK. 
  5. You will be prompted to restart your computer in Safe mode. 
  6. Click the Start menu, type Defragment and Optimize Drives and click Open. 
  7. Select the drive you want to defragment and click the Optimize button. hOptimize How to defrag windows 10
  8. The defragmentation process will take some time to complete. 
  9. Once done, go to System configuration, switch to the Boot tab, uncheck Safe boot, click Apply, then OK. Restart your computer in normal mode. 

4. Use the Settings app

  1. Press Windows + I to open Settings. 
  2. Go to System. System - How to defrag on Windows 10
  3. Click Storage, and select the Optimize Drives option.Storage - optimize your device
  4. Select the drive and click the Optimize button. Optimize button
  5. Wait for the process to get complete. 

So, these are the methods you can use to defrag your Windows 10 computer. Try them and let us know what worked for you in the comments below.

Discord Music Bot Lagging: 4 Easy Ways to Permanently Fix it

At times, the Discord music bot can start lagging during the chat. This issue seems to be occurring due to latency issues caused by Discord’s voice servers. According to the bot developers, this problem can be resolved by switching your voice server region to a different one.

In this article, we take a look at the steps that you can perform to troubleshoot the Discord music bot lagging issue. What can I do if the Discord music bot is lagging?

How do I fix the Discord bot if it’s lagging?

1. Check your Internet connection

  1. Press Windows + I then navigate to Network & Internet to check your Internet connectivity.network-internet discord music bot lagging
  2. Here, check whether it says connected under your network connection, otherwise click on Wi-Fi and connect to a new network.netwrok-internet-wifi discord music bot lagging

2. Verify the Discord servers’ status

Discord’s main functions rely heavily on the server-side. When there are server problems, many of Discord’s features such as the music bot will not be able to work properly.

When this happens, it’s best to check Discord’s status page. On this page, you can see if the client is currently experiencing or has experienced server issues and if any of its services (or APIs) are affected and check if a fix has been deployed.

3. Change voice server region

  1. Login to your Discord server and select Server Settings (marked as a gear) from the context menu.gear discord music bot lagging
  2. In the Overview tab, locate the Region Override section and click make sure the Automatic option is set. This option will automatically find the best settings so you won’t experience lag.automatic discord music bot lagging
  3. Alternatively, you can select a server that is closest to your region and click Save Changes to apply the changes made.

Once the changes are saved, test the music bot again in the chat or stream to see if it is still lagging. In most cases, changing the server region should resolve the Discord music bot lagging issue.

Note that by changing your region, the following issues will be solved as well: Fredboat lagging, Probot lagging as well as Rythm bot lagging.

It’s a fact that the closer your physical location to a server, the lower latency you will experience. However, only you having a great ping is not sufficient.

Your friend or others on the discover should also have a decent ping to have a lag-free experience. If the users on the Discord servers are from two different or even multiple regions, it is better to find a middle ground between you and your friends with the Automatic option.

Note icon NOTE
Keep in mind that u003cspan style=u0022font-size: revert;color: initialu0022u003eto be able to change the voice region, you must be either a server owner or have a role with u003c/spanu003eu003cstrong style=u0022font-size: revert;color: initialu0022u003eManager Server u003c/strongu003eu003cspan style=u0022font-size: revert;color: initialu0022u003epermissions enabled. Once you have the permission, u003c/spanu003eyou can follow the above steps.

4. Check your hosting service

If you are hosting a Discord music bot yourself, check if it is putting a strain on your server. When you try to upload a lot of things at once, the resources allocated to your music bot may take a hit.

This leads to stuttering and lag issues. If the issue persists, consider trying any other Discord music bot. Changing it should help you overcome the lagging issues caused by bot limitations.

The Discord music bot lagging issue usually occurs due to server latency. It can be resolved by changing the voice server region.

For self-hosted music bots, you can also check the hosting resources and upgrade to avoid any strain on the server.

Discord music bot lagging only for me

Besides checking your Internet connection and changing it to a faster one, you should close the unnecessary processes that are running in your background. Thus:

  1. Press Ctrl + Shift + Esc in order to open Task Manager.
  2. Then, under the Processes tab, look for apps that you think are redundant to run at the moment and click on them in order to choose End Task.processes-end discord music bot lagging

You might be familiar with the fact that when you make a video call and you have a lot of processes running in the background, the audio will crackle since the app isn’t getting the appropriate resources.

The same principle applies in this scenario. The music bot may become choppy if you do not allocate a significant portion of your system’s resources to Discord. These resources include your random access memory (RAM), central processing unit (CPU), graphics processing unit (GPU), and network.

Why is my Discord music bot lagging?

If you’re wondering why the Discord music bot sounds bad, glitchy or distorted, then rest assured as you are not alone in this situation. Many users claimed that Groovy’s audio disappear for a few seconds or lagged.

First, you should know that the issue is mainly related to the Discord voice server region, thus you’ll need to adjust it later on.

Moreover, a poor Internet connection can get you into this trouble. The music bots stream at bitrate and this is different from your voice channel. In case you use a weak Internet connection, you may experience latency while streaming audio.

Last, but not least, the packet loss is another reason that explains why the Discord music bots are not working. Keep in mind that when the live data or the audio is transferred over the Internet, you might notice the packet loss. 

The data is transferred in small chunks and is called Packets, and if any of this won’t arrive properly this got lost and therefore is named Packet Loss.

If Discord outbound packet loss, make sure you check our dedicated guide to fix it in no time. This being said, in today’s article, we’re going to show you the best possible solutions to easily solve all the above problems.

How can I find the right Discord music bot?

➡ Rythm

Rythm is one of the most reliable bots you can find and makes it possible for you and all of your friends to listen to your favorite music together. It’s compatible with several music channels, such as Twitch, YouTube, and SoundCloud. Moreover.

Moreover, this bot is 100% stable, meaning you won’t experience lags in your music unless it’s an issue on your side.

➡ Groovy

The most significant benefit of Groovy is that it’s easy to use. It also supports various customization options, such as showing lyrics and shuffling. Overall, it’s an outstanding addition to your Discord server.

➡ FredBoat

FredBoat is very similar to Groovy. The bot is simple and has many valuable features. For example, it allows you to determine who changes the playlists.

If you’re interested in finding more options, do not hesitate to take a look at the best Discord music bots.

In case the Discord music bot is lagging, these are the best solutions you can try. We suggest trying them out one by one to tackle the problem.

As several users claim, there are also issues with Discord not playing any sounds in their browser. If Discord is not playing any sounds in your browser, check out our dedicated guide right away.

Have the above tips and tricks been useful to you? Don’t hesitate to let us know in the comments area below. 

SSD Not Showing Up: How to Get It Detected

If your SSD is not showing up in BIOS or disk management, this guide can help. This usually happens if your SSD is not initialized or the storage controller driver is outdated. We will cover all the available methods to fix the issue right after discussing the potential causes. Let’s get started!

What causes the SSD not showing up issue? 

There could be various reasons why SSD is not recognized on your computer; some of the common ones are: 

  • Outdated storage controller driver – If the Storage controller driver is outdated or corrupted, your SSD might not show up. To fix this, you need to update the driver.
  • The file system is corrupt – If the file system on your computer is corrupt, then your SSD might not get recognized by your computer. You need to format SSD with NTFS.
  • SSD initialized incorrectly – If your SSD is not initialized properly, you might face this issue. You need to initialize the SSD again.
  • Memory issues – If your SSD has memory issues, it might not show up. To fix this, you must run a memory diagnostic tool on your computer.
  • Issues with the operating system – If your OS has problems with SSD, it might not detect your SSD. You need to check if it appears in BIOS.

What can I do if the SSD is not showing up? 

Before engaging in advanced troubleshooting steps, you should consider performing the following checks:

1. Run the CHKDSK command

  1. Press Windows + E to open Windows Explorer.
  2. Go to the drive, right-click on it, and select Properties.Properties Local Disk ssd not showing up
  3. Switch to the Tools tab, locate Error checking, and click Check.Error Checking _ CHECK
  4. On the next window, select Scan drive.Scan drive
  5. Follow the on-screen instructions to complete the process, then restart your computer.

2. Run the Windows Memory diagnostic tool

  1. Press Windows + R to open the Run console.Msched
  2. Type mdsched and press Enter to open Windows Memory Diagnostic.
  3. Click Restart now and check for problems (recommended).Windows  Memory Diagnostic Tool - ssd not showing up
  4. Your computer will restart, and Windows Memory Diagnostic will perform a test automatically.

3. Configure the SSD settings in BIOS

  1. Press Windows + I to open the Settings app.
  2. Go to Update & security.Update & Security ssd not showing up
  3. Click Recovery, then locate Advanced startup and click Restart now.Recovery Advanced startup
  4. On Choose an option screen, select Troubleshoot.Choose an option - Troubleshoot
  5. Now on the Troubleshoot screen, click Advanced options.Advanced options
  6. On the Advanced options page, click UEFI Firmware Settings.UEFI
  7. Click Restart.UEFI Restart
  8. Now from the next screen, choose the appropriate option to enter BIOS.
  9. Go to Storage options, select Serial SATA, then choose SATA Configuration.
  10. Select the IDE Compatibility Mode.
  11. Click Exit and choose Save & exit or a similar option to save and restart your computer normally.

4. Initialize the SSD drive

4.1 Initialize the SSD 

  1. Press Windows + R to open the Run dialog box.DISKMGMT RUN COMMAND
  2. Type diskmgmt.msc and press Ctrl + Shift + Enter to open Disk Management with admin rights.
  3. Locate and right-click the SSD that is not showing up and choose Initialize Disk.Iniitalize DIsk ssd not showing up
  4. On the following dialog box, choose the SSD you want to initialize and select the partition style.
  5. Click OK to start the process.

4.2 Change SSD drive letter 

  1. Open the Disk Management tool
  2. Right-click on the same disk and choose New Simple Volume.Simple VOLUME SELECT ssd not showing up
  3. On the New Simple Volume wizard, click Next.Next
  4. Select the disk size next to Simple volume in MB and click Next.Next2
  5. For Assign the drive letter, select the drive letter from the dropdown and click Next.assign letter
  6. Change the Volume Label and click Next. New VOlume
  7. Click Finish. The drive will format now, don’t close the window until it is done.Finish

5. Update the drivers

  1. Press Windows + R to open the Run dialog box.Device Manager RUN COMMAND
  2. Type devmgmt.msc and click OK to open Device Manager.
  3. Locate and expand the Storage controllers.
  4. Right-click on the storage controller driver and select Update driver.Storage controller devices - ssd not showing up
  5. On the next window, click Search automatically for drivers.Update driver 2
  6. Follow the onscreen instructions to install the latest driver.
  7. Now on the Device Manager, go to Disk drives and expand it.SSD update driver
  8. Right-click the SSD and select Update driver.
  9. Now follow the same steps mentioned for the storage controller driver.

You can also keep your drivers up to date with specialized programs, such as Outbyte Driver Updater, created to do this procedure automatically.

Outbyte Driver Updater will scan your device for outdated or faulty drivers and find the latest versions from its database as replacements.

⇒ Get Outbyte Driver Updater

6. Format SSD with NTFS

  1. Open Disk Management using the steps mentioned in Method 4.
  2. Select and right-click the problematic SSD drive and choose Format.Format ssd not showing up
  3. This will delete all the data on the drive.
  4. Follow the onscreen instructions to format your drive with NTFS. 

7. Run the Hardware and Devices troubleshooter

  1. Press Windows + I to open the Settings app.
  2. Click Update & Security.Update & Security ssd not showing up
  3. Go to Troubleshoot and click Additional troubleshooters.Additional troubleshooters ssd not showing up
  4. Choose Hardware and devices and click Run the troubleshooter.
  5. Follow the onscreen process to complete the troubleshooting process.

So, these are methods that you can use to fix the SSD not working issue on your Windows computer. If you have any questions or concerns about this topic, please let us know in the comments section below.

Can’t Delete MountUUP Folder? Here’s How to Force Erase It

MountUUP folder typically takes 10-15 GB of storage space on your drive. It could take more space on your machine if there is a download glitch.

If the folder takes more space than it should, it is safe to delete it and retrieve space. However, if you can’t delete the MountUUP folder, we can help!

We will discuss the safest and simplest ways to delete the folder in no time. Let’s get started! 

What should I do if I can’t delete the MountUUP Folder?

1. Use the Command Prompt to force delete

  1. Press Windows + I to open Settings.
  2. Go to System, then click Recovery.System - Recovery Windows 11
  3. Locate Advanced startup and click Restart now.Recovery Advanced Startup
  4. Windows will restart to show you Advanced startup options. On the Choose an option screen, select Troubleshoot.Choose an option - Troubleshoot
  5. Next select Advanced options on the Troubleshoot screen.Advanced options
  6. On the next screen, click Command Prompt.Command Prompt Advanced Options -cant delete mountuup folder
  7. Type the following commands individually to locate the MountUUP folder, and press Enter after every command. The drive letters you see here are different from the ones you see in Windows Explorer: dir C: dir D: dir E:
  8. After locating the drive that contains the folder, copy and paste the following command to forcefully delete the folder and press Enter: rd mountuup /s /q
  9. Wait till the commands execute, then close the Command Prompt and restart your computer.

2. Take Ownership of the folder

  1. Locate the MountUUP folder, select, and right-click it. Choose Properties from the context menu.Properties
  2. On the Properties window, go to the Security tab and click the Advanced button. Security Advanced
  3. Now on the next screen, click Change and click Yes on the UAC prompt.Change
  4. On the Select User or Group window, select Advanced.Select User or Group advanced
  5. Click the Find Now window.
  6. From the Search results field, double-click Administrators and click OK.Find now
  7. Now click OK on Select User or Group window to confirm the changes.OK
  8. On Advanced Security Settings for the MountUUP folder, place a checkmark next to Replace owner or subcontainers and objects.ADSS
  9. Click Apply and then click OK when prompted.
  10. Again on the MountUUP Properties window, go to the Security tab, and select Advanced.
  11. On the Advanced Security Settings window, verify if the Administrator has Full control.Full control
  12. Once checked, close the window and reboot your computer to save the changes.

3. Run the DISM command to dismount the existing Windows image

  1. Press the Windows key, type CMD, and click Run as Administrator.DOS COmmand Prompt
  2. Type the following command to locate the mounted image and press Enter: dism /get-mountedwiminfo
  3. Copy and paste the following command with the drive letter of the mounted image and press Enter: dism /unmount-image /mountdir: "c:\mountuup" /discard
  4. Once the command is executed, close the Command Prompt window. Now the directory c:\mountuup is empty; you can remove the folder.

4. Delete the folder in Safe mode /clean boot environment

4.1 Run computer in safe mode

  1. Press Windows + I to open Settings.
  2. Go to System, then click Recovery.
  3. Now locate Advanced startup, and click Restart now.
  4. Select Troubleshoot on the next screen.
  5. Next, on the Troubleshoot screen, select Advanced options.
  6. Now on the Advanced options screen, select Startup Settings.startup-settings-cant delete mountuup folder
  7. Select Safe mode with networking from the list or press F5 to select it.Enable safe mode with networking
  8. Windows will now restart in safe mode. You can now locate and delete the folder.

4.2 Run the computer in a clean boot environment

  1. Press Windows + R to open the Run dialog box.CLEAN BOOT 1
  2. Type msconfig and click OK to open the System Configuration.
  3. Go to the Services tab, place a checkmark next to Hide all Microsoft services, and click Disable all.Clean BOOT 2 cant delete mountuup folder
  4. Switch to the Startup tab, and click Open Task Manager.CLEAN BOOT 3
  5. On Task Manager, locate all the Enabled items, right-click them one by one and select Disable. Close Task Manager.Clean BOOT 4
  6. Return to the System Configuration window, and click Apply, then OK.CLEAN BOOT 5
  7. Click Restart to complete the process.msconfig restart prompt

5. Unmount the .WIM or .VHD files 

  1. Press the Windows key, type CMD, and click Run as administrator.
  2. Type the following command to unmount the .VHD and .WIM files and press Enter: dism /cleanup-wimCMD DISM cant delete mountuup folder
  3. Once the command is executed, locate the MountUUP folder and delete it. 

6. Remove the MountUUP folder from the Protected Folders list

  1. Press the Windows key, type Windows Security, and click Open.Windows Security open cant delete mountuup folder
  2. Click Virus & threat protection from the left pane.
  3. Navigate to Ransomware protection and click Manage ransomware protection. Ransomware Manage
  4. On the Ransomware protection page, click Protection folders. Protection folder
  5. Locate and click the MountUUP folder, and select Remove.Protected folder remove
  6. On the Remove protection from folder dialog box, click OK to confirm your choice.Remove protection folder

So, these are the methods you need to follow to fix the cant delete the MountUUP folder on Windows 10. If you have questions about the issue, please mention them in the comments below.

Best QoS Software for PC [Top 7 Tools Reviewed]

Bandwidth prioritization is generally thought of as something that happens on the router via QoS (Quality of Service). Bandwidth limiter tools analyze your network and let you control how much bandwidth you want to allocate to specific apps or processes.

The monitoring features that most bandwidth prioritization software comes with are very important in determining what sort of rules to set up.

What is internet priority software?

Due to various reasons, such as a bad connection or low-end equipment, you may experience bad loading speeds when trying to access the Internet.

You can remediate this by prioritizing your Wi-Fi or changing your QoS settings using your router’s admin controls. The more straightforward option, however, is to use dedicated software.

An Internet priority software can greatly help in this type of scenario, helping you boost speed rates and have a seamless experience.

Here’s an overview of what these types of tools offer:

  • Simple and easy-to-follow user interface
  • Prioritize bandwidth for a specific app
  • Capable to monitor and manage Internet speed
  • Monitors traffic, status, and signal strength
  • Basic anti-cyber attackers shield

Now that we know what to look for, let’s see which are the best tools to prioritize bandwidth on your PC.

What is the best bandwidth prioritization software for PC?

ManageEngine NetFlow Analyzer – Complete network overview

If you’re looking for a solution to monitor the bandwidth across all your network and prioritize it on certain processes, ManageEngine’s NetFlow Analyzer is just what you’re looking for.

It’s professional-grade software that not only identifies any app or process that is hogging bandwidth, but it helps you assign limitations to any of them.

Using this app, you can view bandwidth usage by application, protocol, IP address group, and more.

All the live reports can be seen on your dashboard, which is customizable to show traffic charts, bandwidth trend reports, heat maps, top lists, and any other data you may require.

Nothing will escape your eyes because you may monitor controllers, SSIDs, access points, and QoS.

And if you’re on the move, you will still get alerts on attacks and other critical events delivered to your phone so you can take care of the situation ASAP.

The beauty of NetFlow Analyzer is that it’s accessible from any browser, wherever you are, at any time.

Here are some of its top features to consider:

  • Manage the bandwidth on all your network devices, including controllers, SSIDs, access points, and QoS
  • Customizable cloud-based dashboard accessible from anywhere in the world
  • Get extensive and detailed reports on bandwidth consumption
  • View bandwidth usage by application, protocol, IP address group, and more
  • Very easy to implement and use

ManageEngine NetFlow Analyzer

Manage the bandwidth on your entire network on the IP level or application with this professional tool.
Free Trial Visit Website

PRTG Network Monitor – Simple implementation

Keeping an overview of your device’s network traffic is important and, with the help of this tool’s features, you can do that easily.

PRTG Network Monitor has been developed by one of the biggest network security companies in the world.

With the help of this software, you can monitor and manage the speed, load, traffic, status, or signal strength of your routers.

If at any moment your routers are not available or if your network is too loaded, the PRTG Network Monitor will alert you so you can remedy the situation.

Basically, it is a great tool to have that ensures you can fix any network issue before it becomes a big problem and disrupts your work activity.

Here are a few of its key features:

  • Manage the speed, load, traffic, status, or signal strength of your routers
  • On-premises or cloud-based monitoring hosted by Paessler
  • Monitor up to 1,000 devices and services
  • Classic on-premises deployment
PRTG Network Monitor

PRTG Network Monitor

Your best option of bandwidth monitor to manage and control your household network speed and signal strength.
Free Trial Visit Website

GlassWire – Network security features

GlassWire is a multifunctional tool that won’t only monitor and boost your Internet connectivity but also secure your household network against possible cyber-attacks.

The all-encompassing GlassWire console displays graphs that show precisely what programs have been eating your bandwidth and when so you can take the appropriate actions. The entire network traffic is monitored and filtered by IP/Host, app, traffic type, and more.

The tool uses a notification system to alert you of any network-related changes and new devices or apps connecting to your network and affecting bandwidth.

You can even see how your device apps and programs behave while you’re taking a break.

Additional tool features include an efficient firewall that can approve or deny app connection and block any intrusion from possible malware.

Take a look at some of its best features:

  • Network security features
  • Network traffic is monitored and filtered by IP/Host, app, traffic type, and more
  • Alerts you of any network-related changes
  • Detects any apps that are affecting bandwidth

GlassWire

Easy-to-use network traffic monitoring and firewall tool to quickly manage bandwidth limitations with minimum impact.
Free Trial Visit Website

SolarWinds Netflow Analyzer – Simple and modern interface

SolarWinds provides an easy-to-follow bandwidth monitoring software with a simple and modern user interface that allows users to easily access the information they need to improve their connection.

This software monitors your network and is able to identify traffic patterns. It provides IPv4 and IPv6 flow records.

It can also monitor Cisco NetFlow, Juniper J-Flow, sFlow, Huawei NetStream, and IPFIX flow data. Using this information it finds the apps and protocols that consume the most bandwidth.

You can set it up to get alerts whenever there are important changes in your application traffic. This will help you fix the issue right away.

NetFlow Traffic Analyzer uses the data it identifies to create comprehensive reports that help you understand your connection issues and what can be done about them.

The software is secure and is able to detect certain malicious traffic flows. This can prevent cyber attackers from accessing the devices on your network.

⇒ Get SolarWinds NetFlow Analyzer

NetLimiter 4 – Great for individuals

The best software currently available to help users prioritize bandwidth usage is NetLimiter 4.

This bandwidth prioritization software has a ton of features and a modern, easy-to-use interface. It even has a remote web interface that lets you log in from a different computer.

NetLimiter 4 Pro has a fully free trial period that is available to anyone.

This trial period gives users access to extra features such as traffic monitoring, remote administration, and even traffic blocking, along with many other features.

Also, anyone with a license to the pro version of the previous iteration will get full access forever.

It is also still a work in progress, with more features on the way. Packet loss and latency simulation, as well as advanced traffic monitoring that actively scans for threats, are both features that are still in development for NetLimiter 4.

There is also a working yet-to-be-documented API hanging off the program, giving tech-savvy users more options to extend the program to their liking.

⇒ Get NetLimiter 4

NetBalancer – Easy to use

NetBalancer has recently been spruced up with a more modern UI. Still, it does look a bit dated.

This helped keep it lower on the list since it feels less intuitive to use when compared to the more modern NetLimiter 4.

For the number of features in the program, though, it is still more usable than the next item on our list, TMeter.

The features that NetBalancer ships with, however, make it more than worth a look.

On top of all of the usual features one might expect from the typical bandwidth prioritization software, NetBalancer has a couple of surprises.

The first exciting feature is cloud synchronization, which lets users see web traffic and events on one computer from another.

The second is two different quick views of web traffic. NetBalancer has a widget to show current web usage (both in and out) and a system tray icon.

However, the system tray icon and the widgets look just as dated as the rest of the UI.

These two features don’t necessarily help with bandwidth prioritization, but they do help people figure out if they might need to use the prioritization features that NetBalancer has or provide a quick view for those who love statistics.

⇒ Get NetBalancer

TMeter – Wide array of features

TMeter is a free application that comes with a seemingly unlimited number of features.

Of course, it has the basics, such as traffic monitoring and bandwidth prioritization. But it also comes with many advanced features like built-in NAT, DHCP, and a built-in firewall.

All of these advanced features and statistics they help provide come at a cost. It is not a monetary cost, as the application is fully free, but rather a usability cost.

The UI is dated and can be confusing. The program itself is also overkill if you focus on the bandwidth prioritization of a home computer.

However, if you are a power user, the amount of information that can be seen from any of the traffic flowing through the program can be very enlightening.

The statistics can help you set up more advanced rules. When they are combined with advanced features, it can help you set up more advanced rules.

As you can see in the screenshot, rules can even be set up on a per-user basis across the network. So, you could technically limit your spouse’s bandwidth while you game.

The one missing feature, though, is a remote web interface. Unfortunately, that does not look like it’s on the roadmap for this program.

⇒ Get TMeter

How does an Internet priority software work?

Bandwidth prioritization software analyzes your traffic and connection status and, based on that information, is able to determine what apps or processes on your system use the most bandwidth.

They are able to allocate more bandwidth to apps or processes that require that as you use them.

Some allow you to manually select which app needs prioritization, while others determine this automatically and tweak your settings accordingly.

They are mainly useful when your network capacity is limited, and you experience symptoms like latency issues or page loading problems.

They can also greatly help users who connect multiple devices to the same network regularly.

Bandwidth prioritization can be very important to people on Internet connections with bandwidth limits or those seeking to ensure that the applications they care about can access the Internet as fast as they want.

This can be especially helpful for PC gamers to help avoid any possible lag caused by other applications hijacking the computer’s available bandwidth.

Any bandwidth prioritization software discussed above will help you get the job done; it all depends on the number of extra features and customization you might want.

FAQs

What is Internet priority software?

Internet priority software, also known as bandwidth prioritization tools, lets you control how much bandwidth each app or process can use. This ensures critical apps get priority while limiting less important traffic.

How does bandwidth prioritization software work?

These tools analyze your network traffic and allocate bandwidth where it’s needed most. You can either set manual rules for specific apps or let the software automatically adjust based on usage.

What is the best bandwidth prioritization software for PC?

ManageEngine NetFlow Analyzer and PRTG Network Monitor are professional-grade options, while NetLimiter 4 and GlassWire are user-friendly choices for individuals.

Do gamers need bandwidth prioritization software?

Yes. Bandwidth prioritization helps gamers reduce lag by ensuring games get more bandwidth while limiting background apps like downloads, streaming, or cloud syncs.

You might also be interested in our guide on how to limit or change the bandwidth on Windows 11.

In the comments section below, let us know if you have other suggestions or recommendations.

Best Bandwidth Limiter Tools for Windows 10 [Top 9 Picks]

Are you tired of your internet going slow because other stuff on your computer is using it all up? Well, there’s a way to fix that with special tools for Windows 10!

What are the best tools to limit Internet speed on Windows 10?

ManageEngine NetFlow Analyzer – Great bandwidth limiter

For bandwidth analysis and in-depth control of your network elements, NetFlow Analyzer is idea because it also keeps an eye on routers and firewalls.

This software helps you monitor bandwidth usage by interfaces and applications, and check the traffic by volume, speed, and utilization.

Your IT manager will be able to view traffic graphs by volume, speed, and level of usage. And it will be easy to locate any problem because NetFlow Analyzer filters such key metrics by IP address, ports, and protocols.

You may even identify which application is causing a traffic spike and halt it or prioritize any other process instead.

For instance, the built-in Cisco NBAR technology detects specific applications that use dynamic ports and drain your network’s bandwidth so that you may stop them.

Every time when an interface, IP group, or access point is using more bandwidth than the allocated quantity, you will be alerted.

The bottom line is that with NetFlow Analyzer you get deep visibility into all the traffic data on your network so that you can act quickly and block any unusual behavior.

Here are some of its key features to take into consideration:

  • Get alerts on exceeded bandwidth utilization
  • Track bandwidth-hogging applications
  • Get insights into the bandwidth usage of individual elements
  • Detailed graphical representation of network activities
  • Easy to use and implement on any network

ManageEngine NetFlow Analyzer

Set limits on any process or workstation on your network and track any unusual network activity.
Free trial Visit Website

PRTG Network Monitor – Best in the market

PRTG Network Monitor is the best band limiter out there. We are talking about a very complex solution that also includes customizable band-limiting in every aspect.

For instance, you can set channel limits to set threshold values and trigger notifications when they are exceeded.

You can also use a NetFlow sensor to monitor connections and applications with the most bandwidth.

Although this is a professional tool, the user interface is easy to control and master, with a very high learning curve.

After you open the PRTG Network Monitor, you can let the auto-discovery create a set of sensors for your complete network.

Then, you can easily read the live data about your network because it’s rendered in a friendly representation as a graph.

Once you have a complete picture of bandwidth usage, you can enforce limitations, diagnose the consumption, and create reports for your management teams.

You can either get the PRTG Network Monitor free version or the paid version with many more features.

You can start testing it for free for 30 days and then decide if you want to buy the full version or continue with just the basic features for free.

PRTG Network Monitor

PRTG Network Monitor

Take control over bandwidth unusual use for all your Windows 10 with this network limiter and bandwidth diagnosis tool.
Check price Visit Website

GlassWire – Wide range of features

GlassWire’s network monitor allows you to limit your bandwidth and consult your network activity by geo-location, application, and traffic, using easy-to-read graphs.

You will be able to see your computer’s traffic for up to 30 days. You can see the cause of a casual spike in your network activity and try to avoid it in the future by customizing your bandwidth traffic options as you see it suitable.

GlassWire alerts you about spikes, hosts that are known threats, unexpected network system file changes, ARP spoofs, and DNS changes so you can take immediate action.

If you are not in front of your computer, GlassWire allows you to remotely monitor and block suspect activity on the computers or servers you need to take care of.

Its firewall is a great tool to anticipate network threats and stop them before they can damage your system.

GlassWire’s firewall helps you detect what current and past servers your PC is communicating with so you can get rid of potential threats.

Here are some of its best features:

  • Alerts on any unexpected network system file changes or DNS changes
  • Remotely monitor and block the suspect activity
  • Advanced bandwidth limitation options
  • Comprehensive graphical reports

GlassWire

Set up your bandwidth traffic and get nonstop information about your computer and server’s activity, even when you’re not in front of your device. 
Free trial Visit Website

NetLimiter – Quick app

NetLimiter is a bandwidth limiter tool that will limit bandwidth usage on your PC in just two clicks.

When you start the application, you’ll see the list of all active applications, similar to Task Manager. You can see how much bandwidth-specific application uses in the DL Rate and UL Rate columns.

Using this information, you can easily locate problematic applications and limit their bandwidth usage.

To do that, check the desired option in DL Limit or in the UL Limit column. In addition, you can also see how many downloads and uploads your applications are using in total.

This is especially useful if you’re using a connection with a data limit. As an advanced user, you can set custom filters on your PC and fine-tune all your applications.

NetLimiter is a great application for both basic and advanced users alike. Limiting bandwidth speed is simple; you can do that with just a single click.

You can use a free version or purchase the Pro or Lite version.

Check out a few of its key features:

  • Set bandwidth limitations with just 2 clicks
  • Set custom filters on your PC and fine-tune all your applications
  • Check downloads and uploads for your PC
  • Locate problematic applications that hog bandwidth

⇒ Get NetLimiter

NetBalancer – Detailed summary

The first time when you open NetBalancer, you’ll see the list of all available applications along with network usage statistics. In addition to the list, there’s also a live graph that shows you both download and upload.

Using the live graph, you can see which application uses the most bandwidth, so you can easily limit it. If you want, you can pause the graph and examine the information closely.

Regarding the list, it shows you both download and upload rates and total downloads and uploads. To limit certain applications, double-click it from the list, and you can change its download and upload priority.

In addition to priority, you can set drop rate and download delay as well. You can also quickly set download or upload priority or limit from the menu on the top.

In addition, there’s a button available that lets you block all network traffic with a single click.

If you’re an advanced user, you can also create all sorts of custom filters with ease. All actions are available from the menu on the top, so you can quickly change all important settings.

This application also has sync support, so you can easily sync your statistics and settings with other devices.

NetBalancer is a great app for limiting bandwidth, but it comes with a 15-day trial.

After the trial period expires, you can use this app only to monitor your network traffic. If you want to limit your traffic, you’ll need to purchase a license.

⇒ Get NetBalancer

cFosSpeed – User-friendly interface

cFosSpeed is another bandwidth limiter tool, but unlike other tools on our list, it does not set an established limit to your traffic but it would rather shape it continuously.

After you install cFosSpeed, you’ll get a status window in the bottom right corner where you can see your traffic status.

We have to admit that the status window looks rather plain and a bit confusing to new users.

Fortunately, you can click the status window, and it will open a new page and explain to you in detail how the status window works.

cFosSpeed comes with a 30-day trial, and if you want to continue using it, you need to purchase a license.

We have to admit that this application seems a bit complicated with its odd user interface. We couldn’t find the option to limit upload or download to a specific value, which is also a major problem.

cFosSpeed is a complicated application, and if you want to limit your bandwidth, you might want to consider some more user-friendly applications.

⇒ Get cFosSpeed

SoftPerfect Bandwidth Manager – Meant for experts

SoftPerfect Bandwidth Manager is another tool that allows you to limit your bandwidth usage.

This software is a bit more complicated to use than others on our list because it requires you to enter the address and connect to it before using it.

Using this tool, you can create your own rules, but you can also show important information, such as groups or quota managers.

You can also see the defined schedule or check the usage report, event log, or live usage monitor.

SoftPerfect Bandwidth Manager is a great tool, although a bit complicated for basic users. Unless you’re familiar with network configuration and protocols, you might consider using a simpler tool.

It comes with a 30-day trial period; if you want to continue using it, you’ll have to purchase the license.

⇒ Get SoftPerfect Bandwidth Manager

Net Peeker – Built-in Firewall

The first thing you’ll notice when you start, Net-Peeker is the slightly outdated interface. Despite the interface, this application is filled with great features.

As soon as the application starts, you’ll see the list of running applications along with bandwidth consumption.

From the menu, you can choose to end the selected program or process, abort all sessions, or block the program completely from accessing the Internet.

Of course, there’s an option available that allows you to set the upload or download speed for desired applications.

You can also see detailed information, such as a list of all available connections for a specific program. If you want, you can also show a live graph or see live network packets.

The application also has a built-in firewall and System Guard that you can use to protect your system. We have to mention that there are two versions of Net-Peeker available.

The personal version is designed to work only on a single PC. If you need to configure multiple PCs in your network remotely, you might want to try the Group version.

Net-Peeker offers an amazing amount of information and features to the user, and its only flaw is its slightly outdated user interface.

We have to mention that this application is available as a 30-day trial, and if you want to continue using it, you’ll have to purchase a license.

⇒ Get Net Peeker

NetCrunch – To monitor precise data

One of the biggest problems in a network, besides malware, of course, is when a user or process is hogging all of the bandwidth, effectively hindering everyone else’s connection. NetCrunch has that covered, all thanks to technologies like SNMP, NetFlow, IPFix, sFlow, or jFlow.

First of all, NetCrunch lets you monitor the precise distribution of bandwidth so that problems can be identified before any actions are taken.

This data is displayed in real-time and includes parameters like upload or download. You can regulate bandwidth usage by limiting the access of certain devices to it or providing more to others.

Here are some of the core features of NetCrunch:

  • Monitor bandwidth with traffic flow analytics
  • Monitor network bandwidth on servers
  • Monitor traffic with SNMP and RMON
  • Layer 2 mapping and monitoring
  • Live port traffic monitoring
  • Predefined top chart views

⇒ Get NetCrunch

As you probably noticed, most bandwidth limiter tools for Windows 10 require a license to run and effectively do the job.

If we had to pick one, we’d choose PRTG and Glasswire. Both tools have a similar interface and are relatively simple to use, so they will be perfect for most users.

FAQs

What is the best tool to limit Internet speed on Windows 10?

PRTG Network Monitor and GlassWire are among the most recommended tools. They combine bandwidth monitoring with easy-to-use controls for limiting traffic per app or device.

Can I control bandwidth usage per application?

Yes. Tools like NetLimiter and NetBalancer let you see which apps consume the most data and apply custom limits or priorities to balance usage.

Is GlassWire just a bandwidth limiter?

No. Besides limiting Internet speed, GlassWire also acts as a firewall and security tool, alerting you about spikes, DNS changes, or suspicious hosts.

Do I need to pay for bandwidth limiter software?

Most tools like PRTG, GlassWire, and NetBalancer offer free trials or limited free versions, but advanced features typically require a paid license.

Also, do not forget to check the best tools to increase the bandwidth on your Windows PC. We also have a guide on how to use Net Speed Monitor on Windows 11, so you might want to visit it.

If you have any other suggestions or questions, don’t hesitate to leave them in the comments section below.

6 Best Network Bandwidth Monitors For Windows 7

A network bandwidth monitor is a tool to help you assist and keep an eye on your network’s bandwidth usage. Using the tool, you may identify who’s using the most bandwidth.

There are several network bandwidth monitor options on the market. While some are rudimentary, others offer more advanced features to meet your requirements.

How can a bandwidth monitor app help me?

A network bandwidth monitor is an investment worth making as it not only allows you to catch high traffic processes but also offers network administrators insights into what exactly is going on in your network.

If there is a traffic spike or your connection start slowing down without an apparent reason, a dedicated software solution like the ones listed below will help you pinpoint the issue right away.

Today, in this article, we are looking at the top network bandwidth monitors for Windows 7 to help network engineers, and IT professionals gain greater insight into their network resource usage.

What is the best network bandwidth monitor for Windows 7?

Site24x7 – Complete network monitoring

If you’re searching for the best bandwidth monitor for Windows 7, Site24x7 will work perfectly because it comes with a cloud-based interface that will run on any system, even on mobile devices.

You should know that bandwidth is only one of the 60+ performance metrics that you will be able to access by using this complex tool.

It actually helps you watch over your entire network, including servers and other devices that work with an IP address.

The amount of data it retrieves ranges from the average load to counting the threads and handles of processes, and a lot more.

Of course, you can easily filter all this information which will be displayed in a single cloud-based dashboard available even on mobile platforms.

All in all, Site24x7 is a complex solution that empowers any IT manager with an extensive array of tools for preventing any network issues, including bandwidth.

There is a free trial version available so feel free to test it before committing any purchase decision.

Key features of Site24x7:

  • All network components monitoring
  • Analyzes over 60 performance metrics, including bandwidth
  • Cloud-based dashboard with on the go access
  • Comprehensive graphical reports
  • Manage all endpoints securely

Site24x7

This tool works perfectly fine on any system, including Windows 7 so get your network in check now!
Free trial Visit website

NetFlow Analyzer – Great bandwidth performance monitoring

NetFlow Analyzer is a complete traffic analytics tool that provides real-time updates on your network bandwidth performance.

It collects, analyzes, and generates reports based on your network bandwidth usage.

Apart from performing network forensics, network traffic analysis, and network flow monitoring, it can optimize bandwidth usage.

It supports leading flow technologies, including NetFlow, sFlow, IPFIX, Netstrea, J-Flow, and AppFlow.

Moreover, NetFlow Analyzer uses the proprietary Continuous Stream Mining Engine technology to detect a wide spectrum of external and internal security threats.

And the best part is that you will get performance, bandwidth consumption, recent device configuration changes, and other key metrics on a single, cloud-based dashboard.

Key features of NetFlow Analyzer:

  • Real-time traffic graphs and reports 
  • Application protocol monitoring 
  • Clean and easy to use interface
  • Supports leading flow technologies 
  • supports various Cisco technologies such as NBAR, CBQoS, AVC and IP SLA

NetFlow Analyzer

NetFlow Analyzer makes sure that your network is monitored at all times, so you don’t need to worry about this.
Free trial Visit website

PRTG Network Monitor – Easy to use and implement

PRTG Network Monitor is a popular network bandwidth monitor tool to monitor your IT infrastructure.

With unlimited scalability and high customization options, it offers the flexibility to choose the monitoring solution which best suits your requirements.

PRTG Network Monitor offers multiple solutions, including an on-premises solution for PRTG Network Monitor, cloud-based solution PRTG hosted by Paessler, and a solution for large IT environments to monitor all the systems, devices, traffic, and applications in your IT infrastructure

Note that it runs locally on your hardware and offers full system administrator control and flexibility to upgrade at any time.

With the BitDecoder feature, it can structure, mark, and decode complex payload data. 

Key features of PRTG Network Monitor:

  • Easy to configure, install and download 
  • Excellent user interface
  • Good customization options
  • Data mapping and publishing 
PRTG Network Monitor

PRTG Network Monitor

Never worry about activity on your network by using the powerful and exact PRTG Network Monitor.
Free trialVisit website

GlassWire – Great for malware detection

GlassWire is a two-in-one utility that allows you to see your current and past network activity, detect malware, and block badly behaving apps.

You can instantly see the inbound and outbound connections to your PC with the monitoring graph.

Unlike PRTG Network Monitor, GlassWire detects spyware, malware, malfunctioning apps, and system apps or resources hogging all the bandwidth.

Once identified, you may block the malfunctioning apps and connections instantly. When activated, GlassWire can warn you if any network changes are detected, including malware attacks.

Additionally, you can monitor other PCs on your network and get alerts when an unknown device joins your network.

Key features of GlassWire:

  • Excellent graph-based data presentation 
  • Fast and responsive user interface 
  • Built-in firewall to protect against malware 
  • Block functions for unidentified devices and malfunctioning apps
GlassWire

GlassWire

Ensure your network’s safety and integrity with this amazing software!
Free trialVisit website

NetBalancer – Ideal for limiting network usage

NetBalancer is a Windows program that you can safely use for local network traffic control and monitoring.

Employing the tool, you can manage your PC network traffic with rules based on various settings like time, network protocol, and application type.

Furthermore, you can monitor and limit unwanted traffic with Deep Packet Inspection.

DPI can block BitTorrent traffic, limit the Steam application, and change network priority for selected apps and games on your browser.

Key features of NetBalancer:

  • Advanced monitoring tools and statistics
  • Control traffic with priority rules
  • Clean and easy to use interface
  • Automation support with command line commands and web APIs

⇒ Get NetBalancer

NetLimiter 4 – Comprehensive connection reports

NetLimiter 4 is a simple yet effective utility for Windows computers that allows you to control the internet connection used by your computer.

You can use it to set download and upload transfer rate limits for applications or single connections while monitoring the traffic.

NetLimiter 4 comes with a complete set of internet statistical tools, including real-time traffic measurement and long-term per-application internet traffic stats.

The internet traffic monitoring graphics shows all the application connections to the internet and how much data is transferred from and to the internet. All the data is presented in a customizable chart.

Key features of NetLimiter 4:

  • Full traffic control over all the applications 
  • Customizable charts to show internet traffic monitoring 
  • Connection blocker to block inbound and outbound connections
  • Easy to use interface with plenty of customization options 

⇒ Get NeNetLimiter 4

Whether you own a company trying to optimize network bandwidth or you’re a single user looking to boost your network performance, investing in a network bandwidth monitor is critical.

These tools help you identify bandwidth requirements, save money, and add an extra layer of security to your network.

With the number of network bandwidth monitoring tools in the market, we recommend trying all the software in our selection.

If you decide to upgrade your OS, check our list including the best bandwidth monitors for Windows 10 and 11.

For any other suggestions and other products that you consider worthy, tell us all about them in the comments section below.

5 Best Software to Track Browsing History

Tracking browsing activity can come in handy a lot of times. You can find out something that you may have forgotten by check your Internet history to see the specific websites that you have surfed.

You can also keep tabs on your kids, employees, and so on. Internet browsing history can tell a lot about a particular user because you can get to know what he or she has been searching for in order to create a psychological condition of the user in your mind.

We picked out five of the best tools that allow you to track browsing activity easily so make sure to check out their sets of functionalities and features.

What are the best browser history tracking software?

Browser Security Plus – Best web management solution

ManageEngine Browser Security Plus helps you manage and secure your organization’s web browsers effectively.

This tool enables you to create and enforce browser policies to ensure users follow best practices on the web. It is capable of handling enterprise and non-enterprise websites on a single browser with web isolation.

The web management software helps you create customizable dashboards so that you get an overview of the security posture of your browser.

It allows you to deploy and configure browsers across different devices and platforms remotely. You can monitor web activities, security alerts, and policy violations.

With Web Filter, ManageEngine Browser Security Plus allows you to control access to specific sites, ensuring web protection.

You can also restrict users from downloading content from unauthorized websites, thereby securing internet surfing.

The tool automatically redirects legacy web apps to legacy browsers when accessed in modern ones so that you are able to experience the complete functionality of the app.

Take a look at the essential features provided by this web management tool:

  • Pushes browser configurations, policies, and updates to remote users and devices
  • Configure automatic updates and manage the deployment of these updates across devices
  • Generates compliance reports to ensure the organization’s browsers comply with industry regulations & policies
  • Supports mobile browser management for iOS and Android devices to secure and manage them
  • Allows you to monitor and manage browser activities of the entire organization from a single place

ManageEngine Browser Security Plus

Blocks unauthorized access and secures the web browsers of your organization.
Free trial Visit Website

ActivTrak – Best for employee monitoring

ActivTrak is an excellent employee monitoring tool that provides high-quality productivity measurements.

This free software is effortless to set up and use, and you will be able to start collecting data in just a few minutes after downloading it.

First, you have to download the Invisible Agent, and the Agent installer will just take a few seconds to do its job.

After installing this tool, it will begin to take screenshots and gather PC usage data, and all these will appear on your dashboard.

ActivTrack can capture and record screenshots and activity logs from all the monitored systems.

The software offers in-depth reports and controls to provide administrators with the power and the necessary data to analyze and replicate productive workflows.

You will be able to find out more about the functionalities and the amazing features that are included in this software by visiting ActivTrack’s official website. You can also sign up for free and try it before making the decision to start a paid subscription.

Take a look at the most important features that are provided by this monitoring tool below:

  • Easy to install and implement
  • Capture and record screenshots and activity logs from all the monitored systems
  • Friendly dashboard with comprehensive UI
  • Manage productivity levels from the admin panel
  • Block malicious and dangerous websites that may have suspicious activity

⇒ Get ActivTrak

SoftActivity – Detailed browsing monitoring

SoftActivity is able to help you track the Internet life of users by showing their preferences regarding the most frequently visited websites and interests as well.

With SoftActivity’s monitoring tools, you will finally get the chance to know everything about the online behavior of users even if they delete their browsing history.

These tools are able to work as surveillance cameras, and they can record every URL that has been entered and every key that has been pressed. All of this will happen invisibly.

To find out more about SoftActivity, head over to the official website and check out more exciting features of the tools included in the service.

Take a look at this tool’s most important features that you will be able to enjoy if you decide to use it:

  • Supervise all the online activities of the users
  • Track down the browsing history on a computer
  • Built-in Keylogger with a parental monitoring system
  • Built-in surveillance camera tracking capabilities

⇒ Get SoftActivity

SurveilStar Employee Monitor – Great for browsing history

SurveilStar Employee Monitor is another software that lets you view browser history to track what you or other users have done. You can check out the images and movies they watched, the websites that have been visited, what documents have been opened, and more activities that have been performed on a computer.

There are a lot more features and functionalities that are included in this software such as Screen Monitoring, Website Management, Document Management, Instant Message Management, Application, and Email Management, Print Management, Device Usage, File Printing, and many more.

You can check out more in-depth details on this tool’s extended set of features by heading over to SurveilStar Employee Monitor’s website. You have the opportunity to test a 30-day free trial version of this software as well.

Check out more exciting features that are included in SurveilStar Employee Monitor:

  • Track the browsing history of all the systems in your network
  • Block any unwanted websites on any computer in your home or office
  • Record all website logs with the HTML time, title, username, URL, and duration as well
  • Statistics to track down how much time your employees or kids are using to surf the web

⇒ Get SurveilStar

CurrentWare’s BrowseReporter – Ideal for monitoring Internet activity

Last, but definitely not least, CurrentWare’s BrowseReporter is another robust tool for web monitoring that enables both individuals and businesses to monitor Internet activities. This tool can capture the websites that are surfed by a company’s employees.

There’s a potent reporting utility included in this software that can generate graphical and tabular reports with in-depth data. Don’t worry because CurrentWare’s BrowseReporter runs in stealth mode, so users won’t even know it’s there lurking.

Find out more about CurrentWare’s BrowseReporter’s awe-inspiring set of features by visiting the official website. You will also get the chance to give this tool a try for free for 14 days.

Check out the best features that are packed in this piece of cool software:

  • Real-time Internet monitoring in order to keep track of your employees’ online activities
  • Protect your network by highlighting users who are surfing malicious websites
  • Very easy to use and set up
  • The reports generated include the time of surfing, URL data, the duration of each visit to a particular website, and more
  • Accurate time tracking and application usage tracking as well

⇒ Get CurrentWare’s BrowserReporter

These five tools are guaranteed to offer you the best features for monitoring the browsing activity on one or more systems that are running Windows.

Make sure to check out the complete sets of features included in every one of these tools to be able to make the most informed decision for your needs.

You might also be interested in our selection of the best employee monitoring tools for PC.

Did you try any of the software on our list? Tell us about your experience in the comments section below.

How to Fix BSoD Error 777 Failure Operating System

Error 777 is the dreaded Blue Screen of Death (BSoD), indicating a total system error where the computer completely crashes because it can no longer operate normally.

When this happens, Windows will immediately fix itself and restart. Most of the time, this is all that needs to be done. However, if the BSoD keeps happening, you have a serious problem.

What causes the Blue Screen of Death on Windows?

If you’ve used a Windows computer for any extended period of time, you’ve most likely run into the Blue Screen of Death. We also know that soul-crushing feeling of having your unsaved work wiped out.

But what causes it in the first place? Well, as it turns out, there are numerous culprits behind the BSoD; all of which are easily avoidable.

  • Your computer is infected with a virus – Malware is the most common culprit behind the BSoD. Immediately download some antivirus software to clean your hard drive.
  • Corrupt files are messing up your system – Even if you clear out malware, the damage it causes can linger. That’s why you should run an SFC scan to clear up the corruption.
  • You changed or deleted files in the Registry Editor – The Registry Editor is a powerful Windows 11 that lets you manage system files, but messing them can cause various computer problems.

How can I fix this Blue Screen of Death error?

There are several things that you can do to fix the BSoD, assuming that it keeps happening regularly. This is not an extensive list, but it should give you a good launching point.

  • Run some antivirus software to get rid of the infecting malware, then restart your computer. After that, you should be good to go. MalwareBytes and SUPERAntiSpyware are good choices.
  • To prevent getting infected with malware, be sure to install an adblocker to your browser to stop those annoying popups. They are a common vector for viruses.
  • Make sure your computer stays up to date with its updates. Microsoft frequently rolls out fixes and updates to ensure devices are protected against bad actors.
  • Also, be more mindful of what you click on the internet. Clicking random ad banners, popups, or hyperlinks can result in malware being installed without your knowledge.
  • And if all else fails, reinstall Windows 11. This is a last-ditch effort to fix the problem by performing a clean installation to restore the default Windows settings.

1. Download the latest hardware drivers

  1. Go to the website of your computer’s manufacturer. In this example, it’s Dell.
  2. Identify your PC using the manufacturer’s on-page tools.
  3. Select the Check for Updates button, if there’s one available.
  4. After checking, download and install the drivers. Reboot your computer when done to finish the process.

2. Perform an automatic repair

  1. There are two ways to do this, depending on the severity of the problem. First, create a bootable USB drive for Windows 11.
  2. Turn off your computer, insert the USB drive, then power on your PC.
  3. The following window will appear. Select Repair your computer to open the Advanced Settings menu.
  4. Additionally, you can press and hold the Shift key and then restart your computer.
  5. Now in the Advanced Settings, click Troubleshooting, Advanced options, and then Startup Repair in that order.
  6. Give Windows 11 ample time to finish its process. Once done, sign into your account.
  7. Startup Repair will begin fixing the problem. Once done, restart your computer.

A bootable USB drive must come with Windows 11 ISO on it. If you don’t have this, be sure to check out our guide on how to create the ISO.

3. Reboot into Safe Mode with Networking

  1. Like in the previous solution, hold the Shift key, then restart your computer to enter Advanced Settings.
  2. Follow a similar path as before by clicking Troubleshooting, then Advanced options.
  3. But this time, select Startup Settings.
  4. Click Restart on the following page.
  5. Press the F5 key to restart Windows 11 into Safe Mode with Networking.

Safe Mode with Networking launches Windows using only a limited amount of files and drivers. Use this time to troubleshoot apps that weren’t working previously or uninstall recent software.

See what is working and what isn’t working. Uninstall any problematic third-party software you come across.

4. Reset browser settings

  1. On Microsoft Edge, click the three dots in the upper right-hand corner. Select Settings in the menu.
  2. Click Reset settings in the left side menu.
  3. Select Restore settings to their default values in the middle of the screen.
  4. In the new window, select Reset.
  5. On Google Chrome, click the three dots in the upper right-hand corner and choose Settings.
  6. Select Reset and clean up on the left side menu, then select Restore settings to their original defaults.
  7. Click Reset settings in the new menu that appears.
  8. On Firefox, click the three lines in the upper right-hand corner, select Help, then choose More troubleshooting information.
  9. Click Refresh Firefox on the new page.
  10. Select Refresh Firefox in the new small window that pops up.

5. Restore your computer via Command Prompt

  1. If running an SFC scan didn’t work, you have other options. First, bring up Command Prompt on the Windows Search bar and select Run as Administrator.
  2. Type in the following command and press Enter on your keyboard: DISM.exe /Online /Cleanup-Image /Restorehealth
  3. Next, enter the following command: chkdsk /f /r /x
  4. If that doesn’t work, press the Y key so that the drive can be scanned the next time you restart your computer.
  5. Now, search for the Windows Memory Diagnostic in the search bar. Click Run as administrator on the left.
  6. Select Restart now and check for problems.
  7. Now try running the SFC scan again.

What can I do if I have BSoD error 0x0000001a on my computer?

On the surface, all Blue Screen of Death errors might look the same to most people since they always result in the same thing, but there are differences. A different error might cause each one.

For example, error 0x0000001a is caused by computer tasks suddenly failing or outdated device drivers on your Windows 11 computer. To fix this, it’s recommended that you do two things.

First, you update your system drivers, then run an SFC scan to repair all damaged files. You should also learn how to address error 0x00000124 caused by overclocking your computer.

Disabling overclocking and removing overclocking software are the first things you should do. Afterward, update your computer, then repair the system files with an SFC scan.

Feel free to comment below if you have questions about other BSoD errors. Also, leave comments about reviews you’d like to see or information on other Windows 11 functions.

Fix: The System Could not Find the Environment Option

ERROR ENVVAR NOT FOUND usually comes followed by The system could not find the environment option that was entered message.

This is a system error, and it can occur on any Windows operating system, including Windows 10. Since this error is somewhat common, we will show you how to fix it properly.

What does The system could not find the environment option that was entered error mean?

The error message The system could not find the environment option that was entered typically indicates that a command or program is attempting to reference an environment variable that does not exist or cannot be found. This error message can have various causes, including:

  • Typographical errors – Misspelling or mistyping environment variables in a command or script can cause this error.
  • Missing environment variables – This error message can occur if the referenced environment variable is not defined.
  • Corrupted system files – System files associated with environment variables may be damaged or corrupted, causing this error message to appear.
  • Registry errors – Errors in the system registry may cause environment variables to be deleted or misconfigured, leading to this error message.
  • Malware or virus infections – Malware or viruses can corrupt system files and cause this error message.
  • Incorrect system configurations – This error message may appear if the system is not configured correctly or has a conflict between different system settings.

It’s important to note that this error message can appear in various contexts, including when running programs or scripts, installing software, or modifying system settings. The specific cause of the error will depend on the context in which it appears.

How can I fix the system could not find the environment error?

1. Scan your PC for viruses

  1. Type Windows Security in the Search bar, and click on the relevant search result.
    the system could not find the environment option that was entered
  2. Now, click on Virus & threat protection here.
    the system could not find the environment option that was entered
  3. Click on Scan options.
    the system could not find the environment option that was entered
  4. Now, select Full scan and click on the Scan now button at the bottom.
    the system could not find the environment option that was entered

Another common cause for these types of problems is malware infection. Sometimes malware can change your system and cause this and many other errors to appear.

If you suspect your PC is infected by malware, we advise you to perform a full scan as soon as possible. But for that, you will need a powerful and reliable antivirus.

We recommend you get an antivirus with a high detection rate, run a full PC scan, and remove any threats found.

Reliable antiviruses have powerful firewalls, a good privacy policy, and multiple layers of protection to ensure your PC is fully secure.

Of course, using great antivirus also protects you online by blocking potentially dangerous websites.

One of the safest antivirus options we recommend is the TotalAV tool because it has high detection rates and robust multi-layered protection technology that removes any cyber threat.

TotalAV

Get access to powerful antivirus technology and keep your PC safe at all times.
Free Trial Visit Website

2. Add the missing environment variable

2.1 Using Advanced system settings

  1. Click the Power button from the Start menu, and while holding the Shift key pressed, click the Restart option.
  2. Click on Troubleshoot, then on Advanced options.
    the system could not find the environment option that was entered
  3. Select Startup Settings and click the Restart button.
  4. Press the appropriate key to enter Safe Mode.
  5. Press Windows Key + S, enter advanced settings and choose View advanced system settings from the results.
  6. The system Properties window will now appear. Click on Environment Variables button.
  7. Go to the System variables section and click on New.
  8. Enter windir as Variable name and C:Windows as Variable value. Click OK to save changes.
  9. After saving your changes, restart your PC and check if the problem is resolved.

Windows uses environment variables to access certain files faster.

These variables are related to system directories. If a certain variable is missing or not configured properly, you can get The system could not find the environment option that was entered error message.

This issue can appear if %WINDIR% variable is missing.

Performing this solution from Safe Mode is not mandatory, so you can try it without entering it.

This issue can occur due to other missing environment variables, so you should compare the list containing these options with another working PC to find out which are missing.

If you find any discrepancies, you can edit the environment variable list and add the missing one with the help of this guide.

2.2 Using the Registry

  1. Press Windows Key + R, enter regedit, and press Enter or click OK.
  2. In the left pane, navigate to: Computer\HKEY_LOCAL_MACHINE\SYSTEM\CurrentControlSet\Control\Session Manager\Environment
  3. If the windir value is missing, you need to recreate it. Right-click the space in the right pane, choose New, then select String Value.
  4. Enter windir as the name of the new string.
  5. Double-click the newly created windir string to open its properties. Enter C:Windows as Value data and click OK to save changes.
  6. Close the Registry Editor and restart your PC to apply the changes.

This solution is provided if you can’t access Advanced System Settings. Modifying the registry can be potentially dangerous so we advise you to create a backup just in case.

If the windir value is present in your registry, another missing environment variable may be causing this issue. You must find the missing variable and add it manually to the registry.

3. Install Visual C++ Redistributables

  1. Press Windows + R, type appwiz.cpl, and hit Enter.
  2. Click your Visual C++ Redistributables version and select Uninstall.
  3. Visit Microsoft’s website and download a new Visual C++ Redistributable and install it.

Many applications require Visual C++ Redistributable to run properly, and if this component is missing, you might encounter The system could not find the environment option that was entered message.

Users reported that this error usually occurs when trying to start a specific game, and if that’s the case, you can find the necessary files in the _CommonRedistvcredist directory.

This directory is located in the game’s installation folder, and you just have to run the setup files from vcredist folder to fix the issue.

Remember that many versions of Visual C++ Redistributables are available, so you might have to download some older versions as well, depending on the application you’re trying to run.

These components come in 32-bit and 64-bit versions, and if you’re using a 64-bit system you’ll need to install both versions. After installing the necessary redistributables, the problem should be completely resolved.

4. Perform an SFC scan

  1. Search for cmd and click on Run as administrator to open Command Prompt from the list.
  2. Enter the script below and hit Enter.
    sfc /scannow
  3. This process can take a while, so try not to interrupt it.

5. Reinstall Unifi and Java

  1. Press Windows + R, type appwiz.cpl, and hit Enter.
  2. Click on the software you need to reinstall from the software list, in this case, Java, and select Uninstall. Do the same for Unifi.
  3. Download a new Java version and a new Unifi version and install them.

Several users reported this problem while trying to run Unifi. According to them, they fixed the problem by reinstalling Java and Unifi.

After doing that, the issue was completely resolved, and they could reaccess Unifi without problems.

If you’re having this issue with any other application, we suggest you reinstall it and check if that solves the problem.

6. Modify your registry

  1. Press Windows Key + R, enter regedit, and press Enter or click OK.
  2. In the left pane, navigate to:
    Computer\HKEY_LOCAL_MACHINE\SYSTEM\CurrentControlSet\Services\LanmanServer\Parameters
  3. In the right pane, right-click the space and choose New and select DWORD (32-bit) Value.
  4. Enter IRPStackSize as the name of the new DWORD and double-click it to open its properties.
  5. In the Data Value field, enter the appropriate value for your network and click OK (the supported values are from 11 to 50).

Modifying the registry can lead to system instability; therefore, we strongly advise you to create a backup in case anything goes wrong.

Remember that the system could not find the environment option that was entered issue occurs while working on C# projects meaning that this solution won’t work for most standard users.

7. Copy msvcr71.dll to the Tomcat installation directory

This solution applies to developers that use Java and Tomcat. If you’re not a developer using Tomcat, you can skip this solution.

Several developers reported this issue with Tomcat, but you can fix it by copying msvcr71.dll from the Javabin to Tomcatbin directory on your PC. After doing that, you should be able to use Tomcat without issues.

8. Perform a System Restore

  1. Search for create a restore point and click on it from the results.
  2. Click on the System Restore button.
  3. Select Choose a different restore point option and click Next.
  4. Check Show more restore points option in the bottom right corner, choose the desired restore point, and click on Next.
  5. Follow the instructions on the screen to complete the restore process.

If, for some reason, System Restore doesn’t work, you can try to perform it from Safe Mode. We showed you how to run Windows 10 in Safe Mode in solution number 2, so be sure to check it for extra instructions.

If The system could not find the environment option that was entered problem doesn’t appear in Safe Mode, and your user profile is likely corrupted, but you can fix the problem by creating a new profile.

9. Create a new user profile

  1. Press the Windows Key + I to open the Settings app.
  2. Go to Accounts section, then to Family & other users, and click on Add someone else to this PC.
  3. Click on I don’t have this person’s sign-in information.
  4. Select Add a user without a Microsoft account.
  5. Enter the user name for the new user and click on Next.

After creating a new user account, check if the problem reappears. If not, you’ll have to move your files to the new account and use it as your main account.

If the problem is still there, you might have to reset Windows 10. Read on to learn how you can do that.

10. Reset Windows 10

  1. Open the Start Menu, click the Power button, press and hold the Shift key on your keyboard and click the Restart option.
  2. Click on Troubleshoot, and then on Reset this PC.
    the system could not find the environment option that was entered
  3. If you already have a backup of your files, feel free to choose the Remove everything option. Otherwise, you might prefer the Keep my files option.
  4. If you are prompted, insert the Windows 10 installation media.
  5. Choose your version of Windows and select Only the drive where Windows is installed (your system drive and all files on it will be removed).
    the system could not find the environment option that was entered
  6. Choose Just remove my files option.
  7. Ensure all your important files are backed up, and click the Reset button.
  8. The reset process will now start. It might take a while, so you need to wait until it finishes.

This process will remove all files from your primary partition, so we advise you to back them up. This procedure can sometimes require Windows 10 installation media, so create one using the Media Creation Tool.

After the process is completed, you’ll have a fresh installation of Windows 10, and all problems with this error will be resolved. Now, you have to restore all your files and install applications.

This is a drastic solution, and we suggest performing it only if all other solutions can’t fix the problem.

ERROR_ENVVAR_NOT_FOUND and The system could not find the environment option that was entered messages can cause many problems on your PC, but in most cases, you can fix these by checking environment variables.

If the issue persists, try any other solution from this article. For any additions or suggestions, use the comments section below.

Best Local Network Monitor: Top Tools for 2026 & Buying Guide

In information technology and telecommunications, Local Area Network (LAN) is a term describing a computer network connecting multiple computers, including peripheral devices.

There are numerous LAN monitoring software you can use to secure your local network as well as extended networks. Many of them are available for free. Let’s find out which is best for you!

How can I monitor LAN networks?

There are many systems for monitoring your LAN network. If you’re asking yourself what you check in LAN software, rest assured that we can help you with that.

The vital parameters are, for example, the disk space, the percentage of processor usage, memory, and disk usage, network connectivity, etc.

It’s easy to set alerts for all these settings in advance. In this manner, you’ll avoid space saturation and server blockages.

What to check when buying a LAN monitoring tool?

We will highlight the main features that you need to look for when getting a LAN monitoring tool:

  • Alerts – you should receive information about failures and stress from the monitor.
  • Analysis tools – to explore the network.
  • Customizations – in case you want to write your own scripts to automate reporting, the system should allow you to do that.
  • Visualization – you need to be able to see the status of the overall network.
  • Multi-vendor compatibility – the monitoring system and all your existing equipment should communicate.

In this post, we’ll list the most useful LAN monitoring software that you can use for your Windows computer network.

What is the best LAN monitoring software to use in 2022?

Site24x7 – Best LAN monitoring

Site24x7 is an excellent choice if you’re looking for LAN monitoring software. In fact, this tool will cater to your entire network infrastructure, not just LAN.

This tool uses SNMP to automatically discover all the devices present within a provided IP range, or a whole network (LAN or WAN).

You will be able to understand the network traffic behavior with extreme precision because Site24x7 analyzes the flows based on NetFlow, J-Flow, sFlow, CFlow, IPFIX, NetStream, and AppFlow technologies.

This way, you will identify bandwidth hogs, intrusions, slowness, or unauthorized access easily.

Then, simply customize your dashboards to generate reports on network security to get a clear picture of usage and traffic trends over certain periods of time.

Site24x7 follows more than 60 performance metrics and after you configure threshold limits for all of them at the device and interface level, you will be able to take action and keep the network performance under control.

The solution comes with a free trial version so you can test its features before buying so you should definitely give it a try.

Take a look at Site24x7’s best features:

  • Built-in NetFlow, J-Flow, sFlow, CFlow, IPFIX, NetStream, and AppFlow technologies
  • Analyzes more than 60 performance metrics
  • Cloud-based application for easy management
  • Apache, MySQL and Nagios plugin integrations
  • Customizable dashboard

Site24x7

Monitor your LAN traffic, servers, and all the network architecture with this great tool.
Free trial Visit Website

ManageEngine OpManager – Complete network management

The backbone of every modern-day business is the way their networks function so that they can fulfill their duties appropriately, and because of this, a solid network monitoring tool like OpManager can be of help.

This software itself focuses on being easy-to-use and affordable, taking much of the work out of your network administrator’s hands, and providing automation wherever possible.

It provides you with all the tools needed to monitor pretty much anything that has an IP that is connected to your network, from servers to routers and even printers.

ManageEngine’s OpManager automatically discovers all the devices on your network and applies a template with the right metrics for its category.

You can customize your own templates but it comes with more than 9.500 such templates and supports other 53,000 vendor templates.

Another advantage is that OpManager has a cloud-based dashboard that can be accessed on any browser wherever you are in the world.

Here are some of the core features that OpManager brings:

  • Real-time monitoring
  • Virtual and physical server monitoring
  • Dashboards that can be customized
  • Affordability and intuitive use, and more

ManageEngine OpManager

Monitoring the entire activity of your networks is just as good as monitoring the business itself. Get OpManager today!
Free trial Visit Website

PRTG Network Monitoring – Simple implementation

Interface of PRTG Network Monitor

You can easily keep track of your entire LAN and WAN networks with the PRTG Network Monitoring tool.

It offers a very easy way to monitor all your workstations, routers, switches, and servers. Bandwidth can also be monitored if that is something you are looking for.

The monitoring is done using various protocols including the popular SNMP. Packet Sniffing can be used to analyze individual data packets.

If your network has Cisco devices, then NetFlow is available in PRTG to monitor those.

Other great features of this tool:

  • Works with distributed networks using Remote Probes
  • Mobile apps available for on-the-go monitoring
  • Modular and extendable providing REST API sensor and Custom Notifications
PRTG Network Monitoring

PRTG Network Monitoring

This all-in-one networking tool for sysadmins from Paessler is the best LAN monitoring software available.
Check price Visit website

Nagios – Great for network auditing

Nagios LAN software

Nagios is a monitoring system that allows you to identify and resolve any IT infrastructure issues before they have any negative consequences.

It is considered the de facto standard in network monitoring. And it’s true because it’s one of the first tools that did it right. Before Nagios there were others, but they were good only for specific tasks.

The first version of Nagios is from the last century: 1999. Since the official launch, the technology has evolved: Nagios has done it through an ecosystem of add-ons or third-party add-ons that try to complement the features that are missing.

Nagios is able to monitor network devices, systems, and services. Furthermore, the plugin system makes it versatile and adaptable to any monitoring requirement. It is also possible to write custom plugins.

Let’s see some of its most important features:

  • Supports hundreds of third-party addons
  • Set up alerts to notify you when potential threats arise
  • Get all of your log data in one location
  • Monitors routers, switches and more
  • Effective application monitoring

⇒ Get Nagios

Zabbix – Good performance monitoring

Zabbix landed on the market in 2001. It is a fully developed tool, not a fork of Nagios. Its main characteristic is that it has a more holistic vision of monitoring, covering performance, not only states.

In addition, it has a WEB management system that allows control in a centralized way, without cumbersome configuration files, as happened to Nagios.

You will benefit from these core features:

  • Run the app locally or in the cloud
  • Scalable to any infrastructure
  • Native encryption support between all of the components
  • Backed by 250+ global partners

⇒ Get Zabbix

Pandora FMS – Great for IoT monitoring

Pandora FMS was released in 2004. This is a monitoring framework that supports infrastructure monitoring (networks and servers), performance monitoring, and applications (APM) to transactional business monitoring (BAM).

It has a centralized management system and is based on a SQL relational database.

Like Nagios, it has an Enterprise version, but its OpenSource version is more than enough to implement any monitoring need.

Neither Nagios nor Pandora FMS is limited versions like those of other manufacturers, but they lack some features oriented to large environments.

Consider the best features of this tool:

  • Support for over 500 plugins
  • Excellent for students and developers
  • IoT monitoring
  • A single platform to collect and display information

⇒ Get Pandora FMS

Comparing Zabbix, Nagios and Pandora FMS

  • User Configuration and Management

Zabbix has a web management interface that is centralized through the database, just like Pandora FMS does.

Nagios, however, is still managed in thousands of sites through complex text files, scripts, and manual processes, which also make it necessary to use third-party tools for deployment.

This has the advantage that Nagios needs fewer resources by not using a database to store information. The difficulty in management means that you have a team of people who manage Nagios.

  • Plugins and monitoring out of the box

Both Zabbix and Nagios need plugins in order to offer a set of complete functionalities.

Zabbix lacks an official plugin library for the community, but it does have a list of OIDs for SNMP queries.

Nagios has a huge library, but it’s not that well-maintained.

Pandora FMS has a smaller library than Nagios (it does not reach 500 plugins), but it is better maintained. The tool comes with a collection of plugins and modules ready to use.

Zabbix has a powerful system for defining templates and triggers based on regular expressions.

If you want to learn more about the differences between these three software tools, read this analysis published on the official Pandora FMS blog.

This is our selection with the best LAN monitoring software for Windows 10/11 and we hope that you found the perfect tool for your needs.

You may also be interested in our best server monitoring tools list because you will also find a lot of solutions for LAN monitoring.

Lastly, make sure you check out the best LAN emulator software that you can get to simulate online LAN play with your friends.

FAQs

What is LAN monitoring software used for?

LAN monitoring tools track devices, servers, and bandwidth usage on a local area network. They help admins detect failures, prevent downtime, and secure the network.

What are the key features to look for in LAN monitoring tools?

Look for customizable alerts, traffic analysis, visual dashboards, multi-vendor compatibility, and the ability to create reports. These features ensure easier troubleshooting and performance management.

What is the best free LAN monitoring software?

Tools like Site24x7 (free trial), PRTG (limited free sensors), Nagios Core, and Zabbix (open-source) provide powerful monitoring options without cost.

Can LAN monitoring tools detect security issues?

Yes. Many LAN monitors, including Site24x7 and OpManager, can detect intrusions, bandwidth hogs, and unauthorized devices on the network, helping prevent attacks.

Do LAN monitoring tools work on Windows 10/11?

Yes. All major LAN monitoring tools like PRTG, Site24x7, Nagios, Zabbix, and Pandora FMS support Windows environments and can monitor both LAN and extended WAN infrastructure.

If you’ve tested any of the LAN monitoring software choices listed above, you can tell us all about your experience in the comments section below.

13 Best System Resource Monitoring Tools for Windows PCs

Keeping track of your system resources is relatively simple in Windows 10 and Windows 11. However, some users prefer using third-party applications to monitor system resources because they offer a better and more straightforward user interface.

If you require complete data for your system performance and processes, using these tools can offer detailed reports for CPU usage or temperature, RAM usage, or hard drive memory.

What does a Resource Monitor do?

There are various ways to monitor resource consumption on Windows. The simplest option is to use the built-in Task Manager. It lists the CPU, Memory, Disk, Network, and GPU usage on the computer and is a free system monitor in Windows 10.

Task Manager

Along with that, it allows users to terminate applications and programs that hog the system resources and cause it to slow down.

But it doesn’t offer much information on critical aspects, making it slightly difficult to identify things, and this is where third-party tools come into the picture. We have listed the best available Windows Resource Monitors in this guide.

What is a Resource and Performance Monitor?

Windows has two built-in tools, the Resource Monitor and the Performance Monitor, both equally useful and handy when troubleshooting performance-related issues with the computer.

The Resource Monitor allows you to view how the various system resources are being consumed, for instance, RAM and CPU. It has a separate tab for each and also plots the resource consumption on a graph for better understanding.

Resource Monitor

The Performance Monitor, as the name suggests, is used to analyze the performance of the computer and how the various programs and processes run. It provides the option to view this data both in real-time as well as go through the available logs for past performance analysis.

Performance Monitor

However, if you’re looking for a dedicated tool to monitor your system resources, we have gathered here a neat list of programs that you need to check out. Also, some of the options here can be used as a Remote System Monitor, while a few offer a Windows 10 system monitor widget.

Which are the best system resource monitoring tools?

Paessler PRTG – Detailed data

Paessler PRTG, the best Resource Monitor in Windows 10 to download, is an all-in-one software that provides complete monitoring services for your PC, applications, network, and more. Basically, it entails the IT infrastructure at your fingertips. 

Anyone should know that monitoring system resources is a must-do task for any PC. So, keeping track of your hardware components using this third-party software can give you detailed data about CPU usage or other processes. 

Moreover, Paessler offers the possibility to track processes through features like built-in alerting technology, cluster failover solution for safety, real-time maps or dashboards, distributed network monitoring, and a multi-user interface. 

To get a better idea, the software monitors your PC components’ performance using different sensors that show how fast the processor goes. As an example, an SNPM CPU load is a sensor used to monitor your network channels and see helpful data. 

Thus, keeping an eye on the system resources contributes to better functionality on your device, and also monitors traffic-related information at a glance. 

Paessler PRTG

Paessler PRTG

Consider a monitoring software that handles your PC performance seamlessly. Try out Paessler PRTG!
Check price Visit Website

Site24x7 – Comprehensive Windows Monitoring Tool

Managing your Windows systems efficiently requires constant insight into performance metrics, uptime, and resource usage. Site24x7 from ManageEngine offers an all-in-one monitoring solution designed specifically to keep tabs on your Windows environment with ease and precision.

Site24x7 provides detailed real-time monitoring of Windows servers and applications, helping you track CPU, memory, disk usage, and network performance, all from a centralized, cloud-based dashboard accessible anywhere.

The tool automatically detects your Windows devices, simplifying setup and letting you focus on what matters: optimizing system health and preventing downtime.

With customizable alerts and threshold settings, Site24x7 ensures you’re notified instantly if any key performance indicators fall outside your preferred range.

The intuitive interface displays clear graphical reports and trend analyses, enabling IT teams to proactively troubleshoot before small issues escalate.

Key features include:

  • Automatic discovery and monitoring of Windows servers and applications
  • Real-time performance metrics for CPU, RAM, disk, and network
  • Cloud-based dashboard accessible remotely
  • Custom alerting and threshold management
  • Historical data and trend reporting for capacity planning
  • Scalability to support networks of any size

Whether you’re a sysadmin or an IT manager, Site24x7 offers a powerful yet user-friendly tool to maintain seamless Windows system operations.

Site24x7

Site24x7

Monitor performance in real time, get instant alerts, and prevent downtime effortlessly with Site24x7.
Check Price Visit Website

ManageEngine OpManager – Best system resource monitoring tool

If you need real-time monitoring for all the devices on your network, we recommend using a professional tool such as ManageEngine OpManager.

First, with this tool, you don’t need to add the devices manually because it automatically detects and adds them to your software in the right category.

Then it applies one of the preexisting templates to all of them based on their category. OpManager has 9,500 device templates out-of-the-box and it supports over 53,000 vendor templates.

And these templates each contain a set of performance monitors that will help you supervise their health in real time.

Of course, you can customize the list of monitors as you need and then see the graphical representation of the output for each component right on your dashboard.

You may also select filters or thresholds and set the software to be alerted when these parameters are not on par with your specifications.

This will help you take action and troubleshoot the respective Windows computer before the situation gets critical.

Here are some of its most important features:

  • 9,500 device templates out-of-the-box
  • Real-time monitoring of all key metrics
  • Graphical representation of the performance monitor’s output
  • Cloud-based dashboard accessible from anywhere in the world
  • The solution is scalable to any network size
ManageEngine OpManager

ManageEngine OpManager

Follow the real-time metrics of all the Windows PCs in a network and manage your network easily!
Free trial Visit Website

AIDA64 Extreme – Provides comprehensive monitoring

AIDA64 Extreme is a comprehensive system analyzer and benchmark tool which includes some powerful features such as CPU, RAM, GPU, motherboard diagnostics, and system functionalities monitoring.

It can also offer benchmarks and can provide a detailed audit of your system resources.

Its interface is very intuitive and similar to Microsoft Console Management. You can consult a large number of activity indicators.

This software also allows you to stress test all your components in a large variety of combinations.

You will also have great support from AIDA’s team at your disposal. Download and give it a try. Learn more about its diagnostics, stress testing, and reporting in our AIDA64 Extreme benchmark guide.

Aida64

Aida64

Get real-time diagnostics about an overclocked system and support to measure your device’s performance.
Check price Visit Website

Wise System Monitor – Offer a simple UI

Wise System Monitor, one of the best System Monitors in Windows 10, is another useful tool that can help you monitor system resources. The main tool allows you to see all your running processes and see how much of the computer resources they use.

There’s also a Hardware monitor included that allows you to see all hardware-related information. You can see detailed information about your motherboard, CPU, graphics card, memory, etc.

If you want, you can also see relevant information about your operating system.

As for the resource monitor, it is at the bottom right corner, just above your Taskbar. The tool will display information such as download and upload speed, RAM and CPU usage, as well as CPU temperature.

If you want to see detailed information, you just need to click a certain field, and you’ll see which applications are using most of that resource.

Wise System Monitor is a decent tool for monitoring your system resources. The tool keeps all information easily accessible, so it’s perfect for basic users.

Wise System Monitor also allows you to see your system information which can be rather useful for some users.

This is a free and simple application, and the only flaw might be the lack of any customization.

If you’re looking for a straightforward application to monitor system resources, be sure to check Wise System Monitor.

Wise System Monitor

Wise System Monitor

See detailed, but easy-to-understand information regarding your system and hardware status with this free tool.
Free trial Visit Website

Rainmeter – For easy monitoring

Rainmeter is a simple open-source tool that lets you monitor your system resources. The tool will display small gadgets on your desktop so you can easily monitor your CPU and RAM usage.

In addition, you can check the hard drive space as well as the speed for upload and download with the Resource Monitor.

You can easily choose which gadgets you want to display, and you can easily move the gadgets anywhere on your screen.

Although Rainmeter is simple to use, it offers extensive support for customization. By customizing this tool, you can add new skins and a new feature to the application.

If you’re not a developer, there’s an active community that is constantly developing new skins and features.

Rainmeter is available in a portable version, so there’s no need to install it on your PC to run it.

The tool offers all the basic features that you need, but if you want to use the full potential of Rainmeter, we strongly suggest that you try using different skins for the tool.

This is a great tool for system monitoring, but basic users might be turned away by extensive customization.

⇒ Get Rainmeter

FreeMeter – Graphical representation of resource consumption

If you’re looking for a reliable and easy-to-use tool to monitor system resources, you should consider FreeMeter. The application has a simple user interface, and it will show you all the necessary information in the form of graphs.

The tool offers comprehensive performance information that will help you tackle any issue in order to get the best experience possible.

FreeMeter shows easy-to-follow reports and real-time status updates of your system uptime as well as hard drive space.

Along with that, it monitors CPU usage. The professional version can display kernel CPU usage and user CPU usage separately.

In terms of Internet connection, the software is able to monitor both wireless and Ethernet speeds separately.

It can also help with troubleshooting and fixing latency issues. FreeMeter monitors network ping and helps with slow connections.

FreeMeter offers a free version as well as a premium one with a larger set of features. Give it a try and see if it meets your needs.

⇒ Get FreeMeter

Solarwind Network Performance Monitor – Best for network monitoring

This multi-solution company can offer multi-vendor network monitoring on your own PC that shows network connection data at a glance.

Using this comprehensive software, you can see detailed information for network performance aspects like hardware internet issues or cloud server monitoring.

According to your monitoring needs, it’s easy to control your IT infrastructure with a detailed view of physical network performance or cloud server data.

More so, you have absolute control over the network processes and document every matter regarding the connectivity with key metrics and drill-down analysis meant to cover everything.

It is also possible to monitor and analyze Cisco devices’ networks from the comfort of your home. More exactly, you have access to availability or performance graphics in one view.

If you need to detect Cisco routers or other devices, it can’t be more simple than automatically discovering and identifying the network.

Furthermore, for more insights, you can run packet inspections and see network slowdown problems and their causes.

Analyzing over 1.200 applications to see the response time or classifying network traffic gives you the perfect methods to resolve the issues.

Finally, you will efficiently manage the network performance with instant notifications when issues arrive and critical health data for network hardware.

⇒ Get Solarwind Network Performance Monitor

Process Explorer – A Task Manager alternative

Process Explorer is designed as a Task Manager alternative, and this tool will list all your active processes. Using this tool, you can easily end a process or change its priority.

In addition, you can also monitor system resources by using Process Explorer.

There are four graphs available in Process Explorer, and each graph represents a single resource. If you want detailed information, simply click one of the graphs, and a new window will appear.

From there, you can see the summary or check the CPU, memory, I/O, and GPU usage individually.

This tool also comes with a small graph that will appear in your Taskbar so you can constantly monitor your system resources.

Process Explorer is a great Task Manager alternative, but it can also be used to monitor system resources. This application is free and portable, so be sure to give it a try.

⇒ Get Process Explorer

TinyResMeter – Lightweight application for older devices

Another simple tool that allows you to monitor system resources is TinyResMeter. This is a portable and lightweight application, so it can run on almost any PC.

The application doesn’t have a visually appealing user interface, but it will show you all the necessary information.

System information can be displayed in a horizontal or vertical menu. If you want, you can customize the font and colors, but you can also customize available fields.

You can also enter your own labels for the fields. As for available fields, you can display RAM, CPU speed, CPU usage, network speed, etc.

TinyResMeter comes with a bit outdated interface, but it can still be useful. The tool allows you to right-click each field and see detailed information about it.

For example, by right-clicking your hard drive, you can see the total amount of space, label, system type, and all other necessary information.

As for the flaws, the tool feels a bit sluggish at times, and there’s also one visual bug that we noticed.

Every time you hover your mouse over the TinyResMeter, it will turn black, and after a second, it will turn back to normal. This is a small bug, but it can be irritating at times.

TinyResMeter is a simple and portable application that lets you monitor system resources. Despite its simplicity, the application feels a bit outdated, and it has a few minor bugs.

⇒ Get TinyResMeter

CPUID HWMonitor – For detailed system information

If you want to see detailed information regarding your system, HWMonitor is the perfect tool for you.

This system monitor tool is free, and it will allow you to monitor your hardware and see all the relevant information.

The application comes with a hardware tree that you can expand in order to see the necessary information. Using this tool, you can see important information such as temperature, fan speed, and utilization.

Although you can see the information about your motherboard, CPU, graphic card, and hard drive, it seems that you can’t see information regarding your RAM or network connection.

Unlike other tools on our list, HWMonitor doesn’t offer a real-time graph, and in order to check your system resources, you’ll need to keep the HWMonitor window open.

This tool offers a lot of information about your hardware, and it can be useful if you want to know more about your components. As for resource monitoring, the tool offers almost all necessary information, but some users might have issues finding the desired information.

HWMonitor is a decent tool, it’s free and portable, but it doesn’t show any information regarding your network connection or RAM, which is its biggest flaw, in our opinion.

⇒ Get HWMonitor

Moo0 System Monitor – Easily customizable

Moo0 System Monitor is a free and portable tool for monitoring system resources. This tool consists of several graphs that show you all the necessary system information.

Using this tool, you can see CPU usage and temperature, GPU usage and temperature, amount of free memory, HDD temperature, network speed, etc.

If you want, you can also add additional fields to show more information.

The tool supports some customization, and you can change the size of the tool or its transparency. You can also auto-hide this tool after a certain period of inactivity.

The tool also supports many different color schemes, and you can even set the color scheme to change automatically.

Moo0 System Monitor is a great tool, it’s simple and portable, so it will be perfect for both basic and advanced users.

We have to mention that this tool can sometimes take up a lot of space on your screen depending on the number of fields that you have, so keep that in mind.

Overall, Moo0 System Monitor is a great tool, and you should definitely check it out.

⇒ Get Moo0 System Monitor

TaskbarMeters – To quickly identify high resource consumption

Taskbar Meters is a set of applications that allows you to monitor your system resources. There are three applications available, and they all work the same way.

Each application will position itself in your Taskbar, showing your resource usage.

Every application is designed to change color in the Taskbar, so you’ll quickly notice if you’re using too much of your resources.

Using these tools, you can monitor your CPU, RAM, and disk usage, which is more than enough for primary users. Then, if you want, you can adjust the colors or update the frequency of each tool.

We have to mention that these applications use a simple method to display the usage of your system resources.

Unfortunately, using this method, you can’t see the exact numbers, which can be a flaw for some users.

The only flaw of these tools is the lack of ability to show detailed information about CPU, RAM, or disk usage, which can turn away some users.

⇒ Get TaskbarMeters

How do I check my system performance?

  1. Open the Performance Monitor, expand Data Collector Sets, and double-click on System under it.system to monitor system resource
  2. Right-click on System Performance and select Start.start test to monitor system resource
  3. This will trigger a 60-second test to analyze the computer’s performance.
  4. After the period, expand Reports, select System under it, and then double-click on System Performance.system performance to monitor system resource
  5. Now, double-click on the report listed here.report to monitor system resource
  6. You can now view the system performance and identify what’s consuming the maximum resources and other critical information.test result to monitor system resource

If you want to monitor system resources, feel free to use any of these tools because they will provide the necessary information.

It is essential to maintain your computer’s health. The first step is to monitor the system resources accordingly, and this list is more than sufficient to provide the best options for everyone and every PC.

You can use the Resource Monitor in Windows 10 for logging data or try the other third-party tools here. This information can be beneficial when choosing say a browser because you’ll be able to tell how Opera compares to Firefox in CPU consumption.

If you found some problems, here’s what you should do if the system runs low on resources on Windows 10/11.

If you want to keep track of your network usage at all times, then you might want to try Net Speed Monitor for Windows 11.

We’d like to hear which of these tools you prefer and why. Use the comments section to get in touch with us.

How to Change Monitor Number/Identity in Windows Display Settings

When you have multiple monitors connected to your Windows 11 PC and choose the Extend these displays option, the system will automatically select the display order by default.

However, maybe you want to switch it up and use the best monitor as your default one, which is why we’ve prepared this simple guide.

Speaking of monitors, we can also teach you how to change the primary monitor or how you can duplicate three monitors on Windows 10 PCs.

Why do I need to change the monitor number in Windows display settings?

This isn’t something that you have to do. However, if you bought a new, better monitor, you might want to make that your main one.

There can be many causes that would make you change the number/identity of your display in the Windows display settings, so we are about to show you how.

Go through the steps below, and you will have an easy time accomplishing this task. Remember to be patient and not rush things.

Also, there is a separate guide for those situations in which your external monitor is not detected after Sleep, just in case you need it. So, if you have been trying to find out how to change the monitor number in display settings, here’s all you need to know.

How can I change the monitor number/identity in Windows display settings?

Note icon NOTE
You can’t change the monitor number in Windows, but you can easily identify them and set the preferred monitor as the primary display. This section illustrates the process.
  1. 1. Press Win + I to access Settings.

  2. 2. Select the System tab, then click on Display.

    go to display settings
  3. 3. Click on Identify to display a number on each screen to identify which screen is primary and which is secondary.

    multiple displays
  4. 4. Now click on the screen number you want to make primary.

  5. 5. Expand Multiple displays and then check the box next to Make this my main Display.

    make this my primary monitor
  6. Changing your monitor number identity can be done very easily from your PC’s built-in settings. All you need to do is navigate to Display settings and then tweak things however you like.

This is all you need to do whenever you want to change the monitor number or set the preferred one as primary in Windows. Of course, the process is the same regardless of how many monitors you have plugged into your PC, so you can rest assured you are covered.

Changing the main monitor number can also help you fix the game opening on the wrong monitor; read this guide to learn more.

If you were wondering how to change the monitor identity number in Windows 11, there’s no way to do that. But you can always set any of the connected monitors as the primary one.

Some users also ask, why is my main monitor number 2 in Windows 10? This is because Windows automatically assigns monitor numbers. To be clear, the monitor number doesn’t matter, but it’s their arrangement and the primary display that does.

If you need further assistance, you are always welcome to stop by and pick our brains for whatever answer you are searching for. Before you leave, check some quick tricks to fix display issues in Windows.

Was this guide helpful to you? Be sure to comment in the dedicated section below and share your thoughts and opinions.

Remove Recommended in Windows 11: How to Do It the Easy Way

Windows 11 has been a massive upgrade over the previous iteration and offers a plethora of changes, both in terms of UI and features. The Recommended files section in Windows 11 Start Menu is one that has been bothering many, and users are looking for ways to remove it.

The Start Menu features two parts: the Pinned apps at the top, and the Recommended section, which lists the apps and files opened recently.

start menu windows 11

The only problem is that some users aren’t interested in constantly seeing the files, documents, or installed apps, and this section can even get annoying. So, let’s find out how to remove the Recommended section in the Start Menu on Windows 11.

How do I turn off the Recommended list on Windows 11?

1. Disable the recently opened items in Start, Jump Lists, and File Explorer

    You can easily turn off app recommendations in Windows 11 via Settings. This is by far the easiest and quickest method.

  1. 1. Open the Start menu, and choose the Settings app.

    settings start windows 11
  2. 2. On the sidebar at the left, choose the Personalization section.

    remove recommended section from start menu windows 11 personalization
  3. 3. Scroll down and select Start.

  4. 4. Turn off the Show recently opened items in Start, Jump Lists, and File Explorer option.

    Windows 11 remove recommended section from start menu toggle
  5. 5. This will make recently opened files or documents disappear from the recommendations section.

    turn off recommended list windows 11 removal
  6. 6. You can even go a step further and hide even the recently installed apps from the Start Menu. All you need to do is turn off the Show recently added apps option from the previous menu.

2. Modify the policies

  1. Press Windows + R to open Run, type gpedit.msc, and hit Enter.gpedit
  2. Expand Administrative Templates under User Configuration, and then select Start Menu and Taskbar.Start menu and taskbar
  3. Double-click the Remove Recommended section from Start Menu policy on the right.policy to windows 11 remove recommended files
  4. Select Enabled, and then click on Apply and OK to save the changes.enabled to windows 11 remove recommended files

You can remove Recommended in Windows 11 with GPO, but the policy works only for the Windows 11 SE edition. So, those using Home, Pro, or other editions can’t use it.

Also, for those wondering how do I hide the Recommended Start Menu in Windows 11 Registry, the DWORD for Windows 11 recommended start menu corresponds to the policy only. And since it’s available for the SE edition, the Registry method might not work either.

If, after these two methods, the changes don’t reflect right away and the apps opened previously still appear as recommendations, you can fix that by manually removing recommended items one by one.

3. Remove recommended files one by one

  1. Select the file or document that you don’t want there.
  2. Right-click on it, and select Remove from list. turn off recommended list in windows 11 settings
  3. The file will disappear from the Start Menu.

Also, for users who are only bothered by certain files they don’t want to be displayed in the Recommended section, there’s a really quick fix for them too.

Though, remember, there’s no way to remove the Recommended section altogether but just the apps and files listed under it. If and when such an option or setting is available, we will update the article to include the steps for it.

Also, if you’re curious about Windows 10 compared to Windows 11, it’s worth checking out our comprehensive guide to visualize the differences.

For more suggestions or other questions, feel free to leave a message in the comments section below.

Twitch High CPU Usage While Streaming: Lower & Fix [Browsers]

Millions of people actively use this live-streaming service every month. But why is Twitch using so much CPU? The reason behind Twitch’s high CPU usage is usually an equally high resolution that ends up disturbing the ratio between quality and performance.

We bet the next thing on your mind is finding out exactly what CPU you need to stream on Twitch. Don’t worry, we’ll get there soon enough.

Streaming usually claims about 2 cores worth of processing power, so you should consider a minimum quad-core CPU as starting point if you’d like to game and stream simultaneously.

And while we’re at it, we’ll also show you how to lower CPU usage while streaming on Twitch on each and every major browser.

Speaking of browsers, here’s one that could potentially solve your problems with Twitch using too much CPU before you even start troubleshooting.

If you really need to watch Twitch without using system resources at a high level, Opera GX will help.

This featured browser is built with gaming in mind, including CPU or RAM limiters for improved navigation and speed. What’s more, Twitch is integrated right in the sidebar to watch your streams with literally 1 click.

Opera GX

Opera GX

Watch & enjoy the most entertaining streams on Twitch without draining PC resources!

Is streaming on Twitch CPU intensive?

Yes, it can be. Whether you’re watching or streaming on Twitch, it’s usually due to certain settings. So, does streaming at 1080p use more CPU? Definitely. If your settings are particularly high, like 1080p at 60 FPS, then yes, you will see high CPU usage on Twitch.

Here’s how to lower CPU usage while streaming on Twitch. The first thing you can do is to choose a less intense stream configuration starting with your output resolution. So instead of watching a stream on 1080p at 60 FPS, try out 720p at 30 FPS.

Now, streaming at 1080p uses more CPU. In fact, this setup alone will claim an entire core of your processor in order to maintain visual quality as well.

So, in order to reduce or lower CPU usage while streaming, you can downscale the resolution and tweak the settings a bit to reach a combination that works for you.

The second thing that you can do is update your browser to the latest version. You can do this by going to a browser’s respective installation website and downloading the new version.

That should fix most of your problems, but if that doesn’t work, this guide will show you a series of browser-specific solutions that you can try out.

How do I fix high CPU usage on Twitch?

  1. Fix Twitch’s high CPU usage on Chrome
  2. Fix Twitch’s high CPU usage on Firefox
  3. Fixing high CPU on Opera GX
  4. Fixing high CPU on Brave
  5. Twitch Studio vs OBS CPU usage – Which is better?

1. Fix Twitch’s high CPU usage on Chrome

  1. On Chrome, click the three dots in the upper right-hand corner.
  2. Hover over More Tools.
  3. Click Task Manager in the context menu that appears.
  4. This opens up the Task Manager for Chrome which shows you which tab, window, and extension is currently working. You can see which is taking up the most CPU resources.
  5. For example, let’s say the YouTube tab is taking up the most resources. Click it to highlight it.
  6. Click the End Process button in the bottom right corner to shut down the tab. Close the tab when you’re done.
  7. If that doesn’t work, you might have to disable background tasks.
  8. Click the three dots from earlier again and select Settings.
  9. Click System on the left-hand menu.
  10. In System, toggle the switch next to Continue running background apps when Google Chrome is closed. This will grey it out and be turned off.

2. Fix Twitch’s high CPU usage on Firefox

  1. The first thing that you can do is open Firefox in Troubleshoot Mode.
  2. Click the three lines in the upper right-hand corner and select Help.
  3. In the new menu, select Troubleshoot Mode.
  4. Opening in Troubleshoot Mode will disable any extensions, themes, and custom settings on Firefox. In the new window, select Restart.
  5. If you notice your computer running smoother while Firefox is in Troubleshoot Mode, then the problem lies with your extensions or other custom settings. We recommend removing them if that’s the case.
  6. You can also check if hardware acceleration is off. Hardware acceleration will cause Firefox to utilize the GPU and free up CPU resources.
  7. Click on the three lines again and select Settings.
  8. While staying in the General tab, scroll down to Performance.
  9. Check off the box next to Use hardware acceleration when available.

Firefox has had its fair share of issues with streaming services. In addition to Twitch’s high CPU usage, you might have also struggled with Crunchyroll not working In Firefox.

Nevertheless, it’s a great browser to use for high performance as long as you get the right balance between internal settings and processing capabilities.

3. Fixing high CPU on Opera GX

  1. In Opera, press ESC and Shift on your keyboard to open the Task Manager.
  2. See which tab, window, or extension is taking up the most CPU resources.
  3. Let’s say the Twitch tab is taking up the most resources. Click it to highlight it and press End process.
  4. You can also disable Opera GX Hardware Acceleration. Start by pressing Alt and P on your keyboard to open the Settings menu.
  5. In Settings, scroll down until you reach the System section. If you don’t see it, it’ll be behind Advanced.
  6. Under System, toggle the switch next to Use hardware acceleration when available.

Opera GX hardware acceleration on or off – here’s an issue still up for debate. It depends on your specific situation, really. So, in order to provide an answer, another question needs to be addressed.

Does Twitch cause CPU spikes? If it does for you, then you might want to consider disabling the hardware acceleration feature in Opera GX. Moreover, if you can’t get Twitch to work with Opera normally, we’ve got you covered.

4. Fixing high CPU on Brave

  1. Like Firefox, you can check if an extension or theme is messing with the CPU by opening the browser in Private Mode.
  2. Click the three lines in the upper right-hand corner and select the New Private window.
  3. This will disable any and all extensions/themes. If you notice better performance, then you’ll need to delete the offending add-ons.
  4. If problems continue, you’ll need to disable Hardware Acceleration.
  5. Click the three lines again, and this time, click Settings.
  6. On the left-hand menu, select System.
  7. Toggle the switch next to Use hardware acceleration when available.
  8. Then click Relaunch to close and reopen Brave.

Brave Browser using too much CPU is not that uncommon. Nevertheless, there are ways to fix this, and disabling the Hardware acceleration feature is one of them.

? Twitch Studio vs OBS CPU usage – Which is better?

We’ve heard a lot both about OBS and Twitch Studio’s high CPU usage. So, is it better to use Twitch Studio or OBS? Obviously, that depends on your goals but if we’re talking strictly CPU, then Twitch Studio comes second.

Let’s make it simple. Is OBS better for CPU? Yes. Twitch Studio uses more CPU resources than OBS. This is because OBS is much more streamlined and straightforward with regard to streaming.

Twitch Studio is more complex since it has more features and a much busier user interface. Some people have found Twitch Studio to be easier for beginners to use because of its interface.

OBS also takes up less space on your computer since it only occupies 255 MB of storage. Twitch Studio takes up 400 MB of storage.

Twitch using too much CPU can be an issue and it can potentially affect your overall experience on the streaming platform. Fortunately, there are ways to lower CPU usage while streaming.

If you’re interested in more detailed inquiries when it comes to the best browser to pick for different activities, we recommend you give our in-depth comparison of Edge vs Chrome vs Brave a closer look.

That’s it from us! Don’t be shy and let us know if any of these recommendations helped you fix your high CPU situation.

Twitch High CPU Usage While Streaming: Lower & Fix [Browsers]

Millions of people actively use this live-streaming service every month. But why is Twitch using so much CPU? The reason behind Twitch’s high CPU usage is usually an equally high resolution that ends up disturbing the ratio between quality and performance.

We bet the next thing on your mind is finding out exactly what CPU you need to stream on Twitch. Don’t worry, we’ll get there soon enough.

Streaming usually claims about 2 cores worth of processing power, so you should consider a minimum quad-core CPU as starting point if you’d like to game and stream simultaneously.

And while we’re at it, we’ll also show you how to lower CPU usage while streaming on Twitch on each and every major browser.

Speaking of browsers, here’s one that could potentially solve your problems with Twitch using too much CPU before you even start troubleshooting.

If you really need to watch Twitch without using system resources at a high level, Opera GX will help.

This featured browser is built with gaming in mind, including CPU or RAM limiters for improved navigation and speed. What’s more, Twitch is integrated right in the sidebar to watch your streams with literally 1 click.

Opera GX

Opera GX

Watch & enjoy the most entertaining streams on Twitch without draining PC resources!

Is streaming on Twitch CPU intensive?

Yes, it can be. Whether you’re watching or streaming on Twitch, it’s usually due to certain settings. So, does streaming at 1080p use more CPU? Definitely. If your settings are particularly high, like 1080p at 60 FPS, then yes, you will see high CPU usage on Twitch.

Here’s how to lower CPU usage while streaming on Twitch. The first thing you can do is to choose a less intense stream configuration starting with your output resolution. So instead of watching a stream on 1080p at 60 FPS, try out 720p at 30 FPS.

Now, streaming at 1080p uses more CPU. In fact, this setup alone will claim an entire core of your processor in order to maintain visual quality as well.

So, in order to reduce or lower CPU usage while streaming, you can downscale the resolution and tweak the settings a bit to reach a combination that works for you.

The second thing that you can do is update your browser to the latest version. You can do this by going to a browser’s respective installation website and downloading the new version.

That should fix most of your problems, but if that doesn’t work, this guide will show you a series of browser-specific solutions that you can try out.

How do I fix high CPU usage on Twitch?

  1. Fix Twitch’s high CPU usage on Chrome
  2. Fix Twitch’s high CPU usage on Firefox
  3. Fixing high CPU on Opera GX
  4. Fixing high CPU on Brave
  5. Twitch Studio vs OBS CPU usage – Which is better?

1. Fix Twitch’s high CPU usage on Chrome

  1. On Chrome, click the three dots in the upper right-hand corner.
  2. Hover over More Tools.
  3. Click Task Manager in the context menu that appears.
  4. This opens up the Task Manager for Chrome which shows you which tab, window, and extension is currently working. You can see which is taking up the most CPU resources.
  5. For example, let’s say the YouTube tab is taking up the most resources. Click it to highlight it.
  6. Click the End Process button in the bottom right corner to shut down the tab. Close the tab when you’re done.
  7. If that doesn’t work, you might have to disable background tasks.
  8. Click the three dots from earlier again and select Settings.
  9. Click System on the left-hand menu.
  10. In System, toggle the switch next to Continue running background apps when Google Chrome is closed. This will grey it out and be turned off.

2. Fix Twitch’s high CPU usage on Firefox

  1. The first thing that you can do is open Firefox in Troubleshoot Mode.
  2. Click the three lines in the upper right-hand corner and select Help.
  3. In the new menu, select Troubleshoot Mode.
  4. Opening in Troubleshoot Mode will disable any extensions, themes, and custom settings on Firefox. In the new window, select Restart.
  5. If you notice your computer running smoother while Firefox is in Troubleshoot Mode, then the problem lies with your extensions or other custom settings. We recommend removing them if that’s the case.
  6. You can also check if hardware acceleration is off. Hardware acceleration will cause Firefox to utilize the GPU and free up CPU resources.
  7. Click on the three lines again and select Settings.
  8. While staying in the General tab, scroll down to Performance.
  9. Check off the box next to Use hardware acceleration when available.

Firefox has had its fair share of issues with streaming services. In addition to Twitch’s high CPU usage, you might have also struggled with Crunchyroll not working In Firefox.

Nevertheless, it’s a great browser to use for high performance as long as you get the right balance between internal settings and processing capabilities.

3. Fixing high CPU on Opera GX

  1. In Opera, press ESC and Shift on your keyboard to open the Task Manager.
  2. See which tab, window, or extension is taking up the most CPU resources.
  3. Let’s say the Twitch tab is taking up the most resources. Click it to highlight it and press End process.
  4. You can also disable Opera GX Hardware Acceleration. Start by pressing Alt and P on your keyboard to open the Settings menu.
  5. In Settings, scroll down until you reach the System section. If you don’t see it, it’ll be behind Advanced.
  6. Under System, toggle the switch next to Use hardware acceleration when available.

Opera GX hardware acceleration on or off – here’s an issue still up for debate. It depends on your specific situation, really. So, in order to provide an answer, another question needs to be addressed.

Does Twitch cause CPU spikes? If it does for you, then you might want to consider disabling the hardware acceleration feature in Opera GX.

4. Fixing high CPU on Brave

  1. Like Firefox, you can check if an extension or theme is messing with the CPU by opening the browser in Private Mode.
  2. Click the three lines in the upper right-hand corner and select the New Private window.
  3. This will disable any and all extensions/themes. If you notice better performance, then you’ll need to delete the offending add-ons.
  4. If problems continue, you’ll need to disable Hardware Acceleration.
  5. Click the three lines again, and this time, click Settings.
  6. On the left-hand menu, select System.
  7. Toggle the switch next to Use hardware acceleration when available.
  8. Then click Relaunch to close and reopen Brave.

Brave Browser using too much CPU is not that uncommon. Nevertheless, there are ways to fix this, and disabling the Hardware acceleration feature is one of them.

? Twitch Studio vs OBS CPU usage – Which is better?

We’ve heard a lot both about OBS and Twitch Studio’s high CPU usage. So, is it better to use Twitch Studio or OBS? Obviously, that depends on your goals but if we’re talking strictly CPU, then Twitch Studio comes second.

Let’s make it simple. Is OBS better for CPU? Yes. Twitch Studio uses more CPU resources than OBS. This is because OBS is much more streamlined and straightforward with regard to streaming.

Twitch Studio is more complex since it has more features and a much busier user interface. Some people have found Twitch Studio to be easier for beginners to use because of its interface.

OBS also takes up less space on your computer since it only occupies 255 MB of storage. Twitch Studio takes up 400 MB of storage.

Twitch using too much CPU can be an issue and it can potentially affect your overall experience on the streaming platform. Fortunately, there are ways to lower CPU usage while streaming.

If you’re interested in more detailed inquiries when it comes to the best browser to pick for different activities, we recommend you give our in-depth comparison of Edge vs Chrome vs Brave a closer look.

That’s it from us! Don’t be shy and let us know if any of these recommendations helped you fix your high CPU situation.

Twitch High CPU Usage While Streaming: Lower & Fix [Browsers]

Millions of people actively use this live-streaming service every month. But why is Twitch using so much CPU? The reason behind Twitch’s high CPU usage is usually an equally high resolution that ends up disturbing the ratio between quality and performance.

We bet the next thing on your mind is finding out exactly what CPU you need to stream on Twitch. Don’t worry, we’ll get there soon enough.

Streaming usually claims about 2 cores worth of processing power, so you should consider a minimum quad-core CPU as starting point if you’d like to game and stream simultaneously.

And while we’re at it, we’ll also show you how to lower CPU usage while streaming on Twitch on each and every major browser.

Speaking of browsers, here’s one that could potentially solve your problems with Twitch using too much CPU before you even start troubleshooting.

If you really need to watch Twitch without using system resources at a high level, Opera GX will help.

This featured browser is built with gaming in mind, including CPU or RAM limiters for improved navigation and speed. What’s more, Twitch is integrated right in the sidebar to watch your streams with literally 1 click.

Opera GX

Opera GX

Watch & enjoy the most entertaining streams on Twitch without draining PC resources!

Is streaming on Twitch CPU intensive?

Yes, it can be. Whether you’re watching or streaming on Twitch, it’s usually due to certain settings. So, does streaming at 1080p use more CPU? Definitely. If your settings are particularly high, like 1080p at 60 FPS, then yes, you will see high CPU usage on Twitch.

Here’s how to lower CPU usage while streaming on Twitch. The first thing you can do is to choose a less intense stream configuration starting with your output resolution. So instead of watching a stream on 1080p at 60 FPS, try out 720p at 30 FPS.

Now, streaming at 1080p uses more CPU. In fact, this setup alone will claim an entire core of your processor in order to maintain visual quality as well.

So, in order to reduce or lower CPU usage while streaming, you can downscale the resolution and tweak the settings a bit to reach a combination that works for you.

The second thing that you can do is update your browser to the latest version. You can do this by going to a browser’s respective installation website and downloading the new version.

That should fix most of your problems, but if that doesn’t work, this guide will show you a series of browser-specific solutions that you can try out.

How do I fix high CPU usage on Twitch?

  1. Fix Twitch’s high CPU usage on Chrome
  2. Fix Twitch’s high CPU usage on Firefox
  3. Fixing high CPU on Opera GX
  4. Fixing high CPU on Brave
  5. Twitch Studio vs OBS CPU usage – Which is better?

1. Fix Twitch’s high CPU usage on Chrome

  1. On Chrome, click the three dots in the upper right-hand corner.
  2. Hover over More Tools.
  3. Click Task Manager in the context menu that appears.
  4. This opens up the Task Manager for Chrome which shows you which tab, window, and extension is currently working. You can see which is taking up the most CPU resources.
  5. For example, let’s say the YouTube tab is taking up the most resources. Click it to highlight it.
  6. Click the End Process button in the bottom right corner to shut down the tab. Close the tab when you’re done.
  7. If that doesn’t work, you might have to disable background tasks.
  8. Click the three dots from earlier again and select Settings.
  9. Click System on the left-hand menu.
  10. In System, toggle the switch next to Continue running background apps when Google Chrome is closed. This will grey it out and be turned off.

2. Fix Twitch’s high CPU usage on Firefox

  1. The first thing that you can do is open Firefox in Troubleshoot Mode.
  2. Click the three lines in the upper right-hand corner and select Help.
  3. In the new menu, select Troubleshoot Mode.
  4. Opening in Troubleshoot Mode will disable any extensions, themes, and custom settings on Firefox. In the new window, select Restart.
  5. If you notice your computer running smoother while Firefox is in Troubleshoot Mode, then the problem lies with your extensions or other custom settings. We recommend removing them if that’s the case.
  6. You can also check if hardware acceleration is off. Hardware acceleration will cause Firefox to utilize the GPU and free up CPU resources.
  7. Click on the three lines again and select Settings.
  8. While staying in the General tab, scroll down to Performance.
  9. Check off the box next to Use hardware acceleration when available.

Firefox has had its fair share of issues with streaming services. In addition to Twitch’s high CPU usage, you might have also struggled with Crunchyroll not working In Firefox.

Nevertheless, it’s a great browser to use for high performance as long as you get the right balance between internal settings and processing capabilities.

3. Fixing high CPU on Opera GX

  1. In Opera, press ESC and Shift on your keyboard to open the Task Manager.
  2. See which tab, window, or extension is taking up the most CPU resources.
  3. Let’s say the Twitch tab is taking up the most resources. Click it to highlight it and press End process.
  4. You can also disable Opera GX Hardware Acceleration. Start by pressing Alt and P on your keyboard to open the Settings menu.
  5. In Settings, scroll down until you reach the System section. If you don’t see it, it’ll be behind Advanced.
  6. Under System, toggle the switch next to Use hardware acceleration when available.

Opera GX hardware acceleration on or off – here’s an issue still up for debate. It depends on your specific situation, really. So, in order to provide an answer, another question needs to be addressed.

Does Twitch cause CPU spikes? If it does for you, then you might want to consider disabling the hardware acceleration feature in Opera GX.

4. Fixing high CPU on Brave

  1. Like Firefox, you can check if an extension or theme is messing with the CPU by opening the browser in Private Mode.
  2. Click the three lines in the upper right-hand corner and select the New Private window.
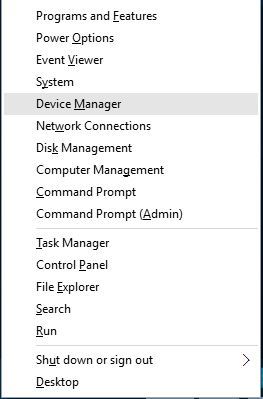
  3. This will disable any and all extensions/themes. If you notice better performance, then you’ll need to delete the offending add-ons.
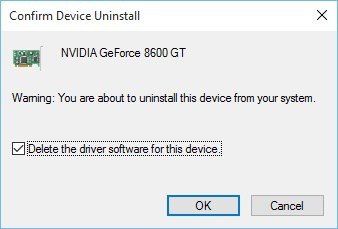
  4. If problems continue, you’ll need to disable Hardware Acceleration.
  5. Click the three lines again, and this time, click Settings.
  6. On the left-hand menu, select System.
  7. Toggle the switch next to Use hardware acceleration when available.
  8. Then click Relaunch to close and reopen Brave.

Brave Browser using too much CPU is not that uncommon. Nevertheless, there are ways to fix this, and disabling the Hardware acceleration feature is one of them.

? Twitch Studio vs OBS CPU usage – Which is better?

We’ve heard a lot both about OBS and Twitch Studio’s high CPU usage. So, is it better to use Twitch Studio or OBS? Obviously, that depends on your goals but if we’re talking strictly CPU, then Twitch Studio comes second.

Let’s make it simple. Is OBS better for CPU? Yes. Twitch Studio uses more CPU resources than OBS. This is because OBS is much more streamlined and straightforward with regard to streaming.

Twitch Studio is more complex since it has more features and a much busier user interface. Some people have found Twitch Studio to be easier for beginners to use because of its interface.

OBS also takes up less space on your computer since it only occupies 255 MB of storage. Twitch Studio takes up 400 MB of storage.

Twitch using too much CPU can be an issue and it can potentially affect your overall experience on the streaming platform. Fortunately, there are ways to lower CPU usage while streaming.

If you’re interested in more detailed inquiries when it comes to the best browser to pick for different activities, we recommend you give our in-depth comparison of Edge vs Chrome vs Brave a closer look.

That’s it from us! Don’t be shy and let us know if any of these recommendations helped you fix your high CPU situation.

2D Animation Software: 6 Best to Use in 2026 [Free&Paid]

As you already know, 2D animation software allows you to create two-dimensional movement in your videos. Your animated characters can move up and down, left, and right.

Unlike 3D animation software, you won’t be able to move your characters towards or away from the viewer.

In this article, we’ll list the best 2D animation software for PC that you can install to create amazing animations.

What is the best 2D animation software?

Adobe Animate – Professional-grade tool

Let us introduce you to our top choice for creating stunning 2D animations. It is our most recommended option because of the large number of options available, the constant updates that bring new features, and the Modern Timeline for a hassle-free experience.

Considering there are multiple platforms available today which you can use to reach your audience we are happy to report that Adobe Animate can export your work into modern HTML5 Canvas, WebGL, or SVG.

The final work that you can create using Adobe Animate stands out from others because you can achieve high-quality results through frame-by-frame animation that lets you create more expressive characters.

Animate is one of the best 2D bone animation software. For more realistic effects, it includes bone tool animations so you can add bones to your characters.

Let’s quickly look at its key features:

  • Excellent vector brushes in all sorts of styles for being able to create a large variety of characters
  • Intuitive layout, so that even the common user can easily get used to it
  • Make your work visible on desktop, mobile, and even TV by using one or more of the export options available
  • Creative Cloud membership allows access to all latest features and fixes as well as other software you might find useful
  • If you find using it a bit difficult or the interface is new there are documentation available and tutorials

Adobe Animate

Breathe life into your characters with 2D powered effects by one of the best software available, Adobe Animate.
Free trial Visit website

SVGator – The easiest way to animate SVG

Animating SVG from scratch is difficult, time-consuming, and not for the faint of heart. If you’re looking for a tool that doesn’t require any coding skills, SVGator is perfect for you.

Packed with all the necessary tools and features, this app is the ultimate SVG  animation creator that you can master using directly in your browser. Its intuitive interface makes it 100% beginner-friendly, with a learning curve that’s significantly less intimidating than that of most other alternative solutions.

You can trigger the animation with a simple click when you scroll on a page and even choose interactive settings for mobile animation exports (for React Native and Flutter). You can also decide what happens on a second click or when the cursor gets away from the animated item. 

This way, everything becomes more engaging for anyone who is interacting with your SVG. 

Moreover, SVGator comes with its own Player API so that you can have full programmatic control over your animations. 

There are simply endless possibilities for motion design using this tool. You can animate icons,  backgrounds, logos, and any other illustrations.

And then, you may also add filters, color animations, path animations, morph effects, etc. There is even the option of creating clipping masks to make your animation visible only inside the shapes you set up. 

SVGator has a built-in completely free SVG creator and editor, which you can use to draw your designs from start to finish. Animators like Stroke Offset and Stroke Dash will then allow you to create cool animated effects, like self-drawing/self-erasing handwriting animations, and much more. 

You can start right now because the online tool comes with a free version that’s meant to give users access to test out features and learn how to use it before committing to a paid plan.

Here are some of its key features:

  • Intuitive easy-to-use interface
  • Full control over your animation
  • Choose CSS or JavaScript as the animation type
  • Step-by-step instructions and tutorials
  • 1 GB of cloud storage for the free version

SVGator

Use this ultimate animation tool to get everything in motion with no coding skills at all!

Adobe Character Animator – Great animation toolset

Part of the powerful Adobe Creative Suite, the Character Animator is one piece of software you wouldn’t want to miss if you’re looking to create show-stopping 2D animations.

This unique program uses your expressions and movements to animate characters in real-time.

This means that by using your webcam and microphone, you can pretty much turn anything into an animated character in seconds.

Seamless integration with other Adobe apps like Premiere Pro and After Effects guarantees professional-looking results with little effort.

You can even choose to start your project with built-in character templates to speed up your workflow even more.

Let’s quickly look at its key features:

  • Animate characters based upon your expressions (from syncing lips to tracking eyes)
  • Built-in character templates to kick-start your project
  • Scene cameras for dynamic (wide, close-up, and zoom) shots
  • Keyframes to adjust timing and motion in your animations
  • Sync audio to your animation
  • Seamless integration with other Adobe apps

Adobe Character Animator

Create spectacular 2D animations in a heartbeat with real-time Adobe-powered AI rendering!
Free trial Visit website

Autodesk Sketchbook – Ideal for drawing

The Sketchbook is unparalleled when it comes to digital drawing, driving every creative process naturally and effortlessly from idea to fully finished artwork.

But there’s more to this software than drawing tools. It also brings a handful of competitive animation tools to the table such as keyframes and a timeline, helping you to really breathe life into your characters.

Let’s quickly look at its key features:

  • Turn your webcam into a scanner to instantly move your projects from paper to the digital environment
  • Cross-platform compatibility to create art whenever, wherever across all your devices
  • Animation toolkit to bring your concepts to life
  • Extensive drawing toolkit (customizable brushes, pencils, inks and more)
  • 16-sector Radial Symmetry and Predictive Stroke for smooth lines and shapes
  • Supports various file formats including JPG, PNG, BMP, TIFF, and PSD
Autodesk Sketchbook

Autodesk Sketchbook

If you can think it, the Sketchbook can make it happen. Draw, edit, animate, and amaze with your creations!

Autocad LT (Autodesk) – Multiple platform usage

Interface of AutoCAD

Master 2D geometry with AutoCAD LT. Owned by famous Autodesk, this powerful CAD software serves best for creating precise 2D drawings and documentation.

For this purpose, you will enjoy a comprehensive set of design, editing, and annotation tools, all packed in an easy-to-use and intuitive user interface crafted to help you work easier and faster.

Let’s quickly look at its key features:

  • Smart dimensioning tools to automatically create the desired dimensions of selected objects
  • Format content (text, columns, boundaries, blocks, leader lines, and styles)
  • Different layouts and layout viewports to display different design elements
  • Cloud storage connectivity
  • Easy selection and object preview to remove multiple objects simultaneously

⇒ Get Autocad LT

PowToon – Great for cartoons

powtoon 2d animation software

PowToon is an interesting 2D animation software developed for business use.

Yes, you read that right, if you own a small business or a website and you want to stand out in the crowd, this tool will help you achieve that.

You can create animations directly in your browser, no download is required. Simply select the type of animation that you want to use and follow the onscreen instructions.

The user interface is very intuitive and you’ll quickly learn how to use the tool without even watching dedicated tutorials.

Choose your characters, props, and scene, drag and drop them into the PowToon editor, and select the animation you want to apply. Presto! You have a free animated video for your website.

⇒ Get PowToon

These are five of the best 2D animation software that you can use on your Windows computer.

As you can see, each of these tools focuses on a specific task: some are perfect for business animations, while others have been developed for game animation.

We also recommend checking our gaming animation software list for more interesting ideas.

We hope that you find this list useful. If you already used some of the programs listed above, tell us more about your experience in the comments below.