Microsoft’s new Copilot key marks 2026 as the year of AI computing

Microsoft declares 2024 the year of the AI PC with a new dedicated Copilot key for Windows 11.

After the new Copilot featured was announced late last year, the software giant takes a forward leap to change the Windows PC keyboard after nearly three decades.

What is the new Copilot key for Windows 11?

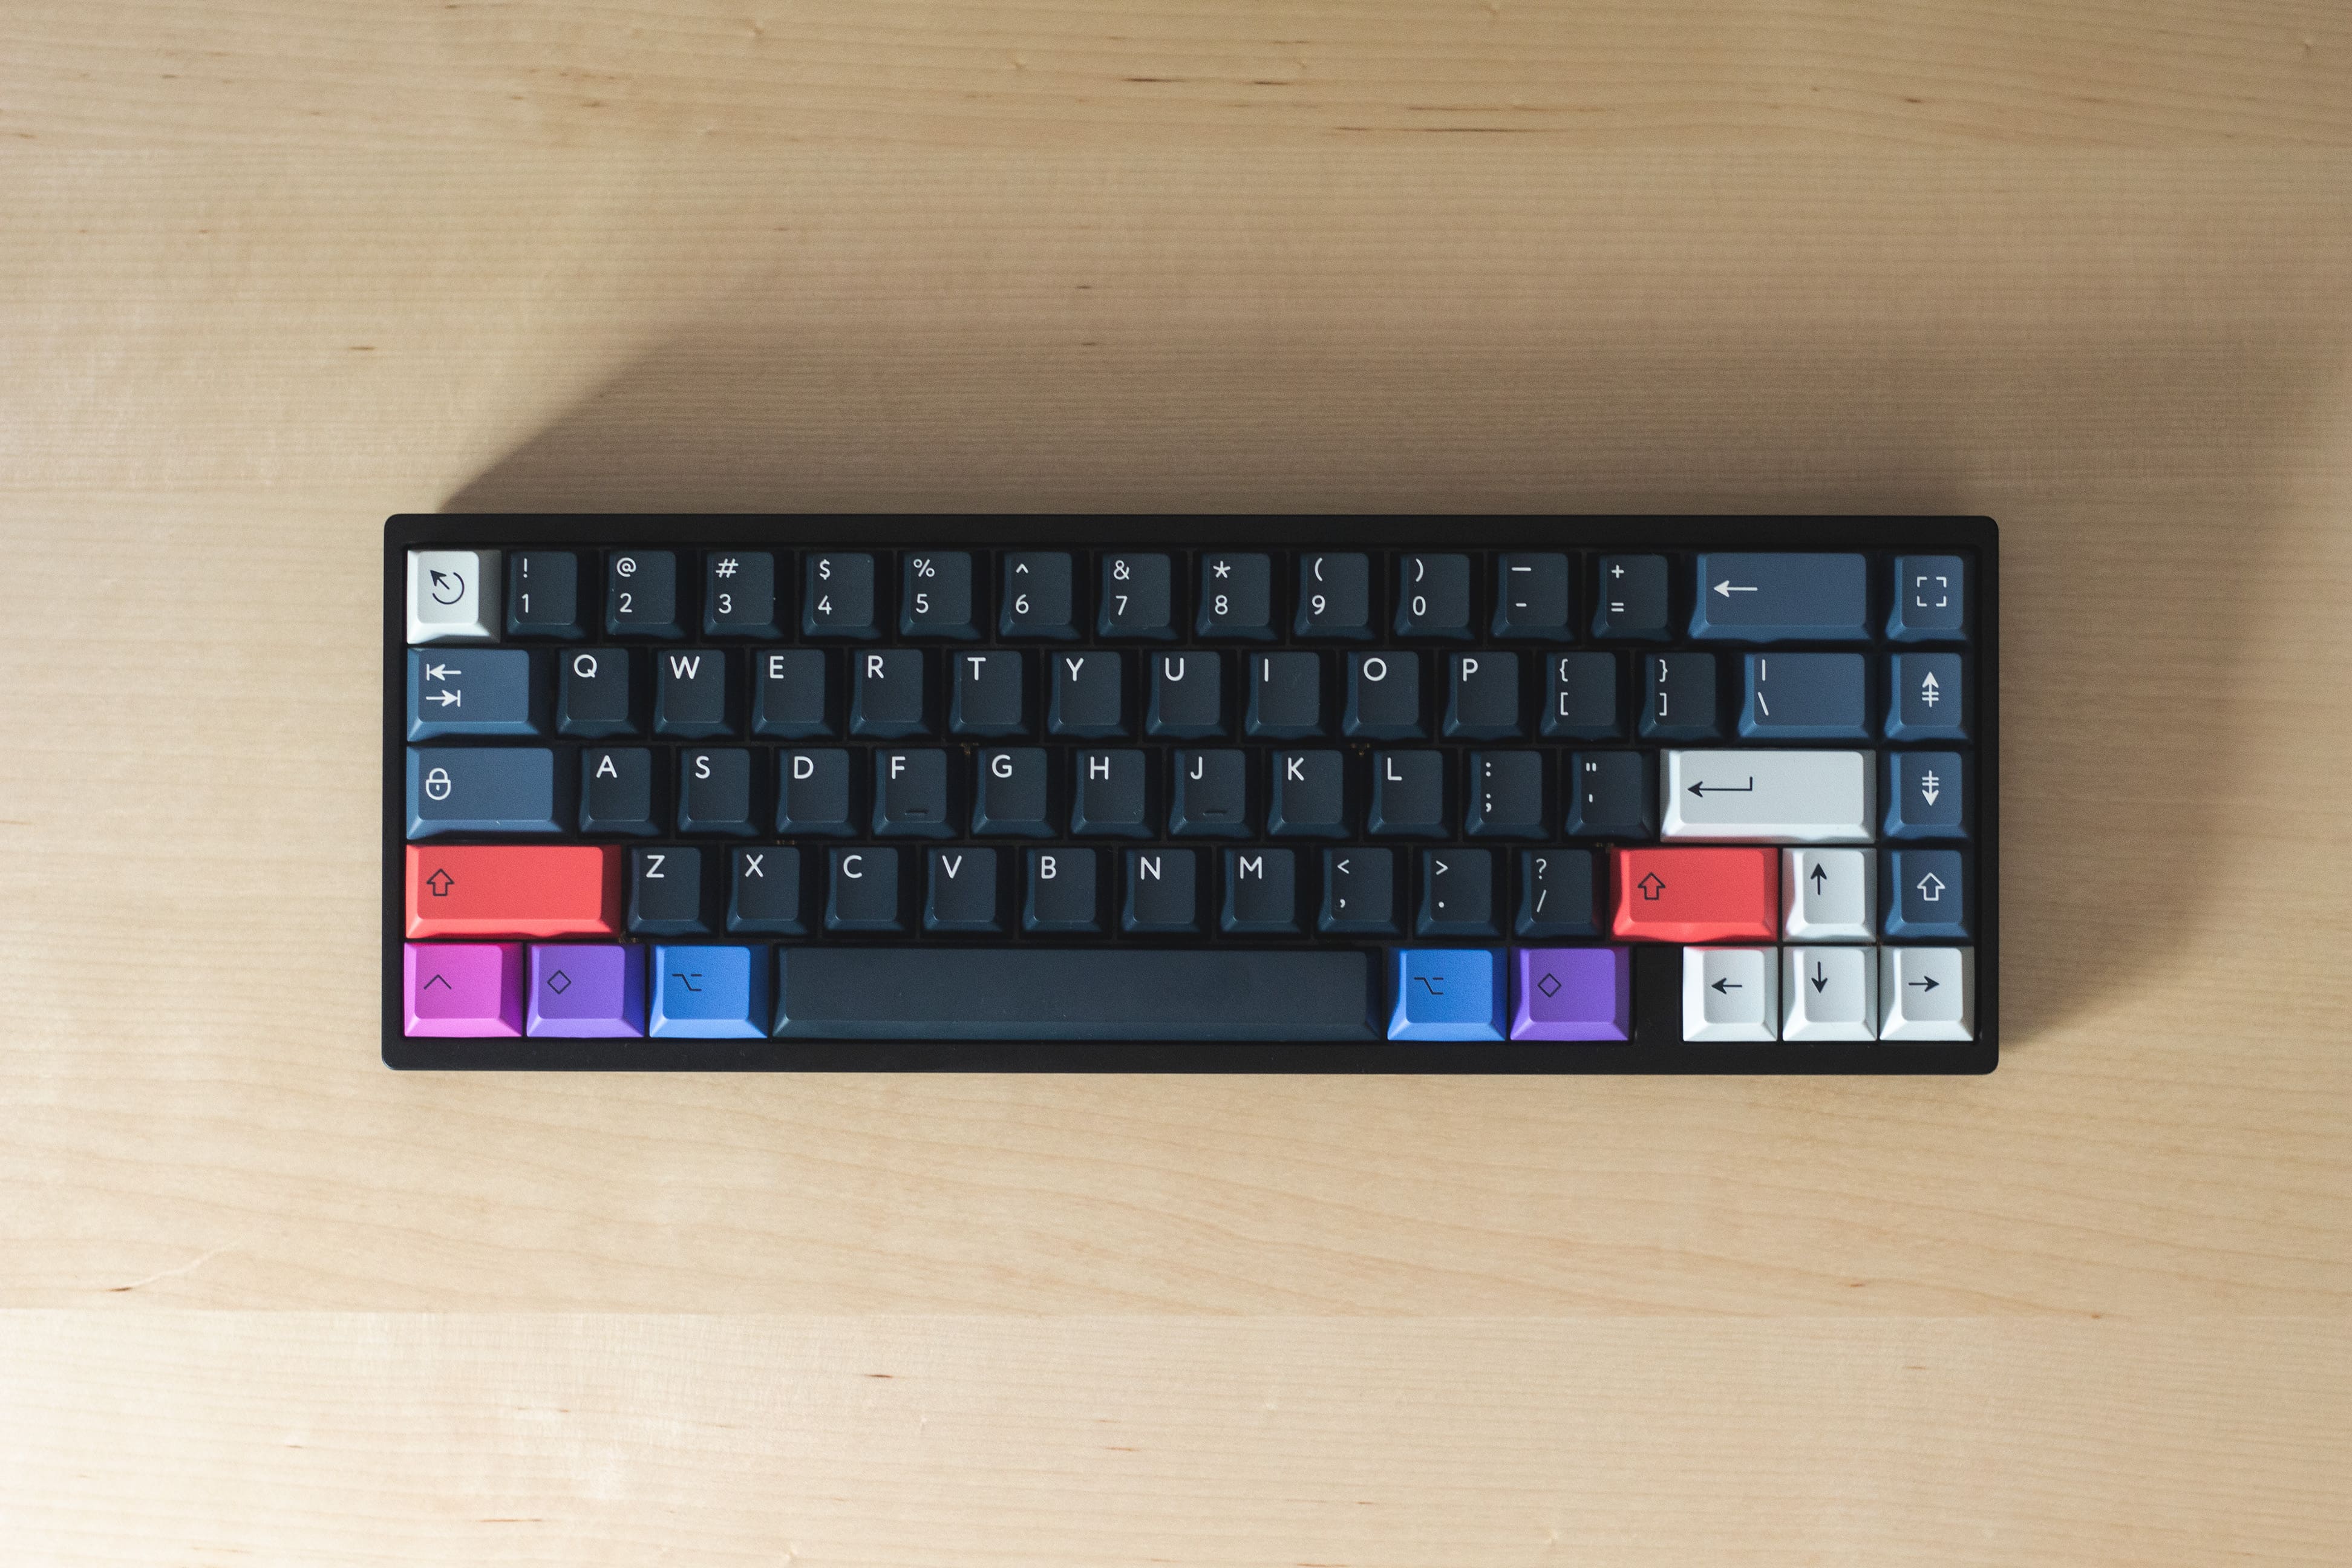
From the new Microsoft blog post, we found that the new Copilot key will be present to the right of the right Alt key on a Windows keyboard. When pressed, it will start the Copilot AI features.

On some keyboards, the Copilot key will replace the Menu or application key that was introduced a long time ago. As a fun fact, it’s in the same place as the old Office key from the Microsoft branded keyboards back in 2019.

The change is as significant as the introduction of the Windows key nearly 30 years ago. Microsoft says that the new key will start its appearance on keyboards beginning in late February through Spring, including on upcoming Surface devices.

The Redmond giant also gave a green flag to all its manufacturing partners that will feature keyboards and devices with the new Copilot key over the next days leading to CES 2024.

We also learned that you will need to log into your Microsoft account to use the new key. Otherwise, pressing the button will only start the Windows Search function. That will also occur if Copilot for Windows is not available or enabled on the device.

Did you know that you can also use Copilot on Windows 10? Hit the highlighted link

What do you think about the new Copilot key? Leave us a note with your thoughts in the comments section below.

WLAN Extensibility Module has Stopped: How to Fix it

If you’re unable to connect to your network or it keeps dropping, it’s most likely the WLAN Extensibility Module has stopped error. This article will show you how to bypass this error.

What does WLAN Extensibility Module has stopped mean?

The WLAN extensibility module is responsible for managing wireless network connections. If it has stopped, your device will not be able to connect or will keep receiving an intermittent connection. This can be blamed on outdated network drivers, software conflicts, or corrupt system files.

The complete error message will be accompanied by a location based on your Network card manufacturer. For instance, Broadcom Corporation users will see: C:\WINDOWS\System32\bcmihvsrv64.dll

How do I fix the WLAN Extensibility Module has stopped error?

Begin troubleshooting this error with the following preliminary steps:

  • Uninstall any third-party network-related software you’ve installed recently, then disable and re-enable your wireless network.
  • Roll back the previous Windows update since Wi-Fi tends to stop working after a Windows update.
  • Power cycle your router, perform a network reset, restart your device then try again.

1. Run the necessary troubleshooters

1.1 Run the Network adapter troubleshooter

  1. Hit the Windows key and click on Settings.settings windows 11
  2. Click on System, then select Troubleshoot.Open system troubleshooter
  3. Select Other troubleshooters.other troubleshooters
  4. Locate the Network Adapter troubleshooter and click on the Run button next to it.Network Adapter Run IPv6 No Internet Access

1.2 Run the Internet Connections troubleshooter

  1. Hit the Windows key and click on Settings.settings windows 11
  2. Go to System, and click Troubleshoot.System - Troubleshoot wifi keeps disconnecting windows 11
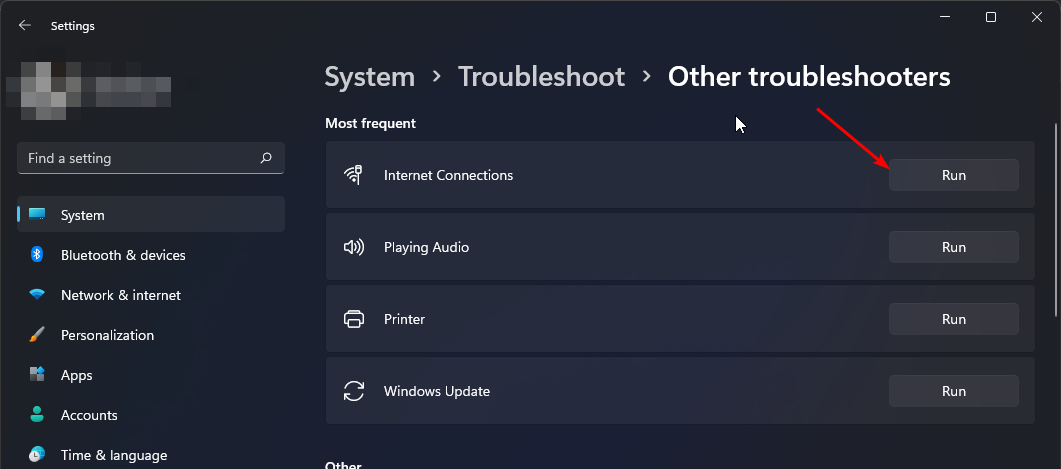
  3. Now click Other troubleshooters. Other troubleshooters
  4. Locate Internet connections, and click Run. 
  5. Follow the onscreen prompts to complete the process.  

1.3 Run the Hardware and Devices troubleshooter

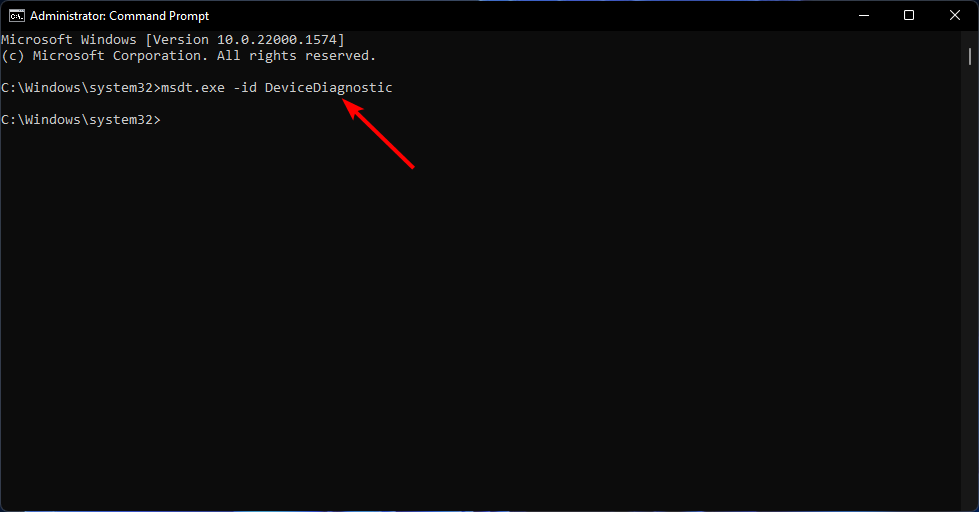
  1. Hit the Windows key, type cmd, and select Run as administrator.cmd-run-admin-w11 unexpected kernel mode trap windows 11
  2. Type the following command and hit Enter: msdt.exe -id DeviceDiagnostic
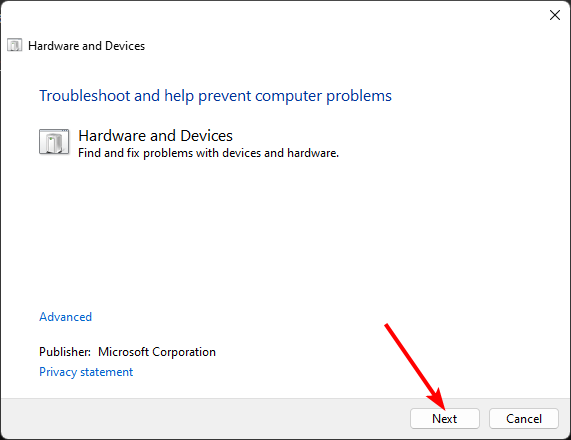
  3. In the Hardware and Devices dialog that appears, click Next.
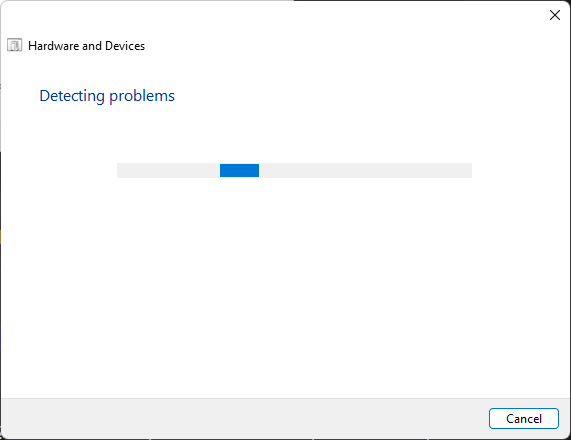
  4. The tool will start scanning for any problems with your hardware and recommend a fix. After it is done, try again and check if the WLAN Extensibility Module has stopped error persists.

The above troubleshooters should be able to pinpoint whether it is a network or hardware problem. If everything is good, proceed with the next steps.

2. Restart the WLAN service

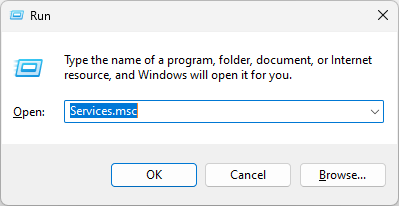
  1. Hit the Windows + R keys to open the Run command.
  2. Type services.msc and hit Enter.Services
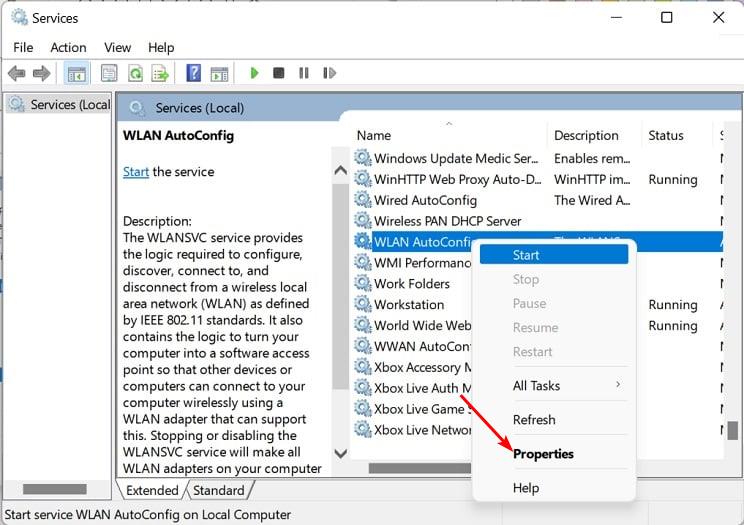
  3. Locate the WLAN AutoConfig service, double-click on it, and select Properties.
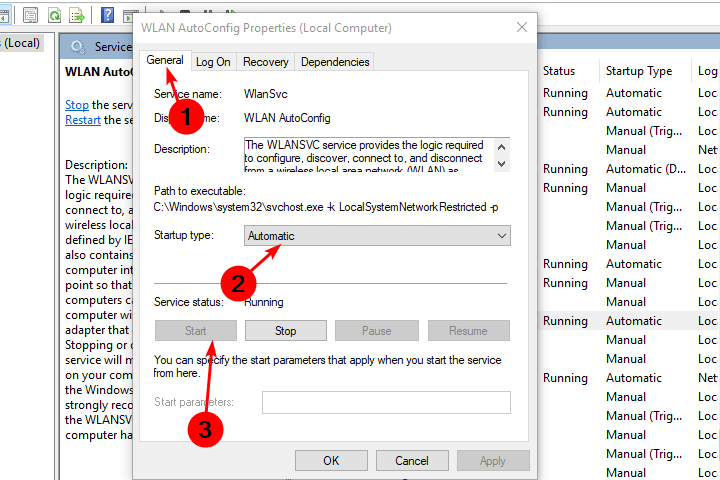
  4. Navigate to the General tab. Under Startup type, select Automatic from the drop-down options and click on the Start button.
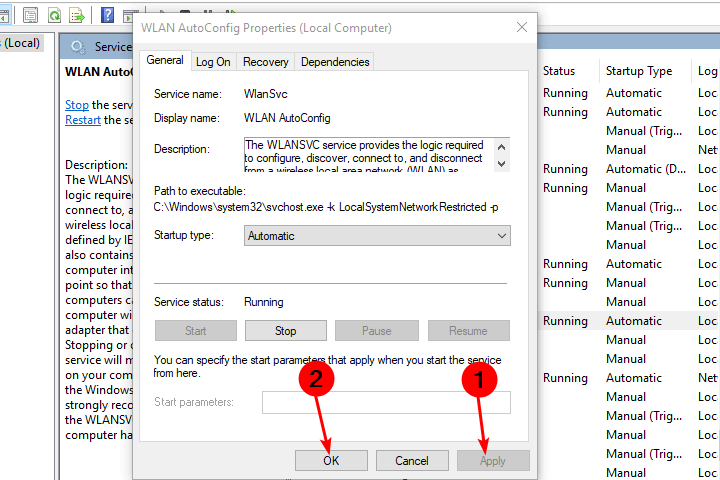
  5. Next, click Apply and then OK.

Check again after a few minutes and see if the service is still running. Sometimes, the WLAN autoconfig service keeps stopping and, you may need to address this issue.

3. Update your network drivers

Note icon NOTE
For these steps, you may have to update or reinstall your network drivers in Safe Mode.
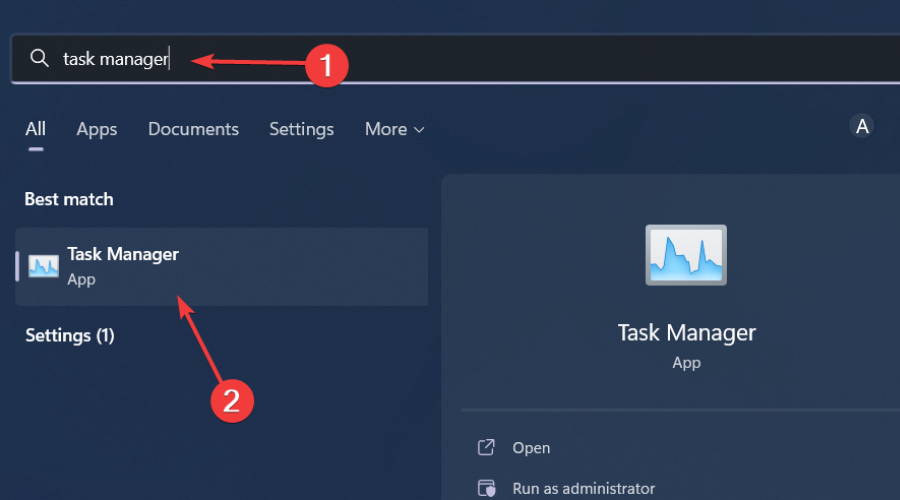
  1. Hit the Windows key, type Device Manager in the search bar, and click Open.device manager w11
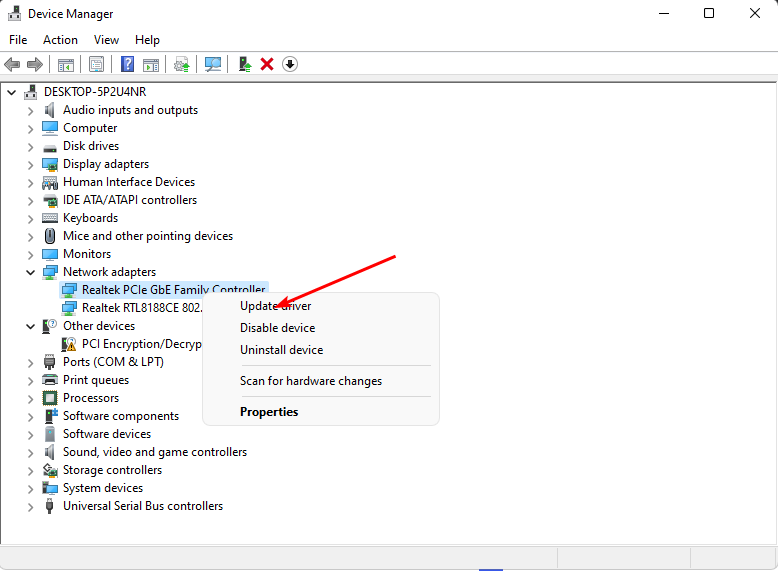
  2. Navigate to your Network adapter, right-click on it, and select Update driver.
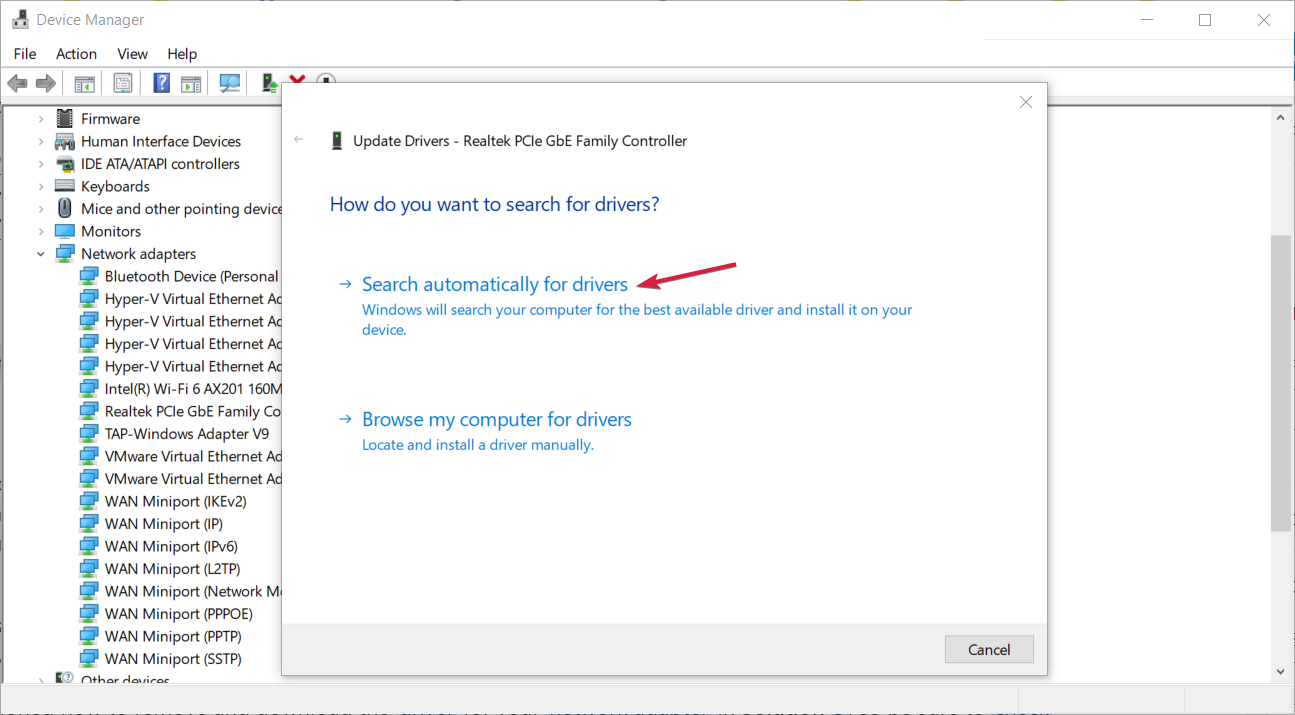
  3. Select Search automatically for updated drivers.

4. Reinstall your network drivers

  1. Click on the Start Menu icon, type Device Manager in the search bar, and click Open.device manager w11
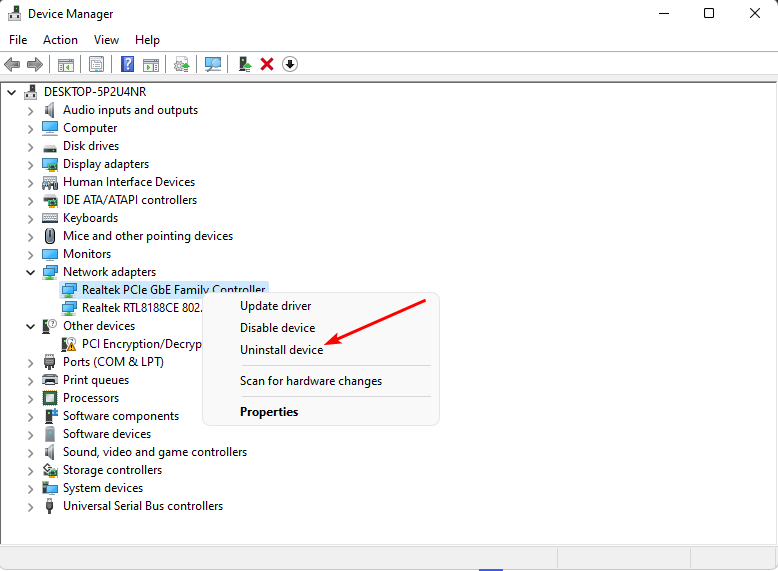
  2. Navigate to your Network adapter, right-click on it, and select Uninstall device.
  3. Confirm Uninstall in the next confirmation dialog.
  4. Restart your PC, and your drivers will be automatically reinstalled.

5. Disable specific driver updates

  1. Right-click on Start, then choose Device Manager.device manager w11
  2. Find any conflicting drive among your network drivers and right-click on it.
  3. Select Properties from the list of options.
  4. Go to the Details tab, and in the Property drop-down menu, click on Hardware ID.
  5. Select all IDs, then copy + paste the data into any text editor.
  6. Press the Windows key, type gpedit.msc, and select Run As Administrator.GPEDIT MSC RUN -Your Virus and threat protection is managed by your organization
  7. Next, navigate to the following path:Computer Configuration/Administrative Templates/System/Device Installation/Device Installation Restrictions
  8. Select Prevent installation of devices that match any of these device IDs.
  9. In the Policy window, click Enabled and then Show.
  10. Copy IDs one by one from the saved document and paste them into separate Volume columns.
  11. Save changes and exit Group Policy Editor.
  12. At the next update, you should be prompted with an error. That is the confirmation that the tweaks were successful, and the selected drivers won’t install anymore.

6. Delete Registry keys

  1. Ensure you back up your Registry or create a restore point before making any changes.
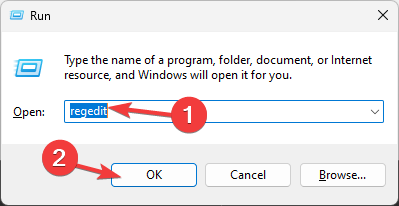
  2. Press the Windows + R keys and type regedit. Click OK or press Enter to start Registry Editor.Regedit RUN COMMAND (2) - directx error mw3
  3. When Registry Editor starts, navigate to the following key in the left pane: HKEY_LOCAL_MACHINE/ SYSTEM/CurrentControlSet/Control/Class/{4d36e972-e325-11ce-bfc1-08002be10318}/0010
  4. Search for the IHVExtensions key and delete it with all its subkeys.
  5. Close the Registry Editor and restart your PC.

IHV Extensions are software modules provided by hardware vendors to enhance the functionality of their WLAN adapters. However, removing them may be necessary in some cases. If they are causing Wi-Fi connectivity issues or conflicts with the operating system, it’s best to delete them.

Wireless networks are a bit tricky because the WLAN autoconfig service may stop running at times. You may also want to check the wlanext.exe file and verify whether it plays a role in your connection problems.

The effectiveness of these steps can vary depending on your specific system configuration and your Network card’s manufacturer. If the issue persists after trying these steps, a repair upgrade should suffice.

However, if you have other solutions that don’t involve overhauling your OS, we’re open to hearing them. Do leave us a comment with your suggestions.

Windows Settings Keeps Scrolling Down: 7 Ways to Fix it

For many, Windows Settings was scrolling down and even disconnecting the mouse didn’t help, which led them to believe that it was a Windows problem. But that’s not always the case!

Why is Windows Settings scrolling down?

The issue often arises when there’s a controller connected to the PC or a ghost device in the Device Manager is triggering conflicts. Also, a malfunctioning mouse or keyboard can cause the problem.

Besides, outdated mouse and keyboard drivers, corrupt system or user files, or misconfigured settings can just as well be the underlying cause.

What can I do if Windows Settings is scrolling down?

Before we start with the slightly complex solutions, try these quick ones:

  • Make sure the Tab key is not stuck.
  • Disconnect all external devices, including the mouse, keyboard, and gaming controller. In case the problem is fixed, it’s one of these devices to blame.
  • If you have a wireless mouse, connect the dongle to another USB port, preferably directly into the PC, without a USB hub.
Tip icon Tip
The solutions listed here are based on Windows 11, but the same ideas apply to all iterations of the OS, including Windows 10 and Windows 7.

1. Disable additional mice and keyboards in the Device Manager

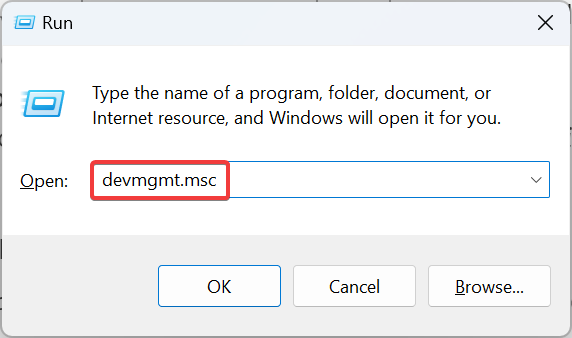
  1. Press Windows + R to open Run, type devmgmt.msc in the text field, and hit Enter.devmgmt.msc
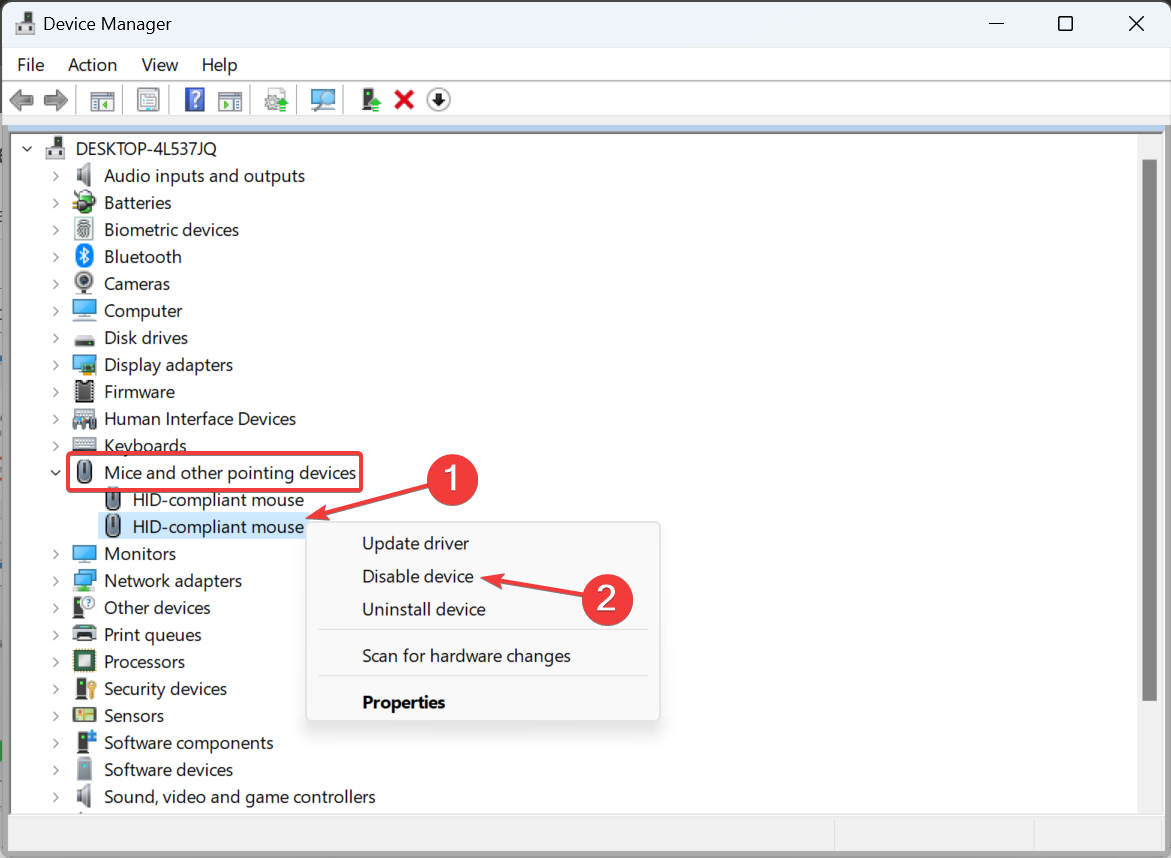
  2. Double-click the Mice and other pointing devices entry, right-click on any ghost device that you can’t identify, and select Disable device.disable device to fix windows settings scrolling down
  3. Click Yes in the confirmation prompt.
  4. Similarly, disable other additional mice and keyboards. If the Disable device option is missing, choose Uninstall device.

In case you inadvertently disable the active mouse, highlight the device, press Enter to open its Properties, then use the Tab and Arrow keys to move to the Driver tab, select the Enable device option, and hit Enter.

2. Update the mouse and keyboard drivers

  1. Press Windows + X to open the Power User menu, and select Device Manager.
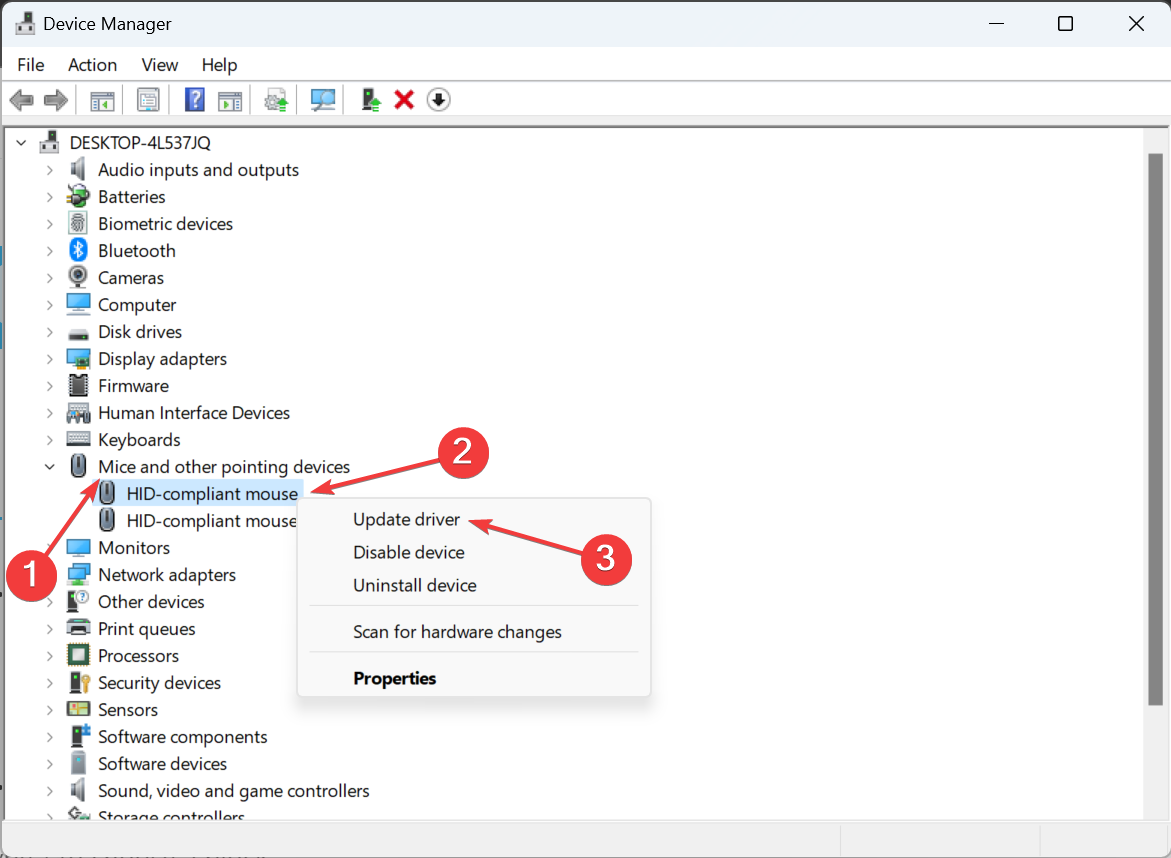
  2. Expand the Mice and other pointing devices entry, right-click on your mouse, and select Update driver.update driver to fix windows settings scrolling down
  3. Choose Search automatically for drivers and wait for Windows to install the best locally available driver.search automatically
  4. Once done, restart the computer and check for improvements.
  5. Similarly, update the keyboard driver.

An outdated or corrupt driver may cause the Windows Settings to keep scrolling down. If Windows can’t find a newer one, head to the manufacturer’s official website, locate the latest version, and manually install the driver.

This also helps when Windows is scrolling by itself.

3. Change the mouse settings

  1. Press Windows + I to open Settings, go to Bluetooth & devices from the navigation pane, and then select Mouse.mouse
  2. Scroll down and click on Additional mouse settings.
  3. Navigate to the Wheel tab, and keep the value under Vertical Scrolling to 3 or lower.vertical scrolling
  4. Click on Apply and OK to save the changes.

4. Repair the corrupt system files

  1. Press Windows + R to open Run, type cmd, and hit Ctrl + Shift + Enter.cmd
  2. Click Yes in the UAC prompt.
  3. Paste the following DISM commands individually and hit Enter after each: DISM /Online /Cleanup-Image /CheckHealth DISM /Online /Cleanup-Image /ScanHealth DISM /Online /Cleanup-Image /RestoreHealth
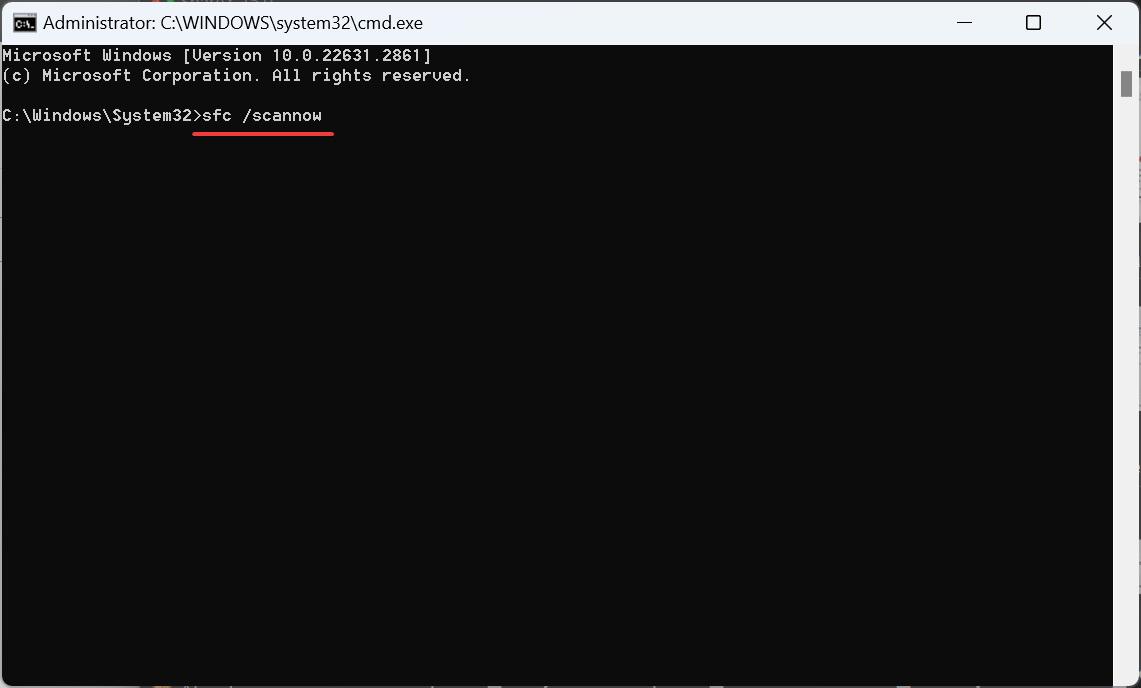
  4. Now, execute this command for the SFC scan: sfc /scannowsfc scan to fix windows settings scrolling down
  5. Finally, restart the computer and check whether Windows Settings keep scrolling down.

You are likely to face software-related issues on a PC with corrupt system files. In this case, running the DISM commands and SFC scans should replace all such files with their cached copy.

Doing this also helps when the Start Menu is scrolling up automatically.

5. Uninstall conflicting applications

  1. Press Windows + R to open Run, type appwiz.cpl in the text field, and click OK.
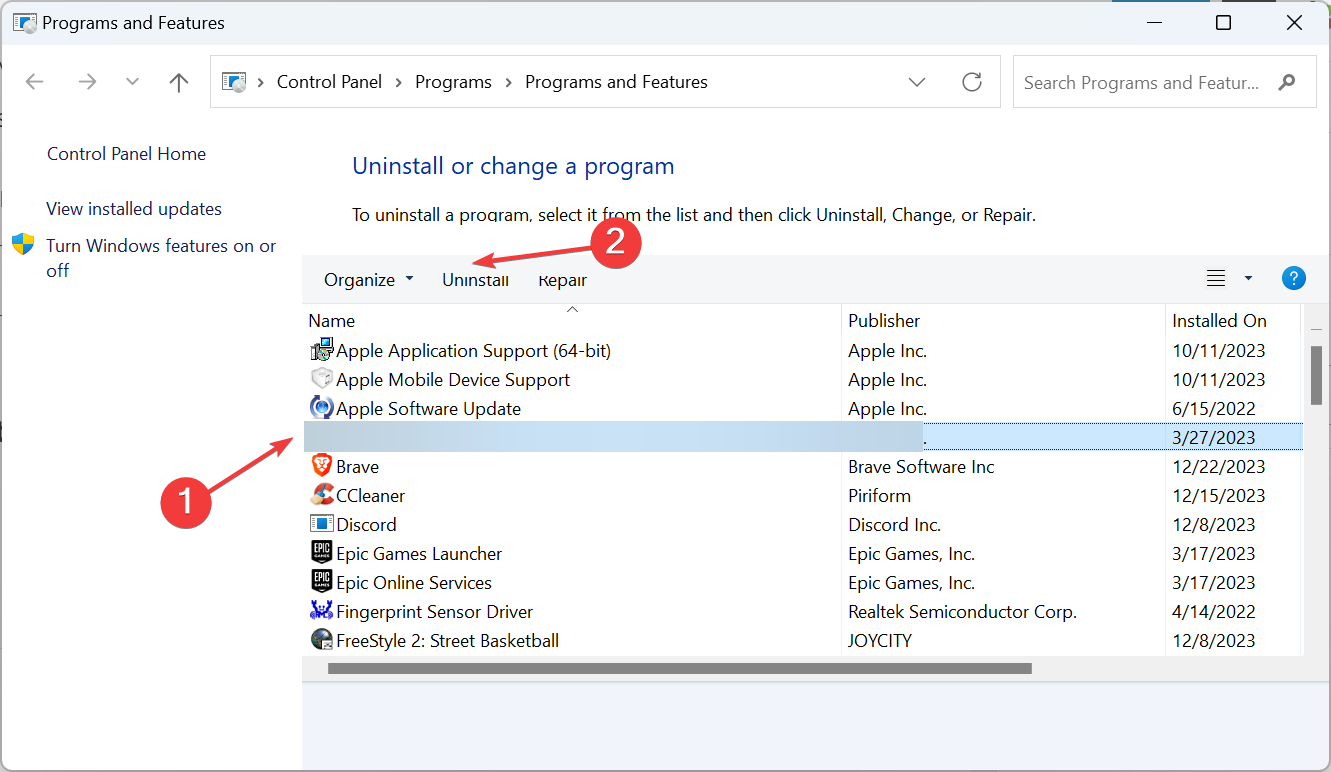
  2. Select any application(s) installed around the same time the error first appeared, primarily key mapping or mouse control programs, and click Uninstall.uninstall
  3. Follow the on-screen instructions to complete the process.

If that doesn’t work, use an effective software uninstaller to clear all leftover files and Registry entries.

6. Create a local user account

  1. Press Windows + R to open Run, type netplwiz in the text field, and click OK.
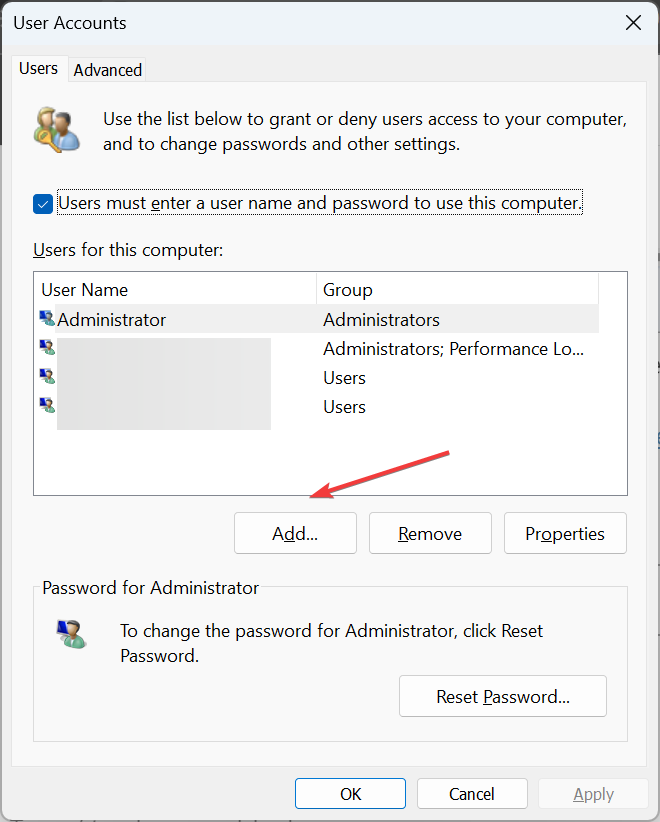
  2. Click the Add button to create a new local user profile.add
  3. Choose Sign in without a Microsoft account.
  4. Click on Local Account.local account to fix windows settings scrolling down
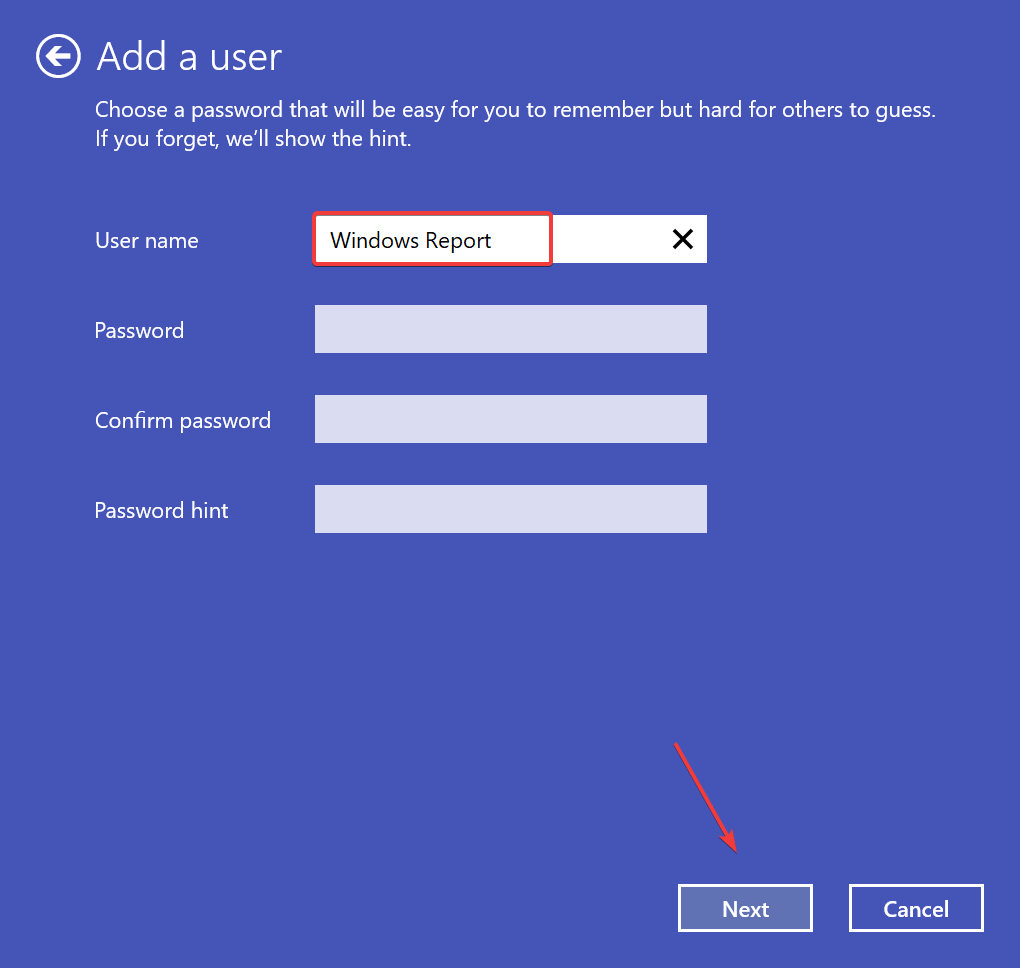
  5. Now, enter the username and password (optional), and click Next to complete the profile creation.user name
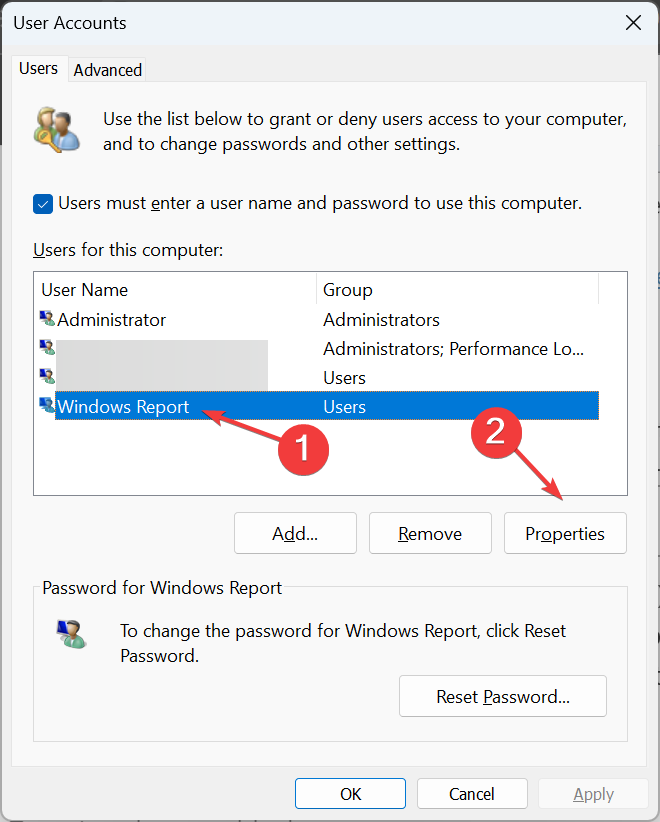
  6. Select the user profile from the list, and click Properties.properties
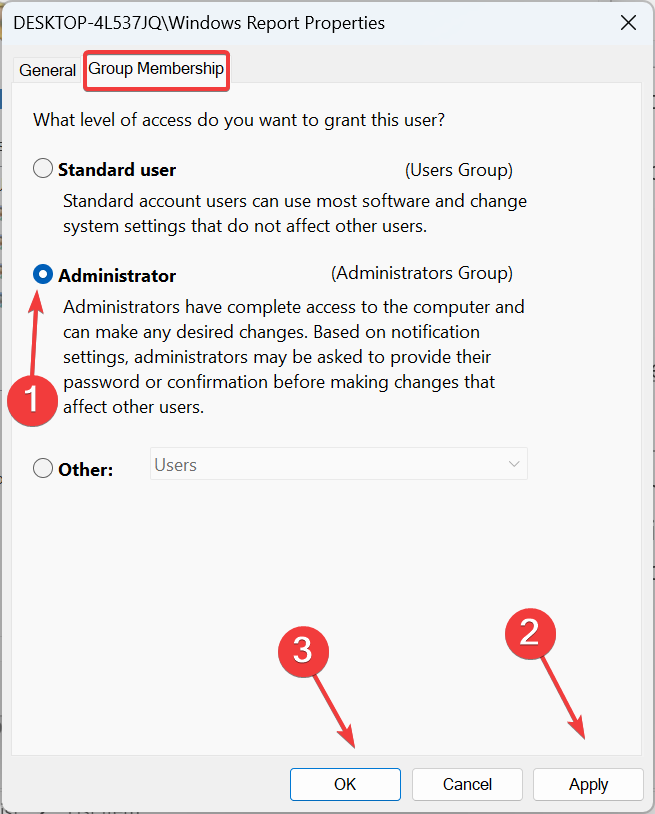
  7. Go to the Group Membership tab, select Administrator, and click Apply and OK to save the changes.administrator to fix windows settings scrolling down

For many, the Windows Settings automatically scrolling down problem didn’t appear in a new local user account. So you can continue using it. As for the files, transfer them using a USB storage device, and you can always share apps between user accounts.

7. Perform a repair upgrade

Note icon NOTE
The steps listed here are for Windows 11. In case you are running the previous iteration, learn how to perform an in-place upgrade on Windows 10.
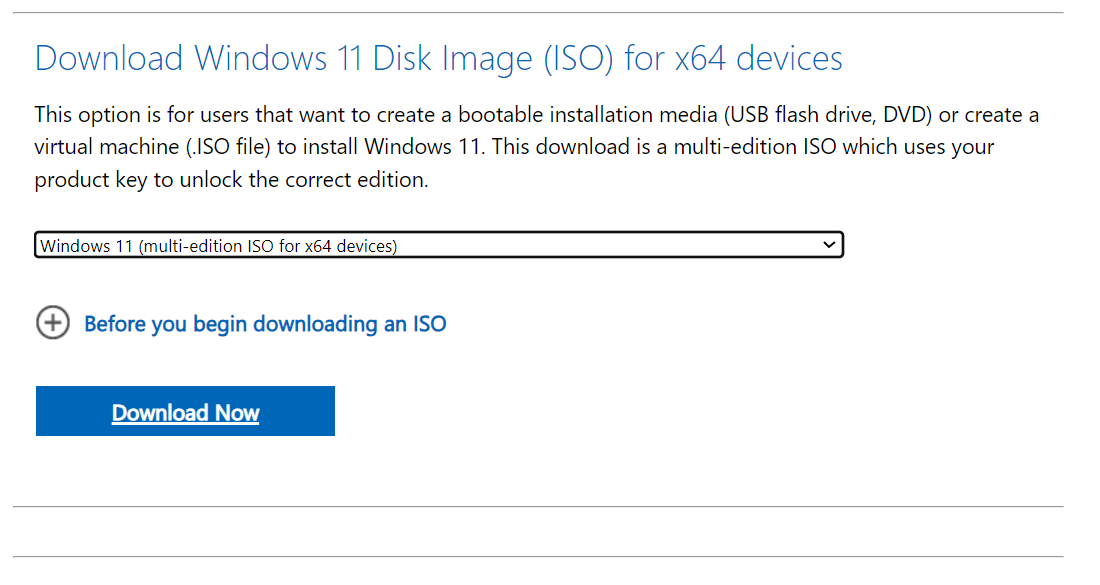
  1. Go to Microsoft’s official website, select the OS edition and product language, then download the Windows 11 ISO.windows 11 iso
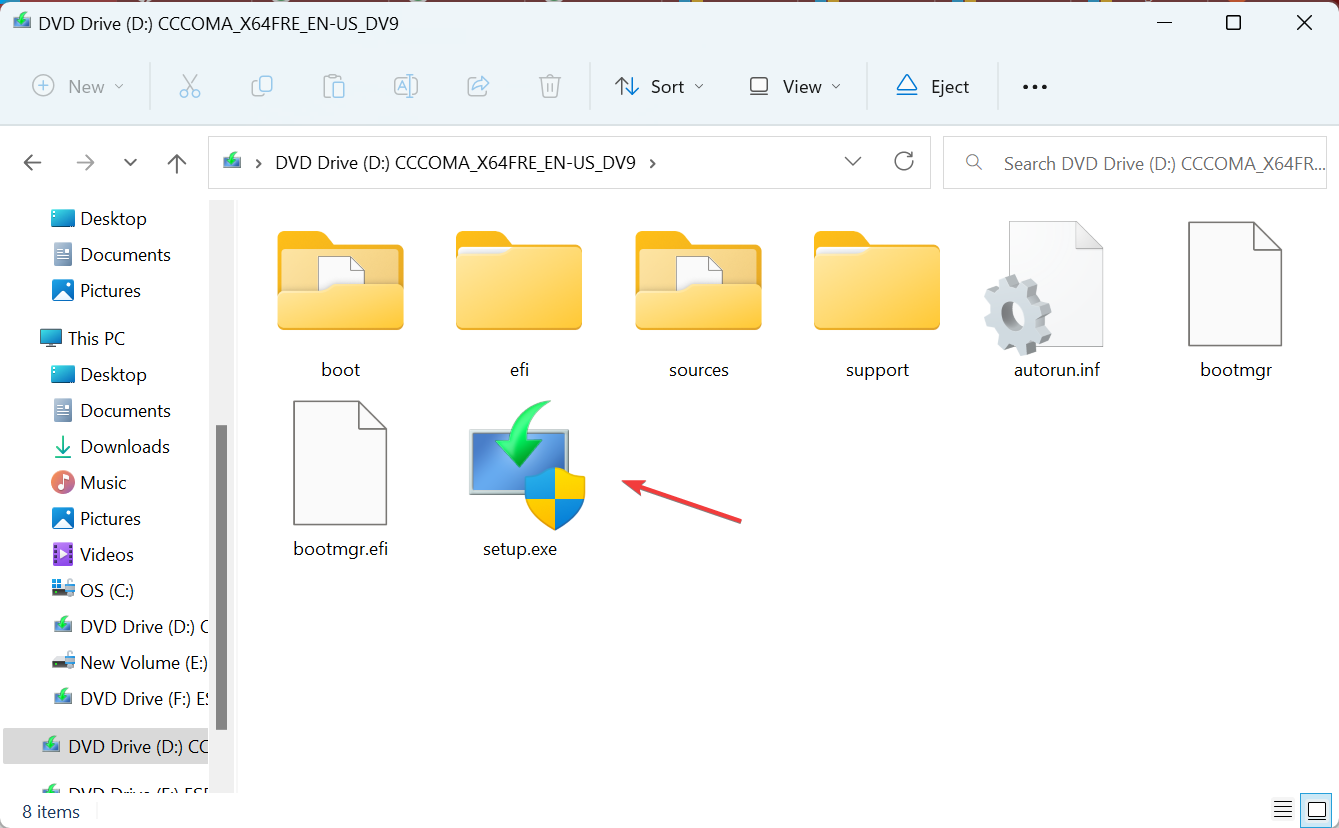
  2. Double-click the ISO file, and select Open in the prompt.
  3. Run the setup.exe file.setup.exe
  4. Click Yes in the UAC prompt.
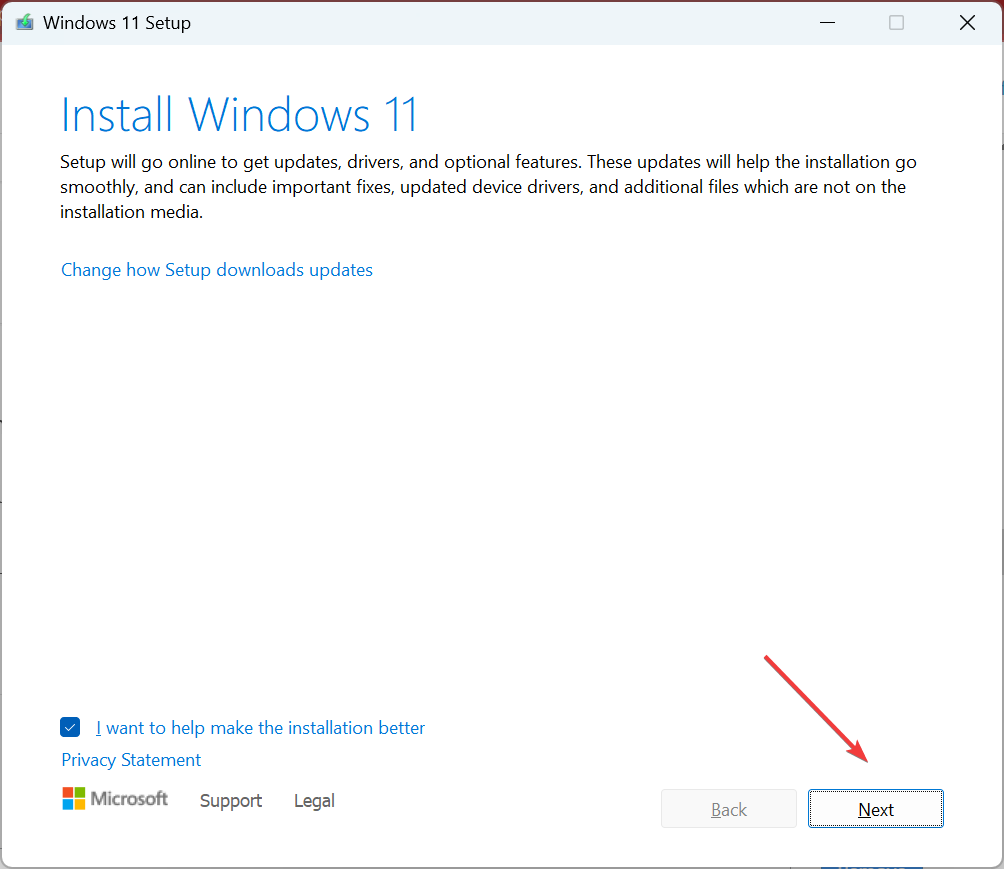
  5. Click Next to proceed.next
  6. Check Microsoft’s license terms and click the Accept button.
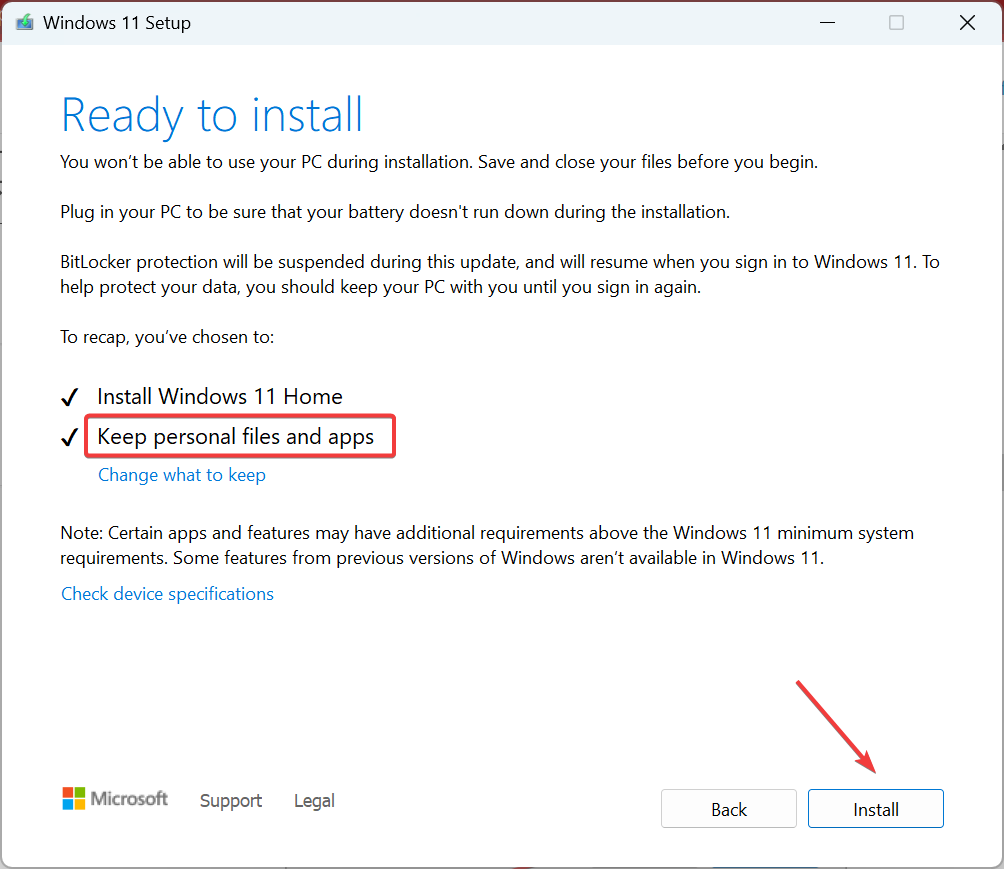
  7. Make sure the setup reads, Keep personal files and apps, and click on Install.repair upragde to fix windows settings scrolling down
  8. Wait for the repair upgrade to complete. It may take 1-3 hours.

When nothing else works and Windows Settings keep scrolling down, you can always do an in-place upgrade. It’s the same as reinstalling Windows, except for the fact that you don’t lose any files or apps.

Remember, the problem can arise due to several reasons, but more often than not, it was either an Xbox controller or ghost devices to blame. Start with those, and then move your way down the list of fixes.

Before you leave, find out how to personalize the mouse cursor in Windows for a lively experience!

For any queries or to share which fix worked for you, drop a comment below.

How to Uninstall Bonjour in Windows 10 & 11

Bonjour is a service developed by Apple and used by iTunes and Safari to facilitate connections between devices on the local network. It’s usually bundled with the iTunes installer, but you can always uninstall Bonjour.

Do I need the Bonjour service? If you don’t employ its feature set (Home Sharing, connecting to Apple TV) or use any of the Apple apps on the PC, there’s no harm in uninstalling Bonjour. Also, it wouldn’t affect the basic functionality of iTunes.

How do I uninstall Bonjour in Windows?

1. Uninstall via Control Panel and delete program files

  1. Press Windows + R to open Run, type appwiz.cpl in the text field, and click OK.appwiz.cpl
  2. Select Bonjour from the list of programs, and click on Uninstall.unistall bonjour
  3. Click Yes in the confirmation box.confirm
  4. Now, click Yes in the UAC prompt.
  5. Wait for the service to uninstall.uninstalling
  6. Once done, restart the computer for the changes to apply.
  7. Now, press Windows + E to open File Explorer, paste the following path in the address bar and hit Enter:C:\Program Filesunistall bonjour files
  8. Select the Bonjour folder, if present, and hit Delete.

While uninstalling Bonjour ideally removes all the related files, primarily mdnsNSP.dll and mDNSResponder.exe, check once since that’s not always the case.

2. Use a third-party uninstaller

To uninstall Bonjour and delete all the files and cache in one go, we recommend using an effective software uninstaller. It’s quick and more effective!

Besides, most uninstallers offer a free version, which should suffice for basic app removal.

3. Disable the Bonjour service (does not uninstall)

  1. Press Windows + R to open Run, type services.msc in the text field, and hit Enter.services.msc
  2. Locate the Bonjour Service, right-click on it, and select Properties.properties
  3. Select Disabled from the Startup type dropdown menu, and click the Stop button under Service status.stop to unistall bonjour
  4. Click on Apply and OK to save the changes.

If Bonjour has a high CPU or RAM usage on the PC, an ideal approach is to disable it via the Services console. This will stop the process from running!

Remember, uninstalling Bonjour can affect the PC’s ability to connect to Apple devices, but it shouldn’t be prominent as long as you rely on wired connections. At the same time, removing the Bonjour service helps fix iTunes errors 5105 and 4005.

If you want to find out more, read our dedicated guide on the Bonjour service in Windows.

For any queries or to share if Bonjour caused any issues on the PC, drop a comment below.

5 Simple Ways to Fix Windows 10 Alt Tabbing Itself

Some of our readers have reported Windows 10 Alt Tabbing itself issue while trying to return to the desktop or accessing an app.

Why does Windows 10 keep Alt-Tabbing itself? The issue could occur due to faulty keyboard keys, third-party software interference, scheduled tasks, or outdated keyboard/graphics drivers.

How can I fix the Alt-Tabbing issue on Windows 10?

Before we go to the advanced fixes to resolve the Alt-Tabbing issue, here are a few preliminary checks you should do:

  • Unplug the keyboard, then plug it back again, or use a different one.
  • Restart your computer, run a malware scan, and ensure your Windows version is up to date.
  • Uninstall unwanted apps to avoid interference.

1. Disable a task in the Task Scheduler

  1. Press the Windows key, type task scheduler in the search box, and click Open.Task Scheduler
  2. From the left pane, navigate to this path: Task Scheduler Library\Microsoft\Office
  3. Locate OfficeBackgroundTaskHandlerRegistration, right-click the task, and choose Disable from the context menu.Windows 10 Alt Tabbing Itself - disable task

Also, check other tasks related to your device manufacturer apps, right-click them one by one, and select Disable.

2. Restart your PC in a clean boot environment

  1. Press Windows + R to open the Run dialog box.msconfig - windows 10 alt tabbing itself
  2. Type msconfig and click OK to open the System Configuration window.
  3. Go to the Services tab, place a checkmark next to Hide all Microsoft services, and then click Disable all.Hide all the services
  4. Now switch to the Startup tab, and click Open Task Manager.Open Task Manager - windows 10 alt tabbing itself
  5. Select the Enabled items one by one and click Disable.Disable Startup
  6. Close Task Manager and click Apply and OK on the System Configuration window.
  7. Click Restart.Restart - windows 10 alt tabbing itself

This will start your computer with a minimal set of drivers and startup programs. Now, try restarting the programs & startup apps that you stopped one by one to identify and isolate software conflicts & troubleshoot startup problems.

Once done, don’t forget to reverse-engineer the steps to start your Windows normally. Performing clean boot could also help you fix the games keep Alt Tabbing by themselves; read this guide to learn more.

3. Edit the AltTabSettings registry entry

  1. Press Windows + R to open the Run window.Regedit - windows 10 alt tabbing itself
  2. Type regedit and click OK to open the Registry Editor tool.
  3. Navigate to this path: Computer\HKEY_CURRENT_USER\Software\Microsoft\Windows\CurrentVersion\Explorer
  4. On the right pane, locate AltTabSettings. In case you don’t find it, right-click Explorer, then select DWORD(32-bit) Value, and name it AltTabSettings.DWORD
  5. Once the value is created, double-click it, change the Value data to 1, and click OK.Value data - windows 10 alt tabbing itself
  6. Restart your computer to let the changes take effect.

4. Update/reinstall the graphics and keyboard driver

  1. Press Windows + R to open the Run window.Devmgmt.msc - windows 10 alt tabbing itself
  2. Type devmgmt.msc and click OK to open the Device Manager app.
  3. Go to the Display adapters category and click it to expand.
  4. Right-click the graphics driver and select Update driver.Update driver - windows 10 alt tabbing itself
  5. Select Search automatically for drivers.
  6. Next, navigate to the Keyboard category and follow steps 4 and 5 to update it.

In case there are no updates available, try reinstalling the driver by using the following steps:

  1. Again, go to the Display adapters category and click it to expand.
  2. Right-click the graphics driver, and select Uninstall device.Uninstall device - windows 10 alt tabbing itself
  3. Once uninstalled, click Action, then select Scan for hardware changes to reinstall the driver.Scan for hardware changes
  4. Now, reboot your computer. Follow the same steps to reinstall the keyboard driver.

Updating or reinstalling the graphics driver can also help you fix the screen goes black when you press the Alt + Tab issue; read this guide to learn about other solutions.

5. Repair the system files

  1. Press the Windows key, type powershell, and click Run as administrator.PowerShell
  2. Type the following command to repair the system files and hit Enter: SFC /scannow
  3. Copy & paste the following command to clean the image file and press Enter: Repair-WindowsImage -Online -RestoreHealthSFCSCAN AND REPAIR - windows 10 alt tabbing itself
  4. Once the command is executed, restart your computer.

If nothing worked for you, you might have to reset your computer to the default settings to fix the Windows 10 Alt Tabbing itself issue.

In conclusion, to fix the Alt Tabbing itself issue, first, check your keyboard for damage, then ensure the device drivers are updated and there are no unwanted tasks scheduled in the Task Scheduler app.

In case you are facing the ALT-TAB is not working issue, it could be due to incorrect system settings or problems with the keyboard.

Did we miss a step that helped you fix the issue? Don’t hesitate to mention it in the comments section below. We will happily add it to the list.

Fix: Your Profile was not Completely Downloaded

When adding a new user to your Xbox profile and you try to log in, you may get the your profile was not completely downloaded message. WindowsReport experts got down to the underlying causes and bring you our tried and tested solutions.

Causes of the Your profile was not completely downloaded error:

What can I do if my Xbox profile is not completely downloaded?

Start off with the following preliminary steps:

  • Ensure that Xbox Live services are running normally by checking the server status.
  • Check your network connection settings and ensure that you have a stable and reliable internet connection. Switch to another connection if possible.
  • Create a new profile aside from your gamer profile then try adding another profile.

1. Check for Xbox console updates

  1. Press the Xbox button on your console and click on your account icon to open Settings.
  2. Click on Devices and connections.
  3. Select Accessories.
  4. Click on your Xbox controller and select Update now and restart once it is finished.

2. Clear Xbox storage

  1. Press the Xbox button on your controller.
  2. Navigate to Settings and select System Settings.
  3. Click on Storage.
  4. Highlight a storage device then press the Y button on your controller to open Device Options.
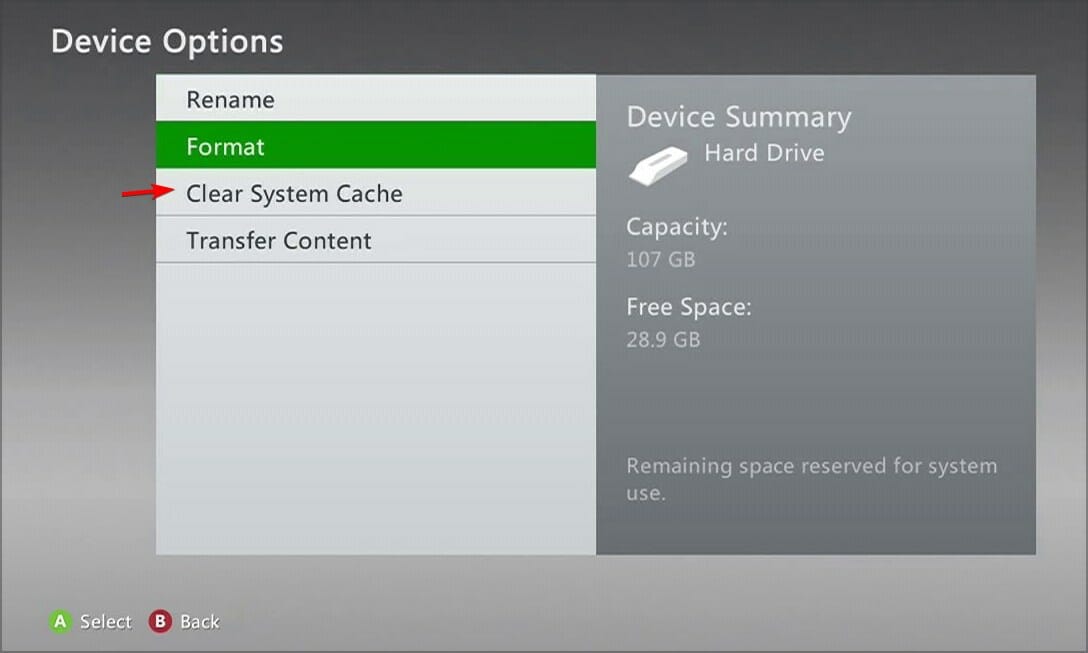
  5. Click on Clear System Cache under Device Options screen.
  6. Click Yes when the confirm storage device maintenance prompt pops up.

3. Disable recurring bills

3.1 Via Xbox console

  1. Press the Xbox button on your controller.
  2. Go to Profile & system>Settings.
  3. Navigate to Account>Subscriptions.
  4. Choose the subscription you’d like to disable recurring billing.
  5. Select Turn off recurring billing.

In case you’re unable to access these settings because of the your profile was not completely downloaded error, you can still turn off recurring bills on your browser.

3.2 Via Microsoft account

  1. Navigate to your browser and sign into your Microsoft account.
  2. Go to Services & subscriptions>Manage.
  3. Select the subscription you’d like to cancel and hit Turn off recurring billing.

4. Enable 2FA Authentication

  1. Navigate to your browser and go to your Microsoft account. 
  2. From the top-right corner, click My Microsoft account.
  3. Go to the Security tab. Then, on the next page, click Other ways to sign in.
  4. Click Use my password.
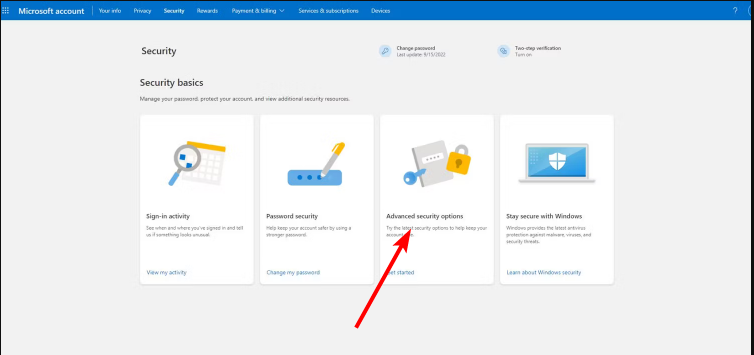
  5. Select Advanced security options.
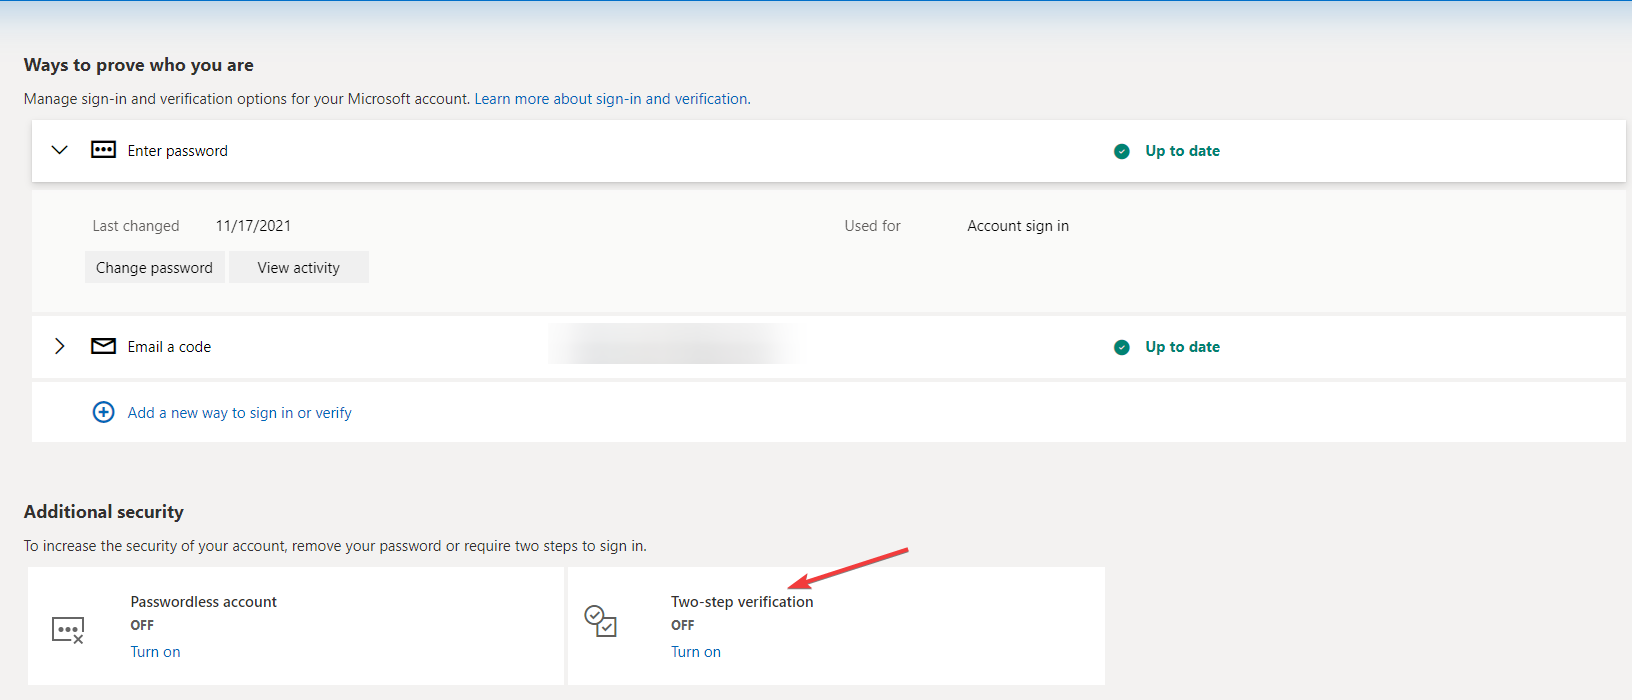
  6. Under Additional security, click Turn on for Two-step verification.Turn 2FA -microsoft authenticator wrong code

5. Remove and re-add your profile

5.1 Xbox 360

  1. Go to Settings and select System.
  2. Navigate to Storage.
  3. If you don’t have external storage devices attached, select Hard Drive. If you have additional devices connected, select All Devices.
  4. Select Profiles and choose the profile that you want to delete.
  5. Choose Delete.
  6. Select the Delete Profile Only option to delete your profile. This option will delete the profile while keeping all your saved games and achievements.

5.1.1 Re-add the profile

  1. Press the Guide button on your controller.
  2. Select the Download Profile option. If you don’t see this option it means that you’re signed in with a different profile currently, so be sure to sign out.
  3. Choose Download Profile.
  4. Enter your Microsoft account login information.
  5. Select the storage location for your profile.

5.2 Xbox One

  1. On the Home screen, scroll left to open the Guide.
  2. Select Settings and then choose All Settings.
  3. In the Account section select Remove accounts and choose your account.

5.2.2 Re-add the profile

  1. Open the Guide and choose Sign in, and choose Add & manage.
  2. Select Add new and enter your login information.
  3. Follow the instructions on the screen to complete the process.

Removing and re-adding your Xbox profile can help resolve any issues with a corrupt profile. You can also remove your profile from your Microsoft account if your profile fails to connect to Xbox servers.

6. Reset your Xbox console

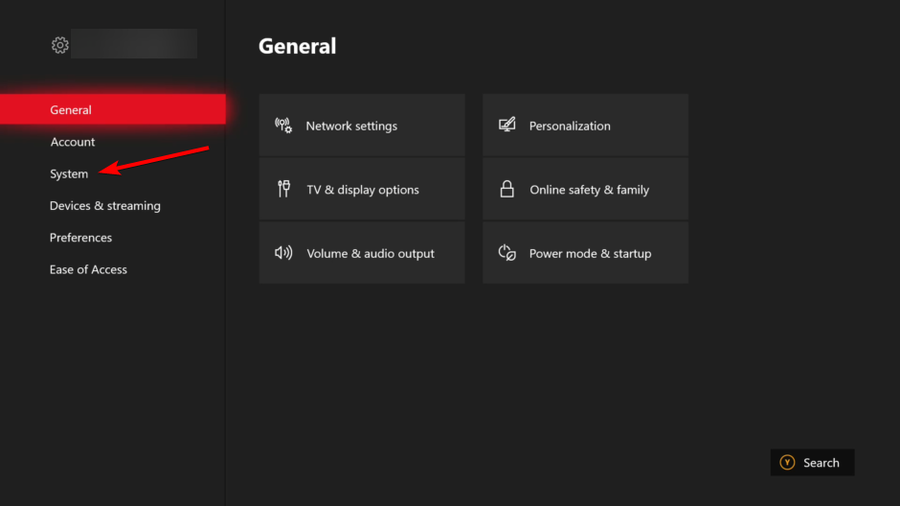
  1. On your controller, press the Xbox button, and on the menu, click the System tab to open Settings.
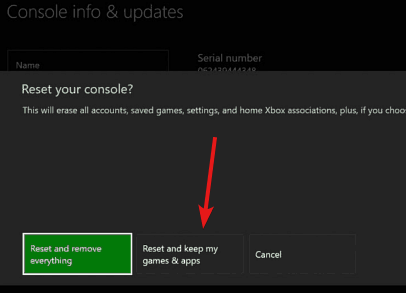
  2. Select System, then click on Console info and hit Reset console.
  3. Choose Reset and keep my games & apps.

Lastly, if the problem persists, consider testing your account on a different Xbox console or contacting Xbox Support for further assistance. It may just be a temporary glitch where Xbox fails to read your profile but, after a while, it resolves itself.

Hopefully, one of these solutions has resolved the issue of your profile was not completely downloaded. If you have any other viable solution not mentioned here, we’d love to hear about it. Drop us a line below.

How to Hack HP Instant Ink After Cancelling the Subscription

Wondering how to bypass HP Instant Ink and keep printing even after you’ve canceled? If you recently stopped your subscription and found your printer isn’t working, the steps below will show you how to keep using Instant Ink.

Here’s how to utilize the remaining ink from the otherwise bricked cartridge(s)!

Howto Bypass HP Instant Ink and use cartridges after cancellation?

Tip icon Tip
These workarounds only work before the HP Instant Subscription has expired or is cancelled. Also, the steps listed here are for a Windows PC, but the concept will work across all operating systems.

1. Reset the network settings and use Wi-Fi Direct

1.1 Resetting the network settings

  1. On the printer’s display control panel, choose Setup.
  2. Now, select Network Setup from the list of options.network setup
  3. Tap on Restore Defaults.restore defaults to hack hp instant ink after cancelling
  4. Tap OK to confirm the change and wait for the reset to complete.

To reset printers without a touch panel, hold the Power button > press the Network button twice > press the Cancel button thrice > and release the Power button.

Resetting the network settings will prevent the printer from interacting with the HP servers and getting information pertaining to the cancelled HP Instant Ink subscription.

1.2. Remove the printer from device settings

  1. Press Windows + I to open Settings, go to Bluetooth & devices from the navigation pane, and select Printers & scanners on the right.printers & scanners
  2. Select the HP printer from the list.
  3. Click the Remove button.remove to to hack hp instant ink after cancelling

1.3 Use Wi-Fi Direct to connect the printer

  1. Scroll down from the top of your printer’s touch display and select the Wi-Fi Direct option.Wi-Fi direct
  2. You will now find the Wi-Fi Direct name and password for the printer.details to to hack hp instant ink after cancelling
  3. Now, press Windows + I to open the PC Settings, go to Network & Internet from the left pane, and click on Wi-Fi.Wi-Fi
  4. Select Show available networks.
  5. Choose the printer’s Wi-Fi Direct name from the list of available devices, and click on Connect.connect to hack hp instant ink after cancelling
  6. Enter the password you found earlier, and connect to the printer.

With this hack, you can print seamlessly with the HP Instant Ink cartridge even after cancelling the subscription. Just make sure to never connect the printer to the Internet!

2. Assign a static IP and disable Internet access for it

2.1 Assign a static IP

  1. Open the printer’s control panel, go to Settings, and then select Network Setup.network setup
  2. Tap on IP Settings.
  3. Tap on OK to proceed.
  4. Choose the Manual (Static) option.manual IP to hack hp instant ink after cancelling
  5. Tap on IP Address.
  6. Manually enter an IP address in the field, and tap Done to save the changes.IP address
  7. Also, leave the Default Gateway field blank.

2.2 Disable Internet access via router settings

You will now have to disable Internet access for the specific IP address set for the printer. Since it’s a critical process, we recommend you check the manufacturer’s website or the router’s manual for the exact steps.

Once done, you can use the leftover HP Instant Ink cartridges even after cancelling the subscription. Just remember to revert to the default printer network configuration at the end!

3. Use compatible, non-instant ink

If nothing else works or you are past the subscription period, there’s always the option to use a compatible, non-instant ink.

When the HP Instant Ink subscription expires, only the instant ink delivered by HP stops working, but other cartridges work fine on the printer. This way, you won’t be able to utilize the remaining ink, but given the circumstances, it’s the best option!

FAQs

Why does Instant Ink stop working after cancellation?

HP remotely disables Instant Ink cartridges as soon as your billing cycle ends. They’re tied to your subscription, not your printer.

Can I use third-party ink after cancelling Instant Ink?

Yes, but your printer may show warnings or block unofficial cartridges. Use original HP cartridges to avoid compatibility issues.

Do I need an internet connection to print after cancelling Instant Ink?

Only if you’re still using Instant Ink cartridges. With standard HP cartridges, you can print offline without restrictions.

Why did my printer stop working after I cancelled Instant Ink?

HP locks subscription cartridges when your plan ends. The printer will stop printing until you remove them and install regular ink.

Is it worth using Instant Ink?

It depends. Instant Ink offers convenience and cost control, but restricts usage. If you prefer flexibility, buy your own ink.

Wrap up

The hacks listed here are not to be used in the long run but only until the leftover HP Instant Ink is utilized after cancelling the subscription. After that, connect your printer to the Internet.

Before you leave, read our review of HP Instant Ink, which details the pros and cons and the highlights segment that benefits the most from the subscription!

For any queries or to share which method worked for you, drop a comment below.

Save Your Chrome Settings to a PDF with This Simple Trick

Until now, there was no documented way to get or export a copy of Chrome browser settings.

Luckily, we’ve found a way to get a report of the current Chrome browser settings, including the browser version, locale, user agent, startup URLs, default search engine, startup type, and installed extensions.

You can save the report to a PDF document and share it or keep it for future reference.

How do I save the Chrome browser settings?

  1. Launch the Chrome browser.
  2. Click on the Menu icon and select Settings.
  3. Scroll down on the left and choose Reset Settings.
  4. Click on Restore Settings to their original defaults.
  5. In the next dialog at the bottom, click on current settings to open a report of the Chrome browser settings in a new tab, which you can save to text or print to a PDF file.

The report contains the following information about Chrome:

  • Locale: en-GB
    This indicates that the user’s device is set to the English language, as used in the United Kingdom.
  • User-agent: Mozilla/5.0 (Windows NT 10.0; Win64; x64) AppleWebKit/537.36 (KHTML, like Gecko) Chrome/120.0.0.0 Safari/537.36
    This string of text identifies the user’s web browser and operating system.
  • Google Chrome: 120.0.6099.130
    This is the version number of the Google Chrome browser that the user has installed.
  • Startup type: Open the New Tab page
    This indicates that the user’s browser will open a new tab page whenever the user launches the browser.
  • Homepage is the New Tab page: Yes
    This indicates that the user’s browser will open the new tab page when the user clicks the Home button
  • Show Home button: No
    This indicates that the user’s browser will not display the Home button on the toolbar.
  • Default search engine: www.google.com
    This indicates that the user’s browser will use Google as the default search engine.
  • Extensions: Web Store, Google Docs Offline, Chrome PDF Viewer, Google Network Speech, IDM Integration Module, Google Hangouts, Chrome Web Store Payments.
    These are the extensions that are installed in the user’s browser

Chrome intentionally includes an option to report your browser settings to Google while you reset. You can select the option and find the browser settings without actually doing a reset.

However, you can also proceed with the Chrome Reset and check what settings have been changed in the browser.

Have you found this tip useful? Let us know your thoughts in the comments below.

How to Refund a DLC on Steam: 2 Easy Ways

If you’ve bought the wrong game or changed your mind, you can refund a DLC on Steam. In this article, you’ll find out how to do that.

Can you get refunds on Steam DLC? Yes, you can get refunds on Steam DLCs. However, the refund request must be made within a fortnight from the purchase date. The title must also not have been played any time exceeding two hours from the time of purchase and with no modifications or transfers.

How do I get a full DLC refund on Steam?

1. By using your Steam account

  1. Launch Steam on your PC and click on Library.
  2. Click on Manage>View downloadable content to display all DLCs.
  3. Find and click on the game whose DLC you’d wish a refund on.
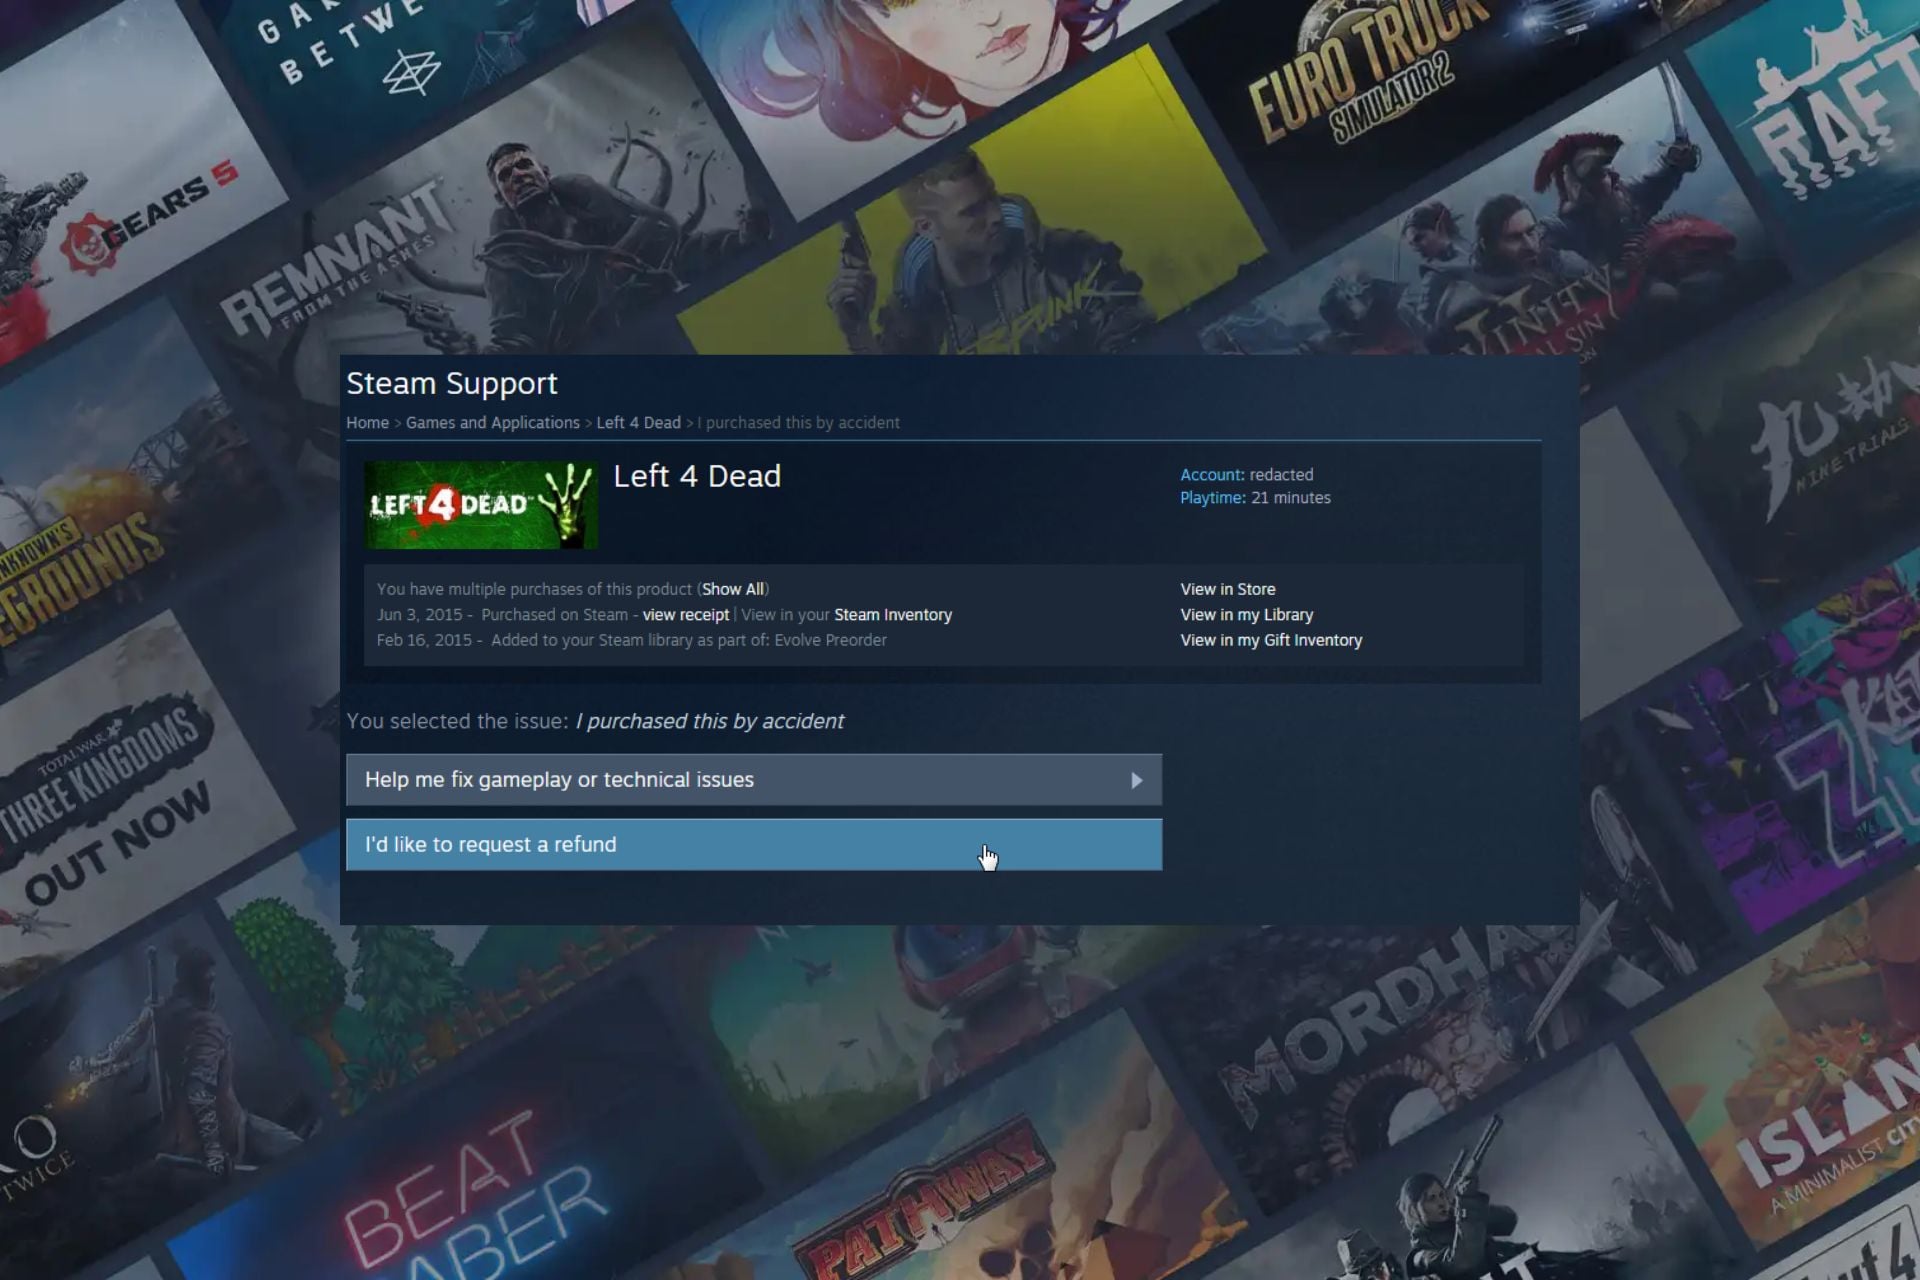
  4. Hit the I’d like to request for a refund button.
  5. Choose your preferred refund method from the options listed.

2. By using Steam support

  1. Navigate to your browser, head over to the Steam support page, and log into your account.
  2. Scroll down and click on the game whose DLC you’d wish a refund on.
  3. Under What issue are you having with this purchase, click on I would like a refund.
  4. Select a reason for the refund from the options listed. If not available, click on My issue isn’t listed.
  5. Hit the I’d like to request for a refund button.
  6. Choose your preferred refund method from the options listed.
  7. Keep checking your email, and if your refund is approved, you should get a confirmation within seven days.

For full instructions on returning standard purchases, check this guide on How to Return a Game on Steam. You may also want to learn how to redeem a code on Steam if you’re activating new games or wallet funds instead of requesting a refund.

Why request a DLC refund on Steam?

  • Mistaken purchase – Sometimes, you may unknowingly or accidentally purchase a DLC. This is if it is part of a bundle or package.
  • Compatibility issues – If your DLC is not working, it’s probably because your hardware fails to meet some requirements. This can result in technical difficulties.
  • Dissatisfaction with content – After purchasing a DLC, you may find that the content does not meet your expectations leading to an unsatisfactory gameplay experience.

Whereas the refund process is pretty straightforward, not every refund request will be approved. Keep in mind that individual circumstances, regional regulations and other factors dictate your eligibility for a refund.

In future, to avoid applying for refunds:

  • A little background check on the content and features offered before buying a DLC can help you avoid impulse purchases. Steam forums or game review sites may be helpful in assessing the quality of the DLC.
  • Always perform the compatibility test to ensure your computer meets the minimum requirements specified for the base game and DLC to avoid performance issues.
  • Try it out first from a friend if possible if you’re unsure whether the DLC will suit your gameplay style or preferences. This can help you dispel any doubts before deciding to purchase the DLC.

If after seven days you’re yet to get a refund or it has been rejected, you can consult the official Steam Support directly for further assistance.

Finally, you can always try free mods for popular games if you’re not in the mood to lose some money.

We’re keen to get some feedback from you. Have you purchased any DLC that you wanted to return? How smooth was the refund process? Share your experience with us down below.

How to Change The Keyboard Settings to Default on Windows 11?

If you are experiencing issues with your keyboard, you need to reset the keyboard settings to default. In this guide, we will discuss the steps to change keyboard settings back to normal.

How can I change the keyboard settings back to normal?

1. Select the preferred language again

  1. Press Windows + I to open the Settings app.
  2. Click Time & language from the left pane.Time & language - change keyboard settings back to normal
  3. Choose Language & region.
  4. Under Preferred languages, click Add a language.Add a language - change keyboard settings back to normal
  5. Choose any other language like English UK, and click Next.English UK - click Next
  6. Select Install.Install
  7. Once installed, click the three dots icon next to the newly installed language and choose Move up to make it the default language.Move up the language
  8. Now restart your computer, and follow the steps from 1 to 4.
  9. Locate the old default language, click the three dots icon, and select Move up.Move up the language - change keyboard settings back to normal

This will reset your keyboard settings back to the default. In case you already have multiple languages added, move up any of the listed to make it the most preferred, then restart your computer and move up the old preferred language again.

You can use similar steps to change the keyboard settings to normal on Windows 10 as well.

2. Reinstall the keyboard driver

  1. Press Windows + R to open the Run dialog box.Device Manager Run command - change keyboard settings back to normal
  2. Type devmgmt.msc and click OK to open the Device Manager app.
  3. Go to Keyboards and click to expand the category.
  4. Right-click the keyboard listed, and choose Uninstall device.Uninstall device
  5. Go to Action and select Scan for hardware changes.Action scan for hardware changes

Windows will scan and install the latest driver available for your device, then reboot your PC to finish.

Once you have reset the keyboard, you can add or remove a keyboard layout to customize it accordingly; read this guide to check the detailed steps.

In case you are facing issues while removing the keyboard layout, it might be because of the lack of permissions, corrupted settings, or it being a default layout; read this guide to learn how to fix it.

If you have any questions or suggestions about changing the keyboard settings back to normal, feel free to mention them in the comments section below.

Jedi Survivor Crashing on Startup: 7 Ways to Fix it

Star Wars Jedi: Survivor has been crashing on startup for many users. We also tried to play it, and if we got past the main menu, the game crashed after a few seconds.

Why is Jedi Survivor crashing on startup? You may find Jedi Survivor crashing after an update, and in this case, it’s usually a bug to blame. Also, Jedi Survivor will not be working when the PC is running low on resources, i.e., 100% CPU or RAM consumption.

Besides, outdated graphics drivers, full-screen optimizations, misconfigured or incompatible graphics settings, Steam overlay, and missing permissions can cause the crash.

What can I do if Jedi Survivor is crashing on startup?

Before we start with the slightly complex solutions, try these quick ones:

Tip icon Tip
The steps listed here are for Star Wars Jedi: Survivor’s Steam installation on a PC, though the idea remains the same for EA app or gaming consoles like PS5 and Xbox.

1. Verify the integrity of game files

  1. Launch Steam, go to the Library tab, right-click on Star Wars Jedi: Survivor from the left pane, and select Properties.properties
  2. Head to Installed Files from the navigation pane, and click on Verify integrity of game files.verify to fix jedi survivor crashing on startup
  3. Wait for the process to complete, then reboot the device, and verify whether Jedi Survivor is crashing on startup.

Repairing/replacing the broken files helps when Steam games close instantly.

2. Set the priority to high

  1. With Star Wars Jedi: Survivor running, press Ctrl + Shift + Esc to open the Task Manager.
  2. Now, go to the Details tab, right-click on the JediSurvivor.exe process, hover the cursor over Set priority, and choose High.priority
  3. Go back to the game and check for improvements.

Some users suggested setting the priority to Realtime, but we recommend against it. Realtime is the highest level, and when chosen, the game will be prioritized over critical tasks, which may lead to system instability.

3. Disable Steam overlay

  1. In Steam, go to Library, right-click on Star Wars Jedi: Survivor, and select Properties.
  2. In the General tab, turn off the toggle for Enable the Steam Overlay while in-game.disable to fix jedi survivor crashing on startup
  3. Finally, launch Jedi Survivor and see it’s still crashing on startup.

4. Update the graphics driver

  1. Press Windows + X to open the Power User menu, and select Device Manager from the list of options.
  2. Expand the Display adapters entry, right-click on the active graphics adapter, and select Update driver.update driver to fix jedi survivor crashing on startup
  3. Choose Search automatically for drivers and wait for Windows to install the best one available locally.driver

Updating the graphics drivers will get things running if the present ones are outdated. Remember, for it to work, your PC must meet the minimum system requirements for Jedi: Survivor.

If this doesn’t work, use a driver uninstaller tool to get rid of the present installation, and then manually install the driver from the manufacturer’s official website. This approach worked for AMD Adrenalin drivers.

5. Disable full-screen optimizations

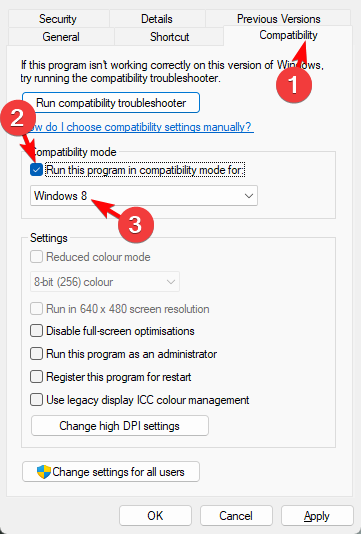
  1. Go to the game’s installation directory (in the Steam or EA folder), right-click on the Star Wars Jedi: Survivor.exe file, and select Properties.
  2. Navigate to the Compatibility tab, untick the checkbox for Disable fullscreen optimizations, and then click on Change high DPI settings.disable to fix jedi survivor crashing on startup
  3. Check the Override high DPI scaling behavior option, select Application from the dropdown menu, and click OK.override
  4. Again, click Apply and OK to save the changes.

6. Move Star Wars Jedi: Survivor to a non-system drive

  1. Open Steam, click the Steam menu near the top left, and select Settings.settings
  2. Go to the Storage tab, expand the dropdown menu at the top, and select Add Drive.add drive
  3. Choose a non-system drive on the PC, and click on Select Folder.
  4. Once a Steam Library folder appears in the chosen drive, select the earlier one, tick the checkbox for Star Wars Jedi: Survivor, and click on Move at the bottom.move to fix jedi survivor crashing on startup
  5. Choose the target drive from the dropdown menu, then again click Move, and wait for the process to complete.move

Whether Jedi Survivor is crashing on startup or throwing the EXCEPTION_ACCESS_VIOLATION reading address 0x0000000000000000 error, moving it to a non-system drive will help. Also, if there’s an SSD connected to the PC, consider moving the game to it for faster performance.

7. Increase the virtual memory

  1. Press Windows + S to open Search, type View advanced system settings in the text field, and click the relevant result.
  2. Click the Settings button under Performance.settings
  3. Go to the Advanced tab, and click on Change under Virtual memory.
  4. Uncheck Automatically manage paging file size for all drives, select No paging file, and click on Set.no paging files
  5. Now, choose Custom size, and fill out the fields using the following formula based on the available RAM size:
    • Initial size: 3 x Available RAM x 1024
    • Maximum size: 1.5 x Available RAM x 1024increase to fix jedi survivor crashing on startup
  6. Finally, click Set and then on OK to save the changes.

Increasing the virtual memory will do the trick when the game is crashing due to low available RAM. To get an idea of the virtual RAM size, say your PC has 4 GB RAM, the Initial size becomes 12,228 (3 x 4 x 1024), and the Maximum size becomes 6144 (1.5 x 4 x 1024).

If nothing else works, uninstall the apps, both Star Wars Jedi: Survivor and Steam/EA, and then download them again. We recommend using an effective software uninstaller to clear any leftover files and Registry entries before the reinstallation.

While you are here, discover some quick tips to optimize the PC for gaming and get the best performance!

For any queries or to share what worked for you, drop a comment below.

WhatsPC app can help salvage non-upgradable Windows 10 PCs

Various news sources have reported on the possibility of a surge in e-waste once Windows 10 reaches its end-of-support date in October 2025. Tech market analyst firm Canalys has estimated that a staggering 240 million Windows PCs might be tossed out once security updates generally cease for the OS (although users will be able to purchase paid security updates annually for up to three years following that).

A new open-source, unofficial Windows app seeks to help Windows 10 users salvage PCs that don’t meet the Windows 11 upgrade system requirements. “WhatsPC” is a small WebView2/Chromium-based application available on GitHub that runs a check of your system to determine what options may be available for your PC, other than throwing it out. As per the app’s GitHub page description:

This started as a fun application to inform some colleagues that they shouldn’t throw away their Windows PC. A fresh install can be sufficient and often even work wonders. If you add a little boost here and there in the form of an SSD, the PC might not need to be discarded at all. Currently, some are already dealing with the end-of-life of Windows 10 in October 2025 and the question of how much electronic waste will be generated. For a better feeling, I have now packaged a wealth of information and system checks into an app (hosted in a WebView2/Chromium control) that analyzes the system and provides tips and hints regarding its health status. This might help prevent someone from throwing away their PC and instead consider other uses for it.

Among WhatsPCs suggestions for repurposing a PC are keeping the computer as a backup, using it as a file server, selling or giving away your computer, or switching to a Linux operating system. Amusingly, Microsoft has a rather useful article on how to do this on its blog. WhatsPC can also give some hardware upgrade recommendations, such as upgrading to an SSD.

At any rate, there is no need to chuck out a perfectly good computer, and there are plenty of alternatives for those who don’t want to run Windows 10 on their device unsupported and don’t want to pay for security updates.

5 Ways to Fix Problem With Printhead on Your HP 6830 Printer

Have you encountered a problem with the printhead on your HP 6830? If so, don’t panic. We narrowed down the top solutions that worked for us.

Common reasons for printhead problems:

If you don’t use your printer often enough or if you use it too much, it may become clogged with ink. Other possible reasons could be a damaged printhead, incorrectly installed or incompatible printhead with your HP printer model.

How do I fix the printhead problem on my HP printer?

Start off with the following preliminary checks:

  • Ensure that the ink cartridge is correctly installed in the printer and verify all connections are connected properly or securely closed.
  • Make sure you have downloaded all the latest updates for your operating system.
  • If you have multiple printers installed on your computer, try removing one of them and restart your printer and PC.

1. Update your printer software

  1. Navigate to your browser and go to the Software and Driver Downloads page for HP printers.HP software and drivers page Missing or failed printhead
  2. Click on Printers, enter the required model number, and press the Submit button.
  3. Expand the Firmware category on the printer’s software page.HP firmware Missing or failed printhead
  4. Click Download to save the firmware listed there to a folder.
  5. Open the folder that includes the downloaded firmware. Then open the firmware file and follow the on-screen instructions to install the latest firmware.

2. Run HP’s maintenance tool

  1. Download the HP Print and Scan Doctor application. Download HP Print and Scan Doctor
  2. Open HPPSdr.exe from the download location. You might need to be an administrator to be able to do this.
  3. Click on Start and select your printer. If your printer is not present, reboot your printer, then choose Retry.Click Start
  4. Follow the prompts the application gives you and choose Yes if it asks to turn on printer updates. Then set your default printer.
  5. Now, select the printer that the Problem with printhead error arises for, and click the Next button.
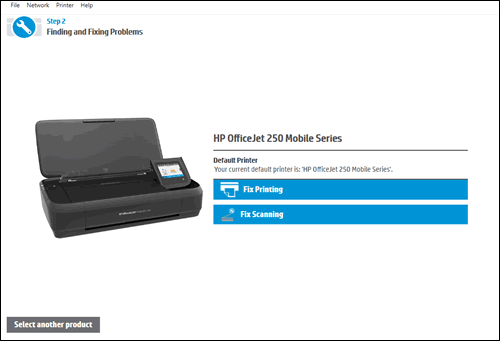
  6. Select the Fix Printing option.
    HP Print and Scan Doctor printer validation failed
  7. HP Print and Scan will then display some troubleshooting results. Follow the troubleshooting instructions if the software displays any X crosses, highlighting unresolved printer errors.

3. Clean the printhead

3.1 Automatically

  1. Open your HP printer paper tray and load some plain paper.
  2. Go to the printer control panel and select Setup.
  3. Scroll until you reach the Printer Maintenance option, then tap to select.
  4. Select Clean Printhead, and a test page will print.
  5. Examine the test page.

3.2 Manually

  1. Turn off your HP printer and unplug the power cord from the wall outlet.
  2. Wait five minutes or until the printer cools down completely before proceeding further to avoid electric shock or injury from hot surfaces while handling parts inside the printer.
  3. Open the cartridge access door, remove all the cartridges, and put them somewhere with the ink opening up. Do not leave the cartridge outside of the printer for longer than 30 minutes.
  4. Now carefully, lift the latch handle on the print carriage until it stops and remove the printhead, also by lifting it up.
  5. Use an alcohol wipe to clean the copper contacts on both sides of each cartridge. Do not touch any other part of these cartridges or let any liquid get inside them.
  6. Blow out any remaining dried ink or dust from inside each nozzle opening on your printhead. Do not use anything sharp or abrasive to clean inside your nozzles.
  7. Replace each cartridge in its slot and ensure it is firmly seated before closing and locking them back into place. You should hear a click sound as confirmation.

4. Reset your printer

  1. Switch on the printer if it’s off, then remove the power cord from the back of the printer.
  2. After that, unplug the power cord from the wall.HP printer and power cable Missing or failed printhead
  3. Next, plug the printer’s power cable back into the wall socket for a few minutes.
  4. Plug the power cable into the back of the printer and switch the printer on.

5. Replace your printhead

Depending on how old your printer is, this can be an expensive affair. Over time, HP discontinues some printer models and versions to make way for newer ones. Unfortunately, you cannot get a generic printhead or else you’ll get the this printhead is incorrect error because of compatibility issues.

If you’re lucky, you can get a replacement for your model. Better yet, if your warranty is still valid, you can take your HP 6830 to one of HP’s offices, and a qualified technician will have a look at it for further diagnosis and assistance.

However, if not, you may have to replace your printer. Lucky for you, we’ve lined up a few affordable HP printers whose performance is great and won’t cause too much damage to your pockets.

What are some tips for printhead maintenance?

  • Clean your printhead regularly by running cleaning cycles, as recommended by the manufacturer.
  • Replace ink cartridges once they have run out to prevent any clogging from happening due to leftover ink.
  • Use only genuine HP cartridges and papers in order to avoid any problems with quality and performance.
  • Avoid staying for long periods without printing, and keep your printer drivers updated to avoid the printer validation error.

These instructions are suitable for resolving the problem with printhead on HP 6830 printer as well as other HP printers. Unfortunately, printhead errors do not end here but we’ve covered most of them in our expert guide so don’t hesitate to review it if you experience a variation of this error.

There are many tactics to fix printer problems so if you have your own that is missing from our list, feel free to share it with us in the comment section below.

How to Fix Samsung Monitor not Detecting HDMI

If your computer is connected to a Samsung monitor through HDMI, but you’re not seeing anything on the screen, your HDMI is probably not being detected. WindowsReport experts experienced a similar issue, and we bring you our tested and approved solutions to get you out of this rubble.

Why is my monitor not displaying through HDMI?

The most common reasons for this issue are a defective HDMI cable, damaged HDMI ports, or your graphics card does not support HDCP (High-bandwidth Digital Content Protection). Another reason could be that you’re using an old version of firmware on your graphics card.

What can I do if my Samsung monitor is not detecting the HDMI cable?

Try the following basic troubleshooting steps before any complex solutions:

  • Disconnect all external peripherals from your PC, restore only the necessary ones, and see if this solves the problem.
  • Check the cable connection by ensuring the HDMI cable is securely plugged into the back of your monitor and the other end into an active HDMI port on your PC.
  • Try using another HDMI cable, port, or monitor. This will help determine if it’s a problem with the monitor or if there is something wrong with the HDMI cable/port itself.

1. Reset your resolution settings

  1. Press the Windows + I to open the Windows Settings app.
  2. Click on System from the left pane, then select the Display option from the right.
  3. Click on the Display Resolution option, then set a higher or lower resolution for your display.
  4. Try again and see if your HDMI is detectable.

Using an incorrect display resolution for your monitor can make your HDMI undetectable. For instance, if your display is larger than your monitor, you may not be able to view the screen in full or at all. Setting it to match the native resolution of your Samsung monitor will fix this issue.

2. Update your graphics card

2.1 Update via Windows Update

  1. Press the Windows key and click on Settings.settings windows 11
  2. Navigate to Windows Update, and click on Advanced options.
  3. Now, click on Optional updates.
  4. Tick the checkboxes for all the available updates under Driver updates, and click on Download & install.

2.2 Update via Device Manager

  1. Hit the Windows key, type Device Manager in the search bar, and click Open.device manager w11
  2. Locate the Samsung driver from the list, right-click on it, and select Update driver.
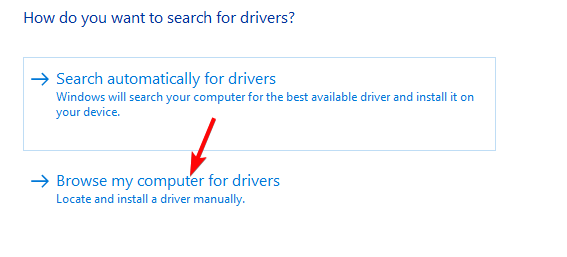
  3. Select Browse my computer for drivers if you have the driver in your files. Otherwise, select the Search automatically for drivers option.Browse my computer for drivers
  4. Follow the on-screen instructions and wait for the driver to be installed. Repeat the same steps but for your HDMI drivers, then restart your PC.

If the Samsung monitor you’re connecting to is a TV, updating the TV’s firmware will also update its drivers.

3. Use a DisplayPort to HDMI adapter

The HDCP protocol is designed to prevent unauthorized copying of digital audio and video content as it travels across connections between devices.

It comes built-in in most new modern monitors, but if you’re using an older monitor, when you connect your HDMI cable, the HDCP compliance may not allow it because of some incompatibility issues. You’ll need a DisplayPort to HDMI adapter to bypass HDCP restrictions.

If you have tried these solutions and still cannot get a picture from your monitor, then there may be something wrong with your monitor. Samsung monitors are known to be very responsive and accurate. But over time, they develop problems and stop working or they may not be detecting the HDMI cable.

Oftentimes, your HDMI cable is the culprit, so make sure you always check for compatibility when purchasing your HDMI cables. Other times, it could be a defective monitor.

After all, every piece of hardware reaches its end of life at some point, so this may be it for your Samsung monitor. Should this be the case, you can get yourself a low-cost Samsung monitor that is equally good without breaking the bank.

For the most part, the process is fairly simple. All you may have to do is switch off and switch back on your devices. Hopefully, this has helped you resolve your issue with connecting your HDMI cable to your Samsung monitor.

Before you go, did you know that you can convert your monitor into a TV? That’s right, and this process is incredibly simple and it will take you just a few minutes.

If you’ve encountered this issue before and have another solution we’ve not mentioned, do not hesitate to leave a comment below. We’d love to hear all about it.

How to Connect and Setup Ubotie Keyboard [Windows, Mac, iPad]

Just got a Ubotie keyboard and want to learn how to connect it? You’re in the right place. Owing to their ease of use and unique appearance, it’s no surprise those are all the rage on TikTok.

Luckily, Ubotie keyboards and mice are compatible with Windows, Mac, Android devices, iPhones, and iPads, amongst others, and can be connected within a minute. So, let’s get straight to it!

How do I set up a Ubotie keyboard?

Windows

  1. Insert 2 AAA batteries into the dedicated slot at the back of the keyboard, wait for a few seconds, and then press any key to wake it up.
  2. Now, press Fn + C to put the keyboard in pairing mode. A slowly flashing red light indicates that the keyboard has entered pairing mode.Fn + C
  3. Next, press Windows + I to open Settings on the Windows PC, go to Bluetooth & devices from the left pane, enable the toggle for Bluetooth, and click on Add device.settings
  4. Select Bluetooth from the list of options.bluetooth
  5. Wait for the Ubotie entry to appear, select it, and wait for the connection process to complete.ubotie keyboard setup and connection

You should now be able to use the keyboard. Remember, there’s no power button on most Ubotie keyboard models, and they automatically turn off after 15 minutes of inactivity.

MacOS

  1. With the batteries plugged into the keyboard, press Fn + C to activate pairing mode.
  2. Click the Apple menu near the top left, then select System Preferences, and choose Bluetooth from the list of options.
  3. If it’s not already enabled, click the Turn Bluetooth On button.turn bluetooth on
  4. Wait for the Ubotie keyboard to appear, then click Connect, and wait for the process to complete.connect ubotie keyboard setup
  5. Once the connection is established, press Fn + E to switch to MacOS mode, and the keyboard should now work seamlessly.

iPad

  1. Insert the batteries into the Ubotie keyboard, and then press Fn + C to put it in pairing mode.
  2. On your iPad, open Settings, go to Bluetooth from the left pane, then enable the toggle for it, and tap the Allow New Connections option, if available.ubotie keyboard setup iPad
  3. When your Ubotie keyboard appears under the list of devices, tap on it, and the iPad will connect within a few seconds.

You can similarly setup your Ubotie keyboard on Android devices and iPhones. Enable the Bluetooth and pairing mode, and then connect the devices.

What can I do if the Ubotie keyboard is not connecting?

If the Ubotie keyboard is not connecting via Bluetooth, check if it supports wired connectivity and use it in the meantime. Also, re-enable Bluetooth on the devices.

Besides, make sure the batteries are properly inserted in the Ubotie keyboard and it’s in pairing mode.

Remember, a red flashing light indicates both low battery and pairing mode. For the former, it flashes quickly, and for the latter, it flashes slowly. Lastly, update the Bluetooth drivers and install the latest keyboard drivers to fix continuous drops.

Ubotie keyboards have received a great response from users and are quick to connect and setup. If you have a Ubotie keyboard and mouse combo, insert the USB receiver into the PC to connect the two. And for any issues, you can refer to the manual that came with the product.

Before you leave, discover some quick fixes when the keyboard is not working on your PC.

For any queries or to share your review of Ubotie keyboards, drop a comment below.

Microsoft Teams Idle Time Hack: 7 Ways to Never Show Idle

Microsoft Teams users reported that it automatically shows their status as Idle after 5 minutes, even when they are actively using the PC but have put Teams in the background.

For some, this happened even when the Teams window was in the foreground, but there was no active engagement. Also, if the computer goes to sleep, Teams will automatically change the activity status. To prevent this, there are a few quick hacks that will stop Microsoft Teams from showing you as away!

How do I stop Microsoft Teams from showing idle?

Tip icon Tip
There was a bug in Teams that inadvertently changed the user status. So, your primary approach should be to update Microsoft Teams. If that doesn’t work, go with the hacks and workarounds listed below.

1. Start a meeting and manually set the status to Available

  1. Open Microsoft Teams, and go to the Chat tab, and click the Meet Now button.meet now
  2. Click the Start meeting button.
  3. Once the meeting starts, go back to the main window of Microsoft Teams, click the profile icon on the top right, and select the In a call status.in a call
  4. Finally, choose Available from the list of options.change status for microsoft teams idle time hack

Microsoft Teams will now show your status as Available as long as the meeting goes on. Just make sure to do that quickly so that others cannot observe that you have created a one-person meeting to set the status as green.

But remember, admins can check the logs and identify that you have set up a meeting with just you in attendance. So, don’t overuse the hack!

2. Set a status message to show availability

  1. Open Microsoft Teams, click on the profile icon near the top-right corner, and select Set status message.status message
  2. Now, type your status message in the text field, choose how long you want it to reflect for, and click Done.show available microsoft teams idle time hack

Now, even if Microsoft Teams changes your activity status to Idle after a few minutes of inactivity, the status message should clearly highlight the fact that you are available. This works best in organizations that don’t prioritize the logged-in hours but call for prompt responses.

3. Increase the time after which the PC goes to sleep

  1. Press Windows + I to open Settings, go to System from the navigation pane, and click on Power & battery. power & battery
  2. Expand the Screen and sleep entry, and set a higher time period, preferably an hour or more, before the computer turns off the screen or goes to sleep, both when plugged in or on battery power.increase sleep time microsoft teams idle time hack

4. Hold the Tab key

Another trick is to open Microsoft Teams and have the Tab key held by placing a small object over it for as long as you are away from the PC. This will keep switching between the available on-screen options and give Microsoft Teams the impression that you are active.

Some users opened the built-in Notepad and had the Spacebar pressed. Other keys like Insert may also work.

5. Install Microsoft Teams on your phone

A simpler Microsoft Teams idle time hack for users on the go is to download the app on your mobile phone, set the status to Active, configure the settings so that the display always remains on, and then have the Teams app running. This works best on a spare phone!

Setting Auto-Lock to Never

If you are at home, keep the phone plugged into charging, and while travelling, use a power bank to never run out of battery.

6. Use a mouse jiggler

A mouse jiggler imitates mouse movements and makes the cursor continuously move, though the deflection is minimal, giving the impression that you are actively engaging. This both prevents the PC from going to sleep and the Microsoft Teams status from changing to Idle.

You can get a USB dongle mouse jiggler or a physical one that creates vibrations to move the actual mouse. A cheaper workaround we found was to keep the mouse on an analog watch. The laser would now track the seconds hand and keep the cursor moving in sync.

7. Use a third-party app

  1. Go to the Microsoft Store, and click the Get button to download the Move Mouse app.move mouse microsoft teams idle time hack
  2. Launch the app, and click the Settings icon.settings
  3. Enable the toggle for Repeat.settings
  4. Go to the Behaviour tab, and enable the toggle for Automatically stop when user activity detected.move mouse microsoft teams idle time hack
  5. Once done, run Move Mouse, and it will automatically move the mouse at the set frequency, preventing inactivity.

You may also use other similar apps, like Caffeine. Remember, administrators can restrict the installation of third-party apps on work devices, so you may have to rely on other methods.

These Microsoft Teams idle time hacks will work for all. But not everyone should employ these. A few organizations have strict policies regarding the use of such hacks, which may even lead to termination in rare cases.

So, it’s best that you share your concerns with the management and collectively find a way forward so that your Idle status on Microsoft Teams doesn’t become a problem.

Before you leave, find out how to create Microsoft Teams avatars and make meetings a lot more fun!

For any queries or to share your favourite Microsoft Teams idle time hack, drop a comment below.

Play Switch Games Offline: How to Play Downloaded Games

Nintendo Switch allows you to play games offline as long as the game supports the functionality, it has been downloaded, and you are using the primary console. Besides, you can play offline if the game is loaded from the cartridge.

How do I play Nintendo Switch games offline?

To play Switch games offline, connect your console to the Nintendo account, set it as the primary console, open the Nintendo eShop, install the game(s), download any pending OS updates, launch the game, and it should now run without a glitch.

What can I do if I can’t play Switch games offline?

Before we start with the slightly complex solutions, perform these quick checks:

  • Ensure the device you are using is set as the primary console and that it has the same profile as the one used to download the game. Also, install any pending game or console updates.
  • Verify that the game supports offline functionality. For most downloaded titles, you can play offline in single-player mode.

1. Re-enable the airplane mode

  1. Press the Home button on the console, and go to the Settings.
  2. Choose Flight Mode from the navigation pane, then select the Flight Mode entry on the right, and press A to turn it off.flight mode to play switch games offline
  3. Now, again, press A to enable Flight Mode, and check whether you can play Nintendo Switch games offline.

Enabling flight mode also helps with Splatoon 3 connection issues.

2. Re-register the console as primary

2.1 De-register the console

  1. Close all active games on the Nintendo Switch console.
  2. Go to Nintendo eShop.Nintendo eShop
  3. When asked Who is using the Nintendo eShop, select your account from the list.
  4. Select your user profile from the top-right corner.user profile
  5. Go to the right, scroll down, and select the Deregister option.deregister to play switch games offline
  6. Again, choose Deregister in the confirmation prompt.
  7. If required, enter the password to verify your identity and complete the deregistration.

2.2 Re-register the console

Once done, all you have to do to re-register the console is link the Nintendo account and then use it to access the Nintendo eShop. The device is then automatically set as the primary console.

To verify, go to your user profile in the Nintendo eShop, scroll down on the right, and make sure it reads, This console is registered as your primary console.

Also, you may now download the cloud backup files if subscribed to Nintendo Switch Online and can then play the downloaded Nintendo Switch games offline.

3. Redownload the games

  1. Highlight the game on the main menu, and press the + button on the console.game
  2. In the Data Management tab, select Delete Software on the right.delete software
  3. Choose the appropriate response in case a confirmation prompt appears.
  4. Now, open the console’s System Settings, go to System from the navigation pane, and select Formatting Options.formatting options to play switch games offline
  5. Choose Clear Cache.clear cache to play switch games offline
  6. Select Reset in the confirmation prompt.
  7. Finally, reboot the console and reinstall the game from the Nintendo eShop.

Now, when you launch the game on Nintendo Switch, which is already set as the primary console, it should run fine without checking for an Internet connection. Remember, if a game doesn’t run offline, it’s likely that an update is pending, and the error message should clearly highlight that.

Some of the best Nintendo Switch games confirmed to work offline by us are Hollow Knight, Divinity: Original Sin 2, Zelda BOTW, Mario Cart 8 Deluxe, and Minecraft, amongst others. Some of these can be directly loaded from the cartridge, while you can download others from the eShop.

Also, if you are interested, check out the best Nintendo Switch online games. Besides, for a more exciting experience, use a seamless Nintendo Switch emulator and play games on your PC.

Before you go, you should know that there’s a Nintendo eShop not available in region error that will prevent you from downloading anything, but it can be easily fixed.

For any queries or to share how you managed to play Nintendo Switch games offline, drop a comment below.

How To Fix VAN9003 Valorant Error in Windows 11 [Solved]

Valorant is throwing the VAN9003 error on several Windows 11 devices and won’t launch. The error message either read This build of Vanguard requires secure boot to be enabled to play or Initial attestation failure: Secure boot requirement not met.

The problem is that Valorant on Windows 11 requires both Secure Boot and TPM 2.0 to be enabled. Without the two, Valorant would fail to launch or crash when you reach the main menu.

On Gigabyte motherboards, the problem remained even after changing the BIOS settings, but it’s easy to fix!

How do I fix VAN9003 error in Valorant on Windows 11?

Tip icon Tip
The process to access the BIOS or change the settings is different for each manufacturer. The steps listed below are for MSI and will provide a basic understanding. Check the manufacturer’s website for the exact process. Also, don’t change any other settings.

1. Change the Secure Boot mode

1.1 Changing the mode

  1. Turn off the computer, then power it on, and as soon as the logo appears, press Esc, F1, F2, F10, or F12, depending on the system manufacturer, to access the BIOS.
  2. Go to Advanced mode in the BIOS, select Settings from the left pane, and then click on Advanced.bios
  3. Select Windows OS Configuration from the list.
  4. Click on Secure Boot.secure boot
  5. Set Secure Boot to Disabled.disable
  6. Now, change the Secure Boot Mode to Custom.custom to fix van9003 valorant windows 11
  7. After the System Mode changes to User, again set Secure Boot Mode to Standard.
  8. Finally, select Secure Boot and choose Enabled from the options.enable to fix van9003 valorant windows 11
  9. Save the changes, exit the BIOS, and boot Windows.

1.2 Verify that Secure Boot is enabled

  1. Press Windows + S to open Search, type System Information in the text field, and click on the relevant result.
  2. Now, in the Summary tab, make sure the Secure Boot State reads On.secure boot

A few users reported that even after enabling Secure Boot on a Gigabyte motherboard, the changes wouldn’t reflect in System Information. In that case, you will have to change the Secure Boot Mode to Custom and then back to Standard.

2. Enable TPM

2.1 Checking whether TPM is enabled

  1. Press Windows + R to open Run, type tpm.msc in the text field, and hit Enter.tpm.msc
  2. Check what is listed under the status:
    • When Enabled: The TPM is ready for use.
    • When Disabled: Compatible Trusted Platform Module (TPM) cannot be found on this computer.tpm

2.2 Enabling TPM

  1. Access the PC’s BIOS, go to Advanced Settings, and select Security.tpm
  2. Now, click on Trusted Computing.trusted computing to fix van9003 valorant windows 11
  3. Choose Security Device Support, and select Enable from the options.tpm to fix van9003 valorant windows 11
  4. Save the changes and exit the BIOS.

To fix the VAN9003 Valorant error in Windows 11, you will need to enable TPM (Trusted Platform Module). For more information about the feature, read all about TPM.

3. Set the VGC service to automatic

  1. Press Windows + R to open Run, type services.msc in the text field, and hit Enter.
  2. Scroll down, right-click on the VGC service, and select Properties.properties
  3. Select Automatic from the Startup type dropdown, and then click the Start button under Service status.automatic to fix van9003 valorant windows 11
  4. Finally, click Apply and OK to save the changes.

Configuring the VGC service to run automatically at boot also helps with the VAN1067 error on Windows 11.

4. Switch to UEFI mode

  1. Access the BIOS, go to Settings, and click on Advanced
  2. Now, select Windows OS Configuration.Windows OS configuration
  3. Select the BIOS CSM/UEFI Mode entry.
  4. Choose UEFI from the list of options.UEFI to fix van9003 valorant windows 11
  5. Save the changes, and then exit the BIOS.
  6. Verify whether the VAN9003 Valorant error in Windows 11 is fixed.

5. Run Valorant in compatibility mode

  1. Right-click on the Valorant launcher, and select Properties from the context menu.
  2. Go to the Compatibility tab, tick the checkbox for Run this program in compatibility mode for, and select Windows 8 from the dropdown menu.compatibility mode to fix van9003 valorant windows 11
  3. Once done, click on Apply and OK to save the changes.

Running the game in compatibility mode also helps when Valorant is not working on Windows 11.

6. Run the Riot Repair Tool

The Riot Repair Tool, though primarily a log collection and sharing app, can be used to fix a range of Valorant errors, including VAN9003 in Windows 11.

Riot Repair Tool

You could download it from the official support website or contact the support team and ask them for the tool since the available download is an MSI file, and the one shared by the team is an executable (.exe), which is easier to run. Also, make sure to run the tool with administrative privileges.

7. Roll back to Windows 10

If nothing else works, and you recently upgraded to the latest iteration of the OS, roll back to Windows 10.

Remember, you can only do this within 10 days, unless the period is manually extended beforehand.

➡️ In case you are past the 10-day period, create a bootable Windows 10 USB, and then install the OS from scratch.

Summary

Reinstalling Windows 10 should be used as the last resort when the previous solutions for the VAN9003 Valorant error on Windows 11 didn’t work. In our experience, enabling both Secure Boot and TPM and running the VGC service should do the trick!

Before you leave, find out the best Windows 11 settings for gaming and enjoy superior Valorant gameplay! We also have a guide on VAN 1067 error on Windows 10, so don’t miss it.

For any queries or to share what worked for you, drop a comment below.

How to Fix Game Opening on The Wrong Monitor

If you have multiple monitors and the game keeps opening on the wrong monitor, this guide can help!

Why did my game open on the wrong monitor? It could happen if you have misconfigured the display settings, loose cables, or outdated system drivers. Also, running games using game launchers could cause this issue as, by default, games launch on the same screen as the launcher.

How can I fix the game opening on the wrong monitor?

Before proceeding with any steps to fix the game opening on the wrong monitor, go through the following preliminary checks:

  • Click on the game window, then press Alt + Enter together to fix it.
  • Right-click the .exe file of the game, choose Create Shortcut, then drag it to the required monitor and double-click to launch it.

1. Move the game to the right monitor

  1. Take your mouse pointer to the game icon in the Taskbar, and when you see a preview screen, right-click it and choose Restore.
  2. Next, hover your mouse over the game, right-click the preview screen, then click Move.
  3. Press the Windows + Shift + Arrow (Left or Right, depending on where you have placed the monitor) keys to move the game to the monitor you like.
  4. Now click the Restore button and put the game in windowed mode, then close it.
  5. Next, restart your game and check if the issue persists.

To learn more, we have a dedicated guide on how to move a game to another monitor, so don’t miss it.

2. Adjust your display settings

  1. Press Ctrl + Shift + Esc to open the Task Manager app, go to the Processes tab, select all the game-related processes one by one, and click End task.End task
  2. Press Windows + I to open the Settings app.
  3. Go to System, then click Display.System - display  game opening on wrong monitor
  4. Under Display resolution, ensure you have selected the recommended option from the drop-down list.Screen resolution - Display
  5.  Select the wrong monitor from the multiple display options, select Show only on 1, then restart your PC.Screen - game opening on wrong monitor
  6. Launch the game on the correct monitor, and exit the game using Step 1.
  7. Now, re-enable the wrong monitor and check if the issue persists.

3. Set the desired monitor as the primary one

  1. Press Windows + I to open the Settings app.
  2. Go to System, then click Display.System - display game opening on wrong monitor
  3. Locate Multiple displays, and choose the correct display, then place a checkmark next to Make this my main display.Make this main display
  4. Restart your computer to let the changes take effect.

You can change the monitor number identity from the Display settings to ensure the applications or games open in the main window.

4. Use the keyboard shortcuts

  1. Launch the game and let it load, then press Windows + P to get the Project settings pop-up window.
  2. Choose Second Screen Only to make your game come back to the main monitor.Second screen only - game opening on wrong monitor
  3. Press Windows + P, then click Choose PC screen only.
  4. Close the game using Task Manager completely, then launch the game again.

5. Change the display settings (If you use Steam as a game launcher)

  1. Press the Windows key, type steam, and click Open, then launch the game.Steam Open - game opening on wrong monitor
  2. Go to Library, then right-click the affected game and choose Properties.
  3. Navigate to General from the left pane and locate Launch Options on the right pane.Properties - Steam
  4. Make sure the box under it is either blank or type in -autoconfigure, then quit Steam and restart your computer.Launch Options -0display game opening on wrong monitor

6. Update your drivers

  1. Press Windows + R to open the Run window.Device Manager Run command - game opening on wrong monitor
  2. Type devmgmt.msc and click OK to open the Device Manager app.
  3. Look for the driver categories for a yellow triangle, then expand it, and right-click it to choose Update driver.Graphics Driver update
  4. Select Search automatically for drivers.Update driver 2
  5. Once done, go to other categories and update drivers under them using the same steps mentioned above.

Updating the drivers can also help you fix the screen that doesn’t fit the monitor on Windows 10; read this guide to know more about it.

7. Reconnect the secondary monitor

  1. Press Windows + I to open the Settings app.
  2. Select System, then click Display.System - display game opening on wrong monitor
  3. Select the second display, and remove the checkmark next to Remember window locations based on monitor connection.Remember window locations based on monitor connection - game opening on wrong monitor
  4. Now click Extend these displays and choose Show only on 1.
  5. Now disconnect & reconnect the second monitor cable.

To conclude, if you want a game to open on the right monitor, you can adjust the display settings, place a shortcut of the game on the same monitor, or ensure your Windows OS and system drivers are up to date.

In case you can change the primary monitor on your multi-monitor setup, read this guide to get the detailed steps.

If you have any questions or suggestions about the subject, feel free to mention them in the comments section below.

Solved: Battlefield 1 Can’t Connect to Any Server

If you have encountered Can’t connect to any server error while trying to launch Battlefield 1 on your computer, this guide can help!

We will discuss common reasons behind the error and delve into effective solutions suggested by WR experts so that you can enjoy your gaming session without any problem.

Why is my Battlefield 1 not connecting?

Battlefield 1 can’t connect to any server due to outdated drivers, flaky internet connection, or corrupted game files.

How can I fix the Can’t connect to any BF1 server issue?

Before moving to any detailed troubleshooting steps to fix this issue, make sure you do these preliminary checks:

  • Ensure you have an updated version of Windows OS and a stable internet connection, or try using a reliable VPN service.
  • Check EA servers for downtime and technical issues, then restart your computer.

1. Run the EA client app as an admin

  1. Locate the EA client app on the desktop and right-click it to open Properties.Properties - Battelfield 1 cant connect to any server
  2. Go to the Compatibility tab, under Settings, and place a checkmark next to Run this program as administrator.Run as admin
  3. Click Apply, then OK to save the changes.

2. Repair the game

  1. Press the Windows key, type ea, and click Open.EA - battlefield 1 can't connect
  2. Go to Installed Games, and locate Battlefield 1.
  3. Click the three dots icon to get the context menu, and choose Repair.Repair the game

The tool will scan and repair the game files; once done, close EA, then relaunch it and the game to check if the issue persists.

3. Update the game

  1. Press the Windows key, type ea, and click Open.EA - battlefield 1 can't connect
  2. Go to the Installed games option and locate Battlefield 1, click the three dots icon, and click Settings.
  3. Navigate to the Download tab, locate Update games automatically, and make sure it is enabled.

4. Update the network driver

  1. Press Windows + R to open the Run window.Device Manager Run command - battlefield 1 can't connect
  2. Type devmgmt.msc and click OK to open the Device Manager app.
  3. Locate and expand Network adapters.Update Network driver - battlefield 1 can't connect
  4. Right-click the driver and select Update driver.
  5. Select Search automatically for drivers.Update driver 2
  6. Follow the on-screen instructions to complete the process.

Updating your drivers can also help you fix issues like Battlefield not launching, read this guide to learn more.

5. Disable the antivirus temporarily

  1. Press the Windows key, type control panel in the search bar, and click Open.Control Panel start menu - battlefield 1 can't connect
  2. Click Category for View by and select System and Security.System and security
  3. Select Windows Defender Firewall.Windows Defender - battlefield 1 can't connect
  4. Click the Turn Windows Defender Firewall on or off option.Turn on or off defender
  5. Select Turn off Windows Defender Firewall (not recommended) for both the Private and Public network settings.Turn on or off, click OK
  6. Click OK.

Now, if the game works, follow these steps to add it to the exception:

  1. Press the Windows key, type windows security in the search bar, and click Open.Windows Security open Windows key
  2. Go to Virus & threat protection and click Manage settings.Manage settings
  3. Under Exclusions, click Add or remove exclusions.Add exclusions - battlefield 1 can't connect
  4. Click the Add an exclusion button, and select Folder.Exclusion list select folder - battlefield 1 can't connect
  5. Choose the .exe file of the game and click Open.

Once done, reverse engineer the steps to turn on the Windows Firewall to secure your computer.

6. Reset the network settings

  1. Press Windows + I to open the Settings app.
  2. Go to Network & Internet, and select Advanced network settings.Network & Internet - battlefield 1 can't connect
  3. Under More settings, click Network reset.Network Reset
  4. Click the Reset now button.Network Reset now

7. Reinstall the app and EA client

  1. Press Windows + I to open the Settings app.
  2. Go to Apps, then select Installed apps.Apps - Installed apps  - battlefield 1 can't connect
  3. Locate Battlefield 1, click the three dots icon, and select Uninstall.Uninstall - battlefield 1 can't connect
  4. Click Uninstall to confirm the action.
  5. Now look for EA, click the three dots icon, and choose Uninstall.
  6. Select Uninstall.
  7. Now go to the EA’s official website and click on the Download the EA app.EA app download
  8. Follow the on-screen instructions to complete the process.
  9. Now, launch the EA app, search for Battlefield 1, and click Install.
  10. Wait for the installation process to complete and launch the game.

If none of the above solutions worked for you, you need to contact the EA customer support team and explain to them the issue and fixes you tried to get further help.

In conclusion, to connect to the servers and play Battlefield 1 with ease, check the server status, ensure you have a stable internet connection, and keep the game updated to the latest version. You can also try using a reliable VPN service, choose a region, and connect to the nearest game server.

Furthermore, restarting your device can fix a lot of Battlefield issues like error code 1; read this guide to learn solutions in detail.

If you want to learn about common issues you might face while playing Battlefield 1 and their quick solutions, read this guide.

Did we miss a step that helped you fix the error? Don’t hesitate to mention it in the comments section below. We will happily add it to the list.

6 Simple Ways to Fix Disney Plus Keeps Crashing

For some of our readers, Disney Plus keeps crashing every time they press Watch.

Why does my Disney Plus keep crashing? If the Disney Plus app crashes when you launch it, it could be due to outdated or corrupted files. However, if you are watching on your browser, the crash could be the result of an outdated browser cache and cookies.

How can I fix the Disney Plus keeps crashing issue?

Before proceeding with any steps to stop Disney Plus from crashing, go through the following preliminary checks:

  • Restart your TV or computer and router, then verify if your internet is working fine.
  • Try using a different browser if using a web version of the app on a computer.
  • Ensure your TV or your Windows computer is updated to the latest version, and check the Disney Plus server status.
Note icon NOTE
This issue might occur on almost all compatible platforms; to fix it, you can follow the below-mentioned steps on any device.

1. Check if the connection between Disney Plus & your PC is open

  1. Press the Windows key, type cmd, and click Run as administrator.CMD elevated -disney plus keeps crashing
  2. Copy & paste the following command and hit Enter: ping www.disneyplus.comPING

By running the PING command, you check for responsiveness and measure the latency between your PC and Disney Plus to ensure you have a stable internet connection.

For a complete walkthrough of common fixes across devices, see our full guide on Disney Plus App Not Working.

2. Clear browser cache and cookies (If using a web version on your PC)

  1. Launch your preferred browser; here, we are using an example of Google Chrome.
  2. Click the three dots icon from the top right corner, then choose Settings.Settings CHrome -disney plus keeps crashing
  3. Select Privacy and security, then click Clear browsing data.Clear browsing data
  4. Next, select All time for the Time range option, and place a checkmark next to Cookies and other site data, & Cache images and files.Settings4 -Settings CHrome -disney plus keeps crashing
  5. Click Clear data.

Once done, relaunch the browser and try to access the website again. Clearing browser cache can help you fix Disney Plus doesn’t work on Chrome issues as well; read this guide to learn more.

3. Clear the app cache

Windows

  1. Press Windows + I to open the Settings app.
  2. Go to Apps, then select Installed apps.Apps, installed apps
  3. Locate Disney Plus, click the three dots icon, and select Advanced Options.Advanced options --disney plus keeps crashing
  4. Scroll down to find the Reset section, and click Repair to repair the app without deleting app data.Repair
  5. If it doesn’t help, go to the Reset section again and click the Reset button.Reset -disney plus keeps crashing

TV

  1. Go to the Settings app from the home screen or press the gear icon on the remote.Settings - Android TV  -Disney Plus Keeps Crashing
  2. Choose Apps.Apps
  3. You will get the list of apps; go to Disney Plus.Select the app
  4. Select Clear cache.clear cache
  5. Click OK to confirm the action.Click OK
  6. If that doesn’t work for you, choose Clear Data.Clear data
  7. Click OK to confirm the action.Clear data - disney plus keeps crashing

This will delete all app data, including your login ID & password, and reset the app to the default settings. So, keep the password handy as you need to sign in on the app again.

Clearing app data can help you fix other Disney Plus errors like error code 73; read this guide to learn about other solutions.

4. Update the app

Windows

  1. Press the Windows key, type ms store, and click Open.Microsoft Store -Disney Plus Keeps Crashing
  2. Go to Library, scroll through the list of apps to find Disney Plus, and click Update to install the latest version.Update - Disney Plus Keeps Crashing

TV

  1. Locate and select Google Play Store from the home screen.
  2. Click the Profile icon and choose Manage apps & games.Manage apps and games - Disney PLus keeps crashing
  3. Select Updates.
  4. From the list of apps, locate Disney Plus and select the Update button.

5. Uninstall the Android System WebView (Beta) update (TV)

  1. Locate and select Settings from the home screen.
  2. Select Apps.Apps
  3. Scroll to find Android System WebView (Beta) from the installed apps list.
  4. From the list of options, choose Uninstall.Select Uninstall from the options

Restart your TV, then launch the app and check if the issue persists.

6. Reinstall the app

Windows

  1. Press Windows + I to open the Settings app.
  2. Go to Apps, then select Installed apps.Apps, installed apps - Disney plus keeps crashing
  3. Locate Disney Plus, click the three dots icon, and select Uninstall.Uninstall app
  4. Click Uninstall again when prompted.
  5. Press the Windows key, type ms store, and click Open.Microsoft Store -Disney Plus Keeps Crashing
  6. Search for Disney Plus and click Install to get it on your computer.install

TV

  1. On the home screen, scroll to locate Settings, then select it.
  2. Choose Apps.Apps
  3. From the list of apps, select Disney Plus.Select the app
  4. Next, scroll through the options and locate & select Uninstall.Select Uninstall from the options
  5. Once done, launch the Google Play Store from the home screen, search and select the Disney Plus app, then click Install.search for the Disney Plus app on the Google Play Store

Once done, close the Google Play Store, launch the Disney Plus app, and log in to your account to enjoy watching your favorite shows.

Reinstalling the app can help you fix other issues related to the app, such as error code 14; read this guide to learn more.

In conclusion, the Disney Plus app crashing issue could occur due to a flaky internet connection, an outdated app, or corrupted cache.

So, to resolve this issue, restart the app & device, check the server status of Disney Plus, verify if you have a reliable internet connection, and try updating or reinstalling the app.

Alternatively, if your ISP is blocking the website, you can rely on a stable VPN service to access digital content on the platform.

If you have any questions or suggestions about the subject, feel free to mention them in the comments section below.

Fix HP Smart App Windows 11 not Working


Experiencing issues with the HP Smart app not working on Windows 11 can be a common problem. To help resolve this issue, here is a step-by-step guide with specific actions you can take:

Check System Requirements and Update Windows

Ensure your system meets the HP Smart app‘s minimum requirements for download and that your Windows 11 is updated with the latest patches.

Reinstall HP Smart

Uninstall the app from “Settings” > “Apps”, then reinstall the latest version of the HP Smart app.

Reset the Store App

Try resetting the Microsoft Store app by typing wsreset.exe in the Run dialog (Windows key + R) and waiting for the process to complete.

Use PowerShell Commands

For more complex issues, running specific PowerShell commands as an administrator might help to fix problems related to the Microsoft Store app.

Keep Printer and PC Near Router

Ensure your printer and PC are close to the router during setup. If connected via Ethernet, switch to a Wi-Fi connection.

Enable Bluetooth on PC

Turn on Bluetooth on your PC to aid the app in detecting the printer.

Run Printer Troubleshooter

Utilize Windows 11’s built-in troubleshooter for printers, accessible via the Settings menu, to resolve common printer problems.

Diagnose & Fix Using HP Smart App

Use the HP Smart app’s Diagnose & Fix feature to troubleshoot your printer directly from the app.

Set HP Printer as Default

Make sure your HP printer is set as the default printer in your Windows settings.

Install Printer Drivers

Ensure you have the latest drivers for your HP printer. Check the HP website for driver downloads for your specific printer model.

Download Optional Updates

Occasionally, Microsoft provides optional updates that can resolve printer issues in Windows 11.

Restart Printer Spooler Service

Restarting the printer spooler service from the Services menu in Windows can sometimes fix printing issues.

Disable Firewall

Temporarily disable your Windows Firewall, as it can interfere with printer operations.

Disconnect VPN

Turn off any VPN connections during the printer setup process, as they can sometimes cause connectivity issues.

Update Windows 11

Make sure your operating system is fully updated, as new updates often include fixes for known issues.

These steps are designed to cover a range of potential issues with the HP Smart app on Windows 11. If these solutions do not resolve the problem, it may be best to contact HP support for further assistance.

Fix: HP Laptop Won’t Connect to Wifi on Windows 11

If your HP laptop running Windows 11 is having trouble connecting to Wi-Fi, it can be a frustrating experience. This issue can arise due to various reasons such as incorrect Wi-Fi settings, outdated drivers, or hardware problems. To help you resolve this, let’s go through some effective solutions. Each of these methods addresses a different potential cause of the problem.

1. Check Your Wi-Fi Password

One of the most common reasons for being unable to connect to Wi-Fi is an incorrect password. Ensure that the password you’re entering is accurate. Pay attention to case sensitivity and special characters, as Wi-Fi passwords are usually case-sensitive.

2. Manually Connect to the Network

Windows 11 typically auto-connects to known networks, but if it doesn’t, you may need to connect manually. To do this, open the Quick Settings pane by clicking on the Network icon in the taskbar, select your Wi-Fi network, and click ‘Connect’.

3. Toggle Airplane Mode On/Off

Toggling Airplane Mode can reset your laptop’s wireless capabilities. To toggle, open the Quick Settings pane and click the Airplane mode tile. Wait a few seconds and toggle it off again. This can often resolve minor connectivity glitches.

4. Move Closer to the Router

If the Wi-Fi signal is weak, your laptop might have trouble connecting. Moving closer to the router can improve the signal strength. If you regularly have signal issues, consider repositioning your router or using a Wi-Fi extender.

5. Run the Network Troubleshooter

Windows 11 includes a network troubleshooter that can automatically diagnose and fix common Wi-Fi issues. Access it by going to Settings > System > Troubleshoot > Other troubleshooters, and run the Internet Connections troubleshooter.

6. Forget and Reconnect to the Network

Forgetting the network and reconnecting can often resolve connectivity issues. In Wi-Fi settings, find the network, click ‘Forget’, and then reconnect by entering the password again.

7. Disable Metered Connection

A metered connection setting can restrict Wi-Fi usage to save data. If enabled, it might be preventing your laptop from connecting to the internet. Disable it in the Wi-Fi settings under the properties of your network.

8. Update Wi-Fi Driver

Outdated or corrupt Wi-Fi drivers can cause connectivity issues. Update them by going to Device Manager, expanding Network adapters, right-clicking on your Wi-Fi driver, and selecting ‘Update driver’.

9. Reinstall Wi-Fi Driver

If updating the driver doesn’t work, try reinstalling it. In Device Manager, right-click on the Wi-Fi adapter and select ‘Uninstall device’. Restart your laptop to automatically reinstall the driver.

10. Flush DNS

Flushing the DNS can resolve internet connection issues. Open Windows Terminal (Admin) and execute commands like netsh winsock reset and ipconfig /flushdns. Restart your laptop to apply the changes.

11. Update Windows

Outdated versions of Windows may have bugs affecting Wi-Fi connectivity. Check for system updates by going to Settings > Update & Security > Windows Update, and install any available updates.

12. Reset Wi-Fi Network Adapter

As a last resort, you can reset your network adapter. This will remove and reinstall all network adapters and their settings. Go to Settings > Network & Internet > Advanced network settings > Network reset, and click ‘Reset now’.

By methodically working through these solutions, you can identify and resolve most common Wi-Fi connectivity issues on your HP laptop running Windows 11. If the problem persists, it might be a more complex issue, and consulting with a professional might be necessary.

How to Enable or Disable Loudness Equalization on Windows 10


Whether you are a casual computer user or an avid movie buff, to normalize the volume of different sounds and get a consistent listening experience, you need to learn how to use Loudness Equalization. In this guide, we will discuss the simple steps to enable or disable Loudness Equalization on Windows 10.

How can I enable or disable the Loudness Equalization on Windows 10?

  1. Go to the Sound icon from the taskbar, then right-click the icon and choose Sound Settings.Open Sound Settings - loudness equalization windows 10
  2. Scroll to Advanced, and click More sound devices.More sound settings
  3. Switch to the Playback tab, select the sound device you are using, then click Properties.Speakers  _ Properties
  4. On the Properties window, switch to the Enhancements tab.
  5. Place a checkmark next to Loudness Equalization.Enable loudness equalization windows 10
  6. Click Apply, then OK to save the changes.

If you want to disable the audio enhancement feature, reverse engineer the steps. In case you are looking to set up surround sound on Windows 10, we have a separate guide on that.

What if you can’t find the Loudness Equalization feature?

  1. Press Windows + R to open the Run window.Device Manager - loudness equalization windows 10
  2. Type devmgmt.msc and click OK to open the Device Manager app.
  3. Go to the Sound, Video, and Game Controllers category.
  4. Right-click the sound driver and choose the Disable device option from the context menu.Disable device
  5. Click Yes.Yes disable
  6. On the Device Manager window, look for Sound, video and game controllers, right-click the audio driver, and select Update driver.Update driver
  7. Next, select Browse my computer for drivers.Browse
  8. Click Let me pick from a list of available drivers on my computer.Let me pick -Enable loudness equalization windows 10
  9. On the Select the device driver you want to install for this hardware page, choose the sound driver, then click Next.Choose the driver
  10. Once done, click Close.
  11. Restart your computer to save the changes.

To conclude, enabling or disabling the Loudness Equalization feature on Windows 10 depends upon a user’s discretion.

If you want to avoid sudden spikes and drops in volume while watching your favorite movie or series on your laptop or PC, you can consider enabling it.

However, if you prefer the original sound with its dynamic range and volume fluctuations, you should keep it disabled.

In case you want to learn how to improve sound quality on your Windows; read this guide for tips.

Alternatively, check out this guide to learn how to improve your headphone sound quality in Windows 10 and get the best out of them.

If you have any questions or suggestions about the subject, feel free to mention them in the comments section below. We will be happy to interact.

rsEngineSvc: How to Remove This Resource Hogging Process

The rsenginesvc process often shows a high RAM and CPU usage in the Task Manager, sometimes 100%. And given that the name doesn’t tell much about it, users believe rsenginesvc.exe to be a virus.

In fact, the rsenginesvc.exe process is a part of the RAV Endtime Protection antivirus developed by Reason Labs. It’s not malware but can be categorized as a PUP (Potentially Unwanted Program).

Here’s how to delete rEenginesvc:

How do I uninstall rsEngineSvc?

1. Manually delete the rsenginesvc process

  1. Press Ctrl + Shift + Esc to open the Task Manager, and go to the Details tab.details
  2. Right-click on the rsenginesvc process, and select Open file location from the context menu.location to fix rsenginesvc
  3. If it’s stored in the Reason Labs directory, select the executable (.exe) file, and hit Delete.
  4. Choose the appropriate response in case a confirmation prompt appears, and then empty the Recycle Bin.

Also, if you are just concerned with the high CPU usage, simply choose End task.

In case you get the Access denied error, right-click on the file, select Properties > go to the Security tab > and take full ownership of the file.

2. Uninstall the RAV Antivirus

Note icon NOTE
Never leave your system unprotected! Once you uninstall RAV, enable Windows Defender or get another antivirus that’s not packed with bloatware!
  1. Press Windows + R to open Run, type appwiz.cpl in the text field, and hit Enter.appwiz.cpl
  2. Select the RAV Endpoint Antivirus from the list, and click on Uninstall.uninstall to remove rsenginesvc
  3. Follow the on-screen instructions to complete the process.
  4. Similarly, uninstall any other programs by Reason Labs.
  5. Once done, reboot the PC and check whether rsenginesvc is removed.

If this doesn’t work, use an effective software uninstaller tool to get rid of any leftover files and Registry entries. PUPs like these are usually not completely removed with the native Windows process!

3. Perform a system restore

  1. Press Windows + S to open Search, type Create a restore point in the text field, and click the relevant result.
  2. Click the System Restore button.system restore to remove rsenginesvc
  3. Select the Choose a different restore point option and click Next.
  4. Pick an older restore point from the list, preferably one created before the process first appeared, and click Next.restore point
  5. Verify the details and click the Finish button to start the restore process. It takes around 30-60 mins to complete.

4. Reset Windows

Once you have a malware or PUP on the PC, it’s sometimes tricky to remove all the related files. And in this case, resetting Windows to factory defaults does the trick!

Remember to back up your critical files or move them to an external USB drive beforehand.Reset will remove your files and data, so saving it prior is essential.

By now, you should have removed rsenginesvc and gotten rid of all other RAV Endpoint antivirus files. A similar approach helps delete 1.exe, another unsafe process on the PC.

For any queries or to share how you managed to delete rsenginesvc.exe, drop a comment below.

Splatoon 3 Connection Issues: How to Fix Them

Splatoon 3 is notorious for connection issues. Users report dropping out of the game every few minutes or encountering a communication error. The error message reads, A communication error has occurred.

The problem may be with your network connection, Internet speed, corrupt game cache, or even the Nintendo server being down for maintenance.

How do I fix Splatoon 3 connection issues?

Before we start with the slightly complex solutions, try these quick ones:

  • Change the character for a while and then revert to the initial one.
  • Switch to another wireless network or a mobile hotspot. If your is a dual-band router, connect to the 5GHz network instead of 2.4 GHz. Also, use the steps on the support page to set up a wired connection.

1. Force restart the Nintendo console

  1. Hold the Power button on the top of the console for 3 seconds, and when the Power Menu appears, select Power Options.power options
  2. Now, choose Restart, and once the console reboots, check for improvements.

If a hard restart doesn’t work, verify that the Nintendo servers are running through the official website or use a real-time monitoring platform like Downdetector and update the console’s software.

This solution also helps if you encounter the Error Code 2122-2503.

2. Turn on flight mode

  1. Go to the console Settings, select Flight Mode from the navigation pane, then choose Flight Mode on the right, and press A to enable it.flight mode to fix splatoon 3 connection issues
  2. Now, launch Splatoon 3 and go into Splatsville.
  3. Finally, turn off the Flight Mode and continue playing the game.flight mode

This workaround was shared by Nintendo in an official X (formerly Twitter) post and helps fix the Splatoon 3 black screen and connection issues.

Flight mode also helps when you can’t play Switch games offline.

3. Clear the cache

  1. Open the Nintendo console Settings, select System from the navigation pane, and tap on Formatting Options.formatting options
  2. Now, tap on Clear cache.clear cache to fix splatoon 3 connection issues
  3. Tap Reset in the confirmation prompt.
  4. Once done, restart the console and check whether the Splatoon 3 connection issues are fixed.

4. Switch to another DNS server

  1. Press the Home button on the console to access System Settings.
  2. Go to Internet from the navigation pane, and click on Internet Settings.internet settings
  3. Move to your network from the list and press the A button to select it.
  4. Choose the Change Settings option.change settings to fix splatoon 3 connection issues
  5. Select DNS Settings and choose Manual.manual
  6. Now, enter the following in the fields underneath:
    • Primary DNS server: 8.8.8.8
    • Secondary DNS server: 8.8.4.4change DNS to fix splatoon 3 connection issues
  7. Once done, save the changes and check for improvements.

You can eliminate connection issues and communication errors in Splatoon 3 by switching to Google’s DNS. Also, for higher speeds, choose the fastest DNS server near you.

5. Contact Nintendo support

If the listed solutions don’t work, you can always contact Nintendo support. There is an option to raise a ticket, chat with a live agent, or contact them over call.

Choose the one that works best, provide as much information as possible, and wait for Nintendo to share a series of fixes or address the issue in future updates.

In the meantime, you can use a Nintendo Switch emulator and play your favorite games on the PC. This helps users facing Splatoon 3 connection issues on older versions of the console.

Also, you can go with an all-in-one emulator and play from an extensive library of games.

For any queries or to share what worked for you, drop a comment below.

BTRoblox Review: What is it and is it Safe?

It’s common to ask yourself whether the addition of a new extension like BTRoblox is safe. Roblox has a reputation for being a great place to play games, but one thing it’s less known for is its website.

The main site is clean and easy to navigate, but it lacks the visual flair of other social media platforms. So, with Better Roblox offering to give your Roblox a revamped look, is it really safe? Here’s what we found.

Is BTRoblox associated with Roblox?

This is a third-party add-on that enhances the Roblox site to make it more vibrant with a bunch of extra functional features. BTRoblox is available as a Chrome extension and an add-on for Firefox browsers.

While it is associated with Roblox, BTRoblox is not affiliated with Roblox in any way. Like many other extensions, this was developed by a fan of the platform.

How do I know BTRoblox is safe?

1. Download source

Your source of the BTRoblox extension should tell you whether it is safe or not. The best way to find out if an extension is safe is to look for official sources on the web or in app stores.

If it’s not listed there, find out if there is an official website for the company or developer who created the extension. If there isn’t one, then be wary of downloading it because there is no way of knowing what kind of data it might collect about you.

Having a reliable browser antivirus will also come in handy as it will be able to detect any threats before you install it.

2. Check for reviews

The first tell-tale sign of the safety of an extension should come from the users. Since the BTRoblox extension is available on the Chrome web store, you can check for reviews. Granted, you’ll come across some complaints, but that is normal for any plugin.

Look out for any reviews that suggest the add-on is malicious. A quick tip is to search for keywords such as spyware or malware in reviews. Also, if you see lots of one-star reviews, that’s a red flag that something might be wrong with the extension.

While checking for reviews, do some due diligence on the developer. If an extension is from an unknown developer, do some research before installing it. Check the name against a list of malicious software and see if it has been reported by other users as malware or phishing scams.

3. Read the privacy policy and terms of use

Most privacy policies and terms of use are usually long pages, and many users will ignore them. However, this is the first mistake. A good privacy policy will tell you exactly what information the extension collects and why it needs that information.

You should also be able to opt out of certain types of data collection if you choose to uninstall or disable an extension later on.

If there’s a feature within your browser that you don’t want to use but can’t disable, then you might have a problem on your hands. Since BTRoblox is on the Chrome web store, it adheres to its privacy policy.

Some green flag policies we thought you should be aware of to put your mind at ease include:

  • The usage of permissions – Chrome does not allow developers to future-proof requested permissions. This means an extension cannot request access to permissions for features yet to be implemented.
  • User data – Chrome does not allow humans to access user data unless explicitly consented by the user. This way, no one can access your data unless you greenlight it.
  • Transfer of data is prohibited – You can rest assured that any data collected will not find its way to advertisers or information resellers because it is not allowed.

4. Check permissions requested and data collected

Examine closely what permissions an extension asks for when you install it, and make sure they make sense for what the browser does. For example, a video downloader shouldn’t need access to your camera or microphone unless it really needs those things for its functionality.

Browser extensions can collect your personal data, send it to other servers, or even infect your system with malware if given access to certain permissions.

5. Keep an eye on updates for your browser extension

If an extension has a security vulnerability or bug, developers will usually fix these problems quickly by releasing updates. However, if you don’t keep up with updates, you may end up running software with known vulnerabilities in them.

Browser extensions are a great way to extend the functionality of your browser, but they can also be used to spy on you or harm your computer.

This doesn’t necessarily mean that BTRoblox is malicious software, but it does suggest that users should be careful when installing extensions. Browser attacks can manifest in various forms like this one if you don’t know what they do or how they work.

In conclusion, BTRoblox is a worthwhile extension to have. It is customizable and reliable for most users, eventhough it doesn’t work sometimes. And when you get it, don’t stop there. There are a handful of other Roblox extensions that will elevate your experience like the Ropro extension, so don’t get left behind.

Have you installed the BTRoblox extension, or are you planning to install it? We’d love to hear your thoughts on how it’s working out for you. Drop us a comment down below.

How to Fix Kyocera Memory Allocation Failure: 6 Tested Fixes

Kyocera Memory allocation failure error typically arises when the printer’s memory is overloaded or mismanaged. Causes can include large print jobs that exceed the printer’s memory capacity, or corrupted or outdated printer firmware. You can’t cross off the list conflicts with printer settings or hardware problems.

How do I fix the Memory allocation failure on Kyocera?

1. Restart your printer

  1. Turn off the printer using the Power button.
  2. Unplug the printer from the power source.
  3. Wait for about 60 seconds to allow the printer to reset.
  4. Reconnect the printer to the power source and turn it on.

The easiest way to fix the Kyocera Memory Allocation error is to restart your printer. This will clear the temporary memory issues and might resolve the problem quickly.

2. Reduce the print job size

  1. Divide large print jobs into smaller ones. This reduces the load on the printer’s memory.
  2. Optimize your documents by lowering resolution or printing in black and white.

Obviously, this is a memory problem, and reducing the print job size will require less memory.

3. Update the printer firmware

  1. Visit the Kyocera website and navigate to the support section.
  2. Find your printer model and download the latest firmware.
  3. Install the firmware update by following the provided instructions.

Outdated firmware can lead to memory allocation issues, so we recommend getting the right driver for the printer straight from Kyocera.

If you have problems, we have a guide on how to download and install Kyocera drivers.

4. Adjust the printer settings

  1. Access the printer menu either through the printer interface or your computer.
  2. Locate memory-related settings such as spooling mode.
  3. Adjust these settings to ensure they are optimized for your typical print jobs.

The printer software and settings are different for each printer and brand, but typically, you will find the Spooling settings under the Advanced tab from the printer Properties.

Spooling ensures that the print job is optimized before sending it to the printer, thus avoiding the Memory allocation failure for your Kyocera printer.

5. Check for hardware issues

If none of the above steps work, the problem might be hardware-related.

  1. Check for any visible signs of damage to the memory modules.
  2. Consult the printer manual or contact Kyocera support for guidance on inspecting hardware components.

6. Contact Kyocera Support

If all else fails, the best action is to contact Kyocera support. Before calling, take down the printer model number and a description of the issue.

This information will be needed in order to pinpoint the problem and fix it quickly.

How do I prevent the Memory allocation error on Kyocera?

We have a few tips on what to do to avoid the Memory allocation error in the future:

  • Regularly update your printer firmware.
  • Avoid sending excessively large print jobs.
  • Regularly monitor and adjust printer settings.

Memory allocation failure in Kyocera printers can be a nuisance, especially if you need the printer immediately. However, from our tests in the WR labs, this problem goes away by restarting the printer and reducing the print job.

Following this guide can resolve the issue and get your printer back to its optimal performance.

If the Kyocera printer is not recognized, follow the highlighted guide to fix the problem.

You might also be interested in reading our guide on how to fix the XPS print error because it’s also related to a memory allocation failure.

What is L3 Button on your Xbox Controller?

The Xbox controller is a vital component for any console gamer. On the back of the controller, you will find the pair button, the USB-C power port, the left and right bumpers (LB and RB), and the left and right trigger buttons (LT and RT).

The front of the controller houses the RS and LS buttons that pack many functions. One of the functions of the LS (Left Stick) is the L3 button. In other words, it’s the action of pressing the left stick.

In this guide, we will explain everything about the LS, as you may have also read about the R1 and L1 buttons, or the RS and LS buttons on your Xbox controller.

What is L3 on my Xbox controller?

As we’ve mentioned above, L3 is actually the button part of the left stick on your controller, and it is usually used to access different menus.

However, as the L3 button is associated with moving the character in a game with the left stick, pressing it can trigger in-game actions such as sprinting or crouching.

Just to clarify, many of the games you play will not mention it as L3, but as pressing LS or Left Stick.

How can I fix my Xbox L3 button if it’s not working?

  1. Turn off the console by pressing the Power button on your Xbox One console for about ten seconds.
  2. After it shuts down, unplug the power cord from the Power port.
  3. Leave it alone for five minutes, then plug in the power cord, and turn on the console.
  4. Re-sync your controller with the console again.

Like with any controller buttons, if the L3 button is not working, this is caused by a syncing problem or by a malfunctioning switch.

You may also check if there is any new controller firmware and update it, then replace the batteries. This combo of actions usually fixes most problems.

Although less likely, the L3 button may remain pressed for some readers. If you have this problem, the switch may be clogged with debris or it’s simply malfunctioning. In this case, you might try cleaning the controller using some cotton buds and some alcohol.

For a complete step by step guide on safe disassembly free cleaning, see our tutorial on how to clean an Xbox controller.

The LS that contains the dirrectional controls and the L3 button is very important since it is necessary for movement in any game you can imagine.

How do I resync my Xbox controller?

  1. Press the Sync button on your controller for about 10 seconds until it turns off.
  2. Press the Xbox button on the controller to turn it on again.
  3. Now, press the Sync button on the controller and the Sync button on the Xbox at the same time until the lights flash on both. That means it’s synced.

You might be interested in how to update the Xbox One controller driver so check out the highlighted guide for complete info.

Here’s what the RT button on your Xbox controller is and how to fix its problems.

That’s it! Now you should know everything about the L3 button on your Xbox controller and how to fix some of its related issues.

For any other questions or suggestions, feel free to use the comments section below and let us know about them.

Cannot Load Library DevIl.dll: 5 Ways to Fix it

Often, while using the DevIl image library and Microsoft Visual Studio, you may get the Unable to load DLL ‘DevIL.dll’: The specified module could not be found. (Exception from HRESULT: 0x8007007E) or a similar error.

The problem arises when there’s a mismatch between the versions (x32 and x64) of the DLLs and Visual Studio or if the linker settings are configured incorrectly.

How do I fix the Cannot load library DevIl.dll error?

Before we start with the slightly complex solutions, try these quick ones:

  • Make sure the DLL file or library (lib) is placed in the same folder as the project (.exe file).
  • Roll back to the previous version of DevIL, if possible.
  • If you have another PC running the same OS architecture, get the DevIl.dll file from it.

1. Use a DLL repair tool

Your primary approach when faced with the Cannot load library Devil.dll error should be to use an effective DLL repair tool.

A reliable tool has an extensive library of DLLs. It will scan all available DLL files on the PC and replace the missing or corrupt ones with a fresh copy.

2. Get the correct DLL version

As per our experts, using the 64-bit version of the DevIL DLL on a 64-bit Windows PC, but with a 32-bit version of Visual Studio will likely throw errors. So, if you have the 32-bit Visual Studio, get the 32-bit DevIl.dll file, irrespective of the OS architecture.

Remember, since DevIl.dll is a program or project-specific DLL, it won’t be stored in the System32 folder or any of the other Windows folders. Also, after you manually download the DLL, move it to the project-specific folder.

3. Change the Linker settings

  1. Right-click on your project and select Properties.
  2. Go to C/C++ from the navigation pane, and click on Additional Include Directories.properties
  3. Now, locate the include folder within the DevIl’s directory, and click Open.
  4. Once done, expand Linker from the left, and go to General.linker
  5. Now, add the DevIl’s lib folder (containing DevIL.lib, ILU.lib and ILUT.lib) to the Additional Library Directories option.

4. Download Microsoft Visual C++ Redistributables

  1. Go to Microsoft’s official website, and download the latest compatible version of Microsoft Visual C++ Redistributables, corresponding to the system architecture.redistributables
  2. Run the setup and follow the on-screen instructions to complete the installation.redistributable
  3. Once done, reboot the computer, and verify whether the Cannot load library DevIl.dll error is fixed.

5. Reinstall the program

  1. Press Windows + R to open Run, type appwiz.cpl in the text field, and hit Enter.appwiz.cpl
  2. Select the program that requires the DevIl.dll file, and click Uninstall.reinstall to fix cannot load library devil dll
  3. Follow the on-screen instructions to complete the process.
  4. Restart the computer, and then reinstall the program from an official source, i.e., the website or Microsoft Store.

Most programs that require DevIl.dll usually come bundled with it, and if you get the Cannot load library error, the file was not downloaded due to an installation issue. In this case, reinstalling the program will do the trick!

A similar approach helps when you come across a missing opencl.dll error.

For any queries or to share what worked for you, drop a comment below.

Vsmain.exe: What is it and Should You Remove it?

If you see a Vsmain.exe error while trying to run a malware scan using McAfee on your computer, then this guide can help!

We will talk about the probable causes of the issue and delve into the effective solutions recommended by WR experts.

What is Vsmain.exe?

Vsmain.exe is an executable file related to McAfee security software, specifically associated with the virus scan component, and is responsible for security-related functions.

It can consume significant system resources while running full system scans or when updating its virus definitions.

How can I remove the Vsmain.exe error from my PC?

Before fixing the error related to Vsmain.exe, it is important to consider the following prerequisites:

  • Restart your PC, then verify you have logged in using your Administrator account.
  • Ensure no Windows updates are pending and create a backup of your computer.
  • Delete all the unwanted apps from your PC.

1. Run a full system scan

  1. Press the Windows key, type mcafee, and click Open.
  2. From the left pane, select My Protection.
  3. Click Run a scan.
  4. Next, from Scan types, choose Full Scan, and it will scan your whole computer for malicious files or programs.full-custom-scan - vsmain.exe
  5. Once it is complete, click View Results to look for suspicious files.

If you can’t see the View Results option, it means the security software has not found any threats on your PC.

2. Update the McAfee app

  1. Go to the system tray, locate, and right-click the McAfee icon.Check for updates vsmain.exe
  2. Choose the Check for updates option, and if it is available, wait for the program to update.

You should regularly check for updates to keep your security suite up to date with the latest virus definitions to ensure the safety of your device.

3. Run the McAfee Diagnose & Repair tool

  1. Download the McAfee Diagnose & Repair tool and double-click it to run.
  2. Click Start and wait for the process to complete.McAfee DR - vsmain.exe
  3. Once done, you will see All issues resolved message.

Several windows could open during the repair process; don’t close them until the scan is complete. Once done, try to update the antivirus using Method 2 and check if the issue persists.

Using this tool can also help you fix other .exe file issues of McAfee, like Uihost.exe; read this guide to learn more about it.

4. Run SFC & DISM scans

  1. Press the Windows key, type cmd, and click Run as administrator.CMD elevated -vsmain.exe
  2. Copy & paste the following command to repair system files and hit Enter:sfc /scannowSFCSCANNOW CMD -vsmain.exe
  3. Wait for the command to complete, then type the following command to restore your Windows system image and press Enter:Dism /Online /Cleanup-Image /RestoreHealthRestore health
  4. Once done, restart your computer.

5. Reinstall the McAfee app

  1. Press Windows + I to open the Settings app.
  2. Go to Apps, then click Installed apps.Apps - Installed apps -
  3. Locate McAfee, click the three dots icon, and select Uninstall.Uninstall - vsmain.exe
  4. Click Uninstall again to confirm the action.
  5. Go to McAfee’s official website and download the security app.
  6. Double-click the downloaded file and follow the onscreen prompts to complete the installation.

If none of the above methods helped you, then it might be a device-specific issue, therefore, you need to contact McAfee customer support for specialized assistance.

Remember that Vsmain.exe is an important component of McAfee, and problems with the file could put your computer in harm’s way. So, if you are not using McAfee anymore, delete the app completely to ensure Windows Security can replace it and ensure your PC protection.

However, if you are using the antivirus software and getting the Vsmain.exe error, it could be due to malware infection or outdated McAfee security software.

Therefore, to avoid such issues, you need to ensure that your antivirus is always up to date and there are no pending updates for your Windows OS and system drivers.

You can also try to run the repair tool offered by the security company to restore the missing files of the tool or completely reinstall it to fix the issue once and for all.

Did we miss a step that helped you fix the Vsmain.exe error? Feel free to mention it in the comments section below. We will add it to the list.
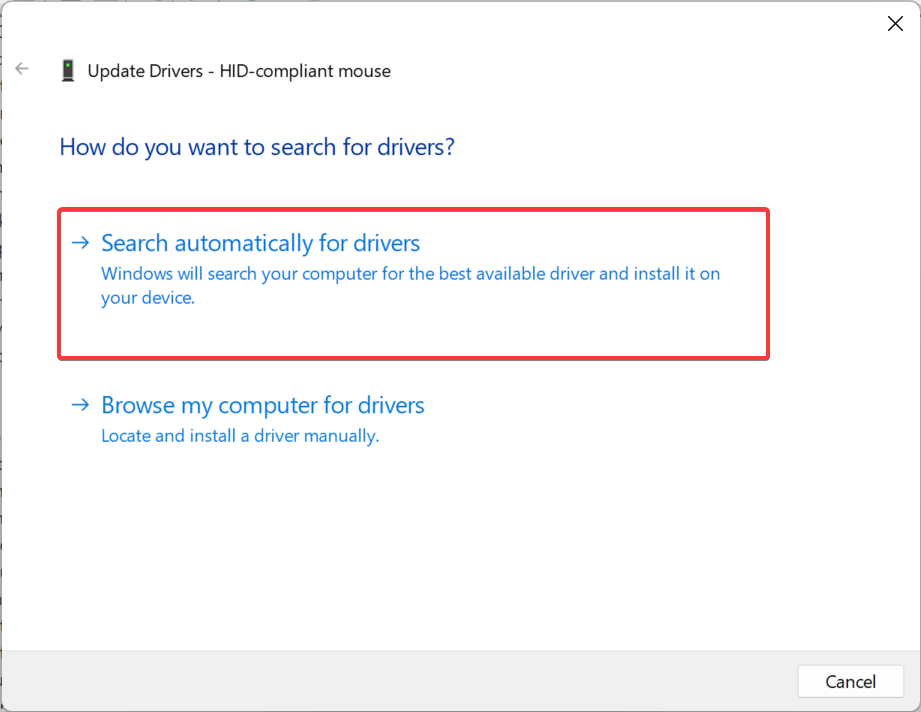
The Estimation of Software Size by Measuring Functionality: How to do it

In this article, we will discuss how the size of a software project can be estimated by measuring its functionality.

Software size estimation is a necessary and important task in software development. It can be used to determine the resources needed for developing a product and forecast its final cost.

Is it possible to estimate software size before coding?

Yes, but it is important to note that the size of the software depends on several factors. The number of lines of code (LOC) in the software is a good place to start. Other factors that aid in estimation include the number of functions, bugs, or even the number of users.

While LOC is commonly used, it does not account for non-functional elements, duplicate lines, and some unused functions. Further, different programming languages have different numbers of lines per unit of code. This, therefore, makes it an inaccurate estimation technique.

How do I measure software size by functionality?

Overview

This is the most common method of measuring software size. Using this technique, you measure the functionality you need to deliver to your users. In other words, you will count the number of features that have been implemented.

Functionality is a good metric of size because it measures the complexity of the software.

1. Identify all functions and features

  1. Create a list of all of the functions and features in your software. You can use a tool like Microsoft Excel.
  2. Next, include a description of what it does and any other attributes you think are important, as this information will come in handy when grouping them into logical components.
  3. Determine which functions/features depend on others. A component with no dependencies can be considered standalone, and its size will equal its LOC count. You can count the LOC manually or use a LOC counter tool.
  4. If a function/feature has dependencies, increase its size by adding up all the LOC dependent on it.

2. Assign each function to a group

  1. Group like functions together and assign them to one or more categories.
  2. Assign points per function within these groups based on their complexity and difficulty.

The size of a component should be proportional to its complexity. A component with more complex logic will have more features than a component with simple logic. For instance, when grouping functions, you can create a distinction between basic and core functions.

Each software has basic and core functions and features. They are the key ingredients that make your product work properly and are a necessity. This will help you create more meaningful metrics when comparing your application’s size over time.

3. Calculate the size of each component

After you’ve grouped your components and decided which ones need to be included in your calculation, you need to determine how many lines of code (LOC) each component has.

You can manually do it by identifying the number of groups and multiplying each group with its size in terms of function points. Alternatively, you can do this by using a tool that can automatically count LOC for each component.

Pros and cons of using the functionality metric in software size estimation?

Pros
It is easier to determine the quality of a program
Provides a better indication of what will be delivered and amount of effort required to deliver that functionality
Can be used to compare different versions or versions under development to each other
Can be used to predict the size of future products
Cons
Doesn't provide any information about the quality of the software
It can be hard to determine what constitutes a feature
Must be used with some other kind of measurement technique, such as lines of code

Traditional software size measurement methods only count the number of lines of code, which doesn’t show how many features are really in your software. Measuring software size by functionality makes more sense, especially when talking about large-scale, enterprise-level software.

It gives a more accurate picture of what is available to the user, and allows the product owner to easily assess the competitive landscape.

And even though this method has its drawbacks, it is much better compared to other size measurement techniques. After all, the end user can always reduce the software size if they deem fit and your code allows it.

As you can likely tell, our thoughts support the functional method. However, we must admit it’s not everyone’s cup of tea, so we’re open to hearing your suggestions. Is there any estimation of software metrics you think would do a better job? Let us know below.
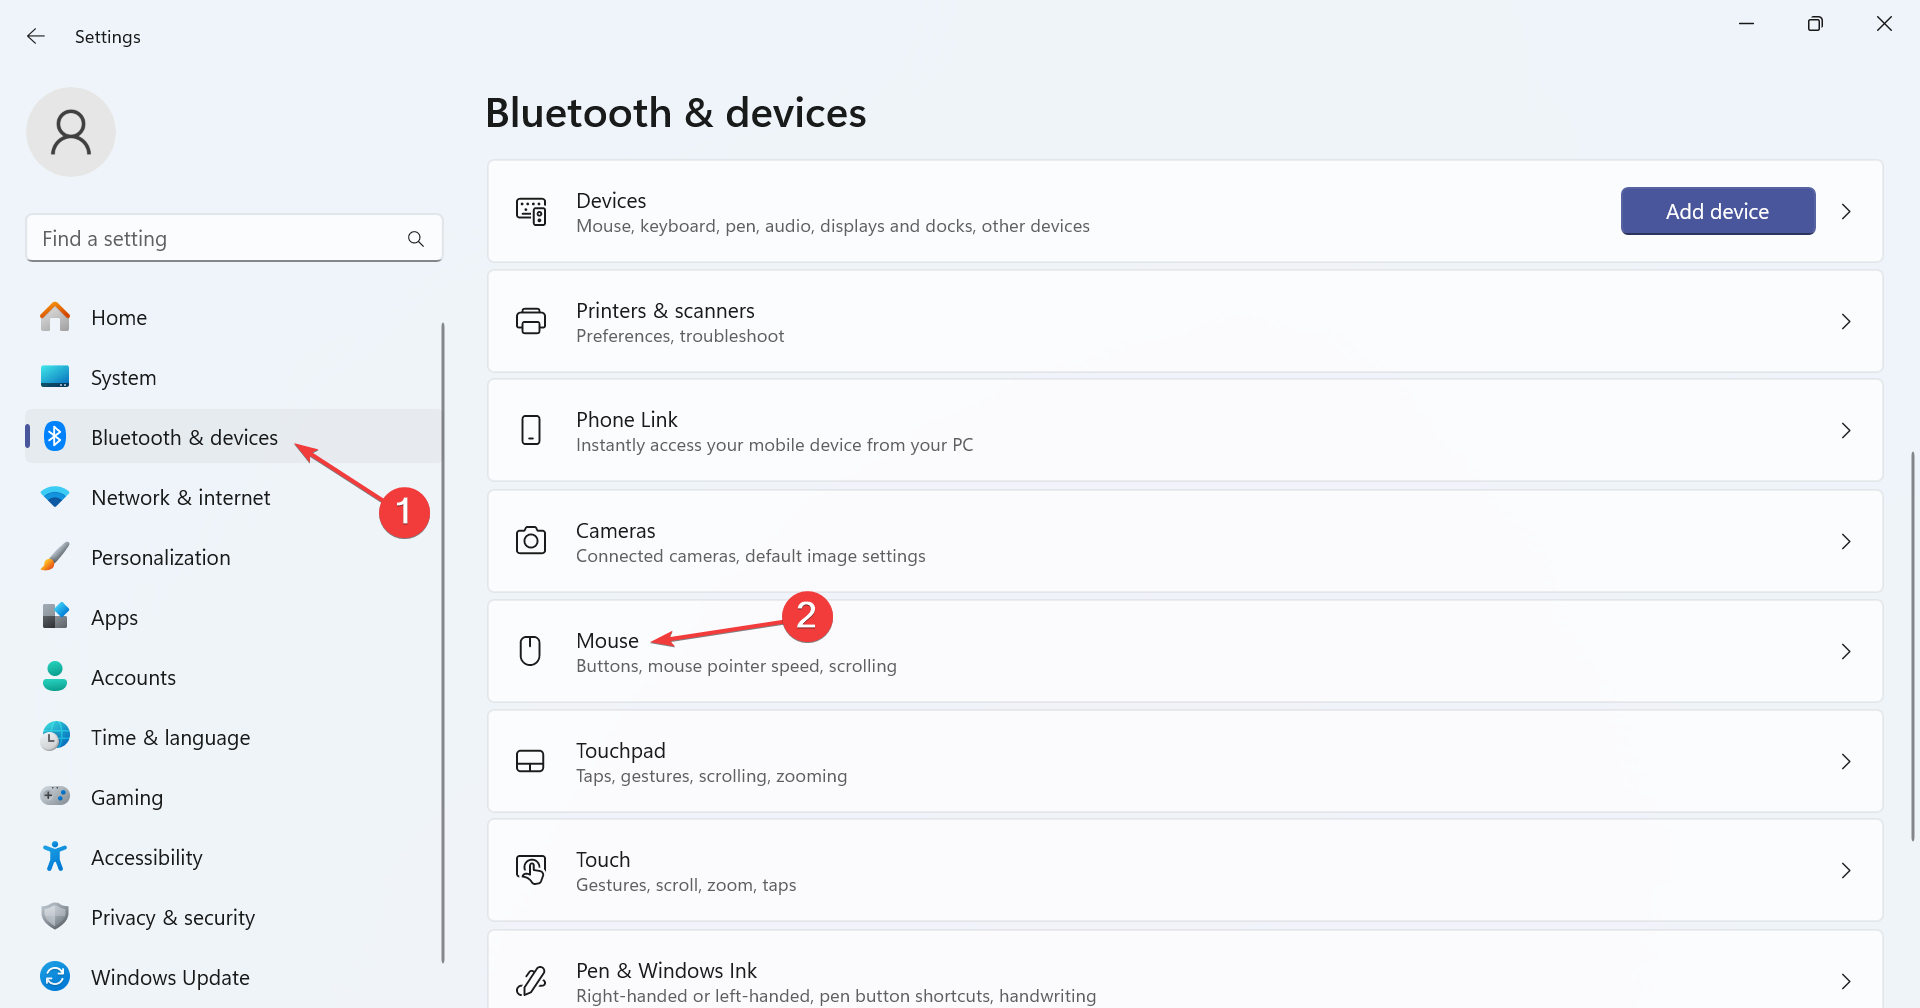
5 Easy Steps to Fix the Pbid.exe Application Error

If you get a pop-up box with a Pbid.exe Application Error message when trying to launch an app related to the executable file, this guide can help!

We will discuss common causes of the issue occurrence and delve into the effective solutions by WR experts.

What is pbid.exe? Pbid.exe is an executable file and a part of the Garena Online Pt apps. It is a legit file and can be located here: C:\Online Games\PointBlank Garena\gamedata\Apps\PBID\

The application error usually occurs if the program related to this file is corrupted or the system files related to it are missing. Also, you might see the pop-up if your computer is infected with viruses.

How can I fix the Pbid.exe Application Error?

Before moving to the detailed troubleshooting methods, here are a few preliminary checks you should do: 

  • Ensure your Windows and system drivers are updated to the latest version.
  • Press Ctrl + Shift + Esc to open Task Manger, then select all the open apps one by one and choose End task.

1. Run a malware scan

  1. Press the Windows key, type windows security and click Open.Windows Security open Windows key - pbid.exe application error
  2. Go to Virus & threat protection.
  3. Click Scan options.V& T Scan options
  4. Choose Full scan and click Scan now.Full scan -pbid.exe application error
  5. The deep scan will start and might take some time to finish. Once done, you will be able to see if there are any malicious apps or files on your computer.

The malware infection can cause sudden crashes; therefore, a deep scan is necessary to find the suspicious files on your device to prevent further damage. It can also help you fix the Application.exe has stopped working issue.

2. Run SFC & DISM scans

  1. Press the Windows key, type cmd, and click Run as administrator.CMD elevated - pbid.exe application error
  2. Type the following command to repair system files and press Enter: sfc /scannowSFCSCANNOW CMD
  3. Wait for the command to be executed, then copy & paste the following command to restore your Windows system image and hit Enter: Dism /Online /Cleanup-Image /RestoreHealthRestore health -pbid.exe application error
  4. Once done, reboot your computer.

Executing the DISM command to restore your Windows system image can also help you fix the Application Error 0xc0150004; read this guide to learn about other solutions.

3. Restart your computer in Clean boot

  1. Press Windows + R to open the Run window.cleanboot1 -pbid.exe application error
  2. Type msconfig and click OK to open the System Configuration window.
  3. Go to the Services tab, place a checkmark next to the Hide all Microsoft services option, then choose Disable all.Clean boot Disable all
  4. Switch to the Startup tab and click the Open Task Manager link.Open task Manager Clean boot
  5. Locate all the Enabled items one by one and click Disable.Disable Third party startup apps -pbid.exe application error
  6. Close Task Manager, then click Apply, and OK.CLEAN BOOT 5
  7. Now select Restart.Restart clean boot -pbid.exe application error

Upon restart, your computer will only have Microsoft-related services running; you can turn on one third-party service at a time to find out the culprit.

Once you have figured out which process is causing the issue, you can reverse engineer the steps to restart your computer in normal mode.

4. Reinstall the program

  1. Press Windows + I to open the Settings app.
  2. Go to Apps, then select Installed apps.Apps, installed apps -pbid.exe application error
  3. Locate the app, click the three dots icon, and select Uninstall.Uninstall the app
  4. Click Uninstall again.
  5. Now go to the program’s official website and download the file.
  6. Double-click the downloaded file to initiate the installation process.

5. Perform a system restore

  1. Press Windows + R to open the Run window.rstrui command Restore point - pbid.exe application error
  2. Type rstrui and click OK to open the System Restore wizard.
  3. On the System Restore window, select the Choose a different restore point option and click Next.Next Choose a different restore point - pbid.exe application error
  4. Select the restore point created before the issue appeared and click Next.Choose a point
  5. Click Finish.Finish

Windows will restart and restore your system settings to the chosen point. If the system restore did not complete successfully, it could be due to conflicting apps; read this guide to learn more.

In conclusion, if you see the Pbid.exe Application Error pop-up window, it could be due outdated program, corrupted system files, or malware infection.

You need to run a deep scan using a reliable antivirus, scan SFC & DISM scans, reinstall the program, or restore your device to the last known good configuration to fix the issue.

If you have any questions or suggestions related to the subject, feel free to mention them in the comments section below.
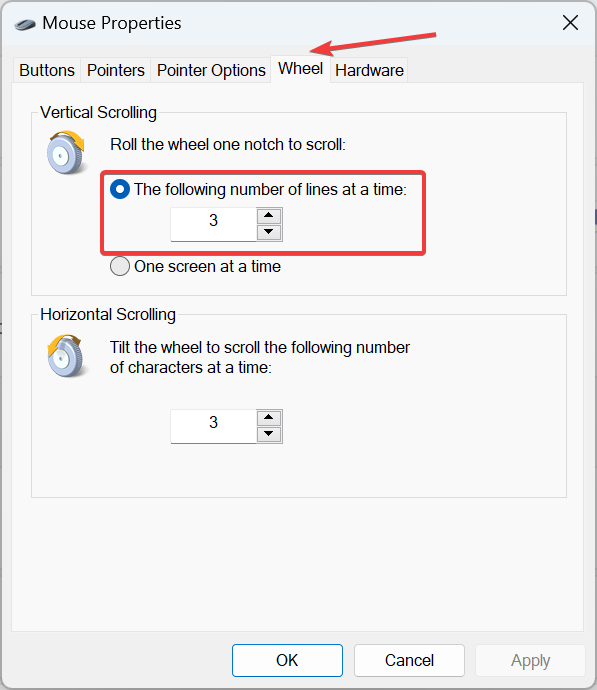
How to Get BitLocker Recovery Key from CMD

If you can’t remember the BitLocker password of an encrypted hard drive, you need a recovery key to get access to the drive.

In this guide, we will delve into simple instructions to get the BitLocker recovery key from CMD, along with other methods to recover it.

How can I get the BitLocker recovery key from CMD?

1. BitLocker recovery key from Command Prompt

  1. Press the Windows key, type cmd in the search box, and click Run as administrator.CMD elevated -how to get bitlocker recovery key from cmd
  2. Click Yes on the UAC prompt.
  3. Copy & paste the following command to get the recovery key of BitLocker after replacing C: with the drive letter you want to use and hit Enter: manage-bde -protectors C: -getCMD RECOVERY KEY
  4. Next, you will get the details related to your TPM Identifier and the Numerical password of 48 digits; note them and close the CMD window.

2. Get the Recovery key for a local computer (forcefully)

  1. Open the Command Prompt with the administrator rights using the same steps from Solution 1.
  2. To forcefully recover the BitLocker key for your local computer, type the following command after replacing BitLockerVolume with the driver letter and press Enter: manage-bde -forcerecovery <BitLockerVolume>
  3. Note down the key and close the CMD window.

3. Get the Recovery key for a remote computer

  1. Open the Command Prompt with the administrator privileges using the same steps from Solution 1.
  2. Copy & paste the following command after replacing RemoteComputerName with the name of the computer and BitLockerVolume with the driver letter and hit Enter: manage-bde. -ComputerName <RemoteComputerName> -forcerecovery <BitLockerVolume>
  3. Make a note of the recovery key and close the CMD window.

Sometimes, even with a correct recovery key, BitLocker fails to unlock your computer; it could happen if you lose your administrator rights on the computer; to learn more, read this guide.

What are the other methods to find the recovery key?

Another popular method is to use your Microsoft Account to get the BitLocker Recovery key for any of the computers registered under it. To learn the detailed step-by-step instructions, we suggest you read this guide.

To conclude, if your computer is asking for a BitLocker recovery key upon restart or you have forgotten your password or PIN, you need your phone or another computer and your Microsoft account to recover the key and log into your PC.

However, if you just want to keep the recovery key handy for rainy days or get it for a remote computer, the simplest way would be to use the Command Prompt option.

You can improve long term security by storing BitLocker keys in Active Directory, and you can follow our guide on how to store BitLocker keys in Active Directory to prevent future recovery issues.

In case you don’t like the BitLocker encryption and are looking for a way to permanently disable it on Windows 11, we have a separate guide for you.

We also have a detailed guide on how to use the auto-unlock feature on BitLocker, allowing you to retain control over the process; read it to learn more about it.

If you need any help or are stuck somewhere while following the steps, feel free to mention your queries in the comments section below.
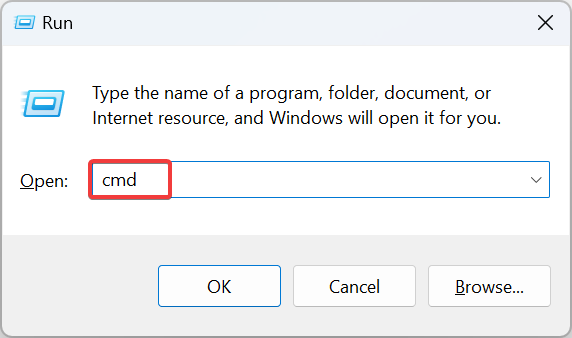
Microsoft Teams reaches 320 million active monthly users

Microsoft has announced that its messaging app, Microsoft Teams, now has more than 320 million active monthly users. This comes just a few months after the general release of the “New Teams,” a revamped version of the app, for Windows and Mac.
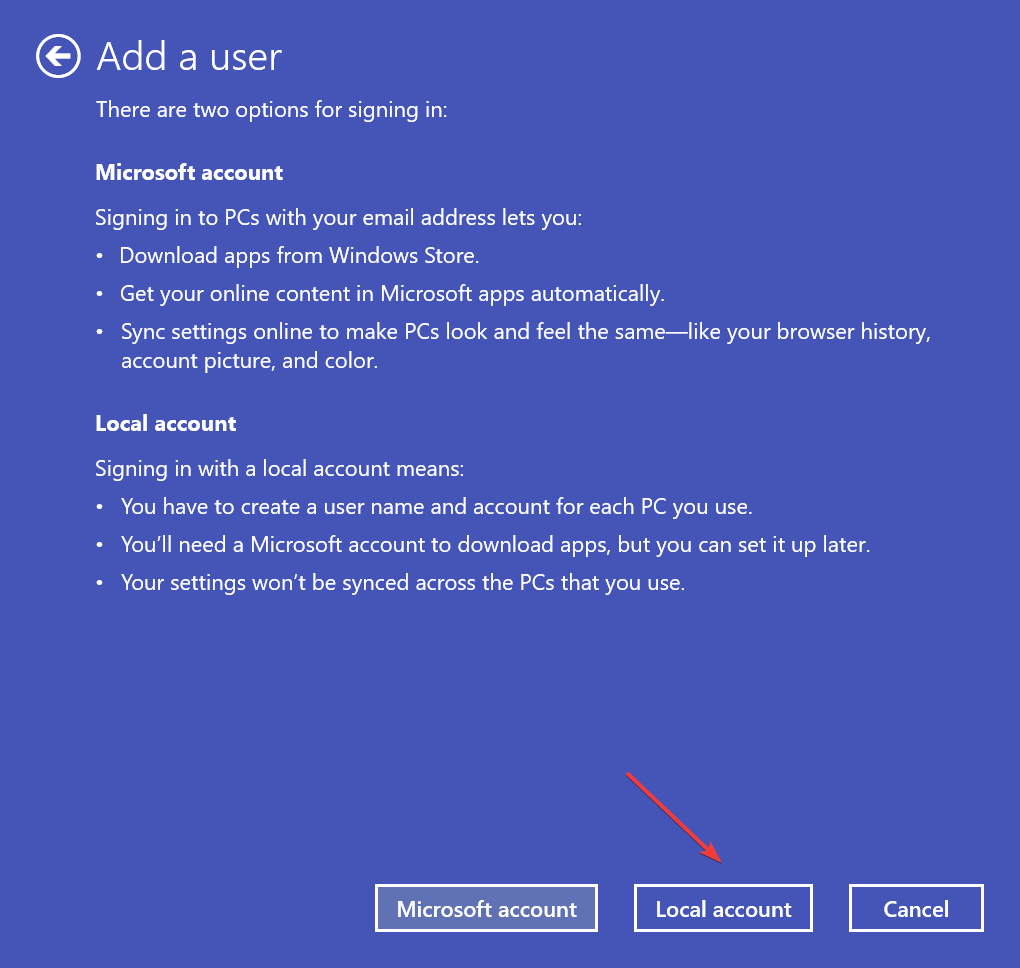
This “2.0” iteration of Teams boasts improved performance (“up to two times faster while using 50% less memory,” according to the announcement post on the Microsoft tech community blog). More specifically, users switching to the New Teams can expect:

  • 3x faster installation
  • 2x faster startup times
  • 1.7x faster switching between chats and channels
  • 2x faster meeting join experience

This in addition to some new features like Copilot integration within Teams, which can do things like summarize meetings etc. for greatly improved workflow and efficiency.

The post states that Classic Teams users will be automatically updated after March 31st, 2024. Microsoft product lead Anupam Pattnaik says of the new and improved Teams: “We have focused on providing high-quality performance and enhancing the basics in areas such as reliability, security, and IT management to make sure that new Teams meet the evolving requirements of your organization.”

What is WbemCons.exe and How to Fix its Application Errors

The WbemCons.exe file may not be helpful to every standard PC user, so if you spot it and it’s causing trouble, WindowsReport experts have figured out ways to expunge it from your system.

What is the WbemCons.exe file? WbemCons.exe is a process associated with HPE System Insight Manager. You can find it in the following path: C:\Program Files\Hewlett Packard\HPE Systems Insight Manager\wbemcons.exe

The WbemCons process starts automatically when you start the HPE System Insight Manager application and remains running in the background while you are using the application. The program provides remote access to the configuration and management of the computer and its applications.

How can I fix WbemCons.exe application errors?

Before we start off with troubleshooting steps, below are a few variations of the WbemCons.exe errors you may encounter:

Wbemcons.exe is missing
Error in Application: wbemcons.exe
Wbemcons.exe not valid
Fault in Software Path: wbemcons.exe
Wbemcons.exe encountered a problem and will close
Wbemcons.exe can't be located
Start-up error in application: wbemcons.exe
Wbemcons.exe is not running
Cannot find wbemcons.exe
Wbemcons.exe halted
Note icon NOTE
The first four steps are to remove the WbemCons.exe file if it is causing performance issues on your PC. Otherwise, proceed with steps 5 onwards if it is a malicious file.

1. End the process

  1. Hit the Windows key, type Task Manager in the search bar, and click Open.task manager search
  2. Navigate to the Processes tab, and find the WbemCons.exe process.
  3. Right-click on it and select End task.

Ending the process will temporarily solve any high CPU usage. However, if the process runs in the background, every time you power up your PC, it will start over again. If it is a necessary process, you may want to limit its CPU usage.

2. Run the program in compatibility mode

  1. Locate the WbemCons.exe file, right-click on it, and select Properties.    
  2. Navigate to the Compatibility tab, check the Run this program in Compatibility mode option, and select Windows 8  from the drop-down menu.   run this program in compatibility for
  3. Allow the program to finish installing, then check whether the error persists.

If the issue was WbemCons.exe constantly crashing or freezing your system, running it in compatibility mode will resolve the issue. Perhaps all along, the problem was compatibility issues with your OS.

3. Uninstall the program

  1. Click on the Start Menu icon, type Control Panel on the search bar, and click Open.control-panel-search fallout new vegas runtime error
  2. Select Uninstall a Program under Programs.going uninstall program control panel
  3. Find the HPE System Insight Manager app, click on it, and select Uninstall.
  4. Confirm uninstallation in the next pop-up.
  5. Go back to its location path and delete the exe file.

Once you’re done, clean up any remnant files to prevent any instances of the app from running in the background.

4. Disable the HPE System Insight Manager

  1. Hit the Windows key, type cmd in the search bar, and click Run as administrator.cmd-run-admin-w11 unexpected kernel mode trap windows 11
  2. Type and Enter the following command: >mxstop
  3. To start it again, type in the following command and hit Enter: >mxstart

5. Check for viruses

  1. Press the Windows key, search Windows Security, and click Open.
  2. Select Virus & threat protection.
  3. Next, press Quick scan under Current threats.
  4. If you don’t find any threats, proceed to perform a full scan by clicking on Scan options just below Quick scan.Scan options
  5. Click on Full scan, then Scan now to perform a deep scan of your PC.Full Scan Scan Now
  6. Wait for the process to finish and restart your system.

6. Run DISM and SFC scans

  1. Hit the Start Menu icon, type cmd in the search bar, and click Run as administrator.cmd-run-admin-w11 unexpected kernel mode trap windows 11
  2. Type the following commands and press Enter after each one:DISM.exe /Online /Cleanup-Image /Restorehealth sfc /scannow

What does HPE Systems Insight Manager do?

HPE Systems Insight Manager is a remote monitoring and management solution that provides real-time information about your IT infrastructure. It enables organizations to proactively manage their IT environment, including servers, storage systems, data center infrastructure and networks.

Such tools are great because they give you the power to discover problems before they occur. When you arrest problems in their infancy stage, you can optimize resource utilization and ensure the availability of applications and services.

When it comes to exe files, you can never know when they won’t open so you can force launch them in such cases. We have extensive guides on a lot more of these kinds of files so should you run into a main.exe file and don’t know what it is, we unpack all about it.

That’s it from us but if you have any additional thoughts on this article, we’d love to hear from you so do leave a comment down below.