Operation Canceled Due to Restrictions in Excel 2010 [Fix]

Many encountered This operation has been canceled due to restrictions in effect on this computer error in Excel 2010. If this message appears, you won’t be able to open any links from Excel or other Office tools.

This is a small but rather tiresome issue that can interfere with your work, so let’s see how to fix it.

What does This operation has been cancelled due to restrictions in effect on this computer in Excel 2010 mean?

This message means that your registry isn’t properly configured, or that you don’t have the right file associations set on your PC.

How can I bypass This operation has been canceled due to restrictions in effect on this computer in Excel 2010?

1. Change your default browser

  1. Press the Windows key + I to open the Settings app.
  2. Navigate to Apps and select Default apps.
     
  3. Select the browser that you want to use as default. In our example, we’ll use Microsoft Edge.
  4. A list of file extensions that Edge can use will now appear. Select the first one that’s not associated with Edge.
     
  5. Select Microsoft Edge from the list and choose Set default.
  6. Repeat the last two steps for all file extensions on the list that aren’t associated with Edge.

To learn more about how to change the default browser on Windows 11, we have an in-depth guide that shows you how to do that.

2. Modify the registry

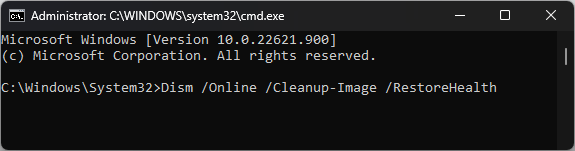
  1. Press the Windows key + S and type cmd. Select Run as administrator.
    CMD elevated -How to Disable Challenge Phrase
  2. Run the following commands one by one:
    REG ADD HKEY_CURRENT_USER\Software\Classes.htm /ve /d htmlfile /f
    REG ADD HKEY_CURRENT_USER\Software\Classes.html /ve /d htmlfile /f
    REG ADD HKEY_CURRENT_USER\Software\Classes.shtml /ve /d htmlfile /f
    REG ADD HKEY_CURRENT_USER\Software\Classes.xht /ve /d htmlfile /f
    REG ADD HKEY_CURRENT_USER\Software\Classes.xhtml /ve /d htmlfile /f
  3. Close the Command Prompt and check if the problem is still there. If it is, try restarting your PC.

How to bypass this operation has been cancelled due to restrictions in effect on this computer?

  1. Press Windows key + R and enter gpedit.msc.
  2. In the left pane, in User Configuration navigate to Administrative Templates and then System. In the right pane, choose Don’t run specified Windows applications.
  3. Make sure this policy is set to Not configured.

This method only works if you get this message while trying to run a specific application that has been blocked by the administrator.

This operation has been canceled due to restrictions in effect on this computer in Excel 2010 can be easily fixed, and in most cases, you just need to adjust your file associations or make a few tweaks to the registry.

This isn’t the only application affected, and we already wrote about This operation has been canceled in Device Manager error in our previous guides.

In case your hyperlinks aren’t working in Excel after following these steps, you can try reading one of our other guides.

What solution did you use to fix this problem? Let us know in the comments!

How to Open VBC Files: 3 Easy Ways

VBC files were extensively employed in the past, but the format doesn’t find much use today. Since Windows and MacOS don’t natively support the file type, there aren’t many options to open VBC files.

What is a VBC file? There are two types of VBC files, Visual Business Cards and VodBurner Crude, the VodBurner’s Skype recordings. VodBurner, by default, saves these video call recordings in the VBC format.

So, let’s explore the available supported programs for both!

How can I open VBC files?

Tip icon Tip
Windows Report is not associated with the third-party tools listed below. While these appear safe, we recommend you scan the files with an effective antivirus solution, for example, ESET HOME Security Essential, and have it running at all times to eliminate any threats.

1. Go with Visual Business Cards

  1. Download Visual Business Cards from the official website.
  2. Run the setup and follow the on-screen instructions to complete the process.visual business cards to open vbc files
  3. Once done, restart the computer for the changes to come into effect.
  4. Now, launch Visual Business Cards, click the File menu, and select Open Existing Business Card.open file
  5. Navigate to the file location, select it, and click Open.load to open vbc files
  6. The .vbc file will now be available for viewing and editing.

Developed by Tailwag Software, the Visual Business Cards program will allow you to easily open and edit VBC files.

As per the official website, the program offers a free 30-day trial, after which users have to purchase the license. However, you can always use the test drive version, but it will have the word, Sample, printed on all business cards.

2. Use VodBurner

  1. Download VodBurner from the official website or a reliable third-party source. In our case, the official website wasn’t accessible.
  2. Run the setup and follow the instructions to install the program.vodburner to open vbc files
  3. Now, right-click on the saved VBC file, select Open with from the context menu, and choose VodBurner.

Remember, you can only use VodBurner to open VBC files created by the program.

3. Convert the file into a supported format

You can also convert VBC files into a format supported by Windows or MacOS, depending on the device you are using. There are several online and downloadable converters that will quickly do the job. But first, set the file extensions to be visible.

Since the VBC extension is used by different programs, never confuse between them. Also, manually changing the extension in the file name, say from .vbc to .hex, might not work and may render the file unreadable.

For users who regularly work with such files, a universal file opener will be the best choice. It will negate the need to install a dedicated program for each format.

For any queries or to share how you opened the VBC file, drop a comment below.

What is Msascuil.exe and Should I Disable it?

MSASCuiL.exe may be considered harmful to your device, especially if you don’t know its origin. If you observe any unusual behavior or suspect that it may be malicious, we show you how to remove it.

What is MSASCuiL on my computer?

MSASCuiL.exe, or Microsoft Antivirus Security Center user interface logo, is an executable file associated with Windows Defender.

This is Microsoft’s official built-in antivirus and antimalware software for Windows devices. The file is located in the Windows Defender program folder on your computer.

How can I disable MSASCuiL.exe on my PC?

Check off the following first:

1. Disable the process from Startup

  1. Start with backing up your Registry or create a restore point.
  2. Hit the Windows + R keys to open the Run command.
  3. Type regedit in the dialog box and hit Enter to open the Registry Editor.
  4. Navigate to the following location: Computer\HKEY_LOCAL_MACHINE\SOFTWARE\Microsoft\Windows\CurrentVersion\Run
  5. A list of startup apps will appear on the right.
  6. Right-click on the MSASCuiL.exe, then select Delete.

Keep in mind that disabling or removing MSASCuiL.exe can prevent you from accessing and managing the features and settings of Windows Defender.

Windows Defender plays a crucial role in protecting your computer from various types of malware and providing real-time scanning for threats, so disabling it would leave your computer vulnerable.

2. Optimize the startup process

  1. Navigate to your browser and download Microsoft Autoruns.
  2. Locate the downloaded file and unzip it.
  3. Right-click on the autorun.exe file and select Run as administrator.
  4. Click on Agree to accept the license terms.
  5. Type and Enter srvhost in the Filterbox entry.
  6. Locate the following entry, right-click on it, and select Delete: C:\ProgramFiles\WindowsDefender

At times, killing the process during startup does not do the job. Some autostart utilities are great at hiding and will need a more proactive removal process.

Here’s where Autoruns come in, as they do a good job of illuminating these processes that may be hiding in other accounts on your system.

3. Run a malware scan

  1. Press the Windows key, search Windows Security, and click Open.
  2. Select Virus & threat protection.
  3. Next, press Quick scan under Current threats.
  4. If you don’t find any threats, proceed to perform a full scan by clicking on Scan options just below Quick scan.Scan options
  5. Click on Full scan, then Scan now to perform a deep scan of your PC.Full Scan Scan Now
  6. Wait for the process to finish and restart your system.

Although Windows built-in antivirus is your device’s primary threat protector, it does have its drawbacks and sometimes, Windows Defender is not working. As such, cybercriminals may take advantage of this loophole and inject a similar file to MSACuiL.exe, but in essence, it is malware-infested.

In this case, you’ll have to use third-party antiviruses. You, however, need to take its results with a pinch of salt too, as they are known for making false positives.

Tips to differentiate legitimate exe files from compromised files

  • File location – Legitimate files are usually located in established system folders such as C:\Windows or within program folders. Exercise caution if it is in an unusual or unexpected location.
  • Digital signatures – Files from reputable developers are often digitally signed. Simply right-click on the file and go to Properties>Digital Signatures tab to verify against the original developer.
  • File size – Compare the file size of the suspicious .exe file with the known legitimate file. If there is a significant difference in file size, it may indicate a potential issue.
  • Antivirus scans – Run a reputable antivirus on the suspected file. Antivirus software can often detect and flag malicious files as long as they’re up-to-date.
  • Verify source – Official websites or trusted software repositories minimize the risk of downloading compromised files.

While these tips can assist in fool-proofing the legitimacy of .exe files, it is important to exercise caution and rely on a combination of methods to ensure the security of your system. Windows 10 and 11 users are in luck because of the Windows Defender Sandbox feature.

You can easily isolate apps in a controlled environment to detect malware attacks and block them before they enter a network. This way, you get to easily elevate your system’s security without the need for additional apps.

Speaking of Windows Defender files, you may also be interested in learning about a similar MSCASCUi.exe file that is responsible for launching the Windows Defender GUI among other tasks.

Have you come across the MSASCuiL.exe file or process? Would you say it was a great startup process, a nuisance to your system or it had no effect? Let us know in the comment section below.

What is MsSense.exe and How to Fix its Errors on Windows

MSSense.exe is the executable file for Defender for Endpoint, a Microsoft security platform tool designed for enterprises.

What is the service name of MsSense.exe? The service name of MSSense.exe is SENSE. Additionally, when it’s launching a Live Response session on the Microsoft 365 Defender, the process also starts SenseIR.exe.

How do I fix MsSense.exe errors and issues?

1. Fix MsSense.exe high CPU and memory usage

  1. 1. Click the Start button, type Windows Security in the search bar and click on the app from the results.

  2. 3. Select Virus & threat protection.

  3. 4. Choose Manage settings from Virus & threat protection settings.

    Click on Manage settings under Virus & threat protection
  4. 5. Scroll down and click on Add or remove exclusions under Exclusions.

  5. 6. Select Add an exclusion and choose Folder.

    add exclusion
  6. 7. Select the following path:C:Program files\Windows defender

  7. 8. Validate the change by clicking on Exclude this folder.

  8. MsSense.exe high CPU and memory usage usually occurs when Windows Defender is scanning your PC and can get stuck during that process.

    However, you should know that during scan, it’s normal for the process to take up to 50% of CPU. Another way to mitigate the problem is to change the scanning schedule so that it performs the scan when the endpoint is not active.

If you want more guidance on this issue, you can consult our guide on how to fix MSMpEng.exe high CPU because this is another associated process that is causing this problem.

Please note that you can’t just simply kill the MsSense.exe process from Task Manager even if you have administrative privileges because this is a protected security process.

2. Fix MsSense.exe crashing with error code 0xc0000005

If you’re experiencing MSSense.exe crashing every 5-10 minutes and showing the error code 0xc0000005, the easiest way to fix it is to install all the latest OS updates.

This is a known bug with Microsoft Defender for Endpoint and alternatively, you can install the KB5005292 directly from the Microsoft Update Catalog to update its definitions.

You may also take a look at our guide on how to fix error code 0xc0000005 on Windows 11.

3. Fix Defender for Endpoint (MsSense.exe) locking files

  1. Log in to Microsoft Defender XDR using an account with the Security administrator or Global administrator role assigned.
  2. In the navigation pane, select Settings > Endpoints > Rules > Automation folder exclusions.
  3. Click New folder exclusion.
  4. Enter the folder name, extensions, file names, and/or the descriptions for the files that are locked by Defender for Endpoint.
  5. Click on Save when you’re done, restart the endpoint, and see if the files are still locked.

For some of our readers every time the application downloads a file from the server, mssense.exe creates an RWD lock on the file for a short period of time, but enough for the app to return an error when accessing the file. By adding a folder exclusion in Microsoft Defender as shown above, you will avoid this issue.

Now you know what is MsSense.exe and what to do if it causes any problems. You might also be interested on how to fix the Windows Defender Service Access Denied error.

Did you manage to fix the MsSense.exe issues using our guide? Tell us more in the comments section below.

The Security Module on This Device is Not Working [Solved]

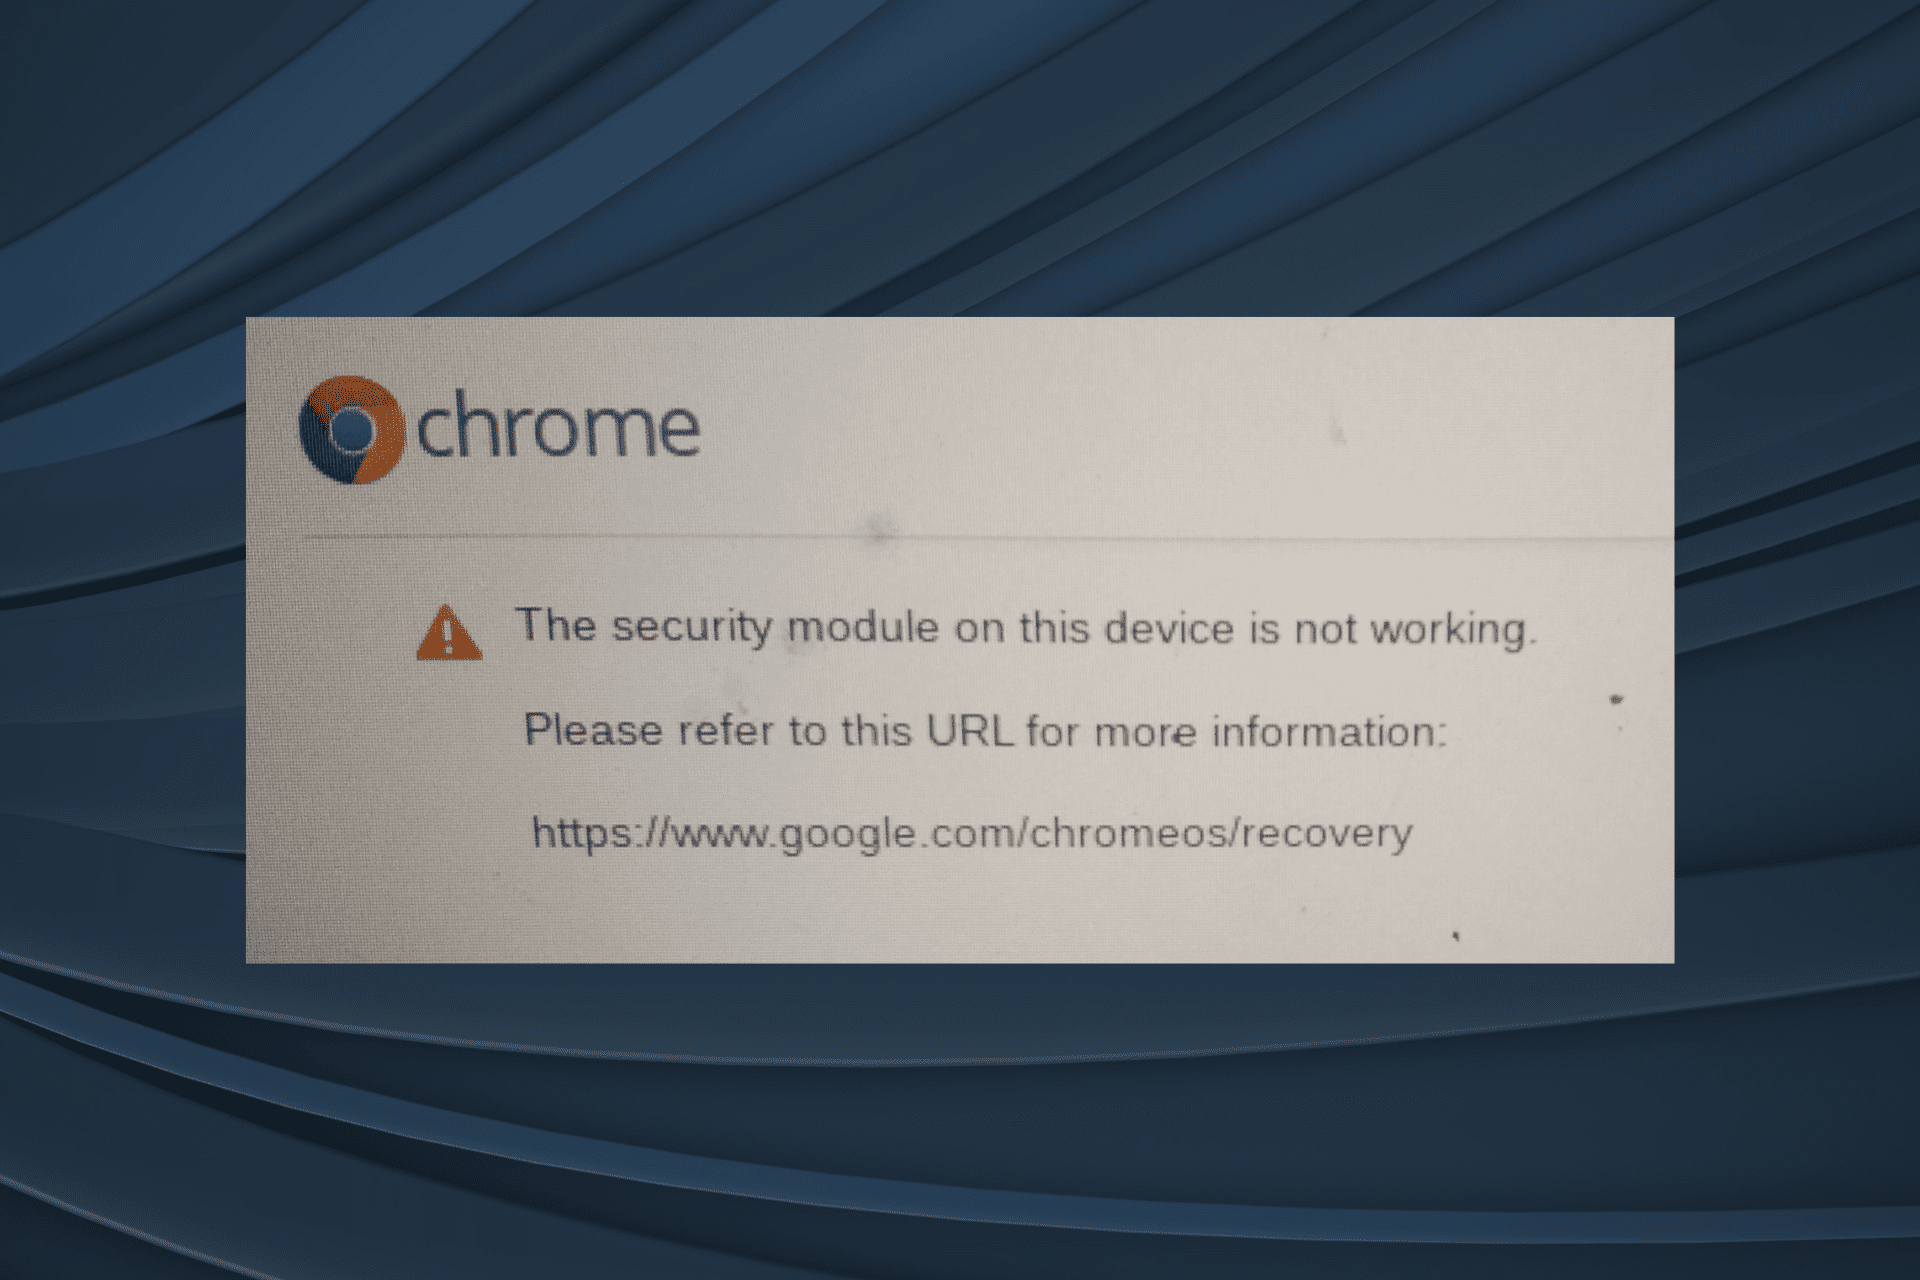
The security module on this device is not working Chromebook error appears when users connect a recovery USB drive or SD card to reinstall the OS after getting the Chrome OS is missing or damaged screen.

If you hold the Tab key, the details read, TPM error in read-only firmware.

Why is the security module not working? The problem arises when the EC chip is malfunctioning and requires a reset. Also, on older Acer or Asus Chromebook models, it might be a hardware issue to blame.

How do I fix The security module on this device is not working error?

Before we start with the slightly complex solutions, try these quick ones:

  • Restart the Chromebook and verify whether it boots the Chrome OS.
  • Plug in the bootable USB in another slot. For certain models, say Samsung Chromebook XE303C12, the blue slot doesn’t work for recovery.
  • Plug the Chromebook into charging, turn it on, and leave the device overnight. If the Chromebook is not charging as well, it’s a hardware issue.

1. Reset the EC chip

  1. Disconnect all external peripherals, including any bootable USB drives and SD cards.
  2. Power on the device and wait for 30 seconds. Remember, start the 30-second countdown after you get to the error screen.
  3. Now, hold the power button to turn off the laptop.power off to fix the security module on this device is not working
  4. Repeat the process 25-30 times until the EC chip is reset. Based on our experience, it usually takes 7-10 attempts.

EC (Embedded Controllers) chip or the security module plays a critical task in regulating the temperature, controlling power and battery charging, and facilitating the use of certain external peripherals.

When it’s not working, the Chromebook throws The security module on this device is not working error and fails to recover. Remember, you may have to repeat the process a few times. Use a stopwatch for higher precision.

2. Drain the battery

Unplug the charging cable while the Chromebook is powered on, and let the battery drain. The device will automatically turn off after some time. Wait for 30 minutes, then reconnect the charging cable and check for improvements.

Also, some users reported that removing and then reconnecting the battery helped fix the Chromebook recovery USB error. Besides, if you see An Unexpected error has occurred in Chromebook recovery, make sure the connections are proper.

3. Consult a professional

Surprisingly, there are not many solutions available for the error since it’s related to a malfunctioning or damaged motherboard. The only option left is to get the device inspected by a professional.

If it’s under warranty, contact the manufacturer. For older out-of-warranty devices, you may go to the local repair shop.

One of these fixes should work for The security module on this device is not working recovery driver error on Chromebook. And if you see the Chrome OS is missing or damaged error, don’t go with reinstall, but first try a quick reset.

For any queries or to share what worked for you, drop a comment below.

Opening .dxr Files: 2 Ways to do it

DXR files are non-editable movie/video files. They found extensive applications in gaming in the 90s, but after the discontinuation of Adobe Director, users are having a tough time opening .dxr files.

DXR files are uncompressed and were created using Macromedia Director (later known as Adobe Director). They are suitable in cases where disk space is not a constraint, and the stored data only needs to be viewed. When it comes to editing, DIR files are the preferred format.

How can I open .dxr files?

Tip icon Tip
The guide lists tools that are to be downloaded from third-party websites. While these appear safe, we recommend you take the necessary precautions at your end. Scan the downloaded files using an effective antivirus solution and have it enabled at all times!

1. Get a dedicated player

The primary option is to use a dedicated player for opening .dxr files. Your first choice would be Adobe Director.

Even though it is not officially available for download, you can still find it on Internet Archives, a third-party website hosting the discontinued software. The installers for both Windows and MacOS are listed.

opening DXR files

Download and extract the files, run the setup and complete the installation. You can then view .dxr files like the good old days! Also, Adobe Director will automatically be set as the default file association for DXR files. If that doesn’t happen, manually set the default app.

We got the 0x80004005 error while extracting files, but using a dedicated extraction software helped fix the problem.

2. Convert the file into a supported format

You can also convert DXR to MP4 using an online converter. There are several options available. Choose one that works best for you!

There are a few downloadable DXR converter programs as well. The preferred option for most is ProjectorRays on GitHub. The tool converts non-editable DXR files into editable DIR files.

Also, earlier, you could use a web browser for opening .dxr files, but with Adobe Shockwave Player being discontinued, that’s not the case anymore. However, if you can get hold of it from a reliable third-party source, viewing DXR files would be much simpler!

In case you regularly work with outdated or unsupported formats, we recommend getting a universal file opener and removing individual programs for each file type!

For any queries or to share which program worked best for you, drop a comment below.

How to Remove DNS Unlocker From Chrome

If you have encountered with unexpected disruptions due to ads related to DNS Unlocker on your Google Chrome, this guide can help!

What is DNS Unlocker? It is a potentially unwanted program or adware which affect web browsers and is designed to alter the Domain Name System (DNS) settings on a PC, redirecting web traffic through its own servers.

How can I remove DNS Unlocker from Chrome?

Before proceeding with any steps to remove the DNS Unlocker from Chrome, go through the following preliminary checks:

1. Delete the DNS Unlocker app

First restart your computer in Safe mode, follow these steps:

  1. Press Windows + R to open the Run dialog box.msconfig - Remove DNS Unlocker From Chrome
  2. Type msconfig and click OK to open the System Configuration window.
  3. Go to the Boot tab, locate Boot options, then place a checkmark next to Safe boot and network.Safe boot network
  4. Click Apply, then OK to save the changes.
  5. Now click Restart.Restart clean boot

Once your computer reboots, the system will run with minimal set of drivers and no interference from the third-party apps. Now, follow these steps to uninstall the app:

  1. Press Windows + I to open the Settings app.
  2. Go to Apps, then select Installed apps.Apps - Installed apps - Remove DNS Unlocker From Chrome
  3. Scroll through the list, locate DNS Unlocker, and click three dots icon, then select Uninstall.UNinstall the app
  4. Click Uninstall.

Once DNS Unlocker app is uninstalled, you need check the list of installed apps for unwanted apps, and uninstall them too.

2. Clear the browsing data

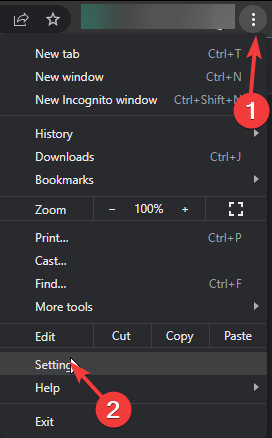
  1. While in safe mode, launch Google Chrome, click the three dots icon on the upper right corner, and choose Settings from the context menu.Settings CHrome
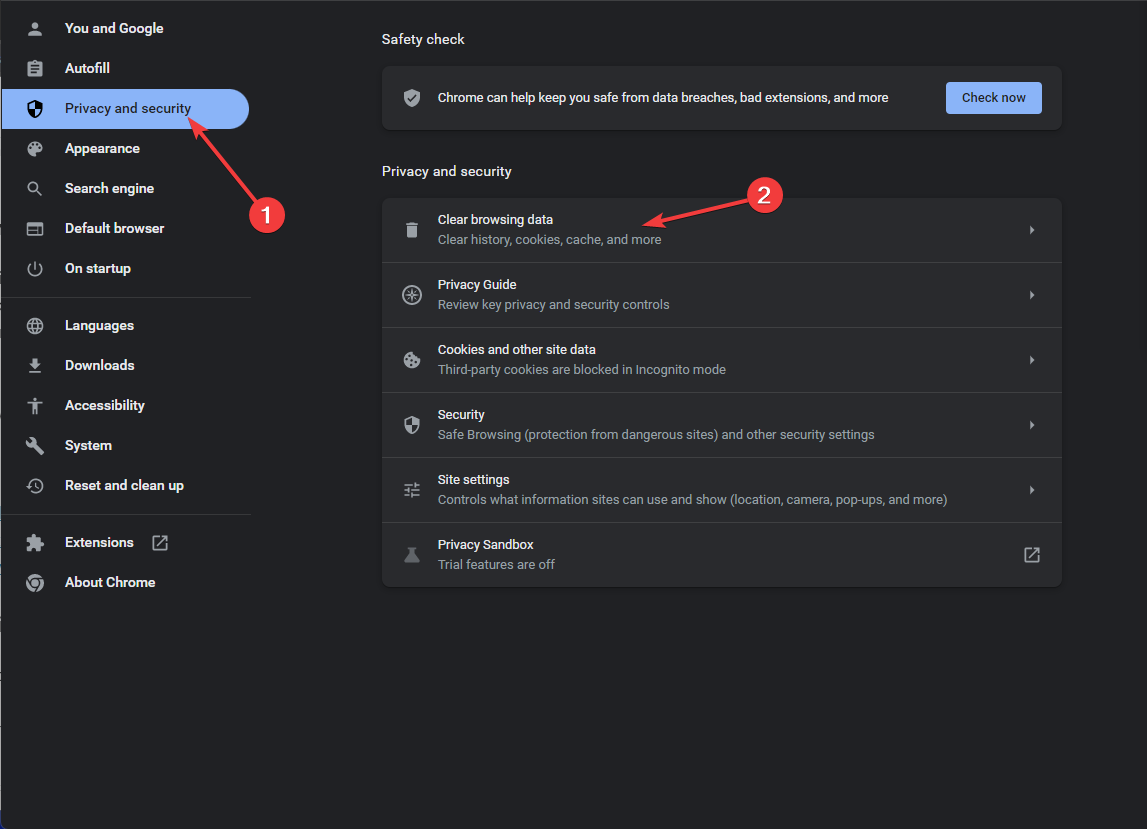
  2. Click the Privacy and security option, then select Clear browsing data.Clear cache Chrome - Remove DNS Unlocker From Chrome
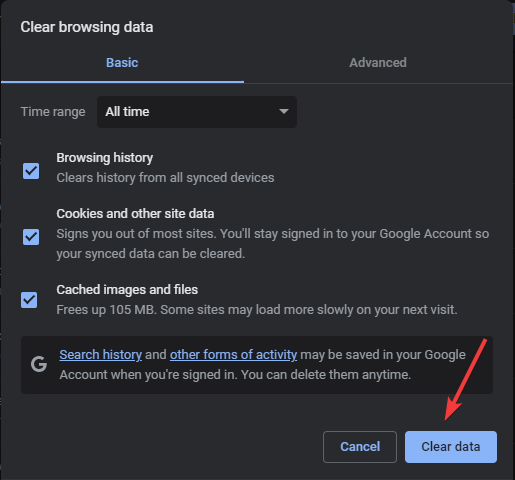
  3. For Time range, select All time and place a checkmark next to Cookies and other site data, and Cache images and files.Clear data
  4. Click the Clear data button.

3.  Remove the unwanted extensions

  1. While in safe mode, launch Google Chrome, click the three dots icon on the upper right corner, and select Extensions from the context menu.
  2. From the sub-context menu, choose Manage Extensions.Manage Extensions new
  3. Carefully examine all the extensions and for all unwanted ones, click Remove to delete them.Extnesions remove - Remove DNS Unlocker From Chrome

4. Check the DNS settings

  1. While in safe mode, open the Google Chrome and type the following command in the address bar and press Enter: chrome://net-internals/#dns
  2. If you see any entries related to DNS Unlocker, click the Clear host cache button.Clear cache - Remove DNS Unlocker From Chrome
  3. Close the browser.

5. Reset the browser

  1. While in safe mode, launch Chrome, click the three dots icon on the top right corner, and select Settings.Settings CHrome - Remove DNS Unlocker From Chrome
  2. Click Reset settings from the left pane, then choose Restore settins to their original defaults.Reset your settings - Remove DNS Unlocker From Chrome
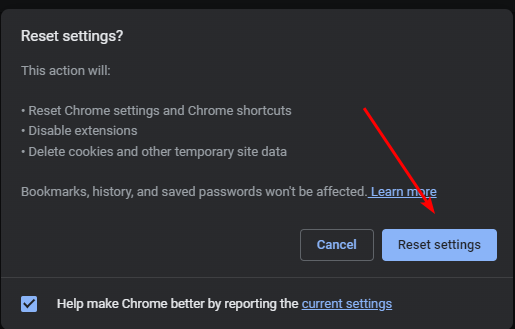
  3. Now on the Reset settings popup window, select the Reset settings button.

Resetting your browser to default also help you handle errors like There’s a problem with website’s security certificate; read this to learn about it in detail.

6. Restore the DNS settings on your PC

  1. In safe mode, press Windows + R to open the Run window.Network connections
  2. Type ncpa.cpl and click OK to open the Network Connections window.
  3. Right-click the active connection and choose Properties from the context menu.Properties for Network Connections
  4. Select the Internet Protocol Version 4 (TCP/IPv4) option and click Properties.IPV properties
  5. Click the radio button next to Obtain DNS Server Address Automatically and Obtain an IP address automatically, then click OK.Obtain an app

Once you have followed all the steps mentioned in the guide, don’t forget to follow the reverse engineer the steps mentioned in Solution 1 to restart your PC normally.

In conclusion, to remove the DNS Unlocker on Google Chrome, you need to remove its extension, uninstall the app from the computer, and clear browsing data.

In case you still see the ads related to the PUPs, try resetting the browser to fix it once and for all. Also, you can use these steps to fix the same issue on other browsers as well.

In case nothing has worked for you, you need a dedicated PUP remover tool to eliminate it; read this guide to learn your options. You can also reset your computer to get rid of the problem.

If you have questions or suggestions about removing DNS Unlocker from Chrome; feel free to mention them in the comments section below. We will be happy to help.

How to Open an ADOC File: 4 Ways

In this guide, we will walk you through simple steps to open the .ADOC file on your Windows computer.

A file with the ADOC file extension is an AsciiDoc file. It is a plain text file used to create a formatted document like PDF or HTML file. Here’s how to open it:

How do I open the ADOC file?

1. Use Microsoft Notepad

  1. Press the Windows key, type notepad and click Open.Notepad - open adoc file
  2. Go to File, then click Open.Open a file
  3. Select All files from the drop-down menu, then locate the file, and click Open.Open the file
  4. The .ADOC file will open on the Notepad app.

You can also use Microsoft Notepad to open a JSON file on Windows 11; read this guide to learn other methods.

2. Use Microsoft Word

  1. Press the Windows key, type word and click Open.Word - how to open adoc file
  2. Go to the File menu.
  3. Click Open, then under Other locations, click Browse.Browse - how to open adoc file
  4. On the Open dialog box, choose File format as All Files from the drop-down menu, then locate the file and click Open.Open the file on Word adoc file
  5. The .ADOC file will open on Word.

3. Use your browser

  1. Press Windows + E to open the File Explorer window.
  2. Locate the ADOC file, right-click it, hover over Open with, and select Google Chrome or your preferred browser.Choose another app - how to open adoc file
  3. If you can’t see the option, then click Choose another app.Google Chrome
  4. Choose Google Chrome and select Just Once. Now you can now view the file on your browser.Google Chrome Just once

4. Use the WordPad app

  1. Press the Windows key, type wordpad, and click Open.Wordpad - how to open adoc file
  2. Go to File, then choose Open.File - Open
  3. On the Open dialog box, change the file type to All Documents from the drop-down menu , then select the ADOC file and click Open.Wordpad - how to open adoc file
  4. The file will open in WordPad.

If you’re having trouble opening WordPad, scan for malware and try fixing file corruption.

You can also use popular text editors like Noetpad++ and other online tools to open and edit the file.

In case you want the file extensions to appear next to the files on your Windows computer, read this guide to learn the simple steps.

If you have any questions or suggestions on opening the ADOC file, don’t hesitate to mention them in the comments section below.

What Is ?gws_rd=ssl Error on Google and How to Fix It

Many users have reported getting redirected to https://www.google.com/ with an extension of gws_rd=ssl. Today, we’ll explain what it means and how to address issues related to it.

What does Gws_rd SSL mean on Google?

The gws_rd SSL is a parameter in a Google search URL, which redirects the query to the suitable Google web server, ensuring quick & efficient delivery of search results.

Though it’s generally unproblematic, if you’re facing any issues because of it, you may be dealing with cached files issues or DNS problems. Here’s how to fix that:

Before proceeding with any steps to fix the error, go through the following preliminary checks:

1. Clear the browsing data

  1. Launch your preferred browser, here we use Google Chrome to demonstrate the steps. Click the three dots icon on the top right corner, and select Settings from the menu.Settings CHrome - ?gws_rd=ssl
  2. Click the Privacy and security option, then select Clear browsing data.Clear cache Chrome - ?gws_rd=ssl
  3. For Time range, select All time.
  4. Now, place a checkmark next to Cookies and other site data, and Cache images and files, then click Clear data.Clear data

Clearing browsing data can help you fix other SSL-related issues like SSL_ERROR_BAD_CERT_DOMAIN; read this guide to learn more.

2. Adjust the Time & date on your computer

  1. Press Windows + I to open the Settings app.
  2. Go to Time & language, then click Date & time.data & time - ?gws_rd=ssl
  3. Ensure the toggle next to Set time automatically is turned on.Set time automatically
  4. In case you are not able to do that, make sure you have the right zone selected and manually enter the correct time.

Setting the correct time on your computer can also help you avoid the HTTPS sites not working issue; read this guide to learn more.

3. Delete the unwanted extensions

  1. Launch your preferred browser, here we are using Google Chrome to demonstrate the steps. Click the three dots icon on the top right corner, and select Extensions from the menu.
  2. From the sub-context menu, select Manage Extensions.Manage Extensions new -  ?gws_rd=ssl
  3. Carefully examine all the extensions and for all unwanted ones, click Remove to delete them.Remove extensions

4. Delete the third-party cookies

  1. On Google Chrome browser, click the three dots icon on the top right corner, and select Settings from the menu.Settings CHrome - ?gws_rd=ssl
  2. Click the Privacy and security option, then select Third-party cookies.Third-party cookies - ?gws_rd=ssl
  3. Choose See all site data and permissions.Site and data
  4. Click Delete all data.Delete all data  - ?gws_rd=ssl

Relaunch the browser; you might have to sign in to some of the websites as all the data related to them will be removed. Also, the browser will temporarily run slow.

5. Reset your browser

  1. On Google Chrome browser, click the three dots icon on the top right corner, and select Settings from the menu.Settings CHrome
  2. Click Reset settings from the left pane, then select Restore settins to their original defaults.Reset to default - ?gws_rd=ssl
  3. Now on the Reset settings popup window, select the Reset settings button.Reset 2

Resetting your browser to default also help you handle errors like There’s a problem with website’s security certificate; read this to learn about it in detail.

6. Flush DNS

  1. Type Command Prompt in the Windows search bar and select Open as Administrator.run command prompt as administrator
  2. In the prompt, type the following command: ipconfig/flushdns and press Enter.ipconfig flush dns
  3. Wait for the process to complete and restart your browser.
  4. Try accessing Google again.

In conclusion, gws_rd=ssl is a parameter that Google uses for tracking and routing purposes. If you want to remove it from the URL, try replacing HTTP from HTTPS.

However, to fix the usual errors related to the parameter, you can clear browsing data, delete third-party cookies, remove unwanted extensions, or reset your browser.

Recently we covered the gws_rd=ssl#spf=1 and gws_rd=cr in Google Search URL in our latest guides, so don’t miss it for more information.

In case you have questions or suggestions about ?gws_rd=ssl; feel free to mention them in the comments section below. We will be happy to help.

How to Open QTL Files [Windows & Mac]

To open QTL files, you’ll need special software that can read such types of files. QTL files contain references and instructions for playing media files, so let’s look at how you can open them on your Windows or Mac device.

How do I open QTL files?

1. Windows

1. VLC Media Player

  1. Launch your Microsoft Store and download VLC Media Player.
  2. Open the VLC media player app and select Media in the menu bar. A drop-down menu will appear where you can then click on Open file.
  3. Browse through your computer’s files for the QTL file you want to open, select it, and click Open.

Use the VLC Android version to open QTL files on your Android device.

2. Windows Media Player

  1. Hit the Windows + E keys to open File Explorer.
  2. Locate the QTL file from your folders or paste the location path on the address bar at the top.
  3. Right-click on the file and select Open with>Windows Media Player.

3. Online QTL Viewer

If the above tools do not open the QTL file, you can simply copy and paste it to an online viewer. Filext offers a free QTL viewer, so you don’t have to worry about downloading any apps, especially if you have storage constraints.

Remember that these online QTL viewers are third-party tools, and the security and privacy of your files should be considered. Make sure to read the privacy policy and terms and conditions carefully when uploading your files online.

Note icon NOTE
WindowsReport is not affiliated with Filext.com, so do your due diligence before uploading any personal information on the site.

2. Mac

Quick Time Media Player

  1. Locate your Quick Time Player app on your Mac and launch it.
  2. Navigate to File > Open File, then select your QTL file.
  3. Alternatively, you can drag and drop the file to the Quick Time app.

If it doesn’t, we recommend alternative media players for opening QTL files. A universal file viewer should suffice in case you’re out of options.

And if you’re having trouble opening a QTL file, there are chances it could be corrupt. As such, we’ve outlined ways you can easily fix corrupt Quick Time movie files.

What’s the difference between QTL and MOV file formats?

QTL files are primarily associated with Quick Time and are commonly used on macOS. However, Apple sunset its support for Windows, especially the newer versions.

You can check whether it’s a Quick Time install error, a qtcf.dll file missing or try a workaround to run Quick Time on Windows 10 and 11, but it’s not a guarantee it will work.

MOV files, on the other hand, are commonly used for storing and playing video files and are widely supported by different media players. The main similarity is that both QTL and MOV files were developed by Apple and designed for their native QuickTime multimedia framework and Quick Time player.

The difference is that QTL files are specific to the QuickTime framework, while MOV files can be played on both Mac and Windows operating systems using compatible media players. For more complex file extensions like tg file formats, check out our expert article on how to open it.

Have you encountered QTL files before? Which program did you find easier to open them? Let us know in the comments section below.

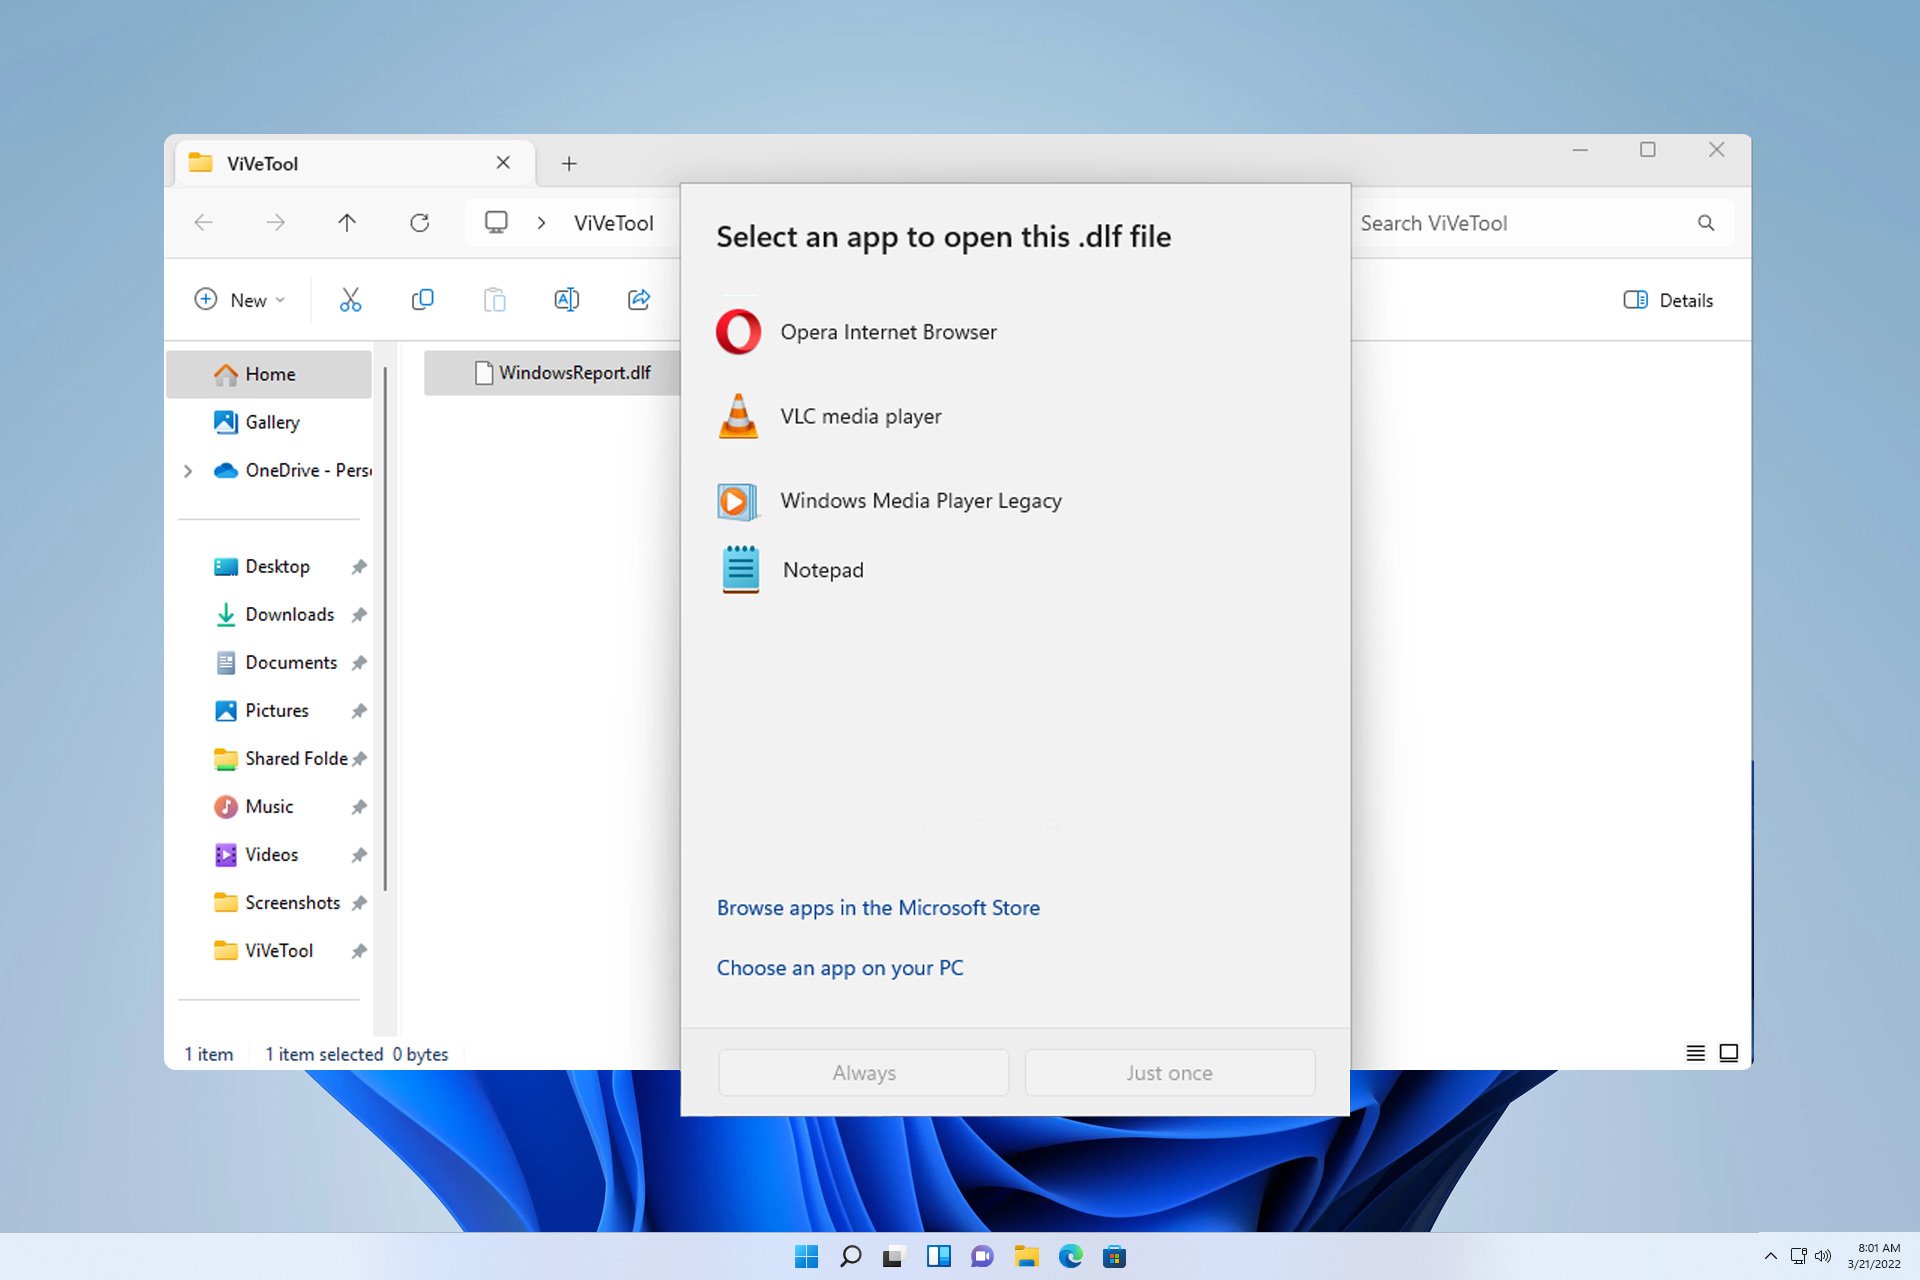
How to Open DLF File: Everything You Need to Know

Have you ever wondered how to open a DLF file? This isn’t a common file type, so opening it might not be as simple as you think.

Join us while we take a closer look at this file type and show you the ways to access it.

What is a DLF file?

DLF file can be associated with Belkin router firmware file. Many applications, such as DOSBox or FlashFXP use this file type to store language files. Games such as Battlefield 3 also use these files.

In some instances, these files are associated with DataCAD software and vectorized 3D image files.

How can I open a DLF file?

1. Use DataCAD

  1. Download DataCAD and install it.
  2. Once installed, double-click the DLF file and it will automatically open.
  3. Alternatively, start the software, choose the Open option, and then select your file.

2. Update your Belkin router firmware

  1. Ensure that the DLF file is a firmware update and that it matches your model.
  2. Check your model, you can determine the model using the sticker on the bottom of the router.
  3. Next, open your browser and enter the router’s address. By default, it should be 192.168.2.1.

  4. Enter router username and password.
  5. Next, go to Utilities and select Firmware.
  6. Click on Browse, select the firmware DLF file, and then click Update.
  7. Wait for the process to finish.

Updating router firmware is a somewhat dangerous procedure, so before performing it, make sure that your DLF file is a firmware update intended for your router. Also, check the Belkin manual for exact instructions.

We also have a guide that can help you update router firmware, so you might want to visit it.

Unless your DLF file isn’t for DataCAD, you won’t be able to open it in most cases. Some Belkin routers might be able to use it, but before doing that, ensure that it’s a legitimate firmware update file.

This isn’t the only file type that’s not natively supported, and in our previous guides, we wrote how to open OPUS file format as well as how to open an RBF file on Windows.

For more information, you might want to read about the XMZX file extension and learn how to open it.

What method did you use to open the DLF file? Share your findings with us in the comments section.

AT&T Family Map Not Working: 5 Simple Fixes

Keeping tabs on your loved ones puts you at ease so when the AT&T Family Map is not working, you should first check whether there’s a downtime. We got down to the main causes of this problem and how you can quickly resolve it.

Can you track a family member by AT&T?

AT&T offers a service called AT&T Secure Family that allows you to track the location of your family members.

You can utilize location tracking features to monitor the real-time location of connected family devices. The requirement here is you’ll have to download the Secure Family Companion App on the family member’s phone whom you wish to track.

What can I do if AT&T family map is not working?

Begin troubleshooting by checking off the following prerequisites:

  • Verify that the family member’s device is compatible with AT&T Secure Family and that the app is up to date on both the parent’s and the family member’s devices.
  • Ensure that the family members you want to track have their devices connected to the AT&T network and have the requisite permissions granted.
  • Check and ensure that the devices are connected to a stable internet connection and verify that the server status is active.

1. Clear app cache and data

1.1 Android

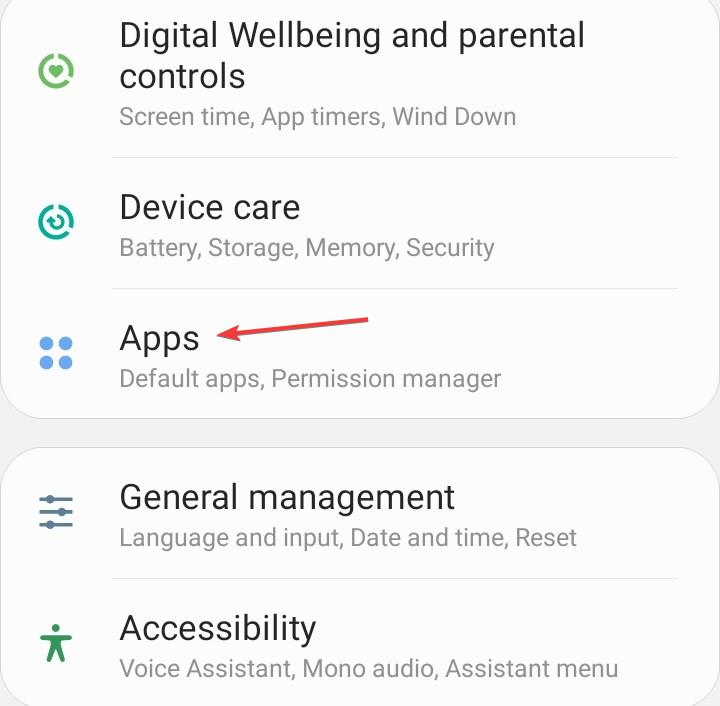
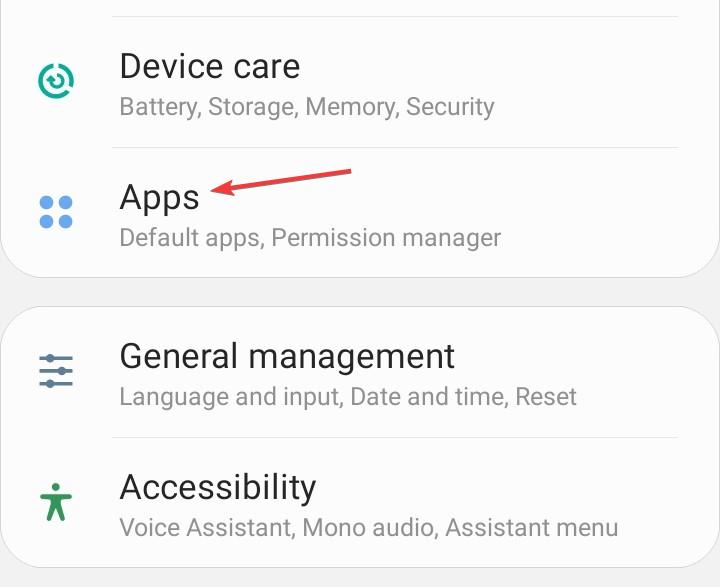
  1. Open the Settings app on your Android device, and select Apps.apps
  2. Choose AT&T Secure Family from the list of applications.
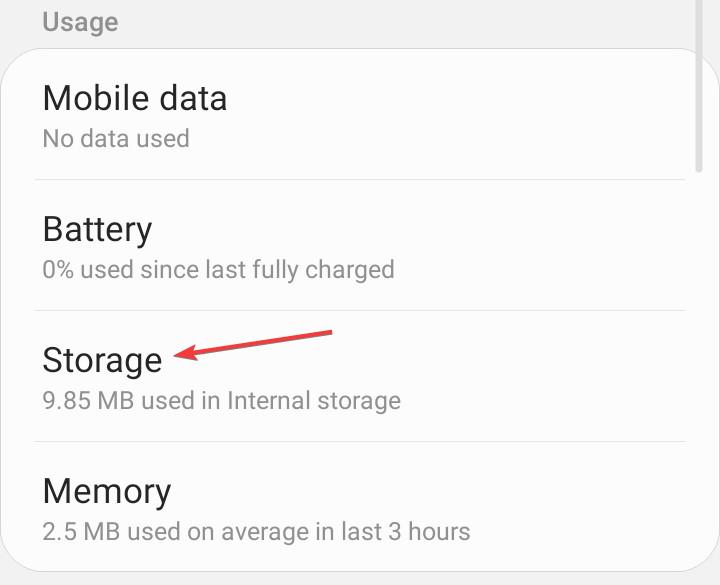
  3. Tap on Storage.storage
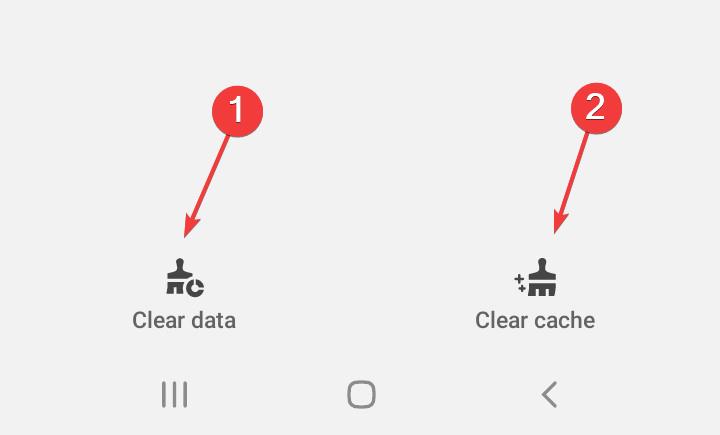
  4. Tap on Clear data and then on Clear cache.clear cache to fix error code 14 disney plus
  5. Open the AT&T Secure Family app again and check for improvements.

1.2 iOS

  1. Locate Settings on your iPhone and tap on it.
  2. Go to General>iPhone Storage.
  3. Find the AT&T Secure Family app, tap on it, and select Offload App.

2. Reinstall the parent app

2.1 Android

  1. Open the phone Settings, and go to Apps.apps
  2. Select AT&T Secure Family from the list.
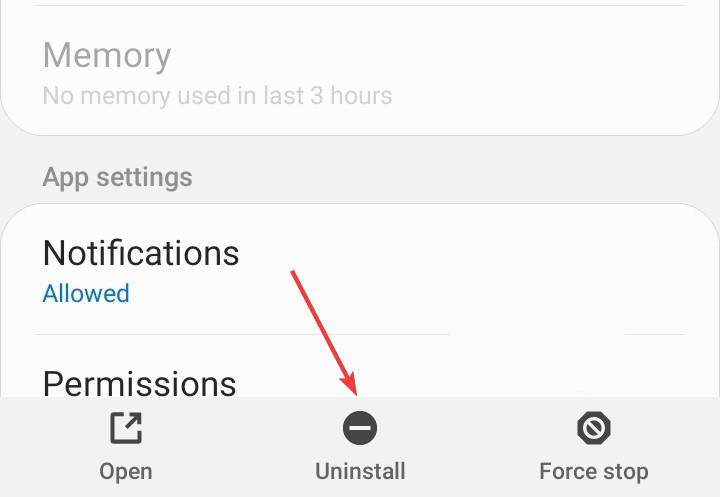
  3. Tap on Uninstall at the bottom.uninstall
  4. Choose OK in the confirmation prompt.
  5. Finally, reinstall AT&T Secure Family from the app store. 

2.2 iOS

  1. Locate Settings on your iPhone and tap on it.
  2. Go to General>iPhone Storage.
  3. Find the AT&T Secure Family app, tap on it, and select Delete App.

3. Disable your VPN

VPNs can sometimes interfere with location tracking services as they can mask or spoof the device’s GPS location. You can disable the VPN on your iPhone.

If you disable your VPN temporarily for troubleshooting purposes, make sure to re-enable it afterward if it is necessary for your security.

4. Rollback to a previous version

A good number of users complained that the issue of the AT&T family map not working started shortly after a new update. This could imply the latest update is infested with bugs. Since it may take a while for the AT&T technical team to address these issues, you can install an older version of the AT&T app.

AT&T doesn’t avail these older versions on their site but there are some third-party sites where you can get them. As these sites are sponsored, you need to be careful as the app may be bundled up with other software or even malware.

Ensure you have a reliable antivirus that can catch any viruses before they’re downloaded into your device.

Note icon NOTE
WindowsReport is not affiliated with APKTOY.COM so do your due diligence before you install any program from the site.

5. Contact AT&T support

If the AT&T family map is still not working after trying the above steps, contact AT&T support for further assistance. They can help troubleshoot the problem and provide additional guidance

Sometimes it’s just a downtime that lasts only for a few moments. Additionally, other factors, such as poor signal or GPS settings on the device, could also impact the accuracy and functionality of location tracking services.

However, if tracking your loved ones is a life-and-death situation, we recommend other third-party apps that offer location-tracking features for families as well.

These may provide additional functionalities and options for tracking and monitoring family members’ locations. And it’s not just your family members or loved ones whose location is important. You can also find the specific location where a picture was taken.

As for Windows 11 users, the Find My Device feature is perfect for keeping track of your device and goes as far as locking it remotely.

That brings us to a close but we’re keen to hear about any other solutions that may have worked for you. Do share them with us in the comment section below.

How to Open TG files in Windows and Mac

TG files are guitar tablature docs natively used by the TuxGuitar program. These files allow users to view and listen to the notes and tablature and/or make changes. There are several apps to open TG files on Windows, Mac, Linux, and Android.

While researching, we came across other formats with the same extension. These include TableGen Language Source Code and Logisim Toggle Circuit File, but they find rare applications. So, in this article, we will stick to TG files from TuxGuitar.

How can I open TG files?

1. Use TuxGuitar

Tip icon Tip
Windows Report is not associated with TuxGuitar, and even though it appears safe, we recommend you scan the app files using an effective antivirus solution.
  1. Go to TuxGuitar’s Github page and download the installer for your OS. We are downloading it on a Windows PC.
  2. Double-click the downloaded file to run the setup. You may receive a warning. Click on Run anyway to continue only after scanning the file.
  3. Follow the on-screen instructions to complete the installation.install
  4. Once done, restart the computer for the changes to apply.
  5. Now, locate the TG file, right-click on it, select Open with, and choose TuxGuitar.exe, if it doesn’t automatically become the file association.tuxguitar to open tg file
  6. You should now have the TG file visible. Click the Play button to listen in or make changes to the tabs.tabs

TuxGuitar is the best option to open TG files in Windows, Mac, Linux, and Android. There’s a separate installer available for download for each operating system on the GitHub page. However, TuxGuitar is not available for iOS.

2. Go with another supported viewer

There are a few other guitar tab software that will allow you to view TG files in Windows. But, since the format is not native to these, there might be missing or unreadable data.

In some programs, the TG file will be open right away, while for others, you will have to manually import them.

3. Convert the file into a supported format

  1. Open the TG file in TuxGuitar and click on the File menu near the top left.
  2. Select Export, and then choose the relevant format from the flyout menu. We chose PDF since it’s natively supported by both Windows and Mac.export
  3. Select the desired storage path, and click on Save.
  4. Head to that location, open the PDF file, and the guitar tabs will be listed here.open tg in pdf

When you convert a TG file to PDF or another format using TuxGuitar, there is no data loss or corruption. Besides, TuxGuitar allows TG file conversion to a wide array of formats for seamless accessibility across programs and operating systems, including Android, iOS, and Linux.

Remember, never manually change the file extension. That might corrupt the data!

Also, there are several online TG file converters available. Perform a quick search and go with one that works best if you don’t have TuxGuitar!

Now that you know how to open TG files, our recommendation, at this point, is not to convert it into another format, unless absolutely needed. TuxGuitar is one of the best programs in the segment. Besides, converting it to PDF will result in the loss of audio functionality.

Also, for users who work with such files on a regular basis, a universal file opener would be a perfect fit!

For any queries or to share how you opened the file, drop a comment below.

Open RTP Files: What Are They And How to Access Them

Many users noticed RTP files on their PC, and this is why they want to know how to open RTP files on their PC.

This might not be an easy task, and in today’s guide, we’ll take a closer look at these files and see what they do and how to access them.

What is an RTP file extension?

This file extension is often associated with legacy game patching, and these types of files contain only binary changes. In some instances, the extension can be associated with GROMACS or Report Generator software.

How can I open RTP Files?

1. Use Report Generator software

  1. Navigate to the Report Generator download page and click the Login to download software button.
     
  2. Enter your Tektronix account information.
  3. Once you download the setup file, install the software and use it to open the RTP file.

2.  Use GROMACS

  1. Navigate to the GROMACS download page.
  2. Download the source code.
  3. Follow the instructions from the website to learn how to compile and run it.
  4. Use the software to open the file.

GROMACS is a Linux software, but if you’re not using Linux, you should be able to run it on Windows using WSL. To see how to do that, check our guide on how to access files on Windows Subsystem for Linux.

RTP is a relatively obscure file format, and therefore it’s not easy to open RTP files. As a general rule, always try to find out the purpose of the RTP file before you look for the software to open it.

In case a file is associated with a legacy game, you won’t be able to open it at all, since the required software has been discontinued for years.

This isn’t the only file type that has problems opening, and recently we covered how to open SKV and how to open TXF files, so don’t miss those guides.

We also have an article on how to open STK files, so you might want to check it out. Lastly, many have reported AADL3inscription2024.dz on their PC, and we have a guide that explains what it is and how it works.

Have you ever encountered RTP files and how did you open them? Let us know in the comments below.

Logon Balancing Error 88 in SAP GUI [Solved]

The Logon balancing error 88: Cannot connect to message server (rc=9) issue is a common problem that highlights the PC’s inability to connect to the SAP servers. It’s encountered by users on SAP GUI when connecting to a SAP system.

What causes Logon balancing error 88? It’s encountered due to misconfigured settings, missing permissions, incorrect location of the saplogon.ini file, or issues with the services file. As per our findings, the error may not affect all areas and is sometimes limited to a few.

How do I fix Logon balancing error 88 in SAP?

Before we start with the slightly complex solutions, try these quick ones:

  • Use the menu to sign into the SAP system rather than accessing via the command line. In the case of the latter, the saplogon.ini file is not loaded.
  • Make sure you are running the latest version of SAP GUI.
  • If trying to access the company’s network from a personal laptop, you will need to set up a VPN. This can be best done by the IT team.

1. Check the location of saplogon.ini

  1. Launch SAP Logon, click on the menu icon near the top left, and select Options.
  2. Now, expand SAP Logon Options, then choose Local Configuration Files under it, and copy the path for the saplogon.ini file on the right.configuration files
  3. Press Windows + E to open File Explorer, paste that path in the address bar, and hit Enter.path
  4. Copy the saplogon.ini file and directly paste it into the following path: C:\Windowsmove saplogon.ini to fix logon balancing error 88
  5. Once done, reboot the device and check for improvements.

2. Edit the services file

  1. Press Windows + E to open File Explorer, navigate this path or paste it in the address bar and hit Enter:C:/windows/system32/drivers/etc
  2. Right-click the services file here, and select Edit in Notepad.services
  3. Now, make sure the TCP port is specified. You can do that by adding the following while replacing PRD with the SAP SID of your system: sapmsPRD 3600/tcpspecify tcp to fix logon balancing error 88
  4. Press Ctrl + S to save the file, then restart the PC and verify whether the Logon balancing error 88 issue is fixed.

It’s not recommended that you add the line specifying TCP to the end, as it can be ignored. If you do, make sure to leave a blank line after it. Also, you can copy/paste the SAP-related contents of the services file from a coworker’s PC.

3. Run the Stunnel TLS wrapper service

  1. Press Windows + R to open Run, type services.msc in the text field, and hit Enter.services
  2. Double-click the Stunnel TLS Wrapper service to open its Properties.service
  3. Select Automatic from the Startup type dropdown menu, and then click the Start button under Service status.run to fix logon balancing error 88
  4. Finally, click Apply and OK to save the changes.

4. Modify the Registry

  1. Press Windows + R to open Run, type regedit in the text field, and click OK.
  2. Click Yes in the UAC prompt.
  3. Paste the following path in the address bar at the top and hit Enter: HKLM\System\CurrentControlSet\Services\TCPIP\Parameters\DatabasePathpath
  4. Right-click on the DatabasePath key in the navigation pane, select Rename, and then name it DatabasePath1.rename to fix logon balancing error 88
  5. Right-click on the empty portion, hover the cursor over New, select Expandable String Value, and name it DatabasePath. expandable string
  6. Double-click on the newly created string and enter the following path under Value data: %SystemRoot%\system32\drivers\etcvalue data to fix logon balancing error 88
  7. Click OK to save the changes, then restart the PC, and check whether the Logon balancing error 88 in SAP GUI 760 or 770 is fixed.

5. Turn off the firewall

  1. Press Windows + S to open Search, type Control Panel in the text field, and click the relevant result.
  2. Click on System and Security.system and security
  3. Click on Windows Defender Firewall.
  4. Select the Turn Windows Defender Firewall on or off option from the left pane. firewall
  5. Choose Turn off Windows Defender Firewall under both Private network settings and Public network settings, then click OK to save the changes.disable to fix logon balancing error 88

If Windows Defender Firewall is blocking a port or program, a simple approach is to disable it for a short while and identify whether the Logon balancing error 88 is fixed. If that works, we recommend whitelisting the port or program, as the case may be.

Remember, while the firewall is disabled, do not access untrusted websites or connect other devices. Also, this helps when Windows is blocking websites.

6. Contact the administrator

If nothing else works, the last option is to contact the IT administrators who configured SAP in your organization.

As we said earlier, they might set up a VPN on your device or reconfigure the permissions at their end.

But based on the experience of Windows Report experts, the Logon balancing error 88, or SAP logon problems, in general, arise due to missing entries in the services file. So, you should check that with great attention!

Before you leave, discover some quick tips to boost the Internet speed in Windows.

For any queries or to share which fix worked for you, drop a comment below.

How to Open TXF Files: 2 Easy Ways for Windows and Mac

TXF or Tax Exchange Format files are used to store tax-related information. These files may contain income statements, tax forms, and accounting details. However, the Tax Exchange Format is not natively supported in Windows or Mac. So, how do you open TXF files?

The best option is to rely on third-party apps. Any reliable tax preparation software should allow users to view the contents of TXF files. Listed below are the best products for the job!

How do I open TXF files?

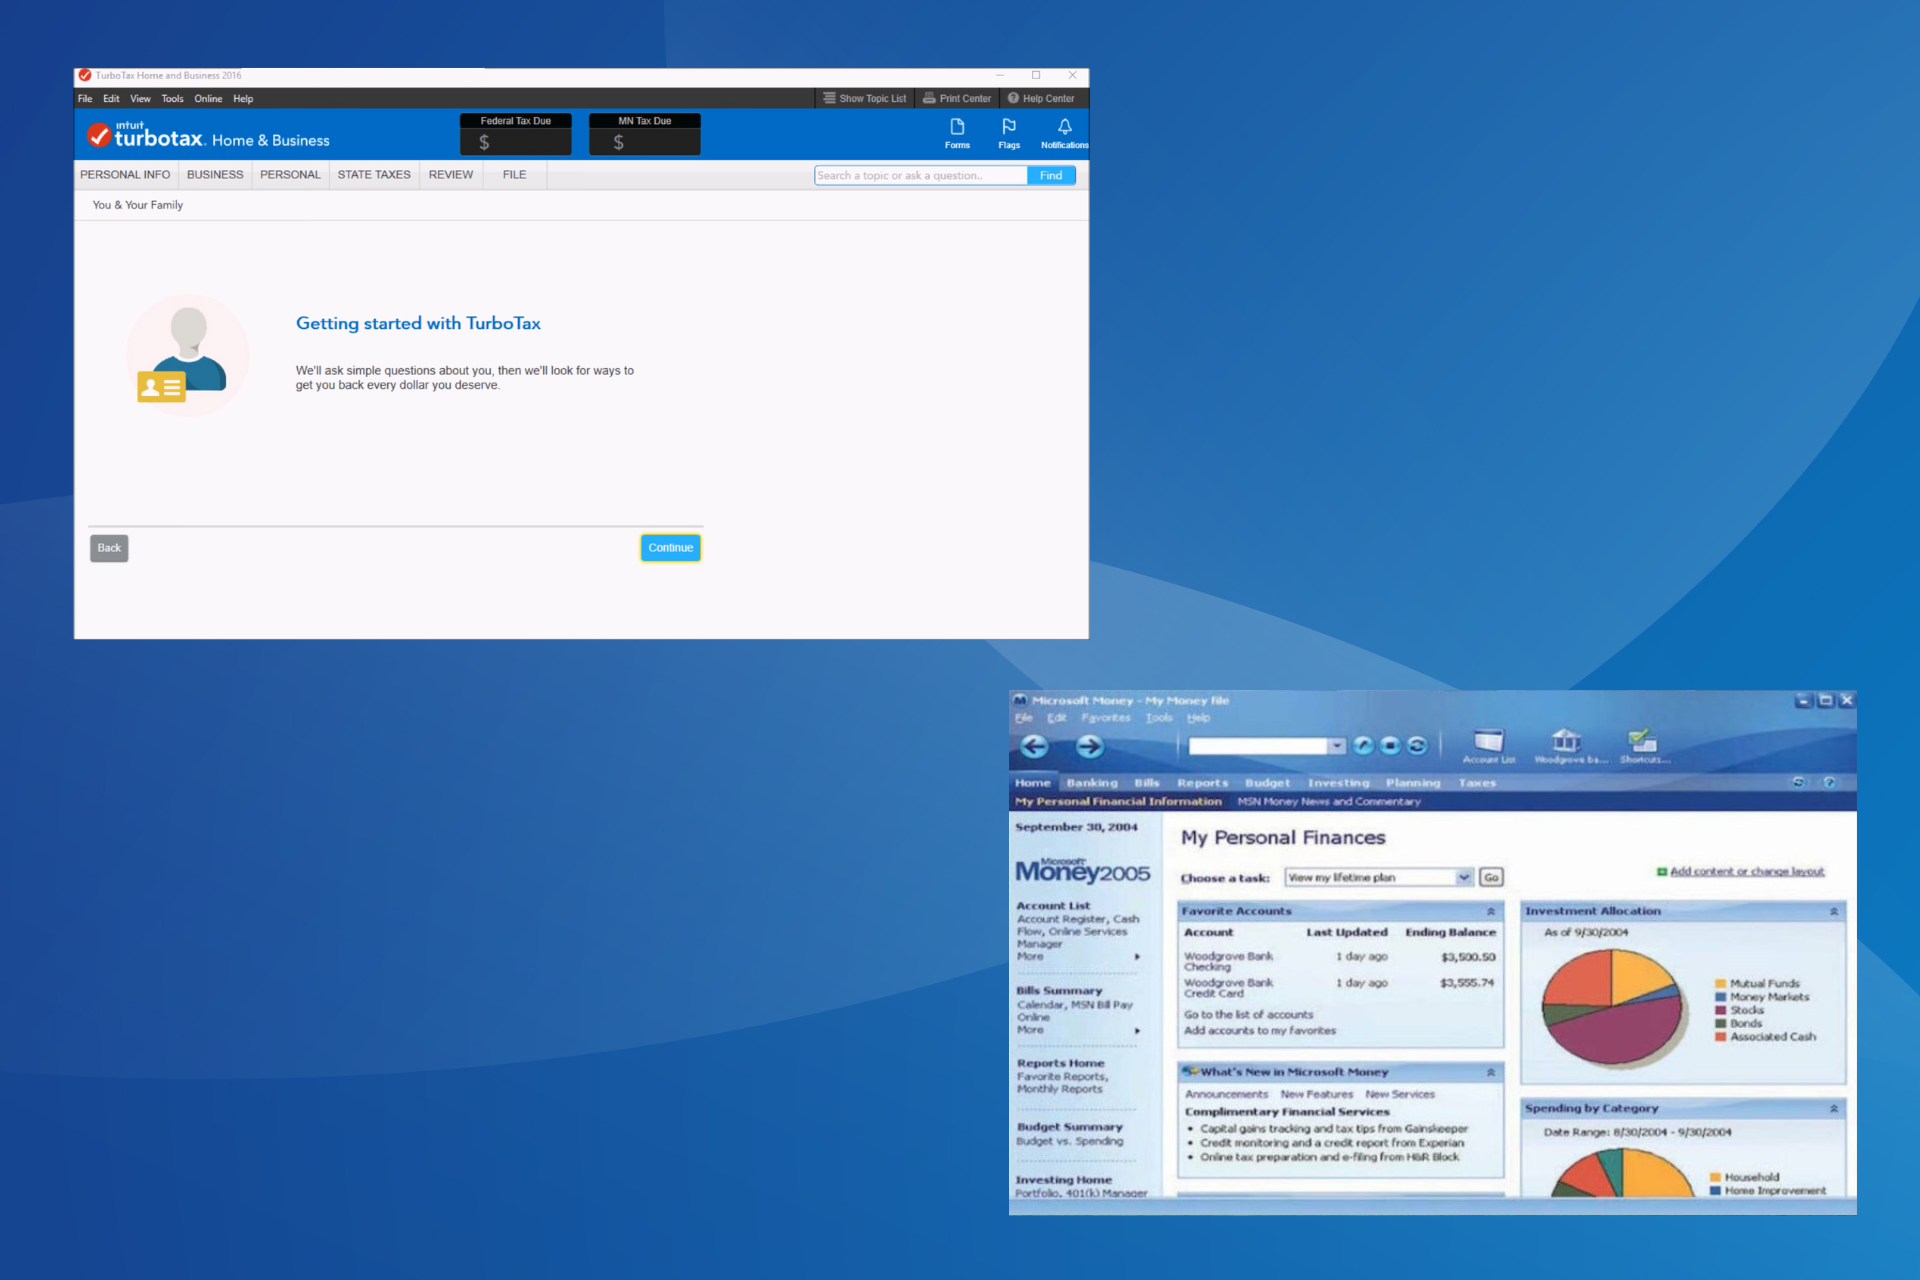
1. Go with TurboTax

  1. Download TurboTax from the official website.turbotax
  2. Run the setup and follow the on-screen instructions to complete the installation process.
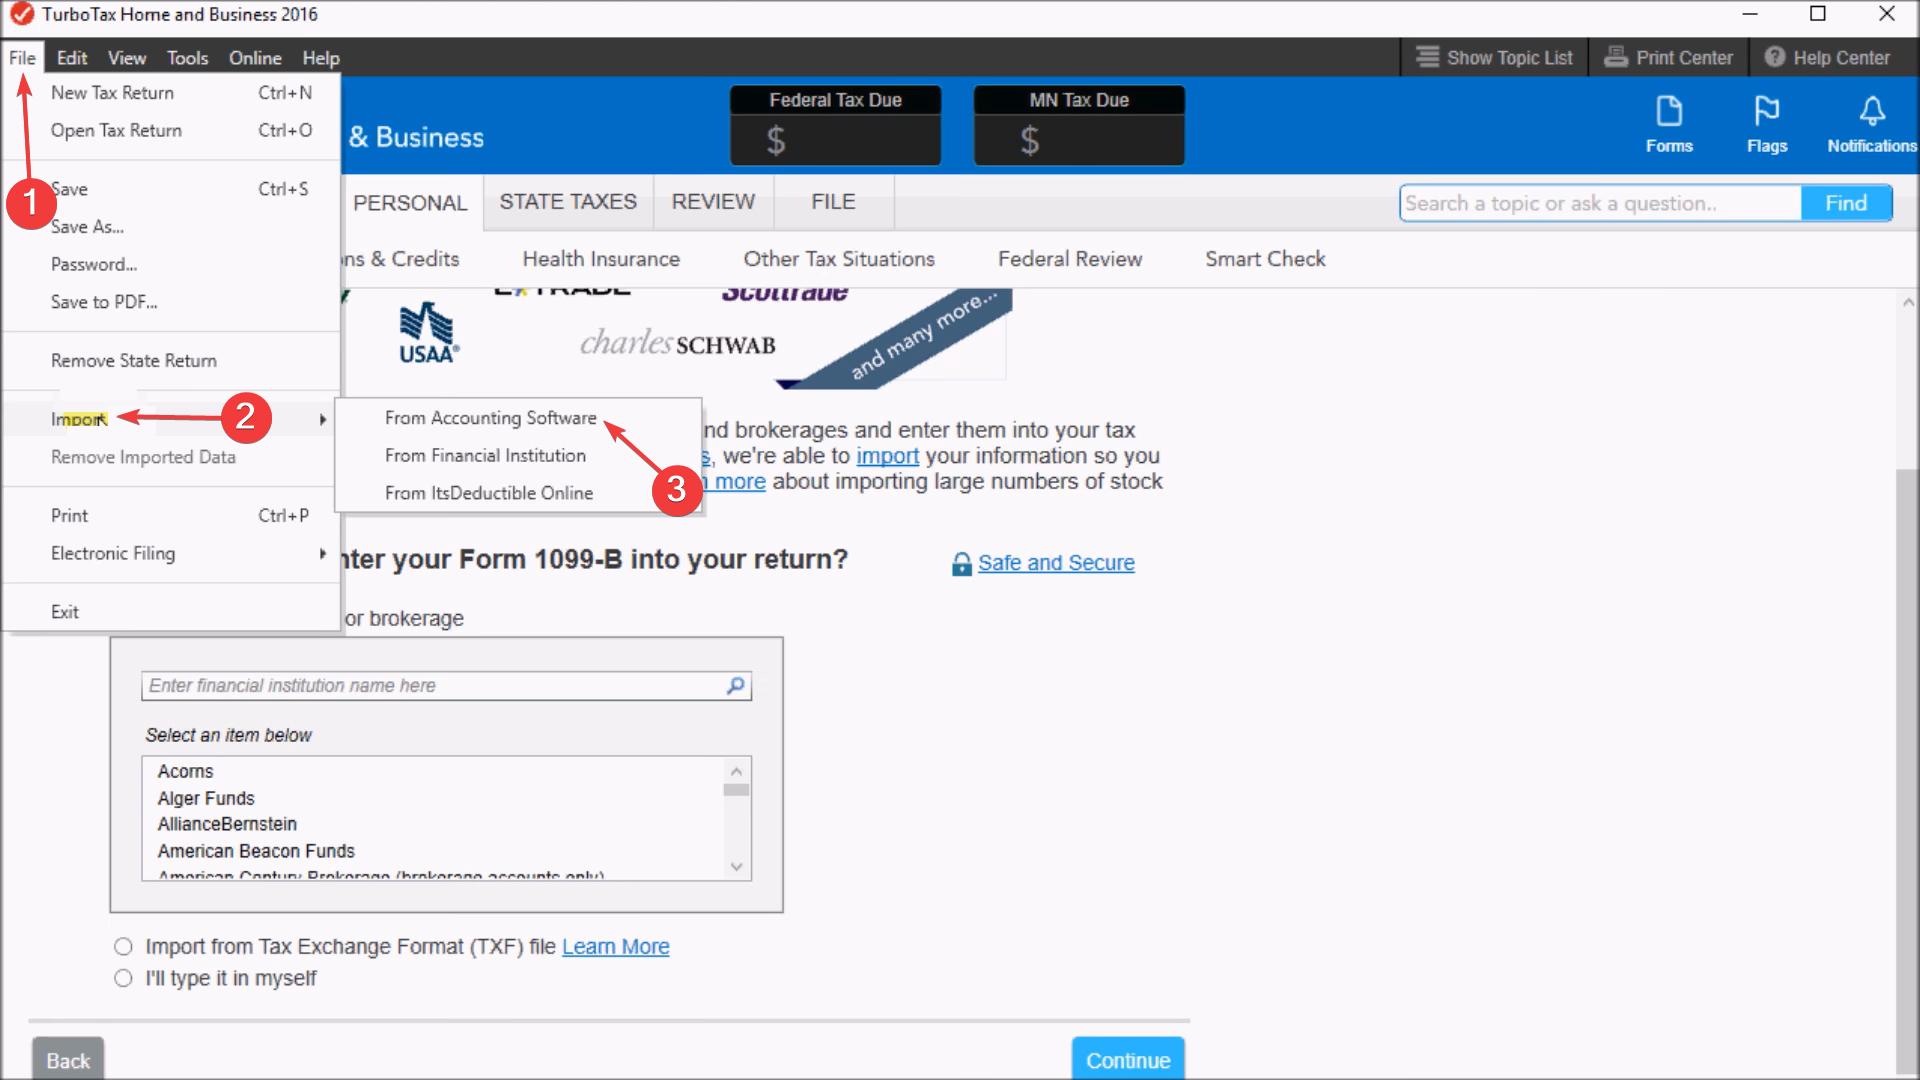
  3. Click the File menu, hover the cursor over Import, and select From Accounting Software or From Financial Institution, depending on where the file is located.open txf files in TurboTax
  4. Click on Browse files.
  5. Locate the TXF file, select it, and click on Open.
  6. You will now be able to access and edit the file’s content.

TurboTax remains the easiest way to access TXF files in Windows and Mac. You can also upload and open the TXF files through TurboTax’s online web portal. Besides, other programs by Intuit will allow you to view TXF files.

For more on the software, read our latest review of TurboTax.

2. Use Microsoft Money

Microsoft Money is a simple option to open TXF files in Windows. Though officially discontinued, you can still download Microsoft Money.

It’s not as advanced as the present-day apps, but the user-friendly interface and low resource consumption make Microsoft Money a preferred choice for many.

TXF files are common in the USA but not so much in other parts of the globe. For users who need to view the file’s content, it’s best to use Microsoft Money, while for those who have to edit the TXF file, our recommendation is TurboTax.

Also, if you regularly work with unsupported formats, we recommend using a universal file opener and eliminating dedicated programs for individual file types!

For any queries or to share how you access TXF files, drop a comment below.

Solved: Spectrum Remote Volume Not Working

Many users have reported that they can’t control the volume using their Spectrum remote. In this guide, we will discuss some troubleshooting methods to fix the issue in no time.

Why is my spectrum volume not working? The volume button might not work if there is a significant gap between the remote & device, incorrect remote settings or outdated firmware of the remote.

How do I fix the Spectrum remote volume not working issue?

Before proceeding with any steps to fix the Spectrum remote volume not working issue, go through the following preliminary checks:

  • Ensure the volume on your TV or external speakers is not muted, and select the correct input if using a remote to control multiple devices.
  • Press and hold the Menu and 3 buttons together until the Input button light flashes.
  • Try replacing or cleaning the batteries and make sure there is no interference between your TV and remote.

1. Power cycle your TV

  1. Turn off all the devices in the setup, including the cable box and TV.
  2. Next, remove the power cables from the devices, then press and hold the Power button for a few seconds to discharge them.
  3. Flip your Spectrum remote, remove the back cover, then take out the batteries, then press and hold the Power button on the remote. Now, wait for 3-5 minutes before inserting the batteries again.
  4. Reconnect all the cables and restart all the devices. Once powered up, try using the remote to control the volume on your TV.

2. Use Auto-Search to program your remote

  1. Turn on the TV that you want to program; now press the Menu and OK buttons together until you see the Input button blink twice.Menu and OK  - spectrum remote volume not working
  2. Press the TV button, and the Input button will light up solid.TV button - Spectrum Remote Volume Not Working
  3. Aim the remote at your TV and press & hold the UP arrow.
  4. Once the device is turned off, let go of the UP arrow.

3. Switch between TV control and cable

  1. Locate & press the CBL button from the top-right side of the remote, and while pressing the button, press & hold the OK or SEL button for a few seconds.CBL and OK - spectrum remote volume not working
  2. Now, release both buttons simultaneously, and then you will see the CBL button light up.
  3. Press the Volume Down button once, and then press the TV button.TV and Down button -
  4. Again, the CBL button will flash. Once the process is complete, the flashing will stop.

Now, your remote will transmit a signal to your TV instead of the cable box and then check if the issue persists.

In case you want to switch the control back to the cable box, you can follow the same steps and press the Volume UP button to reverse it.

If you have encountered the Spectrum On Demand Error hl1000 error, it could be due to an outdated version of the app; read this guide to learn more.

4. Enable the TV control pairing function

  1. Turn on the cable box and your TV, then press the Menu button on your remote.
  2. From the menu, select Settings & Support using the arrow keys, then press OK to open.Settings & Support - Spectrum Remote Volume Not Working
  3. Select Remote Control.Remote control
  4. Choose Connect Remote to TV, then select Connect to TV.
  5. Next, choose the brand of your TV. If you can’t find your TV brand, click View All, then select your TV brand and click OK.
  6. Follow the on-screen instructions to complete the process.

5. Reprogram your remote

  1. Ensure your TV is turned on, then go to the Spectrum support page.
  2. Select the device type and brand, then click Get device codes.Get device codes
  3. Once you have the codes, press the Set Up button on the remote until it blinks.Setup - spectrum remote volume not working
  4. Enter the TV’s pairing code to initiate the steps. You must see the light blink twice again.
  5. Now press the TV button, then press & hold the Set Up button on the remote until it blinks.
  6. Enter the second code and let the light blink twice again.

Once done, try using the remote to increase or lower the volume on your TV.

6. Reset your remote to default settings

  1. Press and hold the TV button.TV and OK Spectrum Remote Volume Not Working
  2. While holding down the button, press OK for a second, then release the buttons at the same time. TV, AUX, and DVD buttons will flash, and the TV button will keep glowing.
  3. Now press & hold the Delete button for a couple of seconds, and you will see the TV button blink and turn off.

Once the TV button stops illuminating, your remote is reset to its default settings. Restart all the devices in the setup and check if the issue persists.

In case nothing worked for you, we would suggest you contact Spectrum support and explain to them the issue & steps taken to fix it to get further help.

To conclude, to control the volume on your device using the Spectrum remote, you need to make sure there is no interference between your remote and receiver.

Also, to fix the volume not working issue, you need to reprogram your remote, switch the control to your TV, use Auto-search, enable the TV control pairing function or reset the remote to factory settings.

In case you’re having trouble with your Spectrum self-install, we have tackled the issue in a separate guide; check it out!

If you have any questions or suggestions about the subject, feel free to mention them in the comments section below.

2 Simple Ways to Open SDR Files on Windows

The files created using the SmartDraw app use the .SDR file extension. SmartDraw is a web-based diagramming tool popularly known for designing flowcharts. In this guide, we will talk about simple ways to open a .SDR file on your Windows computer.

How can I open the SDR files on Windows?

1. Use the SmartDraw Import function

  1. Open the SmartDraw’s web version.
  2. You might have to sign up to access the web version of the app; you can either enter details to create an account or use a Google account.
  3. Locate the Import section from the left pane, then click the SmartDraw file option.Import
  4. Click Choose Files. Choose files -  Open the SDR Files on Windows
  5. Select the .SDR file you want to open and click Open.Open the files
  6. Now, click Import Selected Files to upload and open the file.IMPORTED SELECTED FILES - Open the SDR Files on Windows

You can make the changes to the file and download it again in the same format. However, if you want to Export in Office, JPG, PNG or PDF format, you need to have the licensed version.

Alternatively, you can open the file in the SmartDraw app and make the changes. Once done, while on the document, press Ctrl + A to select the content. Now, open Word, Excel, PowerPoint, or Paint to paste the content and save it to any format you like.

2. Use a universal file opener

If you often work with files with different formats, we recommend you use a universal file opener; here is the list of best choices.

To conclude, you can only use the SmartDraw app to open and edit the .SDR files. As per WR experts, no SDR file converter tool available online works properly, so we recommend not using any of them as you might end up losing the data on the file.

Remember that you should never change the file extension of a file manually as it could corrupt the data and leave it unreadable.


Need help accessing other uncommon file types on Windows? Take a look at our step-by-step tutorial on how to open RPT files and discover reliable ways to view or convert report files safely.

In case you want the file extensions to appear next to the files on your Windows computer, read this guide to learn the simple steps.

If you have any questions or suggestions on opening the SDR file, don’t hesitate to mention them in the comments section below.

How to Open RBF File on Windows

Windows uses the RBF file format to create temporary backups during software installation, allowing the OS to revert things if the installation doesn’t go through. And you can easily open RBF files with a suitable program.

RBF (.rbf) files are usually stored in the following path: C:\Config.Msi

But since these are protected system files, the Config.Msi folder can’t be viewed or accessed unless the protected system files are set to be visible and you have full folder access. Let’s find out how you can open RBF files.

How do I open an RBF file?

1. Use Retrospect Backup for Windows

Tip icon Tip
Windows Report is not associated with Retrospect Backup for Windows or any other tools offered by the developer. We recommend you scan the installer using a reliable antivirus program, such as ESET HOME Security Essential, and proceed at your own discretion.
  1. Go to the official website, and download the latest version of Retrospect Backup for Windows.retrospect to open RBF files
  2. Right-click on the downloaded ZIP file, and select Extract All.
  3. Go with the default file path or click Browse to set another one for the extracted files, and then click Extract.extract
  4. Run the Install Retrospect.exe file.installer
  5. Click on Install Retrospect.install
  6. Click Yes in the UAC prompt.
  7. Follow the on-screen instructions to complete the installation process.installation
  8. Now, right-click on the RBF file, hover the cursor over Open with in the context menu, and select Retrospect.open rbf file

Once done, Retrospect will automatically be set as the default file association. If not, manually set the default app to quickly open RBF files in the future!

Remember, Retrospect Backup for Windows is a paid software with a 30-day trial period.

2. Go with a text editor

You can also open RBF files in Windows using built-in text editors like Notepad. But, since it’s not natively supported, the content won’t be displayed in the ideal form. Some of the data may be unreadable or have indecipherable characters.

RBF file opened in Notepad

Still, Notepad remains a viable option for users who don’t prefer installing third-party programs.

These are the two ways you can open RBF files created by the Windows installer. We have also come across another file with the same extension, Robot Brick File (RBF), and it can be viewed in LEGO Mindstorms EV3.

Also, the RBF file is not malware or threat as long as it is, by default, stored in the Config.Msi folder in the C: drive. However, if it’s in another directory, we recommend scanning the file for threats.

Besides, it’s best to download a universal file opener for users who regularly work with such formats and eliminate the need to install one for individual extensions.

For any queries or to share how you viewed the RBF file, drop a comment below.

Fix: Firestick Says Network Disconnected but Internet Working

Your Firestick may say the network is disconnected even when there is indeed a working internet connection available. If this sounds familiar, this article will explain why it happens and possible solutions.

Why does my Firestick say no Internet when there is?

  • A weak Wi-Fi signal or your Firestick may be too far away from your router.
  • Outdated or corrupted software on your Firestick or streaming device.
  • Network configuration issues that don’t augur well with your Firestick.

How do I fix my Firestick when it says network disconnected?

Start off with the following basic solutions:

  • Consider repositioning your router or Firestick to improve the signal strength, then restart your Firestick.
  • Power cycle your router and try with another HDMI port and high-speed HDMI cable.
  • Forget and reconnect to your network, or try another connection if available.
Note icon NOTE
You may have to set up a mobile hotspot or connect to another connection for steps that require a working internet connection.

1. Reconnect your Firestick

  1. Make sure your TV set is OFF and remove the Firestick from the HDMI port of the TV.
  2. Unplug the power cord from the stick.
  3. Wait at least 5-10 minutes, and then re-plug the power cord to the Amazon Fire TV stick and wait for 5 minutes.
  4. Turn on your TV and reconnect the Fire TV stick with the HDMI port.
  5. Press any button on the Fire TV remote. Wait for a few seconds after each input. It might take time to execute the commands.

2. Check for updates

2.1 Firestick

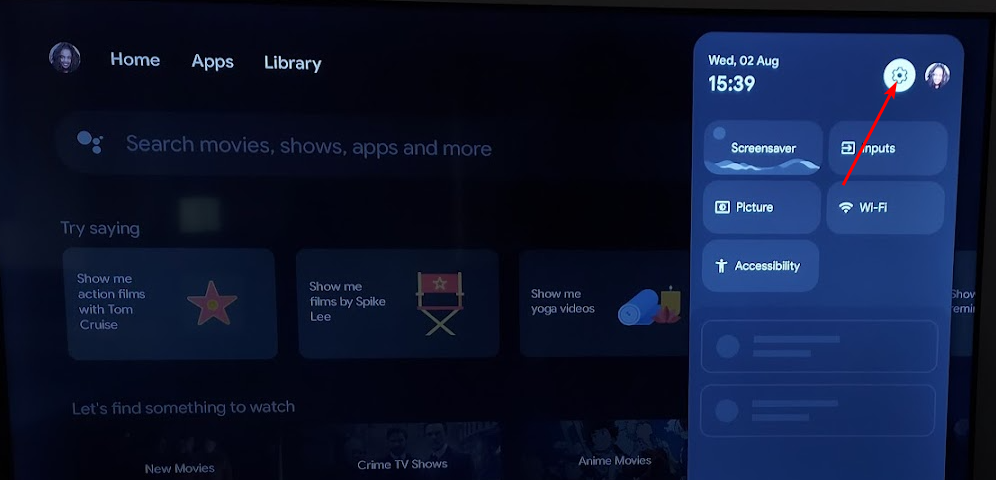
  1. Go to the Home page and click the Gear icon.
  2. Select the My Fire TV option.
    settings disney plus not working on firestick
  3. Now, select About.
    about
  4. Finally, click the Update option.

2.2 TV firmware

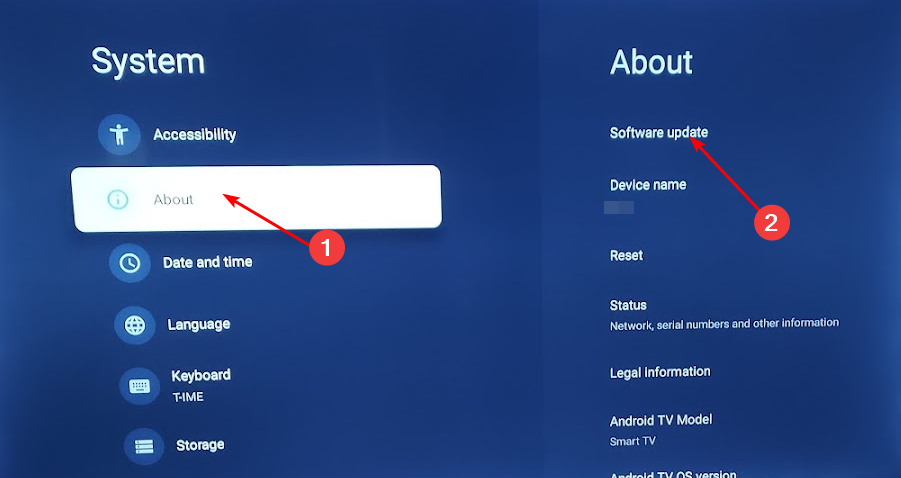
  1. For this solution, we shall be using the TCL model.
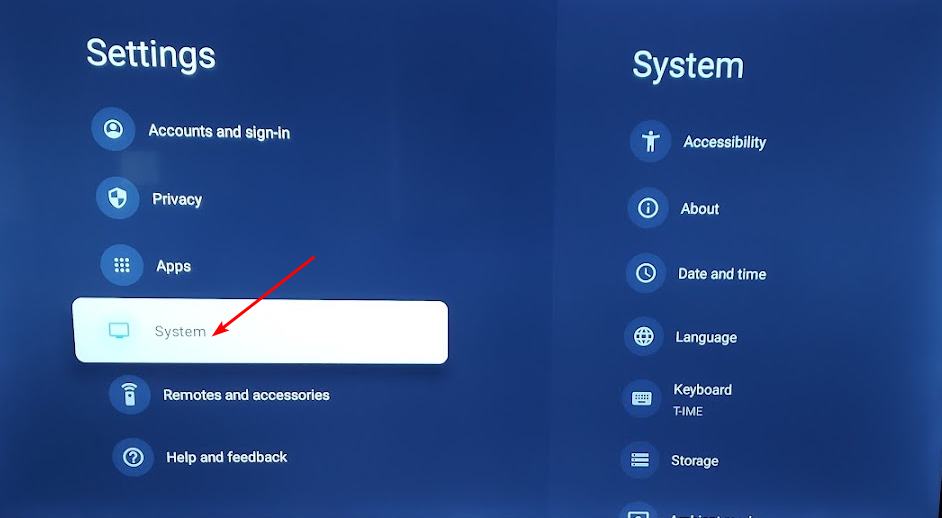
  2. On your TV, find your Settings.
  3. Go to System.
  4. Click on About then select Software update.
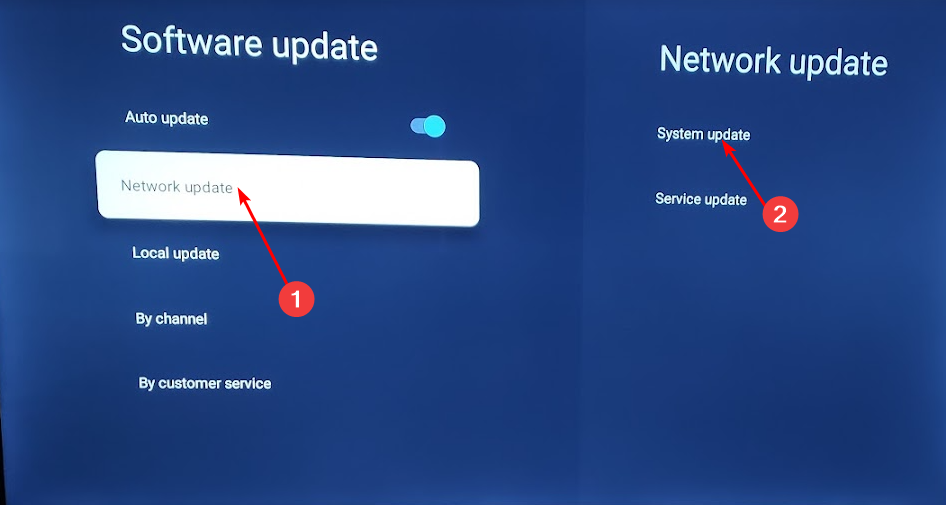
  5. Select Network update and click on System update.
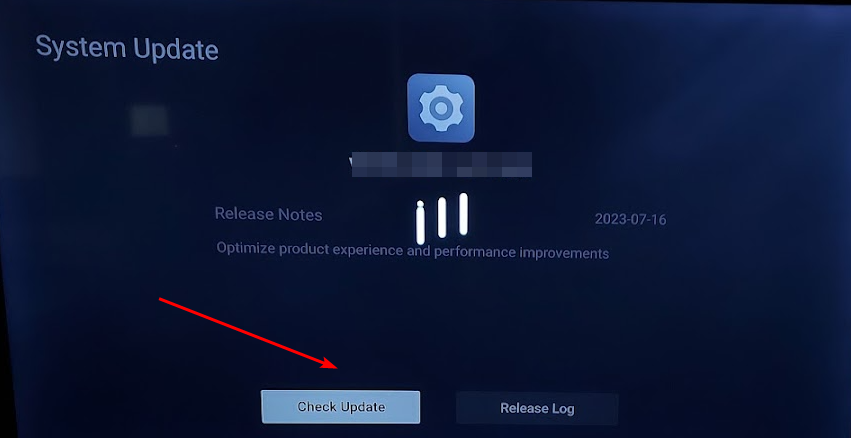
  6. Now click on Check Update. Your system will scan for any available updates.
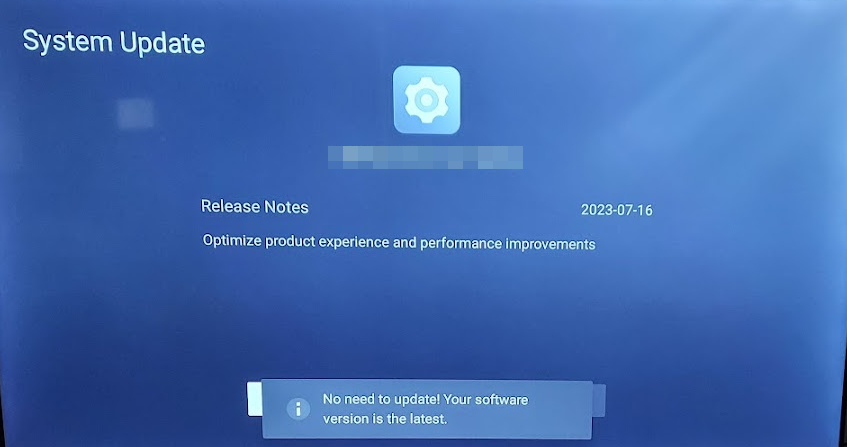
  7. You’ll either start downloading updates or get a message that your TV is already up to date.

If you’re using your Windows PC, also check for updates and download if available.

3. Change your network band

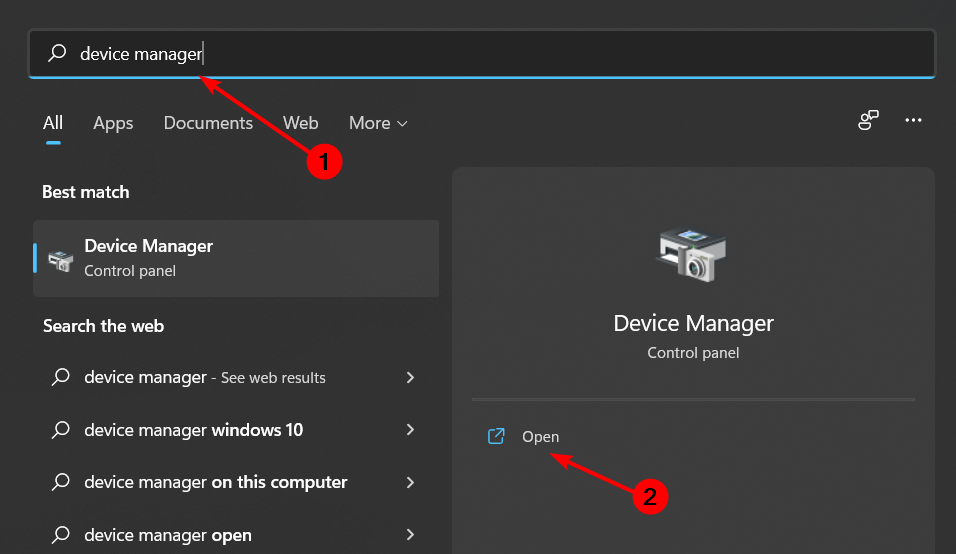
  1. Hit the Windows key, type Device Manager in the search bar, and click Open.
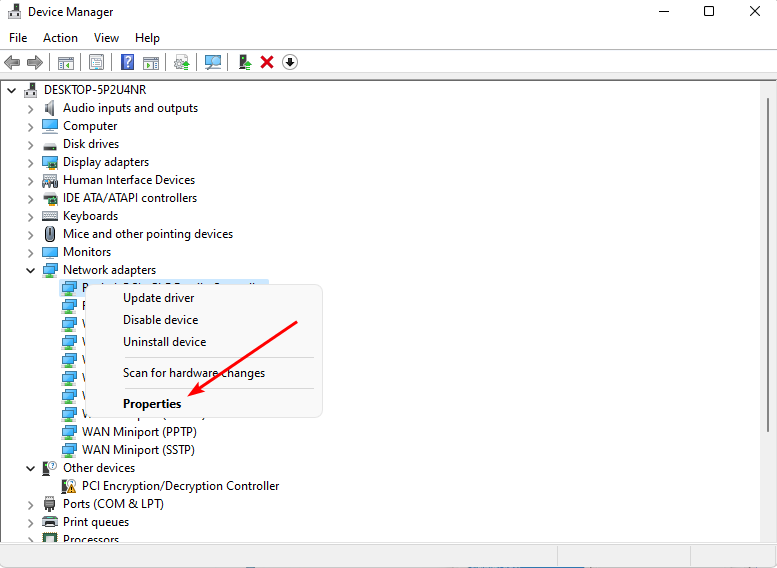
  2. Navigate to Network adapters and double-click to expand.
  3. Right-click on your network adapter and select Properties.
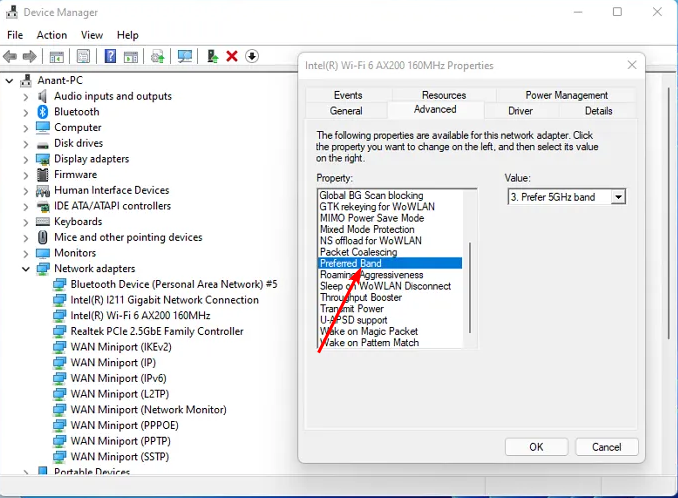
  4. Click on the Advanced tab and locate the Preferred Band.
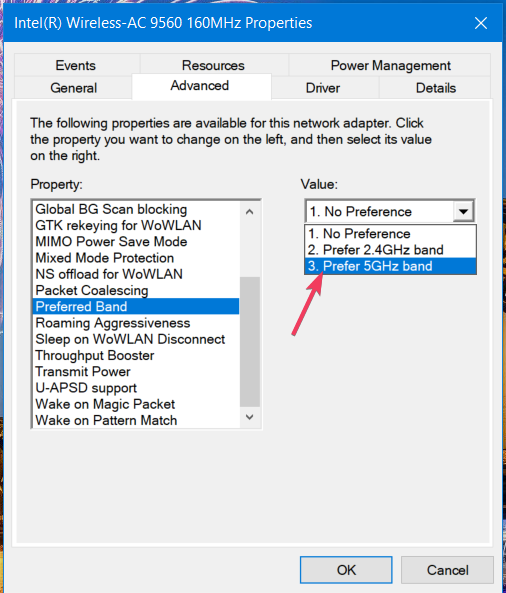
  5. In the Value drop-down menu, select Prefer 5GHz band then hit Enter.
  6. Restart your PC.

If you have an older TV model or earlier Firestick, the 2.4GHz mode band will work better. It’s worth noting that changing the network band may not always work as it depends on your router configuration and how well your Firestick is able to detect and connect to your network.

4. Reset your Firestick

  1. Go to the Home page and select the Settings option.
  2. Select My Fire TV.
    settings disney plus not working on firestick
  3. Now, click the Restore to Factory Defaults option and follow the onscreen instructions to complete the process.
    reset default disney plus not working on firestick
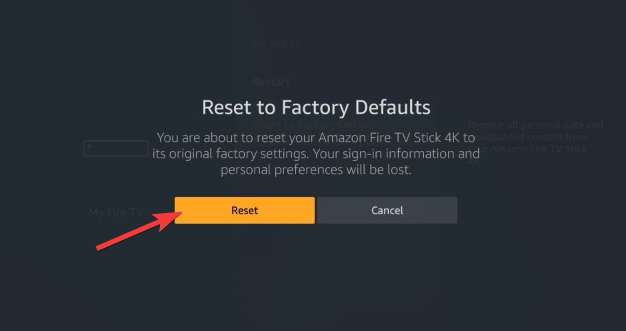
  4. The message You are about to reset your Fire TV to its original factory settings. Your sign-in information and personal preferences will be lost will appear. Click on the Reset button.
  5. The restore process will take approximately 5 to 10 minutes. Wait for your Amazon Fire TV to reset.

In case your Amazon Firestick fails to boot up after the reset, it may be a power issue, so check our article on what to do.

5. Perform a Network reset

  1. Hit the Windows key and click on Settings.settings windows 11
  2. Navigate to Network & internet.
  3. Select Advanced network settings.going advanced network settings win11
  4. Click on Network reset.Network Reset 1
  5. Next, hit the Reset now button.Network Reset now

Resetting your network will remove all saved Wi-Fi networks and require you to enter the network credentials again. This way, if you had tampered with the network settings unknowingly, this will help you re-establish the connection.

Tips to keep your Firestick connected at all times

  • Keep your Firestick updated with the latest software version to help improve its stability and connectivity.
  • Place your router in a central location in your home, away from obstructions, and use an Ethernet connection where possible.
  • Ensure you always have sufficient bandwidth by minimizing the number of devices connected to your network, or consider upgrading your internet plan to accommodate all your devices.

Aside from your Firestick not connecting to your Internet, you may also encounter a situation where it is not connecting to your TV. This may be an issue with your VPN as Firestick doesn’t work well with VPNs.

Still, it shouldn’t be too hard to resolve as we’ve come up with clever ways to bypass such restrictions. Hopefully, one of the above solutions has resolved your connectivity issues with Firestick.

We’d love to get your feedback on this problem so do leave us a comment with any additional thoughts.

How to Open SKV Files on Windows and Mac

You can’t view SKV files natively (using the built-in applications) on Windows and Mac and will need dedicated software to open them. These files can be easily accessed in a spreadsheet-oriented program.

What is the SKV file type? SKV files are used to store text-based data. The SKV file format is similar to CSV, but while the former uses semicolons, the latter employs commas for data storage.

How do I open an SKV file?

1. Use Microsoft Excel

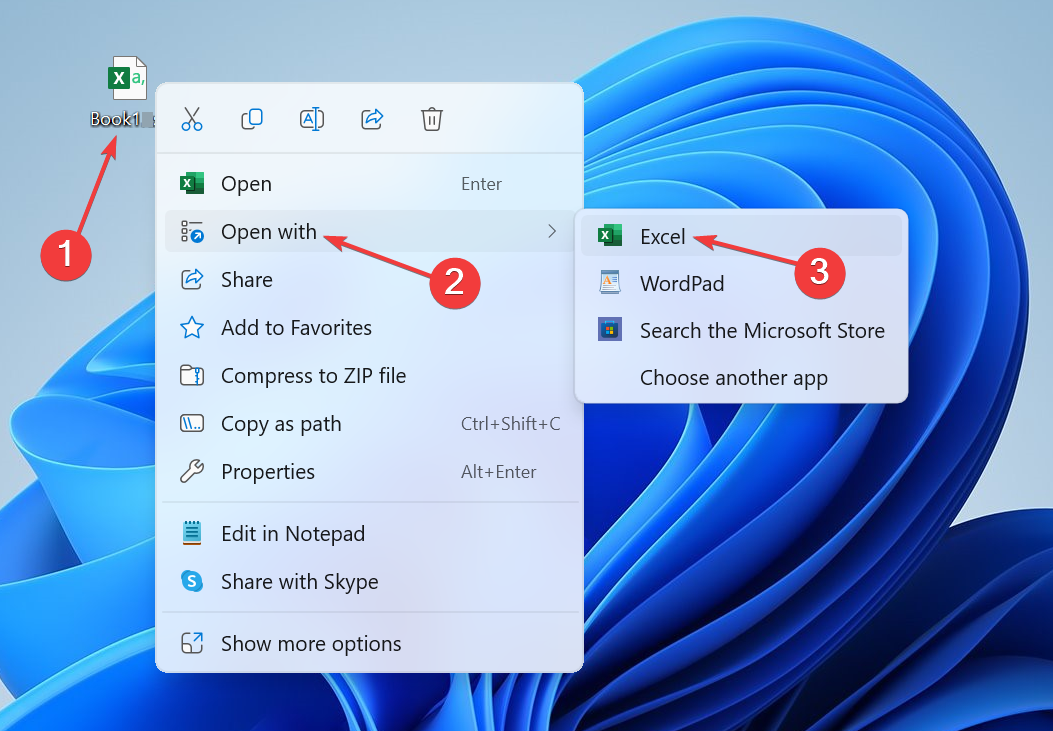
  1. Locate the .skv file, right-click on it, hover the cursor over Open with, and select Excel from the list of options.open with
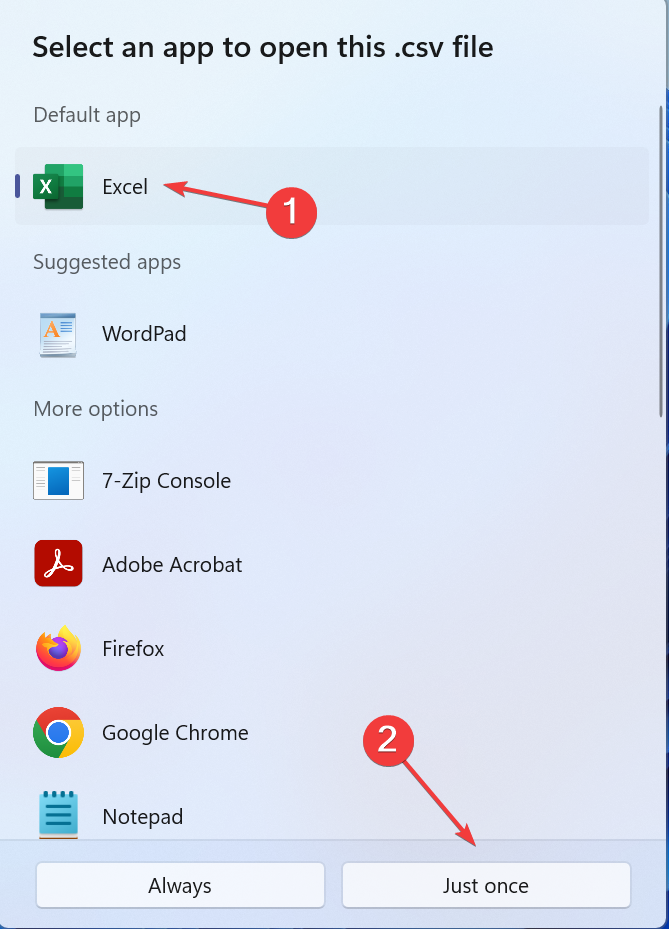
  2. If Excel doesn’t appear here, select Choose another app, and then pick Excel from the list, and click on Just once or Always. The latter will make Excel the default program for SKV files.open SKV files in Excel

You can similarly open an SKV file in Mac. Simply download Microsoft Office from the Mac App Store. Also, if you regularly have to open SKV files, we recommend setting Excel as the default app!

2. Go with a third-party file opener

There are several reliable third-party office suites that will allow you to open SKV files. While we have not tested it with all programs individually, users have reported being able to access the file’s content.

Remember, some data from the file might be missing when using another software, or the file may not open if it is not formatted correctly. In such cases, it’s best to use Microsoft Excel or recreate/redownload the SKV file.

3. Convert the file into a compatible format

If none of the options work, you can always convert SKV files to the CSV format and open them in a CSV-supported program. Also, the CSV format is compatible with Microsoft Excel.

To convert, use an online file converter or download one on the PC. A quick Google search will yield several results. Since not all such websites and files are safe, we recommend you have the firewall enabled and a secure antivirus solution running on the PC.

Remember to never convert the format by manually changing the file extension. This may end up corrupting the data and leaving the file unreadable!

Besides, if you regularly deal with such formats, it’s best to use a universal file opener. With it, you can get rid of individual programs for each file type!

For any queries or to share how you open SKV files, drop a comment below.

The HoeflerText Font Wasn’t Found Scam [Prevention Guide]

The “HoeflerText” font wasn’t found prompt on Google Chrome for Windows users is designed to trick them into installing a malicious file, Chrome Font v7.51.exe. The prompt resembles a genuine error message, and the text on the website is garbled and replaced with random characters.

The fake prompt reads, The web page you are trying to load is displayed incorrectly, as it uses the “HoeflerText” font. To fix the error and display the text, you have to update the “Chrome Font Pack”.

The scam was first reported in early 2017, wherein hackers infiltrated legitimate websites that employed poor security standards with malicious JavaScript. For users who came across the Chrome font missing scam, the tips here will help!

How do I keep my PC safe from The HoeflerText font wasn’t found scam?

1. Do not install the Chrome Font v7.51.exe file

If you see The “HoeflerText” font wasn’t found message on any website, do not click the Update button. Just close the Chrome tab and don’t visit the website until the administrators have resolved things at their end. Your PC is safe until now!

Chrome Font v7.51.exe

Here are a few tips to identify this scam and others:

  • Check the language and tone: If an error message has grammatical errors or uses a rather generic language, it’s most likely fake. The same goes for prompts that highlight urgency and require you to download files.
  • Verify the information: In the case of The “HoeflerText” font wasn’t found scam, the Chrome Font Pack’s current version for everyone was 53.0.2785.89, which can’t be true. If faced with a similar situation, try accessing the website on another device.
  • Look for inconsistencies: When we scrutinized things, the actual file name and the one listed in the prompt were different, another aspect that led our experts to conclude that it was a scam!

2. Scan the PC for malware

  1. Press Windows + S to open Search, type Windows Security in the text field, and click the relevant result.
  2. Click on Virus & threat protection.virus & threat protection
  3. Click on Scan options.
  4. Select Full scan and click the Scan now button.full scan to get rid of the hoeflertext font wasn't found scam
  5. Wait for the built-in antivirus to identify and remove any threats.

In case Windows Security isn’t able to locate the malware, we recommend you use an effective antivirus solution that performs extensive scanning.

For example, one of the most efficient tools is the TotalAV software. This tool is a complete solution for all your security needs, it includes real-time scanning, antivirus, anti-spyware, ransomware shield, and overall protection for all your devices.

⇒ Get TotalAV

3. Reset the PC

  1. Press Windows + I to open Settings, go to System from the navigation pane, and click on Recovery.recovery
  2. Click the Reset PC button.
  3. Select Remove everything.remove everything to get rid of the hoeflertext font wasn't found
  4. Choose Local reinstall.
  5. Verify the current reset settings, make any changes you intend to, click Next, and then follow the on-screen instructions to complete the process.current settings

If nothing else works, the last option is to reset Windows to factory defaults. Since it will wipe all data from the PC, we recommend you back up the critical files or move them to an external storage device. Remember, a complete reset is a guaranteed fix against almost all virus and malware attacks.

We also came across a few cases where Firefox users saw the same prompt, but instead of Chrome Font Pack, it read Firefox Font Pack. So, you have to be cautious on other browsers as well.

Similar to The “HoeflerText” font wasn’t found prompt, we have covered tech support scam pop-ups and Google’s critical security alert scam. A basic understanding of how such scams work will help you identify one and keep the PC safe!

For any queries or to share the website affected by the scam, drop a comment below.

Fix: Display Driver amdwddmg Stopped Responding and has Successfully Recovered

The Display driver amdwddmg stopped responding and has successfully recovered error message in Event Viewer highlights that the AMD graphics driver stopped working, usually for a few seconds. In this period, you will see a black screen with no sound and any active applications will crash.

Why has the amdwddmg display driver stopped responding? The issue usually appears due to problematic connections, misconfigured graphics or power settings, corrupt system files, RAM errors, or an outdated/incompatible graphics driver.

How do I fix Display driver amdwddmg stopped responding and has recovered?

Before we start with the slightly complex solutions, try these quick ones:

  • Switch to DisplayPort from HDMI and lower the frequency to 120 Hz or in the same range.
  • Check the installed version and update the BIOS.
  • Remove the RAM sticks, wipe them, and reseat them in the slots. Also, try interchanging the slots for each stick.

1. Reinstall the graphics driver

  1. Press Windows + R to open Run, type devmgmt.msc in the text field, and hit Enter.
  2. Expand the Display adapters entry, right-click on the graphics adapter, and select Uninstall device.uninstall to fix display driver amdwddmg stopped responding and has successfully recovered.
  3. Tick the checkbox for Attempt to remove the driver for this device, and click Uninstall.uninstall
  4. Finally, restart the computer, and Windows will automatically install a fresh copy of the default AMD driver.

If that doesn’t work, use a driver uninstaller tool to wipe out the current installation, and then let Windows install the best version. Remember, a complete reinstallation also helps with AMD driver crashes in Windows.

2. Update the graphics driver

  1. Press Windows + X to open the Power User menu, and select Device Manager from the list.
  2. Double-click on Display adapters, right-click on the AMD graphics adapter, and select Update driver.update driver to fix display driver amdwddmg stopped responding and has successfully recovered
  3. Choose Search automatically for drivers and wait for Windows to install the latest available version on the PC.search automatically
  4. Once done, reboot the computer.

Updating the AMD graphics driver is critical to fixing the Display driver amdwddmg stopped responding and has successfully recovered error.

If the latest version doesn’t work, go to AMD’s official website, search for the previous stable version, and manually install the driver using the setup (.exe file).

Checking the installed driver version

To find out the installed driver version, open Device Manager > expand Display adapters, double-click on the AMD graphics > go to the Driver tab > check the Driver Version.

3. Disable non-critical AMD services

  1. Press Windows + R to open Run, type services.msc in the text field, and hit Enter.
  2. Locate the AMD Crash Defender service, right-click on it, and select Properties.properties
  3. Select Disabled from the Startup type dropdown menu, and then click the Stop button under Service status.stop to fix display driver amdwddmg stopped responding and has successfully recovered
  4. Click on Apply and OK to save the changes, then restart the computer and check for improvements.

4. Disable Link State Power Management

  1. Press Windows + S to open Search, type Control Panel in the search bar, and click the relevant result.
  2. Click on System and Security.system and security
  3. Click on Power Options.
  4. Now, click Change plan settings next to the active power plan.change plan settings
  5. Select Change advanced power settings.
  6. Expand the PCI Express entry, choose Link State Power Management, and then select Off for both On battery and Plugged in.disable to fix display driver amdwddmg stopped responding and has successfully recovered
  7. Click Apply and OK to save the changes.

The Link State Power Management feature, when disabled, may not completely eliminate the Display driver amdwddmg stopped responding and has successfully recovered error, but it will reduce the frequency.

5. Repair the corrupt system files

  1. Press Windows + S to open Search, type Command Prompt, right-click on the relevant result, and select Run as administrator.command prompt
  2. Click Yes in the UAC prompt.
  3. Paste the following DISM commands individually and hit Enter after each: DISM /Online /Cleanup-Image /CheckHealth DISM /Online /Cleanup-Image /ScanHealth DISM /Online /Cleanup-Image /RestoreHealth
  4. Once done, execute this command to run the SFC scan: sfc /scannowsfc scan to fix display driver amdwddmg stopped responding and has successfully recovered
  5. Finally, restart the computer.

If there are corrupt system files, running the DISM commands and SFC scan will replace them with their cached copy stored on the PC.

In case the Command Prompt reads, Windows Resource Protection found corrupt files but was unable to fix some of them, boot Windows into Safe Mode and try again!

6. Create the TdrDelay DWORD

  1. Press Windows + R to open Run, type regedit in the text field, and click OK.
  2. Click Yes in the UAC prompt.
  3. Now, navigate the following path or paste it into the address bar and hit Enter: HKEY_LOCAL_MACHINE\SYSTEM\CurrentControlSet\Control\GraphicsDriverspath
  4. Right-click on the empty space, hover the cursor over New, and choose DWORD (32-bit) Value or QWORD (64-bit) Value, depending on whether you have a 32-bit or 64-bit Windows installation, respectively.DWORD or QWORD
  5. Name the DWORD/QWORD TdrDelay.
  6. Double-click the DWORD, enter 8 in the Value data field, and click OK to save the changes.value data to fix display driver amdwddmg stopped responding and has successfully recovered
  7. Restart the computer and verify whether the AMD driver crashes have stopped.

7. Run tests on RAM

  1. Press Windows + S to open Search, type Windows Memory Diagnostic in the text field, and click on the relevant result.windows memory diagnostic
  2. Click on Restart now and check for problems.run to fix display driver amdwddmg stopped responding and has successfully recovered
  3. After the PC restarts, check for improvements.

In case the built-in utility didn’t work, use Memtest86, a more extensive open-source third-party RAM testing tool. Let it run tests on RAM overnight, and if any issues are found, replace the RAM sticks with compatible new ones. Remember not to exceed the maximum RAM limit for your PC.

One of these solutions should have helped with the AMD driver error, Display driver amdwddmg stopped responding and has successfully recovered. Based on our experience, more often than not, it’s the installed version to blame, and completely reinstalling the driver does the trick!

Before you leave, discover some quick tips to make Windows faster than ever!

For any queries or to share what worked for you, drop a comment below.

How to enable Teams Meeting Start Menu Recommendations in Windows 11

Microsoft has recently added a new feature to Windows 11 dev and canary builds that allows Microsoft Teams users to see notifications about upcoming meetings in the Start Menu. This feature may have been available only for Teams, work, and school accounts. Here’s how you can enable or disable Microsoft Teams meeting recommendations in the Start Menu.

Microsoft Teams is one of the popular messaging apps. It has recently surpassed the 320 million active monthly users mark.

With Microsoft Teams, you can communicate and collaborate with your team members and contacts in various ways. You can chat, call, share files, and work on projects in one place with Teams. You can use Teams on any device, such as Windows, Mac, iOS, or Android. If you have Windows 11, you can access the full app experience of Teams for personal accounts, which also powers Chat.

There are a variety of ways to join a meeting. For instance, you can join Microsoft Teams Meeting by visiting the meeting invite link received in your email or by signing into the Teams app with Meeting ID and passcode, via the Calendar link in Microsoft Outlook and Teams app and Notification on your PC. You may find the notification that reminds you about upcoming meetings more useful.

Microsoft is now testing showing Teams Meetings notifications as recommendations in the Start Menu. So you can just click it, follow onscreen instructions, and join a meeting.

The feature is being tested in Windows 11 Insider Dev and Canary builds, here is how you can enable it.

How to enable Microsoft Teams Meeting Recommendations in the Start Menu in Windows 11

  1. Visit GitHub and download Viveltool
  2. Extract files to a folder
  3. Copy its Path
  4. Open command prompt as administrator
  5. Paste the path and run the following command afterward
    vivetool /enable /id:45240877,46375308
  6. Restart your computer.
  7. After this, open Settings
  8. Visit Personalization>Start
  9. Enable the “Show upcoming Meetings” setting.

This allows Windows 11 to show your Teams Meetings to happen next in the Start Menu.

If you don’t like these notifications, you can disable Start Menu recommendations like any other, just turn off the “Show upcoming meeting” setting in Start.

So, will you find Teams Meetings notifications in the Start Menu to be useful or annoying? Let us know your thoughts in the comments below.

Microsoft Edge now lets you Add Screenshots to Copilot

Microsoft Edge’s Copilot feature is an AI-powered tool that can help you create amazing images based on your words using DALL-E 3 technology. It also can now upload screenshots in addition to images. The feature is now available in all versions of Edge browser from Copilot available in the sidebar.

In addition to image creation capabilities, Copilot can generate page summaries, perform searches, and answer questions related to the page you’re viewing. This makes it a useful tool for finding information quickly and easily. Copilot is available in the Edge browser sidebar, and you can access it by clicking on the Copilot icon.

Till now, Edge Copilot allows adding an image from your device and it can then analyze and explain it. Copilot in Edge has now received the ability to add screenshots to the chat box. Here are the steps to add a screenshot to Copilot:

How to add Screenshots to Copilot in Microsoft Edge:

  1. Open the Edge browser.
  2. Visit the webpage you want to take a screenshot of and upload it to Copilot.
  3. Click on the Copilot icon on the sidebar.
  4. In the chat box, click on the Screenshot icon.
  5. Capture a region on the screen, click on the tick arrow,
    This image has an empty alt attribute; its file name is capture-screenshot.jpg
  6. Submit to Copilot with something like “What do you see in the picture?”.

Edge utilizes the browser’s built-in screenshot tool for this feature. Once you select an area on the screen and click done, it will be added to the Copilot chat box, where you can ask Copilot to explain about it.

As mentioned in Reddit, Copilot does not allow adding full-page screenshots, which is a popular feature of web capture. The thread mentions Windows Copilot could also get the screenshot feature.

This feature is helpful to users because it allows them to easily add screenshots to Copilot without having to use a separate tool or application.

So, from now on, when you find something on a webpage Copilot can’t reveal, just take a screenshot using the new option and let it give you the information.

Let us know your thoughts on this in the comments below.

How to Fix The OOBEEULA Error on Windows 11?

If you are stuck with Something went wrong but you can try again OOBEEULA error while resetting your Windows computer, then this guide can help!

What causes the OOBEEULA  error? It could occur if the Out Of Box Experience End User License Agreement files are missing or if Windows can’t display it to you.

How can I fix the OOBEEULA error on Windows 11?

1. Use the Cloud Download option instead

If you are stuck at the OOBEEULA error screen, you need to restart your computer in Windows Recovery Environment (winRE); for that, follow these steps:

  1. Press & hold the Power button for 10 seconds to turn off your device.
  2. Now press the Power button again to restart your device. Once you see the device manufacturer’s logo, press & hold the Power button for 10 seconds to turn it off again.
  3. Follow Steps 1 and 2 twice, and when your system restarts for the third time, let it boot up, and you will be in the Windows Recovery Environment.

Once you are in winRE, follow these steps to reset your PC:

  1. On the Automatic Repair screen, select the Advanced options button.Advanced options  - oobeeula
  2. Select Troubleshoot from the Choose an option screen.Troubleshoot
  3. On the Troubleshoot screen, select the Reset this PC option.Troubleshoot = Reset this PC - oobeeula
  4. Select the appropriate option from Keep my files or Remove everything.
  5. On the next screen, choose Cloud Download.
  6. Follow the onscreen instructions, then click Reset to initiate the process.

2. Run SFC & DISM scans

  1. Restart your computer in winRE using the steps from Solution 1.
  2. On the Automatic Repair screen, select the Advanced options button.
  3. Click Troubleshoot.
  4. On the Troubleshoot screen, choose Advanced options.
  5. Select Command Prompt from the next page.Command Prompt Advanced Options - oobeeula
  6. On the Command Prompt window, type the following command and hit Enter: sfc /scannow
  7. Once the command is executed, copy & paste the following command and press Enter: Dism /Online /Cleanup-Image /RestoreHealthRestore health - oobeeula
  8. Wait for the command to complete, then close the window, choose Continue, and reboot your computer.

Repairing the system files can also help you fix the Oobesettings error on Windows 11; read this guide to learn more on the topic.

Scanning and repairing system files can be simplified by using specialized repair software. With a very intuitive interface and easy-to-follow process, you can scan, identify, and replace any broken system files with fresh genuine ones.

3. Edit a registry entry

  1. Reboot your PC in winRE using the steps from Solution 1.
  2. Click the Advanced options button on the Automatic Repair screen.
  3. Select Troubleshoot, then choose Advanced options from the following page.
  4. Choose Command Prompt.
  5. Type the following command to open Registry Editor and press Enter: regedit.exe
  6. Navigate to this path: Computer\HKEY_LOCAL_MACHINE\SOFTWARE\Microsoft\Windows\CurrentVersion\Setup\OOBE
  7. Right-click in the empty space on the right pane, and choose New, then select DWORD (32-bit) Value.DWORD - oobeeula
  8. Name it SetupDisplayedEula.regedit_value data 1
  9. Double-click it and set the Value data to 1, then click OK.
  10. Next, create another DWORD and name it UnattendCreatedUser.oobeeula
  11. Double-click it and set the Value data to 1, then click OK.
  12. Reboot your computer.

4. Reload the OOBE screen using the System Preparation (Sysprep) tool

  1. Restart your computer in winRE using the steps from Solution 1.
  2. Click the Advanced options button on the Automatic Repair screen.
  3. Select Troubleshoot, then choose Advanced options from the next page.
  4. Choose Command Prompt from the Advanced options screen.
  5. Copy & paste the following command and press Enter: %windir%\System32\Sysprep\sysprep.exe /oobe /rebootcmd_sysprep tool - oobeeula

Your computer will restart and take you to the Out-of-Box-Experience screen, then follow the on-screen instructions to complete the process.

The Sysprep tool can help you fix the Windows keeps booting into the OOBE issue; to learn more about the issue; read this guide.

5. Create a temp account using Command Prompt

  1. Reboot your PC in winRE using the steps from Solution 1.
  2. Click the Advanced options button on the Automatic Repair screen.
  3. Select Troubleshoot.
  4. Click Advanced options.Advanced options
  5. Choose Command Prompt from the Advanced options screen.Command Prompt Advanced Options - oobeeula
  6. Type the following command after replacing username and password with the preferred username and password and hit Enter: net user /add [username] [password]
  7. Copy & paste the following command to give administrator rights to your temporary account after replacing the username with the username of the new account, then press Enter: net localgroup administrators [username] /add
  8. Close the window, and press Continue to restart your computer.
  9. Now login using the new user account.

Remember, this is a workaround to access your computer if the issue is only with the profile you were using earlier.

To conclude, if you are stuck with the OOBEEULA error, the best way to fix it is to try to reset your computer again.

You can also try to run the SFC & DISM scans to repair the damaged system files or add the registry entry to make the problem go away.

However, if nothing worked for you, you might need to reinstall your Windows OS again to fix the problem completely.

In case you have questions or suggestions about the OOBEEULA error, feel free to mention them in the comments section below.

Solved: 895 System32.exe Failure on Windows 11

If you have encountered the 895-system32.exe failure on your Windows computer, then this guide can help!

What causes the 895-system32.exe failure error? This pop-up appears if your system is infected with viruses or has unwanted programs.

How can I fix the 895-system32.exe failure?

Before proceeding with any steps to fix the 895-system32.exe failure, go through the following preliminary checks:

1. End the unwanted processes

  1. Press Ctrl + Shift + Esc to open the Task Manager app.
  2. Click Processes from the left pane and locate all the unwanted programs, along with your browser on which you got the 895-system32.exe failure pop-up.
  3. Select them one by one and choose End task.Taskmgr_895 system32.exe failure
  4. Switch to the Startup apps tab, select all the unwanted third-party apps one by one, and click Disable.Disable -895 system32.exe failure
  5. Once done, restart your computer.

2. Remove the unwanted apps

To avoid interference, first, follow these steps to restart your computer in safe mode:

  1. Press Windows + R to open the Run window.msconfig - 895 system32.exe failure
  2. Type msconfig and click OK to open the System Configuration window.
  3. Go to the Boot tab, navigate to Boot options, then place a checkmark next to Safe boot & network.Safe boot with network - please insert the external storage media and press ok
  4. Click Apply, then OK.
  5. Select Restart to enter the Safe mode.Restart - 895 system32.exe failure

Once your computer is in safe mode, your system will be running with only the required services and drivers; follow these steps to uninstall apps:

  1. Press Windows + I to open the Settings app.
  2. Go to Apps, then click Installed apps.Apps, installed apps - 895 system32.exe failure
  3. Scroll and go through the list to find suspicious apps; once located, click the three dots icon and select Uninstall.Uninstall
  4. Click Uninstall to confirm the action.Uninstall the app
  5. Follow the same steps to uninstall other unwanted apps from the list.

Uninstalling suspicious apps from your computer can also help you deal with other System32.exe failure popup on Windows 11; read this to learn more.

3. Clear the cache from your computer

  1. First, follow the steps mentioned in Solution 2 to enter the Safe mode.
  2. Press Windows + R to open the Run window.appdata - 895 system32.exe failure
  3. Type %appdata% and click OK to open the App Data Directory.
  4. Open the Local folder and go through the list of folders; if you find any of the uninstalled apps on them, select them and click Delete.delete
  5. Next, invoke the Run dialog box, type %temp% and click OK.
  6. Press Ctrl + A to select all the content on the following folder, and click the Delete button.
  7. Open the Run window again, type temp, and click OK.
  8. Press Ctrl + A to select all the files and click the Delete button to remove them.

4. Remove the unwanted extensions from your browser

  1. Restart your computer in Safe mode using Solution 2, then open the affected browser; here, we are using Google Chrome to demonstrate the steps.
  2. Click the three horizontal dots from the top-right corner and select Extensions, then choose Manage Extensions.Manage Extensions new
  3. You will get a list of the add-ons installed.
  4. Go to all the suspicious or unwanted extensions one by one, and click Remove.Extnesions remove - 895 system32.exe failure

5. Reset the browser settings to default

  1. Reboot your PC in Safe mode using Solution 2, then open the affected browser; here, we are using Google Chrome to demonstrate the steps.
  2. Click the three horizontal dots from the top-right corner and select Settings.Settings CHrome - 895 system32.exe failure
  3. From the left pane, select Reset settings.
  4. On the next screen, choose Restore settings to their original defaults.reset - 895 system32.exe failure
  5. Click Reset settings to confirm the action.Reset

6.  Check your browser properties

  1. Right-click the browser shortcut and select Properties from the context menu.
  2. Go to the Shortcut tab, locate Target and delete everything after yourbrowsername.exe” (for Chrome, it would be chrome.exe”).Target - 895 system32.exe failure
  3. Click Apply, then OK to save the changes.

7. Restore your computer to a previous version

  1. Press Windows + R to open the Run window.rstrui command Restore point
  2. Type rstrui and click OK to open the System Restore window.
  3. On the System Restore page, select Choose a different restore point and click Next.Next Choose a different restore point
  4. Select the restore point just before the issue started and click Next.Choose a point - 895 system32.exe failure
  5. Click Finish.Finish

Windows will restart and try to restore the settings to the selected version. If you see the System Restore didn’t successfully complete message, read this guide to learn the reasons and fixes.

Restoring your computer to the last known good configuration can help you fix similar errors like Rundll32.exe application; read this guide to know more.

To conclude, to avoid these pop-ups, always install apps from the official website or Microsoft Store, don’t visit any suspicious websites and never download content from unauthorized sites.

In case your computer is already infected, you need to end all processes, restart your PC in Safe mode, then uninstall the malicious apps and unwanted extensions from the browser, reset it to default or perform a system restore to fix the issue.

If nothing worked for you, you need to reset your computer to default settings to get rid of the pop-up for good.

Did we miss a step that helped you with the system32.exe failure? Don’t hesitate to mention it in the comments section below. We will happily add it to the list.

Solved: Please Insert The External Storage Media and Press OK

If you have encountered the Please insert the external storage media and press OK message while reinstalling or updating Windows, this guide can help!

What causes the Please insert the external storage media and press OK error? It could occur due to insufficient space on your hard drive or if your computer can’t access the SD card after it restarts itself.

How can I fix Please insert the external storage media and press OK?

Before proceeding with any steps to fix the problem, go through the following preliminary checks:

  • Disconnect all the external devices apart from the USB drive with Windows updates, mouse and keyboard.
  • Update your BIOS to the latest version.

1. Reconnect your external media device

If you are using an SD card to store Windows update files, follow these steps:

  1. Remove the SD card from your computer.
  2. Plug in a USB card reader into a free USB port, then insert the SD card with updated files into the card reader.
  3. Wait for a pop-up to ensure the card is connected, then try the reinstallation process again.

In case you don’t have a USB card reader, you can copy the files from an SD card to a flash drive and insert it into your computer.

If you are using any other external storage device, you can try removing it, then connecting it again, then press OK on the error and try to install updates. Also, check if the SD card or external storage device you are using is not corrupted.

2. Perform the system restore

First, you need to create a Windows 11 bootable USB on a different computer. Once done, follow these steps to change the boot order:

  1. Insert the USB drive into the affected computer.
  2. Restart your computer, then press any of the keys, F10, F2, F12, F1, or DEL, according to your device’s manufacturer, to get into the BIOS settings.
  3. Go to the Boot tab, and use the arrow keys on your keyboard to select the USB drive as a priority.
  4. Once done, press F10 or go to the Exit tab, select Save And Exit, and then press Enter.

If your Windows computer is ignoring the boot order, then check if the disk is bootable or ensure it is not corrupted; read this guide to learn more.

Now, follow these steps to repair your computer to fix the issue:

  1. On the blue screen, select your Language, Time and currency format & Keyboard or input method.
  2. Click the Repair your computer link from the next screen.
  3. From the Choose an option screen, select Troubleshoot.Troubleshoot
  4. Choose Advanced options from the next page.Advanced options - please insert the external storage media and press ok
  5. On the Advanced options screen, select the Command Prompt option.Command Prompt Advanced Options .
  6. Type notepad and press Enter on the command prompt window.
  7. Once Notepad is open, go to File, then choose Open, and select All Files from dropdown.
  8. You will get the File Explorer here, plug in another external USB drive and copy all important files. Once done, close the Command Prompt window. You can skip Steps 5 to 8 if you don’t want to save any files.
  9. Next, follow the same steps from 1 to 4 to access Advanced options and then select Startup Repair from the Advanced options screen.Startup Repair - Please Insert The External Storage Media and Press OK
  10. Once the repair process is complete, reboot the computer.

In case Startup Repair is not working for you, it could be due to broken or corrupted system files; you can try the methods mentioned in this guide.

If nothing has worked for you, you need to back up your data and reinstall your Windows operating system to fix the issue once and for all.

In conclusion, to avoid such Update errors, you must always clean your disk and ensure there is sufficient space on your computer before installing updates.

Did we miss a step that helped you resolve this problem? Don’t hesitate to mention it in the comments section below. We will happily add it to the list.

Solved: Discord Checking for Updates Forever

If you’re experiencing an issue where Discord is stuck on checking for updates forever, we’ve compiled this report to help you address this problem.

Why is Discord taking forever to update?

  • Discord server issues or internet connection problems.
  • Running an unofficial Discord app.
  • Insufficient permissions or cached data from previous Discord sessions.
  • Antivirus/firewall interference or your Discord installation itself might be corrupt.

How do I fix the Discord update bug?

Start off with the following basic steps:

1. Run Discord as Administrator

  1. Make sure Discord is completely closed.
  2. Right-click on your Taskbar and select Task Manager.
  3. End any process related to Discord.
  4. Reboot your system.
  5. After the reboot, right-click on the Discord app and select Run as Administrator.

2. Clear Discord cache

  1. Close all active instances of Discord from your Task Manager.
  2. Press the Windows key + R to open the Run box, type %appdata%, and hit Enter.
  3. Locate the Discord folder in the Roaming folder, right-click, and select Delete.
  4. Once the folder is deleted, close the window, and restart your PC to complete the fix.

3. Disable your antivirus temporarily 

  1. Hit the Start menu icon, type Windows Security in the search bar and click Open.
  2. Click on Firewall & network protection, then select Public network.league of legends black screen after champion select
  3. Locate Microsoft Defender Firewall and toggle the off button.turning off Microsoft Defender Firewall Windows

If your antivirus or firewall’s security settings are too aggressive, it may flag Discord update files as potential threats or false positives and prevent them from being downloaded or installed.

Ensure you re-enable the antivirus software once the update is complete to maintain your computer’s security. If disabling the antivirus software is not feasible, you can whitelist Discord as an exception.

4. Disable VPN 

  1. Press the Windows key and select Settings.settings windows 11
  2. Next, select Network & internet and click on VPN in the right-side menu.
  3. Select the VPN connection you want to disable, click on the drop-down and select Remove.remove VPN

Discord may block certain VPN IP addresses due to attempts to circumvent geographic restrictions. You can disable your VPN temporarily and then later turn it on since it offers specialized servers optimized for gaming.

5. Disable Proxy 

  1. Press the Start Menu icon and select Settings.settings windows 11
  2. Click on Network & Internet on the left pane, then scroll down and click Proxy on the right pane.Network proxy settings
  3. Select Edit next to Use a proxy server option in the Manual proxy setup section, toggle off Use a proxy server and click on Save.Disable proxy server

6. Reinstall Discord

  1. Press the Windows key, type Control Panel, and hit Enter.
  2. Click on Programs and Features in the Control Panel window.
  3. Scroll down to locate Discord, click on it, and click Uninstall.
  4. If there is a confirmation prompt, click Yes to confirm the uninstallation and close the Control Panel once the process is completed.
  5. Next, remove any software leftovers to make sure your new installation is not interfered with by corrupt remnant files.
  6. Press the Windows key, type Microsoft Store, and hit Enter.
  7. Type Discord, and click on the displayed result.
  8. Click the Get or Install button to download the app.
  9. Once it’s installed, launch the app to see if the update will go through.

7. Perform a Network reset

  1. Hit the Windows key and click on Settings.settings windows 11
  2. Navigate to Network & internet.
  3. Select Advanced network settings.going advanced network settings win11
  4. Click on Network reset.Network Reset 1
  5. Next, hit the Reset now button.Network Reset now

It’s important to note that the specific cause of Discord checking for updates forever may vary, and different solutions may work for different users. Therefore, it may be necessary to try multiple troubleshooting steps to find the one that works for you.

If it’s a Discord temporary network error, you need to first address the connection issues before you try updating again. For server or access-denied issues, there’s not much you can do but wait for them to be back up again.

Sometimes, Discord will fail to update completely but it’s nothing you can’t fix from our easy-to-follow guide. As a rule of thumb, always ensure you’re running the official Discord app. It’s easy to get hacked on Discord when the software has been acquired through dubious means.

That’s all we had for this article but we’re keen to hear about any other solutions that may have worked for you. Do leave a comment below if you have any.

Turn any key into a Copilot Key: Here’s how you do that

Recently, Microsoft announced that it will add a dedicated Copilot key to future Windows 11 PC keyboards. This key lets you launch Copilot quickly on Windows.

However, you don’t need to wait or buy a dedicated keyboard or device. You can turn any key on your keyboard to open Copilot on Windows 11 by remapping a key to the Copilot shortcut (Win + C).

When you press that key, the AI Assistant opens. Here’s how you can do that using Microsoft PowerToys.

First, find a keyboard key that you don’t use that often daily. You can select the Menu key, which Microsoft has considered. Next, follow these steps:

How do I remap the Menu key to open Copilot in Windows 11?

  1. Download and install PowerToys on your Windows 11 PC.
    Note: PowerToys is available on GitHub and Microsoft Store.
  2. Launch PowerToys.
  3. Click on Keyboard Manager.
  4. Ensure that the Enable Keyboard Manager setting is turned on. Under Keys, click Remap a key.
  5. Click Add key remapping.
  6. Click Select.
  7. Press the physical key on the keyboard which could be the Menu key, which appears next to the Right Win key, and click OK.
  8. Under To Send, choose the Win (Left) key and select the C option.

You can now notice PowerToys Keyboard Manager highlighting Apps/Menu key was remapped to Win(Left) C combination.

Just press the Menu key, and Copilot now opens without you pressing Win + C.

This saves muscle memory and makes it easier to access Copilot on Windows 11.

More information about Copilot and the new AI key

For those of you who don’t know, Microsoft Copilot is an AI-powered tool that is now available for Windows 11, Windows 10, Android, and iOS. You can visit the Copilot website, sign in with your Microsoft account, and access it in any web browser, not just Edge or Bing chat.

Copilot can help you with a variety of tasks, such as generating summaries, answering your queries, and much more.

Microsoft is now bringing its AI Assistant to Windows keyboards in place of the Menu key that generally appears next to the Right Alt key on the keyboard. After Office and emoji, the AI key is the biggest change for the Windows Keyboard in the last 30 years.

Have you found this trick that converts the Menu key to a Copilot key on the keyboard, useful? Let us know your thoughts in the comments below.

Failed to Start emSigner Service for MCA: 5 Ways to Fix it

If you are getting the Failed to start emSigner service error while trying to submit a GST application with DSC for MCA, it’s most likely that the service isn’t installed or not running. Also, missing permissions or conflicts with the installed antivirus can trigger the error.

Remember, Java is a critical requirement for the emSigner service to work, and you should have the latest version for the best results. Let’s find out what you can do if the emSigner service is not starting!

How can I fix the Failed to start emSigner service error?

Before we start with the slightly complex solutions, try these quick ones:

  • If you don’t have it, download emSigner from the official website.
  • Launch the emSigner service with administrative privileges. To do that, right-click on it and select Run as administrator.
  • Make sure you are running the latest version of Java, if already installed.

1. Uninstall programs using Port 2015

  1. Press Windows + S to open Search, type Resource Monitor in the text field, and click the relevant result.
  2. Go to the Network tab, and expand the Listening Ports entry.network
  3. Identify the program using Port 2015. It’s Express VPN for a lot of users.program using port 2015
  4. Now, press Windows + R to open Run, type appwiz.cpl, and hit Enter.appwiz.cpl
  5. Select the program you identified earlier, and click Uninstall.uninstall to fix failed to start emsigner service
  6. Follow the on-screen instructions to complete the process, and then restart the computer.

If that doesn’t work, use an effective software uninstaller to clear any leftover files, app cache, or Registry entries, and check whether the Failed to start emSigner service error is fixed!

2. Install Java

  1. Go to the official website and download the Java installer based on the system architecture (32-bit or 64-bit).jave
  2. Run the setup, and click Yes in the UAC prompt.
  3. Follow the on-screen instructions to complete the installation.java to fix failed to start emsigner service
  4. Restart the computer to check for improvements.

You need to install Java for the emSigner service to work for MCA. Once done, you will see the emSigner service started successfully message on running the service.

3. Whitelist https://127.0.0.1:1585

  1. Press Windows + R to open Run, type control panel in the text field, and hit Enter.
  2. Select Large icons from the View by dropdown menu near the top right.large icons
  3. Choose the Java entry.java
  4. Navigate to the Security tab, and click on the Edit Site List button.edit
  5. Click Add.
  6. Enter https://127.0.0.1:1585 in the blank text field and click OK.add to fix failed to start emsigner service
  7. Again, click Apply and OK to save the changes.

4. Disable Windows Security

  1. Press Windows + S to open Search, type Windows Security in the text field, and click the relevant result.
  2. Click on Virus & threat protection.virus & threat
  3. Now, click on Manage settings under Virus & threat protection settings.manage settings
  4. Disable the toggle for Real-time protection, and click Yes in the prompt to confirm the change.disable to fix failed to start emsigner service

If you are using a third-party antivirus, make sure to disable it. Also, do not visit any untrusted websites or download files while the antivirus protection is turned off.

5. Reinstall the emSigner service

  1. Press Windows + I to open Settings, go to Apps from the navigation pane, and click on Installed apps.installed apps
  2. Locate the emSigner entry, click the ellipsis next to it, and select Uninstall.uninstall to fix failed to start emsigner service
  3. Again, click Uninstall in the confirmation prompt.
  4. Restart the computer for the changes to apply.
  5. Finally, reinstall the service from the official source.

If the previous solutions didn’t work, reinstalling emSigner will do the trick! The emSigner installer comes bundled with all the critical programs and processes, so make sure you go with the default choices.

In case the Failed to start emSigner service error still appears, we recommend you wait for 24-48 hours or try submitting on MCA in the early hours so that there’s minimal load on the servers.

Also, do not forget to discover the best tax software and start using one today to get maximum savings!

For any queries or to share how you fixed the error, drop a comment below.

What is a DCB Association and Should I Remove it?

Received a message dubbed DCB association with some alphanumerics? You may be wondering whether you’ve been hacked. We answer what it entails and whether you should disable it.

What is a DCB association?

A DCB association or Direct Carrier Billing association is the integration between your mobile network operator and a digital service provider. It enables you to make online purchases or payments by charging them directly to your mobile phone bill or deducting the amount from your prepaid balance.

This makes it easier to pay for digital goods and services such as mobile apps, games, music, eBooks, or in-app purchases. It eliminates the need for traditional payment methods like credit cards or bank transfers that may be plagued by card verification errors and failed transactions from time to time.

How can I disable a DCB association?

1. Remove your mobile number from the payment methods

  1. On your phone, launch the Google Play Store app.
  2. Tap on your profile picture and select Payments & subscriptions.
  3. Select Payment methods.
  4. Tap on More payment settings and you’ll be directed to Google’s Payment Center.
  5. You’ll see your mobile phone carrier listed then tap Remove.

2. Deactivate your phone number

For some reason, you may be unable to remove your phone number from your Google Play Store account. If so, you must contact your mobile network operator’s customer service to deactivate your phone number.

It’s important to note that the process of disabling or removing a DCB association will vary. Factors such as your mobile network operator and the service associated with the DCB will come into play. This may be impossible if you have any pending payments or active subscriptions.

However, your mobile network operator may be able to help by freezing your funds until such a time you’ll be able to opt out of the service.

Reasons to opt out of a DCB association

  • Unauthorized charges – If you notice suspicious activity related to the DCB association, you should disable it to secure your financial information.
  • Unwanted subscriptions – If you subscribe to services through the DCB association without your consent or knowledge, you might want to disable the association.
  • Alternative payment methods – The DCB association is not everyone’s cup of tea, so if you prefer using other payment methods, such as credit cards or digital wallets, you may choose to remove the DCB association.

Generally, there’s no need to remove the DCB association since it’s a very secure and convenient payment method. Most importantly, it is not a hacker trying to access your details. With many scams like the FedEx text scam going around, you can rest assured this is not one of them.

Most of the unwanted and unauthorized charges are usually from free trials. You probably just forgot to cancel before you’re charged. As for protection, you can always enable 2-step verification on your Google account and keep an eye on your subscriptions.

However, if your Google Pay transaction is not going through, you may benefit from virtual credit card apps.

Have you connected your phone number to Google Pay? Would you say the DCB association is better than traditional credit and debit cards? Let us know your thoughts in the comment section below.

Google Play Error Code 492 [Solved]

The Google Play error code 492 is seen when downloading or updating apps from the dedicated Android app store. It could affect one, multiple, or all apps and doesn’t resolve independently.

The error code highlights a corrupt Google Play Store or app cache and files. An underlying cause is missing or misconfigured permissions, often due to OS and app updates. Besides, issues with the SD card can trigger the Play Store error code 492.

How do I fix Google Play Store error code 492?

Before we start with the slightly complex solutions, restart the device and ensure enough free storage to download or update the app, log out and sign back into the Google Play Store and verify whether the Google Play services are down using the official status page or a third-party real-time monitoring service like Downdetector.

1. Clear the Play Store’s cache

  1. Open the device Settings, and go to Apps.apps
  2. Select Google Play Store from the list.
  3. Tap on Storage.storage
  4. Now, tap on Clear data and Clear cache individually to clear all non-critical files.clear cache to fix google play error code 492
  5. Choose the appropriate response in case a confirmation prompt appears.
  6. Similarly, clear the cache for Google Play Services, and check for improvements.

This also helps fix the USB storage is running out of space error.

2. Update the Android version

  1. Go to the device Settings, and select Software update.software update
  2. If a newer version is available, tap on Download and install.download to fix google play error code 492
  3. Tap the Download button at the bottom to start the update.
  4. Once done, restart the device and verify whether the Google Play error code 492 is fixed.

For many, it turned out to be a bug in the installed version of the OS that triggered the error. This also helps with the Please update your device settings to accept media files error error.

3. Uninstall the Google Play Store updates

  1. Open the Settings, go to Apps, and select Google Play Store from the list.
  2. Tap on the ellipsis (three dots) near the top right.ellipsis
  3. Now, select Uninstall updates.uninstall updates to fix google play error code 492
  4. Finally, tap OK in the confirmation prompt, wait for the process to complete, and then check for improvements.

Uninstalling the Google Play Store updates also helps with the Checking for updates error.

4. Reinstall the affected app

  1. Open the device Settings, go to Apps, and select the one that’s not getting updated.
  2. Tap on Uninstall at the bottom.uninstall to fix google play error code 492
  3. Tap OK in the confirmation prompt.
  4. Now, open the Google Play Store and reinstall the affected app.

5. Check the app files in the obb folder

We came across cases of corrupt files in the following directory for the individual app: Android/obb

To identify such instances, check whether the app’s folder icon is replaced with a question mark (?). If that’s the case, the best option is to delete the file(s).

obb Files

To access and delete the file(s), use the built-in, if available, or an effective third-party File Manager. The app will, most likely, redownload a fresh copy the next time you launch it. Also, if you can’t find the obb folder in the Internal Storage, check your SD card.

6. Download the app’s APK from the official website

You can download the app’s APK (Android Package Kit) from the manufacturer’s official website and install it on the device as a workaround. Remember, this only works for apps that offer an APK.

We tested it for PUBG when faced with Google Play error code 492, and the downloaded APK installed fine! Remember, you must reconfigure the device’s app installation settings for this to work.

Allow installation of unknown apps

To do that, open Android Settings > go to Apps > tap the ellipsis near the top right > select Special access > choose Install unknown apps > select Google Chrome (or the browser you will use to download APK) > enable the toggle for Allow from this source.

7. Factory reset the Android device

  1. In the Android Settings, and tap on General management. general management
  2. Tap on Reset.
  3. Choose Factory data reset from the list of options.reset to fix google play error code 492
  4. Scroll down to the bottom and tap on Reset.
  5. Choose the appropriate response in the confirmation prompt.

If nothing else works, the last option is to restore the device to factory defaults to fix the Google Play store error code 492 while downloading or updating apps. Remember, this will wipe all data on the phone, so make sure you create cloud backups for critical apps.

The Play Store code 492 may be easily fixed for some, while others must rely on intricate solutions. But it’s fixable! Also, we wouldn’t recommend making any changes you are unsure of, as it might affect the functioning of other apps.

Before you leave, discover the best Android emulator for Windows and play your favorite games on the PC! If you have additional errors with Google’s service, check our OR-CCSEH-26 article for more solutions.

We also have a great guide on Your administrator has not given you access to this item Play Store error, so don’t miss it.

For any queries or to share how you fixed the error, comment below.

6 Best Kanji Translator From Image Tools

If you want to recognize the intricate characters of Japanese writing, Kanji, from an image or PDF, you need an effective translator. In this guide, we will explore the six best tools to accurately translate Kanji characters from images.

What to consider when choosing a Kanji image translator? You must consider factors like accuracy in character recognition, language support, user interface intuitiveness, and speed of translation.

What are the best online Kanji translators from image?

Easy Screen OCR – User-friendly controls

Easy  screen OCR

Easy Screen OCR is one of the best Kanji translators from image, which can efficiently extract Japanese text from images and scanned documents like PDFs.

You can either download the tool on your computer or use the online version to get the documents ready to edit, format, index, and translate.

It is based on Google OCR, comes with two Kanji text-recognition modes, supports more than 100 languages, and works effectively as a translator as well.

Easy Screen OCR online version is free for use, and it allows you to upload images in PNG and JPEG formats.

⇒ Get Easy Screen OCR

PDNob – Has a short processing time

PDNob - kanji translator image

A robust OCR tool with remarkable scanning and translating capabilities, PDNob can convert and recognize text from PDFs and images in a few clicks. You can even take a screenshot of the text and extract it in the desired language.

It is capable of turning images of Japanese, Chinese, Korean, Serbian, Spanish, Latin, English, Italian, French, Bulgarian, Portuguese and Traditional Chinese into text.

PDNob allows you to import PNG, JPEG, JPG, and TIFF files and export them as DOC, TXT, and DOCX files.

It imposes some restrictions with the trial version, but once you have the subscription, you can upload 100 images at a time and convert unlimited images to text.

⇒ Get PDNob

Nanonets – Comes with a free trial

Nanonets

Nanonets is an intuitive software that can extract information from most Japanese documents like bills, receipts, cards, passports, invoices, and more with approx 95% accuracy.

This easy-to-use tool supports more than 120 languages and can connect to email, Google Drive, Outlook, and customer relationship management platforms like Salesforce.

It has a free trial & free account option, which allows you to test the tool before buying, and offers 24×7 customer service.

Nanonets comes with a modern user interface and has the ability to store documents online.

⇒ Get Nanonets

FreeOCR – Comes with an export option for MS Word

FreeOCR

Another free optical character recognition software, FreeOCR, comes with a recent Tesseract (v3.01) OCR engine, which makes it more accurate than other tools in the market.

It can extract Kanji text from an image and support a variety of languages but can work on a single PDF or image at a time.

FreeOCR allows you to import directly from popular image formats, PDF & Twain Scanners,  multi-page tiff documents, and more.

For personal use, the tool is available for free on Windows, but it has a few downsides, like an outdated user interface and no option to create documents.

⇒ Get FreeOCR

Yandex Translate – Intuitive interface

With optical character recognition support, the Yandex translator is one of the best Kanji translators from image.

It is simple to use and lets you translate from Japanese to more than 100 languages. You can upload the image file or enter the URL and select the preferred languages to begin.

This online translator tool allows you to load JPG, PNG, GIF, or other formats of image files of up to 5 MB in size.

The tool is available for free and can accurately convert and translate an image text in a few steps.

⇒ Get Yandex

i2OCR – Supports more than 60 languages

i2OCR - Kanji From Image Translator Tools

i2OCR is an image OCR tool that can help you extract Kanji text from an image. You can change, format, search, and index Kanji text in a few steps.

It also allows you to export files in editable format in Word without losing any information, however, you might have to adjust the formatting.

i2OCR enables you to extract text from the image, then allows you to edit it in Google Docs or translate it to your preferred language using Google or Bing.

This online tool can recognize Japanese characters, including Kanji, Hiragana, & Katakana, and allows you to update both images and PDF files.

⇒ Get i2OCR

Once you have extracted text from an image, you can turn your Google Sheets to a translator to get the text in a desired language; read this to learn how.

How can I translate Kanji from images?

  1. Download the PDNob Image Translator on your device.
  2. Click on Import to choose a document or image.IMport  - 5 Best Kanji From Image Translator Tools
  3. You can also press Ctrl+Alt+Z to activate the screenshot feature if you want to snap a picture of the text to extract it.
  4. Once the image is uploaded, select the Recognized language and Translate language from the left and right pane.Select Language - 5 Best Kanji From Image Translator Tools
  5. You will get the translated language almost instantly, you can either click the Copy icon or Export button to get the output.Export or Copy

So, these are some of the best Kanji translators from image that can be considered for their accuracy, language support, and user-friendliness.

Easy Screen OCR is popular for its user-friendly interface and extensive language support; PDNob swiftly processes images and PDFs.

Whereas Nanonets comes with a 95% accuracy rate and a free trial option, FreeOCR has an MS Word export feature, and Yandex Translate & i2OCR are simple to use.

In case you are looking for the best offline translator apps for your PC, we recommend you check out this guide to learn more about them. If you need something more advanced, consider using these live translation apps.

If you have any questions or suggestions about the subject, feel free to mention them in the comments section below.

How to Get a Railjack in Warframe For Free

Railjack is an interceptor spacecraft that significantly enhances the attack and defence capabilities. It’s best used in teams of four such that each player can control one area of the spacecraft. But the real question is, how do you get a Railjack in Warframe?

While there’s an easy option to purchase Railjack in the in-game market, many prefer completing the Rising Tide quest to get the spacecraft. Now, let’s go through both options to acquire Railjack!

How do I get to the Railjack in Warframe?

1. Complete the Rising Tide quest (get Railjack for free)

Your first option is to complete the Rising Tide quest. It can be accessed from the Codex under the Quests tab.

Rising Tide Quest

To begin the Rising Tide quest, players must complete the Second Dream quest, which offers the Railjack Cephalon blueprint as a reward. You will then receive a message from Cephalon Cy detailing the steps.

To summarise it, you will have to research Cephalon Cy from the Research Terminal in the Dry Dock, then replicate the blueprint, and finally, build Cephalon Cy in the Foundry. Players who are part of a clan that has built a Dojo will find it easier.

Cephalon Railjack blueprint can also be purchased from the market for 35,000 credits. Remember, Cephalon Cy is critical for the Rising Tide quest and serves as the navigator for the spacecraft.

The Rising Tide quest entails tasks to collect parts that will help you build the Railjack. On completion of the quest, you will find Railjack listed as the reward!

Here are some quick tips to easily complete the Rising Tide quest:

  • Make sure you have enough resources to rebuild Railjack parts. This will considerably reduce the time to get a Railjack.
  • Be a part of a clan that already has a Dry Dock. You could build one, but that takes time and resources. 

2. Buy the Raijack in the in-game market

The second and relatively easier option is to get Railjack in the in-game market. It costs 400 Platinum (Plat). On the Warframe’s official website, you can get 1000 Platinum for $49.99.

Buying Railjack for 400 Platinum

The pricing of Railjack may be a bit on the higher side, but there’s always the option to get it for free! It’s up to you whether to take the quest or choose the simpler route. Also, if you buy it from the market, the Rising Tide mission is automatically considered completed.

Before you leave, discover some quick tips to improve the performance of Warframe and enjoy a superior gaming experience!

For any queries or to share how you managed to get the spacecraft, drop a comment below.

How to Restore Google Thumbnails: 6 Easy Ways

Google has a host of services, so thumbnails not showing could happen on Photos, Chrome, or any other related app. WindowsReport experts got down to this problem and compiled this guide.

Why are thumbnails not showing on Google?

  • Built-up browser cache can cause images or thumbnails to not load properly.
  • A slow or unstable internet connection may take longer for thumbnails to load.
  • Certain browser settings or extensions can interfere with the display of thumbnails.

How do I restore Google thumbnails?

Try the following basic steps first:

  • Test your connection speeds and ensure they’re optimal for browsing.
  • Ensure you’re running an official and up-to-date browser or any other Google app.
  • Refresh the tab, re-open the browser, try incognito mode or another browser.

1. Clear the browser cache

  1. Launch your browser, and for this step, we shall be using Google Chrome.
  2. Click the three horizontal dots and select Settings.
  3. Go to Privacy and security and click Clear browsing data.
  4. Select Browsing history, Cookies and other site data, & Cached images and files, then click Clear data.

2. Disable browser extensions

  1. Launch your Chrome browser, and in a new tab, enter the following address:chrome://extensions/
  2. Peruse through your extensions and toggle the Disable button for any suspicious-looking ones.
  3. Repeat this step until you find the culprit.

3. Disable the Safe Search feature

  1. Launch your browser, and for this step, we shall be using Google Chrome.
  2. Click the three horizontal dots and select Settings.
  3. Go to Privacy and security>Security.
  4. Scroll down to the Safe browsing section and check the No protection (Not recommended) feature.

Disabling safe search in Google may potentially allow explicit content, including thumbnails, to appear in search results. Google restricts sites that may harm your computer to ensure a safer browsing experience and comply with Google’s policies.

However, if you feel this is a mistake, you can add these sites to the trusted list so that they always display the thumbnails.

4. Verify that the Chrome thumbnail preview is enabled

  1. Launch your Google Chrome browser and open a new tab.
  2. In the address bar, type and navigate to the following location: chrome://flags/ 
  3. You’ll be directed to the Experiments tab.
  4. In the search bar, type and enter Tab Hover Cards.
  5. Click on the drop-down menu next to Tab Hover Cards and ensure it is set to Enabled.
  6. Next, click on the Relaunch button that appears at the bottom of Chrome, which will prompt a browser restart.

5. Update your Graphics card

  1. Hit the Windows key, type Device Manager in the search bar, and click Open.device manager w11
  2. Navigate to Display adapters to expand, right-click on your graphics card, and select Update driver.Graphic Driver Update
  3. Select Search automatically for drivers.

Keeping your graphics drivers up to date ensures compatibility with the latest web technologies and can help resolve display issues, including missing thumbnails.

6. Reset your browser 

  1. Open your Chrome browser and click on the three vertical ellipses at the top right corner.
  2. Select Settings.
  3. Next, click on Reset and cleanup, then select Restore settings to their original defaults.
  4. Confirm Reset settings in the next dialog box.

If a browser reset doesn’t restore your Google thumbnails, it means your browser settings are not the issue. In this case, perhaps it’s the browser update causing this problem. As such, you can roll back to an older Chrome version.

Since you won’t find this app version on the official Chrome site, you’ll have to download it from a third-party site. Ensure you have a proactive antivirus solution to avoid downloading malware.

Note icon NOTE
WindowsReport is not affiliated with the Uptodown.com site. Do your due diligence before downloading any programs from the site.

The problem of thumbnails not showing is not unique to Google. Sometimes folder thumbnails are not showing in Windows 11, or YouTube thumbnails are playing hide and seek. Whatever, the case, restoring them should be an easy task.

Further, you can even create your own custom YouTube thumbnails, especially if you’re a digital creator and looking to add some little spice to your videos.

Additionally, you can manually add thumbnails to Chrome if it becomes a persistent issue or contact Google support directly for further assistance.

That’s all we had for this article, and hopefully, one of these steps has helped you restore your Google thumbnails. If we’re missing any solution that worked for you, feel free to let us know about it in the comment section below.