Pin Website to Taskbar in Windows 11: How to Easily do it

It is no longer a surprise that the latest Microsoft OS allows performing various actions to personalize the digital environment according to your own needs.

In today’s article, you’ll discover how to add a website to the taskbar in Windows 11 easily. No matter what network browser you’re using, we prepared some methods applicable to all the popular ones.

Fortunately, the process is pretty similar from one browser to another. It will only take a few seconds, so you won’t waste time doing it.

Before getting into the main subject, check out why you should add websites to the Windows 11 taskbar.

Why should I pin a website to Windows 11’s Taskbar?

To save much more of your precious time, having quick access to frequently used or hard-to-remember websites is always a great idea.

In case there are network pages that you need to open, adding them to your Windows 11 taskbar regularly will not require an actual search.

And why is that? Because you’ll not have to look for websites in browser history or constantly keep them open.

In addition, keep in mind that Windows 11 allows you to add websites from multiple browsers, so you’ll have plenty of options you can choose from.

To find out how it works, make sure you read this article entirely.

How can I add a website to the taskbar in Windows 11?

1. Pin a Chrome website to the taskbar

  1. 1. Launch Google Chrome on your PC.

  2. 2. Navigate to the website you want to add.

  3. 3. While on that website, click on the three vertical dots in the top right corner of the screen. These are a shortcut for the Settings and more options menu.

    chrome settings
  4. 4. When the menu opens, hover the cursor over the More tools option, then choose Create shortcut.

    pin chrome to taskbar shortcut
  5. 5. Now, you can choose the name of your website, by typing it in the indicated box. You can leave the name empty if you want. It is not necessary to give the shortcut a name, but it helps you easily recognize the website later on.

  6. 6. Once you’re done with the changes, click on Pin.

  7. 7. The Chrome website will now be added to your Windows 11 taskbar.

  8. If you are a Google Chrome user, you can easily add a website to the taskbar via the app’s built-in Settings. All you need to do is open the website you want to pin and create a shortcut for it, that will be placed on the taskbar.

2. Add a Microsoft Edge website to the taskbar

  1. In Microsoft Edge, navigate to the website you want, go to Settings and more options, marked as three vertical dots.Microsoft edge settings
  2. Hover the cursor over More tools, then click on Pin to taskbar.Microsoft edge more tools
  3. Choose a name for your website, then click on Pin.
  4. You’ll now have the desired website pinned to Windows 11 taskbar.

Microsoft Edge comes as the default browser in the latest OS design. However, it seems like some users are not so happy with using it, and a few also decided on more drastic measures.

If you’re one of them, do not hesitate to check how to disable Microsoft Edge in Windows 11. Nevertheless, we do not recommend doing it unless it is a serious reason.

For a more pleasant experience, you should enable Microsoft Edge Efficiency mode on Windows 11. It will help you to optimize its performance by saving the battery and minimizing resource usage

3. Put a Mozilla Firefox website on the taskbar

  1. Click the Windows key, then type Firefox, right-click on the result, and choose to Open file location.firefox settings
  2. Now, in the file location, right-click on Firefox, then select Show more options.firefox show more options
  3. Choose to Create shortcut.firefox create shortcut
  4. In the pop-up dialog box, click on Yes. Windows will automatically create a shortcut, placed on your desktop.
  5. Navigate to your desktop, right-click on the created shortcut, then select Properties.firefox properties
  6. Click on the Shortcut tab, then enter the desired website URL.firefox shortcut
  7. Select OK to save the changes.
  8. Now, you have the shortcut for your desired Firefox website.
  9. Right-click on it, then choose to Pin to taskbar.

4. Add an Opera website to the taskbar

  1. Click on the Windows icon, search for Opera, right-click on it, and choose to Open file location.opera open file location
  2. There, right-click on Opera, then choose to Show more options.opera show more options
  3. Hover the cursor on the Send to option, and choose Desktop (create shortcut).opera create shortcut
  4. Now, go to the created shortcut, right-click on it, then select Properties.opera properties
  5. Navigate to the Shortcut tab, enter the needed URL.opera shortcut navigation
  6. Click on OK to save the changes.
  7. Right-click again on the created shortcut from your desktop, then choose to Pin to taskbar.

Can I remove pinned websites from Windows 11’s taskbar?

In case you change your mind and want to remove the added websites from your Windows 11 taskbar, it is extremely simple, taking only a few seconds.

To easily do it, right-click on the undesired website, then choose to Unpin from the taskbar. Repeat it for each pinned network page you need.
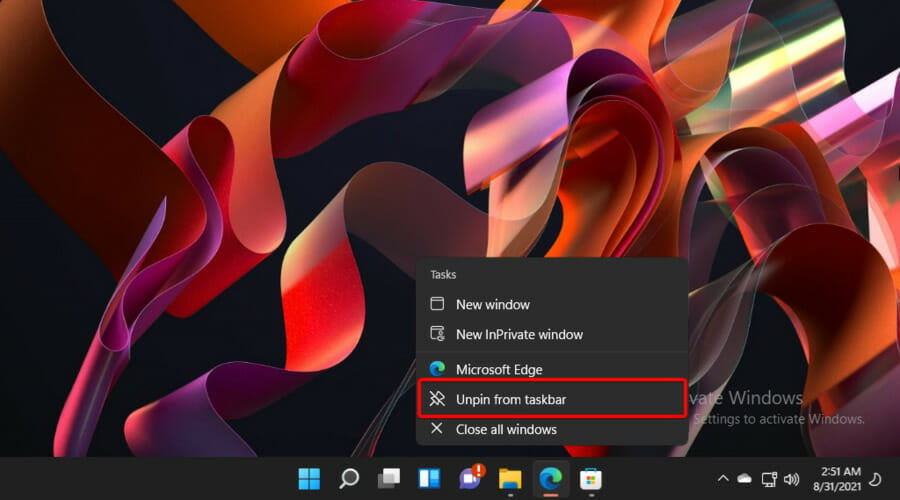
unpin from taskbar windows 11

However, you can’t pin all the items to the Taskbar using the same steps. In case you want to a batch file to the Taskbar on Windows 11 to access repetitive tasks without any hassle, you need to use a workaround. To learn more, read this guide.

Which is the most popular web browser?

And because we talked about multiple browsers that can be used to add websites to the Windows 11 taskbar, let’s see some statistics that reflect which is the most popular.
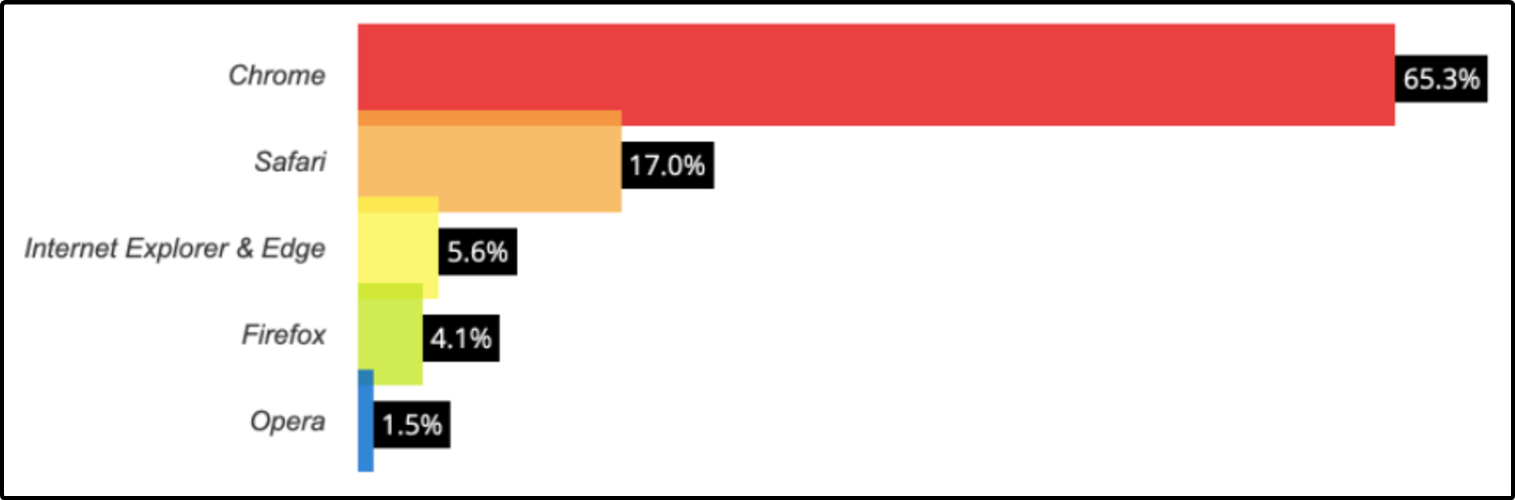
internet browsers graphic
Source: Tech Advisor

As you can see, Google Chrome is by far the most used web browser, indicating more than half of the entire network traffic.

In a distant second place, we can find Safari, with 17%. Even if the study set Microsoft Edge and Internet Explorer usage into one figure, we’d highly recommend not using the latter anymore. These registered 5.6% of the total results.

The last-placed web browsers are Firefox and Opera, with a percentage of 4.1%, respectively 1.5%.

As mentioned before, Microsoft Edge is the default browser in Windows 11. If you have other preferences, you can always change that. If you’re not sure which one you should try, check out these Windows 11 browsers that are highly customizable.

If you want to customize your taskbar further, we have articles that you can read on how to change the size of the taskbar and how to hide the taskbar.

Do not hesitate to keep in contact with us by using the comment section listed below.

Modern Warfare Packet Loss: How to Fix It for Good

Call of Duty: Modern Warfare it’s held in high regard by the gaming community as being one of the best Call of Duty games since Black Ops III.

It’s both the sixteenth installment of the CoD series and a reboot for the MW (Modern Warfare) series. CoD: Modern Warfare is set in a realistic, modern environment, as its name subtly hints.

You can enjoy the game in both single-player and multiplayer modes. It also has a Special Ops game mode that lets you cooperate with other players on missions that act as a follow-up for the campaign ones.

However, multiplayer enthusiasts really dug into CoD: Modern Warfare’s online modes.

The game embraced a tactical approach that enables players to breach doors, encourages them to explore the map, and even lets them remove the HUD.

The game also features a battle royale mode that’s called Call of Duty: Warzone, where 150 players seek to be the last player/team standing. In Warzone, you can either play solo or in teams of 3 to 4 players.

Why is my CoD packet loss so high?

Generally speaking, packet loss may happen to anyone at some point due to a number of reasons. So it can be caused by your Internet provider or other PC settings.

More exactly, you have high packet loss on CoD gameplay if your network connection is unstable, you have outdated drivers, or hardware issues on the router.

Another valid cause can be related to your WiFi connection, in case there are too many users and the network is congested.

CoD: Modern Warfare packet loss symbol

CoD: Modern Warfare has a bunch of screen indicators that can come in handy while you’re in the game. A quick glance at the side of your screen and you’ll know right away whether there’s something wrong or not.

Note that the main cause of packet loss is usually network congestion. Therefore, if you can afford it, you might want to wait for it to fix itself, as it usually does.

CoD: Modern Warfare also displays icons for server performance, high latency, latency variation (jitter), low FPS, game health icons Modern Warfare, and refresh rate.

What do the 3 squares mean in Modern Warfare?

Essentially, 3 orange squares in Modern Warfare mean that you have packet loss while playing the game.

The Modern Warfare connection symbols also referred to as packet burst, signal that you’re experiencing packet loss.

This means that some packets you send or receive never make it to their destination.

If you check the warning icons guide, you’ll see that packet loss belongs in the Client category. This means that the leak is likely on your side, or somewhere in between you and the game server.

How can I fix the packet loss in CoD: Modern Warfare?

1. Try using a VPN

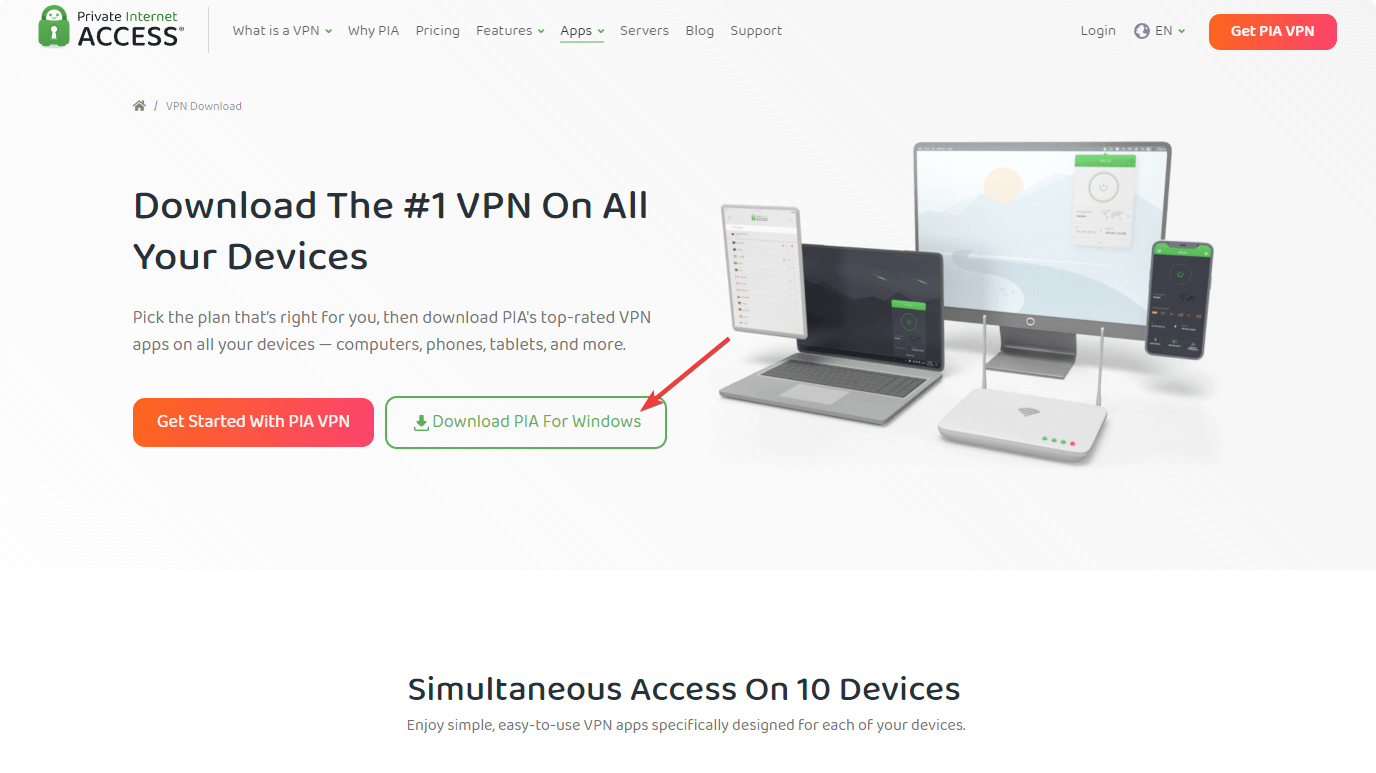
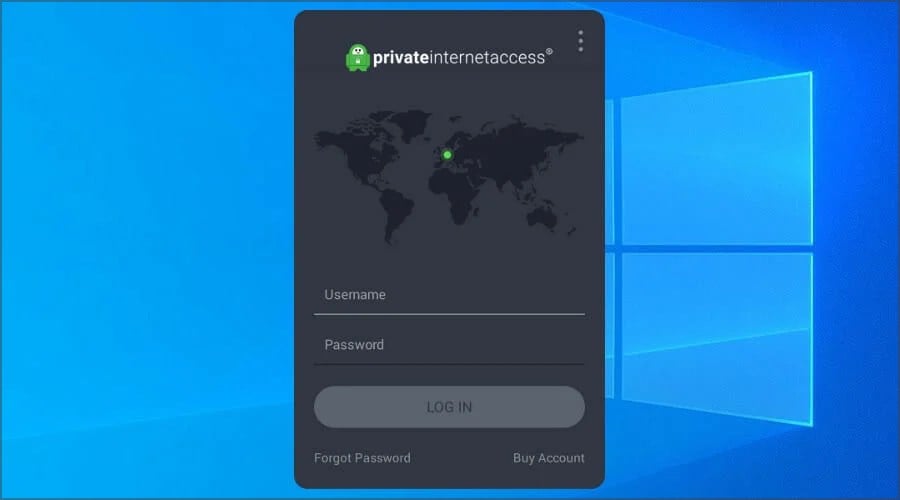
  1. Download Private Internet Access on your PC.
    download-pia
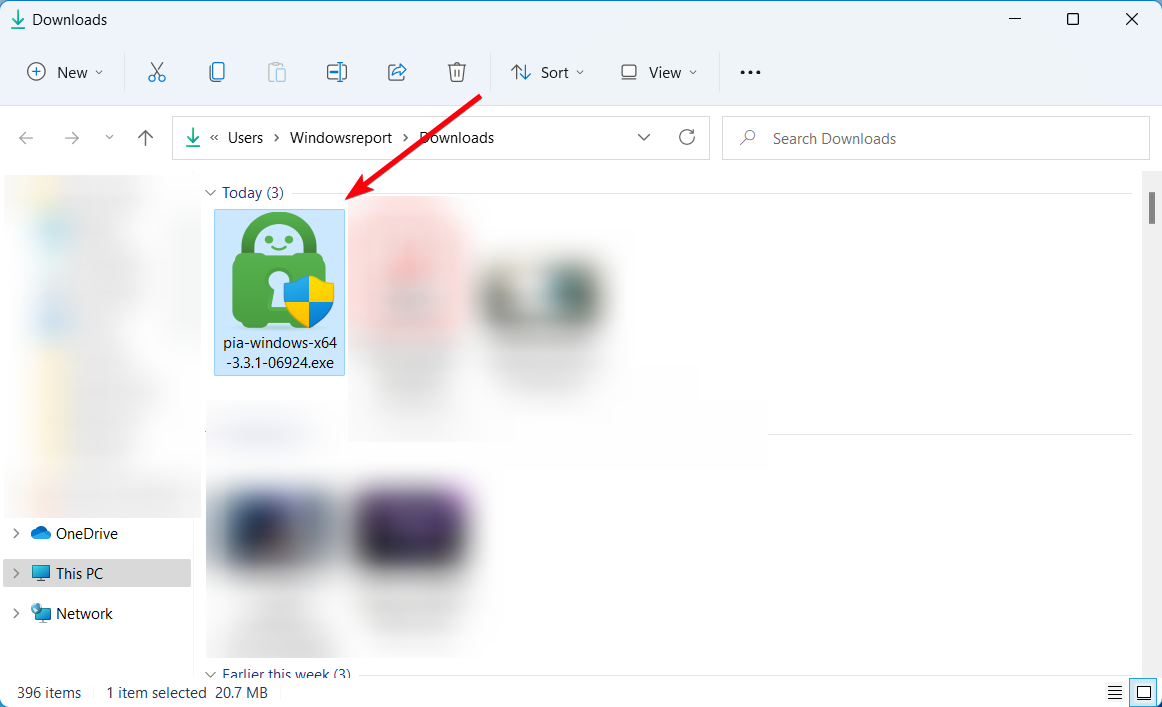
  2. Install it on your PC, and launch it.
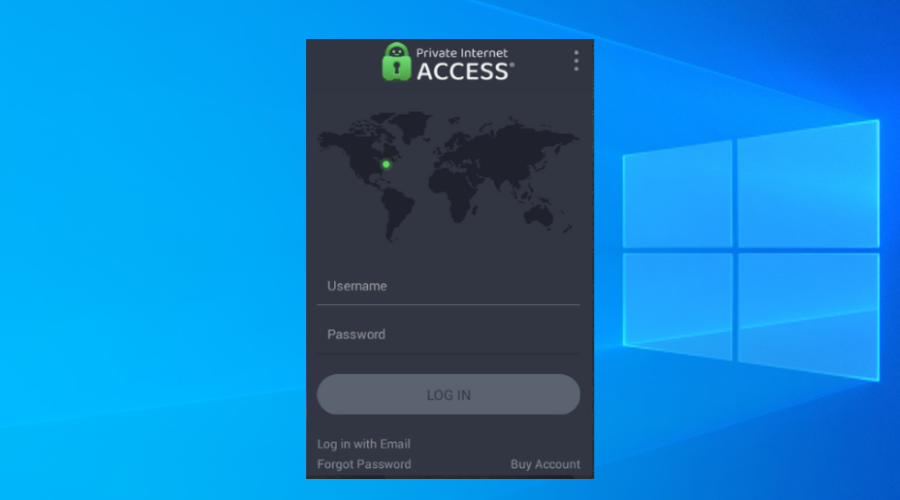
  3. Log in to your PIA account.
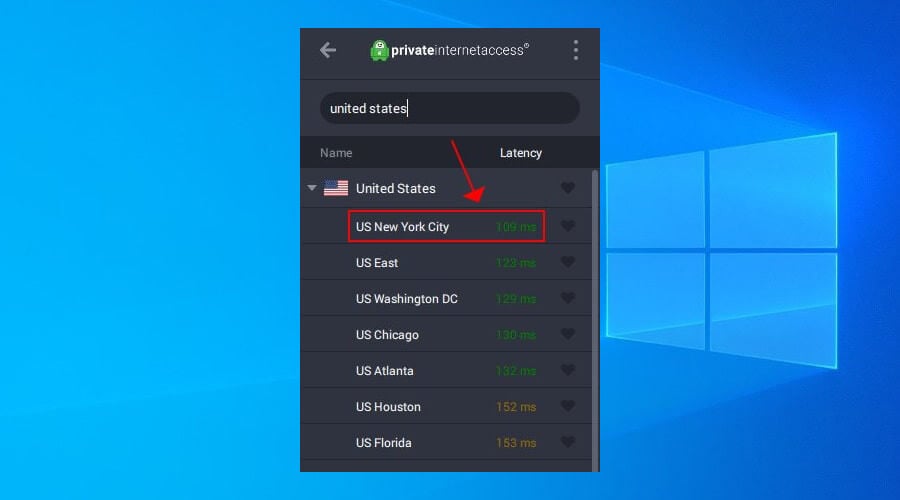
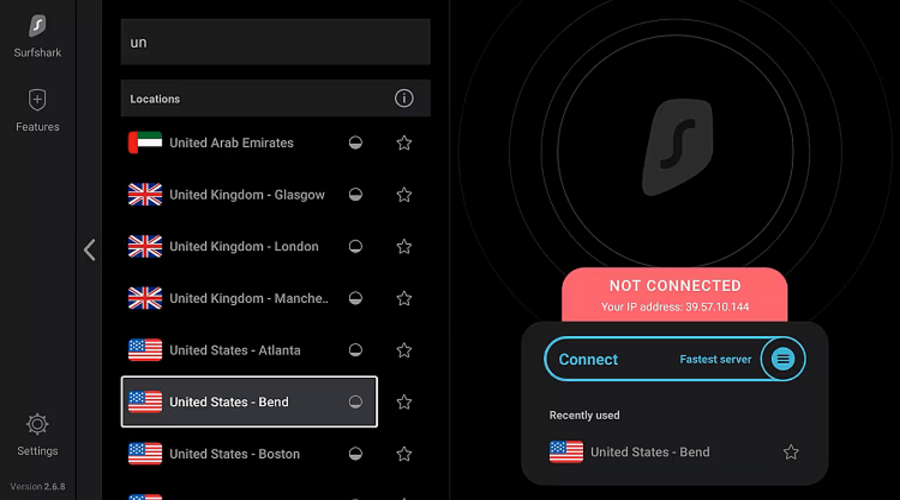
  4. Connect to a fast server.
    use PIA US servers
  5. Launch CoD: Modern Warfare.
  6. Check if the problem still persists.

Private Internet Access is an excellent all-round VPN solution from Kape Technologies.

Besides solving your packet loss issue, a VPN such as PIA could also help improve your privacy, bypass geo-restrictions, and secure your connection.

Private Internet Access

Experiencing packet loss in CoD: Modern Warfare? PIA offers useful connection support.
Check price Visit website

Note: VPNs can improve packet loss, but it doesn’t work every time. Basically, it only works if your ISP is the one causing the packet loss by either having an improperly routed network or throttling your bandwidth.

2. Troubleshoot your connection manually

CMD pathping
  1. Run a packet loss test using pathping.
  2. Note the hop where the packet loss occurs.
  3. Depending on your findings, take the corresponding action from this list:
  • Check and repair/replace/update/upgrade any software/hardware components on your end (PC, router, cables).
  • Call your ISP and inform them if there’s something wrong on their side.
  • Contact CoD: Modern Warfare’s support crew if the problem seems to be on their end.
  • Switch to wired instead of Wi-Fi (Wi-fi often leaks packets).

CoD: Modern Warfare packet loss is no big deal

The bottom line is that you can usually fix packet loss in CoD: Modern Warfare. More often than not it’s caused by network congestion and fixes itself. All it needs is time and a bit of patience.

However, if you don’t have the luxury of time and patience, you can try out one of our suggestions to fix it. Sometimes using a VPN can improve ping and packet loss.

If using a VPN doesn’t help, keeping your home network in top shape is always a good practice, and not only for packet loss, but for speed, and overall stability, as well.

Lastly, if you want to better your gameplay, simply start by ruling out Packet Loss.

More so, visit our Gaming Hub as well to discover more reviews, news, guides, and tips & tricks.

Please Wait While Windows Configures… Stuck [Full Fix]

When you open software, a configuration window might occasionally open. However, some MS Office users get stuck with a configuration dialog box that opens every time they launch one of the suite’s applications.

The configuration window states Please wait while Windows configures Microsoft Office.

The software still opens, but the configuration window keeps on popping up whenever some Microsoft Office users launch the applications. Consequently, the applications don’t launch especially quickly.

This configuration dialog box error pertains to various Office versions. This is how you can get rid of that configuration window if it keeps on opening when you launch MS Office software.

How can I fix Updating Office, please wait a moment error?

  1. Try out Stellar Repair Toolkit
  2. Repair Microsoft Office via the Control Panel
  3. Open the Microsoft Easy Fix 50780 Tool
  4. Select the Windows Search Option
  5. Enter Registry Keys in Run
  6. Switch Off MS Office Add-ins

1. Try out Stellar Repair Toolkit

get Stellar Repair Toolkit

You’re used to getting the very best out of this family of client software and services developed by Microsoft. However, Microsoft Office configuration issues appear quite often.

Instead of imaging the worst-case scenario, we’d suggest wasting no more time and downloading the Stellar Repair Toolkit.

This handy all-purpose utility is known to easily repair corrupt Microsoft Office documents – Word, Excel, PowerPoint, and even PDF files.

It really doesn’t matter if they are damaged due to improper system shutdown, compression errors, or virus attacks. The result is guaranteed and you’ll be able to launch the suite’s applications once again.

Stellar Repair Toolkit

Stellar Repair Toolkit

Looking for a way to solve MS Office configuration issues? There’s no better choice than Stellar Repair Toolkit!
Get it free Visit website

2. Repair Microsoft Office via the Control Panel

  1. 1. Press the Windows + R keys at the same time.

  2. 2. The Run dialog box will open on the screen.

  3. 3. Enter appwiz.cpl in Run and click OK.

    programs and features windows
  4. 4. Select the listed MS Office suite.

  5. 5. Press the Change button, and then click Yes to confirm.

  6. 6. Select the Repair option and click Continue.

  7. 7. For MS Office 2016, select the more thorough Online Repair option, and then click Repair.

    repair office
  8. 8. Wait for the repairing process to finish.

  9. 9. Check if the issue persists.

  10. Repairing corrupted MS Office installations might get rid of the configuration dialog box. To do this, you need to navigate to the Programs and Features menu and manually set up a repairing process for the app.

3. Open the Microsoft Easy Fix 50780 Tool

There’s a Microsoft Easy Fix 50780 tool specifically for fixing configuration windows that keep on opening for MS Office 2010 applications.

This tool probably won’t be much good for the latest Office versions, but it might get rid of the configuration window for Office 2010 applications.

Click the Download button on this Microsoft Easy Fix page to save the tool to Windows. Then you can open that tool’s easy fix wizard to fix the configuration window.

4. Select the Windows Search Option

  1. Open the Run accessory in Windows.
  2. Input appwiz.cpl in Run’s text box, and click the OK button.
  3. Click Turn Windows features on or off to open the window in the snapshot directly below.
  4. Then select the Windows Search option if it’s not currently checked, and press the OK button. Note that Windows 10’s Windows Features window doesn’t include that setting.

It might the case that you’re running a 32-bit version of MS Office on a 64-bit platform. If so, a Microsoft Office 64-bits Components window will pop up when you launch the applications.

If that’s the configuration dialog box that is opening, activate Windows Search in Windows 10 as described above.

5. Enter Registry Keys in Run

Some Microsoft Office users have resolved the Windows configuration dialog box error by adding new keys to the registry. You can do that with Run instead of the Registry Editor.

So open Run with the Windows key + R hotkey, and separately enter the following registry keys in Run’s text box:

  • reg add HKCUSoftwareMicrosoftOffice15.0OutlookOptions /v NoReReg /t REG_DWORD /d 1
  • reg add HKCUSoftwareMicrosoftOffice15.0WordOptions /v NoReReg /t REG_DWORD /d 1
  • reg add HKCUSoftwareMicrosoftOffice15.0ExcelOptions /v NoReReg /t REG_DWORD /d 1
  • reg add HKCUSoftwareMicrosoftOffice15.0PowerpointOptions /v NoReReg /t REG_DWORD /d 1
  • reg add HKCUSoftwareMicrosoftOffice15.0AccessOptions /v NoReReg /t REG_DWORD /d 1

Each registry key is for one of five Office suites. Note that the MS Office version number in the registry keys above (15.0) is for MS Office 2013.

You will need to modify that number for alternative versions of the Office suite. For example, the version number for MS Office 2010 is 14.0.

So, you would enter the following key for Word 2010: reg add HKCUSoftwareMicrosoftOffice14.0WordOptions /v NoReReg /t REG_DWORD /d 1

MS Office 2016 users will need to change the version number to 16.0.

6. Switch Off MS Office Add-ins

  1. Open an MS Office application.
  2. Click File and select Options to open a settings window.
  3. Select the Add-ins tab to open a list of add-ins.
  4. Select COM Add-ins from the drop-down menu.
  5. Press the Go button to open the COM Add-ins window.
  6. Now deselect all the selected add-ins listed there.
  7. Press the OK button on the COM Add-ins window.
  8. Close and reopen Microsoft Office.

The Windows configuration dialog box might keep on opening because of third-party Office add-ins. To see if that’s the case, disable all your MS Office add-ins.

You can switch Office 2016’s add-ins off as described above.

To read more about similar issues, feel free to visit this Windows 10 Troubleshooting section.

To achieve a world-class experience, we also encourage you to bookmark our Microsoft Office Hub.

These were a few resolutions that might obliterate a stuck Windows configuration dialog box for MS Office or help to solve the Updating Office, please wait a moment error.

Office software should eventually launch a whole lot quicker. Let us know if this happened to you as well in the comments area below.

4 Ways to Fix the ReferenceError: Browser is not Defined

ReferenceError: browser is not defined is a common issue in many popular browsers. It occurs when the browser isn’t properly referenced in the code for web design or testing.

Below, we’ll walk you through step-by-step instructions on how to fix this error for good.

How can I fix the browser not defined error?

1. Update your browser

  1. Click on the browser menu located in either the top left or right corner and select Help. Open the menu and select Help.
  2. Click About. Click on About.
  3. Here your browser will automatically check for any updates. If there is an update, click Update. Update your browser to fix the browser not defined error.

If your browser is out of date, then issues may arise in the console. Regularly check for updates in your browser to avoid any future issues.

2. Disable add-ons

  1. Click on the browser menu located in either the top left or right corner and select Settings. Open browser settings to fix browser not defined error.
  2. Select Extensions or Addons. Open extensions.
  3. Go through and toggle each extension off. Disable extensions to fix browser not defined error.

Users report that disabling add-ons like Ad-block has solved the problem. Disabling all of your extensions may fix the issue

3. Change the namespace

If you’re running into the ReferenceError: browser is not defined in Google Chrome, then you will need to change the namespace with callbacks from browser.* to chrome.* for cross-compatibility. You can do this by manually changing the namespace and callbacks to chrome.* which will work in both Chrome and Firefox.

Use the WebExtension polyfill to fix browser not defined error.

Users can also use a shim or polyfill to convert the browser.* namespace to chrome.* with callbacks for Chrome. One shim to use is WebExtension which offers a lightweight polyfill library WebExtension APIs in Chrome.

4. Try another browser

If all else fails, consider using a different browser.

There are several causes of browser errors, but we noticed minimized issues in the Opera One browser. Switch to Opera One with all of your saved data from your existing browser and test the connection.

A browser’s undefined failure might be caused by an outdated version of the browser, but not in Opera. It is constantly updated and is known to be one of the most stable browsers out there.

Opera One

Switch to this error-free browser and benefit from AI assistance, free VPN, adblockers, and much more!

Why am I getting the browser not defined error?

The ReferenceError: browser not defined occurs when there is a reference to a non-existent browser somewhere in the code when trying to create an extension. Declare the browser in reference or make sure it’s accessible in the script.

Browser not defined.

The browser variable declared within a function is not available outside of that function which could lead to the error. Defining the browser outside of the scope of function will make it accessible. Another possible cause could be a misspelling of the browser global variable.

Here are some variations of the error for browsers:

  • browser is not defined in Firefox
  • referenceerror: browser is not defined in Chrome

For other platforms:

  • browser not defined in JavaScript
  • browser not defined reactjs
  • referenceerror: browser is not defined webdriverio
  • browser is not defined adblock
  • browser is not defined puppeteer
  • referenceerror: browser is not defined mocha

We hope one of the above solutions helped you fix the browser is not defined. error. If you’re looking for recommendations for the best browsers for developers, we have a guide for that. Let us know in the comments which solution worked for you or if you have a suggestion for a different solution.

How to Change BIOS Settings on Windows 11 Fast

Need to tweak your hardware settings? BIOS is where it happens. In Windows 11, changing BIOS settings lets you adjust boot options, enable virtualization, or manage system performance.

This guide shows you exactly how to access and modify BIOS settings – step by step. Whether you’re troubleshooting or optimizing your PC, we’ll make it simple.

How can I change BIOS settings on Windows 11?

1. Access BIOS using the shortcut key during the booting process

  1. While your system boots, keep pressing the Del key.
  2. Windows will now boot to BIOS.
    USB bios connect

This is the easiest way to access BIOS, but it’s not universal. Some motherboards use a different key, and you can do two things to find the right key.

  • During the boot, look for the message saying Press Key to enter setup or any similar message. In most cases, pressing this key will allow you to enter BIOS.
  • Check your motherboard manual and find the shortcut key.

You can find the correct shortcut for your hardware by checking this guide on how to get the BIOS key, which helps you confirm the exact key your PC uses.

2. Enter BIOS using the Settings app

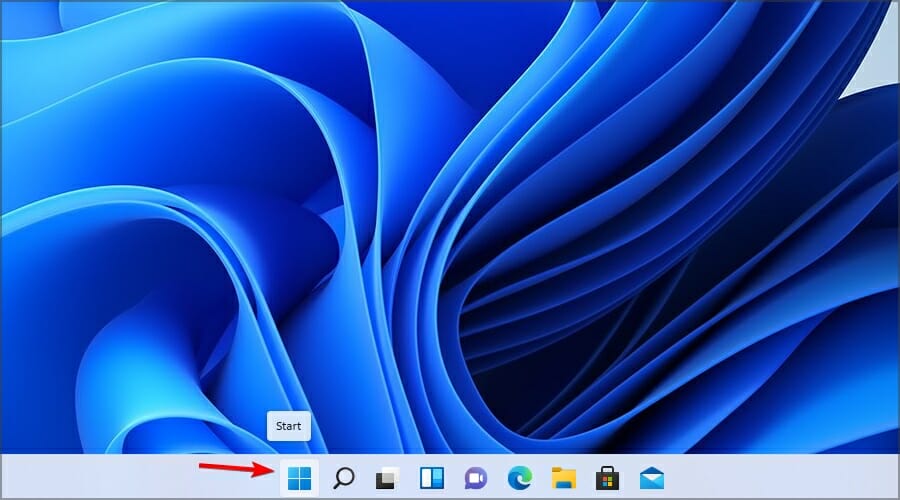
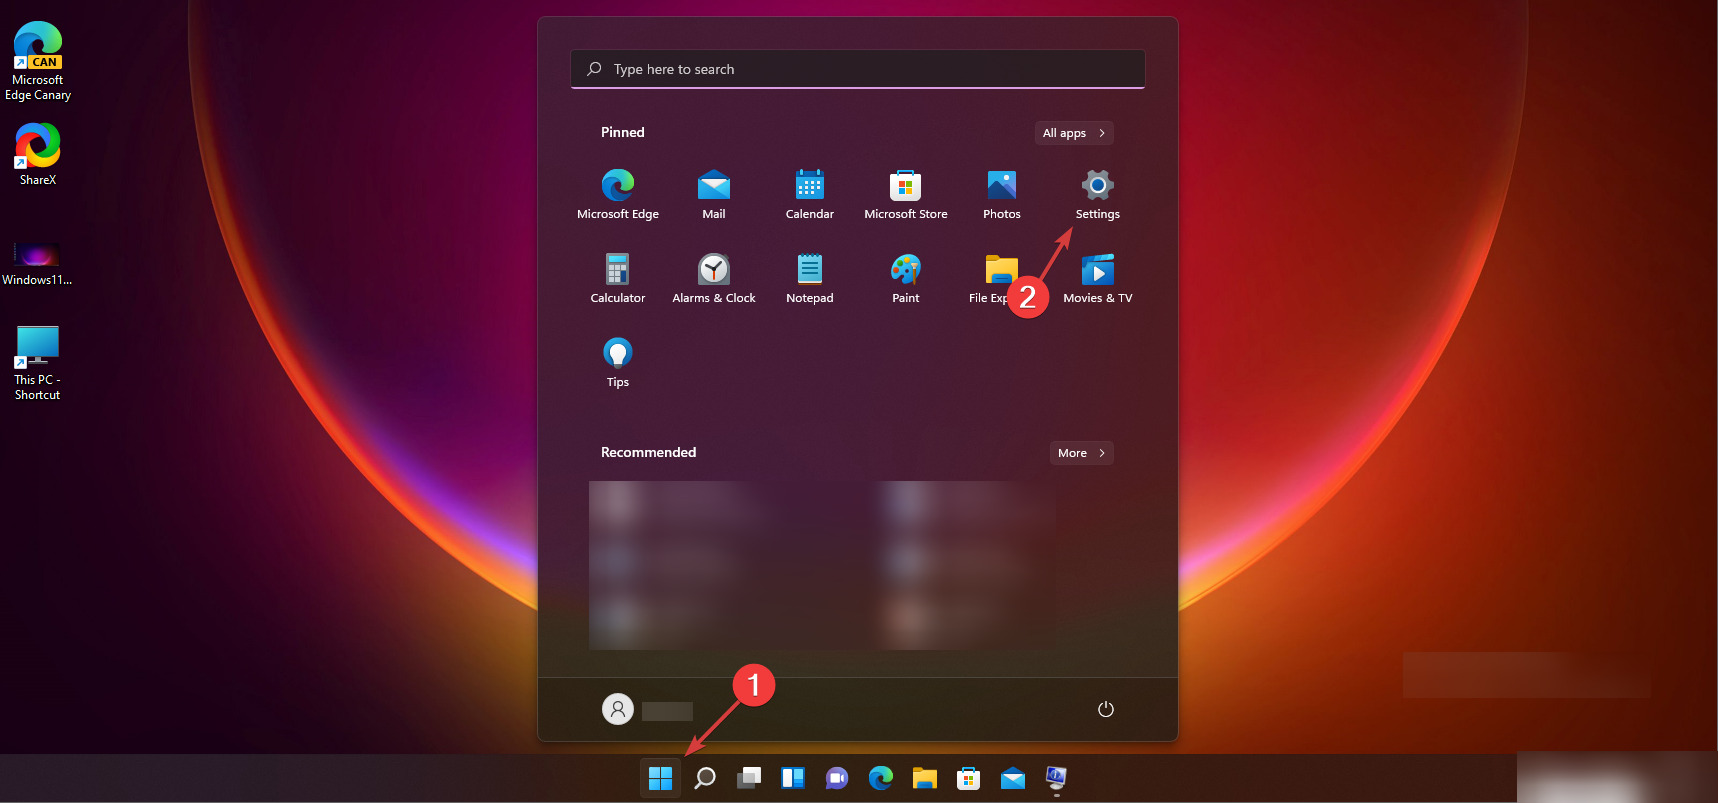
  1. 1. Click the Start icon in the Taskbar.

    start button taskbar
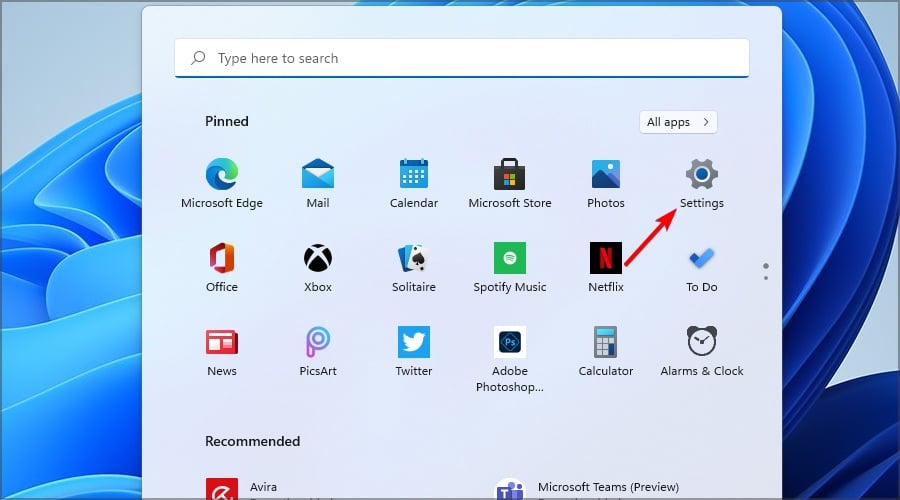
  2. 2. Now select the Settings app from the menu that opened.

    start menu settings windows 11
  3. 3. Go to the Recovery options.

    windows 11 recovery
  4. 4. In the Advanced startup section, click on Restart now.

    advanced startup settings w11
  5. 5. Select Restart now to confirm.

    restart pc windows 11
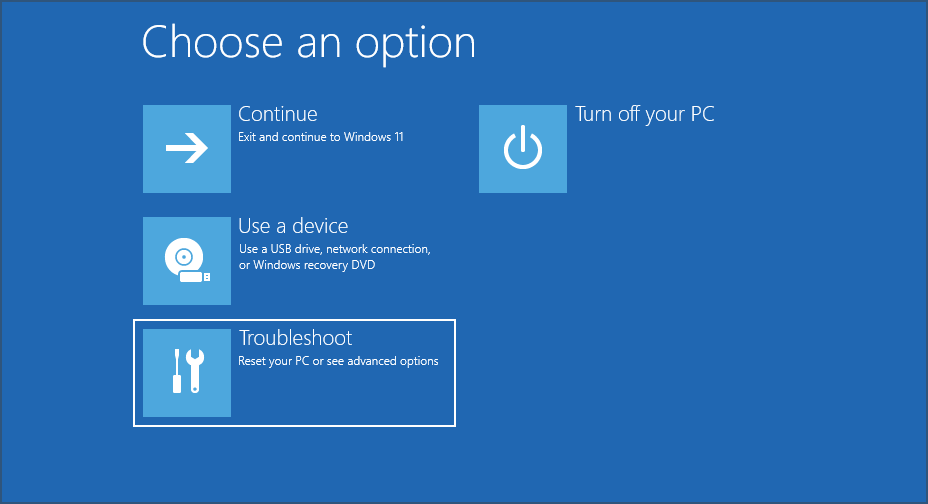
  6. 6. Go to the Troubleshoot center.

    Troubleshoot to fix device manager power management tab missing
  7. 7. Select Advanced options.

    start windows 11 in safe mode
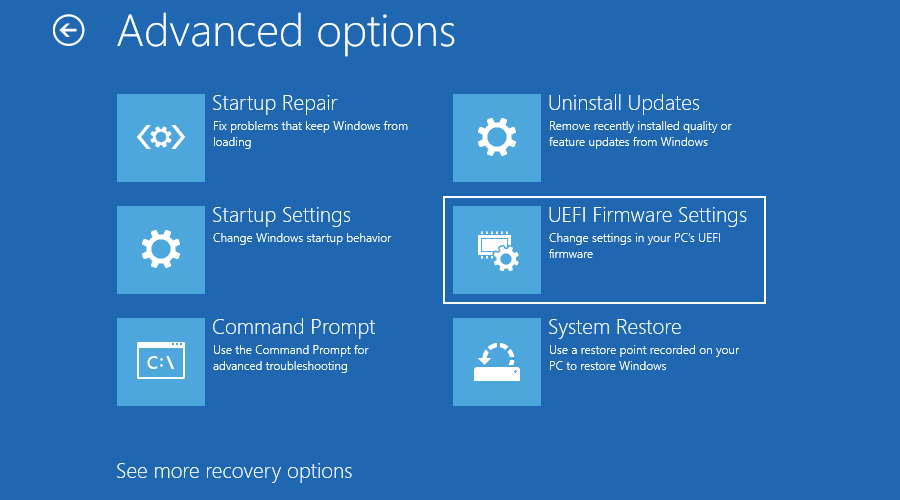
  8. 8. Now select UEFI Firmware Settings.

    UEFI Firmware settings to fix device manager power management tab missing
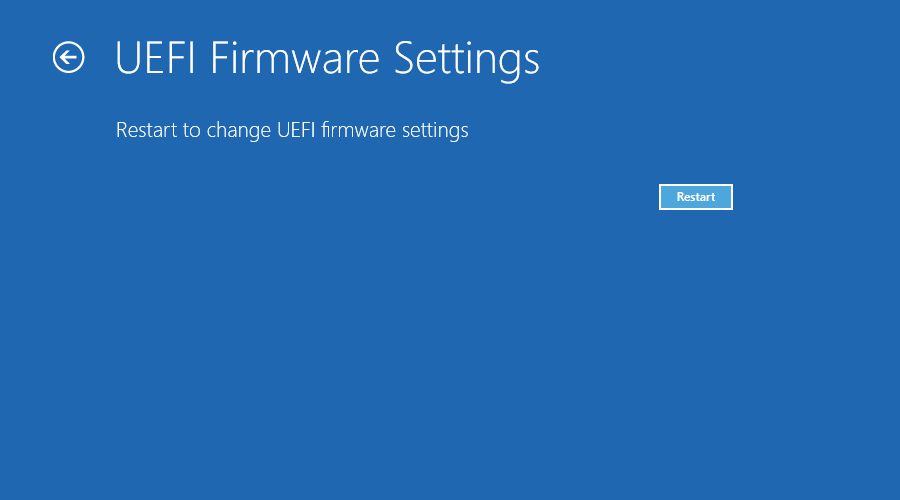
  9. 9. Finally, click Restart to confirm.

    Restart
  10. 10. After the restart, Windows should boot directly to BIOS. From there, you can make all the BIOS changes you want.

  11. There is a method to enter BIOS on Windows 11 without having to use a keyboard shortcut. Instead, you can access BIOS via Settings.

When should I update my BIOS?

You should only update your BIOS if you have a clear reason to do so. If your PC is working fine, there’s no need to install the latest version. Most BIOS updates fix specific bugs or add support for newer hardware like CPUs. So, unless you’re upgrading components or dealing with hardware issues that the update addresses, it’s better to leave it alone. Keep in mind that updating the BIOS carries some risk. If the process fails, your PC might not boot anymore. Only proceed with an update if it’s absolutely necessary.

What is the difference between BIOS and UEFI?

BIOS and UEFI are both firmware interfaces that help your PC start up, but UEFI is the modern replacement for BIOS. While BIOS is stored on a chip and has a basic interface, UEFI lives on a dedicated partition and often includes a graphical UI with mouse support. UEFI also enables faster boot times, Secure Boot, TPM integration, and support for larger drives. Most modern systems use UEFI by default, even though they may still refer to it as BIOS in settings.

Short Video Explainer ▶️

5 Best Dead by Daylight VPNs to Reduce DBD High Ping & Lag

Dead by Daylight is a survival horror game that you can play on Windows PC, Xbox One, PlayStation 4, Nintendo Switch, Android, and iOS.

You can play as a killer and hunt down four survivors, or become one of the survivors and try to escape an area without getting caught by the killer.

What makes Dead by Daylight special is that the survivors don’t have any weapons, so they can’t eliminate the killer.

Instead, they can use gear like bandages to patch up wounds, or a flashlight to blind the killer long enough to make a run for it.

The game incorporates famous fictional killers, such as Michael Myers from Halloween, Leatherface from The Texas Chainsaw Massacre, or Freddy Krueger from A Nightmare on Elm Street. New killers are added with each DLC.

Dead by Daylight has dedicated servers in several regions, including the US, South America, Europe, and the Asia Pacific.

However, many users occasionally have trouble playing the game due to high ping. It also depends on how the 5 players are matched in each session.

Still, you can significantly improve your ping with a VPN app. By connecting to a VPN server that’s in the same region as the Dead by Daylight server, you can eliminate lags and enhance your gaming experience.

How to reduce ping in Dead by Daylight?

Any gamer needs high performance on survival games like this one to keep up with other players, so getting rid of high ping is a must.

To reduce your ping level and improve game performance, consider these practical tips:

  • Change your DNS servers
  • Use the right ports on your router
  • Connect to faster servers on your VPN
  • Close any background apps on your system
  • Try an Ethernet cable connection

Hence, focus your actions on these potential causes and apply them in order to eliminate laggy performance in this incredible game.

What are the best VPNs for Dead by Daylight?

Private Internet Access – Best choice for game speed

Created by Kape Technologies, Private Internet Access (PIA) is our top choice when it comes to the best VPN services for Dead by Daylight.

By connecting to fast VPN servers, you can drastically reduce ping and delays so that you can enjoy the game.

PIA comes with military-grade encryption, supports OpenVPN and WireGuard protocols, and it protects you from DDoS attacks.

It’s one of the best VPNs for Windows 10, but it also works with PlayStation 4, Xbox One, Switch, Android, and iOS.

How can Private Internet Access reduce ping in Dead by Daylight:

  • +3,200 servers in 46 countries
  • Private DNS servers
  • DDoS protection
  • No logs

PIA doesn’t have a free trial but comes with a 30-day money-back guarantee.

Private Internet Access

Improve gaming in Dead by Daylight by eliminating lags with PIA.
Check price Visit website

Nord VPN – Extensive server network

NordVPN is yet another reliable service that is proven to provide some of the fastest servers in the industry.

It is known for its advanced security features and frequent performance-oriented updates and implementations.

NordVPN can help you reduce lag and ping in Dead by Daylight by finding a high-speed server for your configuration.

The VPN offers over 5,000 servers in 60 countries, so the chances to find the perfect connection are very high.

The tool can automatically detect the best server for you, but you can also handpick your location from a list.

Other key features of NordVPN include:

  • Obfuscated servers
  • DoubleVPN
  • Powerful AES-256 encryption
  • Split tunneling
  • Secure killswitch

NordVPN users can choose between several subscription plans. Each plan includes a 30-day money-back guarantee.

Nord VPN

Say goodbye to lag and ping and play Dead by Daylight with no limitations.
Check price Visit website

CyberGhost VPN – Unbeatable anonymity features

CyberGhost VPN is a free VPN solution that you can use to tremendously lower your ping time when playing Dead by Daylight.

Owned by Kape Technologies, this VPN solution supports streaming, torrenting, and up to 7 simultaneous connections.

CyberGhost VPN delivers excellent security features, including anti-DDoS mode.

It’s one of the fastest VPNs for Windows 10, and you can also use it on PlayStation 4, Xbox One, Switch, Android, and iOS.

How can CyberGhost VPN lower ping in Dead by Daylight:

  • +6,200 servers in 89 countries
  • Exclusive DNS servers
  • Anti-DDoS mode
  • Zero logs

CyberGhost VPN offers a 1-day free trial and includes a 45-day money-back guarantee.

CyberGhost VPN

Cut down on ping while playing Dead by Daylight, all thanks to this VPN app.
Check price Visit website

Surfshark – Best cyber threats security

Surfshark is a complete VPN alternative that can provide increased digital privacy with its server network, and boost gaming results on Dead by Deadlight

This VPN offers multiple benefits to ensure great privacy online with useful tools that guard you against online dangers, malware, or data theft.

For instance, the CleanWeb tool will help you stay unknown while navigating online and stop any ads or trackers.

More so, you have functionalities that assure access to awesome content or games around the world due to NoBorders Mode which hides your location in seconds.

Other key features of Surfshark include:

  • Private DNS leak security
  • Camouflage mode for total privacy
  • No log data monitoring
  • Latest data encryption type
  • IKEv2/IPsec protocols

Surfshark

Enjoy your gameplay using this VPN with fast servers and great anonymity tools.
Check price Visit website

ExpressVPN – Greatest network speed

ExpressVPN is the gateway to a safer online world and provides the fastest network connection to speed up your game as we speak.

Using this unique VPN can assure you extremely fast servers and access to free content for up to 94 regions worldwide.

With this ultimate privacy, you’re able to browse without any local restrictions or blocked websites due to open Internet traffic.

More than this, ExpressVPN takes the stage for connection rate due to TustedServer functionality. That can improve your game performance right away.

Other main features of ExpressVPN include:

  • IP address shield
  • Free content all over the web
  • VPN split tunneling
  • Kill switch tool
  • Lightway protocol to faster results

ExpressVPN

Be the last survivor of Dead by Daylight and enjoy the game with lightning VPN support.
Check price Visit website

Can you get banned for using a VPN on Dead by Daylight?

Using a VPN connection on Dead by Daylight is not prohibited by the developer. However, you can get banned if you try to purchase the game from other regions.

It actually depends on what actions you’re performing using a VPN. If you just need to increase your speed or use servers in different locations, you’re good to go.

Also, be aware that some VPNs can be detected much easier and block your servers. To avoid this, be sure to use professional software like the ones described below.

In conclusion, if you’re having trouble when trying to play Dead by Daylight due to high ping, make sure to use one of the VPN solutions we described above to lower ping and improve your gaming experience.

If you’re not sure, we suggest picking Private Internet Access, thanks to its reliability.

For any problems related to VPN services, visit our VPN Troubleshooting section.

To discover how you can improve your gaming experience, see our Gaming VPN Hub.

Is Windows 11 File Explorer Slow? 5 Ways to Speed it up

File Explorer is one of the most essential utilities in all Windows platforms. Microsoft has given Explorer a revamp in Windows 11. File Explorer’s redesigned user interface gives it a new look and feel. But for many users, File Explorer is slow in Windows 11.

One user told us about the fact that using arrow keys to navigate in Explorer leads to lag, just as when selecting items. He even reinstalled Windows 11 using a pen drive.

Why is File Explorer so laggy in Windows 11?

With its fancy new UI, the revamped File Explorer has caused a memory leak issue in Windows 11. A memory leak occurs when an app doesn’t release unneeded RAM. Consequently, File Explorer’s RAM utilization can get very high, which causes lag.

Microsoft is aware of File Explorer’s memory leak bug. The command bar is doing unnecessary calculations when navigating to folders, causing this decrease in performance.

This is also believed to be the root cause of performance issues when using drag to select files, as well as using the arrow keys to navigate in specific folders.

The command bar Microsoft refers to is what has replaced File Explorer’s old ribbon tabs. Thus, that new UI feature in Explorer is the primary culprit for the memory leak.

However, File Explorer acting slow is not a novelty, as this used to be a problem on Windows 10 as well. To fix the lagging, give some of these potential resolutions a try.

How do I fix slow File Explorer in Windows 11?

1. Press File Explorer’s hotkey

First, try going full-screen with File Explorer instead of utilizing it in a smaller window. To do so, press the F11 hotkey. When you do that, you’ll notice the command bar isn’t visible in that mode.

With the command bar gone, Explorer might not be so laggy.

Full-screen File Explorer windows 11 file explorer lagging

2. Update Windows 11

  1. Click Start on the taskbar.
  2. Select the Setting app pinned to the Start menu.
    Pinned Settings app windows 11 file explorer lagging
  3. Click Windows Update on the left side of Settings.
  4. Press the Check for updates button to download and install new patch updates.
    Check for updates button windows 11 file explorer lagging
  5. If a new Windows 11 build is available, update the platform to the latest version.

If Windows 11 File Explorer is slow after an update, there should be a patch for it in the subsequent version, and installing the latest updates should do.

3. Close superfluous apps and background processes

  1. Press the magnifying glass taskbar button, which opens the search box.
  2. Type Task Manager in the search box.
  3. Click on Task Manager in the search results.
  4. Select the Processes tab.
  5. Next, select and press the End task button for all programs listed under apps.
    End task button windows 11 file explorer lagging
  6. Then look through and select unneeded third-party processes listed under Background processes. Click the End task button to close them.

If you need more details, check out this guide on how to open Task Manager in Windows 11.

4. Restart File Explorer

  1. 1. Press the Windows Key to open the search box.

    open search bar
  2. 2. Type Task Manager in the search box to find the tool.

  3. 3. Click on the first result to open Task Manager.

  4. 4. Locate Windows Explorer in the list of apps.

  5. 5. Right click on it, then press the Restart button from the context menu.

    reset file explorer fix lag
  6. 6. Wait for a few moments while it restarts.

  7. 7. Check if the app works normally now. If the lags persists, try another solution.

  8. If your File Explorer app is lagging, you should try restarting it via Task Manager. A reset is likely to solve the app’s issues and ensure its proper functionality. To do so, you need to restart Windows Explorer, which includes File Explorer.

5. Disable Quick Access

  1. First, press the folder taskbar button for opening File Explorer.
    The File Explorer button windows 11 file explorer lagging
  2. Then click the See more button.
    See more button windows 11 file explorer lagging
  3. Select Options on the menu.
  4. Choose the This PC option on the Open File Explorer to drop-down menu.
    This PC option windows 11 file explorer lagging
  5. Uncheck the Show recently used files in Quick access checkbox.
  6. Deselect the checkbox for the Show frequently used folders in Quick access option.
  7. Also, click the Clear option.
  8. Select Apply to save the new settings.
  9. Then click OK to exit Folder Options.

When Windows 11 File Explorer is slow to open, disabling Quick Access should do the trick.

Can I restore classic File Explorer in Windows 11?

If you prefer the old tabbed File Explorer, you can restore it in Windows 11. To do so, you’ll need to make a relatively straightforward registry tweak. This is how you can restore classic File Explorer by editing the registry:

  1. First, bring up Windows 11’s search utility.
  2. Input the keyword Registry Editor in the search box.
  3. Select Registry Editor to open its window.
  4. Next, browse to this registry key location: HKEY_LOCAL_MACHINE\SOFTWARE\Microsoft\Windows\CurrentVersion\Shell Extensions
  5. Right-click Shell Extensions to select New, then Key.
    The Key option windows 11 file explorer lagging
  6. Enter Blocked for the key’s name.
  7. Select the new Blocked key.
  8. Right-click a space on the right side of the Registry Editor to select New, then String Value.
    The String Value option windows 11 file explorer lagging
  9. Enter {e2bf9676-5f8f-435c-97eb-11607a5bedf7} to be the new string’s name.
  10. Thereafter, close the Registry Editor.
  11. Select the Power and Restart Start menu options. After restarting, open classic File Explorer.
    Classic File Explorer windows 11 file explorer lagging

As restoring the old File Explorer removes the command bar, this might be another potential resolution for fixing the lag. However, it’s more of a workaround than a solution for users who prefer Windows 11’s revamped File Explorer.

Remember that Windows 11 is a new OS. Therefore, it’s not surprising that it has a few bugs like the group by option being greyed out that Microsoft needs to iron out.

The big M has already released one update that’s supposed to address File Explorer lagging in Windows 11, and there might be more. Make sure you keep Windows 11 up to date.

As File Explorer lag usually arises because of memory leaks, some of the resolutions in our guide on how to fix memory leaks in Windows 10 might also help resolve this issue. Although that’s a Windows 10 guide, you can still apply many of its suggested fixes in Windows 11.

Things are no different when it comes to this article dedicated to solving a serious issue: File Explorer is slow. Give these tips a try to speed things up right away.

Don’t hesitate to make Windows 11 altogether faster and more responsive. Disabling the visual effects is one of the most efficient tips in that regard.

Although not necessarily guaranteed to work for all users, the resolutions above are worth a try. Users who have found other ways to solve File Explorer lagging issues in Windows 11 are welcome to share their resolutions in the comments below.

How to Set or Change Default Speakers on Windows 11

As you probably already noticed, on your Windows 11 PC, you might have many different audio output options to choose from.

Whether there are devices hooked up, such as speakers, headphones, headsets, or otherwise, you can switch between them and decide which one you want as your default one.

In this article, we will show you how to do so, just in case you will need this knowledge in the future.

How can I change my default speakers on Windows 11?

1. Change the default Speakers via Settings

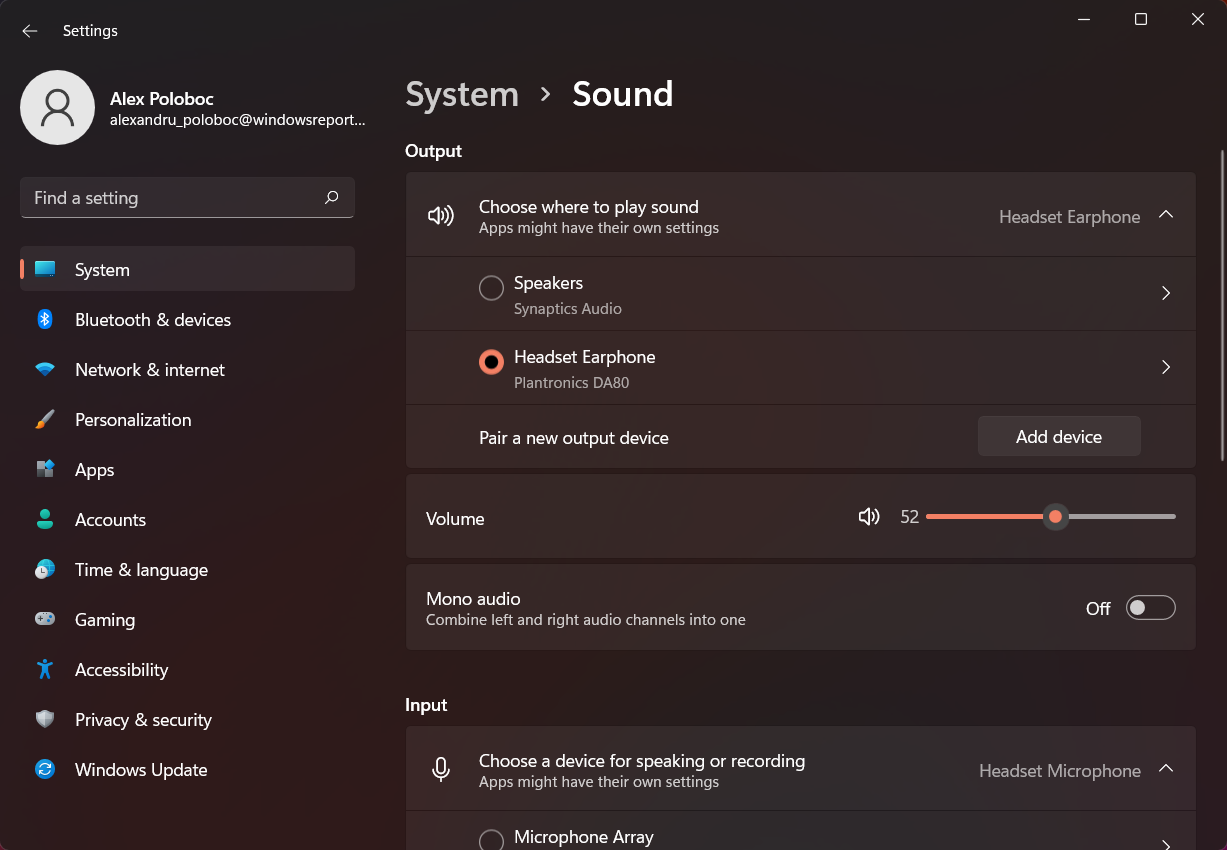
    Default speakers can be easily changed from the Sound Settings menu on your Windows 11 device. The changes you make in this menu apply to all the apps on your computer.

  1. 1. Press Windows key + I at the same time on your keyboard.

  2. 2. The Settings menu will open.

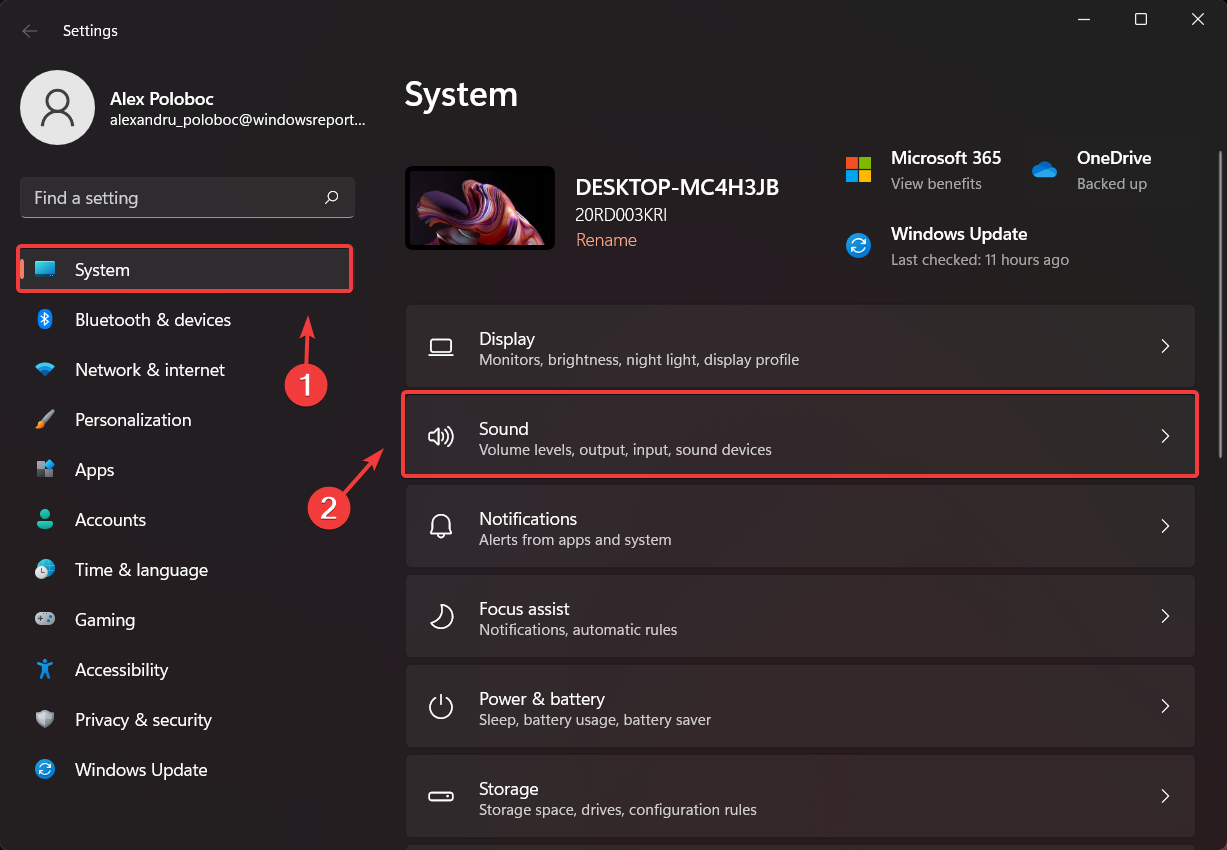
  3. 3. Select System, and then click on Sound.

    system and sound
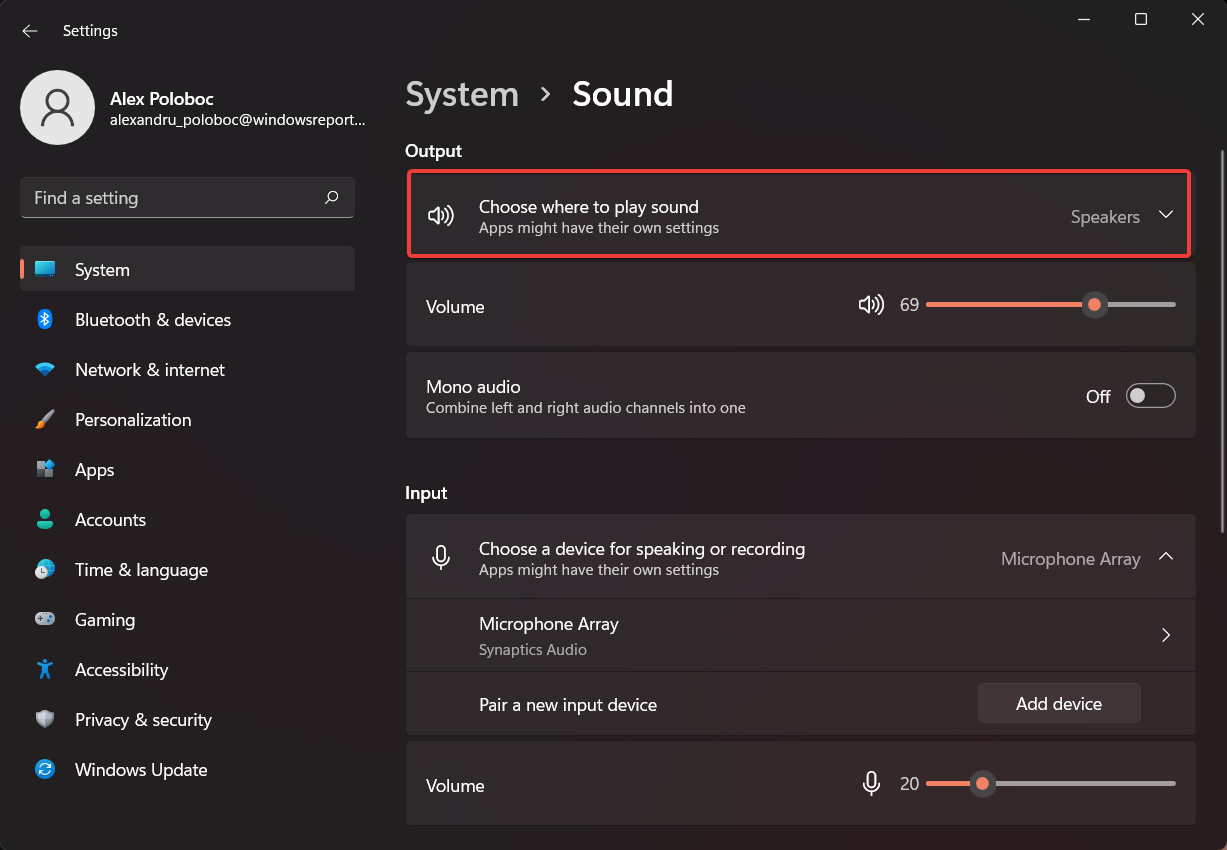
  4. 4. Click the Choose where to play sound button, to extend the section.

    choose where to play sound
  5. 5. Select the device you want to use as default, from the list of available ones.

    select output device
  6. 6. Exit the Settings menu and the changes will be applied.

Of course, all this process will take place in the Settings menu, as you most likely guessed. However, don’t be discouraged because this is not at all a daunting task and will only take up a few minutes of your time.

These changes will be applied system-wide, for absolutely all apps. However, also keep in mind that certain applications may be customized to override this setting and choose a different output device.

This method doesn’t involve installing any third-party software or downloading any Microsoft add-ons, but only using the options page.

Before adjusting your speakers, you can quickly open Sound Settings in Windows 11 to access all available audio output devices from one place.

2. Set a default sound output without using the Settings app

We would like to bring to your attention the fact that there is even a quicker way to perform these changes, without having to go through Settings.

Here’s what you need to do:

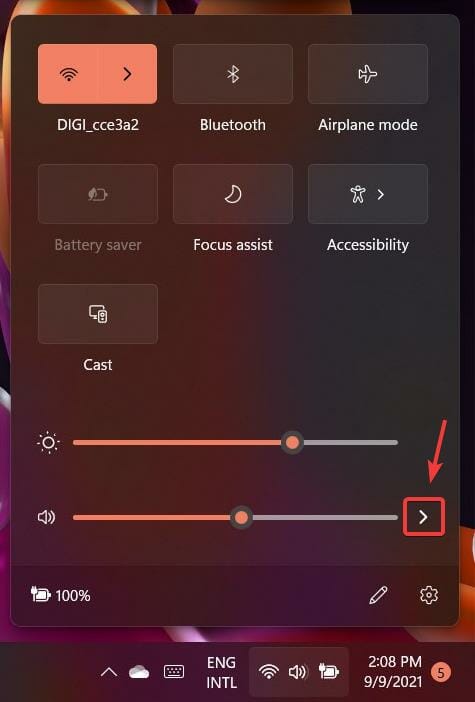
  1. From the bottom right corner of your taskbar, click on the Sound button.speaker icon
  2. Once the tray opens, click on the tiny arrow located next to the volume control.sound options
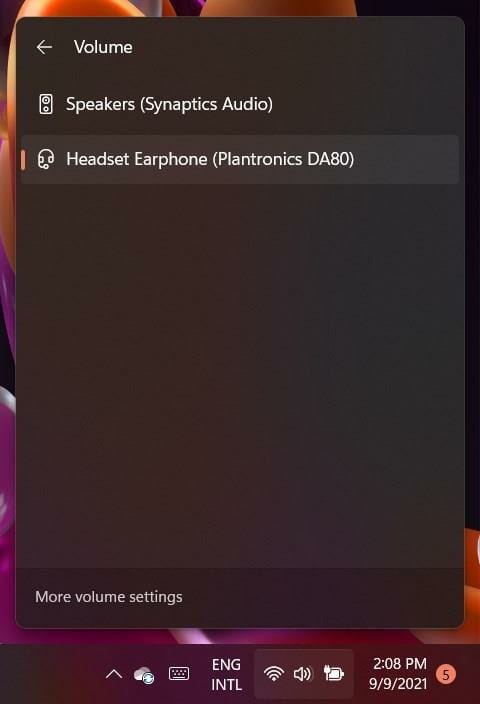
  3. Select your defaut output device and close this menu.select output method

That’s all there is to it! Pretty easy, right?

Maybe most of the time you are comfortable with your laptop speakers but will need to switch to your Bluetooth speaker and crank the music a bit louder.

From now on, when the need to change your default output method for sound arises, you will be prepared to face this challenge and perform this task in less than a minute.

To learn more about audio devices, check our guide on how to change the output device on Windows 11.

Was this guide useful to you? Let us know in the comments section below.
[Fixed] This Effect Requires GPU Acceleration: 5 Quick Ways

Artists working in the entertainment industry always look for different ways to improve and streamline their workflows in a bid to reduce rendering times.

However, they sometimes come across errors such as this effect requires GPU acceleration, especially when working with Adobe applications such as Premier Pro and After Effects.

So, what do you do when you get this error and your computer does not have GPU acceleration? GPU acceleration uses your computer’s Graphics Processing Unit to increase rendering speeds. Video editors understand that this acceleration is required for some effects to work well.

Fortunately, you can take certain measures to fix this error and continue working on your video. Let us explore some of the fixes for this error. But before then…

What does it mean when it says This effect requires GPU acceleration?

GPU acceleration can be defined as the process that uses your computer’s GPU (Graphics Processing Unit) to improve the speed at which videos are rendered.

Some effects cannot work well without this acceleration. You can use GPU acceleration for different tasks, key among them 3D rendering, video encoding, and video decoding, among others.

It, therefore, means that the certain effect that you are applying to the content you are working on requires the use of your computer’s GPU for it to be successful.

For instance, when working on projects that require things like color correction, you might have to enable GPU acceleration for the process to be completed successfully.

How do I fix This effect requires GPU acceleration?

1. Enable GPU Acceleration

  1. Run Adobe Premier Pro and then click on Files on the top left side and select Project Settings.File and Project Settings - this effect requires gpu acceleration
  2. Click on General from the extended drop-down menu.General Settings
  3. Click on the drop-down menu, Renderer, under the Video Renderer and Playback section.Renderer - this effect requires gpu acceleration
  4. Select Mercury Playback Engine GPU Acceleration.
  5. Click OK to save the changes.Save Rendering

2. Update Windows graphics drivers

  1. Right-click the Windows Start button and select Device Manager.Start and Device Manager
  2. Expand the Display adapters option from the list of device drivers.
  3. Right-click on your graphics drivers and select Update driver.Update Display Drivers - this effect requires gpu acceleration
  4. Choose to let Windows find a driver for you automatically or manually seek a fresh driver file on your machine.Search Drivers
  5. Follow the on-screen instructions to install the driver update and then restart your computer.

The easier and more time efficient solution is to use Outbyte Driver Updater to automatically identify the most recent version of the driver and have it downloaded for you.

This intuitive tool will show the list of all the newest or missing drivers and will let you choose the one that you need to bring up to date.

Outbyte Driver Updater

Use this software and never let your drivers get old again.

3. Change the order of effects (for users with multiple effects on Videos)

  1. Identify the effect that is causing the error.this effect requires gpu acceleration - identify pro effect
  2. Drag the effect to the top of the list and save.Change the effect
  3. Repeat the process to see if you will get the error again.

4. Uninstall any third-party plugins

  1. Press the Windows key + E to start File Explorer.
  2. Navigate to Local Disk (C:) or the drive where Windows is installed and open Program Files.Program Files Folder - this effect requires gpu acceleration
  3. Now, navigate to the following path and delete the third-party plug-ins from the folder: C:\Program Files\Adobe\Adobe Premiere Pro CC 2017\Plug-InsPlugins - this effect requires gpu acceleration

5. Reinstall the Adobe software

  1. Open the Adobe Creative Cloud application and select Apps on the top right corner.
  2. From your installed applications, look for Adobe Premier Pro and then click on the Menu (three dots) on the right.
  3. Click on Uninstall from the drop-down menu list.Uninstall - this effect requires gpu acceleration
  4. Select Remove to get rid of all damaged settings and third-party plugins.Remove - this effect requires gpu acceleration
  5. Wait for the uninstallation process to complete and then restart your computer.
  6. Relaunch the Adobe Creative Cloud application and look for Premiere Pro.
  7. Click on the Install button alongside the app.Install
  8. Follow the on-screen instructions to complete the installation process.

What are GPU accelerated effects?

Understanding GPU accelerated effects requires you to first understand what GPU accelerated computing is.

It is the use of the Computer Processing Unit (CPU) and Graphics Processing Unit (GPU) to enable faster operations and high quality. 

Therefore, GPU accelerated effects are effects that require the use of the GPU and CPU for them to be rendered well and at fast speeds.

Without acceleration, you might notice your computer getting slow when working with these effects.

How do I enable GPU acceleration?

Enabling GPU acceleration depends on the application that you are using. For instance, if you are using Adobe Premier Pro, you can enable GPU acceleration by going to File, selecting Project Settings, then choosing General, and then picking a renderer.

GPU acceleration is important, especially when working in the video production industry. However, you can face challenges and errors that might cause frustration.

Some of these errors, such as this effect requires GPU acceleration error can be fixed easily following the steps discussed above.

For any other questions or suggestions, don’t hesitate to let us know in the comments section below.
How to Hide or Remove Recycle Bin in Windows 11

Months before the final version of Windows 11 was available, users had already been testing the preview build 22000.65.

Some said it’s the best Windows version yet, and some said they’re waiting for the final version to make a decision, but everyone was looking to find out more about its features and how to enjoy it.

One of the things users are curious about when it comes to Windows 11 is how exactly to hide the Recycle Bin from their desktops.

To make things easier for those who need a little customization here and there, today we’ll show you how to keep your desktop clean and hide the Recycle Bin icon.

What is the purpose of the Recycle Bin?

The Recycle Bin is a location where deleted items such as folders and even shortcuts are temporarily stored. It occupies a predetermined amount of storage space on your computer’s hard disk, but you can adjust some settings to your needs.

You can delete unwanted files manually or with the help of your keyboard. Moreover, there are some excellent Recycle Bin cleaners worthy of your attention.

How to remove Recycle Bin from Desktop in Windows 11

1. Use the Settings app

  1. 1. Press the Windows + I keys at the same time to open the Settings app.

  2. 2. Select the Personalization option from the menu on the left.

    Settings_Personalization
  3. 3. Click on Themes.

    Settings_Themes
  4. 4. Go to Desktop icon settings.

  5. 5. A window containing desktop icons will open.

  6. 6. From this window, unselect the checkbox next to the Recycle Bin to hide it.

    Uncheck Recycle Bin
  7. 7. Now click on Apply and OK to save the changes.

    hide recycle bin windows 11 apply changes
  8. The easiest method to hide the Recycle Bin icon is via Settings. From the Desktop Icon Settings, you can choose which icons to be visible on the desktop. All you need to do is uncheck the box for Recycle Bin, and it will be removed from your desktop.

2. Remove the Recycle Bin using Run

  1. Open the Desktop Icon Settings window by presssing Windows + R keys and typing the following command: desk.cpl ,,5desktop settings
  2. This simple command will open the Desktop Icon Settings interface.
  3. As before, uncheck the Recycle Bin option.Uncheck Recycle Bin
  4. Click on Apply, then OK to save the settings.

Note that while here, you can customize your desktop to your liking. Those who want to have a clean desktop can hide all desktop icons. As for others who want everything on display, they can choose to do so just by following the steps above.

If you want to know how to get the restored files from Recycle Bin if they are missing, then read this guide.

In case you accidentally deleted files and cannot retrieve them, check out our article to find out what to do.

If you’re interested in more information about the new OS and all its new features, you should take a look at how Windows 11 compares to Windows 10.

For more information regarding the previous version, we have a great guide on how to use Recycle Bin on Windows 10, so don’t miss it.

Do you prefer to have the Recycle Bin icon on your desktop or hide every icon on sight? Don’t hesitate to tell us in the comments section below.

How to Remove Zeus.2022 Trojan Detected From Windows

Windows is one of the most used OS, but it’s also the primary target for hackers and viruses. The main goal of the viruses is to steal your private info (Passwords, Credit Cards, etc.)

Hackers are an unscrupulous bunch, and they prey on the uninformed. Like phone scammers, they’ll find a way to get your sensitive data and rob you of your belongings, identity, and whatnot.

That’s exactly the deal with the Windows detected ZEUS Virus prompt some users see on their web browsers.

In this article, we will explain how to remove this malicious software and how to recognize threats like this below.
What is Zeus.2022 Trojan?

If you’re prompted with the Windows detected ZEUS Virus message, you can be certain there’s no such thing as a ZEUS Virus. Your PC might be infected, but not as the message prompt puts it.

This is just trickery by adware you’ve mistakenly installed on your PC. These kinds of browser hijackers are not uncommon in the current state of the internet.

The only way this adware can hurt you is if you comply to give some sensitive data in order to resolve it to the cybercriminal who developed it. Don’t do it.

Adware is almost always not a real danger, and the problems start only when users panic and call support or provide the hacker with credentials of any sort.

Hence, what you need to do is follow a cleanup procedure, which we’re about to explain below.

How to remove Zeus Virus from Windows 10?

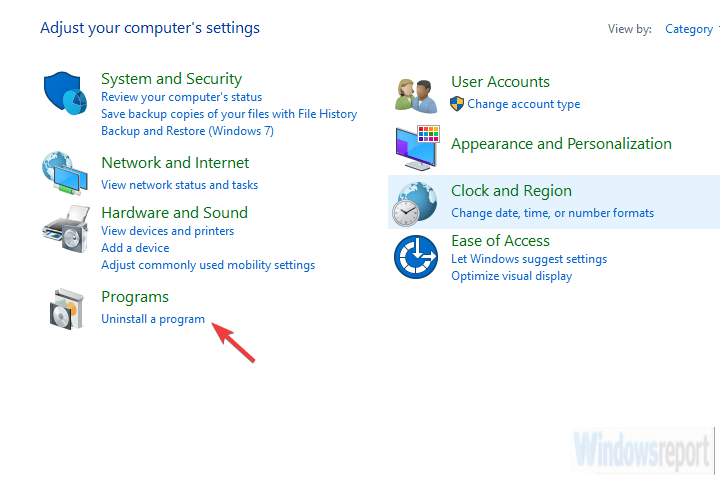
1. Uninstall from Control Panel
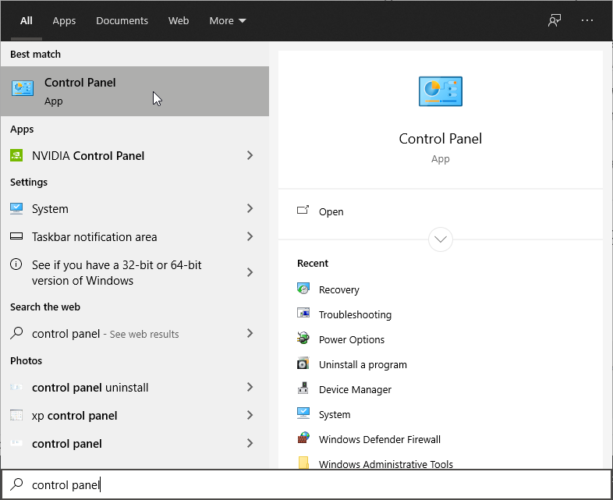
  1. In the Search bar, type Control, and open Control Panel.
  2. From the Category view, select Uninstall a program.uninstall a program
  3. Navigate to one (or multiple) suspicious and untrusted programs.
  4. Right-click on a program and uninstall it.
  5. Restart your PC.

Let’s start the whole cleanup procedure by inspecting the list of installed programs. The peculiar, unrecognized applications are ones you should pay attention to.

They are usually installed by mistake, hidden within some installers, or directly added to your browser as add-ons. We call them PUPs (Potentially Unwanted Programs).

However, if you notice that you can’t remove the apps by simply uninstalling them, use our dedicated guide on how to remove stubborn programs.

2. Scan for malware

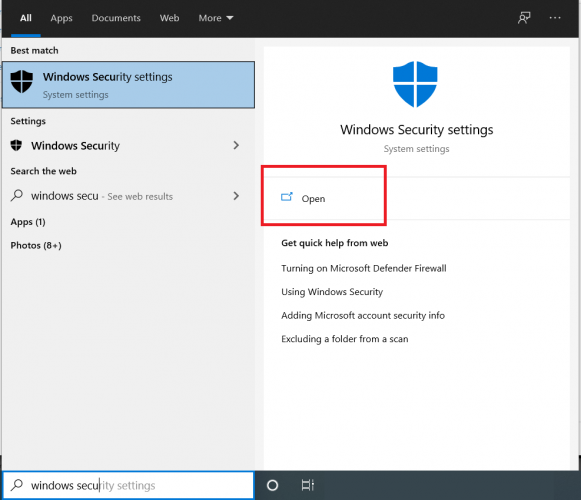
  1. 1. Press the Windows key on your keyboard.

  2. 2. Type Windows security in the search bar that opens and click on the result to open the Windows Security Settings menu.

    windows security open
  3. 3. Navigate to the Virus & threat protection section.

  4. 4. Choose Scan options.

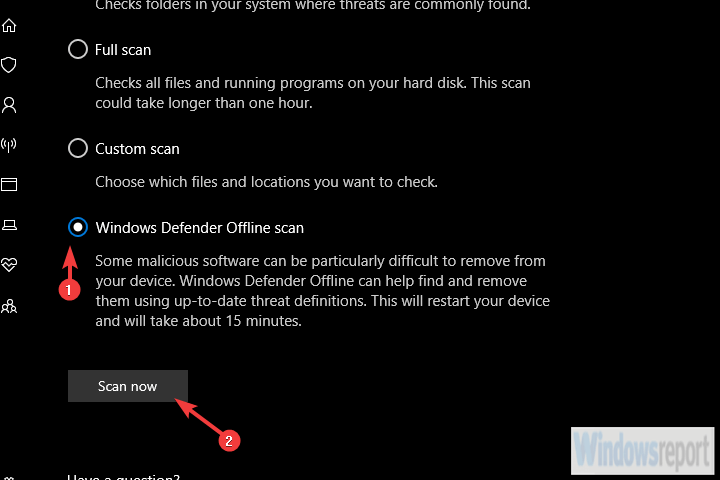
  5. 5. Select Windows Defender Offline Scan from the list of options.

    offline scan windows defender
  6. 6. Before you click on Save now, make sure that you save everything you’re doing as this mode will restart the PC.

  7. 7. Click Scan now to begin scanning your PC for malware. This process can take a while.

  8. If you are getting the Virus.2022 Torjan alert, you should check for possible malware infection on your PC. You can use the Windows 10 built-in security, Windows Defender. It is free and you already have it.

However, Windows Security offers only basic protection and doesn’t always detect advanced malware.

Just to make sure there’s no malicious intrusion at hand, we suggest going for a deep scan with a dedicated antivirus solution, that can detect malware before they infect your PC.

We recommend you use a modern antivirus that can detect and remove adware, browser hijacks, and other unwanted computer viruses.

TotalAV

You can rely on TotalAV for advanced security and in-depth protection solutions.
Free Trial Visit Website

3. Remove PUP-s and adware

PUPs hijack your browser, replace your default search engine, and redirect your traffic to suspicious websites. Or, in this case, prompt you with the Windows detected ZEUS Virus message.

These usually require specific tools that deal with unwanted programs. At the core of the problem, we probably have an unwanted program and we most certainly want it removed.

In order to stop these apps from installing on your computer, we recommend you choose one of the best Potentially Unwanted Program removal tools.

Plus, such helpful tools can help to detect PUP sources efficiently to prevent downloading potential dangerous software on your system.

Hence if you notice that your PC starts acting strange all of a sudden, with pop-up ads or opening new tabs, then you certainly need the above programs.

4. Reset the browser settings

Chrome

  1. Open Chrome.
  2. Click on the 3-dot menu and open Settings.Gmail not checking spelling
  3. Scroll down and open Advanced.
  4. Scroll to the bottom and click Restore settings to their original defaults.restore default settings chrome
  5. Click Reset.

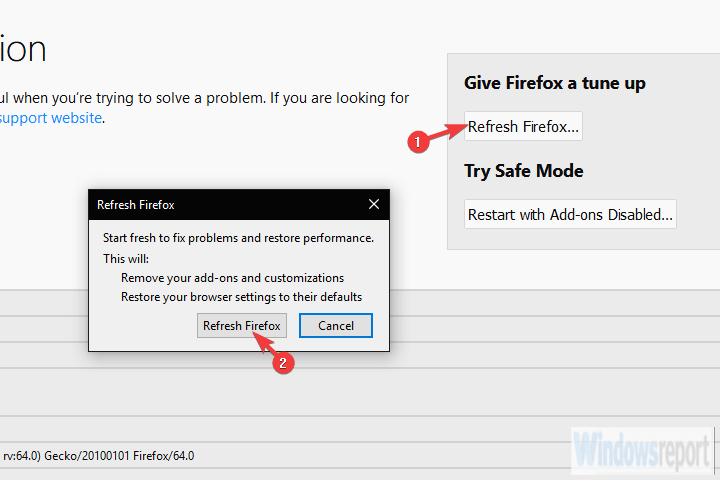
Firefox

  1. Open Mozilla Firefox.
  2. Click on the 3-line menu and open Help.
  3. Open More Troubleshooting information.
  4. Click Refresh Firefox.refresh firefox

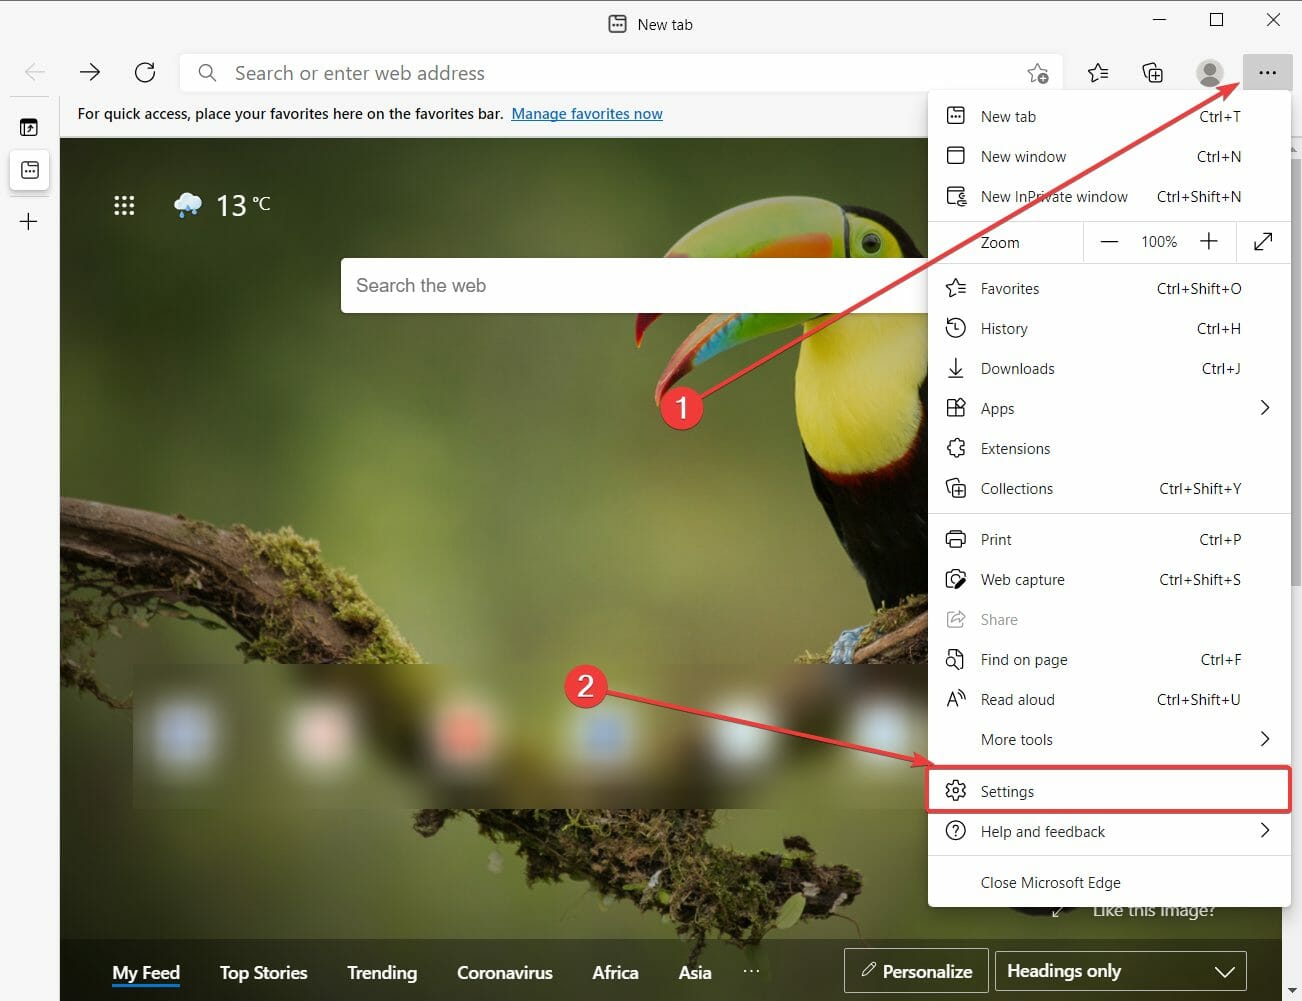
Edge

  1. Open Edge.
  2. Click on the 3-dot menu and open Settings.
  3. Choose Clear Browsing data and then Choose what to clear.
  4. Click Show more and check all the boxes.
  5. Click Clear and restart Edge.

Finally, the browser settings that were changed once the infection occurred won’t be restored. You need to reset your browser to factory settings by hand.

If you don’t do it, the default search engine and the possible malicious add-on will continue working. And we don’t want that.

In addition, make sure to clear all locally cached files, as some of them might be corrupted. The reinstallation might be your safest bet, but the factory reset should do the job for now.

With that said, we can conclude this article. If you still have issues with the Windows detected ZEUS Virus prompt, repeat all steps and consider reinstalling the browser.

If you want to discover other great tools to keep your computer safe from all kinds of online threats, you can use any of these best lifetime license antivirus tools to get rid of the more advanced Zeus malware.

We certainly hope this was a helpful read. If that’s the case, don’t forget to tell us in the comments section below.
How to Check PC Specs on Windows 11 [5 Ways]

When you need to know if your PC can run certain software or if a new component will be compatible with your system, check your computer specifications.

You can find data about your CPU, RAM, operating system version or type, or even the system or device IDs.

For instance, to know for sure if your PC can run a software solution, check its system requirements and confront them with your configuration.

What are the main computer specs that I can find?

Whether you want to know the system tech specs to check the software or hardware compatibility, or you’re just curious, we listed a few criteria about the system’s components in the order of their importance.

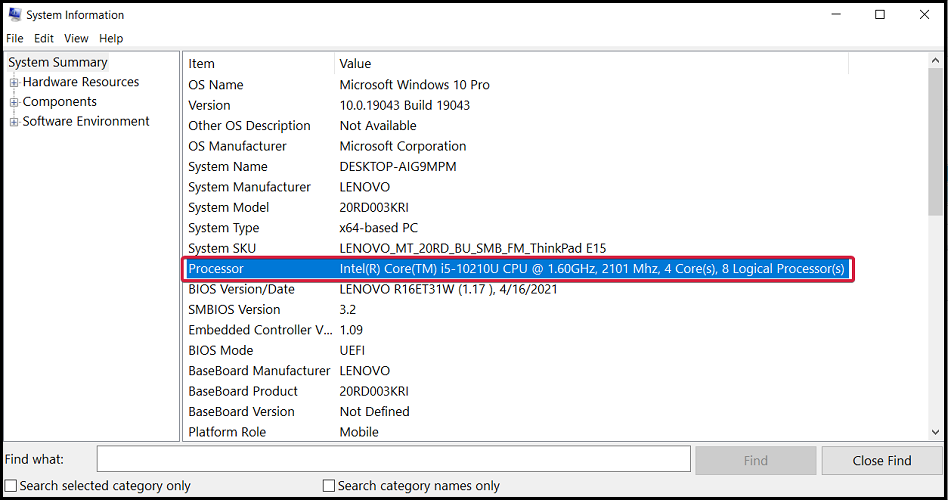
➡ CPU – When it comes to the processor, you need data like the maker and model, the operating frequency, the number of cores, and logical processors.

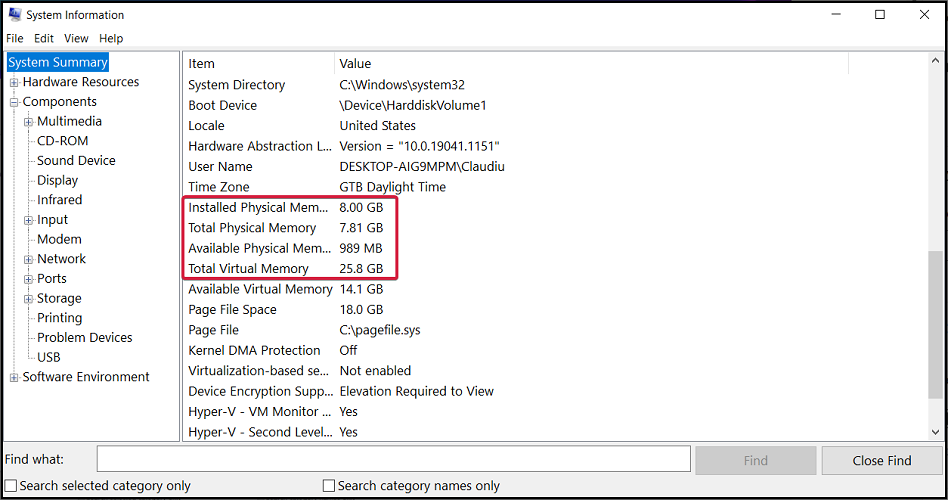
➡ RAM – You can find the actual amount but in the System Information app you will also see data about the available memory and the virtual memory.

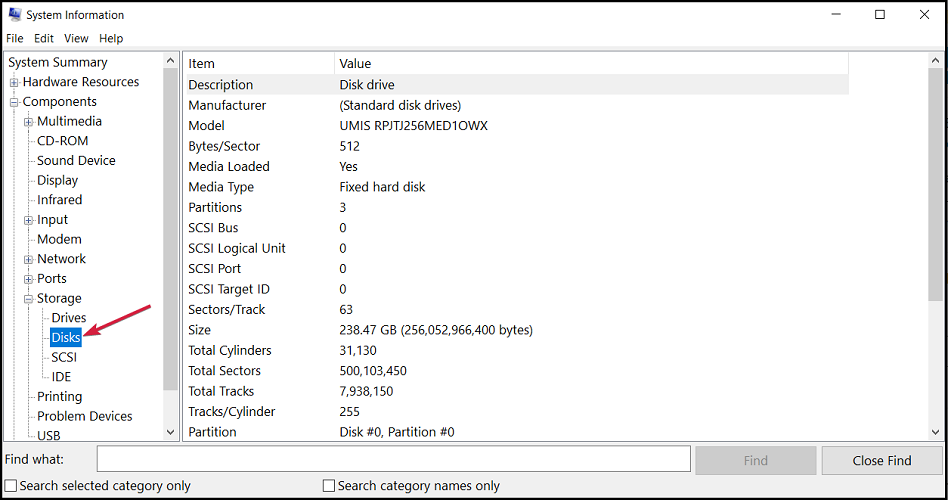
➡ Disks – The size of the disk may be easy to find even from the drive properties but when it comes to the number, type of the partitions, and the space allocated to them, you will have to consult a system information tool.

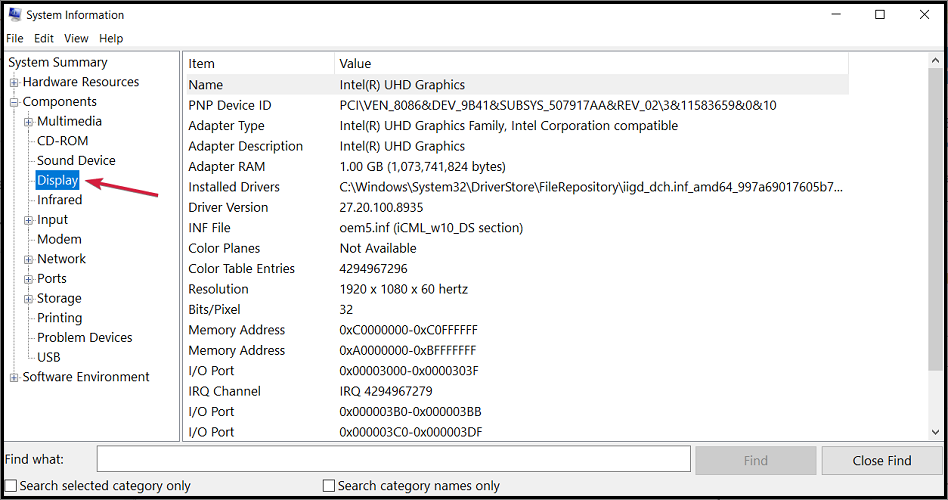
➡ Display – You can always check the monitor details, resolution, and frequency of the display from the display settings but you might also want to get info about the adapter and its amount of memory, or even the driver and its version, the I/O Port address or its IRQ channel.

These are only a fraction of the information you may need to verify compatibility or get some data in order to help you troubleshoot a component. Here’s how you can get relevant data on all specs right away:

How can I find my computer specifications on Windows 11?

1. Via System Properties

  1. 1. Press the Windows key + E to start File Manager.

    file explorer windows 11
  2. 2. Right-click on This PC from the left pane and select Properties from the menu.

    system properties windows 11
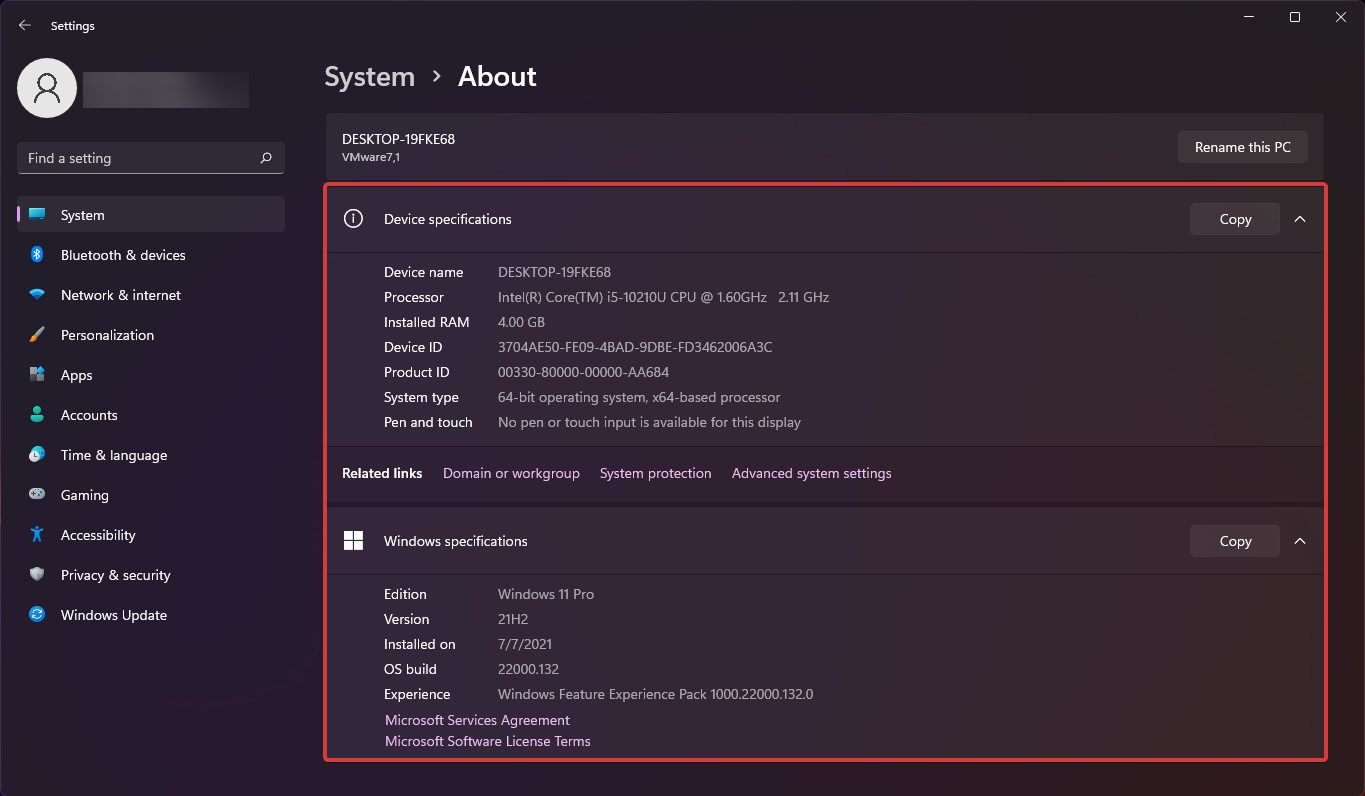
  3. 3. In the menu that opened, you can find two sections: Device specifications and Windows specifications.

    check pc specs windows 11
  4. 4. You can see all the PC specs in here. The technical specifications include the CPU data, the amount of RAM, device and product ID, the system type and information about the version and build of your OS.

  5. 5. You can copy the data to your clipboard by clicking on the corresponding Copy button in the window and then pasting it in a document file or on a troubleshooting page.

    copy pc specs windows 11
  6. 6. After you finish, close the window.

  7. A great method to check your PC specs is to navigate to the About menu via Settings. In that menu you will can find device specifications, as well as Windows specifications.

2. Use the Settings app

  1. Click the Windows button and select the Settings app.
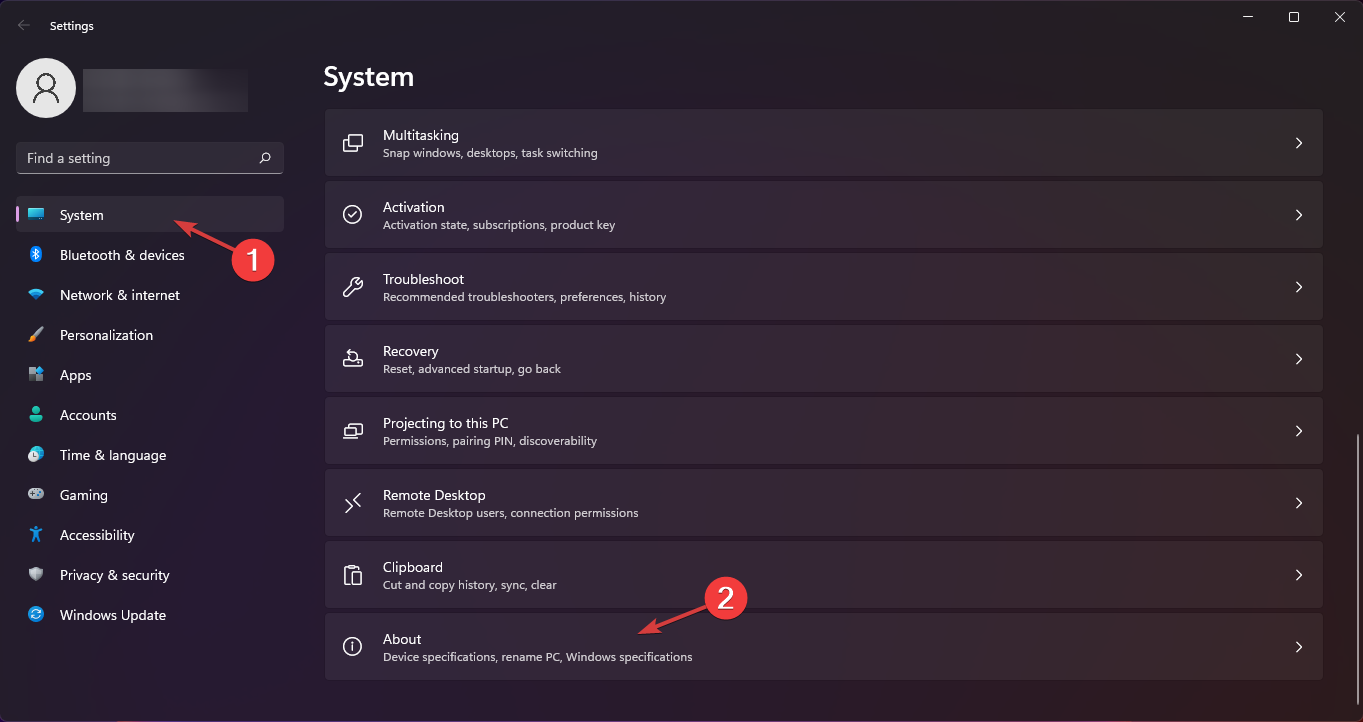
  2. Select the System section from the left pane and then choose the About option from the bottom right.
  3. In the next window you will find exactly the same data as the one from our previous solution.

3. Use Command Prompt

  1. Press the Windows key + R to start Run.
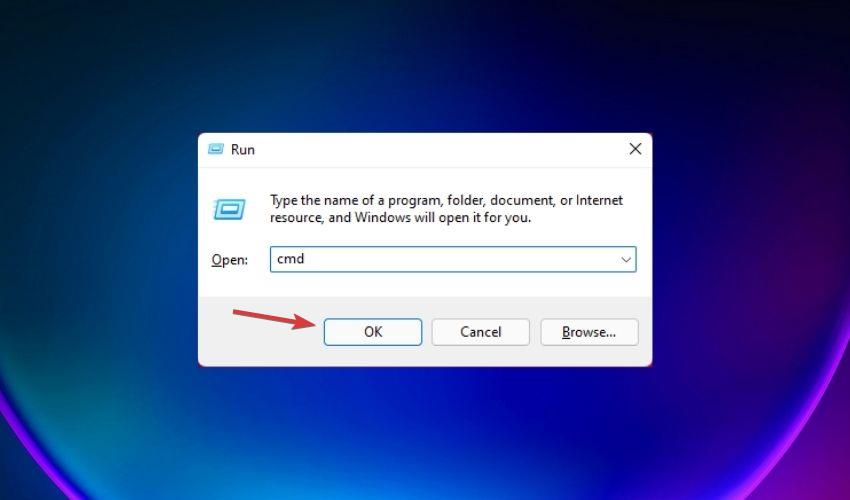
  2. Type cmd and press Enter or click OK.
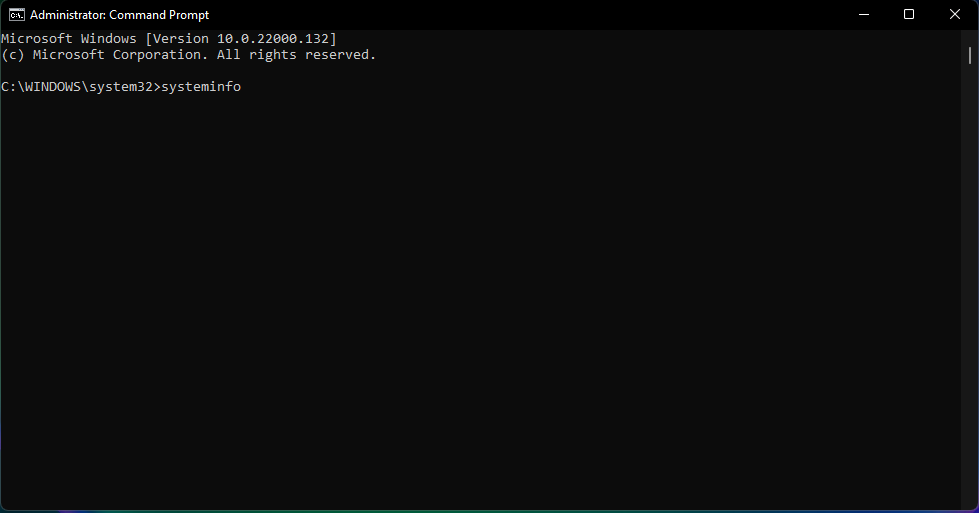
  3. Now type the following command and press Enter to run it: systeminfo
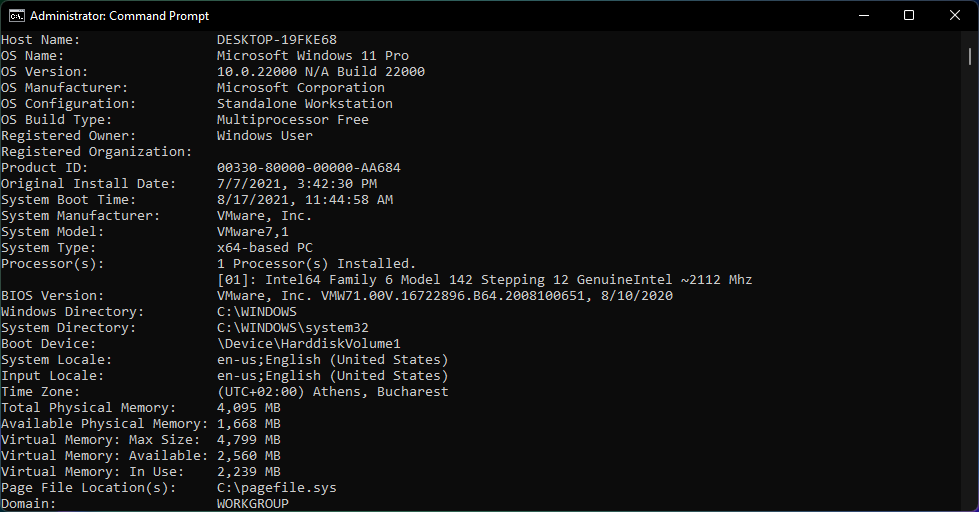
  4. You will see a list with all the specifications of your system. Just scroll up to see all the necessary data.

Listing the technical specifications with Command Prompt offers a lot more data about your system than the previous methods.

For instance, you will be able to learn about the latest KB fixes installed lately and your PC’s Wi-Fi and Bluetooth modules.

4. Use the System Information app

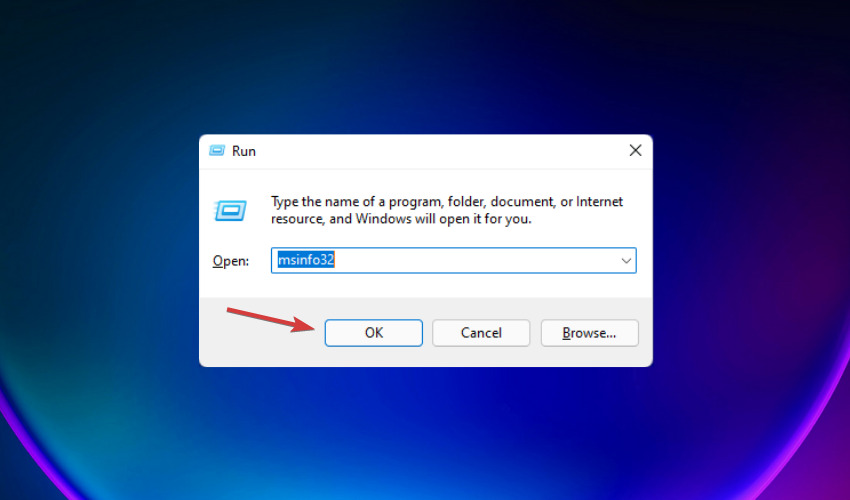
  1. Press the Windows key + R to start Run.
  2. Type msinfo32 and press Enter or click OK.
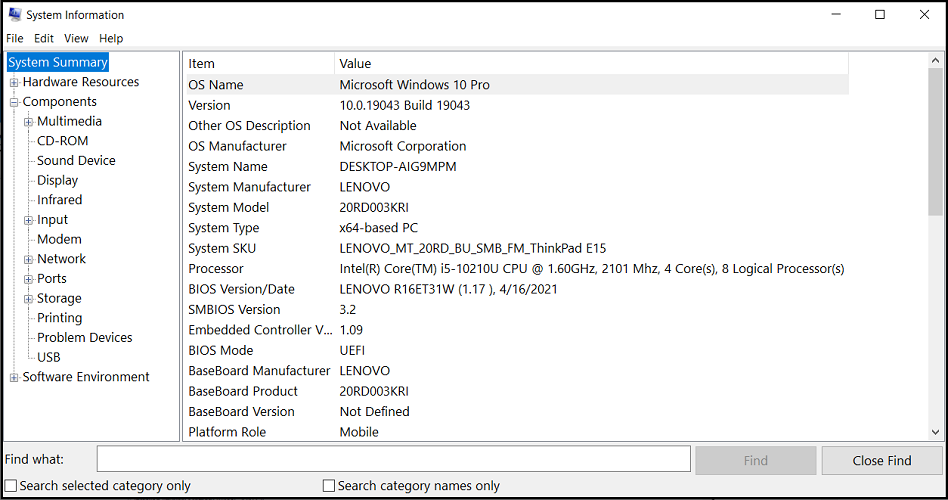
  3. This will open the System Information app with a plethora of data about your system.

The System Summary is just a part of the information here available so you can pick any category on the list, from the left pane, to see more data on the right pane.

5. Use Windows PowerShell

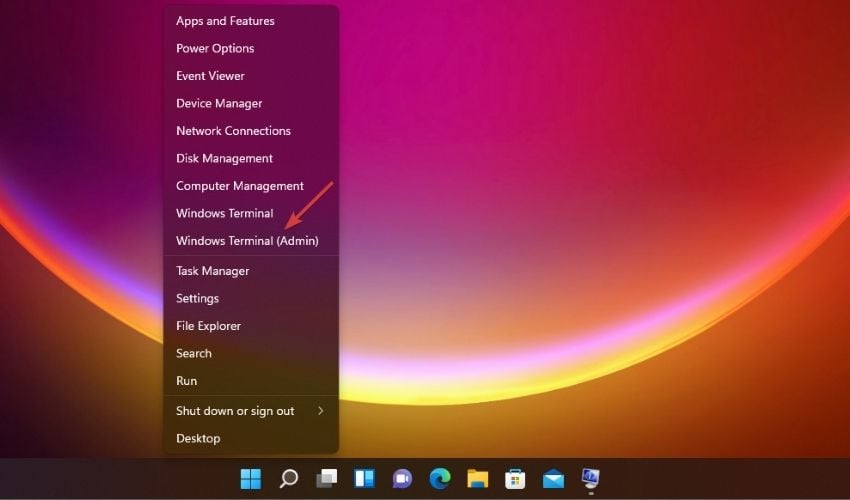
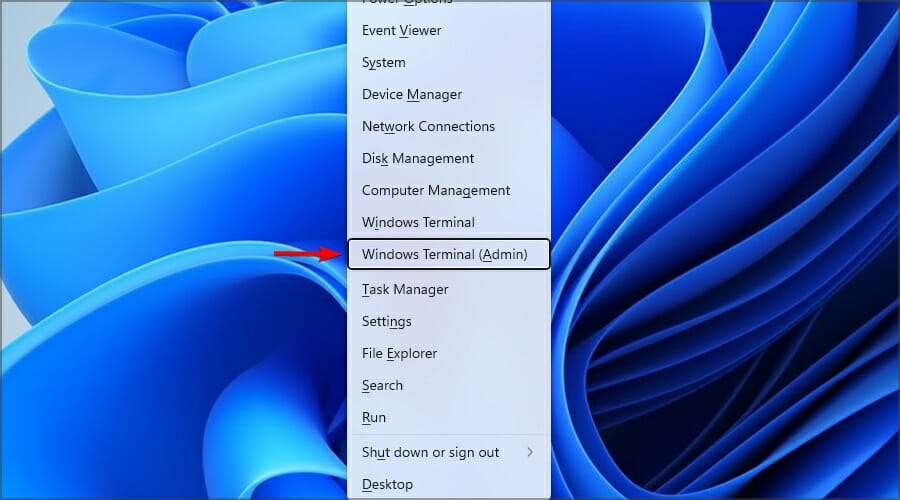
  1. Right-click the Windows button and select Windows Terminal (Admin) from the list of options.
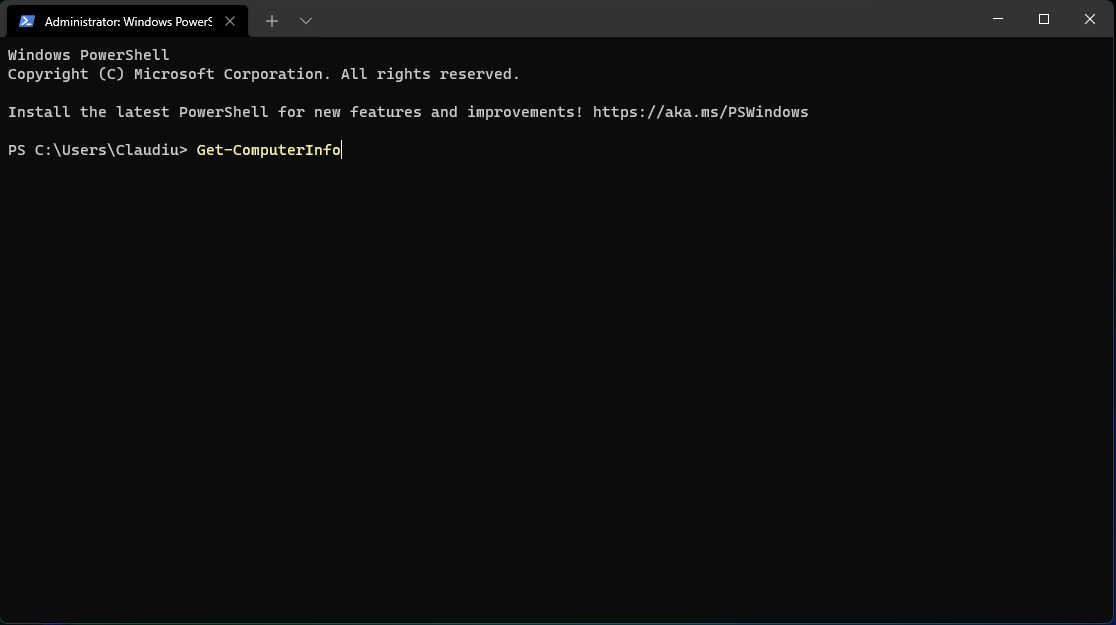
  2. Type the following command and press Enter to run it: Get-ComputerInfo
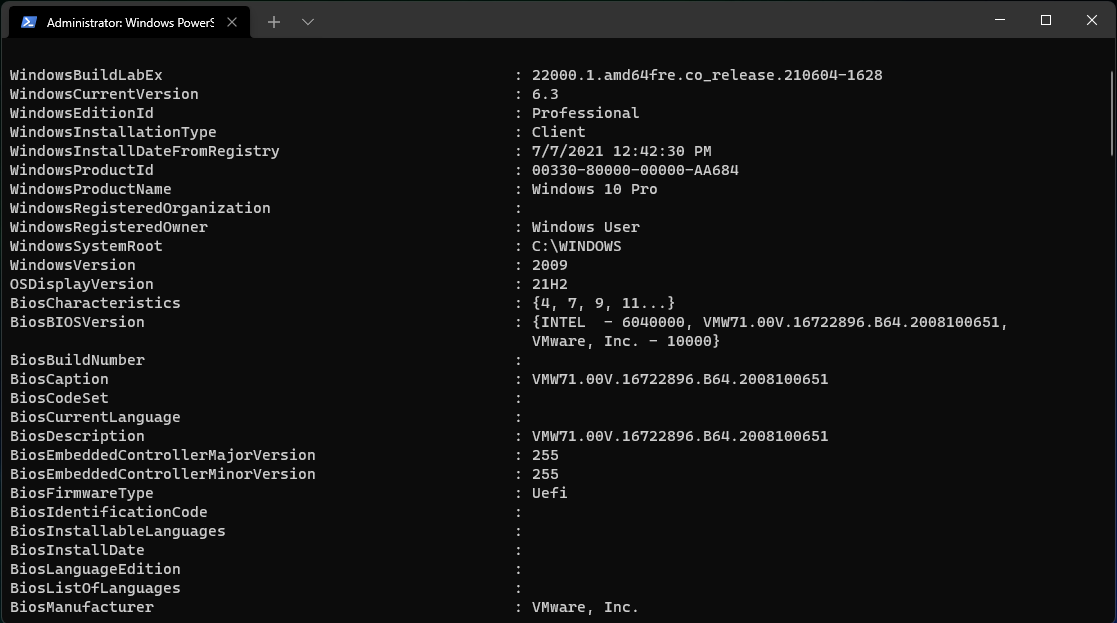
  3. The system will analyze the info and you will receive a lot of information about your PC, including the BIOS version.

The Get-ComputerInfo command from PowerShell will get you much more information than the ones you get with Command Prompt, including details about the OS and your network.

How do I check my RAM on Windows 11?

  1. Press the Windows + R shortcut to start Run.
  2. Type msinfo32 and press Enter or click the OK button.
  3. In the next window, you can check the physical memory and the available memory from the right pane.

After checking your RAM amount available on your system we will try to answer some common questions that you might have on this subject.

➡ How much RAM do you actually need? – It depends on the applications you need to run on your Windows 11 PC. If you want to play one of the latest action games without any problems, you will need at least 16 GB. On the other hand, for regular office tasks, you will be fine with just 8 GB.

➡ Will more RAM speed up my computer? – Certainly, yes! If you are used to multitasking or even if you open more tabs in a browser, you will definitely see an improvement with an increase of 2 GB or 4 GB.

➡ Is it better to have more RAM or storage? – When it comes to PC resources, more is better. However, if you don’t feel that the system is slow or you don’t run any demanding applications, you don’t need to invest in more RAM. You could take a look at our article on how to speed up your PC instead.

Will Microsoft change Windows 11 requirements?

During the first month after releasing the first Windows 11 build within the Windows Insider Program, Microsoft changed the minimum system requirements.

So, it’s possible to see that again until the final release for the public, although we don’t expect these changes to be drastic.

Let’s recap the main tech specs you’ll need if you want to run Windows 11:

  • CPU: At least a 2 core processor with minimum 1 GHz frequency
  • RAM: Minimum 4 GB
  • Storage space: At least 64 GB
  • Firmware: UEFI
  • Security: TPM 2.0 required and UEFI Secure Boot
  • Display: HD resolution (720p), 9-inch minimum, 8 bits per color channel
  • Graphics: DirectX 12 API, WDDM 2.0
  • Connectivity: Bluetooth (excluding desktop PC), Wi-Fi or Ethernet connection
  • Digitizer: Precision Touchpad (if touchpad is present)
  • Buttons: Volume buttons and the power button must be present
  • Ports: USB ports (at least one), video output needed

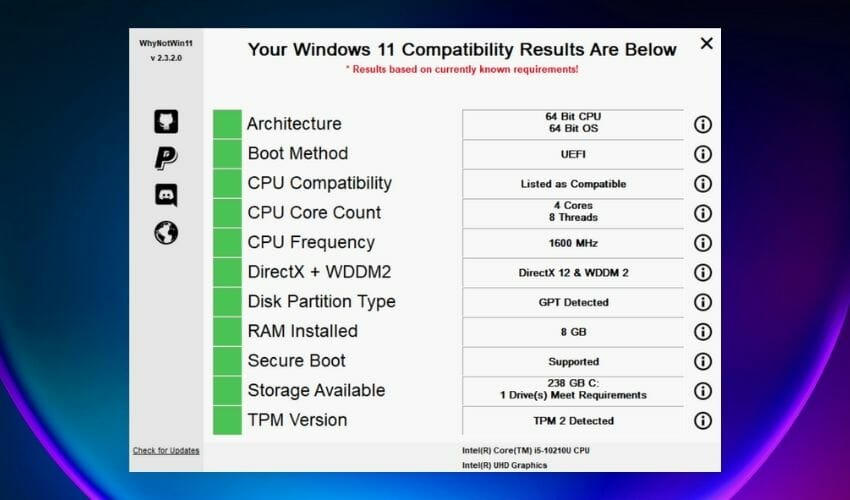
By using the methods provided in our guide, you will find out all that and a lot more. Or you could use a dedicated app called WhyNotWindows11 that will show you exactly if you can run Windows 11.

whinotwin11 logo

After you download and run it, your system will be analyzed and you will receive a chart like the one above. If all the squares are green, you are good to go.

Anyway, now that you know how to assess your system with the tools provided by the Windows system, you will be ready.

The fourth method offers a lot more information about your system than any of the others, and the data is very well structured, so you can always find the data you are looking for.

However, if you’re looking for basic information, any of the other solutions will provide enough to go with.

On the other hand, if you’re still unsatisfied with the results, you can use the best-dedicated solutions to find system specifications.

For any questions and suggestions, don’t hesitate to use the comments section below and drop us a line.

5 Best Crossfire VPNs to Fix High Ping and Reduce Lag

CrossFire is an online free tactical FPS (First-Person Shooter) from Z8Games that is enjoyed by hundreds of millions of players worldwide.

As a player, you can assume the role of a mercenary company, either the Global Risk or the Black List, and fight the other party.

There are multiple game modes, and most of them can handle a roster of up to 16 players. So each team can have a maximum count of 8 players.

There are some play modes such as Zombie and Wave, where special conditions apply.

If you play for a while, you can progress in your military rank. You start off as a trainee, and depending on your skill you can promote your character all the way up to Marshall.

You can also customize your appearance and equipment.

Can I use VPN in CrossFire?

Yes, you can use a VPN in CrossFire. In fact, a VPN can contribute to better speed, prevent phishing attempts, and hide your private data on gaming servers.

Strong VPNs can hide your location and help you bypass geo-blocks on CrossFire so you can play even from unsupported countries.

For that, we recommend using a premium VPN with good encryption and additional privacy features like double VPN/multi-hop or obfuscated servers.

What are the best VPN apps to play CrossFire?

  1. ?Private Internet Access – huge server network covering all regions where CrossFire is available
  2. NordVPN – advanced anti-detection features to play CrossFire in blocked countries or on restricted networks
  3. ExpressVPN – lightning-fast speeds to lower ping and get amazing FPS in CrossFire
  4. Surfshark – Budget-friendly option with tons of servers in countries where CrossFire is supported
  5. CyberGhost VPN – high-speed servers and easy-to-use apps to quickly configure for better CrossFire gameplay

Private Internet Access – best US server coverage

Private Internet Access (PIA) is an excellent VPN service brought to you by Kape Technologies. It passed all of our security, speed, and reliability tests with flying colors, which makes it suitable for a wide range of situations.

It boasts a wide server network, which plays a huge role in circumventing geo-blocks.

Additionally, thanks to its lightning-fast servers, you can enjoy CrossFire without annoying high latency (lag) issues.

Private Internet Access users can benefit from unlimited bandwidth, thus enjoying a fast connection at all times.

The VPN is able to bypass restrictions making sure your traffic data go undetected so there’s no risk of ISP throttling.

What you need to know about PIA:

  • Boasts over 3,200 secure VPN servers spread in 66 locations, in 46 countries
  • Fast servers to help you eliminate high ping issues
  • Lets you connect up to 10 devices from the same subscription/account

Private Internet Access is available under multiple subscription plans. All plans include a 30-day money-back guarantee.

Private Internet Access

Want to explore more servers on CrossFire? PIA can do that and improve ping at the same time.
Check price Visit website

NordVPN – most advanced privacy features

NordVPN is another great choice as it strives to offer access to fast responding servers while keeping a very secure connection.

This VPN uses its own type of WireGuard protocol that is built to provide high-speed rates. After lots of testing, the VPN is proven to be able to provide a download speed of over 4 000 Mbps and upload speeds that surpass 6 000 Mbps.

So, if you decide to give a try to this VPN, you are all set when it comes to speed rates. Not only does it provide servers with great speed potential, but it also helps fight against ISP restrictions.

NordVPN combines multiple features including powerful AES 256-bit encryption, double VPN (routing traffic through 2 private servers), and obfuscated servers to make sure your activity stays completely anonymous.

What this means is that your ISP will not get any information about the amount of data you use when you are connected to the VPN, thus not being able to throttle your traffic.

Other key features of NordVPN include:

  • Strict no logs policy
  • Connect up to 6 devices
  • Private DNS
  • Multi-factor authentication
  • Split tunneling

NordVPN is a subscription-based VPN service with multiple plans available. All new users can benefit from a 30-day money-back guarantee.

Nord VPN

Say goodbye to ping and lag in Crossfire and connect to fast and secure servers across the world.
Check price Visit website

ExpressVPN – fastest VPN protocol

ExpressVPN is another reliable VPN that you can use for unrestricted and lag-free sessions on Crossfire.

The VPN client offers users access to thousands of fast servers from 94 different countries. You will certainly find a good server for your unique location.

ExpressVPN masks your IP address and gives you a virtual one from a location of your choice.

This way you will be able to bypass blocks on Crossfire as it will appear as if you connect from a supported country.

The VPN users TrustedServer technology meaning they don’t write any data on the hard drives, on top of their strict zero logs policy.

With the split tunneling feature, you can select which apps on your device use VPN and which ones use regular traffic.

This can come in handy when you want to reduce ping and lag in games. You can prioritize all VPN traffic to Crossfire.

Other key features of ExpressVPN include:

  • Network Killswitch
  • DNS protection and private DNS
  • Military-grade encryption
  • Lightway protocol
  • Threat manager

ExpressVPN

Improve in-game speed and protect data with ExpressVPN!
Free trial Visit website

Surfshark – dedicated support for multiple devices

If you want fast servers all around the world at a low one-month subscription price, then Surfshark is definitely worth a shot.

This VPN service is a great choice for CrossFire, thanks to its 3 200+ servers located in 95 different countries.

Surfshark has a strict zero logs policy. They do not log or monitor user activity in any way, so your data is completely safe.

Plus, all VPN traffic is encrypted with AES-256 GCM algorithms, so there’s no way a tracker, ISP, or hacker will be able to trace you.

Surfshark VPN lets users change their IP address and thus bypass geo-blocks on restricted platforms.

It’s ideal for Crossfire and has proven to unblock even very strict platforms with anti-VPN monitoring like Netflix.

Other key features o Surfshark include:

  • Private DNS on every server
  • Support for multiple VPN protocols including IKEv2/IPsec and OpenVPN
  • Secure killswitch
  • NoBorders mode

Surfshark

Boost up game speeds for uninterrupted sessions in Crossfire!
Check price Visit website

CyberGhost VPN – easy-to-use VPN app

Another great Kape Technologies-signed product, CyberGhost VPN also offers you great ping reduction and block-bypassing capabilities. It provides you with airtight security and doesn’t log any sensitive information about you.

Thus, you can safely use it outside of CrossFire, as well.

Due to CrossFire being available only in specific countries, a service such as CyberGhost VPN can help you explore a wider selection of servers effortlessly.

More so, thanks to CyberGhost VPN’s fast servers, you can experience the game at blazing speeds. It’s one of the fastest VPN apps.

Cyberghost includes advanced security features such as DNS security, powerful encryption, and a secure killswitch to make sure your privacy is protected on all fronts.

What you need to know about CyberGhost VPN:

  • Has more than 6,400 secure servers in 89 countries
  • Lets you connect up to 7 devices to the same account
  • Fast servers to help you improve ping
  • Helps you circumvent geo-restrictions

CyberGhost VPN is subscription-based. Each subscription plan includes a 45-day money-back guarantee in case you are not satisfied with the product.

CyberGhost VPN

Curb your ping issues and eliminate geo-restrictions in CrossFire with CyberGhost VPN.
Check price Visit website

Can you play CrossFire in the US?

Yes, you can play CrossFire in the US. The game is available to play in the United States without any restrictions.

There are however locations where the game is no longer supported. Regions where the game is blocked include South Korea, Japan, Taiwan, and Iran.

More so, some users encounter bothersome ping issues while playing the game.

In this situation, VPN software can be quite useful. VPNs can improve ping and circumvent geo-restrictions like the one described above without significant effort.

What does the CrossFire data transmission not stable error mean?

The data transmission is not stable error could mean one of two things: either your connection is bad and you have high ping, or the CrossFire servers are down.

The first one you can fix if you use one of the VPNs recommended above. However, if the issue is with their servers, you’ll just have to wait it out.

Wrap up

To wrap it up, even if you can probably play CrossFire unhampered without a VPN, there’s still room for improvement. Using any of the VPN services we’ve suggested can upgrade your playing experience.

Because nowadays gaming platforms try to block VPNs, it may be difficult to find a good option. But if you use the tools we recommend you can fix Crossfire’s high ping even in 2023.

More so, our suggestions are great all-round services. Therefore, even if you’re done playing CrossFire, you can still count on them to keep your connection private and secure, away from prying eyes.

Puffin Browser for Windows PC: Download & Install Guide

CloudMosa’s mission is to enhance the performance of devices worldwide via cloud computing and make them universally useful and incredibly powerful.

CloudMosa’s Puffin browser is a lightweight, cloud-based browser that uses remote servers to help users download and render web pages extremely fast without overusing their local resources.

Puffin was only available on iOS and Android, but it turns out that slower PCs could also benefit from this cloud-based boost.

As a result, CloudMosa brought the browser to the Windows platform as well.

Can you download Puffin Browser for PC?

Puffin Browser is only available for desktop devices. You can easily download it for your Windows PC from the official website.

However, it is only compatible with Windows 7 (SPI) and Windows 10. Also, it has a Mac version for Macbook users. For other operating systems, you might have to consider another browser.

Is Puffin still available?

Puffin Browser is available for download from the official website and other third-party sites. But, for the safety of your PC, you should only download it from the official website.

How can I download and install Puffin Browser?

1. Download Puffin and enjoy faster browsing on slow PCs

  1. Visit the official website to download the Puffin browser installer.
  2. Click the Download Windows Installer option.
    installer puffin browser download windows
  3. Click the downloaded installer and follow the simple onscreen instruction to complete the installation.

The Puffin browser is similar to Opera Mini, using the servers to pre-process and compress web pages.

Thanks to remote rendering, it won’t leave any traces on your PC. All the traffic from the Puffin app to the Puffin server is securely encrypted, making it safe to use even on public Wi-Fi networks.

Puffin’s JavaScript engine and cloud computing services and technology use servers to achieve loading times up to five times faster.

This allows you to save up to 90% of your bandwidth compared to any other regular web browser.

Puffin browser managed to reach more than 80 million users, and it’s currently the top utility application in the App Store in 58 countries, including France, the United Kingdom, Japan, Italy, South Kore, and more.

The company hopes that it be as successful for PCs running Windows as well.

Even if there were some security concerns about Flash, you wouldn’t have to worry about them when you’re using Puffin, according to CloudMosa.

The Puffin browser is more of a desktop rather than a store application, and it’s currently available on Windows 10 and prior versions.

2. Puffin Browser is good, but Opera One is better

Are you looking for a different lightning-fast browser? If Puffin fails to meet most of your demands, check out Opera One instead.

There’s hardly a proper challenger for this lightweight browser regarding both loading and download speeds.

Opera One will score the best performance even when having an underwhelming PC specs sheet in front of you or dealing with varying Internet speeds.

The fact that it uses the minimum of your resources while working seamlessly makes a statement of its own.

Besides that, it ensures that you’re safe and anonymous while roaming the plains of the World Wide Web.

Opera One

If Puffin Browser isn’t what you need, try this one for yourself and see how remarkably solid it is.

Does Puffin still support Flash?

CloudMosa announced that Puffin Browser would support Flash beyond 2020. Also, it will provide a Puffin Flash Store to help the educators using the plugin a better experience.

However, it is important to note that Flash contents are no more safe as they are no more receiving security updates. So, you should be wary of them.

With this, we can say you have all the information needed to download and install the Puffin Browser on your PC. We can only wish you good luck from here.

Do you need an in-depth Puffin Browser review? Then, check our guide on the topic to know about its security and all other important details.

Feel free to let us know in the comments below if you encountered any problems while installing the browser.

Hibernation in Windows 11: Enable or Disable [Quick Guide]

The Hibernation mode can be very helpful because it allows you to suspend activity on your PC and save all your work to get back right where you left off when you turn it on again.

However, the Hibernation mode is not present in Windows 11’s Start menu for the Power option and you can’t find it in the Power user menu (Ctrl + X) either.

In this guide, we will explain how to enable and use the Hibernation mode but first, let’s see how the Hibernation mode can help you.

Why is Hibernate mode important?

In a lot of ways, the Hibernation mode is like the Sleep mode, because its purpose is to suspend your activity so you can get back to it where you left off.

But unlike the latter, in the Hibernation mode, all your apps and document instances that are opened will be saved on your hard drive instead of RAM.

The only disadvantage of this option is that it uses a lot of space on your hard drive (in the order of gigabytes) but everything will be stored in a hidden file called hiberfil.sys.

According to Microsoft, there are two Hibernation file types:

hibernation file types

There is also a major advantage when it comes to the Hibernation mode, and that is the possibility to turn off the computer completely, saving power in the process.

This can be extremely helpful if you’re dangerously low on your laptop battery and you want to make sure that everything will be fine until you find an outlet and power it back.

So, if you don’t mind the space problem and you still want to make sure that you’ve saved your work, here’s how you can enable Hibernation mode in Windows 11.

How can I enable the Hibernation mode in Windows 11?

1. Use Control Panel

  1. Click the Search icon in the Taskbar, type control panel and select the app from the results.
  2. Select System and Security.
  3. Under Power Options, click on Change what the power button do.
  4. Next, select the Change settings that are currently unavailable option.
  5. Now check the Hibernate box and click on Save changes.
  6. You will now see the Hibernate option when you click the Start button and then the Power button.

If you can’t see the Hibernate option, it might be because the Hibernation is not turned on. You can do that very easily by following the next step.

2. Use Command Prompt

  1. Click on the Search icon from the Taskbar, type cmd and click on Run as administrator to launch Command Prompt with full privileges.
  2. Select Yes when you are prompted to allow this app to make changes.
  3. Type the following command and press Enter to run it: powercfg.exe /hibernate on

3. Use the Registry Editor

  1. Press the Windows key + R to start Run.
  2. Type regedit and press Enter or click OK.
  3. Select Yes if you’re prompted for app permissions.
  4. Go to the following path in the editor: HKEY_LOCAL_MACHINE\SYSTEM\CurrentControlSet\Control\Power
  5. Double-click the HibernateEnableDefault.
  6. Type 1 in the value data box and click OK or press Enter.

How to disable Hibernation in Windows 11?

  1. 1. Click on the Search icon from the Taskbar.

  2. 2. Type cmd and select Run as administrator to run Command Prompt with administrative privileges.

    cmd admin windows 11
  3. 3. If you are prompted by the UAC dialog, click Continue on the pop-up window.

  4. 4. Type the following command in Command Prompt:powercfg.exe /hibernate off

    cmd disable hibernation windows 11
  5. 5. Press Enter to run the command.

  6. 6. Close the cmd window.

  7. 7. Hibernation mode is now turned off on your device.

  8. Hibernation Mode can be easily disabled via cmd. All you need to do is input the appropriate command, and the tool will do the work for you.

You can also use the reverse method from the first step of this guide if you don’t want to see the Hibernation option in the Start menu, by unchecking the Hibernation box.

How to enable the Hibernation mode in Windows 10?

  1. Press the Windows key + S to start Windows Search, type control panel and select the app from the list of results.
  2. Select Power options.
  3. Click on Choose what the power buttons do.
  4. Now select the Change settings that are currently unavailable (administrative privileges needed).
  5. Check the Hibernate box and click on Save changes.
  6. Now you will be able to see the Hibernate option when you click the Start button and select the Power option.

If you have problems with the steps or you need more info, we have a more comprehensive guide on how to add the Hibernate option to the Start menu in Windows 10.

What to do if you can’t see the Hibernation in the Windows Power options?

If you can’t see the Hibernation mode even after you performed the steps above, you might be in the situation where you are running Windows 11 on a virtual machine.

Virtual machines like VMware and VirtualBox don’t allow using the S4 state (Hibernation) on the emulated operating systems.

Also, make sure that you have enough space on your hard drive to use this feature. As we mentioned in the opening of our guide, Hibernation uses a few gigabytes of your drive space.

We hope that our guide helped you turn on or off the Hibernation mode in Windows 11 and you are now prepared for an eventual power outage.

power mode windows

You can also check the status of your battery if you click on the Battery icon from the status bar. Feel free to change the Power Plan to a balanced or saving mode by toggling the switch.

Hibernation vs Sleep Modes

The usual method of suspending the activity on your portable is the Sleep mode, which will use the RAM to store your settings but still uses a little amount of energy from your battery.

And when the power runs out completely, your RAM won’t be able to hold any of your memory because it’s volatile.

Hibernation is a step forward because data is stored on your hard drive, on a file called hiberfil.sys so you will be able to shut down your computer completely.

Of course, that means that even if the power from your portable runs out completely, you will still be able to turn it on and find everything on as it was before you turned it off.

We have a dedicated article comparing Hibernation Mode and Sleep Mode that you can check out for more details.

Should I shut my computer down every night?

Every time you shut down your PC, the system closes all processes and apps and you will start the next day with a clean slate. However, it will start slower when you do so.

That’s why it’s a lot better to use the Hibernation mode before going to sleep. Your laptop won’t consume battery power and electricity, but it will start a lot faster, and you will be able to resume your work.

It will still start up a bit slower than from Sleep but it’s still quicker than loading up from a complete shutdown.

However, during the day, it’s a lot faster and more useful to put your computer in Sleep mode because you will be able to resume your work faster.

The Hibernation function is obviously designed for laptops and it’s excellent when you know that you will be away from an outlet for an extended period of time.

For desktop PC, there is also the option of Hybrid Sleep which combines the benefits of the Sleep mode with Hibernation.

The contents of the RAM are copied on the disk, so the PC can wake up in an instant but all the files and apps you’re working on at the moment will be safe even if you’re going through a power outage.

Coming back to portables, if you have problems with the battery of your device, we have an excellent guide on how to check battery health in Windows 11.

If you’re a Windows 10 user, we have a new guide that will show you how to disable hibernation on Windows 10, so don’t miss it.

For any questions or suggestions, don’t hesitate to use the comments section below this post.

How to Move the Taskbar to Other Monitors on Windows 11

The new Taskbar in Windows 11 is, most certainly, a very nice feature of this Microsoft OS.

However, some users are complaining that the Taskbar is not working as it was supposed to on multiple monitors:

The Windows 11 multi monitor taskbar is not working properly. The taskbar is visible on the secondary monitors but seems to have little functionality or is broken. Tested this on multiple systems.

If using: When using multiple displays, show my taskbar apps on has no effect with any setting.

More than that, others signaled on Reddit that the Taskar is not showing up on their second monitor at all:

The Taskbar on my second monitor is empty. I tried to reduce DPi to 100%, relogging, restarting. Nothing helped.

Actually, Microsoft already announced that they are aware of this issue and they promise to solve it in an upcoming build.

So, at the moment, there isn’t an actual solution to this. However, we do have a workaround that might help you so read more below.

We also have a guide on how to move the taskbar from one monitor to another in Windows 10 that you can check out.

How do I show the taskbar on multiple monitors?

  1. Right-click on an empty space on your desktop and select Personalize.windows 11 personalize
  2. Now click on the Taskbar option from the left menu.
  3. On the right pane, scroll until you find the Multiple display option. Show taskbar on all displays should be turned ON if you have multiple displays but if it’s not, do that yourself.show taskbar on all displays setting
  4. Also, select Show buttons on all taskbars from the drop-down menu right below.show buttons on taskbar windows 11

Can I remove the taskbar on the monitors?

How do I remove the taskbar from two monitors? You don’t have the option of removing the taskbar on just certain monitors.

However, you can revert to showing it on all monitors by performing the same steps and unchecking the Show taskbar on all displays.

We’ve also encountered the question of how you can stretch your taskbar across 3 monitors. Our solution does just that but you can’t actually drag the taskbar to stretch it.

    How to move the taskbar to other monitor on Windows 11

    Moving the taskbar to a specific monitor of your choice is a very easy task and can be done via Display Settings. The idea is to change the main display and the taskbar will automatically show up on that display.

  1. 1. Right-click on an empty space on your desktop and choose Display settings from the menu that opens.

    display settings windows 11
  2. 2. On the right pane, click on the display you want to move the taskbar to.

    select display windows 11
  3. 3. Scroll down to the Multiple displays option.

  4. 4. Check the Make this my main display feature.

    change main display windows 11
  5. 5. The taskbar will automatically switch to the main monitor you assigned.

  6. 6. You can now view and use the taskbar from that monitor. If you want to switch it back, simply change the main display to be the previous monitor.

So, if the Windows 11 taskbar is not showing on a second monitor, there is a simple workaround. It’s not ideal, but until Microsoft is solving this problem, we’re stuck with it, unfortunately.

This solution can be efficient if you don’t need to move too often back and forth from one display to another. Additionally, you can use DisplayFusion which allows you to add a taskbar on each monitor.

Best tips on how to handle multiple displays in Windows 11

  • Just like in Windows 10, you can open the multiple display settings by pressing the Windows key + P
  • By pressing the More display settings button you will get to select more options for your displaysdisplay settings more windows
  • Clicking on the advanced display arrow will get you detailed information about all your displayswindows advanced display settings
  • In the next window, you can select which display to view information for and even change their refresh ratechoose a display windows 11

If the Windows 11 taskbar not working properly, we can also wait for a patch from Microsoft that will make things right.

Keep in mind that your system tray icons won’t move, however, we have a guide on how to show system tray icons on multiple monitors on Windows 11, so don’t miss it. In the meantime, do not hesitate to change the layout and taskbar to look like Windows 10 again.

Do you know about any other solutions to this problem? Write us a comment below. This might help other users like yourself solve the problem.
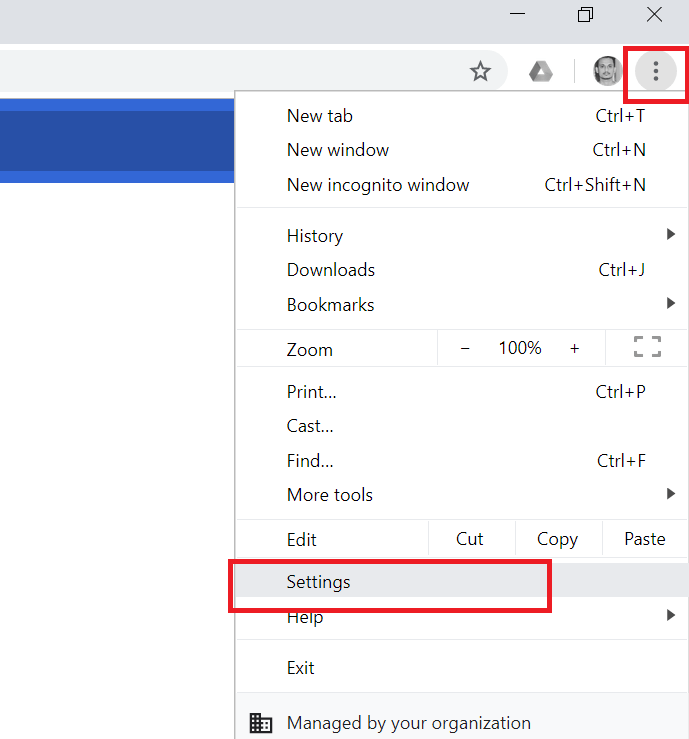
How to Play Pokemon Go on Windows PC [Complete Guide]

Pokémon Go was one of the most awaited games for mobile devices. When it finally came on August 2, 2016, Android and iOS users were in the seventh heaven.

This game made Windows PC users, who would have wanted to play and catch adorable Pokemon creatures, envious.

The thing is that this game requires a device’s GPS to detect its location and to place the player on the map, which they will follow to find Pokémon.

Since desktop computers are not moving, it is difficult for players to take them outside and wander the streets searching for monsters.

But, with the best emulators on Windows PC, users can play Pokemon Go, and we will show you how to do it in this guide.

Is it possible to play Pokemon Go on PC?

Officially, there is no way to play Pokemon Go on a Windows PC. The developers only made the app available on iOS and Android devices.

However, you can use an Android Emulator to play the game on your PC. We will show you how to do it later in this article.

Can you get banned for playing Pokemon Go on PC?

Pokemon Go has been doing everything to stop all forms of cheating. Playing the game is considered one of the most significant offenses.

The punishment is usually a permanent ban from playing the game. So, you must be careful if you are playing the Pokemon game on a Windows PC.

How can I play Pokemon on PC?

To play Pokemon Go on your Windows PC, you need to download and install an Android Emulator. It is recommended you use BlueStacks.

Before downloading BlueStacks App Player, you must know that Niantic, the developer of this game, is blocking cheaters (temporarily or permanently).

This means that there is a high chance that you’ll be caught while playing on your desktop. However, you’ll be fine if you don’t make in-app purchases. Now, follow the steps below to play Pokemon on your Windows PC:

  1. Download and install BlueStacks.
  2. Give the emulator access to the Google Play Store.
  3. Now, click the location icon from the left-hand menu.
  4. Look for a postcode and double-click a point on the map to mark it.
  5. Click the Play button in the bottom right corner.
  6. Click the Android tab at the top. You should see Pokemon Go among the trending apps. If not, search for it.
  7. Log in or create a new account when the app loads.

With this, you can finally play Pokemon Go on your Windows PC.

Tip icon Editor’s tip
Important update:
Niantic finally made the bold decision to make Pokemon Go playable on Emulators. So, the game is no longer on BlueStacks and other emulators from 2020.

How can I play Pokemon on my PC without an emulator?

Since Niantic made Pokemon unavailable on emulators, the only way to play the game on your Windows PC is to use a screen mirroring app. You only need to download any mirroring app and connect your phone and PC.

This will transfer everything you do on your Android to your PC. However, you will need a location spoofing tool to help change your location without going out.

Pokemon Go is an exciting game with many players worldwide. While the game is pretty enjoyable on mobile devices, many users like to play it on a big screen.

With this guide, you now have everything to play the Pokemon Go game on your Windows PC. If you want to know how to play the best Pokemon games online on your browser, check our guide for the steps to do it quickly.

Do keep in mind that errors with Pokemon games can occur, and we recently wrote about Pokemon Home error code 400, error code 10104, and Pokemon TCG Live error 10099, so don’t miss them.

For related fixes, see our full Pokémon TCG Not Working guide to troubleshoot crashes, login issues, and connection errors.

Feel free to let us know in the comments below if you encounter any problems while trying to play the game.

Lynx Browser: Everything There is to Know [Multiple Devices]

Web browsers have changed a lot through history, but if you want to see how web browsers worked in the early days, then the Lynx web browser might be perfect for you.

Lynx is a unique web browser, and in today’s article, we’re going to go through its features and see what this web browser has to offer.

What is Lynx in a computer environment?

Well, if you really want to know, we’re going to tell you that Lynx is actually a customizable text-based web browser for use on cursor-addressable character cell terminals.

And, as another interesting face, as of this year (2022), it is the oldest web browser still being maintained, having started in 1992.

What is the latest version of Lynx?

The most recent version of the Lynx browser is 2.8.9. If you are also interested in some of the features that came with this version, we’re about to show you the most notable ones:

New features (some are compile-time options):

  • added command-line option and options-menu item for COLLAPSE_BR_TAGS.
  • added support for client certificates.
  • added support for some HTML5 elements Using this change, you can jump to <section id=”speakers”>. (The addition in src{0,1}_HTMLDTD.txt is copied from DIV.) <section>, <article>, <main>, <aside>, <header>, <footer>, <nav>, <figure>
  • added PREFERRED_CONTENT_TYPE defaulting to text/plain and options-menu to replace an assumption in HTMIMEConvert that everything is text/html. Since most servers provide a valid Content-Type for HTML, and are more likely to omit it for files lacking a known suffix, defaulting to text/plain is a better choice
  • The gopher protocol now supports a + item type and the extension link to URL.

Quick Tip:

Although Lynx is a unique web browser, it lacks many features that modern browsers have. If you want a fast and reliable modern browser, we suggest trying out Opera One.

Opera One has a built-in ad blocker, a tracker blocker and VPN. Additional features include the ability to search and organize tabs into workspaces and tab islands, a built-in screenshot tool, a unit converter, a pop-out video player, and native AI.

Opera One

Opera One is a modern browser with a cool UI and thousands of customization options.
Free Download Visit website

How do I download Lynx browser?

What is Lynx browser?

Lynx web browser main page


Lynx browser is a text-based web browser that was released way back in 1992. The web browser is still in development, and the latest version was released just two years ago.

The first thing that users will notice about this web browser is the lack of graphics. The browser can’t display images or videos, but it can launch external programs in order to handle them.

There’s no support for JavaScript, which will prevent certain pages from running entirely. Since Lynx doesn’t support graphics and modern technologies, there are few privacy concerns involved.

Regarding availability, this browser works on Unix, macOS, VMS, Windows 95/98/NT, and DOS386+.

⇒ Download Lynx web browser

How do I download Lynx for Mac?

  1. Visit the Homebrew page and install Homebrew on your Mac device.
  2. Use the following command to install Lynx through Homebrew: brew install lynx
  3. After installation, run it as usual by running the following command at the Terminal: lynx osxdaily.com

Does Lynx support JavaScript?

Even if, as we said, Lynx is still a supported browser to this day, don’t make the mistake of thinking that many of the many modern technologies that work on modern browsers also work on Lynx.

That being said, know that, unlike most web browsers, Lynx does not support JavaScript, which many websites require to work correctly

How do I enable JavaScript in Lynx?

You can’t really do that because, as we just said, the Lynx browser does not support JavaScript at all, which means this endeavor is impossible.

If you really need JavaScript for your work, we recommend you switch to a modern browser that will suit your needs.

Many users have been asking about the Lynx browser JavaScript features, but there really aren’t any to be found.

Yes, you can absolutely find the Lynx browser for Windows 10 and download it from the link we provided above, and also use this information to learn how to install Lynx on Windows 10.

The Lynx web browser is still supported by many operating systems and still updated by manufacturers, but is far from being reliable software.

Also remember to look for the Cygwin package for Lynx, if you are planning to use the Lynx browser for your Windows OS.

Since we’re on the topic, yes, there is also a Lynx browser for Android, just in case you were wondering about that.

There are also Lynx browser download links for Linux, but even on this operating system, the Lynx browser won’t be compatible with JavaScript.

Lynx web browser offers a unique experience when it comes to web browsers, but if you want to visit modern websites, we suggest sticking with Opera One or any other modern web browser.

Resolve all Fallout 4 Errors on Windows 10 [Gamers Fix]

Fallout 4 was one of the most anticipated games at its release, and although it’s an amazing game, some Windows 10 users are reporting issues with it, so let’s see if there’s a way to fix these issues.

Users report that Fallout 4 keeps crashing a few seconds after they start a game, and this can be extremely frustrating since they cannot play the game they just bought.

But don’t worry, there are a few solutions that might be helpful.

Can Windows 10 run Fallout 4?

Of course it can and Fallout 4 is a great game, but many users reported various issues with it.

Speaking of issues, these are some of the most common Fallout 4 problems on Windows 10:

  • Fallout 4 won’t start, launch in Windows 10 – Fix the problem by using one of our solutions.
  • Fallout 4 has stopped working in Windows 10 – It is a common problem with Fallout 4. Try running Fallout 4 in Compatibility mode.
  • Fallout 4 black screen issue in Windows 10 – The problem might be your graphics card. Use a dedicated graphics card to run the game.
  • Fallout 4 crash in Windows 10 – Caused by problematic drivers so update your drivers.
  • Fallout 4 not responding in Windows 10 – Make sure that other third-party applications aren’t interfering with your game.
  • Fallout 4 x3daudio1_7.dll is missing in Windows 10 – You probably don’t have the necessary components installed. Install DirectX and the required C++ Redistributables.

What are the Fallout 4 minimum requirements?

Here are the system requirements for Fallout 4 on PC as they were laid out by Bethesda:

MinimumRecommended
Operating systemWindows 7/8/10 (64-bit OS required)Windows 7/8/10 (64-bit OS required)
ProcessorIntel Core i5-2300 2.8GHz / AMD Phenom II X4 945 3.0GHz or equivalentIntel Core i7 4790 3.6GHz / AMD FX-9590 4.7GHz or equivalent
Memory8 GB8 GB
Drive space30 GB30 GB
VideoNVIDIA GTX 550 Ti 2GB / AMD Radeon HD 7870 2GB or equivalent NVIDIA GTX 780 3GB / AMD Radeon R9 290X 4GB or equivalent

Of course, you will also require Internet access and at least a free Steam account to install the game.

How do I get Fallout 4 to work on my PC?

1. Update your display drivers

Before we start, you’ll need to uninstall the display driver because if you try just to update it, you might not get the best results.

It’s risky to try and uninstall the driver manually and it’s also a tedious process. However, you have better options when it comes to driver updating tools.

Thus if you need to install just the display driver or all at once, it’s no problem for specialized driver software.

2. Download the latest Fallout 4 update

  1. Open Steam and find Fallout 4.
  2. Right-click it and choose Properties.
  3. Find the latest update to download and install.
  4. Run the game and see if the issue is resolved.

In order to boost your game performance and get rid of crashes, slowdowns, lags, low FPS, and other annoying issues, we recommend downloading Game Fire (free).

3. Run the game in compatibility mode

  1. Open Steam and find Fallout 4. Right-click it and choose Properties.
    Fallout 4 Windows 10 crash
  2. Go to Local Files and click on Verify Integrity of Game Cache.
    Fallout 4 Windows 10 won't start
  3. Go back to Local Files tab and click on Browse Local Files.
  4. Find Fallout4.exe and right-click it. Choose Properties from the list.
    Fallout 4 has stopped working Windows 10
  5. Go to the Compatibility tab.
  6. Select Run this software in compatibility mode for and select Windows 7 from the list. Also, make sure that you check Run as Administrator checkbox as well. Click Apply and OK to save the changes.
    Fallout 4 Windows 10 black screen
  7. Now repeat Step 5 for Fallout4Launcher.exe (it should be located in the same folder as Fallout4.exe).

4. Change the Fallout4Prefs.ini

  1. Open File Explorer and go to Users<username>DocumentsMy GamesFallout 4.
  2. Open the file called Fallout4Prefs.ini with Notepad.
  3. Find the following variables and change them to these values:
    • bMaximizeWindow=0
    • bBorderless=1
    • bFull Screen=0
    • iSize H=1080
    • iSize W=1920
  4. Make sure that iSize H and iSize W match the current screen resolution that you’re using.
  5. Save the changes and start the game.

If you don’t like Notepad, check out this list including the best note-taking apps for Windows 10.

5. Uninstall Raptr software

If you can’t run Fallout 4 on your Windows 10 PC, the problem might be the Raptr software.

According to users, this software can interfere with Fallout 4 and prevent you from running it. However, you can fix the issue simply by removing the problematic application.

There are many ways to do that, but the best way is to use specialized uninstaller software to remove it.

Many applications tend to leave files and registry entries even after you remove them, and sometimes these files can cause problems in the future.

Therefore, it is better to assure a deep uninstallation of unused or problematic apps by using the best uninstaller programs on the market now.

6. Change your video settings

According to users, you might be able to fix this problem simply by changing the resolution of the game.

To solve this issue, your in-game resolution should match the display resolution in Windows 10. After changing your resolution, check if the problem still persists.

Several users reported that switching to Windowed mode fixed the problem for them, so you might want to try that as well.

Surprisingly, few users reported that disabling the windowed mode fixes the issue for them, so be sure to try both settings.

If Windows 10 won’t let you adjust your screen resolution, follow our comprehensive guide to solve the problem in no time.

7. Repair the C++ Redistributables installation

  1. Navigate to the Fallout 4 installation directory. By default, it should be Steam\steamapps\common\Fallout 4.
  2. Navigate to the vcredist2012 directory.
  3. You should find two vcredist.exe files. Run both files and choose Repair from the menu.
  4. Follow the instructions on the screen.

8. Check if your graphics card meets the hardware requirements

Fallout 4 is a demanding game, but before you can run it, you need to check if your PC meets the hardware requirements.

According to users, they were unable to run Fallout 4 because their graphics card didn’t support DirectX 11.

Fallout 4 requires DirectX 11 support, and if your graphics can’t work with this version, your only option is to upgrade your graphics card.

Before upgrading, be sure to check your graphics card configuration and be sure that it doesn’t support DirectX 11.

9. Change Switchable Graphics Application Settings

According to users, if you can run Fallout 4 on your Windows 10 PC, be sure to change the settings.

To do that, open the Catalyst Control Center or the Nvidia Control Panel, and locate Fallout 4 on the list. Now change the Graphics settings to High Performance.

After doing that, save changes and try to start the game again.

If you have problems with the graphics card software, we have a guide on what to do if you can’t open the NVIDIA Control Panel on Windows 10.

There’s a similar guide for AMD Catalyst Control Center, so be sure to check it out if you have the same issue.

10. Make sure that you’re using a 64-bit system

According to users, Fallout 4 doesn’t work on 32-bit systems, so if you’re using a 32-bit operating system, you won’t be able to run Fallout 4.

In order to install a 64-bit operating system on your PC, you need to have a 64-bit processor. It’s also worth mentioning that you can’t convert 32-bit into a 64-bit system.

If you’re using a 32-bit operating system, you’ll need to perform a clean install of a 64-bit system instead.

For those who own an SSD, we have a complete guide on how to install a fresh copy of Windows 10 on SSD.

Almost all newer computers support 64-bit operating systems, so you won’t have any issues installing and running a 64-bit operating system on your PC.

11. Check your antivirus

Sometimes, antivirus tools can interfere with your applications and cause various problems. If you’re unable to run Fallout 4 on your PC, you might want to check if your antivirus is the problem.

To fix this issue, it’s advised to disable your antivirus completely and try to run the game again. If the issue persists, you might want to uninstall your antivirus and switch to a different antivirus solution.

We strongly recommend switching to a more effective antivirus that doesn’t affect your games negatively.

Consequently, have strong security on your PC and grant robust gaming enhancing features by choosing from the best antivirus software for gaming.

How much is Fallout 4: Game of the Year?

The regular price for Fallout 4 G.O.T.Y. is $39.99 but right now, there is a 67% discount so if you hurry up, you can get it for only $13.19.

That’s about it. We hope these solutions helped you to solve the problem and that you’ll be able to normally play your new Fallout game. If you’re dealing with Fallout 4 Mods issues, we have a dedicated guide for that too.

If you’re looking to upgrade your gaming session, try to boost it with Game Fire.

Also, if you have any suggestions or questions, just reach out in the comments section below.
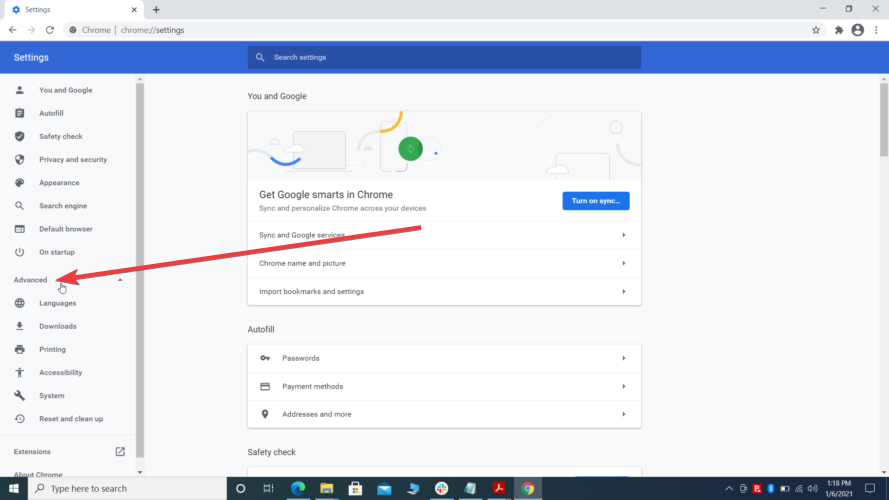
How to Open Firefox’s Downloaded PDFs with Edge PDF Reader

Firefox, being one of the best browsers for all devices, has many endearing features. One of them is a built-in PDF Reader that allows you to open PDF files on the browser easily.

However, Microsoft Edge PDF Reader is the default app for opening PDFs in Windows 10. So, sometimes when you open a PDF file on Firefox with the system viewer, you might be using the Edge PDF Reader.

This guide will show you everything you need to know about the feature and how to use it.

Does Firefox have a PDF Reader?

Firefox has a modern PDF viewer that allows you to view and read PDF files within the browser. It is the default PDF Reader on the browser and will help you open your files when you click on them.

However, Firefox allows you to download and change your PDF viewer and use the Windows default option.

Quick Tip:

If you work with lots of PDFs and need easy access to view and read them, we recommend Adobe Acrobat Reader for this job.

Adobe Acrobat Reader is a free app that gets you the best viewing experience for all types of PDFs. Also, it comes with fill and sign options for important documents.

Adobe Acrobat Reader

Simple and fast PDF viewer lets you access files from any device.

How can I open Firefox’s downloaded PDFs using Edge PDF Reader?

Use Open in System Viewer or Always Open in System Viewer 

Gone are the days when you required Acrobat Reader to open PDFs. With common browsers like Chrome, Edge, and Firefox offering built-in PDF readers, you no longer have to deal with the troubles of installing or troubleshooting Acrobat Reader.

But each browser’s PDF reader has unique features, shortcomings, and strengths. Well, Firefox lets you use Open in System Viewer or Always Open in System Viewer to read downloaded PDFs.

To do so, press Ctrl + J in Firefox to access the PDFs you downloaded using the browser. When you right-click on a PDF, the context menu that comes up includes the new options for viewing PDFs:

  • Open in System Viewer: This option lets you open the document in the default PDF reader just once.
  • Always Open in System Viewer: This option lets you view PDFs in the default app. Therefore, clicking on a downloaded PDF opens it right away, always.

Of course, you can set the default PDF viewer to another app instead of Microsoft Edge PDF Reader in Windows. In that case, the other app you select will launch your PDF documents if you choose any of the Open in System options in Firefox.

The Edge PDF Reader itself received new enhancements recently, including the ability to highlight words or sentences when reading a PDF.

Why won’t Firefox open a PDF?

not open edge pdf reader

If Firefox doesn’t open a PDF file in the browser window, it might be because of your settings. If the browser is set to download PDF, Firefox will need to download the file before you can open it from the downloads folder.

To revert this, you need to change the settings to open PDF. With this, when you click a PDF file, your browser will immediately open it in a new tab.

Have you figured out how to use the Edge PDF-reading tool yet? Try this guide we prepared for you!

Meanwhile, you may leave us a message in the comments below to share your thoughts on the new options for viewing downloaded PDFs in Firefox.

How to Unblur Images in Adobe Photoshop [Quick Guide]

No matter how good a photographer you are, some pictures can be blurry.

You can retake the picture, but if you found out too late or only had one chance, you can unblur the picture in Adobe Photoshop.

If you don’t have the application, you can also use Photoshop in your browser.

For designers and photographers, Photoshop is a go-to application for adjusting images.

Thankfully, the software also lets you remove blurriness in pictures. In this guide, we’ll explore the two most effective methods with which you can unblur pictures in Adobe Photoshop.

How can I unblur pictures on Adobe Photoshop Express/ Elements?

1. Unblur images using the shake reduction filter

    The best method to unblur pictures is to use the shake reduction filter in Photoshop. With the shake reduction filter, Photoshop automatically finds one area of the picture with high edge contrast and encloses this portion in dotted lines called a blur trace.

  1. 1. Open the picture that you want to unblur.

  2. 2. Click on the Filter tab.

  3. 3. Go to Sharpen, and choose Shake Reduction from the list of options.

    unblur-picture-adobe-shake-reduction
  4. 4. Drag the corners of the blur trace to adjust it or click the circle to drag it around.

  5. 5. Go to the Advanced panel.

  6. 6. Click on the Add Suggested Blur Trace.

    unblur-picture-adobe-advanced-shake-reduction
  7. 7. Select the Detail loupe to focus on more blurry areas.

  8. 8. Use the Enhance At Loupe Location icon to change the focus automatically.

  9. 9. Apply the blur traces.

  10. 10. Save the image to your PC.

You can find and review the unblurred picture in the Shake Reduction dialog.

Photoshop creates only one blur trace, but creating multiple blur traces will give you a sharper image. You can also save blur traces to use on a different picture using the Load option in the Advanced panel.


2. Unblur images with an extra layer

  1. Open the picture that you want to unblur in Photoshop.
  2. Press the CTRL + J combination to duplicate the background layer.
  3. Go to the Layers panel and select Layer 1.unblur-picture-adobe-layer-one
  4. Go to Filter and choose Other.
  5. Select High Pass.unblur-picture-adobe-high-pass-filter
  6. Change the blending mode to Hard Light.
  7. Set the Opacity to a value that looks good on the image (ideally 100% or 50%).

The Shake Reduction Filter is my preferred method of unblurring pictures in Adobe Photoshop. Also, for some images, leaving the default values and blur traces gave better results. Manually creating and adjusting the blur traces worked better for other pictures.

An extra layer also works wonders when you unblur pictures in Adobe Photoshop. Hopefully, this guide was easy to follow.
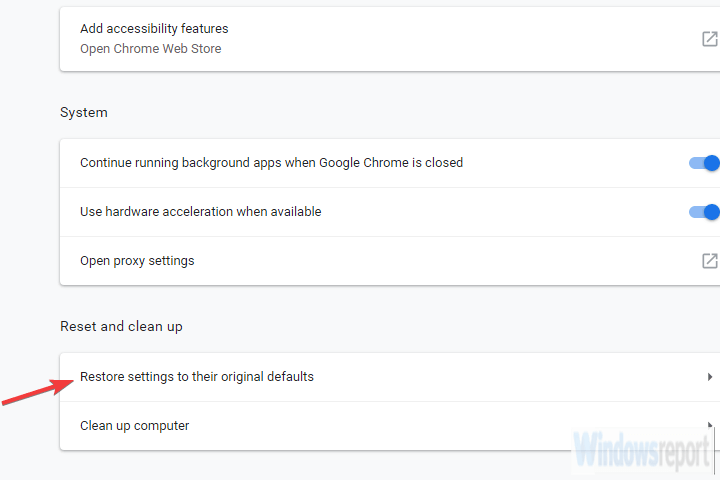
If you’re curious and want to learn more today, check out this guide on how to invert colors on PDFs using Photoshop.

Bookmark our How-to section to quickly access tons of similar guides.

Don’t hesitate to explore our in-depth Adobe Photoshop review to find out more details. We also have a great guide on how to unblur an image on a website, so don’t miss it.

If you want to learn more about blurring images, we have a great guide on how to blur the background in Photoshop, so don’t miss it.

Use the comment section below to share your experience with us.

How to Route All Traffic Through VPN on Windows 10 & 11

Using a VPN is an excellent way of protecting your online privacy if it’s done right. It’s effective because the VPN service redirects all your network traffic through a private server, away from prying eyes.

Many casual users turn to VPNs to hide their IP address, spoof their location, or unblock streaming services.

But there are also businesses that use corporate VPNs like Cisco AnyConnect or SonicWall Global VPN Client to secure their networks.

However, in some cases, certain bits of traffic might escape the private tunnel and expose you. We call these incidents leaks.

In this article, we’re going to show you how to prevent these leaks from ever occurring on your PC.

Does VPN redirect all traffic?

Yes, a VPN redirects all your network traffic to its secure tunnel, unless you use split tunneling or a browser with a built-in VPN or VPN extension.

By routing all your Internet traffic through VPN servers, you protect all applications with web access on your computer or mobile device.

At the same time, you can route all traffic through OpenVPN on Windows 10 and connect to your access servers for enhanced privacy.

Similar to the split tunneling tool, it’s possible to route certain traffic through a VPN on Windows 10.

This is useful to redirect Internet traffic for particular cases like reducing high ping in games and keeping other PC services on the local connection.

How to route all traffic through VPN on Windows 10?

1. Using a VPN client’s kill switch

  1. Launch your VPN client (we used PIA in this example since it’s the best in the business)
    pia login
  2. Open its configuration section
  3. Look for the kill switch option
  4. Make sure it’s set to Auto or Always
    use PIA kill switch

It goes without saying that using a reliable VPN such as Private Internet Access can save you a lot of hassle.

You just go to its configuration section as we’ve described in Method #1 and make sure to activate the kill switch feature.

This tool makes sure that all your network traffic goes straight through the private VPN tunnel.

If the VPN connection fails, PIA automatically blocks all traffic, eliminating the risk of accidental leaks. It’s the best VPN with a built-in kill switch.

Private Internet Access

Worried about IP, DNS, or WebRTC leaks? PIA offers a built-in kill switch to quickly fix it.
Check price Visit website

2. Modifying a VPN connection manually on Windows 10

  1. Go to your Network Connections window
  2. Locate the VPN connection you normally use
  3. Right-click it and select Properties in the menuProperties of VPN Connection
  4. Select the Networking tab in the VPN’s properties window
  5. Choose the Internet Protocol Version 4 (TCP/IPv4)
  6. Click the Properties buttonProperties button IPv4
  7. In the newly-opened window, click the Advanced buttonAdvanced IPv4 settings
  8. Make sure that the Use default gateway on remote network option is checkedDefault gateway remote network setting
  9. Click OK
  10. Restart your PC

3. Using OpenVPN

  1. Locate the OpenVPN configuration file associated with your server (OVPN)
    OpenVPN Connect file tab
  2. Open it in a text editor
  3. Add the following line somewhere in the OVPN file: redirect-gateway def1
  4. Save the file and close it
  5. Restart your OpenVPN server

Make sure that your network traffic is routed entirely through VPN

All things considered, there are several ways to ensure that all of your network traffic stays inside your private VPN tunnel. Depending on your setup, you can tackle the issue in various ways.

However, your safest bet would be to pick a reliable VPN service and let it do all the work.

Kill switches are some of the best tools you can use to ensure that all your network traffic is encrypted before getting out in the open.

As a general rule, you should avoid trusting free VPNs like Turbo VPN with your sensitive data.

While they’re a great starting point to get used to VPN technology and see how it changes your Internet experience, a premium VPN is worth it in the long haul.

How to Use your PC as a Wi-Fi Router in a Few Simple Steps

Making the best of your connection was always imperative. If you’re, say, stuck with an outdated modem that lacks Wi-Fi support, you’ll be able to use nothing but the wired connection.

However, no one said that you can’t turn your PC into a wireless router that spreads the joy of the internet to all surrounding Wi-Fi-capable devices (read: every modern device out there).

Because of that, we offer a few ways to take the full potential of your PC and use it as a virtual router. The router that we all need and deserve.

If you’re not accustomed to creating and configuring virtual wireless routers, the steps we provided below should show you how to do it in no time.

How to turn your PC into a Wi-Fi router

  1. Use Windows Resources
  2. Use Virtual Router Manager
  3. Use Connectify Hotspot

1. Use Windows resources

    After the Windows 10 Anniversary Update, Windows 10 users are able to create a Wi-Fi hotspot with nothing else but system resources. This feature comes in handy in many scenarios and eliminates the need to install various third-party programs in order to share the Wi-Fi or wired connection to other devices.

  1. 1. Right-click on the Start button and open the Settings app from the options.

  2. 2. Select Network & internet from the menu that opened.

    use pc as wifi router network and sharing center
  3. 3. From the left pane, select Mobile Hotspot.

    use pc as wifi router mobile hotspot
  4. 4. Toggle ON the Share my internet connection with other devices setting.

    use pc as wifi router setup
  5. 5. Click on Edit.

  6. 6. Give your newly-created Hotspot a name and set a password, then click on Save.

    use pc as wifi router set password
  7. 7. Now that your Wi-Fi is set-up, all you need to do is try to connect to it using another device.

Basically, everything you need is a Wi-Fi adapter and a few tweaks and you’re good to go.

The procedure is as simple as they come, but we made sure to walk you through in the steps above.

For changing your Wi-Fi name, password, or DHCP settings on the main router, follow this guide on how to login to your router.

2. Try Virtual Router Manager

If for some reason you’re unable to utilize the built-in mobile hotspot, there are also third-party programs (or rather tools) that should correct that injustice.

There’s a multitude of tools, some better some worse, so we curated them and brought to you the most reliable ones.

The first tool is widely regarded as the best virtual router manager and it’s called, expectedly, Virtual Router Manager.

The tool is completely free and it’s easy to set up.

use pc as wifi router virtual router manager

Besides that, it comes with quite a simple and intuitive interface, and it’s light on resources. Here’s how to use it on Windows 10 (or any other Windows version, for that matter):

  1. Download Virtual Router Manager, here.
  2. Right-click on the installer and run it as administrator.
  3. After the installation completes, restart your PC.
  4. Now, open Virtual Router Manager, name your connection, set the password, and select the shared connection source.
  5. Click on Start Virtual Router and that should do it.
  6. In case you’re unable to start the connection, navigate to Network and Sharing center > Change adapter settings.
  7. Right-click on the connection you want to share and open Properties.
  8. Under the Sharing tab, check the ”Allow other network users to connect through this computer’s internet connection” box and save changes.
  9. Try again and it should work like a charm.

3. Use Connectify Hotspot

The second tool is also quite popular in the virtual routers niche, it’s a freemium tool, and it’s called Connectify Hotspot.

In comparison to Virtual Router Manager, Connectify is a ted more feature-rich and it holds the overall simplicity and intuitive design. However, it can get on your nerves with frequent ads and pop-ups reminding you to buy the premium version.

use pc as wifi router connectify hotspot

The setup is quite similar, but, just in case you’ve run into trouble, make sure to check the steps below:

  1. Download Connectify Hotspot
  2. Right-click on the installer and run it as an administrator
  3. After the installation ends, restart your PC
  4. Follow the detailed instructions to configure Connectify Hotspot
  5. These include naming the hotspot, setting a password, and choosing the default sharing device.
  6. Click on the ”Start Hotspot” and you should be good to go

The steps listed above should be enough to allow you to use your Windows 10 computer as a router. Now, if your hardware configuration does not allow you to follow the steps mentioned earlier, you can simply install one of these hotspot software solutions on your machine.

Download your software of choice, install and simply follow the on-screen instructions to get the job done.

That should conclude it. Now you should be able to use your PC as a virtual router and spread the Wi-Fi joy to a whole household. Finally, don’t forget to share your questions and suggestions below. We’ll be happy to hear from you.
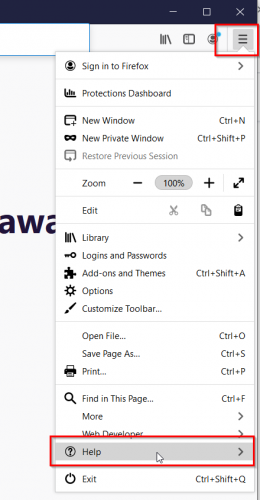
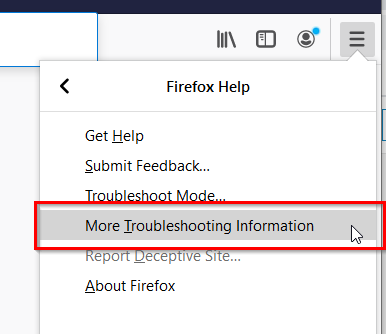
3 Ways to Remove PhysX CPU from the Screen in All of Your Games

PhysX is essentially a physics engine that runs on your CPU or GPU and can display annoying notifications on your display, so you may want to remove PhysX CPU on screen.

The primary goal of the PhysX API is to provide game developers with a crude, GPU-accelerated method of modeling realistic, versatile objects in 3D environments.

Though technically everyone has access to the API, only Nvidia hardware is designed for use with PhysX; for this reason, you can find a corresponding option in the Nvidia Control Panel.

Is PhysX better on CPU or GPU?

You will typically get better game performance with PhysX set to use the GPU, but occasionally a game won’t run as smoothly.

You can set PhysX to either GPU or CPU via Nvidia Control Panel under the PhysX tab. The CPU manages it just fine unless the games heavily utilize PhysX. But some games may cause issues such as PhysX CPU on-screen Valorant gameplay distraction.

How do I remove PhysX CPU from the screen?

1. Via Control Panel

  1. Right-click the Desktop and select the NVIDIA Control Panel.Nvidia control panel option
  2. Click on 3D Settings and uncheck the Show PhysX Visual Indicator.Show PhysX Visual Indicator option in nvidia control panel

This is the main fix suggested by the official Nvidia website, so it should work in many cases.

2. Remove the application

  1. Go to Control Panel.
  2. Select Program, then Programs and Features. Here, you will find a list of all installed programs.control panel programs and features option
  3. Find PhysX under Nvidia and right-click to Uninstall.uninstalling the physX system

Removing the software can be considered a temporary fix.

3. Reinstall the Nvidia Physics system

  1. You must visit the Nvidia website, click Drivers, and then choose All Nvidia Drivers.All Nvidia Drivers
  2. Once that page has opened, click on NVIDIA PhysX System Software in the Beta, Older drivers, and more section. Download the Nvidia PhysX System Software. Save it instead of installing it right away.Nvidia Physics
  3. Go to Control Panel / Programs and Features and uninstall Nvidia PhysX System Software,
  4. Restart the system.
  5. Install the downloaded version next, and after completing the installation, restart again.

This solution has reportedly worked for ARMA 3 PhysX CPU on-screen notification problem.

How do I disable PhysX?

Even though some games require PhysX to run properly, you can still uninstall the software that uses it.

But you can’t disable it completely since If you want to solve Witcher 3 PhysX CPU on-screen text problem and remove the software, your machine will install it automatically since the game needs it to run.

Users have reported numerous issues regarding the PhysX engine, such as cyberpunk 2077 PhysX CPU on-screen notification.

While the text may sometimes appear briefly, it frequently remains and takes the player’s attention away from the entertainment.

Nvidia occasionally improves the gaming experience, but it also sometimes creates problems that are difficult to resolve.

In the comment section below, let us know if you were able to fix the issue.

How to Remove Password from Windows 11

Keeping your PC protected is important, and to do that you probably use an account password. By doing so, only authorized people can access your Windows profile.

This isn’t always the best protection method, but it gets the job done in most cases, especially if you’re a home user.

But what if you don’t want to have an account password anymore? You’ll be pleased to hear that it isn’t mandatory and you can easily remove it.

There are several methods to remove passwords on Windows 11, and in this guide, we’re going to show you the simplest and fastest ways to achieve your goal.

Does a Windows password encrypt my files?

Windows password and file encryption are completely separate. The password on your Windows profile protects your user account and your files from unauthorized access.

This means that the files on your drives are unencrypted, and users can still access them if they know the proper way to do it.

To make sure that your files and completely protected, it’s best to encrypt them with dedicated file encryption software.

How can I reset my account password?

  1. On the login screen, click the Reset password option.
  2. You’ll be asked to insert a password recovery USB.
  3. Now enter your security questions and a new password.

Keep in mind that you need to have a recovery USB drive created before starting the password reset process to complete it. If you don’t have it, using dedicated password recovery software might help.

If you’re using a Microsoft account, you can reset it from Microsoft’s website on any other device.

How to remove the login password in Windows 11?

1. Via Account Settings

    The easiest way to remove your password on your Windows 11 device is to adjust your Account Settings. This menu is built-in on your device and safe to use.

  1. 1. Open the Start Menu by clicking the Start icon in the Taskbar.

    start button taskbar
  2. 2. Navigate to the Settings menu.

    settings start menu windows 11
  3. 3. Select Accounts from the left pane, then click on Sign-in options from the menu that opened on the right.

    sign in options windows 11
  4. 4. Expand the password section and select Change.

    change password windows 11
  5. 5. Enter your current password.

    input current password windows 11
  6. 6. You’ll be asked to set up a new password. Leave the fields blank and click Next.

    set new password windows 11
  7. 7. Now click on Finish to complete the process.

    finish removing password windows 11

Keep in mind that this method doesn’t work if you’re signing in with a Microsoft account.

2. Use the Windows Terminal

  1. Press Windows Key + X and select Windows Terminal (Admin) from the menu.
  2. Now run the following command: net user WindowsReport *
  3. You’ll be asked to set a new password and confirm it. Don’t input anything and just press the Enter key twice.
  4. After doing that, the password for the account WindowsReport will be removed.

3. Modify your registry

Note icon NOTE
Modifying the registry can lead to system stability issues, so be sure to back up your registry before making any changes.
  1. Press Windows Key + R and enter regedit. Click OK.
  2. When Registry Editor opens, navigate to the following path in the left pane:
    Computer\HKEY_LOCAL_MACHINE\SOFTWARE\Microsoft\Windows NT\CurrentVersion\Winlogon
  3. Right-click the right pane and expand the New section. Select String Value. Enter DefaultUserName as the name of the new string.
  4. Now double-click the DefaultUserName string.
  5. Enter your Microsoft account email address as the Value data and click OK.
  6. Create a new string and name it DefaultPassword. Double-click the DefaultPassword to open its properties.
  7. Enter your Microsoft account password in the Value data field and click OK to save changes.
  8. Lastly, double-click the AutoAdminLogon.
  9. Set the value data to 1 and click OK to save changes.

Now you should be able to sign in to Windows 11 without having to type your account password. By doing so, you’ll disable the Windows login password even if you’re using a Microsoft account.

What’s the difference between a password and a PIN?

A PIN has many advantages over a password, especially if you’re using your Microsoft account to sign in. A strong password needs to be long and have various characters including numbers and symbols.

Sometimes it’s not convenient to enter a long password every time you want to log in to your PC, and this is why a PIN might be more practical.

PIN needs to be at least 4 characters, so it’s easier to remember, plus your PIN is associated only with your PC, so if it gets stolen it can’t be used to access your Microsoft account online. If you happen to experience any issues, you can always use our guide on what to do if the PIN is not working.

Lastly, your PIN works with a TPM chip, so even if your device is stolen, without an actual PIN nobody will be able to access it.

The TPM chip ensures that your device isn’t tampered with, and if anyone tries to remove the PIN using software or hardware methods, the TPM chip should block that.

Note icon NOTE
If you ever need to remove the PIN, you should know that it can be removed similarly to a Windows password.

How to remove a PIN on Windows 11?

  1. Press Windows Key + I to open the Settings app.
  2. Go to Accounts in the left pane. In the right pane select Sign-in options.
  3. Expand the PIN (Windows Hello) section and click on Remove twice.
  4. Enter your account password.

After doing that your PIN will be removed, as you’ve intended from the very start.

As you can see, it’s pretty simple to remove a password on Windows 11 if you’re using a local account, but if you’re using a Microsoft account, you might experience issues, so we don’t advise doing that.

With Windows 11, Microsoft has made it harder to log in without a password if you’re using a Microsoft account, so you might want to consider using a PIN instead.

If you want to remove a user in Windows 11, check out our article to find out what to do.

We have a dedicated article on how to change your password in Windows 11 that you can check out for more details. If you can’t log in, you can always try using the default Windows 11 password.

Even more, if you don’t want clutter on your system, learn how to easily remove users in Windows 11. You can also choose to disable Local Account Security Questions on Windows.

Did we miss any other method that can be used to forget all about the Windows password? Let us know in the comments below.

The Chess Lv.100: Download and Play Chess on Windows 10/11

Chess Lv.100 is one of the best Windows 10 apps for playing chess and now it has been updated with some bug fixes and some new features.

This Windows 10/11 chess game works really well on any decent computer or notebook.

What is Chess LV 100?

We’re not going to state the obvious here, but it’s certainly the most downloaded chess game app on Microsoft Store.

To this, we’re going to add that it’s free and you can even play online with other players.

Does Chess Titans work on Windows 10?

Chess Titans is an old chess game that came with Windows 7 but you can still download and play it on your Windows 10 PC.

You will get an archive with the preinstalled game so all you need to do is to unarchive it and double-click the executable file.

Quick Tip:

Completing the latest levels might be hard even for experienced players. If you want insights from your matches, we recommend DecodeChess.

DecodeChess is an AI software that analyzes your games and shows where you made mistakes, what were the best moves and how to improve your overall chess skills.

DecodeChess

Your AI buddy when it comes to analyzing chess games.
Free Download Visit Website

Here’s what you need to know about The Chess Lv.100 on Windows 10/11

Chess Lv.100 is one of the most popular chess games available in the Microsoft Store. It has got a review score of 4.5 stars from an impressive number of 19K reviewers.

As a player, you can select the appropriate difficulty level depending on your chess skills. There are over 100 levels available based on the engine Crazy Bishop.

As you already guessed, Level 1 is suitable for absolute beginners, while Level 100 is almost impossible to beat even for experts.

Choose your computer strength on a scale from 249 to 2600 in ELO rating and hit the play button. Beat the computer and you can win many shiny medals.

In its latest iterations, you can also play with a live opponent online and the system will try to match the ratings to find a suitable game.

You will hear superb music in the background, and you can change the pieces and board appearance.

The only downside is that at the bottom of the screen you will see some ads, but they are not intrusive at all.

Other Chess Lv.100 important features:

  • Human vs Computer and Human vs Human support
  • The computer evaluates your skills in ELO rating, allowing you to better track your progress
  • Enter and analyze any position in Edit mode
  • Use hints to improve your game
  • Save/Load game records
  • PGN file support for both reading and writing
  • You can view your full game history in the game record and restart the game from the selected move to improve your game

Follow the link below for The Chess Lv 100 latest version for PC, download it, and enjoy the game.

⇒ Get The Chess Lv.100

Which is the best offline chess game for PC?

There are plenty of chess software options out there and if you want to better your game, you first need to challenge yourself with offline games.

For instance, you can also enjoy a great chess experience by choosing one of the free chess software solutions for Windows 10 which will definitely make sure you keep your mind healthy. Note that most of them work on Windows 11 as well.

We hope that now you have all the information you need about The Chess Lv.100 and you can enjoy playing it.

If you’ve tried it already, share your experience in the comments section below.

Windows 11 Battery Drain: 6 Ways to Permanently Fix it

Windows 11 comes up with plenty of new features and cool improvements. However, it seems like these require higher performance, and users encounter battery drain issues.

From what they say, after upgrading the OS to the newest version, their device went from casual use to barely half of the normal terms.

For example, if laptops were able to work around 3-4 hours before, this issue slows them to a maximum of 1.5-2 hours. Since you’ll need to always check your battery and charge your device, this issue can be pretty annoying.

If you want to improve your battery life on Windows 11, check out our article.

Why do Windows 11 battery drain issues appear?

The first one implies loading too many background apps that consume battery power even if they are not being used.

Incompatibilities between your device and the newest OS specifications might be another explanation for this issue. Since Windows 11 requirements are official, we suggest checking if your laptop meets them.

Considering Windows 11 doesn’t support old devices, aged devices can be another reason for battery draining. Also, consider that some settings preferences can reduce its capacity.

How to fix the Windows 11 draining battery issue?

1. Reduce the screen brightness

  1. Click the Windows key, then open Settings.
  2. Go to System, then click on Display.
  3. Adjust the slide bar. To reduce the brightness, just move it to the left.

2. Enable the battery saver

  1. Open Windows Settings.
  2. Go to System, then click on Power.
  3. Look at the Battery saver section, then click on the Turn on now button.

3. Adjust Battery Video Playback

    A great method to fix the battery drain issue on your Windows 11 device is to adjust your system settings to optimize the display when viewing HDR videos. When viewing HDR content on your device, your display’s brightness automatically turns up in order to show you bright and vibrant images. You can manually configure display settings to optimize for battery life instead.

  1. 1. Press the Windows key on your keyboard and type Settings in the search box.

  2. 2. Click on the result to open the Settings app.

  3. 3. Go to Apps, then click on Video playback.

    apps video playback windows 11
  4. 4. Navigate to the Battery options section and click on the Optimize battery for life button.

    battery drain windows 11 fix
  5. 5. Ensure that both Don’t automatically process the video when on battery and Play the video at a lower resolution when on battery are checked.

    windows 11 battery drain options
  6. 6. Go back to System > Display.

    system display options w11
  7. 7. Navigate to HDR.

    hdr settings windows 11 configure
  8. 8. Tap the drop-down menu beside Battery Options and select Optimize for battery life.

    optimize battery drain hdr settings
  9. 9. Click on Apply and tap OK after you finish.

4. Optimize the Power Plan

  1. Click the Windows key, type power plan, then click on Choose a power plan.
  2. Checkmark the Balanced option, then select Change plan settings.
  3. Select Changed advanced power settings.
  4. Expand Multimedia settings.
  5. Click on Video playback quality bias, then set it to power-saving bias for On battery.
  6. Similarly, tap When playing video and set it to Optimize power savings for On battery.
  7. Click on Apply, then on OK.

5. Use the Dynamic Refresh Rate Mode

  1. Open Settings.
  2. Go to System, then click on Display.
  3. Click on Advanced Display.
  4. Besides Choose a refresh rate, select the option with Dynamic in the name.

6. Prevent apps from running in the background

  1. Open Settings.
  2. Go to Apps, then click on Apps & features.
  3. Look for the apps that you’re not currently using.
  4. Click on the three vertical dots, then choose Advanced options.
  5. Search for the Background apps permissions, then drop-down the menu and select Power optimized (recommended).
  6. Repeat the same process with all the unnecessary apps.

Since battery usage depends on how many apps are loading and running in the background, you should prevent this by closing unimportant ones. Additionally, you can try Battery Optimizer that will automatically perform a scan of your PC and make changes in order to extend battery life.

Certain apps drain your battery faster than others. Thus, you should take a look at this guide on how to check battery usage & health in Windows 11.

Moreover, to make sure you won’t get viruses and to save your battery as much as possible read how to block potentially unwanted apps on your Windows device.

What apps drain your Windows 11 battery the most?

For example, video games with medium and high requirements need a lot of computer power from the graphics card and also from the processor. And that’s why they can drain your battery really fast.

Using web browsers like Chrome, Firefox, or Opera, with a lot of tabs opened at once will also drain a lot of battery. Instead, you can try using Microsoft Edge, and this is how to enable its Efficiency mode on Windows 11.

Moreover, running the new integrated Android apps may get Windows 11 into the battery drain issue.

As you can notice, there are plenty of methods you can try to stop your Windows 11 battery from draining. It’s not mandatory to use all of them but to get the best out of it, we recommend doing it.

Keeping your device on a high-performance plan can simplify your work, so checking how to use the ultimate power plan in Windows will surely make a huge difference.

If your laptop battery drains when off, we have a special guide that addresses that issue.

If you have any additional questions, do not hesitate to leave a comment in the section below.

How to Delete Temporary Files in Windows 11 (Full Step-by-Step Guide)

Knowing how to delete temporary files in Windows 11 is essential for keeping your PC running fast and clutter-free. This guide shows you every safe and effective way to remove temp files, from simple built-in tools to advanced cleanup options.

How can I delete temporary files in Windows 11?

1. Use the Settings menu

  1. Hit the Windows key, then open the Settings menu.settings start menu
  2. Select the System section, then navigate to Storage.system storage settings app
  3. Click on the Temporary files section.temporary files selected in storage
  4. Checkmark all the files you want to delete, then click on the Remove files button.remove files button temporary storage

To delete temp files, you must have administrator access or else, you’ll get the folder access denied message.

2. Try Disk Cleanup

  1. 1. Press the Windows key on your keyboard.

  2. 2. Type Disk Cleanup in the search box that opens, and click on the result to open the app.

    disk cleanup windows 11 launch
  3. 3. Checkmark the files you want to delete, then click on OK.

    disk cleanup remove temporary files windows 11
  4. 4. After, click on the Clean up system files button.

    how to delete temporary files windows 11 system files
  5. 5. Select the files you want to delete, then click on OK.

    delete temporary files windows 11 click ok
  6. 6. To confirm the changes, click on the Delete Files button.

    remove temporary files in windows 11 confirm

Disk Cleanup is a free disk cleaner that’s built into Windows 11, but if you want something more advanced, you can also try using automatic repair and optimization software.

3. Delete files from Temp Folder

3.1 With File Explorer

  1. Use the following keyboard shortcut: Windows + R.
  2. In the Run dialog box, type %temp%, then click OK.%temp% run dialog
  3. Select the files you need to delete, then click on the Delete icon, marked as a trash.delete icon temporary files

3.2 With Command Prompt

  1. Press on the Windows key, type cmd, then choose to Run as administrator.cmd run as administrator
  2. Copy and paste the following command, then hit the Enter key: del /q/f/s %TEMP%\*
  3. Now all the temporary files that don’t require additional permissions will be deleted.deleting temporary files cmd

This is one of the fastest ways to perform a junk files cleanup, so don’t hesitate to try it.

4. Automatically clear Temporary Files with Storage Sense

  1. Navigate to the Storage page, from the Windows Settings menu.
  2. Look at the Storage Sense section, then make sure the toggle button is set on On.storage sense enable
  3. Now click on the Storage Sense section to customize various options.
  4. In the opened window, under Configure cleanup schedules, select the drop-down menus for each section, then select the desired options.storage sense configure

After enabling Storage Sense in Windows 11 and configuration, your temporary files will be automatically cleaned on your system as per the set schedule.

5. Delete Prefetch Folder Contents

  1. Press Windows + R to open the Run dialog.
  2. Type prefetch and hit Enter.
  3. If asked for permission, click Continue.
  4. Press Ctrl + A to select all files.
  5. Press Shift + Delete to permanently remove them.
  6. Skip any files in use.

6. Clear Browser Cache

For Microsoft Edge or Chrome:

  1. Open the browser.
  2. Press Ctrl + Shift + Delete.
  3. Check Cached images and files.
  4. Select All time as the time range.
  5. Click Clear now or Clear data.

For Firefox:

  1. Open Firefox and press Ctrl + Shift + Delete.
  2. Check Cache.
  3. Select Everything as the time range.
  4. Click OK to delete.

7. Manually Delete Files in C:\Windows\Temp

  1. Open File Explorer with Windows + E.
  2. Navigate to: C:\Windows\Temp.
  3. Press Ctrl + A to select all contents.
  4. Press Shift + Delete to remove them permanently.
  5. Skip any files in use or locked by the system.

8. Delete Windows Update Cache (SoftwareDistribution Folder)

  1. Press Windows + R, type services.msc, and hit Enter.
  2. Scroll to Windows Update, right-click it, and select Stop.
  3. Open File Explorer and go to: C:\Windows\SoftwareDistribution\Download.
  4. Delete all files in that folder.
  5. Return to services.msc, right-click Windows Update, and click Start.

9. Disable Hibernation to Remove hiberfil.sys

  1. Press Windows + X and select Terminal (Admin) or Command Prompt (Admin).
  2. Type this command and press Enter:
    powercfg -h off
  3. This disables hibernation and deletes the hidden hiberfil.sys file.

10. Use Safe Mode to Delete Locked Temp Files

  1. Press Windows + I to open Settings.
  2. Go to System > Recovery > Advanced startup.
  3. Click Restart now.
  4. On the blue screen, go to: Troubleshoot > Advanced options > Startup Settings > Restart.
  5. Press 4 or F4 to boot into Safe Mode.
  6. Once in Safe Mode, delete:
    • %temp% via Run
    • C:\Windows\Temp
    • prefetch
  7. Restart your PC normally.

11. Automate Temp File Deletion with a Batch Script

  1. Open Notepad.
  2. Paste this script:
    @echo off
    echo Deleting temp files...
    del /s /f /q %temp%\*
    del /s /f /q C:\Windows\Temp\*
    del /s /f /q C:\Windows\Prefetch\*
    rd /s /q %temp%
    md %temp%
    echo Done!
    pause
  3. Save it as cleanup_temp.bat.
  4. Right-click the file and choose Run as administrator.

FAQs

Is it safe to delete temp files in Windows 11?

Yes, it’s completely safe. Temp files are non-essential and are mainly used for caching or setup processes.

What happens if I delete all temp files?

You may free up storage space and improve performance. Some apps might recreate these files when needed, but no core system functions are affected.

Where are temp files stored in Windows 11?

Common locations include %TEMP%, C:\Windows\Temp, and the Prefetch folder.

How often should I delete temporary files?

Ideally, once every 1–2 weeks. You can automate this using Storage Sense or a batch script.

Can I delete temp files using Command Prompt?

Yes. Use del /q/f/s %TEMP%\* in an elevated Command Prompt to quickly delete temp files.

Wrapping up

That’s all you need to know to safely and efficiently delete your temporary files in Windows 11.

If you encounter any problems, we have a guide on what to do if temporary files aren’t deleting, so be sure to check it out.

For any additional questions or thoughts, do not hesitate to leave a comment in the section below.

External Monitor Not Working on Chromebook: 3 Ways to Fix It

Connecting a Chromebook to an external monitor is a useful way to enhance your computing experience, but some users have reported problems connecting their devices to external displays.

The Chromebook is a great device for many people. Sometimes you might need to use your Chromebook as a secondary device for another purpose — like watching movies or playing games — and the small screen size can be limiting. 

That’s where an external monitor comes in handy. It can be frustrating when external monitors don’t work on your Chromebook. The cause may be as simple as a loosely connected HDMI cable or as complicated as a problem with your graphics card.

Why can’t I connect my Chromebook to my external monitor? 

If you’ve tried connecting your Chromebook to an external monitor and it’s not working, here are a few possible reasons:

  • Incompatible cable – If you’re using a Chromebook and the USB-C external monitor is not working, it may not be compatible. Make sure it’s compatible with your monitor. 
  • Damaged cable – The cable connecting your Chromebook to your monitor may be broken somewhere along its length. If you have another computer, try to connect them with the same cable and see if it works. If it does, then you need to replace that cable.
  • Outdated Chrome OS – Make sure your Chromebook is running the latest version of Chrome OS. It’s possible that your computer doesn’t have the proper drivers for the external display.

In some instances, your external monitor may not support the resolution of your Chromebook. Make sure both the Chromebook screen and external monitor are set to the same resolution for best results.

Do Chromebooks work with external monitors?

Chromebooks, like other computers, can be used with external monitors. Before you can use an external monitor with your Chromebook, you’ll need to connect it to the HDMI port on the side of your device.

If you have an external monitor, you can set up your Chromebook to use it as a second screen for your computer. This allows you to move windows between the two screens, and view multiple windows at once.

How do I get my Chromebook to recognize my external monitor?

1. Unplug and replug all cables 

Your Chromebook should automatically detect the external display when you plug it in. If this doesn’t happen, try unplugging and then replugging all cables between your Chromebook and your external display. 

Make sure the cables are firmly inserted into both ends of the device, and that they’re not bent or damaged in any way.

2. Replace the HDMI cable 

The HDMI cable that comes with your Chromebook is designed to fit into the port on your Chromebook and connect directly to your external monitor.

Make sure that your HDMI cable is not damaged. If the cable is damaged or broken, it will not work properly and your monitor will not be able to recognize it. You might want to replace the HDMI cable with a new one.

In some cases, it is possible that the HDMI port is damaged so try on another device too to rule out this scenario.

3. Reboot the Chromebook  

Press and hold the power button for 10 seconds to restart your Chromebook. This can fix many issues that occur during startup or after you wake up from sleep.

If you have multiple monitors connected, disconnect them all and try connecting only one at a time to see if they work. If they do not work, then it is likely that the problem lies with your Chromebook and not the monitor itself.

4. Update graphic drivers

Another valid workaround is to use a driver updater. From the large variety existing on the market we recommend you to use Outbyte Driver Updater. After installing and running, it will automatically show you a list of the outdated or missing drivers that need to be installed in order to have your device optimally performing.

Choose the Graphic driver and update it. By doing so, you will allow your Chromebook to be up to date with the latest version of the video card driver.

Furthermore, search for the monitor drivers and update them as well to assure the Chromebook recognizes it and allows the image to be visible on that external monitor.

Outbyte Driver Updater

Use this easier and faster software to have all your drivers up to date.

Where is the Display key on Chromebook? 

The Display key is located on the top right side of your Chromebook. It’s used to toggle between different display modes. It’s above number 6 typically where you’d find F5 on a PC’s keyboard. If you have a display connected via HDMI, you can use this key to cycle through them.

Alternatively, you can use the Chromebook mirror display shortcut: Ctrl + F4 to switch between display modes.

While you are still here, check out our expert list of the best gaming browsers for your Chromebook. 

Let us know of any additional thoughts on this issue in the comments section below.

Opera GX Adblock is Not Working on YouTube [Fixed]

Opera GX adblock not working on YouTube? This can ruin your experience, but we’ll show you how to fix it in just a few simple steps.

What can I do if Opera GX adblock is not working on YouTube?

1. Check if YouTube is on the exclusions list

  1. Click the Menu icon in the top left corner and choose Settings.
    menu settings opera GX
  2. Search for adblock and then select Manage exceptions.
    adblock search manage exceptions opera gx
  3. Locate YouTube on the list, and click the Menu icon on the right side. Choose Remove.
    remove youtube exceptions opera GX

2. Update adblocker lists

  1. Type opera://settings/adBlockerLists in the Opera GX search bar.adblocker lists address in opera gx
  2. Hit the Update button.update adblocker lists button in opera gx
  3. Go back to YouTube and see if you still get ads.

3. Update Opera GX

  1. Open Opera GX.
  2. Click on the Opera Menu in the top-left corner.opera gx menu icon
  3. Select Update & Recovery.opera gx update and recovery
  4. Click Check for updates.wait for opera gx to check for updates
  5. If an update is available, click Update Now.
  6. Restart the browser to apply changes and go to YouTube to check if ads are now blocked.

4. Clear cache and cookies

  1. Click on the Opera Menu and go to Settings.opera gx settings
  2. Scroll down to Privacy & Security and click Clear browsing data.opera gx privacy and security settings
  3. In the dialog box, check Cookies and other site data and Cached images and files. Only clear Browsing history if you have your passwords and credentials backed up.clear data opera gx
  4. Select Clear data.
  5. Restart Opera GX and check if YouTube ads are still showing.

5. Use an adblocker add-on

  1. Go to uBlock Origin extension page.
  2. Click on Add to Opera button.
    add to opera ublock extension opera GX
  3. Wait for the extension to install, then enable it and go bak to YouTube.

For the most part,  Opera GX’s ad blocker is reliable, but at times, it won’t block YouTube ads. The broadcasting platform declared war on adblockers and it’s doing its best to force ads through.

Making sure your browser is up to date and checking the inclusion list are essential steps if you want to prevent this.

And if you’re still struggling, you can install a third-party adblock add-on. Ublock Origin is a great choice that might block ads that pass through Opera GX.

We hope that with the steps above Opera GX is now working on YouTube. If you have any more questions, don’t hesitate to ask in the comment section below.

5 upcoming video game TV shows to look out for in 2022 and beyond

They say we are in a golden age of television. And when you think of all the great shows that we’ve been treated to in the last decade or so, it’s hard to argue against the point. Game of Thrones, Lost, Breaking Bad, Westworld, and Stranger Things all come to mind, along with so many others.

But it’s a great time to be a gamer too. And part of the reason why gamers have it so good these days is the sheer quality of video game adaptations in movies and television.

This hasn’t always been the case. Anyone who had the misfortune of watching the Super Mario Bros. film adaptation back in the day will tell you that those are 104 minutes of their lives that they will never, ever get back.

Although games have historically gotten rough treatment on the small and silver screens, it is safe to say that those days are over. We are in the middle of nothing less than a video game adaptation renaissance, with Netflix’ Castlevania animated series being hailed as the (arguable) gold standard. Franchises like Halo and The Witcher are the latest getting in on the video game-to-television show action.

And many more are set to follow suit in 2022 and beyond. So get ready to put your controller down and grab the popcorn: the following are what we feel are some of the most promising video game shows on the horizon.

Fallout (Amazon Studios)—release date TBA

We reported just a few day ago new image leaks from one of the sets of the upcoming Fallout TV series. We know the show will star Walton Goggins, Ella Purnell, Kyle MacLachlan, and Aaron Moten. And if the leaked images and video are anything to go by, then this is shaping up to be a real treat for fans of the Fallout universe.

The Last of Us (HBO)—January 1, 2023 (tentative)

Last of Us

To quote HBO’s own synopsis,

The series takes place 20 years after modern civilization has been destroyed. Joel, a hardened survivor, is hired to smuggle Ellie, a 14-year-old girl, out of an oppressive quarantine zone. What starts as a small job soon becomes a brutal, heartbreaking journey, as they both must traverse the U.S. and depend on each other for survival.

It’ll star Bella Ramsey and Pedro Pascal (both of Game of Thrones fame). And if that alone doesn’t get you excited for this, we don’t what will!

Tomb Raider (Netflix)—2023

Shadow of the Tomb Raider: Definitive Edition art

The latest screen adaptation of Lara Croft’s adventures and exploits will see the lovely Hayley Atwell (who we saw most recently in Doctor Strange in the Multiverse of Madness) take on the lead role. Personally, we couldn’t think of a better choice.

God of War (Amazon Studios)—release date TBA

We don’t know much about the upcoming God of War TV show, but we’ve got our hopes set high for this. What we do know is that it will almost certainly be live-action, and that it will be distributed by Amazon Prime Video.

Cyberpunk: Edgerunners (Netflix)—September 13, 2022

From the official Description:

“The series tells a standalone, 10-episode story about a street kid trying to survive in Night City — a technology and body modification-obsessed city of the future. Having everything to lose, he stays alive by becoming an edgerunner — a mercenary outlaw also known as a cyberpunk.” 

Some bonus shows

There are just too many exciting video game adaptations on the horizon to only mention five, so we’ve added a couple bonus mentions here.

Twisted Metal (Peackock)—release date TBA

Twisted Metal: The Entire Cast of Peacock's Live-Action Video Game Adaptation (So Far) - IGN

An action-comedy series based on Sony’s classic (and some say neglected) vehicular combat franchise. It follows a driver trying to deliver a package across a post-apocalyptic wasteland.

Sonic Prime (Netflix)—Fall 2022

Sonic Prime follows the Blue Blur’s quest to save the multiverse. And with a Fall 2022 release date, we won’t have to wait long for this one. Which somehow seems appropriate given its Sonic the Hedgehog we’re talking about. In the meantime, here is a “first look” courtesy of Netflix.

Captain Laserhawk: A Blood Dragon Remix (Netflix)—release date TBA

An animated series based on Far Cry 3: Blood Dragon, created by the Bobbypills studio and Castlevania executive producer and showrunner Adi Shankar.

Castlevania: Nocturne (Netflix)—release date TBA

This follow-up to the smash hit original was officially announced back in June. Not much is yet known about the project, but it is widely believed it will be set against the backdrop of the French Revolution, and will follow characters Richter Belmont and Maria Renard.

Of course we can’t forget Halo, the TV series, the first season has aired on Paramount+, but there’s a second season in the works!

Wrap up

So tell us, which of these projects are you most excited about? Let us know in the comments. They all look promising—could there be another Castlevania in store for us among these upcoming shows? Here’s hoping each and every one fulfills its respective potential.

Featured image courtesy of whats-on-netflix.com.

YouTube Keeps Signing Me Out on Xbox: 3 Quick Ways to Fix It

Several user reports bring to notice that Xbox keeps signing them out of YouTube. This weird issue has been reported for quite some time.

If you are one of such users who is facing YouTube keeps signing me out on Xbox issue, then you are at the right place.

Because in this guide, we will give you three quick solutions that will help you resolve the YouTube keeps signing me out on Xbox problem and get back to watching your favorite content.

The reason for this issue can vary for different users, and solutions may also vary. For some, a simple restart could do the trick, while others might need to perform a complete reset of the Xbox to cure the problem.

Whatever the case may be, we will address the problem with our 3 quick fixes that have helped Xbox users fix the YouTube keeps singing me out on the Xbox issue. Let us get right into it.

Why does Xbox keep signing me out of YouTube?

After looking at various user reports, we did our research and found out that there are quite a few reasons why you would come across YouTube keeps signing me out of Xbox problem.

Some of the reasons are listed below:

  • It turns out that for several users there was a pending firmware update that was waiting to be downloaded
  • The temporary data of YouTube if it gets corrupted can also cause multiple issues including the one at hand
  • Your YouTube installation might have gotten corrupted because of which you are facing such problems on your Xbox
  • Because of a faulty internet connection, this YouTube keeps signing me out on Xbox issue gets triggered
  • There might be a problem with the YouTube app itself
  • Your Xbox profile might be corrupt
  • Presence of corrupt system cache or Xbox cache

Now that you have an idea of what are the most common reasons you would come across YouTube keeps signing me out on Xbox problem, let us check out the solutions.

Quick Tip:

Try using a dedicated gaming browser to access YouTube on your console. The Opera GX browser for Xbox uses elements to provide users with easy access to their favorite websites.

Frequently visited pages, such as YouTube, can be added to Opera’s Speed Dial. The powerful compression technique included in Opera GX ensures seamless video playback on YouTube.

Opera GX

Install Opera GX on your Xbox console and try logging in on YouTube.

What can I do if Xbox keeps signing me out of YouTube?

1. Download pending updates

  1. Head to the main dashboard of your Xbox console.
  2. Press the Xbox button on your controller.
  3. This will open the guide menu.
  4. Move to Profile & system> Settings > System > Updates.
  5. Now click on Console update available if a new update is available.
  6. Restart your Xbox and check if this fixes the problem or not.

Not only do new updates fix the multiple issues that you might be coming across on your PC, but it also fixes several app-related issues.

Chances are the version of the firmware installed on your Xbox isn’t the latest one, and is conflicting with the YouTube app. In such a case, it is essential to keep the latest software installed on your Xbox to avoid facing frustrating issues.

2. Clear Xbox cache

  1. Head to the main dashboard of your Xbox console.
  2. Press the Guide button on your controller.
  3. Navigate to All Settings > Settings.
  4. Select the System tab.
  5. From the right-side select Console info & updates.
  6. Choose the Reset console option.
  7. In the confirmation dialog, click on Reset and keep my games & apps.
  8. Once the process gets completed, your console will restart.

There is a possibility that the cache files on your console are corrupt, which is why you are facing YouTube keeps signing me out on the Xbox issue.

Follow the above steps to clear the system cache on your Xbox and check if this fixes the problem or not.

3. Reinstall the YouTube app

  1. Open up the guide menu by pressing the Xbox button on your controller.
  2. Click on the My games & apps menu.
  3. Highlight the YouTube app from the list of your apps and games.
  4. Tap on the Menu button.
  5. Click on the Uninstall option.
  6. After the uninstallation is complete, find the YouTube app in Store.
  7. Download and install the app again and check if the issue is fixed or not.

If nothing works, then we would suggest you go the layman’s way and try reinstalling the YouTube app on your Xbox console.

There could be chances that because of the faulty installation, the YouTube app isn’t working as intended. Reinstalling will install all the important files and possibly fix the problem as well.

How do you refresh YouTube on Xbox?

To refresh the YouTube app on your Xbox, you can either reinstall the app or press a combination of buttons to refresh the dashboard of your Xbox.

There is no such way to refresh the YouTube app on Xbox, but you can simultaneously press the Left Trigger (LT) + Right Trigger (RT) and Y buttons together to refresh all the elements on the Xbox dashboard.

That is it from us in this guide. If you are coming across an update error on the YouTube app, then you can check out our dedicated guide to resolve the problem.

We also have a guide that will help you to fix the Xbox ventilation problem. Let us know in the comments below, which of the above methods helped you resolve the error on your Xbox console.

5 Best Coding Games that You can Try in Your Browser

Learning programming is quite a difficult task. It implies reading a lot. However, you also need to practice every day.

And you don’t always have an IDE at your disposal. We are here to help you and we have the solution. In the next article, you are going to find out how you can practice programming online, in your browser.

You don’t have to download anything. You just type in your code and the online compiler takes care of everything.

Is there a coding video game?

As you will see below, there are plenty of coding games that you can play. And some of them are really great for practicing your coding skills.

These coding games online are free because most of them have also some built-in teaching courses.

Practice alone or cross your code in a duel with other users. The best coding games in your browser are described in this article.

What is the best free coding game?

CodinGame – Interesting choice

CodinGame is a well-established coding site. It is built around the concept of gaming and has support for more than 20 programming languages. The interface and the content are colorful and pleasant to the eye.

You can type your code in well-known C++ or Java, or even in Go or Scala. There are detailed tutorials for every programming language.

You need to create an account, but this comes with benefits. It is like an RPG. You get experience points when your code is compiled successfully or for posting programming tests.

Practice alone to improve your programming skills. Or compete in a programming challenge against other users for fame and experience.

Interested in a job? Based on your knowledge and experience, CodinGame can put you in touch with IT companies looking for programmers. CodinGame is great both for experienced programmers and for junior developers.

⇒ Get CodinGame

CodeCombat – Teaches children programming through games

CodeCombat aims to teach children programming through games. With an interface inspired by games, it is very attractive. The coding programs target both teachers and students.

It supports Python and JavaScript. It has two learning programs, one for beginners and the other for more advanced concepts in Computer Science.

You can use it for free in a limited manner for practice. Though you need to pay a membership fee to make use of their program as a student.

CodeCombat is one of the best free coding games for beginners. It is very useful for those who want to learn programming in an organized way with a qualified instructor.

Teachers can create an account and start teaching programming to students.

⇒ Get CodeCombat

Code Wars – Discipline and effort are both involved

Code Wars has a karate room outlook. If you want to train here, you need to create an account and become a karate. It is a very simple and fast process.

You must choose your favorite programming from a multitude of languages they support. With every successful compile of your code or kata, as it’s known in Code Wars, you go up in your rank.

When you gain enough confidence and knowledge, you may challenge an opponent. It’s a very fun and intuitive way of learning and practicing programming. And karate, discipline, and effort.

⇒ Get Code Wars

CheckiO – Learn and practice programming

CheckiO is another great site where you can learn and practice programming. It displays a rich, game-inspired interface. You can test your skills by solving interesting tasks using Python or TypeScript.

Its main idea is to captivate children and turn their programming learning experience into something pleasant.

CheckiO is one of the best coding games for teens. For teachers is very handy as a tool for programming classes.

You need to create an account or use your Gmail, Facebook, or GitHub account. Once you sign in, it is free to use.

⇒ Get CheckiO

Dash General Assembly – Great for kids

Here, you can start learning development. You are going to learn how HTML 5, CSS3, and JavaScript work together to create a beautiful website. It asks you to practice what you learn in small and interesting tasks.

You need to sign up for a free account. It is one of the best coding games for kids free.

To be able to use Dash General Assembly, you need to enable JavaScript in your browser. Read this article to find out how.

⇒ Get Dash General Assembly

We recommend all these sites above for browser programming games. We also recommend opening these sites in the best browser, Opera GX.

If you want to try some other genres check out our list of 50 all-time best browser games.

Make use of the comments section below to tell us what you think of our propositions.

2 Best Ways to Play Dungeons and Dragons Browser Games

You must have heard about Dungeons and Dragons, but have you ever considered playing the browser game? Let us tell you all you need to know.

When it comes to tabletop games, Dungeons and Dragons is probably one of the most popular; this tabletop game is a founder of the RPG genre that we know today.

Speaking of which, if you ever wanted to play Dungeons and Dragons, today we’ll show you how to play it in your web browser.

As you start playing online, we recommend using any of the best web browsers for online gaming.

Is there an online game for D&D?

As browsers have evolved over the years, so has the use case for browsers. From rendering only simple static pages, they are now capable of outputting the most complex data types.

Games have taken advantage of this, and D&D is not an exception. Players can now play and enjoy the online version of the game using their favorite web browsers.

Quick Tip:

Playing games online is simple, but if you want to get the best performance, it’s advised to use a browser that is optimized for gaming.

Opera GX allows you to limit the resources used by your browser. Doing so will leave enough resources for other vital processes to work smoothly.

Opera GX

Play D&D games like a pro from within the world’s first web browser created precisely for gaming and feel victory within your grasp

Where can I play D&D online for free?

1. World of Dungeons

  1. Visit the World of Dungeons website.
  2. Click on Join now button.
    join now world of dungeons dungeons and dragons browser game
  3. Enter the required data and click on the Continue button.
    dungeons and dragons browser game
  4. Once the registration process is finished, log in and create your character.

Remember that this isn’t an official Dungeons and Dragons game, but it’s heavily inspired by it, so it’s a perfect alternative.

2. Roll20

  1. Go to the Roll20 website.
  2. Click the Create Free Account button.
    create free account roll20 dungeons and dragons browser game
  3. Enter the required information.
    account information roll20 dungeons and dragons browser game
  4. Log in to your account and find the group to play with.

Roll20 offers official Dungeons and Dragons content, so if you want a genuine Dungeons and Dragons experience, be sure to try it.

Is Roll20 good for DND?

Online D&D gaming might be difficult, but Roll20 is a technology that can make virtual adventures seem natural.

It offers a complete set of tools to easily roll dice, create characters, and manage any game. It is free to use, browser-based, and the most liked platform for playing tabletop roleplaying games online.

In conclusion, note that there are many variations in DoD. You can play Dungeons and Dragons online board games, web games, and D&D online tabletop.

Now that you know how to play Dungeon and Dragons in your web browser gather your friends, and get ready for questing.

How to Get Microsoft Games in Windows 10 [Solitaire Collection & More]

We will discuss Microsoft games in Windows 10, so if you have enjoyed playing any Microsoft games in the past, you will want to read on.

The old Microsoft games you were accustomed to have received a massive overhaul in Windows 10 and now look much more impressive.

The games that we are all used to and love from Windows 7 and other versions of the OS have received a major upgrade in the newer versions of Windows.

We have previously discussed the new Microsoft Minesweeper, which has one of the most significant changes, but the others have also been upgraded.

Microsoft Solitaire, the other card games, and Mahjong have gotten more than a new coat of paint. And today, we will be taking a look at them.

Does Windows 10 have Microsoft Games?

You may think of games like Chess, FreeCell, Hearts, Mahjong, Minesweeper, Purple Place, Solitaire, and SpiderSolitaire. These are all popular from the Windows 7 era and make up what most users know as Microsoft games.

In Windows 10, you no longer have these games readily available as part of the OS. But can you still play the games? Of course, you can.

We will be talking about some of them revamped in Windows.

What happened to games on Windows 10?

What used to be Games on your OS has been moved to the Microsoft Store starting from Windows 8. So while you may have the same old exciting games, you will be downloading them from the store.

Quick Tip:

We grew with these Microsoft games and we sure miss playing them. An alternative where you can find some of these games is the built-in gaming corner of the Opera GX browser.

Opera GX Corner is a place where you can play games right from your bowser, without downloading them. It features a lot of gaming-focused settings and also brings integrated social platforms like Twitter or Instagram right to the sidebar.

Opera GX

Don’t miss on any game favorites with this great gaming browser.

How do you get Microsoft games on Windows 10?

1. Microsoft Solitaire Collection

  1. Launch on the Microsoft Store app by clicking the icon on the taskbar.
    microsoft games windows 10
  2. In the search bar, type Microsoft Solitaire Collection, and click on the Microsoft Solitaire Collection option.
    microsoft games windows 10
  3. Now, click on Play.
    microsoft games windows 10
  4. Click on any of the games to start playing.

Previous versions of Windows had card games, such as Solitaire, Hearts, and FreeCell, that have been updated over time, and Windows Vista and Windows 7 had arrived at their best versions in both gameplay and graphics.

It would have seemed that they had nothing more to add in Windows 10, but Microsoft has surprised us with a revamped game called Microsoft Solitaire Collection.

This new game, apart from integration to Xbox Live and a new look, has encompassed Solitaire, Spider Solitaire, and FreeCell, but it now contains two new game modes: Pyramid and TriPeaks.

As a bonus for joining Xbox Live, you have Daily Challenges, Medals, and Xbox Achievements, and you can race against your friends to get the biggest score and the most Daily Challenge Badges. The game also shows the Leaderboard, where you can compare scores with the other players.

In addition, we have a new feature that allows you to create your card themes and backgrounds. This will enable you to build a custom deck of cards and background with any image you want, making the game unique.

Furthermore, you can quickly swap between games by right-clicking the background and selecting any other game in the collection from the top of the screen. The stats are shown on the app’s main screen; this way, you can see your progress on all games without the need to open each of them.

2. Other games on the Microsoft Store

  1. Launch on the Microsoft Store app by clicking the icon on the taskbar.
    microsoft games windows 10
  2. You can scroll through the different applications or search for a game by typing the name in the search bar.
  3. Click on the Get button.
    microsoft games windows 10
  4. Once it is installed, launch the game and start playing.

This step applies to all other apps on the Microsoft Store. You must locate them and click the Get button to download them on your computer.

How do I download games on Windows 10 without the store?

You must use third-party sources to get Windows games if you don’t have access to the Microsoft Store. Note that part of the process entails using Windows PowerShell. Finally, remember that adopting these techniques will only allow you to get free games.

We have written a detailed step-by-step guide on downloading the Microsoft app without using the Microsoft Store.

Now you should be able to get any of your favorite Microsoft games for Windows 10 and 11. The steps are straightforward, especially if you use the Microsoft Store. Now you can enjoy Microsoft games like Chess, Freecell, and Solitaire on Windows 10.

Fore more information, don’t miss our guide on how to get Purble Place on Windows 11.

In the comment section, let us know if you have succeeded with any of these solutions.

How to clear caches and cookies in Google Chrome

Caches and cookies, in simplest terms, are a way for your PC remembers the information from the websites you visit. Cookies store information like user preferences, usernames, passwords, and so on. Caches, on the other hand, stores useful website content like images, videos, etc.

In fact, keeping a log of this data is what makes your browsing experience lightning fast in the first place. However, in some cases, this can lead to problems. And that’s where removing them can help you. Here’s how you can get started with it.

How to clear caches and cookies on Chrome

When you clear away the caches and cookies stored on Chrome, you might experience a slight dip in your browser’s speed. But that’s not a problem as you can come over those problems as long as you using your browser.

To access the catches and cookies on Chrome, you first have to head to the Chrome settings. Here’s how:

  1. Launch the Chrome browser and select the Settings menu (the three dots) from the top-right corner.
  2. From there, select More Tools and click on Clear Browsing Data…
  3. On the Basic tab, select the checkbox for Cookie and Caches, choose a Time range, and click on Clear data.

 clear caches and cookies in Google Chrome

That’s it — your caches and cookies will be cleared in a few seconds. And, if you like to go the extra mile, click on the Advanced tab, and you can clear away a bunch of other things as well—passwords, browsing history, autofill data, etc.

Clearing Caches and Cookies on Google Chrome

Hopefully, this guide helped you clear caches and cookies in Google Chrome. Besides, it’s one of the best ways to fix any bugs on your PC. If you’ve followed the above methods, your browser caches and cookies will be cleared by the end. But that’s not all. For instance, you can also clear out the caches on your Microsoft Teams and for your laptop as a whole as well.