Like its functionality on Microsoft 365 Office apps, Copilot on Windows 11 will streamline tasks and free up your focus on creativity. It empowers multitaskers like yourself to collaborate effortlessly across multiple apps by minimizing the time required to locate and open applications.
We already know how it’ll work on Office apps, but how will Copilot work on Windows 11, and what can you do with it? Here’s everything we’ve gathered so far.
What can you do with Microsoft Copilot on Windows 11?
We all know the immense potential of Bing chat mode, so Microsoft takes it a step further by integrating its plugins that enable developers to enhance their applications within the Windows Copilot ecosystem. This integration opens up new possibilities for developers to provide a seamless and enriched experience to users, leveraging the power of Bing chat mode.
Copilot is now live for you to experience in the Windows Insider Program. Microsoft announced Build 22631.2129, and it has come with a lot of new features, including the long-awaited Copilot.
To do so, the Copilot button will live prominently on the taskbar, offering easy access to its features. Once activated, the Windows Copilot sidebar remains consistent across apps as a personal assistant that’s always ready to lend a helping hand.
How to enable Copilot on Windows 11
You can activate it by clicking on the new button on the taskbar (or WIN + C) to launch Windows Copilot. However, you should that Windows Copilot will use the same Microsoft account (MSA) or Azure Active Directory (AAD) account used to sign in to Windows.
Just like on Office, Copilot on Windows 11 also provides easy access to familiar features like copy/paste, Snap Assist, Snipping Tool, and personalization.
What’s also worth noting is that Windows Copilot goes beyond traditional operations, allowing you to request content rewriting, summarization, or explanation. From simple queries to complex tasks, you can ask the tool to provide you with quick and accurate responses to assist you in your everyday activities.
As Copilot is still in a preview phase, you will be able to submit feedback on it directly to Microsoft. Just click the … icon at the top right of the sidebar in Windows Copilot to submit feedback on any issues you run into.
Copilot is basically Bing running via Microsoft Edge
Windows enthusiast @mayank_jee has found that Copilot is Bing running via Edge. Apparently, you can inspect Copilot, and you can even change its name if you want to. Since the AI tool is web-based, you can easily do that by editing the HTML code attached to the name.
So what does this mean? Essentially, Copilot is a sort of web browser that will use the Internet to build answers and solutions to your issues. Since it’s based on Bing, and Bing itself is based on ChatGPT, it is possible that Copilot will soon be capable of having an internal database to do the work.
However, the tool is still in its early phases so you should be aware that a lot of changes are coming to it. If you don’t like the Windows Copilot and want to disable it, check out this guide to find different methods to do so.
If Edge is the problem, you can also get CoPilot on Chrome and see how that works out for you.
Another great AI assistant available in the preview for Microsoft Security Copilot, explains Microsoft is all about adapting the latest technology to help people and enterprises. And if you’re feeling adventurous, dive into Microsoft Copilot alternatives and see what’s out there.
Are you excited about the Copilot AI assistant on Windows 11? Let us know in the comments!
Back in the day, to create a content piece, writers used to do all kinds of research and rack their brains to make it interesting or worth reading. However, the task has become a lot simpler with the help of AI.
With increased efficiency and growing demand, AI writing assistants are gradually becoming indispensable for the workforce due to their ability to streamline and structure your content.
Here we will talk about one of the powerful AI-writing assistants, HIX.AI, which can help you revolutionize your content creation and comes with an efficient Chrome extension that makes it easier to use.
What are the best features of HIX.AI?
1. Helps write content like a pro
If you often find yourselves in the middle of writer’s block, HIX.AI’s AI Writer tool can help you overcome that. It has 120+ AI writing tools, including Paraphrasing Tools, HIX Translate, Content Rewriter, Content Improver, Content Summarizer, Sentence Expander, Grammar Checker, and more, plus it works in over 50 languages.
Whether you want to write an SEO-oriented article, a paper for school, an ad for a marketing campaign, social media captions, hashtags, slogans, an email body, or website content, your AI writing copilot has got you covered.
It can paraphrase, translate, rewrite, proofread, simplify, or summarize your content to improve the quality and make it captivating.
The AI writing assistant comes with its grammar and plagiarism checker, which ensures your content is original and grammatically correct.
Want to translate your message into a language you aren’t familiar with, don’t worry HIX Translate can help. Paste the content, choose the tone, and the language you want it to get translated, and click Translate.
It will automatically detect the content’s language and perfectly translate it into the chosen languages.
If you don’t want the hassle of logging in every time you want to use the tool, install the HIX.AI Chrome extension to access it anywhere and anytime.
2. Write long-form articles hassle freely
HIX.AI includes a fantastic tool, Long-Form Article, which can help write long-form content with perfection.
It has several options besides general content, including Amazon Product Roundup, Single Amazon Product Review, General Product Roundup, Product Reviews, How-to Guides, News Articles, and Product Comparison.
All you need to do is select any of the above options, provide information, like a brief about the topic, context, keywords, word count, target audience, language, and more, and click Generate Titles.
You will get an outline and title according to the brief; you can change the title and outline structure, add a heading and click Generate button to create unique, SEO-friendly, fact-based, plagiarism-free content that matches your writing standard in a few minutes.
3. Edits your document to polish your content
Proofreading content can be tiring and not mistake-proof, especially if it is long; that’s where you need help, and HIX Editor is the best option. It comes with three modes to enhance your writing and editing experience:
AI Mode – Engage the AI assistant in writing and editing the content you produce and get suggestions to improve the draft as you go.
Power Mode – Get access to 120+ AI writing tools right in the document you are editing to let this AI writing copilot help in every stage of content creation.
Chat Mode – Invoke HIX Chat, enter your query, and get tips and inspiration to create appealing content.
You can access the supercharged editor on WordPress and Google Docs via the Chrome extension, making refining, formatting, editing, and even composing content 10x faster and easier.
If you are worried about formatting and styling the content, don’t, as the tool can adjust the alignment, font size, spacing, and heading in a single click.
Once satisfied with the content generated, copy it or download it as a Word document or PDF.
To share the content, you can use the Share by Link or the Share on Social Media option to share it across various platforms, like Twitter, LinkedIn, Instagram, and more.
Moreover, you can directly export the content to Google Docs or WordPress in a single click. All you need to do is click the Download button, and under Export, select any of the two.
4. Write & respond to emails in the most innovative way
HIX Email Writer helps you compose a fresh email or generate a grammatically correct response with improved flow ten times faster. You can use the HIX.AI web app to get the web version or the browser extension to access it from your Inbox.
On the web app, click the HIX Email Writer from the dashboard, click the Compose or Reply tab, press the forward slash (/) twice, describe what content you want, and press Enter.
It comes with 13 different tones of voice and 20+ Ready to use email templates to curate customized emails or generate on-point responses to convey the message correctly.
You get options like Rephrase, Shorter, or Longer to change the suggested content the way you like. Once you are satisfied with the result, click Insert to Email to the final result on the draft.
Got a lengthy and complex email and want help understanding the core message? This AI Email Writer can help; the tool can summarize the email for you to ensure no critical details are skipped.
5. Answers your queries accurately
Whether you are curious about something, have a code to write, or have a mathematical problem to solve, HIX Chat (The ChatGPT-like Chatbot) can help!
It is powered by GPT 3.5/4 and supported by Internet data which helps it generate more accurate responses than ChatGPT at an affordable price.
Its extensive knowledge of different fields and capability to understand & respond in 30+ languages make it the perfect AI chatbot to answer all your queries on any topic with the latest information.
You can access it from the HIX Dashboard or download the Chrome extension so that this AI writing copilot can always be at your disposal.
The extension adds a Sidebar, similar to Bing AI Sidebar, to the browser to access AI chat on your Chrome at the right or left side of the browser. To invoke the sidebar, click the floating HIX.AI icon or press Ctrl + P and access HIX Chat on Google Docs, Email clients like Gmail, Yahoo & Outlook, and various social media platforms.
The add-in also includes a Toolbar that allows you to select text from any site within the browser and click Ask AI to initiate AI chat or choose options like Rewrite, Summarize, Grammar check, Translate, Explain, and more.
Unlike ChatGPT, HIX Chat also has updated AI image generation technology, so you can give instructions to generate an image to get appealing graphics instantly.
6. Access anywhere on Chrome
HIX.AI comes with a Chrome extension which helps extend its ability to your browser as it works on Google Docs, Gmail, YouTube, Twitter, Instagram, and more.
To invoke this AI writing copilot right from your browser, install the Chrome extension, type two forward slashes (//) in Google Docs, and write 100% original content like Notion AI.
This ChatGPT copilot for the web can help you write social media posts and generate impeccable comments in a single click to boost your connections.
All you need to do is type two forward slashes (//) or click the HIX.AI icon, select a tone, add some instructions on what you want to write, then click Generate, voila, and you get the results.
It also gives hashtag suggestions for your posts to increase traffic, reach, and visibility.
Want to write eye-catching subject lines, engaging emails & personalized replies right from your Gmail, Yahoo Mail, or Outlook window? This extension for email can help with just that.
It works on all popular search engines like Google, Bing, Yahoo Search, Naver, DuckDuckGo, Baidu, and Yandex to provide accurate answers to your query within the search engine interface.
Press Ctrl (Windows)/ Cmd(Mac) + P or the HIX.AI icon from the right side of the window to access the tool anywhere on Chrome.
So these are some of the valuable features of the advanced AI writing copilot that can help you in all the content creation stages.
It also has many features in the pipeline, like Grammarly Integration, SEO Score Audits, Brand Voice, Bulk Processing Chat with PDF, YouTube Summarizer, and more, making it more promising than any other AI-powered content creation tool.
Click Try for free; it will take you to the sign-up page; use your Google account or input the information asked to proceed.
Once done, HIX Dashboard will open.
On the left pane, you can see all the products available, including AI Writer, Long-Form Article, HIX Editor, HIX Chat, & HIX Email Writer. The right pane displays the most popular tools and other information related to the account, such as Words Generated, Items Generated, Tools Used, and more.
Select any listed products from the left pane, the tools from the right pane, or click Create Content to initiate.
Based on the tool you choose, you will be directed to a page wherein you will find a dialog box. Input the text or write instructions about the content.
To refine the results, select options for How to improve, Target audience, Tone of voice, and Language from the drop-down menu, then click Generate.
Once satisfied with the content, click Copy or Export to get the generated content to different platforms such as Google Docs, WordPress, or a social media platform.
2. Use the HIX.AI extension
2.1 Install the add-in
Go to the Chrome Web Store to download HIX.AI and click Add to Chrome.
Once you have the extension, click Extensions and pin it to access it easily.
Now whenever you want to use the tool within Chrome, either press Ctrl + P or click on the HIX.AI icon from the right side of the browser to get the Chatbot.
Whether you composing emails, writing content on Google Docs, or creating social media posts, press // to get the AI writing copilot activated right in your browser.
2.2 Use the extension on Google Docs
If you are using the add-in on your Google Docs, it lets you switch between theAI,Power,andChatmodes to start generating quality content or get answers to your queries. WithAI Mode, you get suggestions to improve your content.
ThePower Modebrings all the AI writing tools to your dispense; choose any of them.
Enter the instructions and clickGenerate.
Wherein theChat Modegets you the answers to your queries. All you need to do is select the mode, type in the query, and clickSendicon to get answers.
2.3 On search engines
Once you are on Google web search, press Ctrl + P to launch the Sidebar.
You will get two options, Write and Chat, to interact and create content.
On the Write tab, you can access any of the AI writing tools offered by HIX.AI, wherein Chat mode lets you ask queries.
It also shows up as a window on the right side of the search, which explains or summarizes your query.
2.4 On websites
Go to any of the websites of your choice. Select the content on the website; you will see the HIX.AIAsk AItoolbar.
Click the drop-down menu next to it to change the action you want it to perform when you clickAsk AI. By default, the action selected isExplain.
You can also change it toRewrite,Summarize,Grammar Check,Translate, or more.
HIX.AI
Generate, rewrite, summarize, proofread, & paraphrase content with a powerful AI writing assistant.
HIX.AI is a one-stop solution for generating well-crafted, plagiarism-free blogs, articles, emails, and messages in a few clicks. Here are a few advantages of using it as a copilot:
Increased productivity – With an AI writing assistant to help, you can generate content faster, saving you time and thus enhancing productivity.
Simple & intuitive interface – The dashboard has a clean interface, allowing you to navigate to various tools listed and do the work without hassle.
Improved accuracy – Spots grammatical errors and makes corrections to the formatting & structural mistakes to help you produce accurate and mistake-free content in a few clicks.
Scalability – Handles a large number of users and queries at the same time, which makes it suitable for both small and large-scale usage.
Whether you want to write fresh content, summarize your essay or paraphrase the written text, HIX.AI has got you covered.
With the 120+ writing tools and intuitive interface, you can write & edit an essay, SEO-powered articles, emails, Amazon product content, social media content, ads, slogans, prompts, and more within a few clicks.
The HIX’s powerful Chrome extension makes it better as you can access the HIX Chat, the ultimate Chatbot, and other powerful AI writing tools right where you are.
Upon testing, we found the platform to be true to all its claims and works wonders in creating & editing content and responding to queries without lag time.
Have you tried HIX.AI? If not, try the advanced AI writing copilot today and create supercharge content faster at affordable prices. If you have questions or suggestions, please mention them in the comments section below.
Outlook is a very popular email client and an all-around tool for managing your emails, contacts, and calendars. As such, you’ll find people syncing their appointments to the Outlook calendar to stay organized.
However, you may miss out on these appointments because your calendar failed to sync. But why would this happen? We get to the bottom of this in this article and provide solutions.
Why has my Outlook calendar stopped syncing?
If you’re missing out on events and important engagements because your Outlook calendar is not syncing, it could be because of one or more of the following reasons:
Internet connection is not working – If you’re having any connection issues, it will be impossible for Outlook to sync your calendar. A strong and stable connection is one of the prerequisites for successful synchronization.
Incorrect Outlook account settings – If you have changed any of your account’s settings, such as the password or username, it can lead to syncing problems for your Outlook calendar.
Older Outlook version – If you’re using an outdated version of the Outlook application, it is possible your calendar is not syncing because of compatibility issues.
You have set up the Outlook calendar to sync with another account – If you have more than one Outlook account, you may set up your calendar to sync with one of the accounts and expect it on the other.
Server issues – Since syncing depends on the server to communicate between the two apps, syncing may fail if it is experiencing downtime.
How do I force Outlook calendar to sync?
Try the following simple workarounds before moving on to the more advanced solutions:
Verify that you’re syncing to the correct Outlook account if multiple accounts are signed in.
Switch to an Ethernet connection if you are using Wi-Fi to ensure you’re getting a stronger and more stable connection.
If the Ethernet is still not providing a stable connection, switch to another Internet connection, such as a mobile hotspot.
Log out, then log back into your Outlook account.
Restart your router.
Check for any restrictions your administrator may have set if you use a work or school account.
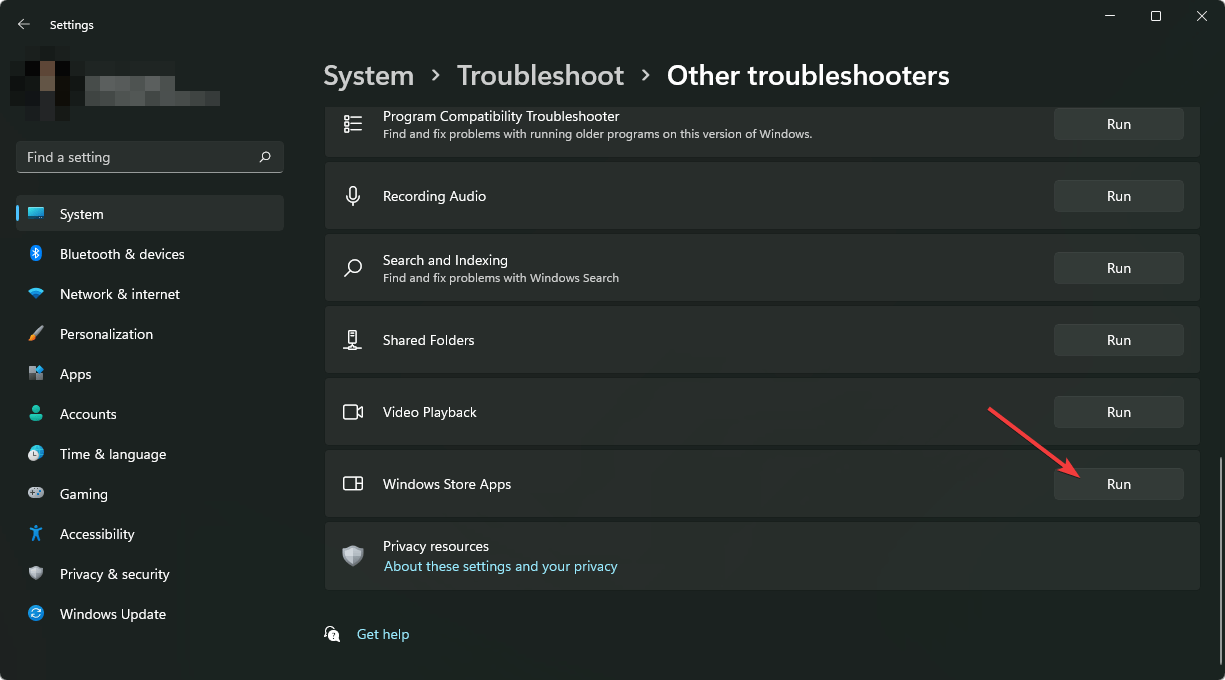
1. Run the Windows Store Apps troubleshooter
Hit the Windows key and click on Settings.
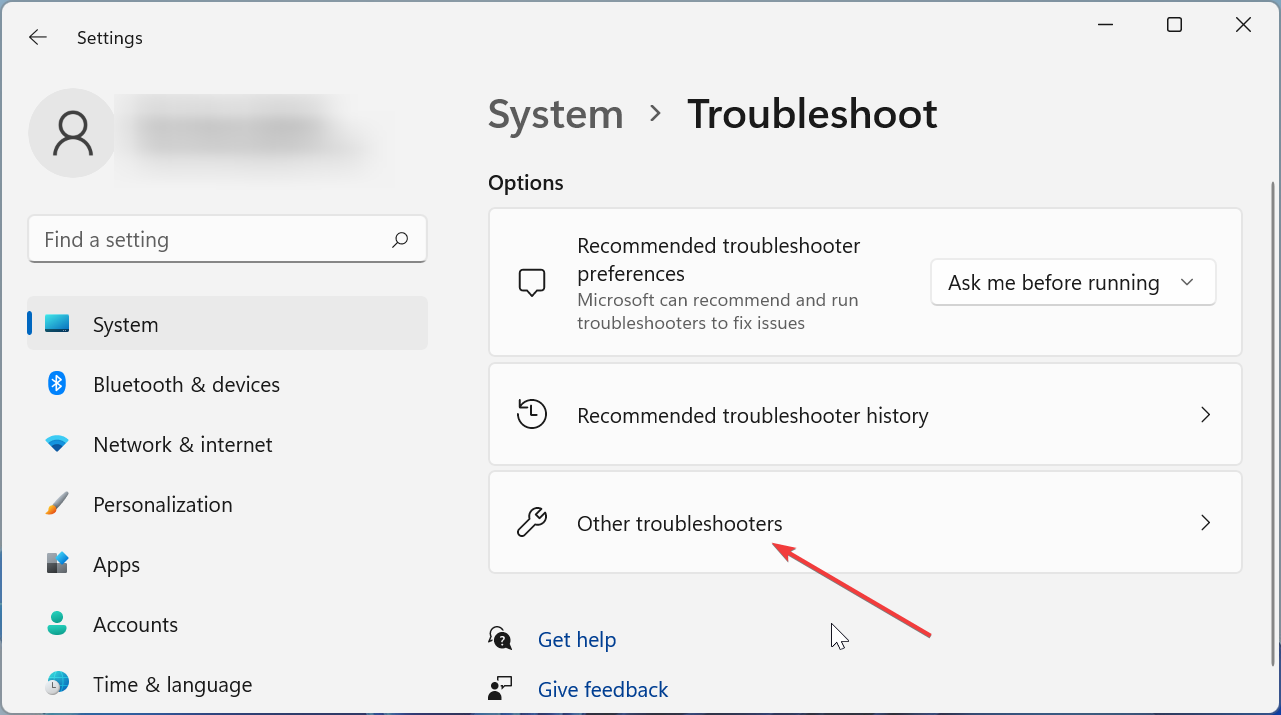
Click on System then select Troubleshoot.
Select Other troubleshooters.
Navigate to the Windows Store Apps troubleshooter and click on the Run button.
2. Repair Microsoft Office
Hit the Windows key, type Control Panel in the search bar, and click Open.
Navigate to Uninstall a program under Programs.
Locate MS Office, click on it, and select Change.
Select the Online Repairoption and click on the Repairbutton.
Press the Windows key + I to open the Settings app.
Click on Apps followed by Apps & features.
Within the Apps & features box, seek for the Office application by typing its name into the search area and selecting it from the three-dot menu, then selecting Advanced options.
Scroll down until you reach the Reset area, and then click on the Reset button to restart the process.
4. Delete and re-add the problematic account
Hit the Windows key, type Control Panel in the search bar, and click Open.
Type Mail in the search bar and click to open.
Next, click on Show Profiles under Profiles in the Mail Setup window that pops up.
A list of Outlook profiles registered on your PC will appear. Find the one that was having problems, click on it, then select Remove.
A confirmation dialog box will appear, click Yes to confirm.
Repeat the same steps, but when you get to step 4, instead of Remove, click on Add.
Follow the on-screen prompt to re-add the account.
Although this method may work, and you’ll be able to sync again, you stand to lose all your data. This can be a rigorous process of remembering all details or important emails. To cushion yourself and avoid losing all data, you can move some of your Outlook folders to your Desktop.
In case you’re having issues with events, you can import them manually. To learn how to do that, check our how to import ICS file in Outlook guide. Even more, don’t hesitate to take a closer look at our guide on how to keep Outlook’s calendars selected.
Over onto other related issues. You may also experience other sync-related issues, such as the 0x8007274d error. Lucky for you, we’ve already discussed and come up with fixes to resolve it quickly.
Have you ever accidentally closed a tab on your browser, but when you went to restore it quickly, you couldn’t? Well, Chrome users have this as the latest headache. And while Google has built a fairly robust and powerful backup system, there are some obvious shortcomings.
Of course, you can always enable Chrome’s memory saver to avoid having to close tabs, but other factors can still raise this issue. If you have tried restoring your Chrome tabs, but it seems impossible, we’re here to make it easier for you.
Why did my tabs not restore?
If you’ve been using Google Chrome for a while, you probably know that you can restore your previous session. This feature is helpful if you close your browser accidentally or want to open up a website you were visiting earlier.
However, this is not always a guarantee. Possible reasons for this include:
Browser crash – If your Chrome browser crashed while you were in the middle of doing something, your tabs probably won’t be restored the next time you launch it.
Incognito tabs – When you close an incognito tab, it gets cleared out of memory, and any temporary files associated with it are deleted. As such, restoring incognito tabs becomes a bit difficult.
No Internet connection – If your computer is offline or there is no Internet connection, it will not be able to restore all your open tabs.
Virus infection – If some malicious programs are installed on your system, they may cause issues with saving your tabs automatically in Google Chrome.
Not enough memory – If there is not enough space available on your computer’s hard drive, then it may not be able to save all of your open tabs when you restart Chrome or shut down Windows completely.
Incompatible extensions – Some extensions may cause issues that prevent you from restoring your tabs.
Browser quota exceeded – This happens when there are too many tabs open in your browser at a particular time, and it runs out of memory while trying to restore them back again.
How do I force Chrome to restore tabs?
A few basic checks to perform before any advanced solutions include:
Restart the browser.
Use the keyboard shortcut combination of Ctrl + Shift + T and try to reopen the closed tabs.
Ensure you have enough memory in your Chrome browser by clearing the cache.
Check for any problematic extensions and disable them.
Right-click on an empty space after the last open tab on your Chrome browser.
Select Reopen closed tab.
You’ll have to repeat this step until you get to the tab you’re looking for or open all recently closed tabs.
This can be a tedious exercise if you have a lot of tabs open and are only looking to restore one. If you only want to reopen one or two tabs, proceed to the next step.
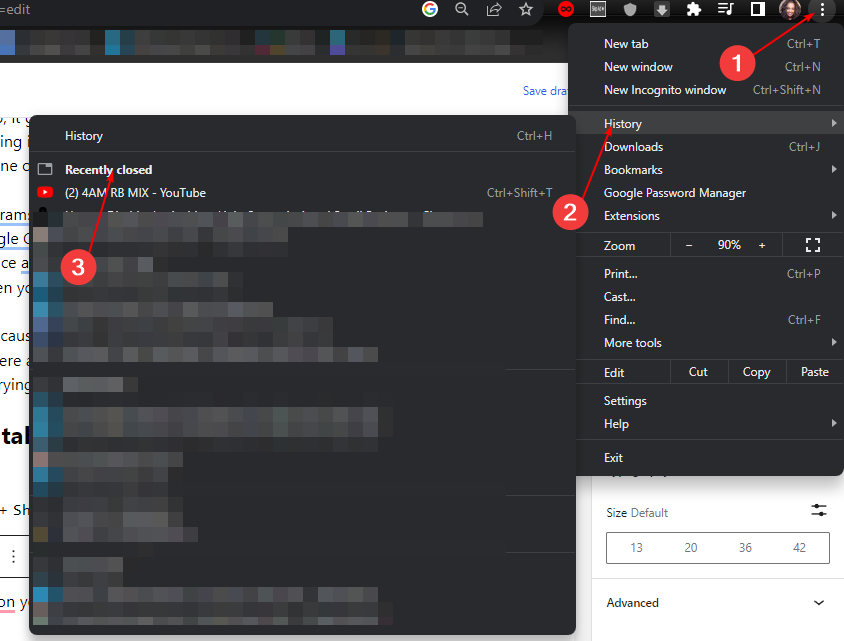
2. Restore from history
Click on the three ellipses at the top right corner of your Chrome browser.
Select History, then navigate to Recently closed.
Here, you’ll find all the tabs you’ve visited across all devices synced to your Google account.
Click on the three ellipses at the top right corner of your Chrome browser.
Select Bookmarks, then select Bookmark all tabs.
Now, whether you close a tab accidentally or your browser crashes in the middle of loading, this tab will be saved.
You can restore it using any of the methods listed above.
The downside to this method is that if you open hundreds of tabs in a day, you can imagine the number of bookmarks that will be saved. Bookmarks are ideally created to save a handful of your most visited sites or sites you want to return to, then remove them once you’re done.
Having such a high number of bookmarks can cause serious performance degradation on your Chrome browser. This is because it takes quite a significant amount of space, and you may notice some lag and freezing.
4. Restore from Journeys
Press Ctrl + H to open the History settings on your Chrome browser.
Navigate to the Journeys tab.
You’ll find tabs organized based on topics you’ve been searching for.
Click on the ones you wish to reopen.
This method of reopening closed tabs is more appropriate in situations where your search history is a bit all over the place, and you’ve accumulated a lot of history.
Journeys groups your tabs based on similar topics and based on the most recent searches. This way, you can easily jump to a section and click a tab to reopen.
So, there you have it. A Chrome browser crash can be scary, but it doesn’t have to be. With the above solutions, you can easily reopen closed tabs.
Imagine typing out a document but getting nowhere because Microsoft Word keeps deleting the text. You’ll be typing along and suddenly see that one or more letters or words have disappeared from your document. Sometimes even whole paragraphs will vanish.
The most likely reason is that some formatting applied to your document knowingly or unknowingly makes the text behave in unusual ways. So how do you get to type without having text disappear? Here’s how.
Why does Word keep deleting my text?
Have you encountered an issue where Word is automatically deleting your text? What could be the reason? We explore some possible causes below:
App crash – It is possible that your Office application has crashed in the middle of typing something, and your text cannot be retrieved from the system’s memory.
Accidental deletion – There are some shortcuts you can press while editing in Word that will delete your text. For instance, you may have intended to copy, but since Ctrl + X and Ctrl + C are so close, your fingers wandered, and you ended up deleting your text.
Keyboard malfunction – Keyboards, like any other piece of hardware, can start to act up. It could be a specific key or just the entire keyboard that automatically deletes text in your Word application.
Hidden formatting – Some documents contain hidden formatting, such as the overtype mode. This is common, especially if you’re not the document’s original author. In such instances, it can cause automatic deletion because it’s been programmed to replace anything you type.
Virus infection – We are all aware of how a virus attack on your PC can upset the status quo of your system. It has the ability to change how certain apps behave, and Word may be the casualty hence why it is automatically deleting text.
Driver errors – If your keyboard drivers are incompatible or outdated, they may cause errors.
How to stop text from erasing when typing?
Check the following first before you make any permanent changes:
Open a different Word document and observe whether the same behavior persists.
Launch your Word document, click on File, then select Options from the fly-out menu.
Click on Advanced.
Navigate to Editing options and uncheck the Use the Insert key to control overtype mode and the Use overtype mode boxes. Hit OK to save changes.
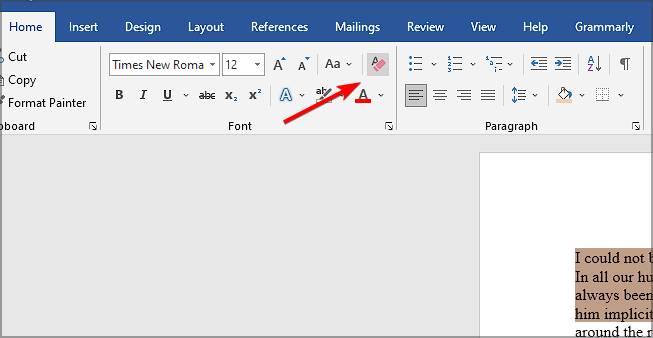
2. Clear all text formatting
Press the CTRL+ A combo to select all text on your Word document.
Click on the Clear all formatting icon.
This will reset the document to default settings and get rid of any formatting previously applied that may have been interfering with your text.
3. Run Microsoft Word in Safe Mode
Press the Windows key + R to open the Run command.
Type the following command and press Enter or click OK: word /safe
If you’re having issues with an app, try opening it while in Safe Mode and see if it works. If it does work, then one of the apps or services running in the background while using it may have been causing the issue.
Click on the Start Menu icon, search Windows Security, and click Open.
Select Virus & threat protection.
Next, press Quick scan under Current threats.
If you don’t find any threats, proceed to perform a full scan by clicking on Scan options just below Quick scan.
Click on Full scan, then Scan now to perform a deep scan of your PC.
Wait for the process to finish and restart your system.
Besides Windows Defender, we recommend our users check this antivirus program list for the highest detection scores and the best protection for their devices.
5. Repair MS Office
Hit the Windows key, type Control Panel in the search bar, and click Open.
Navigate to Uninstall a program under Programs.
Locate MS Office, click on it, and select Change.
Select the Online Repairoption and click on the Repairbutton.
6. Reinstall Microsoft Office
Hit the Windows key, type Control Panel in the search bar, and click Open.
Navigate to Uninstall a program under Programs.
Locate MS Office, click on it, and select Uninstall.
So that’s it for this post. Hopefully, you’re feeling a little less stressed about the situation now. Moving forward, make it a habit to save every few minutes such that even if your document experiences such bugs, you can restore your saved work.
Many of our readers have enquired whether they can connect multiple Bluetooth devices to their systems or not. This includes both casual users and professionals who rely on Bluetooth connectivity for their work or personal use.
By pairing multiple Bluetooth devices, they want to get stereo audio output with their wireless speakers, etc. Connecting a Bluetooth audio device to a Windows PC is simple, and in this guide, we will explain how pairing multiple Bluetooth devices on Windows works.
Can you connect multiple Bluetooth devices to Windows?
Yes. You can connect multiple Bluetooth devices to your PC. It could be two audio devices to achieve a stereo mix, or two pair of headphones to listen to movies together.
Basically, you can connect more than one Bluetooth device to a Windows 10 or 11 PC. The only condition that it must satisfy is that the devices should support Bluetooth 5.0. If the device doesn’t support Bluetooth 5.0 then you won’t be able to enjoy stereo mix.
While Bluetooth 5.0 is stable and offers stutter-free transmission of an audio signal, often it is observed that when multiple Bluetooth devices are connected to Windows, it results in frequent disconnections, recurring connection drops, audio loss, etc.
How do I connect to multiple devices using Bluetooth?
1. Using the manufacturer’s app for pairing
If you have bought a new Bluetooth device, then you should check whether the brand provides a dedicated app for pairing.
Brands like Bose, JBL, Sony, etc., offer a dedicated app for mobile devices and PCs, that will help you to pair multiple devices and change the audio settings.
Do note that not all manufacturers offer an app for Windows devices. So, you might have to do some research on which brands of audio devices offer a dedicated app.
2. Pairing devices that can connect with each other
Press the Win + I keys to open the Settings menu.
Click on Bluetooth & devices on the left pane.
Click on Add to pair a new Bluetooth device.
Select the Bluetooth option.
Connect your device.
Once the connection of the first device is complete, try connecting the other device following the same process.
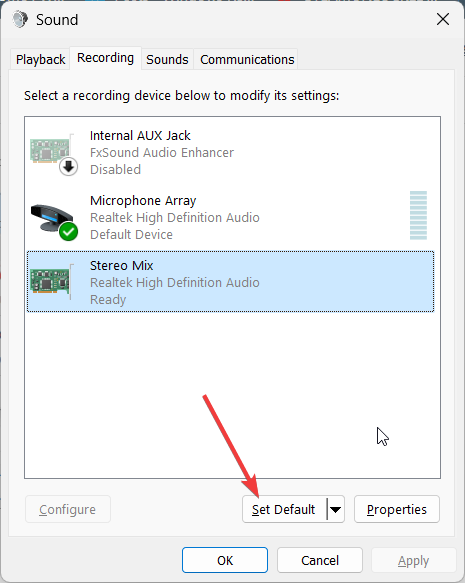
After the pairing is complete, click on the Speaker icon on the Taskbar and select the Sound Settings option from the context menu.
Scroll down and select More Sound settings.
Click on the Recording tab.
Right-click on an empty space and select Show Disabled Devices.
Right-click on Stereo Mix and select Enable.
Select Stereo Mix and click the Set default button.
Again select Stereo Mix and hit Properties.
Switch to the Listen tab and check the Listen to this device box.
Select your second speaker from the Playback through this device drop-down and click OK.
Hit Apply and OK to apply the changes.
By other devices, we mean devices from the same brand or model. You must try connecting two devices of the same brand and tweak the audio settings as mentioned above, as chances are they could pair up simultaneously.
Download Voicemeeter from the official website and install the program.
Click on the Speaker icon on the Taskbar and select the Sound Settings option from the context menu.
Scroll down and select More Sound settings.
Under the Playback tab, select Voicemeeter, right-click on it, and select Set as default device.
Plug both your audio devices into your PC using the audio port, audio splitter, or USB port.
Launch the Voicemeeter app, on the right corner you will see two buttons, A1 and A2.
Click on A1 and choose the first audio device from the list.
Repeat the same steps with A2 and select the second audio device.
You can even connect two speaker systems to listen to them simultaneously.
We have used the Voicemeeter app which is free to download and use. It is an excellent virtual audio mixer that allows you to connect multiple devices and listen to their output simultaneously.
Do note that in order to use the Voicemeeter app, you need to have Windows 10 or above installed on your PC. For Windows 11 users, there is another option called the Boom 3D software to get an immersive sound or stereo sound experience.
4. Using a Bluetooth transmitter
Apart from using software for listening to dual audio and pairing multiple Bluetooth devices on Windows, you can also make use of a hardware product known as a Bluetooth transmitter.
A Bluetooth transmitter or a Bluetooth adapter is a device that lets you connect a non-Bluetooth device connect to Bluetooth devices via the USB port.
However, there might be limitations with the Bluetooth adapter that you have as not all adapters support dual audio or multiple devices streaming. Ensure that the adapter supports Bluetooth 5.0 and A2DP.
For your convenience, we have a guide that lists down some of the best Bluetooth adapters that you can try on your Windows 11.
Is there a limit to how many Bluetooth devices can connect to a PC?
You can simultaneously connect up to 7 devices and a practically unlimited number of devices can be paired. However, this is true for Bluetooth 5.0-supported devices. Older versions of Bluetooth will have some other limitations.
You customized your Opera GX browser with your favorite wallpaper but it’s not working anymore. The reason can be anything but you can resolve this issue and get back to enjoying the customization.
Opera GX is a great browser that offers a lot of customization options. You can set up animated or live wallpaper and choose from a range of different designs, abstracts, landscapes, and a lot more.
Also, if you’re a passionate gamer, you can choose Opera GX mods to elevate your gaming experience and fix mods not working issues in case you’re having some troubles already.
Applying wallpaper on a browser isn’t a big task. You just have to choose your favorite one to personalize your browsing experience. But even this simple task can start causing trouble sometimes.
Opera users have reported malfunctioning wallpapers. Sometimes, the homepage wallpapers go black, stop responding, or stop displaying entirely. But fret not! you can resolve these problems.
Why has wallpaper stopped working on Opera GX?
Well, the reasons why your custom wallpaper stopped working on the Opera GX browser are many. But you can troubleshoot the underlying issue and enjoy personalization once again!
These are the main possibilities for your Opera GX live wallpaper not working problem:
Browser extension issues
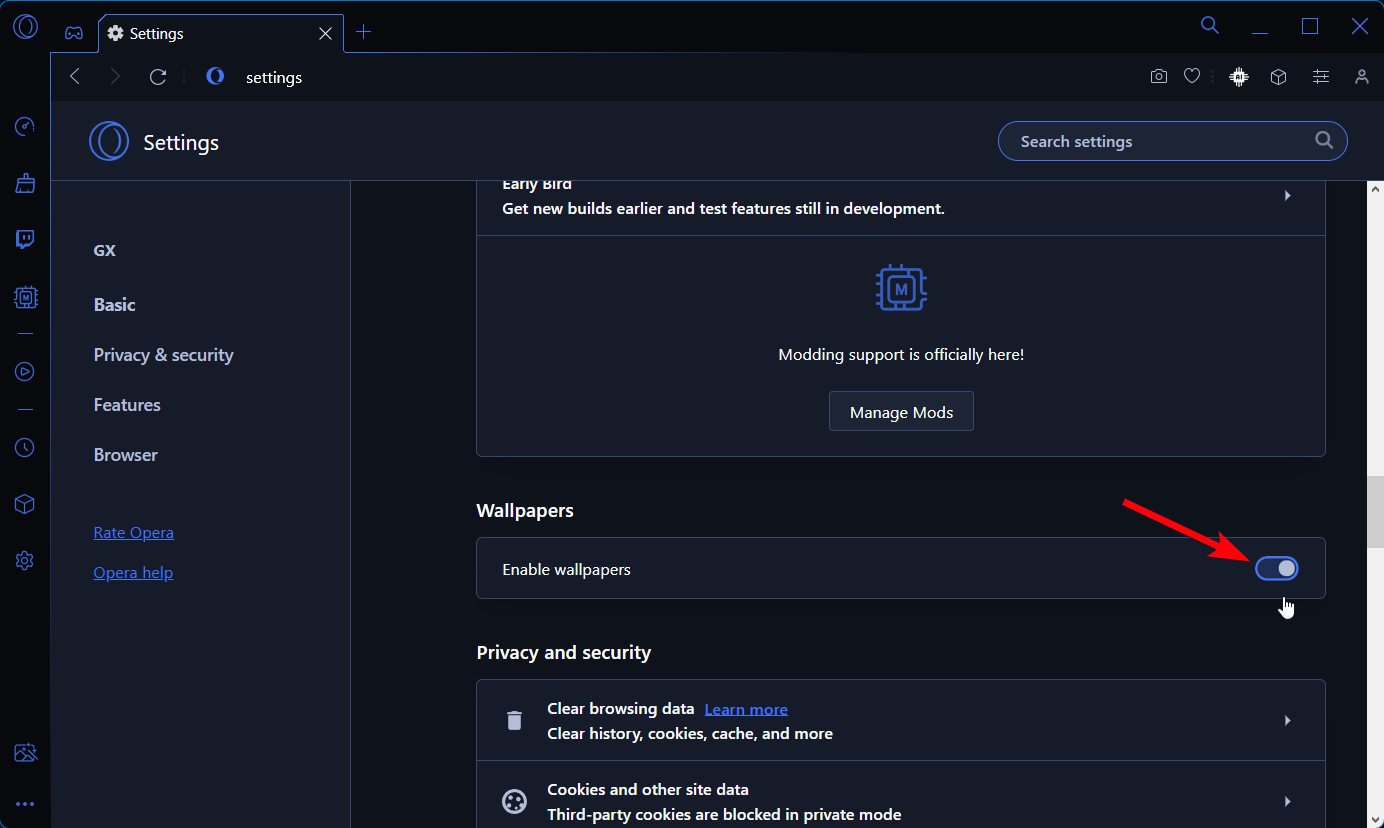
Disabled wallpapers in the settings
The battery-saver option is interfering with the wallpapers
Corrupted cache or cookies data
An unsupported operating system is also one of the issues that can stop wallpaper from working properly. Furthermore, so many background processes running in the background can cause wallpaper malfunction.
So, now you do know what’s stopping your custom wallpaper from responding. It’s time to get to the heart of the matter.
How can I fix Opera GX wallpaper not working issue on PC?
Below is the list of fixes that could resolve the issues like wallpaper not working on Opera GX browser on your Windows PC.
1. Check the browser settings
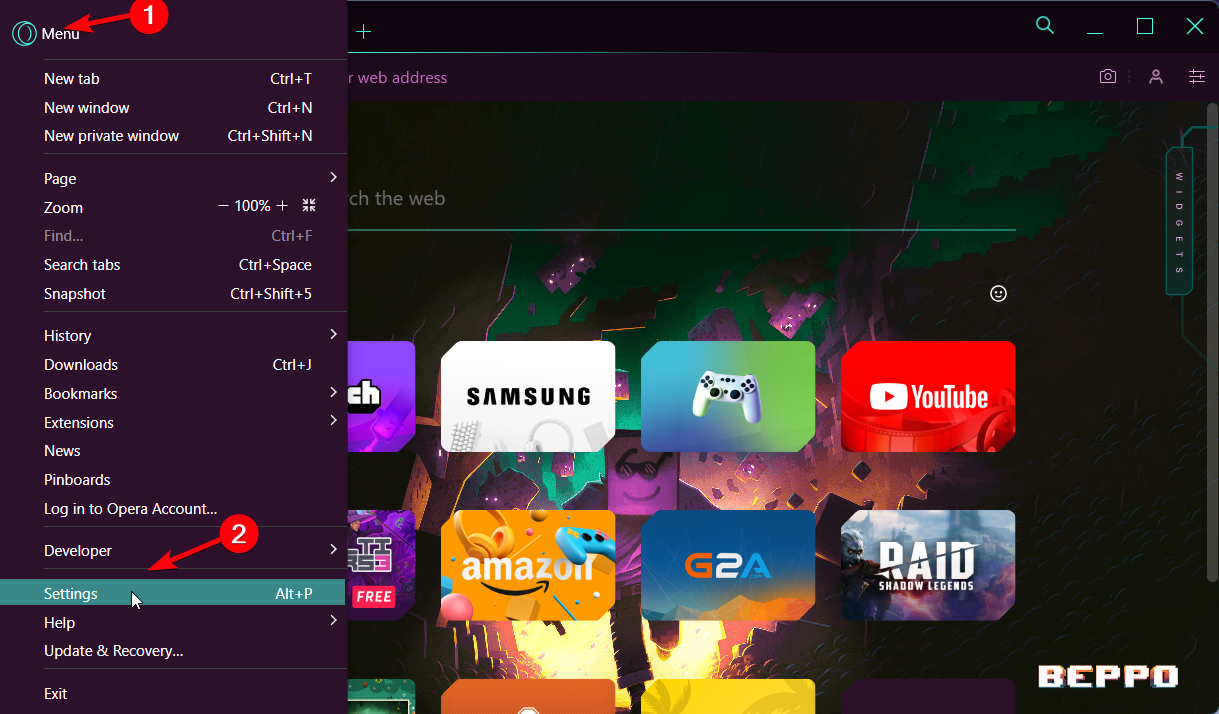
Click on the Opera logo and select Settings.
Scroll down from the top of the page to find Wallpapers.
See if the Use custom wallpaper option is enabled; if not enable it.
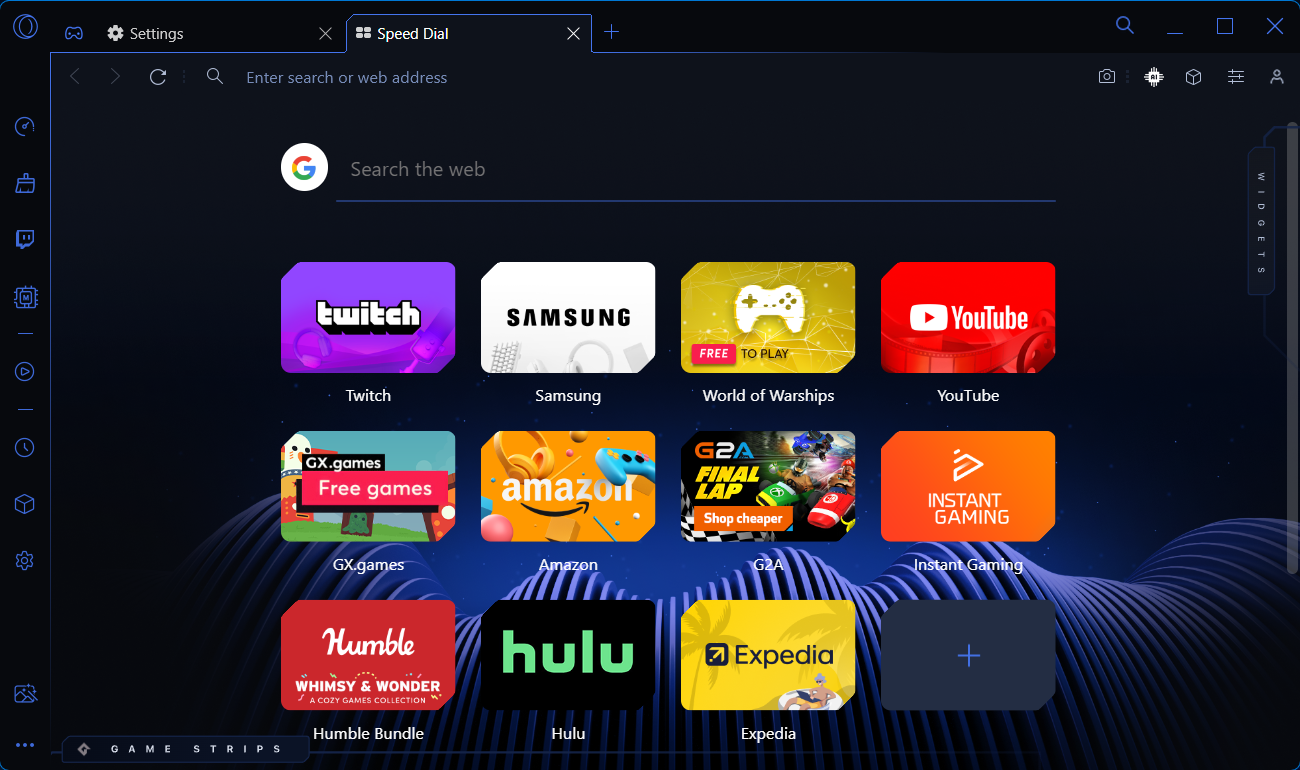
Open a new tab and see if the wallpaper is now working.
Shortly, this simple workaround may be a plausible cause if the custom wallpaper stopped working on Opera GX. In case it didn’t fix the issue already, check the next solutions.
2. Verify if the browser is up-to-date
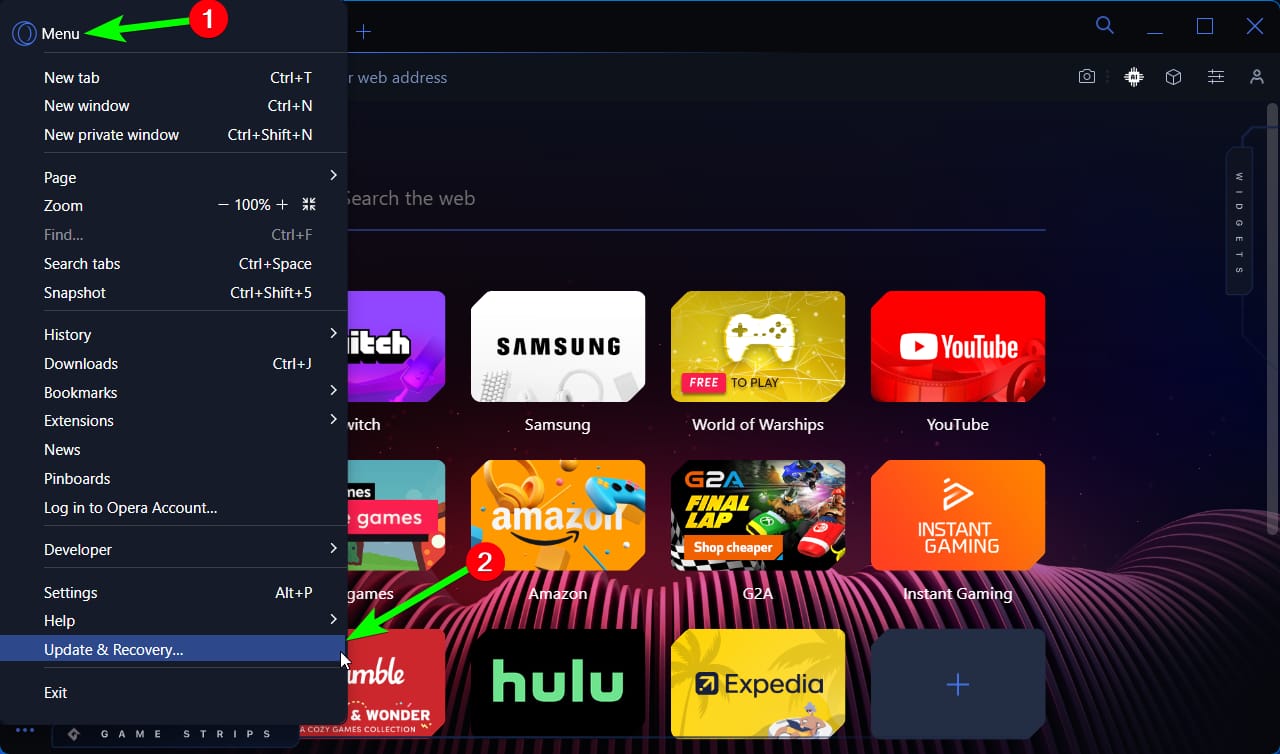
Select the logo button on the top-left and choose Update & Recovery.
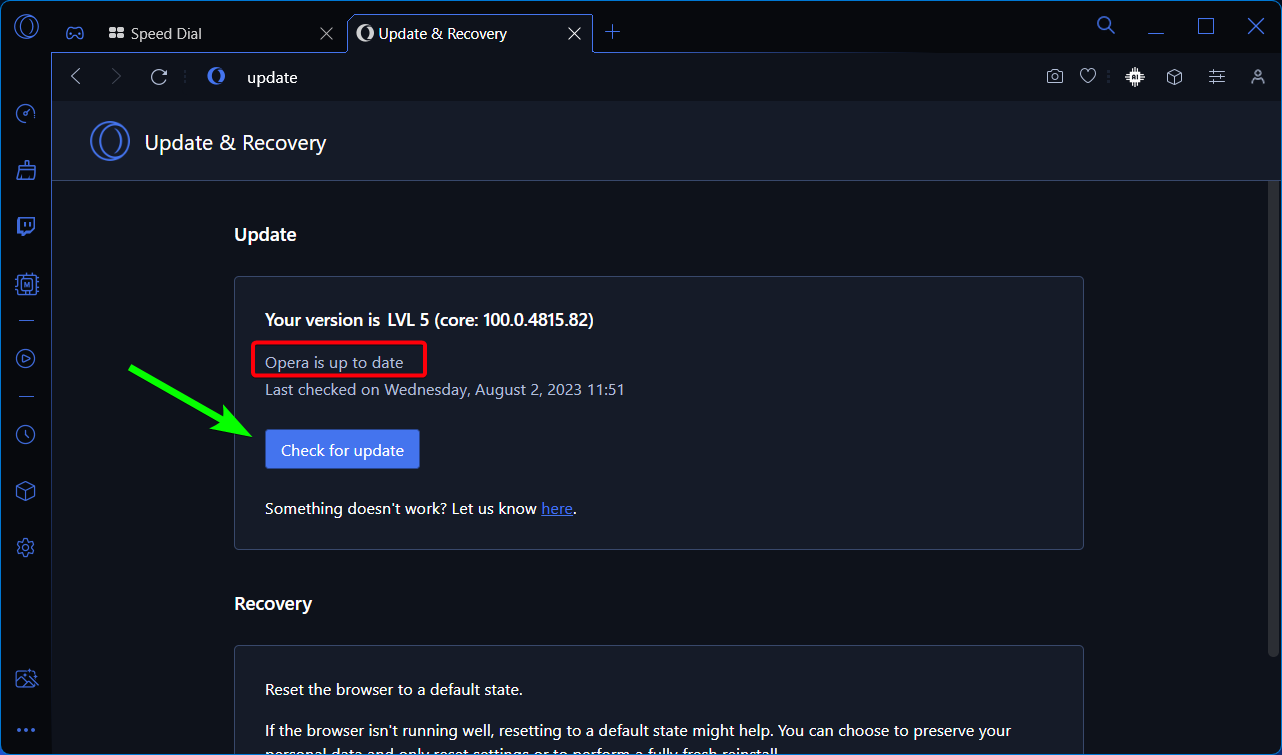
In this window, click on the Check for updates button.
Wait for a bit and see if the browser has the latest version.
If not, update it directly from there to fix the issue.
Opera GX
Get the latest update of the Opera GX gaming browser and fix the issue.
There is a chance to meet this problem due to corrupted extensions on your GX browser. To check this, follow these steps:
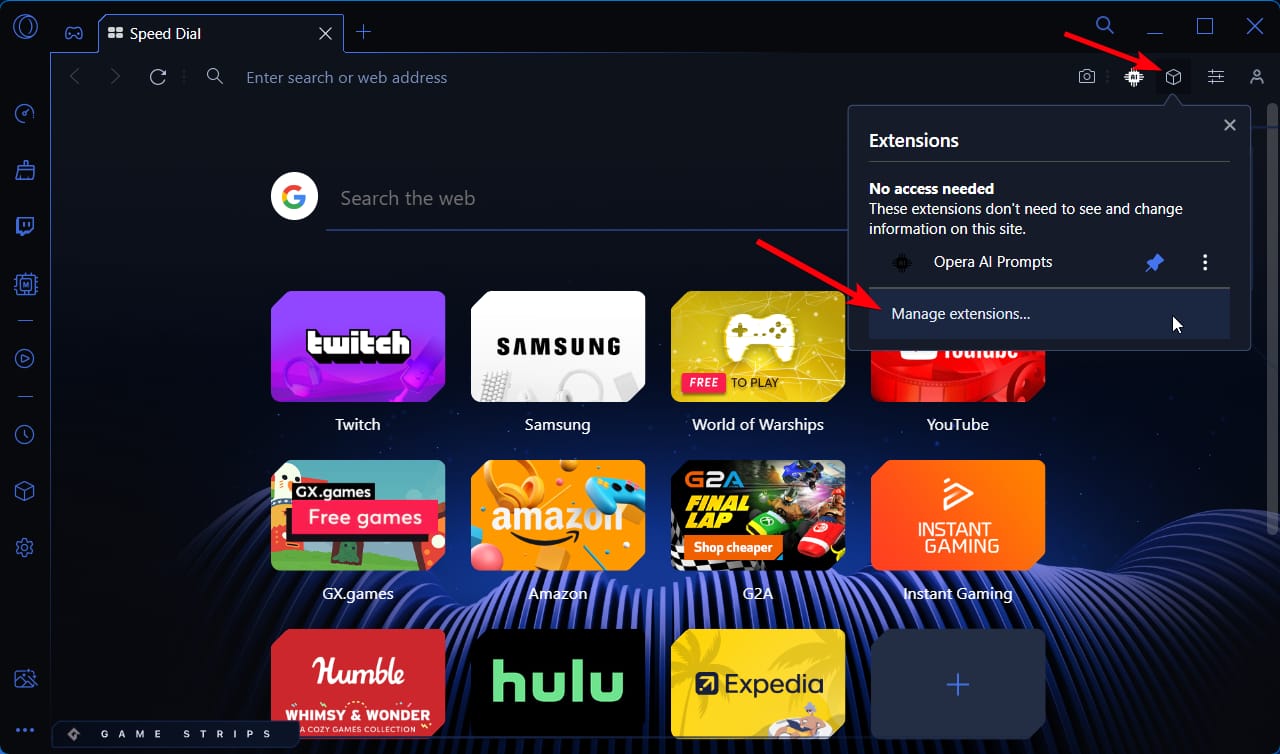
Click on the cube icon on the top-right pane to open Extensions.
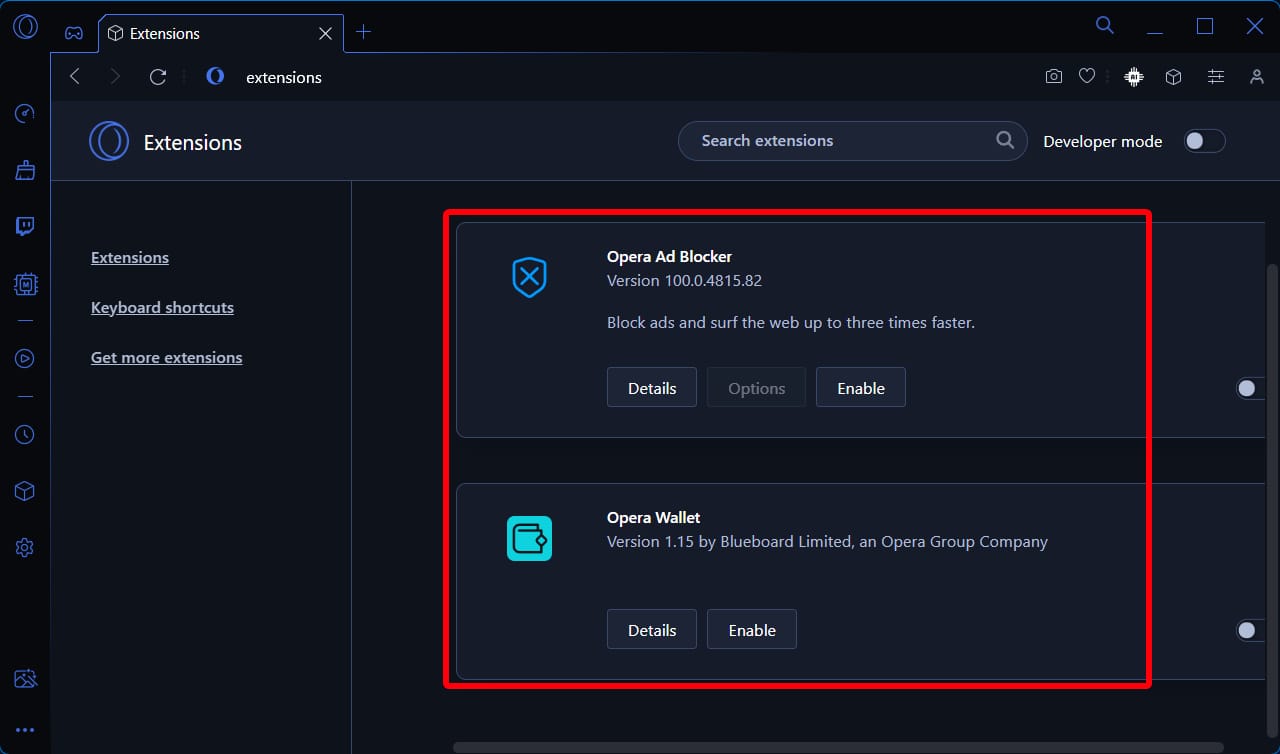
Select the Manage extensions button.
Next, check each extension you use to see if it’s behaving normally.
If it blocks or it gives you glitches, disable it from the menu.
Verify if the wallpaper is now showing on the homepage.
4. Toggle off battery-saver options
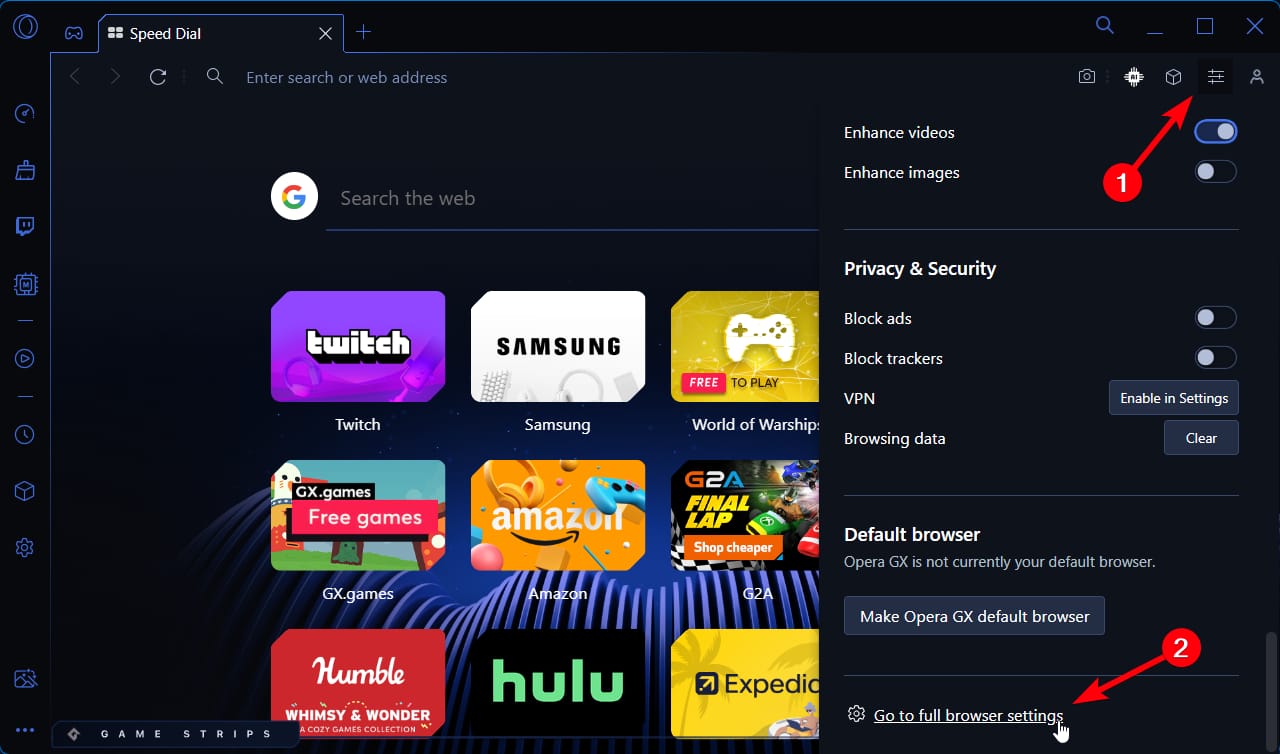
Select the Easy Setup button and go to the last Full browser settings option.
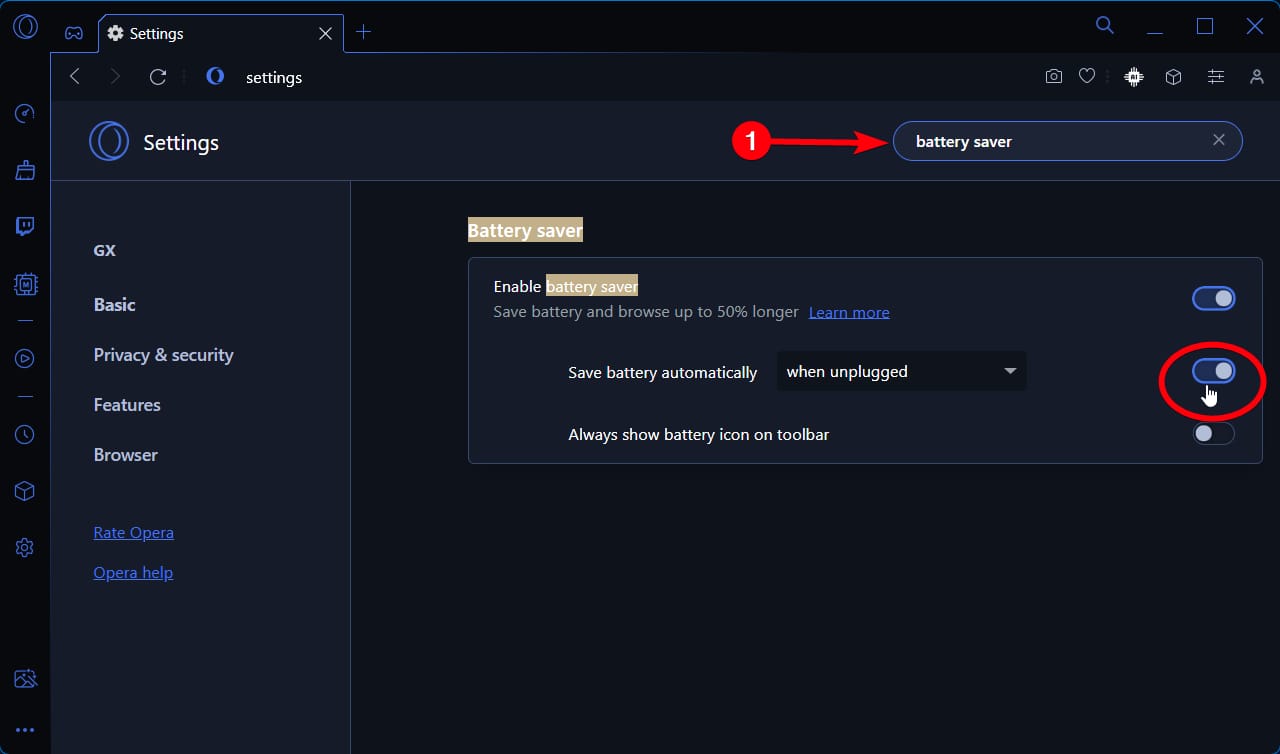
Go to the search box at the top bar and write Battery saver.
The results will appear so disable the Battery saver option there.
After disabling the option, check if the wallpaper is active.
5. Clear the cache data
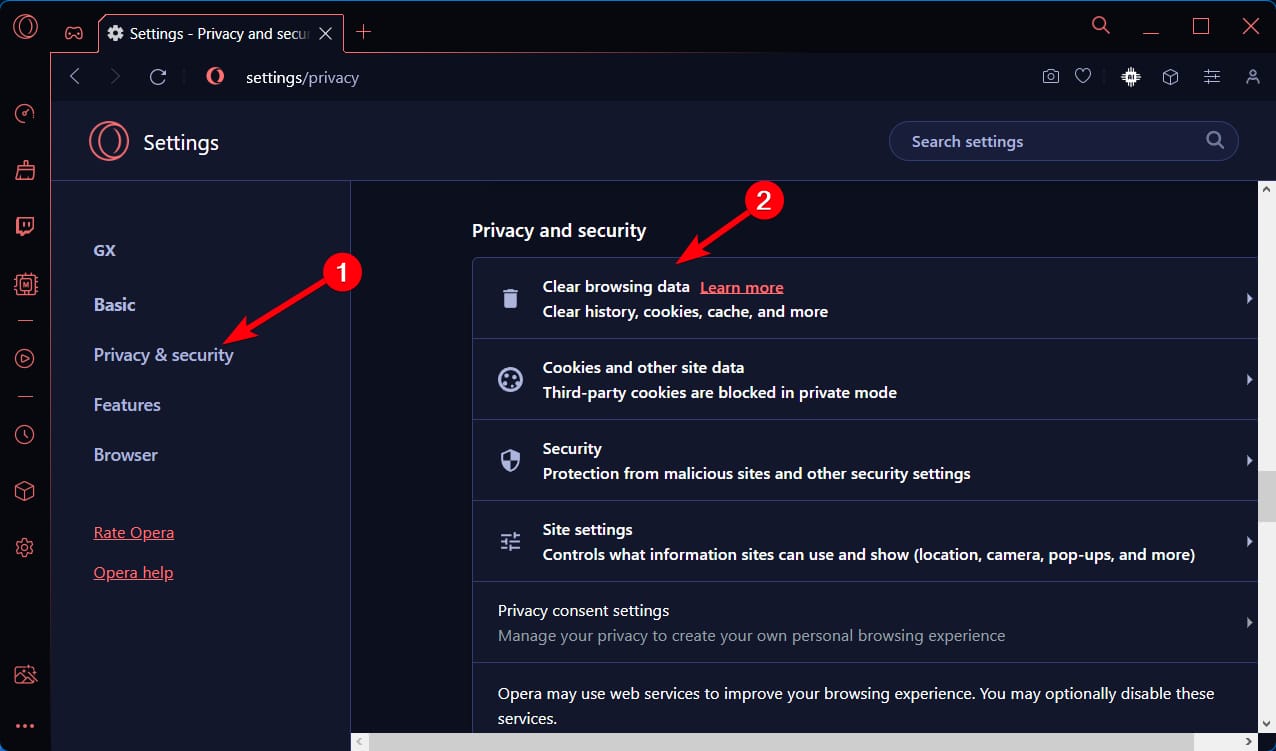
Click on the Opera logo button and select Settings.
Go to the Privacy & Security menu.
Now, click on the first option named Clear browsing data.
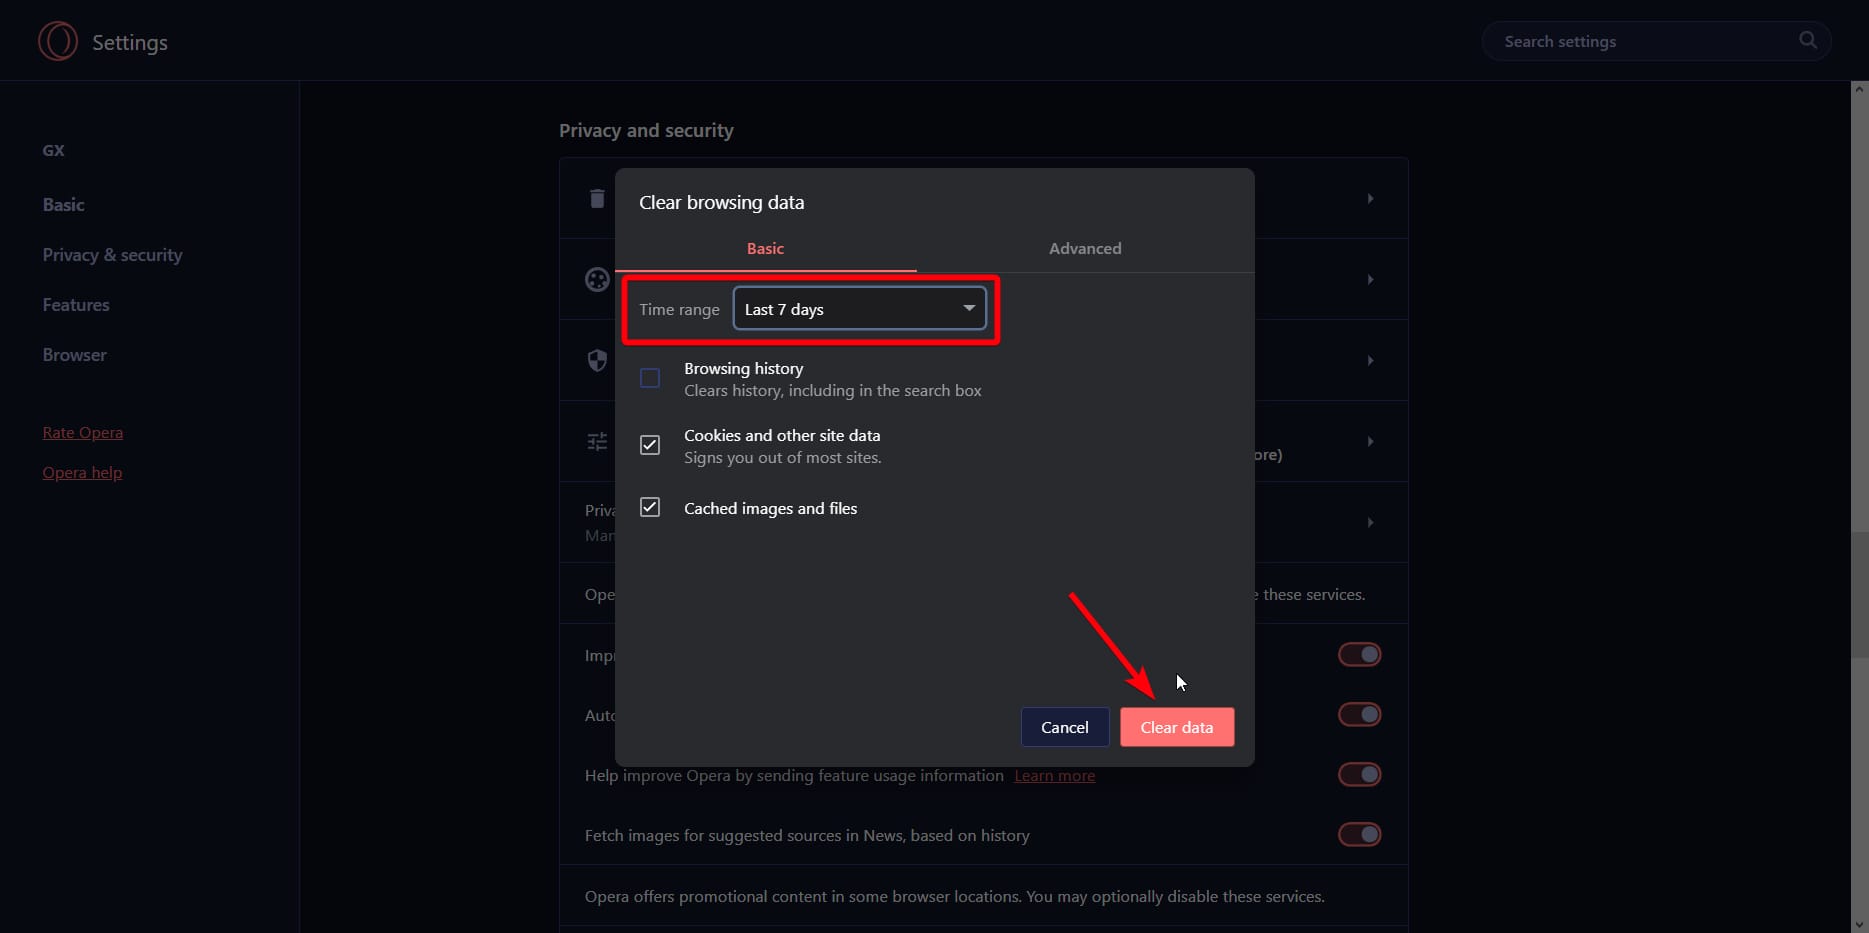
In the prompted window, select Cache images and files and set a time range.
Simply select the Clear Data button.
After applying the steps mentioned above, you should be able to finally get back to personalize your browser with your favorite wallpaper. It’s worth mentioning that these fixes work for live or animated wallpapers as well.
Be sure to apply our guided workarounds here to bring back control over this beloved gaming browser. You may be lucky and fix it with a couple of clicks. If it didn’t happen in your case, do not get stressed, and contact us in the comments section below for more help regarding wallpaper not working on Opera GX
Microsoft Azure is one of the growing leaders in the market of cloud services platforms. It provides basic and advanced cloud hosting services like virtual machines, machine learning, Kubernetes, and more.
Microsoft announced Azure in Oct 2008 and launched it on February 1, 2010, as Windows Azure (later renamed it Microsoft Azure on March 25, 2014).
It was behind its competitors Amazon Web Services (2006) and Google (2008) and had much catching up to do.
However, with years passing by, it has become one of the deserving competitors in the cloud computing market.
This guide will provide a detailed overview of Microsoft Azure, including revenue, user base, market share, and other statistics.
What percent of Microsoft is Azure? (Revenue and growth)
As per Microsoft’s recent report, Microsoft Azure has generated the highest-generated revenue, $75.3 billion in 2022, which is commendable, given its rocky start and already established competitors.
If we compare the cloud services revenue from 2017, Azure was only able to generate $27.5 billion, which is only 36.5% of 2022 revenue. This is not a sudden growth; let us check the revenue generated for the last six years to understand more:
In 2020, the cloud computing platform recorded its highest worldwide market share, i.e., 31%, indicating a sudden spike compared to the numbers recorded for 2018, 2019. Let us have a look at the same:
Year
Revenue
2023
26%
2022
21%
2021
20%
2020
31%
2019
16.9%
2018
26%
With the latest market share recorded, this cloud computing company became the second-largest cloud service provider, with only AWS standing in the way.
How many people are using Microsoft Azure?
According to Azure Active Directory, in 2022, there were 722.22 million Azure users, of which 40% of users are from the United States of America. Let us see the growth in numbers:
Year
Number of users
2017
715 million
2018
716.44 million
2019
717.88 million
2020
719.32 million
2021
720.76 million
2022
722.22 million
According to statistics by Microsoft, Azure is used by 65.11% of male and 34.89% of female users, which means 30.22% of men use Azure more than women. These statistics could be accurate, given that there are more male than female employees in the tech industry.
27,751 websites in the United States use Microsoft Azure services, followed by The United Kingdom with 8411 websites, and Japan with 5641 websites.
Fun fact if you have paid Office 365 subscription, then you are using Azure services, and Microsoft 365 uses Azure Active Directory (Azure AD) to manage user identities behind the curtain.
How many companies are using Microsoft Azure? (Azure market share)
98% of tech companies worldwide use cloud services in one way or another. According to a report on Statista, 486,738 companies are dependent on Microsoft Azure for its cloud services.
Also, since 2015, about 70 percent of organizations globally have used Azure once for their services. The most used services offered by the company are machine learning and artificial intelligence, data management, developer tools, and Internet of Things apps.
If we talk about the industries, the cloud platform is mainly used by Information Technology and Retail, followed by Computer software, Construction, and Automotive.
If we talk about the top countries using Microsoft Azure, it is the United States with 40%, followed by the United Kingdom with 8%.
According to a report by Enlyft, 63% of companies using Microsoft Azure are small, with less than 50 employees, 26% are medium-sized, and 11% are with employee strength is approx 1000.
Microsoft Azure allows its customers to save structured NO SQL data on the cloud and provides storage for flexible datasets such as web apps, address books’ user data, and more, making the companies trust the company.
According to a report on Contino, Verizon is one of the top Microsoft Azure customers. It has a yearly contract of $79.9 with the company, followed by MSI Computer, LG Electronics, Century Link, and NTT America.
Looking further, you will understand that some giant sea fishes, like Starbucks, Sears, Jeep, and Volvo, use Microsoft Azure for hosting.
What is the geographical distribution of Azure users
According to statistics from similarweb, the average user base of Microsoft Azure lies between the age of 25-34, which is 32.38% of the market. Other age groups’ share is as follows:
The platform is usually used in the United States, as stated earlier, with 93.53 % of users accessing it via desktop; let us check the numbers in detail
Country
Access Percentage
Desktop
Mobile
United States
38.23%
94%
6.47%
India
13.50%
86.52%
13.48%
United Kingdom
7.11%
86.54%
13.46%
Netherlands
4.68%
95.45%
4.55%
Australia
2.31%
69.28%
30.72%
According to a Semrush report, the average time spent per visit on the cloud computing platform is 25 minutes, 31 seconds.
As per the traffic generated on azure.com, the United States, with 18.20%, is leading, followed by India with 7.76%, Brazil with 5.44%, the United Kingdom with 4.89%, and Poland with 3.97%.
What products and services does Microsoft Azure have?
From virtual machines, SQL database, Cosmos DB, App Service, and Azure Data Factory, Azure Storage Explorer to Event Grid, Microsoft Azure has several products and cloud-based services to offer; some of the popular ones are listed here:
Service
Type
Used for
Free (monthly usage)
Free period
API Management
Integration
Manages APIs across all platforms, comes with a hybrid multi-cloud platform
1 million calls free per month
Always
App Service
Compute
Allows you to create robust apps for any device or platform using tools like PHP or Node.js
10 web/mobile/API apps with 1 GB storage 1 hour per day
Always
Automation
Management and governance
Simplifies the process of cloud management with automation
500 minutes of job runtime
Always
Azure Database for MySQL
Databases
Enables you to host a fully managed, scalable MySQL database
750 hours of Flexible Server—Burstable B1MS Instance, 32 GB storage, and 32 GB backup storage
12 months
Azure DevOps
Developer tools
Allows to build apps in any language using Ci/CD, Git repos.
5 users with unlimited private Git repository
Always
Azure Kubernetes Service (AKS)
Compute
Helps deploy & manage containers using desired tools
Free
Always
Bot Service
AI + ML
Develops enterprise-grade bots on demand
Free
Always
Database Migration Service
Databases
Allows you to migrate on-premises database to the cloud
Free for Standard Compute
Always
IoT Edge
Internet of Things
Expand cloud intelligence & analytics to IoT edge devices
Free
Always
Machine Learning
AI + ML
Allows to develop & run Python and R models on the desired platform
Free
Always
SQL Database
Databases
Enables you to create an SQL database that comes with inbuilt intelligence
250 GB S0 instance with 10 database transaction units
12 months
Virtual Machines—Windows
Compute
Creates Windows VM with customized storage in a few seconds
750 hours B1s burstable VM
12 months
Visual Studio Code
Developer tools
Lightweight code editor for cloud development
Free
Always
Virtual Machines—Linux
Compute
Allows to create Linux VM with customized capacity in a few seconds
750 hours B1s burstable VM
12 months
Open Datasets
AI + ML
Speeds up ML with organized datasets
Free (egress charges may be levied)
Free
Is Azure a future-proof company?
Even though Microsoft Azure started a little late in the race, compared to Amazon Web Services, and Google Cloud platform, it has come far.
In 2019 Microsoft signed a 10 billion dollar contract with the Pentagon to provide cloud computing services. The company has also won huge deals with NBA & BlackRock.
With the latest numbers and revenue indicators, it seems the company is doing well, and with more organizations putting their trust in cloud computing services, there is scope for more.
To conclude, Microsoft Azure statistics show that it is one of the popular cloud platforms which has come to stay, and its revenue growth, increased userbase, and impact on different industries are evidence of the same.
If you encounter issues on Microsoft Azure, like Azure Directory sign-in issues, we recommend you check out this guide to find easy solutions.
Please feel free to give us any information, tips, and your experience with the subject in the comments section below.
Bad sectors on hard drives are pretty scary, as it is usually difficult to recover data from them. There are different types of bad sectors: Logical and physical bad sectors.
The type of bad sector you are dealing with goes a long way to determining if your data is recoverable. In this guide, we will show you the possible ways to recover your data from your hard drive, irrespective of the type of damage done to it.
What is a bad sector in a hard drive?
A bad sector on a hard drive simply means one of the multitude of sectors on your drive is damaged or corrupt. As mentioned earlier, the two known types of bad sectors are physical and logical bad sectors.
The physical bad sector indicates that there is physical damage to your hard drive surface. In this case, the drive usually becomes unusable, and data might not be recoverable.
The logical bad sector, on the other hand, is usually caused by corruption from malware, power failure, and other factors. Data here can sometimes be recovered depending on the damage done.
The concerning fact about bad sectors is that the more you have on your hard drive, the higher the risk that it becomes unusable. Also, bad sectors lead to data loss, and there is no certainty that you can recover them.
What causes a hard drive to have bad sectors?
There are a series of potential factors that can cause bad sectors on a hard drive. Below are some of them:
Malware infection: Viruses can destroy some of your hard drive platters and other elements used by the CPU, leading to bad sectors.
Power outage: If you abruptly shut down your PC or remove the hard drive power cord it is in use, then some of its sectors are likely to get damaged.
Aging: Like every other device, your hard drive becomes weak with time. So, if you have been using the same drive for a very long time, some of its sectors are likely to become bad.
Shaking or dropping: If you frequently shake your hard drive or it drops from a considerably high ground, its transistors and other parts can get permanently damaged.
File System error: This is one of the leading causes of bad sectors in hard drives. What makes this worse is that the data on the drive will be permanently lost.
How can I recover data from a Hard Drive with Bad Sectors?
1. Create a recovery drive
Prepare a new and empty external hard drive of 16 GB size ready to prevent issues during the process.
Press the Windows key, type create recovery, and click Create recovery drive.
Next, check the box for Back up system files to the recovery drive.
Click the Next button to continue.
Now, connect the 16 GB USB drive to your PC and choose it.
Click Next.
Finally, click the Create button and wait for the process to complete.
After downloading process completes, your recovery drive should now be ready. With this, you will have a backup of the data on the drive with bad sectors.
Note that using an empty USB drive is important because this process will wipe its contents. Also, this process will take time because many files will be copied.
Hence, you must be patient and ensure your device is connected to a power source and active.
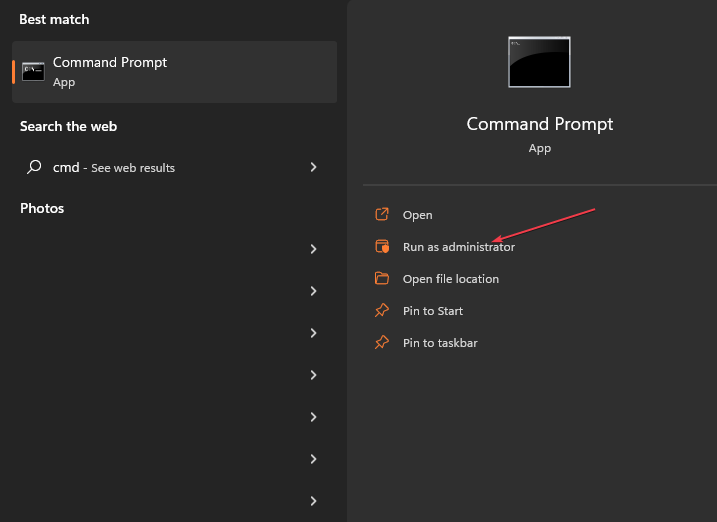
Press the Windows key + S, type cmd, and select Run as administrator under Command Prompt.
Type the command below and hit Enter to run it: chkdsk c: /f /r
Now, press Y when prompted.
Finally, wait for your PC to restart, and the command will check for errors on the specified disk.
In some cases, instead of trying to recover data from the hard drive with bad sectors, it is better to try to repair the drive. This is especially true if the bad sectors are many and you are finding it hard to recover your data.
Press the Windows key, type defrag, and select Defragment and Optimize Drives.
Choose the drive you want to defragment and click the Analyze button.
Wait for the process to complete.
Now, select the drive again and click the Optimize button.
Finally, wait for the optimization to complete. This takes time, depending on the level of defragmentation required.
Data is stored on your hard drive in different sectors, and the drive need to rotate so that the head can access it when there is a need to access data from it.
But when you delete or move a file, the sectors on the drive become empty. This creates space between your data which causes problems in those sectors.
To fix this and recover your data from these somewhat problematic or bad sectors, you need to defragment the drive. Note that this is only needed on SSD but not HDD, as SSD has no moving parts.
4. Use third-party software
While there are different built-in tools you can use to recover your data from a corrupt hard drive, things might not work in some cases. In this case, you need to employ the service of specialized data recovery software.
The best of these tools will allow you to clone the faulty drive to retrieve the data on it, while some can even repair the bad sectors.
For instance, we suggest you the leading data-recovering tool for gaining back your valuable data from any storage device including hard drives.
Yes, you can prevent bad sectors by performing regular hard drive maintenance. This does not only improve the life span of your drive but also prevents data loss. Below are some of the common maintenance tips to apply:
Clean your hard drive regularly
Handle hard drive with care
Perform a frequent malware scan
Disconnect the drive properly and prevent static electricity
We have come to the end of this detailed guide on how to recover data from hard drives with bad sectors. While you can always repair the bad sectors, it should not be your first option, as it usually leads to total data loss.
Recovering your data, as shown in this guide, gives a lifeline for rescuing something from the drive. However, we must mention that there is no guarantee that you will be able to get all or any of your data back.
Expanded features, gorgeous graphics, and the ultimate WWE experience. Hit the ring with a deep roster of WWE Superstars and Legends including Roman Reigns, “American Nightmare” Cody Rhodes, Ronda Rousey, Brock Lesnar, “Stone Cold” Steve Austin and more!
2K SHOWCASE: INTERACTIVE SPORTS DOCUMENTARY Play through the key moments and toughest opponents of John Cena’s storied 20-year WWE career. And in a franchise-first, take on the role of each marquee opponent – some of WWE’s greatest of all time – as you aim to take down Mr. Hustle, Loyalty, and Respect.
IT’S WARGAMES The fan-favorite action-packed WarGames makes its debut in WWE 2K23 and delivers heart-pounding 3v3 and 4v4 multiplayer mayhem inside two side-by-side rings, surrounded by a double-steel cage!
Descenders is extreme downhill freeriding for the modern era, with procedurally generated worlds, and where mistakes have real consequences. Will you lead your team to glory and become the next legendary Descender?
• Procedurally generated worlds: Take on different jumps, slopes and hillbombs every time you play • Freestyle bike controls: Control every subtle movement of your rider, with an in-depth physics system made for slick whips and scrubs • Risk vs reward: Push your rider for massive scores and combos — but bail too many times and you might lose it all • Build your Rep: A fully-featured online Rep system lets you show off your worth, and earn new bikes and threads • Become the next Descender: Can you survive the game in a single run, and reach the ranks of the legendary Descenders?
DRAGON BALL FIGHTERZ – FighterZ Edition
The FighterZ Edition includes the game along with the FighterZ Pass, which adds 8 new mighty characters to the roster.
Partnering with Arc System Works, DRAGON BALL FighterZ maximizes high end Anime graphics and brings easy to learn but difficult to master fighting gameplay.
3vs3 Tag/Support Build your dream team and sharpen your skills to master high-speed tag combinations.
Thrilling Online Features Ranked matches, interactive lobby, crazy 6-player Party Match… There is something for every taste!
Exclusive Story Mode Discover a never-seen-before scenario featuring Android 21, a brand new character whose creation was supervised by Akira Toriyama himself.
Learn more about Xbox Free Play Days
Xbox Free Play Days delivers a new set of games (almost) each and every week for members to try. It’s a great way to try out something new and maybe even find the next must-play title. Learn more about the program over on the Xbox Free Play Days FAQ page.
While attempting a file transfer in Windows, our readers have reported triggering the 0x800700E1 error. The message reads Operation did not complete successfully because the file contains a virus or potentially unwanted software, preventing you from completing the file transfer.
If you’re trying to send a file but are stuck on the 0x800700E1 error, this article briefly discusses it and provides steps to help you resolve it.
What is error 0x800700E1 on Windows?
During a file transfer or a running backup operation of your PC, you can experience an error that prevents you from completing the operation. Many errors can trigger this, but it is usually associated with the 0x800700E1 error code.
It occurs during a virus scan or any related Windows operation.
Prevents current operations from completing successfully.
Often caused by corrupted system files, viruses, and malware on a PC.
Once a PC displays the error 0x800700E1, it automatically cancels the operation and cannot be restarted until fixed.
How do I fix Windows virus error 0x800700E1?
Before we proceed with more advanced solutions, here are a couple of quick fixes you can attempt:
Perform a full scan using Windows Defender or, even better, a third-party antivirus.
Unplug all your external devices and restart your PC.
Perform a clean boot or enter the safe mode to troubleshoot the problem.
If the error message persists, use the following troubleshooting techniques to fix it.
1. Delete System images and backups
Left-click the Start menu, type the control panel, and launch it.
Then open the Backup and Restore (Windows 7) and click on Manage space in the new window.
In the new window, click View Backups.
Then select the backup you want to delete and click on the Delete button.
Doing this will delete all your earlier system images, thereby saving more disk space
This will delete your earlier system images and keep only the latest System Image, thereby freeing up disk space to fix the 0x800700E1 error.
2. Temporarily disable Real-time protection
Press the Windows key, type Windows security, and hit Enter.
Click on Virus and Threat Protection and Manage Settings.
In the next window, click the toggle button next to Real-Time Protection to turn off the feature. (You can also disable more options in this tab).
Close the Windows Security window and restart your PC to check if the error is resolved.
The Windows Security app protects your PC from harmful files and applications but can also infringe on the functionality of Windows by preventing specific third-party applications from operating.
3. Disable the Windows Firewall
Press the Windows key, type Windows security, and hit Enter.
Click on Firewall & Network Protection and select any network profiles – Domain, Private, or Public.
Under the Microsoft Defender Firewall, click the toggle button to turn it on or off.
However, firewalls can unintentionally block legit Windows operations leading to errors like the 0x800700E1; temporarily disabling the firewall can help fix the error.
More specifically, we highly recommend scanning your PC with a multi-layered antivirus that offers a high detection rate and powerful malware removal tools.
Press the Windows key, type cmd, and select Run as administrator.
Click Yes in the User Account Control (UAC) window.
In the command prompt window, type in the following command and hit Enter: sfc /scannow
Then type the following and hit Enter: DISM.exe /Online /Cleanup-Image / Restorehealth
Wait for the scan to be complete, close the command prompt, and restart your PC to check if the error is fixed.
Corrupt system files can trigger errors on Windows PCs; if your PC has such files running, it can cause the 0x800700E1 error. You can check out our guide on how to fix the Windows resource protection error on Windows.
The 0x800700E1 error is standard among Windows users and is usually triggered during a Windows backup or file transfer; whichever is the cause of the error, you can fix it by applying the steps listed in this article.
One of the best methods to keep files safe and prevent unauthorized access is through file encryption. Encrypted files are converted into a secret code known only to designated recipients. However, some of our readers have asked if antivirus can scan encrypted files.
Hence, this article will provide relevant information on whether an antivirus can scan encrypted files on your Windows PC.
What is an encrypted file?
An encrypted file is a file that has been transformed using encryption algorithms to protect sensitive information stored in the file from unauthorized access or view. Also, some other factors to note about an encrypted file are:
Encryption can block essential documents, photos, and directories for data confidentiality.
Only users with the password or decryption key can unlock and gain access to the contents.
There are two primary types of encryption: symmetric and asymmetric.
Symmetric encryption uses the same key for both encryption and decryption.
Asymmetric encryption involves a pair of related keys: a public key for encryption and a private key for decryption.
Now that you know what an encrypted file is, let’s proceed to how to decrypt an encrypted file.
Can antivirus scan encrypted files?
No, the antivirus is not capable of scanning encrypted files. Encrypted data is designed to remain inaccessible to anyone without the encryption key.
To that effect, only the person with the decryption key can access the file’s contents. Since your antivirus does not know the key, it cannot read or open the encrypted file.
How do I decrypt an encrypted file?
Before engaging in any solution, you should consider performing the following:
Request essential keys or credentials to decrypt the file from the sender.
Check the steps below if you still have issues decrypting a file.
1. Decrypt files using Command Prompt
Left-click the Start menu, type cmd, and click Run as administrator.
Select Yes in the UAC prompt.
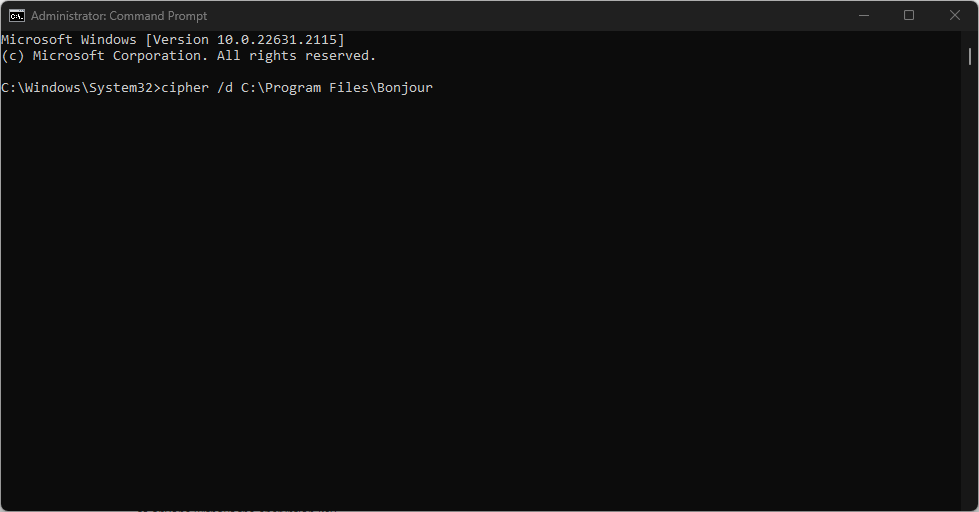
Input the following and press Enter: cipher /d /C:"Path"
Replace the Path with the file location.
This works if you previously encrypted the file using the Cipher command and you’re using the exact same PC and copy of Windows as you did when you encrypted it.
2. Via file properties
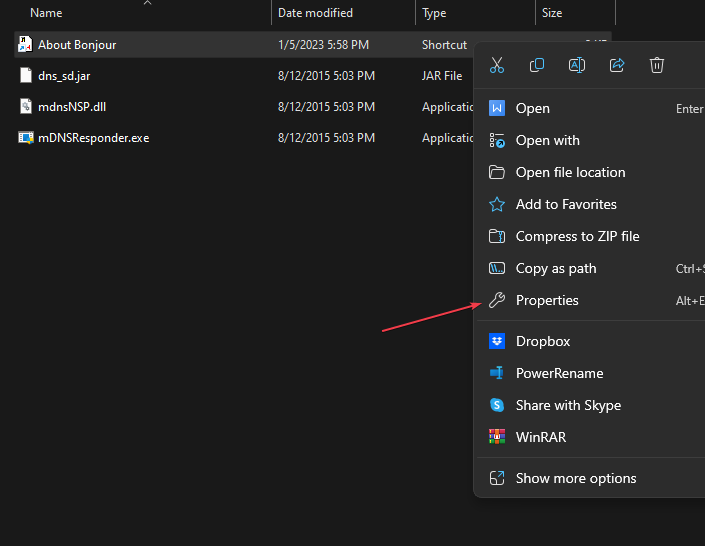
Open the File Explorer, locate the file, right-click it, and click Properties.
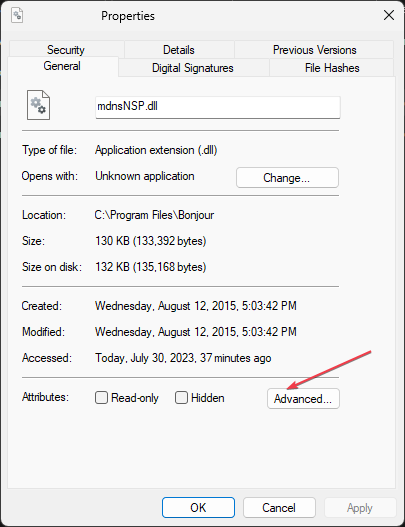
Select Advanced in the General tab.
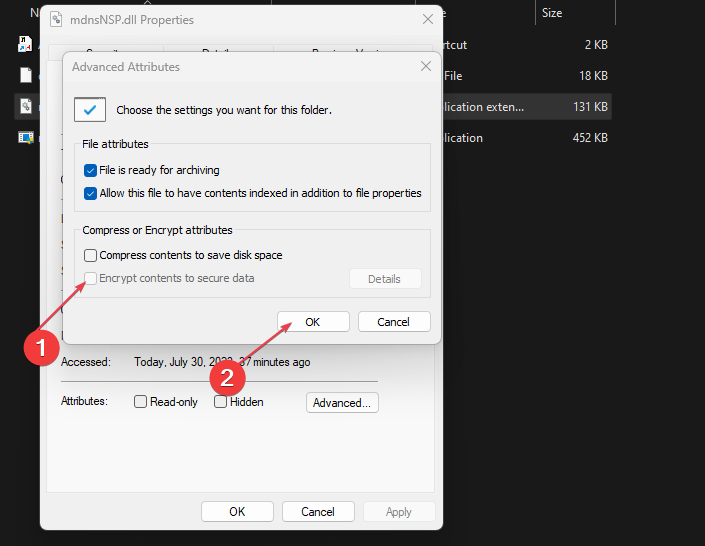
Then, uncheck Encrypt contents to secure data and click OK.
The first line of truth is there’s no perfect security. A tech-savvy individual with the necessary resources (time, the key, and a strong motive) can crack an encrypted file. However, the buffer can be challenging to break into an encrypted file.
The security of an encrypted file depends on the following factors:
The strength of the encryption algorithm,
The length and strength of the encryption key or password.
And the protection of the encryption key.
Generally, well-implemented encryption provides a high level of security, making it extremely difficult for unauthorized individuals or third-party tools to access the file’s contents.
And that’s it on how antivirus can scan encrypted files. You can work your way through any of the solutions provided above.
If your WD external hard drive isn’t showing up in File Explorer, it means your computer detects the physical connection but doesn’t recognize the drive properly.
This issue can be caused by a faulty USB driver, damaged port, file system incompatibility, or partition errors. Below, we’ll show you how to address all of these issues so your hard drive will finally show up.
What can I do if my WD external hard drive doesn’t show up?
1. Check the WD drive with disk management
Press the Windows + R keys, Type diskmgmt.msc in the dialog box, and press Enter.
Locate and right-click on the WD hard drive, then select Initialize Disk.
Select the partition style (MBR and GPT) and press OK.
Now, right-click on the unallocated WD external hard drive.
Choose New Simple Volume and follow the on-screen instructions to create a new partition.
Next, right-click on your WD external hard drive and select Change Drive letter and path from the options.
Assign a new drive letter to your WD external drive and press OK.
Ensure that you backup important files before running the disk management tool. However, if the disk management tool fails to load, you can follow these steps to fix it.
If your WD drive went missing right after a Windows 11 update, it can look just like an uninitialized disk in Disk Management, check out our guide on hard drives missing after Windows 11 updates for the specific tweaks you’ll need.
2. Turn on the USB Root Hub
Press the Start button, type devmgmt.msc in the search box, and press Enter to open Device Manager.
Expand the Universal Serial Bus controllers. Right-click on the USB Root hub from the list, and select Properties.
Then, navigate to Power Management. Uncheck the box Allow the computer to turn off this device to save the power, and press OK.
Repeat the same steps for other available USB Root hubs and restart your computer afterward. Now, check if your WD external hard drive shows on your computer.
If the drive still disconnects randomly, even after tweaking power settings, this can mirror the “external hard drive keeps disconnecting” problem some Windows 8.1 users saw.
Press the Windows + I keys to open the Settings app.
Choose Windows Update and click Advanced option.
Select optional updates.
In the new window, select other updates, check for the updates, and click Download & install.
Your computer will automatically install any available update for WD hard disk drivers.
Restart your PC.
After updating the WD hard disk driver, reconnect it to your computer; it should now be recognizable to your computer when connected.
Alternatively, you could also update this particular driver with a standalone driver update software that will automatically scan your PC and update all drivers from their official manufacturers.
Even with the latest drivers, you might hit a “Access denied” error when opening your drive—that’s often a permissions snag. Here’s how to fix external hard drive permission issues so you can read and write freely.
4. Disable the USB selective suspend option
Right-click the Start button and select Power Options from the context menu.
Choose the power plan you want to modify. Click on Change plan settings next to the selected power plan.
In the next window, click on Change advanced power settings.
Scroll down and expand the USB settings.
Under the USB selective suspend, set both the On battery and Plugged-in options to Disabled. Click Apply and then OK to save the changes.
By disabling the USB selective suspend, you should be able to fix the WD external hard drive not showing up error if this setting causes it.
Work through any of the methods provided in this guide, and you should be able to fix the WD external hard drive not showing up.
There are several cases of external hard drive errors ranging from mild to fatal cases. However, there are methods to troubleshoot the issue seamlessly.
And if you’re also juggling a second internal HDD that suddenly stops booting Windows after connecting your WD USB drive, our deep dive into second hard drives that stop booting has the answers.
Do not hesitate to use the comments section below if you have any questions or suggestions.
Even more, the console is getting over 5000 new games that are currently in development, and its roadmap for the months ahead doesn’t look bad either. The console, at least Xbox Series S and Xbox Series X, is popular even in places where it wasn’t before, such as Japan. It became the second best-selling Xbox in the country so far.
Maybe that’s why Square Enix, a Japanese video game developer and publishing studio, and the mastermind behind the Final Fantasy franchise, announced that a lot of its games will be coming to Xbox from now on, according to IGN.
Does "whenever possible" translate to "whenever Sony doesn't pay us to keep our games off of the Xbox"? https://t.co/lKRpGHkgzy
If you don’t know, Final Fantasy XIV is finally coming to Xbox soon, and with this announcement, Phil Spencer, Xbox Head, also said that Square Enix’s future games will be available to Xbox as well.
Enjoyed being onstage with Yoshi-P and Kiryu-san to announce Final Fantasy XIV coming to Xbox. We’re thrilled that the Xbox community will join the Warriors of Light and we look forward to partnering closely with Square Enix on future games.
Phil Spencer
What other Square Enix games are coming to Xbox?
During the popular Final Fantasy Fan Fest 2023, Phil Spencer, head of Xbox, made an appearance on stage to announce that Final Fantasy XIV is coming to Xbox in Spring 2023. But Square Enix CEO Takashi Kiryu also said that more Square Enix games are coming to the console, though he did not specify which ones.
And one more thing: as CEO of Square Enix, we want to continue to deliver fabulous games to fans across the world. And of course, we want to welcome the Xbox community as well. Starting with today’s announcement of Final Fantasy XIV coming in spring 2024, and whenever possible, we are planning to bring our games to Xbox for players around the world to enjoy. We’re really looking forward to working closely with Phil and the Xbox team to make this possible.
However, it’s safe to say that games from franchises such as Final Fantasy, Kingdom Hearts, Just Cause, Nier and many more will be making their way to Xbox consoles as well.
If you remember, during the Microsoft v. FTC trial, it was revealed that Microsoft has very close to buying Square Enix back in 2019, although the deal was not ended. Either way, even if Microsoft didn’t end up buying the legendary game studio, a lot of old and new Square Enix games will be on Xbox.
Are you excited about it? Let us know in the comments section below.
Netgear is one of the most-used routers thanks to its privacy and security features. However, some users are complaining that the block sites feature on Netgear is not working.
This prevents you from restricting access to some sites, especially for children on a home network. In this guide, we have prepared detailed steps to help you fix the underlying causes of this issue.
Can I block websites on a Netgear router?
One of the major advantages of the Netgear router is that it allows you to restrict access to some websites. You can do this by adding the website domain name to the list of your blocked websites.
However, there is a limit to this, as the feature does not work for some website formats.
How can I fix my Netgear router if it’s not blocking sites?
Before proceeding to the solutions in this section, try the following troubleshooting steps:
Update your firmware.
Never use Parental Control and OpenDNS together.
Block the site’s IP address or DNS (via OpenDNS) instead.
If you still can’t fix this issue, explore the fixes below:
1. Check the website format
The first thing you need to check before making changes to your router is the format of the website you are trying to block. If it is an HTTPS website, you should know that Netgear cannot block it.
This is because HTTPS websites are encrypted, so the router will not be able to see their URL. There is no way to block the URL when it can’t view it. So, if the block sites feature is not working on Netgear, ensure you are not using it on an HTTPS site.
2. Flush the DNS cache
Press the Windows key, type cmd, and select the Run as administrator option under Command Prompt.
Type the command below and hit Enter: ipconfig/flushdns
Finally, wait for the command to finish running and retry the command.
If the block sites feature on Netgear is not working, it might be because you didn’t clear your DNS cache after setting it up. This is especially true if you are trying to block the DNS instead.
Launch your browser (we are using Chrome as an example) and click the Menu button in the top right corner.
Click the More tools option and select Clear browsing data.
Now, click the Time range dropdown and select All time.
Next, tick the boxes for Cookies and other site data and Cached images and files.
Finally, click the Clear data button.
In some cases, you might be getting an error message while trying to use the block sites feature on Netgear because of corrupt browser data. You can fix this by clearing the data and trying the process again.
We have reached the end of this guide on fixing the block sites feature not working on the Netgear router issue. If you still can’t solve the issue after trying the solutions above, you have no choice but to contact Netgear customer support.
This is because the issue might be due to technical glitches. Similarly, if the Netgear router login is not working, check our comprehensive guide to fix it.
Feel free to let us know the solution that helped you correct this issue in the comments below.
Bcc (Blind Carbon Copy) is a feature that allows you to send mail to multiple recipients without revealing the email addresses of other recipients. This is unlike Cc (Carbon Copy), which shows recipients the email address of other people who were sent the same mail.
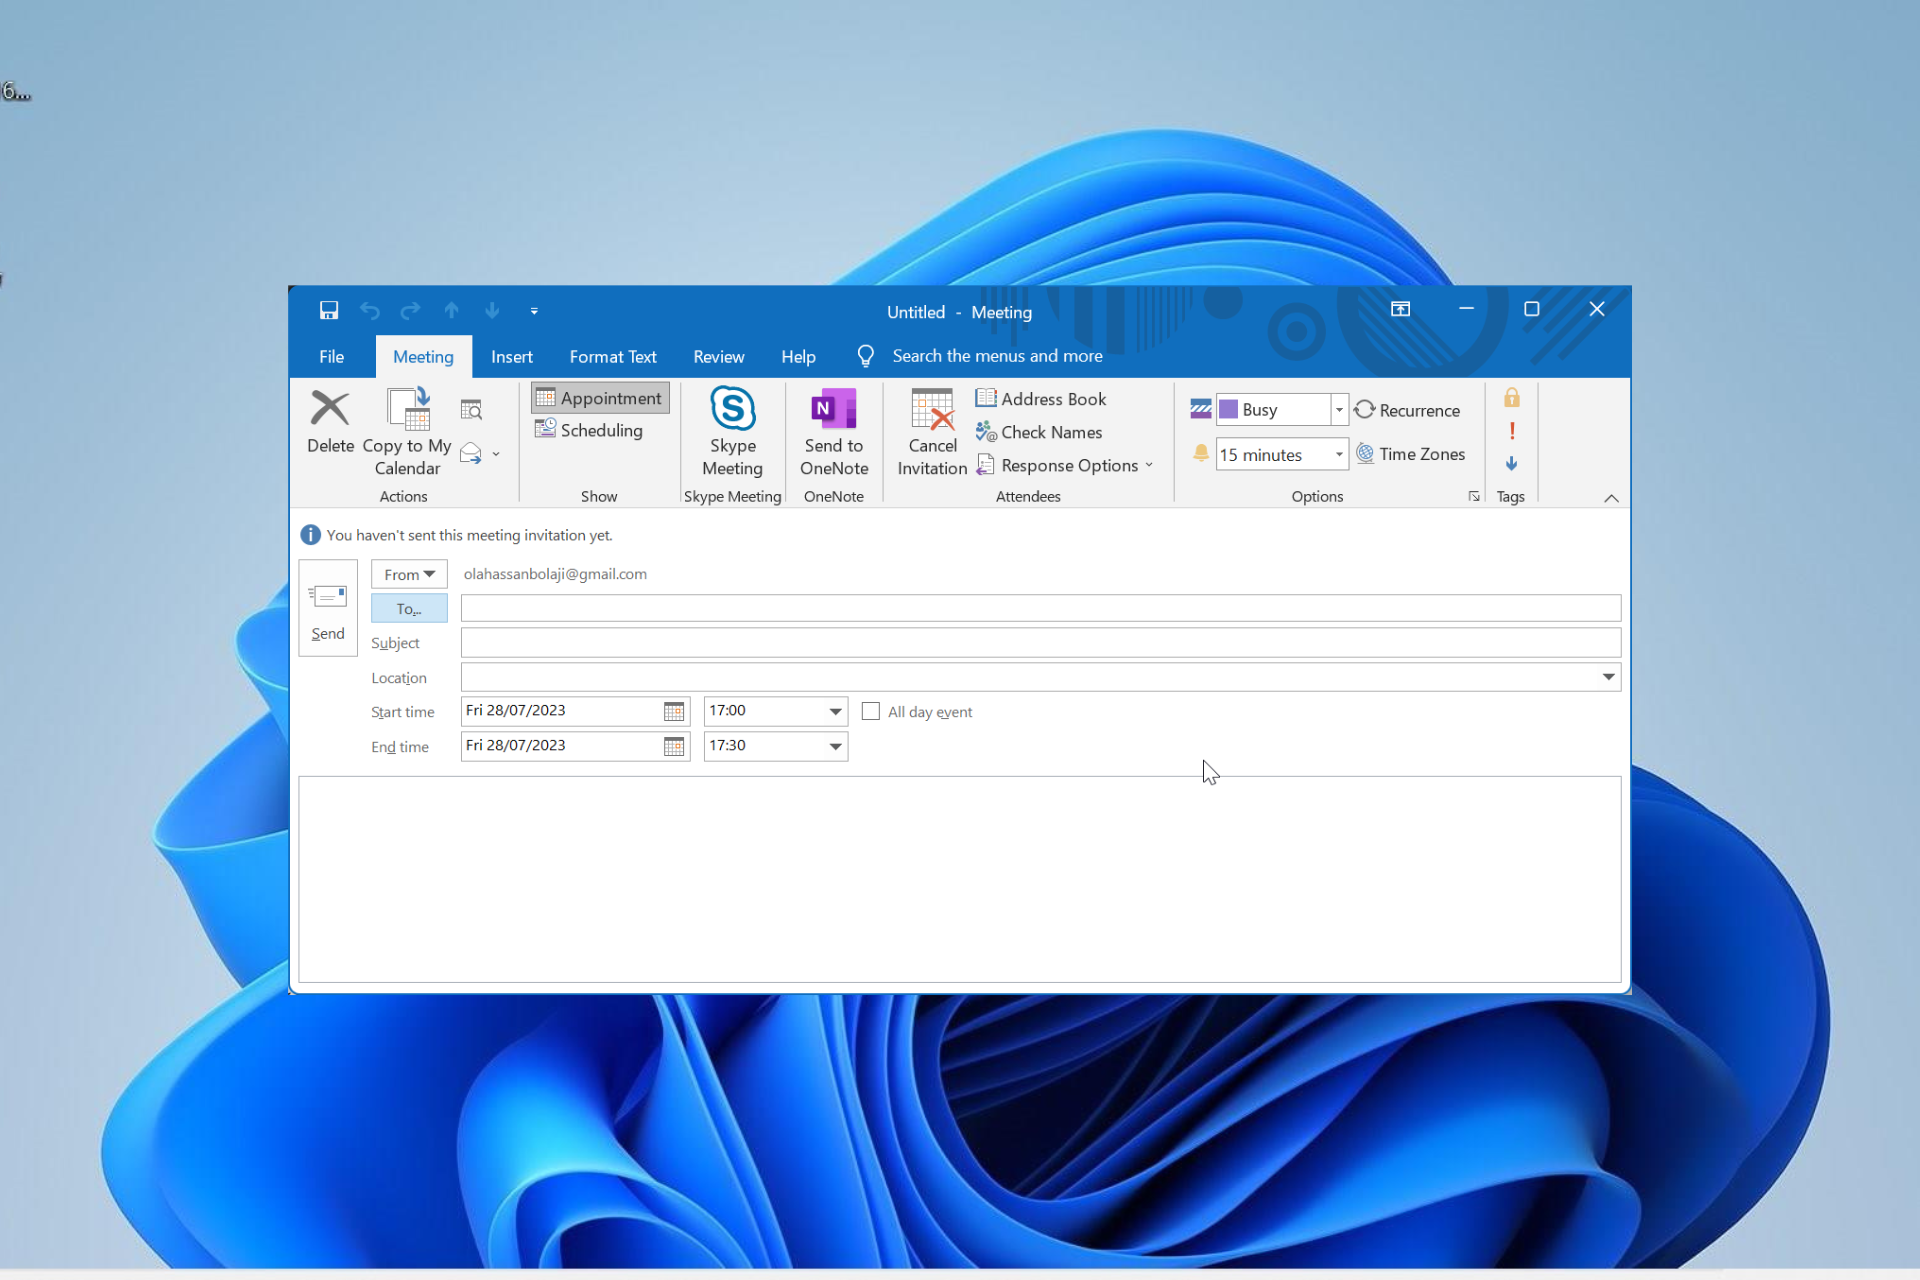
While the Bcc field is available when you are trying to send a normal email message to multiple users on Outlook, the field is noticeably absent when sending meeting invites and appointments.
This is pretty annoying as users are looking to add the privacy Bcc offers when sending meeting requests too. Fortunately, you can apply a few workarounds to add Bcc to your meeting invites, and we will show them in this guide.
Can I BCC a meeting request in Outlook?
As mentioned earlier, the Bcc field is unavailable when sending meeting invites on Outlook.
However, there are some ways to add the feature when sending meeting invites, as shown in the next section.
How do I add BCC to a team meeting invite?
1. Adding invitees as resources
Launch Outlook and click the Calendar icon in the left pane.
Click the New Meeting option at the top.
Now, click the To button in the newly opened Meeting window.
Next, select the recipients to Bcc and click the Resources button. If you don’t have their email addresses on Outlook, you can type it manually.
Click the OK button.
Finally, compose the meeting details on the new meeting page and click the Send button.
The first method to add Bcc to your meeting invite is to resource attendees, as shown above. This requires you to have an existing list of emails to select from.
Now, click the Forward icon under the Action group and select Forward as iCalendar. This will open a new mail page with the meeting attached in iCalendar format.
Finally, enter the email address of the recipients in the Bcc field and send the mail.
With this, the email message will be forwarded to each of the recipients without showing the email address of others.
The only issue with this option is that the people you sent this invite to will be unable to see any update made to the meeting schedule, just like if you sent a Screen Shot. Also, you won’t be able to track the invite to know if they will attend.
Unlike in normal emails, the Bcc field is not usually available when you send meeting invites on Outlook. However, you can use a couple of workarounds, like adding the invitees as resources and forwarding the calendar invite.
We explained how to go about this in detail in this step-by-step guide, and one of them should help you add the Bcc to your meeting invite on Outlook.
The PDE.plugin will damage your computer error on Mac is one of the concerning issues users encounter. Some users think the PDE.plugin to be a virus trying to destroy their PC.
This is false, however, as an incompatible or unsigned HP Printer driver causes the error. Fortunately, as scary as the error message looks, it can be easily fixed with the right instructions, which we will provide in this comprehensive guide.
What causes the PDE.plugin to damage your computer error?
The major cause of the PDE.plugin damage error is an incompatible driver, as reported by official sources. This is due to HP unintentionally revoking credentials on some older versions of Mac drivers.
This led to a situation where most users cannot print and get this error instead.
How can I get rid of PDE.plugin will damage your computer?
1. Update Mac
Click the System Preferences option from the Apple menu bar in the corner of your screen.
Select the Software Update option and wait for the scan to complete.
Now, click the Upgrade Now button to install any available updates.
If you are dealing with the PDE.plugin will damage your computer error, the problem has been fixed with the release of a new printer software driver update that is compatible with the latest Mac versions.
2. Delete and re-add HP Printer
Select System Preferences from the Apple menu, as shown in the previous solution.
Choose the click Printers & Scanners options.
Now, select the HP printer and click the minus sign (remove button).
Now, go back to the Printers & Scanners menu, as shown above.
Finally, click the Add button and follow the on-screen instructions to complete the process.
If you are unable to find the HP software update via the System update, then you can uninstall and reinstall the latest version of the software for your printer model.
This should come with the latest driver that should get rid of the PDE.plugin will damage your computer error.
Open the downloaded file and double-click the DMG option.
Now, follow the on-screen instructions to complete the installation process.
Finally, go back to the Printers & Scanners page to re-add your printer.
In some cases, you might need to remove everything that has to do with your HP printer and add them again. This is because the problem might be down to your printer driver certificate.
Now, run the software when it finishes installing and click the HP Easy Start tab at the top.
Choose Uninstall HP Software to remove everything that has to do with the HP software and the driver.
After the removal is complete, choose the Set Up New Device option.
Finally, follow the onscreen instruction to install the latest drivers and restart your Mac.
If manually removing your driver failed to get rid of the PDE.plugin will damage your computer error, you can employ the Easy Start tool from HP.
This software will remove all instances of the HP software, including all printer updates, and help you install the latest versions.
5. Use AirPrint to reinstall the printer
Choose System Preferences from your Apple Menu and select Printers & Scanners.
Remove your HP printer if it is still on the list of printers.
Click the + sign.
Now, select the Add Printer or Scanner option.
Locate your HP printer name and click the Use or Print Using option.
Next, select AirPrint and click Add next to your printer name.
Finally, try to print with the printer to see if it works.
Since the PDE.plugin will damage your computer error is due to driver issues, you can actually print with your driver on Mac without a driver. This is possible with the help of the AirPrint feature that supports wireless printing.
However, your printer needs to be an AirPrint-enabled printer to use the feature. To confirm, check the list of compatible printers.
How to prevent this message from popping up in the future?
To prevent the PDE.plugin will damage your computer error on Mac in the future, you should always check for and install the latest Mac updates regularly.
This should mainly include software updates for your drivers too, which will prove helpful since HP already released newer drivers to fix it.
While the PDE.plugin will damage your computer on Mac can look scary, it is not the most difficult to fix. The issue, which was caused by a mistake from HP, can be resolved by simply updating your PC, among other solutions.
We have detailed the steps you need to follow to restore normalcy on your PC in this guide. All you have to do is to apply the fixes carefully.
Remember Microsoft Fabric? The analytic platform set to reduce your business costs brings together all the analytics and data tools that organizations use on a daily basis.
Microsoft Fabric also integrates technologies such as Azure Data Factory, Synapse Analytics, and Power BI and unifies them, allowing you to swiftly change between technologies and make use of them to plan and develop the work.
The collaboration between Microsoft and dbt made it possible to the adapter to make it into Microsoft Fabric. And you can already use it because the dbt adapter was released on Fabric on August 1st.
This is what you’ll be able to do with Microsoft Fabric and the dbt adapter
dbt (Data Build Tool) is an open-source framework that simplifies data transformation and analytics engineering when it comes to data warehouse. The adapter is already used by over 20.000 companies worldwide to automate various development practices. Think about version control practices, CI/CD, testing, documentation, and transformations.
Using it together with Microsoft Fabric will allow you to create and develop:
One-stop development tools and platform combinations.
Full CI/CD / DevOps integration.
Full semantic modeling.
End-to-End Analytics.
Open table format using Delta.
The dbt adapter is available to use in Microsoft Fabric today. Microsoft also announced that a lot of new features are coming to the platform.
When it comes to developing experiences, Microsoft Fabric will soon add REST APIs, SQL Project support, git integration, and deployment pipelines. They will complement the existing service principal support. But you can follow their community website to know exactly when they will be available.
And if you have any thoughts about it, let us know in the comments section below.
The Mail & Calendar app allows you to add multiple email accounts and manage them all from a unified interface. However, some users get the error 0x80040b0b while trying to add an account for some reason.
This issue can be due to multiple factors, like issues with the Mail app and your email address. Thankfully, despite being a pretty annoying error, you can easily fix it with the solutions in this guide.
What is error code 0x80040b0b?
The error 0x80040b0b usually occurs when users try to add an account in the Mail & Calendar app. In some cases, this Mail app error causes an existing email to disappear, and users will be unable to add them.
The error 0x80040b0b is especially prominent in Outlook and Hotmail email accounts, as reported by users. It also makes it difficult for users to sync Mail in the app.
How to Fix the 0x80040b0b Mail App Error
1. Update the Mail app
Launch the Microsoft Store app.
Click the Library option in the left pane.
Now, click the Get updates button.
Finally, click the Update button before the Mail and Calendar option and wait for the process to complete.
Oftentimes, the 0x80040b0b mail error can be due to an outdated app. Updating the app from Microsoft Store should do the trick here.
Press the Windows key + I to open the Settings app and select Troubleshoot in the right pane.
Choose the Other troubleshooters option.
Finally, click the Run button before the Windows Store Apps option and follow the onscreen instructions.
In some cases, the error 0x80040b0b might be caused by glitches with the Windows Store. You can fix this by running the Windows Store Apps troubleshooter and applying the recommended fixes.
3. Run an SFC scan
Press the Windows key, type cmd, and select the Run as administrator option under Command Prompt.
Now, type the command below and hit Enter to run it: sfc /scannow
Finally, wait for the scanning process to complete and restart your PC.
Corrupt system files can cause a series of issues, including the 0x80040b0b Mail error. You can fix this by running using the System File Checker tool.
4. Repair and reset the Mail app
Press the Windows key + I and select the Apps option in the left pane.
Select Apps & features in the right pane.
Next, click the three vertical dots before the Mail & Calendar app and choose Advanced options.
Click the Repair button and wait for the process to complete.
Finally, if repairing the Mail app does not work, go back to the page and click the Reset button instead.
According to some users, the error 0x80040b0b might be caused by problems with your version of the Mail and Calendar app. Thankfully, Windows has an option for repairing and resetting the app.
5. Reinstall the Mail app
Press the Windows key, type powershell, and select Run as administrator under Windows PowerShell.
Now, type the command below and hit Enter to run it: Get-appxprovisionedpackage –online | where-object {$_.packagename –like “*windowscommunicationsapps*”} | remove-appxprovisionedpackage –online
Finally, visit the Windows Store to reinstall the Mail & Calendar app.
Reinstalling a fresh version of the app should get rid of the potential factors causing this problem.
6. Switch to a local account to reinstall the Mail app
Press the Windows key + I and select the Accounts option in the left pane.
Choose Your Info.
Now, click the Sign in a local account instead link in the Account settings section.
Click Next to confirm the action.
Next, enter your password or PIN.
Enter your desired username and password for the account and click the Next button.
Click the Signout and finish button to complete the process.
From here, follow the steps in solution 3 to uninstall and reinstall the Mail & Calendar app.
If you were able to add the email address, repeat steps 1 to 3 above, click Sign in with a Microsoft account instead and follow the onscreen instructions to switch back to your Microsoft account.
In some cases, the error 0x80040b0b occurs when trying to add an email with Windows Mail occurs because of the Microsoft account email, which is the default that is configured in the Mail app.
Many users have been able to rectify this by switching to a local account, reinstalling or disabling the Mail app, and adding the email after.
With this, we can conclude this detailed guide on how to fix the 0x80040b0b error message in the Mail & Calendar app.
While this error can be pretty frustrating as it stops you from adding an email account or syncing and refreshing your accounts on Mail app Windows 11 and 10, it is not the most difficult to fix, as we have shown in this guide.
So, you only need to follow the instructions therein, and things should be back to normal. In the same vein, If the Mail app is not showing HTML codes, check our detailed guide to fix it.
For those of you who don’t know, Office 365 A1 Plus is a free Office subscription that includes Office desktop apps for schools that purchased Office institution-wide for faculty and staff.
While the Office 365 A1 Plus will be retired next year, schools are encouraged to use Office 365 A1, which is a no-cost option, or Microsoft 365 for Education, which will be at a significant discount.
And there is something else too: Microsoft will also reduce the cloud storage limit for Microsoft 365 or Office 365 education customers. All school tenants will now receive 100TB of storage across OneDrive, SharePoint, and Exchange, with an additional 50GB or 100GB of pooled storage per paid user for A3 and A5 subscriptions.
Each user will be limited to a maximum of 100GB of OneDrive storage within that 100TB school storage pool. This change will happen on February 1, 2024.
Why is Microsoft retiring 365 A1 for Education?
The Redmond-based giant tech says there are good reasons why it’s retiring the 365 A1 for Education program.
From a cost perspective, storing data, accounts, and information that is mostly unused is not sustainable in the long run.
Plus, unused data also has a significant impact on the carbon footprint. With these changes, Microsoft pledges to efficiently use its resources to reduce this impact, and it encourages users to do the same, on their part.
Given the recent hacks and data breaches that a lot of Microsoft products have experienced, storing data without a plan for end-of-life puts schools and education institutions at risk for cybernetic attacks.
If you encountered the IPv6 connectivity no internet access error while trying to connect to a network on your Windows 10 or 11 computer, then this guide can help!
We will explore the potential causes of the issue and discuss the expert-recommended solutions to fix the issue & regain internet connectivity.
Why does my IPv6 say no Internet access?
There could be various reasons for this network error; some of the common ones are mentioned here:
Misconfigured network settings – The network settings, if not configured properly, could cause this network error. Try renewing or releasing the IP configuration or disabling IPv6.
HT mode settings – Incorrect HT mode settings could be the reason for the no-network access error. Check the settings and ensure everything is in place.
Outdated drivers – If the network drivers are old or corrupted, you might have to face all kinds of issues, including this one. Try updating network drivers.
Firewall interference – Something firewall settings set could restrict the network access causing all types of problems. Try disabling the antivirus and turning off the firewall temporarily.
Now that you know the causes of the issue, let us move on to the troubleshooting solutions.
Do I need IPv6 Internet access?
IPv6, the sixth version of Internet Protocol, was introduced in 1998 and was eventually supposed to replace IPv4.
It is longer than an IPv4 address, meaning it allows you to create more unique addresses, and IPv6 uses a 128-bit address & capable of providing 340 undecillion IP addresses.
Most websites and search engines still support IPv4, but some support IPv6 as well; therefore disabling the latter would not be a great option.
Additionally, disabling it could cause issues if your router is using an IPv6 address. That’s why there is no harm in keeping both of them enabled.
You can follow this dedicated guide for enabling IPv6 on Windows 11 whenever you want to turn the protocol back on.
How do I Fix IPv6 no Internet access?
Before engaging in advanced troubleshooting steps, you should consider performing the following checks:
Type ncpa.cpl and click OK to open Network Connections.
Locate the active network adapter, and right-click it to open Properties.
On the next window, click Configure.
Switch to the Advanced tab, select the HT Mode option, then from the drop-down, choose Enabled, then click OK.
7. Disable Firewall
Press the Windows key, type windows security and click Open.
Locate and click Firewall and network protection from the left menu and choose a network profile, such as Domain network, Private network or Public network.
Locate Microsoft Defender Firewall and toggle off the switch to disable it.
Perform this for all network profiles one by one and check it resolves the issue.
Close the Windows Security window, and check if the IPv6 connection can be established.
8. Set DNS and IP addresses to obtain automatically
Press Windows + R to open the Run dialog box.
Type ncpa.cpl and click OK to open Network Connections.
Locate the active connection, and right-click it to open Properties.
Scroll down to the Internet Protocol Version 4 (TCP / IPv4) option, select it and click Properties.
On the Internet Protocol Version 4 (TCP / IPv4) properties window, ensure Obtain an IP address automatically & Obtain DNS server address automatically are selected.
Click OK, then Close.
9. Disable the IP Helper service
Press Windows + R to open the Run window.
Type services.msc and click OK to open Services.
Locate IPHelper and double-click it.
Next, for the Startup type, select Disabled from the drop-down menu; under Service status, click Stop.
Click Apply, then OK to save the changes.
So, these are the methods that you can use to fix the IPv6 no Internet access problem and regain
Several Windows users have been complaining that they are unable to complete the installation of the available update on their Windows device and receive an error code 0xe0000003 instead.
As reported, the update gets downloaded successfully, and you are instructed to restart your PC. However, the update is stuck during the reboot process and upon force restart is rolled back.
Why do I get the Windows update error 0xe0000003?
There can be several reasons why you are the error code 0xe0000003 occurs when you update Windows PC to the latest version. Here is the list of the most common ones.
Poor Internet connectivity – In most cases, poor and unstable internet connectivity is the main reason why you encounter the error code 0xe0000003 when updating Windows.
Corrupt system files – Missing or corrupt system files on Windows PC prevent you from successfully updating the latest Windows update.
Disabled System Update service – If the Windows system update service is disabled or has encountered an error, updating Windows PC is not possible.
Third-party antivirus – Third-party programs such as antivirus software sometimes give false positives and block the Windows update-related background services.
Insufficient storage space – You might receive the error code 0xe0000003 when attempting to download the Windows update if there is insufficient space on the disk drive.
Now that you are aware of the potential causes, try the solutions listed below to install the latest Windows update successfully and fix the Windows update error code 0xe0000003.
How do I fix the 0xe0000003 Windows update error?
You should try these preliminary steps before implementing the software-related fixes discussed later on:
Ensure you are connected to a stable internet connection having enough bandwidth required to download the Windows update.
Disconnect all the peripherals such as the printer, webcam, and USB drives to prevent them from interrupting the Windows update process.
After performing these actions, try the solutions put together below.
1. Run the Windows Update troubleshooter
Use the Windows + I shortcut to bring up the Settings app.
Scroll down the System settings and choose Troubleshoot from the right section.
Next, select the Other troubleshooters option.
Go to the Most Frequent section and click the Run button for the Windows Update troubleshooter to being the troubleshooting process.
Windows has a built-in troubleshooter that detects the underlying issues preventing Windows from communicating with the update servers. Resolving those issues should fix the 0xe0000003 error code.
2. Run SFC and DISM scans
Press the Windows key, type cmd in the search bar, and select the Run as administrator option from the results section.
Click Yes on the User Action Control prompt to access Command Prompt with administrative privileges.
Type or paste the following command and press the Enter key to run the SFC scan. sfc/scannow
After the SFC scan gets completed, type or paste the following command to let the DISM tool fix the system files. Dism /online /cleanup-image /scanhealthDism /online /cleanup-image /checkhealthDism /online /cleanup-image /restorehealth
After the corrupt system images are repaired, restart your PC and try downloading the Windows Update.
The SFC and DISM tools will restore the missing or corrupt protected system files and images by replacing them with the cached copy stored in the compressed folder. You can also use automatic tools to take care of this process.
3. Start the Windows Update Service
Launch the Run dialog box using the Windows + R shortcut key, type the following command, and hit Enter to launch Windows services. services.msc
Locate the Windows Update service in the list of services and double-click to access the Properties window.
Look at the Service status in the General tab. If it says Stopped, press the Start button to start the service.
Press the Apply button to save the changes and OK to exit the properties window.
Follow the same procedure to enable the Windows Update Medic Service, Background Intelligent Transfer Service (BITS), and Cryptographic services.
Exit the properties window and restart your PC.
Some of the Windows services have an instrumental role in ensuring that the Windows update installs properly. If these services are disabled for some reason, you will encounter the error code 0xe0000003.
4. Delete the Windows Update cache
Use the Windows + R shortcut combination to bring up the Run dialog box.
Type or paste the following path in the text box and press OK to navigate to the given location. C:\Windows\SoftwareDistribution\Download
Use the Ctrl + A shortcut to select all the files in the download folder and press the Delete key.
Windows maintains all the system configuration and update related cache in a folder known as SoftwateDistribution. If the download process is interrupted, the folder contents will become corrupt and will affect the next attempts as well.
Deleting the content of the download folder ensures that the previous download files will no longer trigger the 0xe0000003 error code.
So, these are the measures that you can employ to make sure that the Windows updates process is no longer interrupted by the 0xe0000003 error code.
Ransomware is the most deadly attack which encrypts the user data and denies access to the infected computer. The hackers then demand the victim to pay a ransom if they do not want their confidential data to be made public,
So, the question arises whether antivirus software is capable of successfully detecting and removing ransomware from your PCs.
In this article, we will explore how effectively an antivirus tool can detect and remove ransomware from your system.
Does antivirus detect and remove Ransomware?
Antivirus software may successfully detect standard forms of ransomware because they act in specific recognizable patterns. When ransomware tries to encrypt files, the antivirus program can identify and report this unusual conduct to the user.
Antivirus operates by continually verifying the user input and classifying the safe programs and flagging the shady ones. It learns from the user’s actions and utilizes this knowledge to detect potential threats. As a result, known ransomware is pretty simple for the antivirus to catch.
However, hackers continuously develop advanced forms of 2nd generation ransomware. These new variants are designed to be mysterious and tricky for antivirus programs to detect. The hackers are using methods that can avoid standard detection mechanisms, making it harder for antivirus software to protect against them.
If the ransomware can bypass the antivirus software and take control of your system, the antivirus will not be of any help.
How does an antivirus detect ransomware?
These are the approaches that an antivirus tool adopts to detect ransomware:
Signature-based detection – The antivirus compares ransomware binary hashes to malware signatures present in the library. However, it may not be effective against new ransomware strains. Hackers often modify malware to bypass security layers. Adding just one byte forms a new hash which will not be detected by antivirus based on signature-based detection technique.
Detection Based on data traffic –Analyzing the pattern of traffic in the network and the data volumes transferred between the system also helps detect ransomware attacks. Unusual spikes in the transfer of data lock the system to prevent ransomware. However, this method often gives false positives and locks the system even if the activities are legitimate.
Detection based on data behavior – When ransomware sneaks into your system, it starts encrypting files and data so that it can demand a ransom. An escalation in the file encryption process or any change in the location of files can be indicative of a ransomware attack. When abnormal behavior is detected, antivirus software blocks the execution of such suspicious processes.
Deception-Based Detection – Deception-based technology is a prevalent method to deceive ransomware into a pseudo network with fake files which seems identical to the legitimate network. Deception-based detection technology assists you to spot the infiltration strategies of the attacker, such as weak passwords, terminals, and servers.
Safety guidelines to prevent a ransomware attack
Ransomware is a unique form of malware that can result in indefinite downtime and loss of essential files. Follow these safety guidelines to prevent destructive ransomware attacks:
Don’t click on suspicious links: If you see any unexpected emails, messages, or websites, abstain from clicking on those links. These links may direct you to malware that can infect your system.
Install script blockers: Use script-blocking add-ons for your browser to stop potential ransomware attacks and other malicious activities when visiting unfamiliar websites.
Backup your files: You should back up your essential data on the cloud or an external disc. This protects against data loss and guarantees access to critical information even if your machine is under attack.
Be cautious of scareware: Scareware is a tactic used in ransomware attacks that tricks you into accepting your system is compromised forcing you to perform activities out of fear. Avoid paying ransom or installing unknown programs based on such scare tactics.
Educate your employees: If you run a multiscale organization, ensure your team is well-trained about cybersecurity best practices. Human error is a common entry point for ransomware attacks, so awareness is crucial.
Employ VPN and encrypted connections: You can set up a virtual private network (VPN) to encrypt your network. This prevents theft of your data during transmission, especially when using public Wi-Fi or unsecured networks.
Conduct stress tests: Large IT infrastructure should simulate false attacks to determine the effectiveness of your security defenses. This helps identify if your security measures are up to date and if your staff can prevent real attacks.
Keep your software updated: Always update your operating system and essential software to the latest versions available. Outdated software often has security loopholes that attackers exploit to spread ransomware.
That’s all in this guide! We hope you now understand how efficient is antivirus software against ransomware and whether it can prevent such attacks.
If you are looking for a robust antivirus program to protect your system against malware, check out this guide for the most suitable alternatives.
In case you have any further questions, feel free to reach out to us.
If you have just purchased a new PlayStation console and want to set it up, you will be asked to create a new account, which can generally be completed in a few seconds.
However, some PlayStation owners face difficulties and cannot create an account on PlayStation. Even though the problem is not common among all the new PlayStation users, the issue still needs to be resolved quickly.
If you also face challenges and cannot create an account on PlayStation, go through this guide to find out how.
Why can’t I create an account on PlayStation?
As reported on the official PlayStation support website, you may not be able to create a PlayStation account for the following reasons–
Unstable Internet connection – If you are facing internet connectivity issues at the moment, you will not be able to create an account on PlayStation.
Server error – The remote server may be undergoing maintenance, so you might be unable to create an account on PlayStation. Also, this is often the reason behind the WS-117178-5 sign-in error on PS5.
Incorrect email address – PlayStation allows you to create only one account with the email address. If this is the case, you cannot create an account if the email is already associated with another PSN account.
Corrupted or outdated data – Although rare, the cached data on the gaming console can get corrupt and can be the reason why you are facing issues when creating a new account on your PS5 gaming console.
Now that you know why you are facing problems with the account creation process, let’s check out the solutions that will efficiently resolve the problem.
What should I do if I can’t create an account on PlayStation?
1. Verify the PSN server
The first troubleshooting step should be to check the current status of the PlayStation server by visiting the official PlayStation status page.
You will be notified whether there is some temporary interruption in one or the other PSN service. If the webpage indicates a server outage, you need to wait until Sony addresses the issue from their end so that you can proceed with the PlayStation account creation process.
In case the status page says that all the services are up and running, you need to proceed to the next fix.
2. Troubleshoot network issues
You will not be able to create an account on PlayStation if you are experiencing poor internet connectivity. To fix this, you can switch to a different network source, such as a mobile hotspot or LAN.
You can easily convert your smartphone into a personal mobile hotspot and then see if you can create an account on PlayStation. If you cannot access the router, you can restart the router to restore the internet connection. But first, you need to clear the router cache by pressing the reset button present on the rear side.
After this, you must press the Power button to shut down your router and disconnect the device from the wall socket. Now wait a short duration, say thirty seconds, so that the capacitors drain completely.
Then, reconnect your router to the power source and hit the power button to restart the router. If the network issue is not yet resolved, you should contact your ISP.
Press and hold the PS button for approximately 10 seconds until you see the Quick Menu.
Next, go to the Power tab.
Select the Restart PS5 option.
Confirm your action in the popup.
Wait a few seconds while your PSN console reboots, and try to create the account on PlayStation again.
Restarting the PlayStation console will flush out the cached data, which might interrupt the account creation process.
4. Update your PSN firmware
Power on your PSN console.
Connect the console to a stable internet source.
Hit the PlayStation button on your controller.
Go to Settings and select the System Software Update option from the menu.
Choose the Update Using Internet option from the next screen.
Follow the on-screen guide to update the console, and when the update is complete, reboot PlayStation.
If the PlayStation firmware is outdated, you cannot create an account on the PlayStation console. Updating the firmware should be able to fix the problem.
5. Using a different email account
As the official PlayStation support page mentions, you can only have one PlayStation account connected to an email address. Hence, if you have already used this email address, you need to provide a new one to complete the registration process.
Also, you need to ensure that the email address and the phone number are successfully verified before you link it to the PlayStation account. In case you are not receiving the verification email in your inbox, check the Spam folder for the same.
That’s all in this guide! Hope you were able to resolve the underlying issues and were successful in creating an account on PlayStation.
With the growing cyber threats and latest hacking techniques, the tools designed to protect us, such as antiviruses might sometimes cause your system to become vulnerable.
Sometimes, users cannot help but wonder whether their antivirus program is safe or can be hacked.
This guide will illustrate how even the most robust antivirus systems may be at risk as well as investigate the vulnerabilities that hackers could exploit.
Is it possible to hack an antivirus?
Despite significant investments in antivirus software, there have been several instances when hackers have succeeded in hacking the security solution. The success of antivirus solutions depends on their ability to detect known viruses in the computer.
However, if hackers employ a new or previously unknown type of virus, the antivirus software may be unable to identify it, leaving your system at risk.
It’s important to acknowledge that no antivirus software is 100% foolproof and can provide absolute protection against all cyber threats. More than relying solely on antivirus software, it is required to secure your device completely.
It is typically advised to use a multi-layered approach that uses antivirus software, a proxy, a firewall, encryption, data loss prevention software, and a backup solution.
Antivirus software can be a possible target for hackers to make their way to your PC and steal sensitive data. Proactive measures, continuous monitoring, and quick incident response are vital to safeguard personal and sensitive data from potential exposure.
Limitations of antivirus software
Eventhough the antivirus market share has been steadily growing, their usefulness has declined recently, especially against the most recent viruses and second-generation malware.
Second-generation malware operates independently within the operating system and initiates its destructive actions as soon as the system starts to boot up. This makes identifying and removing these viruses a real challenge.
Antiviruses are but a piece of software often has a loophole that can be exploited by hackers and cybercriminals to gain unauthorized access to your antivirus and gradually your entire system.
These attacks might also severely slow down your computer and potentially permanently lose sensitive information, such as bank account details and password-protected data stored in password managers.
Various antivirus providers vary in capabilities, with some lacking adequate spyware protection. While antivirus software alone cannot entirely stop hackers, choosing a robust antivirus solution is immensely necessary to enhance your protection against cyber threats and potential data breaches.
There are some possible ways in which antivirus software can be hacked, some of them are listed below:
Malware – Malware is widely used by hackers to gain authority over your antivirus software. They comprise viruses, worms, and trojan horses, which upon acquiring access, steal your private details and use them for identity theft. Trojans are malware that masquerades as legitimate software and takes access control of your programs when you download them by mistake.
Phishing – Phishing is a fraudulent communication technique using emails when hackers pretend to be an acquaintance, like a friend or your work. These prove a sense of emergency that compel you to provide login credentials or open attachments. If you fall for it, malicious software will install on your computer, which can hack your antivirus and eventually your PC.
SQL Injection: This type of attack targets antivirus programs that use SQL as the programming language to store essential data. By modifying the website’s code, the hackers can gain access to sensitive information and damage the software database.
Password guessing – People often reuse login credentials across multiple programs and websites, which hackers collect secretly. They easily use the password username combination to gain access to your PC and disable antivirus without your consent.
Now that we know how hackers can hack your antivirus, let’s take a look at some safety tips you should swear by to prevent your antivirus from being compromised.
How can you prevent the hacking of antivirus?
To enhance your business’s defenses against antivirus hacking, implement these essential measures to protect your devices and safeguard sensitive data:
Download and install a firewall to ensure your computers are safe against hackers
Windows operating system has built-in firewalls, acting as a barrier between your information and the external world. Nevertheless, you should invest in a third-party firewall or consider purchasing a hardware firewall from reputable companies if you are an organization having a lot of data at stake. Similarly, for larger businesses, investing in an additional business networking firewall is crucial.
Avoid using unsecured public Wi-Fi
Public Wi-Fi does not have security features and poses a significant cybersecurity risk if working outside the office. Refrain from connecting to password-free, widely used Wi-Fi networks, as they are attractive targets for hackers.
Implement encryption
Encryption can stop fraudsters from understanding the data even if they get access to your network. Encrypt your Windows hard drive using tools like BitLocker (Windows). You can also check out the best file encryption software for Windows PC offers features not a part of the native software. Secure USB flash drives containing sensitive data and use a VPN to encrypt web traffic.
Only conduct online transactions on encrypted websites, identifiable by identifying the https security protocol in the address bar and a closed-padlock icon.
Employ two-factor authentication and multi-factor authentication
Enable two-factor authentication or multi-factor authentication techniques as an additional layer of verification. To log into software or a website, you need to enter your password followed by a number code delivered to your phone or email address or an answer to a secret question.
Consider using virtualization to protect your network
Virtualization software such as Parallels or VMware Fusion enables you to run your browser in a separate environment, reducing the risk of browser-derived intrusions on your system when visiting potentially unsafe websites.
Beware of spam emails
Refrain from responding to emails from unknown senders and avoid clicking dubious links and attachments to prevent system infiltration. While email clients now have spam filters, be vigilant against sophisticated phishing emails that impersonate familiar contacts and businesses.
Use complex passwords
Ensure your passwords are robust by making them longer and unique. Incorporate a combination of numbers, uppercase and lowercase letters, and special characters. Avoid using recognizable words or personal information hackers could easily associate with you. Never reuse passwords if you do not want to be hacked easily. In case, you are unable to manage passwords, consider using a password manager for extra security.
That’s all in this comprehensive guide. Hope you now have a good idea about the limitations of the antivirus software and why it can be hacked easily.
If you have any queries or feedback for us, feel free to drop them in the comments section below.
Multiple users have reported coming across an Event ID 158 error event in the Windows event logs. This event message pops up every 5-10 seconds on joined computers.
In this guide, we will share with you the details that will help you understand what this Event ID 158 means and how you can quickly resolve it. Let us get right into it.
What is event ID 158?
According to Microsoft, the Event ID 158 that pops up in the Windows event logs indicates that two or more physical disk devices in Windows 11 or 10 are assigned identical disk GUIDs. Event ID 158 is also known as Disk Signature Collision.
GUID stands for Globally Unique Identifier and is a 128-bit integer number to identify resources. It is a common term that is used by developers working with Microsoft technologies. Others use UUID which stands for Universally Unique Identifier.
Notably, Event ID 158 does not have any functionality or performance impact on Windows PCs. It just warns you that two or more disk devices are sharing identical disk GUIDs.
What are the possible causes of Event ID 158?
This problem can be caused by any of the below-mentioned reasons:
Microsoft Multipath I/O (MPIO) isn’t enabled – In this case, multiple paths will be assigned to the physical disk because the device is exposed to the system by all paths so Disk Identifiers, Device Serial Number, Vendor ID, Product ID, etc. are exposed to multiple times.
Virtual Hard Disk is duplicated to create Virtual Machines – If the user has performed copy and paste operations to create Virtual Hard Disk (VHDs) to create more Virtual Machines (VMs) then the same Device Serial Number, Vendor ID, Disk Identifiers, Product ID, etc. are exposed to multiple times.
Let us now take a look at the most effective solutions that will help you resolve the Event ID 158 issues on your Windows PC.
How to Fix Event ID 158?
1. Enable MPIO
1.1 Install Server Manager
Visit this link and download the Server Manager on your computer.
Open the EXE file to begin the installation.
Click Next.
Accept the terms and agreements and hit the Next button.
Select the location and hit the Install Now button.
Click Finish to complete the setup.
In order to fix the Event ID 158 Windows event log, you need to have the Server Manager installed on your computer.
Many users weren’t able to find the Server Manager inside the Administrative Tools section because it wasn’t installed in the first place.
Follow the above steps to install the Windows Server Manager on your PC. We have a guide that explains some other methods via which you can install the server manager and cross-check if all components of the Server Manager were installed on your PC or not.
1.2 Enable MPIO on your PC
Press the Win key to open the Start menu.
Type Windows Tools and open the top result.
Click on Server Manager to open it.
Click on the Manager option on the top and select Add Roles and Features option on the right.
Select Features from the left pane, scroll down, and check the box for Multipath I/O (MPIO).
Hit the Next and Install button.
After the installation completes, close the wizard and reboot your PC.
Once the PC boots up, open the Start menu, type MPIO, and open it.
Click on the Discover Multi-Paths tab on top.
Select the device under the Others section, and click Add.
Restart your computer.
Following the above steps you make sure that the MPIO or the Multipath I/O is enabled on your PC, which is the main reason why you were getting the Event ID 158 issue.
Microsoft Teams is one of the most popular applications for organizations everywhere. The app is the preferred choice for companies due to its constant new features. For example, Microsoft has integrated AI into Teams, and now you’re able to recap meetings more efficiently.
The Redmond-based tech giant is also planning to make the new version of Teams, Teams 2.0, the standard client for all customers. So this means, Teams will run even more smoothly and you’ll have a lot of new features to enjoy,
While the app is no stranger to malware attacks and phishing schemes, Microsoft is making sure protection is assured, and efficiency is the key. For example, you’ll be able to read transcripts in your own language in Teams soon.
How to use the live transcription translation in Microsoft Teams
For now, the feature is only shown in the roadmap; apparently, users won’t have to do much to use it.
You will most probably need to enable it and set your preferred or native language. And then the feature will work in an automated way.
The feature is coming to Microsoft Teams Premium users only. According to Microsoft, you’ll be able to see the Live Transcript in your languages of choice.
It will happen live during the meeting, and you can also choose to show the translated transcript with the original transcript as a reference.
You’ll also be able to use this feature on desktop devices, such as Windows 11 desktops or Macs, as well as mobile devices, including iOS and Android.
As we mentioned earlier, the feature will be generally available but only to Team Premium users starting in September 2023.
Cyber attacks are on the rise, and not only their frequency has grown in numbers, but their varieties have also evolved. Cyber or ransomware attacks have increased in volume and continue to threaten businesses and individuals.
Cybercrime or malware attacks have seen a substantial upward shift due to the COVID-19 pandemic. Cyber attacks include data hacking and data breaches, phishing, identity theft, cyberstalking, etc.
This article aims to provide a comprehensive overview of the current statistics of cyber attacks, including the most common types, their frequency, the industries most affected, and the cost implications.
We will also delve into the future trends in cybersecurity and the measures businesses can take to protect themselves against cyber threats because, spoiler alert, the ransomware attacks are expected to double in 2025.
What are the most important cyber attack trends?
Cyber threats or malware attacks are vicious for every industry. While some sectors are less prone to cyber threats, some industries are on the hit list of attackers.
We have listed some of the most vulnerable industries to cyber attacks in 2022 below.
1. Healthcare sector
The most prone or vulnerable to cyber threats or ransomware attacks is the healthcare industry. The reason is pretty simple they hold a large amount of valuable patient data that could be groundbreaking for anyone.
Hackers can use the healthcare industry’s data to sell it to another company for an astronomical amount of money, identity theft of patient data, or sell it on the black market.
Although the average cost of investment in cybersecurity ventures for data protection has increased over the years, it hasn’t proven to be sufficient to tackle modern data cyber thefts.
Attackers can access vital data by different means including targetting employee’s mobile devices, phishing emails, injecting malware, or accessing the server using unsecured networks.
Here is the list of data that cybercriminals can access from the healthcare industry:
Health records
Clinical research data
Patient records, including social security numbers, billing information, and insurance claims
Data of confidential medicines or healthcare devices/medical devices
2. Financial sector
Institutions like banks and investment firms are also favorite places of cyberattacks for hackers, and why not, as it involves direct access to money and financial gain?
Financial data, bank-related information, passwords, credit card/debit card numbers, SSNs, etc. are of huge importance to cybercriminals to commit fraud or theft.
Again, financial institutions have increased their average cost in cybersecurity ventures to safeguard their assets, but they are still a bit behind the evolving cybercrime.
Moreover, it becomes a bit difficult to neutralize these attacks as millions across the globe use financial apps. Another way of committing a financial cybercrime is by installing crooked ATMs and card traps or simply stealing the machines.
Besides, as the world has moved over to cloud storage, all the critical data are now stored in cloud services and if they have a zero-trust architecture, the data becomes an easy bait.
3. Education sector
In this field, cybercriminals can access student and faculty data, financial information, and research data. Many top institutions partner with government wings for R&D, and this data is of high value.
With online tools such as payment gateways, digital data sources, cloud storage, connected devices, etc., the vulnerability of the education sector is at an all-time high.
Moreover, the basic types of attacks that lead to data breaches in the education sector include access to private networks, malware attacks on mobile devices, password leaks, phishing emails, firewall intrusion, etc.
Below are some of the important information that a hacker can get access to after a cybersecurity breach in any educational institution:
Student’s and faculty’s personal information
Banking details of the institution
Records of any research
University programs
4. Government organizations
Well, we all know that the world is moving towards some sort of war, and this time, it will be less of a war of guns and arms but more of data and technology.
Government organizations are one of the most vulnerable sectors, according to different cybersecurity statistics.
This is because any country can hire cybercriminals to extract confidential government information of their enemy country and prepare for a counterattack. For example, for years, Russia and the US have been known to breach each other’s defense contracts and steal military infrastructure.
While the average cost spent on cybersecurity measures, including military-grade antivirus software, is at the highest level in government organizations, data breaches are still more prevalent in this sector.
Cybercriminals are actively looking to breach government institutions as not only can they help their country stay ahead in the modern-day race to become a superpower, but their value is astronomical.
5. Retail industries
Trade has been one of the major economic boosters for many countries and it holds some of the most vital information. Since the world has become digital, digital fraud tools are also on the rise.
Retailers most commonly suffer from DDoS attacks, which basically disrupt the targetted server, websites, etc. The reason is that the retail industry is known to rely on low-standard network security.
The method of social engineering attack is the one that is most commonly used for data breaches in retail industries according to various cybersecurity experts. These attacks can easily help get customers’ account information, credit card details passwords, etc.
Retailers, by simply adopting the usage of two-factor authentication, where an OTP is sent on mobile devices to verify access, can significantly reduce the number of attacks. Moreover, strong passwords are also key to protection against cybersecurity threats.
6. Manufacturing industries
Cyber attack statistics show that manufacturing industries have now increasingly become a popular target for hackers.
Since everything is now automated using machines and software, any attack on the manufacturing process can hamper or malfunction the machines.
This could lead to physical damage, loss of lives, billions of dollars in damage, production halt, and much more.
Hackers attack manufacturing companies to hack the ICS (Industrial Control Systems), monitoring, and control the industrial processes.
Any attack on the manufacturing facilities of a country or state can lead to large-scale disruptions and economic losses. While this industry isn’t at the top list of attackers, if it is targeted, the disruption factor is very high.
Well, according to cyber attacks statistics, if it were measured as a country, the damages that cybersecurity attacks totaled $6 trillion in 2021, which would be the third-largest economy, behind the US and China, and ahead of the UK and Germany.
Notably, Cybersecurity Ventures believes that cyber-attacks are expected to grow exponentially, and the damage cost estimation is speculated to grow dramatically by 15% YoY, reaching a staggering $10.5 trillion annually by 2025.
Besides, the costs of cybercrime are expected to be worth 1% of the global GDP. The damage injected by ransomware attacks was 57 times more lethal in 2021 than in 2015.
While the above cyber attacks statistics represent the value or worth of the entire cybercrime presently and in the years to come, according to the IBM report for 2023, below is the list that shows the cost of different types of cyber attacks:
Business email compromise cost $4.89 million (compared to $5.01 million in 2021)
Phishing attacks stood at $4.91 million (compared to $4.65 million in 2021)
Malicious insider attacks amounted to $4.18 million (compared to $4.61 million in 2021)
Social engineering criminal attacks cost $4.10 million (compared to $4.47 million in 2021)
Vulnerabilities in third-party software cost around $4.55 million (compared to $4.33 million in 2021)
The average cost of data breaches globally stood hit the $4.35 million mark in 2022. According to Cybercrime Magazine, global cybercrime costs are expected to grow by 23 percent/year and will reach $23.84 trillion annually by 2027.
By next year, i.e., 2024, online payment fraud will reach a high and will cause around $25 billion in annual losses. Ransomware costs are expected to bill around $30 billion globally in 2023.
The cost of cyber attacks will rise in the current year 2023 because for multiple reasons, one being the economic woes across the globe. Inflation and energy crises in major parts of the world are also going to be responsible for the increased cyber security costs.
Some other important reasons could give rise to the cost of cyber attacks:
Easy access to powerful malware kits
Geopolitical tension among major economies
Rapidly expanding attack surface
A study done in 2020 showed that, execessive screen time could cause increase the levelas anxiety, sadnesss, uncertainity, and aggression, also increased cyberattacks during pandemic.
What are the types of cyber attacks?
1. Malware attacks
According to cyber attack statistics, 92% of the malware is distributed through email attachments, and it takes up to 49 days to get detected.
Generally, software is utilized in malware attacks to access the IT network and disrupt the entire network and associated devices.
Around 4.1 million websites are malware-infected, and 18% of them are known to contain critical cybersecurity threats.
Malware attacks are generally a bit complex to detect but are easier to protect against by using reliable anti-malware software.
98% of the malware attacks are targeted toward Android mobile device users. Ransomware attacks are a subset of malware attacks; the frequency of ransomware attacks has increased, for instance, 11% in 2022 compared to 7.8% in 2021.
2. Phishing
Phishing attacks are a type of attack that makes use of email, SMS, or phone and other social engineering techniques to get hold of one’s device and access sensitive information.
There are different types of phishing attacks such as spear phishing, whaling, SMishing, and Vishing. Phishing attacks are usually successful; however, can be pretty easy to protect against.
Phishing attacks are on the rise and according to a report by Lookout, 2022 recorded the highest level of mobile phishing attacks.
Some of the best ways to protect oneself from phishing are to never click on a link in an email that arrives in your inbox randomly, not enter your personal information on any random website, change passwords regularly, install firewalls, keep your antivirus software up to date, verify the integrity of a website before visiting, etc.
3. Supply chain attacks
As per Gartner statistics, by 2025 around 45% of organizations will experience an attack on their supply chains.
Supply chain attacks target open-source code or third-party APIs developed by developers. However, relying on third-party software means any disruptions in the software can unintentionally introduce vulnerabilities to the main system.
Supply chain attacks can be a bit hard to detect in case they are discovered too late and spread like wildfire as it is distributed via some software update or installation package.
Such attacks can be significantly reduced by deploying strong integrity code policies, using endpoint detection and response solutions, rolling out regular security patches, applying multi-factor authentication all across the system, use of strong passwords, checking digital signatures, etc.
4. DDoS attacks
DDoS attacks originate from multiple systems and are harder to block because of their origin. In the Distributed Denial of Service attack is malicious as it can disrupt a network and flood it with internet traffic.
In 2022, Microsoft officially reported that an average of 1,435 DDoS attacks daily were mitigated by security experts.
One of the most significant and recent DDoS attacks occurred in March 2023 on the website of the French National Assembly orchestrated by Russian hackers.
Some of the best practices to prevent DDoS attacks are:
Improve network security
Ensure server redundancy and usage of multiple servers
Use cloud-based protection
Look for warning signs and have a quick response in place
5. IoT attacks
Internet of Things attacks will continue to grow because of the increase in the usage of smart home appliances like TVs, speakers, security cameras, and others.
In IoT attacks, hackers attack a network and get hold of all the interconnected devices. The IoT attacks have seen an exponential increase of 87% in 2022 compared to the previous year.
Some of the best ways to protect against IoT attacks are listed below:
Keep the firmware updated
Ensure IoT devices are secured properly with passwords
Limit access of users connected to the devices
Set a unique password for all connected devices
How can I protect against cyber attacks?
1. Apply the basic measures
One of the easiest ways an attacker can access a business is via its employees. Businesses should train their employees in some basic measures, some of which are listed below:
Educate them about checking the links or malicious email attachments before opening them
Have them verify each email or website before visiting or opening them
Apply common sense before sending confidential data over the network. Ask them to call the person before actioning the request
Apply strong passwords and remind them to change the passwords frequently
Restrict employees from using their personal devices in the workspace for office work
2. Keep firmware updated
You should ensure that the network’s connected devices are regularly updated. Businesses should have a patch management system that will manage all the software and system updates.
Attackers look for any type of vulnerabilities; the best is outdated systems or software. Most security incidents can be prevented by keeping the firmware up to date.
3. Install firewall and antivirus
It goes without saying that having a dedicated and reliable antivirus is essential to keep a business free from general attacks that could happen on a daily basis.
The network must be put behind a firewall and a sophisticated one because it will help avoid any brute attack and give you time to safeguard all of your crucial data.
4. Protect your customers
Businesses should protect their customers because losing customer information can lead to a bad reputation in the industry.
Investments should be made in online security for transactions and customer information storage. Complicated security policies should be in place to safeguard customer data to avoid data loss.
5. Backup data and consider cybersecurity insurance
It is a known fact that cybercriminals have their way around sophisticated secured networks. In such a scenario, it is important that businesses have backed up their data.
This could prevent loss of data, downtime, and other problems because of cyber attacks. Besides, investing in cybersecurity insurance can help at times because the cost of dealing with a cyber attack is more than that just repairing the databases, fixing compromised devices, etc.
Cybersecurity jobs
While the current scenario of jobs isn’t that good as a lot of companies are laying off their staffs due to troubling economic issues, cybersecurity jobs have seen tremendous growth in recent years.
Going by the numbers, the cybersecurity job vacancies grew by 350% in 2021, from 1 million openings in 2013 to 3.5 million vacancies in 2021. Cybersecurity is a growing field and the industry is projected to grow by 11% in 2023 and by 20% in 2025.
While there is a huge demand surge in cybersecurity jobs, it comes with a lot of responsibility on the shoulders of cybersecurity professionals.
They are responsible for the company’s data and information
They are responsible for the company’s reputation in the market
Have to save the company’s valuable assets
Are responsible for saving the company’s unnecessary spending on tackling cyber threats
The above are some of the responsibilities of a cybersecurity specialist. There are different roles that you can take up in this field, some of which are listed below:
Chief Information Security Officer (CISO) – Should have IT experience, communication and presentation skills, must be certified as Certified Information Security Manager (CISM) and Certified Information Systems Security Professional (CISSP) and risk management skills
Cybersecurity Engineer – Networking knowledge, computer science background, knowledge of C/C++, Python, Java, and other languages, strong communication and presentation skills, must be a Certified Ethical Hacker or a CompTIA Security+ certified professional
Malware analyst – Knowledge of different operating systems, use tools such as IDA Pro, OllyDbg, RegShot, and TCP view, coding should be the stronghold
Penetration Tester – Networking skills, trained in Java, Python, and Perl, must know black-box testing, and knowledge of different OSs
How many cyber attacks happen each year?
According to multiple research reports, over 800,000 people fall victim to cyber-attacks each year, which is expected to continue to increase in the coming years.
How many cyber attacks occur each day?
Speaking of the number of cyber attacks each day, it is estimated that a cyber attack usually occurs every 39 seconds. Research companies have found that more than 2,200 cyber attacks happen each day.
This can be attributed to the online piracy statistics, which indicate that a large number of people visit illegal sites on a daily basis.
That is it from us in this guide. To conclude the only thing that we would say is that it is a digital world out there, and while have to rely on them, our safety and security are of utmost importance.
Anything you can do right now to protect your data and information should be done today and shouldn’t be left for tomorrow, as vicious cyber-attacks are happening every second.
Please feel free to add more on cyber attack statistics in the comments below, which will help others get some crucial information.
Microsoft is making it possible for you to buy Xbox controller replacement buttons, with a new page on Microsoft Store. For now, the program is only available in the US region, and there are a lot of items that you can choose from to replace your broken controller’s buttons.
There are replacement buttons for Elite, which is a popular Xbox controller. If your Elite controller is broken, you can actually look up buttons on the newly-founded page.
The store will be updated in the future with new replacement parts. So, if you don’t find what you’re looking for now, you can always come back at a later time and check it out. But there is more: you can even buy replacement hardware for a faulty Xbox controller. Just check in to see your model and the available hardware in the store.
You won’t only improve the purchasing experience, but you can also contribute to the expansion of the program. By writing feedback and requesting some parts that weren’t available at first, you can expand the replacement parts catalog.
You can leave feedback on Twitter, Microsoft Support, and any other Xbox social media pages. This way, the team behind the program will know which parts are needed, and which ones are not.
You should also know that this is a new program, so your feedback is essential for the program to evolve and offer more solutions.
What do you think about it? Let us know in the comments section below.
In this guide, we have provided a detailed, step-by-step explanation of how to schedule dark mode in Windows 11.
It will cover both manual methods and third-party applications that can help automate the process. Moreover, we will also share common issues and provide troubleshooting tips. Let us get right into it.
How do I manually schedule dark theme on Windows 11?
Press the Win key to open the Start menu.
Type Task Scheduler and open the top result.
Click on the Action menu and select Create Task… option.
Under the General tab, type a name for your task, for example, switch_dark_theme.
Check the radio button for Run only when the user is logged in or not and tick the Do not store password option.
Switch to the Triggers tab and click on the New button.
Select On a schedule from the Begin the task drop-down and choose the Daily option under the Settings section. Set the time from when you want to start the dark mode and click OK to apply the changes. Also, set the Recur every option as 1 day to repeat the task every day.
Choose the Actions tab and select the New option.
Type reg in the Program/script option, then type the following in Add arguments option and press OK.add HKCU\SOFTWARE\Microsoft\Windows\CurrentVersion\Themes\Personalize /v AppsUseLightTheme /t REG_DWORD /d 0 /f
Repeat the above steps and but this time add the below command:add HKCU\SOFTWARE\Microsoft\Windows\CurrentVersion\Themes\Personalize /v SystemUsesLightTheme /t REG_DWORD /d 1 /f
Go to the Settings tab and tick the items as displayed in the below image.
Go to the Conditions tab and uncheck the Start the task only if the computer is on AC power and then click OK.
You will find the newly created task name listed under the Task Scheduler library.
Right-click on the new task and select Run to start the task.
The Windows Task Scheduler is a built-in app that helps you automate tasks on a fixed schedule. Using the Task Scheduler you can also schedule a light theme on your PC for custom hours as well.
Using third-party applications to schedule dark mode on Windows 11
1. Download the program
Open the Start menu by pressing the Win key.
Launch Microsoft Store.
Search for Auto Dark Mode and open the top result.
Install the Auto Dark Mode app by hitting the Install button.
Auto Dark Mode is a third-party application that will help you set a dark theme on your PC from sunset to sunrise or at a specific time. Following the above steps, you can safely download the app. Now, let us learn how you can use the Auto Dark Mode app to set dark and light themes.
2. Use the app
There are different settings that you can tweak within the application. Let us check them out one by one.
2.1 Customize the mode timing
Click on the Time tab from the left pane where you can set the timer.
Disabled – Turn off the mode switching.
Set custom hours – Choose this option to set custom start timing to automatically start light or dark themes.
From sunset to sunrise – Choose this option to switch the modes based on the sunset/sunrise times for your location. The app will automatically get the location data from your system and use it to change themes.
From sunset to sunrise (geographic coordinates) – This is the same option as above with a difference. Basically, you need to manually provide the longitude and the latitude of your location.
Follow Windows night light – Choose this option to follow the system’s night light mode timing.
2.2 Change switching conditions
Click on the Switch Modes option from the left pane and you will see the below option.
Conditions – Choose this option to stop switching modes while playing games or when the system is busy. You will get a notification before the app changes the theme.
Battery powered devices – You can select whether you want to only enable dark theme when the device is not plugged in.
Hotkeys – This option sets up hotkeys for forcing light or dark mode.
2.3 Other settings
Click on Apps from the left pane. You will see the option to make apps apply light or dark themes or adapt to the system setting. Under the Personalization option, you can set up a custom desktop wallpaper or a desktop theme
What do I do if scheduling dark mode is not working?
1. Restart File Explorer
Press the Ctrl + Shift + Esc buttons to open the Task Manager.
Select Windows Explorer and hit the Restart task button.
2. Re-apply and restart your PC
Press the Win + I keys to open the Settings menu.
Click on Personalization from the left pane.
Click on the Colors menu.
Under Choose your mode, choose Light.
Restart your PC.
Follow the steps again and in step 5, in place of Light select Dark
3. Other solutions
Here are some other effective solutions that will help you resolve the problem
Many Instagram users reported Please wait a few minutes before you try again message while trying to log in. This error will prevent users from using Instagram entirely, so it’s important to fix it as soon as possible.
Why does Instagram say please wait a few minutes before trying again to login?
This message appears if you log out frequently from Instagram. Hacking attempts can also cause this issue as well as logging in to the service using different devices.
What to do when Instagram says, please wait a few minutes?
You can try closing all other apps on your phone and accessing Instagram again. A device restart can also help. Lastly, you can use the web version. Waiting for up to 48 hours can sometimes help as well. If that doesn’t work, try using a different network.
1. Use a VPN
Press the Windows key and select Settings.
Next, select Network & internet and click on VPN in the right-side menu.
Click on Add VPN and follow the prompts to enable it.
Try logging in again and see if the issue persists.
If you don’t have a VPN, we have several VPN recommendations for both PC and phones, but for now, we suggest you try ExpressVPN because it allows you full access to both the Instagram app and website while encrypting your network traffic, protecting your data continuously, and preventing issues from occurring.
2. Reinstall the Instagram app
As a last resort, try reinstalling your Instagram app. It may be experiencing some issues, but a fresh install can sometimes work in your favor.
If none of the above works, you must contact Instagram support. In such cases, you must provide as many details as possible because if it is a hacking attempt, the hackers may also have similar information.
You should also consider disabling third-party apps with access to your Instagram account. While they may help stay up-to-date and perform tasks, sometimes they do more harm than good.
In Clipchamp, users are said to discover more unique offerings, like a stock library filled with more than a million royalty-free videos, audio tracks, and images that can be added to videos.
There’s even an Azure-powered text-to-speech generator capable of creating voiceovers in more than 70 languages.
Clipchamp also connects with OneDrive, meaning that you can both import files and save videos quickly and securely.
Plus, you can now use Clipchamp with your Microsoft 365 applications as well. The app is no longer only suited for personal accounts but for professional accounts as well.
Here’s what Microsoft has to say about it:
Until now, Clipchamp has only been available to those using their personal Microsoft accounts. Today, we’re thrilled to announce that Microsoft Clipchamp will become available to Microsoft 365 commercial customers through the Targeted release program. Over the coming weeks, this release will make it possible for anyone to easily and efficiently create videos to help streamline their productivity and enhance their work.
Microsoft
NOTE
All these changes will become available for the general public after they make it through the Insider testing phase, therefore not available for everyone yet.
The access should be easy. In the following weeks, you’ll see a special new Clipchamp start page on Microsoft 365. From there, it is as easy to use the video-editing tool as you would use for your personal business.
Now, with all these great features and integrations, it’s understandable how many of us already want to get our hands on it.
And, if you need a bit of assistance in this area, we’re always here for you, eager to help and speed up any processes you currently have in mind.
Can I download Clipchamp?
Yes, you can! Even though the Redmond-based tech company bought it in order to be bundled with its latest OS, the software is still available for everyone.
The first instinct most of us have when faced with such a dilemma is to quickly ask Google what to do. If you did, the first search result will send you to the Clipchamp official website.
However, any download link you will click on this website will send you to the Microsoft Store, so we’re just going to start there.
There’s no need to even open your browser in order to install this video editing software. For that, we will use the Windows 11 Store.
Open the Microsoft Store on your PC.
Search for Clipchamp.
Click on he Get button.
Open Clipchamp.
The software is totally free and you can get it with just a few clicks. However, there’s no telling what charges we might have to pay in the future, for certain features or services.
But, if you want to get Clipchamp on your PC and start fiddling around with it, this is the easiest way to do so on your Windows 11 device, for more advanced users, we recommend to professional software like Adobe Premiere that is more than enough for any video editing needs.
Have you managed to get your own Clipchamp video editor? Let us know in the comments section below.
For most people, the best way to install drivers is through Windows Update. Whenever you check for updates, drivers are also automatically downloaded. However, not everyone has unlimited access to the Internet, so updating drivers is not always as easy.
Still, drivers are essential for the proper functioning of your PC, so you need to know how to update drivers without the internet. So how do you go about it? Easy. We show you how to below.
Can we install drivers without the Internet?
Yes. We’re so used to automatic driver updates that it’s almost impossible to imagine life without a stable Internet connection. However, for some users, this is their reality.
When it comes to keeping your hardware up-to-date, Internet access is practically a requirement. But what happens if you’re away from Wi-Fi or the Internet?
Internet connection may not come easy for some, but at the end of the day, you need your system to stay updated with the latest drivers.
Drivers are significant because they ensure that your computer can communicate with the hardware. If you don’t have them installed on your PC, it can be a nightmare. The driver is like a translator between the computer and the hardware.
If you don’t have the right one, it can cause problems and even damage your computer. To avoid issues such as BSODs and other errors that may pop up due to outdated, incompatible, damaged, or missing drivers, it is critical to update your drivers regularly.
Luckily, you can take steps to update drivers without the Internet. It’ll take a little more legwork, but it’s not impossible. After all and having updated drivers is worth any amount of effort.
Why update drivers without an Internet connection?
Now that we know we can update drivers without an Internet connection, it begs the question of why one would choose this route. The most obvious reason is not having access to the Internet, but there are other compelling reasons, such as:
Privacy protection – If you have a PC that contains extremely sensitive information, it is best to keep it offline. We all know how vulnerable a PC is once it is connected to the Internet. By updating your drivers offline, your privacy is protected since no personal information is sent over the network while updating drivers online.
Avoid viruses and malware – When you update your drivers online, there are risks involved because many websites might be infected with viruses. In the absence of a comprehensive antivirus that is able to catch these viruses, your system is at risk of harmful programs that can infect your system or steal private information from it without permission. For others, they probably don’t want to purchase more than one antivirus solution, and under such circumstances, you have no other choice but to update your drivers without the Internet.
Outdated hardware – For some users, the issue is not that they can’t access the Internet. The underlying problem is that they’re probably operating older hardware that doesn’t connect to the internet.
How to install a driver easily without the internet?
For this process, you will need:
Another working computer or phone that can access the Internet.
1. Use the manufacturer’s CD
Most computer manufacturers provide you with a CD/DVD containing all the drivers you need to make your new PC start up and run. If you’ve purchased a retail copy of Windows, the disc likely contains all the drivers you need.
Simply insert the driver disc into your computer’s CD or DVD drive and follow the prompts. With the OS installed, so will your drivers. The only issue that may arise is that the drivers may be outdated when activating your copy of Windows.
2. Transfer the setup file
Here’s where the second computer comes in. If you don’t have access to a second computer, your phone can also do the job. You’ll need to access your PC’s manufacturer’s website, locate and download the corresponding driver.
Here, you’ll need to download the correct drivers, so pay attention to the model of your PC, the Windows version, and whether it is a 32-bit or 64-bit system.
Once downloaded, you can transfer it via a USB flash drive, Bluetooth, or CD to the PC without an Internet connection, click on the setup file, and the driver will be installed.
Alternatively, you can use Device Manager to set it up manually as follows:
Hit the Windows key, type Device Manager in the search bar, and click Open.
Expand the related-driver section, right-click on the needed driver, and select Update driver.
Choose Browse my computer for drivers.
Click on the Browse button, then select a location for your driver. (This is the location you copied the driver you downloaded).
Hit the Next button and wait for the installation to complete.
While updating your hardware drivers can be tedious and technical, it doesn’t have to be. The good news is that we live in an age where drivers don’t necessarily require internet access to update, so long as certain prerequisites are met.
Hopefully, this guide has helped you understand how to update drivers without the Internet. If you have any additional questions or encounter any difficulties, please feel free to comment.
Bing AI in the Windows 11 Search taskbar is still a very discussed feature for many Windows 11 users. The little Bing icon allows you to open Edge directly from your Search taskbar and search online for the item or subject you were going to search for anyway.
For those of you who don’t know, Microsoft released the Bing AI feature on the taskbar in late February, then reportedly removed the Bing AI chatbot from it, shortly after. But then it came back.
Microsoft’s intention with this feature was to enable the user to move more freely on Windows 11. However, not many users like it. Fortunately, there is a way to disable it if you no longer want to see it on your screen.
Today, we take the next major step forward adding to the incredible breadth and ease of use of the Windows PC by implementing a typable Windows search box and the amazing capability of the new AI-powered Bing directly into the taskbar. Putting all your search needs for Windows in one easy to find location
Microsoft
Here’s how to disable the Bing AI Windows 11 taskbar
You should know that if you don’t particularly enjoy seeing the Bing AI icon on your Search Taskbar, there is a way to disable it. It only takes a couple of minutes.
Go to Windows 11’s Settings.
Once you’re there, go to the Privacy & Security panel.
In the Privacy & Security panel, you should look for the Search Permissions option and click on it.
This will take you to another pane, scroll down and disable Show search highlights. You should see now that the Bing AI icon will appear and disappear as you enable/disable the option.
While Microsoft has no official intention to remove the Bing AI option in your Windows 11 taskbar, now that you can disable it, it shouldn’t be a bother anymore.
What do you think about this feature? Do you like it or not? Do you find it useful or not? Let us know in the comments!
Avast Secure Browser, formerly known as Avast SafeZone browser is designed to provide users a secure and private browsing experience. Previously, it used to come bundled with antivirus as an option, but one can install it from its website as well.
It is based on the open-source Chromium project just like many other privacy-focused browsers. It is available for all the widely-known operating systems, including Windows 11 and the installation is not difficult.
The web browser from Avast has built-in privacy features such as anti-phishing and anti-tracking to protect users. Additionally, the browser automatically blocks online ads to improve website load time. It also offers tab grouping, tab hibernation, and tab pinning to help users manage their tabs more efficiently.
One of the reasons why you should download the Avast Web browser is the web encryption and safer navigation against trackers or even hacking attempts. For that reason, it is also considered the most used browser in Australia and the US.
Where do I get Avast Secure Browser?
You can easily find and install the Avast browser for PC from the dedicated browser download page and that too for free. All you have to do is press the free Download button and get the browser. Even so, you might already have installed the old browser version and you need to uninstall Avast SafeZone Browser first.
Once you press the Avast Secure Browser download button, the installation process will begin and you can start by following the process. Plus, we can fully support you with getting the browser safely on your Windows PC or mobile device.
How can I install Avast Secure Browser on my Windows 11 PC?
There is a single official way to install the browser on Windows 11 devices and we’re going to show you the full walk-through. So, let’s begin!
If you are stuck on the sign-in screen because PlayStation is not sending a verification code issue, this guide can help! We will explore some of the expert-tested solutions to fix the issue in no time.
Before any of that, first, let us know more about the PS verification code and what could cause this issue.
What is the PS verification code?
The PlayStation verification code refers to a second layer of security added to your account, which helps avoid unauthorized use of your console.
When you enter your login credentials on any of the devices, including your computer, tablet, mobile phone or PlayStation console, a unique verification code is sent to your mobile phone. You can enter the code and successfully sign in to your account.
Why isn’t PlayStation sending me a verification code?
There could be various reasons for not getting a verification code from PlayStation; we have listed some of the common ones here:
Carrier blocking SMS – The SIM settings are set to block these types of messages, causing this issue. Check the SMS settings in your mobile phone to ensure that it is not the reason.
Outdated software on the phone – If your phone OS has pending updates, you could face all kinds of issues, including this one. Ensure it is up to date.
Weak internet connection – A slow or interrupted network connection could also be the reason behind the problem. Check your internet connection or contact your ISP.
SMS mailbox full – If your mailbox is full, you might not receive any messages; try to send another message to your device to check the same. If it is the case, you need to delete some messages.
Now that you know the causes of the issue, let us talk about the solutions to fix this problem.
How do I fix PlayStation not sending a verification code?
Before moving to the detailed troubleshooting steps, make sure you go through these preliminary checks:
Check the SIM settings on your mobile device.
Restart your phone and resend the code.
Ensure you have a stable internet connection, or try a wired connection.
Next, check with your SIM carrier if they are blocking the message.
Check your login credentials.
Use a browser on your computer or phone to reset the password.
Ensure there are no pending updates for console software.
If you can access your PSN account on another device, such as your PC, go to your profile and click Account Management.
Next, select Security.
Under 2-Step Verification, click Edit.
Click Deactivate.
To confirm the action, click Yes.
Next, go to 2-Step Verification; the status would be Disabled; click Edit.
Select the 2-Step Verification method: Text Message or Authenticator App.
On the next screen, for Choose a mobile number option, either select the existing one or click Add Movile Number to proceed. If you choose the latter, enter the number and click Continue.
Next, you will receive a verification code on your mobile number input it and click Verify.
Click OK to complete.
If you can’t access your PlayStation account on any of your devices and don’t have a backup code handy, you need to contact PlayStation customer care support to recover your account.
So, these are the methods you can use to fix the PlayStation not sending a verification code issue and regain access to your PS account.