Fix: Oops! Looks Like You’re on the Go Error

Microsoft Rewards are great since they allow you to purchase content, but many reported Oops, looks like you’re on the go message when trying to access their rewards.

This can be an annoying issue, and in the past, we already wrote about Microsoft Rewards errors, so be sure to check that guide for more information.

Fixing this error can be tricky, but before we start, let’s see what causes this issue.

Why am I getting Oops! Looks like you’re on the go error?

There are several causes for this error message:

  • Server glitches – It’s possible that Microsoft servers are having issues, and that’s why you’re getting this issue.
  • Changing your location – In case you’re traveling, you might have issues accessing Microsoft Rewards.
  • VPN – Using reliable VPN software is important, but many reported that VPN will interfere with this feature. However, there are VPNs that work with Microsoft Rewards that you can use.

How can I fix Oops! Looks like you’re on the go error?

Before fixing this issue, there are a few solutions you can try:

  • Wait it out – Usually, this is a glitch on Microsoft’s end, and in some cases, you just have to wait until they fix the issue on their end.
  • Change the browser – If this problem appears in one browser, try using another. if you need a new browser, check our list of best browser software.
  • Log out and log in to your Microsoft account – In some cases, logging out and back into your Microsoft account can help with this issue.
  • Use private browsing – Using private browsing won’t fix the issue, but it will help you pinpoint the cause of the problem.

1. Clear the cache

  1. Click the menu icon in the top right and choose Settings.
     
  2. Select Privacy, search and services from the left pane. In the right pane, click on Choose what to clear.
  3. Set the Time range to All time and click on Clear data.

Once the cache is cleared, check if Oops, looks like you’re on the go error is gone.

2. Disable extensions

  1. Click the Extensions icon next to the address bar. Select Manage extensions from the menu.
  2. Next, click the switch icon next to the extension’s name.
  3. Repeat this for all extensions.
  4. Once all extensions are disabled, check if the problem is gone.

If the issue doesn’t appear anymore, enable extensions one by one until you manage to recreate the issue. Once you find the extension that is causing the problem, remove it or keep it disabled.

In case you need some great extensions, we have an extensive guide on the best Edge extensions that you check out.

3. Disable VPN/proxy

  1. Open the Settings app. You can do that quickly with the Windows key + I shortcut.
  2. Next, go to Network & internet and choose VPN from the right pane.
     
  3. Make sure that VPN isn’t enabled.
  4. Go back and choose Proxy.
  5. Ensure that the proxy is disabled.

Once the proxy and VPN have been disabled, check if Oops, looks like you’re on the go message is gone.

Note icon NOTE
If you have a VPN client installed, be sure to disable it or close it.

As you can see, this error message can be tricky to fix, but in most cases, the issue is caused by problems on Microsoft servers.

If you’re having more problems, we have a great guide on how to fix Microsoft Rewards is not available in your country error.

What solution worked for you? Share it with us in the comments below.

Outlook Library Not Registered Error: 2 Best Ways to Fix It

Numerous users have expressed their grievances regarding the Outlook Library not registered error.

While it is a dependable platform for freelancers, employees, and employers alike, it is not immune to glitches like any other application. This issue is similar to Outlook error 0x8004010f, but we covered that in an older guide.

Before we start fixing this issue, let’s see what causes it.

What is Outlook library not registered error?

Outlook Library not registered error is an Outlook error, and it’s usually caused by the following:

  • Registry issue – The machine’s registry holds a key for a previous iteration of the Outlook View Control. It appears that an updated version may not be in use.
  • Older version – The remnants of a prior Microsoft Office installation can sometimes cause issues.

How can I fix this Outlook library not registered error?

1. Change Outlook startup folder

  1. In Outlook, go to File and select Options.
  2. Now choose Advanced.
  3. Change Start Outlook in this folder to Inbox and save changes.

2. Change the Windows registry

  1. Close Microsoft Outlook.
  2. Press the Windows key then press R. Type regedit then choose OK.
  3. Navigate to the following location:
    HKEY_CLASSES_ROOT\Typelib\{0006F062-0000-0000-C000-000000000046}

  4. Expand {0006F062-0000-0000-C000-000000000046} via the plus sign, then right-click the 1.2 key and then choose Delete. Do the same with other keys that start with 1 (1.0, 1.1, etc.)
  5. Choose Yes considering you do want to permanently delete the value.
  6. Exit the Registry Editor.
  7. Open Microsoft Outlook and choose Personal Folders or use any other approach to access the Outlook Today screen. The message of error is no longer expected to appear.

We hope that this guide has aided you in resolving your issue. If you encounter any further obstacles, we suggest consulting our supplementary solutions for Explorer.exe class not registered.

It would be immensely helpful if you could share which solution proved to be the most effective by leaving a comment below.

LexisNexis and Microsoft Announces Lexis Connect – An AI-Powered Application

LexisNexis, a leading global provider of legal research and analytics solutions, has announced the preview launch of Lexis Connect, a legal intake and matter management product that is set to revolutionize the way legal departments handle internal requests. The product is designed to work within Microsoft Teams and uses conversational AI assistants to help deliver answers more quickly.

Developed in partnership with Microsoft, LexisNexis is proud to have Microsoft’s Corporate, External, and Legal Affairs (CELA) department as the first preview customer to test and help further develop Lexis Connect. LexisNexis is looking for another five or six legal departments to join the commercial preview for free. Anyone interested can get a demonstration at the CLOC Global Institute next week in Las Vegas.

About LexisNexis

LexisNexis is an organization that provides legal research, information, and analytics solutions. It is a part of the RELX Group, a global provider of information-based analytics and decision tools for professional and business customers. LexisNexis has been in operation for over 45 years and has a presence in more than 130 countries worldwide. Its products and services are utilized by law firms, corporations, government agencies, academic institutions, and legal professionals globally. 

LexisNexis offers a wide range of legal information solutions, including research tools, practice management software, and information analytics products. It is dedicated to helping legal professionals find and use the information they need to make informed decisions and deliver better outcomes for their clients.

Key Features of Lexis Connect

During the briefing, Muthuraman M K, lead product manager, demonstrated the key features of Lexis Connect. 

One of the most exciting features is the Ask Legal app. It is a conversational AI assistant that can aid anyone in a company by answering legal questions. It has two modes of operation: Chat mode and Request mode. In Chat mode, employees can ask questions, and the app tries to answer by using the company’s internal policies and guidelines. In Request mode, employees can submit a request to the legal department, like preparing or reviewing a contract.

Another fantastic feature of Lexis Connect is the lawyer-facing part of the product, where lawyers manage all the matters that have been submitted. With access to a dashboard, lawyers can view all matters or filter to view only their own. By selecting a specific matter, they can see all its details, along with any communications and documents related to it. Additionally, lawyers can use an AI-generated feature to view similar matters.

Legal Research is another AI assistant of Lexis Connect specifically for legal research. Lawyers can utilize this feature to ask questions in natural language and receive answers powered by Lexis Answers.

Lastly, the app has the Ask Legal feature. The feature is still in development and will soon integrate with the Lexis+ AI product that was released last week. This integration will allow users to ask questions of Lexis+ AI directly within Lexis Connect in a conversational interface powered by large language models.

Further Development

Several other aspects of the product are still being developed, including analytics, Outlook integration, and support for multiple legal teams.

At the briefing, Jason Barnwell, Microsoft’s General Manager for Digital Transformation in CELA, highlighted that this product is precisely what legal departments require to cope with the increasing demand for their services and to gain better insight into their department’s operations.

LexisNexis has always been at the forefront of legal research and analytics solutions, and the preview launch of Lexis Connect is just another step into that.

Via: LawNext

0x80048839 Microsoft Store Error Code: How to Fix It

Many Tech enthusiasts have been complaining about this 0x80048839 Microsoft Store error code, you might have encountered this issue when you visit the Microsoft Store for installing TV shows, Applications, Games, Music, and Videos.

The platform is trusted and reliable for software downloads, but just like any other app, it can also experience glitches. This article will guide you on how to fix this niggling error and similar error.

What is the 0x80048839 Microsoft Store error?

This 0x80048839 Microsoft store error is a troublesome error that can occur on Windows operating systems. This error is prevalent and can lead to detrimental dilemmas if not properly handled.

There are a multitude of factors that can lead to errors, but typically the primary offenders are as follows:

  • Corrupted store cache – Accumulated data in your app cache can lead to this error.
  • Inaccurate system settings – If your settings are not properly set up, this error might keep popping up.
  • Server issues – If your Internet connection is not stable, you might experience this issue occasionally.

How can I fix this 0x80048839 Microsoft Store error?

  • Restart your PC – At times, a bug lurking in the account might be the cause, log out and log in again.
  • Update Windows – Keep your Windows up to date prevents this niggling issue.

1. Enable Microsoft Store Install Service

  1. On your Windows search, type Services, and press Enter.
  2. Find Microsoft Store Install Service.
  3. The moment it starts to run, right-click and select Restart.
  4. If the service is not running, double-click it, and pick Automatic under the Startup type from the drop-down menu.
  5. Click Start, Apply, and OK.

2. Reinstall Microsoft Store

  1. Be certain your Microsoft Store is closed and not running in the background.
  2. Right-click on Start and choose PowerShell (Admin).
  3. Paste the following command and press Enter:
    Get-AppXPackage *Microsoft.WindowsStore* | Foreach {Add-AppxPackage -DisableDevelopmentMode -Register “$($_.InstallLocation)\AppXManifest.xml”}

  4. Close Powershell.

3. Run SFC and DISM

  1. Type cmd in Windows search.
  2. Right-click on Command Prompt and select Run as administrator.
  3. User Account Control should pop up – click Yes.
  4. Type this command and press Enter:
    sfc /scannow
    Wait for the scan to finish.
  5. Immediately after the scan is done, Windows will report whether integrity violations were found and if they could be resolved. No matter the result, use these commands next, pressing Enter after each:
    Dism /Online /Cleanup-Image /CheckHealth
    Dism /Online /Cleanup-Image /ScanHealth
    Dism /Online /Cleanup-Image /RestoreHealth


  6. Exit the Command Prompt and Restart your system.

We trust that this guide has been of assistance in resolving your concern. Error 0x80048839 can cause many problems, and that’s one of many Windows Store error codes you can encounter.

We would greatly appreciate it if you could share which remedy proved to be the most efficient by leaving a comment below.

0x00000027 BSOD: 3 Ways to Properly Fix It

Have you ever encountered an error message that reads 0x00000027 BSOD, also known as the blue screen of death? If so, take a deep breath and read on for additional information.

There are similar BSOD errors users have been complaining about on their PC too. This article is crafted to assist you in dealing with this error.

What is 0x00000027 BSOD?

The Blue Screen of Death (BSOD), also known as RDR_FILE_SYSTEM, is a frustrating stop error that can occur on Windows operating systems. These errors have various codes and can be caused by different issues.

When it comes to this error, various factors can contribute to this. However, the main culprits are usually as follows:

  • Failing computer drivers – The Wi-Fi, Network, and Video drivers are common causes of this error.
  • Anti-virus software mismatch – This issue arises when the anti-virus software installed on a system cannot work in tandem with other security features, leading to a loss of protection against malicious threats.

How can I fix this BSOD 0x00000027 error?

  • Redirecting AppData – Have you ever considered redirecting AppData roaming to your local drive? This simple tweak can have a significant impact on your computer’s performance.
  • Set Samba server – To properly configure your Samba server, it is crucial to ensure that the “security = USER” parameter is included. 

1. Delete the third-party anti-virus software

  1. Click Ctrl + Shift + Esc altogether to open Task Manager.

  2. Select the running anti-virus and choose End task.
  3. Right-click on the Start button and select Settings.
  4. Choose Apps & Features.

  5. Scroll and find security software and click Uninstall.
  6. Restart your PC.

Uninstalling anti-virus software like Norton and drivers like Symantec Endpoint Protection has been acknowledged by plenty of users.

2. Update drivers

  1. Right-click on Start button and select Device Manager.

  2. Amplify the grouping of interest (Display adapters, Network adapters) and locate your device (e.g, Intel (R)HD Graphics 3000).
  3. Right-click on the device and select Update Driver.
  4. When prompted, choose Search automatically for updated driver software and chill till the Windows downloads and lastly, installs the updates.
  5. Reboot your PC.


We trust that this guide has been of assistance in resolving your concern. If you encounter any more difficulties, we recommend referring to our BSOD error 0x00000154 for supplementary solutions.

We would greatly appreciate it if you could share which remedy proved to be the most efficacious by leaving a comment below.

KB5026435: This hot-wanted box is back on your Windows 10

It’s that time again. Microsoft is back with another update for Windows 10 22H2 users. This time, the update, which is billed as KB5026435, brings a plethora of interesting improvements, including the return of the hotly-wanted improved search box experience. 

The search box will now appear on all types of taskbars, including top, bottom, regular, or small icons taskbar. Users can use the search box to easily access apps, files, settings, and more from Windows and the web.

You may recall that Microsoft released the KB5025297 update in April 2023, intending to reintroduce the improved search box. However, they decided to postpone it to a later release. Now, the feature is finally being rolled out with the current update.

However, if you prefer their previous search experience, it can easily be restored by using the taskbar context menu or responding to a dialog that appears when using search.

All search box fusses aside, what other features and improvements does KB5026435 bring, you may ask? Here’s everything we’ve got so far. 

What other features are coming in the KB5026435 update?

  • New! This update now displays up to three high priority toast notifications at the same time. This feature affects apps that use Windows OS notifications to send notices for calls, reminders, or alarms. Up to four toast notifications might appear at the same time. This means that there can be three high priority notifications and one normal priority notification. 
  • This update addresses an issue that affects App Installer. Sometimes, MSIX apps fail to update.
  • This update addresses an issue that affects Server Message Block (SMB). You cannot access the SMB shared folder. The errors are, “Not enough memory resources” or “Insufficient system resources”.
  • This update addresses an issue that affects the Local Security Authority Subsystem Service (LSASS). It stops working. This occurs when you use Azure Virtual Desktop (AVD).
  • The update addresses an issue that affects scheduled tasks. The tasks fail when they use stored local user account credentials. This occurs when you enable Credential Guard. The error message is “2147943726 : ERROR_LOGON_FAILURE (The username or password is incorrect).”
  • This update addresses an issue that affects the Storage Spaces Direct (S2D) cluster. It might not come online. This occurs after a periodic password rollover. The error code is 1326.
  • This update addresses an issue that affects access to Tab settings for IE mode sites.
  • This update addresses an issue that affects dot sourcing. It fails files that contain class definition in Windows PowerShell.
  • This update changes the support phone number for Microsoft India for Windows activation.
  • This update addresses an issue that affects the PublishDfsRoots policy. It does not apply correctly to a targeted client that has mobile device management (MDM). One example of MDM is Microsoft Intune.
  • This update changes the international mobile subscriber identity (IMSI) ranges for certain mobile providers.
  • This update addresses an issue that affects the Windows Firewall. The firewall drops all connections to the IP address of a captive portal. This occurs when you choose the Captive Portal Addresses option.
  • This update addresses a multi-function label printer issue. It affects the installation of some of them.
  • This update addresses an issue that affects devices that are joined to Azure Active Directory (Azure AD). The Windows Firewall cannot apply the correct domain and profile for them.
  • This update addresses an issue that affects signed Windows Defender Application Control (WDAC) policies. They are not applied to the Secure Kernel. This occurs when you enable Secure Boot.
  • This update addresses an issue that affects the touch keyboard. Sometimes, it does not show the correct layout based on the current input scope.
  • This update addresses an issue that sometimes fails to open the touch keyboard.
  • This update addresses an issue that might affect a large reparse point. You might get a stop error when you use NTFS to access it. This issue occurs after a canceled FSCTL Set operation changes the reparse tag.

If you can recall, Microsoft had planned to end support for the latest version of Windows 10, the 22H2. 

As previously mentioned, security updates would continue to be available until October 14, 2025. While several years remain until this happens, it can be difficult to bid farewell to a polarizing OS that has received mixed reactions from users.

Have you installed the KB5026435 update? Let us know in the comments!

Say goodbye to printer issues with KB5026436

The Release Preview Channel now has access to Microsoft’s KB5026436 update, as launched by the tech giant. One of the updates included in the KB5026436 release is the resolution for printer installation issues.

This update resolves a problem that impacts specific printers, causing them to be unable to install when automatically connected to Wi-Fi. Additionally, the update also addresses an issue related to the installation of some multi-function label printers.

There are plenty of issues that cause the printer won’t install on Windows 11. We’ve also prepared a set of guides about it, but in short, some of these issues include outdated drivers, software conflicts, lack of permissions/farewell issues, and more.

As you may recall, Windows 11 has had previous issues with printers that it has attempted to resolve. In September 2022, when Microsoft released the Windows 11 2022 Update (22H2), some users experienced a severe printer problem where their device would vanish because it was unable to be detected by the Microsoft IPP Class Driver or Universal Print Class Driver.

So, what other improvements does the KB5026436 bring, you may ask? Here’s what we’ve got from Microsoft’s release note. 

What other fixes and improvements does the KB5026436 update bring?

  • This update addresses an issue that affects searchindexer.exe. It stops working after you sign out. This issue occurs after you upgrade your machine to Windows 11 Azure Virtual Desktop (AVD) and sign in to that machine.
  • This update addresses an issue that affects Narrator. It does not announce text attributes correctly for words, such as “misspelled”, “deletion change,” and “comment”.
  • This update addresses an issue that affects Server Message Block (SMB). You cannot access the SMB shared folder. The errors are, “Not enough memory resources” or “Insufficient system resources”.
  • The update addresses an issue that sends unexpected password expiration notices to users. This occurs when you set up an account to use “Smart Card is Required for Interactive Logon” and set “Enable rolling of expiring NTLM secrets”.
  • This update addresses an issue that affects the Local Security Authority Subsystem Service (LSASS). It stops working. This occurs when you use Azure Virtual Desktop (AVD).
  • The update addresses an issue that affects scheduled tasks. The tasks fail when they use stored local user account credentials. This occurs when you enable Credential Guard. The error message is “2147943726 : ERROR_LOGON_FAILURE (The username or password is incorrect).”
  • This update addresses an issue that affects the Storage Spaces Direct (S2D) cluster. It might not come online. This occurs after a periodic password rollover. The error code is 1326.
  • This update addresses an issue that affects access to Tab settings for IE mode sites.
  • This update addresses an issue that affects dot sourcing. It fails files that contain class definition in Windows PowerShell.
  • This update addresses an issue that affects the use of Event Viewer. The issue limits the number of event sources that users who are not administrators can access.
  • This update addresses an issue that affects applications that perform certain actions in a callback. The applications might stop working. These actions include closing a Window (WM_CLOSE).
  • This update changes the support phone number for Microsoft India for Windows activation.
  • This update addresses an issue that affects certain printers. They fail to install if they connect to Wi-Fi automatically.
  • This update changes the international mobile subscriber identity (IMSI) ranges for certain mobile providers.
  • This update addresses an issue that affects the Windows Firewall. The firewall drops all connections to the IP address of a captive portal. This occurs when you choose the Captive Portal Addresses option.
  • This update addresses a multi-function label printer issue. It affects the installation of some of them.
  • This update addresses an issue that affects devices that are joined to Azure Active Directory (Azure AD). The Windows Firewall cannot apply the correct domain and profile for them.
  • This update addresses an issue that affects audio playback. It fails on devices that have certain processors.
  • This update improves the user experience (UX) and interactions for the search box on the taskbar.
  • This update addresses an issue that might affect a large reparse point. You might get a stop error when you use NTFS to access it. This issue occurs after a canceled FSCTL Set operation changes the reparse tag.

If you remember, the Release Preview Channel provides Insiders with builds that are near-final, allowing them to test new features and provide feedback before the builds are released to the general public.

Unlike the hot-off-the-presses Canary channel, this channel is aimed at users who want to test the latest features of Windows 11 with minimal risk of encountering bugs and other issues.

Have you installed the KB5026436 update? Let us know in the comments!

This Message Has not Been Downloaded from the Server [Fix]

Anyone using email clients today can choose from a wide variety depending on their needs. Each has its own pros and cons, but what they all have in common is that they all face some issues from time to time. 

For instance, iPhone users are getting the This message has not been downloaded from the server error on their mail applications whenever they try to open emails. If you’re facing the same issue, this article will greatly help you.

Why are my emails not downloading from the server?

One of the most common problems people face is that their emails are not downloading from the server. Have a look at what to do when Gmail is not receiving emails.

If you check your inbox, several messages may have been sent since your last check. 

You will see those messages in your inbox, but you can’t retrieve them until they’re downloaded by your phone’s email app or mobile browser.

This issue can be caused due to various reasons:

  • Server issues – Your email provider may be having issues with their servers, and you should check with them to see if they are experiencing any problems.
  • Connection issues – Sometimes, due to technical issues or other reasons, your internet connection may stop working properly. And when you try to open an email or download it from the server, it will not work properly or download at all. 
  • Mailbox is up to capacity – Your inbox might be full, and hence there is no space left for new emails to be stored in it.
  • Port is blocked – Your incoming server port may be blocked due to high traffic volume or malware infection on your computer that’s consuming a lot of bandwidth and slowing down your network connection speed. 
  • Outdated firmware – If your phone’s operating system is not up-to-date, it will not be able to connect with email servers properly, and thus you won’t be able to access all your emails in your inbox.
  • Insufficient storage – If you’re wondering why your iPhone says this message has not been downloaded from the server, it’s probably because it is full.

How do I get a message to download from the server?

A few workarounds that may help get you out of this fix include:

  • Ensure your device is connected to a Wi-Fi network and has an active Internet connection.
  • Switch to a different network or create a mobile hotspot.
  • Verify from your mail service provider whether there is a service outage.
  • Toggle the Airplane mode on and then off.
  • Try restarting the mail app.
  • Free up some storage space on your iPhone.
  • Finally, reboot your iPhone.

1. Check for iOS updates

  1. Tap on your iPhone Settings and select General.
  2. Select Software Update and check for any available updates.
  3. If present, download and install.

2. Delete and add your email account 

  1. Click on your iPhone Settings and select Passwords & Accounts.
  2. Tap on Fetch New Data.
  3. Toggle the Push option off, select the problematic mail account, and set it to Fetch.
  4. Also, set the Fetch option to Automatically.
  5. Restart your iPhone.

3. Adjust mail preview

  1. Tap on your iPhone Settings and select Mail.
  2. Navigate to the Message List section and tap on Preview.
  3. Select 5 Lines.
  4. Restart your iPhone.

When you send an email, it’s stored on your server. Some email clients allow you to set the number of lines in your preview pane. However, the minimum is normally one or two lines hence why your email is not downloaded from the server on your iPhone.

If you increase the preview, this may trigger the email to download the entire message.

4. Reset network settings

  1. On your PC, hit the Windows key and click on Settings.settings windows 11
  2. Navigate to Network & internet.
  3. Select Advanced network settings.going advanced network settings win11
  4. Click on Network reset.Network reset 1
  5. Next, hit the Reset now button. Reset now

And that’s how to address this message has not been downloaded from the server error. Elsewhere, you may come across an issue where Windows Mail is not downloading emails, so feel free to check our expert guide for quick fixes.

Feel free to drop us a comment on any other related issue on this topic.

PDF Keeps Opening in Chrome: 4 Ways to Stop It

Have you ever encountered a PDF document that you wanted to open while browsing online, and when you clicked on it to view, it opened in Chrome instead of your default PDF reader? This is normal, but what if it keeps opening in Chrome even after some changes?

First, you must install an external PDF reader on your PC before complaining of PDFs opening in Chrome. If you’re all set but still encounter this issue, this article is for you.

Why do my PDFs keep opening in Chrome? 

If you have a PDF file that keeps opening in Chrome but would like this to change, you must understand why this happens before making any changes.

Below are some reasons behind this behavior: 

  • Google Chrome is your default browser – If you’ve set Chrome as your default browser, every time you open a PDF file, it will open in Google Chrome instead of Adobe or another PDF viewer app.
  • No other PDF reader/viewer – The most common reason for this problem is that you have not installed Adobe Reader or similar software on your computer. If you want to open a PDF outside Chrome, you need to have another program for that specific purpose.
  • You have enabled Chrome PDF Viewer – Chrome PDF Viewer is a browser plugin that allows you to view PDF files in Google Chrome. When you open a PDF file, Chrome will automatically use the Chrome PDF Viewer if installed.
  • Virus/malware on your PC – Malicious software can often change system settings without your knowledge when your PC is void of a reliable antivirus. It’s worth checking it out if none of the other reasons apply to you.
  • Outdated PDF viewer – You may be using an outdated version of your PDF viewer, and this is why the PDF file keeps opening in Chrome. 
  • Corrupt/damaged PDF viewer – If you’ve installed a third-party PDF reader, it may be damaged or become corrupt hence unable to open PDF documents.
  • Insufficient storage space – For a PDF file to open with your external PDF viewer, it must be downloaded first. If you don’t have enough space in your hard drive, it will open in Chrome.

How do I stop PDFs from opening in Chrome?

Perform the following checks before any advanced troubleshooting:

1. Disable Chrome’s default PDF viewer 

  1. Launch your Chrome browser and click on the three vertical ellipses at the top right corner.
  2. Select Settings.Settings CHrome
  3. Click on Privacy and security, then select Site settings.
  4. Scroll down to the bottom and click on Additional content settings.
  5. Click on PDF documents.
  6. Navigate to the Default behavior section and check the Download PDFs option.

2. Set your PDF reader as the default PDF viewer 

  1. Hit the Windows key and click on Settings.settings windows 11
  2. Click on Apps on the left pane then select Default apps on the right pane.
  3. In the Set a default for a file type or link section, enter .pdf.
  4. Click on Microsoft Edge then in the pop-up prompt, select Switch anyway.
  5. Select an app from the list or click on Look for an app in the Microsoft Store.
  6. Now click on OK to set your select app as the default PDF viewer.

3. Scan for viruses

  1. Press the Windows key, search Windows Security, and click Open.
  2. Select Virus & threat protection.
  3. Next, press Quick scan under Current threats.
  4. If you don’t find any threats, proceed to perform a full scan by clicking on Scan options just below Quick scan.Scan options
  5. Click on Full scan, then Scan now to perform a deep scan of your PC.Full Scan Scan Now
  6. Wait for the process to finish and restart your system.

This method can help you to detect various malware attacks on your PC, but it will not offer advanced virus scanning compared to efficient antivirus software.

We suggest you consider multi-layered antivirus support for detecting new emerging viruses and ransomware threats.

⇒Get TotalAV

4. Repair your PDF viewer

  1. Hit the Windows key and click on Settings.settings windows 11
  2. Click on Apps then select Apps & features.
  3. Find your PDF viewer from the list, right-click on the three ellipses, and select Advanced options.
  4. Click on Repair.

If your PDF viewer was damaged or corrupt, repairing it could help you open your PDF files.

Hopefully, one of these solutions has helped you open your PDF file in your preferred program instead of persisting to open it in Chrome.

With that out of the way, we’d like to direct your attention to another error you may encounter. Some users reported that PDF thumbnails were not showing, so we came up with an article to help you restore them.

We also have answers to when your PDF is not saving, so be sure to check out our helpful guide.

It’s a wrap for this article, but keep the conversation interactive in the comment section below with any additional thoughts you may have.

Fix: Printer Operation Could Not be Completed

Using a printer on your Windows 11 can present the error Operation could not be completed (error 0x00000709), especially if you’ve recently made some Windows updates. 

Usually, it could just be an issue of the printer not being connected to the network, but sometimes, it’s beyond a connection issue. Let’s now have a closer look at what this error means and how to bypass it.

What does the Printer Operation could not be completed mean?

This common error can occur when printing a document, but it does not necessarily mean that your printer is broken. You may also get the sharing printer operation could not be completed (error 0x00000709) message when you attempt to share your printer over the network.

There are many reasons why the Printer operation could not be completed message can pop up on your screen, and here are some of them:

  • Default settings – If you let Windows manage the printer to use, in some cases, it might select the wrong printer as your default printer. Other times, the default printer keeps changing.
  • Problematic Windows update – Some users reported that this error showed up shortly after a recent Windows update. Sometimes, these updates alter your default settings.
  • Incorrect Registry settings – If your registry is corrupted or has missing entries, it may cause this error. Also, if you recently had a virus infection, it may have made some changes in your Registry, causing this error.
  • Faulty drivers – Your drivers play an important role in the proper functioning of your printer, so ensure they are always up-to-date.

How do I fix 0x00000709?

Check the following before proceeding to the slightly technical solutions:

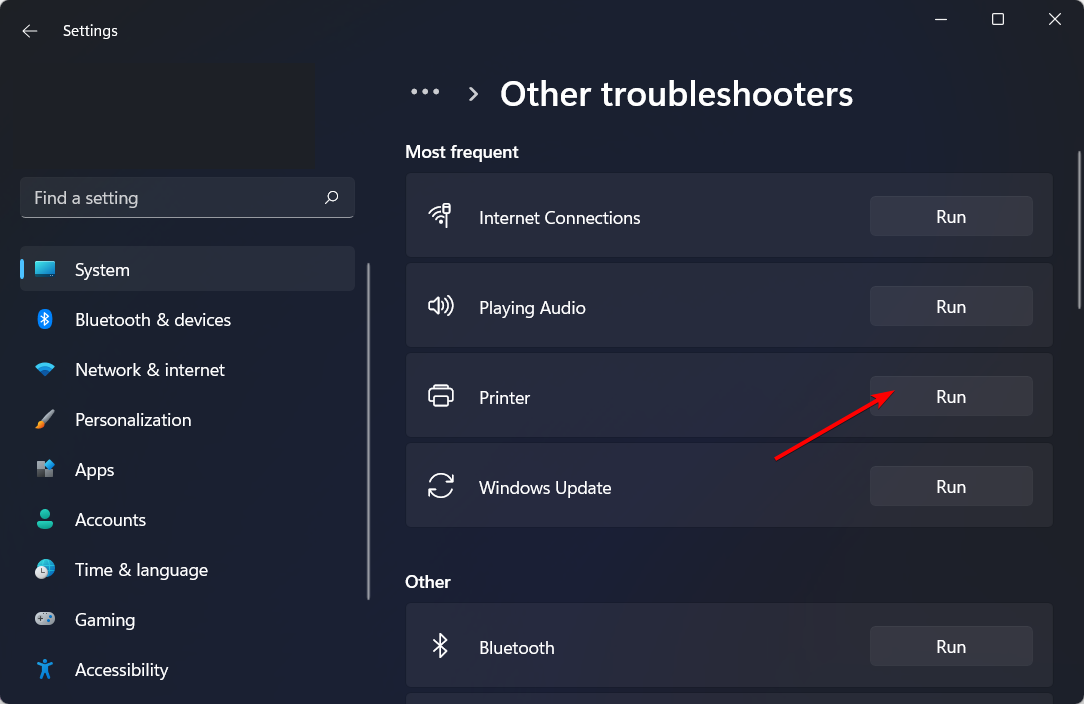
1. Run the Printer troubleshooter

  1. Hit the Windows key and click on Settings.settings windows 11
  2. Select System on the left pane, then click Troubleshoot on the right.Open system troubleshooter
  3. Click on Other troubleshooters.other troubleshooters
  4. Find the Print troubleshooter and click the Run button next to it.printer-run windows cannot connect to the printer

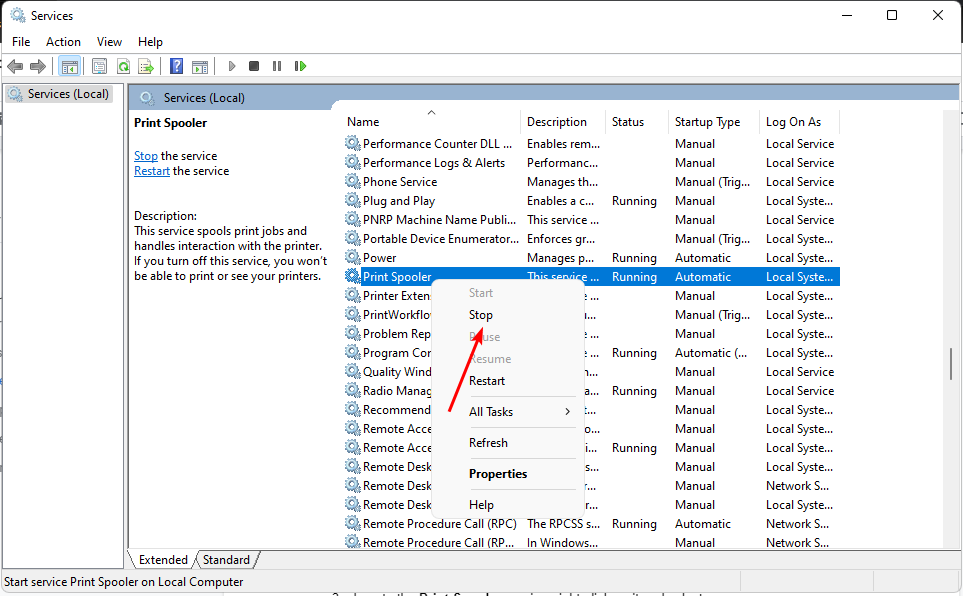
2. Restart the Print Spooler service

  1. Hit the Windows + R keys to open the Run command.
  2. Type services.msc in the dialog box and hit Enter.run services.msc command
  3. Locate the Print Spooler service, right-click on it, and select Stop.
  4. Right-click on it again, then select Start.start service

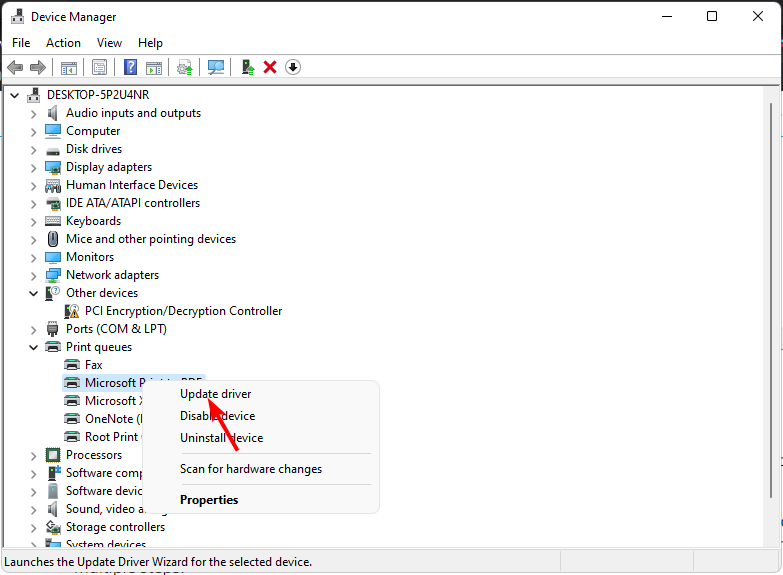
3. Update the Printer drivers

  1. Hit the Windows key, type Device Manager in the search bar, and click Open.device manager w11
  2. Navigate to Print queues, locate your printer, right-click on it, and select Update driver.
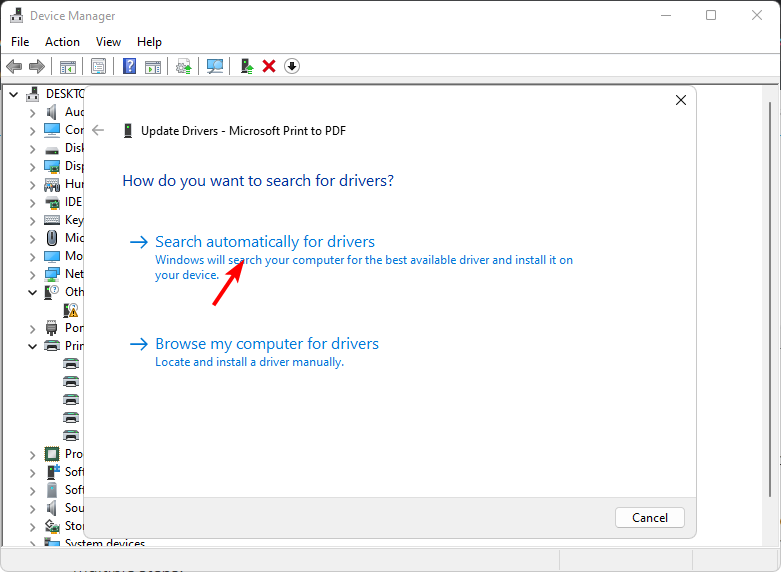
  3. Select Search automatically for updated drivers.
  4. Windows will find the most suitable driver and recommend you install it.

Manually installing the driver requires some computer knowledge and know-how. It’s not difficult, but not as easy as using a software tool.

Outbyte Driver Updater is a driver updater software that scans your computer and detects all the missing or outdated drivers. This makes the process much simpler and easier for anyone who doesn’t want to go through multiple steps.

⇒ Get Outbyte Driver Updater

4. Disable automatic printer management

  1. Hit the Windows key and click on Settings.settings windows 11
  2. Click on Bluetooth & devices, then select Printers & scanners.
  3. Scroll down to Printer preferences and toggle off the Let Windows manage my default printer option.

5. Set the default printer

  1. Hit the Windows + R keys to open the Run command.
  2. Type regedit in the dialog box and hit Enter to open the Registry Editor.
  3. Navigate to the following location: Computer\HKEY_CURRENT_USER\Software\Microsoft\Windows NT\CurrentVersion\Windows
  4. Locate LegacyDefaultPrinterMode, double-click on it, and under Value data, enter 1.Windows 7 default printer keeps changing to Adobe PDF

Remember to create a backup of your Registry to be on the safe side should anything go wrong when modifying the Registry.

6. Uninstall recent Windows updates

  1. Hit the Windows key and select Settings.settings windows 11
  2. Click on Windows Update and select Update history on the right pane.update-history restart to repair drive errors
  3. Scroll down, and under Related settings, click on Uninstall updates.uninstall-updates-w11 computer-recognize-logitech-unifying-receiver
  4. This will take you to the most recent installed updates.
  5. Select the topmost update and click on Uninstall.uninstall-update-latest computer-recognize-logitech-unifying-receiver
  6. Restart your PC and check if the problem persists.

And that’s how to solve the Printer Operation could not be completed error. You may also run into another printer-related issue where the printer is not printing the actual size. If so, feel free to check out our detailed article on maneuvering this issue.

Drop us any additional thoughts on this topic in the comment section.

Fsquirt.exe: What is it & Should You Remove it?

Are you wondering what the Fsquirt.exe file is and whether or not you should remove it from your PC or not? Well, before you take any drastic step, you should go through this guide.

Because here, we will give you a proper explanation of what the Fsquirt.exe file is and whether is it safe for you to delete the file from your system. Let us check out the solution.

What is Fsquirt.exe?

The Fsquirt.exe file is a software component of Microsoft Windows. It is an executable file that runs the GUI (Graphics User Interface) of the Bluetooth File Transfer wizard, which basically facilities sending or receiving files between a PC and a Bluetooth device.

You will find the Fsquirt.exe inside the C:\Windows\System32\ directory. You may find two instances of this file, but do not worry as they aren’t viruses or malware.

The Fsquirt.exe file is loaded in the main memory, i.e., the RAM of your system. However, being such an important file, malware can easily duplicate this file and execute the file without your knowledge if your PC is infected.

Is Fsquirt.exe safe?

The Fsquirt.exe is a system-related file and it is generally safe. But viruses or malware can easily infect these important files and create a duplicate of them.

Also, such files can be replaced and in place of the original file, the infected file may run and cause harm to your PC. The best way to verify if the Fsquirt.exe is safe or not is to check the location of the file.

Usually, the Fsquirt.exe file can be found inside the C:\Windows\System32, C:\Windows\ServicePackFiles\i386, or C:\Program Files\Bluetooth Suite\. If it’s not there, then there is a high chance that it is a virus.

How do I disable Fsquirt.exe?

1.1 Using the Services menu

  1. Press the Win + R keys to open the Run dialogue.
  2. Type services.msc and press OK.
  3. Double-click on Bluetooth Support Service.
  4. Select Disable under the Startup type.
  5. Click Apply and OK.

1.2 Using the Registry Editor

  1. Press the Win + R keys to open the Run dialogue.
  2. Type regedit and press OK.
  3. Navigate to the below path. HKLM\System\CurrentControlSet\Services\Bthport\Parameters
  4. Right-click on the right-side, select New and DWORD (32-bit) Value.
  5. Rename the new DWORD as DisableFsquirt.
  6. Double-click on the DisableFsquirt key.
  7. Edit the Value data to 1.
  8. Close Registry Editor.

You can utilize both ways to disable Fsquirt.exe on your PC. In order to reverse the process and enable Fsquirt.exe, all you need to do is delete the DisableFsquirt registry key.

However, do note that if this disables the legit Fsquirt.exe file, then you will face Bluetooth-related issues on your PC.

What can I do if the Bluetooth icon disappears?

  1. Press the Win + I keys to open Settings.
  2. Select Bluetooth & devices from the left pane.
  3. Select Devices.
  4. Click on More Bluetooth settings.
  5. Check the box Show the Bluetooth icon in the notification area.

How can I fix the Fsquirt.exe-related errors?

1. Run a SFC scan

  1. Press the Win key to open the Start menu.
  2. Type Command Prompt and open it as an administrator.
  3. Type the below command and press Enter. sfc /scannowsfc scan
  4. Wait for the process to complete.
  5. Reboot your PC.

Since the Fsquirt.exe is a system-related file, chances are some third-party program might corrupt it. In such a case, we would suggest you run the system file checker and fix the problem.

2. Scan your PC for viruses

  1. Open the Start menu by pressing the Win key.
  2. Open Windows Security.
  3. Click on Virus & threat protection.
  4. Select Quick Scan.
  5. Wait for the process to complete.
  6. Apply the prompted fixes.
  7. You can also select Scan options and choose Full scan for in-depth scanning.
  8. Restart your PC.

A virus infection might have corrupted the Fsquirt.exe file which is why you might be coming across multiple issues related to that file. In that case, a simple virus scan can do wonders and help fix the issue.

We have a list of some of the best antivirus tools that you can opt for and keep your PC safe and protected from threats.

If Bluetooth isn’t working on your Windows 11 PC, then we have a guide that lists some solutions to help you resolve the problem.

You can also read our guide on how to use the Windows Bluetooth auto-connect feature in 4 steps. Also, if you are facing the BTServer.exe errors, then read our guide and understand what it is and how to fix errors related to it.

Feel free to drop a comment in the comments box below, to let us know if you were able to fix issues related to Fsquirt.exe or not.

Addinprocess.exe: What Is It & How to Remove It

Nobody really thinks to check the GPU usage unless you want to monitor the consumption of resources of a specific program or your PC has become unresponsive. Users have since discovered a new Addinprocess.exe process that consumes 100% GPU.

It’s normal for some programs to consume high GPU or CPU, but when it’s an unknown process, this should be cause for alarm. Let’s now get into the nitty-gritty of this process and how to get rid of it.

What is Addinprocess exe? 

Addinprocess.exe is part of the Microsoft .NET Framework. It is used to load programs and games that require the framework. You’ll most likely find the addinprocess.exe in the following location:  C:\Windows\Microsoft.NET\Framework64\v4.0.30319

While the executable file seems important for the proper functioning of some of your programs, it is notorious for high GPU consumption. The reason it consumes a lot of resources stems from the origin of the downloaded programs.

Windows has very stringent security measures which prohibit the installation of unverified software. Still, some users have discovered loopholes in how to get programs they need using other methods such as torrents and other unreliable sites.

The problem with downloading such files, especially when you don’t have a comprehensive antivirus, is that your system is exposed to all kinds of vulnerabilities, from virus infections to malware and trojans.

Not to say that all sites are a no-go zone, but you should always do your due diligence when downloading non-verified applications. 

What is the error in Addinprocess exe?

Now that we know what addinprocess.exe is, you may wonder whether to keep or remove it from your system. Well, it depends. If everything is running as it should on your PC, there’s no need to upset the status quo.

However, if you’re among the users complaining of high GPU, CPU, and system crashes, you can disable it. When downloading programs from unofficial sites, some often contain malware, which can be very dangerous.

Malware can hide itself in the system and run in the background, consuming resources such as CPU, RAM, and storage space.

This can lead to a memory leak because the program cannot manage memory allocations correctly. Over time, the program consumes more and more memory until it eventually crashes or causes other programs to crash because there is not enough memory left in the system.

Since this seems to be the cause of the addinprocess.exe process, the most obvious step is to disable it from the Task Manager. 

So far, users have not had any luck in stopping this process. Also, deleting the file from its path is prohibited unless you take ownership of it, but that is still a long shot. 

With those failed methods, we have curated this article to show you how to get rid of the addinprocess.exe.

How do I remove the Addinprocess exe?

First things first, check off the following:

1. Run DISM and SFC scans

  1. Hit the Start Menu icon, type cmd in the search bar, and click Run as administrator.cmd-run-admin-w11 unexpected kernel mode trap windows 11
  2. Type the following commands and press Enter after each one:DISM.exe /Online /Cleanup-Image /Restorehealth sfc /scannow

In case the steps above don’t suit your needs, we suggest you approach another effective way to solve this issue.

If you need to fix the issues related to this exe process, a dedicated system repair tool below is able to scan your PC and fix corrupted system files.

2. Scan for viruses

  1. Press the Windows key, search Windows Security, and click Open.
  2. Select Virus & threat protection.
  3. Next, press Quick scan under Current threats.
  4. If you don’t find any threats, proceed to perform a full scan by clicking on Scan options just below Quick scan.Scan options
  5. Click on Full scan, then Scan now to perform a deep scan of your PC.Full Scan Scan Now
  6. Wait for the process to finish and restart your system.

3. Use Autoruns to remove the file

  1. Navigate to your browser and download Microsoft Autoruns.
  2. Locate the downloaded file and unzip it.
  3. Right-click on the autorun.exe file and select Run as administrator.
  4. Click on Agree to accept the license terms.
  5. Type and Enter srvhost in the Filterbox entry.
  6. Locate the following entry, right-click on it, and select Delete: C:\Windows\Microsoft.NET\Framework64\v4.0.30319

4. Perform a clean boot

  1. Hit the Windows key, type msconfig, and open System Configuration.
  2. Switch to the Services tab and select Hide all Microsoft services.
  3. Click on the Disable all button, then hit the OK button to save the changes.
  4. Go back and click on the Startup tab, select Open Task Manager then click OK.
  5. In the Startup tab of the Task Manager, Disable all the Enabled startup items.
  6. Close Task Manager and restart your PC.

5. Update BIOS

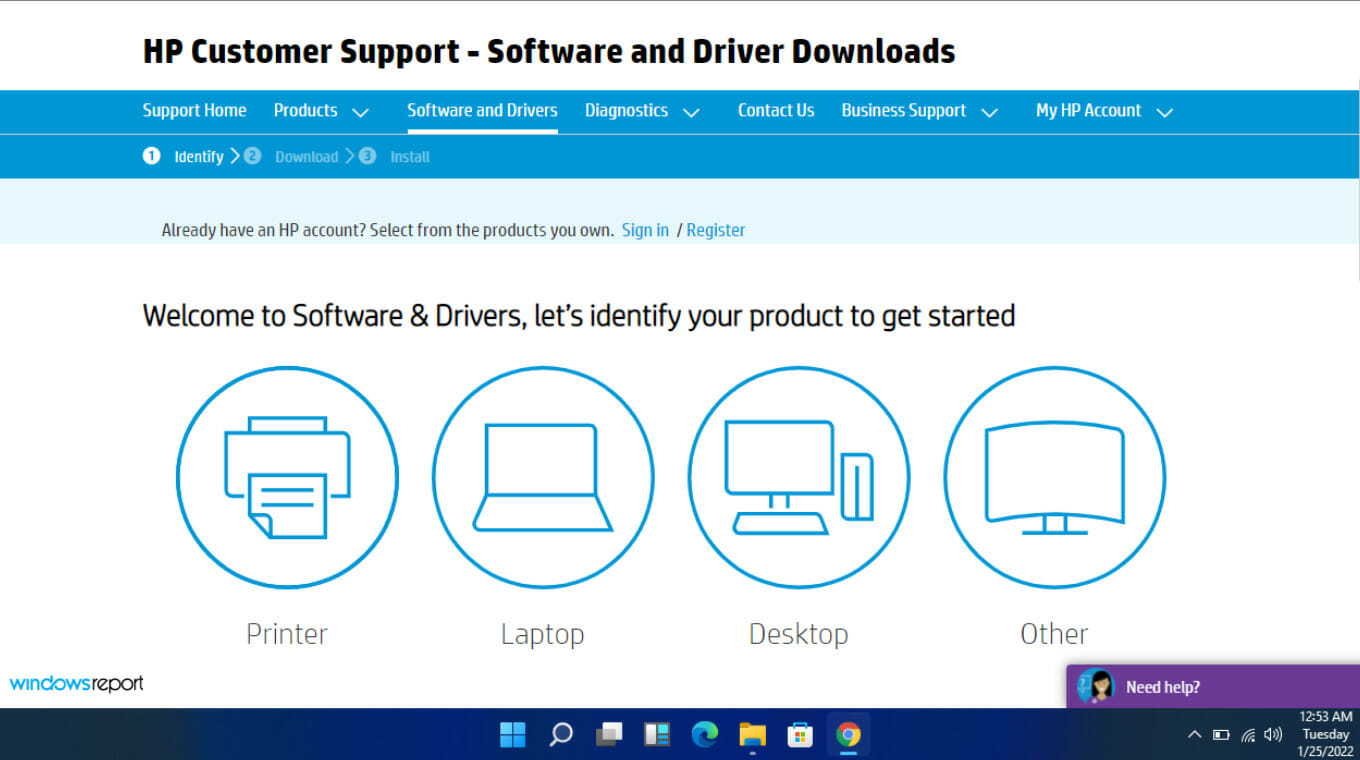
  1. The process of updating BIOS will differ depending on your motherboard. For this step, we shall be updating the HP motherboard.
  2. Navigate to the HP driver and software download website.
  3. Choose laptop or desktop, depending on the type of computer you’re using.
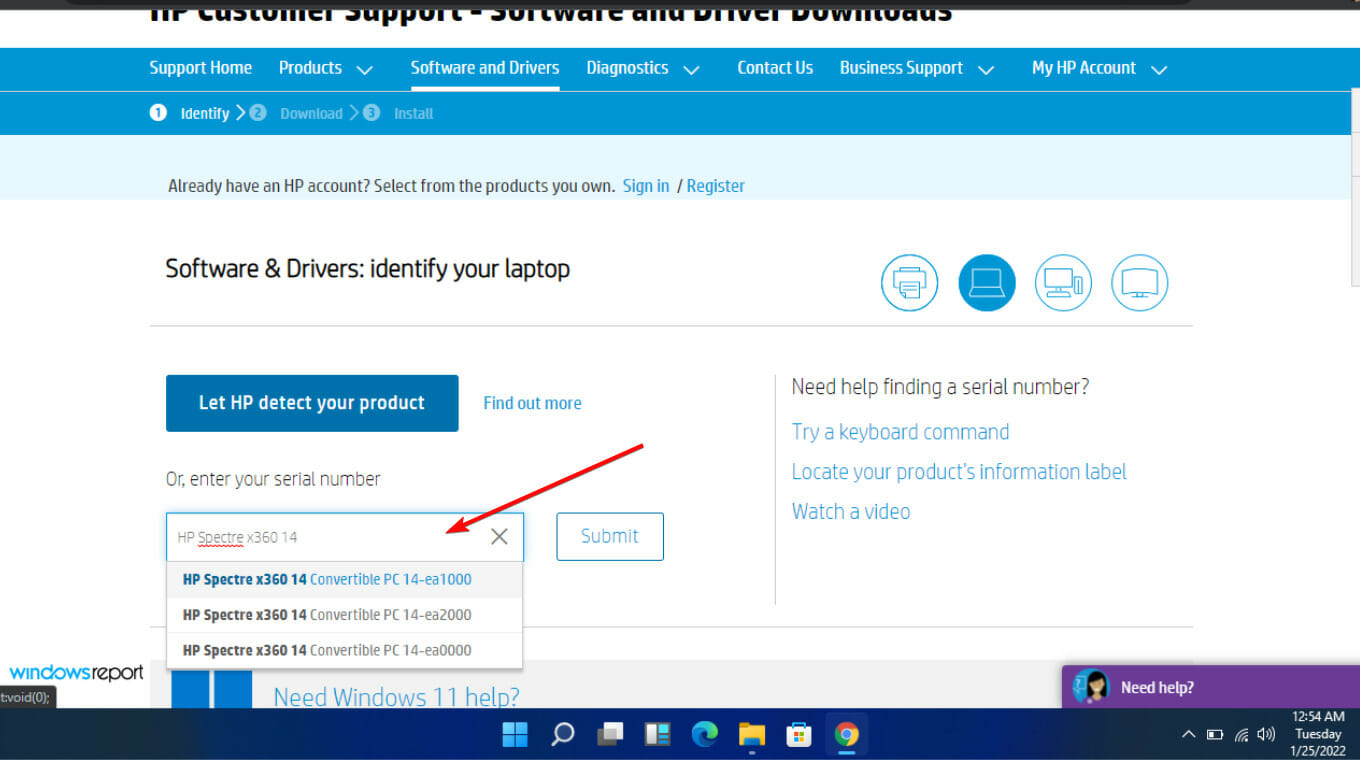
  4. Enter your exact serial number or your exact computer model.
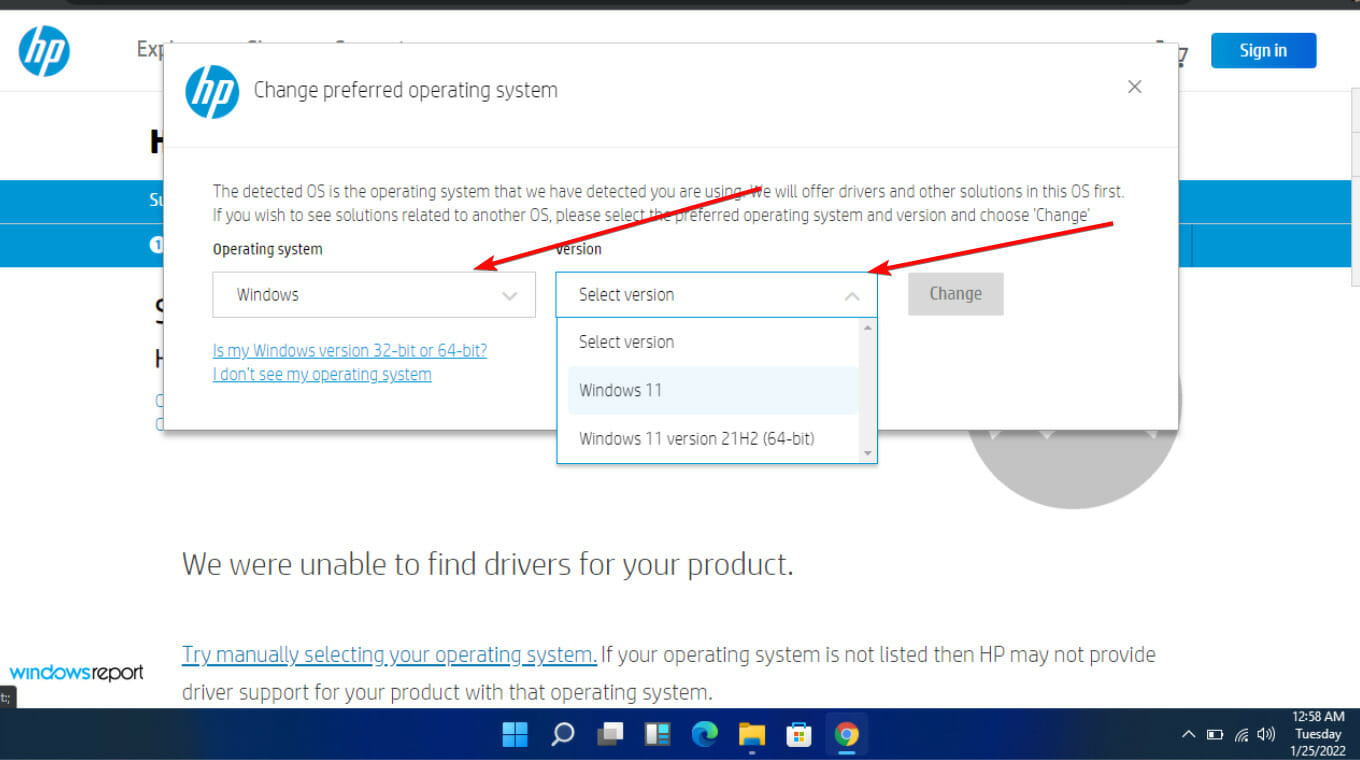
  5. Select your OS and OS version, then click Submit.
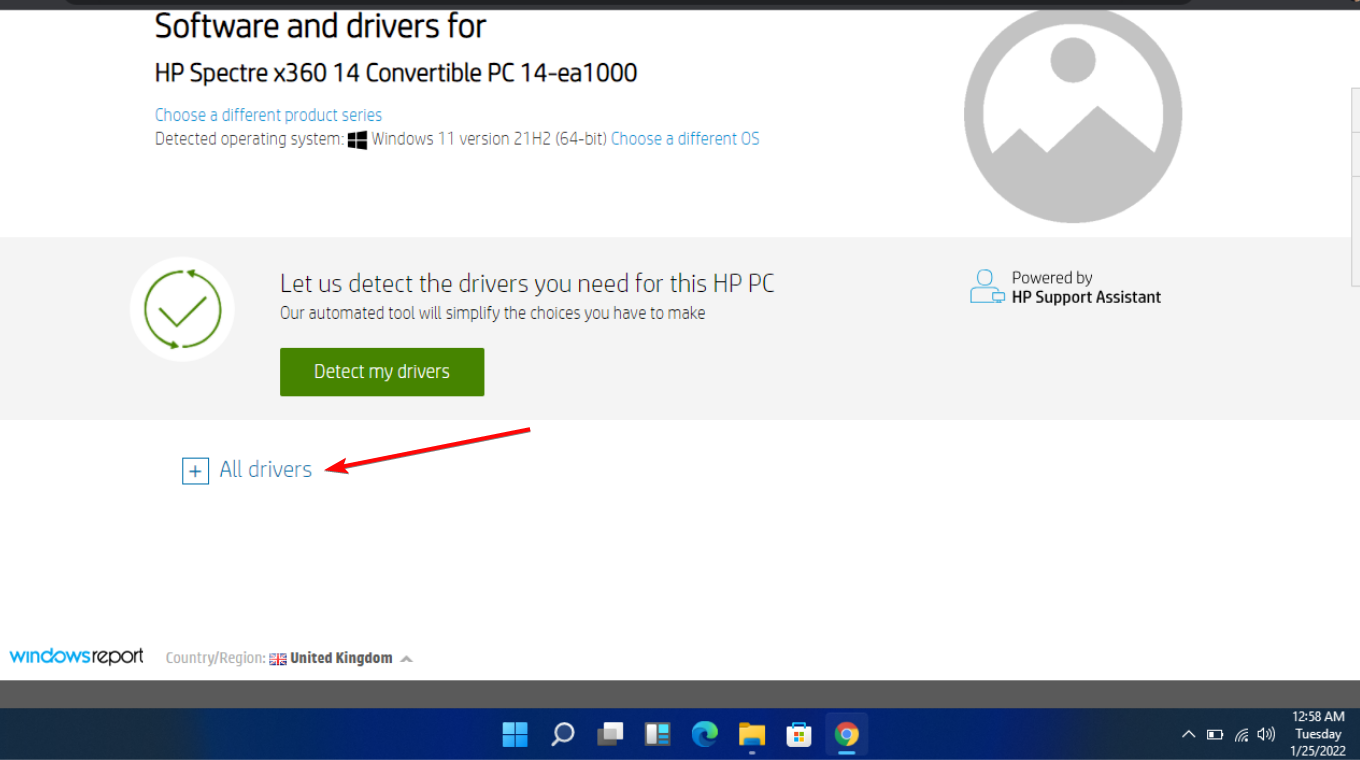
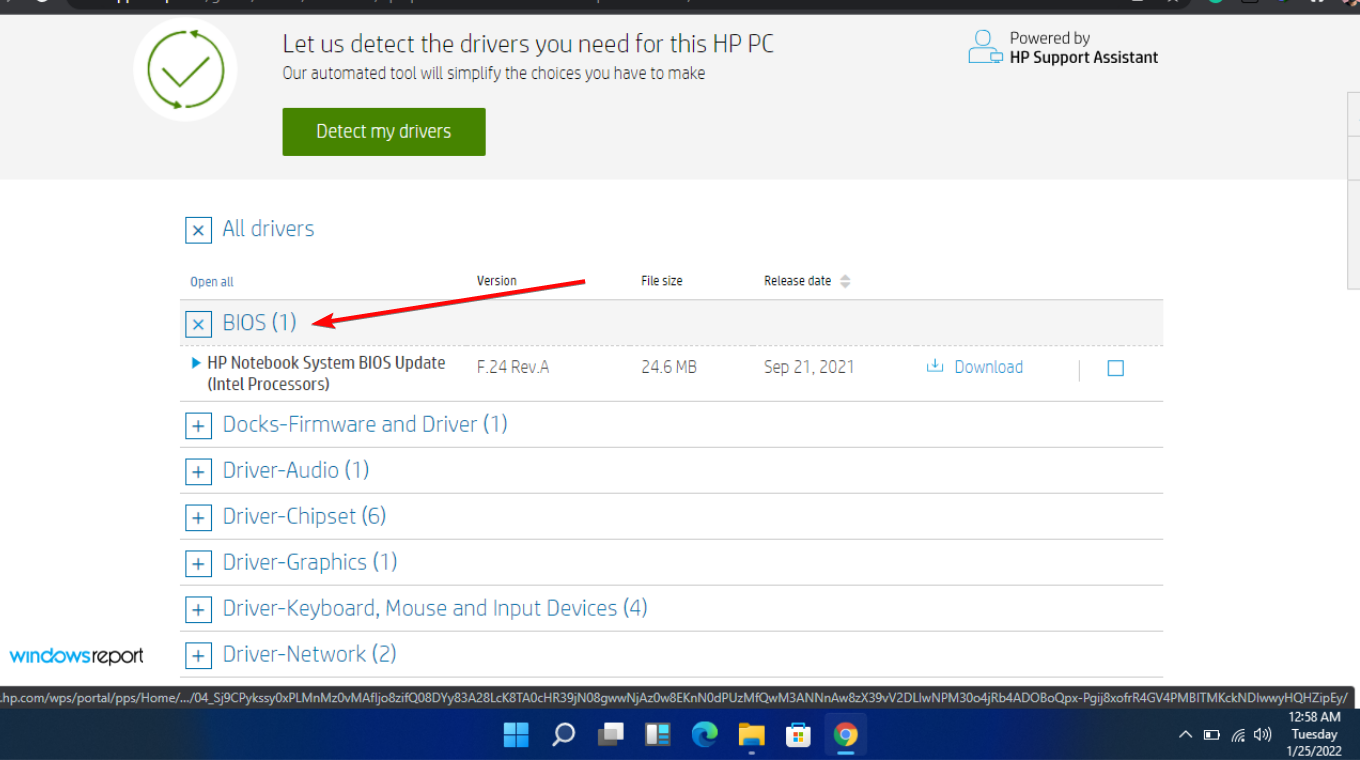
  6. Click on All drivers and then expand BIOS to see available updates.
  7. Click the download icon.
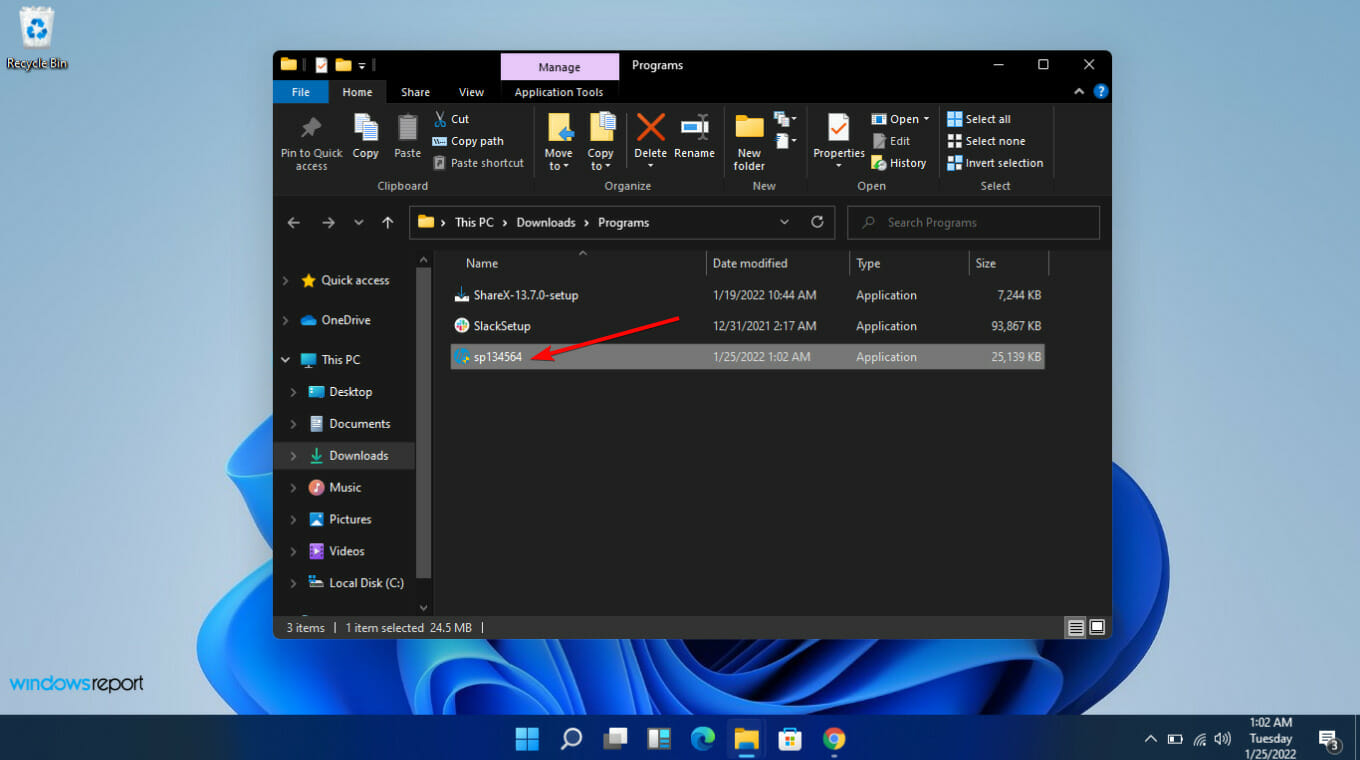
  8. Install the .exe file, following the on-screen instructions.
  9. Restart your PC.

Since the addinprocess.exe is not the only file that may find its way to your PC, we recommend getting uninstaller software for such problems.

You may also be interested in a similar article where we discuss the uiseagnt.exe and ASCService.exe and whether you should disable them.

For any further queries or suggestions, leave them in the comment section.

Rust is now up and running in Windows 11 kernel

This week has seen a lot of surprises regarding Microsoft News. We had the Patch Tuesday coming out, with significant updates for all Windows versions.

We’ve also received a new tool from the Redmond tech giant, the new Windows 10/11 HVCI/memory compatibility check tool, which can be used to perform memory compatibility checks. Taskbar clock seconds were also officially added to the Windows 11 OS, earlier this week, which you can manually turn on after you get the update.

We also found out that Edge will no longer be on future Windows server containers, thus greatly improving your experience on the platform.

It’s time to witness yet another surprise from Microsoft. After David Weston, Vice President, Enterprise and OS Security at Microsoft, teased it out, earlier this year, Rust is finally up and running in Windows 11 kernel.

Microsoft has released the Rust integration in Windows 11 kernel

First seen by Twitter user Mark Russinovich, it seems that Windows 11 Insider has some bits of Rust code in it as the Win32k.sys kernel mode (KM) driver files have been ported to Rust. Win32k.sys is the manager of the graphical device interface (GDI), and overall window management on Windows.

For those of you that don’t know what Rust is, keep in mind that it is actually a programing language for developers.

The Redmond tech giant has been interested in this language for several reasons and one of those happens to center around memory safety and security that Rust offers.

Weston said that Windows 11 will soon be booting with Rust in the kernel and it could be happening really soon. And now, we can see it live and running in Windows 11 kernel.

The feature comes only a couple of months after it has been teased out, and in doing so, Microsoft kept its promise to release it as soon as possible.

Are you excited about it? Or not? Be sure to let us know in the dedicated comments section located right below.

Unable to Shrink C Drive? 5 Quick Ways to Fix it

Are you unable to shrink the C drive on your Windows PC? Well, if you are then you are in the right place because, in this guide, we will give you some methods that will help you shrink the C drive.

Shrinking a drive will help you get extra storage space and allocate it to a new drive or an already existing drive to store more files in that drive. Let us get right into it.

Why am I unable to shrink the C drive?

We did our research and found a bunch of reasons why you will be unable to shrink the C drive. Some of the common errors that will prevent you from shrinking your C drive are listed below:

Well, these are only a few errors that you will come across when you are trying to shrink any drive.

How can I shrink the C drive easily?

1. Run Disk Cleanup

  1. Press the Win key to open the Start menu.
  2. Type disk cleanup and open it.
  3. Select the drive you wish to clean and press OK.
  4. Select the files you want to get rid of and click OK.
  5. To free up more space, click on Clean up system files.
  6. Select the drive.
  7. Choose the files to remove and click OK.
  8. Restart your PC.

When you are removing the files from the drive, then make sure that you are also selecting the hibernation files and restore point files.

2. Disable System Restore

  1. Press the Win key to open the Start menu.
  2. Open the control panel.
  3. Select Recovery.
  4. Click on the Configure System Restore link under the Advanced recovery tools page.
  5. Switch to the System Protection tab.
  6. Select the C drive under the Protection Settings section and click on Configure.
  7. Under the Restore settings section, click on Disable system protection.
  8. Click Apply and then click OK.

After you have disabled the System Restore, check if the problem of being unable to shrink the C drive is resolved or not.

3. Disable the pagefile

  1. Press the Win key to open the Start menu.
  2. Open Control Panel.
  3. Select System.
  4. Click on Advanced System Settings.
  5. Under Performance, click on Settings.
  6. Switch to the Advanced tab.
  7. Click on Change.
  8. Uncheck the Automatically manage paging file size for all drives option.
  9. Select No paging file and click OK.

4. Disable the Kernel memory dump

  1. Press the Win key to open the Start menu.
  2. Open the Control Panel.
  3. Select System.
  4. Click on Advanced System Settings.
  5. Under Startup and Recovery, click on Settings.
  6. From the Write debugging information drop-down, select None to disable the Kernel memory dump.
  7. Click OK and restart your PC.

Disabling the Kernel memory dump option has also helped many of our readers fix the unable to shrink C drive problem on their Windows 11 PCs.

For users coming across the Kernel Security Check failure problem, we have a guide that lists effective solutions to resolve the problem.

5. Disable the Hibernation mode

  1. Press the Win key to open the Start menu.
  2. Type the Control Panel and open it.
  3. Select Power Options.
  4. Click on the Change what the power button do option on the left.
  5. Click on Change settings that are currently available.
  6. Uncheck the Hibernate box and hit the Save changes button.
  7. Restart your PC.
  8. Open File Explorer by pressing the Win + E keys.
  9. Navigate to the below path. C:\pagefile.sys
  10. Select the pagefile.sys and press Delete.

One of our readers suggested this solution and it has helped many to fix the problem of being unable to shrink the C drive.

You can also make use of third-party partition assistant tools to easily shrink any drive on your PC. However, we have a guide that gives a list of some of the best disk management software that you can use in 2023.

Feel free to let us know in the comments below, which one of the above tools helped you resolve the unable to shrink C drive problem.

How to Corrupt a File on Purpose [4 Safe Ways]

We’ve all probably encountered a computer problem wherein some system or application files get corrupted or damaged by malware and viruses, system crashes, or some other factors. But, corrupting a file on purpose is the reverse of this case.

While some people have their reasons for doing so, in this article, we will take you through detailed steps on how to corrupt a file on purpose and if it is safe to self-corrupt a file.

Is it safe to self-corrupt a file?

Intentionally corrupting a file is not safe even when it seems like an easy and harmless task to do. Attempting to intentionally corrupt a file can have unpredictable and potentially harmful consequences.

It may cause data loss, system instability, or other issues that can affect the performance and functionality of your computer or other devices.

Regardless, backing up your data and making use of specialized data recovery software and procedures can help protect your computer from the harm you may encounter should you choose to corrupt a file on purpose.

In the next section, we will discuss some safe steps to self-corrupt a file.

How can I corrupt a file on purpose?

Before attempting any of the steps provided below, you should consider performing the following precautions:

Now that you’ve confirmed the above checks, you can explore the steps provided below to corrupt a file intentionally.

1. Corrupt a file by renaming the file extension

  1. Press the Windows button, type file options, and click on it.
  2. Navigate to the View tab in the top menu area, and uncheck the box with the Hide extension for known File types option to show the file extension if it was hidden. Click Apply, then click OK.
  3. Next, locate the document file that you want to corrupt and right-click on it. Select Rename from the options.
  4. Change the file extension to .doc/.bak/.lit or another extension depending on the file you’re renaming.
  5. Press Enter, then click OK.

By renaming the file extension, you won’t be able to open the file neither will others. However, you or anyone else can undo the corruption by renaming the file extension to its original format.

2. Use Notepad to corrupt a Word document

  1. Open the File Explorer. Right-click the file you want to corrupt, select open with, and click on Choose another app.
  2. In the next window, select Notepad.
  3. Now, go to File and select Save As.
  4. Now, change the type of the document from .txt to another file. Press the Enter button to Save.

Another safe way to corrupt a file on purpose is to use the Windows Notepad app. By saving your document file with it, it becomes unreadable whenever you try to open it with the Word document app.

3. Use an online file corrupter

  1. Visit the official File Corrupter website.
  2. Scroll down and click on From Your Computer to upload the file to corrupt.
  3. Then, click on the Corrupt file button and wait for a moment.
  4. Your file will now be corrupted and saved at your desired location.

Using the online file Corrupter is one of the safest means to self-corrupt a file without allowing anyone to detect that you corrupted the file intentionally. This tool can be used to corrupt Word, Excel, archives, MP3, and other popular file types.  

4. Corrupt a Word file using the Compression tool

  1. Right-click the Word file you want to corrupt. Choose Send to from the options and select Compressed (zipped) folder.
  2. Pause the compression process and stop it when it is about 90% to completion.
  3. Now, try to open the Word file after canceling the process.
  4. If the interruption is successful, you won’t be able to open the file using Word.

Halting the compression process of a Word file is another safe and efficient means to self-corrupt a file. However, you need to take note of the progress of the compression to ensure that it is not completed successfully because Word files are quick to compress.

And that’s it on safe ways to corrupt a file on purpose. You can work your way through any of the methods depending on your needs.

Do not forget to back up your data securely before attempting any intentional file corruption.

In case you need to repair your files, you can explore our dedicated guide on how to fix corrupted files in Windows 10 or check how to fix system-corrupted files in Windows 11.

If you have any questions or suggestions, or possibly another method that you’re sure of, kindly use the comments section below.

Best Pastebin Alternatives: 5 Picks For Easy Code Sharing

Pastebin is a site that people use when they want to share some text or code online. The site allows users to paste text and keep it for a certain period on the website.

However, there have been several complaints about the website as it has annoying ads. To this, some of our readers have recently requested for best Pastebin Alternatives. We have gathered some of the best and easy-to-use sites in this article for you.

What is Pastebin?

Pastebin is a popular online platform that allows users to store and share text-based content easily. It gained popularity among users who needed a simple and efficient way to share code snippets, log files, and other textual content.

The platform enables users to paste any text they want to share into a text box and then generate a unique URL that they can share with others. The content remains on the platform for a period of time specified by the user, usually ranging from a few hours to several months.

It has become an important tool for sharing information and collaborating in various online communities, particularly in the tech and programming communities. It is also used by journalists, researchers, and others for sharing sensitive information or data dumps.

Although Pastebin is a useful platform, there are newer and more feature-rich alternatives available. Below are the top five best Pastebin alternatives.

What are the best Pastebin alternatives?

Ghostbin – For Privacy & Security

Ghostbin

Ghostbin is a free and open-source Pastebin alternative used for sharing text snippets and codes securely. Unlike Pastebin, Ghostbin does not store any user data on its servers, ensuring complete privacy.

It features syntax highlighting for over 50 programming languages and enables users to set an expiry time for their snippets. Ghostbin also offers password protection and allows users to edit their snippets even after publishing them.

Furthermore, Ghostbin supports Markdown formatting, making it an excellent choice for sharing formatted text.

⇒ Get Ghostbin

Hastebin – An open-source alternative

Hastebin is a lightweight and fast Pastebin alternative that allows users to share code snippets and texts. It features syntax highlighting for over 50 programming languages and supports collaboration, making it an excellent choice for teams.

Hastebin does not require users to create an account to start sharing snippets and allows users to set an expiry time for their snippets.

Furthermore, Hastebin is open-source, making it an excellent choice for developers who want to deploy their own Pastebin-like platform.

⇒ Get Hastebin 

Codepen – Best for Web development projects

Codepen is a Pastebin alternative used primarily for sharing front-end code snippets and web development projects.

It offers a live preview feature, enabling users to see their code snippets in action. Codepen supports HTML, CSS, and JavaScript, making it an excellent choice for web developers.

Additionally, Codepen allows users to collaborate on projects, share their work on social media, and embed their snippets on websites.

⇒ Get Codepen

GitHub Gist – For GitHub Programmers

GitHub Gist is a Pastebin alternative provided by GitHub, used for sharing code snippets and texts.

It features syntax highlighting for over 200 programming languages and allows users to create private and public gists. GitHub Gist is integrated with GitHub, making it an excellent choice for developers who use the platform.

Additionally, GitHub Gist allows users to fork and clone gists, making it an excellent choice for collaboration.

⇒ Get GitHub Gist

Ideone – Compiler & Debugging tool

Ideone is an online compiler and debugging tool. You can compile source code and execute it online in over 60 programming languages on the website.   

It has many cool features that make it easy for you to manage your code. Also, the website is pretty straightforward to use.

Also, sharing code with others is extremely easy with this one. Copy the address from the URL bar and share it. Or use its built-in share features.

It also has a sphere engine system that allows users to run applications remotely while maintaining a full runtime environment.

⇒ Get Ideone

And that’s it on the five best Pastebin alternatives to share your code and texts to collaborate with other users.

In case you have been looking to replace Pastebin, you can work your way through any of the provided Pastebin alternatives provided in this article that offer similar or enhanced features.

If you have any questions or suggestions, do not hesitate to use the comments section below.

Onedrive vs Dropbox: Which One’s Better For You in 2026?

In the Cloud Storage industry, OneDrive and Dropbox are household names that provide similar services. This makes it a bit hard for users to choose between the two services.

In this guide, we’ll provide you with a comprehensive comparison between OneDrive and Dropbox to help you decide which one you should use.

What is OneDrive?

OneDrive

OneDrive is a cloud storage service provided by Microsoft. Every user with a Microsoft Account has automatic access to OneDrive’s features and functionality.

For users who sign up for a free OneDrive account, they have access to 5GB of free storage while Microsoft 365 subscribers have access to 1 TB of storage.

Windows 11 users automatically get their files synced with OneDrive allowing them to store, protect, and share their files with users anywhere in the world. Once your files are synced to OneDrive, you can share and access them on any PC in the world.

What is Dropbox?

Dropbox is one of the oldest and most popular cloud storage services available today. It keeps files, folders, and documents in sync between your personal devices and the Dropbox cloud. Dropbox can be accessed via the web or the app that can be installed on PC, Mac, and mobile devices. 

Dropbox offers a free community plan that provides users with 2GB of storage but with a subscription plan, you can get up to 3TB storage. Once you install the Dropbox app, any file you store on it will be automatically backed up to the Dropbox cloud.

OneDrive vs Dropbox: What are the differences?

1. Features

Since OneDrive is owned by Microsoft, its use, as a default option, has been adopted by most Windows users. This is made possible due to its integration with Office suite apps like Word, Excel, and PowerPoint. Although you can sync Dropbox also after buying the Office 365 subscription.

Dropbox gives more flexibility to diversify outside the monopoly of Microsoft products. You can easily integrate with other applications listed in its App Center. With this, you can genuinely select the best app rather than use default MS apps that are part of your subscription.

Both support mobile devices with extensive access to offline files and other improved features for easy access for their users. OneDrive was developed by Microsoft as a result is compatible with selected operating systems. Dropbox on the other hand is compatible with all operating systems.

The two apps thrive in supporting a whole range of file types -documents, images, videos, PDFs, and many more. Dropbox’s subtle feature allows you to select different work environments without duplicating documents in multiple formats edges.

Whatever Dropbox lacked in integration due to OneDrive’s company, they recovered in features. From HelloSign to Google integration, Paper, and Showcase, Dropbox rivals OneDrive on every Microsoft app.

2. Pricing

While they both excel at servicing users who require large amounts of cloud storage without extra apps, pricing is integral to shaping your decision.

OneDrive offers above the industry standard of free plan – 5GB compared to the 2GB of Dropbox. However, if your needs extend beyond this, then you can upgrade OneDrive’s personal plan of 100GB for $1.99/month.

OneDrive pricing

Further, you can get Office 365 on the next plan at 1TB for $6.99/month. The family plan accommodates up to six people, includes Office 365, and costs $9.99/month to get 1TB per user.

Meanwhile, Dropbox offers more for less on the individual plan at $11.99/month for 2TB or $19.99 for 3TB. The family plan also follows suit with 2TB/3TB of space allotted to individuals, up to six.

Lastly, the business plans of the two cloud services are as follows:

  • OneDrive Business plans offer $5/month and $10/month per user with unlimited storage and an annual commitment.
  • Dropbox Business plans cost between $15 and $50 /month per user for access to unlimited storage.

Lastly, OneDrive’s pricing structure is a bit complex. If you have a Microsoft 365 account, you have access to 1 TB which costs $69.99 yearly. For users with a Microsoft 365 Family subscription, it comes with a total of 6TB of storage costing $99.99 annually.

Take note that the prices are subject to change and you should check them before purchasing any of the products.

3. File Sharing/Security

Both services pride themselves on providing maximum security for shared or stored files. They both provide a maximum of 256-bit AES encryption on files. However, you need to be on the Business plan on OneDrive for the encryption to be effective with stored files on the servers.

Further, you can enable two-factor authentication for an additional layer of security on both services.

In terms of file sharing, you can hardly go wrong opting for any of the two services. In OneDrive, file sharing is done via links. While with Dropbox, file sharing is done via web applications.

You have the autonomy to set expiration dates for links on files shared. Also, you can deny files download or control third-party access to files.

The only distinction is that OneDrive allows you to control network usage. So, you can set up the minimum and maximum bandwidth allowance.

4. Support

If there’s an area of distinction, then OneDrive might have the upper hand in this section. Due to the extensive support provided by Microsoft on all their services, it is easier to get more active support.

Also, there are countless self-help articles and forums dedicated to troubleshooting. However, getting direct access such as email or phone support might be quite difficult.

Meanwhile, the automated chat service provided by Dropbox makes it easier to get personalized support. Although it may not make so much difference from the self-help articles provided on the support.

OneDrive vs Dropbox: Which One is Better?

Choosing between either of these cloud service providers depends entirely on your specific requirements and preferences. However, here are a couple of factors to help you make your choice:

  • User Interface – The OneDrive interface is pretty similar to most Microsoft products; it won’t impress you with its feel or look, but it’s familiar, and that means a lot to some users. Dropbox on the other hand, provides users with a more modern feel, and intuitive UI.
  • Operating System – For users with existing Microsoft accounts, OneDrive seems the logical choice because OneDrive comes preinstalled with your account. Additionally, with a Microsoft 365 account, you’ll pay no extra fee to get a massive 5 TB of storage. However, for users with no Microsoft Account or subscription, Dropbox can be a viable alternative if you’re willing to try something new.
  • Pricing – The OneDrive pricing method pretty much favors users with a Microsoft account or subscription. Dropbox on the other hand offers a more flexible pricing plan that favors users who have no existing Microsoft subscription.
  • Supported File Formats – One Drive supports a wide range of file formats in their respective categories e.g images, audio, log, etc. Dropbox also supports a wide range if file formats but OneDrive offers support for a lot more.

OneDrive Vs Dropbox: Verdict

OneDrive and Dropbox are both excellent cloud storage providers but if it comes down to it, OneDrive is a better alternative for users who have an existing Microsoft account.

This is because you don’t need to spend extra bucks purchasing storage plans unless you want to upgrade your storage.

For users with a Microsoft 365 account subscription, it makes it even better because you’re offered a standard 5GB of free storage. However, if you don’t have a Microsoft account, it pretty much levels the playing field as you’d still have to purchase a subscription similar to Dropbox.

Our verdict would be for Microsoft users to stick with OneDrive as their cloud storage provider while non-Microsoft users can try out Dropbox.

Dropbox and OneDrive have pretty much dominated the cloud storage market with each providing users with top-notch services. 

If you’re interested in trying out Dropbox we have a guide on how to download Dropbox for Windows 11, so feel free to visit it.

If you’ve been struggling to choose between the two services, we hope this guide has eliminated the confusion and helped you narrow down your choice to your preferred software.

Midjourney Error Fix: The Application Did Not Respond

The Midjourney application is an AI-powered tool used in Discord that can be used to create nice images or stunning pieces of art. However, some users claim they encountered Midjourney the application did not respond error while using the bot inside Discord.

What causes the Midjourney application not to respond?

First, The application did not respond error in Midjourney is just a way to say that the AI bot is not working at the moment.

Actually, it’s only a single explanation of why the Midjourney bot is not working in Discord and that is because the service is temporarily unavailable or an internal server error. In other words, the Midjourney bot is down or under maintenance.

Basically, there is a single thing to do in this case: wait. However, if the situation lasts longer than a few minutes, here are some solutions that might help.

How do I fix The application did not respond Midjourney error?

Before trying any of the solutions provided below, you should consider performing the following preliminary checks:

If these prerequisite methods didn’t fix the problem, let’s perform the following solutions.

1. Re-add the bot

  1. Open the Discord app on your mobile or computer and locate the Midjourney Bot.
  2. Click on the bot’s name. Then click on Kick Midjourney Bot to remove the bot from your server.
  3. Wait for a few minutes to allow time for the bot to reboot before inviting the bot again.
  4. Go to the Midjourney server. click on people icon, click on Midjourney Bot, and select Add to server.
  5. Select your server, and Continue.
  6. Then, select Authorize.

Now, try to access the Midjourney bot and check if the problem has been fixed.

2. Revert the system settings to default

  1. Open your Discord application on your computer or mobile device.
  2. Open the bot server and type /prefer suffix in the chatbox.
  3. Press Enter and wait for the process to complete.

After completing these steps, your system settings should be reset to default. Now check whether Midjourney the application did not respond error has been resolved.

And that’s it on how to fix the issue with Midjourney The application did not respond error.

If you have any questions or suggestions, or possibly another method that may help resolve this error, please use the comments section below.

What is Twdsuilaunch.exe & Should You Delete it?

The Twdsuilaunch.exe isn’t a system-related file and is associated with the software for Brother Printing Utility by Microsoft Windows.

It isn’t a virus but facilitates using the Brother printers on your Windows system. However, it isn’t an essential file and if corrupt or infected, can cause several issues with your PC.

Notably, the Twdsuilaunch.exe file isn’t important and you can delete it if necessary. You will usually find this file in the C:\Windows\twain_32\Brimm15a\Common\ folder.

How do I remove the Twdsuilaunch.exe file and fix its issues?

1. Uninstall the Brother software

1.1. End the associated task

  1. Open the Start menu by pressing the Win key.
  2. Open Task Manager.
  3. Locate the Twdsuilaunch.exe process.
  4. Select Twdsuilaunch.exe and press End Task.

Before removing the Brother printer software, you should end its process using the Task Manager as shown. This will help get rid of the Software is running prompt while uninstalling.

1.2 Remove the app

  1. Open the Start menu by pressing the Win key.
  2. Open Control Panel.
  3. Click on Programs and Features.
  4. Select the Brother printing software and hit the Uninstall button at the top.
  5. Follow the on-screen steps to remove the software from your PC.
  6. Restart your PC.

When you remove the Brother printing software, then you will remove all files associated with the tool along with the Twdsuilaunch.exe process. This is another way of removing the file from your PC.

2. Delete the file from its location

  1. Press the Win + E keys to open the File Explorer.
  2. Press Ctrl + F and search for Twdsuilaunch.exe and press Enter.
  3. Right-click and select Open file location.
  4. Delete all Twdsuilaunch.exe files inside the C:\Windows\twain_32\Brimm15a\Common\ location.
    (Do not delete the file inside the C:\Windows\system32 folder.)
  5. Restart your PC.

Deleting the file from the location will not allow the error message to pop up since the file won’t be in existence. This is a simpler approach to getting rid of the Twdsuilaunch.exe file.

3. Scan your PC for viruses

  1. Press the Win key to open the Start menu.
  2. Select Windows Security.
  3. Click on Virus & threat protection.
  4. Choose Quick Scan.
  5. You can also click on Scan options and select Full scan for an in-depth scan.
  6. Apply the prompted solutions.
  7. Restart your PC.

If you are getting errors such as twdsuilaunch.exe application error, twdsuilaunch.exe not found, twdsuilaunch.exe has stopped working, or twdsuilaunch.exe access violation, then you should scan your PC for the virus.

Chances are that the original twdsuilaunch.exe file has been replaced by a duplicate file. We also have a list of the best antivirus tools that you should check out to keep your PC safe.

4. Update the Brother printer software

  1. Visit the official website of the Brother printer.
  2. Hit the Downloads button next to the Firmware Update Tool.
  3. Select the product category of your printer.
  4. Choose your product.
  5. Download and install the software.

Updating the firmware of the Brother printer driver can help resolve several issues since there are chances that some underlying bug was causing the error.

Is Twdsuilaunch.exe safe?

The Twdsuilaunch.exe file is generally a safe file and belongs to the software for Brother printer. However, malware or virus can mask this file or duplicate it and behave as if it is legit.

If the infected file remains on your PC for long, then it could tweak the system settings, desktop, and other settings and cause your system to misbehave.

The best way to verify if the Twdsuilaunch.exe file is legit or not, you should check if the file is found inside the location it should be or not. If not, then there is a high chance that this file is infected.

That is it from us in this guide. You can refer to our guide that explains how you can fix the high CPU usage issue with WavesSvc64.exe.

We also have a guide explaining what is TextInputHost.exe, as well as a guide on abDocsDllLoader, so feel free to check it out.

Many of our readers have also reported coming across the McUICnt.exe error. Fortunately, we have a guide that will explain how you can deal with the error associated with the file.

Feel free to drop a comment below if you found this guide helpful in understanding details about the twdsuilaunch.exe file.

Local Security Authority Protection is Off: 3 Ways to Fix it

Many users reported that Local Security Authority Protection is off on Windows 11 and that can be a problem and leave your PC vulnerable.

Issues with Windows updates can cause this problem and certain security policies. Disabling Safe Boot can also cause this problem.

Before we start, make sure that LSA and CPU virtualization are turned on. Make sure you’re signed in as administrator and enable additional protection for LSA.

How do I turn on Local Security Authority protection?

1. Use the Windows Security app

  1. Press the Windows key to open the Start Menu, type Windows Security in the search box, and press Enter.
  2. From the left pane, choose Device security. Under the Core isolation section, select the Core isolation details option.
  3. Enable the toggle under the Local Security Authority protection section.
  4. Then, click Yes in the UAC prompt that appears.
  5. Restart your PC to apply the changes.

2. Use Registry Editor

  1. Press the Windows + R keys to open the Run dialog box. Type regedit in the dialog box and press Enter.
  2. In the Registry Editor, navigate to the following path: Computer\HKEY_LOCAL_MACHINE\SYSTEM\CurrentControlSet\Control\Lsa
  3. Then, double-click on RunAsPPL in the right pane. Change the Value data to 1 (or 2 as some users claim this worked for them) and press Enter.
  4. Repeat step 3 for the RunAsPPLBoot entry. You may create DWORD entries for RunAsPPLBoot and RunAsPPL if you do not have them.
  5. Restart your PC to apply the changes.

3. Via the Local Group Policy Editor

  1. Press the Windows + R keys to open the Run dialog box, type gpedit.msc, and press Enter.
  2. In the Local Group Policy Editor window, navigate to the following path: Computer Configuration\Administrative Templates\System\Local Security Authority
  3. On the right pane of the window, right-click the Configure LSASS to run as a protected process.
  4. Next, click on Enable.
  5. Under Options, select Enabled with UEFI Lock, then click Apply and OK to save the changes.
  6. Restart your device.
Note icon NOTE
Once you have enabled Local Security Authority (LSA) protection and restarted your device at least once, you may dismiss warning notifications and disregard any further notifications requesting a restart.

What happens if Local Security Authority protection is off?

As we outlined above, the LSA protection protects your PC from threats, and if the feature is off, your device is exposed.

Now that you know some factors responsible for disabling the local security authority protection, check out the solutions below to turn it back on.

Some users also claim that signature verification could also be why LSA protection is off. So, if LSA is not signed as expected, you can explore this guide for further assistance.

We also wrote about high Local Security Authority CPU and memory usage in another guide, so don’t miss it.

Before you go, check our dedicated guide to learn what to do if the Local Security Authority Protection option missing. We also have an article explaining why is Local Security Authority trying to access the Internet, so don’t miss it.

And that’s how to re-enable Local Security Authority Protection if it is turned off. If you have any questions or suggestions, please use the comments section below.

Edge will no longer be on future Windows server containers

Microsoft is keen in its efforts to reduce the Windows server containers’ image size. Earlier this year, they reduced the image size by about 40% as part of the February 2023 release.

With the release of the May 2023 Patch, they continued reducing the image size by disabling unnecessary scheduled tasks and non-essential log files. They also made changes to the image tooling, which should also further reduce the size and improve the experience.

What’s next, you may ask? The Redmond tech giant has big things in store for Windows server containers. and one of them focuses on Edge.

Edge will be removed on upcoming Windows server containers

Yes, you heard that right. In the next months, Microsoft is taking further steps to improve the experience with Windows containers.

Edge will no longer be a default component in Server and Windows images. In the upcoming months, Microsoft will undock the browser from these images, thus reducing their size even further.

Don’t worry though. If you need Edge back on for whatever purpose, Microsoft will publish detailed instructions on how to add it back. windows server container image size reduce

Another important feature that will be released in the upcoming patches is the foreign layer removal. This feature will allow you to redistribute container images from their container registries, improving the overall developer experience with it.

It seems that May is a month with much-needed releases. Just this week, Patch Tuesday addressed 38 CVEs, with all of them rated critical, and important in severity, including CVE-2023-29336, which was an active bug at the time of the release.

So it comes as no surprise that Microsoft would announce these important upcoming changes to the Windows server containers.

With that being said, you can find the new images in the Microsoft Artifact Registry. Go to Nano Server, Server Core, Server, or Windows, and get them.

What do you think about the future changes coming to the Windows server containers? Are you excited about them? Let us know in the comments.

This Device is not Present (Code 24): How to Fix

Many of our readers have encountered the This device is not present, is not working properly, or does not have all its drivers installed. (Code 24) in Device Manager. This is a minor Windows error you can fix in no time by using our solutions below.

Why do I see the This device is not present (Code 24) error?

This error can appear for many reasons, but we will highlight the most important below:

  • Improper installation – The device you are trying to use was not installed properly, probably because you or the system loaded the wrong driver.
  • Problematic driver – If you install an incompatible driver or the one you already have is corrupted, you will get the This device is not present (Code 24) error.
  • The device was removed – After you remove a device, you still have the driver installed, but the system can’t detect the device. Uninstalling it properly will fix this issue.
  • The device is malfunctioning, or it’s improperly connected – If the cable or the device itself is damaged, it will appear as disconnected. However, sometimes it’s just not plugged in completely.

Now that we know what are the roots of this issue, let’s fix the problem quickly.

How do I fix the This device is not present (Code 24) error?

Before starting to tweak the software on your PC, crosscheck these methods from the list:

  • Make sure that the device is properly connected to your computer. If possible, test the device on another machine to rule out the malfunctioning issue.
  • If you removed the device and you’re no longer using it, make sure you also uninstall it from Device Manager.
  • Install the latest Windows updates.
  • Restart your PC and see if the problem resurfaces.

If these prerequisite measures didn’t fix the problem, start performing the solutions below.

1. Update or reinstall the driver

  1. Right-click the Start button and select Device Manager.
  2. Locate the device that has the Code 24 error, right-click on it and select Update driver.
  3. Choose Search automatically for drivers.
  4. If any new drivers are available, the system will install it.
  5. Check if the problem is resolved and if not, perform the solution again, and in Stept 2, choose Uninstall device instead.
  6. Now, unplug the device (if possible), restart your PC, and plug the advice back in. The system will detect it and install a driver for it.

If the system can’t find a suitable driver for your device, visit the manufacturer’s website and download the right one for your system.

Then again, it’s no need to spend lots of time searching for the right drivers. That is because you have tailored software applications.

This popular tool will start by scanning your overall system to find outdated drivers, thus updating them all automatically in a single click.

⇒ Get Outbyte Driver Updater

2. Perform SFC and DISM scans

  1. Click the Search button on your taskbar, type cmd, and select Run as administrator to start Command Prompt with full privileges.
  2. Type the following command and press Enter to run it: sfc /scannow
  3. Wait for the scan to finish, then paste the following command and press Enter to start the DISM scan: DISM /Online /Cleanup-Image /Restorehealth

The SFC and DISM scans will fix any potential problems with the system files and the drive.

That’s it! We hope that the solutions from our guide helped you fix the This device is not present (Code 24) error.

We also recommend checking our guide on what to do if the USB device is not recognized in Windows 11 and the code 19 where the device cannot be started.

If you have any questions or suggestions, leave them in the comments section below.

Taskbar clock seconds are officially added to the Windows 11 OS

Have you checked out the May 2023 Patch Tuesday security update rollout? Microsoft has released a total of 38 new patches to address various system issues.

And, speaking of the recent Patch Tuesday,

Microsoft constantly trying to improve the taskbar in Windows 11, and you won’t believe what feature made its way back to us through the above-mentioned event.

Some missing features are slowly returning, and Windows 11 KB5026372 finally brings back support for seconds in the taskbar clock.

Get more control over your time with this new feature

Back in March, we announced that this feature made its way back to us through the Insider Beta Channel (KB5023780). Now, however, it seems that everyone will get it.

After the KB5026372 cumulative update, which is rolling out via Windows Update, it is possible to turn on this feature manually.

That being said, to make the taskbar clock display seconds, you must change Windows Registry and set the value of ShowSecondsInSystemClock to 1.

Please keep in mind that, starting with the release of Windows 11 version 21H2, the feature known as ShowSecondsInSystemClock was no longer included in the OS.

The tech giant stated that the feature has been removed from Windows 11 due to potential performance issues as displaying seconds in real time increases the load on the processor.

This actually resulted in power and battery backup issues when first tested, so many argue that this is what they waited for.

And, this feature was previously available in Windows 10 and other operating systems, but it was removed in Windows 11.

But, with the release of the May 2023 update, the ShowSecondsInSystemClock feature will be returning to the Windows opearting system.

Microsoft also confirmed that it plans to let users quickly turn on or off taskbar clock seconds from Windows Settings.

Have you managed to turn on this exciting feature on your maching? Share your experience with us in the comments section located below.

Mpksldrv.sys: What is it & How to Fix its Reloading Bug

Many of our readers have reported that mpksldrv.sys file, a part of Microsoft Malware Protection, keeps reloading repeatedly every ten minutes with the message The service mpksldrv has been created.

This reloading bug suddenly showed up after installing an update and keeps clogging up the display of the monitoring system. 

Why do I encounter the mpksldrv.sys reloading bug? 

The mpksldrv.sys reloading bug can show up in several scenarios, some of the significant ones being: 

  • Incompatible drivers – Corrupt or incompatible kernel mode drivers often cause the mpksldrv.sys file to reload on a Windows computer.
  • Malware attack – If your PC gets infected by viruses and malware, reloading bugs like these are a common sight. 
  • Buggy Windows update – A recently installed Windows update may be bug-ridden, which might trigger the mpksldrv.sys bug.
  • Corrupt system files – This reloading bug can also occur if the system files get corrupted or are damaged during an incomplete Windows update. 
  • Incompatible software – A recently installed app may interfere with the functionality of the malware protection service hence the error. 

If you also experience the same problem on your computer, walk through this guide to discover the possible solutions. 

How do I fix the mpksldrv.sys reloading bug?

Try these workarounds before proceeding to the advanced solutions listed below. 

If these methods did not help get past this BSOD error, employ the following fixes. 

1. Perform a clean boot state  

  1. Right-click the Windows icon and choose the Run option from the Quick Links menu. 
  2. Enter the following command in the text box and press Enter to launch the System Configuration window. msconfig mpksldrv.sys
  3. In the General tab, disable the Load startup items option and enable the Load system services option. mpksldrv.sys
  4. Now in the Services tab, enable the box for the Hide all Microsoft services option in the bottom left, and press the Disable all button. mpksldrv.sys
  5. Switch to the Boot tab, here check the box for the Safe Boot option present in the Boot Options section, and enable the Minimal radio button. mpksldrv.sys
  6. Press Apply to save the changes and OK to close the System Configuration window. 

Now restart your PC to perform the safe boot and enter the clean boot state. At this point, your computer will load minimal services and no third-party programs will function. Use your computer for some time to see if it mpksldrv.sys bug still reloads on your PC.

If this problem does not arise, it means a third-party program installed on your computer is causing this bug to reload repeatedly. You should try uninstalling that conflicting app and see if it helps.

2. Run SFC and DISM scans

  1. Press the Windows key to launch the Start menu, type cmd in the Search bar and choose Run as administrator from the right results section. mpksldrv.sys
  2. Click the Yes button on the User Account Control prompt. 
  3. Type or paste the following command and press the Enter key to initiate the System File Checker. sfc /scannow Mpksldrv.sys
  4. After you see the message verification is 100% complete, type or paste the below command and press the Enter key. DISM /Online /Cleanup-image /Restorehealth Mpksldrv.sys

System File Checker will scan your PC to find the corrupt system files and will replace them with the original file stored in the compressed folder. Similarly, the DISM tool will identify and repair faulty system images in Windows. 

3. Run Driver Verifier

  1. Bring up the Run dialog box using the Windows + R shortcut key combination. Type the following command in the command box and press Enter to execute the command. verifier Mpksldrv.sys
  2. Click the Yes button on the User Action Control prompt to grant Driver Verifier Manager permission to make changes on your PC.
  3. Next, from the Select a task section, enable the Create Standard Settings option and press Next. mpksldrv.sys
  4. Now, enable the radio button preceding the Automatically select all drivers installed on this computer option and click the Finish button. Mpksldrv.sys

Restart your computer as you normally do and try using your PC for some time until the mpksldrv.sys files begin to reload with the name of the problematic driver. You can then update or rollback that system driver to get rid of this bug from your PC. 

Driver Verifier monitors the Windows kernel-mode drivers and graphics drivers and diagnoses the illegal function calls that might lead to abnormal system behavior. 

That’s pretty much it! We are positive that you we’re able to successfully troubleshoot the mpksldrv.sys reloading bug on your PC using the solutions listed in this guide. 

In case you are facing high CPU usage due to the antimalware executable service, refer to this guide to disable it.

If you need further assistance regarding troubleshooting this error on your PC, feel free to reach out to us. 

Check out the new Windows 10/11 HVCI/memory compatibility check tool

We know you like keeping your machine in tip-top shape, and for that, you need the right set of tools. Whether you work on Windows 10 or Windows 11, this will be right up your alley.

Only a few days back, Microsoft released a new tool that will let users check compatibility issues with memory integrity or hypervisor-protected code integrity (HVCI).

This tool is simply known as memory integrity scan tool (hvciscan) and it can be useful on Windows 11, Windows 10, and Windows Servers.

By the way, don’t forget to check out the May 2023 Patch Tuesday rollout. Also, remember that emails from outdated or unpatched Exchange Servers will be blocked.

Windows 10, Windows 11 and Servers just got a new tool

If you weren’t already aware, memory integrity is a feature of Virtualization-based Security (VBS) and essentially runs Kernel Mode Code Integrity (KMCI).

Of course, we’re talking about an isolated virtualized Windows Hypervisor part of the memory such that the kernel is kept safe from malicious code.

Not to mention that it is often cited as a reason why Windows 11 does not support AMD Ryzen 1000 (Zen1), Intel 7th Gen, and older chips.

Keep in mind that newer Intel and AMD CPUs have special hardware-based acceleration feature for hypervisor which enables a more efficient code integrity handling.

For Intel users, it is known as Mode-based Execution Control (MBEC), while on AMD it is called Guest Mode Execute Trap (GMET). Even then, VBS can still lead to performance loss.

Here’s what we’re looking at when talking about this tool:

Memory integrity scan tool

Use the hvciscan.exe to check for compatibility issues with memory integrity, also known as hypervisor-protected code integrity (HVCI).

System Requirements

Supported Operating System

  • Windows 11, Windows Server 2016, Windows Server 2019, Windows Server 2022
  • Windows 10, Windows 11, Windows Server 2016 or higher

Install Instructions:

Download the hvciscan.exe for your system architecture (AMD64 or ARM64). From an elevated command window or PowerShell, run hvciscan.exe. Review the resulting output to identify any incompatibilities.

If you want to use it, you can download it directly from the official Microsoft website. We urge caution and advise you not to get it from anywhere else.

Have you downloaded and used this new tool? Share your experience with us in the comments section right below.

How to Resize the Discover Pane in your Microsoft Edge

After the relatively not-so-heavy Patch Tuesday, The Dev Channel update to 115.0.1843.0 is now live, too, and it comes with a lot of fixes, policies, and new features.

Some of them focus on stability and reliability, and after updating, you will be able to play videos and media files on certain websites where they wouldn’t work.

Another much-needed feature is that you can now drag your links anywhere in the Vertical Tabs area to open them in a new tab.

However, one of the most significant features is the one that lets you resize the Discover pane in Edge. This feature is quite handy because you can allocate as much space as you want to the Discover panel without overcrowding your Edge.

Here is how you can resize the Discover pane in Edge

  1. Open your Microsoft Edge browser.
  2. Click on the Discover button at the top right of the browser (a rectangular pane should pop up automatically).discover pane edge
  3. Once you’re there, just go to its left border and you should be able to resize it.edge resize

With this being said, the update release to 115.0.1843.0 follows the same pattern as the major Patch Tuesday updates released by the Redmond tech giant this week. The list is fairly simple, but the features are worth it.

You can read the complete release details below:

Added features:  

  • You can now drag links anywhere in the Vertical Tabs area to open the link in a New Tab.
  • Discover pane is now resizable.
  • macOS:
    • Added Control + Option + Command + Down shortcut to open spellcheck correction card.
  • Enterprise:
    • New policy: (Note: Updates to documentation and administrative templates may not have occurred yet)
      • Added DiscoverPageContextEnabled policy.
      • Added policy to configure recommended settings dialogs.

Improved reliability:  

  • Fixed browser crash when selecting text in the InPrivate window.
  • macOS:
    • Fixed browser crash when prompting proxy credentials.
  • Android:
    • Fixed browser crash when tapping on the forward or back button twice quickly.

Changed behavior: 

  • Fixed unable to play videos on certain websites.
  • Fixed AV1 media playback.
  • Fixed Workspaces unable to reconnect when lost connection.
  • Fixed edge://app-settings page displaying “This page has been blocked by Microsoft Edge” message.
  • Fixed the missing Discover pane header.
  • Linux:
    • Fixed spellcheck suggestions not working in certain scenarios.
  • macOS:
    • Fixed the browser not getting focus when opening links from other apps
  • WebView2:
    • Fixed ScriptDialogOpening issues for beforeunload kind (#3355)
    • Lunching External URI API has now been promoted from the experimental stage to public.
  • Enterprise:
    • Fixed external unmanaged links not opening in InPrivate tabs on Android.
    • Fixed keyboard shortcut for Discover still activates Discover while being disabled by policy.

Speaking of Edge, it seems that Microsoft is keen on making the browser stand out in the crowd by any means.

Just this week, users in Turkey got a notification on Edge whenever they would download another browser.

And there is more. It seems that the Redmond tech giant is making it even harder to switch from Edge to another browser. Microsoft is blocking other browsers’ one-click feature to set them as default browsers.

What do you think about all this? Are you using Edge as your default browser? Do you like it? Let us know in the comments section below.

How to Use a Laptop Display as Your Second Monitor

If you don’t have an external monitor, you may still use a laptop as a second monitor. It’s not the best option, but two screens are better than one. In this article, we will explain how to use a laptop as a second monitor and extend your desktop screen area.

Can I use a laptop display as a second monitor?

The short answer is yes, but you probably have problems with this task because you were trying to use a USB-C or HDMI cable.

Using a laptop display as a second monitor is impossible with a cable unless you have a video captioning dongle connected to the second laptop.

However, you can do that wirelessly, and in this article, you will learn exactly how to do that.

How can I use a laptop display as a second monitor?

1. Install the Wireless Display feature

  1. Turn on the laptop you will use as a second screen, click the Start button, and select Settings.
  2. Now, select Apps from the left pane and click on Optional features from the right.
  3. Click the View features button under the Add an optional feature section.
  4. Next, type wireless display in the Search bar, check the Wireless Display box, and hit Next.
  5. Hit the Install button and now, your laptop will be available as a wireless display.

Make sure that your laptop is connected to the internet so that it can install the feature.

2. Extend the display to the second laptop

  1. Click the Start button and choose Settings.
  2. In the System tab, click on Projecting to this PC from the right.
  3. Now, tweak the settings according to your requirements and make sure that the discovery feature from the bottom is turned On.
  4. Now, press the Windows key + P to start the projection options, and select Extend.
  5. Finally, choose the laptop you want to project to and enjoy.

Again, make sure that both laptops are connected to the same wireless network, otherwise, it won’t work.

To expand your setup even further, see how to use 3 monitors on a laptop and create a seamless multi-display workspace.

How do I use a laptop as a second monitor in Windows 10?

You will be happy to know that the process on Windows 10 is almost the same. Although, the Projecting to this PC looks a bit different.

Other than that, all the process is the same as the one described for Windows 11 above.

We also recommend reading our guide on what to do if Windows 11 is not detecting the second monitor.

Before leaving, you might also want to learn how to check your laptop warranty to ensure your devices are still covered for repairs or replacements.

If you have any questions or suggestions, please drop them in the comments section below.
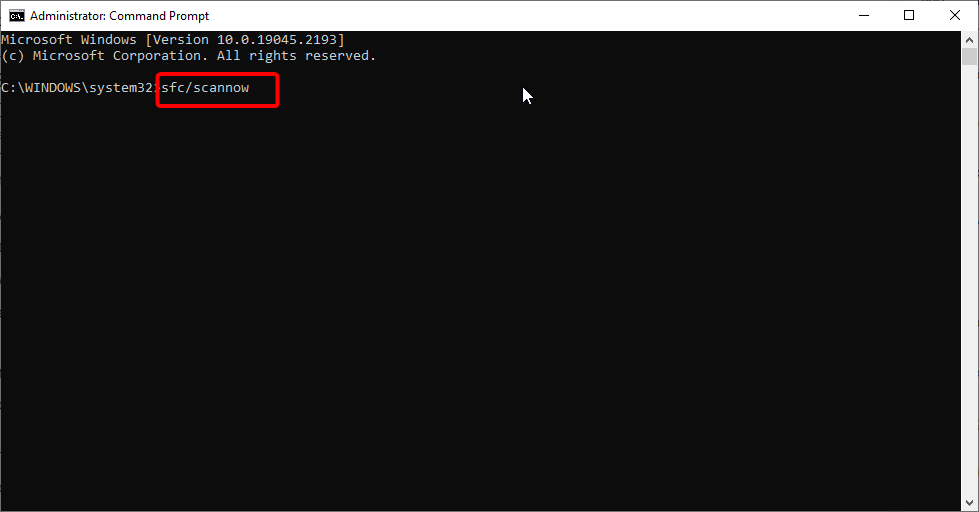
Chat history is coming to Microsoft’s Bing Chat

We got another one in the Bing Chat-GPT saga, so hold on to your seats. Before we tell you what it is though, you should learn how to disable Bing Chatbot in Skype.

Also, if your Bing Chat is not working, we got the solution you were looking for. But enough about that, let’s get into why we are here for.

We’re here to tell you that Microsoft Bing Chat finally starts rolling out its long-requested chat history feature.

You might not get the feature right away but it’s coming

When Microsoft first launched the Bing Chat chatbot a few months ago, one of the most requested features by users was to add a way to save their chats.

Back then, the Redmond-based tech giant promised for weeks that the feature was indeed in the works, and that was repeated last week when the company revealed a ton of other upcoming Bing Chat additions.

This week, however, it appears the chat history feature has started rolling out and posts on the Bing Reddit forums show screenshots of the feature in action. 

Even though there are reports of seeing the feature go live as well, there are apparently still some users who don’t see it when they use Bing Chat.

The simple explanation is that this feature is actually still rolling out for public use, so don’t get alarmed if you don’t get it right away.

Furthermore, this feature is, at least so far, limited to the web version of Bing Chat. Keep that in mind before giving yourself a hard time trying to install it anywhere else.

That being said, if the feature is indeed live where you are when you use Bing Chat, there’s no need to panic.

In fact, any conversation thread is saved and placed in a Recent Activity section on the right-hand side of the chat, complete with a time stamp.

You can actually rename the saved chat if you want and it will certainly be a very helpful addition for people who want to preserve their conversation turns.

How do you feel about this whole situation? Make sure you let us know in the comments section located right below.
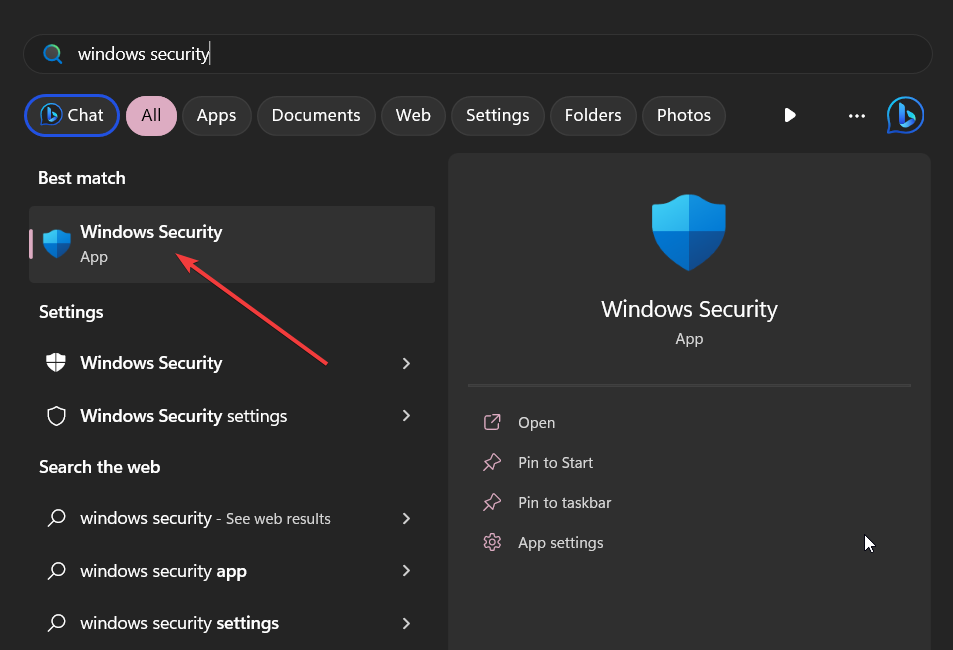
Even more, Copilot’s chat history gets expanded, so find out more on this topic right away.

Fix: Windows Can’t Communicate with the Device or Resource

Windows can’t communicate with the device or resource error indicates that your PC can’t communicate with the Primary DNS Servers assigned by your internet service provider. So, it’s advisable to know how to check and change DNS servers on Windows 10/11 PCs.

Why can’t Windows communicate with the device?

The main culprit for this problem is an outdated network driver. When network drivers are outdated, they can malfunction and cause issues with your connections. Other factors that may cause the problem are:

  • Issues with the DNS server – When the DNS server set by your internet service provider or you to use is unavailable, it may prevent your PC from accessing the DNS server, prompting Windows can’t communicate with the device or resource error. You can check our guide on how to DNS server set up 1.1.1.1 on Windows 10/11.
  • Issues with your network settings – Windows may experience difficulties communicating with the Primary DNS server if there are conflicting configurations in your network settings. It can impede the network connection on your PC.
  • Network device problems – Devices such as Ethernet and routers can run into several errors that can outrightly cause issues with their connection to Windows. Also, corrupt or outdated router firmware infects it with bugs that can affect its functionality.

However, Windows can’t communicate with the device, or resource error messages can appear when you run the Network Diagnostics. You can fix it by troubleshooting some settings on your PC.

Why can’t Windows communicate with the device?

Before proceeding with advanced troubleshooting, we recommend you follow these preliminary checks to prepare your devices.

  • Disconnect your every connection on the network device.
  • Power cycle your network device and reconnect your PC.
  • Unplug external USB devices and peripherals connected to your computer.
  • Restart Windows in safe mode and check if the error message appears again.

After observing the preliminary checks above and the error persists, go ahead with the troubleshooting steps below.
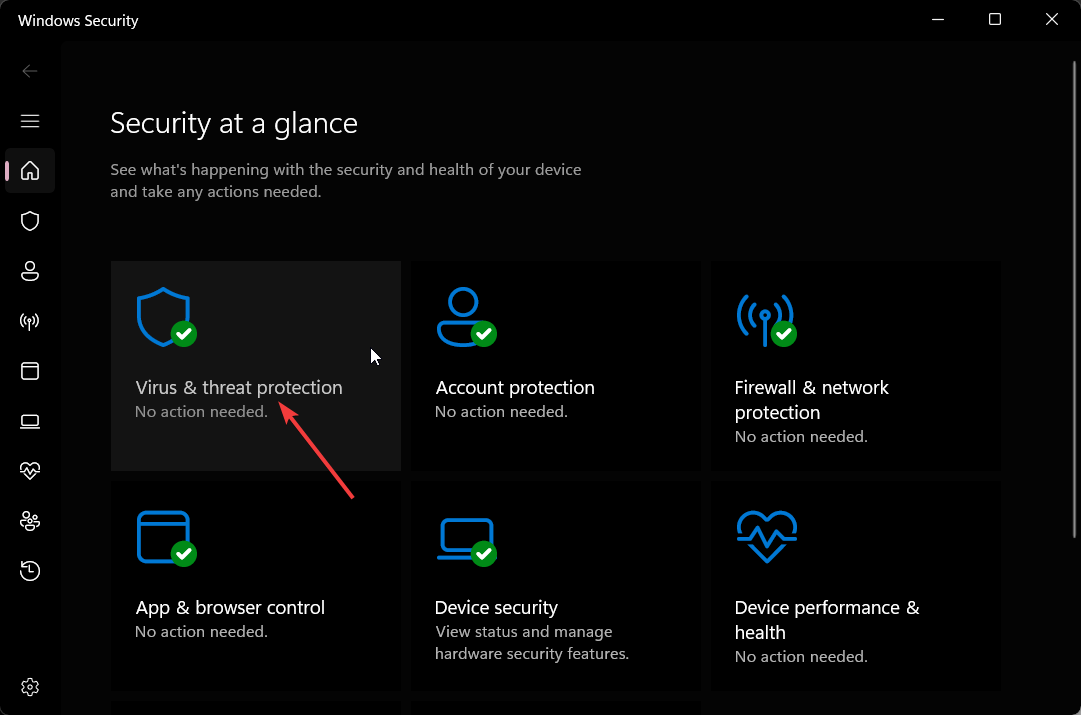
1. Change the IPv4 and IPv6 settings

  1. Press Windows + R keys to open the Run box, type the control panel in the search box, and press Enter.
  2. Click on the Network and Internet, then select the Network and Sharing Center option.
  3. Select your network on the View your basic network information and set up connections tab.
  4. Then click the Properties button at the bottom of the screen.
  5. Double-click on Internet Protocol Version 4 (TCP/IPv4).
  6. Tick the boxes for the Obtain an IP address automatically and Obtain DNS server address automatically options, then press OK to save the changes.
  7. Double-click on Internet Protocol Version 6 (TCP/IPv6).
  8. Tick the boxes for the Obtain an IP address automatically and Obtain DNS server address automatically options, then press OK to save the changes, then restart your PC.

Changing the Internet Protocol Version (IPv4 and IPv6) Settings on your PC can resolve conflicting issues causing the error.

2. Update your Network drivers

  1. Press Windows + R key to open the Run box, type devmgmt.msc, and click OK to open the Device Manager.
  2. Expand the Network adapters menu, right-click on your device, and select the Update driver option from the drop-down. 
  3. Select the Search automatically for updates option and restart your computer.

Read our article if you have issues updating network drivers in Windows 11.

Sometimes updating your drivers automatically is much easier, thus we recommend you use Outbyte Driver Updater. It is a dedicated tool that finds the latest updates for your drivers from its large database.

Outbyte Driver Updater

The quickest method to update not only your network drivers but all your device drivers as well in a second.
Free Trial Download now

3. Reset TCP/IP

  1. Press the Start button, type Command Prompt, and select Run as administrator.
  2. Type the following commands on the new page one after the other, then press Enter after each command: ipconfig /flushdns  nbtstat –r  netsh int ip reset  netsh winsock reset
  3. Restart your computer and check if Windows can’t communicate with the device or resource error is solved.

Resetting the above network properties will fix any conflicting configurations in your settings. This guide teaches you what to do if you can’t run Command Prompt as administrator on Windows 10/11.

4. Clear DNS records on your PC

  1. Press the Windows + R keys to open the Run tab, type cmd, and press Enter to open the Command Prompt.
  2. Type the following in the command box and press Enter: ipconfig/flushdns
  3. Then restart your PC.

Flushing or clearing the DNS record on Windows can help fix issues with the DNS server that may prompt the error. It can also fix the DNS server not unavailable on Windows 10/11.

Alternatively, you can read our detailed article on how to resolve DNS issues on Windows computers.

Kindly leave your questions and suggestions in the comments section below. We’d like to hear from you.
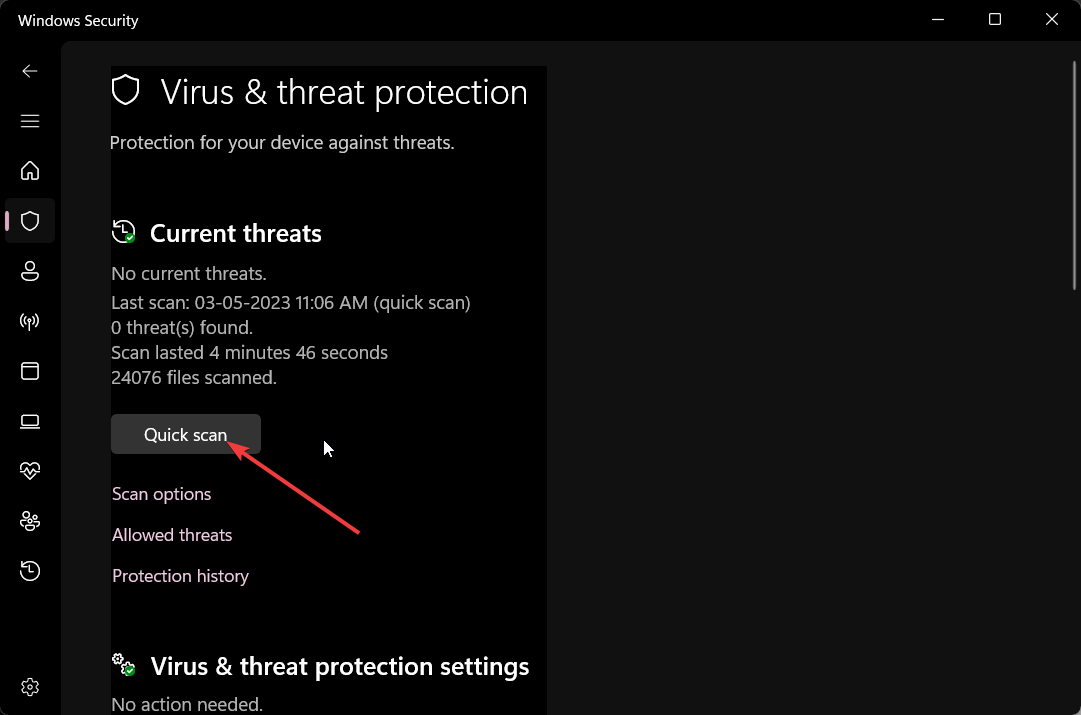
What is Ene.exe & Should You Remove It?

If you experience device or system performance issues, you may wonder if you should remove the ene.exe process. In this guide, we will discuss what ene.exe is, its purpose, and whether or not you should remove it from your computer.

What is ene.exe?

Ene.exe is a process that runs in the background of Windows operating systems, including Windows 10. It is related to devices such as keyboards and touchpads manufactured by ENE Technology Inc.

While the process is not essential for the functioning of the Windows operating system, it is required for some devices to function correctly. Removing it could cause malfunctioning of some devices; however, if it is of no use to you and you want to get rid of it, scroll down.

How can I remove ene.exe from my PC?

Before removing the ene.exe process, it is important to consider the following prerequisites:

  • Make sure the ENE Technology Inc. driver is not required.
  • Verify you have logged in using your Administrator account.
  • Create a backup of your computer.

Once you finish these checks, move to the steps to remove the process. You must follow the steps mentioned in the same order to complete it.

1. Uninstall the related driver

  1. Press Windows + R to open the Run dialog box.Device Manager Run command ene.exe
  2. Type devmgmt.msc and click OK to open the Device Manager.
  3. Locate the device which uses the ENE Technology Inc. driver, right-click on it, and select Uninstall device.Uninstall device Ene.exe
  4. Follow the on-screen instructions to complete the process.

2. Stop the ene.exe process

  1. Press Ctrl + Shift + Esc to open the Task Manager app.ene.exe Task Manager End task
  2. Go to Details & right-click the ene.exe, then select End task.

3. Delete the ene.exe file

  1. Press Windows + E to open the File Explorer window.
  2. Navigate to this path: C:\Program Files (x86)\ENE\ioene exe delete
  3. Select the ene.exe and click the Delete button to remove it.

If you face any issues removing the file, you can enter safe mode and try again.

So, these are steps that you can follow to remove the ene.exe file. If you have any questions or suggestions, feel free to mention them in the comments section below.

Microsoft and Oracle Considering Alliance to Solve GPU Shortage

Oracle and Microsoft are considering a collaboration to tackle the growing demand for high-capacity servers in the field of artificial intelligence. According to The Information, the two tech giants are contemplating an arrangement that would enable them to rent servers from each other to cater to their large-scale AI cloud customers. The companies plan to offer their clients easy access to computing resources on both clouds by using their existing partnership established in 2019.

The agreement being proposed will use the strong infrastructure built by the fiber links connecting Oracle and Microsoft’s data centers directly. Originally designed to help distribute computing tasks, these connections can now also be used to share GPU server capacity. This helps address server shortages and meets the growing demand for AI computing power for both companies.

Microsoft has previously implemented access restrictions to AI servers for certain internal teams, prioritizing customers’ access to computing resources, with companies like OpenAI benefiting from this arrangement. The company has an exclusive license to offer OpenAI’s ChatGPT and Dall-E creator services over its Azure cloud platform.

Other than resource sharing, Oracle has also expressed interest in reselling OpenAI’s software to its customers, just as it resells Microsoft 365 productivity suite to its customer base. Incorporating OpenAI’s software into its offerings will enhance Oracle’s AI capabilities and provide its clients with cutting-edge solutions for their business needs.

The discussions between Oracle and Microsoft highlight the importance of collaboration and resource optimization in the fast-evolving field of AI. The two companies aim to pool their resources and expertise to ensure their customers can harness the full potential of artificial intelligence in a seamless and efficient manner. This collaboration has the potential to enhance the availability and efficiency of AI-related computing power, benefitting large-scale AI cloud customers, and paving the way for improved customer experiences.

Via: DCD

What is SDXHelper.exe and How to Disable It

SDXHelper.exe is a process that runs in the background of Windows operating systems, specifically Windows 10. It is a system component that helps to manage and install updates for Windows, Microsoft Store apps, and other related components.

While this process is essential for maintaining the health and security of your PC, it can sometimes consume high CPU and memory usage, slowing down your system’s performance.

How can I disable SDXHelper.exe?

1. Disable the associated task

  1. Press Ctrl + Shift + Esc to open the Task Manager app.End task SDKhelper
  2. Go to Details & right-click the SDXHelper.exe, then select End task.

2. Disable the MS Office feature updates

  1. Press the Windows key, type computer management, and click Open.Computer Management click OPen SDXHelper
  2. On the Computer Management window, click the arrow next to the Task Scheduler.
  3. Then, click the arrow for Task Scheduler Library.
  4. Click Microsoft, then select Office.
  5. Right-click Office Feature Updates, and select Disable.Disable
  6. Now right-click Office Feature Updates Logon and choose Disable.Disable

3. Repair/Reinstall the Office app

  1. Press the Windows key, type control panel, and click Open.Control Panel start menu SDXHelper
  2. Select View by as Category and click Uninstall a program.CP Uninstall
  3. On the Programs & Features window, select Microsoft Office and click Change.Change
  4. Click Repair.repair Office
  5. If this doesn’t help, go to Programs & Features window, select Microsoft Office, and click Uninstall.Uninstall Office
  6. Click Uninstall.Uninstall
  7. Now login to your Microsoft account and click Services & subscriptions.
  8. Click Install.Install office
  9. Now double-click the downloaded file and follow the onscreen instructions.

Restart your computer to save the changes.

4. Rename the SDXHelper.exe file

  1. Press Ctrl + Shift + Esc to open the Task Manager app.
  2. Go to Details, & right-click the SDXHelper.exe, then select End task.
  3. Press Windows + E to open File Explorer.SDXHelper.exe rename
  4. Navigate to this path: C:\Program Files\Microsoft Office\root\vfs\ProgramFilesCommonX64\Microsoft Shared\OFFICE16
  5. Locate the SDXHelper.exe and rename it SDXHelper.old.exe.

Open Task Manager and check if the process is still running. Also, if you run into trouble, perform the above solution again and restore the file’s original name.

5. Disable the feature update using the Windows PowerShell

  1. Press the Windows key, type powershell, and click Run as Administrator.Powershell 2
  2. Copy & paste the following command one by one and hit Enter after every command:
    • Schtasks /change /s $_ /tn ‘\Microsoft\Office\Office Feature Updates’ /disable
      Schtasks /change /s $_ /tn ‘\Microsoft\Office\Office Feature Updates Logon’ /disable

Now open Task Manager and check if the SDXHelper.exe is disabled. Also, if you run into trouble, perform the solution again to restore the file’s original name.

So, these are methods to disable the SDXHelper.exe safely and quickly and we hope that you have done that successfully. You may also look at our guide on what to do if Windows Update is not working.

If you have questions or suggestions, feel free to mention them in the comments section below.

4 more games this week with Xbox Free Play Days May 11-14

Xbox Free Play Days is back once again. The program has been on quite a roll as of late, delivering more than the usual two or three offerings for several weeks now. This time it’s another four games on offer for subscribers of Xbox Live Gold and Xbox Game Pass Ultimate. Without further ado, let’s check them out.

Just Die Already

Just Die Already is an old people mayhem sandbox game created by the designers of Goat Simulator.

You are an old retired person in a near future where people aren’t having any children. There isn’t anyone to pay for pensions due to those ungrateful millennials who prefer playing video games instead of doing actual work. With no one to cover your living costs, you – just like all other old people in this world – have no other choice but to survive on your own.
How will you survive in a world that wants you to Just Die Already?

DRAGON BALL XENOVERSE 2

DRAGON BALL XENOVERSE 2 gives players the ultimate DRAGON BALL gaming experience! Develop your own warrior, create the perfect avatar, train to learn new skills & help fight new enemies to restore the original story of the DRAGON BALL series. Join 300 players from around the world in the new hub city of Conton & fight with or against them.

Hunting Simulator 2 (Xbox Series X|S and Xbox One)

It’s open season! In stunning natural environments, choose your gear from the best official weapons and accessories and set off with your dog in search of a variety of animal species in this hunting simulation.

Overcooked! All You Can Eat

Overcooked!, Overcooked! 2 and all additional content are blended together and remastered in this delicious definitive edition! Enjoy hundreds of levels of cooperative cooking chaos across increasingly perilous and obscure kitchens.

How to take advantage of Xbox Free Play Days

As mentioned, you’ll need either Xbox Live Gold or Xbox Game Pass Ultimate to enjoy these games, which will be available from May 11-14 as part of the event. Learn more over on the Xbox Free Play Days FAQ page.

D3d12.dll Missing: How to Fix or Reinstall it 

D3D12.dll, also known as Direct3D 12 Runtime, is a DLL (Dynamic Link Library) file developed by Microsoft for the Windows operating system.

This DLL contains essential procedures and drivers required by several programs specifically games. So, if it goes missing, the related apps and games will be restricted from launching. 

Why do I get the missing d3d12.dll missing error? 

While it is not possible to identify the exact cause of the problem, the following may be the possible reasons for this problem:

  • Presence of malicious software – Viruses and malware present in your PC mess up your computer and corrupt the system files such as d3d12.dll. Scan your PC with a reputable antivirus to get rid of them. 
  • Accidental deletion – There is a possibility that the missing DLL might have been deleted accidentally while cleaning up the disk space. 
  • Corrupt Windows Registry – If the Windows Registry files become corrupt, they may restrict system programs from accessing certain files.
  • Missing system files – D3d12.dll file might also go missing if the system files get damaged or faulty for some reason.
  • Physically damaged hard drive – If there is any physical damage to your hard drive, your machine will not be able to locate several files. 

If you are also struggling with the missing d3d12.dll file, the guide will provide you with effective ways to solve the problem.

How do I fix the missing d3d12.dll error? 

1. Use a dedicated DLL fixer 

Incompatibility between the game and DirectX is the primary reason why the d3d12.dll file may be missing or not recognized by Windows.

In such a scenario, it is recommended to employ a dedicated DLL repair tool capable of resolving various system-level issues such as the one at hand at a button click.  

2. Reinstall DirectX Runtime libraries

  1. Launch your preferred web browser and navigate to the download page of the DirectX End-User Runtime Web Installer.
  2. Select your preferred language in the drop-down, and hit the Download button next to it to initiate the download of DirectX 12 Web Installer. d3d12.dll
  3. Next, run the installer, accept the license agreement, click Next, and follow the step-by-step instructions to complete the package installation. d3d12.dll

Once the installation is completed, reboot your computer to ensure that the changes are applied, and then launch the affected app.

3. Run DISM and SFC scans

  1. Press the Windows icon on the taskbar to launch the Start menu, type cmd in its search bar on top and choose the Run as administrator option from the results section. d3d12.dll
  2. Click Yes on the User Action Control prompt to launch the Command Prompt with elevated permissions.
  3. Type or paste the following command and press the Enter key to run the System File Checker scan. sfc /scannow d3d12.dll
  4. After the SFC scan gets completed, type or paste the following commands one at a time and press Enter after each command.  DISM /Online /Cleanup-image /Scanhealth DISM /Online /Cleanup-image /Restorehealth DISM /online /cleanup-image /startcomponentcleanup d3d12.dll

The SFC scan and DISM tool will scan all the protected system files of your PC and will replace the damaged system images with the cached copy of the files compressed folder.  

After the repair is successful, you will no longer get the missing d3d12.dll file error on your Windows PC.

4. Manually install the missing DLL 

If you are still struggling with the missing d3d12.dll issue despite employing the fixes listed above, we will advise you to manually download and replace the DLL file. While doing so, you should stay clear of unreliable sources to avoid falling prey to online threats. 

You can visit reliable websites like DLL_Files and download the missing d3d12.dll file compatible with the architecture of your system. 

After the download gets completed, unarchive the ZIP or RAR file and paste it into the given location. C:\Windows\System32

You can also move this DLL into the installation folder of the game or program affected by the file. regsvr32 d3d12.dll

After replacing the corrupt DLL in the given folder, launch the application and see if the problem is resolved. 

That’s it! Try the easy solutions listed in this guide to fix the missing d3d12.dll file issue on your computer. 

If several DLL files are missing from your PC, you can implement the methods listed here to restore them. We also have a guide on restoring 3dmgame.dll file that can come in handy, so don’t miss it.

Also, if you have any suggestions or feedback for us, do let us know in the comments section below. 

0x800710e0: Operator Has Refused The Request [Fix]

If an automated task failed with the 0x800710e0: operator has refused the request error, this guide can help.

We will discuss some expert-recommended methods to fix the problem right after explaining the causes.

What causes the 0x800710e0 error on Task Scheduler?

There could be various reasons for this error; some of the common ones are mentioned here:

  • Wrong user permissions – When the user account running a scheduled task has insufficient permissions to complete the task, you can see this error. Check for proper permissions.
  • Task scheduling conflicts – The error can occur if scheduling conflicts with other tasks prevent the task from running.
  • Security software interference – Firewall software can sometimes block scheduled tasks from running, causing the error. Check the firewall permissions.
  • Task corruption – Sometimes, a scheduled task can become corrupted, preventing it from executing properly. Try to edit the permissions or create a new task.

So, these are the causes of this problem, let us check out the solutions for the same.

How do I fix the 0x800710e0 error on Task Scheduler?

Before engaging in advanced troubleshooting steps, you should consider performing the following checks:

  • Ensure you have logged in via the administrator account.
  • Check for the scheduled tasks to ensure no other task conflicts with this task.
  • Make sure you have entered the right path for the task.
  • Disable the antivirus temporarily and try again.

If you still have the issue, follow the below-mentioned methods to fix the problem.

1. Change the task settings

1.1 On the General tab

  1. Press the Windows key, type task scheduler, and click Open.Task Scheduler 0x800710e0
  2. Locate and right-click the affected task and click Properties.Properties
  3. Go to the General tab, and make sure there is a checkmark next to Run with highest privileges.General tab, 0x800710e0
  4. Now click the User or Group option.Admin click OK
  5. For the Enter the object name to select field, type Administrators and click OK.

1.2 On the Conditions tab

  1. On the Properties window, switch to the Conditions tab.Conditions tab
  2. Remove the checkmark next to Start the task only if the computer is on AC Power.

1.3 On the Settings tab

  1. Now switch to the Settings tab, and place a checkmark next to Allow task to be run on demand & Run task as soon as possible after a scheduled start is missed.Settings app user permissions  0x800710e0
  2. For the If the task is already running, then the following rule applies option, select Stop the existing instance from the drop-down.
  3. Click OK.

Now restart your computer and check if the task is running. If the error still appears, try creating a new task to fix it.

2. Run an SFC scan

  1. Press the Windows key, type cmd, and click Run as administrator.CMD elevated 0x800710e0
  2. Type the following command to repair the system files on your PC and hit Enter: sfc/scannowSFCSCANNOW CMD
  3. Wait for the scan to complete and if the command comes up with an error, copy and paste the following command and press Enter: Dism /Online /Cleanup-Image /RestoreHealthRestore health
  4. Wait for the command to be executed successfully, then restart your computer to save the changes.

3. Verify if the Task Scheduler service is running

  1. Press Windows + R to open the Run console.sERVICES ruN COMMAND 0x800710e0
  2. Type services.msc and click OK to open the Services app.
  3. Locate & right-click Task Scheduler, and select Properties from the context menu.pROPERTIES
  4. Now, check whether the Service status is Running.Running Services
  5. If not, click on the Start button and select Startup type as Automatic.
  6. Click Apply and OK, then restart your computer to save the changes.

So, these are steps you can follow to fix the 0x800710e0: operator has refused the request error.

We also recommend reading our tips guide on how to use Task Scheduler on Windows 11.

If you have any questions or suggestions, feel free to mention them in the comments section below.