Emails from outdated or unpatched Exchange Servers will be blocked

We know that you are aware of the fact that there are several instances in the recent past where Exchange Servers were under attack.

We’ve covered cases in which vulnerabilities have been exploited in order to extract information or sums of money from unsuspecting victims.

You can check some of the fixes applied through the last Patch Tuesday rollout and see what you have to worry about and what not to worry about.

Some of the above-mentioned scenarios include the Hive windows.exe ransomware case from 2022, followed by a couple of 0-day attacks later in the year, among others.

The situation is about to change pretty soon, as Microsoft is planning on taking some extra security measures.

Microsoft is tightening the security belt around its products

In order to improve security, earlier this year, Microsoft recommended removing certain objects from the exclusion list. This followed January’s update which improved PowerShell payload security.

Today, however, Microsoft has updated a Tech Community blog post where it has shared details on how it is protecting against unsupported, unpatched Exchange Servers.

These server versions are the most vulnerable category since they no longer receive updates, including those for security.

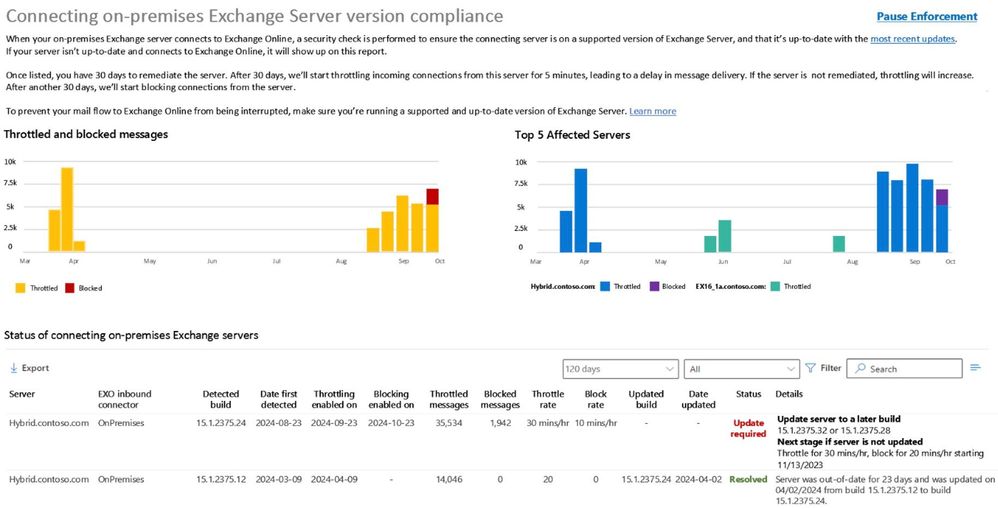
The Redmond tech giant says that it is enabling a transport-based enforcement system (TES) in Exchange Online.
thumbnail image 1 of blog post titled 


							Throttling and Blocking Email from Persistently Vulnerable Exchange Servers to Exchange Online

And, in case you are wondering how transport-based enforcement systems function, it will basically help to throttle or delay emails from unpatched servers until they are remediated.

In case there is no upgrade to the vulnerable server, the email flow will consequently be blocked, to avoid future problems.

Thus, to efficiently address this problem, Microsoft is enabling a transport-based enforcement system in Exchange Online that has three primary functions: reporting, throttling, and blocking.

Keep in mind that the system was designed to alert an admin about unsupported or unpatched Exchange servers in their on-premises environment that need remediation (upgrading or patching).

thumbnail image 2 of blog post titled 


							Throttling and Blocking Email from Persistently Vulnerable Exchange Servers to Exchange Online

Furthermore, it also has throttling and blocking capabilities, so if a server is not remediated, mail flow from that server will be throttled (delayed) and eventually blocked.

Microsoft doesn’t want to delay or block legitimate emails, but it does want to reduce the risk of malicious emails entering Exchange Online by putting in place safeguards and standards for email entering our cloud service.

Remember to share your thoughts and opinions with us in the dedicated comments section located right below.

0xc00002e3 BSoD Error Code: How to Fix It

Our readers have reported the 0xc00002e3 BSoD error code known as STATUS SAM INIT FAILURE. The error relates to issues with Security Account Manager’s failure during initialization. Hence, we will discuss probable solutions to fix the 0xc00002e3 BSoD error code.

Alternatively, you can read about fixing Windows’s 0x0000004E BSoD error code.

What causes the 0xc00002e3 BSoD error?

Several factors can cause the 0xc00002e3 Blue Screen of Death error. Some common ones include:

  • Corrupted boot configuration data (BCD) – The BCD contains boot-related configuration data and settings for Windows and, if corrupt or damaged, can cause the 0xc00002e3 BSoD error code.
  • Corrupted system registry – When the Windows registry is corrupt, it will cause issues with systems performance and can affect the Security Account Manager initialization process.
  • Hardware issues – Faulty hardware components, such as hard drives, memory modules, or CPUs, can cause the error.
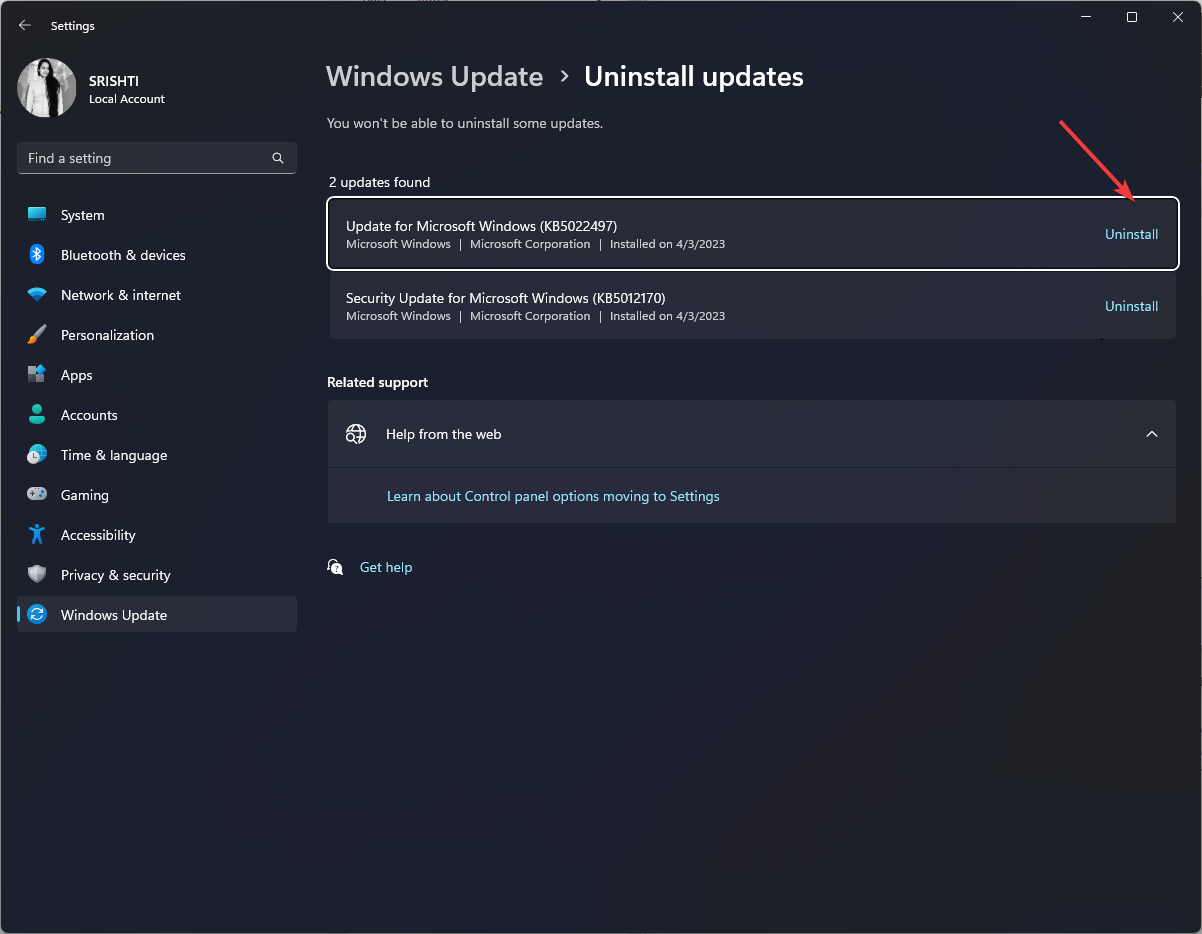
  • System updates or upgrades – System updates or system upgrades can sometimes cause the BSoD error, especially if the update is not installed correctly or is incompatible with the system configuration.

Although the factors above vary on different PCs, we will discuss solutions to fix the error code.

How can I fix the 0xc00002e3 BSoD error?

Before trying advanced steps, apply the following:

  • Install pending updates for your system drivers.

You should proceed with the advanced steps below if the error persists.

1. Perform an Automatic Repair

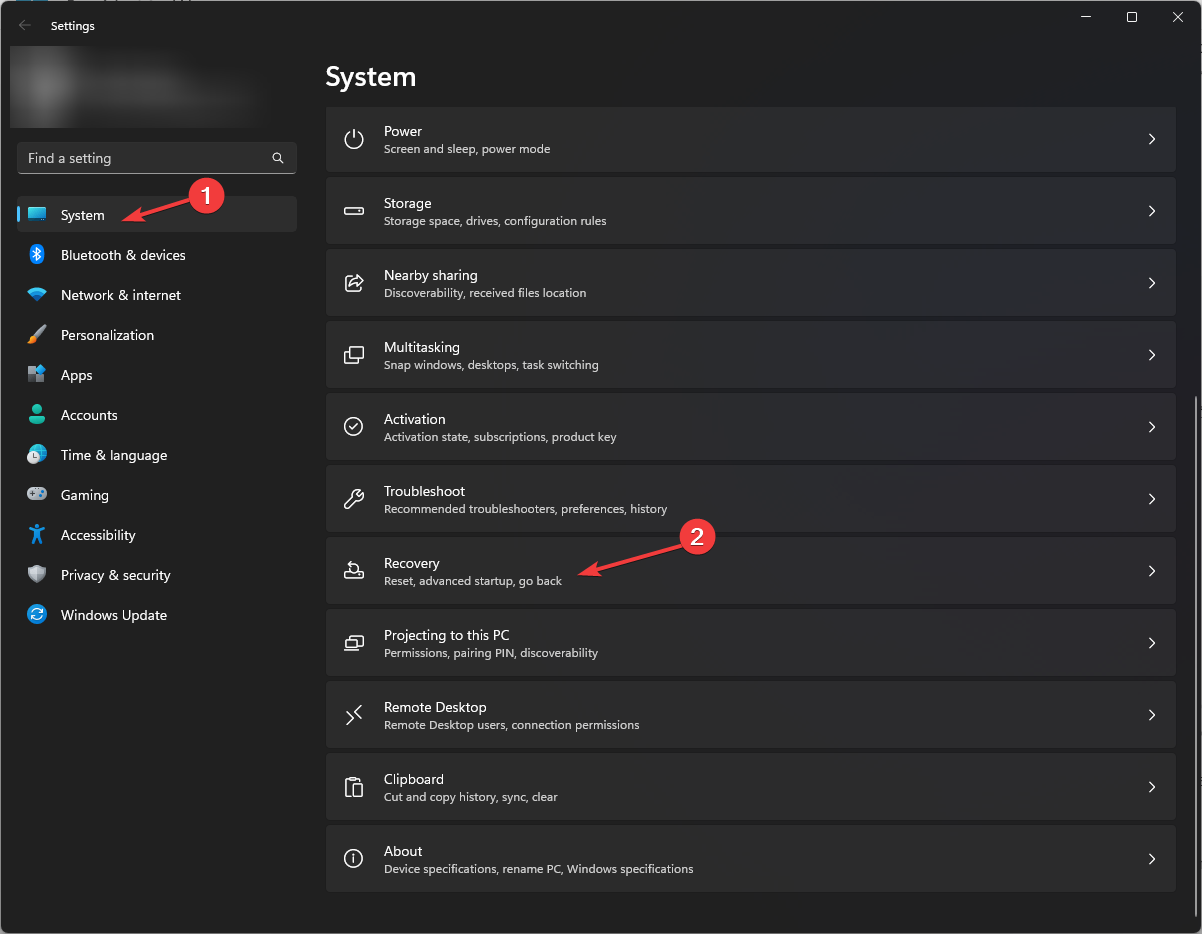
  1. Left-click the Start menu and select Settings.
  2. Then click on System and select Recovery.
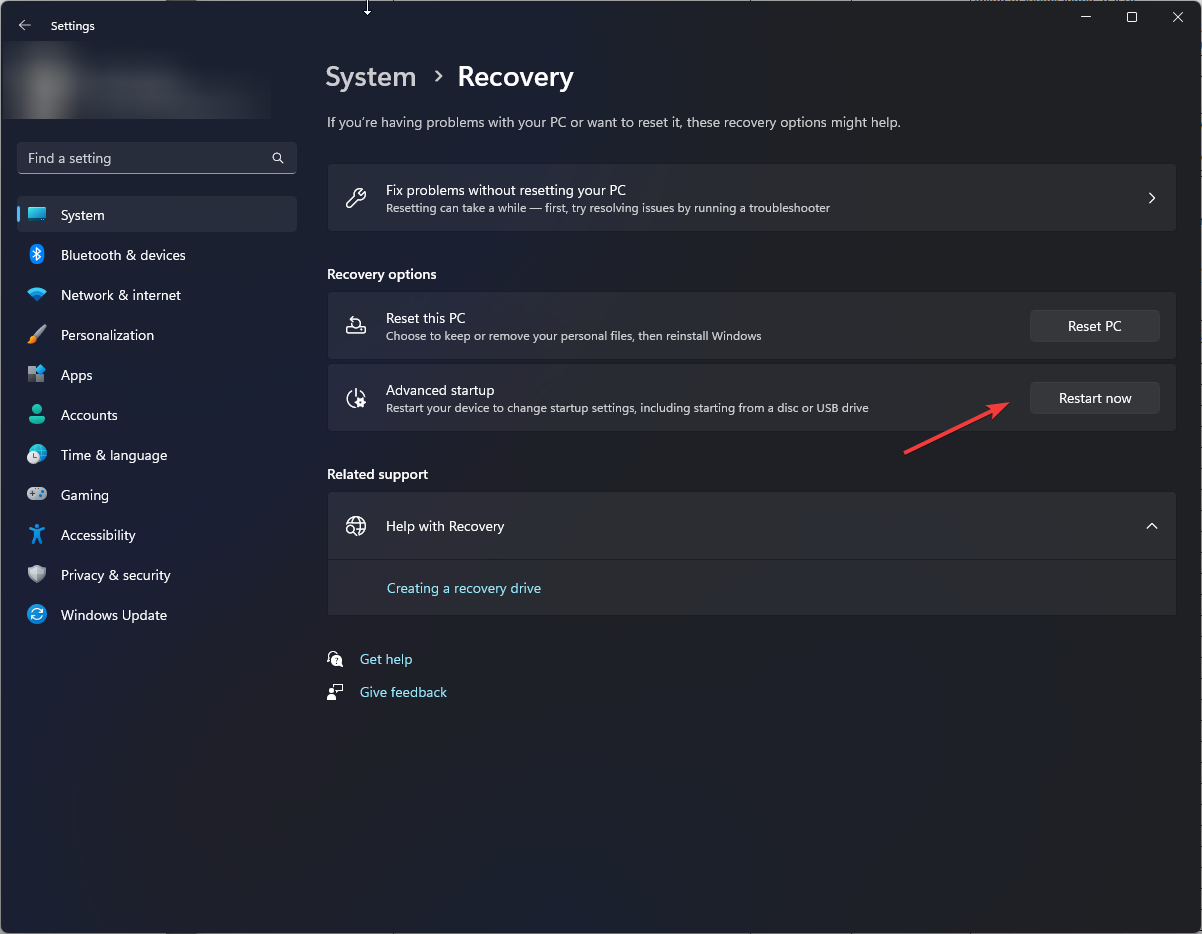
  3. Choose Advanced Startups and select Restart Now. Wait till Windows boots into Advanced Startup options.
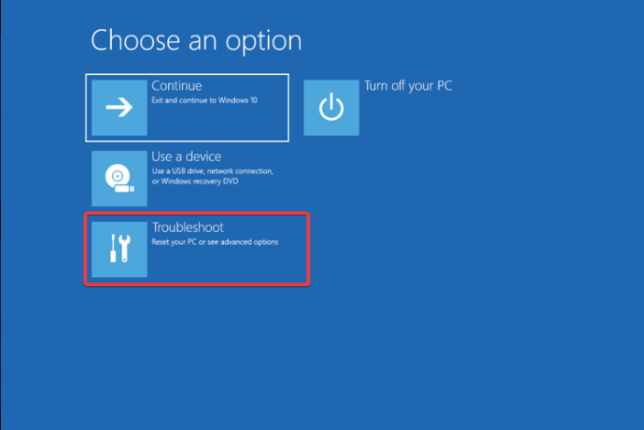
  4. Then, select Troubleshoot.
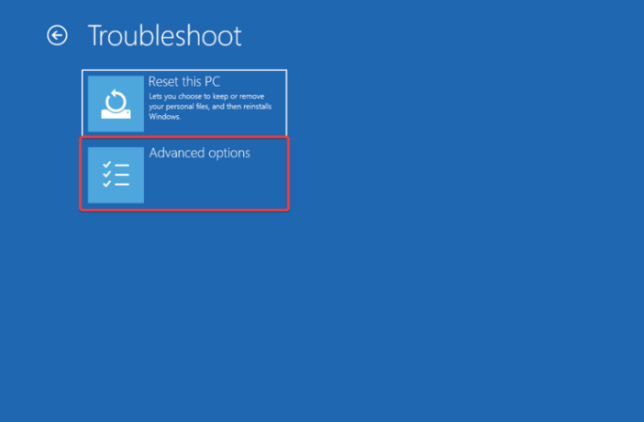
  5. In the new window, select Advanced options.
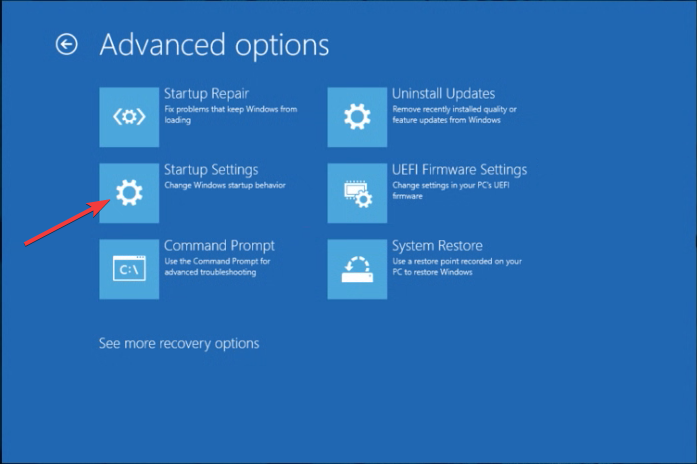
  6. Now, select Automatic Repair. Then wait for PC to restart.

Performing an automatic repair will fix issues with the Windows OS that can cause the BSOD error.

2. Perform an SFC/DISM scan

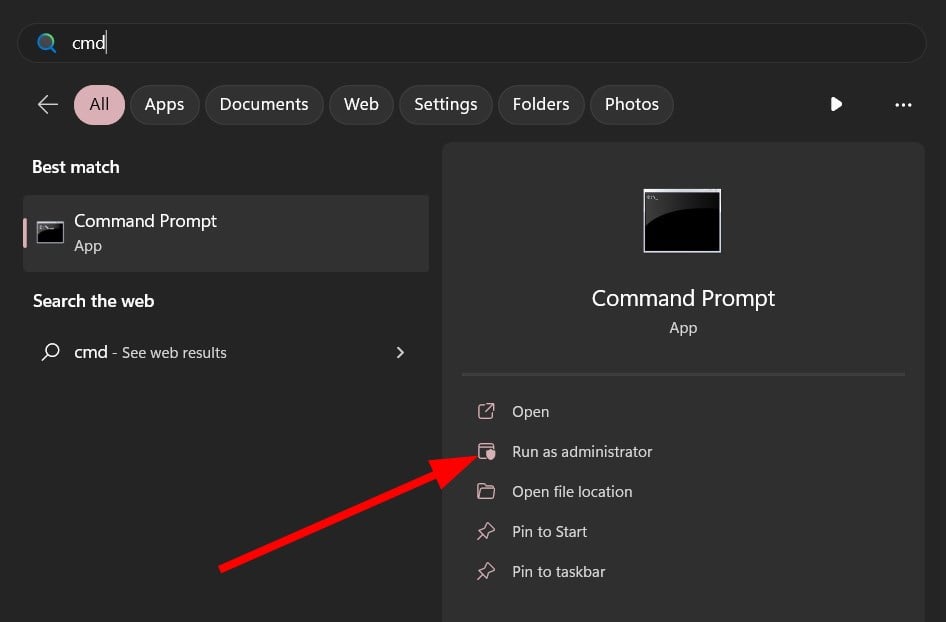
  1. Left-click the Start button, type the command prompt, and select Run as administrator.
  2. Click Yes on the User Account Control prompt.
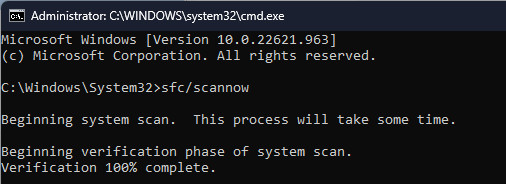
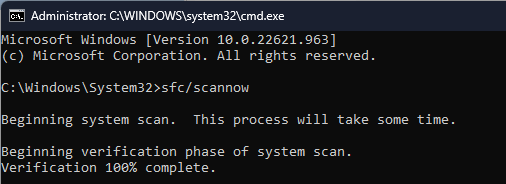
  3. Type the following and press Enter: sfc /scannow
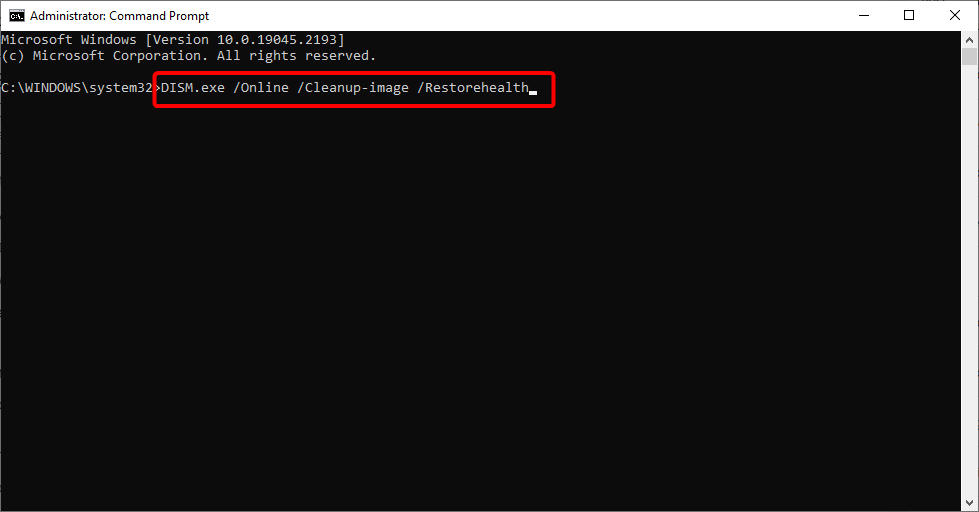
  4. Input the following command and press Enter: DISM /Online /Cleanup-Image /RestoreHealth
  5. Restart your PC and check if the error persists.

Running an SFC/DISM scan on your PC will locate and repair the corrupt system file. We have a complete guide about how to fix SFC scannow not working on your Windows device.

However, this process requires some extent of knowledge and it may be time-consuming on your PC. This is why you can try a specialized system repair tool.

3. Rebuild BCD file manually

  1. Create a bootable USB drive and boot the PC using the media.
  2. On the Install Window, click on Next, and choose Repair your Computer.
  3. On the System Recovery options, select Troubleshoot.
  4. Then click on Advanced options.
  5. Now select Command Prompt.
  6. Then, input the following commands and click Enter after each: BOOTREC /FIXMBR BOOTREC /FIXBOOT BOOTREC /scanos BOOTREC /rebuildbcd
  7. Then, exit and restart the PC to take effect.

4. Repair registry entry issues

  1. Left-click the Start button, type regedit, and press Enter to open the Registry Editor.
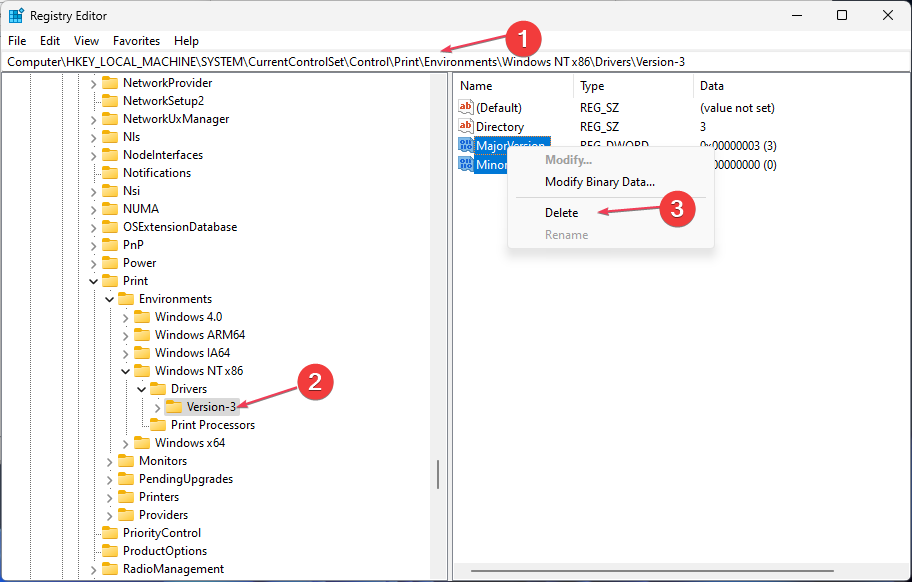
  2. Copy and paste the following path into the Registry Editor directory address bar and press Enter: HKEY_LOCAL_MACHINE\SOFTWARE\Policies\Microsoft\Windows\WindowsUpdate
  3. Find the WUServer and WIStatusServer from the right-hand pane, right-click them, and click Delete.
  4.  Restart your PC and check if the error persists.

The above steps will troubleshoot the Registry Editor database and repair corrupt registry keys affecting the system.

5. Perform a System Restore

  1. Press Windows, type restore, and click on Create a restore point.
  2. Click on System Protection and select System Restore.
  3. Click Next in the Restore system files and Settings page.
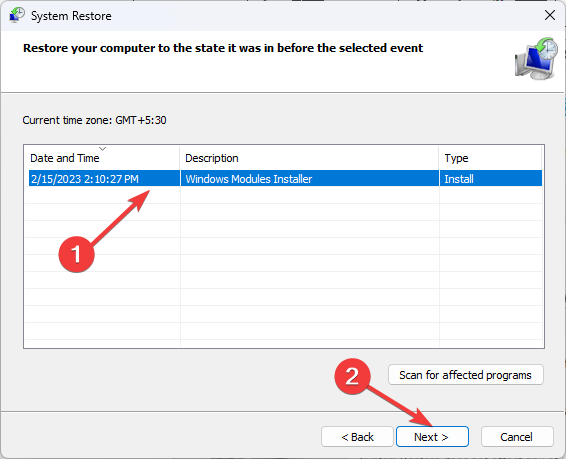
  4. Choose the restore point you want to restore from and click Next.
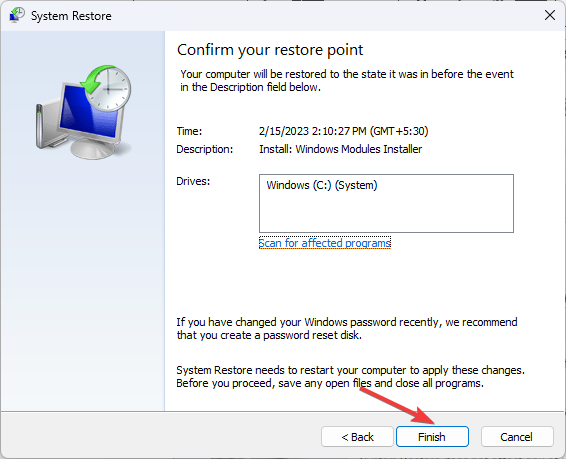
  5. Then, click Finish and restart your PC.

Performing the System Restore will backdate recent system changes and configurations causing the error. Read our guide on how to fix Restore Point if it’s not working on your PC.

Read about how to fix Windows not connecting to update services if you have any issues updating Windows on your PC.

In addition, we have a complete guide on fixing BSoD error 0x00000154 on Windows 11. Also, our readers may be interested in our guide about the best BSoD Fixers to repair blue screen errors.

Further, if you have more questions or suggestions about this guide, kindly drop them in the comments section.

Is Microsoft bullying its users into using Edge again?

Microsoft is known to have done numerous rather-sleazy attempts to make users stay, but in a recent discovery on Reddit, Redmond officials seem to have gone too far.

As spotted by this Redditor, who runs Windows 11 with the KB5025305 update from late April 2023, Microsoft slaps a notification on Edge whenever the system detects that another browser has been installed. 

As seen on screenshot in the Turkish language, the notification reads Be safer with Microsoft Edge. Edge helps you stay protected by blocking phishing and malware attacks, followed by two buttons More information and No thanks.

Microsoft was criticized by online communities for appearing to force users into using Edge. One suggestion was to uninstall the pre-installed browser, but there’s a possibility it could reappear with the next monthly cumulative Windows update.

If you want to know how you can uninstall Edge on both Windows 10 and 11, we’ve prepared a set of guides you can try. Or, if you’re in the market for another browser with completely seamless and smooth UI experience and AI-friendly interface, we recommend the new Opera One as we’ve reviewed here.

Microsoft continues pushing Edge as default browser

It’s not entirely new as this issue has also been spotted in older flights, but it’s still not a good look for Microsoft. Its persistent efforts to promote its Edge browser have left many users feeling frustrated and annoyed thanks to its various tactics that some deem as aggressive and intrusive. From notifications to pop-ups, users are bombarded with prompts to switch to Edge, which has sparked criticism from the online community. 

Edge is used to be people’s second favorite browser following Google Chrome’s domination, but things seem to change since the end of April 2023 when its market share slowly falls short behind Apple’s Safari. 

Third-party tool like EdgeDeflector offers workarounds to Microsoft forcing people to use Edge in Start menu search results, even if their default browser is not Edge, but Microsoft sabotaged the project back in 2021 to stop people from leaving. 

Google Chrome used to have an option to let you set it as your default browser, but in the KB5025221 update that shipped in April 2023, Microsoft seems to be blocking this feature. However, as spotted by Edge enthusiast @Leopeva64, Google has been working closely to fix this issue. 

What do you think about this move by Microsoft? Let us know in the comments!

Ksecdd.sys BSoD Error: 4 Ways to Fix It

Our readers complain about experiencing the Blue Screen of Death errors referencing the ksecdd.sys. The issue mainly occurs after installing an app, updating, and opening files on the PC. Hence, this article will discuss fixes for resolving the error on Windows 11.

Alternatively, you can check our comprehensive guide about what causes the Blue Screen of Death on your PC.

What causes ksecdd.sys BSoD error?

Several factors can be responsible for the Ksecdd.sys Blue Screen of Death error on your computer. Some notable ones are listed below:

  • Corrupt or outdated drivers – The error can also occur when you have outdated drivers running on your computer. The bugs can cause other drivers and hardware components to be corrupted.
  • Corrupt system files – Ksecdd.sys is a system file and can’t be removed or altered because it can affect some functionalities in the system. However, corrupt system files can infect the .sys file, resulting in the BSoD error.
  • Windows memory issues – Some users can run into the error due to memory corruption errors affecting the system and the ksecdd.sys file.

Different users can experience the error for varying factors depending on the circumstances. Nonetheless, we’ll take you through the basic steps to fix the issue.

How can I fix the ksecdd.sys BSoD error?

Try the following preliminary checks before anything else:

  • Remove the login scripts from the user profiles and switch to the GPO network drive.

If this fails, then try the following steps:

1. Perform a System Restore

  1. Press Windows, type restore, and click on Create a restore point.
  2. Click on System Protection and select System Restore.
  3. Click Next in the Restore system files and Settings page.
  4. Choose the restore point you want to restore from and click Next.
  5. Then, click Finish and restart your PC.

A System Restore will roll back recent system changes and configurations liable to cause the issue. Read our guide on how to fix Restore Point if it’s not working on your PC.

2. Update the system drivers

  1. Press Windows + I key to open the Windows Settings.
  2. Click on Windows Update and select Advanced options.
  3. Choose Optional updates from the options.
  4. Select Driver Updates, mark all the available updates, and click on Download & Install button.
  5. Repeat the steps above for other drivers.

Updating your device drivers will fix the bugs affecting the system and improve the device’s performance. Also, you can check how to reinstall devices in Devices Manager Windows 11.

In addition to this method, we advise you to consider dedicated support when it comes to updating drivers. Luckily, you have the ideal software that can detect and update any drivers automatically.

⇒ Get Outbyte Driver Updater

3. Run MemTest86+

  1. Go to the Official download site for MemTest86+ and click Download.
  2. Insert your USB drive, double-click on the downloaded file, and follow the installation prompts to install it on the USB.
  3. Then, boot from your USB and allow MemTest86 to scan your PC and prompt results afterward.

It will immediately restart the PC to perform a memory check, and the results will be displayed after the restart. Alternatively, you can use the Windows Memory Diagnostic on your PC, although it’s not as reliable as MemTest.

4. Run a System File Checker (SFC)/ DISM scans

  1. Left-click the Start button, type the command prompt, and select Run as administrator.
  2. Click Yes on the User Account Control prompt.
  3. Type the following and press Enter: sfc /scannow
  4. Input the following command and press Enter:DISM /Online /Cleanup-Image /RestoreHealth
  5. Restart your PC.

Running a System File Checker scan will find and repair corrupt files causing the Blue Screen of Death error.

In conclusion, our readers can check our guide on fixing the Wdcsam64.sys Memory Integrity error on Windows 11. Also, you may be interested in Ndis.sys BSoD and some fixes for the error.

If you have further questions or suggestions, kindly drop them in the comments section.

Stop Microsoft Word From Freezing When Saving a Document

Microsoft Word is a popular word processor and a part of the Office suite. It’s employed both in home and office setups and is often the first choice of users. But many have found Word freezing when saving a document

While for some Microsoft Word doesn’t open, this particular problem where Word crashes or freezes when trying to save a document is different and requires a specific approach. Let’s find out!

Why is my Word document stuck?

Here are a few reasons Word documents keep freezing when trying to save them:

  • The document is corrupt: Oftentimes, you are unknowingly working on a corrupt document, and, as a result, changes to it can’t be saved by Microsoft Word.
  • Issues with the drive storing the document: In some cases, the drive storing the document may have issues affecting the reading and writing operation; thus, Word is freezing when saving a document.
  • Slow Internet speed: If you are working on files stored on the cloud, slow Internet speed will affect the saving time, and in some cases, Word may crash.
  • Problems with Microsft Office: There’s also a chance that Microsoft Office is running into issues internally which affect its core functioning.

What can I do when Word is freezing when saving a document?

Before we head to the slightly complex solutions, try these quick tricks:

  • Restart the computer and check whether Word crashes when saving documents.
  • Move the file to another folder or probably the desktop, and try saving it.
  • While working on files saved on the cloud, you must have a fast Internet connection, so check that.
  • In case the file is stored on OneDrive or another cloud service, download it to the computer and then work on it.

If none work, move to the fixes listed next.

1. Repair the document

  1. Launch Microsoft Word, click on Open towards the left, and then click on Browse.open
  2. Navigate to the desired folder, select the affected file, click on the arrow next to Open, and click on Open and Repair.open & repair to fix word freezing when saving a document
  3. After the document opens in Word, verify whether you can now save it.

2. Launch Word in Safe Mode

  1. Press Windows + R to open Run, type winword /safe in the text field, and hit Enter.safe mode to fix word freezing when saving a document
  2. After Word opens, load the document and check whether the problem is resolved.

In case Word is freezing when saving a document, even in Safe Mode, it’s probably a major issue, and a repair should fix things. But if the problem disappears, it’s likely an add-in to blame.

3. Disable add-ins

  1. Open Microsoft Word, and click on Options near the bottom left.options
  2. Go to the Add-ins tab from the navigation pane, and click on Go with COM Add-ins selected.add-ins
  3. Select any installed add-ins and click on Remove.remove to fix word freezing when saving a document
  4. Once done, relaunch Microsoft Word.

Many users often install add-ins that could affect the functioning of the word processor and find it freezing when saving a document. Also, instead of removing all the add-ins in a single go, delete them individually to identify the conflicting one, and then reinstall the others.

4. Install any pending updates

  1. In Microsoft Word, click on Account near the bottom-left corner.account
  2. Now, click on Update Options and choose Update Now from the menu.update now to fix word freezing when saving a document
  3. Wait for any available updates to install.

Microsoft did acknowledge a bug in Microsoft Word that led to freezing when saving a document, and a patch for it was released via updates. So make sure you are running the latest version of Word.

5. Disable OneDrive syncing

  1. Click on the OneDrive icon in the system tray, then on the Settings icon, and select Pause syncing.pause syncing to fix word freezing when saving a document
  2. Now, choose 24 hours from the available options.

After disabling OneDrive syncing for 24 hours, if Word is not freezing when saving a document, you have found the problem, and an easy solution would be to disable OneDrive for good.

6. Repair Microsoft Office

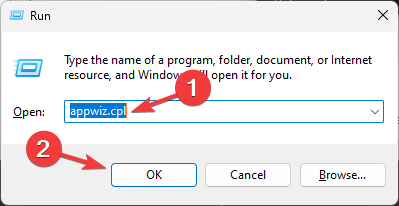
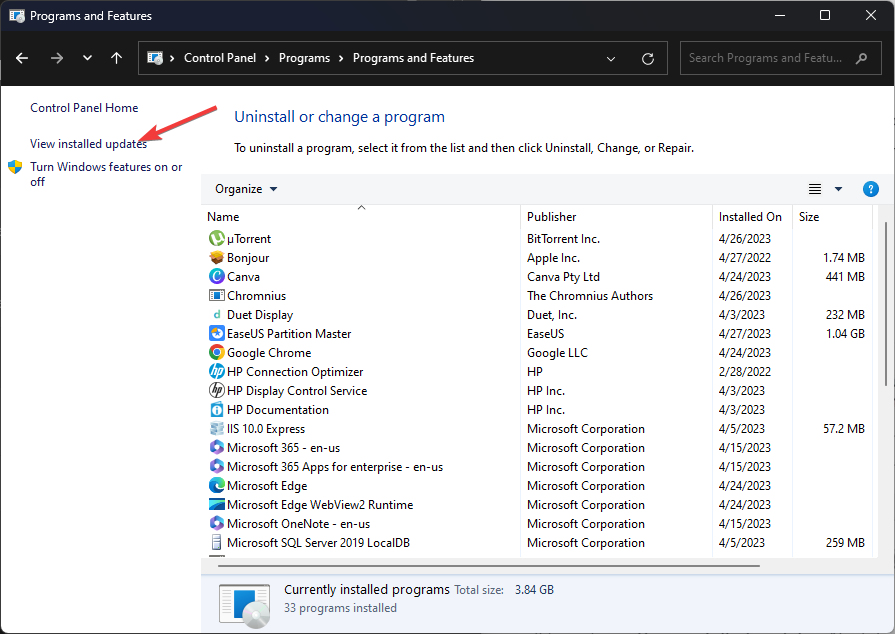
  1. Press Windows + R to open Run, type appwiz.cpl in the text field, and click OK.appwiz.cpl
  2. Select Microsoft 365 (or Office 365) from the list of installed programs and click on Change.repair to fix word freezing when saving a document
  3. Choose Online Repair, and then click on Repair.online repair to fix word freezing when saving a document
  4. Again, click Repair in the confirmation prompt, and wait for the process to complete.repair

Often it’s a problem with Microsoft Office and affects every application in the suite, in which case, performing an Online Repair should get things up and running if you are wondering how to save frozen Word document.

Remember, repairing Office will also work if Microsoft Word freezes when typing.

7. Switch to a different version of Office

When nothing else works, it could be the compatibility to blame for Word freezing when saving a document. So, if you are running 64-bit Windows, ensure the 64-bit version of Microsoft Office is installed.

Or switch the version from 32-bit to 64-bit and vice versa, and the problem should be fixed in no time. All you have to do is sign into Office and download the desired version.

That’s it! One of these fixes should have worked to eliminate the issue. If the problem persists, the last option is to contact Microsoft Support.

Before you leave, discover how to integrate ChatGPT with Microsoft Word and transform your experience for good.

For any queries or to share which solution worked for you, drop a comment below.

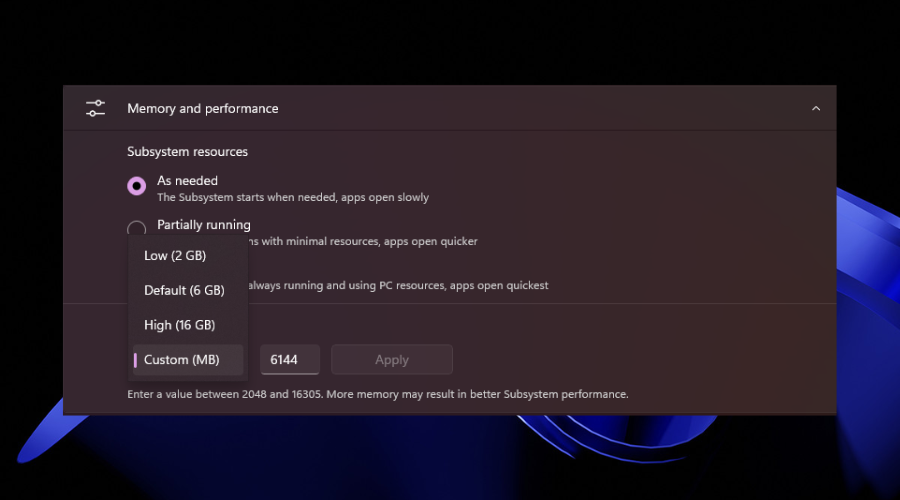
You can assign memory to mobile apps with Windows 11’s WSA

You might not be aware of it yet, but Microsoft has recently released an update to Windows Subsystem for Android (WSA) for Windows 11.

This above-mentioned update, dubbed the May 2023 update, brings many new features and bug fixes, so it is definitely worth checking out.

Before we begin, know that one of the most significant changes is the ability to assign memory to Android, enabling them to customize how much memory is allocated to mobile apps.

And, speaking of WSA, if you are having trouble and it’s not working, we can show you how to remedy the situation with 7 easy steps.

Check out the latest Windows 11 WSA update

Keep in mind that the new update also includes package verification for apps on WSA, which scans Android apps using anti-virus software installed on Windows before app installation.

Let’s break this down a bit. The general idea behind this initiative is that it actually helps to ensure the safety and security of the installed apps.

One of the other new features is the Android AppLink support, which launches Android apps when a user opens a supported app link from any app.

The recent software also includes performance and reliability improvements to WSA and an update to the Linux kernel version to 5.15.94.

After installing the update, your Windows Subsystem for Android will be bumped to version 2304.40000.3.0.

The changelog is pretty brief, but the content will surely make your day. The improvements are quite significant and most users seem happy with them:

  • Package verification for apps on WSA: Android apps are scanned using anti-virus software installed on Windows prior to app installation.
  • Ability for users to configure how much memory to assign to Android.
  • Android apps will be launched when a user opens the supported app link from any app (Android AppLink support).
  • Linux kernel updated to 5.15.94.
  • WSA reliability and performance improvements

The Redmond tech giant still has big plans for WSA, and it has already confirmed adding more new features in the coming months.

It’s safe to say that, pretty soon, you can expect an update that will allow file transfer to Android, enabling the quick transfer of files between File Explorer and Android apps.

Looking to the future, voices from Redmond confirmed that another update will bring back support for shortcuts for easier access on Windows.

Also, in addition to these updates, Microsoft is working on bringing hundreds and thousands of Android apps to Windows Store via Amazon Store.

Seeing how the previous update added picture-in-picture, which allows you to open Android apps in a small window on top of native apps, the future looks pretty good.

Happy with the new Windows Subsystem for Android for Windows 11’s changes? Let us know in the comments section located below.

UnrealCEFSubProcess: What Is It & How to Fix its High CPU

High CPU usage is a problem in Windows we have all faced at some point, but in most cases, it’s a temporary issue, and things are fixed automatically within a short period. But with processes like UnrealCEFSubProcess, the problem persists unless concrete action is taken.

Many users have reported UnrealCEFSubProcess 100% CPU usage with Valorant. You will find forums flooding with queries about whether UnrealCEFSubProcess is a virus. Let’s find out all about it and the solutions that worked for others!

What is Unreal CEF SubProcess?

For those wondering is UnrealCEFSubProcess important, it’s a legit Riot Games launcher process often linked to Valorant and is responsible for a range of gaming-related tasks. You may often find multiple such processes running in the Task Manager.

And for some users, UnrealCEFSubProcess is not closing, or as soon as it does, another one appears automatically. Here are a few reasons for the high CPU usage:

  • Conflicting third-party application: In most cases, when you see 100% CPU usage, it’s often the third-party antivirus conflicting with the process to blame.
  • The process is actively running: The UnrealCEFSubProcess comes into play when users access the in-game store to purchase Valorant Points. This may lead to the problem in some cases.
  • Multiple instances of the process: Oftentimes, multiple such processes were found running on the PC, and each consumes significant resources, thus triggering the issue.

How do I fix UnrealCEFSubProcess high CPU usage?

Before we head to the slightly complex solutions, here are a few quick ones to try:

  • Restart the computer.
  • If you are in the Valorant Store, exit and check whether the UnrealCEFSubProcess CPU usage is reduced.

If none work, move to the fixes listed next.

1. Add UnrealCEFSubProcess as an exclusion in the antivirus

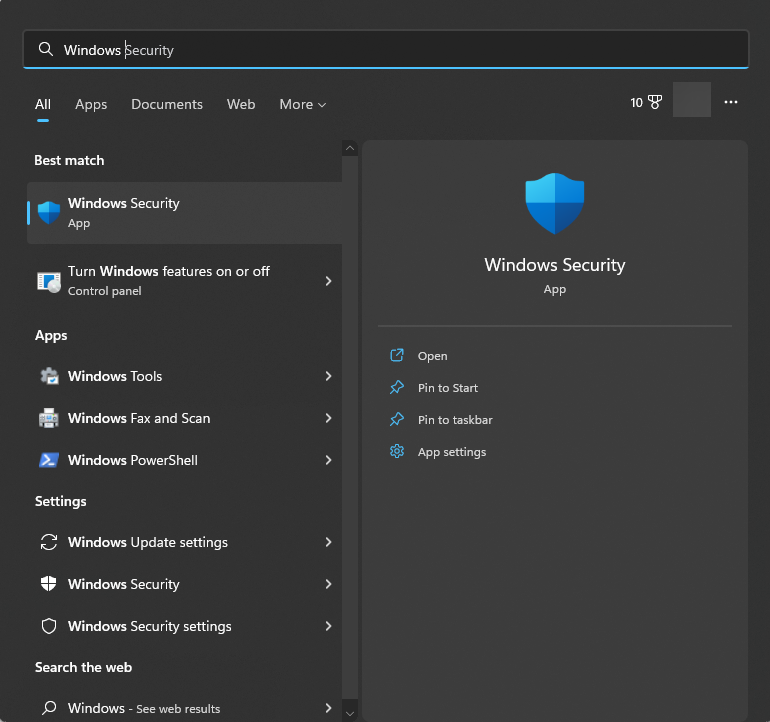
  1. Press Windows + S to open Search, type Windows Security in the text field, and click on the relevant search result.windows security
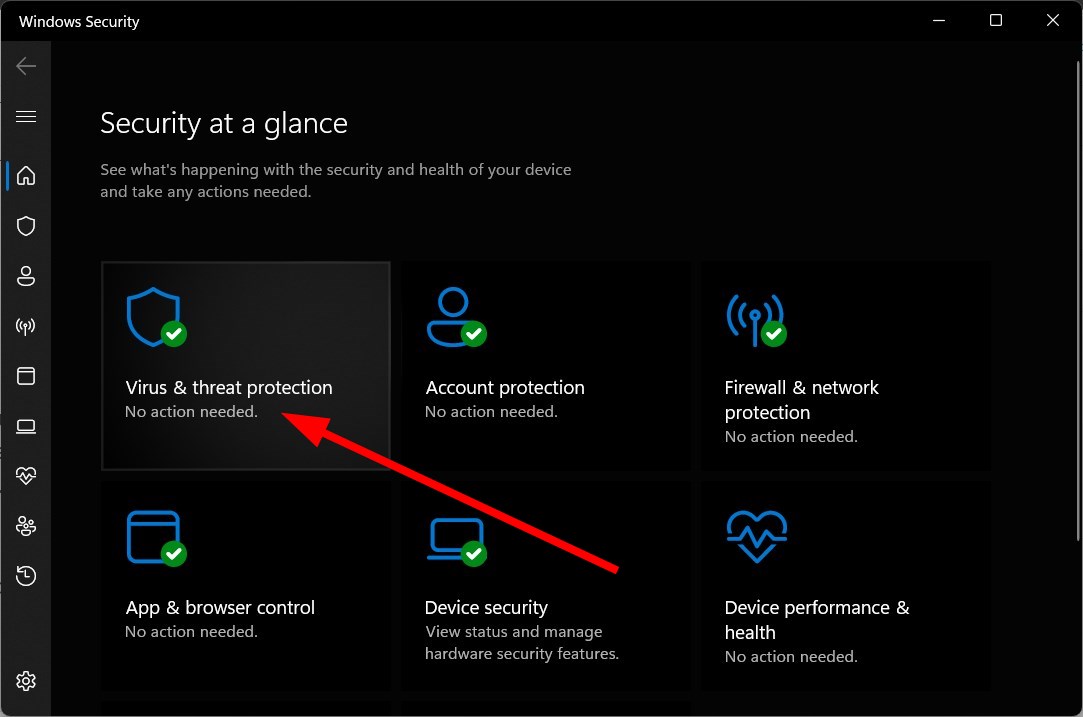
  2. Click on Virus & threat protection.virus & threat protection to fix UnrealCEFSubProcess
  3. Click on Manage settings under Virus & threat protection settings.manage settings
  4. Now, scroll down and click on Add or remove exclusions.add or remove exclusions to fix UnrealCEFSubProcess
  5. Click on Add an exclusion and select File from the menu.add an exclusion to fix UnrealCEFSubProcess
  6. Navigate the following path or paste it in the address bar and hit Enter:C:\Program Files\Riot Games\VALORANT\live\Engine\Binaries\Win64
  7. Select the UnrealCEFSubProcess file, and click Open.file
  8. Once done, restart the computer for the changes to come into effect.

Adding the UnrealCEFSubProcess.exe process as an exception to the antivirus should get things up and running when it leads to high CPU usage. Remember, the steps listed here are for Windows Security, and if you are using another antivirus, check the manufacturer’s website for the process.

2. Uninstall the antivirus

  1. Press Windows + R to open Run, type appwiz.cpl in the text field, and hit Enter.appwiz.cpl
  2. Locate the third-party antivirus installed on the PC and select it, then click on Uninstall.uninstall to fix UnrealCEFSubProcess
  3. Follow the on-screen instructions to complete the process.
  4. Once done, restart the computer, then relaunch Valorant, and you shouldn’t see high CPU usage.

In many cases, it was an antivirus that triggered the UnrealCEFSubProcess high CPU usage, and uninstalling the program did the trick. The AVG antivirus was reported as the underlying cause by many, but other antivirus, too, can be the underlying cause.

3. Reinstall the game

  1. Press Windows + I to open Settings, go to Apps from the navigation pane, and click on Installed apps.installed apps
  2. Locate Valorant, click on the ellipsis next to it, and then choose Uninstall.uninstall
  3. Again, click Uninstall in the confirmation prompt.uninstall to fix UnrealCEFSubProcess
  4. Similarly, remove Riot Client from the PC as well.
  5. Once done, download Valorant from the official website.

When nothing else works, it could be a problem with the game installation to blame, and reinstalling it will get things up and running.

After you have fixed the error, check some quick tips to optimize the PC for gaming and tricks to boost the Windows performance.

Tell us which fix worked for you in the comments section below.

How to Fix Disk Signature Collision Error in Windows 11

Disks are a critical part of the PC and store both the operating system and the personal files. While some users have reported slower disk performance, it doesn’t pose as big a problem as the Disk Signature Collision error, which turns disks inaccessible.

The error message when hovering over the disk in Disk Management reads, This disk is offline because it has a signature collision with another disk that is online. Any of the affected disks will be listed as Offline. So, let’s find out all about the error!

What does a signature collision mean?

Disk Signatures are unique IDs allotted by Windows to each storage device to distinguish between them and perform operations. This data is a part of the MBR (Master Boot Record) and is vital for various reasons.

So, when two drives have identical disk signatures, Windows turns one offline to avoid conflicts.

Here are a few reasons you come across the Disk Signature Collision error:

  • Cloning: The problem usually arises after cloning a drive using a dedicated cloning tool since the cloned drive has the same disk signature as the one it was cloned from. Here, you will have to change disk ID after cloning.
  • Creating a virtual drive: Even when creating a virtual drive using a physical one, the disk signature will be identical, triggering the error.
  • A Disk was replaced: Though rare, a few users reported that replacing an old drive with a new SSD led to a similar situation.

How do I fix the Disk Signature Collision error?

1. Turn the disk online

Tip icon Tip
Proceed with this method only when the affected disk doesn’t have the operating system installed. Otherwise, you may encounter errors booting Windows.
  1. Press Windows + X to open the Power User menu, and select Disk Management from the list of options.disk management
  2. Right-click on the disk labeled as Offline, and select Online from the context menu.online to fix Disk Signature Collision Error

That’s it! Often the simplest solution to fix disk signature collision errors in Windows 10 is to turn the drive online.

2. Change the disk signature

  1. Press Windows + R to open Run, type cmd, and hit Ctrl + Shift + Enter.cmd to fix Disk Signature Collision Error
  2. Click Yes in the UAC prompt.
  3. Now, paste the following command and hit Enter to start the Diskpart utility:diskpartdiskpart
  4. Use this command to view the available disks:list disklist disk
  5. Now, run this command to select the affected disk where X is the number allotted to it:select disk Xselect disk
  6. Finally, execute the following command to set a new disk signature where XXXXXXXX is the new ID:uniqueid disk ID =XXXXXXXXchange disk ID to fix Disk Signature Collision Error

The disk ID is a simple eight-digit alpha-numeric figure. We choose 1415ADEB as the disk signature for the ID, while you can choose anything else. And this will help fix signature collision with another disk.

Also, if you get an Access is denied error when you change identifier using uniqueid command of Diskpart, disable Controlled Folder Access to proceed since it is blocking the change.

3. Run Startup repair

  1. Press Windows + I to open Settings, and click on Recovery on the right in the System tab.recovery to fix Disk Signature Collision Error
  2. Now, click on the Restart now button next to Advanced startup.recovery
  3. Select Troubleshoot.troubleshoot
  4. Click on Advanced options.advanced options
  5. Next, choose Startup Repair from the options listed here.startup repair to fix Disk Signature Collision Error
  6. Select an account to proceed.account
  7. Type the password for the account in the text field, and click on Continue.startup repair

When nothing else works, the built-in Startup Repair utility should do the trick in the case of the disk signature collision error. Since the problem has the potential to prevent Windows from booting, Startup Repair looks for it and eliminates any inconsistencies.

Which is the command to capture disk signature in Windows?

  1. Press Windows + S to open Search, type Command Prompt in the text field, and click on Run as administrator.command prompt
  2. Click Yes in the prompt.
  3. Execute the following command:diskpart
  4. Use this command to view disks:list disk
  5. Replace X in the following command with the number allotted to the drive to select it:select disk X
  6. Finally, run this command, and Windows will list the disk signature:uniqueid diskuniqueid

That’s all there’s to fixing the disk signature collision error in Windows 11, as well as any other iteration of the OS.

And once you are done, do not forget to check some quick tips to increase the file transfer rate in Windows.

For any queries or to share which solution worked for you, drop a comment below.

How to Resize Partition Without Losing Data [3 Safe Ways]

Systematic data storage and organization are critical to seamlessly accessing files on the PC, and partitions often help achieve this. But many wonder if one could resize the partition without losing data and whether there are safe methods.

While you could easily split disk space, losing personal files bothers many. So, let’s find out all about it and the options to resize partitions in Windows 10 for free.

Can I resize the partition without losing data?

Yes, you can resize partitions without data loss. This is because the disk space used to store data can’t be shrunk and is not affected in the process. Only the free storage on the disk can be changed into an unallocated state. So you can safely resize the partitions and not worry about the critical files.

Here are the primary benefits of creating partitions on the disk:

  • Organized data storage: One of the primary pros of disk partitions is how well the data can be organized. The default system partition could be used for Windows files, while others can store personal or work-related files.
  • Better security: This may be a surprise, but partitioning a hard disk can increase security. Malware and viruses often tend to attack the partition where system files are stored, while others remain relatively safer.
  • Run multiple operating systems: There’s nothing better than running multiple operating systems on the PC for some of us. It saves quite a few bucks and eliminates hassle. Partitioning is an easy way to go, though you can use a virtual machine.
  • Simplified backups: Backing up the data is vital to avoid the loss of important files, and with it being optimally organized in various partitions, you can choose one without having to select files and folders individually.

How do I resize the partition without losing data?

1. Via Disk Management

1.1 Shrinking a partition

  1. Press Windows + X to open the Power User menu, and select Disk Management.disk management to resize partition without losing data
  2. Right-click on the partition that you want to resize, and select Shrink Volume.shrink volume to resize partition without losing data
  3. Enter the storage space to reduce in the field, then click Shrink, and wait for the operation to complete.shrink space

1.2 Extending the volume

  1. Once done, right-click on the partition to the left of the unallocated space, and select Extend Volume.extend volume to resize partition without losing data
  2. Click Next to proceed.next
  3. Make sure to enter the maximum available storage in the Select the amount of space in MB text field unless you want to create another partition on the unallocated space, as detailed in the next section, and click Next.extend
  4. Finally, click on Finish to extend to partition to the unallocated space.finish

1.3 Creating a new simple volume

  1. Right-click on the unallocated space in Disk Management, and select New Simple Volume.new simple volume to resize partition without losing data
  2. Click on Next.
  3. Make sure the maximum available disk space is entered in the Simple volume size in MB text field, and click Next.volume size
  4. Assign a drive letter or go with the default selection, and click Next. Remember, a drive not assigned a drive letter won’t show up in the File Explorer.drive letter to resize partition without losing data
  5. Now, choose a File system, Allocation unit size, and Volume label, and click Next to proceed. It’s best that to go with the default settings unless you are fully aware of the process.file system
  6. Finally, verify the details, and click on Finish.start creating new simple volume

That’s how you can resize a partition in Windows 10 without losing data. While doing so, you can either extend another partition or create new ones from the unallocated space created after deleting a partition.

2. Use Diskpart

2.2 Selecting and shrinking a partition

  1. Press Windows + R to open Run, type cmd in the text field, and hit Enter.command prompt
  2. Click Yes in the UAC prompt.
  3. Use this command to run the Diskpart utility:diskpartdiskpart
  4. Paste the following command and hit Enter to view the available disks:list disklist disk to resize partition without losing data
  5. Now, run this command while replacing X with the number allotted to the desired disk:select disk Xselect disk
  6. Execute the following command to view the partitions:list partitionslist partition
  7. Use this command while replacing X with the partition number to select the desired one:select partition Xcommand to resize partition without losing data
  8. Finally, use this command to shrink the partition by the required amount where XXXX represents the space to be shrunk:shrink desired=XXXX

2.2 Extending another partition

  1. After shrinking a partition, use the following command to select another partition to be extended:select partition Xselect
  2. Now, execute this command where XXXX represents the space to be extended:extend size=XXXXextend

2.3 Creating a new simple volume

  1. Simply use this command to create a new partition while replacing XXXX with the available unallocated size:create partition primary size=XXXXcreate to resize partition without losing data
  2. Run this command to assign a drive letter where X represents an unused one:assign letter=X
  3. You can now format the drive with the desired disk format, be it fat32 or NTFS.

That’s it! You can always use Diskpart to shrink partitions without losing data and resize them seamlessly. Though the command line utility seems a bit intricate initially, it’s way simpler than Disk Management once you get the hang of things.

There’s also the possibility to use Disk Management in Windows 7, and the highlighted guide will provide all the information.

3. With a dedicated tool

If the two methods seem complex, there’s always the option to use a reliable and dedicated Disk Management tool to create, format, and resize partitions in Windows.

The basic functions are included in the free version for most tools, but you must subscribe to the paid version for advanced features. But owing to the simplicity offered by these, many prefer a dedicated tool.

Now that you understand how to resize partitions without losing data, check how to speed up an SSD and quick tips to increase the file transfer speed in Windows.

For any queries or to share your thoughts on the subject, drop a comment below.

How to Merge Multiple USB Partitions [3 Ways]

While it’s often critical to split disk space, the same doesn’t apply to USB drives, given their relatively smaller size and a different use case altogether.

As a result, excess partitions on a USB drive often pose a problem, and users look for ways to merge USB partitions.

Also, many reported that the partition on a bootable USB drive is not accessible, another problem that could be eliminated by combining USB partitions. And there are quite a few ways you can do that. Let’s find out!

Why should I merge USB partitions?

Here are a few reasons you should merge USB partitions:

  • Better store data: Partitions on USB drives provide no real benefit to most and often lead to confusion regarding data storage. Combining them into a single partition will help better store and manage data.
  • Recover unallocated space: Frequently, there is an unallocated space that remains inaccessible to Windows, and no data can be written to it. This, too, can be fixed by merging it with another partition.
  • Fixes trivial issues: In some cases, formatting issues and other minor problems can be eliminated by merging USB partitions in Windows 10.

How do I merge USB partitions?

1. Use Disk Management

  1. Press Windows + X to open the Power User menu, and select Disk Management from the list.disk management
  2. Now, right-click on a partition and choose Delete Volume from the context menu.delete to merge usb partitions
  3. Click Yes in the confirmation prompt.yes
  4. Similarly, delete any other partitions on the USB flash drive.
  5. Once done, the whole storage space will be listed as unallocated. Now, right-click on the Unallocated space, and choose New Simple Volume.new simple volume
  6. Click on Next to proceed in the wizard.next
  7. Now, enter the volume size, or go with the default entry, which is the maximum available size, and click Next.size for merge usb partitions
  8. Choose a drive letter and click Next.drive letter
  9. Choose the File system, Allocation unit size, and Volume label, then click Next.volume parameters
  10. Finally, verify the details, and click on Finish to start the process.finish to merge usb partitions

That’s it! This is, by far, the simplest method to remove multiple partitions on a USB drive and merge them all. Remember, for USB drives, the Extend Volume option is greyed out, and you first have to delete all available partitions before combining them into one.

2. Via Diskpart

  1. Press Windows + R to open Run, type cmd, and hit Ctrl + Shift + Enter.cmd
  2. Click Yes in the UAC prompt.
  3. Paste the following command and hit Enter to kickstart the Diskpart utility:diskpartdiskpart to merge usb partitions
  4. Run the following command to view the available disks:list disklist disk
  5. Use the following command while replacing X with the drive letter for the USB: select disk Xselect disk
  6. Now, execute this command to list the partitions:list partitionslist to merge usb partitions
  7. Run this command while replacing X with the partition number to delete:select partition Xselect partition
  8. Execute this command to delete the selected partition:delete partitiondelete to merge usb partitions
  9. Similarly, select and delete all the other partitions on the USB, if any exist, except one.
  10. Next, use the following command while replacing X with the number for the existing partition:select partition Xselect
  11. Finally, run this command to combine all the partitions:extendextend to merge usb partitions

For those who want to delete all partitions on a USB drive with CMD, the Diskpart utility offers an easy way. Once you have deleted these, extend the last one to merge USB partitions. The Diskpart utility works the same way as Disk Management but is relatively more straightforward and quicker.

3. With a dedicated tool

While there are built-in options, many users prefer a dedicated tool to merge USB partitions on a USB flash drive. The best part, there are several reliable Disk Management software, and you can use any of these!

A dedicated third-party tool offers a user-friendly interface and is often the quickest of the three options discussed here.

And now that you know all the ways to merge USB partitions, choose the one that best matches your requirements.

Before you leave, do check some quick tips to increase the file transfer speed on the PC.

For any queries or to share your favorite software for the task, drop a comment below.

Microsoft expects 3 language model updates for Bing Chat per year

Last week, Microsoft shipped Bing Chat to open preview for everyone to try out. However, you’ll still need a Microsoft Account to access the AI chatbot’s capabilities.

Of course, the company continues to push updates as well as improvements to Bing Chat ever so often in a bid to enhance its user experience, with the latest update adding chat saving support. But a concerned user reached out to Microsoft’s CEO of Advertising and Web Services, Mikhail Parakhin on Twitter seeking to understand how and when the company updates the chatbot’s models.

Mikhail disclosed that the company takes several months to train Bing Chat’s models. As such, users are highly likely to see the models updated at least three times a year. “Models themselves it takes months to train, so, outside of some small RLHF tuning runs, you should expect models to be updated maybe 3 times a year or so,” says Mikhail.

After shipping Bing Chat to open preview, Microsoft also promised that it is working closely with OpenAI to bring third-party plugin support to the chatbot. In turn, this will allow developers to create plug-ins for Bing Chat.

via SE Roundtable

Microsoft debuts the Microsoft 365 Copilot early access program

Back in March, Microsoft unveiled Microsoft 365 Copilot, a new AI-powered assistant for its Microsoft 365 apps and services. Essentially, the tool’s designed to help people with generating emails, documents, and more. The tool is powered by OpenAI’s GPT-4 and ships with Copilot for Word, Excel, PowerPoint, Outlook, Teams, and the Power Platform.

And now, as more organizations begin to embrace and inject AI into their services and products, there’s a growing need to help them learn how to leverage AI capabilities to reshape work and ultimately promote creativity as well as productivity.

Microsoft 365 Copilot Early Access Program

As such, Microsoft has announced the launch of the Microsoft 365 Copilot Early Access Program. It’s an invitation-only, paid preview program that’s set to roll out to only 600 clients across the globe at first.

The company has received overwhelming feedback from the clients it’s been testing the tool with indicating that the tool can be leveraged to transform and reshape work. The organizations further added that the Copilot can be used to make meetings more impactful and better overall. What’s more, it can be used to help boost creativity.

Semantic Index for Copilot

Additionally, Microsoft has also announced that it’s set to start rolling out Semantic Index for Copilot, a new capability in Microsoft 365 E3 and E5. The tool will present users with a detailed report highlighting company data alongside the user. The company further added that it makes use of conceptual understanding so that it’s possible to meet your needs and wants.

Aside from the Copilot early access program, Microsoft has also made several announcements highlighting new capabilities coming to Microsoft 365 Copilot. Here’s everything you need to know:

Copilot in Whiteboard

Microsoft is bringing significant changes to Copilot in Whiteboard such that users will now be able to leverage its capabilities to make their Microsoft Teams meetings more interactive and impactful. In that, they can make use of the tool to come up with creative ideas, and designs that bring ideas to life, and even use it to organize ideas into themes.

The company further added that:

And with the power of Microsoft Designer, Copilot in Whiteboard can turn your ideas into original images that complement and enhance your text.

Copilot in PowerPoint

The company also indicated that it will be incorporating Dall-E, OpenAI’s image generator into PowerPoint. As such, users can ask Copilot to generate custom images that will make their presentations better.

What’s more, with these new changes, users will now also have the capability to refresh the content in their presentations by either turning bullet points into paragraphs or vice versa. Additionally, they’ll also be able to change the tone of the text in the presentation and even make it more contextual.

Copilot in Outlook

If you struggle with composing emails, Copilot is getting a new update that will make the process easier for you. All you need to do is to draft an email and the AI assistant will do the rest for you which includes providing tips and suggestions that will help you improve on clarity as well as tone,

Copilot in OneNote

In April, we got a slight glimpse of how Microsoft intends AI Copilot to work in OneNote. The company stated that the tool leverages “the power of large language models (LLMs) with your data from the Microsoft Graph—notes, calendars, emails, chats, documents, meetings, and more—and the Microsoft 365 apps to turn your words into a powerful productivity tool.”

And now, Microsoft has detailed that users can enhance and redesign their notebooks on OneNote using just their words. It further added that users can use it to reorganize content, change format, and even highlight key points.

Copilot in Loop

Loop components provide multiple users collaborating on a project with a centralized location where they can share, exchange, and create ideas. And while this is quite helpful, over time the space begins to get cluttered making it impossible for some users to keep up with new changes and information coming in.

But luckily with the new update, users can ask the Copilot to summarize all the content on the Loop content thus making it easier to catch up with everything. What’s more, it’s possible to edit the summaries generated by the Copilot, add additional details, and even send out the summaries to other users as Loop components.

Copilot in Viva

Microsoft is bringing Copilot to Microsoft Viva, The tool will help employees curate their own learning experiences including designing upskilling paths,
discovering relevant learning resources, and scheduling time for assigned training.

The company has also announced that academies in Viva Learning has finally shipped to general availability. This means that organizations can now create role and line-of-business-specific experiences, thus providing employees with great learning opportunities.

What are your thoughts on the Copilot expansion? Let us know in the comments.

Featured image via Bing Image Creator 

Lenovo rolls out new PC towers, ThinkPad’s and mini-PCs to power workstations in 2023

Lenovo is refreshing its lineup of workstation PCs with the addition of the ThinkStation P3 Tower, Ultra, and Tiny workstations as well as the ThinkPad P16 and 16v, P1 Gen 6, and the P16 and 16s.

Riding the wave of the performance-driven Intel 13th Generation vPro core i7 and i9 series chips Lenovo is bringing forth a series of PCs intended to help push those machine learning models and quantum computing platforms in 2023.

ThinkStation P3

The ThinkStation P3 Tower comes with a whole new expanded tower design built to support larger power supplies that include 1100w sources. The expanded power support portfolio will be necessary for anyone making frequent use of the 26TBs of storage for heavy data applications.

While adhering to the standard matte black motif of the ThinkPad lineup, the P3 Tower still represents an executive level PC equipped with trademarked red accents and the ThinkPad-like branding.

06_P3_Ultra_Hero_Front_Facing_Left_with_P27Q

Specifically, the ThinkStation P3 will come with processor options up to Intel’s 13th Gen vPro Core i9 supporting Windows 11 Pro, Ubuntu Linux, and Red Hat Enterprise Linux operating systems. Users can also configure their graphics support starting from Intel’s discrete UHD graphics 770 and up to NVIDIAs RTX A5500 24GB VRAM cards.

The P3 tops out at 128GB 5600Mhz memory with 4x UDIMM slots, and up to 24TB of storage across six drives.

As far as ports go, there are the standard array of eight USB-A, 1 USB-C, full HDMI, 2 DisplayPorts, RJ-45 Gigabit Ethernet, mic, and audio jack. There are options for Intel Wi-Fi 6E and Bluetooth 5.3 connectivity.

Lenovo is also offering a bit of customization when it comes to towers as well by offering additional options in the P3 Ultra and P3 Tiny with the former containing similar specs to the P3 but with a lower storage capacity at 9TBs in exchange for an additional GPU option in the RTX A2000, while the Tiny comes with 64GB of memory, an NVIDIA T1000 8GB VRAM and up to 4TB for storage in a 3lbs computer.

06_ThinkStation_P3_Tiny_Hero_P27H_Right_forward_facing

ThinkPad P14s, P16s, P16v, and P1

Moving over to the more mobile offerings in the ThinkPad P lineup will now include a Gen 4 refresh of the ThinkPad P14s, Gen 2 P16s, P16v, and Gen 1 P6.

The ThinkPad P1 Gen 6 and P16 Gen 2 comes in with mostly spec bump as the chassis still weighs around 4lbs and 6.5lbs respectively, while hosting familiar port selections across the two devices that include 2 Thunderbolt 4 ports, 2 USB-A slots and full HDMI support as well as an SD Express 7.0 Card reader.

15_Thinkpad_P1_Gen6_Specialty_B_C_Cover

Where the P1 Gen 6 and P16 Gen 2 differ is with Intel’s 13th Gen vPro with the P16 Gen supporting Core HX up to i9 and the P1 Gen 6 with just an H up to i9.

The GPU support on both devices also differs with the P16 Gen 2 hosting both Intel UHD Integrated Graphics and optional NVIDIA RTX 5000 upgrades whereas the P1 Gen 6 gains an additional option of configuration with the NVIDIA GeForce RTX 4090.

18_Thinkpad_P16_Gen2_Specialty_Floating_Front_Back

Similar to last year, the two models still support Lenovo’s move to 16:10 with screen options of WQUXG OLED both with UHD and QHD+ resolution.

Lenovo’s P14s and P16s this year come with improved battery life according to the company as well as a litney of display options that include 2.8K OLED, WQUXGA and FHD+ IPS.

03_Thinkpad_P14s_i_Gen4_Hero_Left_Side

Both models come with Intel’s 13th Gen vPro up to i7 configurations, optional NVIDIA RTX A500, and 64GB or 48GB memory with support for Intel’s own integrated GPUs as well.

Memory for both the P14s and 16s tops out at 48GB with integrated GPU configurations and 64GB for discrete GPUs.

Understandably, the battery capacities differ between the screen sizes with the 14 maxing out at 52.5Whr and the 16s at 86Whr and 100W and 135W Type-C power supplies respectively.

Last up is the P16v i, which is yet another portable workstation powered by Intel’s 13 Gen vPro Core H-series chip with support up to i9 configurations as well as both integrated Intel Iris Xe graphics or optional NVIDIA RTX A2000 8GB GDDR6 support.

03_ThinkPad_P16vi_Gen1_Hero_Front_forward_facing_right

Customers can configure the memory of the P16v i up to 96GB of DDR5 and 4TB of PCIe Gen 4 RAID 0/1 storage.

The P16v i hosts most of the same ports as its bigger brothers minus a dedicated ethernet port and the 16:10 display supports WQUXGA and WUXGA resolution with up to 800 nits of brightness for content creators.

At 4.85lbs the P16v i remains relatively heavy and partly due to the 90Whr battery on board with support up to 170W charging via Type-C.

ThinkStations and ThinkPads listed above will be available throughout the month of May 2023 with price adjustments listed in Lenovo’s ThinkStation page.

0x80072746 Error Code: What Is It & How to Fix It

Error 0x80072746 is an error Windows users encounter when trying to sync Windows Mail clients or loading new emails. It indicates an existing connection was closed abruptly by the remote host. However, this article will discuss why you encounter the error and how to fix it.

Also, our readers may be interested in our guide on 0x800CCC79 Windows Live Mail Error ID on the PC.

What causes the 0x80072746 error?

You can encounter We’re having a problem downloading messages. Make sure you have a connection and your account info is correct, and then try again, Error code 0x80072746 error for many reasons. Some notable ones are:

  • Using a VPN connection with Outlook or Mail app – The error can occur when the connection is bordered by a VPN or network-related devices, causing the Mail client not to download emails. Also, incompatible server machine certificates binding to HTTPS can cause it.
  • Firewall interference – Firewall services running on your computer can block the connection between the mail app and its server. For instance, BitDefender, AVG, and Windows Firewall can block the svchost.exe file, leading to Mail error code 0x80072746.
  • Machine certificate issues – If the relevant machine certificate is not installed on the VPN server, it can cause problems with its connection. Also, HTTPS binding may be faulty or improperly configured.

The above-listed factors are liable to vary on different computers. Regardless, you can fix the issue by following the solutions to be discussed as we go further into the guide.

How can I fix the 0x80072746 error code?

Before trying any advanced steps, go through the following:

  • Temporarily disable third-party antivirus software on your computer.
  • Fix network congestion or other network-related issues.
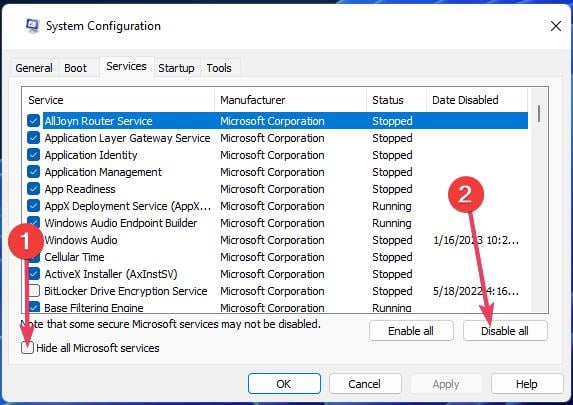
  • Perform a clean boot to disable startup apps interfering with the Email client.

Proceed with the solutions below if you can’t fix the issue with the checks above:

1. Set up your account manually

  1. Left-click the Start button, type Windows Mail in the text box, then click on it from the search bar.
  2. Click the Settings icon and tap the Manage Accounts button from the drop-down.
  3. Select the mail account generating the error, then click the Remove this account from your device link.
  4. Go to the Delete account section and click the Delete button to confirm the process.
  5. Visit the email provider’s website and copy the manual settings for IMAP. If the IMAP setting is not listed here, select POP3.
  6. Go to the Windows Mail client, click the Settings icon, and tap on the Manage Accounts button from the drop-down.
  7. Click on the Add Account button. Scroll down and select Advanced Setup.
  8. Select Internet email to add the credentials and manual settings you got from your email provider for IMAP, and Apply settings.
  9. Click the Sign In button and check if the error message persists.

The above steps will reset account settings and resolve account-related issues causing the error.

2. Allowing Svchost.exe through Windows Firewall

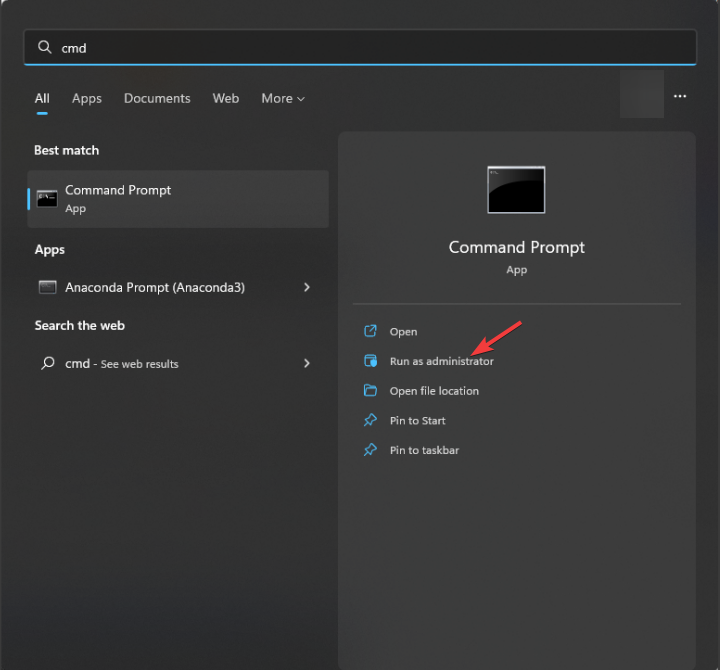
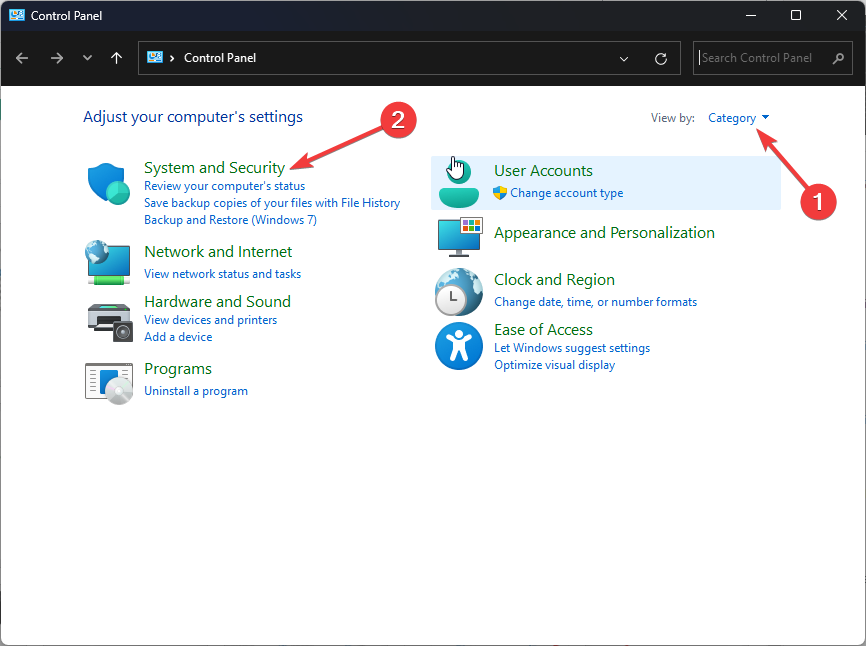
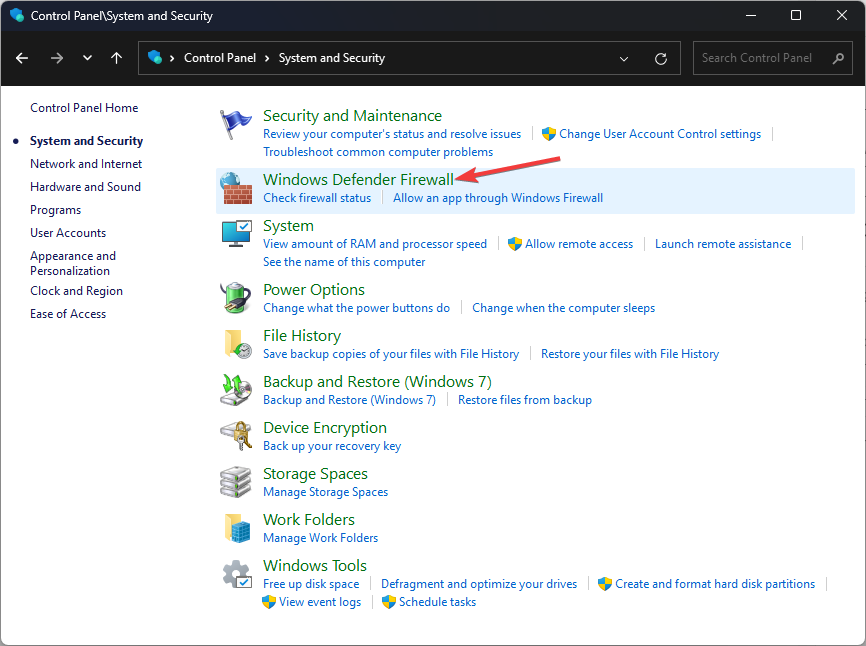
  1. Left-click the Start button, type firewall, and open Windows Defender Firewall.
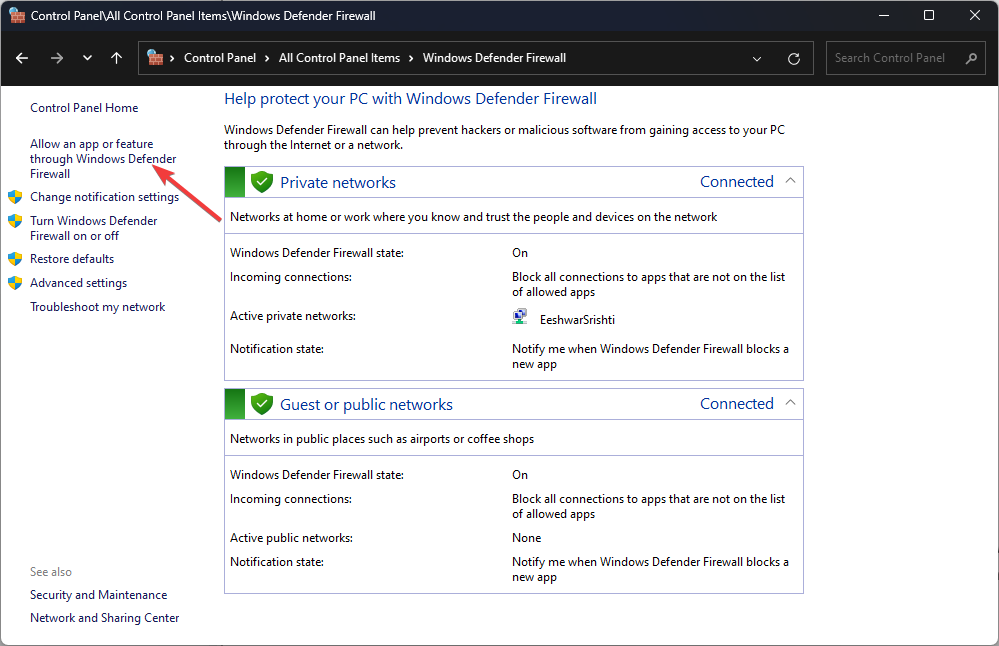
  2. Go to Allow an app or feature through Windows Defender Firewall on the left pane.
  3. Click the Change Settings button, then the Allow another app button.
  4. Tap on the Browse button.
  5. Navigate to the Windows directory and then system32, select svchost.exe from the list, then click the Add button.
  6. Click OK to save the changes and restart your PC.
  7. Go to the Mail client and check if you can access your email without errors.

Allowing Svchost.exe as an exception in Windows Firewall prevents the firewall from checking or blocking its processes.

3. Change VPN settings

  1. Press Windows + I key to launch the Settings app.
  2. Select Network & Internet and click on VPN.
  3. Ensure to toggle On the Allow VPN over metered network option.
  4. Click the Change adapter options link and select your current internet connectivity network.
  5. Right-click on your LAN (Wi-Fi) connectivity, then select Properties from the drop-down menu.
  6. Select Internet Protocol Version 6 (TCP/PV6) and tap OK to confirm the changes.

Tweaking the VPN settings will resolve the error 0x80072746 on Windows PC.

Conclusively, our readers can check our list of the best email apps for Windows 11. Also, you can read about Microsoft Account’s unusual sign-in activity spam.

If you have further questions or suggestions regarding this guide, kindly drop them in the comments section.

FIXED: 0x00000040 Operation Could Not Be Completed Printer Error

Some readers have reported a printing error message that reads Operation could not be completed (error 0x00000040), when attempting to print a document.

In this article, we solve the problem so that you can use your printers on Windows 11 seamlessly again.

How do I fix the 0x00000040 printer error in Windows 11?

First, restart your PC and reset your router. If you’re still having problems, keep reading:

1. Run the printer troubleshooter

  1. Press Windows + I to open the Settings app.
  2. On the right pane, click on Troubleshoot.
    0x00000040
  3. Select Other troubleshooters.
    0x00000040
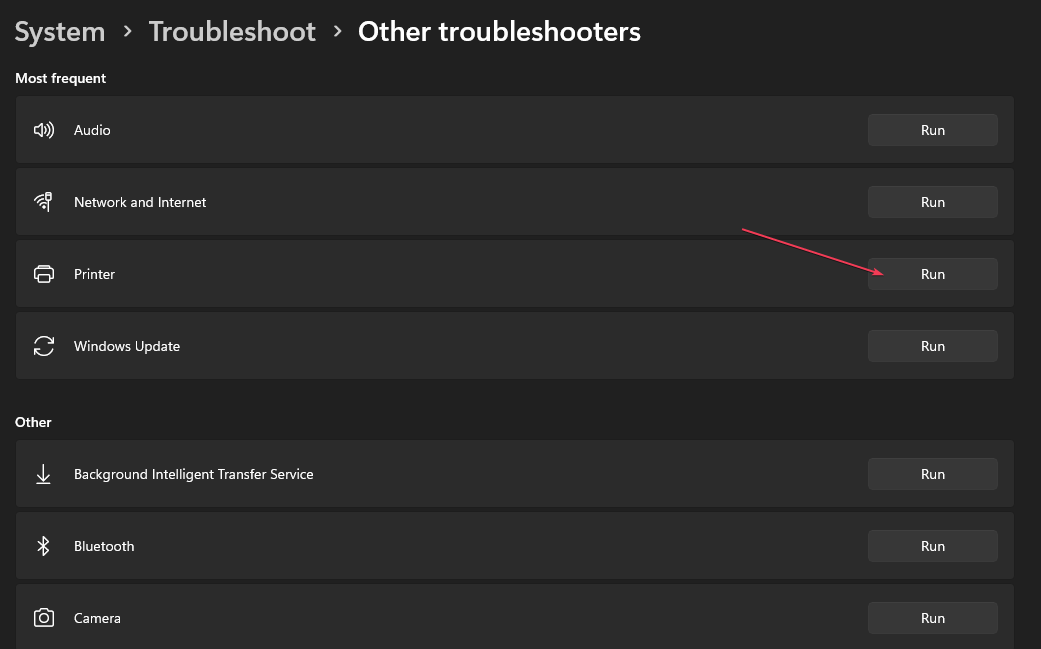
  4. Click on the Run option for Printer, then follow the prompts to complete the troubleshooting process.
    0x00000040
  5. Verify if it fixed the 0x00000040 printer error.

2. Repair corrupted files

  1. Press Windows + R, type cmd, and hit Enter.
    0x00000040
  2. Run the file checker script below, and give it a while to completely execute.
    sfc /scannow
    0x00000040
  3. In the Command Prompt, input the scripts below, hitting Enter after each one.
    DISM /Online /Cleanup-Image /CheckHealth
    DISM /Online /Cleanup-Image /ScanHealth
    DISM /Online /Cleanup-Image /RestoreHealth
    0x00000040
  4. Restart the device and confirm that the 0x00000040 printer error is resolved.

3. Update printer drivers

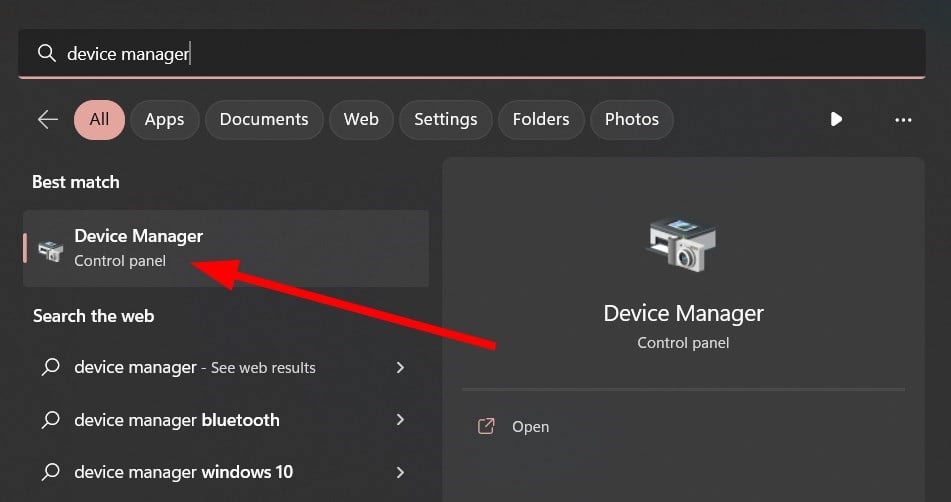
  1. Right-click on the Start menu and select Device Manager.
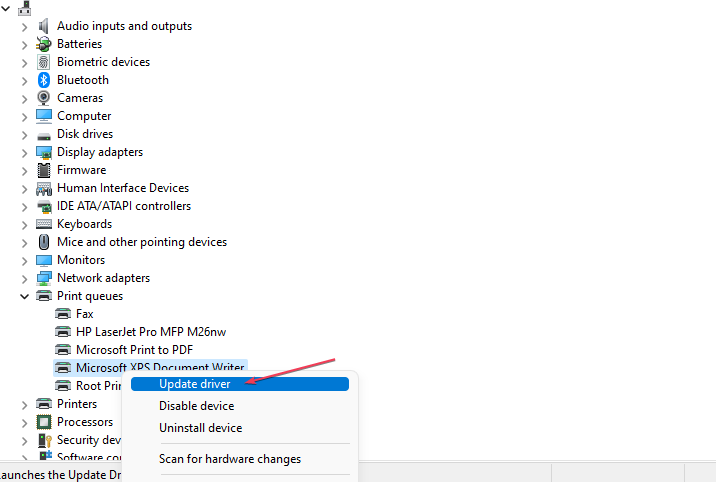
  2. Expand Print queues, right-click your printer and select Update driver.
  3. Select Search automatically for drivers.

If the manual steps to update your printer driver didn’t solve it, you could utilize another efficient solution.

Hence, one helpful suggestion is to use a driver manager that automatically updates or repairs drivers on your device.

⇒ Get Outbyte Driver Updater

4. Restart vital print services

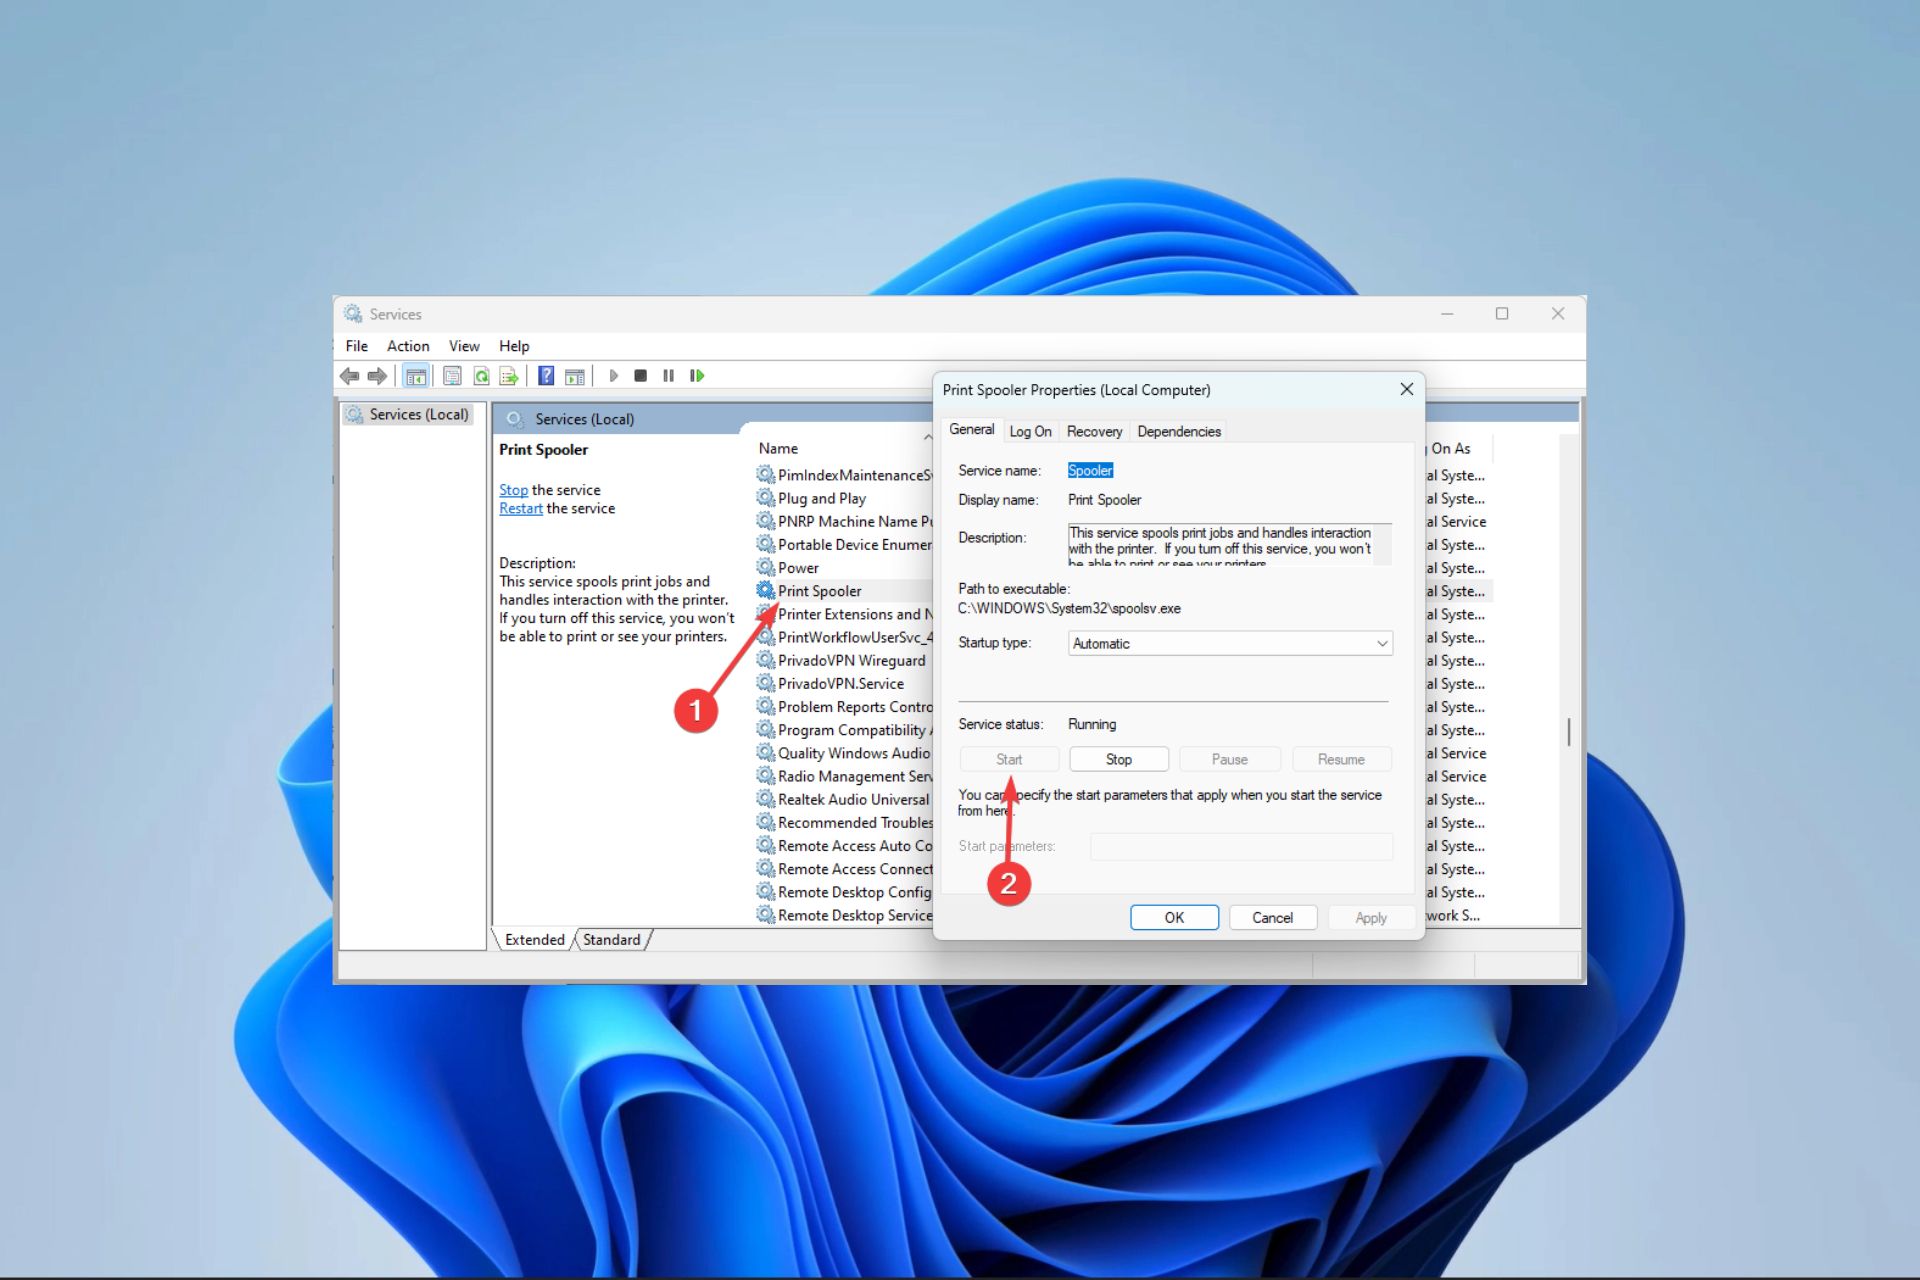
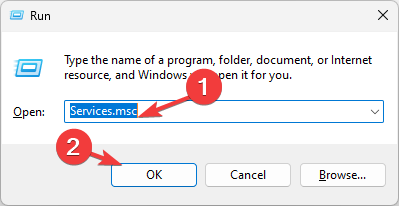
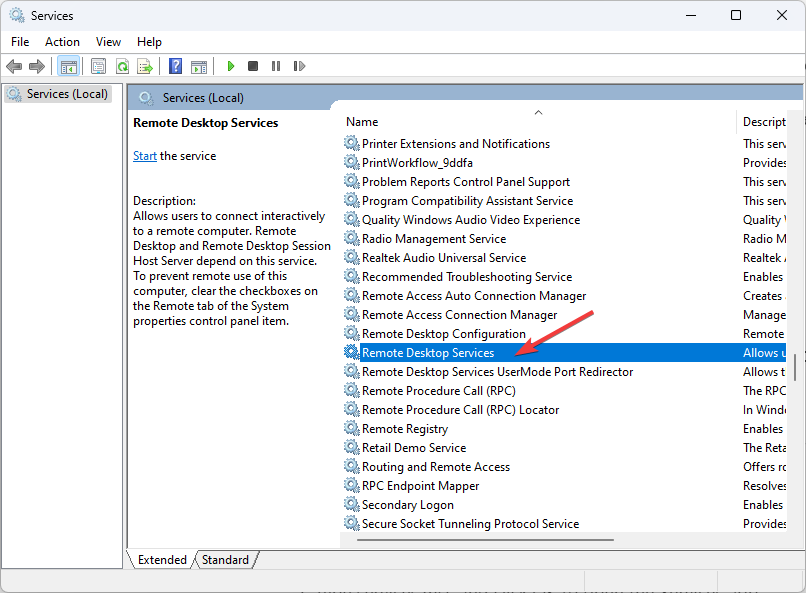
  1. Press Windows + R, type services.msc, and hit Enter.
    0x00000040
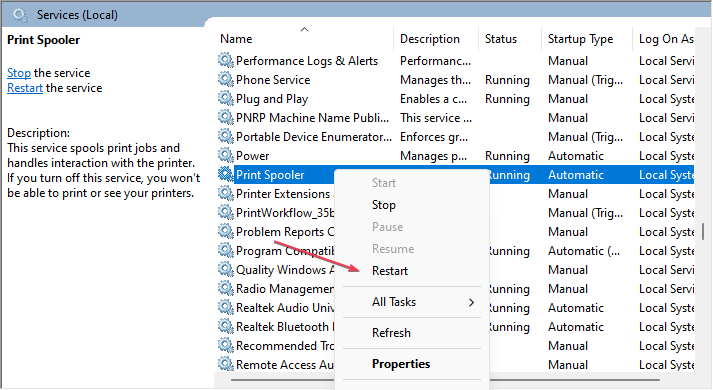
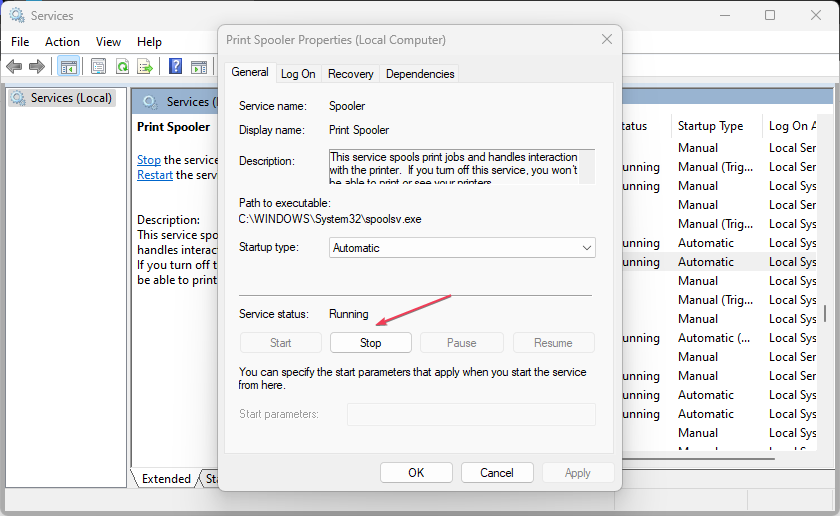
  2. Double-click on the Print Spooler service; if it is stopped, click the Start button.
  3. Also, Restart the Printer Extensions and Notifications, the PrintWorkFlowUserSvc, and the Workstation services, using the same steps above.
  4. Finally, verify the printer error has been resolved.

What causes the 0x00000040 printer error?

Any of the following factors could result in the printer error:

  • Malware infections – These malware infections will cause computer problems, such as printer error with code 0x00000040.
  • Driver issues – This error can occur if your printer drivers are corrupted, outdated, or incompatible with your system.
  • Printer spooler service-related issues – Any problems with the printer spooler service can lead to errors in managing the print queue and print jobs.
  • Hardware issues – If the printer hardware is defective due to damaged cartridges, faulty cables, or paper jams, this error code may also be caused.

How do I fix the 0x00000040 printer error in Windows 10?

All the solutions we have gone through above are also valid fixes for the older Windows 10 OS. However, you may notice slight changes in the user interface.

To open the Device Manager in Windows 10, you may rather press Windows + R, type devmgmt.msc, and hit Enter rather than follow the process in Solution 3.

The 0x00000040 printer error is pretty easy to resolve, you should choose any of the solutions and walk your way through the rest till it is fixed.

That is as much as we cover in this guide. If you have any comments or want to share what solutions worked for you, we would like to read from you in the comments section.

7 Ways to Enable or Disable Startup Apps on Windows 11

When you switch on your computer, it takes some time for Windows to boot up. This is mainly because the applications perform their tasks in the background. These applications are called startup apps.

While they make work easier, they can be disabled if they do not benefit your computer. If you have been wondering how to improve your boot time, we share which apps to disable and how to disable them.

Why should I enable/disable startup apps?

When you turn on your PC, it launches several applications automatically. Startup apps can be either good or bad for your computer. So, what are the advantages of enabling startup apps?

  • They save time since they launch automatically when your system boots up. This lets you get on with what you must do as soon as possible.
  • Startup apps also reduce potential security risks, especially if you have enabled antiviruses as startup apps to check for malware immediately after your system boots up.

Now, onto the disadvantages:

  • If you have multiple startup applications that are set to run at startup automatically, they can significantly slow down the time needed for your computer to boot up. This is because each of these applications needs to load before the operating system will continue booting up, which can affect your system’s performance. 
  • Some startup apps can lead to performance issues or even drain your battery faster than normal because they’re running continuously whether or not they need to do anything at any given moment.
  • Too many unnecessary startup apps can eat up your RAM. If your PC is low on memory, you’ll have problems operating your PC, such as freezing random crashes.
  • It can take a long time to boot your PC. The time your computer takes to boot up is directly proportional to the number of startup apps you have loaded. Therefore, the more apps you have running at startup, the longer it will take for your computer to boot up completely.

Disabling will help reduce memory usage on your computer and improve its overall speed and performance by making available more memory for other programs that need it urgently.

You can also follow a dedicated guide on how to make a program run on startup in Windows 11 when you want specific apps to launch automatically as soon as the system boots.

How do I change what programs run at startup?

1. Use the Task Manager 

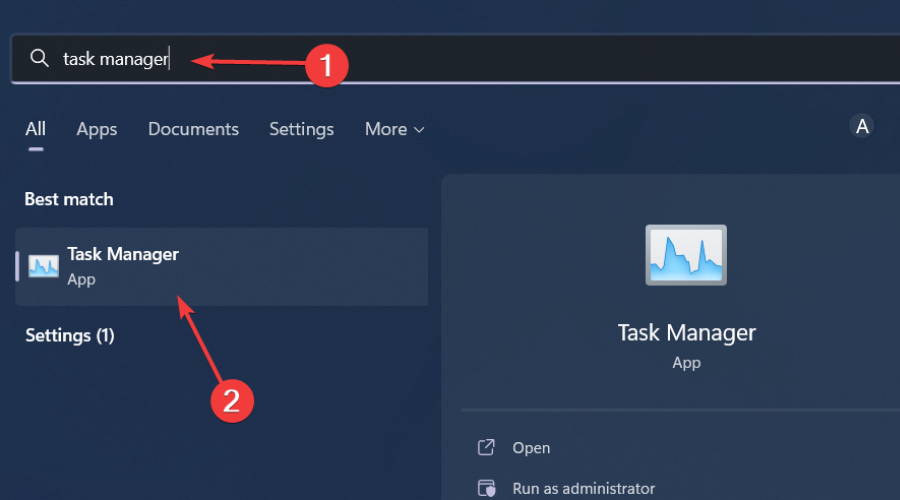
  1. Hit the Windows key, type Task Manager in the search bar, and click Open.
    task manager search
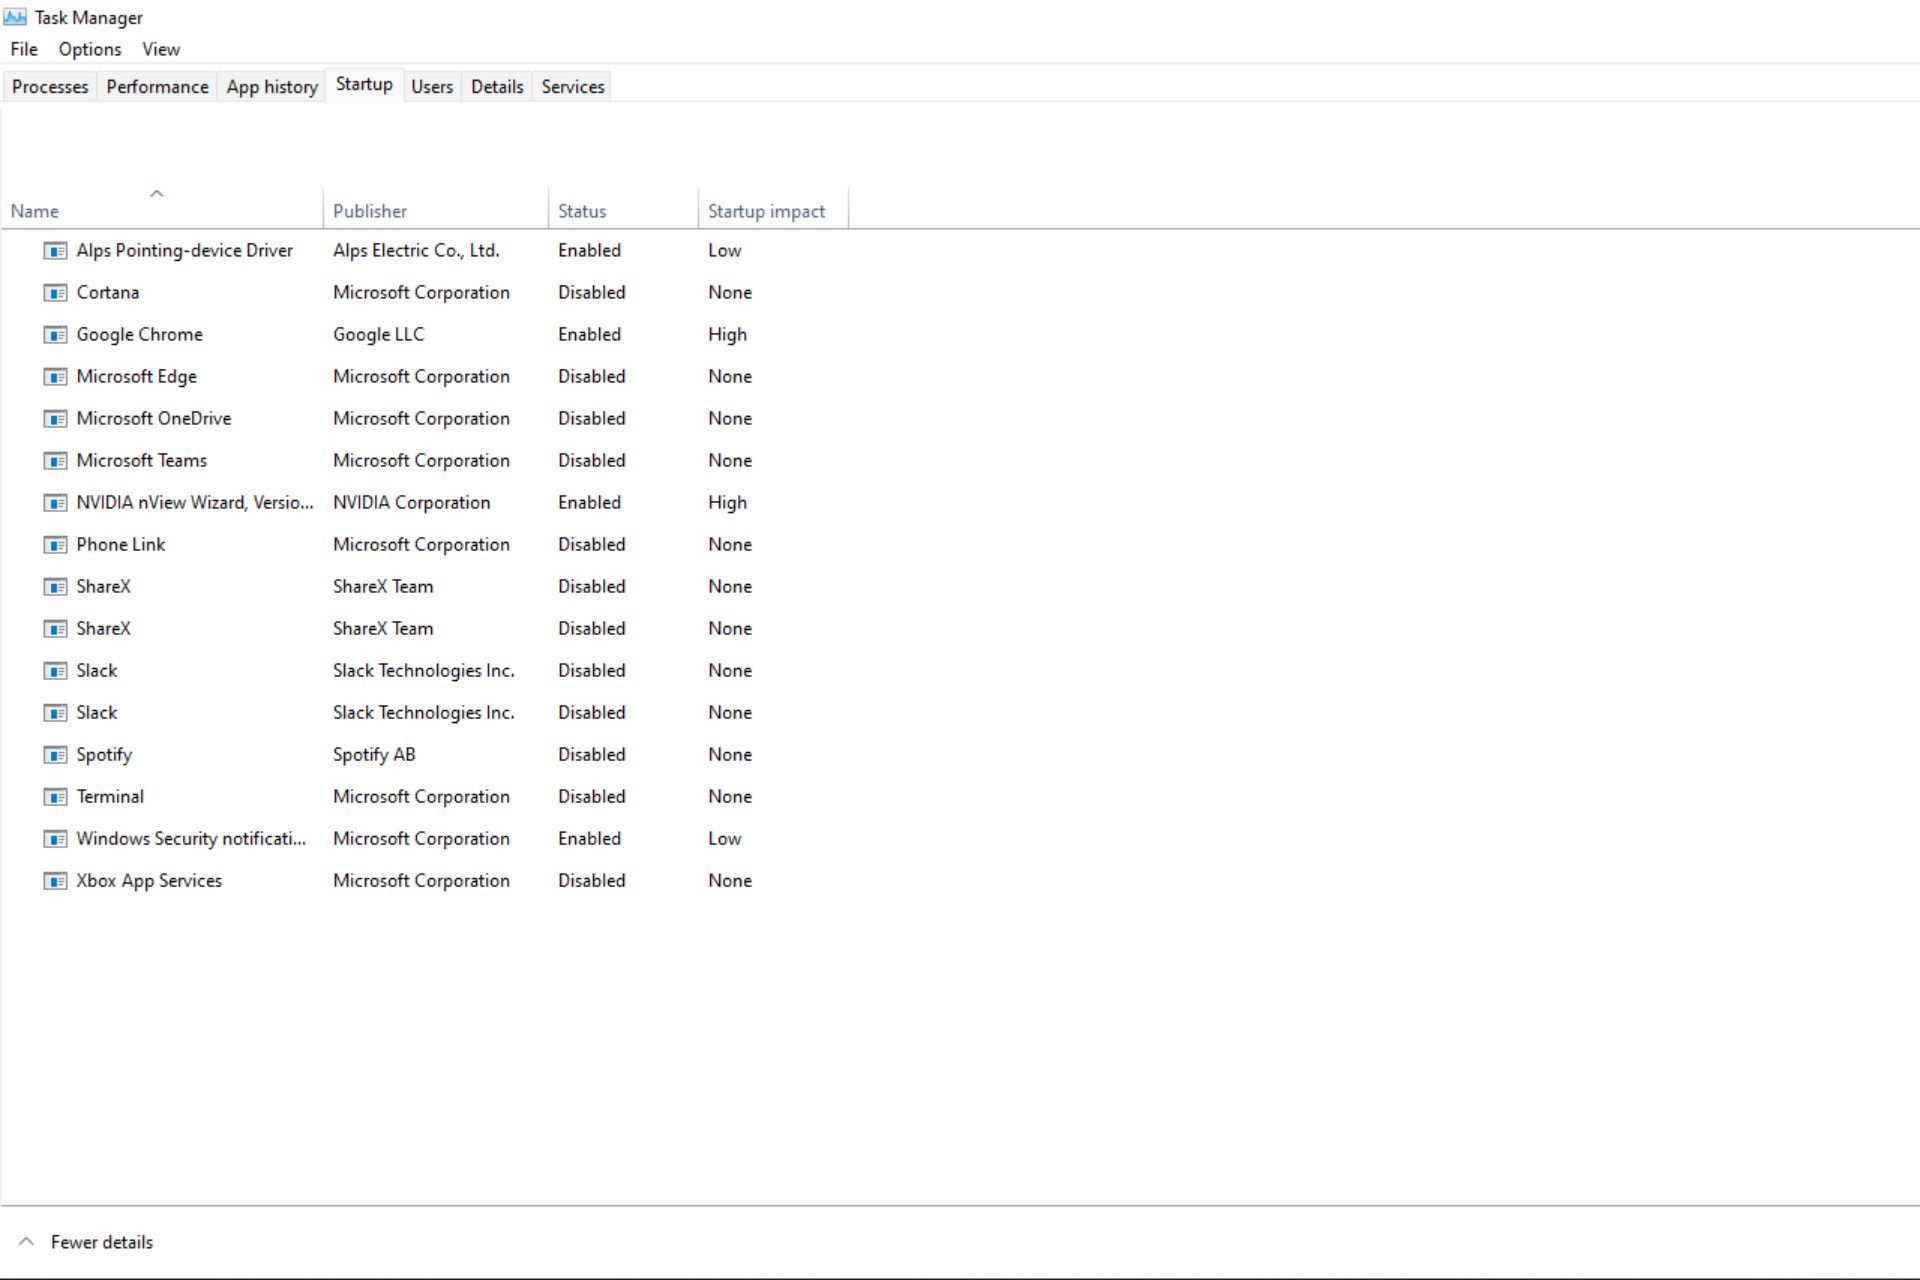
  2. Navigate to the Startup tab to view the list of startup apps.
  3. Go through the list and select each app you want to disable or enable by clicking on the options at the bottom.

2. Use Settings 

  1. Hit the Start Menu icon and click on Settings.
    settings windows 11
  2. Click on Apps on the left pane then select Startup on the right pane.
  3. A list of apps on Startup will appear. Toggle the off button to disable and the on button to enable. 

If you are unsure which apps to disable, you can sort by high impact. The difference between a high-impact and low-impact app is the amount of resources they use. 

High-impact apps are programs that require a lot of resources to run. These programs can slow down your computer if you have too many running simultaneously. 

Low-impact apps are lightweight applications that don’t take up much space on your hard drive or require much power from your computer’s CPU or RAM. 

You can, therefore, balance between the two categories and only enable the necessary apps.

3. Use app built-in settings 

  1. Hit the Windows key and click on Settings.
    settings windows 11
  2. Click on Apps on the left pane then select Apps & features.
  3. Examine the list and find the apps you want to disable on Startup.
  4. Click on the three ellipses of the select app and click on Advanced options.
  5. Under Runs at log-in option, toggle the Off button to disable and back on to enable.

If you want to remove the app from your computer completely, we have a great guide to remove apps using PowerShell to get the work done using a single command.

4. Use a third-party app

Although Windows offers a handful of options to change startup programs in Windows 11, you may have noticed that these steps are somehow cumbersome and can take a significant amount of time, especially if you have a lot of programs.

You don’t have to go through this excruciatingly painful process when installing a third-party tool. Startup managers are incredibly helpful in managing your startup apps, so you should consider installing one.

CCleaner is our recommended fighter, and this is how to go about it.

  1. Download and launch the CCleaner app.
  2. Click on the Tools option, then select Startup.
  3. Navigate to the Windows tab and select the app you want to enable or disable by clicking the options on your right.

5. Use the Startup folder 

  1. Hit the Windows + R keys to open the Run command.
  2. Type in shell:startup in the dialog box and hit Enter to open the Startup folder.
  3. Select the app you want to disable then click on the trash icon to delete. To enable, restore this folder from the Recycle bin.
  4. If you want to add a new startup program, find the executable file and drop it in the startup folder.

Should you find out that your Startup folder is not working, we have an excellent article on how to bypass this issue. 

6. Use System Configuration 

  1. Hit the Search icon on the taskbar, type msconfig, and click Open.
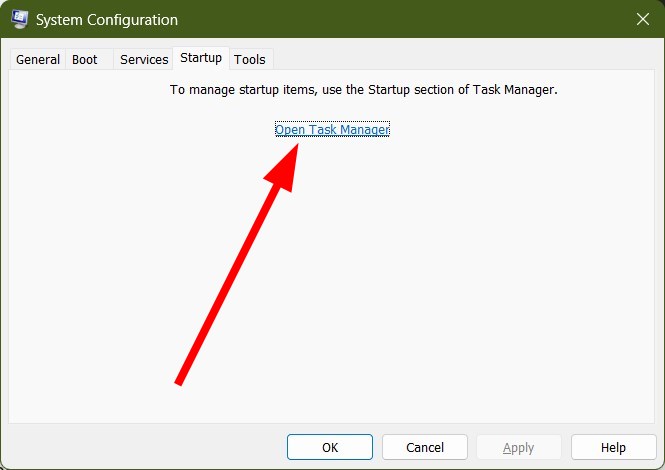
  2. Navigate to the Services tab and click Open Task Manager to view all the startup programs.
  3. Go through the list click and disable all the apps you want to disable, then check those you want to enable.
  4. Restart your PC for the changes to take effect.

7. Use the Registry Editor

  1. Hit the Windows + R keys to open the Run command.
  2. Type regedit in the dialog box and hit Enter to open the Registry Editor.
  3. Navigate to the following location: Computer\HKEY_LOCAL_MACHINE\SOFTWARE\Microsoft\Windows\CurrentVersion\Run
  4. A list of startup apps will appear on the right.
  5. Right-click on those you want to disable then select Delete to remove startup programs from Registry in Windows 11.
  6. To enable a new startup program, right-click on Run in the left pane and select New String value.
  7. In the Value name entry, set it to the name of the program you want to enable. For instance, Slack in this case.
  8. Under Value data, enter the path location of the app, then hit Enter. 
  9. Repeat these steps for all the apps you want to enable for startup.

As a disclaimer, changing any portion of the Registry can have unpredictable effects on your computer. The scary thing is that some may not even be immediately apparent.

If you aren’t comfortable making Registry changes, don’t do it. However, if necessary, create a restore point first to act as a safety net. This way, should anything happen, you can revert to an earlier time when your PC was functioning correctly.

You can also look at ways to optimize your startup to minimize the excessive use of resources. Also, check out how to disable startup apps in Windows 10. 

And that’s how to change startup programs in Windows 11. Let us know of any additional thoughts you may have on this topic down below.

How to Fix 0x000000FE BSoD Error in 6 Steps

0x000000FE is an error code that appears when your PC comes from sleep or hibernation mode. If your computer freezes or reboots after coming out of sleep mode, it’s likely due to bad memory on the motherboard or an incompatible driver running in the background.
When you experience this error, your computer automatically restarts itself and displays a blue screen with information about what caused the problem. Sometimes, it may resolve itself, but other times, you need to troubleshoot. 

This article is for when you need to troubleshoot it.

What is the bugcheck 0x000000FE? 

You may get a 0x000000FE error if your computer wakes up after going into sleep mode or hibernation mode and then attempts to load Windows again. 

This happens because some drivers aren’t properly loaded when waking up from sleep mode, causing them not being able to function correctly. Other causes include:

  • Incorrect/failed uninstallation – If you have recently removed a program from your computer, and are now receiving this error message, then it’s likely that the uninstallation process did not complete successfully. 
  • Unexpected shutdown – The error can also occur if you try to shut down your computer while it’s still trying to perform an action or while it’s loading a program. 
  • Corrupt/deleted system files –  If a system file has been corrupted or gone missing, you won’t be able to access it, and will cause errors when it’s called upon. This may result in 0x000000FE BSoD error or PC crash.
  • Failing hard drive – A failing hard drive can cause BSODs by corrupting or losing data required for operation.
  • Bad hardware component – A bad component, such as a graphics card that has failed due to age, heat damage, or other factors, can also cause the BSoD error 0x000000FE.
  • USB Suspend Settings – Some computers have a setting that automatically turns off USB devices when not in use. This can cause a bugcheck 0x000000FE error code if you are using an external device and the computer goes into sleep mode.
  • Outdated BIOS – The BIOS is responsible for initializing all hardware components and loading the operating system kernel. If any of these processes fails due to an outdated version of BIOS software, then your computer will display the bugcheck 0x000000FE error message.

How do I fix the BSoD error 0x000000FE? 

We recommend you try the following basic checks before proceeding to the more complex solutions:

For the below steps, ensure to start your PC in Safe Mode.

1. Run the DISM and SFC scans

  1. Click on the Start Menu icon, type cmd in the search bar, and click Run as administrator.cmd-run-admin-w11 unexpected kernel mode trap windows 11
  2. Type the following commands and press Enter after each one: DISM.exe /Online /Cleanup-Image /Restorehealth sfc /scannow
  3. Restart your PC.

This Windows process can be useful, yet it may not be suitable for the average user. If you need an easier and more effective system repair software.

2. Perform a disk check

  1. Click on the Start Menu icon key, type cmd in the search bar, and click Run as administrator.cmd-run-admin-w11 unexpected kernel mode trap windows 11
  2. Type the following command, replace the C letter with your drive’s letter, and press Enter: chkdsk C: /f

3. Scan for viruses

  1. Click on the Search icon, type Windows Security, and click Open.
  2. Select Virus & threat protection.
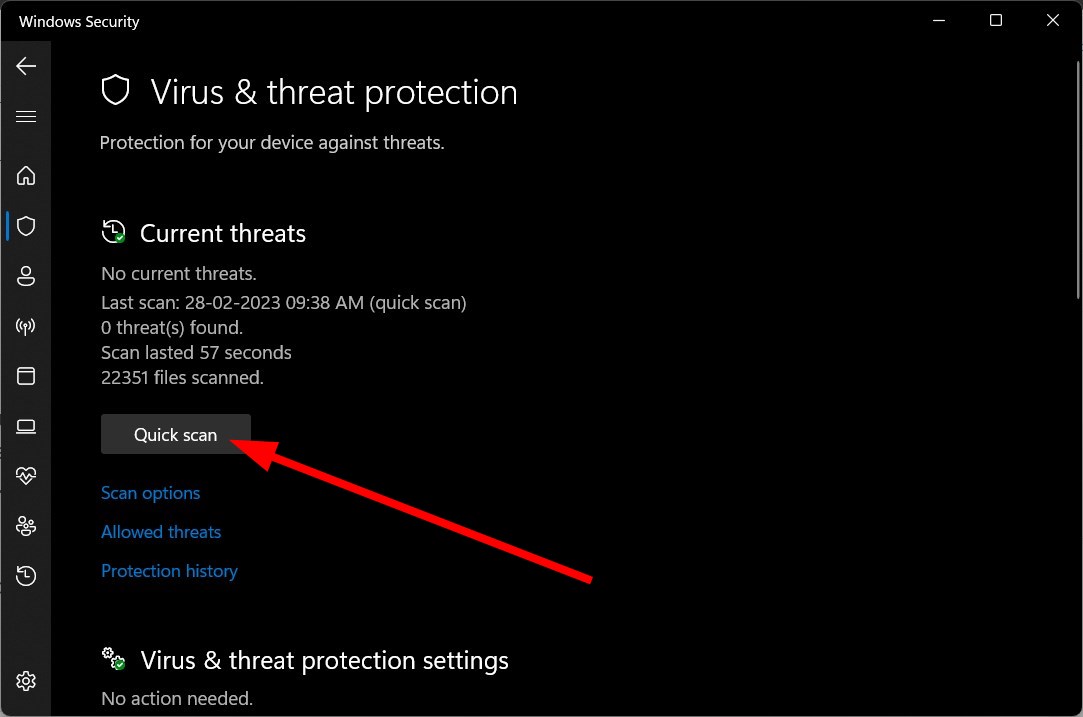
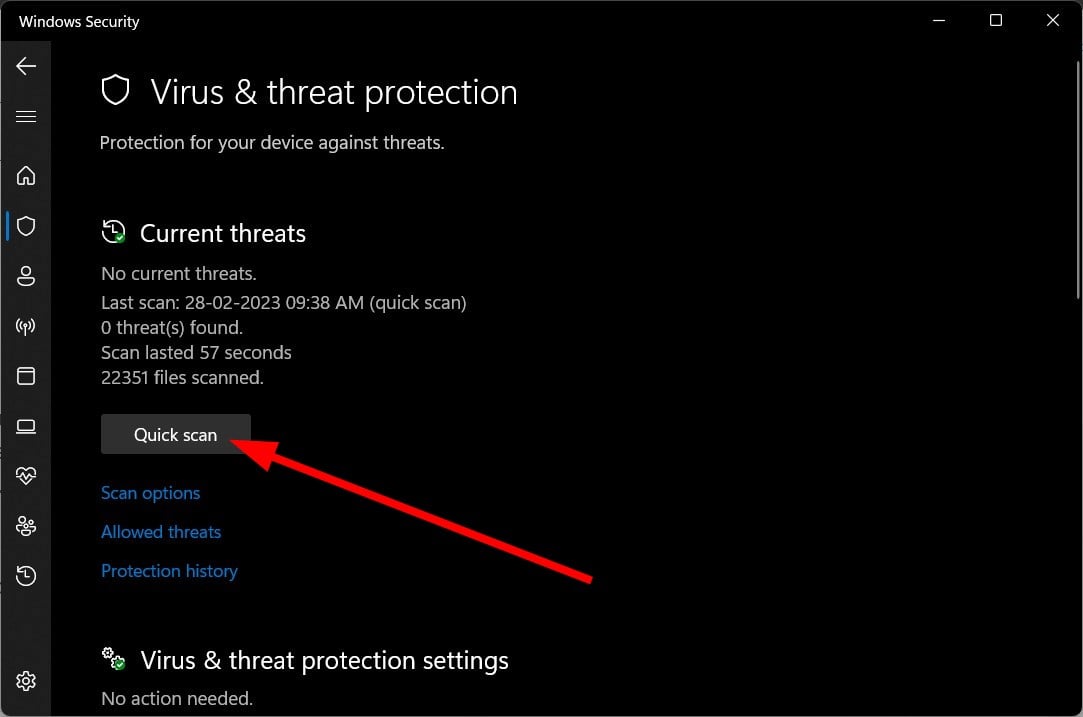
  3. Next, press Quick scan under Current threats.
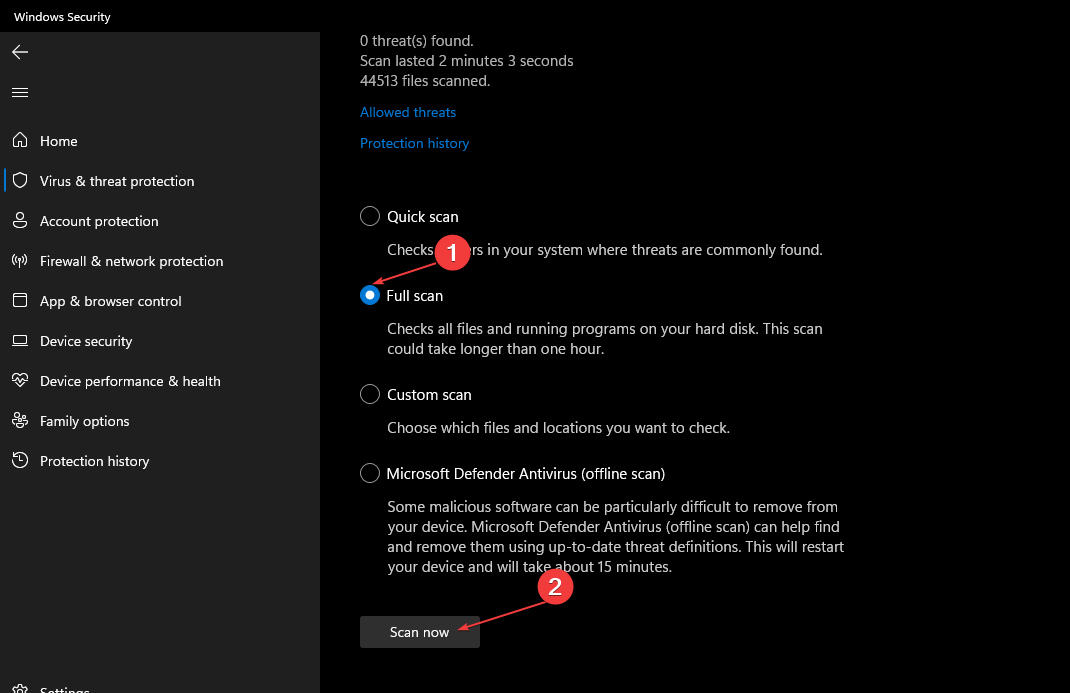
  4. If you don’t find any threats, proceed to perform a full scan by clicking on Scan options just below Quick scan.Scan options
  5. Click on Full scan then Scan now to perform a deep scan of your PC.Full Scan Scan Now
  6. Wait for the process to finish and restart your system. 

4. Update display drivers 

  1. Click the Windows button, type Device Manager in the search bar, and click Open.device manager w11
  2. Navigate to Display adapters to expand, right-click on your graphics card and select Update driver.Graphic Driver Update
  3. Select Search automatically for drivers.

Consequently, a third-party driver updater utility can also do the job in one click. Outbyte can scan your system for any missing or outdated drivers and replace them with the correct ones from its official driver database.

5. Check for Windows updates

  1. Hit the Windows key and click on Settings.settings windows 11
  2. Select Windows Update and click on Check for updates.check-updates-w11 windows 11 blue screen
  3. Download and install if available.

6. Disable USB selective suspend settings

  1. Hit the Windows key, type Edit power plan in the search box, and click Open.
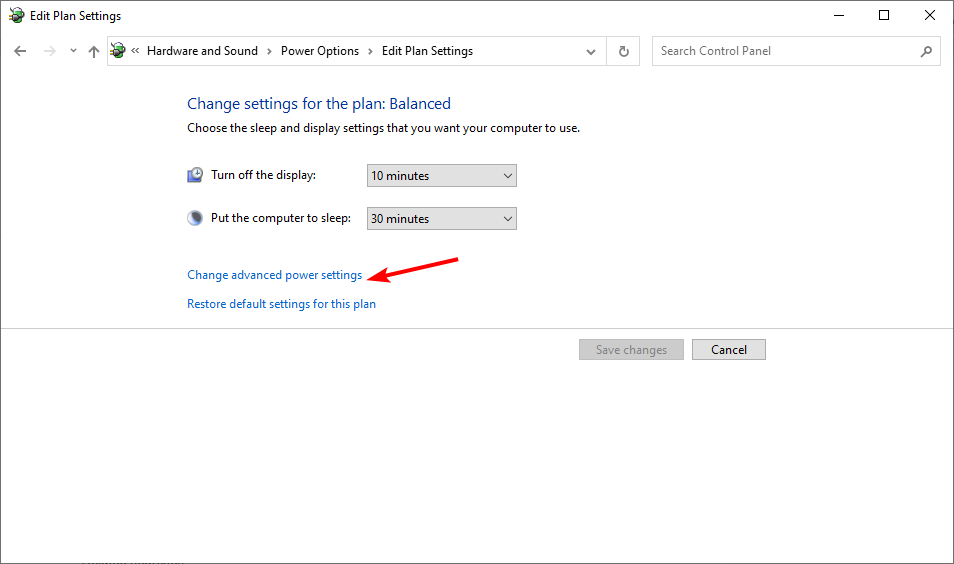
  2. Click on Change advanced power settings.windows-11-not-recognizing-usb
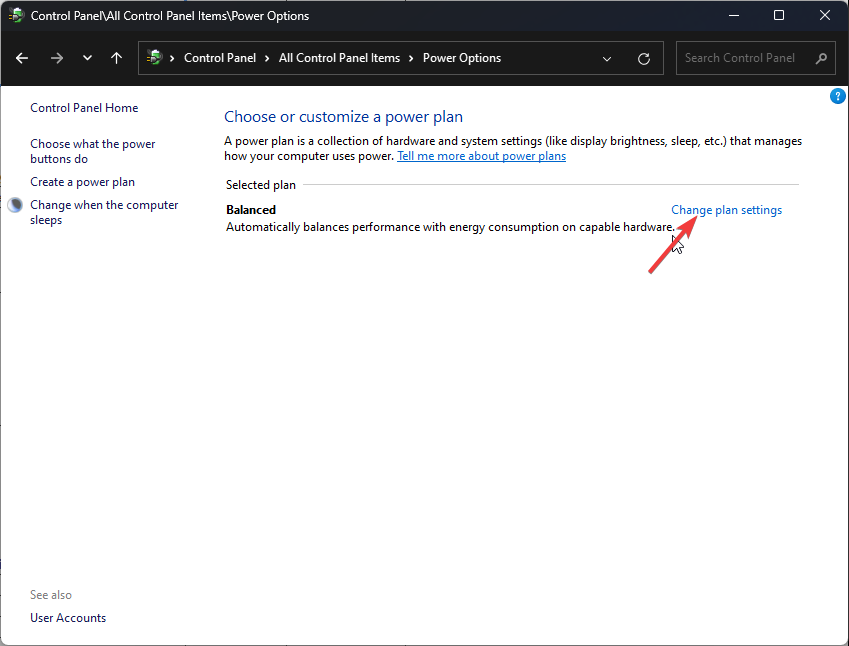
  3. Select Change plan settings.Change plan settings
  4. In the Power Options dialog box that opens, click on USB settings to expand.
  5. Click on USB selective suspend setting and in the drop-down menu, select Disabled.

The USB selective suspend setting is a feature in Windows that allows your computer to enter a low-power state by suspending USB ports that are not in use. 

This means that your computer will not require as much power to run, and thus your battery will last longer. However, if you encounter USB-related BSoD errors, it is best to disable it.

If none of these methods solve the 0x000000FE error, it may be time to perform a System Restore or clean install on your PC. 

Alternatively, BSoD fixers can save the day as these automatic tools can scan your system and fix any BSoD errors effortlessly.

Leave a comment below if we have missed any solution that was instrumental in helping you fix this error.

Hswultpep.sys BSoD Error: 5 Ways to Fix It

If you are a Windows user, you may encounter various issues while using your PC. One such common problem is hswultpep.sys BSoD error can be caused by faulty or outdated driver-related Intel Wireless Bluetooth software.

What causes the hswultpep.sys BSoD error on Windows?

There could be various reasons for this blue screen error; some of the common ones are mentioned here:

  • Faulty or outdated driver – If the hswultpep.sys driver becomes corrupted or obsolete; it can cause instability & result in a blue screen error. Try updating the drivers to fix the problem.
  • Drivers or software interference – The hswultpep.sys driver can conflict with other drivers or software installed on the computer, resulting in the BSoD error.
  • Malware infections – Malware or viruses can corrupt system files, which could cause this issue. You can run SFC scan to repair system files.
  • Hardware issues – If there are the hardware issues, including a faulty Wi-Fi or Bluetooth adapter, they could cause the BSoD error.

Now that you know the causes of the issue, let us check out the solutions to fix the problem.

How can I fix the hswultpep.sys BSoD error on Windows?

Before engaging in advanced troubleshooting steps, you should consider performing the following checks:

  • Try restarting your computer.
  • Run a malware scan using an antivirus tool.
  • Make sure there are no pending Windows updates.
  • Uninstall the recently installed apps.

If these minor tweaks don’t work for you, move to the detailed solutions.

1. Run the computer in Safe mode

1.1 If you can access the Settings app

  1. Press Windows + I to open the Settings app.
  2. Go to System, then click Recovery.System - Recovery Windows 11 Hswultpep.sys bsod
  3. Under Recovery options, click Advanced startup and then Restart now.Advanced Startup
  4. On the Choose an option screen, click Troubleshoot.Choose an option - Troubleshoot Hswultpep.sys bsod
  5. Select Advanced options.Advanced options
  6. On the Advanced options page, select Startup Settings.Startup Settings Hswultpep.sys bsod
  7. Press the key relevant to select Enable Safe Mode with Networking and click Restart.Enable safe mode with networking

1.2 If your computer doesn’t boot up

  1. Press and hold the Power button on your machine for a few seconds to turn it off.
  2. Press the Power button again to boot it.
  3. As you see the manufacturer’s logo, press the Power button for 10 seconds again to enter Windows Recovery Environment.
  4. On the Choose an option page, click Troubleshoot.Choose an option - Troubleshoot
  5. Select Advanced options.Advanced options
  6. Choose Startup Settings.Startup Settings Hswultpep.sys bsod
  7. Press the key relevant to select Enable Safe Mode with Networking and click Restart.Enable safe mode with networking Hswultpep.sys bsod

Once you are in Safe mode, follow the steps mentioned below.

2 Update or rollback the driver

2.1 Update the driver

  1. Press Windows + R to open the Run dialog box.Device Manager Run command Hswultpep.sys bsod
  2. Type devmgmt.msc and click OK to open Device Manager.
  3. Locate and expand the Network adapters (assuming the Bluetooth driver is causing the problem).
  4. Now right-click the Wi-Fi driver and select Update driver.Update driver Hswultpep.sys bsod
  5. Click Search automatically for drivers.Update driver 2
  6. Follow the onscreen instructions to complete the process.
  7. If this doesn’t work for you, right-click the Wi-Fi driver and choose Properties.Wi-Fi properties Hswultpep.sys bsod
  8. Go to the Driver tab, and select the Roll Back Driver button.Roll Back Driver update
  9. Select the reason for the rollback and click Yes to continue.Rollback Hswultpep.sys bsod

Windows will automatically roll back to the last version of the driver.

In addition, you have an alternative way to update old drivers from your PC efficiently. More exactly, we suggest you utilize tailored software for repairing or updating drivers entirely automatically.

3. Run DISM & SFC scans

  1. Press the Windows key, type cmd, and click Run as administrator.CMD elevated Hswultpep.sys bsod
  2. Copy & paste the following command to repair the Windows OS image and hit Enter: Dism /Online /Cleanup-Image /RestoreHealthRestore health Hswultpep.sys bsod
  3. Wait for the scan to complete, then type the following command to repair the system files and press Enter: sfc/scannowSFCSCANNOW CMD
  4. Windows will take time to scan and replace the corrupt files, then reboot your computer to let the changes take effect.

4. Uninstall the recent Windows update

  1. Press the Windows + R to open the Run box.Appwiz.cpl Hswultpep.sys BSoD
  2. Type appwiz.cpl and click OK to open Programs & Features.
  3. Click View installed updates.View installed updates
  4. Locate the update and click Uninstall.Uninstall Windows update
  5. Follow the onscreen instructions to complete.

5. Restore your system to a previous point in time

  1. Press the Windows key, type control panel, and click Open.Control Panel start menu Hswultpep.sys BSoD
  2. Select Large icons as View by and click Recovery.Recovery Control Panel
  3. Click on Open System Restore.Open system restore
  4. On the System Restore window, select Choose a different restore point and click Next.Next Choose a different restore point
  5. Select a restore point and click Next.Choose a point Hswultpep.sys bsod
  6. Now select Finish.Finish Hswultpep.sys bsod

Windows will restart, and your computer will be restored to the selected point in a few minutes. If the System Restore didn’t successfully complete, we advise you to check out this informative guide for solutions.

If nothing worked for you, you can perform a clean installation to fix the problem. So, these are methods that you can follow to fix the hswultpep.sys BSoD error on Windows.

If you have any questions or suggestions, feel free to mention them in the comments section below.

VirtWiFi Has No Internet Access: 6 Ways to Fix This Error

With Windows 11, you can run Android apps on your computer and all this is done using the Windows Subsystem for Android. However, many of our readers are facing the VirtWiFi Has No Internet Access error that prevents Amazon App Store from accessing the internet on the Windows 11 PC.

What is VirtWiFi and why doesn’t it have internet access?

VirtWiFi lets your network switch your wireless card across different networks by exposing all the virtual networks. If your PC is connected to the internet using an ethernet cable, you can make use of VirtWiFi to connect.

There can be multiple reasons that could trigger the VirtWiFi Has No Internet Access error:

Now that we know what we’re dealing with, let’s fix the problem with the solutions below.

How can I fix the VirtWiFi Has No Internet Access error?

1. Run the Network Adapter troubleshooter

  1. Press the Win + I keys to open the Settings menu.
  2. Click on Troubleshooter.
  3. Select Other troubleshooters.
  4. Hit the Run button next to the Network Adapter option.
  5. Select the adapter type from the list and hit Next.
  6. Wait for the process to complete.
  7. Restart your PC.

2. Update your network adapter driver

  1. Open the Start menu by pressing the Win key.
  2. Open Device Manager.
  3. Expand the Network adapters section.
  4. Double-click on your network driver.
  5. Switch to the Driver tab.
  6. Click on the Update driver button.
  7. Select Search automatically for drivers option.
  8. Install the latest update in case available.
  9. Restart your PC.

If your network driver is outdated, you should install the latest version as it will fix various bugs that were presented with the previous version.

In any case, it’s most likely to update any of your PC drivers with the latest official version using dedicated driver update software.

You only have to launch on the desktop to initiate the scan, thus select all the drivers that need updating and update them in bulk.

⇒ Get Outbyte Driver Updater

3. Flush the DNS and reset the IP

  1. Open the Start menu by pressing the Win key.
  2. Run Command Prompt as an administrator.
  3. Type the below command and press Enter. ipconfig/flushdns
  4. Execute the below command one by one and press Enter after each command: nbtstat –r netsh winsock reset netsh int ip reset
  5. Close Command Prompt and restart your PC.

Running the above commands will clear the DNS cache that might be causing trouble with your network and hopefully fix the VirtWiFi Has No Internet Access error.

4. Fix the corrupt system files

  1. Press the Win key to open the Start menu.
  2. Open Command Prompt as an admin.
  3. Type the below command and press Enter: sfc /scannow
  4. Wait for System File Checker to fix the corrupt system files.
  5. Type the below commands and press Enter after each one: DISM.exe /Online /Cleanup-image /Scanhealth DISM.exe /Online /Cleanup-image /Restorehealth DISM.exe /online /cleanup-image /startcomponentcleanup
  6. Restart your PC and see if the issue persists.

5. Enable Windows HyperVision Platform

  1. Open the Start menu by pressing the Win key.
  2. Open Turn Windows features on or off option.
  3. Locate and check the Windows HyperVision Platform box, then hit OK.
  4. Restart your PC and see if the error persists.

6. Change the DNS address

  1. Press the Win + R keys to open the Run dialogue.
  2. Type ncpa.cpl and press OK.
  3. Double-click on your network adapter.
  4. Click on Internet Protocol Version 4(TCP/IPv4) and tap on Properties.
  5. Click on Use the following DNS server addresses radio button.
  6. Enter the below values to use the Google DNS:
    • Preferred DNS server: 8.8.8.8
    • Alternate DNS server: 8.8.4.4
  7. Check the box for Validate settings upon exit and click OK.
  8. Restart your PC.

When you modify the DNS address, it will configure a new VirtWiFi network connection and will fix the issue.

That is it from us in this guide. Users coming across the Windows could not find a driver for your network adapter error, we would suggest you check out our guide that will help resolve the problem at your end.

Some users have also reported coming across the checking network requirements error. You can easily fix it by following the solutions in our guide.

Feel free to let us know in the comments below, which one of the above solutions resolved the VirtWiFi Has No Internet Access error.

Remote Desktop Can’t Find The Computer? Fix It in 8 Steps

Remote Desktop is a powerful tool that enables you to access a computer from a remote location. However, sometimes you may encounter an error message stating that Remote Desktop can’t find the computer, which can be frustrating.

Why can’t Remote Desktop find the computer?

There could be various reasons why you are not able to connect to your computer remotely; some of the common ones are mentioned below:

  • No Entry in the Hosts File – This error may occur if the system hosts’ files have no entry to your RDP server. Try adding it manually to fix the issue.
  • Network connectivity issues – The weak internet connection could be why you cannot establish a connection with a remote PC. Try troubleshooting your network.
  • DNS is not configured – If the DNS is not configured for the system, you might see this error. Configure DNS and try to access the remote device.
  • Remote Desktop Connections Credentials cache – The credentials cache of RDP connections could also be the reason for the issue. Clear them to fix the problem.

Now that you know the reasons for the issue, let us move to the solutions.

How do I fix the Remote Desktop can’t find the computer error?

Before engaging in advanced troubleshooting steps, you should consider performing the following checks:

  • Try restarting your computer and the router.
  • Ensure no Windows update is pending.
  • Check internet connectivity.
  • Verify the host computer name.

If none of the above fixes worked for you, jump right into the detailed solutions to eliminate the error.

1. Allow the remote connections to the computer

  1. Press Windows + R to open the Run dialog box.sysdm.cpl Remote Desktop Can't Find the Computer
  2. Type sysdm.cpl and click OK to open System Properties.
  3. Go to the Remote tab, under Remote Assistance, and select Allow Remote Assistance connections to this computer.SystemPropertiesComputerName_Remote Desktop Can't Find the Computer
  4. Click Apply and OK.

2. Verify that Remote access is enabled

  1. Press Windows + I to open the Settings app.
  2. Go to System, then click Remote Desktop. System - Remote Desktop - Remote Desktop Can't Find the Computer
  3. Locate Remote Desktop and toggle on the switch to enable it.Remote access on
  4. Click Confirm to save the changes.Confirm Remote access on

Now check if you can access the remote computer.

3. Flush the DNS

  1. Press the Windows key, type cmd, and click Run as administrator.CMD elevated Press the Windows key, type cmd, and click Run as administrator. Copy and paste the following command to flush DNS and hit Enter: ipconfig/flushdns Close the Command Prompt and restart your computer.
  2. Copy and paste the following command to flush DNS and hit Enter: ipconfig/flushdnsIpconfig DNS  Remote Desktop Can't Find the Computer
  3. Close the Command Prompt and restart your computer.

4. Delete the RDP connections history

  1. Press Windows + R to open the Run dialog box.Regedit run command Remote Desktop Can't Find the Computer
  2. Type regedit and click OK to open the Registry Editor.
  3. Navigate to this path: Computer\HKEY_CURRENT_USER\Software\Microsoft\Terminal Server Client\Default
  4. Select MRU0, right-click it, and select Delete to remove all the entries.MRU0 Remote Desktop Can't Find the Computer
  5. Close Registry Editor and reboot your PC.

5. Add Hostname to the Host file

  1. Press the Windows key, type cmd, and click Run as administrator.CMD elevated Remote Desktop Can't Find the Computer
  2. Copy & paste the following command to open the hosts’ file in a notepad, and hit Enter: Notepad C:\Windows\System32\drivers\etc\hostsAdd host Remote Desktop Can't Find the Computer
  3. You will have to add a string in the following format: 127.0.0.1    [hostname of the server]Notepad_Remote Desktop Can't Find the Computer
  4. Press Ctrl + S to save the changes. Close Notepad, and then Command Prompt.

6. Allow Remote connection through the firewall

  1. Press the Windows key, type control panel, and click Open.CMD elevated Remote Desktop Can't Find the Computer
  2. Select View by as Category and click System & Security. System and security
  3. Click Windows Defender Firewall.Windows Defender Remote Desktop Can't Find the Computer
  4. Now click Allow an app or feature through Windows Defender Firewall.Allow an app
  5. Click Change settings.Change settings
  6. Locate Remote Assistance and Remote Desktop, select them, and make sure the Private & Public option for both is selected.Remote assistance and Remote desktop select
  7. Click OK to close the window.

7. Change the Port number

  1. Press Windows + R to open the Run window.Regedit Windows
  2. Type regedit and click OK to open the Registry Editor.
  3. Navigate to this path: Computer\HKEY_LOCAL_MACHINE\SYSTEM\ControlSet001\Control\Terminal Server\WinStations\RDP-Tcp
  4. Locate and double-click PortNumber.regedit_change port number
  5. Change the Base to Decimal and the Value data from 3389 to 3388.
  6. Click OK and reboot your computer.

8. Enable the Remote Desktop Services

  1. Press the Windows + R to open the Run dialog box.Services Remote Desktop Can't Find the Computer
  2. Type services.msc and click OK to open the Services app.
  3. Locate and double-click Remote Desktop Services to open Properties.Remote desktop services
  4. Select Startup type as Manual and click Apply, then OK.Startup type manual
  5. Restart your PC to confirm the changes.

So, these are methods you can use to get rid of the Remote Desktop can’t find the computer error. If you have any questions or suggestions, please let us know in the comments section below.

How to Disable Password Complexity on Windows 11

Windows enforces strong password complexity requirements to enhance the user accounts’ security. However, if you want simpler passwords, you need to disable Windows password complexity requirements.

How can I disable Windows password complexity requirements?

1. Use the Group Policy Editor

  1. Press Windows + R to open the Run box.GPEDIT MSC RUN Remove Password Complexity Requirements In Windows
  2. Type gpedit.msc and click OK to open the Group Policy Editor.
  3. Navigate to this path: Computer Configuration\Windows Settings\Security Settings\Account Policies\Password Policy Password requirements Remove Password Complexity Requirements In Windows
  4. Locate and double-click the Password must meet complexity requirements option to open Properties.Disabled Password Policy password must meet complexity requirements
  5. Click on the radio button next to Disabled, click Apply, then OK to confirm the changes.
  6. Restart your computer to let the changes take effect.

2. Use the Command Prompt

  1. Press the Windows key, type cmd, and click Run as administrator.CMD elevated password must meet complexity requirements
  2. Copy & paste the following command to dump the local policy or domain policy for the system and hit Enter: secedit.exe /export /cfg C:\secconfig.cfgcmd_local security policy editor
  3. Type notepad.exe and press Enter.cmd_notepad.exe password must meet complexity requirements
  4. On Notepad, click File, then Open to open C:\secconfig.cfg
  5. Now locate Passwordcomplexity and change its value from 1 to 0.
  6. Press Ctrl + S to save the changes.
  7. Open the Command prompt with admin rights.
  8. Copy & paste the following command and press Enter: secedit.exe /configure /db %windir%\securitynew.sdb /cfg C:\secconfig.cfg /areas SECURITYPOLICYcmd_confirm & save the changes password must meet complexity requirements
  9. Reboot your computer to confirm the changes.

3. Use the Local Security Policy Editor

  1. Press Windows + R to open the Run box.Local Security Policy Editor password must meet complexity requirements
  2. Type secpol.msc and click OK to open the Local Security Policy Editor.
  3. Click Action, then select Export policy.Export policy
  4. Once you have saved the file, open it with Notepad.
  5. Go to System Access, and locate Password Complexity. Change its value from 1 to 0.
  6. You can also edit the values for MinimumPassword Age, MaximumPassword Age, & MiniumPassword length. Press Ctrl + S to save the changes.
  7. Press the Windows key, type cmd, and click Run as administrator.CMD elevated password must meet complexity requirements
  8. Type the following command and hit Enter: secedit.exe /configure /db %windir%\securitynew.sdb /cfg C:\secconfig.cfg /areas SECURITYPOLICYcmd_confirm & save the changes password must meet complexity requirements
  9. Restart your computer to confirm the changes.

You can now go to Local Security Policy Editor to confirm if the setting is disabled. If Local Security Policy Editor is missing or is grayed out, we recommend you check out the solutions in this informative guide.

So, these are methods you can follow to remove the password complexity requirements in Windows. You can also delete all saved passwords and input simpler ones if you wish.

If you have any questions or suggestions, feel free to let us know in the comments section below.

Number matching for the Microsoft Authenticator MFA is finally here

Most of us are all about staying secure while online and protecting our identity and valuables. We should all be so concerned when it comes to online exposure.

If your next question would have been Protection from whom?, then maybe you should check out the redesigned list of threats from Microsoft.

Also, before we get into the topic, remember that Windows 11 kernel will soon boot with Rust inside. Just in case you didn’t already know.

Here’s how you can stay more secure with number matching

It’s widely known that even with MFA you should be ultra-careful, as it has shown in the past that it is exploitable.

As a matter of fact, in August of 2022, Microsoft email users were falling to a new phishing attack, even with the feature on.

Fast forward a couple of weeks later, there were reports of hackers bypassing MFA and brute forcing passwords.

Not to mention that there’s also MFA fatigue or MFA spamming or push bombing attacks, which bombards the user with MFA push notifications in hopes that a user accepts the request and gives access to a threat actor by mistake.

On that note, Microsoft has decided that an extra layer of protection was necessary to fight these attempts and further secure them.

And, in order to efficiently combat such attacks, Microsoft introduced number matching as an additional step in its Microsoft Authenticator app to enhance the security provided by Multi-Factor Authentication (MFA) last year.

Starting today, May 8, 2023, the Redmond giant is enforcing number matching for all users, so that’s definitely something to be happy about.

Thus, users will need to enter the number provided into their Authenticator app when signing in, as we are about to show you below.

As Redmond said, number matching is a key security upgrade to traditional second-factor notifications in Microsoft Authenticator.

The company mentioned it will remove the admin controls and enforce the number match experience tenant-wide for all users of Microsoft Authenticator push notifications starting today.

Both we and Microsoft highly recommend enabling number matching in the near term for improved sign-in security.

As you know, relevant services will begin deploying these changes after May 8, and users will start to see a number match in approval requests.

Furthermore, as services deploy, some may see number match while others don’t. To ensure consistent behavior for all users, we also recommend you enable number match for Microsoft Authenticator push notifications in advance.

We’ve recently shared the fact that Windows 11 Build 25357 will absolutely bombard us with notifications left and right.

And, on the same note, we are soon going to inevitably see a lot more Microsoft-inspired ads in the Windows 11 Settings app.

What is your take on this situation? Be sure to leave your thoughts, ideas, and opinions in the comments section below.

0x00000021 BSoD: What is it & How to Fix it

Our readers have reported coming across 0x00000021 – QUOTA_UNDERFLOW Blue Screen of Death error. This basically puts their PCs in a restart loop. Windows 10 users are the ones that are affected because of this 0x00000021 BSoD error among other BSoD problems.

Why am I getting the 0x00000021 – QUOTA_UNDERFLOW error?

After going through various user reports and forum posts, we have listed down some of the most common reasons that could trigger the 0x00000021 QUOTA_UNDERFLOW BSoD error on your PC:

  • Outdated drivers – If your PC has outdated drivers then not only the performance won’t be optimal but you will face multiple issues.
  • Malware infections – Virus or malware can cause great damage to the system files thereby causing issues such as the 0x00000021 QUOTA_UNDERFLOW BSoD error.
  • Corrupt system files – Chances are some important system files are corrupt or are missing from your PC, which is causing the problem.
  • Hard disk errors – Hard disk malfunction or bad sectors can also give rise to multiple Blue Screen of Death errors.

Let us check out the solutions to resolve the 0x00000021 – QUOTA_UNDERFLOW error.

How can I fix the 0x00000021 – QUOTA_UNDERFLOW BSoD error?

1. Perform a Startup Repair

  1. Turn off and on your PC three times using the Power button to boot into the Advanced Startup environment.
  2. Click on Next, then select the Repair your computer option.
  3. Hit the Troubleshoot option.
  4. Click on Advanced options.
  5. Hit the Startup Repair option.
  6. Select your account, enter your password, and click Continue.

You may also use a dedicated tool and fix the BSoD or startup problem pretty easily. For that, we have listed the best boot repair tools that you can use on your Windows 10 PC.

2. Fix corrupt system files

  1. Enter the Advanced Startup environment as instructed in Solution 1.
  2. Click on Next and choose the Repair your computer option.
  3. Hit the Troubleshoot option.
  4. Click on Advanced options.
  5. Select Command Prompt.
  6. Type the below command and press Enter. sfc /scannow
  7. Wait for the process to complete.
  8. Type the below commands and press Enter after each one. DISM.exe /Online /Cleanup-image /Scanhealth DISM.exe /Online /Cleanup-image /Restorehealth DISM.exe /online /cleanup-image /startcomponentcleanup
  9. Restart your PC.

You can easily resolve the system file corruption by using the above two commands and hopefully fix the 0x00000021 – QUOTA_UNDERFLOW error.

Besides this, you can try a specialized repair tool that can fix broken system files automatically in less than 5 minutes.

3. Update the drivers

  1. Press the Win key to open the Start menu.
  2. Open Device Manager.
  3. Expand each section.
  4. Double-click on your driver.
  5. Click on the Driver tab.
  6. Select the Update driver option.
  7. Choose Search automatically for drivers option.
  8. Restart your PC.
  9. Follow the same process for every driver.

4. Scan your PC for viruses

  1. To open the Start menu, press the Win key.
  2. Open Windows Security.Windows Security open Windows key
  3. Select Virus & threat protection.
  4. Click Quick Scan.
  5. You can also click on Scan options and select Full scan for a deep scan.
  6. Restart your PC after the process is finished.

Using the Windows Security tool, you can remove the virus or malware from your PC. However, it isn’t proven to be that effective as compared to dedicated antivirus tools.

We have compiled a list of some of the best antivirus software to protect your PC from various malware and also resolve issues such as 0x00000021 – QUOTA_UNDERFLOW error.

5. Perform a System Restore

  1. Enter the Advanced Startup environment as instructed in Solution 1.
  2. Click on Next.
  3. Choose the Repair your computer option.
  4. Select the Troubleshoot option.
  5. Choose Advanced options.
  6. Choose the System Restore option.
  7. Click Next.
  8. Choose the restore point and hit the Next button.restore point
  9. Hit the Finish button.

You can perform the system restore in order to take your PC back to a state where everything was working without any issues.

That is it from us in this guide. Windows 11 users are reportedly coming across the Black Screen error, which you can easily fix by following the solutions mentioned in our guide.

Let us know in the comments, which solution fixed the problem for you.

Get ready to see a lot more ads in the Windows 11 Settings app

We’ve recently shared the fact that Windows 11 Build 25357 will absolutely bombard us with notifications left and right.

However, if you thought that was the only annoying feature to come to your new favorite OS, you might want to rethink that.

In fact, it was found that the Redmond tech giant is planning to show a lot more ads within the Settings app, in Windows 11.

Many users will surely be displeased and another wave of complaints is bound to come. We already knew that Microsoft has been looking to increase advertising for its products, so here it is.

The Settings app will soon display more ads

Let’s start by saying that an online investigation performed by Twitter user Albacore into a recent Insider build uncovered some disconcerting news.

He learned that the Settings home page will soon start to present adverts for Microsoft 365 products in the near future.

Thus, a banner asking users who aren’t subscribed to the platform to Try Microsoft 365 shows at the top of the Home tab in Settings.

As you see, below the advertisement, there is a section that will show the current storage status for a user’s OneDrive account, and then a security tips section for users to secure their account.

Know that this isn’t the only version of the Home tab that has been seen, with another version having the storage information listed first and the Microsoft 365 prompt to Sign In listed below.

As you would have expected, the final update that has been seen during this investigation into the Settings tab on this Insider build is a small prompt on the Accounts tab.

It shows information about products that are installed in the user’s system that have reached the end of support, such as Office 2013 for example.

We, you, and everybody else know that this isn’t the first time that Microsoft has been incorporating adverts into its operating system.

If we look back just a little, we can remember that Start Menu ads were being seen in the Start Menu of Windows 11 since November 2022.

The tech giant seems keen to drive more subscriptions to the 365 platforms through these adverts and its apparently intrusive approach to advertising, such as the full-screen upgrade ads presented to users in February.

Certainly, we will closely monitor this subject and see exactly when and through what update Microsoft plans to push this feature.

Leave a comment below and express your thoughts, and opinions on this matter and we’ll get back to you as soon as possible.

Microsoft Edge 113 ships to the Stable Channel

Microsoft released a new update for its browser Edge in the Stable Channel bumping it up to version 113.0.1774.35. The update ships with several feature updates as well as the usual policy updates.

Here’s everything you need to know about this update:

First up, the update brings significant enhancements to enhanced security mode. The feature is essentially designed to provide an extra layer of security for users while using the web. But this new release adds a new feature that lets users switch their security level settings between Balanced and Strict modes in a bid to enhance the browsing experience.

Next up, the new update also transitions Microsoft Autoupdate to EdgeUpdater for macOS. This change will only affect Microsoft Edge on macOS, therefore, if you use the feature to block browser updates, you’ll have to switch to the new EdgeUpdater UpdateDefault policy to maintain the same arrangement.

Additionally, the update ships with a new policy for PDF View Settings. The RestorePdfView policy in Microsoft Edge will allow users to get back to the last position they were in the PDF when it was last opened. This is regardless of whether the policy is enabled or not.

And finally, the Microsoft Root Store policy has been updated and will be supported in Microsoft Edge versions 113 and 114. However, it won’t be part of the Microsoft Edge 115 release.

Aside from these feature updates, the release also features some depreciated and new policies. We invite you to check out Microsoft’s changelog for more details.

Microsoft Edge should auto-update to the latest version, but if it doesn’t, you can trigger it manually. Just head to the browser’s menu, choose Help and Feedback then About Microsoft Edge and wait for the update to download, and then restart.

In related news, Microsoft is busy at work trying to integrate Bing into Edge further with reports indicating that Bing Chat has been incorporated into the browser’s context menu.

WFP INVALID OPERATION: How to Fix This BSoD Error

Several of our readers have reported facing coming WFP INVALID OPERATION BSoD error on their Windows 10 and Windows 11 PCs when running certain games.

In this guide, we have the solutions you need to resolve the WFP INVALID OPERATION BSoD error on your PC. Do note that the solutions in this guide are applicable to both Windows 10 and 11 OSs.

What is causing the WFP INVALID OPERATION BSoD error?

WFP in the error message WFP INVALID OPERATION means Windows Filtering Platform. It is basically a set of APIs and system services which allows your PC a base for network filtering apps.

Here are the reasons that could trigger the WFP INVALID OPERATION BSoD error on your PC:

  • Corrupt system files – Missing or corrupt system files are responsible for various petty and annoying errors on your PC, one of which is the error at hand.
  • Malware or virus infection – If your PC is infected with a virus or malware then your PC is bound to throw errors such as this BSoD.
  • Problematic update files – Often corrupt Windows update cache files cause various mishaps on your PC and throw errors such as WFP INVALID OPERATION error.
  • Problem with the game – The game file might be missing or is replaced by some conflicting apps causing the error on your PC.
  • Issue with Windows: If you haven’t updated your PC or some files have been tweaked then you will face multiple system issues on your PC.

Now that we know what we’re facing, let’s go to the actual solutions to fix the problem.

How can I fix the WFP INVALID OPERATION error?

1. Uninstall the latest Windows update

  1. Press the Win + I keys to open the Settings menu.
  2. Select Windows Update.
  3. Click on Update history.
  4. Click Uninstall updates under Related settings.
  5. Select the recently installed update and hit the Uninstall button.
  6. Restart your PC.

You might have installed the latest version of the Windows update on your PC to enjoy the new features and stability improvements, but chances are the update brought in a bunch of bugs causing the WFP INVALID OPERATION error.

Simply remove the recently installed update on your PC by following the above steps and check if this resolves the issue or not.

2. Check for software conflicts

  1. To open the Run dialogue press the Win + R keys.
  2. Type msconfig and press Enter.msconfig
  3. Click on the Services tab.
  4. Check the Hide all Microsoft services box and select Disable all.
  5. Click on the Startup tab.
  6. Click the Open Task Manager option.
  7. Right-click each item in the task manager and disable them.
  8. Close Task Manager.
  9. Switch to the Boot tab.
  10. Check the Safe Boot box.
  11. Click Apply and OK.
  12. Restart your PC.

When you boot your PC in safe boot, you are creating an environment that will help you detect apps that are conflicting with each other and causing several issues including the WFP INVALID OPERATION error.

3. Perform a virus scan

  1. Press the Win key to open the Start menu.
  2. Open Windows Security.security navagio.sys
  3. Select Virus & threat protection.
  4. Click on Quick Scan.
  5. You can select the Scan options and click on Full scan for an in-depth scan.
  6. Apply the fixes.
  7. Restart your PC.

You should scan your PC for viruses or malware regularly to make sure that it isn’t infected with it and that your private files aren’t at risk of being exposed.

Often, Windows Security won’t be that great to locate the virus or malware that is modern. In that case, we would recommend you choose among some of the best antivirus tools to keep your PC safe.

4. Fix corrupt system files

  1. Press the Win key to open the Start menu.
  2. Run Command Prompt as an administrator.
  3. Type the below command and press Enter: sfc /scannowsfc scan
  4. Let the process fix corrupt files.
  5. Type the below commands and press Enter after each one: DISM.exe /Online /Cleanup-image /Scanhealth DISM.exe /Online /Cleanup-image /Restorehealth DISM.exe /online /cleanup-image /startcomponentcleanup
  6. After the process completes, restart your PC.

Corrupt system files can cause multiple issues on your PC. So, you should also run the above two commands and fix system files and hopefully resolve the WFP INVALID OPERATION error.

That is it from us in this guide. Apart from the Blue Screen of Death error, Windows 11 users have also reported coming across the Black Screen error. You can fix it by following the solutions in our guide.

Recently, many of our readers reported facing rt640x64.sys BSoD error. You can refer to the solutions in our guide to resolve the issue.

Feel free to let us know in the comments below, which one of the above solutions fixed the problem for you.

Xbox Series X|S Seagate expansion cards get a permanent price cut

Microsoft has finally dropped the price of its proprietary Xbox Series X|S expansion cards. Manufactured by Seagate, the storage cards (which were originally priced at a hefty $219 for the 1TB option) remain the only option available at the time of this writing for playing games from a fast portable SSD solution.

And current-gen gamers on Series X|S need all the storage they can get, with many modern AAA games taking well over 100GB of storage. For example, the recent Star Wars Jedi: Survivor weighs in at just over 135GB.

The 1TB cards are still not exactly easy on the wallet at the new price of $149.99. Other size options are now priced as follows:

  • 512GB: $89.99
  • 2TB: $279.99

That 2TB expansion card is still eye-watering at nearly the cost of an Xbox Series S console (and over half the price of a Series X). The official Xbox Twitter account announced that the price cuts were permanent following a week-long “discount” period.

If you’ve held out this long, you might want to wait a bit longer as a new competitor may be about to hit the scene in the form of Western Digital. We reported on this last month; and while the supposed $179.99 price point for the Western Digital 1TB card would no longer be the more affordable choice, a new player on the scene is likely what is needed to bring these prices down to a more reasonable level.

Via Tom’s Guide. 

0x000000C1 Error Code: Unable to Install Printer [3 Fixes]

The 0x000000C1 error code occurs when installing a printer on a Windows computer. It can prevent you from using your printer and be frustrating to fix. Therefore, we will examine how to fix the 0x000000C1 error code on your PC.

Likewise, we have a detailed article on how to fix printing errors on Windows PCs.

Why do I get the 0x000000C1 error code?

Several factors can cause the 0x000000C1 error code. Some include:

  • Outdated or corrupted printer drivers – If the printer driver is outdated or corrupted, it can affect the communication between the Windows OS and printer and cause the 0x000000C1 error code.
  • Printer spooler service issues – Issues with the printer spooler service, which manages print jobs in the queue, can also cause this error code.
  • Faulty printer cables – Faulty or damaged printer cables can prevent the printer from communicating with the computer and cause this error.

The following causes differ on various computers. Hence, we will discuss ways to fix the issue.

What can I do if get unable to install printer error code 0x000000C1?

Apply the following before proceeding with advanced troubleshooting:

  • Check for Windows OS updates on your computer.
  • Restart your computer and printer.
  • Perform a Disk Clean up / Disk Defrag.

Proceed with the advanced steps below if the error persists.

1. Restart the Print Spooler service

  1. Right-click the Windows icon and select Run to open the Run dialog box. Type services.msc and press Enter to open the Windows Services.
  2. Navigate to the Print Spooler option and check its status. If the Print Spooler status displays running, right-click it and select restart.
  3. If the status doesn’t display running, right-click it and select Properties.
  4. Click the Start button in the Services Status section. Select OK and restart your device.

Restarting the print spooler can help resolve issues preventing the printer from being installed correctly. Check our comprehensive guide on fixing Local Print Spooler Service is not running on your PC.

2. Use the Windows troubleshooter

  1. Press the Windows + I key to open the Windows Settings.
  2. Click the System tab and select Troubleshooter from the left pane.
  3. Choose other troubleshooters link from the right side pane.
  4. Click on the Run button beside the Printer option.
  5. Follow the on-screen command and restart your PC.

Using the Windows inbuilt printer troubleshooter will fix issues with the printer. Read our detailed guide on the best Windows troubleshooter tools to fix issues on your computer.

3. Modify the Registry Editor and update the printer driver

3.1 Stop Printer Spooler services

  1. Press the Windows + R to open the Run dialog box, type services.msc, and press Enter to open the Windows Services.
  2. Scroll to the Print Spooler, right-click on it, and select Properties.
  3. Then, click the Stop button and select OK.
  4. Left-click the Windows icon, type File Explorer, and press Enter to open it.
  5. Navigate to the following path: C:\Windows\System32\Spool\Printers
  6. Right-click on the folder, and select Delete from the context menu.
  7. Then, navigate to the following path: C:\Windows\System32\Spool\Drivers\w32x86
  8. Right-click the w32x86 folder and select Delete from the menu.

3.2 Modify the Registry Editor

  1. Press the Windows key, type regedit, and press Enter to open the Registry Editor.
  2. Copy and paste the following path into the Registry Editor address bar and press Enter.
    • For 32bit computer: HKEY_LOCAL_MACHINE\SYSTEM\CurrentControlSet\Control\Print\Environments\Windows NT x86\Drivers\Version-x (x represents the version number which varies on different PC).
    • For 64bit computer: HKEY_LOCAL_MACHINE\SYSTEM\CurrentControlSet\Control\Print\Environments\Windows x64\Drivers\Version-x (x represents the version number which varies on different PC).
  3. Select all the entries in the Registry Editor and delete them all.
  4. Go to Windows Services, start the Print Spooler, and restart your computer.

3.3 Update the driver

  1. Press the Windows, type Device Manager, and launch it.
  2. Navigate to Print queues, right-click the driver, and select Update driver from the menu.
  3. Select Search automatically for drivers.
  4. Wait for the process to complete and restart your device.

As an alternative to this, you can automatically update all PC drivers with a standalone application like Outbyte Driver Updater.

This software will fully scan the OS and detect all the outdated drivers, and then install them simultaneously.

Modifying the Windows Registry Editor and updating the printer driver will troubleshoot issues with printer installation.

Check our guide about how to master the Windows Registry with Registry Editor in Windows 11.

Conclusively, you can read about how to fix printer error 0x00000b11 on Windows PCs. Also, check our guide on fixing printer error 1260 with a couple of steps on your computer.

Did you find a different solution? Share it with us in the comments section below.

Hogwarts Legacy reaches $1 billion in sales as the game comes to Xbox One

Hogwarts Legacy has amassed a staggering $1 billion in sales as of Friday, May 5. The news was delivered by Warner Bros. Discovery CEO David Zaslav during the company’s latest earnings call.

What’s even more impressive is that Hogwarts Legacy is likely not even done yet, with previous-gen releases launching that same day, including on Xbox One. The Nintendo Switch version of the game will release in July, and it is expected to do very well on that platform.

Hogwarts Legacy

Hogwarts Legacy has already climbed back to the no.1 spot in the U.K. sales charts for the week ending on May 6, dethroning Star Wars Jedi: Survivor.

The game doesn’t seem to be getting by on name alone, either. It also received a lot of critical acclaim upon release, as can be seen in our Hogwarts Legacy review roundup. With all the game’s incredible success, even in the face of all the controversy that has surrounded it, a sequel seems all but certain. And already a TV show based on the events of the game is reportedly in the works at HBO.

Via Pure Xbox. 

How to Fix 0x801c03f3 Hybrid Azure AD Error

When working on a project in Azure, you must register your device with the Azure account. If you have multiple devices and a single Azure account, you can use one to register all the devices. 

However, sometimes it will happen that your device is not registering with your Azure account. This may be accompanied by the error code 0x801c03f3. You might be wondering how to fix this issue, so keep reading to find out how.

How do I fix error 0x801c03f3?

Start by checking your Office 365 subscription status. Make sure your device is connected to the internet and check check whether TPM is on or off and update TPM.

1. Re-enroll the device in Azure

  1. Hit the Windows key and click on Settings.
  2. Click on Accounts on the left pane, then Access work or school on the right pane.
  3. Locate your account connected to your AD account and click on Disconnect.
  4. Restart your PC, then repeat steps 1-3, but this time, click Connect to re-enroll the device.

2. Re-sync your Azure account

  1. Hit the Windows key and click on Settings.
  2. Click on Accounts on the left pane, then select Access work or school.
  3. Locate your account connected to Azure, then select Info.
  4. Select Sync under device Action status.

Resynchronization can help get your devices back in sync with your Azure AD tenant.

3. Enable automatic enrolment

  1. Login to your Azure portal.
  2. Click on Azure Active Directory on the left pane, select Mobility (MDM and MAM), and click on Microsoft Intune.
  3. Under MDM User scope, configure the settings and select All so that all devices can automatically enroll for Intune.

You don’t need to manually enroll devices in the directory when automatic enrollment is enabled. Automatic enrollment makes it easier for users to sign in from a new device and eliminates the need for administrators to enroll all new devices manually.

Elsewhere, you may run into an error 80180002 where you can’t join the Azure domain with your account, but we’ve already unpacked how to bypass this issue in our detailed article.

What is autopilot error code 801c03ed?

The error 0x801c03f3 is a common error that may occur when you try registering a device with Azure AD, but it keeps failing.

The Windows Autopilot feature is designed to make it easy for automatic registration. You can use Autopilot to automatically enroll new devices into your organization’s Azure AD tenant or to re-enroll existing devices.

However, when devices are brought back onto the network after being taken offline for a period of time, they can sometimes fail. That’s when you might get the error message that the device object by the given id is not found 0x801c03f3.

This brings us to the question of why the device is not registering. Below are some possible reasons:

  • Outdated TPM – You are already aware that TPM is one of the requirements to run Windows 11. It is also required to join a device to Azure AD. If it’s outdated, then you can’t join the device.
  • Offline device – The device may be offline, or you may have an incorrect account ID. 
  • The device is not registered in AD – It is possible that it has not been registered with Azure and must be registered in AD.
  • Compatibility issues – The device you’re trying to register may have an old version of Windows installed and needs to be upgraded to the latest version before joining.
  • Exclusion filter – Sometimes, when creating policies, you may have included an exclusion filter that prevents new devices from registering.

That’s all we had for this error, but hopefully, your device has been able to register in Azure. 

If you tried another solution that worked for you, share it with us in the comment section below.

Microsoft ships Authenticator’s number matching feature to all users

Towards the end of last year, Microsoft announced a couple of security changes coming to its Microsoft Authenticator app. This move was prompted after attackers started leveraging push-based MFA to spam users to bypass Microsoft’s multi-factor authentication.

While the company provided a handful of tips and recommendations that users can use to avoid falling victim to such cons. There was still a need to add an extra layer of protection, that is, the announced number matching feature that’s designed to assist users from making accidental approvals while simultaneously protecting them from MFA attacks by hackers.

Microsoft has announced that the number matching feature is shipping to all Microsoft Authenticator app users starting today. This means users will now need to enter the number displayed on the sign-in screen when approving an MFA request in Authenticator as illustrated below.

Screenshot of user entering a number match.

Microsoft further added that:

We highly recommend enabling number matching in the near term for improved sign-in security. Relevant services will begin deploying these changes after May 8, 2023 and users will start to see number match in approval requests. As services deploy, some may see number match while others don’t. To ensure consistent behavior for all users, we highly recommend you enable number match for Microsoft Authenticator push notifications in advance.

The company also highlighted its plans to do away with admin controls and enforce the number match experience tenant-wide for all users of Microsoft Authenticator push notifications to further enhance security.

We’d also like to invite you to check out our expert guide on how to move Microsoft Authenticator App to a new phone as well as our feature post comparing the Microsoft Authenticator app to LastPass.

Do you use the Microsoft Authenticator app? Share your experience with us in the comments.

via Neowin

DXGI ERROR DEVICE REMOVED: 6 Quick Ways to Fix It

If you have encountered the DXGI ERROR DEVICE REMOVED pop-up message while launching specific games or graphics-intensive programs on your Windows computer, then this guide can help!

The majority of users who complained about this issue had NVIDIA graphics cards but you can use our solutions on other popular graphics cards, including AMD Radeon, & Intel.

What causes the DXGI ERROR DEVICE REMOVED error?

There could be several reasons for which error appears; some of the common ones are mentioned here:

  • Faulty RAM – If the RAM on your computer is damaged or corrupted, it could cause this problem. You need to run a memory diagnostic check to know more about it.
  • Shadow Play is enabled – The NVIDIA Shadow Play is a screen recording feature in GeForce Experience; if it is enabled, it could cause this error. Try disabling it to fix the issue.
  • The graphics card is not running properly – If your graphics card is damaged or not functioning properly, you may encounter this error.
  • Outdated graphics driver – The graphics driver should always be updated. As an outdated driver could cause various problems, including this one. Try updating the driver to the latest version.

Now that you know what causes the issue let us check out the solutions to fix the error.

How can I fix the DXGI ERROR DEVICE REMOVED error?

Before engaging in advanced troubleshooting steps, you should consider performing the following checks:

  • Restart your computer.
  • This problem often occurs when you change a graphics card with one from another brand (from NVIDIA to AMD and vice versa).
  • Make sure there are no pending Windows updates.
  • Make sure that the graphics card is properly seated.
  • Run a deep scan using an antivirus tool.
  • Remove dust from the graphics card and disable overclocking.

If these small fixes didn’t work, let’s move to the detailed methods mentioned below.

1. Use the Registry Editor

  1. Press Windows + R to open the Run dialog box.Regedit DXGI ERROR DEVICE REMOVED
  2. Type regedit and click OK to open the Registry Editor.
  3. Navigate to this path: Computer\HKEY_LOCAL_MACHINE\SYSTEM\CurrentControlSet\Control\GraphicsDrivers
  4. Select GraphicsDrivers, right-click it, choose New, then click DWORD (32-bit) Value. New Dword DXGI ERROR DEVICE REMOVED
  5. Name the DWORD as TdrLevel.
  6. Double-click TdrLevel, and change the Value data to 0.Value data TDR LEVEL DXGI ERROR DEVICE REMOVED
  7. Click OK, then reboot your computer.

2. Disable the Shadow Play option

  1. Locate and right-click the GeForce Experience shortcut and click Run as administrator.
  2. Navigate to the General tab, locate, and toggle off In-game Overlay.Overlay disable DXGI ERROR DEVICE REMOVED
  3. Click Apply to confirm the change and restart your PC.

3. Turn off the Anti-Aliasing feature

  1. Right-click the space on the desktop and select NVIDIA Control Panel.
  2. Click Manage 3D settings from the left pane, and go to the Global Settings tab.
  3. Locate Antialiasing and select Off from the drop-down.Manage 3D settings DXGI ERROR DEVICE REMOVED
  4. Switch to Program Settings and turn off Antialiasing.
  5. Click Apply to save the changes and reboot your computer.

You can disable the Antialiasing option on AMD and other graphics card software to fix this error.

4. Update or reinstall the graphics driver

  1. Press Windows + R to open the Run console.Device Manager Run command DXGI ERROR DEVICE REMOVED
  2. Type devmgmt.msc and click OK to open Device Manager.
  3. Click Display adapters to expand it, right-click the graphics driver from the list, and click Update driver.Graphics Driver update DXGI ERROR DEVICE REMOVED
  4. Select Search automatically for drivers.Update driver 2
  5. Follow the onscreen instructions to complete the process.
  6. If this doesn’t work, in Step 3, choose the Uninstall device option.Uninstall graphics driver DXGI ERROR DEVICE REMOVED
  7. Go to Action, and click Scan for hardware changes.Action scan for hardware changes
  8. The system will install a new driver automatically.

5. Check your RAM

  1. Press the Windows key, type windows memory diagnostic, and click Open.Memory diagnostic tool DXGI ERROR DEVICE REMOVED
  2. Click Restart now and check for problems (recommended). memory-diag-tool 3 Memory diagnostic tool DXGI ERROR DEVICE REMOVED
  3. Your computer will restart, and the Windows Memory Diagnostics tool will perform a test.
  4. Once the test is complete, your computer will boot up and show you the results.

If any errors are detected during the memory diagnostic test, it means that there is a problem with your computer’s RAM, and you should take action to resolve the issue.

In case it’s a minor issue, you can try cleaning memory modules and reseat them in their slots. However, if you still facing the issue, you might have to replace one or more memory modules.

6. Reinstall the NVIDIA GeForce Experience app

  1. Press the Windows key, type control panel, and click Open.Control Panel start menu DXGI ERROR DEVICE REMOVED
  2. Select View by as Category, and click Uninstall a program.Uninstall a program
  3. Select the Graphics card app for NVIDIA GeForce Experience and select Uninstall.Uninstall DXGI ERROR DEVICE REMOVED
  4. Go to the Geforce Experience website and click Download Now.GeForce Experience DXGI ERROR DEVICE REMOVED
  5. Double-click the installer file and follow the on-screen instructions to complete the process.

Follow the same process if you have AMD, Intel, or another graphics card to reinstall the app to get rid of the issue.

So, these are methods you can follow to fix the DXGI ERROR DEVICE REMOVED error so that you can launch your games without any problems.

If you have any questions or suggestions, feel free to mention them in the comments section below.

Microsoft news recap: third-party plugins coming to Bing Chat, Xbox Game Pass referral scheme, and more

Microsoft news recap is a weekly feature highlighting the top Microsoft news stories of the past week. Sit back, grab some coffee, and enjoy the read!

Bing Chat finally hits general availability, with third-party plugins on the way

This week saw Bing Chat enter general availability, ending the need to join a waitlist to get access, instead people can jump straight in to using Bing Chat. Additionally, Microsoft has confirmed that it is working to add third-party plugin in support, giving an example of finding and booking a restaurant on OpenTable via Bing Chat.

Microsoft further integrates the new Bing in Edge

As Microsoft continues to push the new Bing, the company has begun testing a new “Ask Bing Chat” option in the right-click context menu when selecting text. The new option is not currently available to everyone, but does offer a new way to access Bing Chat and send information to it to receive more context.

Xbox Game Pass unveils new friend referral program

Xbox Game Pass Ultimate and PC Game Pass members are receiving a new feature to invite up to five friends to a 14-day free trial of PC Game Pass, as part of a new friend referral program that has been launched.

Minecraft Legends gets its first update as game surpasses 3 million players

The latest game under the Minecraft umbrella, Minecraft Legends, has crossed the 3 million players mark, and also saw its first update this week, bringing a number of improvements, but notably the ability to invite friends to join your team in matchmaking.

That’s it for this week. We will be back next week with more Microsoft news.

How to Stop Spatial Sound Reverting to Windows Sonic

Spatial Sound using Dolby Atmos is the primary choice for many, given the significantly enhanced experience. But it’s not completely error-proof, with many reporting that Spatial Sound keeps switching to Windows Sonic.

This usually happens after a restart or even when the PC is turned on from sleep or hibernation. And if spatial sound keeps resetting, there are a few quick solutions to get things up and running. Let’s find out!

Why does Spatial Sound keep switching to Windows Sonic?

Here are a few reasons Spatial Sound in Windows 11 keeps reverting to Windows Sonic:

  • Corrupt system files: When the system files are corrupt on the PC, you are likely to encounter issues with Windows processes and even notice reduced PC performance.
  • Corrupt or outdated sound drivers: If the installed drivers are outdated or corrupt, it will affect how the OS handles sound-related tasks and could be the reason Spatial Sound keeps switching to Windows Sonic.
  • Playback device settings are reconfigured: In a few cases, third-party apps reconfigured the playback device and chose Windows Sonic instead of Dolby Atmos.
  • Misconfigured audio settings: Even issues with the audio settings can lead to a wide range of sound-related problems.

What can I do if Spatial Sound keeps switching to Windows Sonic?

Before we head to the slightly complex solutions, try these quick ones:

  • When spatial sound is not working in Windows 11, ensure you have the compatible headphone connected. Check this and verify again.
  • Install pending Windows updates.

If none work, move to the fixes listed next.

1. Disallow apps from taking access

  1. Press Windows + S to open Search, type Change system sounds in the text field, and click on the relevant result.change system sounds to fix Spatial Sound keeps switching to Windows Sonic
  2. Navigate to the Playback tab, right-click on the affected device, and then select Properties.properties
  3. Go to the Advanced tab, untick the checkbox for Allow applications to take exclusive control of this device, and click OK to save the changes.disable exclusive control

Your primary approach when Spatial Sound keeps switching to Windows Sonic should be not to allow applications to take exclusive control. This has worked for a lot of users.

2. Disable high-definition audio

When faced with the problem, another quick solution is to disable the high-definition audio device. It works both for Nvidia and AMD. The option can be found in the dedicated control panel. And while you are at it, make sure to uninstall the related sound driver as well.

The solution has been confirmed to work by users, but we still recommend you create a restore point beforehand to revert in case things don’t work out.

3. Update the audio driver

  1. Press Windows + X to open the Power User menu, and select Device Manager.device manager
  2. Expand the Sound, video and game controllers entry, right-click on the playback device, and select Update driver.update driver to fix Spatial Sound keeps switching to Windows Sonic
  3. Now, select Search automatically for drivers and wait for Windows to install the best one.search automatically for drivers

Be it corrupt or outdated drivers, updating the audio driver should get things up and running in no time when Spatial Sound keeps switching to Windows Sonic.

And in case Windows is unable to find one, you can always locate the latest version on the manufacturer’s website and manually install the driver.

For an error-free process, you can try using reliable software to update not only your audio drivers but all your device drivers as well.

This software will detect your PC’s outdated or malfunctioning drivers and then proceed to locate the newest versions as replacements.

Outbyte Driver Updater

Keep your device in check and let Outbyte Driver Updater update your drivers with the best options.
Free Trial Download now

4. Modify the Registry

  1. Press Windows + R to open Run, type regedit in the text field, and hit Enter.regedit
  2. Click Yes in the UAC prompt.
  3. Paste the following path in the address and hit Enter:Computer\HKEY_CLASSES_ROOT\Local Settings\MrtCache\C:%5CWINDOWS%5CSystemResources%5CWindows.UI.SettingsAppThreshold%5CWindows.UI.SettingsAppThreshold.pri\1d7b5d22d14df5e\ec2e2645modify to fix Spatial Sound keeps switching to Windows Sonic
  4. Double-click the entry available on the right.
  5. Type Dolby Atmos under Value data and click OK to save the changes.
  6. Finally, restart the computer for the changes to apply.

5. Reinstall the Dolby app

  1. Press Windows + I to open Settings, go to Apps from the navigation pane, and then click on Installed apps.installed apps
  2. Now, locate the Dolby app, click on the ellipsis next to it, and select Uninstall.uninstall to fix Spatial Sound keeps switching to Windows Sonic
  3. Again, click Uninstall in the confirmation prompt.uninstall
  4. Once done, restart the computer.
  5. Now, download the Dolby Access app you removed earlier from the Microsoft Store.

Often it’s an issue with the app installation that triggers problems behind Spatial Sound switching to Windows Sonic. And the best option, in this case, is to uninstall the app and then download it from a reliable source, preferably the Microsoft Store.

6. Perform an in-place upgrade

Tip icon Tip
The steps listed here are to perform an in-place upgrade on Windows 11. For Windows 10, download the Media Creation Tool from the official page, and use it for the upgrade.
  1. Go to Microsoft’s official website, choose the edition and product language, and download Windows 11 ISO.download
  2. Double-click the ISO file, and click Open in the prompt.iso to fix Spatial Sound keeps switching to Windows Sonic
  3. Now, run the setup.exe file.setup.exe
  4. Click Next to proceed.next
  5. Click Accept to agree to Microsoft’s license terms.accept license terms
  6. Make sure the setup reads Keep personal files and apps, and click on Install to start the process.in-place upgrade to fix Spatial Sound keeps switching to Windows Sonic
  7. Wait for the in-place upgrade to complete. It may take a few hours.

If the previous solutions didn’t work, it’s likely a problem with the OS installation, and performing an in-place upgrade is the most viable solution. You won’t lose any data in the process, but the PC will perform faster after the upgrade, and any errors should disappear.

By now, you should have fixed things when Spatial Sound keeps switching to Windows Sonic, and the problem shouldn’t reappear.

And before you leave, find out how to increase the sound in your laptop beyond 100%.

For any queries to share which fix worked for you, drop a comment below.

0x8007001d Windows Update Error Code: 4 Ways to Fix It

Error code 0x8007001d is a Windows Update error that can occur when updating or upgrading Windows. It typically indicates that there is a file or setting that the Windows Update service is unable to access or modify, which can prevent the update from being installed successfully.

Users have also reported encountering error 0x8007001d when attempting to activate Microsoft Office or other applications that require activation post-purchase.

The error code 0x8007001d can stem from a variety of causes. Try the following solutions to resolve the error.

What is error code 0x8007001d?

Error code 0x8007001d typically indicates a problem updating Windows. There are several possible causes of this error, including:

  • Corrupt system files: If one or more of your system files are corrupt, you may encounter this error when trying to update your operating system.
  • Outdated drivers: If your drivers are outdated or incompatible with your system, you may encounter this error when trying to update your operating system.
  • Malware infection: If your system is infected with malware, it can interfere with your updates and cause this error.
  • Insufficient disk space: If you do not have enough free disk space on your system, you may encounter this error when trying to update your operating system.
  • Faulty RAM: If you have faulty RAM, it can cause problems with your system and interfere with updates.

How do I fix Windows 11 update error 0x8007001d?

To resolve this error before attempting more complex solutions, try the following prerequisite steps:

  • Restart your computer: A simple reboot can sometimes resolve the issue.
  • Check your internet connection: Before attempting to update Windows, ensure you have a reliable and stable internet connection.
  • Disable firewall and antivirus: In some cases, disabling the Windows Firewall and the antivirus program helps.

1. Run Windows Update troubleshooter

  1. Press Windows + I to open Windows Settings app.
  2. Select System on the left pane, scroll down, and click the Troubleshoot tile on the right pane.select Troubleshoot
  3. On the Troubleshoot settings page, click on Other troubleshooters.Other troubleshooter
  4. Now, click the Run button next to Windows Update.Run troubleshooter
  5. Follow the on-screen instructions to complete the troubleshooting process.
  6. Close the troubleshooter and restart the computer.

The troubleshooter will automatically detect and fix any problems that it finds. If it is unable to fix the problem, it will provide you with suggestions on how to fix it manually.

2. Run SFC and DISM scan

  1. Press Windows + R to open the Run dialog, type cmd, hold the Ctrl + Shift key, and click OK to run Command Prompt as administrator.
  2. Click Yes on the User Account Control (UAC) prompt window.
  3. Type the following command in the command prompt window and press Enter: sfc /scannow
  4. After the SFC tool finishes scanning, proceed to run the DISM tool. Type in the following commands and press Enter after each: DISM /Online /Cleanup-Image /ScanHealth DISM /Online /Cleanup-Image /RestoreHealth DISM scan
  5. Once you have executed the SFC and DISM tools, reboot your PC and see if the 0x8007001d error is gone.

3. Reset Windows update components

  1. Press Windows + R to open the Run dialog, type cmd, and hit the Ctrl + Shift + Enter.
  2. Click Yes in the User Account Control prompt.
  3. In the Command prompt, enter the following commands and Enter after each line: net stop bits net stop wuauserv net stop appidsvc net stop cryptsvc Del "%ALLUSERSPROFILE%\Application Data\Microsoft\Network\Downloader\*.*" rmdir %systemroot%\SoftwareDistribution /S /Q rmdir %systemroot%\system32\catroot2 /S /Q sc.exe sdset bits D:(A;;CCLCSWRPWPDTLOCRRC;;;SY)(A;;CCDCLCSWRPWPDTLOCRSDRCWDWO;;;BA)(A;;CCLCSWLOCRRC;;;AU)(A;;CCLCSWRPWPDTLOCRRC;;;PU) sc.exe sdset wuauserv D:(A;;CCLCSWRPWPDTLOCRRC;;;SY)(A;;CCDCLCSWRPWPDTLOCRSDRCWDWO;;;BA)(A;;CCLCSWLOCRRC;;;AU)(A;;CCLCSWRPWPDTLOCRRC;;;PU) cd /d %windir%\system32 regsvr32.exe /s atl.dll regsvr32.exe /s urlmon.dll regsvr32.exe /s mshtml.dll regsvr32.exe /s shdocvw.dll regsvr32.exe /s browseui.dll regsvr32.exe /s jscript.dll regsvr32.exe /s vbscript.dll regsvr32.exe /s scrrun.dll regsvr32.exe /s wuaueng1.dll regsvr32.exe /s wups.dll regsvr32.exe /s wups2.dll regsvr32.exe /s wuweb.dll regsvr32.exe /s wucltux.dll regsvr32.exe /s muweb.dll regsvr32.exe /s wuwebv.dll netsh winsock reset netsh winsock reset proxy net start bits net start wuauserv net start appidsvc net start cryptsvc reset windows components
  4. Restart your computer and check if the 0x8007001d error is resolved.

4. Manually install Windows update

  1. Go to the Microsoft Update Catalog website 
  2. Type the KB number of the update you want to install in the text field and click Search.search with KB number
  3. Click on Download next to the update you want to install.download
  4. On the pop-up window, click the download link.click the download link
  5. Double-click on the downloaded file to start the installation process.
  6. Follow the on-screen instructions to complete the installation.

If you’re a Windows 11 user, discover the best security settings for a safer Windows experience.

In case of any additional questions or suggestions, leave them in the comments section.