Many Windows users may prefer to use an external monitor with their Windows 10 laptop for better productivity, as a large screen allows you to do more if you multitask. However, at times, you may encounter display-related issues. Some users have reported that the display is more prominent than the monitor issue on the Microsoft community forum.
Hi There I just upgraded from Windows 7 to Windows 10 and have a graphics problem.The display fits perfectly on my laptop screen but when I display it on my TV the display is bigger then the screen and I can’t fix it by changing the resolution.
Fix it with these steps.
What can I do when my screen is bigger than my monitor?
1. Customize Graphics Properties (Windows 7 only)
Right-click on anywhere on the Desktop.
Select “Graphics Properties”.
Now click on the Display option.
Click on Customize Aspect Ratio
Now drag the slider to make the display fit your screen.
Close the Graphics Properties and reboot the system. Check if the settings are preserved after the restart.
For Windows 10 Users
Type graphics in the search bar.
Click on Intel Graphics Control Panel option.
In the Graphics Control Panel, click on the Display option.
Under the “Select Display” section, click the drop-down menu and select your external display/monitor.
Click on the Custom Resolutions tab.
Enter your monitor’s screen resolutions in the Width and Height field.
Enter the refresh rate a few points lower than the monitor’s refresh rate. So, if it is a 60hz monitor, enter 56-59.
Now drag the slider for “Underscan Percentage” a little and click on the Add button.
Now set the custom resolution as your preferred display setting and check if that resolves the issue. If the issue persists, try to change the Underscan Percentage a little until you find the correct working resolution.
2. Change Screen Resolution
Click on Start and select Settings.
Click on System and select Display from the options.
Open the drop-down menu under Resolution section, and select the Display Resolution that is supported by your system.
Check if the contents on your screen are displayed normally. If the issue persists, try to scale the layout.
Click the drop-down menu under Scale andLayout and select %150. Check if the scaling has resolved the issue. If not, try again with different scaling options until you find the right size.
Type devmgmt.msc in the Run box and press OK to open the Device Manager.
In the Device Manager, expand Display Adapters.
Right-click on the graphics driver (Intel UHD Graphics ) and select Update Drivers.
Click on “Search automatically for updated driver software“.
Wait for the Windows OS, as it will search and download any pending updates for the driver.
After the update is installed, reboot the system and check for any improvements.
4. Check the Physical Buttons
Most of the monitors come with a physical button at the side or bottom that allows you to control some settings of the display including brightness, orientation, and display resolution.
If your monitor has manual controls, use the physical buttons and try to change the settings. This should allow you to fix display larger-than-screen issue.
In this piece, we’ll share some tips and tricks to help you charge your phone faster with your laptop.
While it’s true that a USB connection won’t match the speed of a wall charger, you can still speed things up with a few simple tweaks.
How can I charge my phone faster with a laptop?
1. Check your USB ports and cables
If your phone and laptop support it, use a USB Type-C. It is the fastest of all USB types, supporting up to 3000 mA (3A) of power, which means it charges your phone much quicker.
On the other hand, USB 3.0 ports deliver up to 900 mA, while USB 2.0 ports are limited to around 500 mA.
Enable USB-C power delivery on your Windows laptop to maximize charging output by following this guide: Enable USB-C Charging.
NOTE
Also, check for a lightning bulb icon next to your laptop port to ensure it supports charging. Some laptops only allow charging from specific ports.
2. Disable USB Selective suspend
Press Windows + I to summon the Settings app.
Open System.
From the left pane, select Power & sleep.
Click on the ”Aditional power settings” in the top right corner.
Click on ”Change plan settings” under the preferred power plan.
Choose ” Change advanced power settings”.
Expand USB settings and then USB selective suspend settings.
Under ”Plugged in”, select Disabled and confirm changes.
That should improve the charging process, at least marginally. In addition, there’s only one more thing you can do to focus power on charging rather than allow your PC to spread it out to various devices.
3. Enable the High-Performance Mode
Go to Control Panel and select Power Options.
Check the box for High-Performance Power plan and save your settings.
This will allow your laptop to allocate more resources to your charging as it won’t focus on preserving battery life.
4. Close unnecessary apps and features
For iOS:
Swipe down from the top-right and open the app switcher.
Close the apps you don’t need by swiping up on them.
Next, head to Settings and select Privacy.
Find Location Services and toggle it off.
Open Control Center by swiping down from the top-right.
Tap the Wi-Fi and Bluetooth icons to turn them off.
On Android:
Tap the Recent Apps button (square shape).
Swipe away the apps you want to close or tap Clear All.
Go to Settings and select Location.
Toggle off Use Location.
Then, swipe down from the top of the screen to open Quick Settings.
Finally, tap the Wi-Fi and Bluetooth icons to turn them off.
Open Control Center by swiping down from the top-right.
Tap the Airplane icon to enable Airplane Mode.
On Android:
Swipe down from the top of the screen to open Quick Settings.
Tap the Airplane icon to enable Airplane Mode.
6. Unplug other USB devices and peripherals
Finally, the output current from your motherboard depends on how many devices are plugged in. If you have a mouse, keyboard, and phone connected, the power available for charging your phone is reduced.
Unplug any unnecessary peripherals to optimize charging. Keeping your laptop connected to an outlet during this process can also help.
To sum it up:
Good and compatible cable is fundamental.
Your battery health is also a factor.
Some USBports charge faster, some slower. Try multiple.
Disable USB selective suspend.
Unplug other USB devices and peripherals while charging.
Not USB nor Wireless charging are close to wall socket charging in regards to speed.
That should conclude our article on the topic of how to make a laptop charge a phone faster. Make sure to share your questions or suggestions with our readers. You can do so in the comments section below.
A VPN is a tool to help protect you online. Adding it to the taskbar on your Windows 11 is highly convenient. It creates an encrypted tunnel between your device and the VPN server.
Using a reliable and effective VPN helps in hiding your IP address, location, and activity from the prying eyes of hackers. It, therefore, makes sense to have it on the taskbar for ease of accessibility. So, let’s find out how you can do that.
How can I add a VPN to the taskbar in Windows 11?
1. Add your favorite VPN to the taskbar
Press Windows + S to open the Search menu, enter the name of your VPN software in the text field, right-click on the app, and select Pin to taskbar.
The VPN will now be available in the taskbar and can be launched in a single click.
Windows 11 allows users to add apps to the taskbar for quick access, and similarly, you can add any VPN software as well. For those unaware, users can also add a website to the taskbar in the latest iteration.
2. Add a VPN to the Quick Settings
Click the Sound icon at the bottom right corner to open the Quick Settings menu.
Select the edit button (pen-looking) icon.
Click Add, and then select VPN.
Besides adding a VPN to the taskbar, you can also add a manually configured one to Quick Settings for easy access. If you feel it is becoming too overwhelming, you can hide the taskbar to allow you to concentrate on your work.
We hope this quick guide was able to help you add a VPN to your taskbar in no time. And while you are at it, find out how to change the icons in Windows 11 and customize each for better visibility and identification.
The Excel file could not be accessed error can arise when users try to save or open a file within that application. Consequently, users can’t save or open spreadsheets when that error arises.
Microsoft has confirmed the issue occurs for Excel spreadsheet files with paths that exceed the maximum of 218 characters.
Check out these resolutions for the file could not be accessed error
1. Edit the Excel file’s title
Click the File Explorer button on Windows 10’s taskbar.
Open the folder that includes the problematic Excel spreadsheet.
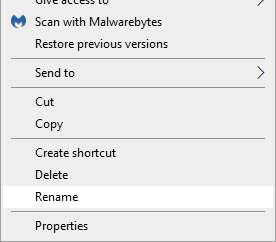
Right-click the Excel file and select the Rename option.
Enter a completely different file title that’s shorter and does not include any exclamation marks or brackets.
Press Return after renaming the file.
Try opening the file in Excel again to save it.
2. Edit the Excel file’s folder titles
Open File Explorer.
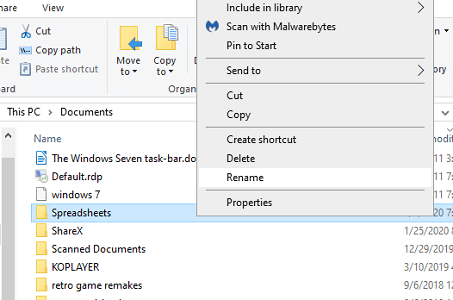
Right-click the folder that includes the Excel file and select Rename.
Enter a shorter folder title, and press the Return key.
If the path for the file includes more than one folder, repeat the above steps for the other folders in its path.
Open the folder that includes the Excel file the error occurs for.
Select the Excel file.
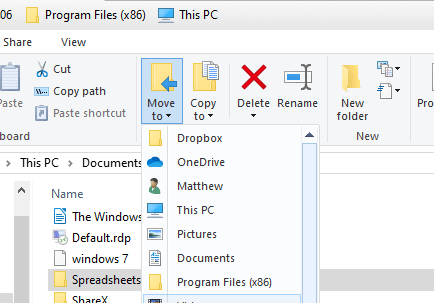
Click the Move to button to open the menu shown directly below.
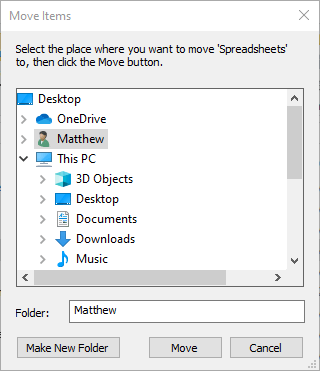
Click Choose location to open the window in the snapshot directly below.
Select the USB drive to move the spreadsheet to.
Click the Move button.
Then open the Excel spreadsheet from the USB stick.
4. Start Excel in Safe Mode
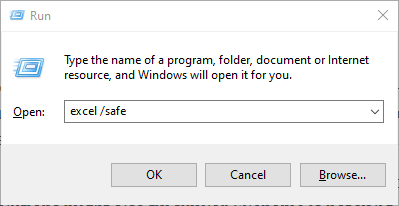
Open Run with the Windows key + R keyboard shortcut.
Input excel /safe in Run’s text box, and select the OK option.
If the issue doesn’t arise in Safe Mode, then a third-party add-in is probably generating the save error. You can carry on utilizing Excel in Safe Mode to edit the required file. To fix the issue outside Safe Mode, however, you’ll need to manually deactivate Excel add-ins.
5. Use a third-party tool for Excel errors
Another viable solution would be to use a tool that specializes in repairing corrupt Excel files and performs this protocol automatically.
Losing critical documents can be terrible, and getting them back can be even more difficult. No matter how inconvenient it may appear, it is possible to recover them when you follow the correct steps in a timely manner.
Do you want to learn how to repair an Excel file? Or do you want to retrieve your missing Excel files? Read through this article to discover the best ways to fix your Excel files using automatic solutions that handle all the work.
Those are some of the resolutions that can fix the file could not be accessed error. Note that the above resolutions might also fix similar Filename is not valid and <filename> could not be found Excel error messages.
If you know of any other fixes we may have missed out on, leave us a message in the comments section below and we will update the article accordingly.
Microsoft Excel includes a handy Send as Attachment option that enables users to attach Excel spreadsheet files to Outlook emails.
Thus, users can attach spreadsheet files to emails and send them directly from Excel. It’s an option that neatly integrates Outlook with Excel.
However, some users have posted on software support forums about a General mail failure Excel error.
That error message can pop up when users try to attach spreadsheets to Outlook emails from within Excel.
Consequently, they can’t attach Excel files to emails with the application’s Send as Attachment feature. Below are some potential resolutions for fixing the General mail failure issue.
What can I do if my Excel file is not attaching to an email?
1. Send it in a different format
If Outlook rejects attaching the Excel file, you can also disguise it cleverly in another format. The best way to do that is to compress the file by using WinZip.
To do that, find the Excel file on your computer, right-click on it and select the Add to archive option. The newly obtained Zip file will be most likely accepted as an Outlook attachment.
Also, this software includes a file conversion option so you can transform your Excel file into another type and see if it gets accepted by Outlook.
WinZip is the most popular file archiving tool but it’s not only that because it evolved a lot during the last few years.
Now, this excellent tool features many other tools like data encryption, data backup, file management, and even file merging.
Your Excel file might be rejected by Outlook because it’s probably corrupted. Don’t worry because you can fix it easily by using specialized software like Stellar Repair for Excel.
This tool’s job is to secure Excel workbooks and data from corruption. However, it can also rebuild corrupted Excel files and restore all the datasets and visuals.
Stellar Repair for Excel can recover all Excel file structures including tables, charts, formulas, and even cell comments.
It also works with more files simultaneously and supports even the older Excel versions from 2000 & 2003 to 2019.
3. Disable the third-party antivirus and firewall software
Some users have confirmed they’ve fixed the General mail failure error by removing third-party firewall blocks for MS Excel.
So, try turning off (or uninstalling) any third-party antivirus and firewall software to see if they’re blocking Excel’s email attachment feature.
A lot of antivirus utilities include a disable (turn off) option of some kind you can select by right-clicking their system tray icons.
If you can’t find such an option, however, uninstall the third-party antivirus or firewall software.
You can as well uninstall your antivirus software, but you will have to replace it quickly because you can’t leave the system unprotected for long periods of time.
We recommend you switch to a more effective antivirus, firstly to not interfere with any of your software so you will not be forced to disable or uninstall it.
If it’s an MSI-based MS Office, select the Repair option. Press the Continue button.
Users with click-to-run Office suites will need to select Online Repair, then click on Repair.
7. Uninstall duplicate Office apps
The General mail failure error often arises due to duplicate versions of MS Office apps being installed.
Some users might have older versions of MS Office applications installed alongside newer ones. Thus, removing duplicate MS Office might resolve the issue.
To do that, open the Windows 10 Start menu and click the Microsoft Office folder there to see if there are any duplicate Office applications there.
Right-click duplicate Office software there and click Uninstall to remove app entries that don’t relate to your current Office version.
8. Reinstall Microsoft Office
First, make sure you have the activation code (product key) to reinstall it with.
Click the Download button on the Microsoft official page to get the Office to uninstall the support tool.
Open the Office uninstall support tool, and uninstall the suite.
Restart Windows after uninstalling Microsoft Office.
If you don’t have any installation file for MS Office, you’ll need to click the download link for the suite on your Microsoft account page.
Then enter your MS Office product key.
Click the Install Office option.
Those are some of the confirmed fixes for Excel’s General mail failure error. With that error fixed, you can then attach Excel files to emails with the application’s Send as Attachment option.
If you have any other questions or suggestions, don’t hesitate to leave them in the comments section below.
Using the sleep option, you can turn off most of your computer hardware and store your current information on your RAM.
While using Sleep mode, your computer will still use some power although a lot less. So it’s good to use this option if you’re going to be away from your computer for a short period of time.
One advantage of sleep mode is that your PC wakes up in just a matter of seconds, so you can easily continue where you left off.
The Hibernate option, also known as Hibernation mode, works in a similar way, but it stores your open documents and running applications on your hard drive and shuts down your computer.
In Hibernate mode, your computer uses zero electrical power, so it’s good to use this option if you’re going to be away for a while and you want to continue where you left off when you get back.
The only downside of Hibernation mode is that it takes a bit more to start compared to Sleep mode.
Let’s find out now how to add Hibernation mode to the Start menu and enable it on Windows 10.
How can I turn on Hibernate Mode in Windows 10?
You need to add the Hibernate mode to your Windows 10’s Start menu before you can use it. Enabling this mode is very easy and can be done via Power Settings in a few minutes.
1. To start off, press the Windows key on your keyboard or click on the Start button on the taskbar to open the Search menu.
2. Type control panel in it and click on the result to open the app.
3. Navigate to Hardware and Sound > Power Options.
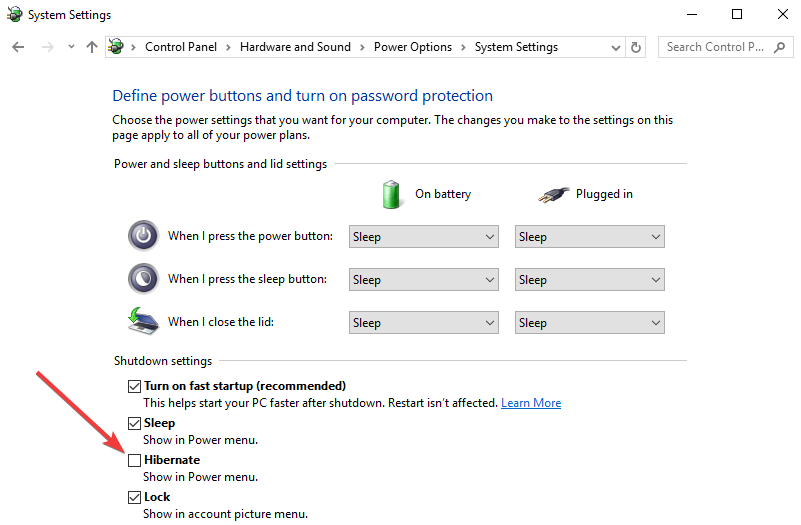
4. Click on Choose what the power buttons do.
5. Next, click the Change Settings that are currently unavailable link. This will allow you to change shutdown options.
6. Check the Hibernate (Show in Power menu) option.
7. Click on Save changes and close the window. The Hibernate mode is now added to the Power menu.
8. If you want to use the feature, you need to press the Start button on the taskbar once more to bring up the Search menu, then hover the Shut down or sign out setting to open a drop-down menu.
You will now see the following options: Sign Out, Sleep, Hibernate and Restart.
9. Click on Hibernate to put your PC in hibernation mode.
Note: If the hibernate option is missing in step 6, run the following 2 scripts on the command prompt. powercfg /hibernate on powercfg /h /type full
Unfortunately, various technical issues may occur after enabling the Hibernation mode on Windows 10. For example, your computer may fail to enter hibernation. In other cases, your computer may take too long to wake up from hibernation.
In case you encounter any of these issues, you can use our troubleshooting guides. Follow the instructions available in the respective guides, and you should be able to fix the problem in just a few minutes.
Now you should have Hibernate option available in the Start menu on your Windows 10 PC. If you have any comments or questions, just reach for the comments section below.
Note: Bear in mind that this path might be slightly different depending on the version of Office you’re using.
2. Make sure that you’re using the 64-bit version of Office
If you’re getting Cannot be accessed the file may be corruptederror, perhaps you’re using a 32-bit version of Office on a 64-bit version of Windows.
This can sometimes be a problem, therefore we advise you to reinstall Office and make sure to install the 64-bit version on a 64-bit system.
In addition, make sure that your version of Office is up to date.
3. Check the filename of the Excel file
Apparently, the length of the file can cause Cannot be accessed the file may be corruptederror to appear.
It seems that this issue appears when your .xls or .xlsx file name exceeds 17 characters. To fix this issue, be sure to rename the file that is giving you this error and give it a shorter name.
Cannot be accessed the file may be corrupted Excel error can be problematic, but you should be able to fix it by modifying your registry or by renaming the problematic file.
If you found our article useful, let us know in the comments section below.
Productivity and good time management are gold in today’s world.
However, it seems that the majority of people still struggle to stay productive constantly. When everything else fails, we usually look for salvation in technology. In this case, apps and services are going to improve our focus and productivity level.
In that manner, we’ve prepared a list of the best apps and programs for Windows 10 that might help you improve your productivity.
If you have problems pronouncing this program’s name, you definitely won’t have any problems using it.
Orzeszek Timer is an extremely simple timer software for Windows that offers a lot of options at the same time. To set up a timer, you need to enter time, hit Enter, and the clock will start ticking.
The best thing about Orzeszek Timer is its versatility, as it allows you to enter any time format, and the program will automatically recognize it. Here are some examples:
5 – 5 minutes
2.5 – 2 minutes 30 seconds
1d 5h 3m 25s – 1 day 5 hours 3 minutes 25 seconds
1.05:03:25 – 1 day 5 hours 3 minutes 25 seconds
1 5 3 25 – 1 day 5 hours 3 minutes 25 seconds
01/01/2017 – until midnight on 1 January 2017
01/01/2017 5:00 PM – until 5:00 pm on 1 January 2017
The program even accepts time to count down as a command line argument, so you can make batch files for your most frequently used countdown values.
However, we doubt you will need this feature unless you’re serious about setting up a timer, but it won’t hurt you to know.
Orzeszek Timer is free and comes as a portable application. You can download it from the link below.
Update: Orzeszek Timer has been replaced by Hourglass, but it offers the same functionality and more.
CookTimer is a very simple timer app for Windows. It sets time intervals of 3/5/10/15 minutes, but you can also set up your own time.
When it comes to the user interface, CookTimer is one of the simplest timer apps for Windows you can find.
So, if simplicity matters to you, and you want your clock to tick, CookTimer might be into consideration.
It also offers a few more features, like resetting the timer by itself or ringing forever when the time is up. So if you forget that you’ve set up a timer, it won’t stop until you get reminded.
You can turn on both features from the main window, which also appears to be the only window CookTimer has.
There’s not much more to say about this app because it’s so simple. You set up a timer and get notified when it does its thing. That’s the whole philosophy.
CookTimer is free, and you can download it from the link below.
DeskTime is one of the best timer apps for Windows that is ideal for a corporate organization. It is a real-time tracker that helps to improve a team’s productivity.
One of the interesting features of this software is the offline tracking feature. This allows you or other team members to take note of your time away from your computer.
Also, if you need to track your productivity on the move, DeskTime is probably the best you can use. This is because it has Android and iOS versions that allow you to track your productivity from anywhere.
What’s more, DeskTime can track URLs, document titles, and apps. With this, you can easily track an employee’s workflow.
To make things better, it has a screenshot feature that helps you monitor your team member work behavior and habits.
When you look at SnapTimer, it would probably appear to be just another extremely simple timer app that doesn’t do much more.
Well, if that’s your first guess, you’re wrong because SnapTimer is much more than that. This tiny program allows you to manage alarms, make an action after the time expires, receive notifications, and more.
Of course, when you open SnapTimer, you can set up a timer and run it, but if you dig deeper, you’ll find more options.
You can set up alarms and even use a customized alarm sound. Additionally, SnapTimer can run a certain program or app after the time expires, which is quite a unique ability.
It also shows you tray notifications when the time is up. As we already mentioned, SnapTimer sports a very simple user interface, so you won’t have any problems getting around.
SnapTimer program is a portable program, so you don’t need to install it. If you’re interested in trying SnapTimer, you can download it free from the link below.
MultiTimer is another Windows 10 app that, as its name says, allows you to set up a couple of timers. The app can also run in the background, which can be a huge plus for many users.
The developer made this app available on Windows 10 and Windows 10 Mobile.
MultiTimer offers quite good management options to keep all these timers under control. Timers can be grouped as logical units and combined to run as a sequence.
It also comes with Cortana integration, which makes setting up a timer even easier.
The fact that this app offers many customization options when setting up a timer also tells us that MultiTimer is all about timer management.
For example, you can edit timers’ names, icons, and notification sounds and set up a custom message that will appear when the time is up. All in all, MultiTimer is a simple yet feature-rich app for setting up timers.
So, if you want to experiment with multiple timers, you should try this app. MultiTimer is free on Windows 10 and Windows 10 Mobile; you can download it from the Microsoft Store.
CoolTimer is the oldest program on our list and one of the pioneers of timer programs for Windows. So, because of its cult status and useful features, we’ve decided to put it on this list.
Despite its age, CoolTimer is still compatible with Windows 10.
As soon as you open CoolTimer, you’ll see an easily adjustable counter where you can set your desired period. Besides the regular timing option, CoolTimer allows you to set up multiple preset times.
You can even choose a notification sound from its library or upload your custom sound and use it as an alert. CoolTimer also has a stopwatch feature, an alarm clock, and a countdown timer.
If you want CoolTimer to ‘tell’ you something when the timer expires, you can set up a custom notification note to show up when the timer does its thing.
It also comes with changeable skins and themes, which gives this app a special charm. However, the default theme is pink, so we’re unsure how many users will decide to stick to it.
If you’re interested in using this vintage timer, you can download it free from the link below.
No, this program doesn’t help you get up in the morning using some magic formula. It wakes up your computer from standby or hibernation.
The process is simple, you set up the time when you want your computer to wake up from sleep, you put your computer to sleep, and WakeupOnStandBy wakes it up automatically.
WakeupOnStandBy doesn’t only wake up your computer, as you can set different actions for the program to perform after it wakes up the system. For example, you can instruct it to shut down the computer, log off, or do nothing.
There are even more automatization options you can perform with WakeupOnStandBy. For example, you can program it to repeat the process every week, for two weeks, on particular days, and so on.
Besides waking up your computer from sleep, WakeupOnStandBy can also serve as your alarm clock. It supports any custom user’s playlist and even the internet radio.
If you want to download WakeupOnStandBy for free, you can do so from the link below.
Struggling to find focus as your thoughts often wander off your important assignment? Well, a program called Focus Booster might have a solution.
This program is pretty easy to use and has (in our opinion) the most beautiful interface of all programs on our list.
It uses a famous Pomodoro technique for time management (breaks time into 25 minutes intervals, with 5 minutes break).
However, Focus Booster allows you to adjust your session and break length, and work at your own pace.
As we said, the interface is straightforward, so you just set up a timer, toggle a ticking background sound on and off, toggle the main alarm sound on or off, and the countdown will begin.
Focus Booster is beautifully designed to look like a meter. It shows you the time progress and fulfills the bar with green color as the time progresses.
Focus Booster is not entirely free. You can get a free version, but you’ll be only limited to 20 sessions per month.
The Individual option gives you 200 sessions for $3/pm, while the Unlimited version costs $5/pm. You can find out more about the pricing plans in the link below.
That concludes our list of the best timer apps for Windows 10. What do you think about our picks?
There’s a chance we’ve missed some great apps or programs that you use, so don’t hesitate to tell us about your favorite timer apps for Windows 10 in the comments section below.
This article will be covering an issue that many users have reported on forums, regarding a particular Microsoft Excel issue:
I keep getting this error upon startup of a spreadsheet i made. I must have made an invalid formula somewhere but can’t seem to find it at all. Is there a way i can easily find the error and prevent this annoying message from popping up every time? Also, I notice this spreadsheet takes WAYYY too long to start up. Not sure if there’s a fix for that too.
For those of you that don’t know, a circular reference means that your formula is trying to calculate itself since you are referring to cells already included in the formula.
The full message reads as follows:
There are one or more circular references where a formula refers to its own cell either directly or indirectly. This might cause them to calculate incorrectly. Try removing or changing these references, or moving the formulas to different cells.
Further research revealed that this is a common error message, so we decided to make a list of the best ways you can overcome the circular reference error in Microsoft Excel.
How do I fix the circular reference error in Microsoft Excel?
1. Enable the iterative calculation feature
If you want a workaround for the circular reference error in Excel, you should enable the iterative calculation feature. By doing so, you will be able to use circular references without encountering any issues. Here is how to do so:
1. Open Microsoft Excel.
2. SelectFileand go toOptions.
3. SelectFormulas.
4. Check the box next to Enable iterative calculation.
5. Click Ok to apply and save the changes.
2. Find the cell causing the circular reference error
Launch Microsoft Excel
Trigger the error message
Go to the Formulas tab
Select Errors Checking
Select the Circular Reference entry
This will automatically fix any reference errors
3. Manually move the formula to another cell
If you have a simple calculation, for example, A1 + A2 + A3= A4, but you wanted to put the SUM formula on A1, A2, or A3 instead of A4, this will trigger the reference error.
That being the case, simply choose a different cell for your formula, without overlapping with the cells that already have numerical values inside of them.
By following the steps below, you should be able to fix any circular reference error and resume using Microsoft Excel accordingly.
Which one of the methods worked best for you? Let us know by leaving us a message in the comments section below.
Certain older apps or software might have a few issues when running on Windows 10.
With Office 365 suite, one of these issues is We couldn’t load the data model error that users encounter when trying to open a PowerPivot for Excel 2013 Manage window.
The issue isn’t a serious one and it can be easily resolved by using one of our solutions.
How do I fix “an issue with the data model is preventing” in Excel?
1. Change the office suite
We’re recommending from the very beginning to change the office suite to a lighter alternative.
Office 365 is a very reliable option and one of the most recommended productivity suites for business and educational purposes. However, there are a lot of lighter, cheaper, and more versatile solutions.
There are many alternative office suite options that include apps that allow you to create text documents, spreadsheets, and presentations, just as the MS Office suite does.
When it comes to compatibility, these alternatives support all major file formats and you should be able to open and edit an MS Office document with them without any issues.
Alternative options are for the most part cheaper and you can even find completely free tools that will allow you to create and edit documents at a similar level as premium tools.
2. Change Local Group Policy settings
Press Windows Key + R and type gpedit.msc. Press Enter or click OK to run it.
Once Local Group Policy Editor opens, you need to navigate to the following in the left pane:
Computer Configuration/Windows Settings/Security Settings/Local Policies/User Rights Assignment
Locate Increase a process working set Policy and double click it.
A list will appear in a new window. This list should include Users group, but if for some reason Users group isn’t on the list, click the Add User or Group button.
In Enter the object names to select enter Users and click Check Names and OK.
Users group should be now added. Click Apply and OK to save changes.
3. Turn off SQL Server Analysis Services (Tabular) services
Users reported that We couldn’t load the data model error message also appears when creating new Excel 2013 workbook and adding a table into Data Model.
In order to fix this problem, users advise to turn off SQL Server Analysis Services (Tabular) services.
Some users also suggest removing Analysis Services 2012 completely from your computer, so you might want to try that as well.
To do this, follow these steps:
Open Control Panel and double-click Add or Remove Programs.
UnderCurrently installed programs, select Microsoft SQL Server, and then click Change.
On theComponent Selection page, underSQL Server instances, select the instance that includes the instance of Analysis Services that you want to remove.
On theFeature Maintenancepage, select Analysis Services to launch theMicrosoft SQL Server Installation Wizard.
On theChange or Remove Instancepage, click Remove Microsoft SQL Server.
Click Next, and then follow the instructions on subsequent wizard pages.
So, to conclude, the We couldn’t load the data model error message usually affects PowerPivot for Excel 2013, and as you can see, it can be easily fixed by using one of our solutions.
Have you tried one of these or anything else? Let us know in the comments section below.
An OST (Offline Storage Table) file is a local copy of an Exchange mailbox stored on a user’s computer. It allows users to access their email, calendar, and contacts even offline or disconnected from the Exchange server.
However, the OST file can become inaccessible if the user’s computer crashes or if the file becomes corrupt. This article will discuss different ways to open an OST file, both with and without Outlook.
What are the benefits of OST files?
OST (Offline Storage Table) files offer several benefits, including:
Offline Access– OST files allow you to access your emails, calendar events, and contacts without a server connection. This can be useful when traveling or working in an area with poor internet connectivity.
Improved Performance – On the server, OST files can improve performance by reducing the amount of data for transmission over the network.
Data Backup – OST files can serve as a backup of your emails, calendar events, and contacts, allowing you to restore them if something happens to the original data on the server.
Data Accessibility – OST files allow you to access your data even if the server is down or you lose your internet connection.
Security of data – OST files keep a local copy of your data which can be encrypted for added security.
Data Management – OST files give you more control over how your data is organized, allowing you to easily sort, filter, and search your emails, calendar events, and contacts.
It’s important to note that OST files are specific to Microsoft Outlook and are used in conjunction with Microsoft Exchange Server.
So, let us now explore the opening of OST files on Windows 11.
How can I open an OST Data File?
1. Open OST data files with Outlook
Open Outlook and go to the File menu.
Select Open & Export, then click on Open Outlook Data File.
Navigate to the location of the OST file on your computer and select it.
Click OK.
The OST file should now be opened, and its contents will be displayed in the Outlook folder hierarchy.
Click on File, then open the OST file you want to view.
2.2 Use a specialized OST file viewer
A specialized OST file viewer or converter software does not require Outlook to be installed. These tools include OST Viewer Pro, SysTools OST Recovery, and Stellar OST to PST Converter.
They work similarly to the Recovery Toolbox OST viewer but are more robust and offer more functionality.
In conclusion, OST files are a valuable tool for accessing Exchange mailbox data offline, but they can become inaccessible if the user’s computer crashes or the file becomes corrupt.
By understanding these different methods of retrieving them, you can ensure that you can access your essential email, calendar, and contacts even if your OST file becomes inaccessible.
CBS All Access, now Paramount +, is an American streaming service offering a broad variety of content. Though many reported streaming problems on CBS All Access.
This is primarily because CBS All Access was available only in the USA, and those in other regions couldn’t access the streaming service.
With the transition to Paramount Plus, though the available countries now include the US, Latin America, Canada, the UK, Ireland, the Middle East, and Australia, it still doesn’t cover a large part of the globe.
But with users even in these countries facing streaming problems on CBS All Acess, it’s time we address things. So if you are facing the problem, read the following sections to find out all about it.
Why does CBS streaming keep buffering?
Here are a few reasons you might be encountering streaming problems on CBS All Access:
Slow Internet speed: In most cases, it’s slow Internet speed to blame for buffering and streaming issues on CBS All Access.
Issues with the CBS servers: If the CBS servers are down, there are bound to be problems while streaming content.
Problems with the device: Oftentimes, it’s the device used to stream content that is the issue.
How do I fix CBS All Access streaming problems?
Before we head to the slightly intricate sets of fixes, we recommend you try these quick ones:
If you have multiple Wi-Fi networks, switch to another one and verify whether the problem is resolved. In case there’s just one, disconnect all other devices with only the one used for streaming content from CBS All Access connected.
In case the device offers support, switch to Ethernet. Wired connections are proven to be more reliable than their wireless counterparts.
Re-login to your CBS All Access account.
Clear all the shows in the Continue watching queue before streaming new ones.
Though not an actual solution, many found that streaming CBS All Access on a mobile phone delivers a far superior experience.
If none of these work, head to the solutions listed next.
1. Clear all cookies and cache
NOTE
The steps here are for Google Chrome, though these remain similar for all browsers.
Launch Chrome, and press Ctrl + Shift + Del to open the Clear browsing data tab.
Now, choose All time from the Time range dropdown menu, tick the checkboxes for Cookies and other site data, and Cached images and files, and then click on Clear data.
Once done, verify whether the streaming problems on CBS All Access are resolved. If not, the next solution should get things going.
2. Watch the content via Amazon
Many users reported that watching CBS All Access via the Amazon channel helped them eliminate streaming problems. The reason, Amazon offers a much more advanced setup than CBS.
Even the dedicated channel on Apple TV for CBS would do. So, try one of these and check if the streaming quality improves.
3. Use a VPN
A VPN helps reroute the connection through a network in another region and is beneficial for two reasons. It helps bypass country-specific restrictions and boosts security on the web.
To circumvent network congestion, you might want to try using a VPN for a change. Private Internet Access, for instance, is one of the most stable and efficient all-around VPNs on the market that can get rid of this issue in no time.
Private Internet Access
Prevent connection issues and increase your online safety and security with this strong VPN service.
However, before you invest in a VPN such as PIA, make sure that the issue occurs due to network congestion (ISP-related).
What can I do if CBS All Access not working on Roku?
Although it appears that there’s no magical fix for this situation, here are some potential solutions:
Restart your Roku device.
Try using a wired connection instead of wireless one.
Restart your router and/or modem.
Contact CBS and see if there’s something wrong on their side.
Make sure you’re using the latest CBS All Access app version.
Update your Roku device’s firmware to its latest version.
It seems that a lot of users enjoy this streaming service on Roku. However, quite a lot of them complain about compatibility issues. Here’s another possible solution that helped many users fix CBS All Access streaming problems on Roku:
How to remove and then re-add the CBS All Access channel on Roku?
Press * on your Roku remote, and choose Remove channel.
Go to Settings.
Navigate to the System category, and choose the System restart option.
Wait for the device to reboot, and then add the CBS All Access channel back.
That’s it! By the time you reach this part, there’s shouldn’t be any more streaming problems on CBS All Access, be it on Windows, mobile, or Roku.
Do not forget to tell us which fix worked for you in the comments section below. Besides, we request you share any additional solutions that we may have missed.
You should know that not only Windows 11 Insiders got their hands on new cumulative updates today, as it seems that Microsoft hasn’t forgotten about Windows 10 users.
Speaking of Windows 11, make sure you check out build 25281 (Dev), and KB5022363 (Beta), to get a better understanding of what is happening with this OS.
The company stated that it will stop selling them after January 2023, which means you can only get licensed copies from retailers that still have them in stock.
Now, let’s finally have a look at this new update, KB5019275 for Windows 10, and what it brings to the table.
What should I know about Windows 10 KB5019275?
Earlier today, Microsoft released the latest cumulative update for Windows 10 (KB5019275) with builds 19042.2546, 19043.2546, 19044.2546, and 19045.2546.
This new update fixes an annoying bug that can cause the News and Interests feature on the Taskbar to flicker or cause File Explorer to be unresponsive.
Please note that Microsoft has stated that there will be no more optional non-security updates for Windows 10, versions 20H2 and 21H2 after March 2023.
After March 2023, there are no more optional, non-security preview releases for the supported editions of Windows 10, version 20H2 and Windows 10, version 21H2. Only cumulative monthly security updates (known as the “B” or Update Tuesday release) will continue for these versions. Windows 10, version 22H2 will continue to receive security and optional releases.
We’re only looking at two significant changes for the popular OS and a lot of fixes that were surely long overdue.
In terms of changes, KB5019275 displays storage alerts for Microsoft OneDrive subscribers on the Systems page in the Settings app.
Furthermore, the alerts appear when you are close to your storage limit. You can also manage your storage and purchase additional storage if needed.
This update also addresses an issue that might affect news and interests. It might flicker on the taskbar and File Explorer might stop responding.
Fixes
This update addresses an issue that affects cached Fast Identity Online 2.0 (FIDO2) authentication data. The first attempt to sign in fails. The second attempt to sign in succeeds.
This update addresses an issue that affects searchindexer.exe. It randomly stops you from signing in or signing out.
This update addresses an issue that affects conhost.exe. It stopsresponding.
This update addresses an issue that affects the Domain Name System (DNS) suffix search list. When you configure it, the parent domain might be missing.
This update adds support for long URL lengths of up to 8196 characters.
This update addresses an issue that might occur when the Input Method Editor (IME) is active. Applications might stop responding when you use the mouse and keyboard at the same time.
This update addresses an issue that occurs when you open Task View. It causes the desktop to stop responding.
This update addresses an issue that damages memory. The issue occurs when you use certain HD audio controller hardware.
This update addresses an issue that affects MSInfo.exe. It reports the wrong enforcement status of the Windows Defender Application Control (WDAC) user mode policy.
This update addresses an issue that affects certain systems that have firmware Trusted Platform Modules. (TPM). This issue stops you from using AutoPilot to set up those systems.
This update addresses an issue that affects printing in landscape mode in Microsoft Edge. The print output is incorrect. This issue occurs when you use Microsoft Defender Application Guard.
This update addresses an issue that affects the Resilient File System (ReFS) MSba tag. The issue causes a nonpaged pool leak.
This update addresses an issue that affects the Resilient File System (ReFS). The issue causes high nonpaged pool usage, which depletes system memory.
This update changes how you enable the Windows diagnostic data processor configuration in preparation for EU Data Boundary support. To learn more, see Enable Windows diagnostic data processor configuration.
Known issues
Devices with Windows installations created from custom offline media or custom ISO image might have Microsoft Edge Legacy removed by this update, but not automatically replaced by the new Microsoft Edge. This issue is only encountered when custom offline media or ISO images are created by slipstreaming this update into the image without having first installed the standalone servicing stack update (SSU) released March 29, 2021 or later.
We know you are also probably wondering with versions of Windows 10 will get the update,so we’re going to share that right now.
The new update is available on:
Windows 10 Enterprise Multi-Session, version 20H2
Windows 10 Enterprise and Education, version 20H2
Windows 10 IoT Enterprise, version 20H2
Windows 10 on Surface Hub Windows 10, version 21H1, all editions
Windows 10, version 21H2, all editions
Windows 10, version 22H2, all editions
Leave a comment below if you have discovered any other issues after downloading and installing this recent cumulative update for Windows 10.
Overclocking is the process of making your CPU run faster. Overclocking is perhaps the best way to make the Windows PC run faster by tuning the PC to modify the core, voltage, and memory settings. And an Intel overclocking tool comes to your aid.
Also, experts recommend overclocking testing software to ensure your PC can handle the strain. And once you are confident, find out how you can overclock the Intel CPU and the best overclocking tools.
How do I OC my Intel CPU?
Here are a few ways you can overclock the Intel CPU:
Improve the RAM performance – Of the many components, overclocking the RAM significantly affects the PC’s performance.
Overclock the CPU cache – Another vital component to overclock is the CPU, which amazingly boosts the computer’s performance.
Boost the motherboard – While motherboards manufactured earlier and cheaper models don’t support overclocking, the new ones offer the option, thus allowing users to boost speed.
Some of the benefits of overclocking are:
Boosts performance – One of the primary benefits of overclocking is improving the PC’s performance.
Allows running resource-intensive apps – Several apps require computing power the computer might be unable to deliver, but with overclocking, you can quickly run these.
Saves money – Overclocking saves a ton of money since users don’t have to purchase a high-end component but can get the same performance from a cheaper option.
What is the best Intel overclocking tool to use?
NOTE
All the tools listed here can be used to overclock the Intel processors and work well, as per reviews and our research. In case you are looking for other options, we have a dedicated guide on the best GPU overclocking tools.
This is a simple Windows-based performance-tuning software for newbies and pros alike, especially overclocking enthusiasts.
Intel XTU helps you overclock, monitor, and stress a system with a software interface that exposes its robust capabilities standard in most platforms, plus you get special new features for net Intel application processors and Intel motherboards.
It is powerful and worth the installation, with features like real-time graphs and charts about CPU utilization, temperature, and frequency of the process.
The manual tuning tab lets you tweak your processor, graphics, voltage, and memory, and the Stress Test modules allow you exercise your CPU, memory, and graphics to determine if the system is still stable.
Also, with Intel XTU, you can perform changes and setups without restarting your computers. The software also comes with the option to save specific profiles. This is of great use if you want to keep track and reuse some overclocking settings.
The latest Intel Extreme Tuning Utility version adds support for the next-generation Intel Core processors. So, even if you own an old computer or the latest 8th or 9th-generation Intel CPU, this software can help you optimize your overclocking settings.
Other key features of Intel Extreme Tuning Utility Include:
System information tab with details about the motherboard, processor, and BIOS
You can overclock specific controls from within the platform without the need to access the BIOS
Remember that using the Intel XTU for overclocking is not advisable unless you know what you are doing. Some risks come with overclocking, so make sure you are prepared. It is, nevertheless, one of the best overclocking software for Intel CPUs.
Intel Performance Maximizer is meant to help users with unlocked 9th or 10th Generation Intel processors manage the performance of their devices.
The software has an advanced system analysis feature that provides recommendations regarding the optimal settings to overclock the CPU. In addition, it lets you know the safe parameters that shouldn’t be surpassed for an optimal overclocking process.
Similar to Intel XTU, Intel Performance Maximizer provides an easy-to-navigate interface, with automatic overclocking included. In addition, there is no need to access BIOS settings.
On top of that, Intel provides a step-by-step guide on how to overclock with this software. In addition, they give tips and tricks regarding safety measurements and backup suggestions.
Other key features of Intel Performance Optimizer include:
Built-in tests
Monitors overclocking stability
Monitors the ability to reset
The software is free and compatible with Windows 10 64-bit RS5 or newer operating systems. In addition, it works for most Intel CPUs.
CPU-Z is another CPU overclocking software that you could use with Intel. Also, it’s compatible with other CPUs, making it the perfect companion.
Though not as user-friendly and intuitive as the other options, CPU-Z is highly effective at its job. It allows overclocking of the CPU, Memory, Motherboard, and Graphics, amongst others.
Some of the key features include:
Provides detailed information about the hardware
Offer real-time data on each core’s frequency
Free to use
These were some of the best Intel overclocking tools you can download on the computer. But remember, excessive overclocking can damage the components and lead to severe issues with the PC. So, be careful and tread with caution.
Microsoft just released a great wireless headphone set for their Xbox console. They are the latest rage in the gaming community, thanks to their affordable price, large range of connectivity options, and compatibility with the latest Xbox consoles.
Of course, you can’t just go and buy the product without knowing how well it performs, and the best way to do so is to compare it with another top Xbox headphones set already on the market.
Because we were looking to compare the newest Microsoft product with the best of the best, we’ve decided to look over how well it fairs compared to theSteelSeries Arctis 9X, a current favorite in the Xbox gaming industry.
Which are the better wireless Xbox gaming headphones?
Connectivity and compatibility
As far as connectivity goes, both headsets are compatible with the Xbox Wireless protocol, so they are easy to pair with any Xbox One or Xbox Series X / S console,
Additionally, they are both Bluetooth–compatible, which is not where the string of common features ends since they both support both protocols simultaneously.
Microphone quality
This next criterion goes straight to the SteelSeries Arctis 9X since it’s superior to the Microsoft headphones in every single way.
This is mostly because of the noise-canceling technology which derives from the bidirectional design of the microphone, the same used by aircraft carrier deck crews.
Admittedly, the Microsoft Xbox Wireless Microphone does come with an equalizer from where you can mute the effects of environmental noises. Still, you need to use the Xbox Accessories app for Windows 10 or Xbox, and the software isn’t yet tweaked.
While it does work effectively during calls, let’s face it, calls are the last thing on your mind if you’re buying them for gaming.
Sound quality
Sound quality is probably the first thing you want to hear about when you consider investing in a new pair of headphones, and in the case of our two entries, the SteelSeries Arctis 9X takes the cake.
While both headphone sets support Surround Sound, the sound clarity of the SteelSeries headphones is greatly superior.
Those of you that like listening to crystal-clear music will easily find flaws in the Microsoft Headphones’ quality, especially during moments when music may sound mixed up.
This may not sound like much of a deal-breaker, especially if you’re talking about gaming headphones, but if you’re the type of person that likes muting their game to listen to YouTube or Spotify in the background, you’ll start noticing the kinks in sound quality.
Battery life
The SteelSeries Arctis 9X is a winner yet again, boasting an impressive 20+ hours of battery life on a full charge, and Microsoft’s headphones aren’t that far behind this time, with 15h of free-roaming from a single charge.
Whether this difference is important or not is debatable, although you have to admit that if you’re on the road, 5 extra hours of your favorite tunes do come in handy.
Design
Whether or not one pair of headphones looks better is clearly a matter of personal preference.
However, one must admit that Microsoft’s headphones do give away their intended purpose with a more game-oriented design, while the 9X looks more like a well-rounded pair of wireless headphones that you can wear to listen to music on the streets.
Build and comfort
In terms of how they felt, both sets came with enough padding to make them feel very comfortable, although the SteelSeries did feel a lot softer.
Another thing to consider is the fact that these two headphone sets are built from totally different materials:
The Microsoft Xbox Wireless Headphones are focused on being flexible and lightweight design with an adjustable headband for extra comfort during extended play sessions.
The SteelSeries Artis 9X are made similarly, although the headband is made of high-quality steel, so they feel more durable and reliable.
Price tag
During this entire article, it seems that pretty much every single criterion favored the Arctis 9X, but there’s one last thing you need to take into consideration, and that is the price tag.
While the Microsoft Xbox Wireless Headphones are worth just $99, their counterparts are worth twice that much, so the difference in performance and quality is almost justified.
We say almost because from a price/performance point of view, the scales tip in favor of Microsoft’s headphones, as they may not be top-dollar in every department, but they come in at a close second for just half the price.
Microsoft Xbox Wireless Headphones
15h battery life
Lightweight and flexible design
Easy connectivity via Bluetooth and Xbox protocol
Easy sound controls via the Xbox Accessories app
Boasts Windows Sonic, Dolby Atmos, and DTS Headphone:X
If peak performance, a long battery life, and crystal-clear sound are what you need, and you don’t care what it costs, the SteelSeries Arctis 9X is for you.
Bottom line is, choosing between these two pairs of headphones is simply a matter of choosing what you value most:
Affordability
Peak-performance
Both are solid choices for any would-be gamer, but despite being the underdog in terms of sheer specs, Xbox’s headphones win just because of how well-rounded and affordable they are.
Microsoft Excel is a major component of the Microsoft Office Suite and acts as the official spreadsheet software.
Because of this, there isn’t a person alive that hasn’t used or at least heard of Microsoft Excel. However, it is just a program after all, and no program is safe from the occasional issues and bugs.
Such would be the case with an error message some users have been reporting, where Microsoft Excel states that it cannot access a file.
I have a large Excel 2013 file that I’m modifying. When I open the workbook I receive errors […] Microsoft Excel cannot access the file…
What can I do if Microsoft Excel cannot access any file?
1. Make sure all the external links in the workbook are valid.
This error usually occurs when you press an external link within a workbook, but the name or the file path of the linked item has been changed.
This leads to the error message described above. Because of this, there are only a couple of things that you can do to remedy this problem:
Make sure that the linked items are not moved or renamed
Make sure the linked items are updated within the workbook if modified
Delete the linked items if they cannot be found anymore
Finding all the external links within a workbook can be a daunting task, especially if the workbook spans several pages and hundreds of cells.
Because of this, one simple solution to finding them is to find links used in formulas:
Open Microsoft Excel
Press Ctrl + F
Click Options
Enter .xl In the Find what box
In the Within box, click Workbook
In the Look in box, click Formulas
Click Find All
This will bring all the external links to other workbooks together, and from here you can update them all.
2. Install the latest updates for Microsoft Excel
Open Microsoft Excel
Click onFile
Click Account
Select Update Options
SelectUpdate Now
Let the updatesrun their course
3. Disable add-ins
Open theExcel sheet
Go to the File menu
Click onOptions
Click onAdd-ins
Select Excel add-ins and click on theGo button
Uncheckall boxes and click OK
By following these steps, you should be able to get rid of the error message in Microsoft Excel.
Know of any other solutions to this common Microsoft Excel problem? Let us know in the comments section below!
Command Prompt is a powerful tool that allows users to perform various tasks on their Windows 11 operating system.
However, some users have reported that the Command Prompt keeps crashing on their computers. This issue can be caused by various factors, including corrupt system files, outdated drivers, and malware.
This article will explore solutions to help you fix the Command Prompt keeps crashing issue on Windows 11.
Why does my Command Prompt keep crashing in Windows 11?
There are a few reasons why the Command Prompt may keep crashing on your Windows 11 system. Some possible causes include the following:
Corrupt system files – Certain files may be corrupted, causing the Command Prompt to crash.
Outdated drivers – If the drivers for your hardware components need to be updated, they may not be compatible with Windows 11, causing the Command Prompt to crash.
Malware – Malicious software, such as viruses or malware, can cause the Command Prompt to crash.
Conflict with other software – Some third-party software may conflict with the Command Prompt, causing it to crash.
Insufficient memory or storage – If your computer doesn’t have enough memory or storage, it may not be able to run the Command Prompt properly, resulting in crashes.
System errors – Some system errors may cause the Command Prompt to crash.
It’s important to note that this is a partial list, and there may be other reasons why the Command Prompt keeps crashing on your Windows 11. To fix the issue, you should try different troubleshooting methods to identify and resolve the specific cause of the problem.
What should I do if my Command Prompt keeps crashing in Windows 11?
Before you start these fixes, you should:
Do a simple reboot. A reboot will force some problematic processes to end and could repair certain minor PC issues.
1. Update Windows
Press Windows + I to open the Settings app.
On the right pane, press Windows Update, then select Check for updates on the right pane.
You may need to restart your computer.
Updating Windows can stop command prompt crashes by installing the latest security updates and bug fixes that Microsoft may have released.
These updates can address known issues causing command prompt crashes, including issues with system files or drivers. Additionally, updates can add new features and improvements that can improve the overall stability and performance of the operating system, which can also help prevent command prompt crashes.
However, it’s worth noting that updates can also introduce new bugs, so it’s important to keep your system updated and a backup in case something goes wrong.
2. Update drivers
Right-click on the Start menu and select Device Manager.
Expand a category, right-click on the driver, and select Update driver.
Updating drivers can help prevent random command prompt crashes on Windows 11 because newer drivers may contain bug fixes and compatibility updates that can resolve issues causing the crashes.
Additionally, new drivers may have improved performance and stability that can help prevent crashes from occurring.
One of the most reliable third-party driver updater software is Outbyte Driver Updater because it has the automatic functionality to detect outdated or missing drivers and find the latest updates from its database.
Outbyte Driver Updater
Save time and effort and let Outbyte Driver Updater locate the latest updates for your drivers.
Press the Windows key, type windows security, and choose the Windows Security app.
Click on Virus & threat protection.
Select Scan options.
Select Full scan and click the Scan now button.
A malware or virus infection can cause the Command Prompt to crash. You should use a reputable antivirus program to scan your computer and remove any malware or viruses that are found.
4. Uninstall conflicting software
Press Windows + R, type control panel, and hit Enter.
Select the Uninstall a program option.
Click on the program you wish to uninstall from the program list and select the Uninstall option.
Finally, follow the prompt to complete the uninstallation.
Uninstalling conflicting software can help stop CMD crashes because software conflicts can cause issues that can lead to crashes. When two or more programs compete for resources or access the same files or settings, it can cause errors or crashes.
Uninstalling one of the conflicting programs can free up resources and resolve the conflict, preventing crashes. Additionally, sometimes software can be outdated and incompatible with the current version of Windows or other installed software; uninstalling it could help remove the problem.
Press the Windows key, type powershell, and click the Run as administrator option.
Write the script below and hit Enter. Get-AppXPackage -AllUsers -Name Microsoft.WindowsTerminal
Exit the PowerShell and see if the crashes continue.
6. Reset or reinstall Windows
Resetting or reinstalling Windows can stop CMD crashes by replacing any corrupted or missing system files that may be causing the crashes.
Additionally, it can also remove any malware or software conflicts that may be causing the crashes. However, it’s important to note that it may not be the only solution to command prompt crashes, and it’s essential to try to identify the cause of the crashes before resorting to resetting or reinstalling Windows.
In conclusion, if you’re facing this issue on your Windows 11, you can try some of the solutions mentioned in this article.
These solutions include running the System File Checker, updating drivers, and scanning your computer for malware. If the issue persists, you can also try resetting or reinstalling Windows 11.
Remember to always back up your important files before making any changes to your system. If you’re still having trouble, it’s best to seek help from a professional or contact Microsoft support. You’ll be back to using the Command Prompt with the right fix.
Sometimes, not even the Internet is perfect. Realistically speaking, it fails our expectations many times. And to top it off, sometimes it even throws some confusing errors.
For instance, when you can’t reach a device, so you try pinging it. The ping test shows the host as unreachable and zero packet loss. Even if you’re tech-savvy, this situation might put a huge question mark above your head.
However, we’re here to demystify this issue once and for all.
What does it mean when ping says destination host unreachable?
The destination host unreachable error message denotes that the host you are trying to ping is down. This error might also mean the host is not returning to ICMP echo requests.
Why is the destination host unreachable?
There are many reasons why a host can be or become unreachable. Even if you’re on the same network, the target device (host) might have different connection settings then you, an aggressive firewall, or even some spoofing, so you can’t exactly pinpoint the main cause.
Here’s a list of the most common reasons why the host might be unreachable:
The target computer might be off
An overly-protective firewall that blocks any incoming requests
Improper cable connection
Spoofing
Misconfiguration of Default Gateway on the source PC (yours)
The point is that if you can’t reach a host, it’s mainly because there’s no route from the local device (yours) to the remote one (host). Either that or something blocks your attempts to connect to the hosts.
Nevertheless, your pings never reach their destination, and still, there’s no reported packet loss.
Destination host unreachable but no packet loss
Ping and packet loss are somewhat tied, but they’re entirely different. For once, ping tests the reachability of certain devices (hosts), whereas packet loss is the percentage of packets that didn’t reach the destination.
So why there’s no packet loss even though the ping destination host is unreachable? The answer is quite simple. If there’s no route from the local system (yours), then the packets you sent were never placed on the route.
Therefore, the requests will always have a 0% packet loss since nothing was sent. Trivia fact: on most Linux systems, pinging reports 100% packet loss.
Destination host unreachable routing issue
If you’ve encountered this issue before, you’ve most likely seen one of these two errors:
Destination Host Unreachable – this error occurs whenever there’s no route between the local system and the destination
Reply from x.x.x.x: Destination Host Unreachable – there’s something wrong with a remote router (x.x.x.x is the IP address of the troublesome router)
There’s yet another scenario when your request time out. After sending echo requests, the PC starts listening for echo replies. The default waiting time for an echo reply is one second.
If the device doesn’t receive the reply within 1 second, the request will time out, and you’ll receive a suggestive error message (i.e., Request Timed Out). This situation is mainly caused by network congestion but can also have other causes.
For instance, silent discards, poorly routed networks, or packet filtering can contribute to request timeouts.
How to fix destination host unreachable ping?
If the cause of the error is improper Default Gateway configuration, we’ll show you how to fix it. Perform the following steps:
1. Confirm your default gateway
Launch your browser, access any non-local website (such as google.com), and check if it goes through.
Press the Windows key, type cmd, and click Run as administrator under Command Prompt.
Now, type the command below (replace x.x.x.x with the IP address of the unreachable host) and hit Enter to run it: ping -6 x.x.x.x
If you are still getting the destination host unreachable error, run the traceroute command below to trace the remote gateway handling your requests: tracert -6 -d x.x.x.x
If you notice a second IP address (shown with the time of the request) in the traceroute, you need to confirm which addresses are set as the Default Gateway.
To do that, type the commands below and hit Enter after each: netshinterface ipv6interface ipv6>showconfig
Finally, check if the Default Gateway shown differs from your IP.
If the Default Gateway shown is different from your IP address, you need to proceed to the next stage to change it.
Right-click the Internet icon on your taskbar and select Open Network & Internet settings.
Select Change adapter options.
Now, right-click the LAN network you want to change the gateway for and select Properties.
Next, choose the Internet Protocol Version 6 (TCP/IPv6) option and click the Properties button.
Tick the radio button for Use the following IPv6 address.
Type your correct IP address in the Default Gateway box.
Finally, click the OK button and restart your PC.
After restarting your PC, try to ping the host again and check if you still get the Destination host unreachable error.
If you are still getting the error, you should disable your firewall and check if the host device is on and connected. You can also check the network cables to be sure they are fine.
You can get 0% packet loss, even when hosts are unreachable
Long story short, you shouldn’t stress over a simple semantics issue. Even if Windows’ ping tool reports 0% packet loss, it’s because there’s no connection and no packets are being sent.
Just try using the ping tool in Linux, and you’ll probably receive a 100% packet loss. The important thing is to understand why such an error occurs and find ways to fix it.
With this, we can conclude this extensive guide on how to fix the destination host unreachable error.
What new features do builds 22621.1180 and 22623.1180 have?
Today, the Redmond tech giant released builds 22621.1180 and 22623.1180 (KB5022363) to the Beta Channel for Windows Insiders.
To give you just a short sneak peek, the new build brings new Widget improvements, a cloud storage alert, as well as many bug fixes.
First, let’s look at the fact that the Settings app supports new visuals on your Accounts page to provide a visual overview of your cloud storage usage across Microsoft products.
These new visuals include a consolidated cloud storage bar that shows your storage usage for each product and notifies you if you’re running low on storage.
The company has also removed the quota bar from our subscriptions card to eliminate duplication on these visuals.
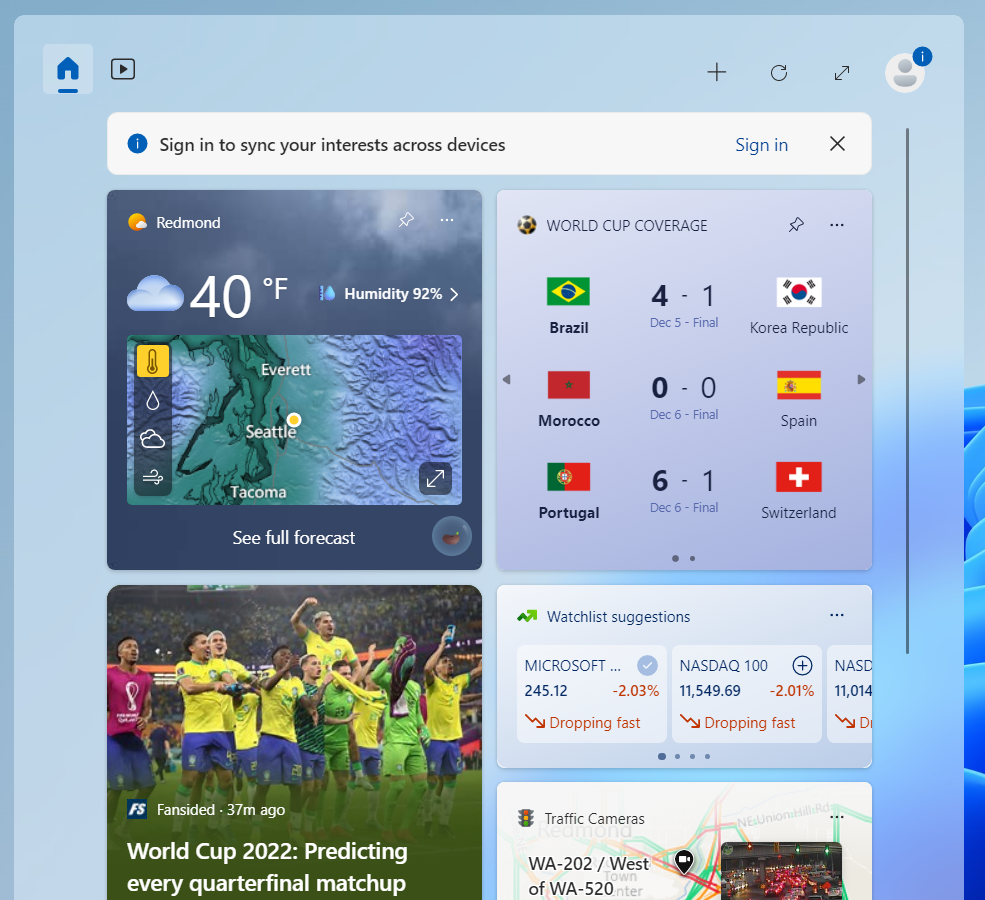
We also have to mention that in the most recent update for Widgets, Microsoft is removing the sign-in requirement for the widgets board and making it available for all users.
Now, you can now get weather updates on the taskbar, pin widgets from your favorite apps, or access personalized dynamic feeds without an account.
This week, however, the list of fixes is pretty small, fact that encourages us to believe that important changes are actually being made.
We’ll look at these changes closer right now and see exactly what we are dealing with after downloading and installing this build.
Fixes in Build 22623.1180
[Taskbar & System Tray]
Fixed an issue where right clicking on certain icons in the hidden icons flyout would make the flyout dismiss rather than bringing up the context menu for that icon.
Fixed an explorer.exe crash which could happen when attempting to load certain app icons.
Task view should no longer show behind the taskbar when using tablet-optimized taskbar options.
Fixed an issue that was preventing taskbar from showing in Safe Mode when using the new search box option.
[Task Manager]
When the Task Manager window size is small and the search box collapses to an icon, hovering over the icon will now show a tooltip.
Fixed a few issues with how icons and labels were displayed when a contrast mode is enabled.
[Other]
Fixed an issue where Braille devices were incorrectly saying there was no screen on the latest version of Braille.
What can I do if I can’t install KB5022363?
Press Win+ I to access Settings.
Select the System category and click on Troubleshoot.
Press the Other troubleshooters button.
Press the Run button next to Windows Update.
Also, make sure to report any other issues you might come across, in order for Microsoft to address and improve the overall OS experience for us all.
This is everything you can expect if you are a Windows Insider. Leave a comment below if you found any issues since installing this build.
Are you facing issues on Discord when streaming Netflix? If yes, you aren’t alone, as you will see multiple user reports and queries regarding Discord showing a black screen on the Netflix stream. This could be frustrating as it could ruin the Netflix screen share time you might have planned with your loved ones.
This guide will give you a bunch of solutions, along with why the Discord screen goes black when you stream Netflix. Netflix and Discord teamed up to allow screen share without issues, but nothing is perfect. Thankfully, this guide is here to help you out.
Why the Discord screen goes black during a Netflix stream?
After some research, we have found the most common reasons why the Discord screen could go black during a Netflix stream or Discord not stream Netflix altogether.
The Discord app isn’t updated: You should ensure that you are running the latest version of the Discord app, as the previous version might have a bug related to the issue.
Hardware acceleration is enabled: When you don’t have a GPU supporting hardware acceleration, turning it on will leave your Discord screen black.
Full-screen mode causing issue: It has been reported that switching to the full-screen mode often leads to a black screen when screen sharing.
Extensions are causing conflict: There are chances that the wings on your browser interrupt the service or feature of Discord, causing the screen to go black.
Discord cache files and app data are causing issues: Discord collects data in the background to open your frequently visited channels and save your personalized settings quickly. However, this can lead to a black screen during a Netflix stream on Discord.
How can I fix the Discord black screen issue during a Netflix stream?
1. Disable hardware acceleration
1.1 In the Discord app
Launch the Discord app.
Click on the Gear icon at the top to open Settings next to your profile.
Select Advanced from the left pane.
Toggle OFF Hardware Acceleration.
Click Okay to confirm.
Your Discord app will restart automatically. Now, you can try a Netflix stream and see if this resolves the problem or not.
1.2 In your Windows PC
Press the Win + I keys to open Settings.
Click on Display.
Click on Graphics.
Hit the Change default graphics settings link.
Toggle OFF the Hardware-accelerated GPU scheduling.
1.3 On your browser
Launch Google Chrome.
Click on the 3-dot icon.
Click on Settings.
Click on System from the left pane.
Toggle OFF Use hardware acceleration when available.
Turning off the hardware acceleration will not force the GPU to enhance the computer’s performance. This often is why the Discord screen goes black when you stream Netflix.
Right-click on your graphics card and select Update driver.
Click on Search automatically for drivers.
Follow the on-screen prompts to install the latest graphics driver on your PC.
Restart your PC.
This is the usual way to update the graphics or other drivers on your PC. However, this could be tiring if you update all drivers on your PC because this requires you to follow the same steps for all drivers.
To ease the process, we would recommend you use a third-party tool called Outbyte Driver Updater. Using this tool, not only can you update drivers on your PC, but it can help you schedule driver scans to keep them up to date all the time, create driver backups, and use its efficient download manager.
Outbyte Driver Updater
Assure that all your drivers are up to date with specialized driver support and expert solution.
Check the boxes for Cookies and other site data and Cached images and files options.
Click on the Clear data button.
3.2 Mozilla Firefox
Click on the 3-line icon.
Select Settings from the drop-down.
Click on the Privacy & Security button from the left.
Under the Cookies and Site Data section, hit the Clear Data button.
Check the boxes for Cookies, Site Data, and Cached Web Content options.
Click on the Clear button.
Cache files store all your personalized settings for the websites or the web apps you use on a browser. If anything happens to these cache files, it can trigger several issues.
That is why it is better to clear the browser cache frequently and check if this resolves the issue. You can also switch to a different browser and see if this fixes the problem, as the error could be associated with a particular browser.
We have a list of some of the best browsers you can install on your PC and enjoy some great features over the browser you are already using.
4. Disable browser extensions
Launch Google Chrome.
Click on the 3-dot icon.
Select Settings.
Click on Extension.
Toggle OFF all the extensions one by one.
There are chances that the third-party extension that you have installed on your browser is causing the issue and might be conflicting with Discord.
5. Disable any VPN
VPN or Virtual Proxy Network allows you to view geo-restricted content or websites. If you are confused about which VPN to use, we suggest you check out our guide, which lists some of the best VPNs you can try on your PC.
However, if you are experiencing a Discord black screen during a Netflix stream, we suggest you disable the VPN and check if this fixes the issue.
6. Change Discord video settings
Open the Discord app.
Click on the Gear icon at the top to open Settings next to your profile.
Click on Voice & Video section on the left pane.
Under the Video Codec section, toggle OFF OpenH264 Video Codec provided by Cisco Systems, Inc. and H.264 Hardware Acceleration options.
Scroll down and under the Screen Share section, toggle ON the Use our latest technology to capture your screen option.
Start a Netflix stream and check if this resolves the issue or not.
7. Switch to Windowed mode
Discord allows you to enter the fullscreen mode by pressing the Ctrl + Shift + F keys. You can press the duplicate keys to get out of the fullscreen mode and put Discord on Windowed mode.
8. Clear the Discord app cache
Press Win + R keys to open the Run dialogue.
Type %appdata% and press Enter.
Locate the discord folder and open it.
Open the Cache folder.
Press Ctrl + A to select all files and press the Delete button.
You should clear the app cache frequently as you tweak the app settings multiple times as per your convenience, and if this gets corrupted, it could cause various issues with your PC if the settings do not match those of the stored cache files.
That is it from us in this guide. If you are getting a robot voice in Discord, you can check out our guide and fix it in no time.
Several users have reported that the Discord member list isn’t loading, so we suggest you check out our guide to fix it. We also have a bunch of solutions that will help you improve game crashes while streaming on Discord, and also some methods to fix the Discord mic not working problem.
It has been the source of much speculation of late, and it looks like we may finally, at long last, “very soon” know when we’ll get our hands on Starfield. At least, that’s according to Bethesda’s Latin America Instagram account, BethesdaLATAM.
As reported by PCGamesN, the account shared a post stating that “very soon we will announce it.” The post was a response from a user inquiring about a release date for the game.
Adding more fuel to the speculation is that fact that the game’s release date on Steam was recently changed from “2023” to “coming soon.” Though this doesn’t give us a whole lot to go on, it would seem to bolster the idea that an official release date is very imminent.
Xbox and Bethesda will livestream a Developer_Direct event next week on January 25th. During this event Minecraft Legends, Forza Motorsport and Redfall will be showcased, with a special Elder Scrolls Online event following. It is likely that release dates for Forza Motorsport and Redfall will be unveiled. A dedicated showcase event for Starfield will follow, though the broadcast date for this is thus far unannounced.
The Microsoft ExcelFile not loaded completely error arises when users try to open an Excel spreadsheet or import a CSV file so big that is not supported by Excel. When that error arises, the File not loaded completely dialog box opens which explains why the error message appears. That dialog box states:
This message can appear due to one of the following : The file contains more than 1,048,576 rows or 16,384 columns… The area that you are trying to paste the tab-delineated data into is too small.
That error often arises when users try to open spreadsheets that eclipse Excel’s maximum worksheet limit specifications for total columns and rows.
Alternatively, you might try to import CSV data into a sheet that eclipses Excel’s maximum limit specs. The Excel specifications and limits page provide full details for all the application’s maximum limits.
How do I fix the File not loaded completely error?
1. Open the spreadsheet with alternative software
Most spreadsheet applications support Excel’s file format. So, try opening the Excel file in an alternative freeware spreadsheet application that might not have the same maximum limits.
If you can open it in alternative spreadsheet software, you can reduce the number of rows and columns in the file so that it opens in Excel.
Alternatively, try opening the spreadsheet with a universal file opener (UFO) software. File Viewer Lite is a freeware UFO software you can add to Windows by clicking Free Download on its page. After installing it, open the Excel spreadsheet in File Viewer Lite.
Note, however, that you can only save modified spreadsheets with File Viewer Plus, which is the full version.
2. Import the Spreadsheet into Access
Open a blank database file in that application
Click the External Data tab
Click the Excel button
Click Browse to select the Excel spreadsheet
Select the Import the source data into a new table in the current database
Click the OK button
Click the Next and Finish buttons on the Import Spreadsheet Wizard window
Thereafter, you can view the spreadsheet’s content within its database table. You can also remove table rows and export the modified file back to Excel as a spreadsheet.
3. Split a CSV file before importing it
If the File not loaded completely error arises when you try to import a CSV file, try splitting the CSV with the Split CSV File program.
Thereafter, you can import the split CSV file into separate Excel worksheets.
4. Repair a corrupted Excel file
The File not loaded completely error can also be due to a corrupted Excel workbook. To fix that, click the File tab in Excel.
Select Open and then the folder that includes the Excel file.
Select the Excel file that doesn’t open.
Click the arrow on the Open button.
Then select Open and Repair on the menu.
Select the Repair option if available.
Those are some of the resolutions that might fix the File not loaded completely error. To ensure that error doesn’t arise, make sure your spreadsheets don’t eclipse Excel’s max limit specifications.
The best way to do that is to utilize multiple sheets within a workbook as the column and row max limits apply more specifically to single worksheets.
Microsoft OneDrive cloud solution has been there for some time and has a big piece of the market share. Yet, many report issues with it, and a common is the OneDrive is full error notification that keeps appearing.
Do we need to say that this is a false alarm and there’s plenty of free space? We provided a few solutions that should come in handy for that purpose. So if you’re seeing this OneDrive is a total error regularly, check them out.
Why is my OneDrive saying it is complete?
Multiple user reports say that they see the OneDrive is full notification on their Windows PC. While on the one hand, this could be a genuine error that OneDrive is facing, or it could be a false alarm because of issues with OneDrive itself.
Here are some of the most common reasons you can come across this error:
OneDrive is genuinely entire – In this case, you should consider getting a storage upgrade.
OneDrive program errors – Often, because of a program or glitch, you will encounter the OneDrive is full error. Reinstalling the conflicting program usually fixes the issue.
There is a presence of an occasional bug – A simple bug can also cause multiple issues, so relinking your account is a safe option to fix this issue.
Installation problems – There are chances that some essential files went missing because of a problematic installation.
How do I free up space on OneDrive without deleting files?
Press Windows + E to open File Explorer.
Click on OneDrive on the left panel.
Head to the folder you wish to move to free up space in OneDrive.
Select the folder and press the Ctrl + C buttons to copy it.
Navigate to the path where you would like to save the local copy of the folder.
Press Ctrl + V to paste the folder and move it from the OneDrive cloud.
Head to OneDrive in the left panel of File Explorer, and delete the original file.
How can I fix OneDrive’s full error in Windows 10?
1. Unlink your account
Right-click on theOneDrive icon in the notification area on your taskbar, click on the gear icon, and openSettings. If you don’t see the OneDrive icon, launch the app, and it should appear.
Select theAccount tab.
Click on theUnlink this PC button.
Sign in with your credentials.
Select the location of the OneDrive folder.
The first obvious step is to try unlinking your account from the current machine and link it back again. By doing so, you should be able to resolve occasional bugs.
Since we’re confident you have a lot of free space, and the error keeps popping up, the chances are that the simple unlinking will do the job.
2. Change the sync folder on your PC
In the Notification area, right-click on the OneDrive icon and open Settings.
Under the Account tab, click on the Unlink this PC button.
Log in with your credentials.
Select another location for the local OneDrive folder and the files you want to sync. If there are a lot of files, the sync might take some time, depending on their size and your capacity.
Another possible reason for the OneDrive is full error is truly the lack of space. Make sure you have enough space on the partition which holds synced files.
If you’re in a shortage of free space, sync your files and delete the ones you don’t need for immediate use. Then, you can access them later on through the browser either way.
On the other hand, if one partition is complete, you can transfer your OneDrive folder to a secondary cell.
3. Reset OneDrive
Press the Win+ R to open the elevated Run dialogue.
In the command line, paste or type the following line and press Enter. %localappdata%MicrosoftOneDriveonedrive.exe /reset
Right-click the OneDrive icon in the taskbar’s notification area and open Settings.
Sign in again.
Besides the reinstallation of OneDrive (which is possible as users can remove OneDrive nowadays, which wasn’t the case before), you can reset its settings.
There’s a particular executable file for this purpose, and it’s hidden in the AppData folder. Once you run it, it should refresh the OneDrive installation.
In the Search bar, type OneDrive and expand OneDrive.
Uninstall OneDrive.
Now, follow this path. C:Users:Your Username:AppDataLocalMicrosoftOneDriveUpdate
Double-click theOneDriveSetup.exe file and run the installer.
After the installation completes, log in and look for changes.
If the step above proposition fails, reinstallation is the last resort. You don’t need to download OneDrive again, as its setup files are permanently stored on your system.
Reinstalling OneDrive will give you a fresh start from scratch, so you’ll need to set it up again.
If you keep having issues with OneDrive, you can switch to a different storage/backup utility. Again, plenty of tools are available, and the best backup software supports hundreds of file types with no issues.
5. Use the browser instead of the desktop client for the time being
Finally, if none of the provided solutions helped fix the OneDrive is full error, we’re afraid there’s not so much we can do.
You should send a ticket to Microsoft explaining your problem. And maybe, and just perhaps, they’ll find it worth addressing in future update releases.
Alternatively, you can always use the browser version of OneDrive to access your files, upload new ones, or download old ones without issues. Just log in with your Microsoft credentials, and you should be ready.
Does deleting files on OneDrive delete from the computer?
In simple terms, yes, if you delete any file from the OneDrive folder on your PC, it is deleted not only from the cloud but from your PC, in case you do not have a backup.
When you delete a file from the OneDrive folder, it goes into the Recycle Bin, where you have a chance to restore it.
So, to avoid losing the file, you can take a copy of it and store it locally on your PC, so it is available for access in case things go south with the OneDrive cloud folder.
Click on the cogwheel icon next to your profile picture to open Settings, and select Options from the list that appears.
Now, click on the Manage Storage option from the left pane.
Click on the Earn more button under the Your additional storage section.
You can share your link with your friends or family members. Both you and your friend will receive an extra 0.5GB of storage space when they register for a OneDrive account.
2. Avail bundled offer
Several bundled offer campaigns are attached to electronic products such as smartphones or laptops.
Whenever you purchase a new smartphone or laptop, check for any such benefits. For example, in the past, Samsung has bundled 100GB of free OneDrive space for a timeline of 2 years, which is fantastic.
Though this may not be a feasible option for everyone to go and purchase a new gadget just for a few GBs of storage, if you are in line to purchase a new electronic product, especially a smartphone or a laptop, you can avail yourself of such benefits.
3. Get yourself multiple Microsoft accounts
Another way of getting free storage is to create multiple Microsoft accounts. For example, you get 5GB of cloud storage with one Microsoft account.
So, you can create an additional three accounts to take the free storage space total to 20GB. While managing each statement can be a task, it is another quick and easy way of getting free OneDrive space.
That should conclude it. By now, you should have fixed issues if OneDrive is full and can now easily upload more files.
If you have questions or suggestions regarding the OneDrive being a total error in Windows 10, please share them with us in the comments section below.
Many users have reported facing error code 0x80860010 while logging into one of the Microsoft apps, including OneNote, Office, OneDrive, etc. This error could stop you from accessing or using the app. Fortunately, we can fix this issue in no time.
This guide will discuss methods to fix the issue after discussing its causes.
What causes login error 0x80860010 in Windows 11?
There could be various reasons for the issue to occur; we have mentioned some of the popular ones here:
Corrupt system files – If your computer has damaged or missing system files, it might cause issues on your PC, including not letting you login into Microsoft apps. You should run an SFC scan to check for the problem.
Incorrect login credentials – If you use the wrong name or password for your Microsoft account, you might see this error.
Microsoft app files are damaged – If the app file is corrupt or missing, you might get this error. To fix it, you can either repair the app or reinstall it.
Conflict with other programs – If a program on your computer interferes with the working of the Microsoft app, then you can get this error. To fix it, try to close the background apps and check if the issue persists.
What can I do to fix login error 0x80860010 in Windows 11?
1. Run the Windows troubleshooter
Press Windows + I to open Settings.
Now go to System, then click Troubleshooter.
On the next page, select Other troubleshooters.
From the list, go to Windows Store Apps and click Run.
2. Repair the Microsoft Office app
Press Windows + I to open Settings.
Go to Apps, then Installed apps.
From the list of apps, locate the Office app, and click on the three dots next to it.
Choose Modify.
On the UAC prompt, click Yes.
Select Quick Repair, and then Repair.
3. Reinstall the app
Press Windows + R to open the Run window.
Type appwiz.cpl and press Enter to open a list of apps.
Select Office and click Uninstall.
Restart your PC.
Now you can download the Office app using your Microsoft account. But first, log in to your account and, click on your profile image, click My Microsoft account.
Go to Subscriptions.
Click on Install Office under Office apps & devices.
Follow the on-screen instructions to install Office again.
Press the Windows key, type CMD, and click Run as administrator.
Type the following command and press Enter: sfc/scnnow
Let the process get complete, and if there is an error, then copy and paste the following command and hit Enter: DISM /online /cleanup-image /restorehealth Once the scan is finished, restart your computer.
If nothing worked for you, it is advised to contact Microsoft Support. Explain the whole scenario and the steps you took to fix the issue. This helps them understand the situation better.
Follow these methods to fix login error 0x80860010 in Windows 11. Try them and let us know which worked for you in the comments below.
And, since we’re talking about Windows 11, the DirectStorage gaming feature for the new Forspoken game will only be available for this OS, not for Windows 10 as well.
What should I be looking forward to in build 25281?
The Redmond-based tech company known as Microsoft has released Windows 11 Insider build 25281 to the Dev Channel today.
You might want to know that the new release brings visual changes to the Graphics settings page, Windows Spotlight tweaking, and Notepad tabs are also rolling out to Insiders in the Dev Channel.
Of course, we also have a long list of fixes, as we’ve all grown accustomed to after all these years of using Microsoft-designed operating systems.
Furthermore, starting with this build, Microsoft is beginning to try out different treatments for how Windows Spotlight looks.
As you expected, all treatments will continue to share existing core Windows Spotlight features such as hovering over the icon on the desktop, right-clicking on the icon on the desktop, and double-clicking on the icon on the desktop.
These above-mentioned treatments for Spotlight will include richer UI around displaying the title and description and learning more information about the image displayed on your desktop via Spotlight.
Equally important is the fact that tabs in Notepad have begun rolling out to Windows Insiders in the Dev Channel with this build.
We know many of you have been anxiously waiting for the tabbed interface for the Notepad app, so we’re pretty excited to announce it.
The rest of the changelog consists in the basic boilerplate changes and fixes, which we are going to examine together right now.
Changes and Improvements
[Settings]
Aligning with the new Windows 11 design principles, we’ve redesigned the graphics settings page under Settings > Display > Graphics to help you get to graphics configurations such as ‘GPU preference’ and ‘Auto HDR’ with greater ease. The functionality of these settings remains unchanged from prior versions of Windows, but we now have a more streamlined visual appearance. For more on all the graphics settings in Windows 11
When removing a paired Bluetooth device from Settings > Bluetooth and Devices, it will no longer pop up a prompt to confirm before removing it.
Fixes
[Taskbar & System Tray]
Updated the printer icon in the system tray when printing something, so it better aligns with other modern icons.
When navigating the taskbar using WIN + T and arrow keys, the position of the app icon should now be called out by Narrator (for example, File Explorer might say “one out of fifteen”, if it’s in the first position and there are 15 app icons on your taskbar).
[File Explorer]
Updated the error dialog when network discovery is off so that it points to the correct location to enable it.
Fixed an explorer.exe crash which could happen when closing File Explorer.
[Settings]
Fixed an issue where SSID wasn’t being populated on the properties page for your Wi-Fi in Network & Internet Settings.
In the scenario where you are prompted with the UAC dialog when switching a network between private and public, that UAC dialog should now come to the foreground rather than being behind other windows.
Fixed an issue where Quick Settings might not be able to re-open after going to the Wi-Fi section and closing the flyout.
[Windowing]
Right clicking a snap group in Task View and selecting “show this group on all desktops” shouldn’t crash explorer.exe anymore.
[Other]
Fixed an issue where Narrator wasn’t announcing when the @ mentions window popped up in Outlook.
Fixed an issue that could cause some app uninstalls to get stuck and fail the uninstall in the last few builds.
Fixed an issue which was causing the Windows print queue window to crash sometimes in recent builds.
Fixed an issue which could cause SQL Server Management Studio to fail to launch.
Known issues
[General]
Using Windows Hello to sign in with facial recognition may not work on Arm64 PCs. A workaround for this is to use the Hello PIN path.
Some users are experiencing longer than expected update times installing recent builds. We are actively investigating this issue.
We’re investigating reports that some Insiders are experiencing freezes when using the browser and certain other apps after the previous Dev Channel flight.
[Taskbar & System Tray]
The taskbar is sometimes cropped in half when using the tablet-optimized taskbar. You may also see this issue on secondary monitors.
[Search on the Taskbar]
There is an issue where you will be unable to change taskbar search box to show as icon only via taskbar settings in some cases. To work around this issue, first change to a different option and then after, you should be able to choose to show as icon only.
[Task Manager]
Some dialogs may not render in the correct theme when applied from Task Manager Settings page.
The data content area of the Processes page may flash once when theme changes are applied in the Task Manager Settings page.
That is surely something that everyone is looking forward to, considering how we all got accustomed to fast download and install speeds for Windows 11 software.
What can I do if I can’t install build 25281?
Press Win+ I to access Settings.
Select the System category and click on Troubleshoot.
Press the Other troubleshooters button.
Press the Run button next to Windows Update.
Also, make sure to report any other issues you might come across, in order for Microsoft to address and improve the overall OS experience for us all.
This is everything you can expect if you are a Windows Insider. Leave a comment below if you found any issues since installing this build.
GOG is a gaming distribution platform with hundreds of titles to choose from. The service has a gaming client, and recently a new version of the client was released.
GOG Galaxy client allows you to organize your games as you wish, but you can also download or purchase games from the GOG store.
Unlike Steam and other distribution platforms, GOG doesn’t use DRM protection, so you can freely back up your games and play them without an Internet connection.
In today’s article, we’ll take a closer look at GOG Galaxy 2.0 and see what features it offers its users.
How does GOG Galaxy 2.0 work?
GOG Galaxy 2.0 works as a hub for all your games. The application works with local games and games from other distribution platforms.
Of course, console games are also supported so that you can organize your gaming library regardless of your gaming platform.
GOG Galaxy 2.0 also works as an online store, therefore you can purchase and download games directly from GOG.
What are GOG Galaxy 2.0 features?
Unified gaming library
GOG Galaxy 2.0 allows you to organize all your games into a single collection with ease. This goes for both PC and console games.
Of course, you can add games from other digital distribution platforms such as Steam, UPlay, Origin, Epic Games Store, etc.
In addition to organizing your gaming collection, you can use GOG Galaxy to launch PC games with ease. Also, you can fully organize your library, sort, and filter your games as you want.
Of course, you can directly buy and download games from the GOG Galaxy 2.0 client.
Unified friends list
The client also allows you to have friends from multiple gaming platforms on GOG Galaxy.
You can see your friend’s online status and activity feed and their stats. The chat feature isn’t available at the moment, but it should be added in the near future.
Cloud storage for saving game files
GOG Galaxy 2.0 will also keep your games up to date, and it will even store your saves in the cloud and sync them between multiple PCs.
Special matchmaking for GOG games
Special multiplayer and matchmaking are also available for GOG Galaxy-powered games, which will surely come in handy.
Ability to roll back problematic updates
The client also can roll back your game to the previous version in you encounter any issues with a game after an update.
Simple and friendly user interface
The interface is sleek and simple, and you should be able to find the desired game with ease while using GOG Galaxy 2.0.
To see how to download and install GOG Galaxy 2.0, visit our dedicated GOG Galaxy installation guide.
GOG Galaxy 2.0
GOG Galaxy 2.0 is a gaming client that lets you organize games from multiple platforms in a single library.
Steam is the largest distribution platform for games, and it’s significantly larger than GOG.
Steam has more than 90 million users and over 9000 titles to choose from, which is constantly growing.
GOG has a smaller user base and fewer games to choose from, but it has several advantages, and the first one is the lack of DRM.
GOG games don’t have DRM protection, meaning you completely own the game once you purchase it.
DRM can cause compatibility issues with many older games, and this is where GOG shines since none of its games, even the older ones, have DRM protection.
Besides, GOG supports offline installation, so you can download your games and create backups. You can even install games without the GOG Galaxy client.
For that, head to your GOG web account, download the offline installer for the game, and run the setup to install it.
Steam requires you to use the Steam client to download and purchase the games, which is not the case with GOG, thanks to the offline install feature.
It’s worth mentioning that you can play both GOG and Steam games offline. While the latter has a dedicated built-in offline mode for it, with GOG, users can directly run the game launcher instead of accessing it via the game client.
GOG also works with games from other platforms, and you can easily add games from consoles to your library.
The same goes for your friend list; friends from all platforms will appear in the GOG Galaxy client.
To recap, here’s a quick comparison of Steam and GOG.
Steam pros:
Larger user base and number of titles
Developed and maintained by Valve Software
Optimized and easy to use
Steam cons:
Many games use DRM
No support for the offline installation of games
Requires constant Internet connection for games to work
No support for older games
GOG pros:
Ability to add games from both PC and consoles to your library
Unified friend list for all platforms
Games don’t use DRM
Ability to download offline installers without the GOG Galaxy client
GOG Galaxy 2.0 takes special care of your privacy and won’t monitor your data or share it with third parties.
Your data is your own, and you can easily remove any data imported from GOG servers.
Final thoughts on GOG Galaxy 2.0
GOG offers some much-needed features that other distribution platforms lack, such as the ability to play games without DRM protection and offline installation for games.
GOG Galaxy 2.0 also works with other distribution platforms, so you can have games from Steam, UPlay, Origin, and Epic Store in one gaming client.
The ability to organize games across multiple platforms is also a major plus, and if you’re a PC or console gamer, GOG Galaxy 2.0 is a must-have application for you.
Transferring photos from iPhone to a Windows computer is usually simple, but sometimes you might encounter the Something went wrongerror while transferring iPhone photos.
If you are facing a similar problem, here are a few quick solutions to fix this error on your Windows PC.
What can I do if the PC won’t import pictures from iPhone?
Before you move to the slightly complex solutions, try these few quick ones:
A quick workaround while transferring iPhone photos to bypass the Something went wrong error is to ensure that your phone remains unlocked throughout, the photos app is open, and that the Battery Saving mode is not activated.
Disable Windows Security and any third-party antivirus installed on the PC before transferring the files. But remember to enable them after you are done.
A faulty USB cable may create a problem during file transfer. So, make sure that your iPhone USB cable is not damaged. Also, make sure to use the official Apple cable for file transfer.
1. Change the Photos settings
On your iPhone, open Settings and then select the Photos app.
Scroll down to the bottom and choose Keep originals under Transfer to Mac or PC.
Once done, try transferring the files again and verify whether you still get the Something went wrong error on iPhone photos.
2. Change file permission for the Pictures folder
Press the Windows + E to open File Explorer, right-click on the Picture folder, and select Properties.
Go to the Security tab, and under Group or user names, click on the Editbutton.
Select your username from the profiles, and under Permission for (your username), make sure all the boxes are checked in the Allow section, including Full Control, and then click on OK to save the changes.
If you already have the Full Control option enabled, disable it and turn it back on.
By default, iTunes transfers media files, depending on their file format, to a default location on a Windows computer. If you have made any changes to your computer recently, it is possible to have changed the file permission for these folders.
Apple does not allow any data transfer between devices if the iPhone is locked. If your iPhone is locked, you may encounter the Something went wrongerror.
To fix this problem, make sure that after connecting your iPhone to the PC, the iPhone is unlocked, and the lock screen is on during the file transfer.
Transferring files between iOS and Windows 10 desktop or laptop is not an easy task, and many users encountered several issues by doing this operation.
In order to store, plan and organize your personal data, you will have to transfer your files to one Windows device, and we strongly recommend the IOTransfer 4 software.
With only one click, you can export all your photos, favorite music, or precious videos to your PC, or selectively copy photos anywhere you wish.
You can also transfer and back up your contacts to a PC regularly in case unexpected accidents happen.
Therefore, once you get used to back up your contacts with this great tool, you are no longer overwhelmed when you lose data or even lose your phone.
IOTransfer 4
Now you can safely transfer photos across iPhone, iPad, and PC without sync limits with IOTransfer.
Press Windows + S to open Search, type Microsoft Store in the text field, and click on the relevant search result.
Search for iTunes, and then download the app.
After you have installed iTunes, set up the application, and then try transferring photos between the iPhone and the computer, and check whether you still get the Something went wrong error.
5. Import photos in small batches
If you don’t import photos from your phone frequently, it is possible that you may have thousands of photos on your phone.
If you try to import all the photos at once, it may create a problem with the transfer process resulting in Something went wrong error. The solution is to import photos in small batches.
Select up to a few hundred photos and try to move the photos to your computer. If it works, increase the number until you get the error again.
Or simply continue to import photos in small batches until all the files are transferred.
6. Use the Import pictures and videos option
Connect your iPhone to the PC and make sure the device is detected in File Explorer.
Look in the left pane, right-click on your phone, and then select the Import photos and videos option.
Select Review, organize, and group items to import option to select the files you want to import, and then click Next.
Click on Import to transfer the photos to your PC.
Windows File Explorer allows you to directly import pictures and videos from any recognized device right in the File Explorer.
The Something went wrong iPhone photos error can be problematic, but we hope you managed to fix it with one of our solutions.
Windows 11 has been released for a while now, and most of us got the chance to test it and see how it works in action.
However, many still have second doubts regarding the Windows 11 upgrade. Therefore, today we’re going to take a closer look at Windows 11 and talk about all its new features, and maybe convince some of you to make the switch.
Can my PC run Windows 11?
The announcement of Windows 11 and the launch was followed by a lot of criticism from users due to higher Windows 11 hardware requirements. While most of the requirements are expected and can be easily met by any modern PC, the following caused the most criticism:
CPU support – Windows 11 requires at least Intel Core Gen 8 CPU or AMD Ryzen 3000 series. For detailed requirements, check the list of supported Intel and supported AMD CPUs.
TPM 2.0 – While most modern PCs support at least some version of TPM, version 2.0 is available only on newer motherboards/CPUs.
To fix these problems, many users were forced to upgrade their hardware to try to install it again. This is one of the main reasons why many decided to stick with Windows 10 and refuse to upgrade.
Despite those claims, many users reported that they have been running Windows 11 on unsupported hardware for months without any issues. However, that might change someday in the future.
What’s new in Windows 11 and should I upgrade?
New Taskbar and Start Menu
The first thing that everybody notices is the redesigned Taskbar. The Taskbar is now centered, which makes it easier to access. Of course, if you don’t prefer that, you can always position it to the left side like in previous versions of Windows.
We like the new design of Taskbar, it looks more minimalistic and cleaner than its predecessor. The old and large Search bar is now gone, and it’s replaced by a more compact Search button.
The Search button seems like an unnecessary addition and in our opinion, it takes unnecessary space on Taskbar, but you can always convert it to an icon, or hide it completely like we usually do.
The Taskbar is now locked at the bottom of the screen
If you’re one of those users that like to position the Taskbar at the top of the screen or the side, we have to inform you that’s no longer an option.
This means that Taskbar will be firmly locked at the bottom of the screen, but you can still have a vertical Taskbar on Windows 11 with third-party solutions.
We never moved Taskbar to any other location besides the bottom one on all versions of Windows that we used in the past, so we don’t mind this change, along with the majority of other users, but we realize how some users might miss this feature.
Less Taskbar options in the context menu
As for Taskbar settings, you can’t access them anymore by right-clicking the Taskbar. In previous versions, you could choose which Taskbar items you wanted to show by using the right-click menu.
This was rather convenient, but not something that’s used on regular basis, so Microsoft decided to remove it in Windows 11. All settings can now be adjusted from the Taskbar settings page in the Settings app.
However, the ability to open Task Manager from Taskbar is still there, and since that’s one feature that we used frequently, we are glad that Microsoft decided to keep it.
Toolbars are also gone, and you can’t add them to the Taskbar anymore. This was a feature that was present in older versions of Windows, including Windows 10.
We never used it, as we like to keep our Taskbar clutter-free, so we won’t miss this feature too much.
Revamped Start Menu
New Start Menu is completely redesigned and streamlined, so it involves less scrolling. No more will you see the list of all apps every time you open it. Instead, you’ll be greeted with a plane of pinned apps, allowing you to easily access your favorites.
Speaking of app and app pinning, be sure to visit our guide on how to pin apps in Windows 11 for more information.
Below the pinned apps is the list of recommended apps and files, and there you can see recently opened files or recently installed apps. The new Start Menu also has a Search bar on the top that you can use to search for files or folders.
However, we think that the Search bar doesn’t have a practical purpose since the search is automatically activated as soon as you start typing after opening the Start Menu or after using the Search button on the Taskbar.
We like the new design, it’s minimalistic and easy to use, and it’s an improvement over the old one in almost every regard.
However, there are a few things that we didn’t like.
Live Tiles are gone, along with customization options
Start Menu now has fixed size
Customization options are gone in Start Menu, and no longer are you able to resize your Taskbar as you please. In Windows 10, you were able to resize the Start Menu both horizontally and vertically.
This allowed you to make it as large or as small as you wanted. Sadly, this isn’t longer possible, and the new Taskbar has fixed width and height, so you’re not able to customize its size.
The new Start Menu, although it looks more streamlined, doesn’t have Live Tiles anymore. We used that feature regularly to check the weather or to-do lists at a glance.
However, in most cases Live Tiles didn’t offer too much useful information, and they were used as large app shortcuts, so it’s no wonder that Microsoft decided to remove them to streamline the interface.
No more groups for tiles
Groups are also gone, so you can’t group your pinned applications or Live Tiles. This was a small but useful feature since it allowed us to organize our work, entertainment, and personal apps and move them freely in the Start Menu.
Luckily, the application folders feature is still there, and it works almost the same. To create an app folder, simply move the pinned app over to another app and both of them will be added to a single folder. Of course, you can name and move the app folders as you wish.
When it comes to the design, app groups on Windows 10 will expand the group downward thus moving all elements that are below it further down. This can be a problem since you need to scroll to find a certain app or make your Start Menu bigger.
On the other hand, Windows 11 shows apps from the app folder in a separate plane, similar to your phone, which allows you to quickly access them without scrolling.
We haven’t used the app folder feature in the past that often, but we’re glad that Microsoft managed to keep it while enhancing it even further.
News, interests, and Widgets panel
Not long ago, Microsoft introduced News and interests panel in Windows 10. This feature wasn’t well received because it cluttered your Taskbar with unnecessary info, such as news and weather.
Although the weather icon can come in handy, once you open its panel you’d be swarmed with unnecessary information from preselected news sources. Most users, including us, would instantly turn this feature off and forget about it since there’s zero use for it.
Microsoft decided to keep this feature and rework it a bit. Now, this feature is called Widgets, and it sits in the bottom left corner showing the current weather.
The redesign looks much better, but again, you’re still swarmed with news from sources you didn’t manually pick. In the end, the feature seems unnecessary as it was on Windows 10.
However, one small difference makes it stand out from its predecessor. The Widgets panel supports widgets, and you can move them or resize them and view useful information, similar to Live Tiles.
This includes your calendar, weather, to-do lists, and more. However, the choice of available widgets is rather limited, and currently, there are only 12 widgets. For this feature to be useful, we expect Microsoft to add more widgets, including ones from third-party sources in the future.
The Widgets panel in its current form leaves much to be desired, but it’s a step in the right direction when compared to its predecessor. However, we wish that the Widgets panel would be an exclusive panel for widgets and not an unsolicited news feed.
The new system tray is redesigned and you’ll notice that sound and network icons are combined into one. This also means that you can’t hide them anymore from the system tray as you could in Windows 10.
The same goes for the clock, so you’ll have to keep those icons on your screen at all times. This isn’t such a dealbreaker for us, since they provide useful information, but some users might miss the customization option.
Volume Mixer is moved to the Settings app
Speaking of missing features, the sound mixer is gone from the system tray. This means that you can only adjust the sound level of the entire system and not for individual apps like in Windows 10.
Now when you click the sound icon and choose the volume mixer option, you’ll be directed to the sound settings page, and you’ll be able to adjust sound levels for individual apps from there.
This is a step back from Windows 10 and its volume mixer that was easily accessible from the system tray. On the bright side, you can use your mouse scroll wheel on the volume icon to quickly adjust your volume.
There are a few workarounds you can use on Windows 11. For example, Game Bar allows you to adjust the volume levels for individual apps easily, with a single keyboard shortcut.
If you’re looking for a traditional volume mixer, then we suggest using EarTrumpet software on Windows 11.
We understand that Microsoft is trying to create a more consistent design with this change, but moving the volume mixer seems like a step back in our opinion.
Revamped Action Center
In Windows 10, Action Center combines quick settings along with your notifications, and it has a dedicated icon in the system tray for quick access.
In Windows 11, things are slightly different and the Action Center now combines your notifications and calendar into one, while settings are located in a different section.
There’s also an option to start a focus session right from the calendar, but we didn’t find too much use for it. One thing that you’ll notice is that quick settings are gone from the Action Center in Windows 11.
Quick settings are now at a different location
To access quick settings, you need to click the volume or network icon. After doing that, you’ll be able to adjust the volume or toggle quick settings.
This menu also has playback controls, allowing you to easily control multimedia playback on your PC. If you want to change how the Action Center works, we have a great guide on how to customize Action Center in Windows 11.
Combining notifications and a calendar into a single panel might come in handy, especially after a short adjustment period. On the other, we rarely used quick settings on Windows 10, and we don’t have too much use for it on Windows 11 as well.
Context menu changes
The context menu has been revamped in Windows 11 completely, and many users aren’t happy with it. The context menu in Windows 10 has all the standard actions, and it usually doesn’t have any icons.
However, depending on the apps you have installed, actions might get added to the context menu along with their icons, and make it filled with features that you don’t use.
However, you can always customize the context menu with third-party software and remove actions that you don’t use.
New context menu is redesigned and streamlined
The new menu is completely redesigned, and each action has an icon next thus making each action stand out so it’s more easily recognized.
You’ll notice that application actions are missing, so your context menu will usually have only the essential functionality.
To reveal application features, you’ll need to select Show more options and you’ll get the same menu that is available on Windows 10.
The context menu slightly changes when you right-click an item, and you’ll get all your standard functionality, but you’ll notice that cut, copy and delete options have been replaced with icons.
This takes some time to adjust, but in the end, it streamlines the interface. As for application functionality, some applications will create their submenus for quick and easy access.
This wasn’t the case with Windows 10, and your context menu would easily get filled with all sorts of features that you don’t use that often.
While this helps keep the context smaller and easier to use, some application features aren’t easily accessible, so you’ll need an extra click to get to them.
This leads to certain inconsistencies, and we hope that Microsoft will sort that out in near future. Overall, we like the new change, because it keeps only the essential functionality in the context menu.
Fresh File Explorer user interface
File Explorer has been completely redesigned, including all the icons. In addition to icons, all windows now have rounded corners, and the new interface looks better than ever and somewhat similar to the macOS.
The new interface is refreshing and visually appealing, and it’s a major improvement over the previous version.
Tabs in File Explorer for quick navigation
Probably the biggest, and most welcome change is the addition of tabs in Windows 11. This is the first version of Windows to have tabs, and by using them you can have several directories open in a single window.
This is perfect for multitasking, and in the past, this type of functionality was available only by using file manager software.
While you can move the tabs, we did encounter some issues with organizing them. The entire process is not as snappy as on a web browser for example.
This is because you need to click and drag the tab you want to move and once the cursor is in the right position, the tabs will change places. This feels a bit different than moving a tab in your browser, and it requires a bit of exercise to master.
As for missing features, we have to mention that we miss the ability to pin tabs. This could be something incredibly useful, especially if you frequently work with specific folders.
Lastly, you can’t split tabs to create another instance in a new window. Instead, you need to manually start another instance of File Explorer which seems counterintuitive.
Overall, tabs are more than a welcome addition, and although this feature lacks some options, it’s a welcome addition to Windows.
The ribbon menu is gone from File Explorer
Ribbons are gone in Windows 11, and instead, we got a single toolbar with all the common actions.
While the single toolbar takes up less space than ribbons, and it has all of its contents in a single place, it can’t be minimized like the ribbon menu.
We rarely used the Ribbon menu on Windows 10, and therefore we kept it minimized most of the time, so this change doesn’t affect users like us.
While the new toolbar looks great and it declutters the old menu, we don’t have too much use for it and we’d like to see an option to minimize or hide the toolbar menu when not needed to get more workspace.
Snap layouts for better window management
Another addition to Windows 11 is the improved layout system. In Windows 10, you can snap windows to a quarter or a half of your screen. This is an incredibly useful productivity feature, and we use it on daily basis.
This feature works the same in Windows 11, but with a set of additional layouts. Now you just need to hover the maximize button of any window and you’ll get to choose between six different layouts.
After that, just pick the section of the layout that you want to position the current window in and that’s it. Next, you need to select which window will take the remaining position and that’s it.
Alternatively, you can just take the window and drag it to the top of the screen and choose the desired layout from there.
This was a great feature in Windows 10, and Windows 11 made it even better. While additional layouts are great to have, some layouts might make your workspace a bit crowded unless you’re using a high-resolution or ultra-wide monitor.
If you aren’t a fan of this feature, you can always disable Snap layouts from the Settings app.
Switch between layouts quickly with Snap groups
It’s important to mention that by using layouts you’ll create Snap groups that you can quickly access from the Alt-Tab menu or your Taskbar.
This is incredibly useful for multitasking if you already have several apps added to your layouts. With this option, you’ll restore all apps to their predefined positions with a single click.
As a result, you can have one or more Snap layouts and switch between them as fast as you switch between apps. Although this feature is useful, we didn’t spend too much time with it.
While having Snap groups is useful, switching between them requires a bit of practice. In addition, creating a Snap group will add another option in the Taskbar when you hover over an app, so you might get the feeling that your Taskbar is cluttered at times.
Lastly, it’s not simple to minimize all windows that belong to a group, and your only option is to right-click the group in the Taskbar and then choose the minimize option.
Although this feature seems interesting, and it will surely help many users, we just couldn’t get used to it, so we ended up not using it on our PC.
Revamped Settings app
The settings app has been completely revamped in Windows 11 and now it comes with a set of new and colorful icons and a two-pane easy to navigate interface.
All categories are available in the left pane, so you can access them quickly at any time. The right pane is reserved for your settings, allowing you to change them quickly.
The new Settings app looks great, it’s easier to use and the new interface feels less flat with the addition of colorful icons, so this is a great design choice by Microsoft.
The Store has been improved and revamped and it features a new design. If you’re on Windows 10, you probably noticed the changes in your app as well.
The new interface is cleaner, and all content is divided into several categories which makes finding it a lot faster. While visual changes are more than welcome, the biggest change is related to the list of available apps.
Win32 apps are now available in Microsoft Store
Windows Store now features Win32 apps, the same ones that you download and install manually on your PC. With the new version of Windows Store, you can get those apps from the Store.
The install process is the same as for any other regular app, just click the Install button and wait for the process to finish in the background.
Universal apps didn’t achieve any massive success in the past, and in our humble opinion, there’s just a handful of applications that can be used instead of their Win32 counterparts.
This is why the inclusion of Win32 apps in the Microsoft Store is a great step in the right direction, and hopefully, it will help make Microsoft Store a centralized app distribution for Windows in near future.
Do keep in mind that not all Win32 apps are available in the Windows Store, but you should be able to find and download most apps with ease.
Windows Terminal – One command line tool to rule them all
Microsoft has been working on a new command line tool called Windows Terminal, and the software is available for download from the Windows Store. Although you can download and use it manually, it’s the default command line software on Windows 11.
With Terminal, you can run any shell that you have on your PC, including PowerShell, Command Prompt, or any other. You can also set a default Terminal in Windows 11 and open it every time you start the app.
The application is customizable, and you can download Terminal themes with ease. The Terminal also has tabs, so you can have multiple shells running side by side.
You can even split a tab and have two or more instances of a single shell running in one tab. Each tab is customizable and you can change its name or color to differentiate it more easily.
Unfortunately, you can’t rearrange tabs or create a new window out of a current tab, but we hope that Microsoft will address that soon.
Windows Terminal is a great improvement, and if you’re a developer or an advanced user that frequently uses the command line, be sure to give the new Terminal a try.
Native support for Android apps
This is probably one of the biggest improvements on Windows 11, the ability to run Android apps natively.
This means that no longer will you have to rely on Android emulators. To learn more, we suggest reading our guide on Windows 11 vs Android emulators.
Unfortunately, we weren’t able to test this feature on our machine since it didn’t meet the hardware requirements.
As you probably know, this feature is brought by Android Subsystem for Windows and its biggest limitation is the reliance on Amazon App Store for app distribution.
Amazon offers fewer apps than the Play Store, so there’s a chance that you won’t be able to find every app that you’re looking for.
According to Statista’s data leading app stores, in the third quarter of 2022, Google Play had 3553050 available apps, while Amazon had barely 483328. That’s almost 9 times more apps on the Play Store, so it’s no wonder that users aren’t happy with the reliance on Amazon Appstore in Windows 11.
However, users have managed to find a workaround for this issue. With a bit of tweaking, you can run Google Play Store on Windows 11 with ease.
Windows 11 also brings many other features that we didn’t get to cover. Many apps got a facelift, most notably the Photos app. The biggest change besides the new design is the ability to see thumbnails of all pictures that are in the same folder while viewing an image.
This makes finding the desired picture faster and simpler than ever before. To learn more, we suggest reading our guide on the new Photos app in Windows 11.
In addition to the Photos app, the new Notepad app has been released as well, and it brings redesigned and minimalistic interface, and it looks better than ever.
Task Manager is revamped as well, and instead of tabs on the top like in Windows 10, now it has a hamburger menu on the left. To top it off, there’s a search bar on the top that you can use to quickly find any app or process.
Windows 11 also has its voice typing tool, and if you want to learn more, we suggest reading our guide on how to use Voice Typing in Windows 11.
For multimedia enjoyers, we’re pleased to inform you that Windows 11 got a new media player. The new design features a hamburger menu for navigation thus making the interface sleek and easy to use.
All the standard features are there and you can create your video or audio library, and manage playlists and your queue. We didn’t get much time with this app, but it keeps the essential functionality while providing a fresh and minimalistic design.
Another addition to the Windows 11 is Microsoft Teams. The app is now integrated into Windows and it allows you to communicate with your team or friends more easily.
For more information, visit our guide on how to use Microsoft Teams in Windows 11. We were never fans of Microsoft Teams since not many people in our circles use it for communication or collaboration.
But what about Skype you may ask? Skype is gone, and Microsoft Teams is its replacement. If you want to know which client is better, we have an extensive guide on Microsoft Teams vs Skype that you should check out.
Of course, you can still get Skype in Windows 11, but it doesn’t come preinstalled anymore, and that’s no surprise since users are moving to different messaging platforms.
However, you can still use OneNote on Windows 11, even though it doesn’t come preinstalled anymore. The same applies to Cortana, and you can manually enable it any time you want.
As for Internet Explorer, you can still install Internet Explorer on Windows 11 if you need it. We never used any of these features on Windows 10, and we probably aren’t the only ones, so it’s no wonder that Microsoft decided to remove them.
Windows 11 offers great features, and the new user interface looks fresh and visually appealing. Regarding the performance, we examined them in-depth in our Windows 11 vs Windows 10 performance guide, so be sure to check it out to see how both versions compare.
Windows 11 has a few minor issues, but that comes to personal preference. For example, we found new Snap groups sometimes a bit cumbersome to use, and tabs in File Explorer could use additional polishing.
The removal of the standard volume mixer is also another minor complaint, but that might be fixed in the future.
Another problem is the way Windows 11 handles default apps and file associations. This process is a lot more complicated than in Windows 10 since you need to set associations for each file type manually.
Overall, Windows 11 is a great operating system, it looks and works great for the most part, and those minor issues will hopefully be fixed in upcoming releases.
What are your thoughts on Windows 11? Let us know in the comments section below.
While trying to install a game, you’re not alone if you get a 0x800700e9 Xbox Game Pass install error on your computer. Many users have complained about the same. Thankfully, the issue can be fixed in no time.
Here in this guide, we will discuss the tested methods to fix the issue right after talking about the causes of the problem.
What causes the 0x800700e9 Xbox Game Pass install error on the computer?
There could be various reasons for the issue; some popular ones are listed here:
Not using the same account for Microsoft Store and Xbox – If you have logged in on Microsoft and Xbox using different accounts, you might get this error while installing games.
Windows is not up to date – If your Windows OS has pending updates, you might get this error. Check for updates and install them to avoid this error.
Unstable internet connection – If your internet connection is not stable or is weak, you might not be able to install the game, hence the issue.
Check if your internet connection is working correctly.
1. Run the Windows Store App Troubleshooter
Press Windows + I to open Settings.
Go to System, then click Troubleshooter.
On the next page, click Other troubleshooters.
Now, from the list, locate Windows Store App and click Run.
Follow the onscreen instructions to complete.
2. Clear Windows Store Cache
Press the Windows key, type CMD and click Run as administrator.
Type the following command to clear the Windows Store cache and press Enter: wsreset.exe
Once done, you might see a confirmation message.
3. Use the Services
Press Windows + R to open the Run window.
Type services.msc and press Enter to open Services.
Locate Background Intelligent Transfer Service and check its status. If it is not running, double-click on it.
On the next window, select the Startup type as Automatic and click the Start button under Services status. Click Apply and OK.
Next, check the status for Locate Delivery Optimization, Xbox Live Auth Manager, Xbox Live Game Save, Xbox Live Networking Service, Gaming services, Windows Update, and Microsoft Store Install service one by one. Ensure their status is running.
For each of these, Change the Startup type to Automatic. If the services are not running, click the Start button under Service status.
4. Use the Windows PowerShell to reinstall the gaming service
Press the Windows key, type PowerShell, and click Run as administrator.
Type the following command and press enter: get-appxpackage Microsoft.GamingServices | remove-AppxPackage -allusers
Wait for the process to complete; now copy and paste the following command and press Enter: start ms-windows-store://pdp/?productid=9MWPM2CQNLHN
Restart your computer.
5. Use the Registry Editor
Press Windows + R to open the Run window.
Type regedit and press Enter to open Registry Editor. Then, click Yes on the UAC prompt.
Follow this path: Computer\HKEY_LOCAL_MACHINE\SYSTEM\CurrentControlSet\Services\DoSvc
From the right pane, locate and double-click Start. Change its Value data to 3. Click OK.
Go to Xbox and cancel any pending installations, if any.
Restart your computer. Now search for the game and install it. 8
6. Repair or Reset the Microsoft Store app
Press Windows + I to open Settings.
Go to Apps, then click Installed apps.
Scroll through the list, and locate Microsoft Store. Next, click the three dots, and select Advanced options.
Under Reset, click Repair.
Try installing the game; if you see the error, click Reset.
So, these are the fixes you can apply to eliminate the 0x800700e9 Xbox Game Pass install error on your PC. Try them and let us know which worked for you in the comments below.
Is your Sony Smart TV not playing Netflix? Then you’ve come to the right place.
Below we’ll explain how to get rid of errors reading: Sorry, we could not reach the Netflix service. Please check Network Settings to connect to an available network and use Netflix (-100) or Sorry we could not reach the Netflix service. Please try to restart the Netflix application (-111).
How do I get Netflix to work on my Sony TV?
A faulty cache, an outdated Netflix app or internet issues could contribute to this error. Here’s how to address all causes:
1. General troubleshooting steps
Check if your internet connection is working properly. Test your speed and if you’re connected to a wireless network, try to restart your router.
Make sure that your Sony Smart TV has the latest firmware update installed.
Check if any other apps, preferably streaming services, are working fine.
Update the Sony TV Netflix app if it is not working. Additionally, you can also try to Reload Netflix.
2. Netflix error (-100)
If you can’t access Netflix on your Sony Smart TV but can open other apps and services, the easiest workaround is to reboot the TV.
To do that, hold down the power button for about 6 seconds or until the TV does a full restart. After the device reboots, Netflix should work properly.
This method worked for many Smart TV owners, so try it yourself, as it might solve your problem without much hassle.
Another confirmed fix is holding down the Home button on your remote, and a task switcher should appear. From there, you can select Netflix, press Down, and then OK to close the app.
Re-launch Netflix, and now it should work without any problems.
3. Netflix error (-111)
When you get this error, you’ll see a RESET or OK button under the error message, depending on the Netflix version. If you have the RESET button, click on it, and the problem should be solved. If you have the OK button, follow the steps to reset the app.
Press the Home button on your remote control.
Navigate to Settings > Apps > System Apps.
Select NETFLIX and select Info.
Now, choose Force stop.
After that, clear the app’s data and cache by selecting Clear data and Clear cache.
Power reset your TV.
After the TV reboots, go to Google Play Store and update the Netflix app.
Once the update is complete, log in to Netflix with your credentials, and the app should function properly.
After doing the power cycle, the app should start functioning correctly.
5. Reset the Netflix app
You must clear the data and cache to reset your Netflix app on Sony TV. This will remove all the saved junk data and settings.
However, it will not remove your downloaded titles or any vital information. You might have to sign in again the next time you try to access the app.
Lastly, it is important to note that the Sony Bravia TV has a reset button you can select after clicking the Netflix app.
Not being able to play Netflix videos on your Sony Smart TV is a pretty annoying problem, but following the solutions provided in this article should help you solve the problem.
Want to learn about Windows Audit Policy best practices? Here is all you need to know. An essential element of Windows auditing is the so-called file integrity monitoring service, also called Windows changing auditing.
Quick access to best practices for a Windows Audit Policy makes a difference in the long term. So, read through this guide.
What is an Audit Policy?
This process manages a variety of value changes across multiple domains. Some include Active Directory, Exchange, SQL, and the file systems found on your network.
Covering these aspects and analyzing security and system events allows companies to reduce the possibility of unauthorized access to data. It also improves the company’s overall capability to deal with system security and management threats.
What does the Audit Policy enable?
A thorough Windows auditing process ensures that any organization can respect the entire set of data protection requirements. They also will preemptively react to possible threats and dampen a data breach’s impact.
As in the case of other complex processes, a few key elements will ensure that the process goes smoothly and that the chosen implementations/changes are managed from one central hub.
Today’s guide will uncover all the secrets to achieving a well-rounded Windows Audit Policy without too much hassle. We also simplify the process considerably using specialized software.
In which order should we enable auditing?
The order in which the auditing process should be enabled will depend on the exact type of threat. There is, thus, no single answer to this question.
It is essential to note that the auditing process has two critical areas to cover:
Active DirectoryAuditing– This feature allows users access to specific information, topics, folder, files, and data based on their identity. Active Directory will be the preferred target for cyber-attacks and malicious third parties.
Windows Policy Auditing – Tracking this feature mainly covers the Windows Policy changes using Group Policy Objects. These can be set up and used depending on the circumstances. An overview of all access points and privileges by specific users helps hone in on the problem and eliminate it.
Generally, Microsoft has created a set of 10 laws of security administration, which should be respected entirely for business-wide coverage of any external threats.
What are Windows Audit Policy best practices?
1. For Active Directory
1.1 Manage and edit the Active Directory Security Groups
The most common attacks are targeting members of Domain Admins, Administrator Groups, and Enterprise Admins in Active Directory. However, this is because a domain account with admin-level access can even modify the access of VIP accounts,
So, you should limit access to these groups to avoid any issues.
1.2 Remove any inactive users in AD
Suppose any inactive users still have access to your Active Directory environment. In that case, it is best to remove them ASAP. This is a standard method malicious third parties use to access critical data without causing suspicion.
1.3 Keep track of Local Administrators
Users with administrator rights have access to a significant part of your organization. So, keeping track of their access level and managing it accordingly can have a considerable impact.
Domain accounts that have administrator-level access to a variety of computers – Even though sometimes these accounts might not have access to high-privilege groups on Active Directory, they might have admin access to many servers inside the Windows infrastructure.
VIP domain accounts – These have access to various intellectual property and other sensitive information from network users. Any account enabling the attacker to access vast data can be considered a VIP domain account. Some examples include executive accounts with wide-range access and accounts from help-desk employees, legal staff, product planners, or researchers.
1.4 Avoid using GPOs to set passwords
Group Policy Objects, can create accounts and set passwords for regular users and Local Administrators within Active Directory.
Also, attackers can use them to gain access to the data found within Active Directory, causing a large-scale data breach.
It is of paramount importance that system admins have the capability of spotting and reporting these situations.
1.5 Audit DC (Domain Controller) logons
As mentioned in the previous step, having system admins that can have an overlook over the entire domain controller structures is of paramount importance.
Lastly, most organizations focus on Enterprise and Domain administrators, but having access to other groups through the DC is a huge threat as well.
1.6 Use protection for the LSASS
As attackers can use various hacking tools to target the Local Security Authority Subsystem Service (LSASS) to steal users’ credentials, it is recommended that security measures are taken concerning this.
1.7 Manage your password policy with care
A firm password policy for your users will ensure that hackers will not have the time to gain access.
Essential elements regarding password policies:
Need to change passwords frequently
Use an automated system that allows passwords to expire
Employ a password expiration reminder software
Use easy-to-remember passphrases instead of complex passwords (which pose a security threat when being stored on the HDD or paper)
1.8 Carefully manage any Nested Groups
Administrators tend to create groups nested in other groups to control users’ access levels quickly, but this can cause a variety of security risks.
A complicated security tree structure can confuse admins and thus may lead to data breaches.
Lastly, to successfully manage this element, it is crucial always to keep track of how many groups there are and how many groups are nested within them.
1.9 Remove Open Access for users
Suppose open access identifiers like Everyone, Domain Users, or Authenticated Users are utilized when creating group policies. In that case, that can lead to privileges being added to users without intent by elements such as file sharing.
Hackers can use these security identifiers to hone in on the exact user with the most significant access level and thus cause the possibility of a security breach.
1.10 Audit server logon rights
Because Local Security Policies are under the control of Group Policy, it is essential to manage user rights accordingly.
So, this principle applies directly to situations where non-admins can access a function that the admins should cover.
If these functions are not constantly monitored and managed, hackers can use them to gain access to sensitive information across the organization.
1.11 Employ the principle of Least Privilege for AD Security
To employ this principle correctly, you must configure your AD Security to allow users only the minimum amount of access to the database and other essential functions.
1.12 Use a backup for your AD directory
A stable and robust backup process is critical to avoid any data loss that can endanger your entire organization.
1.13 Enable security monitoring for AD
Proactively keeping an eye out for any changes that appear in your Active Directory setup is extremely important.
To do this most efficiently, we will need to employ some useful tools, which we will cover in the next section:
What software tools can I use to simplify the process of monitoring Active Directory?
ADAudit Plus – Excellent all-round AD monitoring options
ADAudit Plus simplifies the process of monitoring Active Directory by providing a centralized and automated platform for tracking and reporting on user and group activity, security changes, and resource access.
It eliminates the need for manual log reviews and multiple tools to accomplish the same task. With ADAudit Plus, administrators can view real-time and historical data on user logins, group memberships, permissions, and GPO changes and receive alerts on suspicious activity.
Additionally, the software provides an easy-to-use interface with detailed and customizable reports and the ability to export data to various formats.
It also allows for monitoring multiple domains and forests from a single console, making it easier to manage and monitor large-scale AD environments.
Overall, ADAudit Plus streamlines the process of active directory monitoring by providing a comprehensive and user-friendly solution that allows administrators to identify and respond to potential security threats easily.
ADAudit Plus
By offering a consolidated and automated platform for tracking, ADAudit Plus streamlines the process of active directory monitoring.
AD Manager Plus is a tool that simplifies the process of monitoring Active Directory by providing a centralized platform for managing and monitoring AD environments.
It allows administrators to easily view and manage user accounts, groups, and other AD objects and monitor and track changes to the AD environment.
Additionally, it provides various reporting and auditing capabilities to aid compliance and security.
With ADManager Plus, administrators can perform everyday AD tasks such as creating and managing users and groups, resetting passwords, and delegating permissions with just a few clicks. It also allows for bulk actions, saving time for repetitive tasks.
Overall, ADManager Plus aims to make the process of monitoring and managing Active Directory more efficient and streamlined.
ADManager Plus
This solution simplifies monitoring Active Directory by offering a consolidated platform for administering and monitoring AD deployments.
ADSelfService Plus simplifies the process of monitoring Active Directory by providing a centralized platform for monitoring and managing various aspects of AD.
This includes real-time monitoring of user login and logoff activities, tracking user account changes and password resets, and generating detailed reports on AD user and group information.
Additionally, it provides automated alerts and notifications for specific events, such as failed login attempts or password expiry, which can help IT administrators quickly identify and resolve issues.
Overall, ADSelfService Plus helps streamline the process of monitoring AD by providing a comprehensive set of tools and features that allow IT administrators to monitor and manage AD users and groups easily.
ADSelfService Plus
By offering a consolidated platform for controlling and monitoring different parts of AD, ADSelfService Plus streamlines the monitoring process for Active Directory.
Windows Policy Auditing is an ongoing process, and it’s essential to periodically review and update audit policies to ensure they are still relevant and appropriate.
This includes identifying new threats and vulnerabilities and determining which events should be audited based on the current security needs of the organization.
2.2 Use built-in audit policies
Windows has several built-in audit policies that monitor many events, including logon/logoff events, object access, system events, etc.
These policies are designed to be comprehensive and provide a good starting point for most organizations.
2.3 Enable auditing for sensitive areas
It’s essential to enable auditing for sensitive areas, such as the system registry, security event logs, and privileged user accounts.
Because, this will allow you to monitor and track activities related to these areas, which can help detect and respond to security incidents more quickly.
2.4 Use centralized log management
Centralized log management is a best practice for Windows Policy Auditing.
This allows you to collect, store and analyze all logs in a single location, which makes it easier to identify and respond to security incidents. This is one of the fundamental Windows Audit Policy best practices.
2.5 Test your audit policies
Regularly testing your policies can help ensure they are configured correctly and capture the events and information needed to detect and respond to security incidents.
This can include testing the policies in a lab environment or simulating different security incidents to see how the audit policies respond.
2.6 Monitor and review logs
Monitoring and reviewing the logs generated by the audit policies regularly is essential. This can help identify potential security incidents early and allow IT administrators to respond quickly and effectively to minimize the impact of the incident.
2.7 Regularly backup the audit data
Regularly backing up the audit data helps Windows Policy Auditing in several ways. First, it provides a historical record of events that can be used to investigate past security breaches or other issues.
Also, this can help identify patterns or connections between different events, which can aid in determining the cause of a security incident.
Additionally, regular backups can ensure that the data is not lost in case of system failure or other unexpected issues. And finally, this can be critical for maintaining an accurate record of events and can be necessary for compliance reporting.
2.8 Keep software updated
Finally, keeping software updated helps Windows Policy Auditing by reducing the risk of security breaches and other issues.
Software updates usually include security patches that address known vulnerabilities or bugs that attackers can exploit. By updating software, organizations can reduce the risk of these vulnerabilities and minimize the potential for a security incident.
Additionally, software updates can include new features and improvements that can help enhance the system’s security. Furthermore, it will add new auditing capabilities or improved logging functionality.
In conclusion, Windows Audit Policy best practices are essential for ensuring the security and integrity of an organization’s IT systems.
Hence, by implementing these best practices, organizations can ensure that they are capturing the necessary information to detect and respond to security breaches. Also, they are complying with industry standards and regulations.
Lastly, adopting these best practices can help organizations simplify the process of Windows Audit Policy and improve their overall security posture.
Do you have the wrong phone number in Microsoft Authenticator? Read on!
If you’re using Microsoft Authenticator to secure your accounts, it’s essential to ensure that the phone number associated with the app is correct.
Unfortunately, many users have reported issues with the app using the wrong phone number. This makes it challenging to receive critical security notifications.
This guide explains how to change the phone number associated with Microsoft Authenticator. So you can ensure that your accounts are secure and that you can receive all necessary notifications.
Why should I use Microsoft Authenticator?
If you are considering using an authentication app, there are several benefits to using Microsoft Authenticator:
Increased security – Microsoft Authenticator provides an additional layer of protection for your accounts by requiring a code generated by the app and your password.
Two-factor authentication – By using Microsoft Authenticator in addition to a password, you are using two-factor authentication. So, if someone knows your password, they can’t access your accounts without the code generated by the app.
Convenience – Microsoft Authenticator allows you to generate codes for multiple accounts from one app. Hence, you don’t need to carry numerous physical devices or remember innumerable codes.
Notifications for suspicious activity – It sends messages like someone trying to sign in to your account from a different location. Hence, you quickly detect and prevent unauthorized access to your accounts.
Cross-platform compatibility is available on multiple platforms, including iOS, Android, and Windows. Therefore, you can use it on all your devices.
Easy to use – The app is easy to set up and use. It uses a QR code to link to your account, which you can scan with your phone’s camera. So, once set up, you can sign in with just a tap.
If you use the app and encounter the message wrong phone number in Microsoft authenticator, read on.
How do I change my Microsoft Authenticator to a new phone number?
Open your Microsoft Authenticator app on your device.
On the Authenticator page, select your account.
Select the Update security info option.
Tap on Add a new way to sign in or verify.
Next, tap the Show more option, then Text a code.
Here, input your new phone number and tap Next.
Finally, verify the new phone number by following the prompts.
Note: After updating the phone number, you may need to re-verify all your accounts connected with this Authenticator app.
It’s essential to ensure that the phone number associated with your Microsoft Authenticator app is correct, as this is a crucial aspect of securing your accounts.
If the app uses the wrong phone number, it’s easy to change it by following the steps outlined in this article.
Lastly, by updating your phone number, you can ensure that your accounts are secure and that you don’t miss any important security notifications. So, it’s always better to periodically check and update your phone number.
You got the error message Vcomp100.dll was Not Found. Here is all you need to know.
Windows 11 is a robust OS that offers a range of features and improvements over its predecessor, Windows 10.
However, as with any software, it is not immune to errors and issues. One standard error that users may encounter is that the VCOMP100.dll was not found in the error message.
This error can prevent specific programs from running and can be frustrating. This article will discuss the causes of this error and provide a step-by-step guide to fix it.
What are the causes of VCOMP100.Dll Was Not Found on Windows 11?
Several potential causes for the VCOMP100.dll was not found error on Windows 11. Some of the most common causes include:
Corrupted or missing VCOMP100.dll file – This error can occur if the VCOMP100.dll file is missing or corrupted. The file may have been accidentally deleted or damaged due to malware or other security threats.
Outdated software – If the software that is trying to use the VCOMP100.dll file is obsolete, it may not be compatible with the version of the file on your computer. Updating the software to the latest version can often resolve this issue.
Registry errors– The Windows registry is a database that stores important information about your operating system and programs. If there are errors in the registry, it can cause the VCOMP100.dll error.
Hardware or driver issues – Hardware or driver issues can also cause the VCOMP100.dll error. For example, if the graphics card driver is outdated or incompatible, it may prevent the VCOMP100.dll file from running correctly.
Malware or virus infections – Malware or viruses can also cause the VCOMP100.dll error. They can corrupt or delete important files, including the VCOMP100.dll file.
It’s important to note that this error message refers explicitly to the VCOMP100.dll file and is related to the Visual C++ runtime library. Hence, any problem with this file or the library, in general, could lead to an error message.
How do I fix vcomp100 DLL not found?
Before you start with any of the fixes below, we recommend restarting your computer. Sometimes, simply restarting your computer can resolve the error. Likewise, shutting down and restarting the computer can refresh the system and fix errors.
1. Run the System File Checker
Right-click the Windows icon and select Terminal (Admin) or Command Prompt (Admin).
Once the Command Prompt opens, type the script below and hit Enter. SFC /scannow
Please wait for it to complete, then exit the Command Prompt.
Reinstalling the software that is causing the VCOMP100.dll was not found error will replace missing files, update dependencies (usually files and libraries), fix registry errors, and reset your configuration.
So, this is often an effective fix. However, it’s essential to remember that when you reinstall the software, it will delete any saved data, settings, or customizations you have made, so make sure you back up any critical data before the process.
Right-click on the Start menu and select Device manager.
The culprit is often the graphics driver, so expand Display adapters, right-click on your graphics driver, and select Update driver.
Select Search automatically for drivers, and follow the prompts.
If you want to save time and effort, it is always a great idea to employ the help of a professional driver updater tool. This kind of software can scan your whole system, identify any broken or missing drivers, and install genuine new copies for them, all within a few minutes.
4. Run a malware scan
Press the Windows key, type windows security, and choose the Windows Security app.
Click on Virus & threat protection.
Select Scan options.
Select Full scan and click the Scan now button.
A malware or virus infection can cause the VCOMP100.dll error. You should use a reputable antivirus program to scan your computer and remove any malware or viruses that are found.
The VCOMP100.dll was not found error can be a frustrating issue, but it is not impossible to fix.
By following the fixes mentioned above in this article, you should be able to resolve the error and get your programs running again successfully. Always keep your operating system and programs up to date to minimize the chances of encountering this or other errors in the future.
Finally, if the problem persists, you may need to contact the support of the software you are trying to run.
What began as a small production company in the 1990s grew into one of the largest platforms for anime streaming. Funimation hosts over 10,000 episodes and movies on their massive anime library with subs and dubs.
Funimation also has a free app that is compatible with several devices, including Apple TV, iOS, Android, Roku, Xbox One, and more. However, this article will examine the best browsers for Funimation streaming for those who prefer in-browser watching.
The owner of Funimation, Sony, acquired the streaming rival Crunchyroll in 2021. Sony is merging the streaming services and its subsidiaries into one; Funimation is soon to be known as Crunchyroll, LLC.
Does Funimation Work on Chrome?
We have made a list of browsers that are compatible with Funimation, and Chrome is one of them. However, you may have second thoughts about using the Chrome browser. According to many users, one reason for this is Chrome’s resource use.
To bypass this while viewing anime, you may opt for a lightweight browser that is also easy on your computer resources. Also, several users reported that Funimation is not working on Chrome.
Before we share our top browser picks, since many users have asked, how much is Funimation a month? We will quickly respond to that.
It’s free to join Funimation, but users only can access a limited library with ads. It costs at least $5.99 / month to access the entire library. Funimation also offers a Premium Plus subscription for $7.99 / month, giving an ad-free streaming experience and offline viewing.
However, with Funimation merging into Crunchyroll, soon, users will only be able to stream their favorite shows from Crunchyroll. While more shows will be available, users will have to pay a minimum of $9.99 / month for access.
Crunchyroll will offer a 60-day free trial to existing Funimation, Wakanim, and VRV subscribers.
What are the best browsers for Funimation?
Opera One – Great native integration for messaging
Opera One is one of the best browsers on the market. It has a built-in unlimited VPN that can be enabled and does not require a subscription. Users can stream their favorite anime on Funimation from anywhere in the world.
A feature that makes Opera One the best browser for Funimation is the video pop-out option. This feature allows users to continue watching a show outside of the streaming tab. The video will continue playing in its frame even when Opera One is minimized.
Opera One also has a built-in snapshot feature. Funimation viewers can use this tool to take a screenshot of their favorite scene while streaming.
Users can use the My Flow function to easily share files, videos, and more between connected devices. With this feature, viewers can easily continue streaming their favorite anime on their phones.
Key features of Opera:
Built-in unlimited VPN
Video pop-out feature and Snapshots
Native AI, social media and messaging apps
My Flow, workspaces and tab islands
Opera One
Utilize the pop-up video feature in Opera One for efficient streaming on Funimation.
Here is an excellent browser for Funimation streaming. It provides some of the greatest streaming visual quality.
It might be draining on your battery to stream in such high resolution, but Microsoft Edge features a built-in energy saver that allows users to watch for longer.
Microsoft Edge is one of the quickest browsers since it uses fewer resources than other well-known ones. Users may stream as a result with minimal to no buffering.
Here is another excellent choice for watching Funimation. Chrome supports HTML5 for error-free streaming.
Viewers may smoothly stream Funimation episodes on a large screen using Chromecast, and for fans who like to watch their favorite anime on television, this is a significant benefit.
Chrome provides cross-device synchronization with a password manager and automatic login, much like Firefox. This makes it simple and fast to broadcast from mobile devices and log in.
Thanks to its secure browsing and efficient memory management, Firefox outperforms several of its rivals. Tracking protection is used in the updated Firefox (Quantum) to provide safe surfing without slowing down.
When it comes to add-on possibilities, Firefox offers a large selection. Users may install several extensions to improve their streaming experience. Numerous add-ons made especially for Funimation exist.
Users may sync their passwords, bookmarks, and even extensions across many devices. Without having to enter their login information again, viewers may access Funimation on their mobile devices.
UR Browser, one of the most underappreciated streaming browsers, has surpassed streaming expectations. It’s one of the top browsers for Funimation because of its performance and speed.
The audio quality on UR Browser is among the best, and it supports HTML5. These attributes make UR Browser ideal for Funimation streaming.
With its private browsing capabilities, UR Browser is not only among the fastest browsers available, but it’s also one of the safest.
This browser offers secure streaming without limitations while safeguarding users’ online information. Additionally, UR Browser provides many degrees of privacy protection and includes a built-in VPN.
There aren’t any cookies or trackers that make pages load more slowly, and UR Browser is one of the quickest for streaming as a result.
Why does Funimation say video not available in your region?
All of the anime episodes that Funimation provides are geo-blocked outside of the countries where it is accessible. In other words, if you attempt to stream any of these media on Funimation, the following error notice will appear: We’re sorry, video not available in your region.
Of course, the finest VPN software must be used if you want to get around this.
These browsers are also top picks for streaming on Crunchyroll. Viewers don’t have to use a different browser when Funimation and Crunchyroll combine into one.
The browsers on this list offer the best options for streaming your favorite anime from Funimation. These picks are also perfect for Crunchyroll, so you can be worry-free once the two streaming services join.
Exploring Funimation for anime is a great start, and you can round out your queue with classic and modern toons from other sources too. For curated options and safe sites, see where to watch cartoons online and build a broader watchlist alongside your browser pick.
Leave a comment below letting us know what browser you prefer to use for streaming on Funimation or Crunchyroll.
It can be frustrating when you get a Microsoft Forms Sorry something went wrong error message. Many users have complained about getting this error message, and most don’t know how to fix it.
In addition, you may also experience errors opening Microsoft Forms or find that your account is not enabled, that’ll curtail your ability to access the platform. Read on to find out how to fix this error message.
Why is Microsoft Forms not working?
The software giant, in June 2016, introduced the ability to create quizzes and surveys using Microsoft Office forms.
To improve the user experience, a new version was launched in September 2018 with better capabilities.
This Office 365-integrated tool was developed to gather relevant and input markings, and even download them manually and automatically. Since its debut, the app has become a top data collection tool.
The Microsoft Forms not working error message display can come in different forms:
Sorry, something went wrong please make sure you have permission to access this form
Sorry, something went wrong this form doesn’t exist
Oops,something went wrong
So, what causes this dreaded error?
You may get this error message if your browser does not support Microsoft Forms. More often than not, this error is caused by issues with Microsoft servers. A third-party extension can also cause the error.
How do I fix the Microsoft Forms something went wrong error?
1. Use the Office Hive service for Microsoft Forms
It is possible to open Microsoft Forms in all significant web browsers such as Firefox and Safari. However, there are a few things you should keep in mind.
The Opera One browser works best with the platform, is the most reliable, and provides excellent support for Microsoft Forms.
It’s possible to use practical integrations to help you organize your tasks and create sound forms using the Forms service without errors.
It is important to note that Microsoft 365 Apps and Services are no longer supported in Internet Explorer 11. As a result, you can’t open Microsoft Forms in this browser version, except if you update it.
Opera One
Create or fill out your forms effortlessly with this future-proof browser.
Do you need to exclude a folder from OneDrive in Windows 11? Here is all you should know.
OneDrive is a Microsoft cloud storage service that permits you to store and access files from any device with an internet connection.
While it is a valuable tool for syncing and sharing files, there may be instances where you want to exclude or unsync a specific folder from OneDrive.
Whether for security reasons or to free up space on your local device, this article will provide step-by-step instructions on excluding or unsync a folder from OneDrive on Windows 11.
Why should I exclude a folder from OneDrive in Windows 11?
There are multiple reasons why you may want to exclude a folder from OneDrive on Windows 11:
Security – Certain folders may contain sensitive information that you don’t want to be stored in the cloud. By excluding these folders from OneDrive, you can keep the data secure and prevent unauthorized access.
Space limitations – If you have limited storage space on your local device, you may want to exclude large or unnecessary files and folders from OneDrive to free up space.
File organization – You may want to keep specific files and folders on your local device for easy access, but you want them to be separate from the cloud. Excluding them from OneDrive will keep them on your local machine and make it easier to find them.
Speed – Syncing many files and folders can slow down your device. By excluding specific folders from OneDrive, you can improve the performance of your device.
It’s important to remember that if you exclude a folder from OneDrive, you will no longer access it from other devices or online, and it will not be backed up in the cloud. So it’s always a good idea to keep a backup of essential files.
How can I exclude or unsync a folder from OneDrive on Windows 11?
1. Using the app settings
Click on the little arrow at the bottom right of the Taskbar, and click the OneDrive icon.
Select the gear icon and click on Settings.
In the Settings app, select the Manage backup button.
For the folder, you want to exempt from a sync, tap the Stop backup option.
Click on the little arrow at the bottom right of the Taskbar, and click the OneDrive icon.
Select the gear icon and click on Settings.
Click the Choose folder button.
Finally, uncheck any folders you do not want to link and hit OK.
Unlinking a folder from OneDrive on a Windows 11 device is easy.
In conclusion, excluding or unsyncing a folder from OneDrive on Windows 11 is straightforward.
By following the instructions outlined in this article, you can easily remove a specific folder from OneDrive and prevent it from syncing to the cloud.
This can be useful for maintaining security or freeing up space on your local device. Always back up your essential files if you need to reaccess them.