How to Increase Clipboard Size on Windows 10 & 11

Did you know you can increase the clipboard size on Windows 10 and 11? It’s simple and we’ll show you how

There’s no fixed limit on the clipboard. It depends on your system’s memory and settings. When the clipboard is full, older items are deleted or you get a clipboard out-of-memory error.

Let’s see how you can increase its size to prevent this and store more.

How can I increase the size of the Windows Clipboard history?

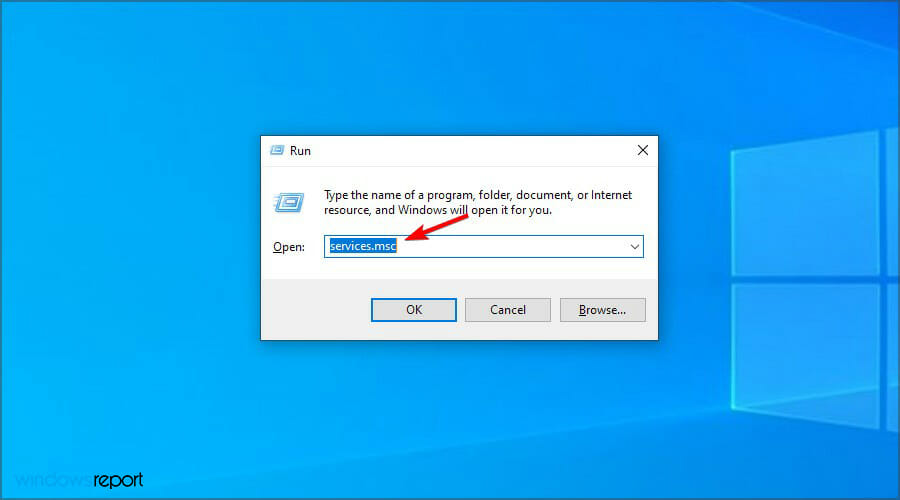
  1. Hit the Windows + R keys to open the Run command.
  2. Type in sysdm.cpl and press Enter.
  3. Navigate to the Advanced tab and under Performance, select Settings.
  4. In the Performance Options window that opens, select the Advanced tab and under Virtual memory, click on Change.
  5. Uncheck the Automatically manage paging file size for all drives option and select the drive you wish to undertake the process.
  6. Click on Custom size and enter a value higher than the minimum size allowed then press OK.
  7. Restart your PC.

If you are unlucky and this method does not work on your OS, don’t worry, we have excellent recommendations of Clipboard managers that do an equally great job or are even better than the built-in Windows version.

Clearing clipboard history can also come in handy. Should you encounter any other related issues such as Clipboard history not working, don’t hesitate to refer to our comprehensive guide on the same.

We’d love to hear your thoughts on how this method worked for you so share your experience in the comment section below.

5 Ways to Fix Monster Hunter Rise Server Communication Error

Monster Hunter Rise players report experiencing connection issues in the game. Upon launching the game, they’re greeted with error messages such as

Monster Hunter Rise: Server communication error/ A communication error has occured/ The Server is not reachable/ An error has occured

Not being able to access your favorite game is annoying, but easily fixable. As it’s the case with most gaming issues like packet loss, high ping, and low FPS, a few tweaks in your settings go a long way.

It’s important to make sure your entire setup is taken care of, from your Internet connection to the operating system and device you’re using.

What is causing the Monster Rise Server Communication Error?

There are a few reasons that could cause you to experience these errors when you attempt to launch Monster Hunter Rise. Some of these reasons include:

  • Bad or unstable connection
  • Outdated game versions
  • Device incompatibility

The first thing you can do to fix the errors in Monster Hunter Rise is to carry out these basic checks:

→ Check your internet connection: launch your browser or another game to make sure that the issue isn’t caused by a problem with your connection, and not with this game in particular

→ Reboot your PC: restarting your PC might get rid of bugs and connectivity issues that may accumulate when you’ve been using the PC for a longer time

How do I fix the monster hunter rise server communication error

If there aren’t underlying problems with your connection and restarting doesn’t do the trick, you can move on to more in-depth fixes:

  1. Free up bandwidth
  2. Update to the newest version of the game
  3. Use a VPN
  4. Check your antivirus
  5. Set up port forwarding

We found the most common issues that cause this connection error in Moster Hunter Rise and complied with easy-to-follow instructions so anyone can fix them.

1. Free up bandwidth

Check and close network processes. Bandwidth simply is the measure of the rate at which your network transfers data over the internet.

You need to run a background check to be able to detect the apps hogging your bandwidth. Close any unnecessary processes that use it up:

  1. Open Computer Settings
  2. Navigate to Network & Internet.monster hunter rise server communication error
  3. Open Data usage.monster hunter rise server communication error
  4. Then click View usage per app.

You can see now which apps use up too much bandwidth. In this menu, you can add data limits for each app and you can also make sure you don’t allow them to run in the background while gaming.

If this is left unattended, it can bring about network congestion as a result of high bandwidth usage, as well as slow download or poor connectivity to servers.

2. Update to the newest version of the game

Older game versions are oftentimes buggy. Not being able to connect to the game can be caused by corrupt game files. To fix this, follow these simple steps to update to the newest version of the game.

  1. Head to the Monster Hunter Rise website and go to the Update section.
  2. Pick the version you want to install and your launcher/ device.monster hunter rise server communication error
  3. Download the files and run the installer.

Ensure you have the latest version to avoid getting constant connection error messages.

3. Use a gaming-optimized VPN

Using a VPN to access the gaming server can help. VPNs with unlimited bandwidth and good speed rates may be able to offer you a better connection than the one provided by your ISP’s servers.

For Monster Hunter Rise, ExpressVPN is a great option.

  1. Visit the official ExpressVPN website and signup for a subscription.maplestory ping
  2. Enter your email address and select your payment method.
  3. Wait for the download to begin.
  4. After the download is completed, click on the installation file and wait for it to install.
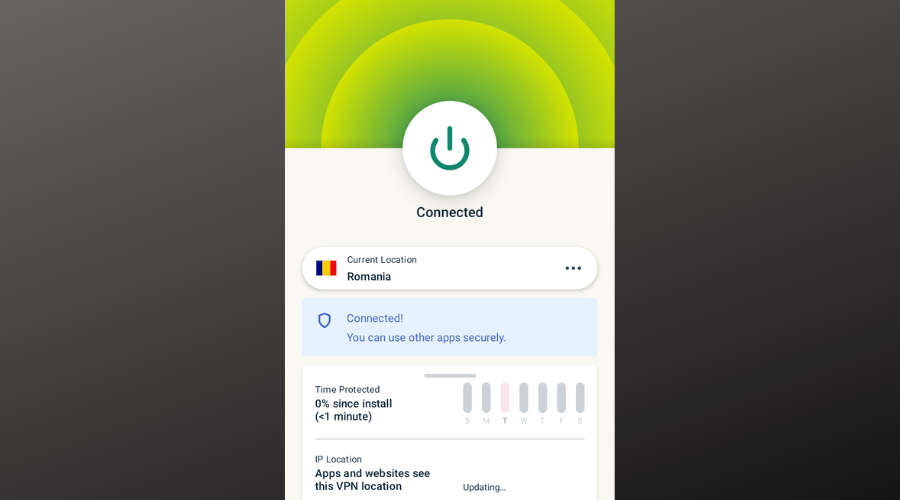
  5. When the installation is complete, launch the app and connect to a server in whichever region you want.VPN Amazon Echo Alexa

Using a VPN can fix other issues in online games and is actually proven to help with packet loss in Monster Hunter World.

ExpressVPN has gaming-optimized servers, making it a great choice for unlocking geo-blocked games, fixing connectivity issues, and preventing DDoS attacks.

ExpressVPN

Connect to ExpressVPN to access gaming-optimized servers for a more stable and reliable connection!
Free trial VIsit website

4. Check your firewall

In order to fix this monster hunter rise communication error, you might need to check to see if there is a conflict between the firewall and the game.

Here’s how to check if this is the problem in a few simple steps:

  1. Launch Control Panel.
  2. Go to System and Security.
  3. Select Windows Firewall.
  4. Go to the Allow an app through the firewall section.
  5. Click on the Change settings button.
  6. Click on the Allow another app option and select Monser Hunter Rise’s exe file.

Scroll to find the Monster Hunter Rise, tick all the boxes with the name of the game then click OK.

5. Set up port forwarding

  1. In your browser, go to your router’s Settings page.
  2. Make sure you log in with the admin account.
  3. Find the port forwarding section and enable it.
  4. Enter your IP information and the game’s ports.
  5. Save the settings.

Port forwarding can improve several aspects of your gaming. Many gamers use it to improve frame rates and get rid of connection issues (case in point), and they’re also preferred by gamers that host gaming servers.

What are the Monster Hunter Rise device specifications?

  • Windows 10 Operating System (64-bits)
  • CPU – Intel Core i5-4460, AMD FX-8300, or even better
  • Memory – 8 GB RAM
  • Video Card – AMD Radeon Rx 570 (4GB VRAM), NVIDIA GeForce GTX 1060 (3GB VRAM), or better video card versions.

Monster Hunter Rise is a popular online game that’s gathered a strong fanbase. Not being able to access the game because of server errors can be a pain, but we hope these fixes helped you.

You can now customize Xbox Elite 2 controllers in the Xbox Design Lab

Seven years have passed since we covered the first Xbox Design Lab event. Last year, we were talking about the first edition of Xbox Series X/S controllers becoming customizable in the Xbox Design Lab.

Now that the Xbox Elite 2 controllers are available for fans everywhere, it was only right that Microsoft and Xbox would come up with Design Lab color schemes.

Just like the standard Xbox wireless controller, the Elite 2 controllers on the Xbox Design Lab will allow you to fully customize nearly all of the parts on the controller, such as the triggers, d-pad, and thumbstick.

Fully customize your Elite 2 controller with Xbox Design Lab

Microsoft temporarily paused the program ahead of the Xbox Series X/S release before relaunching it in June 2021, discontinuing custom Xbox One controllers in favor of the Xbox Series X/S controller.

Now, the company mentioned that players can finally choose between a cross-shaped or faceted D-Pad in the Xbox Design Lab, a feature you previously could not do.

You can further personalize your controller with laser engraving and add your name, Gamertag, or whatever custom 16-character message.

Xbox designed the Elite Series 2 controllers to be fully customizable with interchangeable components, so you can play with a specific setup.

And, you can get a custom-designed carrying case to match your style and keep the controller and components secure and organized.

The possibilities are endless, as you can combine Sterling Silver, Pewter Silver, Gunmetal Silver, Abyss Black, Retro Pink, Deep Pink, Oxide Red, Zest Orange, and Gold.

But wait, there’s more! You also have Electric Volt, Velocity Green, Glacier Blue, Dragonfly Blue, Mineral Blue, Photon Blue, Midnight Blue, Regal Purple, Nocturnal Green, Warm Gold, and lots more.

You will also have the recently released color options such as Dragonfly Blue, Military Green, and Nocturnal Green.

The controller’s thumbsticks also have adjustable tension and you can remap the buttons and change the color of the Xbox button light in the Xbox Accessories app.

Microsoft said that the controller has up to 40 hours of battery life on a single charge and it should easily pair with an Xbox console or Windows PC, as well as smartphones and tablets.

That being said, keep in mind that an Elite Wireless Controller Series 2 that you customize in Design Lab will cost you about $150.

If you also want to buy personalized accessory packs, a bundle of the controller and all Elite components will run you a total of $210.

What is your favorite color scheme for the Elite Wireless Controller Series 2? Share your opinions with us in the comments section below.

The Xbox October Update goes live today with a number of improvements

The Xbox update for October goes live today. These monthly updates continue to evolve the Xbox experience and make it better with enhancements and new features. Here is a look at what the October update brings with it.

Change your TV volume

For Xbox Series X|S consoles connected to TVs via HDMI, TV volume can now be changed inside the audio and music section of the Xbox guide. Press the Xbox button, navigate to Audio & Music, and find the buttons to change TV volume or mute it. You may never have to reach for your remote in the middle of a game or movie again!

Mute startup audio

This oft-requested feature will be a crowd-pleaser for sure. You can now customize your settings to mute all sounds when starting up your Xbox. Navigate to Profile & System > Settings > General > Volume & audio output > Additional options where you can select Mute startup sounds. You can now adjust the power chime here as well.

Select your home Xbox

Making a specific Xbox console your ‘home Xbox’ gives friends and family access to the console when you’re not signed in. It also lets you play your digital games offline.

Power mode options screen changes

Name changes have been made to the power mode options. “Standby” has been renamed “Sleep.” And “Energy Saver” is now “Shutdown (energy saving).” To access these options open the guide and navigate to Profile & system > Settings > General > Power options.

You may have noticed that we recently reported that a new power options screen is currently in beta testing, that will allow you to see how much energy is used in each power mode. Look for this in a future update coming soon.

Xbox passkeys now Xbox PINs

This is merely a name change. Passkeys (now PINs) will work the same way as before.

Xbox controller firmware update

This update features bug fixes for most Xbox controllers.

Edit and trim your game clips in the mobile Xbox app

In the mobile Xbox beta app on Android and iOS, you can now make edits to your game captures. Go to Library > Captures to get started. You can also now share your captures via the Xbox Game Bar to Medal.tv. To access the game bar in Windows press the Windows logo key + G. Or press the Xbox button on an Xbox controller. From there: Captures > See all my captures, then select a clip and then select Share to Medal.tv.

All images via Xbox Wire. 

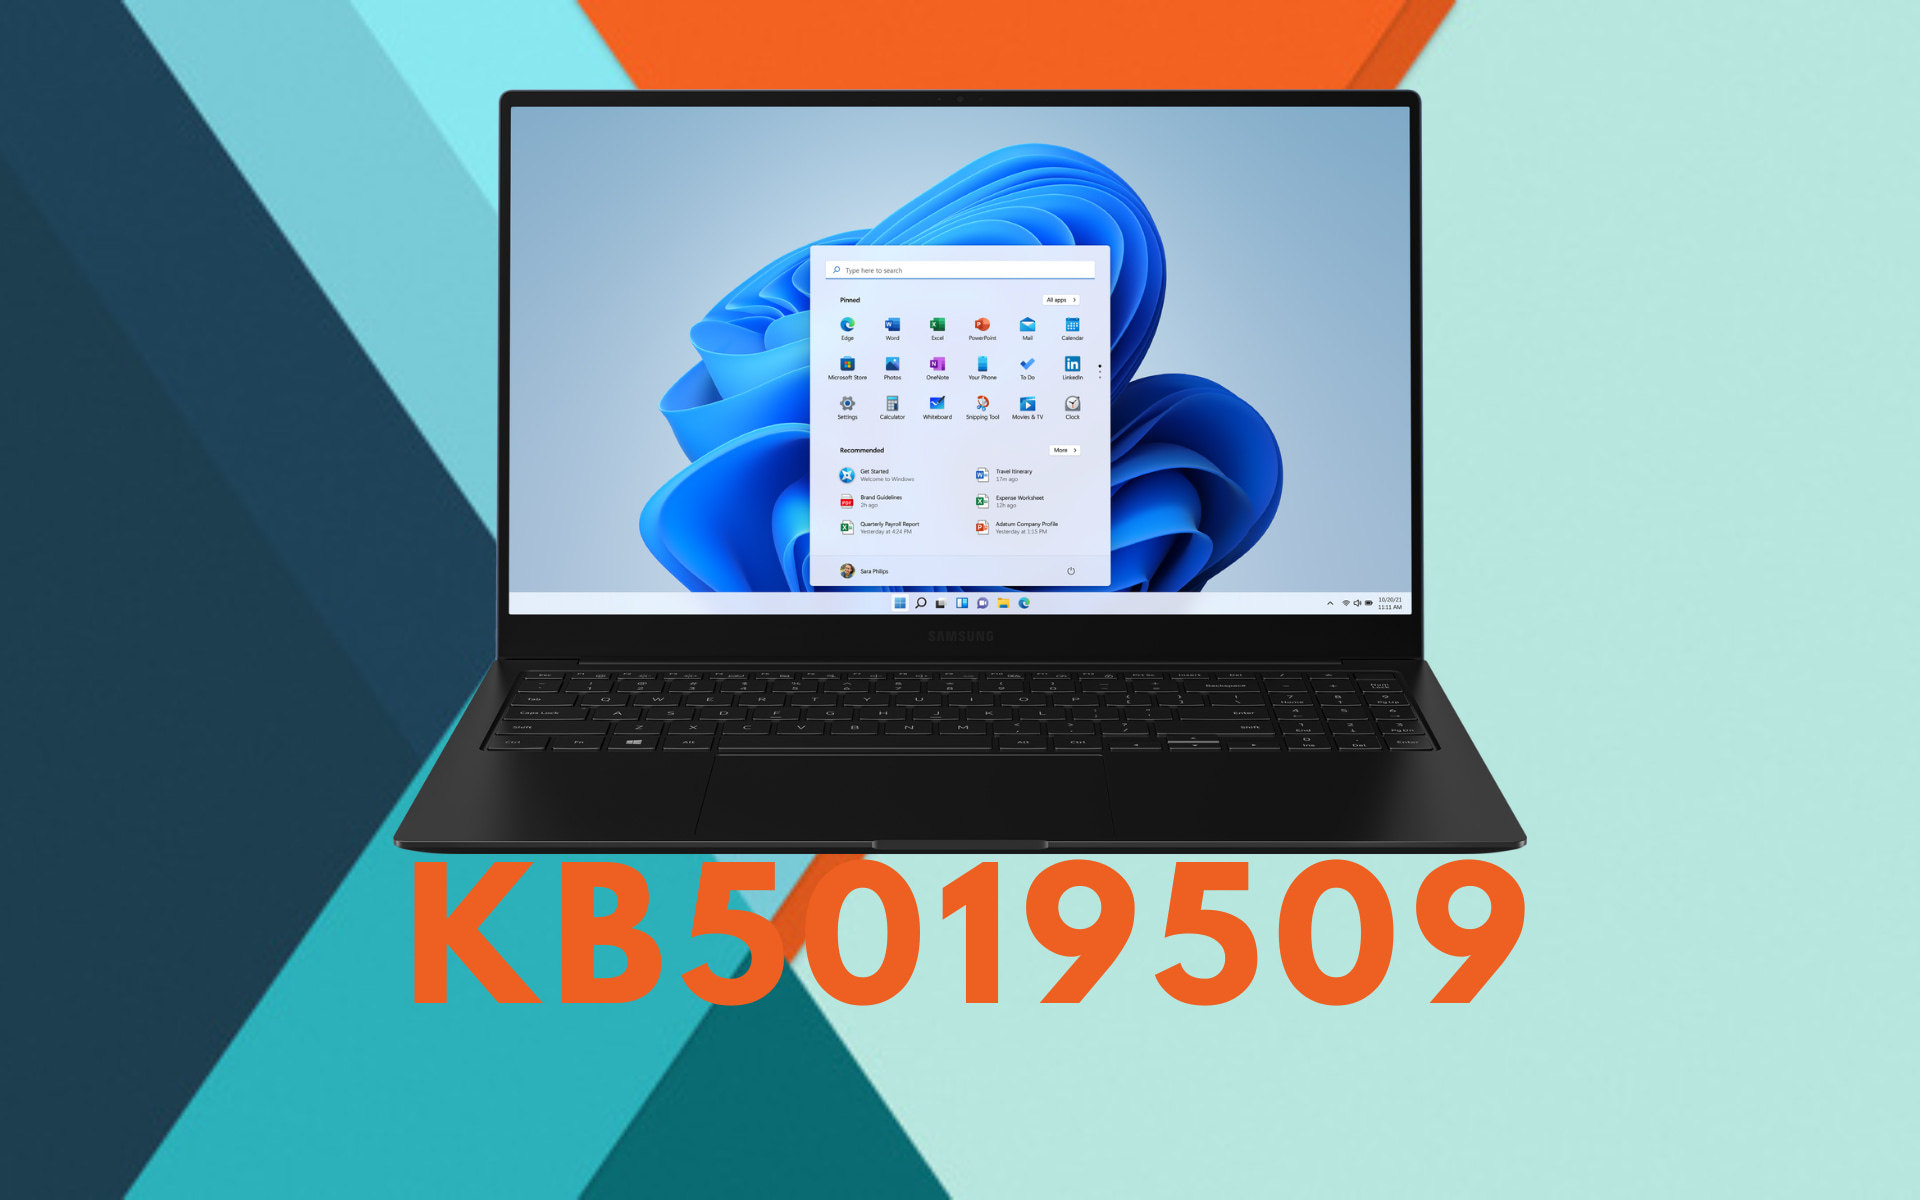
KB5019509 for Windows 11: Download & Features

Not long ago, Microsoft released Windows 11’s first major update, which is version 22H2. This update turned out to be full of bugs and upgrades to this version were even blocked at some point.

However, the tech giant keeps putting in the work to improve the OS, and they’ve already tackled many of the issues, including the TLS/SLS network problem.

Now, KB5019509 comes with some of the features that early adopters have been waiting on for quite some time now.

Taskbar overflow, Suggested Actions & more with KB5019509

The moment has finally arrived, and Microsoft has released the long-awaited Windows 11 tabbed File Explorer, Suggested Actions, Taskbar Overflow features, and Task Manager quick-access features.

Yes, all these new functionalities are in a single new preview cumulative update. However, you will have to be patient since this is a gradual rollout.

The company explained that they will start to roll out the new features to those who installed today’s preview update but that it may take some time before it’s enabled on all Windows 11 PCs.

Starting with KB5019509, on the new File Explorer homepage, you can pin important files for quick and easy access.

And, using the power of Microsoft OneDrive, you can view your colleagues’ actions on your shared files. Microsoft will also provide personalized suggestions based on your Microsoft 365 account.

The Suggested Actions feature is only available for customers in the United States, Canada, and Mexico, at least for the time being.

It allows you to select text in Notepad or other applications and have Windows automatically prompt you to perform an associated action.

When you copy phone numbers or future dates, for example, it provides suggestions, such as making a call with Teams or Skype or adding an event in the Calendar app.

Besides the Suggested Actions and File Explorer tabs features, further improvements include:

  • The taskbar overflow menu allows the taskbar to offer an entry point to a menu that shows you all your overflowed apps in one space
  • You can now discover and share to more devices, including desktops, using nearby sharing
  • You can uninstall, repair, and modify all apps from Windows Settings instead of the Control Panel
  • It improves the performance of federated authentication

Please keep in mind that Microsoft has also brought back the ability to launch the Task Manager by right-clicking anywhere on the Windows 11 Task Bar.

As you remember, this feature was removed with the initial release of Windows 11. This caused many users to right-click on the taskbar for no reason constantly.

That being said, these features are still rolling out and will not be available to all Windows 11 users immediately, so patience is of the essence.

Thus, if you do not have these features yet, just hang around as Microsoft rolls them out over the next few days.

For Windows 11 users who choose not to install today’s optional update, these features will be included as part of the mandatory November Patch Tuesday cumulative updates.

What can I do if I can’t install KB5019509?

  1. Press Win+ I to access Settings.
  2. Select the System category and click on Troubleshoot.w11 troubleshoot
  3. Press the Other troubleshooters button.other troubleshooters windows 11
  4. Press the Run button next to Windows Update.windows update troubleshooter

Don’t forget to report any other issues you might come across, in order for Microsoft to address and improve the overall OS experience for us all.

If you’re still on Windows 10, be sure to read about the importance of KB5034122 for Windows 10 – don’t delay, install now.

This is everything you can expect if you are a Windows 11 user. Leave a comment below if you found any issues since installing this cumulative update.

Fix: Item Not Collected Error on Windows Clipboard

If you are trying to use the Windows Clipboard and getting the Item not collected error message, then this troubleshooter is for you. There are times when you copy or cut a bunch of items to your Windows Clipboard, only to realize that they weren’t copied or cut correctly. 

Usually, it’s because of an unsupported format but let’s take a closer look at what causes this error and subsequent solutions to resolve it.

Why is my Clipboard not pasting?

Wondering why your item is not collected on Windows Clipboard? Below are some possible reasons:

  • You have too many background processes – The more apps you have open at once, the more memory they use up. This can cause problems if one of them uses up too much memory and needs to be closed by the system because there isn’t enough space left for it to continue running smoothly. You need the help of a task killer to manage the background processes.
  • Clipboard is full – The Clipboard may have reached its limit, so if there’s already something on there, nothing else will paste until you clear out some space. If you have multiple items on your Clipboard, try clearing the history of unnecessary items before pasting again.
  • Unsupported format – If the Clipboard contains an unsupported format, it won’t paste anything at all. To fix this issue, open the file in an application that can save it again in a compatible format (such as Word or Notepad). Then copy the new version back into your Clipboard.
  • Your device is low on memory or storage space – The Clipboard app uses RAM to store your copied items. If your device is low on memory, it may not be able to hold data such as copied text and images that you want to paste into another app or text field. To fix this issue, clear up some space.
  • Item is too large – If an item is too large, you may get a message that says Item not collected larger than Clipboard capacity. This could be a file that’s too big or a web page that contains lots of images.

Read on to find out how to resolve this issue.

How can I fix the Item Not Collected Error on Windows Clipboard?

Since the error could be something simple, it is important to perform basic checks before jumping to the more advanced solutions. These include:

  • Try copying from another program and see if you get the same message.
  • Restart your PC.

Now let’s dive into the more advanced troubleshooting below.

1. Restart File Explorer

  1. Hit the Windows key, type Task Manager in the search bar, and click Open.
  2. Navigate to the Processes tab, find Windows Explorer, right-click and select Restart.Restartin Windows Explorer

2. Clear the Clipboard history

  1. Hit the Windows key and click on Settings.settings windows 11
  2. Select System on the left pane then click on Clipboard on the right pane.go to system
  3. Hit the Clear button next to Clear clipboard data.

3. Check your system for viruses

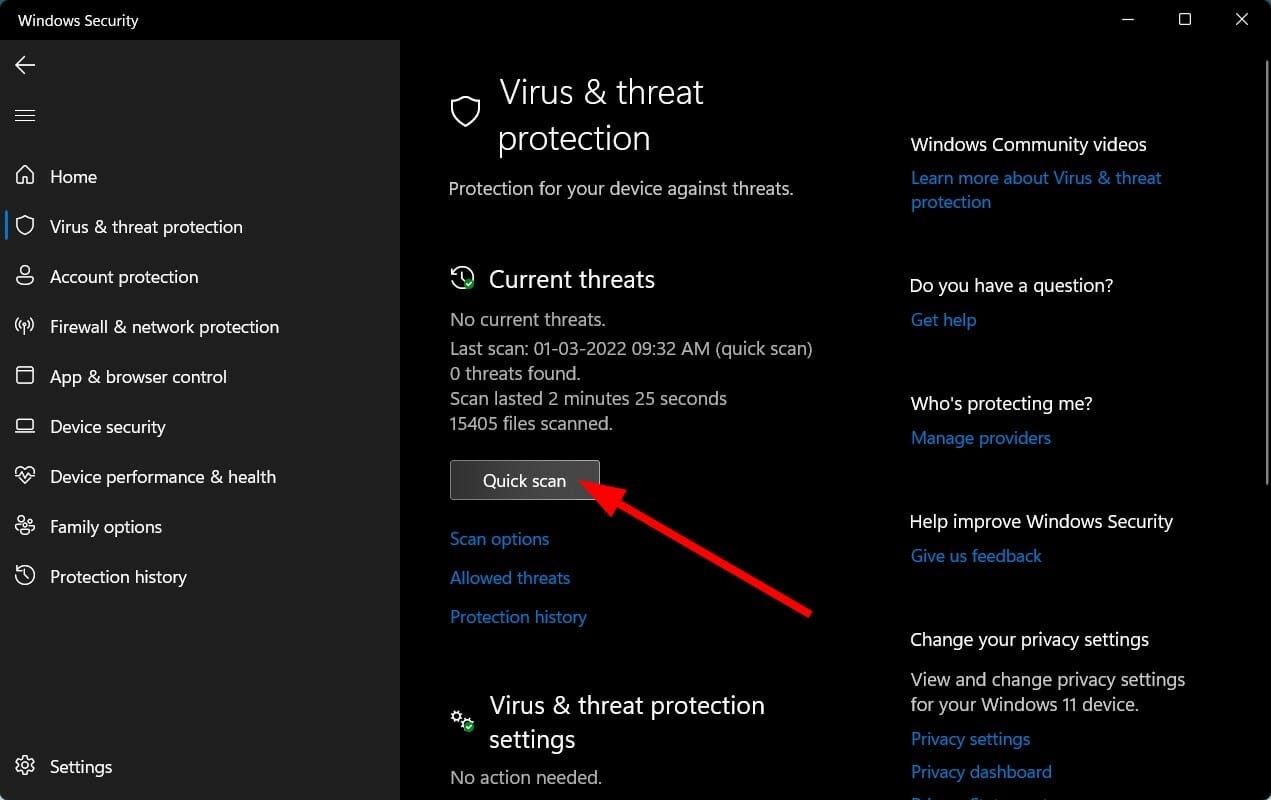
  1. Press the Windows key, search Windows Security and click Open.
  2. Select Virus & threat protection.
  3. Next, press Quick scan under Current threats.
  4. Wait for the process to finish and restart your system.

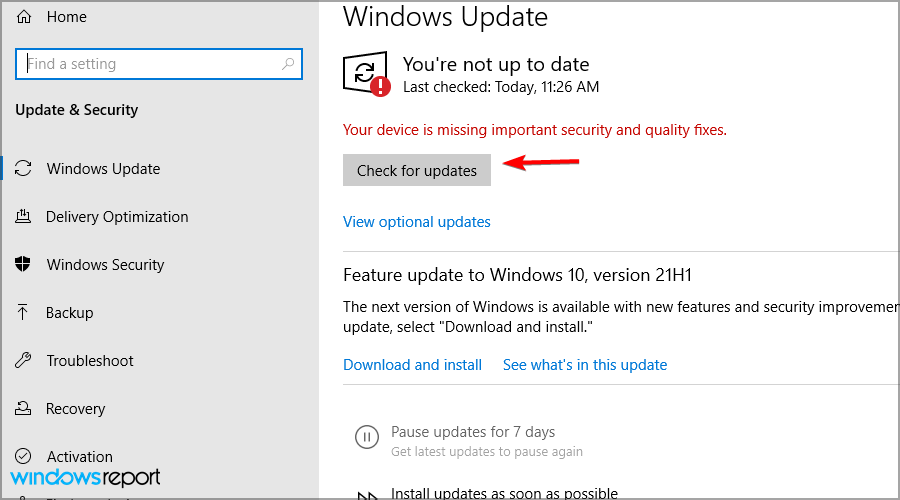
4. Update your OS

  1. Hit the Windows key and select Settings.settings windows 11
  2. Click on Windows update, then select Check for updates.Windows Update section and checking if there are any updates
  3. Download and install if any are available.

5. Convert the item to another format

If your Windows Clipboard is rejecting your copied items because they don’t have a valid format, you’re likely to see a message that says clipboard item not collected: format not supported.

In such a case, you will have to find an alternative tool to convert them into another format before trying to paste them again. Ditto is a great choice as it is an extension of the standard Windows Clipboard. It supports multiple formats and allows you to copy any type of file.

If all these seem like an uphill task, perhaps you should consider a clipboard manager. The built-in Clipboard in Windows works well for most users, but some people might find it not enough for them. 

If you are looking for a way to manage your Clipboard better and reduce the time spent copying and pasting items, this is a good option. A clipboard manager tool allows you to copy text or images from one app and paste them into another application without having to do any manual work.

Most come with a handful of features, support multiple formats, and have more customizable functions. Don’t forget that you can also sync Clipboard between Windows and Android.

Let us know if you have been able to solve this issue in the comments section below.

5 Ways to Fix FPS Drops & Lag in Farming Simulator 22

When we play video games many things can go wrong. Out of all of these things, low FPS and lag is the one that we gamers hate the most. In Farming Simulator 22, you need to have a good FPS to have a smooth experience. 

The performance of your game will depend heavily on your specs. However, even those with fairly old devices can still enjoy these games with FPS booster software. If you don’t have enough space, then in this guide, we show you how to fix FPS drops and lag.

Why is Farming Simulator 22 so laggy?

Farming Simulator 22 is a great game but the stuttering is one of the most annoying problems. There are several reasons why this happens and today we will be talking about them:

  • Bad internet connection – Your internet connection may be slow or unstable. With such conditions, it will be impossible to play this game without any issues.
  • Computer specifications – If your computer doesn’t have enough RAM or processing power, then it won’t be able to handle such an intense game as Farming Simulator 22 without having any issues at all. This brings us to the question of just how much RAM you need to run Farming Simulator 22. Well, at least 8GB RAM among other system requirements.
  • Graphics settings are too high for your computer – If you have a very old computer, then the graphics settings may be set too high and this will cause the game to lag. Lowering your resolution may help with performance.
  • Outdated graphics card – If your computer has an old or outdated graphics card, it can’t keep up with all the action happening on screen and this will cause lag. The best way to get a good frame rate in Farming Simulator 22 is to get a new and powerful GPU.
  • Server issues – If there are too many people playing at once then it can cause server issues for all players. They will experience lag when trying to connect or play online. While this isn’t something that you can control, you can avoid playing at peak hours.

What can I do to fix FPS drops and lag in Farming Simulator 22?

First, check off the following:

  • Before starting the game, check your system specifications and make sure that it meets all the minimum requirements for running Farming Simulator 22. 
  • Close down any unnecessary programs on your computer that may be hogging the bandwidth.
  • Check your internet connection strength.
  • Avoid multi-monitor setups during gameplay.

Next, the more advanced troubleshooting.

1. Check for game updates

The first thing you should do when you encounter a problem with your Farming Simulator 22 game is check for game updates.

This can help ensure that the latest patches are installed and all known bugs have been fixed by developers to make sure you don’t face any more problems in the future.

2. Lower your graphic settings 

Farming Simulator 22 is a very demanding game, so it requires a great deal of power from your computer in order to run smoothly. There are no universal Farming Simulator 22 best graphics settings but you can tweak them for balance.

If your PC does not have enough power, then it will not be able to run this game at an acceptable frame rate. So, to fix this problem, you should lower your graphic settings until you find the perfect balance between performance and graphics quality.

3. Update your graphics card

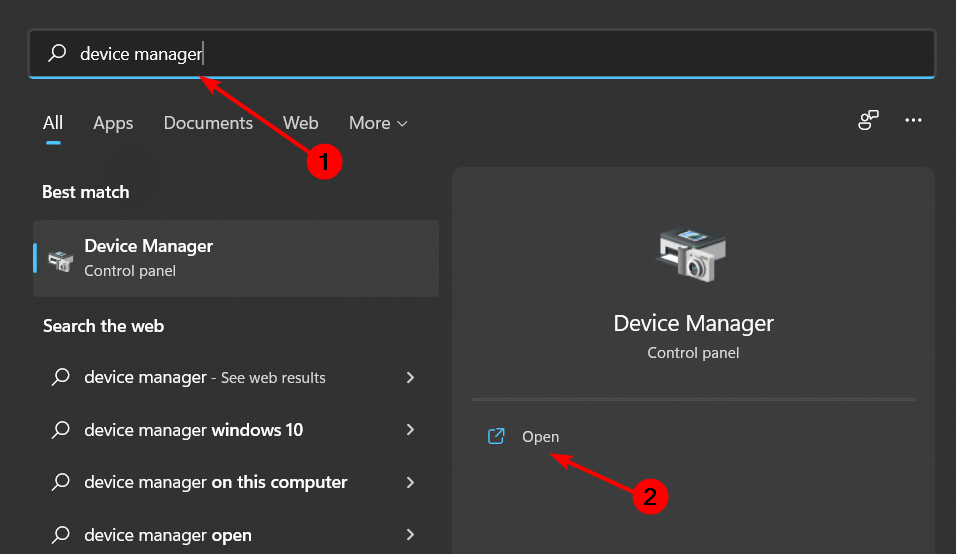
  1. Press the Windows key, type Device Manager in the search box, and click Open.
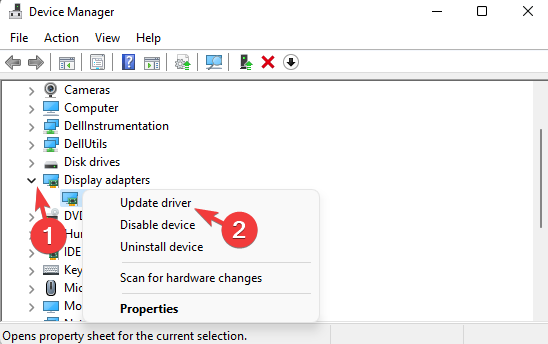
  2. Navigate to Display adapters, right-click on your graphics card, and select Update driver.update graphics driver
  3. Select Search automatically for drivers.

Updating your drivers manually can take you some time, so you can always use a dedicated tool. An excellent option here is Outbyte Driver Updater because it scans your whole device for out-of-date drivers and finds in a second the latest updates from its database.

Outbyte Driver Updater

Upkeep your device drivers and enjoy a lag-free gaming experience.
Free Trial Download now

4. Use an SSD drive instead of HDD

HDDs are slower than SDDs because they have spinning disks that read and write data at a much slower rate than an SSD. The best SDDs, on the other hand, load faster and are more stable. 

This means that if you have a lot of mods installed on your game or are running multiple programs at once, your FPS will drop as the HDD struggles to keep up with all the requests for data from the game itself.

5. Update your OS

If you have an old version of Windows then it’s time for an upgrade. Newer versions of Windows have better support for graphics cards and they make it easier for them to run smoothly without any problems.

Windows Update section and checking if there are any updates

Updating software is always a good idea because it ensures that you have all the latest fixes and patches for any bugs that may be present in your system. This in turn can help with performance issues as well as stability problems.

The last thing you can do if your game still isn’t running smoothly is downloading an FPS monitor and see if there are any spikes in frame rate during gameplay. If there are spikes then something isn’t right with your system configuration and you will need to troubleshoot further.

You can also check FPS using the Xbox Game Bar on Windows PCs. Another issue gamers seem to be pondering about is the capped FPS. Is Farming Simulator 22 60 FPS? Yes, Farming Simulator 22 has a cap of 60 FPS. 

However, most users on community platforms have been wondering: How do you unlock FPS in Farming Simulator 22? 

There is a workaround but you have to be careful because if your system cannot support a higher frame rate or if your graphics card does not have enough memory, you will experience more lags or stutters during gameplay.

Let us know whether you have been able to solve the FPS drops in the comments section below.

New GameDVR features coming to Xbox mobile app

The Xbox app on mobile will be getting some feature enhancements for the GameDVR system. Specifically, users will be able to edit, trim, and share edited clips. Note that this update is currently for the Xbox Beta app; it can be expected to see a full public release sometime in the near future. The beta is available to users with Android and Apple devices.

Xbox GameDVR is Microsoft’s application for recording game footage on the Xbox app and Xbox consoles. Once the new editing features a ironed-out on mobile, it would be reasonable to assume they will then come to Xbox consoles and the Windows version of the Xbox app.

Featured image via PureXbox. 

Here’s the feature Microsoft is currently testing in Bing

Microsoft is currently testing out a new feature in Bing dubbed more on this topic from. The feature is placed below the search results and comes with a button that you can use to pause/play the list of news sites logos running across. Users can click on either one of the logos displayed to check out more news updates from a specific publication.

Here’s a glimpse of how it works:

In other Bing related news, it is also set to get an AI image generator which will allow users to convert text into digital art. All the user has to do is type in the image description then the Image Creator powered by DALL-E 2 image generator technology and developed by OpenAI does the rest. Once the image is created, the user can access it via the Bing Images tab, followed by clicking on the Image Creator icon in the sidebar in Microsoft Edge.

Microsoft will gradually roll out this feature first to a controlled audience, while making some tweaks to it alongside OpenAI with the aim of enhancing its user experience before releasing it to a broader audience. And finally, Microsoft recently launched a new feature that lets users launch Xbox cloud games directly from the browser when using the Bing search engine.

Via: Search Engine Roundtable, Search Engine Journal

How to Open Unknown File? 4 Best Software

Users can identify, run, and also access any file with unknown file extensions on Windows with the help of a few pieces of software.

If you’re on a mission to discover the best tool that can help you identify unknown files, then you must not miss out on these products for Windows 10.

This problem usually appears when you try to open specific files that are not recognized by Windows. Hence, when you try to double-click the file you get the pop-up message How do you want to open this file?

In this case, you can use some solutions to open unknown files, so bear with us to find out effective ways to open your files and overcome the issue.

How do I open unknown files?

1. Choose a program to open the file with from the default list

  1. 1. Right-click on your unknown file.

  2. 2. Select Open with from the menu that opens.

  3. 3. Choose an application from the list. If there isn’t any that is compatible with your file format, select Choose another app.

  4. 4. Browse the list for the appropriate program to open the file with.

    browse and choose for a program to open the unknown file
  5. 5. Click on OK after you make your selection.

  6. When you encounter the issue of opening unsupported files, the first step would be to find a method to open that file.

    Basically, the first thing you need to do to try to open a file with an unknown file extension is to browse the list of available apps and see if there’s any in it that can do the job.

    It is likely that you already have an app on your PC that can open your unknown file, without you having to download any third-party apps.

    This method also works if you install third-party software and want to use it to open those specific files. You simply need to choose the newly installed app from the list.

2. Browse the Microsoft Store for an app that can open your file

  1. Right-click on your file with an unknown file format.
  2. Select Open with.
  3. Choose Search the Microsoft Store.
  4. Download and install an app from the list that can open your file.

Another method you can use is to search in the Microsoft Store for an app to open your unknown files.

You should be aware that using this method to resolve the issue might not be that efficient because there are not so many Store apps that work on desktops.

Anyway, there are chances you can find desktop available programs on Windows Store that open multiple file types, so it is worth a shot.

3. Use third-party programs

In addition, it’s recommended to search in more depth and discover other manners to open unsupported files.

For example, you have useful file extension websites that provide extensive results for various unknown files and what programs you need to open them.

What is the best software to open a file with unknown format?

Adobe Acrobat

Adobe Acrobat Reader DC tools

One of the best software to use to open unknown files is none other than Adobe Acrobat.

If we’re talking about file formats – and we do not only refer to PDFs here -then, Adobe products are sure to impress you.

These powerful tools open a myriad of file extensions including the more usual Microsoft Office formats like .doc, .docx, .xls, .xlsx, .ppt, .pptx to Text, Rich Text Format.

But they also go all the way to rather unusual or very specific app restrained formats such as .wpd for Corel WordPerfect, .xps and .dwg, .dwt, .dxf, .dwf, .dst (Autodesk AutoCAD) and everything in between.

The support does not just end there. In the Pro version of the Acrobat, you also have a plethora of 2D, 3D, video, and audio formats to play with.

And you can easily convert them into editable documents that can be adjusted to your rendering needs.

In addition, you can edit or convert different types of files using this reader and manage them accordingly in a few clicks.

Adobe Acrobat

Adobe Acrobat can deal with a lot of file extensions that other software doesn’t even know about.

Free trial Visit website

TrID File Identifier

tridnet logo

The program comes in two variants: a piece of downloadable software or an online version.

It can identify a file type from its binary signature by browsing for selecting a file that you need to analyze.

After a short wait, the results will be displayed and the file accessed and compared against pre-existing definitions from the program’s database.

This tool has multiple utilities and can assist you in opening unsupported files and support different files recovery.

Moreover, the database of files is constantly updated and describes patterns of various files you need to open on your PC.

Thankfully, you benefit from an expanding database that stores supported files and can detect unknown files accurately with useful analysis.

⇒ Get TrID File identifier

Smart File Advisor

filefacts.net logo

Smart File Advisor can easily identify files that have no extension or have no known compatible software. The tool first analyzes various parts of the file content in order to determine which program to use to open it.

This small and intelligent tool can also notify you about any software updates for the apps installed on your system.

You might encounter unsupported files types now and then so you certainly need support to identify the specific file and the right software to open with.

Using Smart File Advisor you can be relaxed about opening files due to its extensive database that has infinite file types.

Plus, the tool is built to find diverse file types classified by category and it includes a plethora of categories to choose from.

The software is also free to use and is completely safe to use, so you can stay relaxed about spyware or viruses.

⇒ Get Smart File Advisor

Open With

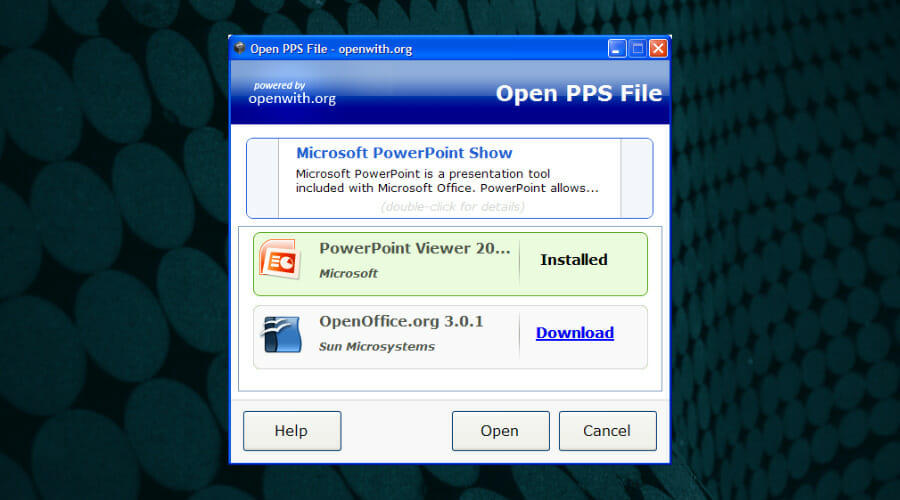
open pps file example

This program provides users with detailed info about file extensions and also links to free software for opening and creating each file type.

It comes with an app that works even when you’re not online. Another great feature is how it can find out the exact software you’ll have to use to access the file after it discovers its type.

Open With is the most suited platform to detect unknown types of files and also find the programs needed to open them.

It includes a rich database with thousands of file extensions to offer you the needed support to successfully open and create file types.

This solution also offers categorized files in order to cover every need regarding Windows files. For instance, you have compressed files, disk images, encoded files, images, documents, and much more.

This being said, you should consider this free tool that can actually offer the same results as the paid software out there.

⇒ Get Open With

FILExt

filext logo

This is an online tool and one of the best-known for identifying file types. The program includes a large database of file extensions and also includes the software that uses them with a site that features an alphabetical index of 1526 extensions.

You just have to enter the file extension that you’re analyzing into the search box of the program and press the Search button.

If it finds the extension in its database, a results page will appear showing the data related to the file.

In the unfortunate case, that the program does not find the extension in its database, the user will get a link to a page with information on what to do next for more research.

It’s good to mention that Filext is a popular tool used by millions of users to detect and view various files. Plus, the software is on market for over 20 years and efficiently assists the users.

Hence, if you require reliable support to open unknown file extensions on your Windows PC, this choice is more than suited for you.

⇒ Get FILExt

File extensions are used to help us find the specific type of file that we need to access — and there are lots of them.

It can sometimes happen that our computer stumbles on a file extension that is unfamiliar to the system.

And as a result, the PC will not be able to open it. Fortunately, the tools above will help your system identify unrecognized types of files.

Which one are you currently using? Share your experience with us in the comments section below.

WMIC Process List: How to Find All Running Processes

When you are working on various important projects and performance is the keyword, knowing exactly what processes are running in the background is a must.

Especially if one or multiple of the above-mentioned processes affect your current work, or you could just use the extra juice.

And finding out exactly what your device is still running in the background is pretty easy. You can use the wmic tool and get all the information you want in only a matter of seconds.

How, you ask? We’re about to show you just that in this article, so you will have this information handy for future reference.

How do I find a list of all running processes with wmic?

    There are, actually, a lot of useful commands that you can input into a Command Prompt window, provided you open it with administrator privileges, that can provide invaluable information.

    You can get a lot of information about your system using WMIC, and we have a dedicated article on this topic.

    Learning about the background processes, as well as gathering system information (BIOS serial number, available RAM, or information about available partitions) is only a few keystrokes away.

    So, without any further ado, here’s how you can get all the required info about all of the processes running on your device. using wmic.

  1. 1. Press the Windows key to open the search box.

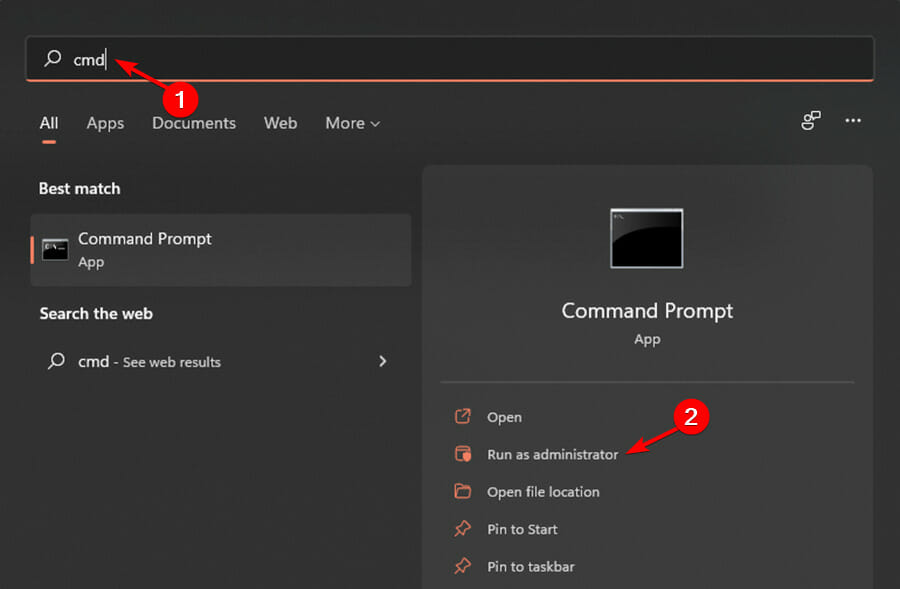
  2. 2. Search for Command Prompt in the search  box and click on Run as administrator.

    run cmd as admin
  3. 3. For a compact view of the processes and their memory usage, type the following command and press Enter: tasklist

    tasklist command
  4. 4. For a more detailed view of each individual process, type the following command and then press Enter: wmic process list

  5. 5. You can now see all the running background processes, as well as their associated services.

Remember to always open Command Prompt with administrator privilege when you are requesting system information.

If you are more of a PowerShell fan, you can get the same results as the ones we’ve shown you above by inputting the get-process command.

For more ways to manage and monitor your system from the command line, check out this detailed Command Prompt commands list that covers essential CMD functions for Windows users.

Why is wmic not listing all programs?

You can’t really show all the programs using wmic, or anything else that makes WMI calls unless all the programs on the machine are Windows Installer (MSI) packages, which is a bit rare.  

However, the Uninstall key in the registry is the only place that pretty much shows everything.  It’s what the Programs and Features list in Control Panel uses to populate the list of all programs.

reg query "HKLM\SOFTWARE\Microsoft\Windows\CurrentVersion\Uninstall" /s | findstr /B ".*DisplayName"

That’s all you have to do and, as we said, all the information you need is only a few keystrokes and a few seconds away.

Since we’re talking about wmic, other Windows users have reported dealing with wmic access is denied, and wmic alias not found errors, so we prepared some fixes for you.

Was this article helpful to you? Let us know in the dedicated comments section below.

5 Ways to Fix Your Device Driver Is Not Compatible in WoW

Broadly speaking, users find navigating through the WoW game easy, yet at times due to certain glitches, you might come across Your device driver is not compatible error in WoW.

If you have ever encountered the above error, you have landed on the right spot. Quickly go through the guide below and pick your fix to resolve this issue!

What causes Your device driver is not compatible error in WoW?

In WoW, this error normally occurs due to outdated Windows or some incompatibility issues with the graphics drivers.

Listed above are a few causes that generally play a crucial role in Your device driver is not compatible error in WoW.

  • Outdated drivers – One of the most common causes of this error is outdated video or sound drivers.
  • Incompatibility issues – If you are using an old or incompatible graphics driver, it might also cause this error.
  • 3rd party software might be conflicting with WoW – Sometimes, other software interferes with WoW and cause this error.

Now that you know the main causes behind this error let’s move on to possible solutions that can help you resolve this error in no time!

How do I fix Your device driver is not compatible error in WoW?

Before moving to the real solutions, let’s have some quick checks that might help you get rid of this error.

  • Restart your computer because sometimes a simple restart can fix all kinds of problems, including this one.
  • Add WoW to your firewall’s exception list.
  • Check the minimum system requirement.

System requirements for WoW

Operating SystemWindows® 7 64-bit
ProcessorIntel® Core™ i5-3450
AMD FX™ 8300
VideoNVIDIA® GeForce® GTX 760 2 GB or AMD Radeon™ RX 560 2 GB or Intel® UHD Graphics 630 (45W TDP) *Requires manufacturer's driver support.
Memory4 GB RAM (8GB for integrated graphics such as Intel HD Graphics series)
StorageSolid State Drive (SSD)
100GB available space
Or
Hard Disk Drive (HDD)
100GB available space (depending on the performance of the drive, player experience may be impacted on HDD)
InternetBroadband internet connection
InputKeyboard and mouse required. Other input devices are not supported.
Resolution1024 x 768 minimum display resolution

After having the quick preliminary checks out of the way, let’s move on to some real and detailed solutions that can help you fix Your device driver is not compatible error in WoW.

1. Update the graphics driver 

  1. In the taskbar, search for Device Manager and open the application.
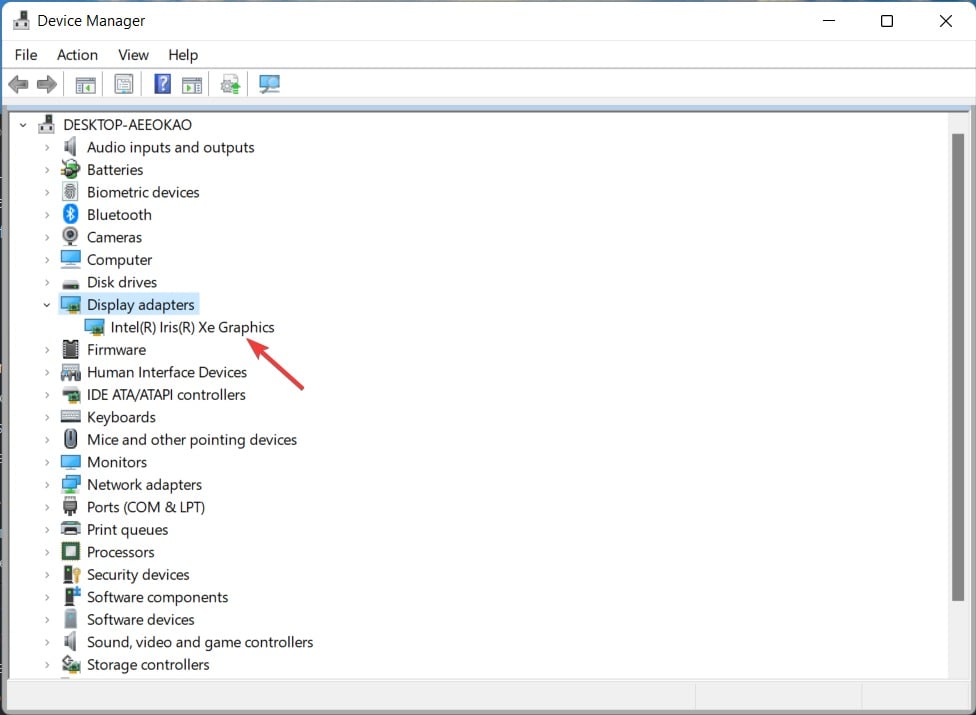
  2. Within the Device Manager window, click on Display adapters and double-click on the Intel(R) Iros(R) Xe Graphics, and a window will open up.
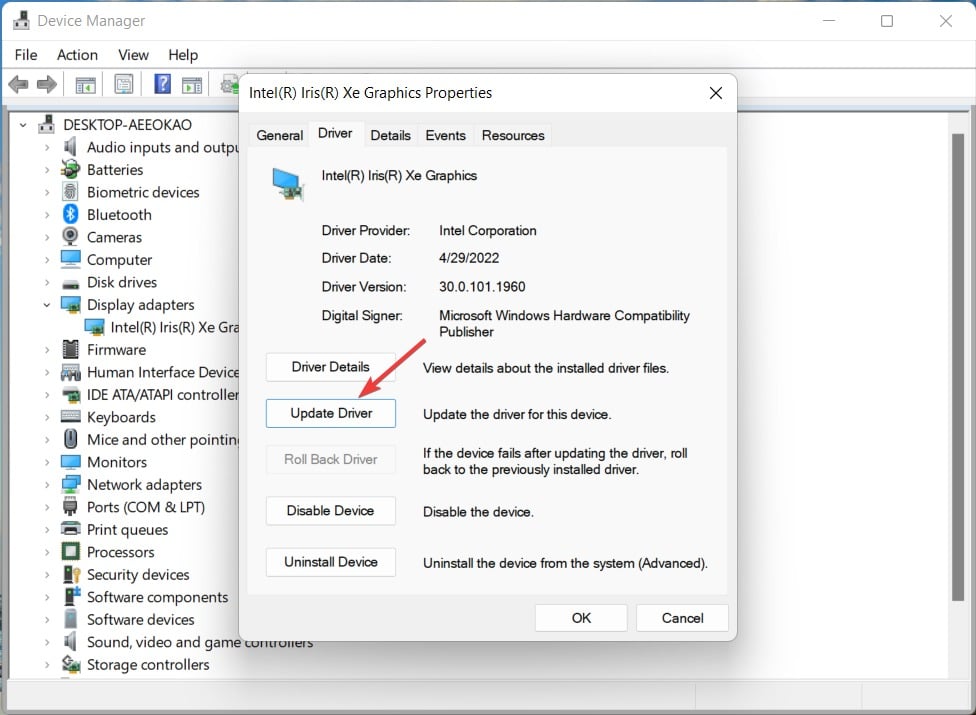
  3. Enter in the Driver tab in your graphic card window and click on the Update Driver button.
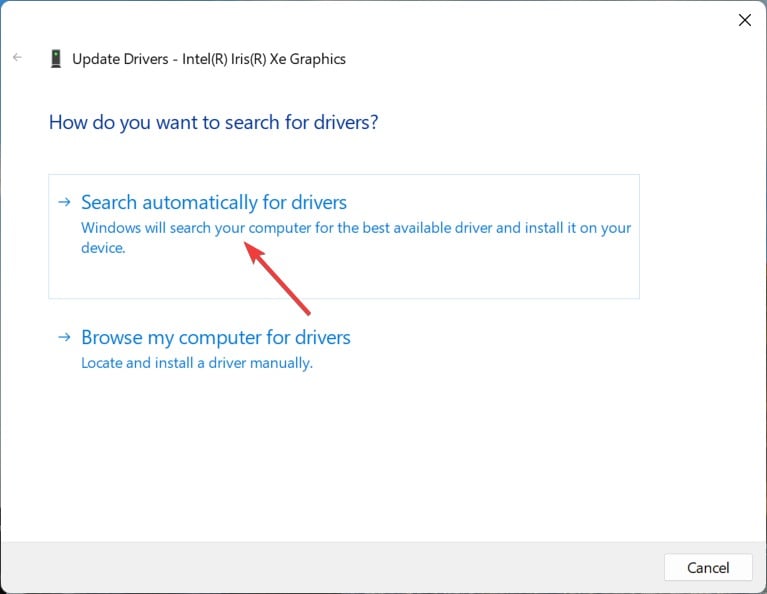
  4. Now select Search automatically for drivers, and update your drivers.

At times this error is caused by corrupted or outdated drivers. In this case, updating your current device driver to the latest available version will resolve the issue. 

If this method doesn’t suit you, you can check other ways to update your graphics drivers.

If you are experiencing frequent lagging, high latency, and dysconnectivity issues, then do check our guide to fix high latency and disconnection issues in WoW.

2. Reset the WoW user interface 

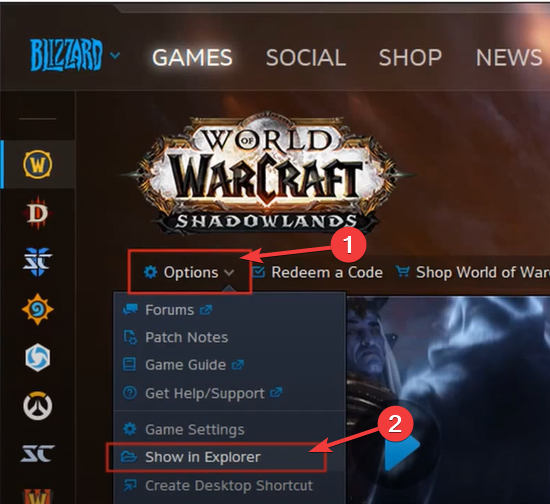
  1. On the main home page, click on Options, then select Show in Explorer.
  2. Within the popup menu that opens up, double-click on the WoW folder.
  3. Next up, double-click on the respective folder for WoW that is causing problems. It must be either _classic_ or _retail_.
  4. Rename the WTF, Cache, and Interface folders to WTFOld, CacheOld, and InterfaceOld, respectively.
  5. Relaunch World of Warcraft to see the changes that you made earlier.

A corrupted interface might sometimes result in Your device driver is not compatible error in WoW. Hence, resetting the WoW user interface will most probably clear the error.

After resetting the WoW interface, if you want to customize the interface according to your personal preferences, then you should check our guide for customizing your WoW interface.

3. Check for your Windows updates

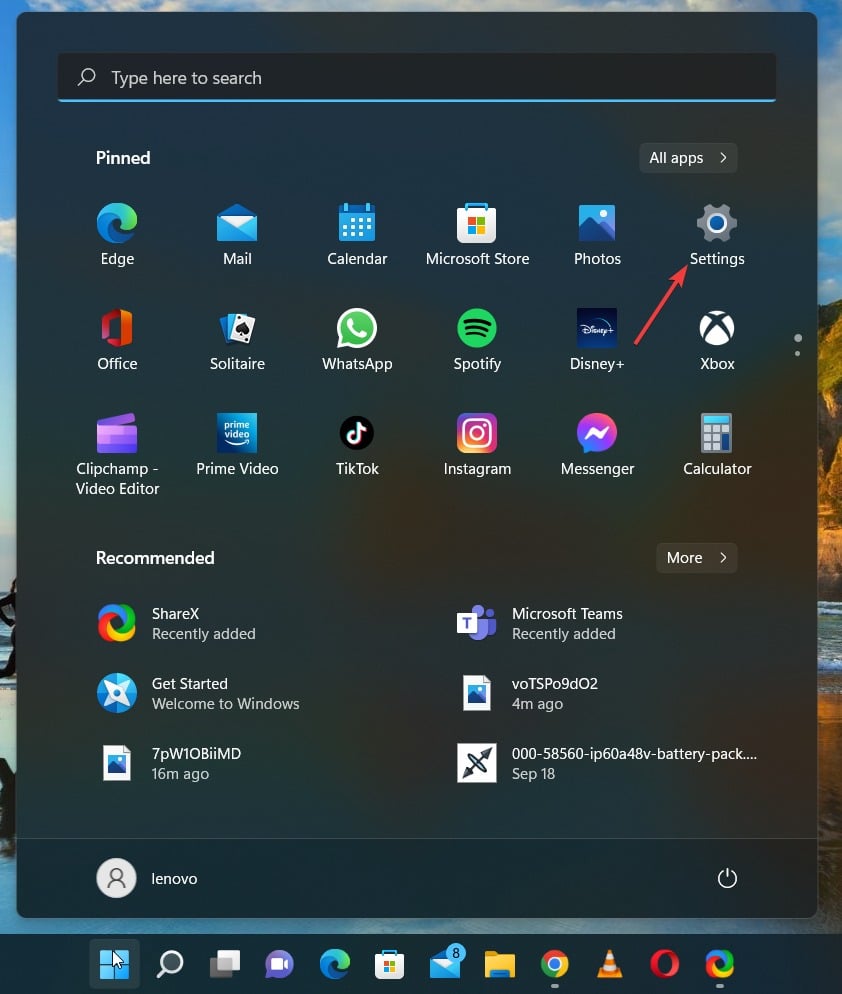
  1. Click on the Windows icon and select the Settings option.
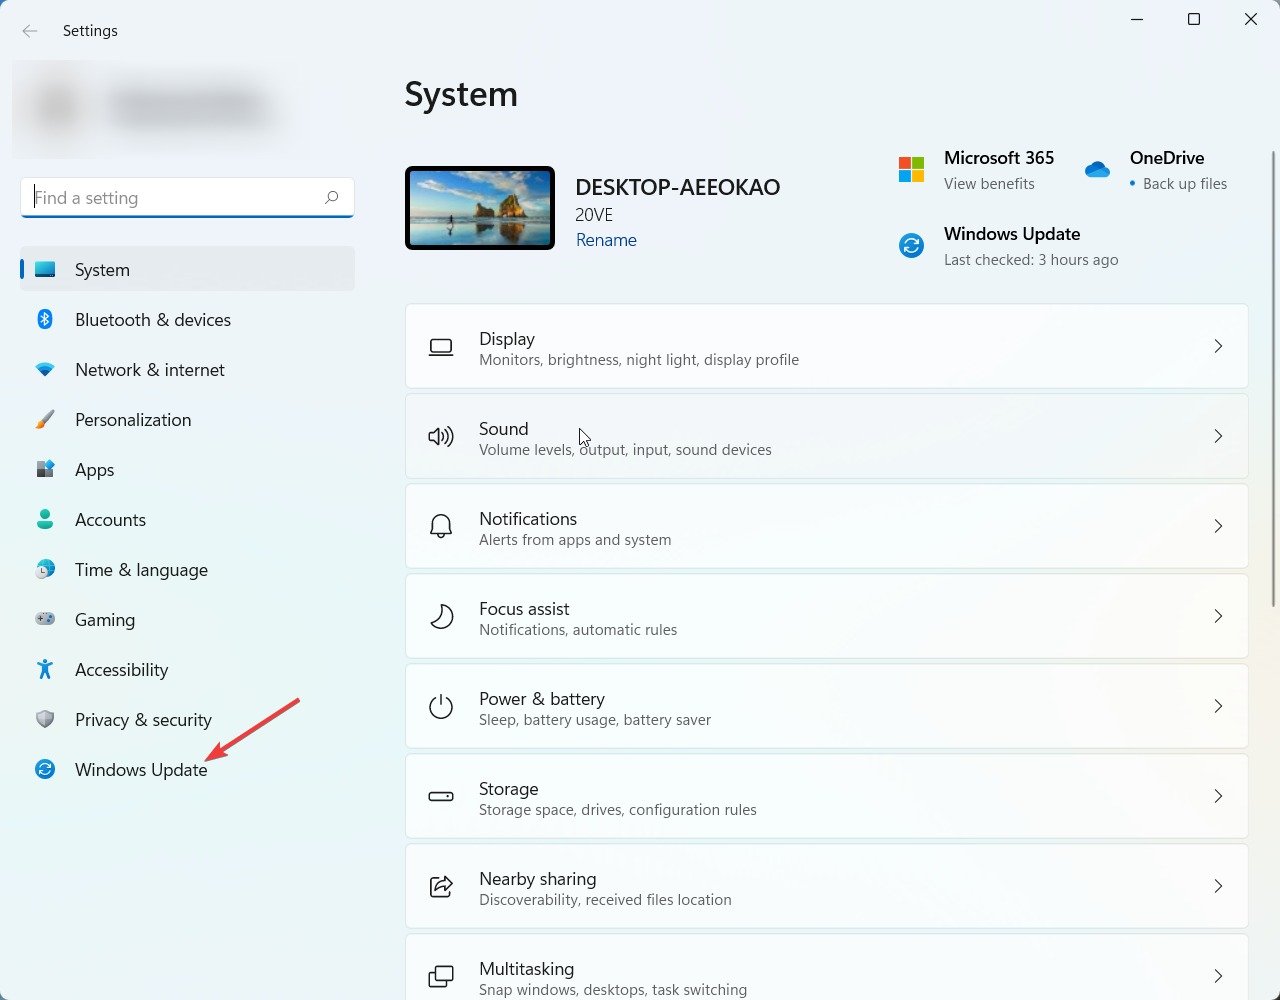
  2. Then, look for Windows Update in the sidebar menu and click it.
  3. Check if any update is available, then go for it and update your PC.

Outdated Windows are likely to cause device driver compatibility errors in WoW. Hence, updating Windows to the latest available version will fix the issue.

While updating your system, if you encounter an error of could not connect to the update service in Windows 11 then you need to check this article to solve could not connect to update service error.

If you are still experiencing the same problem, reinstalling WoW is your last resort.

4. Uninstall and reinstall WoW

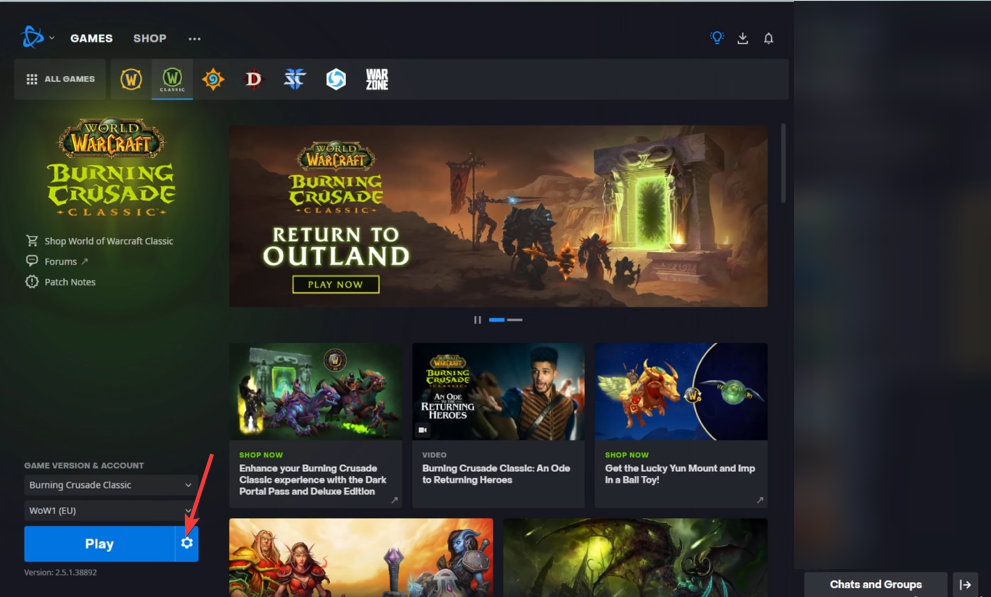
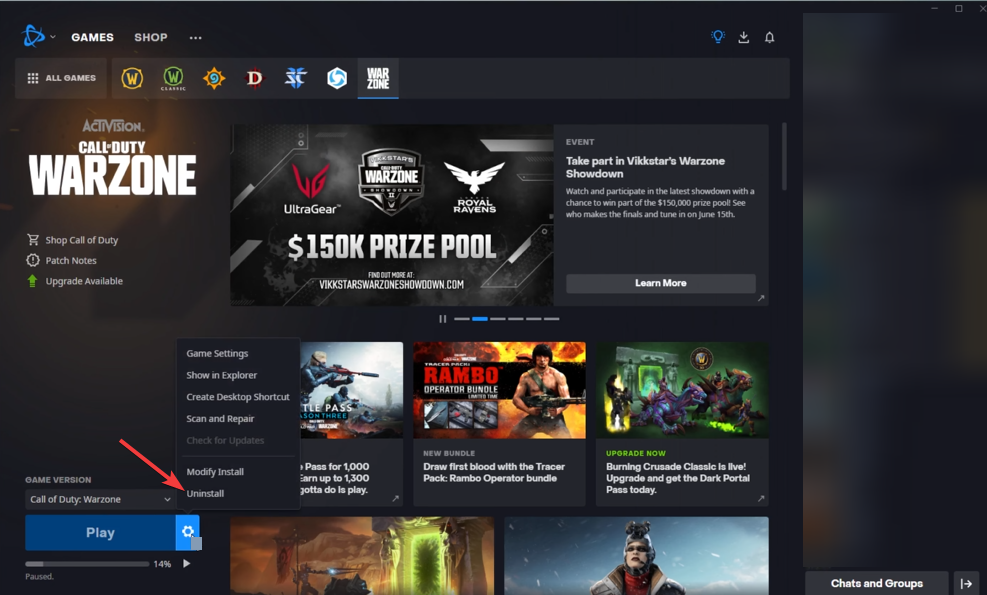
  1. On the home page, select the game you wish to uninstall, then click on the Settings icon beside the Play option.
  2. In the pop-up menu that opens up, click on Uninstall option.
  3. A confirmation prompt will open up; click on Yes, Uninstall.
  4. Open up the Blizzard app again on your PC and log in to your account with your credentials.
  5. Once you have logged into your account, select WoW and click on the Install option present at the bottom and follow the prompts to install the game.

Uninstalling WoW and then reinstalling it from scratch will probably resolve Your device driver is not compatible error in WoW.

With the above error, if you face frequent disconnecting issues in WoW, check our guide to fix frequent disconnects and high latency issues.

We hope this article helped you troubleshoot the respective error for a seamless gaming experience. Give us your feedback in the comments box below.

3 Different Ways to Show Hidden Devices in Device Manager

The Device Manager is a tool that allows you to view, enable and disable the devices connected to your computer. 

You can also use it to troubleshoot problems you may have with your mouse or keyboard. Some devices have multiple drivers, and the Device Manager will show all of them.

When a device is detected and configured, Device Manager will display it in the proper category. If it can’t detect it, or if the driver isn’t fully configured, then you will see an item under the Unknown devices section.

If a device isn’t working correctly on your computer, for example, the sound isn’t working, you may want to try updating the device driver.

When you go to the Device Manager list, you can find the drivers but in some cases, they may be hidden. In such cases, troubleshooting your device can be difficult if you don’t know where it is located. 

Why does the Device Manager hide devices?

The Device Manager only shows information about those devices that are connected and configured on the system.

It also hides nonpresent devices that are not physically present in the system, but still, have configuration information in the Registry.

When a device is plugged in, plugged out, or otherwise removed from the system by removing its drivers, Windows marks it as nonpresent and hides it by default.

Also, if you have a lot of devices on a system, some may only be active when something specific is attached. The DVD drive for example won’t show up unless there’s a disk in the drive. There are others also that do not show when not in use.

How can I view hidden devices in Device Manager?

1. Use the Search bar

  1. 1. Hit the Windows key on your keyboard to open the Windows Search box.

  2. 2. Type Device Manager in the search bar and click Open.

    open device manager
  3. 3. Select the View option.

  4. 4. A drop-down menu will appear.

  5. 5. Click on Show hidden devices.

    click to show hidden devices in device manager
  6. In order to view hidden files in Device Manager, you need to access the Device Manager menu and manually enable the specific option.

    You can access Device Manager very easily using the search bar on your taskbar.

2. Use the Run command

  1. Press Windows + R keys simultaneously to open the Run command window.
  2. Type devmgmt.msc in the Run dialog box that pops up and press Enter.open run device manager
  3. Select the View option, scroll down and click on Show hidden devices.click to show hidden devices

3. Use Command Prompt

  1. Hit the Windows + I keys simultaneously to open Settings.open settings
  2. Type cmd in the search bar and click Run as administrator.launch cmd
  3. Enter the following commands: SET DEVMGR_SHOW_NONPRESENT_DEVICES=1 devmgmt.msc launch cmd device manager
  4. Select the View option, scroll down and click on Show hidden devices.press to view hidden devices in device manager

Can you remove hidden devices in Device Manager?

You can remove hidden devices in Device Manager but first, you have to unhide them.

To remove an unknown device from Device Manager, follow the steps below:

  1. Hit the Windows key, type Device manager in the search bar, and click Open.open device manager
  2. Find the device you want to remove after completing the show hidden devices steps outlined above.
  3. Right-click on the device and select Uninstall from the context menu. click to uninstall bt driver
  4. Click OK when prompted to confirm your choice. click to confirm the uninstall

If you were having trouble locating hidden devices, we hope one of the methods above was able to come to your rescue.

Remember, you can do more with Device Manager such as scan for hardware changes or update your motherboard resources.

Let us know of any tips and tricks that you use with WIndows’ Device Manager in the comment section below.

Turtle Beach Mic Not Working? 5 Quick Ways to Fix it

Encountering an issue with your Turtle Beach headset mic on Windows 11 seems more likely these days, especially if it’s not working or being detected.

Many users have voiced similar complaints about the Corsair headset microphone, where the mic did not record any audio but provided sounds via the earcups.

Why is my Turtle Beach headset mic not working?

There can be several factors behind the Turtle Beach mic not working problem, of which one major reason could be an outdated or corrupt driver. We have to mention that this issue may also be caused by:

  • Microphone device settings: It could be that the Turtle Beach headset is not set as the default device on your computer, or the microphone volume is set to a very low value, so it can’t record your sound.
  • Connectivity issues: If your headphones are not well-connected to your computer, you may encounter this problem by using Bluetooth or your computer’s audio port.
  • Disabled microphone: If your PC’s audio inputs and outputs section is disabled, this problem will likely occur.

How do I fix the Turtle Beach mic when it fails to work?

Before proceeding to explore advanced troubleshooting steps, you should consider performing the following preliminary checks:

  • Ensure that your computer’s audio is not muted or set at a very low value.
  • Pair your headset with your phone or tablet to be sure it is functioning properly.
  • Inspect your headphone carefully to check for any physical damage.
  • If your PC has two jacks for separating the input and output audio for the headphone and mic, then you need to get a Y connector cable to use your headset with your PC.

If the error persists after these checks, endeavor to check the fixes outlined below.

1. Enable your headset microphone for recording

  1. Left-click the Speaker icon on your Taskbar, then select Sound Settings.
  2. Click More sound settings.
  3. Select the Recording tab, then locate your headset device (if you can’t find it, right-click on any empty area in the tab, then select Show Disabled Devices).
  4. Right-click the headset, then select Enable.
  5. Click on the Apply button, then OK to save the changes.

Alternatively, you can check out the ways to fix your laptop if it’s not using the headset mic to set your headset as default.

2. Turn on microphone access on your PC

  1. Click the Start button, type microphone, then select Microphone privacy settings.
  2. Click on the Change button, then turn on the Microphone access for this device.

Enabling microphone access on your device will help fix the Turtle Beach Headset mic not working problem because you can allow all apps to use it.

3. Set the headset as an input device

  1. Right-click the speaker icon on your taskbar and then open Sound settings.
  2. Click Volume mixer under advanced options and locate Apps.
  3. Expand the app and change the device for input audio, then adjust the volume control to the maximum.

The mic should work by manually setting the headset as an input device. However, if the mic is not even present in the device list, you should check our guide for what to do.

4. Troubleshoot your audio settings

  1. Click on the Start icon on the screen, input the Audio troubleshooter, and select Find and fix problems with playing sounds.
  2. Click on Advanced.
  3. Check to Apply repairs automatically and select Next.
  4. Select the audio device to troubleshoot and click Next.
  5. Click on No, Do not Open Audio Enhancement.

Should this troubleshooting fails, there are others you can try out in the guide to fix the microphone not Working in Windows 11.

5. Update your audio drivers

  1. Click the Start button, input Device Manager, and launch it.
  2. Locate your audio inputs and outputs and expand them.
  3. Right-click the driver and click on Update driver.
  4. Choose Search automatically for drivers.

Alternatively, there’s a simpler approach to updating drivers on Windows 11. We recommend you use a dedicated driver updater software and install the latest drivers for your device automatically.

Outbyte Driver Updater is ​​an automated tool that scans and detects all outdated drivers and safely installs selected driver updates.

Outbyte Driver Updater

Solve the microphone issue by updating your old drivers with this smart tool.
Free Trial Download Now

Meanwhile, some users complain about Windows 11 not recognizing their wired headphones, hence this article should help solve the problem if you encounter the issue also.

As you can see, there are plenty of solutions you can choose if you encounter a Turtle Beach mic not working issue. Ensure to follow each step strictly for optimal results.

For further queries and suggestions, you can leave them in the comments section.

Arduino Simulator for PC: 6 Best Software to Use in 2026

These days, Arduino simulators make it possible for anyone, meaning both beginners and professional circuit designers to learn, program, and test ideas without worrying about wasting time and money.

Arduino simulators are the perfect platforms for programmers and designers who want to learn the basics of circuit schematics and design.

With the help of an Arduino simulator, you’ll get an avenue to learn without being afraid that you will damage your board and design equipment.

Students who face challenges purchasing electrical equipment without any clue on how they’ll work can eliminate trial and error mistakes with the help of Arduino simulators, saving both time and money.

Another advantage of Arduino simulators is the fact that they support line-to-line debugging and the user will identify exactly the spot where things went wrong.

Arduino simulators come in all kinds of forms, and they have been developed in such a way to be compatible with the main OSs.

In this article, we’re going to list the best Arduino simulators compatible with Windows PCs.

What are the best Arduino simulators for PC?

Autodesk Eagle – Powerful tools

Autodesk Eagle provides powerful and easy-to-use tools for every engineer out there.

You can now bring your electronic inventions to life with the help of a complete set of PCB layout and schematic editing tools, community-driven features, and library content.

The key features of Eagle include the following:

  • Schematic editor
  • Modular design blocks – you can reuse the existing blocks of circuitry
  • Multi sheet schematics – you can keep designs of any size organized
  • Electrical rule checking – you will finally be able to have confidence in your schematic design
  • Real-time design synchronization – you can stay in sync between schematic and PCB layout
  • PCB Layout editor
  • BGA fanout – you can escape from your BGA in seconds
  • High-speed design – you can design with the latest technologies, including DDR4, PCI Express, or USB-C
  • 3D models for PCB layout – you can unite your PCB and enclosure seamlessly
  • Complete components – this is the one-stop shop for reviewing your component needs
  • User language programs (ULPs) – you can improve your design tool process
Autodesk Eagle

Autodesk Eagle

Get into schematic wiring with a single click and enjoy all the extra perks that the Eagle brings!
Check PriceVisit website

Tinkercad – Program with ease

Tinkercad is a free web app created for 3D design, electronics, and coding that is trusted by over 50 million people around the world.

You can either choose its starter circuits to explore with no additional hardware or you can create a virtual circuit from scratch with wire electronic components.

It has an interactive circuit editor with which you can explore, connect, and code virtual projects. You can simulate with Arduino by simply opening the code editor to program using Codeblocks.

The Arduino simulator within Tinkercad simplifies your learning experience because it works on any PC with an internet connection.

Moreover, it provides an inexhaustible supply of virtual components that you can use to build and simulate your projects.

Other operations include:

  • File editing
  • File exportation
  • 3D designs
  • Presets

⇒ Get Tinkercad

Proteus – Comprehensive diagnostics

proteus vsm

Proteus is a great Arduino simulator that combines simplicity with its various features and manages to make Arduino simulation seem like the easiest thing.

This simulator managed to make inroads in all kinds of industries such as education, automotive, and IoT.

It’s compatible with both Linux and Windows, and there are lots of things to know about its offerings and its vibrant community.

The most prominent and exciting feature of Proteus is its ability to simulate the interaction between software running on a microcontroller and any digital/analog electronics connected to it.

The microcontroller model sits on the schematics together with the other elements of your product design. Just like a real chip, it simulates the execution of your object code.

Proteus includes various virtual instruments such as an Oscilloscope, Logic Analyser, Function Generator, Pattern Generator, Counter Timer, and Virtual Terminal, as also simple voltmeters and ammeters.

More than that, Proteus provides dedicated Master/Slave/Monitor mode protocol analyzers for SPI and I2C – you simply have to wire them onto the serial lines and control/interact with the data live during the simulation process.

Proteus offers an invaluable and inexpensive way to get your communication software right before hardware prototyping.

Proteus also allows the following operations:

  • Debugging: it can perform simulations in single-step modes, and it works just like a debugger.
  • Diagnostics: Proteus is equipped with comprehensive diagnostics or trace messaging.
  • Co-simulate both low and high-level micro-controller code in the context of a mixed-mode SPICE circuit simulation.
  • Proteus improves efficiency, flexibility, and quality all over the design process.

⇒ Get Proteus

Virtronics Simulator for Arduino – Sketch debug

This Victronics Arduino simulator promises to be the most full-featured one that is available now.

Here are the most important benefits that it boasts:

  • It features the ability to teach and demonstrate the inner workings of an Arduino sketch.
  • You can test out a sketch without the hardware or before purchasing equipment.
  • You can debug a sketch.
  • Using it, you can demonstrate a project to potential customers.
  • You are able to develop a complicated sketch faster than when using the hardware.

You can download the free version, try it out, and when you are ready, you can upgrade to the Pro version.

The software is designed for the Arduino Uno, Mega, and more standard Arduino boards. It performs lots of processes including the following:

  • It steps through the program line by line. If a new line is selected, the program will continue from that point.
  • Performs digital write, digital read, and PinMode for pins 0-53
  • Analog read for pins 0-16 and analog write for digital pins 0-53
  • Emulates Serial, LCD output, Ethernet, Servo, SD card, EEPROM, SoftSerial, SPI, Wire
  • If,while,for,switch, do whileloop functionality
  • Subroutines (multi-level) with arguments
  • View variables in real-time
  • Step Into, Step Over, Step Out of or Run mode
  • Ability to edit sketches or open in Arduino IDE
  • 2 and 4-line LCD support only with improvised CGRAM
  • 2-dimensional arrays (without initialization).

You also have the ability to change the font, style, and size of the simulator.

The minimize mode is perfect for demos/training. The software offers limited support for custom libraries, pointers, and structures.

⇒ Get Victronics Arduino simulator

PSpice – Performance-focused

PSpice is another solution meant to simplify your workflows and optimize your performance.

By combining analog and mixed-signal engines, this industry-leading software delivers nothing less than a complete circuit simulation and verification solution.

Performance-focused PSpice will not only provide all the high-end circuit design tools you need, but it will also streamline your processes and lower your costs while boosting productivity.

Versatile and reliable, this software will help you perform system-level simulations in a perfectly safe environment.

⇒ Get PSpice

Fritzing – Educational starter kit

Fritzing is an open-source hardware initiative that makes electronics accessible as creative material for everyone who is interested in the subject.

The website provides a software tool, community, and services in the spirit of Arduino and processing and it fosters a creative ecosystem that allows users the following:

  • Documenting their prototypes
  • Sharing the prototypes with others
  • Teaching electronics in a classroom
  • Layout and manufacturing professional PCBs

With Fritzing, you can inexpensively and quickly turn your circuit into a real custom-made PCB.

This tool can only act as a creative platform if lots of users are using it as a means of learning and sharing.

You can learn a tremendous amount of things from the many tutorials available.

It is also interesting to know that Fritzing turned from a publicly funded research project into a non-profit organization.

This means that to make it self-sustaining and to continue its development Fritzing is offering a few services that include the following:

  • Fritzing Fab – With Fritzing Fab, the PCB production service, you can quickly and inexpensively turn your sketches into professional PCBs.
  • Workshops – There are lots of workshops on Arduino, Fritzing, and everything related, which are offered to beginners and professionals.
  • Part Creation – You can also have your product featured in Fritzing, and if you don’t want to do it yourself, you can hire developers to create high-quality parts.
  • Products – Fritzing has created an educational starter and upgrade kit.

⇒ Get Fritzing

You have reached the end of our Arduino simulators list. Take advantage of the one that you think is right for your needs.

How to Update your PS5 Controller on a PC

It’s no secret that PC gamers often turn to console controllers to optimize their gaming experience and also improve their motor skills.

But nobody said that using Microsoft’s Xbox controllers or other variants explicitly made for PCs was mandatory.

Some opted for Sony’s DualShock PlayStation controllers as their go-to means of interacting with their favorite in-game hero.

Until now, there was no way to efficiently and securely update the DualShock’s firmware from your PC. That’s all about to change, though.

Can I update my PS5 controller through my PC?

Indeed, we are witnessing the day when we can receive firmware updates for Sony for our PS5 controllers without having to use the console itself.

You’re probably wondering how that’s possible, so we’re about to shed some light on how this came to be in the first place.

Now, updating DualShock’s firmware can be done from any machine that runs on Windows 11 or a 64-bit release of Windows 10.

This new application, paired with the instructions you might need to download and use it correctly, are all available on the official PlayStation website.

There are, of course, some prerequisites for using PlayStation’s new firmware update app, but the requirements will actually amuse you.

OSWindows 10 (64-bit) or Windows 11
Storage space10 MB or more
Display resolution1024 × 768 or higher
USB portRequired

How do I update my PS5 controller’s firmware on a PC?

  1. 1. Download the Firmware updater for DualSense wireless controller.

  2. 2. Run the Setup and install the application.

    ps5 gamepad update 1
  3. 3. Connect the controller to your PC with a USB cable.

    ps5 gamepad update 2
  4. 4. Follow the on-screen instructions to start the PS5 update. Ensure that you don’t turn off your PC or disconnect your USB cable during the process.

  5. 5. When the update is finished, a prompt message will appear. All you have left to do is click on OK.

    Now your PlayStation 5 DualShock controller is up to date and all of the new features added by Sony will be yours as well.

  6. It is important to update your PS5’s firmware to ensure its proper functionality. You can do this on your PC with the help of the Firmware updater for DualSense wireless controller app.

    Keep in mind that, while the process is underway, turning off, restarting, or disconnecting the USB cable from the controller is the biggest no-no you can possibly do.

If you want to update your PSN console, you first need to get it in Safe mode; read this guide to learn the steps.

Have you already upgraded your PS5 DualShock controller using the official app? Share your experience with us in the comments section below.

Erratic Mouse Movement in Windows 10: How to Fix it

Computer users complain about one of the most annoying experiences: erratic mouse movement in Windows 10.

Some of the four common issues that almost always come up include mouse or touchpad freezing, mouse cursor disappearing, slow or no cursor movement, and overall not smooth mouse movement.

While there is no doubt that a glitching mouse can seriously impact productivity and cause a lot of frustration to any user, gamers tend to suffer the most from mouse stuttering.

Why is my mouse behaving erratically?

Here are the most common reasons behind erratic mouse movement in Windows 10:

  • Misconfigured mouse settings – If your mouse settings are not properly configured, then you might encounter similar issues on your PC.
  • Outdated or corrupt mouse driver – In case your mouse doesn’t have the latest driver installed, issues are bound to occur, especially over time. To resolve this issue, visit your mouse’s manufacturer’s website, and download the latest version of the driver.
  • Third-party app conflicts – In some situations, a third-party application might interfere with the input generated by your mouse, so make sure to check that you don’t have any apps installed that you’re not aware of.
  • Issues with the connection, both wired and wireless – Ensuring that your Bluetooth drivers are updated, or checking for any cuts on the cable of the mouse is of paramount importance.
  • Obstructions to the sensor or mouse ball – Ensure that the sensor of the mouse or the ball is cleaned and no other items are blocking their signal/movement.
  • Not enough free system resources – If your OS is burdened excessively with tasks and processes open at all times, this issue might be caused by not having enough free resources to correctly process the input of your mouse.

How do I fix the glitchy mouse on Windows 10?

Before we walk you through the software-based solutions, here are a few quick checks that may help:

  1. Verify that the mouse is not placed on a very smooth surface, for instance, glass. Instead, try using a mouse pad.
  2. Make sure the connections are in order and the cable is not damaged in the case of a wired one, for instance, when a wired mouse is stuttering in Windows 10.
  3. Check if anything is blocking the mouse sensor or obstructing the ball underneath, and remove it.
  4. Replace the mouse batteries if you haven’t changed them in a while.
  5. If your PC runs low on system resources, terminate a few non-critical problems in the Task Manager.

In case of these solutions work, it’s likely a problem with the mouse and, too, a software-based one, and the following methods should help.

1. Update your drivers

  1. Press Windows + X and select Device Manager from the menu.device manager
  2. Double-click on Mice and other pointing devices.mice and other pointing devices to fix erratic mouse movement windows 10
  3. Right-click on the touchpad you’re using (or mouse), and select Update driver.update driver to fix erratic mouse movement windows 10
  4. Select Search automatically for drivers.search automatically for drivers

Updating the driver should do the trick if mouse movement is not smooth. However, the manual method is not as effective when fixing erratic mouse movement in Windows 10.

We also strongly recommend a dedicated tool, Outbyte Driver Updater which will automatically find and download all the outdated drivers you need to actualize on your PC.

Outbyte Driver Updater

Fix most issues by keeping all drivers updated with this smart and reliable tool.
Free Trial Download now

2. Perform a clean boot

  1. Press Windows + R to open Run, type msconfig, and click OK.msconfig
  2. Navigate to the Services tab, select the Hide all Microsoft services checkbox, and click on the Disable all button.hide all microsoft services
  3. Next, go to the Startup tab, and click on Open Task Manager.open task manager to fix Uncontrollable cursor Windows 10
  4. Locate any programs configured to launch and Startup (will have Enabled listed under the Status column), select them, and click Disable.disable
  5. Head back to System Configuration, and click OK.OK
  6. Now, click Restart in the prompt that appears.restart

Certain services and background apps are often found to be responsible for an uncontrollable cursor in Windows 10, and disabling it through a Clean Boot worked for many.

3. Turn off mouse acceleration

    It’s very likely to fix mouse issues and erratic movement by changing the right mouse settings, as displayed in the following steps.

  1. 1. Type Mouse settings in the Search bar, and click on the relevant search result.

    mouse settings
  2. 2. Click on Additional mouse options on the right.

    fix-erratic-mouse/
  3. 3. Navigate to the Pointer Options tab, uncheck the Enhance pointer precision option, and click OK to save the changes.

    disable pointer precision to fix erratic mouse movement windows 10

Mouse acceleration is often the reason behind erratic mouse movement in Windows 10, and disabling it should fix things.

4. Run the Hardware and Devices troubleshooter

  1. Press Windows + R to open the Run dialog box, type/paste the following command, and then hit Enter: msdt.exe -id DeviceDiagnostichardware and devices troubleshooter to fix erratic mouse movement windows 10
  2. Click Next and follow the on-screen instructions if a problem with the mouse is detected.run

If the mouse cursor is shaking on its own, running the dedicated built-in troubleshooter should help.

5. Adjust the cursor speed

  1. Type Control Panel in the Search bar, and click on the relevant search result.control panel
  2. Click on Hardware and Sound.hardware and sound
  3. Now, click on Mouse under Devices and Printers.mouse
  4. Navigate to the Pointer Options tab, and adjust the slider under Motion to change the cursor speed.change speed to fix erratic mouse movement windows 10

Adjust the cursor speed as per the problem at hand. For instance, if the mouse cursor moves too slowly, increase the pace here.

How do you get smooth mouse movement in games?

Mouse movement that is not smooth in games can mean more than a simple delay. It can cost you the victory. Unfortunately, gaming-dedicated peripherals such as Razer mice can face issues like stuttering, jiggering, or latency issues.

When a gaming mouse is not smooth, it’s usually because it struggles to run the game. FPS games, in particular, tend to strain CPU and GPU levels to the max. Thus, COD (Modern Warfare) aficionados are frequently affected by mouse lags.

We hope these solutions helped fix erratic mouse movement in Windows 10. Also, these were found to eliminate the underlying cause in the case of the HP touchpad’s erratic cursor movement.

If the problem persists, there’s probably a hardware problem with your device, and it will need replacement. Luckily, we also have a list of the best mice for Windows 10 PCs for you to choose from.

If you have other suggestions, kindly share more information in the Comments section below.

Windows 11 2022 Features Update is starting to roll out and brings Tabbed File Explorer and more

Microsoft’s first official Windows 11 2022 Features Update is rolling out to devices today and brings the long-awaited Tabbed File Explorer UI experience and more.

When Microsoft announced and began shipping its Windows 11 2022 Update back in September, the company also made mention of a Features Update that would accompany the release schedule later this year and bring with it new experiences that just a bit more time to bake.

Here we are a month later and the first Windows 11 2022 Features Update is bringing a new Tabbed File Explorer interface, Suggested Actions, Taskbar Overflow management, expanded Share to Device options, a revamped Photos App, access to the long-awaited Amazon App Store for Windows, and new sports and entertainment apps.

As previously mentioned and reminiscent of that late Sets experiment in Windows 10, the new Tabbed File Explorer allows users to click a plus sign in the Explorer menu to add separate tabs to better navigate content between different locations in Windows 11.

Windows 11 File Explorer

The new Suggested Actions feature is a bit explanatory and will enable users to seamlessly gain contextual prompts when navigating Windows 11. Suggestions include creating events with a simple right click, launching supported communications apps such as Teams or Skype.

Windows 11 Suggestions

Users will also gain access to the updated Taskbar Overflow management experience that adds a dedicated section to neatly store the apps you don’t readily use as well as create a localized Settings Menu app for Taskbar settings.

Windows 11 Taskbar Overflow

In addition, Windows users can now take advantage of sharing files and content with more discoverable devices.

Microsoft re-teased the launch of its revamped Photos App during last week’s Surface hardware event by explaining that soon iPhone users on Windows will have support for iCloud management and back up tools via the new app.

Windows 11 New Photos App

Android apps written to the Amazon Appstore will soon be available to Windows 11 users in Australia, Canada, Germany, Italy, Japan, Spain, United Kingdom, France and a few others via the Windows Subsystem for Android. Windows users instantly gain access to over 50,000 experiences and native apps such as Audible, Kindle, Lutron and more.’

Windows 11 Amazon App Store

Last up is the new Windows app for sports and entertainment rolling out from EPSN. The ESPN app will join a growing list of AAA experiences on Windows that include Hulu, Netflix, Crunchyroll, TikTok, Disney+ and Amazon Prime Video.

If you’ve been waiting to get your hands on some of these new features since Microsoft teased them last month, you may have to continue waiting just a bit longer as Microsoft’s is being overly cautious with the way it’s rolling this pack of experiences out.

These new features and experiences will start to become available today in an optional non-security preview release and a phased rollout via our servicing technology and new apps via Microsoft Store updates5, ensuring you can take advantage of the latest Windows experiences as these new features are ready. The new features will be made broadly available to all editions of Windows 11, version 22H2 in the November 2022 security update release.

So, check your Microsoft Store for app updates and installs, or revisit the whole feature pack in November 2022, when Microsoft should have it fully released for all Windows 11 users alike.

Not Enough Disk Space Error in Hyper-V: 4 Ways to Fix It

Hyper-V not having enough disk space is an error most users complain about frequently, so you’re not alone. This issue prevents users from running multiple virtual machines and results in many Hypervisor errors on Windows 11.

How much disk space does Hyper-V need to run multiple VMs?

Memory is one of the essential components of the Hypervisor. You need to allocate memory to virtual machines for them to be able to run.

A standard Hyper-V host requires about 4 GB of memory space to run Hyper-V and the management operating system.

However, running multiple virtual machines calls for more memory usage. So, users should assign bigger memory space.

Nevertheless, running into this error on Hyper-V can occur due to many factors. The major ones are:

  • Many virtual machines run synchronously: The free disk space on your device may not be enough to run the entire machine on Hyper-V. So, you can run into errors trying to run additional VMs.
  • Background programs: Many programs running in the background can consume your disk space. They use more disk space, leaving no memory space for the Hyper-V VMs.

Many other factors can cause a shortage in memory space in Hyper-V. You can read about fixing Hyper-V that ran out of memory errors to understand the problem better.

What can I do if there’s not enough disk space in Hyper-V?

Before anything else, consider doing these preliminary checks:

  • Close unnecessary running programs on your PC that may be consuming the disk space.
  • Check disk space on Hyper-V to know how much space is available.
  • Free some memory space on your computer and restart your computer to check if the memory error is fixed.
  • An excellent way to free up disk space in Hyper-V for multiple virtual machines is to close other unnecessary VMs. It’ll create more memory space for the new virtual machines to establish. However, we have a detailed guide on what to do if you have issues with virtual machine management in Windows 11.

If after these, the error persists, proceed to the advanced fixes below.

1. Expand Hyper-V disk size via Hyper-V Manager

  1. Click Start, type hyper in the search box, then press Enter.
  2. Select the Hyper-V Manager from the search results.
  3. Click on the virtual machine you want to expand its disk, then select the Edit Disk option to prompt the Edit Virtual Hard Disk wizard.
  4. Click on Next to locate the Disk window, then click the Browse button to find the path of the virtual hard disk.
  5. Select the file and click Open, then click Next.
  6. Choose Expand on the Choose Action page and click Next.
  7. Select the Configure Disk option and input a larger size in the New size space, then click Next.
  8. Click Finish.

Restart your PC and check if the memory issue persists. If you encounter Hyper-V error when applying hard drive changes, take a look at this guide.

2. Perform a disk cleanup

  1. Press Start, type this PC in the search box, and click Enter.
  2. Select the first search result, and right-click on the drive you want to clean up.
  3. Choose Properties from the drop-down, then click on Disk Cleanup.
  4. Select the files you want to delete and click OK
  5. Click on Clean Up System Files and wait for the cleaner to calculate everything.
  6. Select the file to delete, then press OK after selecting.

We recommend you read how to free up Disk space on Windows 11 for further information on this.

3. Initiate Compact Virtual Hard Disks

  1. Click Start, type hyper in the search box, then press Enter.
  2. Click on the Hyper-V Manager from the search results.
  3. Specify the virtual machine you want to expand its disk.
  4. Select Edit Disk to open the Edit Virtual Hard Disk wizard.
  5. Select the virtual hard disk whose size you want to reduce.
  6. Choose Compact, then click Finish.

By initiating a compact disk, more spaces will be available from the shrunk VM memory.

4. Clear deleted VM files

  1. Open File Explorer on your PC by pressing the Windows + E keys.
  2. Check for the VMs you recently deleted that are still in the folder by following this navigation: C:\ProgramData\Microsoft\Windows\Hyper-V\Virtual Machines
  3. Right-click on the virtual machine and select Delete from the drop-down. (If it is empty, close it)

Deleting the VM files of deleted virtual machines will free up disk space. However, we advise that you use Hyper-V backup software to back up your VMs to be able to access them after being deleted.

Alternatively, you can check how to run disk cleanup on Windows 11. Also, you can read our article on how to fix Hypervisor not running on Windows 11.

If you have questions or suggestions, you can leave them in the comments section. We’d like to hear from you.

Hyper-V DHCP Is Not Working: 5 Ways to Permanently Fix It

Running into issues like the Hyper-V DHCP not working can be really annoying, especially if you are an administrator.

Also, users complain about many errors they encounter when using the DHCP network, such as being unable to contact the DHCP server on their PC. Hence, this guide will explore the causes and fixes for Hyper-V DHCP if it’s not working.

Why is the Hyper-V DHCP not working?

Take into consideration these potential causes:

  • Issues with the Hyper-V virtual switch configuration: The Hyper-V DHCP server connection may not work if there is a problem with the virtual switch configuration. Also, the Hyper-V virtual switch configuration of the DHCP is not by default, so it can be hard to maneuver.
  • Outdated Network adapters: It can result in difficulties with the Hyper-V server network setup. It impedes its connection, preventing you from accessing the DHCP server.
  • Poor or slow network connection: Establishing a connection with the DHCP server needs a stable network connection, so it may not work if it is not strong or fast.

How do I fix Hyper-V DHCP if it’s not working?

Before anything, we recommend you pay attention to the following preliminary checks:

  • Disconnect any virtual connection on your computer.
  • Verify if your network settings use DHCP instead of a manually configured address.
  • Restart the host or physical computer to reload its network connections. Try connecting the Hyper-V DHCP network and see if it works.

If, after observing the checks, you’re unable to connect, go ahead with the solutions below:

1. Troubleshoot Network Adapter

  1. Press the Windows key, input Troubleshoot settings into the search space, then press Enter.
  2. Select the first result option, then click on Other troubleshooters and select the Network Adapter to troubleshoot.
  3. Click on Run the troubleshooter.
  4. Select a network from the Select the network adapter to diagnose tab and click Next.
  5. Wait for the troubleshooting to complete and check if the diagnosis identifies any problem.

2. Update your Network Adapters

  1. Click on Start, input Device Manager into the search space, then press Enter.
  2. Select Device Manager from the search results, then click the Network Adapters option.
  3. Right-click on the adapter to update and click on the Update driver button.
  4. Select the Search automatically for updates option (Windows will install updates if there are any available for the driver).

Restart your computer afterward. However, we recommend you consult our article for a guide on updating network drivers in Windows 11.

3. Enable the DHCP Guard in Hyper-V via the Windows PowerShell

  1. Press the Windows + X keys, press Enter to launch the Quick Link menu, and select Network Connections.
  2. Navigate to the Network and Sharing Center tab, then click the LAN 01 option to prompt the LAN Status window.
  3. Click on Details to prompt the Network Connection Details.
  4. Click Start on the Virtual Machine host (VM-HOST), then click Windows PowerShell.
  5. Type in the following commands and press Enter:  Set-VMNetworkAdapter -VMName “DC SERVER=Win 2016” -DhcpGuard On
  6. Go to the CLIENT machine, right-click on Start, then click Command Prompt (Admin).
  7. Type in the following commands and hit Enter: IPConfig /release  IPConfig /renew
  8. Repeat steps 1-4 and check if there’s a DHCP Server IP Address from SUB-01.

Refresh your machines and check if Hyper-V DHCP now works.

Alternatively, for related details, users can refer to our article on how to disable credential guard to run Hyper-V and VMware.

4. Troubleshoot DHCP not working by resetting it

  1. Press Windows + I to open Windows Settings and select the Network and Internet option.
  2. Scroll downwards and click on Advanced network settings.
  3. Click on Network reset and press the Reset button.
  4. On the confirmation message, click Yes.

Restart your PC and check if you have been able to fix the Hyper-V DHCP server connection errors. The steps above should help fix errors like DHCP not enabled for Ethernet too.

5. Configure the DHCP Server function on the router

  1. Launch Pfsense Router and log in with an Admin account.
  2. Navigate to Services and select DHCP server.
  3. Click the LAN option, then select Enable DHCP Server on the LAN tab.
  4. Go to the Range tab and input the IP Address range you want to grant to the workstation.
  5. Select the option to Change the DHCP display lease time from UTC to local time and Enable RRD statistics graphs. Then, click on Save.

Nonetheless, you are liable to encounter lots of other problems with Hyper-V. Hence, we recommend you check our article on how to fix Hyper-V internet connecting issues in a few steps.

Also, read how to enable Hyper-V and container features on your virtual machine.

If you have further queries or know of a better suggestion that has worked for you, kindly leave them in the comments section. We’d like to hear from you.

Reduce Service Host SysMain High Disk Usage in Windows 10

Several users have reported Service Host SysMain causing high disk usage and memory issues in Windows 10, which can be a problem since it will negatively impact your performance.

In this article, we’ll explore a few troubleshooting steps to help you resolve the issues you might have with this service, so let’s get started.

How do I fix Service Host Sysmain high disk usage on Windows 10?

If you want to skip these solutions’ rigors, you should consider upgrading from HHD to a reliable SSD. An upgrade in hardware mitigates many performance issues.

1. Stop SysMain service

1.1 Using the Services app

  1. Press the Windows key + R.
  2. Type services.msc and press Enter.
  3. In the Services window, locate SysMain and double-click it.
  4. Click the Stop button.
  5. Click OK to save the changes.

1.2 Service Host SysMain disable using the Command Prompt

  1. Press the Windows key + S.
  2. Type cmd. Click on Run as administrator to open the Command Prompt.
  3. In the Command Prompt window, type the following command and hit Enter:
    sc stop "SysMain" & sc config "SysMain" start=disabled
  4. You should see Change Service Config Success. This is how you can disable Service Host SysMain.

2. Run SFC and DISM scans

  1. Click the Start button, type sfc, and click on Run as administrator from the results.
  2. Type the following command and press Enter to run it: sfc /scannow
  3. Wait for the scan to complete, then type the following command and press Enter to run it: Dism /Online /Cleanup-Image /RestoreHealth
  4. Wait for DISM to complete the scan and restart your PC afterward to see if the problem has been fixed.

For some of our readers, this issue was caused by one or more corrupted system files, and the System File Checker and DISM tools fixed this problem so you should try it. You can also try specialized software to ease this process significantly.

3. Edit the DWORD value on your Registry Editor

  1. Press the Windows key + R. Type regedit and click OK.
  2. In Registry Editor, navigate to the following location:
    HKEY_LOCAL_MACHINE\SYSTEM\CurrentControlSet\Services\SysMain
  3. Then, in the right pane, double-click on Start.
  4. Enter 4 in the Value Data field. Then, click OK to save the changes.

4. Update Windows

  1. Press the Windows key + I to open the Settings app.
  2. Go to Update & Security.
  3. Check for pending Windows updates and install them.

Installing Windows updates can fix the high disk usage issue caused by a glitch in the operating system.

What is Service Host Sysmain?

Service Host SysMain (earlier known as Superfetch) is a bundle of system processes. You are most likely wondering how it works.

This processes package is supposed to optimize the apps launching and speed up their starting, but sometimes it can do quite the opposite, causing high disk and CPU usage.

What causes SysMain’s high disk usage?

Have you ever wondered why is Service Host Sysmain causing high disk usage? Missing updates are the most common cause of this problem, so it’s advised to keep your PC up to date to avoid such issues.

In addition, if this service is causing problems, you might want to try disabling it. Other Sysmain issues include:

  • 100% disk usage – This occurs when your system works at 100% capacity to handle the tasks.
  • High disk activity – High disk activity means that your system’s disk is running too many apps, and reaches high levels, even though not at 100% yet.
  • High CPU usage – This is caused by your Central Processing Unit, or CPU working excessively to deal with the tasks at hand.

What is the use of service host SysMain?

SysMain is a legitimate Windows service that optimizes the computer’s performance by reducing the app loading time. It does so by continuously collecting data about the app usage pattern.

Once it has a sufficient amount and has identified a pattern, for instance, a user opening the Mail app at 10 AM, it will automatically load the required files so that the app launches quickly when a user manually does that.

If the SysMain is causing high disk usage in Windows 10, this can make your computer slow, affecting the performance of other programs and slowing down the PC.

Once you have fixed the problem, do check some quick tips to boost performance in Windows 10.

Did you find a solution to this problem on your own? Feel free to share your answer with us in the comments section below.

Teams will let users set Adobe Acrobat as a default PDF viewer soon

Last year, we saw Microsoft and Adobe come together to explore new ways to meet their customer’s needs. For instance, the use of embedding Adobe’s software like PDF, e-Signature, and document automation capabilities in Microsoft 365. This is especially after most organizations started taking up the hybrid work approach to mitigate the impact of the pandemic.

Building upon this premise, Microsoft announced that Adobe Acrobat as a default PDF experience in Microsoft Teams is now available in public preview. This means that you can use it to view and edit PDF files from the chat, channel, and files app in Teams. What’s more, tenant users do not require an Adobe subscription or ID to view, search, comment, and annotate PDF files. However, the subscription becomes mandatory when the user wants to create, organize, combine, or export a PDF.

Now you can set Adobe Acrobat as the default app to view and edit PDF files in Microsoft Teams. Once done, all PDF files from the chat, channel, and files app will open directly in the Acrobat app within Teams. Your end-users don’t need an Adobe Acrobat subscription or an Adobe ID to view, search, comment and annotate PDF files. However, to Create, Organize, Combine, or Export a PDF, the tenant users will need an Adobe Acrobat subscription.

To set Adobe Acrobat as a default PDF viewer in Microsoft Teams, admins need to set up the Acrobat app to work in the tenant and then avail it on the users’ Teams client as detailed in Microsoft’s post.

And now, according to the Microsoft 365 Roadmap, the standard release of the feature tagged 95128 has been pushed forward and will now start rolling out in early November and is expected to reach wide availability towards the end of November.

Windows 10 KB5020435 comes with connection problems fix

Nothing important has been happening for Windows 10 lately, apart from this month’s Patch Tuesday rollout, which introduced a number of updates to the operating system.

Pretty soon, Windows 10 is going to get its own version 22H2, just like Windows 11 has. Until then, however, Microsoft needed to take care of some problems.

This bug that we are referring to has actually been triggered by the Patch Tuesday update rollout, so something clearly needed to be done.

A closer look at OOB builds 19042.2132, 19043.2132, and 19044.2132

Just as in the case of Windows 11 (KB5020387), Microsoft has released a new update for Windows 10 devices as well, in the form of KB5020435.

And, exactly like in the new OS, this patch is here to address an issue with Secure Sockets Layer (SSL) and Transport Layer Security (TLS) connections.

Needless to say, the highlights in builds 19042.2132, 19043.2132, and 19044.2132 are the same for Windows 10 20H2, 21H1, and 21H2.

As you know, this update makes quality improvements to the servicing stack, which is the component that installs Windows updates.

Servicing stack updates (SSU) ensure that you have a robust and reliable servicing stack so that your devices can receive and install Microsoft updates.

Highlights

  • Addressed an issue that might affect some types of Secure Sockets Layer (SSL) and Transport Layer Security (TLS) connections. These connections might have handshake failures. For developers, the affected connections are likely to receive one or more records followed by a partial record with a size of less than 5 bytes within a single input buffer. If the connection fails, your app will receive the error, SEC_E_ILLEGAL_MESSAGE.
Note icon NOTE
If you installed earlier updates, only the new updates contained in this package will be downloaded and installed on your device.

Known issues

  • Devices with Windows installations created from custom offline media or custom ISO image might have Microsoft Edge Legacy removed by this update, but not automatically replaced by the new Microsoft Edge. This issue is only encountered when custom offline media or ISO images are created by slipstreaming this update into the image without having first installed the standalone servicing stack update (SSU) released March 29, 2021 or later.
Note icon NOTE
Devices that connect directly to Windows Update to receive updates are not affected. This includes devices using Windows Update for Business. Any device connecting to Windows Update should always receive the latest versions of the SSU and latest cumulative update (LCU) without any extra steps.
  • After installing this update, some Windows devices might have issues with audio not working. Some affected Windows devices might have no audio, but other affected Windows devices might only have issues on certain ports, certain audio devices or only within certain applications. Most affected audio devices drivers have the audio enhancements setting disabled before installing this update or the sound device driver has issues with the audio enhancements feature.

This is what we are looking at for the moment, Nothing too much or over the top, as thie is simply an OOB update.

Don’t forget to report any other issues you might come across, in order for Microsoft to address and improve the overall OS experience for us all.

This is everything you can expect if you are a Windows 10 user. Leave a comment below if you found any issues since installing this Insider build.

Fix: Windows 10 Activation Settings Are Not Loading

Windows 10 notifies you to activate your copy, but the activation settings are not loading. Whether you’re doing a clean install or just updating manually, you will eventually get to the point where the activation process stops on the Windows Activation screen. 

You could end up with a blank page and get stuck. Sometimes you may get past this point but later find out that the activation key is not working. For today, let’s fix the activation settings issue.

Why are Windows activation settings not loading?

If you are stuck with a blank stage when trying to activate your copy of Windows 10, it can be frustrating. Below are some possible reasons behind this issue:

  • Corrupted system files – If you are experiencing activation issues in Windows 10, then it’s possible that your system files may have become corrupt or damaged. You need to repair or restore the corrupt system files.
  • Your computer is blocked from the internet – Make sure that your computer has a working internet connection. If you can’t connect to the internet or have slow internet, try using another device to connect to your router or modem.
  • Corrupt user profile – The most common cause of this issue is a corrupt user profile. This can happen if you have recently reformatted your computer, or if you have upgraded to Windows 10 from an older version of Windows.

Is there any problem not activating Windows 10?

Well, you still get access to most of the features. However, the answer is yes because if you don’t activate it, you won’t be able to use many other features that come with Windows 10.

Many of these features help protect your computer from malware. Failure to activate could result in your PC becoming infected with malware.

Second, your PC will run slowly because Windows is constantly checking to see if it’s a legal copy or not. This constant checking takes up CPU cycles and slows down your computer.

Also, when Microsoft updates Windows 10 with new features and bug fixes, they’ll only update the activated copies of Windows 10. 

If you’re using an unactivated copy of Windows 10 then Microsoft won’t include these updates in their distribution of new features and fixes to users who haven’t activated Windows 10 yet. 

Another small but still bothersome issue is that if you don’t activate your copy of Windows 10,  you’ll get a watermark on the lower-right corner of your desktop. This watermark won’t go away until you find a way to activate Windows but you can find a subtle way to remove watermarks.

So, how long can you use Windows 10 without activating? Find out in our comprehensive article.

What can I do if Windows 10 Activation settings are not loading?

A few basic checks before any advanced troubleshooting you should do include:

  • Unplug any devices that might be interfering with your network.
  • Switch from a wireless to an Ethernet connection.
  • Check if there is a problem with your network by connecting another device to the same network.
  • Restart your computer and router if possible. 

If all check out but the activation settings are still not loading, below are more troubleshooting steps.

1. Run the Activation troubleshooter 

  1. Hit the Start menu and select Settings.windows 10 asking for activation but already activated
  2. Click on Update & Security.update and security
  3. Select Activation on the left hand pane, and click on Troubleshoot on the right hand pane.
  4. Click Yes on the dialog box that pops up.

At times, you may be out of luck and find that even the Activation troubleshooter is not working. You can decide to wait it out or proceed to the next solutions.

2. Run DISM and SFC commands 

  1. Hit the Windows search button.
  2. Type cmd in the search bar and select Run as administrator.
  3. Enter the following command: DISM.exe /Online /Restorehealth dism
  4. Allow for the command to be executed then type in the next one: sfc /scannowrun command to find issues with gpu.

Another option you can choose to use is a specialized tool that can perform this process with just one click.

You can opt for a reliable repair program that scans your PC to detect malfunctioning files and find fresh files as replacements within a few minutes.

3. Create a new user profile 

If your current user profile is corrupted or damaged in any way, it could be causing the issue with your activation status. To fix this problem, create a new user profile on your computer and sign in with that account instead of your old one.

Remember to set the account as administrator so that you will have all the required permissions to make changes to the PC.

Hopefully, you have been able to solve the issue and the activation settings for Windows 10 have resurfaced on your PC. This should allow you to go ahead and activate your OS.

Should you run into any other issues such as the product activation has failed error, we have an excellent guide that addresses this problem.

Also, check out our article on what to do if Windows deactivates after an update as it can be a very strange instance especially if you have just recently updated it.

Let us know what solution fixed the issue for you in the comments section below.

The new Windows 11 KB5020387 fixes TLS/SLS network issues

It hasn’t been long since Microsoft released this month’s Patch Tuesday batch of security patches, but we are getting yet another cumulative update.

We also received a Beta Channel Insider build a few days ago and that is also worth looking into. Speaking of Windows 11, the new Android 12L update for Surface devices will look more like the new OS.

Now, however, the Redmond tech giant has released Build 22000.1100, which is a Windows 11 OOB update that tackles the TLS/SLS network problems.

Check out Build 22000.1100 for Windows 11

Indeed, Microsoft has released an out-of-band (OOB) update (KB5020387) designed to fix the Transport Layer Security (TLS)/ Secure Sockets Layer (SSL) handshake failure issue that users are reporting.

This nasty bug is actually leading to a failure of connection establishment between clients and servers. These were set off by this month’s Patch Tuesday for both Windows 11 and Windows 10.

Highlights

  • Addressed an issue that might affect some types of Secure Sockets Layer (SSL) and Transport Layer Security (TLS) connections. These connections might have handshake failures. For developers, the affected connections are likely to receive one or more records followed by a partial record with a size of less than 5 bytes within a single input buffer. If the connection fails, your app will receive the error, SEC_E_ILLEGAL_MESSAGE.

Improvements

  • Addressed an issue that might affect some types of Secure Sockets Layer (SSL) and Transport Layer Security (TLS) connections. These connections might have handshake failures. For developers, the affected connections are likely to receive one or more records followed by a partial record with a size of less than 5 bytes within a single input buffer. If the connection fails, your app will receive the error, SEC_E_ILLEGAL_MESSAGE.

Please keep in mind that if you installed earlier updates, only the new updates contained in this package will be downloaded and installed on your device.

If you want to download this update, apply any available Windows update or head over to the Microsoft Update Catalog.

Also, recently, Microsoft released the first major update for the new operating system. However, version 22H2 is temporarily full of bugs and issues.

Not to mention that the tech giant has leaked a photo of the new Windows 12 UI, the next operating system in line. For the time being it is still in development.

We’re going to report back next time Microsoft releases a brand new update full of fixes, improvements, and of course known issues.

What can I do if I can’t install KB5020387?

  1. Press Win+ I to access Settings.
  2. Select the System category and click on Troubleshoot.w11 troubleshoot
  3. Press the Other troubleshooters button.other troubleshooters windows 11
  4. Press the Run button next to Windows Update.windows update troubleshooter

Don’t forget to report any other issues you might come across, in order for Microsoft to address and improve the overall OS experience for us all.

This is everything you can expect if you are a Windows 11 user. Leave a comment below if you found any issues since installing this Insider build.

Fix Outlook if It’s Running Slow in 4 Steps

Let us explore Outlook and help you fix issues connected to the service running slow. Outlook has performance issues caused by a corrupt or damaged PST file, an add-in that isn’t functioning, a corrupt profile, or a problem with the Outlook application.

This article presents all you need to know to resolve these issues.

How does the Windows registry get corrupted?

When Outlook 365 is running slow, it could be the installed add-ins to blame. To verify, run Outlook in Safe Mode, and if the performance improves, remove the non-critical add-ins.

Also, Outlook could be slow when recent updates and patches are not installed. Running an outdated version of any app can cause issues with both performance and security.

Besides, a corrupt or damaged Outlook profile, and third-party conflicts, usually from installed antivirus, can be behind Outlook 2016 running slow.

How do I fix a slow Outlook on Windows 10?

  1. 1. Adjust send and receive settings
    1. Click on File.
    2. Select Options from the lower left corner.
      outlook slow
    3. Click Advanced and scroll down to Send and Receive section, then select Send/Receive…
    4. Under Setting for group, adjust the time to a reduced value.
  2. 2. Disable RSS feeds
    1. Click on File.
    2. Select Options from the lower left corner.
      outlook slow
    3. Click Advanced and unselect the two options under RSS feeds.
      outlook slow
  3. 3. Disable add-ins
    • Click on File.
    • Select Options from the lower left corner.
      outlook slow
    • Click Add-ins and select COM add-ins, then click the GO button.
      outlook slow
    • Find the suspect add-ins and uncheck their corresponding boxes.
  4. 4. Compact data files
    • Click on File.
    • Expand the Account Settings option and select Account Settings.
    • Click on Data Files, select any of your data files, and click on the Settings option.
    • Click the Compact Now button.

We also encourage you to check the network connection and verify that you are receiving a decent speed. Slow Internet speed is a common underlying cause of Outlook issues.

Also, if you would rather skip fixing Outlook, you may try other options. For example, we recommend looking into the best Windows 10 email client apps because they provide plenty of valuable features.

That’s it! By now, you should have Outlook running again, and it won’t be slow anymore. However, for more official solutions, check out what Microsoft’s support page for Outlook performance issues.

Why are my emails slowly coming through?

There are a few reasons you may encounter delays in receiving your emails. On top of the list are the following:

  • The email size or size of its attachments
  • Your network latency
  • Issues with backing up virus/spam scanners
  • Delays between recipient or sender client

In most cases, you may not be able to do much about the delays; for example, the sender and recipient client may have a fixed interaction period spanning a few seconds to some minutes.

You may have to wait it out.

How long does it take for Outlook to send emails?

When Outlook is online and linked to a network, emails will be sent immediately after you click Send. Likewise, emails will be sent when the following Outlook is online if you send them when the service is offline.

The solutions below will work for the following error variations:

  • Outlook slow to open/send/receive emails – Adjust the send and receive settings as we have shown in the first solution.
  • Outlook slow and not responding – Delete the RSS feed in order to improve the performance of Outlook.
  • Outlook slow to load emails – You might need to delete old emails, as the storage is getting crowded.
  • Outlook slow to sync with Gmail – Disable add-ins to make Outlook perform better.
  • Outlook slow and crashing – Compact your files in order to free up more space for future emails.
  • Outlook slow synchronizing – Log out then log back into your account to restart the synchronization process.

The fixes above would come in handy if Outlook is having slow synchronizing, is slow to open emails, receive emails, send emails, or load emails. You will also find them convenient if Outlook is slow and not responding.

Repairing Microsoft Office will fix issues that can cause it not to function properly like One or more items in the folder you synchronized do not match; read this guide to learn more.

Were you able to fix Outlook running slow in Windows 10 using the solutions above? Let us know in the comments section below.

How to install and use Edge on Android

Microsoft’s Edge is brimming with features that make the default browser a delight to use—it beats down using the now-defunct Internet Explorer any day.

And, if you’re a fan, it might be a good idea to bring the Edge experience to your smartphone with you. In this article, we’ll look at precisely that. First, we’ll cover how to install the Edge browser on your Android and then go over how to make the most out of it.

So let’s get started.

How to install Edge on your Android

Built on Blink, a browser engine developed through combined efforts of Google, Facebook, Microsoft, and others, the Edge android browser works as fast and efficiently as its PC counterpart.

To get started with installing Edge on your Android, first head to Google PlayStore.

Once you’re in the PlayStore app, click on the search menu from above, type in ‘edge’, and hit Search. The App Store will instantly give you the Edge app in the search results.

installing microsoft edge

From there, click on Install, and the browser download and installation will begin. Depending on your internet speed, the app download will wind up in a few seconds, and the automatic installation will start.

edge app installation

When you’re done with the installation, click on Open. The app will be launched as soon as you do that. Now, let’s look at how you can make the most out of your app.

Using Edge on Android

When you open the Edge app for the first time, it will ask you to sign in to your Microsoft account. By signing into your default account, you can easily sync your data across devices; we suggest you sign in for a seamless user experience.

If you’ve been using other Microsoft products on your smartphone, the app will pick up your email address from there and give that as an option for sign-in. Alternatively, you can click on Add account and manually type in your email address and password.

edge sign in

Alternatively, you can click on Sign in later and move ahead with the sync. For this example, we’ll go with this option.

On the next page, the app will ask you for your data-sharing preference; if you select the checkbox, you’ll be sharing your browsing data—including how you use the browser, your crash reports, etc.—straight to Microsoft. To better protect your privacy, I suggest you uncheck the radio box and click on Confirm.

You’ll then be asked whether you want to set Edge as the default browser on your Android. Choose the option you’d like, and then move ahead.

Finally, on the home screen, you’ll see a search box and a few Microsoft app widgets. When you scroll down you’ll find the Feed section, where you can find all the top news stories doing rounds in your area.

edge home section

edge new feed

Note: You can tweak your feed to your liking by clicking on the Personalise tab from the top of your news feed. Under the My Interests section, you can select a host of options from News, Entertainment, Sports, Money, and so on—the items you choose here will show up on your Feed.

From the bottom, if you click on the three-dotted menu, you’ll see other options like History, Downloads, Settings, etc. From here, you can control the workings of your device with ease.

Installing and using Edge on Android

Using Edge on your Android is not much different from using it on your Windows PC. Moreover, if you decide to use the sync feature of the app, you can synchronize your usage across your devices. Of course, the Edge Android app offers its own share of tips and tricks—real world camera search and read aloud feature, for instance— that can make your browsing experience a delight. So, make sure you explore all the features it has to offer before you move onto something else.

Asio.sys Error: 3 Simple Ways to Fix This BSoD

If you’re getting an Asio.sys error on your Windows PC, it’s most likely because the driver is out of date or missing. We’ll show you how to fix that and a couple of more ways to address this error.

Asio.sys handles low-latency audio communication between your computer’s sound hardware and software, ensuring smooth, high-quality audio performance, especially for professional music production and real-time sound applications.

Given how important asio.sys is for audio, let’s get started with the troubleshooting.

How do I fix asio.sys error?

Before starting any core fixes we have put together, you should consider using a specialized BSOD troubleshooter.

1. Update the Universal ASIO driver

  1. Press Windows Key + S, then type Device Manager.
  2. Expand Universal ASIO Driver, right-click on Universal ASIO Driver and select Update driver.
  3. Once done, restart the PC.

Thankfully, there is another more accessible way to update your drivers. Download third-party software like Fortect Driver Updater that finds the latest driver versions and automatically replaces the bad ones. It is safer and will save you the time of searching and doing it manually.

Alternatively, if it is missing from your PC, you’ll have to download and install asio driver anew.

2. Run an SFC

    A System File Checker is an accessible tool within Windows that can scan and repair your Windows system files.

    1. Type cmd in the Search box and click on Run as Administrator to open an elevated Command Prompt window.
    asio.sys error
  1. 2. When Command Prompt opens, enter the following command and press Enter: sfc /scannow

    asio.sys error
  2. 3. Don’t close Command Prompt or interrupt the repair process. It can take a while, so wait patiently while it completes.

3. Run a complete malware scan

  1. Press the Start button, type virus, and select the Virus & threat protection option.
    asio.sys error
  2. Choose Scan options.
  3. Select the Full Scan option.
    asio.sys error
  4. Finally, click the Scan now button and wait for the scan to finish.

Alternatively, you can run a full system scan using other antimalware tools.

How do I download and install the Realtek ASIO component?

  1. Visit the official site for the driver download (this will depend on your computer manufacturer).
  2. Once you locate the Realtek ASIO driver, click on download.
  3. You should then click the downloaded file to install it on your computer.

We also have another guide that focuses on resolving the asio.sys error on Windows, so don’t miss it.

Lastly, tell us what worked for you in the comments section below.

How to Fix Greyed Out Notification Settings in Windows 10

If you’re using a Microsoft computer, you might have come across a common problem when you try to change the notification settings of your Windows 10. You may have noticed that some notification settings have suddenly become greyed out.

Notifications are not the only settings as your Webcam settings may also be greyed out. If you are facing the notification settings problem, then this post could help you out as we have listed all possible solutions to fix this.

Why can’t I click on my notifications on Windows 10?

When you receive a new notification on your Windows 10 computer, you can click on it to open it. However, sometimes, you may have trouble clicking on your notifications. 

So, why is my message notification greyed out? Here are some possible causes:

  • Your organization has applied GPO settings – Some settings are managed by your organization. This will block some apps from sending notifications. If this is the case, then you won’t see any notifications from any app that isn’t whitelisted.
  • Not enough permissions – When a notification is greyed-out, it could mean that the app developer has restricted access to certain parts of your computer and has not given permission for the app to display notifications.
  • You have not activated your version of Windows – If you’re a Windows 10 user and your notifications appear to be greyed out, there’s a good chance it’s because you haven’t activated your license. You won’t be able to see any desktop notifications even if they’re enabled in the settings.
  • Virus/malware – If you have a virus or malware on your system, then it might be blocking you from clicking on the notifications. You need a reliable antivirus to scan for any viruses.
  • Fast startup has been enabled – If your computer has Fast Startup enabled, it might be the reason why you can’t access notification settings. This feature enables your computer to start up faster but it also makes some crucial system files unavailable when the computer starts up.
  • The app has been disabled – If the action center is greyed out too, it means that the app that sent the notification is not currently running or has been disabled. You will need to open the associated app and enable it.

Let’s now look at ways to solve this issue down below.

How can I fix greyed-out notification settings in Windows 10?

As always, it is prudent to check off the basics before proceeding to any advanced troubleshooting. These include:

  • Ensure you have enabled the Notifications option.
  • Check if the associated app’s notifications have been enabled. You may want to get notifications from apps and other senders but not all.
  • Ensure you are running an activated version of Windows. If you run into an issue where your activation key is not working, refer to our fix guide.

If you’re lucky enough, one of these might solve your issue. However, if the notifications are still greyed out, proceed to more solutions below.

1. Disable Fast Startup

  1. Hit the Windows key, type Control Panel in the search bar and click Open.
  2. Select Hardware and Sound.
  3. Click on Power Options.
  4. On the left-hand pane, select Choose what the power buttons do.Choose what the power buttons does option
  5. Select Change settings that are currently unavailable.Change settings that are currently available
  6. Uncheck the Turn on fast startup option and click Save changes.

2. Check for viruses/malware 

  1. Press the Windows key, search Windows Security and click Open.
  2. Select Virus & threat protection.
  3. Next, press Quick scan under Current threats.
  4. Wait for the process to finish and restart your system.

You can also let a third-party tool scan your device for malware and viruses to make sure that is safe and secure. TotalAV is a great choice in this situation because it has a high detection rate and it can instantly remove any cyber threats.

3. Disable the firewall

  1. Hit the Windows button, type security in the search bar, and click on Windows Security.
  2. Click on Firewall & network protection then select Public network.public network
  3. Locate Microsoft Defender Firewall and toggle the off button.Turn off firewall if canon printer driver not installing.

4. Update Windows 

  1. Hit the Windows key and select Settings.
  2. Click on Windows update, then select Check for updates.
  3. Download and install if any are available.

It is also important to note that if you are running a pirated version of Windows, updating it might not change anything. 

You may also get a message that says: This copy of Windows is not genuine even though your copy of Windows is from the Official Microsoft site. If this is the case, we have covered a detailed guide on how to bypass this issue.

And that’s how to fix the greyed out notification settings in Windows 10. You may also encounter an issue where some apps are greyed out. If they are unnecessary, you can get rid of the greyed out apps in Windows 10 too.

While you are still here, also check out our article on what to do when your Group Policy Editor is greyed out.

Feel free to share any additional thoughts you may have on this topic in the comments section below.

Exception Access Violation: What is it & How to Fix

You can get a software error almost in any application, and speaking of software errors, today we are going to cover the Exception Access Violation error on Windows 10.

We will begin by answering some of your most asked questions and then jump into the list of solutions you need to go through.

What is Exception access violation?

Access Violation is a memory related error. It usually arises while installing or running an application if the memory allocation for the process has not been optimally done. For example, an error may appear when the program tries to access memory not allocated.

It could be outdated drivers, a problem with the RAM, or running an older version of DirectX, amongst others, behind the error.

Speaking of it, users reported the following error messages on their PC:

  • Unhandled Exception Access Violation in Visual Studio – If you have this problem, try reinstalling the affected application and check if that solves the problem.
  • Exception_access_violation in module ntdll.dll, odbc32.dll, uninstallexplorer.dll – Sometimes, this error message will give you the file’s name, which enables you to research the error and find a specific fix.
  • Exception Access Violation in Kaspersky – Various antivirus applications can cause this error message. Users reported this problem with Kaspersky, but other antivirus tools can also cause it;
  • Exception Access Violation in World of Warships, Overwatch, Minecraft, Borderlands 3 (BL3) – Sometimes, this error message can affect certain games, and users report issues with Overwatch, Minecraft, and many other games.
  • Unhandled Exception Access Violation – Unhandled exception errors are also frequent on Windows, and they occur when the software side cannot manage exceptions.
  • The program will be terminated Exception Access Violation – You should try reinstalling the application to see if it helps fix the issue.
  • Exception Access Violation C0000005 – The error is caused due to a buffer overrun.

Without further ado, let’s see how you can fix all these errors in ten different yet effective ways. Follow along!

How do I fix an access violation error?

Before we start troubleshooting, here are a few quick things you may try to resolve the error:

  1. Remove any add-ons or plugins installed on the app throwing the error. For instance, users reported issues with Excel add-ons. Removing add-ons also helps with Exception_Illegal_Instruction.
  2. In the case of games, verify that the settings are correctly configured, or you may revert to the default ones.
  3. If you see the error while gaming with the Logitech headset G35 connected, disconnect it while the game loads, and then plug it back in when you start playing.

If none of these quick fixes worked, let’s head to the comprehensive ones.

1. Check your PC for malware

According to users, sometimes, this error can appear due to malware infections. For example, many reported a fake Chromium browser on their PC that caused this error.

Therefore, performing a detailed scan with your antivirus software is advised. If your current antivirus can’t find and fix the problem, we strongly recommend that you try another solution.

In search of a suitable antivirus for your system, you should look for one that has a minimal impact on the system, has identity safety features, and has strong virus protection.

There are many good antivirus software with free trials, so you can try a few before you decide which is the best for your specific needs.

If you want a complete and thorough scan for malware and other viruses, we strongly recommend you use ESET HOME Security Essential since it has some of the most powerful technologies.

ESET works on any device and, in addition to malware protection, it guards your PC against new threats, encrypts your sensitive data, and even has extra layers of protection for privacy and banking.

ESET HOME Security Essential

Make sure that no malware can infect your PC with one of the most advanced antiviruses.
Free Trial Visit Website

2. Add Data Execution Prevention Exception

  1. Press Windows + S to open the Search menu, type View advanced system settings, and click on the search result.
  2. Under the Performance section, click the Settings button.
    Unhandled Exception Access Violation Visual Studio
  3. Go to the Data Execution Prevention tab. 
  4. Select Turn on DEP for all programs and services except those I select, and then click Add.
  5. Locate the .exe file of the program you wish to run, select it, and click on Open.
  6. After you’ve added that program to the DEP exclusion list, click Apply and OK to save the changes.
  7. Try rerunning the program.

If a program gives you an Exception Access Violation error in Windows 10, you might want to add that program to the Data Execution Prevention exceptions list.

3. Disable User Account Control

  1. Press Windows + S to open Search, type UAC, and click on Change user account control settings.
  2. Now, drag the slider down until it says Never Notify, and then click OK to save the changes.

It has been reported that the Exception Access Violation error occurs when users are trying to install Java or when they try to run Java applets or applications.

To fix this issue, it’s advised to disable User Account Control temporarily. This solution also applies to other software, so even if Java is working without any problems on your computer, you can try disabling User Account Control to fix this issue.

We must mention that disabling User Account Control comes with a slight security risk, so if you’re not comfortable with it, disable User Account Control when you run the desired application and turn it back on.

4. Create an options.ini file

Note icon NOTE
This solution only works for Lord of The Rings: Battle for Middle Earth. If you encounter an error with another app, head to the next solution.
  1. Press Windows + R to open Run, type %appdata%, and click OK to open the AppData folder.
    Exception Access Violation Kaspersky
  2. Now, open the My Battle for Middle Earth Files folder.
  3. If the folder is empty, you must create a new options.ini file.
  4. Create a new text document and add the following lines to it:
    AudioLOD = Low
    HasSeenLogoMovies = yes
    IdealStaticGameLOD = VeryLow
    Resolution = 800 600
    StaticGameLOD = VeryLow
    TimesInGame = 1
  5. Now click File and select Save As.
    Exception Access Violation World of Warships
  6. Enter options.ini as the File name, choose All Files from the Save as type dropdown menu, and click Save.
    Exception Access Violation Java
  7. After the file has been saved, try rerunning the game.

5. Make sure that the file isn’t set as read-only

  1. Find the shortcut of the problematic file, right-click on it, and choose Properties.
    Exception Access Violation Minecraft
  2. In the General tab, make sure the Read-only option is unchecked.exception access violation
  3. Now, click on Apply and OK to save the changes.
  4. Try re-running the application.

6. Check for hardware problems

As we already mentioned, Exception Access Violation errors in Windows 10 can sometimes be related to the RAM, so it won’t hurt to check if your RAM is working correctly.

You can use MemTest86 for this purpose. Just download it, move it to a USB flash drive, restart your computer and let MemTest86 run for a while. Also, you could use reliable PC repair software.

7. Use the Compatibility mode

  1. Right-click on the application throwing the error, and choose Properties from the menu.
    Unhandled Exception Access Violation Visual Studio
  2. Navigate to the Compatibility tab. Check the box for Run this program in compatibility mode for, select an older version of Windows from the list, and click OK to save the changes.
    Exception_access_violation in module odbc32.dll

If you’re getting an Exception Access Violation error message frequently, it can be due to compatibility issues.

Fortunately, Windows has a helpful Compatibility mode feature that allows you to run older applications. Unfortunately, you might have to try several different iterations before you find the one that works on your PC.

8. Run the Hardware and Devices troubleshooter

  1. Press Windows + I to open Settings, and click on Update & Security.
    Unhandled Exception Access Violation Visual Studio
  2. Select Troubleshoot from the left, click on Hardware and Devices and then click on Run the troubleshooter button.
    Exception Access Violation Java
  3. Follow the on-screen instructions to complete the process.
Note icon NOTE
If you can’t find the troubleshooter in Settings, paste msdt.exe -id DeviceDiagnostic in the Run command, and click OK.

9. Reinstall the application

If you’re getting an Exception Access Violation while trying to run a specific application, you might be able to fix the problem simply by reinstalling that application.

After you have uninstalled the application, download it from the official source. And make sure to get the latest version of it.

What is an access violation error in C++?

This Access Violation error points to an issue with a pointer in the C++ code in Visual Studio. While users had to manually identify the problematic pointer earlier, after the recent update, Visual Studio now lists it along with the error message.

Usually, it’s the memory allocation to blame. So, go through the code and verify that the pointers have been correctly assigned.

Some of the other programs that may throw the error are:

  • Exception Access Violation blender
  • Exception Access Violation SAI
  • C++ Exception Access Violation
  • Exception Access Violation Dead by Daylight
  • Exception Access violation Skyrim

Exception Access Violation errors can cause particular problems on your PC, but we hope you managed to solve this issue by using one of our solutions.

Drop a comment below if you have any other queries or managed to fix the error using another solution.

Nearby Share Not Working on Windows 11? How to Fix it

Have you tried to send photos and files to someone via Nearby Sharing in Windows 11? How did that work out for you? Windows Nearby Sharing is a very handy feature for those who want to transfer pictures, music (MP3), videos and more from their PC to other Windows devices. 

Unfortunately, this feature doesn’t always perform its functions as expected and you may run into some hurdles at times. You can choose to troubleshoot the issue or explore other Wi-Fi file transfer software.

Why is my Nearby Sharing not working?

The most likely causes of this are:

  • You have not enabled the feature – The Nearby Sharing feature does not come enabled by default in Windows devices. To use it, you need to make sure that the Nearby Sharing option is on.
  • Devices are not in range – While you can use Nearby Sharing with anyone in your vicinity who has also enabled it, you may find that the app doesn’t work when you’re too far away from them. 
  • Outdated OS – Some older versions of Windows are not compatible with the Nearby Sharing feature. Ensure that you upgrade to Windows 11 for the feature to work on your devices.
  • Unsupported device – At the moment, Nearby Sharing only supports transfer of files between Windows devices. If you are trying to use Nearby Sharing from PC to Android or wondering why its not showing up on your Android device, this is the reason.
  • Poor internet connection – If your computer is not connected to the internet or has slow internet speeds, it won’t be able to send files or receive them from other users. Make sure that you have an active internet connection before trying to use Nearby Sharing.
  • Different networks – If you’re not on the same Wi-Fi network as the person you want to share with, you may experience some connection issues. Try connecting to the same Wi-Fi network as the person you want to share with.
  • Insufficient space – If you are using a device that has low memory, the Nearby Sharing may require more memory than it can access. This can cause it to crash or stop working altogether. You need to make sure that you have enough storage space on your device.

How can I fix Nearby Sharing if it’s not working in Windows 11?

If you’re having trouble with Nearby Sharing, here are some things to try before any serious troubleshooting:

  • Check that the Nearby Sharing feature is enabled on both devices.
  • Try turning off Nearby Sharing and then turning it back on after waiting a few minutes.
  • Make sure that Bluetooth is enabled on the devices. Sometimes Bluetooth is not able to detect devices.
  • Ensure that the device you want to share with is in range of your PC’s Bluetooth connection.
  • Make sure your devices are connected to the same Wi-Fi network.
  • Check your internet speed and ensure it is reliable and stable.
  • Ensure both devices have the same version of Windows installed (or at least Nearby Sharing supported versions).
  • Restart your PC as it fixes a lot of issues.

If all these check out but you are still stuck, here are more advanced troubleshooting options.

1. Check Bluetooth compatibility

  1. Hit the Windows key, type Device Manager in the search bar, and click Open.
  2. Find your Bluetooth device, right-click and select Properties.
  3. Navigate to the Details tab and from the drop down, select the Bluetooth radio supports Low Energy Central Role option.
  4. Scroll down to the Value option and check that it is set to <true>.

Your PC’s hardware may not support Nearby Sharing because it doesn’t have Low Energy support or enough processing power to handle sharing files over Wi-Fi or Bluetooth connections. 

If your computer doesn’t have Bluetooth LE support or it has older versions of Bluetooth LE installed, the value will turn up as <false> and you won’t be able to use this feature. You may have to upgrade to another Bluetooth adapter to use this feature.

2. Update Bluetooth driver

  1. Hit the Windows key, type Device Manager in the search bar, and click Open.
  2. Find your Bluetooth device, right-click and select Update driver.update bluetooth not finding devices
  3. Select Search automatically for updated driver software.update bluetooth drivers
  4. Restart your PC and try reconnecting.

If you want to make sure that you choose the right driver, then we recommend a professional tool like Outbyte Driver Updater. It scans your device and automatically updates not only your Bluetooth driver but all the outdated or missing drivers as well.

Outbyte Driver Updater

Keep your device performance at its best by updating your drivers with Outbyte Driver Updater.
Free Trial Download now

3. Update Your Network adapter drivers

  1. Hit the Windows key, type Device Manager in the search bar, and click Open.
  2. Navigate to Network adapter, right-click and select Update Driver Software.
  3. Select Search automatically for updated driver software.

4. Free up memory

If your device has low memory, it might not be able to share content over the internet. To free up memory, close any apps or tabs that are running in the background. 

You can use the Task Manager to see which programs are using the most memory and close them if they aren’t needed. If more RAM is needed, RAM cleaners and optimizers will come in handy too.

5. Restart the Bluetooth support service

  1. Press the Windows + R keys simultaneously to open the Run window.
  2. Type services.msc in the Run dialog box and press Enter.Open service manager
  3. Find the Bluetooth support service, right-click and select Restart.
  4. Right-click again and select Properties.Bluetooth Support Service
  5. Under the General tab, select Automatic as the Startup type then click OK.bluetooth support service automatic startup
  6. Try connecting again.

6. Reset your network

  1. Hit the Windows key and select Settings.settings windows 11
  2. Click on Network & Internet on the left hand pane then Advanced network settings on the right pane.
  3. Click on Network reset.clicking network reset win11 settings
  4. Hit Reset now and click Yes in the next confirmation dialog box.clicking reset now for network reset win11 settings

7. Update your version of Windows

If you’re running an older version of Windows that’s no longer supported by Microsoft, then there’s a chance that this could be causing issues with Nearby Sharing. 

It’s time to upgrade. The easiest way is to visit Microsoft’s download page and follow the instructions there. 

Hopefully one of these solutions have enabled you to transfer files again using the Nearby Sharing feature if it was not working.

Should you find that the file transfer process is too slow for your liking, we also have a few tips to help you bypass this issue.

If you would like to transfer files from Android/iOS to Windows devices, we have compiled a list of apps you’ll find useful.

Let’s interact more in the comment section as you let us in on what solution worked for you.

New power options menu coming to Xbox Series X|S consoles

Xbox Insiders in the Alpha Skip-Ahead group are currently testing a new power options settings page. Apparently the new menu will allow users to “better decide how you want your console to behave when you turn it off.” Specifically, users will be able to see how much power is used both in standby and energy saver modes, and choose either as the console’s shut-down option.

This is the latest in Microsoft’s efforts to include Xbox in its sustainability measures. You may recall that last year improvements were made to the Series X|S energy saver mode whereby system and game updates were made downloadable in energy saver. Earlier this year Microsoft also stated that it aimed to make all Xbox products 100% recyclable.

You can expect the new power options menu to become available to the general Xbox gaming public sometime soon.

How to Stop Router from Blocking VPN

For all online privacy needs, there is a real necessity for a router to support a VPN connection and protect your personal information.

It is possible that a VPN affects routers in a positive manner and has many benefits in terms of online security.

There are two ways to set up your VPN on your router: either buy a new router setup for the specific job or install it into your existing router – make sure to check for compatibility in both cases.

As a quick heads-up, other users have mentioned wireless router won’t work through TL-R600VPN, Windows VPN does not work through the router with OpenWRT.

In all this, though, you may encounter a situation when your VPN does not work through the router, and probably restarting the VPN app or even your computer and router doesn’t yield any tangible results.

This article lists some solutions you can try to fix the problem.

Why is VPN not working through router?

If you can’t connect to your VPN using the router, the problem may arise from both ends. The most probable reason is that your router is not compatible with the VPN software. Other causes for this issue are:

✅ The router doesn’t support your VPN connection

✅ The VPN usage is restricted by the router firewall security

✅ Your router is blocking the VPN connection

In case you discover that your router doesn’t support a VPN connection, there are other effective VPN routers you can try.

Do all routers support VPN?

No, on the contrary. There are considerable routers that don’t support VPN connections.

Generally, routers that support OpenVPN open-source protocol can support a VPN client as well, but it is best to check for each particular device.

How do I know if my router is VPN compatible?

Simple enough, you can check the manufacturer’s specifications or search for your specific model on the internet in order to see if it is VPN compatible.

To avoid VPN not working through router issues, it is essential to verify that your router supports VPN usage before buying it or getting a VPN subscription.

How do I set up a VPN through my router

There is VPN software that supports router connection and can efficiently connect with your router. This is the simple method to set up a VPN on your Windows PC:

  1. Sign up for an ExpressVPN account.
  2. Login into your router IP address with the user and password.
  3. Configure your router to set up the VPN (OpenVPN protocol supported).
  4. After you adjust the router settings for the VPN, check the connectivity.
  5. Open a browsing page to test your ExpressVPN router connection.

With native support for Wireguard, Lightway proprietary, OpenVPN, and L2TP/IPSec protocols, ExpressVPN has a network of 3000 servers spread across 94 countries worldwide to choose from.

It is as versatile, yet powerful as a VPN can get and is compatible with Asus, Linksys, and Netgear routers. For other routers, you can contact ExpressVPN support to get the firmware.

Plus, you have ultra-fast download speeds, unlimited bandwidth, and stable, or reliable connections guaranteed by coupling this world-leading VPN software with your router.

ExpressVPN

Comes with firmware to install on your router and can be set up automatically or manually.
Check price Visit website

What to do if the VPN not working through router?

1. When experiencing slow speeds

If you’re experiencing slow speeds because of the VPN not working through the router, here’s what you can do:

  1. Disable the firewall of your primary router (ISP modem)
  2. Connect with different servers
  3. Switch between available protocols i.e. PPTP / OpenVPN
  4. Connect to the VPN servers which are closer to your physical location. For instance, if you are in the US, the servers in Canada or Mexico will get you better speeds.

Speaking about speed, you might want to consider a VPN that doesn’t slow down internet speed, while allowing you to switch between protocols and server locations.

2. Unable to browse

If you cannot browse because your VPN does not work through the router, try the following steps:

  1. Change your router DNS settings to OpenDNS i.e. 208.67.222.222 and 208.67.220.220 Or Google DNS  8.8.8.8 and 8.8.4.4
  2. Save settings
  3. Restart your router

3. Loss of connectivity

If you lose your internet connectivity as soon as you couple your VPN to your router, make sure that the router is not working as a modem. You cannot directly configure a VPN on your ISP’s modem/router.

As soon as you will change the modem or router’s WAN settings, you will lose your internet connection.

You have to configure it on an extra one, as you cannot configure two connections on the same router at the same time.

4. Connected, but not getting VPN IP Address

In case your Wi-Fi network has a connected status but the VPN not working through router, you can proceed with this:

  1. Change your router DNS settings to OpenDNS i.e. 208.67.222.222 and 208.67.220.220 Or Google DNS  8.8.8.8 and 8.8.4.4
  2. Save settings
  3. Restart your router

5. Check Error Logs on your router

To check error logs, you are suggested to follow the below-mentioned steps:

  1. Go to the Services tab in DD-WRT
  2. Enable Syslog on the Services tab, or simply go to the Administration tab, then select Commands and enter the command as cat /tmp/var/log/messages. (DDWRT)

6. What to do when disconnected:

  1. Disable the firewall of your primary router (ISP modem)
  2. Switch between different protocols i.e. PPTP / OpenVPN
  3. Switch between different servers

7. Unable to connect

If you’re unable to connect because the VPN does not work through the router, do the following:

  1. Try to connect with OpenVPN protocol if PPTP protocol is causing problems
  2. If the issue remains unresolved, disable the firewall of your primary router (ISP modem)
  3. Connect PPTP / OpenVPN protocol on any other device for testing purposes and check if you are able to connect the VPN using the same protocol

Note: Ensure that the following protocols are supported by the router: PPTP or OpenVPN.  Before configuring the VPN on your router, make sure that your router is not working as a modem.

Other steps you can take

  1. If your equipment supports NAT-T (NAT Traversal), turn it on.
  2. Contact your network administrator to understand the details of how you need to configure your VPN software.
  3. If your company uses L2TP pass-through, register your router’s MAC address with your company’s system administrator.
  4. Upgrade to the latest router firmware.
  5. Enable Port Forwarding for the VPN port 500, (for IPSec VPNs), port 1723 for PPTP VPNs, and port 1701 for L2tp- L2tp routing and remote access. Port 500 may be listed under the list of services.

Note: Check if the WAN IP is Public or Private. Ports can be opened on Public IP addresses only.

By default, the router’s firewall is configured to drop (delete) ICMP packets sent from outside your network to the WAN port. Your VPN may require the ICMP packets. To accept them do the following:

  1. Log in to the router using a browser by typing https://192.168.0.1, https://routerlogin.com, https://routerlogin.net or https://192.168.1.1.
  2. Type admin for the username and password for the password (unless you changed the default password)
  3. Select WAN Setup> Advanced > Respond to Ping on Internet Port
  4. Click Apply

Has any of the above solutions worked for you? Let us know by leaving a comment in the section below.

Best Realtek Audio Settings: 4 Tips to Improve Quality

Most Windows use the Realtek High Definition audio driver because it offers the best audio quality Dolby, DTS, and Surround Sound support. However, installing the driver on your PC has an advanced Realtek HD Audio Manager for tuning and adjusting your device’s sound.

Hence, this article will show you how to maximize audio production by tweaking the Realtek High Definition Audio Manager’s settings.

Should I use the Realtek HD Audio Manager?

The Realtek High Definition Audio Manager allows you to maximize and enhance your sound output.

It functions as a Control Panel for your audio adapters. Users ask if it is necessary to use the Audio Manager, and the answer is no because it doesn’t affect your sound output.

However, the Realtek HD Audio Manager allows you to explore audio settings like bass management, room corrections, speaker settings, and more.

Further, it has two different audio tabs: speakers and microphones. Hence, Realtek High Definition Audio Manager ensures easy access to the sound settings on your PC and the option to customize your speaker configuration.

Also, you can adjust the volume of each speaker independently, adjust the microphone volume and perform tests for your device.

However, the Realtek High Definition Audio Manager is not necessary for your audio devices, but we recommend you use it for fast and wide access to audio settings.

Alternatively, please read our detailed guide about why you need Realtek HD Audio Manager on your device.

How do I get Realtek’s best audio setting for all sources?

1. Increase the overall loudness of your audio output

  1. On the desktop screen, navigate the system tray and right-click on the Realtek HD Audio Manager icon to prompt the audio options menu.
  2. Select the Sound Manager from the drop-down.
  3. Click the Sound Effects tab on the Sound Manager window below the Main Volume slider.
  4. Check the box for the Loudness Equalization option and click on the OK button to save the settings changes.

Enabling the Loudness Equalization feature can also reduce the volume differences in the sound output devices. Also, you can read about how to increase your volume beyond max on your laptop.

2. Set your Default Format

  1. On the desktop screen, navigate the system tray and right-click on the Realtek HD Audio Manager icon to prompt the audio options menu.
  2. Select the Sound Manager from the drop-down.
  3. Click the Default Format tab below the Main Volume slider.
  4. Set your playback default format to 24Bits 44100 Hz Studio quality and select the DVD format option below.

Settings the Default Format helps reduce sound latency and improve your sound quality.

3. Test the right and left speaker output

  1. On the desktop screen, navigate the system tray and right-click on the Realtek HD Audio Manager icon to prompt the audio options menu.
  2. Select the Sound Manager from the drop-down.
  3. On the Sound Manager window and click the Speaker Configuration tab below the Main Volume menu.
  4. Click the Play icon.

The play button in the tab lets you test the output of the right and left speakers, making it easy to identify if there are any irregularities with your sound.

4. Enable the Acoustic Echo cancellation feature

  1. Right-click on the Realtek HD Audio Manager icon on the desktop tray and select Sound Manager from the drop-down.
  2. Go to the Microphone tab.
  3. On the Microphone Effects window, enable the Acoustic Echo cancellation option.
  4. Also, you can enable the Noise Suppression option too.

The Acoustic Echo cancellation feature reduces the echo from the front speakers during recording. Likewise, the Noise Suppression feature reduces the static background noise during audio recording.

However, tweaking the best Realtek equalizer settings for gaming and other activities doesn’t work independently. You need quality headphones or speakers that produce a better audio output.

Also, you can improve your headphone sound quality in Windows 11 for better performance. Using the Realtek Audio Console can run into numerous issues like failure to detect your Bluetooth headphones.

However, you can read our article about how to fix Realtek HD Audio Manager not opening or working on Windows 11. Also, read the fixes for Realtek HD Audio Manager missing on the PC.

If this guide has been helpful, leave your suggestions or questions in the comments section.

How to Change your Microsoft Family Settings

Being the leader of a family means so much more than simply providing for the ones that matter the most to you in this world.

It also means making sure they are always protected, whether, from immediate real-world threats, or the virtual kind, that can harm people over time.

Kids can sometimes be reckless and staying on top of all situations will be its own reward over time. But how can you control all these things?

Microsoft says it’s through the Family Safety app, which gives you some control over the virtual lives of your easily distracted offspring.

The Family application is free and you can get it from the Microsoft Store anytime you want.

Knowing how to manage your family’s needs is important, so we’re about to show you how to navigate the Family app settings.

How can I change the Microsoft Family settings?

  1. 1. In order to change the settings, preferences, and permission for your family, you need to start by going to your Windows settings.

  2. 2. Open the Start menu and access Settings.

    family settings
  3. 3. Select Accounts and then click on Family & other users.

    family settings panel
  4. 4. Click on Manage family settings online or remove an account.

    family manage settings
  5. 5. Access the desired setting from the main account page.

    family settings website
  6. It is quite simple to change your Microsoft Family settings from your PC.  Needless to say, you get the same amount of control and you’re able to tweak the same settings by using the application as well.

    You don’t necessarily have to access the browser version to be able to make the tweaks you want. It’s entirely up to you what version you choose to use

How can I set Microsoft Family settings for individual family members?

We’re glad you asked that question because the answer is simple and we are about to share the entire process with you as well.

If you want to personalize these settings and manage individual permission, all you have to do is:

  1. Click on the family member whose settings you want to change.family choose member
  2. Access and modify any part of the profile you deem necesary.family categories

From this panel you can modify permissions for purchasing, how much screen time everyone gets, or what content is permitted and forbidden.

You can also track your family’s mobile devices, just in case you don’t know someone’s whereabouts, and locating that person becomes urgent.

In case you don’t plan to use this feature, you can go ahead and disable the Family Safety feature on your PC, and we have a perfect guide that will show you how to do that.

Have you managed to properly tweak the Family app settings? Share your experience with us in the comments section below.

How to View Activity History on Windows 11: 3 Simple Ways

Today, we’ll show you how to view activity history on Windows 11. The operating system keeps a record of the websites you visited, images, documents, and other files you downloaded.

This helps you recover lost or accidentally deleted files, view recently visited sites and check if someone else has used your PC without your knowledge.

How do I check the recent activity history in Windows 11?

Step 1. Use Event Viewer to view activity history

  1. 1. Hit the Windows key to open the Windows Search box.

  2. 2. Type Event Viewer in the search box, and then click Open on the first result.

    open event viewer from the search box
  3. 3. Right-click on the Windows logs section to expand it.

    go to windows logs
  4. 4. You can now check whichever events want to see. For example, you can click on System.

  5. 5. You will now be able to see a current log of the number of times your computer has been on.

  6. Users who want to view the recent activity history on their Windows 11 devices can use a built-in tool called Event Viewer.

    This tool comes in very handy when it comes to checking what has been done on your PC. You can sort the events and browse those you are interested in.

Step 2. Use Command Prompt to check the computer history

  1. Press the Windows key, type cmd in the search bar, and click Run as administrator.
  2. Type the following command and press Enter: systeminfo
  3. That’s how simple it is to check computer history in Command Prompt. You will be able to see how many times your PC has been booted.

Step 3. Check the Windows 11 computer’s history with the Run command

  1. Press the Windows + R keys simultaneously to open the Run command.
  2. Type recent in the dialog box and hit Enter.
  3. You will be directed to the recent folder location and see your computer history.

How to check the history on a Windows 11 PC if it has been deleted?

To check your computer history after it has been deleted, follow the steps below:

  1. Press the Windows key, type cmd in the search bar, and click Run as administrator.
  2. Type in the following command and press Enter: ipconfig/displaydns
  3. You will now be able to see a list of all sites visited.

It is very easy to check your computer history on Windows 11. But sometimes you want to keep your activities private. In such cases, you may have to delete your computer history.

However, if small children or your employees are using your computer and you want to keep tabs on their activities, you have to check their history. But what happens if they delete their activity history? You can make use of software to track browsing history or do it manually as outlined below.
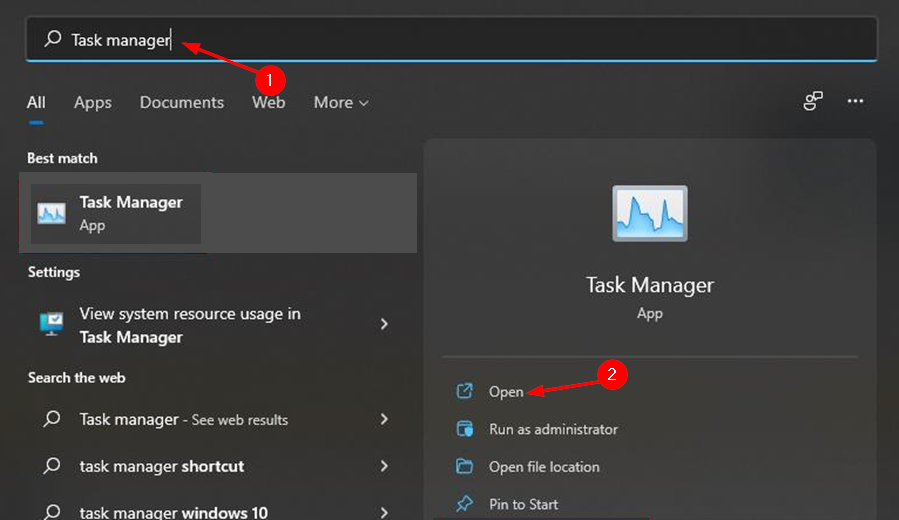
If you are using a shared computer and dealing with sensitive information, it goes without saying that you don’t want any information landing in the hands of unauthorized people.
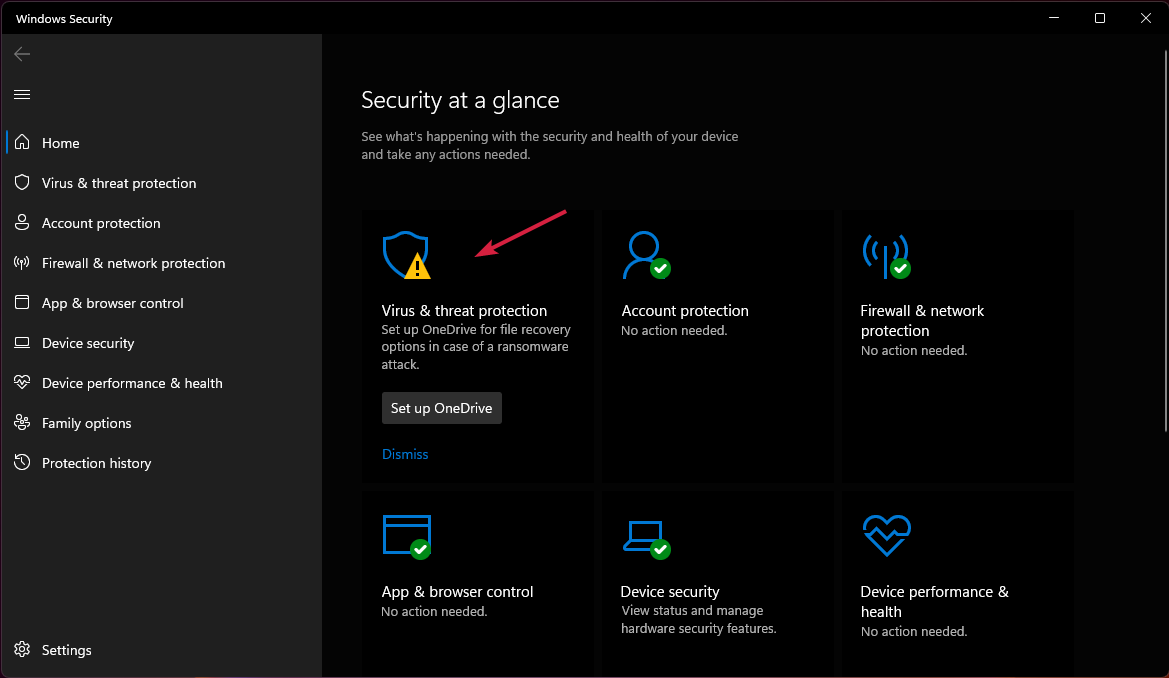
We hope this article was able to shed light on the different ways you can access your computer’s history with ease.

If you have any additional methods you have tried that worked out for you, we’d love to hear them. Share with us in the comment section below.