How to Reinstall Audio Drivers on Windows 11: Step-by-Step

Reinstalling audio drivers on Windows 11 can help you troubleshoot sound problems on your PC  such as the There might be a problem with your audio device error.

While a simple driver update often fixes these problems, you sometimes have to start from scratch. In this guide, we’ll show you how to uninstall and reinstall the audio driver on your Windows 11 and fix audio problems for good.

How to reinstall the audio drivers in Windows 11?

1. Via Device Manager

  1. 1. Press Windows + S to launch the Search menu.

  2. 2. Enter Device Manager in the text field at the top, and click on the relevant search result.

  3. 3. Double-click on the Sound, video and game controllers entry to view the devices under it.

    Sound, video, and game controllers
  4. 4. Right-click on the audio device, and select Uninstall device from the context menu.

    Uninstall device to reinstall the audio driver in windows 11
  5. 5. Tick the checkbox for Attempt to remove the driver for this device, and click on Uninstall.

    Uninstall audio device
  6. 6. After uninstalling the driver, restart the computer.

  7. 7. Windows will now look for the best available driver for the audio device and automatically install it.

  8. The easiest and recommended method to reinstall your Windows 11 audio drivers is via Device Manager. Basically, you need to uninstall the existing drivers and then restart your PC.

    As soon as your PC reboots, it will automatically install the latest driver for your device.

2. Via Control Panel

  1. Press Windows + R to launch the Run command.
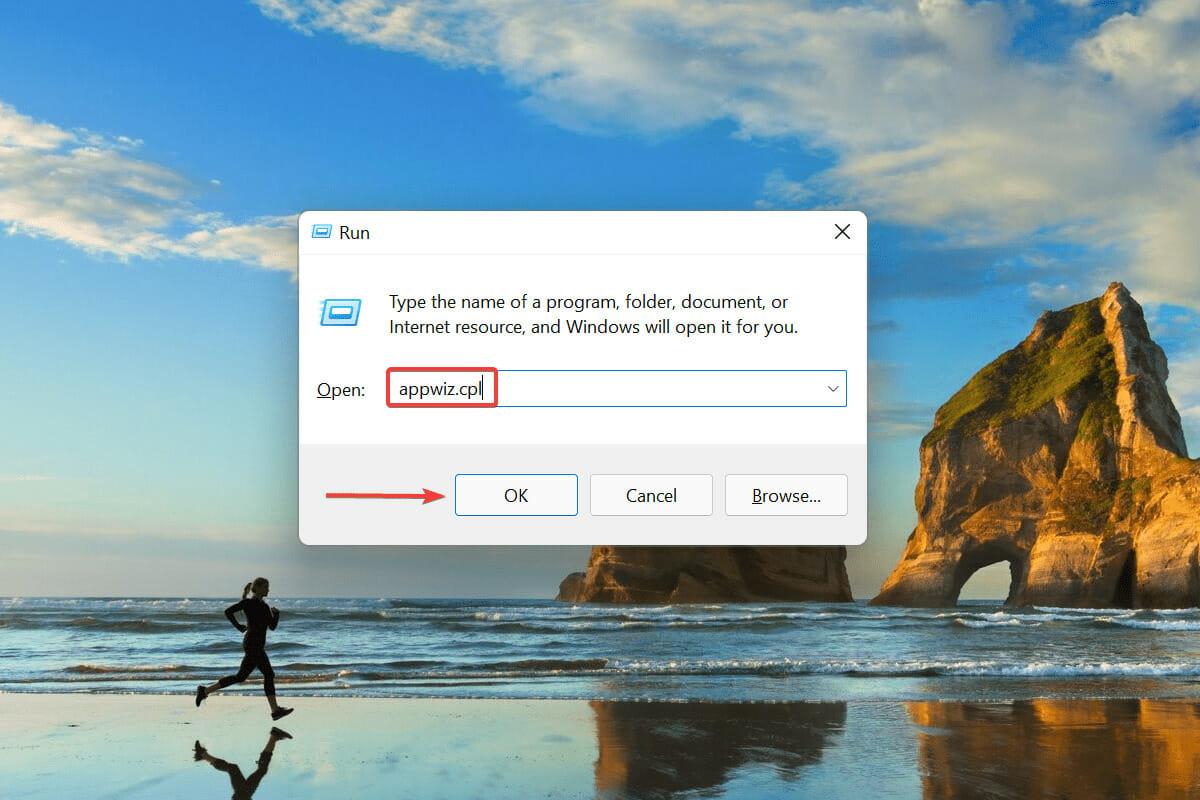
  2. Enter appwiz.cpl in the text field, and either click on OK or hit Enter to launch the Programs and features window.Launch Programs & features
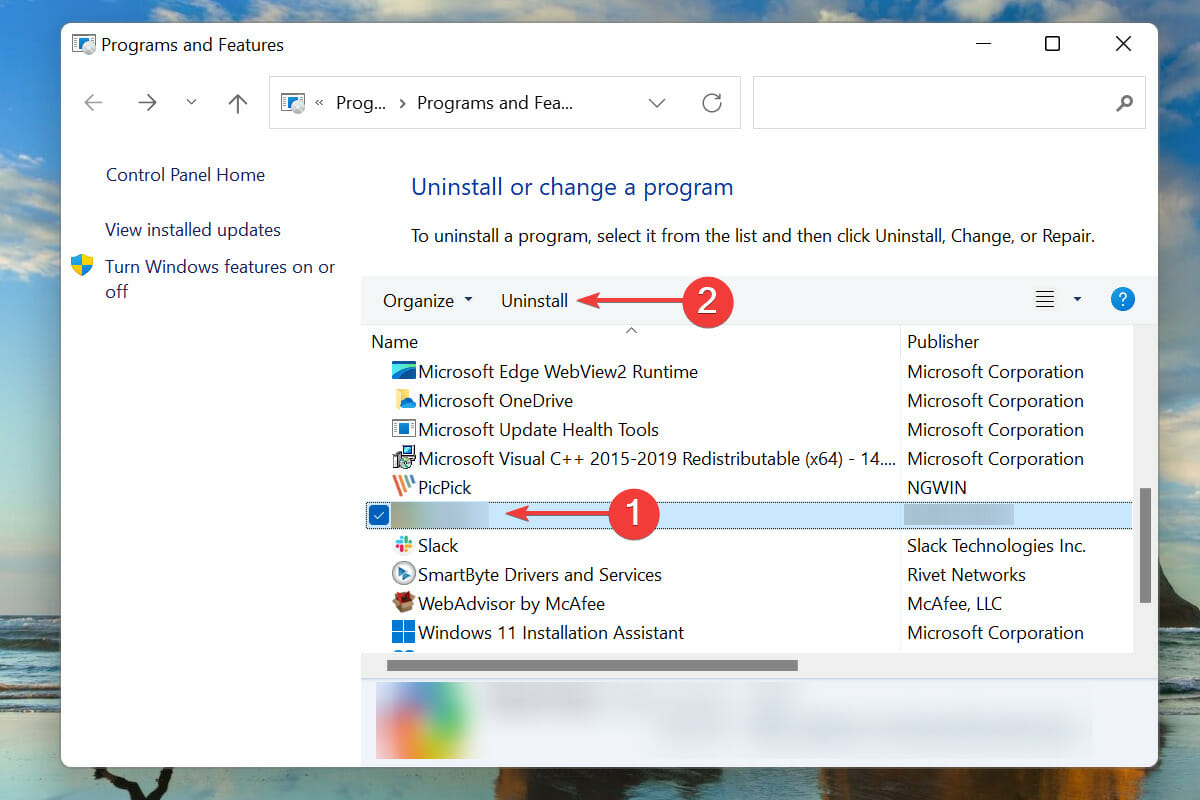
  3. Locate and select the audio driver, and click Uninstall at the top.Uninstall to reinstall audio driver in Windows 11
  4. Click Yes on the confirmation box if any pops up.
  5. Now, restart the computer, and Windows will automatically install the best available driver for the audio device.

Another way to reinstall the audio driver is first to remove it from the Programs and Features window and then restart the PC to let the OS automatically install it.

If you are using external audio interfaces, such as the Focusrite Scarlett Solo, reinstalling the driver directly from the manufacturer often works best. You can follow this step-by-step guide for the Scarlett Solo driver to make sure it installs correctly on Windows.

3. Use specialized software to reinstall audio drivers

You can always rely on a third-party utility if both methods sound too complex or time-consuming. Hence, we recommend using a dedicated tool that automatically scans for any available newer versions and updates the installed drivers.

⇒ Get Fortect Driver Updater

These are all the ways you can reinstall the audio driver in Windows 11. Both methods are equally simple, and it’s up to the users to choose one or use a dedicated third-party tool.

These methods will work on most drivers, including Realtek Audio driver and AMD Audio driver in Windows 11 devices.

You can manually install the drivers in Windows 11 if the automatic update doesn’t work. Before you go, you can also check our guides on AMD High Definition Audio Device driver and Intel High Definition Audio Driver.

Reinstalling the audio drivers can also fix the sttray64.exe Application error, so don’t hesitate to try it.

Lastly, in the comments section below, let us know which method to reinstall the audio driver. Again, we’re eager to hear from you.

Steam Games Won’t Launch on Windows 10: Easily Fixed

A few users have complained that Steam games are not

\unching on Windows 10; we present all you need to know to resolve this error on your device.

Microsoft made the latest Windows OS a gamer-friendly operating system with game streaming, recording, and a great Xbox One app.

But this Steam issue, among a few others, may reduce or ruin the experience.

Why are Steam games not working in Windows 10?

When Steam games are not working, we first recommend you verify if the servers are working fine using a dedicated website like SteamStatus, though it’s not the official one.

Also, it could be that you are trying to play a game during Steam Maintenance Tuesday, which is not working.

If the servers are doing fine and others can play the game, check the game files. Corruptions with these affect the game’s performance; in some cases, the fun won’t launch.

If you run the game through the standalone launcher, it could lead to issues, though unlikely. But try running the game from the Steam app itself to be sure.

Besides, outdated drivers, misconfigured settings, running an older version of the game, Steam, or the OS, are all possible reasons why Steam games won’t launch on Windows 10.

Does Windows 10 affect Steam games?

The OS is a very gaming-friendly Windows edition. With that said, you do not expect any adverse effect on games, even though manufacturers are always likely to fine-tune their applications for new updates.

What can I do if Steam games are not launching on Windows 10?

1. Update your drivers and DirectX

It won’t do any harm if you head to Device Manager, right-click on the graphics card under Display Adapter, and see if there are any driver updates.

The same goes for DirectX, as you can check if the latest version is installed. However, updating drivers manually can be a long process, especially if you are a newbie.

Powerful driver updating software, such as Fortect Driver Updater allows you to scan for outdated drivers, download fresh ones, and ensure they never go out of date again by notifying you about this as soon as it finds new driver versions.

⇒ Get Fortect Driver Updater

2. Verify the integrity of all game files

  1. Launch Steam.
  2. Go to Library, right-click on a game, and select Properties from the menu.
    properties
  3. Select the Local files tab and click the Verify integrity of game files button.
    steam games not launching windows 11
  4. Wait for the process to finish and re-launch Steam.

3. Update Windows

  1. Press the Windows key + I to open the Settings app and select Update & Security.
    update  steam app wont launch windows 10
  2. Click the Check for updates button.
    check
  3. Now, download and install any available update.

Microsoft pays much attention to gaming and considers gamers a valuable part of the Windows community.

Therefore, the company includes some threats for gamers in every major update for Windows 10.

Are you having trouble updating your Windows 10? If you don’t know what to do about the missing Check for updates button, our tips will help you solve the issue in no time.

4. Reset PC

  1. Open the Settings app and select the Update & Security option.
    update  steam app wont launch windows 10
  2. Select Recovery in the left pane and click the Get Started button under Reset this PC.
    get started
  3. Choose whether to keep your files or not and click the Next button.
    keep steam app wont launch windows 10
  4. Now, follow the simple onscreen instruction to complete the process.

Verify that the Steam games not launching has been fixed on your Windows 10 device.

5. Run the game as Administrator

  1. Go to the Steam Library.
    library
  2. Locate the game you want to run.
  3. Right-click the game title, and go to Properties.
    properties
  4. Head over to the Local Files tab, and click Browse Local Files.
  5. Find the game executable, right-click it, and go to Properties
  6. Head to the Compatibility tab, and check Run this program as Administrator.
  7. Save the changes and try to run the game.

Verify that the Steam games not launching has been fixed on your Windows 10 device.

These few fixes may help if nothing happens when you click on the Run as administrator.

6. Run games in the compatibility mode

  1. Go to the Steam Library.
    library
  2. Locate the game you want to run.
  3. Right-click the game title and select Properties.
    properties
  4. Head over to the Local Files tab, and click Browse Local Files.
  5. Find the game executable, right-click it, and go to Properties.
  6. Head over to the Compatibility tab. Check this program in compatibility mode, then choose the operating system.
  7. Save the changes.

That’s it! If Steam games don’t launch in Windows 10 earlier, they will now.

If you encounter any other Steam errors, we recommend you look at this in-depth guide dedicated to fixing common Steam errors on Windows. We also have a great guide on error code 20 on Steam, so feel free to visit it.

How is your gaming experience in Windows 10 after applying the above troubleshooting tips? Share that with us in the comments area below.

6 Best Software to Open RAW Files [View & Edit]

If you want to view every single detail of your photos, you need to open them as RAW files. Most digital cameras allow you to save your pictures in this format. But can your computer read them?

Yes, it can! However, you’ll need specialized software. Today, we’ll show you how to open RAW files and introduce you to the best tools on the market that support this type of image.

How can I view RAW files on Windows?

To open RAW images on Windows, you need to install the free RAW Image Extension from the Microsoft Store.

This extension allows you to view RAW file thumbnails and previews directly in File Explorer and open them with the Photos app. For advanced editing, consider using third-party software:

Best apps to view & edit RAW files on PC

Note icon NOTE
Each camera model has its own RAW file format, such as ARI, CRW, PXN, RAF, RWZ, SRF, DNG, RWL, RW2, and KDC.

InPixio Photo Studio Pro 12 – comprehensive photo editing with RAW support

With InPixio Studio Pro, you can open and work directly with RAW files. This photo manipulation software offers all the features you’re looking for as a photographer or photo editor.

Color correction, background removal, object removal, and filters are just the tip of the iceberg.

Plus, as opposed to other software that drives similar results, the learning curve is minimal and it has a free version.

Key features:

  • Full support for RAW files
  • Advanced photo manipulation features
  • Transparent background, background removal
  • Fully compatible with Windows and Mac
  • Photo file management features
inPixio Photo Studio 12 Pro

inPixio Photo Studio 12 Pro

View, edit, and organize RAW files with this all-in-one photo editor!
Check Price Visit Website

Adobe Lightroom – powerful RAW editing and management tools

adobe lightroom user interface

Lightroom supports editing for various RAW image filename extensions such as CR3, DNG, NEF, CR2, CRW, and more.

Thanks to the Adobe Camera RAW plug-in seamlessly integrating with Lightroom’s architecture you can view and edit RAW images from different cameras such as Nikon, Casio, Epson, Fujifilm, GoPro, Kodak, Konica Minolta, LG, and many others.

Key features:

  • Manage any number of photos
  • In-app, interactive tutorials are available on both desktop and mobile
  • Extensive photo library for inspiration
  • Panorama fill edges
  • Cloud storage starting at 1TB or more

Adobe Lightroom

Simplify your photo editing with this lightweight RAW-file-supporting app!
Check price Visit website

Adobe Bridge – asset management with RAW image support

Adobe Bridge is a complex asset manager that lets you preview, manage, edit, and publish multiple assets including RAW format images.

To open and view RAW images in Adobe Bridge, you only need to specify this option in the Camera RAW preferences from the Edit menu.

Then, in the General tab, go to the Behavior area and click the Camera RAW Settings.

Key features:

  • Option to import photos and videos from your mobile devices
  • Transparency support for PSD
  • Batch export to JPEG
  • Edit photo capture time
  • Native PDF Output Module
  • Quick organization and stacking of panoramic and HDR images
  • Drag-and-drop file flexibility

Adobe Bridge

Open RAW files effortlessly with this powerful creative asset manager!
Check price Visit website

CorelDRAW – professional photo editor with RAW support & advanced features

Editing single or multiple RAW files is as easy as a breeze in CorelDRAW.

Simply use the controls in the Camera RAW Lab to adjust the color and tone of the RAW images, then further retouch them with the advanced editing tools provided by this powerful app.

Let’s quickly look at its key features:

  • Rotation, Zoom, and pan tools
  • Preview mode and dedicated window
  • Color, detail, and properties page
  • Undo, Redo and Reset to the original buttons
  • Create snapshots of the corrected version of an image (thumbnails included)

CorelDRAW

Open, view, and edit RAW images with unmatched precision!
Check price Visit website

ACDSee Photo Studio – Advanced Photo Management and RAW support

The Photo Studio by ACDSee is one powerful app that takes good care of your RAW files be it single images or Zip files containing multiple images.

The app comes in different versions perfectly suited for your digital camera (Adobe, Canon, Epson, FujiFilm, GoPro, Kodak, Konica, Nikon, and more) and there is even a separate product for Mac 6 RAW support).

Let’s quickly look at its key features:

  • Batch Rename option for renaming multiple images
  • Batch Resize tool for resizing multiple images to any dimension
  • GoPro RAW images support
  • Batch watermark tool
  • File management (sort, and organize with keywords, tags, and labels, move, and share your images)
  • Duplicate Finder
  • Advanced photo editing tools (precision filters, crop, flip, rotate, and resize, add text, special effects, correct flaws, red eye, eliminate noise, and more)

ACDSee Photo Studio

View and manage your RAW files with this reliable tool!
Free trial Visit website

FileViewer Plus – Complex edit functionalities

FileViewer Plus is a universal file viewer for Windows that can open and display over 300 different file types. It can also view and edit camera RAWs from over 600 different camera models.

Even the most uncommon or unknown file types are no match for this powerful tool that can do much more than help you open your documents—the FileViewer doubles as an editor and converter for all formats.

Key features:

  • Native support for over 300 file types including RAW image formats
  • Complex view, edit, and convert functionalities (convert audio and video formats into multimedia file types)
  • Advanced image editing (crop, resize, retouch your photos, and more)
  • Ultra-fast batch conversion
  • File Inspector to view the file contents
  • Displays file properties and metadata for every file (author and source information)
  • Smart file detection to identify any format or file extension

→ Get File Viewer Plus

How to setup a default app for viewing RAW files

When you’ve installed a RAW codec, you can open the images in the Windows photo viewer. However, the Photos app doesn’t support RAW by default.

You’ll need to configure the RAW file format to always open with Photo Viewer as follows:

  • First, open File Explorer and the folder that includes your RAW images
  • Next, you should right-click a RAW image to open the context menu and select Open with > Choose another app
  • Then, select Photos App as the default software for the RAW file
  • Select the Always use this app to open … files option
  • Press the OK button to close the app selection dialog

How do I view CR2 files on Windows?

There are two options that can help you view CR2 files. First off, some versions of Windows can let you view CR2 files without additional apps, this only if you have installed Microsoft Camera Codec Pack or Canon RAW Codec software.

Summary

Although you can’t edit them with the Photos App, you can add effects to RAW photographs with software such as Adobe Lightroom, Corel’s PaintShop, Photoshop, and more.

If you have any questions about RAW photos and how to deal with them on Windows 10, feel free to drop them in the comments section below.

Photos App Not Zooming? Here’s How to Fix it

Most users will agree that there are few issues worse than the dreaded zoom problem. You have a file open in Windows Photo Viewer and you want to zoom in, but nothing happens? This can be quite frustrating for many users.

Although the Photos app came with some changes, it still has its own share of problems. If you encounter such an issue don’t worry because here are several tips to help you fix this problem.

Why can’t I zoom in Windows Photo Viewer?

You’ve probably asked yourself: How do I zoom in Windows Photo Viewer? Well, there are two ways to go about it:

  • Use the Zoom slider to zoom in on an image.
  • Keyboard shortcuts to zoom in on an image. Press CTRL + plus sign (+).

However, you’ll find that at times, none of these options work. Some images may contain text and you need to zoom in to see. But, why are you unable to zoom in? Here are a few reasons:

  • Screen resolution settings – If your screen is set to a higher resolution than necessary, decrease it until it matches the display resolution of your monitor. You may even find that your PC changes resolution on its own and needs to be fixed.
  • Unsupported image format – If you’re trying to zoom in on an unsupported image file type in Windows Photo Viewer, it may not work. Image formats such as .gif cannot zoom.
  • Cached images – Your hard drive stores cached images temporarily so they won’t be downloaded each time they’re viewed. If you are trying to zoom in on a cached image, it may not work. You may need to reset the Photos app.
  • Image is too large – If the image is too large, the Windows Photo Viewer zoom feature may not work. Make sure that your computer has enough RAM and CPU power. A low amount of memory will make it difficult for Windows Photo Viewer to load large images or perform other functions smoothly.

What can I do if the zoom feature is not working in Windows Photo Viewer?

Before anything, it is always advisable to check off the basics. These include:

  • Check that the picture has been saved in a supported file format. If not, you may need to convert it using an image editing program.
  • Ensure your computer has enough memory. If it doesn’t, you might need to clean your RAM.
  • Check and ensure the zoom feature has been enabled.
  • If other programs are open, close them to see if that helps resolve the issue.

If none of these solutions work for you then there might be something wrong with Windows Photo Viewer. The following solutions may be able to help.

1. Repair and reset Windows Photo Viewer

  1. Hit the Windows key and select Settings.settings windows 11
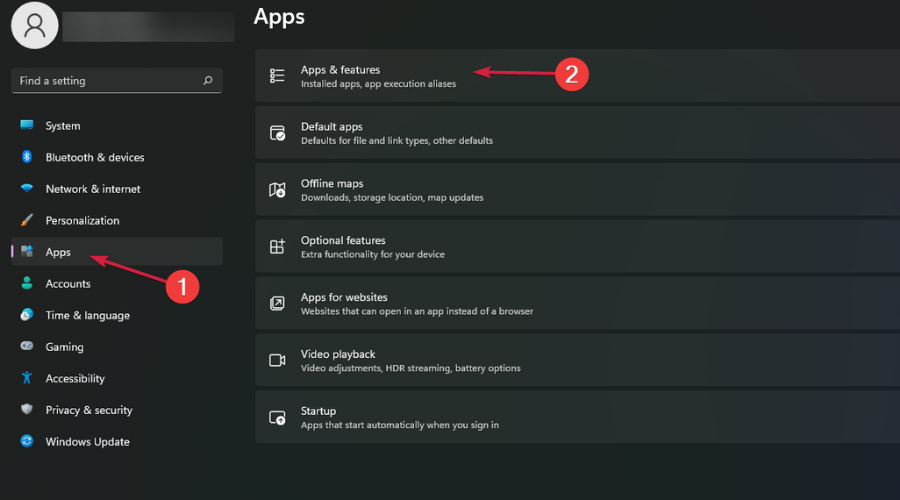
  2. Click on Apps on the left pane then select Apps & features on the right pane.
  3. Locate Windows Photo Viewer, click on the three vertical ellipses and select Advanced options.
  4. Click the Repair button.
  5. Go back and click the Reset button.
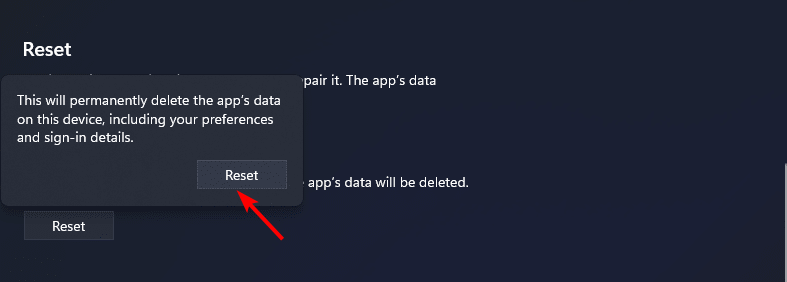
  6. Again, click Reset on the pop-up that appears.

2. Update your device drivers 

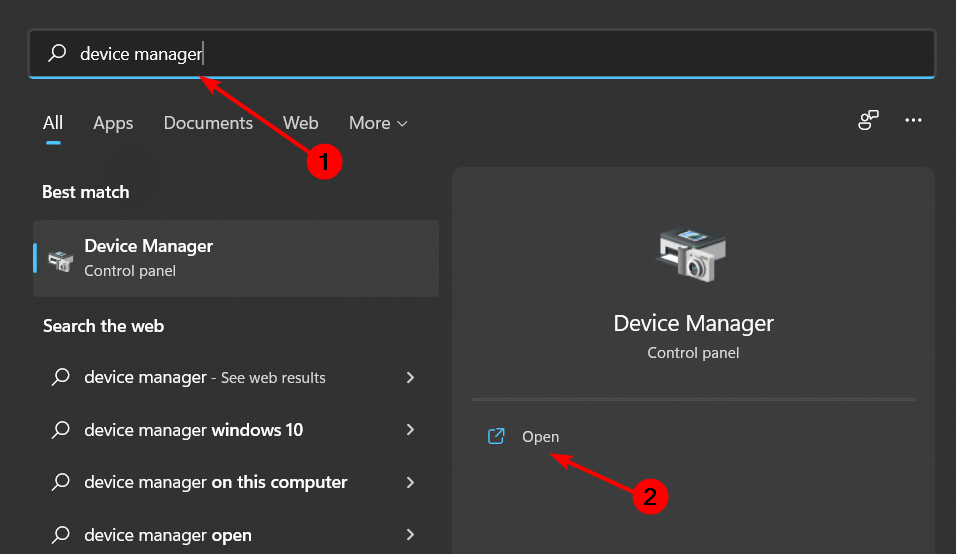
  1. Hit the Windows key, type Device Manager in the search bar, and click Open.
  2. Locate Display adapters, click to expand, right-click on your display device, and select Update driver.display adapter
  3. Select Search automatically for drivers.

If you are not up for it, it is not necessary to go through the tedious process of updating drivers manually when there is an automatic tool that can do that for you.

Outbyte Driver Updater is a comprehensive driver updating tool that scans your computer and finds outdated, missing or corrupt drivers. It will then download the up-to-date versions from the Internet and install them on your PC.

Outbyte Driver Updater

Keep your device at its best performance and let Outbyte Driver Updater find your drivers the latest updates.
Free Trial Download now

3. Run the Windows update troubleshooter 

  1. Hit the Windows key and select Settings.settings windows 11
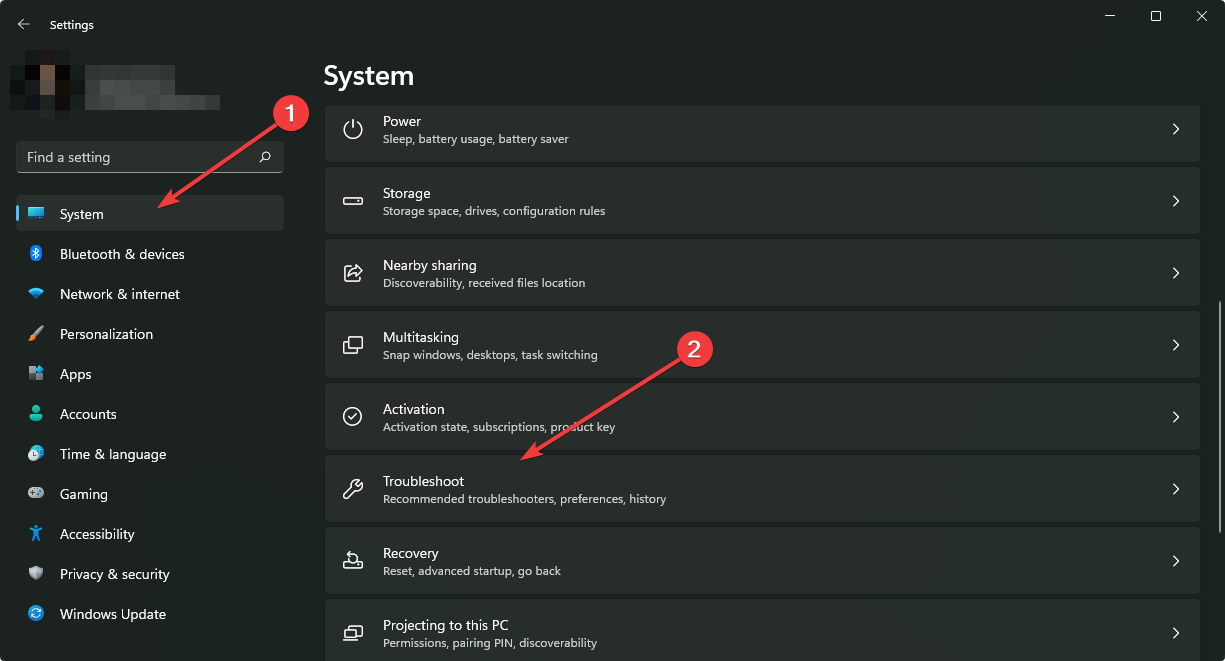
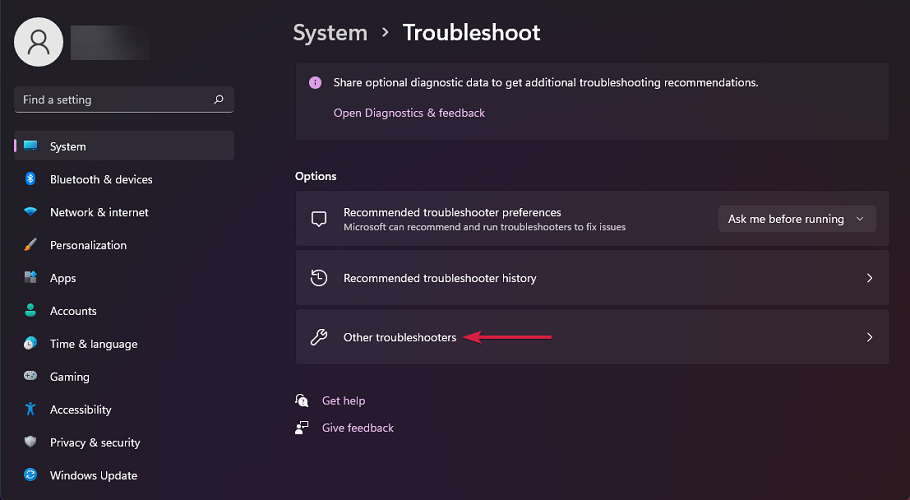
  2. Select Troubleshoot on the System tab in Settings.going system and troubleshoot windows 11 settings
  3. Click on Other troubleshooters.
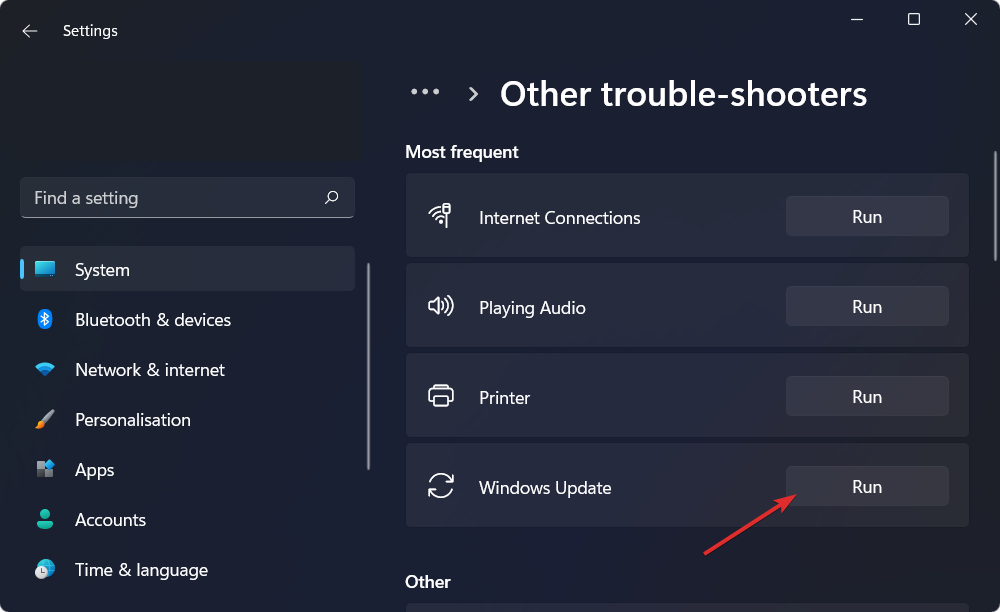
  4. Hit the Run option under the Windows Update troubleshooter.windows-update-troubleshooter windows 11 not updating after restart

4. Reinstall Windows Photo Viewer

  1. Hit the Windows key and select Settings.settings windows 11
  2. Click on Apps on the left pane then select Apps & features on the right pane.
  3. Locate Windows Photo Viewer, click on the three vertical ellipses and select Uninstall.
  4. Now reinstall it from Microsoft Store.microsoft photos app disappeared

5.  Check for corrupted files

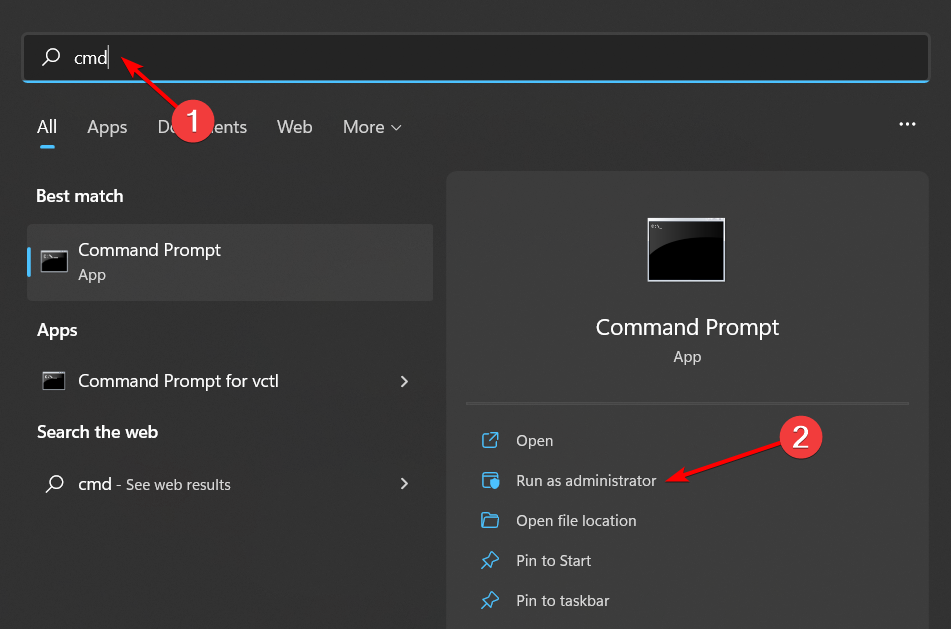
  1. Hit the Windows key, type cmd in the search bar, and click Run as administrator.cmd-run-admin how to clean registry windows 10
  2. Type the following command and press Enter: sfc /scannow

If you’re unsuccessful after trying all these recommendations, perhaps you need to try another image viewer application. Such apps support multiple formats and have an array of useful features that you may need.

In case you’d like to zoom in on pictures without losing quality, we have a recommendation for zooming software to ensure you maintain the integrity of your images.

Fill us in on what solution worked for you in the comments section below.

How to Change the Background in the Teams Mobile App

Today we’ll show you how to change the background in the Teams mobile app. All you need is your phone and a few spare minutes.

Let’s get right to it.

How do I change the background in Teams mobile?

1. Change the MS Teams background on the phone before the meeting starts

  1. 1. While preparing for a meeting, press the Settings button.

  2. 2. Select Background Effects.

    teams background selection
  3. 3. Choose your desired background from the list. If you want to upload an image and use it as a background, click on the + button.

  4. 4. After you finish selecting the perfect background for Teams, press the Done button.

  5. 5. On the other hand, if you want to turn off the Background Effect, press the Denied button.

  6. 6. Start the meeting.

  7. In the Microsoft Teams mobile app, you can easily change your background before a meeting as you would on a computer.

    All you need to do is click to join a meeting, and while you’re setting up your audio and video settings, select from a large section of available background to use, or even use a custom one from your PC.

2. Change the background during a meeting or call in Teams

  1. Go to your meeting or call controls and select More options.
  2. Press the Show Background Effects button.background change teams
  3. Choose your desired background and press Done.
  4. In case you want to upload an image and use it as a background, click the + button.
  5. To turn off the Background Effect, press Denied.

If you want more customization, you’ll have to use your PC. The Windows and macOS apps allow you to set animated backgrounds and offer more customization features.

Since you are interested in backgrounds, we recommend you look at our post with the best free software to change the background on any video.

That’s it! That’s pretty much all you need to know about changing your backgrounds on mobile.

How to Have Different Headers in Google Docs

If you work with a computer or need to do school projects, Microsoft’s Office Suite can come in handy. Unfortunately, the Office Suite comes at a hefty price that not everyone can afford.

If that is the case, one good alternative is to use the web-based software office suite offered by Google within its Google Drive service.

This office suite is comprised of 3 different programs, one of which is Google Docs. Google Docs comes with a wide variety of tools reminiscent of Microsoft Word, all while maintaining a simple interface.

One feature that can easily make a document created in Google Docs more professional-looking is a header.

Of course, having different types of headers within the same document is a bit trickier. That is why we’ve decided to create this guide to show you exactly how to add different headers in Google Docs.


How can I make different headers in Google Docs?

  1. 1. Open your Google Docs file.

  2. 2. Go to Insert.

  3. 3. Select Headers & footers. The new Header or footer will be ready for editing.

  4. 4. Click on Options.

  5. 5. Select Header format from the dropdown menu.

  6. 6. Under Layout, check the boxes next to Different odd & even.

  7. 7. If you want the first page to be different from the rest of the document, you can also check the box next to Different first page.

    Google Docs header select different headers for first page
  8. 8. You can then go ahead and edit how the headers will look on the first page, on odd pages, and on even pages.

  9. When using headers in Google Docs, you can manually configure them to be different from one another. From the Layout options section, you can enable the feature that makes it so that your headers are different on every page.

Using Google Docs depends on the browser that you have. Check out the best browsers for Google Docs.

By following this guide, you can make it so that your Google Docs documents can have up to 3 different header styles. Unfortunately, this is the most customization you can bring to your Google Docs headers.

Currently, you cannot make it so that every single page can have its own unique header.

Do you think this is a feature that Google should implement in Google Docs? Let us know what you think in the comment section below.

How to Get the Windows 7 Task Manager for Windows 10

Task Manager is one of the most useful applications on Windows because it allows you to quickly close an application or process that might be using too much of your resources.

Just like many things. Task Manager was changed a bit in Windows 10. But don’t worry, you can bring the Windows 7 Task Manager back to Windows 10.

Should I make Windows 10’s Task Manager look like Windows 7?

Some users are critical when it comes to the new Task Manager despite its new features, such as improved performance graphs and improved resource consumption statistics.

Users criticize the new Task Manager as being slow because it uses more memory and CPU. In addition, the new Task Manager requires UAC elevation which makes it load more slowly.

Also, one more issue with the new Task Manager is that it doesn’t remember the last active tab. This means that you have to navigate to the last used tab every time you start Task Manager.

As you can see, these are some valid concerns while others are just personal preferences. But if you are used to Windows 7 Task Manager today we’re going to show you how to use it on Windows 10.

How do I install the Windows 7 Task Manager on Windows 10?

1. Execute a quick command in Command Prompt

  1. On your Windows 10 computer, open the Start Menu.
  2. Then, go to the Windows System shortcuts folder.
  3. Here you’ll find the Command Prompt shortcut. Right-click it right away.
  4. Up next, open the More sub-menu.
  5. Tap Run as administrator.
  6. You can now type this command and press Enter: reg delete HKLMSOFTWAREMicrosoftWindows NTCurrentVersionImage File Execution Optionstaskmgr.exe

Users claim that the Windows 7 Task Manager was better since it was lightweight and fast. If you feel the same way, you’ll be pleased to hear that you can execute a quick command and get it back too.

As you can see, you just need to find the Command Prompt shortcut and insert the command presented above.

If you’re having trouble accessing Command Prompt as an admin, then you better take a closer look at our guide.


2. Use third-party software to change Windows 10 Task Manager to Windows 7

  1. 1. Navigate to the Classic Task Manager app’s download page.

  2. 2. Press the Download Task Manager button. A .zip file will be automatically downloaded to your PC.

    press the download task manager button
  3. 3. Open the .zip file and then click on the tm_cfg_win8-win10 file to start the installation wizard.

    click on the application file to start the installation
  4. 4. Press Yes on the UAC prompt.

  5. 5. Select Next.

    click on the next button
  6. 6. Choose a destination location for the app and then click on Next.

  7. 7. Press Next again.

  8. 8. Select whether you want the Setup to perform additional tasks such as creating desktop icons, and then click on Next.

  9. 9. Press on Install and wait for the installation to complete.

  10. 10. Finally, ensure that the Run Classic Task Manager option is checked and then click Finish.

    press on finish
  11. 11. The classic Windows 7 Task Manager is now opened on your screen.

  12. Task Manager is a great application if you want to quickly end a task or a process on your PC, but just because it’s the default application for task management, it doesn’t mean that it’s the best.

    There are numerous third-party task managers, and they usually have certain features that Windows Task Manager lacks.

    For example, certain task managers allow you to see additional information regarding running applications, files, and processes.

    We recommend using the Classic Task Manager app, which can be installed on your PC to add the old Task Manager.

If you’re an advanced user or if you’re looking for a task manager that offers additional features, we strongly recommend finding out more or even trying out Task Manager Professional for Windows 10.

There you go, these are two methods you can use to bring back the old Windows 7 Task Manager. If you found our guide helpful, let us know in the comments section below.

Fix: Realtek Audio Manager Advanced Settings Are Missing

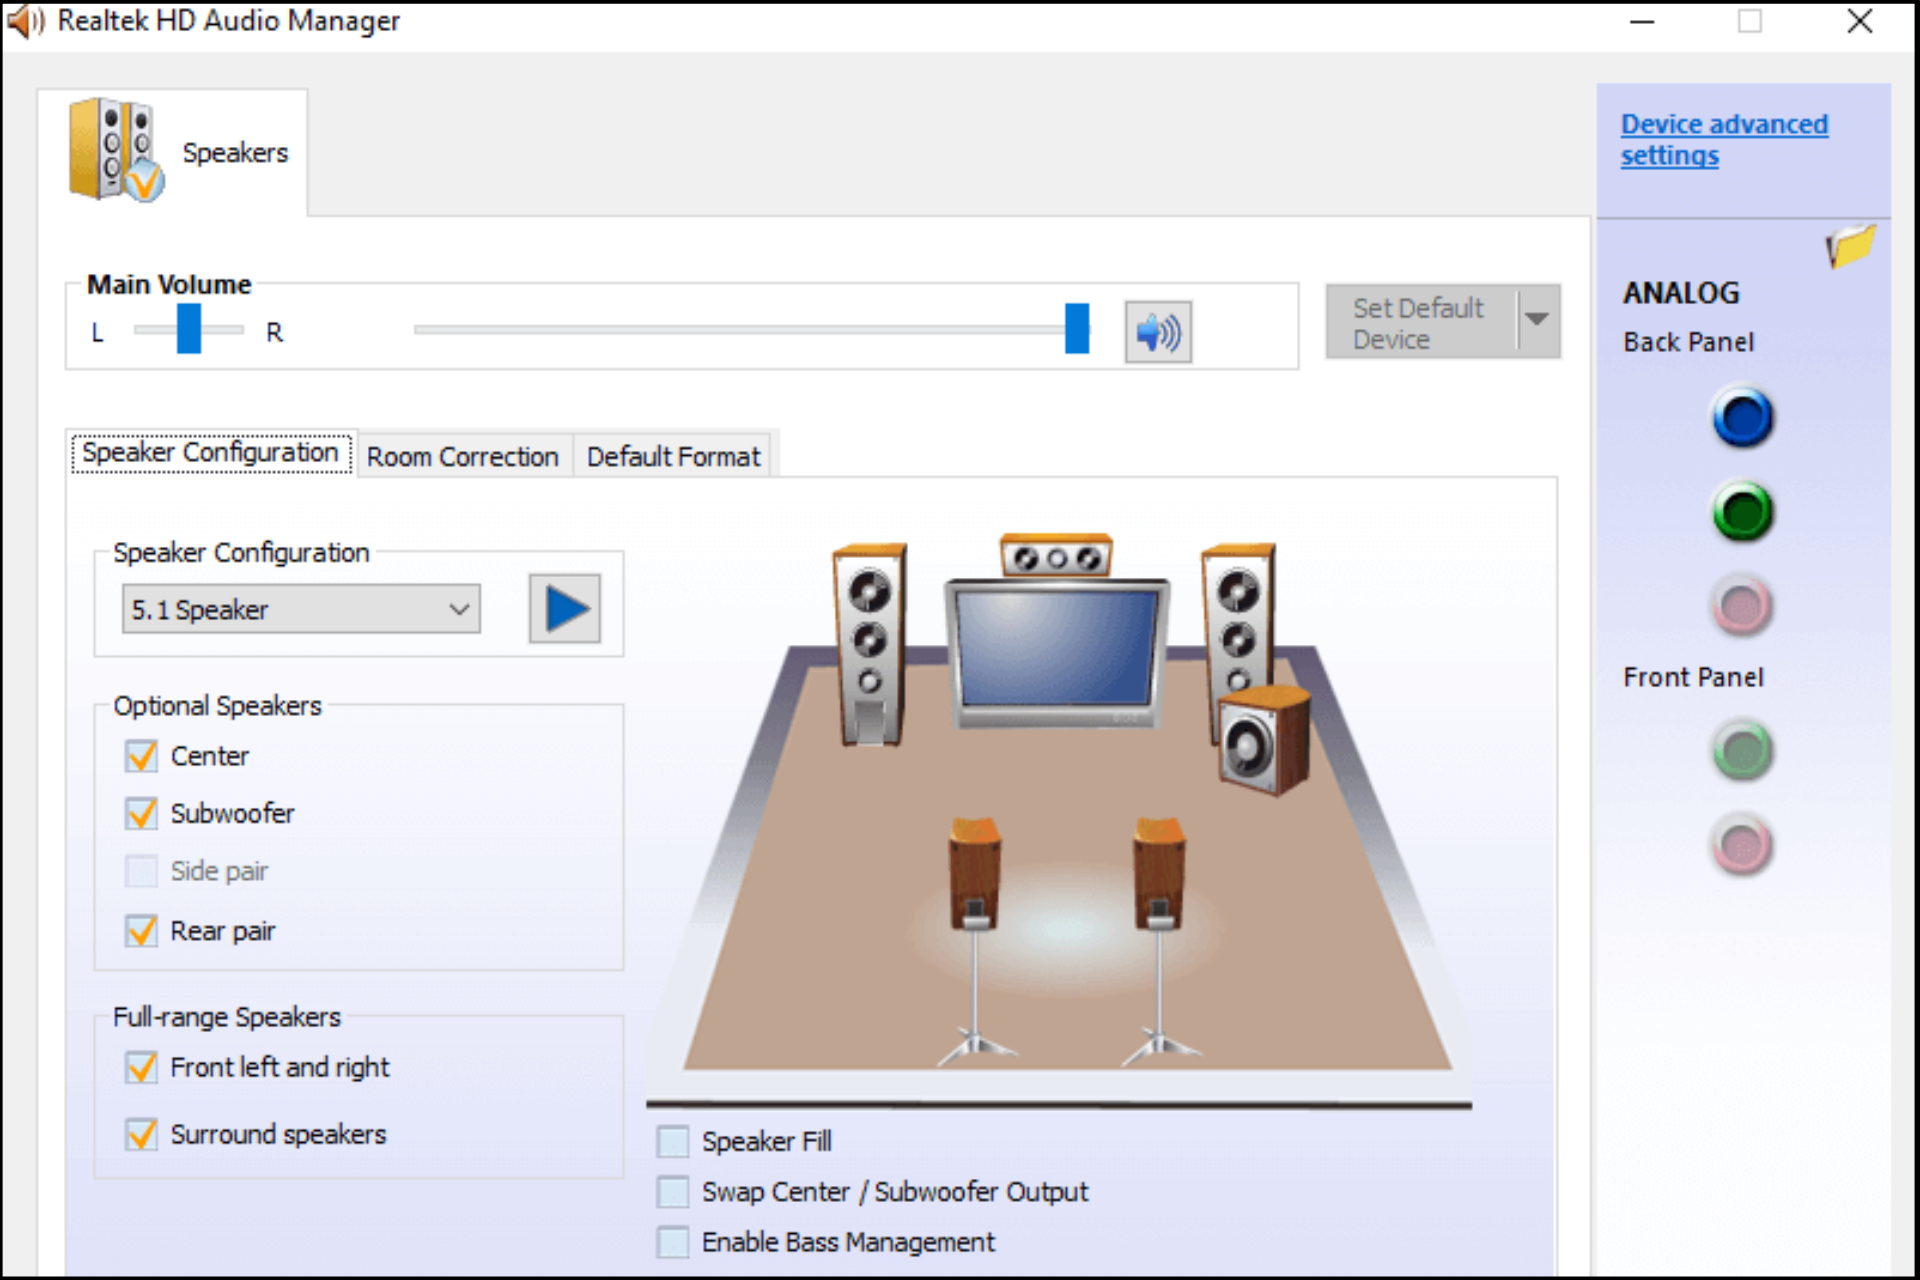
If you are using Realtek High Definition Audio Manager Software, chances are that you may at some point face troubles related to missing Realtek Audio Manager advanced settings.

Realtek HD Audio Manager is a useful utility for managing audio settings on your computer. You can use it to regulate audio settings for all your applications and it also offers you advanced options. So, what gives; is it a computer glitch? Let’s find out.

Why is Realtek HD Audio Manager missing advanced settings?

Sometimes it is the Realtek Audio Manager that is missing, other times it is the advanced settings that can’t be found. Here are a few reasons why it’s missing:

  • Outdated version – If you are using an older version of this software, it is possible that you can’t access advanced settings. You will have to download and install the latest version.
  • Virus infection – It is possible that Realtek HD Audio Manager has been deleted by accident or maliciously removed by a virus or malware infection. It is for this reason we recommend that you install an antivirus tool.
  • Corrupt installation – If you’ve recently updated your Realtek driver or have done any other kind of major system change, it’s possible that something went wrong during the update process. You may need to download the Realtek HD Audio driver or reinstall the program to fix this issue.
  • Unsupported sound cards – If you have an outdated driver version, then it’s possible that your PC may not be able to recognize newer versions of this software anymore. It’s possible for the sound card itself to be incompatible with certain versions of Windows or other programs installed on your computer. If this happens, then it could cause problems with other applications and programs on your PC. You need to update your Realtek audio drivers.

How can I fix Realtek Audio Manager missing advanced settings?

Before you start troubleshooting your missing Realtek Audio Manager, make sure you’ve done a few basic checks. These include:

If all these check out and the advanced settings are still missing from Realtek Audio Manager, proceed to the solutions below.

1. Restore default settings

  1. Hit the sound icon at the bottom right corner and select Open volume mixer.volume mixer
  2. Click on Speakers and navigate to the Playback tab.
  3. Locate Realtek Audio, right-click and select Properties.
  4. Navigate to the Advanced tab and select Restore Defaults then click OK.

2. Update Realtek drivers

  1. Click on the Windows button type Device Manager in the search bar and click Open.
  2. Navigate to Sound, video, and game controllers to expand, right-click Realtek High Definition Audio and select Update driver.
  3. Select Search automatically for drivers.search auto realtek hd audio manager not opening

You can also choose to download directly from the Realtek website. The only problem that may arise is if you don’t pay attention or don’t know the correct driver, you may end up downloading the wrong one.

In such a case, a third-party tool should suffice. Outbyte Driver Updater is a free driver updater software that can scan your computer and find outdated drivers. It automatically scans your system and downloads the correct ones for you, saving you time and money.

Outbyte Driver Updater

Maintain your system in top shape by keeping all drivers updated.
Free trial Download Now

3. Uninstall Realtek drivers 

  1. Click on the Windows button type Device Manager in the search bar and click Open.
  2. Navigate to Sound, video, and game controllers to expand, right-click Realtek High Definition Audio and select Uninstall device.
  3. Restart Windows after uninstalling the driver and it will be automatically reinstalled.

4. Run the sound troubleshooter

  1. Click on the Windows button and select Settings.settings windows 11
  2. Select System then click on Troubleshoot.going system and troubleshoot windows 11 settings
  3. Click on Other troubleshooters.
  4. Hit the Run button next to Playing Audio.playing-audio game audio stops working

5. Restart Windows audio service

  1. Hit the Windows + R keys simultaneously to open the Run command.
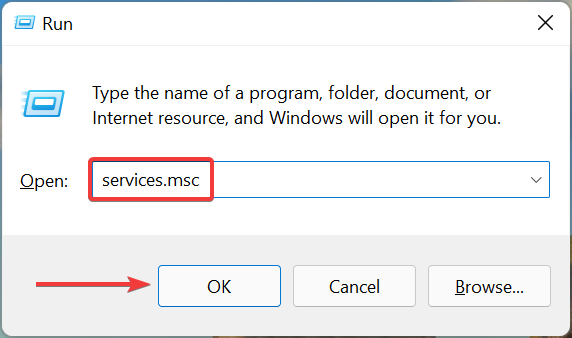
  2. Type services.msc and hit Enter.Services to fix windows 11 not printing in color
  3. Locate Windows audio, right-click and select Restart.restarting windows audio service

Should all these fail to restore the advanced settings option, you can choose to uninstall and reinstall the Realtek Audio Manager software. 

There’s no such thing as a perfect program, and sometimes your computer can suffer from bugs or compatibility issues. These can only be resolved by uninstalling the software. It’s also an effective way to fix problems with programs that have become unstable or unresponsive.

You may also run into some Realtek sound problems. As such, don’t hesitate to visit our detailed guide on how to solve these issues.

If the Realtek Audio Manager is not opening, we also have recommended solutions to bypass this hurdle.

Let us know what approach you used to fix this issue in the comments section below.

Xbox Party Chat Not Working on PC: How to Fix If You Can’t Join

If Xbox party chat is not working on your PC, you should stick around as we resolve this issue in this guide.

The evolution of online gaming is closely followed by the communication services which allow players to chat or use VoIP to communicate with their co-players and friends.

Many excellent services can help you with that, but Windows has a feature that allows you to chat with your friends online.

However, if you are not getting the best of Xbox party, there are ways to fix this issue.

Why can’t I join an Xbox party on PC?

In most cases, the issue can be related to the availability of Xbox Live. If there’s an issue with the service, then Xbox Party won’t work correctly.

In addition, network problems, issues with your playback device, or missing permissions can also cause problems.

Before venturing into any of these solutions, we recommend that you do the following:

  • Visit the Xbox status website since this may be a general server issue that you will need to wait out
  • Restart your PC and router
  • Verify you have a stable internet connection

How do I make Xbox Party chat work on PC?

  1. Install Teredo Adapter
  2. Check the permissions
  3. Restart the app and the associated service
  4. Reset the Xbox app
  5. Change the default playback device

1. Install Teredo Adapter

    If you want to efficiently use Xbox party on your PC without errors, you can install Teredo adapter just like in the step-by-step guide below.

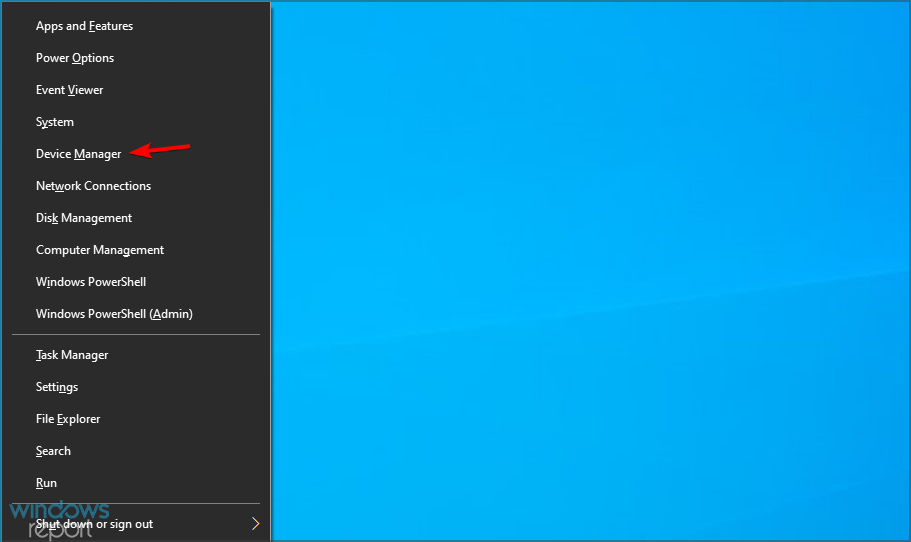
    1. Right-click Start and open Device Manager.
    xbox-party-not-working
  1. 2. Click on View in the Main bar and check the Show hidden devices option.

    xbox-party-not-working
  2. 3. Expand Network adapters and look for Teredo Tunneling Pseudo-Interface.

  3. 4. If it’s not there, make sure you have Network adapters selected. Then, click on Action in the Main bar and choose Add legacy hardware.

    xbox-party-not-working
  4. 5. Click Next.

    xbox-party-not-working
  5. 6. Choose the Install the hardware that I manually select from the list (Advanced) option and click Next.

    xbox-party-not-working
  6. 7. Choose Network adapters from the list and click Next again.

    xbox-party-not-working
  7. 8. Select Microsoft.

    xbox-party-not-working
  8. 9. Choose Microsoft Teredo Tunneling Adapter from the list and install it.

  9. 10. Restart your PC.

This emerged as the top solution for the problem of Xbox party chat not working on PC. Some knowledgeable users resolved all Xbox Party errors by relying on the Microsoft Teredo Adapter to set the P2P connection.

2. Check the permissions

  1. Press the Windows key + I to open the Settings app.
  2. Choose Privacy.
  3. Select Microphone from the left pane.
  4. Under the Choose which apps can access your microphone, toggle on the Xbox app.

3. Restart the app and the associated service

  1. Close the Xbox app completely.
  2. In the Windows Search bar, type Services and open the app from the results.
  3. Locate the Xbox Live Networking service, right-click on it and choose Restart from the contextual menu. If this option isn’t available, choose Start instead.
  4. Do the same for the IP Helper service.
    xbox party chat not working on pc
  5. Close Services and open the Xbox app again.

Other users who use the Xbox Party feature to stream resolved the problem by shutting down the app and restarting associated services.

Even though we’re looking at a built-in app that comes pre-installed on Windows 10, it still tends to stop services. We’re referring to the Xbox Live Networking service and IP Helper.

4. Reset the Xbox app

  1. Open Settings and choose Apps.
  2. Locate the Xbox app under Apps & features and expand it.
  3. Click on the Advanced options link.
    xbox party chat not working on pc
  4. Scroll down and click Reset.
    xbox party chat not working on pc

You can’t uninstall the Xbox app, but you might restore it to factory settings. This will delete all stored cache and fix some minor bugs which are quite frequent. After the reset, you should try updating the app and see if the Xbox party chat not working problem has been resolved on your PC.

5. Reset to default playback settings

  1. In the Windows Search bar, type sound and open Change system sounds.
    xbox party chat not working on pc
  2. Go to the Playback tab and double-click your audio device.
    xbox party chat not working on pc
  3. Go to Advanced and click on Restore Defaults.
    Xbox party chat not working on pc
  4. Repeat this for the microphone in the Recording tab.
  5. Save changes and exit.

Some of the most commonly reported issues with Xbox Party concern sound issues, namely, the microphone sound. However, several users resolved this by resetting the sound devices to factory values.

How does the Xbox Party feature work on Windows?

Xbox Party is available on all Microsoft platforms, including Windows and various Xbox consoles, allowing you to chat and have voice calls with your friends.

This is an essential feature since it allows you to communicate with your friends while gaming, even if you’re on different platforms.

Why is the Xbox party connecting forever?

If the party takes too long to connect, Xbox One network settings may block party chat, so you’ll need to adjust them.

This issue can be a problem, and you won’t be able to start the Xbox Live party on Windows 10 until you fix it.

Keep in mind that this isn’t the only issue with parties, and many reported that Mic isn’t working in the Xbox app on Windows.

Can you join Xbox parties on PC without gold?

To join or start a party on your mobile devices or PC, you do not need Xbox Live Gold or Xbox Game Pass Ultimate. They are no longer necessary, even on the Xbox console.

We hope that this guide has helped you fix the problem with the Xbox Party on your PC and that you can now play with your friends again.

Users have also noted that some of these fixes will be useful if you’re not getting any party invites on Xbox. This error is similar to Xbox app 0x89231806 error that we covered recently, so don’t miss our new guide.

If you have questions or suggestions, feel free to post them in the comments below.

How to Disable Speech Recognition in Windows 11

If you have recently installed the latest Windows 11 operating system on your PC and are looking for ways to disable speech recognition in Windows 11, then you are in the right place.

In this guide, we will explain all the necessary steps that you need to follow to disable speech recognition in Windows 11.

Does Windows 11 have Speech Recognition?

Windows 11, the latest operating system from Microsoft, also comes with similar speech recognition options just like the one you have in Windows 10.

Notably, you can use speech recognition offline or use it with an internet connection. Speech recognition lets you control some apps using your voice and also dictate text to a word document.

Microsoft doesn’t offer you a whole host of features with its speech recognition service. Interested users can check out our guide on some of the best speech recognition apps that you can download on your PC to enjoy advanced features.

Do note that you need to train the feature to improve its accuracy, and many would not find its performance satisfactory. So, you may want to disable it for this very reason.

For whatever reason, before you disable speech recognition on your Windows 11 PC, you should understand that this accessibility feature is meant to enhance your user experience.

It is perfectly safe to turn off speech recognition on your device, it cannot harm it in any way.

Follow this guide to understand how you can disable speech recognition in Windows 11.

What are some of the most common voice commands?

Once you have been given access to the microphone, you can go through the below list of some of the common voice commands and use them to facilitate hands-free usage of your PC.

  • Open Search: Say Press Windows S
  • Select an item: Say Click Computer, Click file name (in place of file name say the exact name of the file)
  • Scroll: Say Scroll up, Scroll down, Scroll left, Scroll right
  • Show a list of applicable commands: Say What can I Say?
  • Insert a new line: Say New line
  • Put the cursor before a specific word: Say Go to word (in place of the word say the specific word)
  • Don’t insert a space before the next word: Say No space
  • Capitalize the first letter of a word: Say Caps word (in place of the word say the specific word)

For a complete list of commands, you can check out the official Microsoft support page.

How can I turn off speech recognition on Windows 11?

1. Disable offline speech recognition

  1. 1. Right-click on the Start menu button and select Settings.

  2. 2. Select Accessibility from the left-side pane.

    Accessibility disable speech recognition windows 11
  3. 3. Now, from the right side, scroll down and under the Interaction section, click on Speech.

    disable speech recognition windows 11
  4. 4. Simply turn the toggle off next to the Windows Speech Recognition option.

  5. 5. If you ever want to re-enable the feature, simply return to this menu and toggle it back on.

  6. You can easily toggle speech recognition on and off via your Windows 11 PC’s built-in Settings.

    All you need to do is navigate to the Accessibility section and configure Windows Speech Recognition settings from there.

2. Use a keyboard shortcut to turn off Windows Speech Recognition

In place of going through the above-mentioned steps, you can also press the Windows + Ctrl + S buttons together to turn the Windows Speech Recognition service on or off.

This keyboard shortcut is sure to get the job done in no time and you can go back to using your PC straight away.

3. Disable online speech recognition

  1. Right-click on the Start menu button and select Settings.
  2. You need to select Privacy & security from the left-hand-side pane.
    privacy disable speech recognition windows 11
  3. Under the Windows permissions section, click on Speech.
    disable speech recognition windows 11 settings
  4. Turn off the the toggle for Online speech recognition option.
    turn off online speech recognition

4. Turn off speech recognition with the Registry Editor

Besides, you can take a step further and use the registry settings to permanently disable the online speech recognition services.

Note icon NOTE
Do note that tweaking the registry editor, although isn’t dangerous, if done wrong, could stop some crucial services on your PC.
  1. Open the Run dialog by pressing the Windows + R buttons together.
  2. Type regedit and press Enter.
    registry editor
  3. In the address bar of the Registry Editor, paste the below path and press Enter.
    HKEY_CURRENT_USER\Software\Microsoft\Speech_OneCore\Settings\OnlineSpeechPrivacy
    Online speech service disable
  4. On the right side, double-click on HasAccepted and change the value to 0.
    change online speech recognition value registry editor
  5. Press OK and close Registry Editor.
  6. Restart your PC and the online speech recognition service will now be permanently disabled.
Note icon NOTE
To turn Windows Speech Recognition back on, you need to change the HasAccepted value to 1.

Why should you disable the Windows Speech Recognition feature?

Thankfully, the Windows Speech Recognition feature isn’t enabled by default in Windows 11. To use this service, you need to enable it manually.

But this also means that users won’t be able to use this feature out of the box. Moreover, to use the speech recognition feature, you need to set it up if you are using it for the first time.

Speech-to-text can be beneficial for users who would like to use their voice to type or perform tasks on their PCs. For such users, we have curated a list of some of the best speech-to-text software for Windows OS.

Just like there are fans of some features, there are people that don’t want to use them. The reason behind this is that some of the third-party apps could enable it.

Disabling it makes sense if you do not wish to use the speech recognition feature on your Windows 11 PC. This will ensure no third-party app can enable it. For that, you can follow the above-mentioned steps.

After turning off the feature, you can still take advantage of voice control by setting up Speech Recognition in Windows 11 when you need to re enable it or customize your experience.

If you are looking for ways to use the voice typing tool on your PC, then you can check out our dedicated guide on how to use the voice typing tool in Windows 11.

Let us know in the comments below if you have any doubts or queries you would like to share with us.

Create & Edit PDF Documents with the PDF Pro Software

PDF documents are used all over the world by all organizations because they are safe, can be signed, and are easily editable.

PDF Pro is a full-featured PDF Editor that positions itself as an affordable solution to Adobe Acrobat, offering simplicity as its main trait. In this article, we will dive into some of PDF Pro’s best features.

PDF Pro is a low-cost alternative to Adobe Acrobat

We’ve seen a lot of other PDF editors, but PDF Pro seems to tick all boxes when it comes to creating, editing and converting your documents.

First, this app allows you to create PDF files from any printable file, including support for Microsoft Office documents, which is not commonly found in many third party tools.

PDF Pro comes with a broad range of tools, such as font modifiers, a form creator, digital signing, as well as a robust and powerful Optical Character Recognition module.

With PDF Pro, you can merge PDF documents, change the order of the pages, edit the text or add and resize the images.

In a few words, you’ve got almost everything that you find Adobe Acrobat with an intuitive and comprehensive user interface.

What are PDF Pro’s best features?

1. Create and convert PDF documents

As we’ve mentioned above, not all PDF editors offer the capability to create a new PDF document.

PDF Pro not only allows you to create a blank PDF File, but you can also create a PDF from existing documents, or merge multiple documents from different file formats into a single PDF.

The software also has a dedicated tab for creating documents. There, you may also flatten the PDF which can reduce the file size. This might be handy if you need to send your document by email, for example.

The CREATE tab gives you the option to convert your document into a Word, Excel, image, HTML, or PDF/A file.

You will notice that all the menus are neatly and intuitively presented. We didn’t feel like there was much of a learning curve.

We find that many other apps on the market tend to have very bloated menus, but not this one, PDF Pro’s menus are easy to navigate, and finding the tool you’re looking for is a breeze.

2. Easy PDF editing

Editing a PDF document is solid with PDF Pro’s WYSIWYG (what you see is what you get). You simply click on the spot where you want to change the text and start typing.

The PDF text editing tool will highlight portions of the document that can be modified. For example, if the text is contained in an image, it won’t be editable without running the OCR module.

Another feature that you won’t find in all PDF editors is the ability to add and edit images contained within the document you’re working on. PDF Pro helps you do that easily.

Just grab the corner of the image to resize it or the top point to rotate it freely. You can also drag and move images to another place on the same page, or cut/paste the image.

We would have liked to see the ability to drop images from your desktop or File Explorer, you have to add them the old-fashioned way, unfortunately.

Within the Edit tab, it’s also possible to add or delete pages, reorder them, change the header or footer, rotate the pages, and more.

3. Sign and secure your documents

PDF Pro offers two Digital Signing options. First, you can sign your documents electronically by applying an image of your signature as a signature annotation. The second method allows you to digitally sign as well as digitally certify through the use of your own digital certificate.

You can either draw your signature or upload a png of your actual signature and remove the background. You even have the option of protecting the signature with a password or discarding it after you close the program for extra protection.

The tool comes with a password protection feature for the whole document. This can be done by applying a password for opening the PDF, or for the rights to modify and print the document.

Password protection allows you to set permissions for your file, such as requiring a password to open the document, printing it, or making other changes such as commenting, inserting, or removing pages.

Other meaningful features of PDF Pro are the OCR scanning from one or multiple files, document annotation, and adding lists, forms, buttons, URLs, and even attachments.

Is PDF Pro worth the money?

PDF Pro comes with a free trial version so you can test all of its suite of features for 15 days. They do ask you to open an account with them, but no credit card is required to sign up.

If you decide to commit, you can go for a paid plan and you have three options to choose from:

  • Monthly payment – $15 per user
  • 1-year plan – $96, which comes to $8 per user per month
  • 2 years plan – $192, which also comes to $8 / user/ month

They seem to be offering a limited promotion right now where you can save 35% on the 1-year plan and 50% on the 2-year plan. So, for 1 year, you will only pay $60 and for 2 years only $96.

It goes without saying that it’s a lot cheaper than Adobe Acrobat and significantly less expensive than many other competitors, while not compromising features or tools.

⇒ Get PDF Pro

We hope that you found our information about PDF Pro useful and that you will give it a try.

If you want more options, check our list including the best free PDF editors for Windows 11, and choose the right one for you.

In the case you already used PDF Pro, share your experience so other readers can use the information.

How to Type Accents on Windows 10 Keyboards

If you’re using the standard US English keyboard on your Windows 10 PC, you might have noticed that you cannot use accent characters.

Typing out in your native or second language might be difficult, and you search the Internet to copy-paste the accented characters.

However, there are some easy ways to quickly use an accented character or add a foreign keyboard to your Windows 10.

How can I type accents on Windows 10?

1. Use accents in Windows 10 with the Virtual Keyboard

  1. 1. Right-click on your taskbar.

  2. 2. Locate the Show touch keyboard button option in the list and click on it to add the virtual keyboard button to your taskbar.

  3. 3. Now, press on the button that you just added to the taskbar. Its icon is that of a keyboard, therefore it is very easy to find.

    click on the virtual keyboard button on taskbar
  4. 4. The virtual keyboard will open on your screen and you will be able to write using it.

    open the virtual keyboard on your windows 10 screen
  5. 5. Click and hold on a character to get the option of using accent versions of it.

    For example, if you want to type e with an accent, you need to click and hold the mouse on the normal e letter, and you will be able to select from the list of options whichever you want.

    hold on a character to get accent versions
  6. An easy and handy method to put accents on letter on Windows 10 is to simply use the built-in virtual keyboard.

    All you need to do is enable it and add it to your taskbar, and then you can use it whenever you want to type with accents.

2. Use Alt codes to put accents on letters in Windows 10

  1. Turn on the Num Lock key on your keyboard.
  2. When starting to type, press and hold the Alt key, then type any combination of numbers from your number pad (located on the right side of your keyboard).
  3. Follow the image below to check the Windows Alt Codes for Accented Vowels.windows 10 alt codes
  4. After you select the accented character that you want to type, release the Alt key.
  5. Repeat the process for any accented character that you want to use.

3. Add a new keyboard layout to get accents on a Windows 10 keyboard

  1. Another way to type in your native or secondary language characters is to use an additional Windows keyboard.
  2. To add a new keyboard, head over to the bottom-left corner of your Taskbar, under the Search bar, type Edit language and keyboard options, and select the first optionwindows edit language and keyboards search
  3. Choose your current default language and click on Optionswindows 10 keyboard options
  4. At the Keyboards section, select Add a keyboardwindows 10 add keyboards
  5. Choose which keyboard layout to add
  6. Your new keyboard layout has been added
  7. To type using accented characters, select your foreign keyboard, then while pressing on the Shift key, input the accented characters by using the [ ] ; ' . / keys.

4. Switch between different keyboard layouts on Windows 10

  1. You can switch between your different keyboards on Windows 10 by following the next steps
  2. Head over to the bottom-right of your Taskbar and click on the Keyboards iconwindows 10 switch between keyboards
  3. Choose which keyboard layout you need
  4. You can also press the Windows key + Spacebar to switch between your different keyboards

5. Remove a keyboard layout in Windows 10

  1. To remove a keyboard layout you no longer need, head over to Edit language and keyboard options
  2. Choose your default language again, then click on Options
  3. Go to the Keyboards section, choose the keyboard that you wish to discard, then click on the Remove buttonremove keyboard windows 10
  4. Your selected keyboard will be uninstalled from your Windows 10 PC

Typing with accented characters in Windows is relatively straightforward, and there are multiple ways to do it.

Windows 10 has made it very practical to add and remove new keyboard layouts for foreign languages while keeping those layouts constantly updated and adding new ones.

If you have upgraded to the latest OS, here’s our guide on how to type accents on Windows 11, and if you want to disable them, read this guide.

We hope you managed to type accents on Windows 10 using our guide. In the comments section below, write down any questions you have about this topic.

Get ready for the October 2022 Adobe Patch Tuesday updates

We’re pretty sure that many of you have been anxiously waiting for the Adobe Patch Tuesday rollout, and we’re here to make it a bit easier for you to find what you’re looking for.

Indeed, Microsoft isn’t the only company that has such a rollout on a monthly basis, so in this article, we’re going to talk about Adobe and some of the patches for their products.

And, as you know we do every month, we will also include links to the download source, so you don’t have to scour the internet to find them.

Adobe releases updates for 29 CVEs

Before we begin, let’s also take a look at what happened in September 2022, when Adobe released 63 CVEs in four patches for InDesign, InCopy, and Photoshop.

The highlight of last month’s release was definitely the Photoshop update which addressed a combination of 10 CVEs, nine of which are rated as critical.

It should absolutely go without saying that the most severe of these could allow code execution if an attacker convinces a target to open a specially crafted file.

Now that that’s out of the way, let’s get back to the present and explore what the company has prepared for its users as a part of the October batch of patches.

ColdFusion

The fix issued for Adobe for ColdFusion seems to be the most critical, with multiple CVSS 9.8 code execution bugs being addressed.

Know that there is also a fix for a bug in the Admin Component service, which uses a hard-coded password for the administrator user.

That being said, an attacker can leverage this vulnerability to bypass authentication on the system. Hard to imagine hard-coded credentials have existed in the product for so long without being discovered.

ProductUpdate numberPlatform
ColdFusion 2018Update 14 and earlier versions    All
ColdFusion 2021Update 4 and earlier versionsAll

Commerce & Magento

Moving on, we are going to take a closer look at the Commerce and Magento update, which addresses only one bug, but it’s a CVSS 10.

Thus, if you’re using either of these products, ensure you test and deploy this quickly to fix the stored cross-site scripting (XSS) bug.

ProductVersionPlatform
 Adobe Commerce2.4.4-p1 and earlier versions  All
2.4.5 and earlier versions  All
Magento Open Source2.4.4-p1 and earlier versionsAll
2.4.5 and earlier versions  All

Acrobat & Reader

We had an update for this app last month as well, so many users were actually confused to see another one this month.

The October patch for Acrobat and Reader was designed to fix six bugs, with the most severe being stack-based buffer overflows that could lead to code execution.

Using this bug, a threat actor would need to trick someone into opening a specially crafted PDF to get arbitrary code exec.

ProductTrackAffected VersionsPlatform
Acrobat DC Continuous 
22.002.20212 and earlier versionsWindows &  macOS
Acrobat Reader DCContinuous 22.002.20212 and earlier versions
 
Windows & macOS
Acrobat Reader DC
Continuous

     22.002.20212 and earlier versions
Windows & macOS
Acrobat 2020Classic 2020           20.005.30381 and earlier versions Windows & macOS
Acrobat Reader 2020Classic 2020           20.005.30381 and earlier versionsWindows & macOS

Adobe Dimension

Adobe also released a fix for Dimension that corrects nine bugs, eight of which are rated critical. Most of these are file parsing bugs and would require user interaction to exploit.  

We should also mention that none of the bugs fixed by Adobe this month are listed as publicly known or under active attack at the time of release.

Furthermore, the company actually categorizes these updates as a deployment priority rating of 3, in case you were wondering.

This is what you are looking at in terms of Patch Tuesday releases for Adobe for the month of October 2022, so hurry up and get the software.

What’s your take on this month’s release? Share your thoughts with us in the comments section below.

Windows Photo Viewer Not Full Screen: 5 Ways to Fix it

Windows Photo Viewer is now Microsoft Photos in Windows 11. It is the default image viewer in Windows systems but it has its own share of problems. Some users are having issues as they cannot launch images on fullscreen.

Most will opt for other photo viewer applications but if you are running low on storage space, you have to troubleshoot this issue. Let’s look at some possible solutions for this problem.

Why is my screen not showing full size?

If your screen is not showing the full size, it could be due to a few reasons. Here are some common causes:

  • Resolution settings – The most common reason is that your display resolution is set to a lower setting than the native resolution of your monitor. When you install Windows, it automatically detects and sets your default display resolution to match your monitor’s native resolution. You may need to set custom resolution for each program.
  • Your graphics card has a problem – A display driver issue could cause problems with Windows scaling feature especially if it is outdated. This happens when Windows doesn’t know how to scale certain content on its own. If you’re using an old computer, it might be time to replace your graphics card.
  • Bad cable – If you’re using an HDMI cable, try using a different one, or plugging directly into the display port on your computer instead of using an adapter. The cable could be loose or disconnected or your PC doesn’t recognize your HDMI cable.
  • Problems with your monitor – Windows is designed to automatically adjust your screen resolution when you change your display settings. If the display is not showing full size, you may have an issue with your monitor. To test this, connect the computer to another monitor that you know works and see if the problem persists. You may have to consider getting a new monitor.
  • Photos cache – Some apps store photos in their cache, and they may not be able to show them in full size. To fix this, clear the cache for Windows Photo Viewer by resetting and repairing the application or generally clear cache in Windows 11.

Now let’s have a closer look at how to resolve these issues.

What can I do if Windows Photo Viewer is not showing in full screen?

As always, it is important to do preliminary checks before moving on to advanced solutions. These checks include:

  • Check that all cables are securely connected to their ports. You can also try another HDMI cable and see if the issue persists.
  • Try the Windows Photo Viewer full-screen shortcut: Windows Key + Shift + Enter.
  • Disconnect any other external monitors that may be causing conflicts.
  • Try with another monitor or external display if available.
  • Restart your PC.

If your screen goes to full screen after trying out these, no need to proceed to the steps below. However, if you are out of luck, here are more troubleshooting steps to try.

1. Adjust display settings 

  1. Hit the Windows key and select Settings.settings windows 11
  2. Click on System then select Display.
  3. Hit the drop-down next to Display resolution and select an alternative setting.
  4. Restart your PC.

2. Update display drivers 

  1. Hit the Windows key, type Device Manager in the search bar, and click Open.
  2. Locate Display adapters, click to expand, right-click on your display device, and select Update driver.display adapter
  3. Select Search automatically for drivers.

If you don’t want to proceed manually, you can opt for a specialized tool, like Outbyte Driver Updater, to detect outdated or missing drivers and update them automatically.

Outbyte Driver Updater

Improve your device’s performance by keeping your drivers updated with Outbyte Driver Updater.
Free Trial Download now

3. Reset and repair Windows Photo Viewer

  1. Hit the Windows key and select Settings.settings windows 11
  2. Click on Apps on the left pane then select Apps & features on the right pane.
  3. Locate Windows Photo Viewer, click on the three vertical ellipses and select Advanced options.
  4. Click the Repair button.
  5. Go back and click the Reset button.
  6. Again, click Reset on the pop up that appears.

4. Disable Game Mode

  1. Hit the Windows key and select Settings.settings windows 11
  2. Select the Gaming category and then click on the Game Mode button.game-mode full screen game keeps minimizing
  3. Toggle the Game Mode option to Off.

Game Mode is a feature in Windows 11 that automatically optimizes your PC for an enhanced gaming experience. It can prioritize CPU and GPU resources so that they’re used by games instead of other apps running in the background.

The feature can also affect how other apps run including Windows Photo Viewer so it is best to disable it when not in use.

5. Restore app package

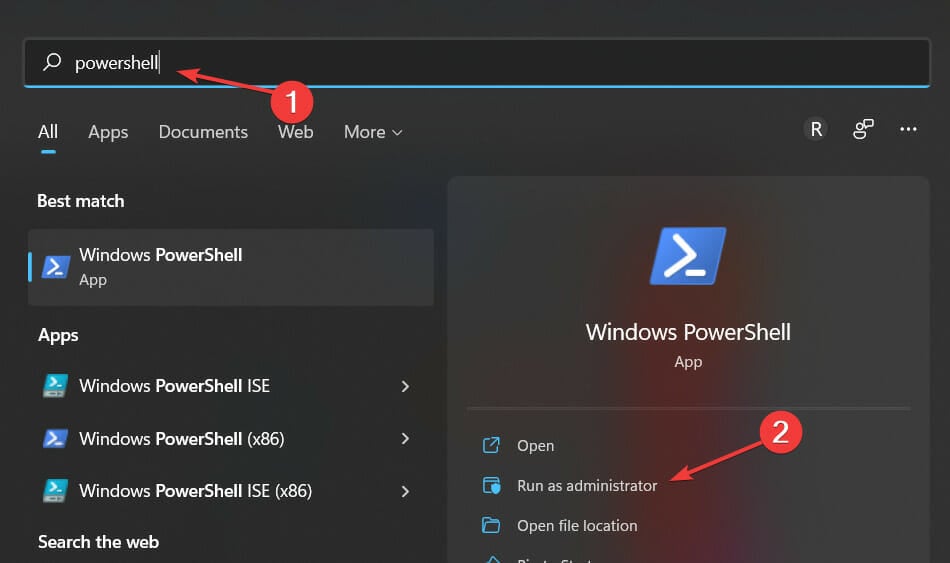
  1. Hit the Windows key, type Powershell in the search bar and click Run as administrator.powershell windows 11 wireless display install failed
  2. Type in the following command and press Enter: Get-AppXPackage -AllUsers | Foreach {Add-AppxPackage -DisableDevelopmentMode -Register “$($_.InstallLocation)\AppXManifest.xml”}
  3. Restart your PC.

Hopefully, you have been able to resolve this issue and can now view your images on Windows Photo Viewer in full screen again. If you occasionally face low resolution issues on your Windows PC, don’t hesitate to check out our guide for simple workarounds.

Alternatively, you can opt for slideshow maker software that allows you to view images in full screen with no extra effort needed from you.

Should you encounter any other hiccups such as Windows Photo Viewer can’t print, we have covered various steps in our detailed guide to help you resolve this issue.

Let us know of any other solution not mentioned here that may have done the trick for you in the comments section below.

The Windows 7 and 8.1 October 2022 Patch Tuesday updates are live

Even though the main focus right now is on Windows 11 and Windows 10, we never miss an occasion to revisit the older versions of the Windows OS.

And, as you surely know by now, the Redmond-based tech colossus also releases security updates for some of the obsolete operating systems, during Patch Tuesday.

That means that not only Windows 10 and 11 users will receive updates during this time. We’re also looking at Windows 7, Windows 8, and various Server versions as well.

We’ve already presented the 85 new updates that became available, along with the official download links, so all that remains is going a bit more in-depth.

Also, we’ve provided download links to the security updates that Adobe released for its suite of products during the same event.

However, now, let’s take a closer look at what Windows 7 and Windows 8 users were given to work with on the October 2022 Patch Tuesday.

What is going to change with the October Patch Tuesday?

The Redmond-based tech colossus has just released Patch Tuesday updates for Windows 8.1, in the form of KB5018474, and Windows 7, in the form of KB5018454.

It should go without saying, but they each come with a whole host of improvements and known issues with some pretty neat workarounds.

All official support for Windows 8.1 will end in January, so Microsoft keeps urging users to upgrade to a later edition of the Windows OS.

And, the Patch Tuesday update for Windows 7 requires you to have purchased the Extended Security Update (ESU) support.

Windows 7

KB5018454

  • Addresses an issue that leads to User Datagram Protocol (UDP) packet drops from Linux virtual machines (VMs).
  • Updates daylight saving time (DST) in Chile to start on September 11, 2022 instead of September 4, 2022.

Known issues

  • After installing this update and restarting your device, you might receive the error, “Failure to configure Windows updates. Reverting Changes. Do not turn off your computer”, and the update might show as Failed in Update History.
  • After installing this update, file copies which use Group Policy Preferences might fail or might create empty shortcuts or files that have 0 (zero) bytes. Known affected Group Policy Objects are related to files and shortcuts in User Configuration > Preferences > Windows Settings in Group Policy Editor.

[DIRECT DOWNLOAD LINK]

Windows 8.1

KB5018474

  • Addresses an issue that leads to User Datagram Protocol (UDP) packet drops from Linux virtual machines (VMs).
  • Updates daylight saving time (DST) in Chile to start on September 11, 2022 instead of September 4, 2022.

Known issues

  • After installing this update, file copies which use Group Policy Preferences might fail or might create empty shortcuts or files that have 0 (zero) bytes. Known affected Group Policy Objects are related to files and shortcuts in User Configuration > Preferences > Windows Settings in Group Policy Editor.

[DIRECT DOWNLOAD LINK]

If you are still using Windows 8.1 as an operating system, remember what we said not very long ago about the impending change.

To be more specific, Microsoft said that it was going to pester users with notifications until they upgrade to a supported version of the OS.

Have you encountered any issues after downloading and installing these new security updates for Windows 7 and 8.1?

Share your experience with us in the dedicated comments section located below.

8 Best Antiviruses Without False Positives on Windows 10/11

To get the best security solution for your Windows 10 system, you need to choose wisely.

There are so many antivirus programs available out there that it can turn out to be a real challenge to pick up the perfect software for your particular necessity.

In that matter, you can always review different AV tests. These tests are showing you different parameters and depending on these values you can determine which software offers more protection than others.

Well, when checking out these tests you should also write down the false-positive results.

False-positive results describe how accurate a certain antivirus is. Now, each antivirus program will receive monthly updates from its devs.

These patches are there to keep the antivirus database updated and as accurate as possible.

Based on this internal database, the security program can successfully detect Windows security breaches, infected files, or malware.

If the antivirus is not accurate enough you can get false positives (results that will detect potentially harmful files even when that’s not the case).

Of course, it’s quite impossible to find a security program that ensures 100% accuracy and which runs without any false positives.

But you can get an antivirus that gets close to this value – with such a security solution it will be unlikely to get false positives especially if you are a regular Windows 10 user.

So, during the guidelines below, we will review the best antivirus program that gets close to 100% accuracy.

What are the best antivirus programs without false positives?

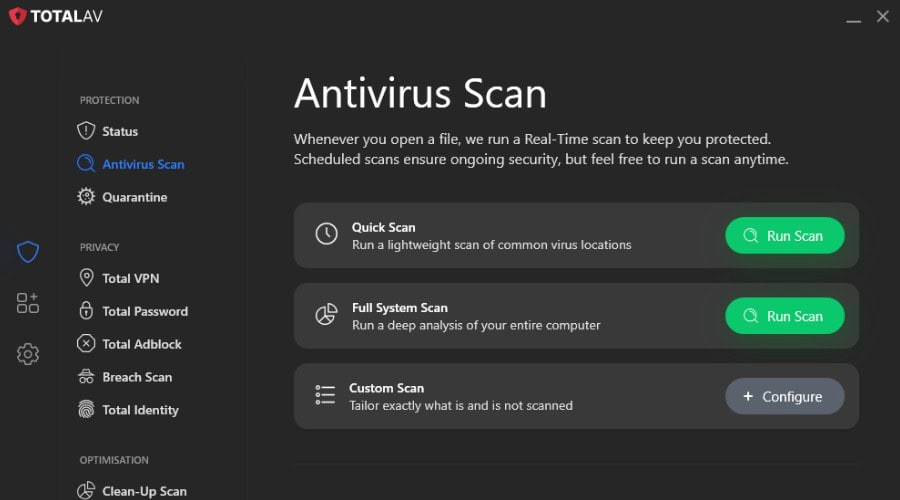
TotalAV – Simple settings, easy exclusions

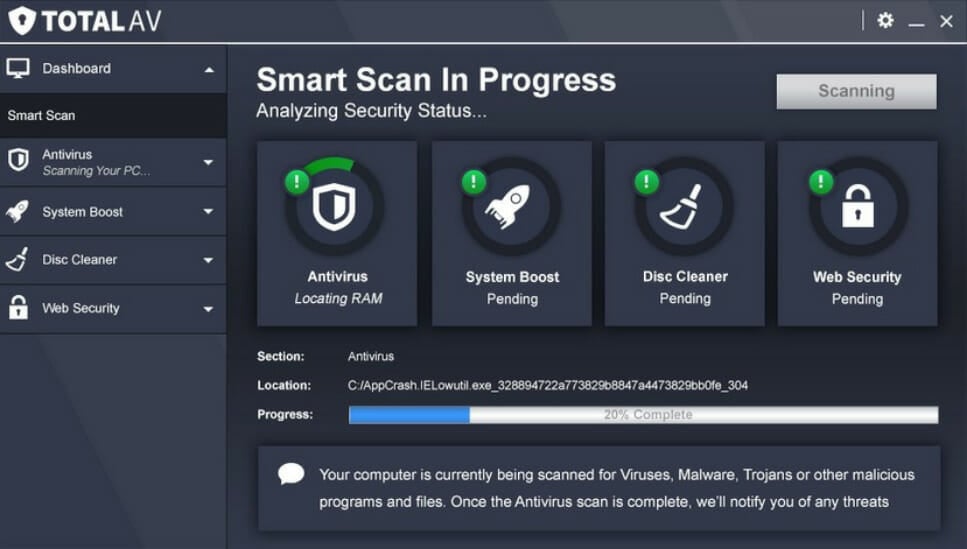
TotalAV antivirus scan

TotalAV keeps its settings simple, and when a file is flagged by mistake, restoring it from quarantine or adding an exclusion takes a couple of clicks. Detections are backed by cloud threat data that is updated continuously, so a wrongly flagged file is usually cleared quickly.

Real-time protection and WebShield run in the background, scans can be scheduled for idle hours, and the interface is clear enough that most people never open the advanced options.

  • Easy quarantine restore and exclusions
  • Cloud-updated threat data
  • Real-time protection and WebShield
  • Scheduled scans
  • Simple interface
TotalAV

TotalAV

With high efficiency in removing false positives, this solution keeps you always on top.
Free Trial Visit Website

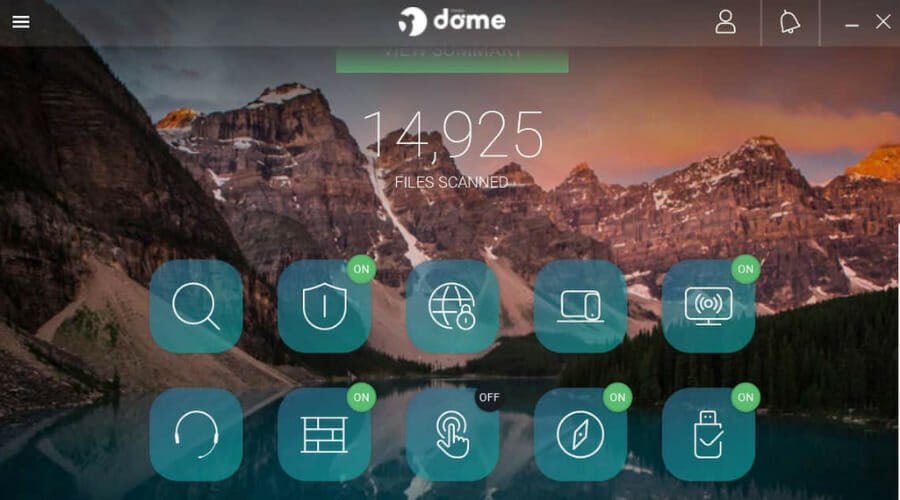
Panda Dome – Most user-friendly and intuitive

router antivirus

Panda Dome is a reliable antivirus program that received high-ranking scores in terms of false-positive testing results.

However, the latest results reported increasing false alarms during virtual scans but that shouldn’t discourage you: only certain files were detected as false positives.

The overall score is still one that can be trusted. Moreover, based on these results, the devs will provide specialized updates in order to fix the small issues.

Panda isn’t bringing as many features as Bitdefender or BullGuard but it’s similar in terms of security performance and this should be the most important aspect especially if you are looking for a cheap and fast security program.

Let’s see some of Panda’s key features:

  • USB protection automatically scans all devices that connect to your PC
  • Multimedia/Gaming mode to enjoy uninterrupted sessions
  • Cross-platform protection for all your devices
  • Data shield and password manager too keep all sensitive data encrypted
Panda Dome

Panda Dome

Simple and easy to use, Panda is the right choice when you need a great antivirus.
Check price Visit Website

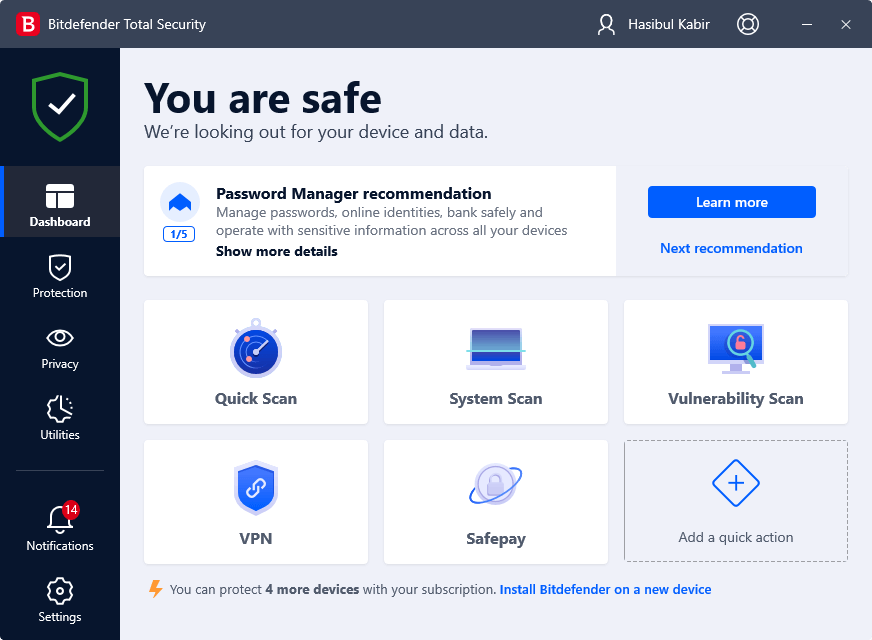
Bitdefender Total Security – Best at protecting and virus prevention

Bitdefender Total Security is one of the best antivirus programs that can be currently used on the Windows 10 system.

The software is pre-loaded with various features that can successfully secure your files and your online data.

Now, depending on what you usually do on your computer, you can choose how to customize and optimize these default capabilities.

Bitdefender’s false positive scoring is high in most AV tests – it is one of the most reliable programs from this perspective.

Let’s quickly look at its key features:

  • Multi-layer, award-winning ransomware protection
  • Artificial intelligence-based security and threat detection
  • Fully optimized with smooth implementation even on mid-range systems (0 system slowdown)
  • The best malware detection rate in the industry
Bitdefender Total Security

Bitdefender Total Security

Want the best security against web threats, with no false positives? Bitdefender is your best choice.
Free trial Visit Website

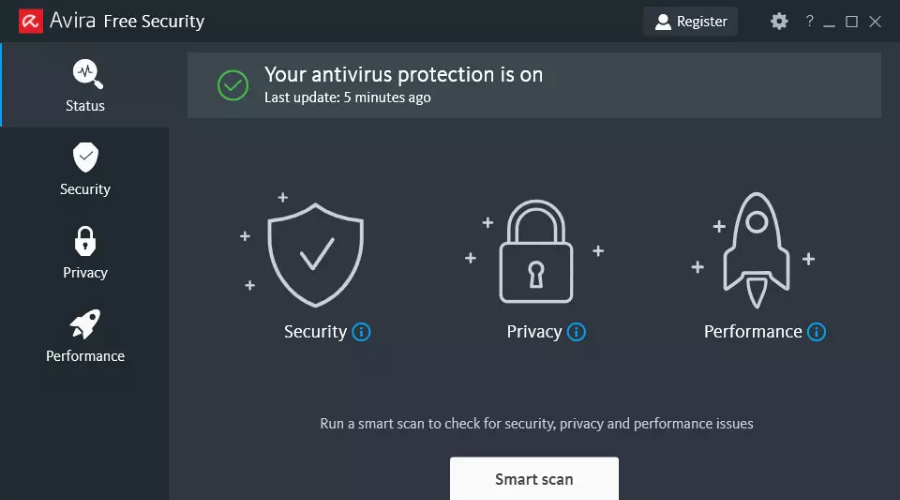
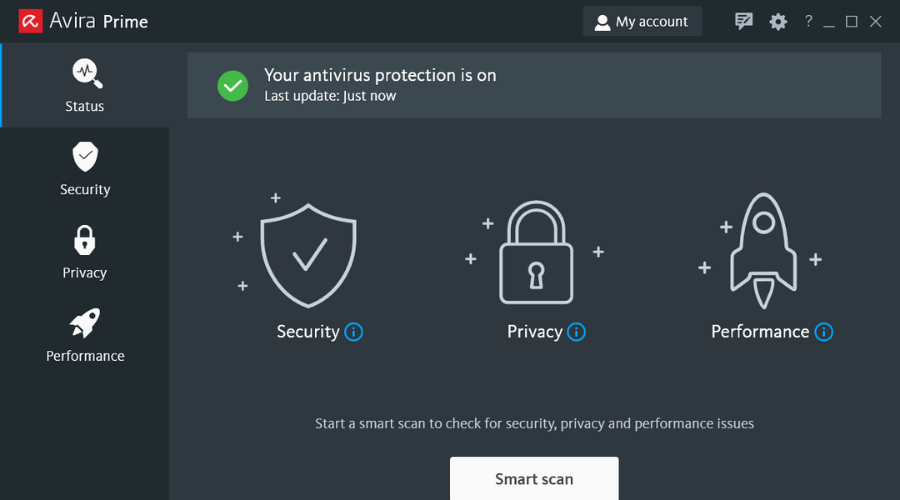
Avira Free Security – Best free security with almost no false-positives

Avira Free Security has over 500 users so it’s also a great source of helping hands when it comes to false positives.

Of course, if you want to report a false positive or a suspicious file you can submit it by completing a short form in just a few seconds.

Avira also has one of the lowest numbers of false positive alerts so you won’t need to file many of those reports to straighten things out.

Avira is a great choice of protection against scammers, identity theft, and financial loss. Prevent any of these from happening and browse the internet worry-free.

You should also see some of its core features:

  • Free solution and free VPN included
  • Built-in PC cleaner tool
  • System optimizer
  • Network scanner
  • Adware, malware, and spyware removal
Avira Free Security

Avira Free Security

Although it’s free, Avira comes with a ton of features and a very low number of false positives.
Free Download Visit Website

Emsisoft Anti-Malware – Best anti-malware protection

Emsisoft Anti-Malware is one of the best AVs with great optimization. It is designed to work even on low-specs and slow computers and is supported by both x32 and x64 platforms.

This tool has a great dual-engine scanner that monitors all your files and blocks suspicious ones. It also searches for unwanted programs and removes them to further improve performance.

With Emsisoft, you can manage it remotely. Block and allow connections through the firewall even when you are not at your workstation.

It also has an intelligent way of detecting and blocking new malware by monitoring the behavior of all running programs.

Let’s quickly look at its key features:

  • Behavior Blocker (check for not yet discovered threats and will block unknown signatures)
  • You can run a system scan in literally 1 minute
  • Remove unwanted programs in no time
  • Web protection and anti-phishing tools

Kaspersky Standard – Great scanning options with low false-positives

Kaspersky will require fewer resources than Bitdefender and BullGuard but it will also run with more false positives than these antivirus programs.

The latest AV results are showing better false alarm results than Panda but still, a high number compared with the first two antivirus solutions that were reviewed above (almost double that of Bitdefender for example).

Kaspersky is one of the most popular antivirus platforms, so in terms of security performance, you should be covered without any sort of problems.

Kaspersky’s main key features include:

  • Free VPN included for better privacy and anonymity
  • Advanced password manager with additional security options
  • Parental control options to make the use of the computer or other devices safe for kids
  • Anti-hacking with network monitoring and anti-ransomware
Kaspersky Standard

Kaspersky Standard

With plenty of scanning features, be sure to get close to no false positives.
Check price Visit Website

McAfee – Great overall protection

When false-positive results are involved, McAfee represents one of the best solutions to choose for your Windows 10 system.

Based on most of the AV tests, McAfee managed to run without false alarms which, in real-life behavior, can be translated into less than a 1% chance of misleading scans.

McAfee is still integrated within the Windows 10 system so you should be able to install it without hassle.

The main McAfee key features are:

  • Included VPN for improved privacy
  • File shredder to clean up junk on your computer
  • Firewall to block all unwanted connection
  • Web protection for every browsing session you have

Avast Free Antivirus – All basic needs included in the free version

Avast Free Antivirus also has a great mechanism for submitting false positives by just completing a small form on its website.

And with 435 million monthly active users, you can be sure that the news of a false-positive will travel extremely fast right for the Avast engineers who will whitelist it.

Avast also has the advantage of offering a very good free version that covers more than the basic needs of the average user.

Take a look at a couple of its top features:

  • Frequent updates with the latest threats signatures and more
  • Great malware removal tool
  • Small footprint for your PC
  • Very generous package for a free antivirus
  • Doesn’t bother you during gameplay or work

So, those are the best antivirus solutions to use on your Windows 10 device if you are looking for a minimum number of false positives.

Other antivirus programs that are ranking high in different AV tests and can represent a reliable alternative are Avira, AVG, Avast, Norton, or TotalAV.

Windows Defender can be also considered a false-positive free antivirus – the third-party apps are more specialized and will receive more updates than Windows Defender.

Feel free to read this detailed review if you want to learn which are the best antivirus programs that can replace the built-in security software.

If you recently tested certain security platforms, don’t hesitate and share your experience with us via the comments field below.

Enterprise Antivirus: 11 Best Picks to Secure Your Business

Best enterprise antivirus software comes with a myriad of benefits not only for your home but also for corporate use.

The benefits of getting antivirus for your business include central management and scalability, besides advanced protection for your systems.

Therefore, you need to find one that matches both your enterprise and security needs so you can enjoy enhanced performance and updated security against known and unknown threats.

A good antivirus for the enterprise should ideally protect your hardware, emails, cloud environment, IP information, and data, therefore you have to be very particular when picking the right one for you.

Here we share the best antivirus for small businesses in 2023 that come loaded with security features meant to deliver maximum protection.

How does an antivirus help your enterprise?

  • Protects your network: reliable antiviruses can scan your Wi-Fi connection making sure that there are no weak points
  • Keeps important data private: antiviruses block and prevent data theft regarding your activity, business plan, or clients
  • Blocks unwanted ads and spam: so you can work more efficiently and with no interruptions
  • Scans and protects removable media: that is frequently used in office settings such as USB flash drives or external hard drives

In conclusion, there are multiple enterprise AV solutions that deserve your attention, so we compiled a list of the most efficient in the market now.

Which antivirus is best for enterprise?

TotalAV – Best business security and maintenance

TotalAV is an award-winning antivirus that offers full protection of all aspects of your home computer or business. From safer browsing sessions and real-time virus removal to system optimization tools for all workstations.

Provides WebShield functionality to protect all online tasks and processes. Malicious websites are automatically blocked, search results are filtered, and downloads and executables are checked before they are accessed.

Also, all web pages will load faster since no ads will be loaded. All ads, popups, and scam notifications will be blocked so you don’t have to worry about people visiting malicious ads.

TotalAV provides a remote firewall so you decide what connections can be made from and to your workstations, which is allowed and which is blocked.

This antivirus alerts you whenever a data breach occurs, so you can take immediate action. All data is actively monitored and kept secure.

Moreover, TotalAV provides the user with a set of tune-up tools to further enhance every system’s performance.

Let’s see some of TotalAV’s main features:

  • Ransomware, phishing, and scam protection
  • Multi-device compatibility so all your devices will be protected
  • PUA protection and zero-day cloud scanning
  • Password vault for enhanced security and better management

TotalAV is a great antivirus that comes with a complete package of all the necessary tools and security features for your business needs.

TotalAV

TotalAV

Choose the complete system security and optimizing package with TotalAV.
Check Price Visit Website

Panda Small Business Protection – Intuitive for small businesses

Provided by Panda Security, Panda Small Business Protection offers all the security options you need while being very easy to set up.

This antivirus offers real-time protection for all your devices. It is able to detect and block threats with high accuracy, removing them from your system instantly.

The tool is light and works properly on pretty much any type of device. It is great for real-time protection as you can let it run in the background and continue carrying out your usual tasks.

Panda secures your online presence as well, with an integrated VPN that supports unlimited Internet browsing.

This can be especially useful for businesses as you probably deal with lots of sensitive information that requires this extra layer of protection.

Another important thing to note is that this antivirus scans your Wi-Fi connection and blocks any suspicious network activity. You can rest assured that your business network is carefully scanned so no one can steal your data.

Other key features of Panda Small Business Protection include:

  • Cloud-based
  • Secures all confidential files
  • Supports any Windows device
  • Daily automatic updates
  • 24/7 customer support

Panda Small Business Antivirus is a paid service. You can create your own plan, with the exact number of devices you want to secure.

Panda Small Business Protection

Panda Small Business Protection

Panda combines advanced protection technologies with ease of implementation for your business.
Free trial Visit Website

Bitdefender Gravity Zone – Best all-in-one complete security package

Your business needs continuous, powerful protection against any sophisticated threats, and Bitdefender is the right antivirus for an enterprise.

Features include layered next-generation endpoint protection against cyber threats, through which Bitdefender detects advanced persistent threats, protects your organization from ransomware, and defeats exploits, and zero-day attacks.

For your infrastructure, Bitdefender protects all endpoints and features an integrated enterprise security system, with simplified security for SMBs and for service providers.

The GravityZone feature – adaptive, layered endpoint security designed for cloud and virtualization – protects your enterprise from advanced targeted attacks, through its monitoring and revolutionary hypervisor introspection architecture.

Bitdefender also has the GravityZone Endpoint HD with HyperDetect, which is a next-generation layer that uses specialized local machine models and behavior analysis techniques trained to spot and detect hacking tools, malware obfuscation, and exploits.

It effectively blocks attacks that most traditional endpoint and next-gen antivirus defenses don’t.

Let’s glance over the top features of this Bitdefender solution:

  • New HyperDetect security layer for detecting hacking tools, malware obfuscation, and exploits
  • Performance is optimized for modern infrastructure
  • Risk management assessment
  • Advanced application behavior monitoring
  • Centralized management of security in both heterogeneous and hybrid environments

This is a lightweight solution, optimized for cloud and virtualization, with centralized smart scanning that translates to 30% performance improvement, if you compare it to traditional antivirus for enterprise vendors.

Bitdefender Gravity Zone

Bitdefender Gravity Zone

GravityZone offers layered, next-generation endpoint protection for all your business needs.
Free trial Visit Website

ESET PROTECT Advanced – Most advanced business security options

As the name of the product suggests, ESET PROTECT Advanced has a Windows enterprise solution that will suit the needs of just any business thanks to all the useful modules it brings.

Need to control and secure your network applications remotely? ESET can ensure efficient on-premise or cloud-based management, to make things easier for you.

Need to ensure that your business data, email accounts, and cloud storage are safe and trustworthy? You can easily achieve that thanks to the File Server Security, Mail Security, and Cloud Protection modules.

Rest assured that with ESET PROTECT Advanced, all the workstations, smartphones, and VMs in your network are protected.

This antivirus notifies you of any changes and activities within the devices it protects.

The notification feature lets you pick from a list of pre-defined notifications, but you can also create your own notifications that get triggered by specific events.

Let’s look at some of its best features below:

  • Multilayered protection with one-click deployment from the cloud console
  • File server security with secure banking protection
  • Over 170 built-in reports from 1000 points
  • Pre-configured live installers deployment for your endpoints
  • Single-click management

This enterprise antivirus can secure as many devices as you want. It works with Windows, Android, iOS, macOS, and Linux devices. The price of the subscription is dependent on how many devices you will connect it to.

ESET PROTECT Advanced

ESET PROTECT Advanced

Complete protection for your company’s endpoints, data, cloud storage, and users.
Free trial Visit Website

Avast Business Endpoint Protection – Best anti-malware for businesses

best enterprise antiviruses to secure your business

This is a simple-to-use antivirus for enterprises and is everything your business needs in one package as it leaves nothing to chance with its powerful antivirus, data, and identity protection.

Avast Business Endpoint Protection is tested and approved by the most prestigious anti-malware institute and is an award-winning antivirus security tool, with 100 percent certified protection against zero-day threats.

It is the ultimate security for your business as it protects your IP, customer data, business strategy, and everything else including your server, email, and VPN.

Use the tool’s Patch Management option to manage, maintain, and update Windows and third-party applications, from the unified dashboard.

With the premium products, you also get server protection and privacy features, which are extremely important to secure your business.

Check out the solution’s best features below:

  • Artificial intelligence, behavior-based machine learning, and proactive cloud threat lab analysis capabilities
  • Manage and deploy your Avast Business solutions from one platform
  • Multi-layered protection for your company’s data, including Sharepoint Server Protection and Exchange Server Protection
  • Protects bank info, passwords, and downloads, especially while on public Wi-Fi
  • Easy to manage and deploy on your endpoints

Avast Business Endpoint is a paid service. You can use it to secure all your devices, both mobile and desktop. It’s compatible with Windows, macOS, iOS, and Android devices.

Avast Business Endpoint Protection

Keep your applications updated and secure your servers from the all-comprising Avast business hub.
Check price Visit Website

Avira – Best for small businesses

Avira has improved its line of both consumer and business products a lot recently. For small and medium businesses, the developer has a convenient product called Prime.

Prime can cover up to 25 devices and offers the classic, but reliable and powerful security featured the home-user products offer as well.

Other notable features of the tool that your business will benefit from are the unlimited VPN and the password manager, to help with both securing and generating strong passwords.

Also, Avira also supervises all system drivers and important software in terms of updates, making sure that they work within optimal parameters.

To make sure your device is completely secure, Avira Prime also incorporates a software and driver updater. 

Other key features of Avira include:

  • Built-in PC cleaner to improve all workstations’ performance
  • Anti-tracking to keep all threats at bay
  • Unlimited VPN so your business is hidden with every connection
  • Low memory usage and built-in password manager

As you probably know, it is highly recommended to run the latest versions of your software and drivers as they implement security measurements that align with current requirements.

Avira

Avira

Use the essential security features that this multi-device antivirus brings to your small and medium business.
Free trial Visit Website

Kaspersky Endpoint Security – Great cybersecurity for business

best antivirus software for small business

Kaspersky’s antivirus for enterprise protects the things that matter to you, while you work. It is designed for businesses running more than 5 computers with servers and other devices.

It works out of the box and has easy management from a cloud-based console, so you don’t necessarily need IT skills to use these powerful security tools.

Features include cloud endpoint security with strong protection and easy management, advanced cybersecurity for business (world-class), ready to scale protection against every type of threat your enterprise faces, whether on-premise or cloud.

You also get multi-layered protection powered by machine learning and human expertise, granular security management, secure communication and collaboration, and enhanced mobile> security and device management.

Other key features include anti-targeted attacks, hybrid cloud security, security operations center to efficiently detect and remediate threats, and Fraud Prevention for proactive detection of cross-channel fraud in real-time.

Let’s see what are the top features of this solution:

  • Boost productivity and protects employees with cloud-enabled controls
  • No performance impact on endpoints
  • Protects against the latest security threats, including fileless threats
  • Reduces your exposure to cyberattacks with endpoint hardening
  • Secures diverse environments including PC, Mac, Linux, iOS, and Android
  • Simplifies security management with a unified console

Whether you are in financial, healthcare, data center, industrial, government or telecoms enterprise, Kaspersky will sort you out.

Webroot Endpoint Security – Shortest computer scans

Webroot Endpoint Security a corporate antivirus promises not to interrupt you as you work because it has been noted that most users find themselves staring at the computer screen while the antivirus does its thing – you won’t have to with this one.

It takes only 20 seconds to check your computer, which is 60 times faster than the average scan time of tested competitor products.

In addition to this super-fast speed, it doesn’t take up much space so you have plenty of room for all your files and documents.

Features include identity theft protection for your usernames, account numbers, and other personal information.

Take a look at a review of its most important features:

  • Automated, remote management
  • Fast and easy deployment on your endpoints
  • Comprehensive reporting for the IT management department
  • RMM and PSA integrations
  • Granular visibility

You also get secure browsing with real-time anti-phishing to block fake sites, lightning-fast scans with no interruptions, and webcam protection from spying threats.

F-Secure – Easy setup with IT infrastructure

F-Secure Antivirus is another reliable utility that lets you do business with confidence.

It is an essential, comprehensive, and advanced tool that secures your company’s endpoints.

This antivirus protects your whole IT infrastructure while managing vulnerabilities proactively. It shields from all conceivable threats with expert guidance.

One of the most impressive features of this antivirus is the Protection Service for Business. It delivers comprehensive but flexible endpoint security for all your devices.

This includes cloud-based protection as well as a rapid detection service that monitors your security status 24/7, alerting you of breaches within minutes with a clear action plan.

F-Secure approaches cybersecurity with a combination of the latest human expertise and continuously improves technology to comprehensively predict, prevent, detect, and respond to threats.

You should also take into consideration this small list with its best features:

  • Easy-to-deploy scanner for your whole network and all its assets
  • Multi-layered security platform for both detection and prevention of attacks
  • Microsoft 365 native email security capabilities with advanced protection against attacks via email and URLs
  • Advanced managed threat-hunting service
  • Manage all your security needs from a single console

You can also enhance your salesforce’s native security capabilities by mitigating risks caused by careless or malicious user behavior.

McAfee – Great business data protection

McAfee has been in the computer security game for quite a while now, but it’s only getting better at what it does.

As an enterprise virus protection software, it offers advanced security that protects all your devices against threats, compatibility with every operating system, and ease of use with its robust user-friendly software that is both easy to install and manage.

With McAfee software, you get features such as advanced online banking security with a data encryption service that’s activated whenever you use online banking.

This antivirus also includes enhanced security with its 255-character paraphrases that are unsolvable to thieves but remembered by you.

Not only that, but it also implements an anti-phishing filter reinforcement, 24-hour data theft protection, secure digital vaults to keep your files and data locked and encrypted, and advanced antispam filter protection for your emails.

Other key features of McAfee include:

  • Anti-ransomware technologies to detect zero-day threats
  • Fast response rates
  • AI guided investigations
  • High fidelity detections

It is simple and easy to use with a console that lets you check the security status of your devices and comes with automatic updates for the latest threat definitions to keep your protection up to date.

Malwarebytes Small Business – Great malware detection in real-time

Malwarebytes has made a name for itself as one of the most reliable and easy-to-use antivirus software.

It provides up-to-date security implementations to make sure your devices are protected on all fronts. The antivirus has a great business version with real-time protection for multiple connected devices.

This antivirus is built under the multi-layer protection principle, combining more than just one type of shield to secure you against malware, viruses, spyware, phishing attacks, RDP attacks, ransomware, and other threats, old and new.

The tool has a great detection rate, being able to stop attackers before they get a chance to cause harm to your system.

However, in case you get the product only after your system is infected, it is important to mention that Malwarebytes is proven to remove all traces of infection without harming your system.

The tool is very quick to set up. Just connect your devices to the same central Malwarebytes account and keep track of the state of each and every one of them.

Other key features of Malwarebytes Small Business include:

  • Monthly security reports
  • Covers up to 20 devices 
  • Compatible with Windows, Mac, Android, and Chromebook
  • Brute Force Attack Prevention

Malwarebytes small business is available under a subscription plan. There are multiple options, depending on the number of devices you want to secure.

What is enterprise antivirus?

Enterprise antivirus solutions are software that protects all workstations in an enterprise by being remote from the endpoint. It provides security for multiple devices simultaneously and keeps all viruses at bay.

It works just like a regular antivirus, but the process is a bit more complicated as more systems need to be protected at the same time. The security provided is excellent and all attempts to steal your data are prevented.

Most companies are targeted because they have sensitive data that can be used against them or because hackers can access their accounts and other information.

As an enterprise, using an antivirus program can be a weight off your shoulders. By providing the necessary security for all devices used within it, you can be sure that no data leaks will occur.

Using an enterprise antivirus can even take care of possible internal leakage since any USB or device connected to a workstation will be scanned as well.

Also, with an antivirus, you can block inappropriate online content or even limit its usage, so no worker can unintentionally download or access any virus.

We hope that our top helped you find the right tool to protect your business and data from any impending threats.

However, if you didn’t there’s also a great idea to check our selection including the best Windows Server antiviruses for your business.

Have you settled on one of these antiviruses for enterprise, or is there one you’re currently using that you’d like to share? Let us know by dropping your comment in the section below.

Best Antivirus for Windows 8 & 8.1: 5 Top Pick for 2026

Windows 8.1 will reach the end of the extended support in 2023 and customers on Windows 8 had to upgrade to 8.1 in 2016, to remain supported.

What we wanted to underline here is that the two systems are close to their end of life and you should make a move towards Windows 10 as soon as possible.

However, there are still many users that can’t do that for many reasons. If you’re one of them you also need to know that an outdated system is more vulnerable.

That is why we definitely recommend protecting it with a dedicated antivirus that will secure your system and your data at all times.

The search for the best free or paid antivirus software has been going on for years and years, and it’s pretty hard to decide on a winner.

We performed searches and tests and came up with a list of the best Windows 8 and 8.1 antiviruses that you can use right now.

Do I need an antivirus for Windows 8/8.1?

Yes, all Windows versions require an antivirus program. Windows 8 and 8.1 have Windows Defender built-in, but it’s proven insufficient for complete protection.

Windows Defender offers good basic security but falls short against larger threats. When faced with a virus, a good antivirus program will not cause you any problems.

Most antivirus programs have numerous security features that add an extra layer of protection to your computer. Below are some of the best we found.

What are the best antiviruses for Windows 8 and 8.1?

TotalAV – Best browser protection and system maintenance

TotalAV is an antivirus that comes with a wide variety of features for PC optimization, virus removal, and browser security.

One of the main features is WebShield. It automatically blocks access to malicious websites and search results, and scans downloaded and executable files for viruses so you’re never at risk.

It offers antivirus protection with its unique full-scale VPN. The major selling point of TotalAV antivirus is a safe browsing VPN. This is where Wi-Fi protection comes into play.

When the VPN is activated your Internet connection is encrypted locally and transmitted to the VPN server where it is decrypted and moved to the site you want to access.

It also includes TotalAdblocker which blocks all unwanted ads, popups, and annoying notifications. This feature improves page loading by eliminating the need to load ads.

Other great features are:

  • Impressive VPN system
  • Good website filtering rates
  • Password vault for enhanced security
  • Disk cleanup and system boost options

TotalAV

Total AV has all the features you need to keep your computer and Wi-Fi network safe from malware.
Check Price Visit Website

Bitdefender Total Security – Best virus prevention and removal

Bitdefender has annually received rewards from independent sources for its security features and it still works on Windows 8 and 8.1 so you should take it into consideration.

The Internet Security version which we recommend below also comes with two extremely important features: Bitdefender VPN and Bitdefender Safepay.

As you probably guessed, the VPN protects your privacy and identity online. It’s limited to traffic of 200 MB per day on a single device but it’s still great when you connect to public Wi-Fi.

Apart from that, this tool works against all e-threats, even from zero-day malware, worms, ransomware, spyware, and rootkits.

It can even secure your peripherals like the webcam and the microphone from any hijacking or intrusions.

Take a look at some of its top features:

  • Friendly interface for all users
  • Advanced firewall to block intrusions and filter your network traffic
  • Behavioral detection to closely monitor active apps
  • Webcam and microphone protection against eavesdropping
  • Secure VPN – limited to 200 MB/day/device

Bitdefender Internet Security

Bitdefender offers complete protection for all your devices, even for your Windows 8 PC.
Free trial Visit Website

Avast Free Antivirus – Best free antivirus with great protection

What do you expect from a completely free antivirus? Well, you will get a lot more from this one because Avast is a rich-featured antivirus even on its free version.

For instance, it has a Behavior Shield that closely monitors all your apps and detects any unusual manifestation. This is because some apps can start to produce damage long after installation.

This antivirus is also perfect for times when you work, play, or watch your favorite movie on full screen because it will block any distractions and pop-ups.

This amazing software also brings a network security scanner and offers browser protection which is a lot for a free tool.

However, you should know that this antivirus is free only for personal use. If you want to use it for business purposes, you will need to upgrade it to a paid version.

Let’s take a look at Avast’s top features below:

  • Network security scanner
  • Do Not Disturb mode for uninterrupted work or play
  • Behavior Shield for close app monitoring
  • Easy to install and operate
  • Completely free

Avast Free Antivirus

Even though it’s free, Avast Free Antivirus will offer optimal protection for your system.
Free download Visit Website

We hope that you found the right tool and you secured your system with one of the best antivirus software for Windows 8 and 8.1.

If not, you might also be interested in our selection of the best lightweight antiviruses for older PCs and see if you have a match.

Which product did you choose? Also, if you have other preferences, tell us about them in the comments section below.

ESET HOME Security Essential – Most advanced security features

Luckily, ESET HOME Security Essential has kept its support for older systems and can be used without a hitch on Windows 8 and 8.1.

In fact, this tool is one of the most advanced at the moment, providing unsurpassed protection for any kind of possible threats and you can secure all your devices with one license.

Being trusted by over 110 users worldwide, this software is adapted to the modern needs of users with advanced banking and online payment security wherever you are.

For instance, when you are connecting to an unknown network it will switch to the Strict Protection mode, making your device invisible to other computers connected to the same network.

You will also benefit from Botnet and Anti-phishing protection and it comes with a strong firewall that will also protect your PC from unauthorized access.

Let’s see what its main features are:

  • Test your router for vulnerabilities
  • Allows you to block storage media – CDs, DVDs, USB sticks, and disk storage devices
  • Parental control features
  • Botnet and Anty-phishing protection
  • Automatically protects you while performing online payments and accessing web-based crypto-wallets

ESET HOME Security Essential

Protect your Windows 8 system with this full-featured professional antivirus for your PC.
Free Trial Visit Website

Avira Free Security – All basic needs within a free antivirus

This is another free security tool, this time from Avira. In fact, it’s a lot more than an antivirus because it comes with a lot of additional features.

For example, let’s look at the free, included VPN. It’s limited to 500 MB/week but it can still provide you with enough privacy protection when needed.

Another great addition is the PC Cleaner tool which will help you erase any tracks from any of your browsers and apps so that your data and activity can remain private.

It also comes with a software updated tool that can keep all your installed apps up to date, avoiding any errors and crashes in the process.

Avira also boosts the speed of your system and comes with a powerful firewall that will put any trespassers at bay.

Consider its best features list below:

  • Free VPN (limited traffic – 500 MB/week)
  • PC Cleaning feature to get rid of any unwanted activity traces
  • Speed booster feature
  • Completely free
  • Software updater tool

Avira Free Antivirus

Avira is more than an antivirus, it’s a security suite with tune-up powers for free.
Free Download Visit Website

Fix: Windows Defender not Scanning on Windows [Full Guide]

Running an antivirus program it’s essential for your system’s security. Windows 10 and Windows 11 come with a built-in antivirus, Windows Defender, that can protect your system against a variety of malware and related threats.

Microsoft’s antivirus program can perform three types of scans: quick, full, and custom.

Getting the antivirus to scan your computer is pretty simple, all you have to do is check one of the three options and wait for the scan to complete.

Unfortunately, recent user reports have revealed that Windows Defender won’t do a quick scan due to an incorrect group or resource state.

Windows Defender is a solid antivirus, but sometimes Windows Defender won’t be able to perform a quick scan. This can be a problem, and speaking of Windows Defender, here are some similar issues that users reported:

  • Windows defender unable to scan, won’t scan – These are some relatively common problems with Windows Defender, but you can fix them using one of our solutions.
  • Your PC couldn’t be scanned Windows Defender – This is another problem that can appear with Windows Defender. If you encounter it, be sure to check if you don’t have a third-party antivirus running in the background.
  • Windows Defender will not complete scan – Sometimes Windows Defender is unable to complete the scan. If this happens, be sure to check the exclusions list and remove any suspicious exclusions.
  • Windows Defender not scanning Windows 10/11 – If Windows Defender isn’t scanning, the problem might be the missing updates. Simply update Windows 10/11 to the latest version and check if that helps.

How do I fix Windows Defender not doing a quick scan?

1. Check the exclusions list

  1. Press Windows Key + I to open the Settings app.
  2. When Settings app opens, go to Update & Security section.
    Windows Defender will not complete scan
  3. From the menu on the left select Windows Security.
  4. In the right pane click Open Windows Defender Security Center.
    Windows Defender will not complete scan
  5. Select Virus & threat protection.
    Windows defender unable to scan
  6. Now select Virus & threat protection settings.
    Your PC couldn’t be scanned Windows Defender
  7. Scroll down to the Exclusions section and click Add or remove exclusions.
    Windows Defender will not complete scan
  8. If your system drive is on the list, be sure to remove it.
  9. You might also have to remove other exclusions from the list.

If your Windows Defender won’t scan, the problem might be your exclusions list. According to users, sometimes malware can add an entire drive to the exclusions list in order to prevent Windows from finding it.

However, you can fix the problem simply by checking your exclusions list. To do that, follow these steps:

After doing that, the problem should be completely resolved.

2. Try a third-party antivirus

If Windows Defender won’t perform a quick scan, maybe the best option is to switch to a different antivirus software.

There are many great antivirus tools on the market, and if you’re looking for antivirus software that will provide maximum protection without interfering with your system, you should consider using one.

Many antivirus programs offer better protection and lots of other useful tools such as anti-identity and data theft, VPNs, and many others which Windows Defender is lacking.

In addition to scanning your PC for harmful software, these apps will also actively remove dangerous files. Don’t hesitate to strengthen your defenses and install a third-party antivirus as soon as possible.

TotalAV

Try the safest, most popular cybersecurity tool on the market, and always protect your device.
Free Trial Visit Website

3. Change the power options

  1. Press Windows Key + S and enter power settings.
  2. Select Power & sleep settings from the menu.
    Windows defender won't scan
  3. When Settings app opens, click Additional power settings in the Related settings category.
    Your PC couldn’t be scanned Windows Defender
  4. Now locate your current power plan and click Change plan settings next to it.
    Windows defender unable to scan
  5. Set Turn off the display and Put the computer to sleep options to Never, then click Save changes.
    Your PC couldn’t be scanned Windows Defender

According to users, if Windows Defender won’t perform a quick scan, the problem might be your power settings.

After doing that, check if the problem is resolved. This sounds like a strange solution, but several users reported that it works, so you might want to try it out.

4. Install the latest updates

  1. Open the Settings app and go to Update & Security section.
  2. Now click Check for updates button in the right pane.

In some cases, you might be able to fix this problem simply by installing the latest updates. Microsoft is working hard to fix Windows 10/11 bugs and issues, and sometimes a Windows Update might fix your problems.

By default, Windows 10 and Windows 11 automatically downloads and installs the updates, but sometimes you can miss an update. However, you can check for updates at any time manually.

If any updates are available, they will be downloaded in the background and installed as soon as you restart your PC. Once your PC restarts, check if the problem is still there.

5. Perform a System Restore

  1. Press Windows Key + S and enter system restore.
  2. Select Create a restore point from the menu.
    Windows Defender will not complete scan
  3. The system Properties window will open.
  4. Click System Restore button.
    Windows Defender not scanning Windows 10
  5. System Restore will now start. Click Next to proceed.
    Windows defender won't scan
  6. If available, check Show more restore points option.
  7. Select the desired restore point and click Next.
    Your PC couldn’t be scanned Windows Defender
  8. Follow the instructions on the screen to complete the restoration process.

If Windows Defender won’t perform a quick scan, you might be able to solve the problem by performing a System Restore.

If you’re having problems with the System Restore, learn how to fix them with this useful article.

Once the restoration process is finished, check if the problem is still there.

Use a third-party system restoration tool

The Windows system restore tool will bring your OS to a previous version, meaning you will lose any data and software that you installed after the restore point was created, which is not ideal.

Therefore, we strongly encourage you to download a third-party system restoration tool that specializes in finding problematic files and removing them, thus keeping your PC error-free.

6. Perform SFC and DISM scans

  1. Press Windows Key + X to open Win + X menu and choose Command Prompt (Admin).
  2. Alternatively, you can also use PowerShell (Admin).
    Your PC couldn’t be scanned Windows Defender
  3. When Command Prompt opens enter the following command: sfc/scannow
    Windows Defender will not complete scan
  4. The SFC scan will now start. The scan can take about 15 minutes, so don’t interrupt it.

Windows Defender is a core component of Windows 10 and Windows 11, and if you can’t perform a quick scan, the issue might be file corruption. Your system files can get corrupted, and that will cause this issue to appear.

However, you might be able to fix file corruption issues by performing SFC and DISM scans. To do that, follow these steps:

Once the scan is finished, check if the problem is still there. If the issue is still present, or if you’re unable to run an SFC scan, you might have to use a DISM scan instead. To do that, follow these steps:

  1. Start Command Prompt as administrator.
  2. Now run the following command: DISM/Online/Cleanup-Image/RestoreHealth
    Windows Defender not scanning Windows 10
  3. DISM scan will now start.
  4. The scan can take about 20 minutes, sometimes more, so don’t interfere with it.

Once the DISM scan is finished, check if the problem is still there. If you want, you can repeat SFC scan once again and all the corrupted files should be repaired.

7. Create a new user account

  1. Open the Settings app and navigate to the Accounts section.
    Windows Defender not scanning Windows 10
  2. In the left pane, select Family & other people.
  3. Now choose Add someone else to this PC.
    Windows defender unable to scan
  4. Choose I don’t have this person’s sign-in information.
    Your PC couldn’t be scanned Windows Defender
  5. Select Add a user without a Microsoft account.
    Windows Defender will not complete scan
  6. Enter the username for the new account and click Next.
    Windows Defender not scanning Windows 10

According to users, sometimes your user account might be damaged, and that can cause issues with Windows Defender to appear.

To fix this problem, it’s advised to create a new user account and check if the problem appears on a new account.

After creating a new user account, switch to it and check if the problem still appears. If not, you’ll need to move your personal files to a new account and start using it instead of your old one.

8. Remove third-party antivirus

Apparently, this error message is a temporary bug that is sometimes accompanied by error code 0x8007139F. Restarting and manually updating Windows Defender should be enough to fix this issue.

If this simple action doesn’t solve the problem, make sure you are not running another antivirus program at the same time. If you do, uninstall it, and keep Windows Defender.

  1. Type remove in the taskbar to open the Add or Remove programs settings panel.windows defender won't scan on Windows 10 11
  2. Locate your antivirus in the list and select it.
  3. Click the Uninstall button and wait for the process to complete.Windows Defender won’t scan on Windows 10/11

If you previously had a different antivirus, and you’ve recently installed Windows Defender, it’s also possible that remnants of your previous security program are still present.

Not being able to perform a quick scan in Windows Defender can be a big problem, but we hope that you managed to fix this issue using one of our solutions.

We also have a guide on what to do if you can’t open Windows Defender Scans folder, so be sure to visit it.

If you have any recommendations or want to tell us which of the solutions above worked for you, feel free to use the comment section below.

7 Best Antiviruses with Wi-Fi Protection [2023 Guide]

If you’re wondering how you can secure your Wi-Fi network with antivirus software, read on. Today, we will be discussing the best antivirus with Wi-Fi protection.

Antivirus is one of the must-have tools for anyone using a computer since the turn of the century.

The advent of viruses, malware, ransomware, trojans, and phishing websites has made it very dangerous to use a computer without an antivirus.

However, Wi-Fi has helped ease the way we work and use the Internet but it has also made it easier for cybercriminals to get your personal information and login details.

This can happen in diverse ways with most Wi-Fi routers increasingly susceptible to numerous hacking. It is vital to get an antivirus software tool with Wi-Fi protection that can secure your Wi-Fi networks.

Keep in mind that this detailed list should come in handy whenever you’re interested in:

  • Wi-Fi virus protection – Protecting your network from infected PCs and other devices is mandatory nowadays; you should take your time and check out the above list for an informed choice
  • Wi-Fi virus scanner – Try out any recommended antivirus for unlimited and accurate virus scans

How can you scan your Wi-Fi for viruses?

Most antiviruses provide features that allow you to scan your home or public router for any vulnerabilities or infections. Without an antivirus, you are exposed to any hacker that can access and take control of that Wi-Fi.

To stay safe before connecting to unknown Wi-Fi, use a VPN to hide your identity, or simply use an SSL connection to ensure that every website you visit is verified.

Most importantly, using an antivirus program is the easiest and safest way to protect your device from data theft attempts. Block unknown connections and allow only verified and safe connections.

What is the best antivirus with Wi-Fi protection?

TotalAV – Best browser protection and system maintenance

TotalAV is a new antivirus software tool that started operation in the year 2016. The antivirus thrives well when compared to older antivirus companies like Avast and Avira.

It offers antivirus protection with its unique full-scale VPN. The major selling point of TotalAV antivirus is a safe browsing VPN. This is where Wi-Fi protection comes into play.

Most antivirus tools protect users’ data when it is local but when your private data is moving around the internet, most of them are limited but not TotalAV.

TotalAV has a virtual private network (VPN) that encrypts your Internet connection protecting your data from snooping and trackers. The VPN service unlike that of Avast is free with no additional costs.

When the VPN is activated your Internet connection is encrypted locally and transmitted to the VPN server where it is decrypted and moved to the site you want to access.

Advertisers and trackers generally use your IP address to follow your Internet activities but when the VPN is activated they only see the IP address of the VPN server used.

Furthermore, TotalAV is an ideal antivirus software although it may not have the name or experience as other well-known antivirus tools.

Other great features are:

  • Impressive VPN system
  • Good website filtering rates
  • Disk cleanup and system boost options

TotalAV

TotalAV has all the features you need to keep your computer and WiFi network safe from malware.
Free Trial Visit Website

Bitdefender Internet Security – Best overall security and virus prevention

Bitdefender is another top antivirus that can easily secure your Wi-Fi hotspots. Thanks to its Wi-Fi Security Advisor, all network connection vulnerabilities are easily revealed.

Moreover, let us assure you that it’s incredibly straightforward to use and has some extra features that are impossible to refuse.

Well, that’s your chance to stay anonymous on the web and protect your computer against malware or even quickly clean it if it happens to be infected.

You also get unlimited encrypted traffic and SafePay tools to help you stay protected while shopping online.

Some Bitdefender key features you should take into consideration:

Bitdefender Internet Security

Get reliable security for any wireless network and claim the best deal right away!
Free Trial Visit Website

ESET HOME Security Essential – Most advanced security features

ESET HOME Security Essential is maybe one of the best tools to use when you want to keep your computer safe from all kinds of viruses, and also to protect your home network.

Moreover, it is a trusted solution by over 1000 million users. Thus, you can rest assured that it will protect you from ransomware and other types of malware with its multilayered protection.

Additionally, the Wi-Fi protection enables you to test your home router for vulnerabilities, such as weak passwords or out-of-date firmware.

Afterward, it provides you with guidance and an easy-to-access list of router-connected devices with improved device detection, to show you who’s connected.

More great features of ESET HOME Security Essential include:

  • Botnet Protection prevents your computer from being exploited for spam and network attacks
  • Protects your privacy and assets against attempts by fraudulent websites to acquire sensitive information
  • Makes your device invisible to other computers connected to the same network
  •  Automatically protects your computer from malicious network traffic
  • Firewall included

ESET HOME Security Essential

ESET HOME Security Essential will secure your computer and Wi-Fi network with advanced protection for all online threats.
Free Trial Visit Website

Avira Free Security – Best free protection against threats

Avira Prima is a great choice when you want to secure not only your Wi-Fi network but also all the devices connected to it.

Moreover, Avira Prime is a cross-platform and multi-device antivirus. With one subscription you can cover up to 25 devices.

It protects your computer and devices from any type of malware, phishing attacks, and real-time protection against other online threats.

Additionally, it comes with a built-in VPN that you can use to surf the web anonymously, and also with 200 privacy settings that you can optimize as you wish.

More important features include:

  • Cleans junk files, speeds up your boot time, and reduces lags
  • Password management option
  • Keeps your software and drivers automatically up to date
  • Scans your network for vulnerabilities and helps you fix them
  • Block infected websites, browser trackers, and intrusive ads

Avira

Avira will secure your WiFi and all devices connected, fixing all vulnerabilities.

Panda Dome – Most intuitive interface

router antivirus

Panda Dome is a significant upgrade to the Panda Free Antivirus with more features and bonus features which include a firewall and Wi-Fi security monitor.

In addition, it also gives decent detection and blocking of traffic from phishing websites that trick users into giving away their information.

There is also the USB vaccination which modifies USB drives so that malware and virus cannot configure themselves to run automatically from the drive.

This antivirus program includes a simple firewall. However, this firewall feature exercises a bit of control over how programs access the web, but it’s quite limited in function.

It blocks suspicious inbound connections in some programs while allowing outbound connections. Users can also configure the program control rules.

One unique feature of Panda pro is its Wi-Fi protection feature which scans the security of each WI-FI network.

After checking the Wi-Fi network it gives a pop-up sound as a warning if the network has low or medium security. The Wi-Fi Inspector tool also gives reports on how to improve your network security.

In addition, you can also view a list of devices on your network and tag any that should be restricted to connect with your Wi-Fi.

Other key features include:

  • Good malware detection rates
  • Firewall feature
  • Wi-Fi protection feature

Panda Dome

Panda offers reliable WiFi protection without slowing down your system, so make sure you try it out!
Free Trial Visit Website

Norton Antivirus – Complete security package for families

Norton Antivirus is one of the popular antivirus software used worldwide. Norton has consistently recorded some of the highest scores in antivirus testing.

The virus protection feature scans all incoming emails and messages for threats. The threats are sent to the quarantine section for monitoring until late it is sure it is not malware.

It also gives protection against removable USB drives such as Flash drives and external hard drives when connected to your system.

It also gives good protection against exploit attacks in which hackers take advantage of vulnerabilities in windows or programs to steal data.

It also gives protection to users’ Wi-Fi connection by blocking exploits attacks on your network which prevents hackers from gaining access to your data.

The password manager stores all your usernames and passwords including online banking credentials and social media login details.

When you log in to these accounts using Norton antivirus you are safe. If any hacker tries to get your password they will get the manager tool password which is not useful to them.

Finally, Norton antivirus is a reputable brand that gives excellent all-around protection and is ideal for those that access the web a lot with its excellent wen protection. The password manager is also a plus.

More great features include:

  • Excellent marks in malware detection
  • Good in preventing phishing websites and WI-FI intrusion
  • Password manager

Norton Antivirus

Use this great antivirus to protect your WiFi network from malware, online scams, and phishing threats.
Free Trial Visit Website

Avast Free Antivirus – Great free antivirus with strong protection

Avast Free Antivirus is a freeware option you can use in order to keep your computer and Wi-Fi network safe from viruses.

Although is free software, it comes with a plethora of features that make it a complete solution for all your cybersecurity needs.

Its Wi-Fi inspector automatically detects weaknesses in your home Wi-Fi and strangers that are trying to exploit or enter your network.

Moreover, the Wi-Fi Inspector scans your PC for malware attacks. Thus, it can detect if your router was infected or attacked by hackers.

Other important features that are worth mentioning:

  • Detect and block viruses, malware, spyware, ransomware, and phishing
  • Automatically send suspicious files for analysis in the cloud
  • Find all those cracks that allow malware to slip in
  • It uses smart analytics to stop threats before they affect you
  • Multiple layers of security

Avast Free Antivirus

Be in control of your WiFi network with one of the best freeware security solutions.

These are the best antiviruses that can protect your Wi-Fi network from intruders, malware, ransomware, and any online threat you can think of.

To discover even more ideal tools to protect your computer, take a look at our guide including the best antivirus for Windows 10. Additionally, you can learn how to deal with rogue Shenzhen devices connected to your network.

Have you tried out any of the antivirus programs we mentioned above? Do share your experience with us by commenting below.

Laptop Cooling Software: 5 Best for PC in 2026

Although many laptops remain cool to the touch, others can feel like the engine of a race car after a long ride in the desert.

A poorly cooled laptop is uncomfortable to use and poses health risks. Any laptop that gets too hot inside can suffer from component damage and poor performance as the CPU cuts back its clock speed to escape heat pressure.

In this guide, we have prepared a list of the best laptop cooling software to keep your PC running cool to the touch.

What is the best laptop cooling software for Windows 10 & 11?

SpeedFan – Dynamic laptop cooling software

SpeedFan is the most popular laptop cooling software, and it does more than just keep your laptop cool.

To ensure everything runs smoothly, it helps you stay on top of your system’s vital statistics, including the control of your laptop speed, fan, temperature, and others.

The latest version of SpeedFan comes with an easy-to-use graphical user interface and can do most of your hardware monitoring work.

This tool is a must-use for anyone who wants to monitor the system’s temperature closely. SpeedFan uses digital sensors to scan your system’s temperature.

This laptop cooling software also reads the temperature of your motherboard and hard disk and changes your PC’s fan speed. What’s more, it checks the status of your hard disk using S.M.A.R.T or SCSI attributes and reads the voltages and fan speed.

Also, it automatically searches your computer for informative hardware monitor chips.

When the system BIOS fails to activate some features that may improve performance, SpeedFan tries to enable them as long as it’s the safest thing to do.

This great software supports a wide range of temperature sensors and hardware monitoring chips, and it can help you find the reasons for failing hard disks or unpredictable reboots.

SpeedFan is a potent tool that can help you reduce the fan’s noise while working or watching movies and tell you whether you are likely to experience temperature-related issues.

If you are looking for the ideal cooling software that you can download for free on your HP, Dell, and Asus laptop, you should give SpeedFan a try.

Take a look at some of its key features:

  • Easy-to-use graphical user interface
  • Monitors all system’s vital statistics, including speed, fan, temperature, and more
  • Checks the status of your hard disk using S.M.A.R.T or SCSI attributes
  • Reads the voltages and fan speed
  • Automatically searches your computer for informative hardware monitor chips

⇒ Get SpeedFan

KAR Energy Software – Best for conserving energy

The more power your computer consumes, the more heat it generates. The KAR Energy Software for laptop cooling employs this principle to enhance your PC’s performance.

At the same time, it keeps your laptop cool by drastically lowering its power consumption by up to 48% in four different ways, including electronically cooling the CPU.

It puts the computer in standby mode even if a program prevents it, reduces the consumption of RAM, and manages the processor’s power.

KAR Energy Software manipulates your CPU speed to conserve energy and reduce overheating. For example, you do not need 3 GHz to write a document.

In such a case, the application will automatically adjust your PC’s clock power to the necessary speed.

This great tool also cools the CPU electronically, which is different from power management, which also cools the processors.

It cools all the unsolicited electronic components. The program also solves non-standby computer issues, which are also called Insomnia. It achieves this by analyzing every laptop activity and forcing standby.

Let’s review some of its best features:

  • Cools the CPU electronically
  • Automatically adjusts the clock power of your PC
  • Solves non-standby computer issues
  • Analyzes every activity of the laptop and forces standby
  • Adjusts your CPU speed to conserve energy

⇒ Get KAR Energy Software

Core Temp – Lightweight app

Core Temp is a tiny, no-fuss, yet powerful app that will help you monitor the CPU temperature and other vital information.

The software can display the temperature of each core of every processor in your system.

And you will be able to see temperature changes in real-time with varying workloads. Core Temp is also motherboard agnostic.

All major processor manufacturers have implemented a DTS (Digital Thermal Sensor) in their products, and these readings are much more accurate than conventional onboard thermal sensors.

So, you can use Core Temp with all the recent x86 processors by Intel, AMD, and VIA.

The app supports plug-ins, allowing developers to add new features and extend its functionality.

So although the basic app doesn’t cover fan speed monitoring, it can be added with a plug-in if the motherboard comes with the required sensors.

Let’s see some of its best features:

  • Real-time, CPU temperature monitoring
  • Support for external plug-ins
  • Compatible with all the latest x86 processors
  • Very accurate temperature readings
  • Data available for each core of every processor

⇒ Get Core Temp

i-Cool – Excellent interface

i-Cool is an excellent laptop cooling software solution for HP, Dell, Lenovo, Notebook, and most other PCs. It drastically reduces the heat generated by the CPU while simultaneously reducing the fan noise.

It has an intuitive graphical user interface that features functional buttons that enable you to change the operating behavior of i-Cool.

You will also find a series of indicators that constantly notify you about the CPU usage and fan noise level. You can modify the CPU performance in two modes: automatic and manual.

The manual mode is highly customizable and allows you to choose between 5 different levels of CPU usage: Silent, Low, Medium, High, and Full load.

For example, the Silent mode can be used in those situations when you don’t need to strain the CPU much, like typing, reading a document, etc.

You can change the mode to Medium when you are performing those activities that require moderate CPU performance.

When you switch to automatic mode, i-Cool automatically monitors the CPU loading without the need for user intervention and adjusts the CPU usage and fan noise level accordingly.

i-Cool is a very efficient cooling software that allows you to monitor your CPU usage without hassle.

The only disadvantage with this software is that it only supports GIGABYTE Intel 945 chipset series motherboards.

i-Cool’s most important features include:

  • Automatically monitors the CPU loading
  • Notifies you about the CPU usage and fan noise level
  • Supports GIGABYTE Intel 945 chipset series motherboards

⇒ Get i-Cool

HWMonitor – Overall health monitor

HWMonitor is a hardware monitoring program that reads the PC system’s primary health sensors, such as voltages, temperatures, and fan speed.

The app works with the most common sensor chips, like the ITE IT87 series, Winbond ICs, and others.

In addition, it can read modern CPUs’ on-die core thermal sensors, hard drives temperature via S.M.A.R.T, and video card GPU temperature.

After you launch the tool, you will see the performance data displayed in a list table format from all the connected devices.

However, the app only shows primary data and doesn’t detail whether the system is performing well.

The software also has an HWMonitor Pro version with more advanced options and functionalities.

Let’s go through some of its best features below:

  • Monitors voltages, temperatures, and the fan speed
  • It also reads hard drives temperature via S.M.A.R.T and video card GPU temperature
  • Shows all data in a table list, conveniently
  • Small and compact tool
  • Very easy to use and read

⇒ Get HWMonitor

Why is my laptop running hot?

If your laptop is running hot, it might be because you are not providing it with enough ventilation, or because too many unnecessary processes are running in the background.

Another possible cause is a virus on your PC. A virus can have a devastating effect on your computer and lead to all sorts of problems.

How can software keep my laptop cool?

While inefficient heat dissipation is the manufacturer’s fault, users can also play their part in keeping their laptops cool.

Either tweak your computer’s power options to maximum cooling or install third-party cooling software.

The so-called cooling software tools are intelligent apps that can reduce the load on the CPU and other computer components, thus reducing their usage.

How can I make my laptop run cool?

There are a few ways to make your laptop run cool. Below are some of the best tips to apply:

  • Avoid blocking your PC’s ventilation
  • Always keep your laptop clean
  • Close down unnecessary processes
  • Install a cooling app
  • Use a cooling fan
  • Know the activities your PC can handle comfortably at a time

How to adjust my system’s settings for maximum cooling?

  1. Click the Start button, type power, and sleep, and select Power & Sleep settings within the results.
  2. Now, choose Additional power settings.
  3. Select Change plan settings next to the power plan you are using.
  4. Click on the Change advanced power settings button, and enable active power cooling.
  5. Ensure that the highest level of cooling is enabled in the Windows power settings of your laptop.
Note icon NOTE
The menu option for enabling active cooling varies from system to system, but in most laptops, it will either read \Active Cooling\ or \Maximum Performance\.

With this solution, we conclude our article on the best laptop cooling software for Windows 10 & 11.

Yes, if you’ve upgraded to the new OS, you should know that all the apps from our list are also Windows 11 compatible.

If your laptop is running too hot and you don’t want to install third-party programs, you should first ensure that the vents are not obstructed by dirt or clogging.

Improving the cooling system on your laptop is paramount for speed and efficiency in performance.

Some laptops are notorious for dissipating heat and can give you a gruesome experience, mainly when used for long hours.

To enhance the performance, we recommend installing one of the laptop cooling software described above and adjusting your system power options to improve the cooling efficiency further.

Also, if you’re interested in other laptop cooling tools, check out our helpful guide on the best laptop cooling pads to keep your device cool.

And if the software listed isn’t doing an efficient job, you can opt for a second-hand AIO cooler.

If you have any other questions or suggestions, don’t hesitate to leave them in the comments section below, and we’ll be sure to check them out.

8 Best Antivirus for Facebook to Keep Your Data Safe

Facebook is the most popular social media platform in the world, with more than one billion active users. Due to this large number of users, Facebook is also a very attractive target for hackers.

Fortunately, the company built a very reliable security system to protect its users and frequently rolls out updates to block the latest threats.

However, sometimes hackers manage to outsmart Facebook’s security team, sneaking malware into the system. The good news is that such events occur extremely rarely.

One of the worst malware infections that ever targeted Facebook took place in 2016. Locky Ransomware evaded Facebook’s whitelisting by pretending to be a.SVG image file.

The virus was sent from compromised Facebook accounts. As always, Facebook reacted promptly and stopped the ransomware on its track.

This unpleasant event confirms once again why having a reliable antivirus is so important. Indeed, Facebook has a strong security system, but it never hurts to add one extra security layer.

Here are the best antivirus tools for Facebook

TotalAV – Best system maintenance

TotalAV is an award-winning antivirus that offers full protection of all aspects of your computer. From safer browsing sessions and real-time virus removal to system optimization tools.

With the WebShield feature, all you do online is completely protected. Malicious websites are blocked, search results are filtered, and downloads and executables are verified, all before you can access any of them.

Also, you won’t see those annoying ads anymore, and no more unwanted pop-ups and notifications. All your Facebook data is safe from any possible stealing attempt.

Moreover, TotalAV provides the user with a set of tune-up tools to further enhance the system’s performance.

Let’s see some of TotalAV’s main features:

  • Multi-device compatibility so all your devices will be protected
  • Password vault for enhanced security and better management
  • Ransomware, phishing, and scam protection
  • PUA protection and zero-day cloud scanning
TotalAV

TotalAV

Choose the complete system security and optimizing package with TotalAV.
Check Price Visit Website

Bitdefender Total Security – Most advanced virus prevention

Bitdefender Total Security combines strong malware protection, antispam, and antiphishing tools that will make your PC malware-proof.

The software blocks virtually all malware, email, and phishing attacks, which are pretty popular among hackers targeting Facebook.

We covered the software thoroughly in our awesome Bitdefender review, so feel free to check it out for more information.

All your data, stored information, passwords, and credit card details are completely safe with Bitdefender. Multi-layered ransomware protection guards against attempts to steal them.

Let’s quickly look at its key features:

  • Powerful anti-malware tools
  • Integrated file shredder
  • Password manager that will make it even more difficult for hackers to infect your PC using the social media platform
  • Scan page URLs for malicious websites (this feature comes in very handy especially when you open a link on Facebook. It can also block outsiders from scanning your system’s ports)
Bitdefender Total Security

Bitdefender Total Security

Take care of your online privacy and information with Bitdefender Internet Security.
Check price Visit Website

ESET HOME Security Essential – Best security features

ESET HOME Security Essential is an award-winning cybersecurity tool that offers you rock-solid protection when you’re online.

This software protects you against malware, and ransomware and alerts you if anyone tries to access your webcam.

ESET HOME Security Essential is available for multiple platforms, so you don’t have to worry if you prefer using Facebook on your phone or tablet.

The software’s multilayered protection has stopped ransomware and malware for millions of users worldwide, proving to be the most advanced security software currently on the market.

Let’s quickly look at its key features:

  • Blocks attacks specifically designed to evade antivirus detection,
  • Protects web browsers, and other apps, including Java-based software (your Facebook session is now safe on any browser: Mozilla Firefox, Google Chrome, Internet Explorer, and Microsoft Edge are all supported)
  • Anti-malware and anti-ransomware protection tools
  • Webcam protection features
ESET HOME Security Essential

ESET HOME Security Essential

Prevent malware from entering your device and accessing your personal data with ESET HOME Security Essential.
Free Trial Visit Website

Guard.io – Great phishing attacks blocker

Guard.io is an antivirus disguised as a browser extension. Very lightweight and with almost no impact on your system’s resources, it’s ideal protection software for your browser and your system.

Being a browser extension has its perks, such as all processes being done away from the endpoint, so there is close to no resource usage.

Harmful sites are blocked before you access them, all downloads are verified, and no unknown connection can bypass the antivirus.

With advanced anti-phishing protection from emails, your personal Facebook data will be entirely safe. Scan, clean, and keep your computer safe at all times with no system slowdowns.

Also, the main features of Gurad.io are:

  • Ads are blocked in seconds, and no ads to be loaded means faster page loading
  • Information leak monitoring to keep track of all data breaches
  • Remove all suspicious extensions and take control of your browser settings
  • With advanced machine learning, you are protected in real-time
Guard.io

Guard.io

Guard every browsing session with this fully pledged antivirus with amazing protection.
Free Trial Visit Website

Avira – Best free security and protection

With Avira, you can safely visit any page, download any file, and stream any video. The tool will block virtually any malware attempting to infect your PC while you’re online.

If you want some extra protection, you can enable the free VPN that is included with the program to keep your IP, identity, and location safe.

Avira blocks all attempts to steal data, whether it’s from Facebook or your other accounts, and with ransomware protection, no one can get close to it.

Also, it blocks ads, trackers, and infected websites. No ads will track your location anymore and since all harmful websites will be blocked, you won’t be exposed to any risks.

Let’s quickly look at its key features:

  • Reliable protection against malware, including viruses, worms, spyware, and ransomware
  • Prevent unauthorized access by ensuring your Firewall is optimized
  • Protect your confidential data from threats – that includes your Facebook password
  • Keep everything on your PC out of hackers’ reach

Kaspersky Standard – Best anti-malware security

Kaspersky Standard is a hacker’s worst nightmare. The software offers thorough anti-malware protection and also features a browser protection module that blocks malicious sites.

To further enhance protection it offers a free VPN to improve privacy and let you browse the web without being tracked.

Kaspersky also has anti-hacking that monitors your network and anti-ransomware that prevents hackers from entering your home network and stealing your data.

Protect your identity and money by making payments through an encrypted browser, securing passwords and information with a private vault, and filtering all malicious websites from safe ones.

Let’s quickly look at its key features:

  • A powerful firewall that blocks network attacks
  • Virtual Keyboard
  • Parental controls
  • Password manager that integrates into Mozilla Firefox, Google Chrome, and Internet Explorer (if you use one of these browsers to connect to your Facebook account, Kaspersky will keep your password safe)
  • Protection feature for cameras (if you use your PC’s camera to go live on Facebook, Kaspersky will block any camera hacking attempts, protecting your privacy)

Kaspersky Standard

Kaspersky Standard is the ultimate level of protection for personal data and sensitive information.
Free trial Visit Website

Norton 360 Deluxe – Great parental control and data security

Norton Security Deluxe is a powerful antivirus that combines antiphishing and antispam capabilities with traditional antispyware and antimalware protection.

With plenty of advanced features, with Norton, you gain a VPN for a private internet connection every time you want to browse the web. It hides your location and makes you untrackable.

Parental control is a must-have feature for your children. Easy-to-use tools to monitor your kids’ activity and smartphone location as well as block inappropriate content.

Norton 360 comes with a family plan to help you simplify the processes of security around the house and help your children learn about the world in a safe way.

Let’s quickly look at its key features:

  • Protects all your devices, including your PC, tablet, and smartphone (an excellent feature if you use multiple devices to connect to your Facebook account)
  • The Norton Management feature (to easily move your protection from one device to another)
  • Scan websites and social networking sites for suspicious links and content in order to identify the latest social networking scams
  • Antispyware and antimalware protection

Avast Free Antivirus – Great free protection and scanning options

Avast Free Antivirus utilizes advanced AI and machine learning to provide real-time protection from older and emerging threats alike, such as malware, ransomware, adware, and spyware.

Protect your social media accounts from data theft or from being accessed by unauthorized people with Avast. If you want even more protection, you can upgrade to the Premium version of the software.

Offering complete protection of your personal information and your PC at the same time makes avast a great protection software.

On the premium side, you gain a VPN to safely access any webpage and avoid all trackers that might try to steal your data.

With Avast Premium, you’ll benefit from these key features:

  • Premium malware scanner and removal
  • PC cleaner and optimizer
  • Customer support and remote control
  • Wi-fi inspector

When you’re online, the risk of malware infection increases. Many hackers target social media in their attempt to spread malware and infect your PC.

Installing a reliable antivirus solution will prevent such unpleasant events, offering you peace of mind when you’re on social media. Which tool do you use? Share your experience with us via the comments section below.

9 Best Intrusion Detection Software [Free & Paid]

Intrusion detection software for Windows checks for changes that are made by all sorts of unwanted programs that could be injected into your system by cyber criminals.

These tools study the data packets, both incoming and outgoing, to check what kind of data transfers are at hand. It will alert you if they find any suspicious activity on the system or in the network.

Intrusion detection software exists as an answer to the increasing frequency of attacks made on systems.

Such tools usually inspect the host configuration for risky settings, password files, and more areas. Then, they detect all kinds of violations that could prove dangerous for the network.

IDS also set in place various ways for the network to record any suspicious activities and potential attack methods and to report them to the admin.

In other words, an IDS is quite similar to the Windows firewall but more than guarding against attacks from outside the network, an IDS is also able to identify suspicious activity from within the network.

Some IDS software is also able to respond to potential intrusion. This is Host Intrusion Prevention System software (HIPS) or just IPS (Intrusion Prevention System).

Generally speaking, Intrusion Detection Software for Windows shows what is happening. The IPS solutions also act upon the known threats.

There are some products which combine these two features, and we’ll present to you the best on the market.

What are the types of IDS?

An intrusion detection system (IDS) is a tool created to test the vulnerability exploits against a target system or computer. There are four main types of intrusion detection systems:

  1. Network intrusion detection system – an independent platform that monitors network traffic, probes hosts, and identifies intruders.
  2. Host-based intrusion detection system – an agent installed directly on the host and filters malicious traffic that goes through allocation logs, system calls, and file system modifications.
  3. Perimeter intrusion detection system – creates “perimeter fences” around main system infrastructures to detect and locate intrusion attempts there.
  4. VM-based intrusion detection system – similar to any of the three above, is deployed remotely via a virtual machine.

Best intrusion detection systems to install on PC

Total AV – Best browsing security and system maintenance

If you want complete antivirus protection, TotalAV is the right choice for you. With features to protect your system from any online or offline threats, it’s one of the few antiviruses that offers you a series of tune-up tools to maintain peak performance.

With TotalAV and WebShield, you are completely protected while browsing. Malicious websites and links are automatically blocked, and downloaded files and executables are verified before you even click on them.

Besides full virus protection, it provides a Total Adblocker to reduce all unwanted pop-ups and notifications and load all pages faster.

Some of TotalAV’s key features include:

  • Data breach monitoring and alerts
  • Blocking of tracking cookies
  • Tune-up tools for system maintenance
  • PUA protection and zero-day cloud scanning

Total AV

A great intrusion detection software that will protect every aspect of your computer.
Check Price Visit Website

ESET HOME Security Essential – Most comprehensive security features

ESET HOME Security Essential will actively protect your PC from any kind of threat. The software will ensure that your sensitive data, banking transactions, passwords, login credentials, and webcam are safe.

ESET uses advanced AI and machine learning to create proactive protection which will stop known malware and emerging ones from entering and infecting your device.

Since it is cross-platform, the antivirus is ready to secure all kinds of devices, such as Android phones, iPhones, Linux and Windows computers, or MACs.

Here is a list of its core features:

  • Privacy protection
  • Anti-theft measurements
  • Lightweight software with minimal power usage
  • Secure active scanning and malware removal

ESET HOME Security Essential

It utilizes advanced AI to scan your computer for harmful software and keep your system safe.
Check Price Visit Website

Bitdefender Internet Security – Most advanced virus protection and prevention

Bitdefender is a self-proclaimed global leader in cyber security, protecting millions of users around the world from online threats.

The software is equipped with multilayered protection to ensure nothing gets past its real-time scanning. In addition, the program is lightweight and doesn’t consume resources from your computer.

Bitdefender Internet Security will perform periodic scans, and it will actively take care of your online data and privacy, prohibiting any intruding software from stealing it.

Let’s have a look at the software’s key features:

  • Multiplatform protection
  • Privacy firewall
  • Parental control is perfect for keeping children safe
  • Multilayered antivirus, malware, ransomware, adware protection

Bitdefender Internet Security

Bitdefender Internet Security is an award-winning antivirus with unbeatable virus protection.
Check price Visit Website

Malwarebytes Endpoint Protection – Best malware protection

According to Malwarebytes, the industry-leading security software manufacturer, there is no better protection strategy than proactive prevention and we couldn’t agree more.

Malwarebytes Endpoint Protection is an advanced IDS solution for endpoints that uses a layered approach packed with multiple detection techniques to identify and keep malware and other cyber threats away from your systems.

It delivers best-in-class protection against both known and unknown malware, ransomware, and zero-hour threats within one unified solution meant to reduce costs and simplify the deployment process.

Let’s quickly look at its key features:

  • Web protection (against malicious websites and ad networks)
  • Application hardening (reduces vulnerability exploit surface)
  • Application behavior protection (prevents apps’ leveraging and endpoint infection)
  • Mitigation (blocks ransomware and attempts to execute code on the endpoint from any distance)
  • Machine learning-based anomaly detection
  • Pre and post-execution layered detection techniques
  • Centralized cloud-console (for easy cloud-enabled deployment and management)

Malwarebytes Endpoint Protection

The best protection strategy is prevention. Keep your endpoints safe with Malwarebytes!
Check price Visit Website

Avast Free Antivirus– Great basic free protection

One other great malware detection software is Avast Free Antivirus. The program also uses advanced AI to optimize its scans and find all harmful software and viruses on your PC.

The free version of this program comes with the malware scanner and removal tool which is more than enough for those who want to keep their data secured.

If you choose to upgrade to the premium version, you’ll benefit from these key features:

  • Premium malware scanner and removal
  • PC cleaner and optimizer
  • Customer support and remote control
  • Wi-fi inspector

Avast Free Antivirus

Avast gives you more than any other competitors, providing excellent antivirus protection for free.
Free download Visit Website

Malware Defender – Great for advanced users

This is a free Windows-compatible IPS software that provides network protection for its advanced users.

The software will successfully handle intrusion prevention and also malware detection. It is very well-suited for home use even if its instructional material is a bit too complex for average users.

Acting as a host intrusion prevention system, the tool monitors a single host for any kind of suspicious activity.

Malware Defender was initially a commercial program, but its excellent features changed its ownership a while ago, and then a new version was released that was freeware.

Let’s quickly look at its key features:

  • Default installation into learning mode to reduce the number of initial alerts to a minimum
  • Files, registry, application modules, and network protection
  • Connection Monitor (the perfect companion to Windows native firewall, with more detailed control)

The software is an excellent performer, but its only minus would be the fact that its complexities make it unsuitable for the average user.

On the other hand, all mistakes can be rectified by changing rule permission from the log entries.

Although if you have already denied a vital system function you won’t be able to do much more to get things back the way they were before, so you should pay attention.

⇒ Get Malware Defender

Snort for Windows – Open-source network IDS

Snort for Windows is an open-source network intrusion software that delivers real-time traffic analysis and packet logging on IP networks.

The software is able to perform protocol analysis, and content searching/matching can be used to detect a variety of attacks and probes, such as buffer overflows.

It will also analyze stealth port scans, CGI attacks, SMB probes, OS fingerprinting attempts, and much more.

The program is straightforward to deploy, and it has a vast number of open-source developers. The Snort community supports the software, but it also provides the core rule sets for some commercial IDS/IPS products.

Protect your home network with the firewall devices on this thorough list and never worry about malware again.

Let’s quickly look at its key features:

  • Returns everything that it sees including detailed packet decodes
  • Easy configuration to only present alerts from its set of rules
  • Robust tools for gathering and for analyzing network traffic.
  • Deployment across very large network infrastructures is also possible

Due to its ability to be quickly deployed, its very comprehensive capabilities, and its great open-source community support, Snort is usually everyone’s favorite.

There is also the commercial version which is available as an appliance from Sourcefire, and it’s guided by Snort’s developer as its CEO.

Roesch managed to blend perfectly the best parts of the open-source and the commercial worlds into the Sourcefire offerings.

⇒ Get Snort for Windows

The Bro Network Security Monitor / Zeek – Good framework analysis

The Bro Zeek IDS

This is a powerful network analysis framework that is very different from the typical IDS you may have known until now. Bro’s domain-specific scripting language will enable site-specific monitoring policies.

The program comes packed with analyzers for lots of protocols, and it enables high-level semantic analysis in the application layer. It also keeps a great application-layer state about the network that it monitors.

Let’s quickly look at its key features:

  • No traditional signatures (interfaces with other applications for real-time exchange of information)
  • Comprehensive logs archive
  • Targets especially high-performance networks

If you are looking for the best free and paid Windows 10 FTP clients, check out this awesome list with the best products on the market and decide for yourself.

While the program focuses on network security monitoring, it will also provide users with a comprehensive platform for more general network traffic analysis.

It is well-grounded in more than 15 years of research the software managed to successfully bridge the traditional gap between academics and operations from its very beginning.

The user community of Bro includes some major universities, supercomputing centers, research labs, and also lots of open-science communities.

Note icon NOTE
Update: The Bro has undertaken a rebranding process and it is now known as Zeek.

⇒ Try The Bro Network security monitor

OSSEC Free IDS for Businesses – Good multi-purpose IDS

This is an open-source host-based IDS that performs file integrity checking, log analysis, policy monitoring, rootkit detection, real-time alerting, and active responses and it runs on almost all platforms including Windows.

The software watches it all, and it actively monitors all aspects of the system’s activity. With this program, you will not be in the dark regarding what is happening to your valuable computer assets anymore.

Let’s quickly look at its key features:

  • Real-time analytics and insights into your network security events (via alert logs and email alerts)
  • Full host-based intrusion detection across multiple platforms
  • Fully open-source, and free to use
  • Fully customizable (extensive configuration options, add your very own customized alert rules and writing scripts, modify the source code and  add new capabilities)
  • Detect and alert unauthorized file system modifications and malicious behavior based on entries in the log files

⇒ Get OSSEC Free IDS

Securing your enterprise these days doesn’t have to be a nightmare and a back-breaking ordeal. All the solutions that we mentioned above will provide you with industrial-strength protection against all intrusion attempts.

All these tools combine the most popular open-source security software into one unified solution stack that will be easy enough to install and use. So feel free to pick your favorite one according to your needs.

Ignite 2022 : Improvements and new features coming to Azure

At this year’s Ignite conference Microsoft announced a long list of new features and improvements to a variety of Azure services. As is to be expected there is continued focus around Machine Learning (ML), Artificial Intelligence (AI) and Big Data. Below are some of the new features or improvements you can expect or are already in preview.

Responsible AI dashboard

The Azure Machine Learning Responsible AI dashboard will be generally available soon, allowing customers to easily implement Responsible AI by debugging machine learning models and making informed data-driven decisions. The Responsible AI scorecard includes an on-demand UI for generating PDF scorecards, allowing no-code/low-code customers to create reports for their models.

Cognitive Service for Speech

New functionalities are being added to the speech-to-text and text-to-speech services offered by Azure Cognitive Service for Speech. The way businesses deliver media experiences, accessibility, and customer service will change as a result of these services.

They include the addition of new languages and emotions to Neural Text to Speech in order to expand the capabilities of voice assistants and do other things, as well as synthetic voice training with Custom Neural Voice, which includes multiple tones like happy or sad. They also include Embedded Speech, which enables businesses to use Azure speech services on their devices, customization features like lexicons to increase speech recognition accuracy, and improved audio processing of all Azure pre-built voices.

Form Recognizer capabilities in preview

A pre-built AI model that automatically extracts elements specific to contracts, such as parties and payment terms, as well as enhanced language support to 275 languages globally are among the additional features that Azure Form Recognizer currently offers in preview.

Computer Vision

Image Analysis 4.0 and Spatial Analysis on the Edge are two services that Computer Vision is introducing and are currently in preview. Image Analysis 4.0 is an improved model created to extract a wide range of visual information from photos to enhance client accessibility and digital asset management.
By absorbing live streaming footage from cameras, deriving insights, and producing events that other systems can exploit, Spatial Analysis on the Edge will increase security and safety.

Cosmos DB adding distributed PostgreSQL support

With the addition of distributed PostgreSQL support, Azure Cosmos DB now provides open-source relational data with a quick, adaptable, and scalable service. The new Azure Cosmos DB for PostgreSQL, which is based on the Hyperscale (Citus) engine, delivers everything developers love about PostgreSQL and the potent Citus extension to Microsoft’s quick and scalable database for building cloud-native apps. Now, developers may use the same well-known database service to create apps that use both relational and non-relational (NoSQL) data.

The developer interface for open-source technologies has been enhanced in Azure Cosmos DB.
Now that Azure Cosmos DB for MongoDB supports documents up to 16 MB in size, MongoDB developers can store larger documents. The majority of these modifications are accessible.

For more information on these and other news, check out the official Microsoft Ignite 2022 site.

What are your thoughts on these new features and improvements? How do they compare to offerings from Google or Amazon? Do you think Microsoft is innovating fast enough to catch up and stave off the competition? Let us know in the comments below.

Best OCR Software for Windows 10 to Use in 2026

You may have noticed that paper hasn’t gone away, but digitalization is slowly taking over. This is where Optical Character Recognition (OCR) comes in. It is a program that can convert scanned, printed, or handwritten image files into a machine-readable text format.

Maybe you have a book or receipt that you typed or printed years ago and you want it put in a digital format but you don’t want to retype it. OCR software can be very useful in such a case on Windows 10.

We can also use this wonderful technology to accurately extract text from images, and convert a printed table into an Excel spreadsheet or an old book into a PDF with searchable texts underneath the page images.

In this article, we will introduce you to the best free and paid optical character recognition software on the market.

Rating (1 to 5)Free/PaidMulti-language recognitionDesktop/OnlineSupport 24/7
Soda PDF5PaidYesDesktopYes
Adobe Acrobat DC5Paid (has trial)YesDesktopYes (phone)
Readiris4.5Paid (has trial)YesDesktopNo
ABBYY Fine Reader 144PaidYesDesktopYes (phone)
Microsoft One Note3.5FreeYesDesktopYes
Simple OCR3FreeYesDesktopNo
Free OCR3FreeNoOnlineNo
Boxoft Free OCR3.5FreeNoDesktopNo
Top OCR3PaidNoDesktopNo

What are the best OCR software tools for Windows 10?

Soda PDF – Fully-featured editing tools

Soda PDF offers a wide range of solutions for your office suite, along with a powerful OCR tool to help you digitize your documents.

Converting documents into digital text without re-typing is fairly easy. Simply take pictures of your physical documents using your mobile phone, upload them to Soda PDF, and convert them into an editable PDF within seconds.

Highly flexible, this tool allows you to customize its OCR tool depending on your needs. With both automatic and manual scanning, you are in full control of your text transmission.

Need to scan multiple images or documents at the same time? The OCR batch scanning feature helps you recognize text from multiple images or documents, cutting down on conversion time.

The OCR tool is included in the PRO version of Soda PDF, which offers the best value for all your PDF editing needs.

Soda PDF features a range of other tools that will help you edit PDFs easier and faster:

  • Fully featured editing capabilities
  • Easy PDF creation and conversion
  • File merging and compression
  • Form filling, surveys, and electronic signatures

If you are uncertain if Soda PDF is right for you, a free trial is available that lets you explore all of its features. The flexible pricing system allows you to choose the plan that best suits you.

Soda PDF

Transform any image into text in seconds with Soda PDF!
Check price Visit Website

Adobe Acrobat DC – Great converter

Adobe Acrobat DC is designed for users who want to enjoy the powerful features of optical character recognition software.

The version of Adobe Acrobat DC supports many input files like .doc, .docx, .xls, .xlsx, .ppt, .pptx, .ps, .eps, .prn, etc., so it will be easier for you to extract the desired part from the text to reformat and retype the sequence. 

It is easy and very intuitive to use because it does the work for you by automatically converting the text section from the scanned document into text that can be modified in a PDF.

Moreover, you can archive your document and add restrictions in order to limit the capabilities of editing and copying.

You can add notes, highlights, and other annotations, and reduce the size of your PDF for easier sharing. It also allows you to send documents to others for signing and turn existing forms and scans into fillable PDF forms.

The OCR is automatically applied to your document, so you will be able to edit it by typing the text sequences that you desire.

Take a look at other key features:

  • Fill and sign
  • Reorder and extract PDF pages
  • Protect PDF feature
  • Compare files
  • Split PDFs into multiple files

Adobe Acrobat DC

Extract and convert all your scanned files into editable formats, and archive and password-protect them.
Check price Visit Website

PDFelement – Powerful AI-powered tool

PDFelement from Wondershare is a great AI-powered solution for all you’re needs related to PDF, including OCR recognition and transformation.

This is a powerful tool that will allow many kinds of file manipulation. You can create, organize, and eSign all sorts of documents.

Wondershare’s PDFelement, as mentioned before, comes with AI-powered tools that will allow you to quickly summarize, translate, or rewrite a document.

Speaking of AI, this program will let you customize your AI prompts, creating unlimited possibilities for work and study.

Overall PDFelement is secure and professional software, here are some more of its key features:

  • Intuitive user interface
  • Batch convert multiple files
  • Change sizes, colors, and font styles
  • Create e-signable PDFs
  • OCR PDFs to Word and editable/searchable PDFs in 23 languages
  • Safeguard your PDFs by adding passwords 

PDFelement

This amazing AI-powered tool will take care of all your OCR needs.
Check Price Visit Website

ABBYY FineReader – Advanced correction tools

ABBYY FineReader is the most powerful OCR software on the market and is the best tool for anyone who needs fast and accurate text recognition.

This OCR handles high-volume work perfectly well and comes with advanced correction tools for difficult tasks.

The superb verification tool easily corrects doubtful readings by making a neat comparison between the OCR texts and the original.

ABBYY Finereader does more than you would expect from an OCR. Is it that 500-page old book you want to be converted to a searchable PDF? The application handles it with utmost precision.

ABBYY will extract the most accurate texts from the images found on the web and can convert a scanned document into HTML or into the ePub format used by e-readers.

You can share ideas, collect feedback from others, and get documents approved by marking up, commenting on, and drawing within the document directly in a PDF thanks to its collaboration tools.

With this software, you can apply and verify digital signatures, clean up sensitive information, detach hidden data, and manage access to your PDF files.

ABBYY Finereader also has these key features:

  • Edit and organize PDFs
  • Convert into searchable PDFs
  • Create fillable PDF forms
  • Compare documents in various formats
  • Optimize digitization routines

ABBYY FineReader

Share, convert, and edit your PDFs in no time with software that uses AI-powered OCR technology.
Free Trial Visit Website

Readiris – Rare cloud-saving feature

readiris start window

Readiris is the latest version of this high-performance OCR software. It comes with a new interface, a new recognition engine, and faster document management.

You can easily convert to many different formats, including audio files thanks to its verbal recognition. Readiris supports most file formats and comes with other attractive features that simplify the conversion process.

For instance, images can be sourced from connected devices like scanners and the application also allows you to adjust processing parameters such as DPI adjustments.

Readiris has a rare cloud-saving feature that allows users to save the extracted text to different cloud storage services like Google Drive, OneDrive, Dropbox, and others.

It is perfect for collaboration because it offers a group of tools so you can annotate, comment, and attach hypertext lines on your PDFs.

With Readiris, you are able to sign and protect your PDFs and send them electronically. You can also edit texts embedded in your images because its OCR engine allows you to recover texts in all kinds of files, preserving the original format with flawless accuracy.

Here are some other great features of Readiris:

  • Recognize texts in many languages
  • Integrate verbal recognition
  • Add watermarks
  • Edit character styles
  • Visualize annotations in one view

Readiris

Convert audio formats and create editable files from your scanned documents at an affordable price.
Free Trial Visit Website

Simple OCR – User-friendly interface

SimpleOCR is a handy tool you can use to convert your hard-copy printouts into editable text files.

If you have a lot of handwritten documents and you want to convert them to editable text files, then SimpleOCR would be your best option.

However, handwritten extraction has restrictions and is only offered as 14 days of a free trial. Machine print is free and has no restrictions.

There’s a built-in spellchecker that you can use to check for discrepancies in the converted text. You can also set up the software to read directly from a scanner.

Just like Microsoft OneNote, SimpleOCR does not support tables and columns.

⇒ Get SimpleOCR

FreeOCR – Automatic scan cleanup

FreeOCR uses the Tesseract Engine which was created by HP and is now maintained by Google.

Tesseract is a very powerful engine and is said to be one of the most accurate OCR engines in the world today.

FreeOCR handles PDF formats very well and has support for TWAIN devices such as digital cameras and image scanners.

In addition, it supports almost all known image files and multi-page TIFF files. You can use the software to extract text from pictures and it does that with a high level of accuracy.

And, just like the other OCR software solutions for Windows 10 from this list, Free OCR can’t translate tables and columns.

⇒ Get Free OCR

Boxoft Free OCR – Easy to use

Boxoft Free OCR is another handy tool you can use to extract text from all kinds of images.

This freeware is easy to use and is capable of analyzing multi-column text with a high degree of accuracy.

It supports multiple languages including English, Spanish, Italian, Dutch, German, French, Portuguese, Basque, and many more.

This OCR software allows you to scan your paper documents and converts them into editable texts within a very short time.

While there are concerns that this OCR doesn’t excel in extracting text from handwritten notes, it performs exceptionally well with a printed copy.

⇒ Get Boxoft Free OCR

TopOCR Reader – Multi-format support

TopOCR Reader differs from the typical OCR software in many aspects but performs the job accurately. It works best with digital cameras and scanners.

Its interface is also different as it has two windows – the image (source) window and the text window.

Once the image is sourced from the camera or scanner on the left side, the extracted text appears on the right side where there is the text editor.

The software supports GIF, JPEG, BMP, and TIFF formats. The output can also be converted into multiple formats including PDF, HTML, TXT, and RTF.

The tool also comes with camera filter settings that you can apply to enhance the image.

⇒ Get TopOCR Reader

The market is flooded with OCR software programs that can extract text from images and save you a lot of time you could have spent retyping the document.

How to use OCR software in Windows 10?

Optical Character Recognition (OCR) can be used in all apps targeting Windows 10 because it is a part of the Universal Windows Platform.

OCR is created to help you manage various types of images, from scanned documents to photos, so you can use it to extract text and text layout information from them.

How can I choose which OCR software to download?

This is the main question that you might have before downloading an OCR. We will help you choose by answering more specific questions:

  • Does it support multiple file formats?
  • Does the OCR software have language recognition?
  • Can you use an OCR tool online?
  • Does it recognize the text from image files?

However, good OCR software should do more than extract text from printed documents. It should maintain the layout, text fonts, and text format as the source document.

If you’re working with Kanji you might want to explore the best image-based Kanji translator tools in one of our older guides.

We hope that this article will help you find the best OCR software for Windows 10. Feel free to comment and share.

How to Use Clipchamp to Trim Video, Audio or Images

So you want to become a savvy clip producer, and you chose Clipchamp as your starting ramp? If so, now it’s time to learn how to properly trim your videos in Clipchamp.

How can I trim videos using Clipchamp?

  1. 1. As usual, the first step is to go to the Microsoft Store and download and install the Clipchamp video editor.


  2. 2. Open Clipchamp and press the Create a video button.

    clipchamp create video
  3. 3. Click the plus button to add your video to Clipchamp.

    clipchamp upload video
  4. 4. Press the Add button or drag the clip to the timeline.

    clipchamp add video
  5. 5. Click on the clip to highlight it and position your cursor over the front or back end of the clip.

    clipchamp trim
  6. 6. Press on the trimming icon and drag it depending on how much you want to trim the video.

    clipchamp trim guide
  7. 7. When you are happy with your results, use the Export button to save your final video.

    clipchamp export video
  8. Trimming is one of the most basic actions you can perform in Clipchamp. Yet trimming is extremely important, especially when you want to create certain sequences.

    Follow the steps above and trim your video to your liking using this software.

We’ve recently explored the app’s functionality panels and reviewed how to edit videos using Clipchamp, so you already know the basics.

FAQs

How do I cut out the middle of a video in Clipchamp?

Use the Split tool. Place the playhead at the start and end of the section you want removed, split twice, select the middle part, and delete it.

Can I trim multiple clips at once?

No. You must trim clips individually, but you can split and delete sections across several clips.

Does Clipchamp reduce video quality after trimming?

No. Clipchamp keeps your original quality unless you export at a lower resolution.

Where do I find the trim handles?

Trim handles appear on the left and right edges of a selected clip on the timeline.

That’s pretty much all you need to do if you want to trim clips using Clipchamp on your Windows 11 device, so don’t be discouraged.

After exporting, you may also want to review our guide on how to save a project in Clipchamp to fully understand autosave, export, and backup options. To avoid losing your edits, learn how to save Clipchamp videos directly to your computer with our Clipchamp save to computer guide.

To take your editing further after trimming, see our step-by-step guide on how to speed up video in Clipchamp.

If you also want to split or remove parts of your footage, check out this guide on how to cut video in Clipchamp for simple steps.

This free video editor may yet prove to be your best choice when it comes to fast, simple editing.

⇒ Get Clipchamp

However, there are tons of other video editing software alternatives out there as well, if you feel that Clipchamp just won’t do enough for you.

Did you find this guide to be useful? Let us know in the comments section below.

What is Quota Underflow? Fix this BSOD in 9 Steps

If you have a quota underflow problem in Windows 10 or 11, we have prepared all you need to know to resolve it in this article.

BSOD errors are usually caused by faulty hardware or a software conflict. These errors can be severe and even prevent you from accessing Windows 10.

Fortunately, there are several solutions available that can help you fix this issue. We’ve comprised a list covering all of them, so put your trust in us and read them in detail.

What is Quota Underflow?

Windows 10 and 11 stop code QUOTA_UNDERFLOW is one of the many BSOD errors a user may encounter. It basically arises due to issues with the disk quota and causes the OS to crash.

This could be the case when either the Disk Quota, the File Quota, or both have been misconfigured by the system administrator. This a fairly complex error and requires a proper understanding before you can effectively troubleshoot it.

What causes Quota Underflow error?

The Quota Underflow error is mainly caused by incorrectly configured, outdated, or corrupted drivers. However, it can also be caused by malware, registry issues, and hardware problems.

The blue screen error QUOTA UNDERFLOW frequently occurs following the setup of new devices or software.

It can also happen when software, including games, starts up, shuts down, or when an application is in use. Users have also encountered a quota_underflow blue screen error and a quota_underflow (21) error.

How can I fix the QUOTA UNDERFLOW BSOD error on Windows 11?

1. Use a third-party BSoD fixer

An excellent system file restoration tool with many features will keep your entire system and data in pristine condition and safe.

2. Update your Windows

  1. Press Windows + I to launch the Settings.
  2. Navigate to the Update and Security section.
    quota underflow
  3. Now click the Check for updates button.

Often these issues are caused by hardware or software incompatibility, and to prevent these issues from appearing, you must update Windows 10 regularly.

Microsoft is constantly fixing hardware and software issues, and to achieve the most stable and error-free Windows 10 experience, you must install updates regularly.

Several users reported that their problem with the QUOTA UNDERFLOW error was resolved after updating Windows 10 to the latest version.

Remember that updating Windows 10 might not fix your problem, but keeping you free from most incompatibility issues is still a good practice.

3. Update your drivers

3.1 Manually updating drivers

  1. Press Windows Key + X and choose Device Manager.
  2. Once Device Manager opens, locate the problematic device, and right-click on it.
  3. Choose Update Driver Software. You’ll have to repeat this step for several devices until you find the one causing you problems.
    quota underflow

As we already mentioned, the QUOTA UNDERFLOW error can be caused by outdated drivers, and to fix this error; it’s essential to have the latest drivers installed.

You can download all the necessary driver software from your hardware manufacturer or the Device Manager.

3.2 Update the drivers automatically

Searching for drivers on your own can be time-consuming. So, we advise you to use a tool automatically to do this for you.

Using an automatic driver updater will save you from the hassle of manually searching for drivers and keep your system updated with the latest drivers.

A dedicated tool will help you update drivers automatically and prevent PC damage caused by installing the wrong driver versions.

We concluded that the most efficient method of resolving drivers’ issues is using the best driver update software on Windows 10.

4. Run the BSOD troubleshooter

  1. Open the Settings app and go to the Update & Security section.
    quota underflow
  2. Select Troubleshoot from the menu on the left, select BSOD from the right pane, and click on Run the troubleshooter
    quota underflow
  3. Follow the instructions on the screen to complete the troubleshooting.

The next thing we will try is Windows 10’s troubleshooting tool. This troubleshooter can resolve various system issues, including BSOD problems.

So, it might also be helpful when dealing with the QUOTA UNDERFLOW error. To run Windows 10’s troubleshooter, follow the steps mentioned above.

5. Try the SFC scan

  1. Right-click on the Start menu button and open Command Prompt (Admin).
  2. Enter the following line and press Enter: 
    sfc /scannow
    quota underflow
  3. Please wait until the process is done (it may take a while).
  4. Then, if the solution is found, it will automatically be applied.
  5. Now, close the Command Prompt and restart your computer.

We will try a command-line troubleshooter if the built-in troubleshooter doesn’t get the job done. The SFC scan goes through your system, searching for issues and resolves them on the way.

6. Run the DISM

6.1 The Standard way

  1. Right-click Start and open Command Prompt (Admin).
  2. Paste the following command and press Enter:
    DISM /Online /Cleanup-Image /CheckHealth
  3. Wait until the scan is finished, restart your computer and try updating again.

6.2 With the Windows installation media

  1. Insert your Windows installation media.
  2. Right-click the Start menu and, from the menu, choose the Command Prompt (Admin).
  3. In the command line, type the following commands and press Enter after each:
    • dism /online /cleanup-image /scanhealth
    • DISM /Online /Cleanup-Image /CheckHealth
  4. Now, type the following command and press Enter:
    • DISM /Online /Cleanup-Image /RestoreHealth /source:WIM:X:SourcesInstall.wim:1 /LimitAccess
  5. Make sure to change an X value with the letter of the mounted drive with Windows 10 installation.
  6. After the procedure is finished, restart your computer.

And the third troubleshooting tool we’re going to try is DISM. Deployment Image Servicing and Management (DISM) is a tool that deploys the system image repeatedly.

So, the QUOTA_UNDERFLOW error may be resolved using the standard and the procedure that utilizes the installation media above.

7. Uninstall recently added software or hardware

  1. Click the Start menu, type control, and select Uninstall a program option.
  2. Select an app from the list and click the Uninstall button.
    quota underflow
  3. Follow the wizard to complete the uninstallation.

If you installed any software or hardware recently that could cause a QUOTA UNDERFLOW BSoD error, you need to find that respective app and uninstall it.

Sometimes hardware isn’t fully compatible with your PC, which can cause this BSoD error.

If you remember adding any new hardware, such as a new wireless network adapter, hard drive, or graphic card, make sure to remove it and check if your system usually works without it.

Regarding the software, make sure to remove any software that you installed in the last few days.

Some software might not be fully compatible with Windows 10, and this can cause QUOTA_UNDERFLOW BSoD errors to appear.

8. Remove your antivirus software

In some cases, antivirus software can be the leading cause of BSoD errors, and many users reported that removing their currently installed antivirus software fixed the QUOTA_UNDERFLOW error.

When removing your antivirus, remember that certain parts, such as registry keys and files, can remain on your computer, so it’s best to use a proper uninstaller tool.

A dedicated uninstaller is the best and easiest way to uninstall these programs. The software will automatically scan your PC for installed programs, then present them to you in a list.

You can uninstall any software you want with just a few clicks. It is also worth mentioning that this tool can detect software that your default windows uninstaller cannot.

It’s worth mentioning that almost any antivirus software can cause a QUOTA_UNDERFLOW BSoD error to appear.

But most commonly, these problems are caused by McAfee, Avast, AVG, or sometimes Kaspersky.

Even if you don’t use any of the tools above, you should try removing your antivirus software and check if that fixes this issue.

If the problem gets fixed after this, you should immediately switch to another antivirus solution, so we advise you to choose the best antivirus software at the moment.

9. Check your hardware

Users reported that a hardware failure often causes QUOTA_UNDERFLOW BSoD; according to users, after replacing their RAM or SSD, the Blue Screen of Death error was permanently fixed.

It’s worth mentioning that almost any hardware component can cause a BSOD to appear, so you need to perform a thorough investigation to find a faulty part.

There are specific tools, most notably MemTest86+, that you can use to test your RAM, and all that you have to do is to download the tool, install it on a USB flash drive, and boot your PC from that flash drive.

After your computer boots, start MemTest86+ and let it run for several hours. If it reports any errors, your RAM module isn’t working correctly and should be replaced.

How do I fix the Quota Underflow error on Windows 10?

If you have read this far, there is good news for you; you can fix the Quota Underflow error on Windows 10 if you are wondering how to note that the two operating systems are very similar.

This implies that the same triggers in Windows 10 exist in Windows 11. So, the fixes we have discussed still apply.

You should not worry about the interface because, for most parts, they are the same or just marginally different.

QUOTA UNDERFLOW BSOD error can be troublesome, and in most cases, it’s caused by a hardware failure, so you’ll have to locate the faulty hardware and replace it.

Before replacing your hardware, try all the other solutions mentioned in this article.

Windows 11 New Task Manager: How to Get & Enable

Windows 11 comes with a new and improved Task Manager that shows you programs, processes, and services currently running on your computer.

You can easily monitor the performance of your device or close a program that isn’t responding using the Task Manager.

When compared to the old version, the Windows 11 version of the Task Manager does hold some potential to improve the speed of your computer. It now comes with a sidebar menu that includes more options.

The new Task Manager uses WinUI to match the latest Windows 11 design principles. It also comes with dark mode support and a new settings page that allows modifying the update speed of your device.

The new design is far from perfect. However, Microsoft is trying to address UI consistency issues in the operating system, and we can expect more improvements to show up in future builds.

All you need to know about Windows 11’s Task Manager

The Task Manager in Windows 11 is one of the best tools to identify troublesome apps and end their processes.

With the latest version of Windows 11, Microsoft is trying to explore a new and improved Task Manager.

The new version can display the same set of screens, such as Processes, Performance, App History, Startup Apps, Users, Details, and Services.

Nevertheless, there are a few noticeable changes. Below is a list of some new features that come in handy with the new Task Manager.

  • A new sidebar menu that houses options like Processes and Performance
  • Improved tabbed sections with the hero element feature display the computer’s name, model, CPU, GPU, and memory
  • New settings page to modify the Task Managers update Speed and more
  • Command bar on each page to help users access everyday actions
  • A unique feature named Efficiency Mode to limit an app’s CPU usage is also added

What is the shortcut key of Task Manager?

There are two sets of shortcut keys you can press to open the Task Manager directly on your device.

The first set of keys is CTRL + ALT + DEL. This set of keys is mainly used when your device encounters some bugs while performing a specific task and the screen freezes.

This combination allows the user to terminate the hung application and reboot the system if that doesn’t work.

However, you can also use this to access the Task Manager if required. Once you press these keys together, you’ll be redirected to the Security Options, from where you can access the Task Manager.

The second Task Manager shortcut of keys is CTRL + SHIFT + ESC. By pressing these keys altogether, the Task Manager will open directly.

How can I open Task Manager in Windows 11?

Opening the Task Manager in Windows is a very easy task. There are numerous ways to do so on your Windows 11 device.

1. Open Task Manager from Windows 11’s taskbar

  1. 1. Press the Windows + X keyboard shortcut.

  2. 2. The WinX menu will now open, also known as the Power menu.

  3. 3. Locate Task Manager in the list of options.

  4. 4. Click on it.

    open task manager from the taskbar windows 11
  5. 5. Task Manager is now opened on your screen.

  6. One of the easiest ways to get to the Task Manager in Windows 11 is via right-clicking on the taskbar, and then selecting the tool from the WinX menu.

    This is simple and can be done at any time on your PC, regardless of what programs you have opened.

2. Using a Run command

  1. Press the Windows key + R to open the Run dialogue box.
  2. Type taskmgr and hit Enter to open Task Manager.
    Using Run

3. Create a Desktop Shortcut for Task Manager

  1. Right-click on Desktop and select New, then select Shortcut.
    Shortcut icon
  2. It will now ask to enter the file path. Enter the following path as mentioned below:
    C:\Windows\System32\Taskmgr.exe
    task manager windows 11
  3. Now enter the shortcuts name and hit Enter.
  4. You’ve now successfully created a shortcut to open the Task Manager.

4. By running a command in Command Prompt

Click on Start, search for Command Prompt and select Open.
Type taskmgr and hit Enter.
Using cmd
The Task Manager will now open.

5. From the Control Panel

  1. Press the Windows key + R to open the Run console.
  2. Type control and hit Enter.
  3. Once the Control Panel opens, search for the Task Manager in the search bar.
  4. Click on Task Manager under System and the program will open.
    task manager windows 11

6. Using the Settings app

  1. Press the Windows key + I to open the Settings app.
  2. Search for Task Manager in the search bar and hit Enter.
  3. Click on the View system resource usage in the Task Manager option to open Task Manager.
    Using Settings
  4. Task Manager will open.

7. Using Windows Terminal

  1. Click on the Search icon, type terminal, and select Open.
  2. Type taskmgr and hit Enter.
    task manager windows 11
  3. The Task Manager will now open.

8. Using the Start menu

  1. Click on Start and select All Apps.
  2. Scroll down and click on Windows Tools.
    task manager windows 11
  3. Then, click on Task Manager.
    Windows tools task manager

9. Using Windows Powershell

  1. Click the Search icon on your taskbar, type powershell, and select Open.
  2. Type taskmgr and press Enter.
    task manager windows 11
  3. The Task Manager app will now open.

How do I get Task Manager on my Taskbar Windows 11?

If you were wondering how to use Quick Launch in Windows 11, the answer is you can’t.

Unfortunately, Quick Launch is not available in Windows 11 so the closest thing you can get to that function is to add Task Manager.

So, here’s a quick way to add Task Manager on your Taskbar in Windows 11:

  1. Click the Search icon from the taskbar and type task manager.
  2. Then, click on Pin to Start from the results under Task Manager.
    task manager windows 11

How do I open Task Manager in a folder?

You can also open the Task Manager using its executable file called Taskmgr.exe. This exe file is present in the drive where your Windows is installed. Here is how you can open the Task Manager in a folder:

  1. Open This PC from the desktop.
  2. Click on the drive in which your Windows 11 is installed and navigate to the following path:
    C:\Windows\System32
  3. Search for Taskmgr.exe and open it.
    task manager windows 11
  4. Doing so will open the Task Manager in Windows 11.

How do I enable Task Manager permanently?

  1. Download ViveTool from GitHub to enable the new Task Manager.
  2. Double-click on the zip folder and open it with File Explorer.
  3. Extract and install the tool.
  4. Now click the Search icon, type command prompt and select the Run as administrator option.
  5. Type the following command to navigate to the ViveTool folder and hit Enter (replace FOLDER PATH with the actual path of the folder where you installed the app):
    C:\FOLDER\PATH\ViveTool.exe
    task manager windows 11
  6. Type in the following command to enable the new Task Manager on Windows 11 and hit Enter:
    vivetool addconfig 35908098 2
    Enable new task manager
  7. Once done with these steps, restart your device, and the resigned Task Manager experience will be available on your installation of Windows 11.

Why is my Task Manager not showing?

The Task Manager needs to function properly as it monitors how your system’s resources are being utilized.

But recently, many of our readers have complained that Task Manager is not showing or not working in Windows 11.

As Task Manager is an important utility tool, it’s essential to fix it. Below are some troubleshooting methods to help you fix the problem:

1. Run an SFC scan

  1. Click on Start, search for command prompt and select Run as administrator.
  2. Type the following command and hit Enter:
    sfc/scannow
    task manager windows 11
  3. Once the scanning is over, close the Command Prompt window, restart your device, and check if Task Manager opens.

This error can also occur due to the presence of corrupted files on your system. Run an SFC or System File Checker scan to get rid of these corrupted files. Besides that, you can give a try to a specialized tool that will scan your system and fix any errors related to corrupted system files.

2. Run a DISM scan

  1. Click on the Search icon, type command prompt and click on Run as administrator.
  2. Type the following commands one by one and hit Enter after each one:
    DISM /Online /Cleanup-Image /CheckHealth
    DISM /Online /Cleanup-Image /RestoreHealth

    CheckHealth-1
  3. Restart your device and check if the Windows Taskbar is now working.

System image corruptions are also known to cause issues like these. Run a DISM Scan to repair any system image corruptions on your device.

3. Disable the third-party antivirus

The third-party antivirus software installed on your device can also cause this issue. Disable any antivirus software installed on your device and check if the Task Manager starts running.

If disabling the antivirus didn’t work, uninstall it temporarily and check for the same.

4. Switch the account using Admin Profile

  1. Press Windows key + R to open the Run dialogue box, type netplwiz and hit Enter.
  2. Choose the profile to modify and click on Properties.
    task manager windows 11
  3. Navigate to the Group Membership tab and select Administrator.
  4. Click on Apply and then on OK to save the changes.
    Group Membership tab

This error can also occur due to a lack of access permissions. To fix this, switch the user account using the admin profile.

Several users complain about corrupt user profiles in Windows 11. Rest assured that our guide shows you what to do in case that happens.

How do I restore Task Manager tasks?

  1. Press Windows key + R to open the Run console window, then type regedit and hit Enter.
  2. Navigate to the following path:
    HKEY_CURRENT_USER\Software\Microsoft\Windows\CurrentVersion\TaskManager
  3. Right-click on the TaskManager key and select Delete to restore the Task Manager tasks.
    Delete Taskmgr from regedit
  4. Once the TaskManager key is deleted, Windows forgets its settings and launches Task Manager with its default settings and tasks.

There isn’t any direct method to reset Task Manager to its default settings. Deleting the TaskManager key in the registry editor will make it run in compact mode.

Does Windows 11 have a dark-mode Task Manager?

Similar to other Microsoft components that are being updated the new Task Manager is getting a new design as well as dark mode support. This redesign was offered to the app with the Insider build 22538.

This new re-designed version of Task Manager follows the same design guidelines as Windows 11 does.

However, the dark Task Manager Windows 11 is still under testing and sometimes can cause the application to crash.

How do I enable dark mode in Windows 11?

  1. Press the Windows key + I to open the Settings app.
  2. Navigate to the Personalization tab and click on Colors.
  3. Beside Choose your mode click on the drop-down menu and select Dark.
    task manager windows 11

Switching to dark mode in Windows 11 brings only cosmetic changes. It won’t affect the performance of your device in any way and could be disabled anytime.

How do I bring up Task Manager in Remote desktop?

While navigating to a Windows device remotely there are a variety of things you can perform including launching the Task Manager. Using the Task Manager is easy on a remote system.

You can open the Task Manager directly by pressing the CTRL + SHIFT + ESC keys on a remote system. Also you can use any of the steps mentioned above to do the same.

What are the most common Task Manager issues?

Despite being the best Windows performance monitoring utility, the Task Manager can still encounter some problems.

Below is a list of some common issues faced by the Task Manager:

  • Task Manager crashing on Windows 11
  • Task Manager disabled on Windows 11
  • Windows 11 Task Manager not working
  • Task Manager missing on Windows 11
  • Windows 11 Task Manager not showing processes
  • Windows 11 Task Manager not showing network usage

If you are also facing any of these issues read our post on how to fix the Task Manager on Windows 11.

What to expect from the redesigned Windows 11 Task Manager?

As we wrote above, the redesigned Windows 11 Task Manager is still in its early stages of development. So it doesn’t contain many modern design changes at the moment.

Many more changes are expected to come as Microsoft is bringing back the Eco mode as Efficiency mode.

However, it will be somehow limited, and users can only apply the Efficiency mode to a single process and not to the entire group.

Well, this was all about Task Manager in Windows 11. We hope the steps mentioned were able to help you.

You might also be interested in our article on how to open Task Manager when it’s disabled by the Administrator.

If you still have any issues or want to make any suggestions, do let us know in the comments below.

Ignite 2022: Updates, new features coming to Microsoft Viva

Microsoft is improving the employee experience platform in its Office 365 for Business offering.  Microsoft Viva allows organization leaders to track the productivity of employees but allows them to interact in a private setting to keep company goals in line with worker goals and satisfaction.  Microsoft is bringing several enhancements to Viva to help enhance relationships inside organizations.

Viva Insights Updates 

Employee feedback is a key aspect of any productive organization.  Meeting effectiveness surveys can now be displayed at the end of meetings with five or more participants.  Meeting organizers with a Viva Insights subscription will be able to see the aggregated results and feedback to promote an effective engagement.  Employers and Employees can also set up a Focus mode experience that allows users to break up projects into short undisturbed bursts followed by a short break.  New Quiet Time settings will also allow admins to silence after-hours notifications and limit the use of apps after hours.

New Viva Learning Experiences 

Learning Paths will allow managers to create a sequenced group of learning materials and make those available to employees as a Learning Path that can be discovered and shared through Viva Learning.  A learning path can be created on any topic. Learning collections will allow employees to organize content from Learning Paths to fit their personalized likes and needs.

The new Viva mobile app features a private homepage with access to required information and pieces of training.  You’ll also be able to see your notifications and complete training exercises on the go.

Viva Engage Storyline is Now Available

Viva Engage provides organizations with a way to create social connections between company leaders and various interests inside the organization.  Anyone inside the company can create feature-rich posts to share with others.  These posts will appear in the Storyline which can be viewed in Viva Engage, Outlook, and the Viva Connections feed inside of Teams.

Stories, which is currently in preview, will allow a more feature-rich experience on the Storyline.  This allows users to share short video clips or photo collections to help enhance relationships among colleagues.

Goals Integrations 

Viva Goals has just launched to help employees and organizations keep their goals aligned.  This helps ensure that people are working on the top priorities that they expect to have the biggest impacts.  It also allows employees to see how their work makes a difference.  New third-party integrations with Microsoft Goals from Slack and Google Sheets are available today, with a Jira integration coming soon.  The Slack integration will allow users to receive notifications, and reminders and conduct OKRs directly from Slack.  The Google Sheets integration will allow users to sync their results inside proper sheet cells.  Microsoft will also be releasing integrations for first-party Microsoft tools and OKR notifications with Azure DevOps, Microsoft Planner, Dynamics 365, and more in the future.


Neat volume trick in Windows 11 22H2 from Jen

It has been a couple of weeks since the Windows 11 2022 update began rolling out, with a ton of features as well as enhancements. While we hit most of these in our previous posts, there’s a nifty and convenient trick that we didn’t get to. It lets users increase and decrease the volume on their devices as noted by Jen Gentleman, Sr Programmer at Microsoft on the Windows Insider team, and has a knack for keyboard shortcuts.

The conventional approach to this is quite tedious and calls for a bit of navigation, this could be done via the Control Panel’s Volume Mixer, the Quick Settings menu, or the Settings app. But now, you can adjust the volume on your Windows 11 device by hovering over the volume icon and scrolling the mouse wheel. Update your device to run on Windows 11 22H2 today to access this and more.

Have you tried out this trick? Share your thoughts with us in the comment section below.

Patch Tuesday October 2022: 85 patches released by Microsoft

It’s almost the end of 2022 and we’ve already reached October, which means the temperatures are slowly but surely starting to drop, so we can get our winter coats out.

Furthermore, it’s the second Tuesday of the month, which means that Windows users are looking towards Microsoft in hopes that some of the flaws they’ve been struggling with will finally get fixed.

We’ve already provided the direct download links for the cumulative updates released today for Windows 7, 8.1, 10, and 11, but now it’s time to talk about Critical Vulnerabilities and Exposures again.

For October, Microsoft released 85 new patches, which is a lot more than some people were expecting in the middle of autumn.

These software updates address CVEs in:

  • Microsoft Windows and Windows Components
  • Azure, Azure Arc, and Azure DevOps
  • Microsoft Edge (Chromium-based)
  • Office and Office Components
  • Visual Studio Code
  • Active Directory Domain Services and Active Directory Certificate Services
  • Nu Get Client
  • Hyper-V
  • Windows Resilient File System (ReFS)

The month of October comes with 85 new security updates

It’s pretty much safe to say that this wasn’t either the busiest or the lightest month for Redmond-based security experts and developers.

You might like to know that, out of the 85 new CVEs released, 15 are rated as Critical, 69 are rated Important, and only one is rated Moderate in severity.

Looking back, we can say that this volume is somewhat in line with what we’ve seen in previous October releases, however, it sets Microsoft on track to exceed its 2021 total.

And, if that were to happen, 2022 would the second busiest year for Microsoft CVEs, so keep that in mind if you want to compare it to other periods.

Know that one of the new CVEs released this month is listed as publicly known and one other is listed as being in the wild at the time of release.

We are going to take a closer look at the patches released in October 2022 and rank them by severity, type, and active exploitation status.

CVETitleSeverityCVSSPublicExploitedType
CVE-2022-41033Windows COM+ Event System Service Elevation of Privilege VulnerabilityImportant7.8NoYesEoP
CVE-2022-41043Microsoft Office Information Disclosure VulnerabilityImportant4YesNoInfo
CVE-2022-37976Active Directory Certificate Services Elevation of Privilege VulnerabilityCritical8.8NoNoEoP
CVE-2022-37968Azure Arc-enabled Kubernetes cluster Connect Elevation of Privilege VulnerabilityCritical10NoNoEoP
CVE-2022-38049Microsoft Office Graphics Remote Code Execution VulnerabilityCritical7.8NoNoRCE
CVE-2022-38048Microsoft Office Remote Code Execution VulnerabilityCritical7.8NoNoRCE
CVE-2022-41038Microsoft SharePoint Server Remote Code Execution VulnerabilityCritical8.8NoNoRCE
CVE-2022-34689Windows CryptoAPI Spoofing VulnerabilityCritical7.5NoNoSpoofing
CVE-2022-41031Microsoft Word Remote Code Execution VulnerabilityCritical7.8NoNoRCE
CVE-2022-37979Windows Hyper-V Elevation of Privilege VulnerabilityCritical7.8NoNoEoP
CVE-2022-30198Windows Point-to-Point Tunneling Protocol Remote Code Execution VulnerabilityCritical8.1NoNoRCE
CVE-2022-24504Windows Point-to-Point Tunneling Protocol Remote Code Execution VulnerabilityCritical8.1NoNoRCE
CVE-2022-33634Windows Point-to-Point Tunneling Protocol Remote Code Execution VulnerabilityCritical8.1NoNoRCE
CVE-2022-22035Windows Point-to-Point Tunneling Protocol Remote Code Execution VulnerabilityCritical8.1NoNoRCE
CVE-2022-38047Windows Point-to-Point Tunneling Protocol Remote Code Execution VulnerabilityCritical8.1NoNoRCE
CVE-2022-38000Windows Point-to-Point Tunneling Protocol Remote Code Execution VulnerabilityCritical8.1NoNoRCE
CVE-2022-41081Windows Point-to-Point Tunneling Protocol Remote Code Execution VulnerabilityCritical8.1NoNoRCE
CVE-2022-38042Active Directory Domain Services Elevation of Privilege VulnerabilityImportant7.1NoNoEoP
CVE-2022-38021Connected User Experiences and Telemetry Elevation of Privilege VulnerabilityImportant7NoNoEoP
CVE-2022-38036Internet Key Exchange (IKE) Protocol Denial of Service VulnerabilityImportant7.5NoNoDoS
CVE-2022-37977Local Security Authority Subsystem Service (LSASS) Denial of Service VulnerabilityImportant6.5NoNoDoS
CVE-2022-37983Microsoft DWM Core Library Elevation of Privilege VulnerabilityImportant7.8NoNoEoP
CVE-2022-38040Microsoft ODBC Driver Remote Code Execution VulnerabilityImportant8.8NoNoRCE
CVE-2022-38001Microsoft Office Spoofing VulnerabilityImportant6.5NoNoSpoofing
CVE-2022-41036Microsoft SharePoint Server Remote Code Execution VulnerabilityImportant8.8NoNoRCE
CVE-2022-41037Microsoft SharePoint Server Remote Code Execution VulnerabilityImportant8.8NoNoRCE
CVE-2022-38053Microsoft SharePoint Server Remote Code Execution VulnerabilityImportant8.8NoNoRCE
CVE-2022-37982Microsoft WDAC OLE DB provider for SQL Server Remote Code Execution VulnerabilityImportant8.8NoNoRCE
CVE-2022-38031Microsoft WDAC OLE DB provider for SQL Server Remote Code Execution VulnerabilityImportant8.8NoNoRCE
CVE-2022-37971Microsoft Windows Defender Elevation of Privilege VulnerabilityImportant7.1NoNoEoP
CVE-2022-41032NuGet Client Elevation of Privilege VulnerabilityImportant7.8NoNoEoP
CVE-2022-38045Server Service Remote Protocol Elevation of Privilege VulnerabilityImportant8.8NoNoEoP
CVE-2022-35829Service Fabric Explorer Spoofing VulnerabilityImportant6.2NoNoSpoofing
CVE-2022-38017StorSimple 8000 Series Elevation of Privilege VulnerabilityImportant6.8NoNoEoP
CVE-2022-41083Visual Studio Code Elevation of Privilege VulnerabilityImportant7.8NoNoEoP
CVE-2022-41042Visual Studio Code Information Disclosure VulnerabilityImportant7.4NoNoInfo
CVE-2022-41034Visual Studio Code Remote Code Execution VulnerabilityImportant7.8NoNoRCE
CVE-2022-38046Web Account Manager Information Disclosure VulnerabilityImportant6.2NoNoInfo
CVE-2022-38050Win32k Elevation of Privilege VulnerabilityImportant7.8NoNoEoP
CVE-2022-37978Windows Active Directory Certificate Services Security Feature BypassImportant7.5NoNoSFB
CVE-2022-38029Windows ALPC Elevation of Privilege VulnerabilityImportant7NoNoEoP
CVE-2022-38044Windows CD-ROM File System Driver Remote Code Execution VulnerabilityImportant7.8NoNoRCE
CVE-2022-37989Windows Client Server Run-time Subsystem (CSRSS) Elevation of Privilege VulnerabilityImportant7.8NoNoEoP
CVE-2022-37987Windows Client Server Run-time Subsystem (CSRSS) Elevation of Privilege VulnerabilityImportant7.8NoNoEoP
CVE-2022-37980Windows DHCP Client Elevation of Privilege VulnerabilityImportant7.8NoNoEoP
CVE-2022-38026Windows DHCP Client Information Disclosure VulnerabilityImportant5.5NoNoInfo
CVE-2022-38025Windows Distributed File System (DFS) Information Disclosure VulnerabilityImportant5.5NoNoInfo
CVE-2022-37970Windows DWM Core Library Elevation of Privilege VulnerabilityImportant7.8NoNoEoP
CVE-2022-37981Windows Event Logging Service Denial of Service VulnerabilityImportant4.3NoNoDoS
CVE-2022-33635Windows GDI+ Remote Code Execution VulnerabilityImportant7.8NoNoRCE
CVE-2022-38051Windows Graphics Component Elevation of Privilege VulnerabilityImportant7.8NoNoEoP
CVE-2022-37997Windows Graphics Component Elevation of Privilege VulnerabilityImportant7.8NoNoEoP
CVE-2022-37985Windows Graphics Component Information Disclosure VulnerabilityImportant5.5NoNoInfo
CVE-2022-37975Windows Group Policy Elevation of Privilege VulnerabilityImportant7.8NoNoEoP
CVE-2022-37999Windows Group Policy Preference Client Elevation of Privilege VulnerabilityImportant7.8NoNoEoP
CVE-2022-37993Windows Group Policy Preference Client Elevation of Privilege VulnerabilityImportant7.8NoNoEoP
CVE-2022-37994Windows Group Policy Preference Client Elevation of Privilege VulnerabilityImportant7.8NoNoEoP
CVE-2022-37995Windows Kernel Elevation of Privilege VulnerabilityImportant7.8NoNoEoP
CVE-2022-37988Windows Kernel Elevation of Privilege VulnerabilityImportant7.8NoNoEoP
CVE-2022-38037Windows Kernel Elevation of Privilege VulnerabilityImportant7.8NoNoEoP
CVE-2022-38038Windows Kernel Elevation of Privilege VulnerabilityImportant7.8NoNoEoP
CVE-2022-37990Windows Kernel Elevation of Privilege VulnerabilityImportant7.8NoNoEoP
CVE-2022-38039Windows Kernel Elevation of Privilege VulnerabilityImportant7.8NoNoEoP
CVE-2022-37991Windows Kernel Elevation of Privilege VulnerabilityImportant7.8NoNoEoP
CVE-2022-38022Windows Kernel Elevation of Privilege VulnerabilityImportant2.5NoNoEoP
CVE-2022-37996Windows Kernel Memory Information Disclosure VulnerabilityImportant5.5NoNoInfo
CVE-2022-38016Windows Local Security Authority (LSA) Elevation of Privilege VulnerabilityImportant8.8NoNoEoP
CVE-2022-37998Windows Local Session Manager (LSM) Denial of Service VulnerabilityImportant7.7NoNoDoS
CVE-2022-37973Windows Local Session Manager (LSM) Denial of Service VulnerabilityImportant7.7NoNoDoS
CVE-2022-37974Windows Mixed Reality Developer Tools Information Disclosure VulnerabilityImportant6.5NoNoInfo
CVE-2022-35770Windows NTLM Spoofing VulnerabilityImportant6.5NoNoSpoofing
CVE-2022-37965Windows Point-to-Point Tunneling Protocol Denial of Service VulnerabilityImportant5.9NoNoDoS
CVE-2022-38032Windows Portable Device Enumerator Service Security Feature Bypass VulnerabilityImportant5.9NoNoSFB
CVE-2022-38028Windows Print Spooler Elevation of Privilege VulnerabilityImportant7.8NoNoEoP
CVE-2022-38003Windows Resilient File System Elevation of PrivilegeImportant7.8NoNoEoP
CVE-2022-38041Windows Secure Channel Denial of Service VulnerabilityImportant7.5NoNoDoS
CVE-2022-38043Windows Security Support Provider Interface Information Disclosure VulnerabilityImportant5.5NoNoInfo
CVE-2022-38033Windows Server Remotely Accessible Registry Keys Information Disclosure VulnerabilityImportant6.5NoNoInfo
CVE-2022-38027Windows Storage Elevation of Privilege VulnerabilityImportant7NoNoEoP
CVE-2022-33645Windows TCP/IP Driver Denial of Service VulnerabilityImportant7.5NoNoDoS
CVE-2022-38030Windows USB Serial Driver Information Disclosure VulnerabilityImportant4.3NoNoInfo
CVE-2022-37986Windows Win32k Elevation of Privilege VulnerabilityImportant7.8NoNoEoP
CVE-2022-37984Windows WLAN Service Elevation of Privilege VulnerabilityImportant7.8NoNoEoP
CVE-2022-38034Windows Workstation Service Elevation of Privilege VulnerabilityImportant4.3NoNoEoP
CVE-2022-41035Microsoft Edge (Chromium-based) Spoofing VulnerabilityModerate8.3NoNoSpoofing
CVE-2022-3304Chromium: CVE-2022-3304 Use after free in CSSHighN/ANoNoRCE
CVE-2022-3307Chromium: CVE-2022-3307 Use after free in MediaHighN/ANoNoRCE
CVE-2022-3370Chromium: CVE-2022-3370 Use after free in Custom ElementsHighN/ANoNoRCE
CVE-2022-3373Chromium: CVE-2022-3373 Out of bounds write in V8HighN/ANoNoRCE
CVE-2022-3308Chromium: CVE-2022-3308 Insufficient policy enforcement in Developer ToolsMediumN/ANoNoSFB
CVE-2022-3310Chromium: CVE-2022-3310 Insufficient policy enforcement in Custom TabsMediumN/ANoNoSFB
CVE-2022-3311Chromium: CVE-2022-3311 Use after free in ImportMediumN/ANoNoRCE
CVE-2022-3313Chromium: CVE-2022-3313 Incorrect security UI in Full ScreenMediumN/ANoNoSFB
CVE-2022-3315Chromium: CVE-2022-3315 Type confusion in BlinkMediumN/ANoNoRCE
CVE-2022-3316Chromium: CVE-2022-3316 Insufficient validation of untrusted input in Safe BrowsingLowN/ANoNoSpoofing
CVE-2022-3317Chromium: CVE-2022-3317 Insufficient validation of untrusted input in IntentsLowN/ANoNoSpoofing

This October 2022 patch release also includes fixes for 11 information disclosure bugs, including one in Office that’s listed as publicly known.

The rest of the info disclosure vulnerabilities only result in leaks consisting of unspecified memory contents, according to experts.

However, the bug in the Web Account Manager could allow an attacker to view unbound refresh tokens issued by one cloud on a different cloud.

Also, the patches for Visual Studio Code and the Mixed Reality Developer Tools fix disclosure bugs that could allow reading from the file system.

That being said, know that the final info disclosure bug fixed this month could allow reading from the HKLM hive of the registry which you normally would not have access to.

Furthermore, eight different DoS vulnerabilities were patched this month, the most interesting being the DoS in TCP/IP, which could be exploited by remote, unauthenticated attackers and does not require user interaction.

This update rollout is rounded out by five spoofing bugs, including the lone Moderate-rated fix, which addresses a spoofing vulnerability in Microsoft Edge (Chromium-based).

Looking forward, the next Patch Tuesday security update rollout will be on the 8th of November, which is a bit sooner than some expected it.

Have you found any other issues after installing this month’s security updates? Share your opinion in the comments section below.

How to Label a Legend in Google Sheets

Sheets is Google’s alternative to Microsoft Excel. The Sheets web app is freely available to all Google account users.

Although it might lack some of Excel’s features, Sheets is still a pretty good alternative.

Like all spreadsheet applications, Sheets enable users to set up charts for data entered. To make Sheets graphs clear, you must add legend labels to them. The legends will show what data the graphs display.

Read on to find out how to add text to a legend in Google Sheets.

How can I label legends in Google Sheets?

1. Add a label legend

  1. First, enter the data for your graph across a column or row in a Google Sheets spreadsheet.
  2. Hold the left mouse button and drag the cursor over the data entered to select it.
  3. Click Insert > Chart to add the graph to the sheet.
  4. Click the Chart type drop-down menu to select one of the pie graph types to add a label legend to.
    Sheets graph without a legend add words legend in google sheets
  5. Click in the Add Label box, and select the cell range that includes your chart data. Then the chart will display the data value labels like the one in the snapshot directly below.
    Add Label box add words legend in google sheets
  6. You can remove the label legend by deselecting the Use column as labels checkbox.

2. Add and edit text in a Google Sheets legend

  1. 1. Double-click a label on the chart that you want to change and go to the Customise tab.

    legend google sheets text options
  2. 2. Navigate to the Legend section.

  3. 3. You can select an alternative font, as well as a different font size for the labels by clicking on the drop-down menu beneath Legend font.

  4. 4. Double-clicking a legend label a second time will open a small text box with which you can change the label’s text.

    change label text box sheets
  5. 5. Click the B and I buttons in the Text style box to apply bold and italic formatting for all the labels.

  6. 6. Press on the Text color box to choose an alternative text color.

  7. You can manually fully edit the text in a Google Sheets legend. Its font size, font type, color and formatting can be easily modified via the built-in Chart editor.


3. Edit the legend labels’ positioning

  1. To change legend positioning, click the Customize tab on the Chart editor’s sidebar.
  2. Click Legend to expand further options.
  3. Then select either Top, Bottom, Left, or Right in the Position drop-down menu to change the legend to one that doesn’t display percentage value labels for pie charts.
    Position drop-down menu add words legend in google sheets
  4. Double-click a specific value within the legend to select it.
  5. Then you can apply specific text formatting to the selected value with the options on the Chart Editor’s sidebar.

So, that’s you can add and edit label legends in Google spreadsheet graphs. The data labels those legends display are essential to charts.

If you found this information useful, or you would like to add some other suggestions to this guide, please feel free to use the comment section found below this article.

Caps Lock Light/Indicator is Not Working: How to Fix it

A few years back, computer companies started experimenting with removing the LED indicator lights from laptops for challenging drive activity and Scroll Lock.

After that, they removed the Num Lock and the Caps Lock indicator lights. Speaking of Caps Lock, many users reported that the Caps Lock light is not working on their Windows 10 PC.

Missing Caps Lock indicator is a minor problem, but some users like to have a visual indicator that shows them whether Caps Lock is activated or not.

In this guide, we will show you how to fix this issue, as we did with the keyboard not working on Windows 10/11 problem.

Why is the Caps Lock light not working?

There are a series of potential causes for the Caps Lock light not working issue. Below are some of the popular variations of the problem and their reasons, as reported by users:

  • Caps Lock indicator on screen: Some users prefer a Caps Lock indicator on their display. This is relatively simple to achieve, and the best way to do it is to use third-party software.
  • Asus Caps Lock light not working on laptop: Sometimes your Caps Lock indicator on the Asus laptop can become missing. To fix this problem, be sure to reinstall the on-screen software that came with your laptop.
  • Caps Lock indicator Windows 10 Lenovo, Dell, HP: This issue can also affect Lenovo, Dell, and HP devices. If you have this problem, be sure to check your keyboard settings and reinstall the keyboard software.
  • Wireless keyboard Caps Lock indicator not working: If the Caps Lock indicator isn’t working on your wireless keyboard, the issue might be your drivers, so be sure to update them.
  • Caps Lock indicator not showing Windows 10: Many users reported that the Caps Lock indicator isn’t showing on Windows 10. This can be caused by a problematic update, so be sure to remove any recent updates.
  • Caps Lock indicator taskbar, tray icon: If you want to have a Caps Lock indicator on your Taskbar or as a tray icon, you’ll have to use a third-party solution to achieve that.
  • Caps Lock indicator not showing on-screen
  • Caps lock light not working Dell,
  • Caps Lock light not working – HP

How do I fix Caps Lock on Windows 11?

1. Change Ease of Access settings

  1. Click the Start button and select the Settings icon.
    settings caps lock light not working
  2. Choose Ease of Access.
    ease of access
  3. Select the Keyboard in the left pane.
    keyboard
  4. Enable Play a sound whenever you press Caps Lock, Num Lock, and Scroll Lock under Use Toggle Keys.
    use toggle key caps lock light not working

Now, each time you activate Caps Lock, Num Lock, and Scroll Lock, your computer will play a notification sound, and it will also play a different one when you turn off these features by pressing the keys again.

2. Enable CAPS lock indicator using TrayStatus

traystatus

TrayStatus is a small application developed by BinaryFortress that places indicator icons directly into the taskbar.

TrayStatus supports icons for Caps Lock, Num Lock, and Scroll Lock but can also display the status of the CTRL, ALT, SHIFT, and WINDOWS keys.

In addition, you can also have an indicator icon for hard drive activity.

The application is very lightweight, taking less than 4 MB of space from your system drive without increasing Windows’ boot time if you enable it to run at startup.

3. Update keyboard driver

  1. Press the Windows key + X and select Device Manager.
    device manager
  2. Double-click the Keyboards option to expand it.
    keyboards
  3. Right-click the driver there and select Update driver.
    update driver
  4. Now, click the Search automatically for drivers option.
    search automatically caps lock light not working
  5. Wait for the Search to complete and install any available update.

If your Caps Lock light is not working on an MSI laptop, it might be down to outdated keyboard drivers. Scanning for updates with the built-in updater should show you the available updates to install.

Alternatively, you can update your drivers with a reliable tool in Outbyte Driver Updater. This tool automatically scans for outdated drivers on schedule and recommends timely updates before they can cause issues.

Also, Outbyte Driver Updater is not just limited to driver updates. It also fixes broken drivers and installs missing ones to ensure your PC runs optimally.

Outbyte Driver Updater

An impressive tool that scans your device drivers and updates them to help you boost your PC performance.
Free Trial Download now

4. Enable Caps Lock light using Keyboard Indicator

Keyboard Indicator is a small application similar to TrayStatus. It was initially developed for Windows XP, Vista, and 7, but it works fine on Windows 8.1 and 10.

Even though I recommend you first try TrayStatus as it officially supports Windows 10, Keyboard Indicator offers many more options.

For example, by default, when you press Caps Lock, Num Lock, or Scroll Lock, you’ll get an icon inside the taskbar that changes status, exactly like TrayStatus does.

However, Keyboard Indicator will also give you a toast notification and will play a notification sound, ensuring you never miss activating one of these functions.

Caps lock indicator not working in Windows 10

Also, Keyboard Indicator offers many customization options, from the font size and color to the position and time duration of the toast animation. It even allows you to customize the text it displays.

The only downside of the Keyboard Indicator is that you can get indicators only for Caps Lock, Num Lock, and Scroll Lock.

If Keyboard Indicator is the application you want to try, you can download it from its official website, found here.

5. Remove the problematic updates

  1. Open the Settings app by pressing the Windows key + I shortcut.
  2. Select the Update & Security option.
    update and security
  3. Now, click on View update history.
    view update history caps lock light not working
  4. Select Uninstall updates. This will open the Control Panel.
    uninstall updates
  5. Now, locate the most recent update and click on it.
  6. Finally, click the Uninstall option at the top and follow the simple onscreen instructions to complete the process.
    uninstall update caps lock light not working

If the Caps Lock indicator isn’t working on your PC, the problem might be a recent update. Windows 10 automatically install updates, and sometimes a specific update can cause this problem to appear.

If this problem started recently, you might be able to fix it simply by removing the latest update. Once you remove the update, check if the problem still appears. If not, it means that the update caused the problem.

We also have to mention that Windows 10 will try to install the same update again, and that will cause the issue to reappear. However, you can prevent that from happening by disabling Windows updates.

6. Check if your keyboard is faulty

Sometimes the missing Caps Lock indicator can signal a faulty keyboard. The best way to check your keyboard is to enter BIOS and see if the LED light is working.

Alternatively, you can connect the keyboard to a different PC and see if the issue is still present.

Even if the Caps Lock indicator isn’t working, the problem is most likely a bad LED, and if your keyboard is working correctly without the Caps Lock indicator, there’s no need to replace the keyboard.

If your keyboard is faulty, maybe a virtual keyboard on the screen that allows you to use the mouse pointer for typing the way you do it with the regular keyboard could be helpful.

⇒ Get Comfort On-Screen Keyboard Pro

7. Turn on Toggle Keys and change accessibility settings

  1. Open the Settings app.
  2. Choose the Ease of Access option.
    ease of access
  3. Click the Keyboard option in the left pane.
    keyboard
  4. Toggle the switch for Use Toggle Keys forward to enable it.
    use toggle key caps lock light not working
  5. Now, choose the Audio option in the left pane.
    audio
  6. Click the dropdown under Show audio alerts visually and select Flash the active window.
    flash active window

If you want a visual indicator that your Caps Lock key is pressed, you might want to turn on Toggle Keys.

This gives you a visual notification whenever the Caps Lock key is pressed. After that, your active window or screen will flash whenever you press Caps Lock.

This effect doesn’t look visually appealing, but at least you’ll receive both audio and visual notifications whenever you press Caps Lock.

8. Reinstall Lenovo On Screen Display

If the Caps Lock light is not working in Windows 10, the problem might be Lenovo On-Screen Display software.

Issues with this software can occur, and to fix the problem, it’s advised to reinstall Lenovo On Screen Display. There are several ways to do it, but the best way is to use uninstaller software in CCleaner.

CCleaner is a unique application that can remove any program from your PC. In addition to removing the application, it will also remove all associated files and registry entries.

This will ensure that the application is completely removed and fix any issues caused by the application.

After you remove Lenovo On Screen Display, reinstall it again and check if the problem is resolved. If you’re using a different laptop brand, check for similar software and reinstall it.

9. Install the latest updates

  1. Press the Windows key + I to open the Settings app.
  2. Select the Update & Security section.
    update and security
  3. Now, click the Check for updates button.
    check for update caps lock light not working
  4. Finally, click the Download and install option.
    download and install

Several users reported that installing the latest updates fixed the problem for them, so you might want to try that.

If you’re having problems with the Caps Lock indicator, the issue might be caused by missing updates. However, you can fix this problem simply by updating Windows to the latest version.

By default, Windows 10 automatically installs the missing updates, but sometimes you might miss an important update due to specific bugs.

How do I fix the Caps Lock light not working on Windows 11?

If the Caps Lock light is not working on Windows 11, it can be because of outdated keyboard drivers. You can effectively fix this by updating your drivers using a dedicated tool.

Another known cause of the issue is a problematic update. Removing this update should fix the problem in this case. You can set the subject using any of the solutions in this guide.

How do you reset Caps Lock?

  1. Open the Settings app and select the Time & Language option.
    time and language
  2. Choose Language in the left pane.
    language caps lock light not working
  3. Select Spelling, typing, & keyboard settings under Related settings.
    spelling
  4. Now, choose Advanced keyboard settings under the Related settings option.
    advanced keyboard
  5. Click Language bar options.
    language bar
  6. Click the Advanced Key Settings tab at the top.
    advanced caps lock light not working
  7. From here, tick the radio button for Press the SHIFT key under the To turn off Caps Lock section.
    press shift
  8. Click the Apply button, followed by OK to save the changes.
    apply
  9. Finally, restart your PC.

You can always turn off the Caps Lock with the Shift key.

Problems with the Caps Lock indicator usually aren’t severe, but if you’re having any issues, feel free to try any of our solutions.

Are you facing other issues like the keyboard typing wrong characters and letters? Then, check our detailed guide to fix it effectively.

Feel free to let us know if you were able to fix the issue using any of our solutions in the comments below.

7 Ways to Fix Your Xbox Game Bar if the Mic is Not Working

The Xbox app for Windows 11 was intended as a cross-platform, all-in-one gaming hub. However, since its ascension, it hasn’t worked all that great for casual gamers and streamers. One of the common problems reported by many is that the mic is not working in the Xbox Game Bar app.

The problem is usually encountered when in an Xbox chat party and has left users in a lurch since there isn’t much information on the web, and the full error message reads: Something went wrong with your microphone. Try changing your party audio settings.

So, we decided to take up the issue, and by the time you are done with this article, things should be up and running if the mic is not working in the Xbox party on your PC.

Why won’t my mic work on Xbox Game Bar?

If the Xbox app voice chat is not working on your PC, it could be the configured permissions to blame. Likely, Xbox can’t access the microphone, and you would have to modify the permissions.

Other than that, a faulty microphone is just as likely to cause the problem. Even connection issues are an underlying cause here. You can verify this by checking if the mic works on other apps.

Also, you may have an incorrect mic chosen in the Xbox Game bar, leading to it not being detected. Besides, outdated microphone drivers or running an older version of the app are just as likely to cause the issue.

What can I do if the mic is not working in Xbox Game Bar?

1. Clear apps cache

  1. Press Windows + I to open Settings and select Apps.apps
  2. Expand the Xbox Game Bar app and then click on Advanced options.advanced options to fix xbox game bar mic not working
  3. Scroll down and click Reset.reset to fix xbox game bar mic not working
  4. Again, click Reset in the confirmation prompt.reset

Let’s start by troubleshooting the app itself. The lackluster nature of the Windows 11 Xbox Game Bar app resembles Windows Live from back in the day. The app has a lot of issues, both performance-wise and design-wise.

Microsoft is seemingly trying to sort things out, but not with significant success to this day. Although most essential features usually work as intended, that’s not always the case.

Every app will eventually pile up the cache, and once that happens, some issues might emerge, including the Xbox Game Bar mic not working in Windows. That’s why the first step we recommend is resetting app services.

2. Check the app’s permissions

  1. Press Windows + I to open the Settings app, and then choose Privacy.privacy
  2. Select Microphone under App permissions from the left.microphone to fix xbox game bar mic not working
  3. Now, make sure the toggle for Xbox Game Bar is enabled.enable toggle to fix xbox game bar mic not working

To use the mic with any app on the Windows 11 platform, you’ll need to permit it. This should be the case by default, but it’s not a rule, even though we’re talking about a preinstalled app.

Once done, check if the Xbox game bar mic is now working. If not, head to the next solution.

3. Check audio input drivers

  1. Press Windows + R to open Run, type devmgmt.msc in the text field, and click OK.devmgmt.msc
  2. Expand the Audio inputs and outputs section.audio inputs and outputs
  3. Right-click on every entry individually and select Uninstall device.uninstall device
  4. Again, click Uninstall in the confirmation prompt.uninstall to fix xbox game bar mic not working
  5. Reboot your PC and make sure the mic is plugged in.
  6. Windows will now automatically install a fresh copy of the driver.

Finally, besides networking, consider reinstalling the audio input driver. Maybe we need to look at the bigger picture, and the driver is subpar, so the audio input device won’t work as intended.

Once you’ve uninstalled the driver, it should be reinstalled on its own after restarting the computer. On the other hand, you can try using a specialized tool to automatically search for the missing driver.

Professional driver updating utilities allow you to scan and update all your drivers in just a few minutes. Plus, they work great as maintenance tools, since they will allow you to set up automatic scans that will notify you if your drivers are going out of date.

⇒ Get Fortect Driver Updater

4. Change the default output format

  1. Right-click on the speaker’s icon in the notification area and select Sounds.sounds
  2. Go to the Recording tab, right-click on your default mic, and select Properties.properties to fix xbox game bar mic not working
  3. Navigate to the Advanced tab and select an option with DVD Quality or Studio Quality from the Default format dropdown menu.change default format
  4. Once done, click OK to save the changes.ok

Many users managed to resolve various mic issues (stutter, delay, or mic not working) by changing the default output format of the recording device. Also, setting the mic you’re using as the default device is essential.

The default format won’t usually work with the mic regarding the Xbox Game Bar app’s performance. Therefore, you must switch from the assigned form (usually CD) to DVD and look for changes.

Some users even switched to Studio quality, and it solved things. So, if the DVD format doesn’t work, try others.

5. Troubleshoot the connection

Another possible reason why one feature fails or underperforms within the Xbox app can be related to network issues. Firstly, you might want to go to the official Xbox Live Status website and check whether any services are down.

Also, the following ports must be open as they are mandatory when using any Xbox Live service:

  • Port 88 (UDP)
  • Port 3074 (UDP and TCP)
  • UDP Port 3544 (UDP)
  • Port 53 (UDP and TCP)
  • Port 80 (TCP)
  • UDP Port 4500 (UDP)
  • Port 500 (UCP)

In addition, restarting your PC and router, for starters, might resolve the temporary connection situation; after you’re sure everything is configured correctly, test your mic within the app and look for improvements.

6. Disable Firewall and antivirus temporarily

Another possible reason the Xbox app can’t access your mic is firewall-imposed limitations. This is hardly the case for the built-in Windows Firewall, but third-party firewalls are known for blocking specific apps from accessing the PC peripherals.

This leads us to believe that disabling them might fix things if the Xbox Game Bar mic is not working.

So, if you’re knowledgeable enough to add an exception to your third-party firewall, do so. On the other hand, temporarily disabling the firewall before using the app should help if you’re not sure how to do it.The Xbox Game Bar push to talk not working issue will be fixed afterward.

7. Install Teredo Adapter

  1. Right-click the Start button in the Taskbar, and then select Device Manager.device manager to fix xbox game bar mic not working
  2. Click on the View menu, and then check the Show hidden devices option.show hidden devices
  3. Expand Network adapters and look for Teredo Tunneling Pseudo-Interface.
  4. If it’s not there, click on the Action menu, and choose Add legacy hardware.add legacy hardware to fix xbox game bar mic not working
  5. Click Next.
  6. Choose the “Install the hardware that I manually select from the list (Advanced)” option and click Next.
  7. Choose Network adapters from the list and click Next again.
  8. Select Microsoft.
  9. Choose Microsoft Teredo Tunneling Adapter from the list and install it.
  10. Restart your PC. The Xbox app voice chat not working on PC issue will be solved.

A lot, and we mean a lot, of Xbox Game Bar app issues trace back to the P2P connection. And in this case, if you are sure that the mic is fully functional, but you still see that the selected microphone could not be found, try with an alternative virtual adapter.

The alternative to a standard configuration is the Teredo Adapter. However, remember that the adapter’s driver installation requires some work.

If the Xbox Game Bar mic is not working in Windows 11, you first should run the Recording Audio troubleshooter. The built-in troubleshooter will automatically identify and fix the problem if Microsoft has already recognized it and a solution is available.
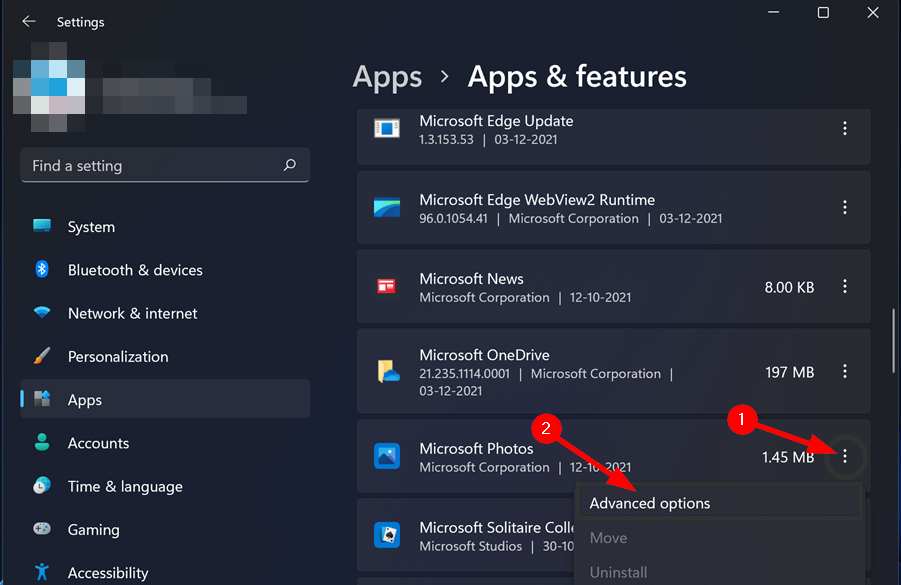
Recording Audio Troubleshooter

Also, make sure the connections are in order. If the mic is not working throughout the system, the links are likely improper, the cables are damaged, or the microphone is faulty.

Besides, you should check the Xbox Game Bar settings and verify that the proper microphone has been selected.

How to use the mic on the Xbox app on a PC?

You can easily open the Xbox Game Bar app and access the microphone settings from the Audio section.

Xbox Game Bar

It allows you to choose the desired microphone and modify the sound level. And through it, you can use the mic on Xbox and reconfigure settings for the desired output.

If you cannot make your mic work in the Xbox app, consider contacting Microsoft support. Unfortunately, it seems that even this, the simplest of features, sometimes doesn’t work.

Also, find out how to optimize the PC for the best gaming performance and enjoy every minute you spend on the Xbox app.

Besides, the solutions listed here would work even if you are getting the Something went wrong with your microphone, Try changing your party audio settings error.

Furthermore, if you have any alternative solutions or questions, feel free to tell us in the comments below.

Fix: Left Mouse Button Drag Not Working on Windows 10

Most of us use the mouse to drag and drop files in Windows rather than copy/paste. This makes things easier and faster, thanks to the little stress and ease of access.
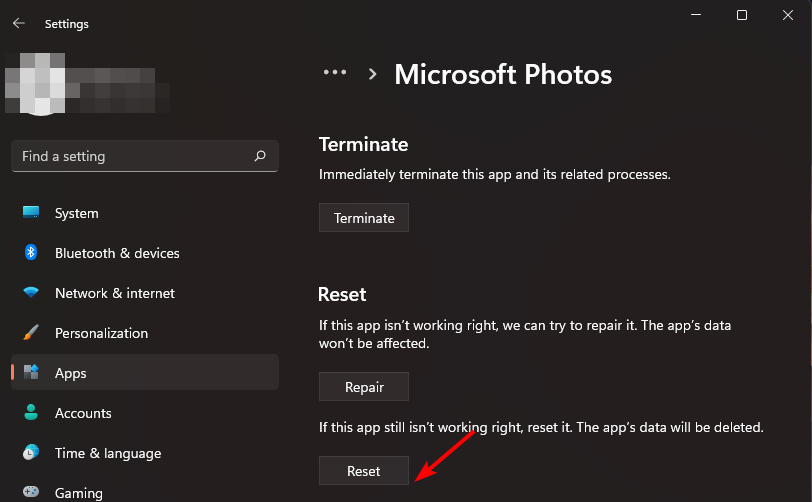
However, some users have reported that their drag-and-drop option doesn’t work when they try to move a specific file or folder.

Thankfully, it is not the most challenging issue to solve, as shown in this guide.

Why is the mouse dragging not working?

The left mouse drag is not working issue has various potential causes. However, one of the essential things you can point to is outdated drivers.

Also, if you have recently installed an application before noticing this issue, the app or software might be causing the problem. So, you might need to remove this app to solve the issue.

What are the other mouse dragging issues that users reported?

There are many problems with your mouse that can occur, and speaking of mouse issues, these are some of the most common problems that users reported:

  • Mouse drag and drop not working Windows 10: This is a relatively common problem that can occur with your mouse. If you’re having this issue, feel free to try any of our solutions.
  • Mouse left click and drag not working properly: This is just a variation of this problem. If you have this issue, be sure to check if your mouse is working properly.
  • Mouse dragging problems Windows 10: Mouse dragging problems are relatively common, and in order to fix this problem, you might want to enable Mouse ClickLock feature.
  • Mouse not dragging properly: Sometimes the dragging function might not work properly on your mouse. This can be a big problem, but you might be able to fix it by cleaning your mouse.
  • Left mouse button won’t drag: Several users reported that left mouse button won’t drag at all. This is an annoying problem, and a faulty mouse most likely causes it.

Now let us discuss some solutions. Note that you may apply them if your touchpad click and drag is not working or your mouse won’t highlight or drag.

What can I do if the left mouse drag doesn’t work?

1. Enable Mouse ClickLock

  1. Press the Windows key + S, type mouse, and select Mouse settings.
    mouse settings left mouse drag not working
  2. Select Additional mouse options.
    additional mouse
  3. Under the Buttons tab, check Turn on ClickLock.
    turn on clicklock
  4. Click the Settings… button in the ClickLock section.
    settings left mouse drag not working
  5. Now, set the time you want your click to be locked.
    set time
  6. When you set everything right, click OK.

You can use a temporary solution until you find the real cause of the left drag problem. And that is ClickLock, a feature that allows you to drag your files just by longer-clicking on them without constantly holding the left mouse button.

Now, you don’t need to hold your mouse button to drag your files, but this would probably be a temporary solution since you get used to having a mouse button. It’s up to you.

2. Update Drivers

  1. Press the Windows key + X and choose Device Manager.
    device manager
  2. Double-click on the Mice and other pointing devices option to expand it.
    mice and left mouse drag not working
  3. Now, right-click on your driver and choose Update driver.
    update driver
  4. Click the Search automatically for drivers option.
    search auto
  5. Wait for the scan to finish and install any available updates.

Windows 10 still has a problem with drivers in general, as some hardware manufacturers didn’t provide the needed software. So, that could be the case with your mouse, mainly if you use a ‘high-end’ device.

So, it won’t hurt to check if your mouse drivers are up to date.

Always keep ahead with updating your outdated drivers for your computer to work properly because they are crucial for some of your system functionalities.

A much easier alternative would be using a third-party driver updater like Outbyte Driver Updater.

This tool oversimplifies the process of updating your drivers, and as a bonus, it also takes care of and fixes the ones that are broken or missing.

The UI is extremely simplistic, the program itself is easy-to-use, and you can even program it to automatically run in the background to find newer drivers as soon as they become available.

Outbyte Driver Updater

Your mouse drivers will no longer be the source of your peripheral problems if you keep them updated with Outbyte Driver Updater.
Free trial Download now

3. Remove any recently installed applications

  1. Press the Windows key + I to open Settings.
  2. Select the Apps option.
    apps left mouse drag not working
  3. Choose the app you want to remove.
  4. Click the Uninstall button and follow the onscreen instructions to complete the process.
    uninstall app

Sometimes third-party applications can cause this problem to appear. If this problem starts appearing recently, remove any applications you’ve installed in the last few days.

According to users, this issue was caused by the Rocketdock application, but the problem was resolved after removing it.

Given the situation, your best bet is to use a dedicated uninstaller software in CCleaner that can remove the program and any remaining residual data that may otherwise be left behind.

CCleaner is an entirely safe utility that can detect residual files and force remove stubborn apps from your PC.

It is easy to use. In just a few clicks, you can select the app you want to remove, and the software removes it and scans your PC for any leftover files related to it.

After successfully removing unwanted apps, check and see if the problem is fixed.

4. Clean your mouse

Maybe the problem isn’t in Windows 10 at all. On the other hand, maybe your mouse is full of dust and needs a good cleaning. Several users reported that they fixed the problem simply by using compressed air to clean the inside of their mouse.

Sometimes, you might have to adjust the little spring in the micro switch.

In addition, you might want to check if your left mouse button is working correctly. Then, simply set the right mouse button as the primary button in the Mouse options.

After that, check if the problem appears using the right mouse button. If the issue doesn’t occur with the right mouse button, the problem is your mouse, so you might have to replace it.

If you’re unsure how to clean your mouse, Search online for the instructions correctly.

5. Perform a Clean boot

  1. Press Windows key + R, type msconfig, and click OK.
    Mouse not dragging properly
  2. Click the Services tab and check Hide all Microsoft services.
  3. Now click the Disable all button.
    Left mouse button won't drag
  4. Navigate to Startup tab and click Open Task Manager.
    Mouse won't drag and drop Windows 10
  5. Right-click on each of apps there and choose Disable.
    Mouse click and drag not working properly
  6. Now, go back to the System Configuration window.
  7. Click on Apply and OK and restart your PC.
    Mouse dragging problems Windows 10

Sometimes left mouse button drag won’t work because of the third-party applications. To fix that, performing a Clean boot is recommended to check if that solves the problem.

Once your PC restarts, check if the problem still appears. If not, it means that one of your startup applications or services was causing the issue.

To find out which application is the cause, you need to enable applications and services individually or in groups. Remember that you need to restart your PC after enabling a group of applications or services.

Once you find the problematic application, you can disable it or uninstall it to fix the problem permanently.

6. Connect your mouse to a different USB port

The problem might be your USB port if you’re using a USB mouse. Several users reported that they fixed the problem simply by connecting their mouse to a different USB port on their PC.

If you have a USB mouse, we advise you to connect it to a USB 2.0 port instead of a USB 3.0.

USB 3.0 offers excellent speed, but your mouse won’t ever need that kind of bandwidth, so we advise you to connect it to USB 2.0 and check if that solves the problem.

It’s worth mentioning that this problem can also occur while using a USB hub.

USB hubs are great since they give extra USB ports for your devices, but sometimes issues can occur with a USB hub and your mouse.

To fix the problem, it’s recommended to disconnect your USB mouse from the hub and connect it directly to your PC.

7. Press the Esc key

Many users reported that they solved left mouse button drag problems simply by pressing the Esc key. This is an unusual solution, but it works according to users.

If your mouse doesn’t drag, press the Esc key, and the problem should be resolved. Several users reported that this solution solved the problem, so try it out.

8. Change Internet options

  1. Press Windows key + S and enter internet options.
  2. Select Internet Options from the menu.
    Mouse not dragging properly
  3. Go to the Programs tab and click the Manage add-ons button.
    Left mouse button won't drag
  4. A new window will now appear. Locate XML 3.0 and disable it. Of course, you can also disable XML 4.0, but it’s not mandatory.

According to users, if you’re unable to highlight text correctly because the left mouse button drag isn’t working, you might be able to fix the problem by changing your Internet options.

This is an unusual solution, but it works according to users.

After making these changes, check if the problem with your mouse is resolved. Several users reported that this solution worked for them, so you might want to try it out.

How can I fix drag & drop not working on Windows 11?

The drag and drop not working issue on Windows 11 is similar to the case reported on Windows 10. The causes are the same, and so are the solutions.

Hence, you can effectively apply the solutions in this guide to fix the issue.

Why does my left click not work sometimes?

If your left click does not work sometimes, it might be down to hardware issues. So, you might need to perform some troubleshooting steps like removing dust and cleaning.

The issue might also be down to outdated drivers. We have shown how to update your drivers in this guide effectively. So be sure to check it out.

The left mouse drag not working issue can be frustrating, as it takes away an essential ease-of-use feature. We hope this article helped you with the left mouse button drag problem.

If you are facing other issues like the mouse keeps clicking on Windows or middle mouse button not working check our detailed guides to fix it effectively.

If you have any comments or questions, write them down below.

Ignite 2022: Mesh avatars come to Teams, Teams Premium introduced, more Teams news

Communication is the cornerstone of any business, it doesn’t matter how big or small.  For businesses that use Microsoft Office 365, Microsoft Teams is the communication tool of choice.  Microsoft is announcing new features available now in Microsoft Teams, and what they are working on in the pipeline for future releases.

Mesh Avatars

Now you don’t always have to turn your camera on during a meeting.  Mesh avatars offer you the ability to choose how you show up in a meeting by designing and choosing a customized avatar.  You can design your avatar by using the Avatars App in the Microsoft Teams App Store.  Users will be able to design up to three avatars using hundreds of customizations ranging from physical attributes to accessories.  

Once your personal avatar is created you can use it in Teams meeting by choosing the option “Effects and Avatars” menu before joining the meeting.  During the meeting, you will be able to use various gestures with your avatar to react to topics.  

Mesh avatars are available in standard Team meetings for private preview customers.  If an organization is interested they can signup for updates on the Teams website if they are not enrolled in the Teams Technical Access Beta Program. 

Teams Premium

The new Microsoft Teams Premium addon will be available in preview starting in December.  Teams Premium will make all meetings more personalized and secure.  Meeting guides will allow you to tailor the path of the meeting to your needs.  Guides can be set up for each meeting by the organization’s I.T. team.  You can also brand each meeting to your specific needs.  

Intelligent recaps, give personalized highlights of every meeting to help you find what matters most to you.  AI-generated tasks are assigned throughout the meeting as well.  Think of it as having a virtual assistant attending your meeting.  Intelligent playback and personalized insights help divide the meetings into chapters making it easier to find what is important to you.  

Teams Premium will also feature live translations of meetings and offer and offer a more secure experience to protect against leaks.  Features such as watermarking and limiting who can record the meeting.  Those with a Microsoft Office 365 E5 subscription will have the most secure options.  Those E5 customers will have access to Microsoft Purview Information Protection to apply protection options.  

Advanced webinars and virtual appointments will enhance the business-to-consumer relationship.  Users will be able to join webinars and appointments through mobile or web browsers as well as the Teams app.  Integration with Microsoft Bookings and the ability to send out SMS message reminders will help keep wait times to a minimum.  

Teams Premium features will begin to roll out in December 2022  as part of the Teams Premium Preview with general availability coming in February of 2023.  AI capabilities and intelligent meetings will begin rollout in the first half of 2023. 

New Chat and Collaboration Features

Staying organized and focused during a busy meeting can be challenging.  Microsoft is introducing new Teams features to make staying engaged easier.  You’ll now be able to send short, rich video clips from desktop or mobile.  The receipt can choose to reply in chat or video of their own.  You can also spice the conversation up with over 800 Teams Emojis.  Suggested replies are also currently available in one on one chats. Teams can suggest a reply based on the context of your conversation.  Suggested replies will be coming to the group chat in October.  

Improvements to Teams Channels

Team channels are getting their design improved for a more modern look and fee. The design will be more intuitive allowing workers to focus more on conversation content.  The compose box will be moved to the top of the page, Pinned posts will make it easier for users to find what’s most important.  Pop-out conversations will also allow users to keep track of a specific conversation while working.  A more streamlined info pane will make it easier to keep users up to speed.  

Branding channels will also be possible.  You’ll be able to customize the channel bar to fit your organization’s brand.  Microsoft will also be adding post types that allow corporations to customize posts, such as announcements or company milestones.  

New App Microsoft Places

Microsoft Places is a brand new app being introduced to optimize places for hybrid work.  The Microsoft Places app can be used the help decision-makers better modify to work environment to accommodate hybrid work.  Microsoft Places will help bridge the gap between remote and in-person work environments.  

Microsoft Places will soon be available in preview and will have such features as a calendar to know when users are working remotely or in the office.  Users wil also be able to use the app to accommodate travel time.  Users will be able to use the app for waypoint finding inside the office and be able to book conference rooms.  Microsoft Places will make it easy for business decision-makers to be able to track facility usage for future planning.

Team Platform For Developers Updates

Updates include a Teams Live Share SDK that allows developers to turn any shared app into a Teams meeting.  Teams Live Share SDK is now in preview and includes the ability for participants to use virtual writing tools to markup meetings.  Teams apps will also be extended to Outlook and Office using the Teams JS 2.0 SDK that was announced at Microsoft Build 2022.  Developers will be able to extend Teams Pages and Message Extensions throughout Office and Outlook. Teams Toolkit is now a part of Visual Studio.  Developers can now use Visual Studio to build collaborative apps to work across Teams, Office, and Outlook.