Efficiency mode, also known as power-saving mode or low-power mode, is a feature available in Windows 11 that helps optimize your device’s performance by conserving battery power and minimizing resource usage.
When enabled, Efficiency mode frees up resources used by inactive apps running in the background and prioritizes resources for other active apps.
However, efficiency mode may limit app performance, causing them to perform slowly and in some circumstances, making the apps unusable or even crash completely.
What is the efficiency mode in Windows 11?
Efficiency mode in the Task Manager is a new feature that lets you limit how much an app uses your device’s resources, such as the CPU, memory, disk, network, and background running time. It also helps decrease the CPU’s thermal footprint, reduces fan noise, and improves battery life.
Not all applications and processes in Task Manager have access to this feature. You can only enable or disable efficiency mode for supported processes. Some applications don’t support this feature because enabling it reduces their priority in using system resources.
How do I turn off efficiency mode in Windows 11?
Right-click the Taskbar and select Task Manager from the menu.
In the Task Manager window, select the Processes tab.
Now, locate and click on the desired process from the list of processes.
If you can’t find the process, click on Status at the top of the Task Manager window, and it will show you a list of all the processes running in Efficiency mode.
Once you have selected the process, right-click on the process and uncheck the Efficiency mode option from the context menu.
That’s it! Efficiency mode will be turned off for the selected process.
If you want to disable Efficiency mode for other processes, repeat the same steps for each desired process.
To disable efficiency mode for certain processes, you may need to disable it individually for each sub-process.
However, efficiency mode is permanently enabled for apps like Chrome and Edge, meaning you cannot turn it off. You can temporarily disable efficiency mode for these apps, but they will automatically be re-enabled upon the next restart.
Apps like Chrome and Edge have their own efficiency mode and battery saver options that can be turned off to improve the performance of the respective apps.
If you have any more questions, please leave them in the comments section below.
This article will explain what Smart App Control is, how it works, and how to turn it on or off in Windows 11.
What is Smart App Control in Windows 11?
Smart App Control (SAC) is a new security feature introduced with the Windows 11 22H2 update. It runs alongside your Microsoft Defender or third-party antivirus software to block potentially unnecessary apps that can slow down your device, display unexpected ads, or perform other unexpected actions.
How does Smart App Control work?
Whenever you try to launch an app Smart App Control uses an AI (cloud-powered security service) to check the app’s safety before allowing it to run. If the security service thinks it is safe, SAC will let it run. However, it will be blocked when found malicious or potentially unwanted.
If the security service is unsure about an app’s safety, Smart App Control checks whether the app has a valid signature. If it does, the app can run. However, apps that are unsigned or have an invalid signature are blocked to keep you safe.
By default, Smart App Control is disabled because it cannot provide complete protection against apps from an existing installation. Enabling Smart App Control can potentially disrupt your regular actions. That’s why Microsoft wants you to enable this feature manually.
Some users notice that Smart App Control occasionally blocks legitimate software. Learn how to resolve such cases with this guide on Smart App Control blocking apps.
How do I turn on or off Smart App Control in Windows 11?
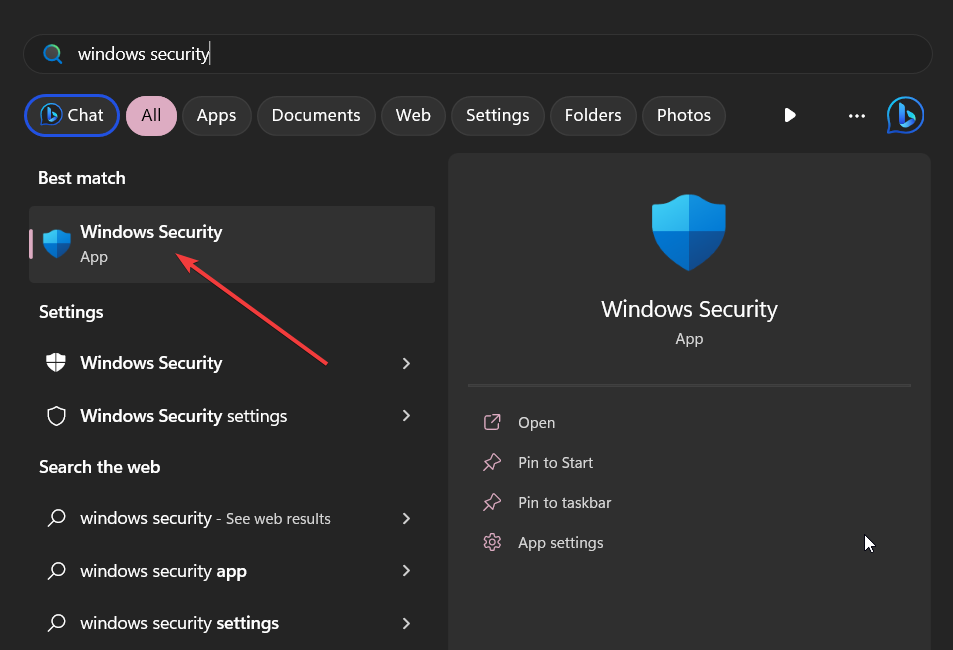
Press Windows key and type Windows Security in the search box and select the Windows Security app from the results.
In the Windows Security app, go to App & browser control in the left sidebar and click on Smart App Control settings.
Once you reset your PC or install a fresh copy of Windows 11, Smart App Control will start in Evaluation mode.
If you want to manually turn on the feature, select On.
Then, click Yes on the User Account Control prompt to enable the feature.
During the Evaluation mode, Windows will check the apps you use to see if Smart App Control can protect you without causing problems. If it works well, Smart App Control will turn on automatically. But if it causes issues, it will turn off by itself. Additionally, in Evaluation mode, SAC will not block any apps.
Once you activate Smart App Control, you will not have the option to revert back to Evaluation mode.
2. Disable Smart App Control in Windows 11
NOTE
Once you disable Smart App Control, it becomes a permanent change. You won’t be able to turn it back on or put it into Evaluation mode without reinstalling or resetting Windows. So, before you continue, ensure you must turn off this feature.
Click the Show hidden icons in the Taskbar corner and click the Windows Security icon from the System tray.
Move to the App & browser control tab and click on Smart App Control settings.
Select the Off option to turn off Smart App Control.
Then, click Yes, I’m sure in the confirmation box.
You can do this whether SAC is turned on or in Evaluation mode. Once the setting is turned off, the other options will be greyed out unless you reset or reinstall Windows.
Another way to enhance your system performance and remove unnecessary programs from your Windows system is by uninstalling the bloatware that comes with it.
Drop us a comment down below for any additional thoughts and queries.
On Windows systems, ClipUp.exe – Bad Image with the error code 0xc0000428 usually occurs when opening an application or doing other tasks related to opening new files using an application.
This error is commonly experienced by Windows 10 and 11 users. While the specific file causing the issue may vary, the error message displayed in the ClipUp.exe – Bad Image prompt remains the same for all affected users.
The file is either not designed to run on Windows or it contains an error. Try reinstalling the program again using the original installation media or contact your system administrator or the software vendor for support. Error status 0xc0000428.
What is Clipup.exe?
ClipUp.exe is a legitimate tool that is part of the Windows operating system and is used for Client License Platform migration. It is specifically designed to help activate PCs that require activation rearming on a regular basis, such as KMS ones in a corporate environment.
When you see the ClipUp.exe error, the problem typically lies with the system files or the program file or DLL file on your computer rather than being directly related to the Client License Platform migration tool.
In some cases, the Clipup.exe file is also known for high CPU usage, leading to system slowdowns and various performance problems.
The ClipUp.exe error – Bad Image with the Error code 0xc0000428 can occur due to various reasons, including:
Corrupted system files: If essential system files become corrupted or are missing, it can lead to the Clipup.exe – Bad Image Error when executing certain applications or DLL files.
Faulty or incompatible software: Installing faulty software, incompatible with your operating system, or contains corrupted files can trigger this error.
Malware or virus infection: Malware or viruses can corrupt system files or modify application files, causing errors when executing the affected files.
Hardware problems: In some cases, hardware issues such as a failing hard drive or faulty RAM can cause the ClipUp.exe error when accessing or executing files.
How do I fix the ClipUp.exe Bad Image error?
Before proceeding to any complicated troubleshooting methods, try these quick workarounds:
Restart your PC: Start by restarting your computer, as it can help resolve temporary software errors.
Install the latest updates: Make sure your operating system is up to date. Install any pending Windows updates, as they may include bug fixes or improvements that can resolve the error.
Reinstall the software: Uninstall the software causing the error from your system and then reinstall it using a fresh installation package. This process can often resolve issues caused by corrupted or incomplete installations.
The search bar in Outlook is a useful feature that allows you to quickly find emails, contacts, and other items in your mailbox. However, there has been a recent Outlook issue reported by some users where the Outlook search bar goes missing without any apparent reason.
If you’re experiencing this issue, don’t worry. In this article, we will guide you on how to fix this Outlook error so that you can continue using your Outlook app without any further problems.
Why is my search not showing up in Outlook?
There could be several reasons why the Outlook search bar is missing:
Customization: It’s possible that the search bar was accidentally removed or there was an issue during the customization process.
Software or Configuration Issues: Sometimes, software glitches or configuration problems can cause sign-in issues on Outlook as well as problems with the search bar.
Third-party Add-ins: If you have installed third-party add-ins or plugins for Outlook, they could potentially interfere with the display of the search bar.
Outlook Version: If you recently upgraded or installed a different version of Outlook, the location or appearance of the search bar might have changed.
Account Configuration: In certain cases, the search bar may be hidden due to specific account configurations or settings.
How do I get my search bar back in Outlook?
1. Launch Outlook in Safe Mode
NOTE
Opening Outlook in Safe Mode will launch the application with minimal features and services, deactivating all third-party integrations and add-ins that might interfere with the app.
Press Window + R to open the Run command box, type in outlook /safe, and hit Enter.
Choose the profile and click OK to launch the app in Safe Mode.
After starting Outlook in Safe Mode, check if you can access and use the Search feature.
If the Search feature is still missing, it indicates that a third-party integration is likely causing the issue.
2. Repair Outlook
Press the Window + R, type appwiz.cpl in the dialog’s text field, and press Enter.
From the list of installed programs, locate the Microsoft Office application or Office 365 and right-click on it.
Choose Change from the context menu.
Click Yes to the User Account Control prompt box.
It is recommended to start with the Quick Repair option. Select Quick Repair and click the Repair button.
Click Repair again.
If Outlook is open, click Continue to close the app and start the repair process.
Wait for the repair process to complete.
Once the repair is finished, check if the Search bar option has reappeared.
If that doesn’t work, you can try using the Online Repair option, but keep in mind that it might take a bit longer to finish and require an Internet connection.
3. Disable Outlook Add-ins
Open Outlook and go to the File tab.
Select Options from the left pane.
In the Options dialog, choose Add-ins and click on the Go button on the right side of the dialog.
Now, uncheck the boxes next to all the listed extensions and click OK to save the changes.
After disabling the extensions, restart the app and check if the Outlook search bar is functioning properly.
4. Manually add a search bar
Open Outlook and right-click on the Home tab.
From the context menu, select Customize the Ribbon.
In the Outlook Options dialog that appears, click the dropdown below Choose commands from and select Tools tabs.
Scroll down and select Search from the list.
In the second column, choose the tab next to which you want to place the Search tab.
Then, click the Add>> button to add the Search tab.
Finally, click OK to save the changes.
You should now be able to see the Search tab on the ribbon.
5. Repair Outlook data files
Press Windows + E to open File Explorer and go to either of the following paths: C:\Program FilesC:\Program Files (x86)
Search for scanpst in the search bar.
Once you found it, double-click on SCANPST.EXE from the search results.
This will open the Microsoft Outlook Inbox Repair tool.
Now, open Outlook and go to the File tab.
Click on the Account Settings dropdown and select Account Settings again.
In the dialogue box that appears, go to the Data Files tab.
Select the data file in the list and click on Open File Location.
From the new File Explorer window, copy the file’s location. Right-click on the data file (.ost) and select Copy as path.
Now, go back to the Microsoft Outlook Inbox Repair tool and paste the file’s path into the text box.
Remove the double-quotation marks around the file’s path and click Start.
Once the scan completes, click on Repair.
After the automatic repair finishes, click OK and check if the search box appears again.
6. Contact Microsoft Office Support
If none of the above steps work, it’s recommended to reach out to Microsoft Office Support and report the search bar issue to them. They might be able to provide specific troubleshooting steps based on your system configuration and version of Outlook.
Additional solutions:
Restart Outlook: If the search bar is missing in Outlook, it could be a temporary glitch. In most cases, restarting Outlook can fix the issue. You can try terminating the Microsoft Outlook process through Task Manager and then relaunching the application.
Update Outlook: It’s also possible that the missing search bar issue is a bug or a problem in the version of Outlook you’re using. Check for any available updates for Outlook and install them.
Many users have reported encountering a Stable Diffusion failed to load the model message when trying to use the image generation tool. If this happens, you won’t be able to generate any images at all.
This issue can arise due to insufficient memory, an outdated graphics card driver, corrupt cache, or missing permissions.
No matter the cause, here’s how to fix it:
How do I fix Stable Diffusion model failed to load, exiting error?
1. Edit the webui-user.bat file
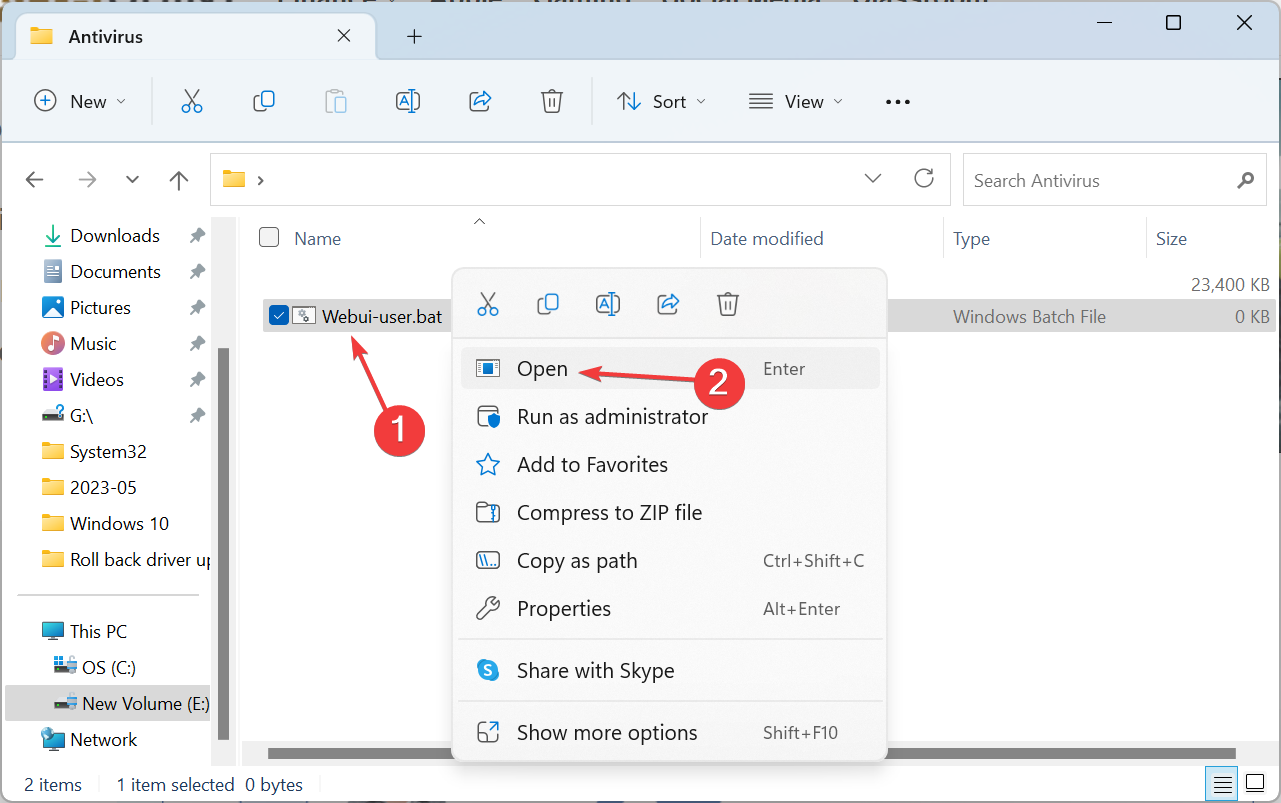
Locate the webui-user.bat file, right-click on it, and select Open.
Now, enter the the following argument in the batch file:--disable-safe-unpickle
It should finally look like this:
@echo off
set PYTHON=
set GIT=
set VENV_DIR=
set COMMANDLINE_ARGS=--disable-safe-unpickle
call webui.bat
2. Update the graphics driver
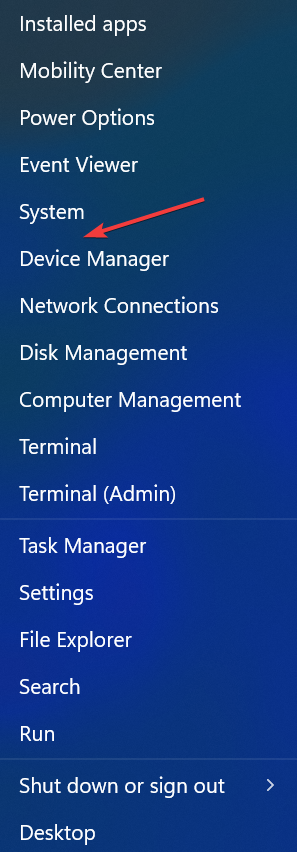
Press Windows + X to open the Power User menu, and select Device Manager from the list.
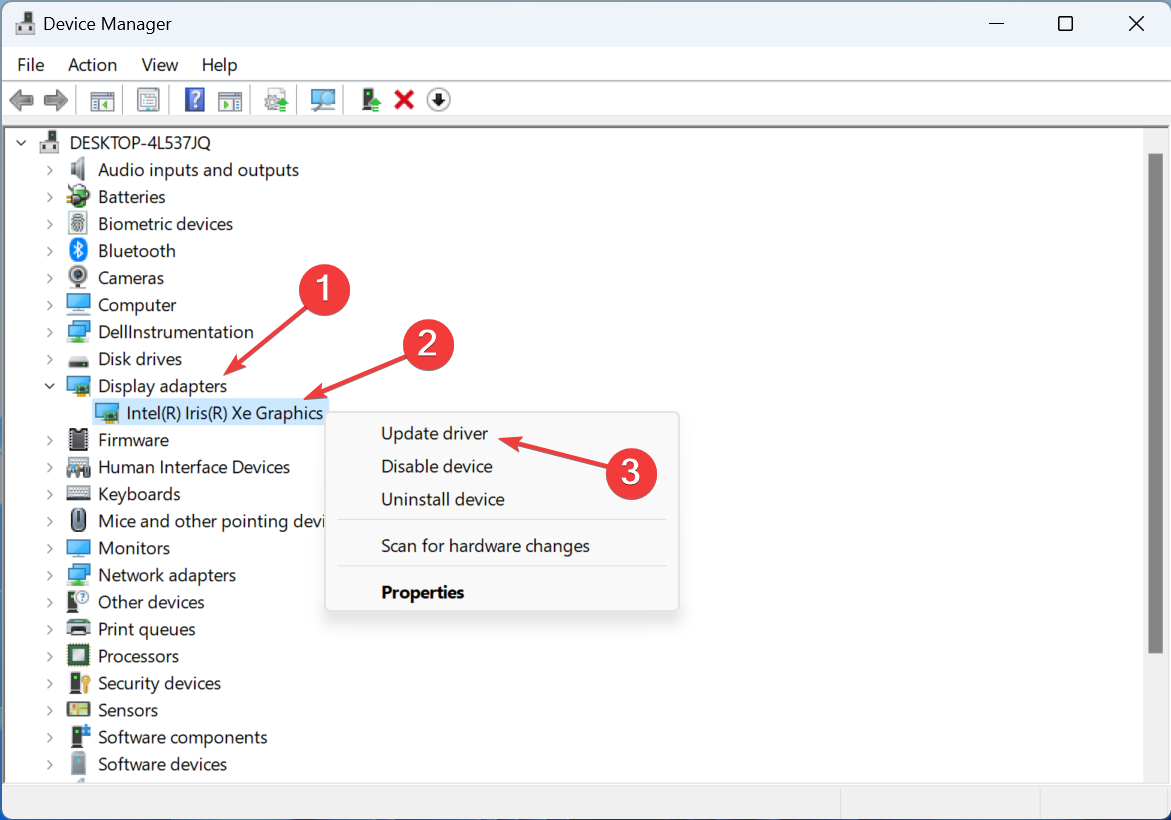
Expand the Display adapters entry, right-click on the graphics adapter, and select Update driver.
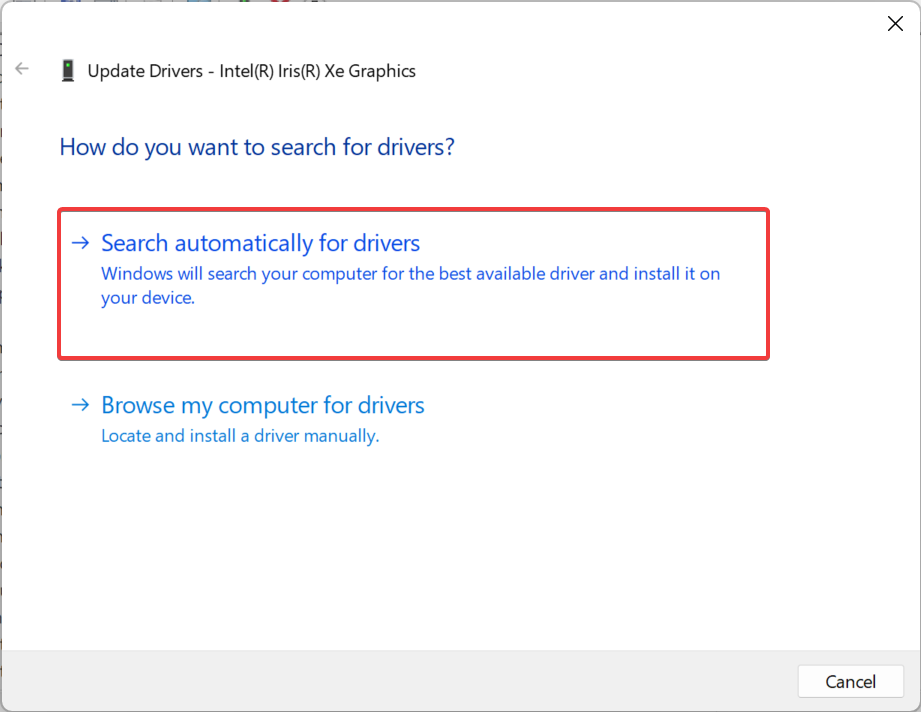
Choose Search automatically for drivers and wait for Windows to install the best one available on the PC.
Once done, restart the computer for the changes to apply.
An up-to-date graphics driver, including Stable Diffusion, is critical for running resource-intensive apps. So, it’s vital that you update the graphics driver when facing issues.
Also, sometimes, an update may not be available locally, and you will have to visit the manufacturer’s website to manually install the latest driver version. Here are the direct links:
As a final but quicker solution, you can ensure graphics drivers are always up to date with the help of professional driver updating software, such as Fortect Driver Updater. This tool will scan your system and automatically download updated drivers for all your components.
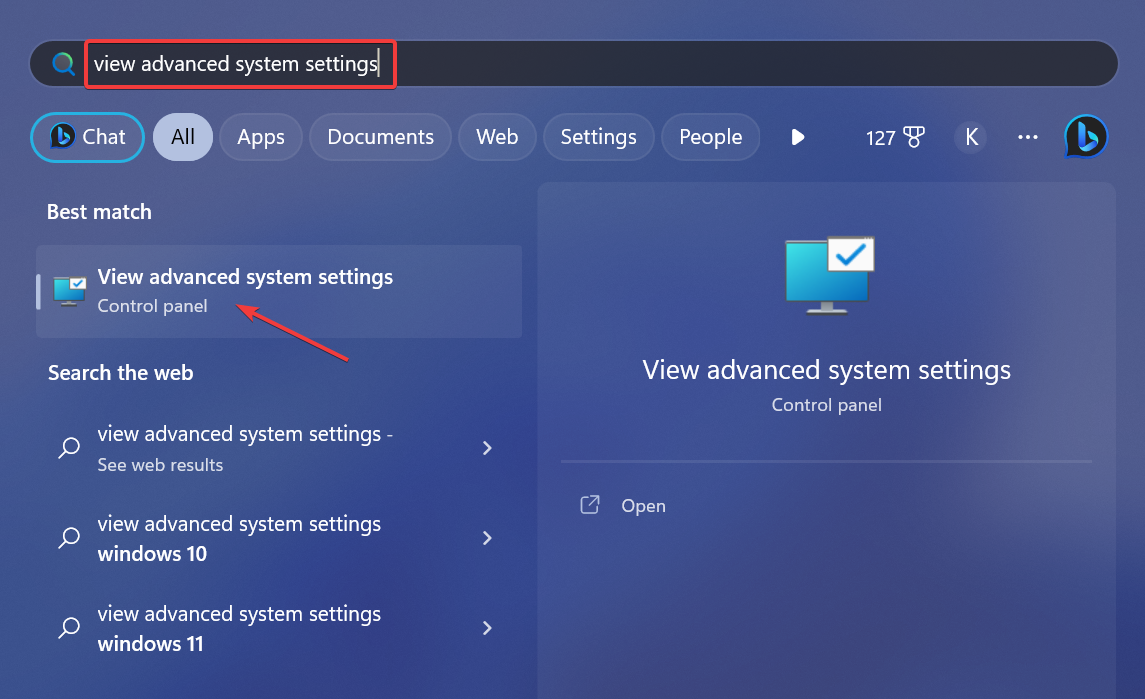
Press Windows + S to open Search, type View advanced system settings, and click on the relevant search result.
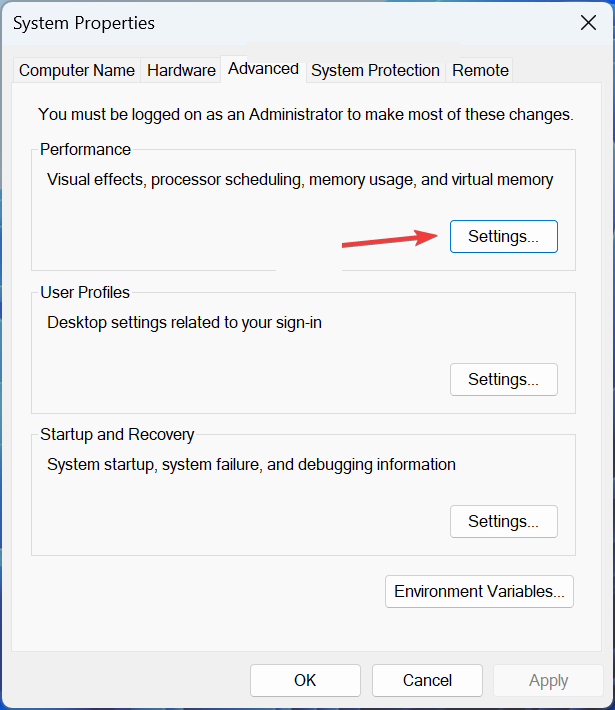
Click on Settings under Performance.
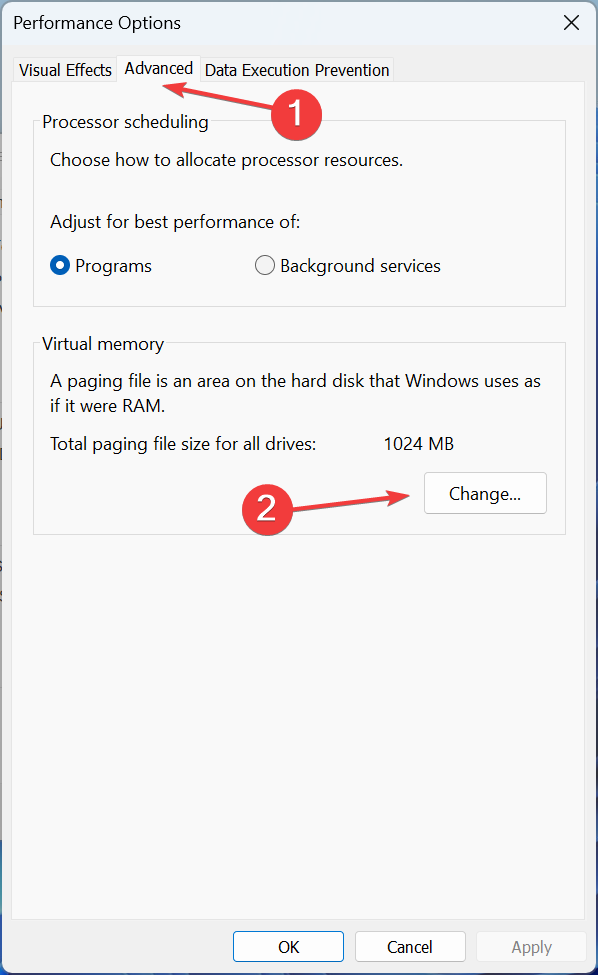
Navigate to the Advanced tab, and click on Change under Virtual memory.
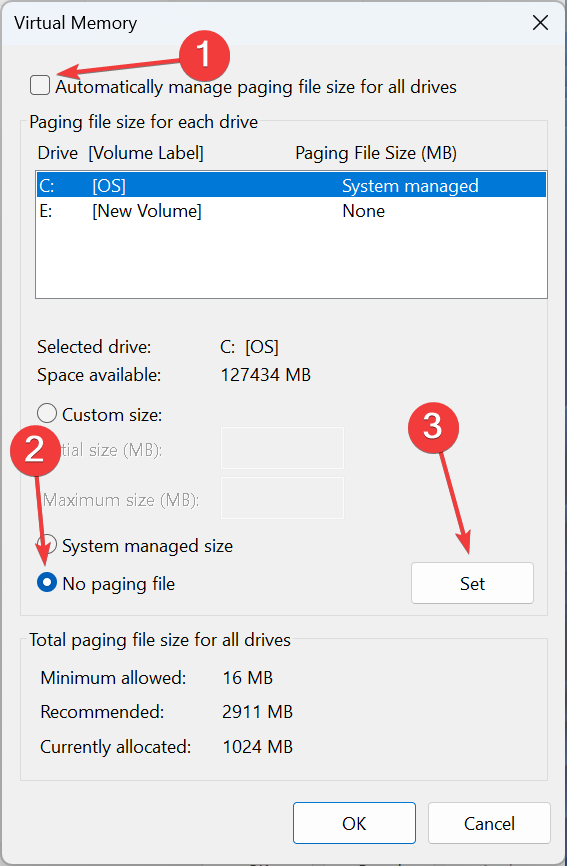
Untick the checkbox for Automatically manage paging file size for all drives, select the No paging file option, and click Set.
Click Yes in the confirmation prompt.
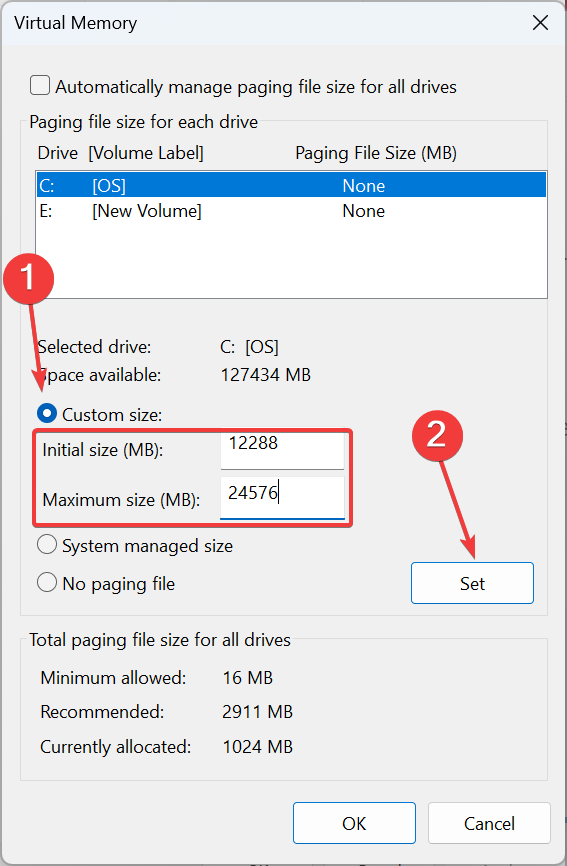
Now, select Custom size, fill out the fields using the following formula based on the available RAM and click Set:
Initial size: 1.5 x Available RAM (in GBs) x 1024
Maximum size: 3 x Available RAM (in GBs) x 1024
In our case, the installed RAM was 12 GB, so the value became 12288 MB and 24576 MB.
Once done, click on OK to save the changes.
4. Remove the huggingface folder
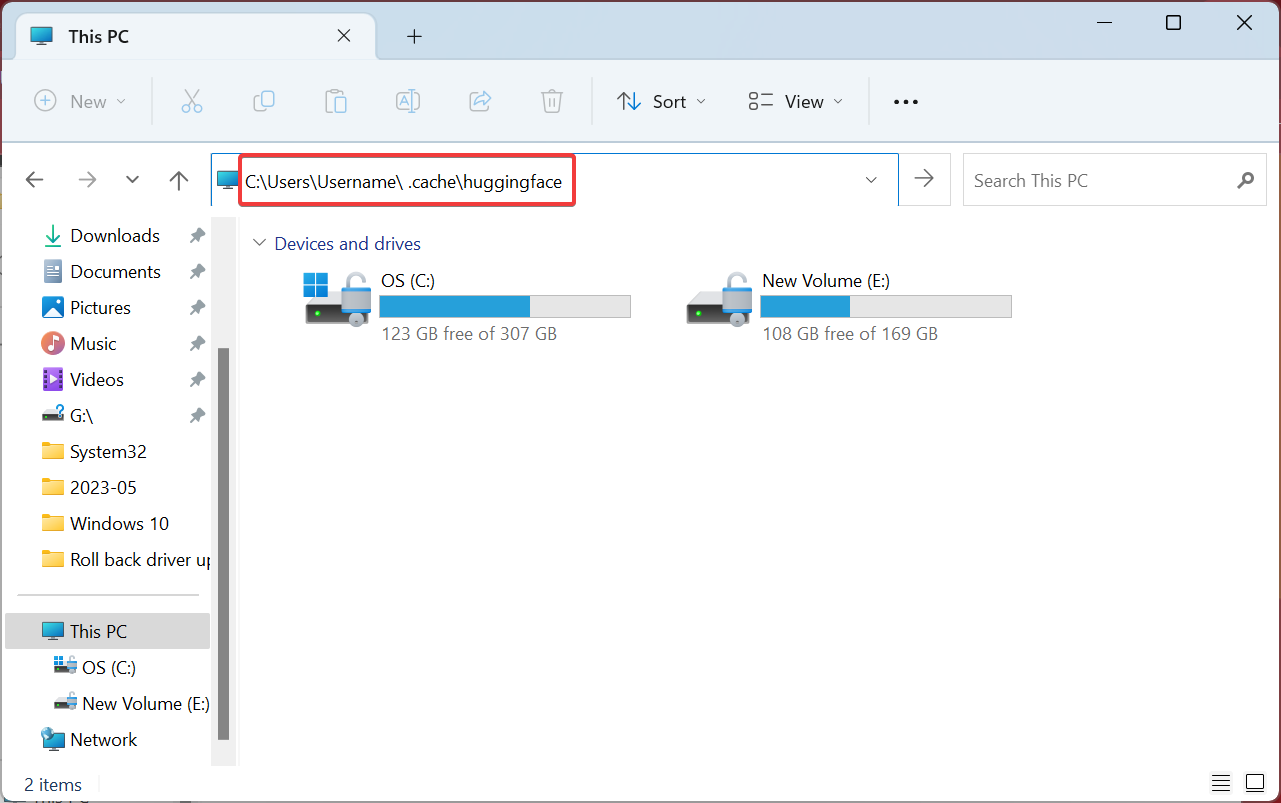
Press Windows + E to open File Explorer, paste the following path in the address bar while replacing Username with the active user, and hit Enter:C:\Users\Username\.cache\huggingface
Press Ctrl + A to select all the files, and hit Delete to clear them.
Restart the computer when done and check if the error is fixed.
5. Delete Python and pip folders
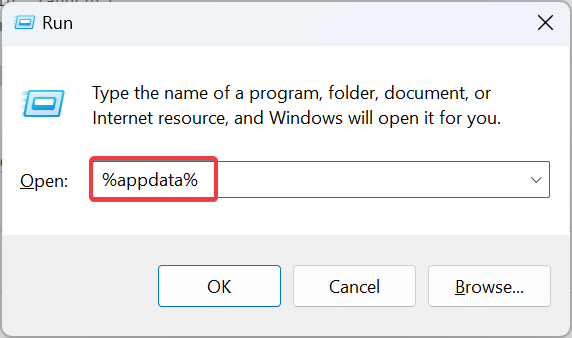
Press Windows + R to open Run, paste the following path, and hit Enter:%appdata%
Locate any folders related to Python or pip, and delete them.
Also, check for cache in Temporary Files and remove it.
6. Perform a system restore
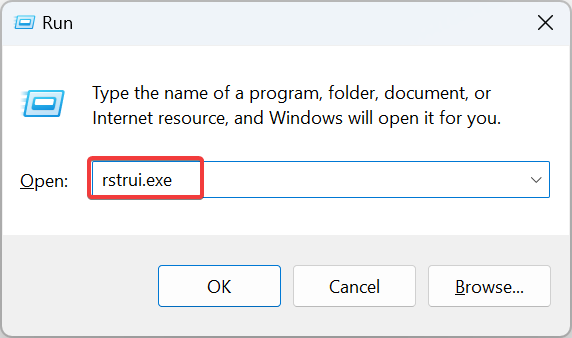
Press Windows + R to open Run, type rstrui.exe in the text field, and hit Enter.
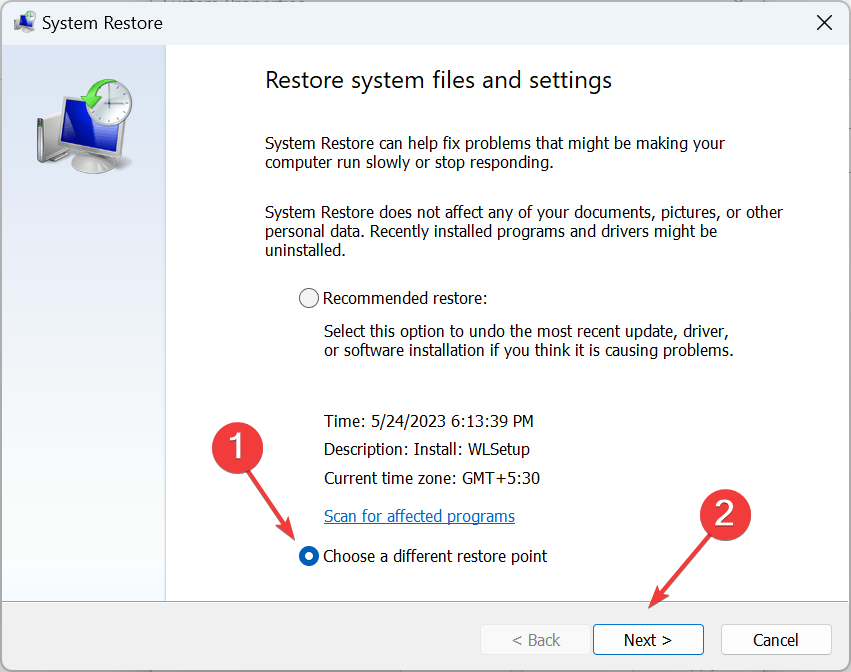
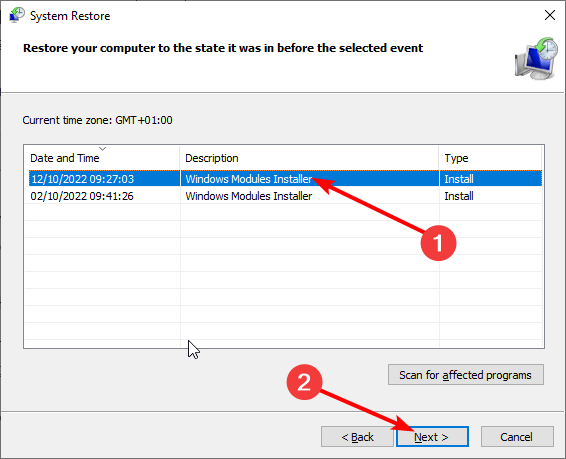
Select Choose a different restore point option, if available, and click Next.
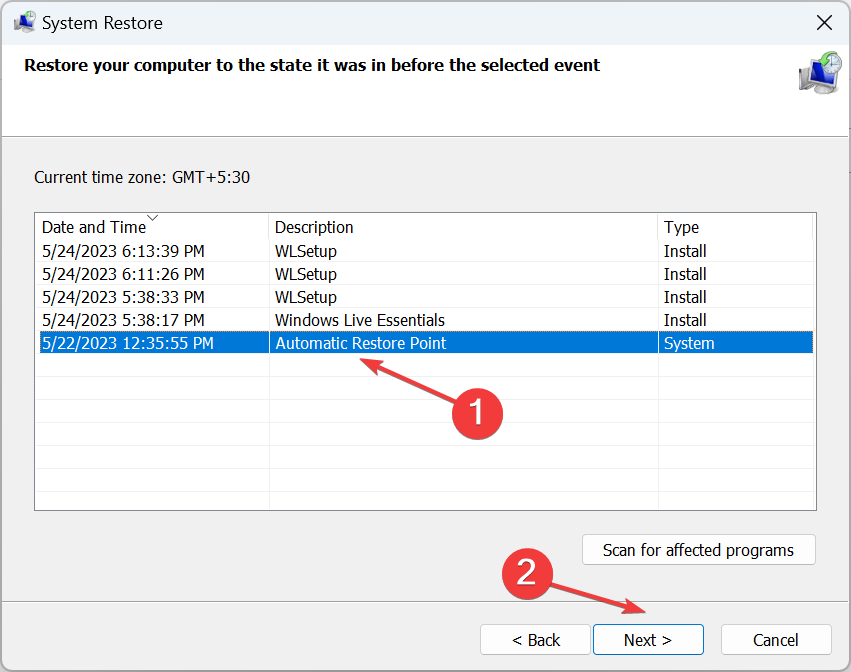
Pick another restore point from the list, preferably the oldest one, and click Next.
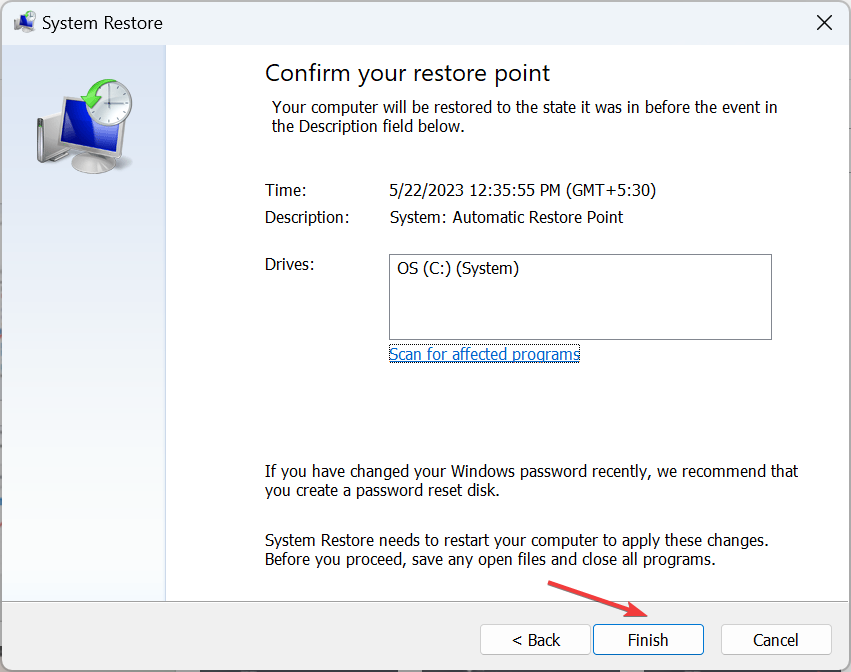
Verify the details and click on Finish to start the restore process.
Wrapping up
Before you leave, check some quick tips to make Windows faster and get a better experience, in addition to eliminating such performance-related issues.
The Internet is largely unsafe unless you possess some technical acumen and the ability to identify online threats.
And it’s often difficult to differentiate between a legit error and a scam. An example here is the Microsoft Defender error 0x80016CFA pop-up.
The pop-up appears when you browse the web and states that a serious malfunction has been detected. It lists a mobile number of a supposed Microsoft-certified technician to contact for a resolution. If you, too, saw the message on a browser, keep reading!
Is 0x80016CFA Windows Defender error a scam?
Yes, the Windows Defender error message in a browser is a scam! Microsoft never sends prompts when visiting a website, nor does it ask users to call for such issues. If there’s a problem with the PC or Windows Defender is not working, there will be an error message within the utility.
So far, the error has primarily been reported on Edge, but Chrome and Firefox, too, seem to be affected. Based on the information we have, it’s not a browser-centric issue.
Here are a few reasons you get the 0x80016CFA Windows Defender popup:
Visiting unreliable websites: For some users, the message popped up when visiting specific websites, especially the ones with weak security.
Computer infected with malware: When you have malware or virus on the PC, it usually malfunctions and throws such errors.
A problematic app or extension has been installed: Scammers often either directly develop apps/extensions or modify the code for the existing ones to deliver such messages at the user’s end. So, always check the app’s reliability beforehand.
How do I get rid of Windows Defender error 0x80016CFA?
Tip
We have used Microsoft Edge to detail the various troubleshooting methods since it was the most affected browser. If you use another browser, the process should be similar.
1. Terminate the process in Task Manager
Press Ctrl + Shift + Esc to open the Task Manager.
Now, select the browser’s process from the list, and click on End task.
Similarly, identify any related processes and terminate them as well.
The easiest solution for the problem is to kill all related tasks. In most cases, it’s a one-time popup, probably appearing on an individual website, and restarting the browser should work.
2. Clear the browsing data and reset browser settings
Open Microsoft Edge, and press Ctrl + Shift + Delete to open the Clear browsing data utility.
From the Time range dropdown menu, select All time, tick the checkbox for Browsing history, Cookies and other site data, and Cached images and files, then click on Clear data.
Now, relaunch the browser and verify whether the problem is resolved.
If not, click on the ellipsis near the top right, and select Settings.
Go to Reset settings from the navigation pane, and click on Reset settings to their default values.
Choose Reset in the confirmation prompt that appears.
In most cases, it’s a problem with the browser itself that triggers the 0x80016CFA Defender error, and either clearing the browsing data or resetting to default should do the trick.
3. Scan for malware
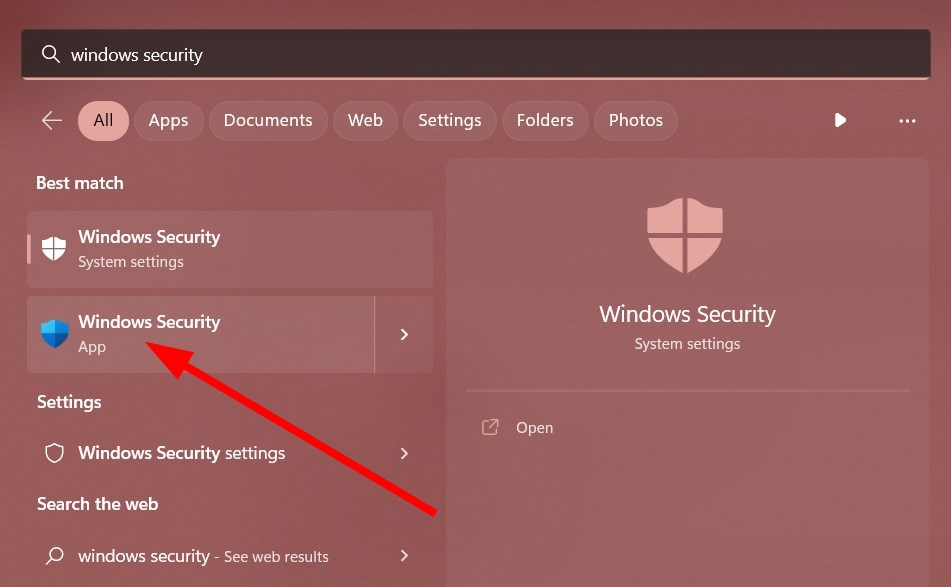
Press Windows + S to open Search, type Windows Security in the text field, and click on the relevant search result.
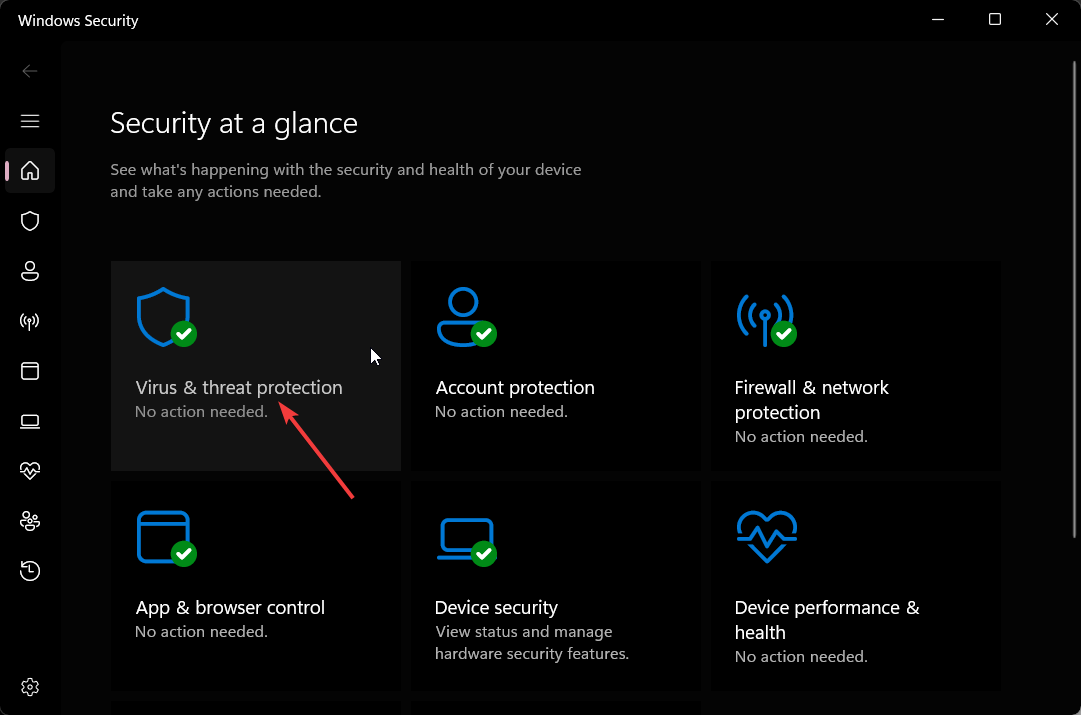
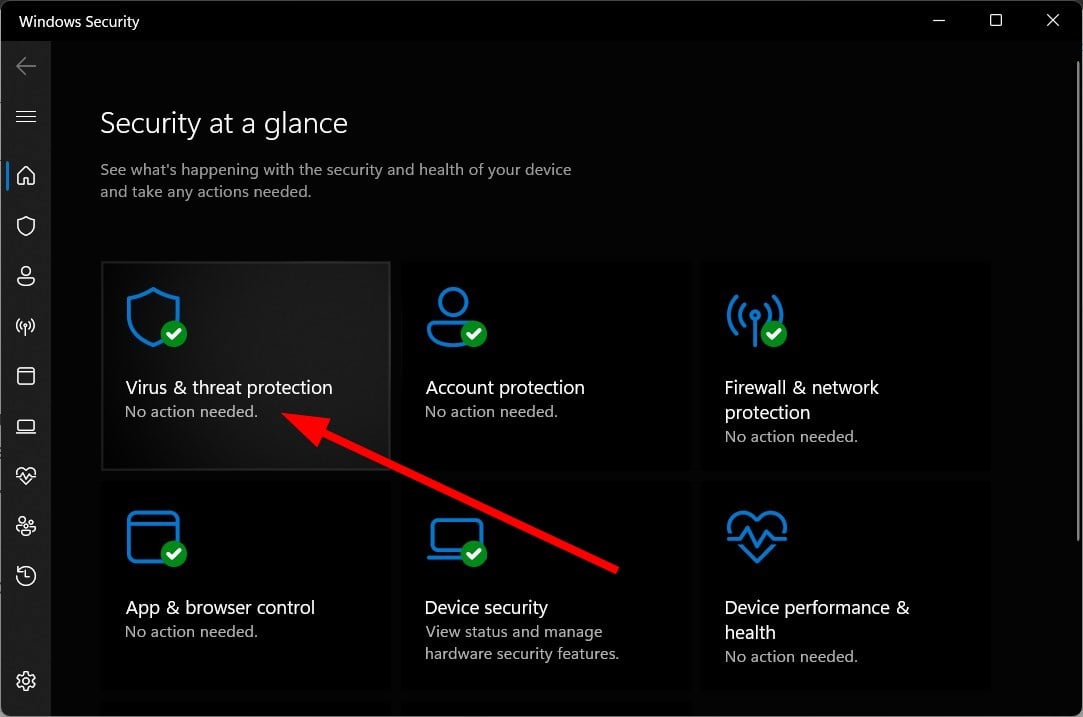
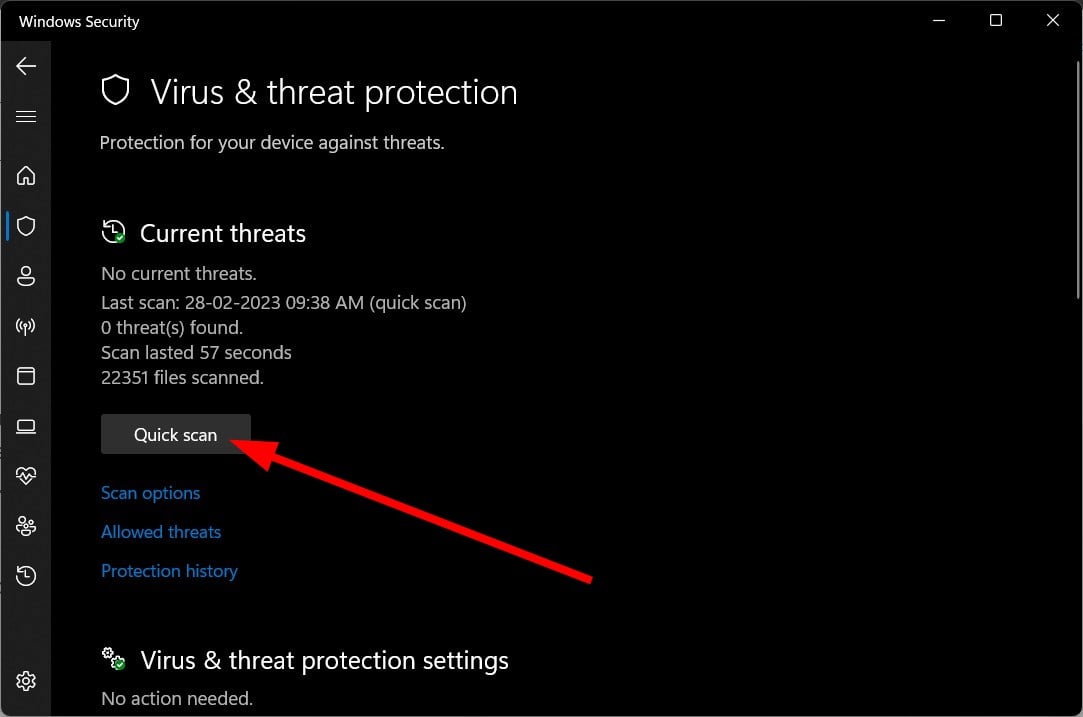
Select Virus & threat protection.
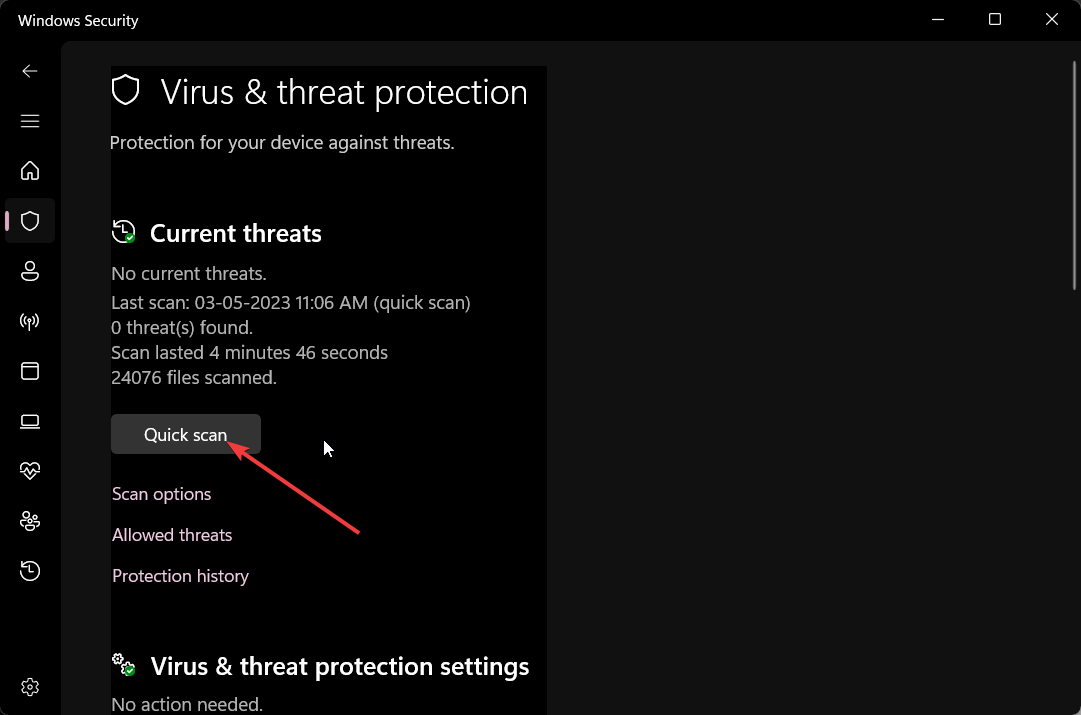
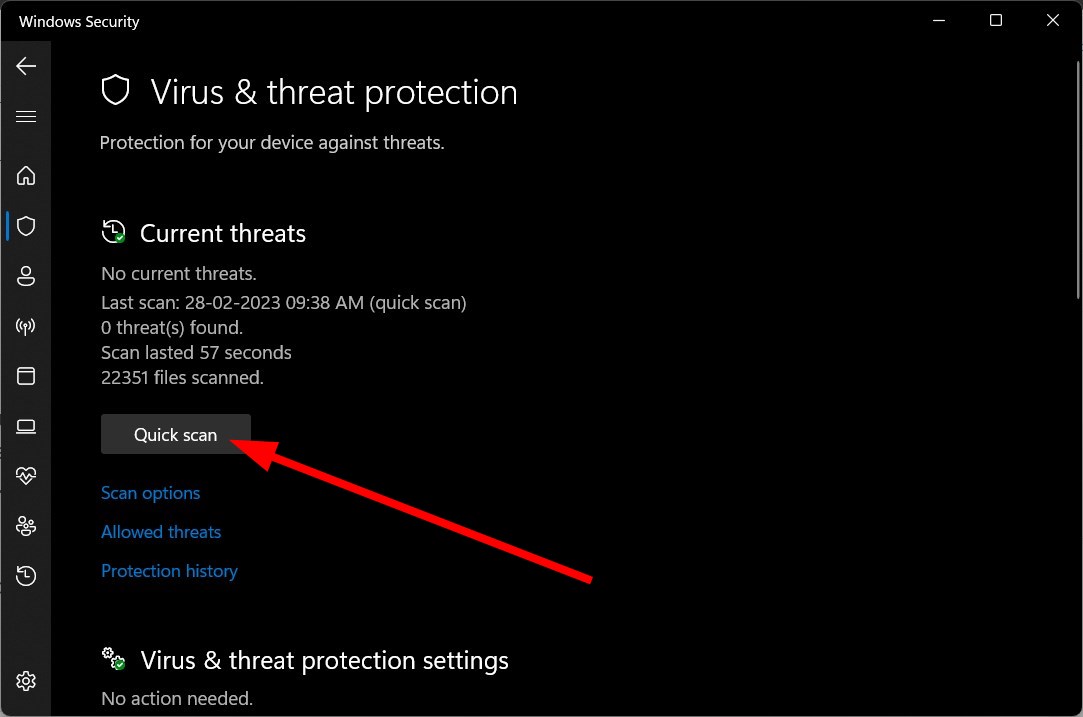
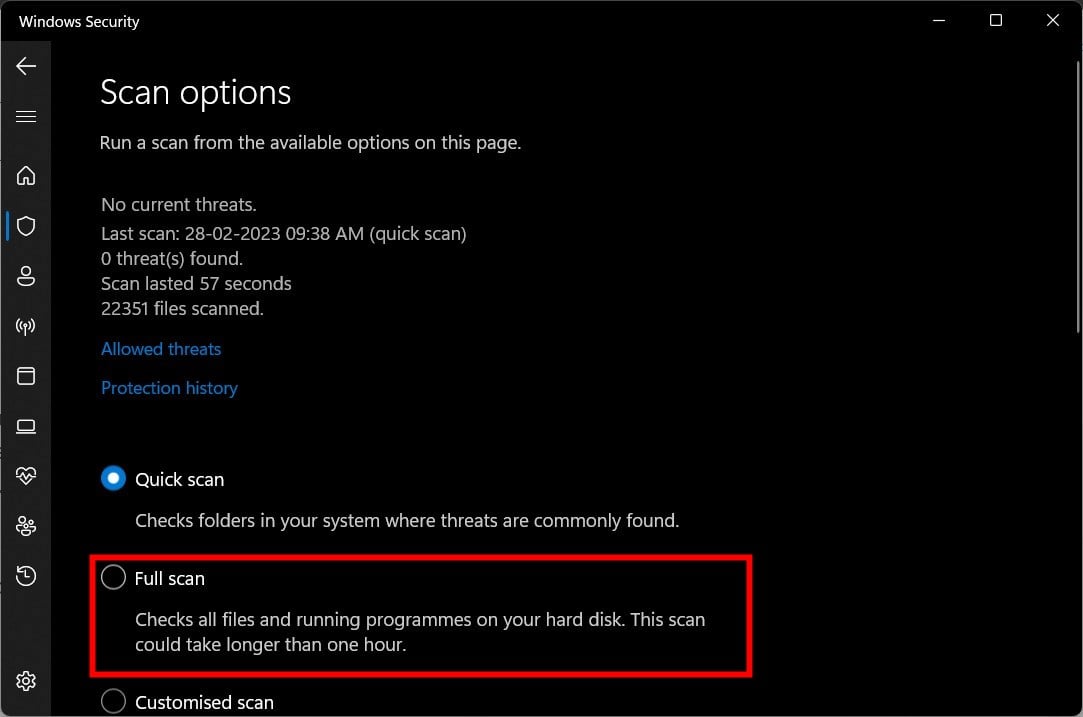
Click on Scan options.
Choose Full scan and click on Scan now at the bottom.
Wait for the scan to complete.
When you get the 0x80016CFA scam message, it could be malware on the PC to blame. And running a system-wide scan with Windows Security would identify and eliminate it. Besides, some recommend using a reliable third-party antivirus for the job so that you may try one of these.
Press Windows + R to open Run, type appwiz.cpl in the text field, and hit Enter.
Select the program you believe to be triggering the message, which should be a recent one, and click Uninstall.
Follow the on-screen instructions to completely remove the app.
Once done, restart the computer.
When identifying the underlying cause, we can’t ignore the possibility of a program being responsible for the 0x80016CFA popup message. Start by uninstalling the recent apps, and once you have found the problematic app, reinstall the rest.
5. Perform a system restore
Press Windows + S to open Search, type View advanced system settings, and click on the relevant search result.
Go to the System Protection tab, and click on System Restore.
Select Choose a different restore point, if the option is available, and click on Next.
Pick another restore point from the list, one created before the error first appeared, and click on Next.
Finally, click on Finish to start the restore.
When nothing else works, you can always perform a system restore and revert to a stable state in case a recent change triggered the 0x80016CFA Microsoft Defender prompt. Remember that it might affect some installed programs.
The Hidusb.sys file is related to the Microsoft USB miniport driver and is a system file that is often known to cause multiple issues on a Windows PC.
In this guide, we will share with you the reasons that could trigger the errors associated with Hidusb.sys file and how you can easily resolve this BSoD error. Let us check out the solutions.
What causes Hidusb.sys BSoD error?
The Hidusb.sys file is usually found inside the C:\Windows\System32\drivers directory. There are several reasons why you would come across the Hidusb.sys BSoD error, which is listed below.
Outdated USB drivers – The USB drivers on your PC might be outdated because of which the ports aren’t responding on your PC.
Corrupt system files – If any system file is corrupt or it is missing, then your PC won’t function normally and cause several issues including the Hidusb.sys BSoD error.
Your PC is infected with a virus – The presence of a virus or malware can easily affect all of your system files and cause multiple issues.
Windows updatesare problematic – Often Windows updates are known to cause the PC to misbehave and cause multiple issues within the system.
Let us now apply the solutions and get rid of the Hidusb.sys BSoD error.
How can I fix the Hidusb.sys BSoD error?
1. Run the Startup Repair
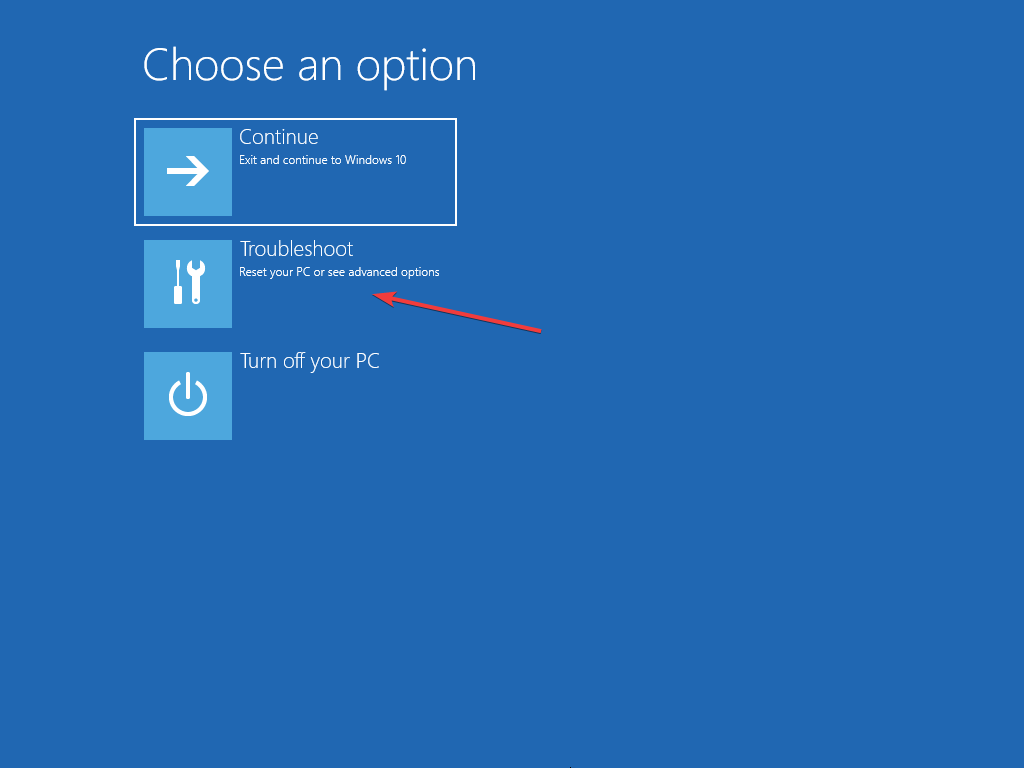
Power off and on your computer three-four times to boot into the Advanced Startup environment.
Click on Next and select the Repair your computer option at the bottom.
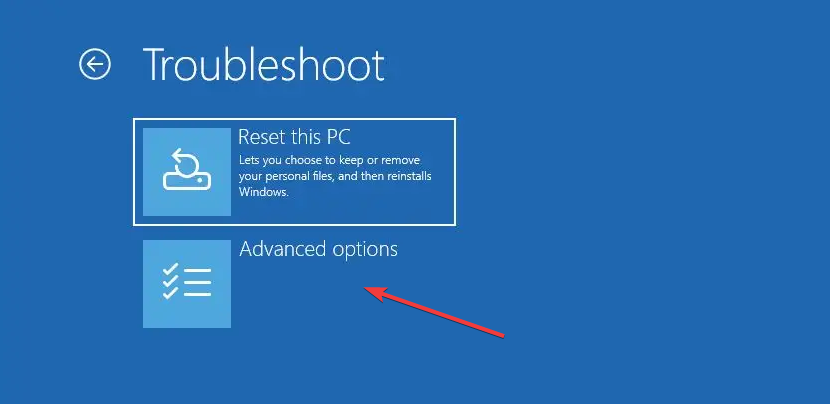
Select Troubleshoot.
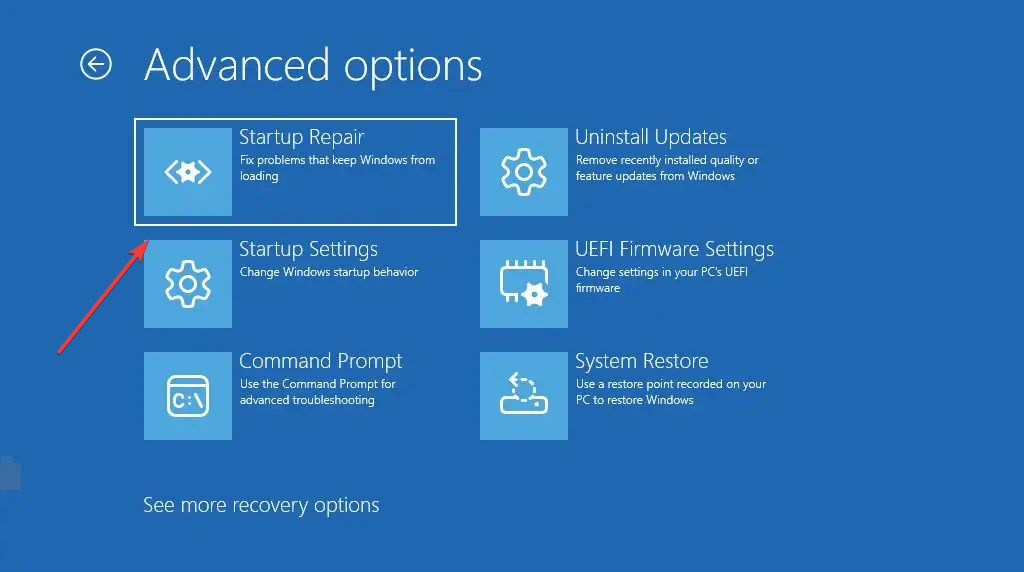
Choose Advanced options.
Select the Startup Repair option.
Choose your account, enter the password for it, and select Continue.
You can also check out our list of the best boot repair tools that will help you to resolve any BSoD startup-related errors on your PC.
2. Run SFC and DISM scans
Open the Advanced Startup environment as shown in Solution 1.
Click Next and select the Repair your computer option.
Select Troubleshoot.
Choose Advanced options.
Select Command Prompt.
Type the below command and press Enter: sfc /scannow
The process will begin to fix the corrupt system files.
After the process completes, type the below commands and press Enter after each one: DISM.exe /Online /Cleanup-image /ScanhealthDISM.exe /Online /Cleanup-image /RestorehealthDISM.exe /online /cleanup-image /startcomponentcleanup
Restart your PC.
Fixing corrupt system files can easily resolve multiple system-related BSoD errors that you will come across. We would suggest you run the above commands and hopefully resolve the Hidusb.sys BSoD error.
You can also click on Scan options and choose Full scan for a deep scan.
Apply the prompted fixes and restart your PC after the scanning is finished.
The Windows Security tool is a nice tool to have at your disposal if you want to protect your PC from incoming threats.
However, it isn’t as effective as dedicated antivirus software. For that, we would suggest you check out our guide which lists a compilation of some of the best antivirus software to protect your PC.
4. Perform System Restore
Enter the Advanced Startup environment by following the steps mentioned in Solution 1.
Click Next.
Select the Repair your computer option.
Choose Troubleshoot.
Select Advanced options.
Choose System Restore.
Click Next.
Click on the restore point and press the Next button.
Hit the Finish button to begin the system restore process.
Performing the system restore will help take your PC back to a state when everything was working normally, and you weren’t treated with the Hidusb.sys BSoD error.
However, for System Restore to work, you need to have a restore point created on your PC. If you don’t know how to do that, you can check out the steps mentioned in our dedicated guide on how to create a system restore point on your PC.
That is it from us in this guide. You can check out our guide which gives you a list of the best BSoD fixers that you can utilize and fix in no time.
Many of our readers have reported facing the Wpprecorder.sys BSoD error recently. You can resolve the issue by applying the solutions listed in our dedicated guide.
Feel free to let us know in the comments below, which one of the above solutions resolved the Hidusb.sys BSoD error on your computer.
Many of our readers complain about running into Error 8018000a: Something went wrong. The device is already enrolled. It occurs when attempting to enroll in Intune. Hence, this guide will discuss ways to resolve the error.
The following are some of the notable factors that can cause the error:
Another user has enrolled the device in Intune – To enroll a device, it must be registered for the first time. If a different user has already enrolled the device in Intune or joined the device to Azure AD, it can prompt the error message 8018000a The device is already enrolled.
Permission issues – You can encounter the error due to permission configurations impeding the device from enrolling in Intune. It can cause the Enterprise not to access the Intune Admin server.
Invalid Intune Licence – Before requesting and accessing Intune services, you need a current and running license to validate it. So, having an invalid Intune license certificate will cause issues with device enrollment.
These factors are liable to vary in different computers. Nonetheless, we’ll take you through some basic steps to resolve the Device Enroll error.
How can I fix the 8018000a Enrollment error?
Before trying any advanced troubleshooting steps, go through the following preliminary checks:
Left-click the Start button, click the User profile, and sign out of your account.
Then, sign in by using the other administrator account that has enrolled or joined the device.
Left-click the Start button, click on Settings, and choose Accounts.
Now, click on Work Access and click Disconnect for the enrolled account.
Repeat steps 1 and 2 to re-sign into your account on Windows and navigate to Work Access.
Then, click Join to enroll your device.
Wait for the confirmation and click Finish.
Sometimes the computer can be managed by Intune but is associated with a different administrator account or user. Hence, you need to remove the other account to enroll yours.
Many of our readers complained about PDFs opening in Chrome instead of Adobe. The issue can occur for many reasons. However, you can fix it by following the steps outlined in this article.
Alternatively, you can check our detailed review of the best PDF reader software for Windows 11.
Why does my PDF open in Chrome instead of Adobe?
Some notable factors that may be responsible for PDFs opening in Chrome instead of Adobe are:
Chrome is the default PDF file reader – If your default settings regarding the software for opening your PDF is Chrome, it’ll work whenever you try to access a PDF file instead of Adobe.
Acrobat Chrome extension on the browser – If you have installed the Acrobat Chrome extension, you can experience difficulty opening PDF files with Adobe Acrobat DC. It can prompt your system to use the extension instead of the app.
Adobe Reader isn’t installed or accessible – The system can direct the PDF file you’re trying to open to an available app that can open the file type. So, if Adobe Reader isn’t installed on your PC, Chrome can open the PDF if it’s the only option.
Chrome PDF settings – The Chrome browser uses its integrated PDF viewer by default whenever you want to open downloaded files. So, it can override other app permissions if it’s not disabled.
These factors are liable to vary depending on the circumstances. Regardless, we’ll discuss how to resolve the problem.
What can I do if PDFs open in Chrome instead of Adobe?
Before proceeding with any steps for resolving the problem, go through these checks:
Check if you still have Adobe Reader installed on your PC.
1. Switch settings to open PDFs in the Reader
Launch Acrobat Reader on your PC, click the Edit button on the taskbar, then select Preferences from the drop-down menu.
Click Internet in the left panel of the Preferences menu and then select Internet Settings.
Go to the Programs tab and click Manage Add-Ons, then choose Acrobat Reader in the list of add-ons.
Click the Disable option to ensure PDFs won’t open in a browser.
The above steps will prompt PDF files to always open in Adobe Reader instead of the browser.
2. Change the default PDF viewer in Windows Settings
Press Windows + I key to open the Windows Settings app.
Select Apps and click on the Default apps option.
Select the Choose default app by file type option.
Click Chrome and select the Adobe Reader app to open PDF file format as the new default.
Close the Settings window and try accessing the file.
Changing the default reader for PDF file format in Settings allows Adobe Reader to be responsible for opening any PDF files on the PC.
3. Set downloaded files not to open in Chrome
Launch the Chrome browser on your PC, click the three dots in the top right corner of the screen to open Menu, then select Settings.
Type PDF into the search bar, then click on Site Settings from the search results.
Scroll down and click on PDF Documents.
Toggle on the switch for the Download PDF files instead of automatically opening them in the Chrome option.
Exit the browser and check if the problem persists.
Tweaking Chrome PDF document settings configure it only to download the PDF files and not to open them with Chrome automatically.
We recognize the need to install the most recent OpenGL drivers to guarantee optimum performance and compatibility.
So that you may use the full capabilities of your graphics hardware, we will guide you step-by-step through installing and upgrading OpenGL drivers on your Windows PC in this article.
What is an OpenGL driver?
The rendering of 2D and 3D computer graphics is made easier by the widely used cross-platform OpenGL (Open Graphics Library) API (Application Programming Interface). It acts as a link between the software programs and the computer’s graphics hardware.
An OpenGL driver is a software component that creates communication between the operating system and your graphics hardware. Sometimes, they are referred to as graphics card drivers or display drivers.
These drivers serve as middlemen. Hence, they allow the software to fully use your graphics card’s capabilities, produce aesthetically spectacular images, and perform quickly.
How do I download an OpenGL driver?
1. Identify your graphics card
Press the Windows key to open the Start menu.
Type Device Manager and select it from the search results.
In the Device Manager window, expand the Display adapters category and double-click on your graphics driver.
You will find the name of your graphics card listed here. Lastly, note down the manufacturer and model information.
2. Downloading the driver from the manufacturer site
Navigate to the manufacturer’s website. In this case, we use the Intel website; the process may be slightly different for other manufacturers, like for downloading NVIDIA OpenGL drivers for Windows 11, for example.
Input your graphics card name from Step 1 in the Search bar and hit Enter.
Click on the Download button next to your graphics.
To start the installation, double-click on the driver file. If asked, provide the required authorizations to continue.
Follow the driver installer’s on-screen instructions. Normally, you’ll have to accept the terms and conditions and decide which installation alternatives to use. Then finally, restart the computer.
To update the driver, you will have to download the most recent version of the driver and install it using the same process mentioned above.
NVIDIA, AMD, Intel, and ATI may all use an OpenGL driver. So, once you know all the information about your graphics card, the process should be straightforward.
Also, the main graphics card manufacturers also have dedicated software for updating the drivers that you can use seamlessly.
However, this process is manual, and you may rather employ a more seamless automatic update process discussed below.
2. Update your Windows 11 drivers automatically
Managing all your drivers can be made simple with dedicated driver update software. You can easily select outdated drivers individually or all at once. Additionally, you can automatically repair broken drivers or find missing ones quickly.
Outbyte Driver Updater is a great option because it is secure and will enhance your PC performance.
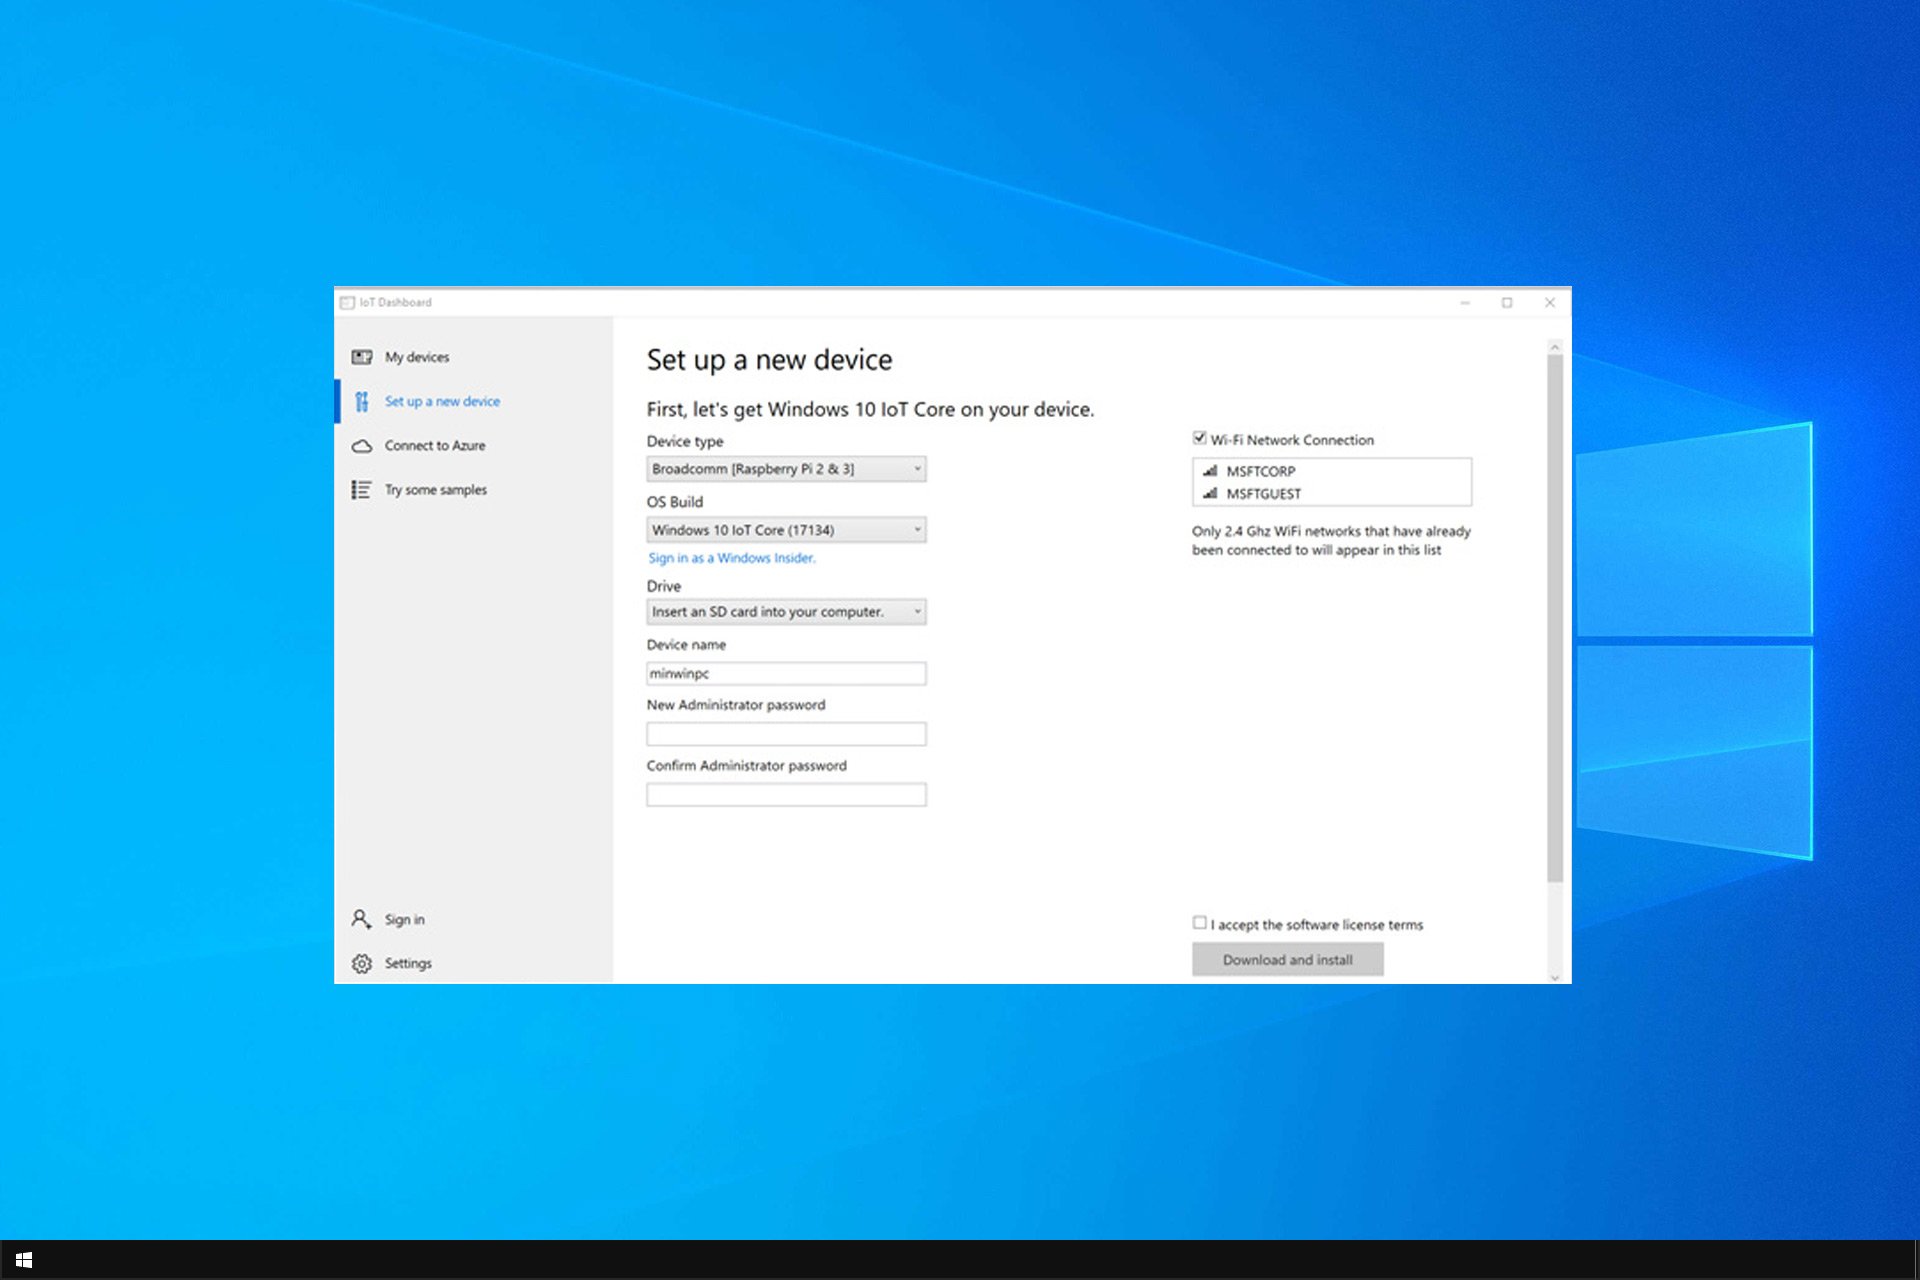
IoT devices are everywhere, so it’s no wonder that Microsoft has its own OS called Windows 10 IoT that runs on these devices.
In case you’re not familiar, IoT boards are cheap, and they can provide all sorts of functionality to their users, as long as users are ready to configure them manually.
Today we’ll focus on Windows 10 IoT and see what it is and how it works, so be sure to keep reading.
A brief history of Windows 10 IoT
Windows 10 IoT was known in the past as Windows Embedded and has been on the market for more than 20 years.
This family of operating systems changed their name to IoT after the release of Windows 10. Windows CE, also known as Windows Embedded Compact, was used on various consumer electronics, including set-top boxes and gaming consoles.
However, it has been completely replaced by Windows 10 IoT.
What is Windows 10 IoT?
This is a version of Windows that is optimized for running on a variety of IoT devices. In case you’re not familiar, Windows has been powering ATMs, terminals, medical devices, kiosks, and other devices over the decades.
This was achieved by running a special version of Windows optimized for those kinds of devices. Various versions of Windows have done that in the past, and Windows 10 continues to do so in the form of Windows 10 IoT.
What is the difference between Windows 10 and Windows 10 IoT?
Enhanced security – The device is locked down, and it usually runs a single application or a set of preapproved applications. Keyboards, USB ports, and other policies can be disabled to protect the system from tampering.
Performance – The device image is configured so that the device boots to the predefined software as soon as it’s powered on.
OEM benefits – With Windows 10 IoT the software and device are licensed to a user as a single solution. The OEM is in charge of providing support for the device and the operating system.
Hardware requirements – Since the Windows 10 IoT Core version doesn’t have all the features of its desktop counterpart, it usually comes with much humble hardware requirements. This allows it to run on almost any device.
Remote management – Windows 10 IoT support remote management, thus making managing multiple devices simpler and faster.
Affordability – Since this version of Windows doesn’t come with the same features as the desktop version, it’s much more affordable.
Long-term support and lifecycle – Unlike the regular version of Windows, IoT has a longer lifecycle that is usually 10 years or more. In addition, the support also lasts about 10 years for each version.
Easy recovery – Reinstalling the OS can be performed quickly and easily via a flash drive or the Internet.
Easy update – Installing and managing updates is simpler since new versions are offered as optional updates every few years while security updates are installed on an ongoing basis.
How many versions of Windows 10 IoT are there?
Windows 10 IoT Enterprise
This version is quite similar to Windows 10 Enterprise version but comes with additional lockdown controls that help secure the device.
With this version, you have the full functionality of Windows, but the system is forced to display a single application in a kiosk mode. This version has one major drawback: it can’t work on devices that use ARM processors.
Windows 10 IoT Core
If you’re looking for a more lightweight version, there’s Windows 10 IoT Core. This version doesn’t have all the Windows features, instead, it runs the background processes and a single Universal App.
However, this version is fully compatible with ARM devices, so you can easily run it on single-board computers. Due to its simplicity, it’s perfect for smaller projects and hobbyists.
What are Windows 10 IoT hardware requirements?
Windows 10 IoT Enterprise
Memory: 2GB RAM
Storage: 16GB for the 32-bit version, 20GB for the 64-bit version
CPU: 1GHz of faster
SoC chips are also supported, but they need to support the following features:
x86 or x64 architecture
PAE, NX, SSE2, and SSE3 support
Support for CMPXCHG16b, LAHF/SAHF, and PrefetchW
Windows 10 IoT Core
Memory: 256MB RAM for headless, 512MB RAM for headed
Storage: 2GB
CPU: 400MHz or faster CPU
If you plan to use x86 compatible CPU, it must support PAE, NX, and SSE2.
What is Windows 10 IoT used for?
Windows 10 IoT Enterprise
Due to its advanced functionality, the Enterprise version is used for industry tablets, retail service points, kiosks, digital signage, ATMs, medical devices, manufacturing devices, and so on.
Windows 10 IoT Enterprise is used in almost all industries, including manufacturing, retail, service, medical, and many more, and it’s an integral part of our everyday lives.
Since this is a minimal version of Windows IoT, it doesn’t have the same features as the Enterprise version, so its use cases are different.
This version is used for digital signage, smart home devices, IoT gateways, human-machine interfaces, and more. As you can see, this version is aimed at tech enthusiasts that want to create their projects.
No, Windows 10 IoT isn’t free; to use it, you’ll need to obtain a license from Microsoft. It’s possible to get a 90-day evaluation copy with Visual Studio Subscription, but for continued use, you’ll need to purchase a license.
Does Windows 10 IoT have a GUI?
Yes, Windows 10 IoT has a GUI, and it’s usually configured to display a single application as soon as the device starts.
You can also use Windows 10 IoT without a display in a headless mode if you’re planning to connect to it remotely.
Overall, Windows 10 IoT is a major component of our everyday lives, and many devices we interact with daily are running on Windows 10 IoT.
If you want to familiarize yourself with this version of Windows, you might be interested in our guide on how to run Windows 10 IoT Core on Raspberry Pi.
We hope that you found this guide informative and that now you have a better understanding of how Windows 10 IoT works.
The WRkrn.sys driver is a kernel-mode driver used by Webroot SecureAnywhere, and it may sometimes trigger a Blue Screen of Death (BSoD) error.
However, the fixes are not always complicated. So, in this guide, we have put together some easy-to-follow steps to rid your computer of the blue screen error.
What causes the WRkrn.sys BSoD?
Corrupted or outdated WRkrn.sys – Outdated drivers are the main culprits for BSoD errors like the one caused by WRkrn.sys.
Conflict with another driver – There are chances that the WRkrn.sys driver is conflicting with other drivers on your computer.
Hardware problem – If your computer’s hardware is not working properly, it can cause the driver to fail and trigger the stop code.
An outdated antivirus – If you use an outdated version of the Webroot antivirus, chances are that associated drivers are outdated and will trigger this issue.
How do I fix a wrkrn.sys BSoD?
Before exploring any complex fixes, we recommend you run a virus scan to ascertain the BSoD is not triggered by malware, restart your computer, and uninstall conflicting apps, which will most likely be other third-party antivirus programs.
1. Reinstall the Webroot antivirus
NOTE
This solution applies only if you installed the Webroot antivirus.
Press Windows + R to open the Run dialog.
Type apwiz.cpl and hit Enter.
Click on the Webroot antivirus from the app list and select the Uninstall button.
Follow the wizard to complete the process, navigate to the official website to get a new copy, and install it.
Our readers reported that reinstalling their Webtroot antivirus fixed the issue, so if you’re in the same situation, use the solution above.
Note that on rare occasions, you may need to boot into Safe Mode to execute the uninstallation.
2. Rename the WRkrn.sys file
Press the Power button to start the computer, and once you see the Windows logo, press and hold the Power button to shut down. Repeat this step a few times till you are redirected to the Automatic Repair screen.
There, you have to click on the Advanced options.
Choose Troubleshoot, then click on the Advanced options.
Click on Startup Settings.
Click on the Restart button.
Press the F4 key to get into the Safe Mode.
Navigate to the path below: C:\Windows\System32\drivers
Search for WRkrn.sys and rename it to WRkrn.sys.old.
Finally, reinstall the app like in Solution 1.
3. Reset the PC
NOTE
This step will mean you lose most of your data and should be done only as a last resort.
Boot into Safe Mode using steps 1 to 6 of Solution 2.
Press Window + I to open the Settings app.
On the right pane, click on Recovery.
Click the Reset this PC option.
Select Keep my files to save as much as possible from the old installation (If the problem persists after a reset, you may redo the process but select Remove everything rather).
Follow the onscreen prompts to complete the process.
If you have tried the above steps and are still getting the WRkrn.sys blue screen error, you may need to contact Webroot support for assistance.
That is all we will cover in our guide. While we have not written these solutions in any particular order, we recommend trying a reset as a last resort since you may lose all your data.
While Chrome, the default browser for Chromebook, does a pretty good job, users still seek other options. One of the options users are exploring is the possibility of installing Microsoft Edge on a Chromebook.
In this detailed guide, we will show you how to download and install the browser without breaking a sweat.
Can I install Microsoft Edge on a Chromebook?
Microsoft Edge is not officially supported on the Chrome OS. This is because the default browser for the operating system is Chrome, and much importance is placed on it.
However, there are unofficial and safe ways to install the browser on your system. It only requires a few tricks here and there, and you will have Microsoft Edge working on your device.
How can I download and install Edge on Chromebook?
1. Using Linux
1.1. Enable Linux
Click the time area on Chromebook and click the Gear icon to open ChromeOS settings.
Next, click the Advanced option in the left pane.
Now, select the Developers option.
Select the Turn on option next to Linux development environment.
Finally, follow the onscreen instructions to complete the process.
The first thing to do if you want to download and install Microsoft Edge on Chromebook is to enable Linux on your device. But to do this, your system must support apps.
Also, your system needs to be running ChromeOS 80 or higher to perform this task. Lastly, note that this process will take some time.
This is because your device will need to download Linux and start its container. So, you need to be patient.
After the installation process is complete, the browser should be available on your device. However, there are some things you need to know about running Edge on the Linux virtual machine on Chromebook.
Some users have complained that they could not use Chromebook’s camera on Edge. Also, the hardware acceleration is visibly absent.
Hence, there is a considerable drop in the graphics performance. Another thing to note here is that you might find it hard to resize Microsoft Edge’s window, leading to problems rendering some fonts.
But, if you really need to use Edge, these are minor issues that should not deter you.
2. Via Google Play Store
Launch the Google Play Store app on your Chromebook.
Search for Microsoft Edge and click the app.
Now, click the Install button and wait for the process to complete.
This method is an otherwise short and direct way to download and install Microsoft Edge on Chromebook. Note that to use this method, you must have downloaded and install Google Play Store on your device.
Also, note that password and information syncing with Chrome browser is not direct. You must use the Microsoft Autofill Chrome extension to complete the job.
We can now conclude this detailed guide on downloading and installing Microsoft Edge on Chromebook. While the browser is incompatible with the OS, the two methods above will help you use it effortlessly.
Microsoft Excel is one of the most used apps by students and companies alike. However, like every other software, there are times when users face issues, with some complaining that Excel files are opening in Notepad.
This problem can be pretty frustrating, as it makes your document disjointed. Fortunately, there are ways to fix this Excel issue, and we will show you how to do it in this comprehensive guide.
Why is my Excel file opening in Notepad?
The reasons Excel files are opening in Notepad are within a close circle. Below are a couple of potential causes of the issue:
Wrong file extension: Sometimes, this issue might be caused by wrong file extensions. The easiest way to fix this is to change the extension to the correct format.
Faulty Office installation: At times, your Excel files might misbehave because of issues with your Microsoft Office installation. The solution to this is to repair Microsoft Office.
Wrong default app: If you have set the wrong default app for Excel-compatible files, you will understandably experience this issue. You need to change your default app appropriately to fix this.
How can I stop my Excel files from opening in Notepad?
1. Use the Open with option instead
Right-click the file you want to open and select the Open with option.
Select the Excel option.
If you can’t find the Excel option, click Choose another app.
Finally, select Microsoft Excel.
If Excel files are opening in Notepad on Windows 10 or 11, you need to use the Open with option to select your preferred app. With this, you remove the guessing game and open your file with the appropriate app.
2. Change file types settings
Press the Windows key + I and select the Apps option in the left pane.
Select the Default apps option.
Now, type the file type you want to set the default app for in the Set a default for a file type or link type search box.
Press the Enter key.
Finally, choose Excel as the default app and click OK.
If you did not set Microsoft Excel as your default app for opening its related files, it would not be surprising that Excel files are opening in Notepad. To rectify this, follow the steps above and make the necessary changes.
Press the Windows key + E to launch File Explorer and go to the location of the file opening on the wrong app.
Click the View tab at the top and select the Show option.
Now, select File name extensions and check if the file is in a format that is compatible with Excel.
If the file is incompatible with Excel, right-click it, and select Rename.
Finally, enter the file name as it should be and add the correct extension separated by a dot.
At times, Excel files might be opening in Notepad because the extension is written or set wrongly. The solution to this is to rename the file accordingly.
4. Repair Office installation
Press the Windows key + R, type appwiz.cpl, and click the OK button.
Right-click your Office installation and select the Change option.
Now, click tick the Online repair radio button.
Finally, click the Repair button and follow the onscreen instructions to complete the process.
If push comes to shove and you can’t stop your Excel files from opening in Notepad, you need to repair your Office installation. This should eliminate the potential problems causing Excel files to malfunction.
If Excel files open in Notepad, it can make your files look disorganized and make it difficult to edit your document. But with the information in this guide, you should be able to fix the issue and restore normalcy on your PC.
Similarly, if Excel runs into problems on your PC, check our comprehensive article to fix it effortlessly.
Let us know the solution that helped you fix this issue in the comments below.
The messages failed to load error on Discord, prevents users from reading new messages on their subscribed servers. When this error occurs, users see only empty bubbles instead of the latest chats in their channels.
This frustrating issue can be due to different factors, including server downtime. Irrespective of the cause of this problem, this detailed guide will show you how to fix it for good.
Why is the Discord channel not showing new messages?
Several factors are responsible for the messages to failed to load error on Discord. Listed below are some of the prominent causes:
Network issues: One of the major causes of this error is problems with your internet. You need to check if your connection is active and strong to get past the problem.
Server problems: At times, this problem can occur due to server downtime on Discord’s end. If this is the case, you need to wait it out.
Memory issues: If your PC memory is having issues, the Discord app might not run properly. You need to run the Memory Diagnostics tool to fix this.
Issues with the app: In some cases, your messages might not load because the Discord app is problematic. Uninstalling the app and reinstalling it from official sources should do the trick.
What can I do if the messages failed to load on Discord?
Below are a few quick checklists of troubleshooting steps to attempt before proceeding to the more sophisticated fixes:
If this does not fix the error, you can now proceed to the solutions below:
1. Mute and unmute the channel
Open Discord and right-click the channel or server, giving the error in the right pane.
Select the Mute Server or Mute Channel, depending on where you are getting the error.
Now, click the Until I turn it back on.
Next, wait for some minutes and right-click the server or channel again.
Finally, choose the Unmute server or Unmute channel option.
Sometimes, the messages failed to load error can be caused by minor glitches with the server or channel giving the error. A workaround for this is to mute and unmute the channel temporarily.
2. Mark messages as read
Launch the Discord app and right-click the server or channel, giving the error in the right pane.
Select the Mark as read option.
Finally, wait for the channel or server to load the messages.
Another quick way to fix the messages failed to load error on Discord on all servers is to mark the messages as read.
Press the Windows key + R, type %appdata%/discord, and click OK.
In the Discord AppData folder, locate the Cache, Code Cache, and GPUCache files.
Finally, right-click each of them and select the Delete option.
A faulty cache can be the cause of the Discord messages failed to load error on the web and mobile. You need to clear the files and restart the app to fix the issue.
4. Run the Memory Diagnostics tool
Press the Windows key + R, type mdsched.exe, and click the OK button.
Click the Restart now and check for problems (recommended) option.
Finally, wait for your PC to restart, and the scan will start automatically.
If there is a problem with your PC memory while running Discord, you might get the messages failed to load error. The Memory Diagnostics tool is the built-in tool that can fix these types of problems.
5. Force stop the app
Press the Windows key + X and select the Task Manager option.
Right-click the Discord option and select the End task option.
Finally, wait for some time and relaunch the Discord app.
In some cases, this error can be due to minor issues with the Discord app. The solution to this is to force stop the app on Task Manager and relaunch the app.
6. Uninstall and reinstall the app
Press the Windows key + R, type appwiz.cpl, and click OK.
Right-click the Discord app and select the Uninstall option.
Now, follow the onscreen instructions to complete the removal process.
If you can’t fix the messages failed to load error on Discord with the solutions above, you have no choice but to uninstall and reinstall the app.
We have reached the end of this guide on the messages failed to load issue on Discord. If you still can’t solve the problem, you might need to contact the official support team.
Surfing the web is not always the safest activity out there. Violent content or mature websites make the virtual space a risky place for juniors. But that’s where a kids-safe search engine comes in.
Firstly, you should make an informed decision regarding the best privacy-focused browsers for adults. Now that that’s out of the way, you can find safe kid-friendly search engines, specifically created for them.
When it comes to children, there are filtering options such as Google SafeSearch that can block sensitive content for the youngest ones. Yet, it doesn’t offer full shielding against aggressive web content as it’s not 100% accurate.
If that’s not helpful, you can always rely on safe kid-friendly search engines that can automatically erase undesirable content for juniors. More so, there is desktop monitoring software that you can use to track kids’ activity online.
What do kids search the most on the Internet?
According to statistical reports, children search for information regarding video game reviews on YouTube, cartoons, or online vlogs from various content creators the most.
Besides that, kids also look for trending music, famous games, or popular toys they would like to get. But that does not necessarily mean they are sheltered against inappropriate content coming their way at full speed.
So, here’s the big question: is there a SafeSearch engine for kids? The answer is certainly positive and here are our top picks:
Kiddle – Best kid-safe search engine
KidzSearch – Child-safe Internet search engine
Fact Monster – The most educational safe search engine
DuckDuckGo – Greatest privacy filters for kids
Kidtopia – Designed for elementary students
You can use multiple search engines developed for kids. But can parents turn on SafeSearch? Indeed they can. We believe that every parent should be able to activate SafeSearch from the browser settings.
Topping our list, this search engine designed for children comes with results suited for kids navigating online.
Namely, there are filtered search results by Google SafeSearch or verified by the editors and classified on the search results according to the complexity and level of reading.
⭐ Is Kiddle owned by Google?
No, this search engine is not owned by Google LLC or affiliated with the company. It was mistaken with the famous search engine, but it’s only powered by Google SafeSearch.
The next kid-friendly search engine is KidzSearch and it breaks sensitive content with advanced filtering tools powered by Google.
First, you have enhanced privacy and a multi-stage search process that ensures precise results with educational-oriented information.
? Is there a kid-safe version of Google?
There is no evidence of a dedicated search engine developed by Google for kids. However, most of the engines here are enhanced by Google and offer filtered results from the giant company.
As we all know, it’s possible to go Incognito and browse the web on Google privately without any history traces. Even more, anyone can learn to hide Incognito bookmarks in Chrome and erase web evidence.
This long-lasting search engine is out there for twenty years and it puts one aspect before everything: education.
With this solution, the kids have an insightful resource about educational topics and can search for anything without reaching inappropriate content of any kind.
It includes big thumbnail results, suitable fonts for improved readability, and quizzes for learning practically.
DuckDuckGo is among the safest browsers and search engines that exist on the Internet. Even though it’s not designed specifically for kids, you can keep it confidently for little curious minds.
The search engine is built with the latest privacy search tools and content filters, anti-tracking scripts, and secure encryption to keep dangerous websites away from your kid.
In addition to this, we highly suggest looking for extremely private browsers to find the most suitable one for kids’ screen time.
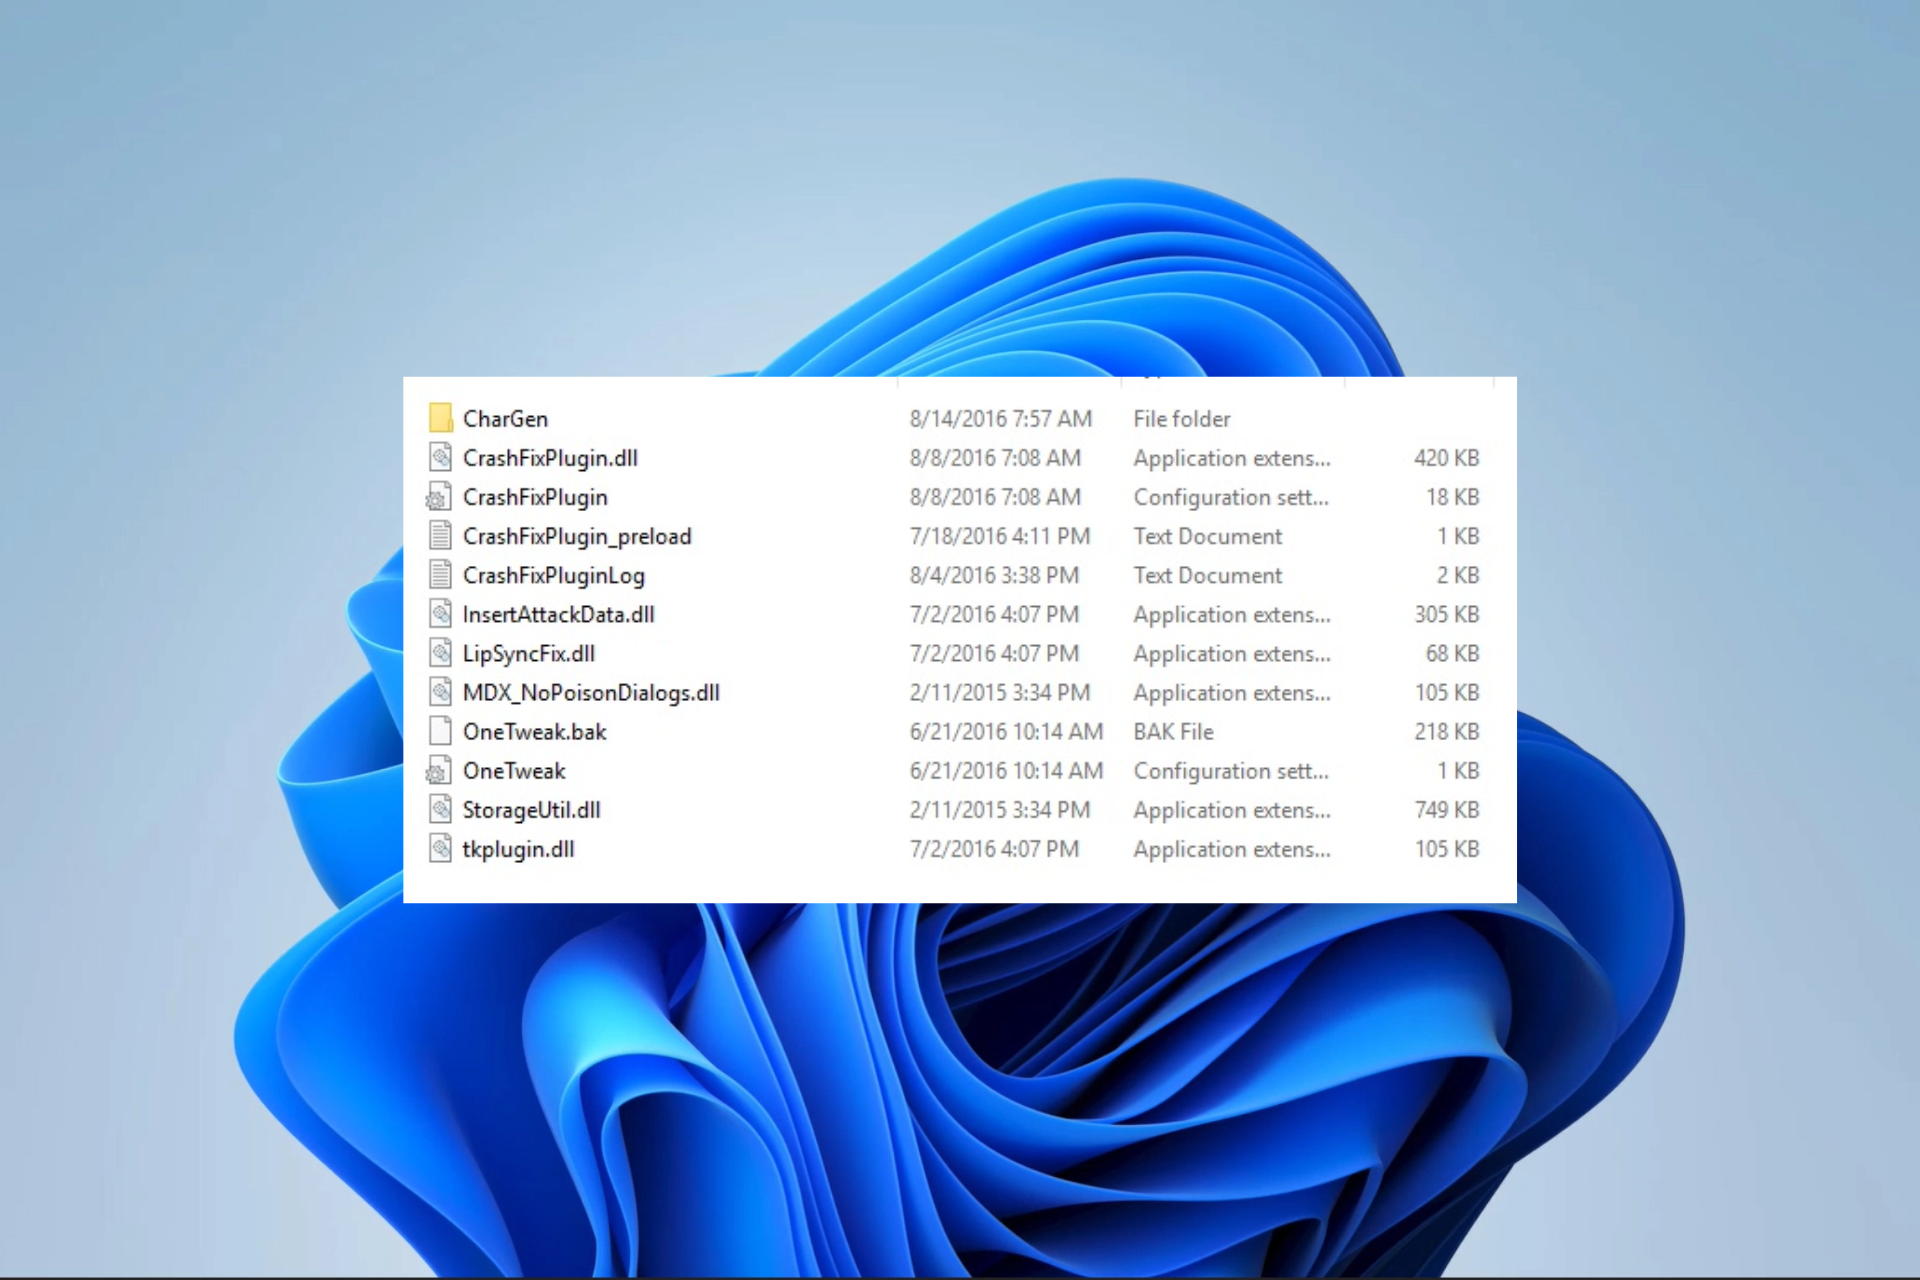
Regarding computers, Dynamic Link Library (DLL) files contribute to the smooth running of processes for multiple programs. A good example is StorageUtil.dll which has caught the attention of many of our readers, especially fans of Skyrim.
In this guide, we will explore the DLL, break down its functions, and tell you all you need to know about it and if it is safe to remove.
The StorageUtil.dll file is utilized by several Elder Scrolls V: Skyrim modifications. It gives modders a mechanism to save data persistently. So, this might help save items like mod settings, character information, or quest progress.
The DLL is often referenced with the PapyrusUtil mod. However, it has since been adopted by other mod authors and is now used by several mods.
Is StorageUtil.dll safe?
Yes, this file is safe on your computer and is not a virus. However, malicious software can often mimic genuine files to be introduced to a computer. So, you should scan with any robust antivirus software if unsure of its authenticity.
Note that you may find the DLL in varying directories depending on the applications that need it to run.
Should you remove StorageUtil.dll?
We typically recommend against removing this file from your system due to its critical function for specific applications.
That said, a few readers talk of some related errors. Some include StorageUtil.dll not found, application error, or the StorageUtil.dll access violation error. So, let us now explore some common solutions for storageutil.dll errors.
How can I fix StorageUtil.dll issues?
1. Use specialized repair tools
Using specialized DLL repair tools is our recommended solution because these tools do all the heavy lifting for you.
These tools are in handy as they will fix compatibility issues associated with non-native Microsoft OS files like StorageUtil.dll.
2. Remove StorageUtil.dll
Launch Vortex.
Navigate to the MODS tab, and locate the mod associated with the DLL. There are a few that may use it, including Wearable Lanterns.
Right-click it and select Open in File Manager.
Locate StorageUtil.dll and delete it.
Click on Deploy Mods in the main Vortex menu.
Finally, save the changes and see if the storageutil.dll issues are resolved.
That is as much as we discuss in this guide. We have covered all the important aspects of this DLL. So, if you are a gamer and encounter the file, you should not be alarmed.
As a general rule, you will want to keep your mods updated, especially when game updates may directly affect their functionality, to avoid any breaks.
Remember that missing DLL files on Windows 10 can also cause this problem, but these methods should work regardless of the version you’re using.
We also have a great guide on SppExtComObjHook.dll, so you might want to check it out for more information.
Lastly, remember to reach out to us in the comments section below if you have any further questions.
Pop-ups are notifications apprising users of actions undertaken in the background, both by third-party apps and built-in utilities.
While these are essential to some, others find them distracting or affecting the workflow. So let’s find out how to stop pop-ups in Windows 11.
When it comes to the Windows ecosystem, there’s no single way to stop all pop-ups in one go. You will have to disable each category and app separately. And it’s often time-consuming. But the best part, you have to block pop-ups on Windows 11 only once.
What are the types of pop-ups in Windows?
Here is a general outline of the various types of pop-ups you may come across:
Critical security-related pop-ups: Windows Security often send pop-ups to users after running background scans or to inform them of any threat.
Notifications from apps: Several third-party applications send pop-ups to users, some even when not actively running.
Windows Update pop-ups: Users also receive prompts from Windows Update about installations and pop-ups to restart the computer.
Personalized ads: Windows allows applications to send personalized ads using the advertising id, and this can easily be deactivated.
Tips and suggestions: Another built-in pop-up in Windows pertains to tips and suggestions, which though useful during the initial days, lose relevance after a while.
How do I stop pop-ups on Windows 11?
Tip
Since there are far too many sources of pop-ups, we have categorised each under different section to help you quickly disable them. Also, a quick way for a distraction-free experience is to use Focus Assist in Windows 11.
1. Stop notifications from apps
Press Windows + I to open Settings, and click on Notifications on the right in the System tab.
Expand the Notifications section, and untick the checkbox for all three, Allow notifications to play sounds, Show notifications on the lock screen, and Show reminders and incoming VoIP calls on the lock screen.
Scroll down, and turn off the toggle for any app you don’t want to receive notifications from.
If you are only looking to disable specific app notifications or stop pop-ups on the Windows 11 lock screen, this would help. Remember, it’s just the start. There is a lot more to do!
2. Disable personalized ads
Press Windows + I to open Settings, go to Privacy & security from the navigation pane, and click on General.
Turn off the toggle for Let apps show me personalized ads by using my advertising id.
Though not as intrusive as other notifications in Windows, personalized apps, too, are a cause of concern for many. So, if you plan to stop pop-ups in Windows 11, this should be a critical change to enforce.
3. Turn off tips and suggestions
Open the Settings app, and go to the Notification section in the System tab.
Scroll down to the bottom, then click on Additional settings.
Now, untick the checkbox for all three, but most importantly, Get tips and suggestions when using Windows.
Tips and suggestions often become a little overbearing, especially for users who understand Windows and the various functions. The good new, you can easily disable it from the Notification settings.
4. Stop Windows Update notifications
Press Windows + I to open Settings, select Windows Update from the navigation pane, and click on Advanced options.
Now, disable the toggle for Notify me when a restart is required to finish updating.
One of the most annoying pop-ups in Windows 11, as well as the previous iterations, are from Windows Update. It comes up every few days; unless manually disabled, these will continue to bother you.
Press Windows + E to open File Explorer, click on the ellipsis near the top right, and select Options.
Navigate to the View tab, untick the checkbox for Show sync provider notifications, and click on OK to save the changes.
File Explorer, too, shows up notificaitons, primarily to promote Microsoft services such as OneDrive and Office. Whether or not you use these, the pop-ups sure are a nuisance and you need to stop them in Windows 11.
6. Block pop-ups from antivirus
Press Windows + S to open Search, type Windows Security in the text field, and click on the relevant search result.
Select Settings from the bottom-left corner.
Click on Manage notifications.
Now, disable the notifications you don’t want to receive. You can uncheck individual options or stop notifications from an entire category by turning off the toggle.
Windows Security, the built-in antivirus, is another source of pop-up in Windows 11, and to stop them, you will need to reconfigure the notification settings.
If you use a third-party antivirus, there should be a similar section to disable these. Those looking to get rid of McAfee pop-ups Windows 11, go to the General Settings and Alterts section. Or, uninstall the program and use Windows Security as the primary antivirus.
7. Disable browser pop-ups
7.1 Chrome
Open Chrome, click on the ellipsis near the top right, and select Settings.
Select Privacy and security from the navigation pane, and click on Site settings.
Click on Notifications.
Choose the Don’t allow sites to send notifications option.
7.2 Edge
Launch Edge, click on the ellipsis near the top-right and choose Settings.
Navigate to Privacy, search, and services, and select Strict under Tracking prevention.
Now, go to the Cookies and site permissions tab, and click on Notifications on the right.
Turn off the toggle for Ask before sending (recommended).
7.3 Firefox
Open Firefox, click on the hamburger icon near the top-right, and select Settings.
Go to Privacy & Security, and click on the Settings button next to Notifications.
Make sure there are no entries here, select Block new requests asking to allow notifications, and click on Save Changes.
Once back to the previous page, tick the checkbox for Block pop-up windows.
Browsers are another source of pop-ups in Windows 11, and though these don’t directly affect the OS, the browsing experience sure goes for a toss. Incessant pop-ups from websites can hide important content and affect usability.
But, the good news is that most browsers now offer a built-in option to stop pop-ups in Windows 11 and the previous iterations.
Learn how to manage pop-ups safely in Chrome, Edge, Firefox, and Safari with this step-by-step guide on how to block or allow pop-ups.
8. Block lock-screen ads
Press Windows + I to open Settings, go to Personalization from the left, and click on Lock screen.
Expand Personalize your lock screen, and untick the checkbox for Get fun facts, tips, tricks, and more on your lock screen.
Remember, the option will only be available when you have Picture or Slideshow selected as the lockscreen background.
The Windows 11 lock screen also has a few irrelevant elements, which might affect the overall experience. And if you are not a big fan of these, setting a Picture or Slideshow as the background will help stop unwanted lockscreen pop-ups in Windows 11.
Press Windows + R to open Run, type gpedit.msc in the text field, and hit Enter.
Under User Configuration, expand Administrative Templates, and select Start Menu and Taskbar.
Double-click the Remove Notifications and Action Center policy.
Choose Enabled to turn it on, and then click Apply and OK to save the changes.
Now, expand Start Menu and Taskbar from the navigation pane, and click on Notifications under it.
Double-click the Turn off tile notifications policy policy.
Again, select Enabled, and then click on Apply and OK.
In the same way, enable the Turn off toast notifications policy here.
When making advanced changes, the Local Group Policy Editor or the Registry Editor works best. And since the two are often interlinked, we choose the former. Once done with the changes, you should find most notifications and pop-ups disabled in Windows 11.
Some readers observed that after installing their games from the digital library on Xbox, they had difficulty launching the games and got a 0x80270254 error. This happens for many games, including Division 2, Tom Clancy’s Breakpoint, and Destiny 2.
This article looks into the error and offers practical resolutions and probable causes to help you avoid a future occurrence.
What causes the Xbox 0x80270254 error code?
A few things may cause the problem, and the following are the more common triggers:
Internet connectivity issues – If you get a 0x80270254 error code, there may be a problem with the network. This could be due to network outages, weak Wi-Fi signals, or issues with the router or modem.
Network configuration problems – If the network settings on your Xbox, like the IP address or DNS server settings, are incorrect, it may result in an error code.
Xbox Live service issues – Occasionally, the problem could be linked to temporary issues with the Xbox Live service. If the Xbox Live servers encounter technical difficulties or are not running, it might hinder the console from establishing a connection.
Firewall or router settings – If your router or firewall blocks certain network ports required for Xbox Live connectivity, it can lead to an error code.
How do I fix the Xbox 0x80270254 error code?
It would help if you tried these preliminary troubleshooting options:
If it is a server-side problem, you will not be able to fix it and must wait till the error is corrected by Xbox. You will have to check the Xbox status page for confirmation.
Turn off your firewall or double-check that no Xbox functionality is blocked by it.
Power cycle your Xbox.
If the above fail, you should continue to more detailed fixes below.
1. Reset the network settings and connect to Xbox Live
Press the Xbox button on your controller to open the guide.
Navigate Profile & System, Settings, General, then Network settings.
Select Advanced settings.
Click Alternate MAC address.
Select Clear, restart the device, and verify if the 0x80270254 error is resolved.
Lastly, ensure you are connected to Xbox Live and are signed in to your profile.
3. Redownload the problematic content
Press the Xbox button on your controller to open the guide.
Click on My games & apps.
Select See all.
Pick the game or app to uninstall and press the Menu button.
Select Uninstall.
Click Uninstall all.
Now re-download the game and verify it fixes the 0x80270254 error.
These are practical fixes to resolve the Xbox error. Since we have not written them in any particular order, we recommend you try what feels the most applicable.
The System Restore utility of the Windows operating system is often a lifesaver when most troubleshooting fails. However, with the 0x80071ac5 error, you can no longer restore your computer.
This has put many of our readers in a fix. So, we will show you the most practical solutions and some probable causes.
What is the 0x80071ac5 System Restore error?
When System Restore cannot finish a restoration procedure, the 0x80071ac5 System Restore Error is a Windows error that may appear. There are several potential causes of this mistake, including:
Corrupted system files – Corruption or issues within the file system of your system drive can interfere with System Restore’s functionality.
Antivirus software interfering – Sometimes, third-party antivirus or security software can conflict with System Restore and prevent it from functioning correctly.
Hardware problems – If you have bad hardware components, they may interfere with the restore utility and must be repaired or replaced.
Driver problems – Outdated drivers are a constant cause of PC issues, including the Windows Restore error.
Software conflicts – In some cases, the problem will be triggered by software interfering with the process.
How do I fix the System Restore error with code 0x80071ac5?
We recommend you try the following workarounds before any further fixes:
Uninstall conflicting apps – If you have recently installed apps, uninstall them as they may trigger the error with your restore utility.
Run a malware scan – Use a trusted antivirus to run a scan that should rid your device of malware that may trigger the error.
If none of the above fixes the problem, you may proceed to more in-depth solutions.
1. Run System Restore in Safe Mode
Click on the Start menu on your taskbar, then select the Power icon.
Press and hold the Shift key on your keyboard, then click on Restart.
Once you’re redirected to the options screen, select Troubleshoot.
Click on Advanced options.
Select Startup Settings.
Click on the Restart button.
In the next menu presented after the reboot, press F4 or F5 to enter safe mode, then rerun the System Restore utility and verify the 0x80071ac5 error is fixed.
2. Run the System File Checker tool (SFC)
Press Windows + R to open the Run dialog.
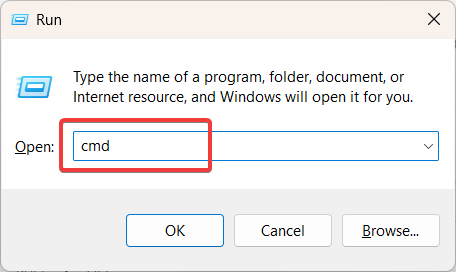
Type cmd and hit Ctrl + Shift + Enter to open an elevated Command Prompt.
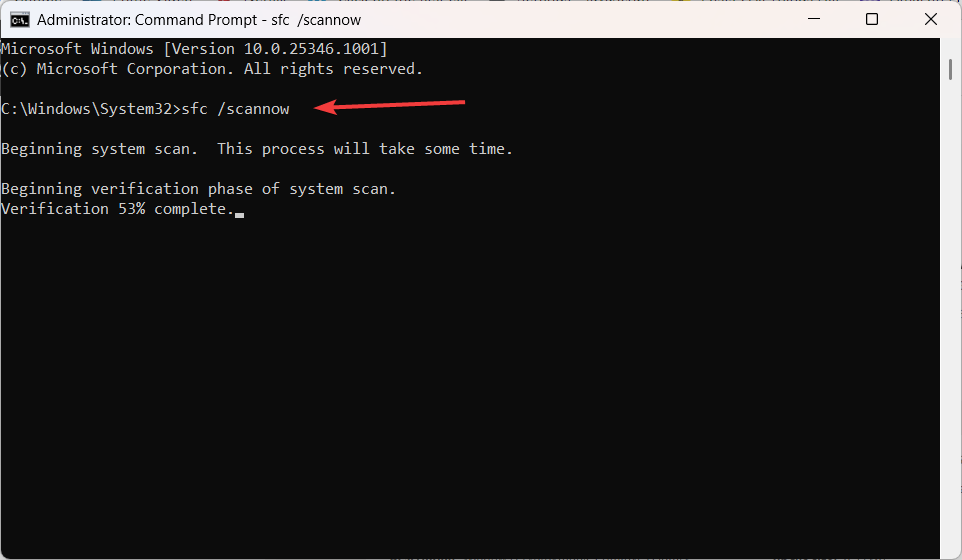
Type the script below and hit Enter. sfc /scannow
Wait while the scan completes, ensure to follow prompts if any, then verify it fixes the System Restore 0x80071ac5 error.
Right-click the Start menu and select Device Manager.
Expand a category with outdated drivers, right-click on your driver, and click Update driver.
Select Search automatically for drivers.
Wait for the update to complete, then retry the System Restore utility.
4. Choose a different restore time
Press Windows + R to open the Run dialog.
Type rstrui and hit Ctrl + Shift + Enter to open the System Restore tool.
Click the Next button.
Select a different restore point if available and click Next.
Click Finish and wait for the process to complete.
5. Start the Volume Shadow Copy service
Press Windows + R to open the Run dialog.
Type services.msc and hit Ctrl + Shift + Enter.
Search for Volume Shadow Copy and double click it.
Change the Startup type to Automatic and click the Start button.
Click Apply and OK and verify if it fixes the 0x80071ac5 System restore error.
Any of the fixes above should come in handy. Since we have not discussed them in any particular order, we recommend you start with any that feels the most applicable to your situation.
We love to hear from you. So, please leave us a message in the comments section, and let us know what fix was effective.
Microsoft has been involved in the quantum field for over two decades, positioning the company to understand the risks associated with this emerging technology. By investing significantly in quantum computing, Microsoft is well-equipped to comprehend the challenges and develop effective strategies to mitigate them.
One of the primary concerns in a quantum computing era is the impact on encryption systems. Current security measures heavily rely on public-key cryptography, which could be vulnerable to quantum computers. Complex mathematical problems that are difficult for classical computers to solve can become considerably easier for quantum machines using algorithms like Shor’s algorithm. This poses a threat to widely used encryption methods such as the RSA algorithm.
To address this potential disruption, Microsoft is investing in research and development to create quantum-safe approaches. The company recognizes the need for algorithm agility, resiliency, and flexibility to ensure the security of cryptographic systems in the face of quantum computing.
While the advent of scaled quantum machines capable of running Shor’s algorithm is still some distance away, Bell emphasizes the importance of immediate action to prepare for future risks. Organizations need to begin the process of becoming quantum-safe, as it will require significant effort and coordination across supply chains and ecosystems.
Microsoft plans to deliver its quantum machine as a cloud service through Azure, implementing technical and operational controls to prevent misuse. However, it is crucial to consider the broader quantum landscape, as not all quantum machines will be protected in the same way. Immediate risks, such as the vulnerability of un-updatable IoT devices and potential “Harvest Now, Decrypt Later” scenarios, demand attention and preparation.
Bell draws a parallel to the Y2K challenge, highlighting the need for a massive industry-wide effort to overcome the potential vulnerabilities posed by quantum computers. Cryptographic systems are widespread and interconnected, making it essential to update and prepare them for a quantum-safe future.
Microsoft is committed to being a trusted partner in this process, leveraging its expertise in both hardware and software development. The company aims to provide practical cryptographic solutions, deepen knowledge of quantum-safe algorithms, and develop a roadmap to address gaps and prioritize critical areas.
The time to act is now. Organizations are encouraged to create inventories of critical data and cryptography technologies, assess their vulnerabilities, and develop transition strategies. Microsoft is already assisting customers and partners in risk-sensitive industries, providing resources and support on their journey to becoming quantum-safe.
As quantum technology continues to advance, Microsoft remains dedicated to the security of its products and customers. Through collaboration and proactive measures, we can embrace the quantum future while ensuring a safe and secure digital ecosystem.
In a year that is on track to go down as one gaming’s best years in recent memory, Street Fighter 6 brashly storms onto the scene to knock down expectations and just maybe redefine a genre that many feel has been stagnant for a long time.
With the Mortal Kombat reboot and Tekken 8 coming on the heels of Street Fighter 6, fighting game fans have rarely had it so good lately. But given the critical reception that is rolling out for the latest entry in Capcom’s most iconic fighter, these new challengers may be in for an uphill battle for fighting game supremacy. See what reviewers are saying about Street Fighter 6 below.
Street Fighter games are always benchmark moments for the 2D fighting game genre, but Street Fighter 6 feels extra special…It’s so good that even the poor story and extremely slow progression of the single-player World Tour amounts to only a jab’s worth of damage on its metaphorical health bar. Whether you’re completely new to fighting games or are a seasoned vet, Street Fighter 6 is a must play.
The GuardianStreet Fighter 6 review (Calls it “the new king of fighting games”)
It takes a lot to reinvent a 30-plus-year-old franchise while keeping step with tradition, and Capcom has succeeded admirably. Hopefully the still-to-come monetisation schemes are reasonable (details hadn’t been fully announced at the time of writing) and the netcode remains smooth, because the king of fighting games, Street Fighter II Turbo, is on notice: here comes a new challenger.
Rockpapaershotgun Street Fighter 6 review (Says it’s “Streets ahead of the competition”)
Although the performance issues take the shine off things, I can still comfortably say Street Fighter 6 is the most fun I’ve ever had with any fighting game on release. After the disastrous launch that was Street Fighter 5, seeing Street Fighter back on top form again just feels right – and I’m extremely excited to see what the next year of content updates can do for a game that already feels this mechanically polished at launch.
Gameshub Street Fighter 6 review (5 out of 5 stars)
Street Fighter 6 is an exceedingly good fighting game. But more than that, it’s an excellent training tool. It’s a fulfilling adventure. It’s a lively community gathering place. It’s an endearingly idealistic and inspiring world of appreciation for martial arts and friendly competition, exceptionally executed in every respect.
Calls it “a revolutionary step forward for the fighting game genre.”
Capcom’s latest takes everything you’d expect from the father of the fighting genre and turns it up to 10. There’s something for everyone here, with no fat or filler to ruin the experience. Street Fighter 6 is the best fighting game in a long time, and in the years to come, its impact and legacy could be every bit as massive as Street Fighter 2.
The roster feels like a great starting line-up, the fighting feels good, the visuals outside World Tour are beautiful and the online lobbies and networking are superb…All-in-all, this game rekindled my love of the franchise, and I can’t wait to see how Street Fighter 6 grows over time.
From top to bottom, Street Fighter 6 is an absolute triumph by Capcom. A genre-defining fighting game that oozes charm and polish in almost every aspect, barring some minor gripes with World Tour.
Street Fighter 6 is a critical triumph!
The praise for Street Fighter 6 is unanimous. The game is yet another hit for Capcom, and looks poised to revolutionize the genre with fresh ideas like the groundbreaking World Tour mode and seriously in-depth training mode. The game releases on June 2 for PlayStation 4/5, Windows PC and Xbox Series X|S.
You might have wondered what the Microsoft Wi-Fi Direct Virtual Adapter does on your PC. It would be best if you rest assured that this network adapter is Microsoft and completely safe.
But if the adapter is messing with your activities and you wonder if it is worth keeping, this guide will provide you with everything you need to know about it.
What does Microsoft Wi-Fi Direct Virtual Adapter do?
As the name goes, the Microsoft Wi-Fi Direct Virtual Adapter helps make your PC a wireless hotspot. With this, other computers can connect to your PC to access the internet.
It does this by virtualizing your wireless network adapter. With this, your single physical wireless adapter will be converted to two virtual ones.
This allows you to connect one of the virtual adapters to your wireless network. The other one then serves as a hotspot for other PCs to connect.
How do I disable or remove Microsoft Wi-Fi Direct Virtual Adapter?
1. Use Device Manager
Press the Windows key + R, type devmgmt.msc, and click the OK button.
Double-click the Network adapters option to expand it.
If you can’t find the Microsoft Wi-Fi Direct Virtual Adapter option on the list of Network adapters, click the View tab at the top, and select Show hidden devices.
Now, right-click the adapter and select Disable device.
Next, click the Yes button when prompted.
Finally, repeat Steps 2 and 3 for every Microsoft Wi-Fi Direct Virtual Adapter entry on the list.
If you want to disable the virtual adapter for some reason, the first option is to do it via the Device Manager. This makes it unavailable for connection.
Should you decide to enable the adapter again, you only need to repeat the steps above and select Enable device in Step 4 instead.
2. Disable the adapter via the Registry Editor
Press the Windows key + R, type regedit, and click the OK button.
Navigate to the path below in the left pane: HKEY_LOCAL_MACHINE\SYSTEM\CurrentControlSet\services\WlanSvc\Parameters\HostedNetworkSettings
Now, right-click the HostedNetworkSettings registry key in the right pane.
Choose the Delete option.
Next, click the Yes button to confirm the action,
Finally, close the Registry Editor and restart your PC.
Another effective option to disable the Microsoft Wi-Fi Direct Virtual Adapter is to go via the Registry Editor. To confirm if the operation was successful, launch Command Prompt as an admin, and run the command below: netsh wlan show hostednetwork
If the operation is successful, the Mode will be set to Not configured under Hosted network settings.
Press the Windows key + S, type cmd, and select Run as administrator under Command Prompt.
Type the command below and hit Enter to stop the wireless hosted network broadcast: netsh wlan stop hostednetwork
Now, run the command below to disable the adapter: netsh wlan set hostednetwork mode=disallow
Finally, close Command Prompt and restart your PC.
An easier way of disabling the Microsoft Wi-Fi Direct Virtual Adapter is to run a few commands on Command Prompt. These commands will automatically stop the adapter from sharing your network.
4. Disable Project to this PC
Press the Windows key + I to open the Settings app and click the Projecting to this PC in the right pane.
Now, select the dropdown under Some Windows and Android devices can project to this PC when you say it’s OK.
Finally, choose Always Off (Recommended).
If this virtual adapter is causing issues with your external Wi-Fi adapter, you can fix it simply by disabling the Project to this PC feature. This will allow you to use the adapter without many issues.
The Microsoft Wi-Fi Virtual Direct Adapter is a useful feature that allows other computers to use your PC’s internet. However, if it causing problems on your PC, the solutions in this guide will help you disable it for good.
Many users have reported experiencing crashes when opening Steam Big Picture mode, especially when launching a game within Big Picture mode. Additionally, there have also been reports of crashes when using Big Picture mode on the Steam Deck.
If you’re experiencing issues with Steam Big Picture mode crashing, there are several steps you can take to troubleshoot and potentially resolve the problem.
Why does Steam crash in Big Picture Mode?
Big Picture mode in Steam is a user interface specially designed for television screens and game controllers. It enables users to easily navigate and play games on their TV without a mouse or keyboard, using only a controller.
There can be several reasons why Steam may keep crashing in Big Picture mode. Here are some common causes:
Software conflicts: Conflicts with other programs or overlays running on your computer, such as antivirus software, graphics card overlays, or other third-party software, can cause crashes in Steam Big Picture mode.
Outdated software: If your Steam client or graphics drivers are outdated, it can lead to compatibility issues and crashes.
Corrupted game files: Corrupted game files can cause crashes in Big Picture mode.
Hardware issues: In some cases, hardware problems like overheating, faulty RAM, or a failing hard drive can lead to crashes in Steam Big Picture mode.
Incompatible mods or customizations: If you have installed custom mods or customized game files, they may conflict with Big Picture mode and result in crashes.
System resource limitations: Insufficient system resources, such as low RAM or inadequate graphics capabilities, can cause Steam crashes.
How do I fix big picture mode crashing on Steam?
Before moving on to the more advanced solutions, try these simple fixes:
Relaunch Steam: Completely close the app and then relaunch the app.
Check for Steam updates: Make sure you have the latest version of Steam installed on your computer. Steam updates often include bug fixes and performance improvements that can address crashing issues.
Disconnect the device and Controllers: Unplug all USB devices and unregister all the controllers connected to your computer. Then, relaunch the Steam and switch to Big Picture Mode.
Uninstall ASUS Gamer OSD: Some users have reported that uninstalling the ASUS Gamer OSD program helped. If you have the AUS Gamer OSD program installed on your computer, uninstall it.
Disable In-Game Overlays: Some overlays or third-party software can conflict with Steam Big Picture mode, causing crashes. Try disabling any overlays (e.g., Discord overlay, GeForce Experience overlay) or other software running in the background to see if it resolves the issue.
1. Clear the Steam client’s download cache
Click the Start button, type Steam, and open the Steam app.
Click the Steam Menu and choose Settings.
Go to Downloads and click the CLEAR DOWNLOAD CACHE button.
Click OK when prompted to log in to your account.
NOTE
Remember that clearing the download cache will not delete your installed games or personal files; it only removes temporary download-related data.
2. Run the Steam client as an administrator
Right-click on the Steam client icon on your desktop and select Properties.
In the Steam properties window, go to the Compatibility tab.
Check the box for Run this program as an administrator and click Apply.
Restart your PC and launch Steam to see if the issue persists.
3. Check if Steam is running in Compatibility Mode
Press Windows + R to open the Run dialog box.
Type the following path and press Enter. C:\Program Files (x86)\Steam
In the Steam directory, find the Steam.exe file, right-click on it, and select Properties.
Click the Compatibility tab and check the box under Compatibility Mode.
Then, click the drop-down list to select a previous version of the Windows system.
Click Apply and then OK to save the changes.
Restart the Steam client and check if the problem persists.
If the Compatibility Mode is already enabled, uncheck the box under Compatibility Mode, save the changes, and restart the Steam.
4. Verify the integrity of your game cache
NOTE
If Steam only crashes when launching a specific game, check the integrity of the game files to fix the issue.
In the Steam app, go to the Library menu.
Right-click on the problematic game and select Properties.
Select Local Files from the left panel and click the Verify integrity of game files button.
Steam will verify and repair any issues with the game files. Then, check if the Big Picture Mode still crashes.
5. Delete tenfoot and appcache folders
NOTE
The tenfoot folder in the Steam installation directory is associated with Steam Big Picture Mode, providing a TV and controller-optimized interface. It contains files related to the Big Picture Mode interface.
Close the Steam program completely. Open the Steam app, click Steam, and select Exit.
Navigate to your Steam directory using File Explorer. The default location is C:\Program Files (x86)\Steam
Locate the folder named tenfoot and either delete it or rename it.
After that, look for the folder named appcache and delete its contents.
After completing these steps, restart Steam and verify if the issue of Steam Big Picture Mode crashing persists.
6. Update your graphics driver and audio driver
Press the Windows + R keys to open the Run bar.
Type devmgmt.msc and click OK.
Expand Display adapters, right-click on your graphics driver, and select Update driver.
Choose the option Search automatically for drivers.
Follow the same instructions and update your audio drivers as well.
Restart your computer and check if the crash still occurs.
If the Big Picture Mode still crashing do a clean install of your graphics and audio drivers. Visit your manufacturer’s website and download the latest drivers and install them.
7. Rollback the drivers
NOTE
If the Big Picture Mode crashing started after a recent driver update, rolling back the driver to the previous version may fix it.
Press the Windows key, type device manager, and select Device Manager console.
Expand Display adapters, right-click on your graphics driver, and select Properties.
Switch to the Driver tab and click on Roll Back Driver.
Then, choose a reason and click Yes.
After that, reboot your computer and see if the issue is resolved.
8. Leave the Steam BETA program
In the Steam app, click the Steam menu and select Settings.
Go to the Account tab or Interface tab and look for the Beta Participation option.
Then, click the CHANGE button.
Click the drop-down menu under Beta Participation, select NONE – Opt out of all beta programs and click OK.
Then, click the RESTART STREAM button.
Wait for Steam to download and install the necessary updates.
9. Reinstall Steam
Press Windows + R, type appwiz.cpl and press Enter.
From the list of apps, right-click Steam and then select Uninstall.
To ensure everything is properly removed when uninstalling Steam, it’s a good idea to use an uninstaller app. This helps get rid of any leftover files and registry entries that could cause problems when you reinstall the app.
Before uninstalling Steam, remember to back up your games using Steam’s backup feature. This prevents game loss during the uninstallation process. You can restore the backups when reinstalling Steam.
Let us know in the comments section below if you found this guide helpful and managed to fix your Steam crashing issue.
It seems like Microsoft is, again, trying an unethical way to keep people to stay on its natively built-in browser, whether it’s intentional or not. Now, things may seem a little bit more complicated if you want to switch from Edge.
Google Chrome, the world’s current leading web browser, had the option to make it a default browser until Windows 11’s April 2023 update (KB5025221) seemed to stop that option from working.
The issue was first raised back in early April 2023 when users started complaining. User Todd Fuhrman1 on Microsoft Forum, for example, said here that the update has switched their system’s browser back to Edge and they can see the default app settings of Windows opened.
“After today’s cumulative update for Windows 10 and 11, 2023-04, every time I open Chrome the default app settings of windows will open. I’ve tried many ways to resolve this without luck. This is happening to all 600 systems with the update. Removing the update makes the issue go away. Anyone else having this issue?”
But now, it seems like the issue has landed on Google’s radar and they’re doing something. As spotted by Edge enthusiast @Leopeva64, Google is already working on restoring this feature as seen on the patch in Gerrit. The good news is, the Stable version of Chrome (114) has now returned with this feature, so all is safe now.
Chrome Stable has been updated to version 114 and can now be set as the default browser with a single click (you have to use a command line flag, but I guess Chromium developers will enable this feature by default soon):https://t.co/W0MQ543Rl2 .https://t.co/sF8Kd5f392pic.twitter.com/9bpKjyXu0m
Not the first attempt by Microsoft to prevent the switch from Edge
As you may remember, this wasn’t the first attempt by Microsoft to stop people from migrating to other browsers.
Back in 2021, Redmond officials blocked third-party apps like EdgeDeflector, which helped you use Windows features like Cortana with the browser of your choice instead of being forced to use Edge. Its replacement, MSEdgeRedirect, is still around, but who knows what will happen in the future.
Microsoft is currently ahead of Google in the market for AI-powered search engines with Bing AI chatbot. As a result, Microsoft has made it an exclusive feature on Edge. If you try to access it on other browsers, you will be provided with a button to switch to Edge instead.
Edge used to be people’s second-favorite browser for months, but according to recent findings by GS StatsCounter, the market share of the browser is slowly falling short behind Apple’s Safari. As we’ve previously reported, Edge’s market share fell short to 10.95% in April 2023 compared to Apple Safari’s 11.89%.
What do you think about Microsoft making it harder for people to switch from Edge? Let us know in the comments!
It seems that Edge’s built-in VPN could give 5 GB of free data in the future, according to this Windows enthusiast. A while ago, Microsoft offered 15 GB of data through Edge’s VPN. Unfortunately, it turned out to be temporary and part of a trial period.
However, this time the Redmond tech giant is giving 5 GB of free data that might be permanent. @Leopeva64 spotted it on the Settings page in Edge Canary, where the data is clearly mentioned as being free.
5 GB of free data seems like a substantial amount enough for Microsoft to keep a swift balance between offering free resources and managing the costs of it. Even more, Edge’s VPN can deliver a good browsing experience, while making sure the services are sustainable.
Microsoft has also removed the option to enable the VPN on all sites, and @Leopeva64 agrees this means the 5GB of free data will be permanent.
And, as spotted by the same insider, there are also options called Protected traffic and Secured Wi-Fi in the Secure Network option.
You might ask yourself, if you should use Edge’s built-in VPN, and the answer is yes. You should.
Edge’s VPN encrypts your internet traffic, so it shields you from unwanted attention, and threats. For example, every time you connect your device to a public Wi-Fi network, you are very vulnerable to attacks. The VPN protects you from that.
Even more, with Edge’s built-in VPN, you can bypass region-restricted content and websites. It also prevents advertisers from tracking your activity. And the best thing is that this VPN comes as a built-in part, so it’s free.
Microsoft announced it a while ago, and it allowed Edge insiders to test up to 15GB of free monthly traffic. However, the limit was set to 1GB once the feature was available to all users.
With that being said, 5 GB is more than reasonable for free data, and this way Edge’s built-in VPN will take care of the users’ experience without compromising security. It’s a great deal.
Do you use Edge’s build-in VPN? What’s your opinion on this? Let us know in the comments section below.
Type cmd and hit Ctrl + Shift + Enter to open an elevated Command Prompt.
Type the following in the Command Prompt and press Enter to flush your DNS cache: ipconfig /release ipconfig /flushdns
Renew your DNS by running the script below: ipconfig /renew
Verify if the fix is effective for the socket error.
The fixes we have discussed should suffice for this error. However, if you have tried all of the above steps and are still getting the error, you may need to contact the server administrator.
Note that there are also a few related errors you may face, like the Winsock errors 10061, 10038, 10014, and 10054. In most cases, the fixes are very similar.
Lastly, we love to hear from you. So, reach out via the comments section below and tell us what solutions were most effective.
A few of our readers have complained about the load Vender.dll error, especially after updating a VGA driver.
The problem is an issue with the Vender.dll file, which Windows couldn’t load properly. This file is a crucial element of the graphics driver that enables Windows to communicate effectively with your graphics card.
What causes a load Vender.dll fail?
From interaction with readers, we gather that a few things may trigger this error. Some of these include:
Driver-related issues – A missing or outdated graphics driver, driver corruption, and other random problems with the graphic card are typical suspects.
Hardware issues – Specific malfunctioning or bad hardware components may also trigger some users’ errors. In most cases, they should be replaced or repaired.
Malware – Malware may infiltrate your computer, corrupt or delete essential system files that will trigger the load Vender.dll error.
How do I fix a load Vender.dll fail?
We recommend you start with the following preliminary workarounds:
Make sure you installed all the new Windows updates.
Try starting your PC in Safe Mode. Only the most important processes will run, and this may get you by without facing the error.
Remove any unnecessary peripherals from your PC.
Scan your PC for viruses with a good third-party antivirus if possible. A malware scan will eliminate the chance of the error due to virus infection on your computer.
If the prerequisite solutions did not work, proceed to more detailed fixes below.
1. Use specialized DLL tools
A few specialized repair tools can fix or replace DLLs if there is an error or if they are missing. These tools also come with powerful features that make them excellent for long-term maintenance once the issue has been fixed.
2. Update the graphics driver
Right-click the Start menu and select Device Manager.
Expand the Display adapters category, right-click on your driver, and click Update driver.
Select Search automatically for drivers.
Wait for the update to complete, then verify if it fixes the load Vender.dll fail error.
While using passwords and PINs is good for preventing unauthorized access to a PC, not everybody likes them, especially on their home computer. This is obvious by the number of users looking for ways to remove their Windows 10 password.
If you don’t want to provide your login information every time, this guide will show you how to remove the security feature for good.
Is it safe to remove my Windows 10 password?
Whether or not removing your Windows 10 password is safe depends on where and how you use your device. For example, a home PC with controlled access can be left without a password.
However, if you use your computer in a public location with unrestricted access, it is advised to use a password or PIN for privacy’s sake.
How can I remove Windows 10 password?
1. Use the Settings app
Press the Windows key + I and select the Accounts option.
Click the Sign-in options in the left pane.
Now, click the dropdown under the Require sign-in section.
Finally, select the Never option.
The first method to remove your Windows 10 password is through the Settings app. However, things might not be straightforward if you use a Microsoft account.
In this case, you need to switch to a local account first by following the steps below:
Press the Windows key + I and select the Accounts option.
Click Your info in the left pane.
Now, select the Sign in with a local account instead option.
Next, type in your details and password hints.
Click the Next button.
Finally, select Sign out and finish.
After switching to a local account, you can now proceed to remove your Windows 10 password.
Press the Windows key + R, type netplwiz, and click the OK button.
Now, uncheck the Users must enter a username and password to use this computer box.
Click the Apply button.
Next, type your username and password when prompted.
Click the OK button to save the changes made.
Finally, restart your PC.
Another effective option to remove your Windows 10 password is to go via the user account feature. This provides a quicker option to perform this task.
This is easier if you are using the local account and not the Microsoft account. To manage passwords for other profiles on the same PC, including resetting a family member or coworker’s account, you can follow this step by step guide on how to change another user’s password in Windows 11.
3. Use Command Prompt
Press the Windows key + S, type cmd, and select Run as administrator under Command Prompt.
Type the command below and press Enter to run it: control userpasswords2
Finally, uncheck the Users must enter a username and password to use this computer box and follow the onscreen instructions to complete the process.
The last option available is to use Command Prompt to use your Windows 10 password. This takes you to the user account page, where you can disable the feature. You can also remove BIOS password via Command Prompt as described in our guide, so take a closer look.
Privacy and security are among the endearing features of the Windows OS, and it is not surprising that users are provided multiple options to secure their PCs.
However, if you want to remove your Windows 10 password, you can use one of the multiple options in this guide.r
If you lose your password and need a Windows 10 password recovery tool, check our guide for the top options available.
Viruses mess with your PC, and in the worst cases, they can destroy it. One recent malware that’s been bugging users is Trojan:Script/Wacatac.H!ml.
This trojan pops up on Windows Defender as a potential threat and, sometimes, on the quarantined list. In this guide, we will show you how to get rid of this malware on your PC.
What is Trojan:Script/Wacatac.H!ml?
The Trojan:Script/Wacatac.H!ml virus usually comes with some third-party cracking software. Also, it can be due to problems with some programs on your PC.
However, you might still receive a false prompt that the virus is still on your PC. But that can be cleared too, and we will show you how in the ensuing section of this article.
How do I get rid of Trojan:Script/Wacatac.H!ml?
Below are some basic troubleshooting steps to try before proceeding to the sophisticated solutions:
Restart your PC.
Delete the faulty file.
If you still can’t get rid of the virus, you can now proceed to the fixes below:
1. Check if it is a false positive
Press the Windows key + E to launch File Explorer.
Click View > Show at the top and check the Hidden items box.
Now, navigate to the path below: C:\ProgramData\Microsoft\Windows Defender\Scans\History\Service
Delete the content of the Service folder.
Next, navigate to the path below: C:\ProgramData\Microsoft\Windows Defender\Quarantine
Delete the content of the Quarantine folder.
Now, press the Windows key, type virus, and select Virus & threat protection.
Select Scan options.
Tick the radio button for Microsoft Defender Antivirus (Offline) option and click the Scan now button.
Finally, your PC will restart to perform the scan. Wait for the scan to complete and check if the virus is still on your PC.
Sometimes, the Trojan:Script/Wacatac.H!ml prompt can be a false positive, especially if you have taken action against it in the past. What you need to do here is to clear some of the Windows Defender files and check if the virus is still present.
Press the Windows key, type virus, and select Virus & threat protection.
Click Scan options.
Now, select your preferred scan option and click the Scan now button.
In the case that the Trojan:Script/Wacatac.H!ml virus is actually present on your PC, you need to perform a full system scan to eliminate it.
While Windows Defender does a good job, it still leaves much to be desired. So, you are better off using excellent antivirus software in TotalAV to eliminate even the most hidden malware on your PC.
This software takes a no-nonsense stand against malware, as it detects and removes the most stubborn viruses before they can cause problems on your PC.
3. Scan for malware in Safe Mode
Press the Windows key + I and select the Recovery option in the right pane.
Click the Restart now button before the Advanced Startup option.
When your PC restarts, click the Troubleshoot option.
Now, select Advanced options.
Select Startup Settings.
Next, click the Restart button.
When your PC restarts, press 5 or F5 to Enable Safe Mode with networking.
Finally, repeat the steps in solution 2 above when your PC boots up.
If you can’t get rid of the Trojan:Script/Wacatac.H!ml virus normally on your PC, you should consider eliminating it in Safe Mode. That has proved effective for some users, and you should try it too.
4. Perform a system restore
Press the Windows key + R, type rstrui.exe, and click OK.
Now, click Next.
Select your preferred restore point and click Next.
Finally, click the Finish button.
If you started noticing the Trojan:Script/Wacatac.H!ml virus on your PC after installing an app on your PC, you need to perform a system restore. However, you need to have created a restore point to do this.
5. Reset the PC
Press the Windows key + I to open the Settings app and select Recovery in the right pane.
Now, click the Reset PC button before the Reset this PC option.
Finally, choose whether to keep your files or remove everything and follow the onscreen instructions to complete the process.
If you still can’t get rid of the Trojan:Script/Wacatac.H!ml virus on your PC, you might need to reset it. If you have a backup of your files, you should consider removing everything to get rid of the virus for good.
We have reached the end of the detailed guide on eliminating the Trojan:Script/Wacatac.H!ml virus. All you need to do now is to follow the instructions carefully, and things should be back to normal.
You will soon be able to backup Chrome passwords on Windows 11, as spotted by Windows enthusiast @PhantomOfEarth, on Twitter.
The new Windows Backup app/experience should support remembering some Google Chrome passwords soon, new toggle for it will be present and this already sort of exists in 23466 but I'm not sure how functional it is.
The Windows Backup app will feature an option to remember Chrome passwords for other apps. You will have to enable the option and you should be able to use the Chrome passwords on the apps that you need them.
So far, the built-in app hasn’t been able to store Chrome passwords, but as @PhantomOfEarth agrees, the feature sort of exists already, but not like this. Plus, it might not even be functional. So it makes sense, Microsoft would enable a feature specifically for Chrome.
In this panel, you should be able to backup your PC.
Once the window pops-up, head over to the bottom and turn on Remember Chrome passwords for other apps.
You should know that currently the feature is only in the Insider Built. So it won’t show in your current Windows, but it will be implemented in the next patches.
And if you’re using ViveTool, it seem that you can already enable a command for the backup Chrome passwords feature to show up in Windows 11.
Here’s the command:
vivetool /enable /id:43358915
But take it with a bit of salt, as insider-only features are insider for a reason: they might mess up with your perfomance and power usage, aside from being unstable most probably, so you’ve been warned.
Are you excited about this new feature? Are you using Chrome on your Windows 11 or Microsoft Edge? Which one do you like more? Let us know in the comments section below.
Whether preparing for an important video conference, recording voiceovers, or engaging in online gaming, these tips will help you optimize your microphone settings and troubleshoot any potential issues.
In this guide, we provide you with a set of expert tips and step-by-step instructions on how to test your microphone effectively.
What can I do to test my microphone on Windows 11?
Before you move to the steps to test your microphone, let us consider performing these checks:
If you are testing an external one, verify the microphone cable and jack are working fine.
Once you are through these preliminary checks, let us move on to the methods.
1. Use the Settings app to test sound
Press Windows + I to open Settings.
Go to System, then click Sound.
Locate Input; you will see the Microphones listed, including the internal one available with your device. Click the one you want to test.
Go to Input settings, locate Test your microphone and click Start test.
Start speaking; you will see the indicator showing the voice response. Once you are done, click Stop test.
Windows will show you the results; if the test result is above 50%, then the microphone is functioning properly. However, if it is lower, adjust the Input volume using the slider to increase it and test again.
So, these are some methods to test your microphone on Windows 11. If you have any questions or suggestions, feel free to mention them in the comments section below.
Several of our readers have been annoyed by an unexpected error prompt with the message 0x80030001: Unable to perform a requested operation which keeps you from copying files when trying to transfer or import media files from an Android or iOS phone to the Windows PC, it is connected to.
The prompt presents an option to Try Again but triggers the exact prompt all over again upon doing so, forcing you to cancel the operation.
What does error 0x80030001 mean?
Normally, the error 0x80030001 occurs when you search for the file you intend to copy to the Windows PC instead of finding it manually and then trying to copy or move the file that is returned from the Windows Explorer’s search result.
In case you are unable to transfer or import the desired media files in File Explorer because of an unexpected error code 0x80030001, walk through this guide to learn how to fix this error and successfully copy the files from your mobile phone to your Windows computer.
How do I fix the 0x80030001 error when copying files?
Plug in your smartphone and launch File Explorer using the Windows + E shortcut.
Select This PC from the left pane and select your mobile phone or any other plugged-in device visible located under the Devices and drives section to access its contents.
Now, go to the search bar located on the top right of the File Explorer window and type the name of the file or the file extension to quickly locate the media file present in your phone storage. For instance, if you want to copy an mp3 file, you should type *.mp3 to view the list of mp3 files present on your phone device.
When the required media appears in the search result, do not copy the file here. Instead, right-click the file and choose Open file location from the context menu.
After you access the actual location of the image or media you wish to copy from the mobile phone, right-click it and choose Copy from the context menu.
Now, navigate to the folder location on your Windows PC where you want to paste the file and use the Ctrl + V shortcut to paste it there.
Hopefully, you won’t encounter the 0x80030001 error code when copying the media files from the actual file location on the phone storage.
That’s how easy it is to overcome the 0x80030001 error prompt, which prevents you from performing the copy or move operation from phone storage to your Windows PC.
Intelligent Recap, a new AI-based feature for Microsoft Teams, is finally out for general use and it looks exciting.
Microsoft announced the feature a while ago for Team Premium, a version of the platform suited for business, and now it has arrived.
So what is Intelligent Recap? Basically, it’s a tool that leverages AI to provide a detailed overview of your professional meetings. But there is more. Intelligent Recap comes with its own plan of action based on the discussions from the meeting.
This way, by taking notes and making suggestions based on the notes, the tool saves up a lot of time for people who, for different reasons, don’t manage to get all the necessary info from a meeting. According to a study conducted by Microsoft:
55% of people attending a meeting report that the next steps are unclear at the end of it
56% of people attending a meeting report that it’s hard to summarize what happened in that meeting
So it makes sense such a feature exists now. How does it work, you would ask? Follow along and we’ll show you.
Here’s how you can use Intelligent Recap in your Teams meetings
First things first, you need a Team Premium license and meeting recording and transcription enabled. Intelligent Recap works after the meetings are recorded and transcribed.
On the Microsoft Teams platform, you have a new panel, called Recap. Head over there and click on it.
In the Recap panel, you can now watch the recorded meeting and you can find valuable info here. At first glance, you can check the meeting for your mentions. You can do that by clicking on the @ over the video.
Or by going over to the Mentions option.
The Recap panel is intuitive, you can access Notes left by your team members. However, you can also check the AI notes, by clicking on them, right next to Notes.
If you scroll down, you can also find the AI-suggested tasks.
You can also you the Intelligent Recap to see the Transcript of the meeting, and the Chat option will give insights into the discussions that happened in the meeting.
System Interrupts is one of the important Windows components, but some users are complaining that the process is registering 100 percent CPU usage.
This is quite rare, as the process is not usually resource hungry. But if you are dealing with this CPU usage spike, this detailed guide will show you how to fix it for good.
What causes the system interrupts high CPU usage?
Several factors can be responsible for the system interrupting 100 percent CPU usage. Below are some of the well-known causes of this issue:
Outdated drivers: One of the major causes of this issue is a faulty or outdated driver. You can fix this by updating your drivers and restarting your PC.
Conflicting apps: If you are experiencing system interrupts 100% CPU usage on startup, it might be due to conflicting apps. You need to perform a clean boot here to know the apps causing the problem.
Outdated PC: If your PC is outdated, it is prone to all sorts of errors. Hence, you need to update your operating system at all times.
Presence of malware: Sometimes, this unusual CPU usage can be caused by the activities of viruses on your PC. Performing a deep malware scan with trusted antivirus software should do the trick here.
How can I fix system interrupts if it is using 100% CPU?
Listed below are some basic troubleshooting steps to try before moving to the more sophisticated solutions:
If the issue persists, proceed to the solutions below:
1. Update drivers
Press the Windows key + X and select the Device Manager option.
Double-click the section you want to update driver for and right-click each of the devices under it.
Now, select the Update driver option.
Finally, choose Search automatically for drivers and install all available updates.
If your PC drivers are outdated, system interrupts might register 100 percent CPU usage. While you can always update your drivers manually, the process can be overwhelming.
Hence, we recommend using a dedicated tool for this task. This software will automatically scan and update all outdated drivers and also repair the faulty ones.
Right-click the sound icon on your Taskbar and select the Sound settings option.
Choose More sound settings.
Now, double-click your sound device.
Click the Enhancement tab at the top.
Finally, check the Disable allsound effects option.
In some cases, your sound effects and enhancements can lead to the system interrupts 100 percent CPU usage. You need to disable this feature to get past this error.
Press the Windows key + X and select the Device Manager option.
Expand the Universal Serial Bus controllers option and right-click the USB Root Hub option.
Now, select the Disable device option.
Finally, click the Yes button to confirm the action.
If you are experiencing the system interrupt 100 percent CPU usage issue, it might be due to problems with the USB Root hub. So, you need to disable it temporarily.
4. Run the CHKDSK command
Press the Windows key, type cmd, and select Run as administrator under Command Prompt.
Type the command below and hit Enter to run it: chkdsk c: /f /r
Now, press Y when prompted.
Finally, wait for the process to start automatically when your PC restarts.
In some cases, this 100 percent system interrupts CPU usage can be due to problems with your hard drive. The solution to this is to repair the bad sectors running the CHKDSK command.
5. Scan for malware
Press the Windows key, type virus, and select Virus & threat protection.
Click Scan options.
Now, select your preferred scan option and click the Scan now button.
Sometimes, this system interrupts 100% CPU usage on Windows 10 and 11 can be due to system file corruption caused by viruses. Performing a malware scan should solve the problem.
6. Disable your network adapters
Launch the Device Manager and expand the Network adapters option.
Right-click your network adapter and select the Properties option.
Now, click the Advanced tab at the top.
Select Wake on Magic Packet and set it to Disabled.
Finally, set Wake on Pattern match to Disabled too, and click OK.
Another excellent solution to the system interrupts high CPU usage problem is to disable some of your network adapter’s properties. This will prevent your adapter from waking unnecessarily.
With this, we can now conclude this guide on how to fix the system interrupts 100 percent CPU usage. Follow the instructions therein, and things should be back to normal.
Feel free to let us know the solution that helped you fix this issue in the comments below.
Here’s some good news. Microsoft has announced the introduction of enhanced voice Narrator support in Excel, aimed at providing a more accessible and efficient reading experience for users, and you can activate it straight away.
As we’ve recorded from the release note of Windows 11 Build 23451 from the Dev channel, this new feature prioritizes announcements based on the information necessary for users to navigate and skim through workbooks, while also allowing for customization through convenient keyboard shortcuts.
What does it do? Well, with the enhanced Narrator support, Excel users like you can now enjoy a more succinct and streamlined reading experience. Announcements are grouped into four categories: Value, Name, Context, and Properties, ensuring that users receive the most relevant information as they navigate through their spreadsheets.
To access the new Narrator announcements in Excel, however, you’d need to ensure their device meets the installation requirements. This includes running Windows 11 and enrolling your device into the Windows Insider Program.
If you’re curious to try out this feature, make sure to enroll in the Windows Insider Program, get Build 23451 from the Dev channel, and follow these steps.
How to activate voice Narrator support in Excel
1. Open any Excel document
2. Press Ctrl + Windows + Enter to start Narrator.
3. Click Install now to get the latest natural voices and you’re good to go!
With that being said, however, there are a few known issues, as the feature is currently limited to several select insiders. Users may experience extraneous speech when navigating from cell to cell, and full support for Braille is not yet available.
Have you tried to activate voice Narrator in Microsoft Excel? Let us know in the comments!