What is 0x8004011c in Outlook & How to Fix it

0x8004011c is a common error for Microsoft Outlook users. This error message usually appears when you try to set up a new email account from a domain. Unfortunately, outlook errors are common; sometimes, the app won’t even open in your Windows 11. 

Users are stalled at creating a new email account for this particular error despite numerous attempts. Therefore, we take a closer look at what causes this issue and how to resolve it.

What is 0x8004011c in Outlook?

0x8004011c is a common error code you can get while using Microsoft Outlook. It is associated with connecting to an Exchange Server, which means there is a problem with the server. 

This issue prevents you from connecting your email account, you can’t send or receive emails from your Outlook account. From a majority of the reports, this issue happened to users using a domain account.

Some of the leading causes behind this error include the following:

  • Connection issues – Your internet connection may be too slow and can’t facilitate the creation of a new account.
  • Server issues – Microsoft servers may be busy or overloaded when you are trying to create an account.

How do I fix error 0x8004011c in Outlook?

A few basic workarounds that may save the day without the need for technical solutions include:

1. Uninstall recent Windows updates 

  1. Hit the Windows key and select Settings.settings windows 11
  2. Click on Windows Update and select Update history on the right pane.update-history restart to repair drive errors
  3. Scroll down, and under Related settings, click on Uninstall updates.uninstall-updates-w11 computer-recognize-logitech-unifying-receiver
  4. This will take you to the most recent installed updates.
  5. Select the topmost update and click on Uninstall.uninstall-update-latest computer-recognize-logitech-unifying-receiver
  6. Restart your PC and check if the problem persists.

2. Run the program compatibility troubleshooter

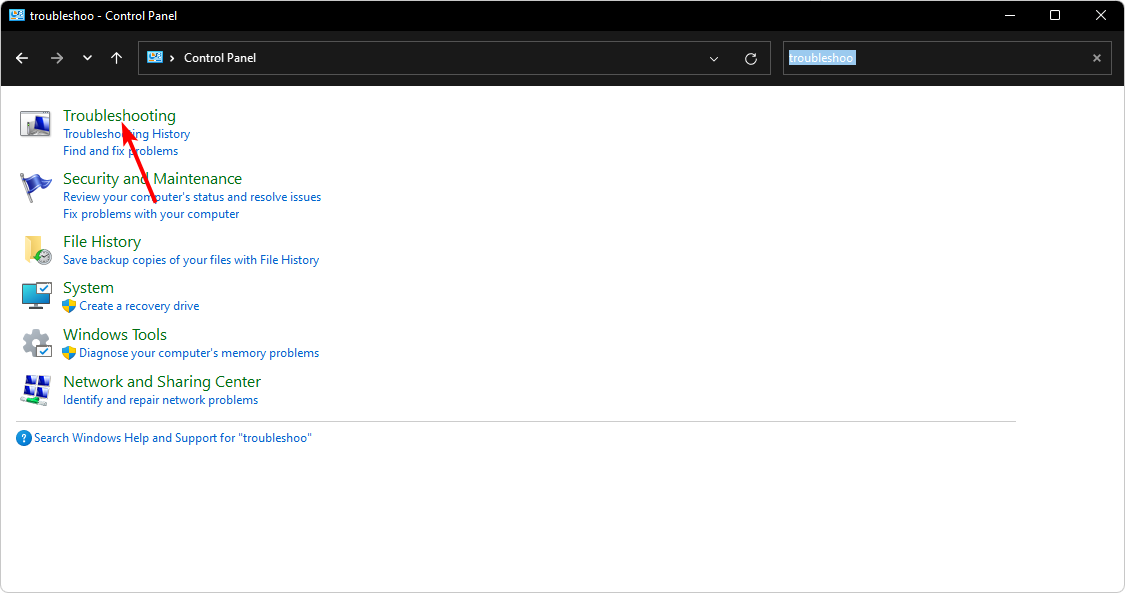
  1. Hit the Windows key, type Control Panel in the search bar, and click Open.control-panel-search fallout new vegas runtime error
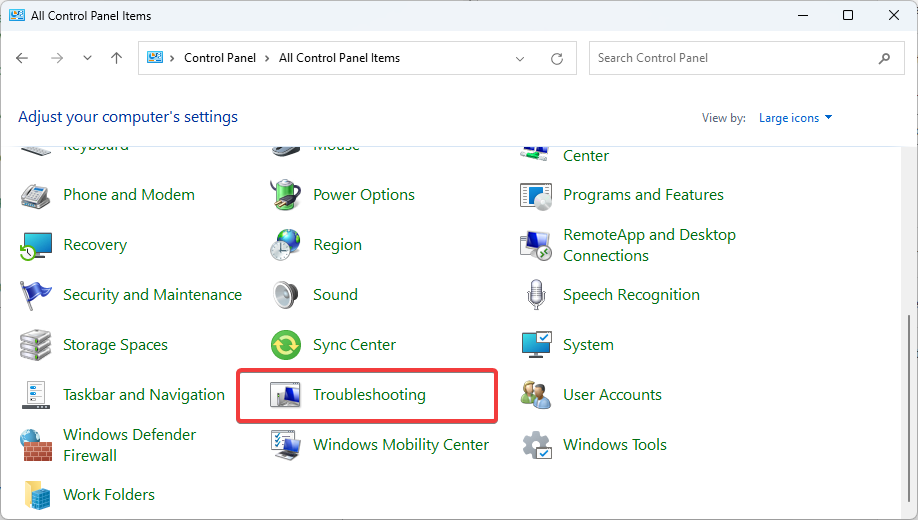
  2. Click on Troubleshooting.
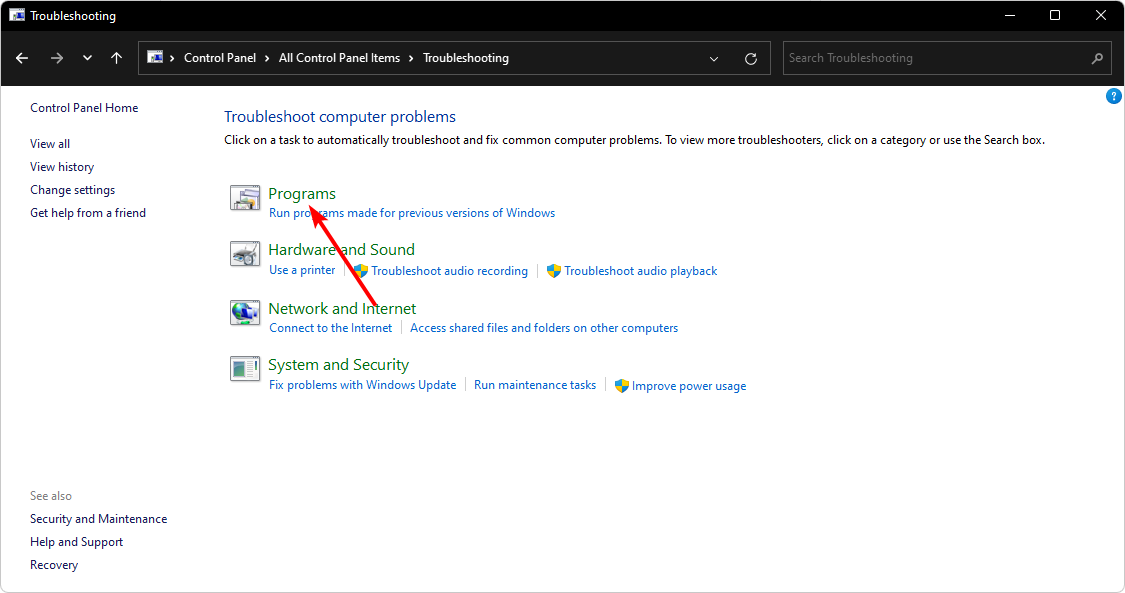
  3. Select Programs.
  4. Click on Program Compatibility Troubleshooter, then hit Next.
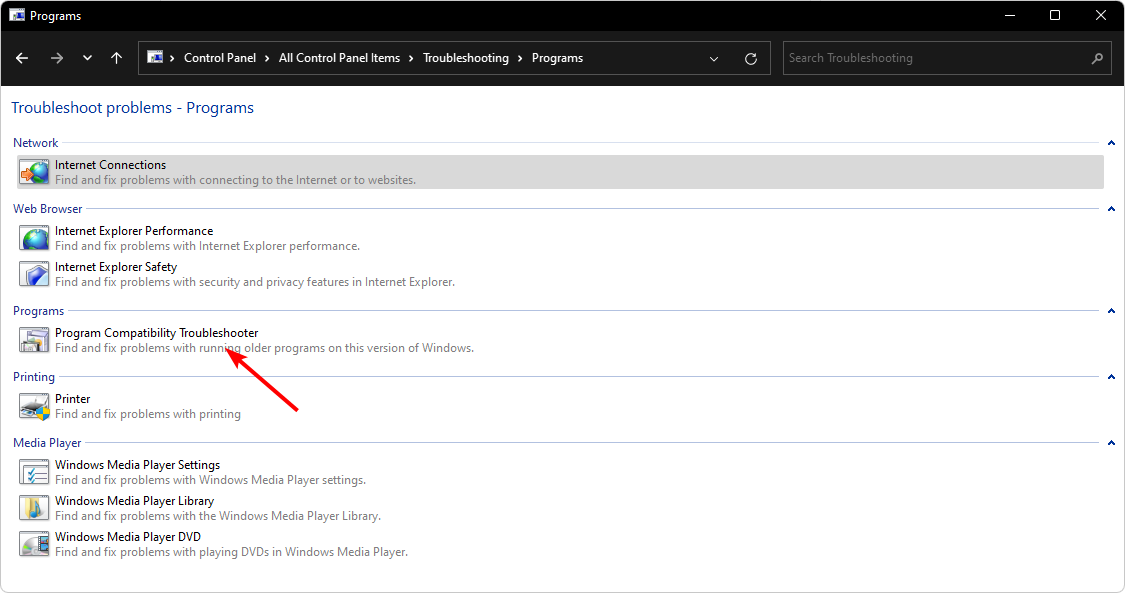
  5. Follow the on-screen instructions and choose the appropriate response when prompted to complete the process.

The program compatibility troubleshooter helps you to diagnose and fix issues when a program fails to run correctly. It will check for problems caused by compatibility issues between your program and Windows and fixes them automatically.

3. Remove compatibility restrictions

  1. Hit the Windows + E keys to open File Explorer.
  2. Navigate to the following location. Please note that this is the default folder location for most apps, so if you moved it, it might not be here: C:\Program Files (x86) or C:\Program Files\Microsoft Office
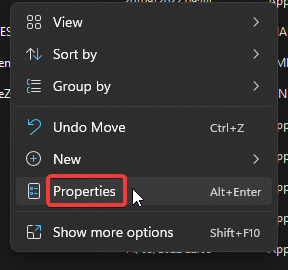
  3. Locate the Outlook.exe file, right-click on it, and select Properties.right-click on outlook.exe and click properties.
  4. Navigate to the Compatibility tab and uncheck the Run this program in compatibility mode for option.
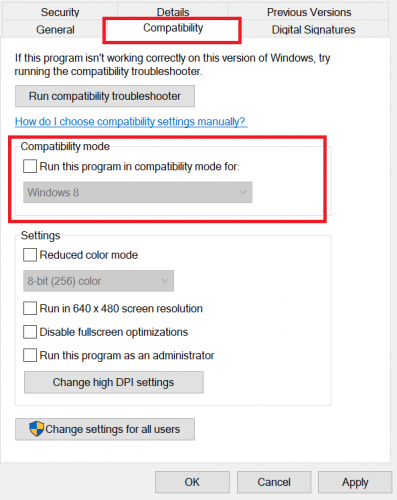
  5. Click on Apply, then OK to save the changes.

4. Edit the Registry 

  1. Hit the Windows + R keys to open the Run command.
  2. Type regedit in the dialog box and hit Enter to open the Registry Editor.

  3. Navigate to the following location: HKEY_LOCAL_MACHINE\SOFTWARE\Microsoft\Cryptography\Protect\Providers\df9d8cd0-1501-11d1-8c7a-00c04fc297eb
  4. Right-click on an empty space on the right side, select New DWORD (32bit) and rename it as ProtectionPolicy.
  5. Double-click on it to modify then; in the Value data entry, enter 1, then hit OK.
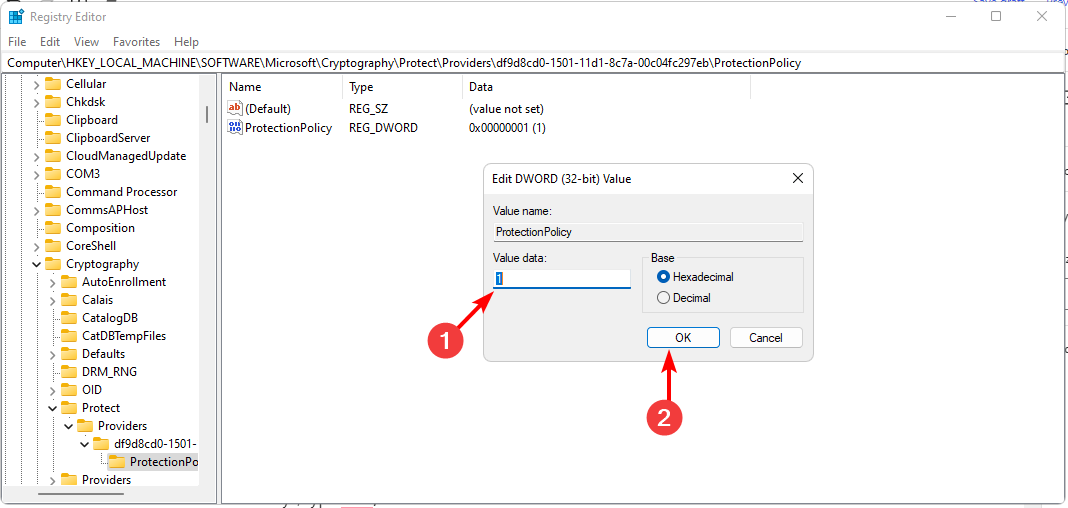
  6. Close the Registry Editor and try creating the email account again.

At this point, we have to mention that the Registry Editor is a very critical component of Windows, and any edits made can have a ripple effect on the performance and stability of your OS. If anything goes wrong, you risk causing your PC irreversible damage.

To cushion yourself from crippling effects, we recommend that you create a restore point so that you can have a point of return. You can also seek assistance from a tech expert if you’re not conversant with how things work.

5. Perform a System Restore

  1. Press the Windows + R keys, type rstui, and hit Enter.

  2. Select the restore point you wish to revert to and click on Next.
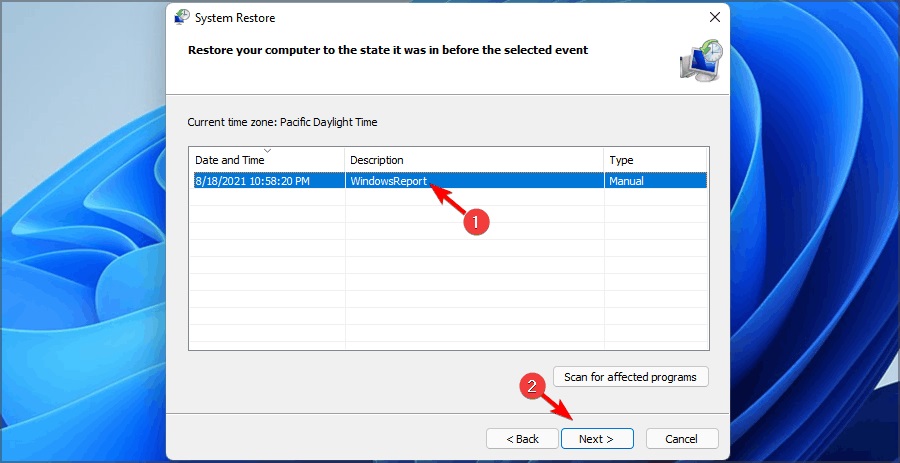
  3. Now click on Finish.

Remember, you must have created a restore point before this step; otherwise, this won’t work. 

That’s all we had for this article, and hopefully, at this point, there will be no more issues when you try to create an email account. If so, we recommend that you contact Microsoft support for further assistance. 

If you want to change or remove your primary account from Outlook, we share a step-by-step process on how to go about it.

For any comments, queries, or suggestions, leave a comment below.

0x80004003: What Does it Mean & How to Fix it

Every Windows user has their favorite app, but the Microsoft Store should be at the top of that list because you may not be able to download other apps without it. Granted, you can still sideload apps on your Windows 11, but this comes at a risk.

Apps downloaded from the Microsoft Store have passed rigorous checks that ensure they are safe. However, the error 0x80004003 can be frustrating, as it prevents users from downloading apps. If you’ve encountered this error, we share how to bypass it in this article.

What does this error code mean, 0x80004003?

The 0x80004003 error code occurs when users try to launch the Microsoft Store application on their Windows PCs. It may be triggered by one or more of the following reasons:

  • Corrupt update – If you’ve recently updated your OS, it is possible one of the installation files had an issue stopping Microsoft Store from working.
  • Bugs in the app  – It is also possible that the Microsoft Store has somehow ended up with a bug. This could be through Windows updates or in-app updates.
  • Cache build-up –  If you’ve been using the Microsoft Store for a while, too much cache may prevent you from launching the app.

How do I fix error code 0x80004003?

Before any complex solutions, try the following basic checks first:

  • First, ensure you’re using a legitimate copy of Windows and that it is activated. Pirated copies don’t usually get regular updates and may not function as well as the original version.
  • Check for any Windows updates and download and install if available.
  • Roll back a previous Windows update, especially if this issue began after updating.
  • Uninstall any recently installed app that may be conflicting with the Microsoft Store.
  • Restart your PC to eliminate any temporary files that may prevent Microsoft Store from launching.

1. Run the Windows Store Apps troubleshooter 

  1. Hit the Windows key and click on Settings.settings windows 11
  2. Click on System and select Troubleshoot.Open system troubleshooter
  3. Navigate to Other troubleshooters.other troubleshooters
  4. Click the Run option for the Windows Update troubleshooter.windows-update-run-troubleshooter runtimebroker.exe error

2. Run the Windows Update troubleshooter 

  1. Hit the Windows key and click on Settings.settings windows 11
  2. Click on System and select Troubleshoot.Open system troubleshooter
  3. Navigate to Other troubleshooters.other troubleshooters
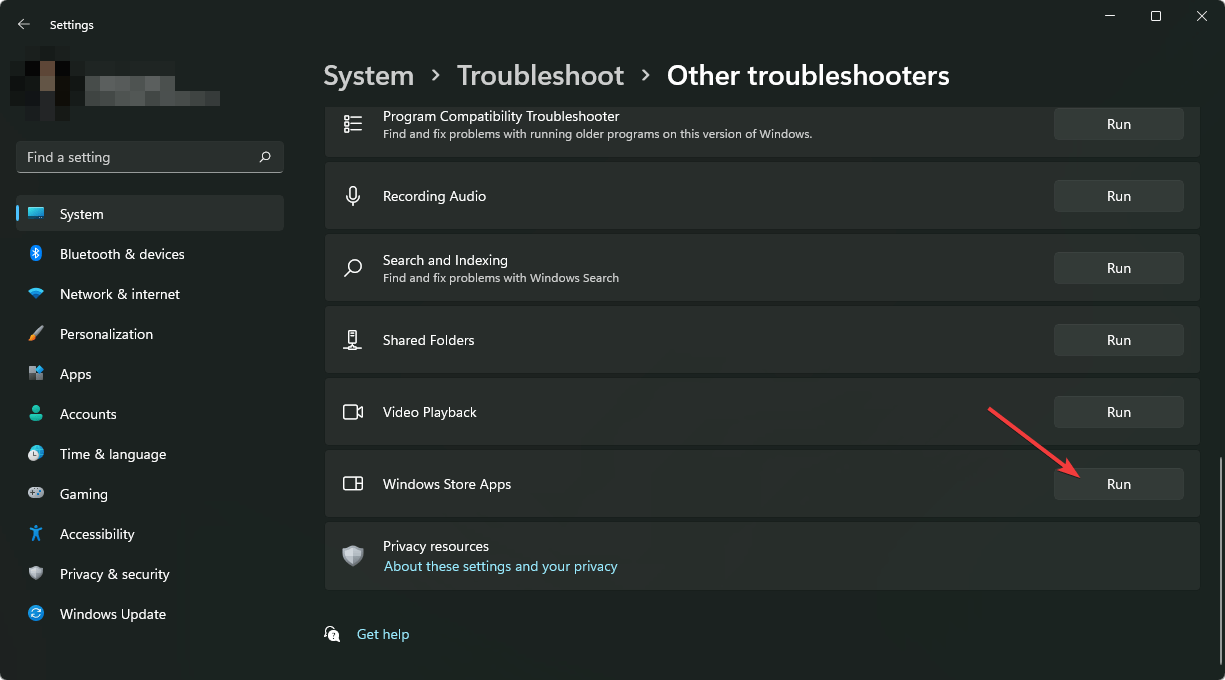
  4. Click the Run option for the Windows Store Apps troubleshooter.clicking run windows store apps troubleshooter

3. Disable antivirus temporarily 

  1. Hit the Start menu icon, type Windows Security in the search bar, and click Open.
  2. Click on Firewall & network protection, then select Public network.league of legends black screen after champion select
  3. Locate Microsoft Defender Firewall and toggle the off button.turning off Microsoft Defender Firewall Windows

4. Repair Windows Store and update components 

  1. Hit the Windows key, type cmd in the search bar, and click Run as administrator.cmd-run-admin-w11 unexpected kernel mode trap windows 11
  2. Type the following commands and press Enter after each one: net stop bits net stop wuauserv net stop appidsvc net stop cryptsvc Del "%ALLUSERSPROFILE%\Application Data\Microsoft\Network\Downloader\*.*" rmdir %systemroot%\SoftwareDistribution /S /Q rmdir %systemroot%\system32\catroot2 /S /Q regsvr32.exe /s atl.dll regsvr32.exe /s urlmon.dll regsvr32.exe /s mshtml.dll netsh winsock reset netsh winsock reset proxy net start bits net start wuauserv net start appidsvc net start cryptsv

5. Clear Microsoft Store cache

  1. Hit the Windows search icon.
  2. Type WSReset.exe in the search bar and hit Run as administrator.

6. Repair/reset the Microsoft Store 

  1. Hit the Windows key and click on Settings.settings windows 11
  2. Click on Apps on the left pane, then Apps & features on the right pane.
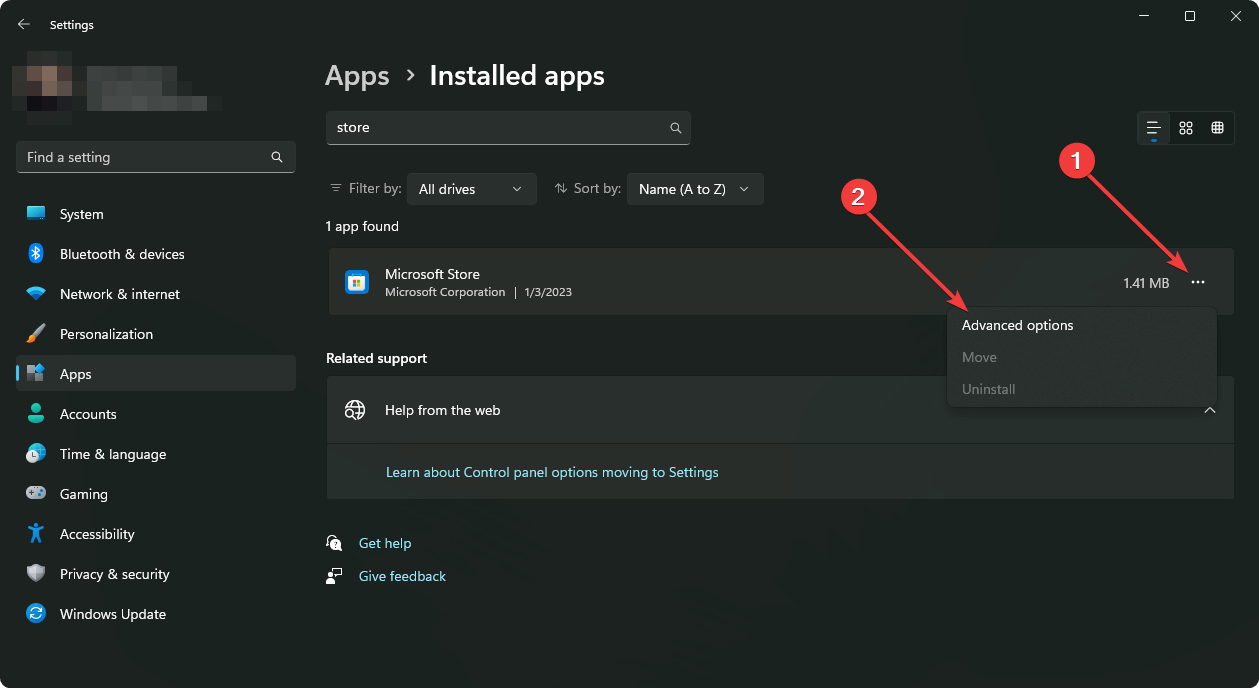
  3. Locate the Microsoft Store app, click the three vertical ellipses, and select Advanced options.going advanced options microsoft store
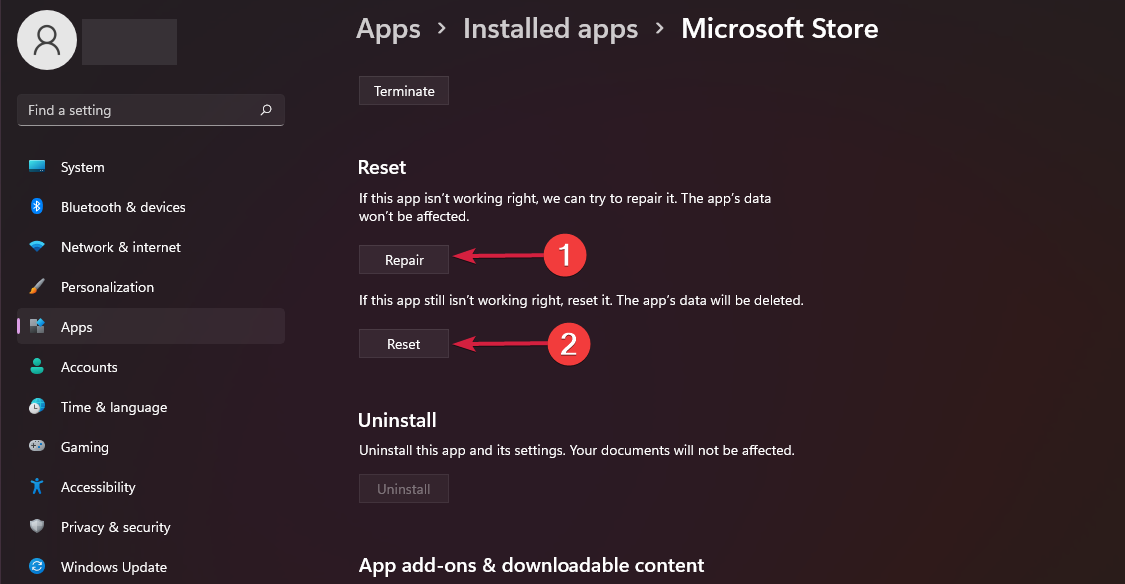
  4. Click on Repair.
  5. Go back and click on Reset if the repair option fails.

You may find that the Microsoft Store is missing the Apps and features, so here’s a quick guide on how to go about it.

7. Reinstall the Microsoft Store

  1. Press the Windows + I keys simultaneously to open Settings.settings windows 11
  2. Type Powershell in the search bar and click Run as administrator.
  3. Enter the following command: Get-AppxPackage -allusers Microsoft.WindowsStore | Foreach {Add-AppxPackage -DisableDevelopmentMode -Register "$($_.InstallLocation)\AppXManifest.xml"

8. Perform a System Restore

  1. Press the Windows + R keys, type rstui, and hit Enter.
  2. Select the restore point you wish to revert to and click on Next.
  3. Now click on Finish.

This step may fail if you have not created a restore point. When there’s no previous point to roll back to, the System Restore will not work.

Unfortunately, this is not the last of Microsoft Store errors. They are in plenty and may appear from time to time. Luckily, we have compiled a comprehensive list of the most common ones and how you can quickly address them.

You may also encounter an issue where Microsoft Store is downloading, but there is no progress. If so, don’t hesitate to visit our detailed guide on how to fix this problem.

Do let us know if there’s a solution that may have helped you avert this error but missing from our list above.

NET HELPMSG 2184: How to Fix This Service Error

The net view command is a built-in command in Windows OS. It is used to display shared resources on a computer.

Net view has two modes: server mode, which shows only servers, and workstation mode, which ensures access to all computers on the network and the servers.

This command helps troubleshoot and diagnose network problems. You’ll probably get a net view service not started message when you run it. A net helpmsg 2185 or net helpmsg 2182 may also be on the horizon. Let’s have a closer look at what this means.

Why is the net view not working?

To use the net view command, you must be logged in to a domain controller or have access to an account that has been granted permission. You’ll keep getting error messages if you don’t meet these requirements.

Unfortunately, when you get the net view service not started message, it does not specify the exact service that has to be started. So you may have to get into a guessing game until you figure out the service and restart it.

Other reasons why the command may not be working include the following:

  • Insufficient permissions – You may not have permission to view the remote computer, or you are not logged in as an administrator.
  • Server unavailability – The server you are trying to access may be inactive on your network segment or moved to another segment.
  • Different domains – Net view can only display computers that are part of the same domain or workgroup. If the remote computer isn’t in your domain, you won’t be able to see it using net view.
  • Network connectivity problems – If there are network connectivity problems between your computer and the remote device, you may be unable to communicate.

How do I resolve the net helpmsg 2184 service error?

There are a few things you can try to troubleshoot this error.

  • Ensure your computer is connected to the internet. Also, if you’re using a VPN, you may have to disable it.
  • If you’re not connected to the internet, try restarting your modem or router.
  • Run Windows update to ensure you have all the latest updates installed on your computer.
  • Ensure all your computers are under the same workgroup.

If the basic troubleshooting steps don’t resolve your issue, please continue with the following steps:

1. Restart the Server service 

  1. Hit the Windows + R keys to open the Run command.
  2. Type services.msc and hit Enter.run services.msc command
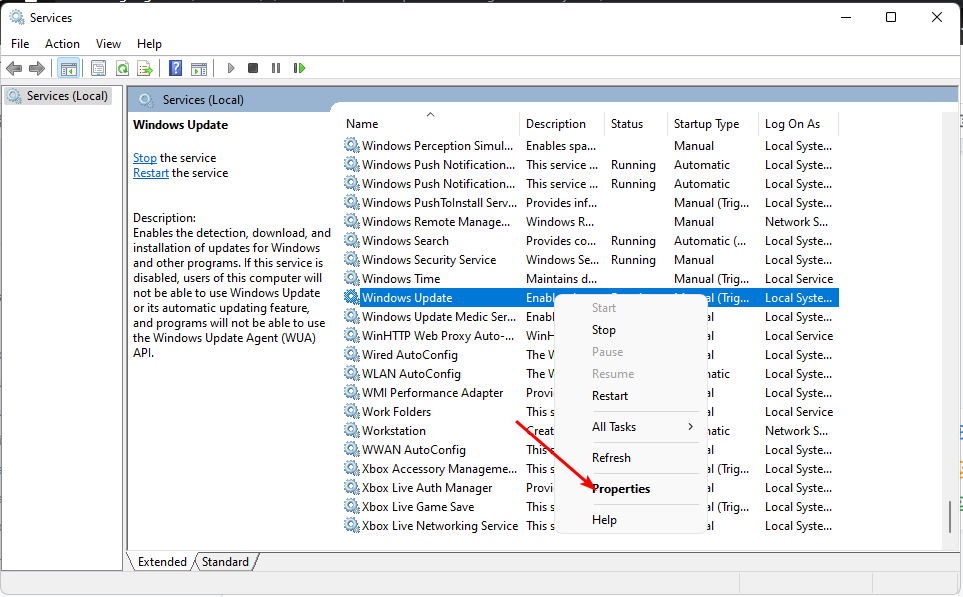
  3. Locate the Server service, double-click on it, and select Properties.
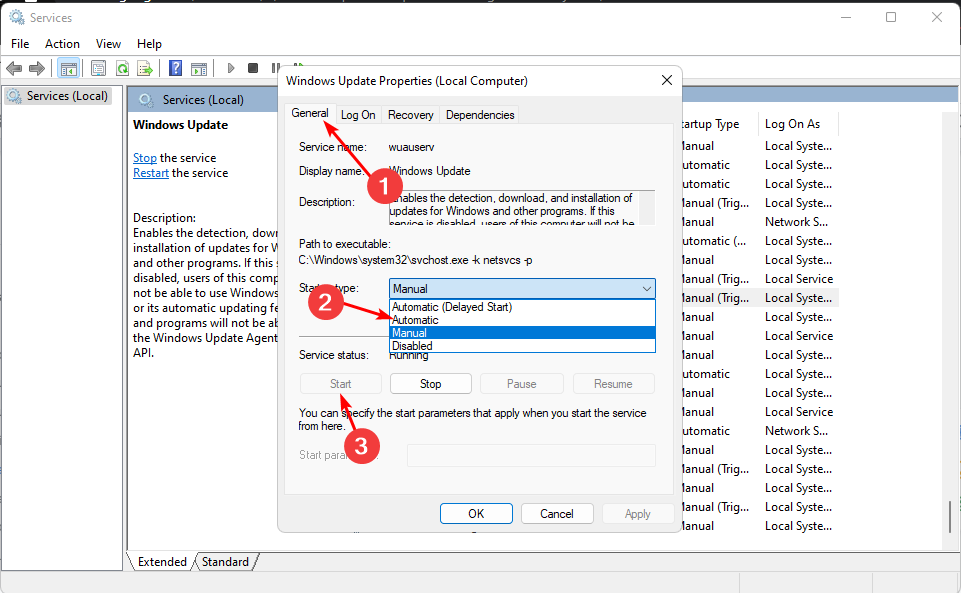
  4. Navigate to the General tab, and under Startup type, select Automatic from the drop-down options and click on the Start button.
  5. Next, click Apply and then OK.

When there are problems with the Server service, your computer might be unable to connect to other computers on your network. It also depends on the workstation service, so you may need to restart it too.

2. Restart the Workstation service

  1. Hit the Windows + R keys to open the Run command.
  2. Type services.msc and hit Enter.run services.msc command
  3. Locate Workstation service, double-click on it, and select Properties.
  4. Navigate to the General tab, and under Startup type, select Automatic from the drop-down options and click on the Start button.
  5. Next, click Apply and then OK.

The workstation service provides seamless integration between the local computer and remote servers. However, since most computers on the remote server depending on the workstation service to run, it is important to restart it in case the connection is lost.

3. Turn on network sharing

  1. Hit the Windows key, type Control Panel in the search bar, and click Open.control-panel-search fallout new vegas runtime error
  2. Click on Programs.
  3. Select Turn Windows Features on or off under Programs and Features.
  4. In the Windows Features dialog box that pops up, check the SMB 1.0/CIFS File Sharing Support option and click OK to save the changes.

A section of users also admitted to restarting the computer browser service as a remedy to net helpmsg 2184. However, the Computer Browser service is an old Windows service and may not be available in newer versions.

Although it’s not widely used, some computers may still use it for their networks. If available on your PC, you can follow the subsequent steps to restart it. 

The service has already been implemented in the Server service for newer versions, so you have nothing to worry about if you have already restarted it. However, in case you run into the Computer Browser Service depends on Server service error, we have the answers in our comprehensive article.

And that’s how we wrap up this article. Share any additional thoughts with us in the comment section below.

Discord Awaiting Endpoint: What is it & How to Fix it

Discord has established itself as a must-have for gamers looking to find communities for their favorite titles. It’s so big that major gaming publishers like Sony are integrating it into their consoles.

And there’s one particular Discord error that you should know about. It’s called the Awaiting Endpoint Error, where you try to connect to a server or call to be stuck in an endless load screen.

What causes the Awaiting Endpoint error?

Awaiting Endpoint is a relatively common problem on Discord because many things can cause it. The following list is not extensive; however, it does cover the more common causes.

  • Your Windows 11 computer is out of date – Having an out-of-date computer can lead to various compatibility problems with apps. Downloading Windows 11 ISO is the fastest way to update.
  • There is a server outage on Discord – Although rare, Discord’s servers can go offline. When this happens, there’s nothing you can do but wait. Also, it’s often the reason behind Discord Error 1105.
  • Your internet is experiencing some downtime – If your internet connection is running slowly, it can affect Discord. We recommend running the Network Troubleshooter. See if it helps.
  • There’s some kind of network connection issue going on – Likewise, the problem could be with your internet service provider (ISP). You may have to wait until the service returns.
  • Windows Firewall is blocking Discord – Windows Firewall can be pretty good at blocking malware, but it can also be a little overzealous and mess with your apps.

How can I fix the Discord Awaiting Endpoint error?

Fortunately, there are many solutions when it comes to fixing the Awaiting Endpoint error. First, you have simple solutions that can be done quickly to more complex fixes if it’s a bad situation.

  • The first thing you can do is restart Discord and your computer. Closing Discord typically may not work. If this happens, shut down the app via the Task Manager.
  • Double-check your internet connection. There could be something wrong with your at-home network. Contact your ISP and see if there’s any throttling.
  • Additionally, you can try restarting your router and modem by powering off the devices, then powering them back on. That should work.
  • Try updating the Discord app. This can be done quickly by clicking on the app, then pressing the Ctrl and R keys to refresh Discord.
  • We also recommend using some file recovery software. There could be something missing from your computer’s files causing the connection issue.
  • See if Discord is down. There are numerous resources online, one of the best being Discord Status. It’ll tell you if all systems are operational or something is down.

1. Change the Discord server region

  1. On Discord, go to the server you’re unable to connect to or one you moderate.
  2. Click the down-facing arrow at the top. Select Server Settings.
  3. Go to the Overview tab under notes.
  4. Click Change in the Server Region box, then switch the server to another location.

Recent updates to Discord have removed the ability to change the server region, so you may not see this. Also, try reaching out to a server admin and see if they could make the fix for you.

2. Flush DNS on Windows 11

  1. Bring up the Command Prompt in the Windows 11 Search bar. Select Run as administrator.
  2. In the line prompt, enter the following command: ipconfig /flushdns
  3. Wait a few seconds, after which you will get a confirmation message.
  4. If that doesn’t work, launch PowerShell with the same administrator-level permissions.
  5. Type in the following command and run it: Clear-DnsClientCache
  6. The final method involves the DNS client. Launch the Services app.
  7. Right-click DNS Client, and in the context menu, select Refresh. Give the software enough time to complete the process.

You can try running a batch script if you can’t achieve admin-level permissions to flush out DNS. But first, read our guide on how to flush DNS without admin rights.

3. Reset TCP/IP

  1. First, check what kind of IP address you have. You can do this by opening the Windows 11 Settings menu, going to the Network & internet tab, and selecting Wi-Fi.
  2. Under your Wi-Fi’s properties, check your IP address. In this example, the computer has an IPv4 address.
  3. Now launch with the Command Prompt with the same admin-level permissions as before.
  4. In the prompt line, enter the following commands one after the other: cd\ netsh int ip reset c:\resetlog.txt
  5. If you have an IPv4 address, type in NETSH INT IPV4 RESET
  6. For an IPv6 address, enter NETSH INT IPV6 RESET

4. Reinstall Discord

  1. In the Settings menu, go to the App section and select Install apps.
  2. Locate Discord in the installed apps list. Then, click the three dots to the right and select Uninstall.
  3. Now go to Discord’s web page and download the app again.

5. Add firewall permissions for Discord

  1. In the Windows Search bar, bring up Windows Defender Firewall.
  2. Select Allow an app or feature through Windows Defender Firewall in the new window that appears.
  3. Click the Change settings button at the top, then Allow another app.
  4. In the new window, click Browse. Locate Discord in your system’s files. It should be in your C: drive.
  5. Once located, click Add, and Discord will appear in the list of allowed apps.

What can I do if Discord randomly crashes?

Some users have experienced Discord randomly crashing in the middle of a call. This may be because of insufficient RAM, corrupt files, or an outdated operating system.

To fix this issue, we recommend any number of things. First, you can try disabling the Hardware Acceleration tool or deleting your computer’s temporary files. That should boost performance.

Recently, Discord launched a new AI companion called Clyde, a chatbot that can create music playlists, send GIFs to people, and give movie recommendations.

You can now try Clyde by joining Discord’s Alpha Insider Program and enabling the AI. However, be aware that AI isn’t perfect. It’s prone to a lot of errors.

Feel free to comment below if you have other Discord problems. Also, leave comments below about reviews you’d like to see or information on other communications software.

Microsoft Designer Not Working? Fix It in 6 Easy Steps

If the Designer option on Microsoft Powerpoint doesn’t work, then this guide can help! We will discuss some of the easiest methods to get rid of this problem right after talking about the causes. Let’s get started!

What causes the Microsoft Designer not working issue?

There could be various reasons why you face this issue; some of the common ones are mentioned here:

  • Outdated version of PowerPoint – The Design Ideas option is available on the latest version of PowerPoint or with a Microsoft 365 subscription. If you don’t have any of these two, the designer might not work.
  • Mixed shapes in a slide – If there is more than one shape or picture on your slide, the designer will not work. Keep one image or shape on a slide, and you will get the designer option again.
  • Exceeded the number of Images, Tables, or Charts allowed on the slide – If you add a number of images, tables, or charts that exceeds the set value, then you might face this issue. For example, you can add 6-10 images (depending on the size), one table, and one chart on a slide and you can access the Designer feature.
  • Custom slide or template – If you are using a custom slide or template, you might not see the Designer section. Use the default/ blank slide or template to get design ideas for your slide.
  • No internet connection – If you are not connected to the Internet, the Design Ideas feature will not work. Therefore, check for an internet connection before using the feature.
  • Not set to Automatically show – If the Automatically show me design ideas option is not selected in PowerPoint options, then you might not see the Designer section.

What can I do to fix the Microsoft Designer not working issue?

Before engaging in advanced troubleshooting steps, you should consider performing the following checks:

  • Check your internet connection.
  • Make sure you have the latest version of PowerPoint or a Microsoft 365 subscription.
  • Use a theme that comes with PowerPoint.
  • Ensure a single slide is selected in the thumbnail pane in Normal view.
  • Make sure the file type is not PowerPoint Macro-Enabled Presentation (.pptm).

1. Check if someone else is editing

If you are co-authoring the presentation with someone else and more than one person is working on a single slide at one time, the Designer would not give you Design Ideas on that slide.

Wait for them to finish, and make sure you are the only person editing the slide. Then, you will see design options on the slide when you add an image, table, or chart to the slide.

2. Enable the Automatically show me design ideas option

  1. On PowerPoint, go to File.File option
  2. Click Options.Options
  3. Select General from the left pane.
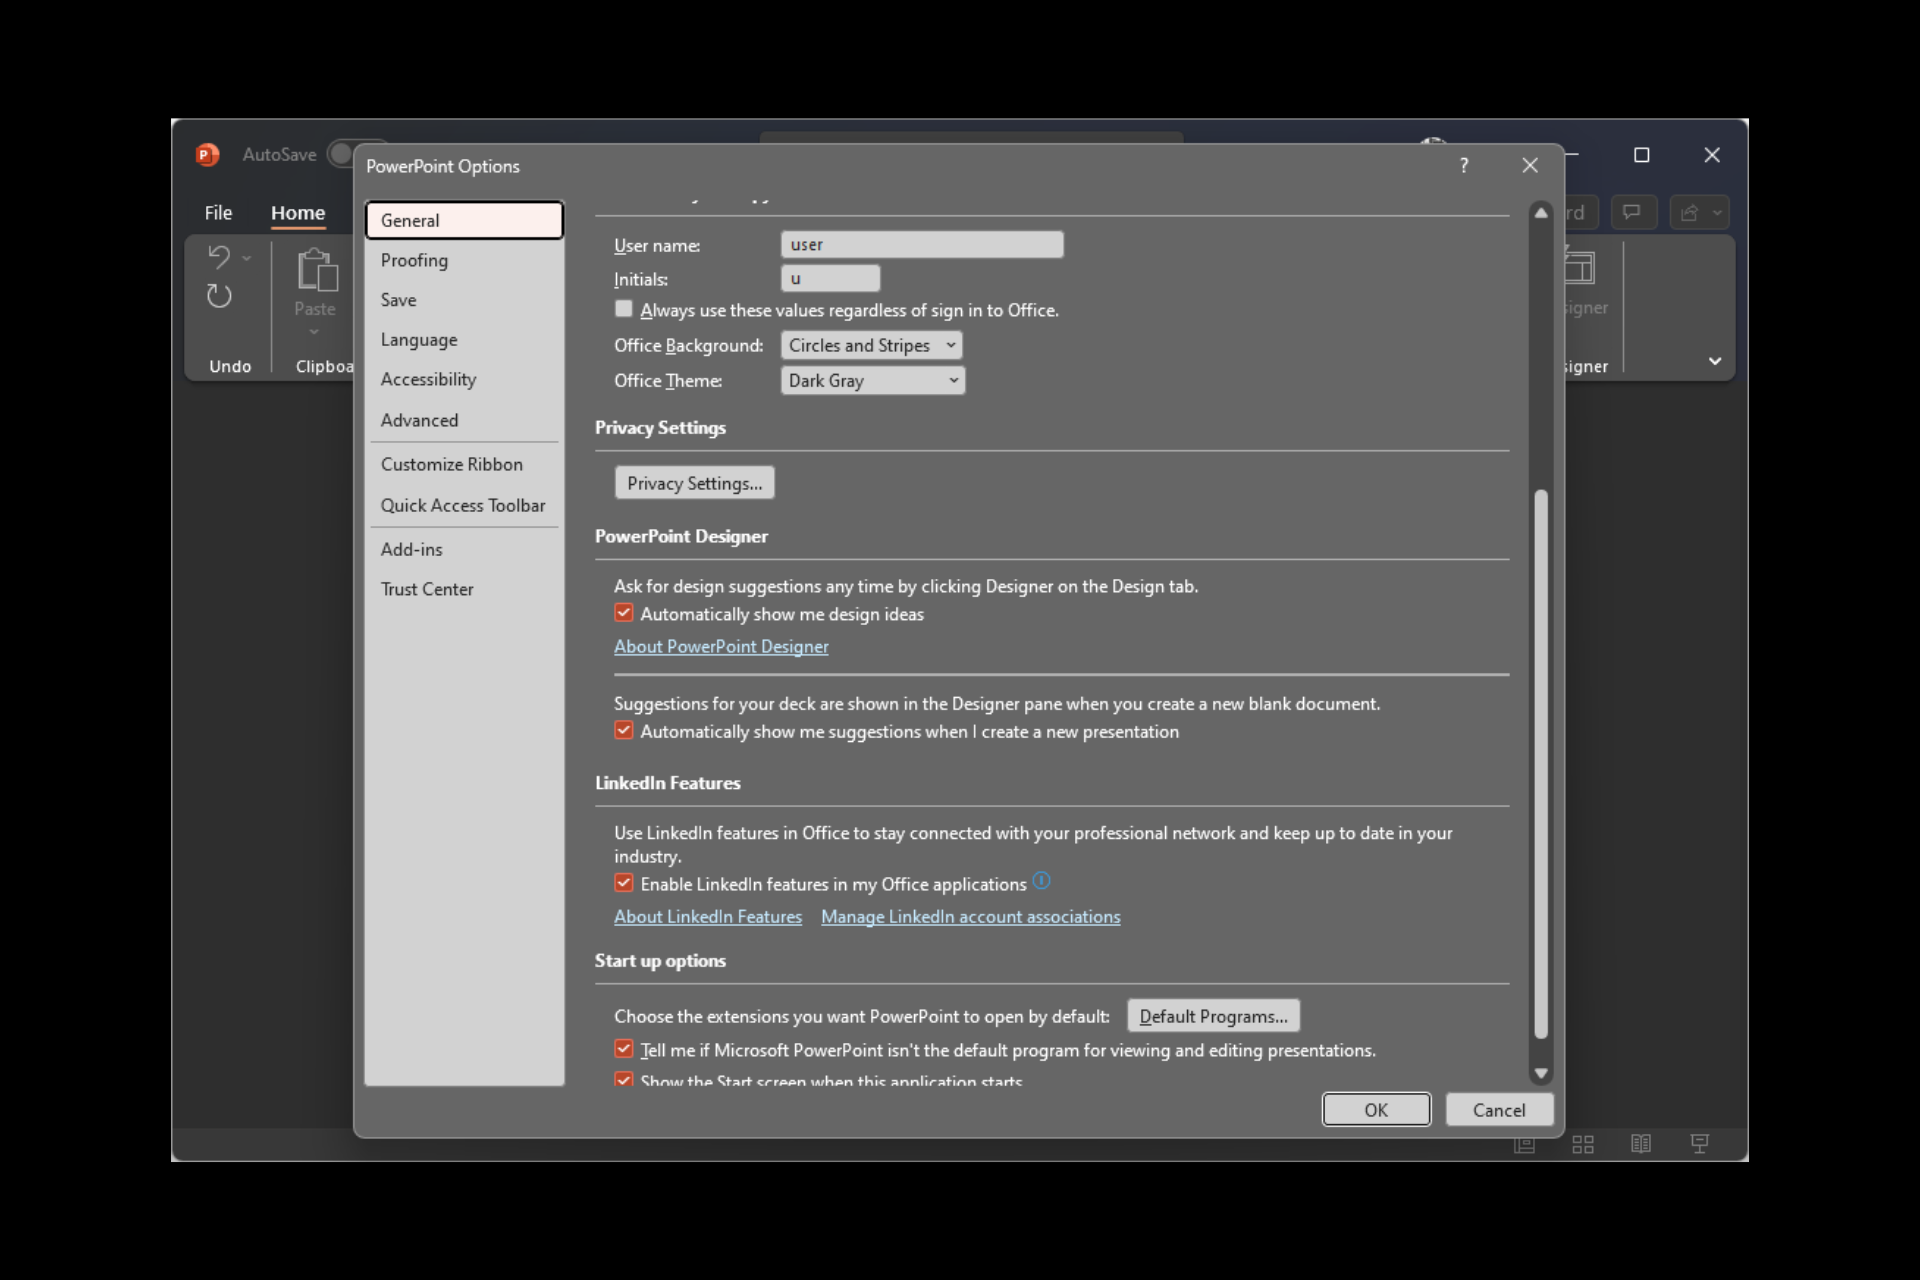
  4. Under PowerPoint Designer, locate Automatically show me design ideas and place a checkmark next to it.POWERPNT_wmicrosoft designer not working
  5. Also, place a checkmark next to the Automatically show me suggestions when I create a new presentation option.
  6. Click OK to save changes.

3. Don’t use slides with pictures or process-based slide

You should only use the default layouts, including Title, Title + Content slide, Section Header, Title Only, Two Content, and Picture with Caption, to avoid any issues. Don’t use additional photos, shapes, or objects on a single slide as an image. Also, make sure the images added to the slide are not more than 6 and are larger than 200*200 pixels in size.

Designer can’t show you design ideas if a shape or text box is added to the slide. Make sure you don’t do any of these if trying to get design suggestions.

4. Enable Office connected experiences

  1. Click File.
  2. Go to Account.Account microsoft designer not working
  3. Under Account Privacy, click Manage Settings.Manage settings
  4. Under Connected Experiences, place a checkmark next to Turn on experiences that analyze your content.Connected experiences
  5. Click OK to save the changes.

5. PowerPoint Designer’s 10-6-1-1-1 Content Rule

Design Ideas feature is a relatively new feature and can only generate slide layout ideas for some PowerPoint objects, and that too in fixed numbers.

For example, you can only add 10 or 6 images (depending on the size), 1 table, 6 icons, 1 SmartArt graphic, or 1 chart on a single slide.

Also, you can’t mix and match these shapes or objects and should not use large-size images on the slide.

6. Reinstall Office

6.1 Uninstall Office

  1. Press the Windows key, type Control Panel, and click Open.CP
  2. Select Category for View by and click Programs.CP Uninstall microsoft designer not working
  3. Under Programs and feature, select Uninstall a program.Uninstall a program
  4. From the list of programs, select Microsoft Office or Microsoft 365 and click Uninstall button.Uninstall

6.2 Install Office

  1. Visit to Office official website and select Sign in if not already signed in.
  2. On your account, click Install or Install apps.install apps microsoft designer not working
  3. The Office setup will be downloaded on your computer, and to install it, follow the onscreen instructions.

So, these are the methods that you need to follow to fix the Microsoft Designer not working issue. If you have any questions about the design ideas on PowerPoint, feel free to mention them in the comments section below. We will be happy to help!

Here’s the fastest way to use Windows Studio Effects on Windows 11

As a Windows 11 user, you may have noticed that the operating system comes with a variety of features and tools to enhance your multimedia experience. One of these features is Windows Studio Effects, a collection of AI filters and effects that can be applied to video calls.

When Panos Panay announced the Windows 11 2022 Update, Windows Studio Effects was included. However, in order to use the new features, you need the correct required hardware that supports it, namely a PC running with a neural processing unit (NPU), a specialized processing chip that only recently has been included with Snapdragon (ARM-based) PCs.

Please note: At the time of this writing, only two machines can access these special features included in Windows Studio Effects: the Surface Pro 9 or the Lenovo ThinkPad x13s, the best ARM laptop in ages. If you don’t have one of these machines or your camera hardware does not support it, you may not be able to access the Windows Studio Effects features described in this guide.

If you’re looking to enhance and improve your video calls or you’re simply curious about what Windows Studio Effects can do, you’ve come to the right place. In this guide, we’ll show you how to use Windows Studio Effects in Windows 11.

What are Windows Studio Effects?

Windows Studio Effects is a powerful software tool that comes with the Windows operating system. It allows you to add visual effects to your videos, images, and other multimedia content, making them more engaging and dynamic. Here are the four Windows Studio Effects available, 3 for the camera and one for the microphone:

  1. Automatic framing: This feature automatically keeps you in frame and in focus on camera.
  2. Background effects (blur): This effect allows you to blur your background between a standard blur and a softer portrait blur.
  3. Eye contact: This camera effect was introduced on the Surface Pro X and uses AI algorithms make it seem like you are making eye contact when you are actually looking at your computer screen during a video call.
  4. Voice focus: This microphone effect filters out background voices and noises to make sure that your voice is heard clearly.

Windows Studio Effects via Quick Settings

The quickest and easiest way to access Windows Studio Effects is via Quick Settings. This a relatively new way to access this feature, but it is the fastest way to access and change Studio Effects settings on the fly. Just make sure you are running Windows 11 build 22621.1344 (released on Feb. 28) or higher and follow these steps:

  1. Click the notification area to open Quick Settings. This is where you see the network, sound, and battery icons on the right of your taskbar.
  2. Click Studio effects. windows studio effects
  3. Under the camera icon for Studio effects, you will see the options available that include Background effect, where you can choose between standard or portrait blur, Eye contact, and Automatic framing to always keep you in focus all without leaving Quick Settings. windows studio effects
  4. Under the microphone icon, you can turn on or off Voice focus, so that your voice is the only voice your viewers can hear regardless of background distractions. windows studio effects

If you don’t see the Studio effects option on your computer, you may need to add the button manually. Click the pencil icon at the bottom of the Quick Settings panel, click Add and choose Studio effects and don’t forget to click Done when you are finished. windows studio effectsIf you don’t see the option to add Studio effects, your PC likely does not have the required hardware to run it.

View more Windows Studio Effects in Settings

Another way you can access Windows Studio Effects is by using the full Settings app in Windows 11. This method is not as quick and easy as using Quick Settings as the camera and microphone options are located in different areas within Settings. Here’s what you need to do in Settings:

To enable Windows Studio effects for the camera:

  1. Open Settings (Windows key + i keyboard shortcut).
  2. Navigate to Bluetooth & devices > Cameras.
  3. Select the webcam you want to use. I have the Lenovo ThinkPad x13s, which only has one front-facing camera (AI Front Camera), but the Surface Pro 9 has two webcams, so there might be different camera effects options available. windows studio effects
  4. Enable the camera effects that you want to use and check the preview video at the top to refine how you want your video to appear when you’re on a video call. windows studio effects

Unfortunately, to enable Voice focus you need to go to a separate area in Settings, but it is pretty easy to do, just use the following steps:

  1. In Settings, go to System > Sound.
  2. Under Input, be sure to that the Qualcomm Audio device on your machine, in my case the Lenovo x13s, is set as the input for audio.  windows studio effects
  3. Click the Qualcomm Audio device to edit its properties and scroll to the bottom under Input settings and make sure that Audio enhancements are set to Microsoft Windows Studio Voice Focus and the toggle next to Voice Focus is turned on. windows studio effects
  4. Close the Settings app once you are finished.

Windows Studio Effects is only one of many features added, but be sure to check out everything that’s included in Windows 11 2022 Update. Want to learn a new feature to use? Check out how to use file tabs in File Explorer with Windows 11 2022.

RasMan Service Stopped? How to Enable It Again

If, after updating your Windows 10 computer, the RasMan service has stopped, then this guide can help! We will cover all the potential fixes to eliminate the problem and its causes. Let’s start! 

What causes the RasMan service stopped issue? 

There could be various reasons for the remote access connection manager service to stop; some of the common ones are mentioned here:

What can I do if the RasMan service stopped?

1. Update your Windows

  1. Press Windows + I to open Settings.
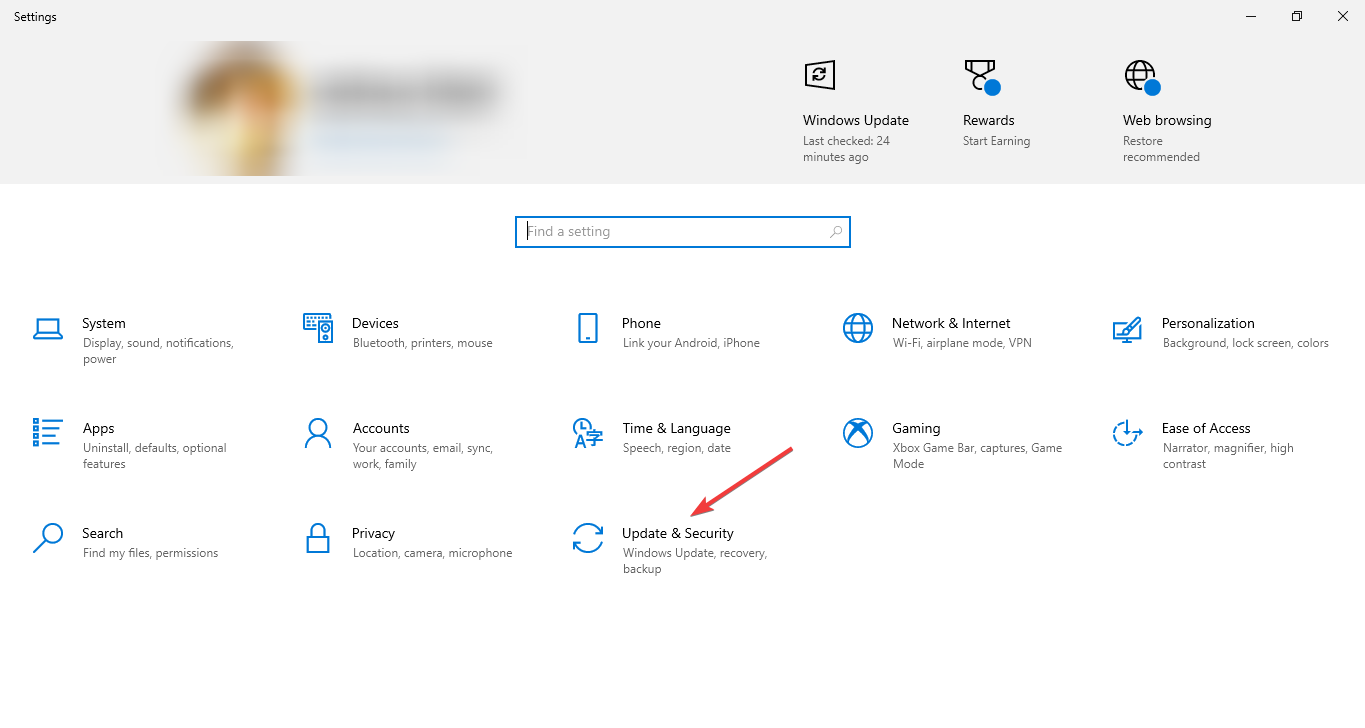
  2. Go to the Update & Security option.Update & Security
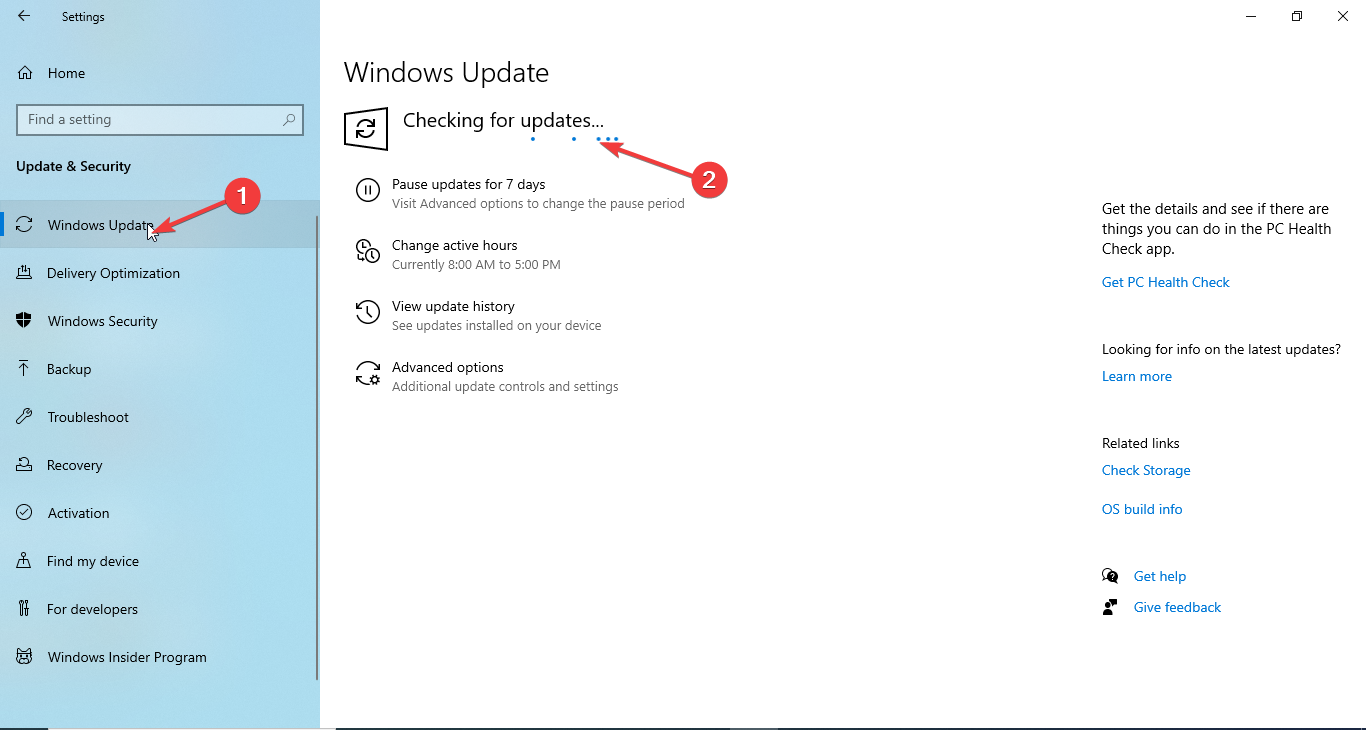
  3. Click Windows update from the left pane and click Check for updates.Windows update check for updates rasman service stopped
  4. Download and install the updates if available. Your computer will prompt you when it needs to be restarted. Please save your work before you restart.

2. Use the Group Policy Editor

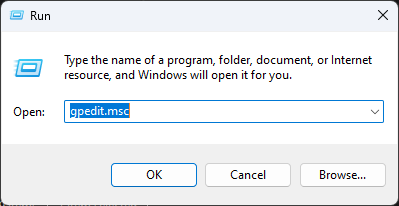
  1. Press Windows + R to open the Run dialog box.GPEDIT rasman service stopped
  2. Type gpedit.msc and click OK to open Group Policy Editor.
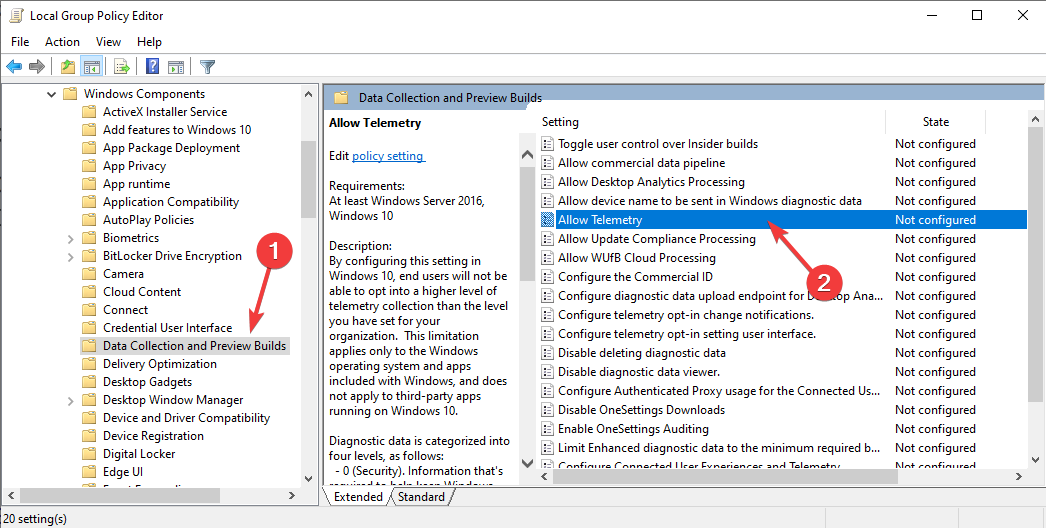
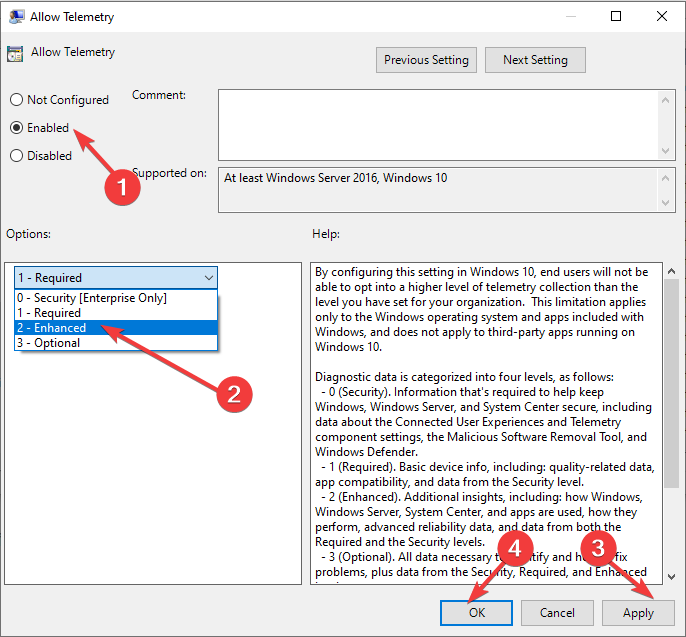
  3. Navigate to this path: Computer Configuration\Administrative Templates\ Windows Components\ Data Collection and Preview Builds\ Allow TelemetryAllow Telemtry 2
  4. Double-click on Allow Telemetry and make sure it is Enabled.
  5. Select the security level from Basic, Enhanced, or Full.Allow telemetry 3
  6. Click Apply and then OK. 
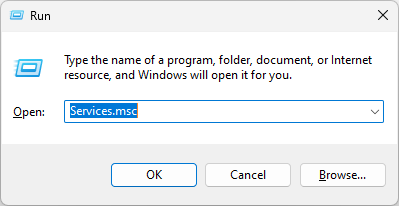
  7. Now open the Run box again, type services.msc, and click OK to open the Services app.
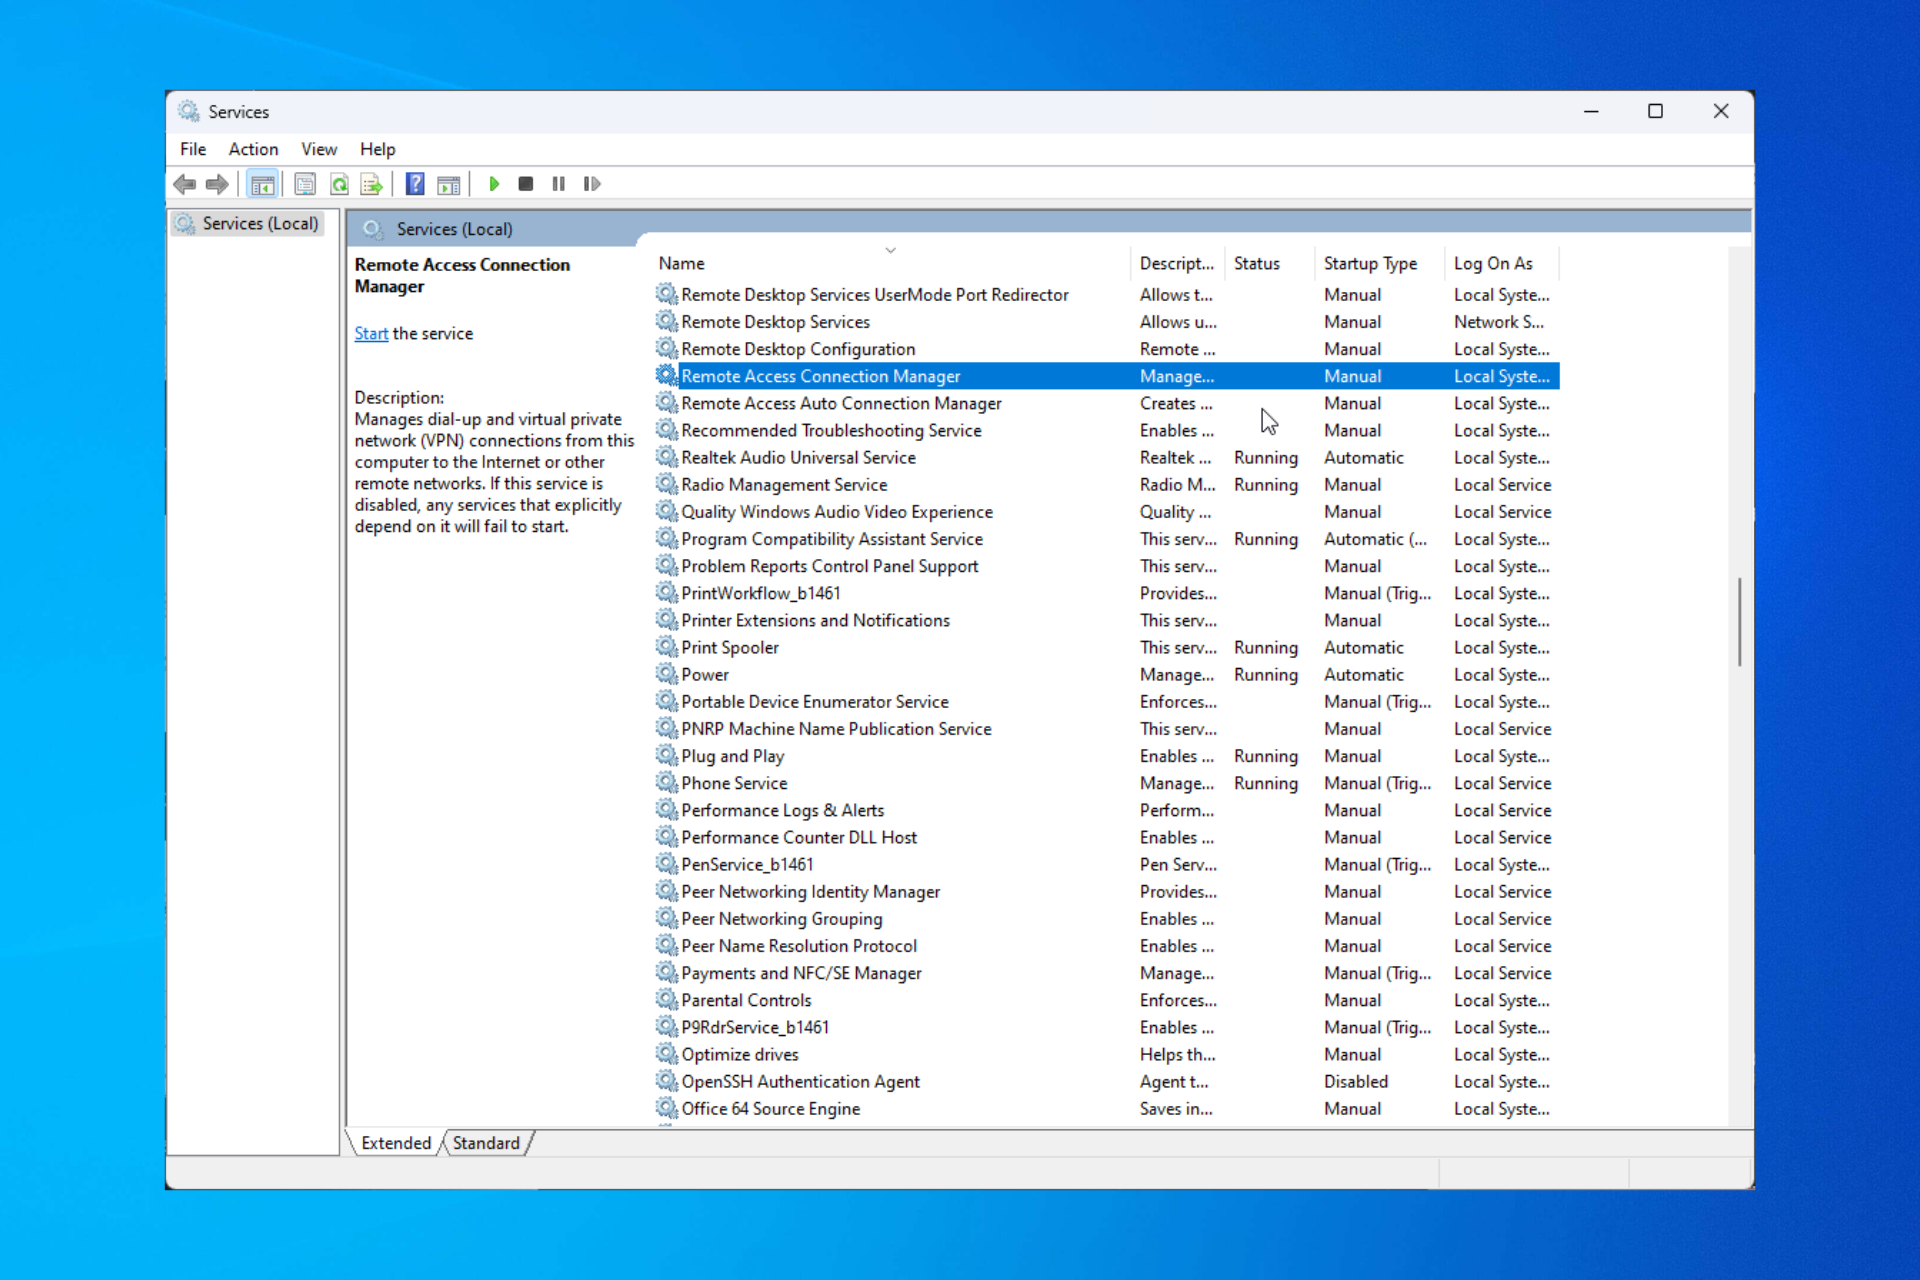
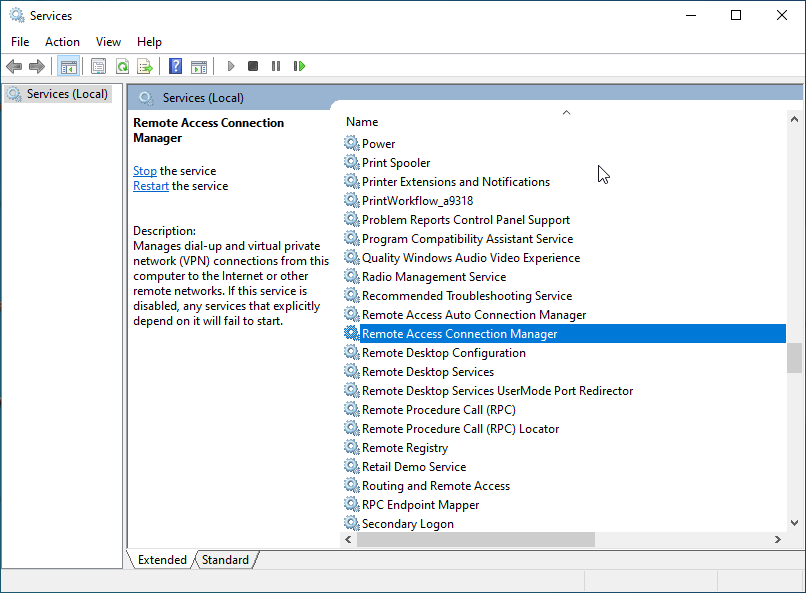
  8. Locate and double-click Remote Access Connection Manager to open Properties.
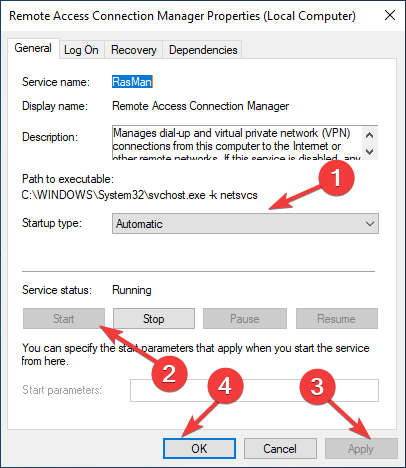
  9. Select Startup type as Automatic and Service status as Start.
  10. Click Apply, then OK.

3. Use the Settings app

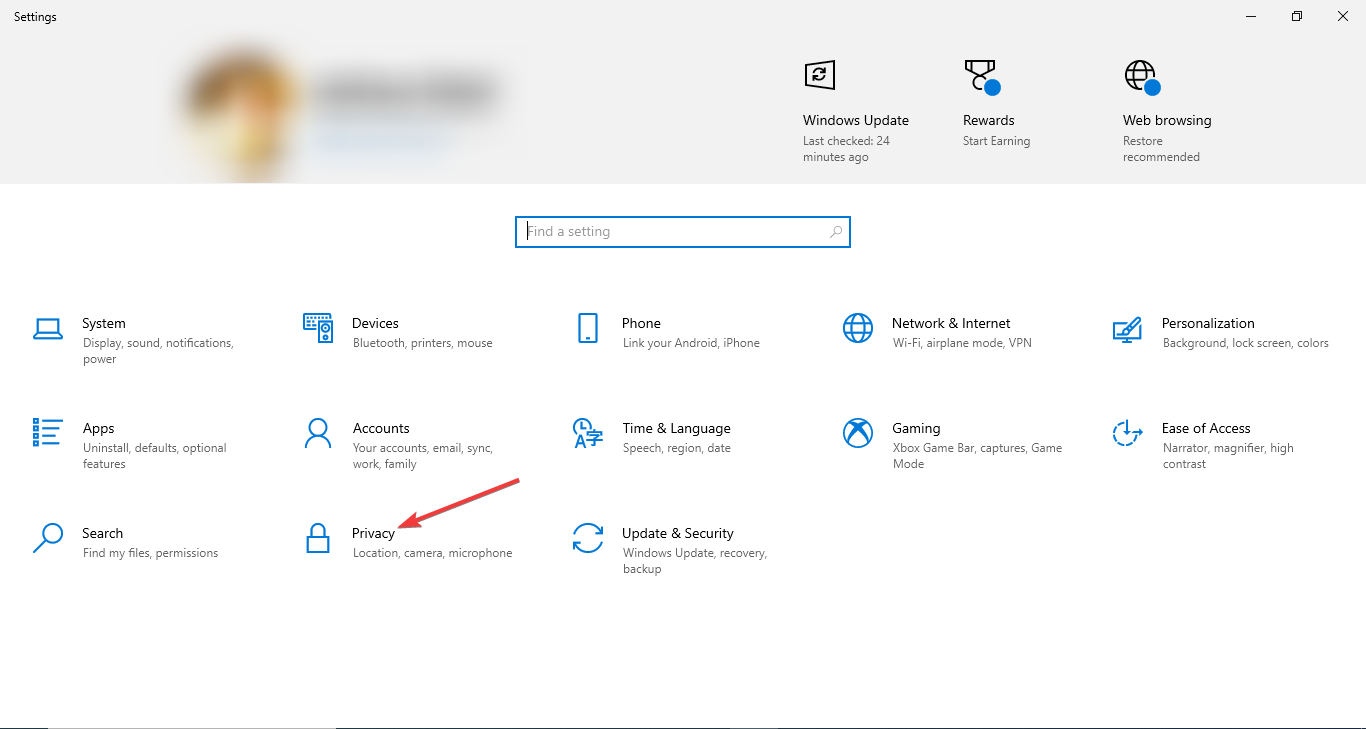
  1. Press Windows + I to open Settings.
  2. Click Privacy.Privacy rasman service stopped
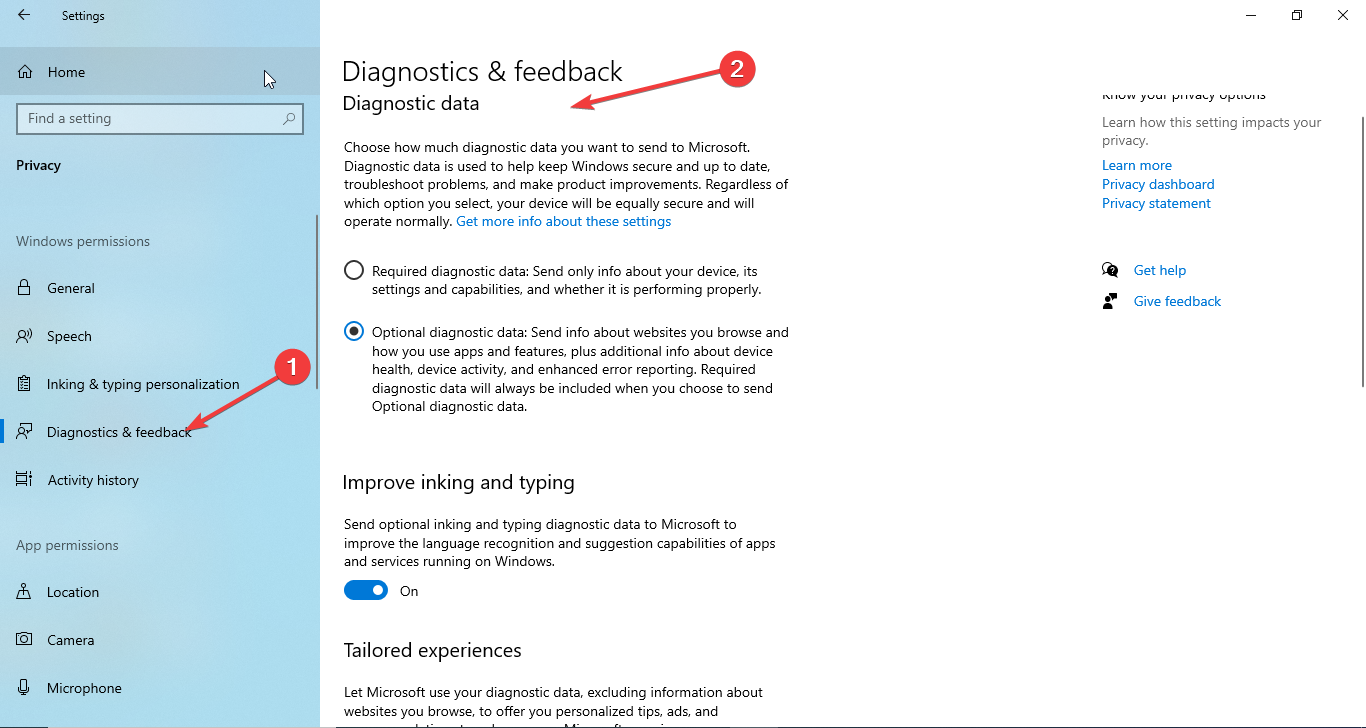
  3. Select Diagnostics and feedback from the left pane.
  4. Under Diagnostic data, choose either Required diagnostic data or Optional diagnostic data.Diagnostic Data
  5. Press Windows + R to open the Run dialog box.
  6. Type services.msc, and click OK to open Services.Services Run Command
  7. Locate and double-click Remote Access Connection Manager to open Properties.rasman service stopped
  8. Select Startup type as Automatic and Service status as Start.Service start
  9. Click Apply, then OK.

4. Use the Registry Editor

4.1 If the AllowTelemetry DWORD is present

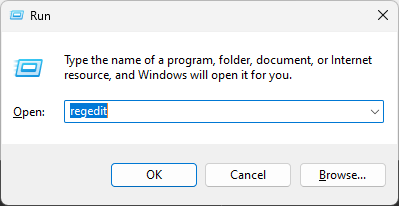
  1. Press Windows + R to open the Run dialog box. REGEDIT RUN COMMAND
  2. Type Regedit and click OK to open Registry Editor. 
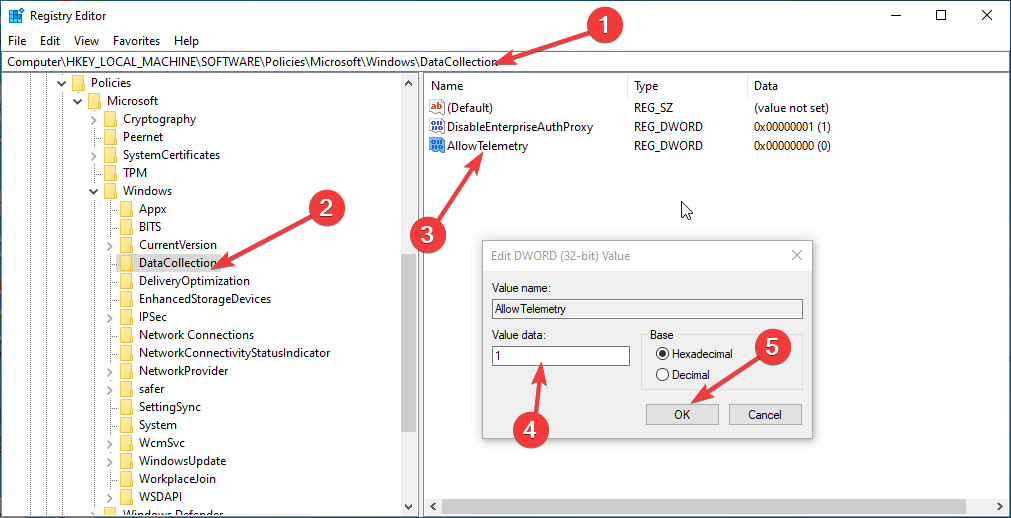
  3. Navigate to this path: Computer\HKEY_LOCAL_MACHINE\SOFTWARE\Policies\Microsoft\Windows\DataCollection
  4. Double-click the AllowTelemetry entry and modify the Value data to 1 for Basic, 2 for Enhanced, and 3 For Full.Regedit Rasman service stopped
  5. Click OK and restart your computer to confirm the changes.
  6. Now restart the Remote Access Connection Manager service using the steps mentioned in method 3.

4.2  If the AllowTelemetry DWORD is not present

  1. Press Windows + R to open the Run dialog box. 
  2. Type Regedit and click OK to open Registry Editor. 
  3. Navigate to this path: Computer\HKEY_LOCAL_MACHINE\SOFTWARE\Policies\Microsoft\Windows\DataCollection
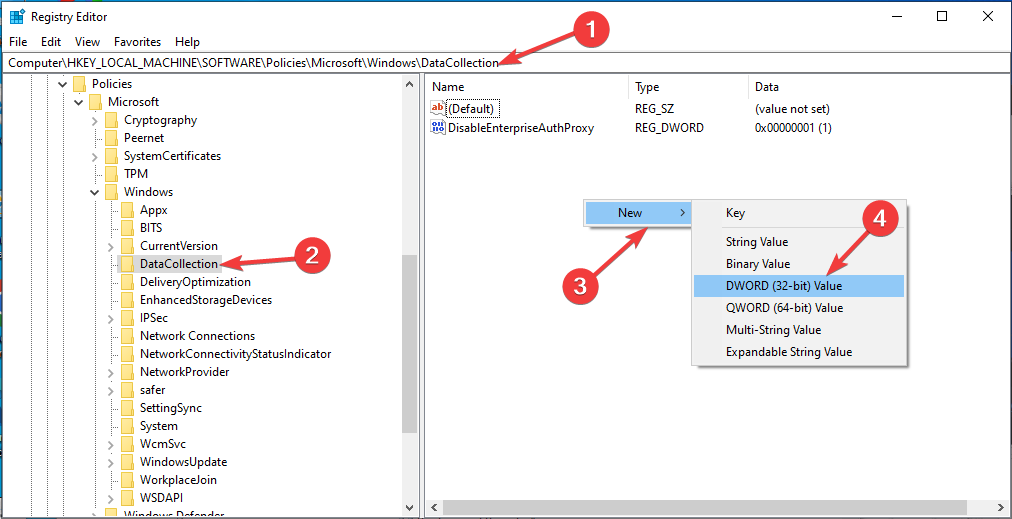
  4. Select Data Collection, right-click it, and choose New, then DWORD(32-bit) value.Data Collection New key -rasman service stopped
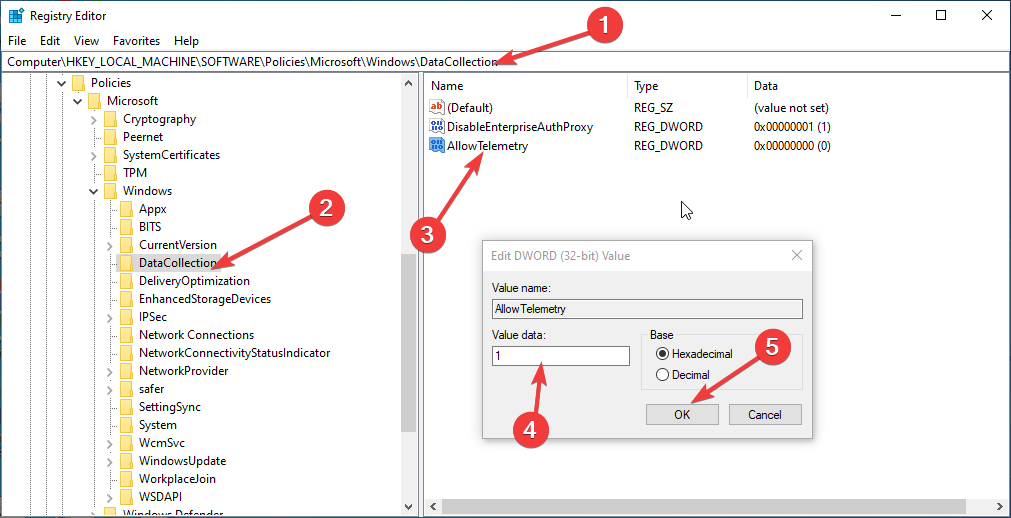
  5. Name it AllowTelemetry and change its Value data to 1 for Basic, 2 for Enhanced, and 3 For Full.
  6. Click OK and restart your computer to save the changes.Regedit Rasman service stopped
  7. Now restart the Remote Access Connection Manager service.

5. Restore the default startup configuration

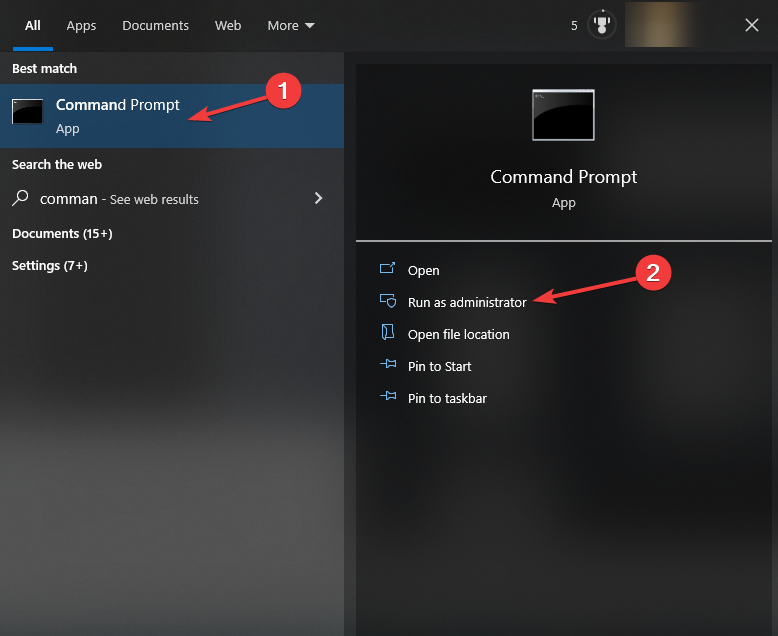
  1. Press the Windows key, type CMD, and click Run as administrator.Command Prompt Windows Run as Administrator rasman service stopped
  2. Copy and paste the following commands one by one and press Enter after every command: sc config RasMan start= auto sc start RasMan
  3. Exit Command Prompt and restart your PC to let the changes take effect.

So, these are the methods you must follow to fix the RasMan service stopped issue. Try them and let us know what worked for you in the comments section below.

Xbox Free Play Days: Far Cry 5, Marvel’s Midnight Suns and more

Xbox Free Play Days is back this week with another fantastic lineup of games for subscribers of Xbox Live Gold and Xbox Game Pass Ultimate. Below you’ll find the complete games lineup for this week’s Xbox Free Play Days event, available from Thursday through Sunday, March 26th.

Far Cry 5

Celebrate the fifth anniversary of one of the most acclaimed games in the long-running Far Cry franchise and get up to 85% off the standard edition!

Welcome to Hope County, Montana, the land of the free and brave, but also the home of a fanatical doomsday cult. Stand up to cult leader Joseph Seed and his siblings, the Heralds, to spark the fires of resistance and liberate the besieged community.

Play solo or two-player co-op in the vast open world of Hope County. Use a vast arsenal of weapons from rocket launchers to shovels, and take control of iconic muscle cars, ATVs, planes, and more to engage the cult forces in epic fights.

Bassmaster Fishing: 2022 Bassmaster Classic

Play the 2022 Bassmaster Classic® today! Get ready to experience the thrill of competitive big bass fishing and the official Lake Hartwell 2022 Bassmaster Classic in Bassmaster® Fishing 2022 Classic Edition. Dive into the fully licensed content from the Bassmaster series from amateur to elite events. Manage your sponsors, equip your dream setup, and customise the look of your angler to tackle the Bassmaster series.

Marvel’s Midnight Suns Enhanced Edition

When the demonic Lilith and her fearsome horde unite with the evil armies of Hydra, it’s time to unleash Marvel’s dark side. As The Hunter, your mission is to lead an unlikely team of seasoned Super Heroes and dangerous supernatural warriors to victory. Can legends such as Doctor Strange, Iron Man, and Blade put aside their differences in the face of a growing apocalyptic threat? If you’re going to save the world, you’ll have to forge alliances and lead the team into battle as the legendary Midnight Suns.

With an array of upgradeable characters and skills allowing you to build your own unique version of The Hunter, you will choose how to send Lilith’s army back to the underworld.

Wrap up

That’s a pretty exciting lineup of games on the slate for this week’s Xbox Free Play Days. Also, these games are discounted on the Xbox Store during the event. If you’d like to learn more then head on over to the Xbox Free Play Days FAQ page.

WhatsApp rolls out new Windows client with improved group calling features

WhatsApp, the widely-used messaging application owned by Meta, the parent company of Facebook, is offering a newly improved desktop application for Windows. It features, among other things, group video calling access to all users.

Meta’s CEO Mark Zuckerberg made a statement on Facebook announcing the launch of a Windows application for WhatsApp. This application will enable desk-based users to make end-to-end encrypted video calls with up to eight people concurrently and allow audio calls with a maximum of 32 attendees. The company asserted that they plan to expand the capacity of group calls moving forward.

With this move, the instant messaging giant is seeking to bolster its presence in the instant messaging and corporate communication sphere with its new Windows app, which has been designed with a familiar user interface for effortless usage and swift loading times. This puts it on par with other popular platforms like Slack and video conferencing applications such as Zoom and Google Meet.

Earlier this week, WhatsApp announced two new updates that focus on groups. The first allows group admins to view requests to join their groups in the “Pending Participants” section, while the second makes it simpler to find shared groups within search results by displaying them when a name is looked up. Before these changes, users had to go to a contact’s profile to identify common groups.

Furthermore, the WhatsApp experience is now more streamlined, allowing users to sync multiple devices simultaneously and thus making it a more convenient experience to carry conversations over device interfaces with ease.

Also, If you’re looking for assistance with using WhatsApp on your Windows desktop, we have compiled a comprehensive guide for you to refer to. If you have any inquiries or comments you’d like to share, we’d love to hear them in the comments section.

Outlook Has Encountered an Error: 5 Methods to Fix It

Some of our readers reported that they received the Outlook has encountered an error that is preventing it from working properly message after logging into their app. Others have also signaled that Outlook keeps crashing, but in this article, we have all the solutions to fix this problem for good.

Why has Outlook encountered an error?

The Outlook has encountered an error that is preventing it from working properly can be triggered by many possible issues, but we will highlight the most important here:

  • Third-party add-ins – If you installed any add-ins lately, that might cause Outlook to encounter an error. Starting Outlook in Safe mode can clear out this issue.
  • Firewall and antivirus interference – The firewall can block the connection with the server, preventing you from logging into your account and producing this error in Outlook or other Microsoft 365 software.
  • Software bugs – Like any other software, Outlook is prone to file corruption and bugs, but repairing Office will get this problem under control.

Now that we know what the possible problems might be, let’s fix Outlook using the solutions below.

How can I fix Outlook if it encountered an error?

Before getting into more complex tweaking, let’s perform the following:

  • Check your internet connection to see if it’s functioning properly, and restart your router.
  • Disable Windows Defender or your third-party antivirus temporarily and see if the Outlook error persists. If so, you should think about switching to a better antivirus.
  • Restart your computer and try to run Outlook again. Sometimes, this simple action may work.
  • Make sure you have installed all pending Windows updates on your computer.

If none of these prerequisite methods worked, start performing the solutions below to fix the problem.

1. Use the Microsoft Support and Recovery Assistant (SaRA)

  1. Go to Microsoft’s official download page for SaRA and click the Download button.
  2. After the download finishes, extract the ZIP file into a folder.
  3. Press the Win + E keys to start File Explorer, navigate to the folder, and double-click the SaraSetup.exe file.
  4. Now, click the Install button.
  5. After the app installs SaRA, hit the I agree button.
  6. Click on the Microsoft you have trouble with, in our case, Outlook, and click the Next button.
  7. Select the problem you’re having and click on Next. If you can’t identify it, select Other problems from the list.
  8. You will be asked to log into your Microsoft account. Follow the on-screen instructions to troubleshoot the Outlook issue.

Microsoft Support and Recovery Assistant is a very powerful troubleshooting tool for Office applications.

Many of our readers managed to fix the Outlook has encountered an error that is preventing it from working properly issue, so you should try it.

2. Start Office in Safe mode

  1. Press the Windows key + R to start the Run console.
  2. Type outlook /safe and click OK or press Enter.
  3. Choose the profile you want to use from the drop-down menu and hit the OK button.
  4. If Outlook can start in Safe mode that means some add-in is causing this problem and you should disable them one by one until you find which one is the culprit.

3. Perform a Clean boot

  1. Press the Win + R key combination, type msconfig, and press Enter or click OK.
  2. Go to the Services tab, check the box with Hide all Microsoft services at the bottom-left side of the page, and click on Disable all.
  3. Now, click on Open Task Manager.
  4. Next, go to the Startup tab, right-click on the apps you don’t want to open during the startup one after the other and choose Disable.
  5. Close Task Manager, click OK in the System Configuration window, and restart your PC for the changes to take effect.

If Outlook works fine after the Clean boot, that means a third-party software is interfering with the app and causing this error.

Restart your PC normally and uninstall or disable the app you installed lately to find the one that is causing this issue.

4. Repair Office

  1. Click the Start button and select Settings.
  2. Select Apps from the left pane and choose Installed apps from the right.
  3. Find Office, click on the three horizontal dots from its right, and select Advanced options.
  4. Now, scroll down and click the Repair button.
  5. Follow the on-screen instructions to repair the Office apps, including Outlook.
  6. Alternatively, you can redo the first three steps and choose the Reset button instead but keep in mind that this action will wipe out any data in the app.

5. Reinstall Office

  1. Click the Start button and select Settings.
  2. Choose the Apps option from the left and pick Installed apps from the right.
  3. Now, look for Office, click on the More button (the three dots on its right), and select Uninstall.
  4. After the uninstallation, reinstall Office with the kit provided or download the latest copy from Microsoft Store.

As a last resort, you can uninstall Office along with Outlook and reinstall it freshly. This should clear out any possible issues with the app.

We hope our solutions helped you fix the Outlook encountered an error problem, and now you can use the app without any problems.

Should you need more information, we also have a guide on what to do if Outlook is not opening on Windows 11.

Also, if you receive the error Something unexpected went wrong with this URL, the highlighted guide will help you.

If you have any questions or suggestions, feel free to let us know about them in the comments section below.

Bing Error E010014 When Trying to Join The Waitlist [Fixed]

If you encountered the Bing error e010014 when trying to join the waitlist, this guide can help! We will talk about some of the workarounds available to fix the issue right after talking about the causes.

What is error code e010014?

The error code is not a specific error for New Bing Chat. Instead, it is a general error code that could have occurred for various reasons, including the Microsoft server and slow internet connection. This seems to be a bug causing the issue, but there is no update on when this error code will be fixed. However, some workarounds can fix the problem.

What causes the Bing error e010014 when trying to join the waitlist?

There could be several reasons for this error code to appear; some of the common ones are mentioned here: 

  • Unstable network connection –  If your internet connection is weak, you might not be able to establish a connection with the Microsoft server, hence the error. To fix this, you need to troubleshoot your internet connection or 
  • Microsoft server outage or is busy – Sometimes Microsoft server doesn’t respond when it is busy due to the heavy load caused by a vast number of access users; hence you can’t reach it and get this error. You need to wait and try again once the server is up.

How can I fix the Bing error e010014 when trying to join the waitlist?

Before engaging in advanced troubleshooting steps, you should consider performing the following checks:

  • Restart your computer.
  • Use a different network connection.
  • Restart your router.

1. Troubleshoot network connections

1.1 Use the Settings app

  1. Press Windows + I to open the Settings app.
  2. Go to System, and click Troubleshoot.
    troubleshoot e010014
  3. Now select Other troubleshooters.
    Troubleshooter
  4. Go to Internet connections and click Run.
    Internet connections Run
  5. Follow the onscreen instructions to complete the process.

1.2  Reset Network

  1. Press the Windows key, type CMD, and click Run as administrator.
    DOS COmmand Prompt - e010014
  2. Copy and paste the following command one by one and press Enter after every command: netsh winsock reset netsh int ip reset ipconfig /release ipconfig /renew ipconfig /flushdns
  3. Once the command is executed, restart your computer.

2. Check the Microsoft Server status

  1. Go to the Microsoft Service Status page.
    Microsoft Server status e010014
  2. Check all the services and apps to ensure there is an outage.
  3. If there is no outage, the server might be busy due to excessive load. Then, it would be best if you waited before you tried again.

3. Use a different browser or try the incognito mode

  1. Open your preferred browser and locate three dots or three lines from the top right corner.
  2. Now select New Incognito window (Chrome), New Private window (Firefox), or New InPrivate window (Edge)to open the Private mode on your browser.
    In private e010014
  3. Now access the same website to join the waitlist.

4. Use VPN 

  1. Download NordVPN on your computer, as it is one of the safest options.
    NordVPN_ e010014
  2. Connect to a server location close to your physical location.
  3. Once the connection is established, try to join the waiting list.
  4. If you have VPN enabled, disable it, wait for 30 seconds, and enable it again.
    VPN disconnect

5. Re-register a Microsoft account with your domain name

  1. Visit the Microsoft admin website.
  2. From the left pane, select Settings, then click Domains.
    Settings Microsoft Admin Center
  3. On the Domain page, click the + icon or Add domain.
    Add domian
  4. Follow the onscreen instructions to own your domain. 
    Add a domain 1
  5. Now back to the Admin center, go to Users, then click Active Users.
    Users - Active Users
  6. Select the user and click Manage contact information and change the information accordingly.
    Manage contact information
  7. Now use the new account to apply to join New Bing.

So, this is how you can fix the Bing error e010014 when trying to join the waitlist. If nothing has worked for you so far, then you can either contact Microsoft support or wait for the bug to be fixed so that you can try to add yourself to the waitlist.

If you have any other questions or concerns about New Bing Chat, please let us know in the comments section below. We will be happy to help!

File Explorer Not Responding on Windows 11? How to Fix It

File Explorer is one of the most frequented apps of Windows, but sadly, it is not immune to bugs and issues. Several readers have reported that File Explorer is not responding on their Windows 11 PCs.

Sometimes, it fails to respond to the commands, and other times, the response is slow. If you are facing a similar issue, we have got you covered.

Why is File Explorer not responding on Windows 11?

Some of the most probable reasons behind the File Explorer not responding issue are as follows:

  • Corrupt or missing system files – Corrupt system files are a common reason why Windows File Manager is responsive to right-click.
  • Incompatible third-party apps – Recently installed third-party apps, if incompatible, can interfere with the working of the operating system and other apps.
  • Corrupt File Explorer cache – If the cached data is not expelled periodically, it can get corrupted and slows down the File Explorer app.
  • Outdated graphic drivers – Outdated system drivers can trigger various issues on your system and are likely to interrupt the File Explorer app as well.
  • Malware or virus infection – Malware and virus attacks lead to several system-level problems, including the File Explorer not responding issue on Windows 11.

In this guide, we have compiled a list of efficient workarounds to fix the File Explorer not responding issue on Windows 11.

What can I do if File Explorer is not responding on Windows 11?

Before implementing the complex troubleshooting solutions, make sure to perform the following actions:

If these simple fixes could not resolve the problem, implement the solutions below.

1. Restart File Explorer

1.1 Using Task Manager

  1. Right-click the Windows icon on the Taskbar and choose Task Manager from the Quick Links menu.
  2. Right-click the Windows Explorer process in the Apps section of the Processes tab and choose the End Task option.File Explorer not responding Windows 11
  3. Click the File option located on the top Menu bar and select Run New Task from the sub-menu.File Explorer not responding Windows 11
  4. Type Explorer or explorer.exe in the text field of the Create new task window and press OK.File Explorer not responding Windows 11

1.2 Using Command Prompt

  1. Press the Windows key, type cmd in the Search bar on top, and click the Run as Administrator option from the result section.File Explorer not responding Windows 11
  2. Press Yes on the User Action Control window.
  3. Type or paste the following command and press Enter key to end the File Explorer process. taskkill /f /im explorer.exeFile Explorer not responding Windows 11
  4. Next, type the following command and execute it to restart File Explorer on your Windows 11 computer. start explorer.exeFile Explorer not responding Windows 11

Restarting File Explorer using any of the two ways discussed above will eliminate the underlying technical glitch that is causing File Explorer not responding issue on Windows 11.

2. Run SFC and DISM scans

  1. Open the Start menu by pressing the Windows key, type cmd in the Search bar, and select Run as Administrator from the result section.
  2. Type or paste the following command and press the Enter key to initiate a full system scan. sfc /scannowPress the Windows key, type cmd in the Search bar on top, and click the Run as Administrator option from the result section.File Explorer not responding Windows 11 Press Yes on the User Action Control window.  Type or paste the following command and press Enter key to end the File Explorer process. taskkill /f /im explorer.exeFile Explorer not responding Windows 11 Next, type the following command and execute it to restart File Explorer on your Windows 11 computer. start explorer.exeFile Explorer not responding Windows 11
  3. After the SFC scan is completed, type or copy-paste the following command and press Enter. DISM /Online /Cleanup-Image /RestoreHealthFile Explorer not responding Windows 11

The SFC scan, along with DISM (Deployment Image Servicing and Management), scans your PC to find the corrupt and missing system images and restore them with the original version, resolving the irresponsive File Explorer app. And this also helps when File Explorer is taking focus.

Although the SFC and DISM scans are a safe solution, some users prefer to use third-party software to automatically repair all corrupt or missing files by finding new parts as replacements.

3. Clear the File Explorer cache

  1. Use the Windows + E shortcut to launch File Explorer on Windows 11 PC.
  2. Click the Menu icon (three dots) on the right of the Menu bar and select Options from the drop-down menu.Open the Start menu by pressing the Windows key, type cmd in the Search bar, and select Run as Administrator from the result section. Type or paste the following command and press the Enter key to initiate a full system scan. sfc /scannowPress the Windows key, type cmd in the Search bar on top, and click the Run as Administrator option from the result section.File Explorer not responding Windows 11 Press Yes on the User Action Control window.  Type or paste the following command and press Enter key to end the File Explorer process. taskkill /f /im explorer.exeFile Explorer not responding Windows 11 Next, type the following command and execute it to restart File Explorer on your Windows 11 computer. start explorer.exeFile Explorer not responding Windows 11 After the SFC scan is completed, type or copy-paste the following command and press Enter. DISM /Online /Cleanup-Image /RestoreHealthFile Explorer not responding Windows 11
  3. In the Folder Options window, press the Clear button located next to Clear File Explorer history and then OK.File Explorer not responding Windows 11

Cache files pile up in File Explorer and if not cleared for a long time, slow down the app and can also be why File Explorer is not responding on Windows 11.

6. Uninstall the display driver

  1. Use the Windows + R shortcut to launch the Run dialog box, type the following command in the text field and press the Enter key. devmgmt.mscFile Explorer not responding Windows 11
  2. Expand the Display adapters category.
  3. Right-click the display driver and choose Uninstall device option.File Explorer not responding
  4. Click Uninstall on the confirmation pop-up.File Explorer not responding Windows 11

After the display driver is uninstalled from your computer, restart your PC to install the standard display driver available for your device. If the display drivers get corrupt, they can cause the File Explorer to malfunction and stop responding to commands.

7. Run the System Maintenance tool

  1. Press the Start button, type control panel in the Search bar, and select the relevant search result.File Explorer not responding Windows 11
  2. Set View by to Small icons and select Security and Maintenance category.File Explorer not responding Windows 11
  3. Expand the Maintenance section and click on Start Maintenance.File Explorer not responding Windows 11

The System Maintenance tool built into Windows 11 diagnoses underlying issues and optimizes the performance of the OS and Windows apps, such as Windows Explorer.

8. Clean boot your PC

  1. Launch the Run command window using the Windows + R shortcut. Type the following command and press Enter to execute it. msconfig File Explorer not respondiing
  2. Uncheck the box for the Load startup items and check the Load system services option in the System Configuration window.File Explorer not responding
  3. Switch to the Services tab, enable the Hide all Microsoft services option located on the bottom left, and press the Disable button.File Explorer not responding
  4. Click the OK button and restart your computer; it will boot in a clean boot state.

Now try opening File Explorer on your Windows PC. If you are successful, it means some third-party apps are interfering with the File Explorer functionality. You can refer to this guide to uninstall apps from Windows.

That’s pretty much it! You can try the solutions listed here if File Explorer is not responding on Windows 11, affecting your workflow. In case File Explorer crashes randomly on Windows, refer to the proven solutions provided in this guide.

If you have any questions or want to give suggestions, don’t hesitate to head to the comments section below.

Unknown Error Trying to Lock File: 3 Ways to Open the Files

Some of our readers report encountering an Unknown error trying to lock a file when opening a file in Excel from SharePoint. Therefore, we’ll examine ways to troubleshoot this problem in this guide.

Alternatively, you can read our guide about how to fix SharePoint documents that won’t open in the application.

What causes an unknown error trying to lock file?

The Unknown error trying to lock a file can occur for different reasons. Hence, the reason below is the specific factors causing this error.

  • File in use – The system stores raw or processed data in a hierarchical structure of directories. Therefore, you can encounter the error unable to lock if the file is already in use.
  • Corrupt file – The system file can become corrupt or damaged due to outcomes of different factors such as malware, bugs, power outage, or human error. It can cause the SharePoint file to malfunction when opened, popping up error messages such as unknown error trying to lock file.
  • Permission issue – Permissions ensure that only authorized users can access and modify system resources. Therefore, you can encounter difficulty opening files if you don’t have permission to access the file on a system.
  • Network issues – Network congestion can cause an error if you are accessing a file over the internet.

The causes above vary depending on the circumstances. Nonetheless, we will discuss the steps to resolve the error and open the files.

How can I fix an unknown error trying to lock the file?

Try the following preliminary checks to fix the file-locking error:

You should proceed with the advanced steps below if the error persists.

1. Create a network location via Registry Editor

  1. Press the Windows button, type regedit, and press Enter to open the Registry Editor.
  2. Click the Yes button on the UAC, copy and paste this address into the directory bar, and press Enter: HKEY_LOCAL_MACHINE\SYSTEM\CurrentControlSet\Services\WebClient\Parameters
  3. Right-click on the right-side menu and select new. Rename the new value to AuthForwardServerList and press Enter.
  4. Right-click the AuthForwardServerList value and click on modify.
  5. Input the URL of your website in the Value data box and click the OK button.
  6. Close the Windows Registry Editor and restart your Webclient Service.

The Registry Editor creates a Network Location for troubleshooting the SharePoint network. Read about how to fix a corrupt registry on Windows.

2. Clear browser cache and cookies

  1. Launch the browser app on your device. Click on the three dots on the top right side, select More tools, and click on Clear browsing data.
  2. Select All Time from the Time range at the top, check the boxes next to Cookies and other site data, and the Cached images and files option. Then click on Clear now.

Clearing the browser cache and cookies will remove all pre-store data and refresh the website. Check our guide about how to clear the computer cache in Windows 11.

3. Add SharePoint as an exception in Firewall settings

  1. Left-click the Start button, type firewall, and open Windows Defender Firewall.
  2. Go to Allow an app or feature through Windows Defender Firewall.
  3. Scroll down and select SharePoint from the list of apps.
  4. Check the boxes for both Private and Public. Click OK to save the changes and restart your PC.

Allowing SharePoint as an exception in Windows Firewall prevents the firewall from checking or blocking its processes.

In addition, read our guide on how to fix these files that cannot be opened error messages. Also, do not hesitate to check how to open SharePoint in File Explorer.

Should you have further questions or suggestions, kindly drop them in the comments section.

How to Undervolt a GPU & Why You Should Do It

The PC generates heat and noise directly proportional to the voltage supplied. So, if your system is too hot or making loud noises from the fans, you need to adjust your GPU. Hence, this article will discuss ways to undervolt a GPU on the PC.

Also, we recommend you check through our guide on how to safely underclock your GPU to lower its performance.

Why should I undervolt a GPU?

Every GPU operation on the system consumes some amount of power, and in turn, they dissipate as heat that can significantly affect the system. This is the reason we recommend you undervolt the GPU.

However, undervolting a GPU (Graphics Processing Unit) means lowering or reducing the operating voltage your graphics card or video card has access. Although it has some benefits to it:

  • GPU undervolting minimizes power consumption and load temperature by reducing voltage.
  • When you undervolt your Graphics processor, it runs without generating excessive heat and lessens the pressure on the GPU power phases. Also, it lowers the voltage output to the GPU at the constant maximum clock speed.
  • Further, undervolting maintains GPU stability and longevity in lower-end motherboards by not overworking the GPU. Also, it reduces the fan noise on your PC.

The above are a few of the advantages of undervolting. Hence, we will explore the various ways to do it on your GPU below.

How can I undervolt a GPU?

Note icon NOTE
Although we don’t recommend third-party software, the ones mentioned below are tested by our experts. Hence, you can safely download and use them for the undervolting purpose.

1. Use MSI Afterburner and Unigine’s Heaven Benchmark

  1. Launch your browser, download the latest MSI Afterburner and Unigine’s Heaven Benchmark, then install them on your PC.
  2. Open the MSI Afterburner software, and you should see a window showing your GPU Speed, Voltage, and Temperature.
  3. Launch Heaven Benchmark, click the Run button on the bottom-left pane, then wait while it loads.
  4. Click the Settings button and uncheck the box for Full-Screen to see the GPU clock speed and temperature during the stress test.
  5. Click on Benchmark in the top-right corner to start testing.
  6. Press Alt + Tab keys to switch to MSI Afterburner while running Benchmark to open them side by side.
  7. In MSI Afterburner, note the maximum GPU clock speed reached and note your GPU Temp.
  8. Switch back to Heaven Benchmark to see if the benchmarking has ended. If it is, note the performance score.
  9. Go to MSI Afterburner and press Ctrl + F keys to open the Fan Curve graph.
  10. With the plot of voltage on the horizontal axis and Clock Speed on the vertical axis, find the point that corresponds to the maximum GPU clock speed you noted earlier on the vertical axis at the left.
  11. After finding the clock speed, look below on the horizon axis to see the voltage corresponding to it.
  12. Figure out the difference in frequencies represented by the red and green lines.
  13. Go to the main window on MSI Afterburner and find Core Clock, input the calculated value, and press Enter. The graph on the fan curve page should drop to the desired frequency range.
  14. Try reducing 50 mV voltage to start undervolting.
  15. Find the square dot corresponding to the voltage you want to get, then drag the square box above to reach the maximum clock speed of your GPU.
  16. Press Shift, select all the areas to the right of the dot, and press Enter to make them straight.
  17. Click on the Apply button on the main screen.
  18. Go to Heaven Benchmark, run the Benchmarking, then note the readings.
  19. Repeat steps 14-17 by lowering the voltage by 50 mV until you reach a low-performance score.
  20. Apply and Save the changes.

You can undervolt your GPU depending on how low you want it to be. So, considering the frequencies you get from the earlier scan, reduce the voltage until you get the desired result.

2. Via AMD Radeon Software: Adrenalin Edition

  1. Download the AMD Radeon Software: Adrenalin Edition and Unigine’s Heaven Benchmark on your PC.
  2. Launch the Radeon software, click the Performance tab at the top, and go to Tuning.
  3. Go to GPU Tuning, then the Clock Speed and Voltage.
  4. Launch Heaven Benchmark, click the Run button on the bottom-left pane, then wait while it loads.
  5. Click the Settings button and uncheck the box for Full-Screen to see the GPU clock speed during the stress test.
  6. Click on Benchmark in the top-right corner to start testing.
  7. Press Alt + Tab keys to switch to AMD’s software while running Benchmark to open them side by side.
  8. Note the GPU clock speed and note Temperature.
  9. Switch back to Heaven Benchmark to see if the Benchmarking has ended. If it is, note the performance score.
  10. Navigate to the GPU section on the AMD software window and select Custom on the Manual Tuning tab.
  11. Toggle the switch for the GPU Tuning option and Advanced Control to enable them.
  12. Type the maximum GPU clock speed, tune the voltage slider to reduce the voltage by 50 mV, then click on Apply Changes.
  13. Run the Heaven Benchmark and check the changes.
  14. Repeat the process until you reach the optimum value.
  15. Alternatively, click the Undervolt option on the Automatic section to let AMD do it automatically.

The above steps will help reduce the voltage and power consumption of the GPU.

In conclusion, you can check our guide on what to do if you’re experiencing a PC crash after overclocking the CPU. Also, we have a comprehensive article about how to undervolt your CPU in easy steps.

If you have further questions, kindly drop them below in the comments section.

Filters Are Not Working in Planner? Here’s What to Do

Filters are a powerful and flexible tool in Microsoft Planner that can help you find exactly what you want. They are a great way to narrow your Planner view and get a more focused view of what’s happening in your business. 

You can easily prioritize your tasks and attend to them with the help of filters. But what happens if your filters aren’t working as expected? This article will walk you through the steps of troubleshooting this issue.

What are the ways a filter can be applied in the Planner app?

Microsoft Planner is a powerful project management tool that allows users to create plans, organize tasks and assign them to team members. The app also comes with a filter option that makes it easy for users to find specific tasks or projects

The filtering capability allows you to filter your data in many different ways. Depending on what you’re looking for, you can filter based on various categories such as:

  • Keyword – This is particularly helpful when looking for a specific task, but the list is vast. The filter will bring up all related keywords, and you choose which ones apply to you.
  • Date – This is a very handy filter and one of the most commonly used. Date filtering is useful for viewing your tasks over a long period of time and keeping track of what you need to do each day. It’s also helpful for seeing how much time you have left before a deadline or the due date for an activity. 
  • Priorities – Tasks can also be filtered according to their priority level, from low to high. This allows you to never miss a deadline because you can attend to pressing issues in a timely manner.
  • Labels – Label filtering can be done within tasks to easily keep track and stay organized, especially if one task has lots of activities.
  • Buckets – This filter is more like labels, but the only difference is that it is more powerful. It allows you to apply multiple filters at the same time. You can group tasks together based on their criteria and then create another filter, say the date or priority filter.

What can I do if filters are not working in Microsoft Planner?

Before you jump to the main solutions, we advise you first to check the following:

  • Make sure you’re using the latest version of Microsoft Office 365. 
  • Test your network connection. Make sure that you have a good Internet connection.
  • Ensure you’re signed into the right account and that the account has permission to view or edit tasks in your workspace. Remember, Microsoft Planner does not work with personal accounts.
  • Sign out and sign in again as another user (if available).
  • Check with your organization whether your Microsoft 365 subscription is up-to-date.
  • Make sure that you’re using a supported filter type. For example, if you have a date range filter set up, ensure that your date range is set up correctly. You cannot filter tasks for a time frame that has already expired.
  • Try another browser. Your current browser may have some issues.

1. Copy the plan

  1. Launch the Planner app and find the plan that is not accepting any filters to copy.
  2. Click on the three ellipses at the top right corner, then select Copy plan.
  3. You can choose to rename the copy to differentiate the two.
  4. Copy the plan under Copy to a group. This can be any of the plans to which you are a member or you can create a new one.
  5. Choose the items you wish to copy under the Include section and select Copy plan.
  6. Wait for the plan to complete copying, open it and try the filters.

2. Clear browser cache

  1. The exact steps will vary depending on the browser you’re using. For this step, we’ll be using the Chrome browser.
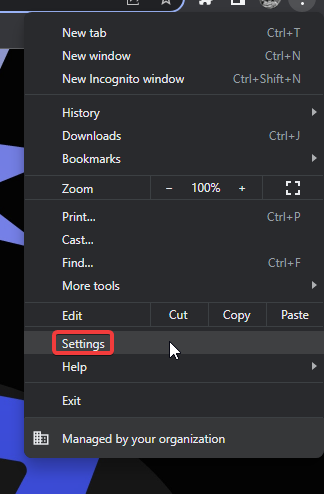
  2. Launch your Chrome browser and click the three vertical ellipses in the top right corner.
  3. Select Settings.
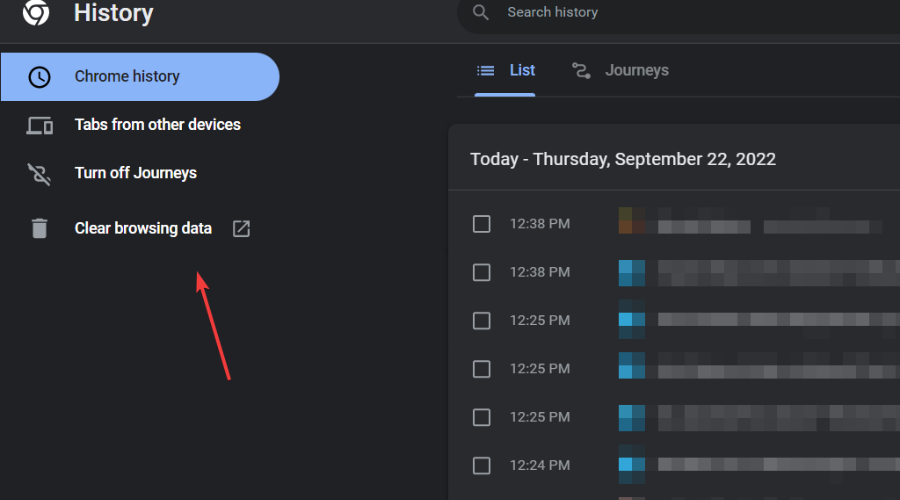
  4. Click on Privacy and security, then select Clear browsing data.clear browsing data chrome
  5. Check Cookies and other site data and Cached images and files, then hit Clear data.clear-data-chrome error-code-224003
  6. If you’re using another browser, also proceed to clear the cache.

3. Reinstall Office

  1. Hit the Windows key, type Control Panel in the search bar, and click Open.control-panel-search fallout new vegas runtime error
  2. Click on Uninstall a program under Programs.going uninstall program control panel
  3. Find Microsoft Office and click Uninstall. If there’s more than one copy, proceed to uninstall them too.Microsoft Office Uninstall
  4. Download Office and follow the on-screen prompts to complete the installation.

If none of these methods bear fruit, we recommend you raise a service request Microsoft 365 admin for further assistance.

That’s all we had for this article but do let us know of any additional thoughts you may have on this issue.

The Snipping Tool app can compromise sensitive data on your PC

We all know that Microsoft’s operating systems are far from being 100% safe, and the tech giant is trying to fix tens, maybe even hundreds of vulnerabilities each month.

This month, for example, the tech company addressed a number of 75 CVEs, some of them being under active exploitation in the wild.

Now, users found another weak spot in Microsoft’s defense and have posted warnings about it all over social media platforms.

Did you think using an innocent app such as Snipping Tool was nothing to worry about? Well, you might want to rethink that, as recent information confirms the exact opposite.

Be careful when using the Windows 10&11 Snipping Tool

Yes, we are talking about a newly revealed issue in Microsoft’s image-snipping tools in both Windows 10 and 11, that has been just discovered.

In fact, this discovery was made by one of the people who first reported on a similar problem in Google’s Pixel screenshot tool Markup.

You should know that the reverse engineering researcher David Buchanan posted his findings earlier today on his Twitter account.

If you didn’t quite get the bigger picture yet, allow us to explain. The post shows that when the user took a screenshot with the Windows 11 Snipping Tool and then saved it, then he could crop the image, save the image to the same file, and show that the cropped data hasn’t been deleted after all.

In more common terms, this vulnerability means that someone could actually bring back the data from the part of the image that was cropped.

And, yes, this can be achieved in mostly the same way the Pixel-based cropped image could be also recovered.

The post’s author also stated that the same exploit script works with minor changes, as the pixel format is RGBA and not RGB. 

What is more concerning is what he actually added in a later post, in which he specified that the same issue is found with Microsoft’s Snip & Sketch tool included with Windows 10.

What’s important and also interesting at the same time here is that, apparently, this doesn’t happen with the original Windows 10 Snipping Tool.

Please keep in mind that, in theory, these exploits could be used by hackers to reveal previously cut-out sensitive information in images, like passwords, credit card numbers, bank accounts, and more.

Collectively, all these have been dubbed the Acropalypse. Know that Google has since patched this issue in its Pixel phones.

However, we are yet to see a post from Microsoft, acknowledging what happened and saying it is currently working on a solution.

Have you also found evidence of foul play in the Sniping Tool? Share your experience with us in the comments section below.

What is Net Helpmsg 3547 Error & How to Fix It

Net Helpmsg 3547 error is common among Windows users using the Net Helpmsg command. The error code results from problems with the Microsoft Windows operating system, which may be caused by malware or a damaged registry key. 

Errors like this can cause your computer to freeze, lock up, or crash. The error may also prevent you from accessing certain websites or online services. Below, we have compiled the top-most rated answers as marked by users to resolve this error.

Why am I getting the Net Helpmsg 3547 error?

Unfortunately, the Net Helpmsg 3547 error message is unclear on the exact cause. If you have recently installed or updated any software or hardware on your PC, this may have caused the issue.

However, from what most users have reported, the Net Helpmsg 3547 error is mostly related to the Windows update service and BITS. Other causes include:

  • Corrupt service registration – When the service registration is missing or corrupt, the Windows update may fail. 
  • The system files are corrupted – System files can easily get corrupted if a virus has found its way to your PC.
  • Problem with your Windows version – According to some users, an update to their current Windows copy brought about the Net Helpmsg 3547 error. 

How can I fix the Net Helpmsg 3547 error?

1. Restart the Windows update service

  1. Hit the Windows + R keys to open the Run command.
  2. Type services.msc and hit Enter.run services.msc command
  3. Locate Windows update service, double click on it and select Properties.
  4. Navigate to the General tab, under Startup type select Automatic from the drop-down options and click on the Start button.
  5. Next, click Apply and then OK.

2. Check for corrupt system files 

  1. Hit the Windows key, type cmd in the search bar, and click Run as administrator.cmd-run-admin-w11 unexpected kernel mode trap windows 11
  2. Type the following commands and press Enter after each one: DISM.exe /Online /Cleanup-Image /Restorehealth sfc /scannow
  3. Restart your PC.

The SFC scan will help in troubleshooting this problem and determine what software component failed to install. If it finds that a file in your system needs repair, it will attempt to fix that file automatically.

3. Run the Windows Update troubleshooter

  1. Hit the Windows key and click on Settings.settings windows 11
  2. Click on System and select Troubleshoot.Open system troubleshooter
  3. Navigate to Other troubleshooters.other troubleshooters
  4. Click the Run option for the Windows Update troubleshooter.windows-update-run-troubleshooter runtimebroker.exe error

4. Run the Windows Store apps troubleshooter

  1. Hit the Windows key and click on Settings.settings windows 11
  2. Click on System and select Troubleshoot.Open system troubleshooter
  3. Navigate to Other troubleshooters.other troubleshooters
  4. Click the Run option for the Windows Store Apps troubleshooter.clicking run windows store apps troubleshooter

This particular step is for when the service registration is corrupt. This means the files required to run an application cannot be found. 

5. Run the BITS troubleshooter

  1. Hit the Windows key, type Control Panel in the search bar, and click Open.control-panel-search fallout new vegas runtime error
  2. Click on Troubleshooting.
  3. Next, click on Hardware and Sound.
  4. Select Background Intelligent Transfer Service.
  5. Click on Advanced, then check the Apply repairs automatically option and press the Next button.

BITS is the Background Intelligent Transfer Service, a Windows service that allows computers to transfer files to and from other computers asynchronously. It’s designed for large file transfers, such as those for software updates or operating system deployments.

Since it is an essential service in the Windows update process, it is necessary to check for any issues and repair them early enough.

6. Reset Windows update components

  1. Hit the Windows key, type cmd in the search bar, and click Run as administrator.cmd-run-admin-w11 unexpected kernel mode trap windows 11
  2. Type in the following commands and press Enter after each one: net stop wuauserv net stop cryptsvc net stop bits net stop msiserver ren %systemroot%\softwaredistribution softwaredistribution.bak ren %systemroot%\system32\catroot2 catroot2.bak net start wuauserv net start cryptSvc net start bits net start msiserver 

7. Rename the directory folder

  1. Navigate to the following location: C:\ProgramData\Microsoft\Network\Downloader
  2. Right-click on Downloader, then select the rename icon. Rename it as Downloader_old.
  3. Once you’re done, restart the BITS service using similar steps in 1 above.

Other errors you may encounter include the NET HELPMSG 2191 and NET HELPMSG 2182 error, so be sure to check out our articles for their fixes.

For further queries, use the comment section, and we’ll get back to you.

KB5023778 brings Bing Chat shortcut to the Windows 11 taskbar

We have been looking at a lot of updates recently and today isn’t going to be any different, since Microsoft put out new software for the Release Preview Channel.

On that note, you should definitely check out the March 2023 Patch Tuesday rollout, and find out how some of these updates might affect SSD performance.

Also, since we’re talking about the Edge browser, we can show you how to disable rounded corners for your web pages.

Today, we’re going to explore KB5023778 and see what it brings to the most recent Microsoft-designed operating system.

A lot of new features coming to Windows 11

Indeed, Windows Insiders that actively test software on the Release Preview Channel are being updated to Windows 11 version 22H2 22621.1483 (KB5023778).

This build includes more ad notifications in the Start menu for those logged into a Microsoft account with handy reminders such as backup your files with OneDrive.

For the time being, this feature is only available to a small audience right now, and it will deploy more broadly in the coming months.

You should know that some devices might notice different visual treatments as Microsoft gathers the necessary feedback.

Furthermore, the new Bing Chat shortcut experience to Edge arrives in the search box on the taskbar, making it easier for us to access the feature.

That being said, know that Microsoft isn’t only adding new features, it is also removing a lot of the older ones, such as the Remote Mailslot protocol in Windows 11.

We have to remind you about the many new features and improvements added to Microsoft Defender for Endpoint as well.

Let’s take a more in-depth look at the rest of the changelog and see for ourselves what we should expect after installing this update.

  • The search box on the taskbar will be lighter when you set Windows to a custom color mode. This will occur when you set the Windows mode to dark and the app mode to light in Settings > Personalization > Colors.
  • This update addresses an issue that affects the combo box in Settings. It fails to show all the available options.
  • This update addresses an issue that affects Microsoft PowerPoint. It stops responding. This occurs when you use accessibility tools.
  • This update addresses an issue that affects Microsoft Narrator. It fails to read items in dropdown lists in Microsoft Excel.
  • This update addresses an issue that affects USB printers. The system classifies them as multimedia devices even though they are not.
  • This update addresses an issue that affects complexity policy settings for PINs. They are ignored.
  • This update addresses an issue that affects the Fast Identity Online 2.0 (FIDO2) PIN credential icon. It does not appear on the credentials screen of an external monitor. This occurs when that monitor is attached to a closed laptop.
  • This update addresses an issue that affects a Clustered Shared Volume (CSV). The CSV fails to come online. This occurs if you enable BitLocker and local CSV managed protectors, and the system recently rotated the BitLocker keys.
  • This update addresses an issue that affects Active Directory Users & Computers. It stops responding. This occurs when you use TaskPad view to enable or disable many objects at the same time.
  • The update addresses an issue that affects the Remote Procedure Call Service (rpcss.exe). The issue might cause a race condition between the Distributed Component Object Model (DCOM) and the Microsoft Remote Procedure Call (RPC) endpoint mapper.
  • This update addresses an issue that affects Microsoft PowerPoint. It stops responding on the Azure Virtual Desktop. This occurs while you are using Think-Cell Features.
  • This update addresses an issue that affects Windows Search. Windows Search fails inside of Windows container images.
  • This update affects the Group Policy Editor. It adds Transport Layer Security (TLS) 1.3 to the list of protocols that you can set.
  • This update affects the Arab Republic of Egypt. The update supports the government’s daylight saving time change order for 2023.
  • This update affects jscript9Legacy.dll. It adds ITracker and ITrackingService to stop MHTML from not responding.
  • This update addresses an issue that affects the Microsoft HTML Application Host (HTA). This issue blocks code execution that uses Microsoft HTA. This occurs when you turn on Windows Defender Application Control (WDAC) User Mode Code Integrity (UMCI) enforced mode.
  • This update affects the Group Policy Management Console. It addresses a scripting error in the Group Policy Preferences window.
  • This update addresses an issue that affects the Windows Remote Management (WinRM) client. The client returns an HTTP server error status (500). This error occurs when it runs a transfer job in the Storage Migration Service.
  • This update addresses an issue that affects Desired State Configuration. It loses its previously configured options. This occurs if metaconfig.mof is missing.
  • This update addresses an issue that affects the Dynamic Host Configuration Protocol (DHCP) option 119 – Domain Search Option. The issue stops you from using a connection-specific DNS Suffix Search List.
  • This update addresses a rare issue that might cause an input destination to be null. This issue might occur when you attempt to convert a physical point to a logical point during hit testing. Because of this, the computer raises a stop error.
  • This update addresses an issue that affects the Simple Certificate Enrollment Protocol (SCEP) certificate. The system reports some SCEP certificate installations as failed. Instead, the system should report them as pending.
  • This update addresses an issue that affects the new Windows Runtime (WinRT) API. This issue stops an application from querying for location information using MBIM2.0+.
  • This update addresses a known issue that affects kiosk device profiles. If you have enabled automatic logon, it might not work. After Autopilot completes provisioning, these devices stay on the credential screen. This issue occurs after you install updates dated January 10, 2023, and later.

This is, folks, what we’re looking at in terms of features in this new update delivered to the Release Preview Channel.

All Insiders have now gained access to it, even though some features are only being rolled out to select Insiders.

What can I do if I can’t install KB5023778?

  1. Press Win+ I to access Settings.
  2. Select the System category and click on Troubleshoot.w11 troubleshoot
  3. Press the Other troubleshooters button.other troubleshooters windows 11
  4. Press the Run button next to Windows Update.windows update troubleshooter

Make sure to report any other issues you might come across, in order for Microsoft to address and improve the overall OS experience for us all.

This is everything you can expect if you are a Windows 11 Insider on the Release Preview Channel. Leave a comment below if you found any issues since installing this build.

Windows 11 Insider Dev Channel build 23419 adds USB4 Settings page, more

Microsoft has released build 23419 to the Windows 11 Dev Channel, and it includes a number of new features:

Live Kernel memory dumps in Task Manager

Task Manager already has a “Memory dump” for user mode processes, but this latest build introduces “a set of new developer-focused features in Task Manager to aid the collection of live kernel memory dumps (LKDs).” In order to try it out:

To capture a live kernel memory dump (LKD), go to the Details page in Task Manager, right-click on the System process and the context menu should light up to show “Create live kernel memory dump file” to capture a Full live kernel or Kernel stack memory dumps.

The dumps will be written to a fixed location:

%LocalAppData%\Microsoft\Windows\TaskManager\LiveKernelDumps

You can head over to the Task Manager settings page to view and/or edit the settings for live kernel memory dumps.

USB4 Settings Page

23419 adds a settings page for USB4 hubs and devices at Settings > Bluetooth & devices > USB > USB4 Hubs and Devices. From this page, you can:

  • View the tree of connected USB4 hubs and devices.
  • View attributes and capabilities associated with the USB4 domain.
  • Copy the details into the clipboard so it can be shared with customer support or system administrators for troubleshooting.

If your system does not support USB4, this settings page will not be displayed.

Bing suggestions for Simplified Chinese IME

Suggestions from the cloud (ie: Bing) are being added to the Simplified Chinese IME candidate window, allowing you to select cloud selections when inputing Simplified Chinese. To turn this feature on, click on the chevron to the right of the IME candidate window and select “try text suggestions from Bing.”

In addition to these new features, 23419 has a number of changes, improvements, and known issues, be sure to check out the Windows Insider blog post for all the details.

Enable Google Chrome to Open in Full Screen Every Time

Google Chrome is one of the best browsers available for Windows.It’s available on nearly all devices and has many useful features for developers and regular users.

However, the browser is plagued with several errors, including the inability to open full screen. This prevents users from opening the browser in full screen, making viewing problematic. 

In this article, we will discuss the common reasons why Chrome doesn’t display full screen and provide you with steps to make Google Chrome go full screen every time. 

Why won’t google Chrome go full-screen?

Here are some of the reasons why Chrome won’t go full-screen:

  • Outdated Browser – Browsers, like all software, are updated regularly to fix errors and improve the app’s functionality. If your PC runs an outdated Google Chrome version, some functionalities may stop working. If this happens, you’ll be unable to go full screen.
  • Bad Cache or Cookies – Browser cookies are pieces of data stored on the user’s computer that let the server know that the user has returned to the website. This data usually accumulates after a long period and can cause errors if any stored cookies are corrupt.  
  • Wrong Display Configurations – In some cases, you’ll be unable to go full screen due to incorrect display configurations. If you have the wrong display setup on Chrome, you’ll likely be unable to go full screen.
  • Third-Party Extensions – If you have multiple flashplayers on your system, the extensions will likely conflict. In addition, a corrupted browser extension installed on your PC can prevent Chrome from opening in full screen. 

What can I do to make google chrome go full screen every time?

Before we proceed with more advanced troubleshooting techniques, here are a few quick fixes you can attempt:

  • Restart your PC.
  • Close and Relaunch Google Chrome.

If the error persists after attempting the above fixes, here are more advanced troubleshooting steps you can attempt:

1. Update Chrome

  1. Press the Windows key, type in Google Chrome, and hit Enter.
  2. Click on the dotted icon in the Chrome app, and click on the Help option.
  3. Click About Google Chrome to open the chrome update tool.

Once you’re in this window, Chrome will automatically check if your browser is up-to-date. If it’s not updated, Chrome will search for and install the latest version of the app.

2. Disable Hardware Acceleration

  1. Press the Windows key, type in Google Chrome, and hit Enter.
  2. In the Google Chrome window, click the dotted icon on the top right pane, and select Settings.
  3. Under the System tab, click the toggle button next to Use Hardware Acceleration When Available to turn it off.
  4. Close Google Chrome and restart your PC.

Enabling the feature can help improve display while doing intensive tasks like gaming but can sometimes mess with the display properties. Also, disabling the feature is one way to enable Google Chrome to open in full screen. 

3. Delete browser cache and data

  1. Press the Windows key, type in Google Chrome, and hit Enter.
  2. Click the dotted icon on the top right pane in the next window and select Settings.
  3. Choose the Privacy and Security tab and click on Clear Browsing Data.
  4. Click on Clear data in the next window.
  5. Restart your PC and check if the error persists.

4. Change the Display Configurations

  1. Locate the Google Chrome shortcut on your desktop, right-click it, and click on Properties.
  2. In the popup window, click on the Compatibility tab, and click on Change High DPI Settings.
  3. Check the option of Override High DPI Scaling Behaviour. Scaling Performed By and select Application.
  4. Click on Apply and click OK.
  5. Close the window and restart your device.

Making changes to the display configurations of applications can help you tweak the apps appearance to your preference. In addition, you can also use this method to fix the Chrome app if it’s unable to go full screen.

5. Reset the Chrome Application

  1. Press the Windows key, type in Google Chrome, and hit Enter.
  2. Click the dotted icon in the top right corner and select Settings.
  3. Scroll down till you locate the Reset Settings tab, click on it and click on the Reset settings to their original default.
  4. In the next popup window, click on Reset Settings and wait till the app resets.
  5. Close Google Chrome and restart your PC to see if the error persists.

While using the Google Chrome app, you can make certain changes that affect the regular functionality of the app. When this happens, you’ll want to revert such changes to restore the app to it’s default state.

If you’re unable to open Chrome in full screen, reset the Chrome app, the default configurations could help resolve the error. 

6. Uninstall and Reinstall Chrome

  1. Press the Windows key + I to open the Settings app.
  2. Click on Apps and select Installed apps on the left pane.
  3. Click the more icon beside Google Chrome and click Uninstall.

Currently, Google Chrome isn’t available for download on the Microsoft Store. You’ll have to download it manually using another browser. Here’s a complete guide on how to install Google Chrome on Windows.

There are tons of ways to resolve the unable to go full screen in Chrome. In this article, we’ve provided you with the best ways to help you resolve the error. 

Hopefully, after reading and implementing the steps in our guide, you should be able to open Google Chrome in full screen.

Microsoft announces developer toolkit that will measure Xbox energy consumption

One of the many announcements to come out of GDC 2023 is that Microsoft will introduce a new developer toolkit that will measure Xbox energy consumption. Microsoft says the toolkit is the first of its kind in the gaming industry, and it hopes developers will use it to find ways to make their games more energy efficient. In its press release Microsoft says,

With a potential reach of over 3.1 billion players worldwide, game creators undoubtedly have potential to have a positive impact. These resources are designed to empower and enable developers to understand energy usage in their games and incorporate efficient strategies to help reduce the carbon impact of games.

Xbox Series XS is the first carbon aware gaming system.

Last year Microsoft announced that Xbox had become the first carbon aware gaming console. And back in January, new power option defaults were implemented via a one-time system update.

Today’s announcement is part of the Redmond company’s ongoing sustainability initiative which includes the goals of making the Xbox brand carbon negative, water positive and zero waste by 2030.

Looks Like Discord Has Crashed Unexpectedly [Error Fix]

Discord is one of the most popular chat platforms used by gamers. The app is a great communication tool and is a decent alternative to Google Meet and Zoom. However, some of our readers have reported that they get Looks like Discord has crashed unexpectedly error.

In this article, we’ll briefly discuss why you’re experiencing this error and provide you with the steps to help resolve it.

Why do I get Looks like discord has crashed unexpectedly error?

Here are some of the reasons why you’re currently experiencing the Looks like Discord has crashed unexpectedly error:

  • Corrupt Application files – During the process of launching an application or a forced PC restart, files can get corrupted. When the application’s files get corrupted you can run into errors like looks like Discord has crashed unexpectedly.
  • Poor Network Connectivity – Connecting to Discord’s servers requires a stable internet connection. If your PC can’t connect to the internet, you’ll be unable to access Discord.
  • Insufficient RAM – Memory allocation helps your PC manage the amount of RAM used by each application. If you have too many background applications running on your PC, you’ll eventually run out of memory which can trigger errors.
  • Outdated Application – Like most software, the Discord application is updated regularly to fix bugs and errors. If your version of Discord is outdated, you can trigger the looks like Discord had crashed unexpectedly error.
  • Outdated OS – If your PC is running an outdated version of your operating system, you’ll likely run into operational errors 

What can I do if I get looks like discord has crashed unexpectedly error?

Before we proceed with more advanced troubleshooting techniques, here are a few quick tips you can attempt:

If the error persists after attempting those quick fixes, here are a couple of troubleshooting techniques you can attempt:

1. Close all background applications

  1. Press the Windows key + S, type in Task Manager, and hit Enter or press the Ctrl + shift + Esc keys to open the Task Manager.
  2. Then, click on the Processes tab, and locate unused applications running in the background.
  3. Click on the application and select End task to stop the application from running.
  4. Repeat this process until you’ve closed down all the unnecessary applications on your computer.

2. Delete Temporary files

  1. Press the Windows key + E to open File Explorer.
  2. Navigate to the following path: C:/Windows/Temp
  3. While in the temp folder, press Ctrl + A to highlight all the folders, and press the Shift + Del keys to delete these temp files from your PC permanently. 
  4. Restart your PC once the files are completely deleted, and check to see if the error persists. 

If you ever encounter the error make sure your Temp folder is valid, be sure to read our guide on resolving it. 

3. Delete Discords cache files

  1. Press the Windows key + R to open the dialog box. Type in %appdata%/Discord/Cache and hit Enter to navigate to the Discord app’s folder.
  2. While in the Discord folder, press Ctrl + A to highlight all the files, right-click and select Delete.
  3. Wait for Windows to delete the files completely, and close the File Explorer.
  4. Launch the Discord app to check if the error persists. 

While running applications, you might run into errors which end up corrupting the app’s folder. When this happens, you’ll find it hard to run the app without hitches.

Deleting the cache data helps revert the application to the default state free of bugs and errors.

4. Disable Hardware Acceleration

  1. Press the Windows key, type in Discord, and hit Enter to open the application.
  2. Then, click the gear icon on the bottom left corner of the window to access the app’s Settings.
  3. Further, click on the Advanced tab and click on Hardware Acceleration to turn it off.
  4. Close the Discord app and relaunch it to see if the error persists.

Hardware Acceleration when enabled can help speed up graphics and animations on your PC. However, it can also have a negative effect on applications like Discord.

Disabling the feature ensures that all your resources are fully optimized and not wasted on a single feature.

5. Install the Latest Version of Discord

  1. Press the Windows key, type in Discord, and hit Enter.
  2. While the Discord app is running, press the Ctrl and R keys simultaneously.
  3. This will automatically restart the Discord app and install any pending updates.

Developers release updates occasionally to help fix bugs and application errors. If there is an existing bug on your Discord’s version, you’ll likely run into errors.

If you run into this error, we have a detailed guide showing you how to fix the Discord won’t update error on Windows.

6. Update Windows

  1. Press the Windows key + I to open the Settings app.
  2. Click on Windows Update and click on Check for updates. Wait for Windows to scan your PC for available updates. If there are any available updates, they’ll be installed automatically.

7. Reinstall Discord

  1. Press the Windows key, type Control Panel, and hit Enter.
  2. In the Control Panel window, click on Uninstall a Program.
  3. Scroll to locate Discord from the list of programs and select Uninstall to delete the application.
  4. Then, click on Uninstall again to confirm the deletion and wait for the program to be removed and close the Control Panel.
  5. Press the Windows key, type in Microsoft Store, and hit Enter.
  6. Locate the search bar in the popup window, type in Discord, and click the app displayed in the search bar.
  7. Click on the Get button to download and install the Discord app on your PC.

Reinstalling Discord is the final step and should be considered only after you’ve attempted all troubleshooting techniques without getting a result.

You can choose to download the app from the Microsoft Store or download it directly from the developers website.

Fixing the Discord keeps crashing error is relatively easy and can be achieved with little to no stress. Things are no different when it comes to those facing upload issues. Rest assured that you may resolve Discord upload errors with these solutions in no time.

If you’ve got alternative solutions that helped you resolve the error, you can let us know in the comments below.

What is an Sr2 File and How Can You Open It?

If you’re using a Sony Digital camera, you’ll most likely have come across an Sr2 file. It’s a pretty usual file format that stores RAW photos captured by the camera.

Also, if you’ve come across an Sr2 file and unsure on how to open it, this article will explain the process.

What is an Sr2 file?

Sr2 stands for Sony RAW 2. It is a raw camera image format by Sony Digital cameras. An Sr2 file protects the integrity of the original, uncompressed image data and renders it exactly as the camera’s sensor acquired it.

Photos captured on Sony Digital cameras are assigned the .sr2 file extension. Sr2 files are also known as CCD – Sensor RAW Data files which indicates that the files are uncompressed and can be processed using the computer.

Due to the RAW state of the files, they can be edited more precisely compared to compressed photographs which are stored at a lower resolution.

How can I open the Sr2 file?

Opening sr2 photo files isn’t as straightforward as opening other image formats like PNG and jpg. You need specially designed software that is compatible with Sony Digital cameras.

In addition, if you attempt to open an the file without the right software, you’ll trigger the Windows cannot open this file error or you’ll receive the message How do you want to open this file?

Hence, we’re going to discuss how you can open an Sr2 file using Microsoft Windows Photos. 

1. Open sr2 Files with Microsoft Photos

Double-click on any .sr2 file to see if you have a suitable app to open the it. If you have a compatible file viewer, the image will open immediately. 

However, if you don’t have any suitable app, you’ll see the prompt How do you want to open this file or the error Windows cannot open this file. If you don’t have a suitable app, follow the following steps:

  1. Press the Windows key + S, type in Microsoft Store, and hit Enter.
  2. In the Microsoft Store app, click on the search bar, type in Microsoft Photos, and click on the displayed result.
  3. On the Downloads page, click on the Get button to download the app to your PC.
  4. Once the download is complete, click on the .exe file and follow the instructions to complete the app installation.
  5. Then, close the Microsoft Store app.
  6. Locate the file and right-click on it. When the Open with prompt displays, select Microsoft Photos from the list of applications.
  7. Enable the check box next to Always use this app to open .sr2 files.
  8. Click on OK to set Microsoft Photos as the default app to open the files 

Once you’re done, all sr2 files stored on your PC will be opened using the Microsoft Photos app exclusively.

Alternatively, you can open the files using third-party viewing software like:

  • Adobe DNG converter.
  • Corel Aftershot Pro.
  • CyberLink PhotoDirector.
  • XnViewMP.
  • EZ Freeware Free Opener.

All of the above applications are suitable for opening this file and other formats.

If you’d like to view RAW files in Windows, be sure to read our guide. We provide you with detailed solutions to view such files.

Further, the sr2 extension isn’t the most common image extension, opening it can often become a bit complicated. With the steps listed above, you should be able to open any file on your PC.  

If you’ve got other solutions that helped you open an Sr2 file, do let us know in the comments.

How to Connect Your Onn Wireless Mouse [Pairing Guide]

The Onn wireless mouse is famous for its compatibility with different PCs but many still have problems connecting the Onn wireless mouse to their PCs.

Alternatively, we have a detailed guide about how to fix the mouse and keyboard not working on Windows 11.

Before trying the methods below, turn off Airplane mode, update the Windows system driver, and turn on your mouse manually to be able to connect to your system.

How can I connect my Onn wireless mouse to my PC?

1. Update your mouse driver

  1. Press Windows + R keys to prompt the Run window, type devmgmt.msc, and click OK to open the Device Manager.
  2. Expand the Bluetooth mouse device entry, right-click on the device driver, then select Update driver from the drop-down menu.
  3. Click on Search automatically for the updated driver software option.
  4. Restart your PC and check if the black screen issue persists.

Updating the device driver will install updates for fixing bugs causing the mouse connection issues. Moreover, it installs the latest features to improve the drivers’ performance.

You also have a faster alternative to update your mouse driver, namely specialized third-party software created to detect outdated drivers and update them with the latest versions from a comprehensive database.

Check our detailed guide about updating graphics drivers on Windows 11 if you have any issues.

2. Check the power settings

  1. Left-click the Start button, type Control Panel, then select it from the result.
  2. Select Hardware and Sound and click on Power Options.
  3. Click the Change plan settings link and select the Change advanced power settings.
  4. Expand USB settings and select USB selective suspend setting. Disable the On battery and Plugged in option.
  5. Select OK and select Apply.
  6. Exit the Control Panel and restart your device.

These steps will resolve battery performance settings that could affect the  USB port not detecting peripheral devices like the Mouse dongle. Read about how to get the best power efficiency in Windows 11.

3. Use Windows Settings

  1. Insert the battery into the mouse correctly and turn on the Onn wireless device.
  2. Press the Windows + I to open the Windows Settings.
  3. Select Bluetooth & devices from the left sidebar and click the Bluetooth toggle to switch it on.
  4. Press and hold the Connect button for 3 to 5 seconds to activate the pairing mode.
  5. Click on the Add device or other device from the right pane of the Bluetooth window and select Bluetooth.
  6. Click the Onn mouse name from the list to connect it.

The Onn Mouses as a fast startup option is default enabled. You should disable the option if there is a connection problem. Also, ensure the device is on the right frequency.

Why is my Onn wireless mouse not connecting?

Different factors can affect your Onn wireless mouse connection. Here are some possible causes:

  • Dead Battery – The Onn wireless device needs a source of energy, and it may only connect to your PC if the battery is charged and stable.
  • Wireless network Interference – Interference with other radio frequencies can disrupt the wireless connection causing it to slow down or cause total disconnection.
  • USB Receiver – Issues with the USB wireless adapter not working can affect the device connection. Also, the dongle is a small device that can be misplaced quickly, causing difficulties with your PC connection.
  • Driver issues – A missing or corrupt driver can affect the Onn mice connection with the system. Although the Windows plug-and-play features allow auto-driver download, you can also update drivers manually.

If you encounter any problem with these steps, check our more detailed guide on connecting a Bluetooth mouse to the Windows operating system.

In addition, you can read how to fix the wireless mouse if it’s not working on Windows PCs. Also, check our guide about how to connect a wireless mouse without a USB receiver on your device.

Should you have further questions or suggestions, kindly drop them in the comments section.

Latest Xbox Insider update allows users to manage subscriptions directly from console

The latest Xbox Insider update is now available for the Alpha Skip-Ahead ring. This update (version RS_XBOX_DEV_FLIGHT\25320.1003.230316-2000) is mostly mundane stuff—bug fixes and small improvements users won’t notice.

This preview build does feature one interesting addition to the Xbox user experience, though. And that is the ability to manage subscriptions directly from the Xbox console.

Xbox Insider Release Notes

Currently, users can only do this by logging into their Microsoft account on PC or mobile, if for example a user wants to cancel or re-sign up for Xbox Game Pass.

Beginning today, you can now change your plan or update the recurring billing status directly from your console. To get started, head to Settings > Account > Subscriptions.

This will no doubt be a much-welcomed feature once it rolls out to the public.

Visit Xbox Wire for the release notes on the latest build.

Microsoft co-founder Bill Gates opines on the reorienting nature of artificial intelligence

Microsoft co-founder and former CEO Bill Gates penned a new piece on his GatesNotes blog where he waxes poetically about the future of artificial intelligence in the wake of OpenAI’s new found success with ChatGPT and AI led chat bots powering dozens of new ventures.

Gates’ work at Microsoft is nothing short of industry leading as he and co-founder Paul Allen helped make graphical user interfaces (GUIs) a ubiquitous concept among laypeople over the past 47 years. With that being said, Gates has been inspired by recent strides in the fundamental development of AI, enough to imagine what it can do to reduce some of the world’s worst inequities, enhance productivity, improve personal health and the healthcare industry, as well as the education sector.

The development of AI is as fundamental as the creation of the microprocessor, the personal computer, the Internet, and the mobile phone. It will change the way people work, learn, travel, get health care, and communicate with each other. Entire industries will reorient around it. Businesses will distinguish themselves by how well they use it.

Gate goes on to not only apply his own definition of AI, but contemplates on how AI will help students succeed at math which will in turn help form the building blocks of improving education overall and result in leveling inequities among Black, Latino, and low-income students.

8-ways-technology-improves-education

While the tech industry is currently redefining what AI can do and be classified as, Gates uses a simple rubric that includes, “a model created to solve a specific problem or provide a particular service.” By Gates’ definition, AI has been around for some time and whether the feasts and famines of attention from the tech industry that include the rush to digital personal assistants such as Siri, Alexa, Cortana and Google, as well as older remnants like Microsoft’s famed Clippy.

However, Gates sees AI’s developmental evolution as way to further help productivity, that doesn’t include an animated paper clip in your Office suite such as,

Eventually your main way of controlling a computer will no longer be pointing and clicking or tapping on menus and dialogue boxes. Instead, you’ll be able to write a request in plain English. (And not just English—AIs will understand languages from around the world. In India earlier this year, I met with developers who are working on AIs that will understand many of the languages spoken there.)

Gates goes into further detail about how AI will help create stronger and more relevant personal assistants than what is currently on the market. Another area of concern for Gates is how AI can help to improve health care and the medical field where artificial intelligence can aid doctors become more productive in countries where too few people actually visit healthcare providers by training models to address region specific diseases.

AI - medicine

As a philanthropist who’s made it his life goal to eradicate Malaria, Gates is very optimistic about the myriad of ways AI can help in expediting medical breakthroughs, produce AI-powered ultrasounds, track complex medical biological systems, search and target pathogens and more.

There are areas of concern with AI Gates discusses such as difficulties in abstract reasoning that lead to incorrect answers, misunderstanding context, and the potential for nefarious individuals, government bodies or nation-states armed with super intelligent AIs to wreak havoc.

All in all, Gates delivers a thoughtful and optimistic read for anyone interested in the machinations of someone who helped usher in the personal computing revolution, and ends his piece with a few examples of what may be yet to come from AI that include new chip development or AIs developing algorithms for other task specific AIs.

Microsoft Loop app is available in public preview today

Microsoft has announced the public preview of the Loop app, available on the web, or via Android or iOS apps. Components of the Loop app have been available in preview already (we’re using a Loop component in Teams to track collaboration on some of our posts), but now for the first time organizations will be able to have a single place to create and access Loop components/

So what is Loop?

Microsoft describes Loop as “a transformative co-creation experience that brings together teams, content, and tasks across your tools and devices,” but basically it’s a way to create and share bits of information across Microsoft 365 products including Teams, Outlook, Word, Whiteboard, Planner, and the Loop app itself, for example creating a document snippet can be embedded into a Word doc or an email, with collaborative changes taking place wherever the Loop is embedded. This video explains a bit more:

Microsoft has also built in Microsoft 365 Copilot, the new AI powered feature that brings “next-generation” AI to help with Loop:

Copilot in Loop gives you AI-powered suggestions to help transform the way you create and collaborate. It guides you with prompts like create, brainstorm, blueprint, and describe. Or simply type in a prompt, like “help me create a mission statement.”

To use the Microsoft Loop preview, you need to use a Microsoft 365 account, that is a work/school account, not a personal MSA. Your IT admin also has to enable Loop in Microsoft 365 Admin settings.

You can learn more about Microsoft Loop and “the future of collaborative experiences” in this Microsoft Design blog post.

Are you excited for Microsoft Loop? Will it help your organization? Let us know in the comments below.

File Explorer Not Opening: How to Force It in 7 Quick Steps

File Explorer is the go-to place for organizing and retrieving files and folders stored on the disk drive. Sadly, File Explorer is prone to several issues, including the inability to open on your computer. This hinders the ability to browse files, causing a lot of inconvenience.

Why is File Explorer not opening on Windows?

If File Explorer is not opening on Windows or is taking forever, the corrupt cache is the most probable cause. Here are some other possible reasons:

  • Misconfigured display settings – Incompatible screen resolution settings on Windows are possible reasons why File Explorer fails to launch.
  • Malfunctioning third-party antivirus – Third-party antivirus software, especially free ones, interferes with the system and prevents File Explorer from opening on Windows.
  • Corrupt system files – Corrupt or broken system files cause your PC to behave erratically and can be why you are unable to launch File Explorer.
  • Operating system bugs – Bugs are a common sight in Windows, and they can hamper the File Explorer app functionality.
  • Excess File Explorer cache – File Explorer cache gets accumulated over time and, if not deleted, grows in size and causes issues in the File Explorer app.

If you are one of those troubled with the File Explorer not opening issue, you are at the right place. Implement the solutions provided in this guide to resolve the underlying problems.

What can I do if File Explorer is not opening?

Before employing the troubleshooting methods listed below, make sure to perform the following actions:

If these preliminary methods didn’t fix the problem, let’s go to the actual solutions to remedy the situation.

1. Restart File Explorer

  1. Use Windows + X shortcut to open the Quick Links menu and select Task Manager.
  2. Look for Windows Explorer in the Processes tab, right-click it, and choose End Task.File Explorer not opening
  3. Choose File from the top Menu bar and then Run New Task.File Explorer not opening
  4. Type Explorer or explorer.exe in the command field and press OK.File Explorer not opening

Windows Explorer is the background app responsible for managing the functionality of File Explorer and related components. File Explorer will not open on your computer if the process encounters a problem; restarting the process will help.

2. Modify the Display settings

  1. Launch the Settings app using the Windows + I shortcut.
  2. Select Display from the right side of the System settings window.File Explorer not opening
  3. Scroll down to the Scale and layout settings and select the recommended value in the Scale and Display Resolution drop-downs.File Explorer not opening

If the Scale and layout settings are already set to recommended, choose a different value and then reselect the option recommended for your computer.

Incorrect scale and display resolution for your PC is a very common cause of why Windows is incompetent in performing the intended action.

Hence, restoring the settings to default values is an effective way to fix the File Explorer not opening problem. However, if you are unable to change the screen resolution, check out our dedicated guide.

3. Clear File Explorer History

  1. Press the Windows key to open Start Menu, type folder options in the Search bar, and choose File Explorer Options from the search result section.File Explorer not opening
  2. In the Folder Options window, look for the Clear File Explorer history option and press the Clear button next to it and press OK to save the changes. File Explorer not opening

File Explorer stores cache files to respond promptly to your search queries. If these files are not deleted periodically, they accumulate and cause more harm than good.

4. Run SFC and DISM scan

  1. Right-click the Windows icon on the Taskbar and choose Windows Terminal (Admin) option.File Explorer not opening
  2. Click Yes on the User Account Control (UAC) prompt.
  3. Type or paste the following command and press the Enter key. sfc /scannowFile Explorer not opening
  4. After the SFC scan, execute the following command to run DISM (Deployment Image Servicing and Management) scan. DISM.exe /Online /Cleanup-image /RestorehealthFile Explorer not opening

Do not exit the terminal window until the DISM tool scans the Windows image and repairs it.
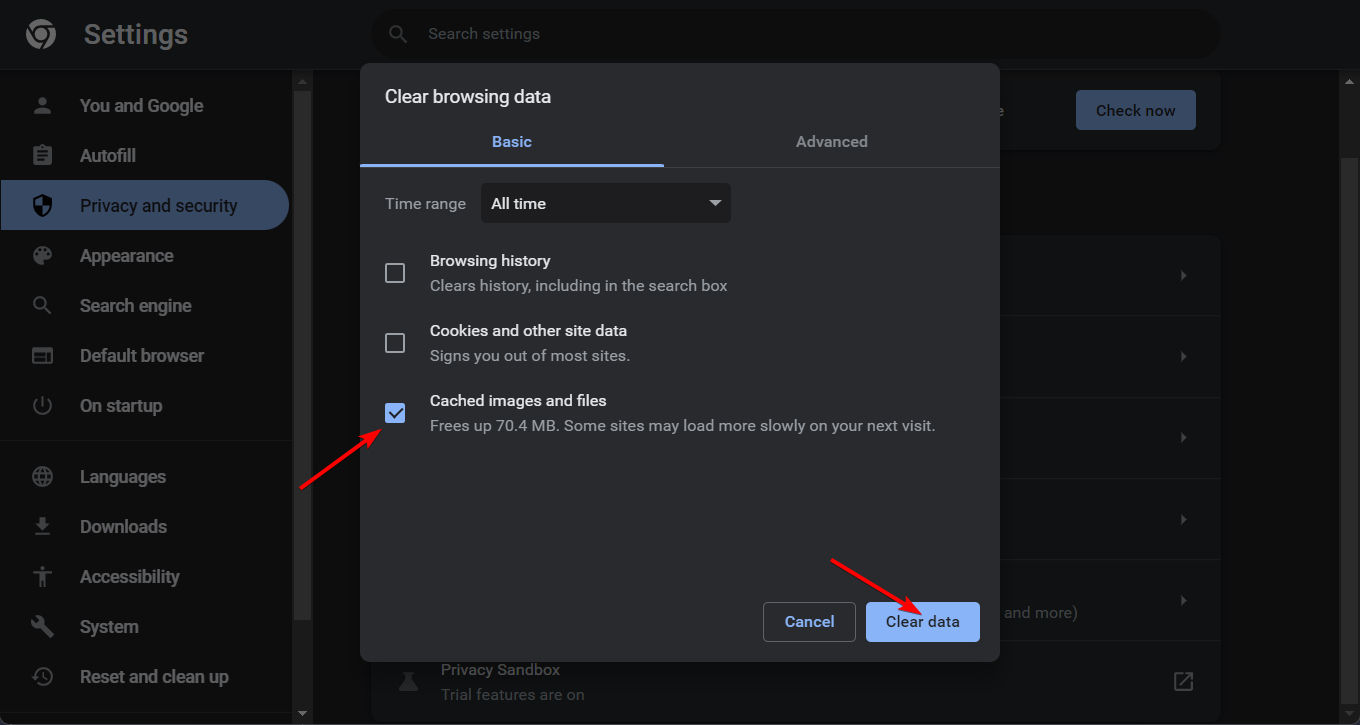
If you’re unsure about performing the SFC and DISM scan manually, you can try dedicated software to help you repair corrupt files by automatically replacing them with healthy parts from its online vault.

5. Restore the File Explorer settings

  1. Press the Windows key to open Start Menu, type Folder Options in the Search bar, and choose File Explorer Options from the search result.File Explorer not opening
  2. Press the Restore Defaults button in the General tab.File Explorer not opening
  3. Switch to the View tab and press the Reset Folders and Restore Defaults buttons.File Explorer not opening
  4. Press the OK button to save the changes and exit the window.

6. Reinstall the File Explorer app

  1. Press the Windows key to bring up the Start menu. Type powershell in the search bar and choose Run as Administrator present on the right.File Explorer not opening
  2. Click the Yes button on the User Action Control pop-up.
  3. Type or paste the following command and hit the Enter key to execute it. Get-AppXPackage Microsoft.WindowsStore | Foreach {Add-AppxPackage -DisableDevelopmentMode -Register "$($_.InstallLocation)\AppXManifest.xml"}File Explorer not opening

Wait until File Explorer, along with other Windows apps, is reinstalled on your computer, and then restart your system. This solution will replace the corrupt or broken installation files if they were the reason why File Explorer was not opening on your PC.

7. Clean boot your computer

  1. Use the Windows + R shortcut to bring up the Run dialog box. Type the following command in the text field and press the OK button. msconfigFile Explorer not opening
  2. In the General tab of the System Configuration window, uncheck the box for the Load startup items and check the Load system services option.File Explorer not opening
  3. Next, switch to the Services tab, check the Hide all Microsoft services option listed on the bottom left, and press the Disable all button.File Explorer not opening
  4. Click the OK button to save the changes and restart your computer in the clean boot state.

Now try opening File Explorer on your Windows PC. If you are successful, it means some third-party apps are interfering with the File Explorer functionality. You can refer to this guide to uninstall apps from Windows.

Employ the above-mentioned solutions to repair the File Explorer not opening on your Windows PC issue.

However, if the problem persists or you encounter other issues like the group by option greyed out, you can check out the best File Manager apps for Windows offering better organizational and accessibility features.

If you have any queries or suggestions for us, please write them down in the comments section below.

Netflix Games to add 40 more games this year as it prepares to launch a cloud gaming service

Netflix has announced 40 more games coming to Netflix Games before the year is out. This in addition to the 55 games that have been made available thus far since Netflix Games launched back in November 2021. Vice President of External Games at Netflix, Leanne Loombe said in a statement,

It’s been a little more than a year since we launched games on Netflix to bring even more entertainment to our members as part of their Netflix subscription. In this short time, we’ve released 55 games, with about 40 more slated for later this year and 70 in development with our partners. That’s in addition to the 16 games currently being developed by our in-house game studios. Our goal is to develop a broad portfolio of games — in different genres and formats — because we believe everyone can find joy in games if they discover the one (or many!) that is right for them.

Among these upcoming games are Valiant Hearts: Coming Home and Mighty Quest: Rogue Palace, both from Ubisoft, and both Monument Valley and Monument Valley 2, among many others.

The Monument Valley games are coming to PC with a new widescreen aspect ratio | VGC
Monument Valley on PC.

Currently Netflix Games titles are only playable on Android and iOS. Users can only see the games in the Netflix App. However, Netflix is looking to change that in the not-too-distant future as it seeks to diversify its offerings, especially games.

Back in October 2022 the video streaming giant announced that it was “seriously exploring a cloud gaming offering.” The news came at the TechCrunch Disrupt 2022 event, on the heels of Google’s announcement that it would be shutting down Stadia.

Loombe also spoke on this, saying:

We are very early in that side of our journey, but we are very committed to making sure that games can be played wherever you have Netflix. We do believe that cloud gaming will enable us to provide that easy access to games on any screen, be frictionless, and provide that accessibility into gaming experiences. But we do want to be super thoughtful about how we build that and how we bring it to our members, … just like we’re doing for mobile games, we will take it slow.

If it does enter the cloud gaming market, Netflix may see some stiff competition from Microsoft, especially if its pending acquisition of Activision Blizzard King goes through. Microsoft is reportedly looking to launch an Xbox mobile gaming store as early as 2024 to take on Google and Apple on that front.

Via The Verge. 

How to Hide & Unhide Columns in Google Sheets [Quick Steps]

Google Sheets is a powerful spreadsheet tool that allows you to organize and analyze data. One good feature of Google Sheets is the ability to hide and unhide columns, which makes it easier to focus on specific data. Therefore, we’ll discuss how to hide and unhide columns in Google Sheets.

Alternatively, you can read about how to turn Google Sheets into a translator from Microsoft.

Why can’t I hide columns in Google Sheets? There could be a few reasons why you’re unable to hide columns in Google Sheets:

  • Protected file – Google Sheets has a feature that makes it possible to encrypt files. Therefore, it makes file editing and removing columns from the Google sheet impossible for unauthorized users.
  • Frozen column – If the columns you want to hide are part of a frozen section of the sheet, you won’t have access until you unfreeze them.

The reasons above may vary for different Google Sheet users. Nonetheless, we’ll discuss how to remove columns in Google Sheets.

How can I hide and unhide columns in Google Sheets?

1. Hide a single column in a Google sheet

  1. Right-click the letter at the top of the column you want to hide.
  2. Select the Hide column from the context menu.
  3. To unhide a single column: look for a box with two end arrows where the hidden column is.
  4. Click the box to unhide the column.

The procedure above will hide a single column and can be used to hide and unhide Rows just have to click on the column number.

2. Hide multiple columns

  1. Click the first column to highlight the area you want to hide.
  2. Press the Shift key and select the last column head you want to hide if the cells are continuous.
  3. If the cells are not continuous, click the first column header, press & hold the Ctrl key (Cmd key on Mac), and click on each column you want to hide.
  4. Right-click one of the highlighted columns and select Hide columns A-F from the dropdown menu. The letter A-F represents the range of column letters you want to hide.

The steps above are How to Hide Columns in Google Sheets on Mac and Windows operating systems.

3. How to hide unused columns

  1. Click the first unused column and press the Shift + Ctrl + Right (shift + command + Right Arrow key for Mac users) arrow key to select all the unneeded columns.
  2. Right-click the selected column and click the Hide columns Y-Y to hide the unused columns. Y-Y is the list of columns selected.

Hiding the used columns on a worksheet will make your work professional and organized.

4. Hide Columns from Certain Users

  1. Select all the columns you want to hide specific users.
  2. Click on the data tab and select the Protected sheets and ranges option.
  3. Click the Enter a description bar, type in the description for the range and select the Set permission button.
  4. Select the Only you option if you don’t want others to have access to the columns. You can click the drop-down arrow in front of Only you and select custom to give others access.
  5. Select all the columns in step 1 and hide the columns.

The hidden protected columns will not be accessible to users who don’t have the right to edit the sheet.

5. Hide Columns on iPad, Android, and iPhones

  1. Open Google Sheets and select the worksheet you want to hide the column.
  2. Tap the column letter to select the entire column.
  3. Touch and hold the selected column until the context menu appears.
  4. Click on the three dots and select the Hide column option from the menu.

The above steps allow users running the app on mobile devices and computers to share and edit files on any device.

In addition, you can read how to swap two cells in Google Sheets. Also, check out our guide on how to perform conditional formatting based on another cell in Google Sheets.

If you are wondering how to grant editing rights to a person or group on Google Sheets, we have a separate guide for you.

If you have further questions or suggestions, kindly drop them in the comments section.

Bing Translator no Longer Has Audio? How to Get It Back

Bing Translator allows you to translate conversations, speech, and text and listen to their audio translations. However, users report that Bing Translator no longer has audio, meaning they can’t hear the pronunciation of the words. Hence, this article will discuss how to fix the problem and get the audio back.

Also, we have a detailed article about some of the best MP3-to-sheet music transcription software you can download on your PC.

What causes Bing Translator not to have audio?

Many factors can cause the Bing Translator not to have audio. Some notable ones are:

  • Browser cookies and cache – The browser keeps cookies and cache to help load websites and web apps faster. However, they can become corrupt when kept for a long and cause the browser to malfunction. So, Bing Translator may not have audio if the browser cookies and caches are blocking its functionality.
  • Issues with Microsoft servers – Since Bing Translator is a Microsoft app, it can be affected by any problems that may arise in the Microsoft server. It can be that the server is undergoing a maintenance session or is down, making it impossible for Bing Translator to interact with it.
  • Network connection issues – Network-related issues like network congestion can cause problems with how the browser works. It can prevent it from loading web pages completely, causing the audio feature to be unavailable or missing.
  • Outdated browser – Users complaining that Bing Translator no longer has audio download most likely experience the issue due to an outdated browser. The browser can’t access updates as patches for bugs infecting the current version.

However, you can fix the issue by following the troubleshooting steps we’ll discuss as we go further into the article.

What can I do to get back the Bing Translator audio?

Before proceeding with any advanced steps, we recommend you go through the following:

  • Close and reopen the browser.
  • Check the Bing Translator web page if it works.
  • Fix network issues on your computer.
  • Restart your PC in Safe Mode, then launch your browser to see if audio is available.
  • Switch to another browser – Check our detailed guide about the best browsers to download on your PC.
  • Check Microsoft servers – If there is a Microsoft server issue, you’ll have to wait till it is resolved before you can use the audio feature in Bing Translator.

If you can’t fix the problem, go ahead with the solutions below:

1. Update your browser

  1. Launch the Google Chrome browser on your PC, then click three dots to open the Menu and go to Settings.
  2. Click on About Chrome. Click on Update Google Chrome. If there’s an update available, it’ll update automatically.

Updating the browser will fix bugs causing the Bing Translator not to work correctly and install the latest features to improve its web app’s performance.

2. Clear your browser’s cache and cookies

  1. Launch the Google Chrome browser on your PC, then click three dots to open the Menu. Go to More tools and click Clear browsing data.
  2. Choose a time range and select All time to delete everything. Check the boxes for Cookies, other site data, and Cached images and files, then click Clear data.
  3. Restart your browser and check if the audio is available in Bing Translator.

Clearing your browser caches and cookies will delete the corrupt files impeding its performance.

3. Disable browser extensions

  1. Open the Google Chrome browser on your PC, then click three dots to open the Menu. Navigate to More tools and then click on Extensions.
  2. Disable all extensions by toggling off the switch for each.
  3. Restart your browser and check if the Bing Translator issue persists.

Enable your Chrome extensions one after the other to find the faulty one.

In conclusion, we have another article on what to do if you encounter something went wrong error in Bing and ways to resolve it.

If you have further questions or suggestions, kindly drop them in the comments section.

Latest Windows 11 Insider Release Preview build (22621.1483) adds Bing button to search

Late yesterday afternoon (the middle of the night for some of you), Microsoft released another Release Preview build for Windows 11 Insiders, this one coming in at build 22621.1483. This build adds some new features to the Release Preview Channel:

  • New! This update introduces notifications for Microsoft accounts in the Start menu. This is only available to a small audience right now. It will deploy more broadly in the coming months. Some devices might notice different visual treatments as we gather feedback.
  • New! Once you have access to the new Bing, the search box on the taskbar will include a button that opens the Bing chat experience in Microsoft Edge. If you don’t have access, the search box on the taskbar will feature a dynamic search highlight button.
  • New! This update adds many new features and improvements to Microsoft Defender for Endpoint. For more information, see Microsoft Defender for Endpoint.
  • New! The search box on the taskbar will be lighter when you set Windows to a custom color mode. This will occur when you set the Windows mode to dark and the app mode to light in Settings > Personalization > Colors.

There’s also quite a list of issues addressed – be sure to check out the Windows Insider blog post for all the details.

Microsoft to release Windows preview updates in the last week of the month

You might already be familiar with Microsoft’s Patch Tuesday, which refers to the Windows updates released every second Tuesday of each month. It’s also referred to as the “B” release internally by Microsoft.

The update often ships with bug fixes, security updates, as well as new features at times. However, Microsoft has announced a significant change made to the schedule. Now, instead of making the release on the second Tuesday of every month, the company has pushed the release date to the last week of every month.

According to Chris Morrissey, Windows and Devices Senior Director of Communications at Microsoft:

Starting in April 2023, we now target optional non-security preview releases for the fourth week of the month. We have found this to be the optimal time for us to publish and for you to consume these updates. That’s two weeks after your latest monthly security update and about two weeks before you’ll see these features become part of the next mandatory cumulative update. We’re excited for this improvement as it is meant to optimize the validation of payloads, improve consistency, and enhance the predictability of your testing, update, and upgrade experience.

Microsoft uses these cumulative updates to test out non-security fixes that are slated to be released to the Windows systems in the next Patch Tuesday release. When the change takes effect next month, the optional non-security preview release will now replace the previous “C” and “D” releases which normally ship during the third and fourth week of every month.

The company will continue providing Out-of-band (OOB) releases when required to patch bugs or vulnerabilities. Share your thoughts with us regarding the change in the release schedule.

Change Audio Language on YouTube In Just a few Quick Steps

YouTube is our go-to entertainment stop on our smart devices. We can listen to songs, watch videos, and whatnot. There are so many things to watch on YouTube, and you can even watch content from different countries, languages, and regions.

One exciting thing that YouTube offers is allowing users to change the audio language on YouTube. Yes. You can easily watch a video in your native language. All you need to do is a few clicks, and you are done. In this guide, we will show you how you can do that. Let us get right into it.

What is YouTube’s multi-language feature?

YouTube has introduced a multi-language feature that allows the creator to upload audio files in different languages to a video.

Viewers can easily watch the content in any language when this is available. This is known as dubbing and is different from a subtitle.

In dubbing, the creator must record audio for their video in a different language. Afterward, they need to upload those audio files to the original video.

One significant advantage of this feature is that it negates the need for the creator to upload different videos in different languages.

How to change the audio language on YouTube?

1. On Mobile

  1. Open the YouTube app on your phone.
  2. Launch the video you wish to view.
  3. Tap on the Settings icon on the top right corner of the screen.
  4. Tap on Audio track on the menu.
  5. Select the language you wish to change the video to.

The above steps are straightforward, and you can easily change the video’s audio. Note that the video must have multiple audio files to change the audio.

If the video does not offer multiple audio tracks, switch to subtitles and, if you encounter the YouTube autotranslate not working issue, use our fixes to restore translations.

2. On desktop

  1. Visit the YouTube website on your browser.
  2. Select the video you wish to stream.
  3. Click the Settings icon.
  4. Choose the Audio track option.
  5. Select the language you wish to view the video in.

That’s it. With just a few clicks, you can change the audio language of the video you are watching. Watching the video in your native language or your familiar language makes watching content much more enjoyable.

Also, reading subtitles isn’t as convenient as watching the video and hearing the audio in your familiar language.

As already mentioned, YouTube lets creators upload videos using the multi-language feature. However, not many use this feature as of yet.

This YouTube multi-language feature supports more than 40 languages, and more languages are expected to be added to this feature.

The audio track list that shows up on a video’s settings depends on how many audio files the creator has uploaded. Our guide lets you fix the YouTube invalid response received error.

Let us know in the comments below if you enjoyed this guide and were able to change the audio language on the video.

Mechanical Mouse Vs Optical Mouse: Differences & Advantages

If you got yourself a new high-end PC or a laptop, and all you want is a brilliant mouse for it, then it could be a tough ask to decide between a mechanical mouse and an optical mouse. While mechanical mice are devices of the good old days, people still use them to get that retro feel.

However, you wouldn’t want your setup ruined just because you got yourself a mechanical or optical mouse. Didn’t you? In this guide, we will share a complete comparison between a mechanical mouse and an optical mouse. Reading this, you will be able to choose between either of them.

What is a mechanical mouse?

Before going ahead with the comparison, let us first understand what a mechanical mouse is. A mechanical mouse uses mechanical parts such as a ball that rolls on the surface.

The sensors then detect the ball’s movement on the surface and move the cursor on your PC’s screen accordingly.

As you move the mechanical mouse, the sensors constantly track the movement and move the cursor. You should note optical mice almost replace mechanical mice.

A mechanical mouse is wired and sends the signal of the ball’s movement on the surface using the wires to the PC.

Mechanical mice are a bit heavy and contain parts that can easily get damaged and ruin your experience. This is the reason lightweight and less fragile optical mice replace them.

What is an optical mouse?

An optical mouse is an advanced mouse and does not use any tracking ball for it to work. Instead, it uses a light, which reflects on the surface and then is read by the sensors to move the cursor on your screen.

The sensors take thousands of microscopic snapshots of the working surface to move the cursor on the PC screen precisely.

However, some surfaces, such as glass, do not allow the light reflected by the LED to be read by the DSG (Digital Signal Processing) sensors.

Since there isn’t any moving part on an optical mouse, it is easy to manage and does not require any cleaning. In addition, sensing is more precise in an optical mouse than in a mechanical mouse.

Differences between a mechanical mouse and an optical mouse

Mechanical mouseOptical mouse
Uses a trackball that is used to move the cursor.Uses LED to move the cursor.
Heavier than an optical mouse.Lightweight and are available in different shapes and sizes.
Mechanical mice are wired.Optical mice can be wired and wireless.
Require cleaning to protect it from wear and tear.Require almost no cleaning and have a better life.
Works even on a rougher surface.Require a flat surface to work without any issues.
Outdated and are only used as a novelty products.Replaced mechanical mice because of their advantages.
Mechanical mice are pricey.Optical mice are cheap.

Advantages of a mechanical mouse

Here are some of the advantages of a mechanical mouse:

  • Better build quality.
  • More accuracy.
  • Can run on a bit rough surface.
  • A bit more durable as compared to an optical mouse.

That is it from us in this guide. However, if you are a gamer, we have a guide explaining why you should disable the mouse smoothing feature on your PC.

If you have lost your wireless mouse’s receiver and are looking for ways to connect to your PC without it, do not worry. You can check out our guide and easily connect wireless mouse without a USB receiver.

Has your mouse’s cursor disappeared from your PC’s home screen. If so, you can apply the solutions in our guide to easily resolve the problem.

We hope that this guide clairifed the confusion if you had any regarding a mechanical mouse and a optical mouse.

Feel free to drop a comment down in the comments section below and let us know if you liked this guide and want more such comparison.

How Does an Optical Mouse Work? [vs Wireless]

To give input commands to your PC, you need input devices such as a keyboard and mouse. While previously there was only a wired optical mouse, now there are wireless mice as well. Have you ever wondered how does an optical mouse work? Or did this thought ever cross your mind?

If yes, then you are in the right place. In this guide, we will share with you a complete explanation of how an optical mouse work and what the features associated with it are over a wireless mouse. So let us get right into it.

What is an optical mouse?

An optical mouse is an input device that allows you to interact with the contents on your PC. It uses a LED (light emitting diode), an optical sensor, and a DSP (digital signal processor).

An optical uses its sensors to convert the movements on a surface to the direction of a cursor on the computer screen.

The optical mouse shines the light on the surface, and the optical sensor then picks up the reflected light. Thousands of images are taken every second by the optical sensor and sent to the DSP for analysis.

The digital signal processor then understands the images determining whether the mouse has moved. This includes information on whether the mouse moved left or right, up or down, and the speed at which it was moved.

This information is then sent to the computer using the cable or the wireless receiver, which then moves the cursor accordingly.

Advantages of an optical mouse

Here are some of the advantages of using an optical mouse:

  • No moving parts. So makes it more durable.
  • Does not require frequent cleaning. This makes it easier to use.
  • Dirt doesn’t go inside the parts, preventing it from damaging the sensors.
  • They do not need a unique surface, such as a mouse pad, to work. You can use them on wood or any plain surface. It shouldn’t be glass, though.
  • They are more precise than mice with a trackball. Trackball mice can get stuck onto the surface if there is dirt or anything. However, that isn’t the case with the optical mouse.
  • They are ergonomically better as compared to trackball mice.

Disadvantages of an optical mouse

  • They are mechanical devices. So, they should be kept away from dust and water.
  • Although optical mouse work on a wide variety of surfaces, they need to be flat for smooth functioning without disturbance.
  • If you use a wireless optical mouse, you need to change the batteries frequently.
  • Wireless optical mice are known to have connectivity issues.

Is an optical mouse better than a wireless mouse?

Well, let us get one thing very clear. Optical mice aren’t only available as a wired mouse. The optical mouse also ships as a wireless mouse.

The technology remains the same, but in wired mice. Although, at the same time, the transfer of information happens through a cable, in wireless optical mice, the transmission occurs via Bluetooth or a wireless receiver.

Here are a few things that will clarify whether the optical mouse is better than a wireless mouse or not.

  • A wireless mouse allows you to operate it from a distance. While if you have a wired optical mouse, you are restricted to using the mouse till the length of the wire.
  • A wireless mouse can cost you much more than an optical mouse. However, we have a list of mice you can buy for yourself in 2023.
  • Wired optical mice are known to offer better accuracy than a wireless mice. However, wireless mice have also evolved and provided better accuracy these days. But if you are a graphics designer or involved in work that requires precision, we suggest you opt for the optical mouse.
  • If you lose the wireless receiver of your wireless mouse, you won’t be able to use it unless there is a Bluetooth connectivity option. With the wired optical mouse, all you have to take care of is the wires. Until and unless the cables aren’t worn out, the wired optical mouse will work without any issues.
  • The wireless mouse requires batteries to run. So, you have to incur extra charges to use a wireless mouse.

The above comparison is between a wired optical mouse and a wireless mouse. There are other differences when you compare a laser mouse with an optical mouse.

We hope the above points helped you better understand the difference between an optical and wireless mouse.

If you are getting erratic mouse movements in Windows 10, then we have a guide explaining how to fix it without any issues.

Our guide explains how you can connect your wireless mouse without a wireless receiver. If the cursor disappeared in Windows 11, then you can check out the solutions in our guide to fixing the issue.

Several users have reported coming across a mouse flickering issue in Windows 11. This can be easily fixed by following the solutions mentioned in our guide.

Feel free to let us know in the comments below if you could understand how an optical mouse works.