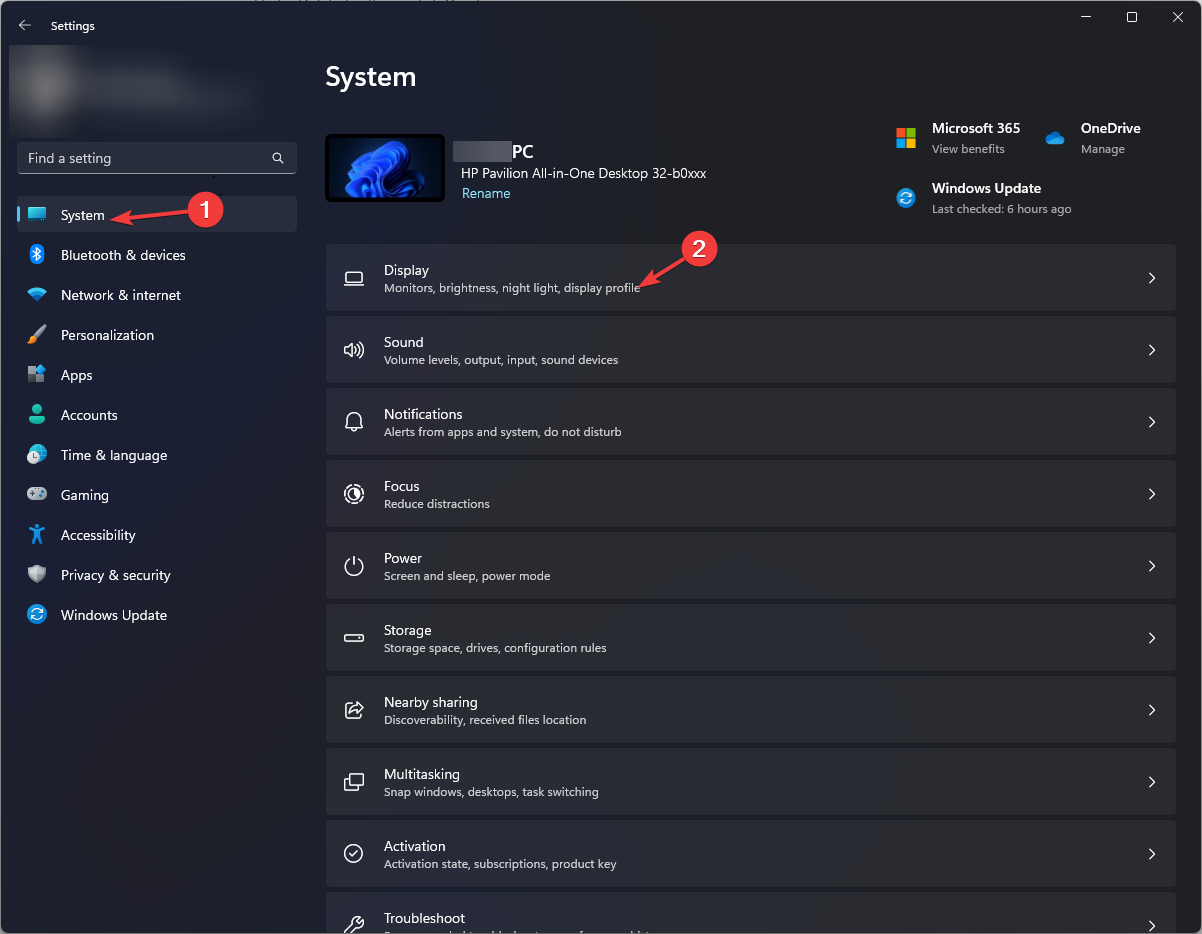
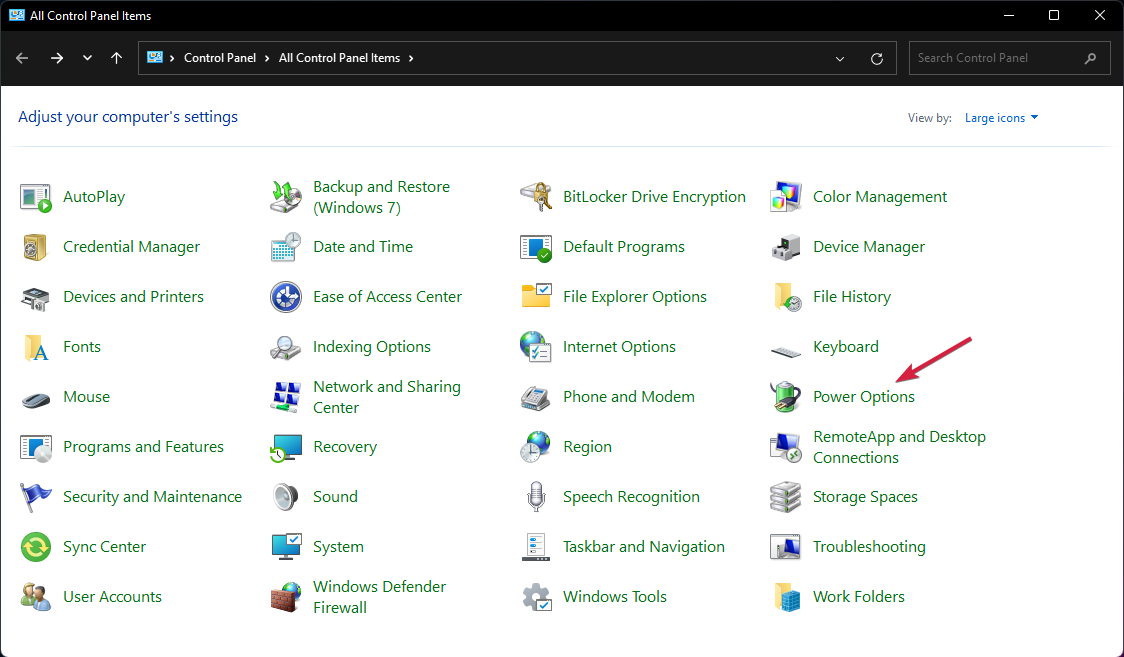
Several users have reported that when they try to download a game from the Steam client, they encounter the Allocating disk space error. The problem is that Steam takes forever to complete this process, and it isn’t worth waiting for it to finish.
In this guide, we will give you a bunch of solutions that will help you fix the allocating disk space Steam takes forever problem. There are different methods that you can apply and fix this issue. So let us get right through it.
What causes allocating disk space Steam takes forever problem?
After researching the internet and various user reports, we have found out the different reasons that could trigger the allocating disk space Steam takes forever problem.
Downloaded cache: Chances are that the cache files of the game you are downloading or the old cache are causing the issue.
The server is full or problematic: There is a great chance that the server from which the game is getting downloaded is full or has some issues at the moment.
Steam was blocked by Firewall: Many users have reported that they found that Steam was blocked by the Firewall because of which they were coming across the allocating disk space Steam takes forever problem.
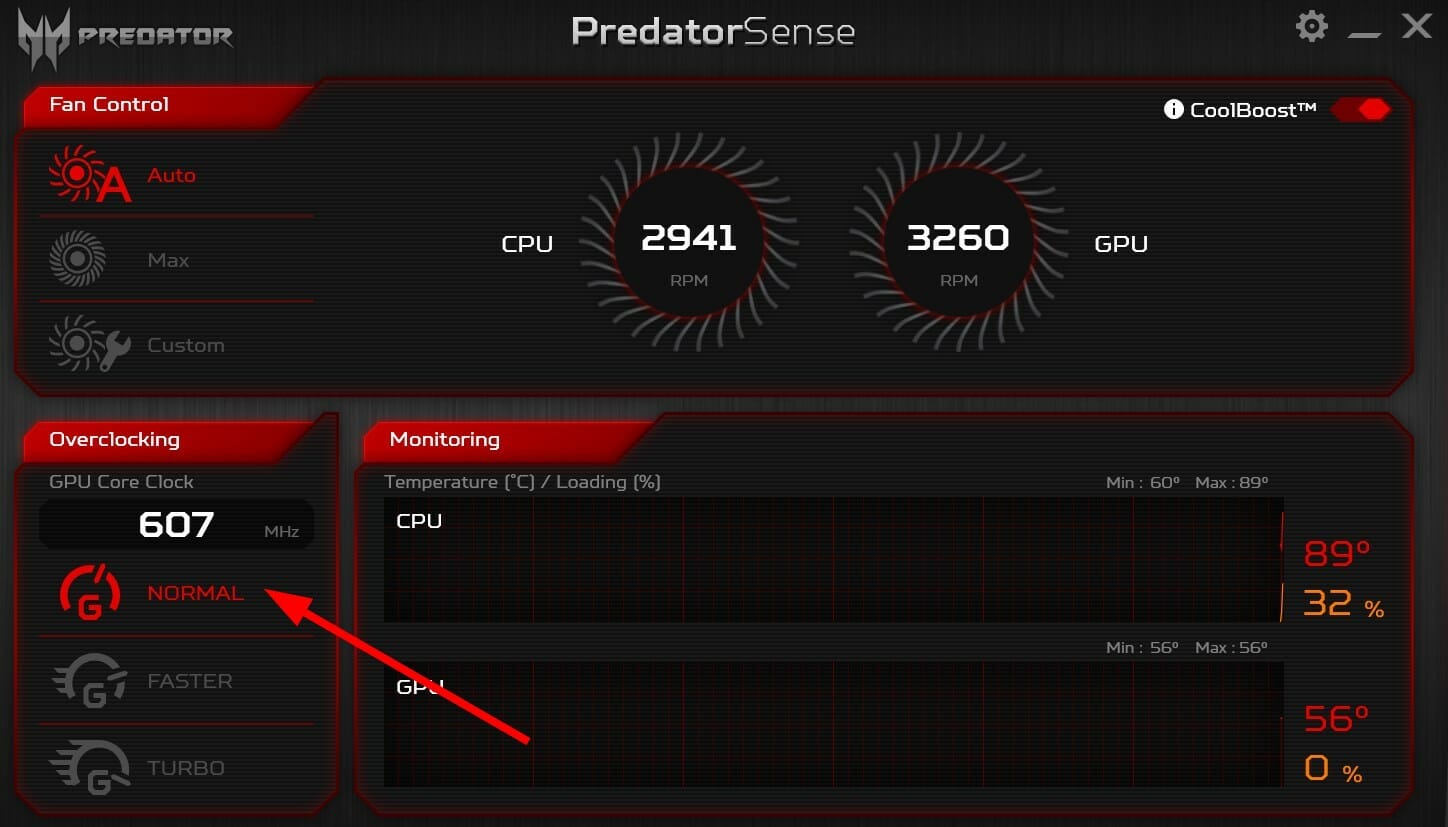
Your PC is overclocked: If you have enabled overclocking on your PC, then chances are that it is interfering with the Steam download progress.
Not sufficient privileges: You might not be running Steam with admin privileges because of which it is getting blocked as it does not have sufficient permissions.
Let us now look at the solutions that will help you fix the allocating disk space Steam takes forever problem.
How can I fix the allocating disk space Steam takes forever problem?
1. Change the download server
Open the Steam client.
Click on the Steam button at the top.
Choose Settings.
Switch to the Downloads tab.
Click the drop-down menu under Download Region.
Choose a different server to download from.
Click OK.
Exit Steam client.
Relaunch Steam.
Finish the download of the game.
When you change the download region and download the game, the Steam client uses the fastest server for that region which might not be full and unproblematic.
Change the download region and check if this fixes the allocating disk space Steam takes forever problem.
2. Run Steam client as an admin
Right-click on the Steam client icon.
Select Properties.
Switch to the Compatibility tab.
Check the box for Run this program as an administrator.
Click Apply and OK.
Relaunch Steam client.
Download the game and check if this resolves the issue or not.
Running the program as an admin provides it with all the necessary permissions required to perform various underlying tasks. You should grant admin access only to legit apps such as Steam and check if this fixes the issue.
Do note that you can clear the Steam download cache even if you are stuck with the Allocating disk space error on Steam.
Follow the above steps, clear the Steam cache, and see if this fixes the allocating disk space Steam takes forever problem.
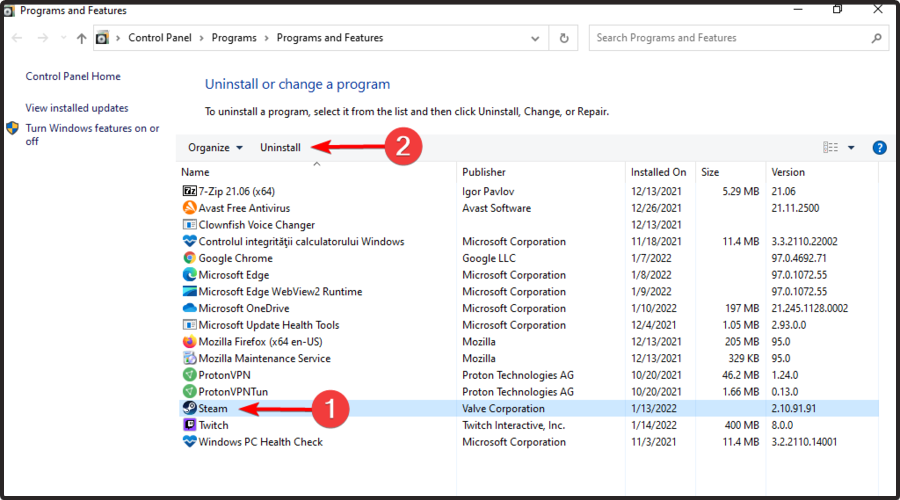
4. Refresh the Steam installation
Right-click on the Steam client icon.
Select the Open file location option.
Select all files and folders inside the Steam folder, except the steamapps.exe folder and Steam.exe file.
Delete everything except the steamapps.exe folder and Steam.exe file.
Open the Steam.exe file.
It will download the Steam client again.
Redownload the game.
Instead of reinstalling the program, you can follow the above steps and refresh the Steam client and check if this fixes the allocating disk space Steam takes forever problem or not.
5. Disable Windows Firewall
Open the Start menu by pressing the Win key.
Open Control Panel.
Click on Windows Defender Firewall.
Click on the Turn Windows Defender Firewall on or off option on the left.
Check the radio button to Turn off Windows Defender Firewall for both Public and Private networks.
Click OK to apply the changes.
Launch the Steam client.
Download the game and check if this fixes the issue or not.
Chances are the Windows Defender Firewall was blocking the Steam client. You can try to disable it and then download the game to see if this fixes the issue.
6. Stop overclocking
Overclocking helps you boost your PC performance to its max limits allowing you to resource-intensive tasks smoothly.
However, overclocking can often lead to system and program crashes, and they can throw up errors such as allocating disk space Steam takes forever problem.
In such a case, we suggest you disable any overclocking software you are using and try downloading the game once again to see if this resolves the issue.
That is it from us in this guide. However, if you are coming across a Steam service error, you should check out our guide that gives solutions to fix the problem.
If you have encountered the DirectX error: setup could not download the file, this guide can help! We will cover all the troubleshooting methods to fix the issues right after discussing the causes of the problem. Let’s get started!
What causes the DirectX error: setup could not download the file?
There could be various reasons for the Direct X error; some of the common ones are mentioned here:
Unstable internet connection – If your internet connection is weak, you might find difficulties installing DirectX. You need to check your internet connection to ensure that’s not the reason.
Runtime files are corrupt – If the runtime files are missing or damaged, you might face this issue.
Outdated or missing Visual C++ Redistributable and NET Framework – If NET Framework or Visual C++ Redistributable software is old or corrupted, you might get this error. You need to repair or reinstall them to fix the issue.
Antivirus interference – Sometimes, your antivirus blocks the installation of certain files. Hence you get this error. To fix it, you must disable the antivirus before installing the software.
What can I do to fix the DirectX error: setup could not download the file?
Before engaging in advanced troubleshooting steps, you should consider performing the following checks:
On the Desktop, right-click and choose New, then click Folder.
Rename this DirectX.
Go to the Downloads folder, and double-click the installer file to run it.
Click Yes.
Click the Browse button to locate the folder.
Select the DirectX folder you created and click OK.
Click OK.
Go to the DirectX folder, locate, right-click DXSETUP.exe, and click Run as administrator.
Follow the onscreen instructions to complete the process.
So, these are methods that you need to follow to fix the DirectX error: setup could not download the file. Try them and let us know what worked for you in the comments section below.
Phil Spencer, the head of Xbox, revealed during an interview with Financial Times that Microsoft’s mobile game store could arrive on iOS and Android devices, as early as 2024.
“We want to be in a position to offer Xbox and content from both us and our third-party partners across any screen where somebody would want to play … Today, we can’t do that on mobile devices but we want to build towards a world that we think will be coming where those devices are opened up.”
The deal, however, depends on regulators’ decision regarding the tech giant’s attempt to purchase Activision Blizzard, as it will rely heavily on games like Call of Duty: Mobile and Candy Crush Saga.
Redmond’s $68.7 billion offer is seen by many, including its biggest competitor Sony, as something that could kill innovation and competition in the market. EU and US regulators have been discussing giving the greenlight, and Microsoft has been trying to win them by announcing plenty of deals that could still keep Activision’s games (like Call of Duty) on competitors’ devices like Nintendo and PlayStation.
“The transaction will improve Microsoft’s ability to create a next generation game store which operates across a range of devices, including mobile as a result of the addition of Activision Blizzard’s content. Building on Activision Blizzard’s existing communities of gamers, Xbox will seek to scale the Xbox Store to mobile, attracting gamers to a new Xbox Mobile Platform.”
What can you do on Microsoft mobile game store on iOS and Android?
Dubbed a next-generation store, Microsoft’s plan to launch an Xbox mobile store wasn’t new. In 2022, just a month after they proposed the acquisition plan, Redmond officials announced that their new mobile store could potentially shake rival Apple and Google’s dominance in mobile gaming.
However, Microsoft would need EU and US regulators to take action against Apple and Google since the two rivals do not allow alternative stores on their devices.
“Shifting consumers away from the Google Play Store and App Store on mobile devices will, however, require a major shift in consumer behavior. Microsoft hopes that by offering well-known and popular content, gamers will be more inclined to try something new.”
As mentioned, Microsoft still relies heavily on Activision’s titles like CoD: Mobile and King’s Candy Crush, and many other titles should be following suit. And, with that said, the proposed Xbox mobile store could also allow devs to run their own app stores within the platform, and this means big news for small & indie game studios.
What do you think about this latest expansion? Let us know in the comments!
If you have encountered fltlib.dll is either not designed for Windows error when the DLL file is not compatible with Windows installed on your PC. In this guide, we will discuss expert-tested ways to fix the error.
What causes the fltlib.dll is either not designed for Windows issue?
There could be various reasons why you see this error; some of the common reasons are:
Malware infection – When your computer is infected with viruses or malware, it could cause the DLL to get corrupted. To remove the infection from your computer, you need to run a malware scan using a reliable antivirus tool.
Deleted accidentally – If you have uninstalled a program that used the dll file, it is possible that the file got deleted. Hence the error.
Bad sector on the hard drive – Bad sectors on the hard drive cause many issues; one such issue could be the DLL file missing.
The DLL file got corrupted – If the DLL file got corrupted or damaged, you might not be able to use the file. So, when you try to launch an app or game that uses the DLL file, you may get the error.
What can I do to fix the fltlib.dll is either not designed for Windows issue?
1. Run SFC and DISM command
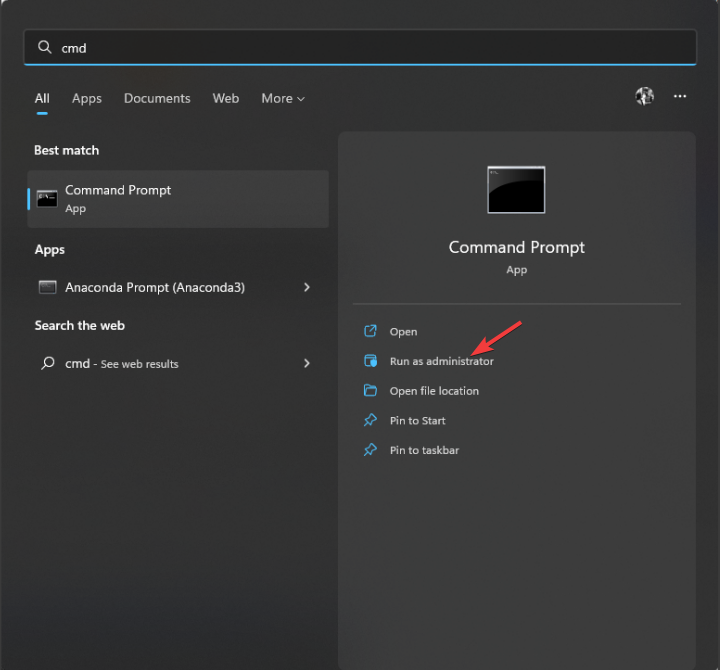
Press the Windows key, type CMD, and click Run as administrator.
Type the following command to repair system files and press Enter: sfc/scannow
Then, copy and paste the following commands one by one and press Enter after every command: DISM /Online /Cleanup-Image /CheckHealthDISM /Online /Cleanup-Image /ScanHealthDISM /Online /Cleanup-Image /RestoreHealth
Once the command is executed successfully, restart your computer.
If the manual method mentioned above seems tedious, we recommend you try specialized software to perform this job. These tools can scan your device for corrupt or broken OS components and automatically search for healthy files from their online database as replacements.
2. Install Windows updates if pending
Press Windows + I to open the Settings app.
Go to Windows Update and click Check for updates.
If available, click Download and install.
The update will be downloaded and installed in a few minutes.
You need to restart when prompted to complete the process.
3. Run a malware scan
Press the Windows key, type Windows Security, and click Open.
Go to Virus & threat protection, and click Scan options.
Select Full scan and click Scan now.
Once the scan is complete, you need to remove the malicious files if found.
Then, under Windows 11 Installation Media option, click Download Now.
Double-click the mediacreationtool.exe to open the Windows 11 Setup wizard.
Click Accept.
On the Select language and edition page and click Next.
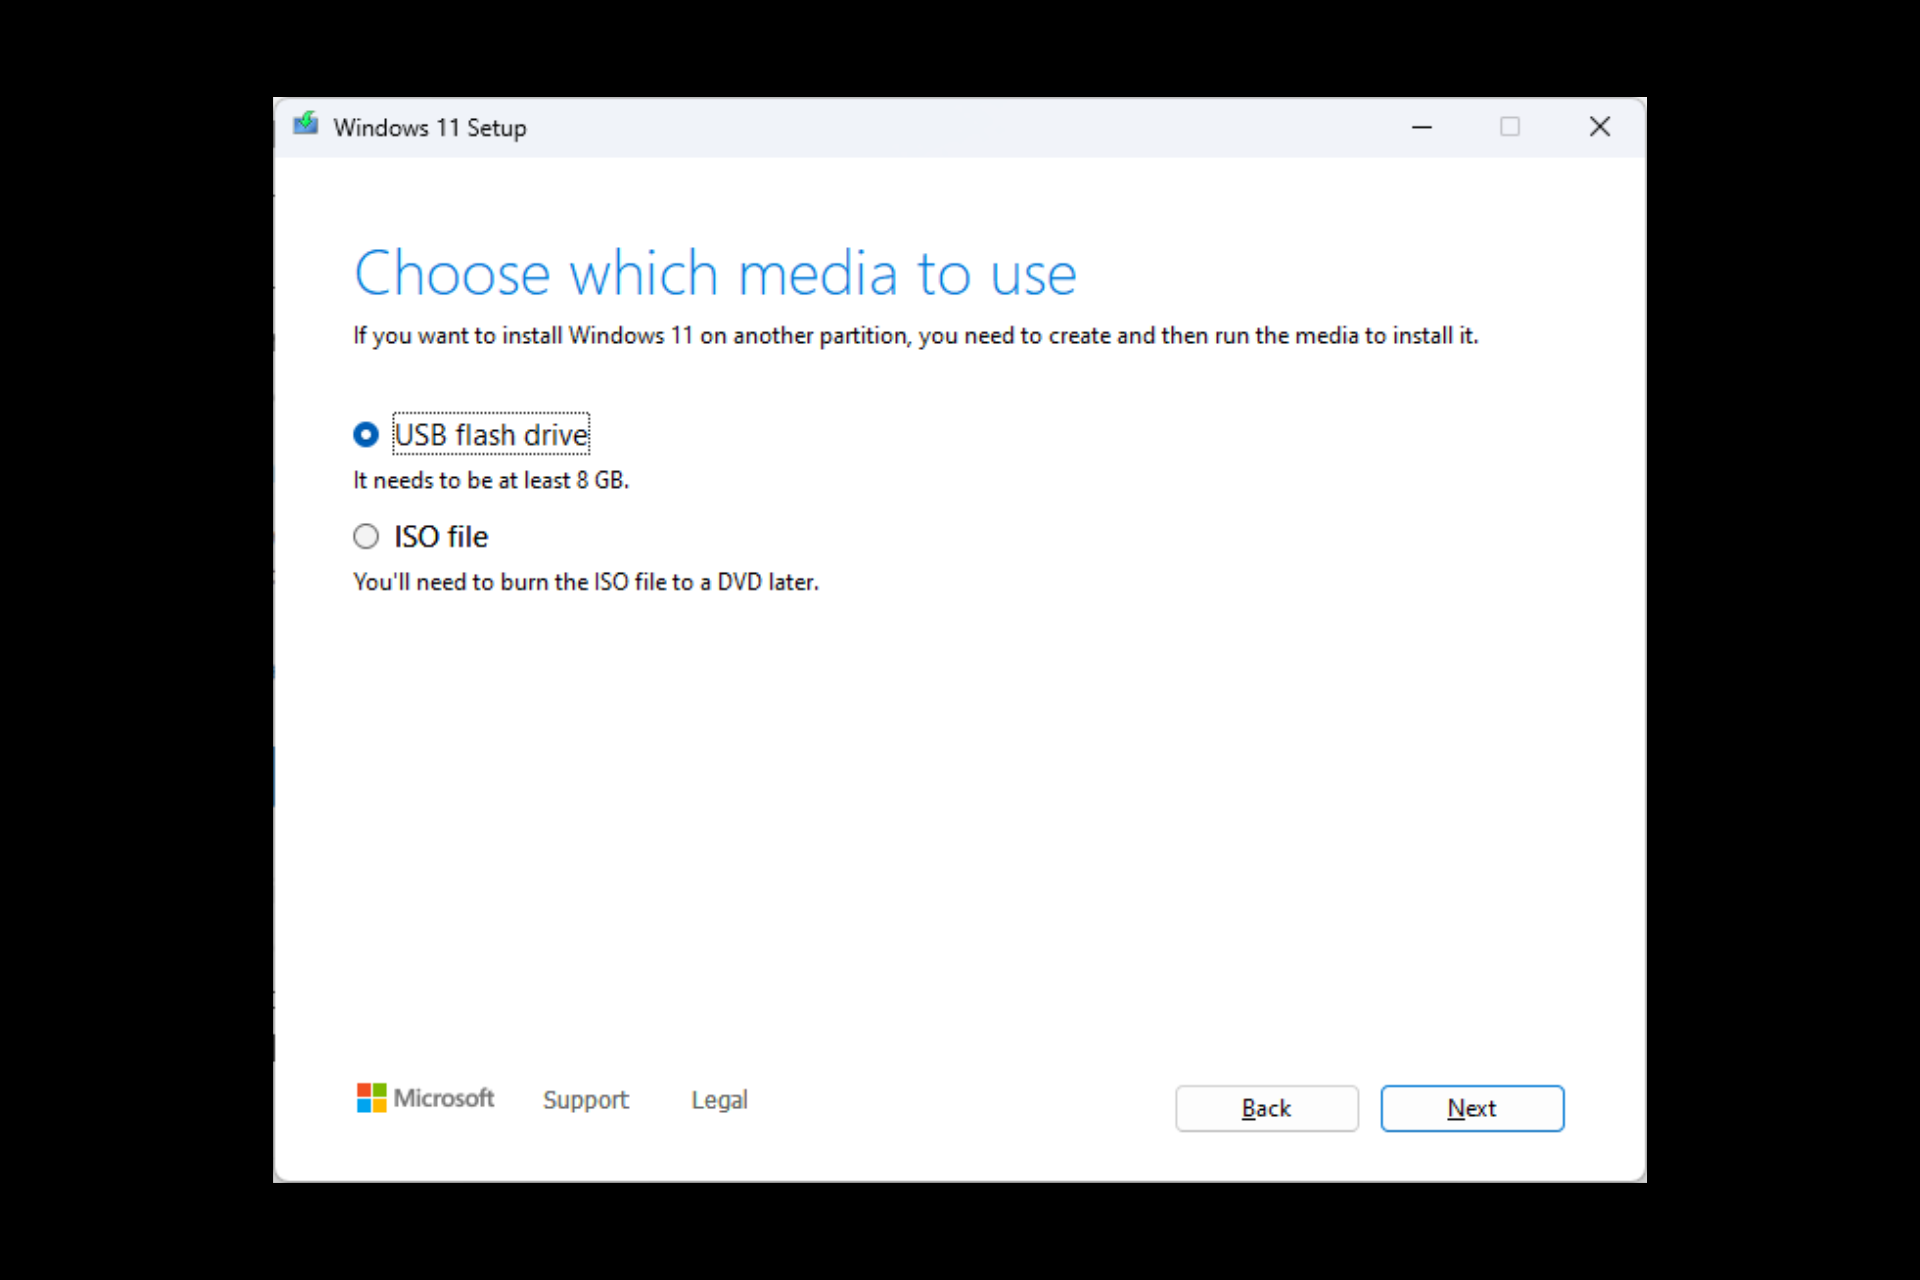
Choose which media to use and click Next.
On the Select a USB flash drive window, click Next.
Then click Finish.
6.2 Install Windows
Restart your computer. When your PC boots up, press F2, F10, or the designated key, depending on your device manufacturer.
In the BIOS, go to the Boot menu and Change the boot order. Select USB flash drive.
When prompted, press any key to continue booting.
Select the language to install and other details on the setup window, then click Next.
Click Install Now to start.
The following window will ask you to enter the product key. Please enter the product key, or you can click; I don’t have a product key option.
On the next page, click Accept. Click Next.
Now choose Custom: Install Windows only(advanced) for a clean installation.
Choose the unallocated space and click Next.
The setup tool will install Windows OS. This might take several minutes; you must wait for the process to finish.
So, these are the methods to fix the fltlib.dll is not designed for Windows issue. But try them and let us know what worked for you in the comments section below.
In the race for popular web browsers, it’s safe to say that Microsoft is falling behind Google Chrome. After all, despite breaking through with Bing AI chatbot, the built-in Edge browser is plagued by a news feed that no one even looks at. In the long run, it takes away its simplicity and drives people even further.
Another case is that some users reported that their Edge browser has been opened automatically despite having another browser as default. One user on Reddit complains that their Edge keeps opening pages they open on Firefox, despite the latter being the default.
When some Windows update is implied, sometimes, it could automatically revert your default browser setting back to Edge. No wonder why some people hate it.
If you could relate to this situation, this article is for you. We’ll be talking about how to permanently use a third-party app called MSEdgeRedirect. As described, it’s a tool that provides resiliency against future changes and passes the command line arguments of Edge processes into your default browser.
How to stop Edge from opening in Firefox
1. Download MSEdgeRedirect from Github. Choose the Stable version.
2. After the download is completed, double-click on the app to install it.
3. Choose Active mode, then Next.
4. Toggle these options, then click Install. In this case, we want to use Google as our default.
5. Click Finish then restart your browser.
Some people also reported that the news feed on Edge is quite annoying. We’ve previously covered simple tips to turn it off, as well as other promoted links on Edge’s homepage.
Do you find these tips helpful? Let us know in the comments!
We’ve received multiple complaints concerning the Acer laptop monitor turning on but getting a black screen. The issue occurs during startup, after sleep, or even when you’re using the laptop. In this guide, we’ll discuss the causes of the Acer laptop’s black screen and some ways to fix it.
Restart your PC and check if it helps resolve the error.
Automatic alternative: If you want to skip manual driver updates, you can use Fortect Driver Updater to scan, detect, and update outdated or missing drivers automatically. This ensures your graphics and other essential hardware components are always using the latest compatible versions, helping prevent black screen issues in the future.
2. Use the Function keys
Unplug all external devices from the PC.
Hold the Power button for 10–15 seconds to ensure the laptop is off. Then, press the Power button to turn on the laptop.
Press the F2, F9, F10, and Enter keys on your keyboard when you see the Acer logo or splash screen appear.
Select Exit, then Yes, and press Enter. The laptop should start and fix the black screen problem.
The above-listed dedicated keys will fix the Acer laptop’s black screen on startup and resolve startup issues grounding its functionality.
Left-click the Start button, type command prompt, and select Run as administrator.
Click Yes on the User Account Control prompt.
Type the following and press Enter: sfc /scannow
Restart your PC to see if the black screen appears.
A System File Checker scan will check and remove corrupt system files on your Acer laptop and allow it to work correctly. Check what to do if nothing happens when you select run as administrator on Windows 10/11.
4. Perform a Hard Reset
A hard reset helps clear temporary hardware glitches that can cause a black screen.
Shut down the laptop completely.
Disconnect the charger and remove the battery (if removable).
Hold the power button for 30 seconds to drain residual power.
Reinsert the battery, connect the charger, and turn on the laptop.
This simple step often resolves black screen issues on Acer laptops caused by static charge buildup.
5. Check the Display Brightness
Sometimes the screen appears black because brightness is set too low.
Press the brightness up key (usually F6 or F7 on Acer laptops) and see if the display becomes visible.
If using an external monitor, adjust brightness through the monitor’s controls.
6. Connect to an External Display
If the built-in screen is faulty, testing with another display can confirm the cause.
Connect your Acer laptop to a monitor or TV via HDMI.
Switch the display output using Windows + P and select Duplicate or Second screen only.
If the external display works, the issue is likely with your laptop’s LCD or internal display cable.
7. Adjust Power Settings
Incorrect sleep or hibernation settings can prevent the display from waking up.
Press Ctrl + Alt + Delete to see if the security screen appears.
If it does, select Task Manager, then go to File > Run new task and type control to open the Control Panel.
Navigate to Power Options and set Turn off the display to a longer duration.
8. Reset BIOS to Default Settings
Corrupted BIOS configurations can cause startup display problems.
Turn off the laptop and press F2 repeatedly during startup to enter BIOS.
Locate the option to Load Setup Defaults (often under the Exit tab).
Save changes and restart the laptop.
If you can’t see the BIOS screen, the issue may be deeper and require professional service.
What causes Acer laptops black screens?
If the Acer laptop is turning on but displaying a black screen, there could be several reasons for this:
Outdated graphics card driver – When the graphics cards running on your laptop are obsolete, they can cause the GPU to show signs of failing, like black screens. Also, If you recently installed a new driver, the black screen can happen due to incompatibility.
Virus and malware infection – The Acer laptop screen can go black while the fan is still running due to virus infection. Viruses and malware impede the functionality of the core features on the laptop, preventing them from responding when required.
Overheating – Your laptop can overheat due to an improper cooling system or poor ventilation inside the laptop case. Also, if you’re using a low-capacity laptop and overwork it, it can go blank till its temperature is down and stable.
These factors can vary on different Acer laptops. Regardless, you can fix them by following some troubleshooting steps enumerated below.
If there’s one thing that keeps people away from Microsoft’s built-in and often-overlooked browser Edge, it’s its interface.
Once you open the browser, by default, you will see dozens of endless news coming your way on the home screen. Ironically, these news pieces are often biased toward a certain political wing, or even rooted in adware promotions, useless marketing deals, and AI-generated articles.
One Reddit user complains that this issue takes away Edge’s simple look and drives people even further from the browser. No one wants to read the news when they open their browser.
“Why is the MS homepage filled with Clickbait Trash articles? Yes, I understand you can edit the topics that appear on the browser tab when you open the new browser. But if you don’t, by default the newsfeed on Edge is like a solid wall of clickbait trash articles. I mean they want people to start using Edge/Bing, but c’mon. I feel like this is a huge part of the reason most people don’t use Edge or Bing”
If you could relate to this problem, then this article is for you. Here’s a workaround for how you can disable the news feed on Edge.
How to disable the news feed on Edge
1. With your Edge open, click on the three dots ➜ Settings.
2. On Start, home, and new tabs, scroll until you find Customize your new tab page layout and content. Click Customize.
3. On the Content dropdown, click Content off.
4. Additionally, you can also turn off other options with these toggles to simplify your Homepage even further.
Sure, Redmond officials have done all they can to make the browser stand out and stand strong against its competitor, Google Chrome, especially with its Bing AI chatbot, but until then, we can see why Edge is not so popular.
Do you find these tips helpful? Let us know in the comments!
Microsoft Teams is a popular teleconferencing app. Initially used for work and school, the app has helped millions of people navigate through this era of a hybrid workforce.
However, some users reported that the app had taken too much of their data. The occurrence is common, especially for those taking calls on their mobile phones with no WiFi or on their desktop PCs using mobile hotspots.
One user on Reddit complains that their daily data usage for Microsoft Teams is ruining his pocket due to limited data since everyone on the calls has their cameras turned on. Telling them to turn their cameras off is also not a good option.
So, what’s the workaround? We can try blocking incoming videos. This way, other participants can still see each other’s faces, but we can’t. In the long run, we can also save a lot of data.
If you could relate to this situation, this article is for you.
How to limit data usage on Microsoft Teams?
1. During the meeting, click More actions (the three dots on top of your screen).
2. Click Turn off incoming videos.
In other news, Microsoft shut down Teams Free (Classic) starting April 12, 2023. That said, you must either pay to move your data or remain on the free tier.
If your data issues are more widespread and your system is consuming too much data, you’ll find our article of much assistance to save up on your data subscription.
We have received reports from some of our readers concerning black screens on laptops while the system is running. This issue prevents you from seeing the content on the screen because it appears blank and dark. So, this article will discuss what to do if the laptop screen goes black but still running.
Numerous factors can cause the laptop screen to go black while running. Some notable ones are:
Two conflicting GPU processors running on the system – Installing two conflicting Graphics Processing Unit (GPU) chips on the same PC can cause black screen issues. Either of the GPUs is supposed to be a standalone processor, so the presence of another processor can affect the graphics performance.
Corrupt or outdated graphics drivers – If your graphics drivers are outdated, they can become corrupt. Hence, they won’t function properly and cause a black screen while gaming.
Issues with external display connections – Connecting to display peripherals or Remote Desktop connections may cause the black screen on your laptop.
Power settings and screen saver settings – This factor is applicable when you leave the laptop unattended for several minutes based on the power settings. Thus, it can cause a black screen with a blinking cursor.
Nonetheless, you can fix the problem by following the fixes outlined below.
What can I do if my laptop screen is black but still running?
Before proceeding with any advanced steps, apply the following:
Tap on the space bar key to wake the computer.
Disconnect other external devices connected to your computer.
Plug the laptop into a stable power source.
Reset display drivers – Press Windows + Ctrl + Shift + B built-in key combinations.
If you’re able to restore the screen display, proceed with the solutions below to fix the problem and prevent reoccurrence:
1. Change the Power Settings
Press Windows + R key to open the Run dialog box, and type powercfg.cpl, then press Enter to open the Power Options.
Click on Change Plan Settings.
Locate the Turn off the display option and set both the On Battery and Plugged In optics to Never.
Go to the Put the computer to sleep option and set the On Battery and Plugged In optics to Never.
Select the Power Options menu and click the Choose what the power buttons do option.
Go to the When I press the power button option and set both the On Battery and Plugged In optics to Nothing.
Save the changes and close the window.
Changing the above Power settings allows the system to retain its display while on battery and plugged in. Further, do not hesitate to read our article on what to do when Windows 11 is showing a black screen after sleep.
2. Update your graphics drivers
Press Windows + R keys to prompt the Run window, type devmgmt.msc, and click OK to open the Device Manager.
Expand the Display adapter entry, right-click on the device driver, then select Update driver from the drop-down menu.
Click on Search automatically for the updated driver software option.
Restart your PC and check if the black screen issue persists.
Updating the graphics drivers will install patches for resolving bugs causing the display error and install the latest features to improve the drivers’ performance.
If you worry about not installing the right graphics driver update or simply don’t want to do the job manually, an automatic alternative might be a handy solution.
A reliable option you can go for is the Outbyte Driver Updater software because it can help you get the newest driver updates for your computer in a minute.
Outbyte Driver Updater
Solve display errors effortlessly by updating your graphics driver with Outbyte Driver Updater.
Press Windows + R key to open the Run dialog box, type taskmgr.exe, and click OK to open Task Manager.
Find the File Explorer app, right-click it, then select End Task from the drop-down menu.
Click on File from the taskbar and select Run new task from the menu.
Type explorer.exe and click OK to restart the File Explorer process on your PC.
Restart your PC and check if the issue continues.
Restarting File Explorer on your PC will stop background activities contributing to the black screen issue. Also, it resolves any cache intervening with the internal features of the laptop and causing the issue.
Press the Windows + I to open the Windows Settings.
Click on the Windows Update category and click on Check for Updates. Wait for the Windows update result and click on Install Update if a Windows update is available.
Updating the Windows OS will install patches for fixing bugs and resolve issues liable to cause the black screen. Read about fixing Windows not connecting to update service if the error occurs on your PC.
5. Run an SFC scan
Left-click the Start button, type Command Prompt, and click the Run as administrator option.
Click Yes on the User Account Control prompt.
Type the following command and press Enter: sfc /scannow
Restart your PC and check if the laptop screen is black but still running error persists.
Running an SFC scan will repair corrupt system files that can impede the display features on your PC. Check our guide for quick fixes if you can’t run Command Prompt as an administrator on Windows 11.
6. Uninstall conflicting graphics drivers
Press Windows + R keys to prompt the Run window, type devmgmt.msc, and click OK to open the Device Manager.
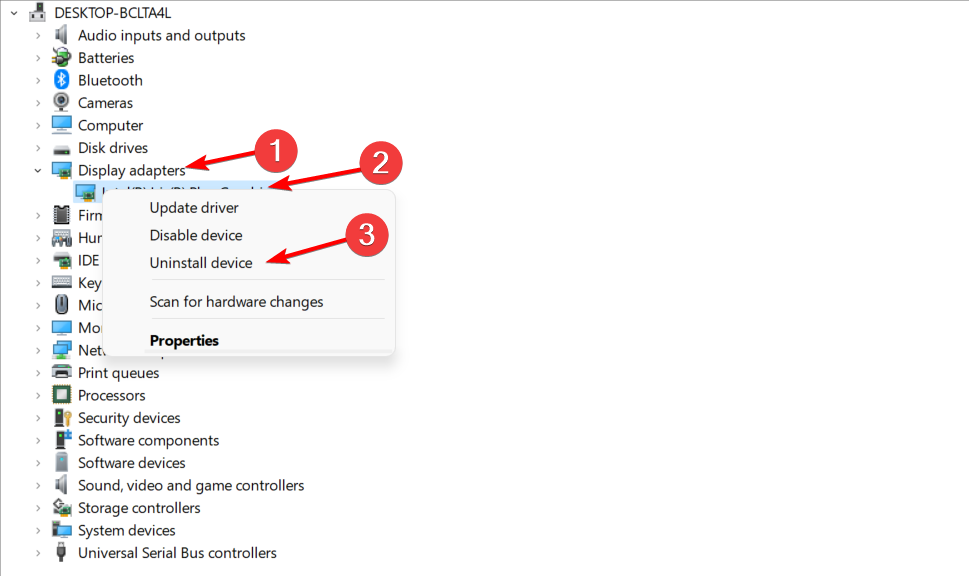
Expand the Display adapter entry, right-click on the device driver, then select Uninstall device from the drop-down menu.
Then click Uninstall to confirm it and restart your PC to take effect.
Also, you can check our list of the best uninstaller software to help remove the device safely from your PC.
In addition, you may be interested in checking out other related issues and ways to fix them. Hence, do not hesitate to explore what to do if you encounter a black screen after the BIOS update here.
Blizzard has once again opened Sanctuary’s doors to intrepid adventurers willing to participate in the open beta of the company’s newest addition to the Diablo IP – Diablo 4.
The open beta has run for three days, during which all of Act 1 could be played to test game systems and servers and for the public to give feedback on bugs.
In an interesting departure from the previous formula, Blizzard has opted for an entirely multiplayer experience where other players can be encountered in the world and take part in events scattered throughout Sanctuary.
How well does Diablo 4 perform?
As stated by Blizzard, the minimum and recommended system requirements are as follows:
Recommended requirements (1080p resolution, medium graphics settings, 60fps)
OS
64-bit Windows 10
64-bit Windows 10
Processor
Intel Core i5-2500K or AMD FX-8100
Intel Core i5-4670K or AMD R3-1300X
Memory
8 GB RAM
16 GB RAM
Graphics
NVIDIA GeForce GTX 660 or AMD Radeon R9 280
NVIDIA GeForce GTX 970 or AMD Radeon RX 470
DirectX
Version 12
Version 12
Storage
SSD with 45 GB available space
SSD with 45 GB available space
Internet
Broadband connection
Broadband Connection
The open beta was off to a rocky start, with many players having to sit through long queues and disconnects. These issues have gradually improved as the weekend went on, with players reporting fewer error 34203 messages after following the troubleshooting procedure.
Compared to the closed beta that ran in the latter part of 2022, the game performs much better. Most assets and textures from Act 1 seem finalized. We were able to take advantage of nVidia DLSS during the playthrough, and with it set to the Quality mode, we saw average framerates of 130-144Hz at 3440×1400 resolution for the most part.
Low FPS issues not fixed by our guide are mostly encountered when you change zones and teleport back to town. This can be attributed to either optimization or latency issues. Less frequent, but still worth mentioning, are FPS drops where multiple players are engaged in events.
Whilst many players have reported issues with Diablo 4’s memory usage, we did not suffer from this issue during our playthrough. Memory usage was consistently around 22 GB of DRAM and 10 GB of VRAM.
D4 renders the player’s character in cutscenes, which helps with immersion, but these cutscenes are shown at a locked 60 FPS, which is very obvious when playing on a high refresh rate monitor with a higher FPS.
One area where developers will have to focus is the slow loading of some textures in cutscenes. We’ve had several instances where low-resolution textures are shown in a cutscene, only for the high-res versions to load after a few settings. A drop in FPS usually accompanies this until everything has completely loaded.
More optimization is needed in this area, as we have seen FPS drops during these cutscenes (down to 16 FPS), as well as armor pieces not rendering correctly.
Overall, performance throughout the playthrough has been slightly lower than in Diablo 2 Resurrected, on average achieving 25% fewer FPS. The two share similar implementations of Ray Tracing and HDR calibration and highly detailed textures lighting.
Graphics, Textures, and Models
Living up to the next-gen moniker, Diablo 4 has major improvements over Diablo 3 in all aspects related to graphics and playable characters. You can now customize your character; whilst not something groundbreaking in the modern area, it is a tasteful first for Diablo.
Character details are amazing
NPC/monster models retain enough features to make them recognizable whilst adding a layer of realism that hasn’t been seen in the franchise before.
All the returning monsters are highly detailed versions of their previous selves. The new textures complement the muted color palette, and the dynamic lighting enhances the scenes and ties everything together.
One area where we hope Blizzard will improve is the close-up look of the player’s character, where the skin has a leather appearance and tattoos look more like gloss paint applied over a plastic model. This is best seen in the menu and during character creation. It is important to mention that this isn’t noticeable during regular gameplay.
Differences between the Low / Medium / High graphical presets are minimal, with the game looking stunning on both high and low settings. Keen-eyed players will notice the harder shadows and the lack of tessellation in certain scenarios, but during intense gameplay, these are details that most will never notice.
Graphics levels of detail
Compared to D3’s criticized design, D4 has returned to its dark roots, and it wants you to know it from the opening scenes.
Diablo 4 Level Design
Diablo 4 has taken a completely different route from former entries in the series. Gone are the flat, linear levels focused on advancing the narrative as they’ve been replaced with an open world that merely nudges the player in a particular direction.
This departure is quite noticeable for returning players and will feel natural to MMO aficionados. This choice seems to be the driving force behind the always online gameplay as well, where players are encouraged to party up and work together to do events and defeat world bosses.
A world boss that may creep you out in Diablo 4
Regions are far larger than we’ve seen before, and the open world only amplifies the feeling of exploration. You will take part in events that change parts of the world, making your actions feel impactful.
In Act 1, we traveled from snow-capped frigid peaks to putrid green forests and descended into foul caverns overflowing with Lovecraftian horrors.
Altars, chests, and stashes are scattered throughout the massive world for players to discover. Some of these count towards your area Renown, which is the completion goal for each zone.
To uncover Sanctuary’s hidden secrets, players now have the use of amount. This is again a move lifted straight out of the MMO world, which serves to distance Diablo 4 from the past familiar formula.
Much emphasis has been put on the verticality of D4, where past games had nested levels, the developers opted for larger maps that traverse different elevations by use of the ability to crawl, climb or zip across. The novelty of this level design in a Diablo game is much appreciated, as it sometimes allows for shortcuts in certain locations.
Everywhere you look there is something to draw you in and away from your quest. Be it an ominous shrine in a meadow, a demonic altar covered in viscera, or a howling ghostly figure. Lore books have yet to make an appearance, but the telltale signs are scattered throughout the world. We expect the final release of the game to have many objects of lore for players to discover.
One of the issues we’ve had with the level design during the beta is the repetition of map chunks in dungeons and cellars. Whilst there are many dungeons throughout Sanctuary, there aren’t enough to mask the lack of variation and the repetition of the same pattern, sometimes within the same dungeon only meters apart.
Sound Design
Sound is an integral part of any game, a crucial part that, if overlooked, can ruin the experience and break immersion. Diablo 4 nails sound effects and elevates the environment. Echoing caves, claustrophobic dungeons, demonic muttering, and powerful spells are all part of Diablo 4’s sound stage.
Voice acting is on par with modern games. Most of the time, characters deliver their lines with emotion, which makes them relatable and believable. The accents complement the setting and help immersion.
Playable characters around the Diablo 4 campfire
That being said, we had a few instances where the protagonist (in this case, the Rogue) delivered lines in a flat tone that does not fit with the overall gravitas of the situation. Whilst few, they did stand out.
An aspect that we hope Blizzard changes in the final release of the game is the initiation of dialogues. As the player, you will select a line of dialogue from the list, but this line will not be spoken, yet NPCs will respond to this telepathic exchange without skipping a beat. This might sound like a small thing, but once noticed, it’s hard to get over.
UI and Gameplay
Comparing Diablo 4’s UI with previous installments, at the moment, it’s usable but most certainly unrefined. Menus and UI elements are too clunky and scattered behind multiple menus. This is certainly an effect of trying to implement too many systems.
Even though we only experienced Act 1 during the beta, the story does feel captivating and well-written, but ultimately, it has to constantly battle with the rest of the game for your attention.
Emotes and titles are two such systems inherited from the MMO world. For seasoned Diablo players, these are just more clutter to deal with. This looks like Blizzard is throwing things against the wall to see what sticks.
Diablo 4 inventory
On a more positive note, the gameplay does feel good. Hits weight them, and skill upgrades have an impact. You feel a dagger cutting deep into hell’s minions, and you wield the power of lightning when you cast a spell.
This is where the improved graphics and the powerful sound effects come together. Diablo 4 feels good to play. A much-appreciated side effect of the large, open maps is the lack of loading screens, now only encountered at dungeons’ entrances.
Blizzard always introduced online gameplay with Diablo 3, but this time around, they doubled down on it. Diablo 4 does not have a single-player mode. You will be playing in a world with other players of different levels. This is probably the most divisive aspect of the game.
During our playthrough of the Diablo 4 beta, it happened on multiple occasions that a killing blow or a boss fight was finished by another player who happened to be in the area at the time. Whilst you still get the loot, it goes without saying that this is frustrating.
Fractured Peaks, one of the regions depicted in Diablo 4 beta
The game needs a purely solo experience. Whilst offline mode is essentially off the table by now, we are hoping that Blizzard will consider adding this game mode in the future.
This is the biggest gamble Blizzard took with the newest entry, which is surprising after the release of Diablo Immortal and the backlash received from the fanbase.
Diablo 4 is a noticeable departure from the tried and tested formula of games past. There is no denying that Blizzard pulled all the stops to create a platform to add (and monetize) in the coming decade.
Who is Diablo 4 for?
After 3 days of playing Diablo 4, we are left with the impression that Blizzard is trying to modernize the franchise by implementing too many systems and game mechanics simultaneously. There is no denying that they’ve achieved something truly great here.
A modern game that looks outstanding, plays well and will generate massive profits. But we’re left with the thought that, somehow, Diablo has lost some of its essences.
Diablo 4 looks to be aimed at a new audience more familiar with and accepting of multiplayer experiences and less geared towards a single-player, story-driven game. Maybe fans of the IP might be looking at the past games through rose-tinted glasses, but even so, sometimes less is more, and limitations breed creativity.
Undoubtedly, Diablo 4 will mature and become better with time, as did Diablo 3 before it and countless others before that.
Toshiba laptop’s black screen is a recent issue most users complain about. The problem can occur when the laptop starts or when performing a task, and it happens while the PC is running. However, there are some methods you can use to fix it.
Also, we have a similar guide on HP laptop black screens and detailed solutions to fix the issue.
What causes the Toshiba screen to go black?
Some probable reasons for the Toshiba laptop’s black screen include:
Faulty graphics cards – The graphics cards running the devices on the Toshiba laptop may be faulty due to a corrupt or outdated graphics driver.
Issues with the laptop’s Operating system – If there’s a wrong configuration or other issues with your OS, it can cause Toshiba black screen problems. Also, an outdated OS can cause issues with the display.
Laptop overheating – When the laptop temperature is high above the normal range, it can cause issues with its components, resulting in the Toshiba laptop’s black screen on startup issue.
Hardware issues – The black screen can occur due to hardware issues like loose cables, failing GPUs, bad LCD power converter, and poor backlight.
These factors may vary on different Toshiba laptops. Nonetheless, we’ll discuss some basic steps to fix it below.
What can I do to fix the Toshiba laptop’s black screen?
Before anything, go through the following:
Disconnect external devices and peripherals from the laptop.
Power cycle the laptop.
If the error appears again, proceed with the solutions below:
1. Restart Windows in Safe Mode
Press the Windows + I key to open the Windows Settings app.
Select System and click on Recovery.
Then, click the Restart Now option under Advanced startup.
Click Troubleshoot and select Advanced options.
Click on Startup settings.
Then select Restart now after pressing F4 to Enable Safe Mode.
Restarting the laptop in Safe Mode will resolve startup issues liable to cause the Toshiba laptop black screen on startup. Read our guide on how to fix the Safe Mode not working on Windows 11.
2. Update your graphics drivers
Press Windows + R keys to prompt the Run window, type devmgmt.msc, and click OK to open the Device Manager.
Select the Display adapter entry, right-click on the device driver, then select Update driver from the drop-down menu.
Click on Search automatically for the updated driver software option.
Restart your PC and check if the black screen issue persists.
Updating graphics drivers will fix bugs causing the display error and resolve the Toshiba laptop’s black screen with cursor issue.
The much-anticipated language AI model, GPT-4 has made its debut in Azure’s OpenAI Service in preview. The entry is designed to help users reach their maximum potential by leveraging Azure’s OpenAI Service to build their own apps.
With this launch, Azure customers can apply for access to GPT-4 and use OpenAI’s multi-modal models, that is, GPT-3.5, ChatGPT, and DALL•E 2. The announcement comes a week after OpenAI’s head, Sam Altman announced the availability of the “most capable and aligned model yet” GPT-4.
What’s more, GPT-4 is powered by “Azure’s AI-optimized infrastructure, enterprise-readiness, compliance, data security, and privacy controls, along with many integrations with other Azure services.” Microsoft has indicated that interested users can begin applying for access to GPT-A as early as today, and that billing for the services will officially commence on April 1, 2023.
The charges are as follows:
Microsoft has indicated that:
GPT-4 has the potential to take this experience to a whole new level using its broader knowledge, problem-solving abilities, and domain expertise. With GPT-4 in Azure OpenAI Service, businesses can streamline communications internally as well as with their customers, using a model with additional safety investments to reduce harmful outputs.
By making use of GPT-4’s capabilities companies will be able to enjoy enhanced end-to-end customer experiences. summarized long-form and gain access to helping write software. And finally, the users will also be able to significantly cut down the risk since the tool will help them predict the right tax data.
Microsoft has opened up endless possibilities by making this launch where users can now build new apps and solutions that are unique from other competitors via a no-code approach in Azure OpenAI Studio. What’s more, the approach provides a unique interface where users can customize ChatGPT and even configure its response behavior to align with your company’s values.
The company has further indicated that it intends to build on these capabilities further “to enable our customers to responsibly adopt Azure OpenAI Service to bring real impact.” To this end, Microsoft has ascertained that entry features an additional layer of protection that’s guided by human feedback this way it’s much easier to handle inappropriate inputs.
If you’re one of these people, you may be interested in improving your laptop usage. For example, you could purchase a brand-new Bluetooth keyboard and disable the one your laptop has.
Why would I want to disable my laptop’s keyboard?
Disabling your laptop’s keyboard may seem like a pretty extreme thing to do, but it does have its benefits:
Typing on a laptop keyboard can be difficult –Laptop keyboards aren’t the most spacious as they have to conform to the screen. Desktop keyboards offer the most room and comfort.
Desktop keyboards are typically higher quality – To maintain a low weight, laptops must be made out of lighter material but sacrifice sturdiness. External keyboards don’t have this problem.
The keyboard may be damaged – If the keyboard is damaged, you’re better off getting a new device altogether. If you can’t afford it, getting a Bluetooth keyboard is your other best option.
How can I disable my laptop’s keyboard?
There are various ways you can disable your laptop’s keyboard, and they’re all pretty easy to do. However, we don’t recommend opening your laptop and physically disabling the keyboard.
You could accidentally and permanently damage the internal hardware of your computer. Instead, it’s better if you opt for a software solution.
If you prefer to disable just a few keys instead of the whole thing, be sure to download some keyboard mapping software like KeyMapper.
Of course, you could always connect a Bluetooth keyboard to your laptop without disabling anything. However, Bluetooth devices do come with their own problems.
Additionally, you could go into your computer’s Registry Editor and modify a file in the directory to disable your keyboard.
1. Disable via the Device Manager
Launch the Device Manager from the Windows Search bar.
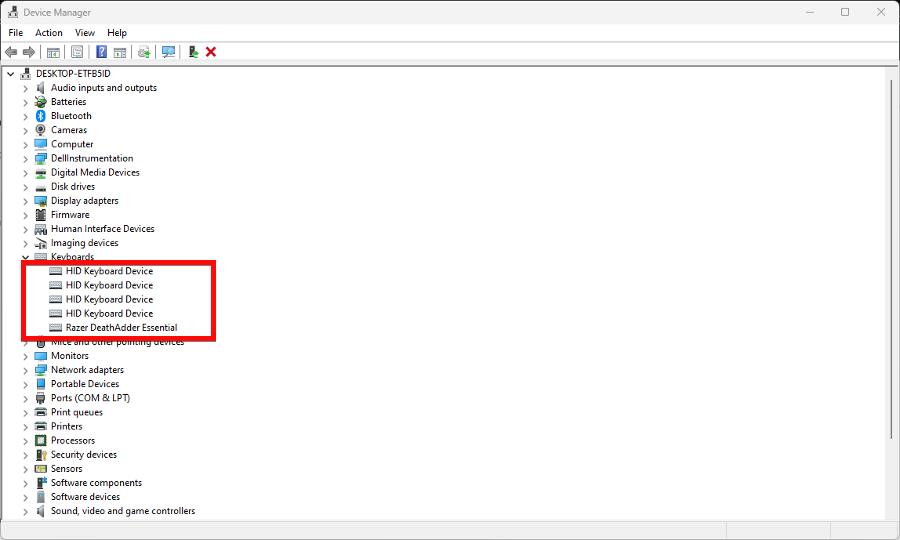
Expand the Keyboard section on Device Manager. Right-click the internal keyboard.
A new context menu will appear. Select Disable. If that option isn’t available, click Uninstall device instead.
Select File at the top of the Device Manager, then click Exit.
It’s possible that after uninstalling, the Device Manager will automatically detect and reinstall the keyboard if you have the app scan for new hardware.
If this happens, you’ll need to uninstall the laptop’s keyboard again.
2. Disable through the Group Policy Editor
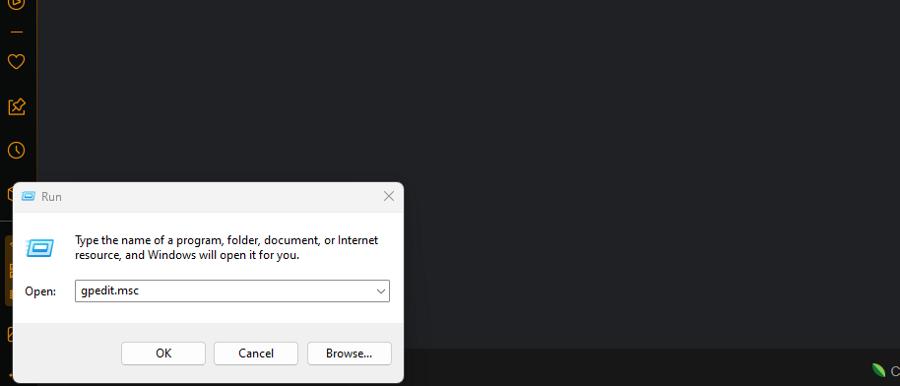
Right-click the Windows Start icon in the lower left-hand menu and select Run. In the window, type in gpedit.msc.
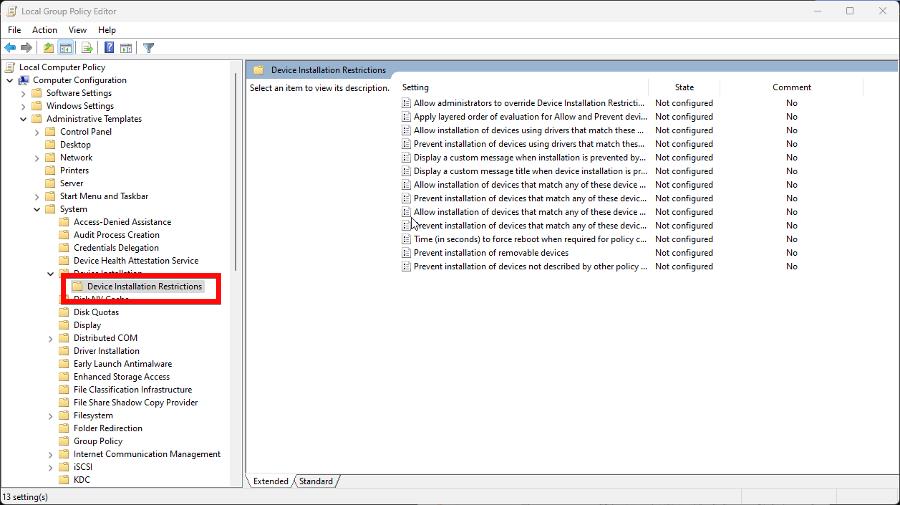
Under Computer Configuration, go to the Device Installation Restrictions folder. You can find it by opening the following folders: Administrative Temples > System > Device Installation.
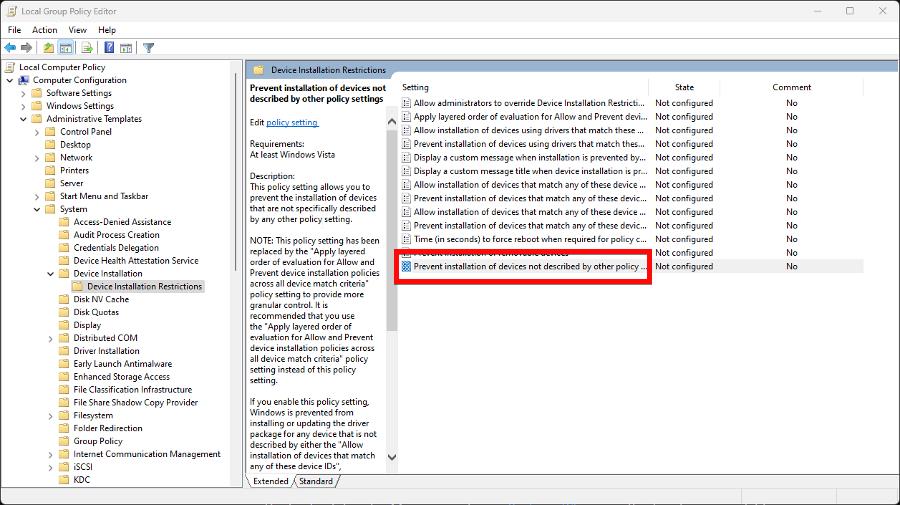
Right-click Prevent installation of devices not described by other policy settings and select Edit.
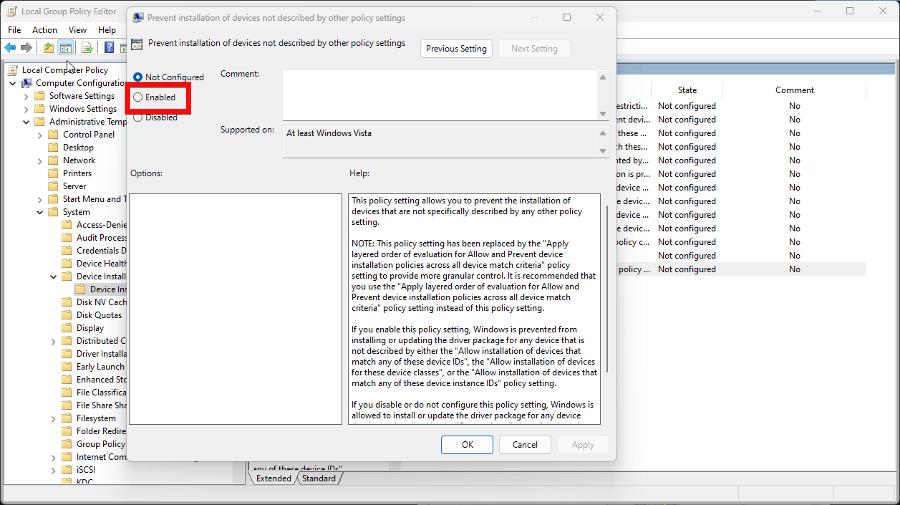
In the new window that appears, select Enabled. Click Apply, then OK.
Return to the Device Manager, and like the previous solution, expand Keyboards.
Right-click your laptop’s keyboard and choose Uninstall device.
Restart your computer, and it should be disabled.
The Group Policy Editor isn’t normally available on Windows 11 Home, but it is possible to enable it. Be sure to read our guide on opening Group Policy Editor in Windows 11.
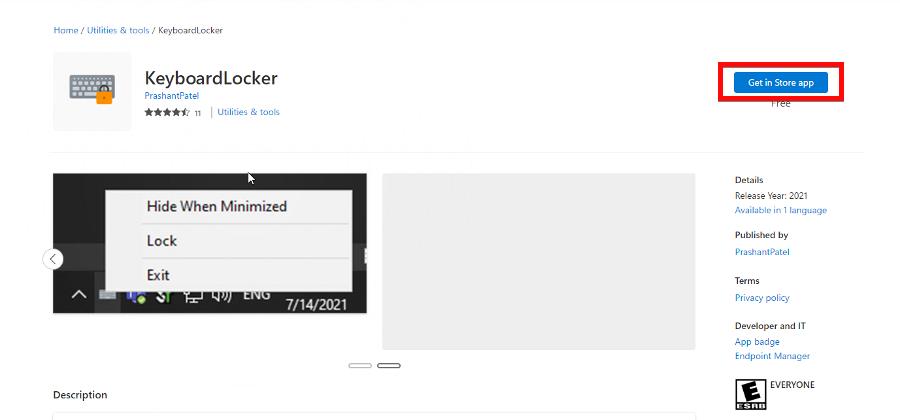
Go to the webpage for the KeyboardLocker app. Select Get in Store app. The Microsoft Store will automatically open, and in this new window, click the Get button.
Open the app when it finishes.
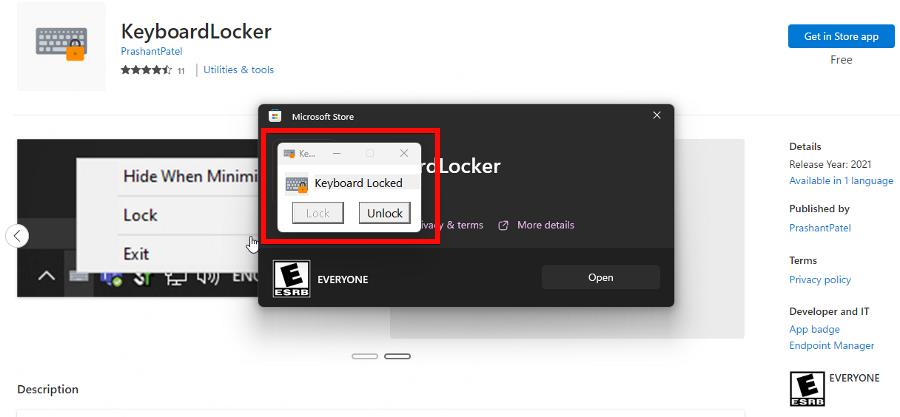
KeyboardLocker opens as a small window. Click Lock to lock your keyboard. Your laptop will not accept input.
Select Unlock to re-enable it.
4. Use the wrong driver
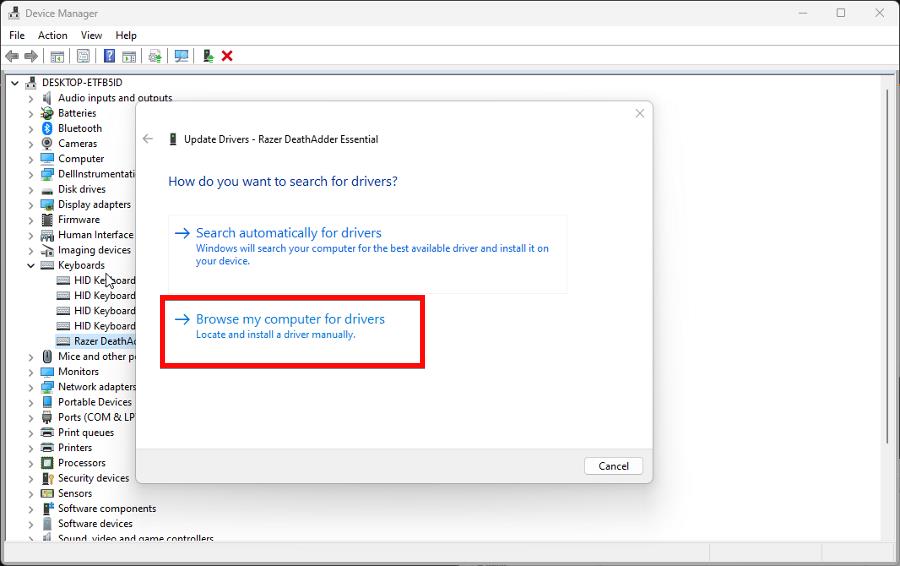
Go to the Device Manager again, expand the Keyboards listing, right-click your device, and select Update driver.
Click Browser my computer for drivers.
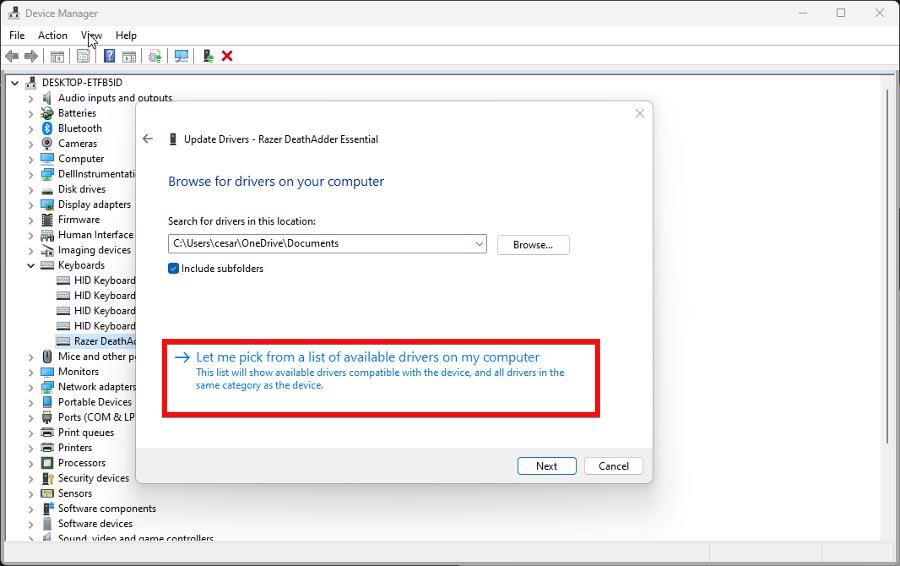
On the following page, select Let me pick from a list of available drivers on my computer.
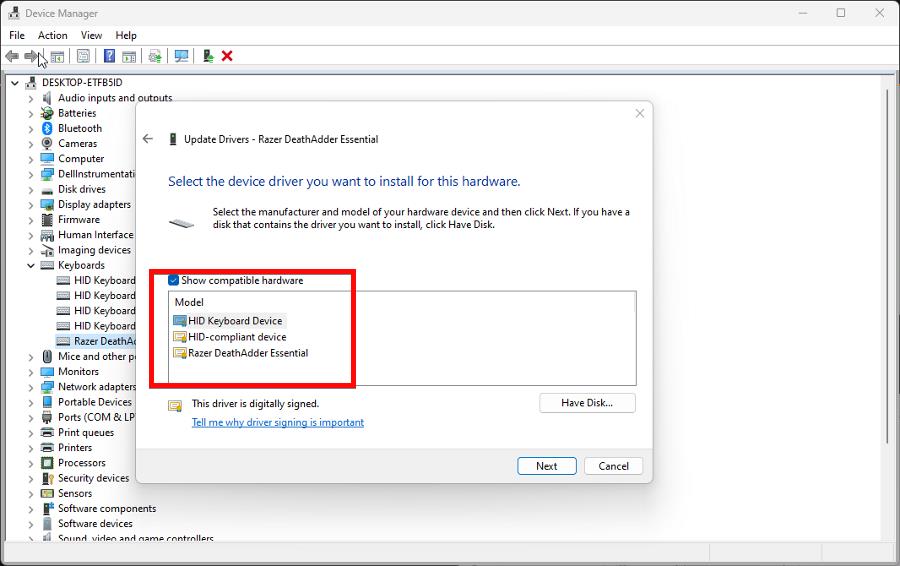
Click the box next to Show compatible hardware. Scroll through the box below and select a manufacturer different from your laptop. When done, choose Next.
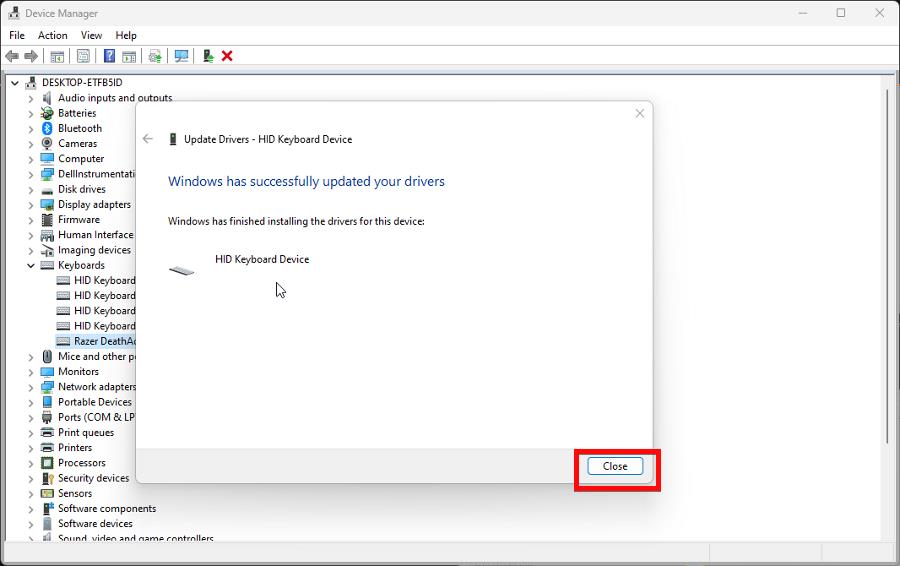
The drivers will install automatically. Click Close when done.
Now restart your computer to finish the process.
To undo the process, go back to the Keyboards entry, right-click it, and select Update drivers.
5. Adjust installation settings
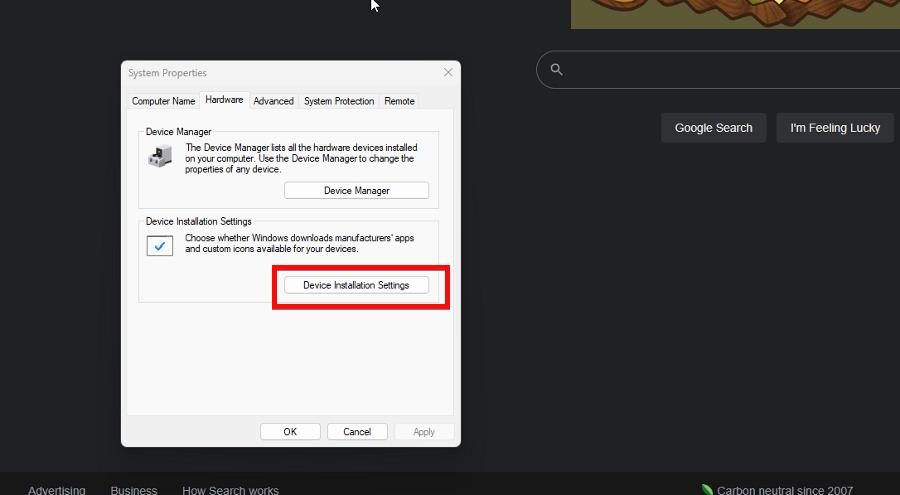
Right-click the Windows logo in the lower left-hand corner, choose Run, and type in sysdm.cpl
Go to the Hardware tab and select Device Installation Settings.
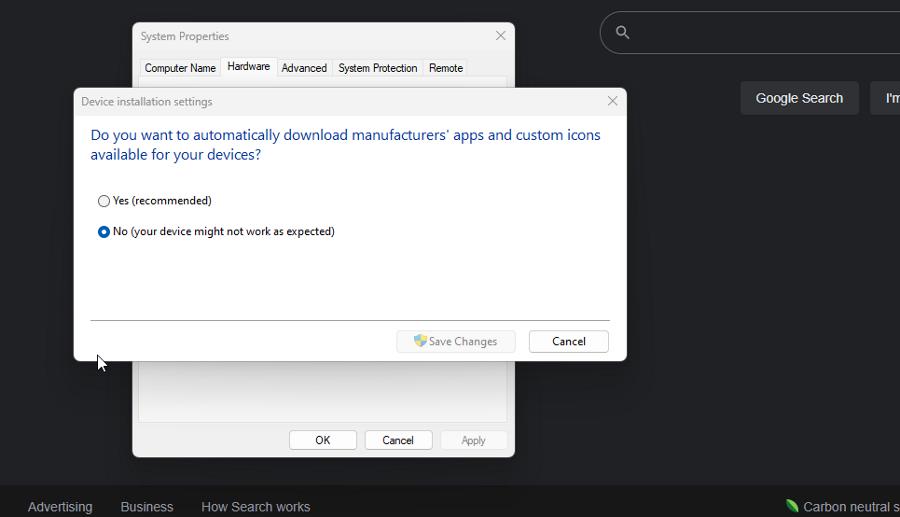
On the new window that appears, click No, then Save Changes.
Now open the Device Manager. And like before, uninstall the keyboard from the app.
6. Disable the keyboard via the Command Prompt
Use the Command Prompt on your Windows Search bar and select Run as administrator.
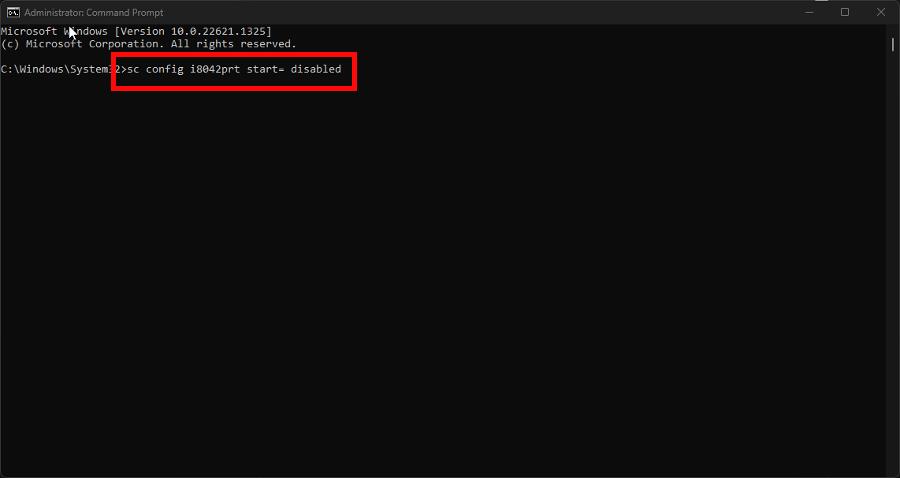
Enter the following command: sc config i8042prt start= disabled
When done, restart your computer.
To re-enable the keyboard, enter the following: sc config i8042prt start= auto
What can I do if my keyboard isn’t working on Windows?
Some of you experience your keyboard suddenly not working for whatever reason. Assuming you don’t have KeyboardLocker accidentally open, you may have a problem with your computer’s BIOS.
To solve this, we recommend connecting an external keyboard and adjusting your machine’s BIOS settings. Specifically, make sure the USB Legacy Support is enabled.
While we have you, we recommend learning how to create a custom keyboard layout on Windows 11. Having different layouts can be useful when adding characters unique to foreign languages.
There are a couple of ways you can do this. You can either go into the Time & language tab in the Settings menu or add them via Windows PowerShell.
Feel free to comment below if you have other keyboard questions. Also, leave comments below about reviews you’d like to see or information on Windows 11 hardware.
If your browser failed to initialize WebGL, you’d find it difficult to run 3D graphics games on the web. While the error is more common in Google Chrome and Mozilla Firefox, it can impact all major browsers.
If you’re wondering what browser supports WebGL, you’re in for a quick answer. WebGL is supported in most modern browsers such as Firefox, Chrome, Safari, Internet Explorer, and Opera.
➡ How do I know if WebGL is enabled Chrome/Firefox? ⬅️
It’s easy. On your browser, navigate to the get.webgl.org website and check whether there is a spinning cube. This is an indication that it is working perfectly.
And speaking of that, if your current browser supports WebGL but still says that initialization failed, you might want to give Opera a try, since it’s as close to an error-free navigator as you can get.
↪️ One of the most common reasons you may receive the WebGL initialization failed error is that your computer does not have enough graphics processing power or your GPU is old.
If your computer has a graphics card that’s more than five years old, it’s likely that you’ll need to upgrade it before you can use WebGL.
The main disadvantage of WebGL is that it has issues and may not perform at its peak on older computers and mobile devices. In order to use this technology, your PC needs to be equipped with a relatively new graphics card.
Most of the time you may come across a runtime error The browser supports WebGL but initialization failed on one browser but WebGL works fine on other browsers.
The error may also occur when running WebGL on Android where you will get Cesium the browser supports WebGL but initialization failed error.
↪️ Finally, WebGL may be unavailable due to a problematic extension interfering with Firefox or Google Chrome’s settings.
Before we start the actual troubleshooting, here are a few quick prerequisites to check:
Make sure you update your browser (Chrome, Firefox, or any other) to its most recent version.
Disable extensions individually as one of them may interfere with WebGL’s functionality
Tweak hardware acceleration settings to On or Off and check for improvements
1. How do I initialize WebGL?
1.1 Chrome
Launch Chrome and type the following in the URL address bar: chrome://flags/
Use the search box to look for WebGL-related options and make sure you set the value to Enabled.
Finally, click Relaunch Now to restart Chrome.
1.2 Firefox
Launch Firefox and type the following in the URL address bar: about:config
Use the search box to look for WebGL-related options and make sure you toggle the value to True to enable.
Restart Firefox to apply your new settings.
To find out if WebGL is enabled in your browser, go to https://get.webgl.org/ and test it directly. Finally, enabling WebGL can also help with Mapbox GL problems in your browser.
2. Update GPU Driver
Press the Windows key, type Device Manager in the search box, and click Open.
Navigate to Display adapters and find your graphics card.
Right-click on your graphics card and select Update Driver Software.
Select Search automatically for updated driver software.
Driver updates make the paths used by the Graphics Card perform their functions faster by eliminating unnecessary actions or better distributing the workload.
Having the most recent graphics card driver is a task for third-party software such as DriverFix, which can install, troubleshoot, and upgrade any missing drivers.
DriverFix installs drivers that are responsible for a responsive browser with 3D graphics, allowing you to fix the WebGL initialization failed error.
At the very least, you will be well-equipped with the most recent graphics card drivers, preventing any other browser errors.
Press the Windows key, type Device Manager in the search box, and click Open.
Navigate to Display adapters and find your graphics card.
Right-click on your graphics card and select Uninstall.
Restart your PC and your graphic cards will automatically reinstall.
4. Disable hardware acceleration
Launch the Chrome browser and click on the three ellipses at the top right corner.
Select Settings.
Click on Advanced and select System.
Toggle off Use hardware acceleration when available.
Now, this option can be bliss just as much as it can be a nuisance. For some, turning it off did the trick, while others found that enabling hardware acceleration and relaunching the browser actually solved the failed to initialize WebGL error.
Now, we used Chrome as an example here, but the steps are similar on Firefox and any other browser you might be using. Speaking of that, if you’re experiencing screen tearing in Firefox, disabling hardware acceleration will definitely improve your situation, so make sure you give it a try.
If you are still encountering problems, you can always switch browsers and see if the problem persists. Feel free to leave us a comment down below if you have additional solutions.
If you have many emails, you might find your Outlook folder a daunting place to navigate. Sometimes folders even disappear. This is because there are so many folders in it, and when you want to find something, you might have to click on each one until you get the one that contains what you want.
However, if you move your Outlook folder to your desktop, it will be much easier to find what you are looking for because all the folders will appear there. Now, here’s a simple guide to walk you through this process.
Can I move an Outlook folder to my desktop?
Yes. You can move an Outlook folder to your desktop using a third-party tool or manually. The real question is why you would want to do so. Some of the compelling reasons include:
Easy access – If you use the desktop for other purposes, such as storing and organizing files and folders, moving your Outlook folders to the desktop might be a good idea.
Offline access – Moving folders to your desktop means you can access them anytime, even without an Internet connection. This is useful if traveling or working in areas with poor connectivity.
Better organization – Outlook already has its folders and you can create new folders to send emails. When you move your folders to the desktop, you can create new ones if you wish to organize your emails in different categories. This allows you to stay organized and keep your personal and professional life in order.
Reduce clutter – As you get more and more emails in your Outlook inbox, it is easy to get overwhelmed. This can lead you to ignore important emails because they’re not easily seen, especially if your mail is full of spam. If there are folders that aren’t relevant anymore, moving them off-screen will help you keep things more organized by reducing visual clutter.
Free up space – If there are folders that contain old messages that no longer need attention, moving them out of sight will make room for new incoming messages which require immediate attention.
Launch the Outlook application, click on File at the top menu bar and select Open & Export then click on Import/Export.
In the Import & Export Wizard that opens, click on the Export to a file option.
Click on Outlook Data File (.pst) then hit Next. Depending on the version of Outlook you’re using, this option could also be Personal Folder File (.pst).
Your Outlook folders will appear on the next screen. Select the ones you wish to import and check the Include Subfolders box if you wish to include them.
Click on the Browse button to select a folder where the folder will be imported to. This is the part where you can select your desktop or hard drive.
Other issues that may trouble you while using the email client include Outlook not opening, but we have already addressed how to navigate this problem in our detailed article.
The NVIDIA Control Panel is a must-have utility for users who want to configure and control their NVIDIA GPUs. Unfortunately, there are times when the program will not save changes made to the Control Panel settings.
This can be frustrating, especially if you have spent time tweaking things to get them right. If you have experienced a similar issue, keep reading and find out how other users were able to resolve it.
Why is my NVIDIA Control Panel not saving settings?
Some users have found that the NVIDIA Control Panel is not saving settings after exiting. You may have just changed your theme, but when you launch your specific game or program, you’ll find the default settings in place.
This issue can be caused by one of the following:
Driver errors – If your graphics card is corrupted, outdated, or missing, you’ll have a hard time saving anything.
Insufficient permissions – You may not be running the NVIDIA Control Panel as an administrator hence can’t make any changes.
Conflicting programs – Some applications have been known to interfere with the functionality of the NVIDIA Control Panel by preventing it from saving settings correctly
How do I fix NVIDIA Control Panel not applying settings?
Before you start on any complex solutions, kick off with the following basics:
Make sure that you are using a valid administrator account. Your current user account may not have enough rights to make changes in the NVIDIA Control Panel.
Examine any recently installed software that may be causing conflicts with NVIDIA’s Control Panel and uninstall it.
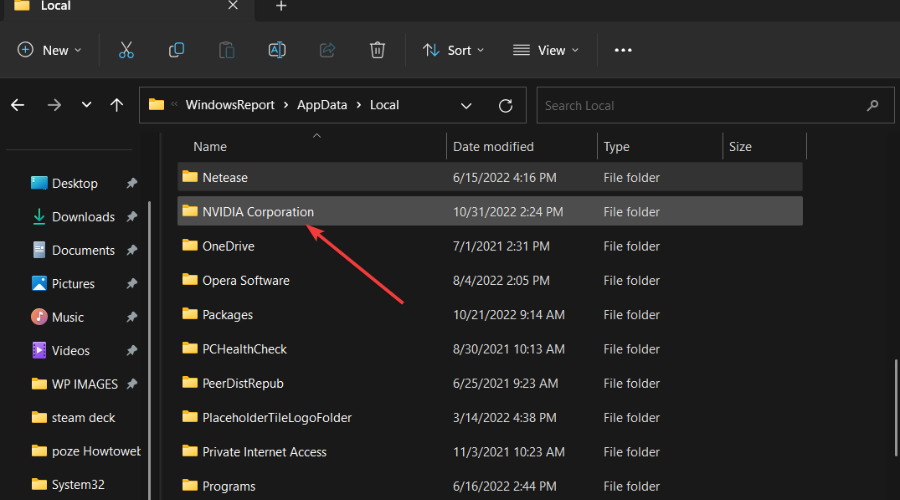
Locate NVIDIA corporation, right-click on it, and select Properties.
Navigate to the Security tab.
Check against the Permissions column and ensure everything under the Allow section is checked.
2. Update your NVIDIA drivers
Hit the Start Menu icon, type Device Manager in the search bar, and click Open.
Navigate to Display drivers, and click to expand.
Locate the NVIDIA driver, right-click on it, and select Update driver.
Select Search automatically for drivers.
Wait for Windows to find the best match for your NVIDIA card.
It would be best if you kept your graphics card updated regularly to stay up-to-date with the latest technologies and features offered by NVIDIA. This will help enrich the user’s experience. If your graphics card has not been updated in a long time, it may not support new features.
Alternatively, if updating drivers manually is not your thing, you’ll be happy to know there’s a way to achieve similar results without going through too many steps. Outbyte Driver Updater is the driver updater utility you need.
It will detect any missing/corrupted/damaged driver, then search from its comprehensive database to find the correct one. Once the process is complete, it will download and install it for you.
Hit the Start menu icon, type Windows Security in the search bar, and click Open.
Click on Firewall & network protection then select Public network.
Locate Microsoft Defender Firewall and toggle the off button.
If you have other third-party antivirus tools installed on your PC, proceed to disable them too. Consider whitelisting the NVIDIA Control Panel utility to ensure you’re not blocked in the future from making changes.
5. Run program as administrator
Go to the following location: C: Drive/ program files/NVIDIA Corporation/Control Panel Client/
Find nvcplui.exe, right-click on it, and select Properties.
Navigate to the Compatibility tab and check Run this program as an administrator.
The NVIDIA Control Panel also faces a myriad of issues from time to time. You may find that the control panel crashes often. Check out our helpful guide for more solutions if this is the case.
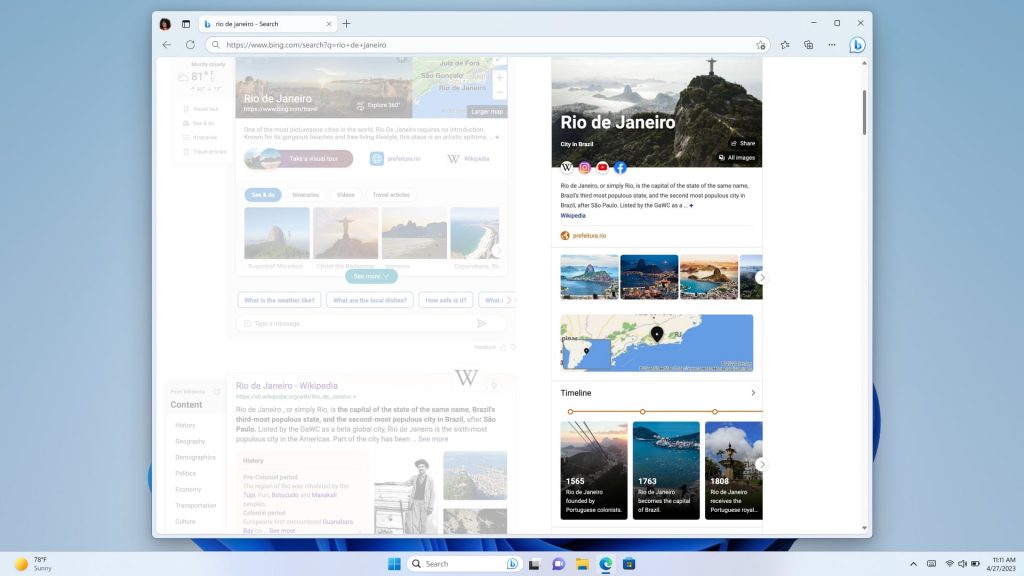
According to the company, the AI-Powered visual stories in Bing will enhance its search experience as well as change how users interact with content while using the web. What’s more, with Knowledge Cards 2.0 users will be able to get insightful information in form of fun facts and key information at a glance.
The AI-powered infographic-inspired experience has received significant enhancements such as interactive, dynamic content like charts, graphs, timelines, visual stories, and more. “With these updates and more coming, our goal is to deliver more immersive experiences in Bing and Edge that make finding answers and exploring the web more interesting, useful, and fun,” says Microsoft.
In related news, Microsoft has also debuted the Bing Image Creator which is designed to let users create and generate images using their own words.
Anyone who owns a PC is not new to CPU overheating. So, when you get the CPU over temperature error, this should not be a cause for alarm, especially if you have been playing games or doing other CPU-intensive tasks.
You should, however, be worried if the message keeps popping up more often than not, as it could indicate a problem with your hardware. As such, you must take the necessary steps to address this issue early rather than later.
What causes the CPU over temperature error?
Overclocking – While overclocking your CPU can improve its performance, sometimes it comes with an overheated CPU. This is especially true if you have an old processor that cannot handle that much pressure.
Faulty cooling system – Your cooling system may not provide the much-needed air, which ultimately causes the CPU to overheat.
Clogged heat sink – A heat sink helps absorb heat from the processor and spread it across a larger area to prevent build-up. If it is clogged with dust, it will no longer be effective at pulling away heat from your processor.
Too much stress on the CPU – If you’re running multiple programs at once, all of this activity can put a lot of stress on your processor and cause it to overheat quickly.
Poor ventilation – If your computer doesn’t get enough airflow through its vents, it will overheat quickly.
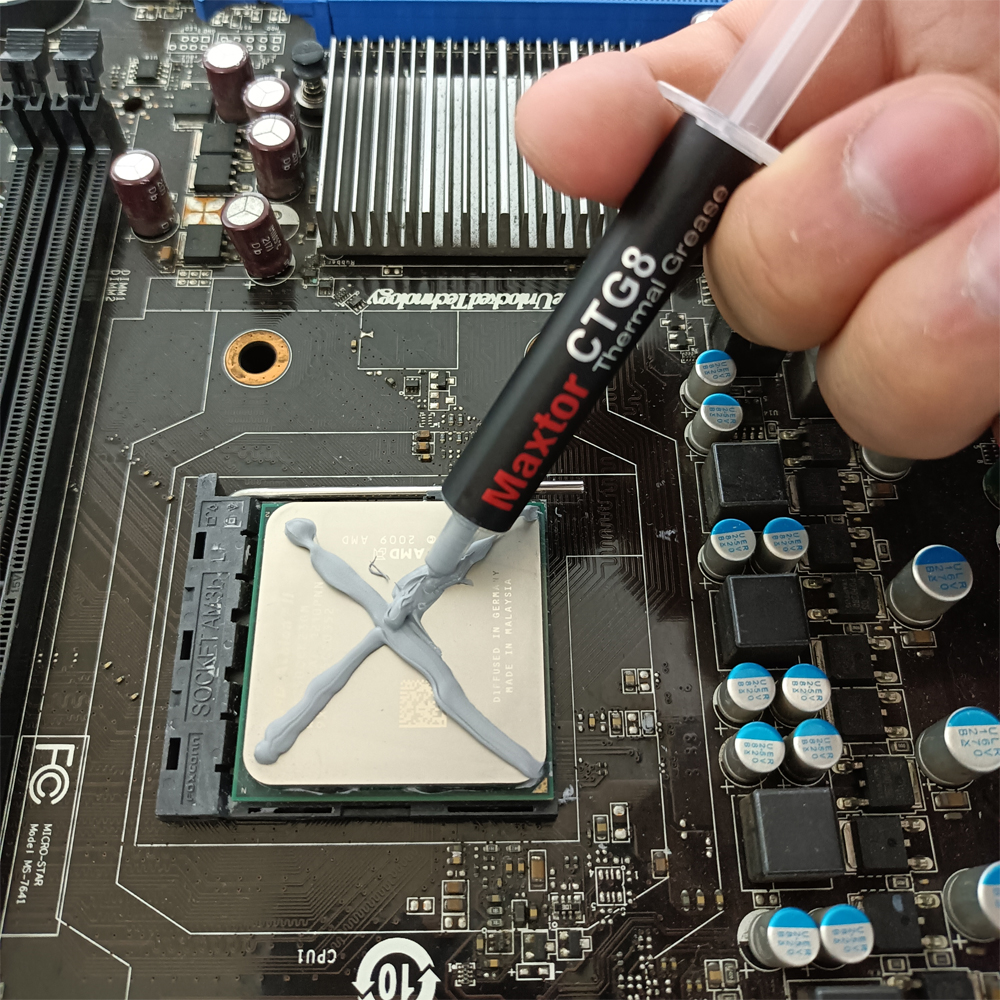
Degraded thermal paste – If you have had your PC for a while, the thermal paste might have degraded over time and needs replacing before it worsens and leads to permanent damage.
How can I fix the CPU over temperature error?
We recommend that you try out the following before moving on to the main solutions: Make sure your PC has plenty of space around it so heat can escape easily, turn off unnecessary applications to free up more RAM, test your PC for stress to ascertain its performance metrics, and update all drivers.
1. Clean dirt
Dust can cause overheating and reduce the fan’s cooling effect. To clean it out, use a can of compressed air or a vacuum cleaner. You can also use a brush to remove dust from the vents on the back of your laptop.
Cleaning off the vents on your laptop can help improve airflow and prevent dust from clogging up those vents. You can also use a soft cloth or other non-abrasive cleaning material to wipe down all areas around your vent openings.
2. Disable overclocking
Overclocking is making your computer run faster than its normal speed. While it can be a useful tool for gamers and other people who want their computers to be as fast as possible, it can also cause problems if done incorrectly.
Overclocking a laptop will increase battery drain and heat output, which can damage the laptop’s components over time. Your processor also plays a huge role in overclocking.
If you have an old processor, avoid overclocking at all costs. Alternatively, you install overclocking monitoring software to keep tabs when your CPU is being overworked and stop the process.
Over time, the thermal paste can dry out and lose its effectiveness. When this happens, air pockets will form between the heatsink and the CPU, preventing heat from dissipating properly.
Since the thermal paste transfers heat from your CPU to the cooler, your CPU will overheat if it cannot perform its functions efficiently. Changing out your thermal paste can help cool down your CPU.
If the CPU over temperature error appears often, it could indicate early signs of CPU failure. Granted, your CPU will not serve you forever, so you need to be prepared for such eventualities. That’s why we recommend some of the best Windows 11 CPUs with impeccable performance.
Classic video game remakes are all the rage right now. This is evidenced by the sheer number of them recently released or coming around the bend: System Shock, Splinter Cell, Prince of Persia, The Witcher, Dead Space, Silent Hill 2 Remake and many others. Unfortunately, the results have been mixed. On the one hand you have the likes of Final Fantasy VII Remake and The Last of Us Part I—games that took classic gaming experiences and reinvented them into something palatable for contemporary gaming audiences. And on the opposite end of the spectrum are video game remakes that somehow missed the mark and failed to do their forebears justice, like 2018’s Secret of Mana and the 2019 MediEval remake.
Given Capcom’s track record with previous remakes of early games in the iconic survival horror franchise, particularly those of Resident Evils 2 and 3 most recently, the excitement for the next in line was understandably high. Resident Evil 4 was the game that redefined not only the series but the horror genre as a whole when it first released back in 2005. It was one of the defining games of its generation and is considered one of the greatest video games of all time.
Those are some pretty big shoes to fill, and now that Resident Evil 4 Remake is about to drop…does it live up to the original’s legacy? Read on to see what some of the top gaming sites are saying.
Whether you’re a fan of the original or a newcomer with a hankering for some action-heavy horror of the highest quality, Resident Evil 4 is like a parasite-riddled Spaniard: a total no-brainer…the most relentlessly exciting Resident Evil adventure of all time that’s been rebuilt, refined, and realised to the full limits of its enormous potential.
IGN’s Resident Evil 4 Remake review lavishes praise on this newest iteration of the survival horror classic.
It’s not a terrible game, but it isn’t seamless, either. It adds enemy variety and fresh environments, but Leon’s bullets routinely hit their targets without dealing damage, his movements are clumsy and his new parry ability is only semi-functional. The game clearly establishes combat strategies for each scene, but then its mechanics get in the way, punishing the player in the process. Overall, the word for the RE4 remake is inconsistent.
Capcom has masterfully created a new version of a beloved game and continues to blaze a trail with its Resident Evil remakes. Like the Resident Evil 2 remake before it, the studio has used advancements in technology and design to modernize an iconic survival-horror and action game…At the same time, it empowers the player with thrilling new mechanics and places challenges in their way to test their mastery of them…It raises the bar for what a good remake is and at the same time, preserves Resident Evil 4’s legacy as a genre-defining experience and one of the greatest games of all time.
The Resident Evil 4 remake is about everything I could’ve wanted. But importantly, it doesn’t overwrite its predecessor. If anything, this new version reinforces why the original Resident Evil 4 is a game people should still seek out, play, or at least watch and learn about. But as a love letter to one of the greatest games of all time, as a new historical artifact that reinforces why the source material was so landmark in the first place, this new trek through the Spanish countryside is as good as it gets and makes a great game that much better.
The Guardian’s Resident Evil 4 Remake review (5 stars out of 5)
This is a wonderful game: a beautiful, tense, camp, gory summation of everything that is so good about Resident Evil. Wherever you find yourself, whether rose garden or torture dungeon, it is alive with intimate detail, from the sounds of distant screams and chants to the sight of a grizzly murder scene or a beautiful vase. It is resplendent, delicious and decadent, like an incredibly rich banquet served amid the detritus of some horrible battle. Believe me, you will feast on it.
Resident Evil 4‘s remake does what the first Resident Evil remake does for the franchise. It expands upon an incredible foundation and creates fresh material while remixing existing scenarios that were sacred. Capcom was very careful with the changes and has delivered another excellent experience that honors the original’s legacy.
Resident Evil 4 Remake: a new horror classic
Much like its predecessor, this new interpretation of Resident Evil 4 is getting glowing reviews ahead of its March 24 release. Does it set a new bar for classic game remakes? Only time will tell. But in the meantime, what are your impressions of the game? Will you be running out and buying Resident Evil 4 Remake? If so, feel free to share your own thoughts with us down in the comments.
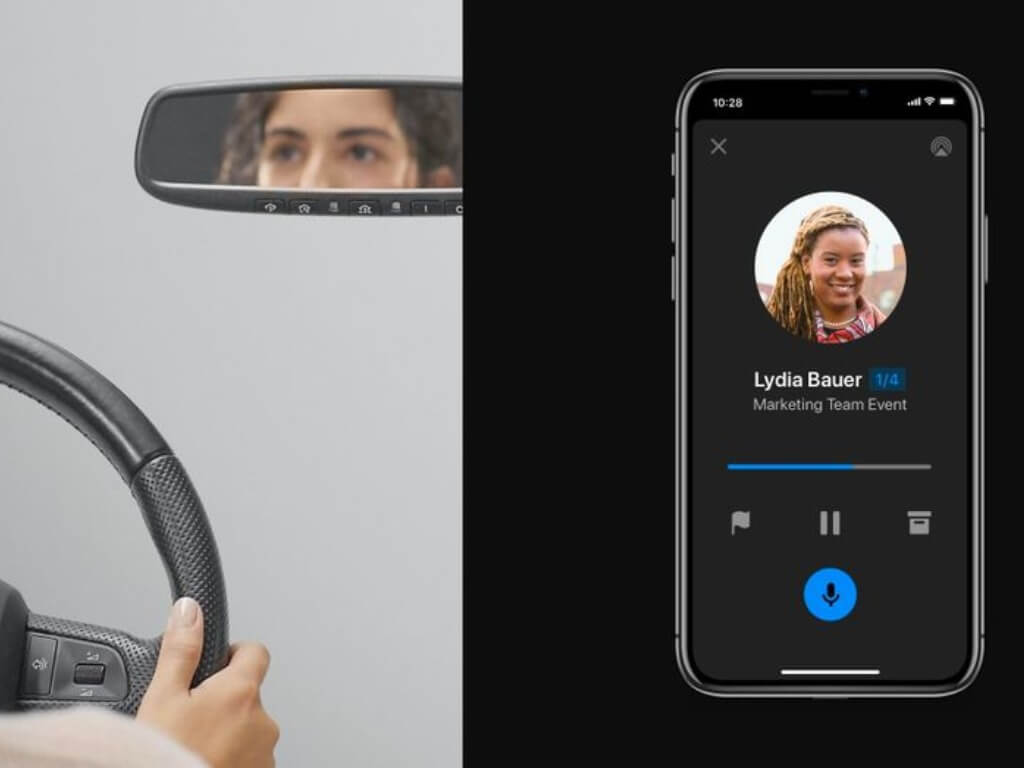
Microsoft has announced that it has expanded the Play My Emails feature in its Outlook mobile apps to French and Spanish speakers. Previously, the feature was limited to English and Portuguese speakers.
For those not conversant with the feature, it is designed to read both emails and upcoming events for Outlook users to make it easier for them to stay up-to-date with everything that’s happening in the inbox.
And now, Microsoft is expanding the feature’s capabilities to two more languages, bringing the total number of supported languages to four.
To access the feature in these new languages, you must be either Outlook for iOS or Android. You must also have an Office 365 work account, an Outlook account, or a Gmail account signed in to Outlook mobile.
Next, you must also ensure that you’re connected to a Bluetooth or wired audio device, then select the Play icon in the notification that appears at the bottom of the screen.
Do you use this feature to enhance your productivity? Share your thoughts with us in the comments.
Type devmgmt.msc and click OK to open Device Manager.
Double-click to expand System devices.
Go to system devices and double-click it to open Properties.
Switch to the Power Management tab.
Removed the checkmark next to Allow the computer to turn off this device to save power.
Click Apply and then OK.
7. Use the BIOS settings
Press Windows + I to open Settings.
Go to System.
Go to Recovery, under Advanced options, and click Restart now.
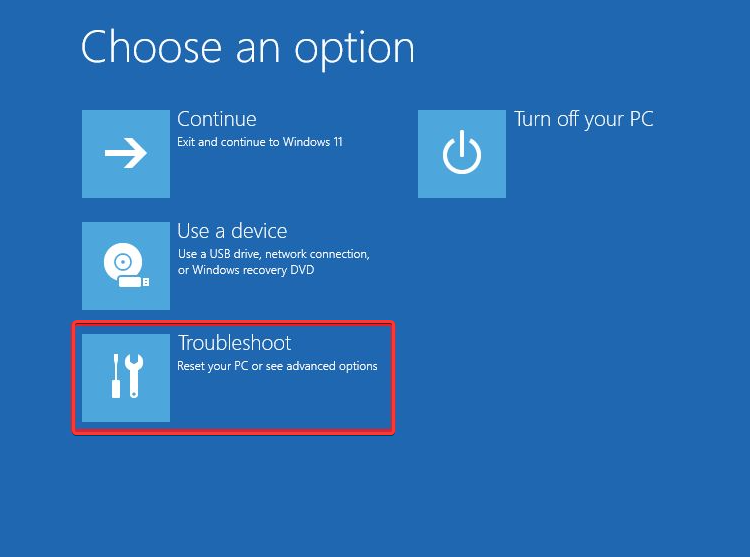
Now under Choose an option page, click Troubleshoot.
Select Advanced options.
On the Advanced options page, select UEFI Firmware Settings.
Click Restart.
Select the appropriate option to reach BIOS. For example, go to Power Management or ACPI settings.
Locate Sleep Mode or Suspend Mode.
Choose Disabled or Off.
8. Use the Task Scheduler
Press the Windows key, Task Scheduler, and click Open.
Click Create Task.
Name the task Disable Sleep Mode.
Go to the Conditions tab, and remove the checkmark next to Start the task only if the computer is idle for.
Under the Actions tab, click New.
In the Program/script field, type powercfg.exe
For Add arguments field, type change -standby-timeout-ac0
Click OK.
9. Use the Windows PowerShell
Go to the search bar, type Powershell, and click Run as administrator.
Copy and paste the following command to change the standby timeout for when the computer is plugged into 0 and press Enter: powercfg -change -standby-timeout-ac 0
10. Use the Windows Registry
Press Windows + R to open the Run console.
Type regedit and click OK to open Registry Editor.
Click File, then click Export. Finally, save the .reg file in a desired location to back the registry entries.
Navigate to this path: Computer\HKEY_LOCAL_MACHINE\SYSTEM\CurrentControlSet\Control\Power\PowerSettings\238C9FA8-0AAD-41ED-83F4-97BE242C8F20\7bc4a2f9-d8fc-4469-b07b-33eb785aaca0
Double-click on Attributes and change the Value data to 2.
Restart your computer for the changes to take effect.
So, these are different ways to turn off sleep mode on Windows 10. Try them and let us know what worked for you in the comments section below.
If you can’t access the Microsoft Teams Admin Center, this guide can help! We will discuss some of the available fixes to resolve the issue quickly. Let’s get started!
What causes the Can’t access Microsoft Teams Admin Center issue?
There can be various reasons why you are not able to access the Microsoft Teams Admin Center; some of the common ones are:
Permissions issues – If your account doesn’t have the necessary permissions to access the Admin Center, then you won’t be able to access it. Before accessing it, check if you have permission or contact the IT admin to make sure.
Browser issues – If your browser has cache, is outdated, or not working correctly, then you might face this issue. Check updates for your browsers and clear the cache to fix the problem.
Network connection is weak – If you don’t have a stable internet connection, you might face all kinds of issues, including this one. So first, check your internet speed; if issues are found, contact your ISP.
Account-related issues – Your account may be experiencing issues that prevent you from accessing Admin Center. Log out and log in to fix the problem.
Microsoft Teams service outage – Sometimes, Microsoft Teams may experience service outages or disruptions that can affect your ability to access the Admin Center.
What can I do to fix the Can’t access Microsoft Teams Admin Center issue?
Before moving to the actual troubleshooting steps, please try to access Microsoft Teams Admin Center in Incognito mode of your browser or use a different browser.
1. Fix browser issues
1.1 Clear cache and cookies
On Google Chrome, click the three dots icon, and select Settings.
Go to Privacy and security, and click Clear browsing data.
Select Cookies and other site data and Cached images and files.
Click Clear data.
1.2 Reset browser
On the Settings page, click Reset settings.
Click Restore settings to their original defaults.
Now click Reset Settings.
1.3 Check for updates
On the Settings page, go to About Chrome.
On the next screen, your browser will try to find an update if available.
Download and install the update.
1.4 Block all cookies
Open Settings; go to Site Settings.
Go to Cookies and site data.
Remove the checkmark next to Block third-party cookies, and Block all cookies (not recommended).
Press the Windows key, type PowerShell, and click Run as administrator.
Click Yes on the UAC prompt.
Type the following command, replace the DOMAINNAME with your domain name, and press Enter: Enable-CsOnlineSipDomain -Domain DOMAINNAME
Close the PowerShell window.
4. Use the PowerShell to manage Teams
Open PowerShell using the steps mentioned in method 3.
Copy and paste the following commands one by one and press Enter after every command: Import-Module MicrosoftTeams$userCredential = Get-CredentialConnect-MicrosoftTeams -Credential $userCredential
You will see a window; enter your admin credentials and click OK.
Select the user you want to assign a license and click on it.
Go to License and apps.
Under the Licenses section, choose Microsoft Teams and click Save changes.
So, these are methods that you need to follow to fix can’t access Microsoft Teams Admin Center. Try them and let us know what worked for you in the comments section below.
Sometimes, you may encounter the Advrcntr6.dll missing error while launching software on your PC.
This can be pretty frustrating as it prevents you from running the app. The error indicates that the DLL file is either corrupted or deleted.
In this guide, we will discuss what Advrcntr6.dll is, different methods to fix the issue, and the causes of the problem. Let’s begin!
What is Advrcntr6.dll?
Advrcntr6.dll is a Dynamic Link Library file developed by Neto AG, a necessary system file of Windows OS. It contains a set of procedures and driver functions used by Windows.
This component is important for Windows to operate properly. If missing, it could affect the software’s working using the file.
What causes the Advrcntr6.dll is missing error?
There could be several reasons why this dll is missing; some of the common ones are mentioned here:
Program not installed properly – If the program you are launching is not installed, it might be able to use Advrcntr6.dll hence the error. To fix this, reinstall the app.
Outdated driver – Old and outdated drivers could be one of the reasons for the missing DLL file. You need to update drivers to fix the issue.
Pending Windows updates – Windows OS needs to be updated to fix bugs and keep everything running smoothly. If not, you may get all kinds of errors.
DLL file is corrupt – If the DLL file is corrupt or deleted, then the app depending on the file, won’t start and will display the error.
What can I do to fix the Advrcntr6.dll missing error?
Before engaging in advanced troubleshooting steps, you should consider performing the following checks:
Download the file which is appropriate to your operating system.
Navigate to this path: C:\Windows\System32
Find the old one and rename it. If you can’t find it, then move to the next step.
Copy and paste the newly downloaded file into the System32 folder.
Now open Command Prompt with administrator rights and copy and paste the following command to register the DLL file: regsvr32 Advrcntr6.dll
Restart the computer.
So, these are methods that you need to follow to fix the Advrcntr6.dll missing error. If you have any questions about Advrcntr6.dll, please mention them in the comments section below.
If you see the SPReview.exe file on the Task Manager on your Windows computer and want to know what it is, this guide can help! First, we will talk about this executable file, how to identify if it is malicious, and remove it if needed.
What is SPReview.exe?
SPReview.exe is an executable file related to the SP Reviewer process, a part of Microsoft Windows OS. The file is installed on Windows systems during service pack installation from Windows Update. It is located in C:\Windows\System32 and is entirely safe. Therefore we recommend not deleting this system file.
To ensure that the file is genuine, follow these steps:
Locate the SPReview.exe, and right-click it to select Open file location.
If this executable file is found in some other folder or directory, it could be the malware or virus disguised on your computer and must be removed immediately.
How can I uninstall SPReview.exe?
1. Use the Control Panel
Press the Windows key, type Control Panel, and click Open.
Select View by as Category and choose Programs.
Under Programs and Features, click Uninstall a program.
Look for SPReview.exe, select it, and click Uninstall.
Once it is uninstalled, restart your computer.
2. Use Windows Security if you think the file is malicious
Press the Windows key, type Windows Security, and click Open.
Go to Virus & threat protection and click Scan options.
Choose Full scan and click Scan now.
If you see any malicious detected by the software, remove it when prompted.
What can I do if there are issues with the SPReview.exe file?
1. Use the Command Prompt
Press the Windows key, type CMD, and click Run as administrator.
Type the following command to repair system files and press Enter: sfc/scannow
Then, copy and paste the following commands one by one and press Enter after every command: DISM /Online /Cleanup-Image /CheckHealth DISM /Online /Cleanup-Image /ScanHealth DISM /Online /Cleanup-Image /RestoreHealth
Once the commands are correctly executed, restart your computer.
2. Run DiskCleanup
Press Windows + R to open the Run window.
Type cleanmgr and press Enter to open Disk Cleanup.
On the Disk Cleanup: Drive Selection window, select C and click OK.
Click Clean up system files.
The Disk Cleanup: Drive Selection window will reappear, click OK.
Now under Files to delete, select all the files listed and click OK.
On the next window, click Delete files.
Spreview.exe file is a legitimate Windows component if found in the System32 folder. If not, you can delete it. If you have more questions about this file, please mention them in the comments section below.
Microsoft has reportedly been testing out a new feature of an Ethereum-based crypto wallet on its often-overlooked Edge browser, and it’s safe to say that not everyone is happy about it.
As spotted by Windows enthusiast Albacore (@thebookisclosed), UI showing Microsoft’s Web3 “non-custodial crypto wallet” is currently out on several select users in its insider program. It can be accessed by typing edge://wallet/crypto/overview into the search bar.
Newest in the gauntlet of questionable upcoming Microsoft Edge features, a crypto wallet ? Not really sure how to feel about this kind of thing being baked into the default browser, what are your thoughts? More screenshots of the UI in the next tweet ➡️ pic.twitter.com/GAUPiZGLIY
As an insider program only, the crypto wallet on Edge is still prone to bugs here and there, which is still far from general availability. On top of that, Microsoft also states that it will not reimburse any lost funds caused by errors within this confidential project.
“We encourage you to test our first Web3 wallet and provide candid feedback along the journey. As the first testers you have the unique opportunity to shape our foray into cryptocurrencies and NFTs.”
You can also view your assets on the tab, send/receive cryptocurrencies in Transactions, and keep up with the latest news on Explore.
It’s quite a risky move, considering how much money can crypto currency bring to the table. And, despite encouraging insiders to test out this internal beta project, many people don’t seem to be so happy about it.
What have people been saying about crypto wallet on Edge?
People’s response to this news has been quite polarizing, if not hugely unpopular and controversial.
One user wrote a lengthy message on Reddit that it could remove Edge’s simplicity, which has somewhat become its trademark despite tons of features added recently. And, apart from this, it could also pose terrible security threats to its users and do nothing but make them retreat to its competitor.
“After so many attempts at regaining the top spot that Internet Explorer once held, MS finally has a chance with Edge and I really, really, really hope they don’t squander it. People only ever leave their defaults for very specific reasons, and Edge being a lighter, cleaner browser was a huge part of why it brought over many users from other browsers.”
With that said, it’s not the first time Microsoft was thrown in hot water for adding features that are deemed useless. When Redmond officials rolled out its Bing AI chatbot companion and the useable sidebar, many complained that they’d somehow taken away Edge’s humble UI that attracted them in the first place.
It’s still unclear whether this crypto wallet feature will come to general users, but given its unpopularity within the insiders’ community, chances are it’s slim to none.
How do you rate this potential move? Let us know in the comments!
If you have encountered the name resolution for the name wpad timed out after none of the configured DNS servers responded error on Event Viewer, then this guide can help!
We will cover all the available methods to fix the issue right after discussing the causes. Let’s start!
What causes the name resolution for the name wpad time out issue?
There could be several reasons for this error message to appear in Event Viewer; some of the common ones are mentioned here:
Badly installed network adapter – If there is a corrupted or incomplete installation of the Network adapter driver, you might get this error. Reinstalling the network adapter can help you fix this problem.
Corrupted DNS cache – If the DNS cache is glitched, it could trigger false positives. To fix it, you can flush the DNS cache.
DNS server is unstable – If the DNS server is unstable, you might get this error message. You can replace the DNS with Google DNS to fix the issue.
Damaged TCP/IP connection – If TCP/IP instructions are corrupted or interrupted, you might see this error. To fix it, you can refer to the TCP/IP connection.
TCP/IP Offload is enabled – If Autotuning, RSS, and Taskoffload are enabled, you could get this error message. You need to disable them to fix the issue.
ISP does not support TCP/IP v6 – If your ISP does not support TCP/IPv6, you can encounter this error. To fix it, disable TCP/IP v6 from the Internet properties.
What can I do to fix the name resolution for the name wpad time out issue?
1. Run the Network adapter troubleshooter
Press Windows + I to open the Settings app.
Go to System, then click Troubleshoot.
Click Other troubleshooters.
Select Network Adapter and click Run.
After the scan, select the problematic network adapter and click Next.
Follow the on-screen instructions to complete the process.
2. Reinstall the Network adapter
Press Windows + R to open the Run dialog box.
Type devmgmt.msc and click OK to open the Device Manager.
Select and expand Network adapters.
Right-click the problematic adapter, and click Uninstall device.
Once uninstalled, close the Device Manager and restart your computer. Your computer will automatically install the best available driver.
3. Reset the TCP/IP connection
Press the Windows key, type CMD, and click Run as administrator.
Copy and paste the following command to reset TCP/IP and press Enter: netsh int ip reset
Once the command is executed, restart your computer.
Press the Windows key, type CMD, and click Run as administrator.
Copy and paste the following commands one by one and press Enter after every command: ipconfig /flushdnsipconfig /registerdnsipconfig /releaseipconfig /renew
Once the command is executed, restart your computer.
5. Change the DNS
Press the Windows key, type Control Panel, and click Open.
Select Category as View by & click Network and Internet.
Next, click Network and Sharing Center.
Now click Change adapter settings.
Right-click the network and select Properties.
On the Networking tab, double-click Protocol Version 4 (TCP / IPv4).
Select Use the following DNS server addresses, choose Preferred DNS server as 8.8.8.8 and select Alternate DNS server – 8.8.4.4
Click OK, then click OK.
6. Disable TCP/IP
Press Windows + R to open the Run dialog box.
Type ncpa.cpl and click OK to open Network Connections window.
Click Network connection and choose Properties.
Remove the checkmark next to Internet Protocol Version 6 (TCP / IPv6).
Click OK to confirm the changes.
7. Disable Autotuning, RSS, and Taskoffload
7.1 Use the Command Prompt
Press the Windows key, type CMD, and click Run as administrator.
Type the following command one by one and press Enter after every command: netsh interface tcp set global rss=disablednetsh interface tcp set global autotuninglevel=disablednetsh int ip set global taskoffload=disabled
Close the Command Prompt.
7.2 Use the Registry Editor
Press Windows + R to open the Run dialog box.
Type regedit and click OK to open Registry Editor.
Navigate to this path: Computer\HKEY_LOCAL_MACHINE\SYSTEM\CurrentControlSet\Services\Tcpip\Parameters
Right-click on Parameters and select New, then DWORD.
Name the DWORD EnableTCPChimney.
Double-click the DWORD and modify the Value data to 0.
Follow the above three steps and create two more DWORD (32-bit) and name them EnableTCPA & EnableRSS,respectively. Finally, modify their Value data to 0.
Close the Registry Editor and restart your computer.
So, these are methods to fix the name resolution for the name wpad timed out error. Try them and let us know what worked in the comments section below.
The war on AI is heating up as popular streaming app Discord just entered the conversation with its latest AI-powered chatbot, Clyde.
The San Francisco-based company announced that the chatbot serves as a companion that could perform multi-complexed searches and ask for recommendations for things like music playlists, GIFs, summaries, and books, on both public and private threads, ChatGPT style.
The feature is currently rolling out the Alpha channel, meaning it’s getting experimented on several select users only as we speak. With that said, being a new feature, you may come across a few bugs here and there. And, just like when Microsoft first rolled out Bing’s chat mode, it may not be able to generate content for every prompt just yet.
Clyde is experimental and might respond with content or other information that could be considered biased, misleading, harmful, or inaccurate even with safeguards in place. Clyde may not have information or be able to respond to every prompt.
On top of that, while you can draft messages using the same OpenAI technology on Slack, you won’t be able to do it here—yet.
How to use Clyde AI on Discord.
1. Make sure you’ve joined the Alpha insider program. If not, head over to the channel’s website. Click Download for Windows or Open Discord in your browser to download the client.
2. Once it’s available for you, go to Server Settings ➜ Integrations.
3. Click Enable (or Disable to perform otherwise).
4. Type ‘@Clyde’ on any thread to summon the chatbot.
Being an Alpha insider-only feature means Clyde is still prone to errors. This is the most unstable version of Discord, with lots of updates. Bugs usually happen here so use this client at your own risk.
On another hand, Microsoft, who’d also paid billions in investment in OpenAI, has integrated the latest GPT-4 technology into its 365 office apps ecosystem. That means, it’s about time we’ll see this AI chatbot feature coming on Teams, Slack’s competitor.
Are you excited about this feature? Let us know in the comments!
Chromebook black screen issues can be frustrating, but they are not uncommon. Many users have experienced this problem, and fortunately, several possible solutions exist. Therefore, we will explore the most effective steps for fixing a Chromebook black screen issue.
Various factors that can cause the Chromebook’s black screen are as follows:
Battery issues – The battery is the power source for the Chromebook. Therefore, a faulty battery or when the laptop battery is drained while the device is off can cause the Chromebook black screen issue.
Hardware issues – Hardware comprises the motherboard, hard drive, and other components. A faulty motherboard can prompt the black screen.
Display brightness – Most users have encountered Chromebook black screen issues that won’t turn off due to reduced screen brightness.
Outdated operating system – An outdated OS can hinder communication with the hardware component. It is because of the bugs affecting the current version, resulting in the screen going blank or black.
Overheated device – An overheating laptop is a common issue with high performance which can cause damage to the internal components or lead to system failure.
Nonetheless, we will walk you through the steps to fix the Chromebook black screen in no time.
How can I fix the Chromebook black screen?
Before attempting any advanced fixes, it’s essential to observe these:
Ensure that the Chromebook is on.
Check if the battery is not dead.
Unplug all the USB & external devices.
Checking these basic things, you can rule out simple issues and focus on the advanced fixes for a Chromebook black screen issue below.
1. Increase the screen display brightness
Click on time and adjust the Sun icon level.
Also, you can press the key with the Bigger Sun logo to increase brightness and the Smaller Sun logo to decrease brightness.
Increasing the brightness will allow you to see the screen.
2. Drain out the battery
Let the Chromebook battery get low and wait a couple of minutes.
Plugin the charger and let it charge for at least 30 minutes before powering it up.
Try to remove the battery and plug it back in after trying the above process.
3. System Recovery
Remove all external hardware.
Press & hold Esc + Refresh + the Power key simultaneously.
Release Power first and release other keys until a message appears on your screen.
Performing the steps above will restore the system to the previous point and fix the corrupt system file.
Wondering what the best browser for adults is? You’ve come to the right place as we will talk about the 7 safest and most private browsers to use when you’re not up for being tracked online.
We’ll go into details below, but if you’re in a hurry, here’s a quick look at them:
Opera One: Built-in VPN, advanced privacy features, and anti-tracking tools for secure browsing.
Tor Browser: Utilizes the Tor network for anonymous browsing, has built-in privacy features, and no tracking.
Mozilla Firefox: Enhanced Tracking Protection, private browsing mode, and numerous privacy add-ons.
Brave: Built-in ad blocker, private browsing with Tor, and strong anti-tracking mechanisms.
DuckDuckGo: Privacy-focused, built-in ad and tracker blocking, and anonymous browsing features.
Chromium: Open-source browser with customizable privacy settings, extensions for enhanced security, and Incognito mode.
LibreWolf: Privacy-focused fork of Firefox, removes telemetry, and includes built-in tracking protection and security enhancements.
Opera does not gather any personal data about you without asking for permission.
The Opera web browser comes equipped with an in-built ad blocker and uses a tracker blocker hence being one of the best browsers for adults with VPN as well.
These features work together to prevent users from seeing advertisements. And from having their activity tracked by other websites and advertisers.
Check out Opera’s best features:
Free VPN + Adblocker
Tracker blocker
Cryptojacking protection
Easy to set up and use
Opera
Perform any online operations via an entirely private browser with VPN and anti-tracking!
2. Tor Browser – Never keeps track of your history
The security of the Tor Browser greatly aids privacy because no one monitoring your connection can monitor your online activities or identify you unless you voluntarily give that information out.
Thus, making it one of the best adult browsers for Windows 10 too. Tor also deletes your cookies after each session and doesn’t keep track of your browser history.
Given that the Mozilla Foundation is a nonprofit organization, it is astonishing to see its volunteer coders working nonstop to make sure Firefox is stocked with the newest browsing and security capabilities within weeks.
Any Internet user would enjoy Firefox’s security features, which include phishing and virus prevention, blocking reported attack websites and web forgeries, and alerting users when a site tries to install add-ons.
Using a built-in ad blocker that also prevents advertisements from monitoring your online activity, Brave includes a number of tools to keep your activity private.
It also has the ability to secure unencrypted websites with HTTPS. Due to its ad blocker, it is one of the best browsers without ads for adults to use.
Even though Brave’s new Tor tab is private, it falls short of the requirements set by Tor itself since it has a scalable window size that might be exploited to track your surfing habits.
Take a look at Brave’s top features:
Blocks trackers, cross-site cookie tracking, fingerprinting, and more
DuckDuckGo rigorously regulates the amount of personal information it gathers, in contrast to other search engines. That makes it an excellent option for users who want to keep their data private.
Same Internet, greater privacy -that’s how DuckDuckGo sums up its services.
Although, as of now it is only available as a search engine for PCs, it does have a browser for mobile phones that is just as safe as the search engine itself. Nonetheless, it is one of the best browsers for adults to use.
Don’t miss out on DuckDuckGo’s best security features:
Chromium is a free and open-source codebase that was first created by Google. It acts as the basis for several other browsers, including Chrome, Vivaldi, Edge, Opera, and Brave.
Because it doesn’t rely on Google’s online services, Chromium is effectively a degoogled version of Chrome. It is unobtrusive, light, and tracker-free.
A good privacy-focused browser is LibreWolf, which has a number of wonderful features including built-in ad blocking, a firewall, and the ability to utilize privacy-focused search engines like DuckDuckGo, Searx, and Qwant.
Here are some of the best security features of LibreWolf:
Back in 2020, the Edge browser was built on Chromium, which indicates that a portion of its code is available to the public.
What’s more, the browser regularly checks for and installs software updates, the majority of which will be security patches.
It was discovered by researchers in the field of information security that Microsoft Edge sends persistent identifiers that can be used to link requests (and associated IP addresses/locations) to backend servers.
The collecting of such data can expose a significant amount about the identity of the user, and there is not a whole lot that can be done about it.
MS Paint is one of Windows’ best and oldest graphics editors and has many users to date. Sadly, almost everyone complains about running into Paint cannot read this file when opening a JPG or PNG image. Hence, we’ll discuss some steps to resolve the error on Windows 11.
Alternatively, many of our readers have reported that they cannot open the PNG files on their PC. Hence, check our solutions in this guide.
Why can’t Paint read this file?
Error message: Paint cannot read this file. This is not a valid bitmap file, or its format is not currently supported appears when opening a JPG or PNG image file you downloaded. Some of the factors responsible for this error are:
Unsupported image file format – MS Paint is only compatible with JPEG/JPG, Bitmap (BMP), GIF, PNG, and TIFF formats. So, attempting to open an unsupported file format on it can cause the error to appear.
Corrupt MS Paint app – The error can occur if the MS Paint app is compromised. It can be due to an outdated program preventing Paint from installing the necessary updates. Check out our file repair software recommendation to fix the app files.
Corrupt image files – If the image file you’re trying to open in the MS Paint app is corrupt, it can affect how it interacts with the app. Hence, it results in an error because Paint cannot read or access the file.
Outdated Windows OS – Running an outdated Windows Operating System on your PC can cause viruses or malware infection because of bugs. Do not hesitate to check what to do if Windows Update is not working here.
After accessing the error and its causes, we have devised some tested and effective solutions to resolve it below.
What can I do if Paint can’t read this file?
Before proceeding with any advanced steps, go through the following:
Try another software or convert the image file to a supported version – the last resort is to try opening the image file via another photo viewer on Windows 11. If it works, then the file format may be the issue.
If the error appears again, proceed with the solutions below:
1. Run an SFC scan
Left-click the Start button, type Command Prompt, and click the Run as administrator option.
Click Yes on the User Account Control prompt.
Type the following and press Enter: sfc /scannow
Restart your PC and check if the Windows update error persists.
Click the Start button, type control panel, then press Enter to open the Control Panel.
Select the Windows Defender Firewall option.
Click the Turn Windows Defender Firewall on or off option from the left side.
Go to the Private network settings and Public networksettings, then click the radio buttons for the Turn off Windows Defender Firewall (not recommended) option.
Press the Windows + I to open the Windows Settings.
Click on the Windows Update category and click on Check for Updates. Wait for the Windows update result and click on Install Update if a Windows update is available.
Updating the Windows OS will install patches for fixing bugs and resolving compatibility issues liable to cause the issue.
However, you can convert or open the image file with one of the best photo editors for Windows 11 and check if it works in MS Paint.
SpeedStep is a technology built by Intel to help optimize system performance in some supported CPUs. However, you may encounter problems like SpeedStep activities not being stable, causing the system to be slow or perform poorly. Hence, we’ll take you through some basic steps to disable the features.
Disabling the intel SpeedStep technology does not affect any core processor or components running on the PC. Since it is not an essential system component, stopping its implementation will not pose issues with other programs and tools.
However, disabling it may affect the battery life and power consumption if used to save energy. But if the intel SpeedStep feature is not performing these functions for you, it is safe to disable it.
How can I disable Intel SpeedStep Technology?
1. Disable SpeedStep in BIOS
Press the Windows + I key to open the Windows Settings app.
Select System and click on Recovery.
Then, click the Restart Now option under Advanced startup.
Click Troubleshoot and select Advanced options.
Tap on UEFI Firmware Settings, and click Restart. The system will restart and enter the BIOS menu.
Choose the Advanced tab on your BIOS.
Select CPU Power Management Configuration to disable SpeedStep.
Select Intel SpeedStep or EIST, then select the Disable option to turn the SpeedStep Off.
Exit the BIOS and restart your PC.
Do not hesitate to check our guide on resolving corrupt BIOS components that may cause the BIOS not to work.
2. Disable SpeedStep via the Windows Power Option
Press Windows + R key to open the Run dialog box, type control, then press Enter to open the Control Panel.
Click on the System and Security option and select Power Options from the right pane.
The Log file feature in VLC stores events and allows users to check the log files for troubleshooting. However, many users find it hard to locate the log files whenever needed. So, this article will explore the quickest ways to view VLC log files.
A VLC log file contains a detailed description of the activities and events on the VLC media player. It is created by VLC when it is in use, and its detailed information can include the player’s actions, such as the files played, the video codec packs used, and any errors that occur during playback.
Can I delete the VLC log file?
Yes, you can delete the VLC log file. Deleting the log file will not harm the VLC media player or its functionality.
However, if you are experiencing issues with the VLC media player, the log file may contain valuable information to help you diagnose and fix the problem. In this case, it is advisable to make a backup of the file before deleting it.
How can I view the VLC log file?
1. View the VLC log file directly in the VLC player
Launch the VLC Player on your computer.
Select the Tool tab from the menu bar and click on Messages from the drop-down menu to open the error log.
You will see all the events since the last time you used VLC Player on the new page.
If you want to save the log file, click on the Save as button to extract the error log to your PC.
Extracting the log file allows you to share it with other users and use it for other purposes.
However, if you can’t find the log file on your VLC Player, you can create a new one to store the details of events on the app. Follow the steps below to create a new log file and how to view it:
2. View the VLC log file by creating a new Log file
Launch the VLC Player app on your PC.
Select the Tool tab from the menu bar, then click on Preferences.
Navigate to the Show settings tab, then click on the radio button for the All option.
Check the box for Log to file on the right pane, then click the drop-down button against the Choose Log format and select either HTML or Text.
Click on the Browse button and create the log and set the proper location of the log.
We first learned about the company’s “next-generation store” late last year, a month after Microsoft announced its acquisition of Activision Blizzard. It’s no secret that the company has been busy at work making strides to ensure that it taps into newer markets, particularly in the gaming sector. Xbox head, Phil Spencer has confirmed that the Xbox mobile gaming store is currently in the works.
As per the EU’s Digital Markets Act, key industry players like Google and Apple will be required to open their mobile app stores to other companies. This change is set to take effect as soon as next year. That said, Microsoft could technically leverage this opportunity to tap into iOS and Android via its Xbox app store around the same timeframe.
This will essentially allow Microsoft’s game store to take on Apple and Google’s mobile gaming stores and give them a run for their money. Microsoft disclosed that it intends to make use of Activision Blizzard mobile titles like Candy Crush Saga, Diablo Immortal, and Call of Duty: Mobile to get more users to hop on the new platform once it ships.
While on an interview with Finacial Times, Xbox’s head, Phil Spencer indicated that:
We want to be in a position to offer Xbox and content from both us and our third-party partners across any screen where somebody would want to play. Today, we can’t do that on mobile devices but we want to build towards a world that we think will be coming where those devices are opened up.
Once the Activision deal goes through, Microsoft will be able to compete with the likes of Google and Apple on an even playing field as it will provide the company with “much-needed expertise in mobile game development, marketing, and advertising.”
That said, Microsoft’s deal is yet to be cleared by regulators. Recently, Microsoft devised new remedies to appease the European Commission in regard to its proposed merger with Activision Blizzard. And even struck deals with Boosteroid and Ubitus to bring Call of Duty and other Xbox titles to those platforms for the next 10 years.
Let us know what you think about Microsoft’s Xbox mobile gaming store in the comments.
When you plug in your Xbox controller to your Windows PC, the last thing you would expect is for it to open the virtual keyboard. Granted, you may have pressed a key accidentally that brought up the keyboard. Sometimes, even the Windows onscreen keyboard keeps popping up.
However, some users have complained that the keyboard pops up, and even after numerous attempts to close it, it still appears on your screen. For today’s article, we get to the root cause of the problem and how to get rid of it.
Why is my controller showing up as a keyboard?
While the keyboard appearing on your screen is not peculiar, users noted that this particular keyboard was not the standard Windows virtual keyboard. A blue keyboard which implies it is the Steam virtual keyboard made a common appearance.
Still, other reasons why the Xbox controller keyboard keeps popping up include:
Glitches in software – It is possible that your Xbox controller is not working because it is experiencing sudden changes or bugs that may interfere with its normal operation.
Outdated firmware – If you have been using your Xbox controller for a while without updating it, it may exhibit some glitches due to software inconsistencies.
Unplugged controller suddenly – If you suddenly unplug your controller while Steam is running, Steam will temporarily think that no controllers are connected and switch to a keyboard-only interface.
How do I stop my Xbox controller from opening my keyboard on my PC?
While the technical solutions have been proven to work fine, a few basic workarounds that may help fix the issue include:
The first thing to try is unplugging your controller and plugging it back in.
If you’re using a wireless controller, make sure that the batteries are charged and that they are installed properly.
Disconnect all peripherals, then connect only your Xbox controller and see if the keyboard still pops up.
Try using a standard keyboard and mouse and check if the problem persists. Perhaps your Xbox controller is the problem.
Press the Xbox button on your controller to open the guide menu.
Navigate through and select the Profile & system option, then click Settings.
Go to General and click on Power mode & startup.
Select Restart now from the power options.
Then select Restart console.
2. Disable the Steam keyboard
Launch Steam on your PC and click on the View tab.
Click on Settings and find your controller.
Select Controller and click on Desktop Configuration.
Click on the box displaying various Arrow keys at the bottom left of the screen.
Next, select the Show Keyboard option under the Click Action settings.
You will now see a keyboard and mouse displayed on your screen. Hit the Remove button, then press OK to save the settings.
You can also disable your Windows virtual keyboard if the issue keeps appearing.
2. Reset the Xbox controller
On your controller, press the Xbox button, and on the menu, click the System tab to open Settings.
Select System, then click on Console info.
Hit Reset console.
Choose Reset and keep my games & apps.
Resetting your Xbox controller could help clear any glitches that may be affecting normal operations. If the issue is caused by one of the apps or games you have installed, when resetting, instead of choosing the option to keep your files, select the one where you remove everything.
The option to uninstall Steam should be a last resort if none of the preceding solutions work. Should the issue be with your controller, it may be time to switch to a modern-day Xbox controller with exquisite features.
In a recent Microsoft press release, the company patted itself on the back for their latest commitment of “empowering” developers with support for third party application pinning and Taskbar pinning.
We will ensure people who use Windows are in control of changes to their pins and their defaults.
We will provide a common supported way for application developers to offer the ability to make their app the default or pin their app to the taskbar. This will provide users a consistent experience across all apps.
Microsoft apps will use the same common supported methods for pinning and defaults.
As a matter of practicality, the above proclamations amount to new publicly available APIs for developers that will allow their apps to be pinned as either primary or secondary tiles to the Taskbar.
While the end result of the new support will fundamentally look the same, Windows 11 users will now be notified in the Action Center about a pending request from the app, to be pinned to the Taskbar in similar fashion as the Edge browser employes when pinning websites as apps to the Start Menu, Taskbar or both.
As for defaults, Microsoft says it will offer “a new Settings deep link URI for applications to take their users directly to the appropriate location in Settings for the user to change their defaults.”
Microsoft may not have publicly acknowledged a backtracking on its own recent bullish default practices with Edge, it is retrenching in its belief that offering specificity will help the end users. It is debatable whether or not users understand protocols or file extensions, but they dropping them into the exact place to set their favorite app as the default interaction could be beneficial.
Not as beneficial as automatically applying the default to the correct extensions and protocols as the OS had once done, but more beneficial than Microsoft simply replacing a third-party apps interaction with its own.
Windows Insiders on the Devi Channel flight release cycle should start seeing these features pop up in the coming months.
So you’ve gone ahead and gotten the best graphics card money can buy, acquired enough RAM to accommodate all your game files, and even with high FPS, your game is still not smooth. You may have 144 FPS, but your game is not smooth. What could be the reason?
Although Windows 11 has been optimized for gaming, some factors may affect your gaming experience. In today’s article, we explore why you’re experiencing choppy gameplay with high FPS and how to mitigate this issue.
Why is my FPS so bad with good specs?
Whereas you can increase your FPS in Windows 11 to boost your gaming performance, sometimes this is not enough. You may notice that your game is not smooth. But why does this happen? Below are some possible causes:
System requirements – Each game has its requirements to perform well. No matter how good your PC specs are, they are not good enough if they don’t meet the particular game’s specs.
Hardware failure – Even the best GPU will fail over time. You need to look out for signs of GPU failure so that you don’t end up struggling to play a game when you can easily replace it for enhanced gameplay.
Power supply – The higher your fps settings, the more power your PSU draws. Your game will be stuttering if you do not have sufficient wattage to accommodate this much power.
Outdated OS – Although some people prefer not to update their Windows often, this can play a huge role when it comes to playing games. Most games have been optimized for the latest software so there may be some inconsistencies if your OS is not up-to-date.
Insufficient RAM – It’s a disservice to your PC to have a good graphics card but not enough RAM to run your game. You need to create a balance between the two.
Refresh rate – The refresh rate of your PC matters as it determines how fast your display responds per second. If you’ve set it to low, you might experience a choppy screen even with high fps.
Power settings – Your power settings also matter in that they determine how much your CPU is willing to push its limits. If it is set below the optimal limits, your game will have a hard time living up to its performance.
How do I fix a choppy gameplay even with high FPS?
We recommend you try the following basic checks before moving on to more advanced solutions:
Navigate to the Scale & layout section then under Display resolution, click on the drop-down menu and pick a lower resolution setting than your current one.
You may need to restart your PC for the changes to take effect.
2. Change your refresh rate
Press the Windows key and click on Settings.
Click on System on the left pane, then select Display.
Navigate to Advanced display.
Next, Choose a refresh rate from the drop-down menu.
Hit the Start Menu icon, type Control Panel in the search bar, and click Open.
Navigate to Power Options and click to Open.
Select the High Performance option as your new plan and check if there are any improvements.
If, at this stage, you’re still experiencing some stuttering in your games, you may need to upgrade your GPU. Changing your PSU could also do you some good, especially if it wasn’t delivering enough power.
When trying out some of these solutions, some users noted that FPS dropped after a RAM upgrade. Should you face a similar hurdle, refer to our detailed article on how to resolve it.
That brings us to the end of this article, but it doesn’t have to stop here. Keep the conversation alive by sharing with us more tips on how to achieve smooth gameplay at all times.