Fix: Display Settings is Not Showing The Correct Resolution

Windows 10 users report a wide array of issues on a daily basis, and it turns out the display settings panel won’t show the correct resolution for some.

Others have stated the resolution changes by itself in Windows 10, while others mentioned the fact that recent updates broke their systems.

Why are my display settings not showing the correct resolution?

We can also show you how to set a custom resolution in Windows 10, but right now let’s focus on the matter at hand, which is that the display settings actually show incorrect resolution information.

As you know, there isn’t just one reason for why this is happening, as with most Windows-related issues. Not seeing the correct resolution can be a result of:

  • Software incompatibility – Your application software or operating system may not be compatible with the monitor’s technology.
  • Incorrect monitor settings – Settings may need to be modified on the monitor itself (different from manufacturer to manufacturer).
  • Mismatch in the graphics settings – Graphics settings may need to be reconfigured if your system includes items such as video/graphics cards.
  • Old or corrupted drivers – You may need new or updated drivers to get the full benefits of your new monitor’s capabilities.

However, before we get into this troubleshooting process, there are a few steps you have to complete, to determine if you have to do it in the first place.

That being said, make sure that if the monitor came with an interface cable, you’ve used it for your installation.

How can I fix the display settings not showing the correct resolution?

Before getting into more complicated procedures, let’s crosscheck some basic steps off the list:

  • Check connections to ensure they’re secure and that the cable is connected to the appropriate port on your PC.
  • If you have a similar monitor, connect that one, to eliminate a possible hardware problem.
  • If the resolution problem is with a specific app or game, check if the display options for that program are compatible with your monitor.

If the situation didn’t change, let’s try to fix the problem with the solutions provided below.

1. Update Windows

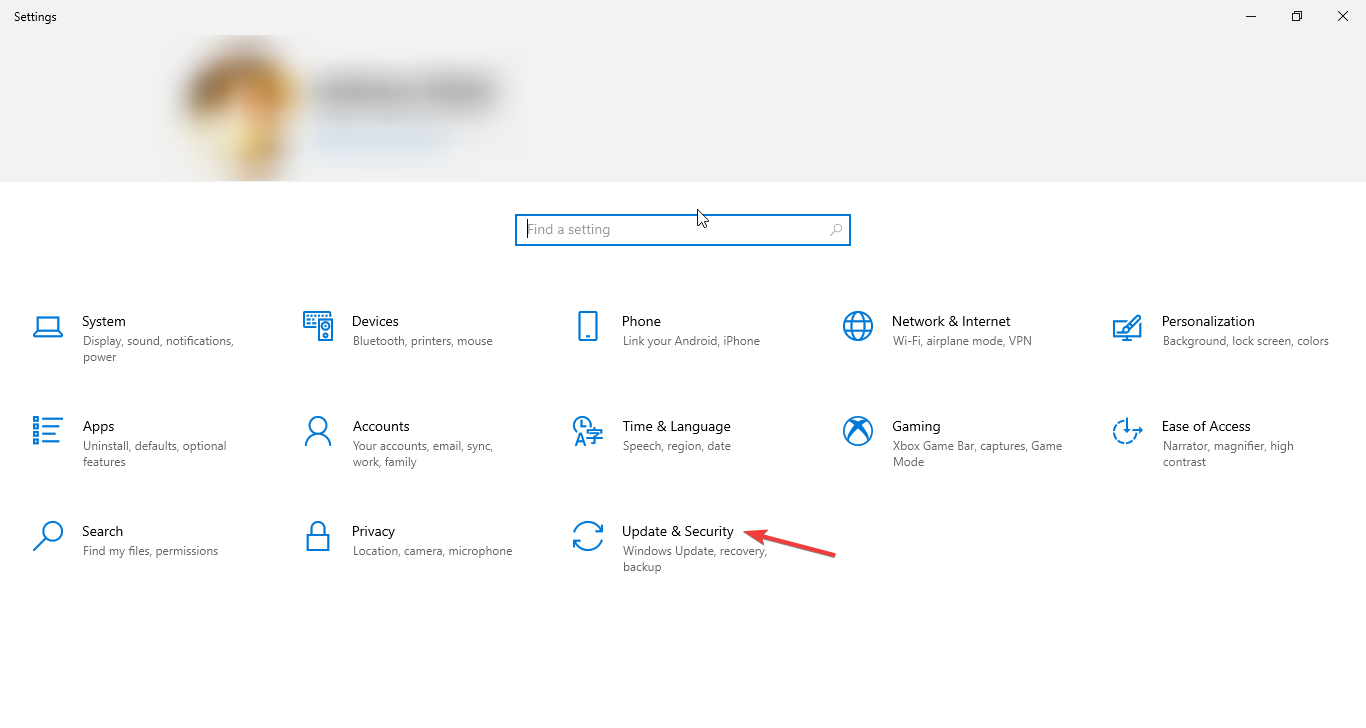
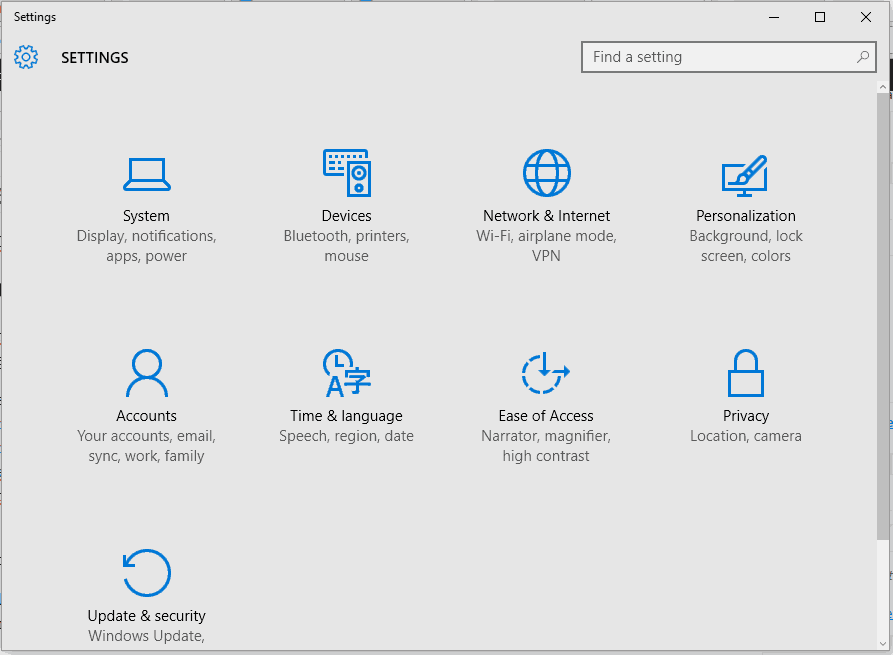
  1. Press Win + I to access Settings.
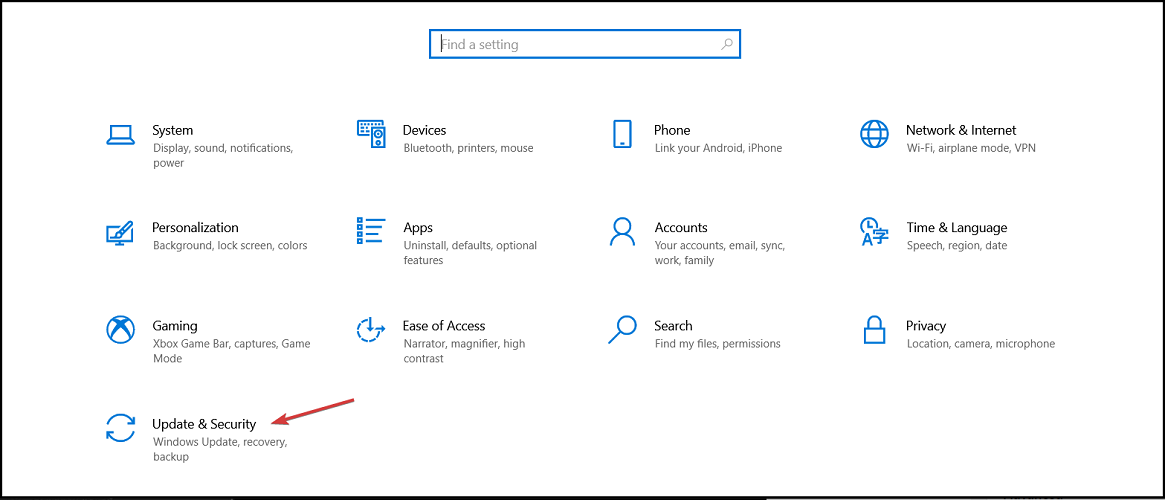
  2. Click on the Updates & Security tab.updates
  3. Select Windows Updates, then click on the Check for updates button.windows update
  4. If Windows found any updates, click on the Install now button.

2. Rollback display adapter driver

  1. Right-click the Start button and select Device Manager from the list.
  2. Expand Display adapters, right-click on the one you are using, and select Properties.
  3. Click on the Roll Back Driver button.rol back driver
  4. If the option is grayed out, that means you don’t have any previous driver to go back to.

3. Disable scaling

Note icon NOTE
The value might differ depending on your monitor or GPU, so always try using the recommended value.
  1. Press Win + I to access Settings.
  2. Select the Display tab, then choose the Recommended scaling value.display

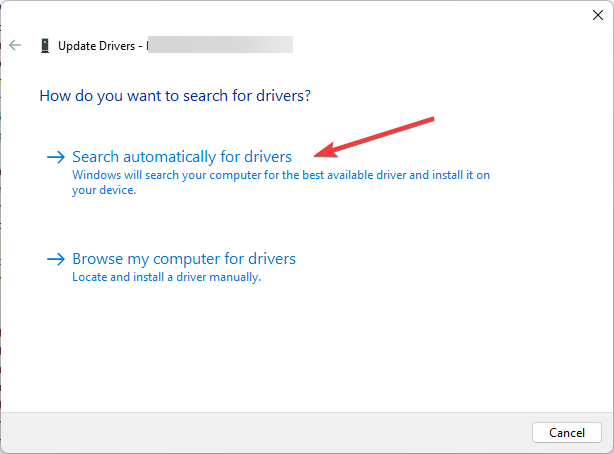
4. Update your graphics driver

  1. Right-click the Start button and choose Device Manager to open the app.
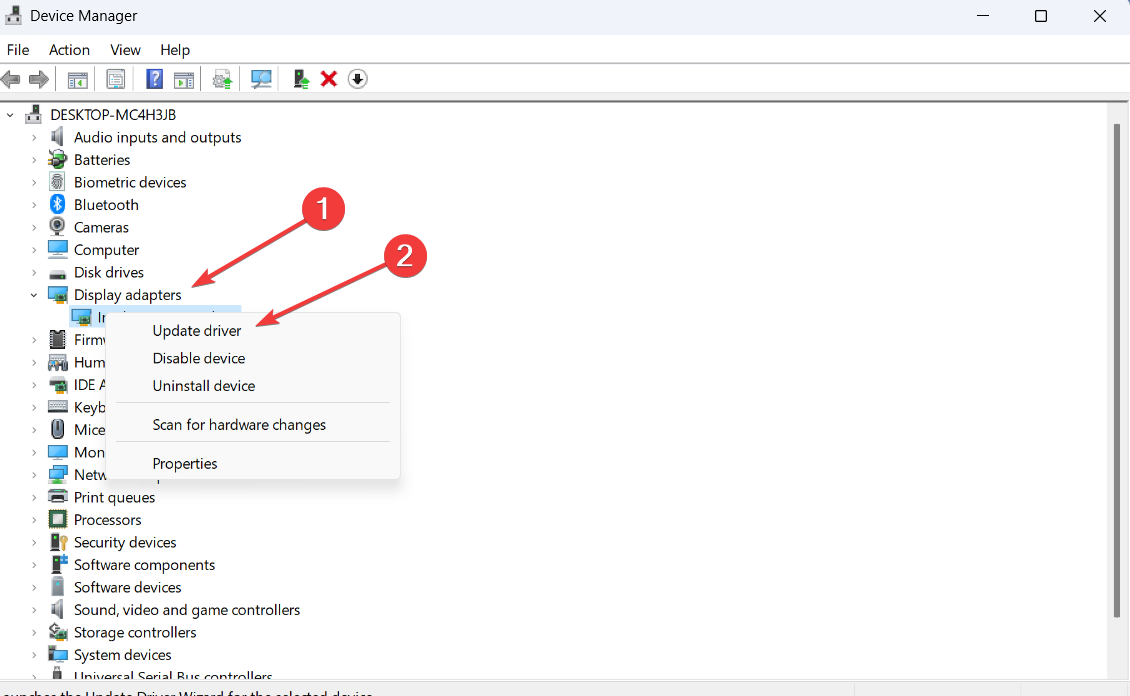
  2. Expand Display adapters, right-click the one you are using, then select Update driver.update display driver
  3. Select Search automatically for drivers.search automatically for display drivers

Now you know a lot more about why your display settings are not showing the correct resolution. After completing this troubleshooting process, everything should be back to normal.

Take your time and go through the steps at your own pace. These solutions have been proven to work and reported as successful by many users facing the same problem.

Some of our readers also reported that Display Settings has no app associated in Windows 10, but this guide should help you if you’re facing the problem.

Has this guide helped you fix the issue as well? Let us know in the dedicated comments section located below.

How to Share a Facebook Post on Instagram: 2 Quick Methods

Most of us use several social networks, and posting the same content on multiple networks can be tedious, especially if you’re doing it manually. And many users wonder how to share a Facebook post to Instagram.

The process, though simple, can be a bit tricky to execute since the option to share posts between the two most popular social media platforms is located, kind of, deep inside the Facebook settings. So, let’s find out how you can do that!

Should I share a Facebook post on Instagram?

That depends on the idea behind the post and the audience you want to present it to. For instance, we may have different social circles on Facebook and Instagram, and sharing the same post on the two platforms might not work out well.

But for users who only have friends and family or the same set of people added on both Facebook and Instagram, the idea to share posts from the latter to the former actually makes sense and is, in fact, quite simple.

Quick tip:

We recommend Opera One because it’s very versatile and full of great features and has kept its shine with constant improvements, integrations, and updates.

This browser offers the opportunity to access Instagram and Facebook news feed, view Instastrories and Facebook stories. Many will also appreciate the built-in ad blocker, video pop-up feature, speed ​​dial home tab, and especially the privacy and security-enhancing VPN feature.

Opera One

Use this reimagined and fluid browser for a more satisfying Web experience.
Free Download Visit website

How can I share a Facebook post on Instagram?

1. Configure the account settings on Facebook

  1. Open your Facebook account, click on the profile icon near the top-right and choose Settings & privacy.settings & privacy
  2. Now, click on Settings.settings to share facebook post to instagram
  3. In the navigation pane on the left, scroll down to the bottom and click on Accounts Centre.Accounts centre to share facebook post to instagram
  4. If you haven’t added an Instagram account yet, click on Add accounts, and then follow the on-screen instructions to complete the process.add accounts
  5. Next, click on Sharing across profiles from the left.sharing across profile
  6. Choose your Facebook account from the list.facebook
  7. Now, make sure the Instagram account is selected under Share to, and then enable the toggle for Your Facebook story and Your Facebook posts, as the case may be.share facebook post to instagram

That’s it! From now on, every time you post on Facebook, it will be automatically shared on Instagram. As we said, the process is simple and quick! You just need to figure out where the exact option is placed.

2. Use a third-party tool

  1. Sign up for IFTTT through the official website.ifttt
  2. Now, head to the Facebook Page to Instagram service, and click the Connect button.
    facebook page to Instagram share facebook post to instagram
  3. If asked, sign in to your Facebook and Instagram accounts.
  4. After doing that, your Facebook posts should be automatically shared on Instagram.

IFTTT offers a wide array of features, so you might want to experiment with different Facebook and Instagram recipes in order to achieve the desired results.

Alternatively, you can use services such as Hootsuite or Buffer that allow you to post on multiple social networks simultaneously, but these services usually have a monthly fee.

By now, you must have figured out how to share a Facebook post to Instagram and some effective tools to automate things for a seamless experience. So, level up your social media game!

Did you know that you can assess the actual engagement on an Instagram account? It’s called exactly like that, Instagram Engagement Rate Calculator, and you just need to enter a username for the numbers to start flowing.

If you’re a frequent social media user, check our list of best web browsers for Facebook and pick the best browser for your social media needs.

For any other queries or to share recommendations for social media toolkits, drop a comment below.

How to Backup TPM Keys in a Couple of Easy Steps

Many users are wondering how to perform a TPM backup on their PC to ensure that their data doesn’t remain encrypted and inaccessible to them.

Microsoft has made some changes in this regard, so backing up your keys might not be as simple as it previously was.

Where is my TPM key?

The TPM has a master wrapping key stored on the TPM chip itself. The wrapping key protects all other keys on the TPM chip.

Is the BitLocker key stored in TPM?

Yes, the BitLocker key used for encryption is stored in the TPM chip so that your drive can be fully protected from tampering.

How do I back up my TPM key in Windows 11?

Adjust the Group Policy settings

  1. Press the Windows + R keys to open the Run command.
  2. Type gpedit.msc in the dialog box and press Enter to open the Group Policy Editor.GPEDIT
  3. In the left pane, navigate to Computer Configuration\Policies\Administrative Templates\Windows Components\Bitlocker Drive Encryption
  4. In the right pane, double-click the Store Bitlocker Recovery information in Active Directory Domain Services.
     
  5. Set it to Enabled and click on Apply and OK.

TPM backup is no longer available in Windows in order to ensure the safety of the device. However, this feature was used for backing up BitLocker keys primarily, and this is still possible with steps from above.

Does clearing TPM erase data?

Yes, clearing TPM will erase data protected by TPM. This includes the following:

  • Created keys related to the TPM, including the BitLocker recovery key.
  • Your sign-in PIN.

Therefore, backing up your Bitlocker recovery key is essential if you plan to clear the TPM.

To learn how to reset TPM, we have a great guide on how to clear the TPM keys.

And that’s how to back up your TPM keys in Windows 11. The same procedure also applies to Windows 10. Don’t forget to check out our article on what to do if your TPM device is not detected.

In case you’re in the market for a new TPM 2.0 chip, we have curated a list with detailed specs and price points to help you get started.

Let us know of any issues you may encounter while backing up the TPM keys in the comment section below.

3 Ways to Enable Remote Desktop on Windows Server 2019

Remote Desktop Connection is a protocol that helps you to connect to another computer that is available at a remote location. But, some users are experiencing problems while enabling Remote Desktop on Windows Server.

So, if you were planning to enable the functionality and remotely access the computer, there are quite a few ways to do that. Read the following sections to learn more about it and choose a method that seems the most convenient.

Does Windows Server 2019 have Remote Desktop?

Yes, Windows Server 2019 does support the functionality and allows users to enable the Remote Desktop feature seamlessly. Though remember, Windows Server 2019 has Remote Desktop turned off by default for security reasons.

So, users need to first manually enable it before being able to connect, access, and control the computer through another device.

How do I enable Remote Desktop in Windows Server 2019?

1. Use PowerShell

  1. Press the Windows key, search for Windows PowerShell, right-click on the relevant search result, and select Run as Administrator.
  2. Paste the following command in PowerShell and hit Enter:Set-ItemProperty -Path 'HKLM:\System\CurrentControlSet\Control\Terminal Server' -name "fDenyTSConnections" -value 0
  3. By default, remote desktop connections are blocked by the Windows Firewall. Execute the following command to configure the firewall to allow remote desktop connections:Enable-NetFirewallRule -DisplayGroup "Remote Desktop"

This is, by far, the quickest method to enable Remote Desktop in Windows Server 2019. If due to some reason, you are experiencing problems, use the Server Manager GUI to enable Remote Desktop connections as illustrated next.

2. Use Server Manager GUI

  1. First, log in to the server as a local administrator.
  2. Now, search for Server Manager in the Start menu, and launch it.
  3. Next, select Local Server from the navigation pane on the left, and then click on the Disabled option next to Remote Desktop.Click Disable local server windows server how to enable remote desktop
  4. Tick the Allow remote connections to this computer option.System properties allow remote connections to this computer windows server how to enable remote desktop
  5. You will now see the Remote Desktop firewall exception warning. Click the Select Users button to add allowed users.
  6. Now add the Username and hit the Check names button. Finally, click OK to save the changes.

That’s it! If the changes don’t reflect right away, perform a quick refresh, and you will find that Remote Desktop is enabled on Windows Server.

3. Use Command Prompt

  1. Press Windows + R to open Run, type cmd in the text field, and hit Enter.cmd
  2. Now, paste the following command and hit Enter:SystemPropertiesRemotecommand to enable remote desktop windows server
  3. Under the Remote tab, tick the checkbox for Allow remote connections to this computer, and click on OK to save the changes.

If none of the solutions were helpful, you could use Mikogo for secure remote desktop services. The tool offers a wide range of other features, each simplifying one task or the other.

In case you are experiencing problems with it, find out what to do when Remote Desktop is not working.

If you have any queries or want to share feedback for this guide, drop a comment below.

How to take text-grabbing to the next level with Text Grab 3.2’s new features and improvements

Text Grab is a quick and easy app available on GitHub that uses Optical Character Recognition (OCR) built into Windows to grab any on-screen text. It doesn’t need to run in the background and doesn’t require an internet connection. It was designed to be easy to use and efficient, allowing users to be more productive on Windows 10 and Windows 11.

Text Grab can be used to grab text from pictures, PDFs, applications, videos, websites, and any combination of the above. It has four different modes: Full-Screen Mode, Grab Frame mode, Edit Text Window, and Quick Simple Lookup.

There’s a new update out, bringing the version number to 3.2, announced by app creator Joe Finney on Twitter.

The app stores the copied text in the Windows Clipboard History and can be accessed by using Windows key + V.

Text Grab 3.2 features and improvements

You can find all the details on Text Grab 3.2 on GitHub, but here’s a quick look at what’s new and improved in the four different modes.

  1. Full-Screen mode can now recognize and extract text from tables.
  2. Grab Frame mode allows users to add, remove, resize, and adjust the lines as they see fit. There are now more advanced search capabilities added, including a menu to add additional quick actions and options.
  3. Edit Text Window now has a fully customizable bottom bar to add quick actions that you use as part of your daily workflow.
  4. Quick Simple Look Up adds “Hold CTRL+ALT to launch Right-side value if it is a valid URI.”

    text grab
    Text Grab: Quick SImple Look Up

You can go to Github to download the latest release, but consider supporting the developer by buying the app from the Microsoft Store. Text Grab is available now at a discount for a limited time. Find information about Joe Finney on his website: https://joefinapps.com/

Text Grab
Text Grab
Developer:
JoeFinApps
Price:
$9.99

Adobe Save for Web Error in Photoshop: Why & How to Fix

A lot of users say that things went smoothly with editing their content until they opened a GIF in Adobe Photoshop to correct some details and got an annoying Save for web error.

Long story short, they couldn’t complete the Save for web action. This Photoshop problem can be frustrating, as it makes the feature unusable.

To help recover this important feature, we have prepared the solutions you need to fix the save for web error in this guide.

How can I fix the Save for web error in Adobe Photoshop

1. Restart Photoshop

One of the quick ways to fix the save for web error on Adobe Photoshop is to restart the app. This is because the issue might just be down to a temporary glitch.

We recommend saving your image as a .PSD before closing the app. This is because you might lose the original file, and the .PSD file will be a backup.

2. Install the latest updates

Another quick fix Adobe save for web error is downloading the latest photo editor version. This is because the latest versions provide more than better features and usability.

More importantly, they also bring bug fixes, so that’s your chance to forget about your current issue.

3. Change image/canvas size

  1. Launch Photoshop and click the Image tab at the top.
  2. Select the Image size option and change it accordingly.
  3. Finally, select the Canvas size option and adjust it.
    image adobe save for web error

Another cause for the Adobe save for web error is the wrong image size. For example, if your image size is set to something like 20,000 inches, you need to reduce it to a lower value.

Also, you should note that your image and canvas size should not be different. If they have different sizes, you must ensure they correspond to get past this error.

4. Save the image as JPEG

  1. Click the File tab at the top and select Save as.
  2. Now, click the Save as type dropdown and choose the JPEG option.
  3. Finally, click the Save button.
    save

Another effective fix for Adobe save for web error is to save the image as a JPEG. This is because JPEG files can be used on the web without using the feature.

5. Reset Photoshop Preferences

  1. Launch Photoshop and click the Edit tab at the top.
  2. Select the Preferences option.
  3. Now, click General.
    preferences
  4. Finally, click the Reset Preferences on Quit button and restart Photoshop.
    reset

If the solutions above fail to fix the Adobe save for web error, you might need to reset the preferences. This will undo the changes you have made to the app and hopefully eliminate the error.

Those are a few of the confirmed fixes for the Save for web error in Adobe Photoshop. So, be sure to apply each of them carefully.

If you want to know how to unblur images in Photoshop, check out our detailed guide to do it quickly.

If you have any other questions or suggestions, feel free to leave them in the comments below.

5 Best Free GPU Comparison Tools [GPU Benchmark]

Whether you have a new GPU you need to rate, or you want to compare yours with better ones, you will need a GPU comparison tool to help you. GPU benchmarking software will analyze the performance of your graphics processor and match it with others by performing specific tests.

What are GPU comparison tools?

The benchmark software is used for testing the main components of your machine. Then, it compares the data with the ones stored in its database about other similar products.

In this article, we will talk about the comparison tools for Graphics Processing Units (GPUs). We will outline their main features, helping you to decide the best tool for your needs.

What are the best GPU comparison tools?

3DMark – Best GPU benchmarking tool

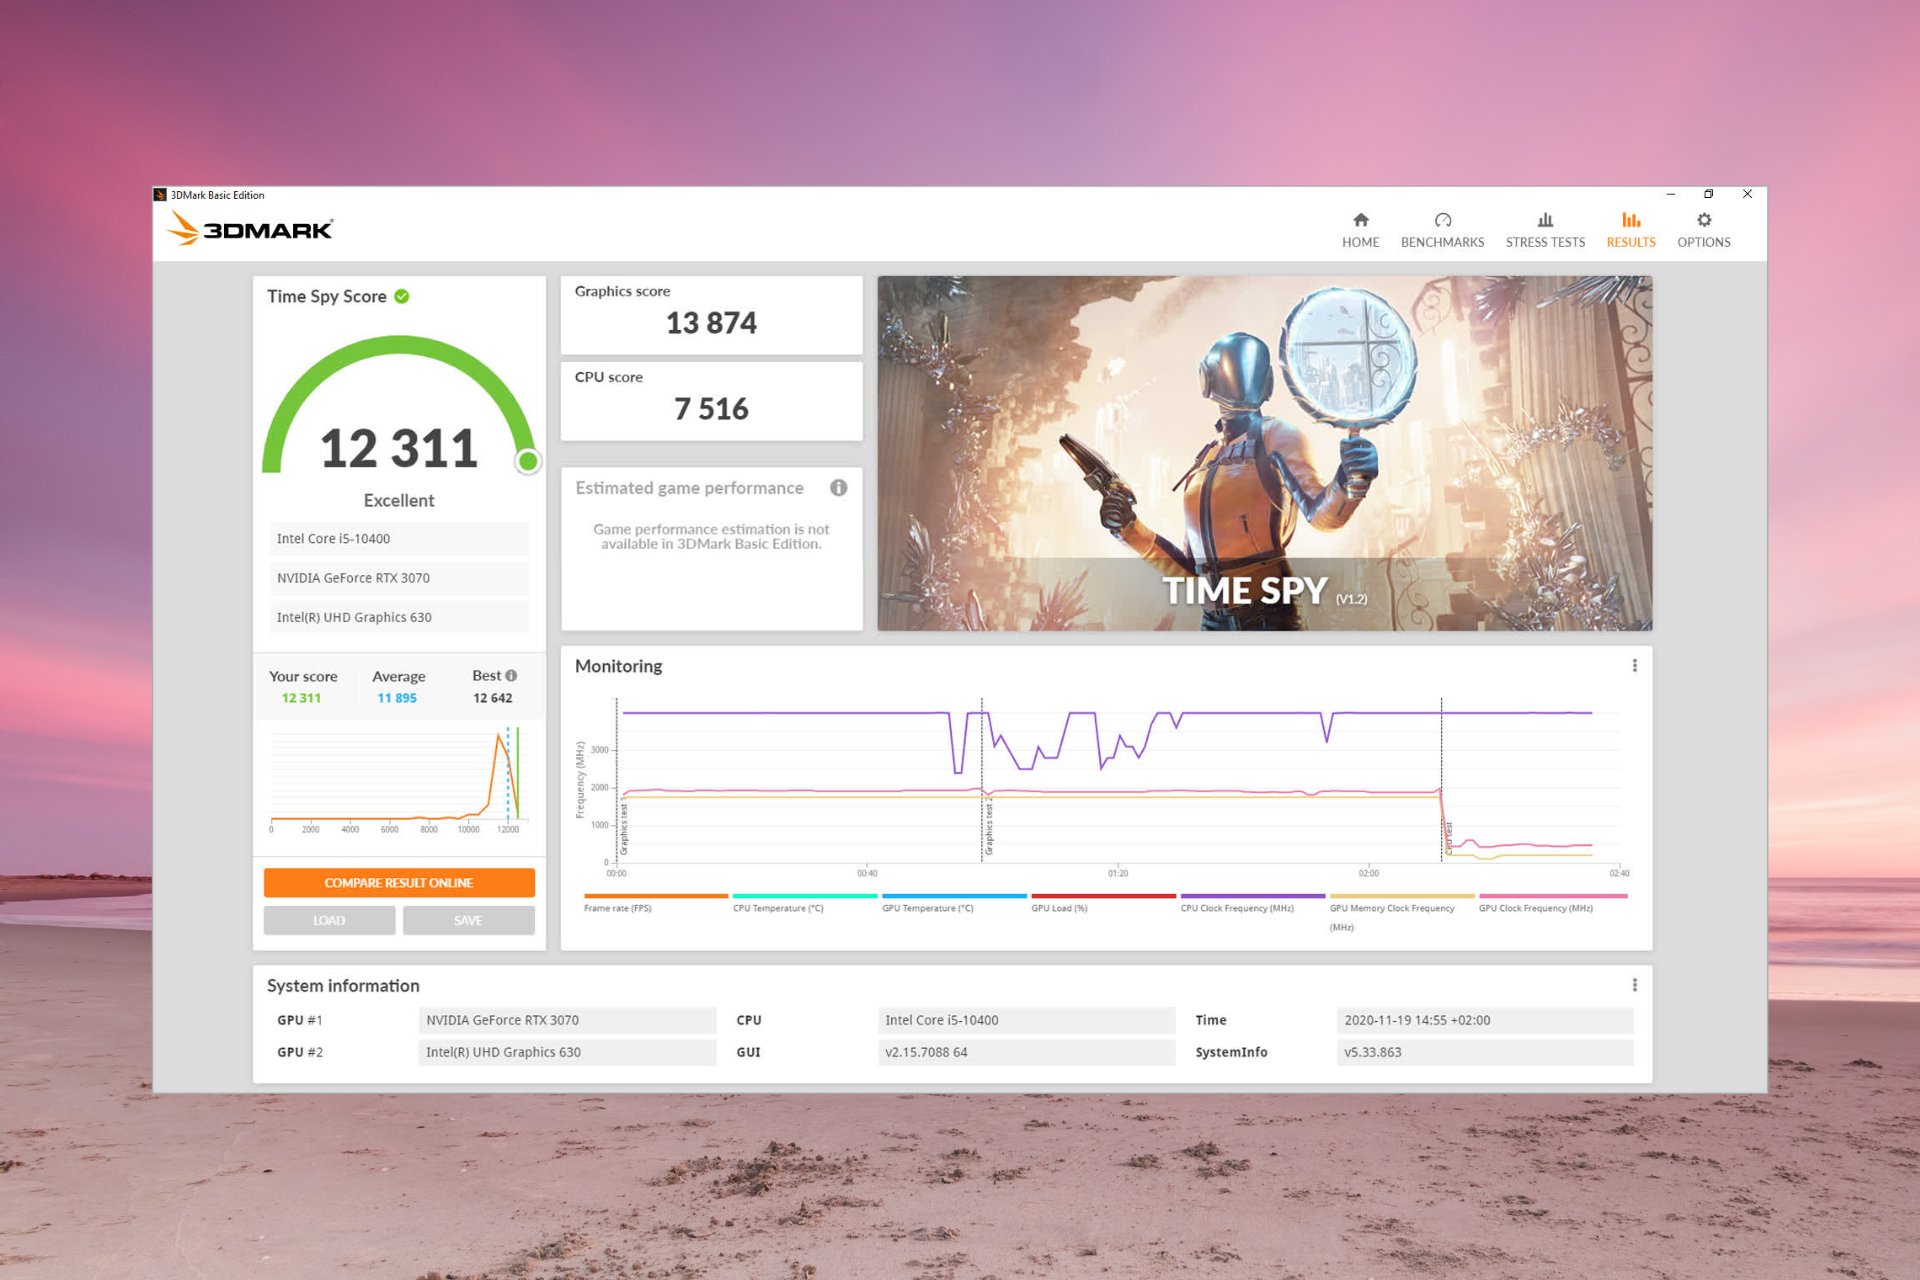
3DMark is the oldest and most reliable benchmarking tool out there, and luckily, it also has a free version available.

The tool displays detailed information on how clock speed and frame rates change during the tests.

Of course, it also detects your hardware and shows you a temperature chart for the CPU and GPU.

However, in the free version, you only get the Time Spy, Night Raid, and Fire Strike benchmarks.

So, if you want a lot more tests and customization options, you should at least go for the paid, 3DMark Advanced Edition version.

It is also available for Android and iOS platforms if you want to test your smartphone capabilities.

Here are some of its best features:

  • Advanced information about CPU and GPU performance
  • Three benchmarks available in the free version
  • Seamless hardware detection
  • Temperature charts for GPU and CPU
  • Get accurate graphics scores

⇒ Get 3DMark

GFXBench – Extensive GPU comparison

Another free and extremely efficient GPU comparison tool to consider is GFXBench.

It measures GPU performance with next-gen graphics features on all platforms. It supports all the APIs including OpenGL, OpenGL ES, Vulkan, Metal, DirectX/Direct3D, and DirectX 12.

GFXBench detects the right level supported by your device and runs only the relevant tests.

Then, it compares the scores of your graphics card against the newest tests and products on the market.

Here’s a rundown of its key features:

  • Supports all the APIs including OpenGL, OpenGL ES, Vulkan, Metal, DirectX/Direct3D, and DirectX 12
  • Extensive library of graphics card scorings
  • Automatically detects the level of your supported APIs
  • Displays the list of your system’s specifications
  • Available for Windows, macOS, Android, and iOS

⇒ Get GFXBench

PassMark – Great 2D and 3D benchmarking

PassMark can be exactly what you’re looking for if you need a simple but effective benchmarking tool.

It has 28 standard benchmarks and covers all the main components, including CPU, GPU, memory, and disks.

For the GPU, PassMark has dedicated 2D and 3D settings, and for the second option, you will have the choice of running DirectX 9, 10, 11 & 12 tests together with a GPU computing benchmark.

You will also have the option to create your own custom tests that can add a bit of flavor to your benchmarks.

There is a 30-day free trial version and the paid one. Of course, the first has limited capabilities, but it’s still fast and reliable.

Take a look at its key features:

  • 2D and 3D benchmarking tests
  • Customized GPU benchmarking for DirectX 9, 10, 11 & 12
  • Tests for all major system components
  • Available for Windows, macOS, Linux, and mobile
  • Easy to use and configure

⇒ Get Passmark

MSI Afterburner – Great overclocking features

With MSI Afterburner, you get GPU benchmarking and extensive overclocking features for your graphics card.

The tool is free and is not only for MSI products but for any type of graphics card and GPU.

Afterburner also monitors the GPU temperature and allows you to set the fan speeds if your graphics card has that capability.

This software also comes with a live monitoring screen that displays the main performance characteristics of any app or game.

And if you need even more detail, you need to pair it with the MSI Kombuster stress test tool to check the results of your overclocking.

Let’s review a few of its best features:

  • Extensive overclocking capabilities
  • Supports all major Windows versions
  • Monitoring in-game GPU performance
  • Works on all major manufacturers’ graphics cards
  • Customizable UI

⇒ Get MSI Afterburner

Heaven Ungine – Great GPU stress test

If you want to hammer your graphics card to the limit, Heaven Ungine is a GPU-intensive benchmark tool that will satisfy that need.

The software assesses the stability of your GPU under extremely stressful conditions and also checks the cooling system’s potential.

Heaven uses the proprietary UNIGINE Engine to get the most out of your graphics card by going through a complex 3D visual experience.

It’s a great GPU comparison tool and it comes with a free version that comes with custom settings and GPU monitoring.

Here are some of its most important features:

  • Extreme hardware stability testing
  • Accurate results due to 100% GPU-bound benchmarking
  • Support for DirectX 9, DirectX 11, and OpenGL 4.0
  • GPU temperature and clock monitoring
  • Dynamic sky with volumetric clouds and tweakable day-night cycle

⇒ Get Heaven Ungine

We hope that our selection of the best GPU comparison tools helped you decide the best option for your needs.

In this regard, you may also consider our list of the best overclocking stress test software for your PC.

If you have any other suggestions for software that provided good results, feel free to let us know in the comments section below.
How to add a copyright symbol on a Windows computer

The copyright symbol, alternatively called a copyright sign, indicates that you own the legal rights to make and distribute any item. Like most things today, the concept of copyrights has also been carried over to the digital world.

 And it makes perfect sense.

With so much content and creators out there, copyright is precisely what protects your work from getting stolen from individuals and other companies. Luckily, if you’re a Windows user, you’d be glad to find that a feature to add copyright symbols is also available on your PC. In what follows, we’ll go over two methods to insert copyright on your Windows.

How to add a copyright on Windows PC

Adding a copyright symbol to your Windows doesn’t have to be complicated. And Microsoft has made sure that this is precisely the case.

Apart from a host of emojis and stickers that you can add with a few shortcuts, through Alt code adding a copyright symbol on your Windows is even easier. Here’s how:

Take your cursor anywhere you’d like to insert the copyright sign and press the Alt key. And, while you hold the alt key, press the “0160” keys using the alphanumeric keys from your keyboard.

Release the Alt key, and that’s it—the copyright symbol will be inserted into your document.

Insert a copyright symbol on Windows without a keypad

While the above method with alphanumeric keys will work in most cases, you may sometimes have to rely on going without a keypad. In situations like that, follow the steps below:

  • Press the Fn + NumLk to turn on the Num Lock key.
  • Locate the numeric keys on your keyboard.
    If you don’t see any specific num lock keys, try the following keys on your Windows:
    M=0, J=1, K=2, L=3, U=4, I=5, O=6, 7=7, 8=8, 9=9.
  • Now, press and hold the Alt key and type 0169 on the numeric keys.

Finally, release all the keys, and if you did everything as laid out above, you’d see the copyright symbol in your document.

Adding a copyright symbol on a Windows computer

Copyright makes your soft documents “yours”—at least on the internet. It clearly signals that what you have to offer shouldn’t be used for free, or at the very least, without a citation. 

We hope one of the methods from above did the trick for you, and you can insert copyright symbols on your Windows documents freely.

BitLocker Could Not Be Enabled: 5 Ways to Fix This Error

BitLocker is a Microsoft encryption utility which encrypts a hard disk drive’s data. Recently, users have complained that they are getting an error message that reads BitLocker could not be enabled the data drive specified is not set to automatically unlock.

It is enabled by default on computers that are running newer versions of Windows, but you can install Windows without BitLocker. If you’ve come across this error, let’s look at why it occurs and how to fix it.

Why is my BitLocker not working?

If you’re having trouble enabling BitLocker on your Windows device, below are some possible reasons:

  • Hardware issues – If you try to enable BitLocker using a computer that does not recognize it, it’s possible that the computer does not have the requisite storage capacity or drivers present on its system. 
  • Bad BIOS settings – If your BIOS settings are not correct, it could prevent BitLocker from working properly. 
  • Unsupported TPM – If your computer is running an earlier version of Windows and you want to use BitLocker, you need to upgrade to TPM 2.0 motherboards.
  • Incompatible partition style – Between the two partitions, MBR and GPT, MBR has less support for features and may not work well with newer versions of Windows.
  • Outdated BIOS – If your BIOS has not been updated in a long time, it may not support newer versions of BitLocker. You need to update your BIOS.
  • Disabled TPM and secure boot – If the TPM is disabled or if the secure boot feature is disabled, BitLocker will be unable to protect your operating system volume.

How can I fix the BitLocker could not be enabled error?

Before you try any of the below troubleshooting options, check off the following:

1. Enable the BitLocker services

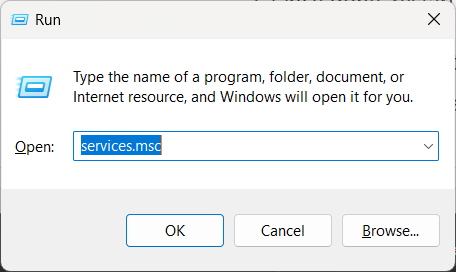
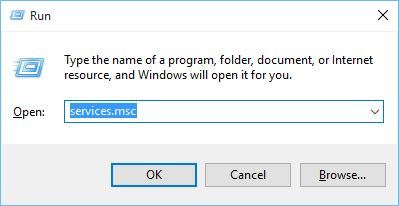
  1. Hit the Windows + R keys to open the Run command.
  2. Type services.msc in the dialog box and hit Enter.Open service manager
  3. Locate BitLocker Drive Encryption Service, right-click on it and select Properties.
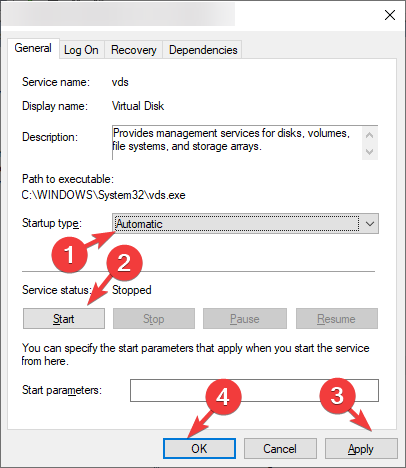
  4. Set the Startup type to Automatic, click Start then Apply and OK to save changes.

2. Reinstall TPM drivers 

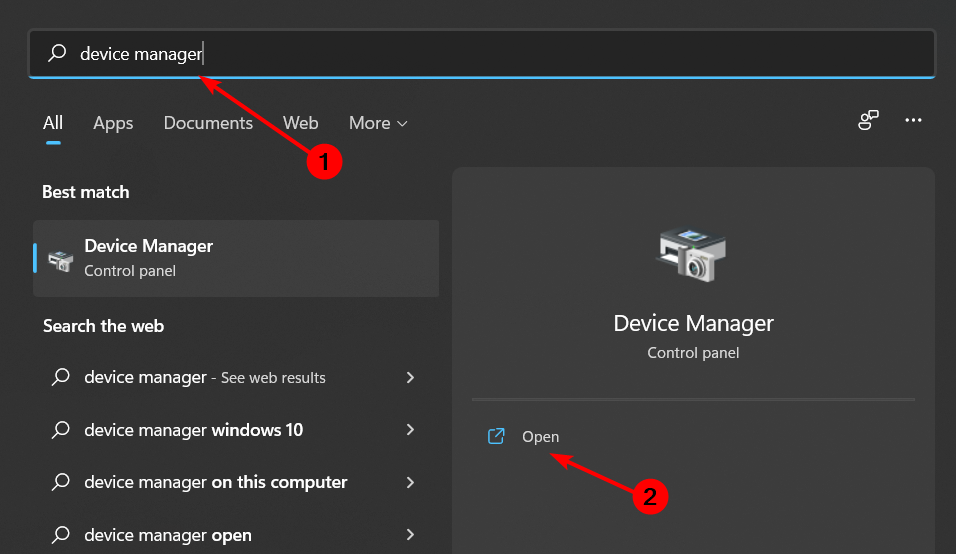
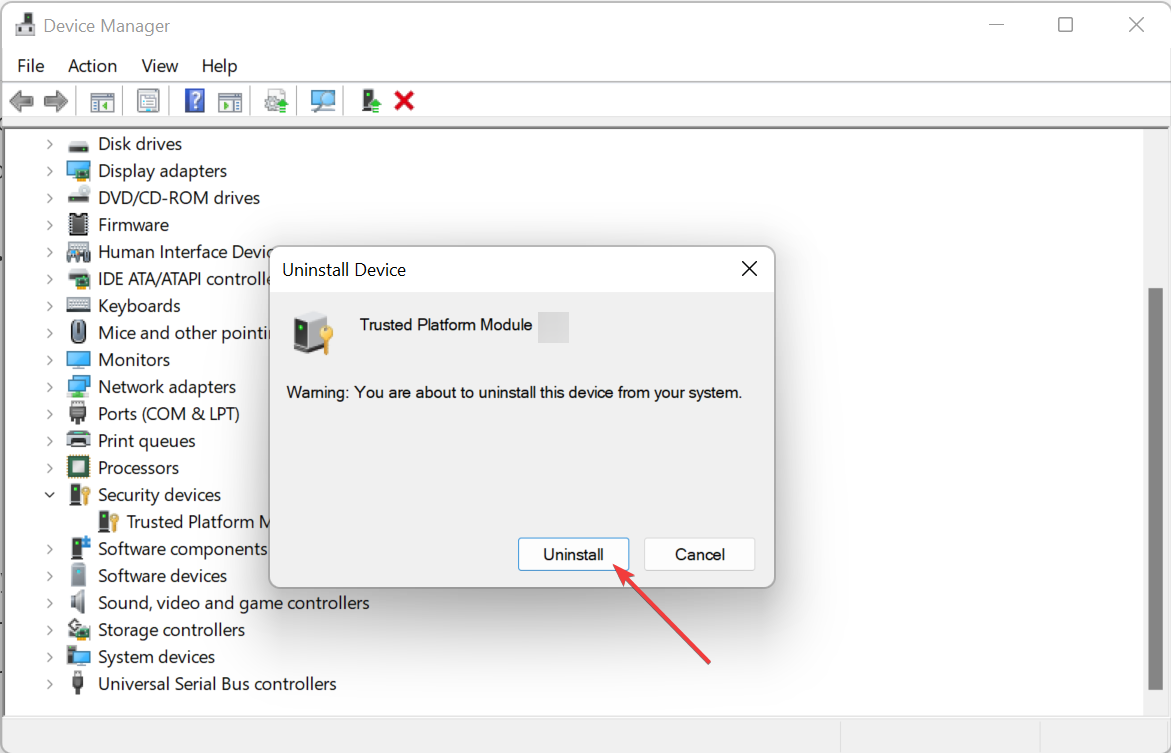
  1. Hit the Windows key, type Device Manager in the search bar, and click Open.
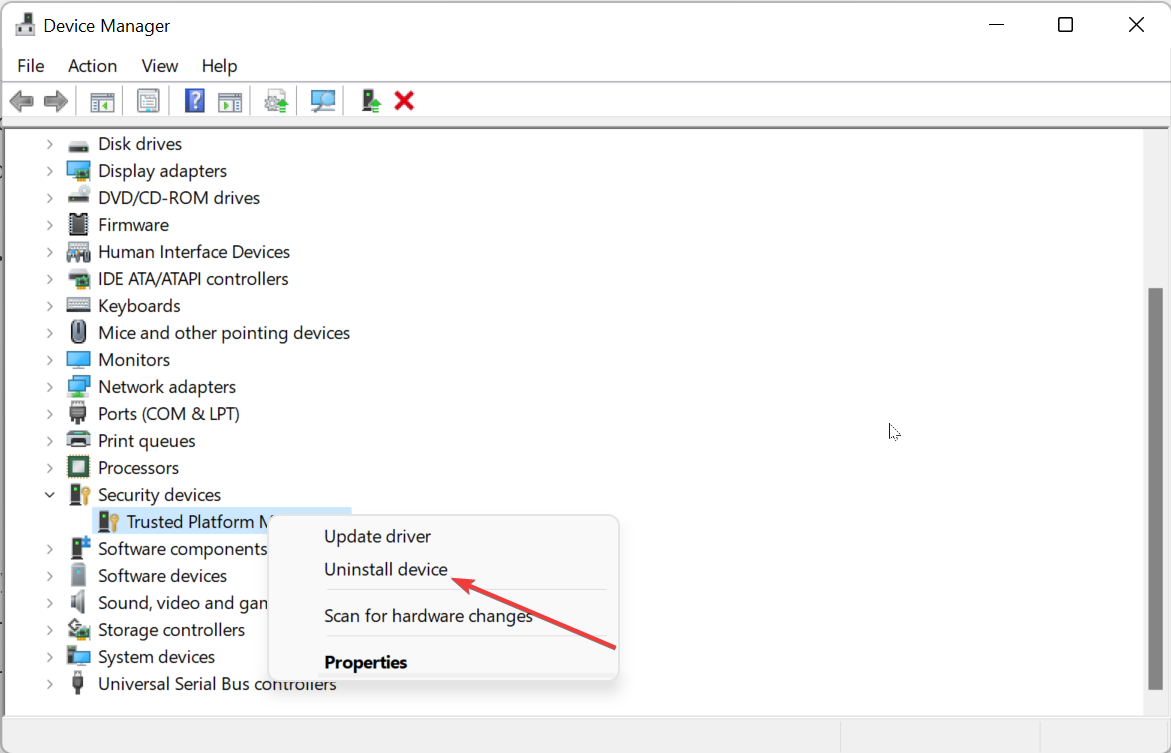
  2. Navigate to the Security devices option, expand and right-click your TPM device.
  3. Now, click the Uninstall device option.uninstall device the pc must support tpm 2.0
  4. Finally, click the Uninstall button to confirm the action and restart your PC.uninstall

This method will only work if your PC already meets the system requirements for running Windows 11. TPM 2.0 is one of the prerequisites so if the drivers are outdated, reinstalling them might solve the issue of unsupported TPM.

3. Update BIOS

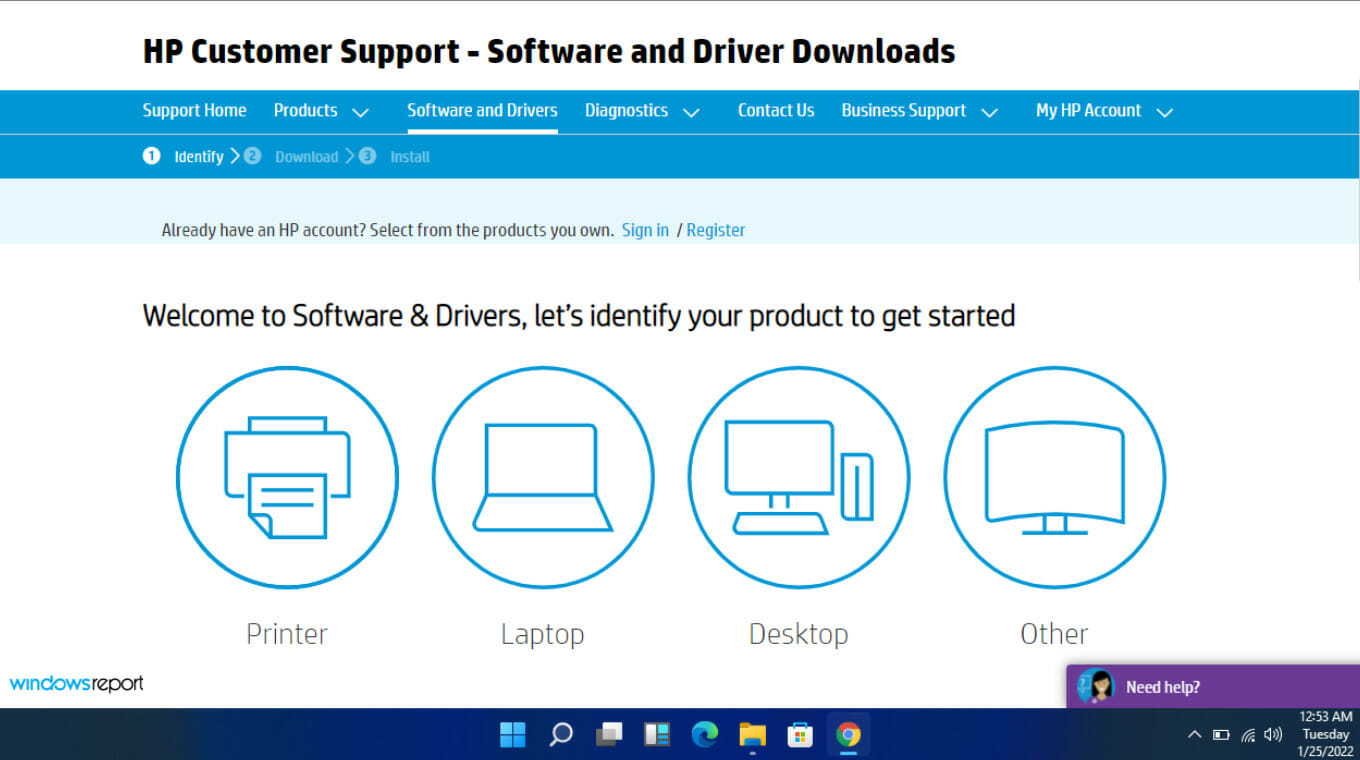
  1. Navigate to your PC’s manufacturer’s site. In this case HP driver and software download website.
  2. Select a laptop or desktop, depending on the type of computer you’re using.
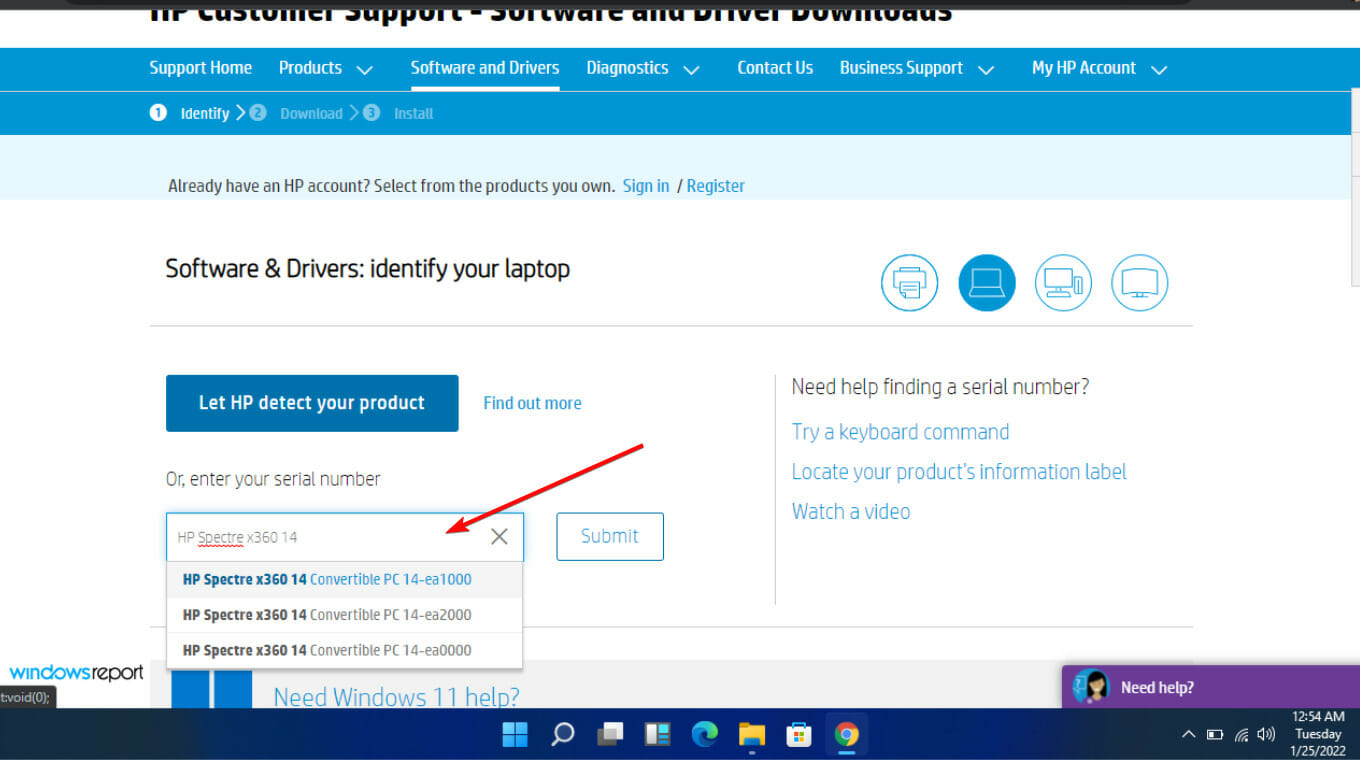
  3. Enter your exact serial number or your exact computer model.
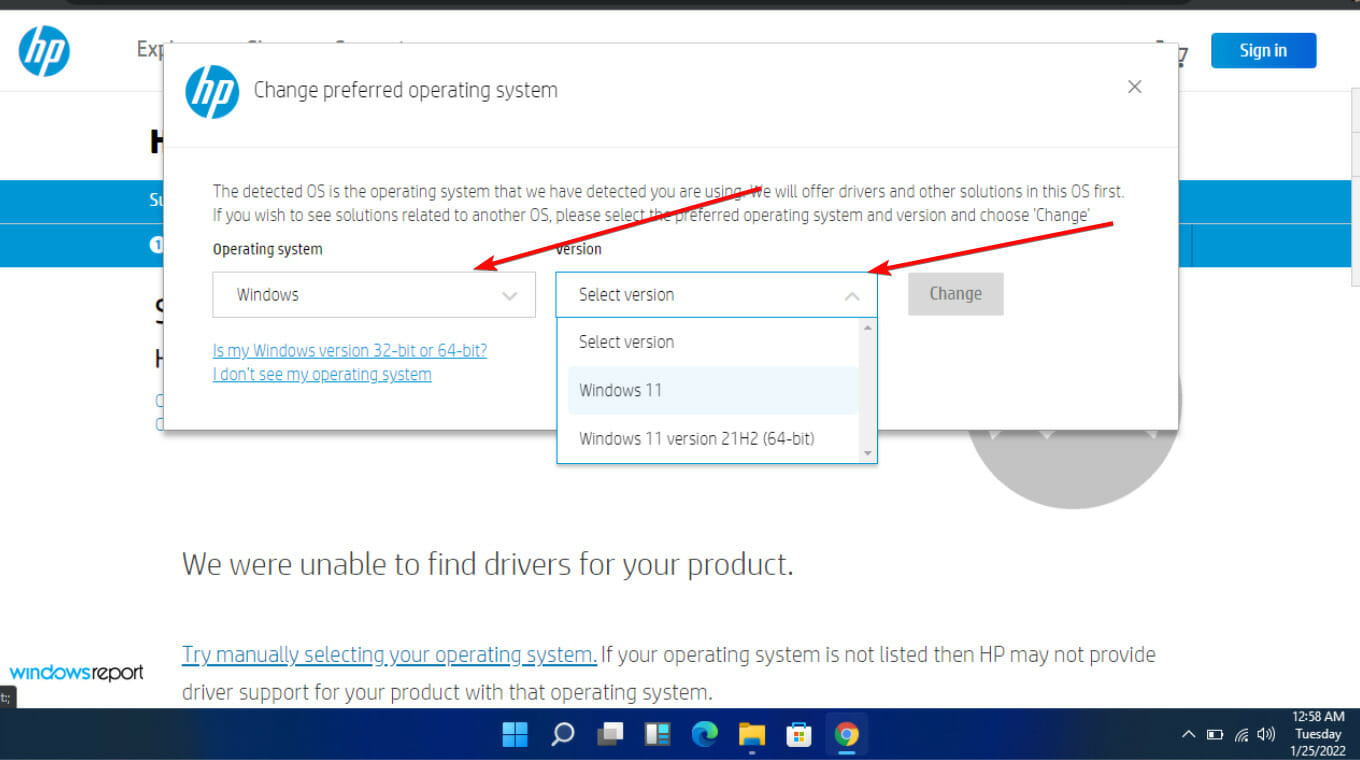
  4. Select your OS and OS version, then click Submit.
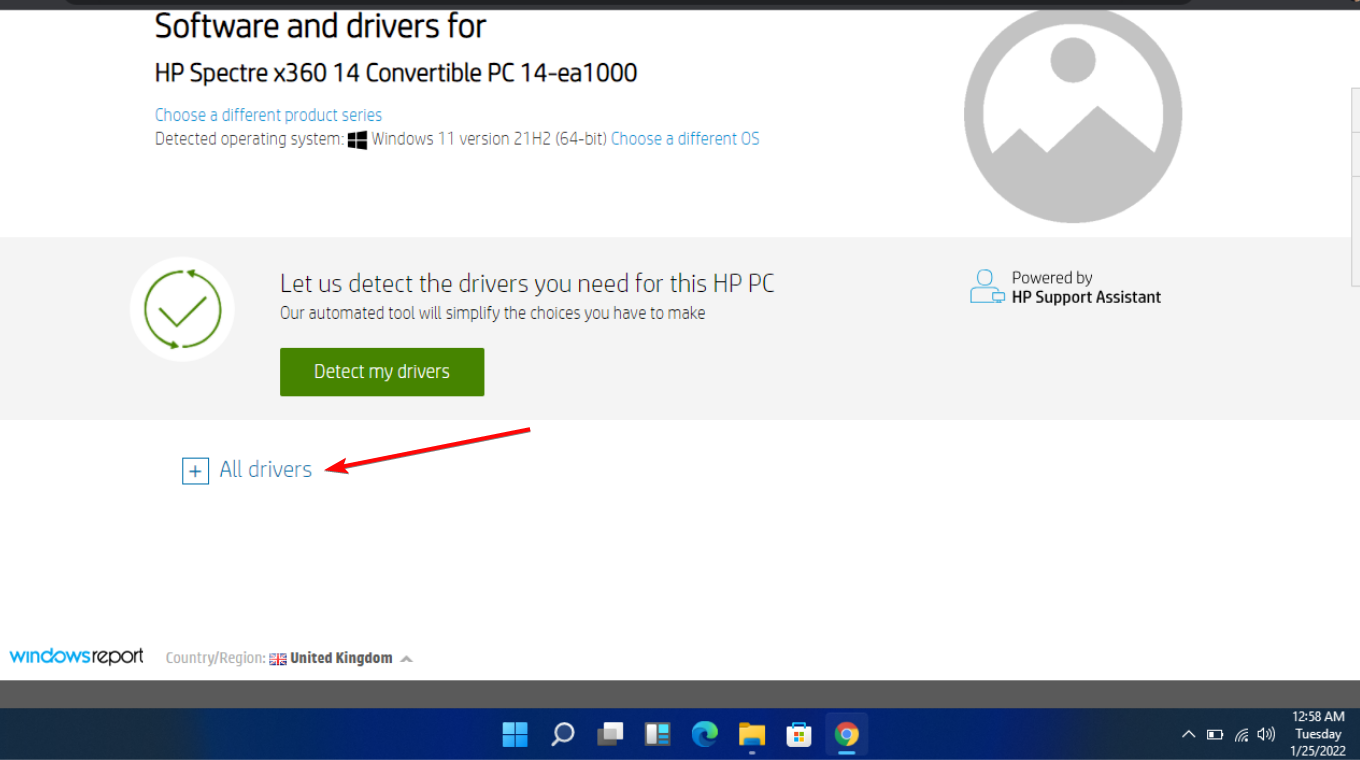
  5. Click on All drivers and then expand BIOS to see available updates.
  6. Hit the download icon.
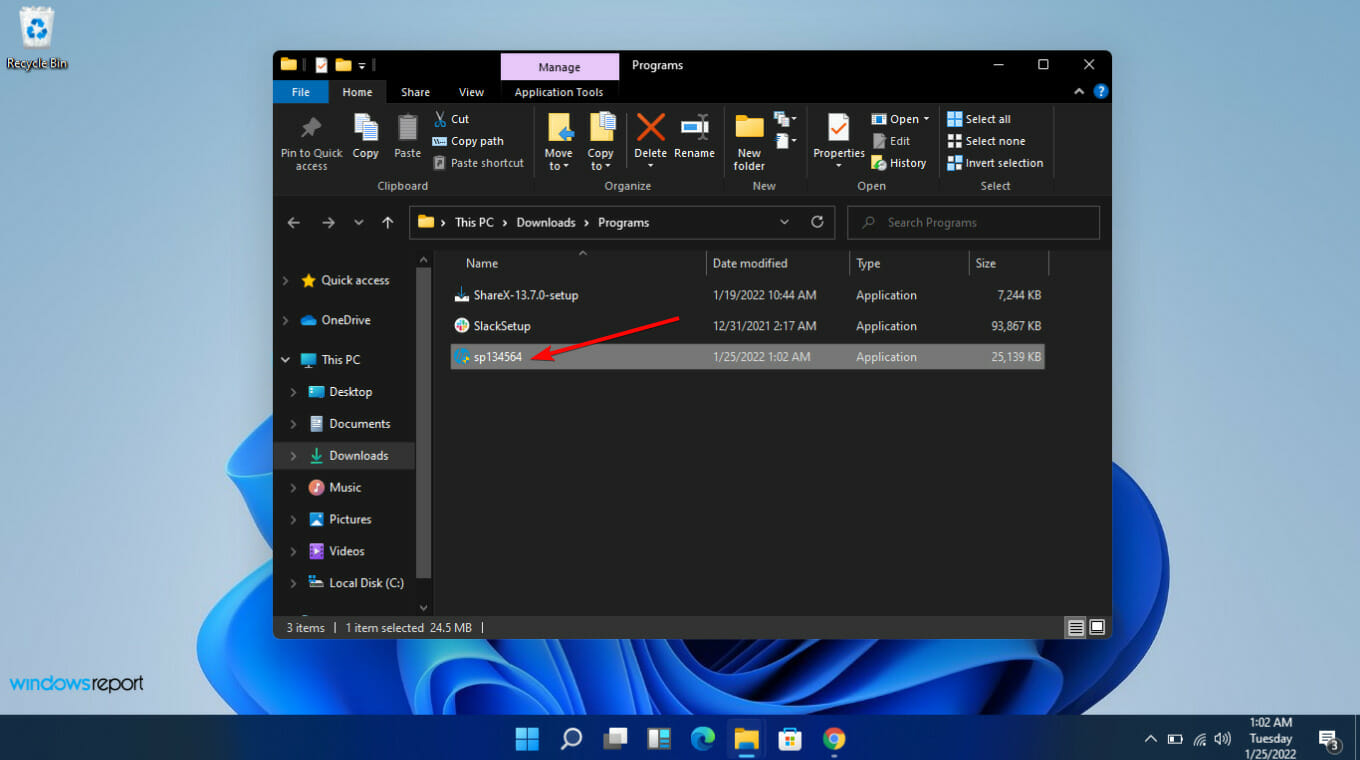
  7. Install the .exe file, following the on-screen instructions.
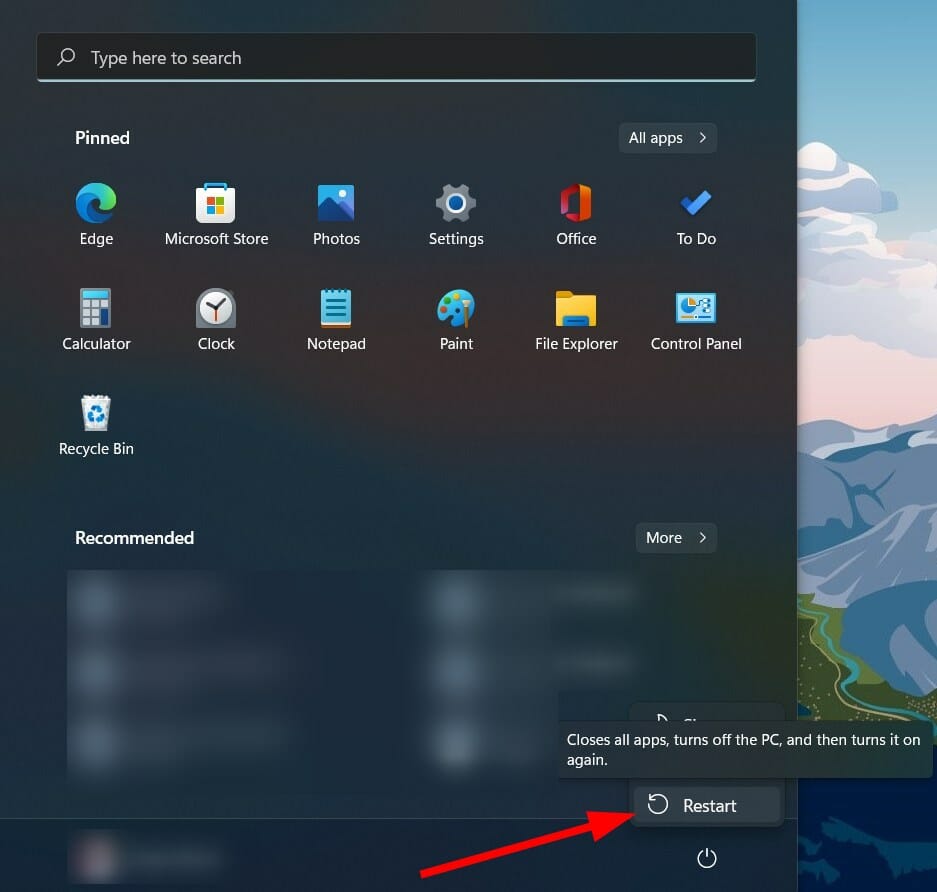
  8. Restart your PC.restart-PC windows 11 scanner not detected error
  9. During the startup, you can select Apply Update Now.

4. Disable TPM temporarily

  1. First, check the status of your TPM by pressing the Windows + R keys to open the Run dialog.
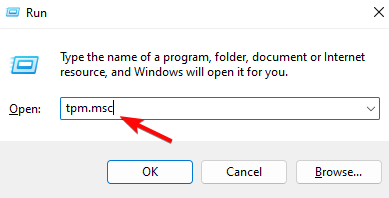
  2. Type tpm.msc in the dialog box and press Enter.run tpm.msc command
  3. Now you should see the status of the TPM.
  4. Next, enter your PC’s BIOS settings.
  5. Navigate to TPM and disable it.
  6. Go back and try to enable BitLocker now.

Remember that you can also enable BitLocker without TPM especially if you’re operating an older system that doesn’t meet modern PC system requirements. This can also help avoid issues preventing you from encrypting a folder.

5. Convert your partition style

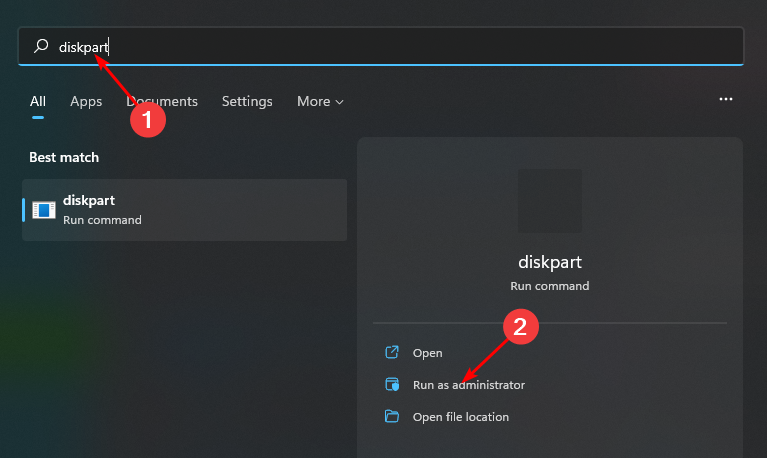
  1. Hit the Windows key, type diskpart in the search bar then click Run as administrator.
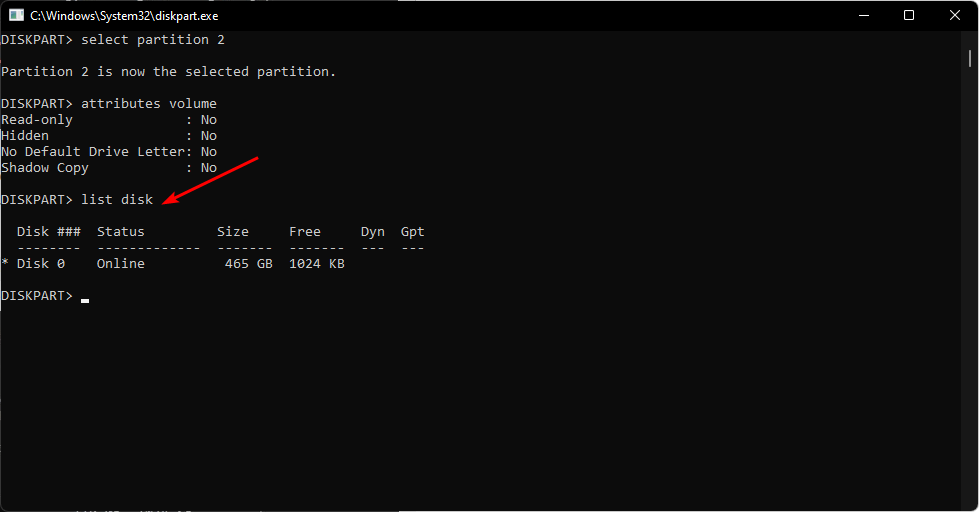
  2. Type in the following commands to establish the MBR and GPT disks and press Enter after each one: diskpart list disk
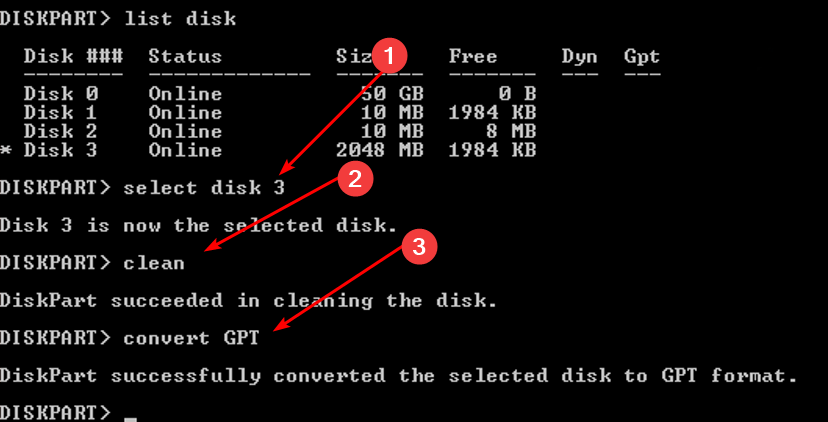
  3. Next, note down the disk you wish to convert to GPT and type the following commands replacing # with the corresponding disk number to be converted: select disk # clean convert gpt

When you do the conversion, any data on that drive will disappear, so ensure that you back up all your files before performing this step.

Also, if you’re successful and can now enable BitLocker, BitLocker may fail to encrypt your hard drive. If you are in such a situation, feel free to check out our expert article on how to get encryption working again.

Aside from the BitLocker not being enabled, you may also come across the BitLocker prompt screen error, but worry not, as our detailed article has steps to fix this issue.

That’s all we had for this article, but be sure to leave us a comment below with any additional thoughts you may have on this issue.

SharePoint Search Is Not Working: 4 Ways to Fix It

SharePoint is a popular collaboration and content management platform used by organizations of all sizes. One of the key features of SharePoint is its search functionality, which allows users to quickly and easily find the information they need.

However, when SharePoint search is not working, it can significantly inconvenience users and impede productivity. This article will examine why SharePoint search may not work and how to fix it.

Why is my SharePoint search not working?

There are several reasons why SharePoint search may not work. Some of the most common causes include:

  • Incorrect search configuration – SharePoint search relies on a set of configurations to function properly. If these configurations are not set up correctly, the search may not work as expected.
  • Indexing issues – SharePoint search uses indexing to create a catalog of all the content in the system. If the indexing process is not working correctly, the search may not return the expected results.
  • Network and firewall issues – SharePoint search relies on network connectivity to function correctly. The search may not work as expected if network or firewall settings are issues.
  • Corrupted search database – SharePoint search relies on a database to store the indexed content. If the database becomes corrupted, the search may not work as expected.
  • Insufficient permissions – SharePoint search requires specific permissions for users to function correctly. The search may not work as expected if users do not have the necessary permissions.
  • Lack of adequate hardware resources – SharePoint search requires specific hardware resources to function correctly. If the hardware is not sufficient, search may not work as expected.

Other common issues users may face using the service include:

Without much ado, let us show you how to fix this problem. Note that these fixes will work if the SharePoint search is not working for one user, SharePoint 2013 or 2016 search is not working, or if the SharePoint list search is not working.

How do I fix SharePoint search?

1. Start the SharePoint Server Search

  1. Go to Central Administration.
  2. Navigate System Settings, then Manage services on the server.
  3. Check that the SharePoint Server Search service is running; if not, start it.

2. Use solutions from the KB article

  1. Open the Central Administration.
  2. Now click on System Settings and select Manage farm solutions.
  3. Check if any recent update has been done on SharePoint; if yes, try to look for the related issues in the KB article and resolve them by following the steps mentioned.

3. Rebuild the Search Index

  1. Press the Windows key, type Power, and select the Run as administrator option for PowerShell.
    sharepoint search not working
  2. Type the command below and hit Enter to Add the SharePoint cmdlets to the current PowerShell session.
    Add-PSSnapin Microsoft.SharePoint.PowerShell
  3. Use the following command to stop the search service (Where Search Service Instance Name is the GUID of the service):
    Stop-SPEnterpriseSearchServiceInstance -Identity Search Service Instance Name
  4. Use the following command to rebuild the index (Where Search Service Application Name is the GUID of the service):
    $searchapp = Get-SPEnterpriseSearchServiceApplication Search Service Application Name
    $searchapp.RebuildIndex()
  5. Finally, use the following command to start the search service:
    Start-SPEnterpriseSearchServiceInstance -Identity Search Service Instance Name

Note that the rebuild Indexing process might take a long time, depending on the amount of data you have and how complex your environment is.

Also, it’s essential to ensure that the SharePoint servers have enough resources to handle the process; otherwise, it might fail.

4. Check for permission levels

Permission levels in SharePoint determine users’ actions on a site or site collection. These actions include viewing and editing content, creating and managing lists, and managing site settings.

When it comes to search, a user’s permission will affect the results they see on a SharePoint site. Users with higher permission levels will be able to see more search results than users with lower permission levels.

So it would be best if you were sure you have the right access to the search you need.

In conclusion, SharePoint search not working can be a frustrating issue to deal with, but with the right troubleshooting steps, it can be resolved

So let us know if this was helpful in the comments section below.
Microsoft Edge will let users split two tabs in a single window soon

If splitting two tabs into one window is something you’ve been long anticipating to enhance your workflow and navigation while browsing the web, then you might be able to access this feature soon. As it happens, Microsoft is currently testing this feature with Edge insiders in the Canary Channel as spotted by Leopeva64-2 on Reddit.

Edge Insiders in the Canary Channel can access this feature by enabling the Microsoft Edge Split Screen flag. By enabling this flag, a new button will be introduced in the address bar. Then, you can click on the Edge Split Screen button to use two tabs simultaneously in one Edge window. Here’s an illustration of how the feature works:

Microsoft Edge tabs in a new side-by-side view.

While it is still possible to achieve the same by having multiple tabs open in a single window simultaneously and be able to navigate between them, it is quite tedious and you might at times lose track of your workflow.

Alternatively, the browser also comes with a provision that allows users to drag a tab and make use of the in-built Windows split view to split two tabs in a single Edge window.

Even then, the process is quite long and tedious, and when compared to the new Edge Split Screen, the latter is by far more appealing since all you need to do is make a single click.

What’s more, users that have access to this feature in Edge can duplicate them, pin them side by side, or even share them in groups. The same feature can also be found in Vivaldi, though instead of splitting one window into two tabs, users can split up to 4 tabs simultaneously in one window.

In other Edge related news, the browser has extended its support for the Windows Server 2012 to October 2023. Share your thoughts regarding this feature in the comment section.

How to Check DisplayPort Version on Windows 11

DisplayPort is a digital display interface that often connects a computer to a monitor or TV. With the release of Windows 11, it is essential to know which version of DisplayPort your computer is using to ensure compatibility with your display device.

In this guide, we’ll discuss how to check the DisplayPort version on Windows 11.

What are the benefits of DisplayPort?

Many users rave about DisplayPort, which is for good reason. It offers the following:

  • High-resolution support – DisplayPort supports resolutions up to 8K, allowing for ultra-high-definition displays.
  • High refresh rate support – DisplayPort can support up to 240Hz, providing smoother visuals for fast-moving content.
  • Multi-stream capability – DisplayPort allows for connecting multiple displays to a single port, allowing more efficient use of ports on a computer.
  • Audio support – DisplayPort supports audio transmission, allowing for a single cable solution for both video and audio.
  • Low power consumption – DisplayPort uses less power than other display interfaces, making it more energy-efficient.

Some users have experienced some problems with the DisplayPort, like the DisplayPort HDMI not working and the DisplayPort VGA not working. However, in all, this is a very sound technology.

Now let us explore how you may check your DisplayPort version.

How can I check my Windows 11 DisplayPort version?

Use the manufacturer’s website

  1. Press Windows + I to open the Settings app.
  2. Select System on the left pane, then on the right, scroll and click the About section.
    how to check displayport version
  3. Take note of your Processor specifications. In our case, it is 11th Gen Intel(R) Core(TM) i7-1165G7 @ 2.80GHz 2.80 GHz.
  4. Head over to the manufacturer site; this may be Intel or AMD (In our case, Intel).
  5. Click Processor.
    how to check displayport version
  6. Select your processor type.
  7. Select an Intel Core Processors option, then check for your Product Name.
  8. Search for Max Resolution (DP); the value signifies the resolution supported through DisplayPort output.
    how to check displayport version

In conclusion, checking the DisplayPort version on Windows 11 is a simple process that can be done by following the steps outlined in this article.

Knowing which version of DisplayPort your computer is using can help ensure that your display device is compatible and that you get the best visual experience.

By keeping your DisplayPort version up to date, you can ensure that your computer can optimize the latest advancements in display technology.

You can now convert a PowerPoint presentation into an animated GIF

Last week, the Office Insider Program got a new name, Microsoft 365 Insider program, as well as a new look. Microsoft executed this move in a bid to align with its transition from Office 365 to Microsoft 365.

The company highlighted that this change will not affect how the program has been running since its inception back in 2015. “Same early access you know and love with a newly expanded purview,” says Microsoft.

Building upon the same premise, the recently revamped program announced the availability of a feature that lets PowerPoint for iPad users export their PowerPoint slides or even an entire presentation into an animated GIF. This feature was already available for both PowerPoint for Mac and Windows users.

Animation of exporting slides as an animated GIF

To access this feature on your iPad, you need to open the presentation you want to turn into a GIF and tap on the ellipses. Select the Create GIF option, where you will be prompted to choose the slides you’d want to turn into a GIF from your presentation. You also get to set how long each slide gets to be displayed as well as the quality of the animated GIF.

If you are part of the Microsoft 365 Insider Program and have an iPad running on Office Insider Version 2.70 (Build 23012202) or later, you should be able to access this neat feature. In related news, PowerPoint for iOS will let users create slides in portrait mode to make the process of creating presentations easier.

Microsoft Edge extends support for Windows Server 2012 to October

Towards the end of last year, we saw Microsoft’s Edge Dev build drop support for Windows 7, Windows 8, and Windows 8.1. Microsoft later cut support for both OSs at the beginning of this month, meaning they’ll no longer receive any security updates.

If you continue using an unsupported version, you are more susceptible to phishing attacks by hackers such as the recent development where attackers use attachments in OneNote’s notebooks to lure unsuspecting users to their traps.

As we had earlier reported, Windows Server 2012 is set to reach its end of support in October, though Microsoft didn’t detail how long it’ll continue receiving Edge updates, The company has now come out to confirm that it will continue to receive updates till October 2023.

According to Microsoft:

Microsoft Edge version 109 will be the last supported version on Windows Server 2012 and Windows Server 2012 R2 (version 110 and later will be unavailable). Version 109 will receive critical security fixes and fixes for known exploit bugs until October 10, 2023. WebView2 Runtime version 109 will be supported in the same way.

That said, if you try to install Microsoft Edge to these unsupported versions, you’ll get error messages. However, it is possible to continue using Microsoft Edge 109 as it was the last version that supports these operating systems. Microsoft will continue providing security updates for the version till October.

It should be noted that though Microsoft Edge 109 will continue getting security updates from Microsoft, Windows Server 2012 users shouldn’t expect any new features or improvements. The company further added that IE11 will also be supported on both Windows Server 2012 and 2012 R2 till October.

Microsoft recommends that admins should consider transitioning to Windows Server 2022 or purchasing Extended Security Updates (ESUs) if they want to keep their on-premises Windows Server 2012 servers running and continue getting security updates.

via: Ghacks

Microsoft set to stop selling Windows 10 downloads on January 31

Microsoft announced that it has plans underway to stop selling both Windows 10 Home and Pro licenses, including license keys at the end of this month, on January 31. As you might already be aware, Microsoft will officially cut support for Windows 10 on October 14, 2025. Therefore, this could be Microsoft’s way of preparing toward cutting support for the OS entirely.

The company halting sales doesn’t mean that it will stop supporting Windows 10, in fact, it will continue to push security updates to the OS till it reaches its end of support date. That said, customers can make their purchases till January 31, after that, it will be impossible though it isn’t yet clear if this also applies to retailers and OEMs.

A Microsoft spokesman told The Verge that, “Customers have until January 31, 2023, to purchase Windows 10 Home and Windows 10 Pro from this site,” and goes on to indicate that users should consider upgrading to Windows 11.

Microsoft first launched Windows 10 back in 2015, the company promises to continue providing security updates for the OS till 2025. In other related news, Microsoft announced that it was going to cut support for ESUs for Windows 7 on January 10 and further urged users to upgrade their devices and OS.

via: The Verge

Secure Boot Enabled But Not Active in Windows 10: 5 Solutions

On the System Information page, if you see the Secure boot option is off, but in BIOS, it is shown as Active, which can be confusing. However, it could be due to some misconfigured settings in BIOS, and it can be sorted with a few steps. 

Here in this guide, we will discuss some steps to fix this issue right after examining the causes of the issue. Let’s get started!

What causes the Secure Boot enabled but not active issue?

There could be various reasons why secure boot is not active on your computer, some of them are mentioned here: 

  • Secure Boot feature disabled – Check if the Secure Boot option in UEFI firmware settings is set to Disabled; the feature won’t work, even if it is technically enabled. So, double-check the settings in BIOS to be sure. 
  • CSM enabled – If Compatibility Support Module is enabled in UEFI settings, you might see that secure boot is not an active issue. It would be best if you disabled it to get the Secure boot option.
  • BIOS is outdated – if BIOS is not up to date, it might not support the Secure boot feature. Check the manufacturer’s website to download and install BIOS updates to enable the feature.
  • Scan for viruses – If your computer is infected with malware or viruses, you might see that secure boot is not active. You need to run a malware scan using a security tool.

Now that we know the problem, let’s fix it using the solutions below.

What can I do if secure boot is enabled but not active?

Before moving to actual troubleshooting steps, apply these quick steps: 

  • Check for Windows updates.
  • The operating system must be configured to support Secure boot.
  • Your device should have a valid Secure boot signature.

1. Update BIOS

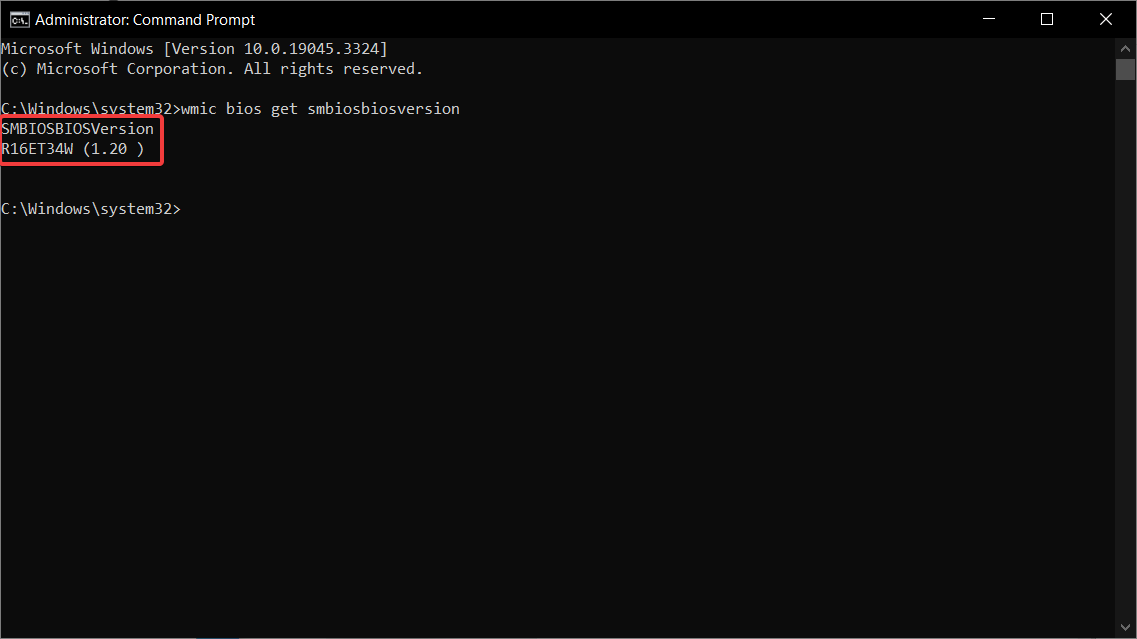
  1. Press the Windows key, type cmd, and click Run as administrator.
  2. Type the following command to check the BIOS version and press Enter: wmic bios get smbiosbiosversion
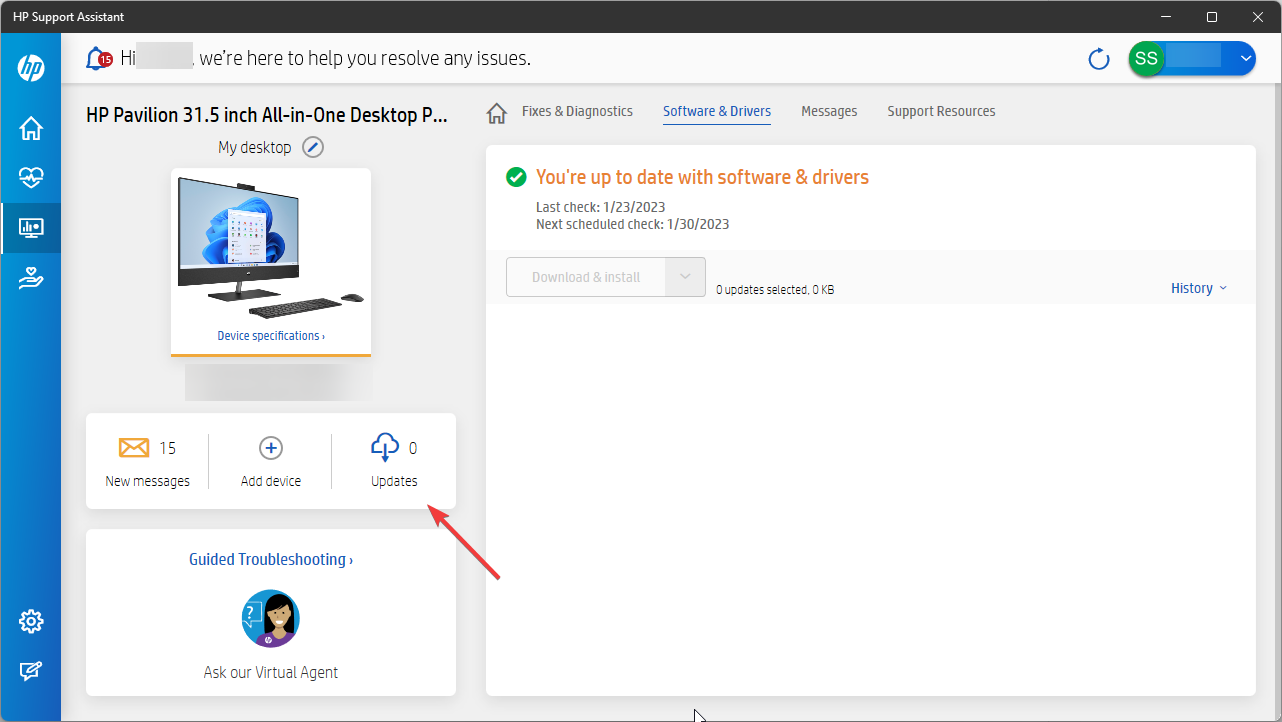
  3. Next, open the device manufacturer’s website or open the assistant app if provided by the manufacturer. For demonstration purposes, we are using the HP Support Assistant tool.
  4. Open the app. Go to Updates, then click Check for updates.HP assistant
  5. If there is an update available, download and install the BIOS.

If you have an older BIOS version or you don’t have an update tool, we have a complete guide on how to update BIOS in Windows 10 that will provide step-by-step instructions.

2. Disable CSM

  1. Press Windows + I to open Settings.
  2. Go to Update & Security.
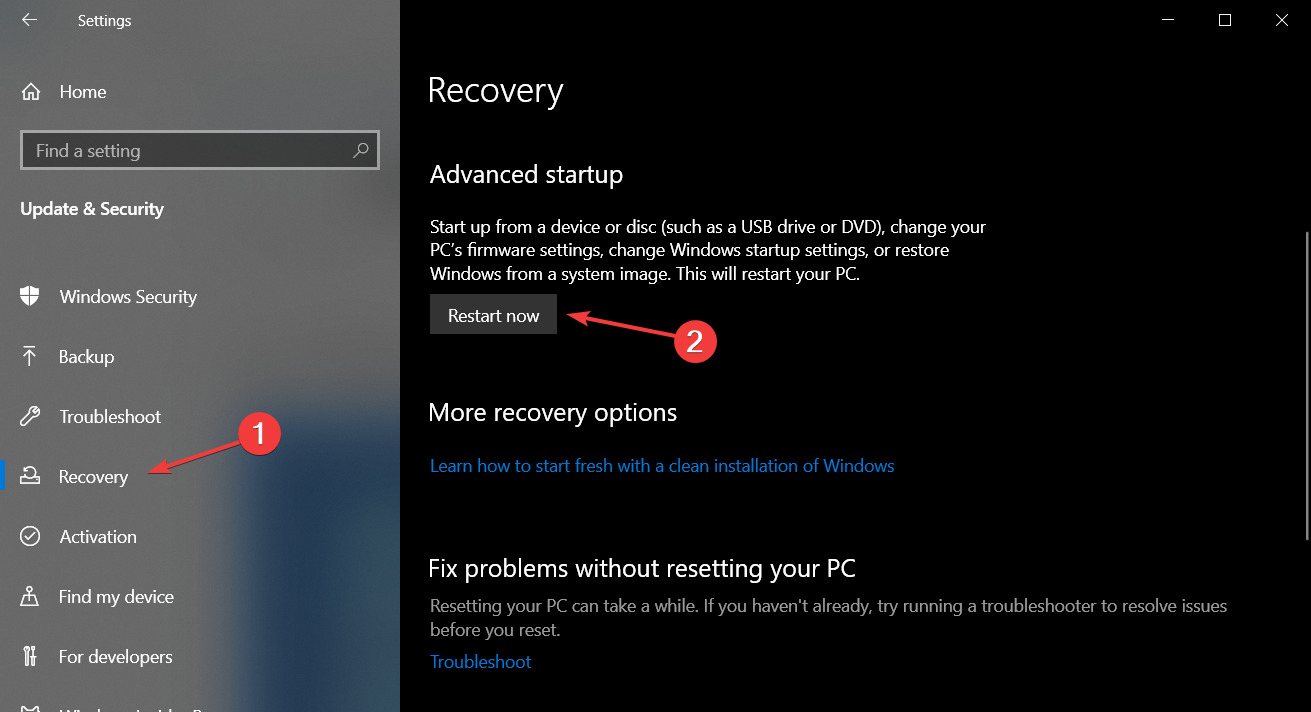
  3. Now, click Recovery from the left pane and under Advanced startup, click Restart now.
  4. From the Choose an option window, select Troubleshoot.Troubleshoot- enable secure boot without bios
  5. Now select Advanced Options.Troubleshoot WITH AO selected
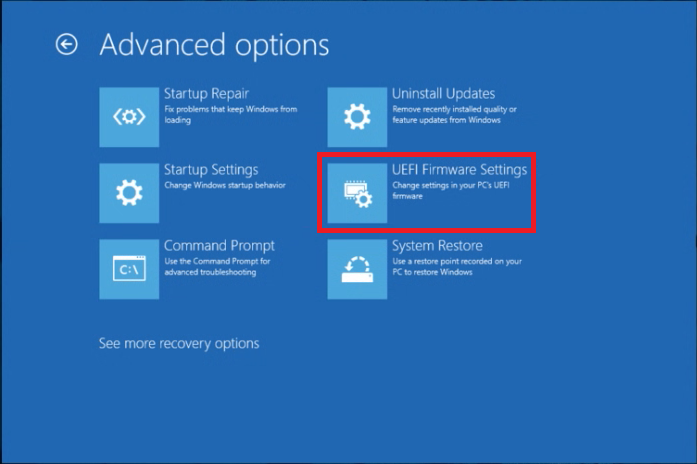
  6. On the Advanced Options window, select UEFI Firmware Settings.UEFI
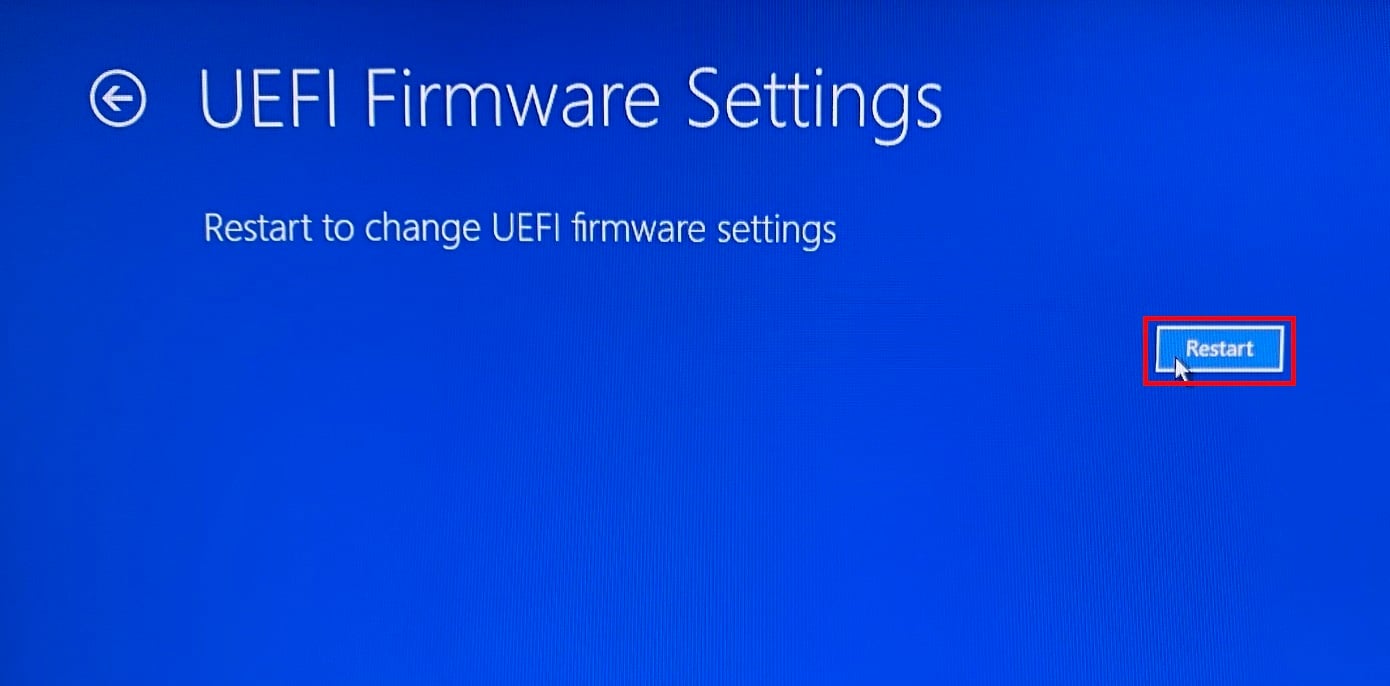
  7. Click Restart. UEFI Restart
  8. The computer will restart and provide you with some options. First, choose the appropriate option to enter BIOS.
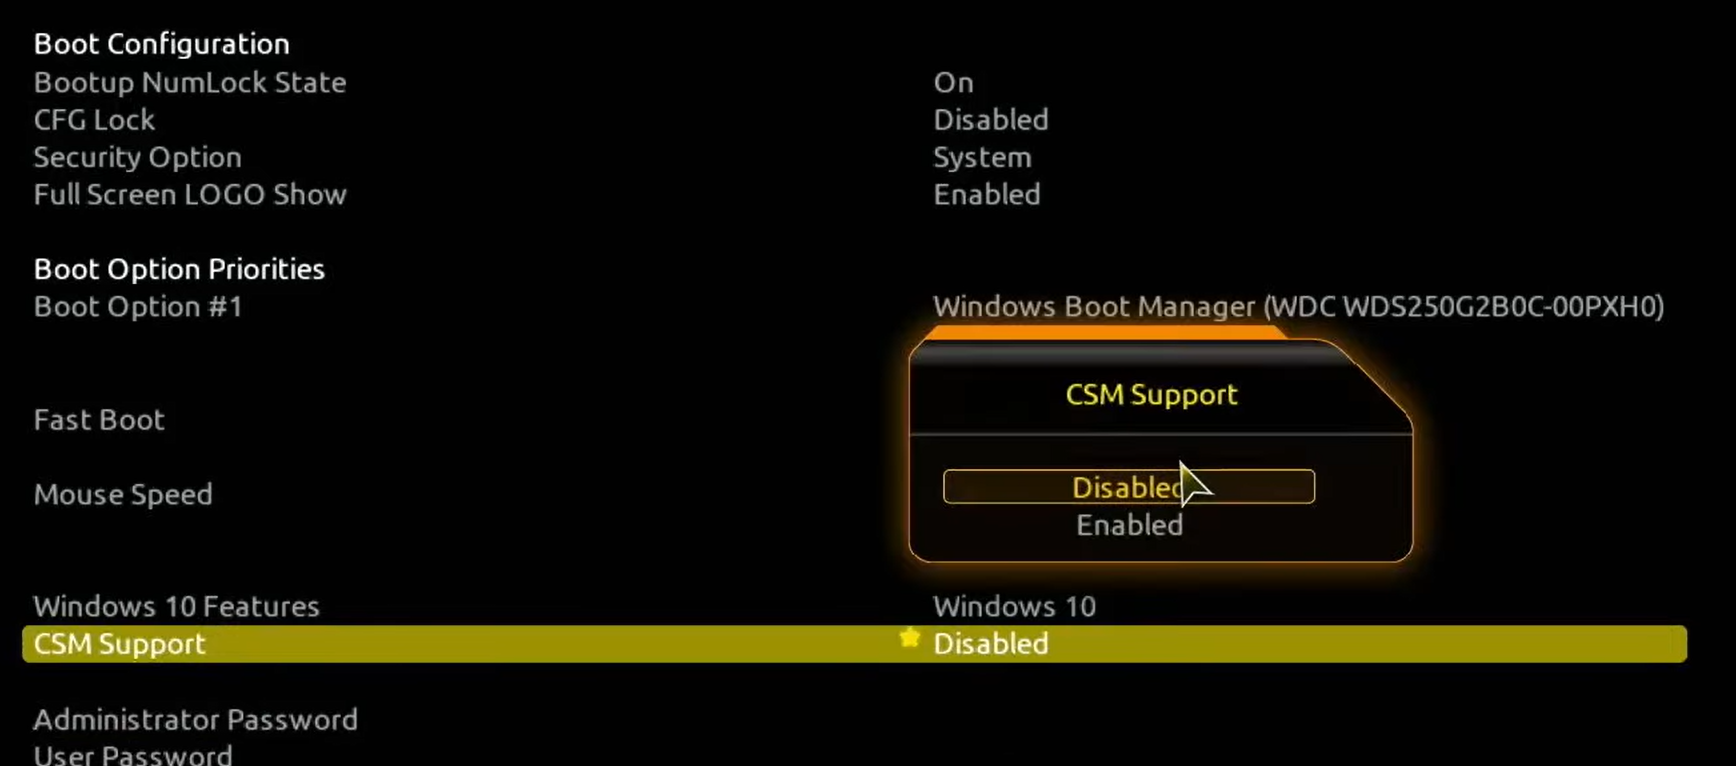
  9. Go to the Boot tab or Security tab, select CSM and choose Disabled.SupportCSM
  10. Now switch to the Exit tab and select Save changes and exit.

3. Change the platform 

  1. Enter the BIOS mode using the method explained in the above method.
  2. Navigate to System Mode and select User instead of Setup.
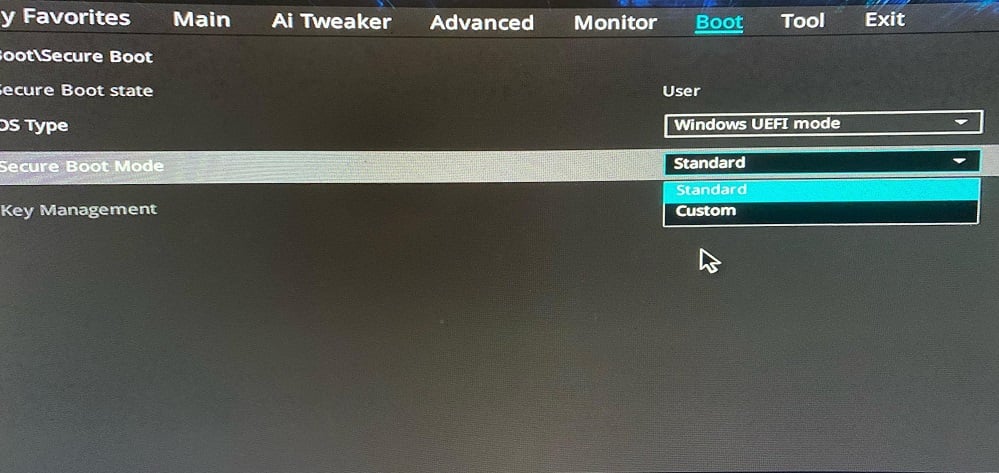
  3. Now locate Secure Boot Mode and choose Custom if Standard is selected.   enable secure boot without bios
  4. Then again, change it back to Standard.
  5. Now switch to the Exit tab and select Save changes and exit.

4. Enable Secure Boot from BIOS

  1. Again enter the BIOS using the method mentioned in method 2.
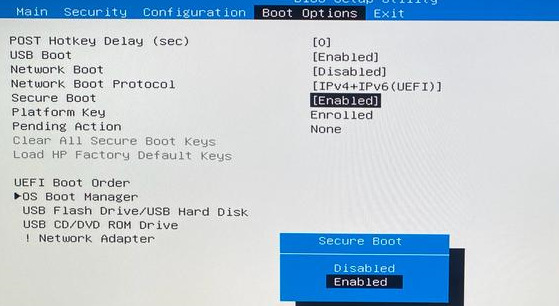
  2. From the Boot menu or Security menu, choose Secure boot.Secure-boot -enable secure boot without bios
  3. Select Enabled. Now switch to the Exit tab select Save changes and exit.

Remember that BIOS software differs for manufacturers and motherboards, so your menu might differ from our solution. Nevertheless, you will find the Secure Boot option within its settings.

5. Scan your computer for malware 

  1. Press the Windows key, type Windows Security, and press click Open.
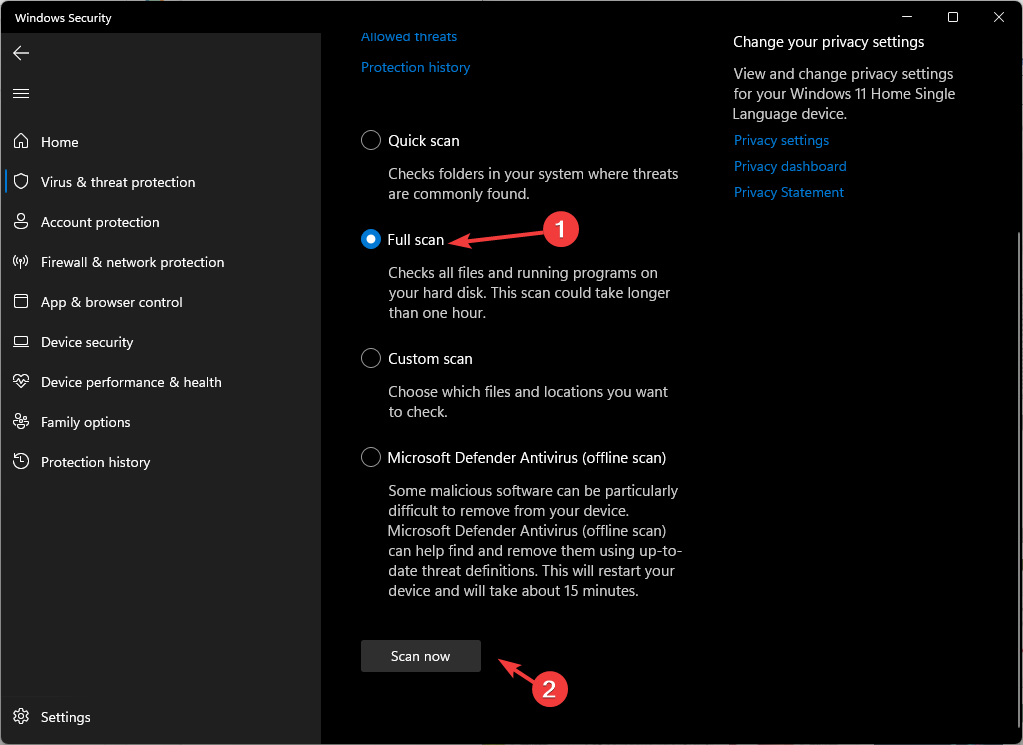
  2. Go to Virus & Threat Protection and click Scan options.
  3. Now select Full Scan, and click Scan now.Full scan -
  4. Once the scan is complete, delete all the malicious files found.

A less probable scenario of Secure Boot being disabled is that a virus or malware did that. Scanning your system with Windows Defender might solve the problem.

Of course, you can do that with a more powerful antivirus to be absolutely sure that your computer is safe.

So, you need to follow these steps to fix the secure boot enabled but not active. If you have upgraded to the latest OS, here’s our guide on how to fix the secure boot enabled but not active on Windows 11.

Try these methods and let us know which worked for you in the comments below.

DesktopWindowXamlSource Empty Window: How to Remove It?

DesktopWindowXamlSource is a Windows application programming interface (API) that lets an app host XAML controls in a desktop window. If you see DesktopWindowXamlSource empty window, then it could be due to API being misused. 

The issue is linked with Microsoft OneDrive and got fixed in 2021. However, the forums flooded with questions regarding the error suggest otherwise. 

Here in this guide, we will discuss some methods to fix the error after discussing the causes. Let’s get started! 

What causes DesktopWindowXamlSource empty window to come up? 

There can be various reasons for the empty window to come up; some of the popular ones are: 

  • Problem with Windows UI automation framework –  If there is an issue with the Windows UI automation framework, which is responsible for providing accessibility features for Windows apps, then it might be stuck with the desktop window XAML source not responding
  • Windows updates pending – If your computer has pending Windows updates, you might get this error. 
  • Problem with the OneDrive app – If the app in question is not working fine or has some missing files, you could get this error. 
  • Corrupt system files – If your Windows has damaged system files, then it could cause a lot of issues, including this one. 

What can I do to remove the DesktopWindowXamlSource empty window?

Before engaging in the troubleshooting steps to eliminate this problem, please perform these preparatory checks: 

  • Restart the OneDrive app
  • Restart your computer 

1. Update the Windows 

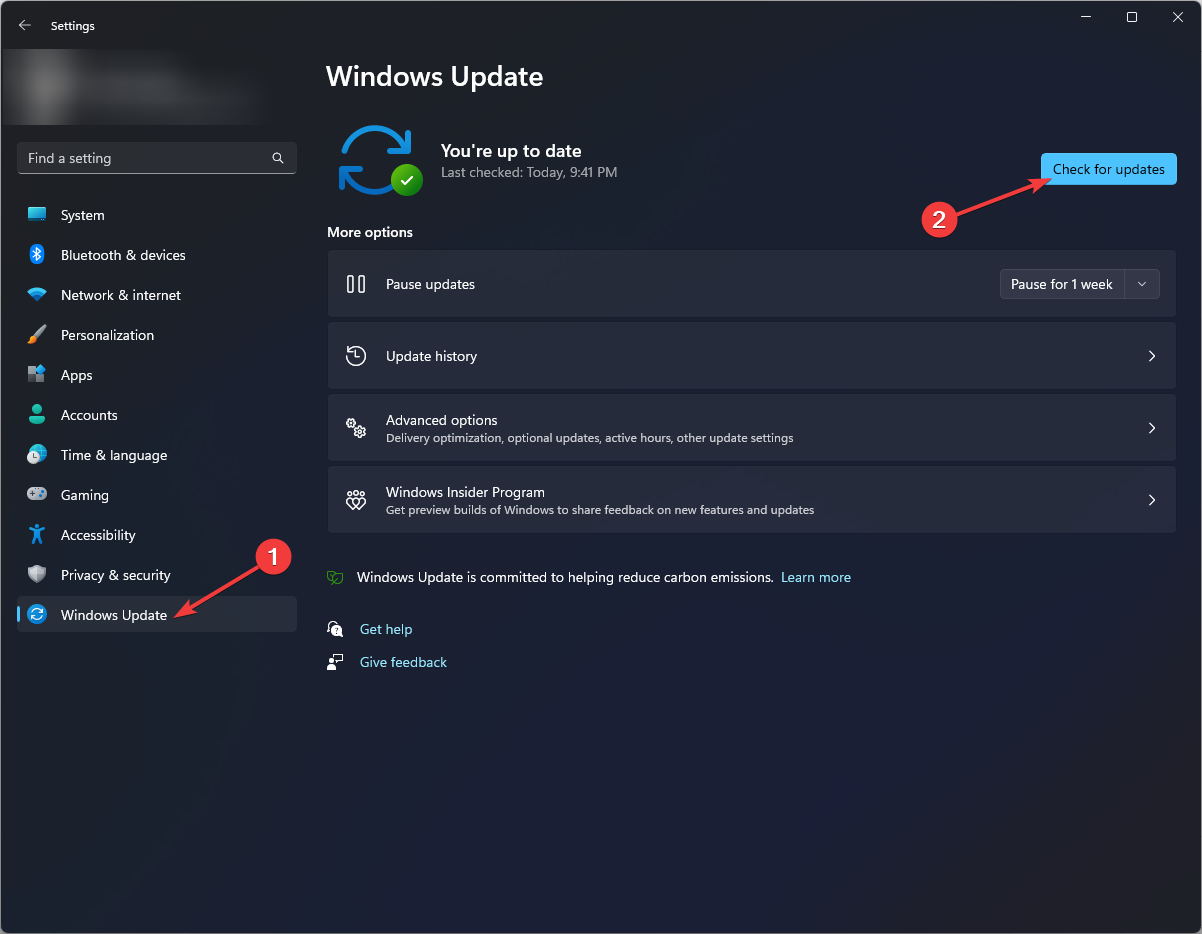
  1. Press Windows + I to get Settings.
  2. Click Windows Update from the left pane, and click Check for updates. Windows Update
  3. If there is an update, download and install it.
  4. Restart your computer when prompted.

2. Repair corrupt system files 

  1. Press the Windows key, type CMD and click Run as administrator. DOS COmmand Prompt - DesktopWindowXamlSource empty windowjoin windows 11 to domain
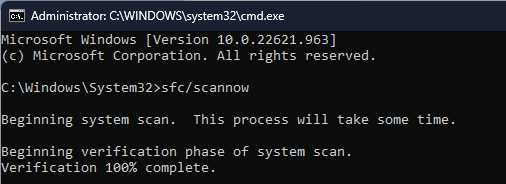
  2. Type the following command and press Enter: sfc/scannow
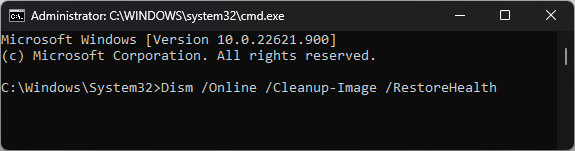
  3. Copy and paste the following commands one by one and press Enter after every command: DISM /Online /Cleanup-Image /CheckHealth DISM /Online /Cleanup-Image /ScanHealth DISM /Online /Cleanup-Image /RestoreHealth
  4. Wait for the process to complete, and restart your computer. 

3. Update OneDrive

  1. Press Windows + R to open the Run window. 
  2. Type the following command to reset OneDrive and press Enter : %localappdata%\Microsoft\OneDrive\onedrive.exe /resetRun command - Update One Drive -DesktopWindowXamlSource empty window
  3. Next, copy and paste the following command to update OneDrive and press Enter: %localappdata%\Microsoft\OneDrive\update
  4. Finally, restart your PC to let the changes take place. 

4. Reinstall OneDrive

  1. Press Windows + R to open the Run window. Programs and Features - DesktopWindowXamlSource empty window
  2. Type appwiz.cpl and press Enter to open Programs and features.
  3. Locate and select Microsoft OneDrive. Then, click Uninstall from the menu. Uninstall OneDrive -Programs and Features - DesktopWindowXamlSource empty window
  4. Wait for the app to be uninstalled. 
  5. Now download OneDrive.
  6. Double-click the installer file and follow the onscreen instructions to complete it. 

So, these are the methods to remove DesktopWindowXamlSource empty window. Try them and let us know what worked for you to resolve this OneDrive error in the comments section below.

How to Cast Windows 10 to a TV [Wireless Screen Mirroring]?

Casting Windows 10 to a TV is a straightforward process. All you need is a Windows computer with casting capabilities. 

This guide will cover step-by-step instructions to mirror your Windows screen on your TV. Let’s get started! 

What can I do to cast Windows 10 screen on a TV? 

Before moving into the actual steps, make sure you check all these on your computer: 

1 Use Settings 

1.1 Add an optional feature

  1. Press Windows + I to open Settings.
  2. Click System.
    System - windows 10 cast to tv
  3. Now select Projecting to this PC from the left pane.
  4. Click Optional features. 
    Optional feature
  5. On the Optional Features page, click Add a feature.
    Download Wireless Display
  6. On the Add an optional feature window, search Wireless Display. Select Wireless Display.
  7. Click Install. Once it is installed, restart your PC.
  8. Now go to Projecting to this PC, click Available everywhere or Available everywhere on a secure networks.
    Projecting this PC
  9. Now, click Apply. 

1.2 Connect

  1. Launch the Action Center.
  2. Click Connect.
    Action Centre COnnect
  3. Select the projecting device. Please wait for a minute and let the devices pair.
  4. Put a checkmark on Allow input from a keyboard or mouse connected to this display.
    Allow mouse keyboard touc - windows 10 cast to TV
  5. Click Change projection mode and select Extend from the Project option.
  6. You can terminate the connection by clicking on Disconnect anytime.

Using Microsoft’s Miracast adapter? Get the Wireless Display Adapter app to update firmware, adjust display settings, and fix common connection issues.

2. If Using Chromecast or Apple TV 

  1. Depending on the device, Chromecast, or Apple TV, install the app on your Windows 10. 
    Ready to cast -windows 10 cast to tv
  2. Configure device settings.
  3. Once the device is set up, open the app and start casting your screen on your TV.

So, these are methods that you need to follow to cast Windows 10 to a TV. Try them and let us know what worked in the comments section below. 

How to Fix MRT.exe High CPU & Disk Usage: 3 Quick Ways

MRT.exe, also known as the Malicious Software Removal Tool, is a program that Microsoft adds to protect your computer from malware. It’s a pretty handy tool but has the issue of using a lot of CPU resources.

Normally, this isn’t really a problem because MRT only runs every once in a while. The problem lies when MRT begins to run for an extended period of time; even days on end. Now, something’s wrong.

What causes MRT.exe to malfunction and use a lot of the CPU?

Besides high CPU usage, other notable symptoms include your computer becoming really hot and scanning errors. To understand why this happens, it’s important to look at the likely culprits.

  • Your computer is infected with malware or a computer virus: This is by far the most likely reason. You may even have malware masquerading as MRT.exe. Use an antivirus app to clean this up.
  • Some kind of software was incorrectly installed: Bad installations can cause app problems because important files are not located where they should be.
  • Something in your system is corrupted: As a result of a bad installation, files can get corrupted interrupting key functions. We recommend repairing and restoring these corrupt files.

How can I stop MRT.exe from using CPU resources?

In order to stop the Malicious Software Removal Tool from malfunctioning, you need to first figure out what’s wrong with it. You can do this by checking the software’s logs.

Before you delve into your computer’s files, there are a couple of quick solutions we recommend you try out:

  • Open the Task Manager and attempt to end the Malicious Software Removal Tool task in the window. If Task Manager doesn’t close it, we recommend using the Taskkill command.
  • Run a full virus scan with Windows Defender if you have a Windows 10 or 11 machine. Malware may have infected your computer.
  • Or if you prefer, you can use third-party antivirus software. What’s important is that you clean up your computer.

1. Check MRT logs

  1. Right-click the Windows menu icon in the bottom-left corner and select Run.
  2. Type %systemroot%\debug in the Run command and hit Enter on your keyboard.
  3. Double-click the mrt text document to open it in Notepad. The file will tell you the last time MRT.EXE ran.
  4. Look under the Results Summary.

If it says no infection was found, there’s nothing else you can do. The problem lies elsewhere. If it does say something was found, proceed to the next solution.

2. Delete and reinstall MRT.exe.

  1. Bring up the Windows search bar and type in MRT.exe.
  2. Click Open file location when MRT.exe pop up.
  3. Right-click MRT.exe and select Delete in the context menu.
  4. If you don’t see MRT.exe anywhere, click View at the top of File Explorer.
  5. Check the box next to Hidden Items. MRT.exe should appear now.
  6. Go to Microsoft’s Download Center to download a fresh copy of the Malicious Software Removal Tool. There are 32-bit and 64-bit versions available depending on the type of computer you have.
  7. Go to where the location of the new Malicious Software Removal Tool. Double-click to begin the installation. If a User Access Control window appears, select Yes.
  8. When installing the software, select Full Scan to start things off. Give your computer enough time to finish.
  9. Click Finish when the software finishes.

3. Use Autoruns to clear up errors

  1. If you get an error stating MRT.exe is missing after deleting it, go to Microsoft’s Learn page and download Autoruns.
  2. Double-click Autoruns.exe and select Extract all. Follow the instructions in the subsequent extraction process.
  3. Now run Autoruns.exe after your computer finishes extracting the files.
  4. In Autoruns, click Search at the top of the window.
  5. Search for MRT.exe in the small window that appears.
  6. Once MRT.exe is located, right-click and select Delete.

The Component-Based Servicing (CBS for short) log file has been reported to become suddenly corrupt after a Windows update. It is pretty important since it keeps track of whenever new updates are installed.

However, you can clean it up or outright delete CBS without causing harm to your computer. You should also learn about fixing Error 0x800f091f. The name may be awkward, however, it’s a serious issue.

You can also review this complete Windows Malicious Software Removal Tool overview for more details on how the tool works and why it may act unexpectedly.

This error prevents the dotNet Framework from updating your Windows computer. Running an SFC scan can fix this, but you might also have to update drivers manually.

Feel free to comment below if you have questions about other native Windows software. And please tell us if there’s a specific guide for any Windows error you’d like to see.

How to Join Windows 11 to a Domain [Easiest Methods]

Find below the easiest methods to add Windows 11 to a domain.

Joining Windows 11 to a domain has several benefits. Some include centralized management, better security, allowing you to back up, remote access to network resources, and resource sharing.

Sounds good? Let’s get started!

What can I do to add Windows 11 to a domain?

Before engaging in troubleshooting methods, make sure you go through the preliminary checks: 

  • An active internet connection
  • A domain name and credentials are provided by your IT administrator.
  • Windows 11 must meet the system requirements to join a domain. 
  • Windows 11 must be connected to the same network as the domain controller. 
  • An account with permission to join the domain.
  • The computer must be configured with a static IP address.

1. Use the Settings 

  1. Press Windows + I to open Settings. 
  2. Go to Accounts, and click Access work or school. Accounts - join windows 11 to domain
  3. Next to Add a work or school account, click Connect. Connect
  4. On the next page, click Join this device to a Local Active Directory domain.
  5. On the Join a domain window, enter the domain name provided by the IT admin and the credentials of an account. Click OK.
  6. Next, click Add an account and click Next.
  7. Wait for the process to finish and click Restart now. 

2. Use the Control Panel 

  1. Press the Windows key, type Control Panel, and click Open. Control Panel -join windows 11 to domain
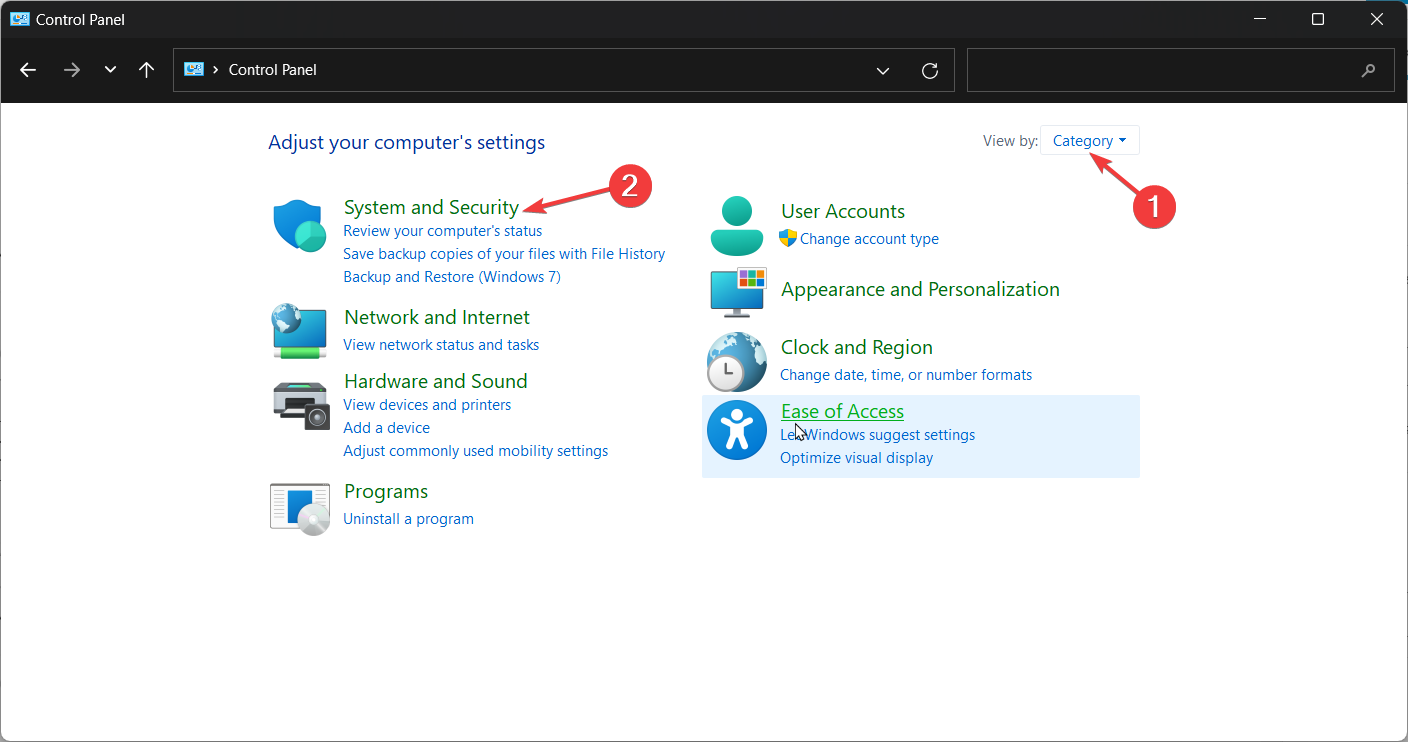
  2. Select View by Category. Click System and Security.Security and System
  3. Click System. System
  4. Locate the Domain and workgroup option.Domain and workgroup
  5. Go to Computer Name, and click Change.SystemPropertiesComputerName_FLxqNGO3wX
  6. Under Member of, click Domain, type the domain name, and click OK.Domain
  7. Again click OK, and restart the PC.

3. Use Windows PowerShell

  1. Press the Windows key, type PowerShell, and click Run as administrator. PowerShell - join windows 11 to domain
  2. Type the following command, replace %domainname% with the appropriate domain name for your network, and press Enter: Add-Computer -DomainName %domainname% -Credential (Get-Credential)
  3. You will get a prompt to enter the username and password of an account with permission to join the domain.

4. Use the Command Prompt

  1.  Press the Windows key, type CMD and click Run as administrator. DOS COmmand Prompt - join windows 11 to domain
  2. Copy and paste the following command, replace %computername%, %domainname%, %username%, and %password% with the suitable values for your network, and press Enter: netdom join %computername% /domain:%domainname% /userd:%username% /passwordd:%password%
  3. Restart your computer once done. 

Can Windows 11 Home join a domain?

No. Windows 11 can’t join a domain. This feature is only available in Windows 11 Prop, Enterprise and Education. If you need domain capabilities, you have to upgrade from Home to one of those.

So, these are the methods that you need to follow to join Windows 11 to a domain. Try these methods to add it to the domain, and let us know which worked for you in the comments section below. 

How to Disable Driver Signature Enforcement in Windows 11

Microsoft has embedded several security features in Windows to ensure that your PC remains safe and secure. One of these is Driver Signature Enforcement in Windows 11.

If you get Windows requires a digitally signed driver or a similar message. This feature is the problem, and today, we will show you how to disable the driver signature enforcement in Windows 11.

What happens when you disable Driver Signature Enforcement?

Disabling driver signature enforcement allows unsigned drivers to be installed on the system. This can be useful for installing older or custom drivers that Microsoft does not digitally sign, but it can also increase the risk of installing malicious or unstable drivers.

Disabling Driver Signature Enforcement allows you to install drivers that Microsoft doesn’t verify. This comes with a couple of benefits and flaws:

  • Security concerns – By disabling this feature, you’ll allow unverified drivers to be installed on your PC. This can be a security risk and allow rootkits to be installed. If this happens, you’ll need USB antivirus software to remove them.
  • Testing purposes – If you’re developing a driver or using older drivers for some reason, you’ll need to disable this feature to install unsigned drivers.

Now, let us explore how to disable Driver Signature Enforcement.

Should I disable the Driver Signature Enforcement feature in Windows 11?

This is the real question here. Though you may want to install a driver that performs better, it’s not always safe. So, if the current ones work just fine, there’s no need to experiment with new ones.

The Driver Signature Enforcement feature is there for a reason, and when you disable it, it negates the whole purpose. Microsoft signs drivers after they are thoroughly checked, their authenticity and reliability verified, and these are the ones that should be installed.

But if you want to download an unsigned driver, conduct thorough research on the source and the driver itself. Once satisfied, you can disable the feature and install the driver.

How can I disable Driver Signature Enforcement in Windows 11?

1. Via Windows Recovery Environment (RE)

  1. Press the Windows key to launch the Start menu, click on the Power icon, press and hold the Shift key, and then click on Restart to enter the recovery mode in Windows 11.Restart in recovery mode
  2. Once the OS enters the recovery environment, click on Troubleshoot.Troubleshoot to disable windows 11 driver signature enforcement
  3. Next, click Advanced options.Advanced options
  4. Select Startup settings from the six options listed here.Startup settings to disable windows 11 driver signature enforcement
  5. Now, click on the Restart button.Restart
  6. If you are asked to enter the BitLocker recovery key, find out what to do. With the feature enabled, Windows may ask you to provide the key to ensure that no one else is accessing the data.
  7. Finally, press the F7 or 7 key to boot Windows with the Driver Signature Enforcement feature disabled.7 or F7 to disable windows 11 driver signature enforcement

Once the system restarts, Driver Signature Enforcement will be disabled in Windows 11. You can now install the desired unsigned driver on your PC. To enable Driver Signature Enforcement in Windows 11, restart the computer.

2. Use Command Prompt

Note icon NOTE
This solution will only work if Secure Boot is disabled. We have a guide on how to enable Secure Boot, but you can use the same methods to disable it.
  1. Click the Start button, type cmd, and select Run as administrator from the results.
  2. Now, type or paste the following command and press Enter to run it: bcdedit /set nointegritychecks on
  3. To check if the command worked, type the following command and look if the nointegritychecks value is set to Yes: bcdedit

This method ensures Windows 11 disables Driver Signature Enforcement permanently. However, make sure that you disable Secure Boot first. Otherwise, the command will not work.

Issues with the Windows system files can be tricky to identify and even more so to fix. It is always a great idea to employ the help of specialized software, whcih can greatly simplify the process.

3. Through Advanced Boot Options

  1. Turn off the computer, and as soon as the display lights up, hit the F8 key repeatedly before Windows starts to boot to launch the Advanced Boot Options.
  2. Use the arrow keys to select the Disable Driver Signature Enforcement option, and then hit Enter.disable driver signature enforcement

These are all the ways you can disable Driver Signature Enforcement in Windows 11. We could earlier execute a bunch of commands in the previous iterations for the same, but with Secure Boot being mandatory in Windows 11, those wouldn’t work anymore.

For those wondering how to check if Driver Signature Enforcement is disabled, try installing an unsigned driver or check the Group Policy settings. Besides, if you remember disabling it via the Recovery Mode, another restart will enable Driver Signature Enforcement by default.

In most cases, updating the driver should help boost the device’s performance if you disable the feature for that.

For that, you can use Fortect, a dedicated tool that will automatically install the latest updates for the drivers on your system and keep them all up-to-date.

Also, find out how to easily update drivers in Windows 11, and stay clear of most driver-related errors. And if you use the previous Windows version, check out our guide on disabling driver signature enforcement in Windows 10.

Do not hesitate to tell us which method you chose to disable the driver signature enforcement feature in Windows 11 and the driver you were trying to install in the comments section below.

Fix: Chrome Was Not Found on Your System or is Not Supported

If you’re a web developer, then you’re probably familiar with Cypress, a tool for testing modern applications for browsers. However, users have reported receiving the error message browser: ‘Chrome’ was not found on your system or is not supported by Cypress.

Using Docker to run Google Chrome is also a great way to use the browser without installing it onto your system. Running Chrome in a Docker container is also good for running tests for web applications.

Why is Chrome not opening on my computer?

Usually, the error, browser: ‘Chrome’ was not found on your system occurs because the chrome.exe file is not installed in the default folder. If it’s located somewhere different, then Cypress will have difficulty locating it and thus will produce the error.

For those wondering if Cypress works with Chrome, the answer is Yes. Chrome, along with a few other browsers developed on the Chromium engine, are all supported by Cypress.

But remember, Cypress still doesn’t support all browsers, and you should verify that beforehand in order to avoid running into errors later.

Quick tip:

Choosing the best browser can make all the difference when it comes to workflow, customizations and user data. We recommended Opera One because it offers a feature-packed interface and is one of the only browsers with a built-in VPN.

Also, this browser has been running on Google’s open source Chromium. This means you can install any web extension from Google’s massive library. The browser also comes with a native AI and social media integration.

Opera One

Choose to navigate safely using this performing browser.
Free Download Visit website

How do I get Cypress to work on Chrome?

1. Create a symlink

  1. Click on Start and search for Command Prompt and right-click it then select Run as administrator. run command prompt as administrator.
  2. Create a directory junction to Chrome’s default folder by typing the following command: C:\mklink /J "C:\Program Files\Google\Chrome\Application" "C:\Program Files \Google Chrome (Local)"
  3. Hit Enter to execute the command. Enter the following command to fix the error browser 'chrome' was not found on your system.

This is a possible solution if you have Google Chrome installed somewhere other than the default folder, which is where Cypress looks for the browser. Creating a symbolic link (symlink) to the default folder will help Cypress locate Chrome.

Be sure to run Command Prompt as an administrator at that the C:\Program Files\Google\Chrome file path exists before trying this step.

2. Clear Cypress cache

Clearing the cache of Cypress will clear out any installed versions of the program on your PC. Like with any application, clearing the cache is a good way to get rid of any corrupt files and clutter. Be sure to run the command: npm install cypress –save-dev to install Cypress again.

Clear Cypress cache to fix the error browser 'chrome' was not found on your system.

3. Run Chrome as an administrator

  1. Locate the chrome.exe file, right-click on it, and then select Properties. Go to chrome.exe file path.
  2. Under the Compatibility tab, check the box next to Run this program as an administrator. Run Chrome as an administrator.
  3. Click Apply and then OK.

4. Reinstall Google Chrome

  1. Press Windows + R to open Run, type appwiz.cpl in the text field, and hit Enter.appwiz.cpl
  2. Now, locate Google Chrome, select it, and click on Uninstall.reinstall to fix Browser: Chrome Was Not Found on Your System
  3. Follow the on-screen instructions to complete the process.
  4. Once done, head to Chrome’s official website, and download and install the browser (with the default settings) all over again.Google Chrome

If nothing worked, it’s likely an issue with Google Chrome that only a reinstall could fix. And that, too, shouldn’t take more than 10-15 minutes. Once done, the Browser: ‘Chrome’ was not found on your system message should not appear in Cypress any more.

How can you tell if your browser is not working?

Users can tell if their browser is not working if they get error messages like browser: ‘Chrome’ was not found on your system or is not supported by Cypress, or the message: Google Chrome not found on this system. These error messages appear in web application testing programs like Cypress or in Docker.

browser: 'chrome' was not found on your system error.

Hopefully, one of the above solutions helped fix the error browser: ‘Chrome’ was not found on your system.

If you’re having difficulties with Cypress failing to connect to Chrome, we also offer a guide for that.

Let us know in the comments which solution worked for you or if you have a suggestion for a different solution that is not listed.

Fix: League of Legends Mouse and Keyboard Not Working

Many gamers reported that the mouse and keyboard are not working in League of Legends. More specifically, these peripherals stop responding, preventing players from controlling their champions. In this article, we’re going to list a series of workarounds that will help you to solve mouse and keyboard issues in LoL.

How to fix League of Legends mouse and keyboard not working in game?

1. League of Legends mouse doesn’t show

  1. Type Control Panel in the Search menu, go to Hardware and Sound > click on Mouse.
  2. Click on the Pointer Options tab and uncheck the Display Pointer Trails and Hide Pointer While Typing options.

If your mouse cursor doesn’t show when a League of Legends match begins, this could be caused by your Windows mouse settings.

2. Mouse is unresponsive in League of Legends

  1. Right-click the Start icon and select Device Manager.
  2. Go to Universal Serial Bus controllers, expand this class and you’ll see a series of USB Root Hubs
  3. Double click them one by one, go to the Power management and uncheck the option Allow the computer to turn off this device to save power.

Also, you can try and switch between the ports or, additionally, reinstall the mouse driver. Sometimes, even the slightest outage might cause problems with the mouse while some ports will work better while others might not comply. Moreover, you should try and reinstall the mouse driver, by following these steps:

  1. Right-click on Start and open the Device Manager.
  2. Expand the Mice and other pointing devices section.
  3. Right-click on your mouse and choose to Uninstall device.
  4. Press Alt+F4  until the Power menu appears, and reboot your PC. Keep the mouse plugged in.

You can also, in case you’re using a laptop, power off your device, unplug everything (including the battery) and hold the power button for 60 seconds. That should remove electrical charge from ports and your mouse should work as intended after that.

3. League of Legends keyboard is unresponsive

If LoL doesn’t detect keystrokes, this is usually caused by errors in the input configuration file. To fix this, you need to reset your bound keys.

  1. Launch a custom game,  tab out of the game, then open your configurations folder.
  2. Go to the location where you installed the game. The default location is C:/Riot Games/League of Legends/Config
  3. Open the config file and delete input.ini if it exists.
  4. Open persistedSettings.json, press Ctrl + F and look for input.ini
  5. Locate the curly brace on the line above the one containing input.ini. Scroll down to find the closing brace. Delete everything between these braces. Here’s what you should find in these braces:
    • {
    • “name”: “Input.ini”,
    • “Sections”: [
    • “name”: “GameEvents”,
    • . . .
    • }
  6. Save your changes, tab back into League of Legends, then exit the game.
  7. Restart the game.

4. Press Enter and Escape in the game

  1. While in the game, press the Enter key to open the chat window.
  2. Then, press the Escape key to close the chat window.

This simple action has been noted by users to refresh the game’s keyboard input recognition, instantly resolving the issue without having to restart the client.

We hope these solutions help you to solve your LoL mouse and keyboard issues. As always, if you’ve come across other workarounds, feel free to list the troubleshooting steps in the comment section below.

Van 1067 Valorant Error in Windows 10: How to Fix

Many gamers reported Van 1067 error in Windows 10, and this error can prevent them from playing the game, however, there are a few solutions that can fix this.

Your security software can sometimes cause this issue as well as pending Windows updates. Problems with network connection are also a common culprit.

What can I do to fix Van 1067 in Windows 10? 

Start by ensuring that your PC meets the minimum requirements and has enough storage space. Also, make sure the internet connection is stable and install the required DirectX and Visual C++ Redistributable. You can also temporarily disable your antivirus.

1. Disable Discord’s Automatic boot

  1. Launch the Discord app and go to User Settings.USER SETTINGS -van 1067 windows 10
  2. From the left pane, click Windows Settings.Windows Settings
  3. Disable Open Discord by clicking the toggle button.

2. Change compatibility settings

  1. Go to the Valorant app, right-click it and select Properties.
  2. Switch to the Compatibility tab.
  3. Place a checkmark next to Run the program in compatibility mode for and from the drop-down, and select Windows 8.Compatibility van 1067 windows 10
  4. Click Apply and OK. 

3. Update Windows 

  1. Press Windows + I to open Settings. 
  2. Click Update & Security from the left pane and click on Windows Update.Update & Security Windows 10- van 1067 windows 10
  3. Click Check for Updates if available, and Download & Install the update.
  4. Restart your PC.

4. Use the Services app

  1. Press Windows + R to open the Run windowFile explorer - van 1067 windows 10
  2. Type services.msc and press Enter to open Services.
  3. Locate the VGC service, and check if it is running. Double-click on it to open Properties.
  4. Choose Startup type as Automatic and click Start under Services status.Startup type - van 1067 windows 10
  5. Click Apply and then OK. 

5. Reset the network connection 

  1. Press the Windows key, type CMD and click Run as administrator.Command Prompt Startup type - van 1067 windows 10
  2. Copy and paste the following command one by one and press Enter after every command: ipconfig/flushdns netsh winsock reset
  3. Once done, restart your computer.

So, these are the steps to fix van 1067 in Windows 10 error. In case you have further problems, we have another guide that can help you resolve Valorant error VAN9003 effectively.

We also have a guide on VAN 1067 Valorant error code on Windows 11 as well as a guide on Valorant Error Code 0.

Before you go, you might want to check our guide on error VAN 152 on Valorant for more solutions.

Try them and let us know which worked for you in the comments below. 

Asus Aura Sync is Not Working: How to Fix & Main Causes

ASUS Aura is a great software for controlling your computer’s LED lights, but many users reported that ASUS Aura has stopped working for them.

This can be a problem, and in today’s article, we’re going to take a closer look and show you how to fix this problem once and for all.

Why is Aura sync not working?

There are several reasons why ASUS Aura is not working, but the most common one is the damaged installation.

It’s worth mentioning that other lighting control software can also interfere with Asus Aura, so you might want to remove it if you suspect that it’s causing issues.

What do I do if Asus Aura has stopped working?

1. Reinstall Asus Aura

  1. Download the latest version of Asus Aura.
  2. Run the setup file.
  3. The previous version of Asus Aura will be removed.
  4. Run the setup file again to reinstall ASUS Aura.

You can also reinstall it manually by doing the following:

  1. Open the Settings app and go to the Apps section.apps asus aura has stopped working
  2. Now uninstall the following software:
    • AURA
    • AURA Service
    • GALAX GAMER RGB
    • Patriot Viper RGB
      uninstall software asus aura has stopped working
  3. After removing these applications go to the following directory: C:Program Files (x86)
  4. Now locate and remove LightingService directory.
  5. After removing all the applications and directories mentioned above, install ASUS Aura again.

Alternatively, we recommend using a professional third-party app that along with uninstalling, will also clean leftovers.

When you remove an app manually, unnoticeable junk files will remain in your system, affecting its speed and functionality over time.

⇒ Get CCleaner

2. Unblock AsIO folders

  1. Uninstall Asus Aura software.
  2. Go to C:Program Files (x86)Io
  3. You should see several AsIO folders.
  4. Right-click the first directory and choose Properties.
    properties context menu asus aura has stopped working
  5. Now check the Unblock option and Apply and OK to save changes.
    unblock asus aura has stopped working
  6. Repeat these steps for all ASiO directories.
  7. After doing that, install Asus Aura again.

Several users reported that you need to unblock the Asus Aura setup file before you install it, so be sure to try that as well.

ASUS Aura is a decent tool, but if ASUS Aura has stopped working for you, be sure to perform a complete reinstall and fix the problem for good.

We covered software issues in the past, and you can find all of our previous articles in our PC Software section.

If you’re a gamer, be sure to visit our Gaming Hub for the latest gaming guides and fixes.

Fix: Windows Apps not Connecting to Internet [8 Ways]

Windows 10 apps have been a huge component of the operating system since their introduction and many use them on a daily basis.

There are hundreds of apps available to choose from, and you’ll find most services available in this form, so you can have them available right at your fingertips.

However, sometimes Windows 10 apps won’t connect to the Internet. If this happens, your app will become almost useless.

This can turn into an issue especially if you rely on those apps on daily basis, but luckily, there are ways to correct that right away.

What can I do if Microsoft apps aren’t connecting to the Internet?

1. Use a VPN

Sometimes using a VPN can help circumvent issues such as this one. Your ISP might be blocking certain servers, thus causing this problem.

A few users reported that using a VPN solved this problem for them, so you might want to try that. There are many great applications that you can take advantage of, but we suggest Private Internet Access for the best results.

2. Use the dedicated troubleshooter

  1. Click the Start button and select Settings.
  2. Choose Update & Security.
  3. Now click on Troubleshoot from the left and select Additional troubleshooters from the right.
  4. Scroll down and select Windows Store Apps and click on Run the troubleshooter.
  5. The system will look for any problems with the apps and try to fix them.

3. Clear the Store cache

  1. Press the Windows key + R to start a Run console, type wsreset.exe, and press Enter or click OK.
  2. Let the command run and try to connect the apps again to the Internet.

4. Switch off Windows Firewall

  1. Go to search, type firewall, and open Windows Defender Firewall.
  2. In the left pane select Turn Windows Defender Firewall on or off.
  3. Select Turn off Windows Defender Firewall.

The firewall of some third-party security software could prevent your apps from connecting to the Internet sometimes. So you can try to disable third-party security software and see if anything is different.

5. Run the Internet troubleshooter

  1. Press Windows key + I to open the Settings app.
  2. Go to the Update & Security section.
  3. Select Troubleshoot from the left pane. In the right pane, select Additional troubleshooters.
  4. Select Internet Connections and click on Run the troubleshooter.
  5. After that, run Incoming Connections and Network Adapter troubleshooters.

6. Allow other people to use the connection

  1. Press Windows key + S and enter network status. Select View network status and tasks.
  2. Click on Set up a new connection or network.
  3. Choose what type of connection you want to set up and enter your credentials.
  4. Make sure to check Allow other people to use this connection.
  5. Follow the instructions on the screen to complete the process.

7. Disable automatic proxy detection

  1. Press Windows key + S and enter proxy. Select Change proxy settings.
  2. Turn off Automatically detect settings.
  3. Now disable all other options as well.

8. Clean boot your PC

  1. Press Windows key + R and enter msconfig. Press Enter.
  2. Go to the Services tab. Check Hide all Microsoft services and click on Disable all.
  3. Click Apply and OK. Don’t restart your PC.
  4. Press Ctrl + Shift + Esc to open Task Manager.
  5. To to the Startup tab. Right-click the first entry and choose Disable.
  6. Repeat this for all entries.
  7. After doing that, restart your computer.

How do I download Universal apps?

  1. Press Windows key + S and enter store. Select Microsoft Store from the list.
  2. Select the app you wish to download.
  3. Now click on Get to download it.
  4. Wait for the download process to finish.

Are Win32 apps better than Universal apps?

Universal apps offer more security since they are distributed by Microsoft, and the user has full control over app access rights.

When it comes to functionality, we can’t help but notice that UWP apps offer fewer features than their Win32 counterparts.

This is because these types of apps are optimized for different platforms, so they will work the same on your PC and Xbox.

On the other hand, Win32 apps are optimized for desktops and laptops, and since they are designed just for one platform, they offer more features to their users.

If the problem doesn’t occur anymore, the issue is related to one of the disabled applications or services, so you need to find it manually.

That would be all, at least one of these solutions should help your apps to establish an Internet connection again.

In case the problem is still there, you might be interested in our Internet browser working but not apps guide for more similar solutions.

Did you manage to fix this problem on your own? Share your solution with us in the comments section below.

How To Use PC As WiFi Extender [Step-By-Step]

A Wi-Fi extender is a dedicated device or software, that can repeat and also extend the wireless signal. Shortly, we are discussing a Wi-Fi repeater which is extremely useful when the wireless router cannot provide the signal as far as you want.

Usually, an extender is required in large spaces or buildings where even a specialized router cannot cover the whole space.

So, in that matter, if you are currently looking for the quickest and also cheapest solution read the following lines and learn how to use your own Windows 10 computer as a dedicated Wi-Fi extender.

Of course, the quickest and cheapest solution isn’t always the best one. And that aspect can be applied when we detail the possibilities of extending your Wi-Fi wireless signal.

Thus, the best thing you can do is buying a repeater for under $50 – this will imply in installing a hardware repeater which will extend the existing signal further than your router currently does. Another way that can solve your problem is by buying specialized extender software, which also costs around $50.

But, if you want a fast solution and if you don’t want to pay anything for it, then the built-in Windows 10 feature will be more than perfect for you.

However, unlike the paid possibilities outlined above, the Windows solution comes with a few downsides: this wireless repeater software will create a second hotspot that your devices must connect to.

How can I use my PC as WiFi extender?

It’s not really a classic Wi-Fi extender since a new hotspot network will be created – this network will be different from the real Wi-Fi network provided by your router.

The new wireless hotspot have its own name and passphrase: on one side of your house, you will have to connect to one network while in the other side you will have to connect to a different one.

Creating a separate wireless hotspot in Windows 10 for extending the wireless signal is easy. All you have to do is to follow:

  1. Press the Win+I keyboard hotkeys.
  2. From System Settings click on Network & Internet.
    fix update and security not working windows 10 windows 10 settings
  3. In the next Window, from the left panel select the Mobile hotspot entry.
  4. Turn on the ‘Share my Internet connection with other devices’ option.
  5. Then, click on Edit and set a new network name and password.
  6. Save your changes.
  7. That’s all.

As already mentioned, this is the free method in which you can use your Windows 10 computer as a Wi-Fi extender. The other solution consists of buying wireless repeater software that can act as a real wireless repeater.

In that respect, Connectify might be the best choice to make – the software is available under three different pricing plans with the cheapest one starting from $50.

You can compare this method with a traditional hardware solution by checking this guide on how to set up a WiFi extender for a more reliable way to boost wireless coverage.

Download it free
connetcify hotspot download
  • Save Bandwidth
  • Increase Wi-Fi range
  • No Wi-Fi COmpatibility issues
  • Free version available

Now you know how to use your PC as Wi-Fi extender. You can also read about the top 21 Wi-Fi extenders for your Windows 10 device, in case you want to buy a specialized hardware solution.

If you have other questions, or if we can help you in any other way, don’t hesitate and contact our team – we will always here for you.

Fix: PS4 Disc Error Cannot Continue Using the Application

When loading any of your PS4 games, you may encounter the cannot continue using the application PS4 disc error. The full error reads:

Cannot continue using the application – Disc cannot be read – Make sure the disc is not damaged or dirty.

According to Sony, this error can occur if the console fails to read the disc. The error can also occur due to database errors or even system software glitches.

In this article, we take a look at a couple of solutions to help you resolve the PS4 disc error cannot continue using the application.

How to fix PS4 disc error Cannot continue using the application, the disc cannot be read?

1. Clean the game disc

cannot continue using the application
  1. Eject the disc from the console if it is still running.
  2. If you are unable to eject the disc, turn off the console.
  3. Once turned off, the disc should eject automatically.
  4. Use a clean, soft cloth to clean the dust.
  5. Make sure not to scratch the disc when cleaning it.

Once cleaned, reinsert the game disc into your PlayStation 4 console and check if the error is resolved.

Try another game disc

If the issue persists, check if the console drive is in working condition. To test the drive, insert any other game disc that you have. If the console can read the disc, the issue could be with the game itself.

2. Rebuild Database

cannot continue using the application

Note: Make sure you have created a backup of your data before proceeding with these steps.

  1. Turn off the PlayStation 4 by pressing the power button on the front panel. The power indicator will blink a few times before turning off completely.
  2. Once the console is off, press and hold the power button, release the power button once you hear two beeps that should happen in about 7 seconds.
  3. Connect the PS4 Dual Shock controller using the USB cable to your console.
  4. Press the PS button, and that should boot your console in Safe Mode.
  5. Under Safe Mode, select the Rebuild Database (5).
  6. PS4 will initialize the database rebuilding process. This may take some time, so wait till it is finished.

Once complete, reboot the console and try loading your game. If the error persists, you may have to initialize PlayStation 4, which is similar to resetting the device to factory default.

3. Initialize PlayStation 4

cannot continue using the application

Note: Initializing your PlayStation 4 will delete all user and game data on the hard disk drive. Make sure to create a backup before proceeding with the steps below.

  1. Turn off the console by pressing and holding the power button.
  2. Once turned off, press and hold the power button again for about 7 seconds. Release the button once you hear a beep twice.
  3. Connect your Dual Shock controller to the console using a USB cable.
  4. Press the PS button to enter the Safe Mode.
  5. In the Safe Mode, select the Initialize PS4 option (7).

Wait for the system to initialize the successfully. Once done, you can restore the saved game data from your backup drive easily. Reinsert the game disc and check if the error is resolved.

4. Check the game disc for error

Initializing your PS4 should fix any issue that is occurring due to the system software. If the issue persists, the problem could be with the system hardware or the game disc itself.

Try to load the disc onto your friend’s console to see if the disc is in working condition. If not, try to exchange or return the disc to get a working game disc.

For hardware issues, you need to send the console back to Sony’s service center to get it repaired.

The PS4 disc error cannot continue using the application that can occur if the game disc is corrupted or damaged.

The error can also occur due to a temporary system glitch that you can resolve by rebuilding the database or performing system initialization.

How to Enable Secure Boot Without BIOS on Windows 11 – 3 Ways

Enabling Secure boot without entering BIOS is tricky, but what if you can’t see the option on your BIOS menu?

Some methods enable you to upgrade to Windows 11 without hassle, and we will cover them all in this guide, so make sure to read through them.

What can I do to enable Secure Boot without entering BIOS? 

To start with, make sure that a valid Secure Boot certificate is installed on your PC and that your BIOS is up to date. Also, the boot mode should be UEFI instead of Legacy.

Now, let’s see how to turn on Secure Boot without BIOS:

1. Use the Registry Editor

  1. Press Windows + R to open the Run window. REGEDIT RUN COMMAND
  2. Type Regedit and press Enter to open Registry Editor. 
  3. Follow this path: Computer\HKEY_LOCAL_MACHINE\SYSTEM\CurrentControlSet\Control\SecureBoot\State
  4.  Now locate and double-click the DWORD UEFISecureBootEnabled.regedit_enable secure boot without bios
  5. Change the Value data to 1 and click OK. 
  6. Now restart your computer to confirm the changes. 

2. Use the Windows PowerShell

  1. Press the Windows key, type PowerShell, and click Run as administrator. PowerShell - enable secure boot without bios
  2. Type the following command and press Enter: Set-SecureBootUEFI -Enable
  3. Restart your PC to confirm the changes.

3. Change MBR to GPT 

3.1 Check the partition style

  1. Press Windows + R to open the Run box. Disk Management - enable secure boot without bios
  2. Type diskmgmt.msc and hit Enter to open Disk Management. 
  3. Right-click on Disk 0 and select Properties. disk 0 properties - enable secure boot without bios
  4. Now go to the Volumes tab, and check the partition style. If it is MBR, proceed. 

3.2 Change the partition style 

  1. Press Windows + I to open Settings.
  2. Go to System, then click Recovery. System-Recovery-Windows-11 - secure boot enable without bios
  3. Under Advanced startup, click Restart now. Advanced Startup
  4. Now from Choose an option window, click Troubleshoot. Troubleshoot- enable secure boot without bios
  5. Click Advanced Options. Troubleshoot WITH AO selected
  6. Select Command Prompt from the Advanced Options window. 
  7. The computer will restart, select the user account and enter the password.
  8. Now you will get the Command Prompt window. 
  9. Type the following command and press Enter: mbrtogpt / validate / disk : 0
  10. Once you get validation completed successfully, copy and paste the following command and press Enter: mbrtogpt / convert / disk : 0
  11. Now when you have the conversion completed successfully message, type the following command and press Enter: exit
  12. From Choose an option screen, click Turn off your PC. Restart your computer and try to install Windows. 

Secure Boot can also affect gaming (Battlefield 2042 now requires Secure Boot to run properly). Thus, the method above can help you also with specific games to make them run well.

So, these are methods that you can use to enable secure boot without BIOS. Try them and let us know what worked for you in the comments below. 

Hibernate Vs Sleep On Windows: Which Are The Differences?

Windows by default offers multiple power conserving features to users that includes Sleep mode and Hibernate. Another option is shutdown, which completely shuts your computer, of course.

Sleep mode is the most common power-saving feature that you will come across in laptops. Most of the modern laptops are by default to set to go to sleep after a few minutes of inactivity.

Hibernation is similar to sleep mode but works differently to save more power. Both of these power-saving modes are effective and comes with their pros and cons.

In this article, we take a look at the difference between Hibernate and Sleep mode in Windows 10.

What is the difference between hibernate vs sleep mode?

Hibernate vs Sleep

Sleep Mode

When in Sleep mode, your computer uses very little power. In Sleep mode, Windows saves all the open files and programs in RAM and shut down all other hardware components for the time being.

Having all the files saved in the RAM allows Windows to restore the files and programs as soon as you wake your computer from sleep.

And if you’re asking if you should shut down your PC overnight, this guide will provide all the answers.

Hibernate Mode

While both Hibernate and Sleep modes appear similar at first glance, the Hibernate mode works differently and is used in different situations.

When in Hibernation, your computer completely shuts down, drawing no power. However, unlike Sleep mode, the computer saves all the open files and programs in a Hibernation File stored in your hard drive.

When you are ready to resume work, your computer will load the progress from the hard drive’s Hibernation file. This may take a few seconds or minutes more than waking up from Sleep mode as the files are stored in your hard drive.

In my testing, the computer could get back to work from Sleep mode in about 3 seconds with the lock screen on. However, hibernate mode resumed in over 8-10 seconds, that is, after saving the Hibernation file in a Samsung 970 Evo Plus NVMe SSD drive.


Is it better to shut down or sleep or hibernate Windows 10?

Sleep – In a situation where you just need a quick break from your work, sleep is the best option. This way, you can save power, but also resume work almost instantly since the file is stored in RAM.

On the flip side, Sleep still uses some battery power to power the RAM that stores the file.

Hibernate – Hibernate works best if you are taking an extended break from your work, but don’t want to deal with the hassle of restarting everything from scratch. This is also good if you want to conserve as much battery juice as possible when traveling.

That said, Hibernation is not an alternative to shutting down. You must shut down your computer occasionally to keep the performance issues at bay.

Shutdown – It is wise to shut down your computer completely once in a while. Restarting your system usually cleans the RAM, helps resolve any performance issue that may occur due to cluttered memory and CPU with background apps and processes.


Is leaving your PC on Sleep bad?

Leaving your PC on sleep mode has no bearing on your system’s overall health. However, some issues may occur due to leaving your PC on sleep mode for an extended period.

Since sleep mode consumes a little power to power the RAM, leaving the PC in sleep mode for an extended period is considered a waste of resources.

Restarting your PC after shutdown cleans out minor issues that may occur due to temporary glitches. Not shutting down your computer for a long time can impact system performance.

There’s also a risk of random power spikes and surges that can damage your computer in sleep mode or powered on when connected to the power outlet.


Is hibernate bad for SSD?

If you have heard someone saying, using Sleep mode or hibernate will damage your SSD, then it is not totally a myth. Although rare, first-gen SSDs were prone to power failures, and there was also a factor of faster wear and tear due to frequent writes to your SSD.

However, modern SSDs come with superior build and can withstand normal wear and tear for years. They are also less prone to power failures. So, it is fine to use hibernate even if you are using an SSD.

Does hibernate damage the hard disk?

No. Compared to SSDs, HDDs are still popular for their durability. Putting your PC to sleep or hibernation will not damage your hard disk. Hard disk corruption usually happens due to abrupt shutdown.

How can I tell if Windows 10 is hibernating?

When hibernating, your PC will look like it’s shut down. Unlike the sleep mode, hibernate will not have the power button LED light blinking. You cannot wake up the computer by pressing a key on your keyboard or mouse either.

However, pressing the power button will instantly bring up the lock screen without the boot screen. This is the only way to know if the PC is hibernating.


Is it safe to use hibernate all the time?

Yes. Hibernate compresses and stores a copy of your RAM image in your hard drive. When your wakeup the system, it simply restores the files to RAM.

Modern SSDs and hard disks are built to withstand minor wear and tear for years. Unless you are not hibernating 1000 times a day, it is safe to hibernate all the time.

That said, shutting down your computer once every few days is recommended as it helps in clearing your computer’s RAM and freeing up memory and processing power.


Sleep

Sleep in Windows 10
  1. Click on Start.
  2. Go to Settings > System > Power & Sleep.
  3. Open Additional Power Settings.
    For laptops & PC – select Choose what the power button does, select Sleep and then click Save changes.
    For laptop only – select Choose what closing the lid does. Next, select Sleep, click on Save changes.
  4. Pressing the power button or closing the lid will put your PC in sleep mode.

Hibernate

Hibernate in Windows 10
  1. Click on Start and select Settings.
  2. Go to Power & Sleep > Additional power settings.
  3. Select Choose what the power button does.
  4. Select Change settings that are currently unavailable.
  5. Under Shutdown setting, select Hibernate.
  6. Click Save changes.
  7. To hibernate the PC, click Start > Power > Hibernate.

If the Hibernate option is not available under Additional power settings, do the following.

Hibernate in Windows 10
  1. Press the Windows key, and type cmd.
  2. Right-click on Command Prompt and select Run as Administrator.
  3. In the Command Prompt window, type the following and hit enter:
    powercfg.exe/hibernate on.
  4. Go to Additional power settings to see if the Hibernate option is available now.

Change the power plan

Power Plan Windows 10
  1. Press the Windows key, and type sleep.
  2. Open Power and Sleep settings.
  3. Select Additional power settings.
  4. In the Power Options window, you have three options:
    Power saver – In this mode, Windows will save power by reducing the performance and brightness.
    Balanced mode – For balanced performance and battery backup.
    Performance mode – Recommended when you are using the laptop plugged in.

How to turn off sleep and hibernate mode in Windows 10

Hibernate in Windows 10

Turn off Sleep

  1. Click on Setting.
  2. Go to System > Power & Sleep.
  3. Scroll down to Sleep.
  4. Click the drop-down menu for both ‘On battery’ & ‘When plugged in’.
  5. Select Never.

Disable Hibernate / Sleep

  1. Click on Start > Settings > System.
  2. Open Power and Sleep.
  3. Click on Additional Power Settings.
  4. Under Power and sleep button and lid setting, click the drop-down menu for ‘On battery’ and ‘Plugged in’.
  5. Select Do Nothing.
  6. Click Save changes.

Disable Sleep/Hibernate from shutdown settings

Hibernate in Windows 10
  1. Open Additional power settings.
  2. Click on Change settings that are currently unavailable.
  3. Under Shutdown settings, uncheck Sleep and Hibernate
  4. Click Save changes.
  5. This will remove both the Sleep and Hibernate option from your power menu.

Hibernate and Sleep mode in Windows 10 are designed for specific purposes. Sleep option is excellent for saving power during a short break.

Now that you know how both work, you might want to disable hibernation on Windows 10, if you don’t plan to use it anymore.

Hibernate, on the other hand, makes sense if you know you won’t be using your computer for a while, but don’t want to open the apps and files when you work again manually.

Here’s How to Lower Ping on a PC [9 Tested Solutions]

Ping is a measure of latency, telling you how quickly the signal travels between your PC and the game server.

When it increases, it can cause lag or choppiness. Often, this will make it difficult to stay competitive in MOBAs, shooters, and other types of games. 

Furthermore, ping north of 150ms will make the game unplayable. Luckily, you can try a few things to get this number down, so let’s see how to lower ping on your PC.

What causes high ping?

First, we need to identify the reasons why your ping is on the high side. Here is what could be behind your high ping and latency issue on a Windows PC:

1. Router location

For gamers who connect to the Internet through Wi-Fi, the router’s location has a huge impact on ping. If this device is located far away from you, it could be what is causing the lag.

2. The number of connected devices

When a router is serving too many devices simultaneously, your ping may increase. An average router can’t handle a high traffic volume and may even crash if you overload it.

3. Background programs

Too many programs running in the background may also cause your ping to go up. 

Software updates, backup services, monitoring tools, and others can take up RAM and use up your network to the point it starts affecting the gameplay.

Windows firewalls and antivirus software are often guilty of slowing down your connection and negatively affecting your ping.

4. Server distance

The geographically closer you are to the game server, the easier it is for data to travel. That’s why playing on a server across the planet from you causes high ping.

5. Outdated drivers

Updating your drivers can negatively affect your PC’s gaming performance and may cause your ping to go down.

6. Poor Internet connection

Some ISPs fail to deliver the speeds they promised, and what’s worse, they may intentionally throttle your bandwidth.

How to lower ping on PC?

There are quite a few tested methods you can try:

1. Use an Ethernet cable

If you think your WI-Fi connection is the reason why you’re getting a high ping, you should consider using an Ethernet cable. 

Ethernet provides better speed and a more reliable connection.

If you want to make the switch, make sure you have sufficient cable length and an Ethernet network card in your CPU with a corresponding driver.

2. Limit connected devices

In case you’re using a Wi-Fi connection for gaming and getting high ping, limiting devices on the network may also help eliminate the problem.

Try disconnecting all devices currently not in use to see if that improves the speed.

3. Move closer to your router

Another thing you can do when playing connected to a Wi-Fi network is move closer to your router.

Walls and rooms between the router and your PC can obstruct the connection, so it’s best when both devices are in the same room.

4. Close background apps

Closing apps running in the background and eating up your Internet bandwidth is one of the easiest ways to lower your ping. 

Identifying such apps through Task Manager isn’t difficult; just follow these steps:

  1. Press CTRL + Shift + ESC on your keyboard to launch Task Manager.
  1. Select an unwanted app or process and click End task.
Windows Task Manager

5. Update your drivers

Looking for a way how to lower ping on your PC? Your drivers may be behind the issue.

Here’s how to check whether your drivers are up to date:

  1. Click the Windows search button at the bottom left of the screen, type Device Manager, and open it.
Device Manager in Windows search bar
  1. Double-click Display adapters from the menu to expand it.
  1. Right-click your graphics card driver and select update driver.
Update graphics card driver
  1. Click Search automatically for drivers to start the process.
Graphics card driver update options
  1. Follow the instructions and restart your PC after installing driver updates.
  1. Repeat the process with your Network adapters.

Alternatively, you can manually look up driver updates online and install them yourself, but that will require more time and effort.

You could also use a dedicated driver updater utility. With those, you can schedule regular updates so you’ll never have this issue in the future.

6. Choose low-quality graphics

If your ping is high, and you’re struggling to identify what’s causing it, it’s a good idea to check the game’s recommended specifications.

If your PC lacks in some aspects, reducing the graphics quality in the game may help with the problem. Lowering effects, turning off shadows, and similar actions won’t impact your gameplay and will reduce ping.

So you should try playing around with different settings to see what works the best.

Game graphics options

7. Use a VPN

When the distance between you and the game server is causing ping to go up, you can use a VPN to change your virtual location.

By choosing a location closer to the server, you’ll create a more optimized route for data to travel through. As a result, you’ll get to enjoy gameplay without lag and choppiness.

Make sure you opt for one of the top VPNs on the market that offer high speeds.

Here’s what you should do:

  1. Purchase a VPN subscription from a reputable provider like NordVPN.
NordVPN pricing plans
  1. Download the software and install it on your PC.
  1. Log in using your credentials.
  1. Choose a location close to the game server.
NordVPN server map
  1. Test to see if you experience lower ping and less lag when playing.

NordVPN

Enjoy gaming sessions with low ping and no lag with this reliable VPN service.
Check Price Visit Website

8. Enable Game Mode on your PC

Windows 10 has a feature that allows you to focus all of your computer’s power on gaming performance. 

When this feature is on, it will disable driver and Windows updates, bringing you a more consistent frame rate.

It takes just a few clicks to turn the game mode on:

  1. Open Settings through the Windows search bar.
Settings in Windows search bar
  1. Press the Gaming option.
Windows Gaming settings
  1. Click on Game Mode.
Game mode on Windows 10
  1. Toggle the Game Mode button on.
Toggle Game mode on

9. Change your ISP

If nothing else works and you believe your PC should have no trouble running the game you’re playing without lag, maybe, it’s time to change your ISP.

Perform an Internet speed test online and compare your connection to deals offered by other ISPs in your area.

Getting a more reliable connection will lower your ping and make it possible to enjoy the gameplay without interruptions.

Whether you play video games to relax or beat your competition, high ping and lag are things you never want to experience.

In case you do, you can find out how to lower ping on your PC in our guide above. You can also check out the best ping boosters on the market to improve your latency.

Once you determine what’s causing the problem and identify the right fix, you’ll enjoy lag-less gameplay.

Authenticamd.sys: How to Fix This BSOD in Windows 11?

Blue screen of death is not a new thing for Windows users. There is a long list of errors that comes under it. One such error that crashes the computer is authenticamd.sys, and is usually linked with the whea_uncorrectable_error.

This usually appears when you are playing a game that is resource intensive. Like other errors of BSOD, this can also be fixed. All you have to do is follow a series of steps.

This guide will discuss some working methods to eliminate the problem after discussing the possible causes. Let’s get started! 

What causes the authenticamd.sys crash error?

There could be several potential reasons for this blue screen error to occur; some of the popular ones are listed here:

  • Faulty or outdated drivers – If your computer has outdated drivers, you may face many issues. One such issue is BSOD. To fix it, you need to keep the drivers up to date.
  • Hardware issues with the processor – If there is a fault in your processor or part of the hardware, you might have to take a look and get it replaced if needed.
  • Malware or virus infection – Malware or virus infection can cause many problems in your computer, including this error. Run a scan using reliable security software to be sure.
  • Corrupted or missing system files – Sometimes, damaged or missing files could hamper the computer’s performance, hence the error. It is essential to find and fix the issue to avoid such errors.
  • Overheating – Since this error usually occurs when playing games or running a memory-intensive program, you might have to check your computer for overheating.

What can I do to fix the authenticamd.sys BSOD error?

Before engaging in advanced troubleshooting steps, you should consider performing the following checks:

  • Check for any physical damage to your computer and the hardware components.
  • Run a malware scan using security software.
  • Check the power supply cable and ensure your computer receives the correct voltage.
  • Ensure your computer is not overheating, and check the temperature of the processor using any third-party software like Speccy or Core Temp.

1. Update drivers

  1. Press Windows + R to open the Run window.Device Manager RUN COMMAND
  2. Type devmgmt.msc and press Enter to open Device Manager.
  3. On the Device Manager window, locate and click on Display adapters to expand the options.
  4. Right-click the driver list and select Update driver.Graphics Driver update -authenticamd.sys
  5. On the next window, click Search automatically for drivers.Update driver 2
  6. Follow the on-screen prompts to complete the process and then restart your computer.

Alternatively, you can use an automatic updater tool like Outbyte Driver Updater. It will scan your drivers and install new ones as soon as they’re available. It can also help fix driver file corruption.

2. Update BIOS

  1. Press the Windows key, type CMD and click Run as administrator.DOS COmmand Prompt - authenticamd.sys
  2. Click Yes on the UAC prompt.
  3. To update BIOS, type the following command and press Enter: wmic bios get smbiosbiosversion
  4. You will get the BIOS version listed on the Command Prompt window.
  5. Now go to your device’s manufacturer’s app or website to find out if there is an update. If available, download it.
  6. Next, extract the file and double-click it to run it. Now follow the instructions to finish the process.

3. Disable Fast Startup

  1. Press the Windows key, type Control Panel and click Open.CP -authenticamd.sys
  2. Select View by as Large icons and click Power Options.Power options Large icons
  3. Now, click Choose what the power buttons do.Choose what the power buttons do
  4. Click Change settings that are currently unavailable.Change settings that are currently unavailable
  5. Under the Shutdown settings, remove the checkmark next to Turn on fast startup (recommended) option.Fast startup disable -authenticamd.sys
  6. Click Save changes to confirm the change.

4. Run the DISM and SFC command

  1. Press the Windows key, type CMD and click Run as administrator.
  2. Click Yes on the UAC prompt.
  3. Type the following command to scan protected system files, reinstall corrupted files, and replace corrupted files with cached copies and press Enter: sfc/scannowCMD sfcscannow -authenticamd.sys
  4. Wait for the scan to complete. Once done, copy and paste the following command to repair Windows images and press Enter: DISM /Online /Cleanup-Image /RestoreHealthRestore health
  5. Once complete, restart your PC to let the changes take effect.

5. Check Windows Updates

  1. Press Windows + I to open the Settings window.
  2. Go to Windows Update and click Check for updates.Windows Update -authenticamd.sys
  3. Windows will check for updates; you can download and install the update if available.
  4. Follow the on-screen instructions and restart your PC to complete.

So, these are steps that you need to take to fix the authenticamd.sys BSOD error. Try them and let us know what worked for you in the comments below.

Power BI Won’t Open On Windows: 4 Quick Fixes

Power BI Desktop is the Windows software for the BI service that enables users to set up charts and other interactive visualizations for data.

However, some users have stated in forum posts that Power BI Desktop won’t launch. Consequently, those users can’t utilize the BI Desktop software.

What can I do if Power BI won’t load?

1. Confirm That NET Framework 4.7 (or 4.8) is Enabled in Windows 10

  1. Some Windows 7 and 8 users might need to install Microsoft NET Framework 4.5. Users can download NET Framework 4.5 by clicking Download on the NET Framework 4.5 page. Then open the installer for NET Framework 4.5 to install.
  2. Windows 10 users should check that NET 4.7 is enabled for Power BI. To do so, open Run with its Windows key + R hotkey.
  3. Input ‘appwiz.cpl’ in the Open box and click OK.
  4. Click Turn Windows features on or off to open the window shown directly below.Windows Features window power bi won't launch
  5. Select the .NET Framework 4.7 Advanced Search checkbox if it’s not selected.
  6. Then click the OK button.

2. Install the Latest Power BI Gateway

Outdated Power BI gateway pipe restrictions can block users launching BI Desktop. To fix that, update the Power BI gateway by clicking Download Gateway on the gateway page. Then users can install the latest data gateway for BI by opening its setup wizard.

The data gateway installer power bi won't launch

Learn how to change the data source in Power BI with these step-by-step instructions.


3. Run Power BI With Admin Rights

  1. To run Power BI Desktop as an administrator, right-click the software’s icon on the desktop or in its File Explorer folder and select Properties.
  2. Next, click the Compatibility tab shown directly below.The Compatibility tab power bi won't launch
  3. Select the Run this program as an administrator checkbox.
  4. Click the Apply button.
  5. Select the OK option to close the window.

4. Install the Correct Power BI Version for 32-bit Platforms

  1. Users with 32-bit Windows platforms can’t run the 64-bit Power BI Desktop. To ensure the correct (and most update) Power BI system version is installed, press the Windows key + R hotkey.
  2. Enter ‘appwiz.cpl’ in Run’s Open box and click OK.The Windows uninstaller power bi won't launch
  3. Select Power BI Desktop, and click the Uninstall option.
  4. Click Yes to confirm.
  5. Restart Windows 10.
  6. Then open the Power BI Desktop download page in a browser.
  7. Click Advanced download options to open a Download Center page for Power BI.
  8. Press the Download button there.
  9. Users with 32-bit system architecture must then select the PBIDesktop.msi option.The PBIDesktop.msi option power bi won't launch
  10. Click Next to download the installer.
  11. Then install Power BI Desktop with the installer.

Getting the correct version will also eliminate the msmdsrv.exe Power BI error.

Those fixes might get Power BI Desktop up and running for some users. Users can get also send BI support tickets to Microsoft by clicking the Create Support Ticket button on the software’s troubleshooting page. However, give some of the resolutions above a shot before sending a support ticket.

Fix: Windows 10 Apps not Opening [Full Guide]

Apps are an essential part of any OS, Windows 10 included. While they are fundamental to the overall experience, some users have reported that Windows 10 apps won’t open on their computers.

We were intrigued by the prospect of Windows 10 programs not opening and started digging around to see what could cause this abnormal behavior.

The program won’t open when I click on it in Windows 10 is merely the tip of the iceberg.

It turns out there are numerous circumstances that can facilitate the appearance of this glitch, so let’s get straight to it.

Why are my Windows apps not opening?

Most common scenariosError description
Windows 10 apps not working after update– Many users reported programs not working after installing a specific Windows update
– Such errors are not uncommon, but you can easily fix them with a dedicated Windows update repair tool
Windows 10 apps won’t open from the Taskbar– Applications won’t start by using the Taskbar shortcut, or they won’t show / won’t maximize
– This issue usually occurs when you have too many instances of the same app open, and terminating all app windows at once may help
– Programs are running in the Task Manager but not opening in Windows 10
– The issue usually occurs on dual monitor setups
Windows 10 apps won’t open after System Restore– If a System Restore does not complete successfully or if it encounters any file corruption, it can cause this and other problems to appear
Windows 10 apps open and close immediately– Windows 10 apps won’t stay open
– Constant crashing/crashing on launch
Windows 10 Settings apps won’t open– It may be greyed out or missing completely
– If the Windows 10 Setting app is constantly crashing, all related programs will be impacted
Windows 10 apps won’t open (Administrator) – This issue appears when trying to run applications while using an administrator account
Windows 10 apps won’t open from the Start menu– This issue is closely linked to cases where the Start menu disappeared altogether (and it can arrive in all Windows versions)
Windows 10 apps won’t open after a restart– Programs stop working following a system restart
Laptop apps not opening– From File Explorer to browsers, your laptop won’t open anything
– The issue can be caused by software as well as registry conflicts

So, what is usually the easiest way to fix an application which won’t start anymore? Don’t worry; we made sure to include all the steps and make things as easy as possible.

How do I fix apps not opening in Windows 10?

1. Make sure that Windows Update service is running

  1. Press Windows Key + R to open the Run dialog.
  2. When the Run dialog opens, enter services.msc and press Enter or click OK.
    Windows 10 apps won’t start
  3. Locate Windows Update on the list of services. Make sure that Startup Type is set to Manual or Automatic.
  4. If it’s not, double click the Windows Update service to open its properties.
  5. When the Properties window opens, find the Startup Type section and select Manual or Automatic from the list.
    Windows 10 apps won’t run
  6. Click Apply and OK to save the changes.

Sometimes, these types of problems can be fixed by performing a Windows Update, so make sure that you have the latest updates installed.

  1. Open Settings App and go to Update & Security.
  2. Go to the Windows Update section and download the latest updates.

2. Run the troubleshooter

  1. In order to run this troubleshooter, you will need to type troubleshooter in Windows search and click on Troubleshoot settings from the results.
  2. Next, click on Additional troubleshooters.
  3. Scroll down to select the Windows Store Apps and click on Run the troubleshooter.
  4. It will take a while if you have many apps installed, but in the end, try to open the apps that are not opening and see if the issue has been fixed.

If Windows 10 apps won’t open, you might want to run the Windows Store Apps troubleshooter. However, this procedure is now guaranteed to work, and you will also lose some precious time.

3. Make sure that your apps are up to date

3.1 Update the apps in Microsoft Store

  1. Open Microsoft Store app, you can do that by pressing Windows Key + S and type Store. From the list of results choose Store.
  2. When the Windows Store app opens, click on your Microsoft Account icon in the top right corner (next to the Search box) and choose Downloads and updates from the menu.
    Windows 10 apps won’t run
  3. Click Check for updates button and update all apps.

If the Store app isn’t working, you can try the same steps from a different user account on your computer, or you can use the Command Prompt to force updates.

3.2 Force app updates using Command Prompt

  1. Search cmd in Windows search and click on Run as administrator to open Command Prompt with full rights.
  2. When Command Prompt starts, enter the following line and press Enter: schtasks /run /tn "Microsoft\Windows\WindowsUpdate\Automatic App Update"
    Windows 10 apps won’t stay open

The command will trigger performing automatic updates for Windows apps so give it a try right now.

If a specific app is not opening in Windows 10, you may need to reinstall it. To do that, follow the steps below.

  1. Open Start Menu and locate the problematic app.
  2. Right-click it and choose Uninstall.
  3. After the app has been uninstalled, open Store app and try to download it again.

4. Perform Store cache reset

  1. Open Command Prompt as administrator.
  2. When Command Prompt starts, type wsreset.exe and press Enter to run it.
    Windows 10 apps stopped working
  3. Close Command Prompt and try launching the Store app and updating your apps.

If you can’t open the Store app, and there’s no way to update your apps, you might want to perform a cache reset by following the steps above.

In most cases, that should suffice. However, the issue can be bigger than that and you might need to perform some additional steps in case the Microsoft Store still does not work properly.

5. Make sure that Application Identity service is running

  1. Press Windows Key + R and type services.msc. Press Enter or click OK.
    Windows 10 apps won’t install
  2. When the Services window opens, find Application Identity service and double click it.
  3. When Application Identity Properties window opens, find the Service status section.
    Windows 10 apps won’t download
  4. If the Service status is set to Stop, click the Start button to start the service.
  5. Click Apply and OK to save the changes.
  6. Close the Services window and restart your computer.

6. Change ownership of your C: drive

6.1. Change C: ownership

  1. Open This PC and locate the drive where Windows 10 is installed. By default, it should be in the C:/ partition.
  2. Right-click the drive and choose Properties.
    Windows 10 apps won’t stay open
  3. Go to the Security tab and click the Advanced button.
    Windows 10 apps won’t show
  4. Find the Owner section and click Change.
    Windows 10 apps won’t maximize
  5. Select User or Group window will appear. Click the Advanced button.
  6. Click the Find Now button (A list of users and user groups will appear).
  7. Select the Administrators group and click OK.
    Windows 10 apps won’t launch
  8. In Select User or Group window click OK.
    Windows 10 apps stopped working
  9. In Advanced Security Settings window owners should be changed to Administrators and the Administrators group should be added to the Permission entries list.
  10. Check Replace owner on sub containers and objects.
    Windows 10 apps won’t install
  11. Click Apply and OK. Wait for the process to complete.

Sometimes Windows 10 apps won’t open due to ownership problems, but you can easily fix that. To change the ownership of a folder, or a hard drive partition, perform the steps from above.

6.2. Add Full Control permissions for ALL APPLICATION PACKAGES group

  1. Open your disk partition Properties and go to the Security tab.
  2. Click the Edit button.
    Windows 10 apps won’t download
  3. Permissions for the Local Disk window will open. Click the Add button.
    Windows 10 apps won’t update
  4. Select User or Group window will appear. Click the Advanced button, and then click Find Now.
  5. Locate ALL APPLICATION PACKAGES on the list, select it, and click OK.
    Windows 10 apps won’t load
  6. Click OK again.
  7. ALL APPLICATION PACKAGES will now be added to the list. Click it and select Full Control. Click Apply and OK to save the changes.
    Windows 10 apps won’t start
  8. If the issue still persists, open disk partition properties, go to the Security tab, and add Full control to the Users group.

7. Change FilterAdministratorToken in Registry Editor

  1. Press Windows Key + R in order to open the Run dialog.
  2. When the Run dialog opens, type Regedit and press Enter or click OK.
    Windows 10 apps crash on launch
  3. When Registry Editor opens, navigate to the following key in the left pane: HKEY_LOCAL_MACHINE\SOFTWARE\Microsoft\Windows\CurrentVersion\Policies\System
    Windows 10 applications keep closing
  4. On the right pane find the 32-bit DWORD called FilterAdministratorToken  (If FilterAdministratorToken DWORD doesn’t exist, you can create it by right-clicking in the right pane and choosing New and selecting the DWORD (32-bit) Value.)
  5. Now change the name of the new value to FilterAdministratorToken.
  6. Double click FilterAdministratorToken DWORD. In the Value data field enter 1 and click OK to save the changes.
    Windows 10 apps don’t work
  7. Close Registry Editor and restart your computer.

8. Use PowerShell

  1. Press Windows Key + S and type PowerShell. Find PowerShell on the list of results and right-click it. Choose Run as administrator.
  2. When PowerShell starts, enter the following lines. Press Enter after each line and wait for it to finish before entering a new line of code: Get-appxpackage -packageType bundle |% {add-appxpackage -register -disabledevelopmentmode ($_.installlocation + "appxmetadataappxbundlemanifest.xml")}$bundlefamilies = (get-appxpackage -packagetype Bundle).packagefamilynameget-appxpackage -packagetype main |? {-not ($bundlefamilies -contains $_.packagefamilyname)} |% {add-appxpackage -register -disabledevelopmentmode ($_.installlocation + "appxmanifest.xml")}

If the Store application cannot launch, you won’t be able to update any apps that won’t open, so it’s advised that you use PowerShell in order to fix this problem.

You can also try this command.

  1. Start PowerShell as administrator.
  2. Enter the following command and press Enter to run it: ren %windir%System32AppLockerPlugin*.* *.bak
  3. Close PowerShell and restart your computer.

If interested, check out this guide to know more about removing system apps from your Windows computer using PowerShell.

9. Move the Database folder from one profile to another

  1. Start Command Prompt (Admin).
  2. Enter the following lines and press Enter after each line in order to execute it: net user "TempAdmin1" "password1" /addnet user "TempAdmin2" "password2" /addnet localgroup administrators "TempAdmin2" /add
  3. Log out of your current account by pressing Ctrl + Alt + Delete and clicking on Sign out.
  4. Log in to the TempAdmin1 account. Users enter password1 as a password.
  5. Log out of the TempAdmin1 account as you did in Step 4.
  6. Log in to the TempAdmin2 account. Use password2 as a password.
  7. After you’ve logged in to the TempAdmin2 account, open File Explorer.
  8. Click the View tab and click on Hidden items. This will reveal hidden files and folders.
    Windows 10 apps won’t uninstall
  9. Navigate to the following location on your hard-drive: C:\Users\Temp\Admin1\AppData\Local\TileDataLayer
  10. Find the Database folder, right-click it, and choose Copy.
    Windows 10 apps won’t load
  11. Now you need to paste that folder to your main profile. Navigate to this folder: C:\Users\YOUR_USERNAME\AppData\Local\TileDataLayer
  12. Find the Database folder and change its name to Database.BAD.
  13. Right-click on the empty space and choose Paste from the menu.
  14. Restart your computer and go back to your main profile.
  15. Press Windows Key + S and type User Accounts. Choose User Accounts from the list.
  16. Click Manage another account, select TempAdmin1, and TempAdmin2 accounts and click on Delete Account to remove these accounts.
    Windows 10 apps crash on launch

To complete this solution, we’ll need to create two new profiles and move the Database folder from one profile to your main profile.

Although this process might look a bit complex, follow the steps above carefully, and you should be able to complete it.

10. Create a new local account

  1. Open Settings and go to Accounts.
  2. Go to Family and other users and click Add someone else to this PC.
    Windows 10 applications keep closing
  3. Click I don’t have this person’s sign-in information.
    Windows 10 apps don’t work
  4. Now click Add a user without Microsoft account.
    Windows 10 apps won’t start
  5. Enter the username and password for the new user.
  6. Go to Settings, select Accounts and click on Your Account.
  7. Click Sign in with local account instead.
  8. Enter your current password and click Next.
  9. After you’ve done that, enter username and password for your local account and click Sign out and finish.
  10. Switch to a new local account and move your personal files to it.
  11. Go to Settings, select Accounts, click on Your Account and click Sign in with a Microsoft account instead.
    Windows 10 apps won’t run
  12. Enter your username and password and click Sign in.
    Windows 10 apps won’t stay open
  13. Now you can delete your old account and continue using this one.

If Windows 10 apps won’t open, you might have to create a new account and transfer all your personal files to it. This solution can prove just as effective when Windows 10 default apps go missing.

Problems with Windows 10 apps that won’t open aren’t that common, but some programs are more likely to be affected than others:

  • WhatsApp for desktop
  • Slack app
  • Office 365 programs such as Microsoft Word and more

One more thing before we wrap it up – Microsft’s freshest OS is not exempt from this erratic (yet occasional) behavior. In case you’re already struggling, we prepared some equally comprehensive steps to help you out when Windows 11 apps won’t open.

That’s all from us. How would you force an app to open in Windows 10? If you know of any other solutions, feel free to drop us a line in the comments.

Windows 10 Goes To Sleep After 2 Minutes: 8 Quick Fixes

Sleep feature is quite useful, and many use it regularly on our PCs, but many users reported that Windows 10 goes to sleep after 2 minutes. This can be an annoying issue since you’ll have to constantly wake your PC up, but in this article, we’ll show you how to fix it.

Sometimes your Windows 10 PC can go to sleep after a couple of minutes, and this can be quite annoying. Speaking of sleep-related issues on Windows 10, here are some problems that users reported:

  • Windows 10 ignoring sleep settings, the screen turns off after 2 minutes – This issue can occur due to various reasons, and the best way to fix it is to modify your registry and then change your power settings.
  • Laptop goes to sleep when plugged in Windows 10 – This issue can occur due to your power plan settings. Simply switch to one of several default power plans or reset your power plan to default.
  • Windows 10 laptop goes to sleep after 2 minutes – According to users, this issue can occur on their laptop, and you should be able to fix it by running the power troubleshooter.
  • Windows 10 goes to sleep too soon, fast, early, every few minutes, while using – There are various power-related issues that can occur, but you can fix most of them using one of our solutions.

Windows 10 goes to sleep after 2 minutes, how to fix it?


1. Modify the registry and change your power settings

According to users, if your PC goes to sleep after 2 minutes all the time, perhaps you can fix this problem simply by making a couple of changes in the registry. To do that, just follow these steps:

  1. Open Run dialog by pressing Windows Key + R. Now type regedit and press Enter or click OK.
    regedit
  2. In the left pane, navigate to the HKEY_LOCAL_MACHINE\SYSTEM\CurrentControlSet\Control\Power\PowerSettings\238C9FA8-0AAD-41ED-83F4-97BE242C8F20\7bc4a2f9-d8fc-4469-b07b-33eb785aaca0 key. In the right pane, double-click the Attributes DWORD.
    Windows 10 laptop goes to sleep after 2 minutes
  3. Change the Value data to 2 and click OK to save changes.
    Windows 10 too fast

After doing that, you just need to change the advanced power settings. To do that, follow these steps:

  1. Press Windows Key + S and enter power settings. Now choose Power & sleep settings from the list.
    power settings
  2. The Settings app will now appear. In the right pane scroll down to the Related settings and click Additional power settings.
    Windows 10 screen turns off after 2 minutes
  3. You should now see all the power plans on your PC. Locate your power plan and click Change plan settings next to it.
    indows 10 goes to sleep every few minutes
  4. Now click on Change advanced power settings.
    Windows 10 ignoring sleep settings
  5. Click Change settings that are currently unavailable. Go to Sleep > System unattended sleep timeout and change the value from 2 to 20 minutes.

After doing that, save changes and check if the problem is resolved. Many users reported that this method fixed the problem for them, so be sure to try it out.


2. Run the Power Troubleshooter

Sometimes certain glitches and bugs can appear on your PC and that can cause various problems to appear. However, Windows comes with various built-in troubleshooters that can scan your PC for any problems and repair them automatically.

If Windows 10 goes to sleep after 2 minutes, you might be able to fix the problem by running the Power Troubleshooter. To do that, just follow these steps:

  1. Open the Settings app and navigate to the Update & Security section. You can open the Settings app quickly by using Windows Key + I shortcut.
    Windows 10 laptop goes to sleep after 2 minutes
  2. Select Troubleshoot from the left pane. In the right pane, select Power and click Run the troubleshooter button.
    troubleshoot power
  3. Troubleshooter window will now appear and you just have to follow the instructions on the screen to complete it.

After the troubleshooting process is finished, check if the problem is still there. Several users reported that this simple solution worked for them, so there’s no reason not to try it.


3. Change your screensaver settings

If Windows 10 goes to sleep after 2 minutes, the problem might be related to your screensaver. Apparently, the PC goes to sleep as soon as the screensaver appears, but you can fix that problem simply by changing a couple of screensaver settings. To do that, just follow these steps:

  1. Open the Settings app and navigate to the Personalization section.
    Windows 10 ignoring sleep settings
  2. Select the Lock screen from the menu on the left. Now pick Screen saver settings from the right pane.
    Laptop goes to sleep when plugged in Windows 10
  3. Set the Wait time to any higher value, for example, 20 minutes or so. Now click Apply and OK to save changes. Alternatively, you can choose not to use any screensaver.
    Windows 10 laptop goes to sleep after 2 minutes

After making these changes, check if the problem is still there.


4. Disconnect USB dongles

According to users, if Windows 10 goes to sleep after 2 minutes, it’s possible that a USB dongle is causing this issue. Few users reported that the problem was caused by a USB dongle for a wireless Logitech mouse.

To fix the problem, users are suggesting to disconnect the USB dongle from your PC and check if that solves your problem. If the dongle is the problem, perhaps you should try updating your drivers and check if that helps. In the worst-case scenario, you might have to replace the mouse.


5. Restore the power plan settings to the default

Sometimes problems with sleep mode can occur if your power plan settings are corrupted or not working properly. If Windows 10 goes to sleep after 2 minutes frequently, the problem might be your power plan, so it’s advised to reset it to the default. This is quite simple to do, and you can do it by following these steps:

  1. Follow the steps from Solution 1 to open the Power Options window.
  2. Locate your currently selected profile and click Change plan settings.
  3. Now click Restore default settings for this plan.
    Laptop goes to sleep when plugged in Windows 10

After doing that, the problem should be completely resolved. Alternatively, if you’re using your own custom power profile, you should switch to one of several built-in profiles and check if that solves the problem.


6. Change the power button settings

According to users, if Windows 10 goes to sleep after 2 minutes, the problem might be your power button settings. As you might know, you can configure your power button to perform various tasks, but sometimes these settings can cause other problems.

If you’re having problems with the sleep feature on Windows 10, you just need to change the following settings:

  1. Open Power Options window.
  2. Select Choose what the power button does in the left pane.
    Laptop goes to sleep when plugged in Windows 10
  3. Set When I press the power button to Do nothing. Now click Save changes.
    Windows 10 laptop goes to sleep after 2 minutes

After making these changes, check if the problem is still there. Several users reported that this solution worked with a laptop while using an external screen, but you can try this on your desktop PC as well.


7. Customize your power settings

If Windows 10 goes to sleep after 2 minutes, it’s rather likely that your power settings are the cause. To fix this issue, users are suggesting to go through advanced power settings and customize them.

This might be a bit advanced solution, but you should be able to follow through. To do that, just follow these steps:

  1. Open the Power Options window. Locate your power plan and click Change plan settings> Change advanced power settings.
  2. Now go to PCI Express > Link State Power Management and set it to Off.
    Windows 10 ignoring sleep settings
  3. Now you need to disable power saving and sleep for all devices on the list such as your wireless adapter, display, hard drive, etc. After doing that, click Apply and OK.

This is a bit advanced solution since you’ll have to manually find and disable power-saving settings. However, once you disable the power saving settings, the issue should be completely resolved.


8. Install the latest updates

If Windows 10 goes to sleep after 2 minutes, the issue might be certain glitches on your system. These glitches can occur for various reasons, and the best way to fix them is to install the latest updates. Usually, Windows 10 installs the missing updates on its own, but sometimes you might miss an update or two due to certain glitches.

However, you can always manually check for updates by doing the following:

  1. Open the Settings app and go to the Update & Security section.
  2. Now click Check for updates button.
    Windows update

If any updates are available, they will be downloaded automatically in the background. Now you just have to restart your PC to install the updates. Once the updates are installed, check if the problem is still there.

How to Keep the Folder Pane Expanded in Outlook [3 Ways]

Outlook’s Folder Pane on the left of its window displays all your folders in its expanded view. Users can also minimize that pane so it doesn’t display folders.

When users expand that Folder Pane again from the minimized view, however, it doesn’t stay expanded when users click outside it. Thus, some users might wonder how they can get the expanded Folder Pane view to stick after minimizing it.

How do I keep Outlook’s Folder Pane expanded?

1. Adjust the Folder Pane setting

  1. You can restore the default expanded Folder Pane by adjusting the Folder Pane setting. To do that, select the View tab.
  2. Press the Folder Pane button shown directly below.Folder Pane button outlook how to keep folder pane expanded
  3. Then select the Normal option.

2. Click the pin button

Alternatively, users can click a pushpin button at the top right of the Folder Pane. Expand the minimized Folder Pane by clicking the arrow button (>) at the top of it.

Then click the pushpin button in the snapshot directly below. Thereafter, the Folder Pane will remain expanded when you click out it.

The minimized Folder Pane outlook how to keep folder pane expanded

3. Set up a VBA macro that automatically expands folders when Outlook starts

  1. To ensure all folders in the Folder Pane are fully expanded when you open Outlook, set up a VBA macro that opens all collapsed folders when the application starts. Open Outlook’s Visual Basic for Applications window with the Alt + F11 hotkey.
  2. Click Project1 on the left of the window.
  3. Expand Microsoft Outlook Objects and double-click ThisOutlookSession to open a code window.
    A VBA code window outlook how to keep folder pane expanded
  4. Select and copy this VBA code with the Ctrl + C hotkey:
    Private Sub Application_Startup()
    ExpandAllFolders
    End SubPrivate Sub ExpandAllFolders()
    On Error Resume Next
    Dim Ns As Outlook.NameSpace
    Dim Folders As Outlook.Folders
    Dim CurrF As Outlook.MAPIFolder
    Dim F As Outlook.MAPIFolder
    Dim ExpandDefaultStoreOnly As BooleanExpandDefaultStoreOnly = FalseSet Ns = Application.GetNamespace(“Mapi”)
    Set CurrF = Application.ActiveExplorer.CurrentFolderIf ExpandDefaultStoreOnly = True Then
    Set F = Ns.GetDefaultFolder(olFolderInbox)
    Set F = F.Parent
    Set Folders = F.Folders
    LoopFolders Folders, True


    Else
    LoopFolders Ns.Folders, True
    End If

    DoEvents
    Set Application.ActiveExplorer.CurrentFolder = CurrF
    End Sub

    Private Sub LoopFolders(Folders As Outlook.Folders, _
    ByVal bRecursive As Boolean _
    )
    Dim F As Outlook.MAPIFolder

    For Each F In Folders
    Set Application.ActiveExplorer.CurrentFolder = F
    DoEvents

    If bRecursive Then
    If F.Folders.Count Then
    LoopFolders F.Folders, bRecursive
    End If
    End If
    Next
    End Sub

  5. Paste that macro into the code window with the Ctrl + V hotkey.
  6. Click File and save the macro. Thereafter, the macro will automatically open collapsed folders in the Folder Pane when you launch Outlook.

So, that’s how you can keep the Folder Pane expanded in Outlook. The VBA macro will also ensure that the Folder Pane’s folders are fully expanded when you start Outlook.

Speaking of UI elements, we have a great guide on what to do if Outlook bar has moved to left.

If you have other questions or suggestions, reach for the comment section below.