3 Easy Ways to Fix the UEFI Boot Problems in Windows

Windows 10 and 11 boot problems might be quite annoying since the troubleshooting process is usually complex. And instead of taking out the time to fix UEFI boot issues, most users reinstall the OS.

But that leads to a loss of data. So, why take that route when a simpler, more viable alternative is already available? Let’s find out about UEFI and how to fix issues with it.

What is UEFI?

UEFI, or Unified Extensible Firmware Interface, is a protocol that replaces the popular BIOS with new software. UEFI offers vital benefits such as improved security measures, faster startup time, support for disks larger than 2 TB, and more. Before proceeding, check which BIOS mode your computer just to be sure.

A broken UEFI means that you have a broken bootloader, in which case you won’t be able to reboot or power on your Windows device.

Therefore, fixing UEFI boot problems is essential, especially if you want to use your device without having to reinstall the Windows OS.

How can I fix Windows UEFI boot problems?

1. Convert GPT to MBR

Note icon NOTE
This method only works when the PC is working and connected to the Internet. If you can’t turn on the computer, head to the next solution.
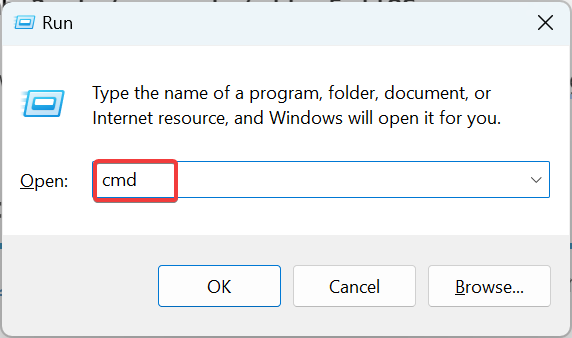
  1. Press Windows + R to open Run, type cmd, and press Ctrl + Shift + Enter.cmd
  2. Click Yes in the UAC prompt.
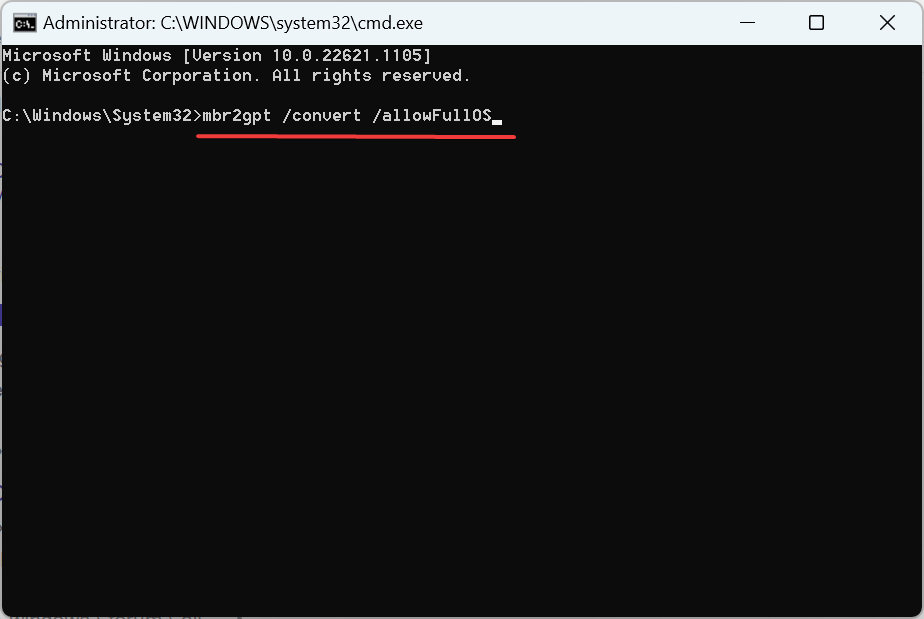
  3. Now, paste the following two commands one at a time, and hit Enter after each:mbr2gpt /validate /allowFullOS mbr2gpt /convert /allowFullOSconvert MBR to GPT

Once done, the primary partition will change from MBR to GPT, which will fix a range of problems with UEFI, including boot issues.

2.  Use Diskpart and recreate Boot Configuration Data

  1. Create a bootable Windows USB for the iteration on another PC using Rufus or another similar tool, and plug it into the affected computer.
  2. Now turn on the PC and boot it from the connected drive.
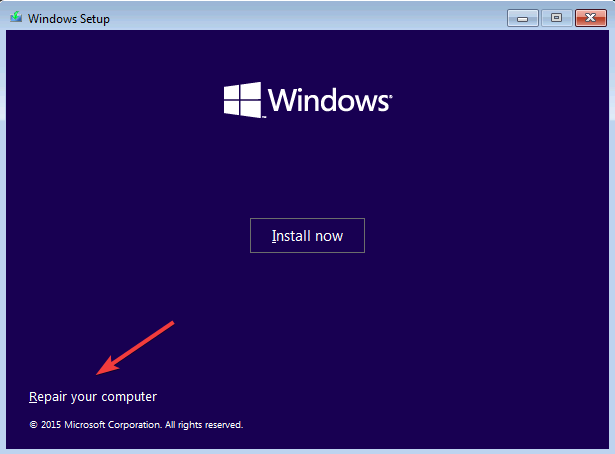
  3. Once the Windows setup loads, proceed with the initial steps and then click on Repair your computer when the option appears.repair your computer
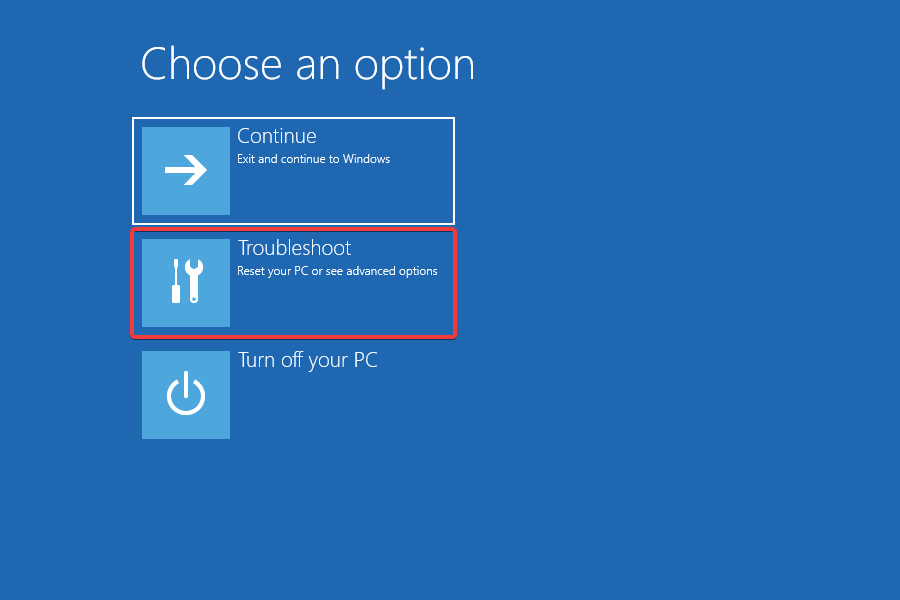
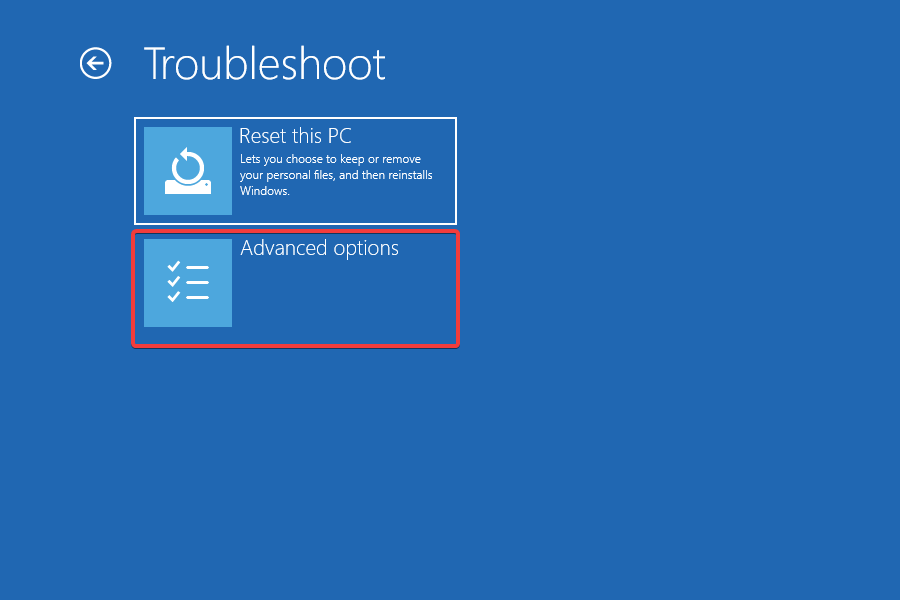
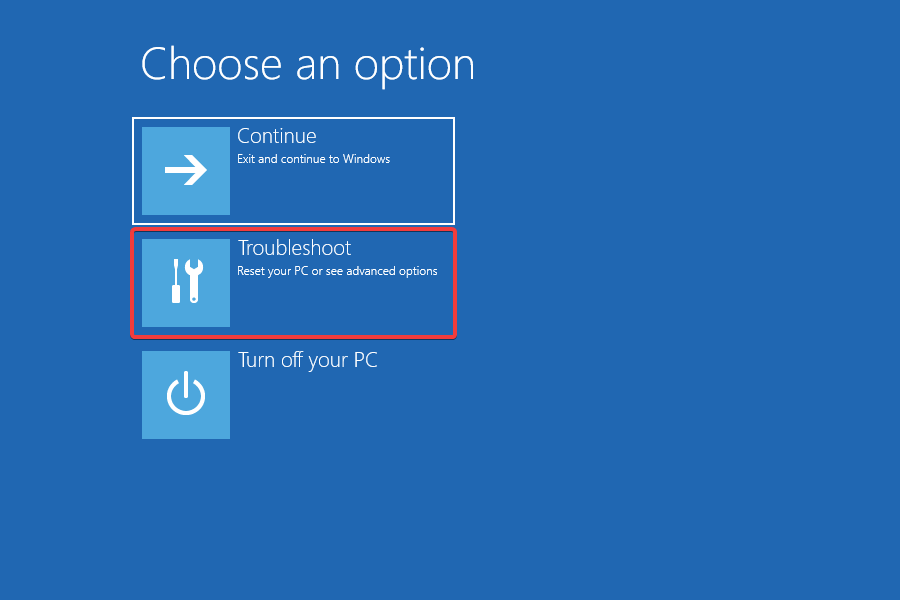
  4. Now, choose Troubleshoot.troubleshoot to fix UEFI boot
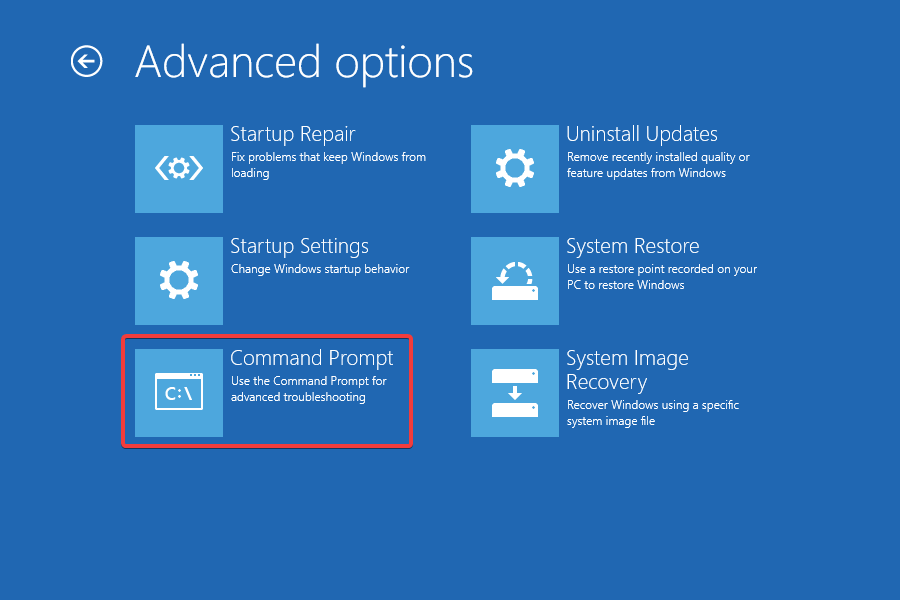
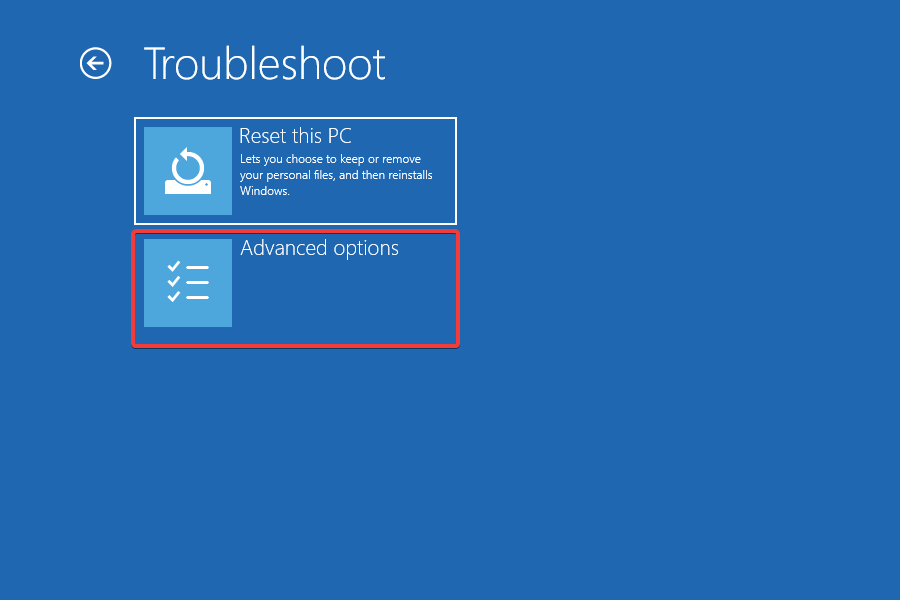
  5. Click on Advanced options.advanced options
  6. Select Command Prompt from the options listed here.command prompt
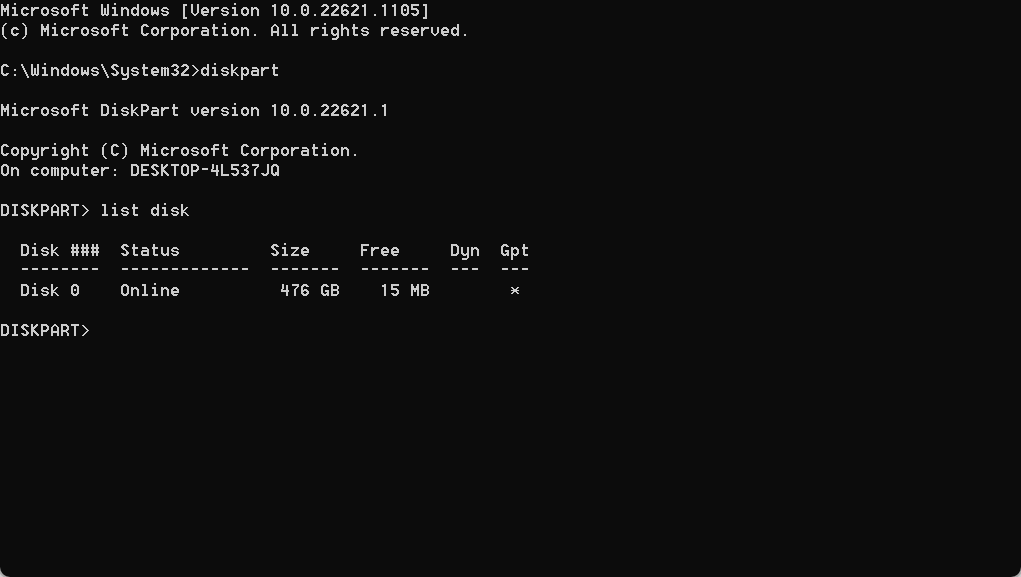
  7. Now, paste the following command and hit Enter:Diskpart
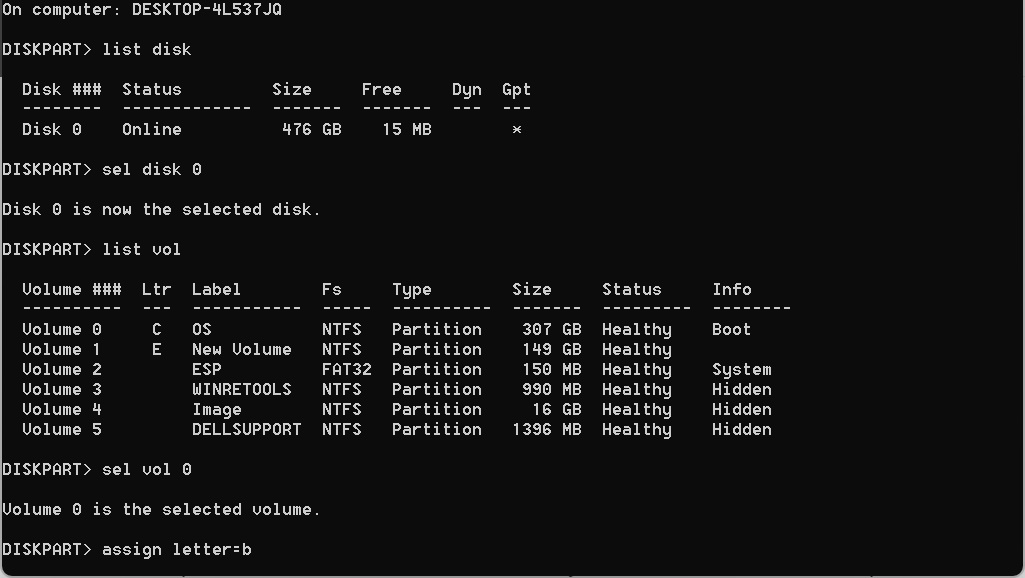
  8. Find out on which disk you have installed Windows by executing the following command:list diskdiskpart
  9. Usually, the Windows system is installed on disk 0. If not, change the following command to select the system disk accordingly to the number of your disk:sel disk 0
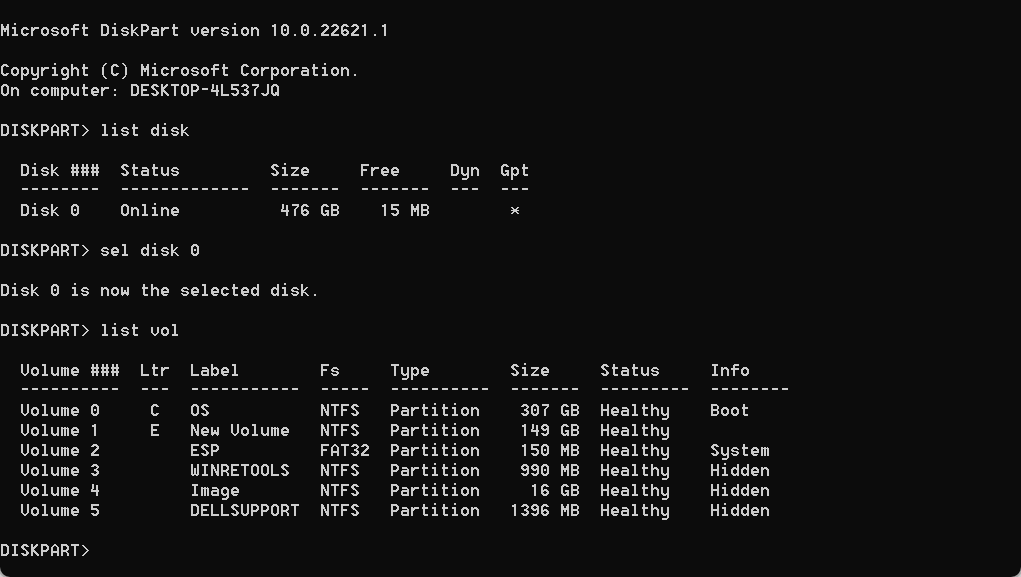
  10. Next, execute the following command to view the partitions:list vollist volume to fix UEFI boot
  11. The UEFI partition should be a FAT32 file system. To select the UEFI partition, execute the following command while replacing X with the correct volume number:sel vol X
  12. Finally, paste the following command and hit Enter to assign a new letter to the selected volume:assign letter=bassign letter
  13. Now, run the following command to leave Diskpart: exit
  14. Finally, execute the following three commands individually to fix the Boot Record and recreate the Boot Configuration Data:cd /d b:EFIMicrosoftBoot bootrec /fixboot ren BCD BCD.old bcdboot c:Windows /l en-us /s b: /f ALL

That’s it! You should now be able to boot Windows normally without running into any trouble with the UEFI.

3. Run Startup Repair

  1. Plug in the bootable drive you created earlier, boot it and choose the Repair your computer option.
  2. Select Troubleshoot.troubleshoot
  3. Click on Advanced options.advanced options
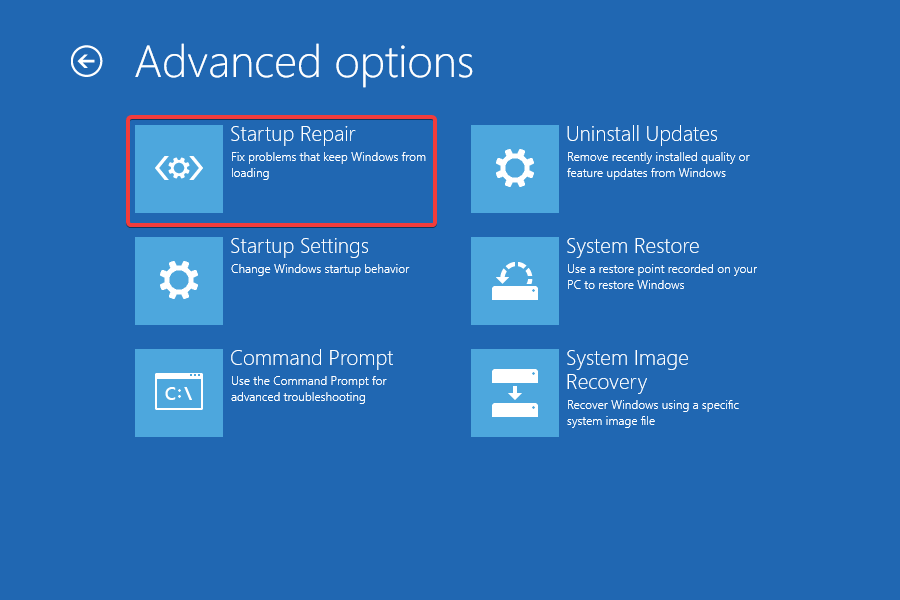
  4. Now, select Startup Repair.startup repair to fix UEFI boot
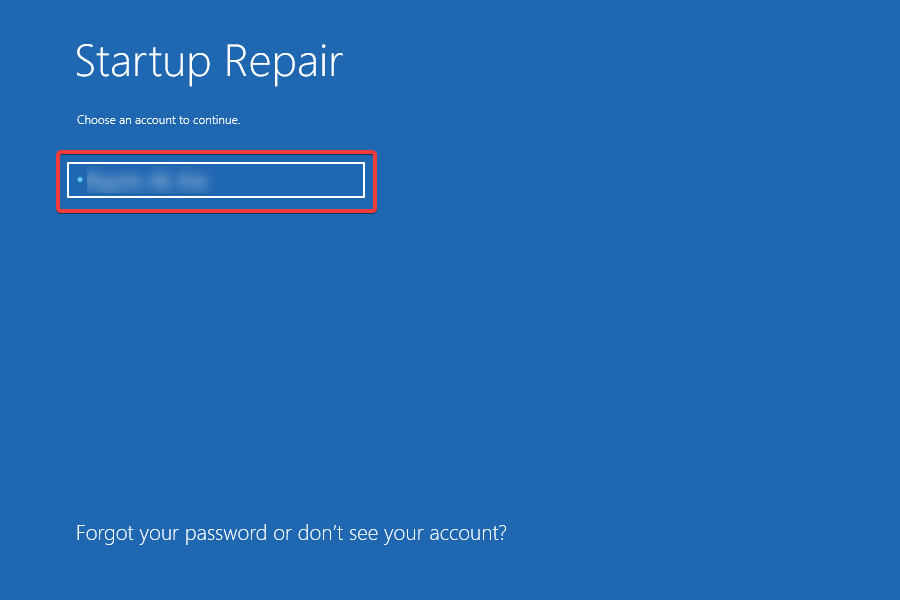
  5. Select your account.account
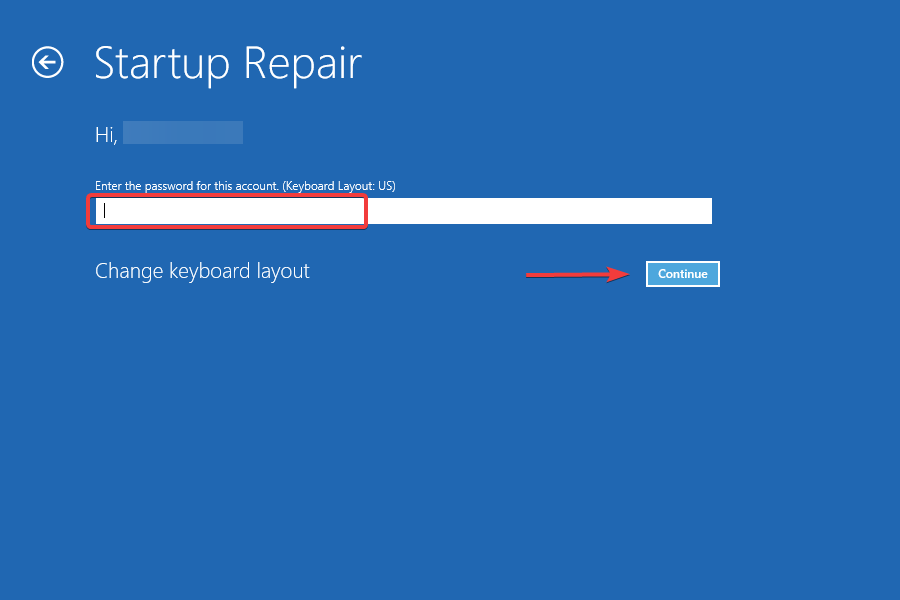
  6. Enter the password for the chosen account and click Continue to start the repair process.enter password

A more straightforward way to fix UEFI boot issues is to run Startup Repair, a built-in option in Windows to eliminate issues preventing the OS from loading. It should be the preferred option for not-so-tech-savvy users.

By now, you should have fixed UEFI boot errors and problems, and these shouldn’t reappear. You can always refer to this article and execute the same steps even if they do. Some of these solutions may even help when the screen reads, Your VAIO failed to start Windows.

While you are at it, also find ways to reduce the boot time in Windows.

Tell us which fix worked for you in the comments section below.

How to Fix Self-Signed Certificate in Certificate Chain Error

For some time now, developers encountered a SELF_SIGNED_CERT_IN_CHAIN error during installing and publishing packages in certain applications and developer tools such as Node.js, npm, or Git.

Until a few years ago, when npm for instance announced that they would no longer support self-signed certificates.

This means that the certificate verification process was no longer automatic. So developers now have to set up their application to see the self-signed certificates.


How do I fix self-signed certificate in the certificate chain?

self signed certificate in certificate chain

Depending on the tool you’re using, there are a few recommendations. Some are risky, some are safe. One thing is clear, though: you should not attempt to disable the certification verification process altogether.

For Node.js

You can insert an environment variable to allow untrusted certificates using the following command at the beginning of the code:

process.env['NODE_TLS_REJECT_UNAUTHORIZED'] = 0;

This is risky and it’s not recommended to be used in production. Alternatively, use npm config set strict-ssl=false if you have to do this for many applications and you want to save repeating the process.

Users also suggest upgrading your version of Node, to fixes any existing bugs and vulnerabilities.


For npm

The recommended solution is, again, to upgrade your version of npm running one of the following:

npm install npm -g --ca=null 

npm update npm -g

Or,  tell your current version of npm to use known registrars, and after installing, stop using them:

npm config set ca ""
npm install npm -g
npm config delete ca

Some users mentioned that they only switched the registry URL from https to http:

npm config set registry="https://registry.npmjs.org/"

We hope that one of these suggestions helped you fix the problem. Should you have any recommendations, please use the comments section below.


[wl_navigator]

How to Get Outlook Notifications For Subfolders

In Outlook, by default, you get notifications for any email that lands in your inbox. However, you don’t get notifications for emails coming to your subfolders. However, with a few tweaks, you can get notified for them too. 

This guide will discuss step-by-step instructions to get Outlook alerts for subfolders so you never miss an important email. Let’s get started!

How can I get outlook notifications for subfolders?

There are a few prerequisites that you should be aware of before setting up Outlook notifications for specific subfolders:

  1. You need to have the Microsoft Outlook desktop app installed on your computer or have access to OWA.
  2. You should have an active email account configured in Outlook.
  3. Must have primary Outlook navigation and locate and access the relevant settings and options in the Outlook application.

Once you have gone through the checks, follow the instructions step by step to get this done:

1. Outlook Desktop app

  1. Open Outlook.
  2. Go to the folders in the email account and under the Home tab. 
  3. Now under Move, click Rule, then select Manage Rules and Alerts. 
    Rules - outlook notifications for subfolders
  4. On the Rules and Alerts window, go to the Email Rules tab and click New Rule.
    New Rule
  5. On the Rules Wizard page, click Apply rule on messages I receive or click Check messages when they arrive. 
    Apply rules
  6. Now, click Next.
  7. On the next page, do nothing, click Next and proceed. 
    Next
  8. Click Yes on the following prompt. 
    Yes
  9. On the Rules Wizard dialog box, place a checkmark beside the display a Desktop Alert. 
  10. Click OK in the onscreen prompt box, then click Next and Finish.
    Create alert
  11. Again click OK on the Rules and Alerts window to finish the process.

Need to confirm that messages were opened as well as alerted? Set up a read receipt in Outlook to track opens.

2. Outlook Web app (OWA)

Tip icon Tip
If you don’t have an Outlook desktop app, you can also create a rule on OWA. This is not the direct way of getting notifications on OWA; it is the workaround.
  1. On the OWA, locate the Settings gear icon and click on View all Outlook settings.
    Outlook settings -outlook notifications for subfolders
  2. In the Settings window, go to the Mail tab and click on the Rules option.
  3. On the Rules window, click the Add new rule button.
    Mail rules add rule
  4. In the Add a new rule window, give the rule a name and specify the conditions to which the rule applies. For instance, you can use the law only for messages from a specific sender or with a particular subject. Once you are finished defining the conditions, click Save.
  5. In the next window, select the Move, copy, or delete action and click Add action.
    Windows
  6. From the Add action window, select the Move the message to different folder option and click Choose folder.
  7. On the Choose folder window, please navigate to the subfolder you want to receive notifications for and select it. Then click Save.
  8. Click Save to create the rule.

If you are also facing notification issues on mobile, check this guide on Outlook notifications not working on iPhone.

So, you need to follow these steps to get Outlook notifications for subfolders. If you are stuck somewhere while working on Outlook notifications for folders, feel free to mention your questions or concerns in the comments section below. We will be more than happy to help!

Missing Proofing Tools In Microsoft Word: 4 Ways To Fix It

When editing a document in Microsoft Word, you may encounter the Missing proofing tools error. The full error reads – Missing proofing tools. This document contains text in <language of the text>, which isn’t being proofed. You may be able to get proofing tools for this language.

This error can occur due to mismatched language settings, missing proofing tools, incorrect default language, or compatibility issues.

Here’s how you fix it:

How do I fix the missing proofing tools Microsoft Word error?

1. Change the proofing language manually

  1. Launch Microsoft Word on your computer and open the document with the error.
  2. Press Ctrl + A to select all the text in the document.
  3. Open the Review tab from the toolbar.review tab word
  4. Click the Language drop-down button.language option ms word
  5. Go to Language and choose Set Proofing Language.
  6. Select your preferred language from the new Language window.
  7. Click the Set as Default button if you want to set the language as default for all the documents.language option ms word
  8. Click OK to apply the changes.

Manually changing the document and proofing language seems to have fixed the error for many users. However, make sure to select the correct document language from the language settings to prevent errors in the future.

2. Install the Proofing Tools 2016

  1. Open the Microsoft Office Proofing Tools 2016.
  2. On the download center page, select the language.
  3. Click the Download button to proceed.
  4. Select the 32-bit/64-bit version of proofing tools, depending on your OS edition.
  5. Click Next.
  6. Run the installer and follow on-screen instructions to install the proofing tools for Office 2016.

Note: It is important to install a 32-bit proofing tool for 32-bit Windows systems and 64-bit for 64-bit systems. The tool otherwise may not work correctly.

Once installed, relaunch Microsoft Office and check if the error is resolved. 

3. Use a dedicated repair tool

If you’re facing issues with Microsoft Word files, Stellar Word Repair can help. It offers a straightforward solution for fixing corrupt .doc and .docx files. 

The tool restores text, images, fonts, and hyperlinks without altering the original content. It can address issues like missing proofing tools errors and provides multiple recovery options, including a free preview of recoverable data.

⇒ Get Stellar Word Repair

4. Repair Word installation

  1. Press the Windows key + R to open Run.
  2. Type control and click OK.
  3. In Control Panel, go to Programs and click on Programs and Features.programs and features cp
  4. Select Microsoft Word from the list of installed apps.
  5. Click on Change and then click Yes when prompted by UAC.change office
  6. Select Quick Repair and then click on the Repair button. Wait for the repair to complete and restart Office. If the error persists, perform Online Repair.
  7. Make sure your computer is connected to the Internet and choose Online Repair.
  8. Click the Repair button to proceed. The repair process will take longer but will fix all issues with your Microsoft Office installation.

After the repair process is complete, restart Office and check if the Missing proofing tools error is resolved.

The Missing proofing tools in Microsoft Word error can occur due to Word document in corruption or issues with Office installation.

Fortunately, you can fix this error by repairing the Word document or changing language preferences.

iCloud Sync Pending / Not Syncing: 7 Quick Fixes

Apple iCloud is a popular cloud storage service, but many Windows 10 and Windows 11 users reported that iCloud drive is not syncing.

This can be a big problem, and in today’s article, we’ll show you how to fix this issue.

How can I fix the iCloud Sync Pending issue?

1. Enable iCloud for Windows

  1. You will need to specifically log in to the iCloud for Windows app for your information to be synced across all devices.
  2. However, prior to that, you are required to set up iCloud on all Apple devices you have and log in at each instance of the app on each device.
  3. It’s only after you are done with the above steps that you need to log in at iCloud for Windows app.
  4. After logging in, you’re good to go. Check if the data is getting synced across devices.

2. Sign out and log in again with iCloud for Windows

Sign out and sign in again if Windows 10 iCloud drive not syncing
  1. Launch iCloud for Windows.
  2. Click on the Sign out button at the bottom right corner to log out of the service.
  3. Close the application and relaunch the same again.
  4. Enter your Apple ID to sign back into iCloud.
  5. As before, select the features and content that you want to sync.

3. Update the iCloud for Windows app

update icloud icloud drive not syncing
  1. Launch Store app on your PC.
  2. Click on the three horizontal dots at the top right corner and select Downloads and updates.
  3. Check if there is an update available for iCloud for Windows.
  4. If yes, click on the downward facing arrow to download and install the update.


4. Update Windows PC

Update your PC if Windows 10 iCloud drive not syncing
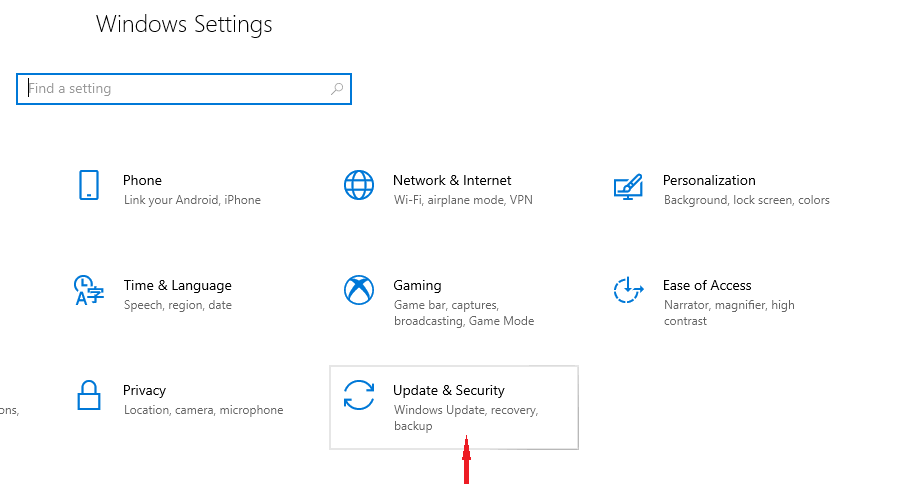
  1. Click on Start > Setting > Update & Security.
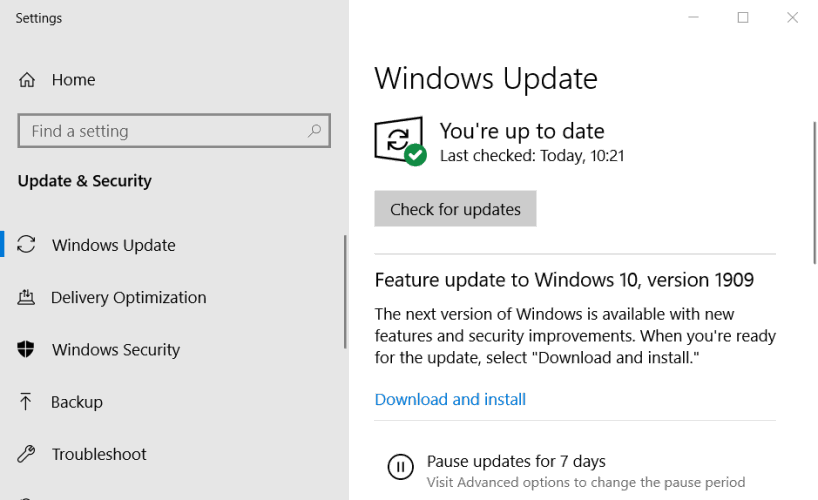
  2. Click on the Check for updates button.
  3. Download the updates if any are available.

5. Check available storage space on iCloud

Check storage space if Windows 10 iCloud drive not syncing
  1. Ensure there is enough storage space available on iCloud Drive.
  2. For that, go to Settings > [your name] > iCloud on your iPhone (or for that matter, any iCloud compatible Apple device).
  3. There will be syncing issues if there isn’t space available to host all files that you want to upload to iCloud.

6. Uninstall and reinstall iCloud for Windows

Uninstall iCloud for Windows and reinstall again if Windows 10 icloud drive not syncing
  1. Click on Start > Settings > Apps.
  2. Select iCloud for Windows from the list of apps installed on your Windows device.
  3. Click on the Uninstall button.
  4. Once the app is removed, install it again and check if the iCloud sync pending error is still there.

7. Change to a specific password for iCloud for Windows app

  1. Apple recommends having a separate password for each of its services.
  2. This not only allows for better security, but there are also fewer chances of system conflicts arising when using cross-platform apps such as iCloud that operates across iOS, Mac and Windows operating systems.
  3. To change password, visit the Apple site here.
  4. Generate a password specifically for iCloud and use the same to log in to your cloud account via iPad, iPhone, and Windows devices.

There you have it, a comprehensive list of things to do if you get the iCloud sync pending error message on your PC.

Telegram Download Stuck: Could Not Be Completed [FIX]

If your Telegram download is stuck or an error reading file download could not be completed sounds familiar, you may want to stick around. We’ll explain how to fix and prevent this issue.

In most cases, stuck downloads in Telegram happen when you enable battery saving mode, your hard drive is full or the file size is too big, and your internet is too slow. No matter the cause, here’s how to fix it:

What to do if a file cannot be downloaded in Telegram?

Start by testing the speed of your connection. If your internet is down, contact your ISP. If it’s up and running, but you still have no success with Telegram, keep reading:

1. Make sure Connection settings are set to default

  1. Enter Settings and scroll to the bottom.
  2. Look for the option saying Connection settings: default (use TCP) and click on it.
  3. Then, click on OK without making any further changes and check if file downloading works again.

2. Check file size

If your video, image, or other types of files exceed 4 GB (or if you try to batch download files whose combined size goes beyond this value), Telegram won’t be able to complete your file download.

To check file size: open the chat, and look at the file’s preview. The size should be displayed next to the file’s name. Alternatively, tap the three dots and select Details.

A quick tip: consider checking the file size. Despite any appearances, it might not even be a Telegram glitch, but your disk could be full.

3. Turn off the Battery saver or customize this mode

  1. Open the Settings app.
  2. Go to System, then Battery.
  3. Click on Battery saver and toggle the button Off.
  4. Alternatively, you exclude Telegram from the battery optimization plan. Simply look in the list of apps and make sure the switch next to it is set to Never or Off.
  5. Now, restart your device and try downloading anything from Telegram.

4. Update or reinstall Telegram for desktop

If you’re wondering why Telegram is not downloading on your PC, it can be because you missed some updates or you simply don’t have the latest version.

If you installed the Telegram app from the Microsoft Store, simply open the dedicated app and go to Settings. Check for any available updates and download them accordingly.

Alternatively, you can also try to uninstall and reinstall Telegram Desktop from the official address and also change the download location on your PC.

So, that’s how to solve the problem of not being able to finish a file download in Telegram.

In case these methods do not work appropriately to troubleshoot the issue, remember that Telegram users can often download large files even when encountering the issue on small-size files.

It’s hard to establish a pattern of behavior, yet you might give it a go as well.

Know any other workarounds for the issue? Share them with us in the comments section below.

PUBG Black Screen on Launch: Try Our 10 Quick Solutions

Looking at its current ratings will give you a good idea about what’s going on with PUBG. Long story short, this is a great battle royale shooter, but it has many issues and bugs. And one of the most common is the black screen on launch in PUBG.

A black screen can be quite challenging in the sea of issues plaguing gamers, making reboot necessary. For the affected users, it appears either on launch or while waiting for the matchmaker queue.

How can I fix the black screen on launch on PUBG?

Before trying any advanced solutions, here’s what you can do:

  • We recommended updating the game. Just open the Steam desktop client, and the update queue will start. After that, restart your PC and try starting the game again.
  • You can try to change some things in router/modem settings that might help you at least lessen the black screen crashes at startup. The first is QoS or Quality of Service, which allows users to set priority applications in bandwidth usage. Setting PUBG as a priority might reduce the gravity of the issue.
  • The second thing you might want to check is port forwarding, which demands more effort, as the procedure differs depending on your router/modem model or version. You can check the manufacturer’s website for the exact steps.

1. Run the game through Steam

  1. Right-click Steam and open Properties.
  2. Select the Compatibility tab.
  3. Check the Run this program as an administrator box and click OK to save the changes.pubg black screen on launch

Even though you can run the game from the desktop shortcut, we still recommend using Steam. If you acquired PUBG via the Steam Store, we suggest using the desktop client to start it.

For some peculiar reason, this seems to work for some users, and the startup black screen or freezing on the title screen is gone. On a side note, we encourage you to run Steam with administrative permissions.

2. Delete the contents of the Movies folder

  1. Press Windows + E to open File Explorer, paste the following path in the address bar, and hit Enter.fix pubg black screen on launch
  2. Now, press Ctrl + A to select all the files here, and hit the Del key.
  3. Choose the appropriate response in case a confirmation prompt appears.

Once done, reopen Steam, and the black screen shouldn’t appear when you launch PUBG.

3. Remove custom launch options

  1. Open Steam and then navigate to the Library tab.
  2. Right-click on PUBG and choose Properties.
  3. Choose “SET LAUNCH OPTIONS…” and delete all inputs.pubg black screen on launch
  4. Confirm changes and restart Steam.
  5. Start the game.

If you’ve made any changes in the Steam configuration concerning the launch options, make sure to disable all of them. Some of them might work in your favor, but for the sake of establishing a blank slate, you’ll need to remove them for the time being.

4. Disable background programs

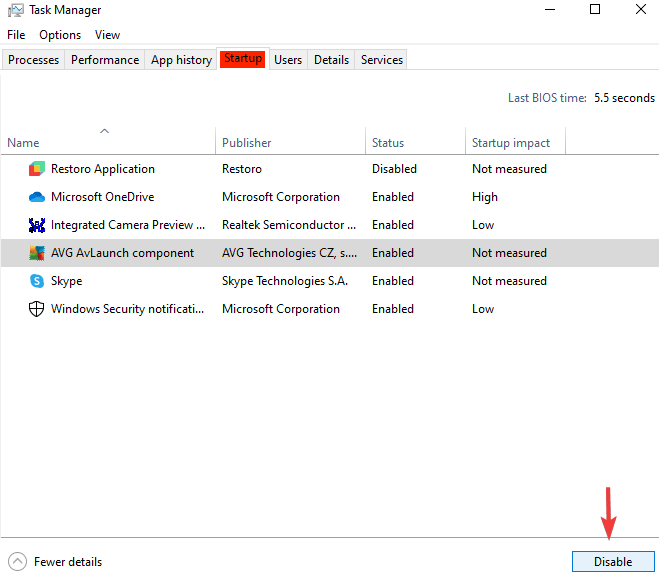
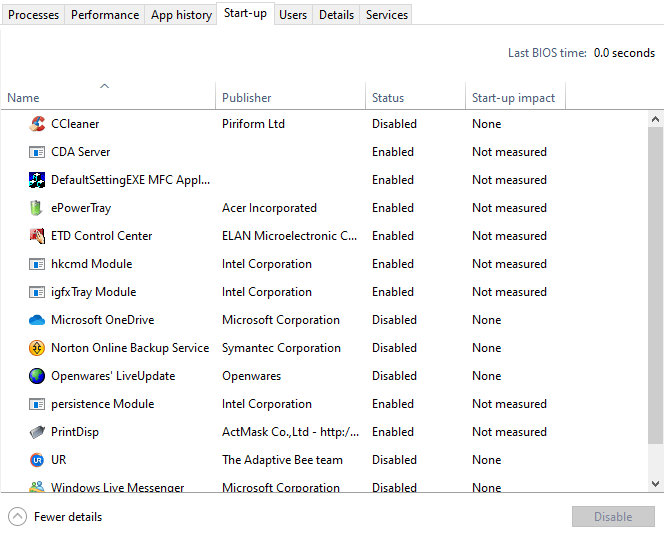
  1. Press Ctrl + Shift + Esc to open Task Manager, and navigate to the Startup apps tab.task manager
  2. Select all applications listed here individually, and click on Disable at the top.disable to fix pubg black screen on launch
  3. Once done, restart your PC.

The impact certain background applications can have on the game was already proven. So, we recommend performing a clean boot, with only system resources running in the background.

In addition, some users advised uninstalling apps, including the GeForce Experience utility.

5. Reinstall GPU drivers

When it comes to in-game issues and Windows 10, we can’t sleep on the GPU drivers. It becomes imperative to find the perfectly suited drivers for your GPU, even for premium graphics cards.

Windows 10 pushes generic drivers, and more times than not, they work as intended. But we still recommend navigating to the official OEM’s support site and downloading the latest driver version. If one fails, try installing an alternative.

Here’s where to find the drivers for major manufacturers:

After that, you can block the installation of generic drivers provided by Windows Update. Also, we recommend installing redistributables and updating DirectX. You can even use dedicated driver updater software to find the latest driver versions automatically.

6. Delete configuration settings and verify the game’s integrity

  1. Copy-paste %localappdata% in Windows Search and press Enter.
  2. Locate the “TslGameSavedConfig” directory.
  3. Delete the WindowsNoEditor file.

Restoring the game configuration to its default settings might help, as well. Some users copied the configuration files from other users who haven’t experienced crashes.

This will hardly work since it’s not likely that you have the same system configuration as the next user. Rather, you’ll need to delete the configuration settings and configure everything again in the in-game settings.

Once done, the next step is to verify the integrity of the game files. Like all other files, the game files tend to get corrupted or incomplete. With this operation, you’ll restore them to their proper values.

  1. Open Steam‘s Library.
  2. Right-click on PUBG and open Properties.
  3. Choose the LOCAL FILES tab.
  4. Click on the VERIFY THE INTEGRITY OF GAME FILES option.pubg black screen on launch

7. Update Windows 10

  1. Type Update in the Windows Search bar and select Check for updates.check for updates
  2. Check for updates and install them.
  3. Restart your PC.

Windows 10 updates are rarely the cause of gaming issues, especially minor ones. However, having the latest patch for Windows might be valuable. Users reported issues with Ryzen CPUs, and the resolution was presented in a timely update.

8. Add exceptions for Windows Firewall and antivirus

  1. Press Windows + S to open the Search bar, type Allow and select Allow an app through Windows Firewall.
  2. Click on the ”Change settings” button.pubg black screen on launch
  3. Find your Steam and PUBG on the list and check the box beside them. Also, make sure that both Public and Private networks are enabled.
  4. Confirm changes and restart your PC.

Allowing the game to communicate freely is of utmost importance. Saying that this is the main reason for the black screen is a far-fetched claim, but it won’t cost you anything to try it.

Firstly, if you have any third-party antivirus solution with a built-in firewall, we urge you to disable it. After that, you can add an exception for Windows-native Firewall.

Allowing the game to communicate freely on your computer is important to avoid other issues like PUBG anti-cheat error, check out this guide to learn more.

9. Disable integrated graphics in dual-GPU configurations

In case you have a dual-GPU configuration, with one integrated and one dedicated graphics card, disabling the integrated one might help you overcome the error at hand.

This can be done in various ways, but the best approach would be to disable integrated GPU from its own control panel.

Some users recommended uninstalling it in Device Manager, but this can cause additional issues, so avoiding this approach is a good idea.

Instead, navigate to Device Manager, expand the Display Adapters section, and disable the integrated graphics. Restart your PC, and you should be good to go.

10. Reinstall the game

  1. Type control in the Windows Search bar and open the Control Panel.pubg black screen on launch
  2. Click Uninstall a program.pubg black screen on launch
  3. Remove PUBG.
  4. In Windows Search, type %localappdata% and press Enter.
  5. Delete the TslGame folder.
  6. Now, navigate to the following location in File Explorer: C:\Program Files (x86)\Common Files\BattlEye 
  7. Now, delete the BEService_pubg.exe file.
  8. Once done with all, open Steam and reinstall PUBG.

Finally, the only thing that comes to mind is reinstalling the PUBG on your PC. If PUBG, as the case has shown, worked just fine and suddenly a black screen on launch started appearing, the reinstallation might be a resolution.

Once you have fixed this, we recommend deploying the best settings for improved gaming performance to eliminate various issues.

On that note, we can wrap it up. Tell us whether the steps mentioned above helped you in the comments section below.

Fix: Amazon Fire Stick Settings Menu Not Loading [3 Ways]

If the menu on Amazon Fire Stick isn’t loading, that can be a major problem since you won’t be able to access anything.

Although this issue might seem alarming, there’s a way to fix it, and today we’ll show you how to do it easily.

What to do if Amazon Fire Stick isn’t loading the Home menu?

1. Restart your device

restart the device amazon fire stick menu not loading
  1. Press and hold the Select and Play/Pause buttons for five seconds on your remote.
  2. Once your device restarts, check if the issue is still there.

This might be just a temporary glitch; to fix it, you need to restart your Amazon Fire Stick.

2. Install ES File Explorer and uninstall applications

uninstall applications amazon fire stick menu not loading
  1. Install ES File Explorer and go to Apps.
  2. Select each app that has Amazon icon on it and select Uninstall.
  3. You should see a message saying Do you want to replace this app with the factory version.
  4. Select OK.
  5. After doing that for all apps, restart the Fire Stick and check if the problem is resolved.

Few users claim that this method worked for them, so you might want to try it. Some users also suggest removing all apps you haven’t used, so try that as well.

3. Reset Amazon Fire Stick to default

reset amazon fire TV to default amazon fire stick menu not loading
  1. Press and hold the Select + Right + Back + Reverse buttons for 10 seconds. If that doesn’t work, press and hold Back and the Right side of the navigation circle.
  2. You’ll be asked to confirm the factory reset. Select the appropriate option.

If the Fire Stick menu isn’t loading, perhaps resetting Fire Stick to default will fix the problem.

Some users are suggesting selecting the No thanks option when setting up your Fire Stick to avoid the issue in the future.

There you go, a quick and easy guide on how to fix menu problems on Amazon Fire Stick. All you need to do now is to follow the instructions therein, and the issue should disappear.

If you are having sound issues on Amazon Fire Stick, check our detailed guide to fix it for good.

If you found this guide useful, let us know in the comments below.

Disney Plus Black/Blue/Green Screen Errors: 5 Easy Fixes

Disney Plus, a popular streaming service, works like a charm until the screen gets stuck with a solid black, blue, or green color. Here, when a user logs in, it’s just a plain black screen without any titles or options listed.

But fret not! We have identified all the underlying causes and the solutions for each, which will be presented in the following sections. So keep reading to find out how to get things up and running when Disney Plus has a black screen.

Why am I getting a black screen on Disney Plus?

Here are a few reasons you are encountering the issue:

  • Server outage: In most cases, it’s an outage at Disney’s end that causes the problem. But if the issue persists or others are not experiencing it, it might be something else to blame.
  • Using a VPN: A reliable VPN, though quite helpful in a lot of ways, can affect the connection parameters and lead to a black screen on Disney Plus.
  • Issues with the connection settings: Oftentimes, an incorrect DNS server or misconfigured connection settings can trigger the issue.
  • Corrupt browsing data: The browser cache and cookies, after getting accumulated over time, can become corrupt and trigger a range of problems accessing specific websites.

How can I fix Disney Plus black/blue/green screen?

Before we try the slightly complex solutions, here are a few quick tricks that will come in handy:

  • Restart the computer and the modem/router. For the latter, unplug it from the power source and plug it back in after at least a minute.
  • If you are using a VPN to establish a connection, disable it, and verify whether the problem is resolved.
  • Make sure that Disney Plus is not down. To check, use Downdetector. In case others, too, are experiencing the problem, it’s likely a server outage, and things should be resolved within a few hours.

If none of these work, the solutions listed next surely will.

1. Disable Hardware Acceleration

Note icon NOTE
The steps listed here are for Google Chrome. In case you use another browser, the process should be similar. For the exact steps, search the web or head to the Support/FAQ section on the browser’s official website.
  1. Launch the browser, click on the ellipsis near the top-right, and choose Settings.settings
  2. Now, navigate to the System tab from the left, and disable the toggle for Use hardware acceleration when available.disable to fix Disney Plus black screen

Once done, relaunch the browser and verify if the Disney Plus black screen still remains. In that case, head to the next solution.

2. Disable Bandwidth Saver on the device

Certain devices come with a Bandwidth Saver option to help minimize data usage, but it often proves counterproductive and messes up the experience. Disabling it did the trick for many users.

As pointed out by one of our readers, Roku TV users can easily fix things by disabling the Bandwidth Saver feature in the Network settings. Here’s how:

  1. Press the Home button on the remote, choose Settings, and then Network.
  2. In the sub-menu that appears, choose Bandwidth saver and turn it off.disable bandwidth saver to fix Disney Plus black screen

That’s it! Once done, your Roku TV (or even another smart TV with the feature) should not display a black screen on Disney Plus anymore.

3. Change the DNS server

  1. Press Windows + R to open Run, type ncpa.cpl in the text field, and hit Enter.ncpa.cpl
  2. Now, right-click on the active network adapter, and choose Properties.properties
  3. Next, select Internet Protocol Version 4 (TCP/IPv4) and click on Properties.properties
  4. Select the Use the following DNS server addresses option, enter the following in the two fields, and click OK to save the changes:
    • Preferred DNS server: 8.8.8.8
    • Alternate DNS server: 8.8.4.4change DNS server to fix Disney Plus black screen
  5. Again, click OK on the previous Window for the changes to apply and restart the computer.

You can also change the DNS server on a TV. Though the steps are different, those can be found on the manufacturer’s official website.

4. Clear browsing data

  1. Launch your browser and press Ctrl + Shift + Del (shortcut works on Chrome, Edge, and Opera but not Firefox) to open the Clear browsing data tab.
  2. Select the Cookies and other site data and Cached images and files option, and then click on the Clear data button. Just make sure All time is selected from the Time range dropdown menu.clear data to fix Disney Plus black screen

Once the data is all wiped out, relaunch the browser, and verify whether the Disney Plus black screen problem is resolved. Because if not, there’s only one viable option left.

5. Switch to another browser

In case the problem persists, or you are encountering it while streaming Disney Plus content via a third-party application, it could be the browser to blame.

Several users reported the issue with Google Chrome, but as soon as they switched to Opera, things started to work fine because it has a built-in adblocker and a free VPN which makes your browsing experience faster and more secure.

That’s it! With the black, blue, and green screen problem on Disney Plus solved you can start watching your favorite shows once again.

Also, do not forget to check our simple tips to eliminate buffering on Disney Plus. And if you’re experiencing repeated crashes, our guide on troubleshooting Disney Plus crashes provides helpful steps for a smoother viewing experience.

Before you go, don’t miss our guide on what to do if Disney Plus plays only audio without video, for more solutions.

If you have any other queries or know of a solution that’s not listed here, drop a comment in the section below.

How to Install Exchange Online PowerShell Module in Windows 11?

Whether you want to manage a mailbox, distribution groups, calendar & contact items, or permissions, the Exchange Online PowerShell module is helpful.

Installing the Exchange Online PowerShell module in Windows 11 is a simple process that includes a few steps. 

Here, this blog will walk you through the steps to install it on your Windows. Let’s get started!  

What can I do to install Exchange Online PowerShell Module in Windows 11?

Before engaging in advanced troubleshooting steps, you should consider performing the following checks:

  • An Exchange Online account to connect and manage via the Exchange PowerShell module.
  • If you are running PowerShell on a version of Windows older than Windows 8 or Windows Server 2012, you need to install the Windows Management Framework 3.0 or later from the Microsoft website.
  • You must log in with administrator rights to install and run commands.
  • Also, ensure you have a reliable internet connection.

1. Set Execution Policy

Tip icon Tip
You cannot install or download scripts in PowerShell without permission. You must set some execution policies allowing us to install external scripts.
  1. Press the Windows key, type PowerShell, and click Run as administrator.Powershell -Powershell -install exchange online powershell module
  2. Type the following command to set the execution policy for PowerShell and press Enter: Set-ExecutionPolicy RemoteSignedSet-ExecutionPolicy RemoteSigned -install exchange online powershell module
  3. Type Y to press Enter to change the execution policy.

2. Install PowerShellGet module

  1. Type the following command to install the PowerShellGet and press Enter: Install-Module PowershellGet -Forcepowershell_Install-Module PowershellGet -Force-install exchange online powershell module
  2. If you get to install the NuGet provider, press Y and then Enter.
  3. Copy and paste the following command to modify the execution policy: Get-ExecutionPolicy
  4. To get the list of installed modules, use the get module cmdlet: Get-Module PowerShellGetGet-Module PowerShellGet

3. Install Exchange Online PowerShell Module

  1. Copy and paste the following command press Enter: Install-Module -Name ExchangeOnlineManagementWindowsTerminal-Install-Module-Name-ExchangeOnlineManagement-Force
  2. If prompted, press Y and then Enter.

So, these are the steps you need to follow to install the Exchange Online PowerShell module. If you want to know how to connect Exchange Online PowerShell module, check out this here.

Installing & Connecting to Exchange Online are the initial steps to set up DKIM for Microsoft 365 for your domain; read this guide to learn more.

Try them, and if you have any concerns or questions, please mention them in the comments below. We are here to help! 

Office 365 Slowing Down Computer: 4 Ways To Fix It

Users have reported an Office 365 slow performance on their PCs, to the point where the PC’s are lagging hard.

The Microsoft 365 suite is among the first services that you want to install on your computer, besides web browsers and a decent antivirus program.

If you think that it is the features of the suite that are causing the slowdown, see these simple steps below to fix the Office 365 slowing down computer issue.

What causes computer slowdown?

Computer slowdown can be caused by a large variety of system-related problems, among them an outdated operating system, certain antivirus features, low disk memory, or background processes that use a lot of resources.

Sometimes, the slowdown can be caused by corrupted files that got into the system upon downloading or installing certain programs. It can happen even when working on a brand new computer or in a freshly installed operating system.


How can I prevent Office 365 from slowing down my computer?

1. Make sure to meet system requirements

Although sometimes ignored, system requirements are almost the basic detail when we’re expecting a program to perform at its best. So keep your operating system updated and performant.

For instance, the Microsoft 365 suite needs the latest Windows 10 OS on a PC/laptop or one of the three latest versions of macOS, for a Mac.

Memory space should be at least 2 Gb RAM for 32-bit Windows or 4 Gb RAM for 64-bit Windows/ Mac. And the available hard disk space should be 4 Gb for PCs and 10 Gb for Macs.

Once you’ve made enough room for the bundle apps to function and you’ve updated the system, computer performance should improve.


2. Check for the latest updates

  1. Open the Start menu > Settings app > Update & Security.DirectX 12 reinstall
  2. Click Check for updates.can I DirectX 12

Usually, Windows is updated automatically. But if any updates are missing, after the process is finished, your computer should resume normal functioning.


3. Check for conflicting programs

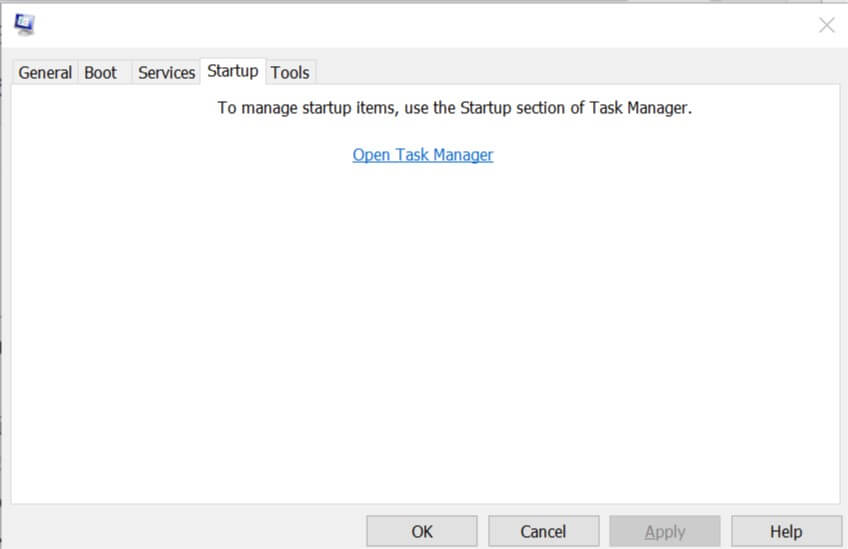
  1. Type System Configuration in the taskbar and select Run as administrator.
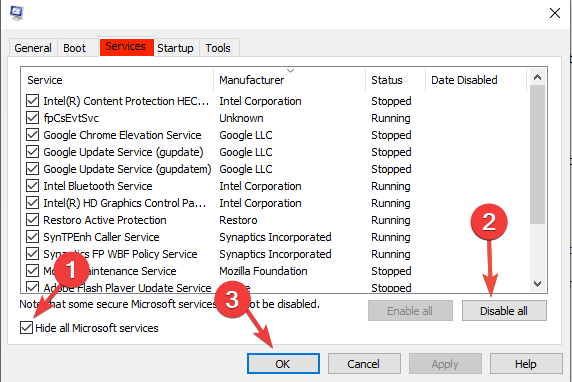
  2. On the Services tab, select Hide all Microsoft services, and then select Disable for all.fix directx installation
  3. On the Startup tab, open Task Manager, and Disable all items.
  4. Close the Task Manager and click OK in the System Configuration window.
  5. Restart your device and reopen one of the Microsoft 365 programs to see if this helped.

A clean boot shows if any other installed program is interfering with the Microsoft 365 features so that you uninstall it or manage its functions.

Afterward, set your device to boot normally by opening the System Configuration as shown previously, and in the General tab, check Normal startup, then OK.

The Office 365 slowing down computer issue should be gone. If not, try out our last solution as well.


4. Disable Hardware Graphic Acceleration

  1. Start any Office program.
  2. In the File tab, click Options.
  3. In the Options dialog box, click Advanced.
  4. Click to select the Disable hardware graphics acceleration checkbox.

To sum up, Microsoft 365 apps should not slow down your computer if installed correctly and if the minimum system requirements are met.

Nevertheless, if none of the above solutions solves the problem, check out this detailed article about how to tackle computer slowdown in general.

Let us know which of the solutions above helped you fix the Office 365 slow performance issue on your PC in the comments section below.

Fix: Unable to Update the Password, Value Doesn’t Meet The Length

If you’re getting the Unable to update the password. the value provided for the new password does not meet the length, you’re in the right place. We’ll show you below a few different ways to fix it:

How to fix “Unable to update the password” error in Windows:

1. Wait for 24 hours and try again

If you get Unable to update the password message, this could be due to certain policies on your PC. Some systems allow you to change your password every 24 hours.

The simplest solution, in this case, is to wait for 24 hours and then try to change the password again.

2. Change the Minimum password age policy

  1. Press Windows key + R and enter gpedit.msc. Now press Enter or click OK.
    Windows 10 password doesn't meet complexity requirements
  2. When Local Group Policy Editor opens, in the left pane, navigate to Computer Configuration > Windows Settings > Security Settings > Account Policies > Password Policy. In the right pane, locate the Minimum password age policy and double-click it.
    Unable to update the password. The value provided as the current password is incorrect
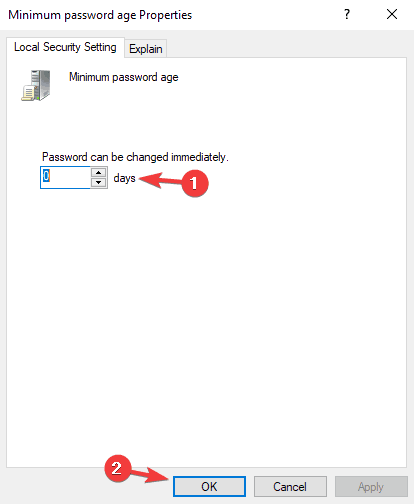
  3. Set the Password can be changed immediately to 0 days. Now, click Apply and OK to save changes.
    Unable to update the password the value provided Server 2012

3. Check the password strength

In order to set a password, it must meet certain criteria. Having a strong password is important since it will prevent malicious users from cracking it. As for the password requirements, these are the necessary requirements:

  • At least six characters in length.
  • Contain uppercase characters.
  • Contain lowercase characters.
  • Contain numeric characters.
  • Contain non-alphabetic characters.

4. Disable password complexity requirements

  1. Open Group Policy Editor.
  2. In the left pane, navigate to Computer Configuration > Windows Settings > Security Settings > Account Policies > Password Policy.
  3. In the right pane, double-click the Password must meet complexity requirements option.
    Unable to change password does not meet complexity requirements
  4. Set this policy to Disabled and click Apply and OK to save changes.
    Unable to update password for computer account

As previously mentioned, sometimes Unable to update the password message can appear if the password doesn’t meet the security standards. Group Policy settings enforce this policy; if you want, you can easily disable it.

5. Make sure that the Change password at the next logon option is enabled

  1. Press Windows key + R and enter lusrmgr.msc. Now, press Enter or click OK.
    Windows 10 password doesn't meet complexity requirements
  2. From the left pane, select Users. In the right pane, double-click the account whose password you wish to change.
    Unable to update the password. The value provided as the current password is incorrect
  3. Uncheck Password never expires option.
  4. Now, check User must change password at next logon.
  5. FInally, click Apply and OK to save changes.
    Unable to update the password the value provided Server 2012

To be on the safe side, make sure that you can access Safe Mode or have a different administrative account available that you can use to disable this feature if anything goes wrong.

6. Try changing the password from Command Prompt

  1. Press Windows key + X and select Command Prompt (Admin) from the list. If Command Prompt isn’t available, you and also use PowerShell (Admin).
    Unable to update the password the value provided Server 2012
  2. Type the command below (replace User_name with the appropriate username) and press Enter to run it: net user User_name *
  3. Now you’ll be asked to enter the new password twice.
    Unable to change password does not meet complexity requirements

7. Install the latest updates

  1. Press the Windows key + I to open the Settings app and select Update & Security.
    Unable to update password for computer account
  2. Click the Check for updates button. Windows will now check for available updates and download them in the background.
    Unable to update the password. The value provided as the current password is incorrect

Unable to update the password message can be annoying, but your security policy usually causes this message. To fix the problem, ensure your password matches the security criteria or disable certain security policies.

In the same vein, if your computer won’t let you type your password, check our detailed guide to restore normal service on your PC.

Feel free to let us know the solution that helped you fix this issue in the comments below.

Windows Defender Won’t Update: 5 Quick Fixes

A good number of Windows 10 users have raised concerns that Windows Defender won’t update on their computers.

Most of these queries have to do with Windows Defender failing to update virus definitions, and this usually happens when their internet connection is good.

Sometimes even the Windows Update feature is affected as it fails to update the system.

While using Windows Defender, you may receive a message with regards to definition updates when opening the service, or when you try to check for updates and it says they cannot be checked, downloaded, or installed.

If you’re experiencing the Windows Defender update failed issue, try the solutions listed below to resolve the issue.

What can I do if Windows Defender won’t update?

Before getting into more detailed explanations, let’s get through a couple of basic checks and steps to perform:

  • Check if you have other security software installed, as these will turn off Windows Defender and disable its updates; uninstall your current anti-malware software
  • Check for updates in Windows Defender Update Interface and try Windows Update if it failed; to do this, click the shield icon in the notification area, select Virus & threat protection, and then click on Check for updates
  • Install all updates that may be pending and restart your computer, then try the Windows Defender update again; set Windows Defender to automatically get updates (it gets this as part of Windows Updates)
  • Run the Windows Update troubleshooter

If your computer is part of a company network, or it is managed by an admin, they’ll configure updates through local network drives or set policies to update after approval. Check with your network admin first.

1. Try out a different antivirus solution

When Windows Defender fails to meet your expectations, it’s time to consider using an alternative. Well, if you want to forget all about update errors, then try the solution below.

This professional antivirus does its job in the background and always keeps you safe from computer viruses, malware, ransomware, and identity theft.

Moreover, rest assured that it’s easy to install on your computer and straightforward to use, having no pointless features that could clutter the interface.

TotalAV

Windows Defender won’t update? TotalAV is the antivirus solution you should use instead!
Free Trial Visit Website

2. Manually install update definitions

  1. Go to the Windows security portal.
  2. Follow the instructions to download and install the definition updates.
  3. If you cannot install manually or still get update errors, there are other things hindering it so contact Microsoft tech support for further assistance.

Microsoft usually delivers updates through Windows Update, Automatic Updates, or Windows Server Update Service (WSUS).

In some cases, Windows Defender won’t update because of problems with these services. In this case, update the definitions manually, as described above.

If you were able to install updates manually, the issue is caused by a Windows Update problem. We gave an excellent list of tools that will help you solve Windows Update issues.

3. Verify that you have all required Windows Update files

  1. Open the Windows Update website.
  2. Install all recommended updates.
  3. Review the Windowsupdate.log file for error messages by clicking Start, then type %windir%windowsupdate.login in the Search box, and then press Enter.
  4. Go to Windows Help and How-to web page and enter the keywords describing the problem from the log file you found.

Usually, all the needed updates will come right to your PC but sometimes, if they are blocked for some reason, you won’t see them. Perform the steps below to make sure you’re up-to-date.

4. Set Windows Defender service as automatic

  1. Press the Windows key + R keyboard shortcut to start Run.
  2. Type services.msc and press Enter.
  3. Right-click Windows Defender antivirus service.Windows Defender won’t update
  4. Click Properties.
  5. Ensure that Service Status is running.Windows Defender won’t update
  6. Ensure Startup type is Automatic (if not, select Startup type as automatic and click Start).Windows Defender won’t update
  7. Click Apply then click OK.

If Windows Defender service won’t start, check out this detailed guide to fix the problem in no time.

5. Run an SFC Scan

  1. Click Start.
  2. Type cmd in the search box.
  3. Click on Run as Administrator to start Command Prompt as administrator.
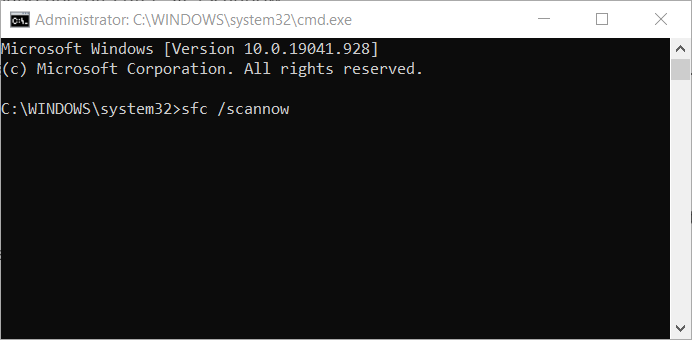
  4. Type sfc/scannow and press Enter.

This will check whether there are corrupted system files that prevent the default antivirus from updating.

What is Windows Defender?

Windows Defender is the default, pre-installed antimalware software built into Windows 10 OS, to protect users from malware.

This includes adware, viruses, worms, Trojans, Rootkit, Backdoor, ransomware, and spyware, among other emerging threats.

In this case, the service should work well in the background notifying users of any detected malware or when something is wrong.

In some cases, however, you may come across issues such as this, when Windows Defender is not updating, or the update fails.

How can I update Windows Defender?

Usually, there are three ways to update it:

  • From the Windows Defender Update Interface
  • From Windows Update
  • From Manual Download via the Microsoft Malware Protection Center (MMPC) website

We’ve written extensively about its problems before, and we have an excellent guide on how to fix Windows Defender issues. Don’t hesitate to take a closer look too.

Let us know if any of these solutions worked when the Windows Defender update failed. Just leave a comment in the section below.

Microsoft Authenticator Wrong Code: How to Fix It In Windows 11?

Microsoft Authenticator sending wrong codes is a well-known issue as many users have complained, including Microsoft sending a 5-digit code instead of an 8-digit code, a 6-digit code instead of an 8-digit code, and more. Thankfully, there are a set of solutions available.

Here, in this guide, we will discuss some expert-tested methods to fix the issue right after discussing some of the causes of its occurrence.

What causes the Microsoft Authenticator wrong code error?

There could be various reasons for Microsoft sending the wrong pin; some of the popular ones are mentioned below: 

  • Incorrect date and time – If your Android or iOS phone shows a different time from your computer or the website you are trying to log in to, this error could occur. 
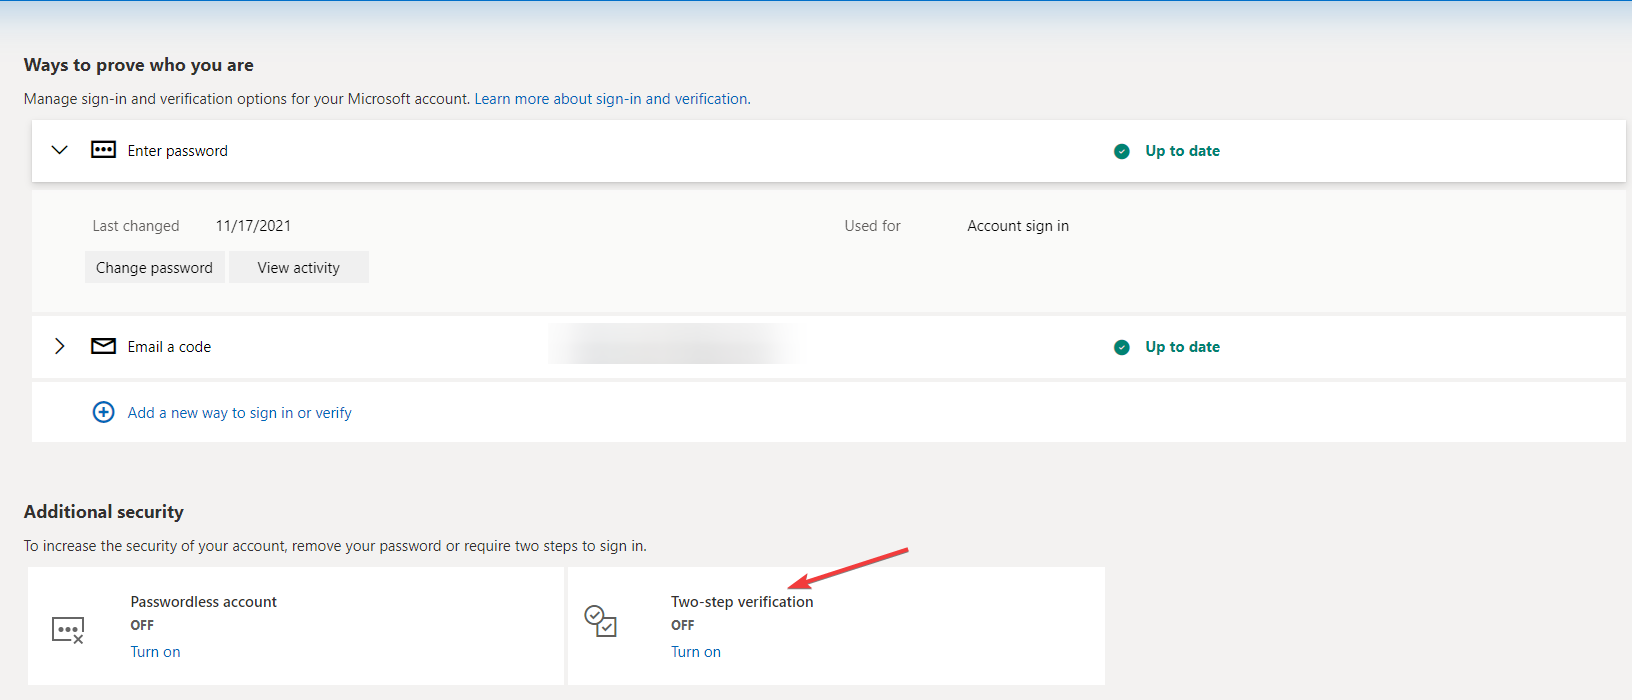
  • Passwordless account and Two-step verification enabled – You need to check if a Passwordless history and two-step verification are enabled for your account. 
  • Outdated app – If your Microsoft Authenticator app is obsolete, you might face this issue. You need to update your app from App Store or Google Play Store.

What can I do to fix the Microsoft Authenticator’s wrong code error?

1. Turn on the Automatic date and time

  1. On your Android device, go to Settings.
  2. Tap Additional Settings.Additional Settings -microsoft authenticator wrong code
  3. Click Date & Time.Date and time
  4. Turn on the Automatic date and time.Automatic date and time

2. Re-add accounts on the Microsoft Authenticator app

2.1 Remove all the accounts

  1. Launch the Microsoft Authenticator app.
  2. Tap on the Microsoft account.MFA account -microsoft authenticator wrong code
  3. Click on the Settings icon on the next page.Settings MA
  4. Tap on Remove account to remove.Remove account MA

2.2 Add the accounts

  1. Login to Microsoft account.MA MY PROFILE -   		 microsoft authenticator wrong code
  2. On the top of the page, click My Microsoft account.
  3. Go to the Security tab. Security Tab
  4. On the next page, click Other ways to sign in.Other ways to sign in
  5. Click Use my password.Use my password - Microsoft
  6. Enter your password and click Sign in.Enter password
  7. Click Advanced security options.Security
  8. Tap on Add a new way to sign in or verify.Add a new user
  9. Click Use an app. Use an app -microsoft authenticator wrong code
  10. Set up the Microsoft Authenticator app on your device
  11. On the next window on your computer, click Next.microsoft authenticator app
  12. Open Microsoft Authenticator on your phone. Click + to add an account.Add account
  13. Now, click Other.Other Google Facebook
  14. Click Scan the QR code on your computer.

3. Disable 2FA Authentication

  1. Go to your Microsoft account. 
  2. From the top-right corner, click My Microsoft account.
  3. Go to the Security tab. Then, on the next page, click Other ways to sign in.
  4. Click Use my password.
  5. Click Advanced security options.Turn 2FA -microsoft authenticator wrong code
  6. Under Additional security, click Turn OFF for Two-step verification.

4. Update Microsoft Authenticator

  1. Go to Google Play Store. Go to the top-right corner and click Profile.Profile -   		 microsoft authenticator wrong code
  2. Tap on Manage Apps & Device.Manage apps and device
  3. Now you will see the Overview tab; go to All apps up to date.All apps up to date
  4. You will find a list of apps, locate Microsoft Authenticator, and Update it if available.Update all

You can also review this guide to Google Authenticator for Windows to compare alternatives that rely on the same TOTP standard and help maintain reliable account security.

So, these are some ways to fix Microsoft Authenticator sending the wrong code. To learn more about this tool and how it works, we have a great guide on how to download the Microsoft Authenticator app.

If these steps do not solve the problem, you can check this detailed guide on how to fix Microsoft Authenticator app not working for more solutions.

Try them and let us know which method worked for you in the comments below.

Windows Memory Diagnostic Tool Stuck: Quick Fixes

Windows 10 and older systems come with a Windows memory diagnostic tool to verify and test the RAM. When launched, it will check the RAM for any issues while working on your system.

Unfortunately, some users have reported the Windows memory diagnostic tool stuck problems after running the tool.

How long should a Windows Memory Diagnostic take?

The Windows Memory Diagnostic tool in extended mode can take anywhere from 15 minutes to 20+ hours, depending on the RAM size.

When run in extended mode, Windows Memory diagnostics can take a couple of hours to finish the testing process. Also, the Windows Memory Diagnostic tool is known to get stuck at 1% and 21% progression for hours.

However, if the tool is stuck for an entire day or more than 10 hours, this problem can be due to a system glitch.

In this article, we have listed a few troubleshooting steps to help you resolve the Windows memory diagnostic tool stuck/frozen issue on your Windows system.

How can I fix the Windows Memory Diagnostic tool stuck issue?

1. Wait for the tool to complete the process

windows memory diagnostic tool stuck

When run in extended mode, the Windows Memory Diagnostic tool can take more than 8 hours to complete the process. At times the tool may get stuck at 21%, 88%, 89%, and 90% progression for hours. You may see no progress for more than 4 hours as well.

However, this is normal with the Windows Memory Diagnostic tool. Unless the tool is stuck at 21% for an entire day, you can let the tool run a few hours and let the process complete without any interruption. 

If the tool has been stuck for more than a day without any progression, you may try other troubleshooting steps listed in this article.


2. Run the tool after performing a clean boot

windows memory diagnostic tool stuck
  1. Press the Windows key + R to open Run.
  2. Type msconfig.msc and click OK. This will open the System Configuration window.
  3. In the System Configuration window, open the Services tab.
  4. Check Hide all Microsoft services box. This will hide all the Microsoft Windows services required by the system.
  5. Next, click the Disable All button.
  6. Click Apply to save the changes.
  7. Right-click on the Taskbar and select Task Manager.
  8. In Task Manager, open the Startup tab.

    windows memory diagnostic tool stuck
  9. Select all the services one by one and click the Disable button. Make sure you have disabled all the services under the Startup tab.
  10. Close Task Manager, and in the System Configuration window, click OK.
  11. Restart your computer.
  12. Your system will start in Clean Boot mode. 
  13. Rerun Windows Memory Diagnostic tool and check if the issue is resolved.

If third-party software prevents the Windows Memory Diagnostic tool from completing the test, then running the tool in Clean Boot mode should help. In Clean Boot mode, Windows starts with a minimal set of drivers and startup programs, allowing you to determine if a background program is interfering with other programs.


3. Test with MemTest86

windows memory diagnostic tool stuck
  1. Make sure you have a working USB Drive to use as a bootable drive. Make sure the drive is empty, as
  2. Download MemTest86 from the website.
  3. Right-click on the downloaded folder and select Extract All.
  4. Click on Extract.
  5. Connect your USB drive to the computer.
  6. From the recently extracted folder, run the imageUSB.exe file.
  7. Make sure your connected drive is detected in the ImageUSB window and click on the Write button.
  8. Once done, click the Exit button to close the ImageUSB tool.
  9. Next, shut down your computer. Insert the USB flash and restart the system.

In most cases, the tool will automatically run after restart. If your system fails to boot from the USB flash drive, change the boot priority drive by changing the BIOS setting. 

Using the Memtest86 will help you determine if the issue is with your RAM or Windows Memory Diagnostic tool. If the test completes without any error, run the diagnostic tool again to check for any improvements.

It is common for the Windows Memory Diagnostic Tool to get stuck at 21% or 29% without any progression for hours.

However, if the tool is frozen for more than 20 hours, try these troubleshooting tips to fix the problem.

Let us know in the comments section below which solution helped you solve the Windows Memory Diagnostic Tool stuck issue on your PC, to help out other fellow users.

100% Disk Usage on Windows 11? Why & How to Fix it

Encountering 100% disk usage on Windows 11 could result in a slow computer. In addition, some processes could take up resources, preventing the PC from functioning correctly. Many users have complained about this after upgrading to Windows 11. However, it can be fixed in no time.

Here we will discuss some troubleshooting tweaks to speed up the computer and reduce disk usage. Also, we will shed light on the reasons for its occurrence.

What causes 100% disk usage on Windows 11?

There could be several reasons for high disk usage on Windows 11; we have mentioned some of the popular ones here:

  • Running many programs at once – If you have a lot of programs running simultaneously on your computer, then they could be using up your disk resources, causing the issue.
  • Background programs – If you have unnecessary programs running in the background, they use up disk resources even if you are not using them actively.
  • Your computer is infected – If your computer has malware or viruses, it could cause your disk usage to spike, as it may be running processes and using up resources.
  • Corrupted or outdated drivers – If your computer has damaged or obsolete drivers, they could cause your computer to run slow and cause performance issues, including high disk usage.
  • Insufficient disk space – If your computer doesn’t have space, then it won’t be able to perform simple functions, which may cause the issue
  • Indexing or other Windows functions – If the indexing services like Windows Search are running on your computer, it might cause the issue.

How do I reduce disk usage in Windows 11?

Before engaging in advanced troubleshooting steps, you should consider performing the following checks:

1. Disable the indexing services

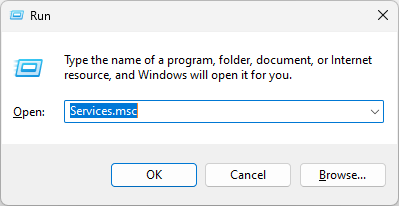
  1. Press Windows + R to open the Run window.
    Services -100 disk usage windows 11
  2. Type services.msc and press Enter to open Services.
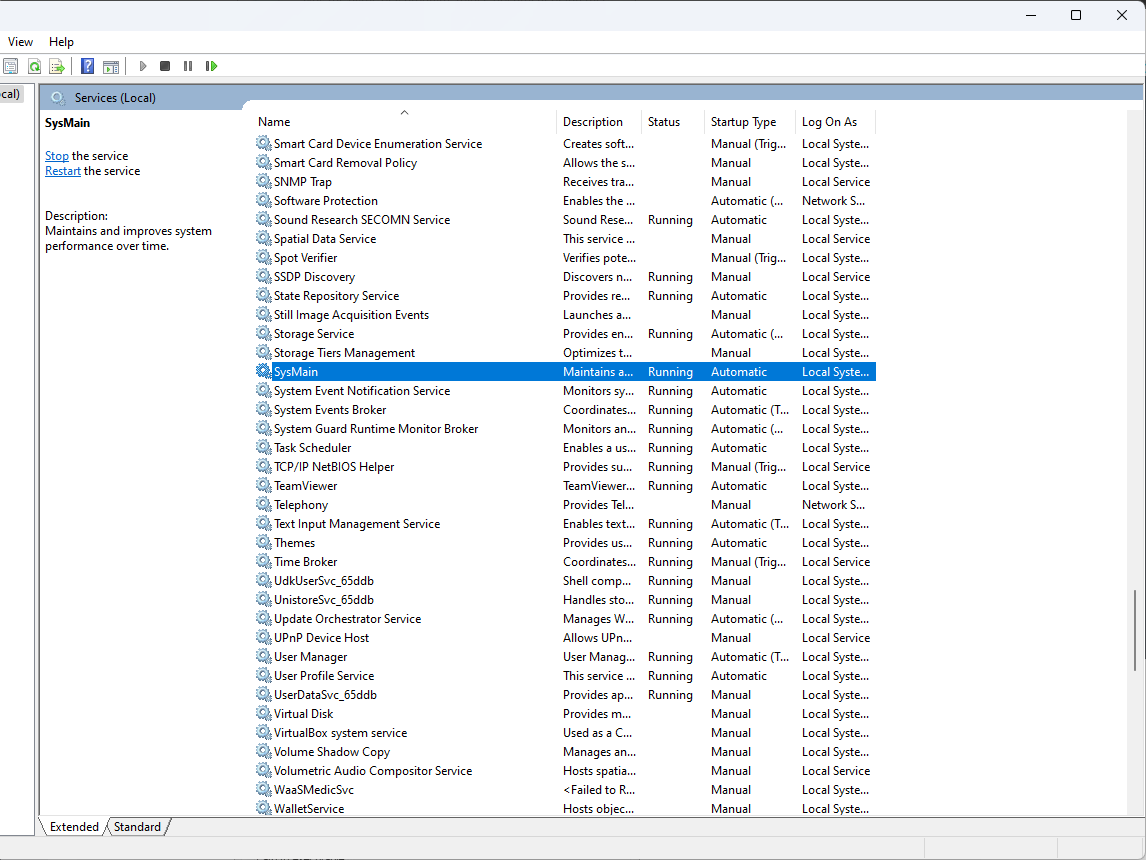
  3. On the Services window, locate and double-click SysMain.
    SYSMAIN
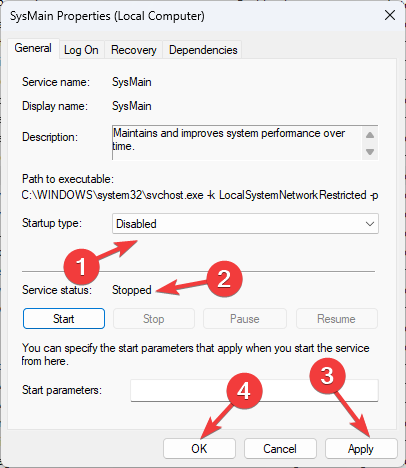
  4. Select the Startup type as Disabled and Services status as Stop. Click Apply and OK.
    SYSMAIN Prop
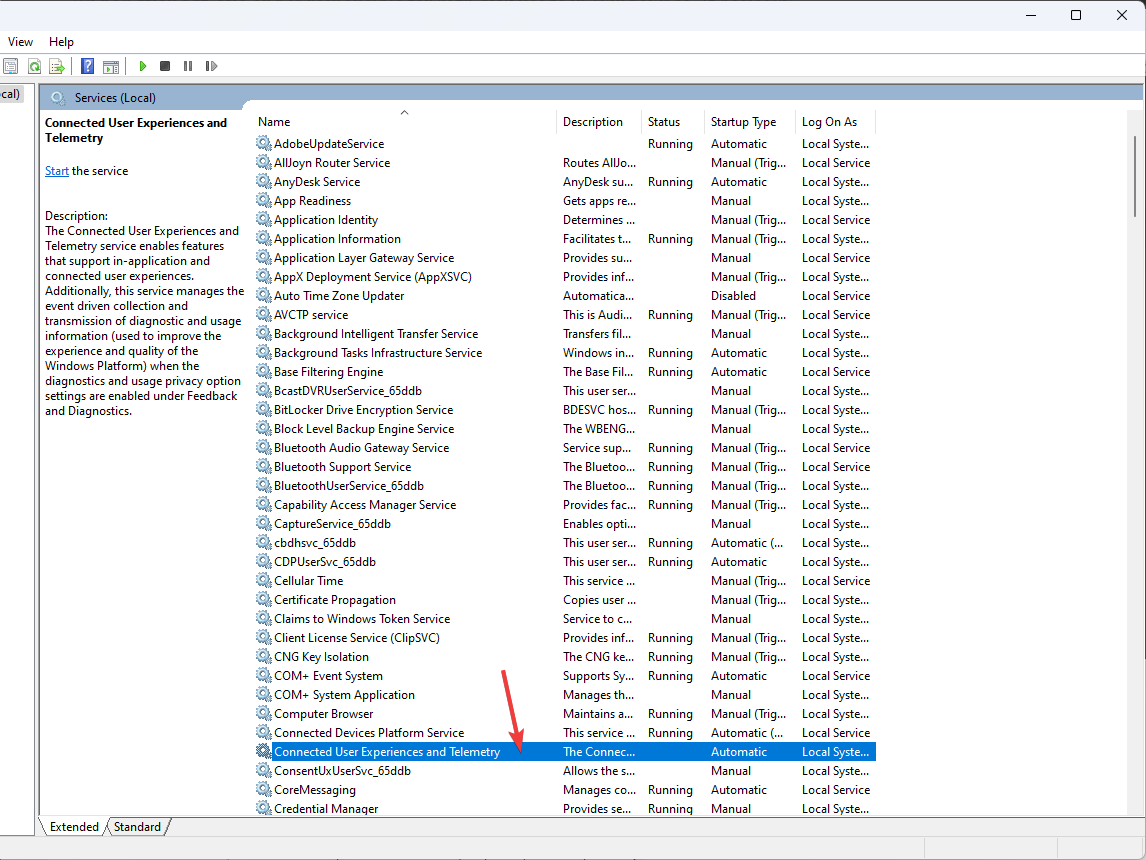
  5. Now locate and double-click Connected User Experiences and Telemetry.
    Connected User experience and telemetry
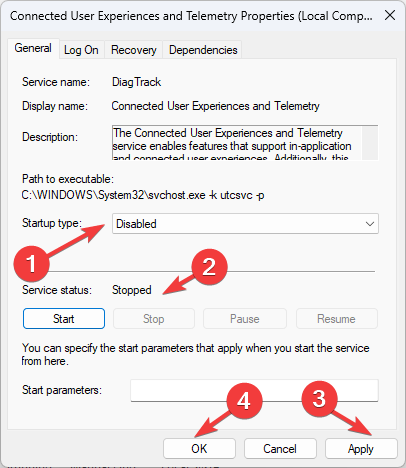
  6. Choose the Startup type as Disabled and click the Stop button for Services status. Click Apply and OK.
    DIsabled user expeirence
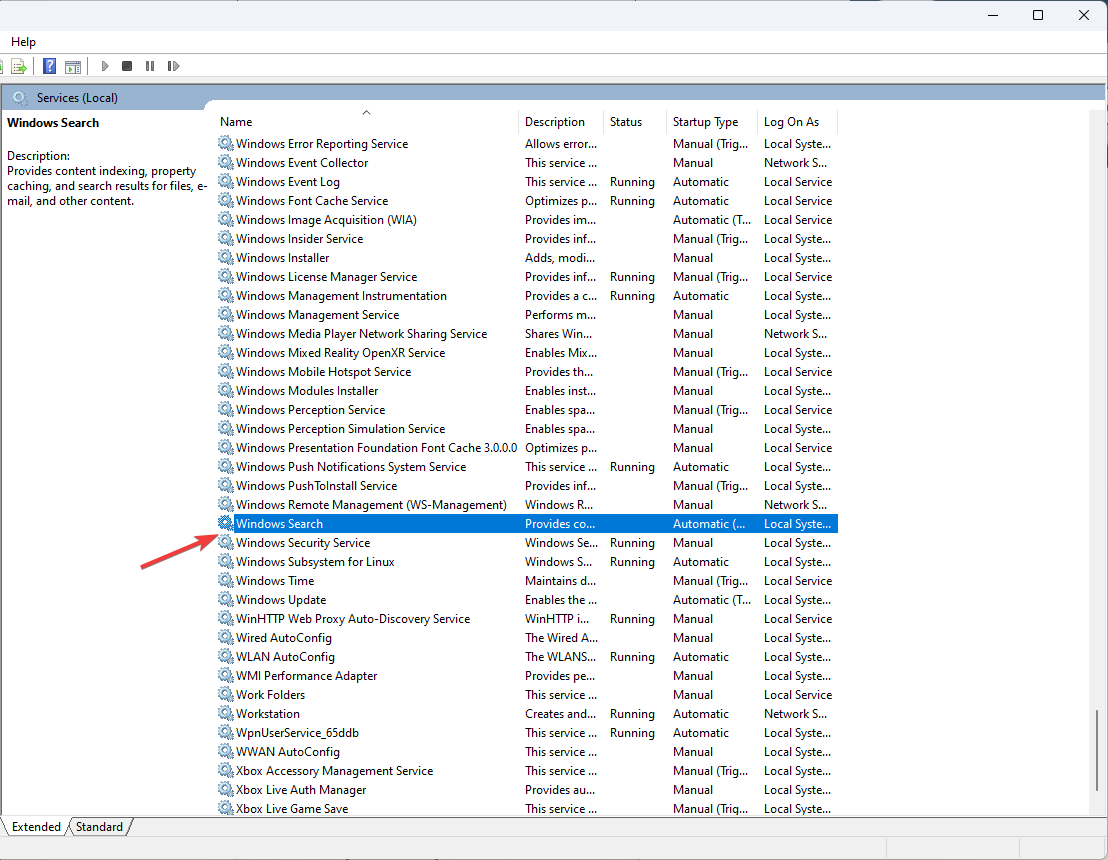
  7. Go to Windows Search, and double-click it.
    Windows search
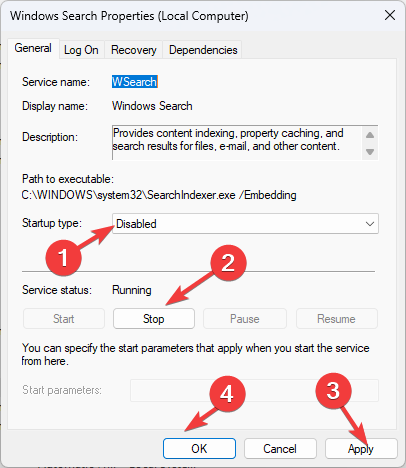
  8. Select Disabled next to Startup type and click the Stop button under Service status. Click Apply and OK.
    Windows search properties

In some cases, the WSAPPX process can also trigger high disk activity. Check out the full guide on WSAPPX high disk usage for additional ways to lower resource consumption and improve system performance.

2. Reset Virtual Memory

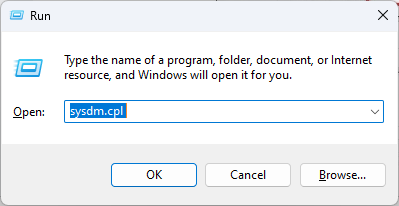
  1. Press Windows + R to open the Run window.
    sysdm.cpl 2 -100 disk usage windows 11
  2. Type sysdm.cpl and press Enter to open System Properties.
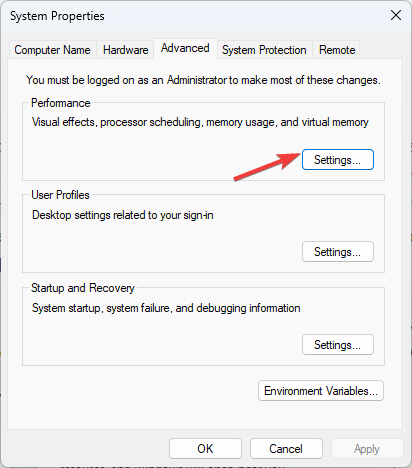
  3. On the System Properties window, go to the Advanced tab.
  4. Go to Performance and click Settings.
    Performance Settings
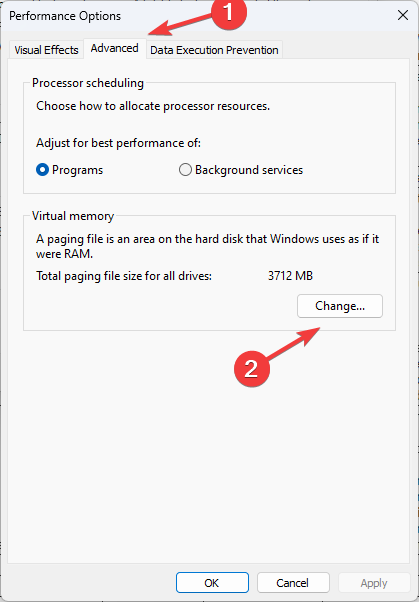
  5. On Performance Options, go to the Advanced tab under Virtual memory and click Change.
    Advanced -100 disk usage windows 11
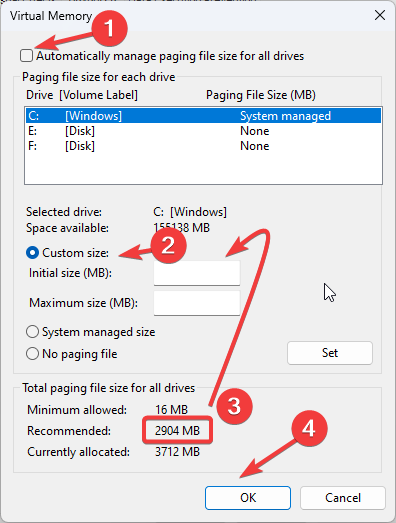
  6. Uncheck Automatically manage paging file size for all drives and select Custom size.
  7. From the Total paging file size for all drives, copy the Recommended size. Input it in the Initial size (MB) field, and in the Maximum size field, enter the 1.5x times your RAM size.
    Virtual memory
  8. Click Set and OK.

3. Use the Command Prompt

3.1 Perform CHKDSK

  1. Press the Windows key, type CMD and click Run as administrator.
    DOS COmmand Prompt -100 disk usage windows 11
  2. Type the following command and press Enter: chkdsk /r C:
  3. Wait for the process to complete, and type Y to restart your computer.

3.2 Run the SFC & DISM scan

  1. Open the Command Prompt with admin rights by following the step mentioned above.
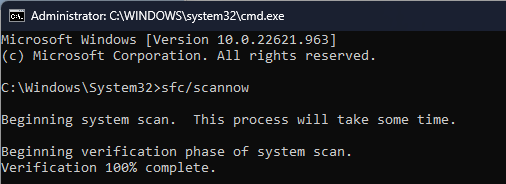
  2. Copy and paste the following command and press Enter: sfc/scannow
    CMD sfc scan 100 disk usage windows 11
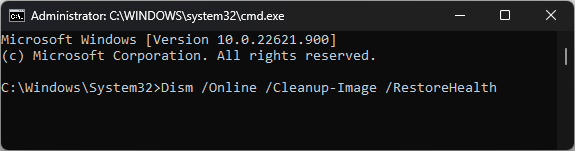
  3. Once it is complete, type the following command and press Enter: Dism.exe /Online /Cleanup-Image /Restorehealth
    Restore health
  4. Once the process is complete, restart your computer.

4. Fix the StorAHCI.sys driver

4.1 Check the driver

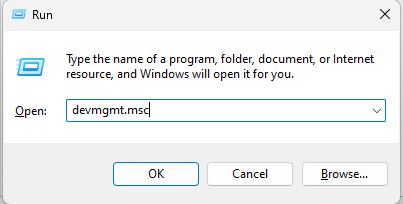
  1. Press Windows + R to open the Run console.
    Device Manager RUN COMMAND
  2. Type devmgmt.msc and press Enter to open Device Manager.
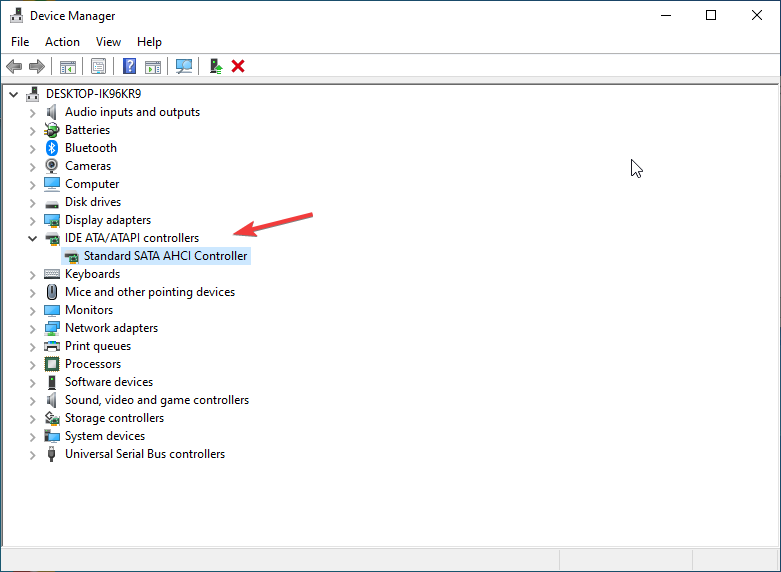
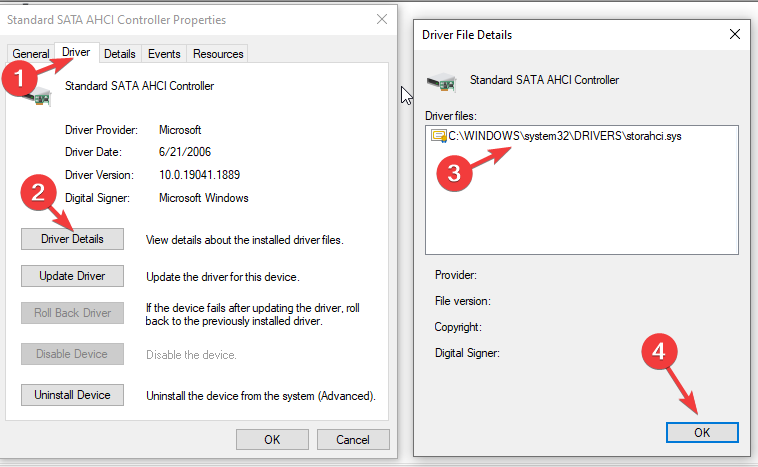
  3. Locate IDE ATA/ATAPI Controllers, then double-click Standard SATA AHCI Controller.
    Device Manager - SATA AHCI
  4. On the Standard SATA AHCI Controller Properties window, switch to the Driver tab and click Driver Details.
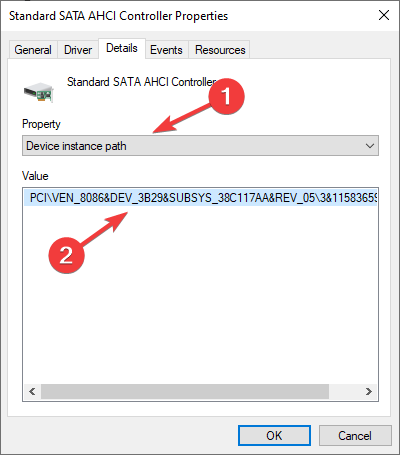
  5. Check if there is storahci.sys file and click OK. Now the properties window, go to the Details tab.
    Driver tabs -100 disk usage windows 11
  6. Choose the Device instance path from the dropdown under Property. Then, note down the name that appears under Value.
    VAN

4.2 Make changes in Registry Editor

  1. Now fire up the Run window again, type regedit, and press Enter to open Registry Editor.
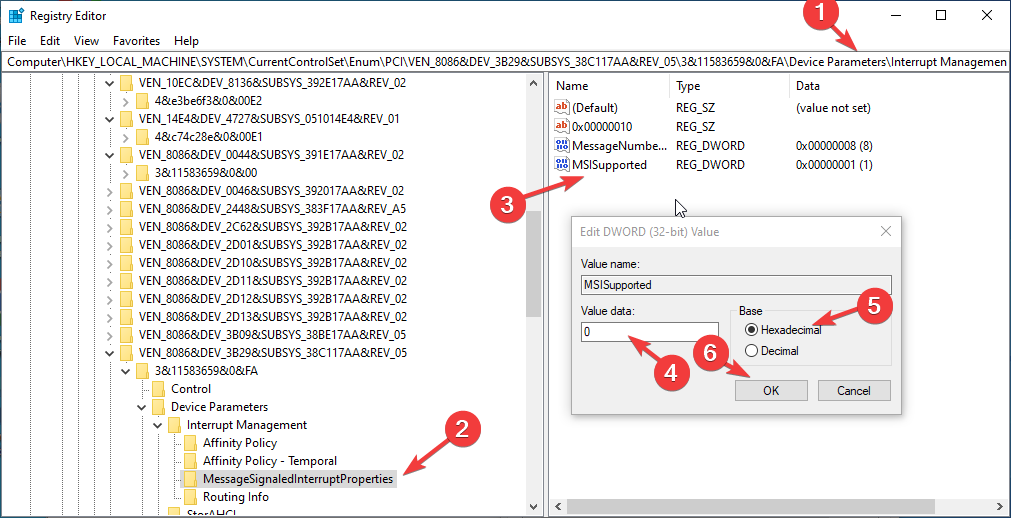
  2. Navigate to the path and replace the VEN_10EC&DEV_8168&SUBSYS_892C103C&REV_15\01000000684CE00000 with the value that you noted down from the Details tab: Computer\HKEY_LOCAL_MACHINE\SYSTEM\CurrentControlSet\Enum\PCI\VEN_10EC&DEV_8168&SUBSYS_892C103C&REV_15\01000000684CE00000\Device Parameters\Interrupt Management\MessageSignaledInterruptProperties
    regedit_MSISupported -100 disk usage windows 11
  3. Double-click MSISupported DWORD and change its Value data to 0. Then, for Base, choose Hexadecimal.
  4. Click OK and close the Registry Editor. Restart your PC.

5. Disable scheduled defragmentation

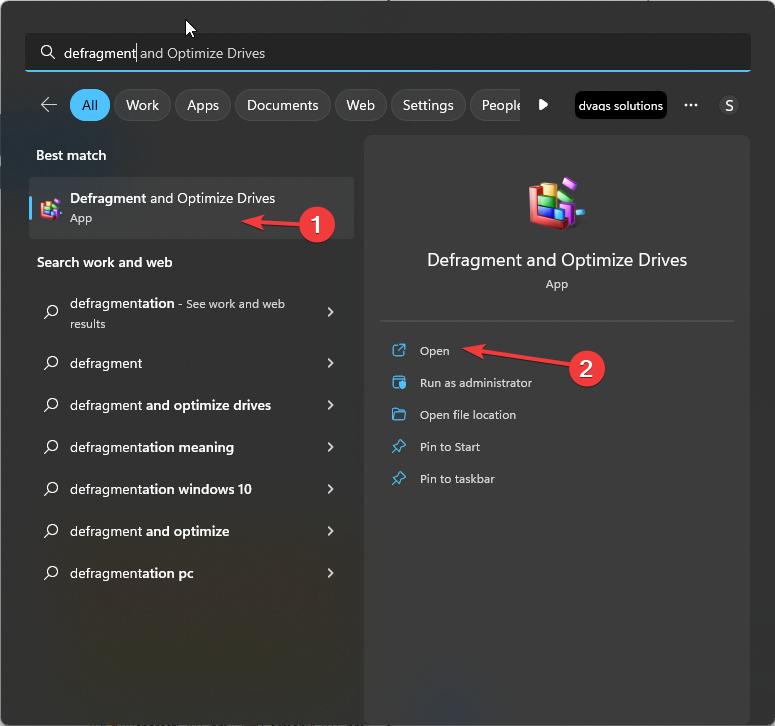
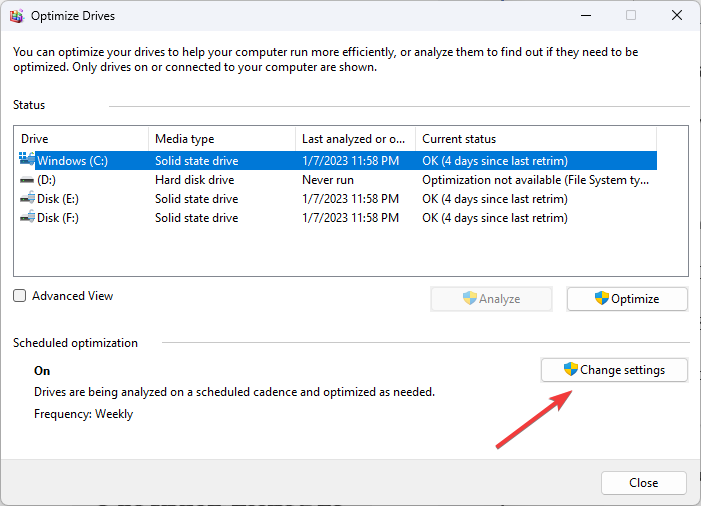
  1. Press the Windows key; type defragment, select Defragment and Optimize Drives. Click Open.
    Defragment - 100 disk usage windows 11
  2. Click Change settings.
    Change settings Optimize drives
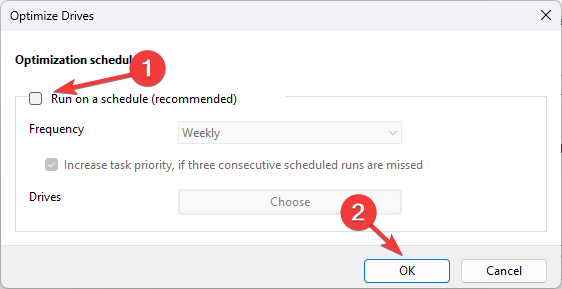
  3. Remove the checkmark for Run on a schedule (recommended) and click OK to disable scheduled defragmentation on your Windows computer.
    Run a schedule

6. Disable background apps

  1. Press Windows + I to open Settings.
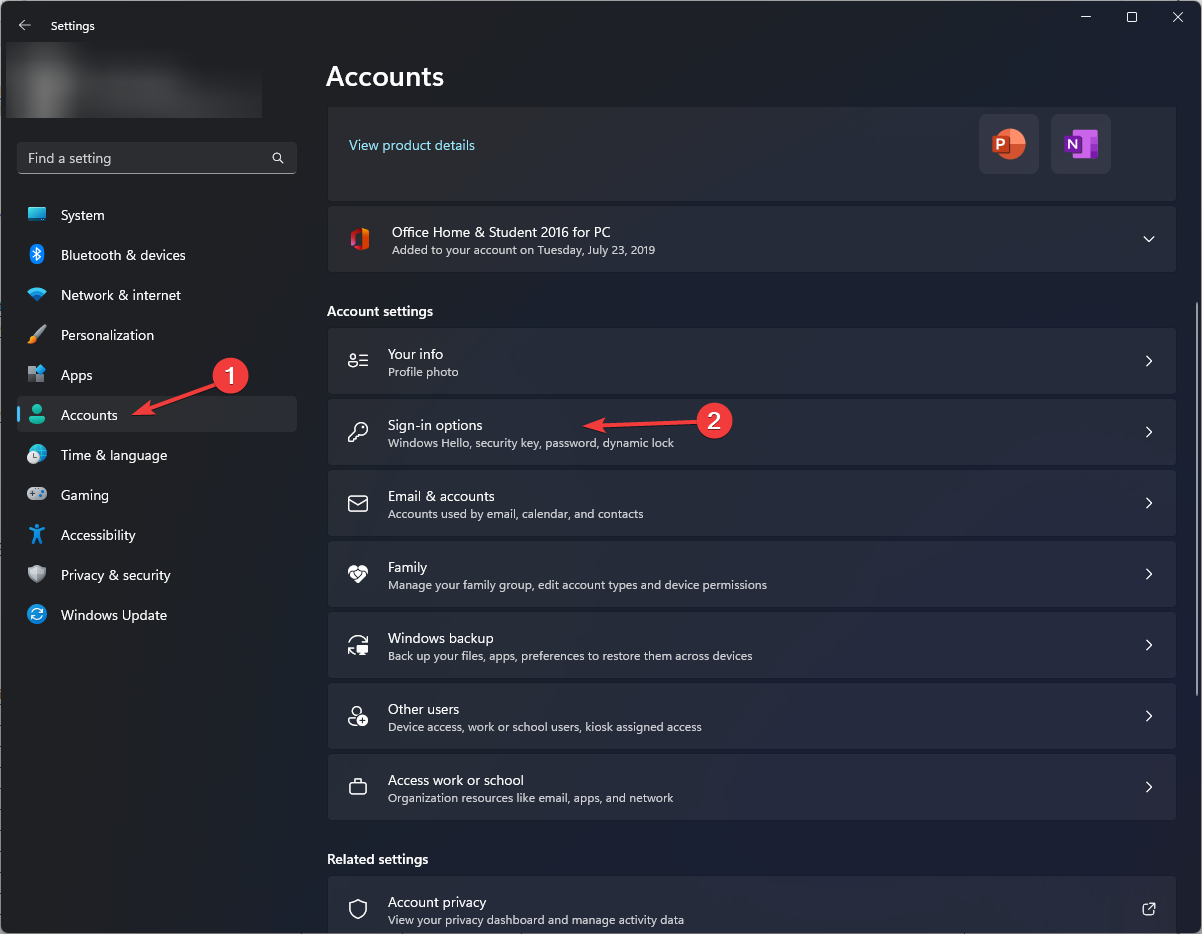
  2. Go to Accounts, and click Sign-in options.
    Accounts sign-in optons -100 disk usage windows 11
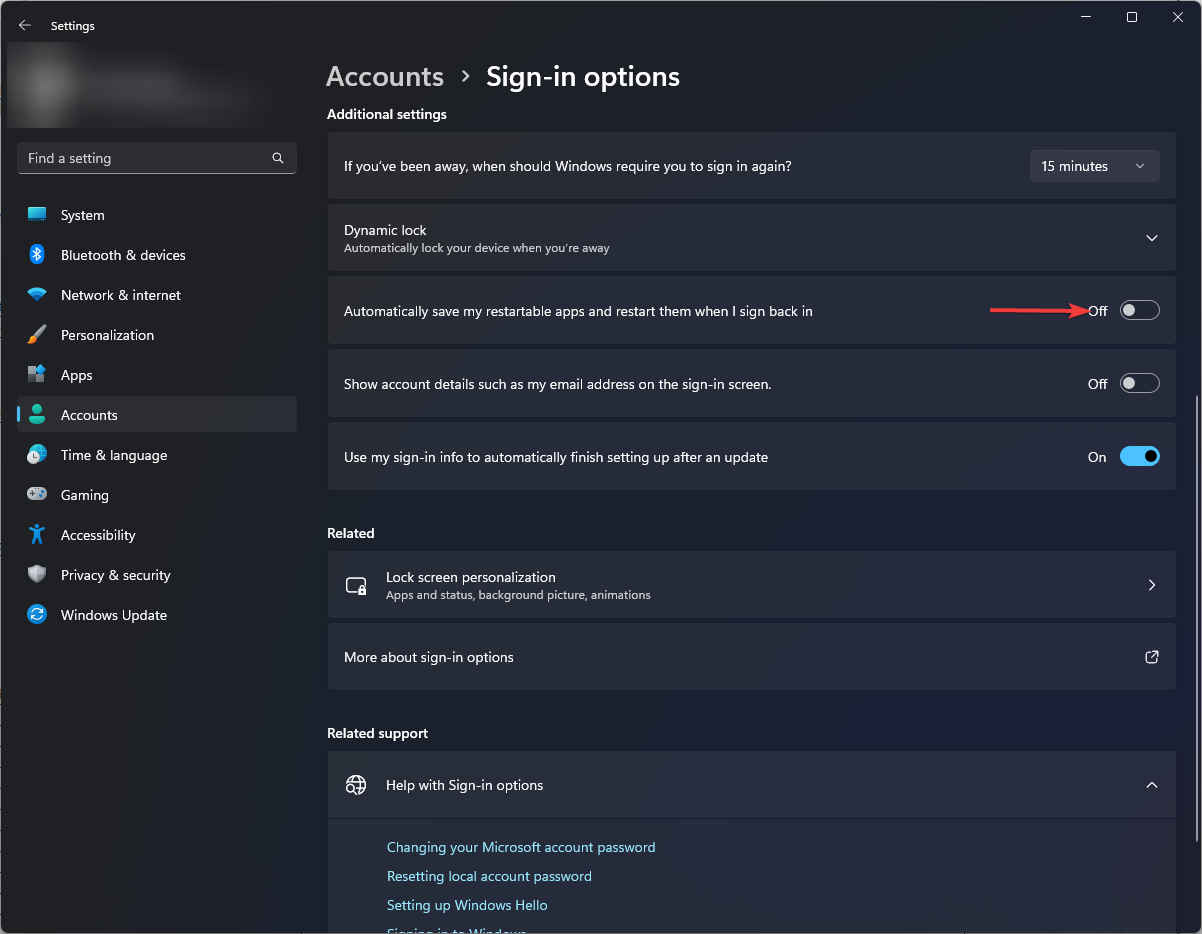
  3. Toggle off Automatically save my restartable apps and restart them when I sign back in option.
    Automatically save my
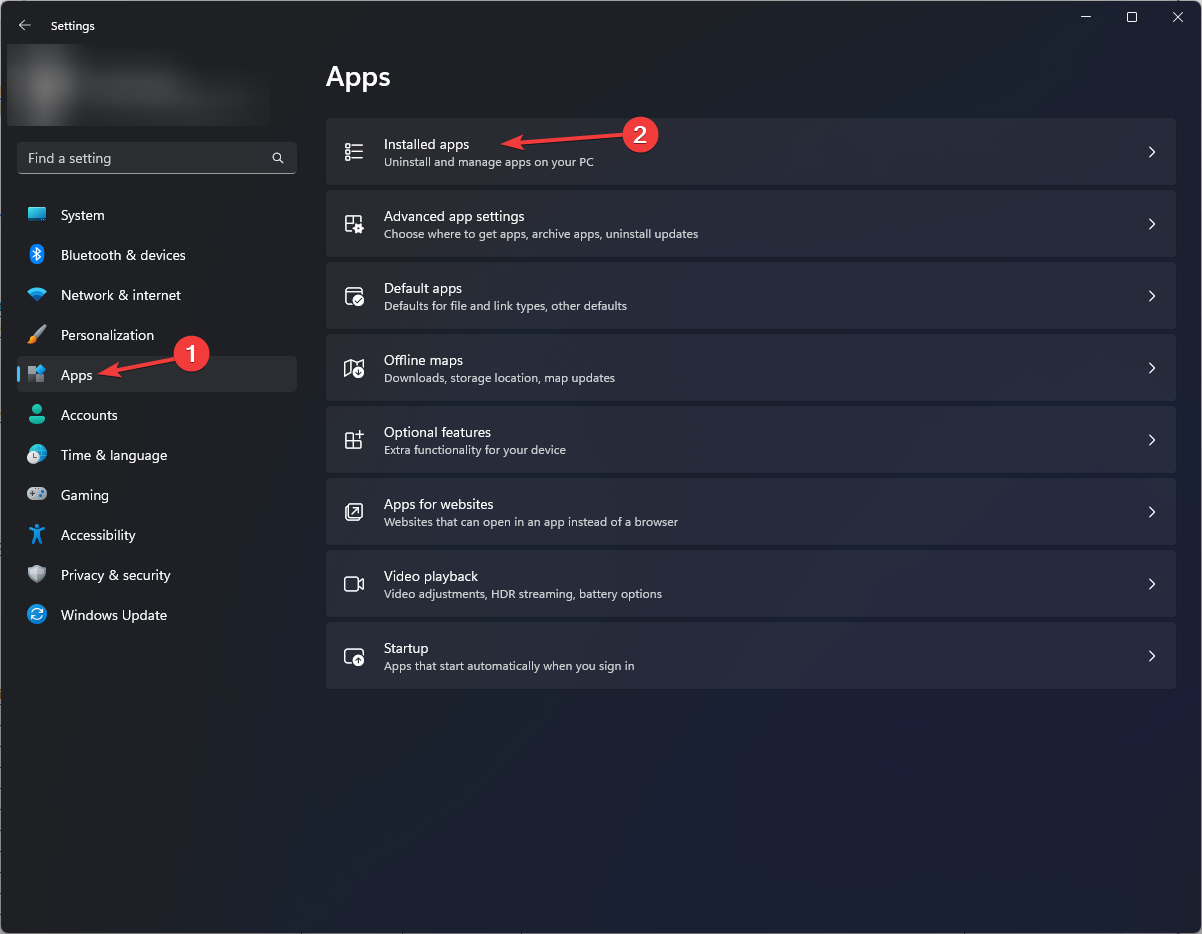
  4. Go to Apps, and click Installed apps.
    Apps installed apps -100 disk usage windows 11
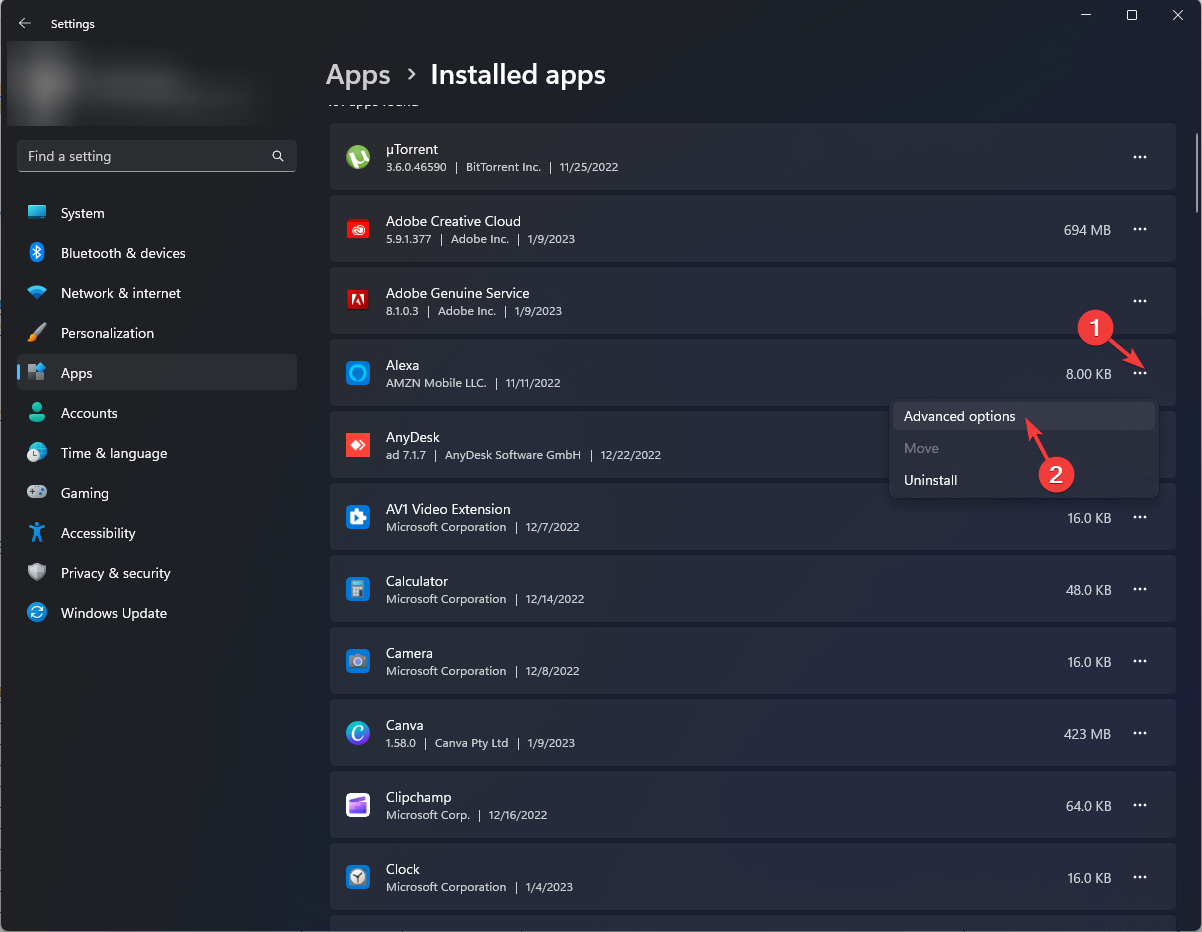
  5. Click on the three dots icon next to the apps you wish to disable from running in the background.
  6. Click Advanced options.
    Advanced options
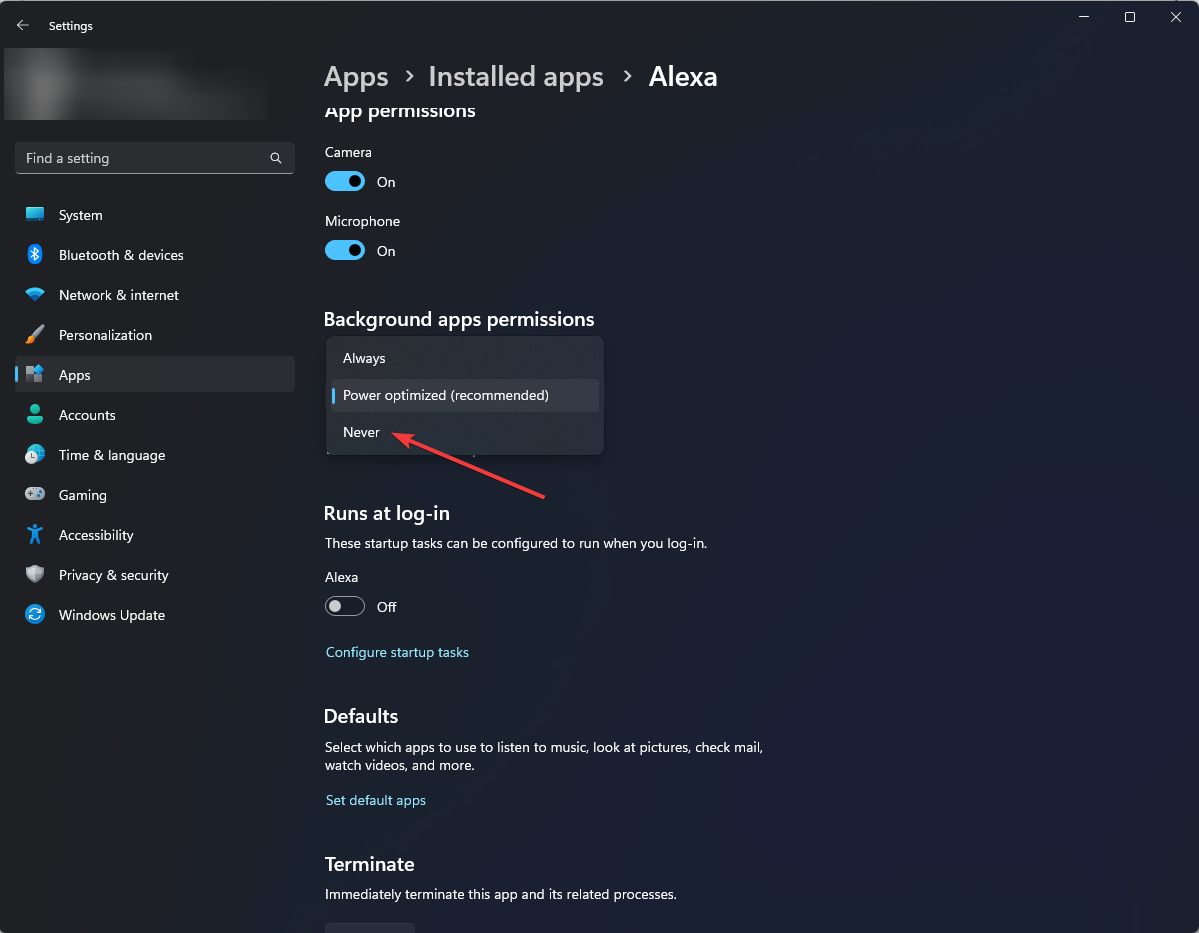
  7. Under Background apps permissions, select Never from the dropdown.
    Background apps permissions
  8. Do this for all the apps you don’t want to run in the background.

7. Restore plan options

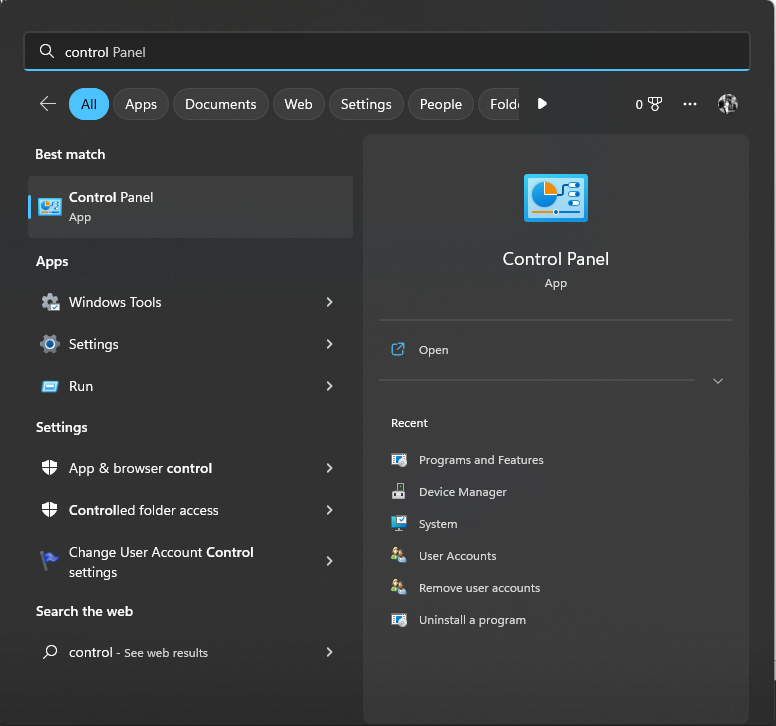
  1. Press the Windows key, type Control Panel and click Open.
    Control Panel
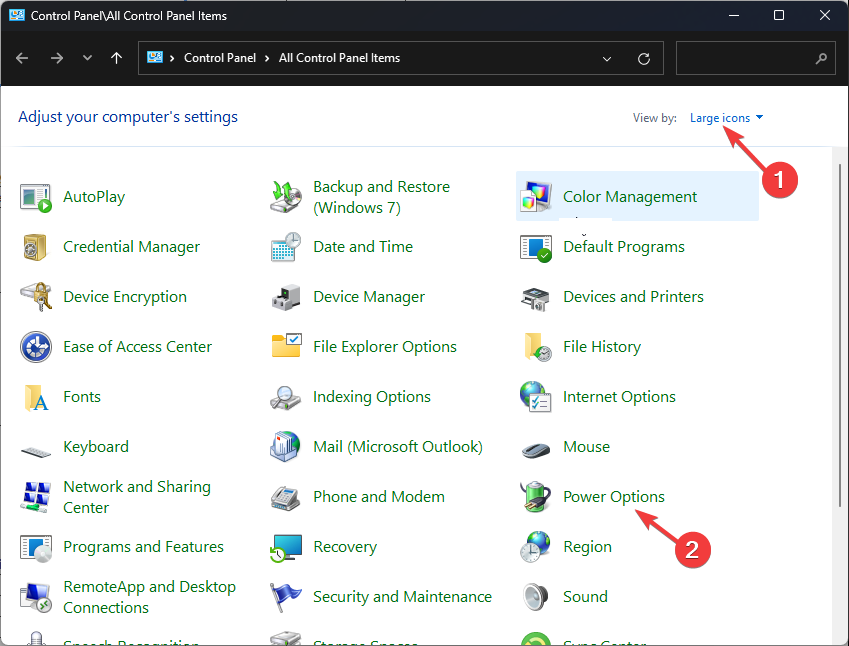
  2. Select View by Large icons and click Power options.
    Power options -100 disk usage windows 11
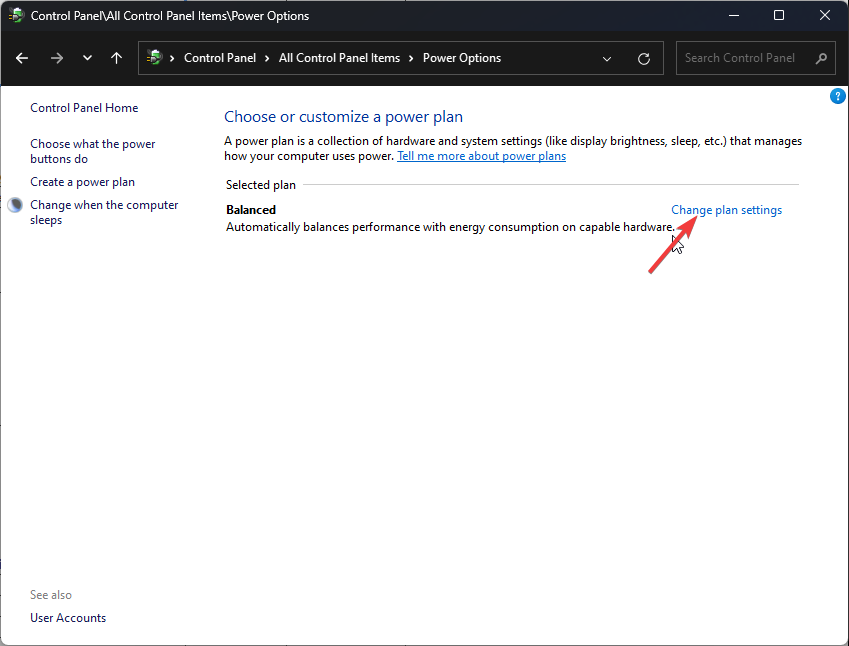
  3. Click Change plan settings.
    Change plan settings
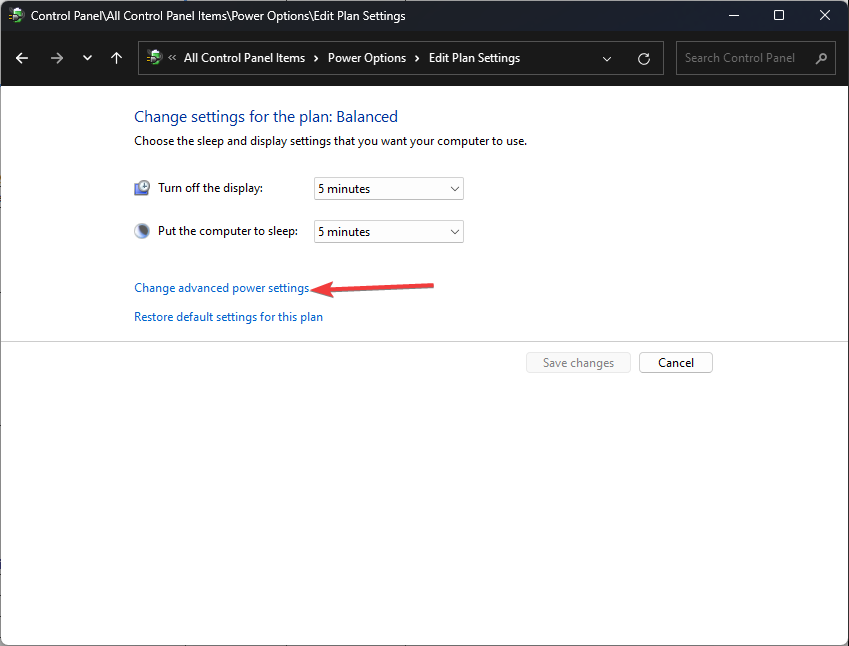
  4. Now click Change advanced power settings.
    Change power settings
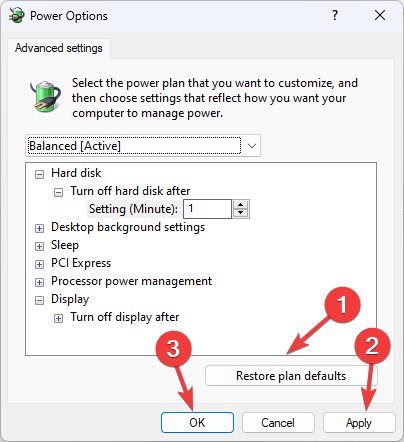
  5. Click Restore plan defaults. Click Apply and OK.
    Restore plan

So, you need to follow these steps to fix the 100% disk usage on Windows 11. If nothing has worked for you, we advise you to perform a clean install of Windows to resolve the issue.

If you have any concerns or questions about the issue, feel free to mention that in the comments section below.

OneDrive Destination Folder Access Denied: 8 Fixes

OneDrive is one of the most used storage solutions, but many reported OneDrive Destination folder access denied message.

This can be a problem since it will prevent you from accessing your files and using OneDrive properly.

This message can be problematic since it will prevent you from accessing OneDrive files, but if you want to fix this issue, we advise you to try some of our solutions below.

Why is OneDrive saying access denied?

If you’re getting Access denied message in OneDrive, there might be several causes for it:

  • Antivirus software – Some antivirus applications block access to certain files or folders to protect them. Changing your settings can fix this.
  • Permissions – Sometimes, your settings can cause this issue to appear. To fix it, you need to take ownership of a file or change its settings.

How can I fix the OneDrive Destination Folder Access Denied issue?

1. Check your antivirus

Sometimes, the OneDrive Access denied error message can appear due to your antivirus. Some third-party antivirus can sometimes block access to certain directories to protect your PC.

However, this feature can cause problems with OneDrive, so it’s advised that you disable it.

If that doesn’t work, you might want to disable other antivirus features. Alternatively, you might want to disable your antivirus completely. In the worst-case scenario, you might have to remove your antivirus.

If removing the antivirus solves the issue, this might be a perfect time to consider switching to a different antivirus solution.

Many great antivirus tools on the market don’t interfere with other apps on your PC. Thankfully, the best options available include up-to-date threat databases and integrated VPNs to protect your device.

You should look for a Windows 10 compatible antivirus that uses fewer resources while keeping your system protected in real time.

2. Clear the browser cache

  1. Click the Menu icon in the top-right corner and select Settings from the menu.
  2. The settings tab will appear. Scroll all the way down and click Advanced.
    onedrive access denied error
  3. Now click the Clear browsing data.
    onedrive access denied error
  4. Set Time range to All time. Now click the Clear data button.
    onedrive access denied error

Sometimes OneDrive Access denied message can appear due to your browser cache. Your cache files can get corrupted, and that can cause this error message to appear.

Since there’s no way to repair damaged cache files, the best method to fix this issue is to clear your cache.

3. Check the permissions

If certain users are getting OneDrive Access denied does not have permissions to access this resource upload failed, the problem might be the lack of permissions.

To fix this issue, it’s advised that you check if your files and folders are shared properly with users.

Be sure to check the list of users you share your files with, and make sure that everything is in order. In addition, you might want to change your sharing settings and make your files public.

This isn’t the best method, especially if you’re using OneDrive to store sensitive documents, but it’s a solid troubleshooting method to check if the security permissions are the problem.

4. Take ownership of the problematic file

  1. Locate the directory that you can’t access, right-click it and choose Properties from the menu.
    onedrive access denied error
  2. Go to Security tab and click the Advanced button.
    onedrive access denied error
  3. In the Owner section on the top, click Change.
    onedrive access denied error
  4. Enter your username and click the Check Names button. If everything is in order, click OK to save changes.
    onedrive access denied error
  5. Now check Replace owner on subcointainers and objects and click Apply and OK to save changes.
    onedrive access denied error

After making these changes, you’ll have full ownership over the problematic directory and the OneDrive destination folder access denied message will be gone.

Change ownership using the command line

  1. Press Windows key + X to open Win + X menu and choose Command Prompt (Admin) or Powershell (Admin).
    onedrive access denied error
  2. Now enter the following commands:

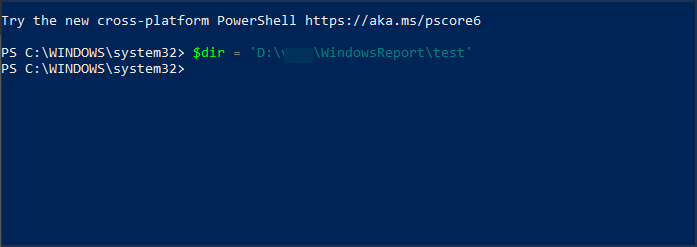
takeown /f “C:\WindowsReport” /r /d y

icacls "C:\WindowsReport" /grant %username%:F /t /q

Of course, be sure to enter the correct location of the directory you want to access.

Although this method is a lot faster, it requires you to enter the exact location of the directory you’re trying to access, so be sure to double-check everything before running this command.

As you can see, Microsoft OneDrive Access is denied contact your administrator message is caused by lack of permissions, but you can easily fix that.

5. Assign Full control to your user account

  1. Locate the directory you’re trying to access, right-click it and choose Properties from the menu.
  2. Navigate to the Security tab and click Edit.
    onedrive access denied error
  3. Now click the Add button.
    onedrive access denied error
  4. Enter the name of the user account that you want to use to access this directory, click Check Names and OK.
  5. Select the desired account, and make sure that you check Full control in Allow column.
  6. Next, click Apply and OK to save changes.
    onedrive access denied error

After doing that, you should have full control over the selected directory, and everything will start working again.

If you keep getting OneDrive Access denied error message on your PC, the problem might be the lack of Full control privileges.

In order to protect your files from unauthorized access, you can assign different privileges to different users.

6. Make sure that the file isn’t encrypted

In some rare instances, OneDrive Access denied error message can appear due to file encryption.

Encrypting your files is a great way to protect your privacy, but sometimes you won’t be able to access certain files if they are encrypted.

To fix this problem, you need first to decrypt the files and then try to access them.

7. Create a new administrator account

  1. Open the Settings app. You can do that quickly by using Windows Key + I shortcut.
  2. When the Settings app opens, go to the Accounts section.
    onedrive access denied error
  3. Select Family & other people from the left pane.
  4. Click on Add someone else to this PC.
    onedrive access denied error
  5. Choose I don’t have this person’s sign-in information.
    onedrive access denied error
  6. Now click on Add a user without a Microsoft account.
    onedrive access denied error
  7. Enter the username for the new account and click Next.
    onedrive access denied error

After creating a new user account, you need to change it from regular to the Administrator account. To do that, follow these steps:

  1. In the Settings app go to Accounts and select Family & other people.
  2. Locate the account that you want to promote to Administrator, select it, and click Change account type.
    onedrive access denied error
  3. Set Account type to Administrator and click OK.
    onedrive access denied error

After doing that, switch to the new administrator account and try to access this directory again.

OneDrive Access denied error messages can prevent you from accessing your files, and the issue is usually caused by a lack of privileges, but you should be able to fix that problem using one of our solutions.

8. Try alternative backup storage software

Our last solution goes in recommending you use pCloud as a backup storage tool. This tool has some fantastic features and will bring you a lot of value.

It comes with generous storage space, trash recovery, and automatic sync across multiple devices.

Moreover, with pCloud, you’ll have access to built-in video and audio players, including video streaming.

The file management options are also available, and you can perform actions such as data recovery, remote upload, or even the feature that will allow recovering accounts that have more than 30 days.

⇒ Get pCloud

We hope you fix the OneDrive destination folder access denied issue on your PC using our solutions.

If you’re still having problems, perhaps our guide on OneDrive access issues might be able to help you.

Let us know which one worked for you in the comments section below.

Fix Adobe After Effects Not Using GPU on PC: 5 Tested Solutions

For some users, Adobe After Effects might cause slow rendering and this usually happens when After Effects cannot use GPU as expected.

The most common cause for this issue is that the Use Graphics Processor option is disabled, so Adobe After Effects won’t use the GPU. Other issues include an unsupported GPU or graphics card or a corrupted or incompatible driver. Also, if the Composition settings are not set to use the GPU, you might face the problem. Ensure you have the Advanced 3D option enabled.

What can I do if Adobe After Effects is not using the GPU?

1. Enable GPU in After Effects

  1. Open Adobe After Effects. Go to File.
  2. Click Project Settings. Go to General.Project Settings - after effects not using gpu
  3. Under Video Rendering and Playback tab, and from the dropdown for Renderer option, select Mercury GPU Acceleration.Mercury GPU
  4. Click OK and click Save.
  5. Press Ctrl + Shift + Esc to open Task Manager.
  6. Locate and right-click the After Effects app and select End Task.

2. Update the graphics driver

  1. Press Windows + R to open the Run console.Device Manager RUN COMMAND
  2. Type devmgmt.msc and press Enter to open Device Manager.
  3. Navigate and click on Display adapters. Next, right-click your graphics drivers and select Update driver.Graphics Driver-After effects not using GPU
  4. On the next window, click Search automatically for drivers.Search automatically for drivers
  5. Follow the prompts to complete.

3. Change Composition Settings

  1. Launch Adobe After Effects. Go to Composition.
  2. Under Composition Settings, go to 3D Renderer.
  3. Also, set Ray-traced 3D. 3d Rendere - After effects not using GPU
  4. Click OK.

4. Add your GPU name to the RayTraced file

  1. Right-click the Adobe After Effects app and select Open file location.
  2. On the next window, locate the raytracer_supported_cards file.
  3. Open the file and check if you can find your graphics card name.
  4. You need to add it manually if you don’t find it there. Then, copy the raytracer_supported_cards file from the folder to the desktop.
  5. To know the graphics card name, press Windows + R to open the Run box.dxdiag
  6. Type dxdiag, and press Enter to open DirectX Diagnostic Tool.
  7. Switch to the Display tab, and note the name next to Chip Type.DXDIAG 1
  8. Open the raytracer_supported_cards and write the name as it appears on the DirectX Diagnostic Tool.
  9. Click File and choose Save. 
  10. Now copy this file, navigate to the Adobe After Effects file location and paste it there. It will ask you to replace it and click Yes.

5. Update Adobe After Effects

  1. Launch the Creative Cloud Desktop app. 
  2. Go to Apps, then click Updates.
  3. Locate and click Check for updates. Updates -after effects not using gpu
  4. If the update is available for After Effects, click Update.

So, these are steps you need to take if Adobe After Effects is not using GPU to render. Try them and let us know which worked for you in the comments below.

Best Video Cartoonizer to Convert Your Video to Animation

If you’re a cartoon enthusiast, you should know that you have the possibility to cartoonify your videos effortlessly with just a few clicks. All it takes is a good video cartoonizer.

Cartooned videos can also be used as a more efficient way to communicate your messages to an audience via animated presentations or videos. And it’s easy to see why it works!

They’re much more fun, easy to understand, and less boring than the real deal.

How can I convert my video to cartoon?

You can easily apply a video cartoon effect, and you can save the converted videos in various formats. You can use a cartoon filter for video, along with a plethora of free online apps or software options to download.

The point is, there is no shortage of alternatives. Since there are a lot of programs on the market that allow you to turn your video into a cartoon, we figured you might need a helping hand.

Here’s a quick preview of our favorite picks:

  • Adobe Animate – Top-notch video-to-animation converter (2D-focused)
  • Adobe After Effects – Excellent video to anime converter
  • AKVIS Sketch – Batch processing video cartoonizer app
  • PowToon – Free video cartoonizer online (presentations-focused)
  • Video Cartoonizer Software – 15+ video cartoon effects to try
  • Cartoon Effect Creator – The ultimate video editor with cartoon effect
  • Ziggeo Cartoon Effect – Amazing cartoon filters for videos

We gathered the best of them to help you create an overall opinion and decide which one is best for your cartooning needs. So, read on as here we go!

What is the best video-to-animation converter?

Adobe Animate – Top-notch video to animation converter (2D-focused)

adobe animate automate animation software

Adobe Animate is a software specially created for 2D animation content and interactive cartoon features. 

Through this software, you can expose your own creativity in a productive and fun way, while also creating authentic, alive stories.

If you are passionate about animated content, or you’re just a creative person, Animate is right for you. 

You can change any idea or personal experience into a lively character, who is able to transmit your message in a very imaginative manner.

If you want to create content for games, add personality to an ad, or turn static content into animation, you can do much more anyway. 

Here are the pro features of Adobe Animate: 

  • Enhanced Paint Fills Only is an option to easily color a fill region of your character  
  • Assets panel allows you to manage and organize assets in the default tab
  • Last frame option permits making a graphic symbol more powerful or customizing it 
  • You can publish your work in video, GIFs, or HTML5 formats using the quick publish feature
  • With timeline and symbol enhancement, you can personalize timeline options, convert layers to symbols, or play graphic symbols on a loop in reverse

Adobe Animate

Easily turn any kind of video content into a live world of your imagination!
Free trial Visit website

Adobe After Effects – Excellent video to anime converter

adobe after effects cartoonizer

Adobe After Effects is an excellent tool for creating cartoon-like videos.

Whether you need to edit your footage into cartoon videos or simply create cartoon video games and films, this tool will help you get the job done in no time.

You can also use After Effects to create cartoons and anime projects from scratch without downloading scenes from third parties.

Animating cartoons in After Effects is a very simple and intuitive process. Separate your character’s moving parts into layers, label them, and complete the rigging process.

Then set some keyframes and polish the moves. It’s as simple as that.

Other key features of animations and cartoons include:

  • The Puppet Pin tool allows users to place and move pins to define what image parts move and what parts stay still (this feature is crucial in cartoon character animation).
  • There’s a plethora of animation presets to choose from.
  • Shape layer animation allows users to animate all the layers in one go.

Adobe After Effects

Adobe After Effects will help you to edit your footage into cartoon videos in no time.
Free trial Visit website

AKVIS Sketch – Batch processing video cartoonizer app

akvis banner

AKVIS Sketch allows the transformation of a video into a cartoon.

The Batch Processing feature from AKVIS Sketch enables the automatic application of the software to a group of files, and this is one of the leading features that come together with this software.

There are two options to use: the standalone version or just the plugin version if you prefer to work in Adobe Photoshop.

Both versions allow automated batch processing to create stunning comic books or cartoons from images.

You can check out the tutorial on how to make a cartoon on AKVIS official website, download AKVIS Sketch’s 10-day free trial, and check out its features.

Check out more essential features included in the program below:

  • The software is really helpful if you want to create a comic book or even a cartoon from a video.
  • On the official website of Sketch V.20.5, there is presented a really detailed tutorial on how to create a cartoon from a video.
  • You will be able to transform short videos into black-and-white cartoons as well.
  • You also have the ability to make color cartoons, depending on the program’s settings.

AKVIS Sketch

Transform your videos into realistic black and white or colored pencil works with an automated process.
Free trial Visit website

PowToon – Free video cartoonizer online (presentations-focused)

PowToon is a simple-to-use cartoon software that allows you to engage, explain and sell with impact using just a short and straightforward PowToon.

The official website describes the way in which a PowToon can be much more efficient than any other form of video or text communication to grab attention in the workplace.

The software can also be used for educational purposes for grabbing the students’ attention by making educational materials come to life with it.

Combine this tool with course-making software so that you’ve got the perfect recipe for success.

You can also interact with your friends using a cartoonized video for all sorts of events and occasions, whenever you don’t want to be ignored.

Check out the most important features that are included in this video cartoonizing software:

  • The program comes with various ready-made templates that will help you create a high-quality PowToon fast and effortlessly.
  • These drag-and-drop templates are designed, scripted, and ready for users in just a few minutes.
  • This software will become your best friend while helping you create animated videos and presentations.
  • You can use this program at work to grab the attention of your colleagues during a presentation.

⇒ Get PowToon

Video Cartoonizer Software – 15+ video cartoon effects to try

Video Cartoonizer Software is compatible with Windows systems, and the software allows you to simply add cartoon effects to your videos effortlessly.

You can also convert more videos with just a simple click. Video Cartoonizer Software supports all versions of Windows. What’s more, you don’t even need an Internet connection or any other program.

The program supports various input formats such as AVI, FLV, MP4, MOV, and more. Meanwhile, the output formats that are supported by the program include AVI, FLV, MP4, and MOV.

Check out the most impressive features that are included in Video Cartoonizer Software:

  • The output size varies between 320×240, 480x 20, 720×480, and 1024×768.
  • With this software, you will have the ability to define and choose the number of frames per second for the output video, and this is really helpful for determining the video quality.
  • Video Cartoonizer Software comes with over 15 effects.
  • You will have more choices of the number of frames per second.
  • You will be able to define the limited time for the created video.

⇒  Get Video Cartoonizer Software

Cartoon Effect Creator – The ultimate video editor with cartoon effect

Using Cartoon Effect Creator, both beginners and professionals will be able to create cartoons. This particular software allows users to edit their videos and convert them into cartoons.

The software is straightforward to use, and all you have to do is choose the video you want to work with and the effects that you plan to apply to it.

Cartoon Effect Creator comes with a really intuitive interface targeted at making its manipulation as comfortable as possible.

Check out the most important features that are packed into this program:

  • Cartoon Effect Creator will enable you to edit your videos by adding effects included in the program.
  • You will have the possibility to choose from over 40 types of effects and filters to apply to your video.
  • Some of the most impressive effect filters include Accents, Emboss, Cutout, Ripple, Patchwork, Sponge, Stamp, Bas Relief, Charcoal, Plaster, Paint Daubs, Diffuse Glow, Chrome, Colored pencil, and Ink Outline.
  • To be able to use this software, you will not need any advanced computer skills or video editing talents.

⇒ Get Cartoon Effect Creator

Ziggeo – Amazing cartoon filters for videos

Ziggeo Cartoon Effect can help you turn your videos into cartoons really easily. The software is able to automatically cartoonize your videos with a simple click via its automatic Video Effect Converter.

The Cartoon effect is an Instagram-like video filter that will transform your videos into cartoon-like videos.

Check out the most impressive features that are included  in Ziggeo Cartoon Effect:

  • The cartoon filter is an entertaining way to have fun with your videos.
  • Cartoon effects are able to hide someone’s appearance.
  • With Ziggeo Cartoon Effect you can create a whole new video art form.
  • Besides the Cartoon Effect, Ziggeo includes other useful features such as video recording, video playback, hosting, transcoding, streaming, easy integration and styling, premium security, and more.

⇒ Get Ziggeo

These are the best video cartoonizer programs on the market.

We recommend that you visit their official web pages as well just to make you that you’re checking out their features in-depth so that you will be able to make the best choice for your video editing needs.

They all come with user-friendly interfaces and all kinds of effects and filters that you’ll be able to apply to your videos.

These tools are targeted at both beginners and more advanced users or video enthusiasts. More than that, all these programs are compatible with Windows systems, and they convert your videos as smoothly as possible.

The software solutions presented in this roundup allow you to enjoy your video-editing sessions without worrying about anything.

ChatGPT service coming soon to Azure, according to Microsoft

The Redmond-based tech giant is working on a lot of projects at the same time, trying to improve the suite of Windows products as much as it possibly can.

That being said, know that some of the other software solutions that the company has will also get enhanced in the near future.

Last week we shared that Bing was about to get an OpenAI ChatGPT chatbot integration, so now let’s focus on Azure a little.

Why? Well, because the tech giant has something special prepared for Azure customers everywhere, and we’re about to share that information right now.

Get ready for an Azure ChatGPT integration soon

There’s no denying that ChatGPT has been making a lot of waves in mainstream media lately. so it was pretty obvious it was going to catch Microsoft’s attention.

If you didn’t know, the capabilities and potential use cases demonstrated by the GPT-3 large language model have managed to astonish consumers and enterprises alike.

Microsoft, which already invested $1 billion in ChatGPT’s founding company OpenAI, with reports of more financing to come, wants to capitalize on this momentum.

Therefore, the Redmond company has committed to launching ChatGPT on Azure soon, so we can definitely get excited about this.

In fact, Microsoft has announced that its Azure OpenAI service is now generally available, which means that customers can access complex AI models such as GPT-3.5, Codex, and DALL•E 2 on the cloud.

GPT is actually the family of large language models powering ChatGPT, Codex is the model that is used to convert natural language to programming code in GitHub Copilot, and DALL•E can generate images after receiving only textual inputs.

The tech colossus has boasted that Azure is the best place to build AI workloads for customers of all sizes across various industries looking to save time on operational activities and offering streamlined AI-powered services to end-users.

Not surprising at all, it also claims that customers can build AI applications on Azure by leveraging purpose-built AI-optimized infrastructure with enterprise-grade functionalities.

We are confident in the quality of the AI models we are using and offering customers today, and we strongly believe they will empower businesses and people to innovate in entirely new and exciting ways.

Please keep in mind that, although ChatGPT will be available as a service on Azure for customers to build upon soon, the Redmond tech giant hasn’t really defined a concrete release date yet.

All that’s left to do right now is just wait and see when Microsoft will permanently implement this new integration.

What is your opinion on this situation? Be sure to leave your thoughts and opinions in the comments section below.

How to Set NTFS Permissions: 3 Easy Methods You Can Use

Setting up permissions on your PC is important, especially if you want to restrict unwanted access, and in today’s guide, we’re going to show you how to set NTFS permissions.

Not having proper permissions can lead to You don’t have permission to open this file and other similar issues, so it’s important to configure them properly.

This is somewhat simple to do, and you can do it on any PC in a matter of minutes. So, keep on reading to learn more about it.

How can I set NTFS permissions?

1. Use File Explorer

  1. Locate the directory whose permissions you want to set. Right-click it and choose Properties.
     
  2. Navigate to the Security tab. From there you can see the list of users and their permissions.
  3. To change the permissions, click the Edit button.
  4. Click on Add to add a new user or group.
  5. Enter the desired name and click on OK.
  6. Now select the desired user or a group and adjust the permissions by checking them.
  7. To view advanced options, click on Advanced.
  8. From there, you can set inheritance, permissions and choose to which folders your permissions apply.
  9. You can double-click the available users or groups to adjust their settings as you wish.

2. Use PowerShell

Viewing permissions

  1. Press Windows key + X and select Windows PowerShell (Admin).
     
  2. For the sake of convenience, we’re going to assign the path to the desired directory to a variable by using the following command: $dir = 'C:\Path\to\directory'
  3. To view the permissions, run the following command: (Get-Acl -Path $dir).Access
  4. Alternatively, you can use the following command to view permissions in a more readable format: (Get-Acl -Path $dir).Access | Format-Table -AutoSize

Setting permissions

  1. Run the following commands to create variables for permissions:
    $identity = 'domain\user'
    $rights = 'FullControl'
    $inheritance = 'ContainerInherit, ObjectInherit'
    $propagation = 'None'
    $type = 'Allow'
  2. Now combine all the variables into a single object with this command: $ACE = New-Object System.Security.AccessControl.FileSystemAccessRule($identity,$rights,$inheritance,$propagation, $type)
     
  3. Now we need to get access rights from the desired directory and store them in a variable: $Acl = Get-Acl -Path $dir
  4. Next, we add the access rule: $Acl.AddAccessRule($ACE)
  5. Lastly, set the rule with the following command: Set-Acl -Path $dir  -AclObject $Acl

Removing permissions

  1. Firstly get the permissions of the desired object and store them in the variable with this command: $Acl = Get-Acl -Path $dir
     
  2. Filter the permissions that you want to remove and store them in a variable: $Ace = $Acl.Access | Where-Object {($_.IdentityReference -eq 'domain\user') -and -not ($_.IsInherited)}
  3. Now remove the access rule: $Acl.RemoveAccessRule($Ace)
  4. Lastly, make the changes: Set-Acl -Path $dir -AclObject $Acl

This is an advanced method, and we barely got into the basics. If you want to use this method, be sure to inform yourself regarding permission and read the documentation thoroughly.

3. Use a dedicated tool

  1. Open AdManager Plus and select the directory whose permissions you want to modify. Next, choose Permission.
  2. In the Select Permission section adjust your permissions accordingly.
  3. To view permissions, click on Preview.
  4. Lastly, click on Modify to save changes.

ManageEngine AdManager Plus

Managing all permissions in your network doesn’t have to be complicated, as long as you use AdManager Plus software.
Free trial Get it now

Now you know how to set NTFS permissions on your PC. The manual method is the simplest one, but it might not be the most effective.

For more advanced users, there’s always PowerShell or other software that can help you set the permissions accordingly. Also, be sure to check our guide on best practices for NTFS permissions to keep your data secure.

What method do you use to set permissions on your network or PC? Let us know in the comments below.

How to Stop Creative Cloud from Running in the Background or Startup

Now, Adobe Creative Cloud by default runs at startup. It enables the app to load faster and run seamlessly. However, numerous users complained that the Adobe Creative Cloud is draining the battery too fast or that it slows down their system and even affect PC performance.

If that is also your case, you might want to know how to stop Creative Cloud from running in the background or loading on startup.

How do I stop Adobe Creative Cloud from running in the background?

1. Disable Creative Cloud from Task Manager

  1. Right-click on the Taskbar and select Task Manager.
  2. Open the Startup tab. You will see a list of startup programs.
  3. Locate Adobe Creative Cloud.
  4. Right-click on Adobe Creative Cloud and select Disable.
  5. Restart the computer to check for any improvements.

The easiest way to disable Adobe Creative Cloud is to disable the app from the Task Manager startup tab. Here is how to do it. If you can’t open the Task Manager, don’t worry, we’ve got the right solution for you.

2. Disable Creative Cloud from the app’s Preferences

  1. Launch the Adobe Creative Cloud app from the taskbar.
  2. Make sure you are signed into the app and accept the license agreement.
  3. Click on the Settings button at the top right corner.
  4. Go to Preferences and select the General Tab.
  5. Click on Settings.
  6. Uncheck the Launch at Login option. stop Adobe Creative Cloud from running at startup
  7. Try restarting the PC to check if the program is disabled at startup.

If the process still starts after the restart, try to disable the service from the Creative Cloud settings. Additionally, you can disable the Core file Sync option to prevent background processes from running in the future.

3. Disable Creative Cloud from System Configuration

stop Adobe Creative Cloud from running at startup
  1. Press Windows Key + R to open Run.
  2. Type msconfig and click OK.
  3. Click the Startup tab.
  4. Go through the list of services that are enabled to launch at the restart.
  5. Uncheck Adobe Creative Cloud service.
  6. Click Apply and OK to save the changes.
  7. Click on Restart Computer. That should help you to stop the Creative Cloud app from launching at startup.
Note icon NOTE
To be able to disable the program, you need to open System Configuration and log in as an administrator. If you don’t have administrator rights, ask the system admin to make the changes.

You can also disable auto-start for any program or service from the System Configuration. Do note that, this is for an older version of Windows. Windows 10 has this option moved to Task Manager as discussed in the first step.

If you need additional info on how to use the System Configuration tool on Windows 10, we got you covered as well.

4. Disable Creative Cloud from the Registry Editor

  1. Press Windows Key + R to open Run.
  2. Type regedit and click OK to open Registry Editor.
  3. In the Registry Editor, navigate to the following location:
    HKEY_LOCAL_MACHINE\SOFTWARE\Microsoft\Windows\CurrentVersion\Explorer\StartupApproved\Run32
  4. You can copy-paste the above location into the registry editor to quickly get the directory. stop Adobe Creative Cloud from running at startup
  5. Make sure you don’t have a key named Adobe Creative Cloud under the Run32 folder.
  6. Right-click on Run32 key and select New > Binary Value.
  7. Rename it Adobe Creative Cloud.
  8. Double-click on the Adobe Creative Cloud key and enter 030000009818FB164428D501 in the Data field.
  9. Click OK to save the changes and close the Registry Editor.
  10. Right-click on the Taskbar and select Task Manager.
  11. Go to the Startup tab.
  12. Select Adobe Creative Cloud and click on the Disable button.

For the tech-savvy in you, the Adobe Creative Cloud app can be disabled by tweaking the registry entries. Note that this method is recommended if you are unable to disable Creative Cloud from the Task Manager.

While the auto-start feature is useful for many people, it can be annoying for some. If you prefer to keep your desktop clean, you can follow these steps and see how to stop Creative Cloud from running in the background.

It turns out that the desktop version of Creative Cloud can end up using a lot of CPU as a result of the Adobe Helper process getting stuck. In this case, you’d most likely want to disable the Creative Cloud Helper.

If you have any more questions or suggestions, don’t hesitate to leave them in the comments section below.

Fix SSL Error Code 0X00000023 & Madden Error WV-109156-2 PS5

Error messages are often alarming as they imply that something could be wrong. Unfortunately, WV-109156-2 is one that a few users have had to contend with.

This error code may be encountered when a player tries to access content from an EA game like Madden.

This article will walk you through common causes and the most recommended solutions to these errors. The solutions we offer are tested and should help you find a resolution.

What is the SSL connection error and Madden error WV-109156-2?

WV-109156-2 is an error code that can appear on a PlayStation 5 (PS5) console. The error message associated with this code is Cannot start the PS5. As a result, the application cannot be started.

This error can occur for various reasons. At the top of the list of triggers, including the following:

  • App problems – These are specific to the game or application you are trying to run
  • System software – Issues with the PS5’s system software or corruption often trigger this error.
  • Hardware-related issues – While, in many cases, users have associated these errors with software, problems with the console’s hardware may also be a trigger.

Some common similar errors are:

  • SSL error PS5 – A secure sockets layer error is generated when a PS5 user attempts to access stuff that an EA game believes they shouldn’t be able to.
  • SSL connect error PS5 – The Cannot communicate via SSL message, which often appears when the device cannot connect to the EA servers, seems to be one of the most well-known problems.
  • PS5 error WV-109156-2 – This is often a communication problem between EA and your PS5 console.
  • Madden error WV-109156-2 – This is just a variant of the above error that happens when you try to communicate with specific content from Madden.

How to fix the SSL connection error and Madden error WV-109156-2 on PS5?

Before going into any of our solutions, we recommend a quick system restart since sometimes a simple restart will force troublesome processes to end and may correct the problem.

1. Check for software updates

  1. Navigate to the PS5 Settings menu.
    wv-109156-2
  2. Click on System.
  3. Under System Software, select System Software Update and Settings.
    wv-109156-2
  4. Select Update System Software.
  5. Hit Update and wait for the process to complete.
  6. Restart your PS5 and check if the SSL connection error and Madden error WV-109156-2 reoccur.

2. Reinstall Madden

  1. Highlight the Madden game icon on the PS5 dashboard.
  2. Click the Options button on your controller.
  3. Select the Delete option.
    wv-109156-2
  4. Confirm your choice.
  5. Now navigate to your games library, and select the Madden game from the game list.
    https://i.imgur.com/MwUo3MD.png
  6. Click on the Install button.

If you are trying to run a specific game or application and are getting this error, try deleting and reinstalling it. You can also check the developer’s website or support forums for information about known issues or troubleshooting steps.

3. Reset the network settings

  1. On the PS5 dashboard, navigate to the Settings icon.
    wv-109156-2
  2. Click on System.
  3. Click on System Software, then scroll down and select Reset Options.
  4. Now enter your console restriction number; in most cases, it will be 0000.
  5. Click on Restore, and when prompted, confirm your choice.
    wv-109156-2
  6. Sign back in and see if the error is resolved.

4. Check for hardware problems

If you have tried the steps above and are still getting the error, there may be a problem with the hardware on your PS5.

You may need expert help in such a case, and we recommend contacting Sony for further assistance.

That is about as much as we will cover in this article. However, you should find these very valuable to fix the SSL Error Code 0X00000023 & Madden Error WV-109156-2.

Let us know in the comments below what worked best for you.

5 Best Internet & Gaming Cafe Software [Management, Monitoring]

First things first. Is Internet cafe still a thing? Well, it’s complicated. For sure, Internet cafe businesses are not as popular as they were back in the ’90s. In this day and age, every household has access to the Internet.

So, people don’t really need to go to an Internet cafe to browse the Internet. They can do that from the comfort of their homes or right from their smartphones.

Nevertheless, such establishments are still alive – at least for now – and still catering to nostalgics. Consequently, using dedicated internet cafe software to properly manage the aspects of this particular business is still very much a necessity.

As you can see, most Internet Cafe software solutions are compatible with Windows 10 and older Windows OS versions. Many developers didn’t bother to go any further due to the reasons listed above.

What is Internet cafe software?

We are talking about a special kind of program, of course. Internet cafe software or cyber cafe software allows you to control and secure your cyber cafe, WiFi, public computers, or your gaming center.

It can handle management and system time monitoring operations, restrict or allow access to different parts of a system according to your settings, and more.

You can even use it for billing purposes in order to cover all kinds of activities that your customers might be indulging in from gaming to using specific apps or simply browsing the Internet.

To make things easier for you, here’s a quick preview of our favorite picks:

  • Antamedia Internet Cafe – Best Internet cafe software (billing included)
  • CyberCafePro – Free Internet cafe management software with multiple languages
  • KrisanCafe – Excellent computer shop time monitoring system
  • MyCyberCafe – Top-notch gaming cafe software with pricing & stats
  • PanCafe Pro – Nifty Internet cafe billing software with performance monitors

There are all kinds of Internet cafe software programs on the market, both free and paid editions, and we picked five of the best tools to help you decide easier.

Take a look at their unique set of features and determine which program works best for your needs. All these programs are compatible with Windows 10 and older versions of the operating system.

What is the best Internet cafe software to use right now?

Antamedia Internet Cafe – Best Internet cafe software (billing included)

Antamedia Internet Cafe is one of the leading Internet café software that you can currently find available on the market. It controls and secures your cyber café, Wi-Fi, public computers, and more.

You will be able to bill your customers for the Internet, apps, games, printing, and so on.

Using this software, you will be able to decide the way that you want to charge your computer and console use.

You can charge by time blocks, and minutes, schedule time of day with different prices, and more. You will also get complete control over your gaming center.

Here are the key features of Antamedia Internet Cafe:

  • This tool provides full Windows 10 support.
  • Each license includes a server and a number of client computers; you will be able to add more clients to any edition.
  • Customers can use the same account for multiple logins until their account expires.
  • You will also be able to restrict access to Ctrl+Alt+Del and other system keys, Control Panel, and local drives as well.
  • You can use the Internet café taskbar and hide the Windows Start button on any version of Windows.
  • The HotSpot module helps you in controlling and bill your Wi-Fi customers for Internet usage.

Anatmedia

Get Antamedia and start managing your Internet café now!
Free trial Visit website

CyberCafePro – Free Internet cafe management software (multilang)

CyberCafePro is a free Internet cafe management software that is designed in such a way as to act as a security app and a point of sale. There will be no charge for any feature of this software.

CyberCafePro Internet cafe software is ideal for your Internet café, cyber café, library, community center with computers, and for any business of this kind.

It comes with employee control features as well such as tracking, templates, point-by-point permissions, employee permission cloning, and an employee time clock.

There are also customer control and communication features such as enabling and disabling Internet access, enabling and disabling Windows desktops, and more.

Here are the key features of CyberCafePro:

  • This software comes with a multi-language capability.
  • You will find that the setup wizard works smoothly.
  • This tool includes a client application launchpad.
  • It also includes an auto-updater and 24/7 online reporting.
  • The software comes with prepaid pricing structures and full customer information profiles.
  • There are also no charge options available as well.
  • You can benefit from single or multiple computer pricing groups and scheduled pricing.
  • CyberCafePro Internet cafe software includes gaming center features as well.

⇒ Download CyberCafePro

KrisanCafe – Excellent computer shop time monitoring system

KrisanCafe is an excellent tool for your Internet cafe, and it also comes packed with a lot of useful features.

Time management features include time and price adjustment, dynamic rate, scheduled rate, custom rate, and more.

There are also a lot of security features included such as print monitoring, server screen snapshot, server uptime recording, executable files protection, client USB write requests, etc.

You will also get remote capabilities such as a chat system, Internet/LAN Bandwidth monitor, remote desktop, remote file manager, remote task manager, and more.

Here are the key features of Krisan Cafe:

  • It offers maximum simultaneous logins and client connections.
  • You will get prepaid or postpaid payment options.
  • Member management tools include the membership and a user group-based membership with pricing and apps restriction.
  • This tool also comes with employee permissions and employee daily time records as well.

You have more options to choose from: the professional package, the standard pack, the lite package, and the free program.

⇒ Download KrisanCafe

MyCyberCafe – Top-notch gaming cafe software with pricing & stats

MyCyberCafe is a professional management solution for Internet cafes, hotels or gaming café, and gaming centers.

In the user account overview, you will be able to create a new user account, and you can also edit and delete an existing account.

It shows statistical information about cash sales, login reports, and session transactions.

MyCyberCafe comes with customizable pricing with prepaid and postpaid accounts, refills, and prepaid codes.
This tool offers clients remote control and various options targeted at security.
The software supports desktop personal computers, NComputing, terminal services, and more.

Here are the key features of MyCyberCafe:

  • This tool controls the time usage of your game consoles and computers.
  • The client software limits the customer activity according to your desire: it can hide desktop icons, access to the system, and the Windows button.
  • This program efficiently manages customer accounts, security, program usage, and games as well.
  • This tool will also control all your printers, and it can optionally deduct the print cost from the session.
  • It comes with a full POS system with customer loyalty, advanced statistics, logs, and reports.

⇒ Download MyCyberCafe

PanCafe Pro – Internet cafe billing software + performance monitors

PanCafe Pro

PanCafe Pro is, by all means, a top-notch software solution when it comes to internet cafe software. It comes with many necessary features and with modern multi-lingual support.

You get a performance monitor to check RAM, CPU, and GPU activity in real-time as well as membership management allows you to add or reduce members’ balances.

Moreover, there is also a USB Disk protection feature included to limit the use of USB drives on 5 different terminals.

Here are the key features of PanCafe Pro:

  • Shortcut customization with 50 different keyboard shortcuts
  • Multi-language support with dozen languages available.
  • Session settings to limit and tweak sessions
  • Automatic application updates
  • Applications management

⇒ Download PanCafe Pro

These are the best five Internet cafe software tools that we recommend right now, and they all support Windows 10 or older versions of the operating system.

They are all packed with lots of unique and useful features. The best thing you can do is to head over to their official website and check them all out by yourself before deciding which one is the best choice for your cyber business.

All in all, if you’re thinking about opening an Internet Cafe business, think again. In a few years’ time, Internet Cafes will be history.

How to quickly run Linux GUI apps on Windows 10 or Windows 11 for added convenience

Windows Subsystem for Linux (WSL) allows you to run Linux GUI apps on Windows 10 or 11 without the need for a virtual machine.

Prerequisites for installation

To run Linux GUI apps on WSL, you will need to install an X Server on your Windows machine. X Server is a program that allows Linux GUI apps to connect to a display on your Windows machine. Other than that, you just need to make sure you have the following:

  1. Windows 10 build 19044 or higher or Windows 11 running on your PC.
  2. An installed driver for the virtual graphics processing unit (vGPU) for Intel, AMD, or NVIDIA.

The first step is to enable the WSL feature on your Windows PC. You can click the Start menu to search for “Turn Windows features on or off,” and then check the box next to Windows Subsystem for Linux (WSL) and press Enter to enable virtualization. You will need to restart your computer for the changes to take effect.

linux gui apps on windows 10Alternatively, you can open a Windows Terminal and type wsl --install to install WSL if you’ve never installed it before and If you already have WSL installed on your machine, you can open Windows Terminal and type wsl --update and then type wsl --shutdown to restart WSL for the changes to take effect.

linux gui apps on windows 10

Next, you will need to install a Linux distribution, such as Ubuntu, on your Windows machine. You can do this by searching for the Microsoft Store app in the Start menu and then searching for Ubuntu. Once installed, launch the Ubuntu app.

In the Ubuntu terminal, you will need to install the X Server software. You can do this by running the command sudo apt-get install xorg to install the Xorg X Server, or sudo apt-get install xserver-xorg-core to install the Xorg X Server core package.

linux gui apps on windows 10Once the X Server is installed, you will need to configure it to allow connections from WSL. To do this, you will need to create a new file called .xinitrc in your home directory. This file will contain the command exec startx or exec gnome-session depending on your distro.

Run Linux GUI apps on Windows 10 or 11

To run a Linux GUI app, you will need to start the X Server by running the command startx in the Ubuntu terminal. Once the X Server is up and running, you can install, launch, and test Linux GUI apps on Windows 10 or 11 using your distro’s terminal.

You can install X11 apps to help you get started. Open your distro’s terminal and type sudo apt install x11-apps -y. X11 is the Linux windowing system and contains a collection of various Linux apps like xcalc, xclock, or xeyes.

It’s worth noting that while running Linux GUI apps on Windows 10 or 11 using WSL can be useful, but it’s not a perfect solution and the performance may not be as good as if the apps were running natively on Linux. However, it’s a good way to run Linux GUI apps on a Windows machine if you need to do so for compatibility or testing purposes.

Microsoft Teams Audio not Working? Here’s how to fix it

If you’re using Microsoft Teams, you might face video or audio issues when joining or hosting a call via the application. This can happen even before you join the call, while during a call, it may also stop working if you open another app that uses audio (such as YouTube or a game).

It happens to both the Bluetooth speaker and earphones and it’s usually due to technical problems with the audio device, an outdated Teams app, or simply incorrect settings.

What can I do if my Teams’ audio is not working?

1. Switch to an alternative audio output

  1. Click on your Teams profile picture in the top right corner and select Manage account.
  2. Click on Manage from the left navigation pane.
  3. Select Devices.
  4. Click on Microphone and select another audio output from the drop-down list.
  5. Now click on Make a test call and see if your audio is working again.

2. Enable microphone access on Teams

  1. Open Microsoft Teams and click on your profile picture.
  2. Next, click on Settings.
  3. Click the Permissions and toggle the Media button on.
  4. Try your audio again.

3. Disable Listen settings on stereo

  1. Click on the sound icon at the bottom right and right-click to select Recording devices.
  2. Select Stereo Mix and click on Properties.
  3. Click on the Listen tab and uncheck the Listen to this device option.
  4. Click OK to save settings and try connecting audio again on Teams.

How can I test audio on Microsoft Teams?

If you cannot be able to hear or be heard on your call, you can test your connection using the steps below:

  1. Open your Teams app and click on your profile picture.
  2. Navigate to Manage.
  3. Select Devices.
  4. Click on Make a test call.
  5. Try listening again.

Check out other ways to test your call on Teams in our article.

Why is the audio not working in Microsoft Teams?

When you have a Microsoft Teams audio call, your experience will vary depending on the device and client you are using.

There are many factors that can cause audio issues for an online meeting or conference call. Some of the top reasons include:

  • Outdated version –The first thing you should do if your Teams call doesn’t have audio is to make sure the version of Microsoft Teams that you’re using is up-to-date. The latest version of Microsoft Teams can be found in the Microsoft Store.
  • Incorrectly plugged-in headset/speakers – It may be that your microphone is not working or that you don’t have any speakers plugged in. Check the physical connections and make sure they are all plugged in and working properly.
  • Muted mic – In some cases, when audio stops working during a call, this is because someone has muted your mic. Check to make sure that the mute button on your microphone is not enabled.
  • Faulty speakers – It’s also possible that your speakers don’t work correctly. If they’re attached to your computer, try plugging them into another set of speakers or headphones to see if they work correctly.
  • Not enough volume – The volume might be turned down. Try increasing the volume using the speaker icon in the taskbar or the volume controls on your computer.
  • A firewall is blocking the app – Your firewall might also prevent your audio from working. It might prevent you from listening to a call if it deems the app unsafe for your system. 

The issue could also be with your Microsoft Teams microphone so feel free to refer to our recommended fix to quickly make the microphone work again.

What can I do to keep my microphone in check?

On Teams, the audio quality of your microphone is directly related to your network speed. Your computer’s audio levels also affect the quality of your voice on Teams. 

So, here are some tips to keep your microphone from common glitches:

  • Check if the battery is charged or not – If you’re using a headset, whatever, and whenever you do, always make sure that the battery is charged enough in the wireless microphones to get you through the needed device. Also, ensure that the connectivity works properly.
  • Always check for driver updates – For the driver of your microphone use Device Manager or the Device Manager page in the Settings app. You can also try updating the driver from the manufacturer’s website.
  • Keep your system free from viruses – When it comes to anti-virus protection, you can certainly pay for a more robust solution. But the built-in Windows Defender is quite capable of keeping your system virus-free.
  • Keep your microphone in shape – One of the most critical steps to improve microphone performance is cleaning the device. If you are using an external USB microphone, make sure you don’t sit on it, throw water, or do anything else that could harm its overall performance. This is because when the device is not in a proper condition, it will impact the audio quality.

Should you experience any other microphone-related issues, visit our guide and refer to some tips to get it up and running again.

You may also be getting an echo on your microphone while on a Teams call but worry not as you can fix the issue using our expert guide.

Your Bluetooth headset may also fail during your call so circle back to our fix guide and attempt to fix the issue.

This isn’t the only problem, and many users encountered Audio conferencing for Microsoft Teams has been turned off message, but it can be easily fixed.

Hopefully, this guide was everything you were looking for to solve your audio not working on Teams call. We’d love to hear what solution worked out for you so do leave us a comment down below.

How to create a Python script on a Windows 11 PC to make your life easier with these quick tips

Interested in some of the ways to use Python on a Windows 11? After you download and installation and verified that it’s working correctly, this guide will help you get started to help write a Python script on a Windows 11 PC.

Here are some typical examples and ways you can use Python on a Windows 11 PC to make your life easier, along with programs or libraries you can use to accomplish them.

Create a Python script on a Windows 11 PC

To create a Python script that can run on Windows 11, you need to follow these steps:

  1. Open a text editor on your PC, such as Notepad.
  2. Write your Python script using the appropriate syntax.
  3. Save the file with a .py extension, for example, Calculator.py. python script on a windows 11 pc
  4. Once the file is saved, open Command Prompt or PowerShell on Windows 11.
  5. Use the cd command to navigate to the directory where you saved the script.
  6. Run the script by typing python Calculator.py and pressing Enter. python script on a windows 11 pc

Python script suggestions with examples

Looking for some ideas to get you started? Here are some suggestions with examples provided for using a Python script on a Windows 11 PC.

  1. Automating repetitive tasks: You can use the Python library “pyautogui” to automate repetitive tasks such as data entry, web scraping, and testing.
    import pyautogui
    
    # Open a text editor
    pyautogui.hotkey('win', 'r')  # open the run dialog
    pyautogui.typewrite('notepad\n')  # type 'notepad' and press enter
    
    # Type a message
    pyautogui.typewrite('This is an automated message.\n')
    
    # Save the file
    pyautogui.hotkey('ctrl', 's') # press ctrl+s
    pyautogui.typewrite('automated_message.txt\n')  # type the file name and press enter
    
  2. File management: You can use the Python library “os” to manage your files and folders. For example, you can use it to search for specific files, rename them, or move them to different directories.
    import os
    os.rename("old_file_name.txt", "new_file_name.txt")
  3. Data Analysis: You can use Python libraries such as “pandas” and “matplotlib” to analyze data and extract insights. For example, you can use it to clean and process data, create visualizations, and perform statistical analysis.
    import pandas as pd
    df = pd.read_csv('data.csv')
    print(df.head())
  4. Automating your social media: You can use the Python library “tweepy” to automate your social media activities, such as posting updates, scheduling posts, and sending messages on Twitter.
    import tweepy
    
    # authenticate
    auth = tweepy.OAuthHandler(consumer_key, consumer_secret)
    auth.set_access_token(access_token, access_token_secret)
    
    # create API object
    api = tweepy.API(auth)
    
    # post a tweet
    api.update_status("Hello, World!")
  5. Creating a personal assistant: You can use the Python library “SpeechRecognition” to create a personal assistant that can perform tasks such as setting reminders, sending emails, and searching the internet.
    import speech_recognition as sr
    
    # Initialize recognizer class (for recognizing the speech)
    r = sr.Recognizer()
    
    # Reading Microphone as source
    # listening the speech and store in audio_text variable
    with sr.Microphone() as source:
        print("Talk")
        audio_text = r.listen(source)
        print("Time over, thanks")
  6. Schedule your daily tasks: You can use the Python library “schedule” to schedule your daily task, such as sending reminders, emails, backup files, etc.
    import schedule
    import time
    
    def job():
        print("I'm working...")
    
    schedule.every(10).minutes.do(job)
    schedule.every().hour.do(job)
    schedule.every().day.at("10:30").do(job)
    
  7. Automating your home: You can use the Python library “openHAB” to automate your home, such as controlling lights and appliances, monitoring security cameras, and adjusting thermostats. There isn’t an example provided for home automation.

These are just a few examples of how you can create a Python script on a Windows 11 PC to make your life easier. There are many libraries and frameworks available for Python, so you can accomplish many things. Remember to check the documentation and tutorials for the library you are using and always test your code before using it in production.

Do you already use a Python script on a Windows 11 PC? Tell us which one works for you in the comments!

Net Framework 3.5  for Windows 10 – Download & Install Guide

NET Framework 3.5 is one of the most important Windows 10 components. The OS relies on this software framework for running applications and programs smoothly.

So, if you want your apps and software to run normally, you need to download the appropriate NET Framework version and ensure it is working without issues. This guide will walk you through the steps required to install this essential component on your PC.

How do I get .Net Framework 3.5 on Windows 10?

1. Enable the feature via Control Panel

  1. Press the Windows key + R, type appwiz.cpl, and click OK.
    appwiz net framework 3.5 windows 10
  2. Choose Turn Windows features on or off in the left pane.
    turn off
  3. Now, check the box before .NET Framework 3.5 (includes .NET 2.0 and 3.0) and click the OK button.
    option
  4. Finally, wait for the installation to complete and restart your PC to effect the changes.

The good thing about Windows 10 is that you can install the NET Framework 3.5 via the Windows feature. This makes the process easier and faster.

2. Install the feature on demand

install net framework 3.5 windows 10

Another method to install the NET Framework 3.5 on Windows 10 is downloading it on demand from an app that requires the feature.

Once you run such an app, it displays a dialogue box that says it requires NET Framework 3.5. In this case, you only need to click the Install this feature option, which will be downloaded on your PC.

Note that you need to be connected to the internet to use this method.

3. Install NET Framework 3.5 manually

  1. Visit the NET Framework 3.5 download page and click the Download button.
    download
  2. Double-click the downloaded setup file to run it and click the Yes button when prompted by UAC.
  3. Finally, click the Download and Install this feature option and wait for Windows to complete the process.
    download and

If you don’t have an app that requires installing the NET Framework 3.5 on Windows 10, you can perform the process manually by following the steps above.

4. Use the Offline installer

  1. Go to the Microsoft Dotnet Framework download website.
  2. Click on the .NET Framework 3.5 link and wait for the download to complete.
    sp1 net framework 3.5 windows 10
  3. Now, double-click the downloaded file and follow the onscreen instructions to complete the installation.

Aside from the online installer, you can also use the offline installer to download and install this important feature. Unlike the online installer, you will have to do most of the installation yourself.

5. Use CMD or PowerShell

  1. Press the Windows key, type cmd, and click Run as administrator under Command Prompt. You can also use Windows PowerShell.
    cmd admin
  2. Type the command below and hit Enter to run it: Dism /online /Enable-Feature /FeatureName:"NetFx3"enable command or the one below on PowerShell Enable-WindowsOptionalFeature -Online -FeatureName "NetFx3"enable powershell net framework 3.5 windows 10
  3. Finally, wait for the command to install the NET Framework 3.5.

If you don’t want to go through the stress of manually installing the NET Framework 3.5 on Windows 10, you can complete the process by running the commands above.

6. Use a Windows Installation Media

  1. Create and insert a Windows bootable media.
  2. Press the Windows key + E to open Windows Explorer and click on This PC in the left pane. Note the drive letter of the bootable media.
    this PC
  3. Now, launch Command Prompt as admin and run the command below: Dism /online /enable-feature /featurename:NetFX3 /All /Source:X:sourcessxs /LimitAccessdism online
  4. Finally, wait for the command to finish running and restart your computer to complete the installation.

With this option, we can draw the curtain on downloading and installing the NET Framework 3.5 on Windows 10. We have provided several options and believe you will surely find one useful.

If you can’t install NET Framework 3.5 on Windows 10, check our detailed guide to force it through.

Feel free to let us know in the comments below if you encountered any issues applying any of the methods above.

Fix: Photoshop Not Using GPU on Windows 10 & 11 [ 5 Ways]

Many users have complained about the graphics processor not being detected by Photoshop. It can be frustrating as it stops you from using vital features to edit photos. Thankfully, it can be fixed.

Here, in this post, we will discuss how to fix Photoshop not using GPU issue right after talking about the causes of its occurrence.

Why does Photoshop not use GPU on Windows 10 & 11?

There could be various reasons for the graphics processor not being detected by Photoshop. Some of the popular ones are:

  • Outdated or corrupted graphics drivers – If the graphics drivers of your device are old or corrupt, then Photoshop might not recognize the GPU. You need to update the graphics drivers to fix the problem.
  • Corrupted or missing files – If Photoshop is missing files or has corrupt files, then Photoshop might not be recognizing GPU.
  • Windows OS outdated – If you have Windows updates pending, you might get this. You need to keep your Windows updated to avoid any issues.
  • Photoshop app is not up to date –  The app installed on your computer is not the latest version so this issue could happen.

What can I do if Photoshop does not detect the GPU?

Before making significant changes via troubleshooting steps, make sure you go through these preliminary checks to fix the Graphics processor greyed out on Photoshop: 

  • Restart your computer.
  • Check for Windows updates.

1. Set Photoshop to high performance

  1. Close the Photoshop app if running. Then, press Windows + I to open Settings.
  2. Go to System, then click Display.System - Display- Photoshop not using GPU
  3. Select Graphics and click BrowseBrowse Graphics
  4. Now go to this path:  C:\Program Files\Adobe\Adobe Photoshop\Photoshop
  5. Click Add. Once added, click the Options button and select High performance.Graphics Settings
  6. Click Save to confirm the changes.
  7. If this doesn’t work, go to Graphics again and click Browse.
  8. Navigate to this path:  C:\Program Files\Adobe\Adobe Photoshop\Photoshop\PrefsManager
  9. Click Add. Once added, click the Options button and choose High performance.
  10. Click Save to confirm the changes.

2. Update your graphics drivers 

  1. Press Windows + R to open the Run window. Device Manager RUN COMMAND
  2. Type devmgmt.msc and press Enter to open Device Manager. 
  3. Locate and click Display Adapters to expand it. Next, right-click the Graphics driver and select Update driver. Graphics Driver-  Photoshop not using GPU
  4. Click Search automatically for drivers on the next window.Search automatically for drivers
  5. Follow the onscreen instructions to complete the process.

3. Make changes to Photoshop app settings

3.1 Enable the Legacy Compositing option

  1. Launch the Photoshop app.Legacy Composition -photoshop not using gpu
  2. Go to Performance from the left pane, select Preferences from the left pane, and place a checkmark beside Legacy Compositing. 

3.2 Modify the Cache Levels 

  1. On the Photoshop app, go to Preferences.
  2. Choose Performance. Cache Levels - photoshop not using gpu
  3. Look for Cache Levels and change them to 4. 

3.3 Disable the Use OpenCL option

  1. On the Preferences page, go to Performance, under Graphics Processor Settings, locate and click Advanced Settings.Graphics Processor Settings- photoshop not using GPU
  2. Remove the checkmark beside Use OpenCL on the next window and click OK.openCL - photoshop not using GPU
  3. Close the app and relaunch it. 

4. Delete or change the location of the Sniffer app

  1. Press Windows + E to open File Explorer.
  2. Go to this PC and navigate to this path: C:\Program Files\Adobe\Adobe Photoshop
  3. Locate Sniffer. Either delete the app or change its location.Sniffer-exe - photoshop not using GPU
  4. Finally, close the window and check if Photoshop is fully operational.

5. Check  for updates in Photoshop

  1. Open the Creative Cloud app. 
  2. Go to Apps, then click Updates.
  3. Locate Photoshop and click Check for updates. 
  4. If the update is available, click Update to upgrade it to the latest version.
  5. Click Continue on the next screen.

So these are steps you need to follow to fix Photoshop not using GPU on Windows 10 or 11. Try them and let us know which method worked for you in the comments section. 

How To Disable NLA Remotely & Locally? Easy Ways

NLA (Network Level  Authentication) is an authentication tool that prompts to input credentials before accessing a remote computer.

It provides you with extra security while establishing a remote connection. However, if you want to disable NLA, you are at the right place.

Here in this guide, we will discuss some of the easiest ways to disable it in no time. Let’s get started! 

How to disable NLA on a remote computer?

Before moving to the actual steps to disable Network Level  Authentication, make sure you go through these checks:

  • Administrative access to the machine for which you are attempting to disable NLA.
  • Connection to the computer remotely or physical access to the machine, depending on whether you are trying to disable NLA remotely or locally.
  • A Remote Desktop client is installed on your local machine and the IP address or hostname of the device you are trying to connect to.
  • Need to have access to the system’s desktop environment.
  • Should know primary Windows navigation and locate and access the relevant settings and options in the Windows operating system.

1. Using the Registry Editor

Tip icon Tip
Before making changes to Registry Editor, take a backup of registry files. To do so, go to File, then click Export. Save the .reg file at the desired location.

If anything goes wrong, on Registry Editor, click File, and then Import. Choose this .reg file to restore the registry entries.
  1. Press Windows + R to open the Run window.REGEDIT RUN COMMAND
  2. Type Regedit and press Ctrl + Shift + Enter to open Registry Editor with admin rights. 
  3. Go to File, then click Connect Network Registry. Connect Network Registry - Disable NLA
  4. Enter the remote computer name and click OK. 
  5. Follow this path: HKEY_LOCAL_MACHINE\SYSTEM\CurrentControlSet\Control\Terminal Server\WinStations\RDP-Tcp
  6. Go to the DWORD SecurityLayer, double-click on it, and change the Value data to 0.Security Layer - disable NLA
  7. Also, locate and double-click UserAuthentication and change the Value data to 0.User authentication

2. Use the Windows PowerShell

  1. Press the Windows key, type PowerShell, and click Run as administrator. Powershell  Disable NLA
  2. Copy and paste the following command and replace the  Target-Machine-Name with your device’s name, and press Enter: $TargetServer = "Server_with_NLA_Enabled"(Get-WmiObject -class "Win32_TSGeneralSetting" -Namespace root\cimv2\terminalservices -ComputerName $TargetServer -Filter "TerminalName='RDP-tcp'").SetUserAuthenticationRequired(0)
  3. Once the process is complete, restart the computer. 

How do I turn off NLA on the local computer?

1. Use the Group Policy Editor

  1. Press Windows + R to open the Run box. GPEDIT - NLA disabled
  2. Type gpedit.msc and press Enter to open the Group Policy Management Console.
  3. Follow this path: Computer Configuration\Administrative Templates\Windows Components\Remote Desktop Services\Remote Desktop Session Host\SecurityRequire user authentication for remote connections by using Network Level Authentication - disable NLA
  4. Double-click Require user authentication for remote connections by using Network Level Authentication and place a checkmark next to Disabled.Disabled
  5. Click Apply and OK and restart your PC.

2. Use the PowerShell 

  1. Press the Windows key, type PowerShell, and click Run as administrator. Powershell Disable NLA
  2. Copy and paste the following command and replace the  Target-Machine-Name with your device’s name, and press Enter: $TargetMachine = &ldquo;Target-Machine-Name&rdquo;(Get-WmiObject -class &ldquo;Win32_TSGeneralSetting&rdquo; -Namespace root\cimv2\terminalservices -ComputerName $TargetMachine -Filter &ldquo;TerminalName=&rsquo;RDP-tcp'&rdquo;).SetUserAuthenticationRequired(0)
  3. Please let the process get complete and restart your computer. 

3. Use the System Properties

  1. Press Windows + R to open the Run window.SYSDM.CPL - disable NLA
  2. Type sysdm.cpl and press Enter to open System Properties.
  3. Switch to the Remote tab, and remove the checkmark next to Allow connections only from computers running Remote Desktop with Network Level Authentication (recommended).Allow connections
  4. Click Apply and OK.

So, these are methods that you can follow to disable NLA remotely and locally. Try them and let us know which way worked for you in the comments below.

How to Fix Low Battery Notification Not Working on Windows 10

The Windows 10 low battery notification popup informs you that a laptop‘s battery is running out and needs charging.

However, that notification doesn’t always work. Is the low battery alert not popping up before your laptop‘s or notebook’s battery runs out? This is how you can fix a battery notification that isn’t working in Windows 10.

Battery notification won’t work on PC [FIX]

1. Switch the Battery Notification on

  1. Press the Cortana button on the taskbar to open that app.
  2. Enter Control Panel in Cortana’s search box.
  3. Select to open the Control Panel in the snapshot directly below.control panel
  4. Click Power Options to open the tab shown directly below.power options
  5. Click Change plan settings > Change advanced power settings to open the window below.advanced power options
  6. Double-click Battery to expand its settings.
  7. Click the + beside the Low battery notification to expand the options below.
  8. If the On battery and Plugged in options are off, select On from their drop-down menus.
  9. Press the Apply button to confirm the new settings.
  10. Click OK to close the window.

Windows includes a couple of low-battery notification settings. Switching those settings on, if they’re off, will probably restore the notification in Windows 10. This is how you can switch the low battery alert on.

2. Configure the Low Battery Level

  1. Open the Power Options window again (which includes the battery notification settings).
  2. Click Battery > Low battery level, as in the snapshot below.
  3. Select On battery and enter 25 in its text box.
    low battery level advanced power settings
  4. Enter 25 in the Plugged in text box.
  5. Press the Apply and OK buttons.

Check the battery level settings if the notification isn’t popping up. Those options adjust the percentage charge required for the notification to pop up. Raise the battery level percentages to about 25% if they’re below 10%.

3. Configure the Critical Battery Action Settings

You might also need to configure the critical battery action settings. Click Battery > Critical battery action to expand its options as in the snapshot directly below.

Click On battery and select Shut down on its drop-down menu. Press the Apply button to apply the new settings.

critical battery action on battery

4. Restore the Power Plan Settings to Default

Restoring the power plan settings to their default configurations can also resolve the battery notification issue. This resolution requires you to adjust all three power plan settings separately.

You can restore the default settings by selecting Balanced, Power Saver, and High Performance on the drop-down menu at the top of the Power Options window. Press the Restore plan defaults button, and click the Yes option to confirm.

change power plan

5. Replace Your Laptop’s Battery

If you have an older laptop or notebook, the low battery notification alert might not need fixing. Your laptop’s battery might have deteriorated considerably. If that is the case, the PC might go off with the battery at the 20-30 percent level when unplugged.

Thus, the PC shuts down before its battery has dropped to the required percentage charge for the notification to pop up.

You can replace user-serviceable batteries yourself. Slide the latch at the bottom of the laptop to remove the battery. Those without a user-serviceable battery can request a replacement from the laptop’s manufacturer.

6. Add an Alternative Battery Notification to Windows

You don’t need to fix the Windows 10 battery notifications, as there are alternatives. A few third-party programs provide alternative battery level alerts and alarms, such as BatteryBar Pro and Battery Alarm.

You can also set up a script in Notepad, or other text editors, that opens a notification window when the charge has dropped below a specified percentage. This is how you can set up a new low-battery alert for Windows.

set oLocator = CreateObject("WbemScripting.SWbemLocator")
set oServices = oLocator.ConnectServer(".","root\wmi")
set oResults = oServices.ExecQuery("select * from batteryfullchargedcapacity")
 
for each oResult in oResults
    iFull = oResult.FullChargedCapacity
next
 
while (1)
    set oResults = oServices.ExecQuery("select * from batterystatus")
    for each oResult in oResults
        iRemaining = oResult.RemainingCapacity
        bCharging = oResult.Charging
    next
    iPercent = Round((iRemaining / iFull) * 100)
    
 
    if iRemaining and not bCharging and (iPercent < 20) Then msgbox "Battery is at " & iPercent & "%",vbInformation, "Battery monitor"
    wscript.sleep 300000 ' sleep for 5 minutes
wend
  1. Copy the script above using the Ctrl + C.
  2. Open Notepad and paste the script by pressing the Ctrl + V hotkey.
  3. Click File and select Save As in Notepad.
  4. Select All Files from the Save as type drop-down menu.
  5. Enter battery.vbs in the File name text box.
  6. Select to save the file to the desktop.
  7. Press the Save button.
  8. Now the desktop will include a battery.vbs script on it. Right-click the script and select Open to run it.

The window alert below will open when your laptop’s battery drops below 20 percent. The notification also has an additional audio effect.

You can adjust when the window opens by editing the iPercent < 20 value in the script. For example, the notification will pop up at 24 percent with the iPercent value at 25.

So, if you can’t fix the low battery notification in Windows, you can always replace it with something else. However, adjusting the battery settings in Windows will usually fix the notification.

In the same vein, if you want to know how to fix a corrupt battery alert, check our detailed guide.

Finally, if you have anything to add or take, feel free to do so in the comments section below. We look forward to hearing from you.

Router Hacked: 3 Things to Do Immediately

If you see that your bandwidth is hogged, and you can’t access your router or can see unrecognized devices on your network, then it is safe to suspect your router is hacked. 

Here, in this guide, we will discuss all the signs to look out for a router being hacked, along with the steps you need to take to fix the problem.

How can I tell if my router has been hacked?

  • Can’t log in to your router  – Your router is hacked if you are not able to log in to your router. Routers usually come with default login credentials. It is advised to change the credentials when the first time you setup.
  • Lost control of your device – An uninvited guest moves your computer mouse, performs actions, and tries to access personal information.
  • Internet speed is slow – If you experience surprisingly slow internet connectivity, then check for devices present on your network. The hacker may use your internet to spread the infection if the router is hacked.
  • Suspicious software installed on more than one device – Look for any unwanted software installed on your phone, computer, laptop, or other devices connected to your network. If there are any, chances are your device is also infected.
  • Changed DNS settings – If you see any changes to your DNS settings that you didn’t make, then it could be a sign.
  • A ransomware message or fake antivirus notifications –  If you have received ransomware messages or scareware that your router is hacked. Chances are that hackers might try to seize control of the router and demand money. Don’t pay them, just reset the router and create a strong login password.
  • Unrecognized devices added to your network  –  Open the list of connected devices on your network on your router web interface. Look for unrecognized ones, remove them from the network, and change the password. Disable remote access if you are not using it.

What can I do if my router has been hacked?

Before are some prerequisite checks you need to perform below applying the fix below:

Tip icon Tip
Change your old password to a password with no personal information, including birthdays, anniversaries, spouses’ names, etc. Also, it should be different from all the other passwords that you used in the past.

1. Change your router credentials 

Once you reset your router, log in to your router using the default credentials provided. Then replace the admin password with a unique and long password as you log in.

This could be one of the effective ways to avoid hacker attacks in the future. For demonstration purposes, we have used a TPlink router; follow these steps: 

  1. Login to your router.
  2. Go to System Tools, then click Password.Reset password - router hacked
  3. Input your old username, password, and your new username & password. Click Save to make the changes.

2. Create a new SSID and password for the Wi-Fi network

The next step would be changing the SSID (Service Set Identifier). The default SSID is usually the brand name, which is an easy one to guess for hackers.

Replace the old SSID with a new complex and lengthy SSID. Also, replace the password with a unique one with special characters and random letters.

It is suggested to create a password of about 20 characters. For the TPlink router, follow these steps: 

  1. Login to your router.
  2. Go to Wireless Settings, then click Basic Settings.SSID - router hacked
  3. Change the Wi-Fi Name (SSID) and click Save.
  4. Now head towards Wireless Security, change the password under Wireless Password and click Save.Password WI_FI

3. Update the firmware of your router

Upgrading your router’s firmware is essential. You can set it to update automatically, or you can do it manually. For the TPLink router, follow the below-mentioned steps: 

  1. Go to the TPLink website and download the firmware.
  2. Login to your router.
  3. Go to System Tools, then click Upgrade Firmware.Firmware upgrade
  4. Now click Choose File and upload the firmware file that you downloaded. 
  5. Click Upgrade.

What happens if your router is hacked?

1. Slow internet 

As a hacker takes control of your router, he can utilize the bandwidth in many activities, including botnet activities, distributing malware to another network, crypto-jacking, internet piggybacking, and more. Hence, keeping your bandwidth occupied without your knowledge.

2. Spy on internet traffic

Once the hackers have access to your router, they can spy on all the devices connected to the network. They can also use packet sniffers to keep an eye on your data and track incoming and outgoing data.

3. Access illegal content 

Hackers can use your internet connection to upload illicit media and pirated content and use it on the dark web.

4. Personal data is at risk 

All the personal data stored on your device becomes available to hackers, including your passwords, email credentials, bank credentials, social media accounts credentials, or private messages. They can use any of these in any way they want.

5. Home for malware and viruses & DDOS attack

Since the device is vulnerable, the attackers can inject malware or malicious code into it. This could comprise your entire network. Also, it can use your device to target other malware attacks.

6. DNS hijacking 

Hackers can also execute DNS hijacking, rerouting users to websites they were not planning to visit. The rerouted website usually is a phishing website.

7. All devices are insecure

If your router is hacked, all the devices connected to the network are under attack. It means all the devices are equally at risk.

So, this is all you need to know if your router is hacked. To sum up, to keep your router secure, it is essential to check the number of devices listed on your network and always use a complex SSID password.

If you have any questions or concerns about this, feel free to mention them in the comments below.

[Fixed] The Archive is Either in Unknown Format or Damaged

Have you tried to download a zipped or a RAR file just to encounter the error message The archive is either in unknown format or damaged when trying to open it?

Rest assured that you aren’t the only one complaining about this unpleasant WinRAR situation. To better grasp, note that these issues usually result from RAR file corruption after download, CRC errors, virus attacks, and not only.

This guide will show you the easy ways to fix this issue and restore normal service on your PC.

How to fix The archive is either in an unknown format or damaged?

1. Try to re-download the zipped or RAR archive file

The archive is either in unknown format or damaged annoying issue may also be the result of an incomplete download.

Therefore, as easy as it may seem, don’t hesitate to redownload the zipped or RAR archive files, most likely to a different location, and see if this solves the problem.

If they aren’t, the file could be damaged, and none of your actions can improve things. If you’ve tried downloading the file from a specific website, don’t hesitate to inform the site owner about the issue and if it is from a friend, ask him to resend it.

2. Fix bad sectors

  1. Press the Windows key + S, type cmd, and click Run as administrator under Command Prompt.
    cmd admin archive is either in unknown format or damaged
  2. Type the command below and hit Enter: chkdsk c: /rchkdsk
  3. Now, if you get a prompt, press Y and wait for the command to finish running.

In some cases, the file might not be the cause of the archive is either in an unknown format or damaged. Instead, it might be due to bad sectors on your hard drive.

The solution to this is to repair these bad sectors.

3. Try WinZip

Consider that the issue could result from a temporary or even permanent glitch of WinRAR itself, and the quickest and simplest fix would be to replace it.

You’ve seen that the message The archive is either in unknown format or damaged pops up unexpectedly and leads to a supposed corruption of the RAR file.

Since you experience this issue within WinRar, consider opening the archive with WinZip this time. Navigation is straightforward, with the guarantee to easily unzip all major file formats.

Moreover, the interface easily adjusts to suit touchscreen devices, while you can connect to Dropbox and Google Drive and work smoothly on the go or at the office.

WinZip

Users often report getting errors about the unknown format or damaged archives. Install WinZip to correct them easily!
Free Trial Visit Website

4. Run a malware scan

  1. Press the Windows key, type virus, and select Virus & threat protection.
    virus
  2. Click Scan options.
    scan option archive is either in unknown format or damaged
  3. Now, choose Custom scan and click the Scan now button.
    custom scan
  4. Finally, select the faulty file, click Select Folder, and wait for the scan to complete.
    select folder

It’s not uncommon to discover that severe malware attacks lead to corrupt RAR files. If the downloaded file is corrupt, you can face the archive is either in an unknown format or a damaged error.

If Windows Defender cannot fix the issue, we recommend using an award-winning antivirus such as TotalAV.

Long story short, it offers rock-solid protection against all virus threats and extra features to keep you safe from the latest online scams.

Moreover, with over 20 years of experience in antivirus/anti-malware solutions, you don’t have to worry about the usual false positives you get from other antivirus options.

5. Use the built-in tool

  1. Right-click the faulty file.
  2. Select the Extract Here option.
    extract here archive is either in unknown format or damaged
  3. Now, wait for the extraction process to complete.

If WinRar keeps returning the archive is either in an unknown format or a damaged message, you should use the built-in file decompressor. This tool is effective and can unzip just about any file.

6. Use the WinRar repair feature

  1. Launch the WinRar app and click on the faulty file.
  2. Click the Repair icon at the top. If you are sure the file is corrupt, double-click it and select Repair archive.
    repair
  3. Now, choose a location to save the file and click OK.
    ok
  4. Finally, wait for the repair process to complete and click the Close button.

If this built-in tool does not work, you can use one of the best tools for repairing corrupt archive files.

That is about it for the archive is either in an unknown format or damaged error. We believe you have all the information needed to fix the issue in this detailed guide.

If you want to know how to fix the WinRar no archive file found error, check our detailed guide to do it quickly.

Don’t hesitate to share how you’ve solved this issue in the comments below.

Windows 11 Rotation Lock Is Greyed Out: 4 Quick Fixes

Is your Windows 11 rotation lock greyed out? Here is all you should know.

One of the new features in Windows 11 is the ability to rotate your screen, which can be helpful when using your device in tablet mode or with a 2-in-1 laptop.

However, some users have reported that the rotation lock option is grayed out, which prevents them from using this feature. So, if you’re experiencing this issue, don’t worry – there are a few quick fixes to get your rotation lock working again.

Why is my rotation lock grayed out in Windows 11?

There are a few reasons why the rotation lock option might be grayed out in Windows 11. Some of the most common causes include:

  • Your device doesn’t support screen rotation – Not all devices can rotate their screens. So, if your device doesn’t have a sensor detecting the screen’s orientation, the rotation lock option will be grayed out.
  • The device driver is not installed – Some devices require a specific driver to use the rotation lock feature. So if the driver is not installed or is outdated, the option will be grayed out.
  • Third-party software is blocking the feature – Some software can block certain features in Windows, including the rotation lock. Hence, if you suspect this might be the case, try disabling any unnecessary software and see if that resolves the issue.

So, if your Windows 11 rotation lock is greyed out, below are some solutions users have found very effective. Note that users on Windows 10 also experience this problem, and some of these fixes may apply.

What can I do if the rotation lock is greyed out in Windows 11?

Firstly, before jumping into any complex fixes, we encourage you to check your device’s specifications. This way, you ensure that your device can rotate its screen. If it’s not, the rotation lock option will be grayed out.

Also, You may try a reboot because a restart can force complex processes to end and solve simple PC problems.

1. Install the latest device drivers

  1. Right-click on the Start menu and select Device Manager.
    windows 11 rotation lock greyed out
  2. Expand any driver category with outdated drivers, right-click on the driver, and select Update driver.
    windows 11 rotation lock greyed out
  3. Select Search automatically for drivers.
  4. Finally, wait for the search to complete and follow the prompt accordingly.

Make sure that you have the latest drivers for your device installed. You can usually find the latest drivers on the manufacturer’s website.

Alternatively, you may use any auto driver updating tools, as they would save you a lot of time by scanning your computer and immediately finding the latest updates.

2. Update screen settings

  1. Press Windows + I to open the Settings app.
  2. Navigate to System and click Display.
  3. Lastly, under the Scale & Layout section, ensure the Rotation lock is turned on.
    windows 11 rotation lock greyed out

3. Use the keyboard shortcut

If the option is greyed out, you should try using the Keyboard shortcut Windows Key + O to toggle screen rotation.

Some users have found this effective in resolving the problem.

4. Uninstall third-party software

  1. Press Windows + R, type control panel, and hit Enter.
  2. Click on Uninstall a program.
  3. Click on a suspected program from the program list and select the Uninstall option.
    windows 11 rotation lock greyed out
  4. Finally, follow the wizard to complete the uninstallation.

So, if you suspect third-party software is blocking the rotation lock feature, try uninstalling any unnecessary software to see if that resolves the issue.

In conclusion, you must note that these solutions will not work for everyone. Hence, trying what you feel is most relevant to you is advisable.

However, your Windows 11 screen rotation lock greyed-out issues should be solved if you have gone through the entire guide.

Lastly, tell us what worked for you in the comments below.

How to Use 2 Audio Outputs At the Same Time in Windows 11

Today we’ll show you how to use two audio outputs simultaneously on Windows 11. Whether you’re a gamer needing separate game and chat audio or an IT professional, by the end of this guide you’ll be able to:

  • Enhance Flexibility: Send different audio signals to different devices
  • Improve Quality: Ensure each audio type uses the best-suited device
  • Increase Control: Adjust volume and effects independently

Sounds good? Here’s what to do!

How do I connect two audio devices to Windows 11?

1. Add a new audio device

  1. Press Windows + I to open the Settings app and navigate to System and Sound.
    how to use 2 audio outputs at the same time on windows 11
  2. Click on Add device under the Pair a new output device section.
  3. Select your kind of output device from the available options. The Everything else option is best if the first two options do not match your device.
  4. Please ensure the device is on and discoverable, and select it from the available options.
  5. Now when you navigate back to Settings, System, and Sounds, you should be able to select between your added output devices where the sound comes from. how to use 2 audio outputs at the same time on windows 11

This first stage is crucial if you wonder how to get sound from both monitors Windows 11 or if you need multiple audio outputs. Once done, continue to the next section to complete the process.

2. Make two audio outputs play sound at the same time

  1. Scroll down and select More sound settings.
  2. Click the Recording tab, right-click on any space, and select Show Disabled Devices.
  3. Right-click on Stereo Mix and select Set as Default Device.
  4. Click the Listen tab, tick the Listen to the device checkbox, and select the second device from the dropdown list.
    how to use 2 audio outputs at the same time on windows 11
  5. Click Apply and OK, and you are done.

Alternatively, if you’re not fully satisfied with the built-in apps, you can install audio management software that supports streaming to multiple devices at the same time.

You can also use a splitter cable. This is simpler method that requires little to no settings adjustments and works great if you have two wired devices such as 2 headphones.

And there you go, that is how to use two audio outputs simultaneously on Windows 11. Again, this is a straightforward operation, and as long as you follow our steps, you should be fine.

Note that some systems may not have the Stereo Mix option. If that is the case for you, then unfortunately, you will not be able to complete this process.

Let us know in the comments below if connecting your dual audio output on Windows 11 worked for you.

The Semaphore Timeout Period has Expired: Why & How to Fix

When you try to transfer files between your Windows 10 system and any other external device or want to access a certain drive connected to your computer, you might get the semaphore timeout period has expired error.

This error will block your action and prevent you from completing the transfer process. In most situations, you will experience the error code 0x80070079 with the prompt while trying to transfer huge files.

Thankfully, it is not the most difficult issue to fix, as we will show in the ensuing sections of this guide.

What does it mean if the semaphore timeout period has expired?

There are various factors that can cause the semaphore timeout period has expired on Windows 10. Below are some of the prevalent causes:

  • Outdated drivers: One of the major causes of this issue is outdated network drivers. You can fix this quickly by updating your drivers to the latest version.
  • Firewall and antivirus interference: If you are facing the semaphore timeout period has expired on your SQL servers, it might due to interference from your firewall and antivirus. The quick way around this is to block your antivirus temporarily.
  • Corrupt system files and memory sectors: In some cases, this issue might be due to faulty system files. To fix this, you need to repair these system files and the bad memory sectors.

How do I fix the semaphore timeout period has expired error?

1. Temporarily disable Firewall and antivirus protection

  1. Press the Windows key + S, type firew, and choose the Windows Defender Firewall option.
    windows defender semaphore timeout period has expired
  2. Click Turn Windows Defender Firewall on or off in the left pane.
    turn windows
  3. Now, tick the radio button for Turn off Windows Defender Firewall (not recommended) under the Public and Private network settings options and click OK.
    turn off

If you are facing the semaphore timeout period has expired on the Azure SQL server, it might be due to your firewall or antivirus. After following the steps above to disable your firewall, you should disable any third-party antivirus on your PC.

However, it should be noted that you shouldn’t disable your firewall and antivirus for long.

2. Update network adapters drivers

  1. Press the Windows key+ R, type devmgmt.msc, and click OK.
    devmgmt semaphore timeout period has expired
  2. Click the arrow next to the Network adapters option to expand it and right-click your wireless device.
  3. Now, choose the Update driver option.
    update driver
  4. Finally, click Search automatically for drivers and install any available updates.
    search auto

When you encounter the semaphore timeout has expired error, it can mean that your wireless adapter driver is outdated.

You can check the manufacturer’s website if the built-in driver updater cannot find the latest driver.

Another option is to resort to professional software that can help you update your drivers by scanning your PC as soon as you install the program.

3. Initiate a clean boot

  1. Press the Windows key+ R, type msconfig, and click OK.
    msconfig semaphore timeout period has expired
  2. Click the Services tab, check the Hide all Microsoft services box, and click the Disable all button.
    services
  3. Now, click the Startup tab at the top and choose Open Task Manager.
    startup task
  4. Right-click each app in the Task Manager window and select Disable.
    disable
  5. Finally, go back to the System Configuration window and click the Apply button, followed by OK.
    apply semaphore timeout period has expired

Sometimes, third-party apps or processes can cause the semaphore timeout period has expired error. The easiest way to know this is to perform a clean boot.

This will start your PC with only the required services. If the error does not appear after the clean boot, you need to start enabling the apps and services in batches to find the problematic one.

4. Convert FAT32 to NTFS

  1. Press the Windows key + E to open File Explorer and right-click the external drive you want to transfer data.
  2. Select the Format… option.
    format
  3. Now, click the File System dropdown and select NTFS.
  4. Finally, check the Quick Format box, click the Start button, and wait for the process to complete.
    quick format

As you might know, transferring huge files is possible only if the actual drivers are formatted into NTFS. So, if you are facing the semaphore timeout period has expired error on your hard drive, you should convert it from FAT32 to NTFS.

5. Repair system files and bad sectors

  1. Press the Windows key, type cmd, and click Run as administrator under Command Prompt.
    cmd semaphore timeout period has expired
  2. Type the command below and press Enter: sfc/scannowsfc
  3. Wait for the command to finish running, type the command below (replace c: in the command with the drive letter), and hit Enter: chkdsk c: /rchkdsk

At times, this issue can be caused by corrupt system files or bad hard drive sectors. The easiest way to do this is to run the commands above.

With this, we can conclude this guide on how to fix the semaphore timeout period has expired error. Just makes sure you follow the steps carefully, and you should be able to transfer your files easily.

Are you facing other issues, like Bluetooth file transfer not working? Then, check our detailed guide to fix this easily.

If you solved this issue using another solution, share your experience with us by dropping a comment in the dedicated section below.