If you want to make your Steam background stand out you’ll need some of the best Steam profile backgrounds there are.
Steam backgrounds are Inventory items that you can purchase in the Steam marketplace. It is very easy to change your Profile background if you already have purchased one for your profile.
There are mainly two types of backgrounds; static and animated. But, if you consider some other things, you may distinguish the profile wallpapers into more categories.
Some backgrounds represent particular games, and some don’t. There is also a type of item called mini-profile background. It is relatively smaller than the normal ones.
Can I have a custom background on Steam?
Steam allows backgrounds available in its marketplace and store only. You cannot upload your custom background and set it to your profile. And we do not see any possibility that Steam will allow it anytime soon.
Though Steam doesn’t allow you to upload your custom backgrounds, it doesn’t mean you should be disappointed. There are thousands of unique artworks available in the marketplace that you can use for your gamer profile.
Every day new awesome backgrounds are landing in the store. That means you can find one according to your taste and set the one that represents your attitude more.
Can you get free backgrounds on Steam?
You may not be able to get a truly free background on Steam. But, from the Point Shop, you can get some amazing ones using your reward points without spending actual money.
What are the best Steam profile backgrounds in 2024?
You may play the game God’s Trigger or not. Still, The New Star of Bethlehem is an impressive profile wallpaper you may like. It features an apocalypse world with a crimson sky. It is one of the cheapest and best Steam backgrounds in 2024.
The Coconut and Azuki in Casual Wear is one of the best anime backgrounds for your Steam profile that you can find for under 1 dollar. This is related to the game called NEKOPARA Vol. 3 Uncommon and is one of the best Steam wallpapers that you can get.
This profile background related to the game The Elder Scrolls Online Uncommon looks very cool. You can find the Fray in the marketplace at a very low price.
The Survivors is an outstanding wallpaper for your Steam profile. It is currently available for under 10 cents on the community market. You can also get this item on the Steam Point Shop using reward points. If you are a big fan of the game Dying Light, you will indeed like this item.
If you own the Counter-Strike GO, this profile background is a perfect fit for you. You can buy this item without spending real money from the Steam Point Shop if you own the game CS Go.
Although the ownership of the game is required, On the marketplace, this wallpaper is available as a paid item. In that case, you do not need to own the actual game.
Are you a fan of the game Hollow Knight? Maybe yes or not. Nevertheless, this dark Steam background will surely give your profile an exceptional look. It is currently available in the point shop, and you do not need to pay any real money to get this item.
Another thing is that the game ownership is also not required to use this profile background.
If you are an Apex Legend fan, the Blood is a perfect artwork that can represent your passion for this game. This profile background doesn’t require you to own the original game. On the Point Shop, you can get it by spending your reward points.
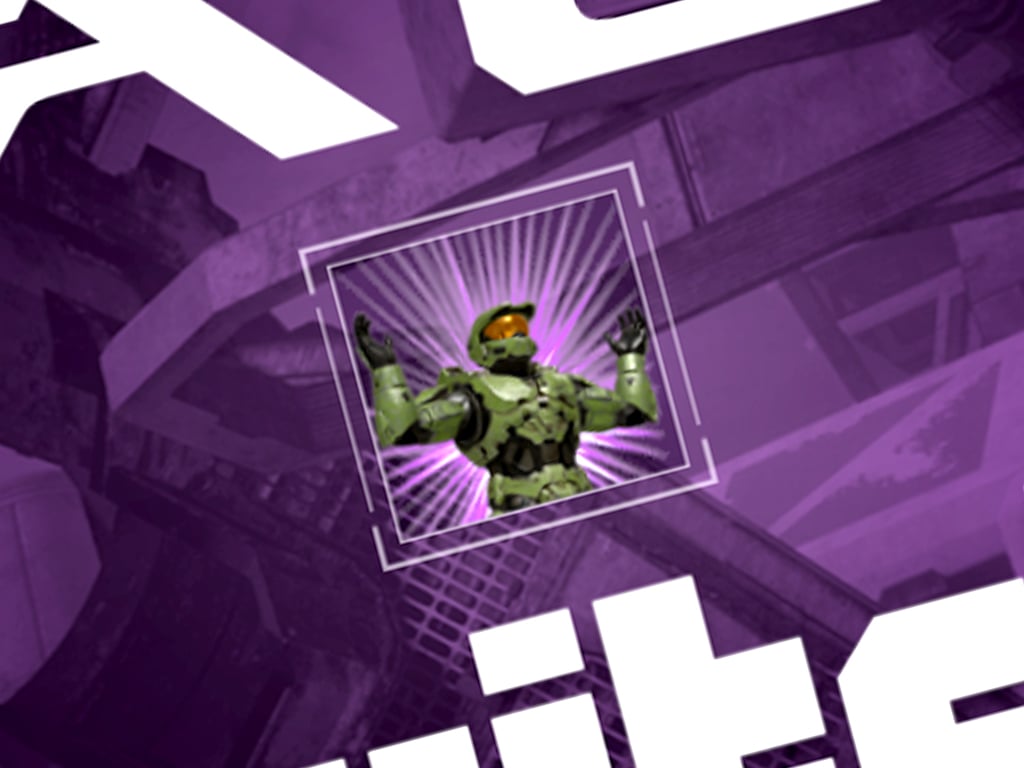
If you need one of the best Steam animated backgrounds, Cyberpunk City is probably one of the best choices out there. The animated loop of the city featuring the night with a big moon in the red sky gives a great look to your profile.
You may know about the new game Gravewood High or not. But, you will definitely like this animated background for your Steam profile. It features an aesthetic indoor environment of a school with a glitch animation effect.
The Testa Ride is a perfect profile background for Steam profile for the racing game enthusiasts. This animated wallpaper will change the vibe of your profile and make someone easily understand that you have a passion for racing games.
Even if you are not a fan of this type of game, you will still want to use this animated artwork for your profile. It is currently available on the Point Shop, where you can buy this item using the points you have earned on Steam.
The Red Clouds is a trendy steam background, mainly for the users who prefer the red color. It is available on both the community market and the Point Shop.
Though the Point Shop requires you to own the game Zup! 8, you can get it on the marketplace without owning the actual game.
If you want an anime-style red Steam profile background, this Sol Badguy is one of the most immaculate choices for you. This item featured the game GUILTY GEAR XX ACCENT CORE PLUS R, which is similar to the Street Fighter.
The Anoxemia Art Background Red is another excellent Steam profile background available right now. You may like the game Anoxemia or not, but this item can change your profile’s look if you prefer the color of blood and dark atmosphere.
Hopeless is a dark black and white Steam background that you can use on your profile. This artwork can give your profile a mysterious vibe. It is available on the community market and is very affordable.
The Smoke is another black Steam background that can be a perfect choice if you prefer a very dark grayscale wallpaper for your profile. You can get this unique item for under 1 dollar in the community marketplace.
The persons who prefer nothing in the black prefer this pure black background. There is nothing in it, just the solid black color. You may like it if you do not want to distract your profile visitors with anything else.
The 7Days cat is one of the most impressive choices if you prefer black-anime background for your Steam. This item is related to the game 7 days with Death. But, it can fit well with any user’s profile who has not played the game.
If you are looking for a sunset steam background for your profile, the Sunset silhouette is a wonderful choice. The bright crimson sky of the evening looks incredible on this wallpaper. This item is available on both Point Shop and the Community Market.
However, on the Steam Point Shop, you will require to own the game Hentai Girl Karen to purchase it.
The Dusk Town is another beautiful bright evening Steam background that features the crimson sky. You will surely like its aesthetic environment. Like the Sunset silhouette, it is related to another anime game called Hentai Girl Linda.
The Iridescent cloud is a fabulous bright steam background related to Hentai Girl Karen’s game. It has featured the bright sky of a fantasy world that can give a unique look to your Steam profile.
This item is available on both Point Shop and the Community Market. To get it, follow any of these links.
If you don’t have any background rather than the default one in the list, you will need to go to Steam Points Shop. Then purchase the ones you prefer.
You also can purchase profile backgrounds from the Steam community market.
It is not easy to find some fantastic backgrounds for your profile as there are many of them. In this article, we have featured some of the best steam profile backgrounds to give you convenience.
How do you get cool backgrounds on Steam?
As Steam does not allow you to use backgrounds from any third-party sources, the only way to acquire any backgrounds is through its Community Marketplace or the Point Shop.
Any wallpaper or artwork can be beautiful. In this case, it depends on the person’s taste. Despite that fact, some backgrounds look good to most people’s eyes. We have featured the best of them in the above list.
If you want to get some fantastic Steam profile backgrounds, you can look at these sources.
There is a huge number of backgrounds in the Steam Point Shop. Most of them look very attractive. You can find animated, static, and mini-backgrounds there.
If you have Steam points, you can purchase the backgrounds from there using these reward points. Though some items are not available for you if you do not own a particular game, you can find them in the Community Market.
The Community Market is another best place where you can buy unique and great profile backgrounds. There are some free and paid ones in this marketplace. Unlike Steam Point Shop, you don’t need to own a game to use any particular artwork.
The Backgrounds Gallery is the best third-party source where you can find the best class of artworks that you can set on your profile. Whatever, it doesn’t host or sell these items as Steam doesn’t allow it to do.
You can find the purchase links to both Point Shop and the Community Market when you view any items that you prefer.
This is another third-party website where you can easily find amazing backgrounds and wallpapers for your steam profile. Even though they do not sell or host the backgrounds, you can view the backgrounds and get the purchase link here.
Steam.Tools is another website that has a lot of Steam profile backgrounds with the purchase link to the Community Market. You also can use it to find the best artwork for your profile.
This article has featured the best steam backgrounds from different categories and also mentioned where you can get amazing steam artworks. If you have an opinion, you can let us know in the comment box.
The main advantage of Bluetooth headphones is that they offer a convenient way to listen to music without being tethered to your device. The downside is that there are various issues with Bluetooth headphones, including audio cutting out intermittently.
Bluetooth audio stuttering in Windows 11 can be a real pain, as it can in any other version of Windows. If you’re not running the latest version of Bluetooth audio then this is why you may be stuttering. This article should help solve any Bluetooth audio stuttering issues you may have.
Why does my Bluetooth headphones keep cutting out on Windows 11?
If you’re using a Bluetooth headset and it keeps cutting out on Windows 11, below are a few reasons why it is happening:
Driver issues – Sometimes drivers can cause problems with Bluetooth connectivity and audio quality. This is especially true if they are outdated or incompatible with your device.
Faulty hardware – If your pair of Bluetooth headphones keep disconnecting, you may have a faulty device or even a PC at hand. This can also cause intermittent audio drops.
Interference – If there is another Bluetooth device nearby, it may be causing interference with your headphones.
Incompatible device – Your device may not be compatible with your headphones. For example, if you’re using an Android phone with a pair of Bluetooth headphones designed for iOS devices, Bluetooth may not detect the device.
Poor signal strength – If your Bluetooth headphones have poor signal strength they may not be able to connect with your device properly. This could happen if there are too many obstacles between the transmitter and receiver.
Low battery – Headphones with low battery can cause problems with the connection.
Incorrect pairing – Make sure that both devices are paired correctly and connected together before trying to use them.
How do I fix my Bluetooth audio stuttering?
Before we start troubleshooting the issue, let’s first see if there are some basic checks to stop the audio stuttering:
Make sure that your Bluetooth device and your PC are compatible with each other. You can check this by visiting the manufacturer’s website and looking for specs on their products.
Check your Bluetooth settings and make sure it’s set to the highest quality. If not, change it to the highest quality.
Ensure your sound settings is set to play through your Bluetooth device.
Make sure that your device is not in power saving mode and that its battery doesn’t need charging.
Move your Bluetooth device closer to your PC to establish a strong connection.
Switch to an Ethernet cable instead of a wireless connection.
Try connecting your device to another Bluetooth-enabled device. This will tell you whether the problem is with your device or with Bluetooth itself. Sometimes, Bluetooth won’t turn on.
1. Uninstall Bluetooth drivers
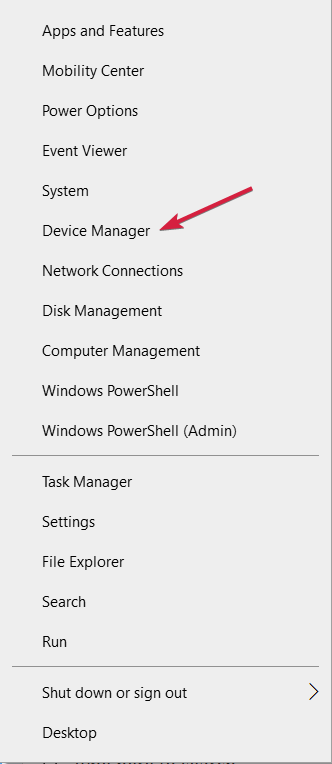
Press the Windows key, type Device Manager in the search bar, and click Open.
Navigate to your Bluetooth device, right-click and select Uninstalldevice.
Restart your PC and the driver will automatically reinstall.
2. Update Bluetooth drivers
Hit the Windows key, type Device Manager in the search bar, and click Open.
Find your Bluetooth device, right-click and select Update driver.
Select Search automatically for drivers.
Restart your PC and try reconnecting.
If manual updates are not your thing, you’re in luck because there exists a third-party tool that can do the heavy lifting for you. Outbyte Driver Updater scans your computer and all attached devices for outdated, corrupt, or missing drivers, then downloads and installs the latest driver.
The program uses a smart detection engine to instantly find out which drivers are missing or outdated in your system, then it will download and install the best-matched driver for you.
Outbyte Driver Updater
Update the Bluetooth drives along with all other outdated drivers on your PC.
Click on System on the left pane then Troubleshoot on the right pane.
Select Other troubleshooters.
Locate the Bluetooth troubleshooter, and click on the Run button next to it.
5. Restart the Bluetooth Support Service
Press the Windows + R keys simultaneously to open the Run window.
Type services.msc in the Run dialog box.
Find the Bluetooth Support Service, right-click and select Restart.
Right-click again and select Properties.
Under the General tab, select Automatic as the Startup type then click Apply then OK.
Try connecting again.
Windows 11 Bluetooth audio issues are in plenty. Sometimes you may encounter a no sound after connecting Bluetooth device problem. You can find various fixes in our article to that effect.
Alternatively, you should consider investing in a Bluetooth audio receiver for your Windows 11 if you want to experience high-quality audio.
ESET is definitely stepping up its security products for Home and it’s rebranding them. Not only that, but now, they have extra security features tailored for these modern times and usages.
In this article, we’re going to talk about all the new features and advantages of this line of security suites.
ESET is rebranding its Home products
First of all, ESET Internet Security and ESET Smart Security Premium have received new transitional names.
ESET Internet Security gets the HOME Security Essential name, and ESET Smart Security Premium is listed as HOME Security Premium.
However, now, all the products have significant improvements, and we will highlight them below.
What are the new improvements in ESET Home products?
1. Integration with Intel Threat Defense Technology
Now, all the products have integrated Intel’s hardware-based ransomware detection technology.
The technology boosts ransomware protection and it exposes any attempts while trying to avoid detection in memory.
This technology uses the Intel TDT machine-learning models on Intel Core Processors to detect such threats.
Advanced evasion techniques like zero-day variants, binary obfuscation, virtual machine cloaking, and file-less attacks will be immediately addressed without any significant changes in the system’s performance.
2. Redesigned user interface with Dark mode
All ESET products now have a new and improved interface with a modern design and intuitive menus. And yes, a Dark mode was added as well!
Speaking of the interface, the Brute Force Attack protection was added to the Settings menu.
Also, while going through the Banking & Payment Protection section, you will notice that the SecureAllBrowsers mode is now turned ON by default for all compatible browsers.
That means you will not be redirected to another secure browser window, thus preventing any phishing attempts.
When opening ESET, you will also be able to see clearly the overall protection status of your machine. The software combines the validity statuses of the licenses and the security statuses of your connected devices.
And you are now able to download protection and access the local technical support form right from the Home Screen.
3. Two-factor authentication
ESET has added an extra layer of protection, a two-factor authentication feature within ESET Home, which is the platform that manages your ESET licenses.
All the popular TOTP apps are now compatible. This includes all solutions like Google Authenticator, Microsoft Authenticator, ESET Secure Authentication, Authy, and others.
In the event that you replace or lose your phone and no longer have access to your two-factor authentication app, ESET automatically sends you a set of backup codes you can use to log back in.
Other notable ESET improvements
Network Inspector – Now, it is possible to mark a network as My Network. Also, you can use ESET to test your home router for vulnerabilities such as weak passwords.
Password Manager – The new onboarding feature enables direct password store creation with ESET Home account email.
With these significant changes, ESET is pushing its products to a new level of protection.
As you saw in the post, gamers playing on Linux through a browser and Chrome OS should be seeing better resolutions and a smoother game streaming experience. Cohen did not elaborate on exactly what sort of technology was implemented to realize these enhancements.
This should be particularly exciting news for gamers on devices like Valve’s Steam Deck and the Logitech Gaming Handheld, both of which can run Xbox Cloud Gaming.
Schools block many Flash and HTML5 gaming websites as security or just to make sure students don’t overuse them. Thus, kids can’t open many browser game sites at school.
Some browsers are able to open blocked sites if you want an easy and user-friendly solution to this annoying problem. If you want to know the best game websites that are not blocked, keep reading.
What games are not blocked at school?
Armorgames – Extensive game library
Unblocked Games 66 – Incredibly simple to use
Unblocked Games 77 – Has all the gaming classics
Unblocked Games 24h – Simple user interface
Unblocked Games Pod – Has all your favorite games
Mills Eagles – Offers great arcade games
Friday Night Funkin – Highly popular
Now let’s find out more about each of these awesome unblocked game sites.
Unblocked Games 66 is a Google HTTP:// site for browser gaming frolics that gets regular updates. The creator established this site specifically for playing Flash games at school.
Unblocked Games 66 includes an expansive list of Flash games within its gaming index, making it capable of playing unblocked games even with the Smoothwall firewall activated. This website also consists of a form with which players can request that new games be added, including online games that are not blocked.
Unblocked Games 77 is another Google Sites website with a similar layout to Unblocked Games 66. There are also plenty of games to play on this website.
It’s opening this website to play Pac-Man, the highest-grossing arcade game in gaming history. Tetris Unblocked is another classic game this website includes.
As in the case of the previous entry in this list, you can also access these games from behind a Smoothwall firewall, thus allowing you to play games without issues.
This website is also part of the list of games that GoGuardian can’t block.
Unblocked Games 24h is another Google Sites-powered website crammed with plenty of fun browser games.
The good thing about this website is that it includes more 3D browser games. It consists of a lot of Mario spinoff games for Mario fans. Pac-Man fans can play Ms. Pac-Man, and there’s also a 3D Doom shoot them up on Unblocked Games 24h.
This website also is categorized as a game that GoGuardian can’t block.
Unblocked Games Pod is one of the best-presented browser game sites that includes both Flash and HTML5 games, which is just as well given that Adobe will discontinue Flash in 2020.
The graphical quality of its games surpasses most other browser gaming sites. Another good thing about this site is that it lets players play the games in full-screen mode.
Fans of the Cut the Rope series can play a Japanese version of the original Cut the Rope Android game. In addition, players can play a Cut the Rope Experiments spinoff game.
Candy Crush and Fruit Ninja are two other big mobile games you can play here, but they aren’t exact emulations of the mobile versions. Thus, Unblocked Games Pod is a good website for Android game fans.
Mills Eagles is a well-organized website for unblocked browser gaming. The problem is that the games are not organized at all. Just titles are thrown in on the page without any apparent criteria (probably popularity?)
However, you get 77 pages of titles, including retro arcade games, such as Space Invaders, Space Blaze, Pac-Man, Asteroids, Tetris, and Donkey Kong.
Friday Night Funkin, or FNF, is just a game and not a website, but users have been enjoying it, and sometimes it’s hard to find it online, so we decided to include this in our list.
Finding an FNF website that’s not blocked is tricky, but we’re confident that we covered this topic.
You can play blocked games at school by using a VPN, a smart DNS, or a free online proxy. Alternatively, you can also access unblocked game websites.
Bypassing blocked sites will allow you to control how you spend your time online, but please ensure that you have a good VPN.
➡ Use a VPN service
A good VPN installed on your device will provide the tools to access any geo-restricted content online or even the range your school has blocked.
That being said, not all VPNs are the same, and we can break them down into two main categories:
Stand-alone VPN services – This type of VPN will not depend on running another software to be able to access its features, and it usually involves a paid subscription
Built-in VPN services – Some browsers have a built-in VPN that allows you to browse the internet anonymously without installing another third-party tool. One example is Opera GX, which has a built-in VPN service, an ad blocker, and a popup blocker.
➡ Try a smart DNS setup: Using a smart DNS will ensure that you can bypass any restrictions on your network, but it won’t protect you from data collection and phishing attacks.
➡ Use a free online proxy: Using an online proxy will allow you to bypass some restrictions, but it is worth mentioning that the traffic is not encrypted; choosing to use a VPN is a better option.
➡Browse the web using a hotspot or mobile data: Even though creating a hotspot from a mobile device will differ from user to user and device to device, using a hotspot will effectively bypass any network restrictions and will allow you to access content usually.
➡ Use the IP of the website instead of the link
Instead of typing in the letters that make up the domain address, you should try using the IP of the respective website instead.
This will ensure that your school computer’s firewall cannot identify from which location the request to access the website was carried out and thus allow you to visit the page without blocking it.
Whether you’re trying to find games that bypass school filters or you’re interested in this topic for work or the military, this article will prove helpful.
What sites do schools block?
To respect the child protection laws, schools are obligated to refuse access to some types of online content, and this, of course, makes sense for our children’s protection, but only if it’s implemented correctly.
Understandably, any adult websites are banned from access in schools by default, but the same principles apply to YouTube, Facebook, and other social networking websites and platforms.
Of course, not all content on YouTube is child-oriented, but millions of educational and science-based videos are also available.
The goal should be to create a program capable of intelligent filtering of the content and thus allow kids to explore their online environment safely while not being refused access to their topics of interest.
What are some game websites that are not blocked by work?
Even though the exact configuration of the blocking feature at your workplace will vary considerably from company to company, we found some gaming websites that might not be blocked at work:
CoolMathGames – This website contains an extensive range of games despite its name, allowing you to play these online without being blocked
Skribbl – Although this game might not be for everybody, Skribbl involves a server of people from across the globe who take turns identifying the sketch created by another user. A simple concept, yet people can lose hours on end with it. This is one of the last IO games not blocked by schools
Sarien – An adventure game genre, players can explore fascinating worlds with some classic Sierra On-Line games
eChalk – This website provides various games to play, including adventure, puzzles, and others.
T-Rex game on Google Chrome – Although this might not work for everybody, disconnecting the internet from your PC and opening Chrome will allow you to play the T-Rex jumping game.
What are some game websites not blocked by the military?
Unfortunately, we couldn’t find any game websites not blocked by the military, as there seems to be a concerted effort to stop any similar activities from being accessed by military personnel.
Besides blocking all game websites, we can find information in The New York Times about a decision to secure another 15 websites to ensure that the networks are maintained while controlling the information that leaves and comes onto the battlefield.
The Army has been flooded with young soldiers who have laptops, iPods, digital cameras, recorders, and that has put the fear of god into some of the generals
Matthew Burden for The New York Times
We hope that the Pentagon will reconsider these measures, as it is unclear how soldiers would be affected in the long term.
This is our selection of the best websites that allow you to play games online even though they are blocked by school, work, or the military.
We’ve also compiled a valuable list of methods to avoid geo-blocked or restricted content and why some options are better.
Feel free to share your opinion using the comments section below.
Microsoft just added the new File Locksmith tool inside the PowerToys suite helps you understand which programs are using certain files.
Although the name suggests some kind of password retrieval tool, the app is pretty harmless and useful altogether.
What is File Locksmith and what does it do?
You surely might have stumbled many times over the File in use error in Windows. If a file is in use by another process, it can’t be accessed by another one, hence the error.
File Locksmith is a Windows shell extension that identifies if one or more files are in use by another process and pinpoints it quickly.
How do I use File Locksmith?
First, you need to install Microsoft PowerToys and the Locksmith was introduced in version 0.64 so make sure you’ve got the latest version.
Press the Windows key + E to start File Explorer, right-click on the file in question, and select What’s using this file? from the context menu.
A File Locksmith window will pop up detecting the processes and you will able to get some details about the processes and hit the End task button to close them.
That’s it! We’ve investigated a pretty meaningless File Explorer DLL file but when you really have some trouble with the file in use error, File Locksmith will prove to be extremely useful.
How do I install Microsoft PowerToys version 0.64?
We remind you that you need to have PowerToys version 0.64 to be able to use File Locksmith. If you don’t know how to do that, here’s a simple method to get it:
Right-click the Start button and select Windows PowerShell (Admin) in Windows 10. On Windows 11, you can use Windows Terminal (Admin) from the right-click contextual menu.
Type the following command and press Enter to run it: winget install Microsoft.PowerToys --source winget
Wait patiently until the PowerToys app is installed.
Now you know how to install and use the new File Locksmith tool inside Microsoft PowerToys.
In the past couple of years, we have seen Microsoft make strides toward ensuring that its footprint across the globe is felt as far as datacenters are concerned. These facilities are in place to ensure that the company is able to deliver Azure, Office 365, and Dynamics 365, along with enterprise-grade reliability and performance combined with data residency.
Though the path has not been smooth all through, especially with the recent hold placed on two of its new Irish datacenters because Ireland’s state-owned electrical utility provider was having a hard time keeping the lights on with its existing datacenters. However, everything seems to be back on track because the development of the datacenter in Grangecastle resumed.
Today, Microsoft has detailed the steps and measures that it has been taking to ensure that these datacenters get to achieve their main purpose. First up is the localization of fact sheets in 28 regions. This resource is in place to help Microsoft’s customers to further understand the role these facilities play, as it features both Power Usage Effectiveness and Water Usage Effectiveness.
Next up, is the enhancement of Datacenters both in North and South America. According to Microsoft, “We are constantly focused on improving our energy efficiency, for example in California, our San Jose datacenters will be cooled with an indirect evaporative cooling system using reclaimed water all year and zero fresh water. Because the new datacenter facilities will be cooled with reclaimed water, they will have a WUE of 0.00 L/kWh in terms of freshwater usage”.
What’s more, the company is edging close to achieving zero waste by 2030 with Microsoft Circular Centers that are right next to datacenters and are used to process decommissioned cloud servers and hardware. Microsoft has also successfully launched a water reuse project in Washington state designed to process water for reuse by local industries, that can be used for datacenter cooling.
Moreover, Microsoft launched a heat reuse project in Finland which is in place to help convert the excess heat released from its datacenters and transfer it to the local districts’ heating systems for domestic and commercial use.
And finally, Microsoft launched a Circular Center in Singapore which has the capability of “processing up to 3,000 servers per month for reuse, or 36,000 servers annually” in Asia Pacific. It has further stated that it intends to launch more Circular Centers in Australia and South Korea starting in 2025.
The company has also signed a new agreement that will allow Microsoft to run all its datacenters with 100 percent renewable energy from the datacenter region that it is planning to launch in New Zealand. Microsoft has further stated that it aims to continue enhancing the efficiency and effectiveness of its datacenters so that their clients are able to achieve more with less.
The specified procedure could not be found is a common Windows 11 error message that can appear in different ways, depending on the cause of the problem. If you see this error message when installing or running a program, it means that the installation process failed.
According to most users who have encountered this error, it happens when they try to open an image or mp4 file on Microsoft Photos.
Why is The specified procedure could not be found error occurring in Windows 11?
The specified procedure could not be found error is usually caused by one or more of the following issues:
Damaged/missing DLL files – The most common reason for this error is due to a missing DLL file that cannot be located on your computer.
Incorrect/missing registry entry – If you try to open a program that is missing a registry entry, you may get this error.
Hard drive corruption – If your computer’s hard drive has been damaged due to a power surge or other physical damage, you may encounter this error.
Incompatible hardware/software – Sometimes hardware drivers or software programs may conflict with each other and cause problems like this one.
How can I fix The specified procedure could not be found error in Windows 11?
There are a few simple things you can do to attempt to fix the error in Windows 11 before moving on to the advanced troubleshooting steps:
Check whether the file you are trying to open is in a supported format.
Try restarting your computer and see if it helps.
1. Repair Microsoft Photos
Hit the Windows key and select Settings.
Click on Apps on the left pane then select Apps & features on the right pane.
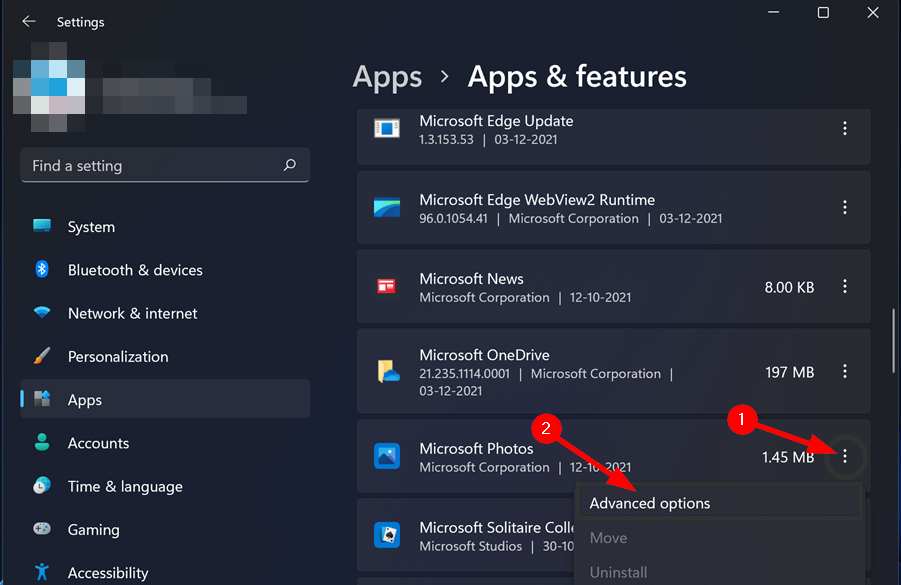
Locate Microsoft Photos, click on the three vertical ellipses and select Advanced options.
Click the Repair button.
When a photo or video is corrupted, it becomes impossible to open. There are many reasons why your photos might get corrupted. That’s why it is important to attempt repairs before anything else.
2. Reset Microsoft Photos
Hit the Windows key and select Settings.
Click on Apps on the left pane then select Apps & features on the right pane.
Locate Microsoft Photos, click on the three vertical ellipses and select Advanced options.
Click the Reset button.
In case the repair function doesn’t work, resetting the app may resolve the issue. Keep in mind that this will remove all of your settings and preferences. This is why we recommend that you always keep a backup of all your important data.
Hit the Windows key, type cmd in the search bar, and click Run as administrator.
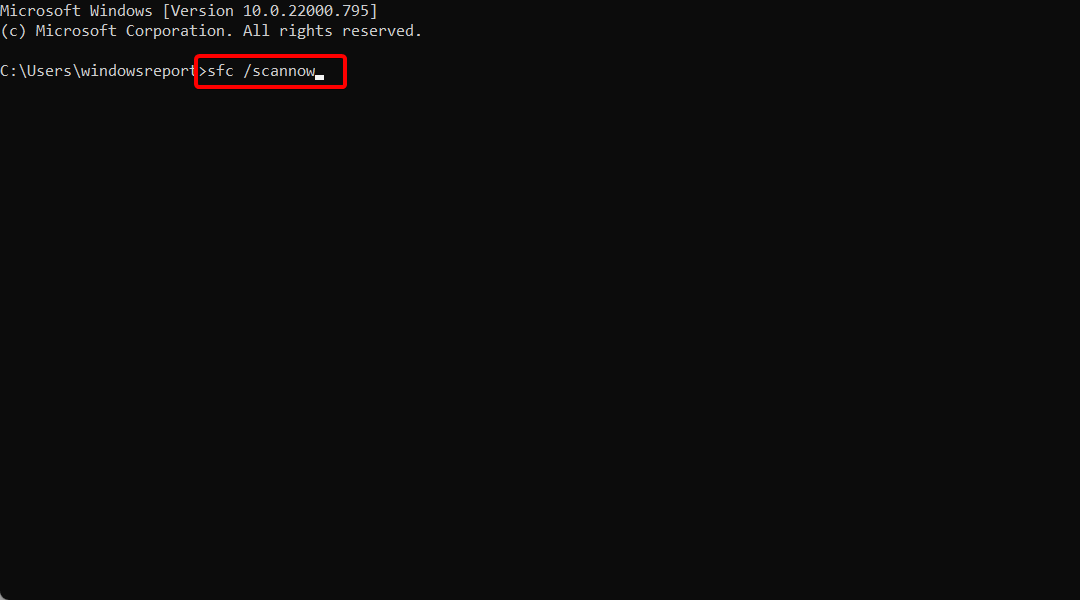
Type the following command and press Enter: sfc /scannow
Although the manual steps are not hard to follow, a quicker and safer option you should try is to use a dedicated tool.
4. Force reset from Powershell
Hit the Windows key, type Powershell in the search bar, and click Run as administrator.
Type the following command and press Enter: Get-AppxPackage *Microsoft.Windows.Photos* | Reset-AppxPackage
Powershell is a powerful tool that can be used to automate many tasks. It is particularly important when resetting apps as it ensures that you start fresh and get rid of any issues that are caused by an app.
5. Uninstall and reinstall Microsoft Photos
Hit the Windows key and select Settings.
Click on Apps on the left pane then select Apps & features on the right pane.
Locate Microsoft Photos, click on the three vertical ellipses and select Uninstall.
Remember to remove software leftovers before you reinstall the app again. This will ensure any residue corrupt files don’t remain behind.
If all these methods don’t work, you may have a virus present in your system. Sometimes when you download files or programs from the internet, they come bundled up with other software.
Most of the time, these programs contain malware and can affect how your system functions. Ensure you perform a virus scan and install a reliable antivirus program as Microsoft Defender may not be comprehensive enough to pick up any threats.
As a last resort, Resetting Windows may be an option if everything else fails. This can restore your PC to a previous state without any problematic files or programs.
If you were experiencing this error, we’d love to hear your feedback. Let us know in the comment section below if you have been able to resolve this issue.
Twitch is one of the most popular live-streaming services for gamers. But despite its popularity, many users reported Twitch keeps buffering, especially on browsers like Chrome or Firefox.
On this note, users complained of VoD, playback problems, or clip buffering, which occurs due to background applications. All these issues will have a massive negative impact on user experience, affecting the overall gaming dynamics.
Why is my Twitch constantly buffering?
The Twitch keeps buffering issue can be caused by various factors from system issues to problems with your browser. Below are some of the popular causes:
Internet connection issues – In case your Internet is slow or unstable, it can cause Twitch not to load on Chrome and Firefox or constant buffering. We suggest checking the Internet status first. In addition, you’ll get more fixes in this way later.
Background apps, extensions, cookies, or cached files affecting the app – In this situation, we recommend temporarily disabling the extensions and clearing your browser’s data.
Your system is infected with malware – Because cyber attacks are more and more frequent, you can easily get viruses that will cause the Twitch buffering issue even with good internet. You can use one of the best antivirus software to scan and remove the malware.
Browser-related problems – If you’re facing this error when running the Twitch browser version, we recommend using one of the best browsers for Twitch streaming.
Now, let’s see what you can do to solve all of the issues mentioned above.
How do I fix Twitch if it keeps buffering?
Before exploring our fixes on the Twitch keep buffering issue, below are some checks to perform that might solve the problem for you:
Ensure that your internet connection is active and stable.
If you are still facing this issue after these preliminary checks, you can now explore the fixes below.
1. Turn off/on low latency
1.1. As a broadcaster
Log in to your Twitch account, click the Profile picture icon, and select Settings.
Click the Channels and Videos tab at the top to open your dashboard.
Choose Settings followed by Stream in the left pane.
Finally, scroll down and check/uncheck the radio button next to the Low latency option under Latency mode.
Now, you can restart the stream and check if the issue persists.
1.2. As a viewer
The Low latency mode is used by streamers and viewers to communicate in near real-time. However, some users have found it to be the cause of the Twitch buffering constantly issue. So, be sure to enable and disable this feature as in the example below
1. Click the Settings icon on the Twitch player of the video you are streaming.
2. Choose the Advanced option.
3. Now, toggle the switch before Low latency to activate/deactivate it.
2. Disable hardware acceleration
2.1 Google Chrome
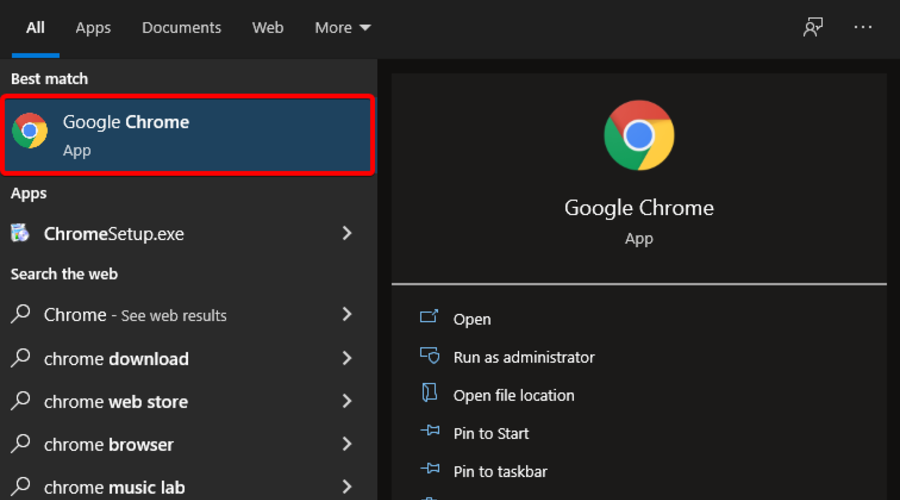
Hit the Windows key, type Chrome, and then open the first result.
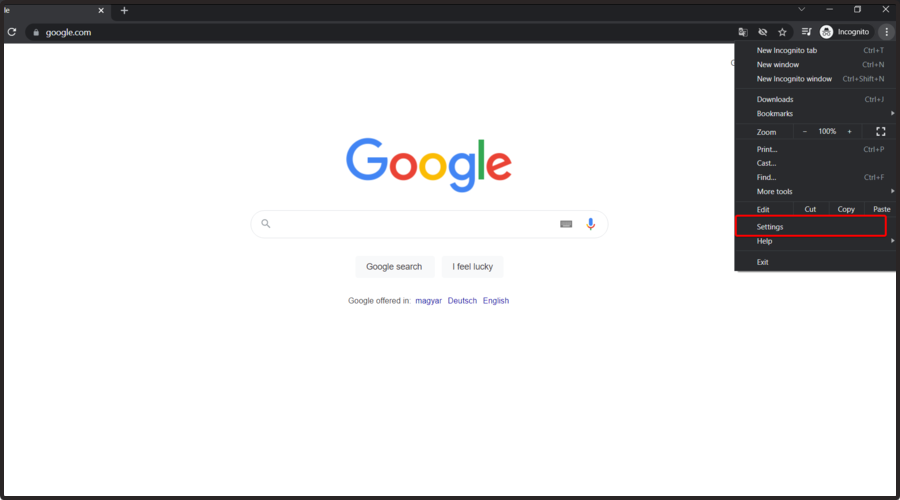
Look at the top-right corner of the window, then click on the 3 vertical dots (the Chrome General menu).
Navigate to Settings.
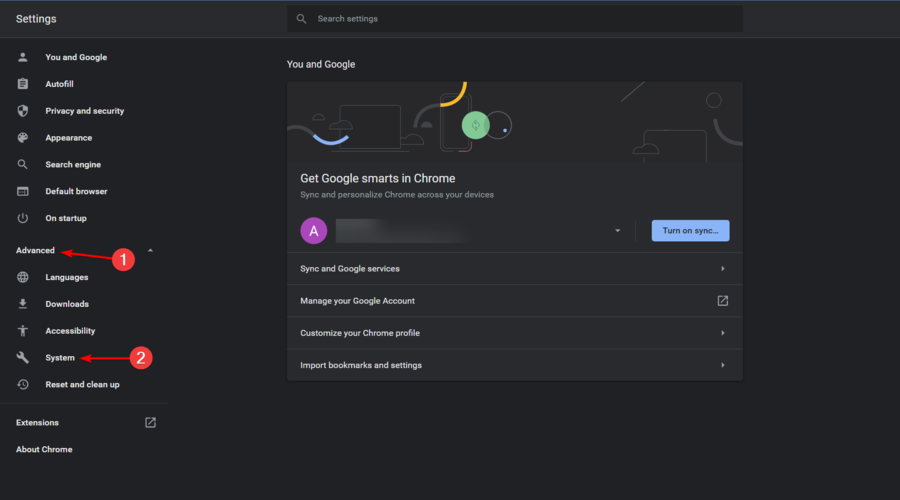
From the left window pane, expand the Advanced section, then click on System.
Locate the Use hardware acceleration when available option and disable it.
Restart your browser.
After disabling this feature, check if still Twitch keeps buffering on your PC.
2.2 Mozilla Firefox
Press on the Windows key, type Firefox, and open it.
Go to the Firefox General menu (marked as 3 horizontal lines in the top-right corner of the window).
Click on Settings.
Now, in the right side of the window, scroll down until you find the Performance section.
There, uncheck the Use recommended preferences settings option, then the Use hardware acceleration when available one.
If Twitch keeps buffering every few seconds, it could be due to the hardware acceleration feature. The hardware acceleration feature will utilize your GPU to process data.
However, it can lead to some problems, so you should disable it. After disabling this feature the issue should be resolved. Other problems can be generated by hardware accelerations, such as the Twitch error 1000.
3. Clear the browser’s cache
3.1 Google Chrome
Hit the Windows key, type Chrome, and then click on the first result.
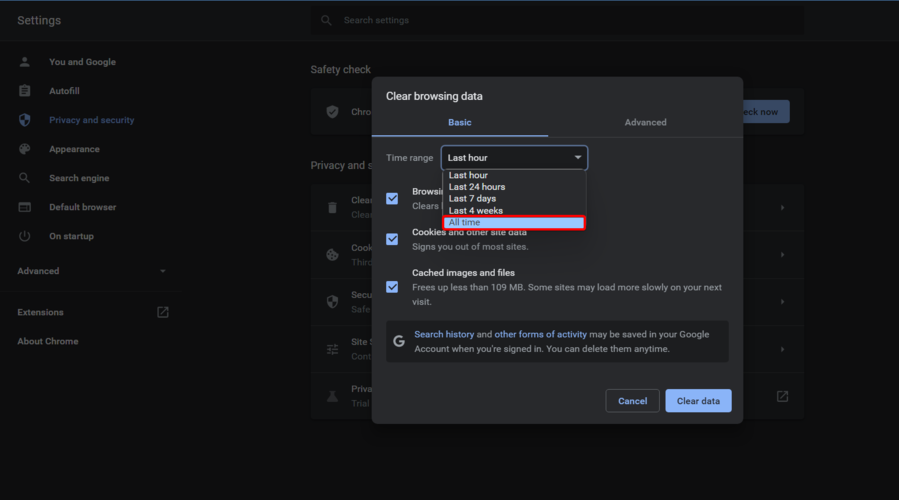
Use the following keyboard shortcut to open the Clear browsing data menu:Shift + Ctrl + Delete.
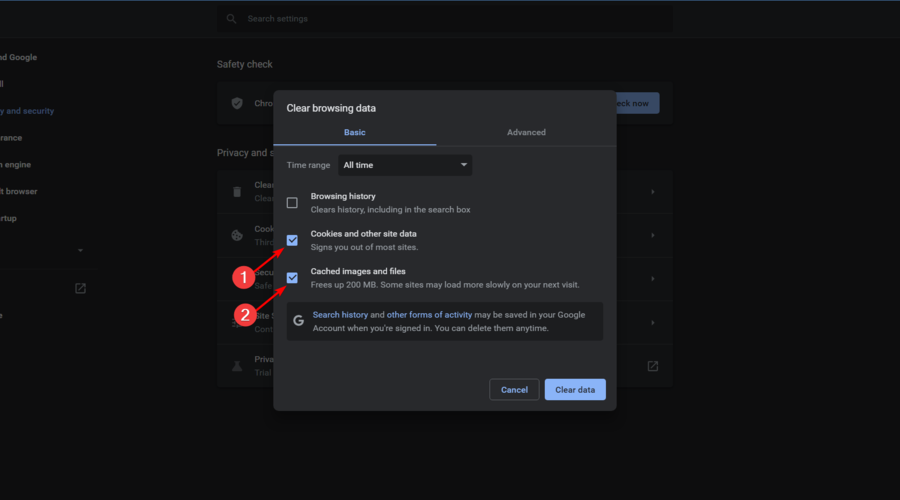
Select All time as the time range.
Checkmark the Cookies other site data and Cached images and files sections.
Click on the Clear Data button.
3.2 Mozilla Firefox
Press on the Windows key, type Firefox, and open the first result.
Click on the 3 horizontal lines button from the top right corner.
Navigate to History.
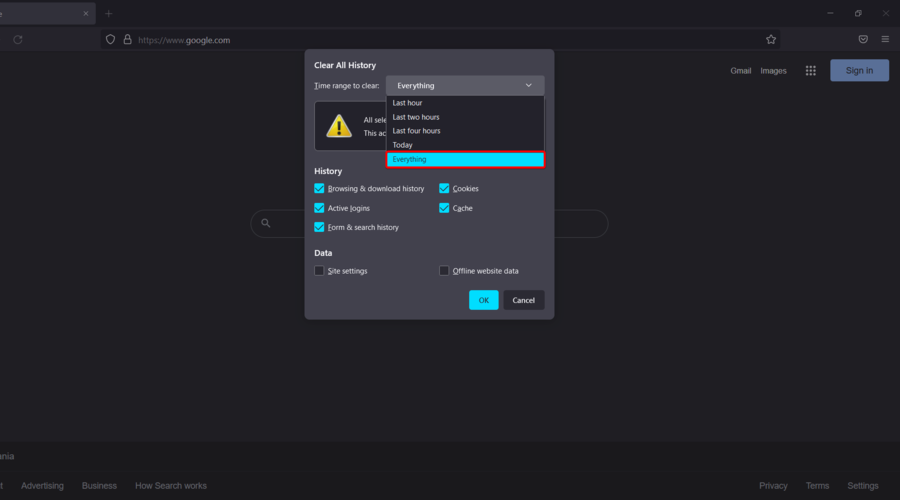
Click on Clear Recent History.
Click on the Time range dropdown menu and select Everything.
Checkmark anything you want to clear from the History and Data sections. We recommend checking all the boxes except Active logins.
Click on OK.
Now, go again to the Firefox general menu.
Navigate to Settings.
From the left window pane, choose Privacy & Security.
Scroll down to Cookies and site data, then click on the Clear Data… button.
You should know that there are tools that can help you perform this task automatically and according to a schedule. Check the best cookie cleaner software for your Windows 10/11 PC to discover which one is more efficient.
4. Disable browser extensions
4.1 Google Chrome
Hit the Windows key, type Chrome, and then open the first result.
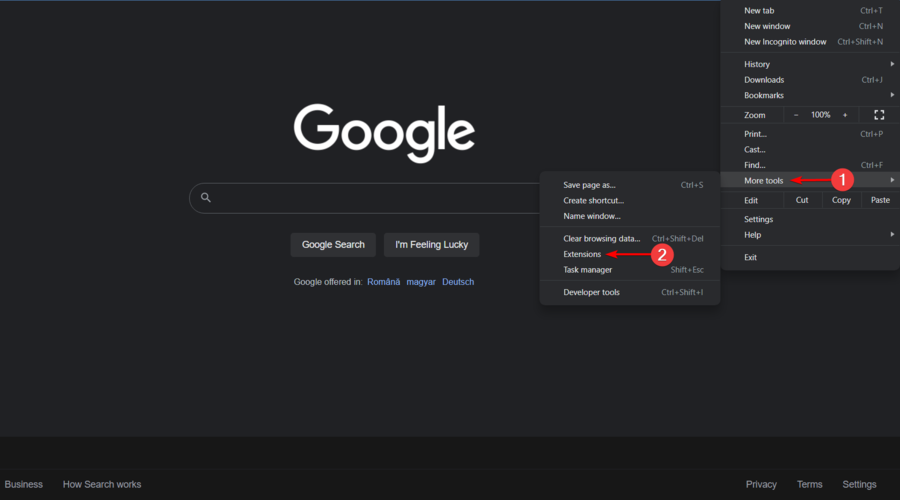
Click on the Customize and Control Google Chrome menu button (the 3 vertical dots placed in the right-top corner of the window).
Hover the mouse over More tools, then click on Extensions.
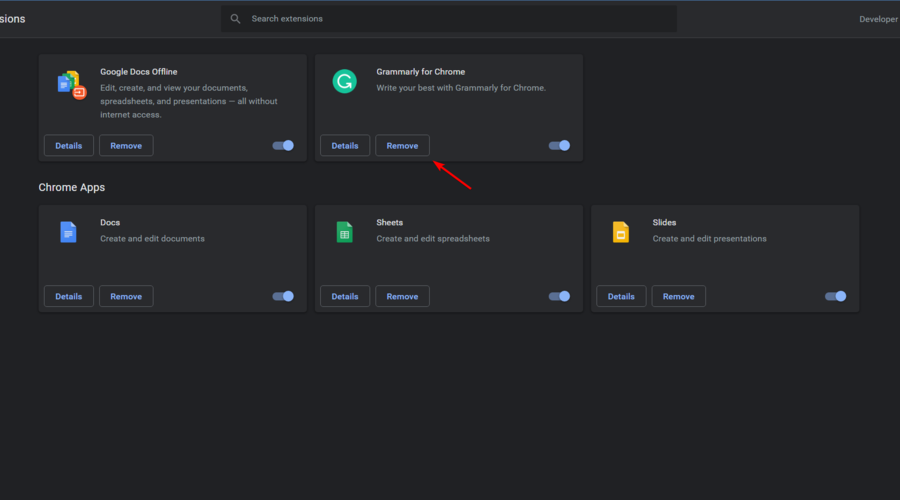
On to the extension you want to remove, click Remove.
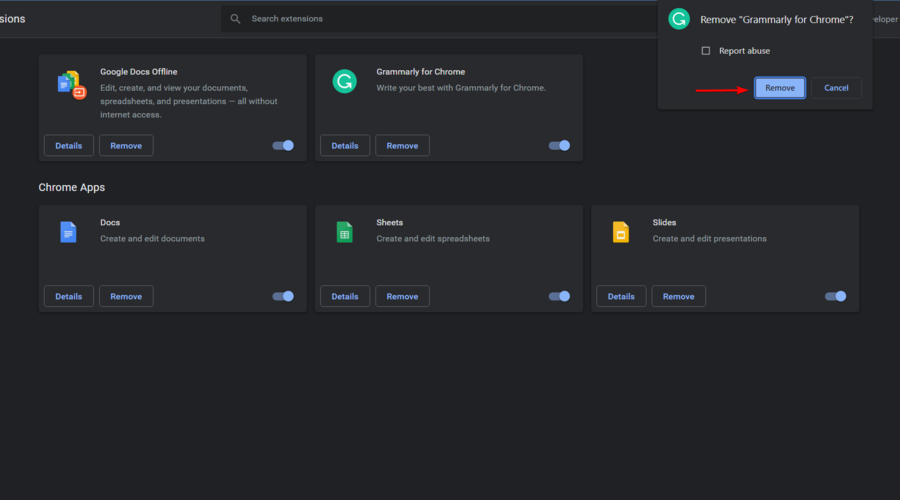
Confirm by clicking Remove.
Repeat the process for all your extensions.
4.2 Mozilla Firefox
Press on the Windows key, type Firefox, and then open the first result.
From the top-right corner of the window, navigate to the Firefox menu (marked as 3 horizontal lines).
Navigate to Add-ons and themes.
From the left window pane, select Extensions.
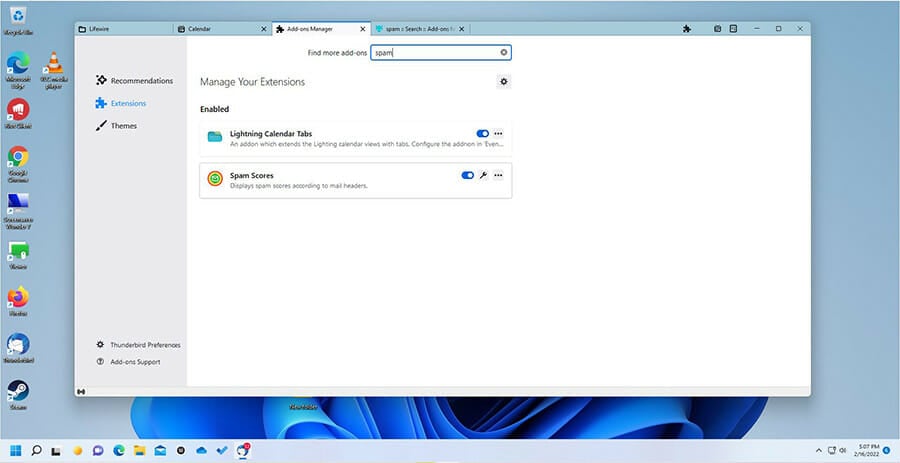
Find the ones you want to disable, click on them then on the Disable button.
If you want to delete an extension entirely, click Remove.
Once you disable all extensions, check if the problem is still there. If the issue doesn’t appear anymore, try enabling the disabled extensions one by one.
Be sure to repeatedly check Twitch to pinpoint the extension causing the problem. Twitch adblock and other adblockers are notorious so once you find the problematic extension, remove it, or keep it disabled.
Use the following keyboard shortcut to open the Settings menu: Windows + I.
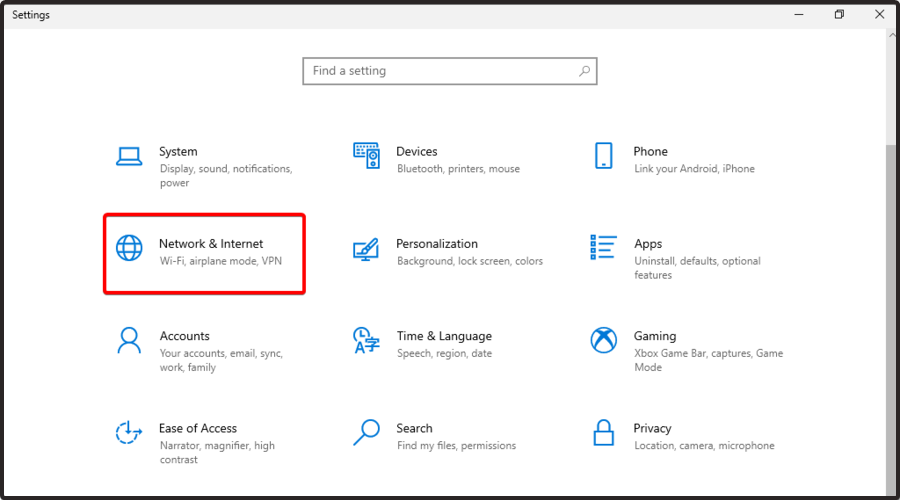
Navigate to Network & Internet.
From the right window pane, click on Change adapter options.
A list of available network connections will appear. Right-click your network connection and choose Properties from the menu.
Select Internet Protocol Version 4 (TCP/IPv4) from the list, then click on Properties.
When the new window appears, select Use the following DNS server addresses.
Now enter 8.8.8.8 as the Preferred and 8.8.4.4 as the Alternate DNS server.
Click the OK button to save changes.
After making these changes, you’ll switch your DNS to Google’s DNS and the issue should be resolved. If Twitch is buffering every few seconds, it’s possible that your network connection is the problem.
6. Disable background applications
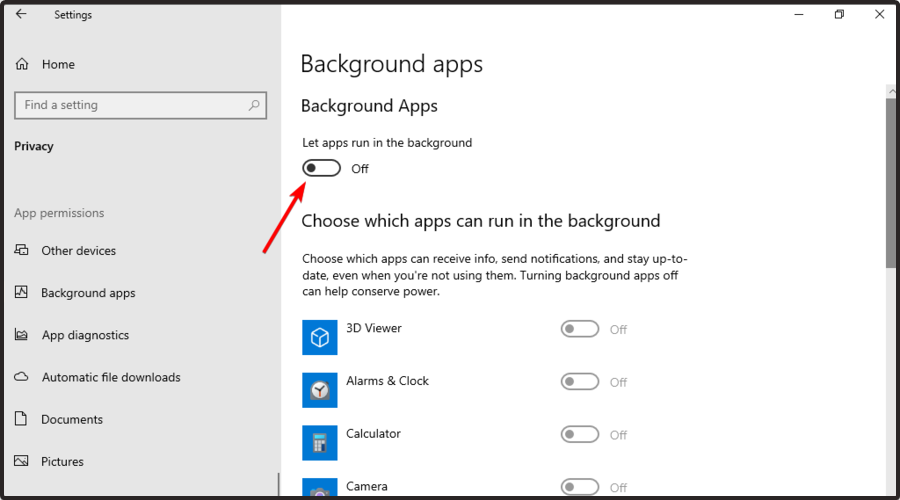
Press the Windows key + I to open Settings and select Privacy.
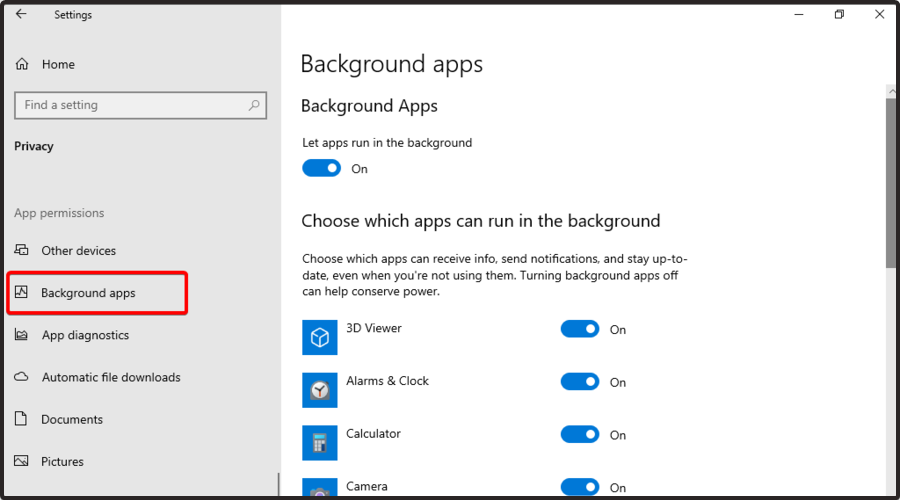
In the left window pane, scroll down to Background apps, then click on it.
Now, in the right window pane, make sure thatLet apps run in the background is turnedOff.
According to users, if you’re facing Twitch buffering issues, the background applications might be responsible.
A common cause for this is Steam updating certain games in the background. So be sure that Steam isn’t downloading anything or that it does not have updating issues.
In addition, check any other applications that might be using your bandwidth in the background and disable them. After you disable these applications, check if the problem is still there.
7. Check for malware
Press the Windows key + S, type virus, and select Virus & threat protection.
Choose Scan options.
Finally, select your preferred scan option and click the Scan now button.
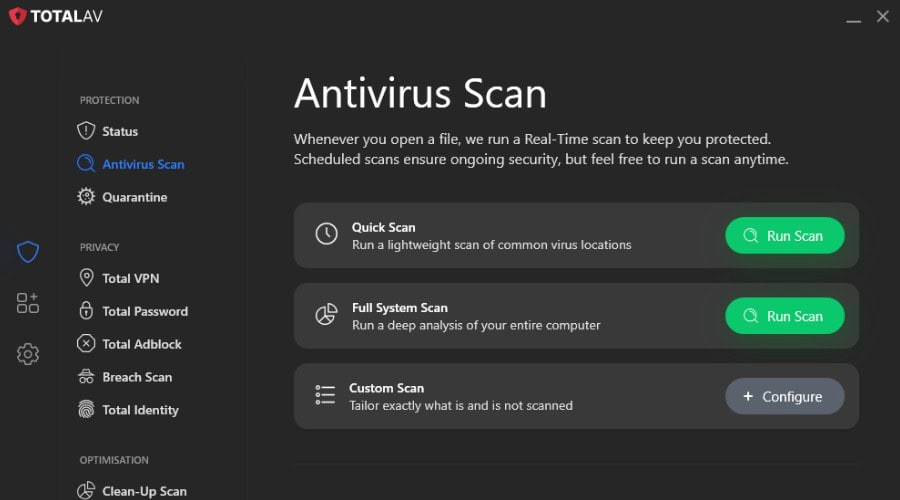
If Twitch is buffering but the Internet is fine, we recommend performing a full system scan using your antivirus
If there’s no malware on your PC, perhaps the issue is your antivirus. To check that, disable some antivirus features and see if that can be a potential Twitch buffering fix.
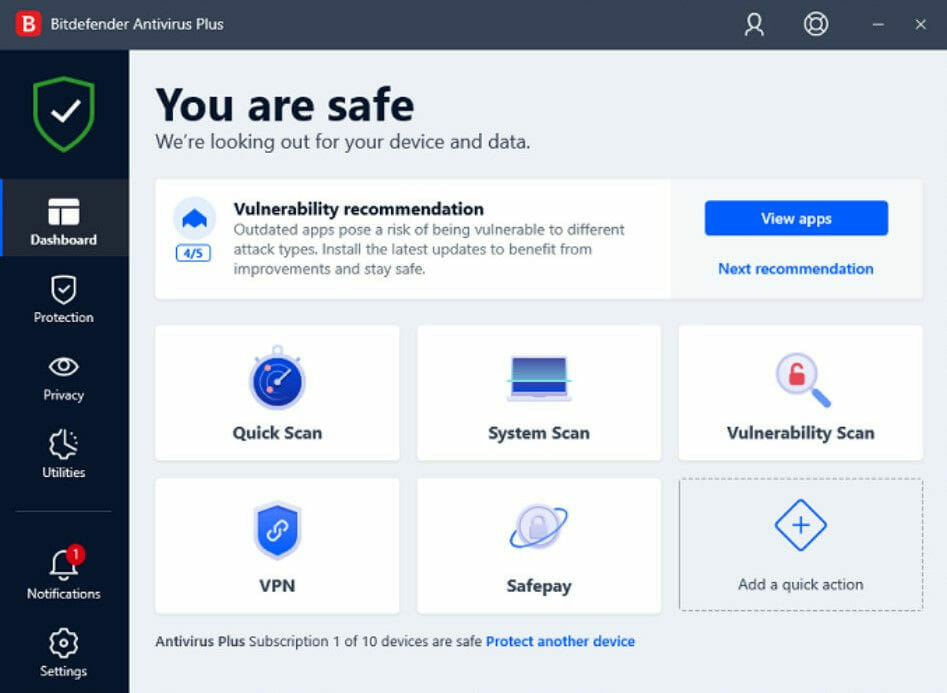
Alternatively, you can remove your antivirus altogether and check if that helps. However, the preferred way, in this case, would be to use one of the best antiviruses with Gaming Mode & Booster in ESET NOD32.
This lightweight software does not interfere with your system and does everything to keep your PC protected online and offline. More importantly, it detects and eliminates viruses before they can affect your computer.
8. Disable your proxy or VPN
Press the Windows + I and select the Network & Internet option.
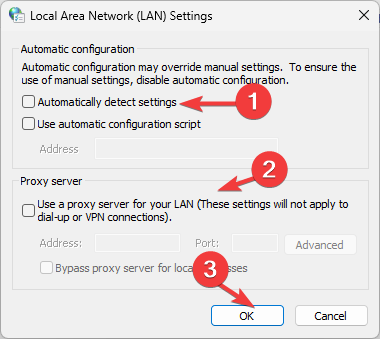
Select Proxy from the left pane, then disable all options from the right pane.
Once you disable all options, the proxy will be disabled and the problem with Twitch buffering should be resolved. If you’re using a VPN, be sure to disable or uninstall it and check if that solves the issue.
What’s more, we suggest that you try a good VPN that won’t interfere with Twitch and other websites.
Besides ensuring that browsing is safe no matter what website you access, a premium VPN also cleans your traffic and unblocks media content that is geo-location restricted.
9. Block specific IP range
Hit the Windows key, type Windows Defender Firewall with Advanced Security, and then click on the first result.
From the left window pane, click on Inbound Rules, then look at the right side of the window, and select New Rule.
Select Custom rule and click on Next.
Keep clicking Next until you reach the Scope screen.
Select These IP addresses and click Add in the Which remote IP addresses does this rule apply to section.
Select This IP address range and enter the following addresses: 206.111.0.0 (From) and 206.111.255.255 (To).
Click OK to proceed.
Now repeat steps 5-7, but this time, use the following IP addresses: 173.194.55.1 (From) and 173.194.55.255 (To).
Once you’re done, click Next.
Select Block the connection and keep clickingNextto finish the process.
Once you configure your firewall, you just have to run the following command in Command Prompt or restart your PC: ipconfig /flushdns
Check if the problem is still there. Many users reported that this solution worked for them, so be sure to try it out.
The Resampledmo.dll file contains a set of instructions necessary for system programs and third-party applications to work on your computer.
When this DLL file is missing on Windows 11, you see errors like The code execution cannot proceed because Resampledmo.dll was not found. You will learn how to fix it in this guide.
What can I do if Resampledmo.dll is missing on Windows 11?
First, make sure your OS is up-to-date, and virus-free, and try launching another app to make sure it’s not an app-specific problem.
If you’re still having issues, keep reading:
1. Reinstall the app requesting the DLL file
Click the Windows icon on your taskbar, type Control Panel into the Search box, and select the Best match result.
Select Programs on the Control Panel window.
Click on Uninstall a program under Programs and features.
Right-click on the application you want to reinstall and select Uninstall.
Follow the on-screen dialogue to complete uninstallation. Next, install the app again to see if the problem has been solved.
2. Register the RESAMPLEDMO.DLL file
Press the Windows icon on your taskbar, type Command Prompt into the search box, right-click on the Best match result, and select Run as administrator from the options.
In the Command Prompt window, paste the following command and hit Enter on your keyboard: regsvr32 RESAMPLEDMO.DLL
Wait for the registration to complete. Windows will notify you with a popup, click on the OK button to exit.
Now restart your computer and launch the application again to see if the error is gone.
3. Run SFC and DISM commands
Press the Windows icon on your taskbar, type Command Prompt into the search box, right-click on the Best match result, and select Run as administrator from the options.
Once the command window opens, paste the following command and press Enter on your keyboard: sfc /scannow
The scanning will take some time. Wait for the scan to complete.
Once that is complete, go back to the command prompt window then paste in the following command and hit Enter on your keyboard: dism /online /cleanup-image /scanhealth
Relaunch the app or run the program again to see if the error has been fixed.
Click on the Search icon on your taskbar, type msconfig into the Search box, and select the Best match result.
On the System Configuration window, switch to the Boot tab and check the box next to Safe boot, then click the Apply and OK buttons.
Next, switch to the Services tab, check the box next to Hide all Microsoft services and select Disable all then click the Apply and OK buttons to apply the changes.
Restart your PC and launch the application again.
5. Download and install Resampledmo.dll manually
NOTE
We do not recommend downloading DLL files manually. We only recommend using the steps explained below because it has been tested to be secure.
Visit the DLL file website to download the latest version of RESAMPLEDMO.DLL files. Choose either a 32-bit or 64-bit file version as applicable to your PC operating system.
Once the download is complete, right-click on the resampledmo.dll zip file and select Extract all from the options.
On the resulting window, click on Browse to select the destination you want the extracted file to be stored then click on the Extract button.
Next, press the Windows + R keys on your keyboard, enter the following path into the Run command box, and click the OK button: C:/Windows/System32
Next, copy the extracted RESAMPLEDMO.DLL and paste it into the System32 folder on your computer.
Restart your PC then start your application.
Why is the Resampledmo.dll missing on Windows 11?
There can be many reasons for this problem on Windows 11. But here are the most common ones:
Wrong file location – If the Resampledmo.dll file is moved to another location other than the System32 folder on your computer, this error will surface.
Faulty application – The Resampledmo.dll files may be present, but the application you are trying to run does not support it. Hence, the error message.
Malware infections –Malicious software can modify or replace essential files like the Resampledmo.dll on your systems. As a result, your computer can no longer use the file.
Regardless of the underlying reason, we’ve put together a comprehensive list of fixes you can employ to solve the problem.
Summary
If you don’t want to go through this manual process, we’ve rounded up some of the best DLL repair tools for Windows. You can never go wrong with any of them.
We certainly hope that you are able to fix the Resampledmo.dll missing and not found on Windows 11 with the above solutions.
The best thing about the Maxthon browser is that it is available across every operating system like Windows, macOS, and Android. Likewise, it is also available for integrated platforms across different operating systems.
Hence, we’ll discuss how to proceed with the Maxthon browser for Windows XP. However, Windows XP is an extension of the Windows NT operating system. It was first released in 2001. As of today, it is no longer available.
Nonetheless, some old computers still operate on Windows XP and need a reliable browser to surf the internet.
The Maxthon browser is a new-age browser. It is among the most capable and reliable browsers among recent browsers in the market. It has many features that help it offer the best browsing experience.
Furthermore, the Maxthon browser has good security & privacy system, and in combination with a good VPN, it can be indestructible. It helps protect users’ data and browsing information from intruders and hijackers. Also, there is an inbuilt Ad Blocker known as Ad hunter that blocks ads from popping up in the middle of your activities.
Moreover, the split screen feature in the Maxthon browser allows users to browse through numerous tabs concurrently by sharing the screen space. It helps you view many pages simultaneously without closing any tab. Also, there are many display skins that you can use for your user browser interface for a more sight-appealing display.
Nonetheless, the Maxthon browser comes with inbuilt Java, Flash, and other advanced tools. Also, users can download and use the Internet Explorer plugins for Maxthon.
The Maxthon browser has a commendable Syncing system that allows it to synchronize users’ browser data and allows you to access it on several devices. Likewise, it uses file upload features like drag-and-drop to send pictures on the internet.
Does Maxthon support Windows XP?
The Maxthon browser is one of the best because of its ability to work on many operating systems, as we have shown in our dedicated guide on how to download Maxthon Browser on Windows 10&11. The browser supports Windows XP because it is a part of the Microsoft Windows NT OS.
What’s the best browser to use with Windows XP?
Maxthon is the best browser that we recommend for Windows XP. It is because not all browsers are still compatible with Windows XP, so it’s hard to get stable on w for it. However, the Maxthon browser has features that can function smoothly for Windows XP without any difficulties.
Furthermore, the Maxthon browser’s latest version, a free download for Windows XP, is available on the official website.
Quick Tip:
If you want a lightweight browser that is compatible with older versions of Windows, we recommend Opera One. It has a very small resource usage rate, which makes it ideal for older machines.
The browser keeps being updated with the latest features for peak performance and online security. It includes built-in social media integrations, VPN, Adblock, a battery saver, and more!
Opera One
Get the best browsing experience even on older operating systems with its dedicated support!
What is the latest version of the Maxthon browser?
The latest version of the Maxthon browser is Maxthon 6.1.3.3000. The new version has advanced features like HTML 5 support and Java available to only a few browsers. Also, the recent version fixed the bugs in the previous versions.
Furthermore, the dual-core display helps the browser load websites quickly and smoothly. Also, the latest version has a customizable system that allows users to customize their browser themes, tabs, and other display features.
However, there are some other browsers you can download and use on your devices. Hence, we recommend you read our article about the best browsers for old and slow PCs. It will help you have a faster and more reliable internet connection.
Let us know how the procedure went for you in the comments area below, as well as whether you like how Maxthon browser fits with Windows XP.
There are plans underway to add support for 2×2 Gallery view for video calls and meetings for Firefox users. The feature tagged 100983 in the Microsoft 365 Roadmap is set to start rolling out in early December and is expected to reach general availability by mid-December.
According to Microsoft, gallery view will support up to 4 participant videos during a meeting in Firefox browser, thus creating a “richer video experience”. What’s more, users will also be able to stream their own video for the rest of the meeting participants.
The feature was already available for both Edge and Chrome users but is now rolling out to Firefox users. Last year, Microsoft also introduced a new paging experience for Large Gallery view in Teams which shows up to 98 participants in two 7×7 grids of the Gallery view.
Share your thoughts with us below regarding the feature.
Three more games are available this weekend for subscribers of Xbox Live Gold and Game Pass Ultimate, with Xbox Free Play Days. This week’s Free Play Days event will run from Thursday, November 6th through Sunday, November 9th. Here is this week’s lineup.
NHRA™ is back – bigger and better than ever! Immerse yourself into the teams, tracks, tuning, and strategies, then strap into the driver’s seat in your ultimate quest to become the Champion among the true Beasts of the Strip™.
Step into the polished shoes of The Cleaner, a professional crime scene cleaner for the mob. There’s no business like the cleaning business, and right now business is booming…
As you can see, these games are also discounted during the Xbox Free Play Days event. Head over to the Xbox Free Play Days FAQ page to learn more.
If you’re looking for a privacy-oriented browser, today we’re going to show you Rabbit Browser for PC and see what it has to offer.
Is Rabbit a browser?
Yes, Rabbit is a browser initially developed for Android devices but you can also install it on your PC.
However, if your PC is running Windows 10 or a lower version, you will need an Android emulator to use it.
Is Rabbit still available?
Rabbit sold all its assets to Kast, a streaming service and it ceased its support for Rabbit.
But luckily, you can still download and install it so we can say that Rabbit is still available for now.
Is Rabbit Browser safe?
Definitely Yes! Rabbit Browser is safe to use, as it is heavily focused on user privacy.
What is Rabbit Browser and should I use it?
1. What is Rabbit Browser?
Rabbit Browser online focuses heavily on users’ privacy, and it’s always running in private browsing mode. This means that all cache and saved logins will be removed once you close the browser.
The browser can work with multiple tabs, so it can have several private tabs open. The browser won’t save any of your data, and all of it will be removed once your session is over.
Rabbit Browser comes with the ability to change the User Agent on the fly, which can come in handy. As for supported search engines, DuckDuckGo, AOL, Bing, Google, and Yahoo are available out of the box.
The software also has an agent cloaking feature, allowing you to trick websites that you’re using a different browser. In addition, there’s a built-in ad blocker, so you won’t have to deal with ads anymore.
The browser has a built-in media player, and it allows you to easily download videos or other files, and thanks to the minimalistic interface you can focus entirely on browsing.
As for availability, the Rabbit Browser is available only on Android. There isn’t a dedicated Rabbit browser for PC but you can run it by using an emulator.
Rabbit Browser offers some interesting features, but other browsers, such as Opera One, offer more advanced features.
For starters, Opera One is available on all platforms, both desktop and mobile, so you can use it on your PC or phone and sync all your browsing data.
The browser also has tracking protection, so it will block tracking scripts and cookies, and make your web pages load faster. Opera One also has its own ad blocker, so you won’t have to deal with ads anymore.
For an extra layer of security, there’s a free VPN with unlimited bandwidth that will surely come in handy.
As for other features, the browser has support for workspaces, tab islands, a pop-out video player, a native AI and modular AI-ready design.
Opera One
If you need a web browser for PC, Android, and iOS that prioritizes security, then Opera One should be your go-to choice.
Are you monitoring your computer drivers and updating them when needed? Updating your drivers can help to fix issues like slowness, crashing, or instability on your computer.
It can also help extend the life of your hardware since some fixes may involve new features or other code changes designed to fix issues. If you are looking for an alternative way other than manually updating, this article is for you.
What is an ITL driver updater?
When you install new hardware, it often comes with pre-installed drivers. Drivers are critical in ensuring your computer is functioning correctly. Without them, one can’t enjoy new hardware and newly developed software. This is because it can cause problems like crashes or slow performance.
However, the pre-installed drivers are often outdated and incompatible with newer versions of Windows. This is why you need to keep your drivers up-to-date. There are many ways to update drivers manually, but most are not very effective and can cause more problems than good.
Since not everyone who owns a PC knows how to install clean drivers, you risk downloading wrong or corrupt drivers into your system. This can expose your device to malware.
ITL Driver Updater is the program that provides you with the newest drivers. The ITL Driver Updater is the best way to keep your computer’s drivers up-to-date. It’s a simple tool that automatically scans your PC and updates any outdated or missing drivers.
You don’t have to worry about installing malware or viruses since this program does not contain any malicious code or adware inside it.
How can I download and install the ITL driver updater?
Yes, the ITL Driver Update is completely safe and doesn’t compromise users’ security or privacy. Besides, it’s one of the most reliable driver updaters in the market and the first choice of many.
When it comes to the best driver updater tool, Windows Update is a good place to start, but it’s not comprehensive enough to cover every driver out there.
If you’re looking for a more comprehensive solution, you need a utility that scans your system for outdated drivers and automatically downloads and installs the latest versions.
The best driver updater software should have a large database of drivers to find the right one for your computer.
This brings us to free and paid driver updaters. The main difference is that paid versions offer additional features and support, while free versions are limited in what they can do. For instance, the ITL driver updater license key allows you to access the Pro version.
Still, there are also many free driver updaters out there that offer more than enough features for most people. Feel free to also check out the Bit Driver Updater and see if it is a fit for your device.
If you are using the ITL Driver Updater, we’d love to hear your thoughts so far on its performance. Be sure to leave us a comment down below.
Is your computer delivering a background sound while you’re using it?
This may be irritating and/or annoying to the ear, especially when listening to your favorite music, watching a good movie, or playing a new game you recently downloaded to your computer.
However, there are ways to finally resolve and deal with any background sound that’s frustrating your enjoyment.
Why does my computer sound like something is running in the background?
High CPU and low GPU usage are frequently the cause of your computer sounding like something is running in the background.
The amount of an impact relies on the number of resources you have, such as core and threads, clock, and RAM, because the slower the PC, the greater the impact of background noises is.
Sound issues can be caused by either of the following, as well:
❌Cables that aren’t properly connected
❌Damaged drivers
❌Incompatible drivers
❌Sound settings
❌Missing updates
❌Sound card problems
It’s rather usual for this to happen in the absence of a virus, and it’s not always tied to it. Still, it’s a good idea to scan periodically with antivirus solutions without false positives in case an infection is missed.
Here are some quick fixes to resolve the background sound issue on Windows.
How do I get rid of background noise on my computer?
1. Run Hardware troubleshooter
The Hardware troubleshooter tool is built-in into Windows 10 operating system so as to check and resolve any sound issues you may have.
Here’s how to do it:
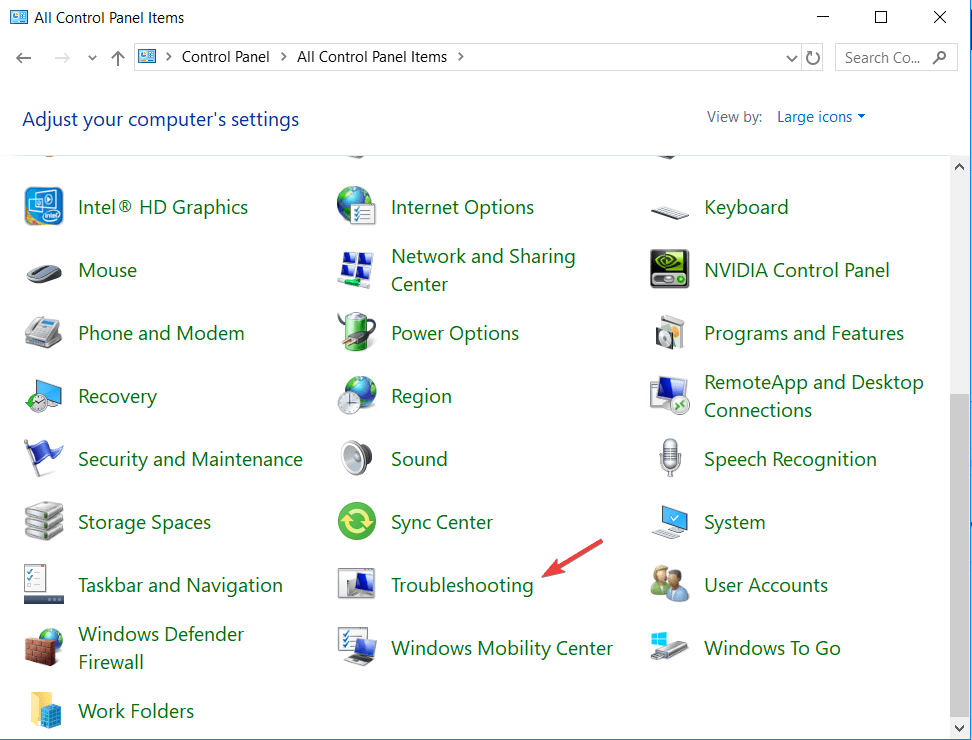
Click Start and type in Control Panel.
Go to the View by the option in the top right corner.
Click the drop-down arrow and select Large icons and select Troubleshooting.
Click the View all option on the left pane and locate Playing Audio.
Run Playing Audio troubleshooter (opens a pop-up window – follow the instructions).
Let us know if this worked. Otherwise, try the next solution.
2. Uninstall Sound card drivers
Sometimes background sound issues may be caused by a damaged or incompatible driver, or a problem with your sound card.
In the event the issue is with your sound card driver, uninstall using these steps:
Right-click Start and select Device Manager.
Search for the sound card driver from the list of devices.
Right-click on the sound card driver and select Uninstall.
If you get the option Delete the driver software for this device, click on it then remove corrupted drivers.
Follow the instructions to complete the process and restart your computer.
3. Update audio drivers
Go to your computer or sound card’s manufacturer’s website, check for the latest Windows 10 drivers available for the model of your computer’s sound card, and then install it based on the instructions on the website.
Manually install drivers
Right-click Start.
Select Device Manager.
Expand the Sound, Video, and game controllers option.
Right-click on the Sound card.
Click Update driver software and wait for the process to finish.
Restart your computer.
A computer cannot handle video cards, computer programs, sound cards, or other hardware, they must be managed by a driver.
You may update drivers manually, but you can also take the simple way by using Outbyte Driver Updater.
This third-party solution has a large daily-updated driver database, so it will provide the most recent drivers available after scanning the system.
In addition, you will obtain a completely thorough report detailing the precise condition of your Windows missing, damaged, or obsolete audio drivers.
Outbyte Driver Updater
Replace corrupted audio drivers causing background noises and using too much of your PC resources.
Click Start and go to the search field box and type CMD.
Right-click and select Run as Administrator.
Type sfc/scannow.
Press Enter..
If the background sound issue persists, try the next solution.
8. Perform a clean boot to troubleshoot the issue
Performing a clean boot for your computer reduces conflicts related to software that can bring up the root causes of the slow game loads issue and background noise while gaming.
These conflicts can be caused by applications and services that start up and run in the background whenever you start Windows normally.
How to perform a clean boot
In order to successfully perform a clean boot on Windows 10, you have to be logged on as the administrator, then follow these steps:
Go to the Start search box and type MSConfig.
Select System Configuration and find the Services tab.
Select Hide all Microsoft services box and click Disable all.
Go to the Startup tab
Click Open Task Manager.
Close Task manager then click Ok.
Reboot your computer.
You will have a clean boot environment after all these steps are carefully followed, after which you can try and check if the background sound is still there.
9. Restore to default sound
In the Start search field box, type Sounds.
Select the Change System Sounds option from the search results.
In the drop-down under Sound Scheme, change the current sound scheme to Windows Default (if it isn’t already).
Any luck with the solutions? If not, we’d love to hear from you.
Share with us what you’re experiencing with the background sound issue, in the comments section below.
Do you have problems related to Elden Ring Easy Anti Cheat not being installed? We will be showing you all you must know in this article.
It’s no surprise seeing triple-A titles having problems before or right after release, so there’s no need to act surprised when we see so many things go wrong with Elden Ring.
Updating your drivers with the help of specialized software like Outbyte Driver Updater is recommended in case you want higher FPS and fewer system errors.
Let us discuss causes and possible solutions if you encounter Easy Anti Cheat is not installed or Failed to initialize the game launcher errors.
Why does Elden Ring Easy Anti Cheat not installed message appear?
This is an error that a few users have faced, and any of the following may be the cause:
Missing files – If you do not have the right EAC files on your device, you can expect to have difficulties using Anti Cheat.
Configuration issues – These errors may be evident in cases where you have not properly configured or set up your installation.
Incompatible antivirus – This is the most likely of the triggers, but in rare cases, you may have your antivirus software blocking important game components.
Let’s discuss the most recommended solutions.
Note that our recommended solutions will work for Elden Ring Easy Anti Cheat crash, Elden Ring launch error 10011, Elden Ring Easy Anti Cheat error 23, and Elden Ring error code 30005.
How can I fix the Elden Ring Easy Anti Cheat error 23, 30005, and 10011?
Before you jump into this fix, ensure your restart your computer. In some cases, after a simple reboot, the problem will fix automatically, and there will be no need for complex solutions.
Open the EasyAntiCheat, then Game Launcher folder.
Paste the files that you extracted earlier.
Verify game file integrity using Steam or try launching the game directly through the game exe called start_protected_game.exe.
Verifying game files is quite easy and will only take a couple of minutes to complete. This is done from Steam, so ensure you access the app before starting.
1.2 Verify game files
Open Steam and click on the Library tab.
Right-click on Elden Ring and select Properties.
Click on the Local Files tab and then click on the Verify Integrity of Game Files… button.
Steam will start verifying the game files and fix any corrupted ones.
Verify that the Elden Ring easy anti cheat not installed issue is solved.
Open Steam, and in your Library, right-click Elden Ring, go to Manage, then click on Browse local files.
Double-click on the Game folder.
Drag the initial files you downloaded and unzipped into the game folder.
Double-click the toggle_anti_cheat.exe file and click OK to disable it.
Now you can start up the game as normal and play.
These are the steps you can go through if you have an Elden Ring easy anti cheat not installed problem. In most cases, you will have to download specific files.
Also note that if you use the second solution, you may not be able to play the game online again. We also wrote a guide on how to run Elden Ring with DX11 so don’t hesitate to check it out.
Was this guide helpful to you? Share your thoughts with us in the comments section below.
You probably just ran into the 0xc00d36c4 error while trying to play some music files. Let us share with you all you need to know.
Errors are a normal part of our computing life. In many cases, they can quickly be resolved. Sometimes, however, they are complex and much more annoying.
What is error 0xc00d36c4 in videos and audio files?
Error code 0xc00d36c4 is a media error that may appear when the user tries to open a video/audio file, usually right after a fresh Windows installation or after installing a major update.
It is often caused by the following:
File extension compatibility – Your audio or video player must be compatible with the file format to play; if not, you will run into some errors.
Copy protection – If the media player has enabled a copy protection feature, you may get this error on DVDs and other external media sources.
Outdated display or system drivers – With media, drivers play a huge role. However, you will encounter a few errors once they are corrupted or obsolete.
How can I fix the Music/Video error 0xc00d36c4?
1. Turn off Copy Protection in Windows Media Player
Launch your Windows Media Player.
On the top left of the Windows Media Player window, click on Organize and open Options.
Open the Rip Musictab, uncheck Copy Protect Music and click OK.
Windows Media Player, by default, copy protects the media files it burns, making them impossible to open in other media/music players. You can quickly turn this feature off.
2. Move your music files
Select the files you need to play from the external storage location, and use hotkeys Ctrl + C to copy them.
Press Windows + E to open the file explorer, then click on the music icon on the left pane.
Paste the copied files in this location and try playing the file to see if the 0xc00d36c4 error is fixed.
On the bottom right corner of the screen, locate the Volume icon, then select Playback devices.
Right-click on your speaker and select Configure speakers.
A list of audio channels will appear. Click on the Test button for each audio channel. If an error message saying Failed to play test tone appears, make a note of the channel.
Once you’ve tested all Audio channels, click Next, then unselect all the speakers that produced the error.
Close the window and see if the media files willplaynow.
4. Use Stellar Repair for Video
Stellar Repair for video is a premium software developed to repair severely damaged video files that broke during the editing and transfer process or even while shooting the footage.
You no longer have to worry about blurry videos or annoying flickering because this tool can fix these problems.
This software is ideal for Windows and Mac users and supports over 17 format video files, including MP4, MOV, AVI, and MKV. It is also compatible with external media storage such as SD cards, USB flash drives, or HDDs.
With Stellar, you can save time by repairing multiple videos simultaneously and seeing the final results before committing the files, thanks to the preview feature.
Stellar Repair for Video
Easily repair any corrupted, broken, or even unplayable video files with this great software.
Codecs help encode and decode the digital data on media files. In addition, they help open digital media files on your computers. Most often, error code 0xc00d36c4 shows up because of missing codecs. Fortunately, you can easily install them.
You must open the installation wizard and follow the on-screen instructions to complete the process. Once done, restart your computer.
Sometimes error code 0xc00d36c4 may appear due to the playback settings being changed by malware or by a different user. Troubleshooting the configurations can help resolve the issue.
We trust that our comprehensive article helped you with fixing the 0xc00d36c4 error. If you have more questions or suggestions, leave them in the comments below.
VRChat is a social 3D MMO game that you can play for free. It’s available only for Windows; you can find it on Steam, Oculus, and Viveport. Although it focuses on virtual reality content, the game can also be played without VR.
In VRChat, you can build your character model, craft entire worlds from scratch, and interact with other players in chat rooms. The gameplay is quite similar to Second Life.
However, many users have VRChat lagging in VR when interacting with the environment or other players, which prevents them from fully taking advantage of the VR game. This can be the cause of several issues, such as network congestion.
You can reduce VRChat’s high ping in several ways, like making optimizations if Steam is running slow. But it may not be enough.
To fix VRChat lagging in VR and improve your network connection speed, you can use a VPN.
The primary role of a VPN is to hide your IP address and encrypt your data traffic to enhance your online security and privacy.
But a virtual private network solution can also help circumvent geo-blocks and speed up your Internet connection while gaming.
Why is VRChat so laggy?
You can face multiple reasons for the lag in VRChat gameplay, so you should be aware of all the factors that can determine this issue.
To give you a better idea, you can experience lag spikes in this game when a server gets too crowded with players, and the network limits are exceeded. However, rest assured that you can take immediate action when worried about VRChat being so laggy on Quest 2.
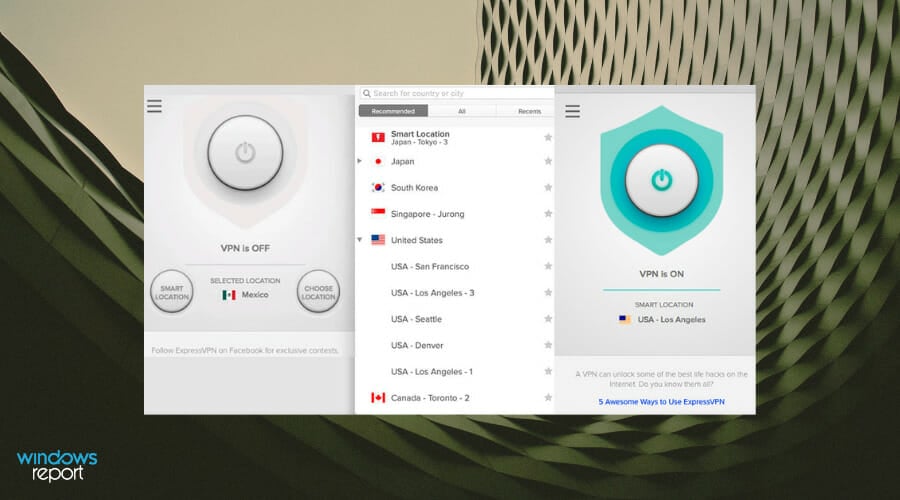
With 160 server locations in over 90 countries, ExpressVPN is one of the most reliable VPN services on the market.
It provides highly secure browsing experiences and ensures that none of your data is disclosed to third parties. You are completely anonymous if you decide to use this software.
ExpressVPN can likely improve your VRChat experience by providing fast and reliable speeds. A useful feature contributing to this respect is the speed test feature provided by the built-in Turbocharge Express VPN.
What it does is scan and pick the fastest server location for your server network. So rest assured that you are always browsing at the highest possible speed.
Other useful features of ExpressVPN include:
Public Wi-Fi Safety
Can be used on 5 devices simultaneously
Wide-ranging payment options
AES-256 data encryption
VPN split tunneling
ExpressVPN is a subscription-based service with a 30-day free trial option.
ExpressVPN
Enjoy VRChat uninterrupted and highly protected with ExpressVPN.
To easily fix VRChat lagging issues stress-free, you can count on Private Internet Access (PIA). It provides you with many VPN servers optimized for gaming and can repair packet loss.
Kape Technologies develops PIA. It’s the only VPN on this list that supports port forwarding, which is handy for hosting game servers. And, if you have any trouble with PIA, you can resort to the 24/7 live chat support.
This VPN protects your identity so well that there’s no risk of getting any bandwidth limit. If you send your data through a VPN, your ISP provider won’t be able to trace and place any throttling on your traffic.
Private Internet Access is very stable and secure. It’s an open-source VPN, meaning it can implement new features and add updates quicker than other types of software.
It has a secure kill switch that will block your traffic if the connection drops. So, there’s no risk of data leaks.
What you need to know about PIA:
+3,300 VPN servers in 47 countries
Private DNS servers to boost your gaming experience
Static and dynamic IP addresses
10 simultaneous connections
Works best with VRChat mirror lag
30-day money-back guarantee (no free trial)
Private Internet Access
If you’re looking for a quick VRChat lag fix, PIA can help you reduce high ping quickly and easily.
NordVPN is one of the best gaming VPNs out there, and it can fix your VRChat lagging issues in one click and enhance your virtual reality experience.
This program hides data traffic from your ISP through encryption protocols, allowing you to enjoy prolonged VRChat sessions without lag. All you need to do is access one of their 5500+ servers using the automatic quick connect function and play without bandwidth throttling.
NordVPN supports all major platforms, including Windows, Android, iOS, macOS, and Linux. You can connect one account to six devices and enjoy a smooth VRChat session wherever you are by choosing one of the servers available in 59 countries across the globe.
Check out other important features of this VPN provider:
DDoS protection
Advanced data traffic security
One-click encryption for mobile
Dedicated IP address
Obfuscated servers
CyberSec technology
24/7 Customer support
Depending on the server you choose, NordVPN can significantly reduce ping time and enable you to interact with other players and the environment in real-time.
NordVPN
Improve your gameplay with this trusted VPN provider!
Surfshark – Affordable price with great connection
Another reliable VPN service that will help you fix latency issues is Surfshark. This tool has a large server coverage of over 3.000 servers worldwide and implements plenty of performance-oriented features.
Surfshark allows you to connect as many devices as you like with just one subscription plan. Plus, it is compatible with all major platforms so you can enjoy privacy and high-speed rates on all your devices.
This VPN has a very well-implemented privacy policy. They do not record any user activity and do not allow third parties to get access to it either. Your whole identity and online activity are completely private and anonymous.
Another benefit of using a well-rounded VPN like Surfshark is that, as mentioned, it hides your identity and even your IP address. This means that if your ISP wants to place any restriction on your traffic, they will not be able to do so.
Moreover, if you feel like you need to increase your speed rates even more, you can use the Bypasser feature. It is essentially a split-tunneling feature that you can use to prioritize traffic toward VRChat.
Other key features of Surfshark include:
OpenVPN
Adblocker
Anti-tracking and anti-malware
Powerful encryption
Surfshark VPN is a subscription-based service. There are three major plans available. The two-year plan is the most budget-friendly. You can try it out before committing as it provides a 7-day free trial.
SurfShark
Connect to the best server and get the best out of VRChat.
If you’re experiencing VRChat lagging in VR, CyberGhost VPN can be of assistance.
It’s a reliable virtual private network service owned by Kape Technologies that you can trust with high-speed servers to improve your gameplay.
CyberGhost VPN is the only free VPN on this list. It comes with split tunneling mode, giving you the possibility to optimize network resources by creating whitelists and blacklists.
ProtonVPN is a high-speed Swiss software that can certainly assist you in fixing lag issues on VRChat gameplay.
Using this reliable VPN solution offers fast servers across 60+ regions so you can easily connect to other servers in order to reduce latency issues on VRChat.
More exactly, you can use 10Gbps servers that are highly capable of reducing high ping and restoring game quality in a short time.
In addition, this software has anti-malware support and comes with built-in NetShield functionality that helps you protect against multiple digital threats.
Apart from that, you have strong encryption with AES-256 support that helps to secure your traffic data strongly.
To summarize, if you’re looking for a simple way to fix VRChat lag and refine your gaming experience, make sure to get equipped with a powerful virtual private network solution.
Other useful features of ProtonVPN include:
Double VPN to route traffic through multiple servers
100% open-source software
Ultra-fast servers across 60+ regions
Malware protection
30-days cashback guarantee
ProtonVPN
Have better ping results for this MMO VRChat gameplay and interact with your friends safely using this VPN tool.
Using the reliable privacy of IPVanish VPN can ensure extremely fast servers you can use to reduce lag on VRChat, plus online freedom with unrestricted content.
This VPN software has many benefits to improve your experience with 2,000 servers worldwide.
You can, therefore, connect to any server in different locations, encrypting your network data for better results in this 3D chat game.
This way, you can hide your IP address and choose between 40,000 exclusive addresses that mask your digital identity.
So, you have advanced VPN protocols that will increase your browsing speed by far and reduce in-game latency instantly. You also encrypt internet traffic and stay away from cyber threats.
In addition, your log data are not tracked by this VPN client, and you’re secured every time you connect to your servers.
It’s with knowing that you have an unmetered server connection for as many devices as you need to protect.
Other useful features of IPVanish include:
SOCKS5 proxy and DNS leaking prevention
VPN Kill switch tool
Split tunneling functionality
Support for all devices like PCs, mobile, tablets, or routers
Risk-free trial period of 30 days
IPVanish
Remove game latency in VRChat and interact with other players with lightning speed.
This usually happens due to multiple reasons related to your VR device or the gameplay itself.
Hence, you can face VRchat stuttering due to factors like incorrect settings on your Steam VR account, hardware resource consumption in the background, or incompatible driver versions.
How do I improve my VRChat performance?
You can enhance this VR gameplay performance using specific settings on your PC to boost your speed or modify some settings in the game.
To give you a better idea, these are different ways to improve your VRChat performance:
➡️ Use Task Manager to set VRChat as a priority
➡️ Adjust graphics quality settings as shown in this VRchat guide
➡️ Use VPN software to enhance connection speed
➡️ Adjust Avatar performance settings
➡️ Delete your browser cache memory
So you can improve the VR experience in this social 3D chat gameplay using these insights to fix lag and low performance.
How do I fix the VRChat lag in Oculus?
You have laggy performance in VRChat because your Oculus device can’t transmit data over a weak signal.
To fix this problem with Oculus, have a try using the following resolutions:
Improve your Internet connection with another bandwidth
Reduce VRChat gameplay quality based on your connection
Adjust your resolution or FPS level from your Oculus app on the PC
Therefore, this is how to fix VRChat lag on your computer to improve your overall experience using the Oculus VR device.
Concluding here, it can be challenging to find the right VRChat VPN. If you can’t decide, we suggest going with PIA.
Having high ping when playing the Ghostbusters game for PC will most likely make the experience very unpleasant. No one likes laggy responses and low FPS.
We’ll show you how to change up your setup to get the most out of what you have and also recommend useful tools like VPNs that can help reduce your ping rates.
Why am I having high ping in Ghostbusters?
Poor Internet Speed – if your connection is poor
Insufficient Bandwidth – too many applications running on the PC can lead to high ping and lag
Outdated Game Version – make sure to always use the latest release
Firewall or Permissions – your security software or firewall may block or restrict the game
How To Fix Ghostbusters High Ping on PC?
There are several tricks you can try to improve your connection for better gameplay.
Tip
? Before you start, we suggest you go ahead and check the Ghostbusters steam page to see if there are any recent outages, in which case you’ll just have to wait.
? Also, rebooting your PC and router can also help. Reconfiguring these devices can get rid of bugs and errors that can accumulate over time.
1. End unnecessary tasks
Background apps and processes can cause high ping, especially those that use your network connection. Make sure to close all unessential tasks before launching the game.
On your PC, Launch Task Manager.
Go to Apps and Background Processes.
Select apps and processes that are not necessary right now and click End Task.
2. Check your firewall
Yes, computers have basic security systems as well. You may find the Ghostbusters game-high ping on PC is caused by a security firewall on your device.
Ensure you also grant permission to the game, especially in access to the network connection. On Windows, you can check your system firewall and ensure it doesn’t block your gaming connection by:
To grant permission for Ghostbusters:
On your Windows PC, go to Settings.
Select Update and Security.
Go to the Windows Security section and select Open Windows Security.
Select Firewall & network protection.
Select Allow anapp through Firewall.
Click on Change settings, then select Allow another app.
Find the Ghostbusters app file and add it to the allowed apps list.
Look for Ghostbusters in the list and select it.
3. Use a VPN optimized for gaming, known for improving ping
A VPN can lower your ping by connecting you to a better virtual region for your game. Virtual Private networks provide access to servers around the world that let you change your virtual location.
Get a VPN for Ghostbusters. We strongly recommend you subscribe to ExpessVPN because it’s gaming optimized and has wide server coverage in 94 countries.
Download the app for your PC and log in with your credentials.
Launch ExpressVPN and click on the power button to connect to a server.
Open Ghostbusters and enjoy low-ping gaming.
A VPN server helps to maintain anonymity while allowing you to find multiple low-ping servers for gaming.
This particular VPN comes with unlimited bandwidth and it allows you to change between servers as much as you need to.
ExpressVPN
Connect to this VPN to get the lightning-fast connection you need to enjoy low-ping gaming on the Ghostbusters PC game!
If your connection is acting up, a plausible root cause is running an outdated network driver. Make sure you update yours to diminish connectivity issues such as high ping:
On your PC, type Device Manager in the Taskbar and open it.
Find the Network adapters section and expand it.
If you have multiple adapters installed, select the one you’re currently using.
Right-click on it and select Update driver.
Alternatively, you can also use a dedicated driver updater likeOutbyte Driver Updater. This will prevent you from having such issues in the future because it can automatically install the latest drivers as soon as they are launched.
5. Update the game
It helps to check your game version if you notice high ping in your connection and general game performance. Outdated game versions can pose security risks and are potential causes of high ping on PC games.
Launch Steam or Epic Games and go to the Ghostbuster’s page. Download any updates if they are available. Wait for the launcher to finish up the download and install process then try to re-open the game.
Even after revamping some of its trademark apps, such as the Microsoft Store, things are not as polished as one would imagine. One of the common issues users report is that they can’t reinstall Microsoft Store.
Though the problem is not tricky, and even though you may have tried troubleshooting it, our solutions would fix things in no time. So, let’s find out why you can’t reinstall Microsoft Store in Windows 10.
Why can’t I reinstall Microsoft Store?
Here are a few reasons you can’t reinstall Microsoft Store:
Corrupt user profile – Most of the time, it’s a corrupt user profile that leads to the problem. There are a few solutions here, but creating a new one is usually the quickest fix.
Issues with the system files – If your computer has corrupt system files, chances are there will be issues while reinstalling the Microsoft Store.
Third-party software is blocking the installation – In many cases, it was a third-party antivirus or security software that blocked the installation of Microsoft Store.
What can I do if I can’t reinstall Microsoft Store?
Before we walk you through the slightly complex solutions, it’s recommended that you try these and see if things get up and running:
Restart the computer. It’s usually the most straightforward fix to eliminate the underlying cause when you can’t reinstall Microsoft Store.
Run Windows Update and install the latest version of the OS.
Disable any third-party antivirus or firewall installed on the PC.
In case none of these work, head to the solutions listed next.
1. Reset the Microsoft Store cache
Press Windows + R to open the Run command, type wsreset.exe, and hit Enter.
Wait for the reset process to complete. It shouldn’t take more than a few minutes.
This is by far one of the simplest methods to fix things when you can’t reinstall the Microsoft Store. It fixes issues while running the app as well as helps with reinstallation. So, make sure to try it.
2. Reinstall Microsoft Store using PowerShell
Type Windows PowerShell in the Search bar, and click on Run as administrator on the right.
Click Yes in the UAC prompt.
Now, paste the following and hit Enter:Get-AppXPackage WindowsStore -AllUsers | Foreach {Add-AppxPackage -DisableDevelopmentMode -Register "$($_.InstallLocation)\AppXManifest.xml"}
3. Reinstall Microsoft Store from the Xbox app
Press Windows + I to open Settings, and choose Apps.
Now, locate and click on the Xbox app, and then select Uninstall.
Again, click Uninstall in the prompt to confirm the change.
After it’s downloaded, run the file and follow the on-screen instructions to complete the installation process.
Now, open the Xbox app, click on the profile icon near the top-left corner, and select Settings.
Navigate to the General tab, look for Microsoft Store under Dependencies, and click on the Install button.
This solution would be of great help when users can’t reinstall the Microsoft Store. And remember, if you are not an Xbox fan, you can uninstall the Xbox app later on once Microsoft Store is up and running fine.
Head to Microsoft’s official website, and click on the Download tool now button under Create Windows 10 installation media.
After it’s downloaded, run the tool and wait while it sets things up.
Now, click on Accept.
Select the Upgrade this PC now option, and click on Next.
Wait for the download to complete, and follow the on-screen instructions to finish the in-place upgrade.
That’s it! An in-place upgrade usually gets things up and running when you can reinstall Microsoft Store. And the best part, you don’t lose any personal files or apps during the process.
5. Create a new user profile
Press Windows + R to open Run, type netplwiz in the text field, and click OK.
Now, click on the Add button.
Provide an email address associated with a Microsoft account, and follow the on-screen instructions to create a new user profile.
Alternatively, you can create a local account by clicking on Sign in without a Microsoft account (not recommended).
Next, click on Local account.
Fill in all the fields, and follow the on-screen instructions to create a local account.
If the current user profile is corrupt, it could the reason you can’t reinstall Microsoft Store. The ideal fix here would be to create a new account. Though you can create a local account, we recommend a Microsoft account for better security and experience.
6. Reinstall Windows
In case nothing so far has worked, the problem is more intricate than it seems, and the best course would be to reinstall Windows. You will need to create a Windows 10 bootable USB to reinstall the OS.
Also, remember that everything on the PC will be wiped clean. So, it’s best that you create a backup for all important personal files before proceeding with the reinstall.
How do I force Microsoft Store to reinstall?
Press Windows + R to open Run, type powershell, and hit Ctrl + Shift + Enter.
Click Yes in the UAC prompt.
Now, paste the following command and hit Enter to uninstall Microsoft Store:Get-AppxPackage -allusers *WindowsStore* | Remove-AppxPackage
Once it’s executed, restart the computer for the changes to come into effect, and again launch PowerShell with administrative privileges.
Finally, execute the following command to reinstall Microsoft Store:Get-AppxPackage -allusers Microsoft.WindowsStore | Foreach {Add-AppxPackage -DisableDevelopmentMode -Register “$($_.InstallLocation)\AppXManifest.xml”}
If you were wondering how to reinstall Microsoft Store in Windows 11, running a few commands in PowerShell should do the trick.
For those who can’t reinstall Microsoft Store, things should be fixed by now, and the store app should run without glitches.
The error code 0xd0000225 is a login screen issue on Windows 11 that can repeat itself up to three times a week. Although Windows recommends restarting your computer, that’s a temporary fix that doesn’t even work for many users.
The error 0xd0000225 on Windows 11 is caused by update bugs, malware attacks, or corrupt system files.
When troubleshooting the 0xd0000225 error, you should start with the basics. Upgrade Windows to the latest version, and if there’s any app you’ve recently installed, try uninstalling the app and check if the problem no longer appears. Lastly, run a full antivirus scan.
How can I fix error 0xd0000225 on Windows 11?
1. Rename the NGC folder using Command Prompt
Hold the Shift key on your keyboard and restart your computer to boot the system into Safe Mode.
Once the Advanced Startup menu appears, select Troubleshoot.
Next, click on the Advanced options.
Go to Command Prompt under Advanced options.
Paste in the following command and hit Enter on your keyboard to take ownership of the NGC folder: icacls C:\Windows\ServiceProfiles\LocalService\AppData\Local\Microsoft\Ngc /T /Q /C /RESET
Wait for the process to complete.
Next, run the following command and hit Enter on your keyboard to rename the folder: Ren C:\Windows\ServiceProfiles\LocalService\AppData\Local\Microsoft\Ngc Ngc.old
Once the process is complete, return to the first screen and click on Continue to proceed with the normal boot.
Now sign in with your password and proceed to configure your PIN again.
The Blue Screen of Death or BSoD is common in Windows and results in system crashes. Kernel Mode Heap Corruption is one such BSoD error; many users have reported that it has crashed their system.
But what does this mean exactly, and most importantly why does BSoD happen? Let’s take a closer look.
What causes heap corruption?
First, a Kernel Mode is one of the CPU operating modes (the other is simply the user mode). By default, processes running in kernel mode have no restrictions in controlling the hardware.
Calling an element outside the index range – This can happen when your computer will try to read an element that exceeds the array of indexed elements.
Software conflicts – A situation in which a computer cannot successfully run two different apps at the same time is known as a software conflict. It might be caused by the latest installed applications, which you will need to uninstall altogether.
Memory leaks or a failing memory in general – This is the result of the fragmentation of a computer’s RAM. It happens when applications that are poorly designed or programmed fail to free up memory segments when they are no longer needed.
Corrupted system files – The directory of a damaged hard drive can make files appear to disappear, which can then lead to more data loss or corruption.
Faulty or degraded hardware components – Computer components are known to degrade over time, especially when they are overused. You may check your hardware using software, but also by taking a close look at their physical state.
Some of the games in which you may encounter the error are:
TarkovKernel Mode Heap Corruption – Updating your GPU driver is one of the most effective solutions in this case.
Destiny 2Kernel Mode Heap Corruption – If Destiny 2 stops working, you can try to reinstall the game, after updating or rolling back your GPU drivers.
Kernel Mode Heap Corruption Lost Ark – Lost Ark gamers are no exception from this error. Running an SFC scan can do the trick.
Kernel Mode Heap Corruption Apex Legends – If the game crashes, try to run the DISM command in order to clean up your disk.
Moreover, users reported getting the Kernel Mode Heap corruption error while installing Windows 10, Windows 11, or even on just a computer startup.
What is heap corruption stack? (What is kernel mode heap corruption?)
When a program corrupts the view that the allocator has of the heap, it is known as heap corruption. This error may result in a memory leak, which occurs when a portion of memory isn’t returned to the heap.
If you want to solve the Kernel Mode Heap corruption simply, keep reading.
How do I fix Kernel Mode Heap corruption?
Before moving on to more complex troubleshooting steps, make sure that you check the following:
Check whether you have inserted your card in the wrong PCIe lane.
Reduce the memory clock speed to below the factory clock speed, since RAM can also cause Kernel Mode Heap Corruption.
1. Use a repair tool
BSoD errors affect all Windows operating systems and fixing them is quite a difficult task that requires a lot of patience.
However, to make sure that you don’t do more harm than good to your operating system, we recommend using a third-party repair tool to do the job for you. It will easily fix Kernel Mode Heap Corruption on a laptop, and more.
2. Check graphics drivers for issues
1. Right-click the Starticon from your Taskbar, then select Device Manager from the list.
2. Expand theDisplay adapterssection, then right double click your graphics card driver in order to open the Propertieswindow.
3. Here, go to the Drivertab then clickRoll Back Driver if you have the option enabled, or click Update Driver.
4. Wait for the process to finish and click OK.
5. If you select the Update Driver option, click theSearch automatically for driversoption next.
6. Reboot the system and check for any improvements to the Kernel Mode Heap Corruption blue screen issue.
It is important for your PC that you keep your drivers up-to-date. You will not only be able to take advantage of a quicker computer, but you will also prevent a significant number of problems from occurring in the future, such as the Kernel Mode Heap Corruption in NVIDIA.
To make sure your drivers are always taken care of, you can employ the help of specialized tools such as Fortect Driver Updater. This software will scan your system and update all your drivers. Plus it will regularly scan in the future so you don’t have to worry about driver issues again.
Press Windows then type disk cleanup and click the top result.
When the Disk Cleanup tool opens, select your system drive. By default, it will be C.
Select the files that you want to delete, by default you will have the Downloaded Program Files, Temporary Internet Files, and Thumbnails selected. Then click Clean up system files. The Kernel Mode Heap Corruption error when installing Windows 10 will be fixed.
In order to perform free up drive space, you will need to have admin rights. In case you don’t have any right now, check out our guide on how to make yourself an administrator.
4. Run a quick SFC scan
If you get Kernel Mode Heap Corruption on startup, press the Windows key, then type cmd and click the Run as administrator option under the result on the right side.
Here, type or copy-paste the following command and press Enter. Wait for the process to finish then reboot your PC: sfc/scannow
If the SFC scan stops without solving any corrupted software files, we recommend that you refer to our guide on what to do about it. Remember, this also helps with the MUTEX_LEVEL_NUMBER_VIOLATION BSOD.
To fix BSoD errors for good, you might need a professional fixer. Take a closer look at our list of the best BSoD repair software and find the right program for your needs.
We hope that our recommendations from this guide were helpful for you to solve the Kernel Mode Heap corruption BSOD. For more suggestions, please access the comments section below.
Having a strong and stable internet connection while playing games is essential, we all know that. But does a VPN help with the ping?
As someone who has been dealing with high ping in various games, we know how incredibly frustrating it is to see your teammates freezing or getting kicked out of a match, so we have a few tricks up my sleeve I want to share with you.
When it comes to the profile of VPN users, there is no wonder that we can notice a trend, particularly among the Millennial generation.
As Surfshark reveals, especially those aged 25 to 34 are the primary users of VPNs, with about one-fifth of them reported as users. However, note that these figures aren’t limited to gaming contexts only but this data encompasses all VPN applications. Regular VPN use varies, with around 36% using it daily and 41% weekly.
But how does it work? The signal goes through multiple servers, right? Well, in some cases, that can be a good thing!
Using a VPN to connect to a server that’s closer to your game server location can significantly reduce ping and boost response rates in games. The more servers your VPN offers, the lower the chance of connecting to an overpopulated server.
A VPN can remove ISP-imposed restrictions such as bandwidth usage limits. It conceals your traffic data so you can enjoy fast connections all the time.
One thing that seems to cause a lot of debate is whether or not VPNs slow down gaming. Rest assured that performance-oriented VPNs that are truly good for gaming also have advanced features that let you prioritize your traffic toward gaming, thus lowering your ping a little more and increasing overall performance.
Since your location and ISP are important factors in achieving lower ping, you must test out the best VPN for your gaming sessions.
So, stick around, and let’s find some great VPNs to fix that annoying lag issue once and for all!
What are the best low-ping VPNs for gamers?
Product
Features
Our Rating
Link
Private Internet Access
● Multiple VPN gateways and unlimited bandwidth ● Integrated ads, trackers, and malware blocker ● Easy-to-use interface with instant setup
Using a VPN connection can decrease latency instances especially if you go for a gaming-optimized VPN client such as Private Internet Access.
It’s a leading-industry VPN software solution that is not only committed to protecting your privacy but also delivers top speeds thanks to its worldwide VPN network.
Speaking of the VPN Tunnel Network, you can choose from 3278 VPN and Proxy servers spread across 45 countries.
You will benefit from enhanced security without sacrificing performance, plus you can enjoy uncensored access to otherwise geolocation-restricted content.
If, for whatever reason you do experience latencies during gameplay, the PIA app even allows you to alternate server gateways and swap ports and protocols.
Here we have one of the best overall VPNs on the market thanks to the next-generation encryption with which it protects your connectivity and online activity, allowing you to make bank transfers or online purchases safely.
As for what you do while you’re connected to NordVPN, that is purely your own business, since the company provides and guarantees a no-log policy where they don’t track, collect, or share your private data.
Of course, with so much security under its belt, one would expect the connectivity to be slowed down, but in the case of NordVPN, that is certainly not the case, as it provides you with almost unhindered Internet speeds without any throttling. However, don’t hesitate to do your part as well and choose the best NordVPN gaming settings.
NordVPN also provides you with quick access to the closest VPN server via Quick Connect, allowing you to stay secure without wasting time browsing through all of its servers.
Speaking of which, NordVPN has over 5400 servers in 58 different countries around the world, so it doesn’t matter where you are or what kind of content you want to watch, geo-blocking will not be an issue.
Other key features of NordVPN include:
WireGuard protocol for top speeds
No logs policy
Live chat customer support
It is currently available on Windows, MacOS, Android, and iOS, and you can connect up to 6 devices on a single account, including smart TVs and routers.
NordVPN
If improving ping in games is what you are after, NordVPN will provide you with everything you need.
You can secure your online activity through ExpressVPN very easily, using optimized tunneling services for a reduced online presence.
Access to such software is authorized from any geographical area, allowing you to choose any network regardless of the LAN in which you are located. Moreover, you can hide your IP address or encrypt your network with just a few clicks, so that no one can discover your activity.
ExpressVPN can also help you with low ping issues. This solid threat protector can offer lighting speed and unlimited bandwidth to satisfy your gaming expectations.
Another great feature you can benefit from is content without border limitations. Regardless of the internet content origin, you can access it and navigate it without restrictions.
The key features of ExpressVPN are as follows:
Connection security with 256-bit AES, DNS/IPv6 leak protection
Accelerated speed on VPN activity
No censorship of content from other regions.
Anonymous browsing and secured downloading
No activity logs from others
This top-rated VPN software can be downloaded on multiple devices and platforms, like Windows, Mac, Linux, iOS, and Android.
ExpressVPN
Choose your expressway to a safe online activity with ExpressVPN now, and enjoy qualitative protection anywhere in the world.
When it comes to providing the best encryption technologies that are available, Surfshark comes out as a winner. You’ll even find that there’s a feature available that helps stop viruses from entering your device.
There are several apps available for different platforms, which should allow you to easily get connected.
You can also use the service with unlimited devices. Beginners and veterans of VPN use will appreciate the intuitive navigation system that Surfshark provides.
Surfshark does have a few cons, which can exist when you are a relative newcomer. While it does offer over 800 servers worldwide, this is not as many as some of the other VPN providers.
One area where the VPN outpaces other services is its speed. If you require a fast connection, Surfshark will be the best choice.
Other key features of Surfshark include:
Split tunneling
Advanced killswitch
Intuitive and responsive UI
Unlimited connections
You have nothing to lose by trying this VPN as they also offer a 30-day money-back guarantee. And if you’d like more options, rest assured that this list including the best VPNs for mobile data is ideal to protect your privacy.
Surfshark VPN
Surfshark lets you create multi-hop connections that allow you to connect through multiple servers across different countries.
Overall, CyberGhost is one of the best, when it comes to VPN to lower game ping. Their servers have great speed, high-end encryption technologies, and ideal performance.
The company also offers various other features that aren’t commonly found in VPN providers. These extra features include antiviruses and advertisement-blocking services.
Not to mention that CyberGhost offers free proxy services. They even have a free, but restricted edition for their VPN services.
There are only a few cons of CyberGhost. For one, it might be a little overwhelming for new users to navigate the somewhat crowded interface.
They also do not have as many locations and servers as other big-name companies out there.
Other key features of CyberGhost VPN include:
High compatibility with many platforms including gaming consoles
Public Wi-Fi protection
Automatic kill switch
Unlimited bandwidth
Nevertheless, if you are looking for a well-rounded VPN provider that offers everything you need, then CyberGhost is for you.
CyberGhost
CyberGhost’s got 256-bit AES encryption, over 5600 servers worldwide, great price plans, and excellent support.
VyprVPN is designed to deliver fast speeds with the highest level of security on over 70 global server locations and over 200,000 IP addresses.
The tool offers benefits such as increased privacy and security, access to content (bypassing restrictive censorship), and an unrestricted online experience using Chameleon technology.
Vypyr VPN implements top-notch technologies to provide the world’s fastest VPN network. It is specifically designed and optimized for speed.
This means that you will experience fewer delays, minimize latency, and get a faster ping.
Not only that, but it will offer you access to multiple games by surpassing geo-restrictions with its worldwide fast server base.
Let’s quickly look at its key features:
Anti-DDoS protection (you can play without worrying about a DDoS attack)
Supports all devices and platforms including Windows, Mac, Linux, Android, iOS, TV, router
Several encryption protocols and VyprDNS exclusively for Vypr users
NAT firewall as an additional layer of security for your connection
24/7 technical support via email or live chat
VyprVPN is available under several subscription plans, all of which include a 30-day money-back guarantee, so you can test it out without financial commitment.
VyprVPN
Get your security protected by VyprVPN with industrial-strength encryption and well-chosen protocols.
Brought on the market by the creators of the renowned antivirus with the same name, Bitdefender VPN is yet another top choice to reduce ping and boost speed rates in your games.
This VPN ensures that you can enjoy your games on the go without any worries as it uses advanced technologies to encrypt and protect your devices even when using public Wi-Fi.
Bitdefender VPN can help boost performance rates with the help of its split tunneling feature. This type of feature lets you handpick the apps that you want to use the VPN traffic and the ones you want to connect to locally.
This lets you pick the most optimal location for gaming and only use the VPN traffic for that which can significantly boost speed rates.
The user interface is minimal and intuitive, giving users quick access to all the features provided by the VPN.
It is a reliable and lightweight VPN solution that will no doubt improve your gaming experience.
Here are its main features:
Wi-Fi connection to any available hotspot
Unlimited traffic
Unlocking all types of content (media, video, and others from around the world)
Extended coverage using multiple virtual locations
Bitdefender VPN has both free and paid versions. The free version is of course a little limited, but you can use it to try it out and see how it works for your needs.
Note: Bitdefender VPN installs alongside your Bitdefender security solution.
Bitdefender VPN
Bitdefender VPN encrypts all incoming and outgoing traffic on your PC, Mac, or mobile devices.
As you see, a VPN can certainly decrease the ping you have in your online games. VPN packets tend to take a more direct route than your normal ISP packet.
That being said, VPNs can only help ping when it’s caused by connection problems. High ping can also be a symptom of system problems. It’s best you monitor PC performance with dedicated software.
Of course, we would love to hear which did you chose and which works the best for you in the comments below.
Last month Microsoft suggested that turning off some security features in Windows 11 would increase gaming performance. Some gamers want every ounce of performance during gaming sessions so turning off certain features is worth the risk. Microsoft didn’t offer any specifics on what performance increases to expect, but disabling Memory Integrity and Virtual Machine Platform (VMP) can offer up to a 30 percent jump in performance.
It appears Intel’s Arc discrete GPUs are seeing some gains with Memory Integrity disabled, too, according to Twitter user Löschzwerg. Using an Arc A380 graphics card and the popular benchmark 3DMark he achieved a two to three-thousand-point increase in performance scores or just five percent higher than the scores with Memory Integrity enabled. 3DMark is a DirectX 9-based benchmark.
Using the DXVK benchmark which is Vulkan based benchmark that uses Direct X translation, there’s roughly double the performance increase as seen in the graphic above. It should be noted that some of the increases could be due to the efficiency of DXVK. The Arc A380 is an entry-level card, so it’s possible higher gains could be seen with the A750 and A770. It’s also key to remember that these benchmarks are light on the CPU already, so performance gains could be minimal.
It appears as though the release date for the much-anticipated The Last of Us television adaptation has been accidentally leaked over on the HBO Max site’s homepage. (Searching The Last of Us on the site no longer displays the release date, however, so don’t waste your time).
Thankfully, users were quick enough to grab screen shots and share them on Twitter. One such seems to be none other than The Last of Us game developer Naughty Dog, as seen below.
HBO’s The Last of Us stars “Game of Thrones alums Pedro Pascal and Bella Ramsay. It is co-written and produced by Naughty Dog’s co-president Neil Druckmann and Craig Mazin, who wrote and produced the HBO miniseries “Chernobyl.”
Druckmann has called the show the “most authentic video game adaptation yet.” Looks like we’ll see in January. And don’t forget to check out our series if you’re a fan of Video Games on TV!
Are you in the market looking out for the best USB to HDMI adapter for your TV? If yes, then you should look no further.
We have searched and created a list of the best USB to HDMI adapters for TV that you can purchase and be done with your task. You should, however, be aware that selecting the best and compatible one is a necessity, and if done otherwise, it could trigger issues.
What is a USB to HDMI adapter?
USB to HDMI adapter is a simple and quick way to transmit media, such as photos, videos, etc., from your PC or any USB device to an HDMI-enabled device without quality loss.
Usually, a PC comes with 2 USB ports and 1 HDMI port. Of course, this would vary from brand to brand, but you get the idea.
These adapters also come in handy when one HDMI port gets damaged and there is just a single port on your PC.
USB vs. HDMI
USB
HDMI
Full form
Universal Serial Bus
High-Definition Multimedia Interface
Uses
USB can be used to connect hardware such as a keyboard, mouse, etc., or can be used to transfer data.
HDMI is used to transmit audio/video to high-definition devices such as projectors, big displays, monitors, etc.
Speed
USB is a little slower compared to HDMI.
HDMI makes use of high-speed transmission since it is made to transmit content at 1080p or higher.
What features do I look for when choosing a USB to HDMI adapter?
Here are a few key things you should always have in mind or look out for before selecting a USB to HDMI adapter for your TV:
Compatibility – Check if the adapter is compatible with the TV that you will be using it with. If your TV supports 4K, then make sure that the adapter supports 4K, etc.
Check the durability – The adapter has a small footprint compared to a cable. So, you should ensure that it is made up of decent material, especially the wire.
Cable length – One of the most important things is to make sure the cable length of the adapter is sufficient enough for your setup.
HDMI version – Go through the specifications of the adapter and check if it supports the HDMI version you are looking for.
The Zulpunur USB to HDMI adapter is a fast USB 3.0 and stable adapter that supports Windows 7 up to Windows 10 and won’t be a problem to be used with a Windows 11 PC.
It supports 1080p high resolution with a USB 3.0 port, thanks to the high-bandwidth support, and offers a mirror mode to extend your laptop display for multitasking.
You can use it to connect to USB-enabled devices including laptops, desktop to HDMI-enabled devices such as monitors, projectors, TVs, etc., and get impressive high-quality images.
Another USB to HDMI adapter for TV comes from the house of Lemorele. It offers support for 1080p high-definition quality.
The best part about this adapter is that it supports macOS alongside Windows. Similar to the Zulpunur adapter, it comes with the Mirror and Extend mode allowing you to display content from your laptop to a big monitor and also display different content from your laptop.
It comes with a 12-month replacement warranty guarantee and provides a stable performance.
RayCue USB to HDMI adapter is a decent option if you are using this adapter for gaming or video conference. With USB 3.0, it supports 1080p high-resolution flawless video transmission.
It supports multiple monitors and comes with Extend and Mirror display feature to sync images on a big screen or extend the image on a split-screen display.
The installation of the RayCue USB to HDMI adapter is also easy and it is plug-n-play.
Ablewe USB to HDMI Adapter is another nice option if you are looking for a USB to HDMI adapter without USB-C.
It delivers 1080p resolution at 60Hz and is ideal for video conferencing, monitors, TVs, projectors, etc. The adapter supports Windows and Windows XP devices but doesn’t support Mac or Chrome OS.
The USB and HDMI ports are gold-plated and support USB 3.0 to ensure the transmission is stable and flawless. In fact, Ablewe USB to HDMI Adapter also supports 3D display.
Elecable USB to HDMI Adapter is the best option, that you can opt for as your USB to dual HDMI adapter. This dual HDMI adapter is available in different configurations such as DP+DP, HDMI+DP, or HDMI+HDMI.
The USP of this adapter is that it supports 4K 60Hz Ultra HD transmission. Note that there’s a premium-quality chip that ensures long life and high-quality transmission.
It supports 1920×1080@60Hz over USB 3.0. The adapter is compatible with macOS, Windows, Android, Chrome OS, and Ubuntu. The package also comes with a USB C to USB adapter, as an inbox content.
We have listed some of the best USB to HDMI adapters that you can find online and purchase.
Also, do note that there is one dual HDMI adapter also that is the best in terms of quality and support.
The deal included some legendary IPs including the aforementioned Hitman and Tomb Raider franchises, in addition to the dormant Legacy of Kain series. Roughly 1100 employees across the three studios were affected by the deal, many of whom will now be losing their employment (although reportedly some will be transferred to Eidos Montreal).
Speaking of which, Eidos Montreal is also being affected by Embracer Group’s cost-cutting crusade, having one project axed completely while another was “rescoped.” Eidos Montreal is reportedly working on a new installment of the Deus Ex series—which is apparently very early in development—as well as working with Playground Games on the upcoming Fable reboot.
As for Crystal Dynamics, it’s developing the next Tomb Raider game in addition to collaborating with The Initiative on the reboot of Perfect Dark.
Whether you like to immerse in a single-player adventure or often engage in a multiplayer battle, which demands unwavering precision, dealing with lag can be a buzzkill.
This comprehensive guide will discuss some of the easiest ways to fix the Steam lagging issue so you can continue your uninterrupted gaming sessions.
Why are my Steam games so laggy?
Network issues – If your internet connection is weak or unstable, you might face lag while playing games on Steam. Check your internet connection or talk to your ISP.
Background processes – Too many processes and programs running on a machine could also cause this issue. Try closing the unnecessary apps to reduce the load.
Game settings – If the In-game settings are not correctly configured, your game might not run smoothly. Verify everything is as intended.
VPN enabled – If you use a VPN while playing a game, Steam might run slow. Try disabling the app.
Outdated driver – If the graphics driver on your device is not updated to the latest version, you might face all kinds of issues.
Now that you know the reasons, let us move to the fixes.
How do I make Steam games less laggy?
Before diving into troubleshooting steps to fix Steam lagging issue, here are some things you could do:
Press Ctrl + Shift + Esc to open Task Manager and kill all the unwanted processes.
If nothing worked for you, try reinstalling Steam, but remember that it may lead to game data loss. In some cases, this issue can be related to the high CPU Usage of Steam Client WebHelper, but we have a guide that addresses that.
Did you miss a step that helped you? Feel free to mention that in the comments section below. We will be including that in our guide.
There are a lot of useful and popular Windows tools, but the Clipboard is definitely an essential part of the operating system and is a pretty handy feature that we frequently use for copying and pasting text and images.
On Windows 11, the clipboard history feature becomes so much better and more productive, and the revamped Clipboard includes emojis, symbols, GIFS, and more. However, if the Sync is not working, we can help you restore this functionality.
Why is the Clipboard Sync not working on my PC?
As reliable as this tool might be, we also have to remember that is part of the Windows OS, which means that it can bug from time to time. When that happens, it’s important to understand what exactly happened and what triggered it, so you can take appropriate actions:
Permissions in the Settings app were incorrectly set for the Clipboard – Now, you will have to go into the Settings app and remedy this.
File Explorer is causing a conflict with Clipboard – If this is truly the case, there’s nothing to do but reset File Explorer.
Windows has become outdated – You will need to update Windows to the latest available version. You can use the Settings app and update your operating system.
OS has become corrupted – In such cases of force majeure, you will, unfortunately, have to reinstall the Windows OS.
That being said, you don’t need to worry. By coming here you’ve already made the first and most important step toward remedying this situation.
What can I do if my Clipboard is not syncing?
1. Enable Clipboard History
Press Win + I to access Settings.
Select the System tab, then click on Clipboard.
Turn on the Clipboard History.
2. Manually enable Clipboard Sync
Press Win + I to access Settings.
Select the System tab, then click on Clipboard.
Turn on the Sync across your devices option.
3. Clear your Clipboard data
Press Win + I to access Settings.
Select the System tab, then click on Clipboard.
Next to Clear Clipboard data, press the Clear button.
Click on Computer Configuration, then Administrative Templates, and finally System.
Select OS Policies.
Double-click on AllowClipboardHistory.
Select Enabled, press the Apply button, then click OK.
Double-click on AllowClipboard synchronization across devices.
Select Enabled, press the Apply button, then click OK.
Close the Registry Editor and restart your PC.
5. Restart File Explorer
Right-click the taskbar and select Task Manager.
Select File Explorer, right-click it, and press Restart.
Wait for File Explorer to start again, and see if the issue is solved.
6. Update Windows OS to the latest version
Press Win + I to access Settings.
Click on the Windows update tab, then click on Search for updates.
If Windows found any updates, click on the Install now button.
Please note that the solutions above have been proven to work and have helped other Windows 11 users resolve this annoying Clipboard problem.
At the beginning of the article, we also mentioned the possibility of having to uninstall Windows. We said that because, in some cases, the OS has become corrupted and no other actions will prove effective or safe.
That being said, only use this option as your last resort and make sure you have backups created, in order not to lose all data when reinstalling the OS.
On September 27, Microsoft posted a new job opportunity for a Principal Software Engineering Manager on their career board. Though applications are no longer being accepted, there was a notable segment in the job details. Microsoft highlighted that it was looking to come out with a new approach where users could now get PCs at a lower cost. However, these PCs would be powered by Windows 365 cloud computing and advertisements.
According to the Microsoft Careers board:
Our work will lead the next wave of cloud innovation for Windows, from defining a new hybrid app model that can scale from local to cloud compute, to building a Web-based shell with direct integration with Windows 365. The building blocks we create will chart a new direction for the experience and business model of Windows – from low-cost PCs powered through advertising and subscriptions, to new direct-to-cloud hardware devices across work and life.
Further in the job description for the Principal Software Engineering Manager post, Microsoft talks about a “Windows Incubation Team,” a unit that was recently formed and is designed to assist with the next wave of cloud innovation for Windows, which includes but is not limited to “defining a new hybrid app model that can scale from local to cloud compute.”
Microsoft has already made considerable milestones when it comes to cloud PCs, especially with the recent launch of the Windows 365 app, which is designed for Windows 11 users to access their cloud PCS conveniently from their devices. The company seems to be on the verge of tapping into cloud computing more intensively per the job details highlighted above. Essentially, by purchasing these “cheap” devices you will also require a Windows 365 subscription since they are powered by both Windows 365 cloud computing and advertisements.
Perhaps the offering of these devices will not feature high-end hardware, thus encouraging the users to conduct their day to day computing needs online rather than on the device itself. As we speak, we’ve already seen Microsoft incorporating ads into the services they provide, for instance, the Microsoft Store. What’s more, Microsoft has further made additional changes, as far as Windows 365 is concerned, where Windows and Surface Chief, Panos Panay now runs the internal team.
It will be interesting to see what the future holds as far as Windows 365 is concerned and how these low-cost PCs will be packaged. Share your thoughts with us below.
Microsoft for Startups brings resources together to help new business owners tackle the challenges of starting a new business. In March of 2022, Microsoft launched the Founders Hub, a place where new business owners could find everything from advice to Azure credits for their startup journey. Now Microsoft is making it easier for startups to find new customers, hire the right talent, and network with their peers by adding access to four LinkedIn services to the Microsoft Startups portfolio.
As of November 1, 2022, members of the Founders Hub will have access to Recruiter Lite, Sales Navigator Core, LinkedIn Premium Business, and LinkedIn ads. Each of these new services comes ready to help you hit the ground running.
Recruiter Lite offers a free 3-month subscription to help you find the right talent for your startup, Sales Navigator Core comes with 3 months of access to people-powered research to help you target the right client for your business, and LinkedIn Premium Business offers a 3-month subscription and free InMail credits allowing startups to find business connections outside of their network. The offering is topped off with $1,000 in LinkedIn Ad credits to help drive traffic and generate leads for your startup.
“Part of growing a business is reaching the right audience at the right time, whether that’s finding a buyer or recruiting new hires with the skills needed to succeed,” said Scott Roberts, VP of Business Development at LinkedIn. “
These benefits give qualified startups access to LinkedIn services at every level to move their business forward. You can learn more about these new benefits and the Microsoft For Startups Founders Hub here.
AMD driver update is a popular tool that identifies the graphic cards, chipsets, and the current Windows version of your PC.
Once this software determines your PC’s specifications, it directly downloads the most compatible and latest available driver packages on your system so that all you have to do is install them.
Can I download the AMD driver update tool on my PC?
Users with the following versions of Windows can effortlessly download the AMD driver update tool to install the latest AMD drivers on their PC directly:
Windows 10 64-bit version 1809 and further versions.
Windows 11 version 21H2 and further versions.
If you meet the following criteria, you can easily download the AMD driver update tool by following the instructions below.
If you don’t have any of the versions mentioned above of Windows installed on your PC, there is no need to worry because you can still install the latest AMD drivers without any software.
How do I download and set up the AMD driver update tool?
Go to the AMD Drivers official site, and then click on the DOWNLOAD NOW option given on the home screen.
Once the download is done, enter the Downloads folder on your computer and double-click the downloaded file to install the app.
Once you run the installation file, the AMD driver update tool will automatically launch and check your PC for hardware compatibility.
Before manually installing AMD drivers, it’s important to ensure that your chipset drivers are up to date. You can learn how to check your AMD chipset driver version by visiting this guide on checking your AMD chipset driver version.
Inside the System tab, click on the Overview tab here to view your computer’s GPU and CPU specifications.
You can also view optional drivers and the latest recommended driver packages for individual GPUs identified in the system within the AMD Software Installer – Radeon Graphics section.
Inside the AMD Chipset Drivers section, you will come across a list of constituents that meet the criteria to update with a check mark. In order to ensure a complete installation, it is recommended to check all the options.
Now you no longer have to search for the latest drivers and install them manually; simply download and set up the AMD driver update tool. Once you have launched the tool on your PC, you must run simple installations to get the latest and most compatible drivers.
How do I manually update my AMD drivers?
Go to AMD’s official website, and select your device from the menu. Keep choosing until a new list of options stops appearing to best identify the device, and then click Submit.
Select the installed operating system.
Click the Download button next to the driver package.
Once done, run the setup and follow the on-screen instructions to complete the installation process.
That’s how you can manually update AMD drivers in Windows within minutes.
We hope this guide helped you familiarise yourself with the AMD driver update tool to a great extent. Do let us know in the comments section below if you have further questions.
The Amazon-owned Twitch streaming service is currently running a special promotion which rewards viewers who make at least two Twitch channel subscriptions with three free months of PC Game Pass, Microsoft’s video game subscription service for Windows PCs.
Accepted monthly subscription types include single month subs, three and six multi-month subs, and gift subs (which is where you buy a subscription to a channel and give it to someone else to use). As is typical with Game Pass promotions, only completely new Game Pass users who have never used Game Pass before nor used any previous promotional codes can redeem this offer.
“Sometimes you’ve gotta mix it up,” the official announcement made earlier today reads. “Whether it’s playing a new title on release day or throwing it back to a classic for all the nostalgia feels, it’s crucial to have that game library available when you want it. So, we want to help. For a limited time, we’re teaming up with Xbox to provide a PC Game Pass trial when you support Twitch streamers with subscriptions.”
PC Game Pass is a monthly subscription service run by Microsoft that gives members full access to around 100 video games on Windows PC. Xbox Game Pass is essentially the same service though designed for Xbox One and Xbox Series X video game consoles and games while Xbox Game Pass Ultimate combines both PC and Xbox tiers and unlocks access to Xbox Cloud Gaming.
Windows 11 is a great operating system that comes with a wide array of apps. However, while most are important and often essential, others may not be as needed.
Many users tend to install third-party software because it does the job better than the built-in ones.
There is a long list of applications that offer more features than their Microsoft counterparts, but today we’re going to focus only on the essential ones.
So, join us while we show you the best utilities for Windows 11 that you should install right after you upgrade.
These must-have free Windows 11 apps will also make a great choice if you are looking for the best free software for Windows 11.
Are Windows 11’s default apps any good?
This depends heavily on your needs and preferences. For example, the new Photos app in Windows 11 brings several improvements but still lacks many advanced features that some users need.
Paint might be a better example since it’s a basic photo editor that everybody is familiar with. Still, it offers the most basic functionality, making it useless for serious tasks.
The default apps are perfect for primary users, but more experienced ones will probably benefit from the advanced abilities that specialized software offers.
Are third-party applications safe to use?
Yes, third-party applications are, in the vast majority of cases, perfectly safe to use, as long as you’re downloading them from a reliable source.
To ensure that the software you’re planning to install is legitimate, always download it from the developer’s website and not third-party sources.
For extra security, you should scan the setup files with any of the best Windows 11 security software and ensure that the apps are free from malware.
Now let’s explore some of the best software tools for windows 11.
What is the best Windows 11 software to use?
Best Windows 11 security software
1. TotalAV – Straightforward antivirus for Windows 11
Windows 11 ships with decent built-in protection, but many people still want a dedicated antivirus, and TotalAV is one of the easiest to live with.
It watches files in real time, so viruses, ransomware and spyware are stopped as they arrive, and its WebShield blocks phishing and malicious websites before they load. Downloads, email attachments and USB sticks are scanned as you use them.
The suite also bundles tune-up tools: a junk cleaner, a startup manager and a browser cleaner, which keep a Windows 11 PC feeling quick. Higher plans add a VPN, an ad blocker and a password vault, and one subscription covers your phone and Mac as well.
Real-time protection against viruses, ransomware and spyware
WebShield blocks phishing and malicious websites
Scans downloads, attachments and USB drives automatically
Junk cleaner, startup manager and browser cleanup
VPN, ad blocker and password vault in the higher plans
TotalAV
This security software protects you from all types of malware while being extremely light on your resources.
Antimalware is essential software for Windows 11, and Bitdefender Antivirus Plus is one of the best among Windows users. It runs silently in the background, offering complete real-time protection without too many resources.
The antivirus uses multi-layered protection to shield your PC against dangerous threats such as ransomware. Not only does it block threats, but it also has data protection features that secure your files against intrusive third parties.
It is proven to detect and protect against known threats and can detect network and system vulnerabilities.
Additionally, Bitdefender allows users to browse the web without worry because it automatically blocks access to and from any suspicious website.
Also, it gives you an anti-fraud warning whenever an unrecognized or potentially malicious website may require payments or valuable information from you.
This antivirus combines features to protect your PC, leaving no vulnerabilities behind. It requires a subscription, and it offers a 30-day free trial.
Other key features of Bitdefender Antivirus Plus include:
Anti-tracker
Web attack prevention
Online banking security
Social media protection
Integrated VPN
Bitdefender Antivirus Plus
Protect your Windows 11 PC with industry-standard antivirus technology.
Microsoft Edge is a solid browser but lacks certain features, which is why many users are switching to different solutions.
One of the most popular options in Opera One, it comes highly recommended and is our best browser software for Windows 11.
If you’re unfamiliar with it, it’s a Chromium browser and works perfectly with all your Chrome extensions.
However, it has a share of unique features, most notably the built-in ad blocker, so you won’t ever have to deal with ads.
If you’re concerned about your online privacy, you should know that there’s a built-in VPN to make your browsing sessions anonymous.
To make multitasking more manageable, the browser has a Workspaces feature that allows you to organize your tabs easily.
Thanks to the advanced search feature, you can effortlessly search for open websites by their name or content and switch to them in a matter of seconds.
Opera One is perfect for social media since it has Twitter and Instagram integration, but it also allows you to use popular instant messenger services while browsing the web.
As for entertainment, there’s a built-in music player to access several popular music streaming services anytime.
UR Browser can be the ideal choice if you’re looking for online privacy and a way to eliminate trackers and other interruptions.
It is relatively new, but it will surprise you with a rich feature set and remarkable loading speed.
Its interface is fresh and modern, and the built-in VPN will ensure you become anonymous online with just a click. However, you will need to create a free account for that feature.
There’s also an ad-blocker on board that will help you ward off distractions and improve browsing speed.
Although we liked the existing interface, UR Browser is highly customizable. For example, you can set a wallpaper for the home screen.
Then, add a lot of favorite websites, news feeds, weather, and widgets to have all your relevant information on the start screen.
You will also enjoy the download manager as they boast of accelerating the download speed. There is even a built-in antivirus scanner and HTTPS redirection to keep your system safe.
UR Browser sure packs some great features for a free browser, so make sure you try it.
Check out its best features below:
Built-in anti-tracking, anti-profiling, and anti-fingerprinting features
Highly customizable interface
Free VPN
High-speed download manager
Antivirus scanning
UR Browser
Navigate the web safely with a free VPN-ready browser that will block unnecessary distractions.
Security and privacy are critical elements in the internet world; hence, using the best VPN service or software for windows 11 is a must.
When protecting your online privacy, there’s no better tool than Private Internet Access, and it works seamlessly on Windows 11 as it did on the older OS editions.
With its 100% no-log policy, you can ensure your traffic data won’t ever fall into the wrong hands.
Its best feature is, however, the massive network with high-end servers from 75 countries and more than 15 million users worldwide can be a testament to the efficiency of this tool.
Whether you’re playing online games, browsing the web, or streaming content that’s restricted in your region, PIA can make that connection completely secure.
Another essential feature is the high-speed connection and unlimited bandwidth that helps you enjoy even the most demanding online multiplayer games and streaming websites.
And with one subscription, you protect up to 10 devices simultaneously, so pretty much all the gadgets used by your family.
Lastly, the app interface is amicable and straightforward, but if you ever need to ask questions, the support team is available 24/7 to solve any problem.
Let’s see what its best features are:
High-speed servers from 75 countries
100% no-logs policy
It covers up to 10 devices simultaneously
Easy-to-use interface
Built-in accessible killswitch
Private Internet Access
Protect your online privacy and get access to any content with geographical restrictions with this premium solution.
Because you’re looking for speed when you become anonymous online, NordVPN could be an ideal choice since it reports an overall network performance of 6,730+ Mbps.
That is great even for gaming, not only your usual video streaming needs or browsing.
As for the connection nods, this solution offers over 5100 servers worldwide, so you can have full coverage wherever you go.
And if you add the NordPass password manager and the NordLocker file encryption cloud solution, you’ve got yourself the complete privacy and security suite.
NordVPN encrypts your connection to log into your accounts, so you will make online payments and bank transfers without worries, even if you’re connected to public Wi-Fi.
Finally, like any other reliable VPN solution, NordVPN has a no-log policy regarding your data or traffic to be completely safe online.
Let’s see some of its best features:
Over 5,100 servers worldwide
Ultra-fast connection speed
Advanced connection encryption
No bandwidth limitations
Protect up to 6 devices with a single license
NordVPN
Get your private streaming and gaming to the next level with this great offer from NordVPN.
1. Microsoft 365 – Best productivity suite for Windows
No productivity tool speaks for Windows better than Microsoft 365 and its office tools. It is easily the best productivity software for windows 11.
Whether a student or teacher working in any business or enterprise environment, you’re using one of the Microsoft 365 products.
Although Word, Excel, and PowerPoint are famous stars among users, you’re probably using the Outlook email client and backing up your data using OneDrive.
And while you’re at the office or working from home, you communicate through Microsoft Teams and use OneNote to keep up with the insights.
Installing Microsoft 365 will add a piece of familiarity to your Windows 11 and ensure your productivity for any project you’re working on.
The Office suite has dramatically evolved over the years. So whether you want to create valuable reports and stunning presentations, keep your emails in order and communicate safely, this is the solution you need.
Take a look at Microsoft 365’s most important features:
Get Word, Excel, Powerpoint, Teams, and Outlook in an attractive package
Seamless integration between all apps from the suite
Excellent compatibility with other productivity apps
Create professional-looking reports and presentations
Smooth integration within businesses and enterprises
Microsoft 365
Get your Office suite of applications and stay ahead in the productivity game with this complete solution.
Sooner or later, you’ll need to work with documents, and few can purchase expensive tools. Luckily, there are many great Microsoft Office alternatives that you can use.
WPS Office is an ultra-light and small office suite with a unique interface that lets you quickly open any file you need.
Each document, spreadsheet, or presentation is opened as a separate tab, allowing you to work with multiple file types from a single application.
It’s worth mentioning that it’s possible to use Microsoft Office files, so there’s no need to worry about compatibility issues.
The software also supports PDF editing and conversion, allowing you to convert them to Word, Excel, PowerPoint, or JPG formats.
Additional features include file repair and picture-to-text, and even 1GB of cloud storage is available to access your documents on different devices.
WPS Office is a small and simple office suite that’s worth checking out if you’re a home user.
Its best features will convince you to try it:
Compatible with all document formats, including Office
PDF editing features
Converts PDF documents in Office or JPG formats
1GB cloud storage available
Ultra-light and affordable
WPS Office
Easy to use and compatible with all document formats, WPS Office is a must-have on Windows 11.
Soda PDF is one of the best alternatives for Adobe Acrobat DC, which gives you all the necessary tools to create, edit, and convert PDF documents at your convenience.
You edit PDF documents just like with a word processor by directly adding, removing, changing, or modifying the text and fonts in the PDF.
This tool also has combiner, joiner, and splitter features for your PDF files, but you will still be able to modify the documents in the process.
For instance, you can extract the pages you don’t need or add more, change their order, and more.
Soda PDF comes in two versions, Standard and Pro. The Pro version has more features that help you transform scanned PDF files into editable and searchable documents and annotate your documents and create custom forms.
The PDF transformation can be achieved by using an advanced OCR feature that detects all the characters from an image and converts them into a digital form.
Lastly, the app also has a digital signage option and can password-protect your documents, sending them safely.
Let’s look at Soda PDF’s best features:
Create editable PDF forms
E-sign and OCR features
Edit, create, convert, compress, merge and split PDF
Convert PDF files into other popular formats
Also available in the Cloud
Soda PDF
Manage your PDF documents with a great and affordable Adobe Acrobat alternative.
Grammarly can be an excellent assistant if you’re an editor or need to double-check your spelling when you write your emails.
We’re talking about an award-winning grammar checker for Windows that has a desktop version or online for you to access directly in your browser. The best part is that it’s available free of charge.
It also comes as a Google Chrome extension to detect grammar and spelling errors and helps you improve the construction of sentences.
Grammarly allows you to check for plagiarism, so if you’re writing or verifying a thesis or a book, this is one of the best solutions.
But coming back to spelling, experts say this tool catches up to ten times more mistakes than your word processor.
Besides the common grammar issues, Grammarly also detects and suggests corrections for preposition errors, irregular verb conjugations, improper usage of nouns, and misused words, making it one of the best spell-checker software for Windows 11.
Let’s see some of its best features below:
Unparalleled grammar errors detection
It makes corrections to all content on any platform
Quick detection and suggestions
Whole sentences analysis
Plagiarism checker
Grammarly
This great tool will quickly check and correct your spelling and sentences on any platform.
QuillBot was easy to include in this list of the best software for Windows 11.
If you need a tool that can get you quickly out of writer’s block or express your thoughts better, QuillBot is a great helping tool.
It’s a software tool that can rephrase sentences with just a click and is ideal for academic, personal, or business purposes.
The program has built-in vocabulary enhancement features. For instance, the AI-powered thesaurus will help you find synonyms, and we all know that finding the right word is hard sometimes.
Its friendly interface integrates directly into Google Docs and Chrome Extension to make the changes right from the corresponding platform.
Using the tool is very straightforward. You just copy the text in the window and hit the Quill button to start analyzing it.
Finally, the most critical aspect is that Quill will intelligently keep the meaning of your sentences while rephrasing them.
Let’s review some of its most important features:
Google Docs and Chrome Extension integration
Great synonyms finder
700 characters on a free plan
Advanced grammar checker
Extremely easy to use
QuillBot
Paraphrase your text, and enhance and correct your spelling with this clever tool.
Our best software for Windows 11 list would not be complete without a conferencing and screen-sharing tool.
Mikogo may be the first option for your Windows 11 device if you’re working from home and looking for a fast and reliable conferencing software solution.
Its primary capability is an excellent screen-sharing function, but you will also find voice conferencing, an interactive whiteboard, a multi-monitor option, and many more.
You won’t need any external file-sharing app because this tool offers file transfer with up to 200 MB. That will take care of those big files you can’t send through by email.
This app lets you record your screen and VoIP calls and include them in a presentation video.
Mikogo is more business-oriented and perfect for personal use, so you should try it.
Key features that you are about to enjoy:
Send files of up to 200 MB each
Set up meetings in advance
High-quality VoIP call
Advanced Annotation Tool
Instant chat messages
Mikogo
Collaborate with your peers using this ultimate conferencing tool that features screen sharing.
GOM Player is one of the most popular video players, and that’s for an excellent reason: it plays almost any video file you may think of.
But that’s just the start because you will need a subtitle after you get the movie, and looking for it online is a long shot.
GOM has been adding subtitles to their library for over ten years, so you will find one for older movies and new ones.
So, when you load the video, the player automatically searches and syncs subtitles for the movie, so you don’t need to do a thing about it.
Prepare for total emersion because this player also supports 360 degrees VR playback, so next time you travel to a new place, you will be able to see it beforehand on your player.
GOM Player is free, but if you want to get rid of the ads and enjoy 4K UHD movies, you will need to pay for the Plus version.
And it’s worth it because it’s also one of the best-paid apps for Windows 11.
Let’s go through some of its best features:
Outstanding file format support
Huge library of subtitles
Subtitles are added and synced automatically
360 degrees VR playback
4K UHD movies with the paid version
GOM Player Plus
Enjoy your movies completed with subtitles on a player that supports all video formats.
If you tend to enjoy multimedia, you’ll need a universal media player, and the best software for many users on Windows 11 is Cyberlink Power DVD.
The software supports over 50 different video formats, including MP4, MKV, HEVC, etc., so you’ll be able to play any file without issues.
You can also play Blu-ray discs, DVDs, ISO files, Ultra HD video, and 4K and 8K videos. There’s a TrueTheater feature for picture enhancement to enjoy the best movie quality.
Regarding audio support, this player works with a wide array of audio files, but it also supports Dolby Digital Surround, DTS, and Hi-Res Audio.
Unlike other similar applications, Cyberlink Power DVD offers 360 videos, VR playback, and spatial audio support.
It’s worth mentioning that the application supports casting, and it works with Google Chromecast, Amazon Fire TV, Roku, or Apple TV.
Overall, Cyberlink Power DVD is a mighty media player, and with support for Blu-ray, 4K, and 8K video, it’s one of the most reliable multimedia apps.
Let’s see some of its best features:
It plays Blu-ray discs, DVDs, ISO files, Ultra HD video, as well as 4K and 8K videos
Dolby Digital Surround, DTS, and Hi-Res Audio support
360 video, VR playback, and spatial audio
Works with Google Chromecast, Amazon Fire TV, Roku, or Apple TV
Supports over 50 different video formats, including MP4, MKV, and HEVC
Cyberlink Power DVD
With support for a wide array of formats, and both 4K and 8K, Cyberlink Power DVD is one of the best media players for your PC.
File archives are one of the most convenient ways to share multiple files, and you’ll encounter them on your PC eventually.
While your operating system can work with ZIP archives, many users use specialized software to compress and extract Windows 11 files.
WinZip is one of the best Windows 11 backup software, which works with more than 25 different formats, including Zip, Zipx, RAR, 7Z, TAR, GZ, ISO, GZIP, and many others.
The application is effortless and straightforward, allowing you to quickly unzip files or create archives.
Support for batch processing allows you to extract multiple archives simultaneously, thus making the processes faster. If needed, the software can also repair damaged archives and restore files.
To ensure data privacy, you’ll be pleased to hear that the security features include 256-bit AES encryption and a password.
You can also use WinZip for backup purposes and even store your files in the Cloud to ensure they aren’t lost in case any issues occur.
Speaking of upload, there’s a helpful feature that lets you split your archives, thus making it easier for you to send your data and share it with others.
Lastly, the software can work as a simple file manager, and while this feature is relatively limited, it might come in handy if you want to perform quick operations with your files.
Overall, WinZip is one of the best compression tools, and if you work with archives frequently, be sure to try it out.
A glance at its best features below:
256-bit AES encryption
It supports more than 25 different formats
Great backup capabilities
Can password-protect the contents
Easy installation and management
WinZip
If you want to compress your files easily and open any archive, be sure to give WinZip a try.
WinRAR has over 500 million users worldwide, so if you’re using a PC, you have at least heard about it; that’s if you’re not using it right now.
As you probably know, the primary applicability of this tool is to compress your data and transfer them quickly.
However, WinRAR does much more than that; it applies military-grade AES 256-bit encryption to your archive and protects it with a password so you can share it securely.
Moreover, this tool has a built-in virus scanner that prevents unpacking an infected archive to protect your system.
If your volume of data is enormous, split the archive into volumes of the desired capacity. It’s that simple!
Then, create self-extracting archives so that the recipient doesn’t need to have unarchiving software to extract them.
And lastly, WinRAR is swift, and you can test it before purchasing it, so if you need an archiving tool, you should try it.
You will benefit from these great features:
Can handle a lot of archive formats, including WinZip
Built-in password manager for archives
Fast compression
Creation of self-extracting archives
AES 265-bit encryption
WinRAR
Archive and back up your data fast and safely with AES 265-bit encryption and a password manager.
Let’s face it! Everybody thinks about Photoshop when they need to edit their photos, but you don’t need such a complex tool for minor changes and enhancements.
For that, Adobe Lightroom might be much better, and you also don’t need too much skill.
This tool handles photo-culling tasks exceptionally and can help you sort your photos after editing.
The friendly user interface will allow you to perform any actions intuitively and as fast as possible.
It’s also important to know that the app works on multiple platforms, so you can work on any device and automatically sync your media with cloud storage.
Note that Adobe Lightroom is a subscription-based program, but it’s also available for seven days of free testing.
Here are some of the benefits of using Adobe Lightroom:
Great for basic editing and image sorting
Adobe Photoshop and Adobe Illustrator integration
Batch process images using the Quick Develop panel
Simple and friendly UI
Basic photo enhancement features
Adobe Lightroom
Edit your photos with this premium solution with all the tools you need to enhance your images.
Adobe Premiere Pro is the best software for video editing, and it comes with complex tools to create professional-quality productions. It is dedicated to moviemakers, so it’s not going to be easy to use if you’re a beginner.
However, it’s never too late to learn, and you will find some masterclass tutorials on their website that will help you get to advanced skills pretty fast.
The user interface is not too straightforward, and it’s understandable since it’s dedicated to cinematography professionals, but at least you can work intuitively with the timelines for storytelling.
Among the unique features of this tool, there is the interactive reframing of the video that helps you optimize the video for Facebook, YouTube, Instagram, and other social media.
Adobe Premiere Pro’s animation tools include the transitions of series, motion graphics, and more great options to turn your creation into a masterpiece.
The software is available for Windows and Mac, the content creators, and video editors’ preferred platforms.
Take a look at some of its best features:
Advanced video editing for professionals
Motion graphics templates
Can handle simultaneous projects
Large video effects library
VR video editing
Adobe Premiere Pro
Get the best professional video editing tool that even has VR video editing features.
Whether you want to create helpful tutorials, record your awesome gaming performance, or just want to make a simple screen caption, Movavi Screen Recorder will capture everything.
It’s a simple and effective tool but supports hardware acceleration and even records your webcam footage with exceptional quality.
The most important feature is, however, the scheduling tool. You can create tasks to record a portion or all of the screen right when you want, set the duration, and then shut down the PC or put it to sleep.
And the recording process is straightforward. You just set up the recording area and settings and hit the Record button.
Then, the basic but efficient editor will help you cut any unwanted part and save it on your PC or Google Drive or simply share them on WhatsApp, Telegram, email, and YouTube.
And while you save the video, you can do so in Full HD or even 4K resolution, so you don’t lose the slightest detail of your caption.
The tool has a free trial version, but your recordings will be saved with a watermark. You must buy the full version to get rid of it.
Let’s see a couple of its best features:
Friendly interface with simple controls
Save your video recordings in 4K
Lots of saving and sharing options
Hardware acceleration support
Schedule your recording tasks
Movavi Screen Recorder
This simple app will record everything on your screen or webcam, even in 4K.
Fortect is one of the most trustworthy repair programs that you can rely on when you need optimization for your computer.
It can scan your whole system to establish your computer’s condition and further investigate which irregularities are slowing it down.
Fortect has advanced OS technology which means it compares your operating system to a brand-new one to see exactly the deficiencies your computer is experiencing.
After that, it helps you repair all the damaged and missing OS files, including DLLs and registry keys, with healthy components from its repository.
Moreover, you can free up space by deleting junk files and build-up documents that clog your folders, disk, and hard drive.
You can perform all these actions with the free trial, but the paid versions will assure limitless usage, email support, and sharing usage with your friends and family.
Let’s look at other key features of Fortect:
Windows Restoration
Complete diagnostic report
Malware and other digital threats detection
Registry Key optimization
60-day money-back guarantee
Fortect
Use Fortect’s full services to keep your computer healthy by repairing all its flaws.
If you want to have all your email accounts in one place and integrate social media, Mailbird can be the right email client for your Windows 11.
Yes, this program has built-in apps like Facebook, Twitter, WhatsApp, Dropbox, Google Calendar, Asana, Todoist, and many more.
Gone are the days when you were looking for an email in vane. Instead, the interface is well-organized, and the advanced search options will help you find that important message in seconds.
Users will enjoy the keyboard shortcuts for all the necessary actions, including archiving, composing, replying, forwarding, and many more.
Mailbird also comes with plenty of customization options with the free themes, and it’s also possible to set it to Dark.
Let’s review some of its best features:
Unified contacts and inbox
Advanced search options for emails and attachments
Customizable friendly interface
Built-in social media apps
Speed Reader included
Mailbird
Unify your accounts, contacts, and emails in a single, easy-to-use email client.
When you don’t want to invest in an email client, Thunderbird can be the best Windows 11 software choice out there, and for a free product, it’s pretty complex.
For starters, it’s the only program that can receive add-ons, just like a browser, to improve its capabilities.
Thunderbird uses a multi-process scheme. That means dividing the program operation into multiple processes, making it much faster than other competitors.
As for the features, the email client includes a PDF viewer, so you can read the documents there without leaving the interface.
Depending on your reading habits, set its interface up and enlarge the icons and text for more convenient usage.
Thunderbird works great on Windows 11, and although it doesn’t have all the fancy features of other paid email clients, it performs flawlessly.
Take a look at some of its most important features:
Best Windows 11 Backup software (+ repair utilities)
1. Aomei Backupper – Best Windows 11 cloning software (workstations + servers)
We can’t stress enough the importance of backing up your data regularly, and AOMEI Backupper is one of the best backup software for Windows 11.
Designed for Windows workstations and servers, this tool supports automatization. That means it allows you to schedule all your backups.
You don’t need to stop using the machine because the Hot Backup feature performs the backup silently in the background.
If you’re an advanced user, you will be happy to hear that AOMEI Backuper supports command-line input for even faster actions.
The backup destinations are limitless. This tool can save your data to internal or external drives, NAS or network share, and various cloud storage platforms.
Bottom line: We suggest trying this solution if you’re looking for reliable and fast automatic backup software.
With Aomei Backupper, you will benefit from these best features:
Command-line support for advanced users
System, disk, partition, and file/directory backup
File syncing support
Automate backups with scheduling and event-triggered scheduling
External/local drives, DVDs, NAS, network share, or cloud storage backup
Aomei Backupper
Perform scheduled and complete backups with this great premium tool that also offers file syncing.
Losing sensitive data can be disastrous, but fortunately, you can get them back with a simple tool like Stellar Data Recovery.
For good reasons, it is a data recovery solution designed for Windows PCs, the most popular external hard drive recovery software.
The tool has advanced data recovery features that will help you restore various files, including documents, video, audio files, and more.
But most important, it can recover deleted or corrupted files from almost any internal or external storage like hard drives, USB drives, and memory cards.
And if your PC suffered a critical crash, Stellar Data Recovery will step in to recover even a lost Windows partition, whether it’s NTFS, FAT, FAT16, FAT32, or ExFAT.
Additionally, the solution is distributed in free or premium (paid) versions. The free package offers 1GB of storage and is designed for home or personal use.
Lastly, if you need advanced features for professional usage, you should go for the premium package that includes unlimited storage.
Take a look at its best features below:
Partition recovery
Recovers of deleted or corrupted files
It supports almost any internal or external storage devices
1GB storage for the free version and unlimited storage for the paid version
Very easy to use
Stellar Data Recovery
This clever tool removes your corrupted or deleted files from any storage media.
File Viewer Plus is the best universal file viewer software for Windows 11 and can open and display more than 400 different file types, including RAW camera photos.
So, it’s a more advanced alternative to the old File Manager and will handle even the most uncommon or unknown file types.
Plus, this tool doubles as an editor and converter for all formats; therefore, it should be one of the most useful apps on your PC.
Moreover, it also manages your archives’ compression and uncompression; the cherry on top is the built-in media player.
But its best feature has to be the one giving the software’s name, and in that respect, File Viewer Plus offers an instant preview of your files directly in the browser.
Let’s quickly look at its key features:
File Inspector to view the file contents
Native support for over 400 file types
Advanced view, edit, and convert functionalities
Basic image editing
File metadata display
File Viewer Plus
Open, edit and manage all your files with this tool which supports over 400 file types.
Its creators say that Passware is the best decryption solution on the market and the claim seems pretty accurate as this tool can recover and reset passwords from over 80 file types and over 300 document types.
And although that alone is very impressive, we can add the fact that it also detects any encrypted files on your PC.
You don’t have to take the files individually because Passware can perform bulk password recovery.
Therefore, all the recovered passwords are automatically stored in a report, so you can access a comprehensive list ready to be used.
But that’s still not all. The software can recover local admin and Live ID passwords, so you’re saved if you forgot any of those.
You don’t need to worry about your mobile because Passware extracts and decrypts data from Android and iOS devices.
The best features of Passware include:
Password recovery in bulk
Automatically detects encrypted files on your machine
Burns password-reset CDs
Displays account properties
Local Admin and Live ID password reset
Passware
This premium tool will detect any encrypted files and recover the passwords automatically.
If you want to have your own personal chat space with your friends, Paltalk is a great alternative. It’s a video chat app that supports all major formats, including desktop and mobile.
Create your own public virtual chat room, and feel free to talk with your peers by voice or text message.
Paltalk also works as a social platform, so you can join any public chatrooms on various topics that may interest you.
Its interface is straightforward, and the interactions with your chat buddies include giving and receiving stickers and gifts to complete the conversation.
There have been over 100 million downloads for this app, so it seems pretty popular and whether you want to catch up with your old friends or meet new ones, give Paltalk a try.
While this application comes at the tail end of our review, it shouldn’t be misunderstood as being unpopular.
It is most famous for being a mobile app and comes preinstalled on most of your mobile devices, but in the last decade, it has become just as much a desktop application.
WhatsApp may not have all the cool features of the mobile app, but you have enough to get by, giving you an equally entertaining chat experience.
You can view the status, broadcast, chat privately, transfer files, and much more using the desktop application.
If you have the Opera One browser installed on your Windows 11, you may kill two birds with one stone using the Opera One WhatsApp integration. That way, you will not need to leave your browser tabs to reply to messages and keep up with friends.
The messaging app has become more than simple messaging but a way of life and, therefore, is one app you should install on your Windows 11 PC.
This list summarizes some of the best Windows 11 software you need to install on your PC as soon as you upgrade or acquire a new computer.
While it’s not mandatory to have all of these tools on your computer, we highly recommend at least installing a reliable antivirus and changing the default browser.
What are the programs that you’re using daily on your PC? Share your must-have apps with us in the comments section below.
Whether you’re looking for UI customization, entertainment, or productivity tools, this comprehensive list of the best free Windows 11 apps has got it all.
We’ll walk you through some of the best software that will improve your experience with the OS. Sounds good? Let’s get started!
What are the must-have apps for Windows 11?
Libre Office – free office tool with word processor, spreadsheets, and more
Libre Office is a free alternative to Microsoft Office. It supports all of the latter’s formats and has a generous set of features, many of which are familiar if you’ve used MS Office before.
Libre’s programs cover any office needs. The programs are Writer, Calc, Impress, Draw, Math, and Base.
It also has a wide selection of extensions and templates that are useful for business and home users. In addition, the latest version adds new features and fixes like new help pages and an improved file import.
WPS Office – modern office suite with useful templates and a free tier
Another great option is WPS Office. It’s organized in Tabs that let you quickly switch between different documents, kind of like a web browser. This makes your job easier if you are a multi-tasker.
It enables users to easily read and import files, something you wouldn’t get with Microsoft’s edition. The ribbon on the top of the page is also more user-friendly, with easily identifiable widgets.
If you don’t know how it looks, you change the WPS Office interface with a few clicks. The free version is already a fantastic download, but if you’re interested in advanced functions like exporting PDFs, you’ll want to subscribe to the paid version.
Focus To Do – Get more work done by staying focused
Focus To Do combines the Pomodoro Technique with task management to help you concentrate and achieve your goals.
This app lets you break your work into manageable intervals, track your progress, and set priorities. With a sleek interface and customizable features, it keeps distractions at bay and productivity on point.
Whether you’re tackling a big project or just trying to stay organized, Focus To Do is your go-to tool for getting things done efficiently.
Whether you’re a professional writer or just writing an email, you have to ensure that your message is clear and grammatically correct, and one way to do that is with Grammarly.
After creating a free account, it checks for spelling and punctuation errors as you type, ensuring your text is clear and professional.
It also offers suggestions for concise phrasing and alternative words, with options to adjust formality. The browser add-on supports email clients, social media, and various document editors.
ShareX – Easily takes screenshots and screen video recording
While Windows 11 includes the Snipping Tool, ShareX offers greater flexibility. It supports screenshot capture, video recording, and GIF creation.
Features include various capture modes (Fullscreen, Window, Region, Webpage), customizable hotkeys, and the ability to capture in different shapes like circles or triangles.
ShareX also provides an advanced editor for cropping, blurring, watermarking, and adding filters, plus automatic uploading to Imgur for easy sharing.
Windows 11 already comes with its file compressor with the ‘Extract All’ option, but like with many things on the operating system, it is limited in what it can do. \
The best alternative is WinZip, the best free compression app.
The free version allows you to unzip over 17 different file formats. It also protects, shares, and helps manage your files in a few clicks. In addition, its compression technology is top-notch and saves a ton of room on your computer.
Mozilla Thunderbird is a free and open-source cross-platform email client that is compatible with all Windows versions, from good old Windows 7 all the way up to the fresh Windows 11. But you can pair it will Linux or Apple-running machines too. It’s that versatile.
It has strong anti-spam and anti-phishing modules and the highest encryption standards, all meant to keep your correspondence safe at all times.
Obviously, there are plenty of great email apps for Windows 11 available, but Thunderbird is a great choice if you’re looking to boost productivity.
As a web browser, Opera One is one of the fastest and most optimized for surfing the web. It’s powered by the Chromium engine developed by Google to bring lighting fast speeds without eating up too much of a computer’s RAM.
In addition to its good RAM usage, you can customize Opera One with many extensions. Plus it has built in VPN and adblock.
Even more, messaging apps are built-in Opera One, so you can chat with your friends without having to switch tabs. It works with WhatsApp, Facebook Messenger, and more.
Firefox is similar to Google Chrome because it has many plugins and extension. It also boasts new protection measures like utilizing DNS instead of HTTPS in the United States.
By making DNS its standard, Firefox keeps internet service providers and websites from tracking and using your data without your permission.
And because it blocks out all these people from keeping tabs, web pages load faster and consume less RAM overall.
Google Chrome – The biggest extension store on the market
Chrome is one of the most popular browsers. Thanks to its vast library of extensions, it has customization potential.
It’s reliable, supports all extensions on the market and offers excellent integration of Google Suite apps like Gmail, Google Docs, and Workspace.
If you play games and care about their performance, then Chrome is not the one for you. But if you don’t know about that and are primarily interested in the vast customization options, and productivity then Chrome is the best.
If you miss the classic look of Windows 10 or even Windows 7, Start11 by Stardock offers a solution.
This app lets you customize the Windows 11 Start menu with various styles, including a return to the tiled interface. You can also adjust the Taskbar’s position.
Start11 is available in multiple plans, from a single-device license to a multi-device package with additional Stardock apps like Fences 4.
RoundedTB is a third-party app that enhances Windows 11’s Taskbar customization. It allows you to round the corners, split the Taskbar into sections, and adjust margins.
Advanced options include Dynamic Mode for resizing based on app icons and a feature to restore the Taskbar’s normal appearance when windows are maximized.
Available on the Microsoft Store, the latest update (version 3.1) fixes bugs and improves performance.
GIMP (GNU Image Manipulation Program) is a free photo editing app comparable to Adobe Photoshop but without the cost.
It features a broad plugin library, customizable interface, and robust tools for professional editing. GIMP supports multiple file formats, offers advanced features like content-aware resizing, animated GIFs, and layer masks.
The latest version introduces a refreshed UI with theme options including Dark and Light modes. It’s a comprehensive tool for high-quality photo and design work.
If you’re looking for some cool apps for Windows 11, Microsoft does not fail to deliver. This is one of the best drawing apps for Windows 11 alongside the mighty Illustrator, Krita, and the other giants.
You can expect realistic effects when mixing and smearing colors just like you would get when dipping the brush in the color palette for real. And there is no shortage of color mixes either.
Plus, you can choose between different materials for watercolors to gouache, and everything in between. Fresh Paint even has touch input, making it a great drawing app to use with your drawing tablet.
Canva is an excellent video editor for Windows 11, that comes absolutely free of charge. Simply access the link and start editing your clips directly in the browser. What can be more convenient?
Since it’s a cloud-based solution, you will be able to access your work from almost any device, everywhere in the world.
Whether you want to create or edit a video, you will find lots of free templates to choose from. Plus, the interface is so intuitive that anyone could master it in just a few minutes.
It allows you to record both video and audio or just one of them. Plus, you can choose to record your screen or your webcam, as per your needs.
There is practically no limit to what you can do with this best camera app for Windows 11, from drawing on your videos during the recording process to scheduling recordings to perfectly meet your agenda.
If anything, Microsoft did well when creating new versions of their apps; however, the usage of the default options is limited in what they can do. But, again, they’re not wrong; they are just OK at what they do.
The apps shown off are among the best on the market and meet the needs of professionals and casuals alike. Microsoft apps have improvements but fail to provide some advanced features that come standard in other apps.
A primary user may be OK with using the Paint app, but experienced people would rather have something like GIMP with its advanced abilities and specialized software.
In addition, Microsoft wants Windows 11 owners to use its default apps over third-party ones. Microsoft has been criticized for making it difficult for users to switch from default browsers and apps to a preferred one in the past few months.
The process isn’t that difficult, but with the extra steps that have been added, it can be pretty annoying for users to deal with.
That said, Windows 11 has much to offer new users. But first, you should scope out the Microsoft Store and see what other exciting apps you can find there. Some of the ones listed in this guide can be found there.






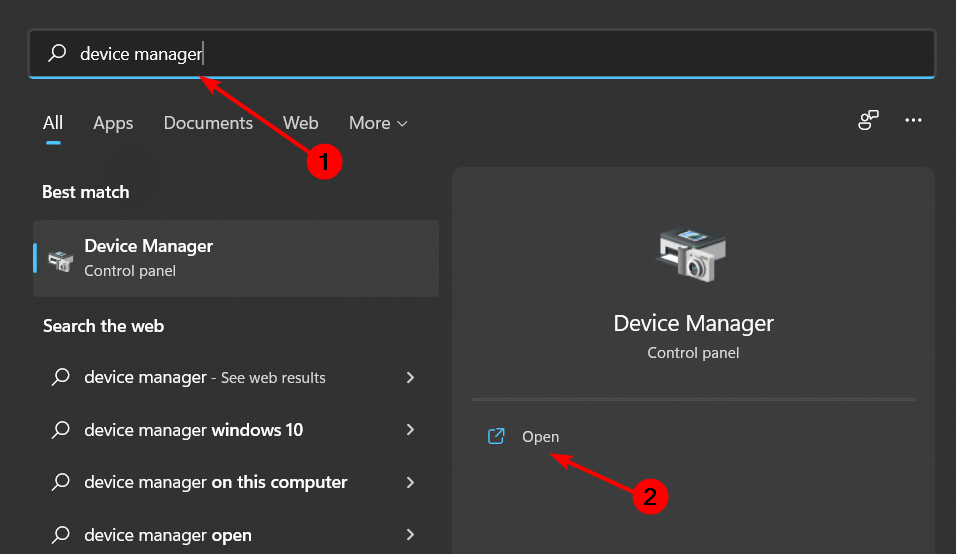

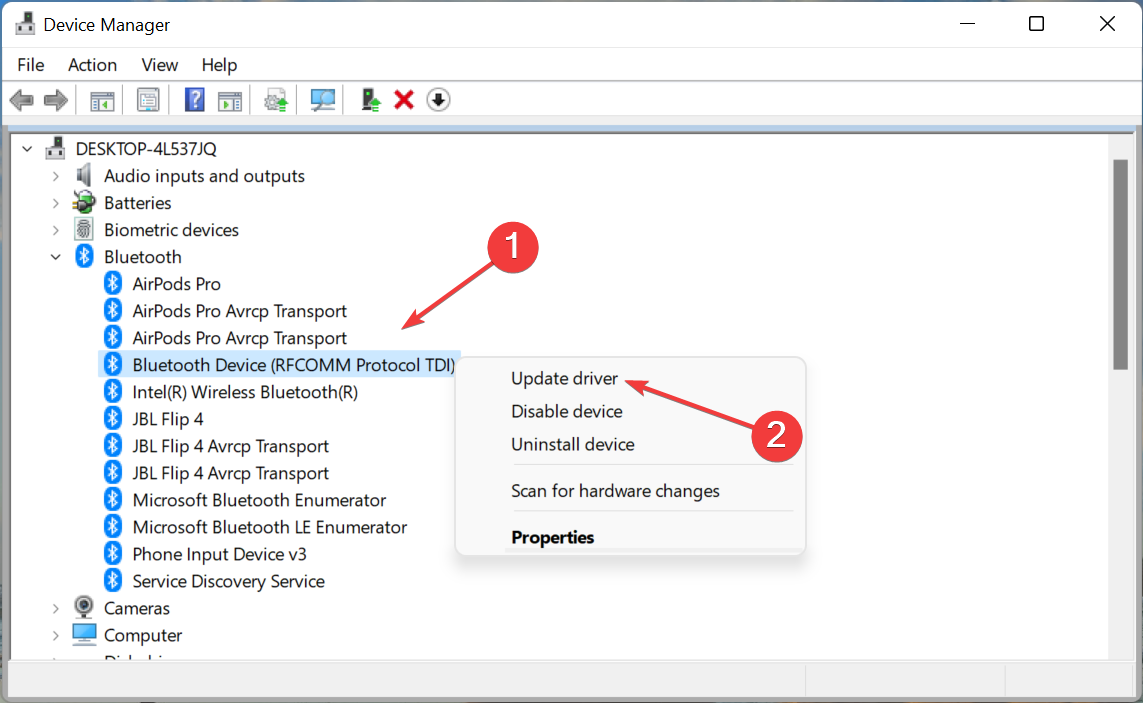
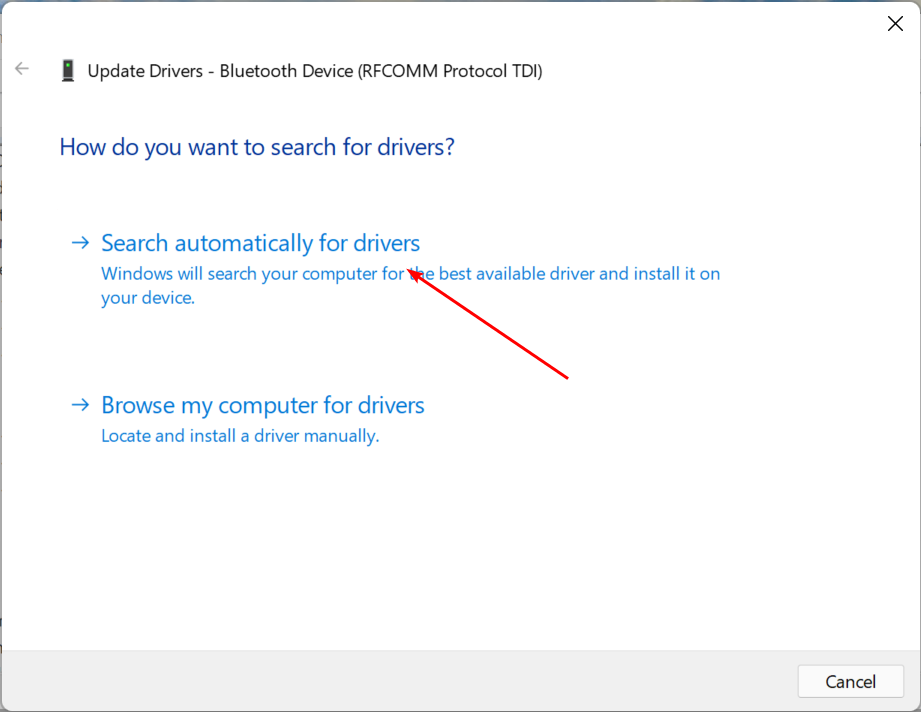

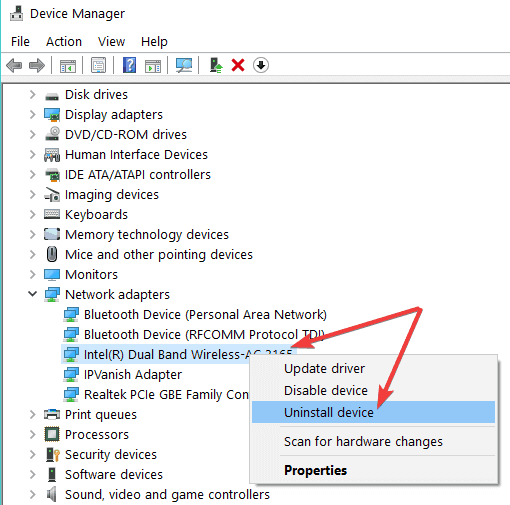


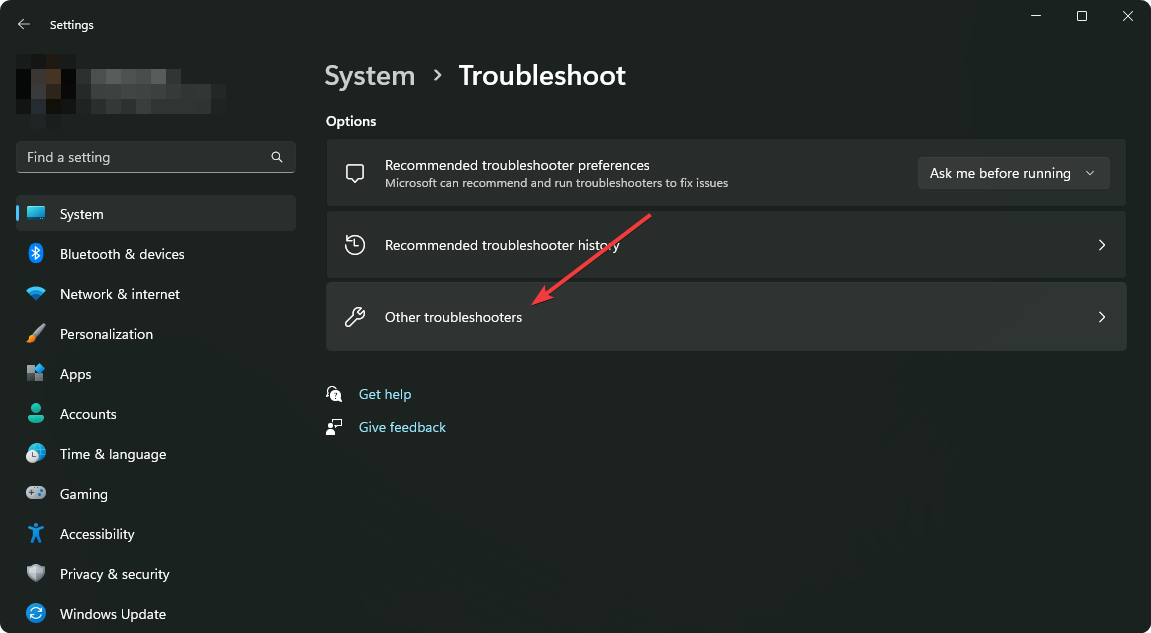
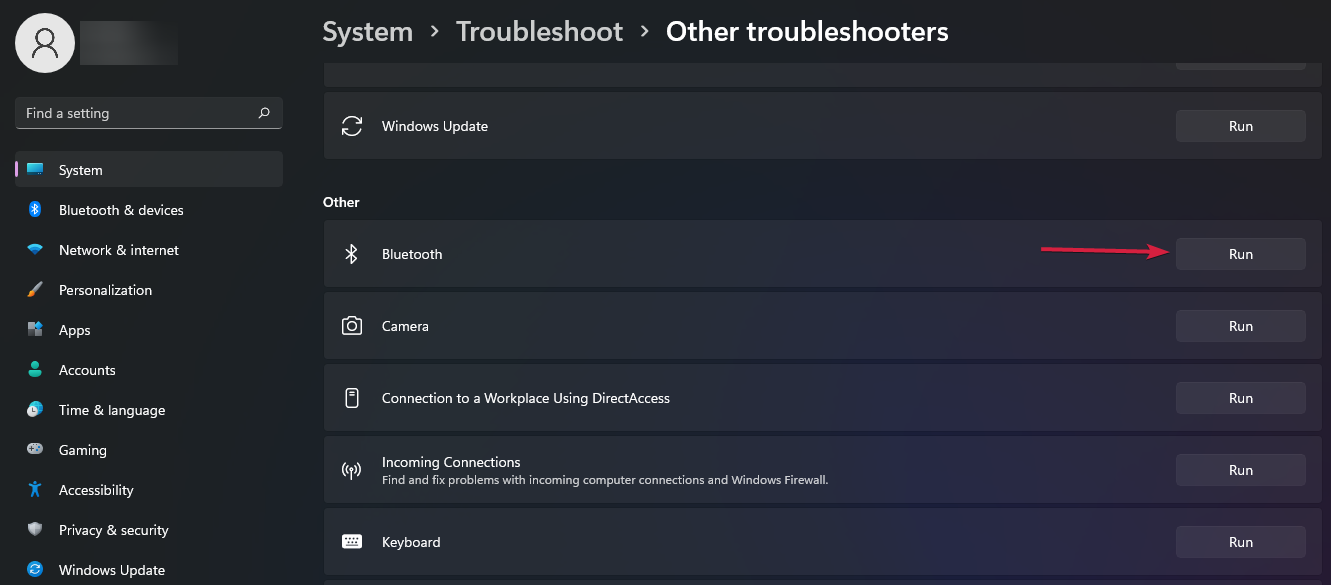
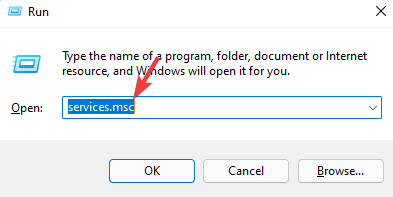
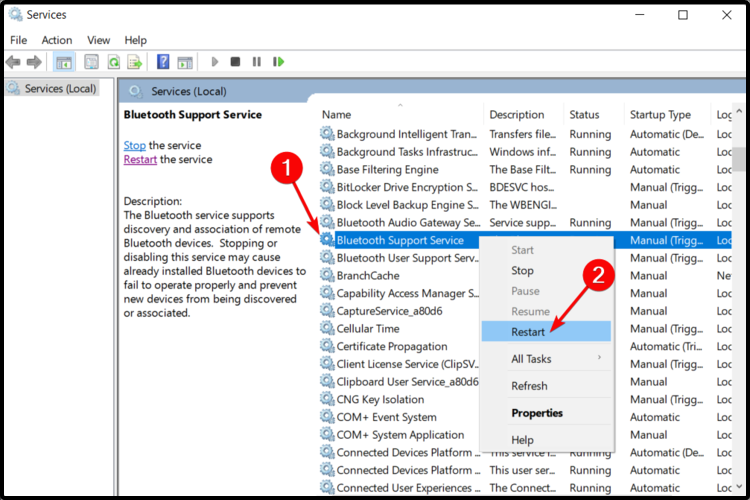
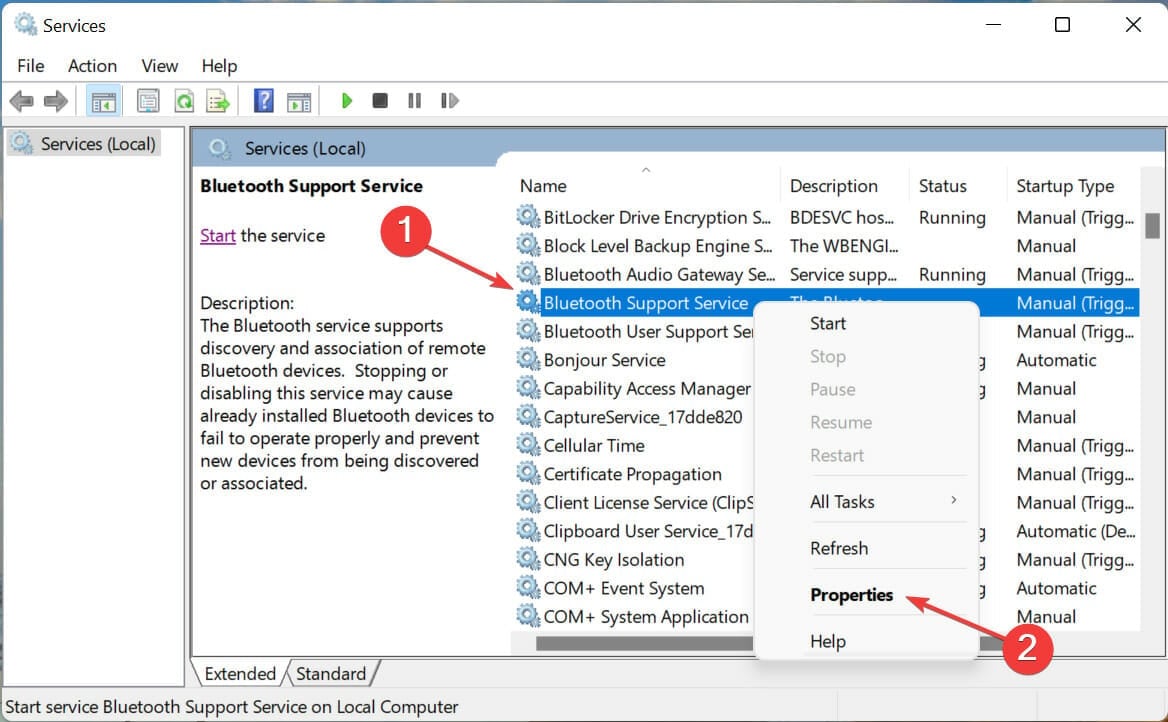
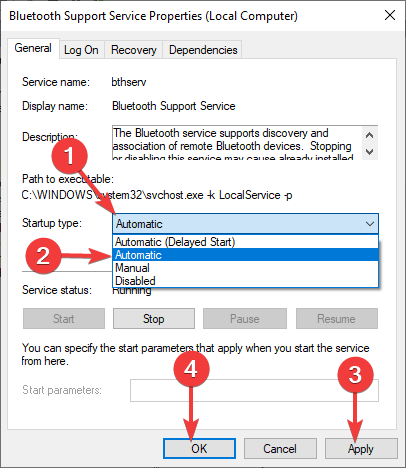


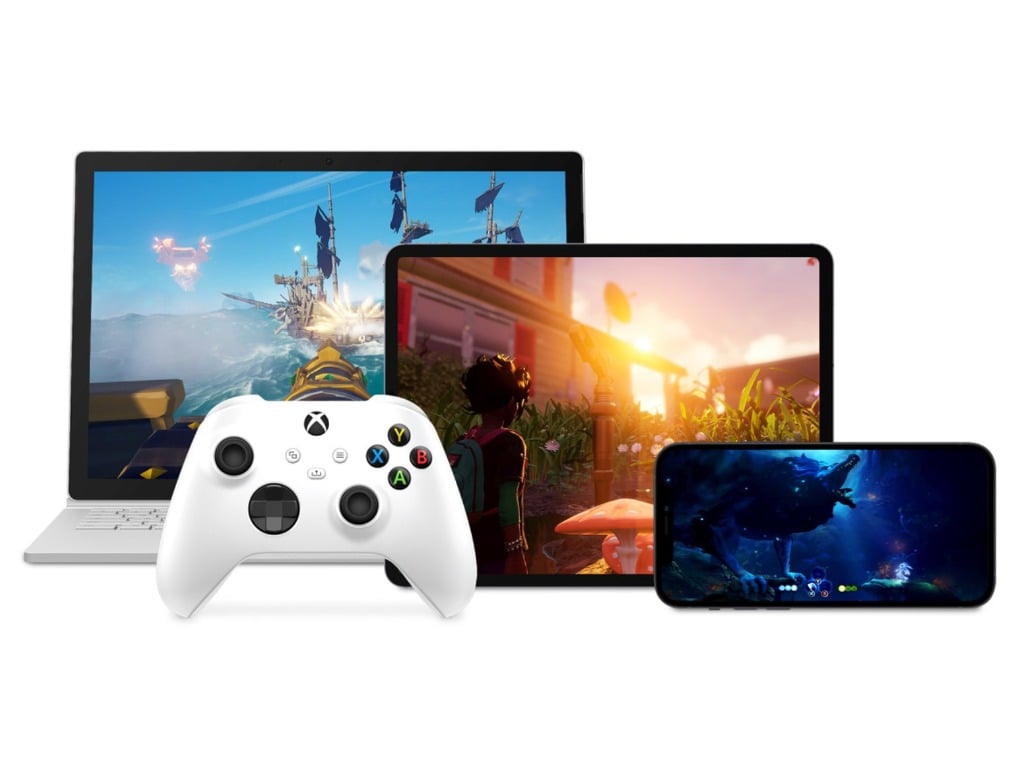
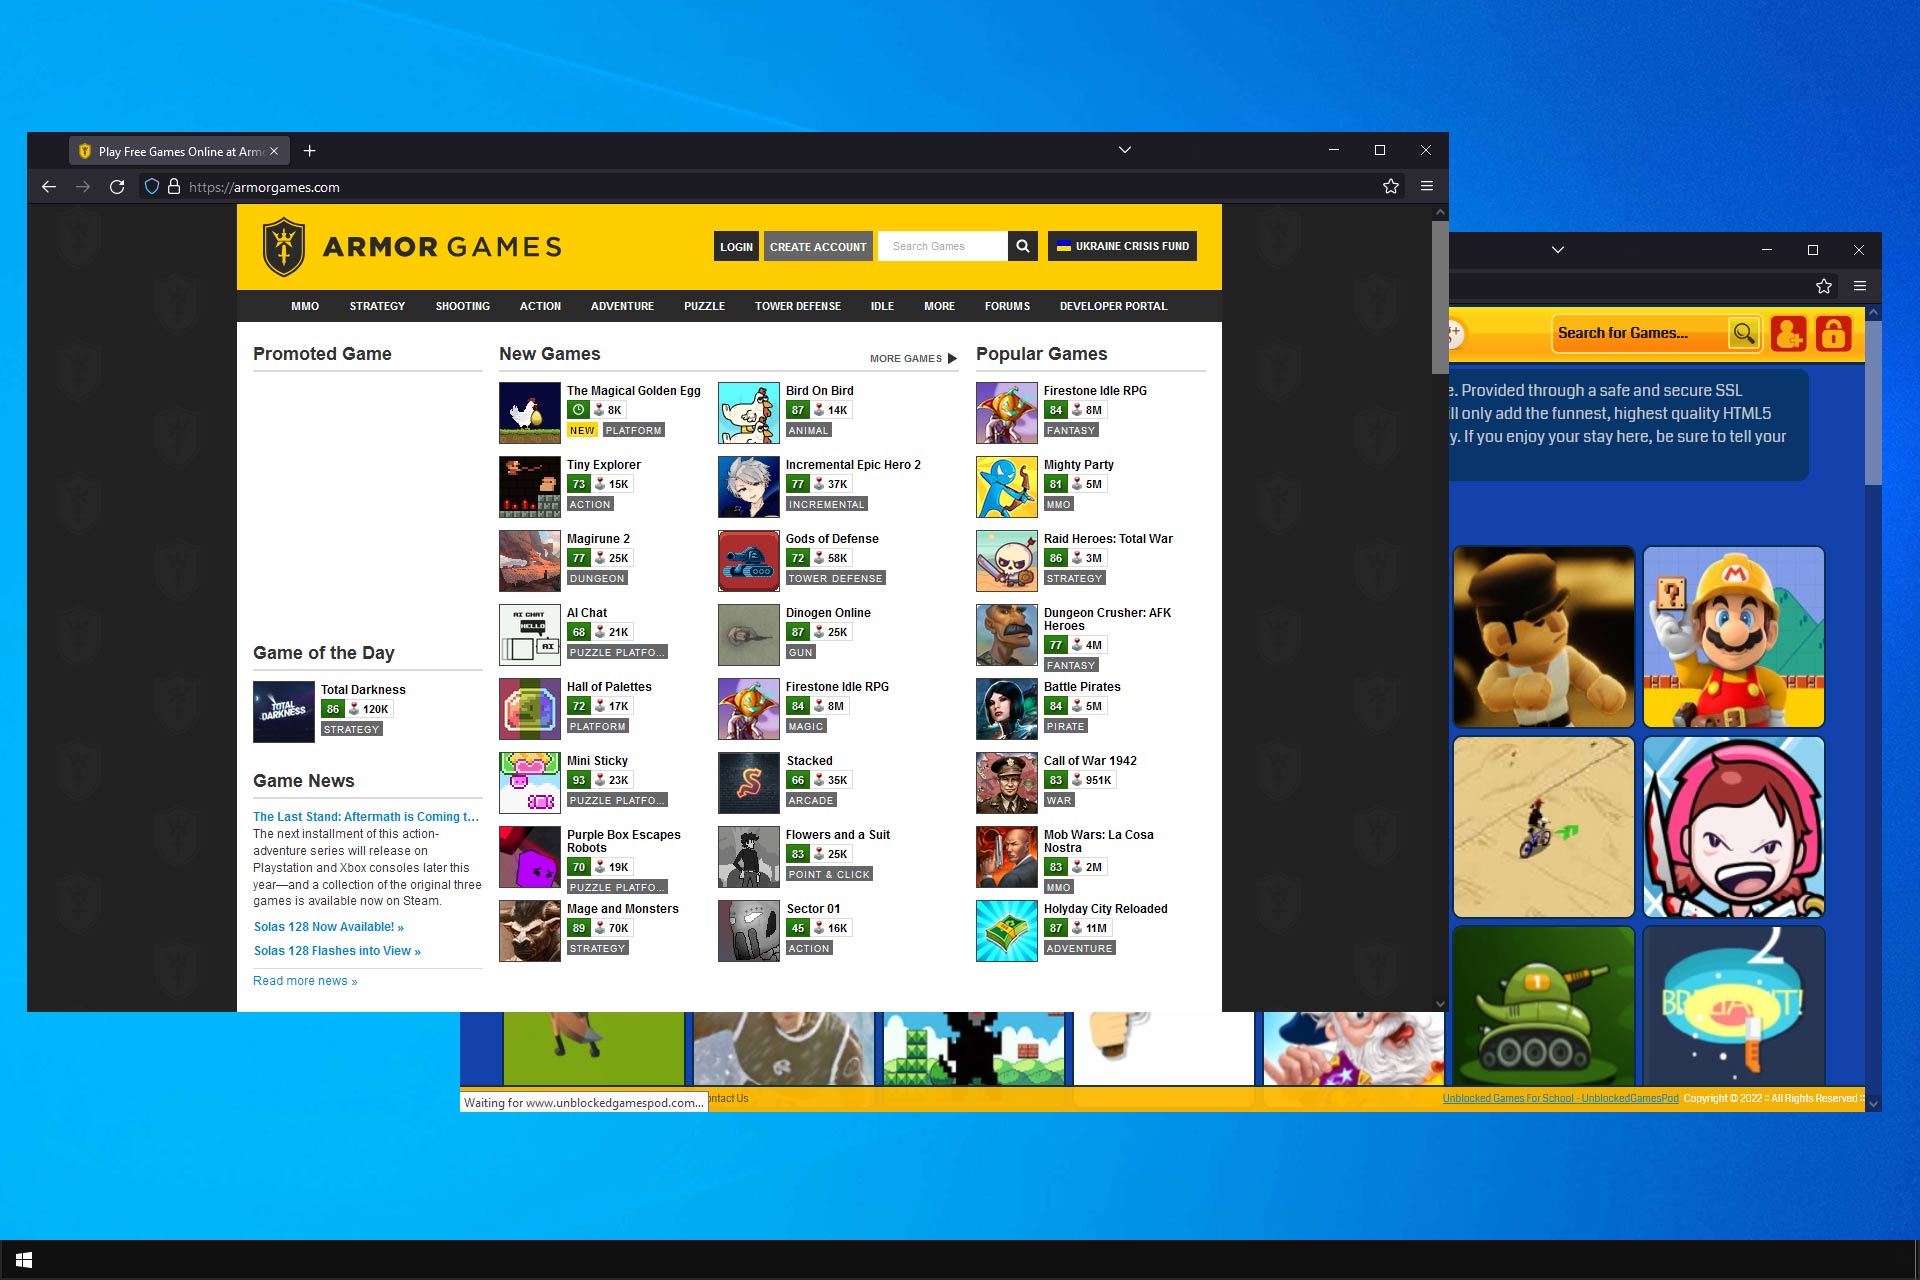


 Unblocked Games 24h is another Google Sites-powered website crammed with plenty of fun browser games.
 Unblocked Games Pod is one of the best-presented browser game sites that includes both Flash and HTML5 games, which is just as well given that Adobe will discontinue Flash in 2020.