Microsoft tries to develop and offer dedicated features and processes to secure the Windows 10 system. And the built-in Windows Defender SmartScreen security software is there to protect your data and your credentials each time a new app or program is installed.
While this default security solution ensures relatively complex protection, in some situations its functionality can become quite annoying.
In that respect, we can now discuss the Windows Defender SmartScreen security warning messages which are displayed quite a lot, even when it’s not necessary.
For example, when you try to install or run a new app and you receive the Windows protected your PC and prevented an unrecognized app from starting warnings.
If you know that this particular app is safe and will do no harm to the Windows 10 system there is no actual reason for receiving those warnings which aren’t letting you with too many options; in fact, you can choose only the ‘don’t run’ option.
Anyway, during the lines below, we will learn how to disable the Windows Defender SmartScreen security software. But first, let’s see how to get past the Windows protected your PC and prevented an unrecognized app from starting warning.
How do I get rid of the Windows protected your PC message?
1. Allow app when Windows protected your PC message appears
The first step would be to allow an app to freely work in the background without Defender preventing it. This is a rather simple task and here’s what you need to do:
When you receive the warning message, don’t click on the ‘Don’t run’ option.
Instead, click on the More info link, displayed beneath the warning message.
Now, a new prompt will be displayed.
If you are sure that the app that tries to access your system can be trusted, click on Run anyway.
Keep in mind that if admin privileges are required, the app will still not run on your computer.
2. Check the Security at a glance
The second step is to check all the boxes (if possible) in the Windows Defender at a glance section. Sometimes, due to a bug, Windows Defender will show a variety of incoherent prompts from time to time. The best way to deal with it is by simply checking all the boxes or dismissing the ones you can’t follow through with. An example would be my disliking of OneDrive. Just dismissed the suggestion and it doesn’t pop anymore.
3. Disable Windows Defender SmartScreen
If you want to permanently get rid of the windows protected your pc error, then you can disable the Windows Defender SmartScreen security software. By doing so, you will stop receiving any more pop-ups from it in the future.
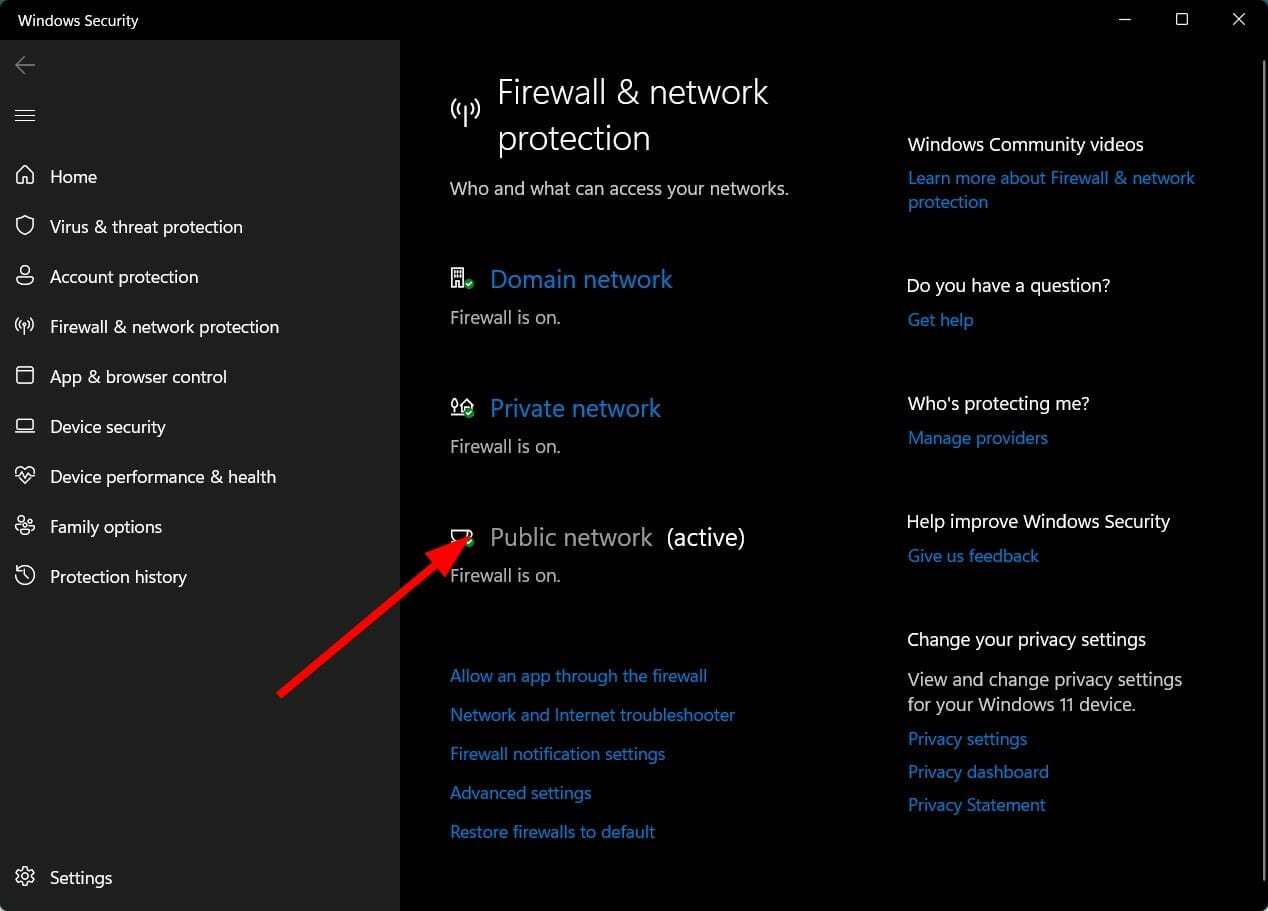
1. Press the Windows Key and type Windows Security in the search bar.
2. Click on the result with the same name to open Windows Defender Security Center.
3. From there go to theApp & browsercontrol field, located in the left sidebar.
So, that should be all. Now the Windows Defender SmartScreen security software is disabled so you will no longer receive the Windows protected your PC and prevented an unrecognized app from starting warnings.
Don’t forget to install an antivirus or antimalware program, otherwise, you will risk in experiencing a malware attack.
If you have further questions don’t hesitate and contact us by using the contact form from below.
Getting a The operation couldn’t be completed. (NSURLErrorDomain error – 1011) when using Blink Intelligent Home Security? You’re not alone!
While Blink is a well-known and resilient security device for your property, it is prone to errors. This particular one is usually caused by VPN interference, out o range WiFI or nework bugs.
How do I fix error 1011 on the Blink?
1. Change your Wi-Fi network
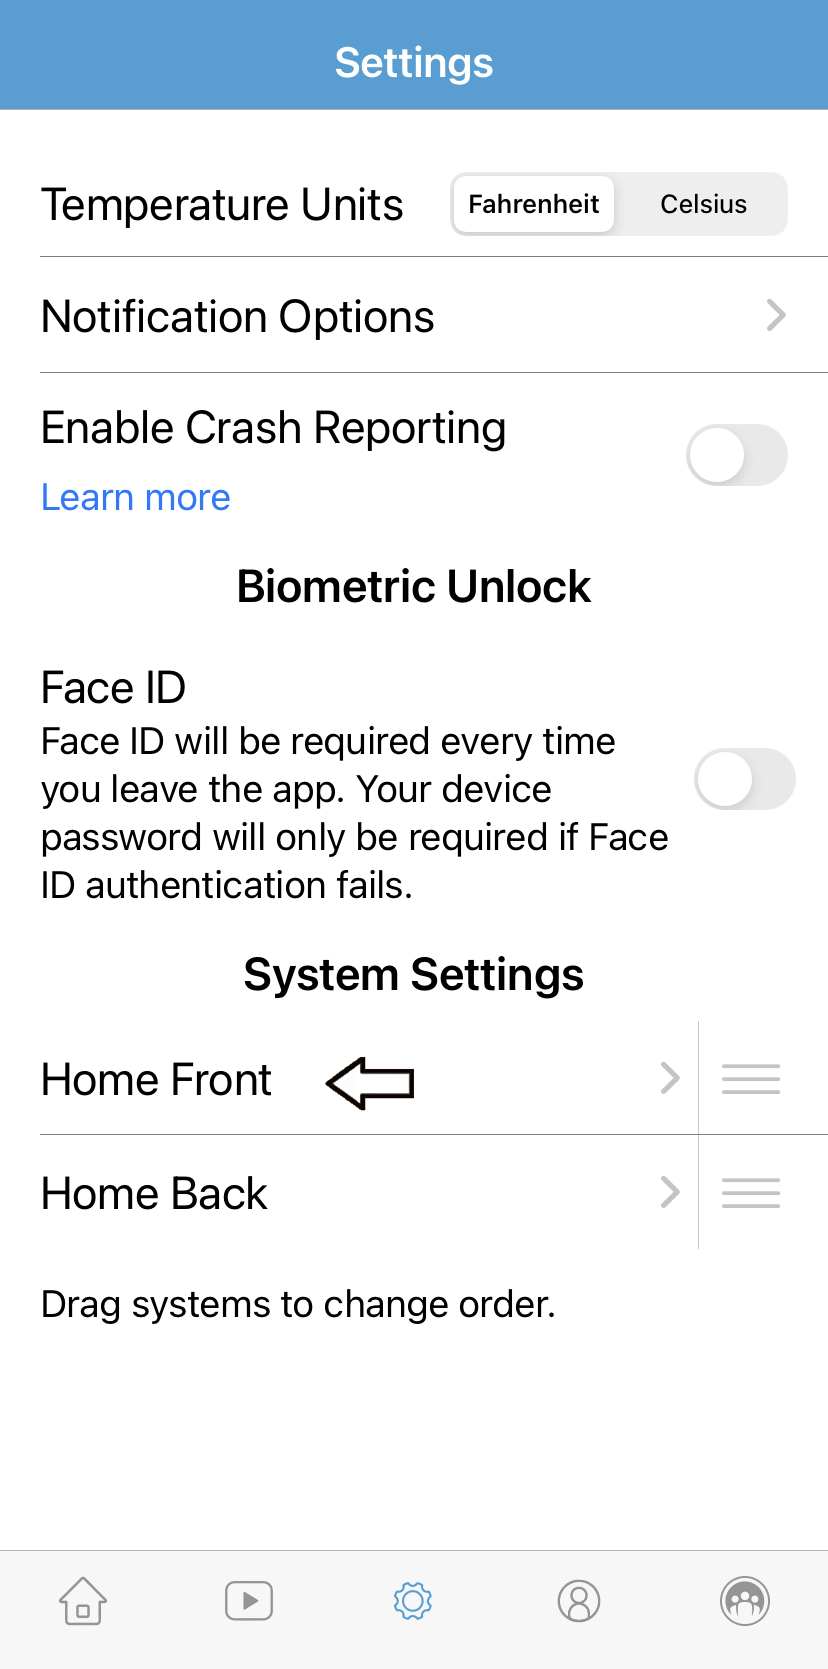
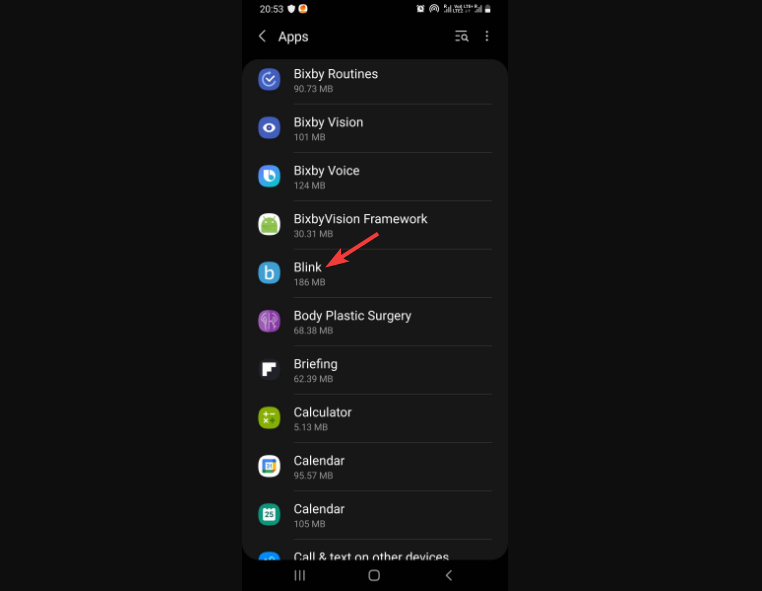
Launch the Blink app and tap on the gear icon (Settings) at the bottom of the screen.
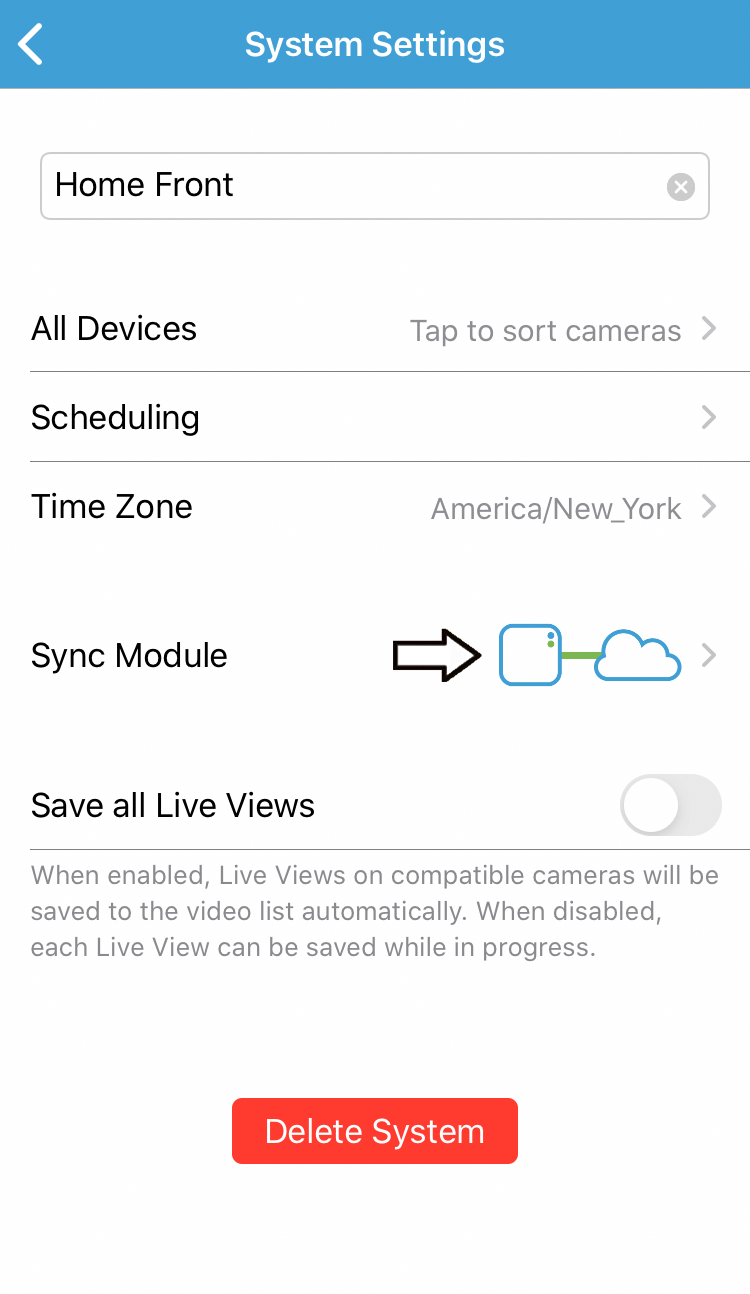
Next tap, under System Settings, tap on your camera device.
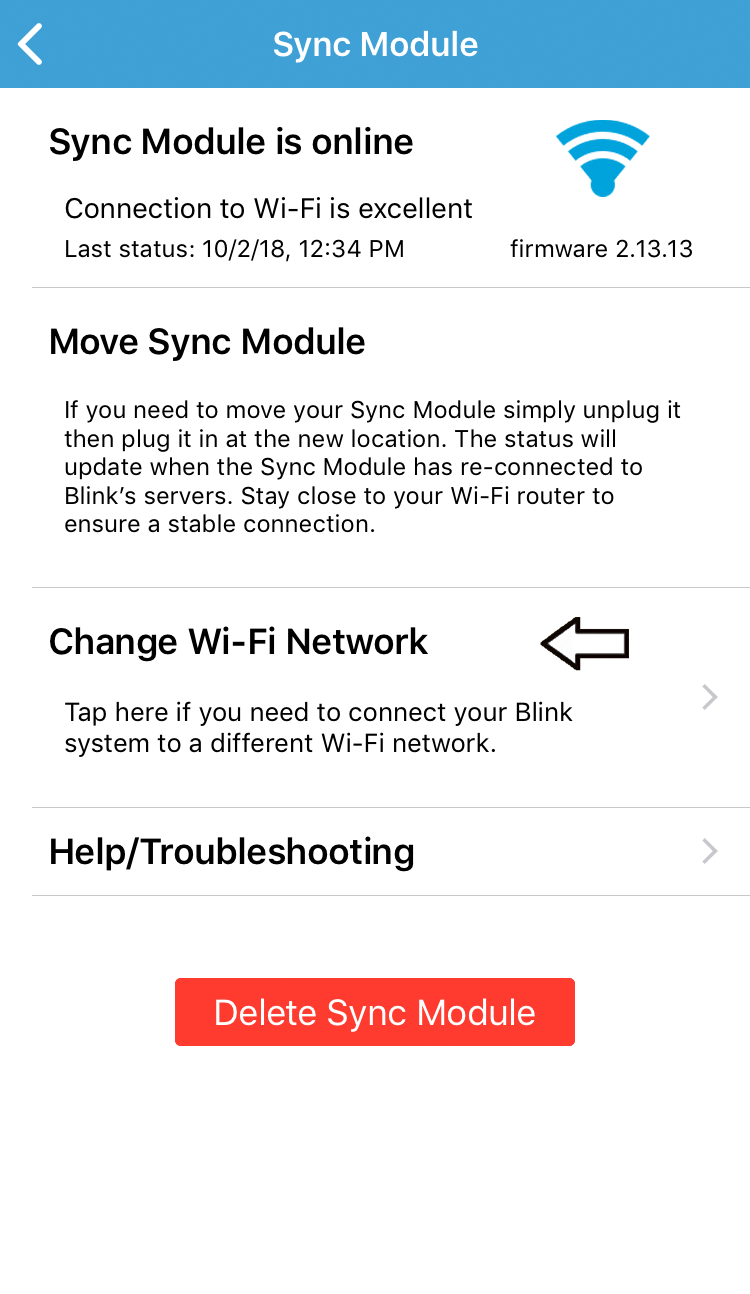
On the System Settings screen, tap on Sync Module to open the status screen.
Now, on the Sync Module page, click on Change Wi-Fi Network.
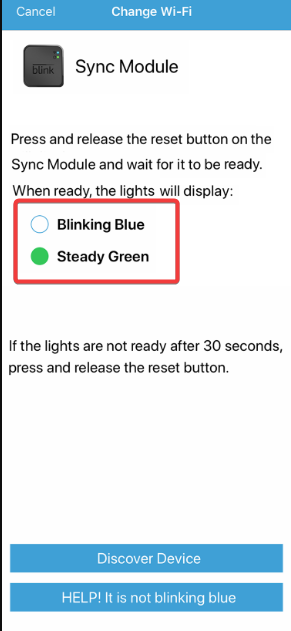
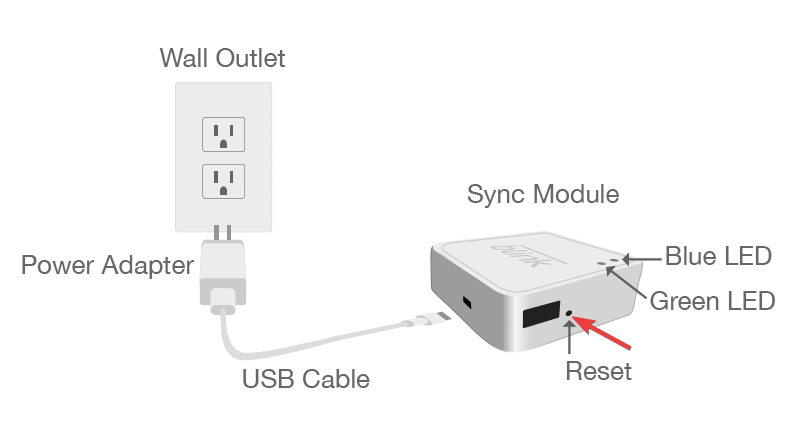
Next, you must follow the on-screen instructions that ask you to press the Reset button on your Blink device, a small hole (on the side of the Sync Module) using a thin object.
On successful reset, the blue LED should blink and the green LED should be solid on your Blink device.
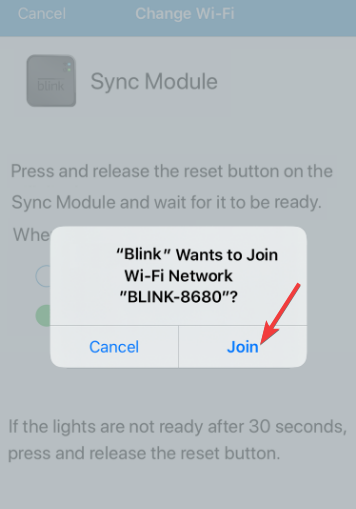
Now, press the Discover Device button and you will be prompted to join the Sync Module Wi-Fi network. Tap on Join.
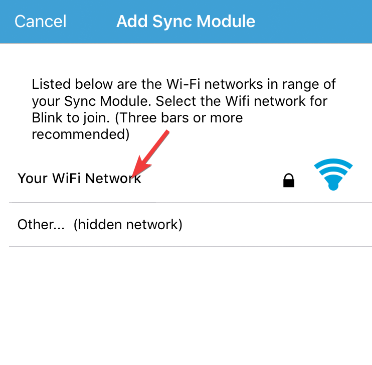
Next, pick your Wi-Fi network from the options provided under Add Sync Module.
You will then receive a success message saying Sync Module added! Tap on Done.
You have now successfully changed the Wi-Fi network for your Blink security device.
2. Disable the VPN
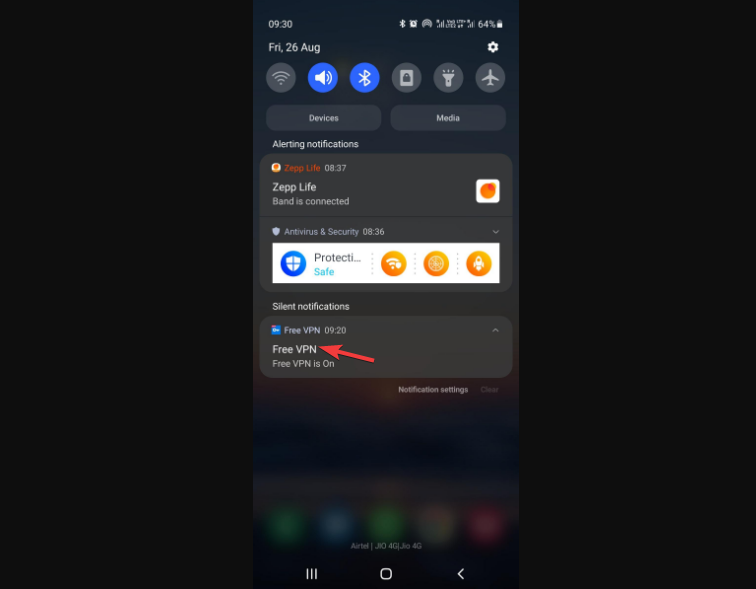
On your Android phone, swipe down from the top of the screen to open the notification panel.
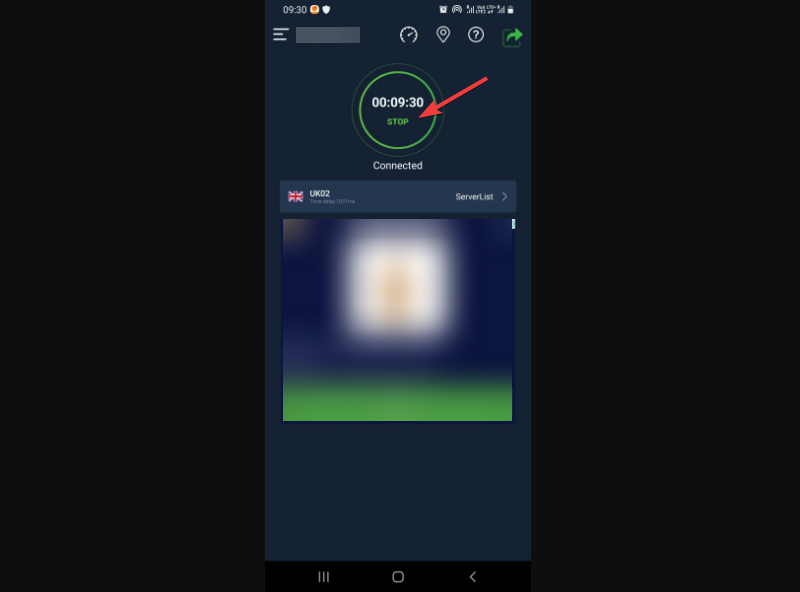
Tap on the activeVPN.
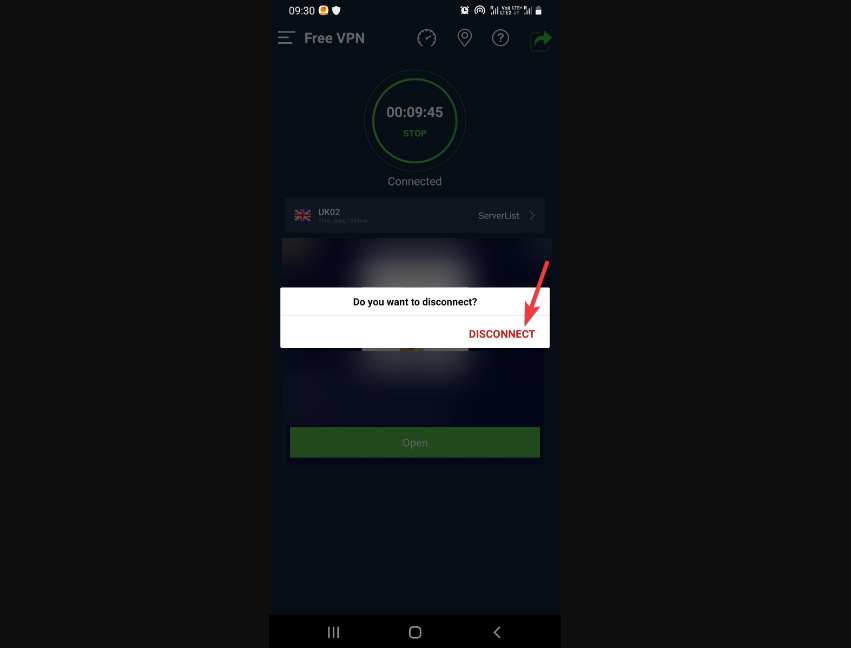
This will open the VPN app. Here, click on Stop.
Now, press Disconnect to confirm the action.
Once done, force close the Blink app and turn it on again. Now, you should not encounter Blink error 1011, and the smart security system should function normally.
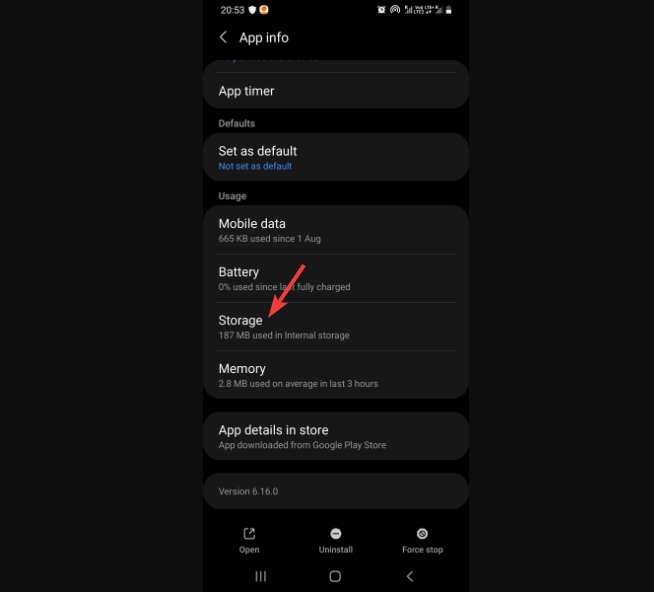
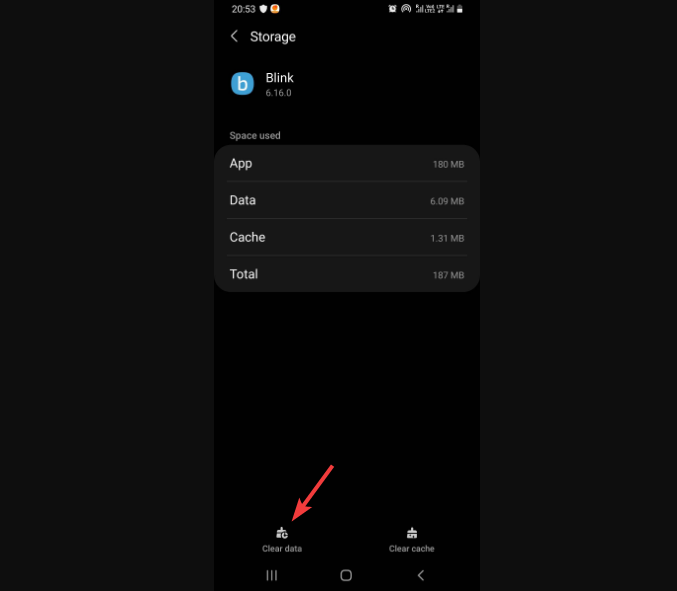
On the Storage page, tap on Clear data at the bottom.
Press OK to confirm the action.
Now that you have successfully reset the Blink app, the error message 1011 should not appear again.
NOTE
You can repeat steps 1 to step 3 as above, and then select Uninstall at the bottom to delete Blink. You can then reinstall Blink, and the error 1011 should not show up again.
Alternatively, you can contact the Blink technical support team for further assistance, and they should readily help you to fix the issue. But if you encounter Blink’s unknown Tulsa error, you can refer to our detailed troubleshooting guide for further help.
YouTube TV is a popular streaming service that brings you not only live TV but also DVR functionality and on-demand video from more than 70 top channels. It requires no cable box nor a contract to work.
You sign up for the service and pay the $49.99/mo. fee, and start enjoying it. However, there’s a teeny tiny catch: you can’t use it nor purchase a plan outside of the US.
Aside from its price-accessible TV streaming capabilities, YouTube TV also provides your own cloud-based DVR. Therefore, you can record your favorite shows and stream them wherever you go.
The DVR has unlimited storage space, and it costs absolutely nothing more than the existing subscription fee. You can share your account with your family members (up to 6 accounts and 3 simultaneous streams).
Last, it costs you nothing to cancel since there’s no binding contract. You cancel the service, and that’s the end of it.
With all that in mind, it’s not hard to see why non-US users want to get their hands on a YouTube TV subscription. And the best way to access geo-restricted services is, as we’ve said before, using a VPN.
Can YouTube detect VPNs?
Yes. Many users report being unable to bypass geo-blocks even when using a VPN because the platform detected it.
The most common thing that makes your VPN connection discoverable is your VPN IP. Many VPNs do a good job at encrypting your traffic and hiding your actual IP.
However, it’s fairly simple to detect whether a user is connected via usual ISP traffic or VPN. To reduce this risk, you need to use a VPN to make it appear as if you are in regular traffic.
We also recommend you always connect with a VPN when accessing YouTube.
That’s because the platforms store some user data, including your location. If they notice you log in from various locations around the world, you may be restricted or get the YouTube TV spinning circle error.
What does VPN proxy detected mean?
This message means that the platform can detect that you are connected using a VPN, hence restricting access.
Try to change to a different VPN server. If the message keeps appearing, we recommend switching to a VPN with features that will hide your traffic better.
Can you trick the YouTube TV location?
Yes, you can, but you need an excellent VPN service for it. YouTube TV tries to block attempts to access the platform from outside the US, and using a VPN signals just that.
So make sure you enable double VPN or server obfuscation and check the guidelines of your VPN provider to see how to best set it up for maximum protection.
Connecting to the exact VPN location and deleting your cookies can also help.
➡️ How many times can you change your location on YouTube TV?
YouTube TV lets you change your account location twice a year.
➡️ Can you have YouTube TV in two different locations?
Yes. You can add several locations to your profile, with a main location being your home.
How do I fix proxy or VPN detected?
YouTube TV, much like other similar streaming services, got smart and started blacklisting VPN traffic. In other words, YouTube TV detects VPN traffic, so there seems to be no way to circumvent it.
VPNs have specific IP ranges, and once YouTube TV caught wind of this, they started to block them.
The same thing happens with Netflix. We’re pretty sure you know that US Netflix is a thing, and it’s more remarkable than the Netflix version you can access from, say, Europe. It has more shows, for once.
But what if we told you you can use a VPN to access YouTube TV?
YouTube TV blocking VPN? Here’s the solution
1. Use a VPN that has both dedicated IPs and obfuscation
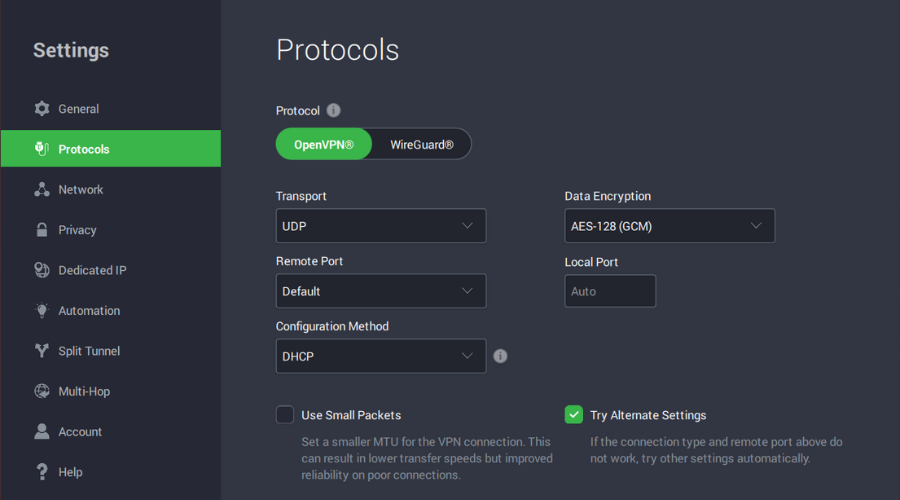
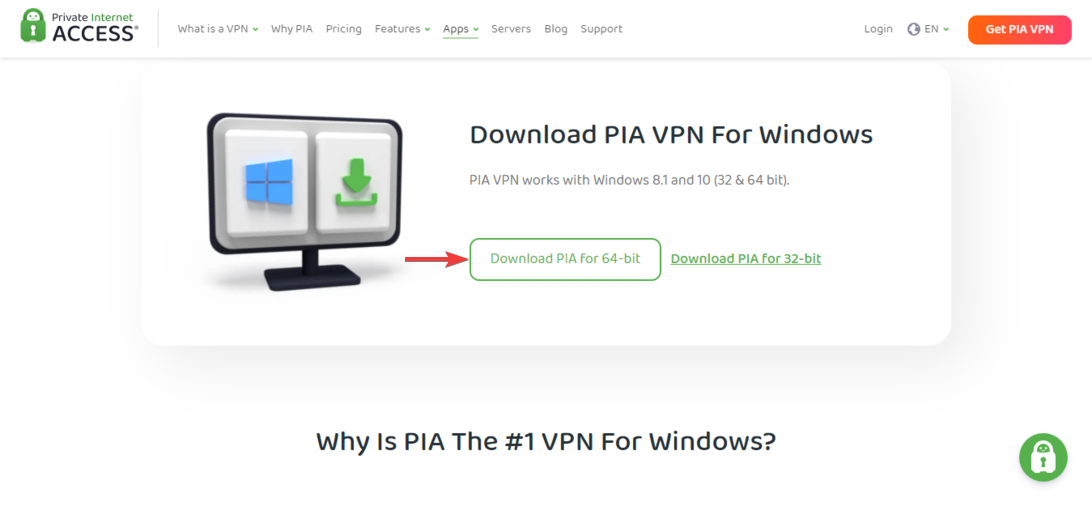
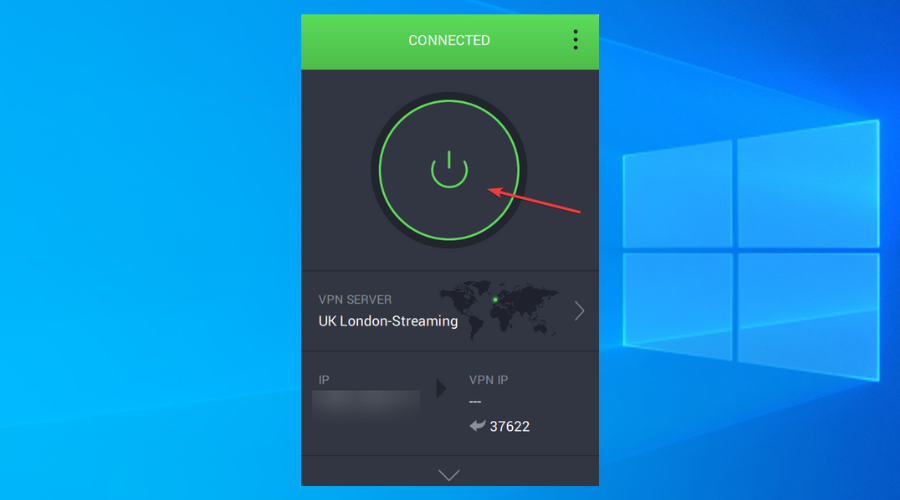
Install it and connect to a VPN server by pressing the power button in the main UI.
Go to the Settings panel.
Select the Multi-Hop section.
Enable Multi-hop and obfuscation feature and choose Shadowsocks as your proxy. Select a US location.
Access YouTube TV.
If you really want to avoid any type of inconvenience when attempting to bypass geo-blocks, use a VPN that lets you use a dedicated IP along with server obfuscation.
Private Internet Access
Unblock YouTube TV without being detected with this VPN with thousands of US servers!
In the Optional add-ons field, locate Dedicated IP.
Hit the Add button in the Dedicated IP box.
Click the Select location menu
Make sure to select one of the three US options (YouTube TV only works in the US)
Continue with the purchase (payment info, checkout)
Download CyberGhost VPN on your PC
Install it and launch it
Log into your account
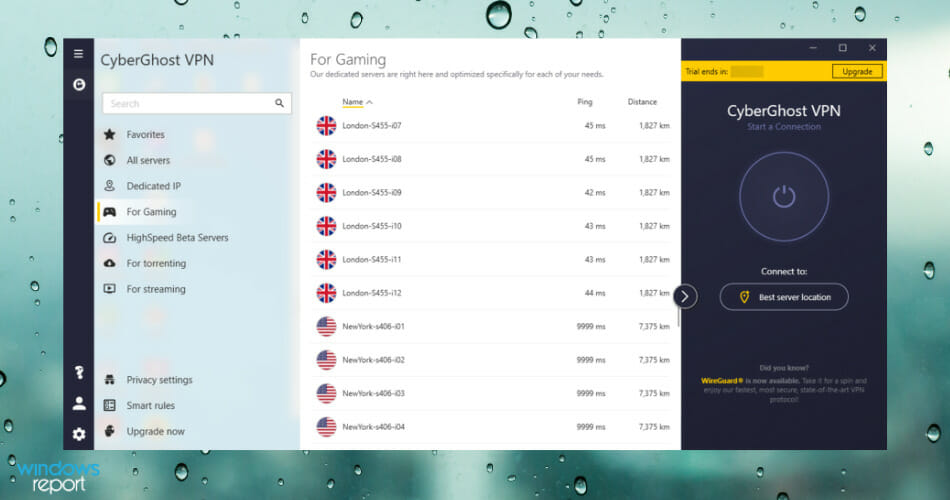
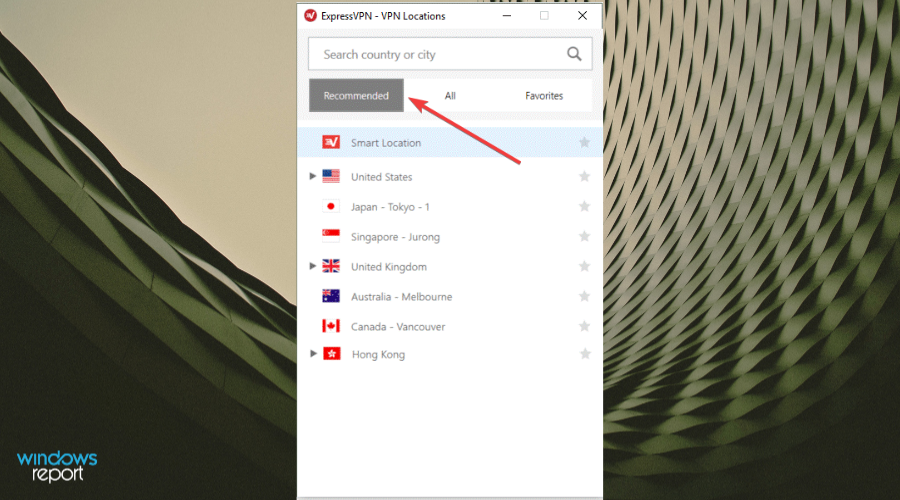
Locate the Favorites section in the CyberGhost VPN app
Connect to your dedicated IP
Access YouTube TV
Everything should be okay, YouTube TV should now see you as a US resident and allow you full access. So you should be able to purchase a subscription/get the trial, and use the service without a hiccup.
CyberGhost VPN
Can’t access YouTube TV with VPN? CyberGhosts’ dedicated IPs can help.
CyberGhost is an awesome VPN service brought to you by Kape Technologies that can help you easily access YouTube TV outside of the US. Just as long as you purchase a dedicated IP, that is.
Connect to an obfuscated US server of your choice.
Access YouTube TV.
Obfuscated servers are a special category of servers that can bypass Internet restrictions more easily than regular ones. It disguises traffic to look just like regular unencrypted traffic by removing metadata that could be tied to VPN protocols.
NordVPN
Does YouTube TV block your VPN? NordVPN might come in handy.
NordVPN also has a dedicated IP address option to purchase alongside your regular subscription. If you did, you can use the dedicated IP server instead of the obfuscated one, just as long as the IP is US-based.
You can watch YouTube TV with a VPN
All things considered, there’s no limit to human creativity when it comes to workarounds. Even though YouTube TV is clearly intended exclusively for US residents, you can access it even if you’re not in the US.
All you need is a trustworthy VPN that offers dedicated IP servers or a VPN with obfuscated servers. However, it’s no harm if the VPN you choose comes with both options.
Scanning documents is essential for many official tasks, educational purposes, and more. These are used in government offices, schools, colleges, banks, etc.
In the olden days, scanning any document was a challenging task. But now, many applications have made these tasks more manageable.
Now scanners can be connected to any system via Wi-Fi or USB cable. They are not just scanning one document but allowing users to check multiple pages using the software introduced by Epson.
Can I scan multiple pages with the Epson event manager?
Yes. Users are allowed to scan multiple pages with the Epson event manager software on the Windows system. This software is supported on other operating systems as well.
How do I get my Epson printer to scan multiple pages?
Connect the scanner device to your Windows system and press the power button to switch it on.
Press the Windows key and type event manager.
Select Event Manager from the search results.
When the Epson Event Manager window opens, select the scanner device connected to your system from the list.
Now make sure the selected scanner device is chosen.
Click the Start button dropdown menu, select Scan and Save – Scan using the EPSON Scan option from the list, and close the Event Manager window.
Once done, you must open the Epson Scan 2 app on your system and select the scanner device.
After that, check the Add or edit pages after scanning the checkbox so that you can add more pages by browsing the PDF file and saving it last.
Select the Image Format as PDF.
Give an appropriate File Name like Scanned_documents.pdf, etc.
Select the Folder where the pdf file should go after saving.
Now place the original document in the scanner and click Scan.
Once done, it will pop up a new window, and you need to click Add after replacing the document in the scanner device.
This will scan again. Now you can replace the original with another document and click Add again.
Repeat the same process till you are done scanning all the documents.
Once all the documents are scanned, you need to click the Save button in the pop-up window.
This will save all the scanned documents in a PDF file in the folder selected by you in the Epson Scan 2 app.
Is there a way to scan multiple pages into separate PDFs?
Yes, there is a way to scan multiple pages into separate PDFs using software that can adjust the settings. This software is meant only for some selected scanners from the Epson called Document Capture Pro.
You have to place a blank page or barcode between the pages of your original documents to let it know where to scan new files.
Now open the Document Capture Pro software on your system.
Click Scan on the left side of the Document Capture Pro window.
Now you will see the preview of the scanned documents.
Go to the File menu and click Batch Save from the list.
Select File Save settings and change all the necessary settings in the window.
Click OK at last, which starts scanning all the documents, and the separate PDF files get saved in the app’s folder selected by the user.
This way, users can scan multiple pages into separate PDFs on their Windows system using Epson’s Document Capture Pro.
The Xinput1_3.dll is missing is an error message that appears when a game or software is launched. The error file is caused by an issue with Microsoft DirectX when the xinput1_3.dll dynamic link library (DLL) file is not found.
The full name of the error is: the code execution cannot proceed because xinput1_3.dll was not found.
However, DirectX improves PC performance for Windows-based games and advanced graphics programs. Furthermore, Microsoft’s operating systems are generally affected by xinput1_3.dll and other DirectX issues.
These Operating versions include Windows 98, Windows 2000, Windows XP, Windows Vista, Windows 7, the most popular OS among gamers, Windows 8, Windows 10, and Windows 11.
We have compiled a list of solutions and how you can fix the xinput1_3.dll missing issue on your Windows PC.
1. Install the DirectX version of the affected program
Software developers usually include a copy of DirectX on the installation disc of the game/program. Installing the DirectX version included in the software can fix xinput1_3.dll is missing problem.
Look for a DirectX installation program on your game or application CD or DVD. Furthermore, the DirectX version that comes with your software installation package is supported on all Windows versions.
It will install the DirectX file needed and supported in that version of Windows. Try this fix to clear xinput1_3.dll is missing error.
Even more, we want to make a note of the importance of DLLs and registries, along with a few repercussions far beyond your imagination.
2. Use a third-party DLL fixer
Since it might be hard to find the specific file by yourself, we recommend using a dedicated third-party repair software that will do that for you, a tool that specializes in DLL fixes, replacements, and repairs.
These kinds of tools are set to solve all your DLL problems in no time. With a quick scan, they will show you not only this error but all the DLL errors that your computer might have.
3. Reinstall the affected program
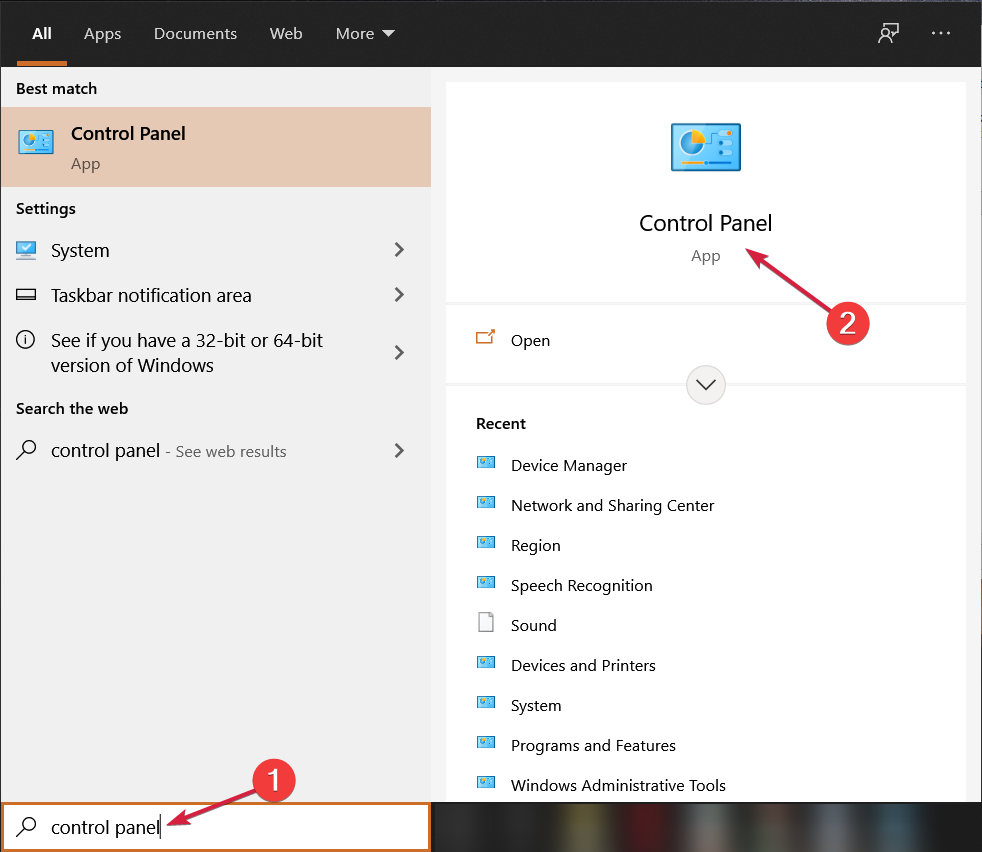
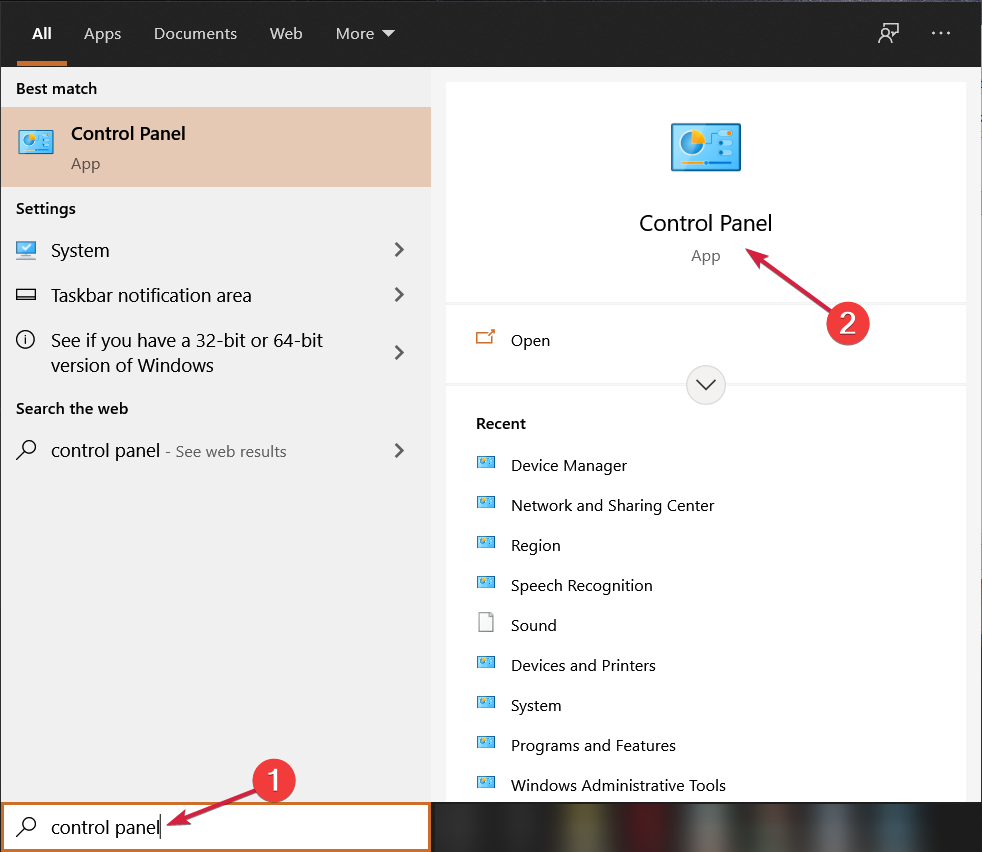
Go to the Start menu, type control panel, and hit the Enter button.
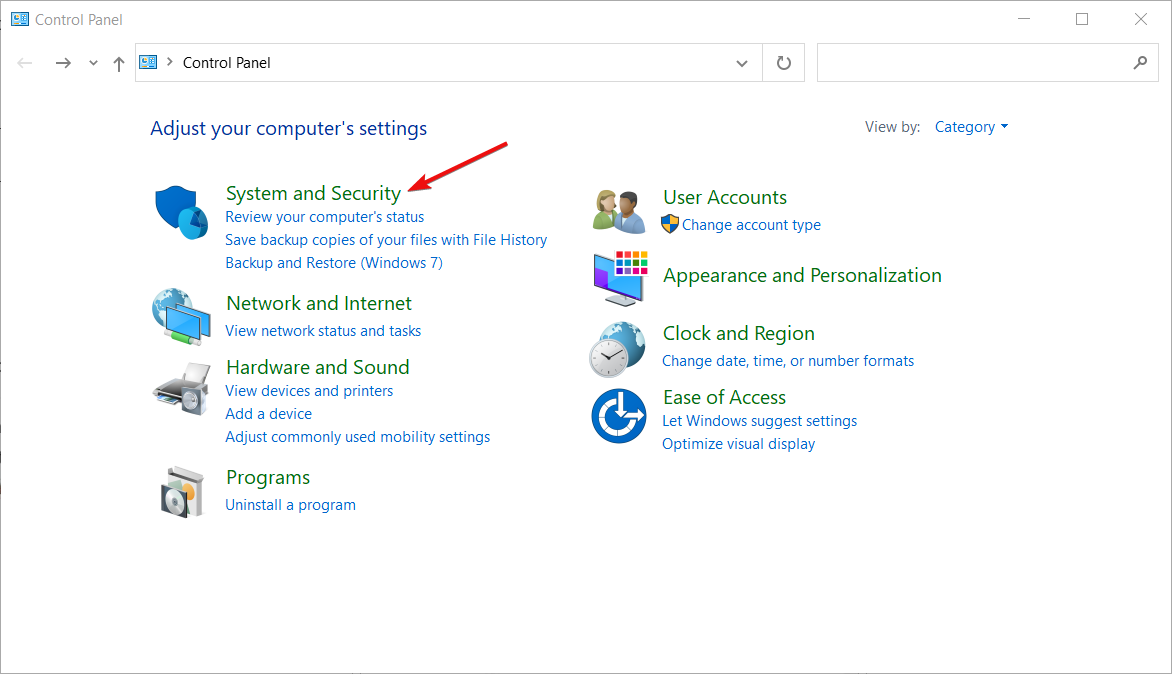
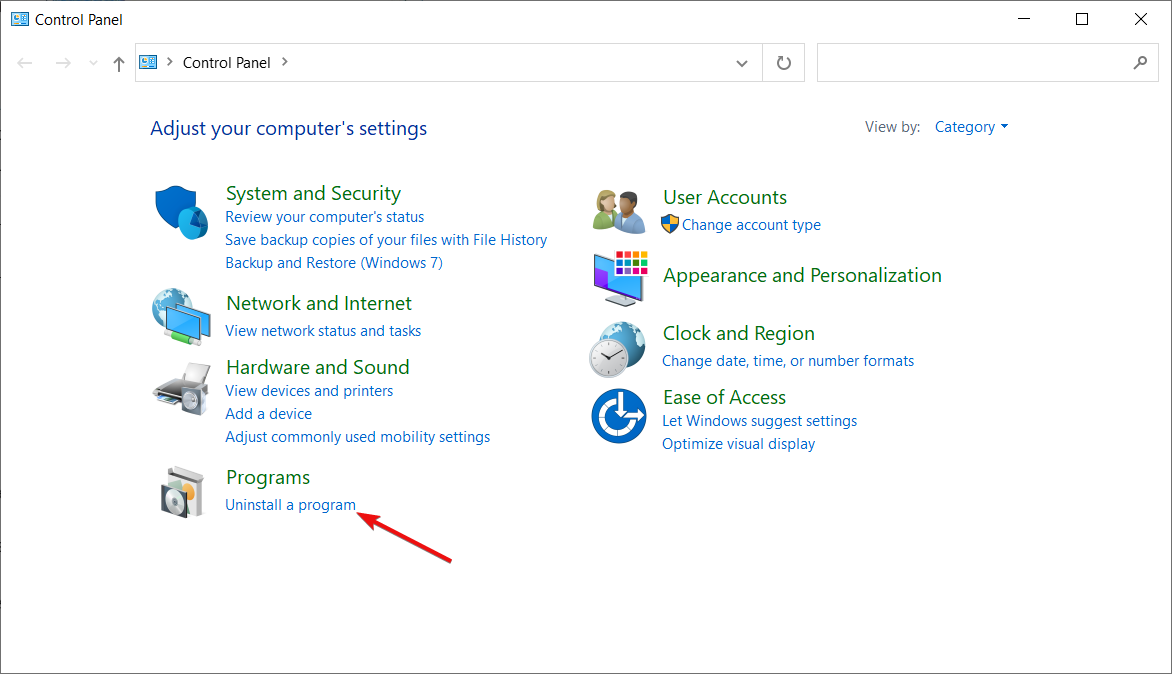
In the Control Panel, go to the Programs and Features menu to uninstall a program.
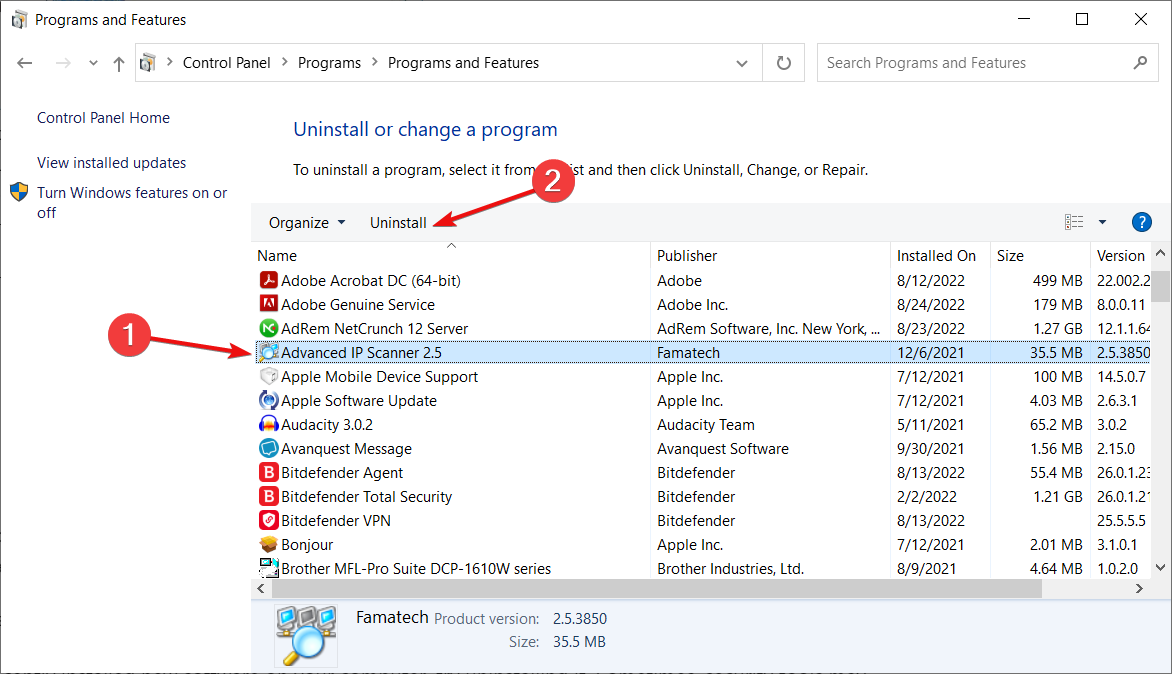
Go through the list of the installed applications and double-click on the application that produced the error. Follow the uninstallation prompts.
If you installed using a CD, insert the CD and install it afterward. Download the application at its official download site.
Launch the installer and follow the prompts untill the installation is complete.
Finally, run the application again.
After you reinstall the program along with its components, launch the program again. This fix will solve the xinput1_3.dll is missing problem.
Consider reinstalling the software application that displayed xinput1_3.dll is missing error. Reinstalling the corrupted program will replace the program files including its dynamic link libraries with a fresh one.
Press the Windows and R keys to launch the Run program.
Type devmgmt.msc and click OK to open Device Manager
From the Device Manager’s left panel, expand the Sound, video and game controller category and right-click on the game controller driver.
Select Update Driver and follow the prompts to apply the update.
Finally, after the update, restart your PC.
However, the software application in question may either require a game controller driver or a graphics driver; use these steps to update the specified driver.
Another reason for xinput1_3.dll is missing is due to old graphics or game controller drivers. The software program or game application requires updated drivers to work efficiently.
Another method of updating your driver is by visiting your PC’s manufacturer website to download and install the game controller driver for your PC’s model.
If you want to have the latest GPU drivers, bookmark this page and always stay updated with the latest and greatest.
4.2Update drivers automatically
In case you are not sure about the driver version you find on the manufacturer’s website, we strongly recommend Outbyte Driver Updater as it’s a very fast and reliable solution that gets the job done with minimum effort and time.
It automatically identifies each device on your computer and matches it with the latest driver versions from an extensive online database.
Start by downloading and installing Outbyte Driver Updater. It’s very light software so it will only take a few seconds to download it. Once it does, run the executable file to install it seamlessly.
After the installation, the tool will start running automatically so you don’t need to find its shortcut or the source folder. Outbyte Driver Updater will scan your system for any problematic or missing drivers and it will provide a report in just a few seconds.
All you need to do is to decide whether you update all the drivers in bulk or one by one if you have reasons not to install certain drivers.
For the first solution, you will have to click on the Update all button from the top of the list and for the second you will need to check the individual boxes for each driver and hit the Update button from the right.
Note: Some drivers need to be installed in multiple steps so you will have to hit the Update button several times until all of its components are installed.
5. Update Microsoft DirectX
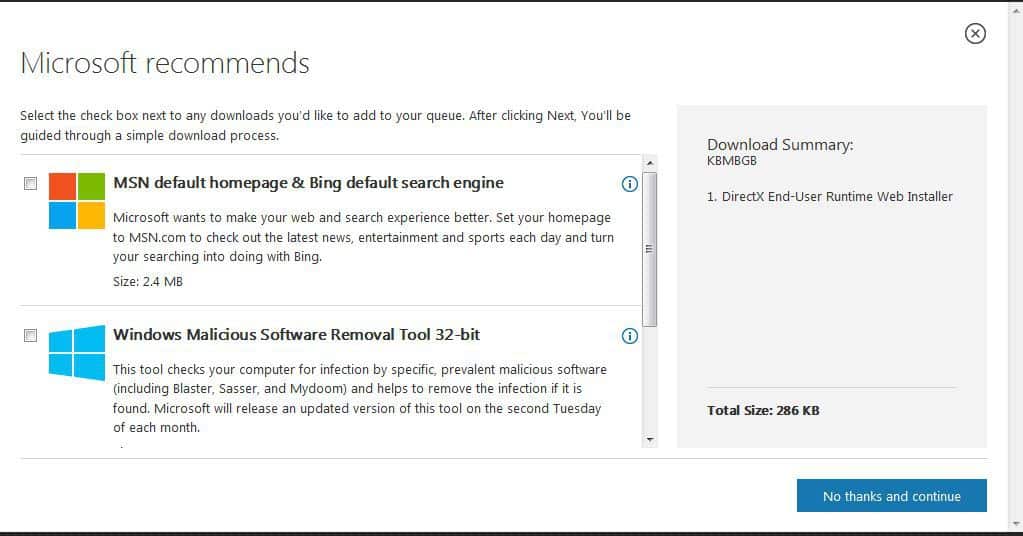
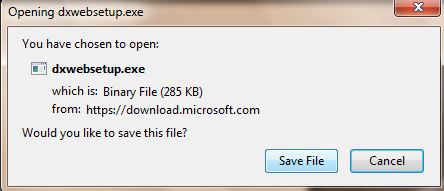
1. Go to Microsoft’s official DirectX End-User Runtime Web Installerdownload page.
2. Select the checkbox for any additional downloads or ignore and click on No thanks and continue.
3. Save the file to a specified path on your PC.
4. Launch the setup file to install the DirectX updates.
5. Follow the prompts to complete the installation.
Upgrading your current version of Microsoft DirectX can fix the xinput1_3.dll is missing error. What you need to do is download and install Microsoft’s latest updates to DirectX.
An Internet connection is required for this fix. After updating your current version of Microsoft DirectX, launch the affected program.
This method has been known to fix xinput1_3.dll is missing error. Do not download DirectX updates from illegal websites or websites with a bad reputation because of the many dangers involved.
In conclusion, these fixes are applicable in solving the xinput1_3.dll is missing problem. Try out any of the fixes and launch the affected program again.
As always, if you have any other questions or suggestions, leave them in the comments section below and we’ll be sure to check them out.
Your WordPress blog can be hosted on two platforms: on a web server, which is the most popular option among bloggers, or on a computer running the WordPress software package.
Hosting your website on a web server has a clear advantage in that you don’t have to worry so much about uptime.
However, if you’re determined to install WordPress locally on your Windows 10 computer, you’re in the right place.
This article is a step-by-step guide to configuring your computer to act as its own web server for hosting WordPress.
What are the advantages of installing WordPress locally?
The only visible difference when you host your WordPress blog on your Windows computer is the address: you’ll use https://localhost[…] instead of the regular web address.
As far as the user experience is concerned, by hosting WordPress on your computer you can work offline, test changes more quickly, and polish them before you roll them out to the live website.
So, this is a very good solution as a starting point, when you are just building your website and making a lot of tries and modifications.
But if you change your mind and want to take your website to the next level, read on because we also have some suggestions about hosting solutions.
How can I install WordPress locally on Windows 10?
Once you download the archive, double-click it to run it.
After you open the archive, extract it to the desired location.
Go to the extract location and run the Start-InstantWP.bat file.
If you get a Firewall prompt, click on Allow access button.
A guide will appear on the screen. Keep clicking the Next button until you reach the end.
1.2 Install WordPress using InstantWP
1. Download and install InstantWP.
2. Launch the InstantWP app. Several Command Prompt windows will appear. This is perfectly normal, so there’s no reason to worry.
3. Wait while the server starts. This can take about 60 seconds, so be patient.
4. Now click the WordPress Admin button.
5. This will open a new tab in your browser and allow you to log in to the WordPress website on your PC.
If you want to create a WordPress website on your computer, you can do so easily using the InstantWP software.
According to the creators, this is a portable and standalone WordPress developer environment, so it’s perfect if you want to familiarize yourself with WordPress or if you’re a WordPress developer.
Bear in mind that sometimes you might not be able to access your WordPress page on a computer. This is because the server is still starting in the background, so you’ll need to wait for a few more minutes while the server completely starts.
As you can see, this is a simple and fast method to run WordPress on your PC. It’s worth mentioning that this tool is fully portable, so you can just transfer it and run it on any other PC.
2. Use ServerPress
2.1 Download and install ServerPress
Download and install the free version of ServerPress. You’ll have to add the Free version to the cart and enter your email so you can get the download link.
After you get the download link, click it and use it to download the tool. Once the download is finished, locate the download archive, open it and extract it to the desired location.
Once you extract the archive, go to the extract location and run the Install DSL v392 file.
When the new window appears, click on Continue. This will restart the installation and start it with administrative privileges.
Click the Next button and follow the instructions on the screen.
This tool comes in two versions, free and premium, and while the free version is limited in terms of functionality, it should be more than enough for all your needs.
2.2. Install WordPress on Windows 10 using ServerPress
Go to the C:\xampplite directory and run the exe file as administrator. To do that, right-click the .exe file and choose Run as administrator from the menu.
Select Start apache and MySQL services and click Next.
If you get a firewall prompt, be sure to click on Allow access.
Click Next to proceed.
Select Create a new development website and click Next.
Now set the desired name and site root. We suggest that you keep them as they are. As for the Blueprint, be sure that WordPress is selected. Click Create to continue. Be sure to memorize the URL because you’ll need it for future steps.
Wait while the wizard creates the necessary files and folders. This might take about a minute or two, so be patient.
After the process is finished, just go to the URL from Step 6, by default it should be https://www.example.dev.cc. Now you just need to enter the required information and your local WordPress page should be set up.
After doing that, you can access your page and modify it any way you want.
How to get a great hosting solution for my website?
Now you know how to install your WordPress server locally, on your PC but do you have a good hosting service for it?
If you didn’t cover that part, we would strongly suggest using WP Engine, a powerful WordPress hosting platform that will help you with a lot of features.
It’s perfect for any type of usage including for small businesses, and large enterprises but also for hosting a small blog.
For the latter, you can use the Personal plan which is very affordable. The Professional plan can be used for small enterprises and the Business plan covers a lot of advanced features to accelerate your website’s growth.
There you go, these are the best methods you can use to set up a WordPress page on your local computer. Both methods are similar, although the first one might be more straightforward for first-time users.
Encountering issues such as set timezone automatically greyed out has become a rampant issue with the new Windows 11 OS. Because of the difference in time zones in the world, Windows incorporated the set time zone feature in their operating systems. Users can set the time zone of their computers manually or configure their time settings to be automatic.
Furthermore, time zones can change as users relocate from one place to another, depending on the geographical boundaries between countries.
Hence, configuring Windows to set a time zone automatically will help users keep up with the correct time of their current locations.
However, some factors can trigger the problem of Windows set time zone automatically not working. In such cases, most users have attributed the causes to either drivers or settings issues.
So, this article will provide the best troubleshooting fixes to help solve this problem without hassles.
Why is set time automatically greyed out?
Outdated Windows: When running an outdated Windows on your computer, it can prompt many issues like the Windows 11 set timezone automatically greyed out. Likewise, not keeping Windows up to date prevents it from accessing the necessary updates and patches to perform smoothly.
Location services are off in Windows settings: For Windows to be able to detect time zones, it requires access to your computer’s location. However, not enabling location services will not allow Windows to set a time zone because it can’t identify your location automatically.
Third-party app interference: Applications like VPN can automatically cause the Windows 11 set timezone to grey out. VPN creates another location server for your computer, which can confuse auto-set time zones. Hence, this error can be prompted as a reaction to this.
What can I do if the set timezone automatically is greyed out?
1. Restart your computer
Press the Alt + F4keys together to prompt the Shut Down Windows.
Click on Restart, then OK.
Restarting your computer will help it fix boot issues that can prompt the Windows 11 set timezone automatically greyed out.
2. Enable Location services in your settings
Press the Windows + Ikeys to prompt the Settings app.
Select Privacy and Security from the left panel.
Go to App permissions and click on Location.
Toggle On the Location services option and the Let apps access your location option.
3. Troubleshoot timezone settings in the Registry Editor
Press the Windows + Rkeys to prompt the Run windows.
Type in Regedit in the search space and press Enter.
Copy and paste the following path: HKEY_LOCAL_MACHINE\SYSTEM\CurrentControlSet\Services\tzautoupdate
Press Enter.
Double-click on Start from the registry.
Set Value data to 3 to Enable the Set time zone automatically option, then click OK.
Doing this will forcefully fix the Windows set time zone automatically not working issue.
4. Boot your computer in Safe Mode
Press the power button to turn on the PC.
Press the F8key to prompt the Advanced Boot Options menu.
Select Startup Settings.
Select the Safe Mode number and press Enter.
Your PC will reboot, and it should fix the issue.
5. Update Windows
Click Start on your screen.
Select Settings from the options.
Click on Windows Update, then select Check for updates.
To get more detailed steps on how to set the time automatically on Windows 11, you can refer to this comprehensive guide on Set Time Automatically on Windows 11.
The primary reason why your time zone keeps changing after you’ve manually set it up is that the Location service is not turned on on your computer.
As said earlier, outdated Windows can cause several issues with the computer. So, it can be a culprit for the time zone changing issue.
These are the best fixes for the Windows 11 set timezone automatically greyed out issue. Hence, try out all the steps in the fixes for optimal results.
Making a checklist in Microsoft Word is straightforward. Although you can do it manually by searching for the checkbox symbol and inserting it in the document, this method is tedious and doesn’t allow readers to mark the boxes.
Microsoft Word has an inbuilt checkbox feature that gives you a completely working checklist in one click.
How can I create a checklist in Word using the Developer tab?
Learn from our guide below how to make checklists easily in Microsoft Word through the use of the Developer tab. By default, the Developer tab is disabled. However, once you enable the Developer tab, it stays there.
1. How to enable the Developer tab
Open Microsoft Word.
Click on the File tab.
Go to Options.
Select Customize Ribbon from the left sidebar.
Find Main Tabs from the Choose Commands From dropdown menu.
Choose Developer and hit Add.
Click on the OK button.
Before you can make a checklist, you need to ensure the Developer tab is enabled on your Microsoft Word. To enable it, just follow the guide above.
2. Use the Developer Tab
1. Launch Microsoft Word.
2. Create a new document or open an existing one.
3. Type the list of items you want on the checklist.
4. Click on the position where you want to insert the checkbox.
5. Go to the Developer tab.
6. Click on the Checkbox Content Control icon.
7. A checkbox will appear where you placed your cursor in step 3. Repeat the steps for the remaining items on your list.
You can easily make a checklist in your Microsoft Word file by inserting checkboxes in your list of things you want to do. The checkbox can be inserted through the built-in Developer tab in Word.
There you have it, you can now make checklists in Microsoft Word.
You can then make more checklists later without having to enable the tab all the time. You can also make index cards in Word, and we have a guide that shows you how to do it.
Let us know if you managed to create checklists in Microsoft Word. You can do so by using the comment section below.
Destiny 2 is a F2P (free to play) multiplayer first-person shooter developed by Bungie. It was released on PCs in October 2017, a month after its PS4 and Xbox One release.
In this game, you choose from 3 classes and play as a guardian with various abilities. You get to level up and upgrade your equipment as the game gets tougher, to level you against your opponents.
The activities you can engage in Destiny 2 are split into PvE (Player versus Environment) and PvP (Player versus Player).
Things might sound awesome on paper, but the fact that Destiny 2 is online-only puts it against some challenges.
Why is Destiny 2 so laggy?
Lag is generally caused by a bad Internet connection. That’s why it’s important you first and foremost take a look at your network and contact your Sp if necessary.
It’s also possible that your ISP is throttling your traffic. It’s a common practice that restricts bandwidth/traffic for demanding tasks in order to be able to deliver bandwidth to all users.
Overpopulated servers in the game can also cause lag and high ping, that’s why we recommend you use a VPN and try to access other servers that may work better.
What is packet loss in Destiny 2?
In Destiny 2, packet loss occurs whenever data packets that you send or receive never make it to their destination.
As a result, it triggers a desync that can end up increasing your latency, rubberbanding, or downright disconnecting you from the server.
Packet loss is among the most annoying issues you may encounter in Destiny 2. Mostly because it has a lot of potential causes and there’s no immediate fix for it.
For instance, even a bad Ethernet cable or outdated drivers can trigger packet loss. However, the most common cause of this issue is network congestion.
Thus, sometimes the best way to improve packet loss is to wait it out.
How to test packet loss with Destiny 2 servers?
Launch CMD.
Use netstat to locate the Destiny 2 server IP address
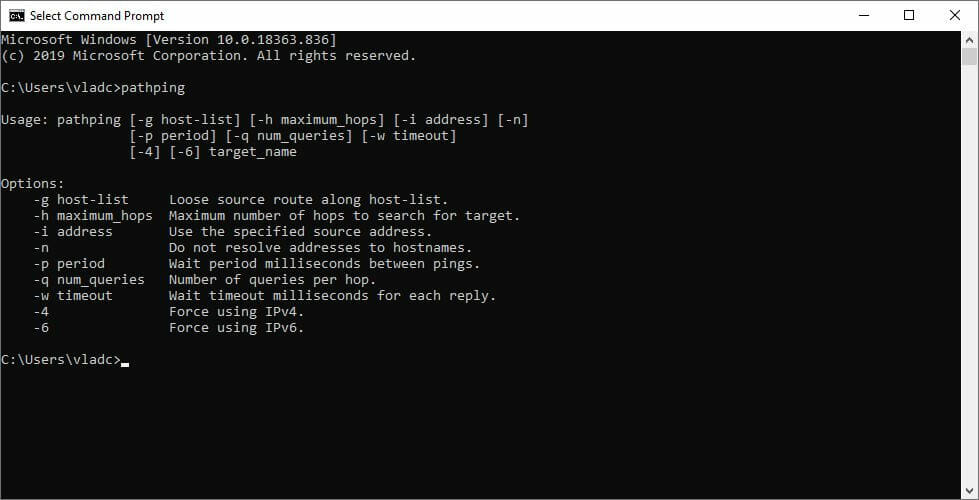
Run the pathping x.x.x.x command (replace x.x.x.x with the Destiny 2 server address)
Wait for the test to complete
Locate the node (hop) that’s leaking packets (high packet loss)
As opposed to other online games, Destiny 2 doesn’t use dedicated servers. Instead, it makes use of a P2P-cloud hybrid to increase performance at the cost of security.
That’s mainly because their P2P model exposes your IP address to every other player in the session. So you might expect some DDoS attacks if you’re unfortunate enough to cross paths with a sour loser.
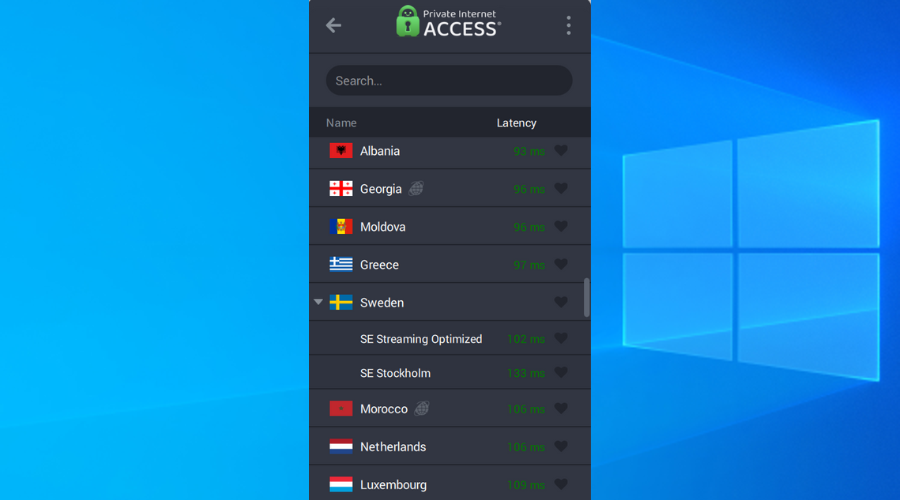
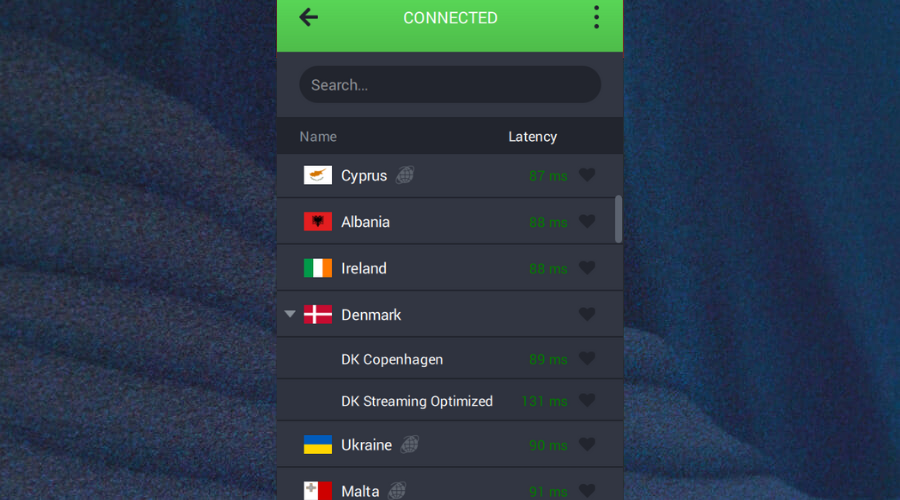
Connect to the server of your choice (make sure it’s a low ping one).
Launch Destiny 2.
Check if the problem still persists.
Private Internet Access is a reliable VPN service brought to you by Kape Technologies that can take care of your packet loss issue and then some.
Remember not too long ago we told you that your public IP is exposed to every other player in the session while playing Destiny 2? Well, using a VPN can take care of this problem.
Private Internet Access
Getting packet loss in Destiny 2? Use PIA to fix it and protect your online privacy!
More so, it can safekeep your online privacy and secure your connection, keeping it away from prying eyes. Last, but not least, a VPN such as PIA can easily bypass geo-restrictions.
Note that VPNs can improve packet loss only if the leak doesn’t occur on your side of the connection or on the side of the server host.
If your ISP throttles your connection, for instance, using a VPN could improve packet loss dramatically.
2. Perform some manual troubleshooting
Restart your router and/or modem
Switch to a wired connection instead of wireless (Wi-Fi leaks packets more often)
Replace/update/upgrade/repair any faulty component on your network (cables, PC, router)
Run a pathping test and call your ISP if it seems that there’s something wrong on their side
Try to avoid peak hours if you notice a pattern of network congestion
All things considered, if you’re leaking packets and can’t enjoy Destiny 2 because of that, you might want to try some of our suggestions.
One of the best courses of action would be investing in a trustworthy VPN, and not only for its potential to fix packet loss issues.
VPNs can also anonymize your IP, so even though Destiny 2 exposes it during an online match, your public IP would be replaced by the VPNs.
For those wondering what Internet connection speed you need for Destiny 2, you should know that at least 3Mbps for download speed and between 0.5 and 1 Mbps for upload speed.
If using a VPN just doesn’t cut it, you might want to try troubleshooting your connection manually. Although it’s not bound to work every time, regularly performing maintenance work on your network is a healthy practice.
If you’re experiencing Arma 3 lag and high ping, use a VPN to fix these issues in no time. Arma 3 is a military tactical shooter with an open world and plenty of MMO content.
You can play this dynamic gameplay on Windows, Mac, and Linux. It’s also available on Steam.
Although the game has a single-player mode, it shines in the multiplayer version, providing you with online and LAN co-op and PvP content. You can use more than 40 weapons and 20 vehicles for combat.
However, a lot of players report Arma 3 high ping and lag, which can be incredibly irritating in multiplayer mode.
If you experience such issues, you can use a powerful Arma 3 VPN to refine your gameplay. That’s because it’s possible to improve your ping with a VPN.
A VPN is not only practical for hiding your IP address and encrypting your data traffic to secure your online identity.
You can also use a VPN to fix packet loss, speed up your Internet connection on restricted networks, and optimize your Wi-Fi for gaming.
Why is my ping so high in Arma 3?
There is no single answer to this performance issue, as it usually involves multiple factors such as Internet connection issues or even advanced system requirements.
Thus, you can experience Arma 3 all servers high ping on your PC due to these reasons:
You have a deficient network connection
The router or modem connections are unstable
Other devices in your home network are increasing the lag
Your Internet connection has packet loss
In addition, it may happen because your WiFi network is not stable enough for gaming purposes. In this case, you can try using an Ethernet cable if possible.
What is a good ping for Arma 3?
Anything between 50 ms and 100 ms ping score is considered to be really good or average. Then, if you have more than 150-200 ping levels on your game, it becomes more difficult to play.
However, different users claim that 200-250 ms ping can be playable on Arma 3, with a few glitches and or server problems.
What are the best Arma 3 VPNs to fix high ping and lag?
If you have Arma 3 constant lag spikes, Private Internet Access (PIA) can help solve this problem.
Made by Kape Technologies, it’s one of the best VPNs for gaming and for fixing packet loss, which can make your Internet connections faster.
You can even open ports for Arma 3 using PIA’s port forwarding mode. It’s wrapped in a user-friendly interface and features intuitive security options, such as DDoS protection.
Private Internet Access is the best Arma 3 VPN if you’re looking to optimize your network for gaming by minimizing jitter and by getting rid of Arma 3 lag and high ping.
At the same time, it features static and dynamic IP addresses, together with exclusive DNS.
In addition, PIA it’s one of the few VPNs with 24/7 live chat support.
Other critical features of PIA:
Compatible with Windows, Mac, and Linux
10 connections at the same time
Eliminates Arma 3 lags when shooting
30-day money-back guarantee (no free trial)
Private Internet Access
If you’re looking for a quick Arma 3 high-ping fix, PIA is the most efficient VPN for it.
NordVPN is among the most popular Arma 3 VPNs when it comes to repairing high ping and lag.
It allows you to swiftly reduce network congestion so that you won’t have trouble playing this game in co-op or PvP mode.
Developed by Tefincom & Co., NordVPN is ideal for bypassing Arma 3 VPN blocks, thanks to the fact that it has obfuscated servers to make your VPN traffic look like regular HTTPS traffic.
So, if you can’t connect to servers using a VPN in Arma 3, use NordVPN’s obfuscation mode.
Furthermore, NordVPN has an integrated kill switch ready to disable your VPN in case of unexpected connection drops. It’s also a great choice for fixing Xbox packet loss.
Other key features of NordVPN:
Works with Windows, Mac, and Linux
Allows 6 simultaneous connections
Provides you with an easy Arma 3 lag fix
30-day money-back guarantee (no free trial)
NordVPN
If you’re wondering how to reduce ping in Arma 3, use this reliable VPN solution.
CyberGhost VPN is another excellent Arma 3 VPN that can fix high ping and lag issues.
Also owned by Kape Technologies, this VPN solution has servers optimized for gaming, streaming, torrenting, and secure browsing. You can use it to evade geoblocks and access blocked sites.
It comes in handy for managing limited network resources by creating whitelists and blacklists so that you can separate VPN traffic by application.
CyberGhost VPN handles Arma 3 lag spikes quite well, thanks to its high-speed VPN servers. It has private DNS servers and leak protection, and it can fix Wi-Fi packet loss for gaming.
Other important features of CyberGhost VPN:
Can be installed on Windows, Mac, and Linux
7 connections at once
One of the best Arma 3 server VPN solutions
Up to 45-day money-back guarantee (1-day free trial)
CyberGhost VPN
Eliminate high ping and lag spikes using one of the best Arma 3 VPNs with high-speed servers.
It should be possible to use ping controls in this PvP shooter. In any case, some users said Arma 3 check ping doesn’t work anymore due to difficulty settings.
Using gaming techniques such as Arma 3 tactical ping can be helpful to mark your targets or elements that improve your game performance.
To summarize, your Arma 3 lag and high ping issues can be quickly resolved by turning to a reliable VPN for Arma 3 that provides you with high-speed VPN servers and top-notch security features.
So, if you’re wondering how to ping in Arma 3, you should be able to use controls like Shift+T to achieve it.
All being said, you can join our VPN Troubleshooting Hub to fix any VPN-related issues or bookmark our Gaming VPN section if you frequently have in-game network issues.
WinRAR is one of the most popular data compression tools out there, and it’s used mostly for compressing large files that could not be sent via email otherwise.
It can happen though that the RAR file is password protected and you have either forgotten the password or you don’t remember it.
But there is no need to worry, we’ve got you covered on both cases.
How can I extract protected RAR files without a password?
In this article, we will explore some ways that can help you open a protected RAR file without having a password.
1. Use a frequently used password
A commonly used method, which you should try before trying anything else, could be thinking and making some guesses in regard to your password.
It depends solely on how you usually protect your files and what type of passwords you are using, but it’s not uncommon to have used the same password on multiple tools.
This could be the case here as well, therefore it’s worth giving it a try. Perhaps you are using often your birth date or initials from your name or hometown.
There are some really big chances that by trying this a few times, you will actually end up guessing the right one.
2. Recover the RAR password online using tools
Another useful method you can try in order to recover your password if you don’t want to use the other ones is to use an online RAR password unlocker.
Usually, using this sort of tool is pretty easy and in just a few easy steps you can recover your files.
One such online tool is HashCrack but keep in mind that you can only recover weak passwords and files that don’t exceed 200 MB.
Weak passwords are the ones that don’t include a lot of special characters, or numbers and letters altogether. They are easier to guess and also to remember.
All you need to do in order to recover your RAR password online is to go to the above website and simply upload your archived file by pressing the Browse button.
From there you will only need to wait for your password to be recovered.
Make sure to keep in mind, when choosing this method that is advised you have your antivirus software activated on your device.
We have a dedicated article on the best free antivirus software that you can use on your device.
Considering that you will upload your file over the Internet and download it afterward, it’s necessary that you keep your device protected from unwanted threats.
3. Use password manager software to recover the RAR file
It can be a lot of trouble trying to remember all the passwords for each tool used on your device, especially if you are using different ones for each app.
In using such software you will take out a lot of pressure from your shoulders trying to remember everything.
Not to mention that the traditional way of writing them down takes some time, can be a bit difficult and it does not guarantee that your passwords will be kept safely there.
Anyone could find them by mistake and this could compromise the security and even confidentiality of your data, especially if you are keeping sensitive information on your device.
4. Use dedicated software
WinZip is a popular compression tool that offers some great features when it comes to compressing or sharing files.
This is a reliable, error-free tool that will make your life a lot easier when it comes to managing your files.
WinZip is an all-in-one software that goes way above simply offering some sharing and archiving features.
It will offer strong encryption that allows you to protect your files as you zip them. Needless to say that the security features WinZip offers are near bank-level encryption.
If you are used to working on your PC or perhaps on different cloud storage such as Dropbox, Google Drive, or OneDrive, then this is another reason why WinZip is the tool for you.
It easily connects with most cloud storage out there and allows easy access to your RAR files, so you will manage them without much effort.
Most of the time, not only large documents take a lot of space or need organizing, but also videos or pictures. With WinZips’ support, you can archive each RAR file and secure them with high encryption tools.
Let’s have a closer look at some of its key features:
A great and reliable method to open your password protected RAR file without using any third-party software is to edit it in Notepad. By making some tweaks in Notepad, you can remove the password requirement from the RAR file.
1. Open the archived file using Notepad.
2. Press Ctr+F and typeÛtà in the Search bar. Replace it with5³tà.
3. Next, search for ‘IžC0 and replace the result with IžC_0.
4. Save the file after you finish making the changes.
5. Open the file. It will not require any password anymore.
We would like to hear which one worked best for you and you can let us know in the comments section below if you have additional suggestions or recommendations.
In previous versions of Windows, you could easily change the name of your network, but in Windows 10 it seems that it’s harder to rename the network.
If you wish to change the name of the network in Windows 10, today we’re going to show you how.
In Windows 7 it was easy to rename your network connection, you just had to go to the Network and Sharing center and click your connection to change its name.
In Windows 10 you can’t do that anymore, but luckily there’s a different way to change your network name.
You can easily change the name of a certain network by performing one registry tweak. All of this can done through the built-in Registry Editor.
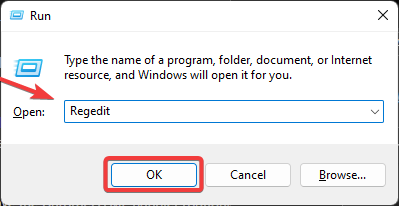
1. Press the Windows Key + R and type regedit, then click on OK.
2. Navigate to the following key in the left pane: HKEY_LOCAL_MACHINE\SOFTWARE\Microsoft\Windows NT\CurrentVersion\NetworkList\Profiles
3. Now you need go through all subkeys (they are all labeled with random numbers and letters) under the Profiles key until you find the key with that has ProfileName set as the name of your network.
4. In the right pane double click the ProfileName in order to change its value.
5. Change the value data to the desired name of your network connection.
6. Close the Registry Editor.
7. In order to apply the changes to your network, you might have to restart your computer, or to sign out and sign in again.
If you don’t want to experiment with your Registry, there’s another way to rename a network. So, here’s how to rename a network by using the Local Security Policy:
Press Windows Key + R, type secpol.msc and press Enter to run it.
In Local Security Policy window, go to the Network List Manager Policies in the left pane.
Now in the right pane double click on the network name that you want to change.
In the Properties windows under the Name section make sure that Name is selected.
Now in the input field enter the name that you wish to use for your connection.
Click Apply then OK to save the changes.
You might have to log in again or to restart your computer before the changes are applied.
And that’s how you rename the network in Windows 10. If you have any comments or questions, just reach for the comments section, below.
The Sims is a life-simulation game series played by people all over the world. Sims 4 is the best-selling Sims game to date.
The game receives constant updates and new content from the developers, but what makes the game shine is the mods community.
Custom content and mods allow players to play out any stories they imagine in the game. They bring a new face to the game and make it feel fresh at all times.
To get you started with the wonderful world of playing with mods, we have prepared a guide on how to install them step-by-step.
How can I install Mods in Sims 4?
1. First of all, you need to check your game version. Press the Windows key + E to start File Explorer.
2. Navigate to the following path and double-click on GameVersion.txt:C:\Documents\Electronic Arts\The Sims 4
3. Now you can start downloading the Sims 4 mods you want to add to your game. You need to verify whether the files you want to download are compatible with your game version.
If they are not compatible, the Mods will not show up in game.
4. Launch Sims 4 on your device.
5. Press on the Options button on the screen.
6. Choose Game options from the list.
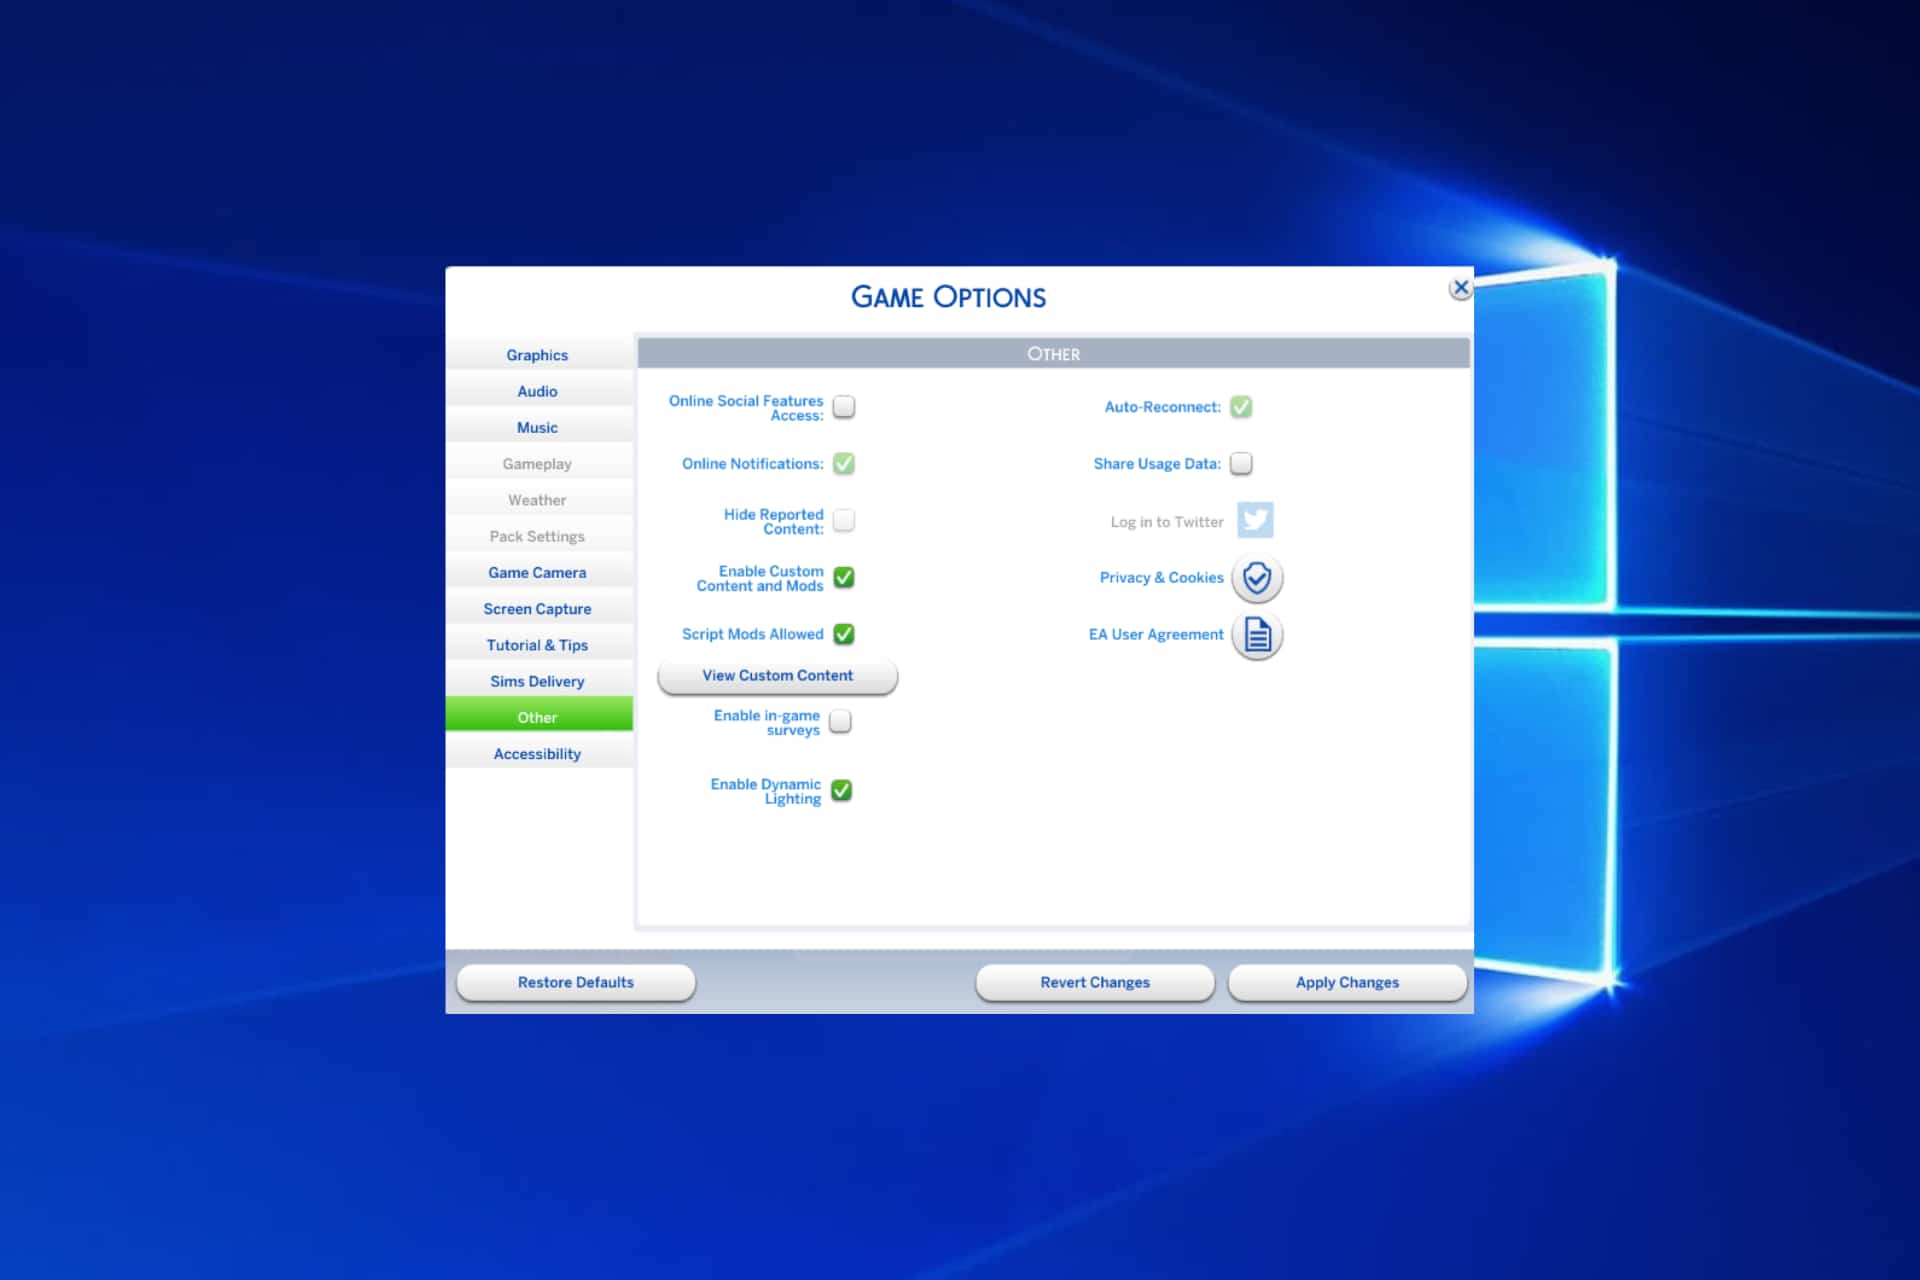
7. Navigate to the Other section in this menu.
8. Tick the checkboxes next to Enable Custom Contentand Mods and Script Mods Allowed. The checkboxes need to be green for these settings to be enabled.
9. Click on Apply Changes and exit the game. Any setting changes you make from the menu require a game restart.
10. Now it’s time to install the mods. Depending on the file extension type they have, they need to be placed in different places on your computer.
11. To install CAS CC and script mods (.package and .ts4script files), you need to navigate to: C:\Documents\Electronic Arts\The Sims 4\Mods
The Mods folder was automatically created by the game when you enabled Custom Content. If the folder does not exist, create it manually and name it Mods.
12. Copy the downloaded files to this folder. If they are zipped, unzip them.
13. If you downloaded lots, rooms or households, you need to navigate and copy the files to: C:\Documents\Electronic Arts\The Sims 4\Tray
14. Lastly, if you downloaded save files from other players, you need to copy the files to: C:\Documents\Electronic Arts\The Sims 4\Saves
Installing mods for your Sims 4 game on a Windows PC or Mac is very easy. What you need to do is download the files that are compatible with your game version, enable Mods via the game’s settings, and then copy the mods to the dedicated folders.
If have an EA account and download mods from the Sims 4 Gallery, they will be automatically added to your game’s Library.
You can access the Library as soon as you launch the game, from the first menu. From the Library section, you can manage which mods you want to have in your game and which you want to remove.
Differences between Custom Content and Mods
These two terms are often used to describe the same thing, which is player-created content for the game. However, you can differentiate the terms.
Custom Content refers to files that change how your sims look and what objects they have around them. For example, CC consists of custom hairstyles or outfits.
On the other hand, mods refer to files that change how your Sims behave, how they interact with each other, and what options they have when it comes to interactions.
For example, the MC Command Center mod allows you to make changes such as: blacklisting certain outfits from being worn by Sims in your world, disabling the ability to get pregnant, auto-cleaning the lot, or changing control to another Sim.
What types of Sims 4 Mods are available to download online?
Sims fans, also known as Simmers, have created all kinds of mods to play with. That being said, you can find these types of CC online:
CAS items (hairstyles, outfits, accessories, eye colors, etc)
CAS backgrounds
Build items
Households (when downloading a custom Sim, you need to download all the CC used to create that Sim)
Lots
Worlds (these types of mods modify an already existing world)
Core mods
Save files
Core mods, also known as script mods, are created from scratch by players using their codes. Therefore, they can modify the game beyond its default restrictions.
The process of installing script mods in Sims 4 is not different from that of installing other types of mods, as you will see in the following guide.
Unfortunately, at the time being, it is impossible to install any type of Custom Content on consoles.
Xbox consoles do not have mods support yet. If you want to play with mods, you need to be using a computer.
Installing Mods on Windows 10 vs Windows 11
If you are wondering whether there is any difference when you install Sims 4 mods on Windows 10 or 11, you should know that the process is the same.
Even more, the same installing process can be used on other OSs as well, for example, on Windows 7.
What to do with .txt, .img or .png files?
These are additional files that come with your Sims 4 mods and are only meant to inform the user about the item they downloaded.
Therefore, they can be safely deleted and do not need to be placed in the mods folder. If you do choose to place them there, they cannot cause any harm, but take up disk space.
We hope that our article helped you install Sims 4 mods on your device. Let us know in the comments section below whether you have any questions about this topic.
Even if you have slow internet, Steam does not slow its download speed, which impacts the speed and performance of your PC.
The way to fix this is to throttle the download speed. However, users report this feature is not working correctly. Check out the solutions below to solve this issue.
Users report that when they have an unstable internet connection, Steam ignores the download limit they set. If you have an internet connection that cuts in and out and is unreliable, then Steam may ignore any download limits.
This type of erratic behavior can also be linked to other related issues, such as when your Steam download goes to 0 bytes unexpectedly or appears to hang despite being active.
Quick Tip:
If you still want to use your browser while you are downloading a huge game, you can use a specialized gaming browser, Opera GX, mostly for its network-limiting capabilities.
Since Opera GX is a gaming browser, it comes with relevant features, such as a network bandwidth limiter for when you are downloading games, making browsing slower but consistent. It also comes with CPU and RAM limiting capabilities, as well as integrated Discord, WhatsApp, and other amazing features.
Opera GX
Set the limits and enjoy your gaming options while browsing the web.
Open Steam, click on the Steam menu in the top left corner, and select Settings.
Under Downloads, check the box next to Only auto-update games between.
Set your desired time and click OK.
Try adjusting the settings to only have Steam auto-update your games between a specific time, preferably a 1-hour interval during a time that you are not using your PC.
This will limit any updates and downloads to take place during that interval.
2. Change download region
Open Steam, click on the Steam menu in the top left corner, and select Settings.
In Downloads, located Download Region.
Change the region to somewhere that is not as active and click OK.
When choosing a region, don’t pick one that is geographically close to you; instead, like one where the local time is in the middle of the night. Or a region with a spread out population.
We hope one of the above solutions helped you fix the download limit in Steam if it’s not working. Let us know in the comments which step worked for you or if you have a suggestion for a different solution.
Steam can download updates and new games in the background while you play, but this can lead to in-game lag or reduced performance depending on your system and network strength. To manage this, go to Settings > Library and adjust the background download options. You can enable or disable downloads while playing games, depending on your preference. If you’re experiencing noticeable lag or stuttering, it’s best to pause downloads during gameplay and resume them afterward.
Why does Steam download fast, then suddenly slow down?
It’s normal for Steam to start a download quickly and then slow down, especially during installation. That’s because after downloading compressed game files, Steam has to extract and install them, which puts pressure on your CPU and storage drive. This is particularly noticeable on traditional hard drives or systems with limited RAM. If the slowdown is extreme or sustained, it may indicate a problem with your drive’s health or a conflict with another background process. Try clearing your download cache or switching your Steam library to a faster drive.
How do I fix Steam not downloading at full speed?
There are several steps you can take to restore full download speeds. First, make sure Steam’s bandwidth isn’t being limited in the Downloads settings. Next, try switching to another download region and clearing your download cache. You should also pause any other apps or devices that might be consuming network resources. In some cases, your antivirus or firewall might be interfering with Steam, so adding Steam to the exception list can help. Finally, check that your drive isn’t full or overly fragmented, which can also bottleneck performance.
What’s a good download server region in Steam?
Steam automatically selects a content server region based on your location, but the closest server isn’t always the fastest. If your downloads are slower than expected, try manually switching to a nearby region that might be less crowded. You can do this by going to Steam > Settings > Downloads and changing the “Download Region” dropdown. Selecting a neighboring country or a major city near you can make a surprising difference in speed, especially during peak hours.
Does Steam throttle download speeds automatically?
Steam itself doesn’t automatically throttle download speeds unless you’ve set it to do so. However, slowdowns may occur when Steam servers are under high demand, such as during major game releases or seasonal sales. Additionally, third-party network tools or routers with QoS (Quality of Service) features may throttle Steam without you realizing it. Make sure Steam is prioritized in your network settings, and disable any unnecessary bandwidth restrictions in Steam or your router settings.
Can I schedule or pause Steam downloads?
Yes, Steam offers a way to schedule downloads so they only run during certain hours. This is perfect if you want to avoid heavy internet use during the day or only allow updates overnight. Head to Settings > Library > Download Restrictions, and you’ll see an option to enable time-based download windows. You can also pause and resume individual downloads manually from your Library, giving you more control over when and how your games are downloaded.
Google Chrome is one of the most popular browsers out there, boasting an incredible number of features, lightning-fast loading speeds, extension support, and more.
Additionally, it offers multi-tab support, allowing you to multi-task efficiently, while also having lots of customization options for said tabs.
The problem with multiple tabs, however, is that when two of them have the audio feature on, you end up getting a convoluted mess that you cannot understand.
The same scenario applies when you need to work in peace and quiet, and every now and then, some ad or video in a certain tab starts blaring.
Thankfully, when this happens in Google Chrome, you no longer have to close the tabs that have audio. Instead, you can simply mute them, while still keeping them open for you to use.
That is why we’ve created this step-by-step guide that will show you how to enable or disable being able to quickly mute and unmute a tab playing audio in Google Chrome.
Why did Chrome remove the Mute Tab?
Back when Google introduced the Tab Audio indicator (the speaker icon) for the Chrome browser, it also added a flag with the ability to mute a tab with a single click.
That only remained as a flag, but contrary to others, it lasted for four years, as Google finally removed it in 2018, saying that Chrome needs to police content if they provide muting control.
So, if you are looking for an easy answer on how to mute a tab in Chrome using a shortcut, know that there is an extension for it.
Quick Tip:
Although Chrome has been dominating the browsers’ segment in terms of usage for some years now, it’s worth noticing other browsers, like Opera One.
Muting a tab in Opera One is similarly easy, by simply right-clicking on it and selecting the Mute tab option. The browser also comes with unique features as built-in VPN, Ad Blocker and AI.
Opera One
Switch off the noisy tabs with just 2 clicks! Try the awesome Opera One browser today
Press the Shift + M combination on your keyboard to mute that particular tab.
2. Use the contextual menu
Launch Google Chrome.
Open multiple tabs.
They can all have audio, it doesn’t matter.
You can recognize tabs that have audio running by the small speaker icon on them.
Right-click on one such tab.
You can do this from an entirely different tab, you don’t need to switch.
Select Mute site from the context menu.
The website should now be muted, and no more audio should be heard from it. In order to reverse this change, simply right-click the tab again and select Unmute this site.
This change persists through page refreshes and it will stay muted even if it moves on to another video. One thing you should note is that the audio will remain muted even if you close the tab.
You can tell if a site has been muted by the microphone icon located on the tab that is crossed out.
This change also persists through browser restarts and PC reboots, so the only wait to unmute a website is by using the method listed above.
First of all, nothing is broken so you won’t need to fix anything, as nothing is broken. All you have to actually do is unmute the tab, just like you muted it in the first place.
Look at the steps above and follow the exact same procedure, only this time select the unmute option instead of the mute.
You will see that everything will go back to normal and the volume for the selected tab will be restored as a result.
But, if you would rather use the Chrome Mute Tab extension, you will get the same results, only through an easier process.
The Tab Muter extension is entirely free, so don’t be shy and give it a go. As we said, Chrome added the mute tab option instead of the entire site.
If you are also looking for information on how to mute a tab in Chrome on your phone, simply follow the same steps.
That is also how to mute a tab in Chrome for Mac, so all the information you need is right here. Do you think website muting is useful? Let us know what you think in the comments section below.
Even though Chrome is the market holder and the most used browser in the world, it still has some things that can be deal-breakers.
For example, if you accidentally close Chrome with multiple tabs open, it will, well, just close. No warning, nothing at all.
There’s no official way to make Chrome ask when closing multiple tabs. The Close all tabs prompt is one standard feature available on other browsers that were frequently asked for and never delivered in Chrome.
Even though Google delivered many features, stability improvements, and better resource usage over the years, this feature never saw the light.
But don’t worry, we got your back. There’s a way to make Chrome ask when closing multiple tabs.
How do you close 50 tabs?
Regardless of the number of open tabs, you close them all at once by clicking on the X at the topmost right of your browser.
However, you must note that depending on your machine, for 50 tabs, it may not close as fast as you wish.
This is because Tabs in Chrome are treated as individual processes, so closing them at once means the PC has to work its way to ending 50 distinct processes.
How can I see how many tabs I have open?
The number of open tabs is straightforward on IOS; this number is displayed at the bottom of the browser.
However, this may not be a straightforward process on your PC, and you will need an extension like Tab count to see the number of opened tabs.
Is there a limit to the number of tabs in Chrome?
You may be able to go as many as 9000 tabs on Chrome according to Google; however, it is not wise as this increases the workload on your computer.
Let us now show you how to make Chrome ask before closing.
Quick Tip:
While you are busy troubleshooting Chrome, you may need another browser to use until the job is done. Opera One is an excellent alternative to Chrome, with a much lower system footprint.
You get unparalleled control over your UI elements, including your tabs. Opera one comes with workspaces and tab islands, which give you much more control over your tabs. Also brings you a free native AI built-in.
Opera One
Get complete control of your tabs, from how they open, behave, and ultimately close with Opera One.
Keep the Chrome Close Lock tab open while using Chrome to prevent it from closing without a prompt.
Chrome’s most significant advantage is its extensive library. So, even when you feel a feature is missing, you always will find an extension that fits the bill.
And this is an easy way to make Chrome ask before closing multiple tabs.
3. Restore tabs closed by mistake
Actually, you shouldn’t worry too much if you closed a tab or page by mistake because there’s a very simple way of restoring it.
Press the Ctrl + Shift + T shortcut while on Chrome and witness the magic. The tab or page will reappear just as it was when you closed it.
We’re pretty sure you already heard about the changes that the Redmond-based tech company is going to implement for the new operating system’s Start menu and taskbar.
Based on community feedback, Microsoft added another way to customize what you get to see in the Start menu, but it’s still an experimental feature so don’t expect to have it yet.
As a matter of fact, only a limited number of Dev Channel Insiders can test the upcoming change, but it will eventually roll out to more people as time goes by.
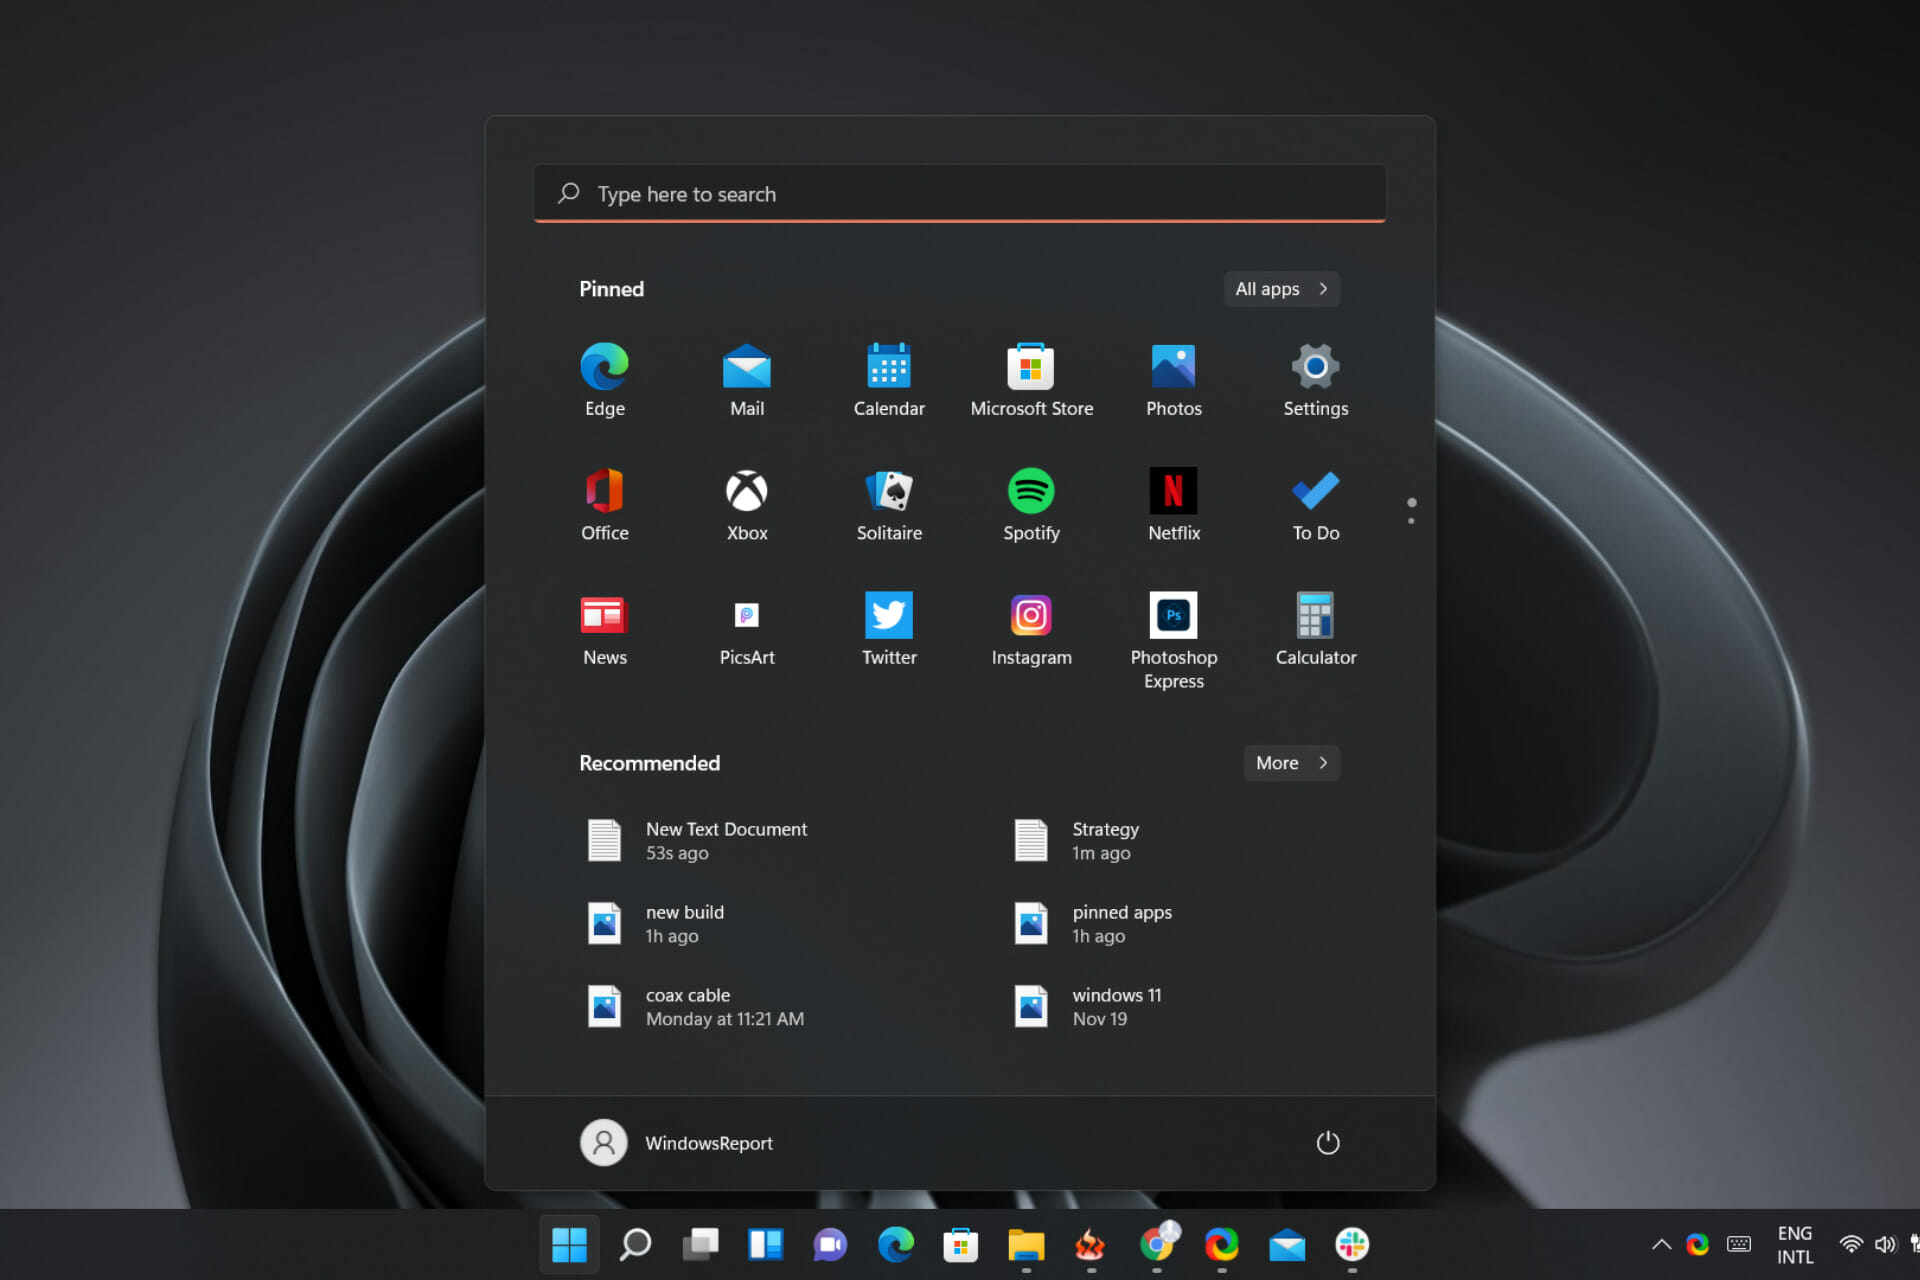
How can I show more pinned tiles on the Start menu?
On the off chance that you aren’t already using one of the third-party apps that permit customization options for the Start menu in Windows 11, you are surely eagerly waiting for this change.
But don’t go thinking that you’ll be able to anchor the Start menu wherever you please on your desktop. In fact, the only new addition is the fact that you’ll be able to control more of the content in it.
You can tweak the flow of pins or recommendations that get displayed on the Start menu. And switching between the two is quite easy, as we’re about to show you.
According to Microsoft, we can access Start settings and choose the More pins or More recommendations layout option to show an extra row of either pins or recommendations, respectively.
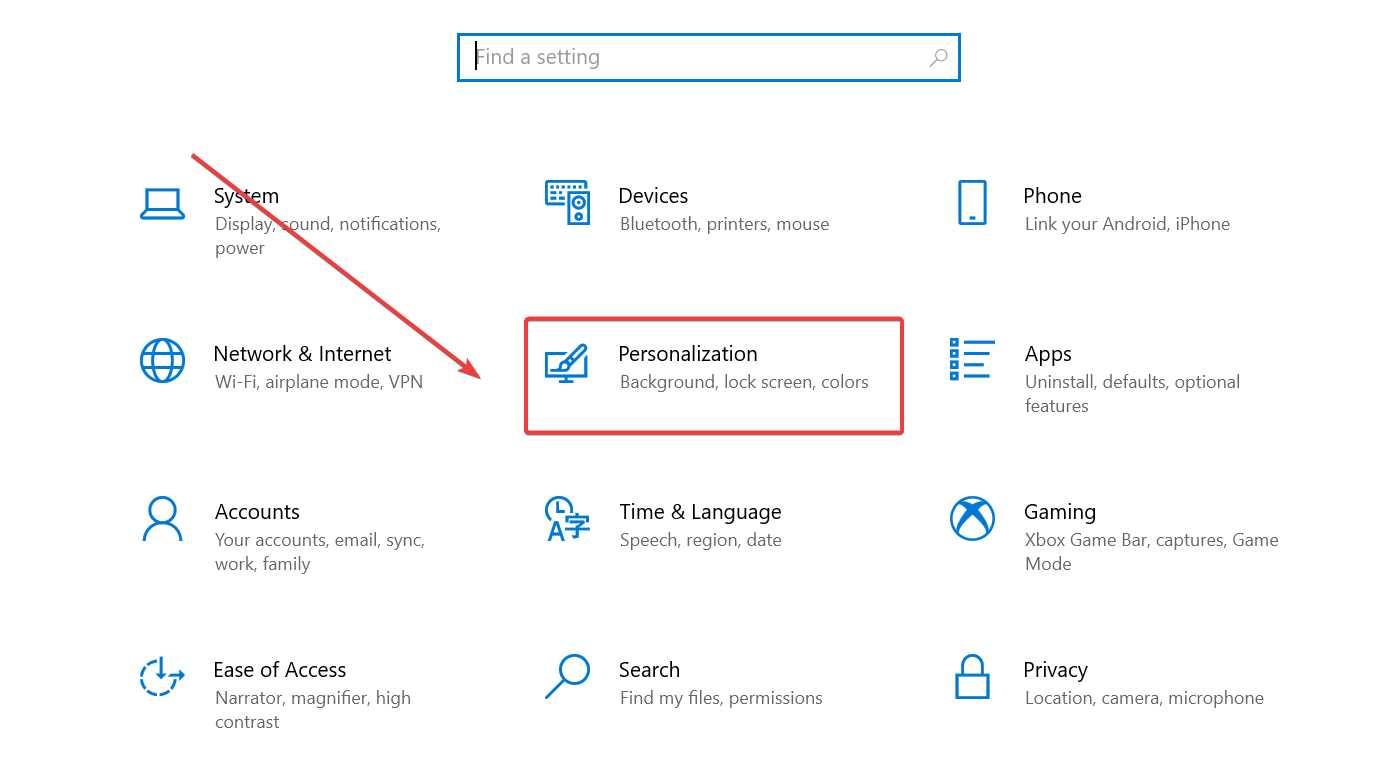
1. Press the Windows + I keyboard shortcut to open the Settings app.
2. Choose the Personalization option from the menu.
3. Now, navigate to the Start section on the left. This will open the Start Settings menu.
4. Tick the box next to the More pins option to show more pins on the Start menu.
5. If you want to show add recommendations to the Start menu as well, tick the box next to the More recommendations option.
Revert settings back to default
However, if you don’t want more of one or the other, you can just revert that option to Default, which means that there will be a balanced number of the two.
In order to set your Start menu not to favor any of them, you do exactly the same, as follows:
Right-click the Start menu and select Start settings.
Tick the box next to the Default option.
That’s pretty much it! A simple process with a useful outcome. Surely many will already be waiting for this new feature, but Windows 11 users won’t be so easily satisfied.
The community wants to see the good old days of multiple functionalities restored to the taskbar as well. But seeing how Microsoft is doing more and more based on feedback, that could pretty much still happen soon.
We’re eager to see what new ideas Redmond developers will come up with and will closely follow the evolution of the new OS, keeping informed as we go.
Excited about the new changes being tested by Dev Channel Insiders? Share your opinion with us in the comments section below.
The Windows 10 error reporting service is designed to help ensure your PC works optimally. The central idea behind Windows Error Report (WER) is to keep Microsoft informed about user issues working with Windows.
However, every Windows OS version has the service enabled on default settings. But an individual user can choose to disable it if the need arises.
This article explores how to enable or disable the error reporting service on Windows 10.
How the Windows 10 error reporting service works
Windows 10 Error Report focuses on discovering hardware and software issues from the user’s PC and reports to Microsoft.
With a database of likely complaints experienced with using the Windows 10, Microsoft can then send solutions for troubleshooting.
While working with the PC, some users experience pop-ups or alerts requesting the submission of the problem report.
Windows error report usually occurs after a system failure, program crashes, refused to load properly or operating system errors. W
Windows usually prompts the user to submit an error report online to help proffer solutions in the future. The problem report may include the program name, date, time of error, and version.
Should I disable the Windows problem reporting service?
Windows users often disable error reporting due to disk space or privacy issues but might need to exercise restraint. Error reporting service for Windows 10 offers dual benefits to Microsoft and PC users.
Each error report helps Microsoft develop more advanced service packs for dealing with glitches. That means a better user experience with Windows 10 based on the information gathered.
How can I disable the Window error reporting Service?
Just like other versions, Windows 10 does have a slightly different graphical user interface for disabling error reports.
Lower versions of Windows OS have error reporting under Action Center Setting. On Windows 10 it is the Security & Maintenance function that requires working with registries.
1. Use the Run dialog
1. Press down the Windows +R keys on your keyboard.
2. The Run dialog box will open.
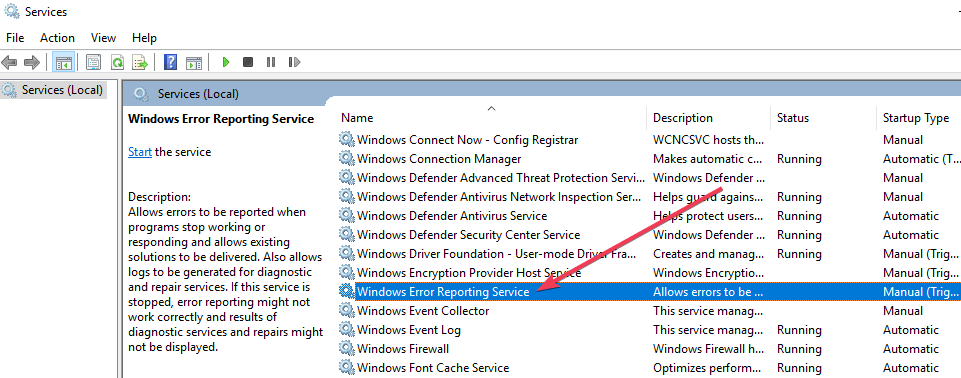
3. Type service.msc in the box and click on OK or press Enter to run the command.
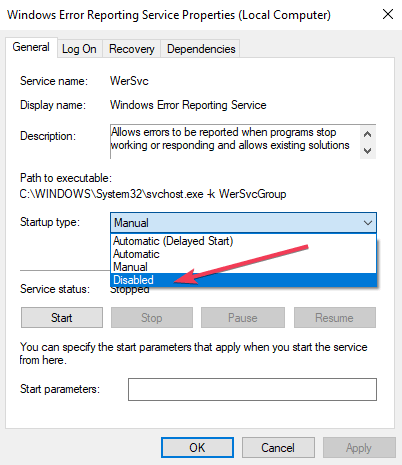
4. Locate the Windows Error Reporting Service in the list that opens.
5. Right click on it.
6. Go to the Startup type section and press the button next to it to open a drop-down menu.
7. Click on the Disabled button, which is at the bottom of the list.
8. Click on Apply and OK to save the changes.
9. Close the service window to exit. Now the process has been completed.
The easiest way to manage the Windows error reporting service is via the built-in Settings app. From there, you can enable or disable the problem reporting service in a few clicks.
In some cases, the Startup type which is close to disabled might appear gray. That means the user needs admin rights to continue the process. Therefore, log out and log in as an administrator. Or locate the administrative command prompt by pressing Windows key+ X to select command prompt admin.
2. Use the Registry Editor
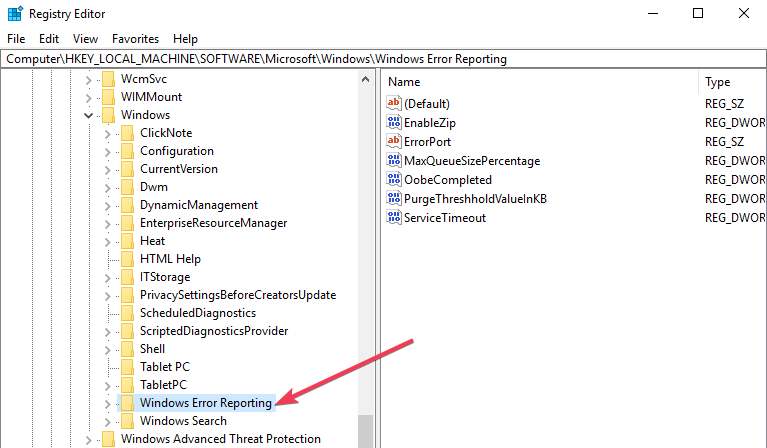
Using the Registry Editor is another way to safely disable the Windows 10 Error Reporting Service. This second method for disabling the Windows error reporting service includes tweaking the registry. But first, you need to check for error report issues:
Locate Control Panel from Windows startup.
Click Control Panel> System and Security> Security and Maintenance.
Look out for Report problems. Report problems should by default display ‘On’.
To confirm that the Windows error reporting service has been disabled, go to Security and Maintenance. Check the comment on the report problem to see if it reads on or off.
Can I enable the problem reporting service after I disable it?
To re-enable the error reporting service on Windows 10, simply set the disabled value back to zero.
Another option would be to delete the disabled value in the Registry Editor.
It’s quite simple to disable and enable Windows 10 error reporting service anytime. And understanding how to use the Registry Editor or finder makes everything much simpler.
Before we start, be sure to keep all your software up to date to minimize the chance of bugs. Also, try reducing the game resolution and graphics quality as a workaround.
1. Adjust paging file settings for the game drive
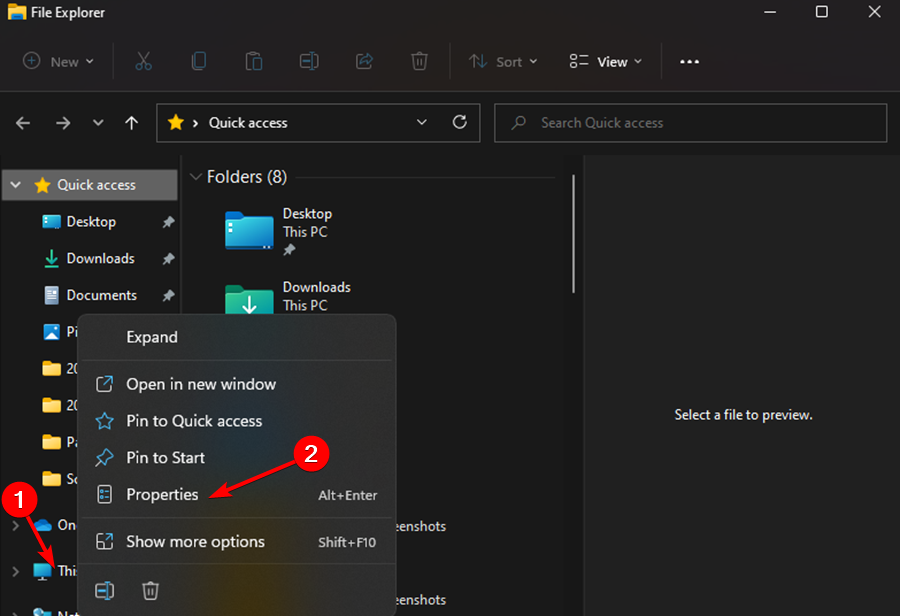
Open your File Explorer, then right-click This PC and open Properties.
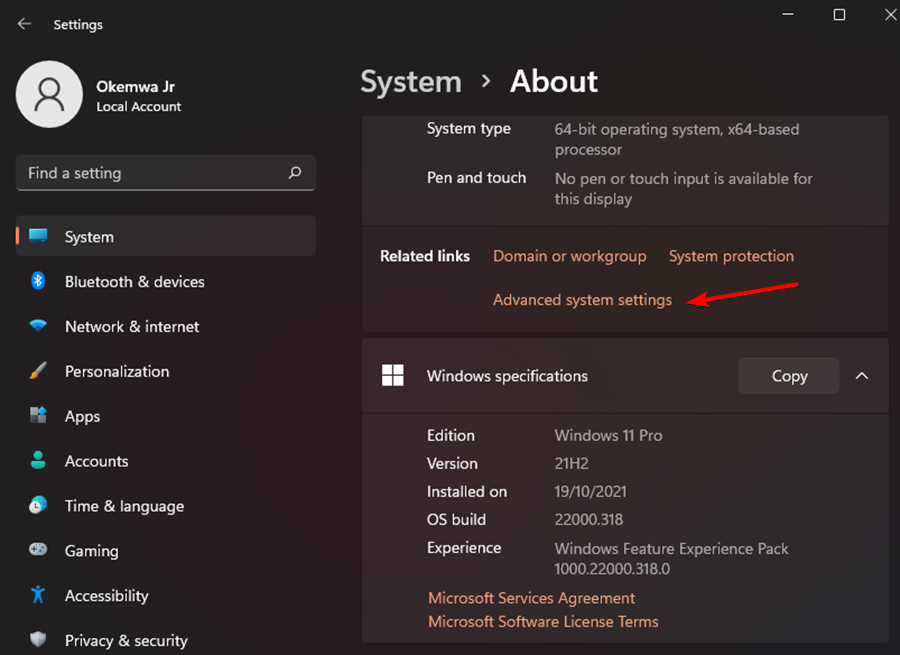
Select Advanced system settings on the left pane.
Click the Advanced tab and now click Settings under the Performance category.
Open the Advanced tab in the Performance Options window that just opened. Under the Virtual Memory category, click Change.
Select your system drive, and then select System managed size. Click Set.
Now select the drive where you’ve installed the game on. Then, click No paging file. Click Set once again. Finally, click on OK.
2. Update the graphics driver
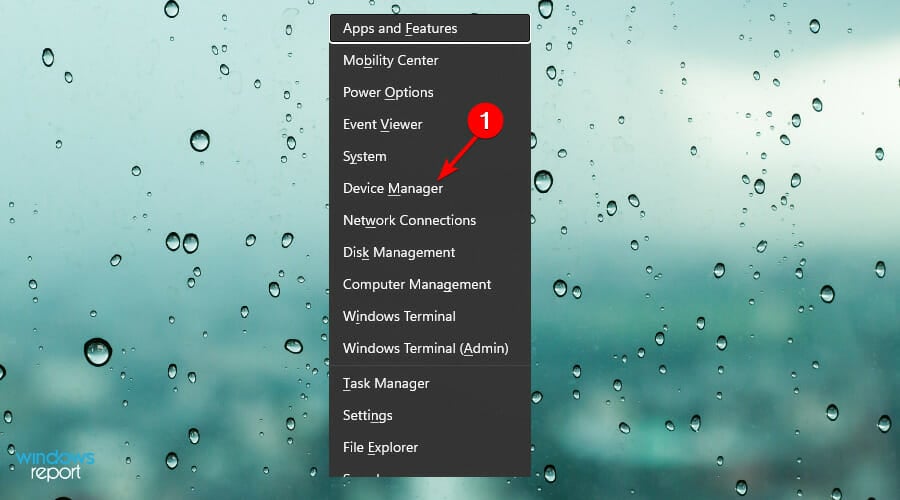
Press the Windows + X key, then select Device Manager from the menu.
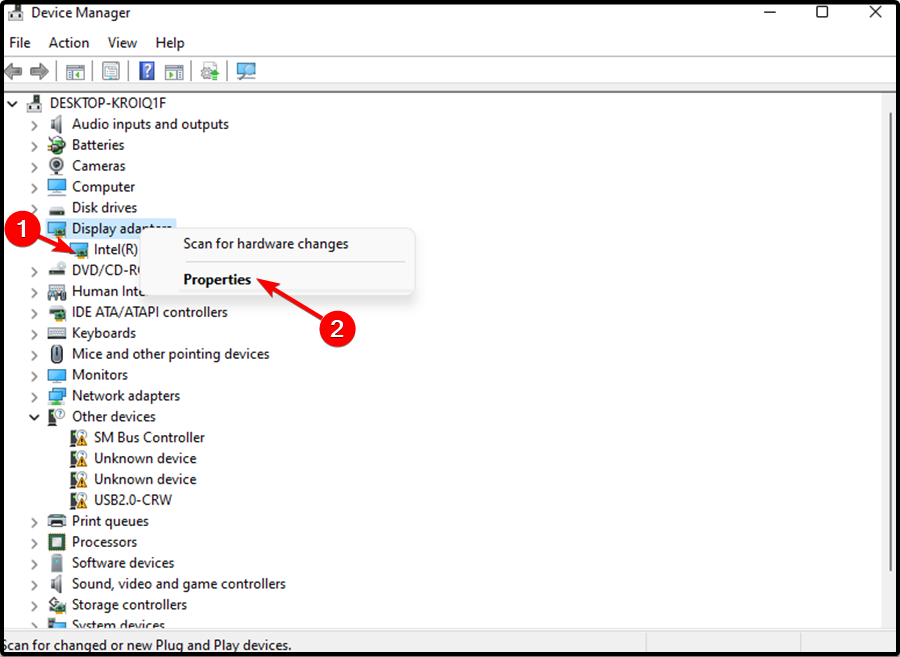
Expand Display adapters and then right-click the listed graphics card to choose Properties.
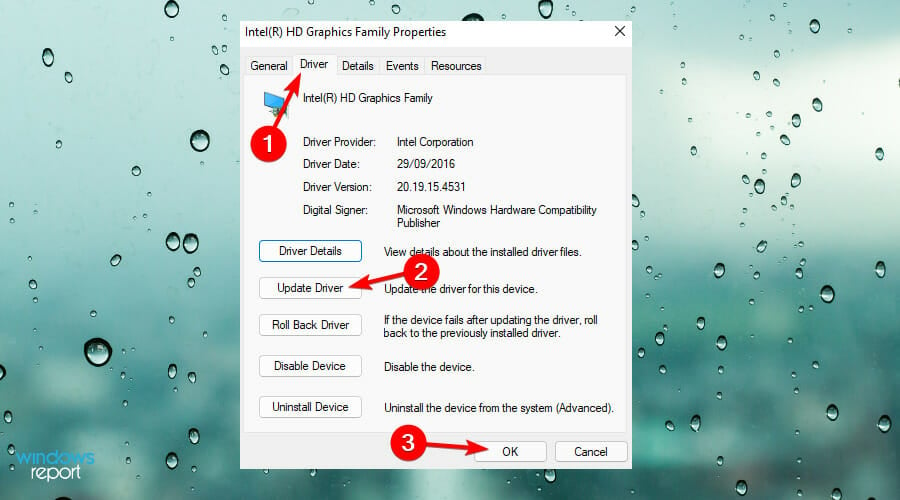
Then, click on the Driver tab and then click Update Driver. Then, click on OK.
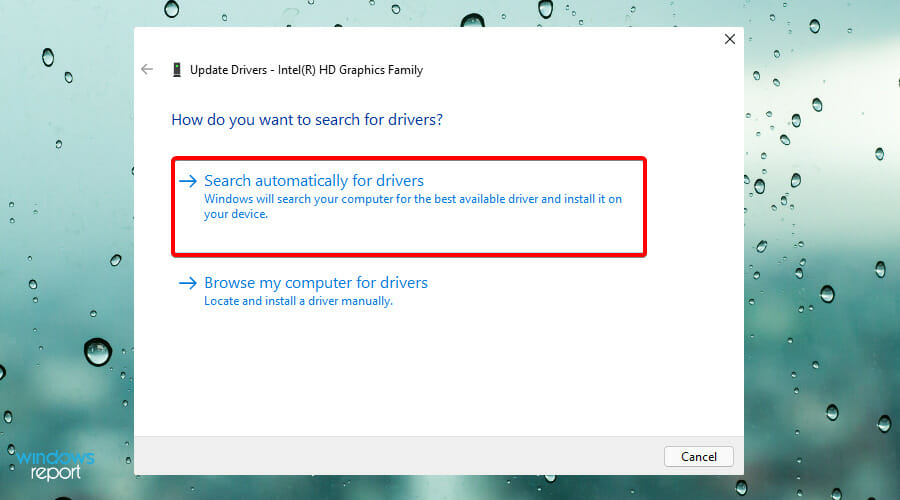
Finally, click Search automatically for updated driver software. Then, follow through with the on-screen instructions to complete updating the driver.
Once you update your device, you will be able to protect it from malware and hardware failures and also prevent system crashes such as Your GPU memory is full, which is also caused by outdated driver problems.
If you don’t like Device Manager, we recommend you to use a dedicated program such as Fortect Driver Updater. Whenever you run this software, it scans your PC to detect outdated or missing drivers.
It will then present detailed reports. At a click of a button, you can select what drivers you want to update, install or repair.
Before executing this fix, you should note that it will reduce the operating system’s space. Also, it could even lead to more crashes.
Search for Command Prompt in the Start menu, then right-click it, and select Run as administrator.
Now, type in the following command and press Enter: bcdedit /set IncreaseUserVa 3072
Finally, restart your device.
For users with a 32-bit version of Windows, this fix will come in handy to correct the problem. As an alternative, you could also get the 64-bit version of Windows.
4. Tweak the graphics card settings
Press Windows + R to open Run, type control panel in the text field, and click OK.
Once the window appears, set the View by option as Large icons.
Find Intel HD Graphics.
Click the 3D option to open the 3D settings.
Click on Enhance Application Settings, then select Restore Defaults. Finally, click the Apply button to save the changes.
5. Check for unnecessary background programs
Press Ctrl + Alt + Delete simultaneously to open the Task Manager.
Look at the Processes running, verify the amount of memory allocated to each, and make an informed decision on which programs should be terminated.
High-res textures, shadows, and effects demand large amounts of VRAM. Reducing these settings helps prevent memory overuse and crashes.
Adjust these settings first:
Texture quality
Shadows
Anti-aliasing
Draw distance
Post-processing
7. Reduce Display Resolution
Lowering your screen resolution reduces the VRAM required for rendering, especially in full-screen games.
Steps:
Right-click the desktop > select Display settings.
Under Display resolution, choose a lower value (e.g., 1600×900).
Confirm the change.
8. Disable Hardware Acceleration in Apps
Apps like Chrome, Discord, and Adobe tools use GPU memory unnecessarily when hardware acceleration is enabled.
Chrome example:
Go to Settings > System.
Turn off Use hardware acceleration when available.
Relaunch the browser.
9. Close Background Apps Using GPU Memory
Some apps—browsers, overlays, launchers—can eat into VRAM even when minimized.
Steps:
Press Ctrl + Shift + Esc to open Task Manager.
Under Processes, sort by the GPU Memory column.
Right-click unnecessary GPU-consuming apps > choose End Task.
10. Use Lighter Game Mods or Texture Packs
High-resolution mods can push your GPU over its memory limit. Opt for performance-oriented texture packs to reduce VRAM usage.
Tip: Choose “Lite” or “Optimized” versions of mods when available, especially on modding sites like NexusMods.
When a GPU runs out of memory, it struggles to display images properly. You might experience longer load times, noticeable lag in games, and a drop in FPS.
Flushing GPU memory can help, but it’s only safe to do so after saving your work, as premature deletion can lead to permanent data loss. Signs of a failing GPU include screen glitches and BSOD errors.
Now that you know how to clear VRAM, you can check our guide to learn how much VRAM you have. If the issue is still there, our guide on increasing VRAM on Windows 11 should be able to help you.
Did the above fixes help you resolve the issue with your graphics card? Share your thoughts with us in the comments section below.
Have you been seeing advertisements on your Windows 10 lock screen lately? You must be wondering what is happening because this is not something users would expect to see.
Well, it is indeed an advertisement, just in case you’re wondering if it is something else entirely or just some random picture.
Why do I have ads on my lock screen?
This is happening because you have activated Windows Spotlight as your lock screen background.
Windows Spotlight is probably a means for Microsoft to make some quick buck. Several users have complained about this in the past, but that is not going to change anything.
Recently, we’ve seen proof of Microsoft advertising Rise of the Tomb Raider on the lock screen with a link to the Windows Store.
We have come across the fabled Rise of the Tomb Raider advertisement ourselves. However, it is gone now and we have failed to get it back on our lock screen since.
In our article today, we are going to show you how to disable lock screen ads on your device.
1. Press the Windows button on your taskbar to open the Start menu.
2. From the Start menu, click on Settings.
3. Navigate to the Personalization tab.
4. From this menu, go to the Lock Screen tab.
5. In the Lock Screen settings tab, search for the Background section.
6. Under it, click on the dropdown menu.
7. To replace the Windows Spotlight option, choose either Picture or Slideshow.
8. Close the window to apply the changes.
Given the fact that ads are enabled on your lock screen due to the usage of the Windows Spotlight background, disabling it should do the trick. All you need to do is navigate to the Lock Screen settings and choose a different background.
As stated before, there are several folks who are not pleased with what Microsoft is doing, but we have to say, it is not as bad as some folks are making it out to be.
The most important thing here is the fact that it can be turned off. It doesn’t take much to do it as pointed out here.
We hope that you had no problems turning off the ads on your Windows 10 device. Let us know your thoughts and impressions in the comments section below.
Microsoft offers Game Pass, a membership service that grants you unlimited access to over 100 games that can be played from any location. This means that you won’t have to purchase the game individually for the Xbox and the computer.
However, a few customers reported that they had been rendered unable to download and install any of the offered games.
During the installation of a game through the Xbox software on Windows 11, you will be given the option to specify which hard drive will be used to store the content. If your hard drive has not been provisioned, then the installation access will be refused from continuation.
In this post, we will go over all of the possible solutions to the error, as well as any other pertinent information that may be used during the troubleshooting process. But first and foremost, let’s take a look at what Xbox Game Pass has to offer for you.
Why won’t my Game Pass games work?
Xbox Game Pass users usually reports issues on the computer, which could be due to several reasons, ranging from missing critical updates to corruption with the Xbox app.
Also, incorrect date and time settings on your device could also lead to issues connecting to the server and, in turn, playing online games. Besides, if the services are down, the Xbox PC app will not be downloading games.
In addition to these aspects, make sure to verify that your Xbox subscription is active. Several users who came across the issue later realized that their subscription had expired.
What does the Xbox Game Pass do?
Microsoft’s Xbox Game Pass is a video game subscription service that allows you to play a variety of games. It is compatible with Xbox One consoles, Xbox Series X/S consoles, Xbox Cloud Gaming, Windows 11 and Windows 10 computers, as well as Android mobile devices.
With the Xbox Game Pass app, you can play more than 100 high-quality games on your Xbox One. Using this feature, you may instantly explore and play the 100+ Xbox games available, as well as download your favorite games on your Xbox console or PC.
Xbox Game Pass is available for $9.99 a month on both consoles and PCs through a subscription plan. The monthly cost of the Xbox Game Pass Ultimate is $14.99. The latter subscribers get access to Xbox Cloud Gaming as a bonus.
On June 24, 2021, Microsoft announced the release of Windows 11, the company’s latest operating system. There are several new features and upgrades in Windows 11, including the introduction of the Xbox Game Pass, which will be incorporated directly into the operating system.
Windows 11 will also have three additional gaming features: DirectX 12 Ultimate, DirectStorage API, and Auto HDR, all of which will be extremely beneficial to gamers.
What should I do if I can’t download games from Xbox Game Pass on Windows 11?
1. Change your region
Open the Settings app by pressing the Windows key + I, then navigate to the Time & language section, and select the Language & region option.
Now set your Country or region to the United States, under the Region section.
By using this simple approach, you might be able to work around the error and gain access to the desired games. In case that doesn’t work, we recommend trying VPNs such as Private Internet Access and then changing your region.
2. Server Error
Any single game in Game Pass may be experiencing technical difficulties, which may be the fault of the creators or the Microsoft Windows store, respectively.
If you can’t download a specific game, it is possible that the server is overloaded or that it is unavailable for maintenance.
In most cases, developers will notify consumers of any issues using their official social media accounts, such as Twitter, or through their official developer website.
Because of this, make sure to check the official social media pages of the company to see if the game servers are down.
Purchasing your Xbox Game Pass from an unlicensed source may be a contributing factor to this problem. Always ensure that you purchase your Xbox Game Pass subscription from the official website, where you can obtain access to all of the Xbox Game Pass titles for only $9.99/month!
3. Reset the Windows Store cache
Press the Windows key on your keyboard, then type wsreset in the search bar, and click on the most relevant result.
Wait for the command to execute in order to reset the Windows Store cache, then restart the Xbox app.
4. Run Windows troubleshooter
Press Windows + I to open the Settings app, navigate to System in the left panel, followed by Troubleshoot from the right side.
Once you are inside the Troubleshoot menu, click on the Other trouble-shooters option.
Now scroll down until you meet the Windows Store Apps troubleshooter and click Run next to it.
When the troubleshooter has finished searching for errors, it will reveal the specific bug that has happened as well as instructions on how to fix it. It is critical that you follow the instructions given exactly as they are written.
Press Windows + I to open the Settings app, then go to Apps, followed by Apps & features.
Once you are inside the Apps & features window, search for Xbox in the search bar, then click on the ellipsis next to it, followed by Advanced options.
Scroll down until you find the Reset section, then click on the Repair button.
Allow the Repair process to complete before proceeding with a computer reboot to ensure that the modifications made are applied.
6. Reset the app
NOTE
When you choose to reset the Xbox application, you will lose all of the information that was previously stored in it. As a result, we strongly advise that you create a backup of any critical data before commencing the process of resetting.
Press Windows + I to open the Settings window and click on Apps followed by Apps & features.
Once you’re inside the Apps & features window, search for the Xbox app by typing it in the search bar and click on the three-dot menu, followed by Advanced options.
Scroll down until you find the Reset section, then click on the Reset button.
Once done, things would start working if you can’t download games from the game pass.
How do I reset my Xbox Game Pass?
You can easily reset the Xbox Game Pass apps installed on the computer through the system settings. Just look for the game, and reset it through the Advanced options.
The steps for the same have been detailed in the last solution of the previous section. Resetting the game will take some time, but once done, any problems with the game should be resolved.
What does the Xbox All Access do?
Lately, Microsoft has been promoting its Xbox All Access financing package even more aggressively than it has in the past in the hopes of luring consumers to form long-term attachments to its new Xbox Series X and Xbox Series S consoles.
Rather than paying the entire amount for a gadget upfront, All Access allows customers to pay a monthly charge over the course of 24 months, saving them money. Xbox Game Pass Ultimate is included for the duration of the contract, making it a valuable addition to any gaming collection.
The Xbox Game Pass Ultimate component of the package cannot be removed to reduce costs throughout a contract’s period of validity.
And, it is impossible to cancel an All Access contract after the first 30 days because it is a legally binding agreement rather than a subscription, nor is it possible to obtain a new console outside of the restricted warranty coverage period.
You now know what to do if Windows 11 Xbox app is not downloading games or if the Xbox Game Pass download is stuck at 0.
Besides, these methods would also work if you encounter the Xbox Game Pass error 0x00000001ac while downloading or installing games.
Let us know in the comments below which solution worked best for you as well as which Xbox game is your favorite one at the moment. Thanks for reading!
It’s no secret that we are getting closer and closer to the rumored launch date of Windows 11 22H2, also known as the Windows 11 2022 update.
And, as everyone expected, most hardware manufacturers have started pushing their drivers optimized for the newest OS version.
We’re actually talking about AMD Radeon Software drivers that are already updated for Windows 11 22H2, and now it is time for chipset drivers.
Windows 11 gamers already have 22H2 optimized drives
No, this is not a joke or a false alarm, and version 4.08.09.2337 is now available for download from the official website.
Keep in mind that it only brings official support for Windows 11 version 22H2, with no other changes being mentioned.
That being said, we’re going to go over the AMD Windows 22H2 driver changelog once more and get you up to speed with everything that is happening.
AMD Noise Suppression
Our newest feature: AMD Noise Suppression reduces background audio noise from your surrounding environment using a real-time deep learning algorithm, providing greater clarity and improved concentration whether you are focused on an important meeting or staying locked-in on a competitive game. To learn more, check out our blog post HERE!.
OpenGL® Optimizations
Up to 79% increase in performance in Minecraft™ @ 4k Fabulous settings, using Radeon™ Software Adrenalin 22.7.1 on the Radeon™️ RX 6950XT, versus the previous software driver version 22.6.1
Up to 75% increase in performance in Minecraft™ @ 4k Fabulous settings, using Radeon™ Software Adrenalin 22.7.1 on the Radeon™️ RX 6400, versus the previous software driver version 22.6.1
Radeon™ Super Resolution
Expanded support for discrete Radeon™ RX 5000 and 6000 series GPUs on AMD Ryzen™ 6000 series processor notebooks with hybrid graphics.
RSR has been improved to provide a more seamless experience in borderless fullscreen mode with a performance/quality slider to personalize your gaming experience.
Fixes
Lower than expected Folding@home™ compute performance with OpenCL™ API on some AMD Graphics Products such as the Radeon™ RX 6800.
Auto Undervolt may disable Zero RPM fan feature.
Hitman 3™ may freeze when rapidly switching between windows in Fullscreen Exclusive mode.
Video upscaling in browsers appears blurry with some AMD Graphics Products such as the Radeon® RX 6900 XT Graphics.
Enhanced Sync may cause games to lock to 15FPS with video playback on extended monitors.
Known issues
Stuttering may be experienced while playing Call of Duty®: Warzone™ on the Caldera map with some AMD Graphics Products such as the Radeon™ RX 6900 XT Graphics.
Radeon™ Super Resolution may fail to trigger after changing resolution or HDR settings on games such as Nioh™ 2.
Virtual Reality headsets may flicker with some AMD Graphics Products such as the Radeon™ RX 6800 XT Graphics.
GPU utilization may be stuck at 100% in Radeon performance metrics after closing games on some AMD Graphics Products such as Radeon™ 570.
Display may flicker black during video playback plus gameplay on some AMD Graphics Products such as the Radeon™ RX 6700 XT.
Enhanced Sync may cause a black screen to occur when enabled on some games and system configurations. Any users who may be experiencing issues with Enhanced Sync enabled should disable it as a temporary workaround.
Another important aspect to take away from this is that the latest AMD Chipset Driver is available for all motherboards compatible with Zen-based processors.
They could be either Ryzen, Athlon, or Threadripper, and include A320, B350, X370, B450, X470, X399, A520, B550, X570, TRX40, and WRX80 chipsets.
Remember that, even though all motherboards with the AM4 and TR4/sTRX4 socket support Windows 11, first-gen Ryzen and Threadripper, seventh-gen AMD A-Series, and Ryzen 2000G do not officially work with Microsoft’s newest OS.
However, users have found a way to bypass this situation using a piece of third-party software called Rufus, just in case you were wondering.
That said, users will be able to still make use of the platform up until Microsoft cuts its support. However, if you weren’t already on the platform but intend to do so, it will not be possible as Kaizala is restricting new tenants from joining starting today as spotted by the folks over at ZDNet.
Interestingly enough, the users trying to join Kaizala will instead be redirected to Microsoft Teams. Though this does not come as a surprise because there were plans already in play to bring Kaizala together with Microsoft Teams in 2019. “The capabilities of Kaizala complement the robust communication and collaboration capabilities of Teams, the hub for teamwork in Microsoft 365”.
According to Microsoft, “Many Kaizala users have Office 365 or Microsoft 365 licenses and haven’t fully enabled them.” Microsoft is positioning the discontinuation of Kaizala as “an opportunity for our partners to move Kaizala users to Teams.” What’s more, all Azure Active Directory (AAD) customers of Kaizala will get Exploratory Teams license, a bid by Microsoft to onboard them to Teams by letting them try it out for free for a whole year.
In the future, we are likely to see Microsoft Teams bundled up with a couple of new nifty features. Some of them are likely to be Microsoft Kaizala-themed features in an attempt to make the transition easier. In other related news, Microsoft recently announced that it will soon be easier for users to leave Teams meetings on all devices.
VPN is one of the best ways to protect your privacy online, but sometimes issues with it can occur. Windows 10 users reported receiving the Connection failed with error 800 message, which prevents them from connecting to their VPN.
If you have the same problem, today we’re going to show you how to fix it.
How to fix the VPN connection error 800?
1. Recreate your VPN connection or use a VPN tool
Press Windows Key + I to open the Settings app.
When the Settings app opens, navigate to the Network & Internet section. Now select VPN from the menu on the left.
Locate your VPN connection in the VPN section. Select the connection and click the Remove button.
Now click the Add a VPN connection button and enter the necessary information to set up a new VPN connection.
According to users, VPN error 800 can appear due to problems with your VPN connection. To fix these problems, some users are suggesting to recreate your connection.
After creating a new VPN connection try to connect to it and check if the problem is resolved.
If this solution does not fix the problem, try to use a VPN tool. We strongly recommend you PIA.
This is an amazing VPN tool that not only will establish a clean, fast and secure VPN connection, but it will also protect your Wi-Fi connection and will keep your true IP hidden.
Private Internet Acces, owned by Kape Technologies, will also allow you to access different web resources that are unavailable in certain geo-locations, unblock popular streaming websites, use over 3000 servers in order to keep your identity totally anonymous.
Here are the key features that recommend PIA:
AES (128-bit or 256-bit) encryption
WireGuard support on all servers
P2P friendly
split-tunnel option
a single subscription can be used for 10 different devices
Private Internet Access
PIA is an extremely stable VPN service with quality servers all over the world, now at a discount price for a limited time only!
2. Check your VPN IP address, username, and password
Press Windows Key + I to open the Settings app.
When Settings app opens, go to Network & Internet section. Now select VPN from the menu on the left.
In VPN section select your VPN connection and click the Advanced options button.
You should now see some basic information regarding your VPN. Click the Edit button.
Make the desired changes and check if your VPN is properly configured.
Connection failed with error 800 message can appear if your VPN configuration isn’t correct. This can occur if your VPN IP address, username or password aren’t correct. If you want to check your VPN configuration, you can do that by following the steps above.
It’s important to mention that your VPN address can’t have https:// or / in its name, so be sure to remove it. For example, change the https://yourvpnaddress.com to yourvpnaddress.com. After making the necessary changes, try to connect to your VPN connection again.
3. Check your router and firewall settings
Press Windows Key + S and enter firewall. Choose Windows Firewall from the list.
In the menu on the left select Turn Windows Firewall on or off.
Select Turn offWindows Firewall (not recommended) in both Private network settings and Public network settings sections. Click OK to save changes.
If you’re getting the VPN connection error 800, we advise you to check your router and firewall settings. According to users, you need to allow for PPTP and/or VPN to pass through TCP Port 1723.
In addition, GRE Protocol 47 must be opened for PPTP VPN connection. After making those changes, check if the problem is resolved.
Some users are also suggesting to temporarily disable your firewall and check if that solves the problem.
If the problem is fixed after disabling the firewall, it means that there’s a problem with your firewall configuration.
We have to mention that you should never keep your firewall turned off because it makes your PC and your network vulnerable.
If this problem is caused by your firewall, turn the firewall back on again and check its configuration.
It’s worth mentioning that other third-party security software can also cause problems with VPN connection, so you might want to temporarily disable your antivirus and check if that solves the issue.
We also advise you to check if the router or firewall supports VPN connections. Some devices don’t work with VPN connections, so you’ll have to install a firmware update in order to use VPN.
In addition, be sure to check if the router supports PPTP Pass-Through.
4. Change the type of VPN
Press Windows Key + X to open Win + X menu and choose Network Connections.
When Network Connections window opens, right click your VPN connection and choose Properties from the menu.
When Properties window opens, go to the Security tab. Set the Type of VPNto Point to Point Tunneling Protocol (PPTP).
After making the changes, click OK to save them.
According to users, VPN error 800 can appear due to your VPN security settings. To fix this problem, you need to locate your VPN connection and change its security type. This is rather simple and you can do it by following the steps above.
5. Check the connection between the client and VPN server
Press Windows Key + X and choose Command Prompt (Admin).
Once the Command Prompt opens, you need to enter ping followed by the address that you want to ping. For example, ping myvpnaddress.com. Now press Enter. You should see how long does it take for the server to respond. Keep in mind that some firewalls block this command, so even if you don’t see the response from the server, it doesn’t have to mean that it doesn’t work.
In addition, you can also wait for a few minutes and try to connect again. If the problem still persists, you might want to try using a different client, such as a different PC, in order to connect to the server.
If you’re unable to connect to the server from a different PC, it means that you have network configuration problems or that the VPN server is having some issues.
Connection failed with error 800 message can appear if there are any connection problems between the client and the server. To check if there are any network issues, you can ping the server and wait for the response.
6. Check for VPN server limitations
Some VPN servers have limitations when it comes to the number of connected clients. If the maximum number of clients is connected, you won’t be able to connect and you’ll get the Connection failed with error 800 message.
This is an uncommon problem, but if you’re a server administrator, you can check for server limitations and change them if necessary.
7. Restart your PC and your router
Sometimes in order to fix Connection failed with error 800 message you just need to restart your PC and your router. First try restarting your PC. If that doesn’t help, you need to restart your router.
To do that, press the Power button on the router to turn it off. Wait for 30 seconds and press the Power button again to turn it on. After restarting the router, check if the issue is resolved.
If the problem still persists, you might have to upgrade your router firmware. This is an advanced procedure, so before you do it we strongly advise that you check your router’s manual for detailed instructions.
8. Check if Routing and Remote Access is running on the server
If you’re getting the VPN error 800, this might be because Routing and Remote Access isn’t running on the server. Sometimes this feature can turn itself off and cause this and many other errors to appear.
If you’re having this problem, be sure to turn on Routing and Remote Access on the server. After turning this feature on, check if the issue is resolved.
1. Press Windows Key + S to open the search box and type notepad in it.
2. Locate the Notepad app on the list of results, right-click it and choose Run as administrator.
3. WhenNotepadstarts, clickFile > Open.
4. Navigate to: C:WindowsSystem32driversetc
5. In the bottom right corner change Text Documents to All Files.
6. Now double click the hosts file to open it.
7. Once the host’s files opens, add at the bottom of it the IP address of your VPN server along with the address that you want to use.
We use 192.168.1.1 thisismyvpn.com in our example.
8. Save the changes you made to your file.
9. Now try to connect to your VPN by usingthisismyvpn.comor any other address that you specified in the previous steps.
According to users,Connection failed with error 800message appears if you try to access the VPN server by using its IP address. To fix this problem, you need to use a regular address instead of an IP address. To do that, you need to add the VPN’s IP address to the hosts file in Windows 10.
This is relatively simple, as shown in the steps above.
10. Contact your ISP
Few users reported that this issue can occur due to problems with your Internet Service Provider. If you suspect that the problem is related to your ISP, be sure to try using a different modem.
According to users, some ISPs block GRE protocol remotely, and that will cause Connection failed with error 800 message to appear. To fix the problem, you need to contact your ISP and ask them to unblock GRE protocol.
For more VPN issues on Windows 10, we have an article with general solutions to apply that you can check out.
Connection failed with error 800 message can cause many problems if you’re using a VPN, but hopefully, you managed to fix the issue by using one of our solutions.
Don’t know what to play on Game Pass? With literally hundreds of games available on the service covering just about every genre out there, it can tough to figure out where to start. But we’ve got you covered with these Game Pass recommendations for all the strategy buffs out there. The following are just some of the best strategy games on Game Pass right now.
Age of Empires IV
The latest installment of the classic RTS series is going strong, with a huge new update coming soon at the time of this writing to celebrate the franchise’s 25th anniversary.
Age of Empires IV is set in the Middle Ages and offers 8 civilizations represented: the English, Chinese, the Mongols, the Delhi Sultanate, the French, the Abbasid Dynasty, the Rus, and the Holy Roman Empire. A forthcoming update will add the Ottomans and the Melians to the mix.
The game won the Best Sim/Strategy Game award at The Game Awards in 2021.
Also check out on Game Pass:
Age of empires definitive edition
Age of empires 2 definitive edition
Age of empires 3 definitive edition
Frostpunk (PC Game Pass)
Frostpunk is a society survival game where heat means life and every decision comes at a price.
This turn-based, top-down tactics game is a spinoff of the Gears of War series of third-person shooters. It is something of a departure from those games (as spinoffs usually are) though it retains much of what made the squad-based combat in the standard Gears titles so satisfying.
Gears Tactics uses five character classes, each with its own distinct set of abilities. Characters can also be customized and can level up and attain new skills. While the game unfortunately lacks a multiplayer mode, it is both a great Gears game and a great tactical game.
Halo Wars 2: Definitive Edition
Real-time strategy makes an explosive return to the Halo universe in Halo Wars 2.
A mob of fun-loving zombies is about to invade your home. Defend yourself with an arsenal of home-guardin’ plants to mulchify zombies before they reach your front door.
A turn-based action game with local and online cooperative play, Research and Destroy is a battle of the Super Scientists vs. The Supernaturals. It puts you in control of three brilliant scientists to develop new weapons and gadgets to destroy the supernatural hordes that have all but annihilated humanity.
Perform vivisections right on the battlefield to gain scientific insight into how develop upgrades and new weaponry. Strategic shooting powered by super science!
Shadowrun: Hong Kong Extended Edition
Shadowrun: Hong Kong – Extended Edition is the capstone title in Harebrained Schemes’ Shadowrun series
So what do you think of our picks? Is there a personal favorite of yours among them? Let us know about it in the comments. It’s good to see the strategy genre so well-represented on both Xbox and PC Game Pass. And if you don’t already have a subscription to Xbox Game Pass, you can sign up here. Learn more about Game Pass over on its FAQ page. And don’t forget to check out our other “What to play on Game Pass” posts for other Game Pass recommendations.
Does Windows 10 support three monitors? The answer is definitely Yes. Multiple monitor configurations are standard these days, as multitasking on a single screen is too restrictive.
Having three monitors can be helpful when you need to see a lot of information at once or when juggling several spreadsheets, writing articles while researching, coding, looking over the documentation, playing games, etc.
Otherwise, the time spent moving or resizing windows would be wasted time.
So, in the article below, you will find out how to benefit from a multiple monitor setup on your device.
Can Windows 10 support three monitors?
For the most incredible experience, Windows 10 includes several features and settings to support one, two, three, four, and even more displays without needing third-party applications.
You are prepared to begin if your computer has the necessary ports, connections, and graphics card to handle three monitors.
Quick Tip:
If you use many displays at the same time, you will agree that it can be inconvenient at times. Because taskbars are frequently counter-intuitive, this might seriously disrupt your multi-display experience.
DisplayFusion can assist you in properly managing your multi-monitor setup, ensuring that your desktop wallpaper is shown appropriately to title bar buttons and multi-monitor taskbars.
Display Fusion
Effective software for setting, tweaking, and optimizing multiple monitor displays.
Let us tell you how to make this work without further ado.
How do I set up three monitors on Windows 10?
1. Things to consider before setting up three monitors
For each added monitor, there’s a separate taskbar to help with keeping things organized.
You can find dedicated apps that can help make multi-monitor setup easier.
More specifically, dual monitors software brings several features to your device so that you can add, manage, or customize several monitors from one single hardware unit.
Furthermore, these tools allow you to resize and relocate all windows to your liking by using the built-in functions or creating your own.
If you want to continue with the manual setup, you should consider how many graphic ports your computer has – VGA, HDMI, DVI, or DisplayPort.
You can set up multiple monitors using the ports on your graphics card and the ones on your motherboard.
Although you have more than two ports, it does not necessarily mean you can use them all simultaneously. To check this, you need to do a little research.
So open Google and specifically search for your graphics card model (e.g., NVIDIA Quadro K1200 three monitors).
If you find out that your graphics card does not support three monitors, the solution is to buy an additional graphics card. In this case, ensure enough space on your computer and enough slots.
If your monitor has DisplayPort multi-streaming support, you can use DisplayPort cables to connect extra monitors.
If you have trouble with your NVIDIA card, find in this guide what to do if the Nvidia graphics card is not detected on Windows 10.
2. How to set up three monitors in Windows 10
2.1 Pick a Project type
To choose how you want to use your display on Windows 10, press the Windows + P keys on your keyboard. Choose a new display mode from the available options:
PC screen only – use only the primary monitor
Duplicate – Windows will show the same image on all monitors
Extend – multiple monitors combine to give you an enlarged desktop
Second screen only – only the second monitor will be used
It would be best to choose the Extend option when using three monitors.
Then, configure your displays on Windows 10.
2.2 Configure display
Launch the Settings and then go to System.
Navigate to Display.
Click on Identify to drag and drop the displays so that Windows can understand how they are physically positioned.
Choose between Landscape and Portrait to change the selected Display orientation.
Click Apply to save the changes.
3. How to personalize your setup – taskbar and wallpaper
Right-click on the desktop and choose Personalize.
Go to Taskbar and enable Show taskbar on all displays.
You can also choose how, where or when you want taskbar buttons to appear.
You can set up different wallpapers for each monitor or a folder full of images that can be randomly shuffled as desktop wallpapers.
How many monitors can Windows 10 handle?
If you have read up to this point, you should already have a hint of what the answer should be.
For the most excellent experience, Windows 10 includes many features and settings to support four displays without needing third-party applications.
We hope we succeeded in showing you that using three displays is not that complicated once you have all the correct details and know they all go together.
Now go ahead and display three monitors in Windows 10, and have a great work or play experience.
Please let us know about your experience in the comments section down below.
Laptops allow users to bring their online life with them on the go easily without being bogged down by chargers and cords. However, many users reported that their laptop only works when it’s plugged in, defeating the primary purpose of a laptop. Keep reading to find the solution to this issue.
Why will my laptop only work when plugged in?
There could be many reasons why your laptop will only work when its plugged in. One of the most common reasons could be that the battery is damaged and needs to be replaced. It could also be due to overheating, power management issues, or debris stuck inside your laptop.
One of the leading causes to a damaged laptop battery is allowing the battery to drain completely and leaving it in a dead state for a long period of time. It’s never a good idea to let your battery to die completely, and if it does, be sure to get your laptop on a charger as soon as possible.
Some make the argument that leaving your laptop plugged in all day on AC power might also ruin the battery. Computer manufacturers like Acer and Asus recommend removing the battery when it’s not being used, however, Dell states there is no issue leaving your laptop plugged in all the time.
Can unplugging your laptop damage it?
No, unplugging your laptop from its charge is what it’s designed for. Laptops should have no issues switching between battery and main power so users can take their PC on the go.
What can I do when my computer only works when plugged in?
1. Clean your battery
If you have a detachable battery or you can easily remove your battery from the inside, then try taking it out and carefully wiping it down with a clean cloth. Use a little bit of rubbing alcohol to dampen the cloth and clean the battery and computer.
If there is any dust or debris built up in the laptop or around the battery then it may cause issues with the battery not working properly.
2. Kill static energy
Power down your laptop.
Disconnect your charger and any USBs.
Detach your battery or disconnect the battery cable if your battery is built in.
Hold the power button for 30 seconds to 1 minute.
Reconnect your battery.
Turn on your laptop without the charger connected.
Doing this will completely drain any power from your laptop. When you reattach the battery and turn it back on, your laptop should be able to detect the battery and give it the power it needs.
3. Uninstall and re-install battery drivers
Click on Start, search Device Manager then hit Enter.
Click on Batteries.
Right-click on the first battery driver and select Uninstall device.
Select Uninstall again.
Repeat steps 3 & 4 on any other drivers in the Batteries section.
Restart your laptop. The drivers will be reinstalled upon powering on.
If one of your battery drivers is corrupted or not properly installed, then your laptop will only work when plugged into the AC charger. Uninstalling and then reinstalling your battery drivers will fix any issues with the drivers and thus solve the issue.
4. Disable and re-enable ACPI-Compliant Control Method Battery
Click on Start, search Device Manager, and hit Enter.
Click on Batteries.
Right-click on Microsoft ACPI-Compliant Control Method Battery and select Disable device.
After a couple of minutes, right-click on Microsoft ACPI-Compliant Control Method Battery and select Enable device.
You’ll notice the battery icon in the taskbar of your laptop disappear and reappear while doing this step. Disable and re-enabling this battery device resets the power schemes on your device. If this solution didn’t work, try the next step.
Click on Start and open Settings(or press Windows + I).
Click on Windows Update then Check for updates.
Follow the instructions to update your laptop.
Having an outdated version of Windows may lead to battery problems. Be sure to keep your device up to date to avoid any issues.
6. Calibrate your battery
If your laptop’s battery isn’t calibrated properly, then you may experience it shutting down at unexpected times when not plugged in. This is because your laptop thinks it’s at 40% when it may actually be at 2%.
There are a couple of different methods to calibrate your battery depending on the brand of the laptop. The simplest way is to run the battery from 100% to almost dead and then plug it in to charge back to 100%. This will provide a more accurate reading of your laptop’s battery capacity.
Some computer manufacturers include a way to calibrate the battery which can be found in your laptop’s manual or about files.
7. Replace your battery
If all else fails and you’ve tried everything, but your laptop still will only work while plugged it, then it may be a strong indicator that you need a new battery. Luckily, it’s relatively easy to replace your laptop battery and can be done at home.
Find a replacement battery online that is compatible with your laptop model number. Power off your laptop and unplug it from the charger before operating. If you have a detachable battery, then replacing it is a breeze. However, for internal batteries, you may need a few simple tools to access them.
Carefully unscrew the old battery and detach it from the motherboard. Ensure that the new battery is free from any dust before gently placing it and connecting it to the motherboard. Once everything is secure, fire up your laptop and see if that solved the issue.
How do I know if my laptop battery needs replacing?
In some instances, Windows will let you know when it’s time to replace your battery. A warning like consider replacing your battery will appear. Your laptop may also shut down suddenly even if there is no indication that your battery power is low.
There are also some third-party tools available that will let users know the status of their battery and its capacity. If you want a list of our top picks for tools to check your laptop battery’s health, we have suggestions for that.
Hopefully, one of the above solutions helped you fix your laptop if it only works when plugged in. Check out our guide for tips and tricks on how to improve your battery life. Let us know in the comments which step worked for you or if you have any suggestions for other solutions.
Please check your network settings and try again is a pretty common Skype error. This annoying error message prevents users from connecting to the instant messaging app.
First of all, if you’re getting this error message, you should follow the suggestions available on the screen and check your network settings.
Why is Skype asking to check my Internet connection?
The Check your Internet connection and try again later error in Skype occurs because the app has a problem connecting to the server.
In other words, there is either a problem with your local connection, the Skype server is down or the Windows Firewall might be blocking the app.
Another common issue is that the software is outdated and you need to get it to the latest version before trying to connect again.
But the good news is that you can quickly fix this problem by following the troubleshooting steps listed in this article.
How to fix the Check your network settings Skype error?
1. Check your firewall settings
Quit Skype.
Click the Start button, type control panel, and click on the app from the results.
Now, click on System and Security.
Select Allow an app through Windows Firewall.
Make sure that the Skype entry is configured to allow it to connect to the internet. Make sure that both Skype Private and Public columns are checked.
Save your changes, then restart Skype and sign in.
Your firewall may be blocking your access to Skype. Configure your firewall settings so as to allow Skype to run on your device.
2. Check your proxy settings
Here’s how to manually configure your proxy settings in order to allow Skype to connect.
1. Open Skype, click Tools > Options.
2. Go to Advanced > select Connection > Skype automatically detects your proxy settings.
3. Enter the Host and Port details of the new proxy server.
4. Tick Enable proxy authentication in case your proxy requires authentication.
5. Type the Username and Password required by the proxy server > click Save. Keep in mind that this is not your Skype name and password.
6. Close Skype launch it again > sign in and check if the error persists.
3. Install the latest Windows updates
Press the Windows key + I to enter Settings.
Click on Update & Security.
Now hit the Check for updates button and install all the available updates.
Make sure that you’re running the latest Windows OS updates on your machine.
As a quick reminder, Microsoft constantly rolls out Windows updates in order to improve the system’s stability and fix various issues.
4. Run the Windows Troubleshooter
Press the Windows key + I to start Settings.
Go to Update & Security.
Select Troubleshoot in the left-hand pane and Additional troubleshooters from the right.
Scroll down, click on Windows Store Apps, and select the Run the troubleshooter button.
Windows 10 and 11 feature a dedicated built-in troubleshooter that can fix general Windows app issues.
Since Skype is a Windows app, this solution can be very efficient in solving the problem.
5. Reset Skype configuration files
Close Skype.
Press the Windows key + R to start Run, type %appdata%, and hit Enter.
Locate Skype folder and rename it to Skype.old. Keep in mind that by renaming your Skype folder your message history will be removed from Skype, but it will still be available in the Skype.old folder.
Now launch Skype again and check if the issue has been fixed.
Go to Start, type control panel, and select the app from the results.
Click on Uninstall a program.
Select the program(s) recently added and click Uninstall.
Then restart your computer and see if the issue has been solved.
If you recently installed new software on your computer, try uninstalling it. Sometimes, security tools may prevent certain programs from running.
IObit Uninstaller is a special tool that helps you delete software packages from your PC. The built-in uninstaller of your PC tends to keep remnants of uninstalled software, but with IObit Uninstaller you can remove them. It is a handy tool that will help you rid your computer of clutter and keep it in top shape.
7. Reinstall Skype
If the solutions listed above failed to fix the issue, try reinstalling Skype. You may use Step 6 to first uninstall Skype. Then go to Microsoft Store and download the latest Skype version.
We’ll end our list here. We hope that the solutions listed in this article helped you fix the problem and now you can use Skype again.
A lot of users have noticed and complained that they are seeing multiple recovery partitions on their Windows 11 PCs when they open Disk Management.
Windows 11 2 recovery partition is not a new problem and has existed since the likes of Windows 10 and earlier versions of the OS.
But the question arises: Why do they have 2 recovery partitions on their Windows 11 PCs? Is it safe to delete one of the recovery partitions? How that can be removed safely without ruining your PC?
If you are also coming across Windows 11 2 recovery partitions issue on your PC, and are looking for solutions, then you have landed in the right place.
Because in this guide, we will give you 5 of the best solutions that you can apply to easily and safely delete recovery partitions.
The recovery partition is a system drive that stores important files that will help to restore the system to factory settings. So, when dealing with it, it requires you to be extra cautious and tweak it only when you know what you are doing.
In this guide, we will show you the safe methods that will help you get rid of Windows 11 2 recovery partitions issues, and keep your PC sorted. Let us get right into it.
What are recovery partitions in Windows 11?
The main purpose of a recovery partition on a Windows OS is to facilitate the computer system, and restore back to its original image if things go south.
In simple terms, the recovery partition saves the default state of your system and helps get back important files if they go missing or corrupt.
The Windows recovery partition is available as a WIM file. It can only be accessed or opened through the recovery interface.
Recovery partition also enables the service of recovering your PC back to the original state, because otherwise, you would need to reinstall the entire OS in order to bring it back to a working state if some important file goes missing.
How many partitions should Windows 11 have?
The answer to this question totally depends on the size of the hard disk you have installed on your Windows 11 PC.
However, if you were to take our advice, we would suggest you have at least 3 disk drive partitions on your hard drive.
This is because one would be reserved for your operating system, one would be available for saving your private files, and another one would be available for your documents, etc.
In case you have a 256GB hard drive, then you should avoid having multiple partitions. Because it is recommended to install the operating system on a drive that has at least 120GB of capacity.
Quick tip:
Aomei Partition Assistant’s intelligent migration process can effortlessly migrate operating systems to another hard drive, including SSD and HDD.
You also get all of the necessary information about the partition, its format, and which partition is the intruder here. Resize, merge, split and move partitions without losing data to maximize disk space use.
Aomei Partition Assistant
Recover lost or damaged partitions, rebuild the master boot record and run from a bootable CD.
Type diskpart and right-click on the Diskpart app.
Select Run as administrator.
Execute the below commands and press Enter, one by one. list diskselect disk n (Here make sure to change the letter n with the disk number that contains 2 recovery partitions on your Windows 11 PC.) list partitionselect partition n (replace n with the partition number of the unused recovery partition) delete partition
After you have finished executing the above commands as mentioned, one by one, you should see that the extra partition on your Windows 11 PC is now gone.
2. Delete using Disk Management
Right-click on the Start menu.
Click on Disk Management to open it.
Select the drive with the recovery partition that you wish to remove.
Search for Windows PowerShell and open it as an administrator.
Execute the below command and press Enter. Get-Volume
Execute the following command and press Enter. Remove-Partition -DriveLetter PARTITION-LETTERMake sure to change the PARTITION-LETTER with the drive letter of the recovery partition that you wish to remove. For example to remove the E drive the command will look likeRemove-Partition -DriveLetter E
In the interface, right-click on the partition that you wish to remove and select Delete.
Allocate the free space to another partition by selecting Extend Partition option from the left action panel.
Select the drive you want to extend.
Click OK.
Click on Apply to execute the process.
We have used the MiniTool Partition Wizard tool in order to delete the extra recovery partition and get rid of the Windows 11 2 recovery partition problem.
However, if you are interested in testing out other partition tools, then you can check out our dedicated guide that lists some of the best partition tools that you can use on your Windows 11 or 10 PC.
5. Delete using the volume command
Open Start.
Open the Command Prompt as an administrator.
Execute the below command and press Enter. diskpart
Type the below command and press Enter. list volume
Run the below command. select volume VOLUME-NUMBER (Make sure to replace the VOLUME-NUMBER with the number of the drive you wish to remove.)
Type the below command to delete the partition. delete volume
Is it safe to delete recovery partitions in Windows 11?
Yes. It is totally safe to delete the recovery partition in Windows 11. They aren’t required by Windows to boot up, so they can be removed from your PC using the above methods safely.
However, do note that in doing so, you won’t be able to go back to factory settings. And the only alternative left would be to reinstall the entire OS again using a bootable disk or USB.
It is not recommended to remove a recovery partition because it only eats up a small amount of space. But you can delete the partition in case there are 2 partitions on your Windows 11 PC as in our case.
That is it from us in this guide. Let us know in the comments below which of the above methods you used to delete the extra Windows 11 recovery partition on your PC.
After Sony announced that it would be increasing the price of its PlayStation 5 consoles in several regions outside of the US yesterday, many naturally wondered if Microsoft would follow suit with its Xbox Series X family of consoles.
Fortunately, Microsoft confirmed today to CNET that the company currently has no plans to increase the prices of the Xbox Series X generation of consoles which include the Xbox Series X and Xbox Series S.
“Our Xbox Series S suggested retail price remains at $299 and the Xbox Series X is $499. This also applies to other markets and their current pricing,” a Microsoft spokesperson informed CNET via email.
It should be noted though that the spokesperson also said that “We are constantly evaluating our business to offer our fans great gaming options” which implies that the situation could change in the future.
Sony’s PS5 price increases does change the gaming console market quite a bit as now there’s around a US$100 price difference between a current gen PlayStation console and its Xbox equivalent in some regions such as Australia and New Zealand. This could naturally become a deciding factor for many consumers looking to buy a new console.
Something else to keep in mind is the growth of Xbox Cloud Gaming which allows subscribers of Xbox Game Pass Ultimate to play Xbox console games on their smartphone, computer, and some smart TVs without having to purchase an Xbox console at all.
In a post on the official PlayStation blog, Sony Interactive Entertainment president and CEO, Jim Ryan, claimed that inflation was the main driving factor in the PS5 price change.
Sometimes you might notice that your IP address is not reachable. That is, you can’t connect to the internet through your router.
Whenever you connect to the Internet, your computer gets an IP address from your Internet service provider (ISP). This is a unique number that identifies your computer and allows it to communicate with other computers on the network.
The most common reason for an IP address not being accessible is that it has been blocked by your router or firewall settings.
Why is my IP address not reachable?
There are several reasons why your IP address may not be reachable. Some of the reasons include:
You’re using a dynamic IP address – Dynamic IP addresses are assigned by internet service providers (ISPs) to their customers’ computers when they connect to the internet. These addresses can change at any time and often do. It’s possible that your server has been assigned a different IP address. In such a case, you need to find your IP address and change it to a static one.
The DNS server is down or is not configured correctly – If you have configured your computer or router to use a different DNS than the one provided by your ISP (Internet Service Provider), then this may cause problems.
You’re behind a firewall – If you’re behind a firewall or proxy server, make sure that they allow access to the hostname or IP address of the server.
The network card driver may be corrupt/incompatible – If you are using a wireless connection and have recently installed the drivers for your wireless adapter, it could be that your driver is incompatible with Windows.
Your ISP may also have connection issues that prevent them from giving you an IP address which will cause problems with your internet connection too.
How do I fix an unreachable IP address?
1. Check your internet connection
If you’re using a router, check the status lights on the front of the unit. Should any of those lights be blinking or flashing red, this could indicate a problem on your network’s end.
Also, if you’re using a wired Ethernet connection, make sure the cable’s plugged in securely at both ends of the connection. If you’re using Wi-Fi, make sure your router is turned on and that it’s within range of your computer.
2. Restart your router
Sometimes, routers stop working correctly and don’t broadcast their IP address properly. Unplug the power cord from the back of your modem for about 30 seconds and then plug it back in. This should reset it and allow it to reestablish its connection with your ISP.
Also, check that all cables are connected properly (including power) and try connecting directly to your modem with an Ethernet cable.
Hit the Windows key, type cmd in the search bar, and click Run as administrator.
Type in the following command and take note of the details: ipconfig /all
Next, type in the following command: netsh interface ip set address name="Ethernet0" static 10.1.2.220 255.255.255.0 10.1.2.1
Type in the following command to assign an alternate DNS address: netsh interface ip add dns name="Ethernet0" 8.8.8.8 index=2
4. Disable firewall temporarily
Hit the Windows button, type Windows Security in the search bar, and click Open.
Click on Firewall & network protection then select Public network.
Locate Microsoft Defender Firewall and toggle the off button.
5. Update your router firmware
If your router is running an old version of its firmware, it could be causing problems with your internet connection.
A good rule of thumb for updating your router firmware is to do it every time there’s a new update available. You can also upgrade your router if it doesn’t meet modern standards.
How do I ping an IP address?
Pinging is a simple way to test whether a particular IP address is online. It works by sending out a packet of data and waiting for a reply. If the device at that address is online, it will send back an answer.
So what do you need to ping an IP address? First, make sure that you have the correct IP address for the device you want to ping.
Next, follow the steps below:
Hit the Windows key, type cmd in the search bar, and click Run as administrator.
Type in ping [IP address] and press Enter.
Can you ping a private IP address?
An Internet Protocol (IP) address is a unique identifier for devices on a computer network. All devices connected to a network must have an IP address so that they can communicate with each other.
Private IP addresses are not routable on the internet. This means that they cannot be reached by any computer outside your network. You can only ping if you have access to the network to the private IP address belongs to.
So, if you’re trying to ping a private IP address, it will never reach its destination and you’ll get a ping destination host unreachable message because it does not have an internet route.
You can use ping with a public IP address just fine because there is an entry in the routing table for the machine and so your request gets forwarded to that machine correctly.
Hopefully, you have been able to solve your IP address not working and can access your desired sites.
We also share various ways to set up a static IP so check that out too for more details. Let us know which solution worked for you in the comment section below.
Microsoft is still committed to ensuring that they transition all their Microsoft 365 services to Azure. Despite not having achieved this in 10 years plus, Microsoft published a case study that details the progress they have made thus far and the measures that they are taking to ensure that it does become a reality in the near future and further indicated that it is a “multiyear effort that’s still underway” as spotted by Mary Jo Foley over at ZDNet.
As per the case study, the Microsoft Experiences and Devices (E+D) team, which spearheads operations for both Windows and Office highlighted that transitioning from Windows containers to Azure Kubernetes Service (AKS) would help them get a step closer to achieving this long-term goal not to mention the significant impact it has on infrastructure cost, thus modernizing the service and at the same time cutting down on cost.
The E+D group’s experience reflects a broader industry trend, as Windows and .NET developers look to update and scale their existing code bases, reduce costs, and gain cloud-native benefits of a Kubernetes ecosystem, like resiliency, scalability, and automation. This platform-first, best-practices approach to modernization is a model that other organizations can follow.
Further in the post, Microsoft explains how the shift to hybrid work impacted Microsoft 365 services and the efforts put in place to ensure that they are able to run it better ever since the COVID-19 pandemic hit. Hence the inception of AKS despite Windows Containers providing a lightweight, isolated environment that promotes consistent development and deployment. AKS provides developers with container-based isolation, Kubernetes-based agility, monitoring, load-balancing, and auto-scaling. It also retains access to IIS, .NET Framework, and all the Windows OS features.
AKS is a hosted Kubernetes service, which is in place to make it easier to deploy and manage clusters thanks to Azure’s inception. “As the new computing power behind Microsoft 365, AKS provides a security-optimized, hardened host operating system with weekly patches, node image auto upgrade, and planned maintenance schedules. AKS also makes it easy to interoperate with Azure security, identity, cost management, and migration services”. The move has been deemed to have ” a deep, positive impact across Microsoft 365 development teams” according to Microsoft E+D Principal Product Manager Anasua Banerjee.
Microsoft has indicated that they are still committed to this cause and are making the necessary strides to ensure that this long-term goal comes to pass. Be sure to also check out their blog post where they highlight more details regarding their efforts.
As part of the Age of Empires’ 25th anniversary celebrations, Microsoft has added a special Age of Empires 25th Anniversary Tee to their official Xbox Gear Shop online storefront.
“T-shirt cannon? Please!,” the T-shirt’s store description reads. “When properly packed, T-shirts are easily fired en masse from a trebuchet. Get the party started with this jealousy-inducing Age of Empires 25th anniversary T-shirt and rain some style down on you and your friends!”
In addition to the AoE T-shirt, a number of new Halo items based on Halo Infinite’s Fracture: Entrenched in-game content have also been added to Xbox Gear Shop.
Xbox Gear Shop Halo infinite merch
Among the new Halo Infinite Fracture: Entrenched items are a glass, enamel cup, two tank tops, trucker hat, jacket, and two official T-shirts.
Every so often you’ll find users of different VPN services post their connection and troubleshooting issues either through social media or official pages of the service providers.
One such issue is when ExpressVPN won’t work with Netflix, but this is just among the many because VPN connections are affected by a myriad of factors that impact the speeds or accessibility.
The most common connection error message you may get when trying to access sites such as Netflix, Hulu, Amazon Prime, or even BBC iPlayer would read: You seem to be using an unblocker or proxy, OR, You’ll need to disable your anonymizer.
This article is for users who are getting an ExpressVPN Netflix error, or rather, ExpressVPN won’t work with Netflix, so try some of the solutions listed below and see if it helps.
Why won’t ExpressVPN work on Netflix?
Netflix doesn’t allow VPNs. So if you wonder why ExpressVPN won’t work with Netflix, it’s because it’s been detected that you use VPN traffic.
It’s also possible that another ExpressVPN user has broken their regulations from the same IP address and got banned.
The issue happens on any Netflix-compatible device, users reported having problems with ExpressVPN not working on PS4, PCs, and smart TVs.
According to our experience, ExpressVPN does a pretty good job of unlocking Netflix without being detected, so if Netflix blocked your ExpressVPN connection, try switching servers before moving on.
However, if you log in from different server locations or both with and without a VPN, Netflix may flag your activity as suspicious. That’s why ExpressVPN no longer works with Netflix even though it has before.
Try using servers from the same location or delete cookies before changing your location.
What can I do if ExpressVPN isn’t working with Netflix?
1. Check your IP address
If ExpressVPN won’t work with Netflix, check your IP address for information such as your city or region (country) next to the location you selected when you connected with ExpressVPN.
If it shows a location near you, it means you’re not connected to an ExpressVPN server location, so try connecting again.
You can use the IPconfig command in Windows to find your IP. Then type it into a search engine and you will see whether it’s known to be proprietary to ExpressVPN or not.
2. Use a VPN solution that always works with Netflix
Netflix puts a lot of effort into ensuring that its content gets streamed only by those who pay for that. It uses advanced tools to prevent anyone from breaking the rules, as you’ve already seen.
Unlike ExpressVPN, Private Internet Access doesn’t get stuck with Netflix. Install it now and secure your connection without having problems with streaming such services.
This Kape Technologies VPN solution constantly has success at getting around Netflix and Hulu blocks, not to mention that it is competing heavily on price at the moment.
If you’re undecided, don’t forget about the 30-day money-back guarantee that you may take advantage of when not entirely pleased.
The VPN is very easy to setup and use with Netflix:
You can either click on the power button to automatically connect to VPN, or pick the VPN server option to select the exact VPN location you want to use.
Private Internet Access
Private Internet Access will always work with Netflix. Here’s your chance to claim the best deal!
To test if you have an active Internet connection, disconnect from ExpressVPN then try accessing a website the usual way. If you cannot access even when disconnected from the VPN, check your Internet connection.
However, if you can access it while disconnected from the VPN, try the next solution.
4. Try connecting to another ExpressVPN Location
Click Choose Location to access the list of locations.
Click on the server location to connect, then click the ON button (you can also connect by double-clicking on the location).
Go to the Recommended tab to see the list of top VPN picks to connect to.
Click the All tab to see the list of VPN server locations by region.
Click the Favorites tab to show the locations you saved as favorites. It also shows the three Recently Connected locations you connected to.
To find your desired location, go to the search bar by pressing CTRL+F, then type the name of your desired server location and double-click on it to connect.
Once you disconnect from the location you selected, you can go back to your smart location by clicking on Smart Location.
If you can access the Internet when disconnected from ExpressVPN, but cannot connect to a server location, choose a different server.
Switch around and see which ExpressVPN servers work on Netflix for you.
For Windows users, take the steps above to choose a different ExpressVPN server location. If ExpressVPN gets stuck on connecting, check out this guide to fix the problem.
5. Change the protocol
Go to the ExpressVPN window and click on the hamburger menu, then select Options (do this while disconnected from the VPN).
Under the Protocol tab, select the protocol you want to use and click OK.
Your device connects to ExpressVPN servers using VPN protocols, the default one being the UDP protocol, which in some countries like the Middle East, is blocked.
So you can try and change the protocol, which will also help you achieve faster connection speeds. For optimal performance, choose the OpenVPN TCP first, then L2TP, and finally PPTP protocols in that order.
However, ExpressVPN doesn’t recommend using PPTP unless it is very necessary to do so as it offers minimal security.
6. Disable your security software
Try and disable your firewall or antivirus as these may block your VPN connection. If you can connect, do the following:
You may need to change the security level from High to Medium (depending on the program) and grant exceptions to ExpressVPN or UDP ports 1194-1204, or set it to Trust ExpressVPN.
If you have the option to reinstall the security software or program blocking ExpressVPN connection, install it after the VPN is already installed so that it allows the VPN to connect by first uninstalling ExpressVPN, then uninstall the program blocking the connection, install ExpressVPN again, then reinstall the program blocking the connection.
Check if you can connect again and try to access Netflix.
If your Windows Firewall is blocking the VPN, check out this guide to get rid of the problem.
Right-click Start and select Programs and Features.
Find ExpressVPN from the list of programs and select Uninstall.
In the Setup Wizard, click You’ll get a notification after a successful uninstall, so click Close to exit the wizard.
If the ExpressVPN is still listed as available after uninstalling it, right-click Start and select Run.
Type ncpa.cpl and press Enter to open the Network Connections window.
Under Network Connections, right-click on the WAN Miniport labeled ExpressVPN.
Select Delete.
Click Start and select Settings.
Click Network & Internet.
Select VPN. If you see ExpressVPN as available, delete it.
Connect again to ExpressVPN and see if you can access Netflix.
Uninstall the ExpressVPN app you’re running, then sign in to your ExpressVPN account and select Set up ExpressVPN.
Find the latest version for your device and then connect again, then see if you can access Netflix.
For Windows 10 users, use the above steps. You can’t open Control Panel? Take a look at this step-by-step guide to find a solution.
8. Flush the DNS
Click Start.
Select All Apps.
Click Accessories.
Right-click Start and select Command Prompt (Admin).
Type ipconfig /flushdns and press Enter. You should get a confirmation that says: Windows IP Configuration Successfully flushed the DNS Resolver Cache.
In some countries, DNS entries saved from your ISP on your computer may be intentionally wrong, as an additional method of blocking Netflix and other sites.
In this case, flush your DNS cache so your computer can automatically access ExpressVPN’s DNS for the proper/correct entries. Here’s how to do it in Windows:
If you’re having trouble accessing Command Prompt as an admin, then you better take a closer look at this guide.
9. Manually configure DNS settings
Open Network Connections settings
Right-click Start and select Run.
Type ncpa.cpl and click OK.
In the Network connections window, find your usual connection, either LAN or Wireless network connection.
Right-click the connection and select Properties.
Set the DNS server addresses
Double click Internet Protocol Version 4 (IPv4) or just Internet Protocol.
Select Use the following DNS server addresses
Type these Google DNS server addresses: Preferred DNS server 8.8.8.8 and Alternate DNS server 8.8.4.4.
If Google DNS is blocked, try the following: Neustar DNS Advantage (156.154.70.1 and 156.154.71.1) enter and press OK, and, Level3 DNS (4.2.2.1 and 4.2.2.2) enter and press OK.
Set ExpressVPN DNS settings
For ExpressVPN 5.X/4.2/4.1/4.0:
Click the three dots and select.
Select the Advanced tab.
Uncheck the Only use ExpressVPN DNS servers while connected to the VPN box and click OK.
For ExpressVPN 3.X:
Go to Options.
Uncheck the Only use DNS servers set by the VPN option.
Your computer may not automatically connect to ExpressVPN DNS servers, so you need to configure it with ExpressVPN DNS servers’ IP addresses, manually.
Manually configuring your computer with other DNS server addresses helps you access Netflix and other blocked sites, and enjoy faster connection speeds.
Once you have configured your computer for ExpressVPN DNS servers, flush old DNS entries again as described above.
10. Manually configure proxy settings
Click Tools.
Select Internet Options.
Go to the Connections tab.
Click LAN settings.
Uncheck all the options except Automatically detect settings and click OK for all.
A proxy server is the go-between your computer and the Internet and is used to hide your real location so you can access websites that Netflix, that would otherwise be blocked.
If you have Internet connection issues, it is possible that it has been set to use a proxy server.
Ensure your browser is set to auto-detect proxy or no proxy, then use the instructions to manually configure proxy settings for your browser. Here’s how to disable proxy settings for Internet Explorer.
Let us know if any of these solutions helped fix the ExpressVPN Netflix error.
If you have any other suggestions or questions, don’t hesitate to leave them in the comments section below and we’ll be sure to check them out.
The main advantage of a full-spectrum VPN over a browser extension is that it integrates all applications. One VPN will bind them all, regardless of their browsers or other tools like Spotify or Popcorn Time.
However, as this case has shown, that integration might come in different shades of gray. Many users experienced issues with Chrome, as Google’s browser just won’t work when paired with a VPN.
This can be a grave problem, especially for most users who prefer Chrome over other browsers. Keep in mind that these fixes refer to VPN solutions rather than extensions.
Why VPN is not working in Chrome?
Usually, you can experience VPN issues on your browser due to different reasons such as an unstable Internet connection or cache data in your browser.
It’s possible that cached data stored in your browser interferes with your VPN client and thus blocks your server connection.
That said, using a VPN, either as software or as an extension in the browser, may generate problems, so follow us to solve this issue in Chrome.
What can I do if VPN isn’t working with Chrome?
1. Check the connection
Restart your PC, router, and modem.
Make sure your Wi-Fi is enabled. Also, try using LAN instead of Wi-Fi.
Flush DNS:
Open Command Prompt by right-clicking on the Start button.
In the command line, type the following commands and press Enter after each:
ipconfig /release
ipconfig /renew
After that, type in the following command and press Enter:
ipconfig /flushdns
Close the Command line and look for changes.
Reset your Power settings to default.
Reset router to factory settings.
Before we proceed with troubleshooting VPN and Chrome, respectively, let’s make sure that your connection is working as intended.
The underlying connection can and will occasionally be a problem, especially in Windows 10, which tends to break the connection with every new update.
There are various ways to confirm whether your overall connection is malfunctioning or the issue is closely associated with Chrome and VPN.
For starters, try running Chrome without the VPN. If the problem is persistent, even with an alternative browser, we advise you to try one of these steps and look for improvements:
2. Connect to a better VPN
First things first, choosing the right VPN can make all the difference. Why look for ways to repair Google Chrome and VPN issues when you can simply avoid them?
Our recommendation goes to ExpressVPN, a trusted VPN client perfectly suited to blend in with Chrome seamlessly.
Browser-friendly, ExpressVPN really has unmatched leverage regarding your safety on the web.
But it does not just secure your browser; thanks to the TCP/IP interface level, it extends its protection to all your apps.
This leading VPN provider relies on tunneling technology to provide multi-layered security. It uses encrypted tunnels to create multiple layers of privacy around you.
Besides its massive network of worldwide servers, the service is your number 1 choice for confidentiality, thanks to its strict zero-logs policy.
It might also be worth mentioning that these advanced features are packed in a very intuitive and easy-to-use interface, allowing you to connect your VPN client with just one click.
ExpressVPN
Match ExpressVPN with Chrome to browse safely and anonymously.
VPN-wise, the best thing you can do when the issues suddenly emerge is to change the server subtly.
Most free and premium VPN solutions offer a large variety of servers positioned all around the world.
So, if you’re experiencing issues with one server, the alternative one will likely resolve the halt.
Some of the most used ones tend to get overcrowded, while temporary server failure is also possible.
The procedure is relatively simple on all available VPNs, so you should have an easy time switching back and forth between the available servers.
On the other hand, in case you’re still stuck with the same issues and unable to connect through VPN and seamlessly use Chrome, make sure to check the additional steps we provided below.
4. Clear Chrome’s browsing data
Open Chrome and press Ctrl + Shift + Delete to open the Clear browsing data menu.
Check the Cached images and files box.
Click on the Clear Data button.
Close Chrome, re-enable VPN, and try connecting again.
Like any other browser, Chrome will accumulate large chunks of data in order to speed up the browsing experience and preserve your history.
However, piling up the cache and cookies will often lead to slowdowns. It might also affect VPN integration and even prevent the connection through the secure tunnel.
In order to avoid this, we recommend clearing your cache and moving from there. Of course, make sure to preserve your passwords or write them down. Here’s how to clear the browsing data on Chrome:
Scroll down and expand the Advanced options section.
Scroll to the bottom and click on Open proxy settings under the System section.
Select LAN settings.
Uncheck Automatically detect settings.
Uncheck the Use the proxy server for your LAN box.
Confirm changes and run your VPN and then Chrome.
If you’ve configured a proxy server on Chrome or it’s automatically configured, we advise you to turn it off. Proxy servers and VPNs are not good friends, as one tends to block the other.
Also, it’s advised to disable the proxy extensions (they mostly are advertised as VPNs, which they’re not in the true sense of the word) if you use a desktop client VPN.
Follow these instructions to disable Chrome proxy:
Proxy server issues are pretty annoying. Make them a thing of the past with the help of this guide.
These steps should show you how to disable Chrome extensions:
Open Chrome.
Under the 3-dot menu, select More tools and then Extensions.
Remove all proxy-related privacy extensions and restart Chrome.
6. Reconfigure DNS
Instead of using the automatically generated DNS, you can try to apply general Google DNS. Follow these steps to reconfigure DNS on your PC:
Right-click on the Connection icon placed on Taskbar and open Network & Internet settings.
Click on the Change adapter options.
Right-click on your default connection adapter and open Properties.
Highlight Internet Protocol Version 4 (TCP/IPv4) and click Properties.
Mark Use the following DNS server addresses.
Under the Preferred DNS server, insert 8.8.8.8.
Under the Alternate DNS server, insert 8.8.4.4.
Confirm changes and close Adapter settings.
Navigate to VPN settings and make sure to enable VPN to change DNS settings only when in use.
Restart your PC and look for changes.
Usually, everything works fine with the automatic acquisition of the IP address, but it’s worth trying to change it.
Also, this action, in combination with the VPN’s own reconfiguring, resolved issues for a lot of users.
Is your DNS server not responding on Windows 10? Don’t worry—we’ve got the right solution for you.
7. Disable antivirus temporarily
Here’s how to do it in a few simple steps:
In the Windows Search bar, type Allow and select Allow an app through Windows Firewall.
Click on the Change settings button.
Find your VPN on the list andcheck the boxbeside it. Also, make sure that bothPublic and Privatenetworks are enabled.
Confirm changes and try connecting through the VPN again.
Antivirus solutions went a long way from simple anti-malware solutions. Nowadays, they come in suits, with all kinds of system monitoring and optimization tools and, foremost, third-party firewalls.
Those can come in handy, especially if you need an extra layer of online security.
However, they also tend to block various connection-dependent services and their subsidiaries. For example, they might block your VPN and thus prevent internet access through Chrome.
To resolve this, you can disable them permanently or whitelist the VPN and Chrome.
This procedure differentiates various solutions, so we advise you to check your VPN’s support website for detailed insight.
Also, you should check the Windows-native Firewall and create an exception for the VPN at hand.
8. Reinstall Chrome and VPN
In the Windows Search bar, type Control and openControl Panel from the list of results.
From the Category view, click Uninstall a program under Programs.
Right-click on your VPN solution and Uninstall it.
Finally, if none of the previous solutions helped you, you can try reinstalling both Chrome and VPN and proceeding from there.
Both applications can be affected by various changes in the Windows ecosystem, making them quite prone to errors inflicted by updates.
For that reason, we recommend a clean reinstallation as a last resort in this matter.
VPNs, like any other software, are sometimes vulnerable to flaws that prevent you from removing the VPN connection from your PC.
Since this may happen, you may need to take many actions to completely uninstall the utility from your PC, as many VPN providers leave files behind.
We recommend usingCCleaner third-party uninstaller tocleanall remaining files andregistry entriesthe VPN has made and restart your PC.
After the uninstallation is complete and there are no remnant files, download the latest version of the VPN of your choice and install it.
Different users complained about issues regarding VPN usage with the Google Chrome browser and keep in mind that the above solutions are ideal in such cases:
Touch VPN is not working in Chrome
CyberGhost Chrome extension is not working
NordVPN Chrome extension is not working
PureVPN Chrome extension is not working
Browsec VPN not working
Urban VPN Chrome is not working
err_proxy_certificate_invalid when using ZenMate
Surfshark Chrome extension is not working
Tunnelbear Chrome extension is not working
Betternet VPN not working in Chrome
VPN not working in incognito
Hoxx VPN is not working
That should do it. Don’t forget to send a ticket to your VPN provider if the issue persists. The package price includes support, so make sure to ask for a resolution from the responsible providers.
In case you have an alternative solution we forgot to enlist or have questions regarding the ones we enlisted, feel free to share it with us. You can do so in the comments section below.
Google Play Store is an Android users’ best friend, as it can give access to apps, games, music, movies, and books in a jiffy.
It provides you with various security features as well as automatic updates (if you opt for them).
Unfortunately, sometimes certain items from Google Play Store might not be available in your country.
On the bright side, there’s nothing in that scenario that a trustworthy VPN can’t fix.
However, VPN users have noticed that sometimes, using Google Play Store may not work while behind a VPN connection.
If you find yourself in this situation, check out our guide and learn how you can troubleshoot it without great effort.
Why is my VPN not working on the Play Store?
First of all, this problem may occur to any users that try to access Play Store apps that are not available in their region.
In case your VPN connection doesn’t seem to work, you should look for potential causes like the following:
The Android cache interferes with your VPN
Your DNS information is cached as well
ISP is throttling your Internet connection
The VPN servers are unstable
You don’t use the proper VPN protocols
In addition, other users reported issues with specific VPN tools with the messages like NordVPN Google Play not working or ExpressVPN Google Play not working.
After the installation, launch and connect the VPN software.
Connect to different servers worldwide with high speeds.
Access the Google Play Store app.
Try installing any apps on your mobile device.
How can I fix Google Play Store not working with VPN?
1. Switch your VPN server
Maybe you won’t believe that choosing a different VPN server could oh-so-easily fix your Google Play Store issues.
However, this is by far the most overlooked fix. Therefore, more often than not it works like a charm.
Although Google Play Store is generally available all around the world, some of the items listed in the store may be unaccessible in certain regions.
Thus, it’s worth mentioning that if you do try changing your VPN server, you should make sure to select a country where the content you seek is accessible.
If that didn’t work, just pick a different region and try again.
2. Avoid using free VPN services
Although free VPNs can be very tempting, as they don’t require you to pay a dime to use them, we recommend steering away from them.
The reason why free VPNs continue to exist is that they’re based on alternative revenues, such as displaying ads or selling your data.
Sure, ads may feel harmless, considering that we keep seeing them everywhere, but sometimes they could deliver malware to your device.
Furthermore, their servers are usually overloaded by free stuff enthusiasts which in turn can make your experience unpleasant.
It’s not a given that using a free VPN is granted to be the reason why Google Play Store won’t work with your VPN, but it’s a pretty solid possibility.
With that in mind, we recommend you pick a premium VPN such as Private Internet Access.
In addition to its potential to get you rid of your Google Play Store VPN issue, you’ll also get faster connection speeds and better privacy protection.
Private Internet Access
Google Play Store not working with your current VPN? Why not try Private Internet Access for a change?
It may be that your device or ISP could enforce some restrictions while using certain VPN protocols.
For that reason, you should try using a different VPN protocol and see if there’s any improvement.
However, if a non-compatible protocol is a culprit, Google Play Store won’t be the only thing you’ll struggle to access from behind your VPN.
Therefore, you can rule it out quite easily by trying to access various other online services and see if they work.
If they do, then the protocol is not what’s causing it and you can move on to our next suggestion.
4. Flush your DNS (Windows)
If you’re trying (but failing) to access Google Play Store on your Windows PC from behind a VPN, one thing you can always do is flush your DNS.
DNS information, much like other types of data on your PC, gets cached and requires the occasional flushing, so here’s how you can do it:
Launch a CMD instance with admin rights
Type these commands, one by one:
ipconfig /flushdns
ipconfig /registerdns
ipconfig /release
ipconfig /renew
netsh winsock reset
Restart your computer
After your PC reboots, re-connect to your VPN and try accessing Google Play Store once more. If it fails, you’ll at least know that your DNS wasn’t the culprit.
5. Use public DNS
Given that ISP-assigned DNS can often be limiting, you should consider switching to public DNS such as the one from Google or Cloudflare.
Here’s how you can do that easily:
Right-click the Start menu.
Select Network Connections.
Click the Change adapter options button.
Right-click the active Internet connection on your PC.
Select Properties.
Double-click Internet Protocol Version 4 (TCP/IPv4).
Toggle the Use the following DNS server addresses radio button.
Type 8.8.8.8 in the Preferred field.
Put 8.8.4.4 in the Alternate one.
Click OK.
Restart your computer.
If your ISP-assigned DNS was imposing certain restrictions on your connection, you’ll break those virtual shackles free after performing this fix.
Therefore, if your default DNS was restricting your Google Play Store-VPN interaction in any awy, you’ll be able to access the Play Store in no time.
Quick tip, though: it’s never a bad idea to back your data up, so for that reason, make sure to note down your ISP-assigned DNS.
You might need it if your ISP forces you to use their DNS to access the Internet.
6. Clear your cache (Android)
Here’s how you do that on basically any Android phone.
Head to your phone’s Settings screen
Go to your App Manager (usually called Apps)
Scroll down until you find Google Play Store and select it
Press Force Stop
Tap the Storage button
Press the Clear Cache button
Tap the Clear Data button
Go back
Locate Google Play Services
Repeat steps 4-7
Restart Google Play Store
As we’ve casually mentioned above, cached data can have a negative impact on the technology you interact with.
In this case, cached data could make it impossible for Google Play Store to work with a VPN on your mobile device.
Therefore, it makes perfect sense that clearing that data could kickstart Google Play Store and patch things up between it and your VPN.
You may have to log in, but if the issue was caused by old cached data on your device, things should now run smoothly between Google Play Store and your VPN.
Note that the location of the configuration sections and their buttons may differ depending on your Android phone’s model.
VPNs for Play Store
In case you need to check what is the most ideal VPN that works with Google Play, here you have a list to choose from:
All things considered, if Google Play Store doesn’t seem to work with your VPN, there are several fixes you could try.
Just remember, don’t lose hope, and at least try to use all of our suggested fixes. Some VPN apps may interfere with the Play Store and cause payment errors, but if you use a reputable one, you shouldn’t worry.
The ones you skip may be the very ones that would’ve fixed your Google Play Store VPN compatibility issues.