Are you having trouble getting access to the Internet due to an incorrect WiFi password? Perhaps you want to change your WiFi password on Windows 11 but are unsure of how to do it.
This is a common problem that many people face when they don’t know how to change the network settings.
A good password is essential for security. If a malicious person gets access to your password, he/she can use it to access your personal information such as emails, bank account details, and other sensitive information.
Changing the password for your WiFi network can be a key step in securing your home network. Whatever the reason, changing your WiFi network password is simple and only takes a few minutes.
How to see WiFi password in Windows 11?
Click on the magnifyingglass icon from your Taskbar then type in Control Panel and open the topmost result.
Select Network and Internet followed by Network and Sharing Center.
Click on your Wi-Fi name next to Connections.
Select Wireless Properties.
Finally, navigate to the Security tab and check the Show characters box in order to know your Wi-Fi password in Windows 11.
Is it necessary to have a WiFi password?
If you’re like most people, you have a wireless router at home that connects to the Internet and allows you to share files and printers on your network. But is it really necessary to have a WiFi password?
In most cases, yes. For example, if you don’t secure your WiFi network with a password, anyone can use your Internet connection – which can be costly if they use up all of your monthly data.
There is also a possibility that they could access sensitive information on any of your connected devices, such as photos or personal documents.
In some cases, it may not be necessary. For instance, if you live in a remote area and don’t have any neighbors nearby who could access your network, then there may not be much point in securing it with a password.
The WiFi password is there for security reasons and for your safety. It ensures that you do not allow unknown people or devices to connect to your network and use your bandwidth. This means that no one can access your data or files without first getting past the firewall in place.
If you’ve never changed your WiFi password, there’s a good chance that you’re using the default password that came with your router.
There is also a possibility that anyone could have looked up that default password on the Internet and gained access to your WiFi network.
You may also have forgotten the password and simply want to update it to something you can easily remember. So, how do you go about changing your WiFi password on Windows 11?
How can I change the WiFi password on Windows 11?
1. Use the Settings App
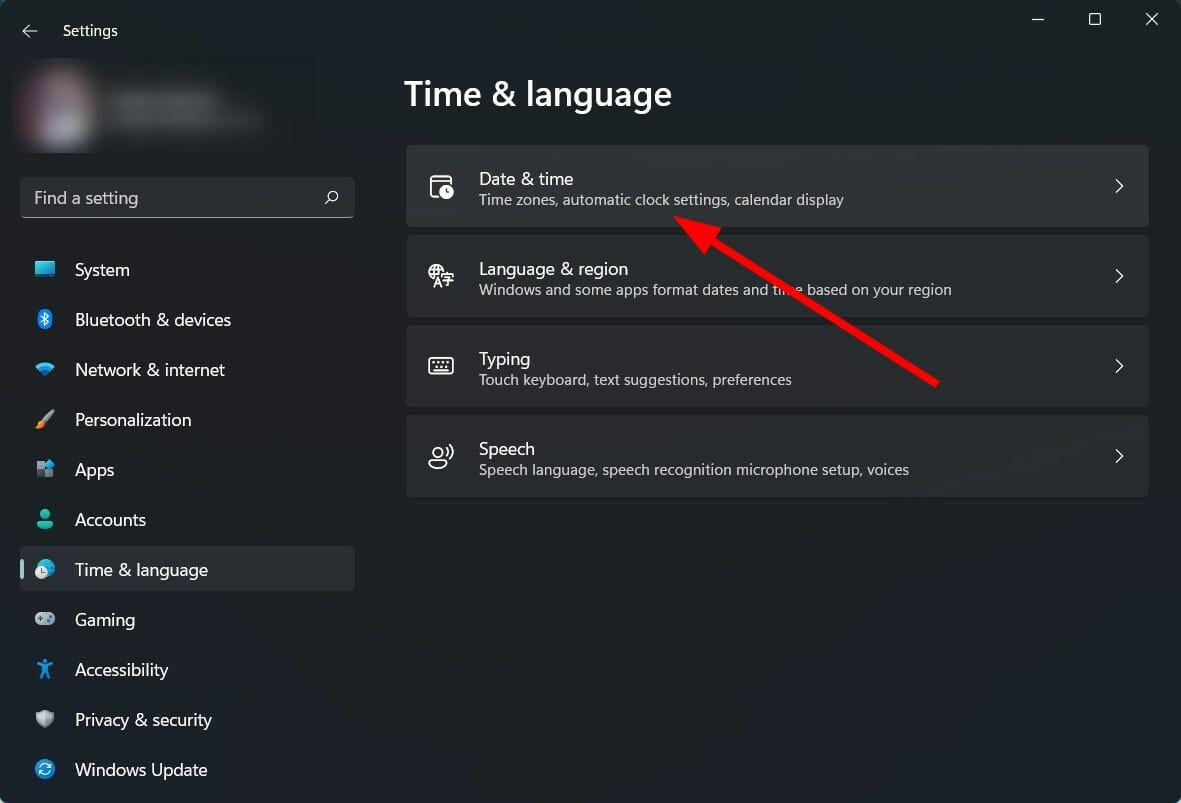
Hit the Windows + I keys simultaneously to open Settings.
On the left plane, select Network & Internet then click on Advanced network settings on the right pane.
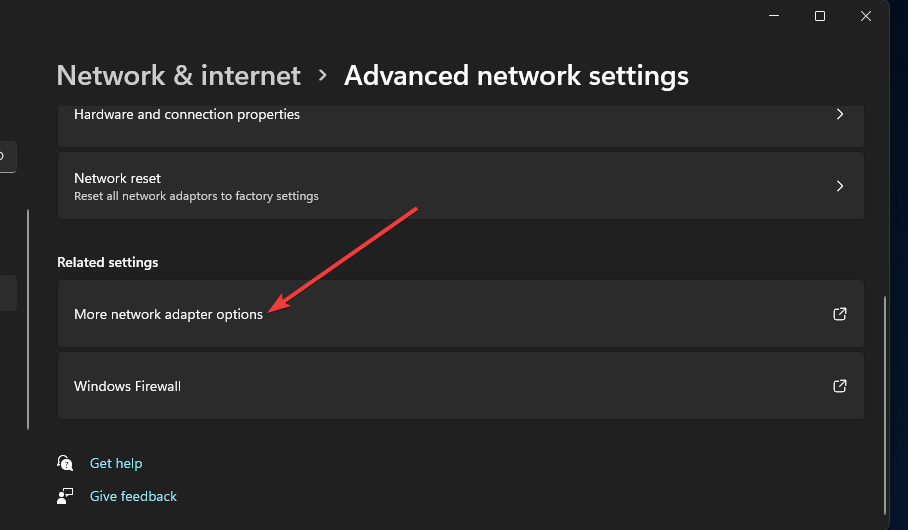
Select More network adapter options.
Right-click on your wireless network and select Status.
In the dialog box that pops up, select Wireless Properties.
Navigate to the Security tab, edit the Network security key entry with the new password, and press OK.
2. Use the Control Panel
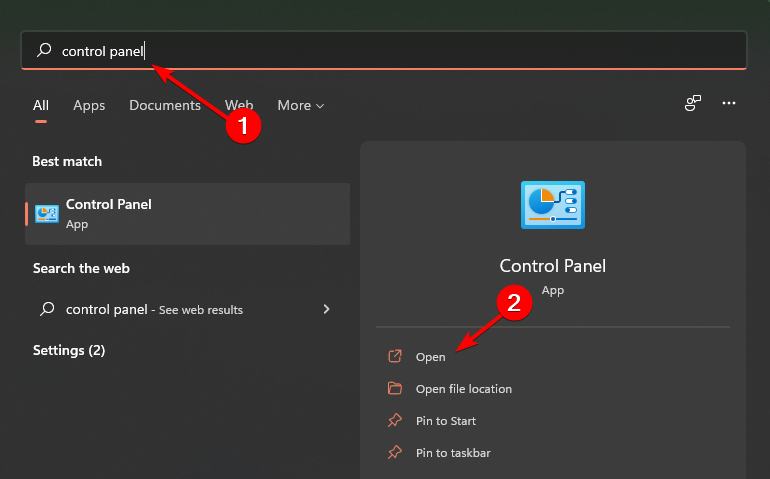
Hit the Windows key, type Control Panel on the search bar, and click Open.
Under Network and Internet, select View network status and tasks.
Select Network and Sharing Center panel then click on Change adapter settings.
Right-click on your wireless network and select Status.
In the dialog box that pop up, select Wireless Properties.
Navigate to the Security tab, edit the Network security key entry with the new password, and press OK.
3. Use the router page
Navigate to your browser, enter your router’s IP address into the search bar and press Enter.
Next, enter your current router’s Username and Password and Login.
Yes, you can. There are times when you need to connect with a new device and your computer is not around or you have forgotten to write down the password. The other reason could be that the previous user has changed it and now you want to change it back.
We know it’s a pain to remember all your passwords. But with so many digital services, each with its own requirements and restrictions, you need a unique and strong password for each site.
That’s why we recommend using RoboForm so you can easily manage your passwords across all your devices.
So, how do you view your saved passwords? Follow the steps below:
1. Use Command Prompt
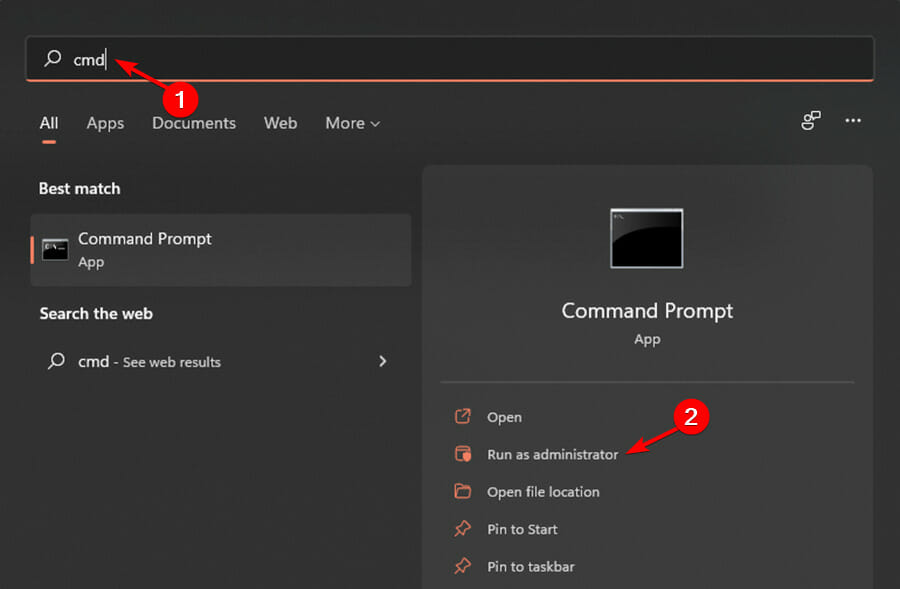
Hit the Windows key, type cmd and select Run as administrator.
Type in the following command, and press Enter: netsh wlan show profiles
Next, type in the following command replacing Wi-Fi name with the name of your wireless network then press Enter: netsh wlan show profile name=“Wi-Fi NAME” key=clear
2. Use Powershell
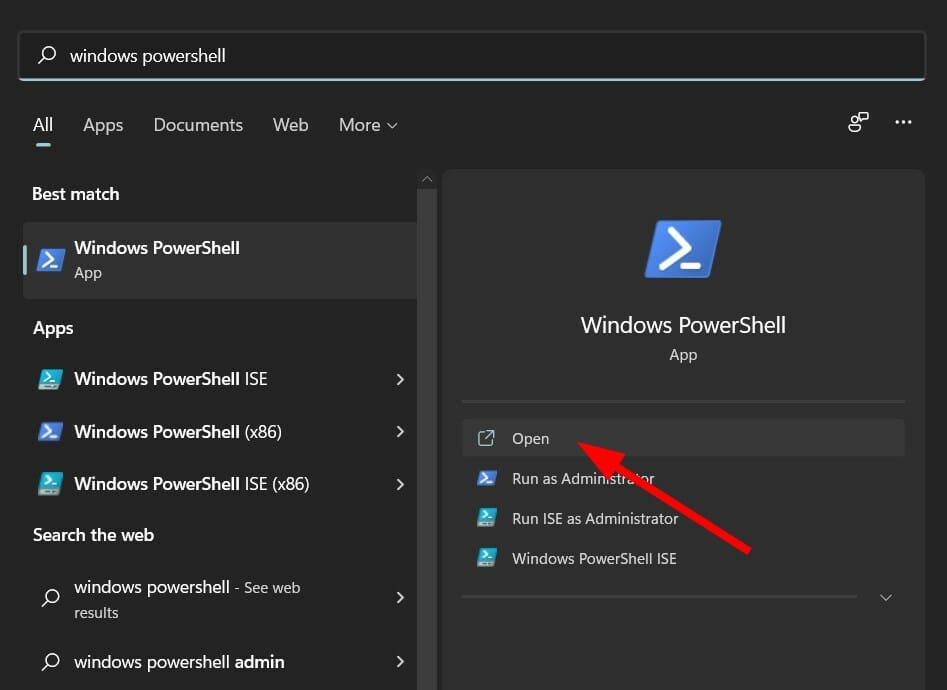
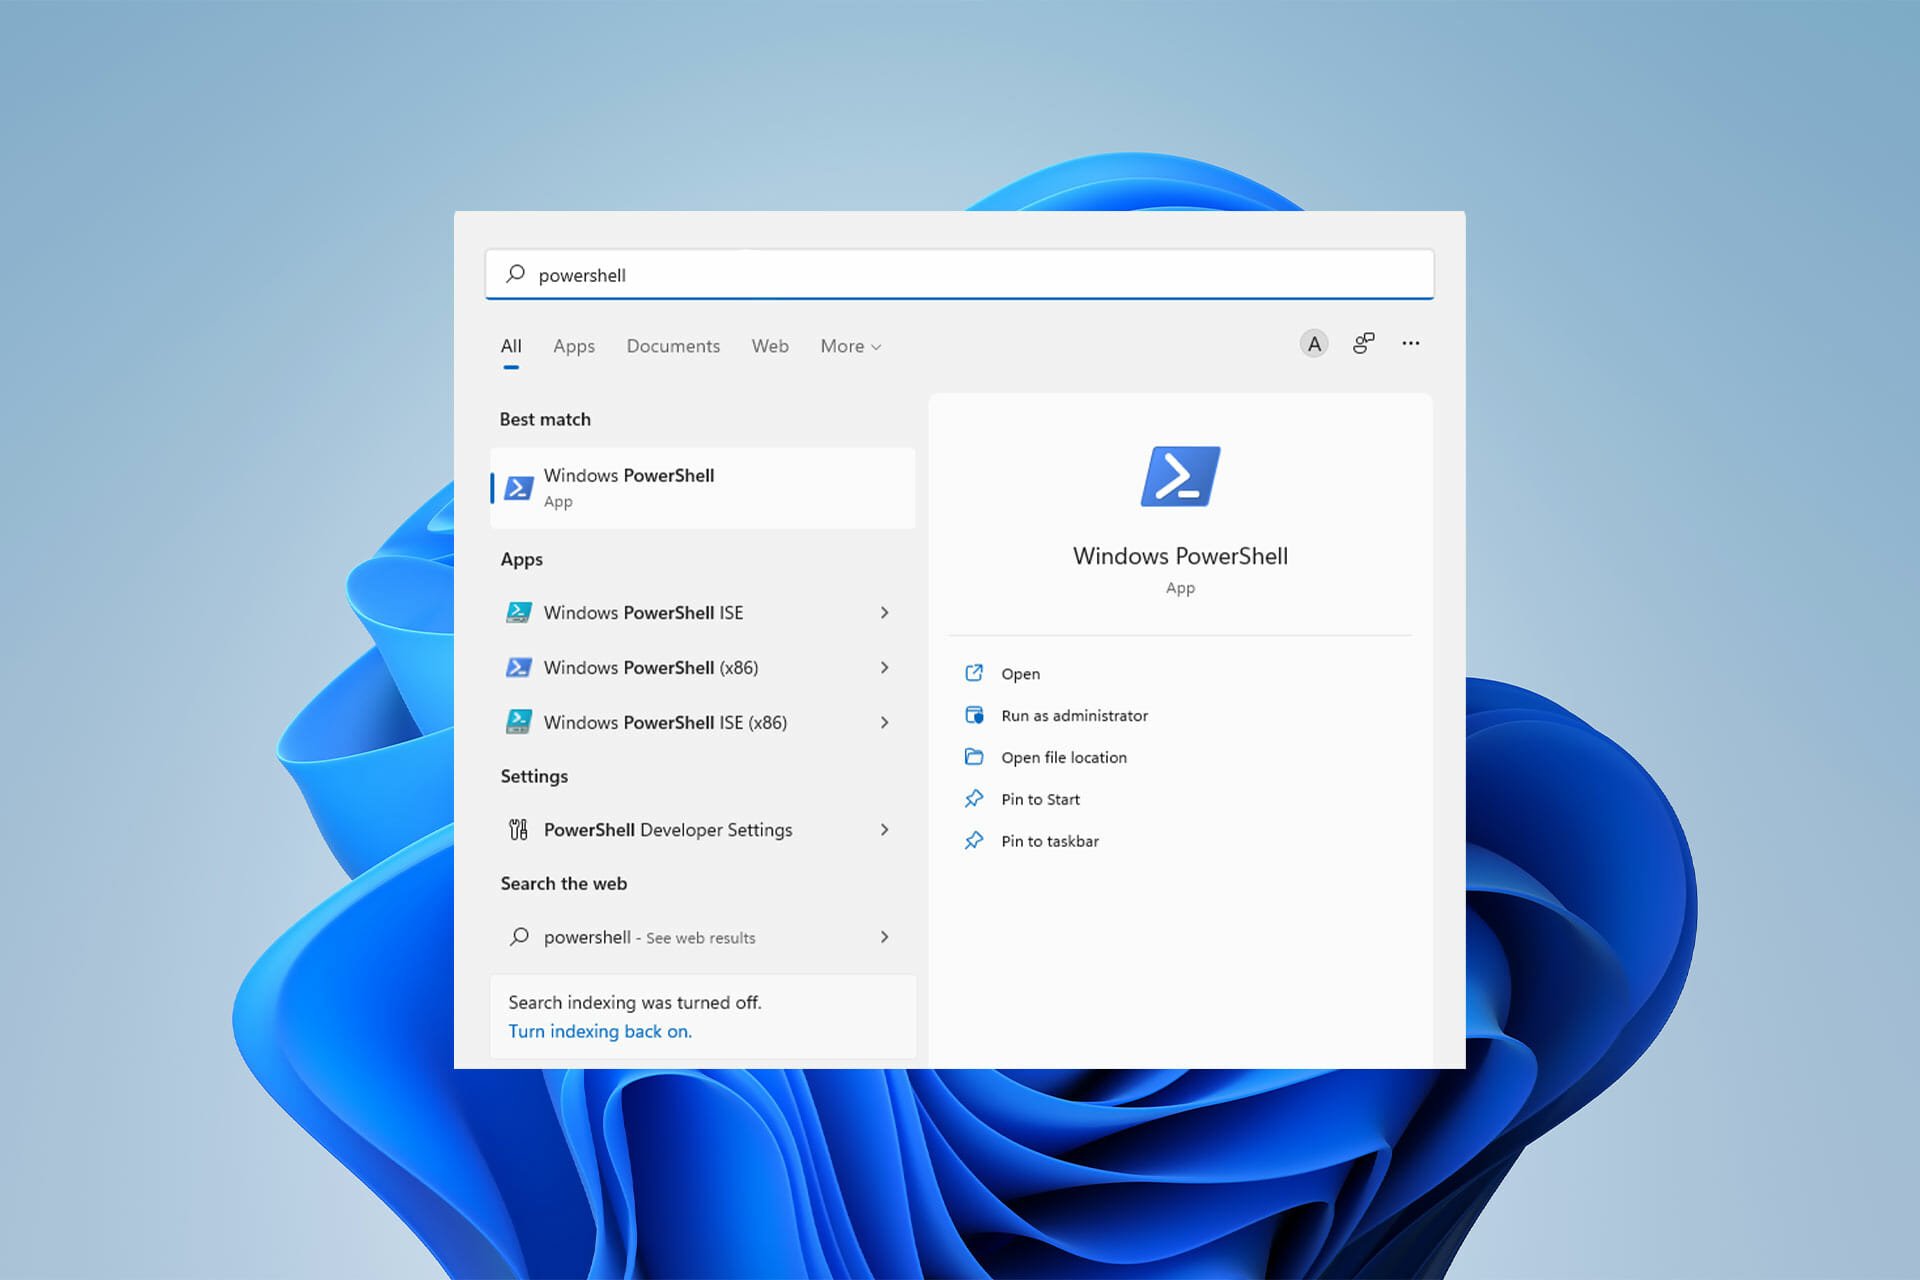
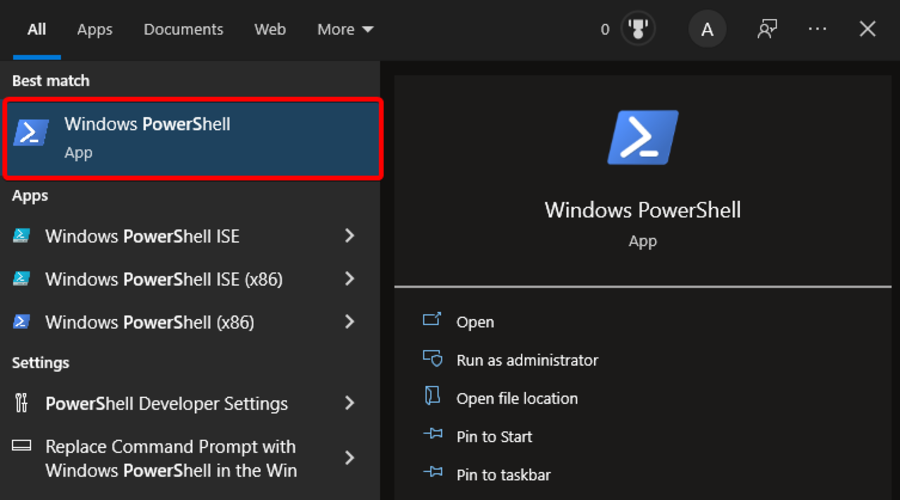
Press the Windows key, type in Windows Powershell, and click Open.
Copy and Enter the following command: (netsh wlan show profiles) | Select-String "\:(.+)$" | %{$name=$_.Matches.Groups[1].Value.Trim(); $_} | %{(netsh wlan show profile name="$name" key=clear)} | Select-String "Key Content\W+\:(.+)$" | %{$pass=$_.Matches.Groups[1].Value.Trim(); $_} | %{[PSCustomObject]@{ PROFILE_NAME=$name;PASSWORD=$pass }} | Format-Table -AutoSize
You will be able to view any saved WiFi password in Windows 11.
Open Settings by holding Windows and I together then navigate to Network and Internet on the left-side menu.
Next, click on Properties under the WiFi name. You will be redirected to all the WiFi settings that you want to tweak.
Why can’t I change my WiFi password?
The most common reason you can’t change your WiFi password is that your device is using an old cached version of your network information. Try disconnecting from the network and then reconnecting.
It’s also likely that the network is being managed by your Internet Service Provider (ISP), employer, or another entity and your router has been configured in a specific way. If this is the case, you will have to contact your ISP and ask them to help you change the WiFi password.
In other instances, you may not be connected to the network. To change your WiFi password, you’ll need to be connected to the Internet. You also need to know your current password.
Should you encounter any other problems with your wireless connection such as Wi-Fi disappearing in Windows 11, we have a step-by-step guide to bypass the issue.
It is our hope that you were able to successfully change your WiFi password with the help of this guide. Did you know that you can easily share a Wi-Fi password as a QR code on Windows 11? That’s right, and our latest article shows you how to do it.
If you encounter any other issues relating to this matter, leave us a comment and we’ll be sure to get back to you.
Getting the best performance in the game is important, especially if it’s an FPS. Speaking of which, many users are wondering what are the best Krunker settings for low-end PC.
To give you a brief, Krunker is a free-to-play multiplayer arena-based online shooting game. Up to 8 players can join the game and shoot each other to death to win the game.
The graphics are not very intense and it is much like what you have with Minecraft or Roblox. It is kid-friendly, meaning there is no blood or gore in the game. But Krunker is a shooting game, so take note of it.
Krunker is a web-based game, though it can also be downloaded via Steam. Several users have reported that they are facing lag or stutter while playing the game on their PC. If you are among such users then this guide is here to help you.
Quick Tip:
Because Krunker is a web-based game, it will be much more fun to play with a dedicated gaming browser. To help you get the most out of both gaming and surfing, the Opera GX browser integrates unique features such as CPU, RAM, and network limiters.
This allows you to run Opera GX alongside online gaming or other resource-intensive applications.
Opera GX
Opera GX Control lets you set limits on how much RAM, CPU, and network usage your browser takes up.
In this guide, we will list down the best Krunker settings that you can set on your low-end PC to enjoy smooth gameplay. Let us check it out.
What are the best FPS settings for Krunker?
1. Tweak in-game settings
1. Launch Krunker
2. Click on Settings.
3. Select the General tab.
4. Click on the Performanceoption.
5. Switch to the Displaytab. Now set all the settings to the lowest values.
If you have a low-end PC and want to play Krunker on it, what you need to do is set your in-game Display settings to low.
The lower the game’s visual settings are set, the better the performance will be for your PC.
2. Change the power plan
Open the Start menu.
Search for cmd and select Command Prompt to open it.
Type the below command and press Enter. This will activate Ultimate Performance mode on your PC: powercfg -duplicatescheme e9a42b02-d5df-448d-aa00-03f14749eb61
Now you need to change your settings by doing the following:
Open the Start menu again.
Search for Choose a power plan and open it.
Expand the Show additional options section.
Check Ultimate Performance located right at the bottom.
3. Change performance settings
Open the Start menu.
Search for View advanced system settings and open it.
In the Advanced tab, under Performance click on Settings.
Select Adjust for best performance.
Click on Apply and OK to save changes.
4. Change graphics settings
Open the Start menu.
Open Graphics Settings.
Click on Default graphics settings.
Toggle on the Hardware-accelerated GPU scheduling option.
Go back and under Custom options for apps, click on Browse.
Select Krunker from the Steam folder, if you are using it via Steam.
After adding the game, click on Options.
Select High performance.
After making these changes, check if the problem is still there.
Disable the toggle for Open Xbox Game Bar using this button on a controller option.
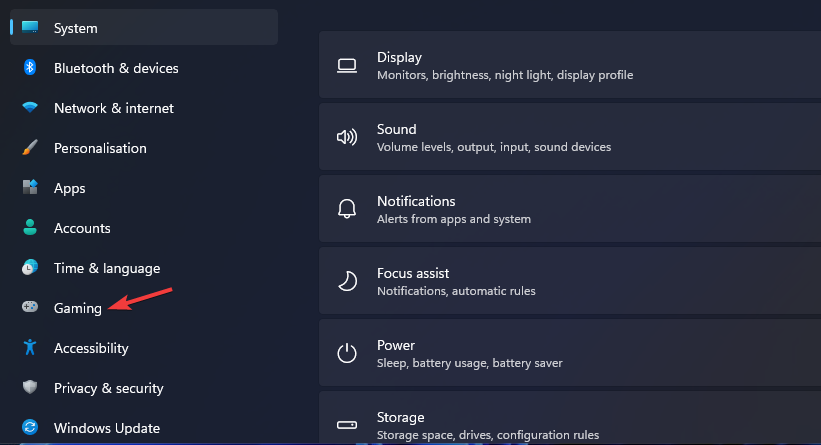
Go back to the Gaming tab, and click on Game Mode.
Toggle on Game Mode.
Best Krunker settings to copy paste
Users have been wondering how to import the best Krunker settings from their favorite gamers such as Sorable, undercoverdudes(ucd), and Kashy Kans. Here’s how you can do it:
For Sorable fans, go to the linked PasteBin page to find the Krunker settings, and select the text file to copy it, and later import it. Do the same for UCD and Kashy Kans.
Next, open your game, go to Settings followed by Import then hit Ctrl + V to paste the settings inside the window that will open up and say Copy paste settings text here. That’s it!
Why is my FPS so low in Krunker?
In most cases, the issue stems from your game settings or your browser, so you need to adjust the settings or change the browser.
Your PC settings can also cause performance issues, so adjusting them is a great way to fix this issue.
These are the best Krunker settings for low-end PC, so be sure to try them if you want to get the maximum performance during your gaming sessions.
Let us know in the comments below if the above settings helped you get the best FPS while playing Krunker on your low-end PC.
Moreover, if there are a few other tweaks that did the job for you, then feel free to share them in the comments.
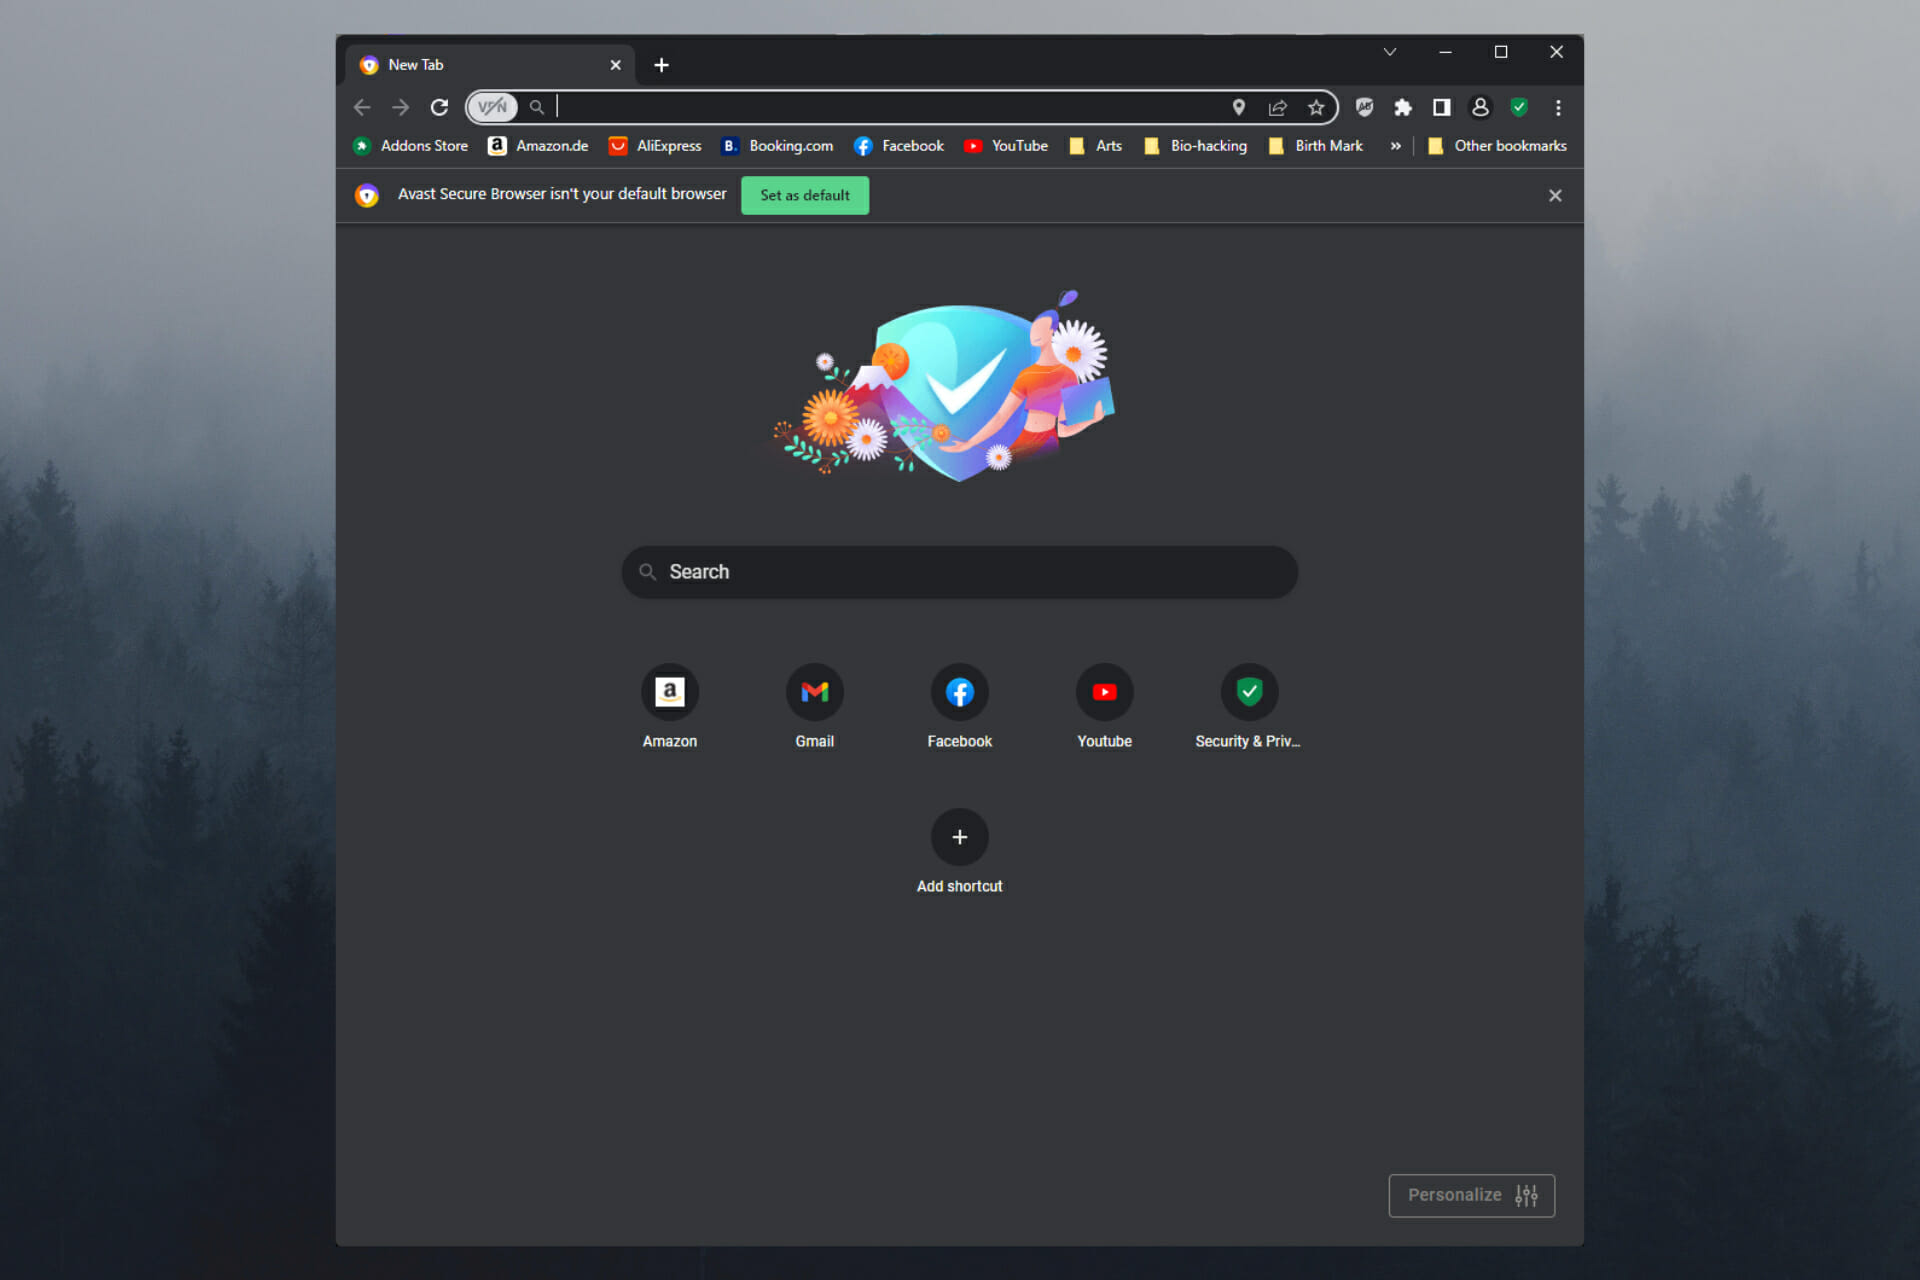
This article will explore issues relating to Avast Secure Browser not responding.
Avast Secure Browser is a free Chromium-based browser from Avast, released in 2018. This browser is essentially a substitute for Avast’s SafeZone Browser, which has been discontinued.
Avast Secure Browser was developed to give consumers better privacy, faster browsing, and protection from online threats.
The browser is available as a standalone product or as part of an Avast security package.
The browser’s features can be expanded with seven extensions, but it also includes an anti-fingerprinting technology that ensures no one can track you.
Furthermore, its anti-phishing protection will keep you safe from dubious websites, an extension guard will keep you safe from untrustworthy extensions, and its stealth mode will allow you to surf without cookies.
There are a few reasons why your Avast Secure Browser may not be working. First, an incomplete update is a common culprit. But other than this, issues like viruses or malware infections could make it not work. In such cases, a proper scan of your PC would be a good solution.
It may even be due to conflicts with other software, especially antivirus software on your computer. While antivirus software would generally work with the Avast Secure browser, it is recommended to use the Avast antivirus on systems running this browser.
No matter the case, you should use any of the fixes mentioned below to get it working again.
?️ Quick Tip! To get back online as soon as possible, you can use another browser with similar security features. Look into Opera One, it’s Chromium-based as well. It has built-in anti-tracking, an adblocker, and a simple VPN with unlimited bandwidth.
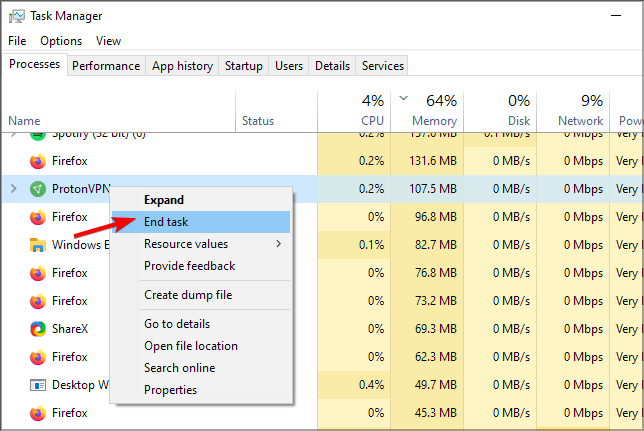
Right-click the Start menu and choose Task Manager from the drop-down menu.
Select the Processes tab.
Search for the Firefox process in the left pane, right-click it, and select the option to End task.
End task is a tool on the Application processes tab of Windows Task Manager that allows you to halt any process that isn’t responding. End Task can be used to end a frozen or non-responsive application without having to restart your computer.
Restart your computer
Close the window by clicking the close button, the X sign at the top right corner of your browser (This is only useful if the browser is already open).
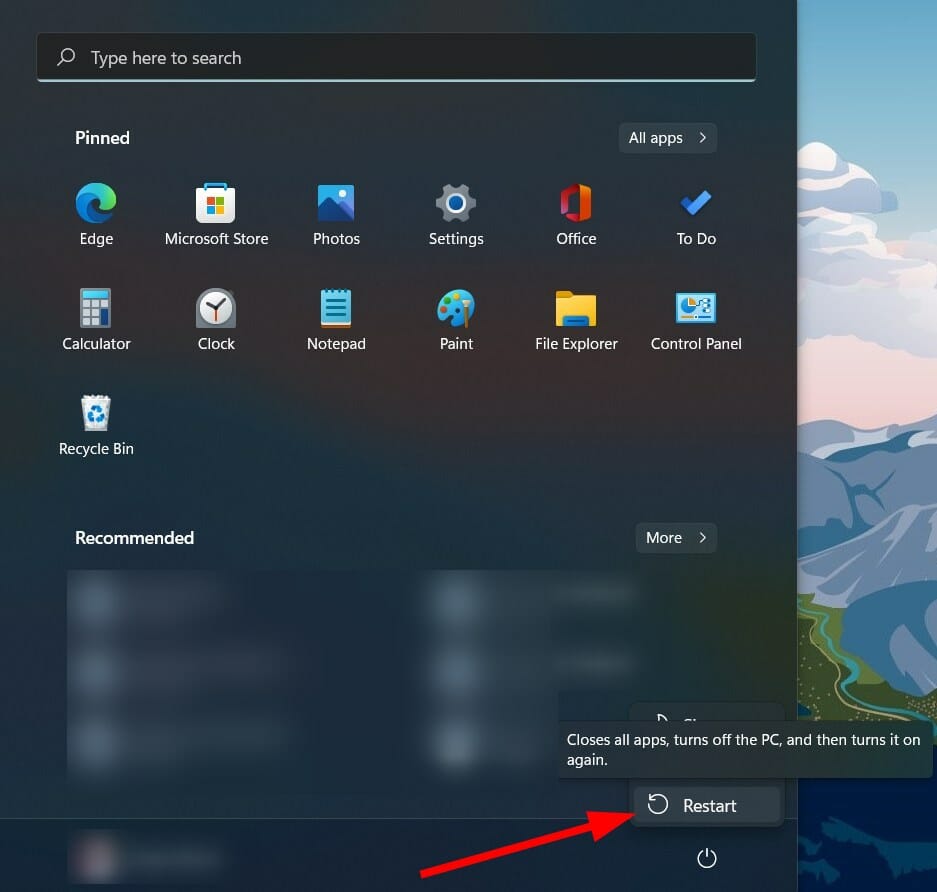
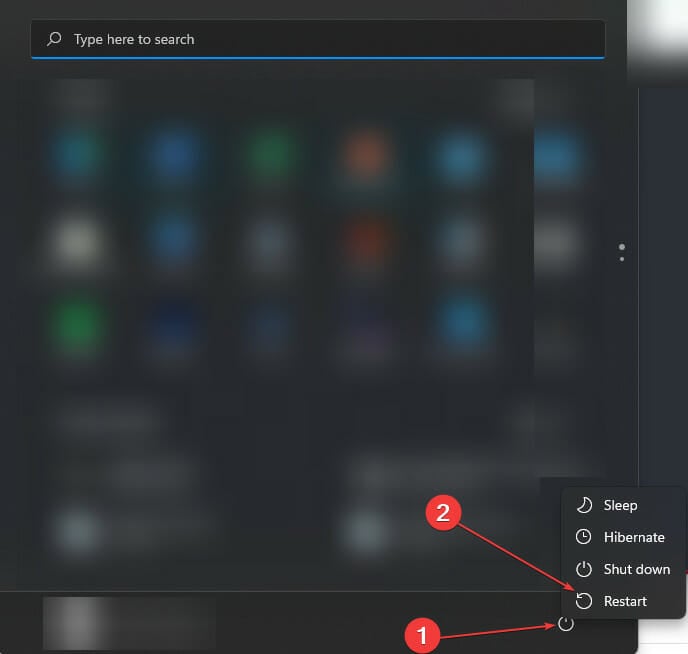
Click on your PC’s Start button, click on the Power button, then the Restart option.
Wait for the machine to turn back on, then reopen the browser to see if the problem has been resolved.
If you restart your computer, it will run more smoothly. A reboot clears the computer’s memory, putting a stop to any processes that are consuming RAM. Furthermore, a program can devour your memory long after you’ve closed it, and a restart ensures that this doesn’t happen.
Finally, a reboot may help with hardware and peripheral issues.
Sign in as an admin
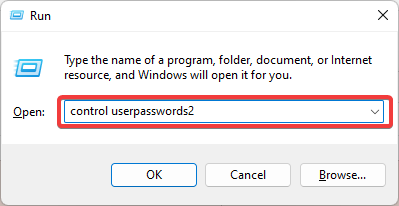
Using the hotkeys Windows+ R, open the Run dialog box.
Enter the code in the box below and press Enter. control userpasswords2
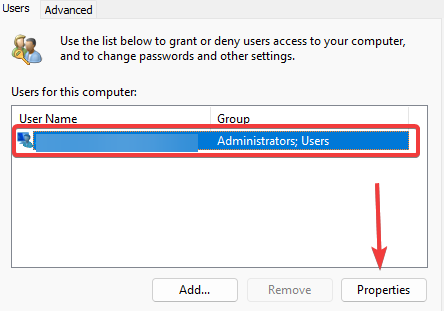
Click the Properties button to see if your user name appears in the list of administrators.
Select the Administrator option from the Group Membership tab, click Apply, and OK.
Try restarting the browser.
If your Avast Secure Browser is still not working, skip to the next solution.
Turn off your antivirus temporarily
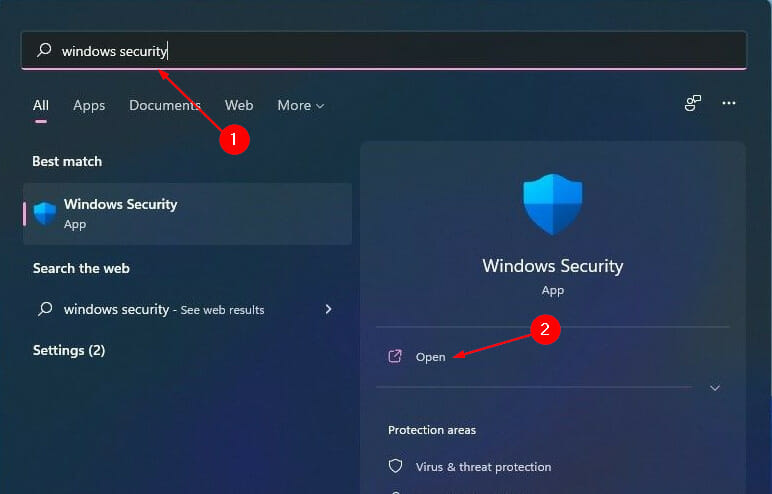
Select Windows Security from the Start menu after typing it in the search box.
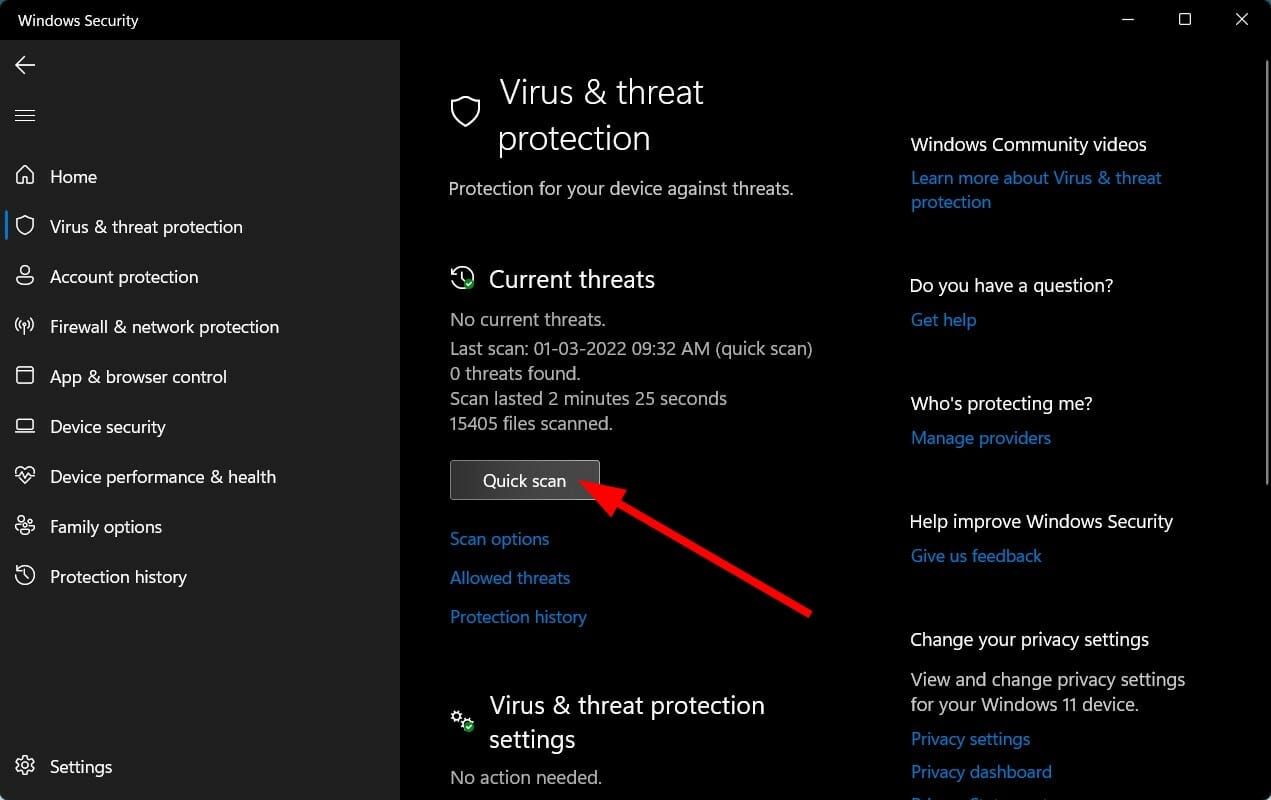
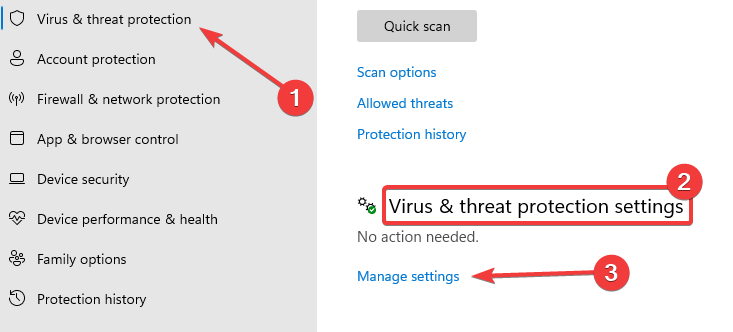
Select Virus & Threat Protection from the left pane, then scroll down to the Virus & Threat Protection Settings menu and choose the Manage settings option.
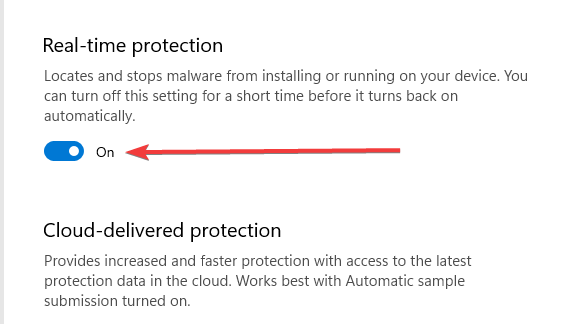
In the Real-time protection section, toggle off the switch.
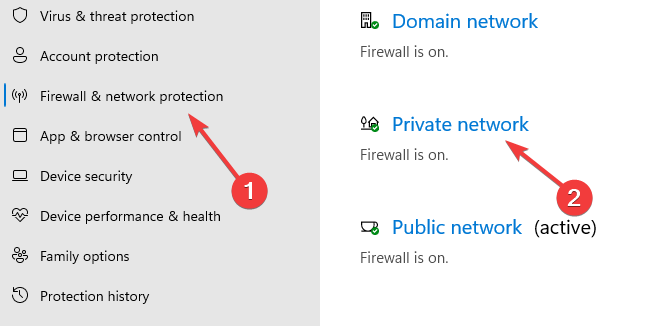
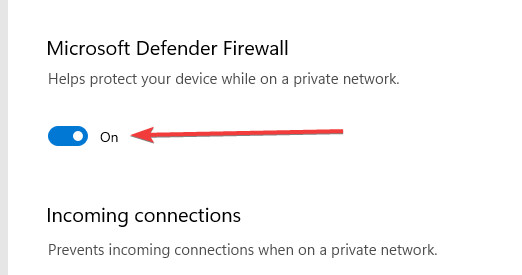
Select Firewall & network protection from the left pane, then Private network from the right pane.
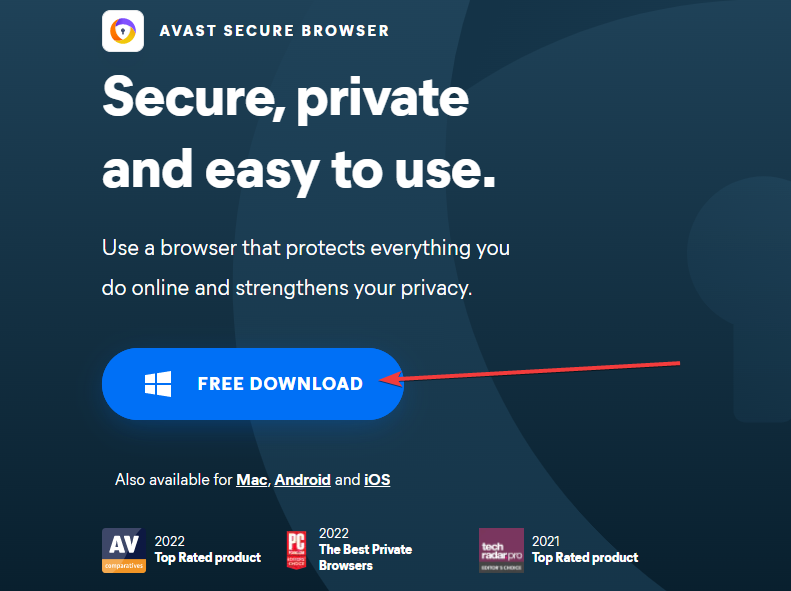
To begin the Avast Secure Browser download, click the FREE DOWNLOAD button.
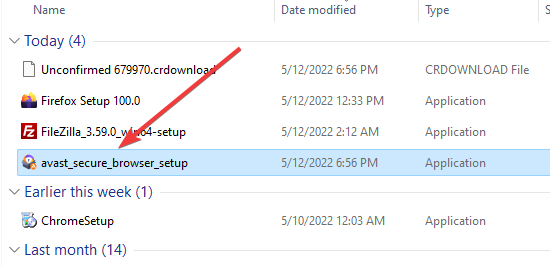
Double-click the setup after opening the download location.
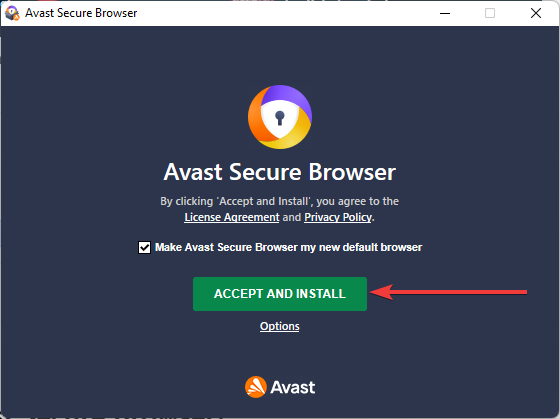
Click the green ACCEPT AND INSTALL button on the installation.
Wait while the installation completes.
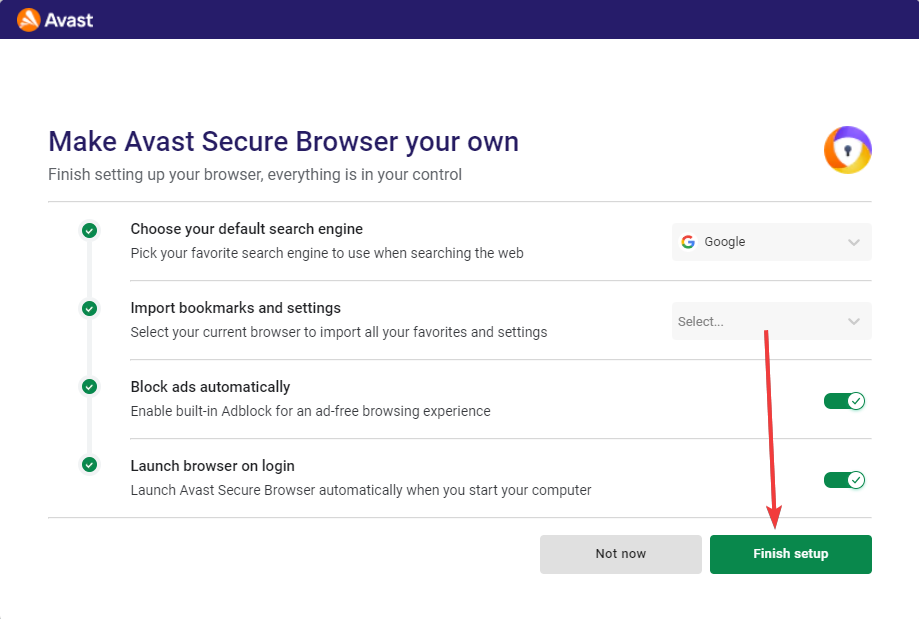
Complete the setup by clicking Finish setup.
Note that even though other Avast products may employ an offline installer, there is no official Avast Secure Browser offline installer.
Using a secure browser in today’s information age is an absolute necessity. Many browsers are famed for specializing in security, but Avast Secure Browser is at the top of the bunch.
With the solutions in this article, you should have successfully resolved any problems stopping Avast Secure Browser from responding. We have also explored Avast Secure Browser download and installation, as this may be a last resort for solving browser-related issues.
This post will not just address your query, how do I fix the error 0x800ccc92 in Outlook, but it will first tell you more about the symptoms and other possible causes.
?️Quick Tip:
When a password issue arises, it is often better to have a backup, especially if you are in an unfavorable situation and cannot access your emails. The advantage of using decentralized email, such as Mailbird, is that there is no central server where all messages are stored, therefore no one can see your emails except you, and no one can hack your email.
Mailbird is also one of the greatest email apps for handling multiple accounts. It works with any IMAP email account, as well as POP3 and Exchange. When it comes to intuitiveness, Mailbird much outperforms Outlook.
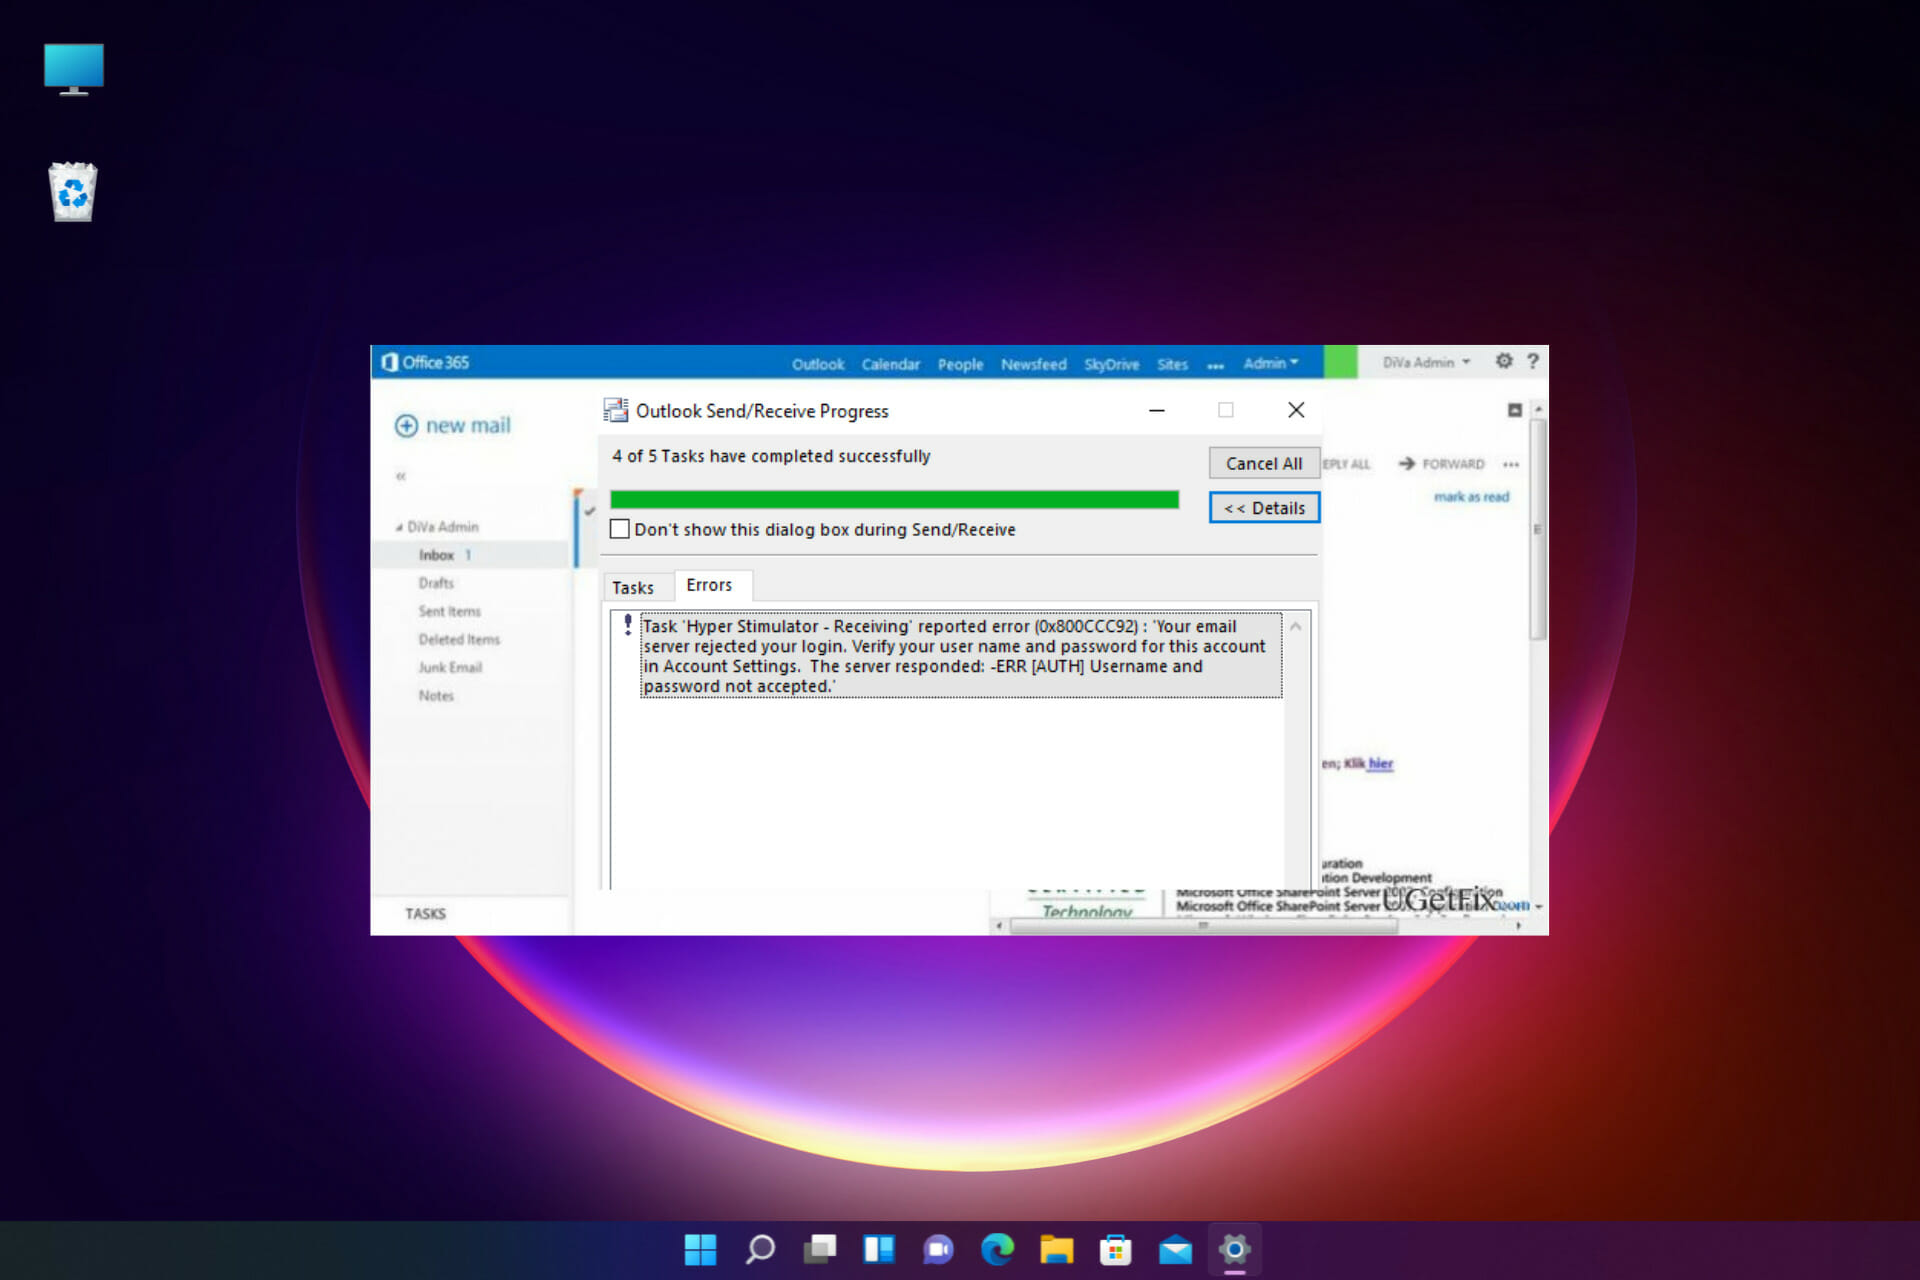
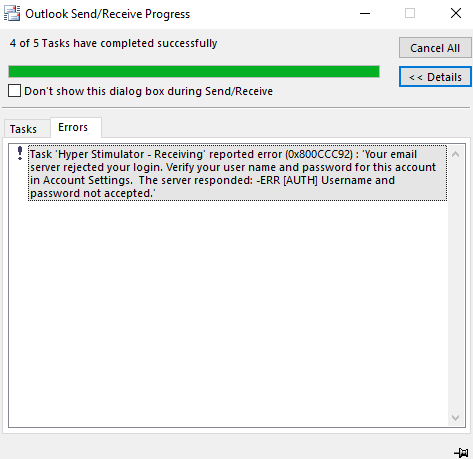
The Outlook error message reads: Receiving reported error (0x800CCC92) Your email server rejected your login. Verify your user name and password for this account in Account Settings. The server responded: ERR (AUTH) Incorrect username or password.
While the message says that the error could be due to an incorrect username or password, in some cases, even after you enter the correct username and password a couple of times, the error persists.
Before we get to the solutions, let’s understand why you keep receiving the reported error 0x800ccc92 your email server rejected your login.
Why does the 0x800ccc92 error occur?
A lot of times, there can be other reasons why you may bump into the 0x800ccc92 error on Outlook. Some of the reasons include:
POP3/IMAP/SMTP settings are not configured correctly for different email accounts (Gmail/Hotmail/AOL) in MS Outlook
Outlook account is active on multiple devices
The Allow less secure apps option is disabled in Gmail on Outlook
Outlook fails to sync with the server
PST file size exceeds the required limit
PST file was affected by the virus
Failed SMTP or POP3 protocols
Outlook shuts down unexpectedly
In this post, we have created a list of the top 5 tested solutions that may help you fix the Outlook error code 0x800ccc92.
How do I fix error 0x800ccc92 in Outlook?
1. Verify your username and password
Sign in to your Outlook account and navigate to the File tab on the upper left.
Now, click on Info on the left pane and select Account Settings from the drop-down on the right.
You will now see the Email-accounts section under Account Settings. Select email to check credentials.
Check your username and password here and verify if the credentials are correct. Press Cancel to exit if it’s fine.
If not, then select the email address and click on Change.
Now, update the correct password.
Alternatively, you can also reset the password and create a new one, update the same in Outlook.
2. Check the server settings of the email account in Outlook
Launch the Outlook app and click on the File tab.
Tap on Info on the left side and then click on Account Settings on the right.
Next, click on Server Settings.
In the IMAP Account Settings window, review your incoming mail settings: User Name: Your email address Password: You use to log in to your webmail Server: imap.gmail.com Port: 993 Encryption: TLS/SSL Secure Password Authentication (SPA): No
Now, review your outgoing mail settings: Server: smtp.gmail.com Port: 587 Encryption: SSL/TLS Secure Password Authentication (SPA): No Outgoing server authentication: Yes, same settings as of your incoming server.
Click on Done once you have verified all the settings.
So, if you see the error 0x800ccc92 on Gmail, it should be fixed and you can now try sending/receiving the emails via Gmail on Outlook.
4. Minimize the PST file size
4.1 Set auto-archive in Outlook 2013
Open the Outlook app and click on the File tab on the top left.
Now, click on Options on the left bottom.
In the Outlook Options window, click on Advanced on the left.
Next, on the right side, go to Autoarchive and press the Auto Archive Settings button.
As the AutoArchive dialogue box opens, go to the Run AutoArchive every field and set it to 14 days, and check all the boxes as shown in the below image.
4.2 Set to archive manually
Open Outlook, and select the File tab on the upper left.
Next, on the left side, click on Info, and then on the right, click on Mailbox settings and click on SetArchive Folder below.
Now, in the Archive window, select Archive this folder and all subfolders and choose what you need to archive manually.
Press OK to save the changes.
4.3 Extract the Outlook archived folder
Launch the Outlook app, go to the menu and click on the File menu.
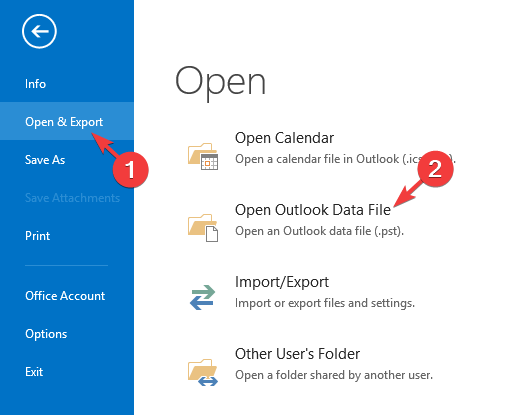
Click on Open and Export on the left pane.
Now, on the right side, click on Open Outlook Data File, select the necessary file and click on OK.
Next, go to the File tab again.
Click on Mailbox settings on the right side of the pane, and then click on the Set Archive Folder option.
Now, check the Archive file and review if any of the information has been changed.
If any data is changed, Outlook will prompt you with a message.
Exit the Archive data file. Now, right-click on the archive data file that you see in the folder panel and select Close Archive.
This will help you search and view the data for the archived emails.
4.4 Clear the recycled items folder
Launch Outlook and navigate to the File tab.
Now, from the left ribbon, select Options.
In the Outlook Options window, click on Advanced on the left.
On the right side, under the Outlook, start and exit section, check the box next to Empty Deleted Items folders when exiting Outlook.
Press the OK button and it will automatically clear all your deleted items folder.
To receive notifications before the removal, click on Advanced on the left again and check the box in the prompt to confirm before deleting items.
Before you proceed to clear your recycled items, follow the above instructions to recover any of the important messages that might have been deleted accidentally.
Simply drag and drop the OST or PST data file from your recycled items folder to your desired location.
5. Generate the app password from your AOL account
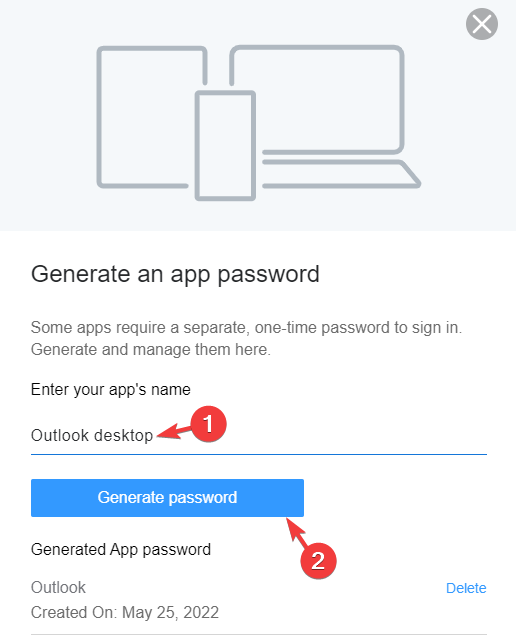
The Account Security page will open. On the right side, scroll down to App Password and click on Generate and manage app passwords.
In the pop-up window, type Outlook desktop under Enter your app’s name field and click on Generate password.
It will generate a one-time app password (16 letters) for your Outlook desktop. Click on Copy and press Done.
Now, proceed with the below steps to update the password.
5.2 Update password in Outlook
Open Outlook, sign in, and click on File on the upper left.
Select Account Information from the left pane.
Choose the email (that’s having problems) from the drop-down.
Now, click on Account Settings.
In the Account Settings window, select the email and click on Change.
In the Change Account dialogue box, go to Logon Information and paste the one-time password.
Press Next and follow the on-screen instructions to finish updating the password.
You can now, log into Outlook with the original username.
Now, enter the one-time app password instead of the original password.
This should update your password successfully and fix the error code 0x800ccc92.
NOTE
The one-time password is auto-generated, so you do not need to remember it, and it does not replace your original password.
What else can I do to confirm the Outlook credentials?
Besides, while configuring an email account in Outlook, you must check if your username matches the account’s full email address.
For instance, if you have set up a Gmail account using POP3 in Outlook, you must enter your complete Gmail address in the user name field as [email protected].
Also, make sure that the same username and password are used for both incoming and outgoing mail servers.
For instance, you must use the same username (the email address: [email protected]) and the same password (password: yourpassword).
Alternatively, you can also create a new Outlook profile to get rid of the Outlook error prompt or remove the email account from any other devices.
That’s all. If you bump into the error code 0x800ccc92 on Outlook 2010 as you try to send/receive emails, following the above methods should help you fix the problem.
Live video creation, video recording, and live broadcasting are all possible with OBS, and here, we take a look at how to install the CLR browser plugin in OBS.
OBS can blend various visual and audio sources into a live environment for video production. At installation, a setup wizard gives the option to optimize the program for live streaming and recording.
This software also has several plugins that may be used to enhance its capabilities, such as VST plugins, NDI support, and stream deck controls.
Its plugins are used to enhance OBS’ capabilities by adding specific code to do certain tasks.
Also, users will notice that support for NDI is an integral part of the most used OBS plugins. The VirtualCam plugin is another easy-to-use option that enables you to link your videos inside OBS to other cameras through virtual webcam sources.
If you need help, this easy-to-follow article will show you all you need to download OBS studio.
After the download, extract it to the following path: C:\Program Files\OBS\Plugins
Once in this path, the plugin has been properly installed. Then, you can restart your OBS, and you will get all the functionality of the newly installed plugin.
After these steps, the CLR OBS studio browser source plugin should be functional.
Note that this process will work for any browser plugin on OBS. You need to extract the zip file to the plugin folder, and you are good to go. The plugin used will work only on the OBS classic version and not the studio version in this example.
Now that we are done installing the OBS studio CLR browser let’s talk about browser sources.
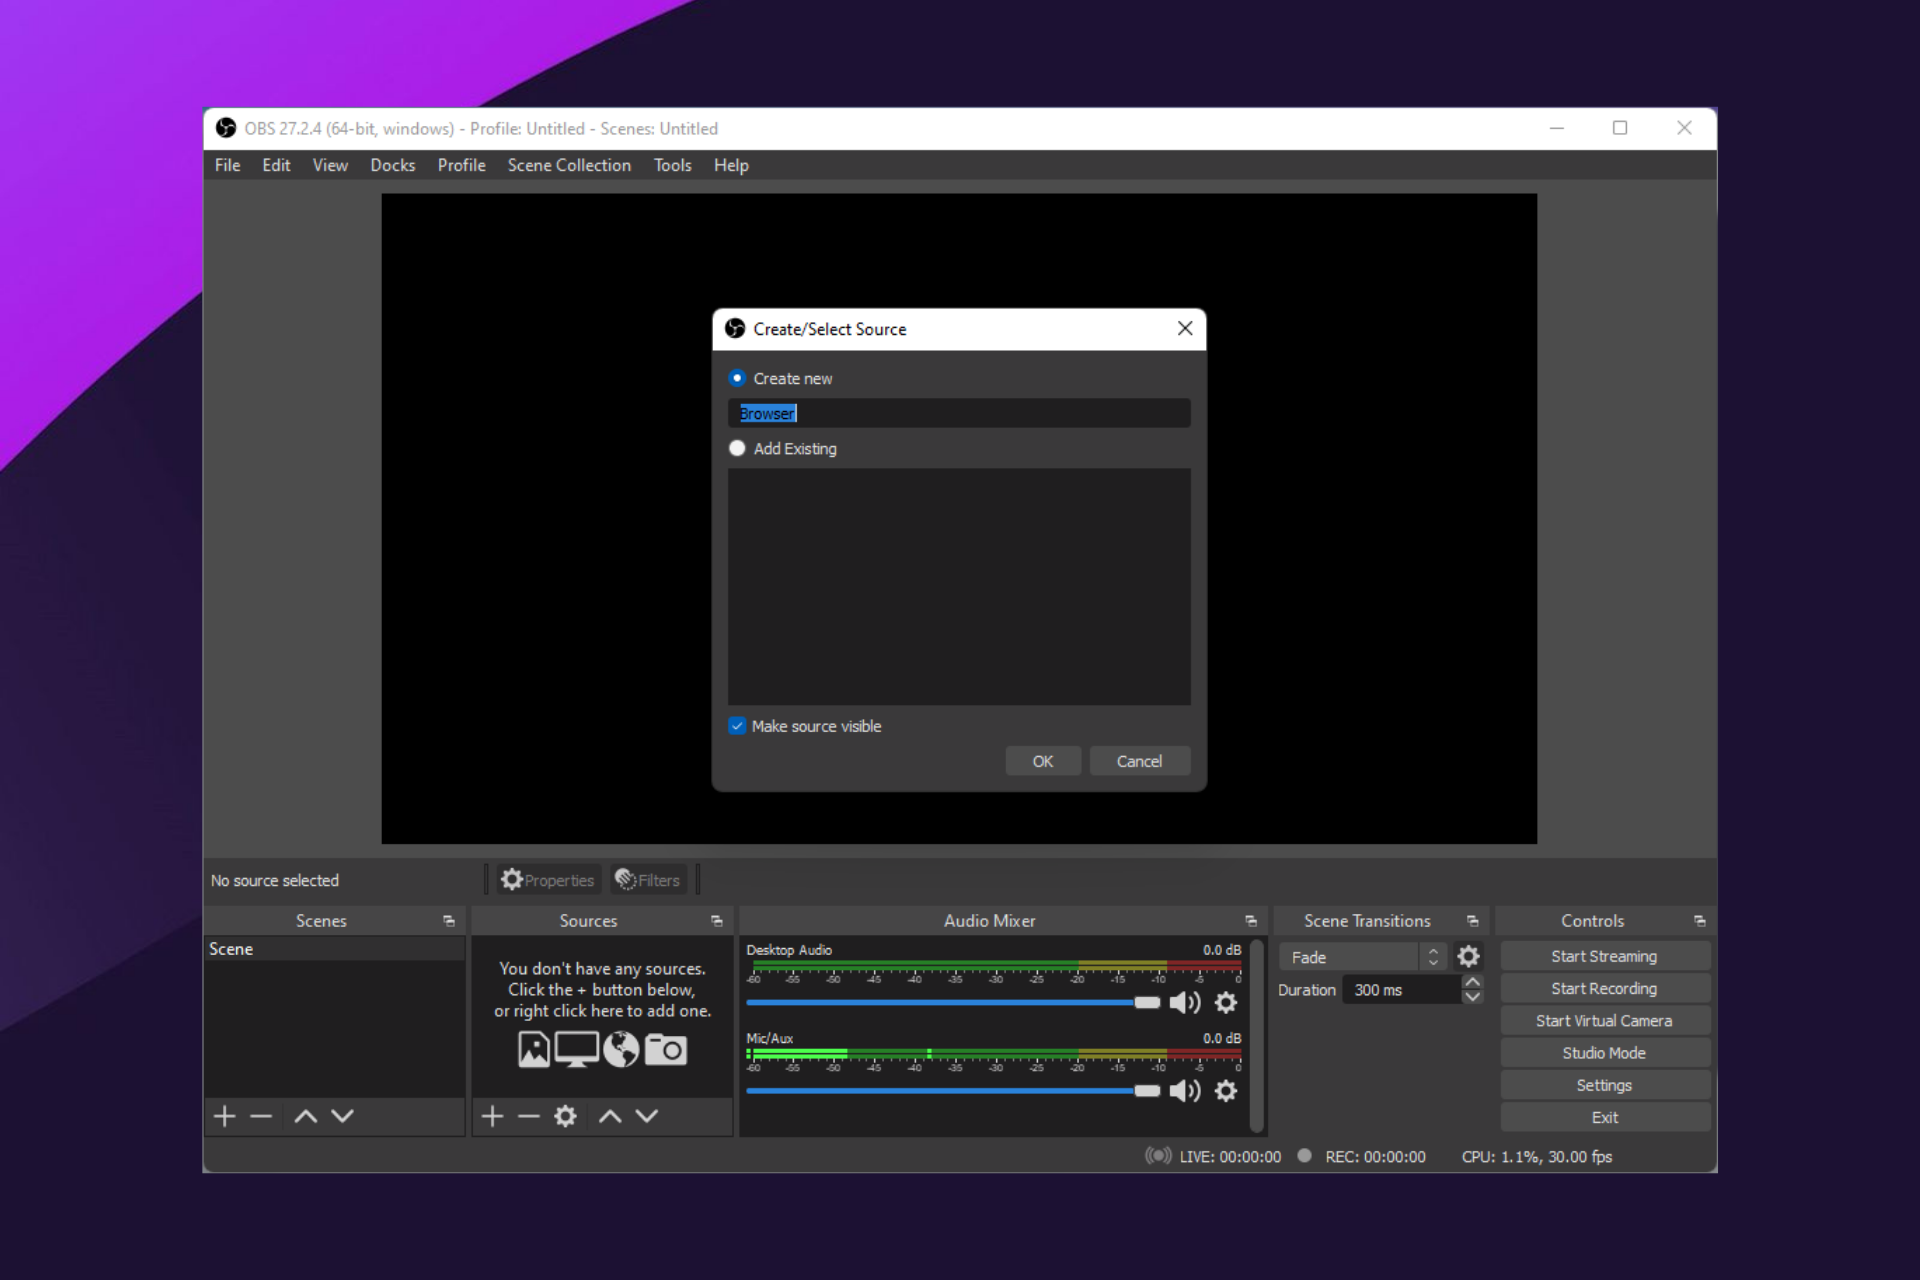
How do I enable browser sources on OBS?
Start your OBS Studio.
On the main OBS window, navigate to File, then Settings.
On the left pane, select the Advanced tab.
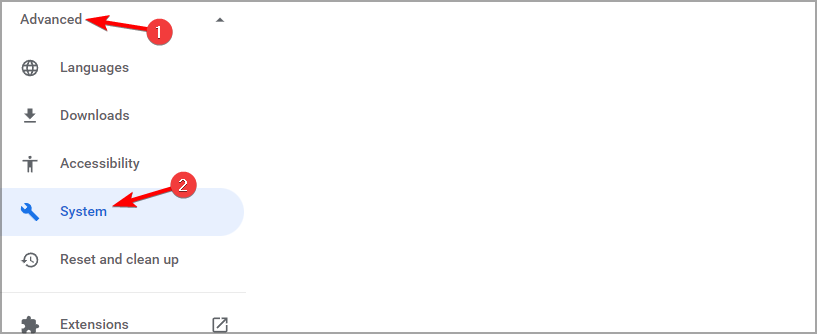
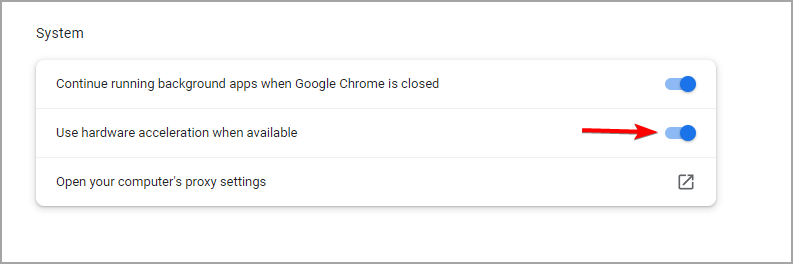
Untick the Enable Browser Source Hardware Acceleration checkbox.
Close and restart the application, then test the browser source.
You can follow the steps in the how do I enable browser sources on OBS? section. The only difference will be to untick rather than tick the source acceleration option.
Using Open Broadcast Software with hardware acceleration might assist create a quicker user experience. This is particularly true if the software uses a significant CPU and functions badly.
In general, enabling hardware acceleration can only be advantageous if your computer has a powerful GPU. This will allow the GPU to perform to its maximum potential, resulting in a more fluid user experience across all programs.
2. Restart OBS
If you have disabled browser source hardware acceleration and the problem is still not fixed, close the application and restart it. This may force this setting to take effect.
We have covered in this article all you need to know about how to install the CLR browser plugin and other operations in OBS.
We would love to hear from you in the comments, so let us know if you have found this helpful guide.
The VLC media player is the best free open-source cross-platform media player worldwide. This media player offers features like good video quality, control over subtitles, and cross-functionality with other devices.
But recently, many users have complained about the VLC media player not working on Windows 11. Issues like these mainly occur due to corrupt cache data. However, there are many other reasons why users may face this error.
Keep reading this post to know how to fix the VLC media player not working on Windows 11.
Does VLC support Windows 11?
The latest version of the VLC media player is now available in the Microsoft Store app on Windows 11. All you need to do is download VLC from the Microsoft Store and start using it.
Well, that’s all from our side on how to solve the VLC media player when it’s not working on Windows 11. If this guide was helpful, do let us know in the comments below.
If you own a restaurant, you know already how difficult is to manage your employee scheduling, update the manager logbook, or record restaurant expenses accurately.
But with the BarSight restaurant software, all those worries are gone because today we’re talking about a restaurant management system that will revolutionize the way you work.
We tested this solution and we’re going to emphasize its best features and use all the tools to increase your restaurant’s profitability.
How can BarSight help me manage employee scheduling?
First of all, the BarSight software is actually a web app, available online from wherever you are on virtually any device that can load a browser.
That means after you’ve created a schedule, you and all your employees will be able to quickly and easily check their weekly schedule on their phones or computer.
Your employees can also download the free mobile app to their phones, so they can get notified immediately when new shifts are published.
With all this information right at their fingertips, your restaurant will see a decrease in personnel problems.
So, BarSight has a very simple restaurant scheduling software, allowing you to create precise scheduling for all your staff but that’s not all.
For instance, at the end of the month, or pay period, it’s easy to download the restaurant’s labor reports as an excel spreadsheet and send it to your accountant or import it into your payroll software.
Moreover, BarSight provides a very clear report of your restaurant expenses so you can track down your budget easily.
What are the most important features of the BarSight app?
1. Restaurant employee scheduling the easy way
The main feature of BarSight is its employee scheduling tool which is extremely easy to use and manage.
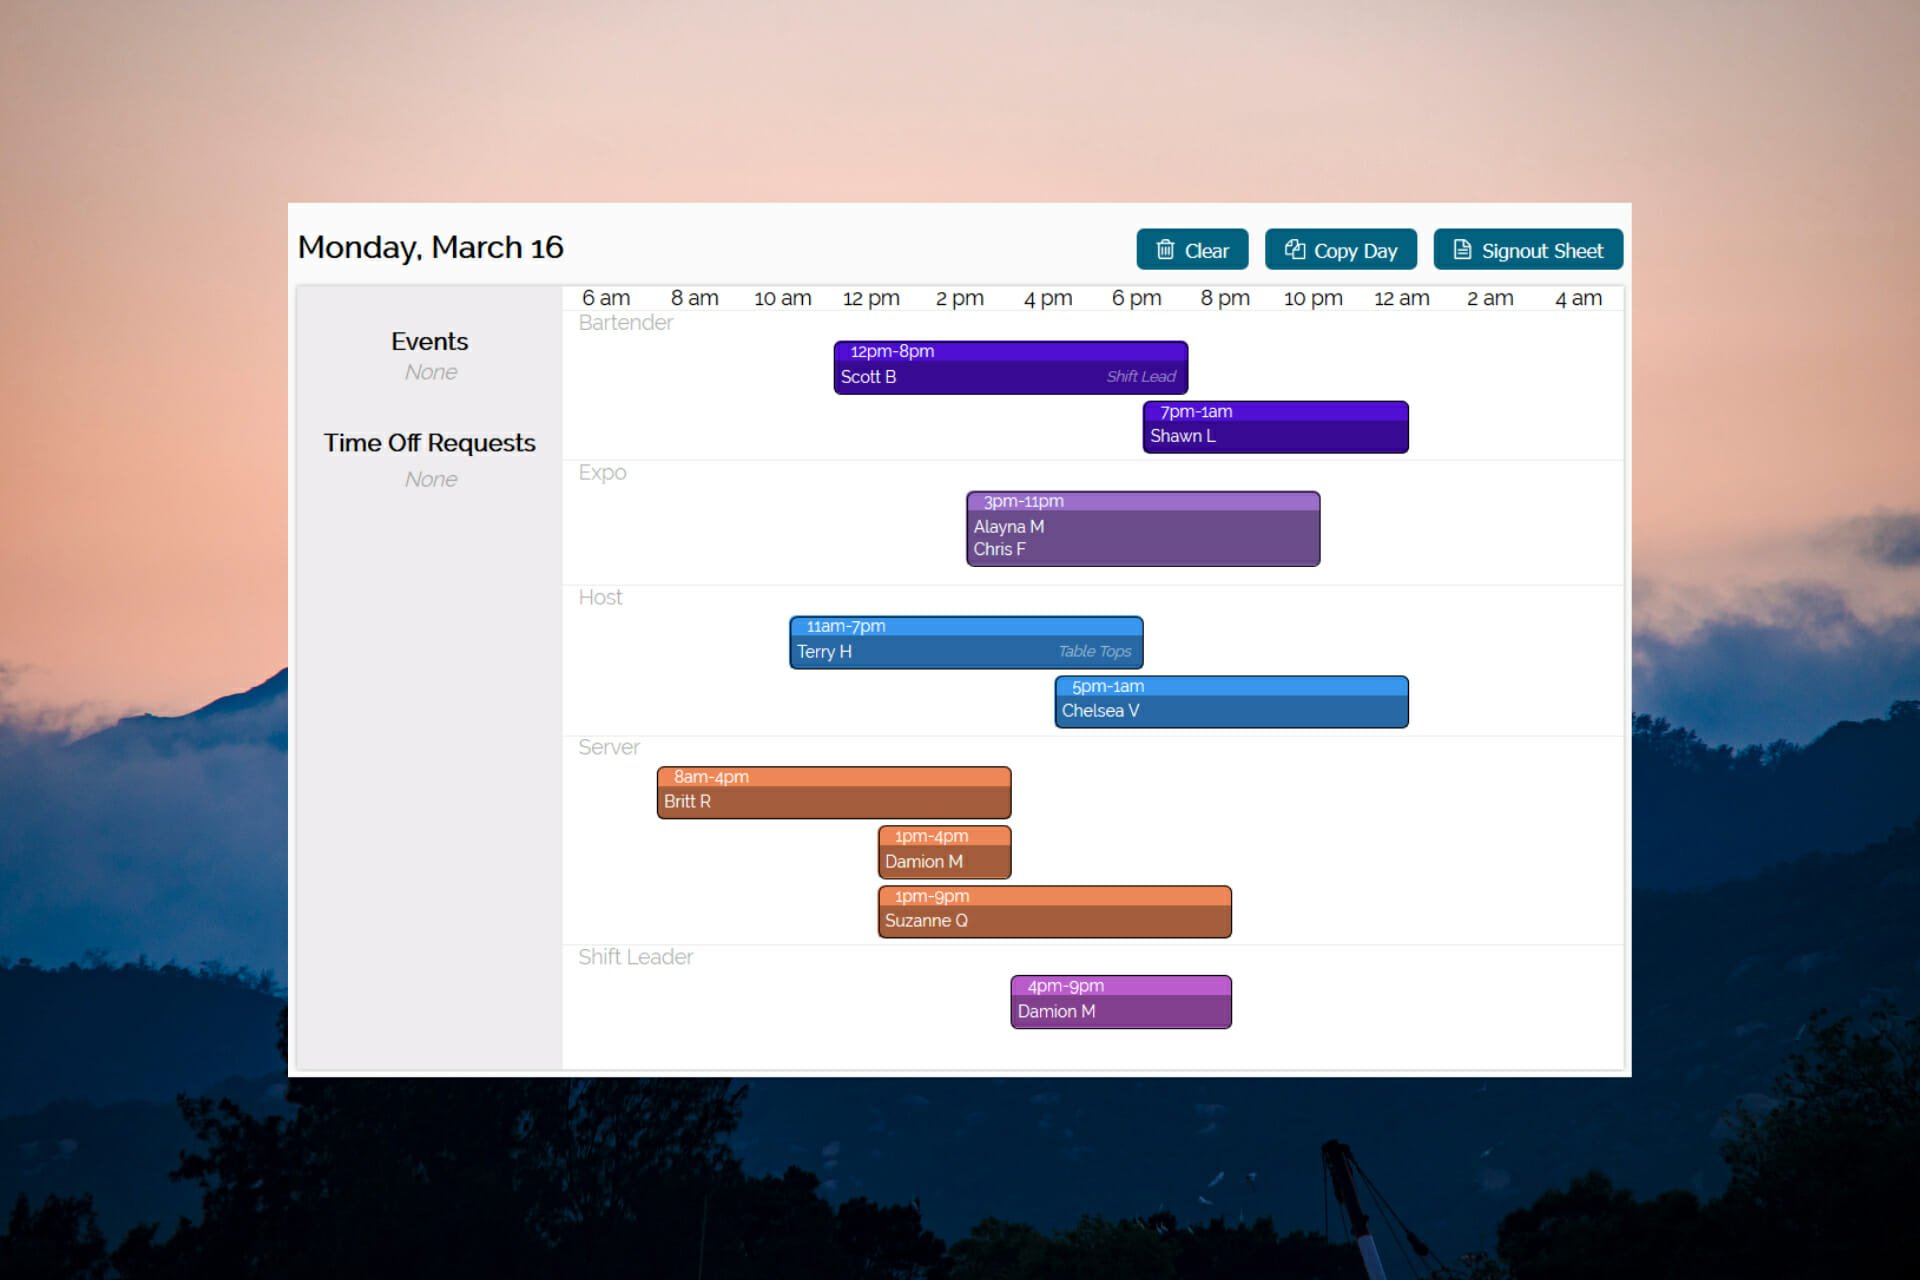
You simply add the employees and set the working times and as you’re building the schedule, the staff will see the schedule on their apps instantly.
The scheduling software automatically validates the start and end times of the shifts and will let you know if there are conflicts with employee availability or approved time-off requests.
That way, you can be sure your staff is ready to show up for their scheduled shifts.
If your staff are unable to work the shifts you have assigned to them, they are able to either request shift trades (aka shift swaps) or drop the shift (aka submitting shift cover requests) and wait for another employee to pick it up.
Once a shift has been requested to be picked up or both employees agree to a shift trade, your restaurant managers will be notified and are able to make a decision.
If the scheduling changes are approved, the changes are effective immediately and all employees are able to see the newly revised schedule.
After you make the schedule for a day or a week, you can just copy and duplicate the data for the next days or weeks.
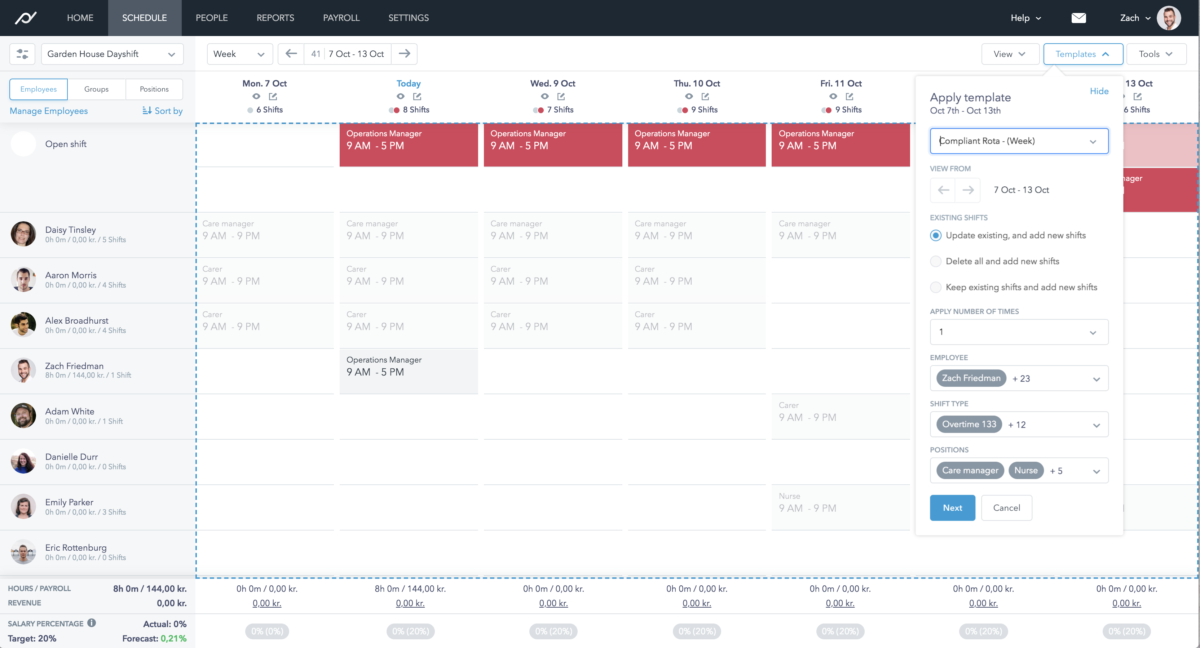
You can even create and save different schedule templates that you can use when required, such as special event weeks or a summer schedule and a winter schedule.
As you build the schedule, you can see in real-time, the estimated labor costs displayed on the screen.
If you connect your POS system to BarSight, the software will automatically forecast your daily sales and display other critical financial data to help you budget your schedule and reduce labor costs.
2. Simple reporting
To keep your accountant’s head from exploding due to frustration, BarSight makes it easy to record and generate reports for your restaurants’ expenses, such as vendor invoices and store receipts.
With BarSight, you can connect your POS system and create accounts for your vendors so all of them will be in one
With BarSights’ Accounts Payable module, you are able to create accounts for your vendors so all of them will be in one place, in a digital format.
Vendor contact information (such as phone numbers or account information) can be stored as well as the ability to instantly see the buying history from each vendor.
Either you or an employee you designate is able to enter the data from invoices right into BarSight and record the method of payment (credit card, direct debit, etc).
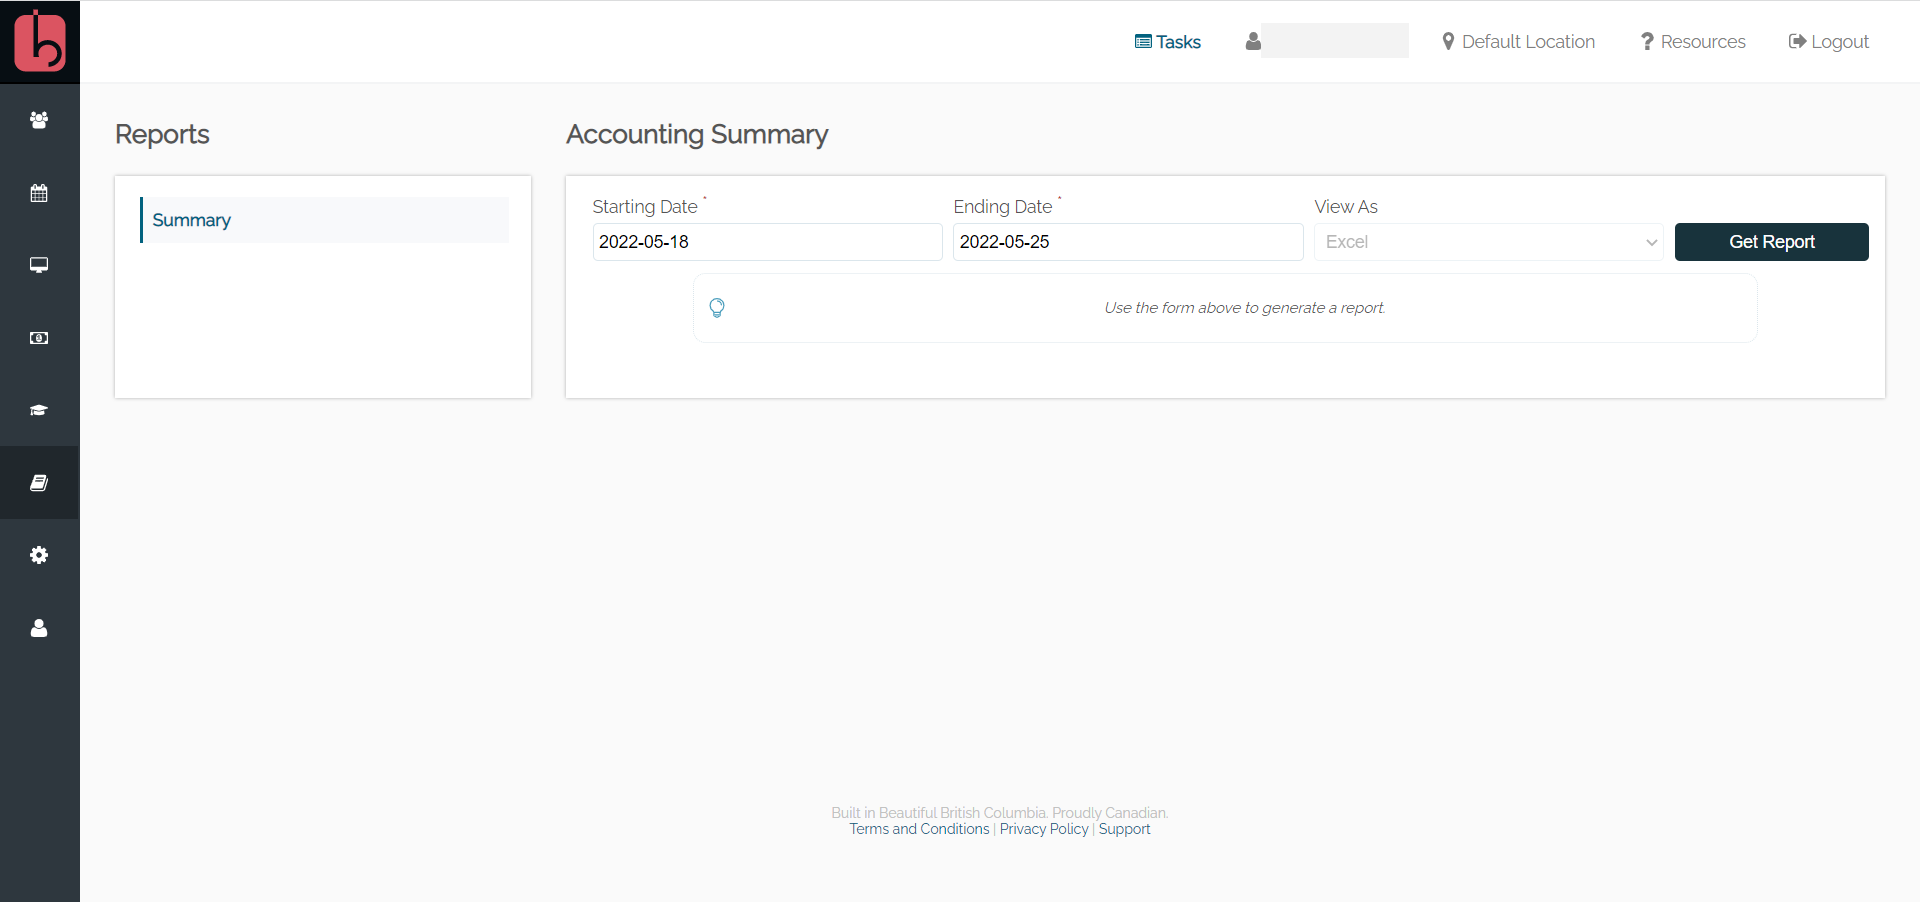
So, at the end of the month, all you need to do is to go to the Reports tab, select Accounting from the list, and hit the Get Report button for the desired period.
You will get the Excel file that you will be able to send directly to your accountant who will be finally happy and stress-free.
In the Reports section, you will also find detailed overviews of the attendance of your employees, their availability, and even their scheduled time off.
3. Workforce management
In addition to being more than just employee scheduling software, BarSight comes with additional tools that will help you communicate with your restaurant staff, and manage their time off requests, availability, and employee profiles.
Gone are the days of chasing down employees to make sure their address is correct so you can mail out important tax documents on time, or having random notes left on your desk with time-off requests.
Your restaurant employees will be able to simply make these changes and request time off or changes to their availability from the free mobile app.
Once a request has been made for time off or availability changes, you or your manager will see them instantly on your Work Force dashboard, and with a simple click, they can approve them instantly.
Also included is the ability for you and your employees to send messages to each other.
This will help improve team communication when you need to make important announcements, such as menu changes, an upcoming event, or staff meetings.
As a manager, you’ll also be able to check up on who has read the messages you’ve sent, and who hasn’t by simply clicking on the message.
Enter your email address to create an account and hit the Start Free Trial button.
Next, you will need to enter some details about your company and location.
Now, you can enter the functions for your staff and create the departments like Front of House, Back of House, and more. You can start out with the basics for now, as you will have the ability to modify these roles and departments later.
Of course, next, you may enter the employees’ names and their email addresses but it’s possible to do that later as well.
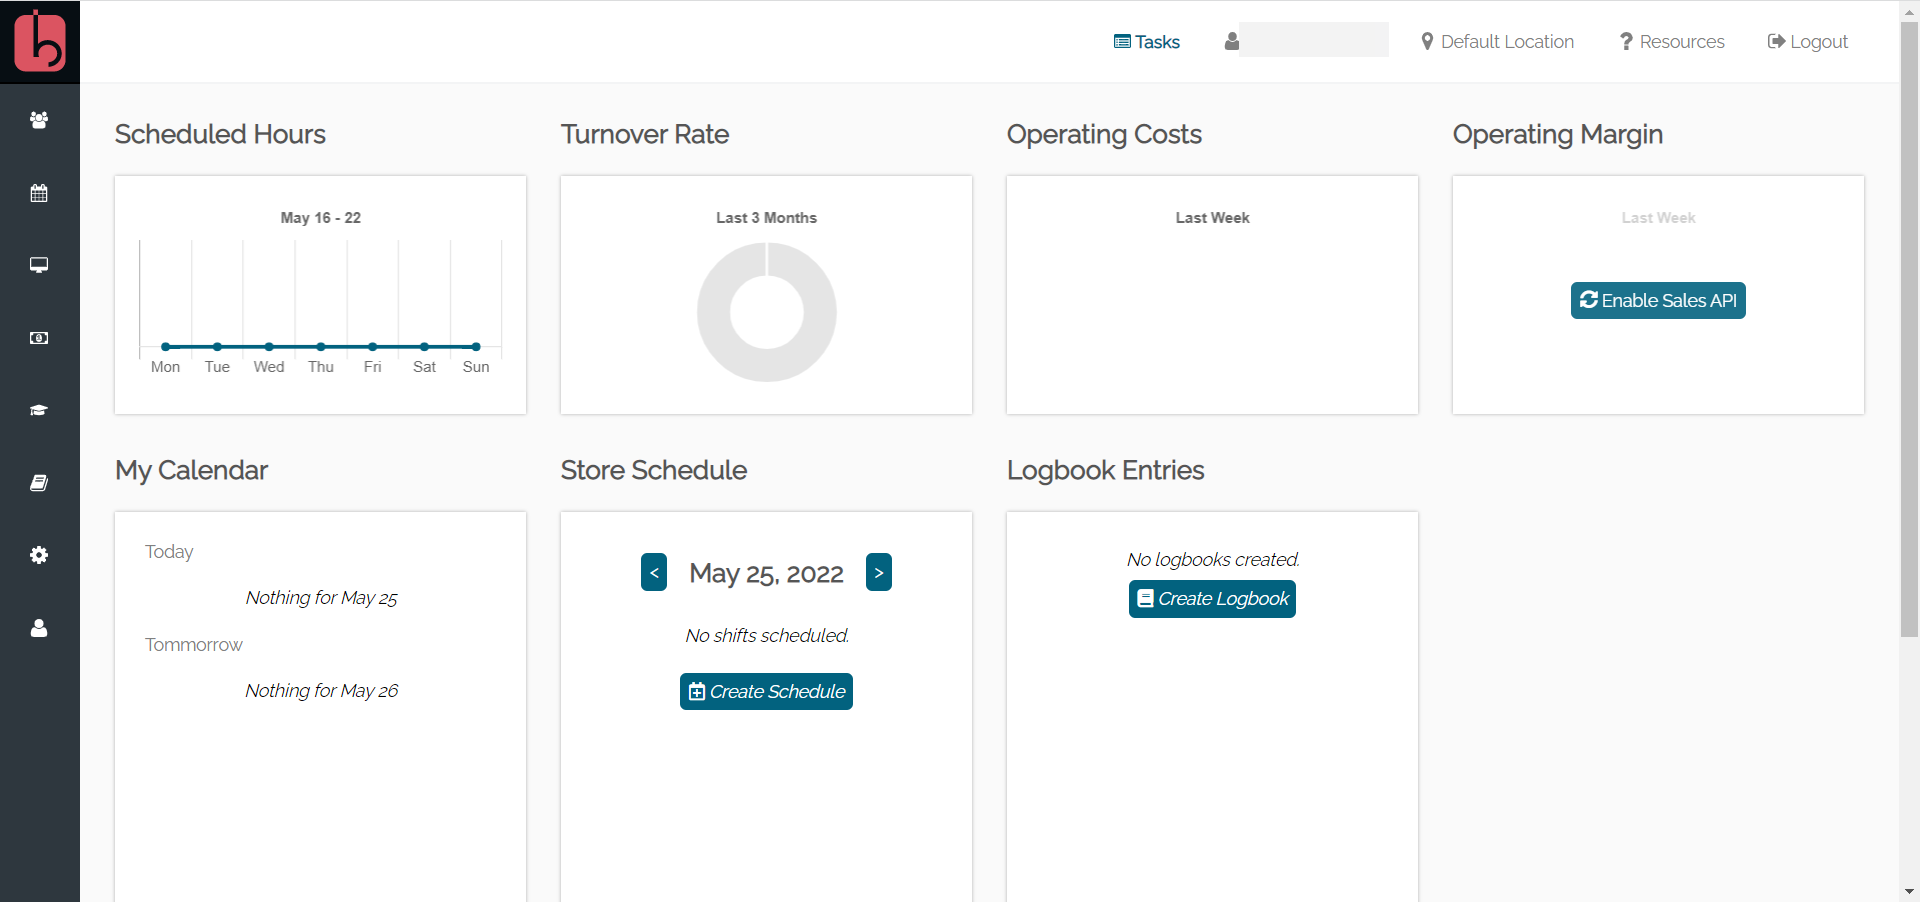
That’s it! Now, you can see your dashboard but at first, it’s going to be pretty empty.
However, straight away you can create a daily manager log book by clicking on New from the Logbook Entries and selecting Daily Log Book.
By default, it’s an empty window where you can add lots of elements like cook times, reservations, freezer contents, and a lot more, but BarSight provides a predefined free form, so you don’t have to worry about that either.
And after that, just access the entry and you will see all the relevant data for that day.
As you see, it’s very easy to create an account and start using BarSight just with a few data entries and a few clicks.
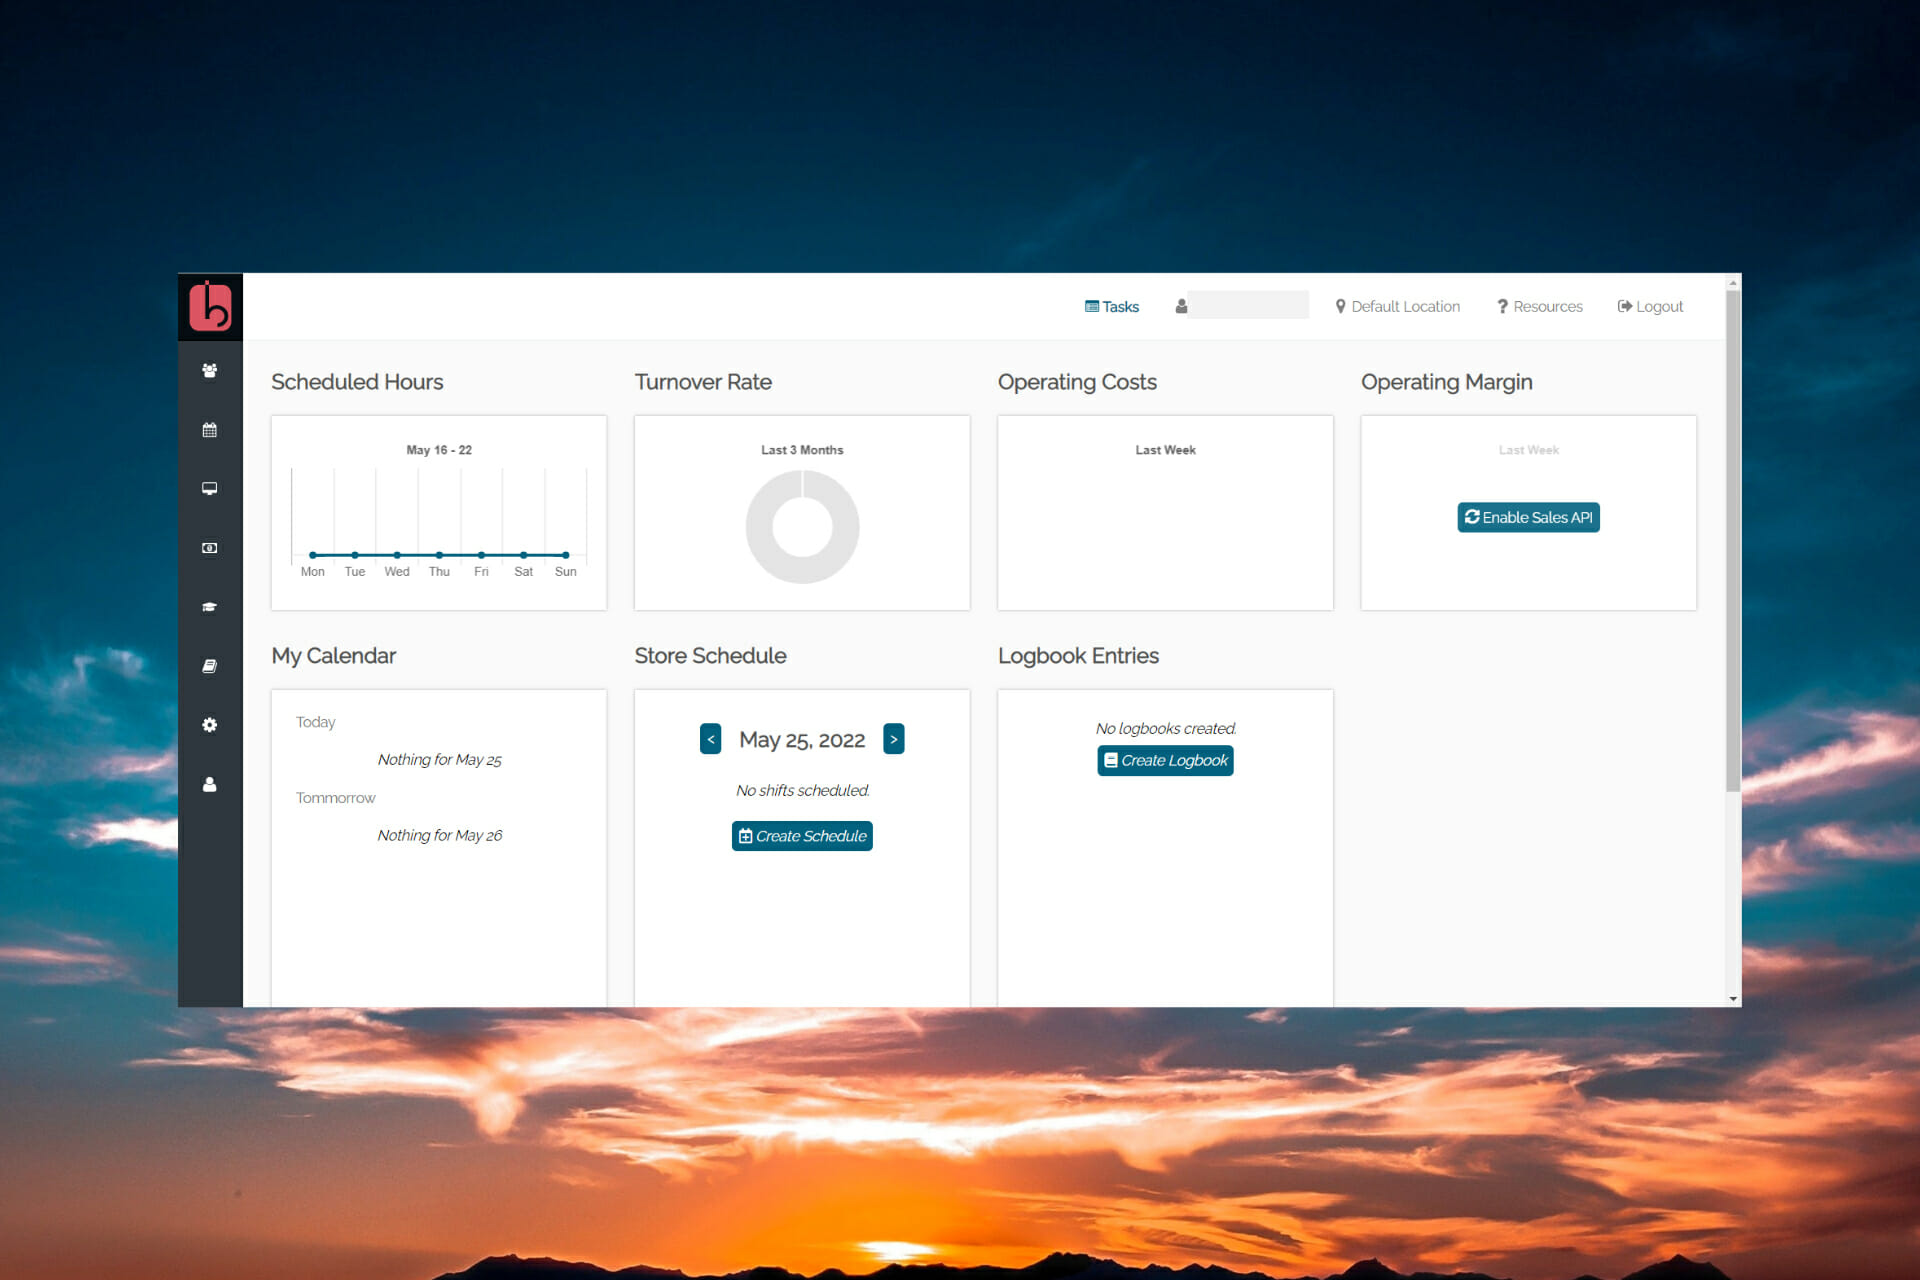
On your dashboard, you will see a brief report on all important data like the scheduled hours, turnover rate, operation costs, margin, and more.
How can I add employees and create a schedule for them?
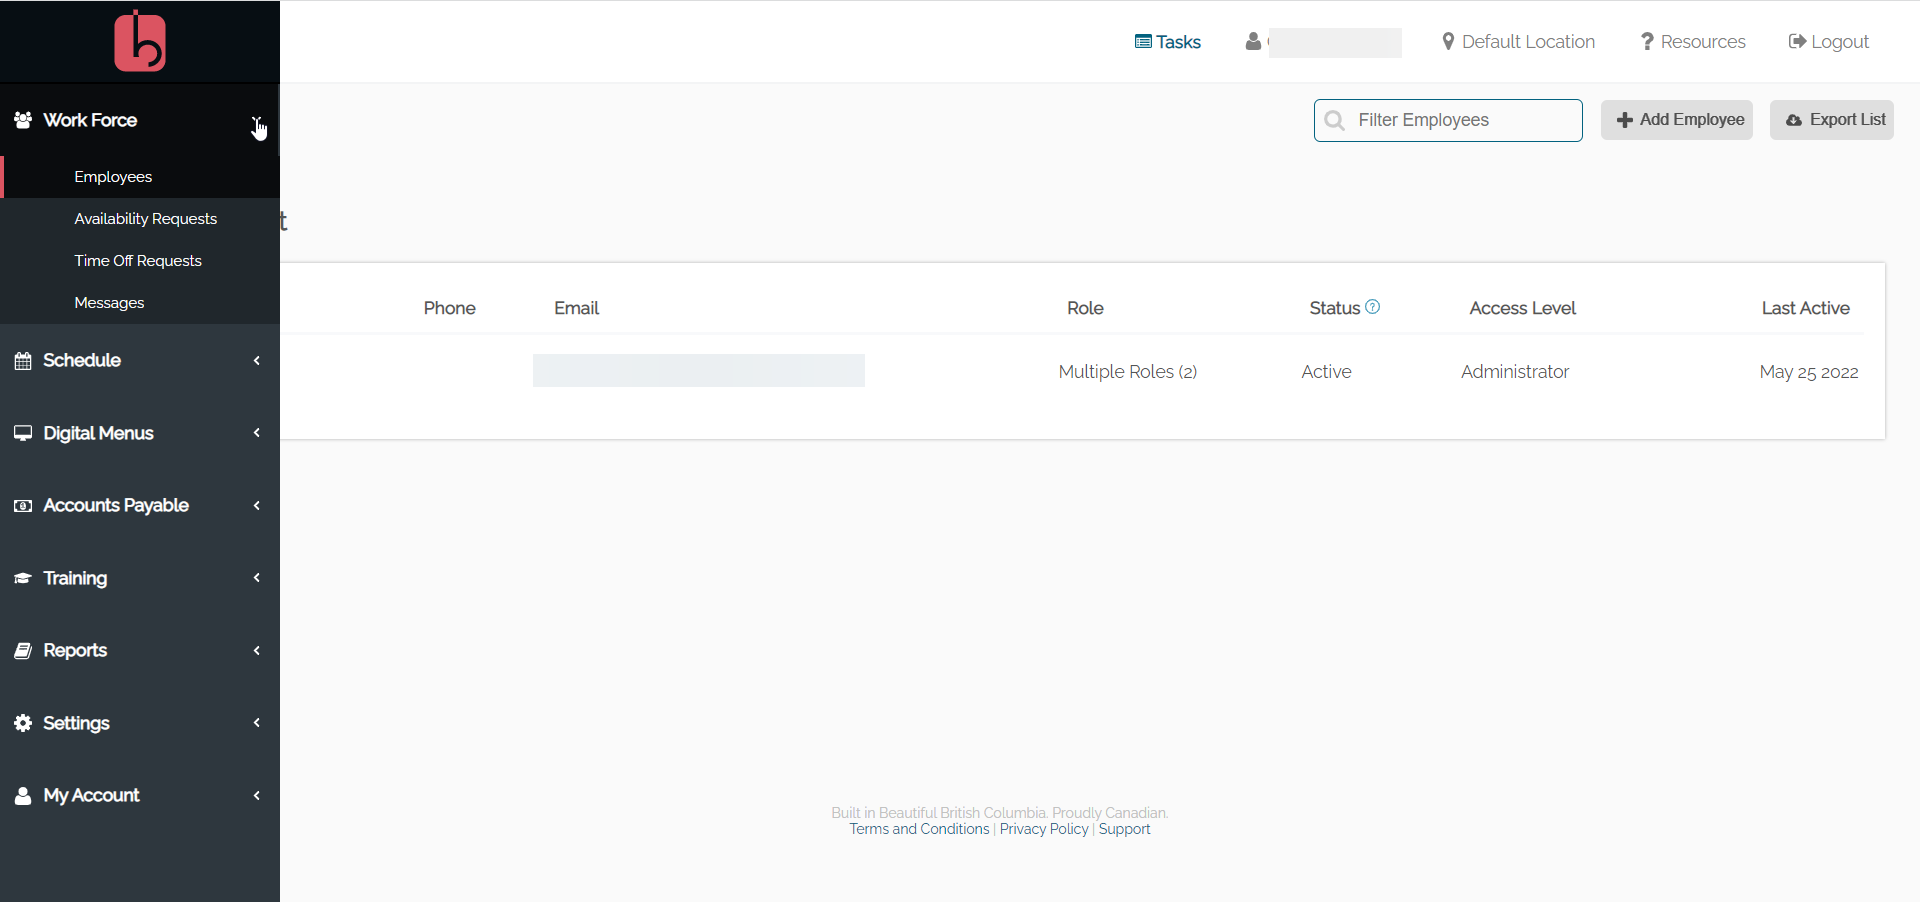
To start adding employees, click the Work Force section, select Employees, and click the Add Employee button.
Now, just enter their data, select the role, wage, and click on Send Email to let them know you added them.
After you add all of them, it’s also a good idea to click on the Export List to download an excel table with all that data. You’ll be able to double-check all the employee information and verify it is correct.
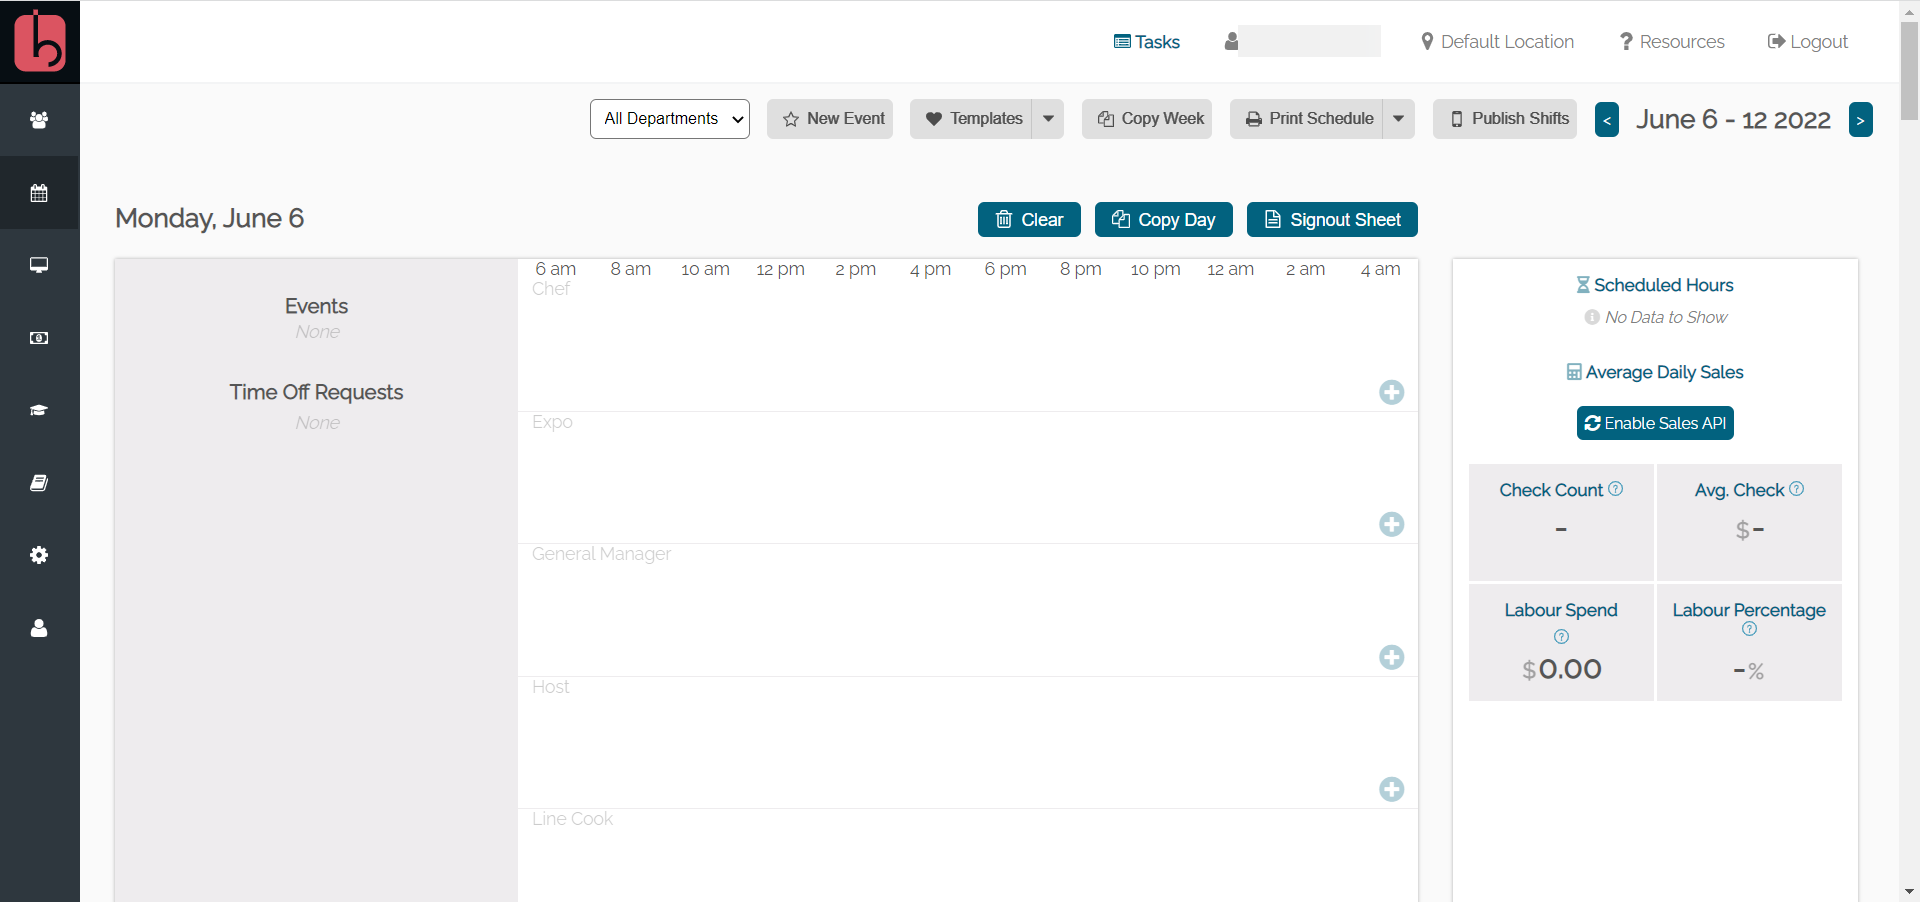
Now, you can click on the Schedule section from the left, select Create and choose the Plus sign from the daily schedule calendar.
In the new window, set the working hours, select the employee from the list, and hit the Save Shift button to add the entry.
Then, you can access the department drop-down menu to see the schedules for each one or for all of them.
This is how you can easily add your employees and create an employee schedule in BarSight with just a few actions.
As you’ve read above, there are plenty of other functions and options you can access, and you can do a lot more with this amazing employee scheduling software.
It is also worth noting, that while this program is geared towards the restaurant industry, we think it would be useful for almost any workplace with shift schedules.
While we have only scratched the surface, we believe that we managed to capture the essence of working with this software and its ease of use.
Anyway, if it got your attention, you can test it yourself for 30 days before making any financial commitments.
Cloud-based app, available on any device that can load a browser
POS integration
Export payroll and employee reports instantly
Cons
Can take a bit of time to add all your employees
Final notes
Honestly, we don’t know much about restaurants except for good places where to eat around our houses, but we do know a lot more about scheduling apps.
And BarSight has all it takes to be an ideal tool for this job, especially because it adds the interaction of the employees who can change their shift on their own devices.
We also found very useful the reporting features that will help you effectively manage your business.
The cherry on top is that you don’t need to download an app or maintain a physical server because everything is online.
Research studies have repeatedly shown that a common cause of failure in restaurant businesses is a failure to properly handle their most important asset: human talent.
Too often, businesses that lack the tools to properly manage their workforce end up incurring massive losses because of staff-scheduling inefficiencies like improper clocking and unplanned overtime.
Now, rather than spend as much as 8 hours chopping and changing the restaurant staff schedule, managers can automate the cumbersome process by investing in a good restaurant employee scheduling software.
These programs are packed full of great features:
They save up to 75% of manager’s time by automating employee scheduling.
The software drastically reduces scheduling errors saving on labor costs.
They streamline staff communication helping to avoid conflict.
Most integrate with POS systems for accurate payroll processing.
What to look for in a restaurant employee scheduling app?
These software have a profound impact and can greatly boost profitability. But you need to sift through a bevy of options as you chase an ideal solution.
Here are some questions to ponder before deciding:
How many restaurant employees do you need to schedule?
How many shifts is the software supposed to cover?
Are the shifts uniform or irregular?
Can the suggested solution share data with other restaurant software like the POS?
Is the software easier to use for your staff?
Answering these questions will put you in a prime position to land a magnificent scheduling system.
There is a host of amazing employee scheduling automating software. Here are some formidable choices.
What is the best employee scheduling app for restaurants?
BarSight is certainly one of the best employee scheduling software but actually, it doesn’t only keep the restaurant schedule but a lot more.
The tool is a whole restaurant management system that integrates with your POS system and offers automatic labor cost forecasting, and daily sales estimates among other data.
For instance, create schedule templates for any routine and special events so you don’t waste time doing that every week.
It also provides employee scheduling to check if their hours are programmed correctly and the system works flawlessly.
That’s because all employee availability requests can be approved by your managers and they will show up on the schedule as you’re building it.
The payroll data can be downloaded into an excel spreadsheet instantly and sent to your accountant or imported into your payroll software.
And the app is also available for the mobiles of your staff where they can even request shift swaps to be approved by the manager.
You can also check out our BarSight review and read detailed information on its best features and on how to use it.
Take a look at BarSight’s key features:
Quick and simple employee schedule creation
POS integration
Export payroll and employee reports instantly
Cloud-based app, accessible from any platform or device
Check employee availability without leaving your office
BarSight Restaurant Systems
Get the best employee management tool with schedule templates, mobile access, and more!
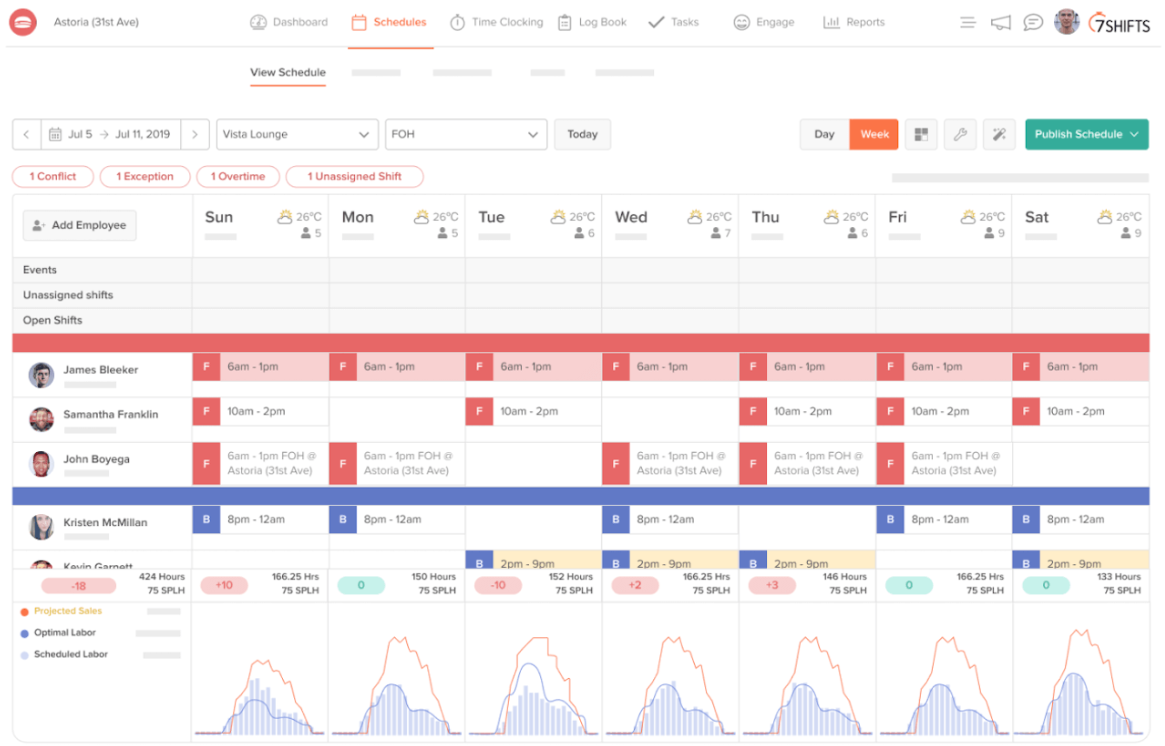
7shifts is absolutely easy to use for managers and staff because it comes with a straightforward scheduling mechanism.
Indeed, you simply drag and drop the staff details to build a schedule. Plus, managers can use the auto-scheduling feature to speed up scheduling.
So, why does it work so well? Well, 7shifts relies on its custom shift templates to quickly generate a schedule as soon as it confirms staff availability.
Even more, staff members are alerted of their shifts immediately after the schedule is published or changes are made.
If you’ve been struggling to rein in your labor costs, then you should get 7shifts. It turns out that the tool monitors your spending in real-time to help stop overspending.
The program also seeks to help restaurant owners comply with local labor laws. For instance, staff members won’t miss their minimum scheduled breaks, so you won’t be paying penalties.
You can even approve or refuse staff requests for time-off on the go from the free 7shifts app.
7shifts comes with a free plan, as well as several paid options. You can try out the free plan and see how it works for you. The paid ones can also be tried for free for 14 days, with all features available.
Let’s review some of its key features:
Drag-and-drop functionality
Labor law compliance
Custom shift templates
Labor costs monitoring and reporting
Time clocking and logbooks
7 shifts
Create shift templates and help employees stay productive with real-time alerts.
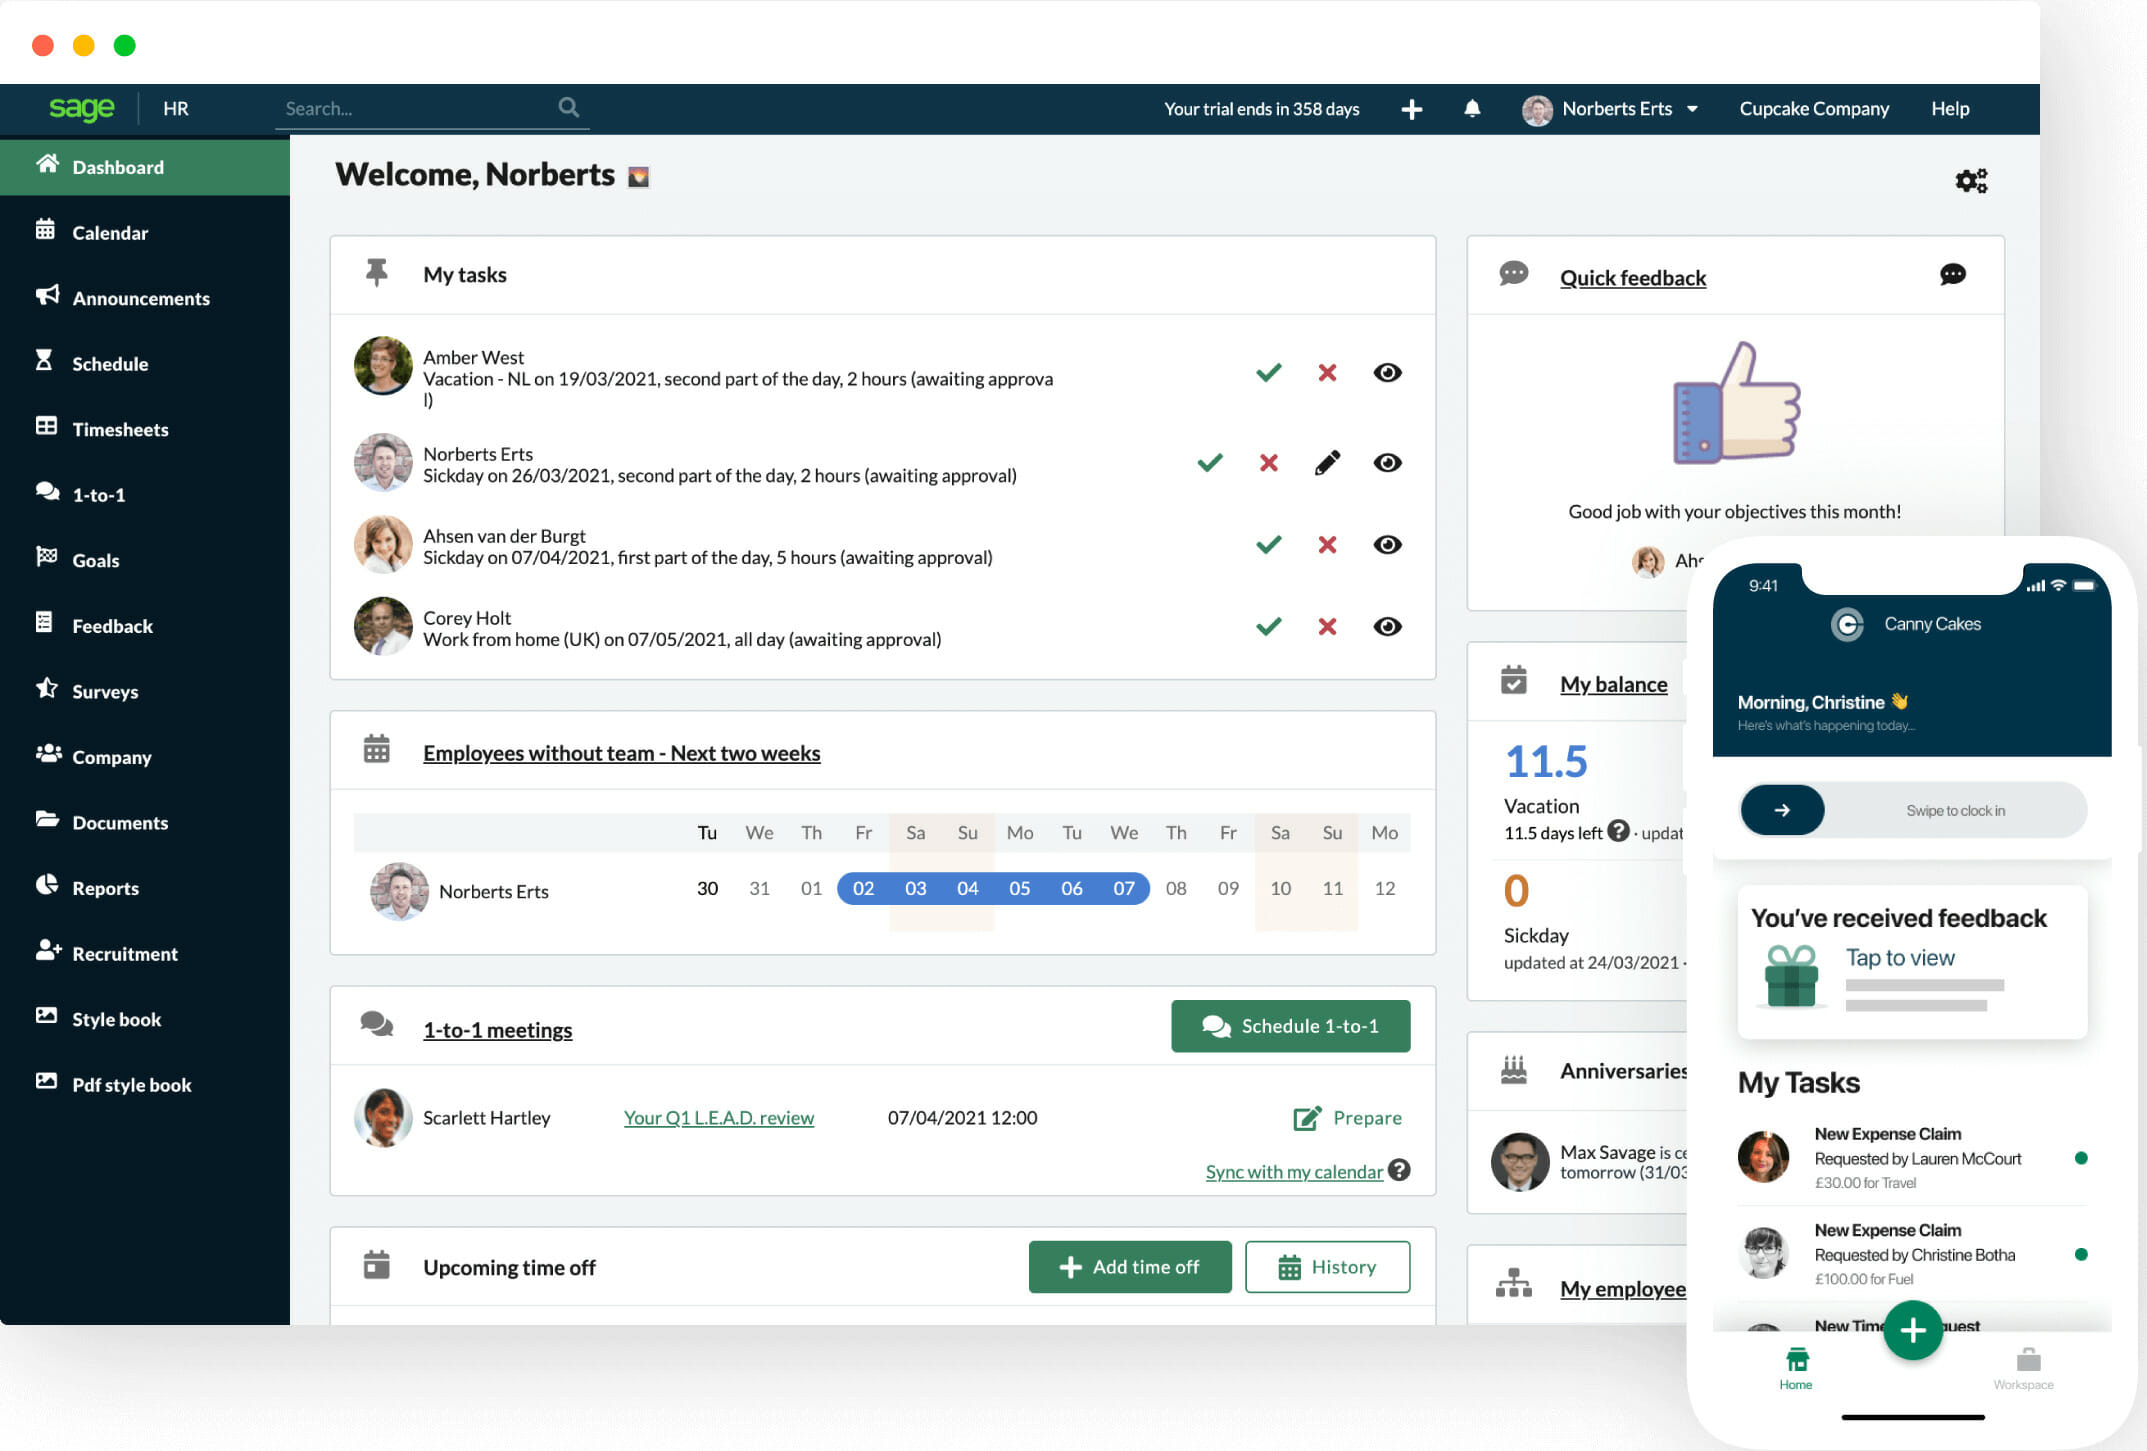
Sage HR is yet another suitable tool for employee management. It comes with complex features that help you with shift scheduling, expenses, leave management, and more.
The software comes with the Timesheets feature which is used to record the time employees spend working. This module comes with its own sub-features, all well-integrated within an intuitive UI.
Employees can submit their timesheets for approval, and the requests go directly to the people who have permission to manage and regulate such issues. You can also easily generate reports that show the total hours worked, overtime hours, and more.
Another feature that works hand-in-hand with the Timesheets is the Shift scheduling feature.
It allows you to easily add, edit, move and copy shifts. You can create separate shifts for different teams or different company locations and get an overview of all of them via the UI.
Moreover, employees can use this feature to show you their preferred working hours and also to inform you about their availability. All these and more are done hassle-free with drag-and-drop.
Sage HR is a paid service with custom plans based on the number of your employees and also your preferred feature set. It comes with a 14-day free trial.
Other key features of Sage HR include:
Fast, digital time off management
Employee database
HR analytics
Expenses management feature with automatic expense recordinga and detailed reports
Integrates popular employee apps like G-Suite, Slack, Active Directory & any custom-built app
Findmyshift is one of the scheduling software that gives you real freedom when it comes to employee shifts.
You see, everything is available from their interactive website meaning you can make and monitor schedules any time and from anywhere.
It integrates with loads of platforms to track employee vacations, send emails and automated shift reminders to employees, and set alarms for upcoming shifts.
Now sample this: It can pay the staff different hourly rates, deduct unpaid breaks, and combine employee timesheets, schedules, and overtime rates to arrive at accurate payroll costs.
Subscription is charged per employee added and it allows you to add unlimited staff. And as a welcome, you don’t pay a dime for the first month!
Employees have also praised its simplicity and functionality. You see, unlike some of the competitors, they can request, cancel, and swap shifts with colleagues using the FindMyShift website on the go.
The website is encrypted so your restaurant’s data remains protected not to mention the system runs automated backups in case you erase some schedules.
You will benefit from the following best features:
Send emails and automated shift reminders to employees
Pay the staff different hourly rates, and deduct unpaid breaks
Planday also makes a compelling case to be considered among the elites and you feel it could actually be a step-up on some of the other entrants in this exclusive list.
Created to make staff scheduling simple and fun for both owners and workers, PlanDay allows you to save your favorite schedule as a template.
You can then customize it to fit the needs of each week or to schedule shifts well in advance.
The software prioritizes efficiency over aesthetics so essentials like the dashboard are plain but very detailed.
Depending on your needs, you can view a snapshot of the work week or month, the hours each employee will work, and how much it will cost your business.
Its wonderful collection of communication tools allows managers to pass the right message to every worker (or groups of employees) to ensure teamwork.
Employees clock in quickly through the app (Apple and Android) as soon as the shift begins while you get a bird’s-eye view of the happenings from the focused reports.
Overall, PlanDay could prove a masterstroke for both employees and management in your growing business.
HotSchedules – Great for managing day to day operations
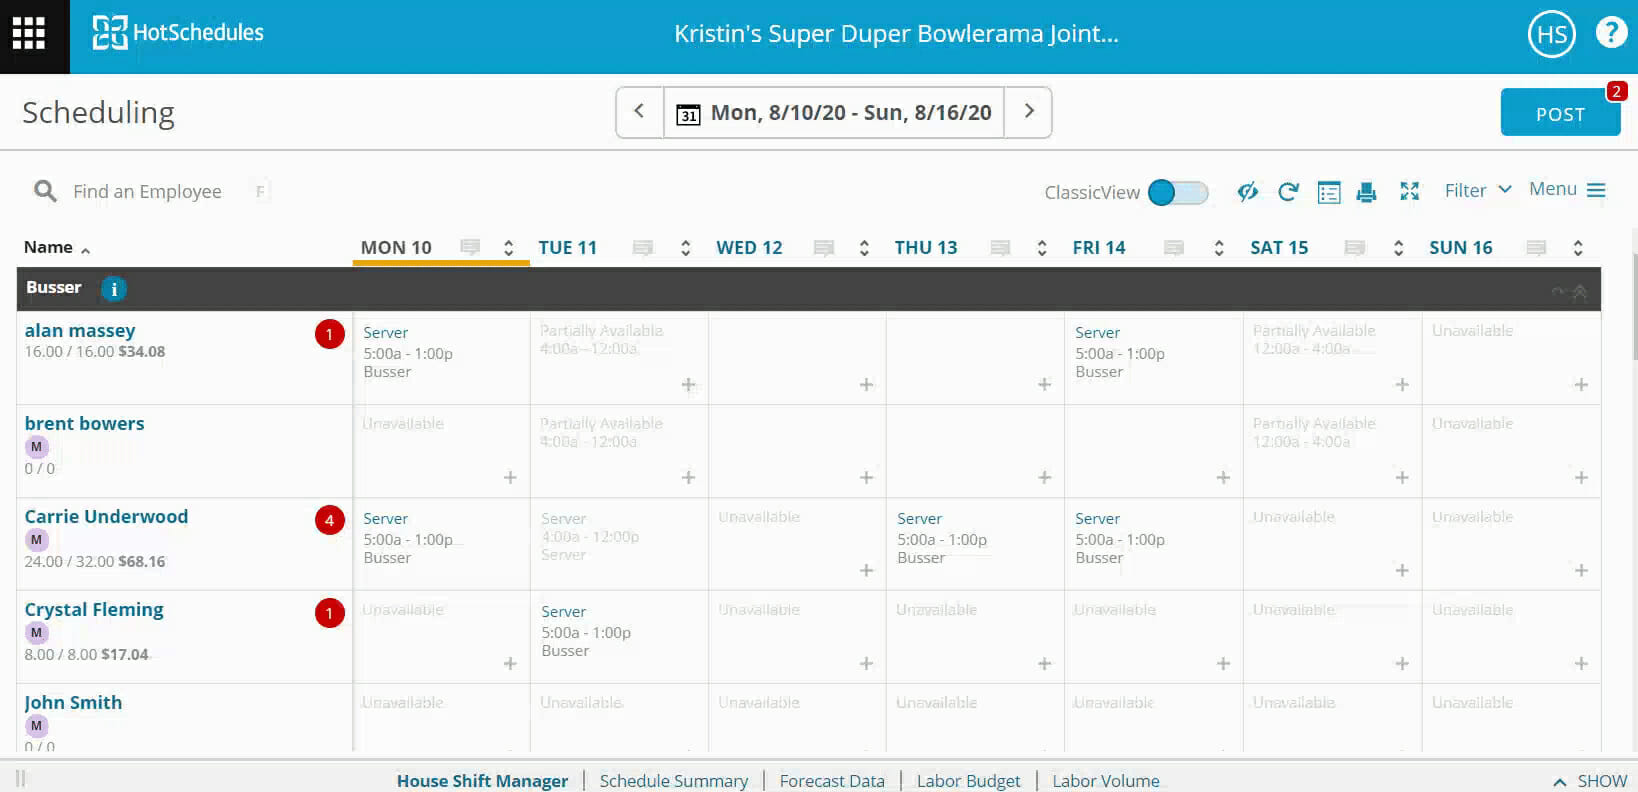
HotSchedules is one of the most advanced scheduling software for restaurants and the hospitality industry at large.
Its impressive suite of clocking, communication, and tracking technologies includes features to help man employees across locations and a powerful native mobile app.
Thus, HotSchedules would be great if you’re searching for a product that not only monitors staff but also helps manage day-to-day operations.
Some of its excellent abilities include enforcing punctuality to reduce time-theft, a straightforward payroll aggregation, meal and breaks enforcement, multiple payroll exports, and more.
These features will save you money and help satisfy the requirements of employee regulations across all your locations.
Incidences of shortages and overages will be long gone as will annoying last-minute calls to the managers.
Employees are also fully catered for and can check schedules, request time off, and pick-up or drop shifts, from their phones.
Ultimately, HotSchedules will do more than just enabling owners and supervisors to schedule employees.
This is also a paid service, with the price depending on the number of employees. In contrast with the other software discussed above, HotSchedules doesn’t come with a free trial.
Take a look at some of its most important features:
Using the best restaurant employee scheduling software solves many of the headaches that managers and owners face with manual and spreadsheet scheduling methods.
The fruits will be a smooth-running business, better management/employee relationships, and compliance with local labor laws.
Such benefits outweigh the meager investment in the software by far but you need to pick the right one for your business.
HP Recovery Manager is a critical software that recovers your media after you set up your system. When your hard disk crashes, you can use recovery media to retrieve your system.
You can also use this tool to reinstall some software programs for the HP system. Note that, this app is available only for HP laptops.
In this article, we’ll go over how to use HP Recovery Manager and how to download and install it for free on Windows 11.
It’s possible to get efficient data recovery on your HP system using dedicated software that can automatically backup or bring back any lost files.
Stellar Data Recovery
Rescue every single file on your Windows PC and take back your lost or deleted files in a few clicks.
You can also apply the same procedures to download HP Recovery Manager for Windows 7 and 10 so that you may backup and restore your data on any of your systems.
How do I open the HP Recovery Manager from Windows?
In Windows:
First, open the search field and type HP Recovery Manager then open it.
Then choose HP recovery environment and click onOKto continue.
Your computer will restart; after that, select Troubleshoot.
Afterward, click on Recovery Manager.
Follow the on-screen tutorial.
From BIOS:
Turn on your computer and press the F11 key constantly.
Then, a window opens on your screen; click on Troubleshoot.
For the next step, click on Recovery Manager.
Finally, follow the on-screen instructions.
You could previously open HP Recovery Environment through the HP Recovery Manager application, but not anymore. Now, in the last official version, you encounter the Can’t open file error message when you open it.
By installing the SoftPaq application, which removes the error message, you can open the HP Recovery Manager easily.
How do I run HP recovery media creation?
Open HP recovery media creation by searching in the search field.
When the User Account Control window opens, click on Yes.
Then, click on I accept and Continue.
The supported media appears on the Create Recovery Media.
Choose the media that you want to use.
Finally, tapon Continue to start HP recovery media creation after inserting the USB flash drive.
This app is only available for HP laptops, as we mentioned earlier in the introduction.
How can I download and install the HP Recovery Manager in Windows 11?
HP Recovery Manager used to come preloaded on HP computers till 2018. HP discontinued them afterward. You should also note that you could have only used this app on HP systems.
There is no longer a download link for this tool. Even if you find one, it is of no use if you do not own an HP computer or if you do not have a Recovery partition (preloaded on HP systems).
However, if you only want to download recovery media, you can make a bootable USB recovery drive. HP cloud recovery tool can help you with it if you have a 2016 model or newer PC.
How to open HP Recovery Manager from the command prompt
Press Win + S, search for PowerShell, and click on Open.
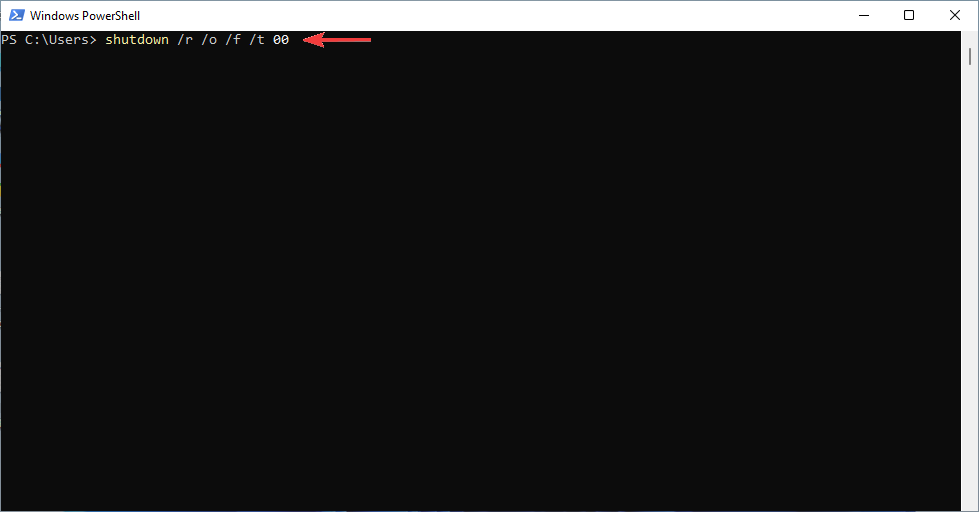
Then, type the following command and hit Enter: shutdown /r /o
Then, click on the close button when the prompt appears.
Select Troubleshoot from the window that appears
Finally, click on Recovery Manager.
If you want to create HP recovery media on a USB flash drive, you need 32 GB capacity or more and an available USB port.
Remember that after you perform any recovery activities, you need to update your anti-virus software to protect your computer.
Run Windows Updatefrom time to time to keep your operating system up-to-date. It will help you have the latest security patches and Windows defender updates.
Recently, the ultra-popular Teams app has officially become available on the Microsoft Store, making it even more accessible by eliminating the need to visit a separate website in order to get it.
The conferencing app has also been receiving a constant flow of tweaks and new features, making it a user favorite and further widening the gap between the competition.
And, just when you thought the Redmond giant was taking a break from improving Teams, know that yet another interesting feature is well on its way.
We get to choose our Teams download folder with next update
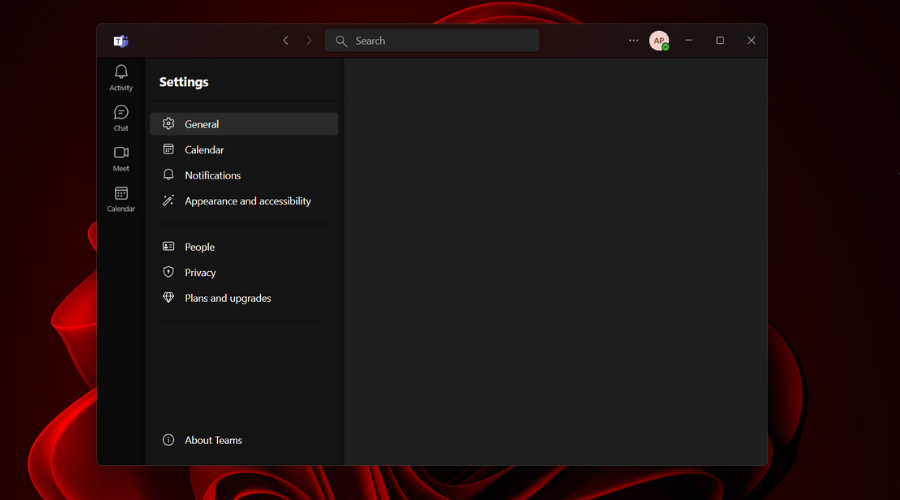
Soon, we will be able to set our preferred download location for all the files we download through the Teams app.
For the time being, Teams files are going straight to the default Downloads folder of the Windows operating system.
This, however, is going to change shortly, much to the delight of the ever-growing Teams user community.
After the following update, users of the Windows and Mac desktop app should be able to choose any directory as the preferred download location.
Keep in mind that this change will only apply to the Teams desktop app on Windows and Mac. The web version will continue to respect the download location you have configured for your browser.
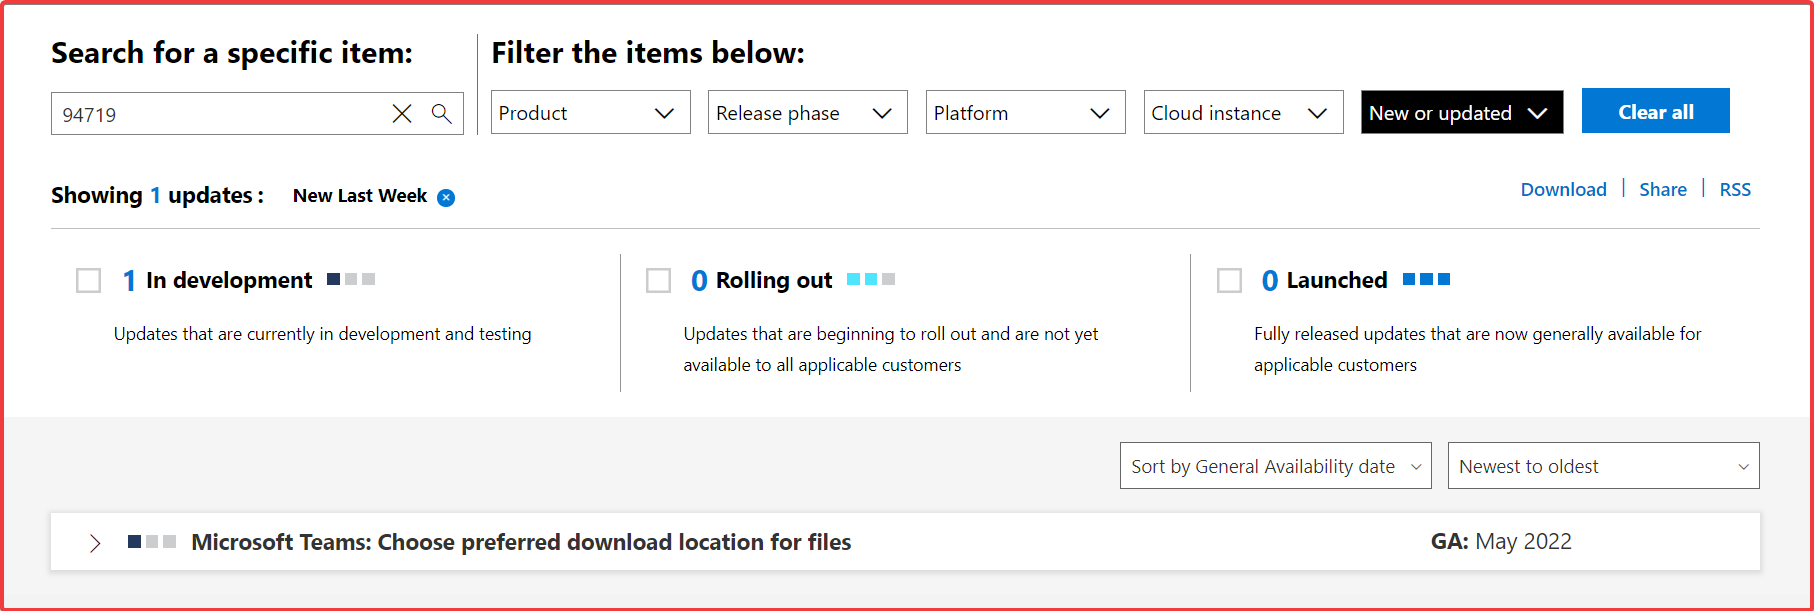
As you noticed from the screenshot above, the Microsoft 365 Roadmap entry says that this feature will hit general availability in May.
That is surely not going to happen now, considering that the month is almost done, so we will most likely get it in early June.
Excited about his new feature that is coming to Teams? Share your thoughts with us in the comments section below.
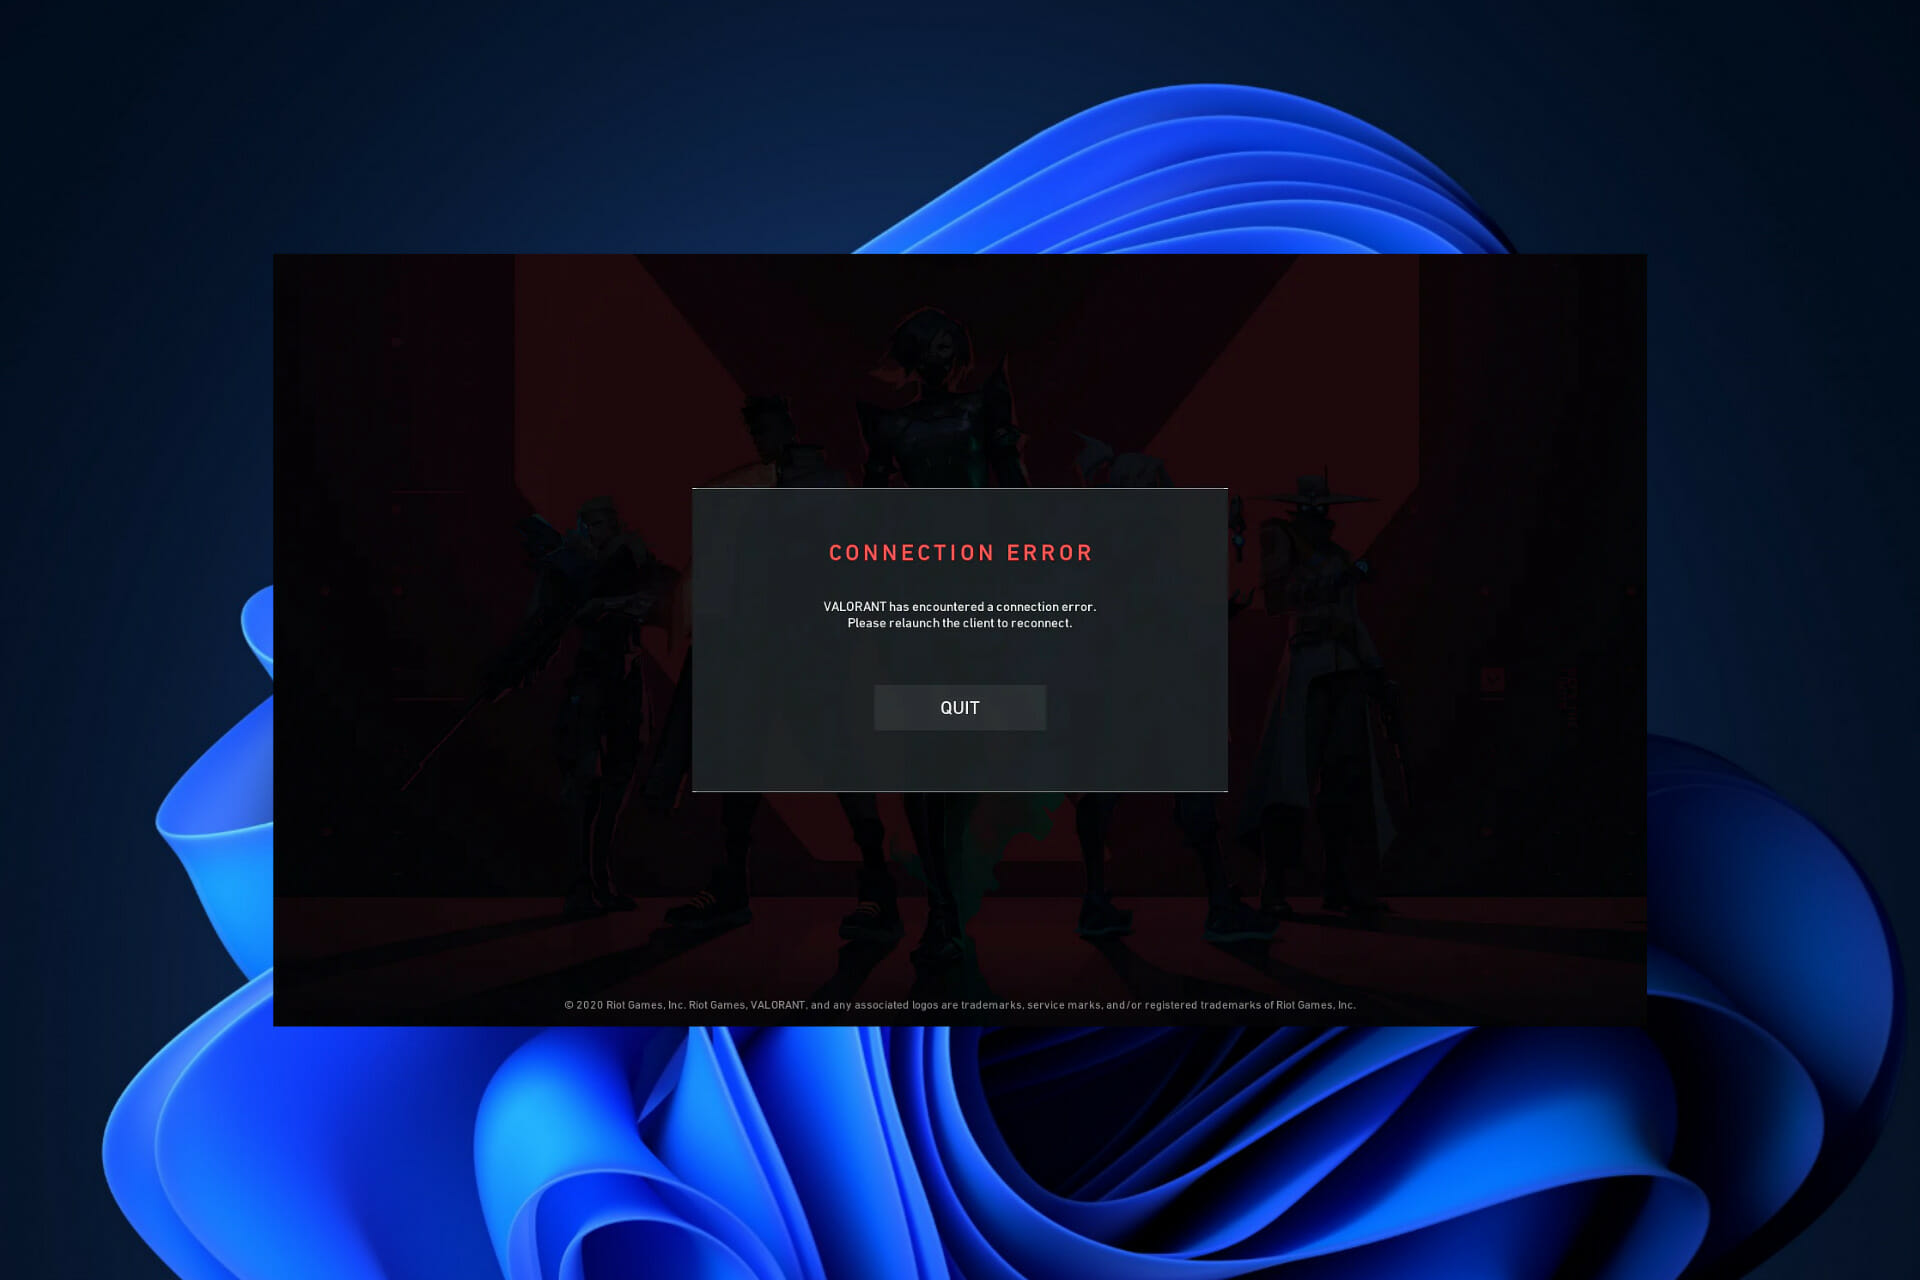
Valorant error code 84 indicates that your client can’t connect to the game servers. Find below easy ways to get rid of this Vanguard issue within minutes.
How do I fix error code 84 in Valorant?
First, go to the Riot Games Service Status to make sure there’s no outage on their end. If that’s it, all you can do is wait it out. Also, consider restarting your game and computer and try again.
If those simple tricks don’t work, follow the advanced steps below:
1. Flush your DNS
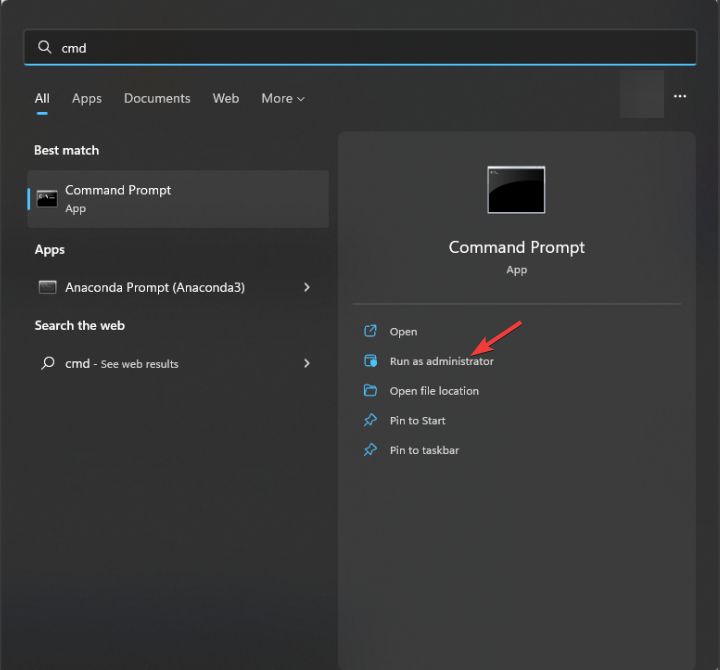
Type Command Prompt in the Windows Search bar and select Run as administrator.
Enter the following commands:
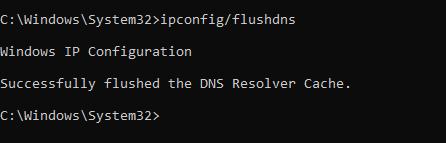
ipconfig /flushdns
ipconfig /release
ipconfig /renew
Once the process is complete, try to access Valorant again.
This process clears your DNS cache, removing networking issues caused by outdated or corrupted DNS records.
2. Disable IPV6
Press Win + R, type ncpa.cpl, and press Enter.
Right-click on your active network and select Properties.
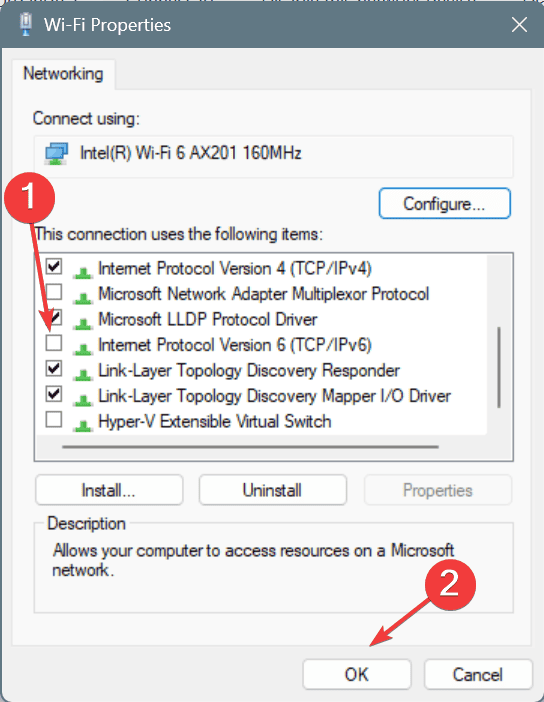
In the list, find Internet Protocol Version 6 (TCP/IPv6), uncheck the box and click OK.
Restart your computer to apply the changes and try to connect to a Valroant server again.
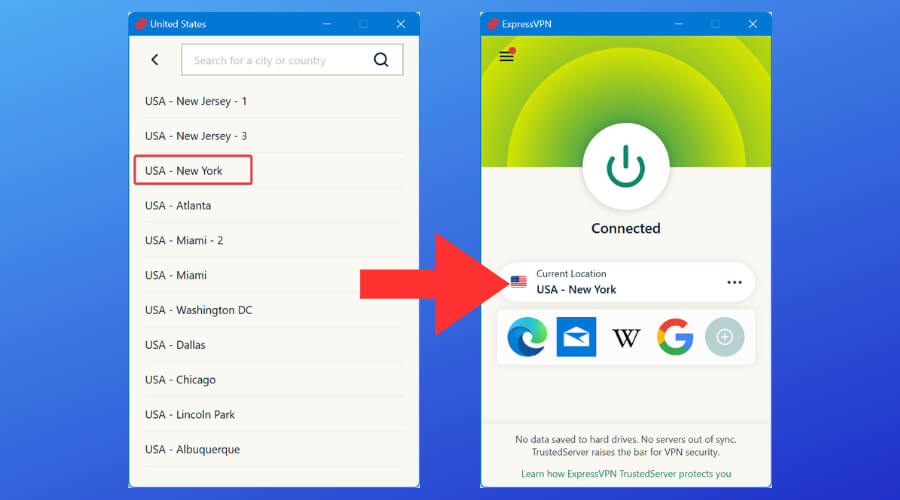
Get a reliable VPN for gaming. We like ExpressVPNbecause it’s fast and has unlimited data.
Install the VPN on your PC and connect to a server. For good speed pick a server close to your actual location.
Try opening Valorant again.
Practically with a VPN, it’s easy to change your IP address. This lets you connect to less populated Valorant servers. Not only that, the private network may also boost your Internet speed.
Locate the Network Adapters section and expand it.
Select the adapter corresponding to your current connection.
Right-click on it and select Update.
Select Search automatically for drivers and wait for the process to complete.
Error code 84 in Valorant manifests itself if there are issues with the game’s connection to the server. This occurs most frequently during periods of server failures, whether they are scheduled or unforeseen.
The Postman Chrome extension is one of the most advanced tools for developers but it has some glitches that prevent it from working from time to time.
Chrome extensions are a powerful way to add new features and functionality to the browser. Extensions can be used by millions of people, and their use is growing every day.
Although extensions are great and offer a unique browsing experience, sometimes they may fail you when you need them the most.
Is Postman a Chrome extension?
Postman is a Chrome extension. You can install it from the Chrome Web Store or by downloading it directly as an application. It is available on Mac and Windows machines, as well as on Linux.
The extension makes API development faster and easier, saving you time and allowing you to build better applications.
It’s the perfect tool for developers who are looking for an efficient way to test their web service APIs, mock HTTP requests, create test data, and share API documentation.
How do I add the Postman extension to Chrome?
The Postman Chrome extension has since become deprecated with the introduction of the updated version known as Postman Native Apps.
With the app version comes new and improved features. You can still use the Chrome extension but the app has more features plus all your data in the extension will automatically move to the app once you download it.
To add Postman to Chrome, follow the instructions below:
Navigate to your Chrome browser and Enter the following address in a new tab: chrome.google.com/webstore/category/extensions
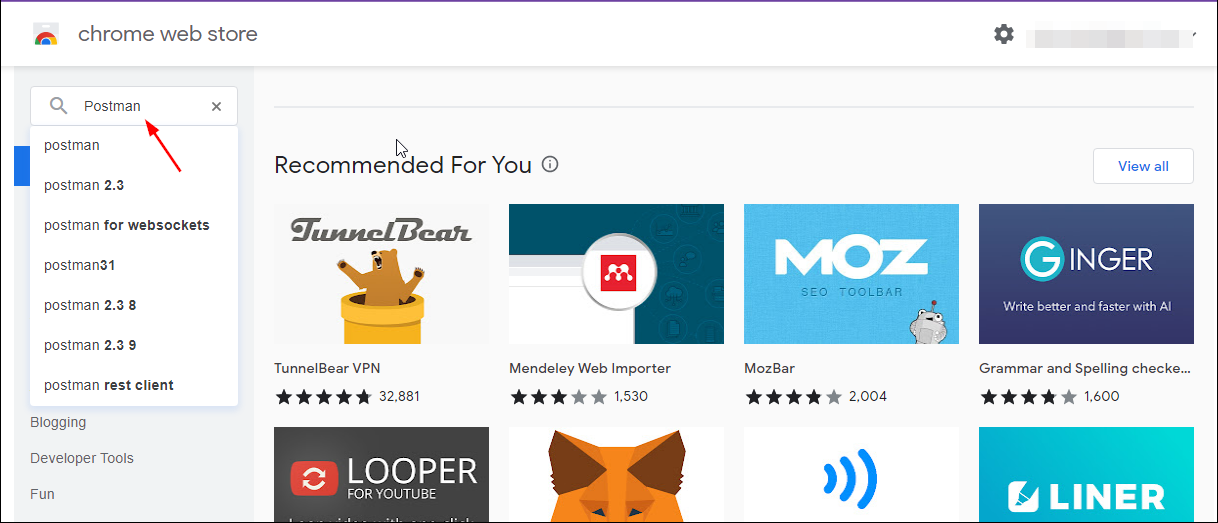
Type Postman in the search bar and click Enter to search.
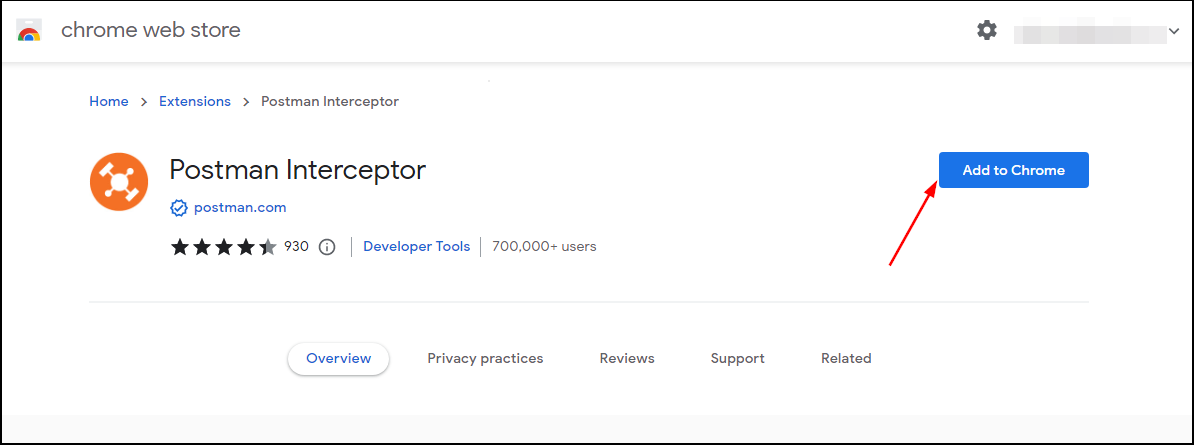
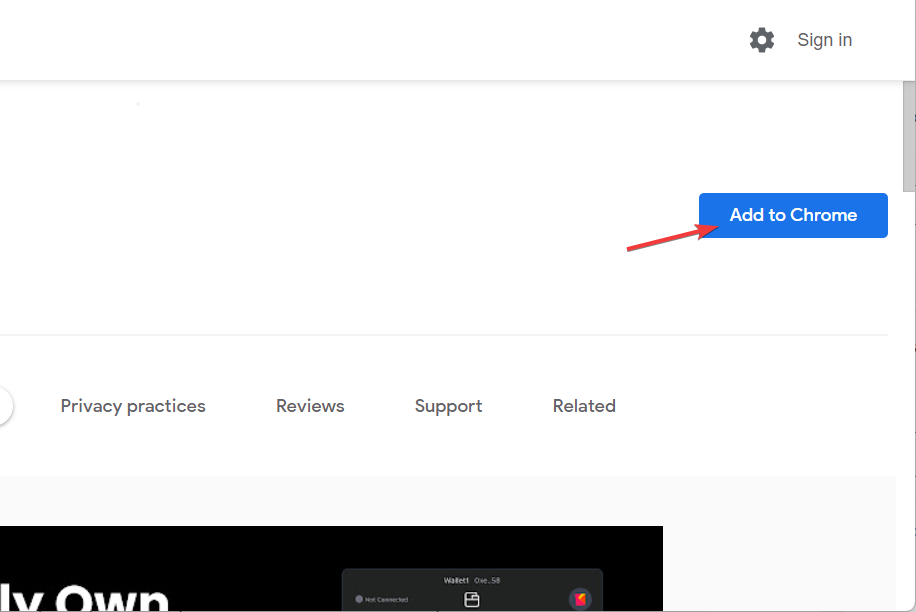
Click the Add to Chrome button.
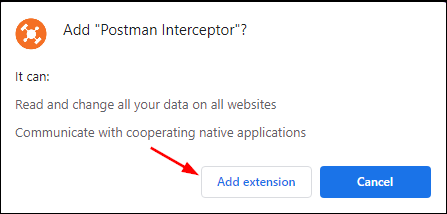
In the pop-up window, click Add extension.
What can I do if Postman isn’t opening?
1. Disable and enable the extension
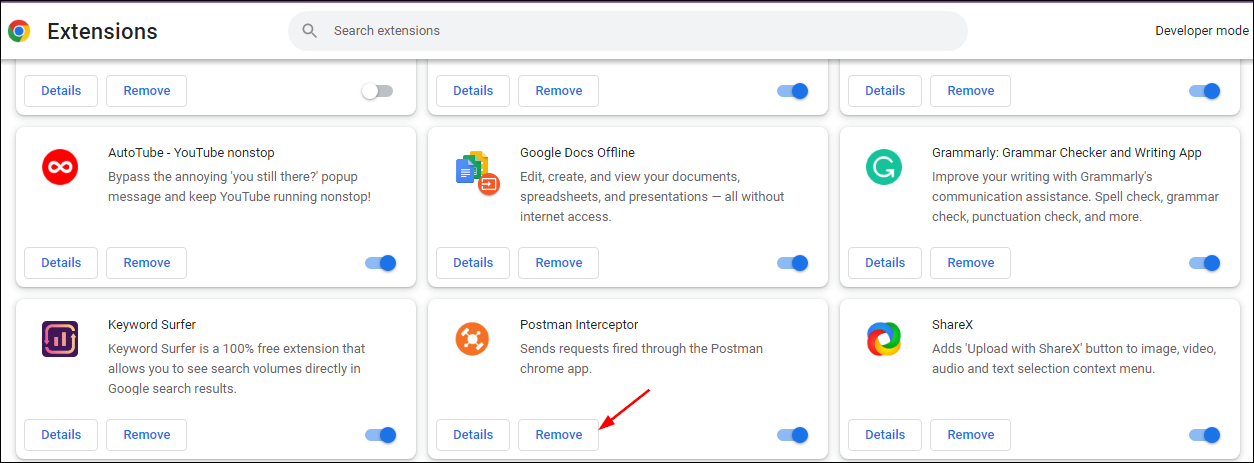
Navigate to your browser and in a new tab, Enter the following address: chrome://extensions/
Locate the Postman extension and click Remove.
Follow the steps above in the (How do I add the Postman extension to Chrome) section.
2. Enable Javascript in Chrome
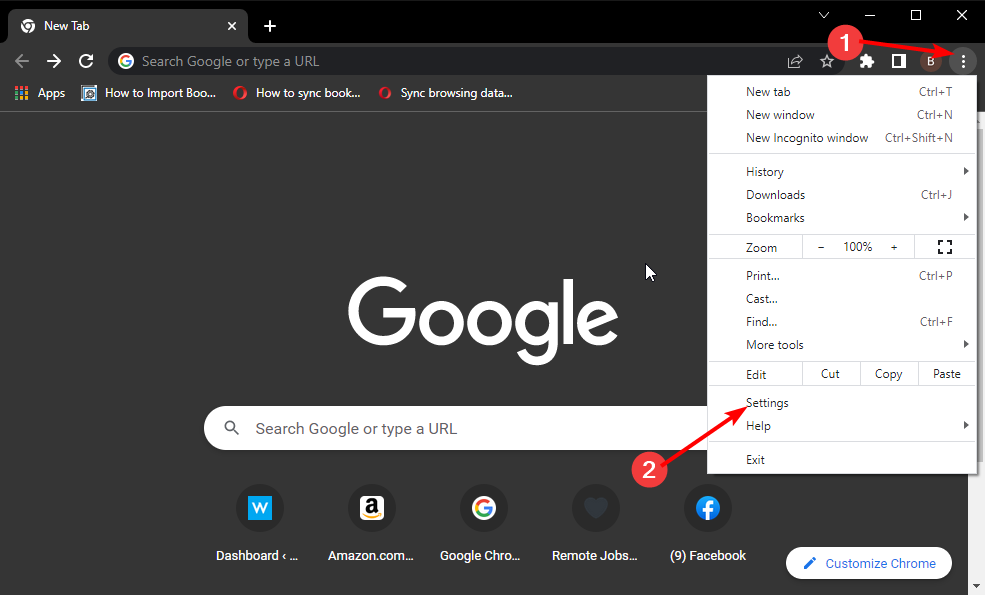
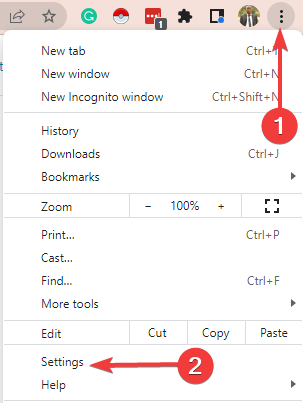
Navigate to your Chrome browser and click on the three horizontal ellipses at the top right corner.
Click on Settings.
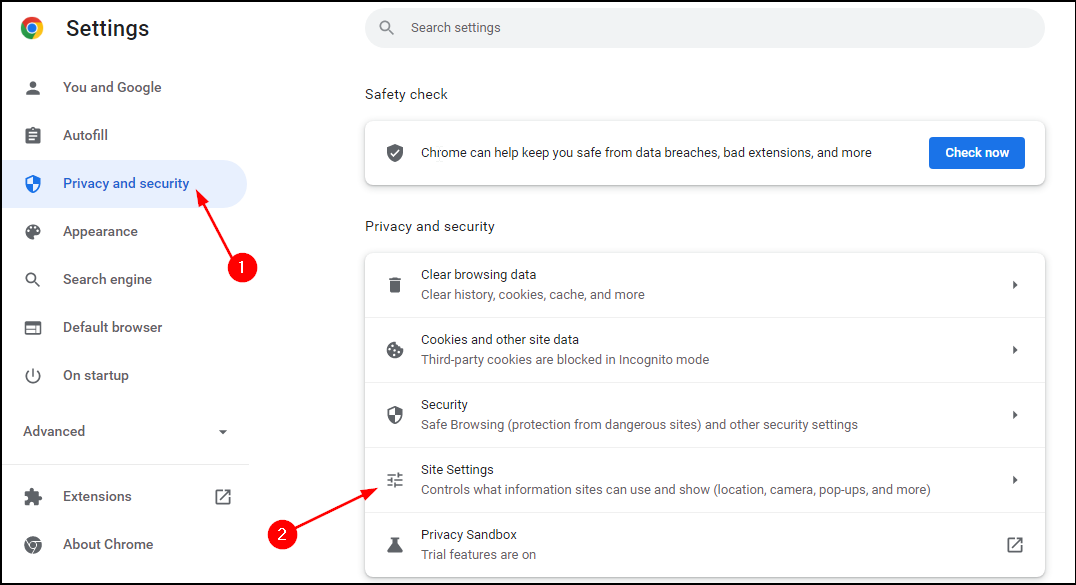
Select Privacy and security on the left pane and click on Site Settings on the right pane.
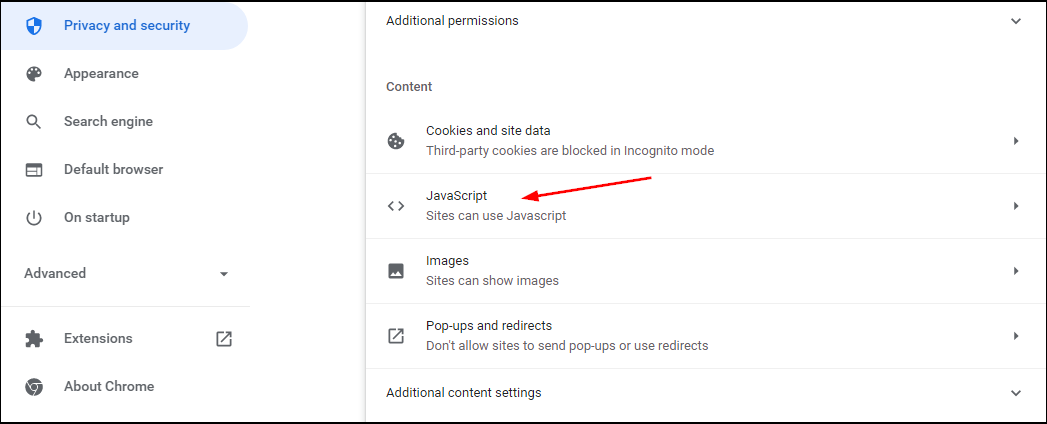
Scroll down and click on JavaScript.
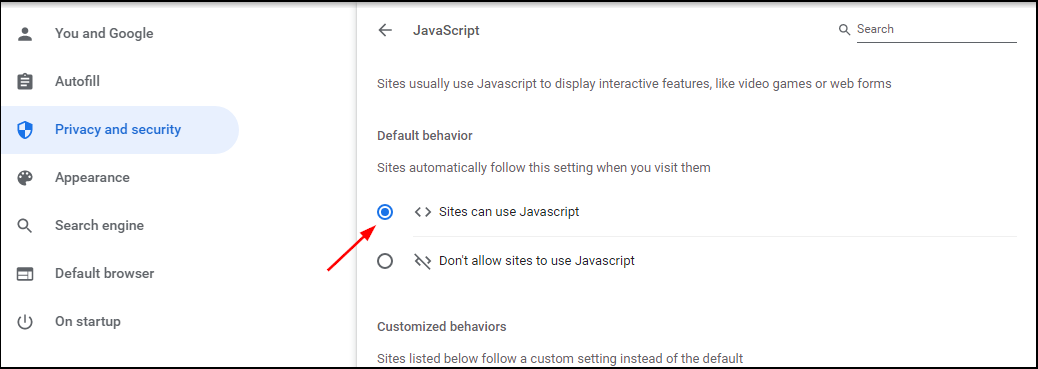
Select Sites can use Javascript.
3. Restart Chrome
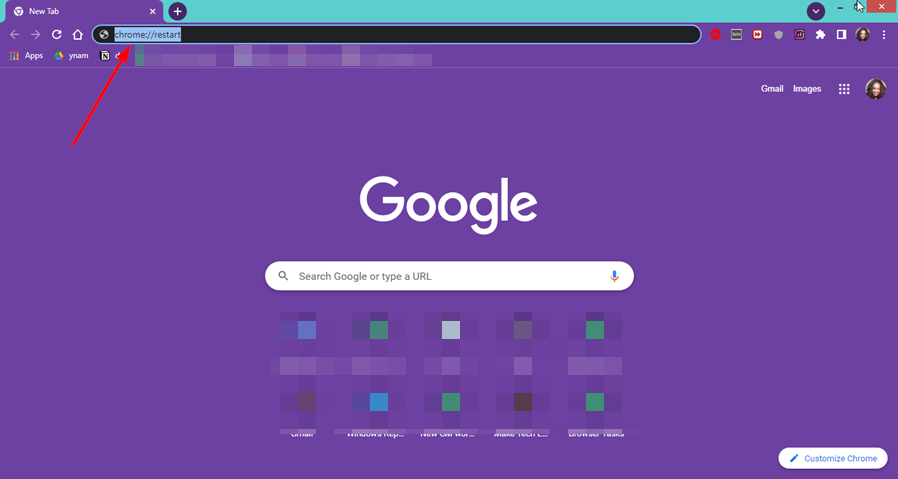
Open a new tab in Chrome and type the following address: chrome://restart
Is there a Postman Chrome extension alternative worthy of my attention?
Postman is an awesome Chrome extension for testing APIs and with great features. If you are looking for an alternative to Postman, here are some of the best ones:
Advanced REST Client– This is a Chrome extension for testing APIs. It’s very similar to Postman, and it has many of the same features.
Requestly – Requestly has some features that make it stand out from other Chrome extensions such as Postman. Its interface is more streamlined than Postman’s and supports most of the features you’d expect from a modern HTTP client.
Mokku – It has a lot of features that are useful for developers, including the ability to share your API calls with others, as well as being able to execute them via the command line.
We hope that with the solutions listed above, you have been able to get your Postman extension working again.
Sometimes, an extension may be infected by bugs or downloaded from an unverified source. In such a case, you need to follow the steps of removing malicious extensions from Chrome to secure your browser.
Let us know what solution worked for you in the comments section below.
VPN, an acronym for Virtual Privacy Networks has certificates by a public authority that manages them. They are essential electronic documents, as VPN devices use them to indicate if they are the ones you connect to. Thus, it is imperative to quickly fix any VPN certificate validation failure.
Digital certificates of VPN are also used for authentication, and this is more secure than preshared keys. VPN certificates expire due to security reasons and when there is a need to replace them.
It used to take a more extended period of time for a valid VPN certificate to last, however, in 2021, SSL certificate expiration was reduced and a valid certificate lasted for 12 months only.
Still, this may not be the sole reason you are getting a failure in certificate validation. There are many other reasons why this may be happening with Cisco or some other VPN service provider.
Virtual Privacy Networks improve your security and privacy as you browse the Internet, which is why people use them. Therefore if you cannot validate VPN security, the purpose of getting the VPN in the first place is defeated.
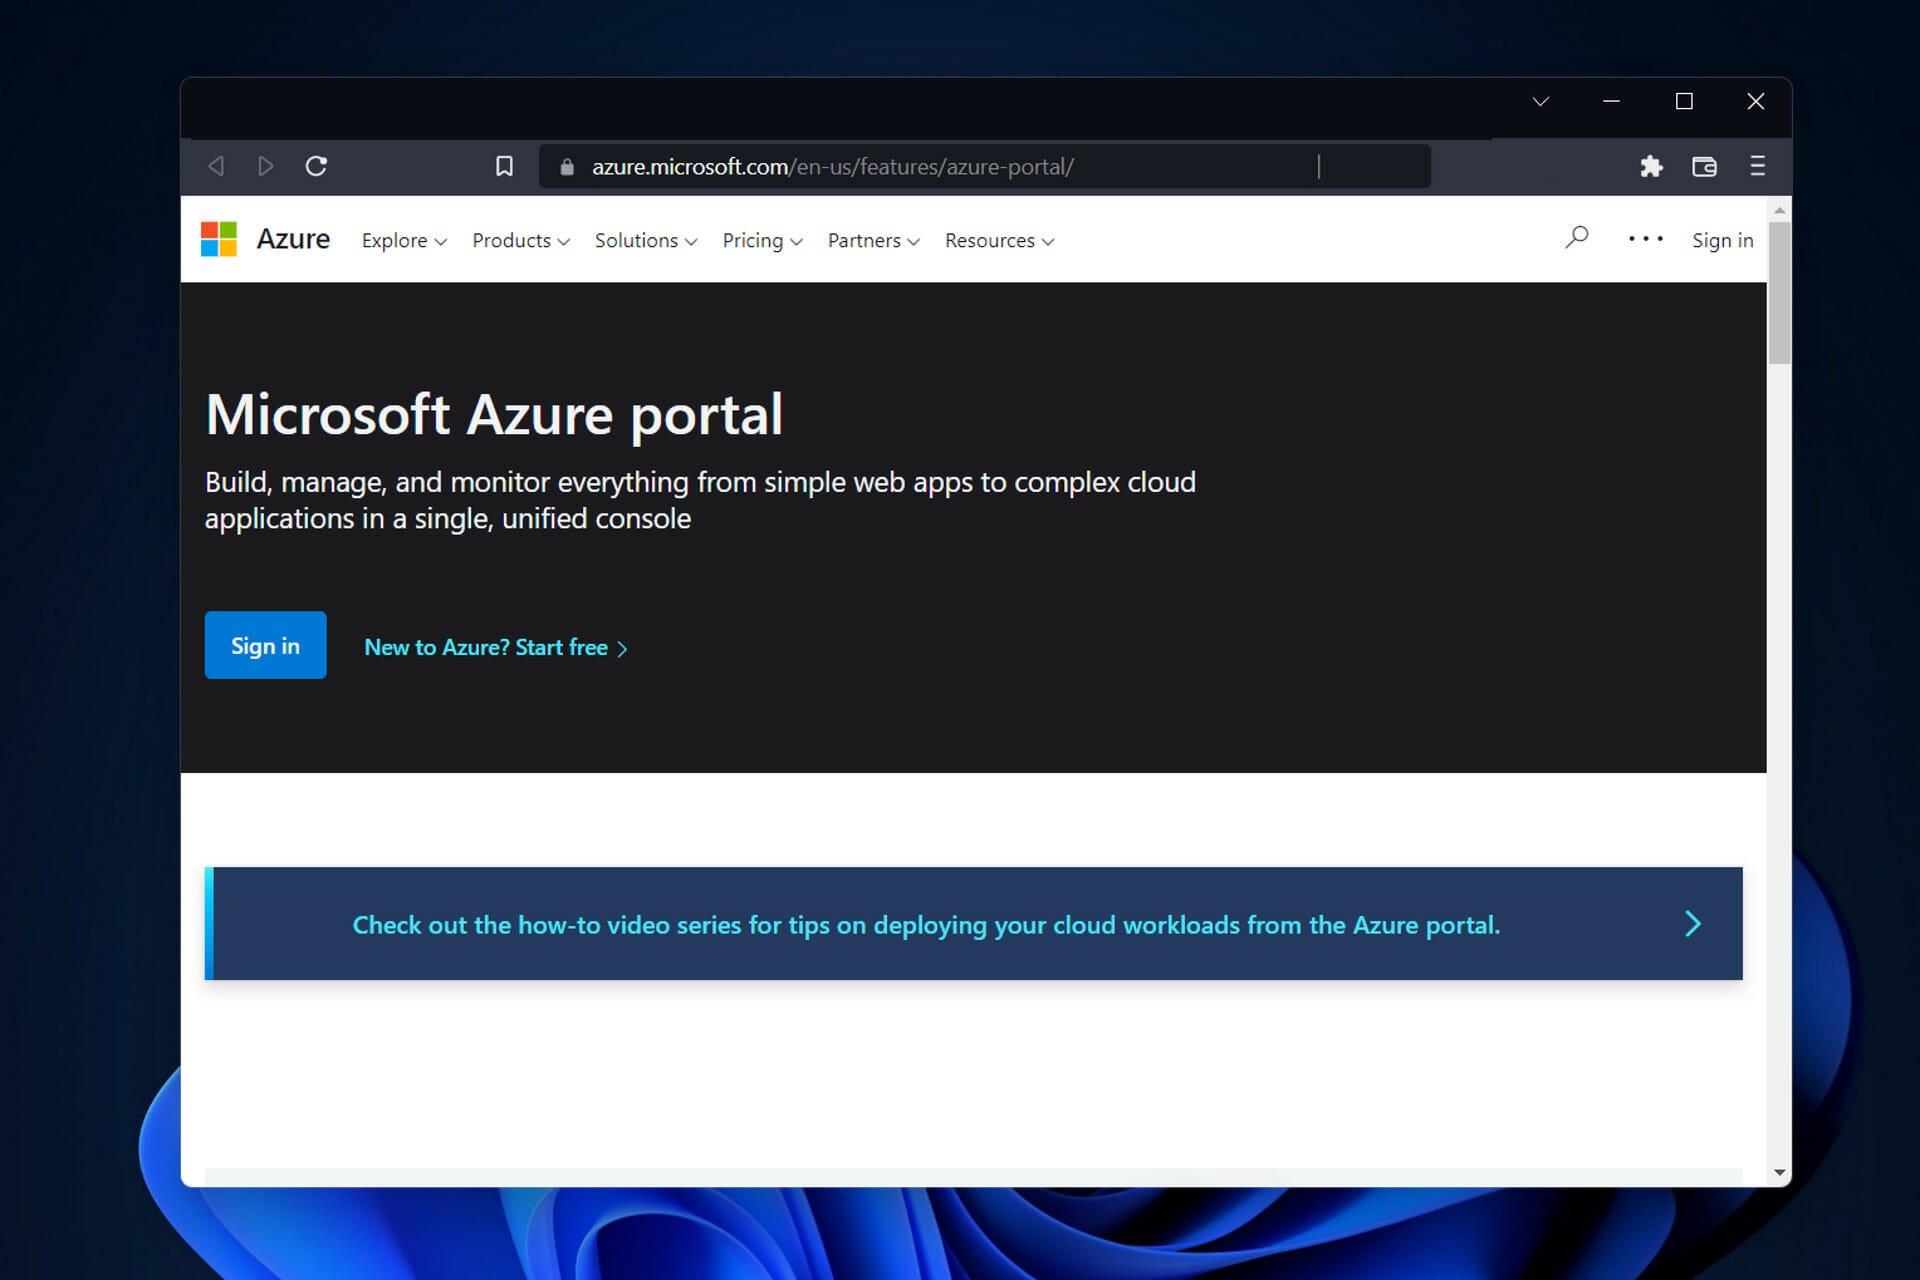
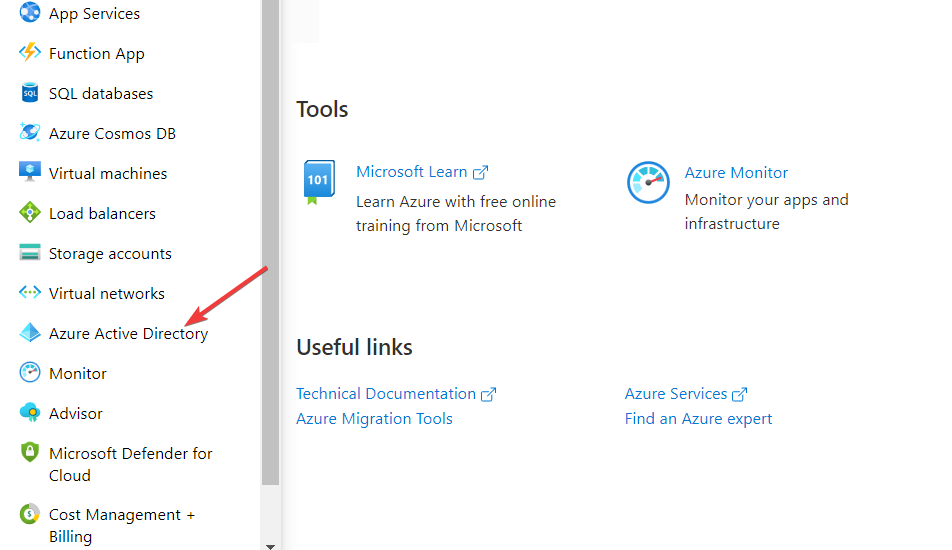
Go to the Manage section in the Azure Active Directory menu and click on Security.
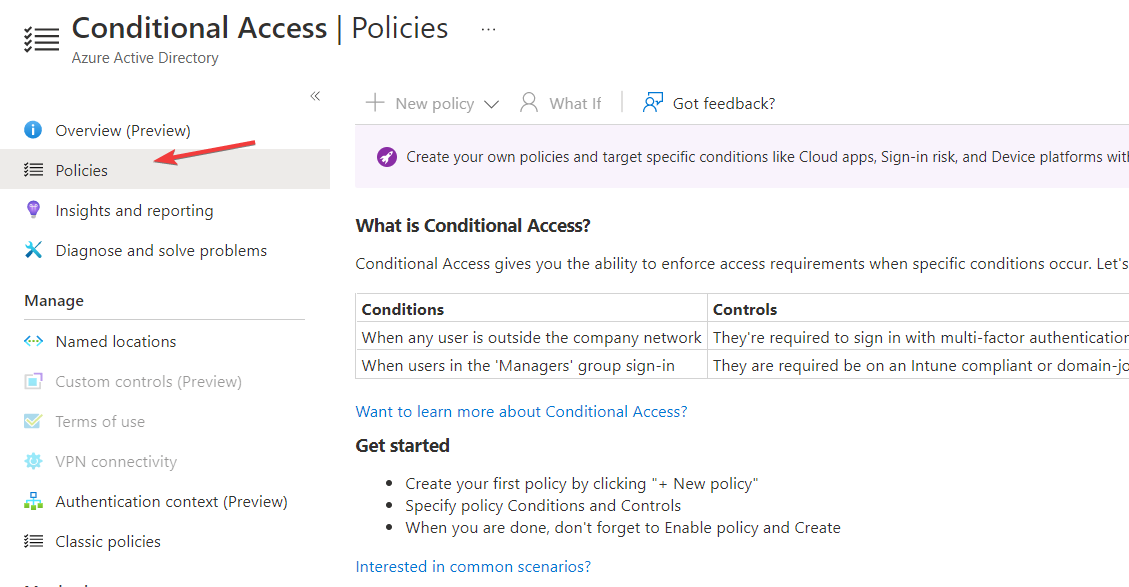
Click on the Protect section on the Security page and select Conditional Access.
Go to the Policies page on the Conditional access page and click on VPN Connectivity.
Click New Certificate and generate one for yourself.
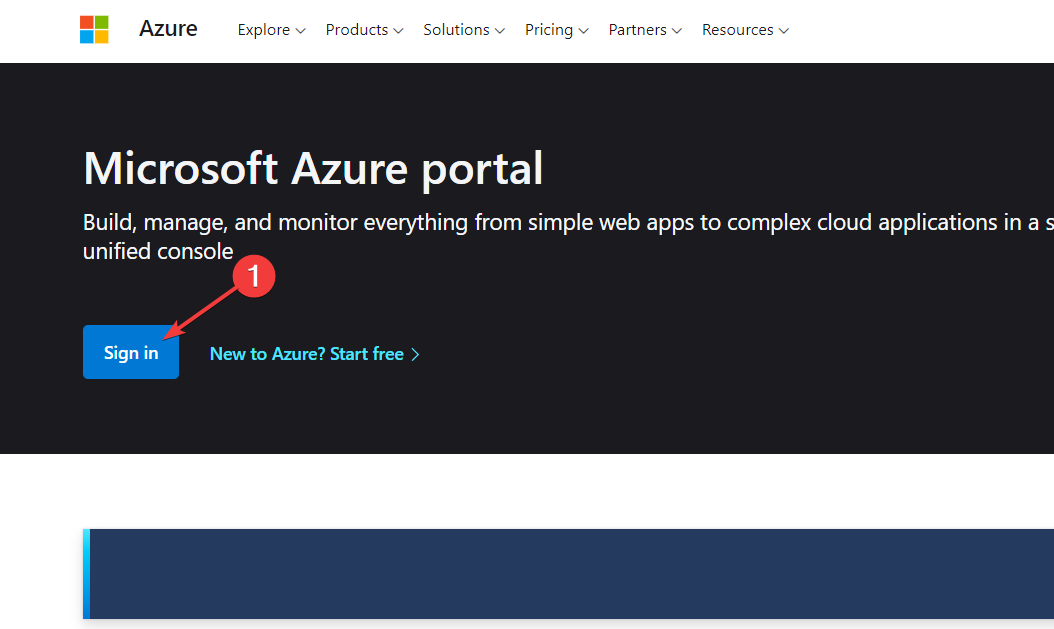
To have access to generate a new VPN certificate, you need to create an Azure Microsoft account. Microsoft has a free trial that you can use to gain access before you need to pay.
When your VPN certificate expires, you need to update it. If you do not update your VPN certificate, you lose security and become exposed to threats that make your private and classified information vulnerable.
How do I update my VPN certificate?
In order to update your VPN certificate, you will have to enter the Certificates – Local Computer app from your system and tweak your current certificate.
For an in-depth, step-by-step guide on how to achieve this, follow the second solution from the list below in order to update your VPN certificate.
Do VPN certificates expire?
VPN certificates are issued with an expiration date for the sake of increased security. After that date has passed, the certificates must be updated with fresh ones.
There is a validity period of three years attached to the VPN certificates that were issued by both the Internal RSA CA for Gateways and the Internal ECDSA CA.
How do I fix VPN validation failure?
1. Check the validity of your VPN certificate
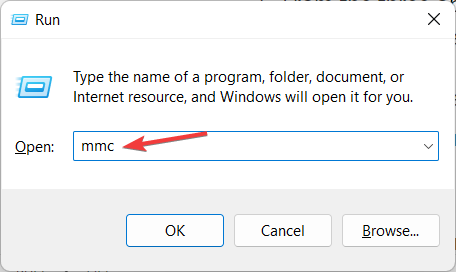
Press the Windows and R keys on your device to open the Run tab and type in mmc then press Enter.
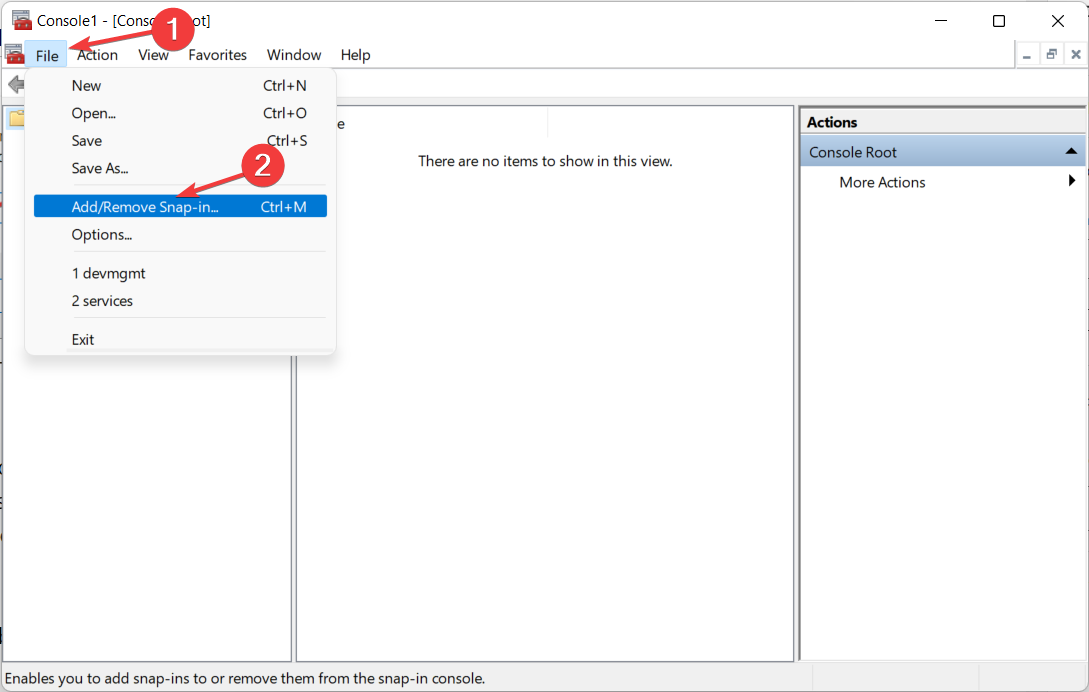
Click on the File option in the top right corner and select Add/Remove Snap-in from the drop-down menu.
Choose Certificates from the Available snap-ins section then click on the Add button.
From the three options, click on My User Account.
These steps will enable you access to the current User certificates to see the certificate that you have in the system. When you double-click on the certificate, you can see the details, which include the validity and expiry date.
After you check, and find that your VPN certificate may have expired, proceed to renew it.
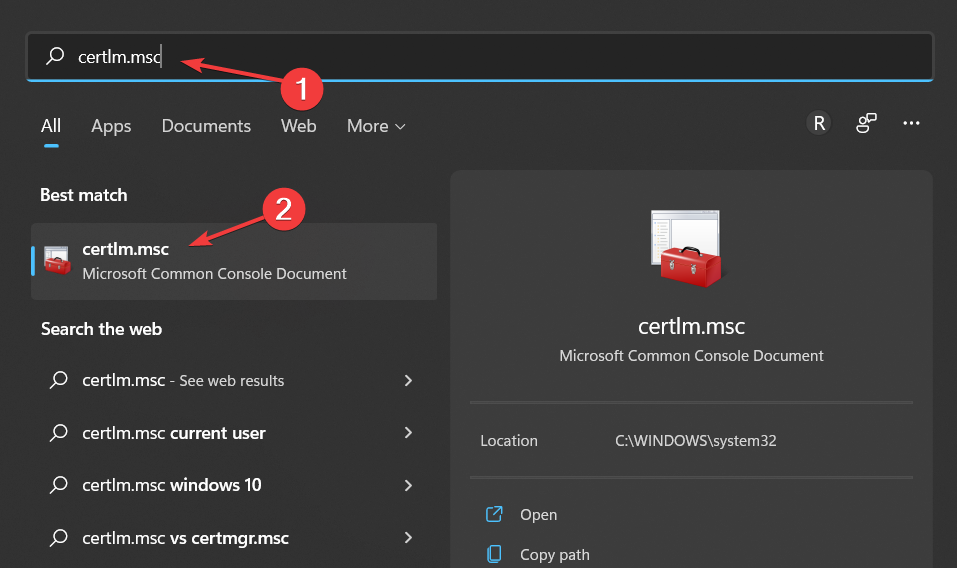
Click on the magnifying glass icon from your Taskbar then type in certlm.msc and select the topmost result.
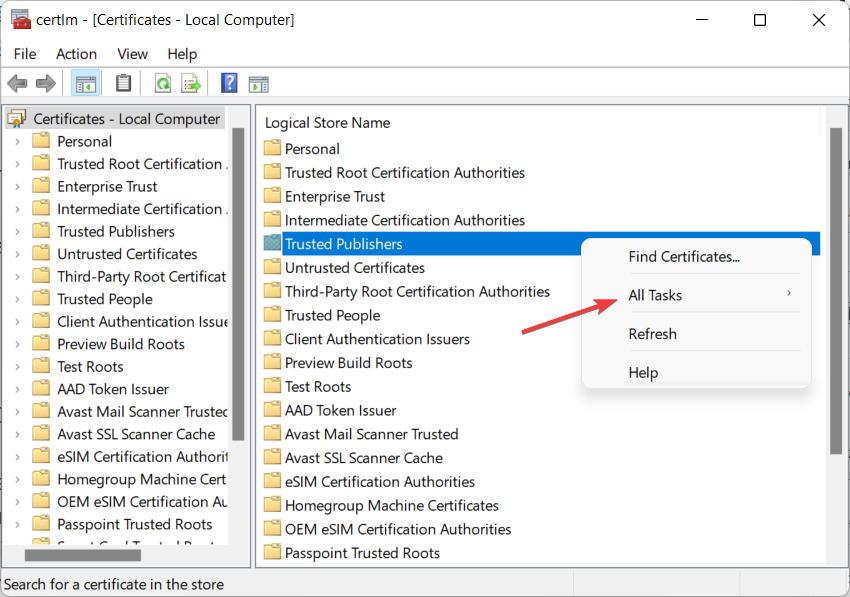
Right-click on the open space and select All Tasks.
Click on Advanced Operations and select Create Custom Request.
Select Proceed without enrollment and continue with the onscreen steps.
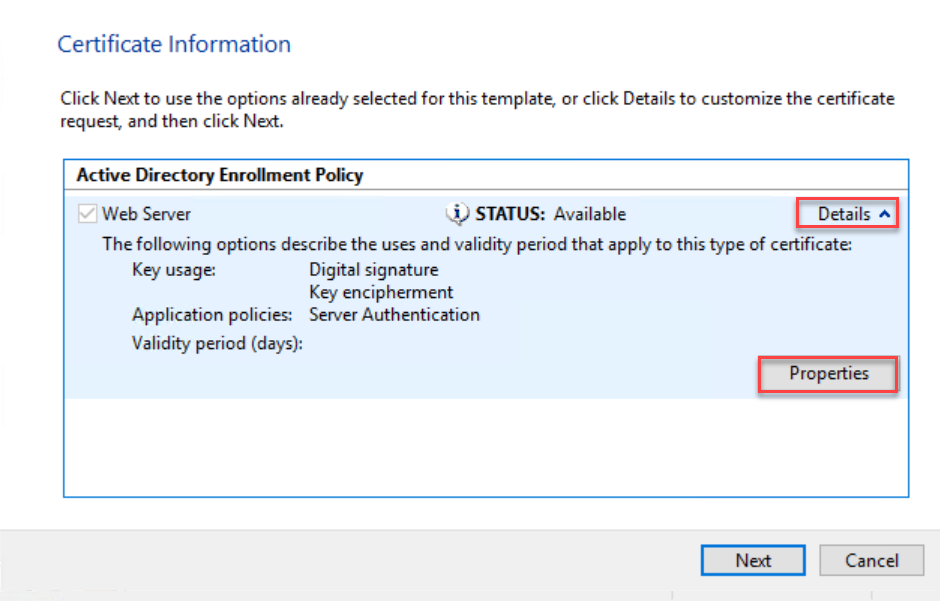
Click on the arrow next to Details and select Properties from the drop-down menu.
Name the certificate a title that is easy to remember then click on Subject and select common name from the Full QDN drop-down menu.
Enter the Fully Qualified Domain Name and click Add followed by Next.
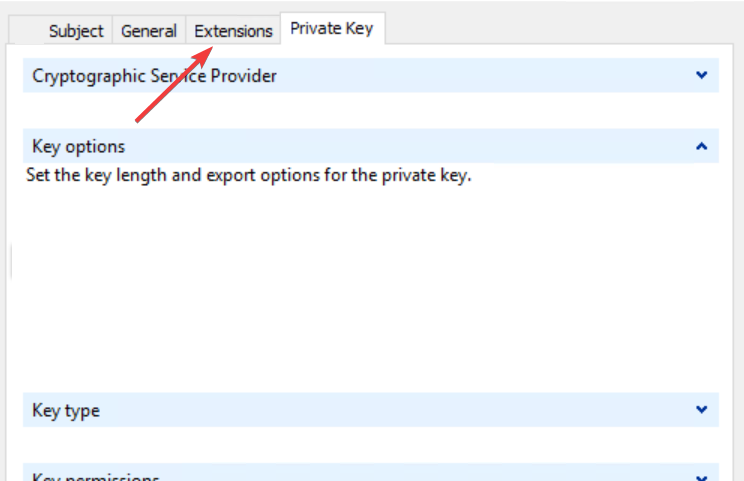
Go back to Properties and select the Extensions tab.
Select Extended Key Usage, and click on Server Authentication and Add.
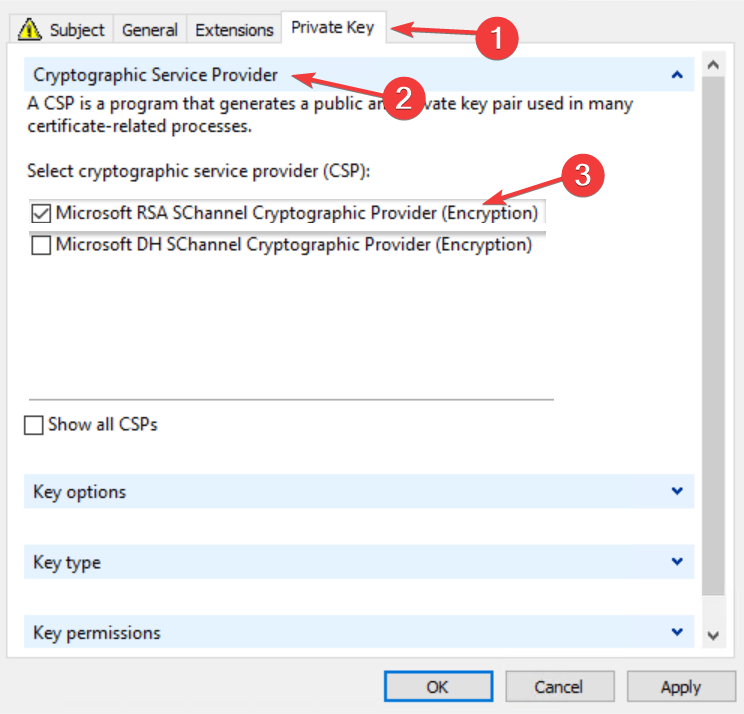
Click on the Private Key tab then select Cryptographic service provider and check the Microsoft RSA or Microsoft DH option as you wish.
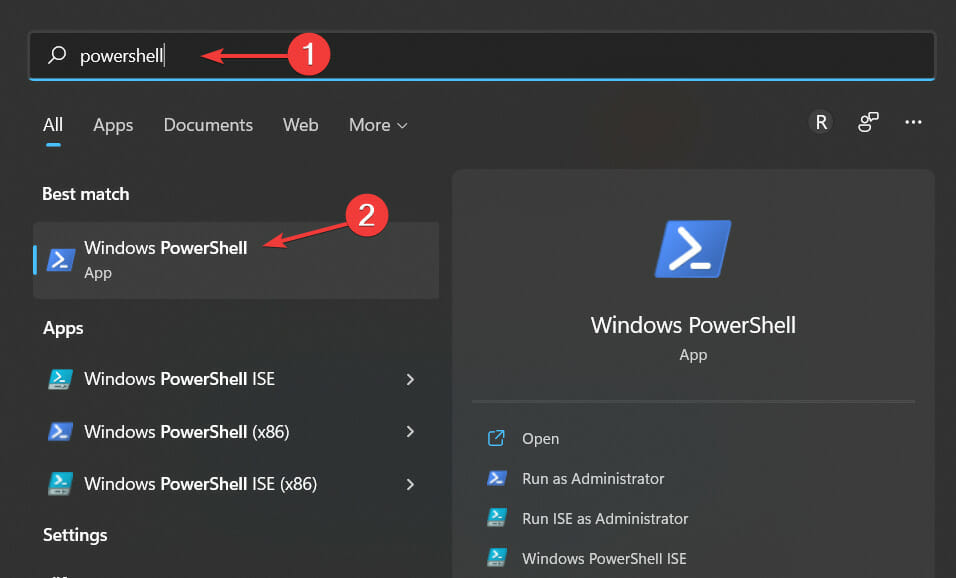
Save everything by clicking on Apply and OK then click on the magnifying glass icon on your Taskbar and type PowerShell. Finally, click on the topmost result in order to open it.
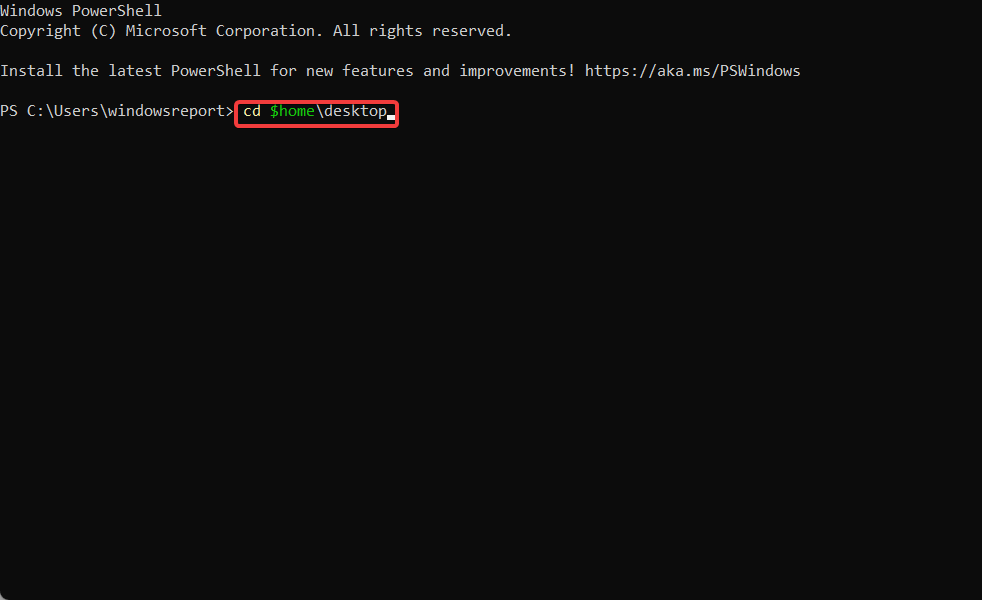
Type in the following command and press Enter: cd $home\desktop
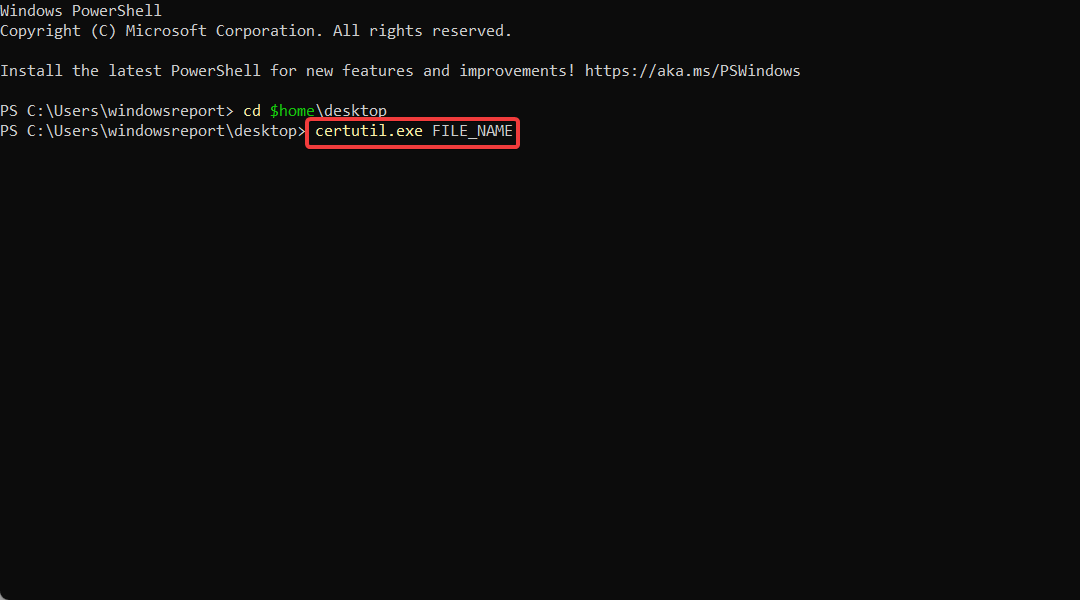
On the next line, type in the following command and replace the FILE_NAME with your certificate’s name: certutil.exe FILE_NAME
Copy the content of the file and submit it to your public certification authority for signing.
To fix certificate validation failure VPN Cisco, and certificate validation failure VPN anyconnect, you have to first verify that the hostname and host address are still valid and then check if the certificate has expired before you proceed to install a new certificate or update the existing one.
3. Turn on OCSP Nonce on the Windows server
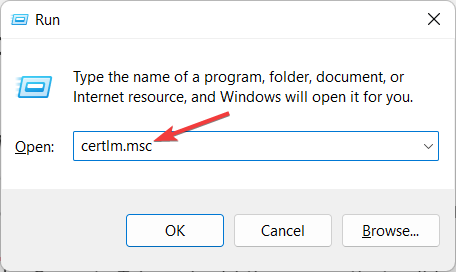
Press the Windows and R keys to open a command bar and type certlm.msc to open the Certificate Service Management Console.
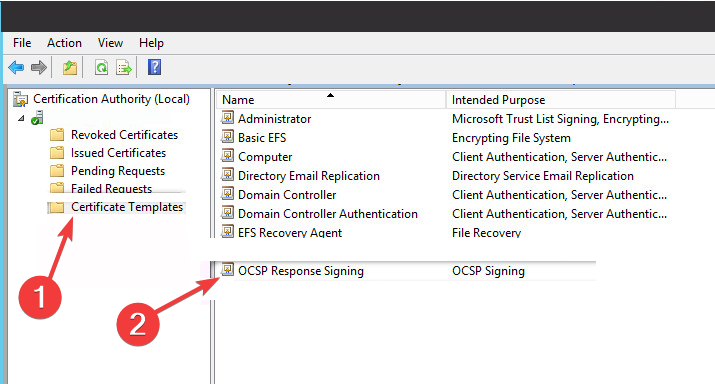
Select Certificate template from the left menu and click on Manage then find OCSP Respond Signing from the drop-down menu and select it.
Right-click on it and select Properties.
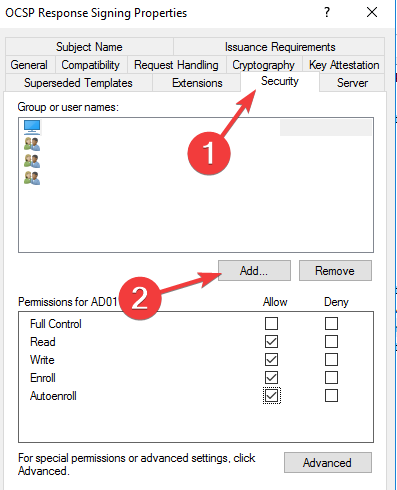
Click on the Security tab and add the server that will be hosting the OCSP services.
CheckRead and Enrol then go back to Certificate template. Click on New, select Certificate Template to issue, and choose OCSP signing.
Click on the certificate server and select Properties.
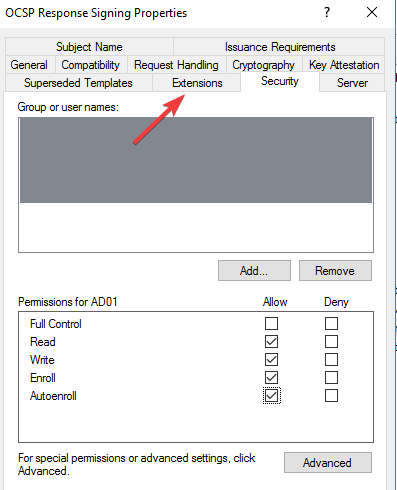
Select the Extension tab and choose Authority Information Access. Select the URL of the server and click on Add.
Go to the dashboard of the server manager of the OCSP service and click on Add roles and features.
Check Active directory services and select Role services. Uncheck Certification Authority and check Online Responder.
Launch the Online Responder management console.
OCSP is Online Certificate Status Protocol, and it is a method that browsers use to ensure that a security certificate is valid. Enabling OCSP service nonce protects secure network communication.
Microsoft Windows uses RFC 5019 while Cisco AnyConnect VPN ASA uses RFC 2560. This disparity causes VPN validation failure, and as such needs fixing.
When OpenVPN certificate verification failed and VPN certificate validation failure occurs, these are the steps that you can follow to rectify them.
Also, for IBM VPN certificate validation failure, there is a renew certificate application in the IBM store that can help you with renewing your certificate if it is outdated.
How do I add a VPN certificate to Windows 10/11?
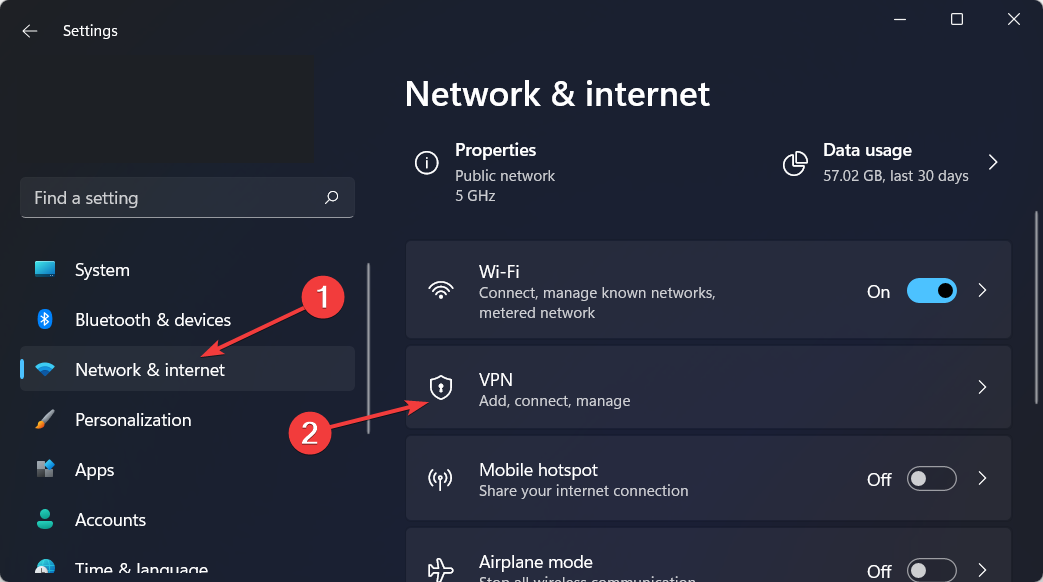
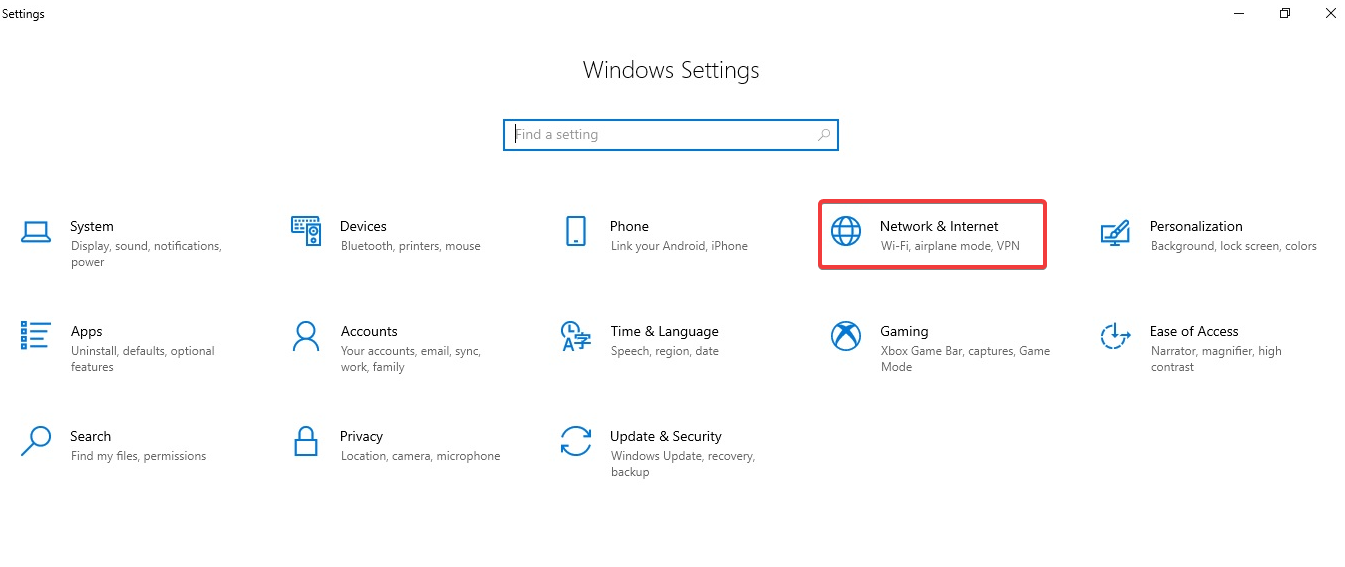
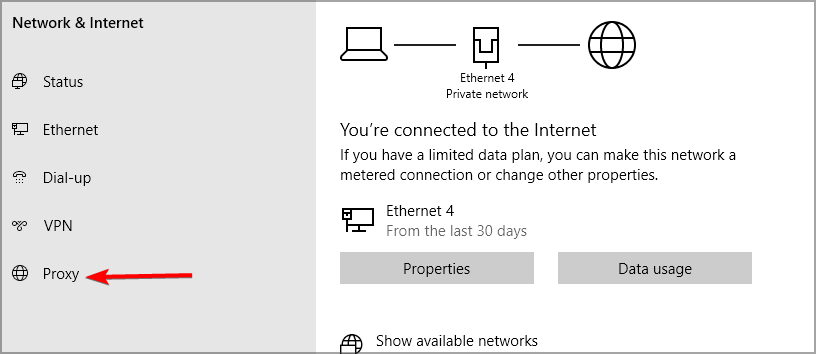
Open Settings by holding Windows and I together then go to Network and Internet followed by VPN.
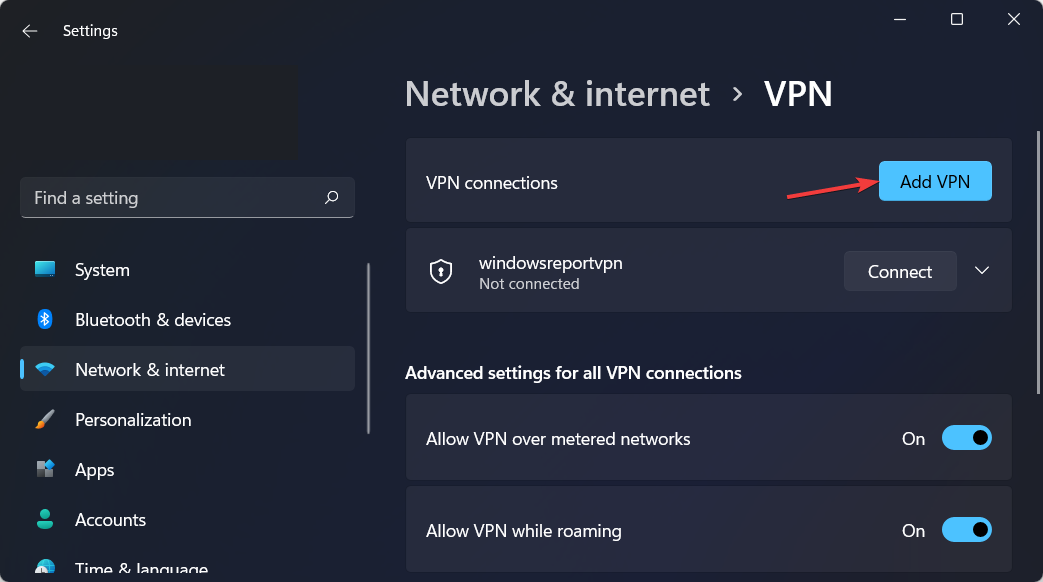
Click on Add VPN.
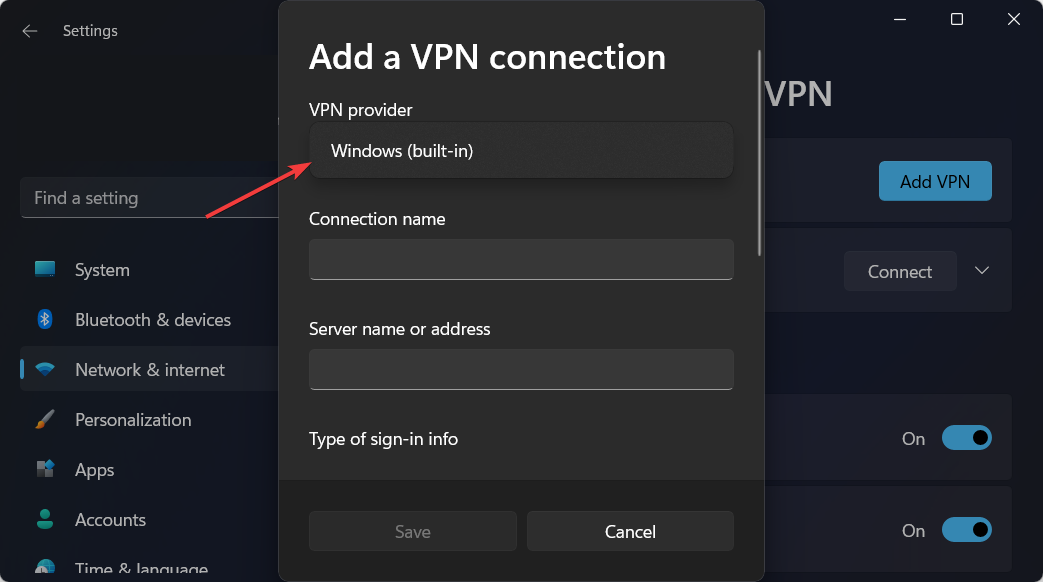
On the dropdown menu, select Windows built-in as the VPN provider.
Type in a name for the VPN connection in the Connection name field.
Get the server name and address from the provider and type it into the Server address field.
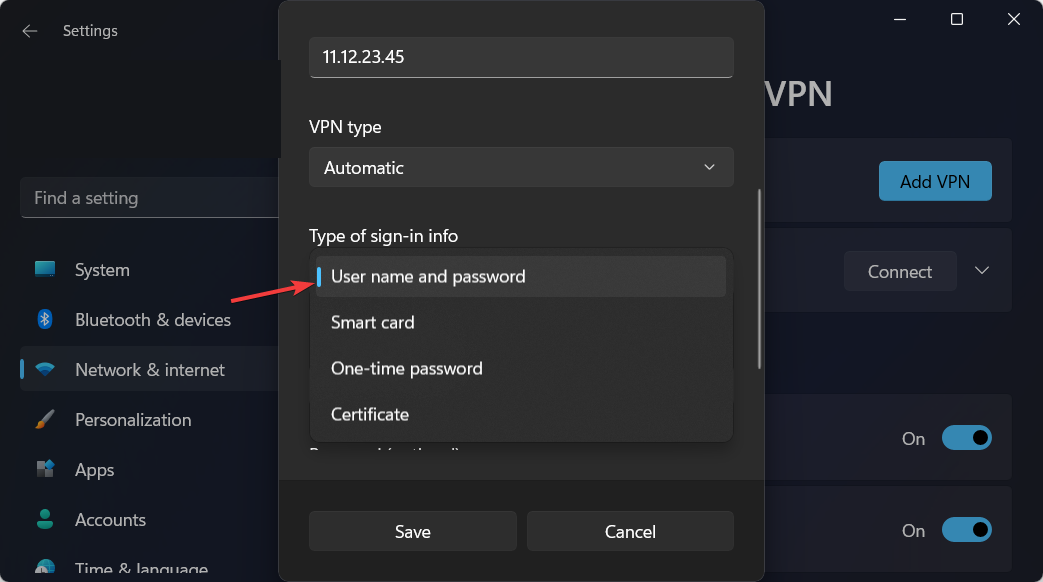
In the Type-of-sign-in info bar, type in the one your VPN provider uses and click on Save.
When the name of the VPN appears, connect to it.
Is there any good 3rd party VPN for business?
There is another security method to protect all your business data and avoid certificate validation failure for your VPN protection.
You can use the Perimeter 81 as a Zero Trust Application Access software and secure any sensitive data from public use. This way, you guarantee private communication with IPSec or WireGuard technology.
Plus, it provides safer digital support against data leaking or cyber threats with access by role, a cloud-based interface, or monitoring tools.
In conclusion, VPN is vital because of the protection and security that users get from it. These steps will fix the validation failure that pops up. However, if these do not work, you can disconnect completely and start a new connection.
Check out our post with the five best VPNs for Windows 11, after 3 months of usage and tests, to decide which one to get on your devices.
We hope our guide proved to be useful to you. Don’t hesitate to share your thoughts with us in the comments section below. Thanks for reading!
It is nearly impossible to use an online service without creating an account. In addition, it can be overwhelming to remember multiple passwords and login information, so using a password manager with emergency access is of paramount importance.
Using the infamous Forgot password link will be frequent, and you may even resort to using the same password across multiple sites.
This way, you’ll continually put your privacy at risk because a regularly used website may be hacked. If the website gets hacked, the passwords of all the site members will no longer be private.
If you use the same website for all your accounts, the hackers will be able to access all your other accounts using the same password.
Brute-force attacks are always possible but might take several years for an attacker to find a password.
Some websites utilize the one-time password method to improve security. However, a password manager is the best thing that will enhance your online privacy and security.
What is an emergency access password manager?
An emergency access password manager protects your digital privacy and security in the event of death or a medical emergency.
A medical emergency or death requires someone you can rely on to access your accounts and personal notes. It’s like having a private emergency line for your online life.
What are the best emergency access password managers?
Currently, NordVPN is among the best and most reliable VPN services available. In addition, NordPass, a password manager provided by the company, is also available.
Exporting a .CSV file from your current password manager and importing it into NordPass makes transferring passwords a breeze.
As a result, you can be done in a jiffy instead of dedicating a considerable amount of time to entering passwords for various online accounts.
When you first set up NordPass, it will automatically fill in your username and password whenever you visit a website or open an application. Auto-filling online forms, generating complex passwords, and evaluating the security of your current passwords are all features of NordPass.
A secure note section and a password manager are included in the app to help you keep track of crucial information that you don’t want to be compromised, such as your credit card number, when making online purchases.
NordPass also has an emergency access feature only available for premium users.
This feature allows authorized users to access another user’s password vault in an emergency. Only authorized users of NordPass can access another person’s vault when there is an emergency.
This feature allows loved ones or relatives to ask for access to a person’s vault without knowing the master password.
NordPass
In an emergency, family or friends can request access to a user’s vault without knowing the master password.
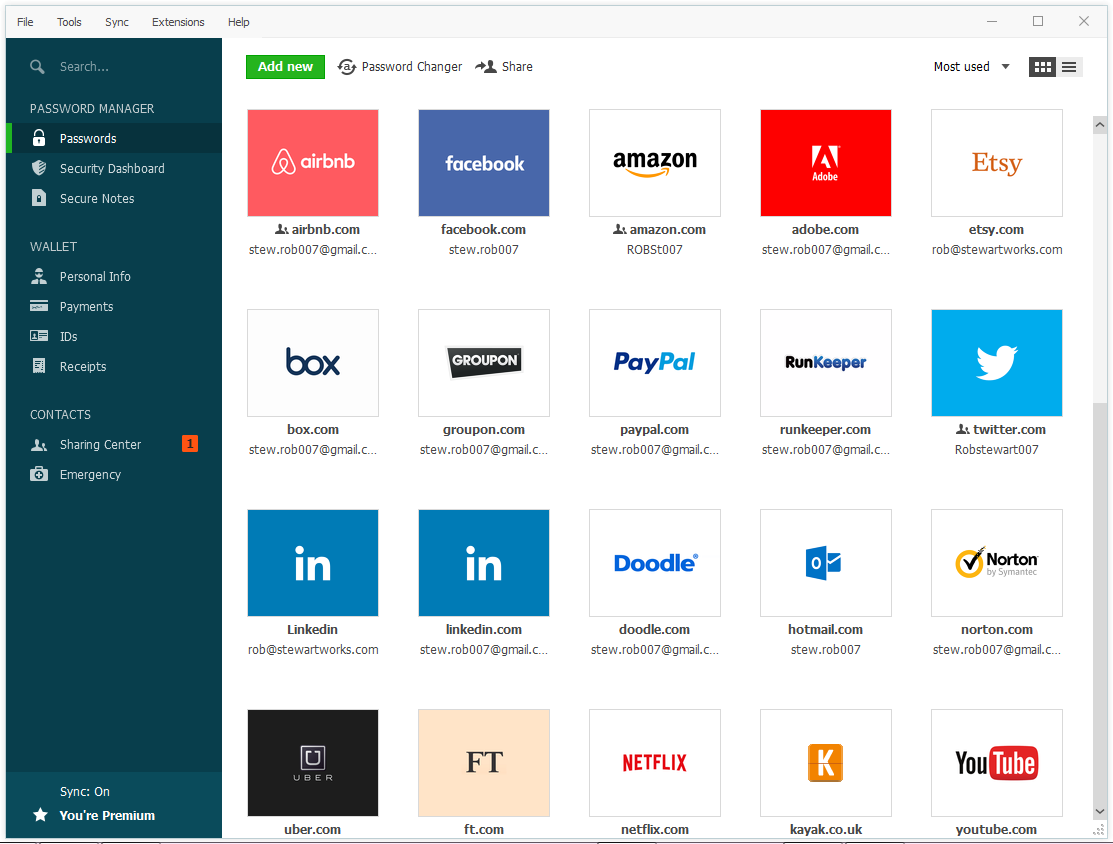
RoboForm is a password management software that you can use to simplify the procedure of storing your passwords for all your accounts.
It has an Emergency Access feature that allows access to your trusted contacts for all your data in the event of death, helplessness, or just as an option for account recovery.
This feature allows secure access to your contacts without the grantor’s Master Password because it uses public-private key encryption, and it also can be revoked at any point.
What’s more, RoboForm has advanced encryption, namely the AES-256-bit algorithm with PBKDF2 SHA256, to protect your activity against brute force, and other threatening attacks.
In addition, it increases the protection of your account with an extra layer by using a multi-factor authentication method.
RoboForm helps you avoid dull, old, or reused passwords that are easy to break and generates strong and unique passwords, further improving your security.
You can have all the features offered in the convenient subscriptions that also include the emergency contact for extra safety, so don’t hesitate to take it.
RoboForm
Grant your trusted contacts access to your information with this all-rounded app.
In terms of password managers, Dashlane is among the best. It can be accessed from any device.
It helps you create secure passwords and watches over your accounts in real-time to alert you to any unusual activity or to suggest a password change.
For those who like to purchase online, the app provides a virtual wallet feature that may securely save your various payment methods, making it possible to complete a transaction quickly and with minimal form-filling.
Dashlane has an emergency access feature that can only be accessed with a premium plan.
Dashlane
Add any trusted close person to access passwords in case of great need, without compromising the privacy of other users.
It keeps all your passwords in a safe vault that only you can have access to via your master code.
Two-factor authentication and AES-256 encryption keep all your data safe, while browser extensions simplify entering login information online. For example, when you shop online, you can pull up your saved credit/debit card and bank information whenever you need to pay.
In addition, 1Password has a unique feature that allows you to store all of your passwords and other sensitive information on the company’s server. Travel Mode is designed to be used when traveling to foreign countries where you may not have access to WiFi or cellular data networks.
All you have to do is turn off Travel Mode to get your data back when you get back home.
If you are using 1Password for your family, you can create an emergency kit, an emergency access tool.
While death is a topic no one wants to think about, it is inevitable, and you should create a way to allow your loved ones to access your accounts.
1Password
Enables the ability to handle accounts on your behalf in a simple and secured encrypted environment.
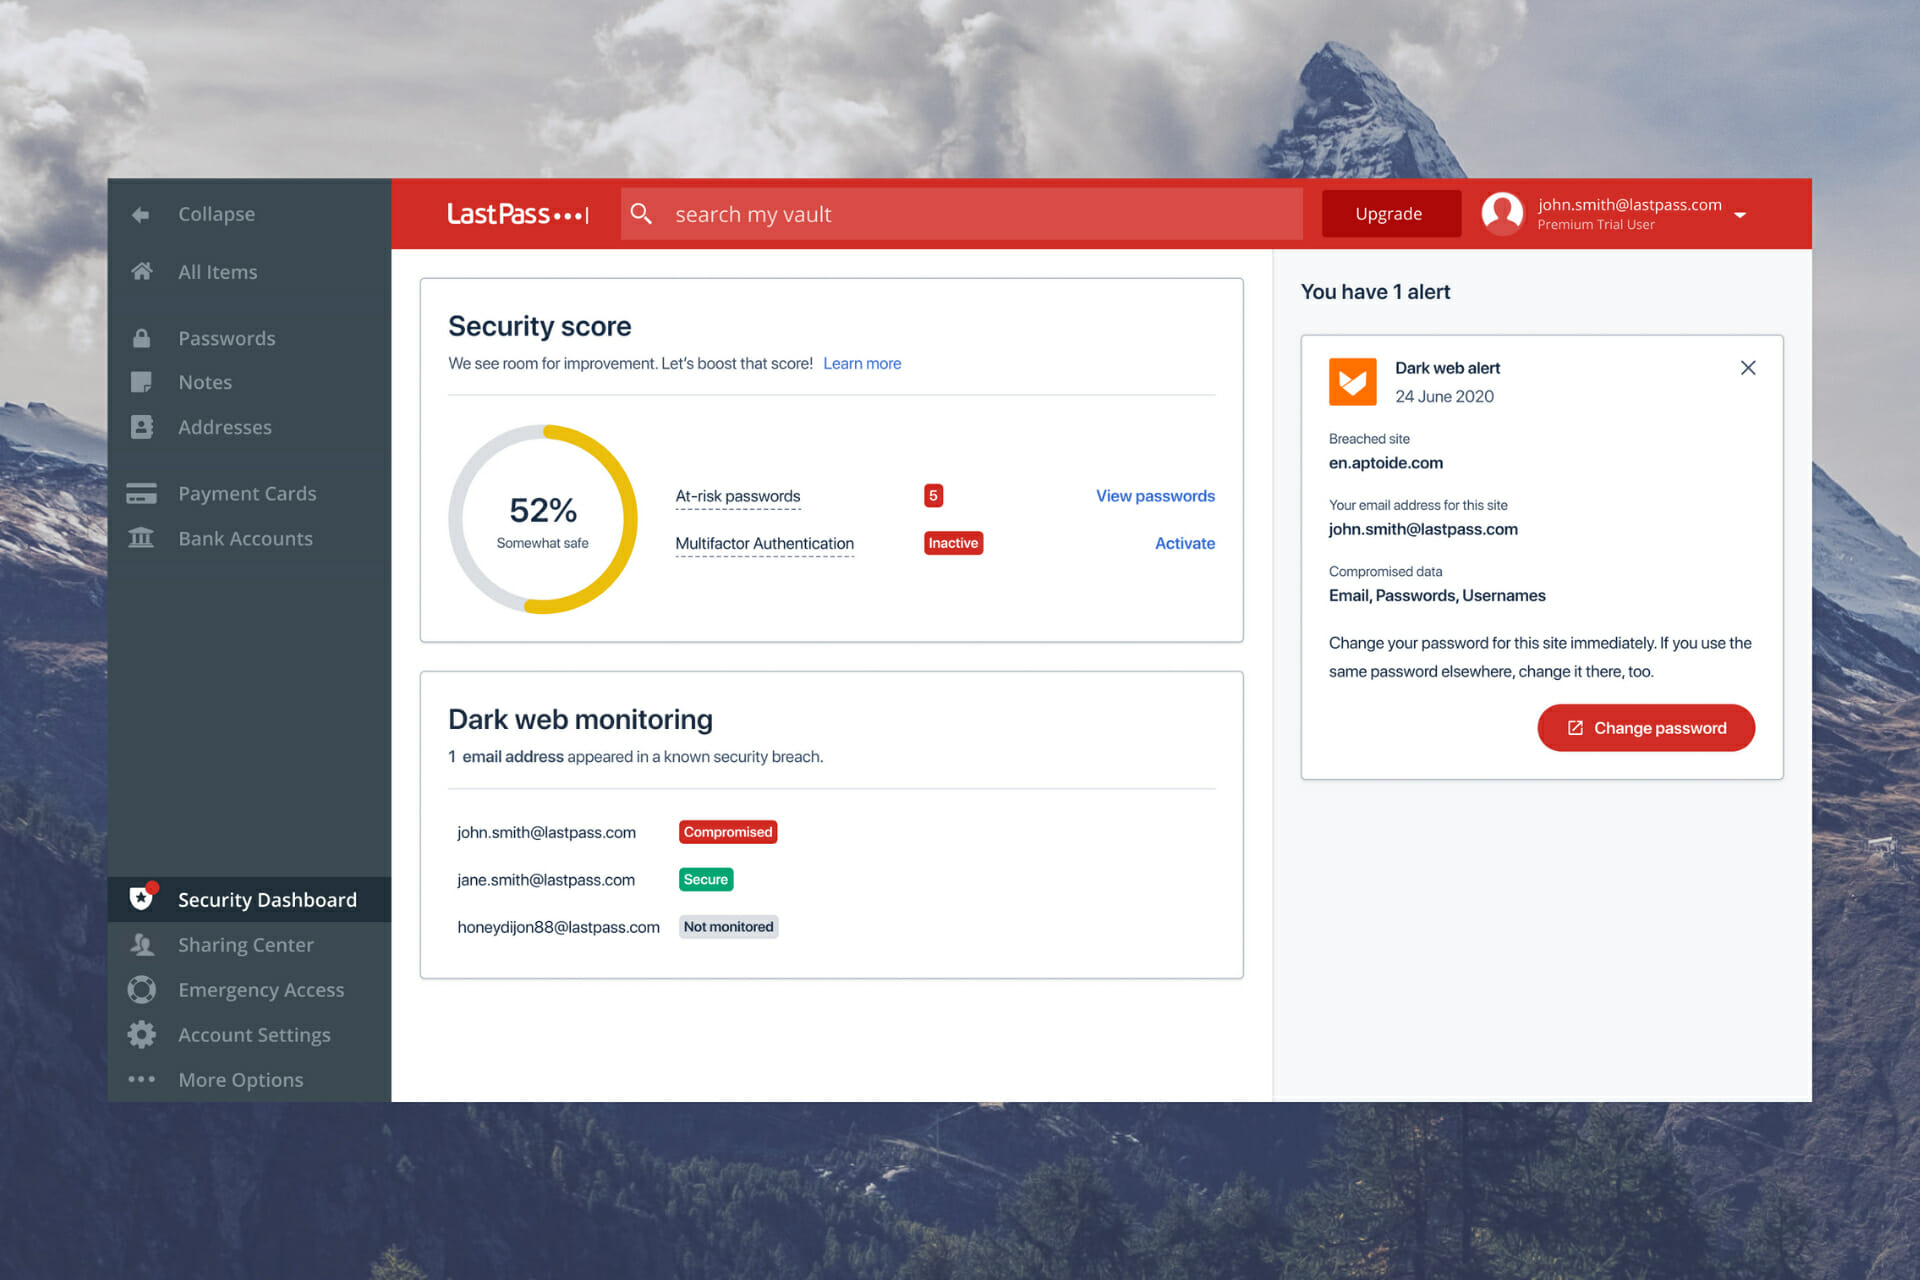
You should check out the LastPass app if you’re searching for a great and affordable password manager for your household.
You can share passwords with your loved ones using LastPass’s family plan, covering up to six accounts.
With this family package, you’ll get access to all premium features.
Clicking on “forgot password” is something many individuals tend to do, and it’s pretty difficult to remember different usernames and passwords used for various sites and apps.
LastPass
By becoming an emergency contact, you can gain access to passwords, accounts, and private notes.
This is a great password manager equipped with 256-bit AES encryption, a zero-knowledge policy, and many MFA(multi-factor authentication) choices.
These choices include regular ones such as the google authenticator compatibility and more complex ones like biometric logins on gadgets.
To top it off, Keeper is highly user-friendly and easy to use. All its features work without any flaws.
Keeper also auto-fills users’ passwords and other web forms with great accuracy. Once you create a new password and login, Keeper offers to save them for you immediately.
Sharing login details with other users and setting specific sharing permissions is also a breeze with this app.
Keeper also has an excellent emergency access tool. Its emergency access feature gives up to 5 trusted relatives or loved ones access to your keeper account in the event of death or a medical emergency.
Keeper
Authorized users have a certain amount of time to visit the vault safely without invading the privacy of other users.
In contrast to its competitors, Bitwarden’s source code is available to the public. As a result, anyone who knows how to decipher code can examine its inner workings, which is a major reassuring factor that it is reliable and safe.
In addition, Bitwarden is free to use for individuals. However, users have access to more advanced features with the Premium plan.
Still, the free version offers all the essentials, including having an unlimited number of users log in and sync across devices.
Bitwarden can also store other sensitive info, such as your credit card number. It also has a username and a password generator.
Bitwarden also has an excellent emergency access feature only available for premium users.
A password manager can also help you generate robust passwords which prevent brute force attacks. Brute force attacks are a prevalent password-guessing attack faced by web developers.
Hackers can use brute-force attacks to find a password by attempting every potential combination of characters, digits, and symbols until they find the one that works.
Brute-force attacks are common on websites that need users to authenticate themselves. Using a password manager will significantly improve your security online.
You can also check out this list to help you select a password manager that suits all your needs. Please share your thoughts in the comments section below!
If you are coming across an error message saying Your IMAP server closed the connection and error code 0x800cccdd in MS Outlook and looking for solutions to fix it, you are at the right place.
Because in this guide, we will list down all the methods that you can try to fix the Microsoft Outlook IMAP Error Code 0x800cccdd.
Notably, the Microsoft Outlook IMAP Error Code 0x800cccdd is one of the most common errors experienced by Outlook users. Almost all versions of MS Outlook have been reported to show this error.
Two of the most common symptoms of the Microsoft Outlook IMAP Error Code 0x800cccdd are that you will get the error message. In addition, if your IMAP server terminates the connection, the Outlook application will frequently freeze while in use.
Besides, some Outlook users have reported they aren’t able to add a new account in Outlook because of this error code.
Whatever the reason, we have listed all the ways and solutions that you can apply to eliminate this error and use Outlook without any issues. This guide is applicable for all versions of MS Outlook, including 2007, 2010, and 2013. So let us get right into it.
What are the reasons for Outlook IMAP Error Code 0x800cccdd?
One of the annoying things when you come across the Outlook IMAP Error Code 0x800cccdd is that there is no one reason for this error to pop up.
Below are some of the reported reasons that trigger the problem for MS Outlook users.
Because of Send/Receive Groups feature.
Presence of corrupt temporary data.
MS Outlook data file is corrupt.
The account is not synced correctly.
Corrupt Outlook profile.
A faulty internet connection prevents send and receive operations from completing promptly.
Your email provider does not support IMAP.
Incorrect time and date.
Now that you understand what might cause the Microsoft Outlook IMAP error code 0x800cccdd let us look at how you can fix the problem.
How can I fix Outlook IMAP Error Code 0x800cccdd?
1. Disable Send/Receive Groups Feature
Launch MS Outlook.
Log in with your email ID and password if you haven’t already.
Click on the Send/Receive tab on the top menu.
Select Send/Receive Groups.
Click on the Define Send/Receive Groups option from the list.
Uncheck the Schedule an automatically send/receive every * minute box.
Click the Close button.
Restart MS Outlook and check if this fixes the issue or not.
Most of the reported cases of Outlook IMAP error code 0x800cccdd have been triggered because of the Send/Receive feature.
Notably, this feature isn’t meant to work with an IMAP connection, which is why users are experiencing the error code 0x800cccdd problem.
Turning off the Send/Receive feature gives IMAP complete control to take over the proceedings of MS Outlook, and you can check if this fixes your issue or not.
2. Create a new Outlook profile
Close any running instances of MS Outlook.
Press the Win + R keys to open the Run dialog.
Type the below command to open the classic Control Panel and press Enter. control.exe
Locate Mail in the classic Control Panel and open it.
Under the Profiles section, click on Show Profiles.
Select Outlook Profile and hit the Remove button to remove your currently attached Outlook profile.
Click Yes to confirm the deletion.
Open Outlook again and follow the steps to set up your account again. You will be asked to create a new profile since the previous one was deleted.
Sync Outlook and send or receive a test email to see if this fixes the issue or not.
One of the most effective ways users have handled and permanently fixed this error code 0x800cccdd with Outlook is by deleting the existing profile and creating a new one from scratch.
You can follow the above steps and create a new Outlook profile and sync it with the client to see if this fixes the issue or not.
3. Check your internet connection
For MS Outlook to work perfectly, you need to have a stable and fast internet connection. In the case of a faulty internet connection, Outlook will not perform optimally and will have sync and other issues.
We suggest you check if your internet connection is functioning correctly or not. Moreover, you can use Fast.com or Speedtest.net to get an idea of the internet download or upload speeds you are getting and match them with your data plan.
If the speeds are poor and you are experiencing frequent network drops, then it is recommended that you contact your ISP and get your internet connection fixed.
4. Extend server timeouts
Launch MS Outlook.
Click on the File option at the top menu.
Head over to Account Settings and select Account Settings.
Click on the Email tab.
Select the email with which you are experiencing the issue.
Hit the Change button.
Click on More Settings at the bottom right.
Switch to the Advanced tab.
Slide the bar to the extreme right for Server Timeouts to Long (10 minutes).
Hit OK to save changes.
Restart your PC and check if this fixes the error code 0x800cccdd or not.
Outlook requires some time to send or receive information or procedures ultimately. By default, the server timeout frame is set to 1 minute.
If there are some underlying issues with your internet connection, then Outlook may not be able to perform the required procedures within the 1-minute timeframe.
For this reason, you can follow the above steps and extend the server timeout frame to the maximum, i.e., 10 minutes, giving Outlook more room to perform necessary actions.
Navigate to any of the below addresses based on your PC configuration. C:\ Program Files - 64-bit VersionsC:\ Program Files - 32-bit Versions
Using the Search bar, look for SCANPST.exe inside the folder and open it.
Click on Browse and select the correct path of your PST file. The default location is usually Documents \ Outlook files.
Hit Start to begin the scan for repair.
Once the scan completes, you will be shown the result containing the errors the tool has found.
Check the box for Make backup of scanned file before repairing option.
Press the Repair button to fix the PST file.
Restart your PC after the repair completes and check if this fixes the Outlook 0x800cccdd error or not.
There is a built-in email-repair tool in Outlook called the ScanPST.exe utility. Users have reportedly been able to fix the 0x800cccdd error using this email repair tool.
It can perform a quick scan of Outlook to detect any corrupt or problematic files and repair them after your consent.
You can follow the above steps and initiate the ScanPST.exe email repair tool and check if this fixes the problem at hand or not.
6. Change date and time
Press Win + I to open the Settings.
Click on Time & language from the left pane.
Select Date & time.
Enable the toggle for the Set time and Set time zone automatically options.
Open Outlook and check if this fixes the issue or not.
If there is a big difference between your local time and the time on the server, MS Outlook will misbehave and show errors, including 0x800cccdd.
You should set the correct date and time for Outlook to match it with the server because several users have fixed this issue with this simple solution.
7. Re-add email account
Press the Win + R keys to open the Run dialog.
Type the below command to open the classic Control Panel and press Enter. control.exe
Locate Mail in the classic Control Panel and open it.
Click on the Email accounts button.
Switch to the Email tab and click on the New button.
Enter all the information asked in the list and click Next to complete the process.
Select the newly created email and hit the Set as default button.
Open Outlook again and log in with the same ID. Check if this fixes the issue or not.
How can I clear corrupted temporary data associated with the connected Outlook account?
The Outlook IMAP error code 0x800cccdd isn’t just the only error you might experience with MS Outlook.
Below are some of the most common errors and issues that Outlook users have reported.
➡ Outlook Meeting issues: If you are experiencing Outlook Meeting issues, where it isn’t showing up in the calendar, not sending invites, won’t open/cancel/delete invites, etc., you should check out our dedicated guide on how to fix the problem.
➡ Outlook can’t upgrade your database error: Users facing Outlook can’t upgrade your database error message can follow our guide on how you can fix the problem for good.
➡ Outlook not searching all emails: If the search bar in MS Outlook isn’t doing its job and letting you search for all emails, you can check out our guide to fix the problem.
Let us know which one of the solutions mentioned above helped you fix your PC’s MS Outlook IMAP error code 0x800cccdd. Also, if you have fixed the issue using a different method, do share that in the comments section below.
Microsoft news recap is a weekly feature highlighting the top Microsoft news stories of the past week. Sit back, grab some coffee, and enjoy the read!
Xbox head Phil Spencer says Microsoft will recognize Raven Software union once Activision Blizzard acquisition is complete
One of Activision Blizzard’ subsidiaries, Raven Software, has seen its quality assurance department vote to unionise. Microsoft is currently in the process of acquiring Activision Blizzard. CEO of Microsoft Gaming, Phil Spencer, during an all-hands meeting with employees said that Microsoft would recognise the union once the acquisition completes.
DuckDuckGo’s partnership with Microsoft calls into question its “privacy first” policies
DuckDuckGo has found its privacy-first stance being questioned after it was discovered that the search engine’s browser on iOS and Android sends data to Microsoft when visiting LinkedIn or Bing, and it has been discovered that this is because of a search syndication agreement that DuckDuckGo has with Microsoft, preventing it from blocking this tracking.
Sometimes you find something so disturbing during an audit, you've gotta check/recheck because you assume that *something* must be broken in the test.
Microsoft confirms “Keystone” Xbox game streaming stick is still in the works, but with “new approach.”
Microsoft is still hard at work on its Xbox game streaming stick, codenamed “Keystone”, but the company released a statement that it has changed its approach to the streaming stick, without giving any specific details.
That’s it for this week. We will be back next week with more Microsoft news.
Finding out Video Speed Controller is not working is always annoying, especially when watching a boring movie or show.
A video speed controller is a tool that allows users to adjust playback speed settings on HTML 5 videos. A good application can use it to speed up or reduce the video speed depending on your needs.
However, most users have been facing the problem of the video speed controller not working consistently. However, the issue is often associated with extension problems.
Since most video speed controllers are browser extensions, our troubleshooting solutions will cater to that.
How do I fix video speed playback?
The best way to fix any issues with the video speed playback on your device is to use the Video Speed Controller element.
Unfortunately, if this is not available or doesn’t work optimally, your capability to edit video speed playback will have to suffer.
In today’s guide, we will cover the exact methods to apply to be in complete control of your device’s video speed playback.
How do I use a video speed controller on Netflix?
Although Netflix had tried to integrate speed control into their apps, it was greeted with strong opposition. So, they ended the project.
Hence, to take advantage of what a video speed controller does, you will need to use a browser to access the streaming service, and you will get some useful information below about how that can be done.
How do I use the video speed controller on Edgenuity?
There might be situations in which you will need to speed up or slow down the playback of videos on Edgenuity, and for these cases, it is recommended to use a Chrome extension.
Unfortunately, this extension is initially made for HTML5 videos, while Edgenuity uses Flash.
The application will allow you to use it only if you disable Flash from running. Follow the following steps to achieve this result quickly:
Type the following path in your Chrome URL box and hit Enter: chrome://settings/
Choose Privacy & Security.
Click on Site settings.
Scroll down to Additional permissions.
Choose the Additional permissions option.
Finally, find and activate the Block sites from running Flash option.
As a result, a number will appear in the top left corner of your screen, indicating the payback speed.
NOTE
After using x1.5 speed, there are situations where the extension doesn’t recognize that the video has finished. If seeing this problem, try rewinding the video a small amount.
How do you use the video speed controller on Android?
To control the video playback speed on your Android device, it is recommended that you install the Video Speed Controller extension on your Firefox browser.
Here is how to use it:
Open a page with a video on it.
Press the video once, and click on More.
Click the Playback Speed option.
Choose the speed you require.
How can I fix the Video Speed Controller not working problem?
➡ Chrome
Make Video Speed Controller the only active extension
Press the Windows key, search Google Chrome and launch it.
Click the menu button (three dots), select More tools and choose Extensions.
Toggle the blue slider next to the Video speed controller to enable it.
Toggle the slider back for other extensions to disable them.
Restart Chrome to take effect
Sometimes, the problem is caused by a faulty extension. Disabling them will enable smooth performance from your Video speed controller.
If this fails to work, try the next solution for the video speed controller on Chrome not working.
2. Clear Chrome Cache
Launch the Chrome app, and click the menu button (three dots).
Select More tools and choose Clear browsing data.
Pick All-time, check Cookies and other site data, and Cached images and files.
Click on Clear data.
Corrupted cache and cookies could cause the malfunctioning of the extension on Chrome. Hence, cleaning the cache will remove all corrupted files.
Press the Windows key, search Firefox, and launch it.
Click the menu button, select help (?), and choose Troubleshooting Information.
Locate the Application Basics section, Select Show Folder beside the Profile folder.
Search for prefs.js files and delete them all.
2. Reset Firefox to default
Follow steps 1 and 2 above to access the Troubleshooting Information page.
Click Refresh Firefox to restart in Safe mode.
Refresh Firefox and confirm it.
Resetting Firefox to factory default will remove all add-ons and customization for best performance. Then you can reinstall your video speed controller after this. A good setup will fix all issues, including the video speed controller not working on Firefox.
These are the best fixes whenever your video speed controller is not opening. If you use a different browser, follow the same steps highlighted here. It is the same solution but may require slight differences in steps.
If you want to improve the appearance of your computer, consider purchasing a CPU cooler with a screen.
The ancient and noisy CPU coolers only served one purpose in the past: cooling the laptop’s core processor. However, times have changed.
Apart from performance, many gamers buy RGB keyboards, mice, and other accessories to make their setup look modern and vibrant.
Several factors should be examined when purchasing a CPU cooler with a screen to ensure that you are purchasing the proper equipment for your setup, both in terms of performance and aesthetics.
What are the qualities of a good CPU cooler?
Given that the majority of CPU coolers with screens are liquid coolers, the fan’s spinning speed and noise should be the first things to examine.
The best CPU cooler with a screen has a high spinning speed, little noise, and an extended life span. Additionally, it should have a good screen quality with high contrast.
GAMMAXX L series AIO coolers are known for their powerful performance, tidy appearance, and appealing cost-effectiveness, and they are the first on the list.
With the “Anti-leak Tech Inside” technology, the GAMMAXX L240 V2 has improved its reliability, allowing users to enjoy maximum CPU performance without worrying about leakage.
What are the specs of this masterpiece of a CPU cooler with a screen? Here there are:
Radiator Dimensions
282×120×27 mm
Radiator Material
Aluminum
Pump Dimensions
91×79×47 mm
Pump Speed
2400 RPM
Pump Noise
17.8 dB
Pump Connector
3-pin
Pump Power Consumption
2.4 W
Fan Dimension
120×120×25 mm
Fan Speed
500-1800 RPM
Fan Airflow
69.34 CFM
Fan Air Pressure
2.42 mmAq
Fan Noise
≤30 dB
Fan Connector
4-pin
Bearing Type
Hydro Bearing
Fan Power Consumption
2.04 W
Screen Type
RGB LED
Let us now discuss the advantages and disadvantages of this CPU cooler.
The Gammaxx L240 features an all-in-one design that integrates a radiator, a pump, and two fans (2 x 120 mm in this case) into a single closed loop.
If your motherboard doesn’t have any LED headers, you won’t be able to control the lighting because there is no Deepcool software and no SATA-powered lighting controller.
The new water-block and fans have a built-in 12V RGB lighting system with three RGB effects: breathing, static, and multi-color cycling, which suit your aesthetic preferences while also allowing popular motherboards to use synchronized lighting control.
The fans are barely audible while the machine is idling. The fans rotate at roughly 1500 rpm under wPrime; they are not silent, but they are relatively quiet.
We had no concerns about the pump because it was nearly inaudible (even when the fans were turned down).
NZXT’s Kraken CPU coolers are among the most well-known all-in-one CPU coolers available.
Let’s start with the specifications of this CPU cooler with LCD screen, then talk about the design and finish with a review of the cooler.
Radiator Dimensions
143 x 315 x 30mm
Radiator Material
Aluminum
Pump Speed
800 – 2,800 ± 300RPM
Fan Speed
500 – 1,800 ± 300RPM
Fan Airflow
27.27 – 98.17 CFM
Fan Air Pressure
0.21 – 2.71 mm-H₂O
Fan Noise
21 – 38 dBA
Fan Connector
4-pin
Screen Type
24-bit True Color LCD
The NZXT Kraken Z63 RGB is a stylish, albeit pricey, CPU cooler. The Kraken Z-3 series is one of the most visually appealing CPU coolers we’ve ever seen.
Note that the pump’s LCD provides active temperature monitoring and the AER 2 fans enable multi-zone RGB with little cabling.
The latest software from NZXT, CAM, allows the user to fine-tune the parameters, making it ideal for reconfigurations.
Temperatures, speeds, power management, and cooling can all be changed. As a result, CAM’s user-friendly program gives you control over your PC.
This is a great CPU cooler with customizable screen, so it’s a must-buy for any enthusiast.
MSI’s first liquid AIO to bear the MPG name, implying that it will outperform the company’s prior MAG CoreLiquid coolers. The specs are next, followed by a review of the cooler.
Radiator Dimensions
394 x 120 x 27mm
Radiator Material
Aluminum
Pump Dimensions
94.66 x 83.36 x 94mm
Pump Noise
20 dBA
Pump Power Consumption
4W
Fan Dimension
120 x 120 x 25mm
Fan Speed
2500 RPM
Fan Airflow
77.4 CFM
Fan Air Pressure
4.29 mmH2O
Fan Noise
39.9 dBA
Fan Connector
4-pin
Bearing Type
Two Ball Bearing
Fan Power Consumption
3.36 W
Each fan has eight blades, with each pair of blades working together to direct airflow and air pressure into the heatsink.
The fan blades appear white, however, they are translucent and frosted to distribute the RGB illumination evenly.
Rubber pads on the front and back corners of the fans serve to decrease or eliminate vibration noise. Each fan has a 4-pin PWM connector, and the ARGB lighting has its own connector.
The LCD is only 2.4′′, despite the fact that the CPU block appears to be quite large. On the sides, there are also black bars. the K360’s cooler screen contrast and color saturation are not its strong suits.
Even more, the RGB lighting is properly diffused, and the CoreLiquid program or the MSI Center app offers numerous effects to pick from.
The fans are also fairly strong, with speeds of up to 2,500 RPM. It can, however, become audible, especially when they’re moving at fast speeds.
Are ASUS CPU coolers good? Yes, they certainly are. If you’re planning a high-end construction but aren’t sure which cooler to use, this is the most secure option.
You will be blown away with the ASUS ROG Ryujin II 360! This CPU cooler with a screen is an AIO liquid cooler that is sure to include all of ASUS’ best features.
It’s a crown jewel, so it’ll be expensive, but it’ll be well worth it.
Radiator Dimensions
394.0 x 121.0 x 27.0 mm
Radiator Material
Aluminum
Pump Speed
840-2800 RPM
Fan Dimension
120×120×25 mm
Fan Speed
500-1800 RPM
Fan Airflow
71.6 CFM
Fan Air Pressure
3.94 mmH2O
Fan Noise
29.7 dBA
Fan Connector
4-pin
Fan Power Consumption
2.04 W
Screen Type
3.5″ Full-Color LCD
A 3.5″ LCD panel on the ROG Ryujin II 360 may display customized visuals. It’s the world’s largest LCD on an AIO cooler.
The Armoury Crate software allows you to customize the LCD settings to display voltages, fan speeds, temps, and frequencies.
Note that the ROG Ryujin II is compatible with both Intel and AMD motherboard platforms. This allows you to use it with any processor you want. Mounting and routing this AIO cooler will be easy thanks to its 38cm tube.
The newer multi-core GPUs can considerably raise the temperature of your system. ASUS integrated industrial-grade PWM fans from Noctua to address these thermal issues.
These provide excellent cooling performance while producing minimal noise.
Let’s talk about a CPU cooler with a temperature display. The simplest way to define the AORUS LIQUID COOLER 280 is as an AIO liquid cooler that looks attractive and performs well.
Radiator Dimensions
315 x 143 x 30mm
Radiator Material
Aluminum
Pump Dimensions
80 x 80 x 60mm
Pump Noise
17.8 dB
Pump Connector
3-pin
Pump Power Consumption
2.4 W
Fan Dimension
140 x 25mm ARGB Fan x 2
Fan Speed
2300 RPM +/-10%
Fan Airflow
100.16 CFM
Fan Air Pressure
5.16 mmH2O
Fan Noise
22.3~44.5 dBA
Bearing Type
2 Ball Bearing
Screen Type
Full-Color LCD
With the new high-performance pump efficiently dispersing heat from high-end CPUs, heat from the CPU should be no problem.
There are a lot of fancy CPU coolers with screens out there, and the AORUS LIQUID COOLER 280 is one of them. It’s in the expensive range, with a configurable LCD display and all the aesthetics you need.
While some people may be hesitant to spend money on something that simply has good aesthetics but poor performance, this is not the case with the AORUS LIQUID COOLER 280.
Users can change the lighting patterns on the AORUS Falcon logo and fan blades, as well as synchronize lights with accessories, allowing them to show off their personal flair.
If you are looking for good looks rather in cost of some performance, then ASUS ROG RYUO will certainly suit your needs.
With an OLED screen and good cooling capabilities, this cooler will make your PC look 100 times better. Let us look at the specs:
Radiator Dimensions
122 x 150 x 27 mm
Radiator Material
Aluminum
Fan Dimension
120×120×25 mm
Fan Speed
800 – 2500 RPM +/- 10%
Fan Airflow
80.95 CFM
Fan Air Pressure
5.0 mmH2O
Fan Noise
37.6 dB(A)
Screen Type
1.77″ Full-Color OLED
Speaking of this model, which is just $20 cheaper than its older brother and is one of the few OLED CPU coolers, its cooling capacity is weak.
Within the price range in which it is found, we have cheaper and better performing options; essentially, the price of this model is determined by the OLED screen rather than other elements.
Compatibility and installation are clearly the most important features of this model.
This CPU cooler includes comprehensive support for today’s sockets, from LGA-115x and AM4 to HEDT sockets like TR4 (thanks to the bracket that comes within the CPUs) and LGA-2066 in the 240mm version.
What is the advantage of having a CPU cooler with a screen?
The coolers with screens are more aesthetically pleasing and give the case a more attractive appearance.
The majority of them are also customizable, allowing you to show off your particular style. The temperature of the CPU and other relevant metrics are also displayed on cooler screens.
Among the CPU coolers introduced above ASUS ROG RYUO, 120 RGB has the best looks with the high-quality OLED screen.
To talk about the best performer, NZXT Kraken Z63 can provide amazing cooling power and prevents your CPU from throttling.
MSI MPG Coreliquid K360, on the other hand, is the most affordable and can be bought for low-budget builds.
Also, don’t worry it still works like a charm when it comes to cooling off the core processor utility of a PC.
If you have to upgrade your PC for the new OS, take a look at our list including the best CPUs for Windows 11.
Which CPU cooler would you choose? Tell us in the comments section below.
Over the last several months, GameStop has been making efforts to diversify its primary business, which has helped the company attain a reputation similar to that of a cult among investors since it has become a meme stock.
The cryptocurrency industry is becoming increasingly competitive, and GameStop decided to release a version of its digital asset wallet. This wallet enables anyone, including gamers, to store, transmit, receive, and utilize NFTs and cryptocurrencies.
Follow along as we will address your most asked questions such as the GameStop wallet extension price, how it works and how you can use it on your browser. Keep on reading!
What is the GameStop wallet?
The free GameStop wallet will be keeping your private keys, which are the passwords that enable you to access your cryptocurrencies, both secure and easy to access.
This will make it possible for you to transfer and receive cryptocurrencies such as Ethereum. Crypto wallets are available in a wide variety of formats, ranging from hardware wallets like the Ledger (which resembles a USB stick) to mobile applications like the Coinbase wallet.
With the GameStop wallet extension, it will be even easier to access your assets. According to the company, the wallet is a self-custodial Ethereum wallet. Moreover, the wallet extension will be able to be downloaded from the Chrome Web Store.
It will also enable transactions on GameStop’s NFT marketplace. Which according to a press release, is expected to launch in the second quarter of the company’s fiscal year.
How to get the GameStop wallet extension?
1. Download on Chrome
Since the GameStop wallet extension is only available on the Chrome Web Store. Therefore you will be able to use the GameStop wallet extension for Chrome and Brave. Thus, open your Chrome browser and type in Chrome Web Store, or follow the direct link towards it.
Next, type GameStop Wallet inside the search bar and click on the GameStop Wallet result.
Click on the Add to Chrome button.
Next, click on the Extension icon from your Chrome and then click on the GameStop Wallet extension. You will be prompted with a pop-up window that will ask you to Create a new wallet or Recover one. That’s it!
2. Download on Brave
Open your Brave browser and click on the burger menu from the top-left corner then select Extensions.
Scroll down and click on the link to the Web Store.
Here, type GameStop Wallet in the search bar then select the topmost result.
Tap on the Add to Brave button then access the extension from the Extensions icon. Just like before, you will be able to create or recover a wallet.
If you lose your private key or seed phrase, you will no longer have access to any coins that are connected with that key. Because of this, it is imperative that you save this information in a safe area.
It is strongly advised that at all times, at least one backup copy be kept in a distinct, safe location. Keep in mind that anyone who has access to your private key and/or seed phrase also has access to your funds.
People who are not familiar with cryptocurrency frequently get one element of it wrong, which is that it is possible to have your cryptocurrency coins hacked and stolen.
Even if there are countless cases of breaches from the past, the private key itself is not what is compromised when a hack occurs because it is the centralized platform that is targeted.
It is simply not feasible for a computer to guess a private key that is connected with a particular address since it would take the computer hundreds or even thousands of years to do so.
However, coins that are saved in a browser extension are still susceptible to several attack vectors. The safest option to keep your coins is on a hardware wallet or through a combination of a web 3.0 wallet and a hardware wallet.
CCleaner is a third-party utility developed by Piriform to clean unwanted files on the system and clear storage space. There are a whole lot of sections in the CCleaner, but Advanced options are one of the most useful and offer a plethora of handy settings.
As the name suggests, these settings are truly advanced and CCleaner recommends you go with the default selections. But, what’s the fun in that?
So if you have ever looked through the Advanced options in CCleaner and wondered about these, here are the CCleaner settings explained.
Is CCleaner still good?
CCleaner was released in the year 2004 for Windows and in 2012 for macOS. It remains one of the most effective tools to delete unwanted, junk, and temporary files. Though the interface is not as appealing and user-friendly, CCleaner still works perfectly and helps clear a large chunk of storage.
Also, it offers a bunch of different settings and customizations to help users configure things as per the requirement. For those who are not yet willing to pay for the tool, there is a free version available as well.
If you haven’t tried it yet, we really suggest you to do so and don’t forget to let us know how you like it in the comments section.
Launch CCleaner and select Options from the navigation pane on the left.
Next, click on Advanced in the list of options on the right.
All the Advanced options will now be listed on the right.
If you ever run into issues with these, you can always go back to CCleaner default settings by clicking on the Restore default settings button at the bottom.
What are the various Advanced options in CCleaner?
Let’s find out the function of each of the settings in Advanced options in CCleaner.
Cleaning results level of details: Two options under it. Advanced Report, selected by default, to list the results of every cleaning option, or File List to mention the items in the form of a list.
Only delete files in Windows Temp folder older than 24 hours: This setting, selected by default, cleans files in the Windows Temp folder older than 24 hours. Ensures that files currently in use are not deleted.
Only delete files in Recycle bin older than 24 hours: This setting deletes files in the Recycle bin after 24 hours.
Hide warning messages: Hides the warning messages. Select it if you want to run CCleaner in silent mode.
Close program after a Custom Clean: When enabled, CCleaner would close after a custom clean operation.
Shutdown after a Custom Clean: When enabled, the PC will automatically shut down after a custom clean.
Show prompt to backup registry issues: This setting, enabled by default, sends prompts to backup your Registry before CCleaner is run.
Minimize to System Tray: Enable this setting and CCleaner will minimize to the system tray when you close it.
Save all settings to INI file: When the option is enabled, the app settings will be saved to the ccleaner.ini file and can be easily copied to other computers.
Skip User Account Control warning: As the name suggests, you wouldn’t receive any UAC prompts with this setting enabled. Though, it’s enabled by default.
Enable Windows Jump List Tasks: This setting allows you to execute various actions in the CCleaner when it is minimized.
This should provide you with a basic idea of the various Advanced option in CCleaner. And from now on, these wouldn’t be so advanced for you anymore.
Why do I need to access CCleaner’s advanced options?
The settings listed under Advanced options in CCleaner shouldn’t be modified under normal use. But some of these may help simplify things to a great extent. For instance, the option to automatically shut down after a custom clean will save you the effort of manually shutting down the PC.
The setting to Skip User Account Control warning helps save a lot of time. Imagine approving all the UAC confirmation prompts while executing a simple task on CCleaner.
In all, the CCleaner’s Advanced options are a great collection and can simplify the whole task, if used properly. Configure them as per your requirement and have the best CCleaner settings on the computer.
However, several users have run into issues with the Advanced options in CCleaner. Many had these settings enabled without realizing and believed that the tool malfunctioned. So, make sure to understand each setting before enabling/disabling it.
That’s all there is to Advanced options in CCleaner and how you can put these to good use. Also, find out what to do if CCleaner keeps disappearing on your PC.
If you have any other queries, feel free to drop a comment in the section below.
The excitement of the arrival of Lego Star Wars The Skywalker Saga was short-lived for some gamers after experiencing issues related to the Skywalker Saga not working.
Bugs and crashes are not peculiar to a specific game, especially newly launched ones. The manufacturer of the Skywalker Saga as expected will continually release updates and patches to fix issues as much as possible.
Most of the issues may not be fixable by patches but by a simple tweak of the computer configuration and game settings. Read along as we highlight how to fix Skywalker Saga when it’s not working.
Can you play Lego Star Wars Skywalker Saga on PC?
Yes. The Skywalker Saga can be played on PC, specifically, Windows-powered computers. Unfortunately, it only supports Windows 10/11.
It is expected that any system you are installing the Lego Star Wars The Skywalker Saga should tick all of these requirements:
Minimum requirements for PC
Operating System (OS): Windows 10 64-bit
Processor: Intel Core i5-2400 or AMD Ryzen 3 1200
Memory: 8 GB RAM
Graphics: GeForce GTX 750 Ti or Radeon HD 7850
DirectX: Version 11
Recommended requirements for PC
Operating System (OS): Windows 10 64-bit
Processor: Intel Core i5-6600 or AMD Ryzen 3 3100
Memory: 8 GB RAM
Graphics: GeForce GTX 780 or Radeon R9 290
DirectX: Version 11
Storage: 40 GB available space
How do you download Skywalker Saga on PC?
There are many platforms offering download links to the Lego Star Wars The Skywalker Saga. However, avoid them at any cost as they may contain dangerous files for your system.
Epic Games and Steam are the two popular and reputable platforms where you can download the Lego Star Wars and The Skywalker Saga. Steam Remote Play Together feature allows you to activate the Skywalker Saga co-op and play online.
To download the game, you only need to visit your preferred site such as the official Lego Star Wars The Skywalker Saga game page on Steam or on the Epic Games platform. Scroll down the page and follow the instructions on the screen to download it.
How do I fix Skywalker Saga on Windows 10/11?
1. Update Windows
Launch a new Run box by pressing the Windows key + R, then type the command below and press Enter: ms-settings:windowsupdate
If there are Updates available to download, select Download now, otherwise click on the same blue button that will say Check for new updates.
Restart your PC to apply the changes made then go back to playing Skywalker Saga.
2. Update your graphics driver
Open the Quick Access Menu by tapping the Windows key + X and select Device Manager.
Click on the small drop-down arrow beside Display adapters. Right-click on the Graphic driver and choose Update driver.
Ensure that you have the most recent versions of your drivers for Skywalker Saga to work properly. There are third-party tools that can perform this for you automatically.
A driver updater program such as DriveFix will instantly scan your computer and list any hardware that has outdated drivers. You may rely on Outbyte Driver Updater to make such changes to ensure a proper update with the most recent graphics card drivers.
Press the Windows key + I to launch Settings then select Privacy & Security and choose Windows Security.
Choose Virus & threat protection.
Scroll, locate and click Manage settings.
Toggle the button under Real-time protection to Off. When prompted by the User Account Control, select Yes.
4. Open the game file using its executable(.exe)
Open the Steam application and go to Library.
Right-click on the Skywalker Saga game and choose Properties.
Pick the Browse option then locate the executable file with .exe extension.
Launch the game from the executable file. That’s it! The Skywalker Saga not working issue will be gone.
5. Verify the integrity of the Skywalker Saga game file on Steam
Launch the Steam application and choose Library.
Locate Lego Star Wars Skywalker Saga in your game lists and right-click on it to select Properties.
Go to the LOCAL FILES tab and pick Verify Integrity.
Select the option Verify integrity of game files…, then wait until the Validating Steam Files message reaches 100%.
What can I do if Skywalker Saga is not launching?
1. Check system compatibility
The Lego Star Wars The Skywalker Saga will not launch on your PC if the Operating System (OS) version is anything lower than Windows 10. The Direct X version must also be nothing lesser than Version 11.
It is recommended that you have up to 42 GB of space available on your system to allow the optimal functioning of the Skywalker Saga game. Also, if the Skywalker Saga keeps crashing, make sure to check the system compatibility.
2. Turn off the Steam overlay
Open the Steam application and select the Library tab.
Right-click on the Skywalker Saga game and choose Properties from the context menu.
Choose the General tab and uncheck the box next to Enable Steam overlay while in-game.
How do I fix Skywalker Saga not loading issue?
1. Wait it out
Sometimes, when players encounter issues related to Skywalker Saga not working, it is only a result of a lack of patience.
The game might take a while to load. Just exercise patience. Wait for at least 5 minutes before thinking of tweaking any settings to fix the issue.
2. Run in a clean boot environment
Launch Run by pressing Windows key + R and type the command below and press Enter to open the System Configuration: msconfig
Go to the Services tab then check the box beside the Hide all Microsoft services. Next, click Disable all and then tap on OK.
Reopen the System Configuration and select the Startup tab. Choose Open Task Manager.
Right-click on each task and click Disable.
3. Adjust the system power plan
Open Settings by tapping Windows key + I then select System and pick Power & battery.
Scroll to locate Power mode and then choose Best performance.
Why is Skywalker Saga not updating?
There have been updates including patches for errors in the Lego Starwars: The Skywalker Saga. The failure of the game to update might not be caused by issues on the platform you are running it.
Until there is a patch to solve this issue, presently, there is no official fix for errors related to Skywalker Saga not saving.
For players using Steam, you can try to uninstall and reinstall the Lego Starwars: The Skywalker Saga. If you have the Steam cloud save enabled, then this may help fix it. You can read our guide on how to safely uninstall games on Steam to use this method.
What are some of the most common bugs in Skywalker Saga?
While there are methods to fix some issues related to the Lego Starwars: The Skywalker Saga, there are others errors caused by bugs. They can only be fixed by updates from the game developer.
Here are some of the most common bugs in Skywalker Saga reported by players so far:
Failure to install and error code CE-100005-6: There have been reports of the Skywalker Saga failure to install. In some cases, it gets stuck on the installation screen. The developer is expected to release a patch for this soonest.
Inability to throw the lightsaber: You may be unable to throw the lightsaber when facing Kylo Ren in Episode 7 of the Skywalker Saga. Using the Single sword swing might help to get past the stage.
Corrupt save file: Players have gone to sleep with their games saved only to wake up to continue and discover they can only make a new save or override the previous. Uninstalling and reinstalling the game might help fix it.
Login and disconnection issues: This Skywalker Saga has been reported to suddenly disconnect users while some were unable to log in. Confirm the status of the server by checking comments on gaming forums and official social media accounts of the game developer.
Malfunction when dubbing: It happens at some points such that you find it difficult to follow the plot in Skywalker Saga. The solution confirmed by many gamers is that you will need to restart the game and it comes at a cost; progress may be lost.
By now, you should have been able to resolve any problem with The Skywalker Saga and be able to enjoy the title as you intended to. For players launching the game using Epic Games and facing login issues, you can find out how to fix Epic Games woes.
Let us know in the comments section if you have any other solutions to issues related to Skywalker Saga not working.
The Open shell not working on Windows 11 isn’t a new problem and has been troubling users since the arrival of this new OS.
The cause of the Open-Shell Windows 11 not working issue is not specific. It could be caused by an unexpected error in a program, the presence of a virus or malware, or corrupt system files as well.
For those who don’t know, Open-Shell is a replacement for the Classic Shell, which was discontinued in 2017. You can check out our guide on how to install Classic Shell on Windows 11.
You can learn more about bringing back a classic Windows layout by reading this guide on the Open Shell Classic Start Menu.
Head to the below-mentioned path. Computer\HKEY_CURRENT_USER\Software\Microsoft\Windows\CurrentVersion\Explorer\Advanced
Right-click on the blank space and select New > DWORD (32-bit value).
Name it EnableXamlStartMenu.
Double-click on the newly created value and set the Value Data to 0.
Restart Windows Explorer and check if this fixes the issue or not.
In the same location as mentioned above, locate Start_ShowClassicMode (If it is not available then you are good).
Right-click on it and select Delete.
6. Check for the latest Windows updates
Press the Win + I keys to open Settings.
Select Windows Update from the left pane.
Hit the Check for updates button.
What are the other things I should know about Open Shell?
➡ Open Shell works perfectly well with Windows 11. However, if you come across any issues, then you can follow the steps above to fix the issues you are experiencing with Open Shell.
➡ If you think Open Shell is causing multiple issues on your Windows 11 PC, then we would recommend you uninstall it. It can be done simply from the Control Panel.
➡ Open Shell does not completely remove the Windows 11 taskbar. However, you can make use of the various customization features in order to change the look and behavior of the Windows 11 taskbar.
Let us know in the comments below which one of the above-mentioned methods helped you resolve the Open Shell Windows 11 not working issue.
Respondus LockDown Browser is a specialized web browser that improves the integrity of Blackboard test delivery.
Students who attempt an exam using this browser cannot copy, print, use other apps, or navigate to a different URL. Learners are locked within an assessment once it is begun until they submit it.
This browser creates a bespoke interface for existing Windows or Mac apps. It does not alter an existing browser like Safari or Internet Explorer; instead, it installs standalone software that launches a custom browser.
The LockDown Browser makes use of the exact security mechanisms, and service packs are available for Safari as well as Internet Explorer. However, it makes no changes to the current edition of these browsers.
Email the completed agreement to the Respondus sales rep.
Finally, wait for a response email and follow the instructions in the email.
Schools that utilize Schoology, Moodle, Brightspace, Blackboard Learn, Canvas, or Sakai may use LockDown Browser for free for two months. This is the ideal approach for a school to test all of its learning management system’s features and functioning.
How do I install Respondus LockDown Browser on Mac?
Get a link to the mac version of the software from your school or teacher.
Open your Safari browser and input the link given to you on the address bar, then hit Enter.
Double click on the download from the download folder.
Click on Continue, then Continue again.
Hit the Continue button and then the Agree button on the agreement.
Click on the Install button.
Lastly, input your password and click on Install Software if prompted to.
And there it is. After you download the Lockdown Browser on Mac, you can open up the new browser and take your tests.
How do I install LockDown Browser on my Chromebook?
Click on the Respondus Lockdown browser link given by the school or teacher.
This link will direct you to the Chrome store, where you should click Add to Chrome (without the link you will not be able to find the extension on the store).
The browser will be installed, and you can locate tests and quizzes from your school.
Now you know how to download Respondus Lockdown Browser on Chromebook, let us discuss some other important details about this driver.
How does Lockdown Browser detect cheating?
This Lockdown Browser identifies cheating by recording a student’s video and voice throughout a test using the PC’s cameras and mic. These cameras identify potentially cheating conduct. Because not all highlighted events justify cheating, the instructors must investigate the situations.
The browser works in the same way as any other conventional webpage. But, the main difference is that certain functionalities are disabled or eliminated in order to conduct exams without cheating.
Flags are occurrences that indicate a potential issue throughout the course of the online test or quiz. And on the Repondus monitor’s timeline, flagged events from the test session are shown.
The teacher may start watching the marked videos at any stage of the timeline.
Respondus Lockdown Browser detects the following events:
Another person in your frame – An incident might be notified if a different individual than the one who began the test is shown in the video frame. Aside from the learner, no one else should be engaged in the exam.
Eye movements – Abnormal eye movements may be detected with the use of eye-tracking devices. It is possible to get flagged if you spend too much time looking at anything other than the test. This normally requires a thorough review by the teacher.
Audio and sound – Respondus solely captures ambient audio and sounds. When there isn’t a built-in response recorder, any audio from the pupils is flagged.
Away from the video – The event will be notified if the pupil disappears and isn’t identified in the frame for a period of time. So, you should sit till the exam ends.
Monitoring IP addresses – An issue is notified when a student attempts to contact Respondus servers using an IP address that the Responders servers are unable to utilize to contact the user.
Can LockDown Browser detect other browsers?
In general, browser lockout software like Respondus LockDown may detect attempts by students to open a different computer app or browser tab and the usage of keyboard shortcuts.
It can’t use screen capture, screen sharing, network monitoring software, messaging, and virtual computers. It’s also worth noting that any other browsers can’t view exams created for the Respondus LockDown Browser.
Here are the essential things to note with Respondus:
Students are not allowed to leave the test until they have completed it.
Removes the refresh, forward, back, and stop functions from the menu and toolbar.
The process of reducing the display screen of the browser is disabled.
Schools deplore the Respondus Lockdown browser to maintain the integrity of tests and exams. In this article, we have shown you how to download Respondus Lockdown Browser.
Remember, this is not like other browsers, and it is designed with the specific goal of being used for school examinations. So, if you do not have a link from a school or a school account, you will not be able to use this Lockdown server.
Lastly, If you have any issues installing the browser, follow these simple steps to install LockDown Browser.
Google My Business is one of the many innovative platforms offered by Google that allows businesses to create a free listing for their company. So when the Google Business messages do not show issue hits, your business may be in trouble.
One of the features of Google My Business is the ability to send and receive messages from customers. If you can’t see messages, don’t worry – there is a way to fix it.
How do I enable Google Business messages?
Sign up for a Google My Business account and create a listing for your business.
Once you’ve created your listing, click on the Messaging section.
Here, you’ll see an option to Verify for Chat. Click on this and follow the prompts to finish setting up Business messages.
What can I do if Google My Business is not showing messages?
1. Add your number
Open Google My Business and tap on the Add phone number button.
This will open a new page where you can enter your phone number. Input the digits and hit save.
You’ll then have to wait for a verification code that may take up to 14 days to arrive. Once your number is verified, you should start getting messages on your Google My Business account.
2. Check your internet connection
One other thing you can try is to check your internet connection. Poor connectivity can be the cause of the issue. Restart your router or modem, or check to see if there are outages in your area. If none of these work, contact your ISP for further troubleshooting.
Scroll down to the bottom and choose Support. This will open a dialogue box with suggestions of possible solutions. If you can’t find what you need, tap on Contact Us to get specific help with the messaging issue.
Google Business message unable to deliver
There are a few possible reasons why your Google Business Messages may not be delivered.
Incorrect or outdated contact information: Make sure that your business name, address, and phone number match what’s listed on your Google My Business page.
Messaging not enabled for your business: In order to start using Business Messages, you first need to enable messaging for your business. This can be done from the “Business Settings” page in your Google My Business account.
Business Messages not yet available in your country: Unfortunately, Business Messages are not yet available in all countries. If you’re trying to use Business Messages in a country where it’s not yet available, you’ll need to wait until it launches in your country.
Google My Business page not verified: In order to start using Business Messages, your Google My Business page must first be verified. This verification process can take up to a few weeks to complete.
Technical issues: There are a few potential technical issues that could cause Business Messages to fail to deliver. These include things like an outdated version of the Google My Business app, or problems with your internet connection.
While contacting Google support may not always result in a fix for your particular issue, it’s definitely worth a try if you’re still having trouble getting messages to show up on your listing. Keep reading our blogs to find more related solutions to everyday tech problems.
Getting a new computer is exciting. You finally have that device you’ve been eyeing or needed to replace your old PC. But after the initial excitement passes, you soon realize that setting up and configuring a new computer is less thrilling.
You may want to go on with your work immediately after taking the computer out of the box. However, it’s better for you in the long run if you spend some time, in the beginning, making sure everything is configured just right.
Checking your PC specifications is one of the most important things to do before installing or upgrading software. This is necessary to ensure that your computer is capable of running new programs because if it isn’t, you can experience problems such as slowness and system errors.
New computers are a huge investment, so it’s important to take the time to make sure they come set up just right.
Many people confuse hardware specifications with software specifications. While both are important, hardware specifications refer to the physical characteristics of a computer.
Software specifications refer to the operating system, programs, and other data that are installed on a computer.
Hardware check
Before you even switch on your new computer, you need to take a good look at it. The hardware of the PC is the part that you can touch and see. You may know the parts inside the PC, such as the CPU, RAM, motherboard, hard drive, and graphics card.
These physical components determine the capabilities of your computer and its performance. Feel free to refer to our guide on different ways to check for your computer specs to see what you are working with.
Before you proceed with checking any hardware, make sure that AC power is properly connected to the PC. It’s easy to forget about this step.
The hardware checks you need to carry out include:
Processor – The processor (also called a CPU) is what makes your PC tick, and it’s often referred to by its brand name and model number. The processor is the most important part of the computer. It’s what takes the instructions you give your PC and does something with them. Some processors have multiple cores, which means they can simultaneously process more than one task at the same time.
Memory information – Memory is the another equally important component of a computer. If you don’t have enough, you’ll be waiting for things to load for a long time. But, how do you know how much you need? And how could it be wrong? The most important thing to remember is that the amount of memory that a computer needs depends on what it’s used for.
RAM – RAM, or random access memory, is your computer’s short-term memory. It provides a space for your computer to process information before it is sent to the hard drive. The more RAM a computer has, the more programs and files it can work with at once without slowing down. Common amounts are 2GB, 4GB, and 8GB.
GPU – If you’re going to be doing a lot of graphic-intensive work, then the Graphics Processing Unit (GPU) is the most important component for you. The better your GPU, the better your frame rates will be and the smoother everything will feel.
Software check
Application programs – Most people think of applications when they think of computer software. We use applications to create documents, listen to music, surf the web, play games, send an email, design graphics, edit videos and do thousands of other tasks.
Device drivers – Device drivers are specialized software that allows Windows to interact with your computer’s hardware. For example, your printer driver controls your printer, telling it how and when to print. Without a driver, the printer would not know what to do with the data being sent to it from the computer. When you buy a new device (such as a digital camera or monitor), you’ll need to install its driver before you can use that device with your computer.
Operating system (OS) – Your operating system is responsible for controlling nearly every aspect of your computer’s operation — from managing files on your hard drive to running application programs and device drivers. Check the OS version and whether it is up to date.
How do I transfer everything from my old computer to my new one?
You can transfer data from your old computer to your new one in a couple of different ways.
Removable device – You can transfer files by copying them onto a removable device such as an external hard drive or flash drive. Ensure you have enough space for all your data.
Cloud services – You may have your files stored in the cloud on One Drive, Dropbox or Google Drive so depending on where your files are stored, you can sign in to your new computer and restore your files.
Transfer software – If you have both computers connected to the same network, you can use your operating system’s built-in file transfer software, which will let you move files from one computer to another.
Is there a general PC checklist template that I can use?
There are a lot of different types of PCs out there, and they all have their own unique features. But the good news is that a lot of the parts are standardized, so you can use the same kind of checklist for nearly all types of PCs.
The most important thing to remember is that you’re looking for a list that will cover every piece on your PC and what type of device it has.
Regular maintenance includes more than just running an antivirus program. It also includes regularly scanning your hard drive for errors and updating system drivers to improve performance.
These tasks may seem tedious, but they’re vital if you want your computer to keep running smoothly.
The general checklist includes:
Processor – This is what makes your computer run. The speed of your processor will determine how quickly your computer will be able to open and run programs, which makes this an important part of your system.
Storage (Hard Drive) – This is where all the files on your computer are stored, so it’s important that you have enough space for everything you need. Most PCs come with at least 500GB.
What to do as soon as you get a new computer?
Hardware changes
1. Check power connections
Before you start using your new computer, there are some basic checks you should make to ensure it is functioning properly. Connect the power cables to a socket and ensure the other end is firmly secured to your CPU and monitor.
If you are using a laptop, ensure that the charging port is working correctly when you switch it on.
2. Check ports
After confirming your new computer is connected to power, also, connect your ethernet cable and ensure it is secure before you power on your PC. Next, ensure your mouse and keyboard are connected to the USB ports available.
It is also a good idea to check for other ports such as the audio port, HDMI, CD/DVD drive, and the SD ports whether they are all in perfect condition.
Software changes
1. Add your accounts
If you’re using Windows, you need to set up your main account with your Microsoft login. This will ensure that all of your files, settings, and data sync across all of your devices that use the same account.
Windows PCs allow for multiple user accounts, so if you set up your computer with only one account, anyone who wants to use it has to log in to your account.
Think about how many people will share this device, and make sure each one has their own account. Having separate accounts helps keep your files organized and secure. You can also choose to set up user accounts with limited permissions.
2. Check your product key and update the OS
If you’re installing Windows yourself, make sure you have your product key number ready before starting.
While Windows Update typically runs automatically in the background when Windows is running, it never hurts to make sure that there aren’t any pending updates that need to be installed.
Your computer has probably been in storage for some time so you want to ensure it is up to date.
To check for updates:
Hit the Windows + I keys simultaneously to open Settings.
Select Windows Update on the left pane and click on Check for updates on the right pane.
If there are any updates, download and install
3. Check your antivirus software
Many new computers come with trial versions of antivirus software that will only work for 30 days or 60 days. Your PC also has a default security system: Microsoft Defender but you may have to add an extra layer of protection with more reliable security software.
If your computer didn’t come with one or if the trial period has expired, install antivirus software immediately. Also, run the antivirus to ensure your PC does not have any issues. If possible, use the same software that you used on your old computer so that everything is in sync.
To run a scan, follow the steps below:
Press the Windows key, search Windows Security and click Open.
Select Virus & threat protection.
Next, press Quick scan under Current threats.
Wait for the process to finish and restart your system.
4. Get rid of bloatware
When you buy a new computer, it can be loaded up with all sorts of programs that you don’t really need such as trial versions, games, and all sorts of other bloatware.
These programs are installed on computers at the factory to make it easier for customers to access their most used programs. Unfortunately, they don’t always serve the same purpose as what you want or need.
It’s amazing how much faster a computer can run after you’ve cleaned out all the unnecessary bloatware that slows it down.
To uninstall any unnecessary program, follow the steps below:
Hit the Windows + I keys simultaneously to open Settings.
Select Apps on the left pane then Apps & features on the right pane.
Scroll down and select an app you’d like to uninstall (in this case WSA).
Click on the three horizontal dots and select Uninstall.
Confirm that you want to uninstall.
5. Remove unnecessary startup programs
Any program that runs automatically when you turn on your computer will slow down its performance and hog your memory. You need to go through your list of startup items and disable anything you don’t use every single time you turn on the computer.
Sure you will need some programs at startup to make your work easier but ensure your list consists of only the necessary programs.
To disable startup programs, follow the steps below:
Hit the Windows + I keys simultaneously to open Settings.
Select Apps on the left pane and Startup on the right pane.
Select the apps you want to disable at startup and toggle the on/off button.
6. Set up anti-theft feature
Theft is all too common and no one wants to get their laptop stolen. Fortunately, many laptops come with a tracking program that will help you find your laptop if it ever goes missing.
As technology becomes an ever-more-integral part of our lives, the need for security against theft is more important than ever.
Each computer is different but the majority require the user to verify their identity with a password or other method before allowing access to the computer.
If your device ever got stolen, having the Find my device feature on can help you locate it. To set up the feature, follow the steps below:
Hit the Windows + I keys simultaneously to open Settings.
Click on Privacy & security on the left pane then Find my device on the right pane.
Toggle the Find my device button on.
7. Install any missing drivers
Before you can enjoy the full potential of your new system, make sure everything is working correctly by installing any drivers that may be missing or updating any outdated software.
Drivers are programs that tell the operating system how to deal with certain hardware. For example, if you go to your printer settings and find no printer listed, there’s a good chance you need a driver.
For a new computer, you will most likely need:
Windows update drivers.
GPU drivers.
Audio drivers.
LAN drivers.
To update drivers, follow the instructions below:
Press the Windows key, type Device Manager in the search box, and click Open.
Click on each device one by one, right-click on it and select Update Driver Software.
Select Search automatically for updated driver software.
Restart your PC.
Missing drivers are neither pleasant nor healthy for your computer; everything we try to do without appropriate drivers might result in major problems later on.
If you believe handling driver updates and installs is not your cup of tea, upgrading drivers through a professional program like Outbyte Driver Updater can help prevent potential unwanted issues and improve overall PC performance. Try it out and let us know if it found your missing Network Adapter drivers.
8. Set up file baackups
When you’re setting up your new computer, be sure to set up file backups. You never know when your computer might crash, or when you might accidentally delete important files.
This is a good habit to get into early on in your relationship with your new machine so that you’ll have the peace of mind of knowing that all those documents, pictures, and videos are safe no matter what happens.
To set up automatic backup, follow the steps below.
Hit the Windows + I keys simultaneously to open Settings.
Select Accounts then Windows backup.
Click on Manage sync settings to back up your files.
9. Optimize your power settings
The default power settings that come with most computers are not the best. Majority of these settings may not be cut out for the activities you do so it’s best to change them.
It’s important to make sure your computer’s power settings are optimized so you’re running at maximum efficiency.
To optimize your power settings, follow the steps below:
Hit the Windows + I keys simultaneously to open Settings.
Select System on the left pane then Power & battery on the right pane.
Under Battery saver, toggle on Turn battery saver on automatically at and select an appropriate percentage.
10. Install a reliable VPN
VPN protects your online privacy by encrypting your data and hiding your location. This is extremely important if you ever use public Wi-Fi networks that you find at coffee shops and airports.
You don’t want an attacker on the same network as you to read your private data or even hack into your device. Check out our comprehensive list of reliable VPNs to install on your new computer.
One of the very first things you should do after setting up your new computer is to enable automatic updates for both your apps and operating system. This will ensure that you always have the latest software and security fixes, which helps keep your computer safe from hackers and viruses.
To turn on automatic updates, follow the steps below:
Hit the Windows + I keys simultaneously to open Settings.
Select Windows Update on the left pane and select Resume updates on the right pane.
12. Change default programs
Your operating system comes with a set of preinstalled programs, but these aren’t always the best options out there.
For instance your browser. It’s likely that the default program is the one that came with your computer but if you don’t like it, you can easily switch to one that works for you.
To change your default programs, follow the steps below:
Hit the Windows + I keys simultaneously to open Settings.
Select Apps on the left pane then click on Default apps on the right pane.
Click or search for the app you want to change default settings and assign your preferred app to open it.
13. Tweak privacy settings
Privacy is a big deal, especially when it comes to your computer. You need to know which apps have access to your camera, microphone, and location, as well as what information they can collect about you when you’re using them.
You can check the settings for all of your apps to make sure they’re what you want. You’ll also want to check your browser’s privacy settings, as well as any other applications you use that might have their own built-in privacy features.
14. Customize the look of your PC
If you are going to be spending hours on end on your new computer, you want it to be visually pleasing, but also easy to use.
Some of the customization settings you can adjust include:
Change your wallpaper
Choose a soothing background image that you’ll enjoy seeing every day. You’ll have plenty of options to choose from, including ones that come with the Windows operating system or ones you can download from the Internet. We have a list of the best Windows 11 wallpapers apps you can use to enhance the look of your PC.
Organize your icons
You spend a lot of time looking at your desktop, so it’s important to keep everything organized. Create folders for documents, music, photos, and other files so they don’t clutter up your screen.
Change your theme
Windows comes with a few pre-installed themes, but you can easily download more—both free and paid. Once you find a theme that suits your personality, you can make it your own. Windows 11 now allows you to have dark themes so be sure to check out our comprehensive list of the best dark themes for your OS.
This is not an exhaustive list as there are still a handful of things you can do to ensure your new computer is set to your preferences and its performance is at its peak.
New computer setup checklist
Component
Checklist
Physical set up
Power cables, Ethernet, USB, Keyboard, and audio and ports
Updated OS
Update to the latest version
Power settings
Optimize your power settings for perfect balance
New computer install checklist
Component
Checklist
Antivirus
Install a reliable antivirus to protect you from viruses and malware
VPN
Install a VPN to protect your identity
Backup
Install backup software
New computer driver checklist
Component
Checklist
Windows update drivers
Drivers to ensure all Windows drivers are up to date
GPU drivers
Drivers to ensure smooth graphics in gaming
Audio drivers
Drivers to ensure your audio devices are working
LAN drivers
Drivers to ensure your internet is working
Once your computer has fulfilled the above checklists, you can also opt to use customization software if you are more tech-savvy and enjoy things working for you automatically.
As always, we love hearing from you so engage us in the comment section below with some of the things you did when you first got your new computer.
HideoutTV has been around for a while, and a source of passive income for people using the platform, but many reported HideoutTV error 3835 while using the service.
The service also has two other domain names, smores.tv and engageme.tv. However, these two separate sites merged with the HideoutTV domain to provide one single service. It’s a GPT (get-paid-to) service where registered earn money by watching the ads featured in the video content.
A perfectly legitimate service, some subscribers have complained of the error 3835 message popping up in the media player, cutting them off from enjoying the video content.
The error message is usually caused by VPN and proxy server issues. That is if one of your browser tabs is using a VPN service, the chances are that you’ll be unable to use the service.
Also, if you’re accessing the website from unsupported locations, you’ll have the same issues, and you might even get Video is not available at the moment message.
The problem is solvable, though. All you have to do is to follow the instructions given below:
How can I fix HideoutTV error 3835?
1. Make sure you’re in a valid location
Unfortunately, this service isn’t available worldwide, and it can be accessed only from specific countries. The list of supported countries includes:
Australia
Canada
Denmark
Germany
Ireland
Netherlands
New Zealand
Norway
Sweden
United Kingdom
United States
If you’re not in these countries, you might experience HideoutTV error 3835 or other issues. You could try using a VPN service to prevent this from happening and stream on HideoutTV without interruptions.
Most VPN services allow you to avoid geolocation restrictions and connect to a large number of servers, however Private Internet Access aka PIA can be a lifesaver in this situation. Our VPN software experts tested PIA on the HideoutTV streaming platform and confirmed that the error 3835 was fixed by connecting the VPN to a less congested location.
PIA will locate the best server location for you, and you will be able to watch constantly at a high speed.
Microsoft launched Power Pages as a standalone product within their Power Platform portfolio. This is made to enhance the creation of websites.
They are trying to address the need for businesses to get a low or no-code solution when developing their websites. Power Pages has existed for a couple of years. It was, however, a component of Power Apps known as Power Apps Portal.
It has, however, been launched as a product on its own. This has seen Microsoft add new enhancements and has promised a unique experience for its users. Microsoft pledges to power every person, even those with a limited technical background.
What makes Microsoft Power Pages stand out from other development platforms? First, Microsoft is riding on the fact that Power Pages can integrate with other services.
For instance, it can integrate with Azure DevOps and Power Platform’s command line. It also works with GitHub and Visual Studio for advanced users to automate their web development workflows.
This means that they can leverage Continuous Integration and Continous Delivery (CD/CD) practices and easily download and upload projects. This is also important for collaboration and avoiding some problems with Power Apps.
What is Microsoft Power Pages?
Microsoft Power Pages is a SaaS (Software as a Service) platform. It promises to be low-code, enterprise-grade, and secure when it comes to creating, administering, and hosting services and websites.
When writing this article, you can create a trial account with Power Apps to explore its capabilities. Unfortunately, this means that its pricing has not yet been released. However, using the old Power Apps pricing, you can run one app or portal per user for $5. You can also get a per-user plan for $20 per month.
Businesses can get a monthly plan for $10 per user. It is based on the number of unique apps or portals a user runs each month. This is a better option, according to Microsoft Power Pages reviews.
Power Pages allows users to create websites even when they are not professional developers. Once you create an account, you can decide to use a custom template or start with the default design template.
Some websites might require a database for adding, updating, or reading business information. For instance, you might have a page that collects information from customers. Fortunately, Power Pages comes with a data service known as Dataverse that works like a database. It stores information just like a normal database. It also comes with Microsoft Power automation, analysis, and security features.
Enter a school or work email account as required. Agree to the terms and click on the Start your free trial button. Azure Active Directory should back the email account.
Follow the onscreen instructions and then choose a website template to use. Select Done after adding all the requirements. Your environment and site will be created.
This is a free 30-day trial period, after which you can subscribe to the plan you need.
Microsoft Power Pages is going to be a game-changer in web development. This is a platform that small to large business owners can rely on for their web development features.
The Chromebook is a device of choice for many, but users reported Camera file system errors on their devices.
This isn’t the only issue, and many reported that their Chromebook wouldn’t connect to WiFi, but we covered this topic in another article, so feel free to check it out.
In this guide we’ll focus on Camera app and file system errors, so be sure to keep on reading.
Is a Chromebook a laptop?
If you’re not familiar, Chromebook is a laptop, but it’s different from your regular Windows or Mac devices.
Unlike them, Chromebook runs only Chrome and Google’s apps. Speaking from a technical standpoint, they fit into the laptop category, but they are not the first thing that comes to the user’s mind when you mention a laptop.
Are Chromebooks Good?
Yes, Chromebooks are great devices, depending on your purpose. For example, if you want to browse the web, edit documents, and take notes, Chromebooks are perfect.
They are fast, light, and straightforward to use. But, on the other hand, if you’re a more advanced user and prefer running various third-party apps, Chromebook might not be for you.
How can I fix Chromebook camera file system errors?
1. Install the latest updates
Make sure that your device is connected to the Internet.
In the bottom right, click the clock and select Settings.
Look at the bottom left and navigate to About Chrome OS. Now click on Check for updates.
If you ever wondered how to update your Chromebook, now you know. Once the latest updates are installed, check if Chromebook camera file system errors are still present.
2. Check if your device is managed
Click the clock in the bottom right.
Look for the Managed Device icon.
If your Chromebook is managed, you need to contact your administrator to fix the issue.
It’s pretty common to get Camera file system errors on school Chromebook because the administrator blocks specific applications.
3. Restart your device
Press and hold the Power button.
Release the button once the device is off.
Now press and hold the Power button again to start the device.
Alternatively, you can restart your device by doing the following:
First, click the clock in the bottom right.
Now click the Power icon.
Once your device is off, press and hold the Power button to turn it back on.
A quick restart is a simple but effective solution for Chromebook camera file system errors, so try it out.
4. Change Chrome flags
Open Chrome.
Navigate to chrome://flags/#camera-system-web-app
Now select Disable.
After doing that, a second camera app will appear at the bottom of the app drawer. Open it, and the issue should be gone.
5. Sign out and sign back in
Click the clock icon in the bottom right corner.
Now click on Sign out.
Wait for a few moments and sign back into your account.
6. Perform a hard restart
Turn off your device.
Now press and hold the Refresh + Power buttons.
When the device starts up, release the Refresh key.
If you’re on a Chromebook tablet, you can press and hold Volume Up and Power buttons for at least 10 seconds to perform a hard reset.
Keep in mind that certain Chromebooks might require different steps to perform a reset. For more information, check the Google guide for resetting your hardware.
Before using this method, please back up your files because the Powerwash process will remove them.
Sign out of your Chromebook.
Now press and hold Ctrl + Alt + Shift + R.
Select Restart.
Now select Powerwash and go to Continue.
Sign in with your Google Account when asked.
Follow the instructions on the screen to complete the process.
8. Recover the Chromebook
NOTE
This process will delete all files from your hard drive, so it’s advised to back them up before proceeding. We recomand using a specialized tool such as AOMEI Backupper to safely backup your files.
Disconnect all peripherals from your device. This includes all USB devices.
Boot to the recovery mode:
Press and hold Esc + Refresh and then press the Power button. Next, release the Power button, and when a message appears on the screen, release other buttons.
On some models, you need to press and hold Esc + Maximize. Next, press the Power key and release it.
Press and hold Volume Up, Volume Down, and Power for 10 seconds on tablets, then release them.
Now select Recover using Internet connection and follow the instructions on the screen to complete the process.
Chromebooks are great devices, and if you want to learn more, we suggest reading our Windows 11 vs. Chrome OS guide. It’ll be worth a read.
Hopefully, reading this article has helped you resolve the Chromebook problem with camera file system errors. If you have any questions or comments, share them in the comments section below.
We are so used to some of the most basic elements of the operating system, that we failed to spot the new addition, which can come in handy for many situations.
There were also some issues involving this context menu for Windows 11, reported by users across social media platforms, so you might also want to keep an eye out for that as well.
What is Copy as path and what does it do?
Just in case you haven’t noticed, on the new preview builds for Microsoft’s upcoming OS, the context menus offer users another tool.
This new integration we keep mentioning is called Copy as path and, upon selecting it, will copy the full path of the selected file or folder as text to the clipboard.
After doing so, with the path of a certain item, you can paste that path to any text area.
C:\Users\alvin\OneDrive\Desktop\Capture.PNG
You will sometimes find yourself in a situation where the full path of a file or folder may sometimes be needed by a program, software, or webpage, in order to identify the path to a required item.
When working with Command Prompt and Windows Powershell, instead of having to manually type the full path to a file or directory, you can just right-click on the item and select Copy as path, then paste it into the command prompt.
A feature such as this has been constantly requested by Windows users for a long time. In fact, any step that Microsoft takes towards simplifying our day-by-day tasks is a welcome improvement.
Who knows, maybe Microsoft will introduce more new features to Windows 11 before they wrap up the tunning process.
Remember that the Redmond company stated that the upcoming OS will start rolling out at the end of this year.
Have you already used the new Copy as path function on Windows 11? Let us know in the comments section below.
Windows 11 supports a transparent Taskbar, and turning on this visual upgrade takes just a few clicks. But while the feature exists, many users aren’t exactly thrilled with how basic or limited it feels out of the box.
That’s why in this guide, we’ll not only show you how to make the Taskbar transparent in Windows 11 using built-in settings, but also how to tweak and enhance it using advanced tricks and free apps for a more personalized look.
How do I make the Taskbar transparent in Windows 11?
1. Use the Personalization option
Go to Start and click on the Settings option.
Click on Personalization from the left-hand pane.
From here, select Colors.
Turn the toggle On next to Transparency effects.
Your taskbar should now be more transparent.
2. Use the Visual effects option
Once again, open Settings from Start.
Go to the Accessibility section.
Click on the Visual effects option.
Enable the toggle for Transparency Effects.
3. Use the Registry
1. Use OLED Taskbar Transparency
Press the Windows + R keys to open the Run box.
Type regedit and click on OK.
Navigate to the following: HKEY_LOCAL_MACHINE\SOFTWARE\Microsoft\Windows\CurrentVersion\Explorer\Advanced
On the right-side pane, right-click in the white zone and choose New, then DWORD (32-bit) Value.
Rename the newly created value to: UseOLEDTaskbarTransparency by right-clicking on it and choosing Rename.
Right-click again, select Modify and change the value from 0 to 1.
Click OK to save the settings.
2. Modify the ForceEffectMode
While you are still in the Registry Editor, navigate to the following key: Computer\HKEY_LOCAL_MACHINE\SOFTWARE\Microsoft\Windows\DWM
Locate ForceEffectMode and change its value from 0 to 1, as you did in the previous solution.
If you cannot locate it, right-click on the white place and choose New, then DWORD (32-bit) Value, and rename it to ForceEffectMode.
Restart your device.
To have even more control over the design, color, placement, or a transparent taskbar in Windows 11, download these apps for the best results when it comes to customization.
You can explore additional free tools that improve the taskbar experience by checking our detailed guide on free taskbar customizer options that offer deeper control and cleaner visuals.
Few of our readers reported that this method didn’t work for them, so it’s possible that Microsoft removed the ability to activate transparent Taskbar in Windows 11 from registry.
1. Enter Microsoft Store and type translucent tb in the search bar. Click on Get to start downloading the app. Alternatively, you can also click here on Get TranslucentTB to download the app.
2. After the download is complete, click Open in order to open TranslucentTB.
3. A pop-up will appear after you open the app. Click Continue.
4. Your Windows 11 taskbar will be fully transparent afterward. Note that the app will also make the Windows 10 taskbar transparent.
What features does the free TranslucentTB app offer?
For those trying to figure out how to make my taskbar 100% transparent, it’s possible with TranslucentTB. It’s the best transparent taskbar Windows 11 app, but you can also make it opaque or introduce a blur effect.
In addition to overriding your color and additional settings for the taskbar, this app combines states such as maximized window, Start Menu open, Cortana open, and Timeline open.
Each one of them has a customizable taskbar appearance to offer you an overall pleasant aspect, personalized to your liking.
For a free app, you have quite a few elements to customize the taskbar. And to make things even better, there’s a Tips and tricks option that teaches you some really cool things.
If you are looking for another way to achieve the transparent taskbar effect and more, you can also try the Microsoft TaskbarX app for a very small fee.
A pop-up will open. Here, select Get started to add a way to pay for the app.
Choose the form of payment you want, complete your information in the next windows and click on Save.
After the download is complete, right-click on the file and unpack the archive.
Open the TaskbarX folder and run the exefile to install the app.
After the installation, your taskbar icons will automatically move to the middle of the taskbar.
What features does Microsoft’s TaskbarX offer?
This app is worthy of your attention as there are quite a handful of features to design, customize, or change every aspect of your taskbar.
You can even move it to the left and have it transparent at the same time with the Position option that allows you to adjust the taskbar icons’ placement. Quite neat, isn’t it?
There are other categories on this configurator, such as Style which manages the transparency level or color of your taskbar, and Animation which controls how the taskbar icons move when you open a new app.
Simply put, you can definitely have some fun with TaskbarX as it gives you so many options to choose from to personalize your taskbar.
Extract the Zip file and click the executable file to run the app.
Set the Accent State to ACCENT_ENABLE_TRANSPARENTGRADIENT.
Click on Options, then check the Start minimized, Apply Settings When Started, and Start With Windows options, and uncheck the last one.
Now, toggling the Windows Accent Alpha switch to the left and right will determine the level of transparency of the taskbar. Of course, you can also play with all the other settings like the background color and change the Accent state as you prefer.
TaskbarTools is a small free tool that allows you to customize the taskbar to your liking, change its color, and more.
And although its latest version dates from 2017, we tested it on Windows 11, and it worked flawlessly. The great thing about this tool is that you can see the changes in real time. So, if other options for a Windows 11 transparent taskbar are not working, you know which app to go for.
We hope that this guide helps you enjoy Windows 11 a bit more. If you have any questions, feel free to use the comments section below, and we’ll get back to you.
When Microsoft launched Windows 11, it came with many changes. One of the changes was increasing the number of User Interface animations. Some users would like to change the way things appear, and they have to find ways to do it. Having animations makes users feel better and friendlier.
Animations use visual effects to make the computer look more appealing and responsive. Some of them include sliding menus after a few seconds or minutes.
Having many animations on your computer can affect the PC performance, slow down, and affect your work. In such scenarios, you have to shut the animations.
The article will cover several ways users can improve the speed of their animations on the PC. You can use the Registry Editor or the customized file that you run to apply the changes.
How can I increase the speed of Windows 11’s animations?
1. Edit the Registry
Press Windows + R to open a new Run box and type regedit inside it. Press Enter afterward.
Enter the following path inside the search bar and locate MenuShowDelay on the right side: Computer\HKEY_CURRENT_USER\Control Panel\Desktop
Double click on the MenuShowDelay option and change the Value data option to any choice between 0 and 4000. To speed up the animations, input a small value that ranges from 0 to 150. Click the OK button to apply the changes and restart your PC.
When performing this process, be very careful as it can affect the computer and have some issues like a corrupt file system. It’s a simple method that anyone can implement. If you want to return to your original speed, you can repeat the same process and change the number again.
Download these two files and extract them. You will have two files in the folder named Reduce Menu Animation to 200.reg and Restore Menu Animation to 400.reg.
Double-click on the Reduce Menu Animation to 200.reg to run it and change the animation speed to 200.
This method works mainly for those who don’t want to use the Registry editor as they feel it’s complicated or hard to understand. If you want to restore the speed to the default, you can use the Restore Menu Animation to 400.reg file.
Both steps are simple to implement, and it takes less than three minutes to be through. However, some users don’t like animations and they prefer the animations disabled, and they treat them as unessential parts of their PC.
How to remove Windows 11’s animations?
If your Windows 11 animations are not smooth, you can disable them from the Settings app that you open by holding Windows and I together then navigate to Accessibility followed by Visual effects.
Next, turn off the toggle next to Animation effects. If you want to turn them back on, simply turn the toggle back on. The changes will apply automatically.
Even while Windows 11’s animation and fading effects are visually pleasing, some users may find that they cause their computers to seem sluggish because they add a little delay to some operations.
This is because the features force some processes to take slightly longer to complete. To provide a user experience that is more responsive, it is straightforward to disable animations.
You surely remember, especially if you are a Teams user, that Microsoft added a new batch of 3D Fluent emojis to its work-focused video conferencing app.
The process has actually refreshed more than 1800 existing emojis for the platform after Microsoft previously announced 3D emojis for both Teams and Windows last year.
This magnificent idea and the rollout of the 3D Fluent emojis update for Teams was first touted via an official blog post.
Latest Teams update brought Fluent Emojis to the app
Microsoft stated that the refreshed 1800 emojis will bring a modern and delightful new version of the emojis we use every day.
Keep in mind that these 3D Fluent emojis will be available to use in Teams chats, channels, and live meetings as well.
Thus, users will also be able to react in chats, channels, and video conferences with the new emojis, and some of them will have unique animations too.
In order to access the new emojis, go to the Settings menu of the Teams app and enable Public Preview from the About section.
That being said, also note that IT admins are required to enable the preview features to let users access 3D emojis.
After being enabled, they will be available on Teams across iOS, Android, Windows, macOS, Linux, and supported web browsers.
Now, you can react and chat with some really well-made and 3D-ish emojis, making every chatting experience an unforgettable one.
Have you tried the latest Teams emojis? Share your experience with us in the comments section below.
Raven Software is a subsidiary of Activision Blizzard and is best known for co-developing several Call of Duty titles. The studio’s quality assurance department voted on May 23 to unionize (the union will be called the Game Workers’ Alliance). Microsoft of course is in the process of buying Activision Blizzard and will become the owners of all the latter’s subsidiary companies once the $68 billion buyout is finalized.
— Game Workers Alliance ????#WeAreGWA (@WeAreGWA) May 23, 2022
During the meeting Spencer stated “We absolutely support employees’ right to organize and form unions.”
He also said “Once the deal closes, we would absolutely support [an] employees’ organization that’s in place. We think it is a right of employees and something that can be a part of a relationship between a company and people who work at the company.”
While it is important to note that Microsoft at present does not have a relationship with either Raven Software or Game Workers’ Alliance, this does mark the first time that a top Microsoft executive has openly stated that Microsoft would recognize a game workers union. Although a Microsoft spokesperson had previously said that “Microsoft will not stand in the way if Activision Blizzard recognizes a union,” in response to a letter sent to Sattya Nadella on the subject.
A version of the letter is also slated to run in Microsoft's backyard this weekend in the Sunday edition of the Seattle Times pic.twitter.com/e1sHUSKFLY
Will the gaming industry become increasingly unionized across the board as time goes on? No one can say at this point, but the move by one of gaming’s giants to recognize unionization is a step in that direction.
Final Fantasy: Brave Exvius is a popular mobile game, but it’s not without its fair share of problems.
One of the most common issues that players are facing is a connection error. In such cases, you will be unable to log in or play the game.
Brave Exvius is not the only game in the same family that has problems as Final Fantasy XV has its own share of issues.
Connection errors are often caused by your internet connection being too slow or your device running out of storage space.
You can fix both of these issues by restarting your phone and clearing some space on your device.
Why can’t I connect to FFBE?
If you are having trouble connecting to the game, it could be because of one of the following reasons:
Poor internet connection – Make sure that your Internet connection is working properly and that you have connected to the correct IP address.
You’re running an old version of the game – Try updating to the latest version through Google Play or App Store.
Your device is running low on memory or storage space – Close other apps and background processes, then try connecting again.
A VPN or proxy service is interfering with your connection – Disable any VPNs or proxy services on your device and try connecting again.
Unsupported device – Final Fantasy Brave Exvius works only on specific devices so check out their website to see if your device is currently supported.
The game servers are down – This issue can be resolved by waiting for a few hours and then trying again. If the problem persists, please contact the game publisher for assistance.
What are some common FFBE connection errors?
Other common connection errors you may encounter include:
FFBE stuck on connecting – If you’re stuck on connecting, it means that the server is down due to high traffic or maintenance work.
Could not connect to game using Wi-Fi – This is a common error that occurs when the internet connection cannot be established. You may have to restart your device and try again.
FFBE stuck at 99 – This happens when you are trying to download the game and your connection is interrupted, the game might get stuck at 99%.
Failed to connect to server – This means that there was a problem communicating between your device and the server hosting the game.
FFBE stuck on loading screen – The game will not load past the loading bar. This can happen if there is an internet connection problem or if your device has run out of memory.
A majority of these connection errors can be solved by restarting the app or uninstalling and reinstalling it again. If that doesn’t work, proceed to our advanced troubleshooting.
How can I fix connection errors in FFBE?
1. Wait it out
It’s not uncommon for the app to take up to 30 seconds to load, so if you’re seeing a loading screen that lasts longer than that, try waiting a bit longer before restarting the game.
Sometimes, there may be an issue with your internet connection or the server itself, this process can take a few minutes — so be patient. The longer you wait before trying to reconnect, the better your chances are of getting in successfully.
While you wait, try closing unnecessary apps and programs you are not using. If you have too many apps open at once and they’re all competing for these resources, then Final Fantasy: Brave Exvius might not be able to connect properly.
Unplug your router for 30 seconds, then plug it back in and wait while it boots up. This will reset the connection between your device and your wireless network.
If that doesn’t work, try restarting your phone and uninstalling and reinstalling the app. This may solve connection issues with your router.
3. Enable storage permissions
On your phone, navigate to Settings.
Select Apps.
Locate FFEXVIUS and click on Permissions.
Click on Storage and toggle on the Allow button.
How do I speed up my Internet connection?
If you have a slow Internet connection, you may not be getting the best out of your broadband service. Luckily, there are some things you can try to boost the speed:
Check for firmware updates – Your router may have available updates so check and ensure that these are installed as soon as possible.
Update software – Out-of-date software tends to slow down over time as more features are added, so keeping everything up-to-date will help reduce lag time when loading web pages or playing games online.
Turn off unnecessary programs and services – If you have too many programs open simultaneously, your internet speeds may be slow as each hogs the bandwidth.
Use an ethernet cable – If you’re using a cable connection, try using a wired Ethernet connection instead of WiFi. This will help eliminate interference from other devices on your home network.
We hope that with these recommended solutions, you have been able to get reconnected and are enjoying your game.
Have you ever done an in-depth comparison of Internet Security vs antivirus and which one you should go for? With the many dangers lurking out there that can wreak havoc on your computer, it can be a daunting task to choose between the two.
Viruses, malware, and other malicious software can slow down your computer. They can also steal personal information, and even bring it to a screeching halt especially if your virus and threat protection is not working.
One of the most common questions people have about antivirus programs is whether or not they should combine them with an Internet Security suite or use them independently.
Internet Security and antivirus are two very important parts of computer security. They are both used to protect your computer from viruses, malware, hackers, and other threats on the internet. But which one is better?
Do I need both Antivirus and Internet Security?
Internet Security and antivirus are two different types of software. They both protect your computer from online threats. While antivirus is an essential part of your computer security system, Internet Security is more comprehensive and powerful.
The best way to protect your computer is to have both installed on it. The reason for this is that they will help protect against different types of threats.
Internet Security provides an all-inclusive solution for protecting your device. You can avoid various threats such as spyware, ransomware, phishing attacks, and more.
The primary purpose of Internet Security is to protect your electronic devices from viruses and hackers that may seek to steal private information or cause damage.
In addition to preventing malware infections on your PC, it also protects private information. Passwords, credit card data, and other personal information stored on your computer are protected from prying eyes.
Although some people prefer to use privacy protector software, when your Internet Security is all-inclusive, it is much easier.
Antivirus software scans all files on your computer for viruses when they are accessed or downloaded from the internet. It is therefore important that your antivirus program stays up to date with the latest virus definitions.
This way it will recognize new threats as soon as possible, even if you don’t notice anything suspicious yourself.
All in all, it depends on what you want to protect. If you have a computer that is connected to the internet, then you should be protecting it. If your PC is not connected to the internet, then you can probably get away with the in-built Windows antivirus.
Does antivirus protect the internet?
With the increased use of computers and the internet, the number of viruses and other malicious software has increased as well. Viruses are a type of malware that can cause harm to your computer and your data.
The most common types are those that slow down your computer or network and make it unusable. Others steal your personal information such as passwords or destroy data on your computer.
Viruses can infect any kind of file, including documents and programs. Antivirus software is not designed to protect your system and data from all possible threats. It is designed to protect you against the most common threats.
When it comes to the internet, your antivirus software can be bypassed, and then your computer can get infected by a virus or malware. It is designed to keep your computer safe when you’re using it — not when you’re surfing the web.
If you download files or install applications, they may contain viruses or other malicious software that can infect your computer.
Some of the characteristics of viruses include:
Attach themselves to existing files
Spread by copying themselves onto new files or email attachments
Replicate themselves so that multiple copies exist on one machine
Invisible in any way until their effects take place
Your antivirus software cannot protect you against these attacks. This is because the application will run before it is scanned for malicious code. That is why Internet Security is needed.
What is the difference between Internet Security and Total Security antivirus?
Internet Security and Total Security antivirus are both products from Kaspersky but Total Security has more advanced features than the other.
Total Security is a premium antivirus program that protects your PC against all types of malware and viruses. The program is designed to keep your computer safe, secure, and clean from any threats.
It offers real-time protection against malware, phishing attacks, ransomware, and other cyber threats. The application also comes with an added layer of protection for your web browser and email client.
Although both Total Security and Internet Security all offer protection against common threats, there are key differences that make one better than the other.
Total Security
Internet Security
Advanced features
Basic features
Costly
Less costly
Speedy
Comparatively slower
What is the difference between ESET Antivirus and ESET HOME Security Essential?
ESET Antivirus and ESET HOME Security Essential are both products of the same company, ESET. They share the same anti-malware engine but differ in their features.
The antivirus is a standalone product that protects your computer from viruses, spyware, and other malicious software. It also protects you against phishing websites and blocks spam emails.
While it has all the necessary features required to keep your PC safe, it lacks parental controls or automatic online updates.
Which is better Bitdefender Antivirus Plus or Internet Security?
Bitdefender Antivirus Plus is an entry-level antivirus program that includes all the basic features you’d expect from a modern security suite.
It can protect your PC against viruses and malware, as well as spyware, phishing attacks and other threats. The program also includes parental control features to keep your kids safe online.
Bitdefender Internet Security offers more advanced features because it’s designed for people who want maximum protection for their devices.
The program also includes online banking protection tools that block unauthorized access attempts by hackers on public WiFi networks or other unsafe places online.
What is the difference between Kaspersky Anti-Virus and Kaspersky Internet Security?
While both Kaspersky Anti-Virus and Kaspersky Internet Security offer protection against computer viruses, worms, trojans, adware, and spyware, there are some differences between the two products.
The main difference is that Kaspersky Internet Security includes features not available in Kaspersky Anti-Virus. Kaspersky Anti-Virus is designed for home users who want basic protection against viruses and other types of malware.
The antivirus option offers a high level of protection compared to other antiviruses. However, it is not designed to be as user-friendly as Kaspersky Internet Security. For example, Kaspersky Anti-Virus does not have parental control features or a firewall included in its basic package.
You can add these extra features if you are interested in them but they will cost extra money. For users who need additional security, Kaspersky Internet Security is a much better alternative with its features that give you increased security against attacks by hackers.
What is the difference between AVG Antivirus and AVG Internet Security?
AVG Antivirus and AVG Internet Security are two of the most popular security products from AVG. Both provide advanced protection against online threats and malware.
The main difference between these two products is that AVG Antivirus is free of charge and is a standalone product. AVG Internet Security is an all-in-one solution that combines antivirus with other features such as firewalls, parental control, data recovery, and performance optimization tools.
AVG Internet Security offers more features than AVG Antivirus, but it comes at a higher price. If you just want to keep your computer safe from viruses and other malicious threats, then AVG Antivirus may be enough for you.
However, if you want more features such as firewall protection or parental controls, then it might be worth paying extra for AVG Internet Security.
What is the difference between McAfee Antivirus Plus and Internet Security?
McAfee Antivirus Plus and Internet Security are two of the most popular McAfee products. Both provide a high level of protection against malware, viruses, spyware, and ransomware. They also offer a wide range of features designed to protect your identity and privacy.
The main difference is that McAfee Antivirus Plus provides antivirus protection only while McAfee Internet Security includes additional features. You get firewall protection, parental controls, anti-spam and more.
Windows 11 comes with its own built-in antivirus. It has been marveled at as the best yet in terms of security out of all other Windows versions. But, just how good is Windows Defender?
Whereas the security has been amped up, Is Windows Defender better than free antivirus? Well, it all depends on your activities. If you are online a lot, you will need a reliable antivirus.
Free antivirus comes with basic functions and may not be able to offer you comprehensive protection. You may need an all-rounded antivirus if you desire your system to stay up-to-date and keep threats at bay.
So, does Windows 11 need an antivirus? Windows Defender is great at detecting threats but when it comes to the heavy lifting, you might need a multi-layered antivirus program to do the job.
It’s not the best antivirus program out there, but it is a good option. If you’re looking for something simple to protect your PC without paying a dime, you can settle for Windows Defender or install another free antivirus.
Which antivirus is best for Windows 11?
The antivirus market is huge, and there are plenty of options out there. But not all antivirus programs are created equal when it comes to performance, features, and overall safety.
Some are better than others at protecting your system from various threats. So how do you know which one is right for you?
Well, a good antivirus must meet some minimum requirements to keep your system safe. You need to look for coverage as well as comprehensive features that will protect your system.
Some of the factors to consider include:
Real-time protection – The best antivirus software should be able to detect and block threats automatically before they have a chance to infect your computer.
Full-system scanning – Antivirus software should scan all of the files on your PC, not just those you open or run. It should also have the ability to scan external media devices such as USB drives and other types of external storage devices.
Automatic updates – Antivirus software should be able to update itself so that it can keep up with new threats as they emerge.
Firewall protection – A firewall is designed to block incoming traffic from unknown sources, which can prevent malware from infecting your computer or stealing data. Most modern antivirus solutions include a built-in firewall, but some don’t — so be sure to check before you buy.
Parental controls – If you want to keep children safe online but don’t want to go through the hassle of setting up a separate software package just for this purpose, look for parental control functionality in your antivirus software.
There’s certainly a good number of antivirus programs out there you can install to protect your PC from threats. You simply need to understand your needs and pick one that satisfies all your wants.
In the modern competitive business world, all organizations are facing new challenges regarding sustained productivity. Things are no different when it comes to creating the most committed workforce.
Obtaining the target output in any organization depends mostly on the consistency of the productivity level of the employees.
In today’s business environment, no organization can perform at its highest levels of productivity unless each employee is committed to improving the organizational levels of productivity.
This means that the employees will contribute to the business’ growth. But unfortunately, some business owners tend to fail in monitoring the daily productivity of their employees.
The result is the fact that their job performance will be detrimental to the business’ growth and this thing will not be able to be detected and controlled.
Such a thing would ruin the business’s ability to achieve its objectives. Thanks to workforce management apps and the software tools for monitoring employee productivity, things are easier for organizations.
They don’t have to wait for a much too long duration of employees’ performance appraisal programs to know how they’re doing at work.
Why should I buy an employee monitoring software?
Emails are the primary source of data breaches for companies because employees have to exchange information through business correspondence. It’s crucial to secure and track data when you are required to comply with HIPAA laws, GRAMA requests, and FINRA regulations.
There are some simple email surveillance solutions available on the market. Use them to monitor employees’ emails to make sure that critical data is not being shared purposely or inadvertently.
Employee monitoring programs include email-monitoring abilities and more tools for monitoring other activities of the employees while they’re doing their jobs.
Another central aspect of employee monitoring software is the capacity to check their activity while using the company’s equipment such as its laptops and desktops.
Such solutions will be able to let you see which websites are being accessed by your employees. You can also discover who are the employees that usually download files, and when they connect or remove USB drives.
These tools will also be able to alert you when particular keywords are being searched that require concern from your company. These include job searching, pornography search, or searches related to competitive contacts.
The best tools for monitoring the workplace will offer you administrative control. This will allow you to block such kinds of activities and also restrict access to inappropriate or unsecured websites.
You can successfully use tools for monitoring your employee’s work for finding out what an employee is up to these days.
Here are our best picks for monitoring employees’ activity.
The app is perfect for employee monitoring but it can also be useful for parental control. Its job is to record all computer activity and sends the new data straight to your online dashboard.
It’s so effective that you may even block websites or the use of certain keywords. Not only that but if you set a filter for certain keywords, you will be notified if someone uses them.
Of course, the IT manager will be able to monitor all URLs from the devices to know what websites and pages the users visited.
For short, CleverControl Employee Monitoring provides total control over employees’ computers, a perfect tool to detect slackers, prevent data leakage and investigate potential unlawful actions.
After you install the CleverControl Agent on target computers, all new data collected from the devices is sent to your online dashboard.
Then, you can sign in to your online account via any device or check the logs locally in the application.
The app also delivers the logs via email so you will still get them over a specified time interval.
Let’s review some of its best features:
Web-based cloud dashboard accessible from any device
Full control of all the employee computers
Set keyword filtering and block websites
Monitor and filter websites visited by the employees
Easy to implement and use
CleverControl Employee Monitoring
Control all the computers of the employees with this smart app that features full logging.
Monitoring your employees can be time-consuming, so that is why ActivTrack’s main focus is transparency and easy setup.
Monitoring your employee’s work habits has never been easier, thanks to the detailed graphs that show you exactly everything you need to know.
This is further emphasized by the automated reports, flexible productivity settings, and granular reporting to deliver immediate transparency with precise detail.
The program is easy to set up, and it manages to do the job regardless of whether the monitored parties are in the office building or working remotely.
More so, the program integrates perfectly with other apps that you would commonly find in an office environment, including Slack, GitHub, QuickBooks, Trello, and more.
All in all, it does an excellent job at finding hidden productivity killers, so that your workforce stays focused on the project at hand throughout their entire designated work shift.
Take a look at some of its key features:
Detailed graphs on employee activity
Great app integration including Slack, GitHub, and many more
Provides automated reports
Easy to set up and use
Remote computer captining
ActivTrak
Get the insights you need to boost productivity and efficiency in the workplace with ActivTrak.
DeskTime is a simple and secure time tracking app that allows you to increase your company’s efficiency and productivity.
Using this tool, you can monitor the daily activity, sick leaves, overtime work, and vacations of your employees easier. You will be able to get a clear overview of your team’s workflow.
With DeskTime you can track apps, URLs, and also offline time and access detailed data regarding the ways that your employees are using apps and websites and what they’re doing when they are not online.
The tool offers your auto screenshots and activity rate trackers which will allow you to follow the time spent on individual projects.
DeskTime provides in-depth insights and reports for billing, and you can use it to customize easily download, and also send CSV reports to give your clients the most precise information regarding the amount of work and time spent on all the projects developed by the business.
You can oversee local and remote teams from both your mobile and your desktop and this way you’re able to save time by looking over the reports on the performance of your business while you are on the go.
The tool’s support team is available via chat, voicemail, and also email. The team from DeskTime follows the industry security standards to secure the personal information that they are provided with.
Check out its best features below:
Monitor the daily activity, sick leaves, overtime work, and vacations of your employees
Track apps, URLs, and offline time
Automatic screenshots and activity rate trackers
In-depth insights and reports for billing
Accessible from mobile and desktop platforms
DeskTime
A desktop and mobile app for time tracking, attendance tracking, and effective workflow management.
Asana is a tool that offers tasks, projects, dashboards, and conversations in order to allow teams to move work more efficiently from start to finish.
You can use it to see the progress of any project without scheduling a status meeting or without having to send emails.
With this tool, you will be able to use custom fields to track anything that is of great importance to you whether it’s bugs, job applicants, or leads.
You can organize your tasks into shared lists or boards for all of your meetings, programs, and initiatives.
The sections and columns will let you customize Asana in order to match your workflows and to add structure to all of your projects.
You will be able to break up the work of a task into smaller parts or divide the work among multiple projects and when a single task becomes a big and important initiative you will be able to quickly turn it into a project.
Take a look at its key features:
Tasks, projects, dashboards, and conversations management
Detailed insight into development projects
Organize your tasks into shared lists or boards
Advanced reporting features
Asana
Run your business efficiently with trustful employees and monitor their productivity for better results.
Wrike is a great collaboration tool and World’s number one project management tool and it will surely help you to monitor and boost your employee’s productivity when you’ll see some changes in your company.
These are just some major features that will help you monitor and manage your employees but you can use Wrike to find more functionalities that will work for you.
Remember that this tool must be a friend for you and your team, not a reporting channel to make your employee’s life harder. We suggest you try it, as it offers a free version.
Let’s see what Wrike can offer you in terms of managing employees and teams of employees:
Real-time work progress visibility
Advanced reporting for project progress
Efficient resource management
Standardize repetitive processes
Wrike
Crush your 2022 goals and keep moving forward with Wrike’s work management platform.
Screenshot Monitor is a great tool for working remotely. This lightweight desktop application allows employees to start and stop monitoring themselves.
The program automatically tracks time and screenshots the tasks that users make while it’s running.
Afterward, the screenshots are sent to the software’s official site securely, where they can be viewed in real-time.
Moreover, the app can be used from any device directly, without any installation. Therefore, the app ensures your employees are spending their time working.
Take a look at some of its most important features:
Light application
Auto monitoring features for employees
Automatically tracks time and screenshots the tasks
Can be used from any device directly, without any installation
Screenshot Monitor
Simple, but powerful tool you can start using in your business in 10 minutes.
Teramind provides software that streamlines the process of collecting employees’ user behavior on PCs in order to identify suspicious activity, monitor efficiency, and effectiveness, detect possible threats and ensure industry compliance.
Teramind’s mission is to reduce security incidents by providing real-time access to user activities by offering warnings, alerts, redirects, and user lock-outs for keeping businesses and organizations as secure and as efficient as possible.
The software comes in both on-premise and Cloud-based deployment options to meet any organization’s requirements.
Teramind can successfully identify which users are most risky to your business by analyzing the trends in their behavior.
You can check out what particular policies they have violated and then educate them in order to prevent future incidents.
With this tool, you can also write rules that react to any observable user activity such as blocking an email from being sent or alerting when a particular document is being printed.
You also have the ability to record and log all activity, and they play it back like a video and analyze session metadata.
To get started with the software you have to follow these steps:
Sign up to Teramind Basic Cloud employee monitoring software for free
Full or part time options for control
Customize alerts and monitoring settings to tailor the platform to your needs
Access all features from the software’s platform to enhance both security and productivity
WorkiQ is a tool that tracks employees’ computer behavior and provides reports on their time spent on non-productive and productive applications.
The tool’s dashboard provides clear visuals which will tell you which employees and actively engaged in their work and which ones are being continuously distracted.
This tool offers you the power to categorize all kinds of activities, track processes across all applications, and compare how different users process similar units of work.
The management dashboards will provide the following advantages:
Identifying unproductive behaviors at the moment of occurrence
Spotting and also rewarding productive behavior
Comparing actual employee productivity
Managing remote workers
Identifying top performers to replicate their processes across time
Improving the distribution of work through the identification of certain criteria
What should you take into consideration legally and technically speaking?
Monitoring employees’ emails may seem an infringement of employees’ privacy. The US Supreme Court ruled back in 2010 that it is legal for organizations and companies to monitor the actions of employees while they’re at work and while they’re using the business’ equipment.
This includes pagers, laptops, USB drives, and mobile devices. Programs for monitoring key logs and for capturing passwords can be used even if there is some ethical controversy around the subject of their usage.
It is important to remember that the federal government doesn’t place restrictions on employee internet monitoring. On the other hand, there are some individual states that put protection first.
More and more states are currently requiring employees to notify their workers in case their company monitors employees’ online activity and this includes keystrokes and emails.
Such notifications can be disclosed within the employee handbook or as an email reminder.
When employers are using such monitoring tools, they can choose the option of using their stealth or transparent mode.
Stealth mode is also known as a silent mode. This means that the employees cannot see the fact that they’re being monitored. High-quality monitoring tools will run unseen and undetected by employees.
The transparent mode of surveillance will allow your employees to see the surveillance program on their systems. Such software requires installation on each individual computer including the administrative portal.
This will not be as easy as stealth mode since the admins will have to check each and every single report from each system to see how the employees are doing.
How do monitoring tools work?
Employee tracking tools must be installed on multiple systems including a central station in case employers want them to go undetected by users.
In order for this type of tool to work properly, you must first turn off the firewall, and it will be turned back on once the installation process is complete.
On the other hand, it is virtually impossible for the program to work without additional patches and programming to enable PC-monitoring software to work around the program.
This will puncture a hole in the security system. It will make the network vulnerable to all kinds of malware, viruses, spyware, and so on.
Be cautious at viruses in disguise
You should be aware of the fact that there are many employee surveillance tools that are actually viruses in disguise and while they may give you keylogging and password-capturing capabilities, they’ll also collect the data behind the scenes and sell it to breach the organization’s security.
Most of the tools for monitoring employee activity can work around the firewall, but it is still possible that some threats pass through undetected. There is plenty of antivirus software that will keep employees and the company safe.
Deploying the software: Cloud and on-premises
Another important aspect to consider is the way that you are implementing the software. On-premises is the most commonly used option, and most tools offer it.
This will allow you to host the program and the data it collects on your own server. This solution requires a bit more IT knowledge, and it can take longer to set up.
Cloud solutions, on the other hand, are easier to manage and they can be set up quicker than on-premises deployment.
Solutions that suit your needs
Parental software and monitoring software are two solutions that monitor personal computer usage. They are both installed and used on a single computer. Also, they don’t pose the same threats as the email surveillance tools, for instance, that we already said work around firewalls.
Monitoring software and parental software come with additional options that are designed to prevent cyber attacks. There are also tools for monitoring children and spouses when they go online.
There are lots of businesses that are also on the lookout for email software and for apps that monitor outbound and inbound messages for spyware, viruses, and Trojans.
There’s also email encryption software that can safeguard personal data and critical information when it is transmitted to third-party recipients.
Such tools will make sure that the sensitive data is only accessed and used by individuals who really need the info while also keeping it as secure as possible.
Employees’ behaviors are unpredictable. With the help of these great tools, you will be able to increase their efficiency at work and your business’s overall productivity.
Browse through all of them and choose your favorite one, according to your needs. We guarantee high quality for all the tools we have discussed above for monitoring your employees’ activity at work.