How to fix the Xbox error 0x97e107df [QUICK GUIDE]

Xbox Live errors are many, usually easily distinguishable and bothering strictly individual systems.

However, as we speak, there seems to be an outrage online due to the infamous (and strange) error that stroke users globally.

The error code is 0x97e107df and it affected complete usability of all Xbox Live-dependent devices. To that point that users report not being able to run digital games or apps at all.

And while the Xbox Support is investigating this global outage, players are left to look up for potential solutions online. Don’t worry, though, as we have some simple solutions to deal with the problem at hand.

How can I fix Xbox Live error 0x97e107df?

1. Check the Xbox Live Services

  1. Open your browser.
  2. Navigate to the official Twitter support account, here, or Xbox Live Service Status website, here.xbox error 0x97e107df
  3. There you can find detailed explanations about the state of the Xbox Live service. If the problem is resolved, you’ll find out there.

We’ve written extensively on Xbox One Xbox Live issues. Check out these guides for more information.


2. Check the network

  • Make sure you use a wired connection instead of wireless.
  • Run diagnostics
    1. Press the Xbox button to open the guide.
    2. Choose Settings.
    3. Tap All Settings.
    4. Open Network.
    5. Select Network Settings.
    6. Now, run the Test network connection.
  • Reset your MAC address:
    1. Open Settings.
    2. Choose All Settings.
    3. Select Network and then Advanced Settings.xbox error 0x97e107df
    4. Choose Alternate MAC address and then Clear.
    5. Restart your console.

3. Log out and log in again

  1. Press the Xbox button.
  2. Select Home.
  3. Select your account by highlighting your gamerpic.
  4. Log out.
  5. Restart your console.
  6. Repeat the procedure and log in again.

4. Hard reset the console

  1. Press and hold the Power button for 10 seconds or so.
  2. Wait until the console shuts down.
  3. After a minute, turn on the console again and look for changes

Fix failed to host lobby error on Xbox with 4 quick tips

Xbox is one of the most popular gaming consoles. However, nothing is perfect. Many users encountered failed to host lobby error on Xbox.
One user reported the following on the Reddit forum:

Initially I would occasionally get this, re queue and it would work fine. Now I can’t play at all, no matter the gamemode, just says can’t host lobby

So, this can be a severe problem, because the user can’t play any games. Luckily, quite a few easy solutions are available. These will fix the error in no time.

Today, we will show you how to make failed to host lobby error on Xbox a thing of the past.

How can I fix host lobby error on Xbox?

1. Restart the game

Sometimes, this issue can be solved just by restarting the game.

2. Hard-reset your console

To reset your Xbox console, you need to hold the power button for at least 15 seconds. Then, start the console again.

3. Obtain DNS automatically

If the solutions above didn’t work, you need to change some settings in your DNS.

  1. Press Windows Key + R and write ncpa.cpl.
  2. Press Enter or click OK.run ncpa
  3. Locate your network connection, right-click it and choose Properties.
  4. When the Properties window opens, select Internet Protocol Version 4 (TCP/IPv4) and click the Properties button.properties ethernet
  5. Select Obtain DNS server address automatically and Obtain an IP address automatically from Ethernet properties.
  6. Click Ok.dns automatically
  7. Repeat the operation for Internet Protocol Version 6 (TCP/IPv6).

4. Re-add your account

Some users reported that if they remove and then re-add their account, your XBOX will work. The games could get corrupted, so, the re-adding your account will solve the failed to host lobby error.

Conclusion

So, it is quite possible that this issue can be solved in no time with the easiest solutions. As you can see, a simple restart can solve this error, but if not, a simple twitch in your DNS settings will make this problem a thing of the past.

However, if you already obtain DNS automatically and the failed to host lobby error appears, just change it to manual.

Also, make sure your games are not corrupted to enjoy the perfect Xbox experience.

Did our solutions work for you? Do let us know in the comments section below!

Posted in Fix

FIX: Windows 10 update error 0x80080008

Installing the latest Windows 10 build can sometimes turn into a nightmare.

There are various errors that may occur during the download and install process, preventing Insiders from getting the latest updates on their devices.

Speaking of which, error 0x80080008 is one of the most frequent build install errors on Windows 10 PC and Mobile.

As a matter of fact, many Insiders who installed the latest Windows 10 Mobile build confirmed they encountered this error during the install process.

The good news is that there are a few quick workarounds that you can use to fix it.

Here’s how one user describes this error:

Rebooting fixed this error. But after it’s downloaded and installed, when I click restart, now it gave me 0x80070002 error!
I’ve restarted again and click update, it showed me restart option, clicked on it and then again 0x80070002.
On that error, I’ve clicked retry and now it’s downloading again.

It is good to know that error 0x80080008 affects non-Insiders, as well. Both Insiders and non-Insiders can use the solutions listed below.

Table of contents: 

  1. Run DISM
  2. Run the SFC scan
  3. Create a batch file 
  4. Delete the Boot Configuration bad memory
  5. Run the Update troubleshooter
  6. Reset Windows Update components
  7. Make sure the Windows Update service is running
  8. Make sure the BITS service is running
  9. Change DNS settings

How can I fix Windows 10 update error 0x80080008?

Fix – Windows 10 error 0x80080008

Solution 1 – Run DISM

The first thing we’re going to try is running DISM. Deployment Image Servicing and Management (DISM) is a tool for, as its name says, deploying the system image all over again.

Hopefully, it will also resolve the problem on the way.

We’ll walk you through both standard and the procedure that utilizes the installation media below:

  • Standard way
  1. Right-click Start and open Command Prompt (Admin).
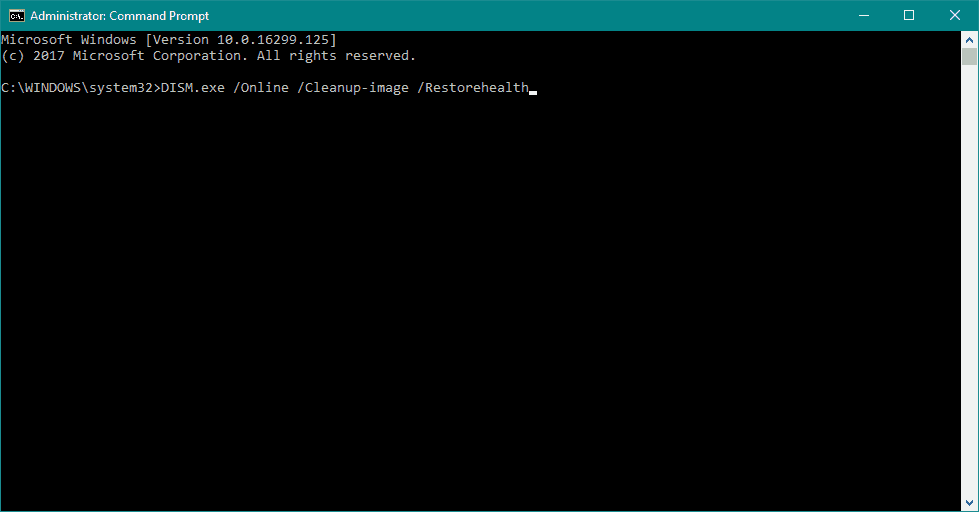
  2. Paste the following command and press Enter:
      • DISM /Online /Cleanup-Image /RestoreHealth
  3. Wait until the scan is finished.
  4. Restart your computer and try updating again.
  • With the Windows installation media
  1. Insert your Windows installation media.
  2. Right-click the Start menu and, from the menu, choose the Command Prompt (Admin).
  3. In the command line, type the following commands and press Enter after each:
    • dism /online /cleanup-image /scanhealth
    • dism /online /cleanup-image /restorehealth
  4. Now, type the following command and press Enter:
    • DISM /Online /Cleanup-Image /RestoreHealth /source:WIM:X:SourcesInstall.wim:1 /LimitAccess
  5. Make sure to change an X value with the letter of the mounted drive with Windows 10 installation.
  6. After the procedure is finished, restart your computer.

Solution 2 – Run the SFC scan

The SFC scan is another command-line tool for resolving various system issues. So, we can also use it to resolve Windows update problems. Here’s how to run the SFC scan in Windows 10:

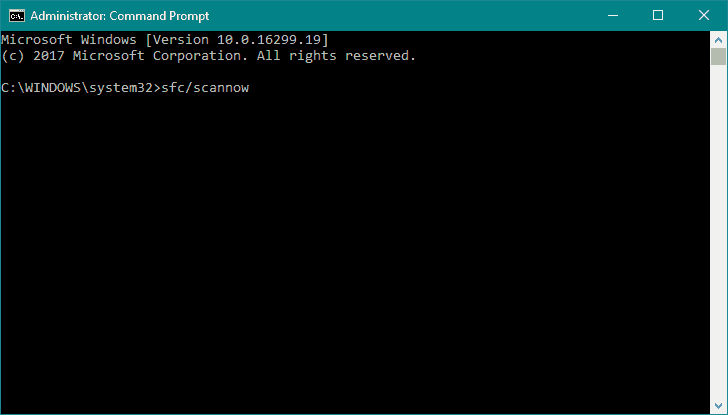
  1. Right-click on the Start Menu button, and open Command Prompt (Admin).
  2. Enter the following line and press Enter: sfc/scannow
  3. Wait until the process is done (it may take a while).
  4. If the solution is found, it will automatically be applied.
  5. Now, close the Command Prompt and restart your computer.

Solution 3 – Create a batch file 

  1. Open Notepad
  2. Create a batch file with the following contents:
    • REGSVR32 WUPS2.DLL /S
    • REGSVR32 WUPS.DLL /S
    • REGSVR32 WUAUENG.DLL /S
    • REGSVR32 WUAPI.DLL /S
    • REGSVR32 WUCLTUX.DLL /S
    • REGSVR32 WUWEBV.DLL /S
    • REGSVR32 JSCRIPT.DLL /S
    • REGSVR32 MSXML3.DLL /S
  3. Save the file as register.bat on your desktop.
  4. Right-click and run it as administrator.
  5. Reboot your PC and try to update again.

Solution 4 – Delete the Boot Configuration bad memory

The next thing we’re going to try is deleting the Boot Configuration. Here’s what you need to do:

  1. Right-click the Start menu and run Command Prompt (Admin).
  2. In the command line, type the following commands and press Enter after each:
    • bcdedit /enum all
    • bcdedit /deletevalue {badmemory} badmemorylist
  3. Restart your PC and give upgrading another try.

Solution 5 – Run the Update troubleshooter

And the third troubleshooting tool we’re going to use here is Windows 10’s built-in troubleshooter.

You can use the troubleshooter to resolve various kinds of system issues, including the update problems. So, running this tool might be helpful in this case.

Here’s how to run Windows 10’s troubleshooting tool:

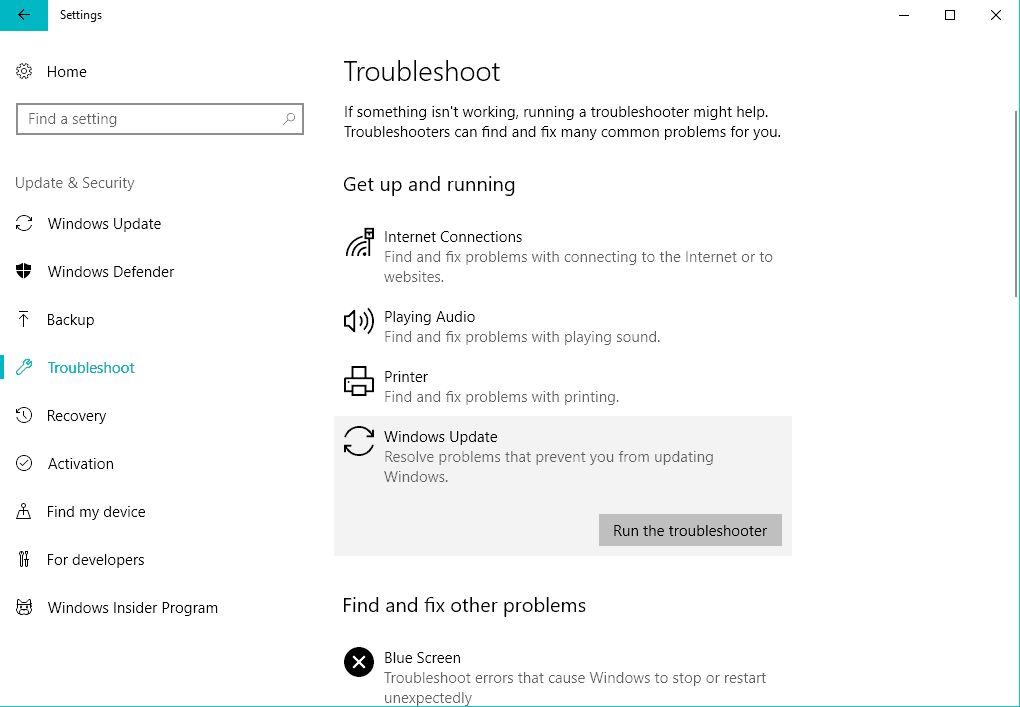
  1. Go to Settings.
  2. Head over to Updates & Security > Troubleshoot. 
  3. Select Windows Update, and go to Run the Troubleshooter. 
  4. Follow further on-screen instructions and let the process finish.
  5. Restart your computer.

Solution 6 – Reset Windows Update components

Windows Update components are crucial for obtaining updates. So, if one of these components is corrupt, you’ll have problems receiving updates.

The best solution, in this case, is to simply reset the update components to their original state. Here’s how to do that:

  1. Start Command Prompt as administrator.
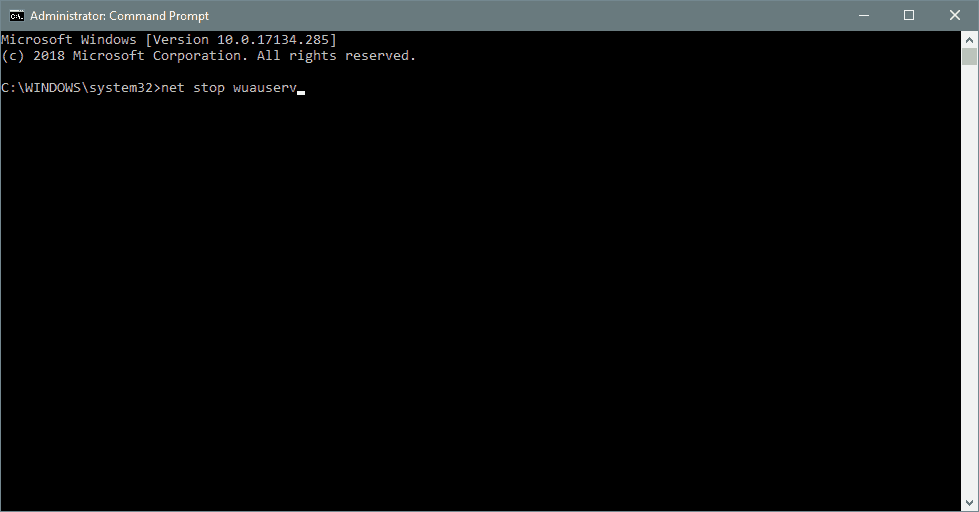
  2. When Command Prompt starts, run the following commands:
  • net stop wuauserv
  • net stop cryptSvc
  • net stop msiserver
  • ren C:\Windows\SoftwareDistribution SoftwareDistribution.old
  • ren C:\Windows\System32\catroot2 Catroot2.old
  • net start wuauserv
  • net start cryptSvc
  • net start msiserver

Solution 7 – Make sure the Windows Update service is running

Just like other components, the Windows Update service is important for receiving updates. So, were going to make sure this service is running.

  1. Go to Search, type services.msc, and open Services.
  2. Find the Windows Update service. Right-click and open Properties.
  3. On the General tab, find Startup type and choose Automatic.
  4. If the service is not running, right-click and choose Start.
  5. Confirm selection and close window.

Solution 8 – Make sure the BITS service is running

The same thing goes for the BITS service:

  1. Press Windows key + R. In search line type services.msc and press Enter.
  2. Look for Background Intelligent Transfer Service (BITS) and double-click it to open its properties.
  3. If the service isn’t running, click the Start button.
  4. Choose Recovery tab and make sure that First failure and Second failure are set to Restart service.
  5. Confirm selection and check for updates.

Solution 9 – Change DNS settings

If none of the previous workarounds resolve the problem, we’ll try and change the DNS settings. Here’s how to do that:

  1. Go to Windows Search, type control panel, and open Control Panel.
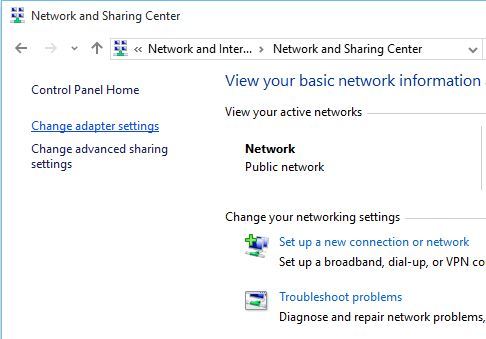
  2. Go to Network and Sharing Center, and click on Change adapter settings from the left pane.
  3. Choose the network you’re currently using, right-click it, and choose Properties.
  4. Scroll down to Internet protocol version 4 (TCP/IPv4), and choose Properties.
  5. Now, choose Use the following DNS Server addresses
  6. Enter the following values:  DNS Server – 8.8.8.8 and Alternate DNS Server – 8.8.4.4
  7. Save changes, and restart your computer

If you’ve come across other workarounds to fix error 0x80080008, list the troubleshooting steps in the comment section below.

Fix IPConfig error: Could not flush the DNS Resolver cache

As an operating system, Windows comes with its own quirks and niggles, however, for every problem, there also exists an equally powerful solution. Tools like Powershell, Run, and IPConfig helps users resolve major problems.

Microsoft has also made it a point to include powerful tools that will help users manage the networking features that Windows has to offer.

In this segment, we will talk at length about how to fix the Could not flush the DNS Resolver cache issue. But first, let’s take a look at some essential aspects:

What is ipconfig?

The IPConfig is a built-in tool that’s most helpful for the admins of the Windows operating system. In a broad sense, it’s used to test the connectivity between the DHCP server and the workstation by making use of various commands.

Yes, we do agree that most of the general users will not ipconfig per se, but still there does exist one feature in ipconfig that is indispensable.

What is DNS Resolver cache and Flush?

The DNS Resolver cache is a temporary database created by the Windows operating system. The database records all the attempts to connect and visit websites. In essence, the DNS Cache is a record-keeping book of all the DNS lookup attempts made by your machine.

A sub-feature called DNS Prefetching is used in the Chromium browsers to resolve domain names even before the user follows the link.

ipconfig /flushdns not working

While the DNS Resolver cache is very helpful in helping us access the Internet in a much faster way and saves on the bandwidth it sure has its own downsides.

Most of the time, the DNS cache is responsible for connection errors and this is often solved by using the Flush DNS command.

The flushdns command is pretty useful when the website has changed its IP address and there is a conflict since you are still using the older entry stored in the DNS cache.

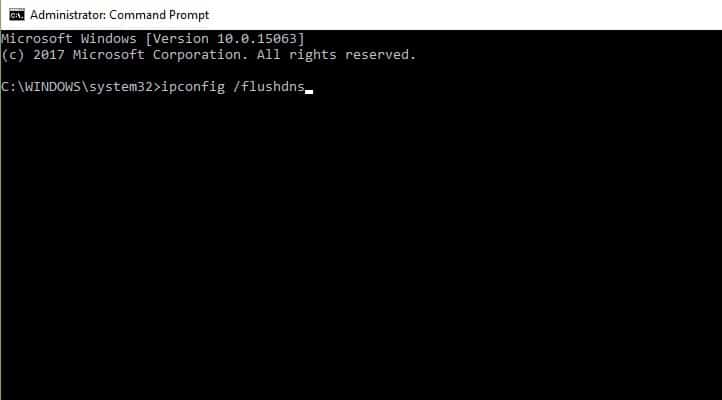
In order to flush your computer’s local DNS cache all you need to do is head over to Command Prompt and type the following command, ipconfig/flushdns.

However, sometimes the Command Prompt throws the following error at you: Could not flush the DNS Resolver Cache.

How can I fix Could not flush the DNS Resolver cache error?

1) Enable the DNS Client

According to experts at Microsoft, this problem is caused when a service named DNS Client is disabled on your computer. Usually, this is enabled at startup. In order to enable the service, follow the steps outlined below:

  • Open the Run dialogue box by pressing WIN+R
  • Type services.msc and click OK
  • Select the DNS name and double click on it
  • Check the settings for the Startup Type and make sure you select Automatic
  • Restart the computer and the DNS Client should be enabled automatically

2) The last resort: Analyse Windows logs

Does the Could not flush the DNS Resolver cache issue still persists? In such cases, one needs to take a look at the Windows logs in order to deduce what happened. Open Run Dialog box by typing WIN+R, click Ok, then go to Windows Logs and select Systems.

Also one can simply type ipconfig/displaydns in order to view all the DNS cache. Furthermore, the results can also be exported by typing out the following command ipconfig/displaydns>cached-dns.txt.

This is how you resolve the Could not flush the DNS Resolver cache issue. On a related note, some of us disable the DNS Client fearing that it will gobble up the computing resources and this is a pure myth.

In most of the cases, the DNS Client will use around 200-300KB of memory and disabling it is certainly not helping you reap performance benefits.

That should conclude it – we hope you found our solutions helpful.

Of course, if you happen to know other methods that might come in handy to solve this Ipconfig error even faster, feel free to share them by hitting the comments section below.

[wl_navigator]

FULL FIX: Windows 10/11 Cortana critical error

Cortana is one of Windows 10’s best new features. As your own personal digital assistant, Cortana can fetch information and generally get things done for you in a more timely manner.

Sometimes, though, Cortana might not function properly due to glitches.

We already helped you address the issue where Cortana pops up automatically on Windows 10 along with the issue where Cortana doesn’t recognize Hey Cortana.

While the above issues have their respective fixes, Cortana on Windows 10 might show some sort of Critical Error.

When confronted by this error, you might see messages like, Critical Error – Start menu and Cortana aren’t working. We’ll try to fix it the next time you sign in.

In this post, we’ll tell you a few ways that can easily help you fix this error. Let’s get started.

Cortana is a key part of Windows 10, and therefore Cortana Critical Error can be quite problematic. Speaking of this error, here are some similar issues that users reported:

  • Critical error Start Menu – Sometimes this error can affect the Start Menu as well, but if you encounter it, just disable your antivirus and check if the problem is still there.
  • Windows critical error message – Critical error message can appear for various reasons, but if you encounter this issue, you should be able to fix it using one of our solutions.
  • Critical error Cortana not working – This is just another variation of this error, but you might be able to fix it just by entering the Safe Mode.
  • Cortana critical error on startup – Sometimes this problem can appear as soon as Windows starts. However, you might be able to fix that simply by performing a Clean boot.

How do I fix Windows 10 Cortana Critical Error?

Solution 1 – Disable your antivirus

According to users, the main cause for Cortana Critical Error message can be your antivirus software.

Certain antivirus tools, such as Avast, can interfere with your system, and they can cause this and other similar issues to appear.

To fix the problem, users are suggesting to check your antivirus settings and disable certain antivirus features.

If that doesn’t solve the problem, you might have to disable your antivirus altogether. If that doesn’t work, your last solution would be to completely remove your antivirus.

If removing the antivirus solves the problem, you should consider switching to a different antivirus solution.

There are many great antivirus tools on the market, but if you want the most reliable protection that won’t interfere with your system, it’s advised to choose the most compatible antivirus software out there.

Solution 2 – Just reboot your system

This might be a problem that occurs just once on your system. To get rid of it, you can simply restart your PC and the issues will be solved. To restart your PC, follow the steps listed below:

cortana windows 10 critical error
  • Click on the Start menu and then click on the Power button.
  • You will see an option to restart the PC. Click it.

If your start menu is not working for some reason, then just press the reset button on your PC cabinet or just long-press the power button until your PC shuts off.

You can now restart the PC and the problem will be fixed.

Solution 3 – Restart your PC in Safe Mode once

According to users, in order to fix Cortana Critical Error, you just have to enter Safe Mode on your PC.

Safe Mode is a special segment of Windows that runs with default settings, so it’s perfect for troubleshooting. To enter Safe Mode, you just have to do the following:

  1. Open the Settings app. To do that quickly, you just need to use Windows Key + I shortcut.
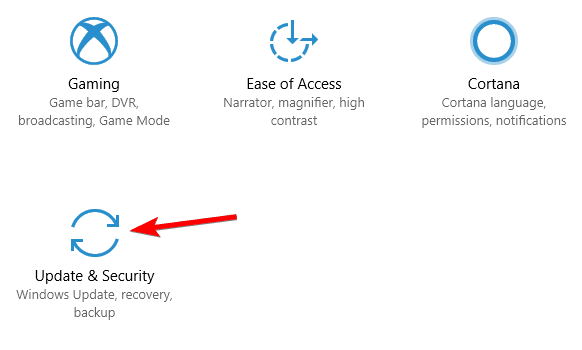
  2. Now go to the Update & Security section.
    Critical error Start Menu
  3. Choose Recovery from the menu on the left. Now click the Restart now button.
    Critical error Start Menu
  4. You’ll be presented with a list of options. Choose Troubleshoot > Advanced options > Startup Settings.
  5. Now click the Restart button to restart your PC.
  6. Now you should see a list of options. Select the version of Safe Mode you want to use by pressing the appropriate key.

Once you enter Safe Mode, check if Cortana works. If everything is in order, restart your PC, start it normally and check if the problem is resolved.

Solution 4 – Update your PC using Windows Update

Microsoft has already released a fix for this issue from their side. If you are still facing the issue, then your Windows 10 is not up to date.

You should always update your Windows OS on PC from time to time to combat such issues.

To update your Windows 10, follow the steps given below.

  1. Open the Start menu and open Settings. 
  2. Inside the Settings app, look for a section that reads Update & Recovery. Click and open it.
  3. Make sure you are into the Windows Update section. You will see a button that reads Check for updates.
    Windows critical error message
  4. This will start checking for updates and if any new updates are available, they will be downloaded and installed.

Solution 5 – Perform a Clean boot

Sometimes Cortana Critical Error can appear due to third-party applications. Many applications and services tend to start automatically with Windows, and that can cause this problem to appear.

However, you can fix the problem simply by performing a Clean boot. This is quite simple to do, and you can do it by following these steps:

  1. Press Windows Key + R, enter msconfig and click OK or press Enter.
    Critical error Cortana not working
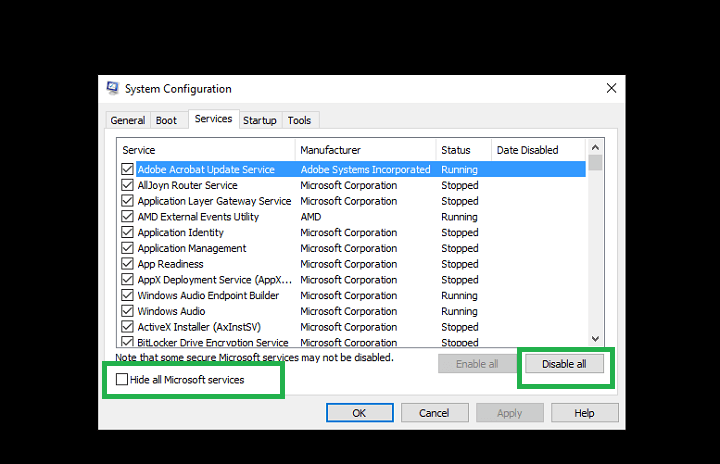
  2. System Configuration window will now open. Navigate to the Services tab, and check Hide all Microsoft services option. Click the Disable all button.
    Cortana critical error on startup
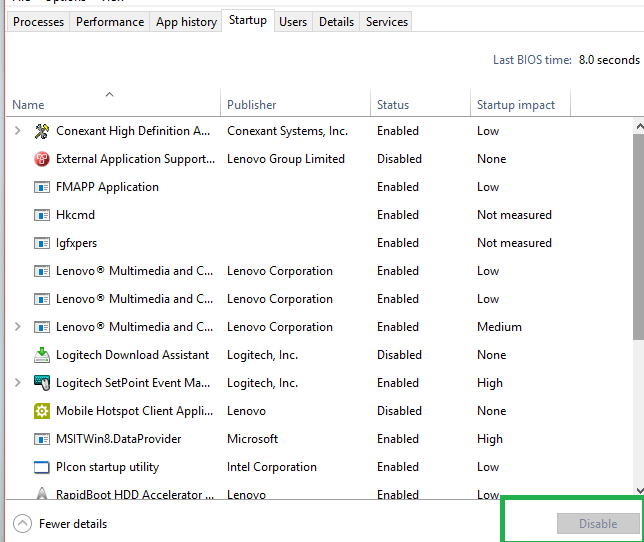
  3. Navigate to the Startup tab and click Open Task Manager.
    Critical error Start Menu
  4. Task Manager will now start and show you the list of startup applications. Right-click the first application on the list and choose Disable from the menu. Repeat this for all entries on the list.
    Windows critical error message
  5. After disabling all startup applications, go back to the System Configuration window. Click Apply and OK to save changes and restart your PC.
    Critical error Cortana not working

Once your PC restarts, check if the problem is still there. If not, it’s certain that one of your startup applications was causing the issue.

To find the cause of the problem, enable startup applications and services one by one or in groups.

Keep in mind that you’ll need to restart your PC after enabling a service or an application in order to apply changes.

Once you find the problematic application, disable it or remove it and the issue should be permanently resolved.

Few users reported that Microsoft(C) Register Server service was the problem, and it seems that this service was trying to start a malicious file.

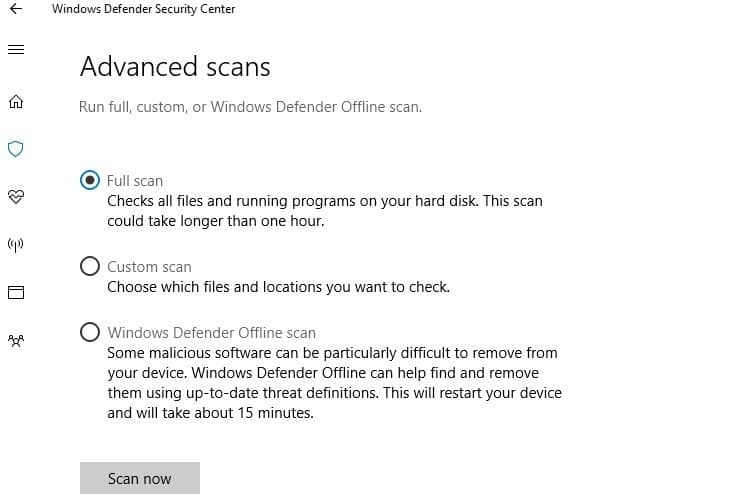
If you have a similar problem, be sure to perform a full system scan.

Solution 6 – Remove the problematic updates

In some cases, Cortana Critical Error can occur due to recent updates. Sometimes a specific Windows update can cause this issue to occur, and in order to fix it, you just need to find and remove the problematic update. To do that, just follow these steps:

  1. Open the Settings app and go to the Update & Security section.
  2. Now choose View update history.
    Windows critical error message
  3. Now you should see a list of recent updates. Memorize a couple of updates from the list and click Uninstall updates.
    Critical error Cortana not working
  4. Double-click the update you want to remove. Follow the instructions on the screen to remove it.
    Cortana critical error on startup

Once you remove the problematic update, check if the issue is still there. If the issue doesn’t appear, it means that the update was causing the issue.

We have to warn you that Windows 10 tends to automatically install the missing updates, so be sure to block Windows from installing the automatic updates.

Solution 7 – Perform a System Restore

If you keep getting Cortana Critical Error you might be able to fix the issue simply by performing a System Restore.

In case you don’t know, System Restore is a useful feature that allows you to restore your system to an earlier date and fix various problems.

To use System Restore, just follow these steps:

  1. Press Windows Key + S and type system restore. Select Create a restore point from the list of results.
  2. When the System Properties window appears, click the System Restore button.
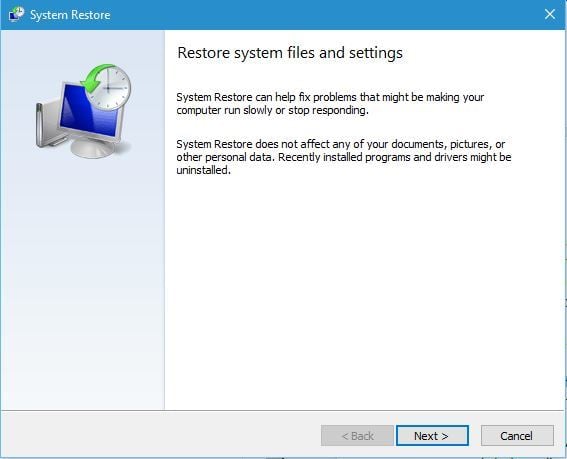
  3. System Restore window appears. Click Next to proceed.
  4. If available, check Show more restore points option. Now you need to select the desired restore point and click Next.
  5. Follow the instructions on the screen to complete the restoration process.

Once your system is restored, the problem with Cortana will be completely fixed.

These methods will no doubt help you in addressing Critical Errors brought on by Cortana. Let us know how you did in our comments!

FIX: Printer error has occurred, follow the steps below

While using the Canon printers, you may encounter the 6000 printer error has occurred, follow the steps below to clear the error message. The full message reads:

6000 printer error has occurred. Follow the steps below to clear the error. If you still have troubles, service is required.

This error can occur due to multiple reasons, including if something is blocking the paper feed tray resulting in a paper jam or out-of-place wiper. If you are also troubled by this error, here are a couple of troubleshooting tips to help you resolve this issue.

How do I fix the Canon printer error?

1. Check if something is blocking the paper feed tray

  1. If something is in front of the paper feed tray, the paper free tray may fail to open when you initialize a print job.
    • This results in a 6000 printer error.
  2. To resolve this, check the printer paper feed tray and remove any physical object that is preventing the tray from opening.
  3. After a thorough inspection, turn off the printer.
  4. Turn on the printer and try to print again. Check for any improvements.

2. Check for internal debris

  1. Lift the lid to move the carriage.
    • Some printers allow you to move the carriage manually.
  2. Check the inside compartment and clean it using compressed air.
    • Check both sides for any obstructions.
  3. Next, remove the ink cartridges from your printer.
  4. Clean the metal contacts on the back as well as the contact patch inside the printer using a soft cloth.
  5. Let it dry and reseat the cartridges.
  6. Now find the clean plastic strip that runs through the printer above the carriage and wipe it clean.
  7. Use a clean white paper and push it through the rollers to clean any debris left during the cleaning process.

3. Reset the printer

  1. Turn off the printer if it is running.
  2. Unplug the power cable from the wall outlet.
  3. Leave it turned off for 10 minutes.
  4. Press and hold the power button for a minute and connect the power cable to your printer and the wall outlet while doing so.
  5. Keep the power button pressed for a minute after plugging the power cable and release the power button.
  6. Now try to print the document and check for any improvement.

4. Take the printer to a service

If the issue persists, you may have internal issues to fix, which requires you to contact Cannon support to get the printer serviced.

The printer error occurs when the printer is unable to use the paper tray. By following the steps in this article, you can fix the issue and get your printer back online in no time.

Which one of these solutions helped you fix this canon printer issue?

Let us know by leaving a message in the comments section below.

FIX: The directory cannot be removed error message

If you’re getting the ERROR_CURRENT_DIRECTORY error code with The directory cannot be removed description, follow the troubleshooting steps listed in this article.

Also known as error 16 (0x10), the ‘ERROR_CURRENT_DIRECTORY’ error code occurs when users try to delete a directory from their PC. This error occurs due to one of the following reasons:

  • The directory not exist, or its directory name is misspelled
  • The directory contains files or other subdirectories
  • The directory has the same name as a reserved device name.
  • There are files or subdirectories which need higher permissions
  • There are files in use.

This error may also occur when setting up your Windows account. In this case, the error is accompanied by the following description: Something went wrong. Please try again later. Error 0x80090010: The directory cannot be removed.

How do I fix The directory cannot be removed error?

1. Correct the directory name

Make sure that the directory name is written correctly. Use simple directory names, and avoid extended characters and spaces which may trigger this type of error. Use any characters within a-z, A-Z and 0-9.

2. Empty the directory

Remove all the files and subdirectories from the directory, and then try to delete it again. Sometimes, the files located inside the problematic directory may prevent you from deleting it. After removing all the files and folders from the respective directory, users are able to delete it.

3. Use the Chdir command

The chdir command displays the name of the current directory or changes the current folder. If you use it with only a drive letter, it displays the names of the current drive and folder. If you use it without parameters, chdir displays the current drive and directory. In this particular situation, you’re going to use this command to change the current directory in all sessions that might be using it.

  1. Go to Start > type CMD > right-click the first result > launch Command Prompt as Admin
  2. Change the default directory on a drive different from the one you are on, by typing the following commands:
    chdir [Drive:[directory]]
    cd [Drive:[directory]]
  3. Try to delete the problematic directory again.

For more information about the chdir command and how to use it in various contexts, go to Microsoft’s Support page.

4. Use the RMDIR command

  1. Go to Start > type CMD > right-click the first result > launch Command Prompt as Admin
  2. Use the rmdir [Drive:]Path/s command to delete the problematic directory.

The RMDIR command allows you to completely remove directories. However, this command comes with a few limitations:

  • it cannot delete directory with hidden or system files. If you attempt to do so, the ‘The directory is not empty’ message appears on the screen.
  • it cannot delete the current directory. If you attempt to delete the current directory, the following message appears:’ The process cannot access the file because it is being used by another process.’ You must first change to a different directory, and only then use rmdir with a path.

Example: If you want to delete the MyDir directory, use this command: rmdir /s / mydir. If you want Command Prompt to delete the directory without asking for confirmation, type this command: rmdir /s /q mydir.

5. Remove the device with the directory name

If the directory name is the same as an installed device, simply remove the device. This should fix the problem and you should be able to remove the directory.

6. Repair your registry

    1. Go to Start and  type CMD
    2. Right-click Command Prompt and  select Run as Administratorcommand prompt
    3. Now type the sfc /scannow commandsfc scannow
    4. Wait for the scanning process to complete and then restart your computer. All corrupted files will be replaced on reboot.

The easiest way to repair your registry is to use a dedicated tool, such as CCleaner. Don’t forget to first backup your registry in case anything goes wrong.
If you haven’t installed any registry cleaner on your computer, check out our article on the best registry cleaners to use on Windows 10 PCs.

You can also use Microsoft’s System File Checker to check for system file corruption.

7. Run a full system scan

  1. From Start menu open System Security
  2. Go to Virus and threat protection
  3. Select Scan Options and from here select Full Scan
  4. Finally, click on the Scan Now button.

Malware may cause various issues on your computer, including errors. Perform a full system scan in order to detect any malware running on your computer. You can use Windows’ built-in antivirus, Windows Defender, or third-party antivirus solutions.

8. Check your disk for errors

  1. Go to Start and  type CMD
  2. Right-click Command Prompt and  select Run as Administratorcommand prompt
  3. Type the chkdsk C: /f command followed by Enter.
  4. Replace C with the letter of your hard drive partition.

9. Check the permissions on the drive

  1. Log in as Admin > select the problematic drive > right-click it > go to Properties > select the Security tab >click on the Advanced button

2. In the new window, click on Users > click on the Change permissions button

3. Select Users one more time > go to Edit

4. Under basic permissions, check Full control > OK.


The ERROR_CURRENT_DIRECTORY error code may also occur if you don’t have the necessary permissions to access the drive where the problematic directory is located. Use the steps above to verify the permissions on the respective drive and change them to full control.

However, keep in mind that if you restart your computer or switch users, these settings will revert to default.

10. Boot into Safe Mode

  1. Hold down the shift key and click the on-screen power button
  2. Select the restart option while holding the shift key
  3. Select Troubleshoot > Advanced options > Startup Settings > hit Restart

4. Wait until Windows 10 reboots, and select  Safe Mode.
5. Delete the problematic directory > restart your computer > check if the problem still persists.

11. Use another OS

If you own a dual-boot system, simply boot into another operating system and try deleting the directory from there. For more information on how to boot Windows with another operating system, check out our dedicated article.

We hope that the solutions listed above helped you fix The directory cannot be removed error. If you’ve come across other workarounds to fix this problem, you can help the Windows community by listing the troubleshooting steps in the comments below.

Fix: The Storage Control Blocks Were Destroyed Error

If you’re getting the ERROR_ARENA_TRASHED error, with the description The storage control blocks were destroyed, this means that some files got corrupted.

This error can occur in various situations, such as when playing games, installing Windows updates, or installing third-party apps and programs.

How do I fix the ERROR_ARENA_TRASHED error code?

1. Run a full system scan

  1. From Start menu, open System Security
  2. Go to Virus and threat protection
  3. Select Scan Options, and from here select Full Scan
  4. Finally, click on the Scan Now button.

Malware may cause various issues on your computer, including errors. Perform a full system scan in order to detect any malware running on your computer. You can use Windows’ built-in antivirus, Windows Defender, or third-party antivirus solutions.

2. Repair your registry

  1. Go to Start and  type CMD
  2. Right-click Command Prompt and  select Run as Administratorcommand prompt
  3. Now type the sfc /scannow commandsfc scannow
  4. Wait for the scanning process to complete and then restart your computer. All corrupted files will be replaced on reboot.

You can use Microsoft’s System File Checker to check for system file corruption but the easiest way to repair your registry is to use a dedicated tool.

If you want to find out more about registry cleaners, check out our article on the best registry cleaners to use on Windows 10 PCs.

3. Updates OS version in Windows 10

  1. Open the Settings app. You can do that quickly by using Windows Key + I shortcut.
  2. Once the Settings app opens, navigate to the Update & Security section.
    Xinput1_3.dll PES 2018
  3. Click Check for updates button.
    Xinput1_3.dll missing Windows 10

Windows will now check for new updates and download them in the background.

Ensure you’re running the latest Windows OS updates on your machine. As a quick reminder, Microsoft constantly updates Windows to improve the system’s stability and fix various issues.

If you’re looking for a particular update, go to Microsoft’s Update Catalog website. Simply type the KB number of the respective update, hit Enter and then click on the download button.

And if you encountered the Please insert the external storage media and press OK message while updating Windows, this guide can help.

4. Perform a clean boot

  1. Type System Configuration in the search box > hit Enter
  2. From the Services tab >  select the Hide all Microsoft services check box > click Disable all.
hide all microsoft services windows 10

3. On the Startup tab > click on Open Task Manager.

4. Now on the Startup tab in Task Manager > Select all items > click Disable.

disable start up items windows 10

5. Close the Task Manager.

6. On the Startup tab of the System Configuration dialog box >click OK > restart your computer.

For more information on how to perform a clean boot on other Windows versions, check out Microsoft’s support page.

5. Uninstall and reinstall the apps affected by the ERROR_ARENA_TRASHED message

If the ERROR_ARENA_TRASHED error code occurs when using a particular app or program, try uninstalling and reinstalling the respective programs. Also, if this error occurs shortly after installing a new app or program, try uninstalling the respective app or program.

We hope the solutions listed above helped you fix The storage control blocks were destroyed error code. If you’ve encountered other workarounds to fix this error, you can list the troubleshooting steps in the comment section below.

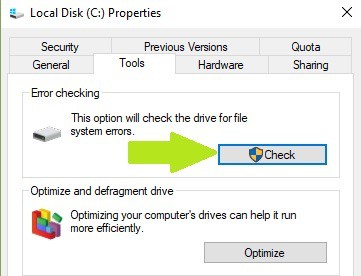
You can check each drive for errors. Open My Computer and in the left-side column left-click on This PC.
In the right-side column, right-click on the drive you want to check and select Properties. Left-click on the Tools tab. Under Error-checking click on Check and in the new window select Scan drive.
 
  • What are system errors?

A system error is a software malfunction that causes the operating system to no longer work properly. System errors are commonly fatal and may require a hardware device to be repaired or replaced.

FIX: Windows sockets registry entries are missing error

Network access is crucial for Windows 10 users, but unfortunately, many Windows 10 users reported certain network issues.

One of these issues is Windows sockets registry entries required for network connectivity are missing error message which can prevent you from accessing the Internet. Although this is a serious issue, there are several solutions available.

Here are some more error messages that you can apply the same solutions to:

  • One or more network protocols are missing on this computer windows 10
  • Winsock missing from registry
  • Could not add the requested feature blocked by group policy

How can I fix Windows sockets registry entries required for network connectivity are missing error?

1. Delete Winsock keys from registry and reinstall TCP/IP

This solution requires modifying your registry, therefore in order to avoid any potential problems, it’s advised to create a backup for the registry keys that you’re about to change. To do that, follow these steps:

  1. Press Windows Key + R and enter regedit. Press Enter or click OK.
    regedit
  2. Once Registry Editor opens, navigate to the following key on the left pane:

    • HKEY_LOCAL_MACHINESystemCurrentControlSetServices

  3. Locate Winsock and WinSock 2 keys, right-click each of them and click Export.
    export-registry
  4. Enter a file name and save them. These files will be used for backup if anything goes wrong.
  5. After you’ve created a backup for these keys, delete them from Registry Editor. To do that, just right-click each key and choose Delete from the menu.
  6. Close Registry Editor.

After deleting Winsock keys, we need to reinstall TPC/IP. To do that, follow these instructions:

  1. Login with the Administrator account.
  2. Press Windows Key + S and enter Network and Sharing Center. Select Network and Sharing Center from the list.
    network-and-sharing-center
  3. Your current connection should be listed on the right. Click it.
  4. Click the Properties button.
    properties-internet
  5. Click the Install button.
    install-protocol
  6. Select Protocol and click Add.
    add-protocol
  7. Click Have disk button.
    have-disk
  8. In copy manufacturer’s files from section enter C:windowsinf and click OK.
    c-inf
  9. Select Internet Protocol (TCP/IP) and click OK.
  10. Restart your computer and check if the issue is resolved.

2. Reset Winsock

If you’re getting Windows sockets registry entries required for network connectivity are missing error message, you need to perform Winsock reset in order to fix it. To do that, follow these steps:

  1. Press Windows Key + X and choose Command Prompt (Admin) from the menu.
    command-prompt-admin
  2. Once Command Prompt opens, enter netsh winsock reset and press Enter in order to run it.
    cmd-netsh-winsock-reset
  3. Close Command Prompt, restart your computer and check if the issue is resolved.

3. Reset TCP/IP using Command Prompt

In order to fix this issue, users are suggesting to reset TCP/IP by using netsh command in Command Prompt. To do that, follow these steps:

  1. Press Windows Key + X and choose Command Prompt (Admin) from the menu.
  2. Once Command Prompt opens, enter netsh int ip reset and press Enter to run it.
    neths-int-ip-reset
  3. After the process is done, restart your computer and check if the problem is resolved.

It’s worth mentioning that sometimes you might get a message in Command Prompt saying Resetting failed. Access is denied. If you get this message, you need to do the following:

  1. Press Windows Key + R and enter regedit. Press Enter or click OK.
  2. Navigate to this key in the left pane:
    HKEY_LOCAL_MACHINESYSTEMCurrentControlSetControlNsi{eb004a00-9b1a-11d4-9123-0050047759bc}26

    26-registry-editor

  3. Right-click 26 and choose Permissions.
    permissions
  4. Now, check Full Control permissions and click Apply and OK.
    full-control-26
  5. Close Registry Editor.

After you’ve made changes in Registry Editor you can try running Command Prompt and netsh int ip reset command again.

4. Update/uninstall your drivers

Windows sockets registry entries required for network connectivity are missing error message can appear after Windows 10 update, and several users reported that the error message was fixed after downloading the latest drivers for their device.

To download the latest drivers, just visit your motherboard or network card manufacturer’s website and download the latest drivers for your device.

We also strongly recommend Fortect Driver Updater to automatically download all the outdated drivers on your PC. This tool will keep your system safe as you can manually download and install the wrong driver version.

Few users are also suggesting removing your drivers from Device Manager. To do that, follow these steps:

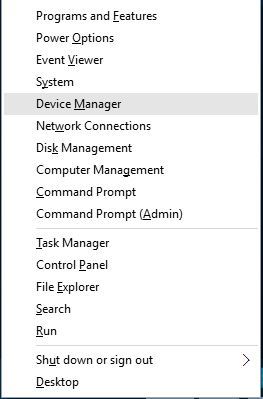
  1. Press Windows Key + X and choose Device Manager from the list.
    device-manager
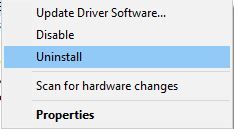
  2. Once Device Manager starts, locate your network drivers, right click them and choose Uninstall.
    uninstall-driver
  3. Restart your computer and Windows 10 will automatically install the default driver.

If the problem persists with default drivers, try to update them to the latest version by following the instructions above.

5. Disable IPv6

According to users, Windows sockets registry entries required for network connectivity are missing error message can be caused by IPv6, so in order to fix this problem, users are advising to disable IPv6. To do that, follow these steps:

  1. Open Network and Sharing Center, and click your adapter on the right.
  2. Click the Properties button.
  3. Locate Internet Protocol Version 6 (TCP/IPv6) and disable it.
    ipv6-disabled
  4. Click the OK button.

Alternatively, you can turn off IPv6 from Registry Editor by doing the following:

  1. Press Windows Key + R and enter regedit. Press Enter to start Registry Editor.
  2. Once Registry Editor opens, navigate to
    HKEY_LOCAL_MACHINESYSTEMCurrentControlSetServicesTcpip6Parameters

    key in the left pane.


  3. On the right pane, double click DisableComponent. If DisableComponent is missing, you’ll have to create it by right-clicking the blank space and choosing New > DWORD (32-bit) from the menu. Enter DisableComponent as the name of the new DWORD.
    new-dword
  4. Change Value data to 0ffffffff and click OK to save changes.
    disable_component
  5. Restart your computer in order to apply changes.

6. Disable network adapters

This is a simple solution, but it might be helpful. To disable your network adapter, follow these simple steps:

  1. Open Network and Sharing Center.
  2. Click Change adapter settings on the left.
    change-adapter-settings
  3. Locate your network adapter, right-click it, and choose Disable.
    disable-network-connection
  4. Right-click your adapter again and choose Enable.

7. Disable proxy

To disable proxy, you need to do the following:

  1. Press Windows Key + S and enter Internet Options. Select Internet Options from the menu.
    internet-options
  2. Once the Internet Properties window opens, navigate to Connections tab and click on LAN settings.
  3. Check the Proxy server section and make sure that Use a proxy server for your LAN isn’t checked.
    proxy issues windows 10
  4. Click OK to save changes.

Alternatively, you can check the proxy by following these steps:

  1. Open Settings app and go to Network & Internet.
  2. Go to Proxy tab and make sure all input fields are empty and that Use a proxy server option is turned off.

8. Use netsh int ipv4 install command

In order to solve this issue, users are suggesting to use netsh command in Command Prompt. To do that, follow these steps:

  1. Press Windows Key + X and select Command Prompt (Admin).
  2. Once Command Prompt starts, enter netsh int ipv4 install and press Enter to run it.
  3. Close Command Prompt and restart your computer.

9. Reset your router firmware

Few users claim that their issue was resolved after resetting their router firmware.

This is an advanced process, and if you’re not careful you can cause permanent damage to your router, therefore make sure to check your router instruction manual for instructions.

10. Obtain your IP address and DNS automatically

Windows sockets registry entries required for network connectivity are missing error message can sometimes appear if your IP and DNS address configuration isn’t correct.

To fix this issue, you’ll have to obtain your IP address and DNS automatically. To do that, follow these steps:

  1. Open Network and Sharing Center, click on your connection and click on Properties.
  2. Select Internet Protocol Version 4 (TCP/IPv4) and click on Properties.
    ipv-4-properties
  3. Make sure Obtain an IP address automatically and Obtain DNS server address automatically are selected.
    automatically-obtain
  4. Click OK to save changes.

11. Restart your router

Sometimes these kinds of issues can be fixed by simply restarting your router. To do that, just press the power button on your router to turn it off. Wait for a minute or two and turn on your router again.

If the problem persists, you might want to reset your router. If you choose to reset your router, you’ll return it to factory settings, so you might have to set up your wireless network again. To reset your router, check your router instruction manual for a detailed explanation.

12. Disable LMHOSTS lookup

In order to fix Windows sockets registry entries required for network connectivity are missing problem, some users are suggesting to disable LMHOSTS lookup. To do that, just follow these instructions:

  1. Open Network and Sharing Center, select your connection and click on Properties.
  2. Now select Internet Protocol Version 4 (TCP/IPv4) and click Properties.
  3. When Internet Protocol Version 4 Properties window opens, click the Advanced button.
    LMHOSTS-lookup
  4. To go WINS tab and uncheck Enable LMHOSTS lookup. Some users are also suggesting to select Disable NetBIOS over TCP/IP so you can try that as well.
  5. Click OK to save changes.

13. Try using wired connection

Sometimes these issues can be caused if you’re using the HomePlug adapter, and in order to fix this problem, it’s highly advised that you connect your PC with your router using the Ethernet cable.

14. Restart your computer

In some cases Windows sockets registry entries required for network connectivity are missing can be fixed by a proper Windows 10 restart.

Turning off your computer won’t work because Windows 10 saves some of your data when you turn off your computer in order to start faster. Therefore, instead of turning off your computer just restart it by clicking the restart button and check if the issue is resolved.

15. Use ipconfig command

Windows sockets registry entries required for network connectivity are missing can be fixed by using ipconfig command from Command Prompt. To do that, you need to follow these steps:

  1. Press Windows Key + X and select Command Prompt (Admin) from the menu.
  2. Once Command Prompt starts, you need to enter the following lines. Press Enter after each line in order to run it:
    • netcfg -d
    • ipconfig /release
    • ipconfig /renew
    • ipconfig /flushdns
    • ipconfig /registerdns

After you’ve entered these commands, restart your computer and check if the problem is resolved.

16. Set DNS to 8.8.8.8

In order to change DNS, you’ll need to repeat the similar steps from Solution 10. When you open Internet Protocol Version 4 Properties window, just select Use the following DNS server addresses and enter 8.8.8.8 as Preferred and 8.8.4.4 as Alternate DNS server.

dns-change

Windows sockets registry entries required for network connectivity are missing error message can cause a lot of problems, but hopefully, you managed to fix this issue by following one of our solutions.

Make sure to let us know which of these methods has worked for you if any by hitting the comments section below.

Data error: Cyclic redundancy check – We have the fix

If you’re getting the ERROR_CRC error code with the Data error (cyclic redundancy check) description, follow the troubleshooting steps listed in this article to fix it.

ERROR_CRC: What it is and why it occurs?

A cyclic redundancy check is an error code that occurs when your system has detected accidental changes to raw data. It is used in digital networks and storage devices, and it often occurs when Windows detects major drive changes and fails to recognize the drives connected to your computer.

This error sometimes occurs in Outlook as well, after the tool downloads emails to your computer, preventing you from viewing the messages that you downloaded. This issue may occur if your personal folder file is corrupted.

How to fix Data error Cyclic redundancy check

1) Check your disk for errors

On Windows 10, you can run a disk check using Command Prompt.

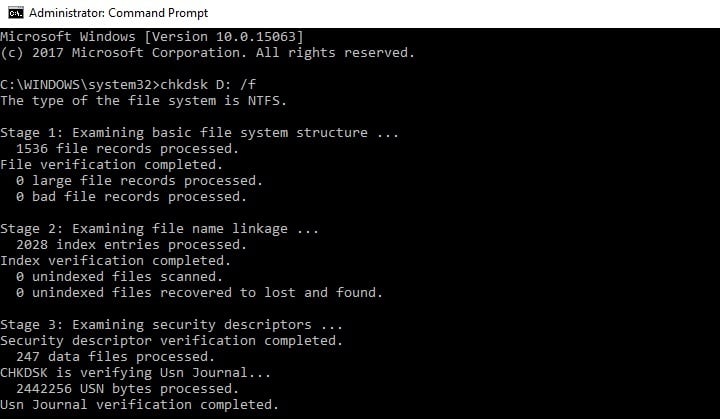
Start Command Prompt as administrator and type the chkdsk C: /f command followed by Enter. Replace C with the letter of your hard drive partition.


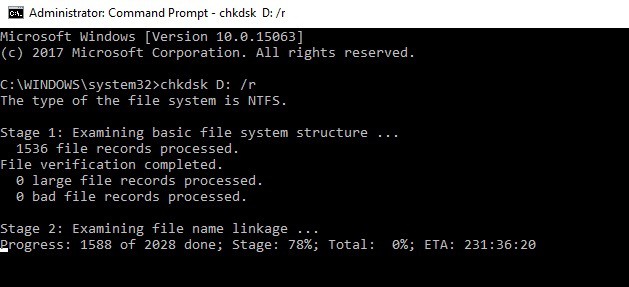
As a quick reminder, if you do not use the /f parameter, chkdsk displays a message that the file needs to be fixed, but it does not fix any errors. The chkdsk D: /f command detects and repairs logical issues affecting your drive. To repair physical issues, run the /r parameter as well.


On Windows 7, go to hard drives > right-click the drive that you want to check  > select Properties > Tool. Under the ‘Error checking’ section, click Check and check the ‘Automatically fix system file errors’ option.

2) Format your hard drive

If the solution above didn’t work, try formatting the problematic drive. Formatting and restoring the default drive settings should fix this error. Keep in mind that formatting your drive means deleting all the files and folders stored on that drive.

You can format your drive using Command Prompt:

1. Go to Start > type cmd > right-click the cmd search result > select Run as administrator
2. Type format C: /FS:exFAT > hit Enter to begin formatting the C drive as exFAT. Replace C: with the letter of the problematic drive.


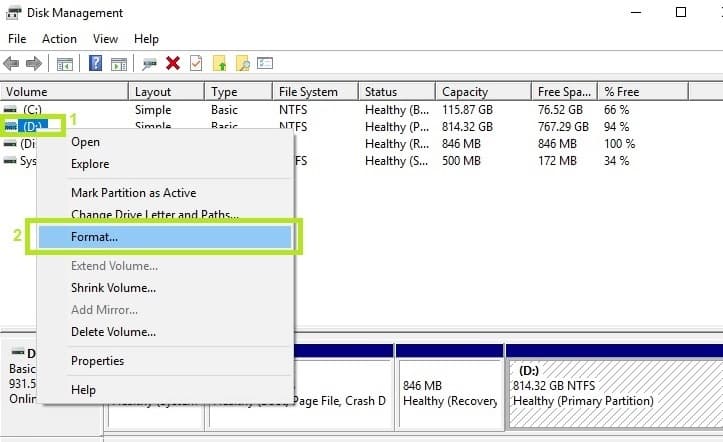
You can also format your drive using the Disk Management utility:

1. Go to Start > type disk management > select the Disk Management utility

2. Right-click the drive that you want to format > select the Format option


3. Follow the on-screen instructions to further customize the format process > click OK on the warning window.

4. Once the format process finishes, you can use your drive. Try to install the updates again to see if this action fixed the problem.

3) Clean your temporary files and folders

The simplest and quickest manner to delete your temporary files and folders is to use Disk Cleanup. As you use your computer or browse the Internet, your PC accumulates various unnecessary files.

These so called junk files may affect your computer’s performance and also trigger various error codes, including the ERROR_CRC error code. Clean your temporary files and then try to use your drive again.

Here’s how to use Disk Cleanup on Windows 10:

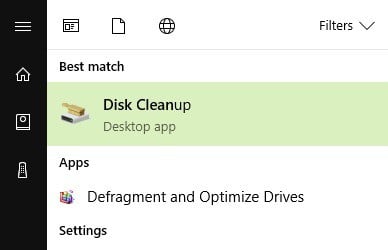
1. Go to Start > type Disk Cleanup > launch the tool


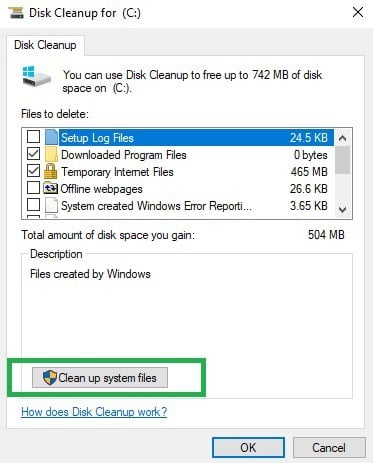
2. Select the disk that you want to clean > the tool will them tell you how much space you can free up


3. Select Clean up system files.

Here’s how to use Disk Cleanup on Windows 7:

  1. Go to Start > type Disk Cleanup > open Disk Cleanup.
  2. In Disk Cleanup‘s description section, select Clean up system files and select the drive that you want to clean up > click OK.
  3. On the Disk Cleanup tab, select the check boxes for the file types that you want to delete > click OK > select Delete files.

4) Use the previous drive letter/ change the drive letter

If the Data error Cyclic redundancy check code occurred after you changed the letter of your drive, try restoring the previous letter.

1. Go to Search > type disk management > select the first result > launch the tool
2. Select the problematic drive > right-click it > select Change driver letters and paths


3. Click on the Change button > restore the previous driver letter > click OK.

5) Install PartedMagic or Recuva

Users also reported that PartedMagic can fix the Data error (cyclic redundancy check) error code. PartedMagic is a disk partitioning and data recovery tool that supports many drive formats, including FAT16, FAT 32, HFS, etc.

It can format internal and external hard drives, create, move and delete hard drive partitions, clone your drive etc.
You can download PartedMagic from the tool’s official website.

Recuva is a powerful file recovery tool that you can use to recover files  from damaged disks. Thanks to its deep scan feature for buried files, Recuva is able to retrieve virtually any lost files. Many Windows users confirmed that Recuva helped them fix the Data error (cyclic redundancy check) error.
You can download Recuva and see if this works for you.

6) Use diskpart

You can also use the diskpart command to fix the Data error (cyclic redundancy check) error code. Diskpart is a powerful tool for hard drive management, and using it can cause damage to your system. Be extra caution when using this command and keep in mind that you’re using it at your own risk.

  1. Go to Start > type Diskpart > right-click diskpart in the search results > Run as administrator.
  2. Type the list disk command to identify all the available devices
  3. Type select volume X (replace X with the volume number assigned to the device) to select the problematic drive
  4. Type the clean command to clean the drive
  5. Now, you’re going to create a new partition using the create partition primary command
  6. Type the command select partition 1 to select the recently added partition
  7. Then type the command activate to activate the new partition and the command format FS=NTFS label=[add the letter your new drive] quick. Type the command without the brackets.
  8. Type assign letter=Y (replace Y with the letter that you want to assign to the device).

Fix Data error Cyclic redundancy check on Outlook

As we mentioned at the beginning of this article, the cyclic redundancy check error may also occur on Outlook. Here’s how to fix it:

1. First check your drive for errors (see Solution 1 above for more details).
2. Repair your personal folder file with the Inbox Repair Tool. For a step-by-step guide on how to do this, check out Microsoft’s support page.

We hope that the solutions listed above helped you fix the Cyclic redundancy check error. As always, if you’ve come across other workarounds to fix this problem, you can help the Windows community by listing the troubleshooting steps in the comments below.

FIX: Windows Photo Viewer can’t open this picture

Windows Photo Viewer (WPV) is the default photo viewer in Windows 8.1, 8 and 7. Windows 10 users can also still use the software for opening images, but it’s not the platform’s default photo viewer.

WPV occasionally returns this error message for some users, Windows Photo Viewer can’t open this picture because either Photo Viewer doesn’t support this file, or you don’t have the latest updates.

Consequently, the WPV users can’t open their images with the software. Here are a few potential fixes that might resolve this software issue.

What can I do if Windows Photo Viewer can’t open this picture?

  1. Does Photo Viewer Support the Image’s File Format?
  2. Quickest solution: Install Illustrator
  3. Run the System File Checker
  4. Restore Windows with the System Restore Tool
  5. Add a third-party software to Windows
  6. Update Windows
  7. Add a third-party software to Windows

1. Does Photo Viewer Support the Image’s File Format?

The error message highlights that Photo Viewer might not support the image’s file format. WPV doesn’t support that many formats. The software supports JPEG, BMP, PNG, GIFF, and TIFF.

The image isn’t going to open in WPV if it has an incompatible file format.

If your picture isn’t one of Photo Viewer’s supported file formats, convert it to a JPEG, GIFF or BMP. Open the image with editing software that does support its format and select File > Save as.

Then select JPEG from the Save as type drop-down menu, and press the Save button.

2. Quickest solution: Install Adobe Illustrator

Before trying anything else, you can use an automated solution that will do the job for you. We recommend you use a photo editing utility that is compatible with all major file formats.

Adobe Illustrator is primarily a graphic design utility, but it can also be of great use when it comes to picture viewing and opening.

Due to the fact that it is a professional design software, it is configured to be able to open many different types of media formats.

The software can help you sort out your image files in different folders and categories, so you can easily keep them in check. You can also make great use of its editing features.

Most people do use photo editing software anyway, so why not use yours for photo viewing as well and kill two birds with one stone?

3. Run the System File Checker

If Photo Viewer does support the image’s file format and you’re still getting the same error message, run the System File Checker. It could have something to do with corrupt system files. In which case, an SFC could do the trick.

  • Both Windows 8 and 10 users can open the System File Checker from the Win X menu. Press the Win key + X hotkey to open that menu as below.
  • Then you can select Command Prompt (Admin) from that menu.
  • Enter ‘sfc /scannow’ in the Prompt, and press the Return key.
  • The scan will probably finish within half an hour. If SFC fixes anything, restart Windows and open the required image with WPV again.

If the command doesn’t work or the process stops without completing, we’ve written a complete guide that will help you deal with scannow issues.

Also, if you want to fix corrupted system files on Windows 10, here’s our in-depth guide to help you with that.

4. Restore Windows with the System Restore Tool

System Restore restores Windows to a previous date. With that you can return Windows back to a time when WPV was opening all supported file formats without an error message. This is how you can utilize the System Restore tool.

  • First, open the search box. Windows 10 users can click the Cortana taskbar button to open the search tool, or press the Win key + S hotkey.
  • Next, enter ‘recovery’ in the search box. Select Recovery to open the tab in the snapshot directly below.
advanced recovery tools
  • Click Open System Restore to open the tool.
  • Click Next and select Show more restore point to expand the list of restore points.
  • Select a restore point, and press the Next button.
  • Click Finish to restore Windows.

A System restore point is very useful and it can save you from a lot of headaches. If you want to know how to create one, take a look at this useful step-by-step guide.

5. Turn off Android Encryption

Android mobiles have encryption settings that encrypt accounts, apps, media and files. Encryption on mobiles also encrypts images. Consequently, WPV might not open encrypted image files imported from Android phones.

You can fix that by switching the mobile encryption off. On Android 5.0 or higher phones select Settings > Security. You can then select an encryption setting from there to encrypt and decrypt the phone.

Decryption will take a while, so plug the mobile in to charge it. Transfer the same image files from the mobile to Windows again after decrypting them.

Note that not all Android phones have a decrypt button, and for those that don’t, such as Nexus 5, a factory reset is usually required.

6. Update Windows

The error message also states, you don’t have the latest updates. This suggests you might have an outdated version of WPV that needs an update. For example, Microsoft released an update that fixed a Photo Viewer printing issue.

As such, checking for updates in Windows 10 might also fix this WPV issue. Note that Microsoft no longer supports Windows 8.

  • You can check for updates in Windows 10 by pressing the Cortana button and entering ‘updates’ in the search box. You can press the Win key + S keyboard shortcut to open the search tool in Windows 8. 1, and enter the same keyword.
  • Select Check for updates to open the Settings app options below.
  • Press the Check for updates button in Windows 10, or click Check now in Win 8.1.

7. Add a third-party software to Windows

open view, edit and convert TGA files with Fileviewer Plus 2

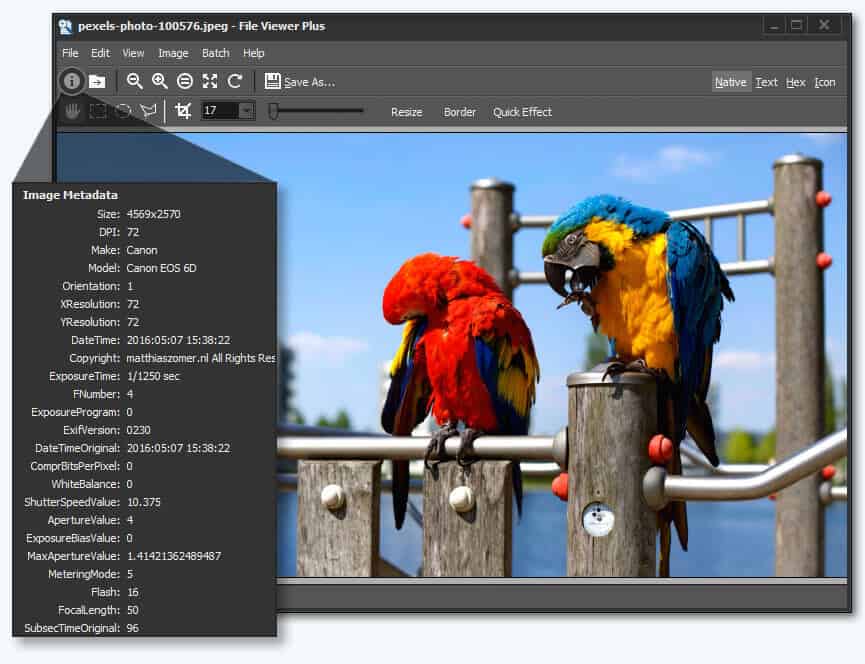
If you still can’t fix Photo Viewer, who needs it anyway? Windows 10 users can always open images with the Photos app. There are also plenty of great third-party software alternatives to WPV that you can open images with.

We recommend FileViewer Plus as it has a straightforward interface and a plethora of very useful features. Easy to set up and use just as drag-and-drop. A free fully-functional trial is available to download here.

Those are a few of the potential remedies that will fix Photo Viewer so that the software opens the images you need it to again. Even if the fixes don’t resolve this WPV issue for you, you can always open the pictures with a universal file viewer.

You’re not happy with Windows Photo Viewer? Read our guide with the best photo viewers for Windows 10.

If you want to learn more about photo viewers for Windows 10, please read all our articles regarding this subject.

If you experienced any other Windows 10 errors we’ve got you covered. Check out our Windows 10 errors hub.

If you have any suggestions or questions, don’t hesitate to leave them in the comments section below.

FIX: Windows 10/11 driver stopped responding and has recovered

Windows 10 users have reported a strange message saying driver stopped responding and has recovered and today we’re going to explore and see how to fix this little problem.

Driver stopped responding and has recovered is an annoying error message that will cause your screen to go black and crash your display driver. Speaking of this error, users reported the following problems as well:

  • Driver stopped responding AMD, Intel, Nvidia – This problem can affect almost any graphics card, and if you encounter this message, be sure to try using one of our solutions.
  • Display driver stopped responding and has recovered Nvidia windows kernel mode driver – This issue can affect Nvidia graphics cards, and if you encounter it, try installing the older driver and check if that solves the problem.
  • Display driver stopped responding and has recovered every minute – Many users reported that this message appears rather frequently on their PC. If that’s the case, be sure to change the TDR value in your registry and check if that helps.
  • Display driver stopped responding and has recovered Windows Update – This error can appear after installing a Windows update. If this issue started occurring recently, try removing recent updates and check if that solves the problem.
  • Display driver stopped responding overclock, overheating – Overheating and overclocking are closely related, and if your GPU overheats, you’ll encounter this message. To fix the problem, be sure to remove all overclock settings. If your PC isn’t overclocked, try cleaning the dust from your graphics card.
  • Driver stopped responding nvlddmkm – This problem is usually related to your Nvidia graphics, and in most cases, you can fix it by reinstalling your graphics card driver.
  • Display driver stopped responding screen goes black – If this problem occurs, your screen will go black for a couple of seconds. This is usual for this kind of problem, and you should be able to fix it by using one of our solutions.

Driver stopped responding and has recovered is usually related to your display driver, and in order to fix it, you can do several things.

What can I do if the driver stopped responding and has recovered?

1. Reset your Visual Effects

If you’ve changed your Visual Effects recently you might want to restore them to default.

  1. Press Windows Key + S and enter advanced. Select Advanced system settings from the menu.
    Display driver stopped responding and has recovered Nvidia windows kernel mode driver
  2. In System Properties window go to Advanced tab and under the Performance section click Settings.
    Display driver stopped responding and has recovered every minute
  3. Choose Adjust for best performance or Let Windows choose what’s best for my computer.
    Display driver stopped responding and has recovered Windows Update
  4. Click Apply then OK to save the changes.

2. Uninstall and update your drivers

You can manually update your drivers from Device Manager by selecting the driver you need. Right-click and choose Update driver then restart your PC. After you’ve uninstalled your drivers, go to the manufacturer’s website, and download the latest drivers for your graphics card.

However, to speed up the process switching to a professional tool can automate the whole process for you. Advanced software will ensure the safety of your system and prevent damage to the PC due to the installation of the wrong version of the driver.

3. Increase GPU processing time in Registry

  1. Open Registry Editor. You can open it by pressing Windows Key + R and typing regedit.
    Driver stopped responding AMD
  2. When Registry Editor opens navigate to:
    • HKEY_LOCAL_MACHINESYSTEMCurrentControlSetControlGraphicsDrivers
  3. See if there’s a DWORD called  TdrDelay available. If it is, go to the next step. In case there’s no TdrDelay DWORD available, right-click on an empty space and choose New > DWORD and set its name to TdrDelay.
  4. Double click the TdrDelay DWORD and change its value to 8 (it should be 2 by default).Driver stopped responding Nvidia
  5. This will increase the processing time, and now close the Registry Editor and restart your computer.

4. Adjust your GPU clock offset

This is an advanced method and if not careful it can cause damage to your computer. We hold no responsibility for any potential damage.

Some users say that adjusting GPU clock Offset to -125 MHz using an EVGA Precision X Utility fixes the issue. This is potentially dangerous, so if you’re going to try this, please research how to do it properly to avoid any potential damage.

We also have to mention that -125 MHz was helpful for one user, but you might need a different value for your graphics card. Once again, if you’re not experienced and not comfortable with doing this hire a professional to do it for you to avoid any potential damage.

5. Change frequency and set energy option for Maximum power

Several users claim that you can fix this problem simply by changing the frequency and energy options for your graphics card. To do this, follow these steps:

  1. Go to Nvidia Control Panel and change the frequency to 50Hz.
  2. Set energy option for Maximum power.

This might not work for all users but it’s worth checking out. If you don’t use Nvidia graphics, try changing these settings from Catalyst Control Center.

6. Close unnecessary applications

Sometimes Driver stopped responding and has recovered message can appear due to your applications. Certain applications will stress your graphics card and cause this problem to appear.

If you’re having this problem, keep a close eye on applications you’re running in the background.

If you notice that this problem appears only when running certain applications, you might want to disable those applications from running in the background.

In addition, you can also reinstall these applications and check if that solves the problem. As a rule of thumb, try to keep only the necessary applications open and check if that solves the problem.

7. Clean your graphics card

If you’re getting Driver stopped responding and has recovered message frequently on your PC, the problem might be overheating.

Your graphics card produces a lot of heat, and in case of overheating, Windows will temporarily disable your graphics card in order to prevent damage to your system.

To check if your graphics card is overheating, we advise you to use temperature monitoring software. These applications allow you to monitor both CPU and GPU temperature, so you can keep a close eye on your graphics card.

⇒ Get Aida64 Extreme

If the Driver stopped responding and has recovered message appears when your GPU gets hot, it’s rather likely that your graphics card is dirty. To fix the problem, it’s advised to clean your graphics card.

This is rather simple and you just have to open your computer case and use pressurized air to clean the dust from the heatsink and fan. After doing that, the problem should be resolved and you won’t encounter this message again.

8. Remove overclock settings

Many users tend to overclock their hardware in order to achieve better performance. Overclocking your hardware is relatively simple, but overclocking puts extra stress on your components reducing their lifespan.

If you encounter Driver stopped responding and has recovered message on your PC, the problem might be your overclock settings, so it’s advised to remove them. After removing the overclock settings, check if the problem is resolved.

9. Try using older drivers

Sometimes Driver stopped responding and has recovered message can appear due to your drivers. Usually, it’s better to install the latest drivers since they offer better performance and new features, but in some rare cases, newer drivers could lead to new issues.

If you’re having this problem on your PC, we strongly advise you to uninstall your current driver and switch to the older driver. We already showed you how to properly remove your drivers in Solution 1, so be sure to check it out for detailed information.

Once you remove the current driver, install an older version that is a few months older, and check if that solves the problem. In some cases, you might have to experiment with different drivers until you find the version that works for you.

If you find experimenting with drivers tedious, you can always install the default driver. Simply remove your current driver and restart your PC and Windows will install the default driver automatically.

If you choose to install the default driver, keep in mind that Windows 10 might try to update it automatically. To prevent that, be sure to check our guide on how to prevent Windows 10 from automatically updating drivers.

10. Use TDRManipulator

As we already explained in one of our previous solutions, this problem can be caused by TDR value in your registry. This value is in charge of resetting your graphics card driver in case the driver doesn’t respond after a certain time frame.

We showed you in one of our previous solutions how to manually adjust the TDR value in your registry, and this is usually one of the best methods to fix Driver stopped responding and has recovered message.

However, if you don’t feel comfortable modifying the registry manually, you can achieve the same results by using the TDRManipulator.

This is a freeware, third-party application designed to modify the TDR value in your registry, without having to open the Registry Editor. The application is simple to use, and if you don’t feel comfortable modifying the registry on your own, we encourage you to try this application.

Several users reported that they fixed this problem simply by using this tool, so be sure to try it out.

11. Change power settings

In some cases, Driver stopped responding and has recovered error message can appear due to your power settings. However, you can easily fix that by doing the following:

  1. Press Windows Key + S and enter power settings. Select Power & sleep settings from the menu.
    Display driver stopped responding overclock
  2. Now in the Related settings section click on Additional power settings.
    Driver stopped responding nvlddmkm
  3. Select High performance power plan and save changes.
    Display driver stopped responding screen goes black

After switching to this power plan, check if the problem still persists.

That’s about it, we hope at least one of these solutions was helpful to you.

If you have any comments, questions, or suggestions, just reach for the comments below.

How to fix Microsoft Teams assignments not showing up

Creating assignments for students in Microsoft Teams issues you cannot overlook if you’re planning to manage multiple tasks and people at the same time.

Many new features have been brought to Teams’ assignments in the past few months. The promise of a faster, more streamlined design has turned into reality and it didn’t come alone.

Assignment creation finally has a more intuitive single-column layout, teachers can easily view how the document would appear for students, review their work in a snap and grade them on the go.

It sounds almost too good to be true, at least until discovering that Microsoft Teams assignments are not showing up sometimes. Worry not, as we’ve got various solutions that you can try to resolve your problem. Let’s dive right in.

What can I do if Teams assignments aren’t showing up?

1. Download the Android mobile app

Microsoft Teams assignments mobile app

  1. Go to your mobile device.
  2. Follow the link on Microsoft’s download page.
  3. You may also grab it from Google Play Store.
  4. Install Microsoft Teams as any other regular app.

Don’t know how to react when Microsoft Teams assignments fail to show up and you’re out of time? Mark it as a known issue and simply apply this workaround, later followed by an actual desktop solution.

If you are looking for the quickest way now, then simply use Microsoft Teams on Android mobile.


2. Check for Microsoft Teams fresh updates

Microsoft Teams fresh updates

  1. Click your profile picture at the top of the app.
  2. Select Check for updates.
  3. If a new update is available, it will be downloaded and installed when the computer is idle.
  4. Then, exit your Teams entirely.
  5. Restart it to check it again.

The desktop client normally updates itself automatically and it’s up to date most of the time. If you want, you can still check for available updates. To do so, just complete the above procedure and make sure they’ll provide the necessary feature and speed enhancements.

Note: You must be signed in for updates to be downloaded.


3. An alternate way to check Microsoft Teams assignments

Check Microsoft Teams assignments

  1. Go to the Teams section of the side-bar.
  2. Select the Team used for your course.
  3. In the Teams client, go to Activity in a single team. Here you should be able to check all the assignments.
  4. Click Assignments in different team to see if you can check it in the Assigned tab, mark it, or give a feedback.

4. Wait for the notification of grading

Microsoft Teams notification of gradingThings get a lot easier when talking about a completed and graded assignment. Assuming that students can view the assignment in Conversation tab, they are free to complete their task. Up next, they click on the Turn In option and sent back their completed assignment to the teacher.

The notification of grading may suddenly restore access to the previously missing assignment. Just double check it via Activity tab.


5. Get Microsoft Teams desktop client

Microsoft Teams desktop client

  1. Visit the official Teams on desktop page.
  2. Choose the Desktop version to start the download.
  3. Do one of the following:
  • Choose Open or Run this program from its current location if you want to start the installation immediately.
  • Choose Save or Save this program to disk to copy the download to your computer for installation at a later time.

Remember that assignments may refuse to show up as Teams doesn’t fully run in Safari. We recommend you to stop looking for the assignments in the Microsoft Teams web client on Safari and download the desktop client instead.


Conclusion

Remember that Microsoft Teams is a collaboration tool used as an extension of a classroom or as a hub for teamwork in general.

There is no arguing that assignments play an important part in any teamwork environment, so make sure to try all of the mentioned methods to solve your problem, even if this means stepping in and taking the matter into your own hands.

If you are not yet a Teams user, sign up for the Microsoft Teams service today.

If you have any other questions or suggestions, make sure to leave them in the comments section below and we’ll be sure to check them out.

[wl_navigator]

Microsoft Teams call queues don’t work? Follow these steps

Microsoft Teams is a neat tool added to the Microsoft Office 365 Suite, thus emphasizing its use in enterprises.

Down to its core, it acts as the de facto collaborative software recommended by Microsoft, as it supports all of the basic features and more. Speaking of which, if you’re curious how efficient Microsoft Teams is, check out our review for more details.

However, Microsoft Teams is notorious for the amount of bugs users have been reporting on the official forums.

This includes and issues where users state that they can’t queue calls.

When you call the queue line, there is a 3-5 second delay before the call is connected. (I understand this is a current issue being worked on) But, even once the call does connect, the agent cannot hear the caller. The caller can hear the agent with no issue. But the agent must place the call on hold and retrieve it for the audio to connect properly.

Apparently this issue is widely known among the community, as most people experience it in one way or another.

Why are Microsoft Teams calls not queueing?

One aspect that you need to remember is whether or not there are Direct Routing numbers assigned to the Call Queues.

This is because that feature is not supported even if it looks like it is possible to fix it with some SBC configuration.

Make sure you have the latest version of Microsoft Teams installed

Up until very recently, call queues weren’t actually a feature in Microsoft Teams.

However, now you can assign Direct Routing numbers to Auto Attendant and Call Queues. As such, make sure you have the latest version of Microsoft Teams installed.

The desktop app automatically updates, but if you want, you can still check for available updates manually.

  • Simply click your profile picture at the top of the app
  • Select Check for updates.

Keep note that the web app is always updated to the latest version, so consider using it by default as opposed to the desktop version.

If you’re using the mobile version of Microsoft Teams, check for the latest version of the app on the Google Play Store.
Microsoft Teams is constantly being updated, fix and improved upon, so any problems you discover won’t be there for too long anyway.

Do you have any more Microsoft Teams-related questions? Please let us know in the comments section below.

[wl_navigator]

FIX: Can’t load images in Microsoft Teams chat

Microsoft Teams is a unified communications platform that integrated with a company’s Office 365 subscription office productivity suite.

Microsoft Teams provides persistent workplace chat, video meetings, file storage, and application integration.

In other words, Microsoft Teams is Microsoft‘s version of a collaboration tool.

Of course, chatting also involves sending and receiving images, and some users have reported that they are having issues seeing the images in Microsoft Teams

I have quite a lot of conversations in Teams Channel that are sent via mobile devices, which allows photo to be attached. Apparently there’s a change in Teams now that the attached photos disappeared and unable to load it from the desktop client.

How to fix Microsoft Teams images not loading

1. Try a different browser

Microsoft Teams can be run on a wide range of browsers, including some of the most popular ones out there.

Essentially, it can run on any browser that is supported by the operating system. By the way, if you’re looking for a browser to run Microsoft Teams on, try this neat and secure alternative.


2. Clear your browser’s image cache

2.1. Google Chrome

  1. Open Google Chrome
  2. Click on the three vertical dots in the top right corner of your browser
  3. Select History
  4. Click History
  5. In the top left corner, click on the option Clear browsing data
  6. Set the Time range to All time
  7. Mark all three options including :
    1. Browsing history,
    2. Cookies and other site data
    3. Cached images and files
  8. Click on Clear data

microsoft teams not loading images Chrome Clear Browsing Data
2.2. Internet Explorer

  1. Launch Internet Explorer
  2. Press Ctrl + Shift + Del 
  3. Press Ctrl + H 
  4. Click the Settings button
  5. Scroll down to Internet Options and click it
  6. Click the Setting button
  7. Follow to History.
  8. Type 0 in the box Days to keep pages in history.
  9. Click OK.
  10. Go back to Internet Options and press Delete button
  11. Go to the Content tab 
  12. Select AutoComplete Settings 
  13. Select Delete AutoComplete History 
  14. Click Delete 
  15. Click OK

microsoft teams not loading images Internet Explorer clear browsing Data
2.3. Mozilla Firefox

  1. Launch Mozilla Firefox
  2. Click the Menu button 
  3. Choose Options
  4. Click Privacy & Security 
  5. Scroll down to History, cookies and site data
  6. Click Clear History to clear to Everything
  7. Select time range to clear history
  8. In the Details list, check all the boxes if you want complete wipeout.
  9. Click the Clear now

microsoft teams not loading images Mozilla Firefox Clear Browsing History


Are you tired of using Microsoft Teams? Give one of these hand-picked collaborative tools a try!


3. Try to send images from the desktop client

Many users observed that most of the problems arise when the images in question were sent from mobile devices.

Pictures posted from the mobile app disappear in approximately one week. So far everyone having this issue is using an iPhone. It’s a small sample size but so far Android users don’t seem to have the issue.

As such, try to send images using the Microsoft Teams desktop client whenever possible.

You can download it for free or part of the Office 365 Suite.

Do your images fail to load on Microsoft teams as well, or do you know any solution we may have missed?

Please let us know in the comments section below.

[wl_navigator]

Fix error code 0x80070005 in a couple of easy steps

Have you ever used Windows Updates or Microsoft Store, waited for it to finish downloading, and start installing just to be met with error code 0x80070005?

What is error 0x80070005? This is a pesky error that means access denied. The most common place to face this error is while updating your computer. It can happen unexpectedly, and it won’t go away with a restart.

That’s why we’ll look at a few ways we can put an end to it.

How can I fix error code 0x80070005?

1. Use Windows Update Troubleshooter

update your PC

Microsoft provides a specific tool to troubleshoot problems with Windows Update (you can find it here). It is a simple and straightforward tool to use.

Simply download the tool for your specific version of Windows, make sure you have an internet connection, double-click on the tool when it’s finished downloading, and it will take care of the rest.

You can find more details on the topic in this detailed guide.


2. Perform a clean boot in Windows

  1. Open System Configuration. You can do this by hitting Windows + R and typing msconfig then hitting enter.
  2. When System Configuration opens, go to the Services tab.
  3. Check Hide all Microsoft services. This will hide all the services that are vital to the operating system.
  4. Click the Disable All button. This will disable the rest of the services, so you can be sure they won’t interfere with the update process.
  5. Open Task Manager and go to the Startup tab. After disabling the services, it is time to go after the startup processes. You can do so by clicking on the Startup tab in System Configuration. You should then click on the Open Task Manager link, and this will take you directly to the Task Manager Startup tab.
  6. Disable all startup processes. Make sure that every item listed has a status of disabled. Do this by selecting a startup process and clicking on Disable.
  7. Restart your computer. Your PC is ready for a clean boot.
  8. Retry the updates and see if you can update your Windows now (it is important to know that clean boot can fix a variety of other issues, such as a pesky program that won’t uninstall, so you should keep these steps handy).

Clean boot refers to configuring Windows in such a way that it will only start with the minimum needed drivers and applications and nothing else will run.

This could be useful if there is some conflict and some obscure application or service is blocking your update.


Can’t open Task Manager? Don’t worry, we’ve got the right solution for you.


3. Restore Windows functionality after performing a clean boot

  1. Open System Configuration again. If you need a refresher, you can do it by Hitting Windows + R on your keyboard and typing msconfig.
  2. Make sure that the Normal Startup option is selected.
  3. Go to the Services tab and hide all the Microsoft services by checking the box at the bottom.
  4. Open Task Manager by going to the Startup tab and clicking the link.
  5. Enable all the startup processes you want by selecting them and clicking on Enable.
  6. Restart your computer.

Whether the previous method fixed your problem or not, it is important that you reactive the services and startup processes so your Windows can function normally again. You can do so by following the steps detailed above.

Finally, you are safe out of the clean boot, and hopefully, the update was performed successfully.


4. Clear cache to fix error code 0x80070005 in Microsoft Store

Microsoft Store

  1. Firstly, press the Windows key + R keyboard hotkey.
  2. Type WSReset.exe, then click OK.
  3. The WSReset tool resets the Microsft Store without changing account settings or deleting installed apps.
  4. A command prompt will then open without any message and automatically close when the process is complete.

Microsoft Store sometimes messes up with storing the cache. This leads up to a plethora of weird behaviors and one of them is precisely the error code 0x8870005.

Your Microsoft Store’s cache is cleared after applying the above procedure. Reboot your computer and try again to see if the problem is fixed.


5. Change the proxy settings to fix error code 0x80070005 in Microsoft Store

  1. Open Internet Explorer.
  2. Click on Tools. It is the icon that resembles a gearbox in the top right corner of your browser.
  3. Choose Internet Options from the drop-down menu.
  4. Navigate to the Connections tab and click on Lan settings near the bottom.
  5. Uncheck Use a proxy server for your LAN.
  6. Click on OK and save the settings.

Proxy connections sometimes cause problems to Microsoft Store. You can disable proxy connections in no time and see if this makes any difference.

Hopefully one of the methods above fixed the issues. If not, be sure to check your date and time to see it is set up correctly.

The error code 0x80070005 is versatile and can pop up in numerous places. Here, we looked at the two most common places it could pop up and how to deal with it.

Tell us in the comments whether you’ve had any experience with this error. Where did you encounter it and how did you deal with it?

Don’t hesitate to check out this list with the best uninstaller software you can use right now.

  • How do I fix Windows Update corruption?

Running the Windows Update Troubleshooter and firing up SFC/Check Disk scans usually do wonders when trying to fix Windows Update corruption.

[wl_navigator]

FIX: Football Manager not working in full screen or windowed

We have seen several improvements with each entry in the Football Manager series, and possibly the most noticeable are graphics improvements.

There is some divide between fans of the series about playing the game in windowed or full-screen mode but one thing that is common between them is that Football Manager is not working in full screen or windowed mode as it should.

What can I do if Football Manager isn’t working in full screen?

1. Force Football Manager to start in full screen or windowed mode

football manager full screen not working

    1. Once you have Football Manager running, use the Windows keyboard shortcut Alt+Enter. You should see the game window go from windowed to full screen or vice-versa
    2. When starting the game from Steam, you can set up launch options. To do so, follow these steps:
  • Right-click on Football Manager in your Steam library
  • Open Properties
  • Click on Set Launch Options
  • Add the code -fullscreen or -windowed
  • Save and run Football Manager

For a full list of launch options, you can check out this page on the Steam forums.

Assuming that changing the display options in Football Manager doesn’t work for you, then you can bypass the game‘s internal settings and get it to open in either windowed or full-screen mode.


For more Football Manager quality content, check out our awesome guides.


2. Update your graphics card driver

update-nvidia-graphics-driver
You should always keep your graphics card driver up to date, regardless if you have a problem or not. All manufacturers recommend installing the latest drivers as this ensures optimum performance and compatibility.

If you are experiencing issues with Football Manager full screen or windowed modes are not working, then you should check for updates as this might solve your issue.

Unsure how to update your graphics driver? We’ve put together a guide to show you how.


3. Clear preferences folder

football manager full screen not working
A solution proposed by the official SI test team to help users who have reported that Football Manager is not working in full screen or windowed modes is to clear their preferences.

When you do this, Football Manager will recreate these folders when it starts, and clear any issues there might be in the config files. Before you delete these files we highly advise that you make a backup of them, as they might be needed later on.


4. Get in touch with the official SI test team

windowed or full screen not working in football manager
In order to help the test team further investigate this issue, they have asked users having problems with Football Manager not working in full-screen mode to create an archive of the config files and a dxdiag dump and upload them to their cloud service for further investigation.

To do this, the devs have set up a page on the support forums to show players how to send their data.

You can find the location of the config files by navigating to this address in File Explorer:

C:Users[YOUR WINDOWS USERNAME]AppData Local Sports Interactive Football Manager 2020

Want to play Football Manager 2020 but it’s not launching? We have a fix for that!


Whether you’re experiencing problems with Football Manager not working in full screen or in windowed mode, this list will help you get it sorted in the end. Keep in mind that the devs are working on it and a fix should be on the way.

If you have any more questions or suggestions, don’t hesitate to leave them in the comments section below.


[wl_navigator]

Pop out chat window in Microsoft Teams to start rolling out next month

Microsoft Teams will soon provide a better messaging experience by allowing users to pop out chat conversations into separate Windows. According to the Microsoft 365 roadmap, this feature will start rolling out to Windows users in early April, with Mac and Linux users to follow “in the coming weeks”.

Multi-Window Chat support for Microsoft Teams was first announced last year at Ignite, and it’s one of the big new features coming soon to Microsoft Teams this Spring, along with the ability to chat and call with Skype users. Teams’ upcoming multiwindow capabilities will also allow users to pop out meetings, calls or documents into separate windows.

Microsoft Teams is one of the fastest-growing apps in the Office 365 ecosystem, and the software giant announced last week that it had reached 44 million daily active users. The app is seeing increased usage during the ongoing coronavirus outbreak, and it’s good to see Microsoft focused on improving the messaging experience.

How to protect your files, emails, and more to work safely from home with Windows 10

Working from home during the Coronavirus crisis (and beyond) means that you’ll be in a shared space with your family and perhaps your room mates. Depending on your job, you might not want people to access your work-related files, or have access to certain things on your computer. Of course, you also could just be in search of some privacy, too.

Protecting your computer with a password or Windows Hello is one way to guard your work stuff from getting in the wrong hands. But, what if you want to go beyond that? In this guide, we’ll show you how you can protect your files, emails, and more so you can work safely from home.

Tip 1: Protect your files and folders in Windows 10

Backing up encryption keys

Our first tip is the most obvious: protecting files and folders in Windows 10. For this tip, you can turn to Windows’ basic password protection. Be warned, though, this is only for personal use and isn’t meant to be used in business settings. It is a built-in Windows feature that ties an encryption key to your account, and if anyone tries to access the file, the contents will be unreadable.

To do this, you can open File Explorer and the file or folder you want to protect. You can then right-click it, choose Properties and then choose Advanced at the bottom. Under the bottom section of the window that pops up, you should see a checkbox for Encrypt contents to secure data. You’ll want to click that, and then press OK. You can then proceed by clicking Apply. You’ll want to follow any directions on the screen, and choose Windows will encrypt the file or folder, and when done, click the encryption notification in your Action Center (accessed by pressing Windows Key and A.) You can then take note of the encryption key to get access to your files.

Tip 2: Password protect your emails in Outlook in Windows 10

Password protecting your files is one thing, but to really be secure, you can password protect your emails in Outlook. With this feature, the contents of the email are converted from readable text into scrambled cipher text. Only the recipient who has the private key which matches the public key used to encrypt the message can properly read the message.

Outlook supports two types of encryption, S/MIME encryption, and Office 365 Message Encryption. S/MIME encryption is supported by most email applications (other than Outlook) and the Office 365 Message Encryption is only supported if the sender has an Office 365 Message Encryption, which is included in the Office 365 Enterprise E3 license.

Our guide will cover S/MIME encryption, as it is the most standard. To get started, you’ll want to make sure that your system is configured to send encrypted emails. You can do this by following the steps below.

  • Open Outlook 2016 or 2019 and click the File ribbon
  • Choose Options, choose Trust Center, choose Trust Center Settings
  • Click Email Security on the left
  • Under Encrypted email, choose Settings.
  • Under Certificates and Algorithms, click Choose and select the S/MIME certificate.
  • Choose OK

With the featured enabled, you can now encrypt your email. You can do this by writing the email as normal, and then click the Options tab, followed by encrypt, and then Encrypt with S/MIME. Fell free to send the message as normal now!

If you’re looking to encrypt your emails on the Outlook Web App, the process is much easier. Simply click the encrypt button above the To: bar on the top of the user interface. Be aware, though that Outlook.com uses opportunistic Transport Layer Security (TLS) to encrypt the connection with a recipient’s email provider. Unlike S/MIME on the Outlook app, with TLS, the message might not stay encrypted after the message reaches the recipient’s email provider. S/MIME can be much more secure, as it encrypts the message itself, rather than the email as it moves between mailboxes.

Tip 3: Turn on and use Bitlocker in Windows 10 Pro

Password-protecting individual files or emails is great, but you can also encrypt your entire computer with Bitlocker in Windows 10. Bitlocker prevents your private data from going to the wrong hands if someone tries to gain access (or erase your device) without entering the password and logging into Windows. Typically that’s done by booting into the built-in Windows Recovery USB or space to reinstall the OS, by pulling out your hard drive, SSD and putting it in another system, or other methods of accessing the Windows operating system.

When someone with bad intentions attempts any of the above, they’ll be prompted for a 48-digit numerical Bitlocker Recovery Key. The key is usually stored online on your Microsoft Account, or on a printout or via a USB flash drive. Bitlocker is only available in Windows 10 Pro, and only on devices with a TPM chip, but most modern Windows PCs should have one.

Bitlocker is usually turned on by default. You can tell if it is turned on by opening File Explorer and clicking on the sidebar where it says This PC. If you see a padlock on top of your Local Disk C drive, then that means it is already protected by Bitlocker. If not, you can turn it on by doing the following.

  • Open Control Panel by searching for it in Windows 10
  • Click System and Security
  • Click Bitlocker Drive Encryption 
  • Choose the drive you want to turn Bitlocker on for by clicking Turn on BitLocker
  • Choose how you want to save the key, either to your Microsoft Account, File, or Print the Key
  • Choose how you want to encypt your computer, either used disk space or entire disk space
  • Choose an encryption type
  • Make sure the option to Run BitLocker system check and then reboot
  • On reboot, BitLocker will prompt you to enter your encryption password to unlock the drive. Type the password and press Enter.

Once you set up Bitlocker, it might take a couple of hours for your device to be fully encrypted. You won’t ever be prompted to enter the key again unless in the situations we described to start. You will, though, need to make sure that you save the key. If you lose the key, you might lose access to all your files, but there are some (very technical) ways to recover them.

Tip 4: Password protect your Office 365 documents in Windows 10

Third up is how you can password protect your Office 365 documents. These are the core ways of doing work for most people, and protecting documents ensures they won’t end up in the wrong hands. You can protect Word, PowerPoint and Excel Documents in just a couple of steps.

Before going on we want to mention that passwords in Office 365 do not encrypt the actual documents. If you want to do that, head back to Tip 1. Passwords in Office documents are just intended for novice users as a way of quickly protecting files stored on a computer.

In Microsoft Word, you can protect your document by heading to the File ribbon, and clicking Info. You can then click Protect Document, and then Encrypt with Password. Once you do that, you can enter a password and press OK. Similarly, in PowerPoint, you can head into the File ribbon, and click Info. After that, select Protect Presentation, and then Encrypt with Password. You’ll then want to enter the password in the Password box and click OK.

Excel is a bit complicated, as you can prevent others from accessing data, or moving it around in a spreadsheet. You also can also lock certain areas of an unprotected sheet. This ranges from not allowing others to see your formulas or ranges. We recommend you to start by protecting an entire Excel document. You can do this by clicking the File ribbon and clicking Info. you can then choose to Protect Workbook and choose Encrypt with Password. You can then enter the password and click OK. 

You can also skip out on locking an entire workbook by just locking certain areas of an unprotected sheet in Excel. You can do this by selecting the data range, right-clicking it, and choosing the Format Cells options. You’ll then want to clear the box where it says Locked. You’ll then need to keep the selection highlighted, and head to the Review tab, choose Protect and then Protect Sheet.

Tip 5: Password protect your OneNote notebook sections in Windows 10

Other than Word, Excel, and PowerPoint, you might also want to protect your OneNote notebook sections, too. This is a way of making sure that your notes don’t end up in the wrong hand. You can easily do this in Windows 10 with the OneNote app (the one downloaded via the Microsoft Store — we’re not talking about OneNote 2016) in just a few quick steps. To get started, you’ll want to double click on the name of the notebook in the sidebar to open it. Then, right-click the section, and choose the option that says Password Protection. That’s it!

How do you keep your computer safe?

We’ve just touched on our top 5 ways that you can protect your files, emails, and more to work safely from home with Windows 10. Did you find our guide helpful? Or do you have your own tips and tricks? Stay safe, and let us know your own advice for working from home by dropping us a comment below.

Microsoft’s team brawler Bleeding Edge is now available on Xbox One, Windows 10, Steam, and Xbox Game Pass

Today, Major Nelson announced on his blog that a new team brawler called Bleeding Edge is available now on Xbox One, Windows 10, Steam, and Xbox Game Pass. Bleeding Edge was developed by Ninja Theory, the game developer behind such game titles as DmC: Devil May Cry and Hellblade II and is the first game release by Ninja Theory published by Xbox Game Studios. Take a look at the Bleeding Edge launch trailer below.

Bleeding Edge is a team-based 4v4 brawler, and offers players a unique multiplayer online battle arena (MOBA) game experience, with different player classes, including Fighters, Support, and Tanks. As noted in the short post, Major Nelson indicates that Bleeding Edge is an Xbox Play Anywhere title, which means you can buy the game on Xbox One or Windows 10 for $29.99 as well as download and play the game on either platform at no additional cost. Bleeding Edge is also available for free for Xbox Game Pass Ultimate subscribers on Windows 10 and Xbox One. Bleeding Edge is also available on Steam right now for $29.99.

Buy Bleeding Edge today through the Microsoft Store for $29.99.

Otherwise, you can get Bleeding Edge for free as part of your new Xbox Game Pass Ultimate subscription, available for purchase here.

Have you played Bleeding Edge already? What do you think of the game? Let us know in the comments.

Drive is not accessible in Windows 10/11? Check these fixes

Worried that drive is not accessible in Windows 10? The hard drive is one of the most important components of a computer. Hardware is not just any peripheral that lets users store their data on but is more than just that.

Most of the time when the hard drive crashes it also brings down the entire operating system since the system files are all stored on a hard drive.

Well, with the advent of the SSD, the problems on the hardware end might have been subdued but still, error messages are not something uncommon.

In this segment, let’s have a look at one of the most common problems plaguing the system – E: is not accessible, access denied.

Users have been greeted with this message quite a few times and while sometimes a simple reboot will do the trick, most often it needs some thorough troubleshooting.

Also, if the error message is displayed for an external drive one can simply reconnect the same. However if the same occurs for an internal drive things start getting sloppy.

The error message could have been displayed due to many reasons. For one, the hard drive might not be able to communicate with the operating system.

Also, the hardware might be suffering from actual damage to its innards. The list further extends to power failures to the hard drive, virus/malware attack, or corrupt file system.

Therefore, whenever someone wants to make changes to a file/folder on a damaged hard disk the error message is displayed. The same message will also be flashed if one tries to access a file on the drive.

In all likelihood, the hard drive is blocked and users need to follow some steps to recover the same.

What can I do if the drive is not accessible in Windows 10?

1. Add another admin account and grant it full permission in Windows 10

  1. Right-click and select the drive that’s inaccessible.
  2. Select Properties and head over to Securities.
  3. Click the Edit button, the one with the small Shield icon.
  4. A new window will be open. Select the Add button next.
  5. Hover your mouse on the Authenticated User and click OK.Authenticated User
  6. Head over to the permission section and select give full control against the newly added user.
  7. Click OK.
  8. Press Apply and you will be done.

2. Give full control to the specified account in Windows 7

  1. Right-click and select the drive that’s inaccessible.
  2. Select Properties and then click the Owner tab.
  3. Select the Owner tab and click on edit.
  4. Head over to the permission section and select give full control against the newly added user.
  5. Finally, click OK.

If you are running Windows 7 the course of action changes slightly. Apply the above steps in order to complete the procedure.

That being said, we’d still advise you to keep a copy of your important files backed up on the Cloud. This way whatever happens with your system the data will still be safe on the Cloud Drive.

The aforementioned methods should help you resolve the issue with the drive that is not accessible for once and forever. Let us know if you’re aware of any other solutions in the comments area below.

Make sure you’re using a top antivirus in that regard.

  • How do I fix drive is not accessible?

Adding another admin account and granting it full permission in Windows 10 is your best bet this time, as described in this guide on how to fix drive accessibility errors.

  • Why is my G Drive not accessible?

When discovering that your G Drive is not accessible, chances are you don’t have the privilege of accessing your disk.

Slack Not Opening Links: How to Quickly Fix it

Slack is a cloud-based proprietary instant messaging platform. You can chat, send files, share images, and insert hyperlinks with other users. However, some users have reported having problems with Slack, which is not opening links sent via chat.

As such, we’ve come up with this guide that may help you fix the problem of Slack not opening links, be it in Chrome, Windows, or Android.

What can I do if Slack is not opening links?

1. Check your browser

More often than naught, Slack is not the one to blame when it fails to open links, but rather the browser you are using.

As you can see from the Slack official Homepage, Slack offers support to only the most widely-used browsers out there:

  • Chrome – Version 66 or above
  • Firefox – Version 60 or above
  • Microsoft Edge – Version 41 or above

More so, Slack had this to say about unsupported browsers:

When a browser is no longer supported, we stop fixing pesky bugs and issues. For a customer, that could be a terrible Slack experience! We do our best to avoid that scenario by blocking unsupported browsers from accessing Slack.

2. Clear application cache

2.1 Slack client for Desktop

  1. Open Slack.
  2. Click on the Menu in the top left corner.
  3. Choose Help, hover the cursor over Troubleshooting, and click on Clear Cache and Restart.
Slack Clear cache and Restart slack doesn't open links

2.2 Slack UWP from Microsoft Store

  1. Open Start, search for Slack, right-click on the app, choose More, and go to App settings.
  2. Select Repair, and if it doesn’t work, try the Reset option.
Slack Clear cache and Restart UWP slack can't open links

2.3 Browser cache

Tip icon Tip
The steps listed here are for Chrome. In case you are using another browser, the process remains similar.
  1. Press Ctrl + Shift + Delete to open the Clear browsing data utility.
  2. In the Time range field, choose All time. Check Browsing history, Cookies and other site data, and Cached images and files. Finally, click the Clear data button.
    clear browsing data slack won't open links
  3. Wait while Chrome removes the selected data and restart your browser.

After clearing the cache, check if Slack still has problems when opening links or whether these start working.

Before you leave, find out how to create and delete reminders in Slack.

Did you find this guide helpful? Share your opinions with us in the comments section below.

Fix Unmountable Boot Volume blue screen error in Windows 10

Errors aren’t uncommon with Windows 10. One of the more serious errors is the Blue Screen of Death with the UNMOUNTABLE_BOOT_VOLUME error message when trying to start your Windows PC.

What is the Unmountable boot volume error? This is a serious issue, as it blocks you from accessing all your files and data. Fortunately, there are a few things you can do to try and resolve this issue.

But before you begin, you will need a bootable media containing Windows 10. This could either be a Windows 10 DVD, or a bootable USB drive with Windows 10.

Once you have the media prepared, plug it into the USB port of your computer, and boot the system. Note that you may have to select boot media by pressing F8 or F12, depending on your system configuration.

How can I fix the Unmountable Boot Volume error?

1. Use Automatic Repair

  1. On the Windows Setup screen, select your language.
  2. The Repair your computer option should now appear at the bottom left corner of the window; click on it.
  3. On the screen that opens, select Troubleshoot.
  4. On the Advanced options screen select Startup Repair.
    Windows 10 Repair Boot
  5. From the list of OS installed in your system, select Windows 10.
  6. The repair should start, wait until the process is complete.
  7. Once the process is complete, restart your computer and remove the installation media.

The first thing to try is to get Automatic Repair to do the fixing for you. To use Automatic Repair, simply follow the above steps. If this didn’t resolve the issue move on to the next solution.


Automatic Repair couldn’t repair your Windows 10 PC? Check this guide to solve the issue quickly!


2. Use the Chkdsk command

  1. On the Windows Setup screen, select your language.
  2. The Repair your computer option should now appear at the bottom left corner of the window; click on it.
  3. On the screen that opens, select Troubleshoot.
  4. On the Advanced options screen select Command Prompt.
    Windows 10 Repair Boot
  5. Once the Command Prompt is open, type chkdsk /r c: and hit Enter (make sure to replace the C with the letter of the partition where you have Windows installed).
  6. The process should start; wait for it to complete.
  7. Once the process is complete, restart your computer and remove the installation media.

If the reason behind the UNMOUNTABLE_BOOT_VOLUME is some error on your hard drive, this can be detected and fixed by the Chkdsk command.


3. Fix Master Boot Record

Master Boot Record

  1. On the Windows Setup screen, select your language.
  2. The Repair your computer option should now appear at the bottom left corner of the window; click on it.
  3. On the screen that opens, select Troubleshoot.
  4. On the Advanced options screen select Command Prompt.
  5. Once the Command Prompt is open, type bootrec /fixboot and hit Enter.
  6. The process should start; wait for it to complete,
  7. Repeat the same for the following commands:
    bootrec /FixMbr
    bootrec /ScanOs
    bootrec /RebuildBcd
  8. Once the process is complete, restart your computer and remove the installation media.

The reason behind the problem could also be a bad Master Boot Record (MBR). The MBR is responsible for identifying the location of your operating system, so a malfunctioning MBR could result in boot errors.

To fix this problem, follow the above procedure.


If you’re having trouble accessing Command Prompt as an admin, then you better take a closer look at this guide.


4. Perform a few hard reboots

Strangely enough, some users reported that after performing a few hard reboots, they got rid of the Unmountable Boot Volume blue screen error.

In other words, when this error appears on the screen, press the power button of your PC until it reboots. Then, let the PC continue the reboot process, but don’t wait until the BSoD error occurs again.

Perform a new hard reboot before the BSoD error appears. Repeat the process 5 times. If the issue persists, move on to the next solution.


5. Reinstall Windows 10

If all else fails, unfortunately, you may have to reinstall Windows 10 altogether. To do this, in the initial window, once you’ve selected the language, click on Install now. Follow the on-screen instructions to reinstall Windows 10.

In case of needing extra help, don’t hesitate to take a closer look at this detailed guide in that regard.

If neither of these solutions works for you, the problem may lie in your hardware. Contact a hardware expert or the manufacturer.

[wl_navigator]

Fix Skype install errors 1603, 1618, and 1619 on Windows 10/11

Skype is a default messaging client on Windows 10, and millions of users use Skype on a daily basis. Despite Skype’s popularity, some users are having issues while installing Skype.

Today we’re going to show you how to fix Skype install errors 1603, 1618, and 1619.

How can I fix Skype install errors 1603, 1618, and 1619?

What can I do when getting Skype install error 1603?

1. Use a Fix-it tool from Microsoft to completely remove Skype

Error 1603 usually occurs when you try to update Skype without removing files and registry entries from the previous Skype installation. To fix this problem, simply uninstall Skype from your PC.

You must be wondering now: How do I completely remove all traces of a program? You normally uninstall it from Control Panel but the default uninstallation utility doesn’t always remove the program entirely.

There are many 3rd party software tools that come in handy in such a case. If you don’t know what to choose, you can’t go wrong with one of these great uninstaller software apps.

After the tool does its job, download the latest version of Skype and try to install it again.

2. Use Run dialog

  1. Open Run dialog by pressing the Windows key + R keyboard hotkey.
  2. Enter wusa /uninstall /kb:2918614 /quiet /norestart and press Enter to run the command.
    run the command

Users reported that you can fix this error simply by running one command. To do that, follow the above steps. If the command doesn’t work, restart your PC and try the same steps again.

3. Use the SRT tool

Users reported error 1603 while installing Skype, and according to them, this issue is caused by leftover files, file corruption or Windows installer issues. Most of these problems can be fixed by downloading and running the SRT tool.

After you download SRT and run it, the issue with error 1603 will be resolved and you should be able to install Skype without any problems.

4. Download Skype MSI

Users reported that this error is a generic error message from MSI-installer, but you should be able to fix this issue by downloading Skype MSI.

If that doesn’t work, you can use tools such as Lessmsi to extract the Skype.exe from the Skype MSI file and use it to install Skype.

5. Delete Skype Video application

Some versions of Skype might install the Skype Video application with them and this application can interfere with the Skype update process causing error 1603 to appear.

To fix this problem, simply uninstall the Skype Video application and try to update or install Skype again.

6. Change the security permissions

  1. Press Windows Key + R and enter %temp%. Press Enter or click OK.
    skype-install-error-1603-1618-1619-temp-1
  2. The temp folder will now open. Go to the Local folder by pressing the up arrow button.
    skype-install-error-1603-1618-1619-temp-2
  3. Locate the Temp folder, right-click it and choose Properties.
    skype-install-error-1603-1618-1619-temp-3
  4. Go to the Security tab and click the Edit button.
    skype-install-error-1603-1618-1619-temp-4
  5. Click the Add button.
    skype-install-error-1603-1618-1619-temp-5
  6. In Enter the object names to select enter Everyone and click Check Names. Click OK.
    skype-install-error-1603-1618-1619-temp-6
  7. Select Everyone from the Group or user names section and check Full control in Allow column. Click Apply and OK to save changes.
    skype-install-error-1603-1618-1619-temp-7

Sometimes, the Skype install error 1603 can appear if you don’t have sufficient privileges over the Temp folder. To change security privileges, perform the above procedure.

After changing the security privileges you should be able to install Skype without any problems.

7. Completely remove McAfee antivirus

The antivirus programs can also interfere with Skype installation and cause error 1603 to appear. According to users, this error was caused by McAfee antivirus and after removing the tool the problem was completely resolved.

Users reported that it’s not enough just to uninstall the antivirus tool, you have to also remove all files and registry entries associated with McAfee.

To do that, you’ll need to download the McAfee removal tool and run it on your PC. Keep in mind that almost any antivirus tool can cause this issue, so even if you don’t use McAfee you can try removing your antivirus program.

Users reported some issues with Spyware Doctor, so if you have this tool installed, we suggest that you remove it and try to install Skype again.

If you’re using any antivirus solution and you want to completely remove it from your PC, be sure to check out this amazing list with the best uninstaller software you can use right now.

8. Make sure that installation directory isn’t encrypted

If you’re getting error 1603, you need to be sure that the installation directory isn’t encrypted. Skype can’t be installed in encrypted directories, therefore you need to temporarily disable encryption to fix this problem.

9. Give Full control to the System account

This error can occur if you don’t have the necessary privileges over the installation directory. To fix this problem, you’ll need to give Full control to the System account.

To see how to do that, locate the installation directory and follow steps 3-7 from Solution 6. Just be sure to assign Full control to System account.

10. Disable User Account Control

  1. Press Windows Key + S and enter user accounts. Select User Accounts from the menu.
    skype-install-error-1603-1618-1619-uac-1
  2. Click on Change User Account Control settings.
    skype-install-error-1603-1618-1619-uac-2
  3. Move the slider all the way down to the Never notify.
    skype-install-error-1603-1618-1619-uac-3

User Account Control is a useful feature designed to alert you whenever you or a certain application tries to make a system change that requires administrator privileges.

Although this feature can provide some protection, it can also interfere with Skype installation and cause error 1603 to appear.

To fix this problem, you can disable this feature by following the steps above. After disabling User Account Control, this issue should be permanently resolved.

Need more help in managing User Account Control in Windows 10? Everything you need to know is right here.

How can I fix Skype install error 1618?

1. End msiexec.exe process

  1. Open Task Manager by pressing Ctrl + Shift + Esc.
  2. When Task Manager starts, go to the Details tab.
  3. Select msiexec.exe and click End task to end it.
    skype-install-error-1603-1618-1619-task-1
  4. After ending the msiexec.exe process, try to install Skype again.

Error 1618 usually appears when you’re trying to install more than one application at a time. For example, this error can appear if you accidentally started Skype installation twice.

In order to fix it, you need to end the msiexec.exe process. To do that, follow the given steps.

2. Use the Windows Repair tool

What is the Windows Repair tool? Windows Repair is a utility that helps you repair the Windows system.

It can quickly scan your computer to identify and fix a large majority of known Windows problems including file permissions, registry errors, or Windows Update issues.

According to users, they managed to fix error 1618 when installing Skype simply by using the Windows Repair tool.

This third-party tool is designed to repair many problems with your registry and folder permissions, and after you run it, the problem with Skype installation should be resolved.

3. Change the registry values

  1. Press Windows Key + R and enter regedit.
    skype-install-error-1603-1618-1619-regedit-1
  2. Go to the HKEY_LOCAL_MACHINESoftwareMicrosoftWindowsCurrentVersionInstaller key in the left pane.
  3. Locate and delete InProgress string.
  4. After that, navigate to HKEY_LOCAL_MACHINESystemCurrentControlSetControlSession Manager key.
  5. Delete PendingFileRenameOperations string.
  6. Go to HKEY_LOCAL_MACHINESOFTWAREMicrosoftUpdates key, locate UpdateExeVolatile entry, double click it and set its value to 0.

Before we start editing the Registry, we have to warn you that changing the registry can cause issues with your operating system.

Therefore it’s highly recommended that you create a backup of your registry in case anything goes wrong. To edit your registry, do the following.

4. Restart Windows Installer service

  1. Press Windows Key + R and enter services.msc. Press Enter or click OK.
    skype-install-error-1603-1618-1619-services-1
  2. Locate Windows Installer service and double click it to open its properties.
    skype-install-error-1603-1618-1619-services-2
  3. Change the Startup type to Disabled.
  4. Save changes and restart your PC.
  5. After your PC restarts, go back to the Services window and set the Startup type of Windows Installer service to Manual.
  6. Save changes and restart your PC.
  7. After your PC restarts, try to install Skype again.

Sometimes this error can occur due to problems with Windows Installer service, but you can easily fix it by disabling and enabling the service.

Some users are also suggesting to stop Windows Installer service and try to install Skype again, so you might want to try that as well.

5. Delete temporary setup files

  1. Press Windows Key + R, enter %temp% and click OK.
  2. Delete all files and folders from the Temp folder.
  3. Go to C:WindowsTemp folder and delete all files and folders from it.

Many applications put temporary setup files on your PC before starting the installation, and those setup files can cause error 1618 to appear while installing Skype.

To fix this problem, you need to delete temporary files by following the above steps. If the installation allows you to specify where do you want to extract temporary setup files, be sure to open that folder and delete everything from it.

After deleting all temporary files, try to install Skype again.

6. Re-register Windows Installer files

  1. Open Win+X menu by pressing Windows Key + X and select Command Prompt (Admin).
    skype-install-error-1603-1618-1619-admin-1
  2. When Command Prompt starts, enter the following commands:
    • msiexec /unregister
    • msiexec /regserver
  3. After the commands are executed, close Command Prompt and restart your PC.

Few users reported that you can fix error 1618 simply by re-registering Windows Installer files. You may try that as well. When your PC restarts, this error should be fixed, and you’ll be able to install Skype without any problems.

7. Change Group Policy Settings

  1. Press Windows Key + R and enter gpedit.msc. Press Enter or click OK.
    skype-install-error-1603-1618-1619-gpedit-1
  2. When Group Policy Editor opens, go to Computer Configuration > Windows Settings > Security Settings > Local Policies > User Rights Assignment in the left pane.
  3. In the right pane locate Debug programs option and double click it.
    skype-install-error-1603-1618-1619-gpedit-2
  4. Make sure that the Administrators account is added on the list. If it’s missing, click Add users or Group and add it. Click Apply and OK to save changes.
    skype-install-error-1603-1618-1619-gpedit-3

You can fix error 1618 simply by changing Group Policy settings. It isn’t at all difficult to do so.

8. Try to run the setup as administrator

If other solutions don’t work, you might want to try running Skype setup as an administrator. To do that, locate the Skype setup file, right-click it and choose Run as administrator.

How can I fix Skype install error 1619?

1. Try to extract files from MSI

Usually, these setup files are packed with MSI installer, and in most cases, you can extract the files and run them manually. We briefly explained how to do that in one of our previous solutions, so be sure to check it out.

2. Try installing the latest version of Skype

Skype installation error 1619 might appear if you’re trying to install an older version of Skype. Fixing this problem is relatively easy, and all that you have to do is to download the latest version of Skype and try to install it.

Skype install errors 1603, 1618, and 1619 are relatively common, but you can easily fix them by using one of our solutions.

Be sure to try them one by one and let us know which procedure worked for you.

Be prepared for anything and take a look at these useful Skype guides to troubleshoot errors.

  • Can I delete my Skype account without deleting the Microsoft account?

Yes, you can. However, make sure to unlink your Microsoft account first, or else you won’t succeed.

Disney Plus streaming service finally launches in the UK, Italy, Austria, Ireland, Germany, Spain, and Switzerland

After an incredibly long wait, Disney’s video streaming service, Disney+, has finally launched in the U.K., Ireland, Germany, Italy, Spain, Austria and Switzerland.

Disney+ was originally planned to also launch in France today but its debut has been delayed until April 7th after a request from the French government, likely due to an attempt to prevent internet services in the country from being overwhelmed due to COVID-19.

The virus will also be affecting the service in other European countries with resolution being downgraded to Standard instead of HD straight out of the gate.

“In anticipation of high consumer demand for Disney+, we are proactively instituting measures to lower our overall bandwidth utilization by at least 25% in all of the markets launching Disney+ on March 24th,” Disney’s Kevin Mayer said in a statement. “In the coming days, we will be monitoring Internet congestion and working closely with iInternet service providers to further reduce bit rates as necessary to ensure they are not overwhelmed by consumer demand. We look forward to the launch of Disney+ and hope it will provide a much-needed respite for families in these challenging and trying times.”

Other streaming services such as Netflix and Amazon are also limiting their video quality throughout Europe.

Disney+ can be viewed on Xbox One consoles via the official Disney+ app and via a web browser on Windows 10 devices.

Are you happy to finally have Disney+? What shows will you watch first? Share your recommendations with the community in the comments below and then follow us on Pinterest and YouTube for more tech content.

Disney+
Disney+
Developer:
Disney
Price:
Free+

The Sonic the Hedgehog movie is getting a digital release NEXT WEEK with pre-orders open now

Following the trend of recently released films getting a digital home release early due to COVID-19 shutting down movie theatres, the Sonic the Hedgehog movie will be coming out on digital next week on March 31st.

Based on the popular Sonic video game franchise, the Sonic movie garnered a lot of attention last year when the initial design of the main character was poorly received by fans in numerous regions. After a complete revamp of the character design which more closely resembled the look of Sonic used in the video games and cartoons, the move came out last month and was mostly well-received by critics and audiences.

With the spread of COVID-19, which is now an international pandemic, cinemas in numerous regions have been ordered shut so the theatrical release of pretty much every movie out at the time was cut short. Due to pretty much everyone being in self-isolation and consuming digital media, quite a few companies have seen early digital releases as a strategy to recoup at least some of the money they lost from a reduced time in cinemas.

Other films which are also receiving early home releases are The Invisible Man, The Hunt (which I personally found hilarious and highly recommend), and Disney/Pixar’s Onward (on Disney+).

The Birds of Prey: And the Fantabulous Emancipation of One Harley Quinn has also received an earlier than expected home release due to COVID-19 and is actually out today. It’s unclear how successful its early release will be, however, as it was a bit of a flop in cinemas before the corona pandemic.

All of these films are available to buy in the Microsoft Store and watch within the Movies & TV app on Windows 10 devices and Xbox One consoles.

Are you enjoying these earlier releases? Which ones would you recommend? Share your thoughts with us in the comments below and then follow us on Pinterest and Twitter for more geek content.

FIX: Error 0xa297sa fake support scam message

If you’re getting the 0xa297sa error code in Windows 10 while using your web browser client, it means you are experiencing a malware attack.

Anyway, at this point the most important thing is to remain calm as acting irresponsibly can raise further problems. Yes, a tech support scam malware is trying to trick you, but that doesn’t mean that you cannot act wisely.

As you will see, removing this malware is easy, but only if you follow the right troubleshooting solution.

Receiving the 0xa297sa error code while trying to access the Internet doesn’t mean that your Windows 10 system is already infected. This error code is indeed displayed by the malware but, for now everything is still safe and secured. What you choose to do from this point can save your day.


Error 0xa297sa: Here’s how the scam works

Usually the 0xa297sa error code is associated with a tech support scam malware which means that you will receive a warning page on which you will be asked to call a specific phone number.

Of course, that’s a scam and you shouldn’t initiate any call. If you do, then you might be asked for additional information required for removing the malware. But, this info will only offer hackers access to your data.

Also, scammers might ask for money or might advise you to install certain software in order to remove the deceptive pop-up. Either way, you will only end up losing your money, wasting time and possibly  losing important files and personal data.

When you receive the 0xa297sa error code along with the deceptive pop-up you should choose to remove the malware instead. And here you have the troubleshooting steps to follow.


How do I remove the 0xa297sa tech support scam error?

1. Close the web browser and the processes associated with the malware

The first thing to do is to stop the processes started by the 0xa297sa tech support scam malware:

  1. Start the Task Manager app – press the Ctrl+Alt+Del keyboard keys.
  2. From Task Manager switch to Processes and first end the task associated with your web browser.task manager processes tab
  3. Then, scroll down and look for other similar processes – if any, end it like you did before.
  4. Close Task Manager.
  5. Hint: if you cannot stop these processes or if you cannot access Task Manager complete this first solution from Safe Mode.

2. Reboot into Safe Mode with Networking

For being able to remove the malware without experiencing further restrictions caused by the virus, follow:

  1. Press the Win+R keyboard keys for launching the Run field.
  2. In the Run box enter msconfig and press Enter.
  3. The System Configuration window will be displayed.
  4. From there switch to the Boot tab.safe mode with networking
  5. And, under Boot options choose Safe Boot – and under this field also choose Network.
  6. Apply the changes and restart your Windows 10 system.
  7. Your computer will reboot into Safe Mode with Networking.

Install antimalware software run a scan

  1. You should now install the antimalware or antivirus program – do it from Safe Mode as otherwise you might not be able to complete the installation process: the malware can make that too.
  2. Choose a security software that is both complex and powerful – if different, the 0xa297sa tech support scam malware might not be spotted.
    • Hint: a possible solution might be provided by Malwarebytes, though choosing the right security solution is up to you.
  3. Now, perform a full scan; don’t initiate a quick scan as certain files might still remain installed on your computer.
  4. Wait while the antimalware program runs and when prompted follow on-screen prompts for removing all infected files.
  5. In the end, restart your Windows 10 computer and see how everything works now.

At this point, you should be able to use your Windows 10 system without problems once more. But that doesn’t mean you cannot experience the 0xa297sa tech support scam malware again, if you’re not careful enough.

That’s why you shouldn’t use your computer without first installing a proper antivirus program. Make sure you turn on Firewall protection and also choose antimalware software that received good reviews from other users.

You can choose from free or paid platforms, it doesn’t matter as long as you have at least a minimum protection enabled.

It’s important to protect your computer at any cost, otherwise your data and personal info can be exposed. Another important aspect: along with the antivirus program make sure you set up a web protection or a web filter – that’s the only way you can protect your online activity.


Let us know which of the methods mentioned above worked best for you by leaving us a message in the comments section below.

FIX: BSoD error 0x000000EA in Windows 10/11

BSOD is short for blue screen of death. This screen is one of the most dreaded sights you can have as a Windows user. For this guide, we will show you how to fix the 0x000000EA BSOD Windows 10 error.

It comes up in the middle of work, randomly or so it seems. The BSOD usually shows up with an error code, and for the 0x000000EA BSOD Windows 10 error, there is an issue with your processor chip or graphics card.

The 0x000000EA BSOD Windows 10 error mainly comes up when you overtask your graphics card by high-definition multimedia or games while it is handling another application.

Fortunately, the blue screen 0x00000ea error in Windows 10 can be resolved easily if you follow the solutions in this guide.

How do I fix the blue screen 0x00000ea error?

1. Update your graphics driver.

  1. Press the Start button on your keyboard and search for Device Manager.
  2. From the search results, select Device Manager.Fix BSoD error 0x000000EA in Windows 10
  3. When you get to the Device Manager window, you will see a list of installed devices.
    • Scroll down to Display Adapters and click on it to expand.
  4. Your graphics card will show up on the expanded list.
    • Right-click on it and hit Update Driver.How to fix BSoD error 0x000000EA in Windows 10
  5. On clicking this button, your computer will begin to look for updated versions of your drivers.
    • If the system finds any, it updates them.
  6. When the updating is complete, proceed to reboot your computer.
  7. Finally, visit the website of the graphics card manufacturer to download and install the very latest edition of your graphics driver.

After rebooting your system, use it normally. If the blue screen 0x00000ea error shows up again, your BIOS may be due for an upgrade.

Updating your drivers with a professional solution is a good alternative to fix the BSoD error 0x000000EA in Windows 10. Use simple, fast, and secure technology encompassed in one performant software that will also optimize your computer hardware.

This solution contains a huge daily-updated driver database, so after scanning your system, it will recommend the latest drivers available. You will also receive a fully detailed report showing the exact status of your Windows 10’s missing, damaged, or outdated drivers.

Once you have downloaded and installed the latest drivers available, the error will disappear. You will also notice an improvement in the performance of your device as it will function like a new one.

⇒ Get Fortect Driver Updater

2. Update your BIOS

  1. Trigger the Run dialog box by pressing the Windows key and then pressing R.
  2. In Run, enter cmd and hit Enter to open a Command Prompt window.Windows error BSoD error 0x000000EA in Windows 10
  3. Enter the following in Command Prompt: wmic bios get smbiosbiosversion
  4. Press Enter to discover your BIOS version.get your bios version to update and fix the blue screen 0x00000ea
  5. Exit BIOS.
  6. Next, on a web browser, visit the website of your motherboard’s manufacturers to check the latest BIOS version.
  7. If yours is outdated, download this latest version onto your computer.
  8. Next, double-click on this downloaded EXE file and run it.
    • Follow the instructions in the wizard to complete this process.
  9. Finally, after successfully installing the BIOS update, restart your machine.

3. Troubleshoot overheating

  1. Press CTRL + ALT + ESC to launch Task Manager.
  2. Click on the Processes tab.
  3. Next, sort the processes in order of CPU usage by clicking on the CPU column.
  4. Look out for the processes with high CPU usage.
  5. If any, right-click on it and select End task.end tasks that overwork the cpu to fix the blue screen 0x00000ea

Also, confirm that dust or debris is not covering the computer’s vents. If it is, remove the particles using a blower.

The 0x000000EA BSOD Windows 10 error means that your graphics card is crashing, and the two main solutions are to update your graphics card, as well as your BIOS. In some cases, an overheating computer can throw the 0x000000EA BSOD Windows 10 error.

Did you try the solutions listed here? Tell us which of them helped you clear the blue screen 0x00000ea error by leaving us a message in the comments section below.

Fix: Microsoft Teams Notifications Won’t Go Away

If you find that a Microsoft Teams pop-up notification won’t go away no matter what you try, note that several people have reported the same issue on different system setups and with different software versions.

In some cases, users were so frustrated by this problem that they reinstalled their Windows 10 systems only to find that the issue still arose. Some think the issue was caused when a password change caused their Teams to log them out while reading a new message.

They tried restarting my computer and reinstalling Teams. The phone app doesn’t display the notification, only the desktop and browser. We will explore the best ways to resolve this issue and eliminate that annoying empty notification from Microsoft Teams.

What to do if Microsoft Teams notifications won’t disappear?

1. Reset your Microsoft Teams notifications

  1. Open up Microsoft Teams and navigate to the Settings. microsoft teams notification settings
  2. Turn off all notifications settings.
  3. Wait for a few minutes -> turn them back on again.
  4. If this method didn’t manage to solve your issue, please try the next one.

2. Clean Microsoft Teams caches

For some unknown reason, the cache for your Microsoft Teams app is spread across your hard drive.

Navigate to these locations and delete all files in the folders to clear the cache:

%AppData%MicrosoftTeamsapplication cachecache
%AppData%MicrosoftTeamsblob_storage
%AppData%MicrosoftTeamsdatabases
%AppData%MicrosoftTeamscache
%AppData%MicrosoftTeamsgpucache
%AppData%MicrosoftTeamsIndexeddb
%AppData%MicrosoftTeamsLocal Storage
%AppData%MicrosoftTeamstmp

Use CCleaner to clear all caches from your browsers. If you’re not sure how you can have a look at our dedicated guide.

3. Use the Alt+Tab method to close the notification

In the case of some users, pressing the Alt+Tab keys on their keyboard and then clicking the X in the corner of the window managed to close the notification for good.

4. Delete the app and reinstall it

To delete Microsoft Teams:

  1. Press Win+X keys -> select Apps and features.Apps and features - Microsoft Teams notification won't go away
  2. Search for Microsoft Teams in the list -> select it -> press Uninstall.
  3. Wait for the process to complete.

To reinstall Microsoft Teams:

  1. Download the latest version of the app.
  2. Run the installer and complete the process.

5. Change the app settings

  1. Open Microsoft Teams and navigate to the settings window.
  2. Disable the option Continue running app.
  3. Restart the app for the changes to take effect.

In today’s guide, we explored the best troubleshooting methods for getting rid of the Microsoft Teams empty notification that will not go away.

We hope the methods we presented here solved your problem. We also have a guide on how to turn off Teams mobile notifications on Desktop, so don’t miss it.

Please let us know if you found this guide helpful by using the comment section below.

To block Microsoft Teams email notifications, go to Settings > Notifications and disable email notifications.

To turn off Microsoft Teams notifications for specific conversations, navigate to the beginning of the conversation, click on More options, and then click on Turn off notifications.

  • How do I change the notification sound for Microsoft Teams?

Windows 10 users cannot currently choose what type of sound plays for notifications. This option is available only on Android.

  • How do I get notifications for Microsoft Teams chat?

To receive notifications from the Microsoft Teams chats you’re involved in, navigate to your team’s channel, select More Options, and then Channel notifications. Now, select chats are the type of activity you want to receive notifications from.

FIX: The system cannot find file specified on Windows 10/11

Computer errors can prevent you from running your favorite applications or from accessing your files.

Speaking of errors, users reported The system cannot find the file specified error on Windows 10.

According to users, they are getting this error while trying to access certain files, so today we’re going to show you how to fix it.

  1. Change your registry
  2. Open the Libraries folder
  3. Install the latest updates
  4. Format your USB flash drive
  5. Use chkdsk
  6. Use WinRAR
  7. Delete ProfileImagePath key
  8. Enable Automount
  9. Check if your system partition is active
  10. Change shadowcopy storage area
  11. Add a printer manually
  12. Copy the files manually
  13. Uninstall all HP applications
  14. Change the drive letter for System Reserved partition
  15. Delete the Config value from the registry
  16. Use download manager
  17. Check if necessary services are running
  18. Check if your USB port is powered
  19. Remove Windows.old folder
  20. Restart Windows Backup service
  21. The system cannot find the file specified cmd
  22. Fix – The system cannot find the file specified uTorrent
  23. The system cannot find the file specified virtual disk manager

How can I fix The system cannot find the file specified on Windows 10?

Solution 1 – Change your registry

According to users, you can fix this error simply by making few changes to your registry.

Modifying the registry comes with certain risks, therefore we strongly advise that you export your registry and create its backup, just in case. To modify the registry, do the following:

  1. Press Windows Key + R and enter regedit. Press Enter or click OK.
    regedit
  2. Optional: To export your registry, click File > Export.
    backup registry
    Now enter the file name for your backup, and select All in Export range section. Click the Save button to export your registry.
    backup registry
    In case anything goes wrong, you can simply run this file in order to restore your registry to its original state.
  3. Once Registry Editor opens, navigate to the HKEY_LOCAL_MACHINESOFTWAREMicrosoftWindowsCurrentVersion key in the left pane.
  4. Expand the key and look for RunOnce key. If this key isn’t available, you need to create it. To do that, just right click the CurrentVersion key and choose New > Key from the menu.
  5. Enter RunOnce as the name of the new key.
  6. Navigate to the HKEY_CURRENT_USERSoftwareMicrosoftWindowsCurrentVersion key in the left pane.
  7. Expand the key and check if RunOnce key is available. If not, repeat the procedure from Step 4 to create it.
  8. Close Registry Editor and restart your PC.

After your PC restarts, The system cannot find the file specified error should be resolved completely.

Once again, we have to mention that modifying the registry can lead to certain issues, so be extra cautious and be sure to create a backup.


If you can’t edit your Windows 10’s registry, read this handy guide and find the quickest solutions to the issue.


Solution 2 – Open the Libraries folder

According to users, you might be able to fix this problem simply by navigating to the Libraries folder.

This folder is hidden by default in Windows 10, and in order to access it, you need to do the following:

  1. Open File Explorer.
  2. In the left pane, right click the empty space and choose Show libraries option.
    show libraries file explorer
  3. After doing that, Libraries folder will appear in the left pane, and you’ll be able to access it easily.
    libraries file explorer

Users reported that accessing the Libraries folder fixed the issue for them, so be sure to try this simple solution.


If you need more info on how to enable Libraries in Windows 10, check out this simple guide.


Solution 3 – Install the latest updates

According to users, this was an issue in the past, but you can easily fix it by installing the latest updates.

Windows updates often fix both hardware and software errors, therefore we strongly suggest that you install the latest updates.

Windows 10 usually installs the updates automatically, but you can also check for updates manually by following these steps:

  1. Press Windows Key + I to open the Settings app.
  2. Navigate to the Update & security section and click Check for updates button.
    check for updates

Windows 10 will now check if updates are available. If so, it will download and install the updates automatically.

If you can’t open the Setting app, take a look at this article to solve the issue.


Having trouble updating your Windows? Check out this guide that will help you solve them in no time.


Solution 4 – Format your USB flash drive

Users reported The system cannot find the file specified error while inserting their USB flash drive. This issue can also appear with any removable storage, and in order to fix it, you need to format your drive.

To do that, follow these steps:

  1. Switch to a different computer that can recognize your USB flash drive. Connect the USB flash drive. If you can, be sure to back up all your files.
  2. Open This PC and locate your USB flash drive. Right-click the USB flash drive and choose Format from the list.
    format storage
  3. When the Format window opens, make sure to uncheck Quick Format option.
  4. Now click the Start button to start the formatting process. Wait for the formatting process to finish.
    format drive

By disabling the Quick Format option all your files will be completely removed and unrecoverable.

Some users are also suggesting to use ImageUSB software.

This software will format your drive and fill it with zeroes thus fixing this problem. Keep in mind that this process can take a while, so you’ll have to be patient.

If you encounter the Windows cannot format this drive error, follow the quick steps from this guide to solve the issue.

Solution 5 – Use chkdsk

If you’re getting The system cannot find the file specified error, that might be because the file is damaged or corrupted. To fix this problem, you need to run chkdsk command and scan your files.

This is relatively simple, and you can do it by following these steps:

  1. Press Windows Key + X to open Win + X menu and choose Command Prompt (Admin) from the list.
    CMD
  2. When Command Prompt opens, enter chkdsk /f X:. Be sure to replace X with the appropriate letter that matches your partition. Press Enter to run the command.
  3. Wait while chkdsk tries to repair your files.

chkdsk is giving you headaches? Check out this quick guide to fix any issues with it.


Solution 6 – Use WinRAR

According to users, The system cannot find the file specified error appears when trying to delete a specific file or folder.

If that’s the case, you might be able to fix the problem by using WinRAR. To fix the problem, do the following:

  1. Locate the problematic file and right click it. Choose Add to archive option from the menu.
    win rar
  2. Check Delete files after archiving option and then click the OK button.
    create winrar archive

Your file will be moved to the archive and the original will be deleted from the hard drive. Now you can just delete the archive to completely remove the file.

Solution 7 – Delete ProfileImagePath key

The system cannot find the file specified error can occur while using Windows Backup, and it will prevent you from creating your backup.

According to users, you might be able to fix this problem by deleting certain values from your registry.

Changing the registry can lead to stability issues, so before you make these changes, we strongly advise you to back up your registry and create a System Restore point.

To delete this key from the registry, do the following:

  1. Open Registry Editor. You can do that by following steps from Solution 1.
  2. Once Registry Editor opens, navigate to HKEY_LOCAL_MACHINESOFTWAREMicrosoftWindows NTCurrentVersionProfileList path in the left pane.
  3. Expand the ProfileList key. You’ll see several subkeys available. Navigate through each subkey and check if the key has ProfileImagePath value available on the right pane.
  4. If certain subkey doesn’t have ProfileImagePath value available or if its Data is empty, you need to delete that subkey. To do that, right click it and choose Delete from the menu.
    delete profile list regedit entry

After deleting the problematic profile, close Registry Editor and check if the issue is resolved.

As we already mentioned, modifying the registry can lead to certain issues, therefore we strongly recommend that you create a backup before making any changes.


Can’t access the Registry Editor? Things aren’t as scary as they seem. Check out this guide and solve the issue quickly.


Solution 8 – Enable Automount

If this problem appears while using Windows Backup, you can fix it by using diskpart and automount commands.

Diskpart is a powerful tool for hard drive management, so be extra cautious while using it.

By using this tool you can cause damage to your system, so keep in mind that you’re using this tool at your own risk. To run diskpart on Windows 10, follow these steps:

  1. Open Command Prompt as administrator. For detailed instructions on how to do that, check Solution 5.
  2. When Command Prompt opens, enter diskpart and press Enter.
  3. Enter the following lines into Command Prompt:
    • automount
    • automount enable
  4. Close Command Prompt and restart your PC.

If the issue still persists, you need to do the following:

  1. Open Command Prompt and start diskpart again.
  2. When diskpart starts, enter list volume. List of all partitions will now appear.
  3. Select your system volume. In our case, that’s Volume 1, so we need to enter select volume 1. If your system volume is labeled by a different number, be sure to use that number to select it.
  4. Type online volume and press Enter.
    diskpart cmd
  5. Close Command Prompt and restart your PC.

After your PC restarts, check if the issue is resolved. Once again, diskpart is powerful tool, and if you’re not careful you can delete files or make your system unbootable, so be extra cautious with it.


If you’re having trouble accessing Command Prompt as an admin, then you better take a closer look at this guide.


Solution 9 – Check if your system partition is active

The system cannot find the file specified error can occur while using Windows Backup. To fix the issue, you need to check if your system partition is set to active. To do that, follow these simple steps:

  1. Press Windows Key + X and choose Disk Management from the menu.
    disk management
  2. Disk Management will now start. Locate your System drive, in most cases it should have a C label assigned to it, and right-click it. Choose Mark Partition as Active option. If you can’t select this option, it means that your system drive is already set to active.
  3. Close Disk Management and restart your PC.

Disk Management won’t load on Windows 10? Count on us to solve the problem.


Solution 10 – Change shadowcopy storage area

If The system cannot find the file specified error appears on your PC, you can fix it by changing the shadowcopy storage area size.

This can be a risky procedure, so we advise you to create a backup just in case.

To change shadowcopy storage area, you need to do the following:

  1. Open Command Prompt as administrator.
  2. When Command Prompt opens, enter the following line vssadmin list shadowstorage.
  3. Now you’ll be able to see shadowstorage area and the amount of space that it takes. To increase its size, enter vssadmin resize shadowstorage /For=C: /MaxSize=5%.
  4. After doing that, restart your PC.

If the issue still persists, open Command Prompt again and enter vssadmin delete shadows /all command.

Solution 11 – Add a printer manually

Few users reported that this issue occurs while trying to add a printer. If you have the same problem, you might want to try adding the printer manually.

This is a simple procedure, and you can do it by following these steps:

  1. Press Windows Key + S and enter printers. Select Devices and Printers from the menu.
    Devices and Printers
  2. From the menu on the top select Add a printer option.
  3. Now you just need to follow the instructions on the screen to add your printer manually.

According to users, this error occurs while installing HP printers, but if you have this problem with any other printer, be sure to try this solution.

Solution 12 – Copy the files manually

Apparently this error can occur while trying to install certain devices, and users reported The system cannot find the file specified error while installing an Epson scanner.

Few users were able to solve this issue simply by finding the missing file in Windows folder and copying it to the appropriate location.

According to users, they fixed the problem with their device by finding the usbscan.sys file in Windows folder and copying it to Windowsinfsetupapi.dev folder.

This solution only works for particular devices, and you’ll mostly need to transfer a different file on your PC.

We have to warn you that making changes in Windows folder can be dangerous, so be sure to create a backup if you plan to make changes to Windows directory.


Can’t use copy paste in Windows 10? Follow this guide and fix the issue quickly.


Solution 13 – Uninstall all HP applications

According to users, this error appears while installing a printer driver on some HP laptops.

If you’re getting The system cannot find the file specified error, you might be able to fix it by uninstalling all HP applications. To do that, follow these steps:

  1. Download Microsoft’s Program Install and Uninstall tool.
  2. Run the application and remove all HP applications from your PC.
  3. After doing that, try to download and install the driver again.

Need more info on how to uninstall programs and apps in Windows 10? Take a look at this guide.


Few users reported the same problem, and according to them, the error is caused by McAfee antivirus. To fix the issue, you need to disable McAfee by following these steps:

  1. Open McAfee Internet Security.
  2. Click on Change settings.
  3. Now click on Real Time Scanning.
  4. Turn Real Time Scanning off and try to download and install the drivers again.

Solution 14 – Change the drive letter for System Reserved partition

The system cannot find the file specified error can appear while trying to use Windows Backup. If that’s the case, you might be able to fix the problem by revealing System Reserved partition.

We have to mention that changing System Reserved partition settings can lead to certain issues, so keep in mind that this procedure isn’t risk-free. To make the necessary changes, follow these steps:

  1. Press Windows Key + X and select Disk Management.
  2. Locate the System Reserved partition and right click it. Choose Change Drive Letter and Paths from the menu.
    Change Drive Letter and Paths
  3. Click the Add button.
    Change Drive Letter and Paths add
  4. Select Assign the following drive letter and choose a letter from the drop down menu. We suggest that you use letter such as Z or W.
    Change Drive Letter and Paths assign the following drive letter
  5. Once you’re done, click OK to save changes.

Close Disk Management and check if the issue is resolved. We have to mention that System Reserved partition will remain visible, so don’t make any changes to it.

This isn’t the best solution, but it’s a solid workaround that might work for some users.

Solution 15 – Delete the Config value from the registry

According to users, The system cannot find the file specified error can appear while trying to reinstall network driver. If that’s the case, you need to open Registry Editor and delete a single value from it.

Before making any changes, we advise you to check Solution 1 to see how to back up your registry. To remove the problematic key, do the following:

  1. Open Registry Editor.
  2. In the left pane, navigate to the HKEY_LOCAL_MACHINESYSTEMCurrentControlSetControlNetworkConfig key. If you can’t find this key in your registry, we advise you to skip this solution.
  3. Right click the Config key and choose Delete from the menu.
  4. After doing that, restart your PC and check if the issue is resolved.

If you need to undo any registry changes in Windows 10, check out this guide and learn how you can do it.


Solution 16 – Use download manager

Few users reported that this problem appears while trying to install downloaded applications.

If you’re getting The system cannot find the file specified error while trying to install certain application, you might want to redownload the setup file.

Users reported that using a download manager such as Internet Download Manager fixed the issue for them so we advise you to try that.

Sometimes your download can become damaged or corrupted, so be sure to try using a download manager.


Looking for the best download managers for Windows 10? Check out this list with our top picks.


Solution 17 – Check if necessary services are running

This error can appear with almost any software, and users reported The system cannot find the file specified error while using VMware.

To fix the problem, you need to start appropriate VMware services, and you can do that by following these steps:

  1. Press Windows Key + R and enter services.msc. Press Enter or click OK.
    services.msc
  2. When Services window opens, locate VMware Authorization Service on the list. Right-click this service and choose Start from the menu.
    start service
  3. After starting the service, close the Services window and check if the issue is resolved.

Another way to start VMware services is to use Command Prompt. This method is faster, and you can perform it by following these steps:

  1. Start Command Prompt as administrator.
  2. When Command Prompt opens, enter net start vmx86 and press Enter to run it.
  3. After the command is executed, close the Command Prompt and check if the problem is resolved.

If the issue still persists, you might have to completely reinstall VMware and check if that solves the problem.

Solution 18 – Check if your USB port is powered

Apparently this issue appears while using Windows Backup feature. To fix The system cannot find the file specified error, it’s advised to connect any external hard drives to powered USB ports.

Few users reported that you can fix the issue simply by connecting an external hard drive to a different port.

It seems that Windows Backup feature requires external storage to be connected to a powered USB port.

After connecting the device to a different USB port, check if the issue is resolved.


USB not working in Windows 10? Don’t let that ruin your day. Fix it quickly with the help of this guide.


Solution 19 – Remove Windows.old folder

According to users, The system cannot find the file specified error can appear due to Windows.old folder.

Windows.old folder appears if you upgrade your Windows or if you perform a clean install of Windows 10.

This folder holds your previous Windows installation, and it allows you to restore it.

Windows.old folder can cause this error to appear while using Windows Backup feature, and to fix the problem, you need to remove Windows.old folder.

This is relatively simple, and you can do it by following these steps:

  1. Press Windows Key + S and enter cleanup. Select Disk Cleanup from the list of results.
    disk cleanup
  2. Select your C drive and click OK. Windows 10 will now scan your PC.
    disk cleanup system drive
  3. Select Previous Windows installation(s) option and click OK.
  4. Wait while Windows removes the selected files.

After removing Windows.old folder from your PC, check if the problem is resolved.

If you need more info on how to delete the Windows.old folder on Windows 10, check out this dedicated guide.


Problems deleting all your junk files? Follow this guide to solve Disk Cleanup issues and save your drive.


Solution 20 – Restart Windows Backup service

If you’re getting The system cannot find the file specified error message while trying to run Windows Backup, we recommend that you restart Windows Backup service. To do that, follow these steps:

  1. Open the Services window by following steps from Solution 18.
  2. When Services window opens, locate Windows Backup service and double click it.
  3. Set the Startup type of this service to Manual. If the service isn’t running, click the Start button to start it again. Now click Apply and OK to save changes.
    windows backup service restart
  4. In Services window, right click Windows Backup and choose Restart from the menu. After doing that, close Services window.
    windows backup service restart

Some users are also recommending to remove Samsung Magician software from your PC. +If you have this software installed, remove it and check if that solves the issue.

How can I fix The system cannot find the file specified error?

Solution 1 – Move the problematic file

According to some users, you might be able to fix this problem simply by moving the problematic file to a different folder.

Users reported that moving the problematic file to the root folder, such as C: for example, fixed the issue for them. This is a simple workaround, but it might fix the issue for you, so feel free to try it out.


Can’t move a certain file in Windows 10? Follow this guide and solve the problem easily.


Solution 2 – Remove problematic software

Some users reported that The system cannot find the file specified error appears every time they start their PC. This can be quite annoying, and according to users, you can fix this problem simply by removing the problematic applications.

It seems that this problem is caused by Apple software, Real Player and Spybot Search & Destroy. If you have any of these programs installed, we advise you to remove them in order to fix this problem. To do that, you need to follow these steps:

  1. Press Windows Key + I to open the Settings app.
  2. Navigate to the System section and choose Apps & features tab.
  3. Locate any of the previously mentioned applications and remove it from your PC.

After uninstalling the problematic applications, you can run CCleaner and use it to remove any remaining files related to these apps. Lastly, restart your PC and check if the error message appears again.


If you want to get rid of any software leftovers from your Windows 10 PC, this guide will certainly help you do that.


Solution 3 – Use bcdedit command properly

Several users reported The system cannot find the file specified error message while trying to run bcdedit command in Command Prompt. This usually occurs if you’re not starting this command properly. To fix the issue, you need to do the following:

  1. Open Command Prompt as administrator.
  2. Now enter bcdedit /store c:BootBCD followed by a command that you want to perform. In order to use bcdedit command in Windows 10, you need to enter bcdedit /store c:BootBCD instead of bcdedit every time.

Solution 4 – Show file extensions

Sometimes you might get The system cannot find the file specified error message in Command Prompt if you don’t know the file’s exact extension.

By default, Windows 10 hides file extensions from the user, and this can sometimes lead to certain problems. For example, let’s assume that you have a file called file.txt.

This might look like a normal text file, but let’s see what happens if we enable file extensions for files. To do that, simply click the View tab and check File name extensions.

view file name extensions
file.txt.txt

Now let’s see how our file.txt looks like. After revealing the file extensions, the full name of the file is file.txt.txt.

If you try to access file.txt.txt instead of file.txt in Command Prompt, you’ll see that it works without any issues. There’s also another way to check the file extension of your files in Command Prompt.

Simply navigate to the desired folder in Command Prompt and enter dir command.

List of all directories and files in that folder will now appear. As you can see, you can now easily find the full name and extension of any file in that directory.

This isn’t an error, and it’s more of a beginner’s mistake. In the future, before trying to access a certain file, be sure to check for its full name by using the dir command or by revealing file extensions.


Need more info on how to show file extensions in Windows 10? Take a look at this useful guide.


How can I fix The system cannot find the file specified error in uTorrent?

Solution 1 – Delete the problematic torrent

If you’re getting The system cannot find the file specified error while using uTorrent, you might be able to temporary fix it by using this solution. To fix the problem, follow these simple steps:

  1. Open uTorrent.
  2. Now locate the torrent that is giving you this message, right click it and choose Remove And Delete .torrent + Data option.
  3. After doing that, try to download the same torrent again.

Keep in mind that this is just a temporary workaround, so it’s quite possible that the same error message will appear again.

We also have to warn you that this method will completely delete the torrent and all associated files from your PC.

If you’re getting the System cannot find path uTorrent error in Windows 10, follow this article to solve the problem.

Solution 2 – Check the torrent’s download folder

Sometimes The system cannot find the file specified error occurs if your download folder path isn’t correct. To fix this issue, be sure to manually select the download folder for each torrent.

To do that, follow these steps:

  1. Right click the problematic torrent.
  2. From the menu select Advanced > Set Download Location.
  3. Now select the correct download folder.
  4. Repeat these steps for all affected torrents.

Alternatively, you can set a default download folder for all torrents by doing the following:

  1. Open uTorrent and choose Options > Preferences.
  2. Now navigate to the Directories tab.
  3. Select Put new downloads in option and choose the desired folder.

After doing that, the error message should be completely resolved.

Solution 3 – Perform a Disk Cleanup

According to users, you can fix The system cannot find the file specified in uTorrent simply by performing a Disk Cleanup.

Sometimes temporary files or old Windows installations can interfere with uTorrent and cause this error to appear.

Several users reported that Disk Cleanup fixed their problem, so we suggest that you try it out.

Regarding Disk Cleanup, we already explained how to perform it in one of our previous solutions, so be sure to check it out.

While performing Disk Cleanup be sure to select all available options in order to remove all unnecessary and old files.


Can’t get rid of the temporary files? After following these easy steps, you’ll delete them like a pro.


Solution 4 – Delete uTorrent installation manually

Sometimes The system cannot find the file specified error can appear if your uTorrent installation is corrupted.

According to users, uTorrent isn’t available on the list of installed applications, and it starts on its own.

If you have the same problem, and you can’t remove uTorrent, you need to follow these steps:

  1. Open Task Manager by pressing Ctrl + Shift + Esc.
  2. When Task Manager opens, locate uTorrent in the Processes tab. Right click it and choose Open file location from the menu.
  3. uTorrent installation directory will appear, and you’ll be able to remove it manually.

Can’t open Task Manager? Don’t worry, we’ve got the right solution for you.


How can I fix The system cannot find the file specified?

Solution 1 – Use Chromebook Recovery utility

According to users, this error can appear while trying to format specific USB flash drives.

It seems that The system cannot find the file specified affects USB flash drives that are used as Chromebook recovery image holders.

In order to fix the problem, users are suggesting to use Chromebook Recovery utility to erase the USB drive.

After doing that, the flash drive will start working in Windows 10, and the error will be resolved. To fix the problem, follow these steps:

  1. First, download the Chromebook Recovery utility.
  2. Connect the problematic USB flash drive to your PC.
  3. Start the Chromebook Recovery utility.
  4. Click on Settings and choose Erase recovery media.
  5. From the dropdown menu select your USB flash drive.
  6. Click Continue > Erase now.
  7. Wait for the process to finish and click Done.

After doing that, you’ll be able to format the flash drive once again from your operating system. Keep in mind that this solution only works with USB drives that are used as recovery media for Chromebook.

Solution 2 – Use clean command in diskpart tool

If you’re having The system cannot find the file specified error while using your USB flash drive, you might need to use diskpart to fix it.

This process will remove all files from your flash drive, so create a backup if you need to.

To clean the USB flash drive, do the following:

  1. Start Command Prompt as administrator.
  2. When Command Prompt opens, enter diskpart and press Enter.
  3. Now enter list disk command. List of storage devices will appear. Check the size of each drive and be sure to locate your USB flash drive. It’s crucial to select the correct drive or else you’ll delete all files from your hard drive permanently.
  4. Enter select disk X to select your USB flash drive. In our example we used select disk 1 since disk 1 matches our USB flash drive. Once again, be sure to double check everything and select the correct USB flash drive.
  5. Now enter clean and diskpart will remove all files from your flash drive.
    diskpart list disk
  6. Close Command Prompt.

Now your USB flash drive is clean from any files, and in order to use it, you need to format it. To do that, follow these steps:

  1. Press Windows Key + X and choose Disk Management from the list.
  2. When Disk Management opens, locate your USB flash drive, right click it and choose Format from the menu.
    format drive
  3. Select the desired options and format your drive.
  4. After the formatting process is completed, close Disk Management.

As you can see, this process is relatively simple, but you need to be extra cautious while using diskpart tool.

Solution 3 – Make changes to your registry

The system cannot find the file specified error appears for some users while inserting a USB flash drive to their PC. To fix this problem, you need to make some changes to your registry.

Before making any changes, we advise you to create a backup of the registry, just in case.

  1. Start Registry Editor. To see how to do that, be sure to check some of our previous solutions.
  2. Now navigate to HKEY_LOCAL_MACHINESYSTEMCurrentControlSetServicesvds key in the left pane.
  3. In the right pane, look for ImagePath. By default, it should have a value of %SystemRoot%System32vds.exe. According to users, the problem can sometimes be %SystemRoot% variable, and you need to change it manually.
  4. Double click ImagePath to edit it. Replace %SystemRoot% with C:Windows in Value data field. After making the changes, Value data field will look like this: C:WindowsSystem32vds.exe. Click OK to save changes.
  5. Close Registry Editor.

In some rare cases %SystemRoot% variable might not work properly, and that will cause this error to appear.

After making the necessary changes and replacing the value with the absolute path, the issue should be resolved.

Solution 4 – Format the drive on Mac or Linux

If you can’t access your flash drive on Windows due to The system cannot find the file specified error, you might need to format it on Mac or Linux first.

According to users, they solved the issue simply by connecting their flash drive to any Mac or Linux computer and formatting the drive using FAT32 file system.

After formatting the drive, connect it to your Windows 10 PC and follow the Solution 2 to clean the drive using diskpart tool.

Solution 5 – Disable automount

In one of our previous solutions, we mentioned how enabling the automount feature can fix The system cannot find the file specified when inserting a USB flash drive.

However, it seems that in some cases you can fix this error by disabling automount in diskpart. To do that, you need to follow these steps:

  1. Open Command Prompt as administrator.
  2. Enter diskpart and press Enter.
  3. Now enter automount disable.
  4. Close Command Prompt and check if the error is resolved.

After disabling automount, you should be able to format your removable storage without any errors. After you’re done, you might want to enable the automount feature.

To see how to do that, check out one of our previous solutions.

Solution 6 – Delete and format all partitions

This solution will delete all files from your hard drive, so if you’re going to use it, be sure to back up all your important files.

Since this solution will delete all files, we suggest that you use it only with a new PC that doesn’t have any important files stored on it.

Users reported that after reinstalling their operating system they are unable to initialize their additional hard drive.

According to them, they are unable to initialize it due to The system cannot find the file specified error message.

If you have this or any other similar issue, you can fix it by using Partition Wizard software.

Simply create a bootable flash drive with this tool and start your PC from it. After the tool starts, you need to delete all your partitions on the drive that you can’t initialize and format them again.

After that, initialize partitions as GPT.

If you want to convert MBR to GPT disk without data loss, check out this awesome guide.


Want to create a Windows 10 bootable UEFI USB drive? Follow the steps from this article and do it in no time.


Once again, this solution will delete all files from the problematic drive, so be sure to use this solution as a last resort or only with a new PC or an empty hard drive.

The system cannot find the file specified error can affect your PC in many different ways. This can be an annoying error, but we hope that you solved it by using one of our solutions.

If you have any other questions, feel free to leave them in the comments section below and we’ll surely check them out.

  • Could not find this item this is no longer located?

Verify the item’s location and try again. If you can’t find it, read our expert guide to fix this problem.

FIX: Windows could not run on this computer’s hardware

Windows Update on Windows 10 is the number one instigator of system malfunction.

Recently, users with Creators Update have had a hard time upgrading due to an error.

During the update installation process, they were prompted with the Windows setup could not configure to run on this computer’s hardware error.

In order to address this, we prepared a list of applicable solutions so make sure to check it out.

If you’re constantly stalled by the error after numerous tries, the below-presented steps should help you out.

  1. Run Windows Update Troubleshooter
  2. Restart Update Services with a batch file
  3. Run SFC and DISM
  4. Uninstall Internet Information Services
  5. Update with Update Assistant or  Media Creation Tool
  6. Install update with the external media
  7. Remove all peripheral devices and check drivers
  8. Block the update for the time being

How do I fix the hardware upgrade configuration error in Windows 10?

1. Run Windows Update Troubleshooter

Windows always had a plethora of troubleshooting tools at users’ disposal. With Windows 10, Microsoft finally decided to make a dedicated menu for troubleshooters.

Windows Update Troubleshooter is one of the most used ones, which is rather obvious if we take into consideration the notoriety of Windows 10 Updates.

In this case, we recommend running it once the major update installation fails. It should restart the update services and check for additional errors.

Follow these instructions to run it in Windows 10:

  1. Right-click Start and open Settings.
  2. Open Update & Security.windows setup could not configure to run on this computer's hardware
  3. Choose Troubleshoot from the left pane.
  4. Expand Windows Update and click Run the troubleshooter.windows setup could not configure to run on this computer's hardware

2. Restart Update Services with a batch file

If the built-in troubleshooter fails, you can always take the matters into your own hands. There are various services related to Windows Update and restarting them could be helpful.

In addition, the downloaded update files ready for installation can often get corrupted for various reasons.

So, what you’ll need to do is to both restart the dedicated services and delete the Software Distribution folder.

After that, the update sequence should recommence.

There are various ways to do this, but the manual approach can take too much of your time. The best way to do it is by running the batch script, and we explained how to do it, here.

3. Run SFC and DISM

SFC and DISM are two essential built-in utilities for troubleshooting major system errors. They should scan the system files and replace them.

The System File Checker tool is the first tool you should run, just to confirm that the error is not within the system.

If it doesn’t help, you might have better luck with Deployment Image Servicing and Management.

Follow these instructions to run SFC on Windows 10:

  1. In the Windows Search bar, type cmd.
  2. Right-click on Command Prompt and run it as an administrator.
  3. In the command-line, type sfc/scannow and press Enter.windows setup could not configure to run on this computer's hardware
  4. Wait for the procedure to end and restart your PC.

And this is how to run DISM:

  1. Open Command Prompt with administrative permissions.
  2. In the command line, type the following commands and press Enter after each:
    • DISM /online /Cleanup-Image /ScanHealthwindows setup could not configure to run on this computer's hardware
    • DISM /Online /Cleanup-Image /RestoreHealth
  3. Wait for the procedure to end and restart your PC.

4. Uninstall Internet Information Services

There are some system features that, when enabled, can cause various update issues.

In this case, numerous users found that IISA (Internet Information Services Admin) services were causing the upgrade error.

There are multiple ways to address this and we can’t guarantee which will work.

The first way relies on disabling this Windows Feature, while the second requires the uninstalling via the Command Prompt command-line. Here’s how to perform both and, hopefully, resolve the issue at hand.

Disable in Windows Features:

  1. In the Windows Search bar, type Windows Features and open “Turn Windows Features on or off“.windows setup could not configure to run on this computer's hardware
  2. Scroll below until you reach Internet Information Services and uncheck its box.windows setup could not configure to run on this computer's hardware
  3. Confirm changes and restart the PC.

Uninstall with Command Prompt:

  1. Open Command Prompt as an administrator.
  2. In the command-line, type the following commands and press Enter:
    • NET STOP IISADMIN
    • SC DELETE “IISADMIN”
    •  NET START IISADMIN
  3. Close the command prompt.

5. Update with Update Assistant or Media Creation Tool

When it comes to major Windows 10 updates, we always recommend upgrading manually with one of the available tools.

The over-the-air distribution is known for various issues and you can avoid them with Update Assistant or Media Creation Tool.

They’ll download the update automatically and install it, without worrying about problems Windows Update feature is plagued with.

Here’s how to update Windows 10 with Update Assistant:

  1. Download Update Assistant, here.
  2. Run the tool and wait until it prepares your PC for updating.
  3. Back up your data from the system partition.
  4. Follow the instructions until the installation is completed.

And this is how to utilize Media Creation Tool for the same purpose:

  1. Download Media Creation Tool, here.
  2. Accept the Agreement terms and click Upgrade this PC now.windows setup could not configure to run on this computer's hardware
  3. Wait until the tool downloads update files and continue with the installation procedure.

6: Install update with the external media

If the system update won’t install through the Windows shell, you can always boot from the installation media drive and install updates that way.

In order to do so, you’ll need the Media Creation Tool and USB drive with 6 or more gigabytes of storage space.

After you’ve created the bootable drive, just change the boot sequence, boot from a drive and upgrade the system without issues.

7. Remove all peripheral devices and check drivers

Since the error prompt obviously points in the direction of hardware failure, you should remove all peripheral devices from USB ports and restart the installation.

A lot of issues in Windows 10 are to be blamed for faulty drivers for legacy devices and lack of proper support.

So, before you start with the updating, make sure to remove all peripheral devices and stick only with the essential ones – mouse and keyboard.

In addition, we recommend navigating to Device Manager and double-checking the state of system drivers.

If there’s an exclamation point informing you about the device failure, make sure to get the proper driver prior to a system upgrade.

Just right-click Start and choose Device Manager.

8. Block the update for the time being

Finally, as the case has shown on many occasions, major Windows updates are quite often unpolished after the release. The latest Windows 10 April Update caused a lot of problems for a variety of both home and enterprise users.

In other words, waiting for some time until Microsoft provides hotfixes is a good idea.

Also, since updates are mandatory, you’ll need to postpone them for some time. Here’s how to do it in a few simple steps:

  1. Press Windows key + I to open the Settings app.
  2. Choose Update & Security.windows setup could not configure to run on this computer's hardware
  3. Select Windows Update from the left sidebar.
  4. Click on Advanced Options.windows setup could not configure to run on this computer's hardware
  5. Choose Semi-annual Channel.
  6. Enter for how long you want to postpone updates (up to 365 days) from the drop-down menu.windows setup could not configure to run on this computer's hardware

With that, we can conclude this article. We hope you addressed the issue at hand. In case you’re aware of other applicable solutions or have some questions, make sure to share them with us. You can do so in the comments section below.

Fix: Wi-Fi Won’t Work But Says Connected in Windows 10/11

Have you ever encountered an issue whereby you can’t open websites in any of your browsers even when your Wi-Fi connection is seemingly fine?

All the Wi-Fi indicators on your router and in Windows might highlight the connection is ok, but websites still aren’t opening.

When that happens, it will usually have something to do with a laptop’s or desktop’s connection settings. These are a few potential resolutions that will fix the issue.

Wi-Fi is connected but still won’t work?

1. Open the Internet Connections Troubleshooter

Firstly, check out the Internet Connections troubleshooter in Windows 10. That can shed light on, and perhaps fix, numerous connection errors. You can open that troubleshooter as follows.

  • Open the Cortana app by pressing its taskbar button.
  • Enter the keyword ‘troubleshoot’ in the search box and select Troubleshoot to open a list of troubleshooters.
  • Click Internet Connections and press the Run the troubleshooter button to open the window shown directly below.
  • Then you can select Troubleshoot my connection to Internet option in the troubleshooter.

2. Reset the DNS Settings

This issue can often be due to the DNS server settings. Thus, resetting DNS settings is among the best resolutions. This is how you can reset the DNS settings in Windows 10.

  • Right-click the connection icon on the system tray and select Open Network Internet settings to open the window in the shot directly below.
  • Click Change adapter options and then right-click your Wi-Fi adapter network to select Properties. The Properties option opens the window shown below.
  • Select Internet Protocol Version 4 and press the Properties button to open the window in the screenshot below.
  • Now select the Obtain an IP address automatically option, and press the OK button.
  • If the Wi-Fi still isn’t working, select Use the following DNS server addresses option on the Internet Protocol Version 4 window.
  • The enter 8.8.8.8 in the Preferred DNS server box and ‘8.8.4.4’ in the Alternative DNS server box. Press the OK button to apply the new settings.

3. Erase Temp Files

  • Some persons have confirmed that erasing temporary files is another resolution for this issue. To clear the temp folder in Windows, press the File Explorer button on the Win 10 taskbar.
  • Then enter ‘C:\Windows\temp’ in File Explorer’s path box, and press the Return key.
  • A dialog box window might open requesting admin permissions. Press Continue on that dialog box window to open the temp folder in File Explorer as in the shot below.
  • Then press the Ctrl + A hotkey to select all the files in that folder.
  • Press the Delete button to erase the selected files.

4. Check the Proxy Server Settings

Recent changes to proxy server settings can generate connection issues. As such, it might be worth checking your proxy server settings. You can check those settings as follows.

  • Open Run by pressing the Win key + R keyboard shortcut.
  • Enter ‘Control Panel’ in Run, and press the OK button.
  • Select Internet Options to open the window directly below.
  • Click the Connections tab, which includes a LAN settings button.
  • Press the LAN settings button to open the proxy settings shown directly below.
  • Uncheck all check box options selected there.
  • Then press the OK button to close the window.

5. Reset the TCP/IP Stack With NetShell

It might be the case that the TCP/IP stack is corrupted. Resetting the TCP/IP will repair the stack and your connection. You can utilize the NetShell command-line tool to reset the protocol.

Follow the guidelines below to reset the TCP/IP.

  • First, open Run by pressing the Win key and R.
  • Open the Command Prompt by entering CMD in Run’s text box and pressing the OK button.
  • Enter netsh int ip reset c:\resetlog.txt in the Prompt’s window, and press the Return key.
  • Alternatively, you can input netsh int ip reset without a directory path.

6. Utilize the System Restore Tool

Windows’ System Restore utility reverts the platform back to a selected restore point. As such, you can restore Windows to a date when the Wi-Fi was working and websites opened in your browsers.

The System Restore utility might restore your connection settings to what they were at the selected restore point and fix this internet issue.

This is how you can utilize System Restore in Windows 10.

  • Enter rstrui in Run and click OK to open System Restore.
  • Click the Next button, and then select a restore point date.
  • You can also select the Scan for affected programs option to check what software you’ll lose after the restore point. You’ll need to reinstall software installed after the selected restore point.
  • Click the Next and Finish buttons to confirm your selected restore point and restart Windows.

So that’s how you can kick-start your Wi-Fi to get browsing again.

Resetting your router or even Windows 10 might also fix this issue. This net article also provides some handy tips for fixing internet connectivity.

For more tips and tricks, take a closer look at our article on fixing WiFi connectivity problems on HP laptops running Windows 11.

This might take several minutes Windows update error [FIX]

Windows updates occasionally get stuck when you boot up your desktop or laptop.

That doesn’t happen often, but some users have reported that Windows Update gets stuck when stating: We’ve got some updates for your PC. This might take several minutes.

However, it doesn’t take several minutes as the update is stuck for hours; and the users can’t log in to Windows.

Does that sound like a familiar issue? If so, this is how you can log in to Windows when an update gets stuck.

What can I do if Windows 10 updates might take several minutes?

1. Give the Update Some Time to Finish

Ok, this might be an obvious suggestion, but don’t assume an update is stuck too quickly. Most minor updates don’t usually take much longer than half an hour.

However, major updates usually take more than an hour. The Windows 10 Fall Creators Update can take up to four hours.

In this case, it states that it might take several minutes, which suggests that this is a minor update. If it were a major update, it would not say that it will take several minutes.

However, wait at least an hour for the update to finish.

2. Press Ctrl + Alt + Del Hotkey

The first thing to do when Windows is stuck updating is to press the Ctrl + Alt + Del hotkey. That might take you to the Windows login screen.

From there, you can then log in to Windows as you usually would. Alternatively, you can also shut down or restart Windows.

3. Reset Your Desktop or Laptop

If Ctrl + Alt + Del doesn’t open the Windows login screen, reset your desktop or laptop.

Press your desktop’s or laptop’s start button for about five secs to switch off the PC. Then you can switch it back on again.

4. Unplug Your Laptop

If the update is stuck on a laptop, you can unplug the laptop instead. Then the laptop’s battery will eventually run out. Thereafter, you can plug the laptop back in and start it up again.

Alternatively, recharge the laptop and then start it.

5. Start Windows in Safe Mode

If the update is still stuck, then start Windows in Safe Mode. It used to be the case that you could start Windows in Safe Mode by pressing F8 during boot up.

However, that doesn’t work for Windows 10 Safe Mode.

You can select Safe Mode via the Advanced Startup Options menu.

To open the Advanced Startup Options menu, you’ll need to insert a Windows 10/8 setup DVD or USB flash drive when you start the laptop or desktop.

Select Troubleshoot, Advanced options, and Startup Repair on the Advanced Startup Options menu. Then press 4 to select Enable Safe Mode on the Startup Settings menu.

enable safe mode PC
If you don’t have a Windows 10/8 setup DVD or flash drive, you can still set up a recovery disk with an empty USB stick if you have another desktop or laptop.

That PC must also include the same platform as the one with the stuck update.

Then you can set up a Windows recovery drive, as outlined in this post, with which to open the Advanced Startup Options menu.

6. Utilize the System Restore Tool

You can utilize the System Restore tool when you’re in Windows Safe Mode. That will undo the incomplete update. This is how you can utilize the System Restore tool in Windows 10.

  • Press the Win key + R hotkey to open Run.

  • Enter ‘rstrui.exe’ in Run, and click the OK button. That opens the System Restore tool in the shot below.

  • Press the Next button on the System Restore window.
  • Then select a recent restore point that will revert Windows back to a date just before the stuck update.
  • Note that you will lose software added to Windows after the selected restore point. Press the Scan for affected programs button to open the window below that lists software that will be removed.

  • Click the Next and Finish buttons to confirm your selected restore point.

7. Run the Windows Update Troubleshooter

The Windows Update troubleshooter can also fix Windows Update issues. That troubleshooter might fix Windows Update so there are no further stuck updates.

You can open that troubleshooter in Win 10 as follows.

  • Press the Cortana button on the taskbar.
  • Enter the keyword ‘troubleshoot’ in the search box.
  • Click Troubleshoot to open the window directly below.

install KB4043961

  • Select Windows Update, and press its Run the troubleshooter button. That will open the troubleshooter shown below.

  • Then you can go through the update troubleshooter.

8. Switch Off the Windows Update Service

Perhaps the best way to ensure you don’t get any further stuck updates is to switch the Windows Update service off. However, then Windows will not get further updates.

Nonetheless, that will be a sufficient temporary fix for recurring stuck updates if nothing else. This is how you can switch Windows Update off.

  • Open Run with the Win key + R hotkey.
  • Enter ‘services.msc’ in Run’s text box, and click the OK button.
  • Scroll down to Windows Update in the window shown directly below.

  • Double-click Windows Update to open the window in the snapshot below.

  • Select Disabled from the Startup type drop-down menu.
  • Then click Apply and OK to confirm the new setting.

So that’s how you can fix stuck updates primarily for Windows 10. Start Windows in Safe Mode if required, and then utilize the System Restore tool or the Win update, troubleshooter.

Switch off the update service as a final resolution. Check out this article for some further tips that might fix Windows Update.

Autoplay not working in Windows 10/11 [COMPLETE GUIDE]

Autoplay can be a useful feature, but it appears that Windows 10 users are having some issues with it. According to users, Autoplay isn’t working on Windows 10 for some strange reason, so is there a way to fix it?

There is a way to fix it, and we’re going to show you exactly how, in this article.

How can I fix Autoplay if it isn’t working in Windows 10?

There are various problems with Autoplay that can occur, and in this article, we’re going to cover the following issues:

  • Autoplay not working when the camera is connected, external hard drive, pen drive – Many users reported that the Autoplay feature isn’t working on their PC. According to them, this problem affects cameras, external hard drives, pen drives, as well as other removable storage.
  • Autoplay enabled but not working – Users reported that the Autoplay feature is enabled on their PC, but it’s not working for some reason. If you have that problem, you might be able to solve it with one of our solutions.
  • DVD ROM, removable disk Autoplay not working – This problem can also appear with DVD and removable disks. There are a few ways to fix this problem, so be sure to try out the solutions from this article.
  • USB Autoplay not working Windows 10 – This is a relatively common problem with USB devices and Windows 10. However, this isn’t a major issue and it can be easily resolved.
  • Autoplay not working SD card Windows 10 – Users reported that the Autoplay feature isn’t working with their SD card. This can be a problem if you want to transfer pictures from your digital camera to your PC.

1) Reset the Autoplay settings

So, the first thing we’re going to try is resetting the Autoplay settings in Windows 10. If you’re not sure how to do that, just follow these steps:

  1. Press Windows Key + S and enter the Control Panel. Now select Control Panel from the list of results.
    autoplay not working pen drive
  2. When Control Panel opens, click on AutoPlay.
    Autoplay enabled but not working
  3. In AutoPlay settings make sure that you check Use AutoPlay for all media and devices.
  4. Next, click the Reset all defaults button. Your Autoplay settings should be reset to default.
    DVD ROM autoplay not working

Most users don’t know what to do when the Windows key stops working. Check out this guide and be a step ahead.

You can also follow this full step by step guide on how to enable Autoplay in Windows 11 so Windows reacts automatically when you plug in a USB drive or insert a disc.


You can’t open Control Panel? Take a look at this step-by-step guide to find a solution.


You can also change your Autoplay settings from the Settings app. To do that, just follow these steps:

  1. Open the Settings app. You can do that quickly by pressing Windows Key + I shortcut.
  2. When the Settings app opens, go to Devices section.
    USB Autoplay not working Windows 10
  3. Select AutoPlay from the menu on the left and in the right pane select Ask me every time for both Removable drive and Memory card.
    Autoplay not working SD card Windows 10

After making these changes, check if Autoplay is working again.


Want to know more about Autoplay settings and how to manage them? Check out this awesome article.


2) Check Registry Editor values

Windows 10 manages Autoplay settings using the registry and speaking of the registry, there’s one specific key that is in charge of Autoplay settings.

Sometimes this key can be changed when you install new antivirus software, so let’s check this key and see if it has been changed:

  1. Open Registry Editor. You can open Registry Editor by pressing Windows Key + R and typing regedit. After typing regedit press Enter to run it.
    Autoplay not working external hard drive
  2. When Registry Editor opens in the left pane navigate to the following registry key:

    • HKEY_CURRENT_USERSoftwareMicrosoftWindowsCurrentVersionPoliciesExplorer

      Autoplay enabled but not working

  3. Find the NoDriveTypeAutoRun value name in the right pane and double click it.
    DVD ROM Autoplay not working
  4. If the data is not 0x00000091 (145), set Value data to 91. Click OK to save changes.
    Autoplay not working when camera is connected
  5. Now go to the following key in the right pane:

    • HKEY_LOCAL_MACHINESoftwareMicrosoftWindowsCurrentVersionPoliciesExplorer

  6. Search for NoDriveTypeAutoRun value. If that value exists change its data like we explained in steps 4-6 using the same numbers.

If you can’t find the values we mentioned in Step 7 and Step 8, don’t worry. This is actually a good thing, and it means that those values weren’t changed.

If changing the registry seems a bit complicated, you can just download .reg files, execute them and add changes to the registry automatically. Just download these files:

After downloading them, just run them both to add them to the registry. We also have to mention that there’s one more value in Registry Editor that can cause Autoplay issues on Windows 10.

  1. Follow Steps 1 to 3 from this solution to open Registry Editor and to navigate to Explorer key.
  2. Now in the right panel, there should be NoDriveAutoRun value. This value can sometimes affect Autoplay options if it’s not set to 0, so double click it.
  3. Now set the Value data to 0 and click OK to save changes.
    Autoplay enabled but not working

After you’ve made changes to the Registry, restart your computer and check if the issue is resolved.

If you can’t edit your Windows 10’s registry, read this handy guide and find the quickest solutions to the issue.


Can’t access the Registry Editor? Things aren’t as scary as they seem. Check out this guide and solve the issue quickly.


3) Check Shell Hardware Detection Service

Shell Hardware Detection Service is in charge of Autoplay functions and if Autoplay isn’t working on Windows 10, maybe Shell Hardware Detection Service isn’t running, as well, so let’s see if we can fix that:

  1. Press Windows Key + R and type services.msc. Press Enter to run it.
    DVD ROM Autoplay not working
  2. When the Services window opens locate the Shell Hardware Detection and double click it to open its properties.
    USB Autoplay not working Windows 10
  3. Now locate the Startup type section and from the dropdown choose Automatic.
    Autoplay not working SD card Windows 10
  4. If the service isn’t running click Start and then OK to save changes.

After changing the startup type of this service, the problem should be resolved.

Most users don’t know what to do when the Windows search box goes missing. Read this article to learn how you can get it back in just a couple of steps.


4) Change notification settings

According to users, you might be able to fix this problem simply by changing your notification settings. Users reported that their AutoPlay notifications were disabled and that caused this error to appear. To fix the issue, you need to do the following:

  1. Open the Settings app and go to the System section.
    USB Autoplay not working Windows 10
  2. In the menu on the left select Notifications & actions. In the right panel, scroll down to the Get notifications from these senders section. Now locate AutoPlay and make sure that it’s enabled. If not, be sure to enable it.
    Autoplay not working SD card Windows 10

Once you made these changes, check if the problem with AutoPlay still persists.


If you’re having trouble opening the Setting app, take a look at this article to solve the issue.


5) Make changes to the Group Policy

Another way to fix this issue is to make changes to Group Policy. Group Policy is a useful tool that allows you to configure various system settings. To start Group Policy Editor and fix Autoplay issues, you need to do the following:

  1. Press Windows Key + R and enter gpedit.msc. Press Enter or click OK.
    Autoplay not working when camera is connected
  2. In the left pane, navigate to Computer Configuration > Administrative Templates > Windows Components > Autoplay Policies. In the left pane, locate and double click on Turn off Autoplay.
    Autoplay enabled but not working
  3. Select Disabled from the menu and click on Apply and OK.
    removable disk Autoplay not working

After making these changes, the problem should be resolved and AutoPlay will start working again. Few users reported that they had to change this setting for User Configuration instead of Computer Configuration.

To do that, you need to repeat the same steps, but instead of going to the Computer Configuration, you need to go to the User Configuration section and follow the instructions above.

Most Windows 10 users have no idea how to edit the Group Policy. Learn how you can do it by reading this simple article.


You don’t have the Group Policy Editor on your Windows PC? Get it right now in just a couple of easy steps.


6) Disconnect all USB devices

According to users, if Autoplay is not working, the problem might be your USB devices. Users reported that they had a connected USB flash drive that caused this problem to appear.

According to them, the drive was used as a SpeedBoost drive, and while the drive was connected the Autoplay didn’t work with cameras and other devices.

After disconnecting the flash drive the issue was resolved and Autoplay started working for all devices.


7) Use Command Prompt

If Autoplay is not working on your PC, you might be able to fix it simply by using Command Prompt. To do that, follow these steps:

  1. Press Windows Key + X to open Win + X menu. Now select Command Prompt (Admin) from the list. If Command Prompt isn’t available, you can use PowerShell (Admin) instead.
    USB Autoplay not working Windows 10
  2. When Command Prompt opens, enter net start shellhwdetection command and press Enter to run it.
    Autoplay not working SD card Windows 10

After running this command, you just have to restart your PC and the problem should be completely resolved.


If you’re having trouble accessing Command Prompt as an admin, then you better take a closer look at this guide.


8) Turn Autoplay off and on

If you still have problems with Autoplay, you might be able to fix them simply by turning Autoplay off and turning it back on again. This is rather simple and you can do it by following these steps:

  1. Open the Settings app and go to Devices > AutoPlay.
  2. In the right pane, locate Use AutoPlay for all media and devices option and turn it off.
    Autoplay not working external hard drive
  3. Wait for a couple of moments and turn this feature back on again.

You can also turn this feature off from Control Panel. To do that, you need to do the following:

  1. Open Control Panel and go to the AutoPlay section.
  2. When the AutoPlay window opens, uncheck Use AutoPlay for all media and devices.
    Autoplay enabled but not working
  3. Wait for a few moments and turn this option back on again.

Both of these methods will disable the Autoplay feature, so feel free to use any of them.

After doing that, check if Autoplay is working on your PC. Few users are suggesting to restart your PC after you turn off the AutoPlay feature, so you might want to try that as well.


9) Install the latest updates

If you still have this problem, you might be able to solve it by installing the latest updates. Windows 10 usually installs updates automatically, but sometimes you might skip an important update.

If this happens, you can check for updates manually by doing the following:

  1. Open the Settings app and go to the Update & Security section.
    removable disk Autoplay not working
  2. Now click on Check for updates button.

If any updates are available, Windows will install them in the background. After your Windows 10 is up to date, check if the issue still persists.


Having trouble updating your Windows? Check out this guide that will help you solve them in no time.


That’s about it, we hope at least one of these solutions helped you to solve the problem with Autoplay in Windows 10. You can get a broader explanation of how the feature works in this detailed Autoplay Windows guide that covers supported media types and expected behavior.

As always, leave all your questions and suggestions in the comments section below.

[wl_navigator]

Emerging Issue 70008: Fix it Using These 8 Solutions

Emerging issue 70008 is an annoying error code users encounter when running Microsoft Apps on Windows 10. This issue prevents users from running Windows Store and some universal apps.

Fortunately, it is an issue that can be easily fixed with the right information, as shown in this guide.

What is Emerging issue 70008?

The Emerging issue 70008 is an error code that majorly prevents users from using Microsoft Store apps. Below are some of the causes of the issue:

  • Outdated PC: If your operating system is outdated, you are likely to encounter this error message. The quickest way around this is to update your PC.
  • Antivirus interference: Most times, this error message is usually due to a conflict between the app you are trying to open and your antivirus software. You need to disable your antivirus temporarily to be able to open the app.
  • Corrupt system files: Another potential cause of this issue is system file corruption. Repairing the faulty files is the solution to this.

After potential causes of this issue, below are some variations of the Emerging issue as reported by users:

  • Emerging issue 67758: This is another common problem that can appear on Windows 10. However, we already covered this issue in our Emerging issue 67758 article, so be sure to check it for some in-depth solutions.
  • Emerging issue 6619: Sometimes, you might encounter this error message on your PC. If that’s the case, be sure to update your system and download the latest updates.
  • Emerging issue 97275: This error can sometimes appear due to your antivirus. To fix the issue, disable your antivirus and check if that solves the problem.

How can I fix Emerging issue 70008?

1. Download the troubleshooter from Microsoft

Microsoft is aware of this issue, and they have already released a troubleshooter that addresses this problem. To apply this solution, download the troubleshooter and run it.

Once the troubleshooter starts, follow the instructions to fix this error.

2. Check your antivirus

  1. Press the Windows key, type virus, and select Virus & threat protection.
    virus emerging issue 70008
  2. Click the Manage settings link.
    manage settings
  3. Finally, toggle the switch under Real-time protection backward to disable it.
    real time

According to users, Emerging issue 70008 can sometimes appear due to your antivirus. Your antivirus can interfere with certain Windows features causing this issue to appear.

However, you can fix the problem by simply disabling your antivirus. If you use a third-party antivirus, you can turn it off by right-clicking its icon on the taskbar and selecting Disable or something related.

3. Use PowerShell

  1. Press the Windows key + S, type powershell, and click choose Run as administrator under Windows PowerShell.
  2. Once the PowerShell starts, type the following commands and press Enter after each: Get-appxpackage -packageType bundle |% {add-appxpackage -register -disabledevelopmentmode ($_.installlocation + "appxmetadataappxbundlemanifest.xml")}Emerging issue 6619$bundlefamilies = (get-appxpackage -packagetype Bundle).packagefamilynameEmerging issue 67758get-appxpackage -packagetype main |? {-not ($bundlefamilies -contains $_.packagefamilyname)} |% {add-appxpackage -register -disabledevelopmentmode ($_.installlocation + "appxmanifest.xml")}Emerging issue 97275
  3. If you still can’t solve the problem, type the command below and hit Enter to run it: get-appxpackage -allusers | remove-appxpackage

To fix Emerging issue 70008, you might need to run some commands on PowerShell, as shown above. After all commands are executed, close PowerShell and check if the problem is resolved.

4. Install the latest updates

  1. Press the Windows key + I to open the Settings app.
  2. Now, go to Update & Security section.
    Emerging issue 67758
  3. Finally, click the Check for updates button and install all available updates.
    Emerging issue 97275

If Emerging issue 70008 keeps appearing on your PC, you might be able to fix the problem simply by installing the latest updates. Windows updates bring a variety of fixes, and Windows 10 usually downloads them automatically in the background.

However, sometimes you might miss an update or two due to certain issues, but you can always check for updates manually by following the steps above.

5. Perform System Restore

  1. Press the Windows key + S, type restore, and select Create a restore point from the menu.
  2. Click the System Restore button.
    Emerging issue 67758
  3. Click Next.
    Emerging issue 67758
  4. Select the Restore Point you wish to revert to and click Next.
    Emerging issue 6619

Users reported that this problem started appearing after installing a specific update or app. In order to fix this, you can perform a System Restore.

After reverting your PC to the previous state, the Emerging issue 70008 should be fixed. If a problematic update caused the problem, you might want to block the update from installing by using Show and Hide updates tool.

6. Perform SFC and DISM scan

  1. Press the Windows key, type cmd, and click Run as administrator under Command Prompt.
    cmd admin emerging issue 70008
  2. Type the command below and hit Enter to run it: DISM /Online /Cleanup-Image /RestoreHealthdism restore
  3. Wait for the command to finish running. Now, run the command below: sfc /scannowsfc scan
  4. Finally, wait for the command to finish running and restart your PC.

According to users, sometimes this issue can occur because your system files are corrupted. However, you can easily fix corrupted files by running a couple of scans on your PC.

7. Create a new user account

  1. Press the Windows key + I to open the Settings app and select the Accounts option.
    Emerging issue 67758
  2. In the left pane, navigate to Family & other people.
  3. In the right pane, click Add someone else to this PC.
    Emerging issue 6619
  4. Choose I don’t have this person’s sign-in information.
    Emerging issue 97275
  5. Select Add a user without a Microsoft account.
    Emerging issue 67758
  6. Enter the desired username and click Next.
    Emerging issue 6619

If you’re having a problem with Emerging issue 70008, you might be able to fix it simply by creating a new user account.

Sometimes your user account can get corrupted, and the only way to fix this problem is to create a new account.

8. Perform an in-place upgrade

  1. Download and run Media Creation Tool.
  2. Click the Accept button on the license page.
    accept emerging issue 70008
  3. Next, choose the Upgrade this PC now option and click Next.
    upgrade
  4. Finally, wait while the setup prepares the necessary files and follow the onscreen instructions to complete the process.

Lastly, if everything proves abortive, you might need to perform an in-place upgrade. Once you complete the setup, Windows 10 will be updated and reinstalled, and the problem with Emerging issue 70008 will be resolved.

We have reached the end of this guide on fixing the Emerging issue 70008. All you need to do now is to follow the instructions therein carefully, and things should be back to normal.

If you can’t install Microsoft apps at all on your PC, check our excellent guide for simple ways to fix it.

Feel free to let us know the solution that helped you solve this problem in the comments below.

FIX: Malicious Software error in Microsoft Security Essentials

Without a doubt, Windows 7 is still one of the most used OS in the world. Despite the fact that there are various reasons to upgrade to Windows 10, users worldwide are still not willing to do so.

And we understand their mistrust with the latest Microsoft addition. Namely, even though Windows 7 has fewer features, it also has much fewer system issues that you may encounter in everyday use. Fewer but not none, sadly.

One of those issues is mild but can be annoying, and is related to Microsoft Security Essentials (MSE). It seems that some users were prompted with malicious software notification but, both quick or full scan, have found nothing. Moreover, the history log of quarantined files is not available.

Here’s one of the most frequent MSE error messages encountered by users:

Preliminary scan results show that malicious or potentially unwanted software might exist on your system. You can review detected items when the scan has completed.

If you’ve experienced an identical or similar bug, we prepared a few possible workarounds for you to fix this issue.


How do I fix Microsoft Security Essentials bugs in Windows 7?

1. Download latest security updates

  1. Open the Control Panel.
  2. Choose System & Security.
  3. Click Windows Update.
  4. Select Check for Updates in the left panel.
  5. Choose Updates you want to install.
  6. Click Install Updates.
  7. After the installation is finished, you may need to restart your PC in order to finish the procedure.

Your first step should be to check for the latest security updates. Even though Microsoft stopped with upgrades for Windows 7, the system still receives security updates.

Moreover, without those updates, you can experience various issues. And the malware security threats are not the only ones.

In case you don’t use updates, we advise you to use a 3rd-party antivirus rather than Microsoft Security Essentials. Without an updated database, it is barely useful.


2. Scan PC with alternative 3rd-party antimalware software

Besides Microsoft’s security tools, you can use any 3rd-party antivirus to check for possible malware infections. You can download and install free programs or use online security scans in order to identify the problem. Here are some of the most trusted free security solutions:

When it comes to online solutions, we advise you to use ESET Online Scanner.


3. Update manually to latest MSE version

There is always a possibility that some of the latest updates created bugs and problems in the first place. So, as most of the technicians would advise you, you should try to turn it off and then on, or in this case, reinstall the MSE. You can do it this way:

  1. Navigate to Control Panel.
  2. Open Programs.
  3. Click Uninstall a program.
  4. Find and uninstall Microsoft Security Essentials.
  5. Restart your PC.
    • You can find the latest version and download it here. Pay attention to your system architecture.
    • Once you have installed the latest version of MSE, try performing a full scan and look for the iteration of previous errors.

4. Uninstall suspicious programs

Certain programs can be identified as Possibly Unwanted Software and that can lead to mentioned errors. If the issue started after a certain program was installed, we advise you to uninstall it.

Moreover, some of the registry files can be placed in Preliminary Scan Results and checked out as possible malware. You should create an exclusion for those files.


The list is now complete. Have in mind that some of the upcoming security updates may resolve this issue. If you have any questions or additional solutions, please tell us in the comments.

[wl_navigator]