Pokemon Home Error Code 400: How to Fix it

If you encounter Pokemon Home error code 400, you won’t be able to trade or move Pokemon, and in some instances, you won’t be able to start the app.

This is a problem if you rely heavily on the app, so in this guide, we’ll explore several ways you can use to fix this problem so let’s get started.

What is Error Code 400?

  • This error message occurs due to issues with your network connection.
  • Cache issues or corrupted installation can also cause this problem to occur.

How do I fix Pokemon Home error code 400?

1. Switch to mobile connection

  1. Open the top menu on your phone and turn off Wi-Fi.
  2. Next, enable Mobile data.
  3. Try to start the app again.

2. Clear the app cache

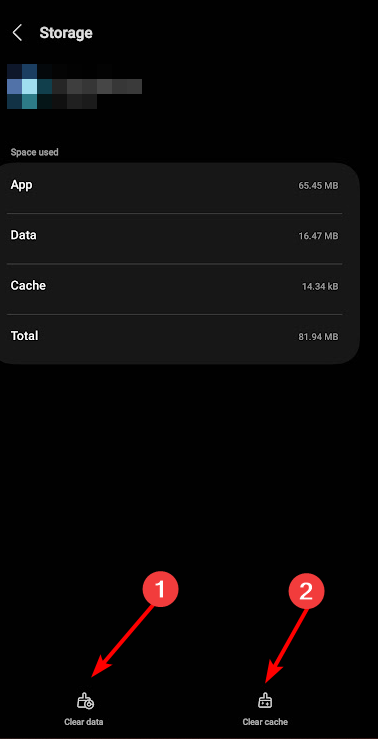
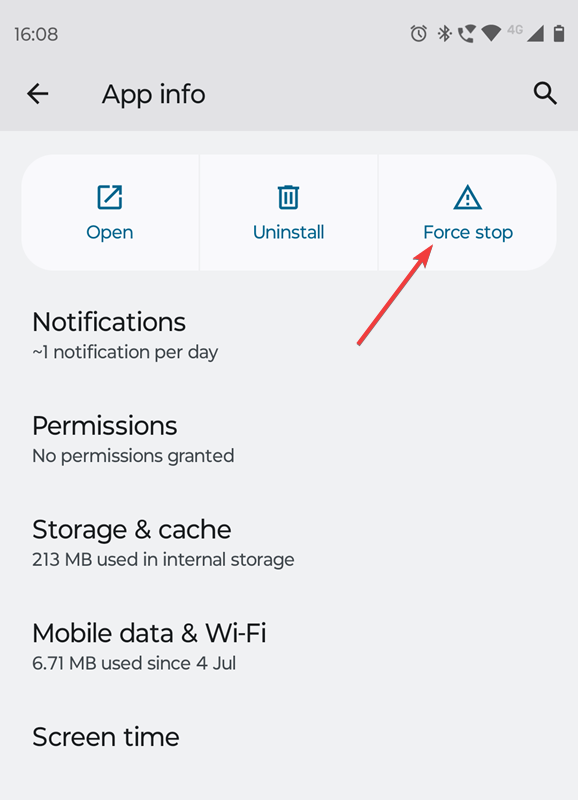
  1. Tap and hold the Pokemon Home icon. Select App info.
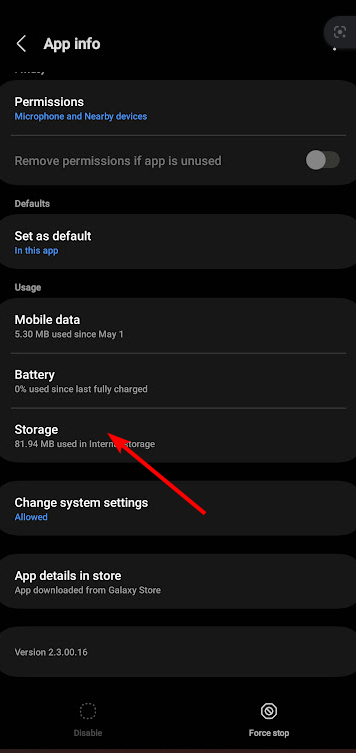
  2. Next, head to Storage.
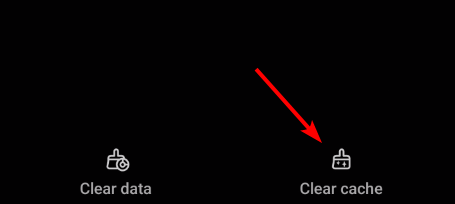
  3. After that, tap on Clear cache and check if the problem is gone.
  4. If not, repeat the same steps but this time choose Clear data.
  5. Tap on Delete to confirm.

Clearing the app data can help you fix other Pokemon game issues on Android, like error code 10104 on Pokemon Masters; read this guide to learn more.

3. Reinstall the app

  1. Press and hold the Pokemon Home icon.
  2. Choose Uninstall.
  3. When the confirmation dialog appears, tap OK.
  4. Search for Pokemon Home.
     
  5. Tap on Install next to Pokemon Home and wait for the app to install.
  6. Once installed, start it again and check if it works.

Pokemon Home communication error code 400 is a simple problem that can appear on your Android device, but it can be fixed by clearing the cache or by reinstalling the app. A server issue can also throw error 504 but it’s nothing you can’t handle.

If you’re a fan of Pokemon, did you know you can play Pokemon Go on Windows? If you prefer different kinds of games, you can also play online Pokemon games.

In case you experience any problems, we have a great guide that can help you fix Pokemon Showdown if it’s not working. If you’re a fan of TCG, then our guide on Pokemon TCG Live error 10099 should help you fix problems with the game.

For broader troubleshooting beyond specific error codes, see our Pokémon TCG Not Working guide.

Before you leave, check out our latest guide on Pokemon HOME error code 10015 for more information.

Did you fix this error on your own? If you have found a different solution, feel free to share it with us in the comments.

Fix: We Can’t Verify Your Email Now Hulu Error

When Hulu is unable to verify the email address associated with your account, you’ll get a We can’t verify email now error message at the login phase.

It can be frustrating but once you verify your credentials, everything should return to normalcy. However, if that doesn’t do it, we have more tricks up our sleeves.

Why does Hulu keep saying we can’t verify your email now?

If you’ve been using an old or invalid email address or entered the wrong login credentials, Hulu may be unable to verify your identity.

In addition, if you’re trying to sign up from a geo-restricted location, you may also encounter this error. And if you try to verify too many times, your account may be blocked.

How do I fix the We can’t verify your email now Hulu error?

Check off the following basic troubleshooting steps first:

  • Double-check that you’re entering the correct email address and ensure there are no typos or strange characters.
  • Ensure your internet speeds are optimal, then switch from a wireless connection to a wired one.
  • Ensure your Hulu app is up-to-date as well your browser if on the web version.
  • Verify the server status of Hulu for any outages or downtimes.
  • Ensure you’ve not exceeded the maximum device limit.

1. Reset your password

You can force Hulu to verify your email by clicking the Forgot password option on the login page to force a password reset. This will prompt a verification code to be sent to your email.

Verify your email by clicking on the link Hulu sent you. If you don’t see this email, check your spam folder, enter the verification code, and follow the prompts to regain access to your account. If possible, try logging in from another device or browser.

2. Resolve Internet connection errors

Login issues are sometimes related to Hulu’s network error, so you first need to ensure you have a stable internet connection to have a seamless login process. You can start by power cycling your router, updating your network card drivers, and resetting your connection.

Also, ensure the home network registered on your account matches your connection otherwise, you’ll get the Hulu is unable to verify your home location error, and you’ll be locked out of your account.

If your connection is okay, perhaps the is Hulu app not working due to server issues, and you’ll have to wait for that to be fixed first.

3. Use a VPN

  1. Press the Windows key + I.
  2. Next, navigate to Network & internet in the left menu and click on VPN in the right pane.
     
  3. Click on Add VPN to start the manual setup.
  4. Enter your VPN settings, such as encryption type, server IP address, and other connection options, and click on Save.

You can accomplish this task with a professional VPN solution. For instance, ExpressVPN is much more secure and efficient than the Windows native solution.

This software offers numerous servers located in 105 countries, and you can always find one that will suit your needs and continue to watch Hulu unhinged.

⇒ Get ExpressVPN Here

4. Clear browser cache

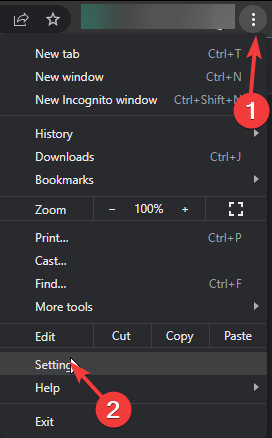
  1. Click the three horizontal dots and select Settings.Settings CHrome
  2. Launch your browser, and for this step, we shall be using Google Chrome.
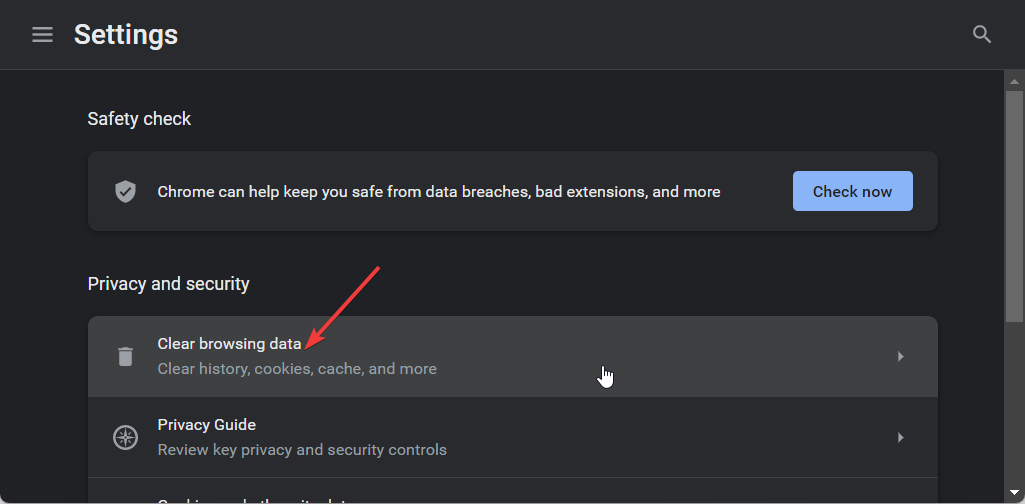
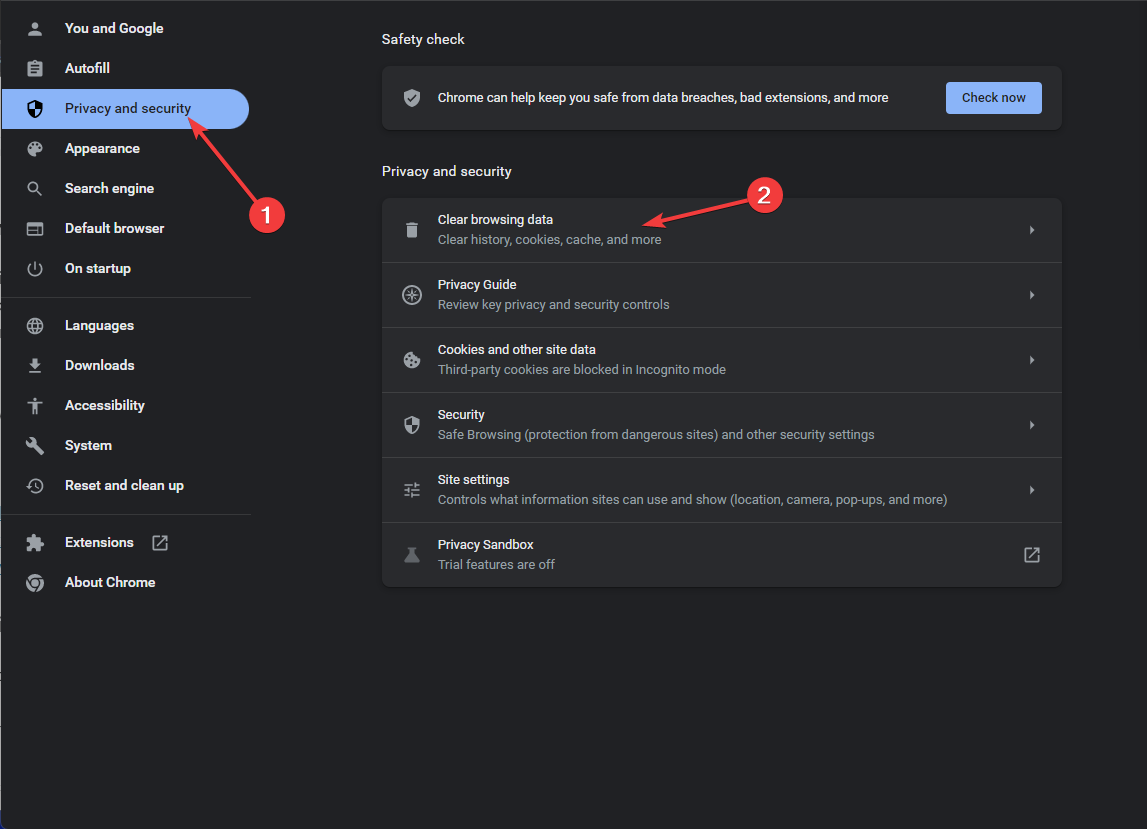
  3. Go to Privacy and security and click Clear browsing data.
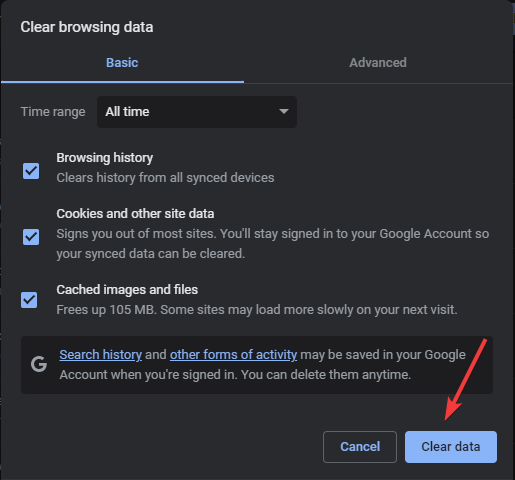
  4. Select Browsing history, Cookies and other site data, & Cached images and files, then click Clear data.

If you’re using other streaming devices like your Android phone, proceed to clear the cache as well.

5. Remove devices from your Hulu account

  1. Launch the Hulu app on another logged-in device if available.
  2. Navigate to Your Account>Watch Hulu on Your Devices>Manage Devices.
  3. In the pop-up screen that appears, select your device and click Remove. Repeat this step until you only remain with the current device you’re on.

Removing connected devices can help you fix the issue, especially if you’re getting We encountered an error when switching profiles on Hulu message.

6. Contact customer support

If all else fails, contact customer support via phone or online chat and let them know about the issue so they can help fix the problem for you.

You may not be able to verify your email address because it has been compromised, shared with others who are not authorized users on your account, or you just don’t remember the original email used to sign up.

Hulu may be able to help you with your account recovery, especially if your payment method for your subscription is via a third-party service.

Hopefully, this article gives you some ideas on how to fix Hulu’s email verification problem. Let us know in the comments if any of these work or if there are other methods you’ve used to fix this error.

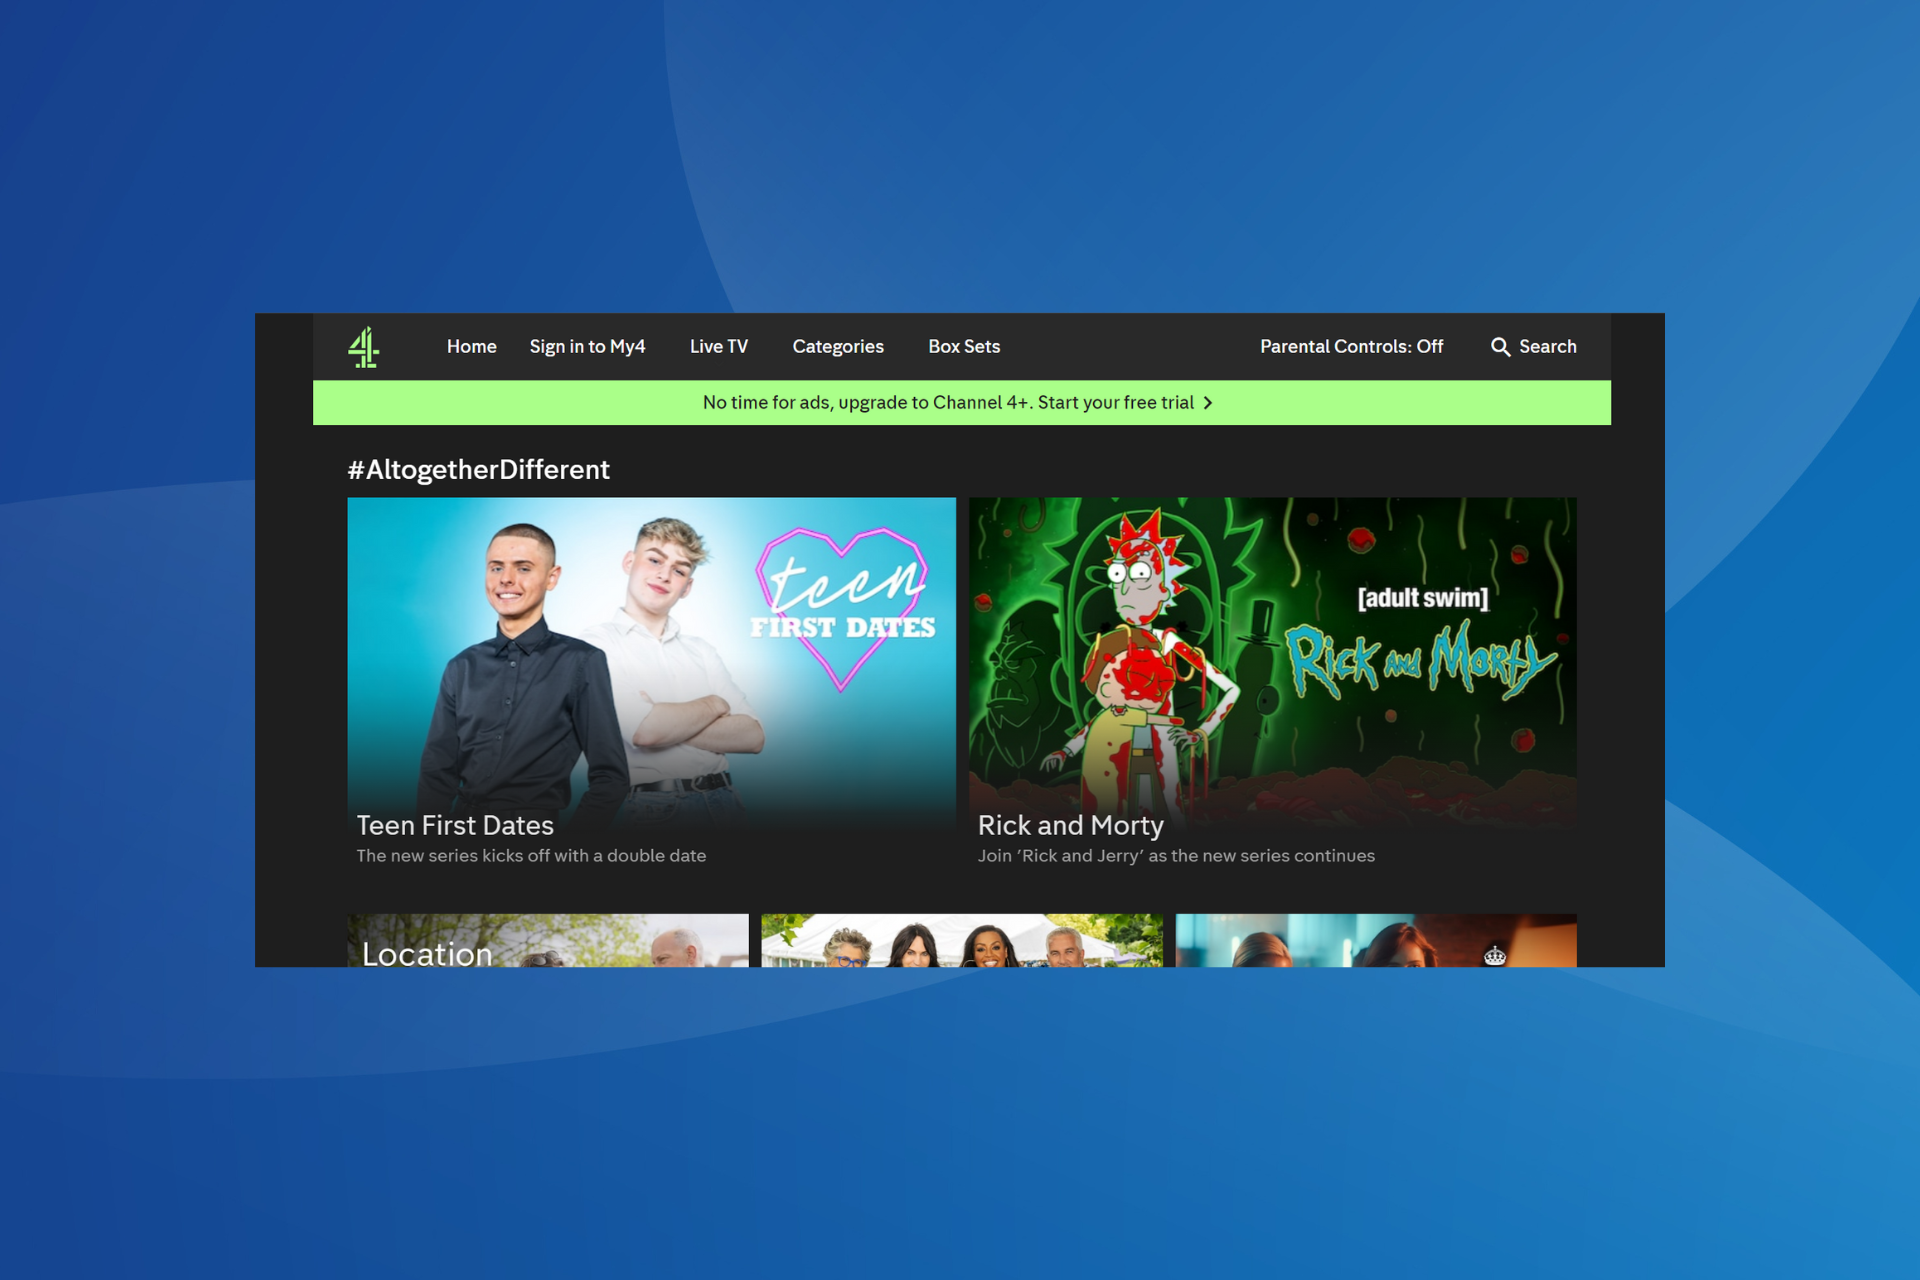
Solved: 4401-Network-File Error on Channel 4

If you’re trying to watch Channel 4, but receive the 4401-network-file error, keep reading. We’ll help you sort it out.

The Channel 4 error highlights the app’s inability to connect with the servers and playback the requested content. Find below what you can do to get it fixed.

How do I fix Channel 4’s (All 4) 4401-network-file error?

Start by rebooting your device and verifying your internet connection. Also, make sure the Channel 4 servers are up and running. You could use Downdetector for that.

If none work, head to the fixes listed next.

Note icon NOTE
The steps listed here are for Amazon Fire TV, though the idea remains the same across streaming devices. If you use another one, follow the equivalent steps, and things should be up and running.

1. Use a VPN

  1. Download and install a reliable VPN with servers in the UK. Our top choice here is ExpressVPN because it’s fast, reliable and has great local coverage.installing expressvpn
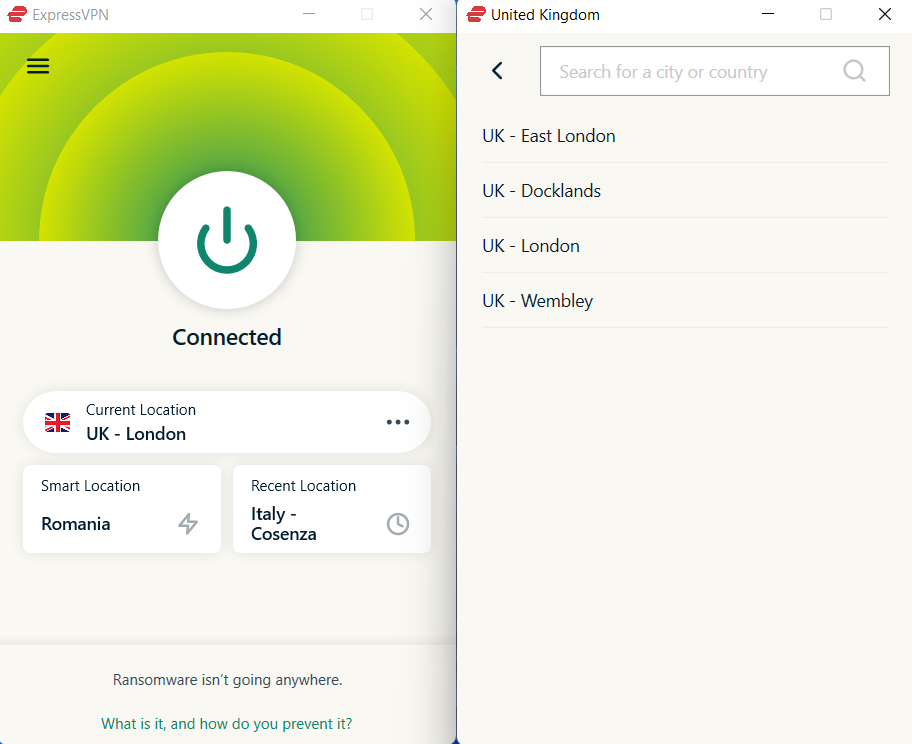
  2. Open the app, and click on the ellipsis to open the server list.
  3. Locate the United Kingdom, pick a city, and connect
  1. Once the connection is up and running, go back to channel 4 and try again.
    ExpressVPN

    ExpressVPN

    Don’t let errors interrupt you from watching Channel 4 with this powerful VPN solution.
    Free Trial Visit Website

    2. Clear the app data

    1. Open the streaming device, go to Settings, and select Applications.application
    2. Now, choose Manage Installed Applications.manage installed applications
    3. Scroll down and select Channel 4 from the list.
    4. Finally, choose Clear data and then Clear cache to delete all the app files. If prompted with a confirmation box, choose the appropriate response.clear data to fix channel 4 4401-network-file

    3. Reinstall the app

    1. On the streaming service, go to Settings, and select Applications.
    2. Select Manage Installed Applications.manage installed applications
    3. Locate and choose Channel 4 from the list.
    4. Now, select Uninstall.uninstall to fix channel 4 4401-network-file
    5. Finally, choose Confirm to start the process.
    6. Once the app is uninstalled, download Channel 4 again from the app store.

    4. Access Channel 4 through the official website

    When you get the Channel 4 error 4401, the problem could be limited to the smart device. In most cases, when this happened, the official Channel 4 website worked fine. So, connect to it and watch your favourite shows!

    Besides, you could use a mobile device, an iPad, or a PC. Try out the different options until one works! 

    5. Contact Channel 4 support

    If nothing else works, you can always contact Channel 4 support. The team will inform you of any server outages or similar issues triggering the playback error. 

    And if it indeed is a problem at their end, wait for a while. Things like these are usually fixed within hours, or at a max, a day.

    One of these solutions will surely fix the Channel 4 4401-network-file error. Besides, if it’s a network connection to blame, it’s best that you contact the Internet service provider for a resolution.

    In the unlikely scenario that it turns out to be a geo-restriction error, you can look at our solutions to watch Channel 4 worldwide!

    For any queries or to share what worked for you, drop a comment below.

    Hulu Webpage Not Available: How to Fix This Error

    If you ever find yourself on the Hulu website and get the This webpage isn’t available error, below are a few ways to avoid this issue.

    In addition, we offer tips to reduce the chances of such errors occurring in the future so that you can get the most out of this streaming app.

    Why is Hulu saying the web page is not available?

    If the website gets too much traffic at once or there is a server-related problem, you may get this error. Your internet service provider might also be experiencing issues with their servers or network infrastructure, causing your connection to be unstable and unable to load websites properly.

    How do I fix the Hulu webpage not available error?

    Start with the following basic troubleshooting steps:

    • Check your internet connection speeds for any instability and switch to an Ethernet cable where applicable.
    • Check Hulu’s website status for maintenance or temporary outages.
    • Close all open browser windows, then refresh your browser or restart it.
    • If you don’t see any improvement, try updating your Hulu app or browser.
    • Switch to incognito mode, another browser, computer, or device and see if that helps resolve the problem.
    • Disconnect other devices from your connection that may be hogging the bandwidth and power cycle your router.

    1. Clear cache

    1.1 Android app cache

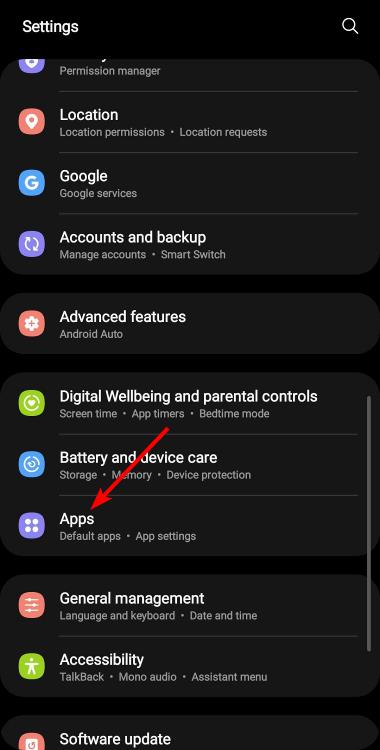
    1. Tap on settings on your phone.
    2. Next, tap on Apps.
    3. Find the Hulu app and tap on it.
    4. Scroll down and select Storage.
    5. Tap on Clear data and Clear cache, then try again.

    1.2 Android TV cache

    1. On your TV, find your Settings.
    2. Go to Apps and select Hulu.
    3. Scroll down and hit Clear data and Clear cache.

    1.3 Browser cache

    1. Click the three horizontal dots and select Settings.Settings CHrome
    2. Launch your browser, and for this step, we shall be using Google Chrome.
    3. Go to Privacy and security and click Clear browsing data.
    4. Select Browsing history, Cookies and other site data, & Cached images and files, then click Clear data.

    2. Deactivate and reactivate your device on the account

    1. Launch the Hulu app.
    2. Navigate to Your Account>Watch Hulu on Your Devices>Manage Devices.
    3. In the pop-up screen that appears, select your device and click Remove.
    4. Next, repeat steps 1-2, click on Add device then wait for a unique code to reactivate it.

    3. Update your TV’s firmware

    1. For this solution, we shall be using the TCL model.
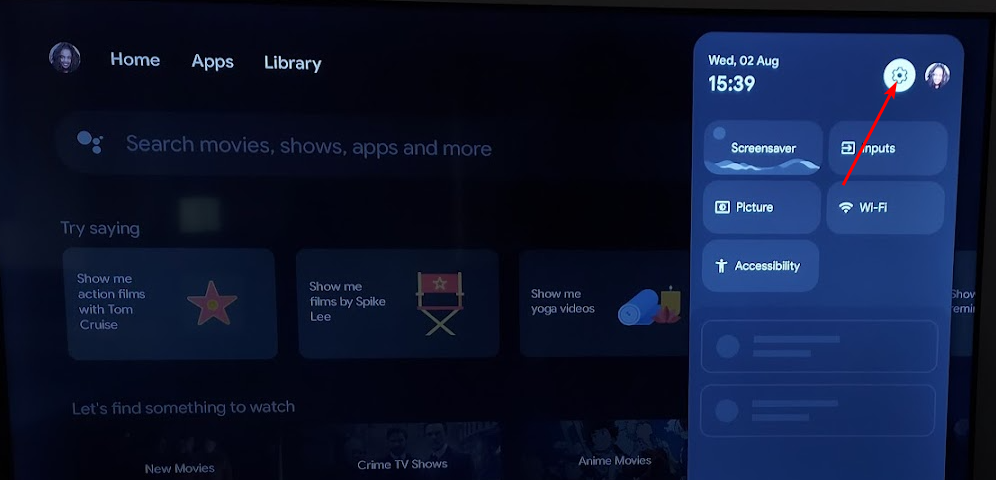
    2. On your TV, find your Settings.
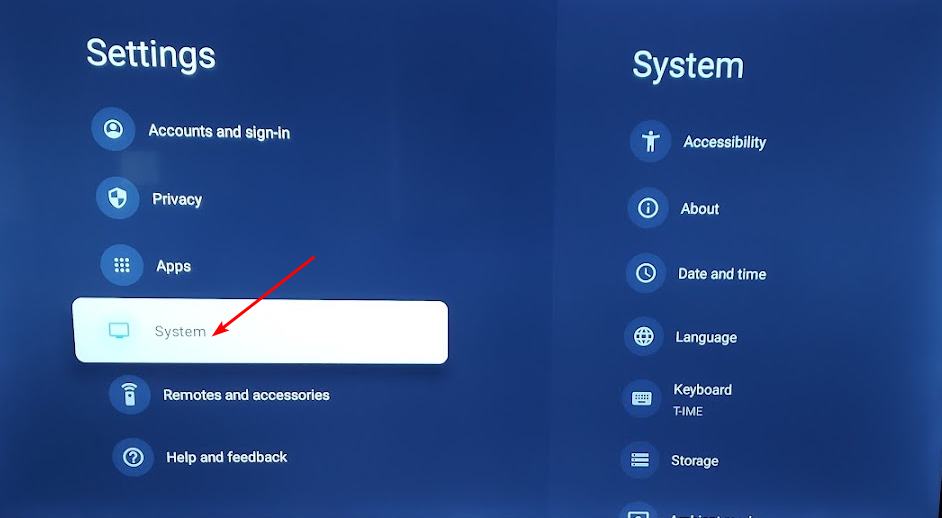
    3. Go to System.
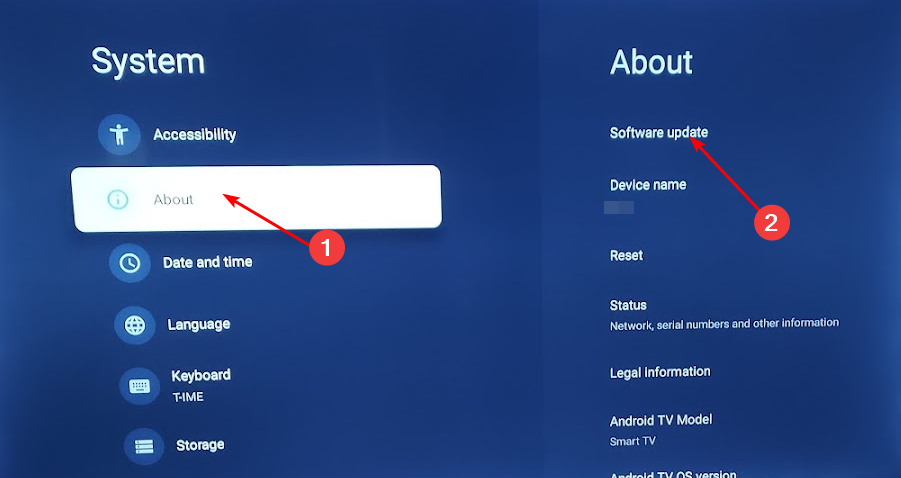
    4. Click on About then select Software update.
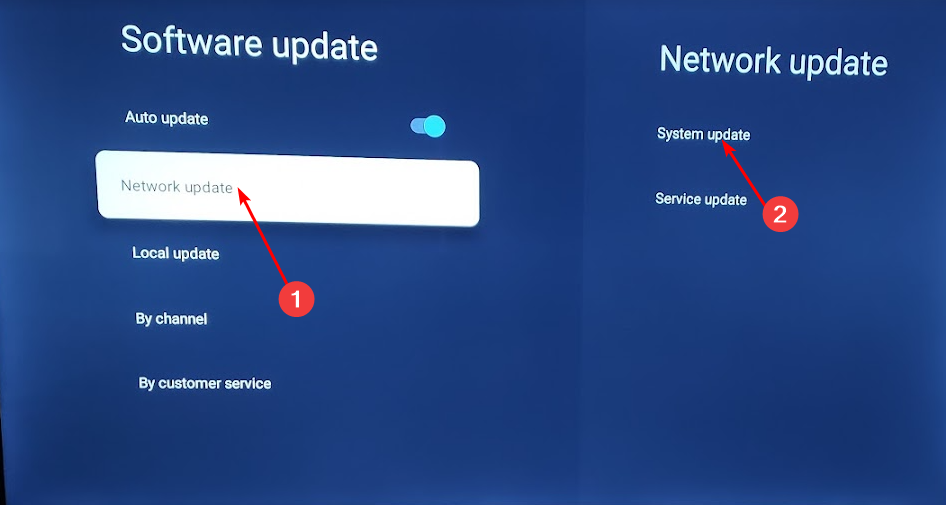
    5. Select Network update and click on System update.
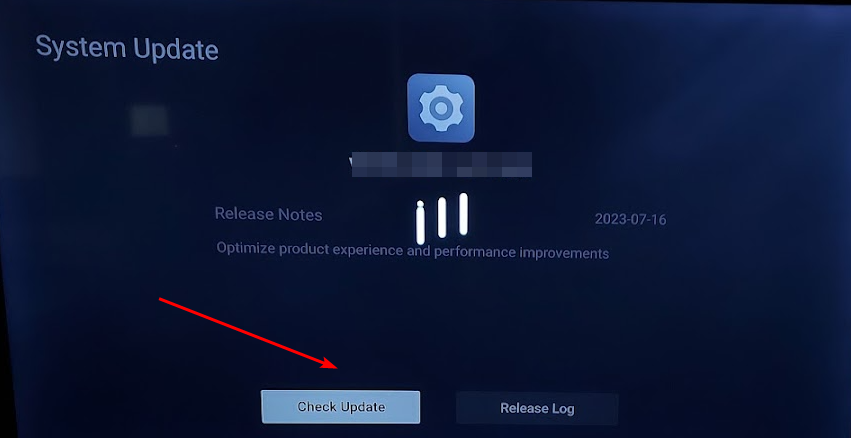
    6. Now click on Check Update. Your system will scan for any available updates.
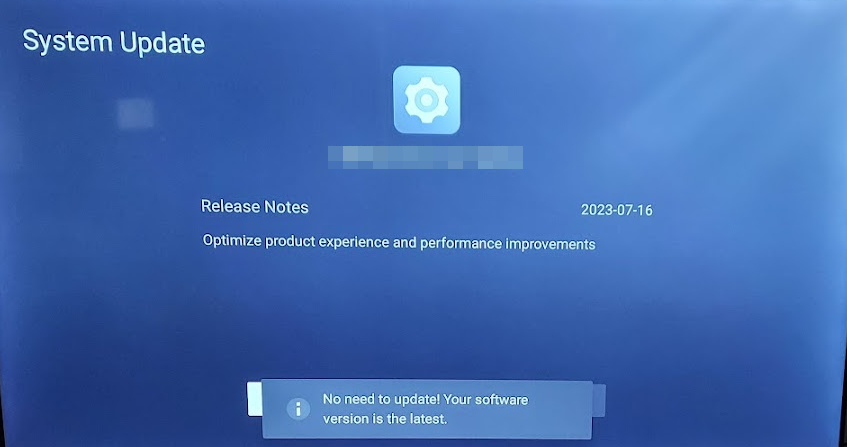
    7. You’ll either start downloading updates or get a message that your TV is already up to date.

    4. Temporarily disable your firewall

    1. Hit the Start menu icon, type Windows Security in the search bar and click Open.
    2. Click on Firewall & network protection, then select Public network.league of legends black screen after champion select
    3. Locate Microsoft Defender Firewall and toggle the off button.turning off Microsoft Defender Firewall Windows

    If you’re getting the webpage not available on Hulu because your firewall is blocking it, you may want to allow the app or browser as an exception to prevent such errors.

    5. Disable browser extensions

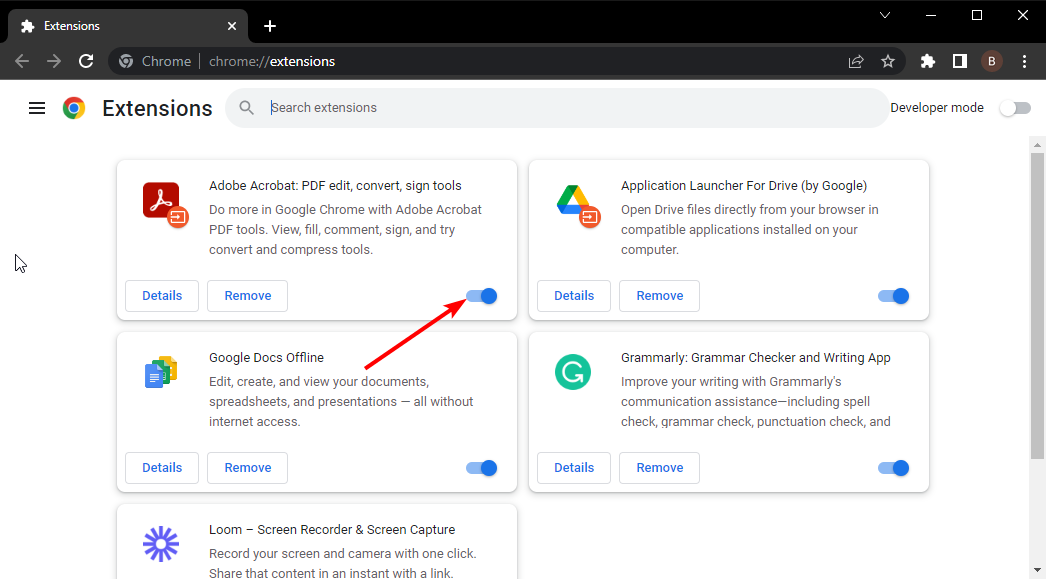
    1. Launch your Chrome browser, and in a new tab, enter the following address:chrome://extensions/
    2. Peruse through your extensions and toggle the Disable button for any suspicious-looking ones.
    3. Repeat this step until you find the culprit.

    6. Enable/Disable your VPN 

    1. Press the Windows key and select Settings.settings windows 11
    2. Next, select Network & internet and click on VPN in the right-side menu.
    3. Select the VPN connection you want to disable, click on the drop-down and select Remove.remove VPN

    Depending on your location, you may have to use a VPN because Hulu is unavailable in certain countries.

    7. Disable your Proxy 

    1. Press the Start Menu icon and select Settings.settings windows 11
    2. Click on Network & Internet on the left pane, then scroll down and click Proxy on the right pane.Network proxy settings
    3. Select Edit next to Use a proxy server option in the Manual proxy setup section, toggle off Use a proxy server and click on Save.Disable proxy server

    What are some preventative measures to reduce such future errors?

    • Check your settings menu regularly – Some firewalls and antiviruses, when updated, can block sites like Hulu, and cause connectivity issues. Other settings include checking the proxy settings, sometimes left on by accident when using a public network.
    • Ensure you have adequate Internet speeds for streaming – Streaming content can be frustrating if your Internet connection isn’t good enough. If you’ve set bandwidth limits, try to reduce the quality of the stream to reduce the occurrence of Hulu network errors.
    • Use a reliable ISP – Your internet provider plays a significant role in your connection because it influences the quality of your connection. If they are experiencing any issues with their service frequently, this could cause an interruption in your ability to connect with Hulu.
    • Update your software regularly – Keep your Hulu app, browser, phone OS, and Windows updated as soon as updates are available to avoid Hulu playback errors.
    • Use the app instead of browsers – While streaming browsers are exciting, especially for people with low storage issues, not every site will work perfectly.

    So there you have it. Another handy tutorial. Hopefully, the next time this happens, you won’t get so frustrated.

    Have you used any of the solutions above and were successful? We’d love your feedback so drop us a comment below.

    Solved: Sky On Demand is Not Working

    If you are experiencing issues while watching your favorite shows on Sky on Demand, or if the device is not working at all, this guide can help!

    We will discuss the common reasons and explore practical solutions to fix the issue so you can watch your favorite content without interruption.

    Why is Sky on Demand not working?

    • Weak internet connection.
    • The Sky Box software doesn’t match the hardware version.
    • The content you want to watch doesn’t come under your subscription.

    How do I fix the Sky on Demand not working issue?

    Before proceeding with any steps to get rid of the Sky on Demand error messages, go through the following preliminary checks:

    • Ensure all the cables are correctly connected.
    • Remove the router from the power source, plug out all the cables, wait for a few minutes, and then plug your internet router into a power outlet to power cycle it. This step can also avoid other standard connection issues like Sky Go error code 4253024421.
    • Verify if you have an active subscription to Sky on Demand services.
    • Check the expiration date for the on-demand content before trying anything else.

    1. Reboot the Sky box

    1. Press the Standby button on your Sky remote and hold it. Don’t let go of it until the command light turns on and starts flashing.Press the Standby button - Sky On Demand is Not Working
    2. Wait for a few seconds, and the red light will appear. Remove the ethernet cable, then plug it back in.
    3. Now press the Sky button on the remote control.
    4. Again, wait a few minutes, then turn it back on. Soon, the green light will appear on the box, indicating that the device is working.

    Rebooting the Sky Q and Mini device can help you fix the error code MR106 issue; read this to learn more about it.

    2. Update the software version

    1. Press the Home button on the Sky remote.Press the Home button on the Sky remote -Sky On Demand is Not Working
    2. Click Settings, then System Info.
    3. Note down the Hardware and Software version. Go to the Sky hardware and software versions website to check the latest version. Ensure the software version matches the hardware version.

    If they don’t match, you need to update the software; follow these steps to do so:

    1. Again, go to Settings, then System Info.
    2. Locate the Software version, then select Setup.Software version - Sky On Demand is Not Working
    3. Choose Software Download to initiate the downloading process.Update software Sky On Demand is Not Working
    4. You will get the Software update in progress message; don’t turn off your Sky box. Once it is downloaded, press the Standby button on the Sky remote to turn off the box.
    5. Once the Sky box restarts, wait for the on-screen instructions to disappear, press the Home button on the remote control, go to Settings, and then System Info to check the version.

    3. Check the network connection

    1. Press the Home button on your Sky remote control.Press the Home button on the Sky remote - Sky On Demand is Not Working
    2. Go to Settings, then select Status.
    3. Next, click Network connection, then select Network setup.
    4. Ensure the Connection to broadband router and Connection to internet options are selected.Connection to broadband router and Connection to internet options  - Sky On Demand is Not Working

    You can also press the WPS button on your router to reset it and ensure you don’t have problems like Sky Go is unable to load configuration due to weak internet connectivity.

    4. Pause and resume the download

    1. Press the Home button on your Sky remote control.Press the Home button on the Sky remote - Sky On Demand is Not Working
    2. Go to Recordings and select Manage.
    3. Click Downloading, and select Pause queue.
    4. Now, to resume downloading the content, click Resume queue.

    5. Reset settings on the Sky box

    1. Press the Home button on your Sky remote.
    2. Navigate to Settings, but don’t select it; press 0,0,1 on your remote, then press Select.
    3. Choose Reset, then click Reset settings, then select Confirm.Reset - Reset Settings - Sky On Demand is Not Working
    4. Wait for the on-screen instructions to disappear, and press the Standby button to complete.

    If none of the troubleshooting tricks worked for you, you should contact Sky Box customer support for further help.

    You must have a stable internet connection and the appropriate subscription plan to ensure you don’t encounter issues while using Sky on Demand.

    If you are using Sky broadband and want to prevent internet service providers from blocking IPTV, use a VPN; for more solutions, read this guide.

    If you have any questions or suggestions about the subject, please mention them in the comments section below.

    Fix: Not Registered on Network Error

    While Vodafone remains one of the popular international operators, issues like Not registered on network can render the device unusable from the mobile network’s point of view. You won’t be able to make calls, send or receive texts, or access mobile data.

    The error message appears when making calls and is usually encountered on an Android device, commonly the Samsung Galaxy series. It may appear due to a problem at your end or a network issue.  

    Why does my Vodafone number say Not registered on network?

    When your Vodafone sim says Not registered on network, you could be in a different country and have to manually select the operator. In the case of roaming, you must enable the functionality and be on a supported plan.

    Misconfigured network settings are known to commonly trigger the error. We also saw cases where a blocked IMEI number resulted in the message. Besides, we can never rule out hardware issues, especially with the SIM tray.

    How do I fix the Not registered on network error on my phone?

    Before we start with the slightly complex solutions, try these quick ones first:

    • Turn the Airplane Mode on, wait for 30 seconds, and then turn it off. 
    • Restart the mobile phone. Also, take out the SIM card, wipe it, and then put it back in. While doing so, blow gently into the SIM slot to clear any dust accumulation.
    • Check for pending software updates and install them.
    • Change the network type in mobile settings. If you are on 5G, switch to 4G or 3G. 
    • Connect the SIM card to another phone and verify whether it works. If it does, the problem lies with the earlier device. In case it doesn’t, the SIM or network provider is at fault.

    If none work, head to the fixes listed next.

    1. Enable Roaming services

    1. Open the Settings on your Android mobile phone, and go to Connections.connections
    2. Tap on Mobile networks.mobile networks to fix vodafone not registered on network
    3. Enable the toggle for Data roaming.enable roaming

    If you are getting Vodafone Not registered on network error while roaming, make sure a relevant pack that supports roaming services is activated and your network provider’s account has sufficient balance.

    Besides, it’s important that Vodafone has partnered with a local network carrier to deliver calling, data, and text services. Verify this through the support team.

    2. Clear the SIM toolkit cache

    1. Launch Settings, scroll down, and tap on Apps.apps
    2. Locate and select SIM toolkit.
    3. Tap on Storage.storage
    4. First, tap on Clear data and then on Clear cache.clear cache to fix vodafone not registered on network
    5. Once done, restart your Android device and check for improvements.  

    3. Manually select the network operator

    1. Open your Android Settings, and select Connections.connections
    2. Tap on Mobile networks.
    3.  Choose Network operators.network operators
    4. Now, tap on Select manually and wait for the device to scan for all available networks.select manually to fix vodafone not registered on network
    5. Once it presents the list, select another network.
    6. If the problem remains unresolved, select another entry from the list. You may have to repeat it a few times until the correct carrier is selected.

    4. Reset the network settings

    1. In your phone Settings, go to General management.general management
    2. Tap on Reset.
    3. Select Reset network settings.reset network settings to fix vodafone not registered on network
    4. Now, tap on Reset settings to confirm the change.

    When the network settings are misconfigured, a reset becomes imperative to fix the SIM card Not registered on network error in Vodafone. This also helps with Vodafone SMS Error 69.

    5. Check for a blocked IMEI number

    Often, when you buy an old phone, there’s a chance that the IMEI number is blocked. This is especially true for devices that were stolen. Also, network operators may block devices with unpaid bills.

    To check for a blocked IMEI number, dial *#06#, and if it shows anything other than listing the IMEI number(s), there’s some misconfiguration or issue. And it’s best that you contact the phone manufacturer. Some websites also help verify IMEI blocking, so you may use one.

    6. Check the APN settings

    1. Open the Android phone’s Settings, and go to Connections.connections
    2. Tap on Mobile networks.
    3. Select Access Point Names.access point names
    4. Choose the currently configured APN.APN
    5. Verify that the details listed here are correct. If you are unsure, cross-check the APN settings with another device on the same network operator or check the web.
    6. In case this doesn’t work, go back to the previous screen, tap on the ellipsis (three-dot icon) near the top right, and select Reset to default.reset to default to fix vodafone not registered on network 

    APN or Access Point Names are critical from the network connection point of view, and issues with these can trigger the Vodafone Not registered on network error. Reconfiguring the APN settings also helps when IPTV is not working.

    7. Contact Vodafone support

    When nothing else works, the last option is to contact Vodafone support to solve the network error. In India, you can contact Vodafone Idea through the MyVI website.

    Whether it’s a damaged SIM card or issues at the network carrier’s end, only the support team will be able to help. Often, replacing the SIM did the trick for users!

    For anyone wondering how to fix the Not registered on network error in Vodafone or any other network, the troubleshooting remains pretty much the same. Check for roaming packs, manually select the carrier, or verify whether the IMEI number is blocked.

    If you believe in the idea of unhindered Internet access and have a VPN running, find out whether VPNs can mess up your phone. There’s a lot to learn!

    For any queries or to share which solution worked for you, drop a comment below.

    Solved: LG TV Keeps Switching Inputs

    If your LG TV keeps switching inputs when watching your favorite shows or movies, it can spoil the viewing experience.

    In this guide, we will discuss the common reasons for the issue and delve into effective solutions to fix the problem in no time.

    Why does my LG TV keep switching inputs by itself?

    • Auto Input Detection feature is enabled.
    • App cache or glitch in an app.
    • The Quick Start mode is enabled.
    • Faulty hardware.

    How do I fix the LG TV keeps switching inputs by itself issue?

    Before proceeding with any detailed steps to fix the switching inputs issue on LG TV, go through the following preliminary checks:

    • If you experience this issue after power fluctuation, use a power surge protector and move the wireless infrared devices away from the television.
    • Check the HDMI cables for damage and replace them if needed. Also, ensure all the cables are correctly connected.
    • If multiple devices are connected to your TV, try placing the remotes in different locations or use a universal remote instead.
    • Ensure the batteries of your remote are working; remove them from the remote and clean them just to be sure.

    1. Power Cycle your TV

    1. Unplug the power cable of your TV and the power outlet.
    2. Press & hold the Power button on your TV for 15-20 seconds.
    3. Wait for a minute, then plug the power cable into your television and power outlet and let your TV start.

    2. Disable the Auto Device Detection feature

    1. From the home screen of your TV, look for the Settings option, then click it.
    2. Select Connections.
    3. Click Device Connection Settings, and click OK.Click Device Connection, and -LG TV Keeps Switching Inputs
    4. Locate Auto Device Detection and disable it.Auto Detection - LG TV Keeps Switching Inputs
    5. Restart your TV.

    3. Turn off Quick Start mode

    1. Press the Settings button on your remote control to get the on-screen options.
    2. Select General.General section and look for Quick Start+.
    3. Go to the Additional Settings section and look for Quick Start+.Quick Start+. LG TV Keeps Switching Inputs
    4. Click on the toggle to turn Quick Start+ off.
    5. Reboot your television.

    4. Turn off the Consumer Electronic Control (CEC) option

    1. From the home screen of your TV, look for the Settings option, then click it.
    2. Select Connections.
    3. Click Device Connection Settings, and click OK.Click Device Connection, and -LG TV Keeps Switching Inputs
    4. Locate SIMPLINK (HDMI-CEC) and turn it off.click OK. Locate SIMPLINK (HDMI-CEC) and turn it off
    5. Restart your TV.

    5. Delete the app cache

    1. Press the Home button on your remote control and select Settings.Home button  - LG TV Keeps Switching Inputs
    2. Select Apps from the list.
    3. Choose Application Manager.
    4. Click the program that got input pop-ups, and press on the Storage option.
    5. Click Clear cache.

    If there is more than one app getting the pop-up, repeat the same steps for them to clear the cache. Remember, deleting the cache will remove your app data, therefore, you need to sign in again, so keep your credentials handy. You can also try reinstalling the problematic apps to clear the air.

    6. Update your TV software

    1. Make sure your TV is connected to the internet via Wi-Fi or the ethernet cable. Press the Settings button on your remote.LG TV Keeps Switching Inputs
    2. Go to the All Settings option.
    3. Select General, then select About this TV.
    4. Click Check for Updates, and if an update is available, click Download and Install.Download and install - LG TV Keeps Switching Inputs
    5. Click Install.

    If you want the software updates installed automatically, ensure you have the Auto Update feature turned on.

    7. Reset your TV to factory settings

    1. Press the Settings button on your remote.
    2. Go to the All Settings option.
    3. Choose General, then select Reset to Initial Settings.Choose Support, then select Reset to Initial Settings. - LG TV Keeps Switching Inputs
    4. Click OK.
    5. Restart your TV.

    Remember, this should be the last resort to fix the issue, as it will remove all the apps and customization you made and return your television to the state when you bought it.

    If nothing worked for you and your LG TV is switching inputs again, the issue could be related to faulty hardware; you have to contact LG customer support and tell them about the issue & steps you have taken to fix it for further help.

    Watching an important football match and can’t afford to spend time on troubleshooting, watch it on your Windows computer; read this guide to learn how.

    If you have any questions or suggestions about the subject, feel free to mention them in the comments section below.

    Solved: PS5 is Blinking Orange

    Although the blinking orange light on PS5 is a normal consequence, it has prevented some users from powering on their console.

    We experienced this issue in our WindowsReport gaming lab. A blinking orange light means that your console is entering the rest mode. Once it enters the standby mode it should change to solid orange.

    What can I do if my PS5 won’t stop flashing orange?

    1. Wait it out

    1. Your console is probably entering rest mode.
    2. It’s possible that the update process is occurring in rest mode.
    3. Try waiting for an hour or so and check if the flashing stops.

    2. Perform a power cycle

    1. Press and hold the Power button on the console for 30 seconds.
    2. Release the button and then press it again.
    3. Your console should now start properly.

    3. Disconnect the console from the power source

    1. Disconnect all the cables from the console. Next, disconnect the PS5 from the power outlet.
    2. Leave it like that for a few minutes.
    3. Connect the console again and try to power it on with the Power button.
    4. If the issue persists, try using a different power cord.

    What happens if you unplug PS5 while blinking?

    According to Sony, if you disconnect the power cable while the console light is blinking, you might cause file loss or in the worst case damage your console.

    In practice, it’s unlikely that anything will happen if you unplug your console, however, you should refrain from doing that.

    Power indicator lights on PlayStation 5

    No lightYour console is turned off
    Blue light that changes to whiteThe console is powering on
    Solid whiteThe console is powered on and working normally
    Blinking orangePS5 is entering rest mode
    Solid orangeThe console has entered rest mode
    Blinking white and then turns offThis indicates the console powering off
    Blinking white, solid blue, or blinking blueConsole error
    Pulsing red lightThe PS5 console is overheating

    If you’re concerned that your PS5 is flashing orange, you should know that this is harmless since the device is entering rest mode. However, if your console is stuck, don’t hesitate to try some of our solutions.

    If you’re unable to wake up the console, you might want to check the battery level on PS5 controller or reset your PS5 controller to default.

    Speaking of issues, many encountered System update something went wrong error on PS5 but we tackled that in a separate guide.

    How did you fix this issue on your PS5? Share your findings with us in the comments section.

    How to Fix Router Init Failed on Altice One Routers

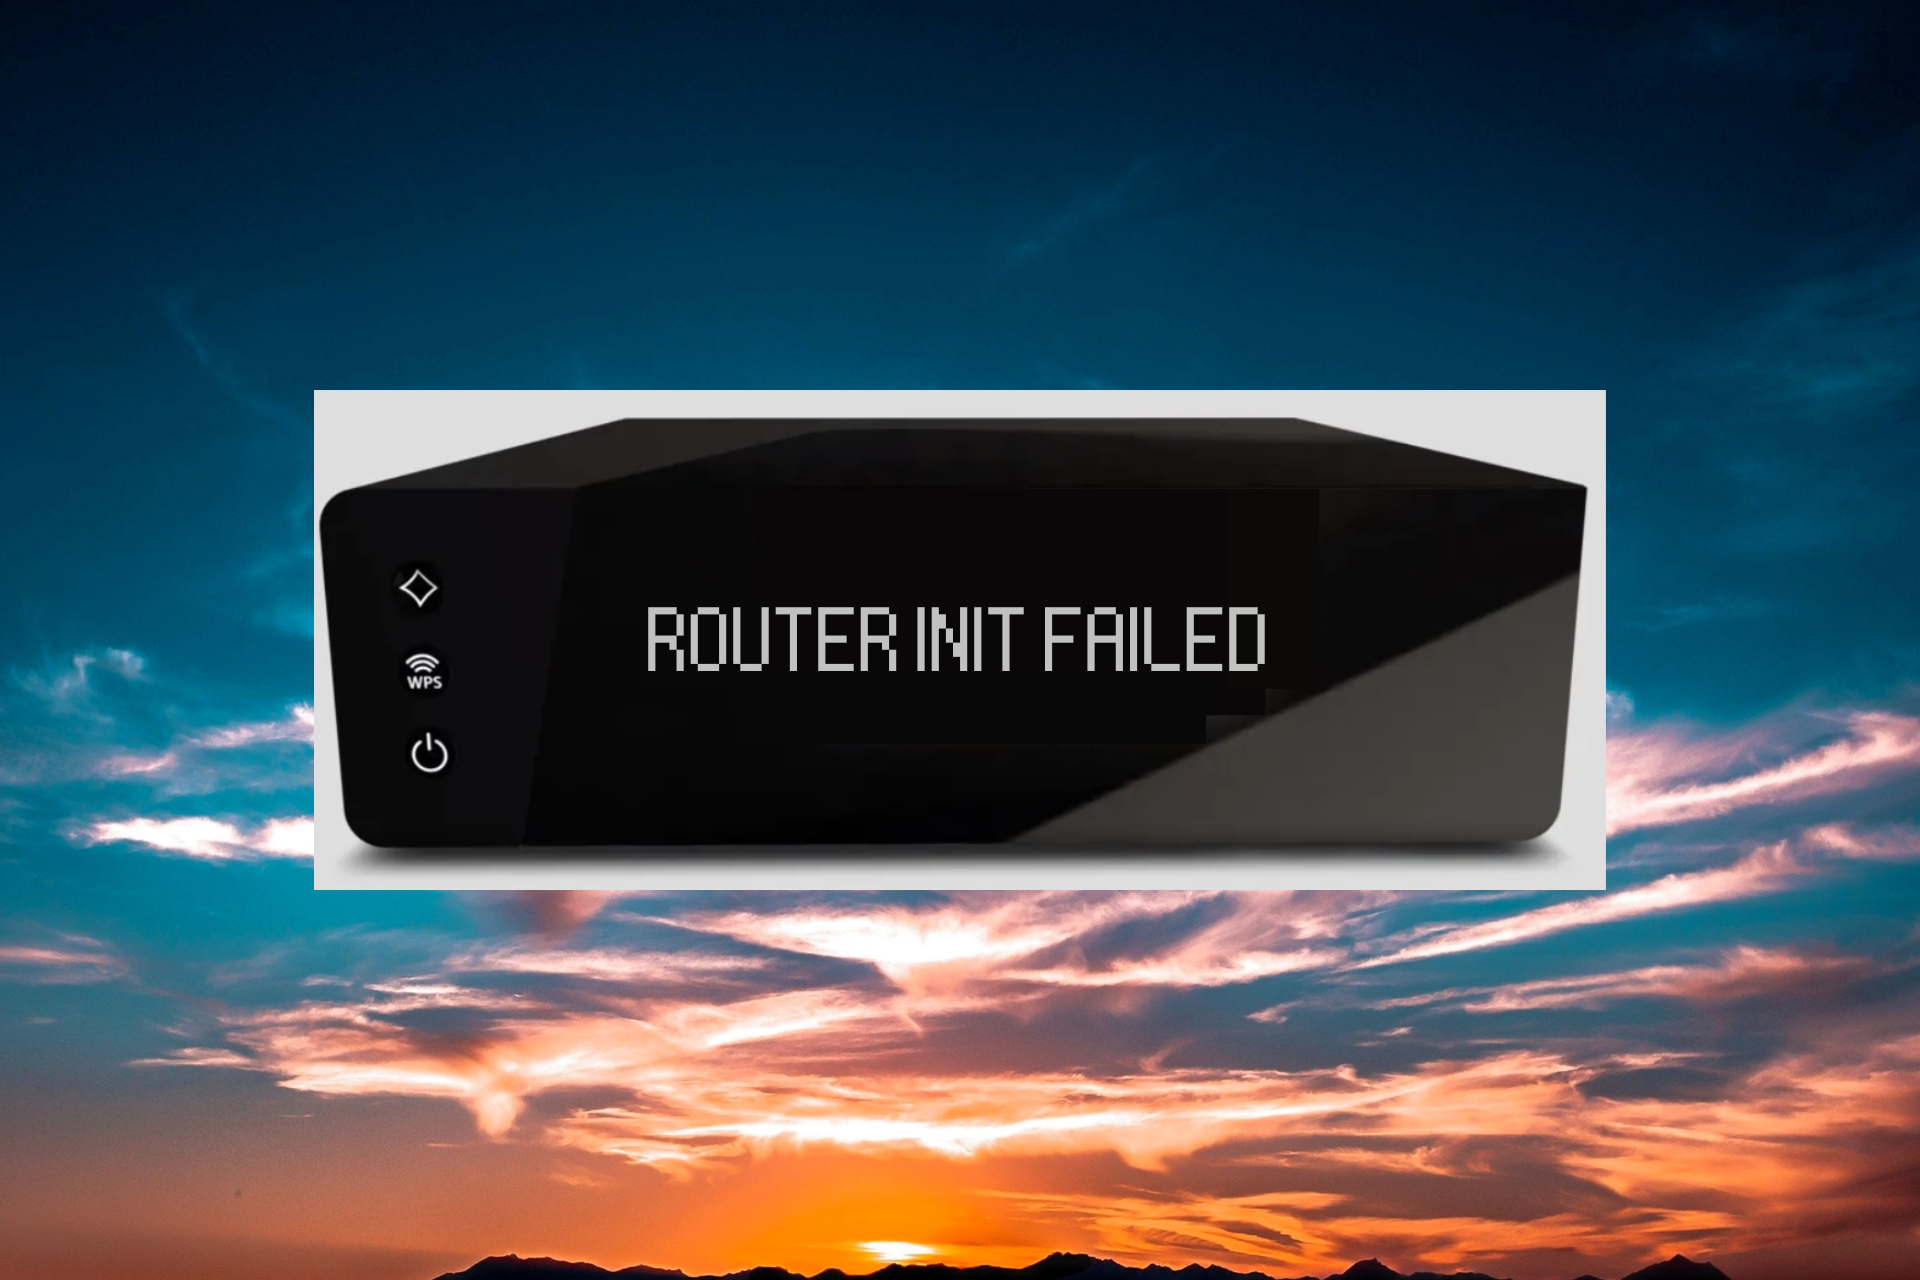
    If you own an Altice One router, once in a while, you will see the Router init failed message. Fortunately, we have tested it in our WR labs and we have some quick fixes for you. Router init failed means that the Altice One router failed to initialize the connection with the network.

    Before starting any solutions below verify if there is any damage on the ISP cable that reaches your Altice One router and if it’s firmly connected to the device. Also, make sure that the router’s path to your devices is not obstructed and its air vents are clear. Try disconnected some devices from the network as well to prevent network congestion.

    How do I fix Router init failed on Altice One?

    1. Restart the router

    1. Unplug the router from the power and all the connected Ethernet or media cables.
    2. Wait for at least 10 minutes and plug and reconnect Altice One to the power and devices.

    Since there is a miscommunication with the internet service provider, restarting the Altice One cable modem is the best way to fix this router error. After rebooting, usually, everything is restored to normal.

    2. Upgrade the router firmware

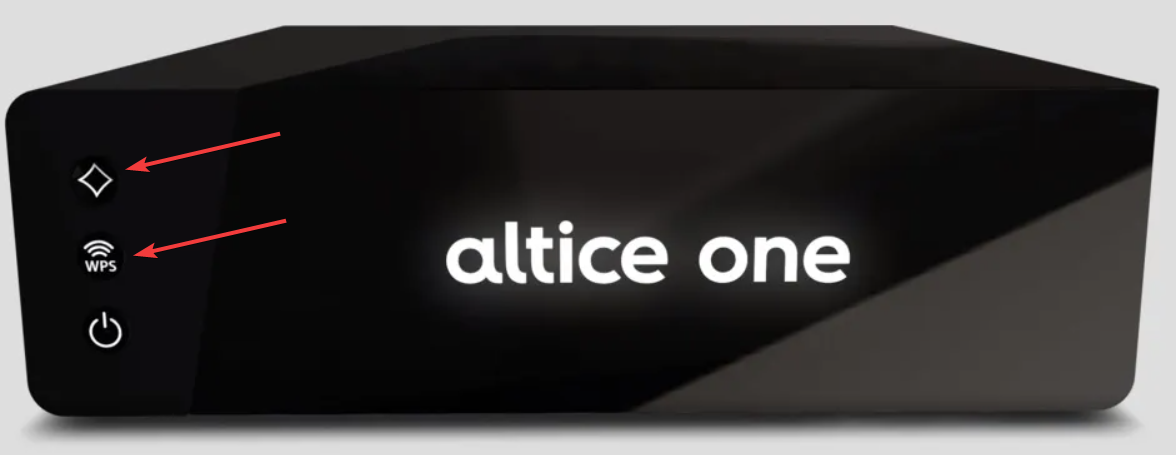
    1. While it’s powered on, press the WPS and Diamond buttons at the same time.
    2. The process will take a few minutes but after that, the router will restart and come back online.

    You don’t need to access the router page for this procedure. However, if you can’t access the router page, this article will help you.

    3. Use the Network Reset button

    1. Look at the back of the router and locate the Network Reset button. You will find it next to the USB service port.
    2. Use a sharp object to press it for 10 seconds. This will reset the Altice One router to normal.

    The Router init error may be caused by power outages and if at that moment, the router was updating its firmware, the best solution is to fully reset it.

    Unfortunately, after this, you will need to reconfigure Altice One again and reconnect your devices.

    If you’re having the same problems with Altice One Mini Box, just press the WPS and Diamond buttons and that will reboot it.

    That’s it! Just to sum up, if you see the Router init failed on your Altice One router, try a soft reset first. If that doesn’t fix the problem, try to update its firmware or reset it to factory settings.

    If the problem persists, contact your internet service provider about this issue.

    You might want to read our article on ways to fix a router that won’t connect to the internet for more information.

    For any other questions regarding the Altice One Router init failed issue, feel free to use the comments section below.

    5 Ways to Fix Insignia TV Channel Scan Problems

    If you have hooked up your new Insignia TV but it cannot scan channels, this guide can help you with the problem! Like other electronic devices, this smart device can also sometimes throw you a curveball.

    We will discuss some effective solutions to fix the problem so that you can reclaim your seamless TV viewing experience.

    Why won’t my new TV scan channels?

    • Bugs/glitches in TV software.
    • The input source is connected to the wrong port.
    • The channels you are trying to scan are subject to geo-restrictions.
    • Damaged or loose cables.

    How do I fix the Insignia TV channel scan issues?

    Before proceeding with any detailed steps to fix the channel scan issues on Insignia TV, go through the following preliminary checks:

    • Check if the input source is plugged into the correct port and restart your router.
    • Inspect the cables for damage, replace them if needed, and ensure they are properly connected.
    • Check the batteries of your remote and replace them if needed.
    • Make sure you look for channels available in your region.

    1. Power Cycle your TV

    1. Unplug the power cable of your TV and the power outlet.
    2. Press & hold the Power button on the remote to remove any residual charges.Press the power button on the remote controller - insignia tv channel scan problems
    3. Wait for 2-3 minutes, then plug the power cable into your TV and power outlet. Once the television starts, check if you can find the cable channels.

    You can also try power cycling your router or updating the router firmware to fix the connection issues; read this guide to learn more.

    2. Run the Auto Channel Search

    1. Click the Menu button on your TV remote, use the left & right arrows to locate Channels, and press Enter.
    2. Locate Auto Channel Search or a similar option, then press Enter.highlight Auto Channel Search - insignia tv channel scan problems
    3. Next, you need to choose an input source; use the arrow keys to choose among Cable/Satellite Box,  Antenna, and Cable from the wall, and then press Enter.Select the medium - insignia tv channel scan problems
      • Cable/Satellite Box – you will get a screen explaining how you can connect a box to your TV. Press Enter, and when the setup is complete, then press Exit.
      • Antenna or Cable from the wall – Your TV will scan for channels.
    4. The scan will begin; if it doesn’t, look for the prompt to initiate it.Scan started

    This process takes some time, so don’t click any button on your remote or television, and ensure your Wi-Fi router, cable box, or HDMI cable stays connected. You will get the message once the action is complete. Close the menu and check the channel list.

    3. Update your TV OS

    1. Locate and click the Settings button on your TV’s home screen.
    2. Go to My Fire TV, click it, and select About.
    3. Select Check for Updates.Check for updates  - insignia tv channel scan problems
    4. Your TV will look for updates, and click Install Update.Install updates

    Wait for the process to complete, and follow the onscreen prompt if you get any.

    4. Re-register your Insignia Fire TV on Amazon (works for Fire TV edition)

    1. On the home screen of your television, go to Settings.
    2. Locate and select Amazon.Amazon account - insignia tv channel scan problems
    3. Next, click Amazon account and select De-register.Deregister insignia tv channel scan problems
    4. Click De-register again to confirm the choice.

    To re-register your TV on Amazon, follow these steps:

    1. Go to Settings and select My Account.
    2. Choose Amazon Account, then click Register.Register Amazon account  - insignia tv channel scan problems
    3. Enter your Amazon credentials and click Sign in.
    4. Follow the on-screen instructions to register your television again.

    5. Reset your TV to factory settings

    1. Locate and click the Settings button on your TV’s home screen.
    2. Go to System, then select Advanced System Settings.
    3. Choose the Reset to Factory Defaults option, then select Reset.Reset -Insignia TV Channel Scan Problems
    4. Click OK to confirm the choice.

    Remember, this should be the last step to fix the issue as it will remove all the apps and customization you made and return your television to the state when you bought it.

    If none of the methods mentioned worked for you, you must contact the TV provider and explain the issue & solutions you tried for further assistance.

    Resolving the issue via provider can take some time, meanwhile, you can watch TV on your Windows computer; read this guide to learn how.

    If you have any questions or suggestions about the Insignia TV channel scan problems, feel free to mention them in the comments section below.

    Fix: Technika TV is Not Turning On

    Powering on your TV is one of the easiest things to do, but when your Technika TV is not turning on after numerous tries, there may be an underlying issue.

    Has the remote stopped working? Could it be a power issue? Find out the root cause of the issue and subsequent troubleshooting tips.

    Why is my Technika TV not turning on?

    • The power supply is disconnected.
    • You have a faulty remote control or dead batteries in it.
    • Bad capacitors in power supply board.
    • The fuse on the power board is blown.
    • Your TV has entered into safe mode to prevent damage.

    How do I fix my Technika TV if it won’t turn on?

    Attempt the following basic troubleshooting steps first:

    • Check if your TV is plugged in correctly and all cables are connected properly to their respective ports, then press and hold the Power button for at least five seconds.
    • Try a different outlet. If you’re using an extension cord, try plugging the TV directly into a direct power source.
    • Ensure the remote control batteries are not dead, and try using other batteries if needed.
    • Disconnect any external drives connected, as some USB drives can prevent your TV from turning on.
    • Ensure there are no obstructions between your remote control and TV.

    1. Disconnect your TV from the power supply

    If you’ve already switched it off and turned it back on, but it still won’t power on, it’s time to increase the wait time. Technika TVs have a safety mode feature known as the Ecohome mode for energy efficiency.

    If your TV stays idle for a while, it will turn itself off to prevent damage. If this is the case, you may have to wait slightly longer before you can power up your TV. As long as you can see the Standby light, it’s probably nothing to worry about.

    2. Power cycle the remote and TV

    1. Take the batteries out of your remote control, press and hold the power button for a few seconds, then release.
    2. Now, press every button on the remote at least once while the batteries are out. This helps to clear residual power.
    3. Insert the battery into the remote.
    4. Next, unplug the TV from the power outlet, and press and hold down the TV’s power button for a few seconds.
    5. Wait for one minute after doing this, plug the TV back into the power source, and power it on.

    3. Check the manual for troubleshooting

    Most TVs come with a user manual on how to operate your device and safety measures you should take to prevent damage. It also contains troubleshooting steps for common problems, so you may want to check for any answers.

    If you can’t find your user manual, you can download one from their website.

    4. Contact customer support

    If all else fails, there might be something wrong with your TV. Provided your warranty is valid, you can get a checkup for free from your manufacturer.

    You can contact Technika Customer Support, and they will help you troubleshoot your issue over the phone or schedule an appointment for an expert to come in and troubleshoot the device at your home or office.

    How do I turn on a Technika TV without a remote?

    • Use your PC as a remote – You can control your Technika TV with a PC, laptop, or tablet. The first thing you need to do is to connect the device to the TV. You can use a USB cable and download software to configure the USB receiver. 
    • Use your phone as a keyboard – If you have an Android or iOS phone with Bluetooth, you can use it to turn on your TV. You’ll need to download a control app to pair your TV and phone for easier navigation.
    • Download a remote control app – Android and iOS devices allow you to use your mobile device as a remote control for your Technika television. Technika particularly has its dedicated remote app. You only need an internet connection on your phone and television set.

    And if you feel these options are not sufficient, you can always opt for universal smart TV remotes. These come with other advanced features like a keyboard, but you need to be careful as your exact model may not pair well.

    TV issues are not specific to the Technika model, and you may experience the same when your Sony smart TV won’t turn on. Sometimes, it’s a damaged Vizio remote control sensor that’s preventing your TV from turning on.

    As always with electronics, it’s best to rule out things like broken wires or bad connections. If you’re lucky enough to discover such an easy fix, you can move on to other areas. Most likely, at least one of the above solutions will apply to you.

    And if your Technika TV is still not turning one and has given up on you, it might be time to look into other TV models.

    Let us know if you have experienced any of these problems or have any additional questions.

    How to do a Firmware Update on Your Virgin Hub 3

    If you want to do a firmware update on your Virgin Hub 3, forget about it because you can’t do that. The Virgin HUB 3 firmware update is pushed automatically by the manufacturer.

    Does Virgin router update automatically? Yes, the Virgin Hub 3 updates automatically. However, our Windows Report networking team has devised a solution to force the process.

    How do I update my Virgin Media Hub 3 firmware?

    1. Heset Virgin Media Hub 3 to factory settings

    1. Turn on the Hub.
    2. Locate the Reset button on the back of the device and use a pen or a sharp object to press it for 10 seconds.
    3. Now wait for about 5-10 minutes for the Virgin Media’s Hub 3 to reboot and come back online.
    4. It will be ready when the white power light from the front of the device is lit continuously.

    If there are any new software updates from Virgin Media, they are likely to be installed after this reset. However, there is no guarantee that it will happen. As we’ve mentioned above, the firmware update is pushed automatically by Virgin Media and there are no known criteria on how they prioritize this action.

    2. Set the Virgin Media hub in Modem Mode

    1. Make sure that your PC is connected with an Ethernet cable or Wi-Fi to the hub.
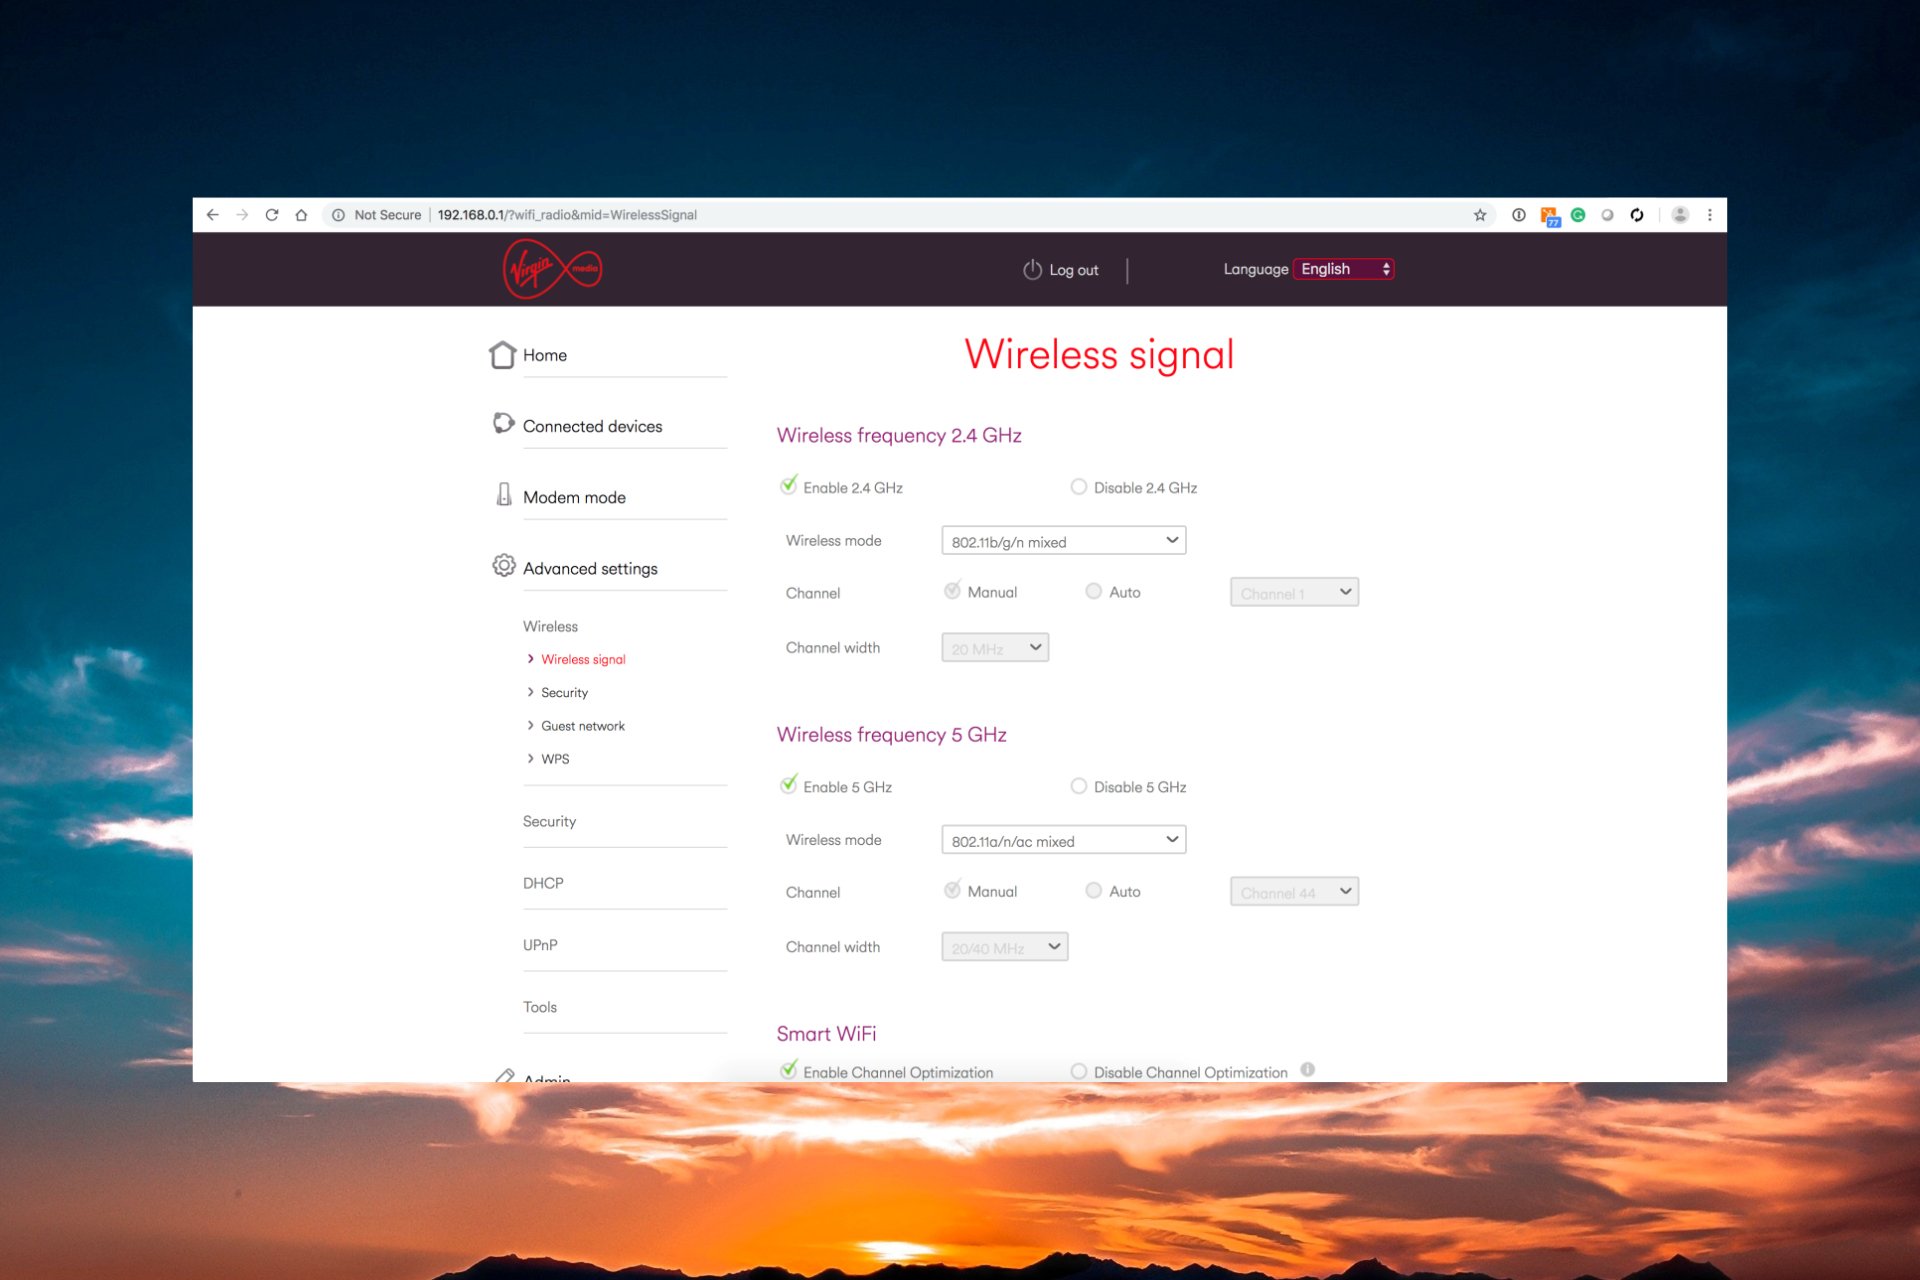
    2. Open a browser of your choice, enter the following IP ((this is the default Virgin Media Hub IP address) into the address bar and press Enter: 192.168.0.1
    3. Log into the hub with your credentials. Check the manual of the device to get them.
    4. Go to Modem Mode, check the Enable Modem Mode option, and select Apply Changes.

    Although it’s not guaranteed, from our tests in the WR lab, it’s more likely to get a firmware update for the Virgin Media’s device if you set the device in Modem mode.

    However, you should know that by setting the Hub 3, 4, or 5 to Modem mode, you will disable some of its functions. One of the most important is the intelligent Wi-Fi capabilities so you might experience latency or packet loss issues.

    To set the hub back to router mode, retake the steps in the solution above and check the Enable Router Mode option instead. Here’s a comprehensive guide on what to do if the Wi-Fi is not working on the Virgin Media Hub.

    This method works on Virgin Media Hub 3, 4, or 5 (not 5x) and Super Hub 1, 2 or 2AC. 

    How do I know if Virgin Media Hub 3 is updating the firmware?

    When the Virgin Superhub or Virgin Media Hub 3 is updating, you will see the front light blinking and you will experience an internet connection outage of 10 to 30 minutes.

    Because the update time is so long, you may be tempted to think that there’s a problem with your Virgin Hub or Virgin Router.

    Instead, check the Virgin Media service status or call them directly to learn about potential issues with the network.

    Troubleshooting issues with a failed or aborted firmware update on your Virgin Hub 3

    If you disconnect the router from the outlet or turn it off during its update, it’s likely to have issues with the Virgin Hub 3 not working or connecting. Here’s what you need to do in this case:

    • Remove all connected devices from the Ethernet ports and the wireless network.
    • Reset the Virgin Media Hub 3 to factory settings, as shown in the first solution from this guide.

    You should also note that not all the subscribers are eligible to get all the SuperHub 3 firmware. Some of them may introduce new features that require extra cost.

    To summarize our guide, you can’t manually update the Virgin Media Hub 3 firmware, but you can trigger it by restoring it to factory settings or setting it in Modem mode. 

    We hope that our guide provided sufficient information about the process and now your device is working properly.

    You might also be interested in reading our guide on what to do if Virgin Media is blocking IPTV.

    If you have any further questions or suggestions on this topic, access the comments section below to leave us a note.

    Fix: Can’t Download Please Ask That it be Resent to You WhatsApp Error

    Can’t download please ask that it be resent to you error message stops you from downloading files from WhatsApp.

    Main reasons why this happens are because the file expired, WhatsApp servers are down, or your Internet is slow. Following the steps below, you’ll address all possible reasons and fix it in no time.

    How do I fix the Can’t download please ask that it be resent to you error?

    1. Restart the app

    1. Locate WhatsApp on your phone. Tap and hold its icon.
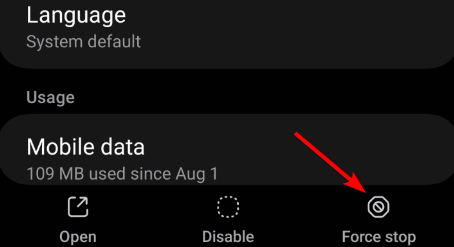
    2. Select App info from the menu.
    3. Tap on Force stop.
       
    4. Lastly, tap OK.
    5. Start the app again and check if the problem is still there.

    2. Clear the cache on the Android device

    1. Open WhatsApp app info.
    2. Navigate to Storage.
    3. Now tap on Clear cache.
    4. Restart the app again.

    3. Check if the app has the necessary permissions

    1. Open the WhatsApp app info once again.
    2. Navigate to Permissions.
       
    3. Select Photos and videos.
    4. Lastly, select Allow.
    5. Also, check if storage permission is enabled so that the app can access internal storage.

    4. Adjust the time settings

    1. Open Settings on your phone and tap on General management.
       
    2. Now choose the Date and time.
    3. Disable Automatic date and time.
    4. After a few seconds, enable it again.
    5. If the time isn’t correct, you might have to adjust it manually.

    Can I download old deleted WhatsApp messages?

    If you have Google Drive backup enabled, you can download old messages by doing the following:

    1. Once you install WhatsApp on your device for the first time, enter your phone number and name.
    2. If the backup is found, tap on Restore.
    3. After the backup is downloaded, you should have all your old messages available again.

    Keep in mind that this won’t work for messages that have been manually deleted from the app.

    In case you encounter problems with this, we have a guide on what to do if WhatsApp can’t restore chat history.

    Can’t download please ask that it be resent to you error can cause problems, and in most cases, it means that the file is gone from WhatsApp servers. Sometimes the problem will appear if you’re on a mobile network and not downloading files over a Wi-Fi connection.

    In these cases, it’s best to ask the sender to resend the files or ask them to upload the files to the file-sharing website and then send a link to you.

    These aren’t the only issues that you can encounter, many reported that WhatsApp web chat history sync is not working or that this version of WhatsApp has expired.

    Have you ever encountered this issue and how did you fix it? Let us know in the comments below.

    How to Fix Vodafone Error 69 [SMS Issue]

    Mobile carriers or network operators usually work seamlessly, but issues may arise when switching handsets, especially Error 69 in Vodafone. The error appears when sending an SMS.

    The error message reads, Can’t send message with Vodafone, error 69. Subsequently, none of the sent SMSs are delivered to the recipient. Many have the issue with Vodafone India, but based on user reports, it’s prevalent worldwide. 

    Why are Vodafone texts not sending?

    When Vodafone texts are not sending, it could be a server outage at the network provider’s end. Also, the subscribed plan may not allow sending text messages.

    Besides, the error code appears when an incorrect SMSC (Short Message Service Center) is configured on the mobile device.

    How do I fix Vodafone Error 69? 

    Before we start with the slightly complex solutions, try these quick ones first:

    • Connect the SIM card to another device. If the messages go through, it’s the first mobile phone to blame. If not, it’s the network provider or SMS settings at fault.
    • Your device receives the SMS/message settings when inserting the SIM the first time. Make sure to save them to be able to send texts.
    • Restart the mobile device. Also, take the SIM card out, wipe it with a clean cloth, and reinsert it into the slot.
    • Try another sim slot on the device if it’s a dual-sim phone. 
    • If you just collected the SIM card, wait 24-48 hours. There’s usually a cool-off period before you can start sending text messages.

    If none work, head to the fixes listed next.

    1. Check the subscribed plan

    First, ensure the service provider’s plan you are subscribed to allows sending text messages. Several packages don’t support the functionality. So, verify the plan details and determine the number of messages permitted per day/month.

    Also, you may get an Error 69 on SMS in Vodafone when the maximum limit is reached. In this case, upgrade the plan or get a text top-up if available in your region.

    2. Change the SMSC number

    2.1 On Android

    1. Open the Message app from the home screen, tap on the ellipsis (three-dot icon), and select Settings.settings 
    2. Select the Vodafone SIM from the list, if you have multiple SIM cards plugged in.
    3. Scroll down and tap on SMSC.SMSC
    4. Now, check the number listed over here and verify whether it’s the same that should be in your region.
    5. To verify, search on Google. For instance, if you use Vodafone India, identify the state-specific SMSC number. Remember, it should be for the state the SIM was registered in and not where you presently reside.
    6. Now, enter the SMSC number in the text field, and tap OK.change to fix error 69 vodafone
    7. Finally, restart the Android device and check whether Error 69 in Vodafone is fixed.

    2.2 On iPhone

    You can’t check or change the SMSC number on an iPhone. While this was possible earlier, Apple has removed the functionality altogether. In this case, you will have to get the latest network settings.

    To update the network carrier settings, open the iPhone Settings, go to General > tap on About > wait 30 seconds for available updates to appear > follow the on-screen instructions to install them.

    3. Clear the message cache

    3.1 On Android

    1. Open the Android settings, and tap on Apps.apps
    2. Select Messages from the list of applications. 
    3. Tap on Storage.storage
    4. First, tap on Clear data and then Clear cache to delete both.clear cache to fix error 69 vodafone

    3.2 On iPhone

    There’s no built-in way to clear the app-specific cache on iOS devices. You can use a third-party solution or offload the app, but it must be reinstalled later.

    So, to solve Error 69 with Vodafone on an iPhone, clear all the stored messages and data files. Remember, clearing the message cache also helps fix things when you can’t send messages with T-Mobile or even with the Arena of Valor error 201.

    4. Reset the network settings

    4.1 On Android

    1. Open the Settings app on your Android phone, and tap General management.general management
    2. Now, tap Reset.reset to fix error 69 vodafone
    3. Then, select Reset network settings.network settings
    4. Tap the Reset settings button to confirm the change.reset settings to fix error 69 vodafone

    4.2 On iPhone

    1. Launch the iPhone Settings, and tap on General.general
    2. Select Transfer or Reset iPhone.reset
    3. Tap on Reset at the bottom.reset
    4. Now, tap on Reset Network Settings from the menu.reset network settings to fix error 69 vodafone
    5. Enter your passcode and confirm the reset.

    Switching to the default state can help fix Error 69 while sending texts on Vodafone when the network settings are misconfigured. This also works if Vodafone is blocking specific websites or with another text issue, O2 error 38.

    5. Contact Vodafone support

    In case none of the changes help, it’s best that you contact Vodafone support. If you are based in India, go to the MyVI website instead. They will be able to identify and troubleshoot the problem. 

    Remember, if the device can’t make calls and throws Error 69 while sending text messages, it could be a damaged SIM card to blame. And a replacement is the most viable solution. All this can be done through the official support channel!

    One of the solutions here should have helped with the Vodafone SMS Error 69, and you should now be able to send text messages seamlessly. It would most likely have been a problem at your end since server outages are rare and temporary.

    Issues with your carrier, such as this one, can lead to other problems including the EE error 0, but we covered that issue in another guide.

    Also, did you know it’s possible to use a phone as a keyboard on the PC? Most of us didn’t. Besides, you could use the PC as a microphone for the mobile. It’s all possible!

    For any queries or to share what worked for you, comment below.

    How to create Excel formulas using the new authoring features

    Microsoft debuted new authoring features that will let users create new Excel formulas in just a few steps, according to the latest blog post.

    The new features are available to Excel for the Web, and Windows users can use them to bring their formulas to life (or good use). It is a welcomed addition to Excel, right before the arrival of the Copilot AI on the platform.

    Copilot will be released on Excel in November, and the AI tool will help users calculate and summarize data, as well as come up with Excel formulas to ease the workload and improve efficiency.

    The new authoring features give users more ways to create Excel formulas, and Copilot might also make use of them, once it’s released. Either way, here’s how you can use the new features.

    How to create Excel formulas using the new authoring features?

    1. Using the Insert Function dialog box: this new box allows users to select the right function and its arguments; it comes with a list of categories, in case users want to look up a specific formula. It can be accessed by opening Microsoft Excel, then going to the Formulas tab and selecting the Insert Function button (alternatively, users can also click the fx button on the formula bar).create excel formulas
    2. Improving the readability of your Excel formulas with Parantheses Coupling: this new feature will automatically appear and take effect every time a user hovers over a complex Excel formula that contains multiple parentheses. The feature will intelligently highlight each set of parentheses, allowing for efficient editing, without getting confused, as Microsoft says.
    3. Monospaced Font is also a new feature coming to Excel and it will ensure that formulas will now have a proper space between numbers and letters, improving their creation, editing, and readability. This feature will be automatically enabled. create excel formulas
    4. Finally, with Value Preview, Excel users will have a simplified troubleshooter of Excel formulas, by using this feature to get real-time displays of values associated with any part of a formula. Users will only need to hover the mouse over a specific part of the formula. This feature is currently rolling to Windows users.

    What do you think about all these new features coming to Excel? Let us know your opinion in the comments section below.

    You can now create your own custom themes in Edge. Here’s how

    Following the release of Edge 119, Microsoft has added a built-in Color picker to the Edge themes section in Edge 120. The new update comes with some customization options that have been long awaited and requested in the Feedback Hub, custom themes being the most important. The feature is still hidden, but you can enable it in Canary right now.

    Currently, there are plenty of themes to choose from in the Edge add-on Store. You can change the browser’s look even with themes from the Chrome Webstore, and Edge has over a dozen color-based themes. But when compared to Chrome, Edge is missing a theme color picker.

    With Edge 120, Microsoft is adding that color picker for themes. Its UI is minimal, but you can apply any color by setting values to R, G, B, H, S, L, or HEX. Once you select a color, Edge applies that theme to the top of the browser frame and toolbar.

    If you want to enable the built-in Color Picker for Themes in Microsoft Edge, follow the next steps:

    1. Close Edge Canary.
    2. Right-click on its shortcut and select Properties.
    3. In the Target field, hit space and apply the following command
      --enable-features=msSettingsThemesColorPicker
    4. Click OK and apply.

    How do I make a custom them in Microsoft Edge?

    Note icon NOTE
    Make sure to launch Microsoft Edge using the shortcut edited above.
    1. In Edge, click the three dots in the top-right and select Settings > Appearance.
    2. Under Customize appearance > Theme, click on Pick a color.
      This image has an empty alt attribute; its file name is pick-a-color-option-for-theme-in-Edge-appearance-settings.jpg
    3. Choose the color you want and release the left-click on your mouse to apply that color to the Edge browser. To change it again, go to the Color Picker and choose another one.
    4. You can restore the default or another theme other than the autogenerated theme by clicking on the respective option.

    And that’s about it. You can enjoy your custom-made theme or change it with the new Color picker. While it’s not that complex right now, it can offer a fair level of personalization. We expect a much more refined set of customizations in the subsequent Edge releases.

    How often do you change the appearance of your browser? Be sure to share your answer in the comments section below, and we’ll continue the talk.

    Microsoft Paint Cocreator: A complete guide on the new AI tool

    Describe what you’d like to create, asks the new DALL-E powered Cocreator, a new AI tool coming to Microsoft Paint, recently discovered by Windows spotters, and then officially announced by the Redmond-based tech giant.

    A person taking a walk in the park during the autumn season, we type in, as outside, in the northern hemisphere, the autumn season is in full bloom. It’s October and we’ve got access to the limited preview of the Microsoft Paint Cocreator, after joining the waitlist for it in the Dev Channel.

    Finding Cocreator is very easy: we just needed to open up Microsoft Paint – we’ve made sure the app is updated to the latest version – and Cocreator was there, alongside the newly-released Layers, which is a feature that adds layers to your Paint projects.

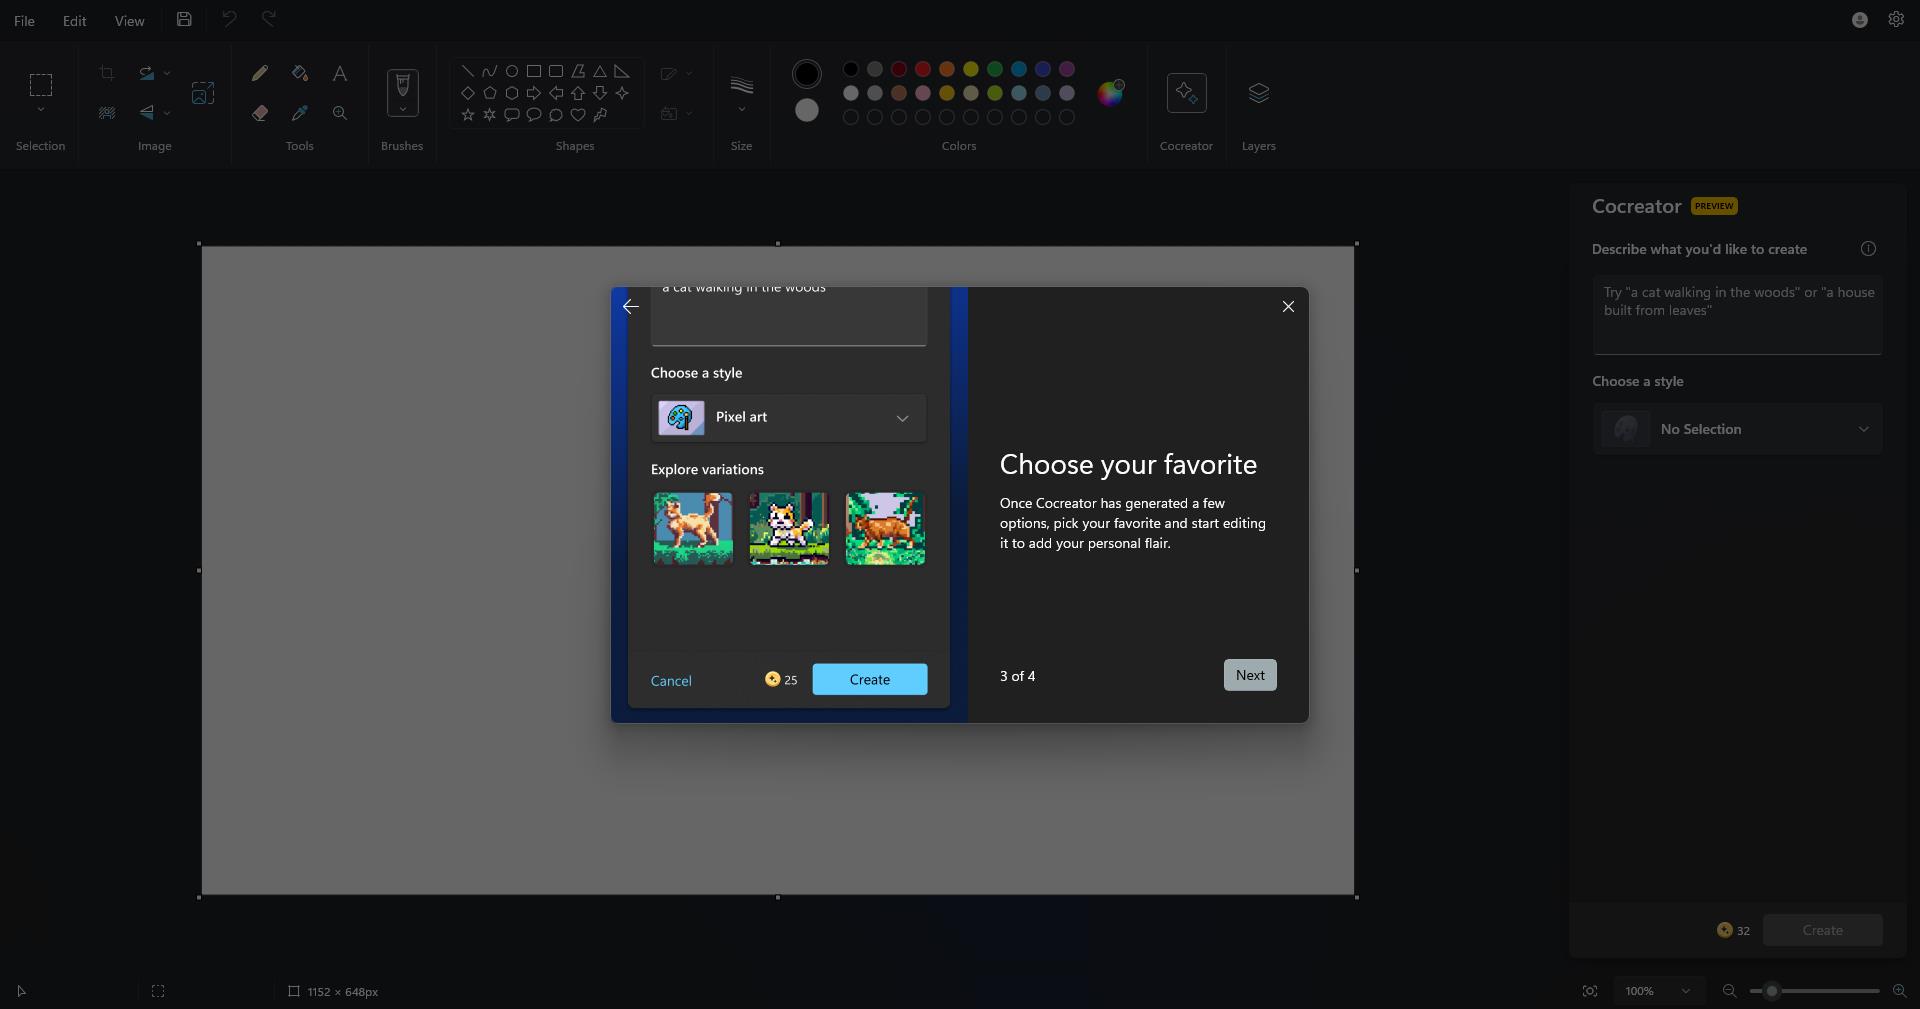
    Once we clicked on Cocreator, the app will welcome us with a short presentation on how to use it to generate the art we want.

    As you can see below, the presentation also acts like a mini-tutorial showcasing everything you need to know before getting your hands on it.microsoft paint cocreator
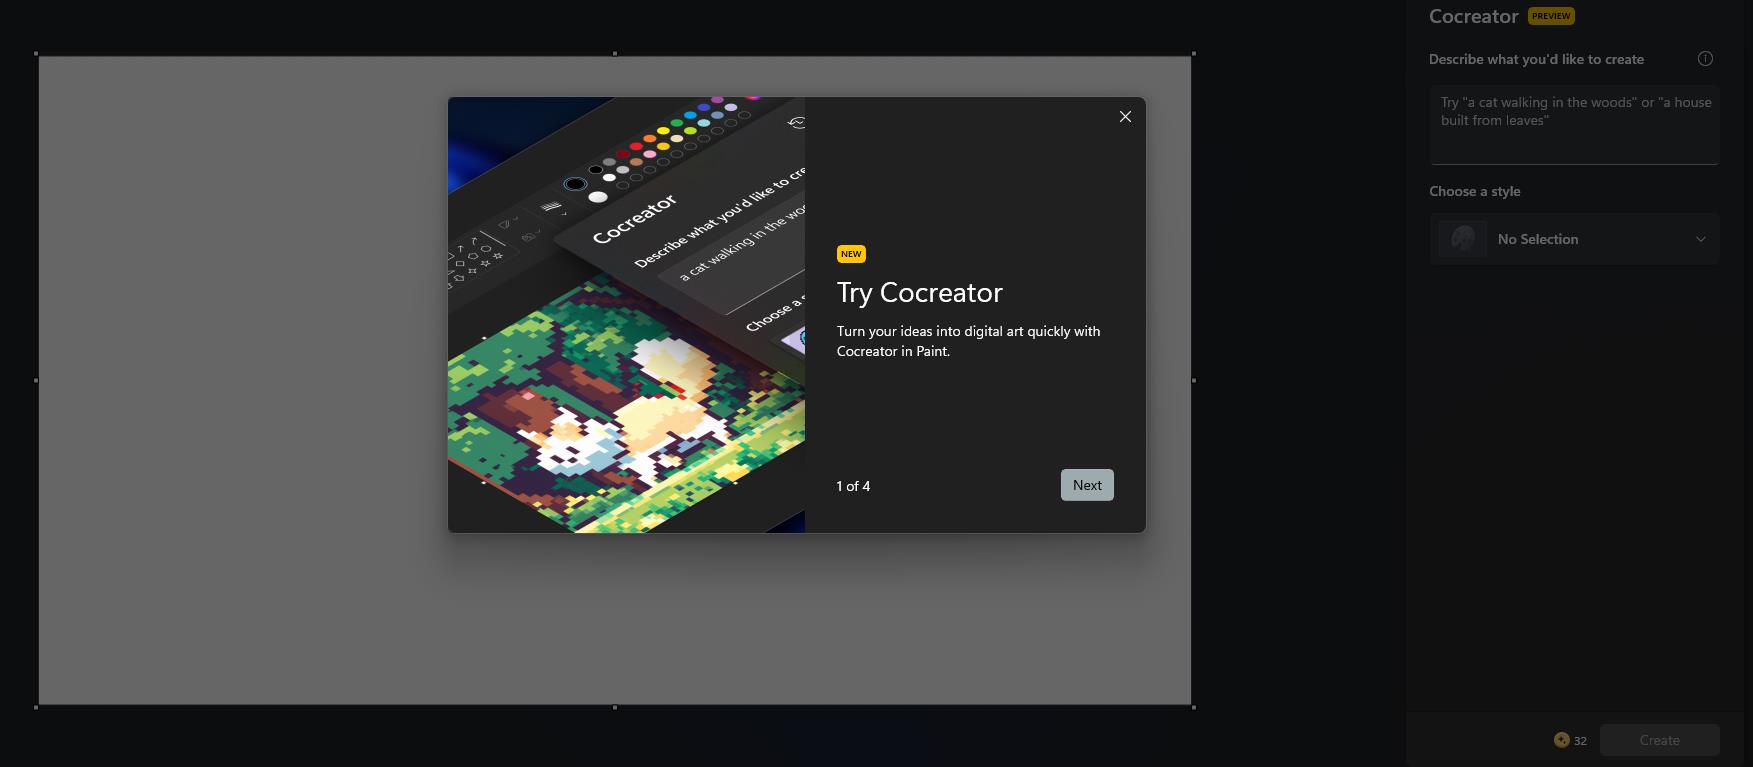
    Then the AI tool appeared as a right sidebar in Microsoft Paint, urging us to describe what we’d like to create. microsoft paint cocreator
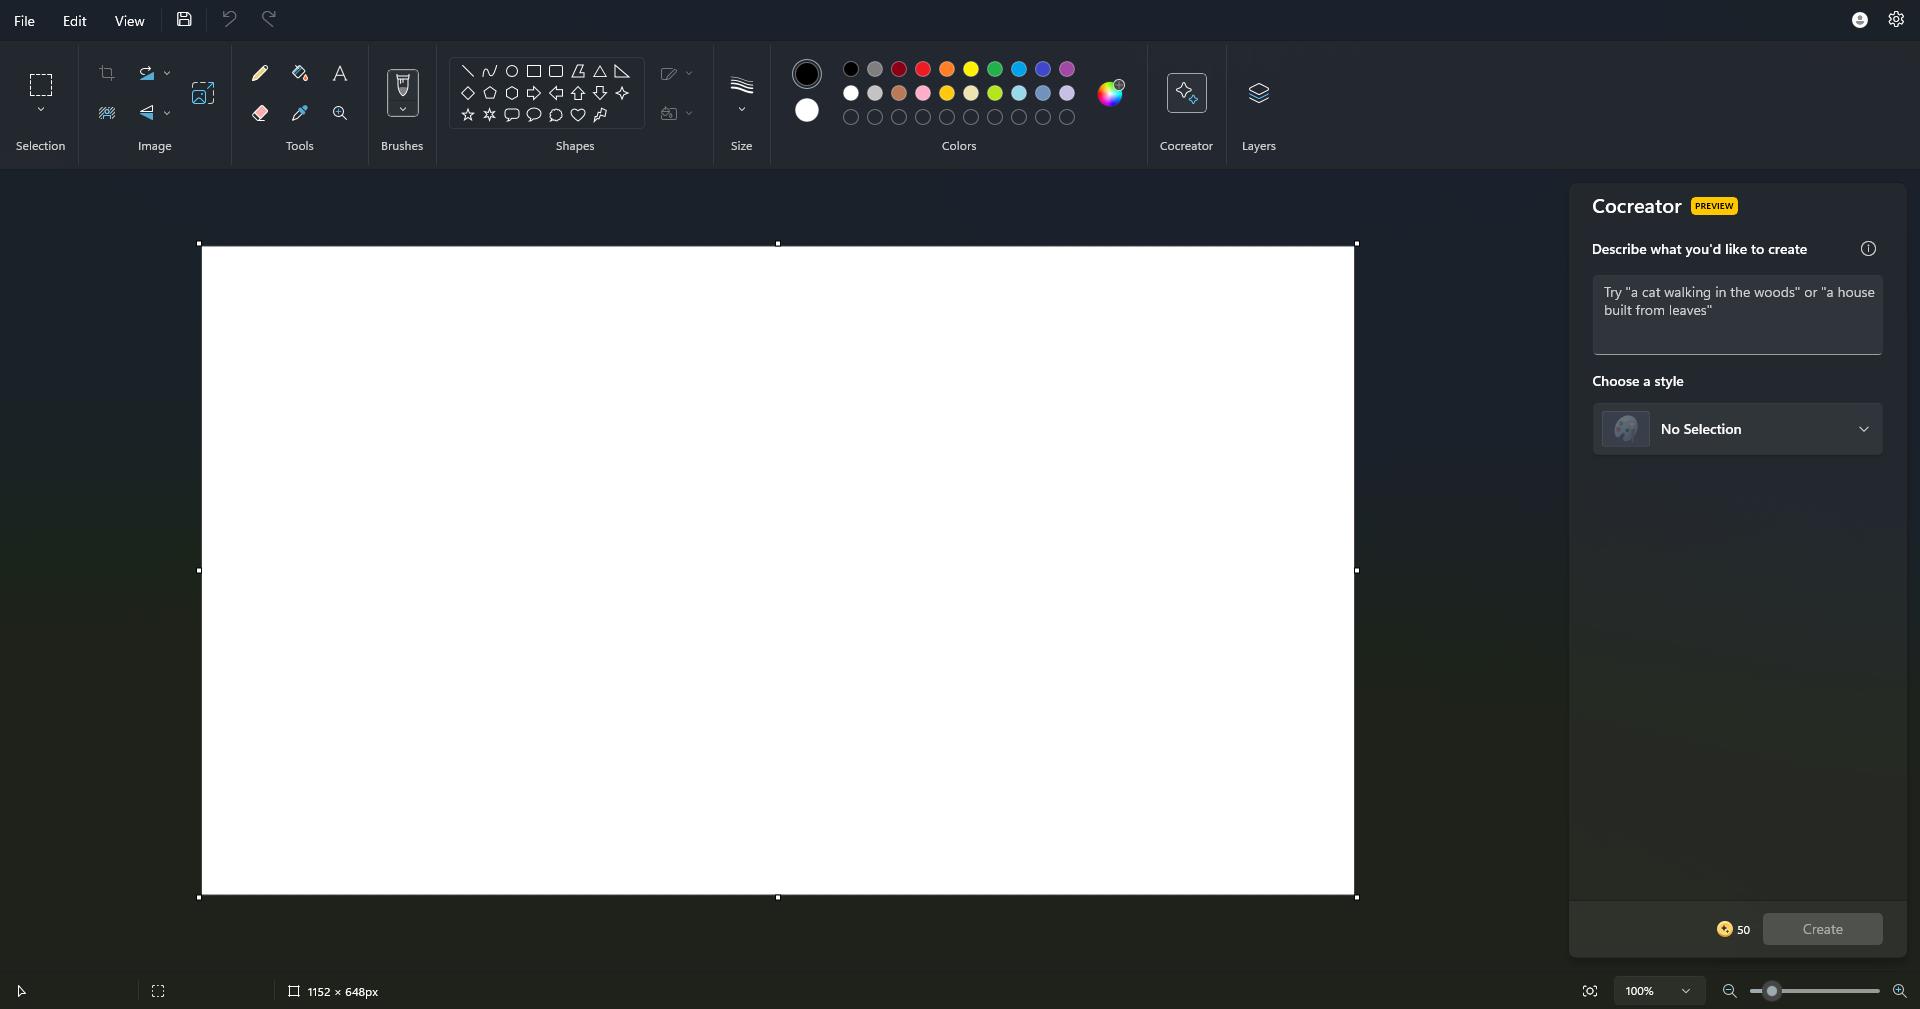
    With this first task in hand, we’ve taken our time with Cocreator and experimented with it for a while. And we’ve come up with a guide on this powerful and incredibly useful image creator.

    Cocreator: 5 important things you need to know before trying it

    Before diving in, if you can’t wait until Cocreator is released to experience it, then you should know these things, first.

    1. Cocreator is currently available in the Windows Insider Channels. We’ve got it while being on the latest version of the Dev Channel, with Microsoft Paint updated to the latest version. You can update it from the Microsoft Store.
    2. Once you’ve done that, you should be able to see the new Cocreator button inside Paint. However, clicking it will prompt a join the Waitlist pane. If you want to use the AI tool now, you should join it. Expect to get permission in 3 to 7 days (6 days in our case).
    3. When you do have permission to start creating images, Microsoft grants 50 points of Credit, and each creation costs 1 Point. Microsoft hasn’t revealed yet how to get credit points, but most likely they will be purchased.
    4. Cocreator is currently available only in the following regions – the United States, France, the UK, Australia, Canada, Italy, and Germany.
    5. Only the English language is supported at this time.

    9 art styles to choose from

    We’ve typed in our request. Cocreator took it and then came back with options, no less than 9 choices of art style:

    • No selection – This art style does not offer anything particular, but when we chose it, Cocreator rendered hyperrealist images. microsoft paint cocreator

    • Charcoal – This art style will render your inputs into images with a vibrant, almost manually drawn vibe. It looks naturally drawn, even though it’s not.

    • Ink Sketch – Cocreator will generate your inputs into images with comic-style art to them. Quite frankly, this could be a very useful way to create comics, even if you don’t know how to draw.
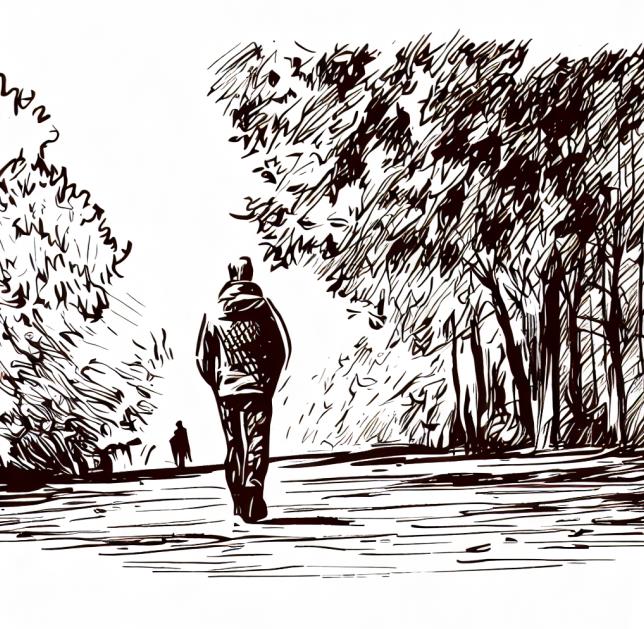
    • Watercolor – A personal favorite, this art style will make your inputs look like paintings. Which is more than enough from just 15 seconds of work. microsoft paint cocreator

    • Oil Painting – Very similar to the other forms of naturally drawn art styles, Cocreator will generate images as oil painting. The best thing? You can even see the paintbrush’s tracks.

    • Digital Art – This art style will create lush images with vivid colors and vague details. While it doesn’t seem the look naturally drawn, the images are impressive.

    • Photorealistic – Another personal favorite, this art style will prompt Cocreator to generate realistic images, with vivid colors, a lot of details, and vibrant all-around. They look like photos.microsoft paint cocreator
    • Anime – If you’re a fan of anime-style art, then this option is perfect for you. The images look naturally drawn (in the anime style, of course), and full of colors.

    • Pixel Art – Finally, the pixel art option will prompt Cocreator to generate images in a pixel art style. This could be very useful if you want to develop a game and need artwork.

    For now, Cocreator only offers these 9 options. However, there is no doubt Microsoft will add more options in future updates, and who knows, maybe even integrate the latest DALLE versions in it. Bing Chat has them, so Cocreator might be getting them too.

    Ultimately, it all comes down to your preferred choice of art style. When you choose one, once you hit the Create button, Cocreator will generate 3 examples for you to choose from.

    Microsoft Paint Cocreator can be a very practical app

    Along with layers, Cocreator can be very useful for creating fast content for social media posts, giving small businesses a way to reduce costs by using AI tools. Microsoft somehow predicted this earlier this year, when the Redmond-based company released a study on the positive impact of AI on small businesses.

    So it’s good to know Microsoft is integrating AI tools, such as Cocreator, into native Windows apps.

    The tool is also extremely easy to use, and the only hard thing to do is to actually come up with an idea for your prompt. So, users don’t have to be versatile in technology to generate images with Cocreator. You just have to type in your input and select an art style, and the tool will take care of the rest.

    The only drawback is that ultimately Cocreator runs on credit, and once the credit is down to 0, you won’t be able to generate any more images, until you get credit. So it’s not a free tool yet, but Microsoft will come up with ways to purchase or earn credit points. Microsoft Rewards, maybe? It can be possible.

    Either way, Cocreator will get updated in the future. Microsoft will add many changes and improvements to it, and it is possible it will add newer versions of the DALL-E AI to it, as well. This would make Cocreator a very versatile app to use, and Microsoft Paint, as a whole, would be revived, if it’s not already.

    With this being said, will you use Microsoft Paint Cocreator, when it’s released? What do you think of this AI tool?

    Word turns 40, and Microsoft will enhance it with some great new features

    Microsoft Word was released back in 1983, which means everybody’s favorite text-editing app turns 40 this year, and the Redmond-based tech giant is up for a celebration of it, according to the company’s latest blog post.

    What is a celebration without reminiscing the great moments of the app’s existence, Microsoft does just that. In its 40 years of life, Microsoft Word has become one of the most used office tools in the world, says Microsoft, and somehow, the app is just starting.

    For example, Microsoft will get AI capabilities next month, with the arrival of Copilot in the platform, effectively enhancing and emphasizing users’ creativity and productivity alike. Copilot promises a new era for document editing, but we’ll have to wait and see.

    But this is not all, though. To celebrate 40 years of existence, Microsoft will be releasing a series of new updates to the Word, and by the looks of them, we’re excited. Check them all out below.

    How old is Microsoft Word? 40, and young enough to get exciting features

    Microsoft says Word will get features that will transform the app into a content creation and consumption platform. That means users won’t only be able to compose, write, and edit their documents, but read them there too.

    Here’s what Microsoft says we should expect to see in Word moving forwards:

    • Shepherding in the age of AI: Copilot provides a fundamental shift in writing & reading experiences. Our goal is to continuously iterate on feedback we get from you, our users, as you create and read content, while leveraging Copilot across platforms and devices.
    • Make your words shine with Word for the web: We’re continuing to invest and innovate in Word for the web to make it a great creation and consumption tool. This includes using your feedback to prioritize our areas of investment.how old is microsoft word
    • Write better together: Word has been at the center of collaborative content creation since its inception. Over the years, we’ve made it easier to co-create with others, provide feedback, exchange ideas, and produce quality content. We’re committed to providing a consisted experience and ensuring that Word remains THE place to efficiently create, edit, and review content, matter where you are, who you are working with, or what device you’re using.
    • Extensibility as a customization driver: We are committed to giving Word developers the tools and capabilities they need to build amazing experiences and support custom workflows.
    • Word as your favorite consumption app: It’s not just about content creation. Word is a great place to read the documents that matter to you, on any device, wherever you are.

    For how long have you been using Microsoft Word? What are your experiences and opinion of it, now that the tool turns 40?

    How to add the Designer app on Microsoft Edge’s sidebar

    The latest update package to Microsoft Edge 118 comes with Designer Preview toogle for users, which can be enabled to use inside the browser.

    For those of you who don’t know, Microsoft Designer is a tool that allows users to create social media posts, images, cover, and graphic designs in minutes. The app is coming to Microsoft 365 apps, as well, and it will take a first step in Word, at the beginning of 2024.

    But now, users can try a preview of it in Microsoft Edge. According to the latest entry in the updated timeline, the release will be in English for now, and Designer on Edge’s sidebar will only be available in Australia, India, New Zealand, South Africa, and the United States.

    Designer is a new AI system from Microsoft that generates visual, customizable designs based on your text description and images.

    Microsoft

    How to add the Designer app on the Microsoft Edge sidebar

    The Designer app will exist in a preview mode, to all Microsoft Edge users with a Manifest version 4.8.5 or higher, according to Microsoft. Users who are working on managed devices will also be able to add the app on the sidebar.

    To add the Designer app, the user will need to:

    1. Open Microsoft Edge, and click on the + button. designer edge sidebar
    2. Once there, the Designer toggle should be available for users to enable. Clicking on it will enable Designer.

    For those users who are not living in Australia, India, New Zealand, South Africa, and the United States, they can still add Designer to their sidebar, but the icon will disappear every time you restart your Microsoft Edge.

    To do it, you’ll need to follow the same steps, but once you click on the + icon, type in Microsoft Designer in the search box, and select the app from there.designer edge sidebar

    It will pop up in the sidebar for the rest of your browsing session, but it will disappear once you restart Microsoft Edge.

    GraphQL Unauthorized Error: 3 Ways to Fix it

    GraphQL unauthorized error has recently reported on Facebook, and it will prevent you from using it in your browser.

    This is a major problem, especially if you use Facebook to stay in touch with your friends, but in today’s guide we’ll show you a few solutions that can help you.

    What is 401 unauthorized error in GraphQL?

    • This is a coding error and it appears if the users doesn’t have necessary permissions to access GraphQL API.
    • If you see this error on Facebook, you should know that this is a server-side issue and not something caused by your PC.

    How do I fix unauthorized error in GraphQL?

    1. Use the Facebook Messenger URL

    1. Open your browser.
    2. Navigate to Facebook Messenger in browser.
    3. Check if the problem still appears.

    2. Use the Messenger on your phone

    1. Download Facebook Messenger for your phone.
    2. Once the app is installed start it.
    3. Log in and you shouldn’t see any errors.

    3. Use Messenger app from Microsoft Store

    1. Press Windows key + S and enter store. Select Microsoft Store from the list of results.
    2. Search for messenger and select Messenger from the list of results.
    3. Click the Install button and wait for it to install.
    4. Once installed, start it and check if the problem is still there.

    GraphQL unauthorized access error in Facebook will prevent you from using the chat feature, and the only way to circumvent it is to use one of these workarounds.

    The developers are aware of this issue, and they are likely already working on it. This isn’t the first time these types of errors occurred and we covered Error performing a query on Facebook in a separate guide.

    Similar errors have been reported in the past, such as Failed to load response data error in Chrome and Error occurred while trying to proxy request.

    Did you find a more efficient way to fix this problem? If so, don’t hesitate to share it with us in the comments section.

    Fix: ITVX Not Working on Firestick – 5 Tested Solutions

    Many of our readers are complaining that ITVX is not working properly on Firestick. Since the WR test team experienced the problem, they prepared the necessary solutions to fix it.

    Why is ITVX not working on my Fire Stick?

    • The ITVX app is bugged or not updated
    • Problems with the cache and data from ITVX
    • ITVX only works in UK so you will need to install a VPN if you want to watch it from other locations.
    • Incorrect storage permissions
    • The on-demand service might be down or your network connection is problematic. Check the status for ITVX.

    How do I fix ITVX if it’s not working on Firestick?

    Before starting to tweak the app and Firestick, check these quick troubleshooting steps:

    • Make sure that you have a stable connection to your Wi-Fi hotspot and restart the router just in case.
    • If you’re using a VPN connection, try to enable or disable it and see if that changes the situation.
    • Disconnect the Firestick from your TV and its power source, leave it for about 10 minutes, and then reconnect it.

    1. Clear the ITVX cache & data

    1. In the Firestick menu, go to Settings.
    2. Now, select Applications.
    3. Now, select Manage Installed Applications and choose the ITVX app.
    4. First, select the Clear cache option and check if ITVX works. If not, come back to this menu and select Clear data instead.

    Clearing the cache and data from the ITVX app usually fixes the problem in most cases but if it doesn’t, go through with the next solution.

    2. Allow storage permissions to ITVX

    1. Go to Settings and select Applications.
    2. Now, select ITVX from the list of apps.
    3. Next, select Permissions from the list of options.
    4. Finally, on Storage, select ALLOW.

    This solution will also fix a buffering issue that some of our readers complained about.

    3. Update Firestick

    1. Launch the Firestick and select Settings.
    2. Now, select My Fire TV from the menu.
    3. Next, go to About and select Check for Updates.
    4. If you have any updates, you will have the option to Install Update.
    5. After installing the update, Firestick will restart automatically.

    Check now to see if you get any error messages on your screen. If Firestick is not booting at all, check this guide for the right solutions to fix it.

    4. Turn on automatic updates

    1. Go to Settings and select Applications.
    2. Next, select Appstore.
    3. Check if the Automatic updates are turned on. If not, turn them on from this menu.

    By turning on the automatic updates, if ITVX has any new updates, they will be loaded as soon as they are available. You can also update the app individually from the Settings>Application menu. When you select an app, you will see the option to update it if it has any available.

    5. Reinstall ITVX

    If all else failed, you may also try to reinstall the ITVX app on Firestick. To do that, go to Settings>Applications and uninstall ITVX. Next, go to the App Store and reinstall it freshly.

    Here, we conclude our guide on how to fix ITVX if it’s not working on Firestick. Hopefully, our solutions helped you fix any performance issues for ITVX on Firestick.

    Duly noted, ITVX is now making a transition from ITV Hub and they still haven’t updated the apps, but this troubleshooting guide should provide useful information.

    Also, remember that ITVX Streaming only works in the UK so make sure that you pick a UK server from the VPN Settings if you want to watch the programs from another country.

    Some of our readers also complained about Firestick not installing apps. If you have the same problem, the highlighted guide will help you.

    For any other suggestions or questions, head over to the comments section below and leave us a note.

    Solved: YouTube TV Spinning Circle Error

    It’s common for apps to have issues, so if you see the YouTube TV spinning circle, this is an easy-to-troubleshoot problem.

    This article explains everything you need to know about the YouTube TV loading wheel, including why you’re seeing it, what causes it, and how to stop it when you see it.

    Why is YouTube TV not loading?

    • Your network connection may be unstable.
    • YouTube TV may have a lot of users trying to access it at once, overloading the servers.
    • Your device is not compatible with YouTube TV.
    • You don’t have enough memory for the app to run smoothly.
    • You’re using a modded version of the YouTube app.

    How do I fix the YouTube TV constant spinning circle issue?

    Start off with the following basic workarounds:

    • Check your Internet speeds and ensure they’re fast enough for streaming.
    • Close YouTube TV, sign out of the app, reopen it, and sign in again.
    • Make sure that your date and time settings are correct on your device.
    • Unplug your router for 30 seconds and plug it back in.
    • Check for an update for the YouTube TV app and restart your TV.

    1. Check for your TV’s firmware updates

    1. For this solution, we shall be using the TCL model.
    2. On your TV, find your Settings.
    3. Go to System.
    4. Click on About then select Software update.
    5. Select Network update and click on System update.
    6. Now click on Check Update. Your system will scan for any available updates.
    7. You’ll either start downloading updates or get a message that your TV is already up to date.

    2. Clear app cache and data

    1. On your TV, find your Settings.
    2. Go to Apps and select YouTube.
    3. Scroll down and hit Clear data and Clear cache.

    3. Uninstall recent app updates

    1. On your TV, find your Settings.
    2. Go to Apps and select YouTube.
    3. Select Uninstall updates.

    Uninstalling recent app updates could help fix the issue, especially if the spinning circle started after you updated the app. This could imply the update was corrupt.

    4. Lower the streaming resolution

    1. Launch your YouTube app and open the video you wish to watch.
    2. Press the OK button on your remote to bring up the display menu, and select the Settings icon.
    3. Select Quality.
    4. From the options, choose a quality lower than your current one and see if the spinning circle disappears.

    5. Restore app to default settings

    1. On your TV, find your Settings.
    2. Go to Apps and select YouTube.
    3. Select Clear defaults.

    This will clear any customizations you’ve made on the app that may be causing it to be slow.

    6. Reinstall the app

    1. Launch the Google Play Store or Apple Store depending on your TV.
    2. Search for the YouTube TV app and click on it.
    3. Select the Uninstall button.
    4. Wait for it to finish uninstalling, then click Install again.

    7. Switch off your VPN

    If you’re using a VPN (virtual private network) to access YouTube TV from banned countries, this could be why you’re getting the spinning circle problem.

    VPNs are designed to hide your IP address from internet service providers so they can’t see what country you’re in and block your access based on that information.

    However, they can sometimes interfere with streaming services like YouTube TV by slowing down their performance or causing them to crash altogether. You can turn it off or switch to a reliable paid VPN since with the free ones, your VPN or proxy can be detected on YouTube TV.

    8. Free up your TV RAM

    If restarting your TV does not resolve the spinning circle issue, you’ll need to free up some memory. You can do this by deleting any photos, or videos stored in your internal storage or uninstalling unnecessary apps.

    Further, you can also clear the cache and data of system and rarely used apps. If you’re still not successful, you may have to factory reset your TV as a last resort. Sometimes, it’s your device that is causing compatibility issues, which can be easily resolved by wiping out all data.

    What are some other tips to avoid the YouTube spinning circle?

    • Keep your app updated at all times and only download from official sources to prevent compatibility issues.
    • Limit the number of connected devices to a minimum to prevent bandwidth hogging.
    • Update your TV firmware regularly.
    • Avoid bulking up your TV’s storage with unnecessary apps and files.

    To sum it up, there’s no good reason that you should be enduring the spinning circle of death while watching your favorite show on YouTube TV. We’re confident you can fix your issue using one of these fixes, no matter how long it’s been going on for.

    And eventhough YouTube playback errors may be in plenty, they’re always relatively easy to fix. Unless of course, it’s YouTube TV not working where you’d have to wait for an official fix.

    That’s it from us but do let us know what solution worked for you or if you have any other we’ve not mentioned here.

    How to Fix Crunchyroll Error P-DASH-114

    Encountering error P-DASH-114 while watching your favorite anime, drama, or manga on Crunchyroll can be frustrating.

    In this guide, we will talk about common reasons for the issue and discuss practical solutions so you can enjoy your favorite shows uninterrupted.

    What does Crunchyroll Error P-DASH-114 mean? The Crunchyroll Error P-DASH-114 indicates an incomplete response from the website’s server, and the system is experiencing some issues.

    • An outdated operating system or browser could cause this problem.
    • Weak internet connection.
    • Browser cache and cookies.
    • Antivirus software or ad blocker interference.

    How do I fix the Crunchyroll Error P-DASH-114?

    Before proceeding with any steps to fix this error on Crunchyroll, go through the following preliminary checks:

    • Check the Crunchyroll server status on Downdetector. If it is down, wait for some time, then try again.
    • Verify if you have a stable internet connection, and log out & log in to the app.
    • If you are getting the error on the website, try the app; if the error is on the app, try the website in the browser’s incognito mode.
    • Turn off your computer, disconnect your router from the power source, wait for 5 minutes, then reconnect the computer and router.
    • Ensure your browser is up to date or try using a different browser.

    1. Clear the browser cache and cookies

    1. Launch your preferred browser; we are taking the example of Google Chrome. Locate and click the three dots icon, and select Settings.Settings CHrome  Settings CHrome -  Crunchyroll Error P-DASH-114
    2. Click Privacy & Security from the left pane, then click Clear browsing data.Settings 2 - clear browsing data
    3. For Time range, select All time from drop-down list, and place a checkmark next to Cookies and other site data, & Cached images and files.Clear data
    4. Click Clear data.
    5. Wait a while; once the process is complete, you will see the Privacy & Security section again.
    6. Relaunch the browser and try again.

    Clearing the browsing data will refresh the website and help you fix issues like Error Code 1020 Crunchyroll Access Denied; read this guide to learn more about it.

    2. Disable the extensions

    1. Launch your preferred browser; here we are taking the example of Google Chrome. Locate and click the three dots icon, select Extensions, then Manage Extensions.Extensions chrome -Crunchyroll Error P-DASH-114
    2. Locate Ad-blocker and VPN extension, and click the toggle switch to disable them.
    3. Relaunch the browser and try to open Crunchyroll.

    If you have a VPN app, you must temporarily disable that; if you have an inbuilt VPN connection, you can check out this guide to learn the steps.

    3. Turn off the Windows Security temporarily

    1. Press the Windows key, type windows security, and click Open.Windows Security open Windows key -Crunchyroll Error P-DASH-114
    2. Go to Virus & threat protection, and select Manage settings.Manage settings
    3. Locate the Real-time protection option and toggle off the switch next to it.Real time protection off
    4. Click Yes on the UAC prompt to confirm.

    If, after disabling antivirus software, you can access Crunchyroll, then consider adding it as an exception to the software; follow these steps:

    1. On the Windows Security app, Go to Virus & threat protection, and select Manage settings.Manage settings
    2. Select Add or remove exclusions.Add exclusions -Crunchyroll Error P-DASH-114
    3. Click Yes on the UAC prompt.
    4. Now, click the Add an exclusion button, then select File.Add an exclusion
    5. Browse the computer to locate the .exe file of Crunchyroll. You can look for it in Program Files on your system drive; once located, select it and click Open to add the app to the exclusion list.

    4. Clear the Watch List

    1. Launch your preferred browser and log in to your account.
    2. Click Menu, then select Queue.
    3. Navigate to My Queue, then select the shows list and delete them.
    My Queue - Crunchyroll Error P-DASH-114

    If you are using the app, then follow these steps:

    1. Launch the mobile app and navigate to My Account.
    2. Go to My Lists, select the show from the list, and click Remove from WatchList.Remove from Watchlist - Crunchyroll Error P-DASH-114
    3. Relaunch the app to see if the issue persists.

    5. Delete the app cache

    1. Press Windows + I to open the Settings app.
    2. Go to Apps, then select Installed apps.Apps - Installed apps -  Crunchyroll Error P-DASH-114
    3. Locate Crunchyroll, click the three dots icon, and select Advanced options.Crunchyroll, click the three dots icon, and select Advanced options
    4. Go to the Reset section and click the Reset button to clear the app cache.Reset

    Remember, this action will delete app data from this device, which means you must sign in to the app again, so keep the password handy.

    Resetting the app cache can also fix issues like internal server errors on the Crunchyroll app; read this to learn more about it!

    6. Check for the app updates

    1. Press the Windows key, type microsoft store, and click Open.Microsoft Store - Crunchyroll Error P-DASH-114
    2. Go to Library, then click Get updates.
    3. Scroll through the list, look for Crunchyroll, and click Update.Update the app
    4. Wait for the updates to download & install, and restart your PC if prompted.

    Updating the app can help you fix common glitches and errors like Crunchyroll error 502 on all devices, including Android, iOS, and Mac; read this guide to learn the steps.

    7. Reinstall the Crunchyroll app (Last Resort)

    1. Press Windows + I to open the Settings app.
    2. Go to Apps, then select Installed apps.Apps - Installed apps - Crunchyroll Error P-DASH-114
    3. Locate Crunchyroll, click the three dots icon, and select Uninstall.Advanced options - Uninstall
    4. Click Uninstall again to confirm.
    5. Once the app is removed, go to the Microsoft Store and click Install to get the Crunchyroll app again.

    Now sign in using the correct credentials and enjoy the anime shows you choose. Avoid using the same account to stream the shows on multiple devices simultaneously to prevent bandwidth strain.

    If nothing worked for you, the chances are there could be issues with your Crunchyroll account; contact the company’s customer support for further assistance.

    Did we miss a step that helped you? Don’t hesitate to mention it in the comments section below. We will add it to the list!

    Solved: YouTube Locate is Not Working

    If YouTube TV cannot find your current location and throws you an error every time you try to access the content in your region, this guide can help!

    We will discuss the common reasons for the issue and practical solutions to fix it so you can watch the content without any trouble.

    Why does YouTube TV not recognize my location?

    • The location settings of the device are disabled.
    • Browser cache and cookies could be responsible.
    • Browser extension interference.
    • Outdated browser or device OS.

    What can I do if YouTube can’t verify my location?

    Before proceeding with any steps to fix YouTube TV not recognizing the location, go through the following preliminary checks:

    • Check if your internet connection works fine, and try using a different browser.
    • Ensure you are using the same email address you used to sign up for the subscription, and sign out & sign back into your YouTube TV app.
    • Turn off your computer, disconnect your router from the power source, wait for 5 minutes, then replug the computer and router, and update your Windows OS.
    • Switch to a different account and wait for a few minutes, then switch back to the main one.
    • Select the US server location on the VPN service if you are in a different physical location.

    1. Turn on the location services for the YouTube TV app

    1. Press Windows + I to open Settings.
    2. Go to Privacy & security, then under App permissions, click Location.Privacy & security - YouTube Locate is Not Working
    3. Make sure the toggle button for Location services is turned on.Location services
    4. Look for the YouTube TV app and tap the toggle button to turn the location on.

    2. Verify your location

    1. On your mobile device (Android or iOS), launch your preferred browser and go to this verification site.
    2. Ensure the location services are enabled, then follow the on-screen instructions to confirm the current location.

    3. Update your Current Playback Area

    1. Launch your preferred browser, and sign in to the YouTube TV website with the correct email address.
    2. Go to the Profile icon and select Settings.YouTube Locate is Not Working -Profile icon and select Settings
    3. Click the Area option from the left pane, and click Update.YouTube Locate is Not Working
    4. Now click Allow on the pop-up to access the location of the device.Allow
    5. If you are on TV, it might ask you to go to the Verification site, open the browser on your mobile device, and let it access the location. However, on your computer, there is no need for the additional step.

    Keeping your home area updated can help you watch the local channels of your region and avoid YouTube TV Playback errors.

    4. Clear browser cache & cookies & disable extensions

    1. Launch the browser you generally use; we are demonstrating steps using Google Chrome. Locate and click the three dots icon, then select Settings from the drop-down menu.Settings CHrome - Youtube locate not working
    2. Click Privacy & Security, then select Clear browsing data.Settings 2 - Clear browsing data
    3. For Time range, select All time from drop-down list, and place a checkmark next to Cookies and other site data, & Cached images and files.
    4. Click Clear data.Clear data
    5. Wait a while; once the process is complete, click Extensions.Manage Extensions - YouTube Locate is Not Working
    6. On the next page, click Remove for the unwanted extensions and toggle off the switch next to others to disable them temporarily.Remove
    7. Relaunch the browser and check if the issue persists.

    Clearing the browser cache and cookies will remove all pre-store data, refresh the website, and help you fix issues like can’t click on YouTube videos.

    5. Clear the app cache (Applicable if using the YouTube TV app)

    1. Press Windows + I to open Settings.
    2. Go to Apps, and click Installed apps.YouTube Locate is Not Working
    3. Locate the YouTube TV app, click the three dots icon, then Advanced options.Advanced options - YouTube Locate is Not Working
    4. Go to the Reset section and click the Reset button to clear the app cache.Reset

    Once done, all the data related to the app will be deleted, and you need to sign in to the app again, so keep the credentials handy.

    Removing the app data cache and using a stable internet connection can help you maintain good streaming quality; read this guide for more tips.

    6. Check for app updates

    1. Press the Windows key, type microsoft store, and click Open.Microsoft Store - YouTube Locate is Not Working
    2. Go to Library, then click Get updates.
    3. Scroll through the list, look for YouTube TV, and click Update.Update the app

    7. Reinstall the app

    1. Press Windows + I to open Settings.
    2. Go to Apps, and click Installed apps.YouTube Locate is Not Working
    3. Locate the YouTube TV app, click the three dots icon, then Uninstall.Advanced options - Uninstall
    4. Click Uninstall again to confirm the action.
    5. Now, go to the Microsoft Store and download the YouTube app again.

    How can I change my current playback area on YouTube TV?

    You can follow the steps mentioned in Method 3 to update your current playback area on your computer in a browser.

    The steps to perform this action on a mobile app are similar; look for the relative options. If you use a mobile device to access YouTube TV, you can follow the above-mentioned methods to fix the error.

    Remember that you can only change your home area twice a year; to update it, you must be physically present in the same region to avoid Outside your home area error message.

    While traveling, you can view local programs from different regions but not from your home area, and you can’t record local programs from other regions.

    In case you are still facing the issue, go to the YouTube Help Center and click Contact Us for further assistance.

    If you have any questions or suggestions about the subject, feel free to mention them in the comments section below.

    Spiderman 2 Galvanize not Working: Tested Quick Fix

    We were playing Spiderman 2 in Windows Report labs and as soon as the Galvanize prompt appeared on the screen in the Set Things Right mission, the game froze. Reloading didn’t work but the WR gaming team came up with a quick solution.

    Why is Spiderman 2 Galvanize not working? Galvanize doesn’t work in Spiderman 2 because there is a glitch in the UI of the prompt that causes the game to freeze.

    How do I fix the Spiderman 2 Galvanize not working issue?

    1. Go to the game menu.
    2. Load the game from the latest checkpoint in the Set Things Right mission.
    3. Press L1 + X immediately after the game loads.

    After that, you will be able to use Galvanize even after cooldown because the game won’t freeze up anymore.

    As it’s a UI prompt glitch, we’re expecting for it to be fixed soon so if you didn’t get to the Set Things Right mission, update the game and you probably won’t need this guide anymore.

    More info about Galvanize on Spiderman 2

    Galvanize is triggered with the L1 + X combination on your controller, and it’s a new action in the Set Things Right mission on Spiderman 2.

    With Galvanize you will be able to punch an enemy into the air, additionally shooting bolts of electricity at other enemies. If you continue to hit them, the action will increase its intensity.

    Other known Spiderman 2 bugs/glitches

    • Spiderman 2 installation stuck at 36% – This happens when you install the game from a physical disc. Try installing the game in safe mode or offline to fix this issue.
    • Can’t install Spiderman 2 on SSD – Move the game to the system storage if you’re having this problem.
    • Spiderman 2 crashing – We’ve encountered this problem while the console is overheating. So, that is mainly a console issue. Change its position and try to clean it from dust and debris.

    So, hopefully, by using this guide, you got rid of the Spiderman 2 Galvanize not working issue and now you’ve completed the mission.

    If you’re a Spiderman fan, check out our selection of online Spiderman games you can play on your browser.

    You might also be interested in our list of the most popular triple-A titles on Xbox.

    For any other questions, feel free to use the comments section below and let us know about them.

    Error: /usr/bin/xcodebuild Failed With Return Code: 65 [Fix]

    Many developers encountered ## error error /usr/bin/xcodebuild failed with return code 65, and in today’s guide, we’re going to show you few methods you can use to fix this error.

    What is error code 65 in Xcode build?

    This error is usually caused by address code signing issues, your project settings or problems with dependencies.

    How do I fix error: /usr/bin/xcodebuild failed with return code: 65?

    1. Fixing the address code signing issues

    1. Verify if your Apple Developer Program membership is active, then go to Project Settings and double-check your signing certificate for your project.
    2. In Project Settings, also make sure that the provisioning profile is the same as the one from Apple Developer Account. You may also refresh the provisioning profile in Xcode to make sure.
    3. If the Error /usr/bin/xcodebuild failed with return code 65 is still present, revoke your signing certificate and create a new one.

    The address code signing is the main problem when getting the return code 65 in Xcodebuild so make sure that everything is alright with the membership and signing certificate.

    2. Fixing incorrect project settings

    1. Go to the General tab in the Project Settings of your project, then locate Bundle Identifier and see if it matches the one in your Apple Developer Account.
    2. On the same General tab, check the Deployment Target. That is the lowest iOS version your app supports, and it must not be higher than the one on your simulator.
    3. Check all the options in the Project Settings and verify if you have the same in the Apple Developer Account.
    4. After you have made all the changes, clean and rebuild your project in Xcodebuild.

    After doing that, check if ## error error the process ‘/usr/bin/xcodebuild’ failed with exit code 65 is gone.

    3. Running tests individually and debugging

    1. Run the tests individually, it should help you pinpoint the problem.
    2. Next, use the debugger to find the cause of the issue.
    3. You might have to repeat these steps several times to pinpoint the cause of the problem.

    4. Cleaning the Build folder and checking for errors

    1. In Xcode, go to the Product menu and select Clean Build Folder to delete all the files from your previous builds.
    2. Now, go to Product again and select Build to create a clean build.
    3. Check if the error persists.

    5. Uninstall and reinstall Xcode

    1. Go to the Applications folder.
    2. Locate Xcode and move it to the Trash bin.
    3. Empty the Trash bin.
    4. Next, run the installer again or download it from Apple Developer Xcode page.

    6. Resetting the iOS Simulator

    1. Go to Xcode, select Open Developer Tool, and choose Simulator.
    2. Click on Device and select Erase All Content and Settings.
    3. Once you reset the Simulator to default settings, rebuild your project and see if you still get the error.

    7. Fixing the Libraries and Dependencies

    1. Check if the dependencies are compatible with both Xcode and the iOS version you’re developing for.
    2. If necessary, check and update the dependencies configuration.
    3. Lastly, rebuild your project.

    Tips on how to avoid the /usr/bin/xcodebuild failed with return code 65 error

    1. Keep your Xcode updated to avoid any bugs or lack of functionality.
    2. Clean your build regularly to remove the clutter that can cause issues with your code.
    3. Use Git to control any changes in your code and revert the build whenever problems occur.
    4. Review your dependencies and test your build as often as possible.

    ## error error /usr/bin/xcodebuild failed with return code 65 can be tricky to fix, since it’s a developer error, but hopefully, this guide managed to help you.

    If you’re an advanced coder, you might also want to install the Xcode command line tools.

    You may also be interested in the best cross-platform code editors that might offer additional help.

    For any other suggestions on how to fix this error, feel free to use the comments section below and let us know.

    Southwest Error 500120309: How to Fix it

    The Southwest Airlines app is known to throw errors from time to time, but Error: 500120309 is rather tricky to troubleshoot, given the surprising absence of any reliable information on the web.

    The error message, encountered on all three: iOS, Android, and the official website, reads, Something went wrong, please try again. Error: 500120309.

    What is error 500120309 on the Southwest app?

    This is a sign-in error. While most couldn’t log in and received the error message, others were kicked out of the session within minutes of signing in, with the same Error: 500120309 appearing. Here are a few reasons you are getting the error:

    • Missing critical permissions
    • Issues with the app cache
    • App or website is blocked on the network
    • The servers are facing an outage

    How do I fix Southwest error 500120309?

    Before we start with the slightly complex solutions, try these quick ones first:

    • Restart the device that’s throwing the error. Also, if you get it on a website, switch to the browser’s incognito/private mode.
    • Verify whether Southwest Airlines is facing a server outage using a service like Downdetector. If that’s the case, try again in some time.
    • Switch to another network. If using Wi-Fi, try mobile data, and vice-versa.
    • Make sure your network doesn’t block access to the Southwest Airlines’ server. A few reported this issue on public networks.
    • Check for any pending app and phone software updates and install them.

    If none work, head to the fixes listed next.

    1. Grant all permissions

    Your primary approach should be to grant all permissions to the app when faced with Southwest Error: 500120309 on iPhone or Android. It should be able to access the network, location, and any other permissions listed.

    Southwest on iPhone

    For the web browser, make sure to grant the critical permissions under Site Settings. These are specific to every website.

    2. Clear the app data

    2.1 On Android

    1. Open the phone settings, and select Apps.
    2. Now, tap on Southwest and then choose Storage.storage
    3. First, tap on Clear data and wait for the process to complete. Then, tap Clear cache.clear data to fix southwest error 500120309
    4. Finally, launch the app and check for improvements.

    Clearing the cache and app data also helps when you can’t sign into OneDrive on Android.

    2.2 On iPhone

    iPhones don’t offer a built-in method to clear the app cache. You can offload the app but will be forced to reinstall it. The only benefit is that the critical app is retained.

    3. Reinstall the app

    3.1 On Android

    1. Locate Southwest on the app screen, tap and hold it, and choose Uninstall from the flyout menu.uninstall app
    2. Tap OK in the confirmation prompt that appears.
    3. Once done, restart the Android device.
    4. Now, download the Southwest Airlines app from the Google Play Store.

    3.2 On iPhone

    1. Hold the Southwest app on the homescreen, and select Remove App.remove app
    2. Tap on Delete App.delete app to fix southwest error 500120309
    3. Finally, tap Delete in the confirmation prompt.
    4. Restart your iPhone, and download Southwest from the App Store.

    4. Access the website instead

    If you are only encountering the Southwest Error 500120309 on a mobile phone, open the Southwest website instead.

    For most users, the website worked fine even when the app was throwing errors or not working altogether.

    5. Contact Southwest support

    When nothing else works, the last option is to context Southwest support. There are several channels available, including a phone number and email address, or you could even send them a letter.

    If it’s a bug in the installed version of the app or a server outage, they should be able to provide a timeline as to when things will be up and running.

    As you see, there aren’t many fixes available, given the low instances of the error. But with a basic understanding of the Southwest Error 500120309 meaning and the solutions, you should be able to sign in!

    Remember, most app issues are fixed this way, including when the Threads app is not working.

    For any queries or to share what worked in your case, drop a comment below.

    Solved: Novafam2023 Code is Not Working

    We all love a good deal, so it can be a bummer when your Novafam2023 code is not working at checkout.

    Nevertheless, you might salvage a chance to make extra savings by making a few adjustments and getting the coupon code for Fashion Nova to work.

    What can I do if my Novafam2023 code is not working?

    Start off with the following basic workarounds before any advanced troubleshooting:

    • Before you start to panic, make sure that the Novafam2023 is an active code.
    • Check the terms and conditions for the code as it may be an exclusive code for students or another group of online shoppers.
    • Switch to the app if you were using the web version. Some codes are limited to the app.
    • Sign out, then sign back into your account and verify that you’ve typed in the discount code correctly. Some are case-sensitive, so ensure you adhere to these rules.
    • Ensure you’re not trying to apply two discount codes simultaneously.

    1. Update your app/browser

    The first thing you should do when a discount code is not working on Fashion Nova is check the app’s version. If you’re using an outdated version or your phone’s operating system is outdated, you may have issues redeeming discount codes like the Diablo IV and others.

    It is also important to ensure your browser is updated if you’re checking out on the web version. Older browsers may not support the latest technologies required for Fashion Nova discount codes to work properly.

    2. Check your internet connection

    If you’re using the app, make sure you have a stable internet connection. This can be very frustrating when you’re trying to check out your cart but it keeps failing because of poor internet connection.

    If you are using a Wi-Fi connection, then make sure that your router is working properly. Network issues are varied, so you’ll have to do a lot of trial and error. A good rule of thumb is to do a speed test or try with another connection if available.

    3. Clear app cache

    1. Tap on settings on your phone.
    2. Next, tap on Apps.
    3. Find the Fashion Nova app and tap on it.
    4. Scroll down and select Storage.
    5. Tap on Clear data and Clear cache, then try again.

    If you’re using the browser version, proceed to clear the cache as well and retry the discount code.

    4. Create a new account

    According to some users, the code only works for new users, so a workaround would be to create a new Fashion Nova account with a new email and then enter the code. You can get free trials from services like Paramount for new users so this could be a similar case.

    Alternatively, if you have an employee friend who works at Fashion Nova, you can ask them to checkout using their accounts, as some users claim that particular code was an exclusive discount for employees only and not a site wide offer.

    5. Reinstall the Fashion Nova app

    If you still can’t get your Novafam2023 discount code to work after updating the app, try deleting it from your device and re-installing it from the App Store or Google Play Store, depending on what device you use.

    Others switched to using a VPN. Although it may get you that discount, on the downside, your delivery address will be restricted to areas covered, so the special deal won’t be so special after all.

    6. Look for other promo codes

    Unfortunately, with some promotional codes, you have to jump through lots of hoops to actually get them to work. And even after troubleshooting, the discount code may not go through because they are often a limited-time coupon code.

    Still, that’s no reason to stop adding items to your shopping cart or quit online shopping. With the Chrome Honey extension, you can make huge savings.

    This extension helps you fish out online coupons with special discounts you can apply at checkout for instant savings. You can also sign up for Fashion Nova’s email newsletter so that you can be notified of any price reduction codes or gift cards.

    A section of users also reported that switching their payment methods specifically to Apple Pay enabled them to checkout without the Novafam2023 discount code being yanked out.

    What does it mean discount code isn’t available to you right now?

    This could mean the server is overloaded with too many requests, your order doesn’t meet minimum requirements, or the discount code has been exhausted. Usually, these coupons are rolled out in a given quantity, and people are using them, hence decreasing the inventory.

    If these still don’t work, you can wait it out. There are some instances where the coupons are disabled for a short period of time and will be activated later. Otherwise, contact Fashion Nova directly through their Customer service contact or Facebook page for further assistance.

    And if you’re looking to make the most out of your savings spree, you might want to check out how you can acquire the Xbox Game Pass Ultimate at ridiculously low prices.

    Hopefully, these fixes will help you move past the issues you’re having and let you shop in peace. If you have any tips and tricks up your sleeve, we’d love to hear about them, so drop us a comment below.

    F1 TV BM1300 Error: 3 Ways to Get it Working Again

    The F1 TV BM1300 error will prevent you from using the service, so you won’t be able to view any races at all.

    This error is serious since you won’t be able to stream any content at all, but there might be ways to fix this problem, and in today’s guide we’ll show you how to do that.

    Why am I getting an F1 TV BM1300 error?

    • Issues with the app or service on a specific platform can cause this error.
    • In some instances, your VPN can lead to this error.

    How can I fix the F1 TV BM1300 error?

    1. Use a different app or a browser

    1. The platform that you’re using the app on may be having issues.
    2. Try playing the stream from your phone or any other Android or iOS device.
    3. Alternatively, try playing it from your web browser on a PC.

    2. Use the community apps

    1. Download Race Control or F1Viewer.
    2. Start the desired application.
    3. Log in with F1 TV credentials and check if the issue is gone.

    Both of these apps are developed by the community, and they use F1 TV API. Race Control is PC-exclusive, but F1Viewer is available on multiple platforms.

    3. Disable VPN

    1. Navigate to Settings and select Applications.
    2. Next, head to Manage Installed Applications.
    3. Select your VPN and choose Disable.

    Keep in mind that these are instructions for Firestick, but if you’re on any other device, disabling the VPN will require different steps.

    Why is the F1 app not working on my Firestick?

    • VPN is the common culprit for F1 app issues.
    • Your firmware might be outdated and it needs updating.
    • Older versions of Firestick might encounter compatibility issues with the app.
    • Issues with the network connection.

    If you’re getting an F1 TV BM1300 error on Roku or any other device, it’s best to switch to a different platform or use community apps since the official ones are having issues.

    Unfortunately, streaming errors are somewhat common and we wrote about TV App-00116 streaming error, Freevee error code ITV-101, and Sling TV authorization error errors in the past guides.

    What method did you use to fix this error? Share your findings with us in the comments section.

    How to Fix Unable to Play Video: Error 150 on Google Slides

    Google Slides has become our go-to presentation suite due to its ease of accessibility across devices, but when playing embedded videos, a few users reported Error 150. As per reports, Google is aware of the problem and hasn’t yet released a fix.

    But it doesn’t mean that the error can’t be fixed. Many, including us, were able to play videos that earlier showed Unable to play video. Error: 150 in Google Slides.

    What is error 150 on Google Slides?

    Error 150 in Google Slides affects embedded videos when there are copyright issues or the creator doesn’t allow embedding. The error code may show up for one or more videos but doesn’t necessarily affect all.

    Since it’s rather new, there’s not much information available for the error message.

    How do I fix Unable to Play Video: Error 150 on Google Slides?

    Before we start with the slightly complex solutions, try these quick ones first:

    • Use another device for the slideshow and check whether the video now plays fine.
    • Make sure you are running an updated version of the browser. Also, you could try switching to another one. We recommend Opera.
    • Verify whether the video has copyrighted content or the creator doesn’t allow it to be embedded. 
    • A user suggested a workaround where you could use the video’s link instead of manually searching for it.

    If none work, head to the fixes listed next.

    1. Change the video settings

    If you published the video throwing Error 150 in Google Slides on YouTube, changing the video settings will do the trick! You just need to allow embedding.

    To enable video embedding, open your YouTube account > click the profile icon near the top-right corner > choose YouTube Studio > select Content from the left pane > click on the problematic video > scroll down and tick the checkbox for Allow embedding.

    2. Set permissions to Unrestricted YouTube access

    1. Sign into your Google Admin console with the administrator account.sign in
    2. In the menu, select Apps.
    3. Now, choose Additional Google Services, and click on YouTube.
    4. Click on Permissions.
    5. Finally, with the organizational unit highlighted, select Unrestricted YouTube Access, and click Save for the changes to come into effect.unrestricted YouTube access to fix error 150 google slides

    3. Clear the browsing data

    Tip icon Tip
    The steps listed here are Google Chrome and work across Chromium-based browsers. In case you use another one, check the developer’s website for the exact steps.
    1. Launch the browser and press Ctrl + Shift + Esc to open the Clear browsing data utility.
    2. Now, select All time from the Time range dropdown menu, tick the checkbox for Cookies and other site data and Cached images and files, then click on Clear data.clear browing data to fix error 150 google slides
    3. Once done, relaunch the browser and check whether Error 150 is fixed in Google Slides.

    If it’s the corrupt cache and cookies to blame, deleting them will do the trick! Clearing the browsing data also helps when Google Docs won’t print.

    4. Add the video from Google Drive

    Error 150 in Google Slides only affects YouTube videos, not those uploaded through Google Drive. So, all you need to do is upload the video to your Google Drive account and then embed it into the presentation.

    To add videos to Slides from Google Drive > upload the video to Google Drive > click on Insert in Google Slides > select Video from the flyout menu > go to Google Drive > choose the video you want to embed.

    5. Open the video directly on YouTube (workaround)

    If the problem remains unresolved, Google suggests a workaround where you should directly open the non-embeddable videos on YouTube. 

    This works across video formats and is the best way to go until Google releases a fix for Error 150 on a Google Slides video.

    What’s the maximum limit on Google Slides?

    Though there’s no absolute restriction on the number of slides, you can create slideshows up to 100 MB in Google Slides. While importing PPTX files, the limit is 300 MB (increased from the previous 100 MB).

    After understanding the meaning of Error 150 in Google Slides and solutions/workarounds, you should be able to embed most, if not all, of the videos that previously threw the error. 

    In case you are an avid user of the suite, learn how to add borders in Docs. Besides, if the toolbar is missing in Google Docs, use the keyboard shortcut or modify permissions. 

    For any queries or to share which fix worked for you, drop a comment below.

    Adult Swim App Not Working: How to fix it

    Most problems with streaming apps like Adult Swim not working are usually internet-related. However, when your internet speeds are awesome but your app still won’t load any videos, there may be other app-related issues that need to be fixed.

    That’s our main focus in this article, so keep reading to find out how you can continue enjoying uninterrupted content.

    Why is Adult Swim website not working?

    • The server could be down, scheduled for maintenance, or overloaded with excess traffic.
    • Your current package may have been repackaged to another tier.
    • You may not have authenticated your cable or satellite subscription.
    • Your time settings may be off, or you’re accessing the content from a geo-blocked location.
    • You may be facing a range of network issues that are disrupting the connection.

    What can I do if the Adult Swim app is not working?

    Attempt the following basic troubleshooting steps before any advanced troubleshooting:

    1. Authenticate your cable provider

    If you’re having trouble watching Adult Swim, it’s likely that you’ve been unable to authenticate your cable provider.

    This is because Adult Swim is a pay-per-view channel and requires you to have a subscription with at least one cable service provider. Note that if your cable provider is not among the listed ones, you cannot access Adult Swim content.

    2. Resolve your Internet issues

    2.1 Check for Internet connection issues

    1. Press Windows + I to launch Settings.settings windows 11
    2. Select System then click on Troubleshoot.Open system troubleshooter
    3. Navigate to Other troubleshooters.
    4. Click the Run button next to Internet Connections.
    5. Select Troubleshoot my connection to the Internet in the pop-up window and wait for Windows to identify the problem and recommend a fix.

    If this doesn’t work, you can forget the network and then reconnect to it again.

    2.2 Perform a Network reset

    1. Hit the Windows key and click on Settings.settings windows 11
    2. Navigate to Network & internet and select Advanced network settings.going advanced network settings win11
    3. Click on Network reset.clicking network reset win11 settings
    4. Next, hit the Reset now button. clicking reset now for network reset win11 settings

    The above are just a few but not exhaustive general Internet troubleshooting steps you should perform whenever you try to play content on Adult Swim app, and the screen freezes. You can also check whether there are issues with your router, update its firmware, or try another connection if available.

    3. Empty the app cache

    1. Tap on settings on your phone.
    2. Next, tap on Apps.
    3. Find the Adult Swim app and tap on it.
    4. Scroll down and select Storage.
    5. Tap on Clear data and Clear cache, then try again.

    4. Enable/Disable your VPN

    1. Press the Windows key and select Settings.settings windows 11
    2. Next, select Network & internet and click on VPN in the right-side menu.
    3. Select the VPN connection you want to disable, click on the drop-down and select Remove.remove VPN

    Depending on your location, Adult Swim may or may not be accessible. Try switching up your location and see if you can get the app working again.

    Also, ensure you’re using a VPN capable of bypassing geo-blocking. Apps like Xfinity block VPNs, especially free VPNs, so ensure you go for a reliable one.

    5. Reinstall the app

    Sometimes, an app can get stuck in a crash loop or just not function properly. To get around this problem, you can try uninstalling and reinstalling the app.

    Also, ensure you’re installing it from the official source or other trusted sources like Google PlayStore. Some third-party apps have been known to include malicious code or other modifications as part of the bundle. This could interfere with how the Adult Swim app functions.

    6. Resolve issues with your cable provider

    In other cases, the Adult Swim app may be functioning well, but your cable provider is having issues. For instance, if Xfinity is your cable provider, it may be throwing the Xfinity 500 error if its server is overloaded.

    This in turn affects other connected applications, so you may have to wait it out or attempt a fix for that first.

    7. Contact customer support

    According to a section of users, they were unable to view content from a particular channel. In response, Adult Swim left a statement that there have been changes in subscriptions, and some have been repackaged to another tier.

    If you’re trying to load a specific video, but it is stuck on the loading page, this could be the problem. You can contact Adult Swim for further assistance.

    Unfortunately, there are so many different reasons why a website can go down, and it’s just a matter of trial and error until you fix it. In some cases, waiting it out is the best option.

    We’d love to hear about any other solutions not mentioned here that worked out for your Adult Swim app not working at some point. Share them with us in the comment section below.

    Fix: Can’t Switch Between Headphones and Speakers Automatically on Windows 11

    If your audio device can’t automatically switch between your headphones or speakers on your Windows 11 computer while playing your favorite audio or video, this guide can help!

    We will explore the common reasons for the issue and discuss the expert-recommended solutions to fix the audio output problem.

    Why does my laptop not automatically switch to headphones?

    • Outdated sound drivers.
    • Bad or pending Windows updates.
    • Malfunctioning hardware.
    • Third-party app interference.

    How do I fix can’t switch between audio devices automatically on your Windows 11?

    Before proceeding with any steps to switch between headphones & speakers on your Windows 11 automatically, go through the following preliminary checks:

    • Ensure you have updated Windows to the latest version.
    • Make sure all the audio devices are connected. You can also try restarting your computer and then replugging the headphones.
    • Try plugging in the headphones to another device to ensure it is working.
    • If the audio device is connected via Bluetooth, disconnect and pair it again.

    1. Run the Audio troubleshooter

    1. Press Windows + I to open the Settings app.
    2. Go to System, then click Troubleshoot.troubleshoot -Switch Between Headphones and Speakers Automatically on Windows 11
    3. Click Other troubleshooters.Other troubleshooters
    4. Locate Audio, then click Run. Follow the onscreen instructions to complete the process.Audio Run thre troubleshooters

    2. Run the Hardware and Devices troubleshooter

    1. Press Windows + R to open the Run dialog box.explorer_msdt.exe -id DeviceDiagnostic
    2. Type msdt.exe -id DeviceDiagnostic and click OK to open the Hardware and Devices window.
    3. Select Advanced.Advanced - Hardware and Devices troubleshooter -Switch Between Headphones and Speakers Automatically on Windows 11
    4. Click Apply all repairs automatically and click Next.Apply all repairs automatically and click Next.
    5. The troubleshooter will try to find the problem and list the problematic device. If that’s not the device, click the I don’t see my device listed option.msdt_I don’t see my device listed
    6. It will detect the issue and find a solution; click Apply this fix and restart your computer.Apply this fix
    7. Once your PC boots up, check if the issue persists.

    3. Set the audio device as Default device

    1. Press Windows + I to open Settings.
    2. Go to System, then select Sound.System, then select Sound - Switch Between Headphones and Speakers Automatically on Windows 11
    3. Click the More sound settings option.More sound settings
    4. On the Playback tab, locate your headphones, right-click, and select Set as Default Device.Set as Default device.
Click Apply, then OK.
    5. Click Apply, then OK.

    Setting the default device on your computer can help you easily switch between headphones and speakers, mainly if you use more than one audio output on Windows.

    4. Update the sound drivers

    1. Press Windows + R to open the Run dialog box.Device Manager Run command - Switch Between Headphones and Speakers Automatically on Windows 11
    2. Type devmgmt.msc and click OK to open Device Manager.
    3. Locate and click Sound, video, and game controllers to expand it.
    4. Right-click the sound driver and select Update driver from the context menu.Select Update driver
    5. Click Search automatically for drivers; if found, proceed with the steps to update it.Update driver 2 -Switch Between Headphones and Speakers Automatically on Windows 11

    Alternatively, you can update your drivers by using specialized tools, such as Outbyte Driver Updater. This Software will scan your system, identify any broken or missing drivers, and download new, up-to-date ones. The whole process only takes a few minutes.

    5. Reinstall the sound drivers

    1. Launch the Device Manager app and click to expand the Sound, video, and game controllers category again.
    2. Right-click the sound driver, and select Uninstall device.Uninstall device -Switch Between Headphones and Speakers Automatically on Windows 11
    3. Now, go to your device manufacturer’s website; here, we are taking an example of HP devices.
    4. Select the type of device from Laptop or Desktop.Select the type of device from Laptop or Desktop
    5. Enter the serial number and click Submit. Then, mention your Windows OS to proceed.Submit
    6. Click the + icon near All drivers to expand. Locate Driver-Audio.All drivers to expand. Locate Driver-Audio - Switch Between Headphones and Speakers Automatically on Windows 11
    7. Click Download to get the latest driver.

    Now, to install the driver on your PC securely, follow these steps:

    1. Right-click the downloaded driver file and select Properties.Select Properties - Switch Between Headphones and Speakers Automatically on Windows 11
    2. Go to the Compatibility tab, place a checkmark next to Run this program in Compatibility mode for, choose the operating system from the drop-down menu, then click OK and close the window.
    3. Now, double-click the driver setup file and follow the on-screen instructions to install it.
    4. Once done, restart your computer.

    Remember to keep the device drivers and Windows OS updated to the latest version to avoid other similar audio device issues like Windows recognizing headphones as speakers.

    To avoid the issue of switching automatically between speakers and headphones in the future, select the headphones or audio device as the Default device you use the most.

    Did we miss a step that helped you? Don’t hesitate to mention it in the comments section below. We will happily add it to the list.

    Solved: FiveM Could Not Contact Entitlement Service

    If you see a FiveM has encountered an error popup with a Could not contact entitlement service message while launching the  Grand Theft Auto V, this guide can help!

    Some of the main reasons why you see the Could not contact entitlement service message on FiveM include:

    • The FiveM server is down.
    • Weak internet connection.
    • Antivirus software or Windows Firewall blocking the access.
    • The account related to FiveM is not verified.

    Here’s how to fix it:

    How to fix FiveM code 530 Could not contact entitlement service?

    First and foremost, check the server status of FiveM. If there is a downtime, wait for the servers to return online. If the servers are up and running, try the following:

    1. Reset your network connection

    1. Press Windows + I to open the Settings app.
    2. Go to Network & Internet, and select Advanced network settings.Network & Internet  - FiveM Could Not Contact Entitlement Service
    3. Click Network reset.Network Reset
    4. On the next page, go to Network reset and click Reset now.Network Reset now
    5. You will be prompted to confirm the action; click Yes to proceed. Once done, your computer will restart in 5 minutes, so save all the work before it reboots.

    2. Allow FiveM through the Windows Firewall

    1. Press the Windows key, type control panel, and click Open.
    2. Select Category for View by and click System and Security.
    3. Under the Windows Defender Firewall option, click the Allow an app through Windows Firewall option.Windows Defender Firewall option, click the Allow an app through Windows Firewall option -FiveM Could Not Contact Entitlement Service
    4. On the Allowed apps page, look for FiveM and related things; if not listed, click Change settings.
    5. Next, click Allow another app.Change app =click Allow another app.
    6. Click Browse, select the file and click Add. Browse, select the file and click Add.
    7. Now you will get FiveM in the Allowed apps list; place a checkmark next to Private and Public, then click OK.

    3. Delete the DigitialEntitlements & cache files

    1. Press Windows + R to open the Run window.explorer_ Local App data
    2. Type %localappdata% and click OK to open the Local folder in the AppData directory.
    3. Next, in the Local folder, select the DigitalEntitlements file and click the Delete icon to remove it from the folder.explorer_ocal folder, select the DigitalEntitlements
    4. Next, in the Local folder, navigate to this path: FiveM\FiveM.app\data
    5. Press Ctrl + A to select all files, then click the Delete icon.explorer_FiveM\FiveM.app\data
    6. Once done, relaunch the game to check if the issue persists.

    4. Verify the integrity of game files

    1. Press the Windows key, type steam, and click Open.Steam Open -FiveM Could Not Contact Entitlement Service
    2. Go to Library, locate your games from the left pane, right-click, and select Properties. Library, locate your games from the left pane, right-click, and select Properties
    3. Next, click the Installed files option from the left pane, and click Verify integrity of game files.Installed files option from the left pane, and click Verify integrity of games files.
    4. Wait for the process to complete, restart Steam, and launch the game to check if the issue persists.

    If verifying the integrity of game files doesn’t work for you, the culprit could be the corrupted cache, therefore, you need to clear the download cache for the Steam client app; read this guide to know more.

    5. Reinstall the FiveM app

    1. Press Windows + I to open the Settings app.
    2. Go to Apps, then click Installed apps.Apps, installed apps - FiveM Could Not Contact Entitlement Service
    3. From the list of apps, locate FiveM, click the three dots, and select Uninstall.FiveM, click the three dots, and select Uninstall
    4. Select Uninstall again to confirm.
    5. Once the action is complete, go to the FiveM’s official website, and click Download Client.Download client
    6. Locate the downloaded file on your PC and double-click it to initiate the installation.
    7. Follow the on-screen instructions to complete the process.

    6. Change the DNS servers to Google DNS

    1. Press Windows + R to open the Run window.NCPA run command  -FiveM Could Not Contact Entitlement Service
    2. Go to ncpa.cpl and click OK to open the Network Connections window.
    3. Right-click the network connection you use on the device and select Properties.Right-click the network connection you use on the device and select Properties.
    4. Next, under the This connection uses the following items box, locate Internet Protocol Version 4 (TCP/IP) and click Properties.under the This connection uses the following items box, locate Internet Protocol Version 4 (TCP/IP) and click Properties.
    5. On the Properties window, click the radio button next to Use the following DNS server addresses.
    6. Now type in 8.8.8.8 for the Preferred DNS server and 8.8.4.4 for the Alternate DNS server.Use the following DNS server addresses.
    7. Click OK, then OK to close all the windows. Restart your PC and check if the issue persists.

    7. Contact GTA support

    If nothing worked for you, try using a different server or contacting FiveM customer support for further help!

    fivem support

    Hit submit a request, pick the type of error and describe your situation. Make sure to select the correct game and offer your contact information.

    Summary

    Reinstalling the GTA game can help you get rid of this issue and is known to be a common solution for other problems like GTA 5 is crashing on Windows 11. Also, read how to install FiveM on Windows 11.

    In case you have any questions or suggestions about the subject, don’t hesitate to mention them in the comments section below.

    Session Error Domain 503 Cash App: How to fix

    As you might imagine already, the session error domain 503 in the Cash App is linked to a connection or domain-side issue.

    What is the cause of 503 service unavailable error? Similar to the Cash App error 400, the session error domain 503 is caused by server unavailability, maintenance, or overload problems.

    In other words, this problem might be out of your hands and into the developer’s. However, our WR software team has found some solutions that you can apply on your side to fix the Session error domain 503 Cash App issue.

    How do I fix the Session error domain 503 Cash App?

    • Check your internet connection and make sure that it’s stable.
    • Visit the Cash App server status page to see if the services are working. When you get a domain error, that’s a sign that the servers are down or under maintenance.
    • Update Cash App to the latest version.
    • If you are using a VPN or a proxy server, disable them temporarily and see if the situation is changed.

    1. Force stop and restart the app

    1. On your mobile device, press and hold its icon and select the Information icon.
    2. Next, tap on Force stop and tap OK to confirm.
    3. Open the app again and check if you still get the error 503.

    Sometimes, even if you close the app on the smartphone, it still runs in the background. Force-stopping it will refresh the Cash app.

    2. Clear the cache and data

    1. Long tap the Cash App icon on your smartphone and select the Info option, just like in solution 1.
    2. Go to Storage & Cache.
    3. Now, tap on Clear cache.
    4. Check if the app is working now. If not, go back to the menu above and tap on Clear data (Clear storage on other devices).
    5. After clearing the data, you will have to log back in. Check if the Session domain error 503 is still present.

    3. Reinstall Cash App

    1. Long tap the Cash App icon on the screen of your smartphone and select Uninstall.
    2. Confirm the option to remove it, then download Cash App from Google Play.

    That’s it! To resume our guide, we recommend checking the server status of Cash App and your local connection first. If those are in order, delete the cache and data of the app or reinstall it.

    If Cash App is still not working, contact customer service and verify if it’s really a server-side error or a problem with your app.

    For any other suggestions or questions, feel free to use the comments section below.

    Users will able to sort emails by category in Outlook

    According to the latest entry in the Microsoft 365 Roadmap, Outlook users will soon be able to sort emails by category in the app. The feature is coming up in December 2023, in the new Outlook for Windows and Web.

    This feature allows users to sort their emails by categories in inbox and other folders. It will help users stay focused and organized by allowing them to group related emails together directly in the message list. This update will be available in the new Outlook for Windows and web.

    Microsoft

    As the Redmond-based tech giant says, users will be able to organize emails based on their relevancy to a certain topic, and they will be able to do it directly in the message list.

    The new feature is a welcomed addition to Outlook, given that Microsoft will release Copilot to it in November, allowing for even greater file management inside the app.

    Unfortunately, the feature won’t be available to classic Outlook, as the version is slowly approaching the end of its life. However, recently Microsoft announced that Copilot-enhanced features will also make their way to the classic version.

    Solved: eBay 403 Forbidden Error Insufficient Permissions

    The eBay 403 forbidden error is pretty common, but our WR networking team has reproduced it and in this article, we will show you how to fix it.

    What is error code 403 Forbidden on eBay? Error code 403 on eBay is a typical access error that occurs when the client (browser) is communicating with the server, and the latter doesn’t get the necessary permissions from the client.

    The problem is similar to the PayPal 403 Forbidden Error and mostly affects browsers like Facebook and Chrome. You might also see it as the Fulfillment API 403 error.

    How do I fix the eBay 403 Forbidden Error?

    Before going into more complicated solutions, try a few workarounds:

    • Try a better browser for eBay.
    • Log out of your eBay account and log back in. Also, sign out from your eBay account on other devices.
    • Disable or enable the VPN for eBay and see if that fixes the issue.
    • Double check the URL you are trying to access and see if it is correct.

    1. Clear the cache and cookies of your browser

    1. In Google Chrome, click the Menu button, hover your mouse over More tools and choose Clear browsing data.
    2. Now, check all the boxes and hit the Clear data button below.

    We used Google Chrome as an example, but deleting the cache and cookies is similar on all major browsers.

    Most of our readers claimed that eBay is not working properly on Firefox, and the 403 forbidden issue is also one of the problems encountered with this browser.

    2. Reset the browser to factory settings

    Note icon NOTE
    Resetting your browser to its original default settings will delete all data and passwords.
    1. Click on the Menu button in Chrome and select Settings.
    2. Now, select Reset settings from the left pane and choose Restore settings to their original defaults.
    3. Finally, click on Reset settings again to confirm your choice.

    Now, try to log into your eBay account and retry performing the action when you encounter the eBay 403 forbidden error.

    3. Contact eBay

    1. Go to the eBay page and click on the Help & Contact button before or after you sign in.
    2. Click on Contact us below, and choose a topic to get help.
    3. Follow the topics until you get the option to send an email to customer support and describe the issue. You will get a reply in 24 hours.

    How do I fix eBay API Error Insufficient permissions to fulfill the request?

    If you’re using an API to access eBay, check if you use the correct access tokens. Remember that the User Access Token and the Application Access Token are not the same. You should be using the User Access Token.

    To refresh the user token, call the following URL: https://api.sandbox.ebay.com/identity/v1/oauth2/token

    Then, use the grant_type:refresh_token header to authorize your call.

    Hopefully, you will now be granted access, and the request will be fulfilled, eliminating the eBay 403 forbidden error when using an API. This procedure will fix the eBay developer login issue.

    Ultimately, if you still get the 403 forbidden error on eBay, it’s also possible that your eBay account was hacked. Don’t panic. Read this guide to learn what you can do in this case.

    To review our guide, the eBay forbidden error is usually triggered by browser or connection issues, but it may also caused by incorrect user token access calling. Our WR networking team usually fixes the problem by clearing the cache, resetting the browser, or using another.

    You might also be interested in reading our guide on what to do if eBay is not accepting credit card payments.

    Authorization issues can also cause problems on the server side; if you want to learn about OAuth2 errors, read this guide.

    If you have suggestions about other proven methods to solve this problem, you’re welcome to use the comments section below.