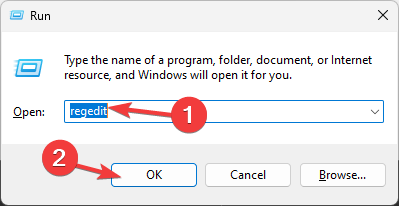
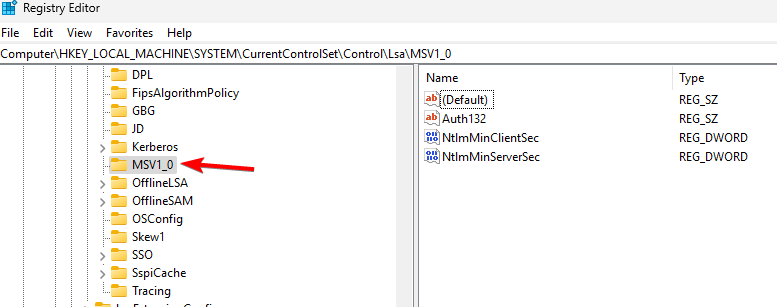
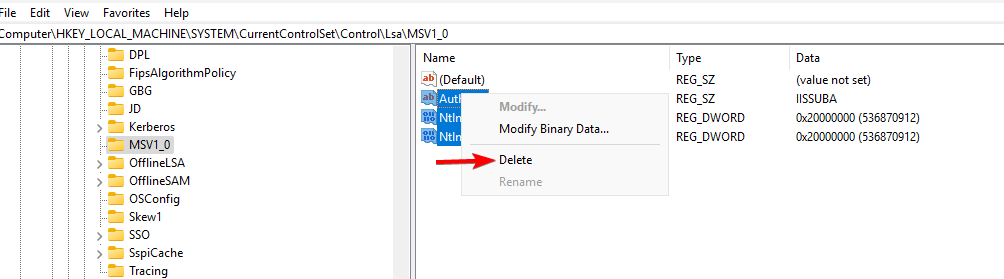
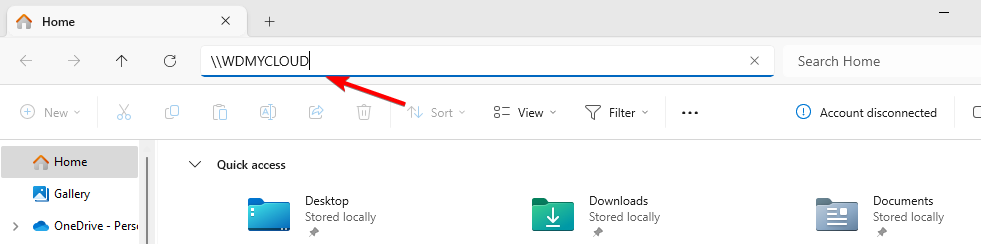
We can all agree that an extra layer of protection is always a welcome option when securing our devices. However, modern methods that require you to insert a physical security key into the USB port may be inconvenient.
As such, you’d rather opt out of the security key business and hop into other ways of securing your account, like verification codes or biometric authentication.
What is Insert your security key into the USB port message on Windows 11?
This is a security measure designed to prevent unauthorized access to your computer. It’s important to know that this message does not mean your computer has been compromised.
Hit the Start Menu icon, type Windows Security in the search bar, and click Open.
Click on Firewall & network protection, then select Public network.
Locate Microsoft Defender Firewall and toggle the off button.
5. Create a new user profile
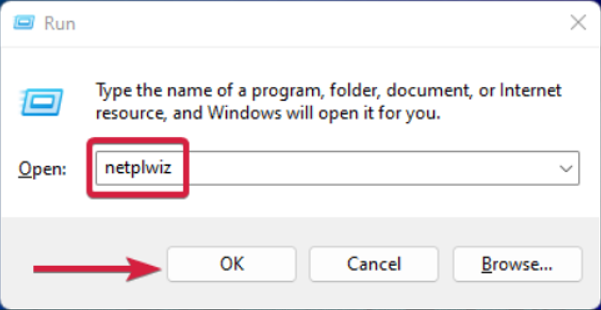
Press Windows + R to launch the Run console, enter netplwiz in the text field, and click OK.
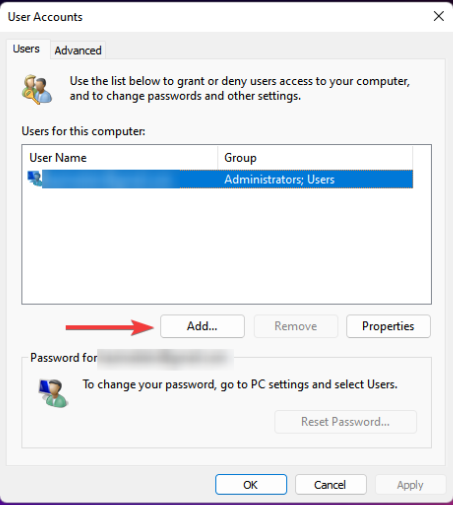
Click Add in the User Accounts window.
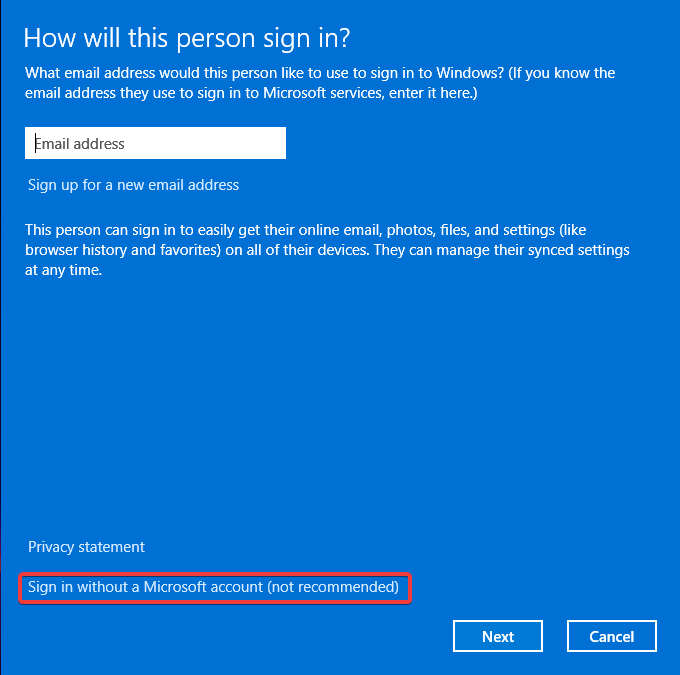
Select Sign in without a Microsoft account (not recommended).
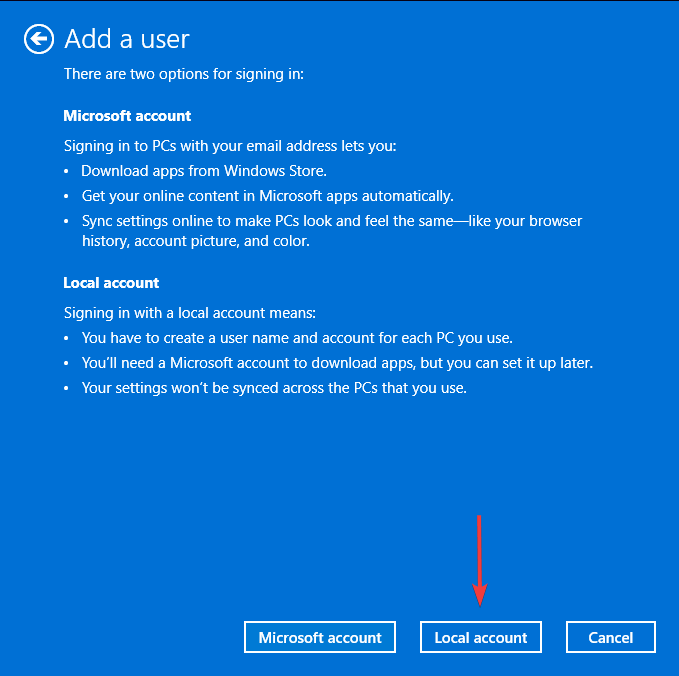
Click on Local account button.
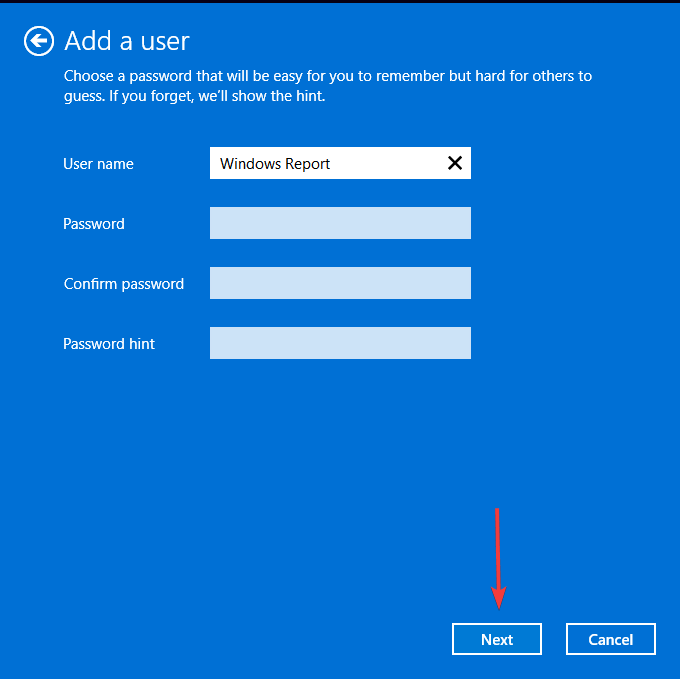
Enter a username and password (optional) for the new user account, and a hint, in case you set a password. Once done, click on Next.
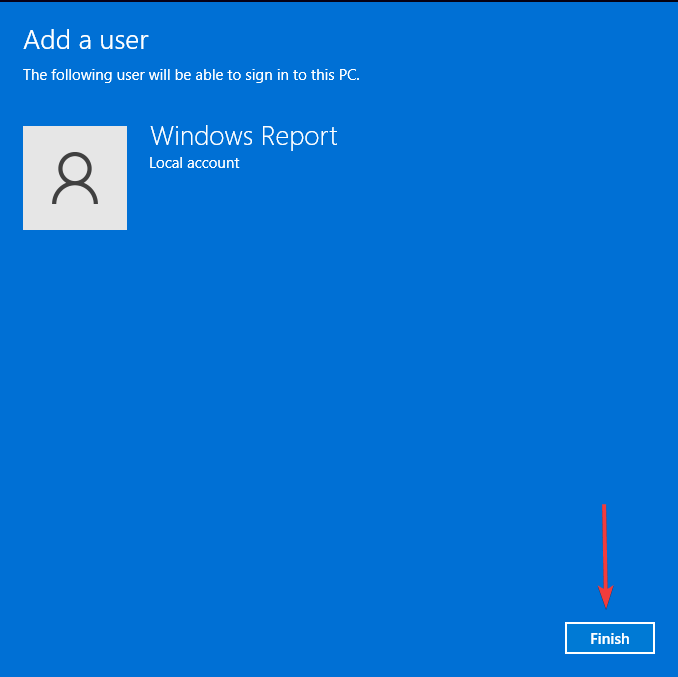
Click on Finish to create the Local account.
If this option works, you can conclude that your user profile was corrupt and take the necessary steps to repair it. However, if neither of these options works, then you’ll need to perform a clean install of Windows or contact Microsoft support for additional assistance with this problem.
What are some of the different types of authentication steps with a USB Security Key?
Two-Factor Authentication (2FA) – This security process requires two different forms of identification to verify the identity of a person attempting to access a device or service.
Verification codes and Backup codes – Verification codes are a series of numbers that your computer generates when you connect your USB Security Key, while Backup codes are another series of numbers that you can use in case you lose your USB Security Key or can’t access your verification code.
Password & security questions – Your USB Security Key will ask you to enter your password before it can be used, then answer a security question to log into your account.
Biometric/Voice authentication – This type of authentication requires that you speak into your computer’s microphone or touch the fingerprint sensor on your USB Security Key before being granted access to an account.
When you create a security key and insert the USB drive, it will not automatically unlock the contents of whatever application you want to open. Otherwise, anyone with access could easily get a hold of your account.
The above authentication steps act as an additional layer of security to prove you’re the true owner before access is granted. As always, we recommend that you follow the best security practices when disabling system components. And remember that all of this is done at your own risk.
Always back up your computer before making changes, and follow your vendor’s guidelines for the best removal process. Elsewhere, you may encounter an issue where your network security key is not working, so feel free to check out our detailed article for quick fixes.
To learn more about security features, don’t miss our guide on the Windows Security button and how to use it.
Do you have an additional solution missing from our list but worked for you? We’d love to hear about it so leave us a comment down below.
DALL-E 3 is now in Bing Chat and the tool can render images in a more subtle way, focusing on details and almost hyperrealistic aspects. It was officially announced at the Microsoft Surface Event 2023, two weeks ago, and now we’ve finally got our chance to try it.
According to Microsoft, DALL-E 3 has a much better understanding of what you’re asking for, and this allows for more precise results.
DALL.E 3 model from OpenAI in Bing Image Creator. DALL.E 3 delivers a huge leap forward with more beautiful creations and better renderings for details like fingers and eyes. It also has a better understanding of what you’re asking for, which results in delivering more accurate images. We’re also integrating Microsoft Designer directly into Bing to make editing your creations even easier.
Microsoft
And we’re honest with you: with DALL-E 3, Bing Chat is capable of generating breathtaking images in seconds. The best thing about it? You won’t have to go for lengthy descriptions. DALL-E 3 is able to take the few words you give to it to generate some amazing images.
Of course, if you do choose to go for a detailed description, DALLE-3 will respect every detail, and it will generate an image accordingly.
DALL-E 3 in Bing Chat: hyperrealist and breathtaking pictures
Before we begin, you should know that for every iteration, Bing Chat will generate 4 images for you. You’ll be able to download them and use them.
Create an image of two spaceships traveling through the middle of a nebula in space.
Create an image of a human figure lost in the dense fog.
Can you create an image displaying a futuristic city full of skyscrapers and lights? Can you also capture this city during nighttime?
Can you create an image of a person wearing glasses?
Create an image of a man smiling.
Can you create an image of a person that smiles? The person should have blue eyes, pink hair, carrying a black backpack and a camera on hand.
As you can see DALLE 3 in Bing Chat is quite good. These are just some examples, but the AI is capable of rendering hyperrealistic human faces, with much more details than before.
We only used short descriptions to test it and it was enough, as DALLE 3 was capable of using the Bing Chat AI-powered searches to look for similar descriptions and render the images.
Plus, the amazing thing about it is that Bing Chat literally renders 4 images for each input in seconds. It takes about 2 to 5 seconds to render them.
However, so far, it seems that Bing Chat might be limited when it comes to typing certain descriptions. If you try to generate an image based on sensitive or adult-oriented information, Bing Chat will stop rendering and it will welcome you with a high demand error.
However, other than this, the results are breathtaking and exceeded our expectations. What are your thoughts on the images? Are they well-rendered or not? Let us know your opinions in the comments section below.
DTS Sound Unbound is an app that unleashes your device’s DTS:X spatial sound, which can be excellent, especially for gaming.
However, you should know that your device needs a DTS-compatible sound card and speakers or headphones, and the sound of your source needs to be DTS-encoded.
The benefits of using DTS Sound Unbound:
Up to 11.2 channels are in the standard format, and up to 30.2 are with DTS:X Pro.
Unlimited support for audio processing objects.
You can find a lot of DTS-encoded content.
Enhanced audio experience and audio quality.
How do I download & install DTS Sound Unbound for Windows 11?
1. Download the app from the official source
Go to the Sound Unbound website and download the app for Windows 10. Don’t worry, we have tested it, and it also works on Windows 11.
You will be redirected to Microsoft Store so click on Get in Store app.
You will be prompted to start Microsoft Store on Windows 11 where you can install the app.
When the installation is done, click on Open to start DTS Sound Unbound.
For some, the app also features a DTS:X Home Theatre feature and if you have a DTS-enabled HDMI device connected, you can unleash the spatial sound on it.
As you might have noticed, there are also DTS Sound Unbound versions for Xbox and mobiles. Installing the DTS Sound Unbound for Windows 11 is also an easy way to prevent DTS:X Ultra not working issue; read this guide to find out more about it!
Then, click the Download button for the right version of your Windows and the latest driver version.
You will get an archive containing a cab file and an inf file. Extract them, right-click on the inf file, and select Install.
Some old laptops came with the DTS Audio Processing app but when they upgraded to Windows 11, it didn’t work anymore. Installing the drivers for Windows 11 22h2 will solve this issue.
3. Install the latest audio drivers
First of all, make sure to install all the pending Windows updates. However, to make sure that you have the latest audio driver, go to the website of your manufacturer, and download the right one for your system and device model.
Usually, on the manufacturer’s website, you will be asked about the model number of your device/laptop and must select the right OS.
If you don’t know them by heart, click the Search bar, type system information, and open the app from the results. This will ensure you get the correct audio driver and use DTS Sound Unbound.
4. Use the Realtek Audio Console in Windows 11
Click the Search bar, type audio console, and select Realtek Audio Console from the results.
Now, click the Settings icon from Speakers (if you have headphones, you can select them instead).
Now, if you have a DTS-enabled sound card, you will see information about DTS sound effects and you can change more or less options depending on your device.
For instance, in our example, we can encode the surround sound to transfer the output to receivers with Matrix decoders.
Our example shows how it works to tweak the DTS on a laptop with a Realtek audio card. If you have an audio card from another manufacturer, look for the dedicated app for it on your computer.
5. Use a third-party audio enhancement app
DTS and Dolby Atmos are the most popular codecs out there and are used for encoding in most movies and games.
However, if your device doesn’t support either technology, you may still employ the help of third-party audio enhancement software to boost and spatialize the sound. Check the selection from our highlighted article and choose the best one for your needs.
That’s it! We hope our guide on downloading and installing DTS Sound Unbound on Windows 11 helps you achieve the 3D audio sound you are looking for.
RAM is a rather straightforward and easy-to-understand computer hardware term that every computer user should be familiar with.
But it is also a complex subject because the memory term RAM encompasses many different types of computer memory. In this post, we’ll briefly explain what RAM is and then delve into the different types of it.
What does RAM do in a computer?
This type of computer memory stores information temporarily as it is being used. It is often likened to your short-term memory, which allows you to store and process information.
The computer’s RAM loads applications and data and then saves them on your hard drive when you exit them. This makes it possible for you to open multiple files/programs at once without slowing down the system or using too much processing power.
What are the different types of RAM?
1. Random Access Memory (RAM)
RAM is the primary storage for computers and other electronic devices. It’s called random access because you can access any byte in RAM anytime. The data stored in RAM stays there until you shut down your computer or restart it, at which point the data is lost.
It’s much faster than hard drives and can be accessed much quicker, making it ideal for holding data that needs processing and manipulation.
However, as more programs are installed on your computer, so does the available RAM. If you don’t clear your RAM often, your PC can run low on memory. This, in turn, will cause your programs to use slower types of memory, such as hard drives or optical discs (CDs or DVDs), for storage purposes.
Basically, the more RAM you have installed in your computer, the more programs will be able to run at once without slowing down your PC’s performance. You should, therefore, check your RAM regularly and clear up some memory for optimal performance.
2. Read-Only Memory (ROM)
Read-only memory is a type of computer memory used to store data that can be read from but not written to, hence the term read-only memory.
This makes them useful for storing the basic start-up instructions that tell your computer how to boot up, which hardware devices are in your system, and what drivers need to be loaded from your hard drive to access them.
While this makes it ideal for storing instructions that need to be executed by the CPU immediately, the downside is that it can only be written once during manufacturing, so it’s not as flexible as other types of memory.
If you want to change the data in ROM, you have to replace the whole chip. This is why it is used as a permanent storage medium for firmware in computers and other electronic devices.
3. Cache Memory
Cache memory is a storage area that’s located on the processor chip. It frequently stores used data and instructions. When the CPU needs some information, and it is not yet available in any of the other types of memory, cache memory can store this information until it becomes available.
This greatly increases the speed of computer operations by reducing or eliminating the need for the CPU to wait for information from other devices.
Although it is a small capacity, it is faster than normal RAM but slower than the CPU. You should frequently clear your cache memory to avoid build-up that can slow down your PC.
4. Video Editing RAM (VRAM)
Video RAM (VRAM) is a type of memory used for storing video information in a computer or other electronic devices. It allows the graphics processing unit (GPU) to retrieve and render video data without the CPU having to read from the main memory.
In modern computers, VRAM is typically found on video cards that use discrete GPUs rather than integrated graphics chipsets. This allows for much higher resolution, color depth, and faster refresh rates compared to traditional frame buffers.
The amount of VRAM on your PC determines how many pixels your graphics card can display at once without having to load them from the main memory. In other words, more VRAM means that you’ll be able to run games with higher resolutions without any problems.
Double data rate (DDR) RAM is a type of memory that increases the bandwidth of the computer and allows for faster data transfer. It can handle two sets of data per clock cycle because it allows for both read and write operations.
DDR basically works as a router and is the most common type of RAM used in personal computers. And while it processes data more quickly and efficiently, it’s not without disadvantages.
With successive versions, such as DDR1 through DDR4, there’s has increased maximum throughput and transfer rates compared to its predecessor. Of course, you can always adjust the DRAM frequency but it comes at a risk of damaging your PC.
Still, even with an upgraded DDR version, the cost also shoots up, and its compatibility with motherboards and processors becomes limited.
6. Flash Memory
This is a form of solid-state storage that does not use any moving parts at all. It is the type of memory used in USB drives and SD cards. Flash memory can be either NOR or NAND type.
NOR flash is slower but offers greater capacity, while NAND flash offers better speed and is more resistant to shock or static electricity damage.
The main advantage of using flash memory RAM is its excellent read/write performance and can provide very high memory capacity in a small space.
7. Memory Sticks/Modules
A memory stick is a device that can be used to store data. It is usually inserted into a computer’s socket on the motherboard so it can communicate with the CPU, game consoles, and other devices to transfer information between them.
These are the most commonly used form of RAM. The size of the memory module is determined by the amount of RAM it contains and how much space is available for data storage on your computer.
For instance, a modern-day computer can have multiple memory slots, meaning it can hold far more information than any other storage device and have a high-speed data transfer rate.
On the flip side, you can’t add as much information as you would in cases where two RAM sticks are incompatible with each other. Also, if the motherboard fails, all the data stored on the onboard memory will be lost.
Understanding Short-Term Memory
Short-term memory, also known as working memory, is the capacity to hold a small amount of information in mind in order to carry out a task.
Temporary Storage and Virtual Memory
When working on your computer, the data you are working with stays in RAM until you close your application and shut down your computer. Thus, when a program is running, it is said to be resident in physical memory (RAM).
However, if your computer is not using all its RAM or runs low on free physical RAM while a program is still running, Windows will swap out some of its active processes into virtual memory so that other processes will run faster.
Virtual memory is a mechanism for making a program believe that it has more memory than is actually available. This allows the program to handle larger, more complex applications than would otherwise be possible.
This allows more processes to run at once than could fit in physical RAM, but it can come at the cost of slower performance if the swapping process takes too long.
Form of Memory and Types of RAM
The form of memory determines how the data is stored. Memory comes in two forms: RAM and ROM.
The type of RAM is based on the function it performs and the different ways that memory can be configured to store data.
Volatile vs Non-Volatile Memories
Volatile memory loses its contents when the power is turned off. It is also known as working or system memory because it constantly changes as new data is loaded into it from storage drives such as hard disks and solid-state drives (SSDs).
It is often used for cache because it needs to be cleared on reboot. The most common volatile memories are random access memories (RAM) and dynamic random access memories (DRAM). This is why you must save your work before turning off your computer or unplugging it from the wall socket.
Non-volatile memory retains its data even when there is no power present. ROM (Read Only Memory) is an example of non-volatile memory because it does not lose its stored data when there is no power present.
The above summary should provide you with an overview of RAM and its different uses. It should also help you better understand what it means for your computer and whether your RAM should be faster than your CPU.
Without enough RAM, your computer would be unable to function due to a lack of memory. In such cases, perhaps using a RAM limiter may do your system some good. So it’s important that you know what RAM does, your PC’s RAM limit, and how the different types compare to each other.
To learn more about memory, we have a great guide on what is Direct Memory Access so you might want to check it out.
If we missed anything or you’d like to share your experiences, please leave your questions, comments, and insights in the section below.
Application crash errors are usually uncommon, but ones not developed properly often throw an error code. One such is the Exception_Illegal_Instruction application or fatal error. It’s commonly encountered with games, but editing software and browsers, too, trigger it.
The error message reads, The exception Illegal Instruction An attempt was made to execute an illegal instruction (0xc000001d) occurred in the application at location XXXXXXXXXX, where the location varies. It’s often followed by a Blue Screen of Death (BSOD), and a crash report is generated.
Causes of EXCEPTION_ILLEGAL_INSTRUCTION error on Windows 11:
AES extensions are not enabled in BIOS
Driver issues, both outdated and incompatible drivers
Missing or corrupt Visual C++ Redistributables if the app is developed using Microsoft Visual C++
Third-party programs triggering conflicts
Add-ons or app extensions
How do I fix the EXCEPTION_ILLEGAL_INSTRUCTION Error on Windows 11?
Before we start with the slightly complex solutions, try these quick ones first:
Make sure you have enabled AES in BIOS. It’s found under the CPU or Processor settings. Also, check if you have an AEX and SSE2-compatible processor. Some apps require it.
If you are getting Exception_Illegal_Instruction with an app developed on Java, make sure all the critical program files are available.
Remove any built-in add-ons or third-party extensions you may have installed in the problematic program.
Reset the BIOS to default settings. If that doesn’t work, update the BIOS and the OS (in this case, Windows 11).
If none work, head to the fixes listed next.
1. Reinstall the graphics driver
Press Windows + X to open the Power User menu, and select Device Manager from the list of options.
Expand the Display adapters entry, right-click the graphics adapter, and select Uninstall device.
Tick the checkbox for Attempt to remove the driver for this device, and click Uninstall.
You can now manually install the driver or simply restart the computer and let Windows automatically download a fresh copy.
When faced with Exception_Illegal_Instruction in Unreal Engine, reinstalling the driver did the trick. If that doesn’t work, use a third-party driver uninstaller tool to effectively remove all traces.
2. Update the graphics driver
Press Windows + R to open Run, type devmgmt.msc in the text field, and hit Enter.
Double-click the Display adapters entry, right-click on the graphics adapter in use, and select Update driver.
Click on Search automatically for drivers and wait for Windows install to install the best available version stored locally.
When you encounter a game crash followed by the Exception_Illegal_Instruction (0xc000001d) error code, updating the graphics driver will do the trick!
And make sure to check the manufacturer’s official website for the latest driver version. Here are the direct links to the download pages:
Right-click the affected program’s launcher, and select Properties.
Go to the Compatibility tab, tick the checkbox for Run this program in compatibility mode for, and select an older iteration of the OS from the dropdown menu, preferably Windows 7.
Once done, click Apply and OK to save the changes.
4. Repair or install Visual C++ Redistributables
To fix Exception_Illegal_Instruction with C++ programs, you will need to repair the Visual C++ Redistributable packages if these are already downloaded. In case they are not found, install them. Another issue linked with redistributables is the LoginUI.exe system application error.
4.1 Repair redistributable packages
Press Windows + R to open Run, type appwiz.cpl in the text field, and click OK.
Select the Microsoft Visual C++ Redistributable package, and click the Change button.
Click on Repair.
Click Yes in the UAC prompt and wait for the process to complete.
4.2 Install redistributable packages
Go to Microsoft’s official website, and download the latest Visual C++ Redistributables. We recommend you get all the versions.
Run the setup and follow the on-screen instructions to complete the download process.
5. Reinstall the affected program
Press Windows + I to open the Settings app, go to Apps from the left, and click on Installed apps.
Locate the affected program, click the ellipsis next to it, and select Uninstall.
Again, click Uninstall in the confirmation prompt
Once done, restart the computer and re-download the app from an official source.
If that doesn’t work, use a reliable uninstaller tool to get rid of any remnant files and Registry entries, and then reinstall the program.
Press Windows + R to open Run, type msconfig in the text field, and click OK.
Go to the Services tab, tick the checkbox for Hide all Microsoft services, and then click the Disable all button.
Now, press Ctrl + Shift + Esc to open the Task Manager, go to the Startup apps tab, select any that are enabled, and then click the Disable button.
Once done, head back to System Configuration, and click on Apply and OK to save the changes.
Click Restart in the confirmation prompt.
A clean boot in Windows 11 will help eliminate any third-party conflicts triggering the Exception_Illegal_Instruction annoying crash. Now, enable the disabled services and programs one at a time, identify the problematic ones, and terminate them for good!
7. Check the RAM
As per the error report file, the underlying cause could often be linked to a malfunctioning RAM. Remove the modules, clean them gently, and then plug them back in.
You could use the Windows Memory Diagnostic tool to run a bunch of tests on the RAM. Also, try running the Extended Mode of it. When the tool starts, press F1 and get into the Extended Mode.
If none of the fixes listed here work against Exception_Illegal_Instruction, we recommend you either contact the app developers for software issues or the PC manufacturer for hardware problems. They have helped many with complex errors like Exception Access Violation.
While you are it, another issue, the Exception Breakpoint application error that troubled many, is also linked to, more or less, the same underlying causes. And one of the fixes for it could work in this case!
For any queries or to share what worked for you, drop a comment below.
This is understandable given just how vulnerable Microsoft apps are when it comes to cyberattacks. For example, 80% of Microsoft 365 accounts were hacked in 2022, with 60% of them being successful.
And if we take into account the fact that most of the Microsoft apps, especially Microsoft Teams, which OneDrive is often used in conjunction with, are prone to modern malware attacks, these security features are a must.
Microsoft doesn’t hold back. It brings no less than 6 new features that will greatly enhance protection, especially when it comes to file sharing. Check them out below.
OneDrive new security features
According to Microsoft, each of these security features is currently available to customers worldwide, unless specified.
Granular conditional access policies: You may want to fine-tune the access requirements for people who use confidential files so that they don’t accidentally access and leak sensitive information. For example, if a person often works with confidential files, you can now add multi-factor authentication to the site to impact only that person’s access requirements.
Restricted access control: As users share files, they give others inside and outside of your organization access to those files. The restricted access control policy for OneDrive lets you block people from accessing shared files in specific OneDrive accounts by limiting OneDrive access to members of a specific security group. For example, if you discover that people have access to certain confidential files you can fine-tune the access so that only users in a specified security group have access.
Moving OneDrive accounts across tenants: Mergers, acquisitions, and divestitures are a fact of life, and many organizations go through them. In these scenarios, you may have a need to move OneDrive accounts from one tenant to another. Now with cross-tenant OneDrive migration, you can easily move OneDrive accounts across tenants and all existing sharing links will continue to work with the redirect feature.
Block download policy: As a SharePoint administrator or a Global administrator in Microsoft 365, you can block the download of files and Teams meeting recordings from SharePoint sites or OneDrive. This feature can be set for individual sites, but not at the organization level. When enabled users will have browser-only access with no ability to download, print, or sync files.
Collaboration insights: External collaboration is the main source of data leakage due to accidental sharing. Now you can identify user-centric collaboration and sharing patterns across your organization. This capability is currently in private preview, register for more information.
Data export for OneDrive sync client admin reports: For data-driven admins, we’re excited to announce that sync admin reports on volume, health, errors, and more will be available as part of Microsoft Graph Data Connect for SharePoint. Once the data is available in Azure, admins can analyze, visualize, and report on this data in a flexible way using Azure data tools like Azure Synapse and Power BI. Microsoft will release this feature to public preview by January 2024.
The brand-new design plus the AI promise a new era for OneDrive, and Microsoft doesn’t stop here. The Redmond-based tech giant is bringing a new improved search to the platform.
Users, specifically the ones that use OneDrive for personal matters, will be able to use the new improved search to quickly find and manage files on the platform.
Plus, Microsoft will release a plethora of new features to OneDrive in 2024, including a Media Viewer, which will integrate the improved search. Overall, the experience of using OneDrive will be greatly enhanced by them.
Improved search on OneDrive: search for people and images with natural languages
Search for people: Microsoft will introduce a new feature that will let users search or browse photos based on people in them. With your permission, OneDrive can find photos based on the names you give to the people in your photos.
Search for photos using natural language: Microsoft will also introduce natural language search in the photo experience. Users will be able to just type what they are looking for and OneDrive will find it. Plus, users can ask it to find specific places, settings, objects, and people all in one search. For example, if you are looking for a particular photo you can search for “camping in the fall, in the mountains with Caroline” and you’ll see the images you are looking for.
Microsoft plans to roll out the AI search features to consumers, in a limited preview, beginning October 2023 on OneDrive for Web and on the OneDrive Mobile app. The Redmond-based tech giant will release the improved search to public preview early in 2024.
Are you excited about the improved search coming to OneDrive? Let us know your thoughts in the comments section below.
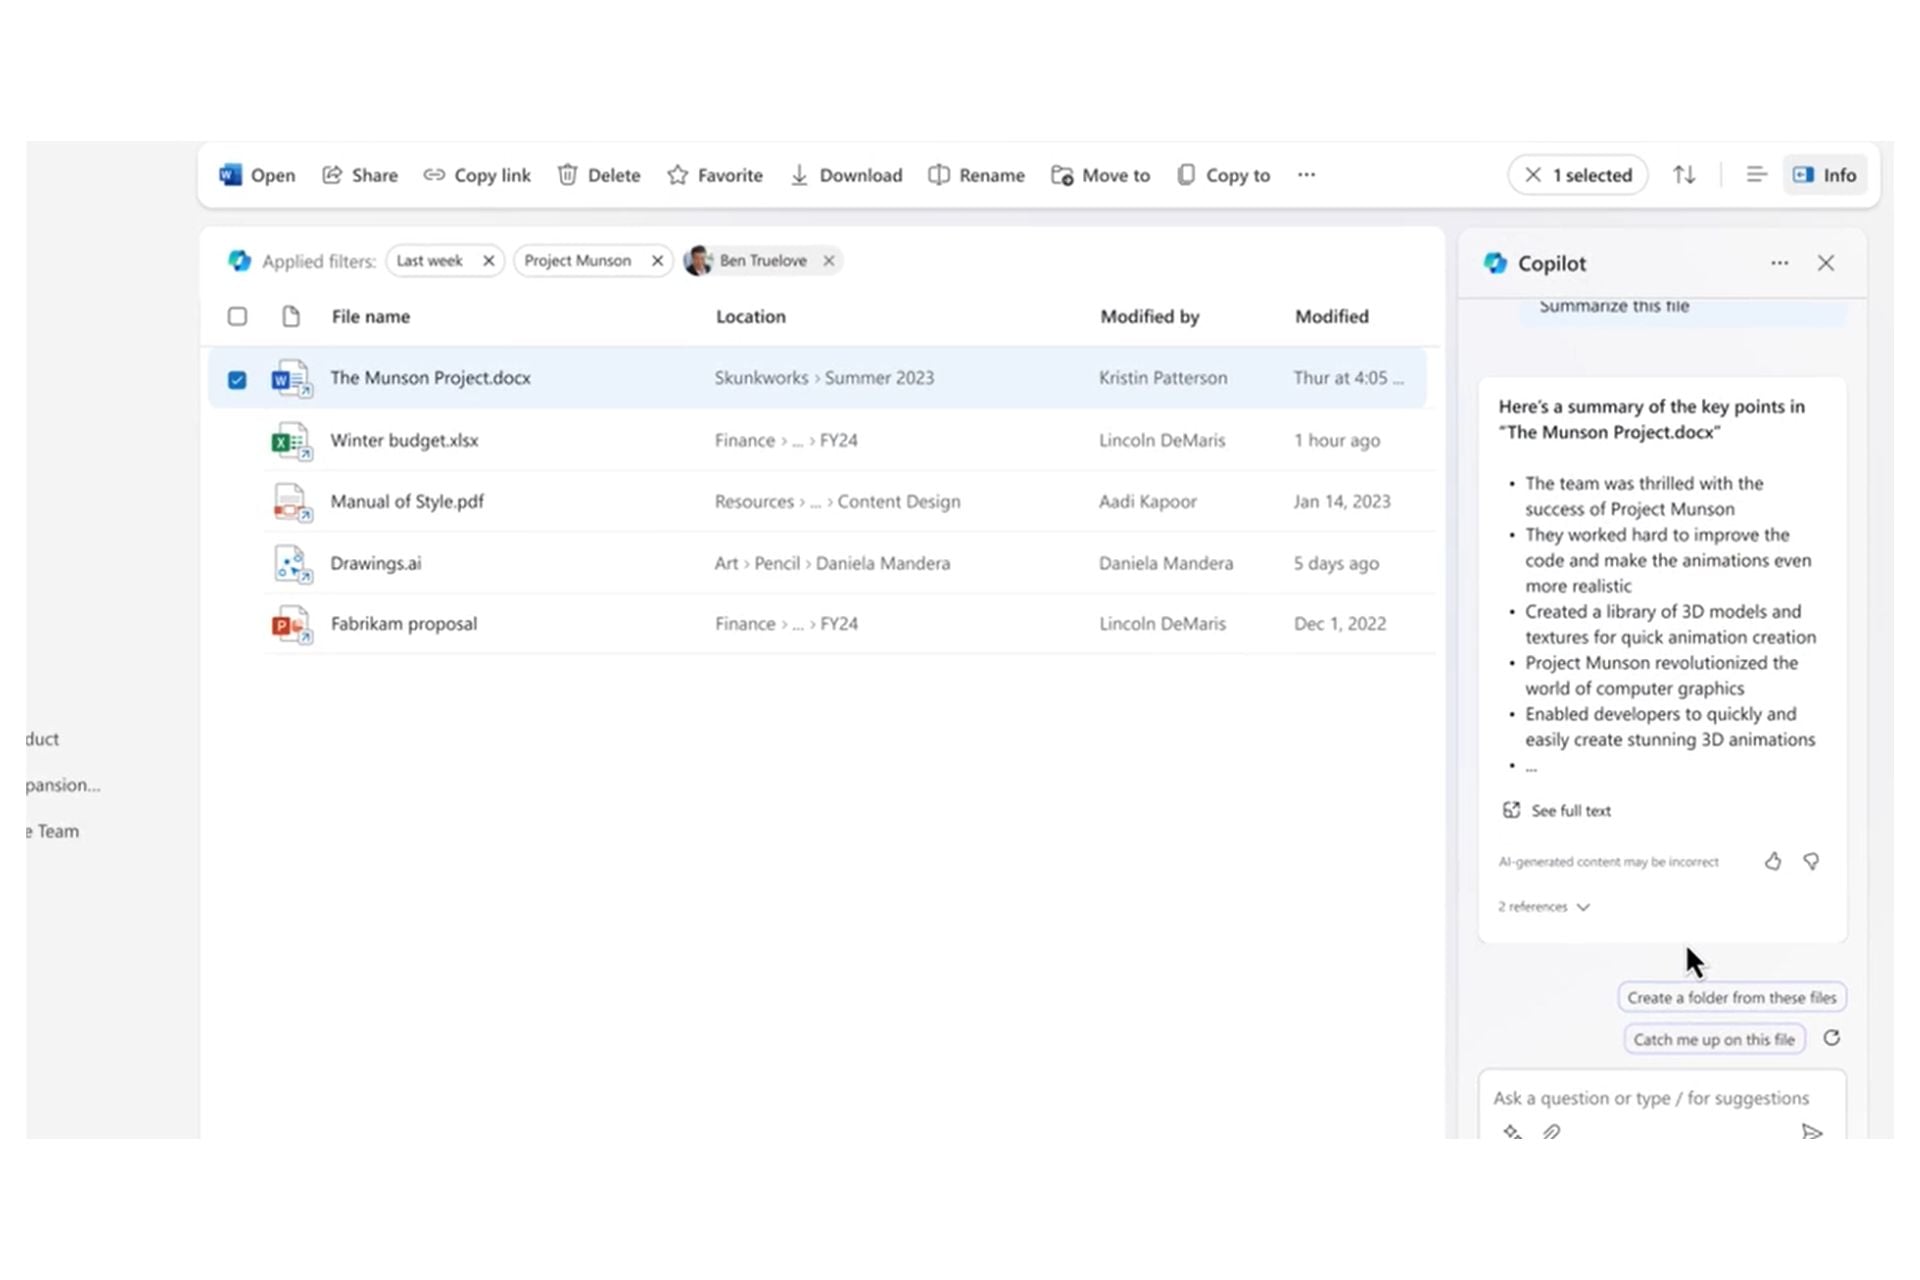
And Microsoft said that Copilot in OneDrive will be available for all customers who have a Microsoft 365 Copilot license, starting in December.
So, what will users be able to do with Copilot in OneDrive? The Redmond-based tech giant says that users will be able to use it to ask open-ended questions related to an individual file or get a summary of the content. And users will be able to do it no matter where the file is located across the Microsoft 365 apps.
This means that Copilot in OneDrive can become the search engine for all the files shared across all the apps. It would indeed allow for greater file management, in the true sense of the word.
Copilot in OneDrive: what’s next for the AI tool
When users work on a specific project, for example, a highly technical project, Copilot will help users find relevant files for it. The AI tool will understand that users might benefit from adding them to a new folder. Copilot then adds these files to the new folder and recommends other files related to the project that were not part of the original search, so that users can add them to the newly created folder.
If users want to share these files with other people, Copilot can generate summaries to include with the share links so their coworkers have more context.
Lastly, Copilot can make it easier than ever to catch up on important updates to user-generated content, for example, a daily digest in OneDrive that shows new files shared with users, changes to files users have shared, new comments, documents relevant to upcoming meetings, and suggestions for follow-up actions.
The Redmond-based tech giant says that Copilot in OneDrive will get new features in the future, as well.
The future of Copilot in OneDrive will help you gather, manage, and transfer knowledge in less time than ever. We are excited about the possibilities of Copilot and look forward to sharing more news in the months to come. Stay tuned to the OneDrive blog for more information.
Microsoft
Speaking of innovation and AI assistant, you can also try using Copilot in Microsoft Word; here is the guide explaining how to enable it.
What do you think about Copilot in OneDrive? Are you excited about it?
Microsoft OneDrive Event just took place, and the Redmond-based tech giant announced that a brand-new design is coming to OneDrive. This new design will also gather up all the new features coming to the app in a single page, called OneDrive home.
But this is not all. Besides the AI Copilot coming to OneDrive, Microsoft is also planning to release a series of new features to the app. These features will greatly improve the experience of sharing and managing files on OneDrive.
And guess what? Some of these features also focus on local management of OneDrive files, meaning users won’t need an Internet connection to actually access files. This feature was somehow teased recently when Microsoft added new ways to manage OneDrive files on its Microsoft 365 Roadmap.
Other features, though, focus on integrating OneDrive with Outlook and Teams, for a seamless working experience across all the Microsoft 365 apps. So you’ve got the 365 integration, and you’ve also got the offline productivity feature. Want to see more? Check out our list below with the most exciting features coming to OneDrive in 2024.
OneDrive’s exciting feature list for 2024
Open in the app: In the same way that you can open a Word, PowerPoint, or Excel file in their respective desktop apps, soon you’ll be able to open any file in its desktop app, edit it, and changes will sync to OneDrive. You’ll be able to edit PDF or CAD files right from OneDrive, as a seamless experience. Microsoft will release this feature in December with a continued rollout in 2024.
OneDrive in Teams: Part of the reinvention of OneDrive is a new approach to working with files in Teams. Microsoft will update the Files app in Teams with the new OneDrive Teams app, providing clean access to all your files across SharePoint and OneDrive from Teams. It takes advantage of all the recent updates made to OneDrive and SharePoint library experiences bringing you the benefits of performance improvements, new views, and feature enhancements in OneDrive. Microsoft will release this feature in December with a continued rollout in 2024.
OneDrive in Outlook: Microsoft will add the OneDrive app in the left navigation of the new Outlook for Windows and Outlook on the web. This addition makes it quick and easy to copy a sharing link and include it in an email or find a shared file without leaving Outlook. Microsoft will release OneDrive to Outlook in December with a continued rollout in 2024.
Files On-Demand for Web: Microsoft says offline file access and sync in are fundamental to OneDrive. The Redmond-based tech giant is extending sync to the browser experience. When you want files and folders available for offline access on your device, just select them to be always available locally directly from OneDrive for Web. Once selected you’ll have offline access to these files. Microsoft will release this feature in early 2024.
Offline mode: When your files are available for offline access you can open and work on them in your browser even if you are offline. All of the changes you make offline in the browser will be automatically synced back to OneDrive when your Internet connection is restored. Plus, you can launch OneDrive in your browser to view, sort, rename, move, copy, and delete files without internet access. Microsoft will release this feature in early 2024
Add new: When you are ready to create a new file without leaving OneDrive just tap the “Add new” button. From here you can launch a blank document or choose from rich templates to jump-start your work. Microsoft will release this feature in Summer of 2024.
Media view: This new view will organize all your images, videos, and media in one place, and it lets you visually browse your content. Microsoft will release the Media view in Summer of 2024.
What do you think about the OneDrive features list for 2024? Let us know your thoughts in the comment section below.
Microsoft OneDrive Event just took place, and it unveiled a lot of new features coming to the app, including a brand-new look, and a brand-new Home page, simply called OneDrive Home.
The slick and intuitive new design will allow, as per Microsoft, for effortless file management and file sharing.
Plus, OneDrive is getting an even more efficient integration with all the other Microsoft 365 apps, and users will now be able to easily use the newly redesigned OneDrive Home to share files across all the apps.
Below is a breakthrough of the new design coming to OneDrive.
OneDrive Home: A new design for a better file-sharing experience
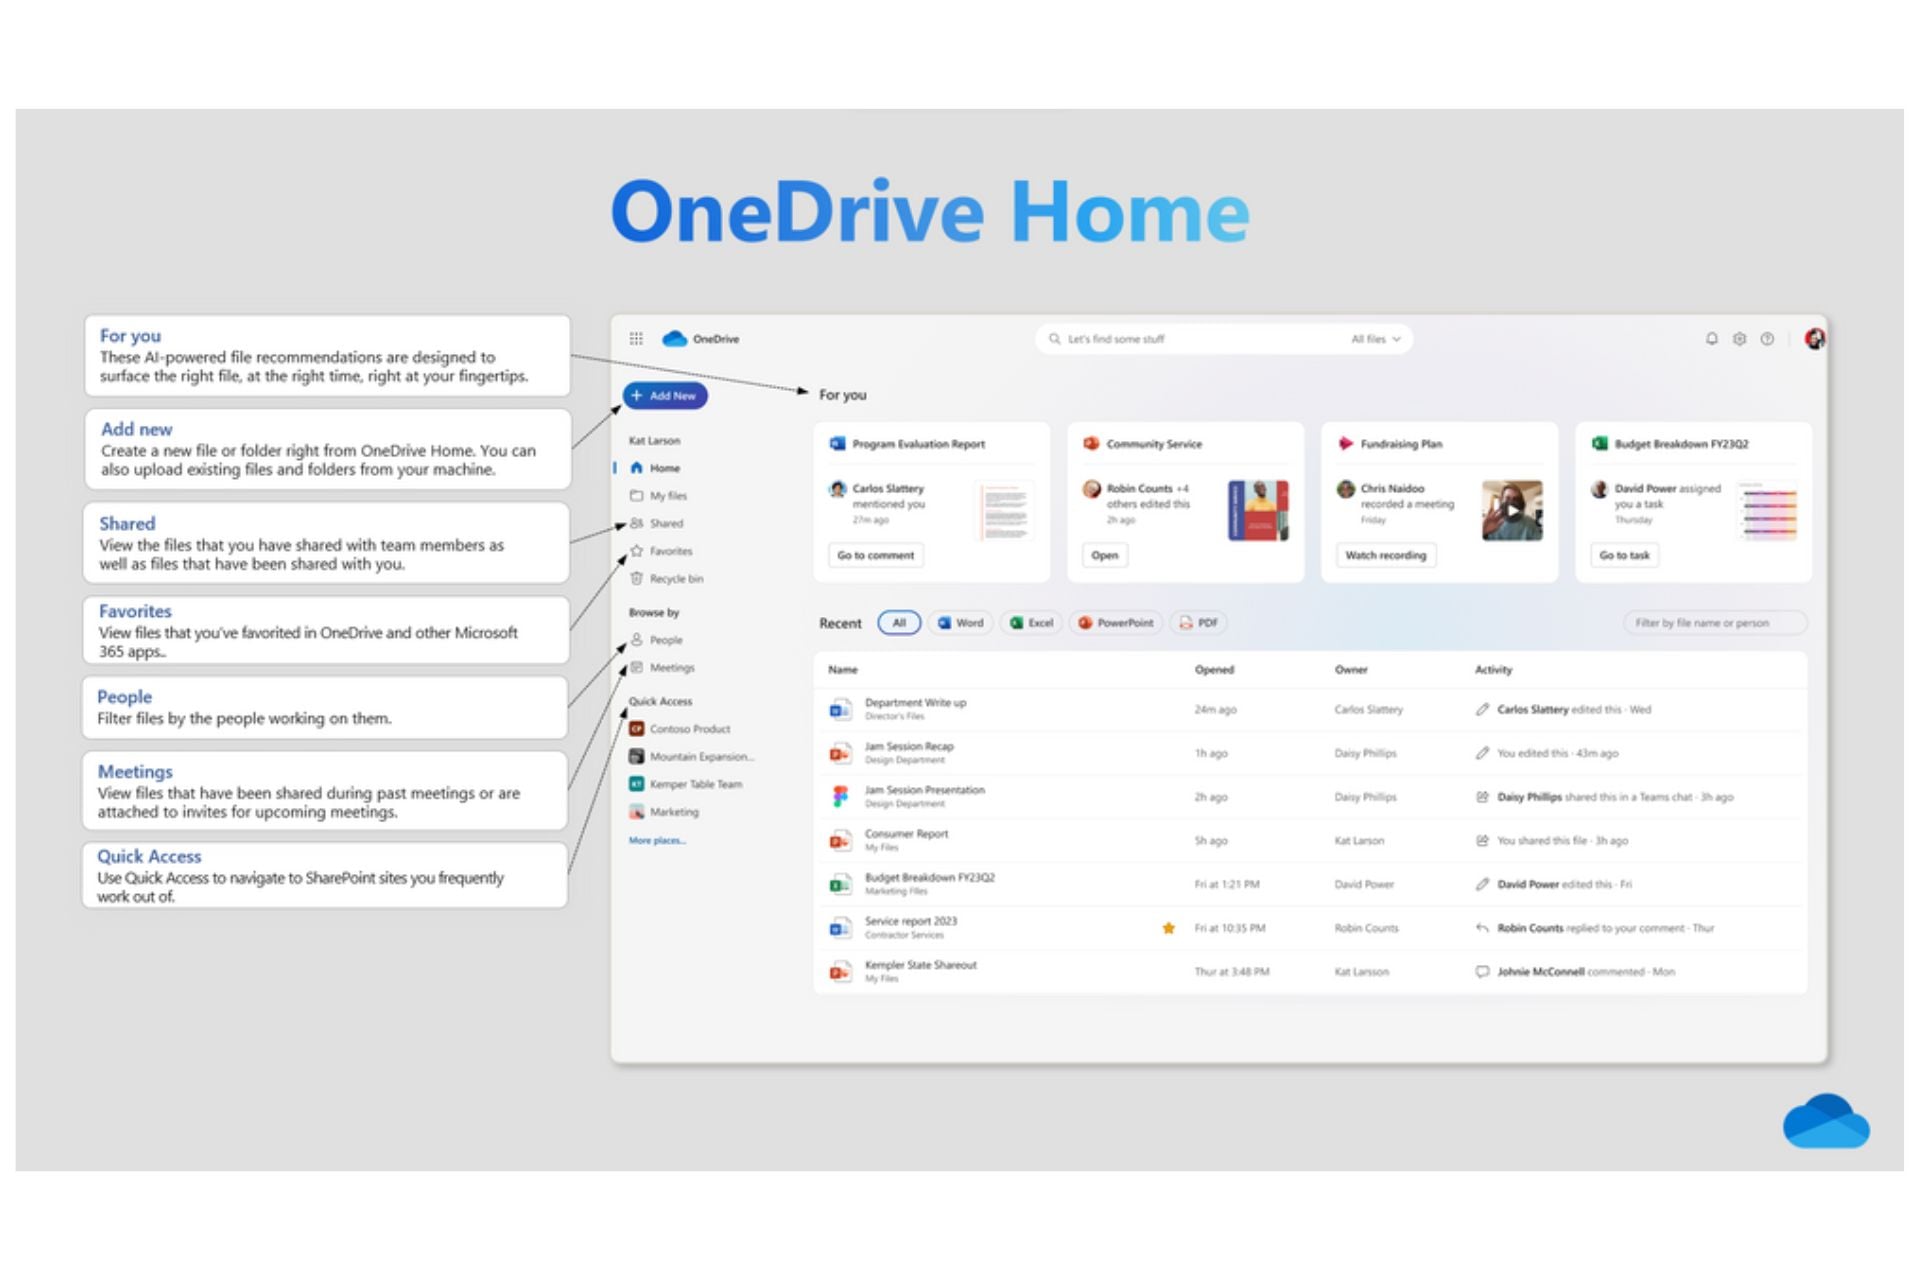
The new OneDrive Home brings in new ways to manage files and share them across all the other Microsoft 365 apps. These are all the new sections coming to OneDrive, according to Microsoft.
OneDrive home: Microsoft redesigned the home experience in OneDrive for Web to help you swiftly retrieve your files no matter where they live in your organization.
For you: This section, at the top of the OneDrive home page, surfaces AI-powered file recommendations to you at the right time, so you have what you need at your fingertips.
Meetings view: The Meetings view shows your upcoming and past meetings along with meeting recordings and shared files. Whether these files were shared in chat or the meeting invite, you’ll find them all here.
People view: Sometimes you don’t remember the name of a file, but you do remember the person who shared it with you. Context is vital when looking for the right file. The People view organizes your files by the people you work with.
Shared view: Any file that’s been shared with you, regardless of how it was shared or who shared it, now shows up in the Shared view. It’s your go-to spot to get back to all the files you are collaborating on.
Colorful folders: Express yourself by choosing the color of your folders and staying organized your way.
Favorites: Keeping track of important files is now easier with Favorites. You can mark any file as a favorite and access it from your Favorites list across OneDrive, Teams, File Explorer, Microsoft 365 apps, and more.
Shortcuts: For quick access to files shared with you or residing in shared team locations, just create a shortcut to them in your OneDrive. This simplifies collecting files for projects, regardless of their original location.
Simplified sharing: Sharing files and copying links is now the most user-friendly it’s ever been, and there are fewer clicks involved.
What are your thoughts on the new OneDrive and its home page? Let us know in the comments section below.
You were copying some files to an external storage media when the Delayed Failed Error on Windows 11 popped up unexpectedly. This may also pop up in a virtual media with the message VMware {delayed write failed} Windows was unable to save all the data for the file.
What does Windows delayed write failed mean? The Windows delayed write failed error means that the external drive is overloaded by data, or a simple connection problem might cause a problem with the Disk Write Caching.
In this article, we will show you how to get rid of the Windows delayed write failed error and prevent it in the future.
How do I fix delayed write failure in Windows 11?
Before applying the solutions below, check the following simple workarounds:
Make sure that the external drive is connected properly to the PC. Trying another USB port and checking the connection cable for damage are also a must.
Check if the external drive is full. You can verify that if you open File Explorer, right-click the external drive, and select Properties.
1. Turn Off Disk Write Caching
Right-click the Start button and select Device Manager from the list.
Expand the Disk Drives section, right-click on the drive that caused the issue, and select Properties.
Go to the Policies tab and uncheck the Enable write caching on the device box.
Now, try to copy the files on the drive again.
2. Restore your system to a previous point in time
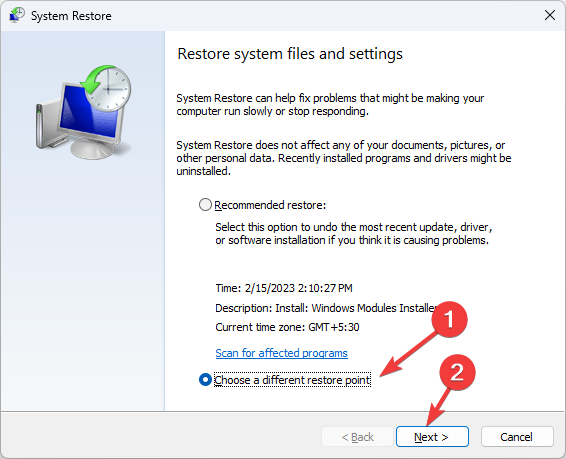
Press the Windows key + R, type restrui, and press Enter to start System Restore.
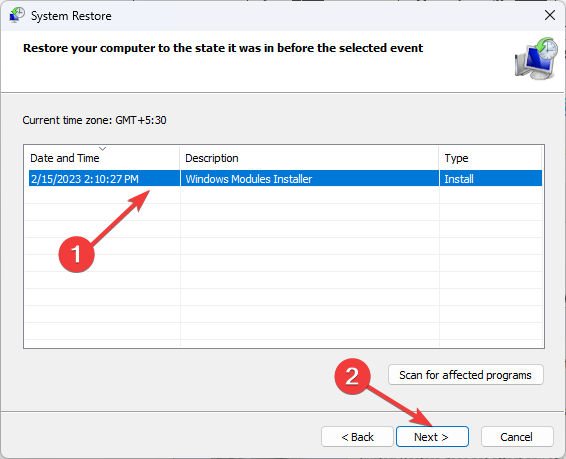
Click Next, then select a restore point previous to this issue happening and click Next again.
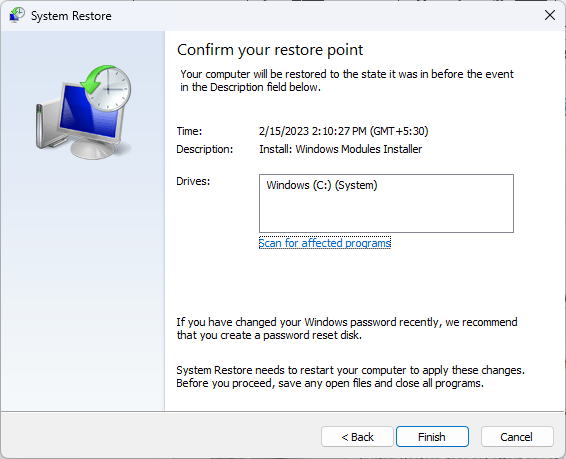
Finally, click on Finish to confirm your selection and follow the instructions on the screen to complete the process.
After restoring your system, check if your files are intact and try to copy them again.
You should note that this procedure only works if you have created a restore point before running into the Windows delayed write failed error.
Right-click the Start button and select Device Manager from the list.
Expand the Disk Drives section, right-click the drive that caused problems, and select Update driver.
Click on Search automatically for drivers and follow the on-screen instructions to finish the process.
If you have an older disk drive, you may also visit the manufacturer’s website and download the latest driver. Then, retake the steps and click on Browse my computer for drivers instead and point to its location on your computer.
How do I prevent delayed write failed popup dialogs?
Every time before you disconnect the external drive from your PC, use the Safely Remove Hardware and Eject Media feature. You can access it from the action tab of the toolbar, or you can eject the drive from File Explorer. Simply unplugging it from the USB port without this action can cause permanent damage to the drive.
Check the connection between the external drive or flash drive and the computer. A malfunctioning or damaged cable can cause delayed write failed pop-ups and errors.
Make sure that your Windows system and drivers are up to date.
We hope that our guide on how to fix the Windows delayed write failed error helped you copy the files you wanted.
Last week, Microsoft introduced Windows Copilot, an AI assistant powered by Bing Chat with the latest update, KB5030310. Many users have complained that it is causing issues with the Wallpaper Engine. If you are one of them, this guide can help!
We will discuss some effective methods with step-by-step instructions to remove Windows Copilot from Windows 11.
Type regedit and click OK to open the Registry Editor.
Click Yes on the UAC prompt.
First, create a backup of registry files, go to File, then click Export. Save the .reg file to an accessible location.
To remove the Windows Copilot button from the taskbar, copy & paste this path into the address bar: Computer\HKEY_CURRENT_USER\Software\Microsoft\Windows\CurrentVersion\Explorer\Advanced
Locate ShowCopilotButton in the right pane and double-click it to open.
Change the Value data to 0 and click OK.
To disable the feature, go to this path: Computer\HKEY_CURRENT_USER\Software\Policies\Microsoft\Windows
Right-click Windows, select New, then DWORD (32-bit) Value.
Right-click the newly created DWORD, select Rename, and name it TurnOffWindowsCopilot.
Now, double-click it and change the Value data to 1, then click OK to save the changes.
If you change your mind about the AI assistant, you can reverse engineer the steps mentioned in any method to enable the extended Bing AI Chat feature. Before you enable Windows Copilot again, learn how to use it properly by following this in depth guide on how to use Copilot in Windows 11.
FAQ
How do I remove Copilot from Windows?
Open Settings, select Personalization, choose Taskbar, and turn off the Copilot toggle to hide it. If you want to remove it completely, uninstall the Microsoft Copilot app from Apps > Installed apps.
How do I remove Copilot from Microsoft Edge?
Open Edge Settings, select Sidebar, then open Copilot. Turn off Show Copilot and disable related sidebar features.
How do I remove Copilot from Outlook?
Go to File > Options, open Mail, and clear the checkbox for Enable Microsoft 365 Copilot under Compose messages. Restart Outlook to apply the change.
Why does Copilot keep showing up after I disable it?
Windows sometimes re-enables features after updates. Check Settings > Personalization > Taskbar again, and remove the Copilot app from Installed apps if it reinstalls.
Soon, Copilot will be added to Microsoft 365 as well, which can be accessed from the Office apps. To know more about its pricing and plans, read this guide.
Your iPhone has a fantastic camera that offers better quality than the majority of webcams, and this is why many want to use an iPhone as a webcam on Windows 11.
This can be achieved with various third-party software, and in today’s guide, we will show you the best ways you can use your phone as an external webcam, so let’s get started.
Benefits of using an iPhone as a webcam on Windows 11:
iPhone offers better image quality than any USB webcam on the market.
It offers more customization thanks to multiple lenses.
You will save money since you don’t need to purchase a new webcam.
Visit iVCam webpage and download and install both the desktop client and iOS versions.
Start iVCam software on your PC and allow it access throught your firewall.
Connect the phone via USB cable. For this method to work, you need to have iTunes installed as well as Apple Device Driver, and Apple Application Support service running.
Next, start the iVCam phone app and it should automatically recognize your PC.
Tips for getting the best video quality from your iPhone webcam
Ensure that all your rear cameras are clean and without smudges.
Check your lightning. If needed, you might have to purchase an additional right light.
If you’re using a wireless connection, make sure that your Internet speed is fast enough and that your connection is stable. If needed, lower the video quality to get a smoother video stream.
For maximum speed and quality, use a USB connection.
Use a tripod or a special phone mount so that your iPhone doesn’t shake.
If you run into issues with unlocking or authentication while setting up your webcam, check this guide on Face ID not working on iPhone for additional fixes.
Now you know how to use an iPhone camera as a webcam for a PC via USB, and as you can see, the process requires you to use a dedicated app on both your PC and phone. However, that’s not the only thing your phone can do.
Securing your Microsoft account is always recommended hence why you would add an alias as an extra layer of protection. However, if you’re trying to add a phone number but keep getting the This alias cannot be added to your account error, you may have exceeded your quota.
Still, there’s a simple workaround to bypass this issue. So, if you have this error on your PC, you can try the below-mentioned methods to fix it and get rid of it as soon as possible.
How many Microsoft aliases can you have? Microsoft assigns you ten aliases, so if you’re yet to exceed this limit, it could be because the alias is already registered to another account or you’re having internet connection issues.
Remember that work/school accounts also enforce their own internal limits, so if your email is part of a reserved domain, you may be unable to use that address as an alias.
How do I bypass This alias cannot be added to your account error?
To start off, check off the following:
Check your Internet connection and make sure that it is working correctly.
Sign out of your Microsoft account and try creating the alias again.
Verify that you can access other services that rely on your Microsoft account, such as OneDrive or Outlook Mail.
Check that the account does not already have a profile set up and ensure it’s not a work/school account.
Ensure you’ve not reached your maximum number of aliases on your account.
1. Use a different form of alias
You can use an email alias or another phone number as an alias. If one is throwing the This alias cannot be added to your account error, try using the other and see if it works.
Also, ensure that whatever alias you use is registered to you, as Microsoft will require you to verify your identity by sending you a verification code.
2. Close your Microsoft account permanently
Although this should be a last resort, it has worked for some users. The only downside is that you must wait for up to 60 days for your account to be permanently closed.
Microsoft gives you a grace period if you change your mind and want to recover your account. However, once the 60-day time lapses, the account will free up, and you’ll be able to add your alias.
If the two options are not viable, try contacting Microsoft detailing the issue. It’s worth a shot, especially if your account is having issues or you had problems when your account wasn’t changed to a Microsoft account.
How do I remove an alias from my Microsoft account?
Sign in to your Microsoft account and go to Manage how you sign in. A list of aliases will appear. Click on any alias you wish to remove and then hit Remove.
Remember that you can only remove an alias if you have more than one account. If you only have a primary email address, the option to remove it will be unavailable.
What are some preventative measures to avoid future issues of this kind?
Use unique and identifiable alias names for different accounts – If you are running multiple accounts, it is important to ensure you use unique ones for different accounts.
Review any added aliases regularly – If you have multiple accounts set up, review these aliases regularly. If one of them stops working, you’ll want to know right away so that you can fix the problem.
Verify your email address – Make sure that you have a valid email address in your account. Otherwise, this alias cannot be added to your account error message will appear.
Unfortunately, if your alias has already been used in another account, it cannot be re-used even after removing it. Fortunately, you can add another alias easily, even if your phone number can’t be added to your Microsoft account, adding an email will work just as well.
With luck, the steps above will allow you to get back into your account or help fix the problems that exist. Overall, it is just a matter of ensuring you do not double-register your aliases with different accounts for maximum security.
Have you managed to fix this issue? Please let us know in the comment section below.
If you are looking for a way to pin your batch file to the Taskbar on Windows 11 for easier access, this guide can help! We will discuss step-by-step instructions to create a shortcut of the .bat file and add it to your Taskbar.
Can you pin CMD to Windows 11’s taskbar?
Yes, you can pin CMD to the Windows 11 Taskbar and Start. All you need to do is press the Windows key, type cmd, and select Pin to taskbar. However, you can’t access Command Prompt with administrative rights using the pinned app.
How do I put a .bat file on my Windows 11 Taskbar?
Before proceeding with any steps for pin batch file to Taskbar on Windows 11, go through the following preliminary checks:
Ensure you have logged in using an account with administrator privileges.
Move the .bat file to a convenient location.
Right-click the .bat file and select Show more options.
Next, select Create a shortcut.
Locate the newly created shortcut, right-click it to open the context menu, and select Properties.
In the Properties window, go to the Shortcut tab, then locate Target, and to open the batch file with Command Prompt, add this prefix to the existing path: cmd.exe /c
Click Apply, then OK to save the changes.
Now right-click the shortcut again, and select Show more options.
Select Pin to taskbar from the list.
This will pin the .bat file shortcut to the Taskbar; you can access it with a single click. You can create a shortcut and pin Recycle Bin or your favorite website to the Taskbar on Windows 11 using the same steps.
Error 801c03ed usually comes with the following message: Administrator policy does not allow this user to device join.
This error message will prevent you from installing Windows and joining your network, thus preventing you from using your PC, so it’s important to fix this issue as soon as possible.
What is error code 801c03ed? This is a Windows installation error and it occurs due to the following:
Azure settings don’t allow new users to join.
The device object isn’t enabled on Azure.
Glitches with the hardware hash in the Azure panel.
How do I fix error code 801c03ed on Windows 11?
1. Check the Intune settings
Log in to the Azure portal.
Navigate to Devices and select Device settings.
Set Users may join devices to Azure AD to All.
Optional: You might also want to change the maximum number of devices per user to Unlimited.
Save changes.
For more security, you can also use the Selected option in step 3 and then select groups that you want to have access.
2. Make sure that the Azure AD device object is enabled
In Intune go to Devices and choose Enroll devices.
Select Devices and search the device by serial number.
Now click on the desired Azure AD device.
Select Enable.
3. Delete the device hardware hash and import it again
In Intune, go to Devices and select Windows Enrollment. Next, select Devices.
Select the device you want to remove and click on Delete.
Click Yes to confirm.
Now wait for a couple of minutes for the device to delete.
After doing that, you need to import the hardware hash of the device to Intune and the issue will be gone.
Error 801c03ed is related to your Azure configuration, and it can be fixed simply by changing the device settings by the Azure administrator. However, this isn’t the only issue you can encounter and we already covered install error 0x80242fff as well as error 0x80070643.
This year’s major update, Windows 11 23H2, was released on October 31st. It should have been launched earlier but was delayed when the tech giant launched the Moment 4 update, KB5030310, for Windows 11 22H2 instead.
However, if you want to download Windows 11 23H2 and enjoy the new features before others, this guide can help!
How big is the Windows 11 23H2 download size? Usually, the setup file size of a Windows upgrade is about 3-4 GB, but the Windows 11 23H2 ISO file size is around 6.1 GB.
How do I download Windows 11 23H2?
Before moving to the detailed steps to download the Windows 11 23H2 ISO file, make sure you perform these checks:
Verify if you have a stable internet connection.
If upgrading your computer from an older version, ensure your computer has new hardware and matches the system requirements of the OS.
Press Windows + I to open Settings>Windows Update>Check for Updates to ensure the feature update KB5030310 is installed on your computer.
The easiest way to download Windows 11 23H2 is to install the latest updates. To do that, go to Settings>Windows Update and hit the Check for updates button.
Wait for the update to install and reboot your PC. The new Windows 11 23H2 update should be available for everyone, but the Copilot in Windows preview will be released first in North America and parts of Asia and South America.
Microsoft plans to release it gradually in other parts of the world, but if you don’t get it right now, you know why.
Run the app and click on Accept and install button from the bottom right corner.
The installer will download Windows 11, verify, and then perform the installation.
The best part about using the Windows 11 Installation Assistant is that it also checks if your system can run the OS.
3. Download the ISO file
Go to the Windows 11 Downloads page, select the Windows 11 version from the drop-down menu, and click the Download button.
Then, select the language, then the 64-bit version, and hit the Download button again.
The file is 6 GB in size, so it might take some time as it depends on the internet connection, your computer’s speed to process, and your location in relation to the host server. To learn more about it, read this guide.
Currently, the Release version of Windows 11 23H2 is only available 64-bit version, so if you have x86, please don’t proceed with these steps.
Windows Copilot is an AI-powered assistant that can take a screenshot, make general changes to Windows settings, write content, and answer your queries based on the conversation style you choose.
File Explorer will have a Details tab on the right and a Gallery tab on the left to help you locate all photos, & screenshots on your PC.
Windows Backup app allows you to save folders, apps, settings, and even Wi-Fi passwords and other credentials on your computer.
The Photos app will come with a new feature, Background blur, and the Taskbar will get the Combine taskbar buttons and hide labels option back.
Microsoft Teams is now added to the Taskbar as Chat, and Windows 11 will have native RAR support.
The Settings Home page will have the Recommended settings section and most used features.
The Notepad app will now automatically save whatever you type or paste in it, and similar to Notes on iOS, it will open on the same page where you closed it.
With the new Phone Link integration with Microsoft Teams (free), you can now link your Android phone to send, receive SMS, and share meeting links via regular phone numbers.
Paint will now be in Dark mode and will have a Remove background feature.
You can extract text from an image using the Snipping tool‘s Copy as text feature.
Some of these features are already available in the latest Windows update, KB5030310, while others will roll out later with Windows 11 23H2 update.
If you don’t see these features on your computer, wait a while, as Microsoft is still releasing the updates. But if Windows 11 23H2 is not showing up after a while, it’s time to fix things!
Which new Windows feature do you like the most? Please share your thoughts in the comments section below.
If you’re listening to music or watching a movie on your Windows computer, you might have noticed that the sound is louder on one side than the other. This could be the default settings of your audio device.
Fortunately, adjusting the audio balance of your system is fairly easy. This article will run through the steps for doing so.
Why is one side of my headphones quieter on Windows 11?
Most times, the problem could be that the headset is not plugged in tightly or the connection has become loose. Also, if the headphone jack has gone bad, you have a sound card problem or interference in your audio device, you’ll notice a difference in sound.
Another reason could be because of the wiring inside of them. The wires may have become loose or disconnected from each other, which causes problems in communication between different parts of your headphones.
How do I balance left and right audio channels in Windows 11?
Before you make any changes, ensure the following check out:
Check for any Windows updates and download and install if available.
Click on your speaker/headphones and select Properties.
Navigate to the Levels tab and click on Balance.
Ensure the Left and Right levels are the same value.
Click on Apply, then OK to save changes.
Need the fastest route to the Sound page before adjusting balance? Follow this guide to open Sound Settings in Windows 11, then continue with the steps below.
Click on the speaker icon on your taskbar and select Manage audio devices.
Select your speaker/headphone then hit More volume settings.
Under Output, select your speaker/headphone and click on it.
Navigate to Output settings, then adjust the Left and Right channel slider to the same value.
Why does the left and right channel volume keep going out of sync on Windows 11?
The audio driver is outdated – Your sound card driver may have been updated to the latest version available, but it’s still not the latest version that provides support or fix a bug.
Poor quality speakers/headphones – If you are using poor quality speakers or headphones, then they might not be able to output audio at the same level as other good ones do.
The speakers are connected to a USB hub – The USB signals from these hubs can vary in quality, which can cause the channels to go out of sync or cause audio lagging.
Third-party app interference – If you have installed any third-party sound applications on your PC, they may be causing problems.
You have an old version of Windows – Old versions of Windows don’t support the latest sound cards, and thus, there may be some compatibility issues between them.
Hopefully, this quick tip will help you get the sound balance you need, as well as allow you to take better control of your audio. Remember, sound is very subjective, so this balance can easily distort your listening experience as it tends to be too high for some people and can cause damage to your ears. You can also use dedicated apps for that like Dynamic Audio Normalizer.
To prevent such occurrences, you should normalize your volume to avoid the sudden high spikes when playing different media.
And for the perfect sound optimization, throw in some sound calibration software with advanced features that can adjust your audio settings to your environment.
Have you managed to achieve audio balance on your Windows 11? Can you spot any difference from your previous settings? Let us know in the comment section below.
The Your organization requires that you change your PIN message appears on the sign-in screen when the PIN expiration limit is reached on a company’s PC. That said, some people with personal accounts report getting this error.
If that’s happening to you, you’re in luck. We figured out why this happens and laid out simple steps for fixing it.
How to turn off your organization requires you to change your PIN on Windows 11?
If none work, head to the fixes listed next.
Tip
To execute the solutions listed below, you will need administrative privileges. If you are signed in with a standard account, switch to an administrator account and then proceed.
1. Remove the account and PIN
Press Windows + I to open the Settings app, go to the Accounts tab from the left pane, and click on Access work or school.
Expand the organization’s account, and click the Disconnect button.
Restart the computer for the changes to come into effect.
Then, again, open Settings, go to Accounts, and this time, click on Sign-in options.
Expand PIN (Windows Hello), and click the Remove button.
Confirm the change.
Now, set up another PIN for the Windows 11 PC and restart the computer to verify whether the error message goes away.
Press Windows + R to open Run, type gpedit.msc in the text field, and hit Enter.
Expand Administrative Templates under Computer Configuration, then double-click on System.
Choose PIN Complexity from the left pane.
Now, double-click the Expiration policy on the right.
Choose Not configured from the top left, and then click Apply and OK to save the changes.
Set all the other policies here to Not configured as well.
Similarly, set the policies in the following path as Not configured: Computer configuration/ Administrative templates/ Windows Components/ Windows Hello for Business
Finally, restart the computer and check for improvements.
Press Windows + S to open Search, type Command Prompt in the search bar, right-click on the relevant result, and select Run as administrator.
Click Yes in the UAC prompt.
Now, paste the following command and hit Enter to disable password expiration for all accounts: wmic path Win32_UserAccount set PasswordExpires=False
4. Modify the Registry
Press Windows + R to open Run, type regedit in the text field, and click OK.
Click Yes in the prompt that appears.
Navigate the following path or paste it in the address bar and hit Enter: HKEY_LOCAL_MACHINE\SOFTWARE\Policies\Microsoft\PassportForWork\PINComplexity
If you can’t find the PassportForWork or PINComplexity key, right-click on the one before it in the path, hover the cursor over New, select Key, and name it accordingly.
Once done, right-click on PINComplexity, select New, choose DWORD (32-bit)Value, and name it Expiration.
Now, double-click the Expiration DWORD, enter 730 in the Value data text field, and click OK to save the changes.
While modifying the Registry Editor, you have the option to set the PIN expiration value between 1 and 730 days. If the previous solutions didn’t work, we recommend you choose the upper limit here.
The lusrmgr.msc utility is only available on the Pro and Enterprise editions. For those running Windows 11 Home, first, install Local Users and Groups.
Press Windows + R to open Run, type lusrmgr.msc, and hit Enter.
Select Users from the navigation pane, and double-click the affected user profile on the right.
In the General tab, tick the checkbox for Password never expires, and click Apply and OK to save the changes.
6. Perform an in-place upgrade
Go to Microsoft’s official website, select the OS edition and product language, then download the Windows 11 ISO.
Double-click the ISO file and click Open in the confirmation prompt (appears after a few seconds of loading).
Now, run the setup.exe file.
Click Next in Windows 11 Setup to proceed.
Check the Microsoft’s license terms, and click Accept.
Verify that the setup reads, Keep personal files and apps, and then click on Install to start the in-place upgrade.
An in-place upgrade takes a few hours to complete but is an effective measure against any sort of corruption, be it the system files or a corrupt user profile. And you don’t lose any files or stored apps in the process.
7. Reset the PC to factory settings
When nothing else works, the last option is to reset Windows 11 to factory settings. Make sure to wipe out all the data on the PC. If required, move the relevant files to a USB storage device as a backup.
If you still can’t get rid of the Your organization requires you to change your PIN error, find out how to bypass the Windows 11 login screen and access the PC without a password, but it shouldn’t come down to that for most users!
Remember, policies are important from the account sign-in point of view, and even slight misconfiguration can trigger errors, including cases when Windows asks to set up a PIN. Make sure the policies are in order, and you are good to go!
This isn’t the only problem you can experience with the organization, and many encountered Some settings are managed by your organization message, but we tackled that issue in a different guide.
For any queries or to share more solutions with us, drop a comment below.
Good OS imaging and deployment software is mandatory when you have a network with 30+ endpoints to manage.
What is OS imaging and deployment? An OS imaging and deployment software helps you back up whole images of the endpoints or just the OSes and deploy them on the same computers or new ones.
If something happens to an endpoint or you’re extending your network, these tools will ensure that all your PCs are in check and have the same configurations at the end of the day.
What are the best OS imaging & deployment software?
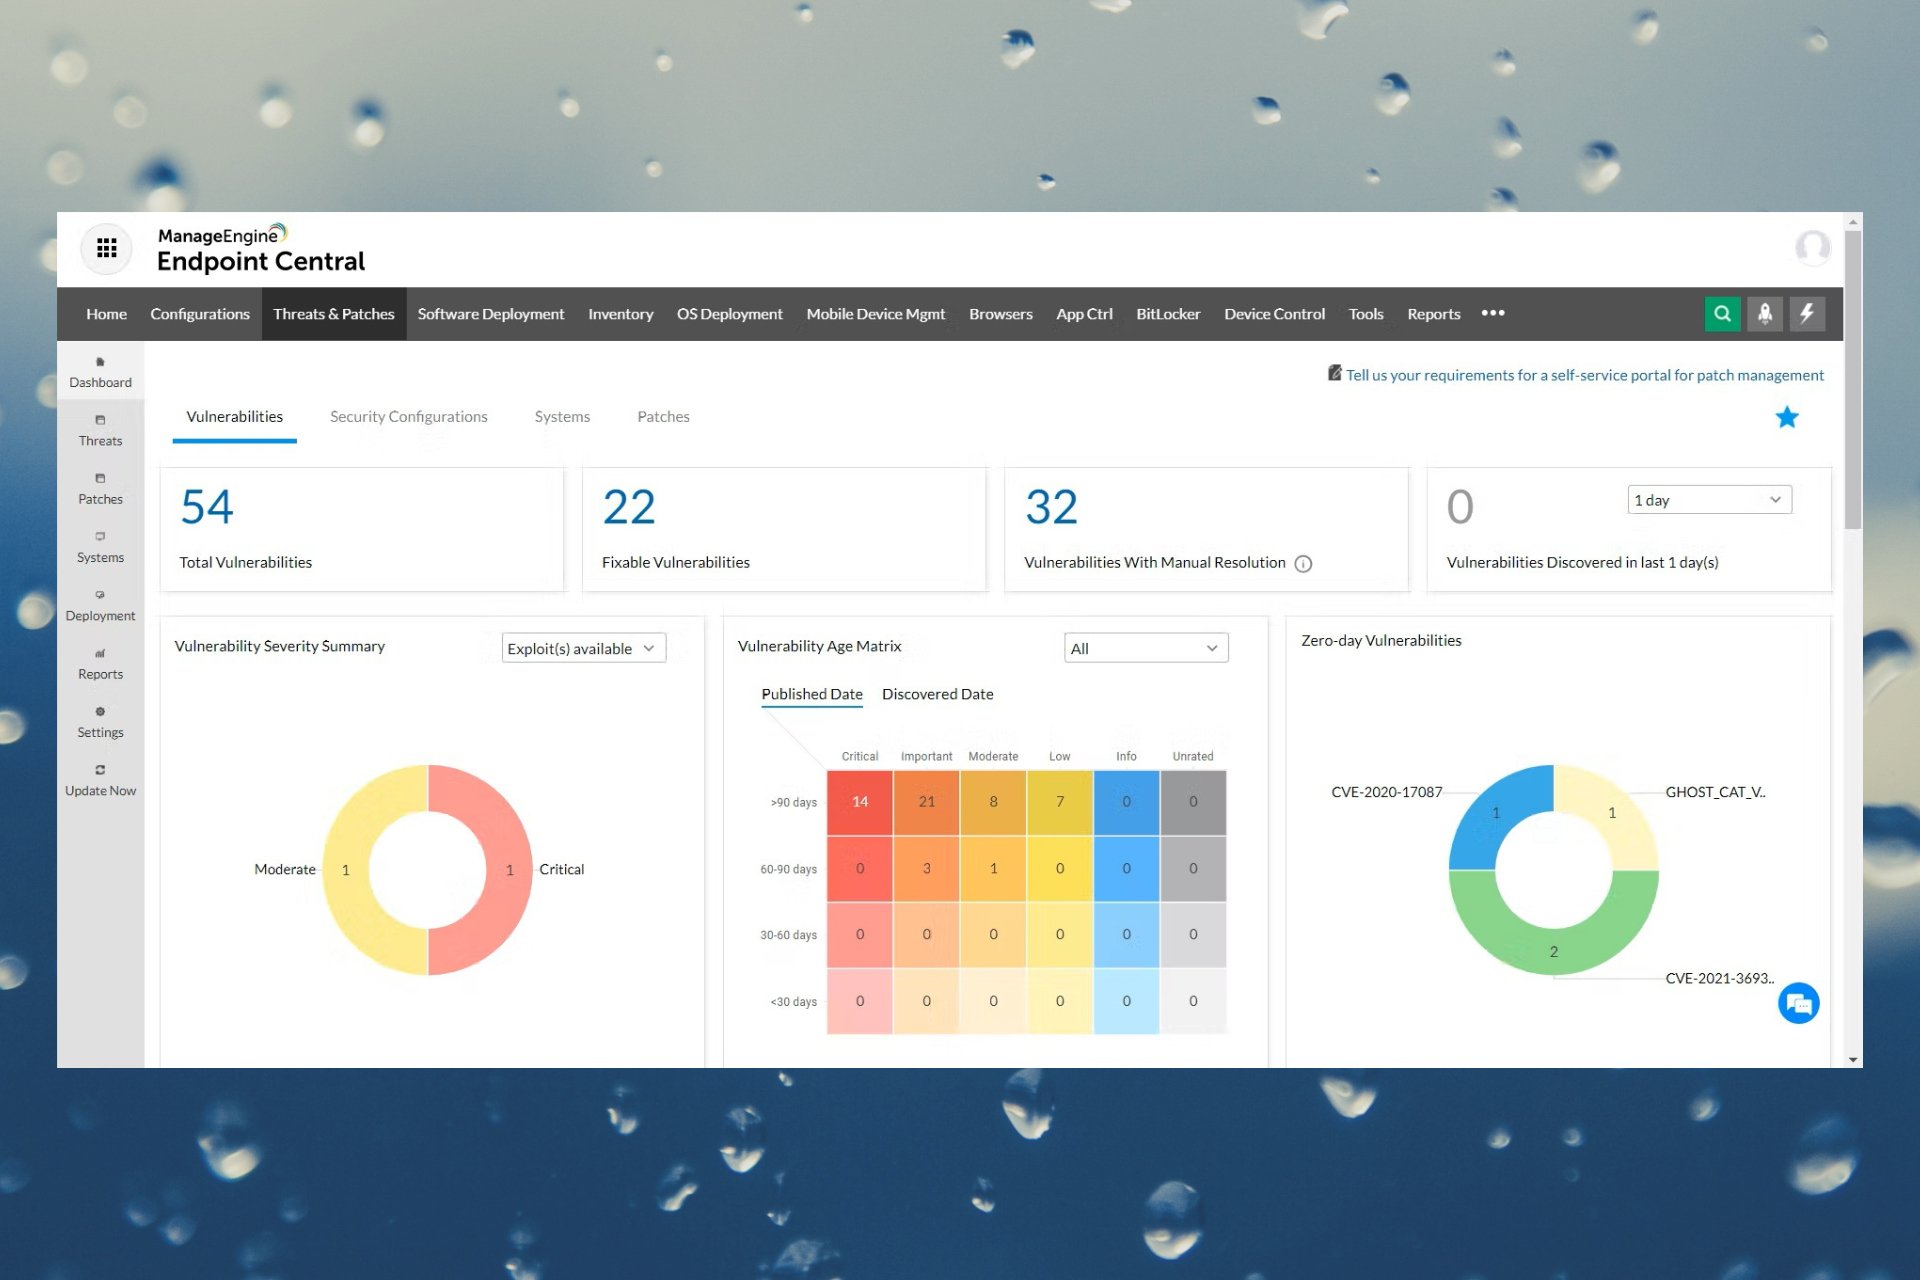
ManageEngine’s Endpoint Central is the ultimate tool for complete endpoint management, not only OS imaging and deployment.
That is because it also takes care of your servers and even your smartphones and tablets and all is done through a single dashboard.
Endpoint Central can help you image entire OSes and endpoints but you may also use it to patch them, deploy apps, and a lot more.
Furthermore, it allows you to manage software licenses, get software usage statistics, control remote desktops, and everything in between.
The tool helps you control Windows, Mac, and Linux devices remotely, or deploy profiles and policies on your mobile devices. Then, the IT manager may configure them for Wi-Fi connections, VPN, email accounts, and so on.
That also means you can apply restrictions for installing software, or camera and browser usage, to name just a few.
In essence, all the enterprise-owned devices are easily manageable in most aspects, including security: enabling passcodes, remote lock or content wipe, and so on.
Let’s review some of its key features below:
Create OS or entire device images and deploy them on any of your assets
Manage all the devices in your network
Control your endpoints remotely and troubleshoot any problem
Apply restrictions for software installation and app or device usage
Advanced hardware and software monitoring
Endpoint Central
Create OS images and deeply them easily on any of your endpoints securely.
If you’ve already got the image and you only need to deploy them on several computers, AOMEI Image Deploy is a straightforward solution.
Moreover, the tool also comes with a free version that you may use on an unlimited number of PCs and on 20 servers in a single action.
However, if you want to create the image first, you will need to use AOMEI Backupper or another imaging tool.
Anyway, with the image ready and client computers online and set for PXE boot or network boot, you just click on the Start Deply button.
AOMEI Image Deploy comes with a very simple and comprehensive interface and the operation will be performed automatically on all the endpoints at once.
If you need more features or assistance, you may opt for the paid version, AOMEI Image Deploy Technician.
The tool supports Windows 10/8.1/8/7/Vista/XP and Server 2003/2008/2012/2016 images.
Here are some of its most important features:
Deploy a Windows image on 20 PCs with the free version
It supports Windows 10/8.1/8/7/Vista/XP and Server 2003/2008/2012/2016 (including 32/64-bit, R2/SBS system)
Simple and easy-to-use interface
90-days money back guaranteed policy for the paid version
AOMEI Image Deploy
Get this simple tool with a free version and deploy Windows OSes on all the PCs on your network.
Acronis Snap Deploy helps you create an exact disk image of any standard configuration, including the OS, configuration, files, and applications.
Then, it simultaneously deploys that image to multiple machines in a single step so it’s perfect as an OS imaging & deployment software.
The app will save you a lot of time because it is recommended for business usage on networks with tens to thousands of endpoints.
Moreover, you can choose between manual, automatic, user-initiated, standalone, and scheduled deployment. That’s right, you can schedule deployments for any moment.
And you can do so on Windows and Linux alike. In its sophisticated configuration, you even have the option to insert the Windows license key in the machine settings.
With Acronis Snap Deploy, you can employ the help of a Master Image Creator tool to quickly create several images for different systems or environments.
The developers have step-by-step guides for each and every single process you might want to perform.
Let’s review some of its key features:
Fast and easy master image creation
Easy deployment on Windows and Linux environments
Store images on local HDD, network shared USB HDD, Flash Drive, CD / DVD / BD-ROM
Unlimited number of deployed images
Deploying to live machines without the need to boot them into the deployment environment manually
Acronis Snap Deploy
Get this enterprise-grade tool to create images and deploy them to all endpoints at once.
Paragon Hard Disk Manager is specialized in backing up and restoring endpoints, but it also comes with OS cloning and deployment capabilities.
You can simply copy a Windows OS from an endpoint and apply it on a fresh system with just a few clicks.
Also, you can create a master flash disk or drive that you may use to restore any data and files on one or more machines in your network.
With a single license, you will be able to maintain up to 100 corporate Windows end-points.
However, Paragon Hard Disk Manager has a lot more features. For instance, it’s very useful if you need to permanently wipe sensitive data on partitions and disk volumes.
The OS migration function works for any Windows OS, including Windows Server 2012/2016/2019.
Take a look at its key features below:
Easy Windows OS copy and migration
Run all backup types; perform sector- and file-level backups
Recover individual folders, files, and application-specific data
Simplify the backup process by separating your data from your operating system
Organize and optimize your hard disk with Create-, Resize-, Format- and Delete-partition options
Paragon Hard Disk Manager
Clone any Windows OS and deploy it quickly and safely with just a few clicks.
EaseUS Todo Backup Home is a back-up and restore solution, but it also comes with a very useful cloning tool.
You can use it to make a bootable image of a whole drive or OS which you can deploy on another system.
Moreover, you can save the back-up on any media, including cloud storage or NAS, and use that to deliver the content to other computers on your network.
And, with a paid license, you can have your own 250 GB space to store your backups or images.
The advantage of EaseUS Todo Backup Home is that you may also restore the endpoints to their original state whenever you need with just a few clicks.
You can do that on the hard drive level, at OS level or simply replace the damaged files with the original ones.
The disadvantage is that you can’t deploy an OS to multiple PCs at the same time so the tool is recommended for personal use mostly.
Let’s review a few of its key features:
Backup system & hard drive to a cloud drive
Complete backup and restore solution for personal use
Clone, upgrade, or transfer your system easily
Back up all data and settings of a partition or all partitions
EaseUS Todo Backup Home
Back up or clone your OS or drive and deploy it on a fresh system in minutes!
Waking up to find that your trusted Lenovo ThinkPad won’t wake up from sleep can be more than a little frustrating. This seemingly simple issue can disrupt your workflow, causing unexpected delays and potential data loss. The good news is that many users have tread this path before and, through collective troubleshooting, have unearthed a variety of solutions.
In this guide, we’ll delve into the common causes of ThinkPads not waking up from sleep and provide a comprehensive set of solutions gathered from Lenovo’s official forums, tech enthusiasts on Tom’s Guide, and other reliable sources. Whether it’s a driver issue, a BIOS update, or a power management setting, we’ve got you covered.
1. Tweak Fast Startup Setting
1. Access Power Options
Press Win Key + X together and select Power Options.
Alternatively, navigate to Control Panel > Power Options.
2. Modify Power Button Settings
In the left pane, click on Choose what the Power buttons do.
Click on Change settings that are currently unavailable.
Uncheck Turn on fast startup (recommended).
Click Save changes and restart your laptop.
2.Change Power Management Settings
1. Keyboard Settings
Go to Device Manager > Keyboards.
Right-click on the keyboard driver and select Properties.
Navigate to the Power Management tab.
Ensure Allow this device to wake the computer is checked.
2. Mouse Settings
In Device Manager, navigate to Mice and other pointing devices.
Right-click on HID compliant mouse and select Properties.
Go to the Power Management tab and ensure the wake option is checked.
3. Wireless Adapter Settings
In Device Manager, go to Network Adapters.
Right-click on your WLAN adapter and select Properties.
Navigate to the Power Management tab and ensure the wake option is checked.
3. Perform BIOS Update
Update the BIOS through Lenovo Vantage.
Note: Post-update, you might need to input your BitDefender phrase from your Microsoft account.
4. Tweak Energy Options
1. Hibernate Settings
Open energy options.
Set the laptop to hibernate instead of standby or opt for a complete shutdown.
2. Driver Disabling
Some users recommend disabling the fingerprint reader and orientation sensor drivers.
3. Network Activity
Consider disabling all network activity to prevent unintentional wake-ups.
5. FixDriver Issues
1. Identify Faulty Drivers
Open the command prompt and run eventvwr.exe.
Search for drivers that aren’t certified by Microsoft.
Update or disable these drivers via the Device Manager.
Bonus Tip: Background Activity
Some users suggest that Windows’ background activity might be causing wake-up issues.
Explore tools or methods to disable all background activity to potentially resolve the issue.
However, it seems that the Redmond-based tech giant is taking things a bit further, and this time, PDF reader lets users translate selected text in real-time, according to Windows enthusiast @Leopeva64.
The feature is up and running in the Edge Canary (unfortunately, it’s not on Edge Dev, as we checked, but it might get added to the channel), and users won’t have to open the context menu to start the translation.
Instead, the PDF reader will automatically translate the text as you select it, and it will change the translation according to the amount of selected text.
How to enable live translation in Microsoft Edge
Assuming this feature will be released on the Edge’s stable channel, then enabling live translation shouldn’t be hard.
You’ll have to make sure the translate button from the toolbar is selected.
Once you do that, you can select any part of the text and Microsoft Edge will translate it live for you.
You won’t have to do anything, as Microsoft Edge does it automatically. The browser will open up the translate sidebar automatically, and there it will display the live translation.
If you remember, we mentioned recently that we don’t know the reason behind the new translate button in the Edge PDF reader’s toolbar. We said back then that it might be used to translate entire documents at once, but we didn’t know for sure.
Now it seems that the button allows for enabling live translation within a document. Nonetheless, it’s one of the most useful features of this app, allowing for a seamless translation without the back and forth.
What do you think about Microsoft Edge featuring live translation? Are you excited about trying it?
A while ago, Microsoft announced that Edge will no longer support a plethora of useful plugins, including the Grammar Tools, Citations, and Math Solver. The news didn’t last for long, however, because recently, Edge insiders found out that the Redmond-based tech giant is bringing some of these plugins back.
Only this time they will be integrated within Bing Chat, the popular AI tool developed by Microsoft. And, as this wouldn’t be enough, it seems that Windows Copilot, the hotly-anticipated AI tool finally released to Windows 11 a week ago, is getting plugins as well.
In a way, this is natural given the fact that Windows Copilot is based on Bing Chat. However, according to Windows enthusiast, @Leopeva64, Microsoft added a short statement regarding the share of data with these plugins.
Data will be shared with the plugins you choose.
Microsoft
Bing Chat users should be getting this statement, which explicitly makes it clear that any data shared with Bing Chat, will be shared with these plugins as well.
Will the Bing Chat plugins’ data sharing affect Windows Copilot too?
Well, considering Windows Copilot is based on Bing Chat, and the plugins that you get on Bing Chat can be easily acquired in Windows Copilot as well, the answer is yes.
Windows Copilot will be affected by this policy as well, meaning that all the data you share with Copilot, while using plugins, will be shared with these plugins too.
But, at least, Microsoft makes it clear to users, so they can make informed decisions on what to share or not to share with Bing Chat.
They also have the option to disable the said plugins, and using Bing Chat without them won’t specifically put them at any risk. This is if we’re not taking into account the data they’re sharing with Bing Chat.
There has been a discussion about users’ personal data being used to train AIs, and the browser giant, Mozzila, even initiated a petition with the goal of asking Microsoft what it plans to do with personal data.
Microsoft’s new terms and agreements, which went into effect last month, are ambiguous about it. However, one thing is certain: you have the option to limit to spread of your personal data by not using plugins on Bing Chat.
Or, even better, don’t share personal data with Bing Chat.
If WD My Cloud is not showing on the network on Windows 11, that can be a big problem, especially if you have your backup or other important files stored on it.
This can be a big problem for users who frequently need to access network storage, so in today’s guide, we’re going to show you how to permanently fix this problem.
Why is WD My Cloud not showing on the Windows 11 network?
Your My Cloud device, network adapter, or Internet connection isn’t properly configured.
The SMB features aren’t installed on your PC.
Temporary glitches with winsock can sometimes cause this problem.
What can I do if My Cloud is not showing on network?
Before we start fixing the issue, there are a few preliminary checks you can perform:
In network settings for your My Cloud device, change the default settings from SMB1 to SMB3.
Make sure that your My Cloud drivers are up to date.
Disable MU-MIMO on Netgear Orbi. You can find this setting in Advanced settings.
On some routers, you need to disable a 2.4GHz network to get this feature to work.
1. Try to access My Cloud via network address
Click on the Cloud Storage icon. This should open the WD My Cloud in your browser.
Copy the IP address from the address bar. That is the device’s network path.
Press the Windows key + R and paste the IP address in this format. Be sure to use the IP address you got from step 2: \\192.XXX.X.XXX
2. Make sure that SMB features are installed
In the Windows search box enter features. Select Turn Windows features on or off.
Locate SMB 1.0/CIFS File Sharing Support and enable it along with all of its features.
Click OK and follow the instructions on the screen to install them.
3. Reset Winsock
Press the Windows key + X and choose Terminal (Admin).
Run the following command: netsh winsock reset
Wait for the network reset to finish.
4. Modify your registry
NOTE
This method might cause potential security issues, so use it at your own risk.
Press the Windows key + R and enter regedit to open Registry Editor.
In the left panel, navigate to Computer\HKEY_LOCAL_MACHINE\SYSTEM\CurrentControlSet\Control\Lsa\MSV1_0
Right-click MSV1_0 and choose Export. Save the file and use it to restore your registry if any issues appear.
Select all items on the right pane except Default, right-click them, and choose Delete.
After that, click Yes to confirm.
How do I map my WD Cloud drive in Windows 11?
Open File Explorer and go to the Network section.
In the address bar enter the following. Do keep in mind that the name might change depending on the model: \\WDMYCLOUD
Enter your credentials. Next, right-click the drive and choose Map network drive.
Select the drive letter and click Finish.
This unfortunately isn’t the only issue with Western Digital My Cloud, and many reported that WD My Cloud is not working. Other models are having similar issues, and we already wrote about WD Passport not showing up in one of our older guides.
It’s better if you delete all unnecessary accounts for enhanced performance and to avoid conflicts. Having previous work accounts still listed can lead to persistent and irrelevant notifications. So, let’s find out how you can remove accounts used by other apps in Windows 11.
The process is usually simple and should also help remove Outlook and Microsoft user accounts, amongst other email accounts. Let’s get straight to it and discover all the ways to remove Windows accounts used by other apps!
How do I remove accounts used by other apps?
Tip
Before you proceed, make sure you are signed in with an administrator user account. If not, switch to one because only then can you remove other accounts from the PC.
1. Via Email & accounts settings
Press Windows + I to open the Settings app, go to the Accounts tab from the left pane, and click on Emails & accounts under Account settings.
Now, expand the relevant email address under Accounts used by other apps, and click the Remove button.
Click Yes in the confirmation prompt to delete the account.
If there’s no Remove option under Accounts used by other apps, you are either signed in with the same account or don’t have the administrative privileges.
2. Disconnecting the account
Press Windows + I to open Settings, navigate to Accounts, and click on Access work or school.
Now, locate the additional account, expand it, and click the Disconnect option.
Click Yes in the confirmation flyout menu.
It’s easy to remove accounts in Windows 11, given things are properly set up, you have the required permissions, and the configuration doesn’t conflict with the OS.
Press Windows + R to open Run, type regedit in the text field, and hit Enter.
Click Yes in the UAC prompt.
Navigate the following path or paste it in the address bar and hit Enter: HKEY_USERS\.DEFAULT\Software\Microsoft\IdentityCRL\StoredIdentities
Under StoredIdentities in the navigation pane, locate the key with the same name as the user account, right-click on it, and select Delete.
Click Yes in the confirmation prompt.
Finally, restart the computer for the changes to come into effect.
4. Creating a new local account
Press Windows + S to open the Search menu, type netplwiz in the search bar, and click the relevant result.
Click the Add button.
Click on Sign in without a Microsoft account (not recommended).
Now, click the Local account button.
Enter the username, password (optional), and hint to create a new user account.
Select the account from the list, and click the Properties button.
Go to the Group Membership tab, select the Administrator option, and then click OK to save the changes.
Now, sign out the current user account, log into the one you just created, and delete the previous account.
To remove the current user account from under Used by other apps in Windows 11, you will need to create a new local account and then delete the previous profile.
Why can’t I remove accounts used by other apps?
You are not signed in with an administrator account.
The account you want to remove is the currently active profile.
Restrictions set by the administrator or host organization prevent you from making changes.
One of these solutions should have helped remove an account used by other apps in Windows 11. Remember, you don’t need the other account to be active or require the password, but just the administrative privileges to remove it! Or, if you don’t want to remove them altogether, consider signing out other users.
Do you visit the same website frequently at approximately the same time every day? This could lead to spending a lot of time opening multiple browser tabs and filling your browser with clutter just to perform routine tasks.
Well, how about opening it without having to launch your browser manually? It’s pretty easy and doesn’t require you to download any third-party app as you shall see below.
How do I set Task Scheduler to open a website?
Hit the Windows key, type Task Scheduler in the search box, and click Open.
On the right sidebar, click on the Create Basic Task option.
In the Name field, type in the name of the website you’d like to open and click Next.
Next, under Trigger, click on a time frequency and hit Next.
Choose how long you wish for the activity to recur and hit Next.
Select Start a program and click Next.
In the Program/script entry, type in the location of the target application you wish to open the site, and in the Add argument, enter the URL of the website.
Click Next and verify the details you’ve entered are correct, then hit the Finish button.
Now click on Run to test whether it is working and wait for the set time for the Task to run.
And there you have it. A little customization and fine-tuning can go a long way when it comes to your workflow. Scheduled tasks may sound like a lot of work, but if you’re a heavy browser user, it’s really a small price to pay for getting things done properly.
While this can be useful for opening frequently visited sites, remember to use it cautiously. Sometimes, scheduling batch files can shave off some time from your tasks, but too many sites can slow down your computer and even clog up your internet connection if you aren’t careful.
You can choose to delay some start-up apps to improve boot time so that you don’t have too many repetitive tasks on your plate competing at the same time or use automation tools. And that’s not all. There are still more Task Scheduler tips you can apply and take advantage of its advanced settings.
Have you tried using Task Scheduler to open a website? How was the experience? Let us know in the comment section below.
The new Lenovo IdeaPad Chromebook Plus family is here! The company just published a press release with its newest devices focused on creativity, portability, and ease of use. There are 3 AI-powered machines:
IdeaPad Slim 3i Chromebook Plus
IdeaPad Flex 5i Chromebook Plus
IdeaPad Gaming Chromebook Plus
Last week, we unveiled exclusive images of the new Lenovo Tab M11 tablet, and while that device is not the best improvement in the Tab M family, it does come up with a beautiful design. And the new laptops from the IdeaPad Chromebooks Plus family follow the same pattern: they come up with a beautiful and slick design, which makes them easy to carry and use.
Slim 3i Chromebook Plus and Flex 5i Chromebook Plus both sport a 14″ display, and they come in dark gray colors, according to the pictures our sources shared with us (confirmed by the press release). The Slim 3i Plus is a bit more robust than the Flex 5i Plus, but that’s understandable, given that the Flex Series has a flexible design.
The IdeaPad Gaming Chromebook Plus is bigger and sports a dark gray color, according to the images. Its slick and flexible design makes it an ultraportable choice for those gamers who are always on the road.
Regarding the specs, it’s a mixed bag of last-gen CPUs, 8 GB of RAM for all the models, and between 1.5 and 2 kg weight. The entire IdeaPad Chromebook laptops has a battery that’s expected to last between 10 and 12 hours, but that will most likely depend on the use scenarios. Finally, they all support the newest WiFi 6/6E connectivity. You can see the whole spec sheet below:
IdeaPad Gaming Chromebook Plus (16”, 7)
IdeaPad Flex 5i Chromebook Plus (14”, 7)
IdeaPad Slim 3i Chromebook Plus (14”, 8)
Dimensions
(mm): 356.5 x 253.0 x 19.95 (inches): 14.03 x 9.96 x 0.79
(mm): 315.5 x 229 x 19.7 (inches): 12.4 x 9.0 x 0.8
(mm): 324.4 x 216.2 x 19.3 (inches): 12.8 x 8.5 x 0.8
12th Gen Intel® Core™ i5-1235U 12th Gen Intel Core i3-1215U
Intel® Core™ i5-1334U Intel® Core™ i3-1315U
Intel Core i3-N305
Graphics
Up to Intel Iris® Xe Graphics (for Intel Core i5-1235U) Intel UHD Graphics (for Intel Core i5-1215U)
Up to Intel Iris® Xe Graphics (for Intel Core i5-1334U) Intel UHD Graphics (for Intel Core i3-1315U)
Intel UHD Graphics
Memory
4266MHz LPDDR4x: 8GB (16GB*32*4 dual channel)
LPDDR4X: 8GB
LPDDR5: 8GB
Storage4
eMMC:128GB SSD (M.2 PCIE 2242): 256GB/512GB
eMMC: 128GB SSD: 256GB / 512GB
eMMC: 128GB / 256GB
Operating System
ChromeOS
ChromeOS
ChromeOS
Battery5
Up to 12 hours
Up to 10 Hours
Up to 12 Hours
Camera
1080p FHD with privacy shutter
1080p FHD with privacy shutter
1080p FHD with privacy shutter
Ports
1 x MicroSD card slot 2 x USB type-C® (USB3.2+PD+DP) 2 x USB Type A (USB3.2) 1 x Combo Audio Jack
1 x MicroSD card slot (SD 3.0) 1 x USB 3.2 Gen 2 Type-C 1 x USB 3.2 Gen 1 Type-C 1x USB 3.2 Gen1 Type-A 1 x Combo Audio Jack 1 x Kensington Nano Security Slot
1 x USB 3.2 Gen 2 Type-C 2 x USB 3.2 Gen 1 Type-A x HDMI™ 1.4b 1 x Audio Combo Jack 1 x Kensington Lock
Audio
4 x 2W Speaker with Waves Audio
2 x 2W Stereo Speakers With Waves tuning
2 x 2W Stereo Speakers With Waves tuning
Connectivity
2 x 2 Intel Wi-Fi 6E (802.11 ax) Bluetooth® 5
2 x 2 Wi-Fi 6/ 6E Bluetooth 5.0 Combo with Wi-Fi Card
2 x 2 Wi-Fi 6/ 6E Bluetooth 5.1 Combo with Wi-Fi Card
Regarding prices, Lenovo IdeaPad Slim 3i Chromebook Plus and IdeaPad Flex 5i Chromebook Plus are now available starting at $549.99 and $499.99 respectively. Both models are currently available in North America, with no pricing for other areas. The Lenovo IdeaPad Gaming Chromebook Plus is now available in EMEA starting at 599 euros, with no pricing for North America. It’s worth mentioning that all models come with a Photoshop web and Adobe Express Premium plan for three months.
See below the exclusive images for the new Lenovo IdeaPad Chromebook Plus devices.
IdeaPad Slim 3i Chromebook Plus (14”, 8)”
The front.
The front.
On the sides.
Front and below.
IdeaPad Flex 5i Chromebook Plus (14”, 7)”
Front.
The flexing capabilities of the new Idea Slim 5i Plus.
On the sides.
Again, powerful flexing capabilities.
You’ll be able to flex this device at any angle.
IdeaPad Gaming Chromebook Plus (16”, 7)”
The front.
Its flexing capabilities.
Front and below.
On the sides.
It has a slick and ultramobile design.
What do you think about them? Do you like how they look or not? Let us know your thoughts.
Xbox controllers are one of the most popular wireless devices. Remember, they are not entirely error-proof, but the likelihood of facing issues is bleak. Yet, a few users reported that their Xbox controller keeps blinking when plugged into a PC.
The problem could lie with the PC, device connection, or the Xbox wireless controller. The underlying causes are endless, but each has a definite solution. Identify and execute the former, and you are good to go!
Why is my Xbox controller blinking when wired to the PC?
The controller batteries don’t have enough charge.
The connection between the controller and the PC is weak, or the two are not connected.
Hardware issues or component malfunction in the controller itself.
For those wondering why my Xbox One controller is flashing and not connecting, you may be using an incorrect cable for wired connections.
How do I fix my Xbox controller if it’s blinking when wired to the PC?
Before we start with the slightly complex solutions, try these quick ones first:
If the Xbox controller is flashing but not turning on, charge the controller or replace the battery pack. Also, if you have an Xbox console, connect the controller for a while.
Disconnect the Xbox controller and re-pair it with the PC, the same way you did initially.
In case the wired Xbox controller is blinking when plugged into the PC, make sure you are using the right cable. Some are meant only for charging. Use one that supports data transfer.
As surprising as it may sound, turning on the controller and connecting it via the cable works when the Xbox controller’s home button flashes.
Press Windows + I to open Settings, go to Windows Update from the navigation pane, and click the Check for updates button.
If an update is available, click on Download & install in case it doesn’t download automatically.
Restart the computer and check whether the Xbox Series X controller is still blinking on the PC.
3. Reinstall the controller driver
Press Windows + X to open the Power User menu, and select Device Manager from the list of options.
Expand the various entries, locate the Xbox controller, right-click on it, and select Uninstall device.
Tick the checkbox for Attempt to remove the driver for this device if available, and click the Uninstall button.
Restart the computer, and Windows will automatically install a fresh copy of the driver.
When the Xbox controller is not working and simply blinking when plugged into the PC, it could be the corrupt driver to blame. If you see a yellow exclamation mark next to the controller icon in the Device Manager, reinstalling the driver will do the trick!
To revert the Xbox controller firmware, you can use the Xbox Accessories app on the console, as detailed in this official guide. But for those who don’t have access to an Xbox console, the same can be done via your PC. Make sure you have downloaded the Xbox Accessories app for PC.
Connect the Xbox controller to the PC using a USB cable.
Press Windows + E to open File Explorer, paste the following path in the address bar and hit Enter: xboxaccessories:\\firmwareupdate?legacyDowngrade=true
When the Xbox Accessories app launches, click the Revert firmware button.
Click on Yes, revert firmware in the confirmation box that appears.
Wait for the firmware rollback process to complete and check for improvements.
5. Contact Xbox Support
When nothing else worked, it’s likely a hardware-related problem or one with the firmware that hasn’t been patched yet. And in this case, it’s best that you contact Xbox Support.
They will be able to provide a solution or a definite timeline as to when the problem will be resolved. Or they may ask you to replace the controller in case of hardware malfunction. This way, you will get rid of any future issues as well.
One of these solutions should have helped fix things if the Xbox controller was blinking when plugged into the PC. Remember, it’s usually a common issue, like when the Xbox controller USB device is not recognized, often related to firmware or driver.
Sometimes you need to restore individual files from Windows Backup, especially if quickly want to restore a few files that you might’ve deleted by accident.
This can be achieved, and it’s simpler than you think, and in today’s guide, we’re going to show you the best ways to do that on your PC.
How do I restore individual files from Windows Backup?
1. Use Backup and Restore
Press the Windows key + R and enter control.
Next, navigate to Backup and Restore.
Next, choose Select another backup to restore files from.
Look for the specific file that you want to restore.
For this method to work, you need to have Backup and Restore manually set up beforehand.
2. Use Disk Management
Press the Windows key + X and choose Disk Management.
Go to Action and choose Attach VHD.
Click on Browse.
Locate your VHD file and double-click it.
Click OK.
The drive will now appear in File Explorer. If it’s not available, right-click it and choose Change Drive Letter and Paths.
Click on Add and assign the desired letter.
After doing that, the drive will be available in File Explorer and you can access it and copy individual files.
Keep in mind that this method works only if you have your Windows Backup saved in VHD format.
Can you restore individual files from an image backup?
Yes, it’s possible to do this, without any third-party tools, however, the system image needs to be in VHD format. We explained this process in detail in Solution 2 of this guide.
As you can see it’s pretty simple to restore individual files from Windows Backup, but before you can do so, you need to manually set this feature up. To learn how to do it, check our Windows 11 backup settings guide.
In case you’re not a fan of Microsoft’s built-in solutions, you can always use a third-party local backup software.
What method do you use to restore individual files from Windows Backup? Share your preferred ones with us in the comments section.
Your PC can easily function well without some DLLs, provided they’re not system-related and you don’t use their corresponding apps.
However, when you’re unable to update your OS because of a corrupt OneSettingsClient.dll file, you have to address the matter swiftly lest you open up a plethora of other error messages.
What is OneSettingsClient.dll?
This is a system DLL file that belongs to Microsoft Windows and is used by the operating system to provide various services to other programs. It is located in the following directory: C:\Windows\System32
How do I fix OneSettingsClient.dll if it’s corrupted on Windows 11?
Start off with the following basic workarounds before any technical solutions:
Check for any new conflicting software installations and uninstall them.
Verify the authenticity of the DLL file by checking its digital signature.
Restart your PC to resolve temporary software glitches.
1. Use a third-party DLL fixer
OneSettingsClient.dll, being a Windows file, means it is essential for the running of your operating system. It should, therefore not be removed if you wish to avoid any problems with your PC’s stability or security.
Using a third-party DLL tool can help repair corrupt DLL files 100%, which often occur due to instability issues.
2. Run DISM and SFC scans
Hit the Start Menu icon, type cmd in the search bar, and click Run as administrator.
Type the following commands and press Enter after each one:DISM.exe /Online /Cleanup-Image /Restorehealthsfc /scannow
3. Re-register the DLL file
Hit the Windows key, type Command Prompt right-click on it, and select Run as administrator.
Type the following command and press Enter: regsvr32 onesettingsclient.dll
This command registers the missing DLL file. However, if more than one DLL file is not registered, you can use the following command: for %1 in (*.dll) do regsvr32 /s %1
4. Download the file manually
If you accidentally deleted the file and cannot restore it from the Recycle Bin, you’ll have to redownload it. You can find a copy of the file from third-party sites like DLLme.com.
Here, you’ll find various versions, so pick one for your Windows version, and once completed, move the file to its original location and delete the corrupted one.
Also, ensure your PC’s security is up to par with a comprehensive antivirus software, as some sites masquerade these files as the real thing only to inject malware into your device.
NOTE
The DLLme site is not an official source, and WindowsReport is not affiliated with it in any way. If you download the file, be sure to run an antivirus check.
5. Scan for viruses
Press the Windows key, search Windows Security, and click Open.
Select Virus & threat protection.
Next, press Quick scan under Current threats.
If you don’t find any threats, proceed to perform a full scan by clicking on Scan options just below Quick scan.
Click on Full scan, then Scan now to perform a deep scan of your PC.
Wait for the process to finish and restart your system.
Press the Windows key, type cmd, and select Run as administrator to open the Command Prompt.
Type the commands below and press Enter after each one:
net stop bits
net stop wuauserv
net stop appidsvc
net stop cryptsvc
Del "%ALLUSERSPROFILE%\Application Data\Microsoft\Network\Downloader\*.*"
rmdir %systemroot%\SoftwareDistribution /S /Q
rmdir %systemroot%\system32\catroot2 /S /Q
regsvr32.exe /s atl.dll, regsvr32.exe /s urlmon.dll
regsvr32.exe /s mshtml.dll
netsh winsock reset
netsh winsock reset proxy
net start bits
net start wuauserv
net start appidsvc
net start cryptsv
7. Perform a System Restore
Press the Windows key, type Control Panel, and click Open.
Select Large icons as View by and click Recovery.
Click Open System Restore.
Select Choose a different restore point and click Next.
Now select the restore point and click Next.
Click Finish to restore the previous settings, and Windows will restart.
What are some causes of corrupt OneSettingsClient.dll files?
Poorly written software code – It’s possible that the program’s code was written and did not include all possible scenarios, leading to unexpected situations when executing it.
Hardware malfunction – Hardware failures can be caused by many things, such as power surges, overheating issues, or even corrupt system files.
Incompatible software – Upgrading to a newer version of Windows will likely cause errors with older versions of DLL files.
Interference from viruses and malware – Viruses can easily infect your PC and damage some critical files which can lead to their corruption.
Accidental deletion or modification of the file – This can happen when you delete a registry key or value by mistake, or when you accidentally overwrite it while editing a registry entry.
While OneSettingsClient.dll is not a virus, it does have the power to negatively affect your computer if it’s not set up properly.
As such, we recommend installing DLL fixer tools to do the job automatically. Hopefully, one of these solutions has helped you fix the OneSettingsClient.dll error.
For any further comments or additional thoughts on this topic, leave us a comment down b elow.
Long before Windows 8 came into being, the traditional way to download an app was its official website or a third-party website, called a desktop app, but with the release of Microsoft Store, everything changed.
If you are still confused about which one you should use, this Microsoft Store apps vs Desktop apps comparison guide can help!
Are all apps on the Microsoft Store safe?
Yes, as all applications on the Microsoft Store go under several tests wherein the app is checked for viruses, suspicious files, and malware before they are made available for users to download.
Microsoft Store Apps vs Desktop Apps: Comparison
Installation and Source
Microsoft Store apps can be installed from the Microsoft Store app, available on all Windows 8, 10, and 11 computers. You can quickly check the listed apps via your PC’s desktop app or web browser.
On the other hand, desktop apps are available on either their developer’s official website, trusted repositories, third-party download websites, CDs, or DVDs.
Installing the Microsoft Store app is a cakewalk; all you need to do is locate the app on the store and click Get; the rest is taken care of by the platform.
Wherein for desktop apps, you need to download a .exe or .msi file on your computer, run the setup file, and install it using the on-screen instructions on the installation wizard.
You can uninstall all desktop apps using the Control Panel. However, some Microsoft Store apps can only be uninstalled via the Settings app.
If you are confused about what inbuilt app to choose to uninstall an app from your Windows computer, read our detailed Control Panel Vs. Settings guide to reach a conclusion.
Interface
Microsoft Store apps use modern UI design language, giving clean and visually appealing layouts. These are designed to work in both snapped view or full-screen mode, promoting multitasking on Windows.
Desktop apps come in different designs, styles, and layouts, ranging from conventional to modern UI, depending on the developer’s approach. With the ability to maximize, minimize, resize, and position the app window, these apps offer more flexibility.
Apps on the Microsoft Store go under a strict review process to check whether they adhere to the platform’s performance and security standards.
These apps run in a controlled environment and have limited access to system resources & sensitive data, thereby reducing the probable impact of a malicious app on your PC.
When it comes to desktop apps, security depends on the developer’s discretion; some of them prioritize security and, therefore, test their apps rigorously; however, others have fewer security measures in place.
These apps can access the entire system and its resources, which is beneficial for their performance; however, they can be equally dangerous due to security risk issues.
Updates
Apps on the Microsoft Store are updated automatically in the background, ensuring the latest security patches and features are always available, which is a streamlined approach.
Updates for desktop apps depend upon the developer’s preferences, as some have inbuilt features to update, while others need to be manually updated. Also, the updates are not regular and are often delayed due to the developer’s release schedule or the user’s awareness.
Integration and Uniformity
Store apps are closely integrated into the Windows ecosystem and are developed to provide an intuitive and consistent experience across PCs, smartphones, and tablets.
On the other hand, desktop apps are not as tightly integrated as Microsoft Store apps, as the level of integration depends on the developer’s choice and the app’s purpose.
Store apps are uniform in design, user interface, and experience as they follow Microsoft’s guidelines, ensuring a consistent look and feel.
Whereas desktop apps don’t have uniformity in design and user interface, developers are free to create unique designs, resulting in different styles and layouts, but lack a consistent look.
Resource optimization
Microsoft Store apps are developed to use fewer resources as they follow Microsoft guidelines and restrictions, thereby not hampering system performance and battery life.
Desktop app’s resource usage depends on the developer’s approach; some apps are optimized, but others hog resources.
Regarding memory and CPU usage, Microsoft Store apps are more efficient and use only the memory needed for operations, ensuring a smoother computing experience.
However, memory and CPU usage for desktop apps depends on the applications, as not all are optimized for performance.
To conclude, the choice between Microsoft Store apps vs desktop apps boils down to the intended purpose, user’s knowledge, and device capabilities.
Microsoft Store apps have modern UI, are optimized for touchscreens, appear on live tiles, and can beautifully integrate with Windows system features, providing a seamless user experience.
However, desktop apps offer a wide range of features, highly customizable interfaces, powerful capabilities, a conventional user experience due to an unrestricted development environment, and are suitable for complex tasks.
If you are a developer & want to make Windows Store apps, looking for a way to start, read this detailed guide to learn the process.
Now that you know about both popular app installation methods, we would love to hear your perspective! Tell us which platform you prefer and why in the comments section below!
With each passing year and a growing population, the demand for electronic devices continues to surge. Therefore, manufacturers are bound to produce new models with the latest features to keep their customers engaged.
However, have you ever considered the fate of discarded devices – the ones that can’t be repaired or are thrown away by you or others? Well, it all amounts to e-waste, and unfortunately, only a small percentage of it gets recycled. The rest sits idle, polluting our environment.
In this comprehensive guide, we will delve into electronic waste statistics and facts that may make you rethink your habits and reflect on the implications of your digital footprint.
Why is electronic waste a growing problem?
Rapid technological advancements.
Growing consumer demand and change in consumer behavior.
Lack of disposal infrastructure and limited recycling initiatives.
Irresponsible manufacturers.
Electronic Waste Statistics and Facts
A report on Statista states that Asia is the largest e-waste producer worldwide, producing 24.9 Million Metric Tons of electronic waste in 2019, twice the amount of waste produced by Americas, and only 11.7% of this waste was collected and recycled.
Continents
E-Waste (Million Metric Tons)
Asia
24.9
Americas
13.1
Europe
12
Africa
2.9
Oceania
0.7
According to the Global E-waste Statistics Partnership, as of 2019, the average global electronic waste generated per capita is 7.3 kilograms, which is the largest volume recorded. In the same year, the global e-waste generation was approximately 53.6 million metric tons.
In 2019, Norway generated the largest amount of e-waste per capita worldwide, i.e. 28.5 kilograms.
Electronic Waste Statistics – Metric tonnes of E-Waste produced annually
From 2010 to 2019, electronic waste generation increased by approximately 60%, and there are no signs of slowing down. It is forecasted that by 2030, the annual e-waste production will reach up to 75 million metric tons.
There is more than 347 million metric tonnes of unrecycled e-waste on Earth in 2023.
If we talk about the amount of electronics waste produced country-wise, China, with 10129 thousand metric tons, is the leading nation, followed by the United States, with 6918 thousand metric tons. Here are other details:
Country
Volume of waste in thousand metric tons
Recycling Rate
China
10129
16%
United States
6918
15%
India
3230
1%
Japan
2569
22%
Brazil
2143
0%
Russia
1631
6%
Indonesia
1618
–
Germany
1607
52%
United Kingdom
1598
57%
France
1362
56%
According to a report by World Economic Forum, electronic waste is 20% of all global waste and this number is estimated to increase up to 30% by the year 2025.
Countries like Estonia, Norway, and Iceland have the best e-waste recycling rates in terms of waste percentage produced by the country.
Rank
Country
E-Waste Recycled (Kt)
Recycling Rate
1
Estonia
13
76%
2
Norway
99
72%
3
Iceland
5
71%
4
Sweden
141
70%
5
Austria
116
69%
6
Switzerland
123
63%
7
Finland
65
61%
8
Poland
246
60%
9
Ireland
52
59%
10
UK
871
57%
More than 82% of electronic waste is not recycled and therefore not documented and tracked where it ends up.
The global average of e-waste recycled is approximately 17.4%, and here is the data on e-waste cycled for different regions:
Region
E-waste recycled (Percentage)
USA
9.4%
Europe
42.5%
Asia
11.7%
Africa
0.9%
Oceania
8.8%
Value of Raw Materials in Electronic Waste
Electronic waste consists of a large amount of valuable material that can be recovered through recycling and reused to make new products, thereby reducing the demand for perishable resources to an extent.
From precious metals like Gold, Silver, Platinum, and Palladium, base metals like Copper, Tin, Aluminium, Nickel, Steel, Iron, Plastics, Lead, Mercury, Cadmium, and glassto rare earth metals like Neodymium, Europium, and Yttrium can be found in e-waste lying around on some dumpster land.
If we recycle a million cell phones, we could collect 75lb of Gold, 772lb of Silver, 35247lb of Copper, and 33lb of Palladium.
As of now, only 5%Platinum, 15%Silver, and 15%Gold are being recovered during the recycling process. If the number reaches 100%, we can generate $12 billion.
Recycling the e-waste through proper channels and extracting these materials will not only keep the environment safe but also be economically beneficial.
By recycling 1 million laptops, we can conserve energy equal to the electricity consumed by 3,500 houses per year.
According to the EPA, one metric ton of circuit boards can contain 40 to 800 times more Gold and 30-40 times more Copper than what can be mined from one metric ton of ore in the United States.
Long-term Environmental Impact from Unmanaged E-Waste
Toxic substance release – E-waste contains hazardous materials like Lead, Cadmium, Mercury, and brominated flame retardants, when not treated right, can leach into soil & water, contaminating the local ecosystem and posing health risks for both humans and wildlife.
Air pollution – Burning e-waste improperly can release toxic particulates & fumes into the air, which could cause illness-related respiration among the habitants.
Soil & water contamination – Dumping e-waste informally can contaminate soil and groundwater, affecting its agricultural properties, which poses a threat.
Climate change – The breakdown and decay of organic materials are the results of improper management of e-waste, which can lead to increased greenhouse gas emissions, accelerating climate change.
Resource depletion – Failing to recycle e-waste means losing valuable materials like rare earth elements and metals that could have been recovered and reused.
Hazardous Substances That Can Be Released from Electronics
With only approximately 17.4 percent of e-waste collected, documented, and recycled, 82%, which is a huge percentage of e-waste, remains unaccounted for.
According to the latest electronic waste statistics, from this huge percentage, 55 tons of Mercury, is released or will be released eventually into the environment.
The list of substances that can be released from discarded electronics is extensive; however, when it comes to hazardous contributors, the top substances are Lead (Pb), Mercury (Hg), Arsenic (As), Cadmium (Cd), Chlorofluorocarbons (CFCs), Hydrochlorofluorocarbons (HCFCs), Brominated Flame Retardants (BFRs), Polyvinyl Chloride (PVC), Beryllium (Be) and Nickel (Ni).
Health Risks from Toxic Substances Contained in E-Waste
Toxic substance
Found in
Health Risks
Lead (Pb)
Solder and CRT glass
Impacts the nervous system, especially in children causing reduced IQ, developmental issues, and behavioral disorders.
Mercury (Hg)
Switches, thermostats, & fluorescent lamps
Damages the liver, kidneys, and respiratory system, contributing to lung cancer and other respiratory illnesses.
International E-Waste Day is an annual event celebrated on the 14th of October to spread awareness about rapidly growing e-waste.
This initiative focuses on educating individuals, businesses, and communities about the significance of e-waste management and proper recycling.
The goal is to bring positive changes in e-waste management, thereby reducing its adverse effects on public health and the environment.
History of International E-waste Day
The WEEE Forum, an international association focused on e-waste collection and recovery systems, realized the dire need to address the rapidly increasing e-waste problems and associated health & environmental risks; therefore, it launched International E-waste Day in 2018.
The goal is to provide a platform for various stakeholders, including non-governmental organizations (NGOs), governments, educational institutions, industry professionals, and the public, to work towards reducing e-waste by recycling, refurbishing, and disposing of electronics responsibly.
Objectives of International E-waste Day
Raising awareness about the increasing e-waste and its impact on our environment and health.
Educating the proper way to manage electronic waste and the importance of recycling.
Advocating for improved policies and regulations at local, national, & international levels to effectively promote sustainable e-waste management practices.
Encouraging refurbishing, repairing, recycling, and reusing of electronics to increase the product lifespan and reduce waste.
Encouraging industry stakeholders, product manufacturers, and producers to develop environmentally friendly and sustainable products.
Another popular initiative, Right to Repair, focuses on electronic equipment owners’ rights to repair their devices, which can reduce the electronic waste caused by unused or broken appliances.
In 2021, the Consumer Reports survey stated that 84% of U.S. adults expressed support towards a policy mandating manufacturers to provide the repair information & parts available to independent repairers or product owners.
Activities Observed on International E-Waste Day
This year, International E-Waste Day has a new slogan, You can recycle anything with a plug, battery, or cable. These are the common activities that are observed on the day:
Educational workshops & webinars, and awareness campaigns to educate the e-waste consequences and impacts with sustainable solutions.
E-waste collection drives and recycling initiatives to accumulate old electronics from individuals and businesses for safe disposal, reusing, and recycling.
School programs & public exhibitions to engage students in learning about e-waste and displaying e-waste recycling techniques.
Industry collaboration & corporate initiatives to encourage collaboration among manufacturers and recyclers to promote sustainable product design and educate employees to dispose of electronic devices responsibly.
Media campaigns, articles, and interviews discuss the growing issue of e-waste, potential solutions, and society’s role in resolving the problem.
Looking at the electronic waste statistics and realizing the growing amount of e-waste is quite concerning.
The staggering numbers stress the urgent need for immediate action to mitigate the problem. The exponential growth of e-waste is directly proportional to the increasing environmental and health risks.
Therefore, to set the record straight, the manufacturers of electronic products should work on creating sustainable, environmentally friendly products with a bigger life span, and the consumers should responsibly dispose of the devices at the end of their life cycle.
If statistics and market share of the electronic devices interest you, read the detailed guide on desktop vs laptop market share.
Don’t you think if we want the change, we are the ones with the power to bring it? Feel free to mention your thoughts in the comments section below.
As you might know, Microsoft has developed a lot of new features for Microsoft Teams in the past couple of months. The Redmond-based tech giant has built an AI recap feature for Teams, which will help you get through Teams meetings much faster and more efficiently. And speaking of AI, Teams will use it to give you a clear sound in meetings, as well.
And now, Cloud IntelliFrame is coming to the app, and it’s an exciting feature. It’s basically a tool that focuses on letting you see all the attendees in a clearer, more focused way. The tool also creates small video feeds of in-room participants, and it will render them live as the meeting goes on.
Microsoft believes that this feature will change the experience of seeing people in Teams meetings. How, you might ask? Well, you’ll be able to see the expressions and gestures of the people in the room more easily. And you’re not going to get distracted by backgrounds.
The Redmond-based tech giant believes IntelliFrame will create inclusivity in hybrid meetings as everyone can be seen and heard.
Everything you need to know about IntelliFrame
When is IntelliFrame coming to Microsoft Teams?
Cloud IntelliFrame has already started to roll out in Microsoft Teams Rooms, since August.
You’ll have to own a Windows with a Pro license and the feature can be viewed on Microsoft Teams Desktop (Windows & Mac) with any license. You should know that all Microsoft Teams Rooms on Windows with a Pro license will automatically opt-in to Cloud IntelliFrame.
Intelligent Camera will be able to recognize people’s faces
Two new entries were added to the Microsoft 365 Roadmap, and according to them, the Intelliframe feature on Teams will be used to recognize people’s faces.
Users will need to enroll in a new enrollment process in Teams: it will allow them to create a face profile, which will be used to recognize them instantly with cameras through IntelliFrame.
Their identity will then be revealed to all participants, remote or non-remote.
Users will be able to enroll their face and create a face profile using the new enrollment process in the Teams desktop client. The face profile is used in Teams Rooms meetings where an Intelligent Camera capable of People Recognition is deployed to recognize in-room attendees, and then labels their identity for all meeting participants, both in-room and remote.
Microsoft
Remote participants will also be able to stream various IntelliFrame videos at once, according to the other entry. This means that they will see a panoramic view of the meeting, as well as a central view of the person who’s currently speaking in the meeting. It will allow for a more immersive experience for remote participants.
Remote attendees in a hybrid meeting will be able to view multi-stream IntelliFrame video, panoramic room view, and in-room attendees with speaker recognition (including name labels) in the new Teams desktop client.
Microsoft
Both features will come to Microsoft Teams in November 2023.
Here are the currently supported cameras:
AVer CAM520 Pro
AVer CAM520 Pro2
BRIO 4K Stream Edition
EagleEye Cube USB
HD Pro Webcam C920
Jabra PanaCast
Logi Rally Camera
Logitech BRIO
Logitech ConferenceCam CC3000e
Logitech MeetUp
Logitech Webcam C925e
Logitech Webcam C930e
Microsoft® LifeCam Studio
Polycom EagleEye IV USB Camera
PTZ Pro 2
PTZ Pro Camera
ThinkSmart Cam
Yealink UVC30
Yealink UVC34
Yealink UVC50
Yealink UVC80
Yealink UVC86
There will be an icon on the top right of the Room video feed indicating that Cloud IntelliFrame is being displayed.
According to Microsoft, people in the Room can disable IntelliFrame by using in-meeting settings on the console. This turns off IntelliFrame and switches back to the standard view of the Room. All online attendees would then see the standard view from the respective Room.
People on Teams Desktop can also toggle IntelliFrame on/off by right-clicking on the Room video tile and selecting ‘Turn off IntelliFrame’. This switches off the IntelliFrame view just on their Teams client.
What do you think about this new feature? Are you excited about it? Let us know in the comments section below.
The feature would do as it says: it would allow automatic optional updates for the operating system, without having to look up them manually, download them, and install them.
Turns out that the latest release to the Dev Channel now allows admins to actually enable the feature. Spotted by Windows enthusiast, @XenoPanther, the feature presents itself as a new policy, and once set in place, will allow the automatic download of optional updates.
Now, optional updates are not essential to the integrity of Windows 11, meaning that the operating system can function without them. However, as optional updates are often focused on peripherals, downloading and installing them will make sure your device works properly.
So, enabling this feature could be a plus to the well-functioning of every device in a company, or network.
Here’s how to enable automatic optional updates in Windows 11
Press Windows key + R to open to Run command.
Type in gpedit.msc and then click OK, or press Enter.
Here, you should take the following path: Computer Configuration > Administrative Templates > Windows Components > Windows Update > Manage updates offered from Windows Update. It should look like this.
Open the new Enable Optional Updates policy, select the Enabled toogle, and select the Automatically receive optional updates (including CFRs). Then click on Apply and then OK.
The Windows 11’s Update panel should now look like this, meaning that your device will now automatically get optional updates.
IT admins will be able to disable this policy at will or enable it, essentially allowing them greater control when it comes to Windows updates.
When it’s enabled, Windows will treat the optional updates as mandatory updates, meaning that it will automatically download and install them.
While it can be seen as a useful feature, it can also become a headache when certain optional updates will need to be installed for various reasons.
Whether you need to recover a malfunctioning operating system, partition drives or deploy a new installation of Windows 11, you can create a WinPE bootable USB drive to get it done.
In this guide, we will discuss step-by-step instructions to create a WinPE bootable disk to perform various tasks, such as system maintenance.
What is a WinPE bootable disk?
WinPE (Windows Preinstallation Environment) bootable disk is a lightweight version of the Windows operating system. It was formerly a part of Windows ADK (WAIK) but now is available separately since the release of Windows 10 1809.
Used in preinstallation and deployment.
Diagnose and resolve hardware-related issues.
Troubleshoot, repair, and recover an existing Windows installation.
Backup & restore files, partitions, or entire disks.
You can learn more about the core features and use cases in our guide on what Windows PE is.
How do I create a bootable WinPE USB drive?
Before engaging in detailed steps to create a WinPE bootable disk, you should consider performing the following checks:
Prepare a USB flash drive with 8 GB free space and make sure there is no important data on it.
Make sure you are logged in with a user profile that has administrative privileges on the PC you will be using for this process.
Double-click the downloaded file, select Install the Windows Assessment and Deployment Kit Windows Preinstallation Environment Add-ons on this computer and click Next.
Click Next.
On the license terms window, click Accept. On the following page, click Install. This might take a few minutes; wait for it to complete.
Press the Windows key, type deployment and imaging tools environment, and click Run as administrator.
Type the following command to display the WinPE system files from ADK, and hit Enter: copype
For the next step, you need to know your system type. If you know it already, skip this step. If you don’t, minimize the command window & press Windows + I to open Settings, then go to System, then About. Locate System type.
Our system type is 64-bit, so we will use this command to copy the WinPE files to a desired location by replacing the FolderPath with the location and press Enter: copype amd64 FolderPath
Now that the folder is created; copy & paste the following command to get the available options, and hit Enter: makewinpemedia
4. Create a WinPE bootable disk
Plug in the USB drive, and first, let us check the partition style, as it needs to be MBR. On the same Deployment and Imaging Tools Environment window, type this command and press Enter: diskpart
Now, type the following command and hit Enter to know the disks on the computer: list disk
If it is marked as GPT, copy & paste the following command after replacing disk 1 with the disk number mentioned next to the USB flash drive and press Enter: select disk 1
Once you are in the drive, type the following command to clean the disk and hit Enter: clean
Type the following commands one by one to make your USB partition style MBR, and press Enter after every command:
convert mbr
create partition primary
Next, to format the drive, copy & paste the following command after replacing Name with any name you want to use and hit Enter: format fs=fat32 quick label="Name"
Type the following command to assign it a letter, then exit diskpart and press Enter:
assign letter="G"
exit
If you don’t see the USB drive marked as GPT, skip Steps 4 to 8, then copy & paste the following command to get the options and hit Enter: makewinpemedia
To copy the files and make the USB flash drive bootable with WinPE, type the following command after replacing FOLDERPATH with the path for the WinPE_64 folder and DiskLetter with the USB drive letter, then press Enter: makewinpemedia /ufd FOLDERPATH DiskLetter
It will warn you about the data loss on the drive; type Y and press Enter to proceed, then wait for the process to complete. Once you see Success, close the window.
Once the process is complete, eject the pen drive safely and use it to set up your hard drive, capture Windows images, modify the Windows OS if not running, or set up automatic recovery tools.
How can I create a WinPE ISO file?
First, follow all the steps mentioned in Methods 1, 2, and 3, then on the Deployment and Imaging Tools Environment window, type in the following command to convert the file to ISO after replacing FolderPath of WinPE_64 with the folder path you created in Method 3 step 4 & FolderPath of WinPE_64.iso with the FolderPath where you want to create the ISO file and press Enter: makewinpemedia /iso FolderPath of WinPE_64 FolderPath of WinPE_64.iso
Now that you have the ISO file, you can burn it to CD or DVD and use it. In case you are facing issues like creating ISO files, read this guide to know the reasons and quick solutions.
Stuck somewhere while following the steps? Don’t hesitate to ask for help in the comments section below. We will be happy to assist!
While most of us are used to troubleshooting issues with the connected printer, Windows, too, may sometimes complicate the situation. A few users reported that the Print option is missing from the right-click context menu in Windows 11.
The problem was present in the previous iterations as well, but given that Windows 11 is newer and many are still unaware of the intricacies, it affected a larger user base.
Why can’t I see the print option in File Explorer?
The feature is available in the Show more options menu.
An incompatible app is set as default. For instance, the Print option won’t be available when Microsoft Edge is the default PDF viewer.
Corrupted system files.
You have selected more than 15 files at once (unlikely in Windows 11, but there have been cases).
How do I add Print to right-click in Windows 11 File Explorer?
Before we start with the slightly complex solutions, try these quick ones first:
Restart the computer and check again.
When printing multiple files, press Ctrl + A to select them all, then uncheck any one, right-click on the files selected, and you should now have the Print option in the right-click menu on Windows 11. This workaround was shared by a user.
Check if Print Management is missing and restore it. Though not directly related, it could still work as a fix.
If none work, head to the fixes listed next.
1. Check the Show more options menu
Right-click on the file, and select Show more options from the context menu.
Check if the Print option is available in the menu.
Windows 11, in an effort to condense the context menu, has put some actions under the Show more options submenu, including Print, which is the reason it’s missing from the right-click menu.
2. Change the file association (default apps)
Press Windows + I to open Settings, go to Apps from the navigation pane, and click on Default apps.
Scroll down and click on Choose defaults by file type under Related settings.
Search for the file format you are facing issues with, and click on the entry. We will take PDF files (.pdf) as an example.
Finally, select a compatible app from the list, and click on Set default.
Here are the default programs you should select to add Print to the right-click menu in Windows 11 for different file extensions:
PDF files (.pdf): Adobe Acrobat
Images (.png, .jpg, .jpeg): Windows Photos
Documents (doc or docx): Microsoft Word
3. Disable Windows from automatically managing the default printer
Press Windows + I to open Settings, select Bluetooth & devices from the left pane, and click on Printers & scanners.
Now, disable the toggle for Let Windows manage my default printer under Printer preferences.
4. Repair the corrupt system files
Press Windows + S to open Search, type Command Prompt in the text field, right-click on the relevant result, and then select Run as administrator.
Click Yes in the UAC prompt that appears.
Paste the following DISM commands individually and hit Enter after each: DISM /Online /Cleanup-Image /CheckHealthDISM /Online /Cleanup-Image /ScanHealthDISM /Online /Cleanup-Image /RestoreHealth
Now, execute the following command for the SFC scan: sfc /scannow
Once done, restart the computer for the changes to apply and check for improvements.
When the Print right-click context menu option is missing in Windows 11, it could be the corrupt system files to blame. To fix things, you can either run the DISM commands and the SFC scan or, as a simple solution, use a repair tool to replace all malfunctioning files automatically with new versions.
5. Modify the Registry Editor
Press Windows + R to open Run, type regedit in the text field, and hit Enter.
Click Yes in the UAC prompt that pops up.
Navigate the following path or paste it in the address bar and hit Enter: HKEY_CURRENT_USER\Software\Microsoft\Windows\CurrentVersion\Explorer
Now, right-click on the empty portion in the right pane, hover the cursor over New, select DWORD (32-bit) Value, and name it MultipleInvokePromptMinimum.
Double-click the DWORD, enter 16 under Value data and click OK to save the changes.
Now, restart the computer and verify whether you can quickly Print from File Explorer in Windows 11.
Press Windows + I to open the Settings app, go to Windows Update from the left, and then click on Update history on the right.
Scroll down to the bottom and click on Uninstall updates.
Click the Uninstall option next to any recently installed update after downloading which the Print option went missing from File Explorer in Windows 11.
Again, click Uninstall in the confirmation prompt.
Double-click the ISO file and click Open in the confirmation box.
Run the setup.exe file.
Click Yes in the UAC prompt.
Click Next to proceed in Windows 11 Setup.
Now, read through the license terms and click Accept.
Finally, make sure the setup reads Keep personal files and apps, and click Install to start the process.
Wait for the process to complete. It may take a few hours.
An in-place upgrade helps when the problem is related to the software aspect. It will set everything back to default and replace the system files without affecting the stored data, both files and installed apps.
How do I get the old right-click context menu on Windows 11?
Since the Print action is moved to the Show more options context menu in Windows 11 instead of the regular context menu, as was the case with the previous iterations, you may consider enabling the old right-click context menu.
It can be achieved through quick changes to the Registry and wouldn’t take more than a minute!
While Windows 11 does seem user-friendly, it’s problems like these that forced many to roll back to Windows 10. Microsoft should include the Print action in the right-click menu on Windows 11 and not force users to open another one for something this vital.