How to Update Dell Drivers (Dell Update Utility App & More Tools)

Keeping your Dell laptop drivers updated is essential for performance and compatibility. The fastest way is to use the Dell Update Utility App, but other methods like SupportAssist or manual downloads also work. Below are several easy and advanced ways to get updates for your computer.

How to Update Drivers on a Dell Laptop (Windows 11/10)

The Dell Update App is Dell’s official utility designed to automatically detect, download, and install driver updates.

  • Press Start and type Dell Update
  • If not installed, get it from the Dell Drivers & Downloads page
  • Open the app and click Check to scan driver updates
  • Once the list appears, click Install to apply them
  • Restart your PC to complete the process

Using this method helps automatically update Dell drivers with minimal effort.

2. Scan with Dell SupportAssist (Built-in Utility)

SupportAssist is another Dell tool that offers driver updates along with system diagnostics and performance checks.

  • Download Dell SupportAssist.
  • Once downloaded, run the setup and follow on-screen instructions.
  • Launch the software, then click Run under Get Drivers & Downloads.
  • Run Dell SupportAssist
  • Follow the prompts to install available updates.

If you’re unsure how to handle Dell drivers update manually, this is a safe alternative. For non-Dell users, you can also try a free Windows 11 driver updater to handle generic drivers across other systems.

3. Download Drivers Manually from Dell Support

Want full control over which drivers you install? Go directly to the Dell Support Drivers portal.

  • Visit Dell Support Drivers
  • Enter your Service Tag or use Browse all products.
    Search Dell Driver
  • Click Find drivers and complete the form.
    Find Drivers Dell
  • Click Download on the needed file.
    Download Dell Driver
  • Open the setup file and follow the installation steps.

Before downloading, make sure your system meets the minimum Windows 11 requirements, especially if you’re running an older Dell model.

4. Update via Windows Device Manager (Advanced Option)

Even without Dell software, you can update drivers using Windows Device Manager.

  • Right-click the Start menu and choose Device Manager.
    Open Device Manager
  • Right-click the driver you want to update and choose Update driver.
    Update Driver Windows 11
  • Select Search automatically for drivers.
    Search for Drivers Automatically

For complete steps, check our full guide on updating drivers in Windows 11.

Why These Methods Work

  • The Dell Update Utility App ensures quick and automated updates for essential drivers and BIOS
  • SupportAssist adds proactive diagnostics and update suggestions
  • Manual downloads allow granular control for experienced users
  • Device Manager is a fallback to handle basic Windows-based driver updates

This flexibility makes it easy to keep your Dell support drivers current. Even if you’re using a system with an older CPU, you can still install Windows 11 on an unsupported processor and proceed with updates.

FAQs

How do I automatically update Dell drivers on Windows 11?

You can use the Dell Update App to automatically scan for and install the latest drivers. Simply open the app and click Check, then Install.

What is the best way to check for Dell driver updates?

The most reliable way is through Dell SupportAssist or the Dell Update Utility App, which scan and download updates for your system model.

Is the Dell Update App safe to use?

Yes, it’s an official Dell tool. Download it only from the Dell Support website.

Can I update Dell drivers without using any software?

Yes, visit the Dell support page to manually download drivers by entering your Service Tag, or use Device Manager.

Why are my Dell drivers not updating automatically?

This may happen if the Dell Update App is not installed, is disabled, or you don’t have admin rights. Try updating manually as a backup.

How often should I update my Dell laptop drivers?

Check for updates every 4–6 weeks, or after major Windows updates. Regular updates help avoid conflicts and improve stability.

Can I use the Dell Update App on unsupported systems?

No, it’s made for Dell hardware. If you’re running Windows 11 on an unsupported CPU, use manual installation or Device Manager instead.

Final Thoughts

Updating Dell drivers on Windows 11 is easier than ever, thanks to tools like the Dell Update Utility App and SupportAssist. No matter if you prefer automatic updates or downloading drivers manually, these methods help ensure your hardware stays compatible, secure, and running smoothly.

Make it a habit to check for updates regularly to avoid performance issues and get the most out of your Dell device.

How to Download and Use Microsoft Loop

Microsoft is ready to allow users to access the first preview of the Loop project. Now, let’s learn where to get it from, how to install it, and how to make the most of it.

Want to find out how to utilize this software across Office apps and manage tasks? You are in the right place.

What is Microsoft Loop?

How should we put this? You can compare Loop to a project board. Here, you can see a list of all Loop components and Loop pages and who is currently working on them.

Think of it as a modern File Explorer, where everything is live and collaborative. Loop pages are individual canvases where people can share and collaborate on Loop components.

Also, Loop components are constantly updated and editable for whoever they’re shared with, which is a pretty nice fight.

You can drop the content as a Loop component into a Teams message or Outlook email. Also, any edits to the table will be reflected wherever it’s embedded or shared.

Microsoft said that Loop would use the Fluid Framework open-source platform. Thus, it will allow Microsoft 365 users to collaborate and share content in real-time.

This great idea is that users can see everything on their project in just one workspace. There will be three parts to Loop, according to its official website.

  • Workspaces: Group all-important project elements in Loop workspaces to see what everyone’s working on and track progress toward shared goals.
  • Pages: Organize your Loop components and essential elements in your project. Links, files, and data, in Loop pages, can grow to match the size of your ideas.
  • Components: Collaborate in the flow of work with Loop components. Work together on lists, tables, notes, or even a customer sales opportunity from Dynamics 365. Do it on a Loop page or in a chat, email, meeting, or document.

And, once shared, you can view your co-workers’ tasks and see when they check off each of those items. This tool can be a helpful functionality to keep the team intact.

Your organization might not support Loop yet. If that’s the case, ask your IT admin to turn this feature on.

How do I get Microsoft Loop?

  1. Type Get Microsoft Loop in your favorite search engine.
    get ms loop
  2. Be sure to only select the official source from the results.
    ms loop
  3. Click on the Get started with Loop button.
    get started with loop
  4. Select Get started – It’s free.
    get started with loop
  5. You will be prompted to sign in with your Microsoft account.
    sign in microsoft account
  6. Now, you can start using Microsoft Loop.

You can download Microsoft Loop from Microsoft Store

If you want to download it as a separate application on your desktop, you can now download Microsoft Loop from Microsoft Store. Microsoft made it available for you to install Loop on its own, without resorting to a Web browser.

The Loop app is also available for mobile. This will help you keep up with whatever you do while on the road.

Remember that Loop elements can be used with Teams and many other Microsoft 365 apps.

How do I start using Microsoft Loop?

First of all, you are going to want to use the sidebar to navigate the Loop app. Everything you need has been simplified and neatly put into a few categories.

When you log in for the first time, Loop will provide you with some essential guidance. The Getting Started section will help us not feel completely overwhelmed.

Now that you’ve become a bit more familiar with the Loop app, we can move on to your projects.

It’s time to look at projects. You can switch between the Getting Started screen and Workspaces by clicking this small button.

Moving on, let’s look at how to create a new Workspace. We’ll also see how to manage the ones you already have on your Loop app.

We’re also going to take a look at creating Loop components. Let’s see how to share them on whatever platform you need to share them on.

How can I create a new Workspace in Loop?

  1. Once on the Workspaces page, click on the Plus button.
    new project loop
  2. Click the Update cover button to select a photo cover for your Workspace.
    update cover
  3. Choose the picture you want, then click on the Select button.
    select cover
  4. Please select a name for your Workspace, then click on the plus sign next to it and select an emoji.
    create workspace

You’ve successfully created a new Workspace. You will find it and be able to interact with it on the Workspaces page.

Need to reverse an edit or fix a mistake? Check this detailed guide on how to undo in Microsoft Loop to keep your work error-free.

Know that you can also edit these Workspaces after creating them. So, don’t worry if it isn’t what you envisioned just yet.

By clicking on the three dots on each Workspace icon, you can set it as a favorite, edit it, or rename it. You can also change the cover or emoji, add or remove members, and even delete it.

Need a step-by-step for changing workspace titles? Follow this guide to rename a workspace in Microsoft Loop and apply the correct name quickly.

How can I create a Loop component?

  1. After creating your project in the new Workspace, click on the dots icon next to it and select Create Loop component.
    create loop component
  2. Now your Workspace has a Loop component that you can share.

How do I share Loop components?

  1. Click on the Copy Loop component button.
    copy component
  2. A link to your Loop component will be generated, so click the Copy button.
    copy link
  3. Paste the link where you want your colleagues to see and interact with it.

This is all you must do in order to create, manage, and share your Loop Workspace components with colleagues via mail or Teams.

Now that Microsoft is opening Loop to public preview, businesses and consumers can access an early version of the software.

Suppose you have a Microsoft Account or Azure Active Directory account. In that case, you can access the web app, and iOS and Android versions will also be available to businesses today and consumers soon.

Excited about the new release? Be sure to share your thoughts, ideas, and opinions with us in the comments section below.

What is Error Code 0x87e00017 & How to Fix It

An error our readers complain about is the 0x87e00017 which appears on the Microsoft Store. It occurs when they try to download or update games from Xbox Game Pass. Hence, we’ll discuss the error and ways to fix it.

Also, you can check our guide on ways to fix the can’t install Game Pass games on PC.

What is the error code 0x87e00017?

0x87e00017 is a fatal error code that appears when you try to update Game Pass games via Microsoft Store.

It indicates something unexpected happened. Also, it is usually associated with issues with Xbox gaming components or Microsoft Store.

What causes the error code 0x87e00017?

Many factors may be responsible for the error code 0x87e00017, and some are:

  • Issues with Microsoft Store – The error can occur while updating or downloading Xbox games due to Microsoft Store cache files interference with the process. When the cache files get old, they can become corrupted and impede the collection of more data, resulting in errors.
  • Xbox app and Microsoft Store corrupt installation files – The Xbox Game Pass performance may be impeded due to the corrupt installation, resulting in trouble with the error code 0x87e00017.

As we go further into this article, we’ll show you steps to resolve the error.

How can I fix the error code 0x87e00017?

Before proceeding with any advanced troubleshooting steps, go through the following preliminary checks:

If you can’t fix the problem, try the solutions below:

1. Run Windows Store Apps Troubleshooter

  1. Press Windows + I key to open the Settings app.
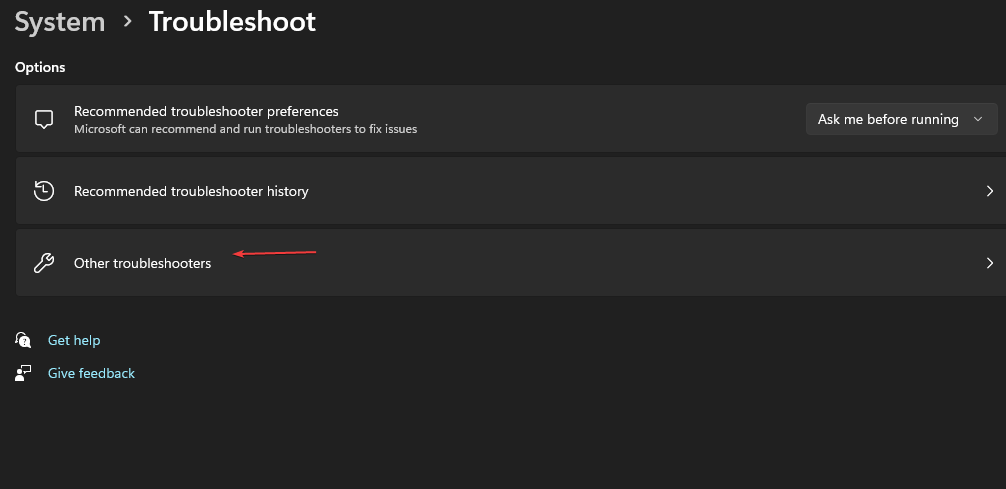
  2. Click on System and select Troubleshoot. Proceed to click on Other troubleshooters.
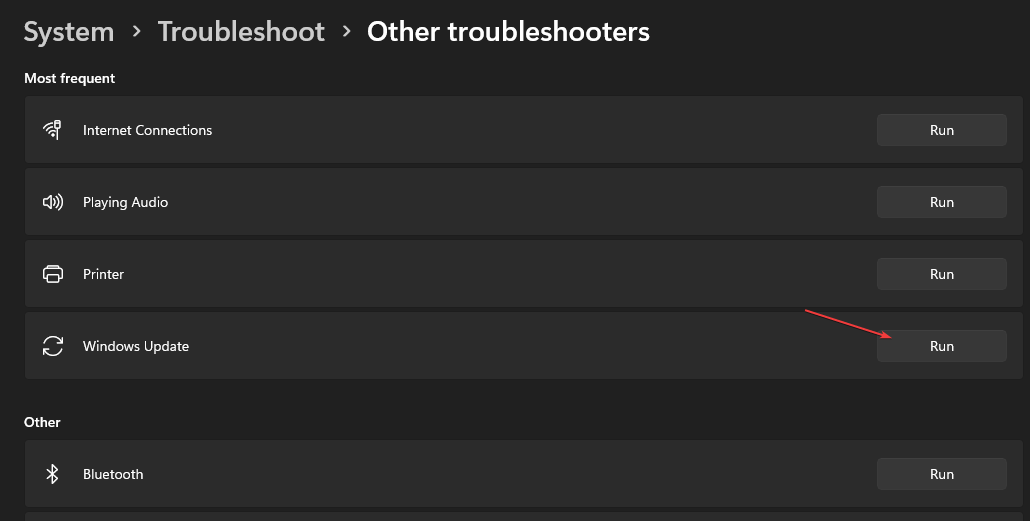
  3. Then click on the Run button beside the Windows Store Apps.

Running the Troubleshooter will resolve issues with Windows Store apps that may cause error code 0x87e00017.

2. Reset the Windows Store cache

  1. Press Windows + R keys to open the Run dialogue box, type wsreset.exe, then press Ctrl + Shift + Enter keys to clear the cache as an administrator.
  2. Wait while the process runs until it closes automatically.
  3. Restart your PC and launch the Microsoft store to check if the error code 0×80073d01 persists.

Clearing the cache on Windows as an administrator will remove any bugs and corrupt files in the cache files and fix the Windows store error 0x87e00017.

3. Restart the Xbox services and Gaming Services

  1. Left-click the Start button, type Services, then open it from the search results.
  2. Find the Gaming Services, right-click on them, and select Restart from the drop-down.
  3. Find all the Xbox services in the list, right-click them, and select Restart from the drop-down.

Restarting Xbox Services and Gaming Services will fix any background tasks impeding their processes on your PC. Check how to download the Xbox gaming services app on your PC.

4. Repair the Microsoft Store app

  1. Press Windows + R keys to open the Run dialogue box, type ms-settings:appsfeatures, then press Enter.
  2. Locate and select the Microsoft Store, then click on the Advanced options.
  3. Go to the Reset tab and click the Repair button.
  4. Restart your PC after the repair process and check if the error is fixed.

Repairing the Microsoft Store app will resolve any issues and corrupt installation files affecting its performance, leading to the 0x87e00017 error.

5. Update Windows Operating System

  1. Press Windows + I key to open the Windows Settings app.
  2. Click on Windows Update and click the Check for updates button. If there are any updates available, it will search for and install them.

Updating Windows on your PC will fix system bugs impeding Xbox Game Pass app updates or downloads. You can read about fixing Windows not connecting to the update service if the error occurs on your PC.

Alternatively, check ways to fix the Xbox app not downloading or installing on Windows 11. Also, you can read about the Microsoft Store page not loading and fixes for it.

If you have further questions or suggestions, kindly drop them in the comments section.

Microsoft joins several other tech companies investigated under the German Competition Act

Germany has set its sights on Microsoft as it opens proceedings to determine if Microsoft’s business in the country can be subject to special abuse measures, aka the German Competition Act, due to the company’s sprawling digital ecosystem.

President of the Bundeskartellamt, Andreas Mundt addressed German’s preliminary investigative probe into Microsoft with the following,

With Windows and its Office products Microsoft has had a long-standing and very strong position with regard to operating systems and office software. Based on this, the company has continuously expanded its product range both for business customers and consumers. More recently, we have seen a strong increase in the importance of the cloud services Azure and OneDrive, which are often linked to other Microsoft applications, and the resounding success of Teams, a software for video conferences and collaborative working. In addition, Microsoft is also active in other areas, including gaming with its Xbox, career networks with its service LinkedIn or internet searching with its search engine Bing. Most recently, the company has attracted attention with the integration of AI applications. In light of this, there are good reasons to examine whether Microsoft is of paramount significance for competition across markets. Such a finding would allow us to take action at an early stage and prohibit possible anti-competitive practices.

It’s unclear at this time if Mundt is flexing some of the newly imbued powers given to the FCO to go after more antitrust cases but there are reviews of Apple, Amazon, Google and Meta currently underway as well.

It should be noted that the FCO is taking the formal step of investigating Microsoft but not actually filing an antitrust claim against the company, and will most likely consult with the European Commission and other regulatory bodies in the region before issuing any official antitrust complaint.

Today’s decision to initiate a proceeding does not yet entail a proceeding to assess specific practices employed by Microsoft. If complaints or other information suggest that there are indications of Microsoft engaging in potentially anti-competitive practices, a separate decision will have to be issued in this matter – also in consultation with the European Commission and possibly other competition authorities.

It’s also unclear what Microsoft has done specifically that may have sparked the FCO’s investigation into the company, but some speculate that it could involve the almost yearlong Activision Blizzard buyout or rumors of the company already applying a heavy hand in regards to data restrictions on 3rd parties looking to jump into the AI chatbot field recently.

Whatever the reason, Microsoft joins several other big names under the FCO microscope and with as many moving parts as it has currently, a formal complaint could become an inevitability.

Exception Code 0xc0000374: How to Fix It in 4 Steps

Lately, some of our readers report the error code 0xC0000374 appearing on their computers. The error occurs when installing Realtek sound card drivers on the PC. Hence, this guide will discuss the correct approaches to resolve the problem.

Also, we have a detailed guide about the Realtek HD Audio Manager device type that is not supported error on Windows 11.

What causes the exception code Oxc0000374?

The Install Realtek HD Audio Driver Failure, Error OxC0000374, occurs when you try to install the necessary Audio drivers for the Realtek sound card on your system.

Hence, let’s explore possible things that might trigger the problem:

  • Sound card failure – When the sound card is not intact or working, it can cause the Audio services not responding error.
  • Outdated operating system – Running an outdated OS prevents the system from accessing updates, resulting in bugs impeding hardware devices and drivers’ activities.
  • Issues with the Microsoft UAA bus driver – UAA bus driver for High Definition Audio can interfere with the Realtek driver installation process and cause the 0xc0000374 error. It is because it supports older devices like Realtek 2.51, and installing a new version can cause compatibility problems.

Nevertheless, you can resolve the error by following the troubleshooting steps below.

How can I fix the exception code 0xc0000374?

Before proceeding with any advanced fixes, go through the following:

If you can’t resolve the error, proceed with the fixes below:

1. Disable Microsoft UAA Bus Driver

  1. Right-click the Start button and select the Device Manager from the drop-down.
  2. Expand the System Devices entry. Right-click the Microsoft UAA Bus Driver for High Definition Audio option, then select Disable from the drop-down.
  3. Click on the Yes button to confirm it.
  4. Then, go to the Device Manager, right-click the Microsoft UAA Bus Driver for High Definition Audio driver, and select Uninstall from the drop-down.
  5. Restart your PC and run the installer to complete the process.

Disabling the Microsoft UAA Bus Driver will fix any interference with the Realtek driver installer. Read how to reinstall Realtek Audio drivers & HD Audio Manager on Windows 11 for more steps.

2. Reinstall the Realtek HD Audio device

  1. Press Windows + R key to open the Run dialog box, type devmgmt.msc, and press Enter to open the Device Manager.
  2. Expand the Sound, video, and game controllers tab. Right-click on Realtek High Definition Audio, and select the Uninstall device option from the drop-down menu.
  3. Check the box for the Delete the driver software for this device option, then click Uninstall.
  4. Restart your computer to automatically install the driver.

If the driver isn’t installed, check how to download the Realtek audio driver on Windows 11.

3. Update Realtek driver

  1. Right-click the Start button, then select the Device Manager from the drop-down.
  2. Expand the Sound, video, and game controllers tab. Right-click on Realtek High Definition Audio, and select Update driver.
  3. Click on Search Automatically for the updated driver software option.
  4. Restart your PC and check if the error persists.

Updating the driver will fix bugs that impede its functionality and cause the 0xc0000374 error.

If you need a straightforward alternative, you can try using dedicated software, such as Outbyte Driver Updater, which will automatically locate the latest updates after detecting all outdated or missing drivers found on your computer.

⇒ Get Outbyte Driver Updater

4. Add Legacy hardware

  1. Press Windows + R key to open the Run dialog box, type devmgmt.msc, then press Enter to open the Device Manager.
  2. Find the Sound, video, and game controllers entry and click on it. Click on Action at the top bar, and select Add legacy hardware from the drop-down.
  3. Select Install the hardware I manually selected from a list (Advanced), then click Next.
  4. Click the Sound, video, and game controllers options and click Next.
  5. Select Realtek from the Manufacturer tab on the left and select the latest version from the Model tab on the right.
  6. Click Next to continue the process. Follow the on-screen instructions to complete the hardware installation.

Adding legacy hardware installs a Peripheral Controller Interface (PCI), manual configuration, and jumper installation to help run the Realtek Audio device.

Alternatively, Realtek Audio Manager can be used to the same effect. If the Realtek HD Audio Manager is missing on your PC, hop here to find the fixes to reverse it.

In addition, you may be interested in fixing Realtek HD Audio Manager not working on Windows 11. Also, read about fixing the Realtek audio driver crashing or slowing down on your computer.

If you have further questions or suggestions, kindly drop them in the comments section.

Error Code 0xc0000428: How to Quickly Fix This BSoD

Some readers encounter error code 0xc0000428 Blue Screen of Death on their PCs. This usually occurs not long after a system update and can be critical.

Fortunately, there are a couple of fixes to resolve the error. You can also check our detailed guide about some factors that can cause a Blue Screen of Death on your PC.

What causes the BSoD error Oxc0000428?

  • Issues with Boot files – You can encounter error code 0xc0000428 during startup because the Boot files or disk are damaged. It prevents the system from accessing the necessary files and components to communicate with the booting center, resulting in a BSoD.
  • Illegitimate or unauthorized files, drivers, or apps – Installing illegitimate apps can trigger the Digital Signature feature to impede the system’s processing due to programs or files that are not digitally signed or belong to doubtful parties.
  • Cloning or resizing of the OS hard disk – Tampering with the disk drives on the computer can cause disk boot failure. Also, it may be due to an essential system file being moved or a partition being affected while resizing the OS hard disk.

Nevertheless, we’ll discuss some troubleshooting steps to help you resolve it and get your system working.

How can I fix the BSoD error Oxc0000428?

Before trying advanced troubleshooting steps, power cycle your computer, disconnect external devices and peripherals from the PC, and restart Windows in Safe Mode to check if the error appears.

1. Rebuild Boot Manager via the Command Prompt

  1. Plug in a bootable USB drive and press the Power button to boot the PC.
  2. Press any key to boot from USB.
  3. Set your Language preferences and click the Next button.
  4. Select the Repair your computer option on the Install now screen.
  5. Click the Troubleshoot option, then Troubleshoot.
  6. Click Advanced and select Command Prompt.
  7. Select your account, type the following commands in the Command Prompt window and press Enter after each of them:
    • C:       
    • cd boot        
    • attrib bcd -s -h –r      
    • bootrec /rebuildbcd
  8. Close the Command Prompt window and restart your PC.

Read our article about creating a bootable USB drive for more detailed steps.

2. Perform Startup Repair

  1. Press the power button for about 10 seconds to turn off the computer.
  2. Press the power button and tap the F8, F2, F4, F8, F10, or F12 keys repeatedly until you see the Advanced Boot Options page.
  3. On startup, select the Troubleshoot option.
  4. Click Advanced and select Startup Repair from the menu.
  5. Select Choose a Recovery tool menu and click the Finish button.
  6. After the startup repair process, restart the PC and check if the error persists.

Running the Startup Repair tool will scan Windows for errors causing the 0xc0000428 error and fix them automatically.

3. Run the Check Disk command to repair Hard Disk

  1. Repeat steps 1-2 in the solution above to open the Advanced Boot option.
  2. Select the Repair your Computer option and press Enter.
  3. Choose a language and click the Next button.
  4. Select Troubleshoot, then Advanced Options.
  5. Choose the Command Prompt.
  6. Type the following and press Enter to scan your hard drive for errors: chkdsk /f
  7. Type the following and press Enter to scan and try to repair bad sectors: chkdsk /r
  8. When the process is complete, restart your PC.

Executing the following commands will scan and fix any errors with your hard drive, allowing the computer to boot correctly without errors.

Check what to do if you’re unable to find the Recovery Environment on Windows 11.

4. Disable digital signature temporarily

  1. Press Windows + I key to open the Windows Settings app.
  2. Select System and click on Recovery from the left pane.
  3. Locate Advanced startup and press the Restart now button below the tab.
  4. On startup, select the Troubleshoot option.
  5. Click Advanced and select Startup Settings from the menu.
  6. Navigate to the Disable driver signature enforcement option and click F7 to enable it.
  7. Restart your PC.

Disabling the Driver signature enforcement option should help you boot your PC successfully. Also, it prevents the feature from checking programs and files during startup.

Alternatively, please read our article about BSoD error 0x00000154 and the basic steps to fix it. Also, check how to fix Critical Service Failed BSoD on a Windows PC or how to easily solve the 0xc0000420 BSOD error code.

Before you go, don’t miss our guide on the error code 0xc0000001 on Windows 11 for more information.

If you have further questions or suggestions, kindly drop them in the comments section.

Everything new in Microsoft Teams Rooms and Devices: Defender for Endpoint Plan 2 and more

We’re on the verge of concluding the month of March, and it’s during this time when Microsoft gives up a round-up of everything new. This time it’s for Microsoft Teams Rooms and Devices.

Microsoft Teams Rooms continues to provide users with simple and easy-to-use meeting rooms that feature “innovative new solutions for inclusive collaboration, with audio and video that gave everyone a voice.” And with these new additions, Microsoft continues to build on this premise with the aim of enhancing the user experience.

Ultimately, helping satisfy the ever-growing hybrid meeting needs while simultaneously providing simple solutions. Here’s everything you need to know:

Teams runs natively on Cisco

Building on Microsoft’s goal to have multiple avenues through which users can join meetings and collaborate together, native Microsoft Teams Rooms is now accessible on Cisco meeting devices. “The new Cisco Board Pro, available in 55-inch and 75-inch sizes, are among the first Cisco devices certified for Teams,” says Microsoft.

Now, users with Cisco devices certified for Teams can easily connect from a native Teams Meeting to a Webex meeting, What’s more, they also have the alternative of setting Microsoft Teams Rooms as the default experience.

Team displays are now easier to use

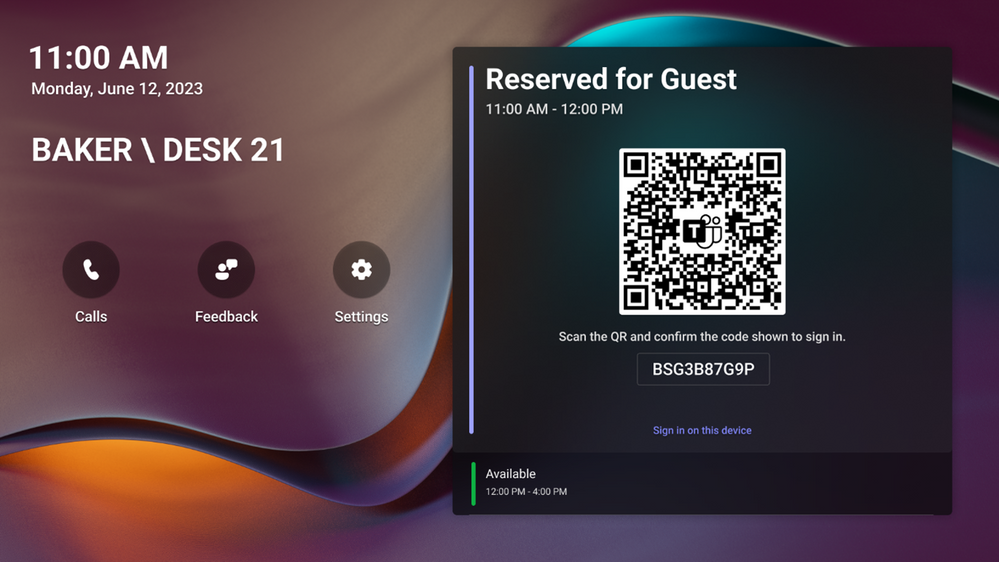
Users can now manipulate Teams displays with the hotdesk experience to reserve a seat in the workplace, thus allowing you to make plans in a timely manner. In turn, promoting effectiveness and efficiency.

Microsoft has plans in place to launch a new QR code sign-in experience later in the summer that will allow hotdesking users to easily access their personal Teams account by simply scanning the QR code on the Teams display, then using the Teams app on their mobile devices to sign in faster.

thumbnail image 2 of blog post titled What's new in Microsoft Teams Rooms and Devices at Enterprise Connect

Therefore, you no longer have to enter your details manually into the device which saves you a lot of time.

Teams meeting experiences expand to Windows and Android

Microsoft has laid out its plans to expand the availability of Teams meeting experiences across both Windows and Android with the aim of providing users with more consistency as well as functionality. Surface Hub is slated to join Teams Rooms later this year, marking the first touch-enabled board running Teams Rooms on Windows.

Microsoft device ecosystem platform

The platform is designed to unify the best experiences from both Microsoft and Android that’s curated specifically for shared spaces and optimized for Microsoft Teams devices. It’s built on the Android Open Source Project (AOSP), which provides security, reliability, management, and easy deployment.

“The Microsoft device ecosystem platform delivers class-leading security tailored for shared spaces and features a class-leading collection of security and tamper resistance features including secure and verified boot, anti-rollback, access-controlled security policies, partition Logical Unit Number (LUN) locking, and data at rest encryption,” Microsoft states in the Tech Community blog post.

Microsoft Defender for Endpoint Plan 2

Microsoft has also announced that it will be further enhancing Team Room’s endpoint security for Teams Rooms Pro to ensure that the meeting experience is secure at all times. The company intends to integrate Microsoft Defender for Endpoint Plan 2 into the Microsoft Teams Rooms Pro license and the Pro Management Portal by the end of Q2 2023, thus making the experience better and more secure.

This means users will no longer have to incur an additional cost while seeking other security services since it has now been incorporated into the experience making it more seamless. The feature will be included automatically for those with existing licenses, and it will also be incorporated into new Teams Rooms Pro licenses.

Teams Rooms on Windows devices gets new UI

Microsoft has also announced its plans to revamp Teams Rooms’ user interface on Windows this month. The redesign will feature five beautiful new themes, more intuitive messages, a homepage and function screen design refresh as well as the ability to customize unique themes that align with your organization’s brand. The redesign will be consistent across Android and Windows devices.

Microsoft Teams Rooms on Android updates

And finally, Microsoft has incorporated a host of new capabilities for Android users such as the ability to quickly start an ad-hoc meeting with the Meet button, and even invite other participants to join from the table console.

thumbnail image 5 of blog post titled What's new in Microsoft Teams Rooms and Devices at Enterprise Connect

What’s more, users will be able to join meetings using an ID. The front-row experience is also available for Teams Rooms users on Android.

That’s it for this month folks, we invite you to check out Microsoft’s blog post for more information as we only hit the key points. Be sure to also share your thoughts with us in the comments.

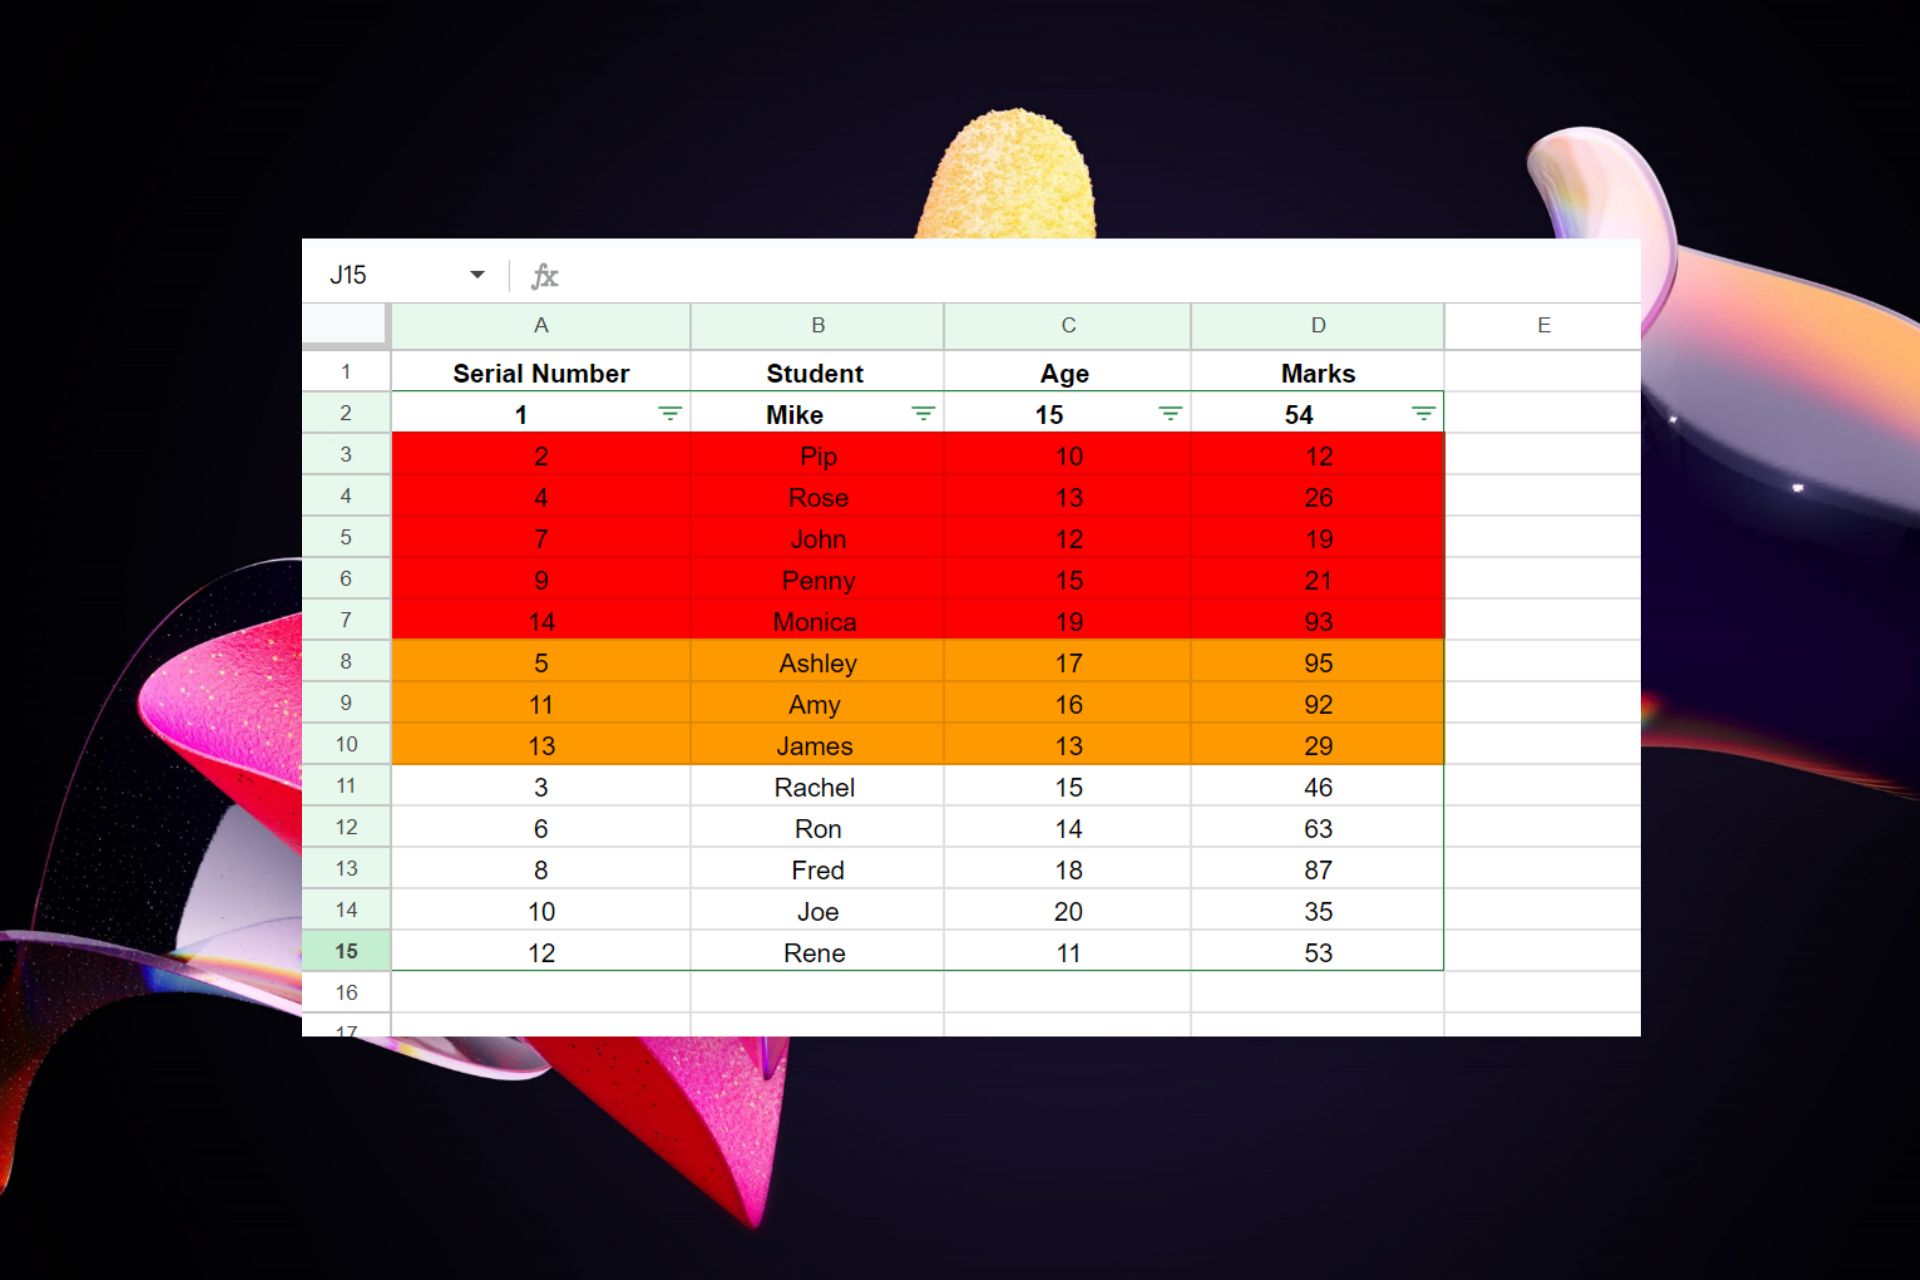
4 Quick Ways to Convert Text to Numbers on Google Sheets

Google Sheets is a cloud-based spreadsheet program for calculations and other tasks. However, you can encounter calculation errors due to data not being recognized as text instead of numbers. Therefore, we will examine quick ways to convert text to numbers on Google Sheets.

Alternatively, you may be interested in what to do when getting the unable to load file error in Google Sheets.

Why can’t I convert text to numbers in Excel?

There could be a few reasons why you are unable to convert text to numbers in Excel:

  • Data format – There are different data formats in Excel. However, you won’t be able to convert text to numbers if the data is in text format. It prevents Excel from recognizing it as a number in the Excel Toolbar.
  • Non-numeric characters – Text that contains non-numeric characters such as letters or symbols is usually not converted to numbers on Excel. You have to remove any non-numeric characters before attempting to convert the data.
  • Data size –  If the data is too large or too small, Excel may not be able to recognize it as a number. In this case, you may need to adjust the number format or use scientific notation.
  • Calculation settings – Converting text to number can be challenging if your Excel calculation settings are manual. It requires you to recalculate your Excel sheet before the conversion can take effect.

Nevertheless, we will discuss methods to convert text to numbers on Google Sheets.

How do I convert text to numbers on Google Sheets?

1. Convert using the main menu

  1. Press the Ctrl + A key to select all data.
  2. Click the Format tab and select Number from the options.
  3.  Select the Number option again for the sub-menu.
  4. Click the Decrease decimal place button on the ribbon to decrease the decimal place in your data and the Increase decimal place button on the ribbon to increase the decimal place in your data.

The Google Sheet has an inbuilt number function that allows you to modify numerical data.

2. Convert using the multiply function

  1. Click the cell you want to convert to identify the cell reference.
  2. Select the cell to which you want to convert the value to.
  3. Type = MULTIPLY(cell references, 1) in the cell you want to convert to and press the Enter key. Example = MULTIPLY(B2, 1)

Multiplying the unrecognised cell will the operand to the numerical value.

3. Use the ArrayFormula

  1. Select the cell range you want to convert to identify the cell reference.
  2. Select the cell to which you want to convert the data, type =ArrayFromula( cell reference range*1), and press Enter key. Example =ArrayFromula( A1:A5*1)
  3. Check if the value is numeric using the =ISNUMBER() function.

The Array formulas in Google Sheets allow you to convert multiple-cell text to numbers. Feel free to read our guide about fixing array values that could not be found error in Google Sheets.

4. Via the Value Function

  1. Select the data cell you want to convert to identify the cell reference.
  2. Click the cell where you want the data converted and type =VALUE()
  3. Input the cell reference into the parentheses and press the  Enter key. Example =VALUE(A1).
  4. Check if the value is numeric using the =ISNUMBER() function.

The above process will enable you to use the Value Function to convert text strings that resemble numbers to numerical values.

In conclusion, read our complete guide on how to add error bars in Google Sheets. Also, you can read about the best browsers for Google Drive, Google Docs, and Google Sheets on Windows.

If you have further questions or suggestions, kindly drop them in the comments section.

Microsoft launches Collaboration Security for Teams, in preview

The Covid pandemic brought on a new era of working remotely, shaking up the traditional ways organizations functioned. Nowadays, two-thirds of businesses across the globe have adopted the hybrid work model, with the likes of Microsoft Teams taking center stage in facilitating collaboration. But with great power comes great responsibility – and, unfortunately, great opportunity for cyber attackers. Phishing and ransomware, the pesky culprits of data breaches everywhere, have extended their reach to collaboration platforms.

To tackle the problem, Microsoft has introduced the public preview of Collaboration Security for Microsoft Teams, aimed at assisting organizations in safeguarding themselves against the increasing cyber-attacks. This new feature is accessible to customers of Microsoft E5, Microsoft E5 Security, or Microsoft Defender for Office 365.

The company is adding security features, including prevention, detection, and response, to Microsoft Teams to protect customer email environments. These collaboration security capabilities will be integrated into Microsoft 365 Defender, a top-rated XDR solution that correlates signals and alerts across various domains. The move will provide customers with a comprehensive and unified SecOps experience to keep their collaboration environments secure.

Furthermore, Microsoft is expanding message protection by empowering Teams users to report potentially suspicious messages. This proactive measure triggers an alert to the security team, who can conveniently view the flagged message within the Microsoft 365 Defender portal for further scrutiny. The tech firm is also introducing Zero Auto Purge (ZAP), which analyses messages after delivery and automatically hides those containing malicious content to prevent compromising the account and safeguard end-users.

To foster knowledge, mindfulness, and threat evaluation among users of Microsoft Teams, the technology heavyweight has integrated simulation and instruction resources for potential attacks. Also, the advanced hunting capabilities of Microsoft 365 Defender are being expanded to cover Teams security, allowing users to examine up to 30 days of raw data and identify potential threats through customized searches or guided hunting workflows.

Via Microsoft 

How to Fix the 0x00000116 Blue Screen Error

The Blue Screen of Death error code 0x00000116 mainly appears during the booting process or when performing a task with high graphic usage. It prevents you from using the system and can render it inaccessible. So, it’s of utmost importance to find ways to resolve the error.

Also, you may be interested in ways to fix DPC Watchdog Violation BSOD in Windows PC.

What causes the error code 0x00000116?

Here are a few factors that can cause the Blue Screen of Death error code 0x00000116:

  • Faulty drivers – The error may occur when there are outdated drivers running on the PC, impeding the performance of the device and infecting other drivers with bugs.
  • Hard disk issues – The BSoD error may appear when there is a corrupted hard drive on the PC, causing the RAM to lag. So, it can prolong the reading process and trigger errors.
  • Corrupt system files – Core features on the system can get affected when the system files are corrupted. It makes the system files inaccessible when invoked by devices that need them on the PC.
  • Outdated Windows OS – Running an outdated Windows operating system on your PC can cause several errors, including the Blue Screen of Death error code 0x00000116.

Nonetheless, we’ll take you through basic steps to fix the error and remove the Blue Screen from your computer.

How can I fix the error code 0x00000116?

Before trying any advanced solutions, go through the following:

If you can’t resolve the error, proceed with the fixes below:

1. Run a System File Checker (SFC) scan

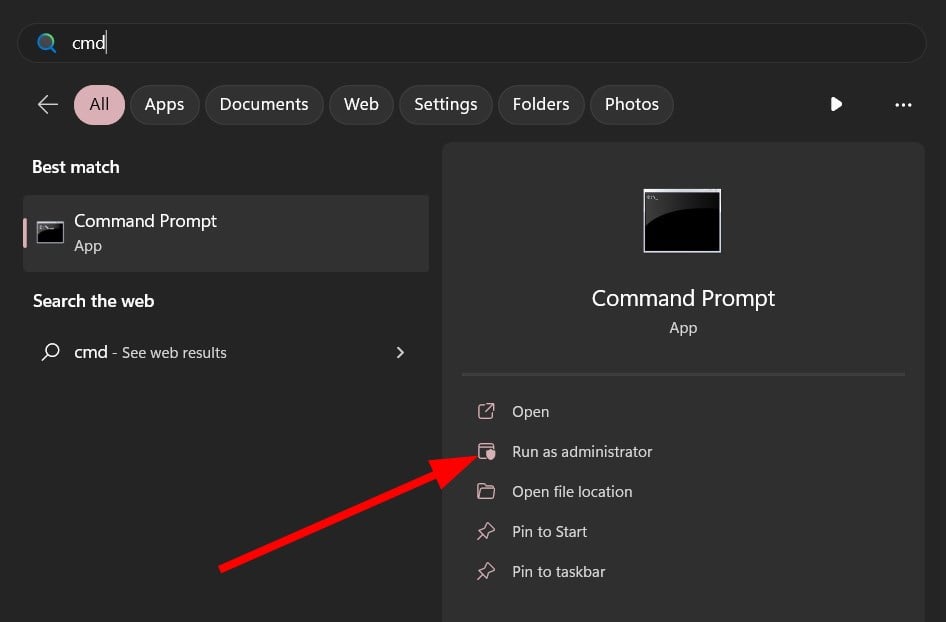
  1. Left-click the Start button, type command prompt, and select Run as administrator.
  2. Click Yes on the User Account Control prompt.
  3. Type the following and press Enter: sfc /scannow
  4. Restart your PC and check if the BSOD error 0x00000133 appears again.

Running a System File Checker scan will repair corrupt files. We recommend you check what to do if nothing happens when you select run as administrator on Windows 11.

If this process seems somehow complex, we suggest you try specialized programs that help you scan your device for corrupt files and automatically repair them by finding healthy components as substitutions.

2. Update your graphics drivers

For users who don’t have any fever driver updates, try updating your graphics driver.

  1. Press Windows + R keys to prompt the Run window, type devmgmt.msc, and click OK to open the Device Manager.
  2. Expand the Display Adapter entry, right-click on the device driver, then select Update driver from the drop-down menu.
  3. Click on Search Automatically for the updated driver software option.
  4. Restart your PC and check if the black screen issue persists.

Check our detailed guide about updating graphics drivers on Windows 11 if you have any issues.

3. Rollback recent driver updates

  1. Press Windows + R key to open the Run dialog box, type devmgmt.msc, then press Enter to open the Device Manager.
  2. Expand the Display adapter, right-click on the driver, and select Properties from the drop-down menu.
  3. Navigate to the Driver tab, select the Roll Back Driver option, and click OK.
  4. Restart your computer and check if the error still occurs.

It will delete the faulty hardware updates causing the error and resolve compatibility issues.

Also, we have an article you can read about how to uninstall updates on Windows 11 for more steps.

4. Run CHKDSK command

  1. Left-click the Start button, type Command Prompt, and click the Run as administrator option.
  2. Click Yes on the User Account Control prompt.
  3. Type the following commands and press Enter: chkdsk C: /r
  4. Restart your PC to see if it works without prompting the error.

The Chkdsk command examines the disk drives on your computer and repairs the corrupt hard disk. Check our guide on what to do if Command Prompt keeps crashing on your PC.

5. Update Windows OS

  1. Press the Windows + I to open the Windows Settings app.
  2. Click on Check for Updates on the left pane of the Windows Update dialog box. Wait for the Windows update result and click on Install Update if a Windows update is available.
  3. Restart your PC.

It installs new updates and patches for fixing bugs affecting your PC.

Read about ways to fix Windows updates not working if you encounter any problems during the update process.

Alternatively, check some factors that can cause a Blue Screen of Death on your PC that are not listed above. Likewise, read about fixing the BSoD error 0x00000154 on Windows 11 or the INSUFFICIENT_SYSTEM_MAP_REGS error.

If you have further questions or suggestions, kindly drop them in the comments section.

0x00000133: How to Fix This Blue Screen of Death Error

The 0x00000133, also known as DPC_WATCHDOG_VIOLATION bug check appears with a Blue Screen of Death while booting or performing other tasks on the system. It affects many users and can occur for different reasons. However, this guide will discuss some basic fixes for the error.

Likewise, users complain about the BSoD error 0x00000154 that’s usually triggered by outdated graphics drivers on Windows 11.

What causes the BSoD error code 0x00000133?

A couple of factors may be responsible for the BSoD error code 0x00000133:

  • Driver issues – Running outdated drivers on your computer can result in several errors as it can cause the bugs from the obsolete drivers to infect other core components of the computer.
  • Conflict of hardware – The BSoD error can appear due to one or two programs or hardware installed on the system not agreeing with each other’s specifications. It causes the DPC watchdog to be executed because it detected a long-running Deferred Procedure Call (DPC), resulting in the error.
  • Damage hard disk – The system may not run its processes correctly if its hard disk is not intact, causing them to take longer time to run. Hence, it triggers the error because the system spent a prolonged time at an INT.
  • Corrupt system files – When the system files are corrupted, it prevents the core services that need them from accessing them and can result in the BSOD error 0x00000133 in Windows PC.

Fortunately, you can resolve the error by following some troubleshooting steps and fixing the BSoD on your PC.

How can I fix BSoD error code 0x00000133?

Before attempting any advanced troubleshooting steps, go through the following:

If you can’t resolve the error, go ahead with the solutions below:

1. Change to Standard SATA AHCI Controller driver

  1. Press Windows + R key to open the Run dialog box, type devmgmt.msc, and press Enter to open the Device Manager.
  2. Expand the IDE ATA/ATAPI Controllers option. Right-click on the SATA AHCI Controller and select the Update driver from the drop-down menu.
  3. Click on Click Browse my computer for driver software.
  4. Click Let me pick from a list of device drivers on my computer.
  5. On the new windows, click Standard SATA AHCI Controller, then click Next. Follow the on-screen instructions to finish the process.
  6. Restart your PC and check if the error persists.

Changing the Family SATA AHCI Controller to Standard SATA AHCI Controller can resolve the error it’s causing with the DPC watchdog.

2. Run a System File Checker (SFC) scan

  1. Left-click the Start button, type command prompt, and select Run as administrator.
  2. Click Yes on the User Account Control prompt.
  3. Type the following and press Enter: sfc /scannow
  4. Restart your PC and check if the BSOD error 0x00000133 appears again.

A System File Checker scan will find and repair corrupt files causing the BSOD error 0x00000133 on your PC.

Alternatively, specialized software would be a great help, as it can detect corrupt, damaged, or missing files from your computer and replace them in a second with healthy parts from a massive database.

Check our detailed guide on what to do if nothing happens when you select run as administrator on Windows 11.

3. Rollback recent driver updates

  1. Press Windows + R key to open the Run dialog box, type devmgmt.msc, then press Enter to open the Device Manager.
  2. Expand the device driver you recently updated, right-click on the driver, and select Properties from the drop-down menu.
  3. Navigate to the Driver tab, select the Roll Back Driver option, and click OK.
  4. Restart your computer and check if the error still occurs.

Removing recent driver updates will delete the faulty updates causing the driver to malfunction. Also, it will fix compatibility issues between the driver update and the system.

Also, we have an article you can read about how to uninstall updates on Windows 11 for more steps.

4. Run the chkdsk Command

  1. Left-click the Start button, type Command Prompt, and click the Run as administrator option.
  2. Click Yes on the User Account Control prompt.
  3. Type the following commands and press Enter: chkdsk C: /r
  4. Restart your PC to see if it works without prompting the error.

Running the Chkdsk command examines disk utility and repairs hard disk errors on your PC. Check our guide on what to do if Command Prompt keeps crashing on your PC.

In addition, you may be interested in our comprehensive article about how to fix BSOD error 0x00000124 on Windows 11. Also, read about ways to fix DPC Watchdog Violation BSOD on Windows PC.

For further queries or suggestions on this guide or other BSoD errors, kindly drop them in the comments section.

Ubisoft will skip E3 to host its own show on June 12

Ubisoft has announced that it will not be attending E3 this year after all, despite previously committing to do so. In a statement to Video Games Chronicle the French publisher said,

E3 has fostered unforgettable moments across the industry throughout the years. While we initially intended to have an official E3 presence, we’ve made the subsequent decision to move in a different direction, and will be holding a Ubisoft Forward Live event on 12th June in Los Angeles. We look forward to sharing more details with our players very soon.”

The company behind such hit franchises as Assassins’ Creed, Far Cry, The Crew, Tom Clancy’s and many more, Ubisoft joins the big three—Sony, Nintendo, and Microsoft—in skipping E3 2023 in favor of hosting its own event.

E3 (the Electronic Entertainment Expo) has traditionally been the video game industry’s most prominent showcase event. However, it was canceled two out of the last three years due to the COVID pandemic, with the 2021 event being virtual only. 2023 marks the return of an in-person E3, though with so many big-name publishers dropping out the future of the expo beyond 2023 seems very much in question at this point.

Lenovo’s Slim PCs lineup combines 13th Gen Intel with its ‘X Power’ platform and Mini-LED displays

Lenovo will be shipping its flagship consumer PC brands the Slim and Yoga next month with some notable upgrades that include new display technology with both software and hardware tweaks that should give customers longer battery life for content creators.

According to Lenovo’s latest press release, the Lenovo Slim Pro 9 leads the pack with a similar chassis to last year’s model but sports a new Mini-LED ‘PureSight Pro’ display and an upgraded keyboard deck. While the Slim 9 will also come with LCD configurations, the MiniLED version will most likely be the showcase device as it pushes 3K resolution alongside 165Hz refresh rate touchscreen on a 16:10 panel with up to 1200nits of brightness and Dolby Vision support.

Onboard the Slim 9i variants will be Intel 13th Gen Core processors ranging from i5 to i9 as well as GPU options from integrated Iris Xe, NVIDIA GeForce RTX 4060 or 4070. Customers can also configure memory options by choosing from 16, 32, and 64GB LPDDR5X options.

08_Lenovo_Slim_Pro_9i_Hero_Front_Facing_Right

For AMD fans the Slim 9 models will come with Ryzen R5 and R7 processors, integrated UMA GPUs or NVIDIA RTX 3050 and 4050 options. The AMD models unfortuntately do not come with MinLED screen options but instead offer three options of LCD panels that include 2.5K matte and glossy at 90Hz refresh rates or a 3K at 120Hz matte selection.

MiniLED technology also makes its way to the webcam system on the Slim 9 alongside IR, and ToF camera sensors.

Lastly, the 9i will come with a 75Whr battery that leverages Lenovo’s X-Power platform that should intelligently throttle or boost performance to help with renders and exports for content creators and sip battery for more data processor-like workflows.

The Pro 9i will come in both 14 and 16-inches this year and should hit shelves as early as May 2023 starting at $1,699.99.

Lenovo also announced that it’s bringing the more affordable version of the Slim, the Slim 7 and 7i to stores starting at soon as April, for $1,179.99.

The Slim 7 and 7i both come in 14.5-inch models and feature the same polished comfort edges as the last generation and the latest Slim 9. Similar to the Slim 9 series, series 7 will also be aided by both Intel and AMD processors and NVIDIA RTX GPUs that range from 3050 to 4050 options.

15_Lenovo_Slim_Pro_9i_Hero

Lenovo expects its Slim 7 PCs to run cooler and for longer with a 73Whr battery onboard as well as support for Rapid Charge Express8 delivering up to three hours of battery life in 15 minutes.

Memory options top out at 16GB alongside an SSD capacity of 1TB, which should be plenty for a Slim 7 PC customer.

Last up are the flexible cousins of the Slim line up, the Yoga’s, that will come in both 14 and 16-inches this year and start at $799.99 starting next month.

For under $1,000 in the US, customers will get the same rounded polished Lenovo comfort edge design as the 9 and 7-series, similar 13th and 7000 Series Intel and AMD processors, memory configuration options that include 8 and 16GB’s, and 16:10 display panels.

13_Yoga_7_Hero_Tablet_Flat

The Yoga’s won’t be getting the MiniLED or ProSight treatment this year but a solid 2.8K OLED or 2.5K LCD touch screen pushing 400nits of brightness at 60Hz could be enough for most users.

Lenovo has also settled on Storm Grey being the color theme for 2023 as every model offers the same color variant alongside a Tidal Teal option as well for select devices.

Microsoft lays off at least 699, cuts come to SCIM, GitHub

According to a recent filing with the Washington State Employment Security Department (ESD), Microsoft announced an additional 559 job cuts on Monday. The job cuts were made in Redmond and Bellevue, Washington, as part of the tech giant’s global plan to lay off 10,000 employees, first announced on January 18. Please note that the ESD filings only reflect job cuts made in Washington state.

The most recent iteration of restructuring has affected the SCIM units of Microsoft, which comprises the Security, Compliance, Identity, and Management department, overseen by Charlie Bell – a former executive of Amazon Web Services, as reported by GeekWire.

According to reliable sources, Business Today has learned that GitHub, an internet hosting service provider under the ownership of Microsoft, has recently laid off approximately 142 engineering positions associated with its operations in India. “A total of 142 engineers were let go at GitHub India yesterday (Monday). Laid-off employees have been given two months’ pay as severance,” a source told the outlet.

In a recent email to employees, GitHub CEO Thomas Dohmke explained the rationale behind some tough decisions the company has made, including staff reductions and new budgetary measures aimed at safeguarding short-term business health and fueling long-term growth. Dohmke also highlighted the importance of accelerating the company’s integration of AI technology, citing GitHub Copilot as a prime example of success in this area.

Several individuals who identify themselves as employees of GitHub have verified the occurrence of layoffs through the social media outlet Twitter, although these appear to be separate from the India layoffs.

“I was laid off from GitHub today. Please let me know about product manager and open/inner source roles or leave me a recommendation on LinkedIn,” said one user.

“Well, the layoffs in the tech industry finally got to me. This morning, I lost my position as manager of the policy desk for GitHub. If anybody is looking for an editor or a writer, hit me up,” said another user.
Microsoft’s restructuring plan, unveiled earlier this year, included 10,000 job cuts spanning various levels, functions, teams, and regions. This marks the third round of layoffs under the plan. In joining the ranks of firms such as Amazon and Meta, who were already undertaking mass job cuts, the move was seen as necessary to address slumping sales and the threat of a global recession. Microsoft CEO Satya Nadella stated in January that the changes would result in a 10,000 job reduction by the end of FY23 Q3. The workforce reduction amounted to around 5 percent of the company’s workforce, which previously stood at over 220,000 employees.


Via GeekWire and Business Today

Microsoft reportedly working on “CorePC” for the Windows 12 timeframe

A stripped down, modular, faster and safer Windows architecture has been a goal of Microsoft for a long time. Years ago we heard about “Project Midori,” which was supposed to be a built from the ground up modular successor to Windows, and then it was Windows Core OS, which was going to start with a core set of Windows functionality, and then add to that core, for say a lightweight notebook, or a tablet, or a full on desktop computer, with different variants having different components, but all built on the same core.

Neither of those products ever saw the light of day, but word from Zac Bowden at Windows Central is that Microsoft is trying once again, this time with “CorePC:”

The project is codenamed CorePC and is designed to be a modular and customizable variant of Windows for Microsoft to leverage different form factors with. Not all Windows PCs need the full breadth of legacy Win32 app support, and CorePC will allow Microsoft to configure “editions” of Windows with varying levels of feature and app compatibility.

The big change with CorePC versus the current shipping version of Windows is that CorePC is state separated, just like Windows Core OS. State separation enables faster updates and a more secure platform via read-only partitions that are inaccessible to the user and third-party apps, just like on iPadOS or Android.

Bowden reports that a version of Windows running only Edge, web and Android apps, and Office apps, planned to compete with Chromebooks with an OS that is “60-75% smaller than Windows 11 SE” is already in internal testing, and the plan is for CorePC to become avialable in time for Windows 12, which is widely expected to launch sometime in 2024.

Of course AI will be a big part of this next version of Windows, as Microsoft has been AI-ing all the things:

Some AI features being developed include the ability for Windows to analyse content on display and provide contextual prompts to jumpstart projects or apps based on the information that’s currently being viewed. Windows may also be able to identify objects and text within images, and allow the user to easily cut out and paste those items elsewhere. Some AI features will require dedicated hardware to function.

Microsoft has been chasing the modular, lightweight core OS idea for ever, yet the desire to continue to support legacy apps and backward compatibility have always gotten in the way for a company that relies on corporate and enterprise business. From the sounds of it, Microsoft might be closer than ever to a newer more modular Windows, but we’ll have to wait and see.

Microsoft launches Viva Connections for Education

Staying on top of everything while in school can be a daunting task, from keeping track of all your assignments and announcements to making sure that you’re able to juggle extracurricular activities, that is sports and even a part-time gig.

All this to say, students struggle to remain “engaged, connected, and motivated” with information streaming in from multiple platforms simultaneously. It is easy to lose track and follow through with everything.

Microsoft has launched Microsoft Viva Connections for Education, a tool designed to provide students with a unified experience directly within Microsoft Teams to mitigate these issues.

“On average, 143 EdTech tools were used by students in the 2021-2022 school year, negatively impacting engagement, retention, and other important outcomes,” says Microsoft.

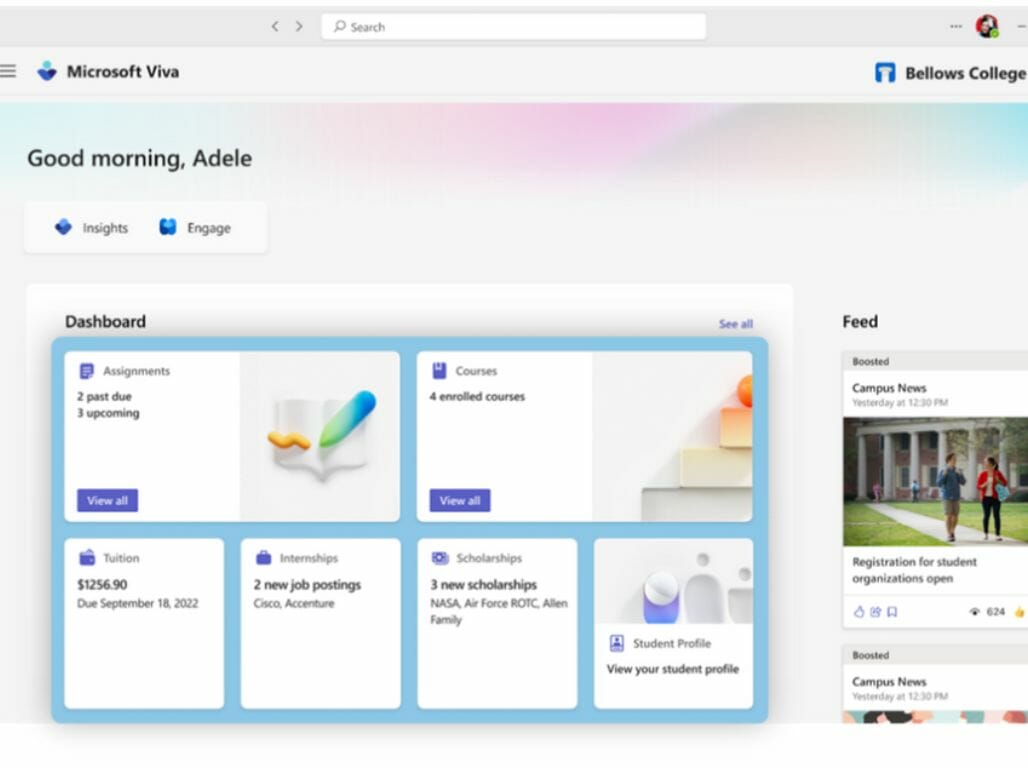
Viva Connections for Education ships with an intuitive design and easy access. What’s more, the dashboard is curated and personalized to meet the student’s needs and wants. This way, it’s easy for them to stay informed about everything going on around them.

Additionally, the tool also features customized cards for every student. The dashboard categorizes their courses, assignments, extracurricular activities, tuition payments, internship opportunities, scholarship applications, and more for easy access.

Users can opt to make use of the already pre-built cards in Viva Connections for Education while setting up or decide to customize their own based on their needs.

Moreover, you can personalize your dashboard experience further by applying your brand as well as your institution’s colors and logo to establish “a sense of continuity for students.”

Microsoft states that:

With Viva Connections for Education, you can also send targeted messages to your whole institution or subsets of students. Students can stay up to date on key news by scrolling through the Viva Connections for Education feed, helping them learn about club announcements, campus events, cafeteria menus, and more.

The same experience can also be replicated on mobile devices, allowing you to access all the information you need to get through the day while on the go.

What is Error Code 0x800704b3 & How to Fix it

Several users have reported coming across the network error code 0x800704b3 on their Windows 10 and Windows 11 PCs. This error indicates a network connection failure and prevents users from accessing the internet or internet resources.

Well, if you are also getting the same 0x800704b3 network error, then you will be glad to know that this guide will give you a bunch of solutions to fix the issue. You can apply the solutions on both your Windows 10 and 11 PCs. Let us get right into it.

Why am I getting the network error code 0x800704b3?

The two most common error messages containing the error code 0x800704b3 that you will come across are listed below:

Windows cannot access
Check the spelling of the name. Otherwise, there might be a problem with your network. To try to identify and resolve network problems, click Diagnose.

Error code: 0x800704b3
The network path was either typed incorrectly, does not exist, or the network provider is not currently available.Please try retyping the path or contact your network administrator.

Here are a few of the reasons that will trigger the network error code 0x800704b3:

  • Your antivirus tool is conflicting: Chances are that the presence of a third-party antivirus tool is causing the network on your PC to not function properly.
  • System files are corrupt: Due to corrupt or missing system files, especially network-related ones, you will come across the network error code 0x800704b3.
  • You have enabled SMB 1.0 protocol: Either you or a third-party program has accidentally enabled Server Message Block (SMB) protocol 1.0, which is causing the problem.
  • Corrupt user profile: Your profile might be corrupt or does not have sufficient rights, because of which the network is having difficulties performing to its full potential.
  • Network-related services aren’t running: In order for your network to work perfectly, all the network-related services should be running on your PC. If they aren’t then you will face such issues.

How to fix network error code 0x800704b3?

1. Run the network troubleshooter

  1. Press the Win + I keys to open the Settings menu.
  2. Click on Troubleshoot.
  3. Select Other troubleshooters.
  4. Hit the Run button next to the Network Adapter option.
  5. Begin the troubleshooting process.
  6. Apply the suggested fixes.
  7. Restart your PC.

Using the network troubleshooter, you will be able to fix all the underlying issues including the error code 0x800704b3. This in-built tool has helped several users fix the problem and could help you as well.

2. Disable any antivirus on your PC

  1. Open the Start menu by pressing the Win key.
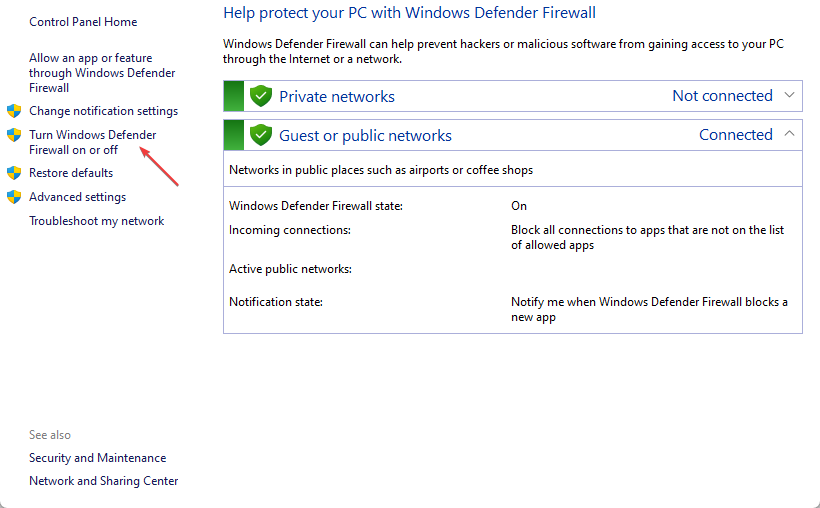
  2. Open Windows Defender Firewall.
  3. Click on Turn Windows Defender Firewall on or off option.
  4. Check the radio buttons for Turn off Windows Defender Firewall (not recommended) for Private and Public network settings.

If you have installed a third-party antivirus tool on your PC or using the Windows Defender on your PC with aggressive settings, then it could complicate things. It could also result in various network errors including 0x800704b3.

We would suggest you disable any third-party antivirus program from your PC. You can also try disabling the Windows Defender settings to check if this resolves the issue or not.

3. Disable SMB Protocol 1.0

  1. Open the Start menu by pressing the Win key.
  2. Open Windows Features.
  3. Scroll down and locate SMB 1.0.
  4. Uncheck the box for SMB 1.0.
  5. Click OK to confirm the changes.
  6. Restart your PC.

SMB or Server Message Block is a network file-sharing protocol that lets you access the connected printer, files, and other resources on the network.

By default, SMB 1.0 comes disabled on recent PCs, and if it is enabled, then it could throw up network issues. Disable the protocol and check if this resolves the error code 0x800704b3.

4. Create a new user account

  1. Open the Start menu by pressing the Win key.
  2. Open the command prompt as an admin.
  3. Type the below command and press Enter. net user 'account name' /add
    (Replace the account name with the name you would like your account name to be)
  4. Type the below command and press Enter. net localgroup administrators 'account name' /add
    (Replace the account name with the name you chose for the new account)
  5. Log out of your current account.
  6. Log in to the newly created account and check if this fixes the error 0x800704b3 or not.

You can check out our guide that explains the different ways to fix corrupt user profile on your Windows PC.

5. Fix corrupt system files

  1. Press the Win key to open the Start menu.
  2. Open the command prompt as an admin.
  3. Type the below command and press Enter. sfc /scannow
  4. Wait for the command to complete.
  5. Type the below commands and press Enter after each one. DISM /Online /Cleanup-Image /CheckHealth DISM /Online /Cleanup-Image /ScanHealth DISM /Online /Cleanup-Image /RestoreHealth
  6. Restart your PC.

The above commands will help you fix the corrupt or missing system files. However, they might not be that effective when solving some complicated problems such as error code 0x800704b3.

In such a scenario, you can make use of third-party software that can fix system crashes, fix DLL errors, fix BSOD errors, remove malware or ransomware from your PC, and much more.

6. Enable network services

  1. Press the Win key to open the Start menu.
  2. Open the command prompt as an admin.
  3. Type the below commands and press Enter after each one. net start dhcp net start dnscache net start netprofm net start nlasvc net start rpcss net start lanmanserver net start lmhosts net start lanmanworkstation net start fdrespub net start upnphost net start dot3svc net start wlansvc net start eventsystem net start browser net start wzcsvc
  4. Close command prompt.
  5. Restart your PC.

That is it from us in this guide. If you are getting a hidden network and can’t connect to this network issue, then you should apply the solutions in our guide to fix the issue.

We also have a guide to changing IP addresses without VPN on Windows 10. Some users have reported facing 0x8007003b network error on Windows. This can be easily fixed by applying the solutions in our guide.

Let us know down in the comments below, which one of the above solutions resolved the error code 0x800704b3 on your PC.

Windows Update Error 0x8007000B: 6 Simple Ways to Fix it

When using Windows OS, you will come across various issues. A bunch of these encounters will happen with Windows updates. Several users have reported facing Windows update error 0x8007000B. This update error prevents you from installing the latest features or security updates on your PC.

Thankfully, in this guide, we have listed a bunch of solutions that will help you resolve the Windows update error 0x8007000B. There are a variety of reasons why this error could trigger one of which is corrupt system files. Let us take a look at the solutions.

Why am I getting the Windows update error 0x8007000B?

Windows update error is the most common error that you will come across when using a Windows laptop or a PC. Some issues are quickly sorted out by using the Windows troubleshooter, while some require some additional input from your end.

Here are some of the most common reasons you will face why you are getting the Windows update error 0x8007000B:

  • Corrupt system files: If the system files on your PC, especially those related to Windows updates are missing or corrupt from your PC, then you will get such errors.
  • Network issue: Chances are that the Microsoft server is busy at the moment which is why you aren’t able to download the update.
  • Your PC is hit by a virus: A PC infected with a virus or malware can not only misbehave but also prevent you from downloading crucial updates.
  • Windows update services might be having issues: The important service called the Windows update service might be at fault here causing the 0x8007000B update error.

How can I fix the Windows update error 0x8007000B?

1. Run the Windows Update troubleshooter

  1. Press the Win + I keys to open the Settings menu.
  2. Click on Troubleshoot.
  3. Select Other troubleshooters.
  4. Click the Run button next to Windows Update option.
  5. Follow the troubleshooting prompts.
  6. Apply the fixes.
  7. Restart your PC.

You can resolve several update-related issues using the Windows update troubleshooter. It is a built-in feature that lets you fix things easily.

2. Restart the Windows Update service

  1. Open the Run dialogue by pressing the Win + R keys.
  2. Type services.msc and press Enter.Services Run Command 0x80240438
  3. Locate Windows Update service.
  4. Double-click to open it.
  5. Press the Stop button if it is running.
  6. After some time, press the Start button under Service status.
  7. Follow the same steps to restart the Bluetooth Intelligent Transfer service.

Chances are that the Windows update service on your PC isn’t running or is having issues. You can fix it by restarting the Windows update service as shown in the above steps. Also, make sure to restart the Background Intelligent Transfer service as well.

3. Run the SFC Scan and DISM commands

  1. Open the Start menu by pressing the Win key.
  2. Open the command prompt as an admin.
  3. Type the below command and press Enter. sfc /scannow
  4. Wait for the command to complete.
  5. Type the below commands and press Enter after each one. DISM /Online /Cleanup-Image /CheckHealth DISM /Online /Cleanup-Image /ScanHealth DISM /Online /Cleanup-Image /RestoreHealth
  6. Restart your PC.

You can run the above commands and fix the corrupt or missing system files on your PC. However, often these aren’t as effective as a dedicated system fixer.

In such a case, we would suggest you make use of a third-party tool that will be able to fix system crashes, fix DLL errors, fix BSOD errors, remove malware or ransomware from your PC, and much more.

4. Reset Windows Update components

  1. Open the Start menu by pressing the Win key.
  2. Open the command prompt as an admin.
  3. Type the below commands and press Enter after each one. net stop bits net stop wuauserv net stop appidsvc net stop cryptsvc Del “%ALLUSERSPROFILE%\Application Data\Microsoft\Network\Downloader*.*” rmdir %systemroot%\SoftwareDistribution /S /Q rmdir %systemroot%\system32\catroot2 /S /Q exe /s atl.dll exe /s urlmon.dll exe /s mshtml.dll netsh winsock reset netsh winsock reset proxy net start bits net start wuauserv net start appidsvc net start cryptsvc
  4. Restart your PC.

The above commands will help you reset the Windows update components on your PC. Resetting the components will help resolve any issues that might be causing the Windows update error 0x8007000B.

5. Scan PC for virus

  1. Press the Win key to open the Start menu.
  2. Open Windows Security.
  3. Click on Virus & threat protection.
  4. Click Quick Scan.
  5. Wait for the scan to complete and apply the prompted fixes.
  6. You can also click Scan options and click Full scan for a deep scan.

The Windows Security tool lets you scan your PC and remove viruses. However, it isn’t as effective as a dedicated antivirus tool.

For that, we would suggest you check out our guide which lists some of the best antivirus tools that you can install on your PC.

6. Download the update manually

  1. Press the Win + I keys to open Settings.
  2. Click on Windows Update.
  3. Click on Update history.
  4. Note down the KB number of the failed update.
  5. Visit this website.
  6. Enter the KB number of the failed update on the search field.

That is it from us in this guide. Several users have reported that their PC is performing slowly after they have installed the latest Windows update. In such a case, we would suggest you try out the solutions in our guide to resolving the problem.

If you are getting the 0x800f0845 Windows 10 update Error, then you should check out the solutions mentions in our guide to resolve the issue.

You can also check out our guide that explains the solutions to fix 0x80070057 in Windows update. For Windows update error 0x80072eff, you can refer to this guide.

Feel free to let us know in the comments below, which one of the above solutions resolved the Windows update error 0x8007000B.

Zoom Account Disabled? How to Reactivate It

Zoom is a popular video conferencing software for remote work, online classes, and virtual events. However, there have been reports of disabled Zoom accounts. Therefore, this article will focus on why the Zoom account is disabled and how to reactivate it.

Alternatively, you can read about ways to fix Zoom not responding on your PC.

Why is my Zoom account disabled?

There are several reasons why you may encounter the Zoom Account Disabled error message. Here are some common ones:

  • Violation of terms of service – Zoom has a set of terms and conditions for users to follow. If you violate any of these terms, your account may be disabled. Thus, this could include engaging in inappropriate behavior during a Zoom meeting or sharing offensive content.
  • Connectivity issues – The platform uses internet connections to communicate with its servers. Hence, network connection issues like slow network, connection timeout, or network congestion can affect account activities.
  • Account-related issues – Zoom account disabled error message can appear while logging in due to account-related issues such as account logged in on multiple devices or changes made to your account by your admins.
  • Suspicious activity – Measures are to detect and prevent fraudulent activity on the Zoom platform. Therefore, If it detects any suspicious activity on your account, it may disable it to protect others on the software platform.
  • Inactivity – If you have not used your Zoom account for an extended period, your account may be disabled to free up resources.

Regardless. We will discuss how to reactivate the Zoom account.

What can I do if my zoom account is disabled?

Go through the following preliminary checks:

  • Close and restart the Zoom app.
  • Fix network-related issues on your computer.
  • Server downtime and maintenance sessions can cause errors to occur on your computer. Hence, visit the Official Zoom Service Status website from your browser to check if the servers are operational. If the Server is down, wait a few hours and try signing in later.
  • Zoom will send an email to the account owner if an account is disabled and attach some information to clarify the reason behind the account being disabled. So, go through your mail to see if you received a message from Zoom, and follow any instructions provided.

If you can’t resolve the problem, proceed with the solutions below:

1. Write an appeal

  1. Visit the Zoom official webpage to request an appeal, select your account’s role type, and click Next.
  2. Input your details, write a detailed overview of account activities and your appeal, and click Submit.

Violating Zoom’s Terms of service or user guidelines can cause accounts to be disabled. Therefore, review the Terms of Service and Acceptable Use Guidelines before submitting this.

2. Verify your Identity

  1. Open the Zoom official web portal on your browser.
  2. Click the Profile in the left pane menu and select the Edit link next to your sign-in email.
  3. Input the new email address and enter your sign-in password.
  4. Click the Save changes button.
  5. Login to your old email, open the confirmation email and click the Confirm button to complete.

Performing the above steps will help to verify your Zoom account and resolve multiple account access issues.

3. Use the Zoom web app

For users who use the Zoom app, we recommend you try using Zoom on your browser. It can help you bypass any app issues causing the account disabled problems to occur.

Do not hesitate to explore how to download & install Zoom on Windows 11 if you don’t have the app.

In addition, check our guide about quick methods to fix the Zoom error code 3113 on your PC. Also, you can read through our article on how to fix Zoom’s high CPU usage on Windows PC.

If you have further questions or suggestions, kindly drop them in the comments section.

Cloudflare 403 Forbidden: What Does It Mean & How to Fix It

Error 403 Forbidden on Cloudflare is a critical error that indicates an HTTP status code showing denied permissions. It explains the impediments between internet communication and can be due to different reasons.

However, this guide will discuss ways to fix it. Also, our readers can check ways to fix Cloudflare checking your browser error in this guide.

What is Cloudflare 403 forbidden?

The main features of Cloudflare are to make everything you connect to the Internet secure, private, fast, and reliable. However, these features can be futile due to errors like 403 Forbidden that impede global network security.

Furthermore, Cloudflare 403 forbidden is an HTTP status code indicating that permissions aren’t established in the connection. It occurs when a client submits a request, and the origin cannot approve or process it.

What are the causes of the Cloudfare 403 forbidden error?

  • Permission/Ownership issues – The error may occur due to permission settings, incorrect file or directory permissions, or an error in the .htaccess rules you have set. It can also be due to issues with the Cloudflare account membership.
  • Cloudflare’s Web Application Firewall (WAF) rules – If the request you’re sending violates any of the Web Application Firewall (WAF) rules enabled for all Cloudflare domains, it will lead to the 403 Forbidden error.
  • Subdomains with no correct SSL certificates – Building connection links via subdomains that don’t have valid SSL certificates can trigger the error because of Cyber attack threats.
  • Browser issues – You can run into the error due to corrupt or old browser caches and cookies affecting the browser performance. Also, it can occur when the web hosting provider is not well configured or has been deleted or moved.

However, we’ll take you through how to bypass Cloudflare 403 Forbidden and resolve the error.

How can I fix Cloudflare 403 Forbidden error?

Before proceeding with any advanced troubleshooting steps, go through the following:

If you can’t resolve the error, try the steps below:

1. Clear your browser’s cache and cookies

  1. Launch the Google Chrome browser on your PC, then click three dots to open the Menu. Go to More tools and click Clear browsing data.
  2. Choose a time range for the data to be cleared, then select All time to delete everything.
  3. Check the boxes for Cookies, other site data, and Cached images and files, then click Clear data.
  4. Restart your browser and check if the Cloudflare error persists.

Clearing your browser caches and cookies will delete the corrupt files impeding the Cloudflare connection.

2. Manage Cloudflare Firewall Rules

  1. Log in to the Cloudflare dashboard, and select your account and website.
  2. Go to Security and click on Web Application Firewall (WAF).
  3. Click on Firewall rules to show the list of all rules available, then Use the toggle switch associated with a firewall rule to enable or disable it.
  4. Restart your browser and check if the 403 forbidden error appears.

You can toggle the firewall rule based on your preferences and knowledge of the error. So, managing it allows you to disable the rules that impede your request approval.

3. Upgrade your Cloudflare account to a Pro subscription

  1. Launch your browser and log in to the Cloudflare dashboard.
  2. Open the external link and click on your account and domain.
  3. Go to Overview.
  4. Click on the Change option to access Plan Extensions.
  5. Choose the appropriate plan type, then click on Continue.
  6. Click the Confirm button to verify that you want to make the upgrade.
  7. The upgrade should be effective immediately, and you should be able to access the website again.

Upgrading to a Pro subscription allows you to access more features and help safeguard your website against threats liable to cause a 403 Forbidden error.

Alternatively, check our articles about the best browsers with the highest support for HTML for your computer. Also, our readers can go through ways to bypass Error 1005 Access Denied in a few steps.

Another common issue is Cloudflare error 1001, which we tackled in a separate guide.

If you have further questions or suggestions, kindly drop them in the comments section.

Getting started with the new Teams – setup and some quirks

Microsoft released a public preview of the new Teams for desktop today, and as advertised, it’s much faster than the old, admittedly slow and somewhat clunky Teams. We’ve been kicking the tires on the new experience, and have noticed some differences, some of them quite a departure from the old Teams. Let’s take a look:

Enabling Teams from the Admin Center

Here at OnMSFT.com, we’ve been using Teams and Microsoft 365 for two years at least, running on a set of Microsoft 365 Business Basic plans. With this plan we get access to Teams, Planner, Loop, Exchange, SharePoint and OneDrive, but with web access only to Office. We also have full control of Admin settings for security and compliance, Azure Active Directory (AAD), Exchange, and Teams, as well as user, roles, groups, and billing settings.

So the first thing we had to do to enable the new Teams was to do a bit of setup on the back end. If you’re already in the Teams Public Preview program, you should be all set and see some prompts to try the new Teams. If not, your Teams Administrator (in our case, me) will have to make some changes by going to the Teams Admin Center>Teams>Teams Update Policies and either add a new policy or as we did, just amend the Global (Org-wide default) policy. Open the policy, and Enable “Allow public preview” and make sure that Use new Teams client is set to “Users can choose.”

Apply the policies, and your users should get a notification that they can try out the new Teams. Once the preview is downloaded, we’ve found that it’s easier to just open the new experience by clicking on the new Teams Preview shortcut (if you don’t have Teams set to launch at startup).

Now, there are a lot of changes to Teams affecting Meetings and Calls, two important aspects of Teams that we rarely use here at OnMSFT.com. We use Teams almost exclusively as a chat client, and having used it for a couple of years we’ve developed some muscle memory.

New Chat behavior – which way to scroll?

So much so that one big (for us) change that didn’t get much play in the blog posts is that in the main chat window, posts are now organized with the most recent posts at the top. With the old slow Teams, it wasn’t uncommon to have to scroll a bit to get to the latest messages, and it took a while to realize that I was scrolling further and further back into history instead of getting to the latest messages. This isn’t necessarily a bad move, but it’s going to take some getting used to, especially as private chats are still ordered by newest at the bottom.

Pop out a thread, or immerse yourself

Back in 2020, Microsoft introduced the ability to “pop out” a chat, that is, open a private chat in a floating window, making it easier to carry on multiple chats along with keeping up with general chat threads. With the new Teams Preview, Microsoft is expanding this ability to include threads in a general chat.

Individual chats can be broken out from the main chat a couple of ways. First, by clicking on the three ellipses (…) at the top right of each thread in a main chat and selecting “Pop out conversation,” which opens the thread in a pop out window much like private chats.

But you can also open an “immersive” conversation, which singles out a thread in the main chat window, focusing solely on that thread. So far, the way we’ve found to open this experience is to click on the Activity tab (the bell) in the left hand column and choose a segment of a thread. This will open the thread in this new immersive mode. You can then close the immersive mode by clicking on “Go To Channel” at the top (or pop out the thread as before into its own window):

Lots more for Calls and Meetings

We’re admittedly not big Call or Meeting users here, but Microsoft made a number of changes to the way they work, too. Be sure to check out the Tech Community blog post for more.

One and one more thing, when you install the new Teams Preview, it creates a shortcut icon you can find in your list of apps. Pin that to Start or the Taskbar to open directly into the new Teams, once you have it enabled, saving you from having to assure Teams that yes you do want to use the new Teams each time you open the app.

What’s your favorite new feature in the new Teams Preview? Let us know in the comments below.

Steam Unpacking Slow: 4 Ways to Make It Faster

Many gamers reported slow unpacking speed when downloading new games or updates on Steam.

This can happen if you’re dealing with a big size game, or if the hard drive or solid-state drive (SSD) is slow. It may also be because you have many opened apps and you run out of resources.

Before taking the steps below, try freeing up some storage space, close unnecessary background apps, and turn off the antivirus temporarily.

What do I do if Steam is unpacking slowly?

1. Set Stream priority to high

  1. Press the Windows + X and select Task Manager to open it.
  2. Click on the Details tab and navigate to Stream.exe. Right-click it and select Set Priority and select High.
  3. Click on Change priority to confirm your choice in the dialog box.

Setting the Stream app as a high priority will boost its performance with top priority over other running apps. Check out our complete guide on how to set priority in task manager for more insight.

2. Defrag HDD or Optimize SSD

  1. Press the Windows key, type File Explorer, and press Enter key to open.
  2. Click on This PC from the left side pane and right-click the drive where the Stream app is. Select Properties.
  3. Then, click the Tools tab. Select the Optimize buttons from the Optimize and defragment drive section.
  4. Click the Optimize button to start the process.

The Optimize Windows tools will trim SSD drive and optimize HDD drive to improve speed. We have a complete guide on ways to fix disk defragmenters that won’t run in Windows.

3. Delete Files in Depotcache Folder

  1. Close the Stream app. Press the Windows + E to open File Explorer.
  2. Copy and paste the following path and press Enter: C:\Program Files (x86)\Steam\depotcache
  3. Delete all the files in the Depotcache folder.

The folder path differs in PCs depending on the drive in which the Stream app is.

4. Check Drive for error

  1. Press the Windows + E to open File Explorer and click on This PC from the left side pane.
  2. Right-click the drive where the Stream is and click on Properties from the context menu.
  3. Click the Tools tab and select the Check button from the Error checking section.
  4. Click on the Scan drive link and wait for the process to be complete.

The process above scans the drive for corrupt system files and bad partitions to improve your system performance. Feel free to read about methods to use if Windows cannot repair the drive on your PC.

In addition, check our detailed guide on ways to fix ISDone.dll error on Windows 10/11. Also, you can read about how to make Windows 11 faster on your device.

Alternatively, you can read about ways to fix a Steam download Stuck at 100% on your device.

Should you have further questions or suggestions, kindly drop the in the comments section.

How to Recover Deleted Files From an SSD [3 Ways]

There are several occasions where our readers complain about mistakenly deleting files from their storage drives. However, it is important to find a way to retrieve these files as they may be essential. So, we’ll discuss ways to recover deleted files from SSD in a few steps.

Also, our readers may be interested in our guide on how to move Windows OS to SSD without incurring any file loss.

Is SSD a permanent memory?

The SSD isn’t a permanent memory because it allows file retraction. SSD data recovery process differs from hard disk drives because it uses a flash memory chip as the storage medium. The flash memory is calculated by the unit of P/E, which means its memory is erased once.

Furthermore, the SSD can upgrade its writing access speed for better performance without erasing its memory. Unlike the regular HDD, the SSD is more compact and reliable because it uses TRIM technology for efficient data recovery.

Also, TRIM allows the SSD to perform GC (Garbage Collection) operations to recover deleted files.

However, the deleted files from SSD are not permanently deleted but merely removed from the directory to free up space for new data writing. Hence, you can recover deleted files from the SSD on your PC without worrying about the data erasing and data writing process.

How can I recover deleted files from an SSD?

Before proceeding with any steps to recover deleted files from the SSD, you have to disable TRIM:

  1. Left-click the Start button, type Command Prompt, and click the Run as administrator option.
  2. Click Yes on the User Account Control prompt.
  3. Copy and paste the following into the command bar, and press Enter: fustil behavior query disabledeletenotify
  4. A return data should appear. If the return data is 1, it means Trim is activated. Should the return data be zero, it means Trim is disabled.
  5. If it returns as Zero, type the following to disable Trim in the command bar, and press Enter: fustil behavior query disabledeletenotify 0

The above command line will disable Trim and prevent any issues that may result in data loss.

If you encounter issues running the Command Prompt as an administrator on Windows 11, read our guide for quick fixes.

1. Recover deleted files on SSD via the Recycle Bin

  1. Double-click on the Recycle Bin icon on your Desktop to open it.
  2. Select the deleted SSD file from the Recycle Bin, right-click on the file, then click Restore from the drop-down menu.
  3. Also, you can drag the desired file out of the recycle bin into another folder.

If the deleted file you want to recover from your SSD is not in the Recycle bin, proceed with the steps below.

Our readers can check our article on how to undo Diskpart Clean and recover the partitions on Windows devices safely.

2. Recover deleted files SSD via Windows File Recovery

  1. Right-click the Start button and select Microsoft Store from the program list.
  2. Type Windows File Recovery in the search box and click Get to download the app.
  3. Install the app on your computer.
  4. Left-click the Start button, type Windows File Recovery, then click the Run as administrator button.
  5. Select the most suitable mode considering the following options: If your files were deleted recently, select the Regular mode. If your file was deleted a while back, select the Extensive mode.
  6. Navigate to the file source using the command lines and select it, then press Y key to continue.
  7. Wait for the process to complete, then press Ctrl + C to stop the recovery process.

Using Windows File Recovery allows your o recover deleted files from the SSD with no threat of data loss. Check how to fix Microsoft Store error 0x800706d9 if it appears on your PC while installing the app.

3. Use third-party file recovery software

Another way to retrieve permanently deleted files from the SSD is to use file recovery software.

These dedicated tools help dive into the numerous partitions and cells on the SSD to recover deleted files that are moved to free up memory.

One of the best recovery tools you can try is the Stellar Data Recovery app, which will reclaim lost or deleted data, including deleted files from an SSD.

This software covers all kinds of situations regarding data loss, such as accidental deletion, files lost due to virus damage, drive formatting, and many more.

⇒ Get Stellar Data Recovery

You can check our detailed guide about what to do if your SSD is not showing or detected on your PC.

In conclusion, we recommend our readers go through how to fix SSD freezing on Windows 11. Also, read about what to do if you can’t install Windows 10 on SSD in a few steps.

Windows Update Error 0x8024402c? 5 Ways to Fix it

Many reported 0x8024402c error while trying to download Windows Updates, and this can be a big problem since it can leave your system vulnerable.

Fixing this issue should be your priority, and in today’s guide, we’re going to show you the best ways to fix this problem on your PC, so let’s get started.

What is error 0x8024402c?

This is a Windows Update error, and it’s caused by the following:

  • Windows update cache can cause this issue, so you might have to remove it from your PC.
  • Windows Firewall interference can sometimes prevent certain components from working.
  • Issues with the DNS or hosts file can also cause this problem to appear.

How do I fix error code 0x8024402c?

Before attempting any advanced troubleshooting steps, go through the following:

If you can’t resolve the error, go ahead with the solutions below:

1. Run Windows Update troubleshooter

  1. Press the Windows + I key to open the Settings app.
  2. Click System, select Troubleshoot, then click on the Other troubleshooters.
  3. Go to Most frequent, select Windows Update, and click on Run.
  4. Follow the on-screen instructions to complete, then restart your PC.

The Windows Update troubleshooter will detect and resolve issues affecting the Windows updates process. Read our guide on ways to run the Windows Update troubleshooter on Windows 11.

2. Clear Windows Update cache via File Explorer

  1. Press Windows + E to open File Explorer.
  2. Navigate to Local Disk (C), right-click on it, and click on Properties.
  3. Click on Disk Clean-up, then click the Cleanup system files button.
  4. Check the boxes for Windows upgrade log files and Temporary Windows Installation files, then click OK.
  5. Exit the File Explorer and restart the PC.

Deleting the update cache files will clear the corrupt files causing the update error. Read our article on what to do if File Explorer keeps crashing your PC.

3. Disable Windows Firewall

  1. Click the Start button, type control panel, then press Enter to open the Control Panel.
  2. Select the Windows Defender Firewall option.
  3. Click the Turn Windows Defender Firewall on or off option from the left pane.
  4. Go to the Private network settings and Public network settings, then click the radio buttons for the Turn off Windows Defender Firewall (not recommended) option.
  5. Exit the Control Panel and restart your PC to see if you’re able to update it.

Disabling the Windows Defender Firewall will resolve any interference it’s causing in the Windows update process and fix the 0x8024402c error.

4. Change your DNS Server Address

  1. Press Windows + R key to open the Run dialog box, type ncpa.cpl, and click OK to open the Network Connection page.
  2. Right-click your network adapter and select Properties from the drop-down.
  3. Select Internet Protocol Version 4 (TCP/IPv4) and click Properties.
  4. Tick the box for the Use the following DNS server addresses option, type 8.8.8.8 in the Preferred DNS server, and 8.8.8.8 for the Alternate DNS server, then click OK to save settings.
  5. Restart your PC, then try updating Windows to check if the error persists.

Read about checking and changing the DNS server on Windows 11 if you’re having trouble with the steps above.

5. Check the hosts file

  1. Press the Windows key + S and type notepad. Right-click Notepad and choose Run as administrator.
     
  2. Click on File and select Open.
  3. Next, navigate to C:\Windows\System32\drivers\etc
  4. Set the following options to All files and double-click on hosts.
  5. Locate 0.0.0.0 anywhere in the file and delete that entire line.
  6. Press Ctrl + S to save changes.

In case you are interested in our guide about Windows Update stuck at 100% and ways to fix it, check here.

Also, check how to fix 0x800f0900 Windows Update error on Windows 11.

If you have further questions or suggestions, kindly drop them in the comments section.

Here’s how you can see the new gallery on Windows 11

Windows 11 may be going WinAppSDK any time soon, and the recent addition within Windows Insider Build 25300 may offer a slight insight into what it may look like in the future.

Windows hacker Albacore (@thebookisclosed) shows on their page that a XAML-based attractive photo gallery is living inside the new File Explorer within this build. The latest addition includes a built-in search box and lets you browse them by dates and years, thanks to the new WASDK-based File Explorer. Once updated, the Gallery icon will appear below Home in the left pane.

“The new gallery view is part of an upcoming general purpose XAML folder view control, suggesting that the main file browsing area will ditch DirectUI in the future. Besides the Gallery view there’s also a simple list view (intended for recent items in File Explorer Home).”

Furthermore, on the first build on the newly-released Canary Channel (build 25314) and Dev Channel’s build 23403, Window seems to make a lot of progress with the XAML File Explorer Home. Although it may not seem to support groupings for different file categories, a nice little animation when interacting with chevrons and controls of modern address bar do exist within this build. 

Then, on Build 23419 from the Dev channel, the feature is getting a neat improvement. Albeit hidden, Windows enthusiast @PhantomOfEarth was able to spot a functionality that automatically refreshes the gallery home when users delete or edit images to show any changes. Plus, it will reportedly bear a nice addition of date at the top of the gallery and the annotated scroll bar with all its information.

It may seem like wishful thinking for this addition to arrive on Windows 11, but we’re getting closer and closer to Windows 12. 

Read along to find out how you can activate the hidden new gallery on Windows 11.

How to see the new gallery interface on Windows 11

1. Install Windows 11 insider build, whether it’s from Canary or Dev Channel. Find out how you can join the Windows Insider Program here.

2. Make sure you have ViVeTool. If not, download the latest version on GitHub.

3. Once downloaded, click Extract all, select the location where you want to extract it by clicking Browse, then hit Extract.

In this case, we extract it at C:\Users\WindowsReport\Documents\Tools\ViVeTool-v0.3.2

4. After installation, change the value of Compatible from 0 to 1 in this registry: HKLM\SOFTWARE\Microsoft\Windows\CurrentVersion\Shell\Update\Packages\MicrosoftWindows.Client.40729001_cw5n1h2txyewy

5. Hit ? on your keyboard, then type “cmd” and right-click -> Run as administrator.

6. Type in cd + the directory where we extracted ViVeTool. In this case, it’s at C:\Users\WindowsReport\Documents\Tools\ViVeTool-v0.3.2, then hit Enter.

7. Enter these commands and hit Enter after each, then Reboot the computer.

ViveTool.exe /enable /id:40729001
ViveTool.exe /enable /id:40731912
ViveTool.exe /enable /id:41969252
ViveTool.exe /enable /id:42922424
ViveTool.exe /enable /id:41040327
ViveTool.exe /enable /id:42295138
ViveTool.exe /enable /id:42105254

With that being said, however, the feature is not ready to be out for the public just yet. The Insider mentions that they ran into some bugging problems and it’s safe to say that you may face some troubles along the way.

Are you excited about this new look of File Explorer? Let us know in the comments!

0x800CCC79 Windows Live Mail Error ID: 3 Ways to Fix It

Windows Live Mail was one of the popular email clients of its time, but after Microsoft discontinued support for the software, errors were bound to appear. And over time, troubleshooting them has become more difficult. One such is the 0x800CCC79 error in Windows Live Mail.

The error message reads, The message could not be sent. The setting for your outgoing email [SMTP] server might need to be configured. To find the server settings for ’email ID’, please contact your email service provider. Let’s find out all about it!

What is 0x800CCC79 Windows Live Mail error?

The 0x800CCC79 error appears in Windows Live Mail when sending emails, usually too many at once. For some users, the email client throws the error at the launch and then automatically crashes within a few seconds. Here are a few reasons you are facing the error:

  • Misconfigured Live Mail settings: The most likely reason you face the error is misconfigured settings, so check these first. Compare it to a PC where Live Mail works fine.
  • Issues with the email service provider: Your email service often block certain ports or introduces changes or restrictions that might affect Windows Live Mail’s ability to send emails.
  • Incorrect credentials: When you have entered incorrect credentials while setting up the account, it will have trouble configuring things and throw the 0x800CCC79 error instead.
  • Malware or virus infection: A system infected with malware or virus throws a range of errors and affects Windows’ performance.

How do I fix error 0x800CCC79 in Windows Live Mail?

Before we head to the slightly complex solutions, try these quick ones:

  • Restart the computer.
  • Change the network. For instance, if you are connected via wireless means, switch to Ethernet. Or you could turn on the mobile hotspot and use the data pack.
  • Check whether your account has been categorized as Unknown. In this case, rename your account to something else, and you shouldn’t receive the 0x800CCC79 error anymore.

If none work, move to the fixes listed next.

1. Change the account settings

  1. Open Windows Live Mail, right-click on your account from the navigation pane, and choose Properties.
  2. Navigate to the Servers tab, tick the checkbox for My server requires authentication under Outgoing Mail Server, and then click OK to save the changes.my server requires authentication to fix 0x800CCC79

When faced with the Windows Live Mail error 0x800CCC79, most users were able to get things up and running by reconfiguring the Outgoing Mail Server settings.

2. Temporarily switch to offline mode

  1. Launch Windows Live Mail, go to the File menu, and click Work Offline on the top right.
  2. Once in the Offline mode, head to the Outbox, right-click on all individual pending emails, and select Delete. Similarly, remove all the emails here.
  3. Once done, switch back to Online Mode in Live Mail as you did earlier, and try sending the email you had trouble with previously.go online

Another trick that fixed the 0x800CCC79 error for many users was switching to Offline Mode and clearing any pending emails in the Outbox. Remember, the Outbox contains the emails that were sent but never made it to the receiver due to an error, while those in the Draft were never sent.

3. Delete and re-add the account

Many users reported that deleting the problematic account from Windows Live Mail and then re-adding it did the trick when getting the 0x800CCC79 error. But while you are doing this, head to your email provider’s dedicated website, and change the password.

Now, wait a few hours for the passwords to sync between the two, then add the account back to Live Mail. Most importantly, make sure the account configuration settings are in order.

Tip icon Tip
If none of these work, you can always switch to a supported and user-friendly email client for Windows for a better experience.

Before you leave, check some quick tips and tricks to boost the performance of your PC and make it faster than ever.

For any queries or to share more solutions with us, drop a comment below.

Which Browser is Best for Esic? Firefox Fully Supports the Portal

The ESIC portal works very well with Mozilla Firefox compared to other browsers.

Users suggested versions 22 and 35, but we found the latest version (111.0, 64-bit) is optimal. To avoid issues and ensure security, always use the latest Firefox version.

However, there are other browser that support the portal, and we’ll talk a bit about them below. We’ll also show you how to open an ESIC portal.

Let’s get into it.

Which browser is compatible with ESIC website?

1. Mozilla Firefox – Download for ESIC portalmozilla firefox best browser for esic portal

Mozilla Firefox is the best browser for those who want to access the ESIC site without any problems. However, you cannot access this site using Mozilla Firefox on any operating system.

For instance, you need to make sure that your device is running Windows XP or the later versions of the Windows operating system.

You can also use it on a Mac running OS X10.6 and the later versions of the operating system. As far as the best Mozilla Firefox version for ESIC goes, you’ll also need to make sure you have the latest browser version installed.

⇒ Get Mozilla Firefox

2. Opera – Top ESIC compatible browser (fast & private)

Opera is a great browser not only for using the ESIC portal but for every navigation need because it’s very fast and convenient to use.

This tool has a lot of integrations, including social networks, and can be customized in great detail.

The best part is that Opera doesn’t use too many resources as other more popular tools and it offers a free VPN. This makes it an excellent browser choice for privacy-concerned Internet consumers.

⇒ Get Opera

3. Google Chrome – Most popular browserGoogle chrome best browser for esic portal

Google Chrome is one of the most popular and most used browsers today especially due to its security features.

Speaking of that, if you’d like to explore more in-browser security settings, we provide you with an extensive tutorial, so make sure you check it out.

Just like Mozilla Firefox above, it is one of the best browsers for the ESIC portal. You, however, need to make sure that you are using the latest version of the browser.

It is also sensitive to the operating system you are using but if you’re running Windows 10 or 11, it should work just fine.

⇒ Get Google Chrome

4. Microsoft Edge – For Windows 10 and aboveedge best browser for esic portal

This is the default operating system that comes with the modern Windows operating system such as Windows 10 and 11.

This browser is also fully compatible with the ESIC portal. Again, you need to use the latest version of the browser.

⇒ Get Microsoft Edge

5. Safari – Best for Mac Users

This is the default browser for Mac users. It is secure and safe. You can use Safari to access the ESIC portal.

However, you need to make sure that you are using the latest version and that your Mac is running OS X10.6 and the later versions of the operating system.

⇒ Get Safari

How do I open ESIC portal in Firefox?

Whether you choose to open ESIC in Firefox or other web browsers, it’s up to you. In fact, here are our top choices to access, open, and use the ESIC website online:

The Employees’ State Insurance Corporation (ESIC) provides social security benefits for workers in India, including but without limitation, medical care to workers and their families, maternity benefits to female workers, and cash benefits to workers who qualify.

They provide a portal for workers to access online. However, you need an ESIC-compatible browser for the portal. 

  1. Make sure you install a fully compatible browser for the ESIC portal. Simply pick one from our list.
  2. Type the unified ESIC website address in your browser’s URL (esic.gov.in) bar or simply click the blue link.
  3. On the left side of the screen, you will see the Services section. Go ahead and access it.
  4. Next, select the option that suits you: Employees or Employers, and expand the different menu options, as follows: IP Portal (for Employees), respectively Employer Portal.
  5. You will be redirected to the requested page and you’ll have to log in with previously awarded credentials, aka login and password provided on registration.

How to fix ESIC website not working

→ ESIC site not working in Firefox

If you are facing any issues connecting to the ESIC portal using Mozilla Firefox, you can solve the issue by resetting the browser.

You can do that by visiting the settings menu and then clicking Help. Next, select Troubleshooting information, and finally, click on the Refresh Firefox button. This helps solve some of the most common problems.

→ ESIC site not working in Chrome

It’s likely a certificate issue, so make sure you add the ESIC website to your trusted sites list in order to whitelist this address in Chrome. While you’re at it, disable any pop-up blockers in order to allow your browser to display certificate chain prompts.

In conclusion, the ESIC portal is sensitive to the browser and operating system you use.

You, therefore, need to make sure that you are using the right version of any of the browsers discussed above on the right operating system. This way, you will not have any problems accessing the ESIC portal.

If you have any suggestions or insights, share them in the comments section below.

How to Fix PINBALL_FILE_SYSTEM (0x00000059) BSoD

Each of us has, at some point, or the other, come across a BSOD error in Windows. These errors crash the OS, and any unsaved data is subsequently lost. One of the relatively uncommon BSOD errors that has troubled users for a long time is PINBALL_FILE_SYSTEM.

The bug check has a value of 0x00000059 and indicates a problem with the Pinball file system, as per Microsoft’s official website. But it doesn’t list many solutions, nor provide a detailed understanding of the error. So, let’s find out!

What is the PINBALL_FILE_SYSTEM error?

The PINBALL_FILE_SYSTEM error appears when there isn’t enough nonpaged pool memory, a part of the RAM reserved for running drivers and kernels. It usually has to do with the hardware. Here are a few reasons you encounter the error:

  • Issues with the RAM modules: The 0x00000059 BSOD error generally arises due to RAM issues, and you should first look for problems with it.
  • Malfunctioning hardware: A malfunctioning piece of hardware or an external peripheral is just as likely to trigger the error:
  • Incompatible or outdated drivers: If you are running incompatible or outdated drivers, it won’t just affect the relay of commands between the PC and the device but may also trigger a BSOD error.

How do I fix the PINBALL_FILE_SYSTEM BSOD?

Before we head to the slightly complex solutions, here are a few quick things you should do:

  • Disconnect all the non-critical peripherals from the PC, except the keyboard, mouse, and monitor, in case of a desktop. Now, turn it on and check whether the BSOD appears. If not, plug them back in one at a time, restart the computer, and when the PC crashes with PINBALL_FILE_SYSTEM, the device last connected is at fault.
  • Make sure the RAM modules are plugged in properly. Or disconnect them, clean the modules with an eraser, and firmly place them in the slot.
  • Check for available Windows updates, and install any pending ones.

If none of these work, move to the fixes listed next.

1. Uninstall recent programs

  1. Press Windows + R to open Run, type appwiz.cpl in the text field, and hit Enter.appwiz.cpl
  2. Select the recently added programs individually, and click on Uninstall.uninstall to fix PINBALL_FILE_SYSTEM
  3. Follow the on-screen instructions to complete the process.

Several third-party programs can conflict with the current PC settings, especially the memory allocation, and trigger the PINBALL_FILE_SYSTEM error in Windows 7 and the later versions. Identify the apps installed when the error first appeared and remove them.

Also, you could use an effective uninstaller software to delete any remnant files and clear the registry entries made by the program.

2. Update the drivers

  1. Press Windows + X to open the Power User menu, and select Device Manager from the list.device manager
  2. Expand the Display adapters entry, right-click on the graphics adapter, and select Update driver.update driver to fix PINBALL_FILE_SYSTEM
  3. Now, select Search automatically for drivers and wait for Windows to identify and install the best possible one.search automatically for drivers

Outdated drivers are one of the primary reasons behind the PINBALL_FILE_SYSTEM BSOD in Windows. And when you start, update the graphics driver first, then move to the others. But make sure to check for updates for all the drivers, even manually install the latest driver version, if required.

If not, there are other alternatives, namely specialized software like Outbyte Driver Updater, which will find all outdated or missing drivers and update them with the latest versions.

3. Test the memory

Since the error is linked to the RAM, you must run a bunch of tests to fix issues with the installed memory. Start with Windows Memory Diagnostics, the built-in memory testing tool, to perform a few quick checks and identify and eliminate problems triggering the BSOD.

If that doesn’t work, we recommend you run Memtest86+, an open-source memory testing tool, to do a wide range of extensive tests on the RAM and fix any issues found. Remember, the scan may take a couple of hours, so it’s best to run it overnight.

Tip icon Tip
In case none of the solutions listed here work, we recommend you change the RAM modules or increase the installed memory in the PC.

That’s it! One of the solutions here should have helped you fix the PINBALL_FILE_SYSTEM BSOD and get things up and running. You may also try a BSOD repair tool to resolve the problem automatically.

Tell us which fix worked for you in the comments section below.

Covpnv64.sys: How to Fix This Blue Screen Error

Blue Screen of Death errors are one of the most dreaded in Windows, particularly due to the loss of unsaved data and its subsequent corruption. One such BSOD is the DRIVER_IRQL_NOT_LESS_OR_EQUAL, often caused by the covpnv64.sys file.

A Windows System File (.sys), covpnv64.sys pertains to the VPN functionality and is often linked to the F5 VPN software. So, let’s find out the various triggers and the troubleshooting steps to fix the BSOD error in no time.

What is the covpnv64.sys blue screen?

The blue screen appears due to issues with the installed drivers, and it’s usually the covpnv64.sys file to blame. Here are a few reasons you get the BSOD:

  • Driver Verifier is enabled: When the Driver Verifier is enabled, the PC automatically crashes with a blue screen whenever a driver initiates an unwarranted action.
  • Conflicting third-party programs: A third-party antivirus or other performance-booster programs can also trigger the error for some users.
  • Corrupt system files: If the covpnv64.sys or other system files are corrupt, you are likely to encounter a BSOD.
  • Buggy update: Some F5 APM Client users started reporting the error after a buggy update which was fixed for most in the subsequent versions.

How do I fix the covpnv64.sys error?

Before we head to the slightly complex solutions, here are a few quick things you can try:

  • Restart the computer and verify whether the error reappears.
  • Scan your PC for malware and virus using the built-in Windows Security or a third-party antivirus, and eliminate any that are found.

If these don’t work, move to the solutions listed next.

1. Upgrade to APM Client version 7.2.2.2 or a more recent one (F5 client users)

The bug was widely reported to F5 by users, and the developers soon came out with version 7.2.2.2, which supposedly introduced the patch for the covpnv64.sys BSOD error. So your primary approach should be to update to APM Client Version 7.2.2.2.

A few users reported the error even after the upgrade, but it was fixed for most of them in the subsequent versions. Just make sure you always remain up-to-date.

2. Reset the Driver Verifier

  1. Shut down the computer, then turn it on, and as soon as the display lights up, hold the power button to turn it off. Repeat this thrice, and on the fourth attempt, the Automatic Repair should kick in. If it doesn’t, try a few more times.
  2. Wait for Automatic Repair to run, and then click on Advanced options.advanced options
  3. Choose Troubleshoot from the entries here.troubleshoot
  4. Again, select Advanced options.advanced options to fix https://i.imgur.com/ic2aNoy.png
  5. Now, click on Startup Settings.startup settings
  6. Click Restart.restart
  7. After the PC reboots, press 6 or F6 to boot Windows into Safe Mode with Command Prompt.safe mode to fix covpnv64.sys
  8. Once in Safe Mode, press Windows + R to open Run, type cmd, and hit Ctrl + Shift + Enter.command prompt
  9. Click Yes in the UAC prompt.
  10. Paste the following command and hit Enter:verifier /resetreset verifier to fix covpnv64.sys
  11. Finally, boot Windows normally.

The Driver Verifier functionality in Windows crashes the OS as soon as an installed driver tries to make an untoward change or perform an action not expected from it. Driver Verifier is just a troubleshooting technique to identify the problematic driver and not a solution in itself.

After you have reset it, check whether the covpnv64.sys BSOD error is fixed.

3. Uninstall conflicting software

Note icon NOTE
If you can’t turn on the PC, boot Windows into Safe Mode either through the method shared in the previous solution or via the built-in Settings.
  1. Press Windows + R to open Run, type appwiz.cpl in the text field, and click OK.appwiz.cpl
  2. Select the F5 VPN Software from the list, and click on Uninstall.uninstall to fix covpnv64.sys
  3. Follow the on-screen instructions to complete the process.
  4. Once done, press Windows + E to open File Explorer, navigate the following paths, and delete any remnant files/folders related to the F5 VPN Software:C:\ProgramData C:\Program Filesfiles
  5. Finally, restart the computer for the changes to come into effect.

That’s it! One of these solutions should have helped fix the covpnv64.sys BSOD error in Windows. And in case you were forced to uninstall the F5 VPN software to get things running, here are the best VPN tools for Windows.

For any other queries or to share a solution not listed here, drop a comment below.

Fallout season 1 filming wraps up as show aims for 2026 release

Season 1 filming of Amazon’s Fallout TV adaptation wrapped up in Utah on Friday, March 24th. Does this mean we’ll finally get to watch in the very near future? Unfortunately the answer is…not likely. The show will now enter post-production phase which typically lasts several months. And though a late 2023 release is possible, 2024 is a more likely bet.

We haven’t heard much about the project since Amazon teased it late last year. One of a great many video game IPs getting the television adaptation treatment, hopes are high for Amazon’s take on Fallout’s post-apocalyptic universe, especially in the wake of the runaway success of HBO’s The Last of Us. Both were featured in our “Five upcoming video game TV shows to look out for” post.

Fallout will star Walter Goggins and Ella Purnel. First announced in 2020, there have since been various leaks of set images throughout the show’s production, as seen above. Upon release, the show will be streamable via Amazon Prime Video.

How to use Microsoft Editor on Chrome

Whether you’re writing an email, a blog, or a social media post, Microsoft Editor can help you catch grammar mistakes, point out typos, and even provide writing suggestions based on your intended audience.

What’s super helpful is that you can also use it on non-Microsoft products.

If you do extensive writing on Chrome, Firefox, or any other popular web browser, then using Microsoft Editor will only take your writing up the notch. So let’s dive into how you can use Microsoft Editor.


How to use Microsoft Editor on Chrome

If you are like 65.74% of the people using web browsers today, you probably already use Chrome for all your internet surfing needs. If you write your emails, social or other posts through your browser, you need to get a writing assistant already.

This is where Microsoft Editor can help. It will fix all your grammar issues, fix mispellings, and give a boost to your writing in general.  So let’s look at how to use Microsoft Editor on your Chrome browser.

Add Microsoft Editor to Chrome

Downloading and adding the Microsoft Editor extension will be the obvious first step. Here’s how you can get started with Chrome:

  1. Launch the Chrome web browser and head to the Chrome Web Store.
  2. Look up “microsoft editor” in the search box and click the Add to Chrome button. The extension will be added to your browser.
  3. Click on Add extension in the next prompt, and the tool will be added to your browser.
  4. You might be taken to the Sign in page if you haven’t logged into your Microsoft account already. There, enter your credentials and log in to your account.
  5. Select the Extensions icon from the top-right corner, and pin the Editor extension to your homepage.

google chrome

You can use the Microsoft Editor on your Chrome from here on. You can simply head to your emails, start typing out what you need to, and if you make any mistake along the way on your Chrome browser, the Editor will auto-correct them for you.

Use Microsoft Editor on Word Web

If you have accessed the web version of Word before, you’ll do just fine. Nothing much has changed here, either. When you go to the home page of your Word web, if your installation went fine, you’ll find the icon of your Microsoft Editor right there under the Comments and Share buttons.

From here, you can start writing out to your heart’s content. As soon as you make a slight typo or grammatical error, the Editor will point it out to you, usually by underlining the mistake. Earlier we’d covered how you can use the Microsoft Editor in Edge, focusing on emails. You can use the Microsoft Editor on Chrome similarly here.

Using Microsoft Editor on Chrome

Microsoft Editor is one of the many tools out there that work by fixing all your writing typos and other related mistakes. The free version of the app is handy on its own and will help you with most of your tasks. If you use Chrome on your Windows even semi-regularly, we’d say trying out Editor for a while might not be a bad idea.

Microsoft warns AI chatbot rivals to refrain from using Bing’s search index

According to a new report by Bloomberg, Microsoft reportedly doesn’t want any of its AI chatbot rivals using its Bing search index. The company has further indicated that it might go as far as placing data restrictions to prevent access.

This news comes after the company reportedly found two companies that remain anonymous using Bing’s search index for their AI chatbot services, outrightly violating Microsoft’s terms and conditions. If both companies continue with this trend Microsoft has indicated that it will revoke their licenses kicking them out of the service.

Microsoft provides licenses to various companies, including DuckDuckGo which recently debuted DuckAssist, Neeva, and You.com which grants them access to the company’s Bing search data. With a license from Microsoft, a company like DuckDuckGo gets to leverage Bing’s capabilities alongside its own to provide users with search results.

It’s apparent that most, if not all companies are trying to clock on the AI trend right now, but with Microsoft now threatening to place data restrictions on Bing’s search index, most of its AI rivals could crumble as most of their search engines are dependent on Bing.

Microsoft indicates that its AI rivals using Bing’s search index as their primary foundation is breaching the set terms and conditions under the license contract. And on this basis, Microsoft will reportedly revoke contracts it’s in with search engines that don’t adhere to these rules.

While speaking to Bloomberg, Microsoft indicated that:

We’ve been in touch with partners who are out of compliance as we continue to consistently enforce our terms across the board. We’ll continue to work with them directly and provide any information needed to find a path forward.

With even more companies incorporating ChatGPT-like features across their services and products, it’s likely that Microsoft might try to make Bing’s search index exclusive to its own chatbot, Bing Chat. Just last week, Google opened up its Bard AI Chat platform to select users in the US and UK with plans to roll out the tool to a wider audience in the near future.

via: The Verge

Microsoft could let you move Windows Widgets to the left on Windows 11

Last week, Microsoft released build 25324 to the Canary Channel for Windows 11 Insiders. The new build featured a ton of improvements such as the USB4 settings page, password copy/paste unsafe warnings, as well as a revamped widgets board experience.

However, as spotted by @PhantomOfEarth on Twitter, the evolved widgets board with a larger canvas and dedicated sections for widgets is not the only enhancement that this build shipped with.

If you interact with widgets a lot in Windows 11, you must’ve noticed that the weather widget is lodged at the left at all times.

Though it now seems that users will soon be able to move the widgets from the left to the right. This will happen when you switch to the left-aligned taskbar on your Windows 11 device.

With this new possibility, the Windows 11 taskbar will resemble the Windows 10 taskbar. There are already multiple tips and tricks that you can use to make Windows 11 look like Windows 10, this new addition will join the list once Microsoft ships the feature to broad availability.

However, as is the case with most build releases, the feature remains hidden and didn’t appear in Microsoft’s changelog. This usually indicates that Microsoft is currently testing the feature and isn’t ready to release it to general availability.

If you’re not particularly interested in widgets on Windows 11 and would like to disable them, we invite you to check out our expert guide that will help you out with that. Be sure to also share your thoughts with us in the comments.

via: Neowin

0x800b0101 Error Code: 4 Ways to Fix It

Updates are critical to the effective functioning of the PC, be it for Windows or the installed apps. An up-to-date computer delivers faster performance and is better protected against threats. But many users reported getting the 0x800b0101 update error.

The error code affects the PC’s ability to install Windows updates via Settings, using the MSU standalone installer, and when downloading apps from Microsoft Store. So, let’s find out how you can get things up and running in these cases.

What is failed to install 0x800b0101?

The error is encountered when you try to install a missing update from the standalone installer downloaded from Microsoft Update Catalog. Normally, we head to the catalog when unable to update the OS normally. But, when it starts to throw an error, users are left in a pickle.

Here are a few reasons your might be getting the error:

  • Issues with certificates: One of the reasons users get the 0x800b0101 error is when a required certificate is not within its validity period. This is usually due to an incorrect time set on the PC.
  • Corrupt update components: When the Windows Update Components are corrupt, users are bound to run into issues updating the OS.
  • Corrupt system files: Even corrupt system files can trigger a wide range of issues, including reduced functionality, app crashes, and update errors.

How do I fix Windows Update error 0x800b0101?

Before we move ahead, try these quick tips:

  • Restart the computer and check for updates.
  • Connect to a different network, preferably a wired one, and verify whether the 0x800b0101 error disappears.

If these don’t work, head to the fixes listed next.

1. Run the Windows Update troubleshooter

  1. Press Windows + I to open Settings, and then click on Troubleshoot on the right in the System tab.settings
  2. Click on Other troubleshooters.other troubleshooters
  3. Locate Windows Update and click the Run button next to it.troubleshooter to fix 0x800b0101
  4. Now, wait for the troubleshooter to identify and eliminate the problem automatically.troubleshooter

When getting the 0x800b0101 error, your primary approach should be to run the dedicated Windows Update troubleshooter. Once done, try installing the same update via the built-in method, and if it still fails, use the update catalog.

2. Correct the PC time

  1. Press Windows + I to launch Settings, select Time & language from the navigation pane, and click on Date & time on the right.date & time
  2. Now, you can either enable the Set time automatically setting, or click on the Change button to manually configure it.set time automatically to fix 0x800b0101
  3. Choose the present date and time from the various dropdown menus, and click on Change to confirm.date and time

3. Run the DISM and SFC scan

  1. Press Windows + R to open Run, type cmd, and then hit Ctrl + Shift + Enter.command prompt
  2. Click Yes in the UAC prompt.
  3. Paste the following three commands one at a time, and press Enter after each:DISM /Online /Cleanup-Image /CheckHealth DISM /Online /Cleanup-Image /ScanHealth DISM /Online /Cleanup-Image /RestoreHealth
  4. Once done, run this command for the SFC scan: sfc /scannowsfc scan to fix 0x800b0101

If it’s the corrupt system files to blame for the error, we recommend you run the DISM tool and the SFC (System File Checker) scan to repair/replace any corrupt system files, as well as fix other issues with the Windows image.

Otherwise, you may also opt for a proficient system repair technology that can fully scan your Windows PC to detect malfunctioned files or programs, broken registry, and many more issues. Such a tool is a suitable choice when you’re dealing with these types of errors that prevent your OS from running properly.

4. Perform an in-place upgrade

Note icon NOTE
The steps here are to perform an in-place upgrade in Windows 11. If you are facing the error on Windows 10, directly download the Media Creation Tool, and run it to repair the Windows installation.
  1. Go to Microsoft’s dedicated Windows 11 page, select the desired ISO edition, and click Download.iso to fix 0x800b0101
  2. Choose the OS language and click Confirm.langauge
  3. Now, click on the provided link to start the download.download
  4. Double-click on the ISO file to view its contents and click Open in the prompt that appears.open
  5. Run the setup.exe file.setup.exe
  6. Click Next to continue.next
  7. Now, click Accept to agree to the license terms.accept
  8. Finally, make sure the setup lists, Keep personal files and apps, and click on Install to proceed.in-place upgrade to fix 0x800b0101

That’s it! Wait for the in-place upgrade to complete (may take a few hours). Once done, things should be up and running like before, and you shouldn’t get the 0x800b0101 error. An in-place upgrade will fix any issues with the OS without affecting the installed apps or stored files.

Also, before you leave, check some quick tips to boost the PC’s performance in no time.

Tell us which fix worked for you in the comments section below.

Fix: The Conversation is Too Long ChatGPT Error

ChatGPT has emerged as the perfect solution for programmers, writers, or those curious about the little things. And the popular AI tool has handled the rush pretty well. But of late, many users started getting The conversation is too long error on ChatGPT.

When the error appears, the conversation is terminated instantly, and the progress is lost. The message reads, The conversation is too long, please start a new one. Let’s find out how you can resolve things here.

Why does ChatGPT say The conversion is too long?

Here are the reasons you usually get the error:

  • Hit the limit: ChatGPT has a limit of 4096 tokens which includes both the question and the responses. Once it’s reached, the error message may appear.
  • Server issues: Users often receive The conversation is too long message on ChatGPT way before the limit is reached, which points to a server issue.

How do I fix The conversation is too long error on ChatGPT?

Tip icon Tip
There are no ways to get past the error, but you can always avoid it or follow our workarounds to continue working with the previous data.

1. Ask ChatGPT to summarize

The way to prevent The conversation is too long message on ChatGPT from appearing is to ask the AI chatbot to summarize the conversation every few thousand words.

You could use the following query, and it will soon generate a comprehensive summary:

Summarize our conversation.

Once you have it, start a new chat, input the summary you generated earlier, and ChatGPT will be able to ascertain the context and come up with relevant responses for future questions.

2. Use a summarization tool

If ChatGPT isn’t able to provide a relevant summary or it isn’t particularly useful to you, some various websites and tools could effectively do the job.

QuillBot is a reliable option preferred by many, while others go with relatively newer tools. So, try a few of the available summarization tools and find out which one works best for you.

3. Break the conversation into smaller parts

Another workaround that did the trick for users was to break the conversation into smaller parts and move to a new one when a specific query was fully answered. This helps ensure that the word or token limit on ChatGPT is not reached and you don’t get The conversation is too long message.

This might not work for users trying to gather detailed information about a given subject, or their style involves splitting the conversation into branches. That’s where the last option comes in.

4. Upgrade to ChatGPT Plus

While there’s no clarity over an increased limit or the removal of it altogether, switching to ChatGPT Plus does offer a range of benefits. And, as per some users, it reduces the chances of coming across The conversation is too long message on ChatGPT.

At present, the Plus subscription is available at $20 per month. It offers access to the AI chatbot even during peak hours, reduces the response time, and provides priority access to new features on the platform.

That’s it! As we said, there are no ways to get rid of The conversation is too long message in ChatGPT. But a fine-tuned approach will prevent it.

Before you leave, discover the best ChatGPT alternatives and discover the other emerging AI chatbots.

For any queries or to share other viable solutions or workarounds, comment below.

How to Sort Google Sheets by Color in 4 Easy Steps

Sorting by color is an incredibly useful feature of Google Sheets, but implementing it can be tricky for some. Whether you’re working on a large dataset or need to optimize data, the ability to sort Google Sheets data by color can be the real game-changer.

In this guide, we’ve explained the different methods to sort Google Sheets data based on cell color.

How do I sort Google Sheets by cell color?

1. Using Filter toggles

  1. Drag and select the dataset you want to sort by color.
  2. Select Data from the Toolbar and select Create a filter from the drop-down menu.Sort Google Sheets by color
  3. Click the funnel icon present in the header row of the column you want to sort the data by.
  4. Choose Sort by color from the flyout menu and then the Fill Color option from the submenu. After this, choose the color you want to sort data by.Sort Google Sheets by color

The selected dataset will now be sorted, and any rows marked with the selected color will appear at the top. All the other cells will still be in their original order.

2. Using the Sort range feature

2.1 Find the Hex color code

  1. Select the cell with the color you want to find the code of.
  2. Choose Fill Color from the ribbon and click the Addition symbol.How to Sort Google Sheets by color
  3. Copy the hex code for the current color from the text field.Sort Google Sheets by color

2.2 Sort data based on Hex color code

  1. Insert a new column having the hex color code next to the dataset.How to sort Google Shoots by color
  2. Select the entire range of data, including the new column with the hex color code.
  3. Select Data from the toolbar and choose Sort range.How to sort Google Sheets by color
  4. Then choose the column having the hex color code and whether to sort in A to Z or Z to A order.sort Google Sheets data by color

The data will now be sorted based on the column having the corresponding color hex code. Sort range enables you to sort the data in the selected dataset based on the chosen column. Here, the data is sorted according to the column having the hex code representing the color.

How do I sort Google Sheets with multiple cell colors?

  1. Drag to select the dataset with multiple colors.
  2. Select Data from the Toolbar and then Create a filter from the drop-down menu.How to sort Google Sheets data by color
  3. Click the funnel icon present in the header row of the column.
  4. Choose Sort by color from the sub-menu and then the Fill Color option.How to sort Google Sheets data by color
  5. Choose a color group, for instance, orange to sort all the orange rows on the top.Sort Google Sheets by color
  6. Next, follow the same steps and choose red from the Fill Color option. This will sort all the red color rows below the orange ones.How to sort Google Sheets data by color
  7. Follow the same process once again and choose white as the color group this time. This will group all the white color rows on the top, red below them, and orange rows at the bottom.How to sort Google Sheets data by color

Google Sheets follows a pattern when sorting a dataset having multiple colors. Rows having the first color choice will appear at the bottom, and the last color to be sorted appears on the top in the resulting data.

How do I sort Google Sheets by text color?

  1. Select the dataset, choose Data from the toolbar, and select Create a filter option from the drop-down.How to sort Google Sheets data by color
  2. Click the Funnel icon in any header column.
  3. Select Sort by color from the drop-down and then Text color from the sub-menu.How to sort Google Sheets data by color
  4. Choose the blue color option to sort all the blue color text entries at the top of the list.How to sort Google Sheets data by color

If the dataset has more than two text colors, follow the same process for the next text color as well. Similar to the background color, it is also possible to sort Google Sheets data based on their text color.

These are all the possible ways to sort Google Sheets data by color to make data easier to organize. While here, you may also be interested to know how to hide columns in Google Sheets.

If you found this guide useful, or have any suggestions for us, do let us know in the comments section.