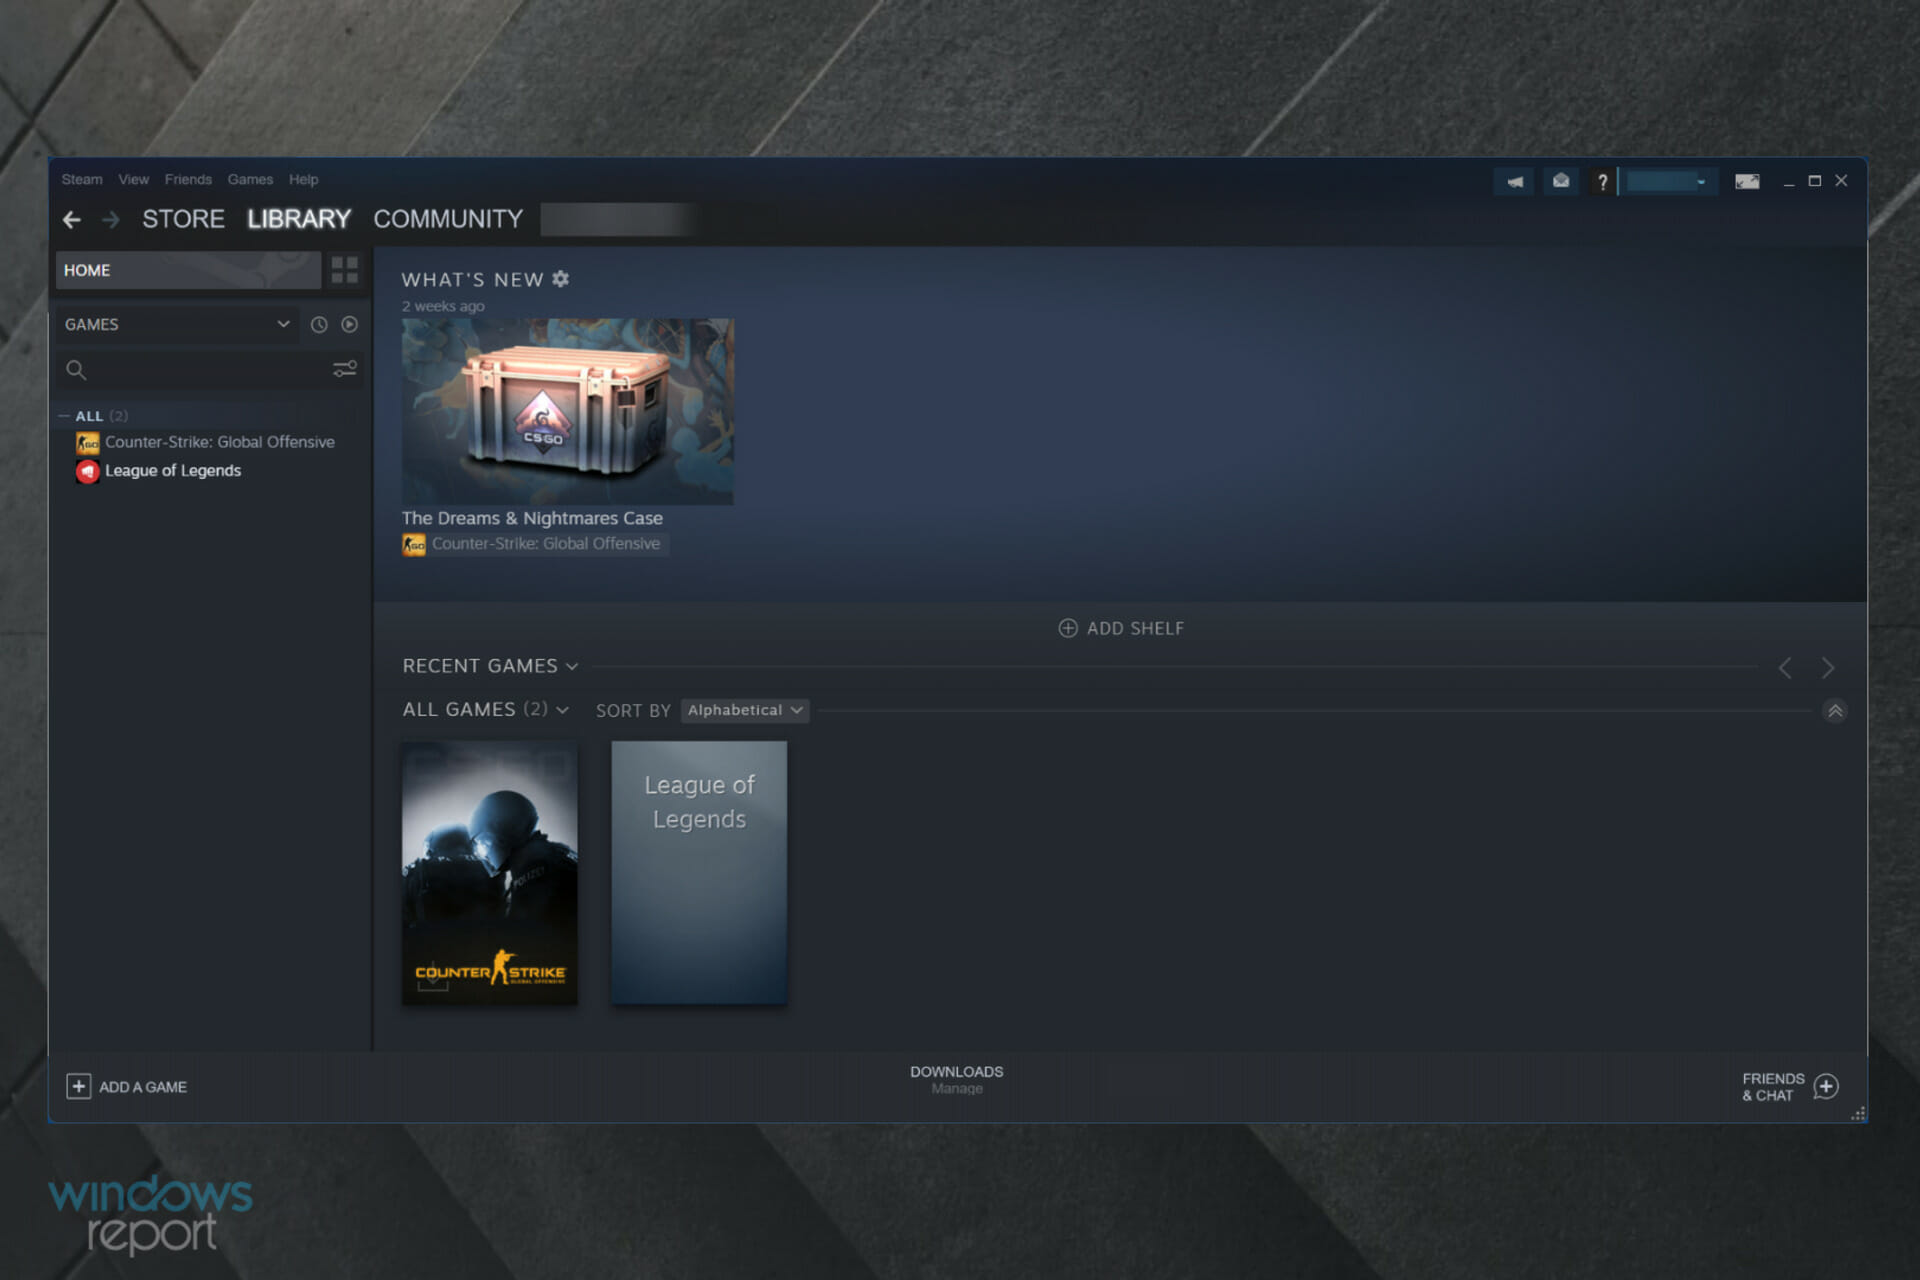
Games for Windows Live is a popular gaming service for Windows, but it has been reported that it has some problems on Windows 10.
Namely, users report that games that use Games for Windows Live won’t work on Windows 10, and the list of games includes many popular games that were released a few years ago.
These games still have a great number of fans, so you can see why not being able to run them on Windows 10 can be such a problem for avid gamers. Speaking of problems, here’s what our readers reported in connection to GFWL.
Where can this error occur and what does it look like?
Games for Windows Marketplace install failed
Games for Windows Live install failed network error or connection error in Windows 10
So if you’re having issues with Games for Windows Live on Windows 10, you should have a look at our solutions.
How do I fix Games For Windows Live issues on Windows 10?
1. Reinstall Games for Windows Live
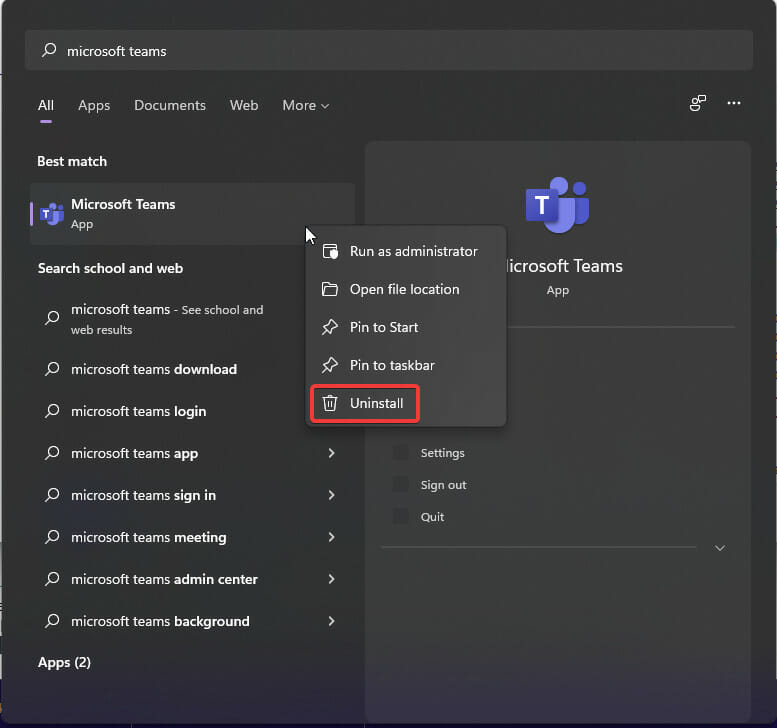
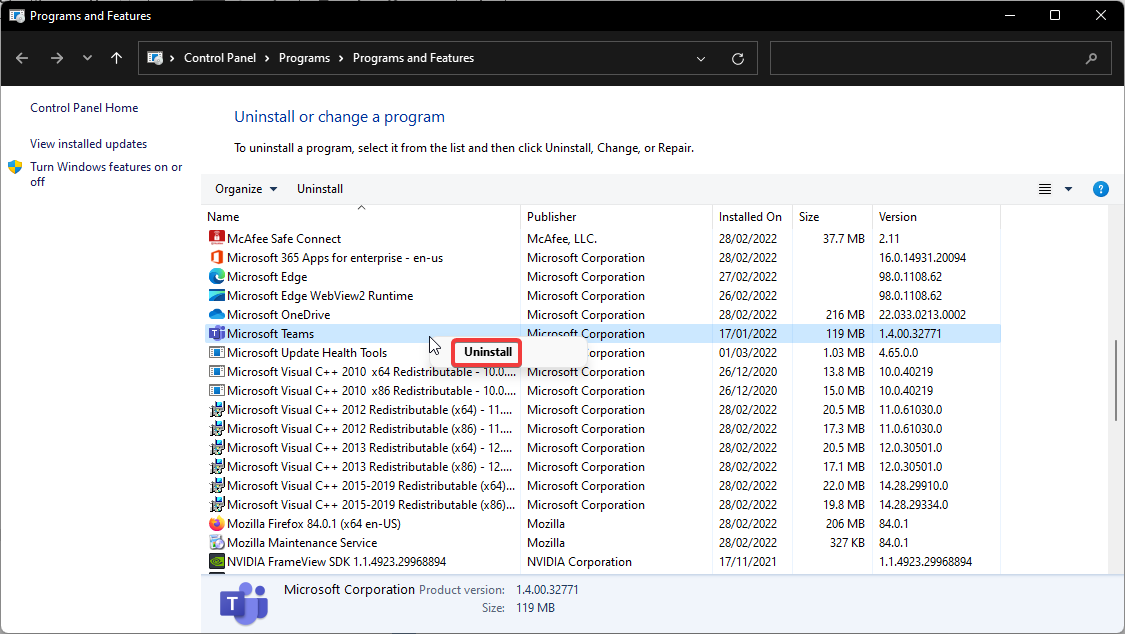
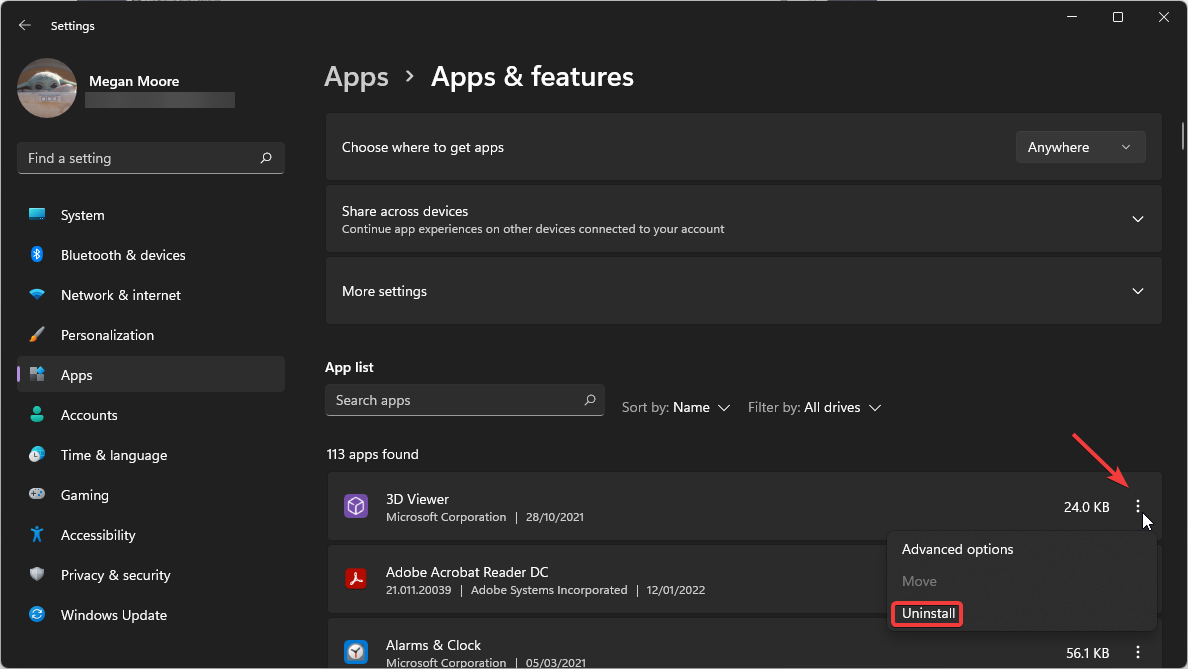
Uninstall Microsoft Games for Windows Live Redistributable and Microsoft Games for Windows Marketplace from your computer. In order to do this, we recommend a dedicated software.
After you’ve uninstalled these applications restart your computer.
Download Games for Windows Live installer.
After you’ve downloaded the installer, right-click it, and choose Properties.
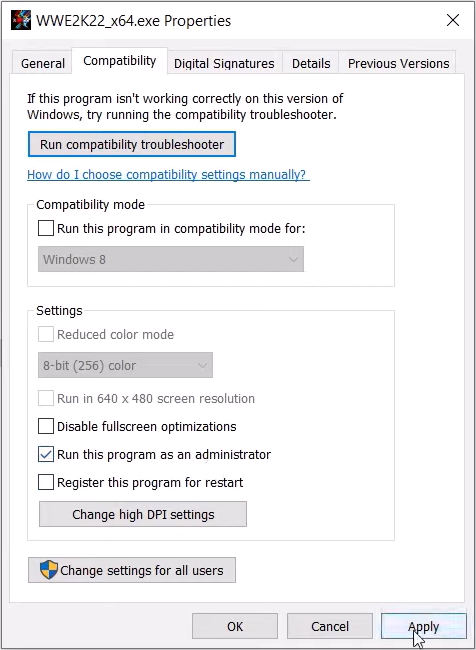
Go to Compatibility tab and check Run this program in compatibility mode for… and choose Windows 7 or Windows 8 from the list.
While you’re in the Compatibility tab make sure that you check Run as administrator.
Save the changes by clicking Apply and OK and install Games for Windows Live.
Everything should work now and your profile should be redownloaded and ready to use.
As mentioned, to uninstall the program in the first place, we suggest using dedicated uninstaller software, for clean removal. This is just to make sure that the process runs completely, without leaving traces in your system, which might cause trouble later on.
A standard uninstall sits in the shadows of a professional uninstall, which removes all residues, including checking for leftovers after the regular uninstall.
Some uninstaller software also has user-friendly interfaces, allowing you to view all installed applications on your PC in a single window. To make things easier, you can locate and remove unwanted apps faster and safer.
2. Install Live Sign-in Assistant
If the previous solution doesn’t work try downloading the latest Live Sign-in Assistant from the official Microsoft page. After downloading and installing Live Sign-in assistant enter your login details and try launching your games.
Go to the following location (if you’re using 32-bit Windows this location might be different): C:WindowsSysWOW64
Find the xlive, xlive.dll, xlive.dll.cat, xlivefnt.dll, xliveinstall.dll, xliveinstallhost.exe files and copy them to C:WindowsSystem32
Try running the game again
If this didn’t work, try copying those files in the installation directory of your game where the game’s .exe file is located.
That’s about it, we hope this article helped you to solve the problem with Games for Windows Live in Windows 10. If you have any comments or questions, just write them down in the comments.
Microsoft Outlook is a communication manager, used by major organizations across the globe. It can be used as an email client by an individual or be used by an organization to access shared features such as mailbox, calendar, appointments, etc.
Microsoft introduced the Outlook personal information manager back in 1997. There are a lot of features that make Microsoft Outlook the best personal manager available as a part of the Microsoft Office Suite.
For instance, you can schedule emails, create meetings, appointments, tasks, and contacts from a single window. It offers Quick Parts that lets you send similar emails quickly, share calendars, create or assign tasks, and more.
Imagine if such a powerful tool stops working, what would you do? Several users are facing the Outlook disconnected error. This error is an issue regarding the connectivity of Outlook.
This Outlook disconnected error throws up different types of error messages. You may receive a The Microsoft Exchange Administrator has made a change that requires you to quit and restart Outlook. error message, or Trying to connect… error message.
Both error messages have the same underlying connectivity issue. If you are also facing Microsoft Outlook disconnected error, then you are in the right place.
Because in this guide, we will give you a set of curated solutions that will help you resolve the Outlook disconnected error on your PC. With that said, let us jump right in.
Why is Microsoft Outlook disconnected but the internet is working?
There are different types of errors Outlook users face from time to time. One such error that often troubles Outlook users is that, even though the internet is working, Microsoft Outlook is disconnected.
Your Microsoft Outlook client might be in handy, offline mode. Notably, Outlook comes with an option to work offline to avoid connection charges or sending/receiving emails due to a slow internet connection.
The offline mode could very well be the reason why Outlook is disconnected even though the internet is functioning properly.
Also, there are chances that the Outlook on your PC might have been disconnected from the Exchange server, which could result in this problem.
The availability of redundant extensions is also one of the key reasons for this problem. Some extensions may interfere with the connection process causing Outlook to misbehave.
It can be frustrating and annoying as it prevents you to send or receive emails. Thankfully, below we have listed some of the solutions that you can apply to fix this problem at hand.
Microsoft Outlook disconnected after password change
1. Delete old password from Windows Credential Manager
Press the Start menu key on the bottom task bar.
Search for Credential Manager.
Click on Windows Credentials option.
Under Generic Credentials, you will find your Microsoft Outlook and MS Office accounts.
Expand each one and delete them by pressing the Remove button.
Close Windows Credential Manager and open Outlook.
Enter your new password and remember to check the Remember my credentials box.
Microsoft Outlook users have reported an issue quite often for them just after a recent password change, they are facing connectivity issues with the Outlook client installed on their Windows 11/10/8 PC.
Notably, this could be because the client isn’t updating the password that you have set. In such a case, you need to clear the old password from the Windows Credential Manager.
2. Create a new profile
Open Control Panel.
Select Mail.
Click on Add to create a new profile.
Configure your email account.
Check the circle beside Always use this profile.
Press OK.
Restart Outlook and see if this fixes the Outlook disconnected after password change issue or not.
How can I fix the Outlook disconnected error in Windows 11/10/7?
1. Restart your PC
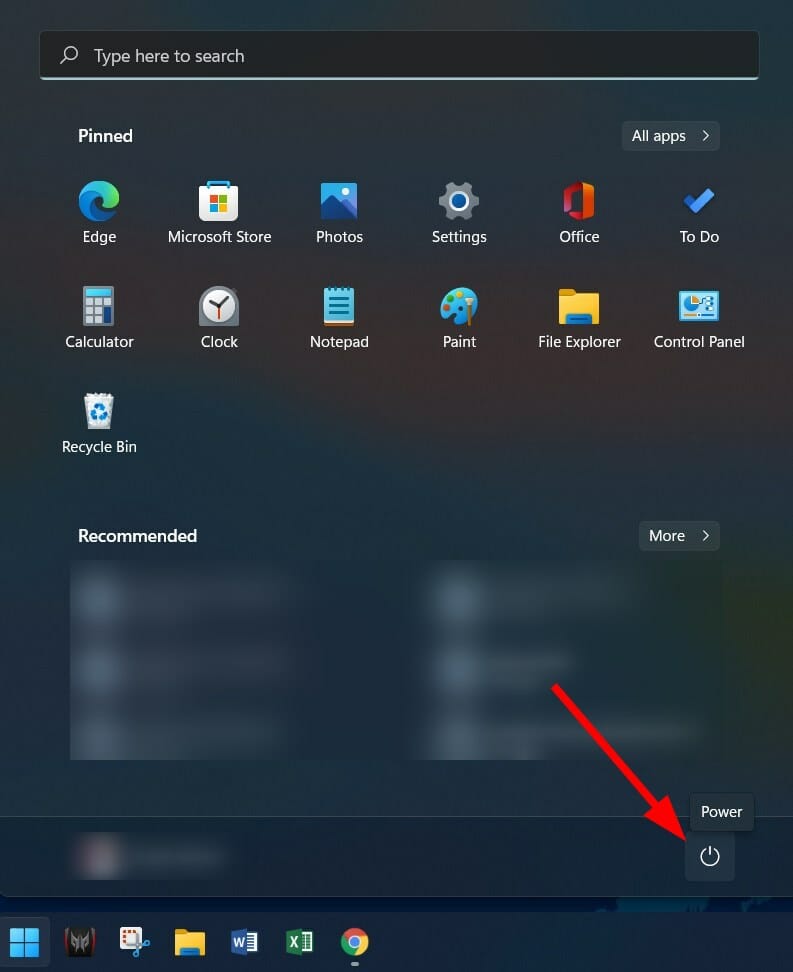
Press the Start menu button.
Click on the Power button.
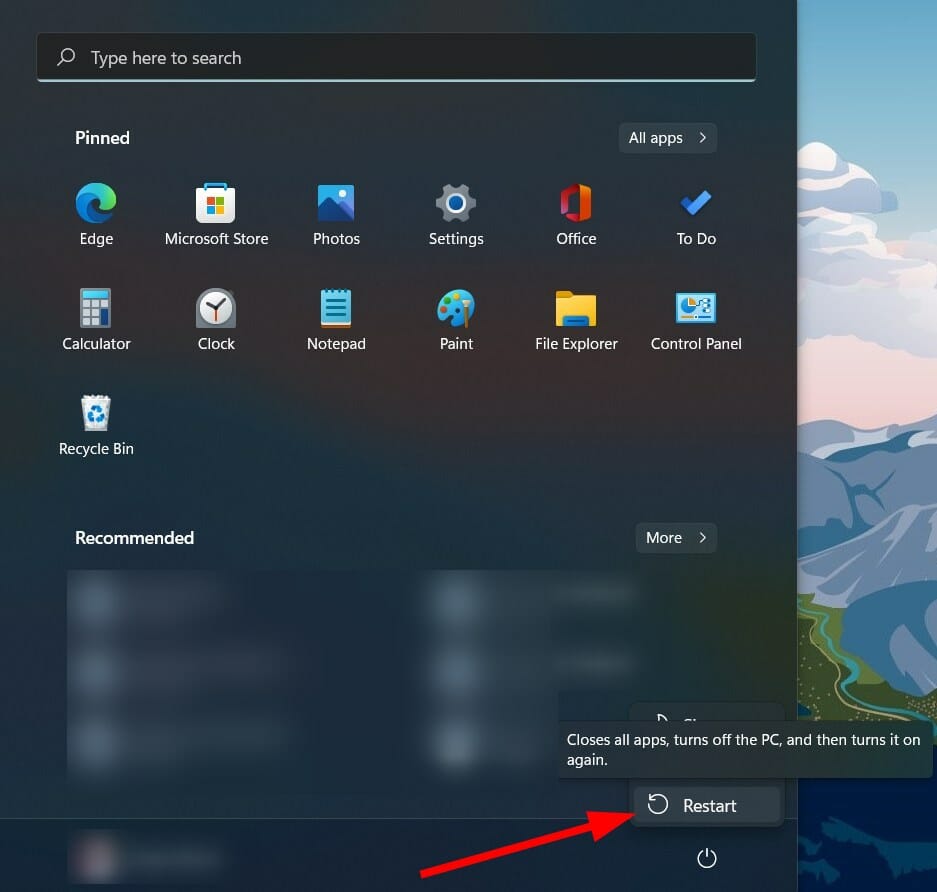
Select Restart.
One of the easiest solutions to many of the common problems related to software is to perform a simple restart.
Restarting not only provides your system a break, but it also loads all system and necessary files from scratch. There are chances that some Outlook files failed to load during the previous session, due to which you are experiencing Microsoft Outlook disconnected error.
2. Check and re-enter your account credentials
Open the Outlook app on your PC.
Click on File.
Select Info.
Then besides Account and Social Network Settings, click Account Settings.
Again select Account Settings.
Select the account that you have connected.
Remove the account and re-enter your account credentials.
3. Ensure Outlook is online
Open the Outlook app.
In the Send/Receive tab, hit the Work Offline button.
Outlook will attempt to reconnect.
4. Remove trailing space from legacyExchangeDN
Press Win + R to open the Run dialog box.
Type ADSIEdit.msc, and press Enter.
Expand the Default naming context to CN=Users.
Select the user account on which Outlook is prompting the error.
Right-click and select Properties.
Locatethe legacyExchangeDN attribute, and then select Edit.
Remove the extra space at the end of the username.
Click OK and Apply.
Exit ADSIEdit.msc.
Restart Outlook and see if this fixes the Outlook disconnected error or not.
After you remove the extra space from your username, all recipients who previously received a message from your username will get a non-delivery report (NDR) if they try to reply to the email with the old username.
Restart the program and see if this fixes the issue.
6. Create a new Outlook profile
Open the Microsoft Outlook application.
Click File tab and select Account Settings.
Select Manage Profiles.
Click on Show Profile.
Choose Add.
Enter the name for your new Outlook profile and press OK.
Add your email account to your Outlook profile.
7. Repair Outlook account
Open the Outlook application.
Click on the File tab.
Select Info.
Besides Account and Social Network Settings, click on Account settings.
Select Account settings again from the drop-down menu.
Select your account and hit the Repair button.
8. Configure a proxy server
Open the Outlook application.
Click on the File tab.
Select Info.
Besides Account and Social Network Settings, click on Account settings.
Select Account settings again from the drop-down menu.
Tap on your account and click on Change.
Then click on More Settings.
Choose Connection tab.
Select the option to Connect to Microsoft Exchange using HTTP.
Click on Exchange Proxy Settings.
Enter the URL to connect to a proxy server.
Select Connect using SSL only.
Also select Only connect to proxy servers that have principal name in their certificate option.
Enter must: URL.
Under Proxy authentication settings, select authentication type Basic authentication or NTLM authentication and press OK.
9. Disable extensions
Open the Outlook application.
Click on the File tab.
Select Options from the left side.
Select Add-Ins from the left pane.
On the bottom, select Go.
Uncheck all the extensions and hit the OK button.
There are chances that the extensions that you have installed or enabled for your Outlook app to enhance the productivity and features might be interfering with the connection.
In such a case, following the above-mentioned steps, you can disable the extensions and then try to connect them.
10. Rebuild Outlook data file
Open the Outlook application.
Click on the File tab.
Select Info.
Besides Account and Social Network Settings, click on Account settings.
Select Account settings again from the drop-down menu.
Select the Data Files tab.
Choose the email account that is causing the issue, then tap on Open File Location.
Rename the file or move it to another location.
Launch Outlook again and see if this fixes the Outlook disconnected error.
The Outlook application saves all the data in a particular folder. If you are experiencing connectivity issues, then you can try to rebuild the Outlook data file.
In this step, we will delete the old Outlook data file and rebuild the Outlook data file. This will help rebuild the missing or lost data files from scratch.
11. Reinstall Outlook
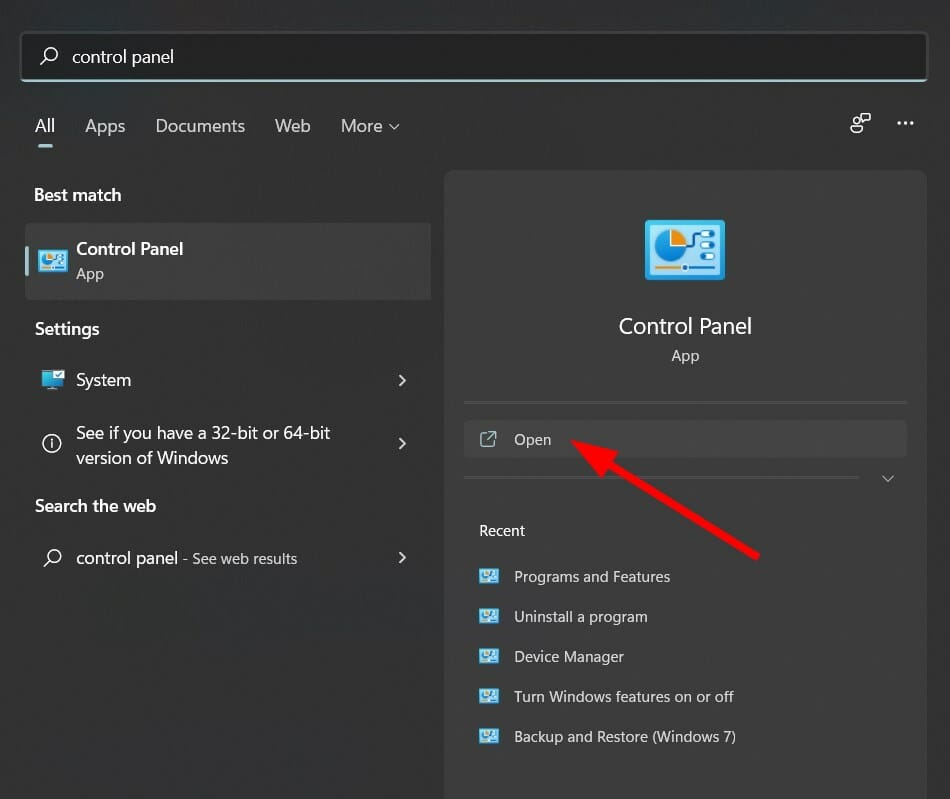
Press Start menu and search for Control Panel.
Select Programs and Features.
From the application manager, select Microsoft Office and hit the Change button.
Select Repair and hit Continue.
The repair will start.
If none of the above-mentioned solutions did the job for you, then, as a last resort, you need to repair the Microsoft Office app on your PC.
Repairing Microsoft Office will fix the application and install files that might have gone missing. The last method is also helpful if you are facing Outlook shows disconnected in Office 365 error.
Microsoft Outlook is a pretty powerful work management tool, as it gives you multiple options, one of which is the option to download all your Outlook emails to Excel.
If you extensively use Outlook for all your work-related needs, it is very important to know how to recover deleted or archived Outlook messages in the event of encountering issues with this element, as users reported seeing this problem quite often.
This Outlook disconnected error or connectivity problem isn’t the only error that users come across now and then while using this app. We also have a guide on how to change Outlook view back to normal, so don’t miss it.
Let us know in the comments section below, which of the above-mentioned methods helped you fix the Outlook disconnected issue on Windows 10, Windows 10, and Windows 7 PC.
Does your installed Steam DLC not work? Several reasons can explain this and to easily get rid of this issue, make sure you completely verify today’s guide.
Steam, which is currently the most used PC gaming store, supports a large number of video games and extra downloadable content.
Some users have reported that DLCs on Steam might not work at all in-game, even if the DLC appears as installed. Let’s take a look at how to solve this issue.
What does DLC mean in Steam and how can I find it?
For those of you who don’t already know, DLC stands for downloadable content. It is additional digital content a player can install on top of a complete video game.
If a game offers additional downloadable content, you can find it on the store from the base game page or by searching for it.
In Steam, you can view and manage the DLC owned by your account in your library, as follows:
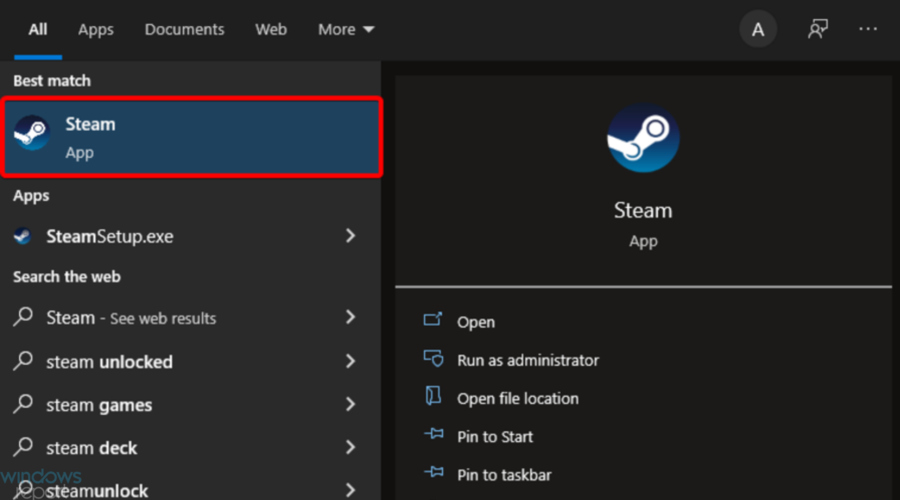
Hit Windows, type Steam, then open the app.
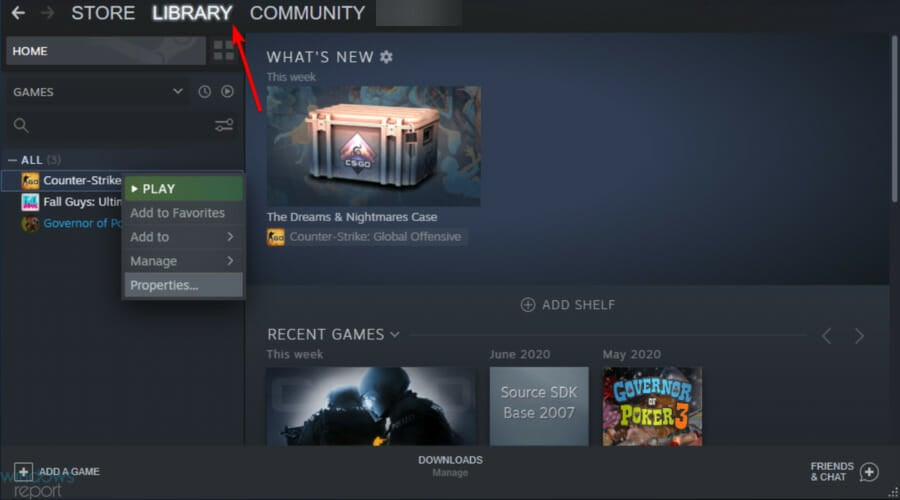
From the main menu, click on Library.
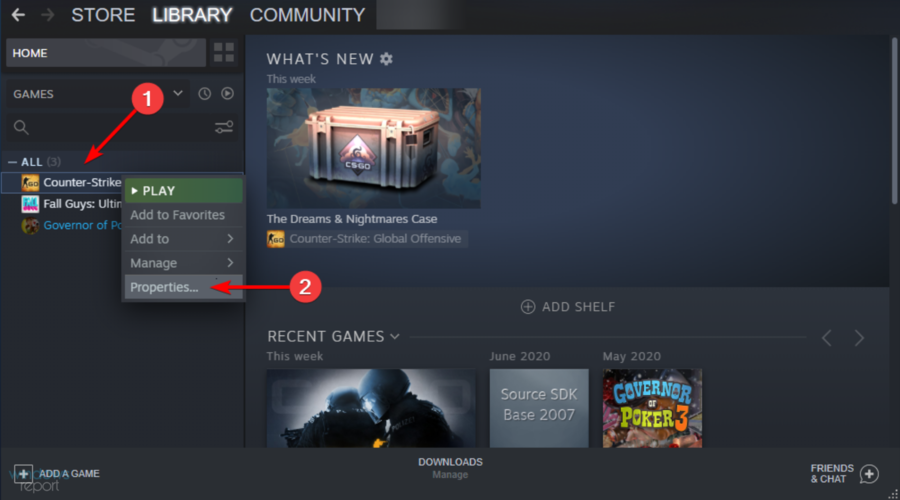
Right-click on the game you need, then choose Properties.
Now, select DLC in the window that appears.
How can I download DLC on Steam?
Keep in mind that most DLC purchased from Steam installs automatically. However, some games require DLC to be authorized through a third-party app. Plus, other games require a verification code to activate DLC.
Now, let’s see how you can easily download DLC on Steam:
Press on the Windows key, type Steam, then open the app.
Click on Library.
From the left window pane, select the needed game, then click on the Store Page.
Scroll down and select the DLC you want underContent for this game.
Complete your purchase, then selectInstall content on the receipt page.
What can I do if my Steam DLC is not installing?
1. Check if your Steam DLC is installed properly
If your DLC is already installed, you will need to uninstall it and follow the next steps to install it properly
Open up your Steam game library and select the game on which you want to install the DLC
Click on Manage my DLC on the left side of the screen
Select the Enabled option under the DLC that you want to install
The selected DLC should start automatically downloading and installing
2. Verify if there aren’t any connectivity issues
There may sometimes be connectivity issues involved if your Steam DLC is installed, but not working. This is usually a result of Steam‘s servers being down or not functioning properly.
This may cause the DLC to appear as downloaded and installed, but not work in the game.
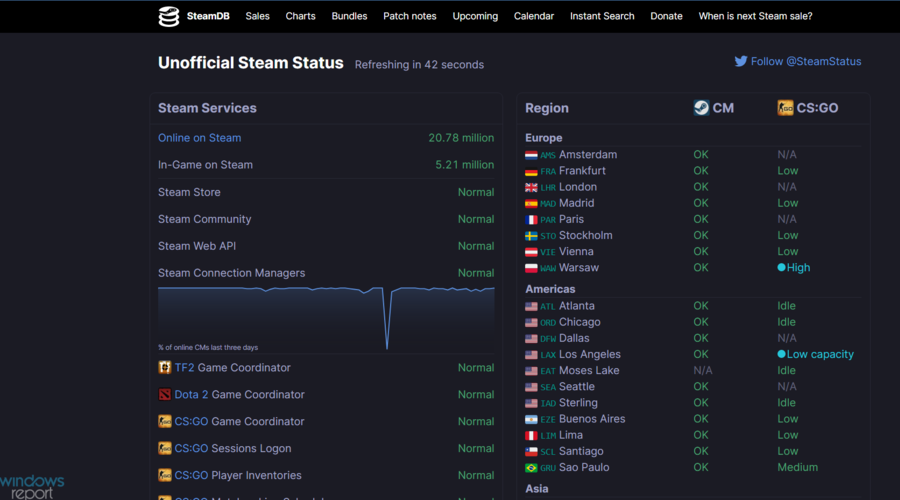
To fix this issue, check if Steam‘s servers are working properly on the app’s official status page.
If there are no Steam issues with the server, there might be an issue with your connectivity.
In case your Internet experiences slowdowns, this may affect Steam DLC installation. If you’re on a Wi-Fi connection, try using an Ethernet cable instead of downloading your Steam content.
Hit the Windows key, type Steam, then open the desktop client.
From the main shown menu, click on Library.
Right-click on the needed games, then select Properties.
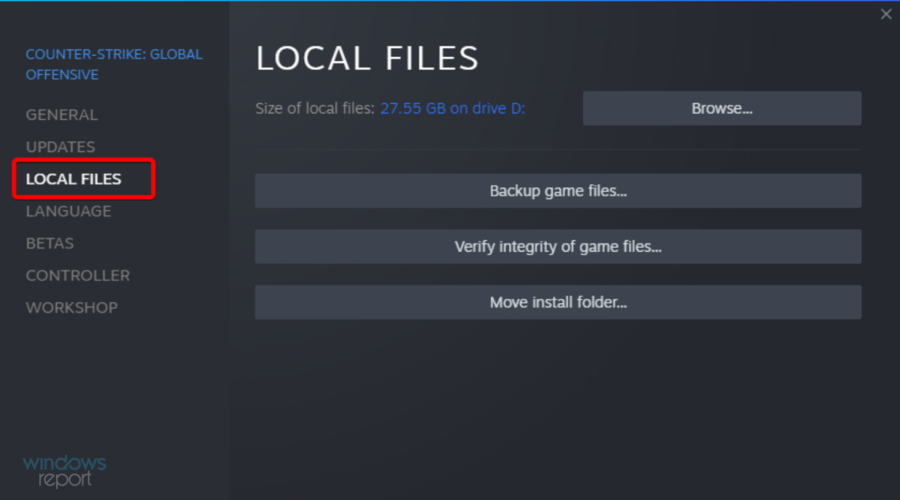
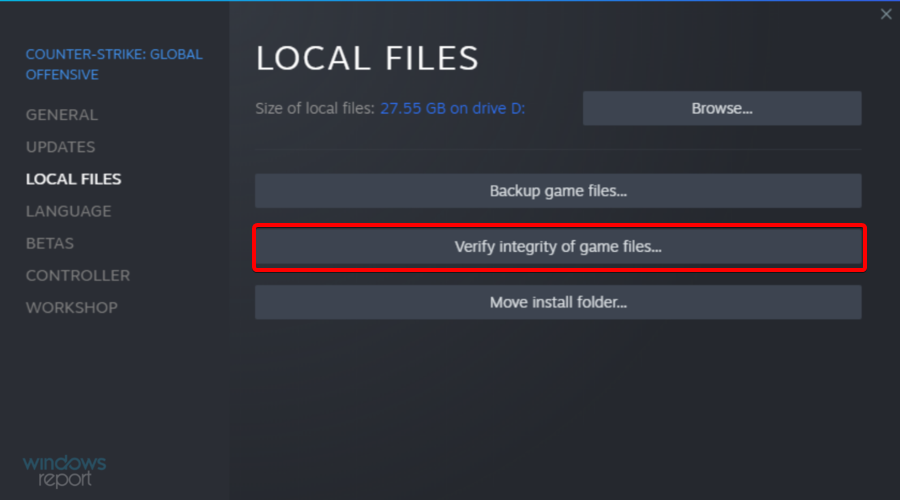
From the left window pane, head over to the Local Files tab.
Click on Verify Integrity of Game Files.
This will prompt Steam to verify the game is installed correctly and fix any game file errors
4. Reinstall the Steam game
Hit the Windows key, type Steam, then open the desktop client.
From the main menu, click on Library.
Select your game in the Steam library, then right-click on it.
Choose Manage, and then Uninstall.
After the game has been uninstalled, download and install the game again on Steam, then reinstall your DLC’s
How do I download DLC on Steam without launching a game?
Many users are interested in whether or not they can download DLC on Steam without launching a game.
If you’re in the same boat, keep in mind that the only option you can try is to click on the Download button from a browser instead of Steam.
This ends up adding the license to your account instead of directly launching the game. You’ll get a message similar to the above one:
Product name is now registered to your account on Steam.
Steam DLCs should be fairly easy to install, however, if you’ve encountered issues with the installation, our guide provides the key solutions to this problem. Alternatively, you can get a refund on your DLC provided you meet the refund requirements.
In case of any related questions, do not hesitate to leave a comment in the dedicated section below.
When working properly, a touchscreen on a laptop or Windows tablet may be extremely useful and productive. However, users have been reporting that their HP Envy x360 touchscreen is not working as it should, thus we will address this issue today.
If your touchscreen isn’t responding at all, don’t forget to resort to the most basic solution which is restarting your computer. Don’t fall short for the general idea that restarting a device is useless. Most IT professionals will tell you that it solves more errors than you have previously thought.
This being said, we have prepared a list of methods that you can try in order to fix the HP Envy x360 touchscreen not working in Windows 11 error, right after we see the benefits of having a touchscreen laptop. Follow along!
What are the benefits of a touchscreen laptop?
A primary goal in developing the touchscreen capability on laptops was to make navigating simpler and more convenient for users. When compared to trackpads and mouse devices, this functionality allows users to complete a plethora of tasks.
Also made easier is the process of starting up applications and switching between them. It is easier for artists and graphic designers to use a touchscreen feature on their laptops since it allows them to work more quickly and efficiently.
When compared to regular computers, touchscreen laptops frequently have superior brightness as well as improved color accuracy, vibrancy, and reproduction. The majority of models that include this feature also have displays with greater resolutions than the competition.
However, in order to accommodate the addition of a touch panel, laptops with touchscreen capabilities are designed to perform an additional set of processing duties on the computer’s hardware. If you intend to utilize this feature on a regular basis, you should keep a backup battery on hand.
How can I fix HP Envy x360 touchscreen not working?
1. Enable the driver
To open Device Manager, you need to right-click on the Start icon then click on it.
Click on the Human Interface Devices section then right click on the HID compliant touchscreen option. Now click onEnable. In my case it is already enabled, hence the Disable option.
Start by right-clicking on the Start icon then click on Device Manager to open it.
Expand the Human Interface Devices section then right click on the HID compliant touchscreen option, and lastly click onUpdate driver.
Select Search automatically for updated driver software and wait for your OS to install the apropriate driver.
Make sure to wait for the processes to finish before restarting your computer to verify that the changes are applied appropriately. In order to avoid manually upgrading your drivers and save time, we strongly recommend that you use a specialist driver update application, such as Outbyte Driver Updater.
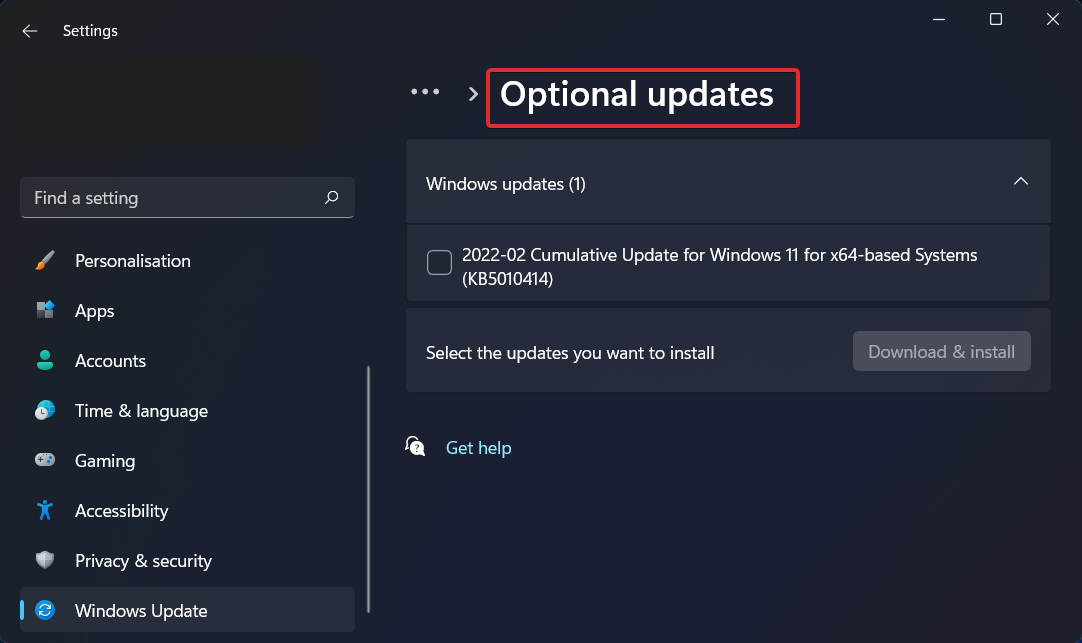
3. Update Windows
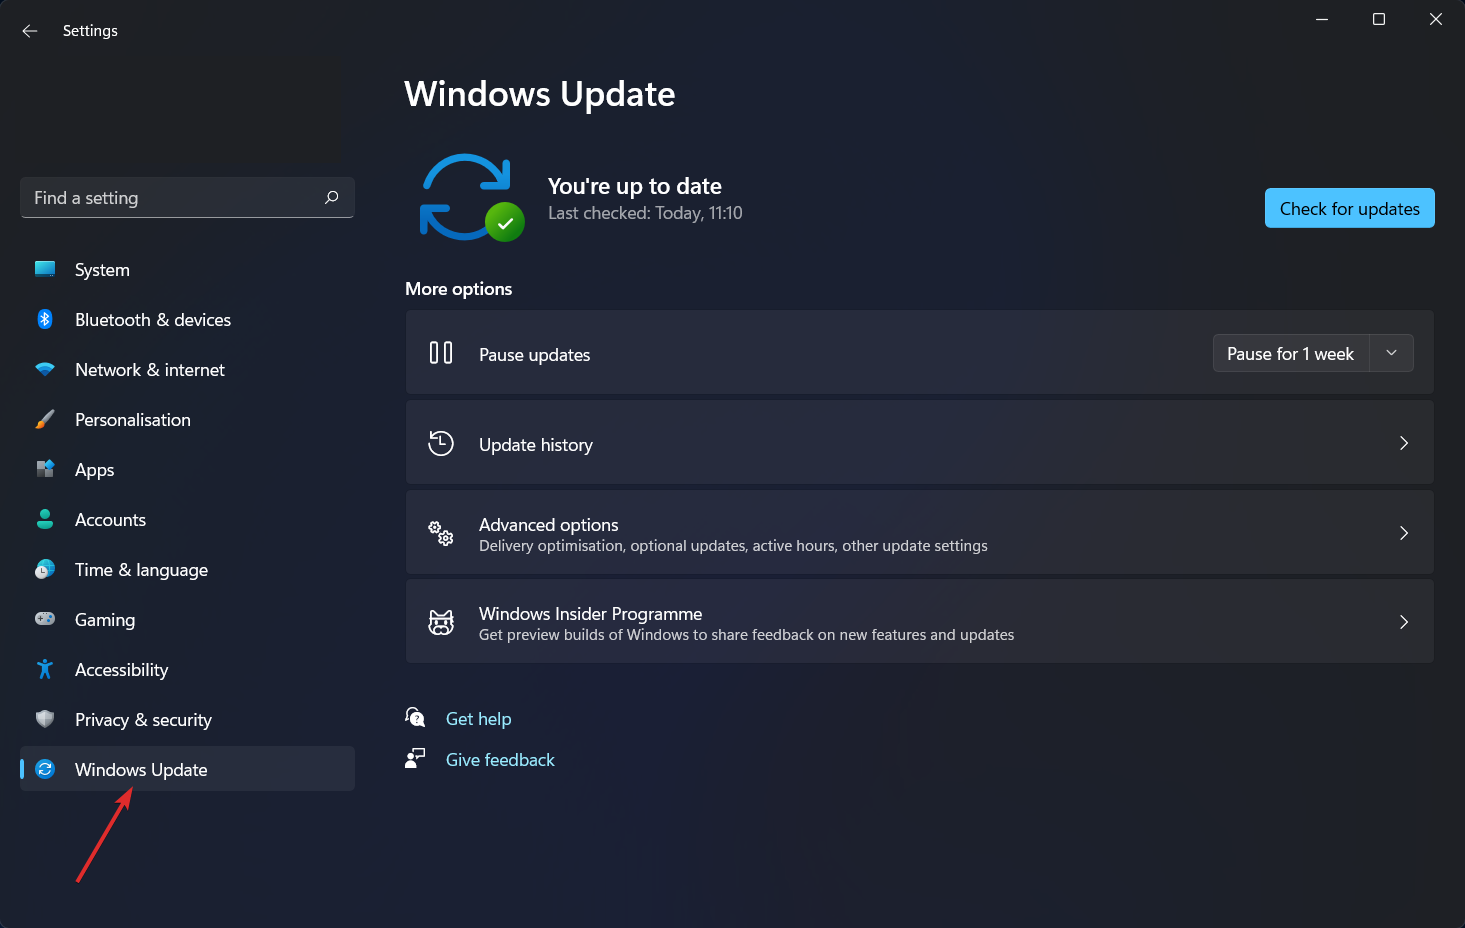
Tap on the Windows key + I to open the Settings app, then select Windows Update as we have shown below.
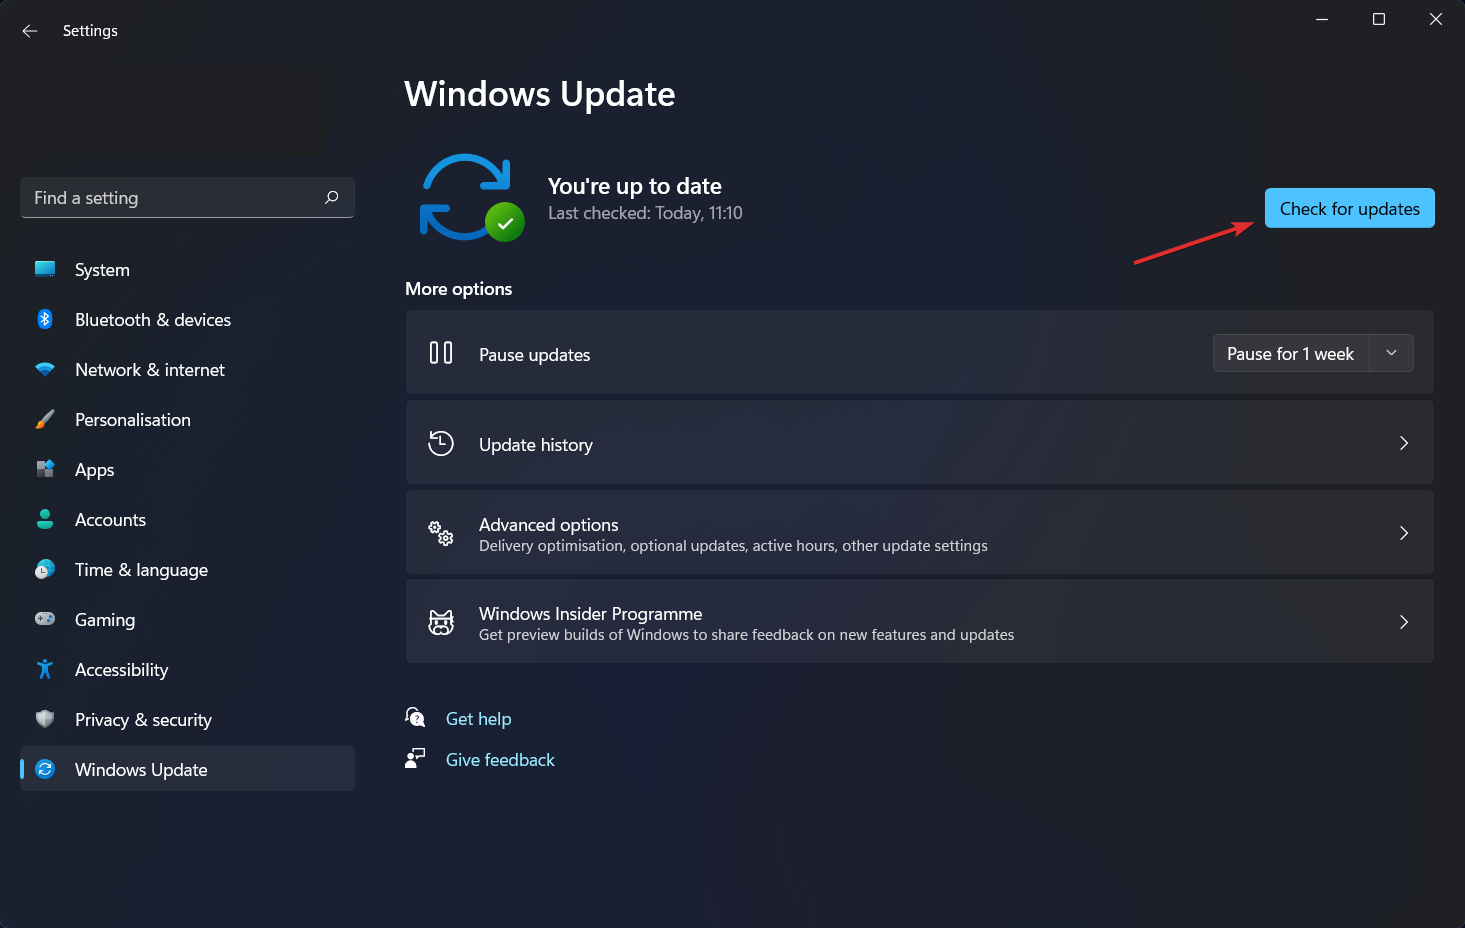
Select the Install now option to install any new updates that are necessary to be downloaded. Otherwise, use the Check for updates button.
This driver can’t release to failure is an error message that more specifically pertains to Gigabyte motherboards.
Some users have stated that the error message pops up after upgrading to Windows 10.
The error message is usually due to a motherboard‘s lack of built-in Wi-Fi, which is something required for the Gigabyte App Center’s Cloud Station Server.
Here are a few resolutions that can fix this Gigabyte motherboard error in Windows 10.
How do I fix the This driver can’t release to failure error?
You might need to update your Gigabyte motherboard drivers to fix the driver can’t releaseerror message. However, the motherboard has various drivers.
As such, it’s probably better to utilize driver-updating software to ensure the motherboard drivers are updated. This includes updating old ones, fixing broken ones, and replacing missing ones.
2. Switch off the Always run on next reboot setting
First, open the Gigabyte App Center via the Windows system tray.
Then click the Cloud Station Server tab at the bottom of the app.
Switch off the Always run on next reboot setting for the Cloud Station Server.
Select the OC tab for Remote OC, and switch the Always run on next reboot option off.
Then select the Gigabyte Remote tab, and turn off the Always run on next reboot option.
Restart your desktop or laptop.
As mentioned, the Cloud Station Server is one component of the Gigabyte App Center that requires onboard Wi-Fi. The Remote OC and Gigabyte Remote are two are components that also need onboard Wi-Fi.
Thus, switching those components off can fix the issue.
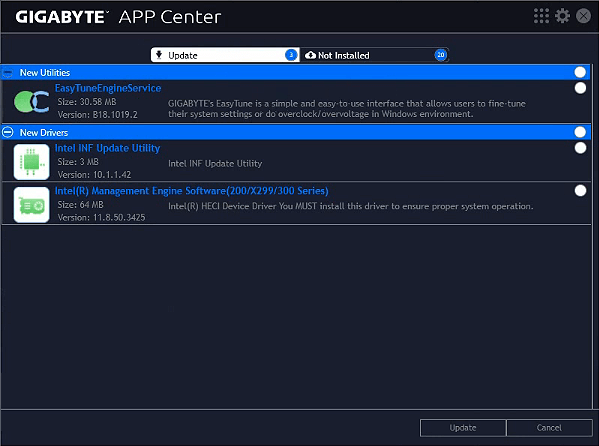
If you’ve recently upgraded to Windows 10, update the App Center to ensure that its compatible with the latest platform.
You can do that by pressing the GIGABYTE App Center Utility Download button on this page.
Then open the installer for the app to add the latest App Center version to Windows.
5. Uninstall the App Center
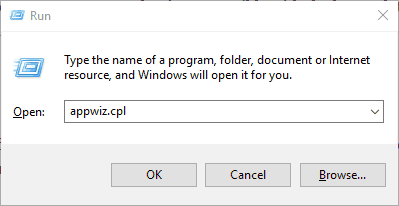
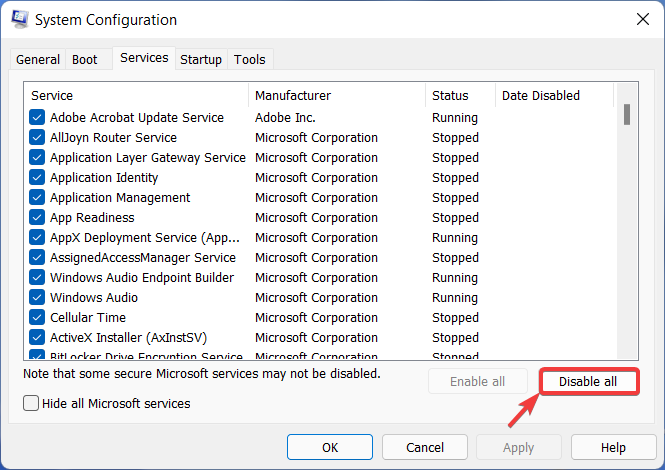
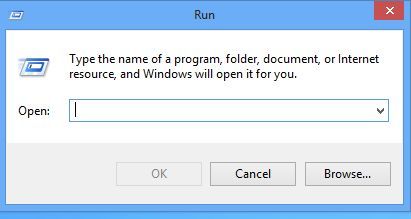
Press the Windows key + R to open Run.
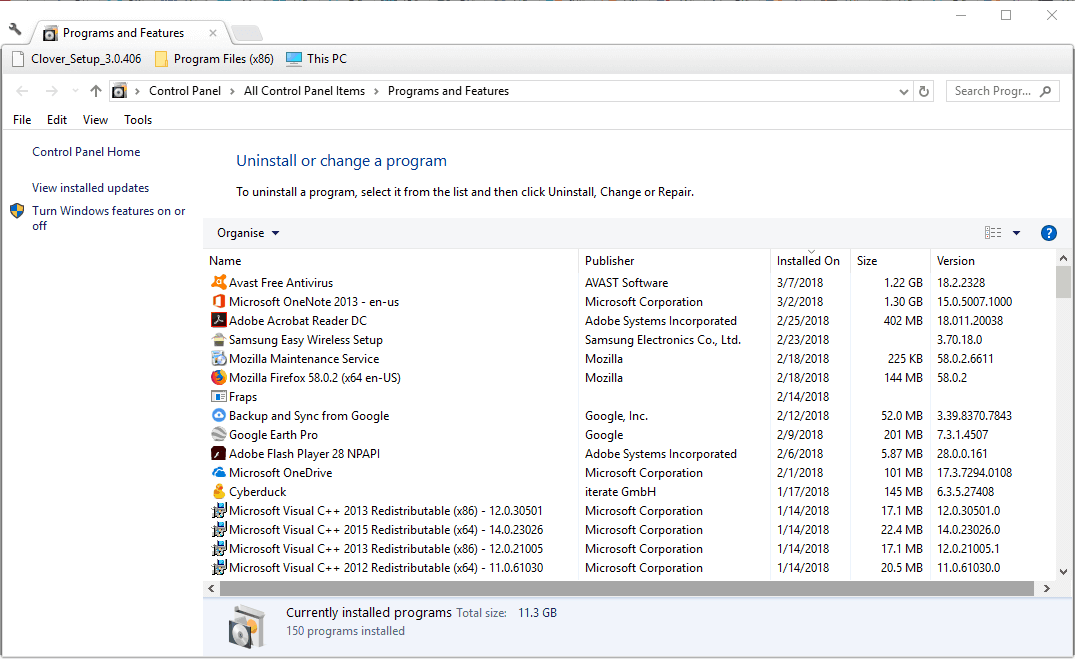
Enter appwiz.cpl in Run and click OK to open the uninstaller window in the snapshot directly below.
Now select the Gigabyte App Center software, and press its Uninstall button.
Press the Yes button for further confirmation.
Then restart Windows after removing the App Center.
Some users have resolved the Gigabyte motherboard error message by removing the App Center from Windows. But there are also a few users who struggle with this. If that’s also your case, read on.
Can’t uninstall the Gigabyte app center
Using the Control Panel to remove a no longer wanted program (as shown above) is quick and easy, but it seems that not everyone can successfully use this option.
For some, the Gigabyte app center won’t uninstall no matter what they do. So, here’s what we suggest:
Clean boot your computer and manually delete the entire folder from C:\Program Files (x86)\Gigabyte\AppCenter directory
Use a good registry cleaner tool to remove any hanging, broken, or superfluous keys that might linger on.
One, or more, of those resolutions, will probably fix the driver can’t releaseerror in Windows 10. If you have any further suggestions for fixing the Gigabyte motherboard error, feel free to share them below.
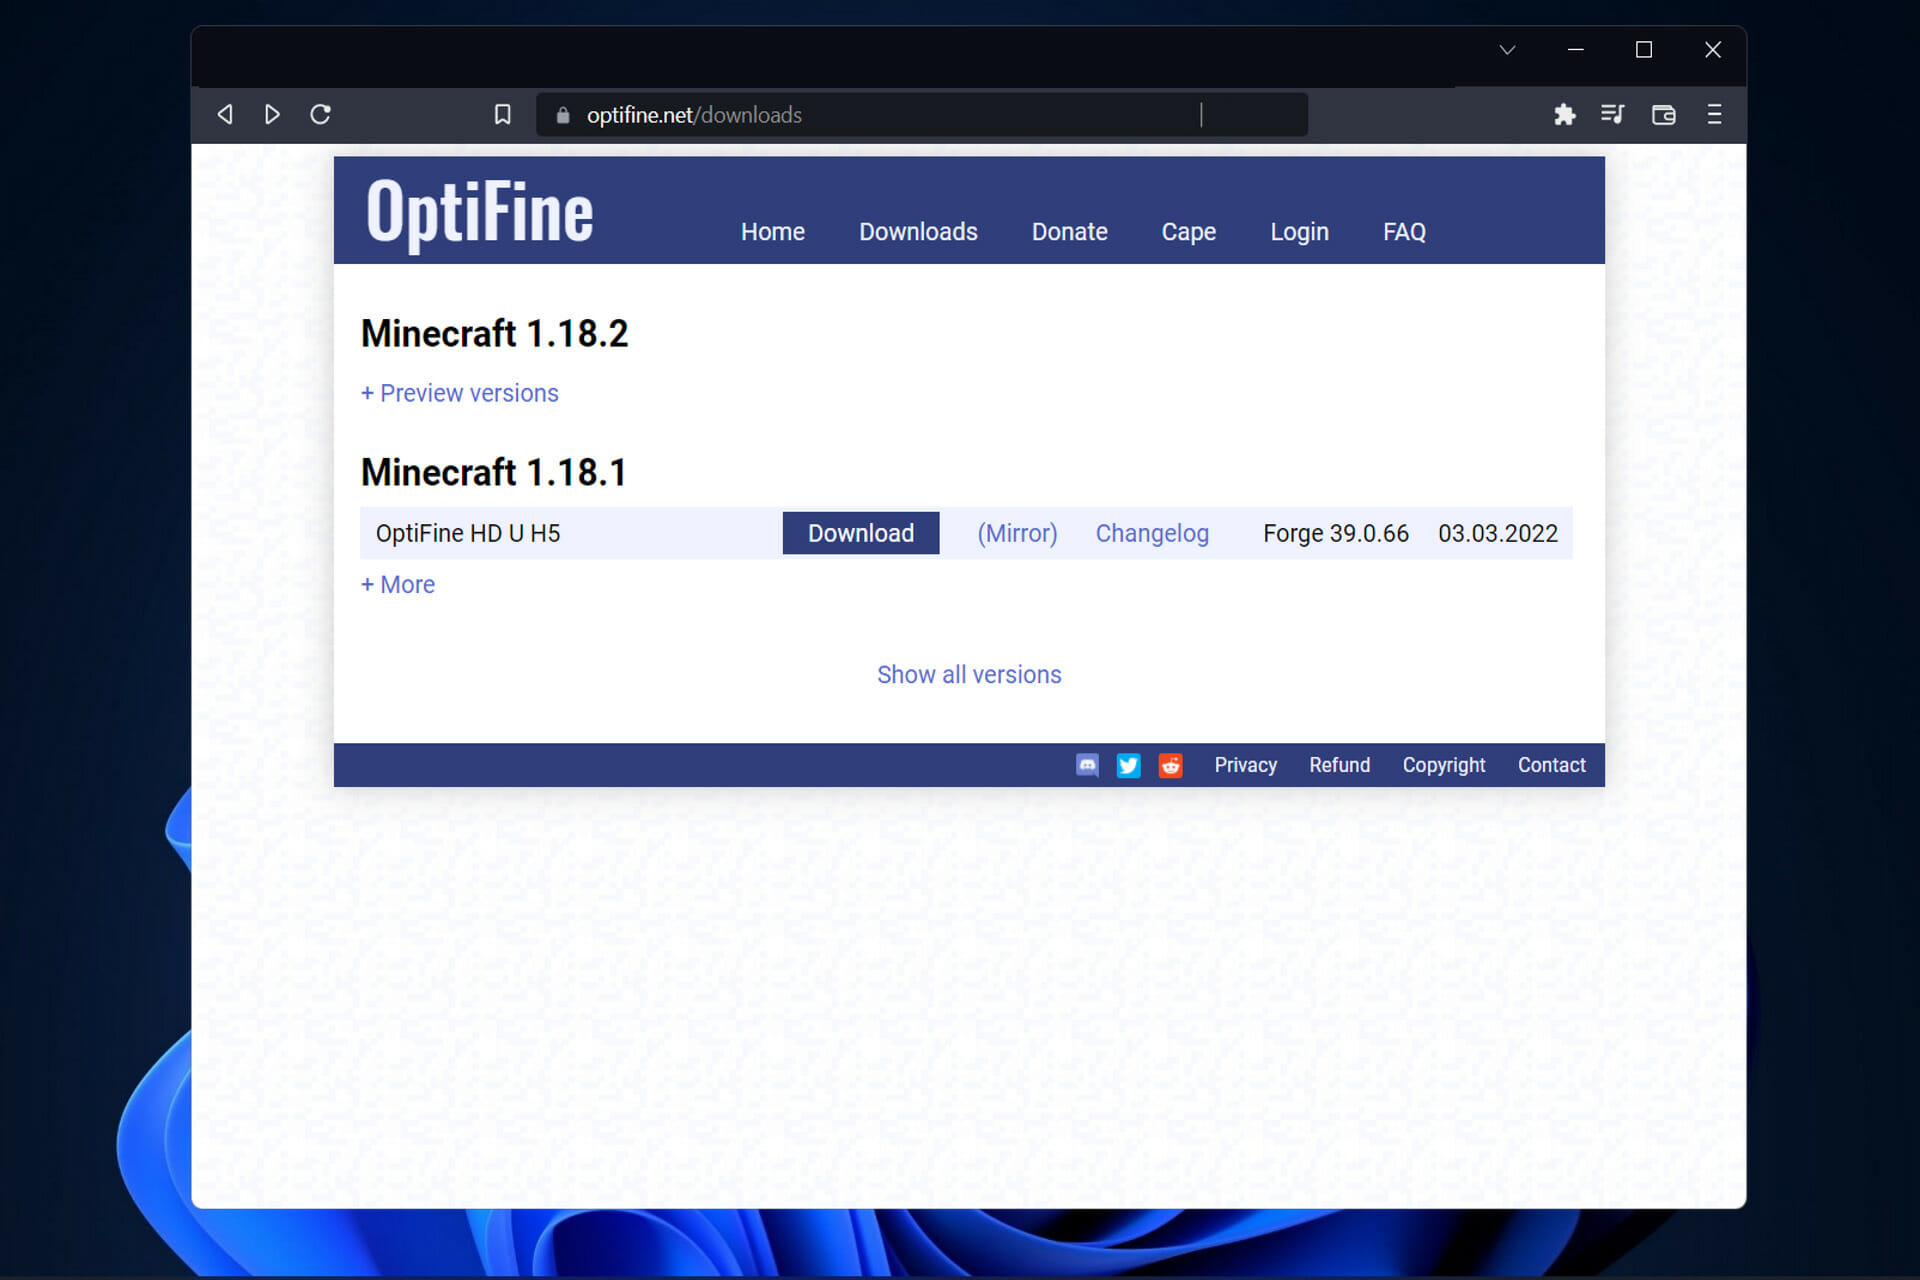
OptiFine is a mod that should not be missed by any player, whether they are experienced players who enjoy modding their Minecraft or new players who are just starting. Thus, today we will show you how to download OptiFine on Windows 11 as well as how to run it.
It’s important to note that, even though Minecraft is a pretty simple game at its heart, its environments are full of intricacies and physics that your PC must still calculate, making it difficult to play on low-end computers in particular.
It is one of the earliest optimization mods, and it has become such a mainstay in the Minecraft modding community that other popular mods now require it as a prerequisite for their functionality.
The likelihood is that you will want OptiFine if you plan on modding your game, adding shaders, or making other cosmetic modifications such as texture packs to your game. Follow along!
How can I optimize games?
Your graphics card is one of the most important components of your desktop or laptop computer. The graphics processing unit (GPU) is responsible for drawing every single pixel on your screen, whether it’s the Windows interface, websites, movies, or games.
It is necessary to have a driver installed on your computer because it allows your operating system — most likely Windows — to communicate with the hardware on your computer, such as your graphics card.
Moreover, keeping your graphics driver up to date is essential for getting the best performance out of your computer, your games, and any other graphics-intensive tasks you may be performing on it.
You can get a performance boost, repair problems, and sometimes even gain access to whole new features by updating your graphics driver. All of this can be accomplished for free if you update them manually, or at a low cost if you choose to use an automatic driver updater such as Outbyte Driver Updater.
Developed by Sun Microsystems, Java is a programming language and computing platform that was initially released in 1995.
Through the provision of a dependable platform around which numerous services and applications are built, it has progressed from humble origins to power a significant portion of today’s digital world.
In the Java Runtime Environment, the Java Plug-in software is a component of the Java Runtime Environment (JRE). It enables some applications written in the Java programming language to be launched through certain web browsers.
And such is the software we have previously downloaded. To open OptiFine, you need to download Java and run the software with it.
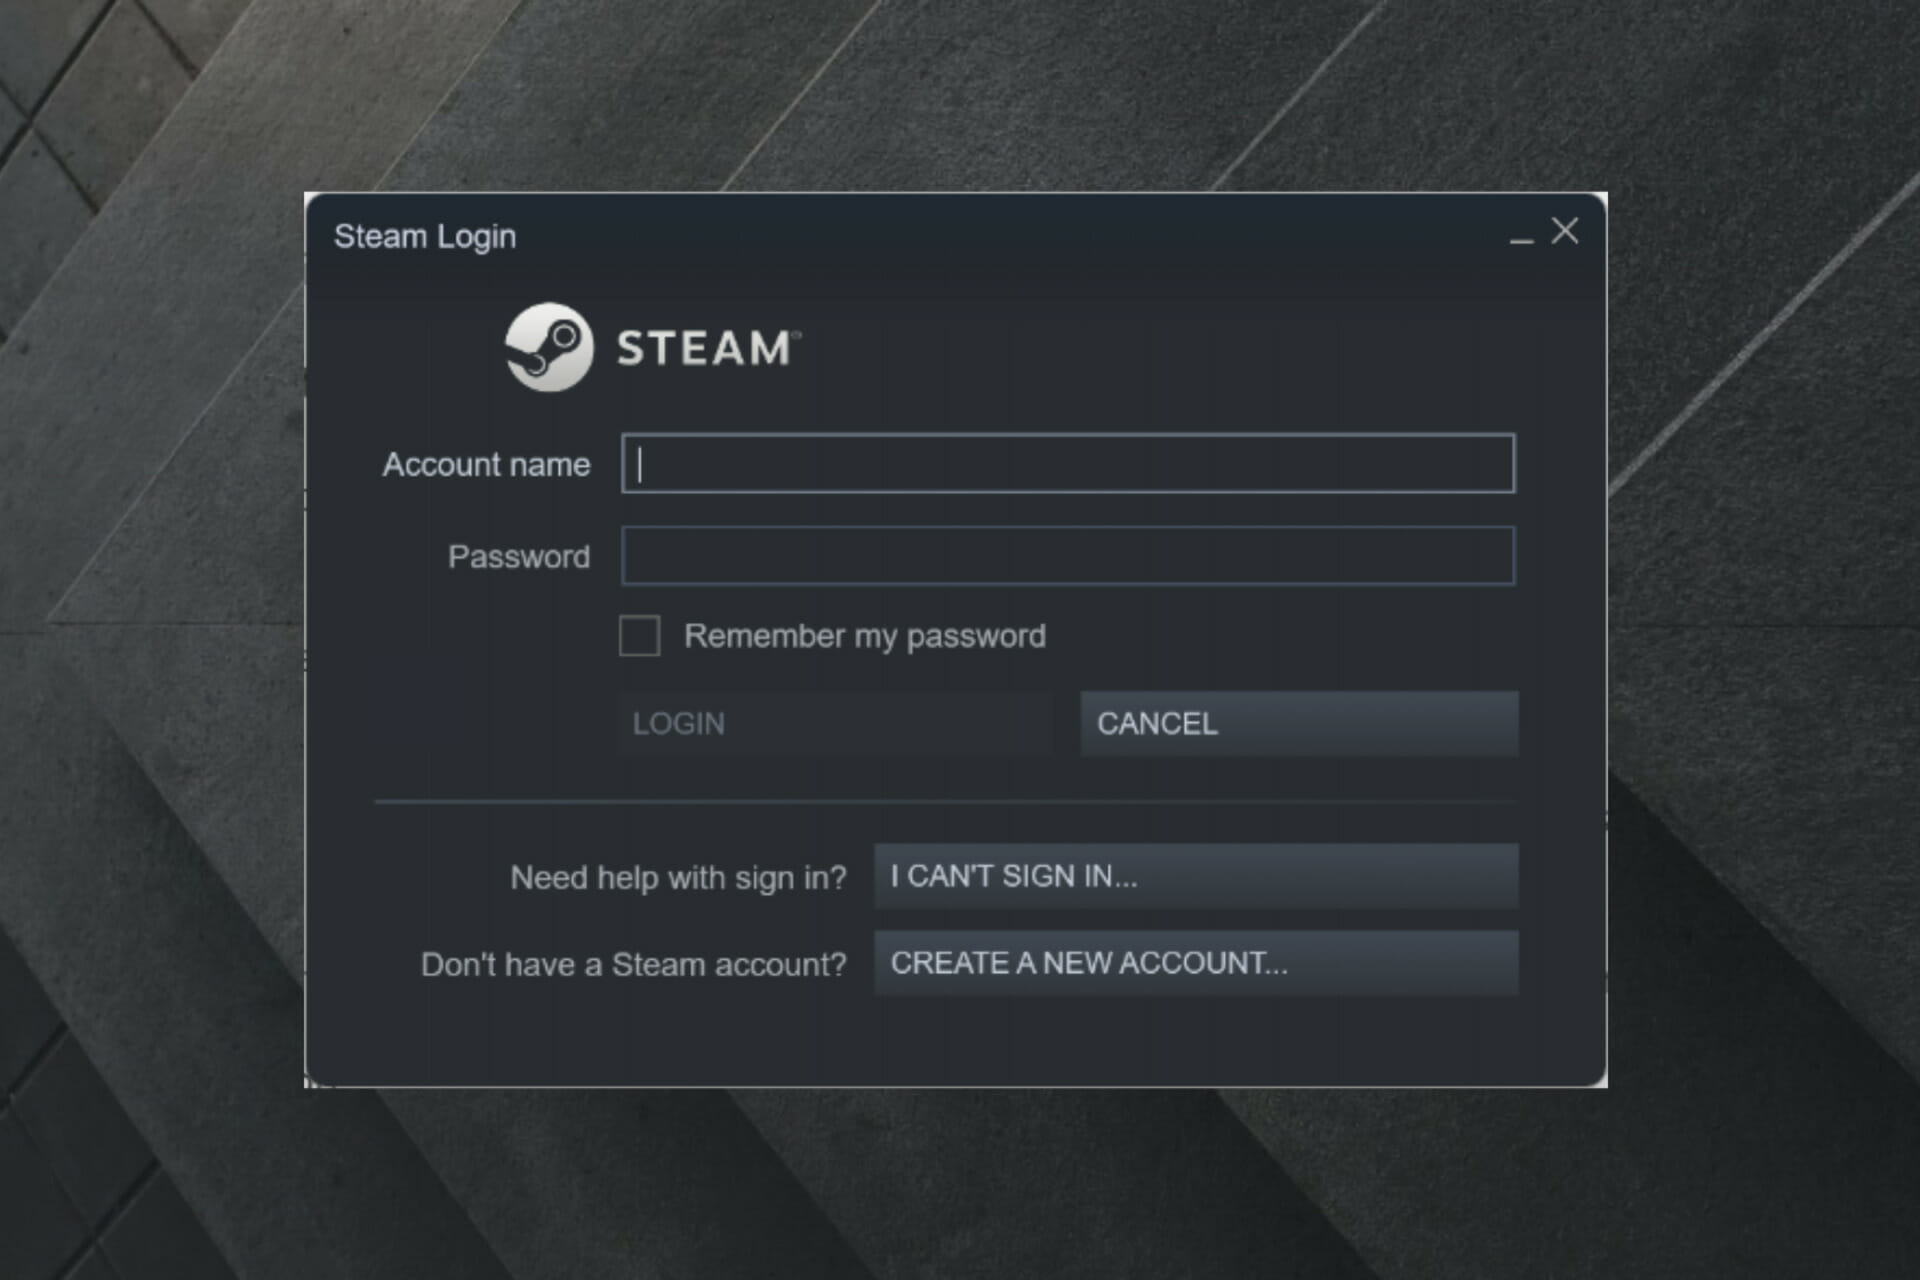
Many gamers claimed that Steam does not remember their password, and it can be pretty annoying to input it every time you access the app.
That’s why users are interested in discovering how they can make Steam remember passwords on their home desktops and laptops.
Otherwise, it becomes a drag to always have to log in every time you turn on your PC.
Here’s how people describe today’s issue:
It’s happening for around 1 month now, steam doesn’t remember my password and I have Steam guard active and its real pain logging in all the time.
Don’t worry since we’re here to set you on the right path and help you solve this problem.
What are Steam password requirements?
In order to have a strong password on Steam, you need to meet some specific requirements, as follows:
At least 6 characters
A combination of upper and lowercase letters
Include at least one number
All of the above criteria will certify your security and privacy and without them, you won’t be able to create or access your account.
Plus, to ensure your maximum security on Steam, you should also carefully take advantage of these recommendations:
Enable Steam Guard two-facto authentification
Verify your contact email address with Steam
What else should I know about my Steam password?
What can I do if Steam doesn’t remember my password?
1. Save account credentials on your PC
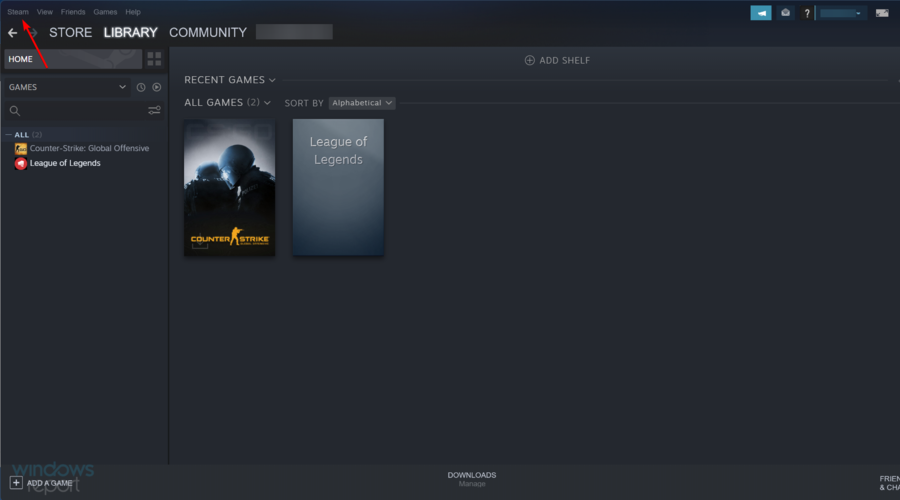
Hti the Windows key, type Steam, and click on the first result.
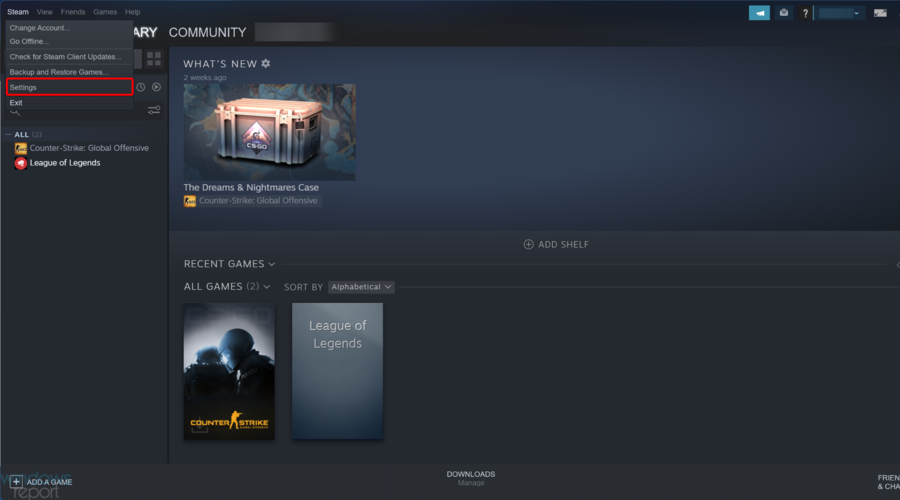
From the top-left corner of the window, click on Steam.
Now, go to Settings.
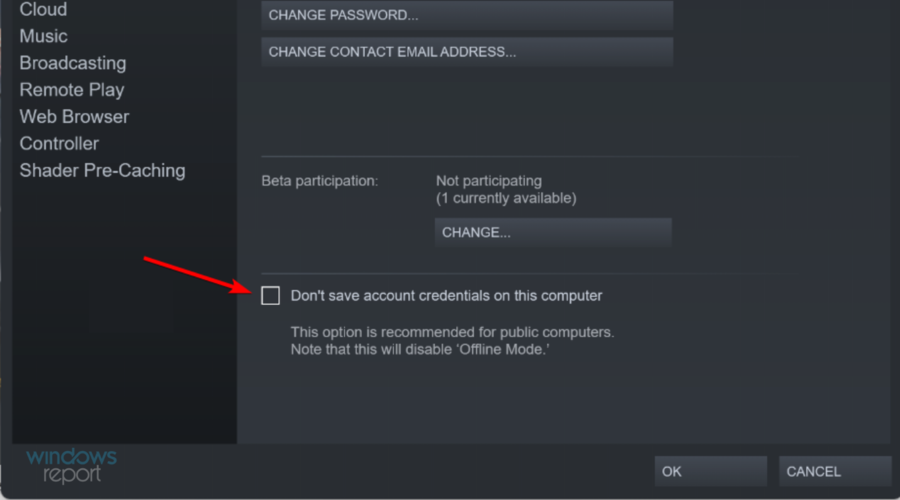
Fron the left window pane, select Account.
Uncheck the Don’t save account credentials on this computer option from the right pane of the window.
Click OK
2. Log in to Steam twice
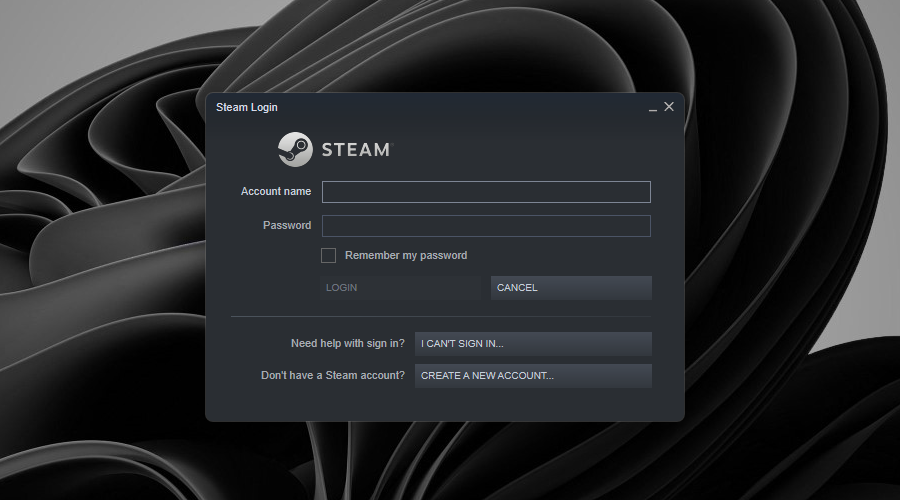
Fire up Steam and log in without asking it to save your password.
Exit Steam right after the gaming platform loads (don’t launch any games).
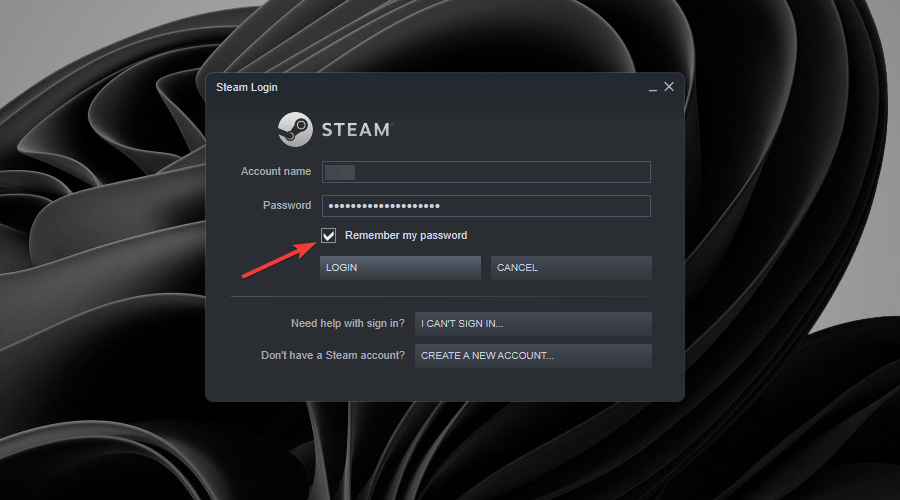
Log in to Steam again but ask it to remember your password now.
This simple workaround seems to work for some users. It might have something to do with refreshing the Steam login settings and game cache.
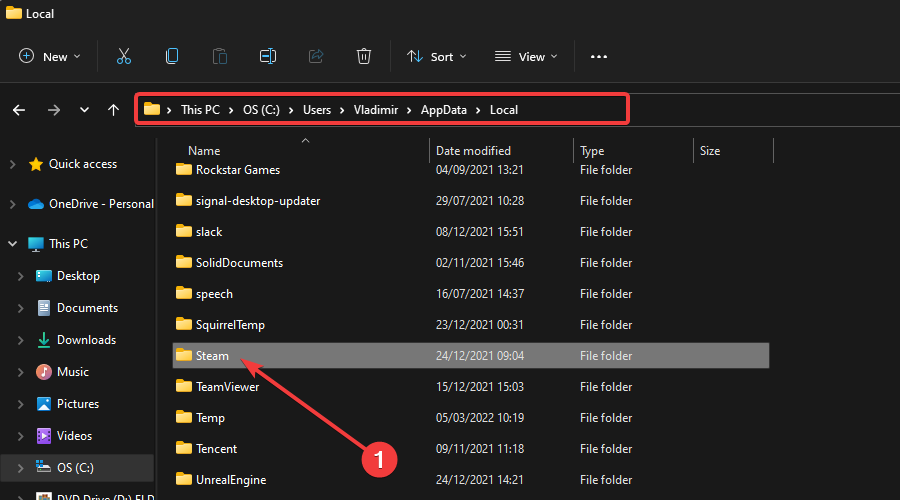
3. Delete the Steam local folder
Use the following keyboard shortcut to open File Explorer: Windows + E.
In the search bar, input this location: C:\Users\YOURUSER\AppData\Local. Make sure to replace YOURUSER with the username registered of your PC.
Once you reach this location, select and delete the Steam folder.
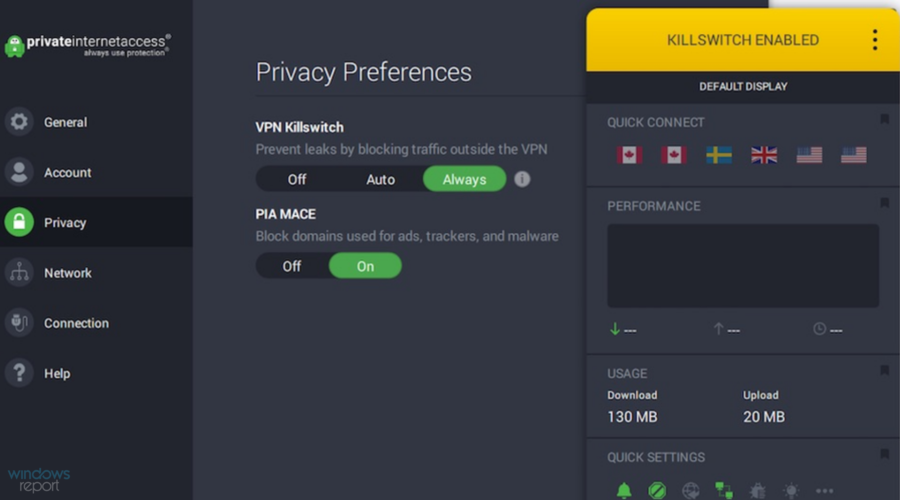
4. Disable your VPN service
If you’re using a VPN to protect your online privacy and keep your device safe from hackers, it could be the reason why Steam keeps forgetting your password.
Because you’re logging in from a new IP address in a foreign country, Steam could interpret this as suspicious activity.
In this case, make sure to deactivate your VPN service before launching Steam on your PC.
But it’s not a permanent solution because you won’t be able to use your VPN while playing Steam games.
A more viable fix to the VPN issue is to turn to a VPN service that supports split tunneling mode.
You can set up Steam to directly connect to the Internet and the remaining apps to the secure tunnel.
This way, you can still take advantage of the VPN benefits outside of Steam, like safely downloading or uploading torrents by protecting your true identity in the torrent swarm.
But you will have a hard time (if not impossible) finding a free VPN with split tunneling. Instead, we suggest investing in a reliable VPN service like Private Internet Access.
This VPN offers over 22,000 VPN and proxy servers in more than 77 countries. So, finding one that is close to your current locations won’t be a problem.
PIA uses WireGuard and OpenVPN protocols with up to military-grade 256-bit AES encryption.
It works amazingly on restricted platforms like Netflix US, HBO Mas, and other streaming services that don’t allow you to view specific content from certain locations.
Also, as it is specially designed to protect up to 10 devices using the same account, we strongly recommend sharing the experience with your close ones.
The most important features of PIA:
Uses WireGuard and OpenVPN protocols and 256-bit AES encryption
Unblocks Netflix US, HBO Max, and other streaming services
Protect up to 10 devices using the same account
A zero-logging privacy policy
24/7 live chat support
Private Internet Access
With PIA, you won’t have to worry about Steam password-related troubles, and if you don’t like it, manufacturers offer a 30-day money-back guarantee.
If you have a gigabit router at home, it’s likely that you have enabled two Wi-Fi networks: 5GHz and 2,4GHz.
Maybe your laptop is connecting to the 5GHz when you’re closer to the router but switches to the 2,4GHz network when you move farther away.
If you frequently connect to different Wi-Fi networks, it could be the reason why Steam fails to remember your password. It could perceive the network change as a hacker attempt.
To solve this matter at home, make sure that your laptop always connects to the same Wi-Fi network (5GHz is faster, 2,4GHz is more reliable for long distances to the router).
For any unused Wi-Fi network, head over to its settings on Windows 10 and disable Connect automatically when in range. Switching from Wi-Fi to cable mode is even better.
7. Set up a static IP address
Home networks with dynamic IP addresses could fool Steam into thinking that an unauthorized user is trying to log in to your account.
As a result, Steam always asks you to input your password, in order to verify that it’s really you. It happens because your IP address changes frequently. Switching to a static IP address might repair this issue.
With Private Internet Access, you can get a dedicated IP address for an extra cost, drop split tunneling mode, and play Steam games from your own IP address that no one else uses.
Why do I have to enter a Steam Guard code every time I log in?
It seems like many Steam users also reported that they need to enter a Steam Guard code every time they log in, and it can be pretty annoying and time-consuming.
With Steam Guard, the app saves a cookie to remember your PC or browser. Your browser must have cookies enabled for Steam Guard to work properly.
If you are being repeatedly asked for a Steam Guard code on the same computer, you will need to ensure your browser has cookies enabled.
Here is how you can turn them on the most popular available browsers:
1. Google Chrome
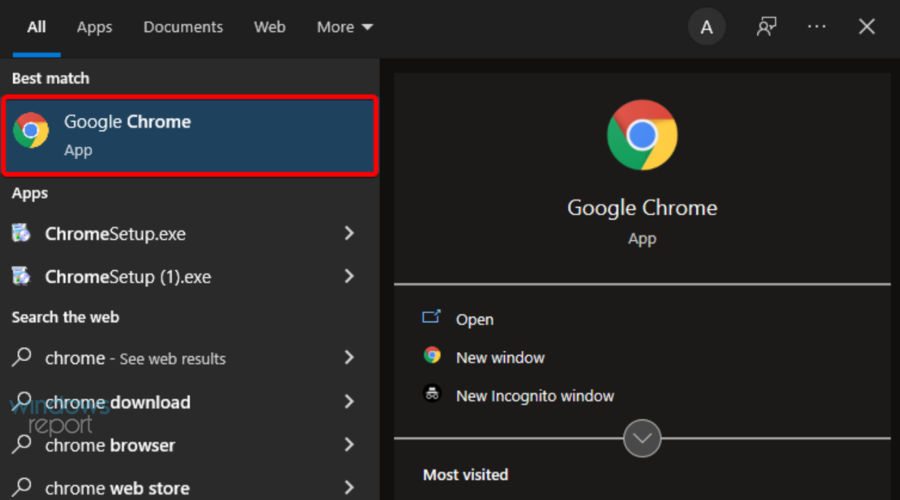
Hit Windows, type Chrome, then open the browser.
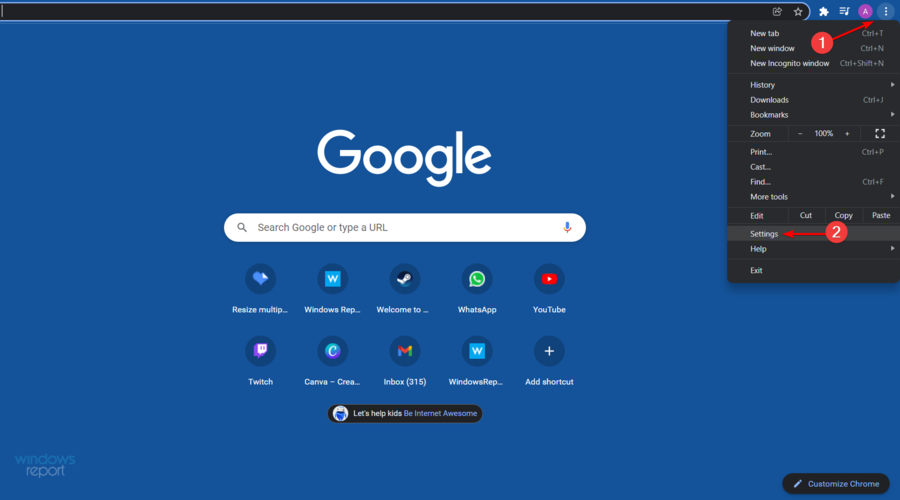
From the top-right corner of the window, click on the 3-dots menu, then navigate to Settings.
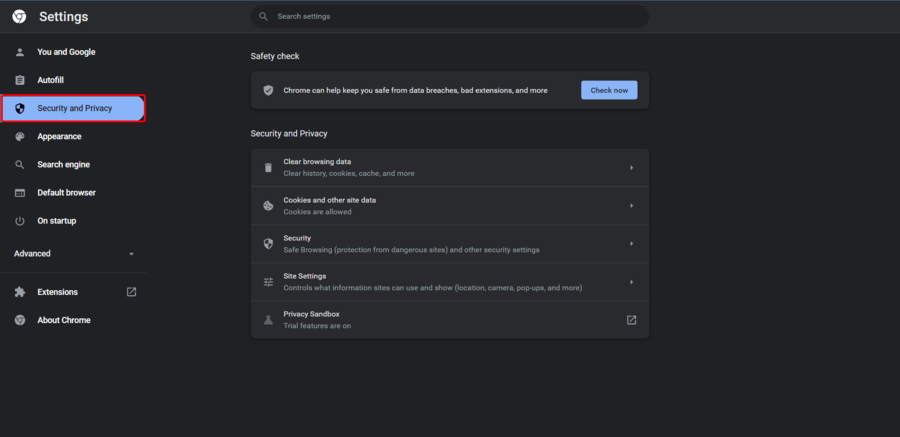
From the left window pane choose Security and Privacy.
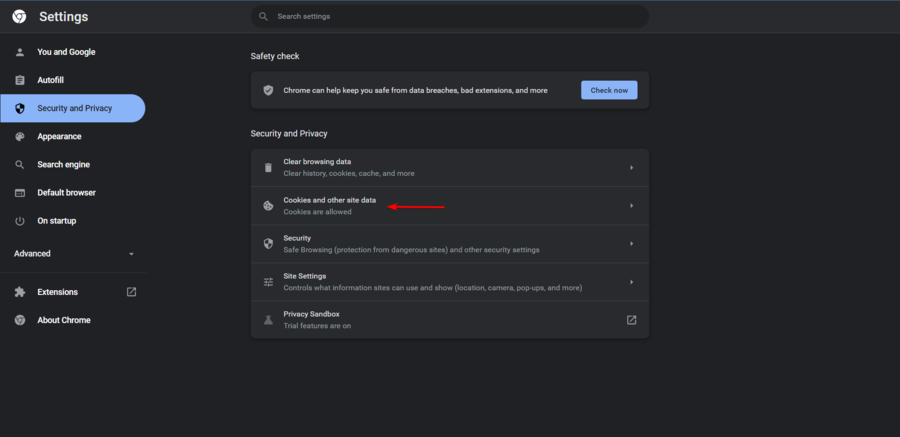
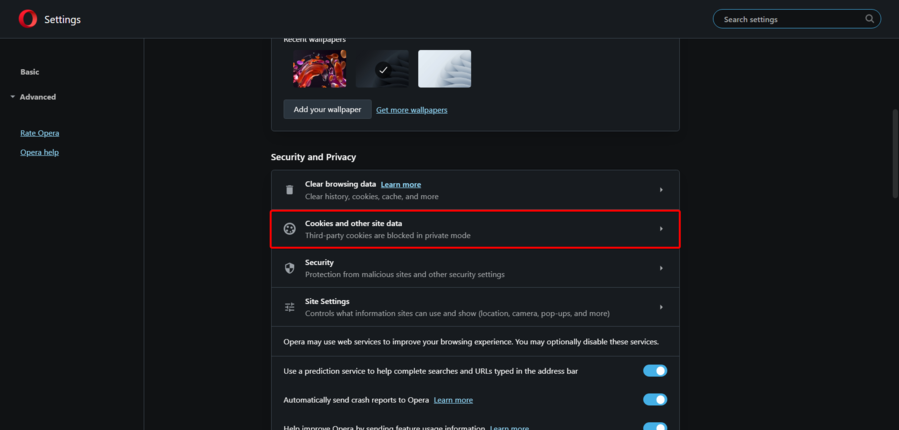
In the right window pane, click on Cookies and other site data.
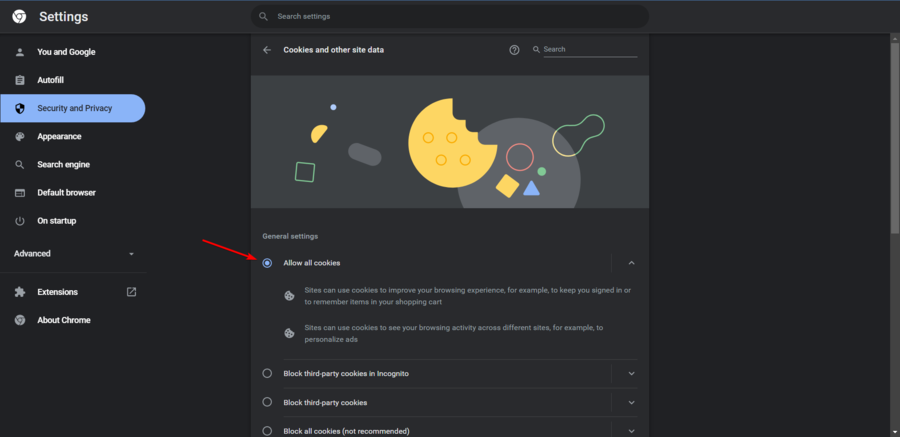
Make sure that the Allow all cookies option is marked.
2. Mozilla Firefox
Press on the Windows key, type Firefox, then open the first result.
From the top-right corner of the page, click on the 3 horizontal lines, then navigate to Firefox Settings.
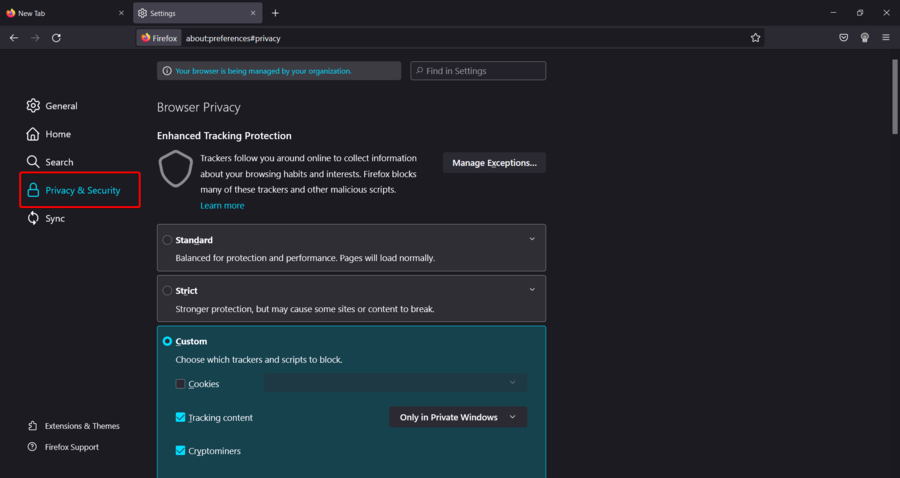
Select Privacy & Security located in the left window pane.
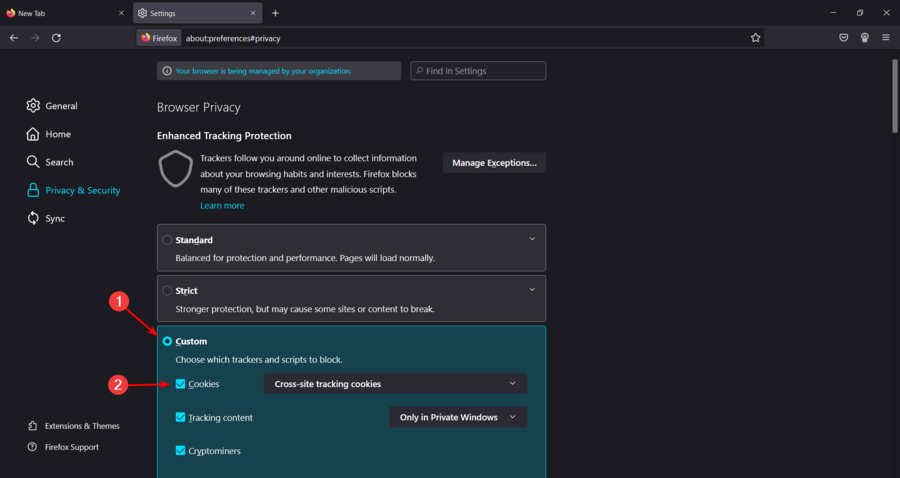
In the Browser Privacy section, checkmark the Custom option, then make sure the Cookies section is enabled.
3. Microsoft Edge
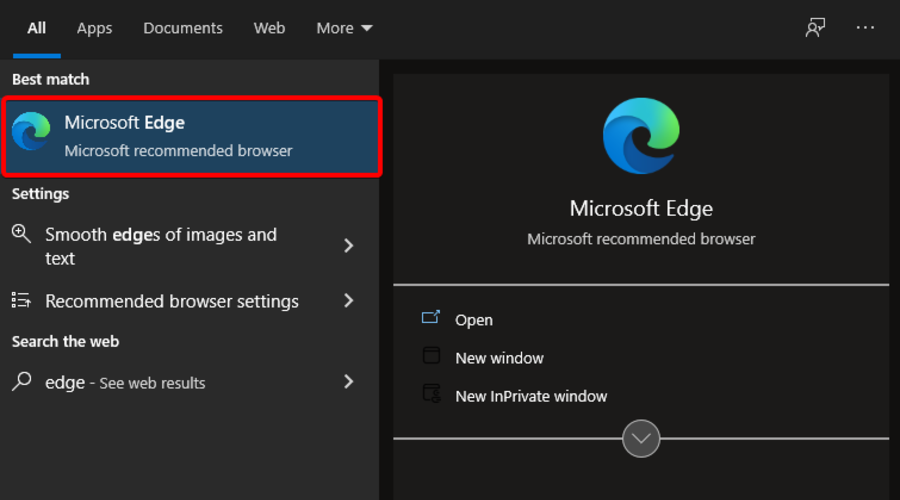
Hit the Windows key, type Edge, then open it.
From the top-right corner of the window, select the 3-dots menu.
Go to Settings.
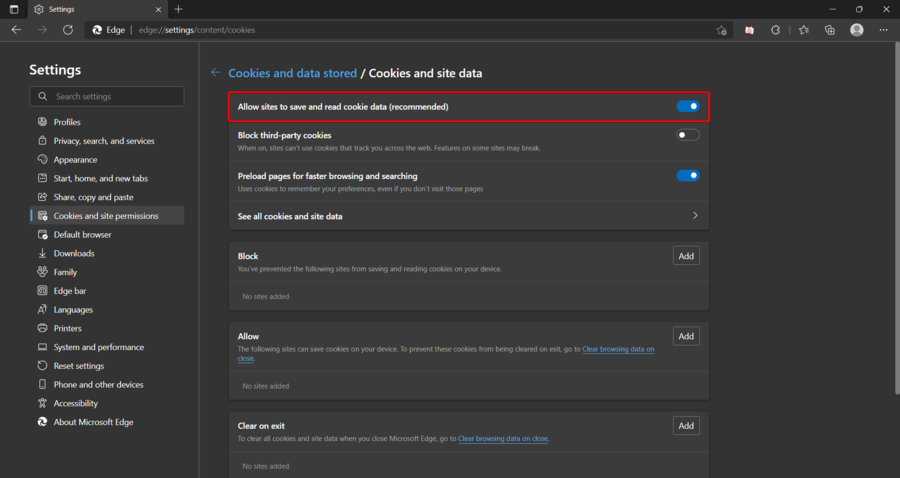
Click on Cookies and site permissions located in the left side of the window. Then, from the right window pane choose to Manage and delete cookies and site data.
Enable the Allow sites to save and read cookie data (recommended) option.
4. Opera
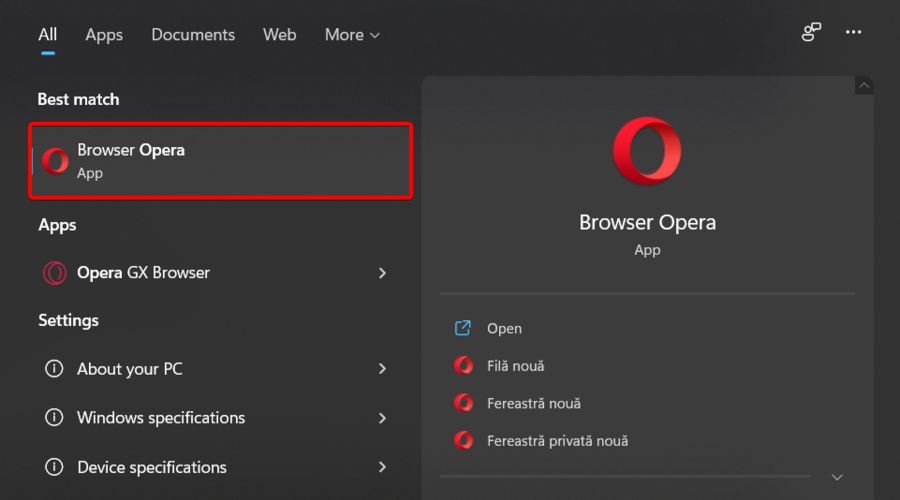
Hit Windows, type Opera, then click on the first result.
Use the following keyboard shortcut to open Opera Settings: Alt + P.
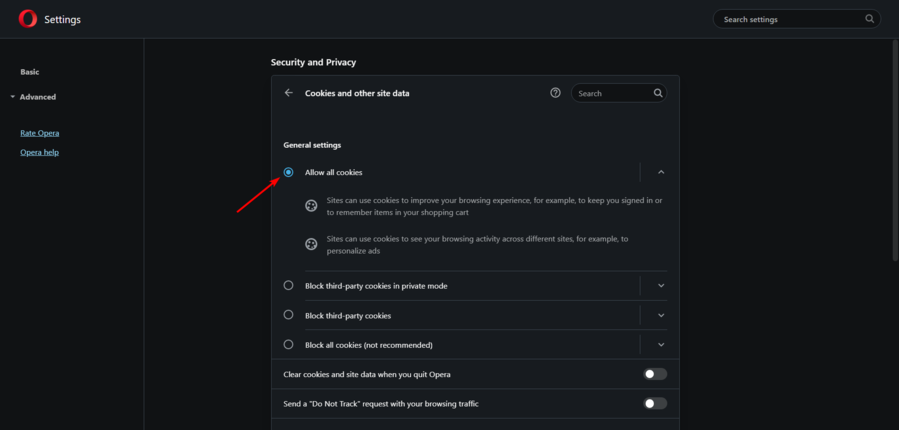
Scroll down, then hoose Cookies and other site data.
Checkmark the Allow all cookies option.
To summarize, if you can’t get Steam to remember your password every time you want to play games, make sure to disable the Don’t save account credentials on this computer option.
You can sign in to Steam twice (without checking the remember option in the first attempt). Another solution is to delete the Steam local folder from your machine.
It’s also a good idea to disable your VPN service or use a VPN with split tunnelling, always connect to the same Wi-Fi network, and set up a static IP address. For any other Steam sign-in errors, check out our fix article.
You can also review this guide on Steam password reset problems to fix cases where the platform will not let you update your account password.
Did these solutions work for you? What else have you tried that actually worked? Let us know in the comment section below.
Playing games on a bigger screen is one of the main reasons people use Steam Link. Many users want to see their favorite Windows games on a greater resolution on their TV to enhance the gaming experience.
However, they encountered a major issue. Steam Link won’t go full screen on TV devices.
According to them, this problem appears because the screen resolutions from the computer and the TV are different. Also, the in-game resolution might not be compatible with the TV or HDMI monitor resolution.
Still, some people said that the gamesdisplayed a full screen once they start, but this is not always the case.
This issue is an important setback for your gaming experience and today we will show you how to solve this problem.
How can I force something to go full screen?
Before discovering certain steps to make your Steam Link go full screen, you should know that the easiest way to force something go full screen is by using this keyboard shortcut: Alt + Enter.
Sometimes, you’ll probably need to use the F11 key.
This method works for most games and apps unless they use it to enable other features.
Do not forget that you can also simultaneously press on these two keys to switch from full-screen mode to windowed.
What can I do if Steam Link won’t go full screen?
1. Change the resolution
Use the following keyboard shortcut to open the Windows search bar: Windows + S.
Search for Steam, then open it.
From the top-left corner of the window, click on Steam.
Now, go to Settings.
Go to the In-Home Streaming tab and select the Advanced hostoptions.
Check the box for change desktop resolution to match the client.
Select the In-Home-Streaming option, then go to the Advanced host options.
Deactivate hardware encoding.
Restart the Steam Link streaming.
This is a problem that comes in different forms (literally). In other words, your Steam Link won’t go full screen in various ways.
For example, some users encountered that the left and right margins of the TV screen remained black, while the rest displayed the game correctly.
This is a fortunate situation, but not all examples are the same. Other users reported that the image is much smaller than the screen and also is not displaying in the center of the monitor.
Why won’t my Steam game go full screen?
Well, you should know that Steam Link might not be the only feature that sometimes might not be able to go full screen. Some users reported this issue appearing while playing their favorite games on Steam.
If you ever face it, make sure you check the screen resolution and the text size directly related to the harmed game.
In other cases, you might need to carefully customize certain options like full-screen optimization.
So, for these people, not showing the full screen in Steam Link is a major problem that makes them return to traditional PC gaming.
Moreover, the culprit might be your HDMI monitor. The default resolution for your display is not compatible with Steam Link.
Try another monitor to see if you can replicate the issue. In this matter, we strongly recommend checking the best cheapest HDMI monitors to buy.
Steam is one of the biggest gaming platforms for PC, millions of gamers use Valve’s platform to download and play games daily. However, some users reported that Steam does not show what game users are currently playing.
Just like other gaming platforms, Steam can inform your friends about your current activity which makes it easier to find friends to play with.
An issue about this feature has been reported by many players though, not allowing them to show their gaming activity.
How does the Steam doesn’t show game playing error manifest?
Not sure what happened with Steam recently, but my status is permanently stuck as Online, so when I start playing a game my friends aren’t notified and if I’m online they can’t see what I’m doing.
Fortunately, we were able to come up with a guide on how to fix this problem.
What can I do if Steam does not show what I am playing?
Change your Privacy Settings
Hit the Windows key, type Steam, then open the desktop client.
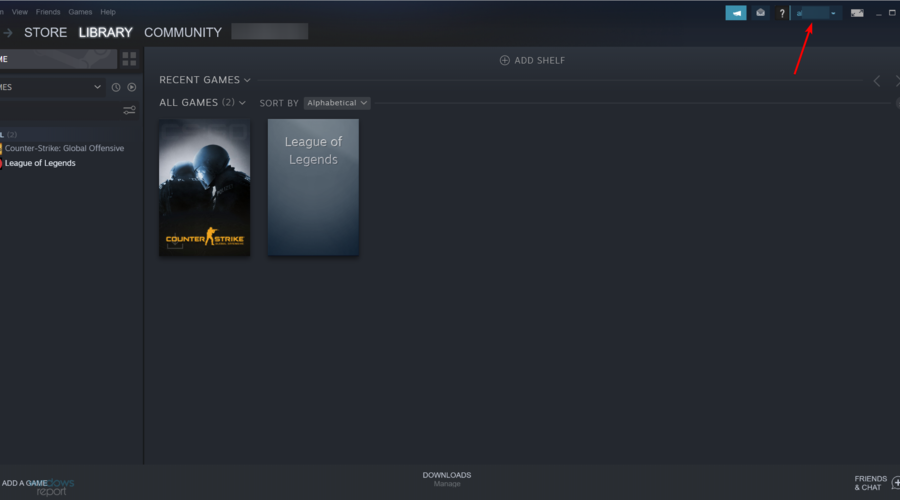
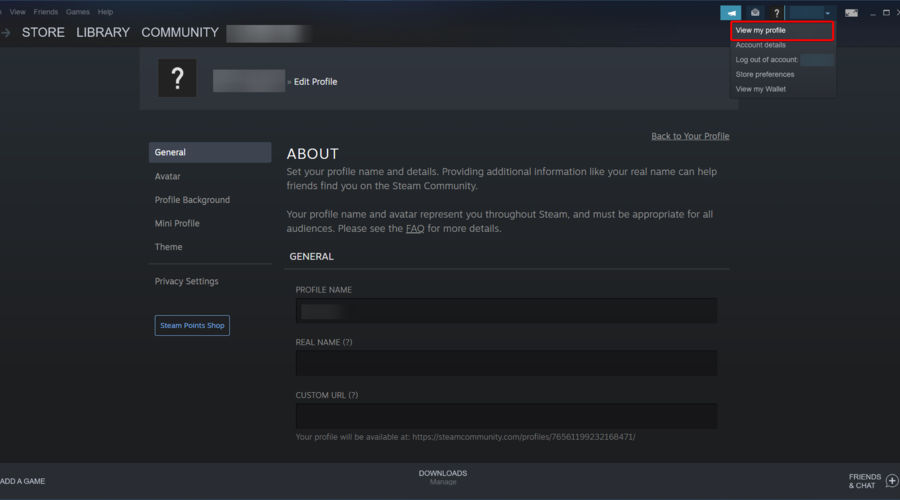
From the top-right corner of the window, click on your Steam profile.
Now, choose to View my profile.
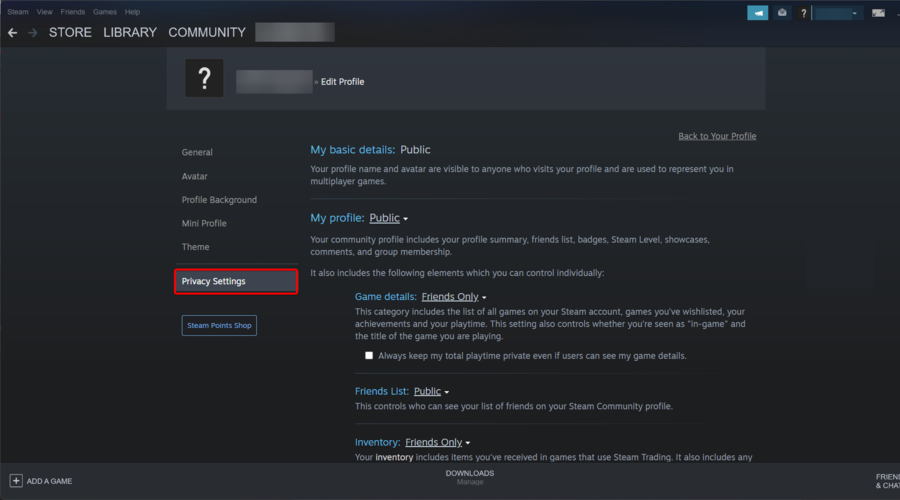
From the left window pane, go to Privacy Settings.
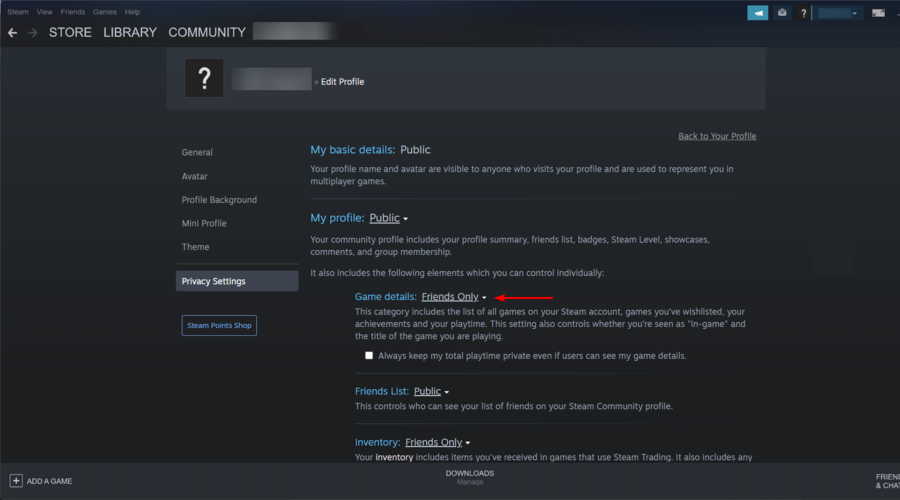
Under My Profile, find Game Details, if you have it set as Private, change it to Friends Only.
Save changes, and check if the problem is resolved.
To make sure that your friends can see what game you are playing, you need to enable a specific feature in your Privacy Settings.
When you install Steam, by default, it has your Privacy Settings set to Private. This makes your gaming activity invisible to your friends.
Steam offers a variety of games and you can sort them according to the category you’re most excited about. In this matter, these are the categories you can find:
Action and adventure – CS, Lost Ark, Destiny 2, GTA V, Forza Horizon 5, Cyberpunk 2077 and many others.
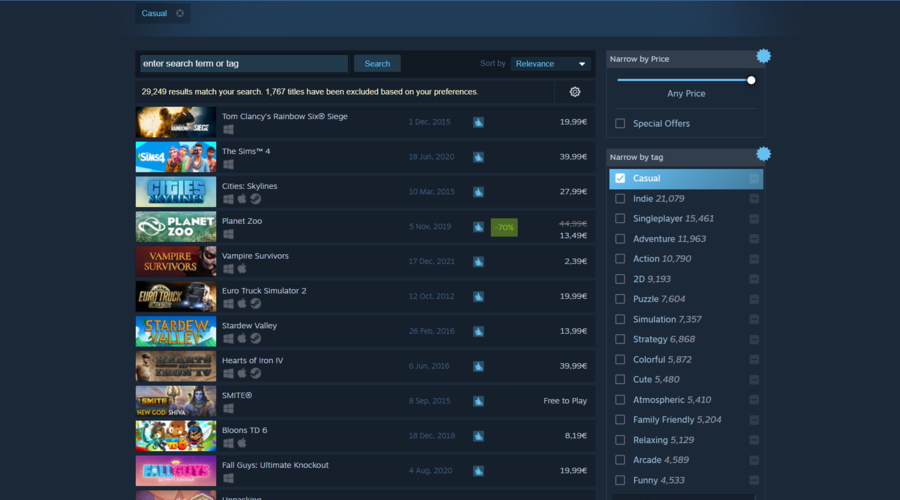
Casual – The Sims 4, Cities: Skylines, Planet Zoo, Vampire Survivors, Tom Clancy’s Rainbow Six Siege, and so on.
Early Access – PUBG: Battlegrounds, Rust, Ready or not, Project Zomboid, Raft, The Forest, etc.
Free to play – Apex Legends, Destiny 2, Dota 2, War Thunder, Star Wars: The Old Republic, and many more.
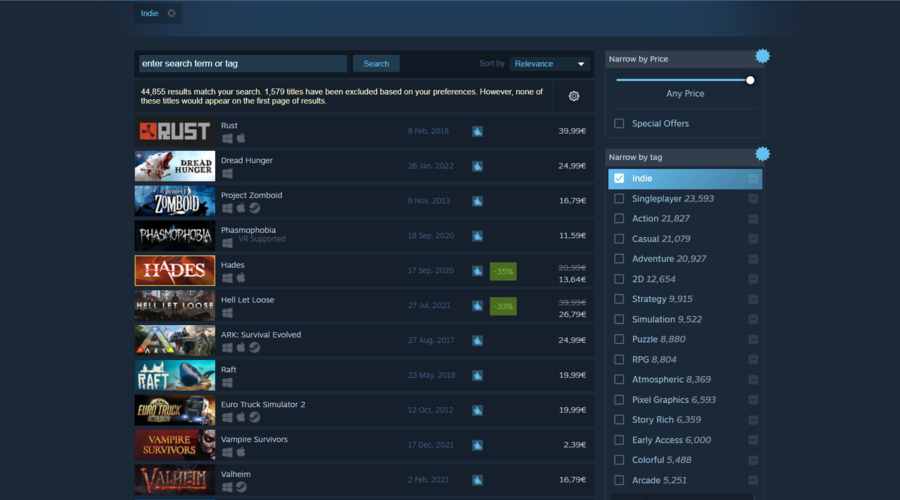
Indie – Rust, Dread Hunger, Hades, Project Zomboid, Phasmophobia, etc.
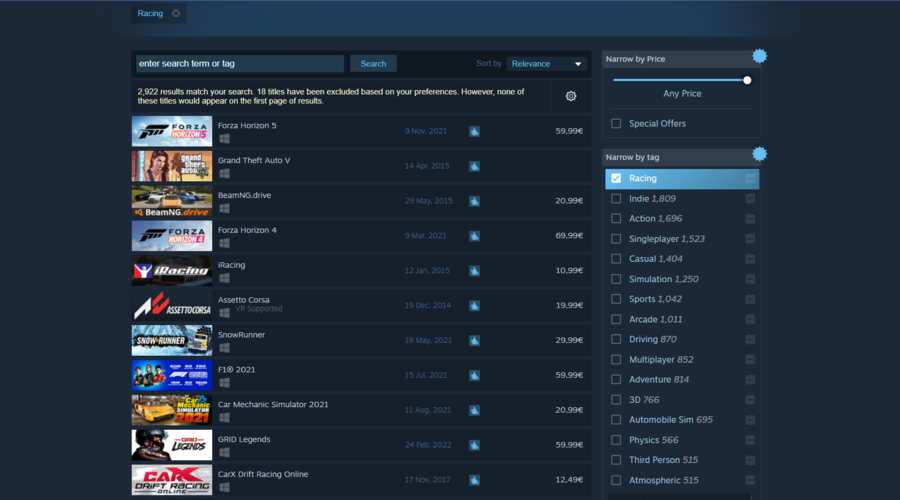
Racing – GTA V, Forza Horizon 4 and 5, BeamNG.drive, iRacing, and many others.
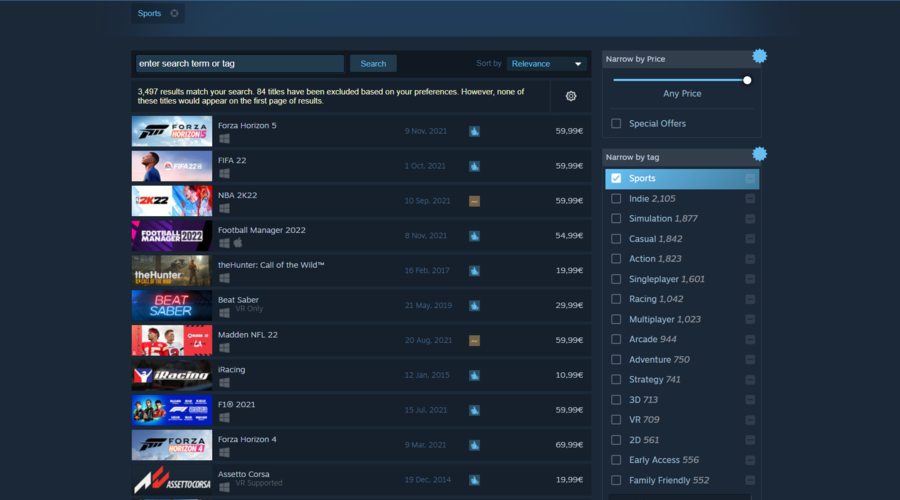
Sports – FIFA 22, NBA 2K22, Football Manager 2022, theHunter: Call of the Wild, etc.
If Steam does not show you’re currently playing, the issue is most likely related to your privacy settings, so you need to adjust them to share your gaming activity with your friends.
In case you were able to get it working, leave us in the comment section below
Steam Link represents a great way to stream games from PC to your TV. For many users, this piece of hardware works perfectly and is easy to use.
However, quite a few users encountered a major issue: Steam Link is not working. Users reported the message No Signal appearing on a black background on their TV.
Also, some said that Steam Link works for a second, and then it is all over when the black screen appears. There is some activity from the controller at the beginning, so we know it’s receiving a signal.
Fortunately, you can solve this error in no time and today we will show you how later in this guide.
Dose Steam Link work only on LAN ?
Keep in mind that Steam Link is not built as a LAN-only feature. You can extend your gaming experience to your mobile device TV or any other computer.
All you’ll need is a local network or a stable Internet connection.
Plus, do not forget that Steam Link now supports Remote Play Together which allows you to invite your Steam Friends to join your local co-op sessions remotely. This happens without being necessary to own or launch the game by themselves.
With the Steam Link app, you can extend your Remote Play Together access to any supported devices with the installed app.
What can I do if Steam Link is not working?
1. Unplug everything
Unplug all the cables from Steam Link.
Plug only the power cable.
Wait at least 30 seconds.
Plug the HDMI again and check to see if anything changed.
Nothing is forever, and the HDMI cable is no exception. We all know how fragile some pieces of hardware are, so there is no surprise if Steam Link is not working because of a faulty cable.
So, many users reported that the HDMI cable was the culprit. Replace it with a new one. Choose wisely the best HDMI cables from our list for enhanced performance.
You might also check if other cables or other components of Steam Link are intact.
As you can see, this is more of a hardware problem that can be solved pretty easily by unplugging and plugging back everything.
Also, your HDMI cable could be old and worn out so connection issues might appear. Replace your duff HMDI cable with a new one if thatțs the case.
What other Steam Link issues should I be aware of?
Indeed, Steam Link might sometimes not work as expected, but let’s see what are the most common specific related errors:
Steam Link won’t go full screen – According to some users, this issue appears because the screen resolutions from the computer and the TV are different. Also, the in-game resolution might not be compatible with the TV or HDMI monitor resolution.
Steam Link not recognizing controllers – It is worth mentioning that this issue appeared on wired controllers, so it’s important to make sure you use the right device. Fortunately, if you check our dedicated guide, you’ll discover all the controllers models that work with the Steam app.
So, there you have it: two easy solutions for a major issue. Moreover, make sure your hardware is intact and change any component if necessary.
Did our article help you? Did you find another method to solve this problem? Do let us know in the comments section below.
It’s possible you’re one of those folks who ignore the touchpad on your laptop in favor of a mouse. However, if you primarily rely on your touchpad and it stops working, such as users reported happening with the Lenovo IdeaPad touchpad, you may be unable to control your computer at all.
There are a few frequent reasons why your touchpad may not be working, which occur more than we would like to admit. Even though IT experts always recommend keeping a close eye on one’s drivers and OS updates, people ignore this message and bump into could-be-avoided errors.
Anyways, on a more positive note, let’s jump into the list of solutions right after we see the causes of this issue and what other issues users reported along the way. Follow along!
Why is Lenovo IdeaPad touchpad not working?
Lenovo IdeaPad 3 as well as Lenovo IdeaPad 5 encounter issues with their touchpad when specific drivers are not installed, are out-dated, or even corrupted. Driver errors can cause the following issues that were reported by our users as well:
Lenovo IdeaPad touchpad not detected – This error message can show up when one’s drivers are out-dated. We have shown below what to do in this case.
Lenovo laptop touchpad not working when charging – Unlike the general note of this article, driver updates are not the cause in this case, but you need to restart your computer or check the charging cable.
Lenovo IdeaPad touchpad not working properly – Users have been wondering what to do when their touchpad is glitchy, and to this we have come in aid.
On top of this, the error can occur on multiple OS iterations under similar error messages such as:
Lenovo IdeaPad touchpad not working Windows 11 – Windows 11 users are now quite familiar with glitches and errors popping up since the new OS iteration is still perfectioning.
Lenovo IdeaPad touchpad not working Windows 10 – Our cousins are no exception to this error and they have also reported getting annoyed at the touchpad not working issue.
Lenovo laptop touchpad not working Windows 7 – The veterans out there might want to consider upgrading their OS since Windows 7 will receive less and less troubleshooting in the future.
What can I do if Lenovo IdeaPad touchpad is not working properly?
1. Make sure it is turned on
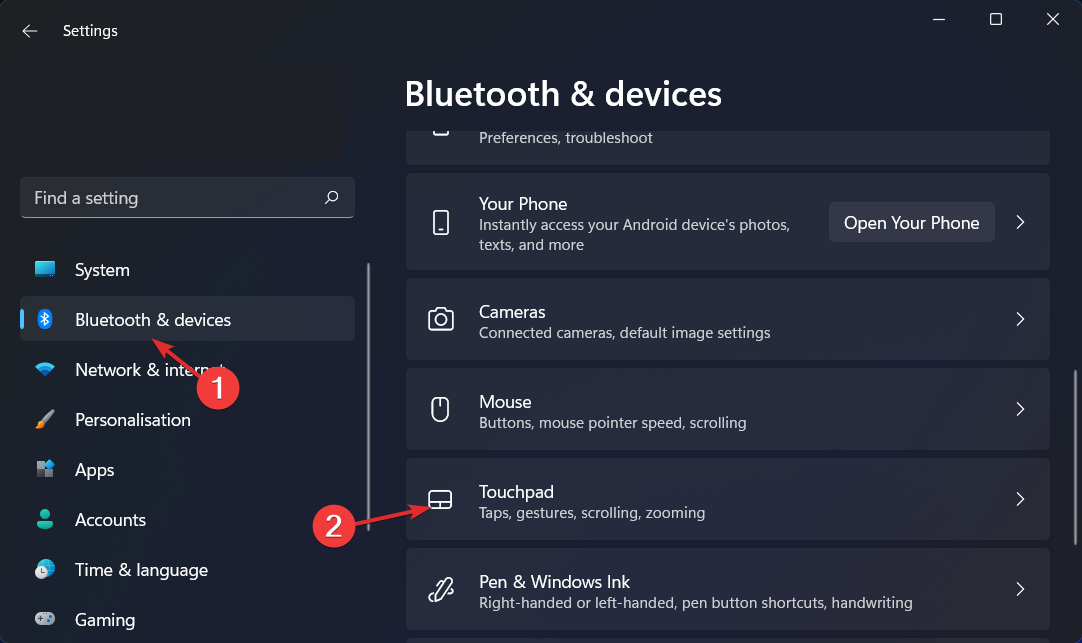
Tap on the Windows key + I and navigate to Bluetooth & devices in the left panel followed by Touchpad from the right side.
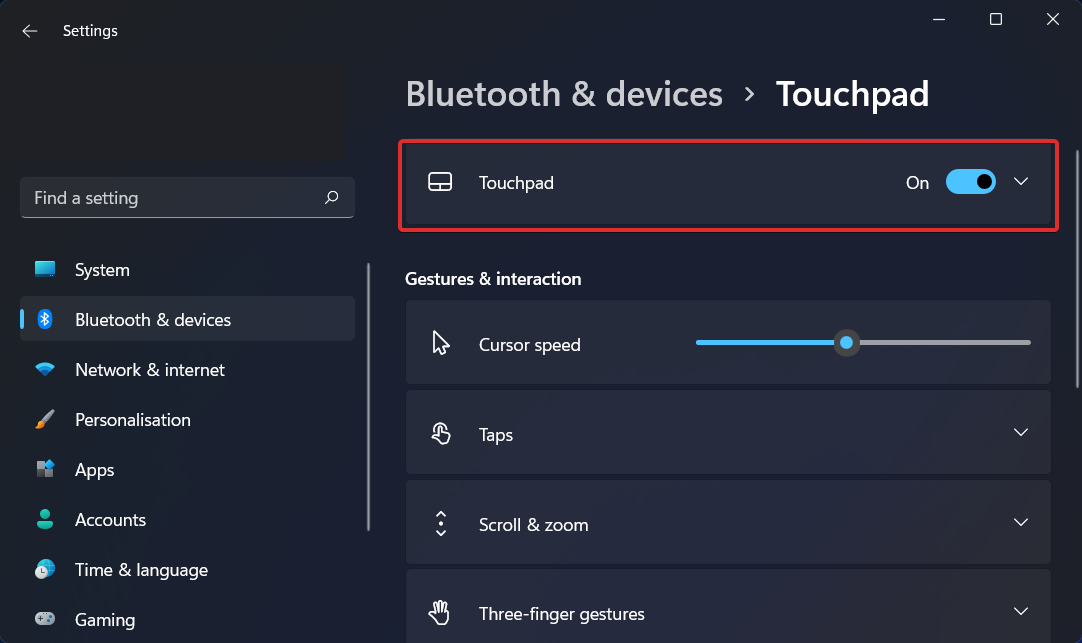
Now make sure the toggle next to Touchpad is turned On.
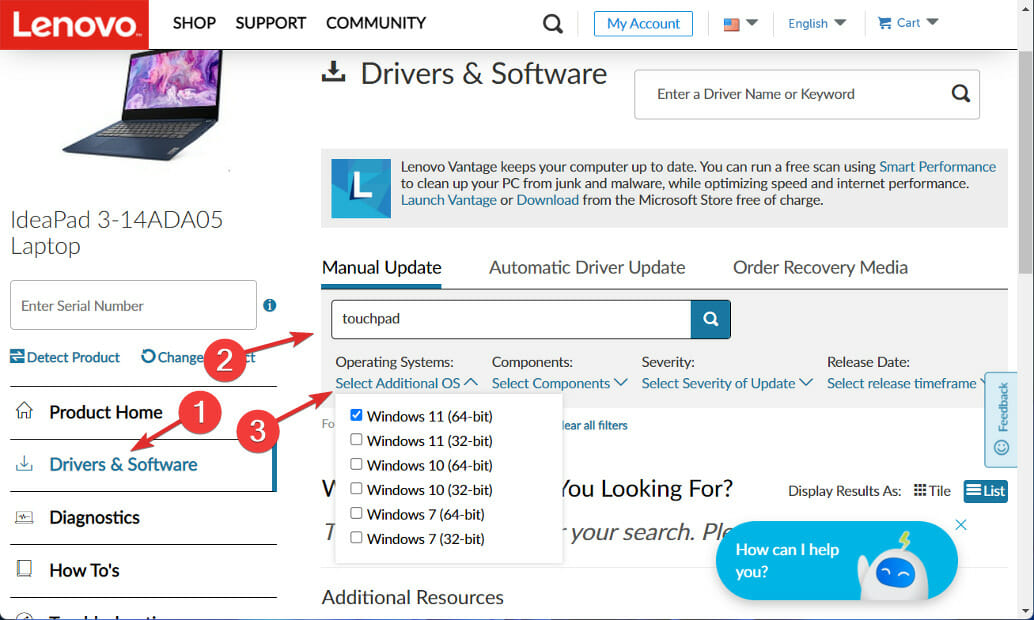
Now click on Drivers & Software, enter touchpad in the search bar, select your OS iteration and download any driver that shows up. Follow the on-screen steps in order to install them and restart your computer afterwards. That’s it!
It is critical to wait for the processes to complete before restarting your computer to confirm that the changes were correctly applied. To prevent manually upgrading your drivers and save time, it is strongly advised that you use a specialist driver update application.
For complete troubleshooting steps and model specific fixes, check our full Lenovo touchpad not working guide.
Was this guide helpful for you? Don’t hesitate to tell us in the comments section below as well as if you have any other solutions in mind. Thanks for reading!
Elden Ring, one of the most anticipated Dark Souls-like games, is now available for all interested players on PC, PlayStation, and of course, Xbox.
The graphics, sound, and overall difficulty of this masterpiece will surely captivate even the most pretentious gamers and will surely remain a classic.
But, as with every new game, there are a lot of bugs and errors that keep players from actually enjoying themselves.
That being said, if your problem has nothing to do with any of the above-mentioned ones, we pretty much know what you are after.
Some players have reported not being able to reconfigure their keyboard controls because they simply can’t find them in the options menu.
We’re about to show you exactly what you have to do in order to fix this in just a couple of minutes.
How can I change my PC keyboard controls in Elden Ring?
FromSoftware, one of Elden Ring’s developers, added the option to show mouse and keyboard prompts instead of controller options in Sekiro.
As expected, the studio also added the option to Elden Ring, making it easier to switch between the two control options.
Most games you play today that support controllers will automatically switch their icons based on whatever you played last.
That’s where this Elden Ring PC control problem generates from and this is what you have to do in order to overcome it.
Run Elden Ring.
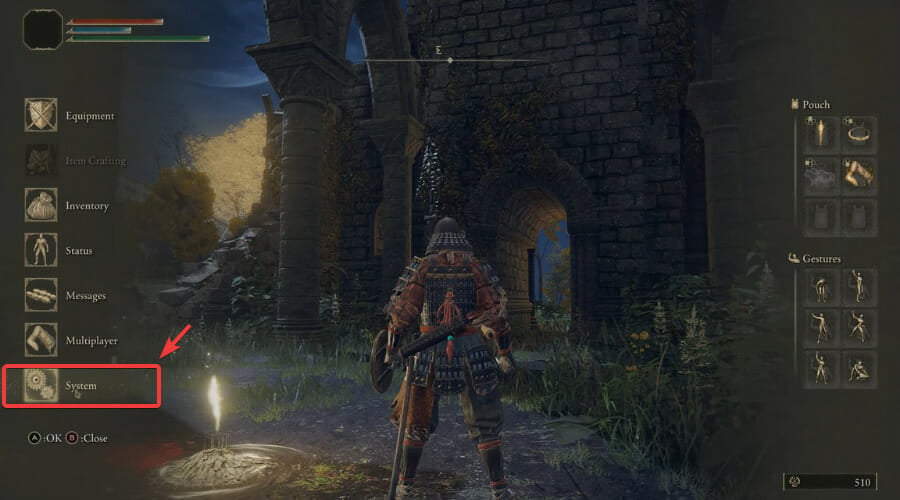
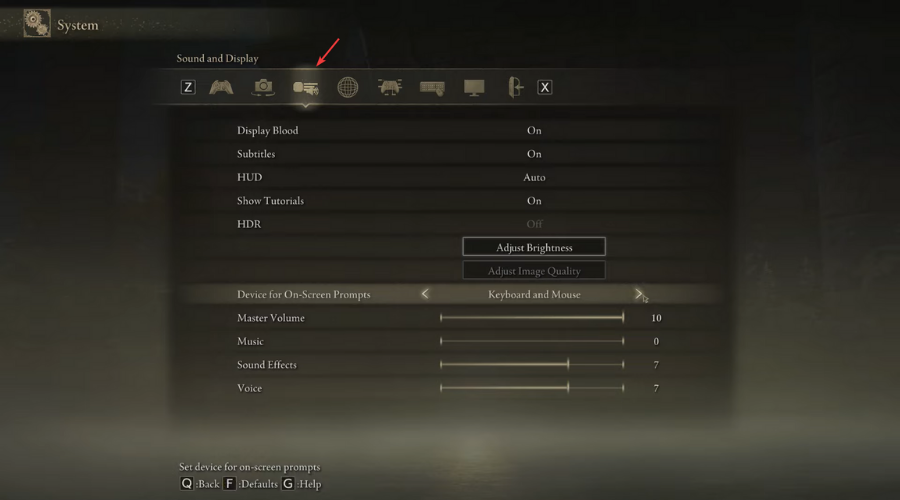
Press Esc to access Settings, then select System.
Select the Sound & Display category.
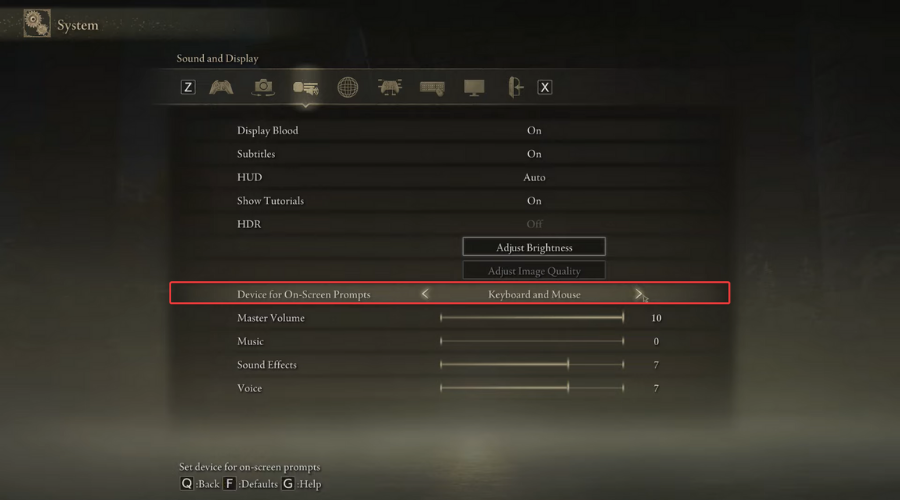
For Device for On-Screen Prompts select Keyboard and Mouse.
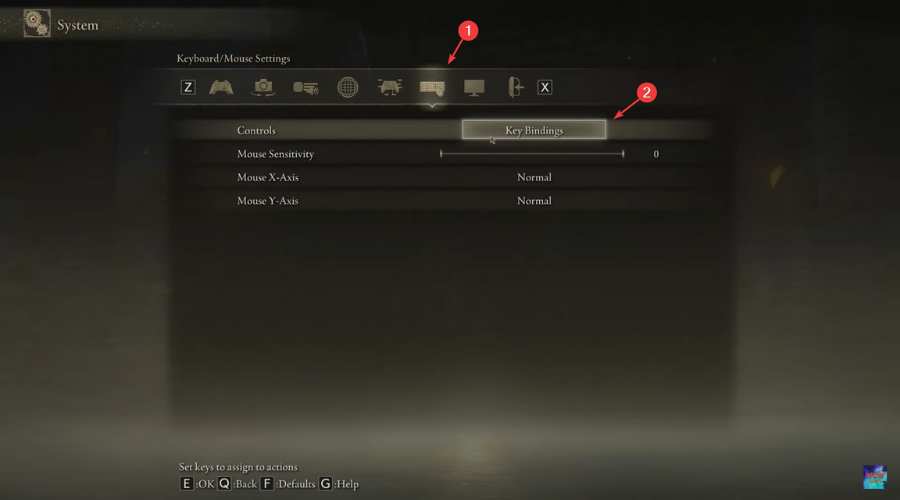
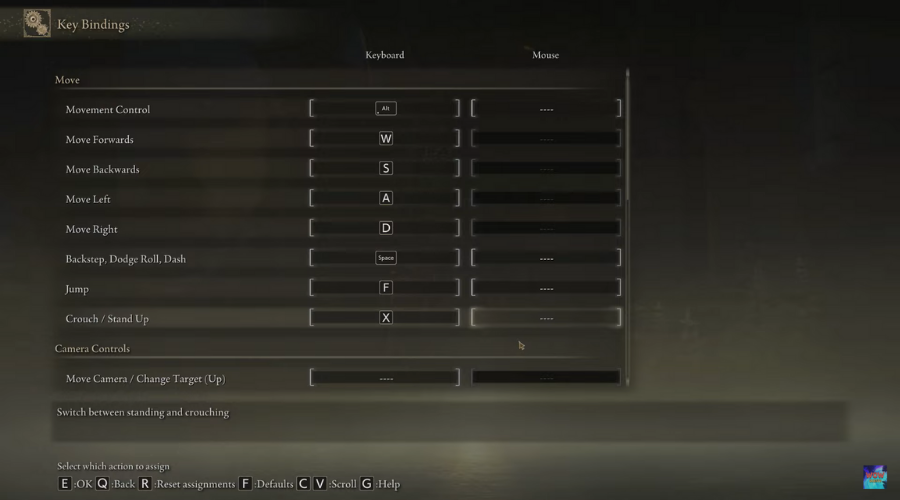
Select the Keyboard/Mouse settings tab and click on Key bindings.
Now you should be able to customize controlls however you want.
This is pretty much all you have to do if you were previously struggling with modifying the way keyboard keys are assigned for Elden Ring.
But what about when your mouse and keyboard won’t work at all when playing Bandai Namco’s latest title?
Elden ring keyboard and mouse not working
Run the game as administrator.
Disconnect aditional input devices.
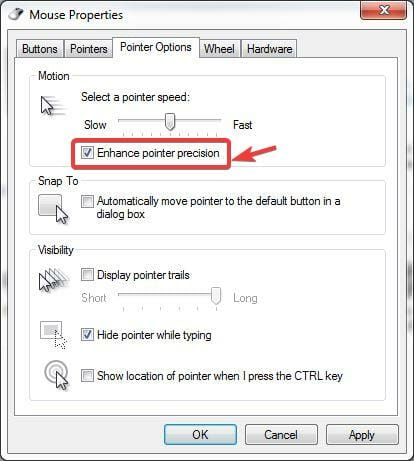
Disable mouse acceleration.
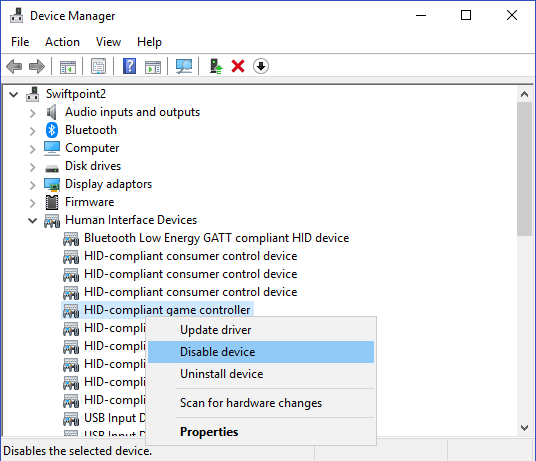
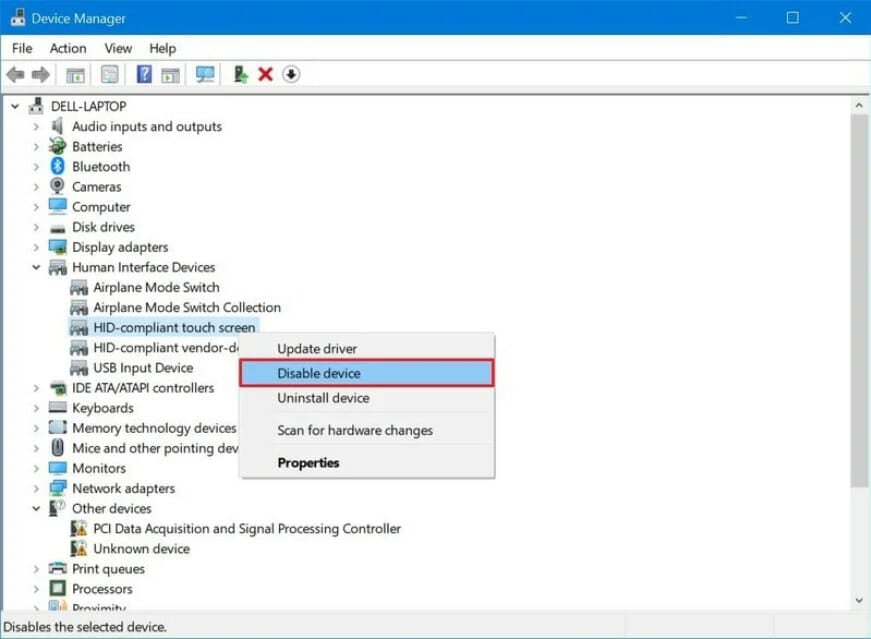
Disable touchscreen.
Run the game in clean boot mode.
It should only take you a few minutes and you will be good to go, off on the adventure of a lifetime, slaying evil bosses and rescuing worthy prisoners.
Keyboard and mouse problems in Elden Ring may also be caused by corrupt, outdated, or missing drivers. To safely overcome this problem, you can use an automated driver updater.
We suggest Outbyte Driver Updater because it is light, easy to use, and can take care of your drivers on a regular basis so you won’t have this type of issue in the future.
As banal and useless as assigning personalized keys to your actions might prove to some, we all know the value of a key binding when we’re in the midst of battle.
Make sure you also find out everything there is about multiplayer before you decide to crossplay Elden Ring with your friends, just to avoid surprises.
Was this guide helpful to you? Share your experience with us in the comments section below.
But Total War: Warhammer 3 is still a pretty young game, considering it was released a little over two weeks ago and has a lot of other bugs that frustrate users beyond imagination.
However, since multiplayer has been one of the biggest selling points of the game, with simultaneous turns and up to eight players able to play at the same time, players want these issues fixed ASAP.
If you simply can’t host Warhammer 3 multiplayer games and the only response you get is the Failed to host game error we can show you what to do while waiting for an official fix.
What can I do to fix this error?
Don’t think that there is an elaborate fix for this issue for the time being, as there really isn’t one. However, judging from what other players had to say after dealing with the same problem, there are some workarounds.
Apparently, if you take a closer look, Steam will show you if you are running any servers, whether you intend to or not, which can actually be the root cause for this annoying error.
It just so happens that one of the affected users checked this and he was running a Space Engineers dedicated server by accident.
Thus, all you have to do is access Steam and stop any server instances that you might have running in the background.
How can you do that, you ask? We’re about to show you the easiest way.
Open Steam.
Press the View button and then click on Servers.
Select the LAN tab.
DIsconnect any servers you are inadvertently running and close the window.
Restart Steam.
Run Total War: Warhammer 3.
All players that try this tweak reported being able to host and play multiplayer games afterward without any other issues.
Remember to also do the same if you are dealing with the same problem until we get an actual official fix from The Creative Assembly or Feral Interactive.
Have you managed to solve the issue using this guide? Let us know in the comments section below.
While Windows 10 has been optimized for gaming, you might encounter FPS issues like spikes and freezes, and the easiest way to increase your PC’s performance is by tuning up your system.
The frame rate is the frequency at which an imaging device produces unique consecutive images called frames, being expressed in frames per second (FPS).
If you want to increase your Windows 10 performance, these tips can help you get a more impressive graphical performance from your games.
Also, if we’re talking about gaming on Windows 10, maybe you might be interested in reading more about DirectX.
Find the product by category choosing the product’s family, line, and name
A driver is a program that helps you communicate with your hardware resources.
To have the best results from your video card, you have to have your drivers updated with the latest bug fixes and optimizations and download them from the manufacturer’s website.
Updating drivers manually is very annoying, so we recommend doing it automatically with the help of a dedicated tool.
Thus, downloading and installing the wrong driver versions will prevent file loss and even permanent damage to your computer.
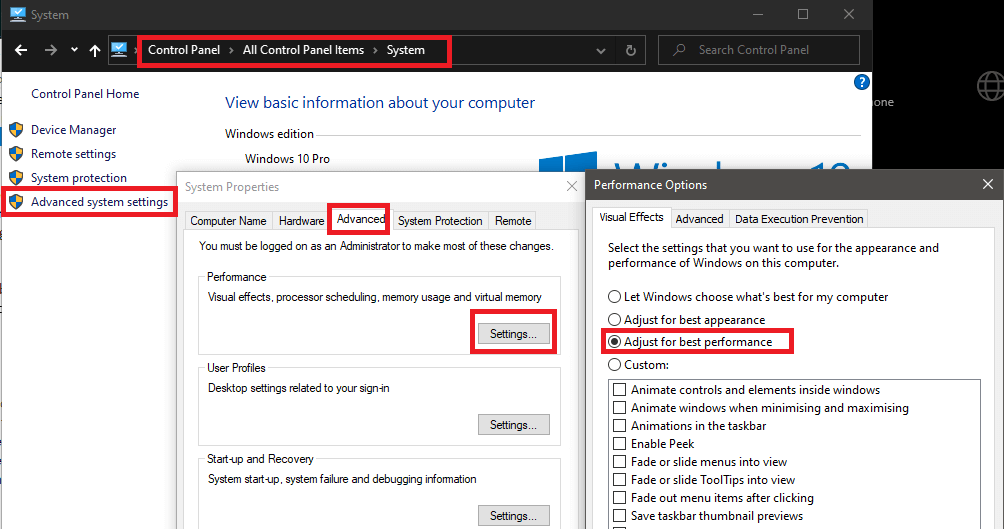
From the left column, select Advanced system settings
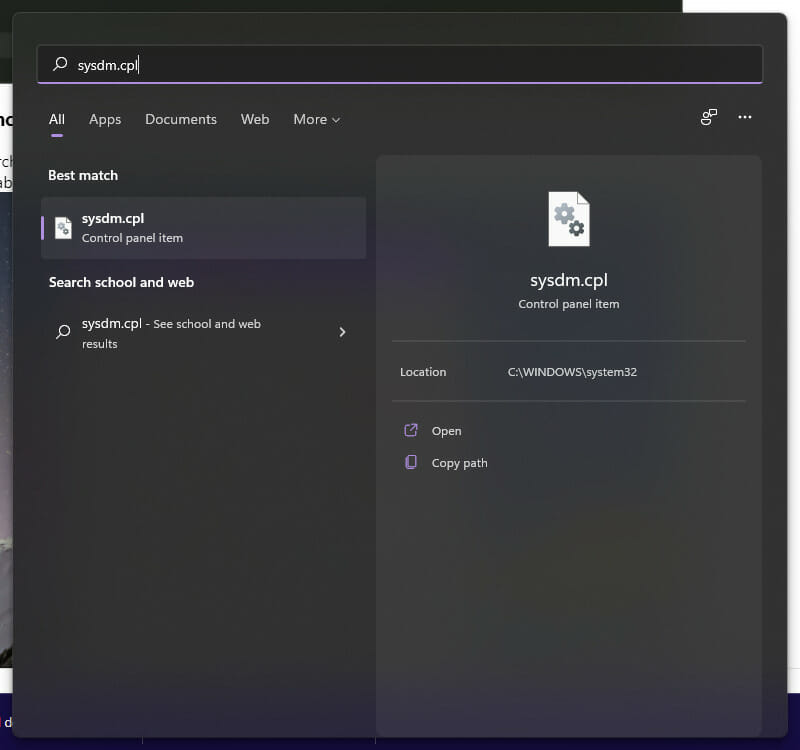
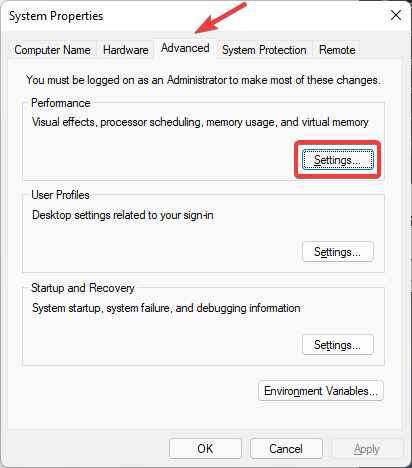
In the new window opened select the Advanced tab and on the Performance, section click on Settings
Check Adjust for best performance
Optional: Go to the Remote tab in the System Properties and untick the Allow Remote Assistance option
From Control Panel, go to Power Options
Select the High Performance / Ultimate Performance power plan
Before applying any additional tweaks, run a computer performance test to identify CPU, GPU, and RAM bottlenecks that may be limiting your FPS.
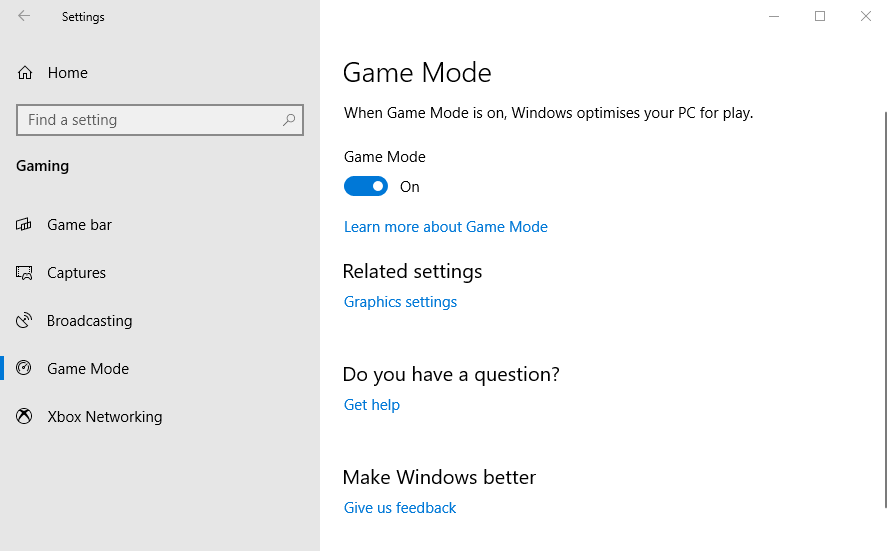
3. Turn on Game Mode
Click on the Start button
Select Settings
Click on Gaming
Go to Game Mode
Turn on
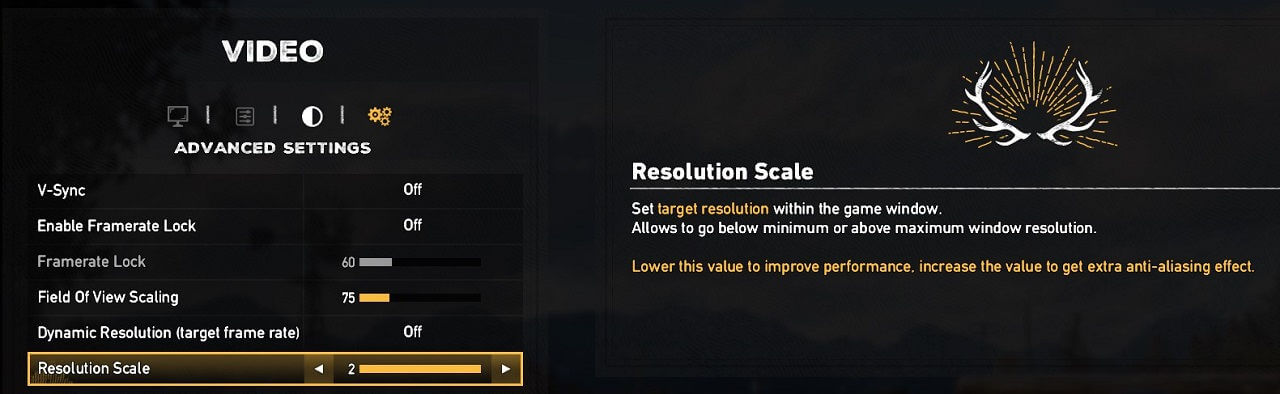
4. Lower your resolution
You can also enhance FPS rates by lowering graphics settings. Reducing the display resolution may increase FPS rates depending on your hardware.
In other words, this is not a universal recipe, but you should test it to see if it works in your case.
In most cases, lowering the resolution will speed up the gameplay. The best solution is to adjust the resolution using the games’ graphics settings.
Additionally, some games offer you the possibility to adjust the rendering scale. You can lower this to improve the quality of gameplay but this feature is not available for all games.
Another option to keep an eye out for here is the FPS lock. If you’re using a 60Hz monitor and your FPS is well above that, you might experience tearing. To solve this, lock your FPS at your monitor’s refresh rate.
5. Configure FreeSync / G-Sync
These two technologies have the same functionality: dynamically adjust your monitor’s refresh rate to match the FPS. The difference between them is their compatibility.
G-Sync is an NVidia proprietary technology, whilst FreeSync is an open-source standard developed by AMD. Recently, NVidia has started allowing Variable Refresh Rate (VRR) on select FreeSync monitors. They are testing and adding support for more monitors with each driver update.
Keep in mind that these features are not available on all monitors, and you should check the specifications of your screen to see if VRR is available.
If your monitor supports VRR, make sure it is turned on from the monitor’s OSD, and then you can configure it in your GPU’s software.
VRR should not be confused with V-Sync as the latter is a software feature that limits your FPS to your monitor’s refresh rate. It works in the opposite way to VRR. If you are experiencing tearing in games, then you can turn on V-Sync.
However, if you don’t encounter this issue, then you should always turn it off, as it will have a negative impact on your gaming experience.
6. Overclock your computer
If you’re a casual gamer, we don’t recommend this solution. However, if you’re an avid gamer and know what you’re doing, you may want to overclock your computer to see if this action boosts your FPS rate.
Keep in mind that overclocking your computer may cause overheating issues. To prevent this problem, you can install cooling software and use a cooling pad as well if you own a gaming laptop.
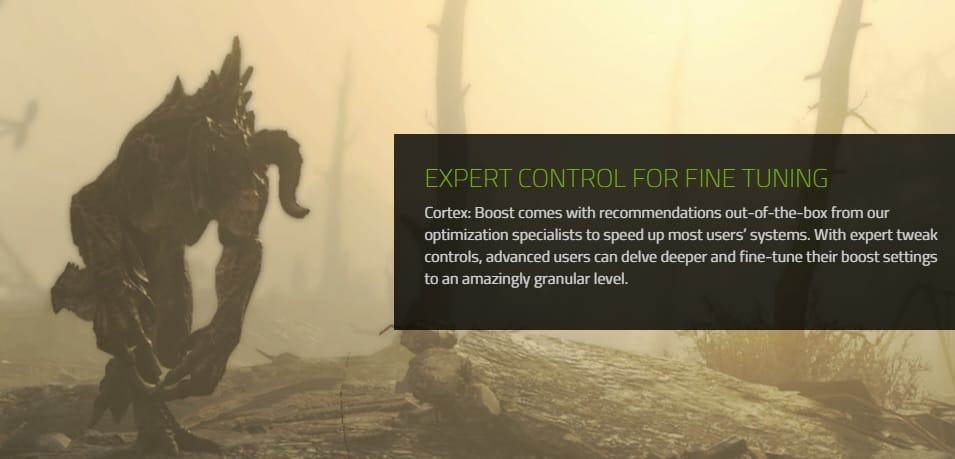
Razer Cortex is a free game booster that optimizes your computer for gaming. As Razer explains, this tool improves your PC’s performance by managing and killing processes and apps you don’t need while gaming.
In this manner, games can access and use computer resources and RAM, resulting in higher frames per second and smoother gaming performance.
Razer Cortex also comes with a built-in FPS counter that shows you the exact FPS that your system is pumping out, offering you real-time feedback on tweaking your game settings.
Using Cortex: Boost is very simple. The tool automatically kicks in when you hit the play button. When you close your gaming session, the software auto-restores your computer back to the state it was before.
Don’t forget to check out this list of the best game booster software that you can install on your computer to get an awesome gaming experience.
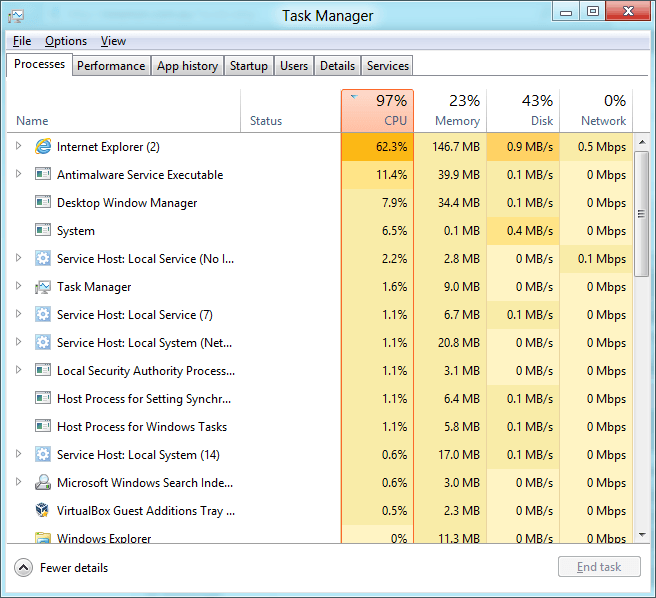
8. Close background processes and resources consuming programs
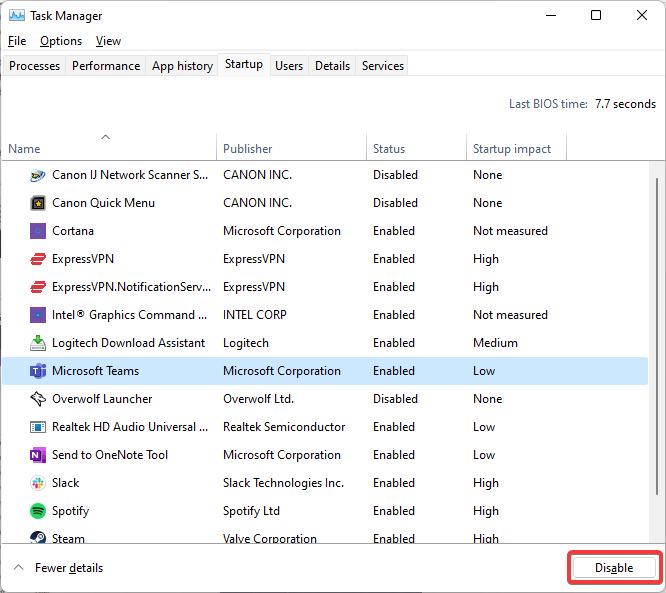
It can happen to have processes that consume a lot of resources and you don’t need to run at this moment (for example chat applications, browsers, etc.).
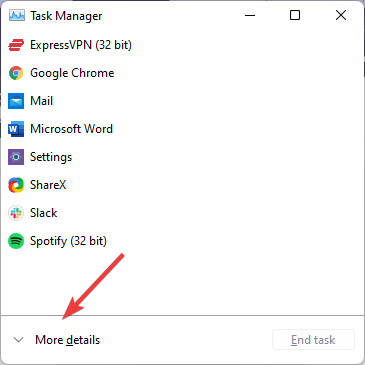
Right-click on the taskbar and select Task Manager
From the Processes tab close any process you don’t need except the system processes
You can also take a look in Add/Remove Programs to uninstall software you don’t use anymore or it was installed along with another program.
Go to Control Panel
Select Uninstall a Program or Programs and Features
Look for the unwanted software and click on Uninstall
9. Scan for malware
The malware installs on your computer without your permission for the purpose of stealing data and damaging your system. You can find on the internet many malware removal free programs
For more information on malware removal solutions, check out this article on the best Windows 10 virus removal tools to vanquish malware for good.
You can also remove real-time protection software like Microsoft Security Essentials or Spybot Search and Destroy because they slow down your system.
10. Check your disk for errors
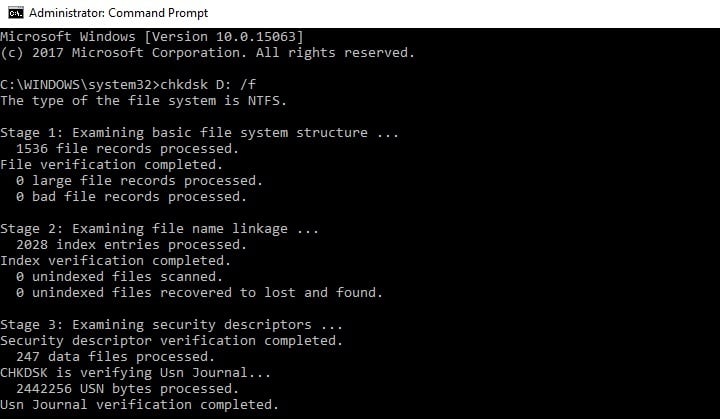
Start Command Prompt as administrator
Type the chkdsk C: /f command followed by the Enter key
Replace C with the letter of your hard drive partition
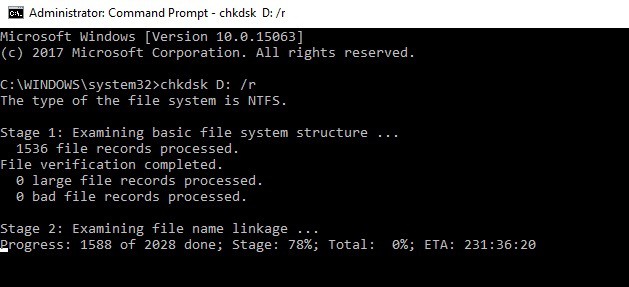
As a quick reminder, if you do not use the /f parameter, chkdsk displays a message that the file needs to be fixed, but it does not fix any errors. The chkdsk D: /f command detects and repairs logical issues affecting your drive. To repair physical issues, run the /r parameter as well.
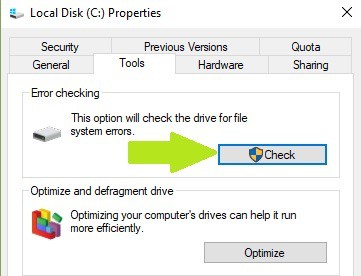
On Windows 7 and Windows 8.1, go to hard drives > right-click the drive that you want to check > select Properties > Tool. Under the ‘Error-checking’ section, click Check.
Right-click on the drive you have Fortnite installed and select Properties
Untick the Allow files on this drive to have contents indexed… box (Apply to subfolders as well)
Disable Windows notifications and Focus Assist
Turn off Windows Game Bar
Turn on Game Mode
Update your system and drivers to the latest versions
Optional: Disable High Precision Event Timer. To do this, open CMD as an administrator and type in:
bcdedit /deletevalue useplatformclock
Run Disk Cleanup on your system drive
Decrease graphics details in-game
While Fortnite doesn’t have the highest graphics requirements, as it was intended to run on most systems, you can still increase your FPS by following our guide and doing the tweaks we’ve shown here.
Go through the optimizations listed above for Fortnite
Set your in-game graphics lower, specifically Effects, Shadows,and Foliage
Note: If you are running out of video memory, follow our guide to fixing the issue.
Bonus: Use FPS booster software
Now, Fortnite or PUGB are two examples. But what about other games, how to increase FPS on Valorant, Minecraft, Warzone, and so on?
We reckon there is a simple way to do it regardless of the game you fancy: by using FPS booster software.
We know you have many questions, and we will try to address them all, starting with how safe FPS boosters are in the first place.
They are no different than any other apps you might be using to enhance computing performance in one way or another. Their role is to make your games run smoothly when your GPU usage is high with low FPS levels.
Of course, they will not act the same; some may perform different functions and tackle different aspects of the enhancing process.
For instance, some will lower your ping, while others will optimize effects and handle resource allocation in order to allow you to make the most of your rig when overclocking your system.
With such a generous offer, you might have difficulty picking the tool that best suits your needs. So, which game booster is best?
We hope that the solutions listed above helped you boost the FPS rate. If you encounter other workarounds to improve FPS, give us more details about these solutions in the comment section below.
No doubt many of you have already tried Total War: Warhammer 3 since its February 17 release. Fans of the series are absolutely thrilled with the game, even though it comes with some issues of its own.
Whether you choose to go on your own or enjoy some multiplayer gaming, Warhammer 3 will surely provide the entertainment and chaos you are looking for.
Without a doubt, multiplayer has been one of the biggest selling points of Total War: Warhammer 3, with simultaneous turns and up to eight players able to play at the same time.
This issue most often occurs when players are playing on different platforms, meaning Steam players attempt to play multiplayer with Game Pass owners, and vice versa.
The quickest option to deal with this nuisance, for both players, is to play the game on the same platform. As for workarounds, you know how it is, modern times call for modern solutions.
Players have reported dealing with this issue in various ways, and each seems to have worked for some of them, while not for others.
One of these temporary solutions involved all players exiting the game until one creates the session they’re all about to play on. Note that this is only for PC players of Warhammer 3.
Everyone of the involved parties must exit Wahammer 3.
Let the host open it and create a game.
Click Join Game directly from your friend list and let Warhammer launch and join like that.
On Steam, you can do this by right-clicking your friend’s name in your friends list. As for Game Pass, you can do this through the friends list on the Xbox app.
The other option you have is to make sure the Game Pass player hosts the game, as for some reason, there’s an internet optimization issue with Game Pass that causes them to struggle to connect to Steam games.
You can sometimes bypass this by making sure your version of Windows and Game Pass is fully updated to the latest version.
However, if both players are on the same platform and they’re still receiving this error, stop trying to use the Join with Code function altogether and use the guide above.
Before we conclude, we must remind you to make sure you have forwarded your ports, as sometimes, when playing on different platforms, one platform will use a different port than the other to connect.
Going the extra mile and making absolutely sure you have your ports forwarded will prevent this issue for the most part, so keep that in mind.
Have you also encountered this error while playing Elden Ring? Share your experience with us in the comments section below.
From billing and data management to keeping track of inventory, finance, and business tasks, Microsoft Excel is one handy program.
The fact that the Excel application is being primarily used by business owners, shouldn’t raise any eyebrows if the important Excel documents are encrypted with a password.
However, if you set a complex password and forgot it or someone else set the password while working on the sheet and forgot to remove it while leaving, you will be stuck with a password-encrypted Excel sheet with no recovery options by default.
Fortunately, there are a couple of password recovery programs to recover Microsoft Excel passwords on Windows devices. These are small, lightweight utilities equipped with different attack modes ranging from brute-force to dictionary attacks and support all versions of MS Excel.
If you are looking for free and paid software to recover MS Excel passwords, here are a few programs you should try.
So, in this article, we take a look at the best software to recover Microsoft Excel passwords on Windows computers.
What are the best software to recover Excel passwords?
Passware Kit Basic is a multi-purpose Windows password recovery tool. It allows you to recover passwords for not only Excel files but also all MS Office documents, Windows administrator accounts, email accounts, web browsers, and more.
Passware Kit Basic is a premium tool, but there is a demo version on offer that you can download for evaluation purposes. The tool is capable of recovering or resetting multiple password types quickly.
Some of the advanced recovery attacks used by Passware Kit Basic include Dictionary, Xieve, Brute-force, Known Password/Part, and more. The combined attack mode uses a combination of letters and numbers to crack the password.
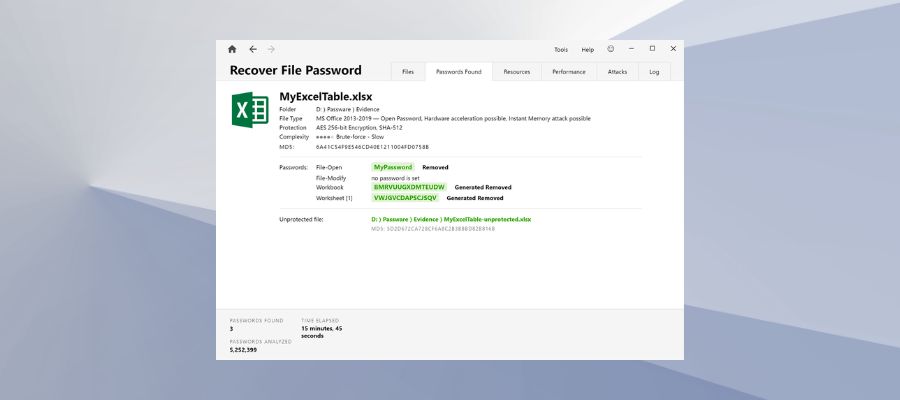
The software comes with an intuitive user interface. After launching the tool, you will see multiple options. To recover the Excel file password, select the Recover File Password option.
Next, you need to select the password-locked Excel file, select the attack type, make changes to the attack types (optional) and click on Start. The recovery process may take some depending on the complexity of the password. You can stop, pause and resume the operation if required.
All the recovered passwords are saved in a separate file and can be reused to unlock encrypted documents. To use Passware you don’t need any technical knowledge, it is fast, easy, and stable and most of the time can accurately recover the password for Excel documents.
Passware Kit Basic
Decrypt your Excel spreadsheets using this software designed for businesses and home offices alike.
This fast and reliable solution for unblocking Excel documents is created for anyone who needs to recover crucial files efficiently.
With this complete software is much easier to recover forgotten passwords of your Excel workbooks, and thus get back important business or personal data.
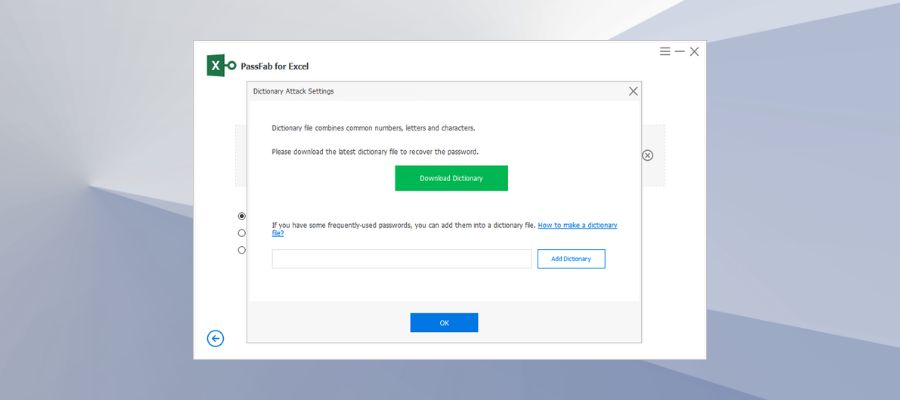
PassFab guarantees the recovery of blocked Excel files with a 100% success rate. You can decrypt protected sheets in a few moments by using complex algorithms for complicated symbols or characters in passwords.
Plus, you can be mind peace about your files because this tool can find out any password regardless of length or complexity.
Using verified recovering methods, you will regain access to read-only files or “can’t edit Excel” worksheets. More exactly, using dictionary attacks or different versions of Brute-Force attacks.
According to your password types, you will get back the Excel files using the mentioned techniques that help by trying all combinations of passwords in case you completely forgot them. Otherwise, you have another method if you know the range or length of the password.
You can thus retrieve multiple Excel files using this intelligent and automated method that will decrypt blocked files before you know it.
Passfab for Excel
Take back your worksheets in a fabulous manner with this smart password-recovering software.
iSeePassword’s Dr.Excel is a password recovery program to recover locked Excel documents on your Windows PC. The software offers a trial-limited version of the tool, while the premium version will benefit you more.
Dr. Excel offers four types of attacks – Brute-force Attack, Mass Attack, Dictionary attack, and Smart Attack. There is a Batch Remove feature to remove spreadsheet and workbook protection.
Furthermore, users can customize and control the recovery process and its impact on system performance as well. If you go to Settings, you can change the number of CPUs the software can use along with enabling or disabling the GPU acceleration option.
You can also change the frequency of automatically saving the recovered password in a separate file.
Dr. Excel is compatible with all versions of Windows since Windows XP, however only supports MS Excel 2003-2016 file format. If you have a newer version, this may not be the right tool for you.
With a modern user interface, Dr. Excel has an intuitive UI. After launching the tool, click on Add File to add the password-locked Excel file to the dashboard. However, the drag-and-drop functionality doesn’t work.
Once the file is loaded, select the Attack Type you want to use. Begin with a dictionary attack and move on to other types if unsuccessful.
To make the recovery process faster you can provide information related to your password such as length, range, lower- or upper-case letters, numerals, etc.
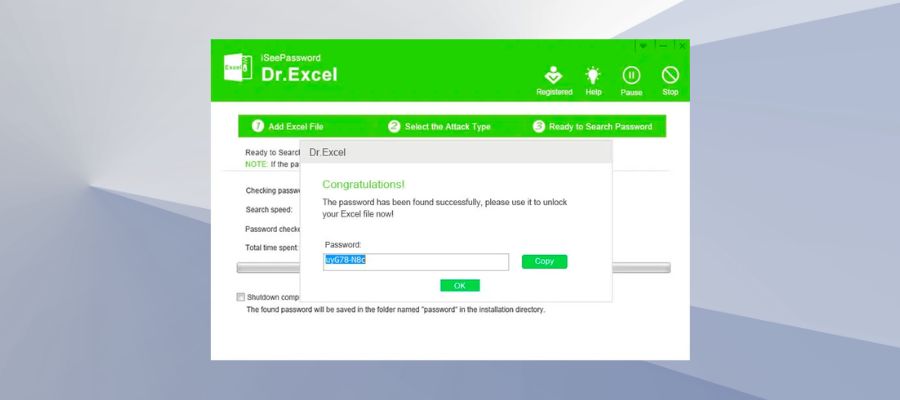
Click on the Start button to begin the recovery process. After the process ends, it shows a Congratulation screen with a recovered password on a dialogue box. You can copy the password to the clipboard and use it to unlock the Excel file.
If you have an older version of MS Excel from 97-2013, MS Excel Password Recovery Master can recover the password for your encrypted Excel file. It is also a premium tool and requires an installation to work.
It is a multi-lingual tool with support for English, French, German, Spanish, and Russian languages. The user interface is simple and easy to use.
You can modify or remove passwords for the Excel workbook and worksheet plus VBA projects using the tool.
Unlike other password recovery tools, MS Excel Password Recovery Master doesn’t make it clear what attack type it uses to crack the password except for the word “Hi-Tech” on its website.
However, we believe the tool uses either dictionary or brute-force attack mode to crack the password.
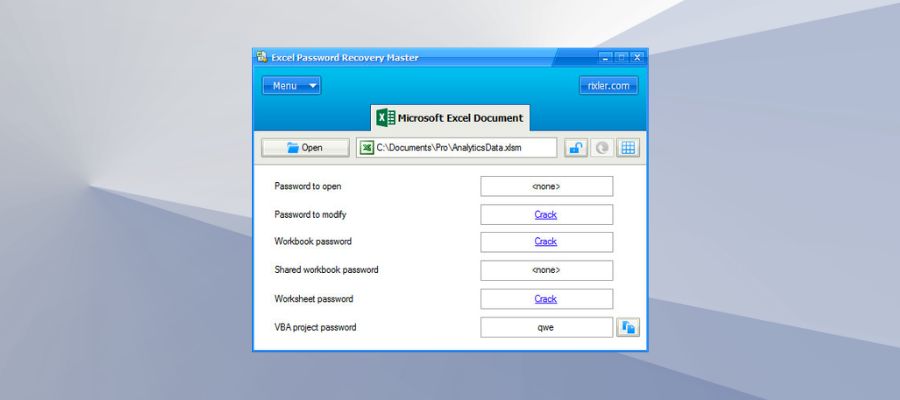
Using the tool is a straightforward affair. After launching the program, click the Open button and load your password-locked Excel file. Next, click on the Crack link beside password modification and removing options.
After the process is complete, MS Excel Password Recovery Master displays the recovered password on the same page.
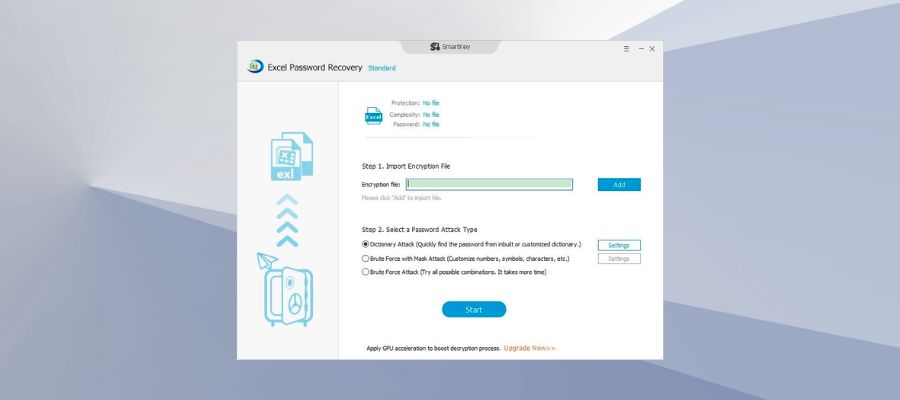
The Excel Password Recovery software from Smartkey is a lightweight Windows-compatible utility that allows you to recover passwords for 2013, 2016, and even the 2019 versions of Excel. If you have an earlier version of Excel format, that should work with the tool as well.
The software can recover lost passwords for Excel workbooks as well as spreadsheets. For complicated passwords, you can use all the resources of the CPU and GPU to speed up the cracking process. Although, this feature is limited to Pro users only.
If you don’t want to install the software on your PC, SmartKey offers an online Excel password recovery service but again for Pro users only.
The user interface of the tool is simple and easy to use. To recover the password, launch the tool and click on Add button. Select the password-locked Excel file and open it.
Next, you need to select the Attack Type. There are three attack types, select Dictionary Attack type for a quick recovery. Check the GPU acceleration option to speed up the decryption process.
By clicking on Settings, you can download a third-party dictionary or add one from your PC. Click on the Start button to initiate the password-cracking process.
The recovered password is displayed on a pop-up window with an option to copy it to the clipboard. However, for demo users, the password will be hidden behind asterisks and ask you to upgrade to see the password.
If you don’t want to use software to recover your Excel password, there is a workaround using VBA code to help you to cancel your original spreadsheet password and unlock the document.
Here are the steps you need to follow to remove the Excel password for any file manually.
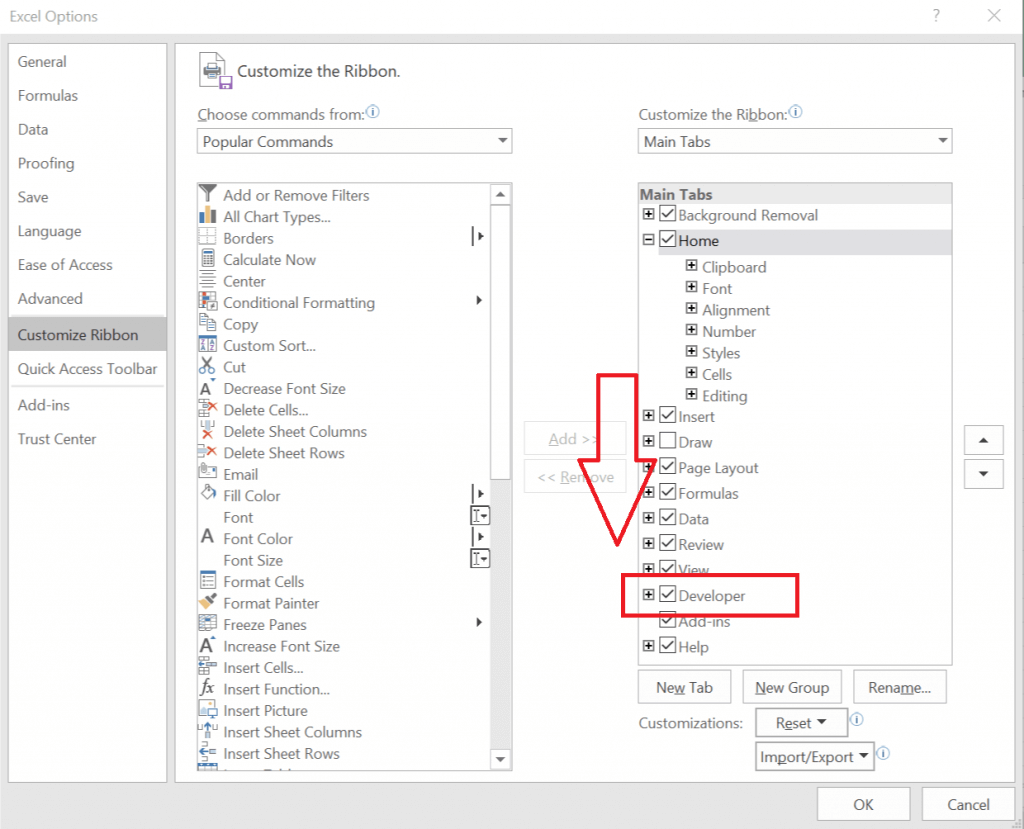
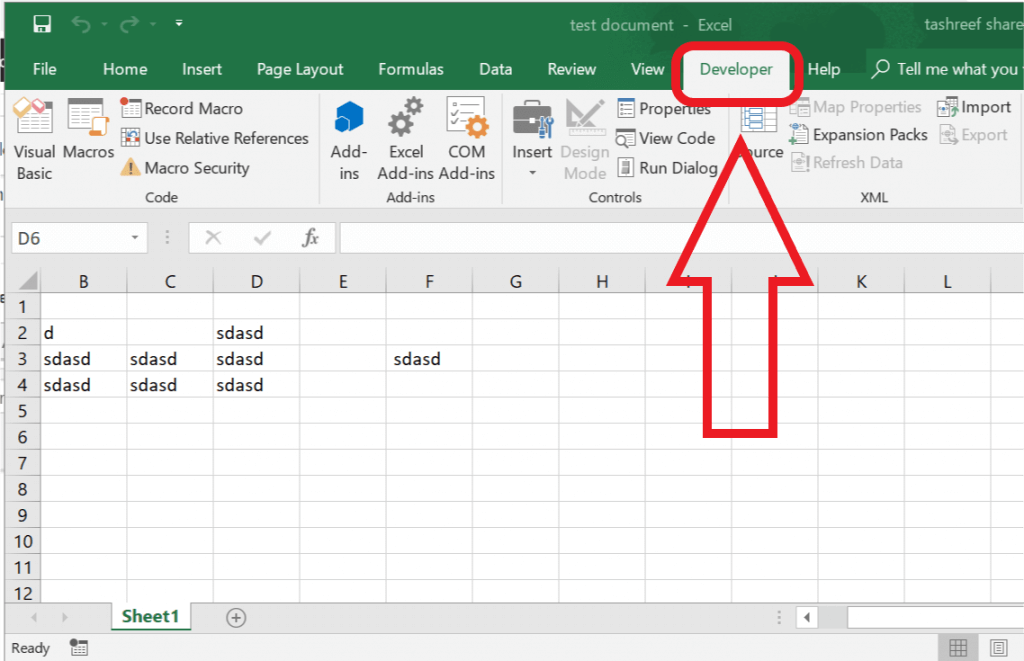
To use the VBA code, you need to enable the Developer option in MS Excel. If you have the Developer tab visible, you don’t need to follow these steps
To enable Developer option, click on File and select Options.
Next, select Customize Ribbon tab. Under the Main Tabs section, check the “Developer” option. Click OK to save the changes.
From the Excel window, click on Developer and select Visual Basic option.
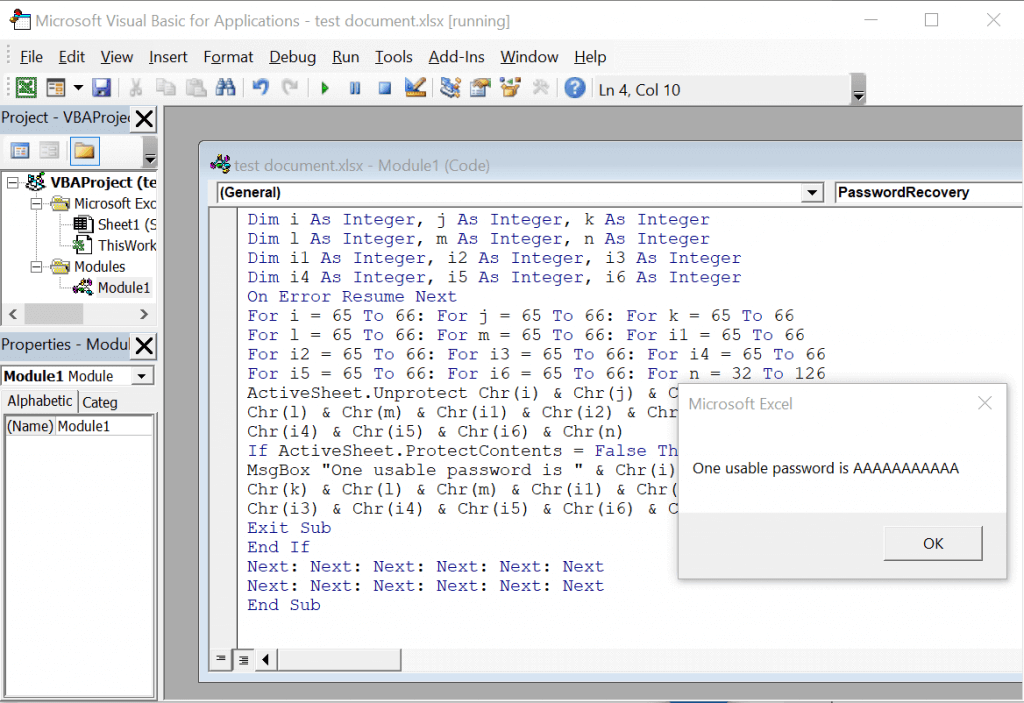
In the new window, click Insert and select Module. Now copy/paste the following line of code in the Module window.
Sub PasswordRecovery()
Dim i As Integer, j As Integer, k As Integer
Dim l As Integer, m As Integer, n As Integer
Dim i1 As Integer, i2 As Integer, i3 As Integer
Dim i4 As Integer, i5 As Integer, i6 As Integer
On Error Resume Next
For i = 65 To 66: For j = 65 To 66: For k = 65 To 66
For l = 65 To 66: For m = 65 To 66: For i1 = 65 To 66
For i2 = 65 To 66: For i3 = 65 To 66: For i4 = 65 To 66
For i5 = 65 To 66: For i6 = 65 To 66: For n = 32 To 126
ActiveSheet.Unprotect Chr(i) & Chr(j) & Chr(k) & _
Chr(l) & Chr(m) & Chr(i1) & Chr(i2) & Chr(i3) & _
Chr(i4) & Chr(i5) & Chr(i6) & Chr(n)
If ActiveSheet.ProtectContents = False Then
MsgBox "One usable password is " & Chr(i) & Chr(j) & _
Chr(k) & Chr(l) & Chr(m) & Chr(i1) & Chr(i2) & _
Chr(i3) & Chr(i4) & Chr(i5) & Chr(i6) & Chr(n)
Exit Sub
End If
Next: Next: Next: Next: Next: Next
Next: Next: Next: Next: Next: Next
End Sub
Click on the Start button (green) or press F5. If successful it will show a “One usage password is” message on a dialogue box.
That’s it. You have successfully removed the Excel password without any software.
However, this method is only useful if you have put a password restriction on Excel to prevent modification and can open the file. If the Excel file is password encrypted and requires a password even to view it, this method won’t work.
Conclusion
So these are some of the best software to recover Microsoft Excel password-lock files. The success rate of password recovery depends on the MS Office version in use, the type of password, and of course the complexity of the password itself.
If you have a hard time remembering the password for all the accounts and files, let a password manager do this work for you so that you don’t have to remember any other password, ever again.
If you depend on the Internet to work, play games and do a bunch of other activities, you must have come across the Your internet access is blocked error in Windows 11 at some point.
Windows 11 is a great operating system with some fantastic features. However, just like any new release, there are bound to be some problems and issues once in a while.
When your access to the Internet is blocked, it can be a frustrating experience especially if you are working on a deadline and don’t know how to fix it.
Sometimes the programs you install on your computer can change your browser settings without your knowledge. This may result in some abnormal behavior of your browser like blocking the internet access or random redirecting of pages.
If you are the kind of user who likes to download APKs and software from unofficial sites, you may encounter this error often. This is because your firewall settings protect you from malicious sites. You need to install and open APKs the right way for the safety of your system.
You can easily bypass this issue by rebooting your router or PC but if that doesn’t work, it means the problem is more advanced and will require additional troubleshooting.
Why am I getting The Your internet access is blocked error in Windows 11?
One of the most common problems in Windows is the problem with Internet access. This problem may occur due to a myriad of issues.
Some of the possible reasons for the error include:
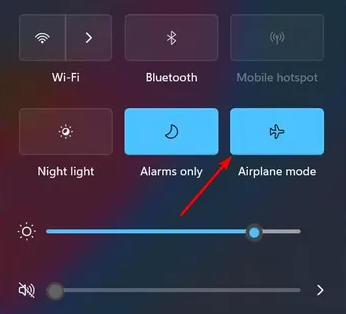
Wi-Fi is disabled – You may find that you mistakenly turned on Airplane mode and that’s why your internet access is blocked. Simply turn it off and sign into the network. If you can’t find the Wi-Fi, see why Wi-Fi option is not showing in Windows 11.
Firewall or Antivirus program is blocking access – Windows Firewall keeps a security check on programs that try to connect from your computer to the Internet. If any of these programs don’t meet the firewall requirements, then it’ll block that program in order to secure your PC.
Virus in your computer – If you see this error message often, it could also be a sign that your system is infected with malware. If you permanently want to get rid of this error, then you need to remove the malware from your computer.
Faulty VPN – If you are having trouble accessing the Internet and have verified that your connection is working outside of Windows 11, it is possible that a faulty VPN is causing the issue. Try disabling the VPN and see whether the problem persists.
Outdated network drivers – Some users face an issue where device settings fail to migrate when they upgrade to Windows 11 which makes the network drivers outdated. You can try updating the drivers or rollback.
Malfunctioned router – Sometimes routers and modems develop bad settings over time. Resetting them can help resolve these problems. To do this, unplug your router for about 30 seconds and plug it back in.
If any of these reasons are the cause of the problem, we recommend you attempt one or more of the solutions listed below.
What can I do if I get The Your internet access is blocked error in Windows 11?
Hit the Windows key, click on System and select Troubleshoot.
Navigate to Other troubleshooters.
Press the Run button next to Internet Connections.
Select Troubleshoot my connection to the Internet in the pop-up window and wait for Windows to identify the problem and recommend a fix.
4. Rollback Network drivers
Press the Windows + I keys simultaneously to open Settings.
Type Device Manager in the search bar and click Open.
Navigate to Network adapter, right-click and select Properties.
Navigate to the Driver tab, select Roll Back Driver then press OK.
Press Yes in the dialog box to confirm rollback.
Restart your PC for the changes to take effect.
5. Update Network drivers
Hit the Windows + I keys to open Settings.
TypeDevice Manager in the search bar and click Open.
Navigate to Network adapter, right-click and select Update Driver Software.
Select Search automatically for updated driver software.
In addition to this, you can make use of a third-party tool to make work easier for you. The application is equipped with an automatic update function.
Unlike many similar products on the market, Outbyte Driver Updater does not require you to have any technical knowledge about PCs because everything is done automatically.
It can detect missing and outdated drivers and install the latest version on your system in a matter of seconds.
Select the VPN connection you want to disable, click on the drop-down and select Remove.
Try accessing the page again.
Switching to a more reliable VPN also has been proven to work for some users, as free or built-in VPN on Windows tend to have bugs and errors. Our recommendation is to try Private Internet Access and see how it goes.
Could the Your internet access is blocked error occur because my system is hacked?
When you have a connection, the primary way in which your system gets exposed to hackers is via the Internet. Once it is blocked, hackers cannot access your system.
That’s not to say that your system cannot be hacked at all – there are many ways to hack a computer. Here are some:
USB devices – It is possible for someone to plug a USB device into your computer and inject malicious codes into it. If you’re in a public place, such as a coffee shop or library, it is easy for someone else to plug something into your computer without you noticing.
Malicious email attachments – If you receive an attachment from someone and open it, the attachment can contain malicious code that will infect your computer. This is the most common method of hacking.
Insecure websites – Some websites are vulnerable to attack and if you visit them then their malicious code can infect your computer.
How can I protect myself from hackers?
Hackers often find ways to exploit weaknesses in software applications or operating systems. Viruses and worms are examples of malicious software that hackers use to attack networks.
But there’s good news: You can avoid the dangers of hacking by taking a few simple precautions.
Here are some tips and tricks to stay safe:
Make sure you have the most up-to-date security software, web browser, and operating system (OS), as well as the latest versions of apps on your devices.
Use strong passwords for all your online accounts. Also, avoid using the same password for multiple accounts.
Watch out for phishing emails from fraudsters trying to steal your personal details. Avoid clicking on links from unknown addresses.
Be careful when downloading files from websites or social networks. Stay safe by downloading apps from official stores or only trusted websites.
Only connect to secure wireless networks (those that require a password) when surfing the web on your laptop or mobile device especially when using public networks.
We have also outlined top antiviruses for your PC if you want an extra layer of protection besides your Windows Firewall.
As you have seen, there are plenty of reasons why your internet access is blocked in Windows 11 but there are also plenty of solutions you can try to remedy the situation.
As of today, on what should have been the date of its premiere, the Minecraft movie appears to be in production limbo as far as anyone can tell. The premise of the film was/is, to use its own unofficial log line: “the story of a teenage girl and her unlikely group of adventurers. After the malevolent Ender Dragon sets out on a path of destruction, they must save their beautiful, blocky Overworld.”
The project was initially announced back in 2019 on Mojang Studios’ official site as well as on social media.
Dates! They are important, because they allow us to clear our calendars for exciting, nay, MONUMENTAL events. Such as the upcoming Minecraft movie, which finally has one! March 4, 2022. Just around the corner! A few more details here: https://t.co/JfIEBYpptcpic.twitter.com/CstpQVKPdY
But that was before the COVID-19 pandemic, in the wake of which Warner Bros. decided to shuffle part of its production schedule. Black Adam, a superhero flick starring Dwayne “The Rock” Johnson, was also delayed alongside the Minecraft movie, but has since been given a new release date for late July of this year.
The Minecraft film however, has not been given the same treatment, leaving fans of the popular block building game to ponder the fate of the project, as no further news has been so much as hinted at thus far at the time of this writing. Will the project ever see the light of day again, or has it been unofficially shelved? Only time will tell, but in the meanwhile fans at least have the game’s cinematic mode to play director with.
Microsoft has finalized its $19.7B acquisition of conversational AI and ambient intelligence solution provider Nuance Communications Inc. With the ink figuratively still wet on the deal, executive vp of Cloud + AI Group for Microsoft, Scott Guthrie offered some words of praise for Nuance as well as a hint at what’s to come from the collaboration.
“Completion of this significant and strategic acquisition brings together Nuance’s best-in-class conversational AI and ambient intelligence with Microsoft’s secure and trusted industry cloud offerings.
This powerful combination will help providers offer more affordable, effective and accessible healthcare, and help organizations in every industry create more personalized and meaningful customer experiences. I couldn’t be more pleased to welcome the Nuance team to our Microsoft family.”
Continuing the vision, Microsoft seems poised to leverage Nuance’s underlying ambient AI technology to help vertically stack Azure solutions for industries such as healthcare, financial services, retail and telecommunications to fill in service gaps for both consumers and businesses.
While Azure does offer similar Nuance-like solutions, Nuance already has “deep vertical expertise and proven business outcomes across healthcare, retail, telecommunications and more, which should accelerate Microsoft’s plans to deploy its services to those fields. In the end, Microsoft may be looking to Nuance to help brand services such as early detection, personalized customer experiences, and streamline online businesses processes with greater intuitive AI steps.
As for welcoming Nuance into the Microsoft fold, Nuance CEO Mark Benjamin will remain chief executive officer of the company and report Scott Guthrie and his Microsoft Cloud + AI department for the time being.
Earlier this week Microsoft shared more about how it is responding to the Russian invasion of Ukraine. It was a four-part response, but the company has now come out provided another update on what it is calling the “unjustified, unprovoked and unlawful invasion,” saying that it has suspended all new sales of Microsoft products in Russia.
The move should not come as much of a surprise, as Microsoft’s rival Apple made a similar decision to suspend sales in Russia back on March 1. Yet Microsoft also added that it is working closely and in “lockstep” with the government of the United States, the European Union, and the UK to stop many other aspects of their business in compliance with governmental sanctions. According to Microsoft President & Vice Chair, Brad Smith:
We believe we are most effective in aiding Ukraine when we take concrete steps in coordination with the decisions being made by these governments and we will take additional steps as this situation continues to evolve.
The situation in Russia is largely a political and humanitarian issue, but many big tech companies and even the video gaming industry have gotten involved to line up with decisions from United States officials. Intel and AMD stopped chip sales in Russia and Belarus, and Google is blocking many Russian outlets on its services. Microsoft also blocked state-sponsored content from RT and Sputnik on MSN.com and Microsoft Start, and re-ranked those search results on Bing, along with removing the Windows Store RT news app.
The impending weekend is looking like a sporty one for Xbox Game Pass and Xbox Live Gold members with the two games lined up for Xbox Free Play Days.
The first of these is Bassmaster Fishing 2022. This is a highly realistic fishing sim with officially licensed content for the Bassmaster Elite professional bass fishing series. The game is at present having an online Bassmaster Classic Tournament where players can earn in-game prizes.
The second game in the lineup is Rims Racing. It bills itself as the most authentic motorcycle video game experience ever created, with simulation physics and over 500 replaceable aftermarket parts for the bikes. It also features 8 dream bikes and some of the most mettle-testing tracks in the world.
Xbox Free Play Days is another perk for subscribers to Game Pass and Xbox Live Gold, which allows members to try out a different lineup of games each weekend. It is a great way to discover new favorites or just try out something different.
By trading software, you can choose to analyze financial products and trade between stocks, bonds, options, currencies, and crypto coins.
They’ll certainly help you make informed decisions and invest successfully in different stocks, plus trade for the leading companies’ shares Additionally, some of the presented tools in this list can also support you as cryptocurrency converter apps.
In this post, we will be looking at the best trading software for Windows & Mac PC.
What is the best trading software for my Windows or Mac PC?
TradingView is a social/trader network where anyone is allowed to publish a trade idea. It is the ideal trading software for PC and is accessible even on mobile phones.
You have over 12 chart types that are customizable to meet your viewing needs. Thus, you can analyze your investments with detailed reports and get more educated decisions.
Let’s quickly look at its key features:
Draw anything on any chart.
Slit screen
Multiple views
Accountability by sharing or publishing your trade ideas.
TradingView
The most active social trading platform with tools that scale from simple to complex to perfectly fit your needs.
From a single copy-trading experience to automatic fully managed portfolio rebalancing with immediate initialization, you can go as basic or as advanced as you like.
In addition, this trading service is perfect for beginners who just need to learn more about stock or crypto transactions. You also have copy trading opportunities to learn from experienced investors.
Let’s quickly look at its key features:
Social Charts to share your comments, exchange views with other traders and explore trends visually
Tradewall to filter events according to your selected criteria such as open or closed trades
Calendar to schedule your important economic events
Forex tools including currency converter, pip value calculator, margin calculator, and profit/loss calculator
Automator feature to notify you when things happen or automatically execute actions based on predefined rules and settings
ZuluTrade
Get all the tools you need for simple, efficient, and profitable trading in a single app!
This platform offers over 2,000 financial instruments, including cryptocurrencies, and is suitable for both novice and expert traders. It also provides ready-made copy portfolios and ensures strong privacy protection
With this financial solution, you can smartly expand your portfolio of investments for market-leading companies.
Plus, eToro is created as a social hub for anyone who needs to make informed decisions about their trade and observe what other investors are buying or selling.
Let’s quickly look at its key features:
Intuitive, user-friendly platforms adapted for all skill levels
Best-in-class security protocols and strong data protection
$100,000 virtual portfolio to practice your strategy
CopyTrader technology for an easy start
Charts and advanced analysis tools
Seamless integration with the eToro wallet
eToro
Try eToro and experience the world’s favorite social trading app!
MetaTrader 4 is a platform specifically designed for trading foreign exchange, financial markets analysis, and expert Advisor’ use. It is compatible with major Windows OS.
In case you need to be part of the Forex trading community and consciously invest in this market, this platform is specially created to help you get the newest financial insights.
You can therefore use this financial analysis solution regardless of the trading experience and profit from advanced tools for your trades.
Let’s quickly look at its key features:
Advanced technical analysis
Flexible trading system
Algorithmic trading
Expert Advisors, as well as mobile trading applications.
Signal and market additional services extend the frontiers of MetaTrader 4. It allows you to copy the trades of other traders while providing you with several expert advisors and technical indicators that you can purchase.
Ability to check if there is still money available in your account
You can easily access history data by using the predefined arrays of Time, Open, Low, High, Close, and Volume
Very easy to get the information about errors in the program
This trading service is highly suitable for any person who needs trustful investing tools and active equity.
Employing this trading solution is a great method to capitalize on your market investments rapidly and with professional tools.
Cobra Trading offers multiple platforms to serve you different needs and help you make informed decisions about your stocks or equities tradings.
You can use the DAS trader platform, Sterling trading, or CobraPro cost-effective platform. Direct access software gives you direct availability for advanced order types, charting, and multi-account management.
That being said, this trading service has complete support and customizable charts for individual traders in order to deliver satisfying results.
eSignal is one of the oldest and most reliable trading platforms in the market. On the retail side, they are among the early innovators of adaptive pattern recognition tools and advanced charting technology.
Their offerings and pricing categories can effectively accommodate casual investors to active traders and also provide 24-hour customer support Monday through Friday.
In addition, online trading capabilities can be integrated via plug-in directly to more than fifty partner brokerage firms.
Let’s quickly look at its key features:
Smooth and stable charting with flexible scaling.
Charts include a rich library of basic to advanced technical indicators.
Stable and seamless level 2, time and sales windows with the ability to add more depth with subscription agreements for ARCA book and Nasdaq Total View.
The Market Screener Plus enables users to scan by technical, fundamental, or values.
The user-defined alert configures the eSignal platform based on pattern, price, metrics, and several other parameters directly through the watch lists, scanner, or on charts.
Sierra Chart has a large set of tools and indicators. Furthermore, its lightweight size makes it appealing to low resources PCs.
With this charting tool, you have detailed charts and reports to see the market changes and predict new strategies for future investments in your stocks.
Plus, using this solution you have complete access to technical analysis, historical and real-time charts about financial markets.
LMSs or Learning Management Systems are great tools for training your employees or your clients if you have a dedicated business.
Such e-Learning software will help you with the administration, documentation, tracking, reporting, automation, and delivery of educational courses, training, or development programs.
But nowadays, the tool is not nearly complete without the video conferencing system, and let’s face it, it’s indispensable if your students are scattered across the globe.
How can I choose the best LMS with video conferencing?
As we underlined above, LMSs are complex tools for e-Learning courses management but some of them even help you build the training modules within their application.
So, let’s look at the most important aspects that you should look for in an LMS with built-in video conferencing:
➡ Integration and usage
If you’re looking for a fully integrated solution, it should provide all the tools needed for the training operation, from original training module creation to management, delivery, and video conferencing.
For instance, the solutions from our list provide a complete platform and include all forms of training and seamless Zoom integration.
➡ Accessibility
This is the most important aspect of an LMS, to be accessible from anywhere in the world and we’re not only talking about students, but also the trainers.
With a cloud-based platform, not only you can have clients from all over the globe, but also teachers. And you will still be able to monitor all their activity from a central console.
➡ Fast and easy to deploy
If you have everything set up for a course but the students can’t load it because it’s too large or not compatible with the conferencing solution, all your efforts have been in vain.
You will also need a quick method of sharing additional learning material and presentation tools to help you explain the content in a more comprehensive way.
That being said, we looked for the best LMS with video conferencing features in terms of usage, features, and, of course, budget.
Adobe Captivate Prime is one of the best solutions for creating exciting and detailed e-Learning content and its integration of other products from Adobe makes it very versatile.
Content creation was taken to a whole new level but the app does take some time to learn so that you get to benefit from all the features it has to offer.
The integration with the Adobe Creative Suite not only provides compatibility with other tools for conferencing and course management but also offers a cohesive interface that will look familiar.
Captivate Prime comes with a lot of presets, built-in animations, and characters that will unleash your imagination, but one standout feature is the possibility of creating truly responsive content.
The app allows you to adjust, add, or remove elements based on the screen size, thus making your content perfectly easy to be followed on any device.
The key features of Adobe Captivate Prime are:
Create courses adapted for any screens and devices
Produce virtual tours, talking-head screencasts, and VR experiences
Create multiple modules of one course and impose restrictions via quizzes
Supports PowerPoint presentations and other media material
Free trial version for testing
Adobe Captivate Prime
Create and manage courses on this LMS that offers integration with other Adobe products.
With LearnWords, not only you can create and promote your courses but you can also sell them so you will be able to really monetize your skills.
Engage your students by easily integrating interactive videos, eBooks, assessments, certificates, SCORMs, surveys, and much more.
LearnWords allows you to convert your videos with automatically extracted transcripts, quizzes, and tables of contents that will transform them into exceptional experiences.
The solution also has a webpage creation tool that comes with intuitive drag and drop functionality and you can start off by choosing one of the hundreds of templates available.
As we mentioned above, the tool features a powerful sales engine, with advanced pricing options for all kinds of digital products that will make it easier to sell your courses.
Basically, with LearnWorlds, you can create your own school and connect it with a lot of marketing and affiliate tools to increase your sales.
Let’s see some of its most important features:
24/7 technical support
Built-in visual editor
In-app purchases
Powerful sales engine
Advanced course building tools
LearnWorlds
This premium tool will also allow you to create your own online school and monetize your courses.
ProProfs is another LMS to take into consideration if you want to create your own courses and other teaching material.
The tool also integrates a virtual classroom that allows you to centrally manage learners and courses, make announcements, view reports, and more.
And after the training, you may include quizzes and survey tools to help you assess the students and collect feedback on the impact of your course.
You can increase the power of the LMS by integrating several third-party tools, including email marketing apps, CMS, and CRM.
Its built-in AI-powered reporting and analytics tool enables your instructors to supervise each learner or group’s progress and view their training data.
After you deploy all your training programs, it’s easy to sell online courses directly from ProProfs or your own website.
Take a look at some of its best features:
Easily create online courses using simple steps
Premium library of over 100 professionally designed and customizable courses and templates
Track attendance and progress of individuals and groups
Increase the size of your online classroom easily according to your growing training requirements
Update training modules or an entire course easily and quickly
If you’re looking for a more simple approach, Kallidus Learning is an LMS with a simple interface and deployment that will cater to your needs.
That’s because it’s a cloud-based learning management system with certification and compliance management, a built-in course library, and SCORM compliance.
The interface comes with course cards that you can search through to find relevant content and the best thing is that it’s accessible from everywhere, on any device.
Managers will have access to a calendar view, an overview of trainee progress, and more detailed data based on students or courses.
In the calendar view displays, you will see which team members are signed up for courses the completion deadline, and who has completed the most courses.
And if you need any assistance, support is offered via phone, email, and a well-designed ticketing system.
Let’s see some of its best features:
Intuitive classroom management system
Great UK based support team
High-level dashboards and in-depth reporting
Access your training wherever you are, from any device
If you’re looking for the best e-Learning platform with video conferencing, iSpring Learn is definitely the best choice and Zoom integration is just a click away on the Integrations menu from Settings.
It’s a cloud-based LMS that you can use to launch a training program in a matter of hours because it’s super easy to use for both learners and training administrators.
Moreover, iSpring Learn comes with an award-winning authoring tool called iSpring Suite that will help you create fresh and amazing e-Learning courses.
With the Learn LMS, you will be able to automatically manage training deadlines, as well as sending invites and reminders so you can focus on what’s important.
And best of all, the integration is complete because you can share data with your HR system, CRM, and other back-office systems by using the iSpring APIs.
Your clients need confidentiality, and your business has to comply with all regulations, including GDPR.
That’s why all content, personal data, and statistics from the platform are securely stored on servers in the USA and Europe and the software ensures full compliance.
You should know that you will still be able to use all the content you’ve created until now on other platforms.
Upload your presentations (PPT), courses (SCORM), video tutorials (FLV, MP4), Flash clips (SWF), and audio content (MP3, WAV), as well as additional documents (PDF, DOC, XLS) on the platform easily.
Although it’s a complex solution, you are still able to test it because it offers a free trial version and you can also request a live demo anytime.
Let’s review some of the key features of iSpring Learn:
Integration with existing systems like HR, CRM and other back-office systems
Cloud-based console accessible from anywhere in the world
Fast and secure access to all resources
Full compliance with GDPR and other regulations
Extremely easy to use without any additional training
You should know that not all LMS offer video conference capabilities and some of them prefer other communication tools, like Microsoft Teams.
As you could see, the top product from our list offers both integrations, providing that you have a license or a valid account for those particular solutions.
For instance, in iSpring Learn, you need to click on the Settings button, then navigate to the Integrations tab and hit the Zoom Enable button below.
Other LMS have a slightly different approach so you should look through their menus until you find the app integration category.
This concludes our recommendation list of the best LMS with conferencing features. We hope that you have found the right one for your needs.
Even if you’re the master of keeping your stuff uncluttered, you could get some help from some desktop customization software to make your life easier.
That’s why the best desktop customization tool would be a must to have everything tidy and organized.
What are the best Windows 10 and 11 desktop customization tools?
We hope that these recommendations from our list were helpful. For more suggestions or other questions, please access the comments section below.
You might also be interested in looking at our best Windows task scheduler software list because it may further help you get things organized on your PC.
To make your desktop even more lively, try Shimeji on Windows 11 and add cute animated characters that interact with your screen for a fun twist on personalization.
These are all great applications, and they can help you fix desktop icon spacing problems on your PC, so be sure to give them a try.
Data is one of the most critical assets in an organization, and the importance of keeping it safe cannot be underestimated.
To enhance data security, it is important to lock your PC even if you step out for just a few minutes. Why? An unattended PC with an unlocked desktop is an invitation for unwanted attention.
Even if you are at home, leaving your computer unlocked and running may expose your personal data to prying eyes or even leak confidential information that may end up in the hands of competitors.
There are several ways to ramp up your personal security on your desktop. You might choose to lock it with a strong password, a lengthy PIN, or even try Windows Hello.
What if I told you there is a way to even up your security by making your USB drive act as a control key to your computer?
This is not an armchair theory; it is a proven technique that works effectively, and it’s also very easy to use. All you need to do is take out your USB drive and boom, your PC is locked – and the moment you plug it back your PC will unlock. However, it’s not always sunshine and roses.
USB lock keys: The Good and the Bad
Even if you create strong passwords, relying on passwords alone is a big security misstep. Windows login passwords are vulnerable for those unaware and can be cracked via Brute Force Method.
The Brute Force method is one of the most popular hacking methods and it employs ‘permutations’ to pull all the possible combinations.
When used with a powerful Graphic Card such as the latest GeForce GTX 1080 that comes with 2560 processors, it will probably take a few days to weeks to crack the password using the Brute Force method.
This is why the best password is both hardware and software-based. Turning your USB flash drive into a security key makes your desktop impenetrable.
Another benefit of using a USB flash drive to unlock your computer is relieving yourself of the burden of memorizing the passwords. But it’s not all good.
You will get a headache if you lose or damage the USB lock key. You might not have access to your own computer if you lose the key.
Always make a backup of the USB security key so as not to lose essential data in the event the key is lost.
In this article, we are going to take you through the various software you can use to password-protect, lock, and unlock your Windows PC with a USB pen drive. Let’s have a look at them.
What is the best software to lock USB in Windows 10?
Gilisoft USB Lock is a full encryption method to lock your PC safely and protect your data through high-end technology. With USB flash drive locking, you can increase your security exponentially immediately.
Your virtual activity is a very significant aspect of your digital experience. And no matter what actions you perform on the computer, it’s impetuously necessary to encrypt your data safely.
To do this, you can adopt a USB encryption offered by third-party software. Think of it as the most convenient way to assure the safety of your password.
Practically, you can use Gilisoft to protect your PC’s data with features like password protection, files protection, multi-layered patented security, no data loss, support for all kinds of external portable media.
To have a better idea, using this solution, you will set the USB stick divided into two areas, public and secure areas. So, with this facility, your data can be stored according to the confidentiality of your files.
Here are the main features of Gilisoft USB Lock:
Great compatibility with various portable devices
User-friendly interface and very intuitive
No leaking of sensitive data
Supports all Windows OS (2000 to 10)
Lifetime upgrade for free
Gilisoft USB Lock
Don’t let your data slip into inappropriate hands and increase your security with Gilisoft USB Lock!
Predator is one of the most popular software to turn your USB into a security control device. It is a free Windows program that turns your USB drive into a key that locks your computer once unplugged.
To unlock the computer, you will need to plug the USB drive back in. Anyone who tries to access your computer without the USB drive receives an epic message “Access Denied”. To get started, follow the instructions below.
Download and install Predator
Run the program
Once prompted, plug in your USB flash drive. A dialogue box will then appear asking you to create a password.
Take note of the key settings in the preference Window. This is critical since it gives you the guidelines on how to unlock the computer should you lose the USB drive.
Click the ‘Register’ key button
Predator is one of the most powerful security tools, with per-user customization and a built-in scheduler. The built-in scheduler can limit computer access to certain times of the day.
In case you lose the USB lock key, the per-user password can be entered instead. These are very powerful features that you won’t find in its competitors.
Rohos Logon Key is a multi-platform access control program and a secure authentication tool that makes use of a USB drive to lock and unlock your computer.
There is a free version and a paid version. Just like Predator, Rohos works by storing your login info and automatically inputs your credentials when the USB drive is plugged in.
Rohos conforms to the highly esteemed NIST principles on data security. Its USB security system does not allow the creation of key duplicates and all the data on the key is secured with AES 256-bit encryption.
This makes Rohos more secure as it does not allow anyone to make a clone or a duplicate copy of the key.
It’s also very convenient as it has an emergency login system that grants you access in case of lost or broken USB. Follow the steps below to set up and use the Rohos Logon key.
Download and install Rohos Logon key
Launch and run the key
Once prompted, insert your USB drive
Enter your Windows password
Click the setup USB key button
Done
Once you have Rohos up and running, you will realize it’s simpler and more straightforward than Predator.
USB Raptor enables you to turn any USB drive into a security key that can be used to lock and unlock your computer.
The tool automatically locks the computer when a specific USB drive is unplugged from the computer and unlocks when the USB is plugged back.
USB Raptor works by constantly checking the USB files for the presence of certain unlock tokens with encrypted content. If this specific file is found, the computer unlocks otherwise, it stays locked.
The program interface gives you clear and simple configuration options. All you need to do is create a password for your chosen USB drive, and the software will create the lock file it requires to lock and unlock your computer.
To avoid potential problems in case you lose the USB drive, you can enable two additional ways to unlock the system: via network message or password.
You can even set the time frame within which the system should lock after removing the drive and the system won’t lock during this timeframe, which is also necessary to avoid unwanted locks.
WinLockr is another popular freeware that lets you lock or unlock a Windows computer using a USB flash drive. It features a simple interface that displays the main functions of the application in a single Window.
The first step in using WinLockr is to create a master password which will be needed in the unlocking process. When your PC is locked, the unlocking window is displayed in a full-screen mode or a mini window.
The program supports automatic keyboard locking. In addition, it features a unique shutdown prevention feature that prevents restarts or shutdowns when the computer is running.
WinLockr also disables both the keyboard and mouse for extra protection and can only be released by a key combination.
Even if someone discovers your password, their attempts will fail because they will need a key combination to unlock the keyboard.
This adds an extra layer of safety and keeps off any unauthorized access to your computer. To use this software, simply launch it after the installation process is complete and create a password.
Once prompted, plug in the USB and choose ‘Install on USB’. This automatically configures the device to act as a locking mechanism.
USB System Lock is an open-source locking freeware that enables you to unlock your computer when a specific USB drive is plugged in and automatically locks the system once the drive is unplugged.
The software can run on almost all USB devices including Card Readers, MP3 players, etc.
The only limitation with this software is that it can only protect your computer under the normal boot. It does not run under the safe boot.
Other than that, the program is really good and straightforward to use, adding an extra layer of security to your PC. You can lock your PC safely using multiple external storage drives to increase the security of your computer.
Hence, using USL software you encrypt your files and better secure sensitive information with USB key system locking.
USB lock keys are very convenient as they don’t require you to memorize passwords from time to time. If you don’t prefer third-party solutions, you can just as easily create USB security key on Windows 11.
Have you used any of the above keys before, or perhaps you know of other handy USB lock key software? Let us hear your thoughts in the comments section below.
You and every other user of your computer usually have full access to the majority of files and folders on your machine.
Most of the time, that’s not a problem, because you have nothing to hide from others, therefore you keep your files and folders unsecured.
But sometimes, you actually have a reason to block access to your data. Maybe you work in a public place and don’t want anyone to access your personal files.
Or you’re a parent who doesn’t want his/her child to access inappropriate content. Whatever the reason, we’re sure that you need to keep your files and folders safe.
It’s easy to do that in Windows 10 because there are so many dedicated tools to protect your files and folders. In fact, you might even have a hard time deciding which option is the best.
That’s where we come in, to show you our best picks of file and folder lockers for Windows 10. But first, let’s take a look at what makes a good password.
How to set a strong password and protect your files?
Well, you clearly need to password-protect and lock your files and folders from unauthorized access or even wrongdoers but if you set an easy to guess access key, it’s all in vain.
You have to set a strong password that no one will be able to guess or even decrypt and we’re going to give you a few ideas about how to do that.
➡ Choose the right length and complexity
We recommend using a password with a length between 8 and 16 characters that should include upper case and lower-case letters.
It’s also extremely important to have symbols and numbers within the characters to complete the sequence.
➡ Stay away from predictable words
Don’t use your or anybody else’s names or call names as they can be guessed easily and repeating the username as a password is out of the question.
Also, avoid using common words like pass, key, user, or just sequences of numbers like 123, 345, etc.
➡ The password has to make sense only for you
You can’t put just random letters, numbers, and symbols because otherwise you will be forced to write it down on a piece of paper or another device and that means it’s not secure anymore.
Instead, you can try to use abbreviations for sentences or phrases that will mean something to you. For example, the password Dyb&C@sp2 would translate in Do your best and create a strong passwordtoo.
It has 9 characters, it includes upper and lower case letters, a special character, and a number. Perfect!
And now that you’ve learned how to create a strong password, let’s take a look at our selection of the best tools that can secure your data.
What are the best file and folder lockers for Windows 10?
WinZip provides one of the best encryption systems allowing you to password-protect your zip files.
But the tool is actually a lot more sophisticated than that and it includes a plethora of additional options for you to choose from.
For instance, the file management features are a big plus, but you can also benefit from compression options for practically anything from images to folders and zip PDFs.
In addition, you can make use of integrated repair tools to keep your files and folders not only secure but also optimized.
WinZip makes it easy to password-protect, compress, save, repair, and share your files and zip folders with an easy-to-use interface.
Basically, after you start the app, you just need to click on the Encrypt option from the Actions pane on the right and drop the files you want to protect in the main, central area.
This way, when you compress the files, you will also be prompted for a password for that archive.
Another plus feature for WinZip is that you will get a free 30-day trial before making the purchase so you can test it properly.
Let’s quickly look at its key features:
A strong file encryption solution
Integrated compression and repair tools
Save space on your PC
Password-protection for all your zip files
Easy-to-use interface
WinZip
Manage your important large files with this versatile compression and protection tool for Windows.
Folder Lock is arguably one of the best solutions for keeping your files and folders safe in Windows 10. It also covers email attachments, USB and CD drives, and even wallets with store credits, and other sensitive information.
If you want to encrypt more than one file or folder, you can even set up a master password, to access all your locked content with just one key.
By setting up a master password, you don’t have to memorize passwords for each locked file or folder, and we’re talking about AES 256-bit military-grade encryption.
You also don’t have to worry about losing your data, because Folder Lock backs up encrypted files in real-time, and stores them in the cloud.
There’s another nifty trick about Folder Lock. For instance, once you’ve locked a folder, it will become hidden, and you will only be able to see it by using the software interface.
There is, however, a downside that you should know about. Using the tool requires creating an account, which is something that you might not like.
Let’s quickly look at its key features:
Lock folders and encrypt files in seconds
Sync and backup
Password-protect USB/External Drive
Shred and permanently delete files
Clean device history and Stealth mode
Save Wallets / Cards / Passwords
Folder Lock
Lock, encrypt, sync, and backup your files in no time at all with this excellent application!
IObit is constantly improving its product palette to the needs of the users and Protected Folder is a tool that proves it.
This folder locker allows you to easily protect your important data with a password to secure its contents.
The tool not only offers you protection from prying eyes that are trying to access your important data but also keeps it safe against malicious attacks.
It has a locking engine optimized to keep your files and folders locked even when your PC is the subject of a virus or spyware attack.
For example, the software is also immune to the widespread WannaCry ransomware virus that is known to encrypt files.
The app is user-friendly and allows you to set options like deny read, deny write or hide so you can’t miss any alternatives.
Although IObit Protected Folder is pretty complex with its diverse options, it comes with a very friendly interface that is very simple to use and understand.
Let’s quickly look at its key features:
Password-protect important files and data
Enhanced privacy mode
Keep locking files even if your PC has been infected by malware
Hide from view, block access to files and modify protection settings
Friendly interface
IObit Protected Folder
Boost your privacy & security with password encryption and advanced protection against malware.
Gilisoft File Lock Pro is a complete privacy suite that will securely shred all deleted files so that they cannot be recovered anymore.
It will also help you delete your browsing and Windows history, clear any traces of third-party programs, and more.
Additionally, the software effectively prevents most illegal operations performed by hackers or malicious software such as viruses, trojans, and spyware.
In fact, it is so good that it will protect your privacy even if you are actually sharing the same PC with someone else.
It does this by efficiently hiding documents, videos, pictures, and more. You can even share folders on your network, password protects them, and limit access in a convenient fashion.
But what if someone accesses your computer and uninstalls File Lock Pro? That is also impossible because they will need a password to do so.
And if they try to break in by entering the wrong password more than 5 times, the app will send alarm notifications on a designated e-mail.
Let’s quickly look at its key features:
Clears Windows and browsing history
Removes third-party software traces
Shreds files and folders
Hides documents
Password-protects files, folders or disk
Stops viruses from tempering with your files
Gilisoft File Lock Pro
Complete privacy suite that keeps your data confidential and secure at all times.
WinRAR is actually a compression tool; however, its 256-bit password encryption and authenticated signature technology make it a strong contender for our list that simply cannot be overlooked.
This software brings a myriad of file management features that will help you better organize your documents, free disk space, and protect your files and folders with the ultimate encryption.
Just like with its more famous rival, WinZip, WinRAR has a simple button conveniently named Set a password available when you create an archive.
Once you click the button, you will be prompted to input a password that will protect the contents of the archive.
You will also have the option to encrypt the file names so that no one can see them in the archive before actually unarchiving it with the correct password.
Of course, like most of the successful encryption methods, WinRAR comes with military-grade 256-bit password encryption.
You can test it for 40 days for free before buying it with all the features included so you don’t need to make a decision right away.
Let’s quickly look at its key features:
256-bit password encryption and its authenticated signature technology
Supports all popular compression formats (RAR, ZIP, CAB, ARJ, LZH, TAR, GZip, UUE, ISO, BZIP2, Z, and 7-Zip)
Special compression algorithms for multimedia files, .exe and object libraries
Split archives into separate disks
40 days trial period
WinRAR
Protect, manage and compress all file formats easily with this simple and effective tool.
You’ve learned how to set a good password and our software selection will do the rest in protecting your files, but up to that point, the best protection is to lock your computer.
If you work in a public environment or in a big office and you need to leave your computer unattended even for a few minutes, it’s a great idea (if not a company rule) to lock your screen before that.
You can do that in two easy ways:
Press Windows key + L
Press Ctrl + Alt + Del and select Lock from the available options
How can I create a Windows 10 user account with limited access?
Click the Start button and select Settings (the cogwheel).
Now select Accounts from the options.
Choose Family & other users from the left pane.
Now scroll down and select Add someone else to this PC.
Click on I don’t have this person’s sign-in information.
Choose Add a user without a Microsoft account.
Complete the table with the new user credentials, including the secret questions below.
Next, click on the user you have just created and select Change account type.
In the next window, click on the drop-down menu and make sure that it’s a Standard User and not an Administrator.
That concludes our list of the best file and folder lockers for your Windows 10 running device. If you had any dilemma about choosing the safest option for your computer, we hope this article provided all the options and explained all the traits of password protecting your files.
Another way of safeguarding your files is to create backups by using a dedicated tool from our selection of the best backup software.
From our experience, keeping your most important data away from other users is an excellent way of protecting your privacy.
However, this can be a two-way street because all the tools require a password to unlock your data and if you somehow lose that password, it can be a daunting task to retrieve it.
Some of the apps in our list can reset your password if you provide proof that you own the software but that can be a daunting task, so make sure you keep your password safe and don’t rely only on your memory.
Should you have other suggestions, feel free to let us know in the comments section below.
The brand new dark fantasy action RPG known as Elden Ring has already captivated an impressive number of fans since its release, which was a little over a week ago.
Elden Ring features Dark Souls-like characters and gameplay with stunning graphics quality, perfect for gamers that like to immerse themselves in dangerous adventures,
However, it seems that the game somehow won’t finish downloading or won’t completely install for PC for some players, which can become frustrating.
What can I do if Elden Ring won’t download?
Even though PC games receive lots of patches, updates, and bug fixes, chances of running across some nasty bugs are higher in newly released titles.
Elden Ring is no exception and it too had its share of bad moments since release. Besides all the glitches it has, such as PC players not being able to play with controllers, this one really drivers gamers insane.
Rest assured we have some tips that will help you overcome this obstacle and start conquering objectives and defeating bosses in Bandai Namco’s most recent title.
The main reason why the game won’t successfully download is because there is probably no more available space on your device.
Make sure you check that before you start downloading Elden Ring, to avoid problems. However, if you find yourself in such a situation, simply free up some disk space.
Remember that the game requires about 60GB of available space, but people that bought it say it’s closer to 100GB, so keep that in mind.
How can i properly install Elden Ring?
As you can imagine, it can be pretty difficult to pinpoint what exactly is causing the installation error for Elden Ring. But there are a few general troubleshooting steps that are worth trying, in an effort to overcome this issue.
Make sure to double-check that your PC meets the minimum system requirements, first of all, to avoid any unwanted surprises.
This can happen for a number of reasons and we’re about to go through the possible workarounds one by one. Here’s what you have to do if you want to fix this.
Perform a hard reset on Xbox or PlayStation, unplug it for a couple of minutes, then power it back up again.
If you have a PC, perofm a restart, then proceed to attempt performing the download one more time.
Make sure to also check for and install all pending Windows updates, if there are any.
Uninstall the game from any external hard drive, disconnect the external hard drive, and install the game on the built-in drive.
Verifying game file integrity, wether you bought the game on Steam or Epic Game Launcher.
These are the temporary workarounds for these annoying and frustrating issues that unfortunately came with Bandai Namco and From Entertainment’s Elden Ring.
Was this guide helpful to you? Share your thoughts with us in the comments section below.
The Outlook error 0x800ccc0f is one that occurs for some Outlook users when sending or receiving emails.
When the error occurs, it returns the following error message: Task server name – Sending and Receiving reported error (0x800ccc0f): The connection to the server was interrupted. If this problem continues, contact the server administrator or Internet service provider (ISP).The server responded:? K’
Consequently, Outlook error 0x800ccc0f ensures that SMTP emails aren’t sent or received. This is how you can resolve the Outlook error 0x800ccc0f in Windows 10.
Why does Send receive error appear in Outlook?
Issues such as Outlook error 0x80042108 can appear if there’s a problem with the server, or with your settings, so make sure you check them.
Your firewall or antivirus can also cause issues such as Outlook error 0x80040115, so make sure that ports and applications aren’t being blocked.
Connection problems can lead to Outlook error 0x80040201, so ensure that your connection is stable and faster if you ever encounter this problem.
It might just be the case that your internet connection is down. So check that websites are opening in your browser. If not, the issue is obviously due to a connection error.
Anti-virus software that scans emails can hamper Outlook’s incoming and outgoing emails. As such, disabling third-party anti-virus utilities might fix Outlook error 0x800ccc0f.
You can disable many anti-virus utilities by right-clicking their system tray icons and selecting a disable, pause or exit option. However, you might need to disable some anti-virus utilities via their windows.
Alternatively, you could temporarily remove your anti-virus software from the Windows startup and then restart the OS as follows.
Now select your anti-virus utility, and press the Disable button.
The anti-virus software will no longer start when you reboot Windows.
3. Switch Off the Windows Firewall
The Windows Firewall is another thing that can block MS Outlook. So switching the firewall off is another feasible resolution for Outlook error 0x800ccc0f. This is how you can configure the Windows Firewall settings in Windows 10.
Click the Cortana button on the taskbar to open that app.
Input the keyword ‘Windows Firewall’ in Cortana’s search box, and then select to open Windows Defender Firewall.
Click Turn Windows Firewall on or off to open the options shown directly below.
Select both the Turn off Windows Defender Firewall options there, and then press the OK button.
Alternatively, you can check if Outlook is permitted through the Windows Firewall by clicking Allow an app or feature through Windows Defender Firewall.
Press the Change settings button, and then scroll to Outlook in the Allowed apps list.
Select both Outlook’s check boxes if they are not ticked.
Then press the OK button to confirm the new setting.
4. Increase the Server Timeouts Setting in Outlook
Outlook includes a Server Timeouts bar that can fix interrupted connections when you drag it to a longer setting. As such, that is another option worth noting for fixing the Outlook error 0x800ccc0f. This is how you can increase the Server Timeouts setting in Outlook 2010.
First, open the Outlook software; and then select the File tab.
Press the Account Settings button and click Account Settings to open the E-mail Accounts window. Then press the Change > More Settings buttons to open the E-Mail Settings window.
Click the Advanced tab, and then can drag the Sever Timeouts bar to the far right.
Outlook has a Safe Mode that can resolve numerous email error messages. The Safe Mode launches Outlook without any add-ins to ensure that they don’t conflict with the software in any way.
You can open Outlook in Safe Mode as follows:
Open the Win + X menu by pressing the Win key + X hotkey.
Then click Run on the Win + X menu to open its window.
Enter ‘Outlook /safe’ in Run’s text box, and press the OK button.
A Choose Profiles window will then open. Press the OK button on that window.
If your Outlook is working only in Safe Mode, take a look at this article to find some guaranteed solutions and fix the issue.
6. Repair Outlook PST Files
Error 0x800ccc0f can also be due to a corrupted Outlook data PST file. Outlook includes its very own Inbox Repair tool with which you can fix data files. You can utilize that tool as follows.
Press the Cortana button, and then enter ‘scanpst.exe’ in its search box. Select to open scanpst.exe if Cortana finds it.
If Cortana doesn’t locate scanpst.exe, open File Explorer instead.
Select the File tab and click Change folder and search options to open the window shown directly below.
Click the View tab, and then select the Show hidden files, folders and drives option.
Press the Apply and OK buttons.
Scanpst.exe will probably be in a C:Program FilesMicrosoft OfficeOffice 16 or C:Program Files (x86)Microsoft OfficeOffice 16 path for 32-bit Windows platforms. Replace the number at the end of those paths with your version of Office; for example, the Office 2013 path is: C:Program Files (x86)Microsoft OfficeOffice 13.
Then you can double-click scanpst.exe to open its window.
Press the Start button on the Outlook Inbox Repair Tool window to scan.
If the scan detects anything, press the Repair button to fix corrupted Outlook files.
If scanpst.exe doesn’t do the trick, you can repair corrupted PST files with Stellar Phoenix Outlook PST Repair. That is not freeware software, but you can still utilize the trial version by pressing the Free Download button on this webpage.
When you’ve installed it, you can repair PSF files with Stellar Phoenix as follows.
First, open the Stellar Phoenix software window below.
Select the Find option and then a drive to scan for the PST file.
Press the Find button to initiate the scan.
Then select a corrupted PST file that the scan detected.
Press the Repair button to fix selected PST.
Thereafter, the software provides a preview of your repaired PST file. Then you can click individual check boxes for each folder to select more specific items to recover.
Press the Save Repaired File button to open further save options.
Select the PST radio button, and then click the Save PST option.
Press the Browse button to choose a path to save to.
Then press the OK button to save the repaired PST file.
Those are a few resolutions that might fix Outlook error 0x800ccc0f so that you can send emails with the software again. In addition, some of the resolutions in this post might also resolve the issue.
As always, if you have any other questions, leave them in the comments section below.
The email server is down due to an outage
Your browser cache is corrupted hence Outlook cannot connect to the Exchange server
Your antivirus or firewall is preventing Outlook from reaching the server
Even though OneDrive is probably the best-suited cloud service for Windows 10, issues like stuck on Looking for changes… or Processing changes can render it completely unusable.
Users reported that they’re unable to sync anything on their OneDrive desktop client due to this inexplicable issue.
Luckily, we prepared a few possible solutions to this problem. If you’re having a hard time with this issue, make sure to check the steps below.
What can I do if OneDrive is stuck on Looking for changes?
1. Unlink account and link it again
Right-click on the OneDrive icon in the notification area and open Settings.
Open the Account tab.
Click on the Unlink this PC.
Now, sign in again with your credentials.
Select the location of the OneDrive folder and what you want to sync.
First, let’s start with the obvious. Since OneDrive is, as the majority of other cloud-storage services are, a multiplatform application, there’s a chance that something went astray with the account.
Namely, the user account that’s linked to multiple OneDrive applications, can run into a halt occasionally. What you’ll need to do is to simply unlink account and link it again.
This is analog to sign out/sign in troubleshooting, and it should help you resolve this or similar issues. Follow the instructions above in order to do so.
On the other hand, if your OneDrive desktop client is still stuck Looking for changes even after you’ve taken these steps, make sure to continue with the additional solutions.
2. Use a different cloud storage provider
If you are looking for the best OneDrive alternative, there are thankfully plenty of worthwhile storage software with similar features and lower error rates.
We recommend two-factor authentication, and generous storage space. Also, make sure that the software supports the file types you work with.
Many cloud storage services include task management and collaboration tools to help you maintain a good workflow, so switching will not be a hassle even if you use OneDrive for professional purposes.
3. Delete 0-byte files
Open your OneDrive folder on local PC storage.
Press F3 to instantly access the Search bar.
Type the following line in the search bar:
size: 0
If you see any search results that are 0 bytes in size, make sure to delete them.
Look for changes.
Now, some users reported that the problem is in, believe it or not, 0-bytes ghost files. Many applications store files that are empty and of no use.
Now, if there’s no size and the file is empty, OneDrive will have a hard time uploading it to online storage from your PC’s local storage.
This will cause a never-ending loop of the file processing and you’ll be stuck for ages.
So, basically, your next task is to navigate to the OneDrive folder, locate and delete empty, 0-bytes files. Afterward, you can restart your PC and give OneDrive another try.
Furthermore, if you’re having issues with a lot of temporary files, make sure to check this useful article on how to deal with those by using solely Windows resources.
This troubleshooter should scan for possible errors, restart related services, and, hopefully, resolve all issues. If this tool fell short, make sure to check additional steps.
5. Change the sync folder location
Right-click on the OneDrive icon in the notification area and open Settings.
Open the Account tab.
Click on the Unlink this PC.
Now, once you log in with your credentials again, make sure to select the different location for the OneDrive local folder.
Copy the unsynced files to the newly selected OneDrive folder and let it sync. Make sure to do it one at a time.
Yes, surely, you’ll lose a lot of time by changing the sync folder location. If your bandwidth is slow and you have a lot of files, it can take some time for OneDrive to re-sync them again.
For more information on how you can increase bandwidth on Windows 10, check out this guide.
However, changing the syn folder location is probably the most reliable solution for this peculiar OneDrive problem.
Namely, by changing the sync folder, you should be able to start the sync procedure again. That way, by adding file by file to the upload queue, you can confirm which exact file caused the OneDrive halt and remove it accordingly.
Follow the instructions above to change the sync folder location in OneDrive.
For the majority of users, this proved as the most viable solution. On the contrary, if you’re still unable to get OneDrive to start with updating, there are still other solutions to take into consideration.
6. Reset OneDrive
Right-click the Start button and run Command Prompt (Admin).
In the command line, paste or type the following line and press Enter:
Right-click on the OneDrive icon in the taskbar’s notification area and open Settings.
Sign in.
Before you move to reinstallation, which is possible after the major Windows 10 updates, you should try resetting. In order to do so, you’ll need to use the elevated Command Prompt line.
Hopefully, the uploading halt will be fixed and you’ll be able to upload your files just like before.
7. Reinstall OneDrive
In the WindowsSearch bar, typeControland chooseControl Panel.
InCategoryview, openUninstall a program.
Uninstall OneDrive and restart your PC.
Double-click the OneDriveSetup.exe file and run the installer.
After the procedure finishes, log in and check for improvements.
Finally, if none of the aforementioned steps make it work, the reinstallation is the only remaining solution that crosses our minds.
Luckily, OneDrive isn’t any more a non-removable part of Windows 10 so it’s much easier to address possible errors and bugs.
In addition, the installation files are always there so you won’t need to download anything and can reinstall OneDrive from the AppData any given day.
Update: Microsoft support has released an official guide here with more possible resolutions as the problem has various causes and was encountered by many users in different scenarios.
This should resolve your problem. In case you’re still unable to run OneDrive, you can always get rid of it and switch to an alternative. We enlisted some viable OneDrive alternatives in this efficient article.
This should conclude it. We hope you were able to move from the Looking for changes screen with the solutions we provided above.
In case you have any questions, suggestions or alternative solutions regarding OneDrive stuck we covered today, make sure to tell us in the comments below.
Imagine a situation where you have to scan multiple pages with your scanner. Typically, every time a page gets scanned, the software creates a new PDF file for each one. If the pages don’t need to be combined or if there are only a few of them to scan, then this process is no big deal. It does become a nightmare in the opposite situation.
Quite frankly, scanning multiple pages, to begin with, is already an annoying chore made worse by having to put everything together. Fortunately, many quality-of-life changes have been made in the consumer electronics industry, and scanning multiple pages has been made less tedious.
Nowadays, scanned pages can be easily thrown together into a single PDF file thanks to some newly updated apps and third-party software on Windows 11.
What are some third-party apps I can use to put multiple pages into one PDF?
Can Windows scan multiple pages to PDF? Yes, it can. One of the best apps you can use is Windows Fax and Scan, which, as the name suggests, is an integrated faxing and scanning app that is native to Windows 11. It’s a standard feature that’s available on all versions of Windows 11, or a least it should be. If it isn’t, you can always look in the Control Panel and activate it from there.
Of course, there are third-party apps available if you prefer a different option or you ultimately cannot activate Windows Fax and Scan on your computer. Also available are Windows Scan from the Microsoft Store which has a much cleaner user interface and PDFelement. The latter has a free version with extra keys locked behind a price tag.
This guide will show you how to scan multiple pages and merge them all onto a single PDF with Windows Fax and Scan. It will also show you how to do the same on Windows Scan, and then combine everything with PDFelement. Both Windows Scan and PDelement by Wondershare can be found on the Microsoft Store.
How can I put together multiple scanned pages into a PDF?
1. Activate Windows Fax and Scan
If Windows Fax and Scan isn’t available on your Windows 11 computer, start by clicking on the magnifying glass icon in the bottom left hand corner.
Search for the Control Panel.
Click on the first entry you see.
Click on Category next to View by.
Select Large icons.
Locate and click Programs and Features.
Click Turn Windows features on or off in the left hand corner.
A small window will appear.
Locate Print and Document Services.
Click the Plus symbol next to Print and Document Services.
Select the Windows Fax and Scan check box, then click OK.
2. Combine with PDFelement
While in the Microsoft Store, you can download Wondershare PDFelement to use to combine PDFs together if you can’t combine files with your word processor or you didn’t like the online option.
Click the Free Download button and select Save File when it appears in a small window.
Go to the file’s location and double-click it to begin installation.
Click Install with the installation wizard appears. Give it a few seconds to install the app.
If you prefer, you bring the app up on the Microsoft Store.
After searching on the Microsoft Store and click the Install button.
After downloading, open the app.
Select Combine PDF.
Here you can choose the files you want to add or drag and drop them.
After adding the images, see that everything looks good and click Apply.
Next, click File in the upper left hand corner and select Save as to a location on your computer.
Be aware that scanning with the free version will adds a PDFelement watermark. To get rid of it, you’ll have to purchase the full version, but the steps are the same.
Conversely, you can scan with PDFelement by clicking on File and hovering over Create.
There, select From Scanner.
Select the scanner you’re using and click Scan.
Scan all the images you need scanned and select Home to go back to the home page. From there select Combine and start the process again.
Open the search bar and look for Windows Fax and Scan.
Click on the first entry you see.
Select New Scan.
In the New Scan window, select the File Type menu and select which format you want.
Click Scan to scan the page.
Give it time to scan the page.
Do the same thing again to all the pages you want to scan. This guide will stick to two pages for the sake of brevity.
You can rename the files by right-clicking on one and selecting Rename…
Enter the name and select OK.
Once done, select Print in the top bar. Conversely, you can select File and choose Print.
Click the drop down menu under Printer.
Select Microsoft Printer to PDF.
Select Print at the bottom.
Find a location for the PDF. Give it a name and select Save.
Do the same to the other scanned images.
Go to where the images are located on your Windows 11 computer.
Highlight them all.
Right-click them and select Show more options.
Select Compress to PDF.
If your word processor has the ability to compress images into a PDF, you will get an image similar to this.
Select Compress or whatever the equalavent is on your processor.
If not, there are online PDF compressors, like Combine PDF.
4. Scan via Windows Scan
Open the Start menu and select the Microsoft Store.
In the Microsoft Store, search for Windows Scan.
Select the Get button to begin downloading.
After downloading, open the app.
In the app, select the File Type drop menu and select PDF.
Click the Scan button at the bottom.
Give it time to scan.
After scanning, select View at the top.
The image you scanned will appear as a PDF on your word processor.
From here, you can save the new PDFs onto your computer.
You can perform the same steps earlier to combine the multiple images together.
You can combine scanned by combining them together in your word processor or find an online PDF compressor.
Are there other things I should look out for pertaining to scanning on Windows 11?
An issue that may arise with Windows Fax and Scan is the inability to complete a scan. This could be caused by a variety of things, which is why it’s recommended that you always keep your drivers updated. The scanner itself may be missing a crucial update or fix.
And if you’re in the market for a new scanner to go with your Windows 11 computer, the Fujitsu SP-1425 is among one of the most recommended machines out there. The device has a compact form factor, can work up to 25 pages, and load documents up to 120 inches long. It even comes with OCR software to convert documents into PDFs.
Now that you no longer wonder how do you scan with Windows 11, it’s also important to point out that there is a lot of other scanner software that you can download instead. All of them are carryovers from Windows 10 but work on Windows 11 just the same. Some of the features you can expect on other apps include being able to sign PDFs and support for tech recognition technology.
Feel free to leave a comment below if you have any questions on other Windows 11 apps or features. Also, leave comments about guides that you’d like to see.
Encountering the Windows 10 error 0xa00f4292 is not good news for your computer’s camera. This error is related to the camera not working properly and it is most likely caused by corrupted or missing drivers.
This error can also occur due to a recently installed update for Windows 10, or due to corrupted drivers. For these reasons in this article, we will explore some of the best methods to try out in order to sort this issue out.
Why does Could not retrieve the camera image timeout has occurred message appear?
This error message is usually followed by error code 0xa00f4271 and it appears if your computer isn’t allowed to access the camera, so you might want to check your settings.
There are many other issues that can give you Something that went wrong camera error and to fix it, you might have to update your drivers to ensure the compatibility of your PC and the device.
Lastly, it’s also possible that your laptop camera isn’t working due to some other reason, but luckily, this article is here to help you.
How do I fix camera error 0xa00f4292?
1. Allow your computer access to the camera
Press the Win+X keys on your keyboard -> choose Settings from the menu.
Inside the Settings window select Privacy.
Navigate to Camera -> activate Allow apps to access your camera.
In case the toggle mentioned above is grayed out, first enable the Allow access to camera on this device option.
2. Allow Camera app access through your PCs firewall or antivirus software
Click on Cortana search -> type firewall -> choose the first option from the top.
Inside the Firewall settings -> select the Allow an app or service through Windows Defender Firewall.
Search for the camera app and allow both incoming and outgoing access.
To allow camera access through third-party antivirus software (steps vary depending on software):
Open up the antivirus software by double-clicking the icon.
Navigate to Firewall settings -> make sure Camera app is allowed access.
3. Update your camera driver
To fix Windows 10 error 0xa00f4292 -> press Win+X keys on your keyboard -> select Device Manager.
Inside the Device Manager window -> scroll through the list and identify your webcam under the Cameras, Imaging devices or Sound, video and game controllers.
Right-click it -> select Update driver -> Search automatically for updated driver software -> wait for the process to complete and install.
Check to see if this solved your issue. If it didn’t, please follow the next method.
Additionally, always make sure that your drivers are up-to-date. Your camera may not function at its best potential if your drivers are old.
To safely update your camera drivers, we recommend you use a third-party driver updater program, that will keep you away from any potential harm. Outbyte Driver Updater is our main suggestion due to its effective automated process of finding, installing, and updating drivers.
Press Win+X keys on your keyboard -> select Device Manager.
Inside the Device Manager window -> right-click your webcam driver -> select Properties.
Inside the Driver tab -> select Uninstall -> Delete the driver software for this device -> select OK.
After the process is completed, click on Action menu button -> select Scan for hardware changes (this will scan for hardware changes and reinstall the appropriate drivers).
Try to see if this fixed your issue.
For this solution, you can also use the third-party app recommended above for efficiently uninstalling and reinstalling your webcam drivers.
In today’s fix article, we explored some of the best troubleshooting methods to deal with the Windows 10 error 0xa00f4292 that affects your computer’s camera.
We hope this guide helped you re-gain access to your PC’s camera. Please feel free to let us know if this guide helped you by using the comment section below.
Last month, Microsoft was testing the ability to sync PWAs in Microsoft Edge. That feature has not yet reached general availability but in a recent Microsoft Edge Canary build release, Microsoft has started testing a “Web App Sidebar,” as spotted by the folks at Neowin.
The Web App Sidebar is essentially a feature that is in place to provide easier access to web searches. However, it does not come automatically enabled and is hidden behind the “#Edge-webapp-sidebar” flag, indicating that Microsoft is still running tests to determine its effectiveness and efficiency.
Yet as Reddit user, Leopeva64-2 discovered, based on the description provided in Edge’s flags when searching for this new feature, folks stand to benefit a great deal. When the sidebar is enabled and open, you can simply type text into the sidebar’s search field, and grab relevant web links, just like Bing.
As if that wasn’t cool enough, Microsoft is also testing a new full-screen mode button for Edge that aims to improve PDF viewing for users. Also in testing since December is a “Performance Detector” feature, which can help you see your resource usage, performance issues, and give you actions to improve overall performance.
No word yet on when these features will come to the Stable version of the browser, but it could come in a few weeks. As usual, Microsoft needs to complete testing with Edge Insiders first and gather the respected feedback.
Update: An earlier version of this post stated that Performance Detector was a new feature. We’ve clarified that it’s been around since December. Thanks, @Leopeva64 for the correction!
One of the best things about Microsoft Office is that it’s a cross-platform service. You can access it on Windows, Mac, iOS, and Android, and even use older versions of Office on Linux.
But what about using Microsoft Office on a Chromebook? Well, if you’ve tried to install the Android versions of Microsoft 365 or Microsoft Office apps on your Chrome OS device, you might have noticed that it does not work. That’s because you’ll need to use the web version, and today, we’ll show you how.
Microsoft Office on a Chromebook
To get to the web version of Office on a Chromebook, all you need to do is visit Office.com in your Chrome web browser. After that, log in with your Microsoft Account, or your Microsoft 365 work account.
You’ll then be taken to the Office.com main page, which lists your documents and the various apps like Word, Excel, and PowerPoint on the right side sidebar. Click on each app to access it, but keep in mind that these web versions of Microsoft Office aren’t as fully featured as the Windows or Mac desktop apps.
The basic editing, creation, and collaboration features are there, but more advanced features might not be. If you feel like something you need is not there, then check out Microsoft’s support document, which dives deeper into what’s missing and what’s not.
Do also keep in mind that you’ll need the internet to access this version of Office.com. It’s not offline like traditional desktop apps are, but this should not be a problem, since Chromebooks are heavily dependent on the web, anyway.
We also want to mention one thing that might make your life easier. Though you can bookmark Office.com to get to it faster, you also can get to it by creating a progressive web app version (PWA.) The PWA version of Office.com will look a bit different when you open it up it up and feel a bit more like a native app since it removes your bookmarks bar and title bar.
You can create a PWA by first opening Office.com, and then clicking the More Tools option. From there, choose to Create Shortcut from the menu. Name the PWA, and then choose Open as Window. You’ll now see that Office will be added to your Chromebook’s launcher. Pin it to the shelf by right-clicking the icon and choosing Pin to Shelf for quicker access.
As you can see, it’s easy to use Microsoft Office on a Chromebook. It’s just as simple as using Teams, which we previously explained in a separate guide.
For lovers of BBC’s iPlayer, if you want to watch channels therein and you’re outside the UK, a VPN comes in handy because the service is geo-restricted.
With the best VPN for iPlayer, however, you can easily pretend that you’re in the UK and unblock iPlayer to watch your favorite shows.
The most important thing is that the VPN has servers in the UK, because you’ll stream HD content, so you need one that delivers fast connection speeds.
Also, because you’re unblocking BBC, you need a reliable VPN with a strong privacy policy and encryption.
If you live abroad or suffer from ISP speed throttling problems, then a VPN is good for you.
Added benefits include watching series earlier, anonymous file sharing, and unlocking restricted content.
Our list of the best VPN for iPlayer has all these required and necessary attributes so you can try one of them and see which one suits your preferences.
Why would I need a VPN for BBC iPlayer?
If you want to have access to BBC iPlayer’s content library from outside the UK, you need to connect to a UK-based server to surpass geo-restrictions.
If you plan to travel abroad or want to access exclusive iPlayer content from a different region, you have to route your traffic with the help of a reliable VPN.
Some iPlayer users report getting a You cannot stream programs on BBC iPlayer outside the UK even when they actually are in the area.
This is an ISP-related issue and it generally means that your IP is not registered correctly. If you have this problem, you can benefit from a VPN until your ISP gets around it.
Additionally, you should also know that a VPN can help you surpass traffic restrictions that some internet service providers may impose.
Most premium VPNs offer unlimited bandwidth and include advanced encryption options so your ISP won’t be able to get any information on how much traffic you use and place any limitations.
This means that you will be able to enjoy seamless video-on-demand content all month round without worrying about using up too much data.
Make sure to get a VPN with powerful encryption that can hide the fact that you use a VPN in the first place. Fortunately, most modern-day VPNs encrypt your data in multiple ways so it is very unlikely to get detected.
How to unblock BBC iPlayer with a VPN
There are various ways to reroute your traffic via a VPN, but the easiest one is to install a dedicated application on your device of choice, as follows:
Sign up for a VPN account (of your choice) and download the application.
Follow the installation prompts and then log in with your credentials.
Pick a fast UK-based server location and connect to it.
Login or create an iPlayer account directly from their website.
Browse the library and pick the show of your choice.
Note that iPlayer is available on multiple devices, but the process is very similar, regardless of platform. For example, to access it directly from your TV, install your VPN and iPlayer applications to your smart TV.
VPN services generally provide straightforward information on how to install their specific product on your device and which devices support said VPN provider.
Private Internet Access, or PIA, offers you the possibility to access geo-restricted content, like BBC’s iPlayer and many others.
Additionally, you benefit from the highest-grade data encryption and secure connections.
Moreso, with one subscription, you can protect all your devices on wired and wireless networks, block ads and IP trackers as well as stay anonymous when online.
If you’re interested in using a VPN to stream media, such as that offered by BBC iPlayer, PIA has you covered, as you have unlimited bandwidth and thousands of servers available.
This VPN is very easy to use. You just have to set up an account and install the application on your devices of choice. Enter your credentials and connect to a private server at the press of a button.
For those of you that want to access restricted content and also browse locally at the same time, PIA offers the split tunneling feature which lets you handpick the apps that connect to the VPN.
PIA is a highly secure open-source software. It can be easily updated and optimized with changes taking effect quicker than with other types of software.
It also has a set of security features that include an ad blocker, anti-tracking tools, and advanced DNS security against malicious sites.
Private Internet Acess lets users connect to secure open-source protocols like OpenVPN and WireGuard.
Here are some of PIA’s key features:
Encrypted WiFi
P2P support
PPTP, OpenVPN and L2TP/IPSec
No traffic logs
Over 3000 servers in 45 countries (and counting!!!)
Protect up to 10 devices simultaneously
Private Internet Access is available with a subscription. There are 3 plans available, each with a 30-day money-back guarantee.
Private Internet Access
Keep your browsing habits private with this amazing VPN, now at a discounted price for a limited time!
NordVPN lets you connect to remote UK servers and make it seem like you’re living in your home country while securing your connection with strong encryption and zero logs.
This way, you can stream your favorite shows securely from any location.
Some of the benefits of this best VPN for iPlayer include security, military-grade encryption, CyberSec technology to shield you from intrusive ads and malware, an extra layer of privacy, IP address protection, and DNS leak protection.
It features an automatic kill switch, Onion Router for maximum security, browser proxy extensions, and SmartPlay technology.
The automated VPN Kill Switch feature ensures your data is secure even in case the connection is lost. It monitors your connection making sure you only use secure traffic.
If you want to connect to iPlayer and use local traffic at the same time, you can do so if you enable the split tunneling feature.
NordVPn uses private DNS on every server along with powerful AES-256 encryption to make sure your data is completely anonymous.
Other key features of NordVPN include:
Mobile applications
Multi-factor authentication
Changes IP address twice
Browser extension for Chrome, Firefox and Edge
NordVPN has a network of 3277 servers in 60 different countries, plus you can connect up to 6 devices simultaneously with one account.
NordVPN
Looking for a great VPN that can unblock BBC’s iPlayer? NordVPN could be the one you need.
Surfshark VPN is another good option for iPlayer because it has a large number of servers across the globe, allowing you to connect to the best server based on your configuration.
This VPN service lets you have a clean browsing experience with its built-in adblocker and anti-tracking features. Plus, it has a basic anti-malware shield that will protect your PC and data.
You should also know that Surfshark places private DNS and leak protection on every server. Along with that, they have a very strong no-logs policy.
Your data is completely private, they do not track anything and they prevent any third parties from doing so. The NoBorders mode allows you to connect to various virtual locations. This way you can get access to restricted content across the whole globe.
Other key features of Surfshark include:
Changes your IP
AES-256 GCM encryption
Camouflage mode
Surfshark is a subscription-based service with three different plans available. You can try it out for free for 7 days.
Surfshark
Surpass any restriction and enjoy limitless content.
If you live abroad and want to watch your favorite flicks or the latest episode on BBC iPlayer, you need not worry about a great VPN like CyberGhost.
With 75 servers in over 15 countries, you can access audio and video platforms whether the services are blocked or not where you reside, including YouTube content that could be available or not depending on where you’re logged in from.
CyberGhost has an Unblock Streaming feature that lets you access many popular streaming services including BBC, without testing servers manually.
This is done based on an internal and regularly updated list, where users can add their favorite sites too.
Other features like ad and tracking blockers or malware blockers are optional so they’re deactivated to avoid streaming issues, but by default, this best VPN for iPlayer provides features such as no logs, military-grade encryption, hiding of IP, IP sharing as an additional security layer, Kill Switch to block traffic, and Leak Protection against IPv6 leaks, DNS, and port forwarding leaks.
Other key features of Cyberghost VPN include:
Compatible with Windows, macOs and Linux
Applications for iOS and Android
Can be installed directly on router
Lightweight
Unlimited bandwidth
Once you’re successfully connected to the server, CyberGhost will send feedback about the website you’re connected to and want to watch, the current server location, and protection status.
CyberGhost VPN
Trying to bypass BBC iPlayer’s geo-restrictions? CyberGhost VPN could definitely help you with that.
ExpressVPN is a trusted leader as one of the best VPN for iPlayer, with high speed, ultra-secure protection, ease of use, and instant setup.
You can access any content across 94 countries in over 148 locations, unblock the sites and apps you love, avoid hacking or tracking using powerful encryption, with blazing fast VPN speeds on a huge network of over 1700 global VPN servers.
The bandwidth is unlimited, and the VPN is easy to use for Windows and other operating systems.
Other advantages include zero restrictions on streaming and downloading from anywhere while your IP is hidden, plus offshore privacy protection with no activity or connection logs.
Additionally, Express VPN ensures protection from hacking and surveillance with 256-bit AES encryption, DNS/IPv6 leak protection, kill switch, and split tunneling.
ExpressVPN is compatible with all major devices and has dedicated applications for Windows, Mac, Linux, iOS, and Android.
It can also be installed directly on routers, game consoles, and Smart TVs.
Other key features of ExpressVPN include:
24-hour live chat support
Anti-tracking features
Lightway protocol
Built-in speed test feature
ExpressVPN is a subscription-based VPN service with three plans available. Each plan includes a 30-day money-back guarantee and users can use plenty of payment methods.
ExpressVPN
ExpressVPN is a great VPN service that can easily unblock BBC iPlayer.
Owned by GZ Systems Limited, PureVPN offers a unique solution that creates encrypted tunnels, restricts malware and viruses, blocks annoying ads, and filters unwanted content.
Its features include antimalware, intrusion detection and intrusion prevention for protection against malicious programs, built-in ad-blocking and URL filtering to block malicious pages before you visit them.
Moreover, it includes app filtering, seamless connectivity, and software and apps for most major platforms and operating systems including Windows.
You can also use multi-logins on one single account, 256-bit data encryption, access all servers regardless of the package you choose with unlimited server switching, and unlimited data transfer.
Once you click on the BBC iPlayer option on the PureVPN extension, you get connected with their specialized servers in the UK, which unlock restrictions and let you stream live online with zero hiccups.
PureVPN is compatible with more than 20 devices, on over 750 servers in more than 140 countries, and has more than 88,000 IP addresses you can use.
Other PureVPN key features include:
Compatibe with all major operating systems
Dedicated mobile appplications
Port forwarding
WebRTC protection against identity leaks
However, it doesn’t come with an iPlayer account, so you have to subscribe separately. All this VPN does is provide a gateway to access BBC, and eliminate speed throttling issues. As for legality, there aren’t laws that restrict access to content through a VPN.
PureVPN
In need of a VPN that can unblock BBC iPlayer for you? You should definitely check out PureVPN.
Wondering where to find the drivers in Windows 11? We’ve got you. Whether you’re troubleshooting device errors or want to install or update your drivers, we’ll walk you through a few ways you can locate them.
Let’s get right to it.
How can I find drivers in Windows 11?
1. Use the Run command
Press the Windows + R keys simultaneously to launch the Run window.
Type the following address in the dialog box: C:\Windows\System32\DriverStore
You will land at the DriverStore folder which is the parent folder for all drivers.
Double-click and select open FileRepository folder to access individual driver folders.
Expand the categories to locate the device you need a driver for.
Right-click on the device, select Properties, and go to the Driver tab for details like version and update options.
As you can see, you can easily search for drivers on Windows 11, and as an added piece of information, you can use the built-in tools to scan for any changes and update them according to your needs.
You can get a clearer view of every driver installed on your system by checking this guide on how to view installed drivers in Windows 11, which helps you understand exactly what your system is using.
Feel free to leave a comment down below if you encounter any driver-related issues and we’ll be sure to get back to you.
There have been some reports from Windows 11 users that their Universal Windows Platform (UWP) apps have been excruciatingly slow to open and are experiencing lag. The grievances of UWP apps stuttering in Windows 11 come from both AMD and Intel CPU users.
Users reported extreme lag and uneven sound output from everyday UWP apps including Calendar, Mail, OneNote, and other Microsoft Store apps. Some have reported that their Windows apps won’t open at all.
With so many users dependent on these UWP apps, it’s crucial that they work properly. Slow starting apps are not only annoying, but they can be catastrophic for workflow and productivity. If you’re experiencing lag or stutters with your UWP apps, follow the suggestions listed below.
Several solutions can fix this issue starting with staying up to date on Windows 11 updates. Microsoft is constantly releasing updates that improve apps and features, including fixes and optimizations for UWP apps.
Other possible solutions include adjusting performance options or uninstalling nonessential UWP apps. In Windows 10, the context menu made it easy to remove unused UWP apps. However, it’s a bit more work in Windows 11. Follow the solutions below to properly uninstall UWP apps.
What are UWP apps?
Universal Windows Platform (UWP) applications (also known as Windows Store apps and Metro-style apps) are apps that are compatible across all Microsoft Windows platforms. This includes PCs, tablets, Xbox consoles, etc.
UWP apps are any apps that are installed from Microsoft Store or apps that are pre-installed on your PC. Universal Windows Platform makes it easy for software developers to use one Software Development Kit (SDK) to reach consumers from all Microsoft Windows devices.
UWP applications only run on Windows 10/11 and perform best on the latest version of Windows 11. However, there appear to be issues with UWP apps lagging or stuttering in Windows 11. Follow this guide to find the solution.
How can I fix slow UWP apps in Windows 11?
1. Check for optional updates
Click Start and open Settings.
Select Windows update in the left panel and click on Advanced options.
Click on Optional updates to display any drivers or optional updates.
Select Download & install on any optional updates, then restart your PC.
2. Adjust performance options
Click on Start and search sysdm.cpl and hit enter.
Go to the Advanced tab and under performance click on Settings.
Select Adjust for best performance and click Apply and then OK.
Return to Start and in your search bar type Task Manager and hit enter.
Click on More details to reveal the full menu.
Click on the Startup tab to show the apps that run at startup and their impact on your PC.
Go through and Disable the UWP apps that you wish to disable at startup.
Close task manager and restart your PC.
Disabling apps that run in the background at startup can help optimize the speed of Windows 11 and improve overall performance. This will help with lags and stuttering in your UWP apps.
Click on Start and search for the app you want to uninstall.
Right-click on it and select Uninstall.
This will take you to the Control Panel where you can find the app you want to uninstall and right-click on it.
Select Uninstall again and this will remove the app.
Repeat on other undesired UWP apps.
3.2 Via Control Panel
Click on Start and search Control Panel and hit enter.
Click on Programs then select Programs and Features.
Find the UWP app you wish to remove and uninstall it by right-clicking.
Repeat the steps on other UWP apps you want to remove.
3.3 Via Apps and Features in Settings
Click on Start and open Settings.
Select Apps then click on Apps and Features.
Find the UWP app you wish to uninstall from the list and click on the three dots, then hit Uninstall.
Click Uninstall again.
Repeat steps 3 and 4 on any other undesired UWP apps.
Removing UWP that you don’t use can help improve the speed and stutters in the apps that you do use. This is also a good way to free up storage on your PC.
4. Upgrade to an SSD to speed up slow UWP apps in Windows 11
If your PC is still using a standard hard disk drive (HDD) and you’re still experiencing lag after following the aforementioned solutions, then perhaps it’s time to consider upgrading to a solid-state drive (SSD).
At this point, your UWP apps should be running more smoothly and without lags or stutters. You can maintain these apps by keeping up with developer updates as well as the latest Windows 11 updates.
We hope the solutions offered in this article helped fix the lag in your UWP apps in Windows 11. If you have any questions or have other solutions to suggest, feel free to leave them in the comment section below.