Microsoft .NET 8: How to download & install

Just a few days after the latest support for .NET 6 and .NET 7, Microsoft announced the release of .NET 8, and its first preview is ready to be downloaded for Windows, Linux, and macOS and promised to release new previews and candidate builds every month.

The announcement came three months after .NET 7 was launched in general availability, but this is the first preview release of the tech giant’s next LTS (long-term support) version of the framework.

Releases of .NET include products, libraries, runtime, and tooling, and represent a collaboration across multiple teams inside and outside Microsoft. The broader themes covered in this blog post do not encompass all of the key scenarios and investments for .NET 8. They represent large areas but are just a part of all the important work going into .NET 8.

Jeremy Likness, Principal Product Manager for .NET.

Microsoft .NET 8 brings several tools, but the tech giant highlights the Ahead-of-Time (AOT) compilation in Native AOT and .NET Container images, which improves startup time, battery life, and memory footprint.

Publishing app with Native AOT creates a fully self-contained version of your app that doesn’t need a separate runtime because everything is included in a single file. As of preview 1, this single file is smaller. In fact, Linux builds are now up to 50% smaller.

Read along to find out how you can download and install Microsoft .NET 8.

How to download Microsoft .NET 8

1 Go to Download .NET 8 page.

2. Depending on your need, you can choose Build apps – SDK or Run apps – Runtime.

3. Choose whichever platform you’ll be running it on. In this case, we’re choosing Windows x86 for app developers, which is compatible for Visual Studio 2022 (v17.6 Preview 1) users.

4. Double-click on the file once the download is finished.

5. Click Install.

What are your thoughts on Microsoft .NET 8? Let us know in the comments!

Energy recommendations on Windows 11: How to enable & use

Microsoft just released Windows 11 Build 22621.1343 (KB5022913) to Insiders in the Release Preview Channel for version 22H2 users, bringing a plethora of updates to live. Once this feature comes stable, it could help you improve the energy efficiency of your device and reduce your carbon footprint.

As spotted by Windows enthusiast PhantomOcean3 (@PhantomOfEarth), additionally, the latest build also introduces a lot of nice additions to Windows 11, such as an addition of process filtering on task manager, a new start menu search box design, and a slight tweak in the taskbar, especially for tablet users.

With that being said, however, these new features are still out for review by select users and aren’t out in the stable yet, so you may expect a few performance hiccups here and there. Features are usually rolled out for general users a month after their availability in the Release Preview Channel.

How to enable & use the energy recommendations on Windows 11?

1. Make sure to join the Insider program and have Windows 11 Build 22621.1343 installed in your system. If not, head over to Microsoft’s Preview Windows page to get started.

2. Go to Settings → System.

3. Scroll down a bit to Power & Battery → Energy Recommendations. Click Apply all to enable all the recommendations.

What other features and fixes are coming in KB5022913?

New features

  • New! This update provided access Windows Studio Effects directly from quick settings on the taskbar for devices that had a supported neural processing unit (NPU). This made it quick and easy to turn on and configure camera effects. Those effects included Background blur, Eye contact, Automatic framing, and Audio effects (Voice focus). You can still access these effects in the Settings pages.
  • New! This update made it easier to get help if you were having PC issues. It added a link to the Quick Assist app at the bottom of Settings > System > Troubleshooters. You could also find Quick Assist in the Start menu’s All apps list.
  • New! This update improved the search box experience on the taskbar. As you typed in the search box, search results appeared in the search box. You could also change the search experience you wanted for your taskbar by going to Settings > Personalization > Taskbar. For commercial customers, this update added a new policy for IT administrators to manage how the search box on the taskbar appears in your organization. For more information, see Customizing search on the Windows 11 taskbar.
  • New! This update provided energy recommendations. If you used them, they could help to improve the energy efficiency of your PC and reduce your carbon footprint. Go to Settings > System > Power & Battery > Energy Recommendations.
  • New! This update enhanced the system tray (formerly called the notification area). All icons had a rounded focus and hover treatment in the lower right, including the “Show hidden icons” flyout menu. You could move icons to rearrange them in the “Show hidden icons” flyout menu or move icons to the taskbar.
  • New! This update introduced a touch-optimized taskbar for 2-in-1 devices that you could use as a tablet. There were two states of this taskbar: collapsed and expanded. To switch between the two states, swipe up and down on the bottom of your screen. When collapsed in tablet mode, the taskbar receded to give you more screen space and kept you from accidentally opening the taskbar. When expanded in tablet mode, the taskbar was optimized to be easier to use with touch. Your taskbar automatically changed to this optimized version when you disconnected or folded back the keyboard.
    • This feature only worked on devices that could be used as tablets and was on by default. To change that, go to Settings > Personalization > Taskbar > Taskbar behaviors. The setting is called “Optimize taskbar for touch interactions when this device is used as a tablet.” If your company manages Windows updates for your device, this feature will be off by default. Administrators can turn it on using the new commercial control for continuous innovation.
  • New! This update provided enhanced support for braille devices. They continued working while you switched between Microsoft Narrator and third-party screen readers. Narrator automatically changed braille drivers. For more information, see Chapter 8: Using Narrator with braille.
  • New! This update also added support for new braille displays and new braille input and output languages in Narrator. Some of the new braille displays included the APH Chameleon, the APH Mantis Q40, the NLS eReader, and many more. For more information, see Chapter 8: Using Narrator with braille.
  • New! This update made voice access more flexible and supported interaction with more user interface (UI) controls. For example, voice interacted with controls that contained:
    • Names that had numbers, such as “Click 5”
    • Names without whitespaces between them, such as “click PivotTable” or “click PivotChart”
    • Names that had special characters, such as Bluetooth & devices (“click Bluetooth and devices”) or Dial – up (“click dial hyphen up”)
  • New! This update added voice access support for spin controls, thumb controls, and split buttons. You interact with these controls by using the “click” command or number overlays. This update also fixed issues that affected snapping commands that snapped a window left or right. Commands that moved the cursor in a text box ran instantly.
  • New! This update also provided voice scrolling enhancements. You could use voice to scroll to the extreme left and right on a page. You could also use continuous scrolling to the left or right like what is already present for vertical scrolling. For more information about the new voice access commands, see Voice access command list.
  • New! For devices that were joined to Azure Active Directory (AAD), this update provided AI-powered recommended content on your Start menu. On the Start menu, you found content to help you to prepare for meetings, quickly access files you were collaborating on, and more.
  • New! We added the new Tamil Anjal keyboard for the Tamil language. To add it, make sure Tamil (Singapore), Tamil (Malaysia), Tamil (Sri Lanka), or Tamil (India) appears in Settings > Time & Language > Language & Region. Select the ellipses (…) next to the language. Select Language Options. Add Tamil Anjal (QWERTY) to the list of keyboards.

Fixes

  • We fixed an issue that affected the Color filters setting. When you selected Inverted, the system set it to Grayscale instead.
  • We improved the reliability of Windows after you installed an update.
  • We supported the United Mexican States’ daylight-saving time change order for 2023.
  • We fixed a date information issue. It affected the format of dates sent between Windows and some versions of the Heimdal Kerberos library.
  • We fixed an issue that affected IE mode. The text on the status bar was not always visible.
  • We fixed compatibility issues that affected some printers. Those printers used Windows Graphical Device Interface (GDI) printer drivers. Those drivers did not completely adhere to GDI specifications.
  • We fixed an issue that affected the software keyboard. It did not appear in the Out-of-Box Experience (OOBE) after a Push-button reset (factory reset). This type of reset required an external keyboard to be attached to provide credentials.
  • We fixed an issue that displayed a blue screen during video playback. This occurred after you set high dynamic range (HDR) on your display.
  • We fixed an issue that might have affected the touch keyboard and the PIN entry keyboard. You might not have been able to use them to enter text when you signed in to your device.
  • We fixed an issue that affected AppV. It stopped file names from having the correct letter case (uppercase or lowercase).
  • We fixed an issue that affected Microsoft Edge. The issue removed conflicting policies for Microsoft Edge. This occurred when you set the MDMWinsOverGPFlag in a Microsoft Intune tenant and Intune detected a policy conflict.
  • We fixed an issue that affected provisioning packages. They failed to apply in certain circumstances when elevation was required.
  • We fixed an issue that affected Azure Active Directory (Azure AD). Using a provisioning package for bulk provisioning failed.
  • We fixed an issue that affected Universal Print’s Configuration Service Provider (CSP). A command prompt window appeared when you installed a printer.
  • We fixed a reliability issue that occurred when you used Task View.
  • We fixed an issue that affected which folders appeared in the Browse for Folder picker.
  • We fixed an issue that affected File Explorer. When you used Shift  +Tab or Shift+F6, the input focus did not move.
  • We fixed an issue that affected the user interface (UI). The volume up and volume down commands from a Bluetooth keyboard did not display.
  • We fixed an issue that affected Xbox subscribers. If you purchased an Xbox subscription using the “Redeem code” option, the Xbox subscription card did not appear on the Settings Accounts page. This occurred when recurring billing was off.
  • We fixed an issue that might have affected lsass.exe. It might have stopped responding. This occurred when it sent a Lightweight Directory Access Protocol (LDAP) query to a domain controller that had a very large LDAP filter.
  • We fixed an issue that affected the Local Security Authority Subsystem Service (LSASS). LSASS might have stopped responding. This occurred after you ran Sysprep on a domain-joined machine.
  • We fixed an issue that affected copying from a network to a local drive. Copying was slower than expected for some users.
  • We fixed an issue that affected parity virtual disks. Using Server Manager to create them failed.

Are you excited about these features? Let us know in the comments!

How to Add & Use Google Calendar on Windows 11

Time management and keeping to tasks have been a challenge for most individuals. Thus, a calendar app helps you manage and schedule tasks, appointments, and events.

So, this article will look at how to add and use Google Calendar on Windows 11.

Is there a Google Calendar app for Windows 11?

Calendar does not have a standalone app for Windows on Microsoft Store. Although, there is no indication of why Google has yet to launch its Google Calendar desktop app.

However, Google Calendar is available on the web and can be accessed through a web browser on Windows 11 or add the web app shortcut.

Alternatively, you can find out how to get Apple Calendar on Windows PC for iOS users.

How do you add Google Calendar on Windows 11?

1. Add Google Calendar to the taskbar

  1. Launch the Google Chrome browser.
  2. Go to the Google Calendar app page and log into your Google account.
  3. Click the Menu button (the three dots), hover with your mouse pointer over More tools, and select Create shortcut.
  4. Check the Open as window box and hit the Create button.
  5. Now, go to your desktop and the Google Calendar shortcut appeared. Right-click on it, select Show more options and select Pin to taskbar from the menu.
  6. Now, you will see the Google Calendar shortcut on your taskbar for quick access.

You need to know that if you don’t check the Open as window box in step 4, every time you click on the shortcut, this will launch the app in Chrome.

This way, the calendar will appear in a separate window. Also, the app will connect to the internet to access Google Calendar.

In our example, we used Google Chrome because it’s the most simple method but you may use other browsers, log into your Google account and create a shortcut to your Google Calendar.

2. Synchronize Google Calendar with Windows Calendar

  1. Left-click the Start button, type in calendar, and click it to open it.
  2. Select the Settings icon in the bottom-left corner of the sidebar menu and click on Manage Account from the pop-up menu.
  3. Click on the Add account button, then select Google from the drop-down.
  4. On the Sign-in menu, fill in your Google account credentials and follow the on-screen instructions.
  5. After signing in, click on Allow to grant Google Calendar the needed permissions.
  6. Input your name into the Send your messages using this name bar and click the Sign-in button.

With the unavailability of the Google Calendar on Windows, syncing your Google Calendar with the Microsoft Calendar will be the best solution as it saves time, is user-friendly, and saves space by having one calendar app.

How do I use the Google Calendar on Windows 11?

1. Create an Event on your Google Calendar on Windows 11

  1. Left-click the Start button, type in calendar, and click it to open it.
  2. Select the date for the event and type in the name of the event in the name bar.
  3. Check or uncheck the box for All day to specify the nature of the event, then input the time the event will take place.
  4. Add the event’s location, then click on the More details button.
  5. Select the reminder notification time and input time.
  6. Select the Event description bar to input the optional event description.
  7. Click on the drop-down arrow button beside the color dot, and from the list, click on Google Calendar. Click on Save.

Selecting Google Calendar and saving the details set on the calendar events allows it to take effect on the Google Calendar. Also, you can find out how to restore Google Calendar missing on Windows.

2. Manage Google Account Sync Settings

  1. Left-click the Start button, type in Calendar, and click it to open it.
  2. Select the Settings icon in the bottom-left corner of the sidebar menu and click on Manage Account from the pop-up menu.
  3. Click on your Google account to prompt its settings interface.
  4. Select Change mailbox sync settings.
  5. Under the Sync option, you can turn on or off all sync options to your personal preference.

Google sync allows users to make changes to their calendar or contacts on one device that will be reflected on all other devices where the account is logged on. It makes it easier to keep track of events and calendar activities across multiple devices.

In addition, our readers can check our guide on the best calendar apps for Windows for a better experience. Also, you may be interested in our article about Google Calendar not loading on Firefox and how to fix it.

In conclusion, following the steps outlined above, you should find it easy to use the Google Calendar on Windows 11. If you have more questions or suggestions, kindly drop them in the comments section.

Game Security Violation Detected in Apex: 4 Methods to use

You may encounter the error message Game Security Violation Detected when attempting to launch Apex Legend.

The error generally shows out of the blue without prior indication and prevents you from launching the game. And every Apex Legend fan must know how to fix it.

This article looks at some troubleshooting steps to help you resolve the Game Security Violation Detected (#00000001) error in Apex Legends.

Why does the Game security violation detected message appear in Apex?

This Game Security Violation Detected error occurs when Apex Legend’s anti-cheat system detects an issue with your game files. That said, most of the time, it is a false positive. A few triggers for this error are:

  • Third-party programs or software – The installed antivirus or firewall is often found to lead to the error. Also, the message can appear when the game’s anti-cheat system detects the presence of other third-party programs or software running alongside the game. 
  • Unauthorized modifications – The anti-cheat system is designed to detect any unauthorized changes to the game’s code or memory. If it detects any suspicious activity, it will trigger the message.
  • Hardware monitoring software – Some types of hardware monitoring software, such as those that monitor CPU or GPU temperatures, may trigger the anti-cheat system and cause the message to appear. 
  • Outdated game files – In some cases, the Game Security Violation Detected message might appear if the game’s files are outdated or corrupted. 

What are some of the most common errors in Apex?

Apex Legends is no stranger to errors; users often encounter these while playing the game. But most errors are easily fixable and shouldn’t take much time.

Here are some of the common Apex Legends errors:

  • Game Security Violation Detected Apex Legends [LightingService.exe] – usually triggered by your antivirus and is often a false positive alarm.
  • Apex Legends Game Security Violation Detected (0000006) – This is very similar to the above error and is often triggered by the same things.
  • Game Security Violation Detected Apex [LEDKeeper] – Here is another variant of the violation error we discuss in this guide.
  • 0x887a0006 DXGI_ERROR_DEVICE_HUNG – This error typically occurs when the graphics processing unit (GPU) stops responding for some time, and the game cannot recover.
  • Apex Legends Error Code 23 – This connection error can occur when the game cannot connect to the servers.
  • Apex Legends Error Code: 100 – This error can prevent players from accessing the game and may occur for various reasons, including internet connectivity issues, server maintenance, firewall or antivirus software blocking the connection, or corrupted game files.

Also, you might come across many other Apex errors, and the solution listed here should work for most of these.

How do I fix Game Security Violation Detected in Apex?

1. Disable Antivirus and Firewall

1.1 Turn off the antivirus

  1. Press Windows + S to open the Search menu, enter Windows Security in the text field, and click on the relevant search result.windows security
  2. Click on Virus & threat protection.Virus & threat protection to fix game security violation detected apex
  3. Next, click on Manage settings under Virus & threat protection settings.manage settings
  4. Toggle the switch to turn off Real-time protection.disable to fix game security violation detected apex
  5. Click Yes in the UAC prompt that pops up.click yes

If you have a third-party antivirus installed, open it and temporarily disable the antivirus. Once done, rerun Apex Legend and check if the Game Security Violation Detected error in Apex on Steam is resolved.

1.2 Disable Microsoft Defender Firewall

  1. Click on Firewall & network protection in Windows Security.firewall & network protection
  2. Next, click on Private network or the other options here, depending on which one reads Active.Private network
  3. Toggle the switch to turn off the Microsoft Defender Firewall.turn off to fix game security violation detected apex
  4. Click Yes in the UAC.yes

After disabling the firewall, run Apex Legends and check for any improvements. Then, makeable the firewall and real-time protection to keep your computer safe.

If disabling the firewall works, add the Apex Legends file to the white list. This way, you don’t have to disable the firewall whenever you want to play the game.

1.3 Allow through firewall

  1. Press Windows + S to open the Search menu, enter Allow an app through Windows Firewall, and click on the relevant search result.allow an app through Windows Firewall
  2. Click on Change settings.change settings
  3. Scroll down, tick the Private and Public boxes for every Apex Legends entry, and click OK to save the changes.allow to fix game security violation detected apex

That’s it. Now try to rerun the game while keeping the Firewall enabled and check if the Game Security Violation Detected error in Apex Legends is fixed.

2. Repair the game

  1. Launch Origin, and select My Game Library from the options on the left.my game library
  2. Right-click on Apex Legends, and then select Repair.repair to fix game security violation detected apex
  3. Origin will scan the game files and apply the required fixes to resolve any issues.

After the repair, close Origin, relaunch the game as administrator, and check if the Game Security Violation Detected error in Apex Legends is resolved.

Try to launch the game from the Origin client instead of directly launching it using the desktop shortcut. This method has worked for several users in fixing crashes.

3. Check for third-party app conflict

If you have a third-party game booster software or game management utility installed, it may create issues with Apex Legend. For example, gaming laptops often come pre-installed with Game Center Software that can conflict with the game’s anti-cheat system.

Close all the third-party apps running in the background, then launch the game to see if it usually works. Also, you can uninstall the app if it doesn’t perform a critical function on the PC.

If the issue persists, open Task Manager and check if any process related to the game management tool or RGB lighting controller is still running in the background. If true, terminate the process and verify if the Game Security Violation Detected error in Apex Legends is fixed.

4. Reinstall Origin

  1. Press Windows + R to launch the Run command, enter appwiz.cpl in the text field, and click OK.appwiz.cpl
  2. Select Origin from the list of installed apps, and click on Uninstall.uninstall to fix game security violation detected apex
  3. Follow the on-screen instructions to complete the process.
  4. Reboot the computer.
  5. Download Origin, and run the setup to install it all over again.

When you open Origin, the Game Security Violation Detected (#0000000D) error in Apex Legends will be resolved.

Also, determine what to do if Apex Legends won’t launch on your PC. And many reported the Apex game logic error recently, so find some quick fixes immediately!

Tell us which fix worked for you in the comments section below.

Battle.net Crashing on PC: Try these 6 Easy Solutions

Battle.net is a popular gaming client and the launcher for Blizzard’s multiplayer games. It has a fair share of users and commands significant appeal amongst the community. However, many users have recently reported that the Battle.net client is crashing on their PCs.

There isn’t a specific underlying cause for Battle Net crashing the computer, so identifying the problem and eliminating it may take time. No matter the case, we will help find you a solution when the game keeps crashing in Windows.

Why is Battle.net crashing on my PC?

  • Lack of permissions: One of the reasons the client crashes in Windows is the lack of administrative privileges.
  • Corrupt or outdated graphics driver: Even corrupt or outdated drivers can trigger issues, both with Battle.net and other apps on the PC.
  • Third-party conflicts: Several third-party applications, usually antivirus or security software, could be responsible when Battlenet crashes on the PC.
  • Misconfigured settings: Many users reported that it was the misconfigured app settings that led to Battle.net causing a blue screen.

What can I do if Battlenet is crashing on my PC?

Before we head to the solutions, restart the computer, launch Battle.net again, and verify if the problem is resolved, check for Windows updates, and if you have any third-party antivirus running on the computer, disable it, and verify whether Battlenet stops crashing on the PC.

1. Update the graphics driver

  1. Press Windows + X to open the Power User menu, and select Device Manager.device manager
  2. Expand Display adapters, right-click on the graphics adapter, and choose Update driver.update driver to fix battlenet crashing pc
  3. Select Search automatically for drivers and wait for Windows to install the best available version.search automatically for drivers

In most cases, users could fix things when Battle.net kept crashing on the PC by updating the graphics driver. In case Windows is unable to find an update, you can directly head to the manufacturer’s website to manually install the driver. Here are quick links for the three:

2. Run Battle.net as administrator

  1. Right-click on the Battle.net launcher and choose Properties.properties
  2. Navigate to the Compatibility tab, tick the checkbox for Run this program as an administrator, and click OK to save the changes.run as administrator to fix battlenet crashing pc

Once done, relaunch Battlenet and verify whether it still keeps crashing on the PC. If yes, move to the next solution.

3. Disable Nvidia RTX Voice

  1. Press Ctrl + Shift + Esc to open the Task Manager, and head to the Startup tab.startup
  2. Locate NVIDIA RTX Voice, select it, and click on Disable.disable to fix battlenet crashing pc
  3. Now, restart the computer.

A few users reported that NVIDIA RTX Voice was responsible for Battlenet crashing on the PC, and disabling it from automatically launching at startup fixed things in no time.

4. Modify settings

  1. Launch the Battle.net app, click on the main icon near the top left, and select Settings.settings
  2. Now, under the App tab, scroll down to the bottom and untick the checkbox for Use browser hardware acceleration.disable hardware acceleration to fix battlenet crashing pc
  3. Click Restart Now in the confirmation prompt.restart now
  4. Again, open the Battle.net Settings, navigate to the Game Settings tab, select the one that’s crashing, and tick the checkbox for Additional command line arguments.command line
  5. Paste the following in the field and hit Enter:-dx9-dx9

Even though most of the playable games that Blizzard offers are primarily made for DX10, some of them may perform better with DX9. So, after making the changes, check whether Battle.net stops crashing on the PC.

5. Reinstall Battle.net from scratch

  1. Press Windows + R to open Run, type appwiz.cpl and hit Enter.appwiz.cpl
  2. Locate Battle.net, select it, and click on Uninstall.uninstall app to fix battlenet crashing pc
  3. Click Yes in the UAC prompt.
  4. Choose Yes, Uninstall in the confirmation box, and wait for the process to complete.yes, uninstall
  5. Once done, press Windows + R to open Run, paste the following paths individually, then hit Enter, and delete any Battle.net or Blizzard files/folders found there:%LOCALAPPDATA% %APPDATA% %TEMP% %PROGRAMDATA%
  6. Next, head to Battle.net’s official website, download the setup, and then run it to install the client.

If the previous solutions didn’t work, reinstalling Battle.net can help fix things if it keeps crashing on Windows PC. Just make sure to remove all the related files before reinstalling the app. Or you may use a reliable uninstaller software to do the same.

6. Create a new user account

  1. Press Windows + I to open Settings, and click on Accounts. accounts
  2. Go to Family & other users from the navigation pane, and click on Add someone else to this PC.add someone else to this PC
  3. Click on I don’t have this person’s sign-in information.sign-in information
  4. Now, select Add a user without a Microsoft account.add user to fix battlenet crashing pc
  5. Enter the username and password (not mandatory for Local Account), and click on Next to proceed.create local account to fix battlenet crashing pc
  6. Now, select the account you just created, and click on Change account type.change account type to fix battlenet crashing pc
  7. Choose Administrator from the dropdown menu, and click OK.administrator
  8. Finally, log into the new account, download Battle.net from the website, and it should run smoothly.

That’s it! If nothing else helps fix things when Battlenet is crashing on Windows PC, the last option is to create a new user account. It works almost every time, but since this process is time-consuming, we recommend you use it as a last resort.

Also, do not forget to check some quick tips to optimize Windows for gaming and download Battlenet for mac or Android.

Tell us which fix worked for you in the comments section below.

Your Xbox games are coming to Nvidia GeForce NOW soon

Microsoft and Nvidia have just teamed up to bring Xbox titles to the latter’s cloud gaming service, Nvidia GeForce NOW and announced a lucrative 10-year deal, during a press conference in Brussels. 

Once the agreement comes into place, gamers can stream Xbox PC titles from GeForce NOW to PCs, macOS, Chromebooks, smartphones, and other devices. The news itself arrives amidst Microsoft’s latest attempt to acquire Activision Blizzard, which has turned into a tug-of-war saga with EU antitrust regulators.

The Head of Xbox Phil Spencer is optimistic that the partnership is beneficial for both parties and gives developers more ways to make money out of their games.

Xbox remains committed to giving people more choice and finding ways to expand how people play. This partnership will help grow NVIDIA’s catalog of titles to include games like Call of Duty, while giving developers more ways to offer streaming games. We are excited to offer gamers more ways to play the games they love.

Phil Spencer, the Head of Xbox

What could the Xbox – Nvidia integration mean for gamers?

Nvidia launched its GeForce NOW cloud gaming service in 2020 and has supported over 1.500 titles for its 25 million members in over 100 countries. With this addition, Xbox games in third-party stores like Steam or Epic will be able to be streamed through GeForce NOW. 

Combining the incredibly rich catalog of Xbox first party games with GeForce NOW’s high-performance streaming capabilities will propel cloud gaming into a mainstream offering that appeals to gamers at all levels of interest and experience. Through this partnership, more of the world’s most popular titles will now be available from the cloud with just a click, playable by millions more gamers

Jeff Fisher, senior vice president for GeForce at NVIDIA.

Previously, Microsoft also announced another 10-year binding deal with Nintendo, hoping to bring its beloved Xbox games to the often-overlooked console in the near future. 

In the latest update of the Microsoft-Activision saga, the Redmond-based company’s execs arrived at a hearing to persuade EU antitrust regulators to greenlight the deal. 

PING: Transmit Failed General Failure: 4 Steps to Fix it

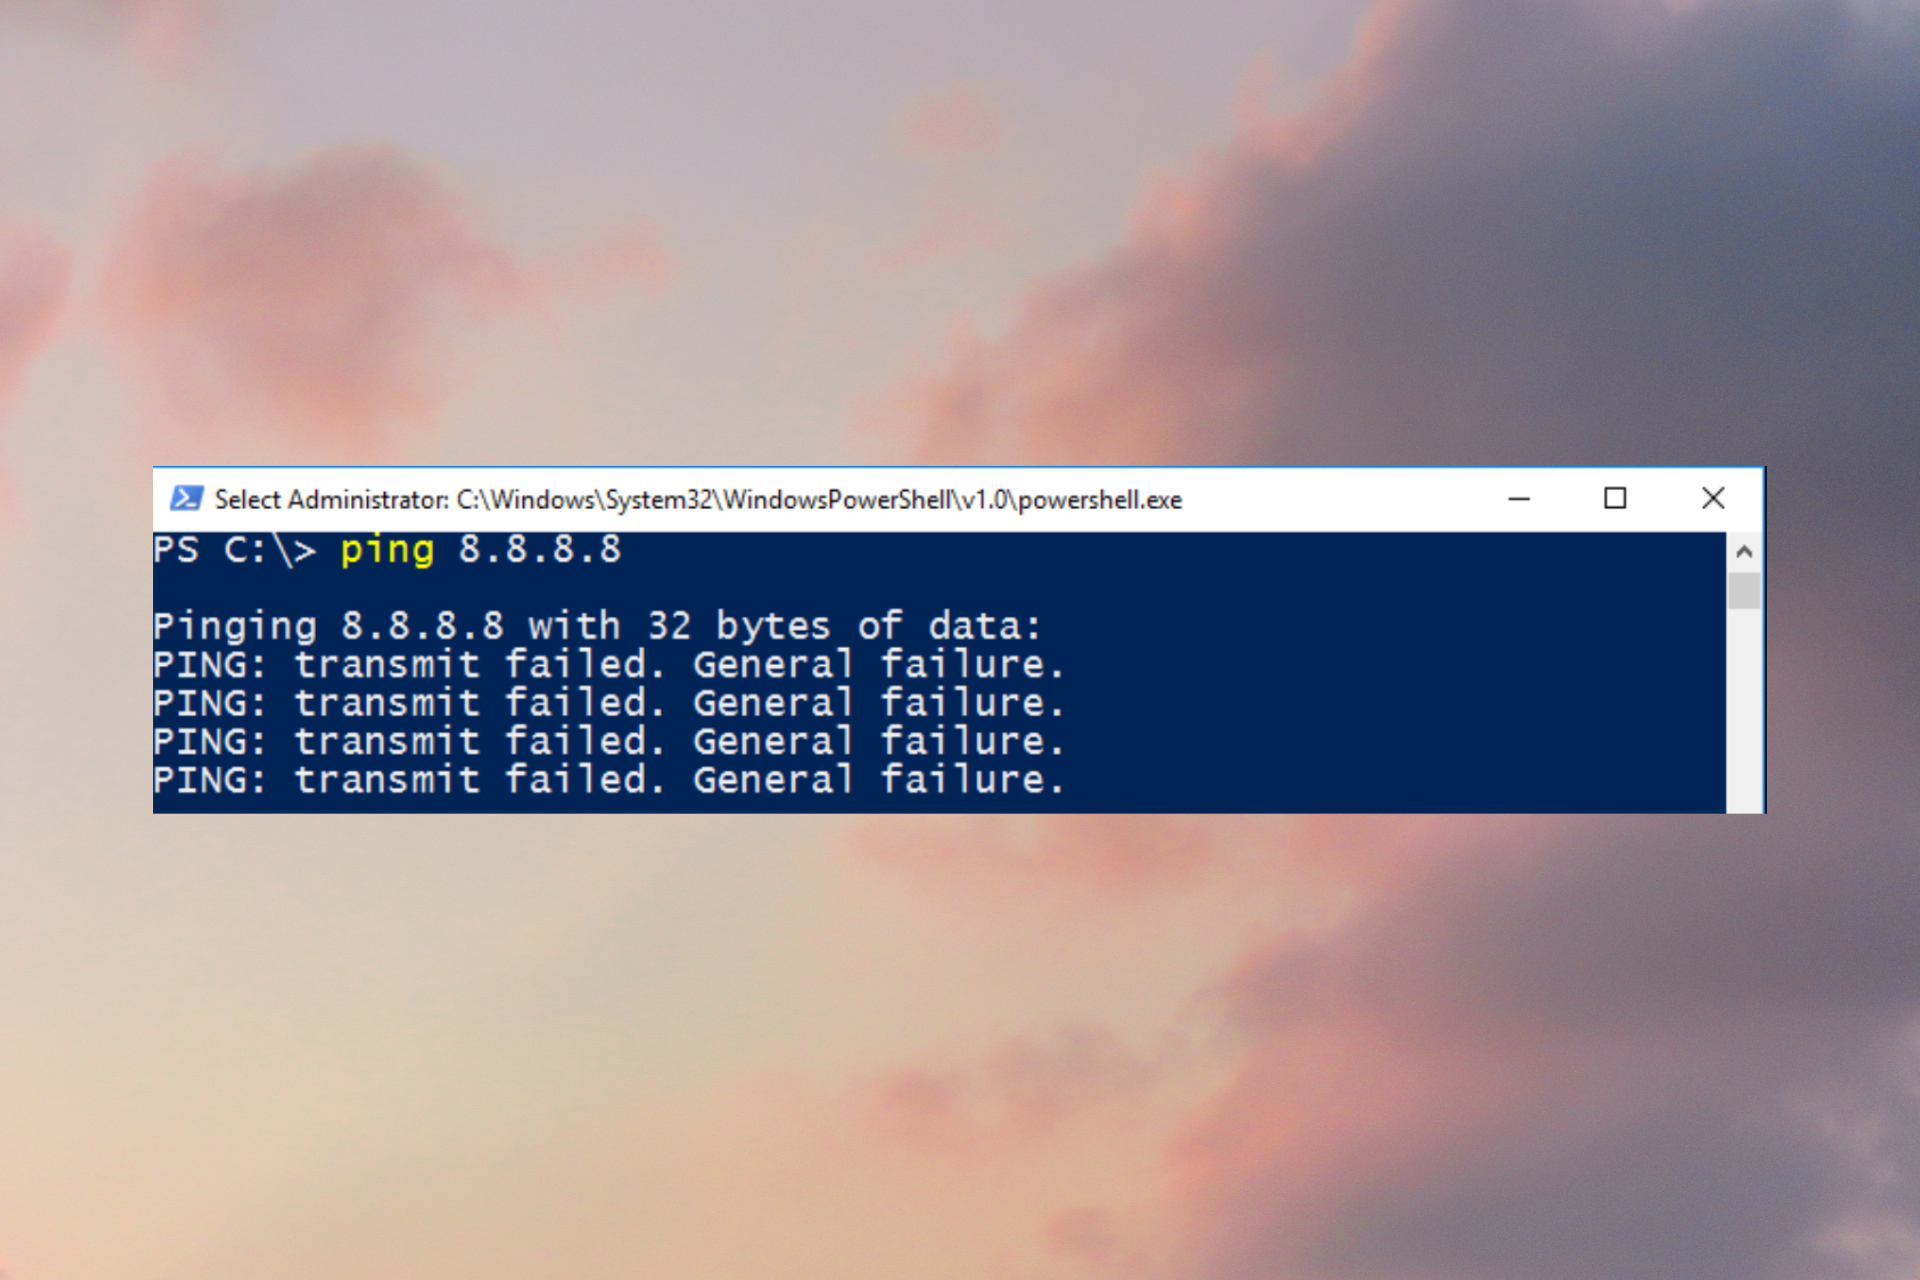
Have you ever faced PING: transmit failed. General failure? Unfortunately, it’s common for Windows users who try to run ping commands.

The main reasons for the ping general failure error are a corrupt DNS cache and network configuration mishaps. Follow the steps below to fix this error in no time.

How do I fix the PING: transmit failed. General failure error?

Before trying advanced fixe, make sure you restart your PC, and router and check if your internet connection is working properly. If the error persists, continue with the guidelines below.

1. Run the Network Adapter troubleshooter

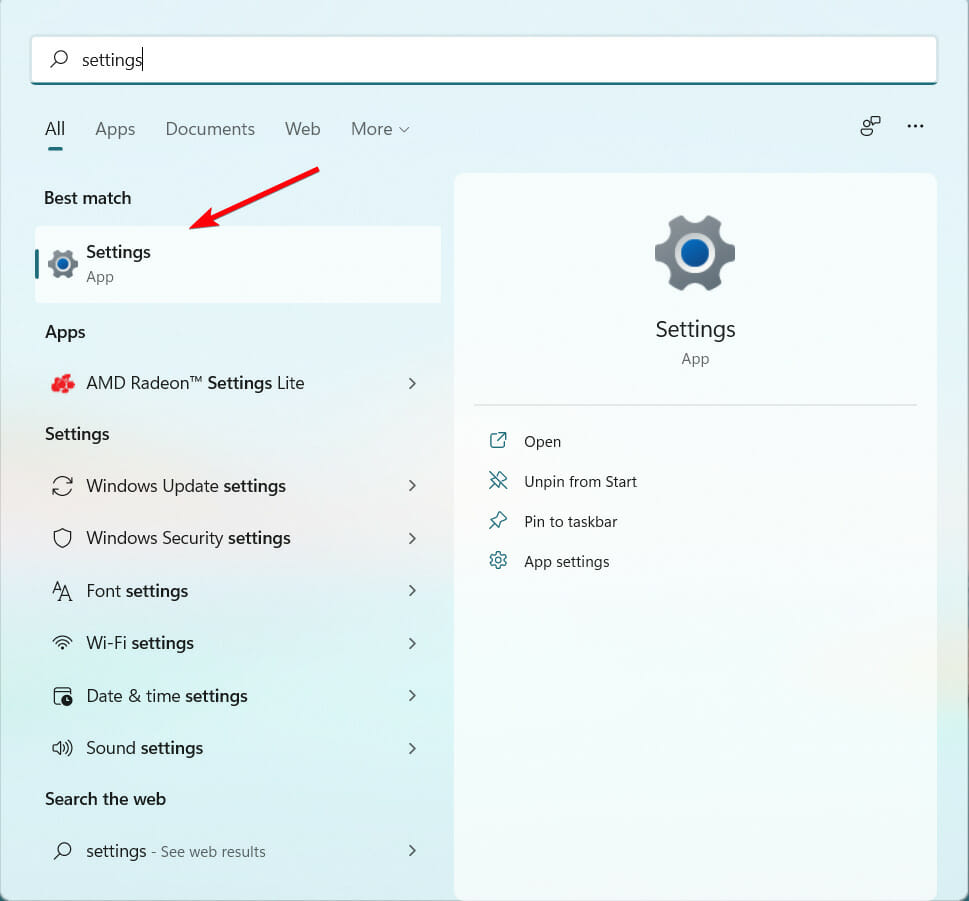
  1. Open the Search menu and type Settings.
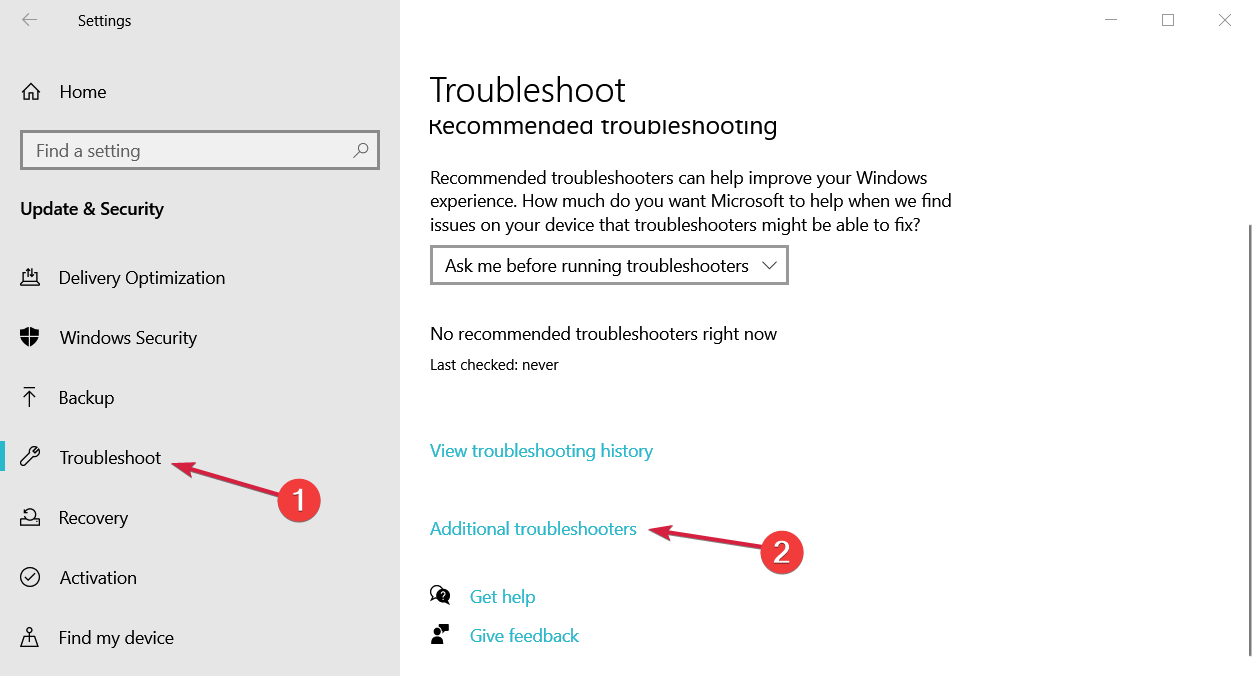
  2. Select the Update and Security option.
  3. Navigate to select Troubleshoot from the left pane and click on Additional troubleshoot.
  4. Choose Internet Connection and click on Run the troubleshooter option.
  5. Follow the troubleshooting process to see the diagnosis.
  6. Restart your PC.

2. Flush the Corrupt DNS Cache

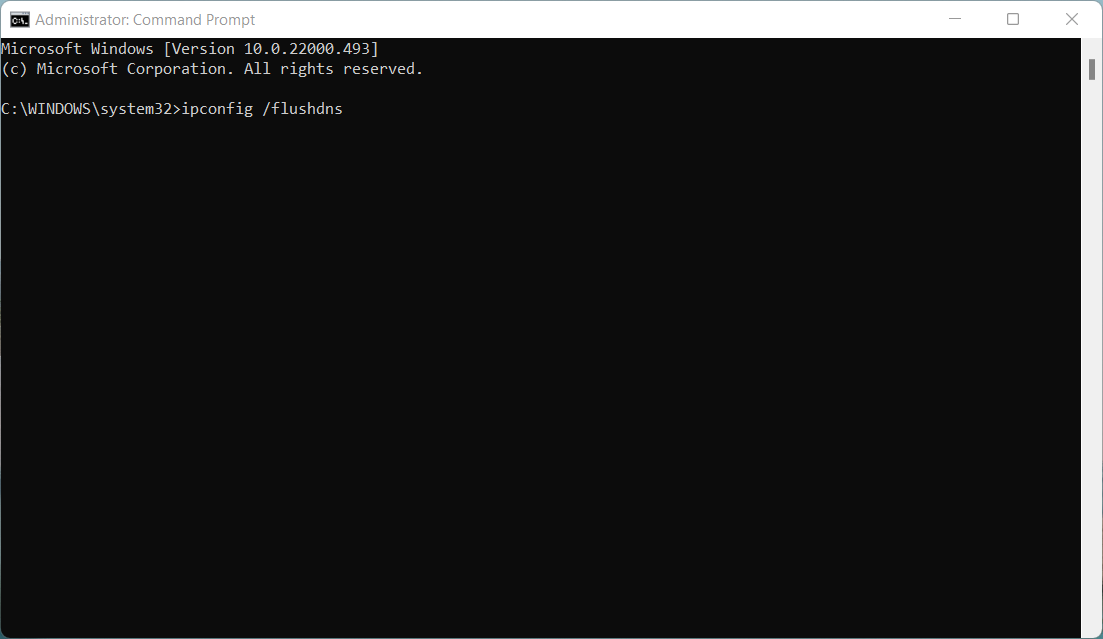
  1. Go to the Windows Search tab and type cmd, then click on the Run as administrator option.
  2. Type this command in the Command Prompt and hit Enter:
    ipconfig /flushdns
  3. Restart your PC after the process.

3. Disable IPv6 transition technologies

  1. Go to Start Menu, enter cmd in the Search box, right-click on it and select Run as administrator.
    cmd Ping general failure
  2. Into the Command Prompt, enter the commands below and hit Enter after each one.
    • netsh int ipv6 isatap set state disabled
    • netsh int ipv6 6to4 set state disabled
    • netsh interface teredo set state disable
  3. After running these commands, close Command Prompt and restart your computer, and check to see if the problem is fixed and if you can run adequate ping commands.

4. Reset your computer’s TCP/IP

  1. Go to Start Menu, enter cmd in the Search box, right-click on it and select Run as administrator.
    cmd Ping general failure
  2. Into the Command Prompt, enter the commands below and hit Enter after each one.
    • netsh i i r r
    • netsh winsock reset
  3. After doing that, close Command Prompt and restart your computer.

We hope these solutions helped you fix your PC’s Ping transmit general failure error. If any of these solutions worked for you, let us know in the comments below.

Epson Printer Not Printing – Quick Fixes for Windows Users

If your Epson printer is not printing on Windows, the cause is usually related to the connection, drivers, ink levels, or internal errors. This guide explains the most common reasons and gives you detailed, step-by-step fixes that apply to all Epson models.

Common Reasons an Epson Printer Will Not Print

  • USB, Wi‑Fi, or Ethernet connection problems that interrupt communication
  • Low ink, clogged print heads, or cartridges not installed correctly
  • Paper jams, incorrect paper size, or mismatched print settings
  • Outdated, missing, or corrupted printer drivers
  • Firmware bugs or internal hardware issues such as faulty sensors or worn components

Step-by-Step Fixes for Epson Printer Not Printing

1. Power Cycle the Printer and PC

  1. Turn off your printer and computer.
  2. Unplug the printer for 30 seconds.
  3. Plug it back in and restart both devices.

Restarting both your printer and PC clears temporary glitches stored in their memory. Over time, small communication errors can accumulate between devices, blocking print jobs. Power cycling forces a clean restart so the printer reinitializes its connection to the computer.

2. Reinstall the Printer Driver

  1. Press Windows + R, type devmgmt.msc, and press Enter.
  2. Expand Print queues, right-click your Epson printer, and select Uninstall device.uninstall corrupt driver
  3. Restart your PC and turn the printer on. The computer should automatically reinstall the printer driver upon detecting the device.

Printer drivers are like translators between your PC and printer. If they are outdated, corrupted, or not designed for your exact model, your print commands may not be recognized. A fresh install ensures full compatibility.

For a faster option, you can use a trusted automatic driver updater such as Fortect. It automatically scans and installs the latest versions of compatible drivers for your hardware.

3. Check Physical Connections

  1. Replace or reseat your USB cable.
  2. Confirm Wi‑Fi connection on the printer display.
  3. Check the Ethernet cable and router status.

Loose cables, bad ports, or unstable wireless signals can silently break the connection. Even a partially connected USB cable can cause intermittent failures. For wireless printers, router updates or interference can cause disconnects. For more help, see our guide on fixing Epson printer Wi‑Fi connection issues.

4. Set Your Epson Printer as Default

  1. Go to Settings → Bluetooth & devices → Printers & scanners.
  2. Select your Epson printer and choose Set as default.

If Windows changes your default printer after updates or when a new printer is connected, jobs may be sent to the wrong device, such as a PDF printer. Setting your Epson as the default ensures every job goes to the correct printer.

5. Clear the Print Queue

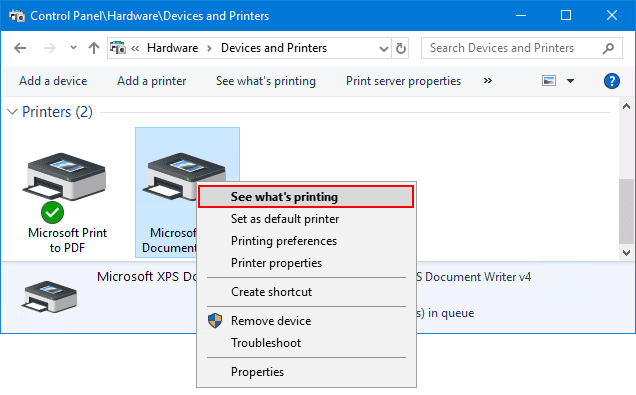
  1. Open Control Panel → Devices and Printers.
  2. Right-click your Epson printer and select See what’s printing.
  1. Cancel all pending jobs.

If a single print job fails, it can block all the others behind it. This is common if the document is too large, corrupted, or uses unsupported fonts or graphics. Clearing the queue resets the print workflow so new jobs can process.

6. Run the Windows Printer Troubleshooter

  1. Open Settings → System → Troubleshoot → Other troubleshooters.
  2. Click Run next to Printer.

The troubleshooter scans for paused print queues, wrong configurations, driver mismatches, and offline status. It applies recommended fixes automatically, which saves time and avoids guesswork.

7. Restart the Printer Spooler Service

  1. Press Windows + R, type services.msc, and press Enter.services msc
  2. Right-click Print Spooler and select Stop.
  3. Delete files in C:\Windows\System32\spool\PRINTERS.
  4. Right-click Print Spooler and select Start.

The spooler is the Windows service that stores and organizes print jobs before sending them to your printer. If its files are corrupted or overloaded, new jobs cannot start. Restarting and clearing it resets the process completely.

8. Check Ink or Toner and Paper Settings

  1. Verify ink levels and cartridge installation.
  2. Run Nozzle Check and Head Cleaning.
  3. Match paper size and type in both Windows settings and the tray.

Low ink or toner can stop printing entirely, and even if ink remains, clogged nozzles can produce blank pages. Incorrect paper size or type settings in Windows can also cause the printer to reject the job. If the printer refuses to print black or white, see how to fix printers that will not print black and white.

9. Enable Print Directly to the Printer

  1. Go to Control Panel → Devices and Printers.
  2. Right-click your Epson printer and select Printer properties.
  3. Open the Advanced tab and check Print directly to the printer.

This bypasses the spooler entirely and sends each job straight to the printer. It is helpful when the spooler service keeps crashing or causing long delays.

10. Update Printer Firmware

  1. Download your model’s firmware from Epson’s support page.
  2. Run the updater and follow the prompts.

Firmware updates address bugs, improve compatibility with Windows updates, and may fix known printing issues specific to your model. If your issue started after a Windows update, a firmware update often restores normal operation.

11. Test a Standalone Print

  1. Disconnect the printer from your PC.
  2. Use the printer’s control panel to print a test page.

If the printer cannot print a standalone test page, the problem is inside the printer such as faulty sensors, print head damage, or a board failure. If you also use Epson Easy Photo Print, see how to fix Epson Easy Photo Print not working.

FAQs

Why is my Epson printer printing blank pages?

Clogged nozzles or empty cartridges are the main culprits. Run a nozzle check from the printer’s utility menu. If you see gaps, run head cleaning until the pattern prints correctly. Using genuine Epson ink reduces clogging issues.

How do I fix the Epson printer showing as offline?

Confirm the printer is powered on and connected. In Devices and Printers, right-click the Epson printer, choose See what’s printing, uncheck Use Printer Offline, then set it as default so jobs route correctly.

What if my Epson only fails in certain programs?

This is likely a software-specific printing issue. Test printing from another application. If it works, update the affected program or export your file to PDF before printing.

Conclusion

Most Epson printer issues on Windows are caused by easy-to-fix problems like bad connections, stalled print jobs, or outdated drivers. Working through these solutions in order solves most cases without needing professional repair. If none of the steps work, the problem is likely hardware-related and requires Epson service. Keeping your printer’s drivers, firmware, and maintenance up to date will prevent many of these problems from happening again.

Bit Driver Updater Reviewed: Is This Free Soft Legit and Safe?

Most users update drivers on their PC manually. However, others don’t enjoy the heavy lifting and prefer downloading software for the job. Bit Driver Updater is one such tool that can help you keep your computer’s drivers up to date. 

Working in the background, it scans your system for outdated and broken drivers and offers to download new ones from its online database. This is useful if you want to keep your computer in good shape. 

Is Bit Driver Updater legit?

Bit Driver Updater is a user-friendly, comprehensive, and safe tool that effectively manages and updates drivers on both Windows and macOS, ensuring optimal system performance and compatibility.

To determine if a driver updater is good, you have to check out a few different criteria:

Ease of use

The software is available for both Windows and macOS users. It comes with an easy-to-use interface that allows you to manage all the installed drivers on your computer. You can uninstall them if they are no longer used or update them if they are outdated. 

Functionality

Overall, Bit Driver Updater actively scans, updates, manages, and checks the status of drivers to optimize system performance and reliability.

  • Scans and Updates Drivers: Bit Driver Updater scans for outdated and broken drivers on the system and updates them from its online database.
  • Driver Management: Users can uninstall unused drivers and update outdated ones through the tool’s interface.
  • Driver Status Checks: It identifies functional drivers and detects corrupted ones, helping to maintain system stability and security.

Safety

Bit Driver Updater is generally safe to use, it’s not a virus and it doesn’t put you at risk of an infection of that kind.

However, its background operation, if left unchecked, can potentially slow down your computer and defeat its own purpose.

It’s crucial to configure its settings according to your PC’s specifications and usage to ensure optimal performance and avoid any unintended impact on system speed.

Driver Source & Certification

Bit Driver Updater claims to only pull WHQL-certified drivers from trusted sources like Microsoft or OEMs (Intel, NVIDIA, etc.). That’s great on paper—and a good sign if true. But real-world user experiences are mixed. Some users report system issues after updates, like broken touchpads or display problems. So while the tool says it sources from official vendors, it’s wise to double-check what it wants to install.

Backup & Restore Safety Nets

This is where BDU shines. It automatically backs up your current drivers before installing new ones. You can restore individual drivers or do a full rollback if something breaks. It also offers to create a system restore point, which is a nice touch for peace of mind.

Verdict: Solid backup and restore options. You’re covered if something goes sideways.

Scan Accuracy & Customization

The scan engine is fast and detailed. You’ll see version numbers, release dates, and publisher names for each outdated driver. Plus, you can schedule scans or exclude specific devices from updates. That’s handy. But—again—accuracy isn’t perfect. Some updates are mismatched or unnecessary, so don’t hit “Update All” blindly.

User Control & Transparency

You get a decent amount of control. Updates don’t install automatically unless you let them. You can review each one manually and skip anything that looks suspicious. The downside? There’s no detailed changelog, so you won’t know exactly what’s changing. Also, the one-click bulk update is locked behind the Pro version.

Performance & Annoying Extras

Bit Driver Updater is lightweight overall, but the free version installs something called “BG Search Monitor”—basically a browser search engine swap that helps fund the app. That’s a red flag. Some antivirus tools flag BDU as a PUP (potentially unwanted program) because of that bundled stuff. You may also see pop-ups or ads asking you to upgrade.

Here are the main things you should know about how to set it up:

How can I download and install Bit Driver Updater?

  1. On your browser, navigate to the Bit Driver Updater website and click on the Download Now button.
  2. Go to your Download folder and click the file to open the installation wizard.
  3. Click on Next and wait for the setup wizard to complete the installation.
  4. The program will create a shortcut on your Desktop and you can click to open and start.

This option is for the Bit Driver Updater free version. If you would like access to more advanced features, such as anti-malware, you will need to purchase the Pro version that comes with a Bit Driver Updater license key.

Also, for those looking for Bit driver updater free key, we recommend not downloading any tools that claim to activate the updater for free since it could be malware.

Can I delete Bit driver updater?

Yes, like any other software, you can delete the Bit driver updater in no time using either Settings or the Control Panel. Uninstalling apps in Windows is quick and simple.

Though it’s not recommended that you do so because the drivers won’t be up-to-date anymore, which will affect the performance of devices and, in the worst case, lead to BSOD errors.

Does Windows 10 need a driver updater?

If you have Windows 10 for basic use, say, run a few simple applications, browse the web, and take notes, a driver updater tool is not required. Microsoft releases the latest drivers regularly through Windows Update, and you can easily get them.

But for resource-intensive applications, such as games or rendering software, you need the latest graphics or network drivers for the best performance. And these, in some cases, never get released through Windows Update and are, instead, directly uploaded to the website.

This is where a driver updater comes into the picture. It scans your computer for devices, then checks all possible sources for driver updates, and if any are found, automatically installs them. The best part, all this takes place in the background.

Which is the best driver updater?

The answer to this question depends on what you’re looking for. Some people want an all-in-one solution, others a free driver updater, while the rest are looking for a portable app that can update drivers offline. It is all based on your driver’s needs. 

The best driver updater program can automatically scan your PC, find outdated drivers, and update them. This can be done manually, but it takes time, and you must go through several steps.

There are many free and paid programs available in the market that will help you to update drivers in Windows. As far as Bit Driver Updater is concerned, it’s a win for us because of one feature: backup.

Before it searches for any drivers, it backs up the available drivers so that if you wish to restore them at any time, you can. New driver versions can sometimes have issues, so it’s always a good idea to have a backup plan. It is much better than having to roll back driver updates.

While you are still here, you may also be interested in driver detector software, so check out our article.

Let us know your thoughts on Bit Driver Updater in the comments below.

Recover Your Unallocated Partition With These 3 Simple Steps

An unallocated partition is a type of partition in Windows that has not been assigned to any drive letter or volume label. Unallocated partitions are usually created when you install a new operating system on your computer. 

They are also created when you format an existing hard drive. You may wonder why unallocated space is a problem. This is because you cannot store any data on it, therefore, rendering it useless. In this guide, we show you how to recover the unallocated partition and make put it into use.

How does one end up with an unallocated partition?

You can end up with an unallocated partition using the wrong partitioning scheme. Also, if you don’t dedicate all space in a hard drive to partitions, any remaining space not taken up by the OS will be unallocated. Other reasons include:

  • Hard drive failure – Sometimes, hard drives can malfunction, and this can interfere with the partitions already in place.
  • Virus/malware – Some viruses target your hard drive and may delete previously stored files. As such, the partition that was in existence may now appear as unallocated space.
  • Unexpected shutdowns/power failure – If you were in a write process and your PC randomly shuts down, or an unexpected power failure occurs, your data may get corrupted and leave you with a damaged partition.
  • Incorrect partition scheme – Usually, MBR and GPT are the two main partition schemes used. If you use one meant for the other, you may have such errors.

What can I do to recover an unallocated partition?

Before jumping into the slightly technical solutions, we recommend you first try these preliminary steps:

1. Use Disk Management

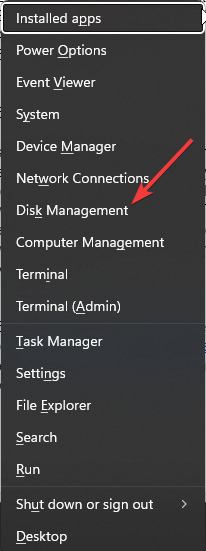
  1. Right-click on the Start Menu icon and select Disk Management.Disk Management
  2. Locate the unallocated space in Disk Management, right-click on it, and select New Simple Volume.
  3. Input a partition size, then click Next.
  4. Type and Enter a drive letter, and select NTFS as the file system in the drop-down menu and other settings to the new partition. 
  5. Click Finish.
  6. You can then follow the process of creating partitions.

2. Use Command Prompt

  1. Hit the Windows key, type cmd in the search bar and click Run as administrator.cmd-run-admin-w11 unexpected kernel mode trap windows 11
  2. Type the following commands and press Enter after each one. Remember to replace X with the corresponding number of the unallocated volume: diskpart list volume select volume X delete volume delete volume override

3. Use third-party software

You can use partition software to recover unallocated partitions. There are many partition recovery tools available for free on the internet. But AOMEI Partition Assistant is our top recommendation. 

It gives users powerful features to recover deleted or damaged partitions and files. This works especially for those with no knowledge of how partitions work. AOMEI Partition Assistant is a powerful, easy-to-use, and reliable partition recovery software. 

What makes it a winner for this task is that not only is it comprehensive in partition management but can also help you recover data from the unallocated drive.

⇒ Get AOMEI Partition Assistant

Is it possible to recover data from unallocated space?

Yes, it is possible to recover data from unallocated space. If you had created a backup of the partition before it became corrupted, you can easily restore it from the Windows backup feature. That’s how to recover an unallocated partition with data for free.

However, if you didn’t, you will need the help of specialized software that can search through every bit of data on the disk looking for certain types of information. There is a lot of data recovery software available, both free and paid.

Although it’s not always a guarantee that you will recover your data, it is good practice to regularly back up your files. This way, you won’t need third-party apps to recover files if such issues arise.

In case you’re having problems creating new partitions, we have an answer in our detailed article, so be sure to check that out.

You may also be interested in hiding partitions, especially when using shared computers. If so, make a quick detour to our article, and let us show you how to go about it.

That’s all we had for this article regarding recovering unallocated partitions. For any additional comments, leave us a comment down below.

A Problem With a Webpage Caused IE 11 to Close and Reopen Tabs [Fix]

Internet Explorer is one of the oldest browsers with lots of good features. Browsing with it on your PC allows you to surf the internet smoothly.

However, users report A problem with a webpage that caused IE 11 to close and reopen the tab without the user prompting it.

Why does Internet Explorer close and reopen tabs?

The issue with Internet Explorer closing and reopening tabs can occur due to many underlying problems with the browser. Some notable causes are:

  • Network issues – If the network is unstable, it causes the browser not to load or takes a long time to load tabs. Also, network congestion on your PC can result in the browser closing and reopening tabs frequently.
  • Faulty browser Add-ons – Add-ons can become corrupt, causing problems with the browser’s performance and tabs closing unexpectedly.
  • Corrupt system files – Corrupt system files may impede the browser’s access to the necessary resources on your PC, causing it to close and repo tabs or crash at will.
  • Outdated Internet Explorer – Internet Explorer is obsolete, and it’s not receiving any new updates, causing it to become unstable and prone to all sorts of bugs.

Some of our readers also complained about Internet Explorer keeps closing. Nonetheless, we’ll discuss how to get Internet Explorer working again.

What can I do if I encounter a problem with a webpage caused IE 11 to close and reopen the tab?

Before trying any advanced troubleshooting steps, go through the following:

We remind you that Internet Explorer is an obsolete browser, and you should opt for a better browser for Windows 11.

However, if you want to fix this issue, our solutions below will help you sort things out.

1. Disable Add-ons in Internet Explorer

  1. Launch the Internet Explorer.
  2. Click Manage Add-ons on the Tools menu.
  3. Click on the add-on to disable it and press the Disable button.
  4. Restart Internet Explorer and see if the error persists.
  5. If it persists, repeat steps 1-3 to disable other add-ons and enable the previously disabled one.

Disabling add-ons in Internet Explorer can stop the activities of the faulty add-on, preventing it from interfering with your tabs.

2. Run an SFC scan

  1. Left-click the Start button, type Command Prompt, and click the Run as administrator option.
  2. Click Yes on the User Account Control prompt.
  3. Type the following and press Enter: sfc /scannow
  4. Restart your PC and check if the error persists.

An SFC scan will scan and find corrupt system files causing Internet Explorer to keep closing and reopening tabs. Check how to fix the run as administrator option if it’s not working on your PC.

In case you require an alternative method to repair damaged system files successfully, it’s advised to utilize a professional PC repair tool.

3. Clear cache and cookies

  1. Run Internet Explorer.
  2. Press the Ctrl + Shift + Del key combination on your keyboard.
  3. Select all the checkboxes, and then click Clear now.
  4. Tap Exit, and then restart Internet Explorer.

Read about fixing Windows not connecting to update service if the error occurs on your PC.

Also, our readers complained about running into Internet Explorer black screen on their computers.

In addition, you can read our article about Internet Explorer not connecting to the internet on Windows 11.

To conclude, you should easily fix the problem that caused IE 11 to close and reopen. You can tell us which solution worked best in the comments section.

WAN Blocking: What Is It & How to Enable/Disable It

Have you seen WAN blocking on your router? Do you need an idea of WAN blocking and how to enable or disable it? Well, you have come across a helpful guide cause this guide will tell you all you need to know about WAN blocking.

What does WAN blocking mean?

WAN blocking prevents specific traffic or network connections from entering or out of a device or network. Through the WAN interface, this can be performed using a router or firewall that can block or filter traffic based on specific criteria such as IP address, port number, or protocol.

Furthermore, the primary purpose of WAN blocking is to improve security by preventing unauthorized access or the spread of malicious traffic. Also, it controls internet usage on the web, for example, blocking social media for protection.

Should I disable the WAN port ping for gaming?

Disabling WAN port ping, also known as ICMP (Internet Control Message Protocol) blocking, can provide additional security for your network, but it may not be necessary specifically for gaming.

Disabling WAN port ping can make it more difficult for others to troubleshoot network connectivity issues, such as deciding if a problem is with your system or the network.

Also, some online games or services depend on the ICMP to check the network connection status. Therefore, disabling the ICMP may cause connectivity issues with these games or services.

It’s your decision whether to disable or enable the WAN port ping, but if you have any doubts, consider consulting an IT professional.

WAN block vs LAN block

Blocking within LAN refers to restricting access to services within the local area network. So, it’s the same as the WAN block but for local networks.

ISPs usually employ LAN blocking to restrict access to certain services for the users.

Also, you can read on Xbox error ICMP fix to enjoy your games.

How can I enable or disable WAN blocking?

WAN blocking enabling and disabling on a router

  1. Connect to your router’s web-based management interface by typing its IP address into a web browser.
  2. Enter your login credentials.
  3. Navigate to the Firewall or Security settings.
  4. Look for an option related to WAN blocking or WAN access control.
  5. If it is disabled, you can enable it or vice versa.
  6. Save the changes you’ve made and reboot your router.

You should note that the above steps are a general guide, and the process may vary depending on your router.  Hence, we recommend you check your router manual or contact the manufacturer for assistance.

Also, our detailed guide on ways to fix problems with wireless routers in Windows will help get your router up and running.

In addition, you may check out the guide on checking if the firewall is blocking a port or a program on their computers.

Conclusively, you can leave your comments to tell us if this guide has been helping in enabling or disabling WAN blocking.

Xbox Live 1.0 replacement Insignia adds support for 11 more games

If you haven’t heard of Insignia, it is an unofficial, community-created replacement for Xbox Live 1.0. This was the original incarnation of Microsoft’s online gaming service for the original Xbox.

Insignia launched back in November last year, with support for 25 games, on the 20th anniversary of the launch of Xbox Live 1.0. New titles have been added to the service since then, and 11 more are soon to be added to the list. Some have already been added, and more will launch next week bringing the number of supported games to well over 60. Below is the list of newly added and coming soon.

  • Call of Duty 2: Big Red One (February 3rd, 2023)
  • Capcom vs. SNK 2 EO (February 3rd, 2023)
  • Dancing Stage Unleashed (February 3rd, 2023)
  • Trivial Pursuit: Unhinged (February 3rd, 2023)
  • Tony Hawk’s American Wasteland (February 3rd, 2023)
  • Rainbow Six 3 (March 3rd, 2023)
  • Room Zoom: Race For Impact (March 3rd, 2023)
  • Splinter Cell Pandora Tomorrow (March 3rd, 2023)
  • Marvel Ultimate Alliance (March 3rd, 2023)
  • Thousand Land (March 3rd, 2023)
  • Prince of Persia Warrior Within (March 3rd, 2023)

Insignia is a free service. It is invite-only however, not to mention it is still in beta form at present. Its feature list includes online multiplayer with matchmaking functionality and online leaderboards. At the time of this writing just over 4,600 people have signed up for Insignia so far.

Saved Passwords Missing in Edge: How to Recover Them

Microsoft Edge is the default browser and PDF reader for Windows OS. However, many of our readers complained about saved passwords missing in Edge. In addition, it makes it difficult to access the password manager.

Why are my saved passwords missing in Microsoft Edge?

Different factors can contribute to saved passwords being missing in Microsoft Edge. The primary reason could be bugs and glitches in the app development. Other factors are:

  • Malware or viral attacks – Malware or virus attacks can intrude and corrupt the data stored in the password manager, preventing access to saved passwords. Also, it can result in the Edge browser freezing.
  • Corrupt browser profile – A corrupt browser profile can cause issues with saved passwords that become inaccessible or cause errors when the browser attempts to use them.
  • Add-ons and extensions – Installing browser extensions such as privacy or security tools can result in saved passwords getting deleted or missing.
  • Privacy settings error – If you have enabled passwords under the privacy settings, it deletes saved passwords when the Edge browser is closed.

These reasons may differ on various PCs. Finally, we will show you how to retrieve your saved password and prevent further occurrences.

What can I do if saved passwords are missing in Microsoft Edge?

Before trying any advanced password recovery options, apply the following:

After observing the following preliminary check, you can proceed with the advanced steps below.

1. Use Credential Manager to view and recover passwords

  1. Click the Start button, type in Credential Manager, and press Enter to open it.
  2. Select Web Credentials to view all saved usernames and passwords in Microsoft Edge.
  3. Click the drop-down arrow next to the web address, then select Show next to the password to view the password for a particular website.
  4. You must input your Microsoft or local user account password to view the selected website password.

Using the credential manager to view passwords lets the user view saved passwords individually. Also, you can read about how to fix Credential Manager not working and not saving passwords on your PC.

2. Use the Edge password option to view and recover passwords

  1. Open the Microsoft Edge browser.
  2. Click the Menu button in the top-right corner and select Settings from the drop-down.
  3. Select Passwords from the right pane.
  4. On the password display panel, select the eye icon beside the password on the website link to reveal the site password.

The above-stated option provides access to view forgotten passwords within Edge.

3. Check the Microsoft Edge Clear browsing data setting

  1. Launch Microsoft Edge.
  2. Click on the Menu button in the top-right corner and select Settings.
  3. Select the Privacy, search, and services option on the left panel.
  4. Navigate to the Clear browsing data section, and select the Choose what to clear every time you close the browser option.
  5. See if the Passwords option is toggled on, turn it off, and restart Microsoft Edge.

Turning off the password from the list of what to clear on the Microsoft Edge browser prevents it from deleting passwords when closed.

You can check out our guide to learn about Microsoft Edge to get different levels of privacy control settings.

Read our guide on what to do if Microsoft Edge is slow or lagging on Windows 11 to fix this problem.

Alternatively, you can access our guide on fixing Microsoft Edge not working in Windows to enjoy Microsoft Edge on your PC.

In conclusion, you should be able to gain your lost passwords on Microsoft Edge by following the outlined steps. Now that you’ve recovered your passwords, why not check our guide on how to manage saved Edge passwords on Windows 11?

Should you have further questions or suggestions, kindly drop them in the comments section.

ESO Error Code 200: How to Fix This Authentication Issue

The error code 200 is the most common error code that is seen on the login screen of ESO. If you’re logging in for the first time, you may be unable to reach one of the game’s mega servers. This issue can occur when the gamer tries to log in but is locked out.

The game client may be trying to connect to one of the mega servers, but your connection is not fast enough to keep up with the game’s speed. There may also be other issues that we look at in detail and explore possible solutions below.

Why won’t ESO let me log in?

There are many reasons why you might be seeing this error message, but the most common are:

  • Your firewall is blocking your access to the game – If you are experiencing problems logging in to ESO, it is possible that you have a firewall or other program blocking your access. 
  • Change of servers – If you are trying to play on a different region or server than the one that you purchased the game from, you may be locked out.
  • Your internet connection is down or limited – There may be a temporary slowdown in your internet connection. Sometimes this happens when the game has trouble loading new data or if you’ve been playing for a long time. 
  • System requirements – It’s also possible that you are using an old or faulty computer that does not meet ESO’s system requirements. 
  • Server overload – At times, it has nothing to do with you. The ESO unexpected internal error is usually because of downtime, which should be resolved in no time.
  • Your ESO account has been banned – If you’ve breached any of the Terms and conditions for using ESO, you may get this error too.

How do I fix Error 200 in ESO?

Ensure you perform the following preliminary steps first as they could solve your issue without you having to go through the slightly technical solutions:

  • Check the server status to see if the game is working.
  • Wait a few minutes, then try again. If the number of players on a specific server has reached its limit, players from other servers will not be able to connect to that server until it has been freed up.
  • Ensure you have selected the correct server from the list of available servers when logging in for the first time after installing ESO Client.
  • Check your internet connection and ensure it is working.
  • Ensure your copy of Windows and ESO are both up-to-date to rid of any compatibility issues.
  • Run a malware scan on your PC.
  • Exit and restart Steam, then try logging in again.

1. Allow the game through the firewall

  1. Hit the Windows key, type Windows Security in the search bar, and click Open.
  2. Click on Firewall & network protection.
  3. Select Allow an app through firewall.allow an app through firewall
  4. In the drop-down menu, check ESO then click OK to save changes.

2. Switch Megaservers

  1. Launch the ESO Launcher and select the SERVER option at the top left corner of the login page.server option eso unexpected internal error
  2. When prompted, select a server to connect to (EU or NA).select server
  3. Wait for the process to complete with an announcement indicating the server change before logging in.

3. Open router/modem ports

  1. Hit the Windows key, type cmd in the search bar and click Run as administrator.cmd-run-admin-w11 unexpected kernel mode trap windows 11
  2. Type ipconfig/all and hit Enter.
  3. Take note of the IPV4 address, copy and paste it on a new tab in your browser. This will take you to your router’s login page.
  4. Enter your login credentials. (The router for this step is TP-Link).
  5. Click on NAT Forwarding then select Virtual servers.
  6. A list of virtual servers will appear. Click on the Add icon.
  7. Now proceed to open the following ports:

TCP / UDP Ports 24100 through 24131
TCP / UDP Ports 24300 through 24331
TCP / UDP Ports 24500 through 24507
TCP Port 80
TCP Port 433

While some programs may use specific ports, opening up ports on your routers is an easy way for hackers to get into a network and steal sensitive data from within.

This is because anyone with access to those ports could gain access to your internal network by simply connecting directly to them. In addition, opening up additional port ranges on your router may result in some devices becoming nonfunctional or unstable.

If all else fails and the ESO error 200 has not been resolved, try using a VPN and see whether this fixes the issue.

Although ESO is not geo-restricted, using a VPN can help improve the overall performance of the game in terms of speed and connectivity. To that effect, we have an awesome recommendation of VPNs perfect for ESO.

Feel free to contact Customer Service for assistance, especially if you have tried all recommended fixes.

Let us know if you have been able to log in after trying out these steps in the comment section below.

ChatGPT VS Google Bard: One Is Better at Its Job

Over the years, Search engine technology has evolved greatly, improving the search-ability available for users. Google has been the leader in the field for more than 15 years without a competent rival.

However, the advancement of AI-powered chatbots like ChatGPT and Google Bard redefine the way we look at online search.

Hence, we’ll discuss ChatGPT VS Google Bard to give a detailed comparison of the two.

What is ChatGPT?

ChatGPT is an AI-powered chatbot built on OpenAI’s GPT-3 with long-form question-answering models that help it to understand human conversations and provide meaningful responses.

Furthermore, ChatGPT can predict the next word in a series of words because of its ability to follow instructions and generate responses that are satisfactory to humans.

It uses the Reinforcement Learning with Human Feedback (RLHF) training model to improve its conception and development of human feedback. Also, it can generate code snippets, write essays, etc.

Since ChatGPT is often flooded to capacity, you can check our detailed guide on the best ChatGPT alternatives if you need an AI service.

Also, our guide about ChatGPT not working will help you fix it if it gives you any headaches.

What is Google Bard?

Google Bard is a similar AI chatbot powered by the Language Model for Dialogue Applications (or LaMDA for short).

The conversational AI service, as Google calls it, combines the information it draws from Google’s search engine with an intelligent language model to provide comprehensive, natural responses.

ChatGPT vs Google Bard – Which one is better at its job?

ChatGPT claims to offer a more precise and short answer, meaning it’s more effective than Google Bart.

However, Google Bart is only augmenting its search with AI responses and also provides the search responses as it used to, below the AI response.

Hence, we’ll take you through the comparison of the two tools to know which is better at its job.

Advantages and downsides of ChatGPT

Advantages:

  • ChatGPT has large language models that allow it to understand human interaction and generate more natural and coherent responses. Also, it is fluent in responses and can handle short and long text forms.
  • ChatGPT is efficient for text development and summaries, analysis, language understanding, and others. It makes it easier to approach text because of its human-like interaction properties.
  • Developers can integrate ChatGPT into their apps. Also, it is excellent for code debugging as it searches for code snippets, generates the actual code, corrects the code, and explains the error.
  • ChatGPT can serve as a virtual assistant due to its artificial intelligence and empathy for human emotions deduced from texts.

Downsides:

  • ChatGPT is free for just the trial and customer-feedback period. Users will soon be required to pay a subscription to access the platform.
  • Many AI intelligence enthusiasts say ChatGPT has accuracy issues and may not provide facts. It is limited in data because it uses a data model limited to 2021.
  • ChatGPT is limited in knowledge and cannot provide real-time facts.

Advantages and downsides of Google

Advantages:

  • Unlike ChatGPT offering precise answers but is limited by its knowledge, Google Bart combines over a hundred billion web pages indexed in its database with the AI chatbot response.
  • LaMDA is a new engine developed on top of previous models tested by Google while ChatGPT uses an older GPT-3 language model.
  • Although we don’t have precise information yet, like Google Search, Bart will be free, and embedded into Google Search.
  • Although it’s not yet a fact, we can imagine that Google will embed Bart into Google Chrome and other Chromium software and it will also be available for developers.
  • From the early information, Google Bart will also embed AI responses that will include visual and audio information.

Downside:

  • Google Bart is available to only a few developers right now.

ChatGPT VS Google Bart

Both AI chatbots and search services essentially offer the same thing: quick natural language answers to naturally asked questions.

ChatGPT vs Google

ChatGPT got a head start because Microsoft built it into its Teams app, and it’s coming to the Edge browser in a limited form for developers.

The Opera browser also stated that intends to embed ChatGPT in the future while Google Bart is still in a closed testing medium.

However, we can definitely see Google Bart built into the Chrome browser and other Chromium products soon.

Bart, explaining the James Webb discoveries to a 9-year old

ChatGPT comes with a plagiarism checker feature, and Google Bard doesn’t. However, LaMDA may be adapted to offer that usability as well.

Both ChatGPT and Google Bart had examples of providing incorrect responses and that makes us question not only their functionality but also the ethics behind them.

The bottom line is that while ChatGPT had a first starting position, Google Bart has the huge advantage of being embedded into an existing product that already has the leading edge in search.

Google BartChatGPT
Powered by LaMDAPowered by GPT-3 (older language model)
Embedded in Google SearchOnly text responses through queries
FreeFree and paid plans
No plagiarism tool GPT-2 Output Detector plagiarism tool
Available only to selected beta testersAvailable now

Overall – Google Bart is superior to ChatGPT because it combines natural language responses with the search service.

How does ChatGPT compare to other Google services?

Considering that Google Bart is not yet available to the general public, it makes sense to compare ChatGPT to other existing Google services like Assistant and Translate.

ChatGPT VS Google Assistant

Scrutinizing ChatGPT based on its assistant feature, it is more advanced than other technology in the market. It doubles as a virtual assistant that can draft a contract, write an essay, suggest gift items, and much more.

Google Assistant is a virtual assistant software that can engage in two-way conversations. It can answer questions, schedule events, adjust hardware settings, etc. However, it can’t operate as the ChatGPT virtual assistant does.

Overall – ChatGPT has the best virtual assistant because it offers more functionality than its competitor.

ChatGPT VS Google Translate

ChatGPT offers a translation service that translates code snippets, languages, and other data into your desired language. It is swift and straightforward with its translation. Also, it proffers correction to translated words if improperly formed.

ChatGPT vs Google Translate

Meanwhile, Google Translate supports more than 100 languages and can translate written or audio content from one language to another. It functions offline with 59 languages.

Moreover, Google’s tool can translate whole websites by providing a page link.

Overall, Both tools are vibrant for translations, but ChatGPT can translate code snippets that Google can’t.

For more reading, you can check our article about the best AI software for Windows 11 to use on your PC.

In conclusion, this guide has taken a deep dive to explore the differences between ChatGPT and Google Bart. You should be able to make an informed decision on what to use after going through this guide.

Should you have further questions, kindly leave a message in the comments section.

ChatGPT Professional: What Is It & Why Do You Need It?

ChatGPT is an AI-powered chatbot built on OpenAI’s GPT-3. Its large question-answering models help it understand and respond to human conversations. It is free for users since it is in the trial stage.

However, OpenAI plans to release the premium version of ChatGPT Professional or Plus. Keep reading to learn all about this new tool.

What is ChatGPT Professional or Plus?

Since the release of OpenAI’s ChatGPT, it has been free to use because it was in its trials and user-feedback stage. Moving forward, Microsoft’s OpenAI has launched a paid version of the chatbot and says it is due to the need to ensure the tool’s long-term viability.

However, ChatGPT Professional is a monetized version. It requires users to pay a monthly fee to access the exclusive features of the Professional. The ChatGPT Professional introduces priority access to new features, increases functionality with no limits, and quicker reaction times.

In fact, the newer ChatGPT version available for paying customers is Turbo, and it’s optimized for speed.

Furthermore, the ChatGPT Pro version doesn’t remove the rights of users who are now willing to pay for the tool. The free plan allows you to use it as it has since its first release.

Our readers can check how to bypass the ChatGPT not available for your country issue on their PC.

What are the differences between ChatGPT and ChatGPT Plus?

Of course, both services are built on the same engine, but the Professional or Plus version has a lot of advantages over its free iteration:

  • Larger dataset – OpenAI says that the paid version has a larger training set. That translates into better, more precise answers to queries.
  • Better support and resources – ChatGPT Plus users will have access to tutorials, documentation, and will be able to benefit from customer support for guidance to maximize the tool’s potential.
  • Ready-made API – Right now, you can’t access the OpenAI API but with a ChatGPT Plus account, you will be able to access the ChatGPT API, and incorporate it into your own software and infrastructure.
  • Turbo responses – The paying customers will access a much faster, Turbo version of the tool, with lightning-fast responses.
  • High volume of requests – Right now, in the free version, a lot of users exceed their quota of requests. With ChatGPT Plus, you will have a much larger quota fitted for organization usage.

New users who are exploring subscription options may also want to see this quick guide on how to use ChatGPT before deciding on a plan.

Readers who plan to work with the API can also check this guide on how to get an OpenAI API key to set up access for their projects.

How much ChatGPT Plus costs?

On the company’s official Discord server, OpenAI posted a waitlist link. It asks a series of questions about payment preferences, including at what price (per month) would you consider ChatGPT so expensive that you would not consider buying it? It is to hear from the user’s perspective how much to bill.

The Professional version of OpenAI’s ChatGPT Plus is available on a $20 monthly plan with many features. However, there may be other plans to make a variety for users to choose from in the future.

Can I subscribe to ChatGPT Plus right now?

Unfortunately, not! Even for a paid subscription to ChatGPT Plus there is a waiting list.

Although there was an official release of this service, OpenAI officials didn’t provide a launch date for public availability.

Why do I need ChatGPT Plus?

The free version of ChatGPT has worked okay since its release. Interestingly, the ChatGPT Professional has premium features and tools that are only available to paid users. Some of the premium features that you will enjoy are:

  • It’ll be available at all times, even during high demand or internal server errors. It guarantees no blackout periods.
  • Another reason you need the ChatGPT Pro version is because it guarantees faster response speed, breaking every impediment that may draw back its performance.
  • Premium users have priority access to new features on the platform. It offers more quota and resources than the free plan.

According to OpenAI, many other features will be added to the Professional ChatGPT version to make it more valuable.

In addition, you may be interested in our guide on ChatGPT’s too many redirects error and how to fix this issue.

Likewise, you can read about the best ChatGPT alternatives that compete with the original app. To better understand setup and usage, here is a detailed guide on how to use ChatGPT with step by step instructions.

We hope you found out all you wanted about the ChatGPT Professional release. Please write down any thoughts you have about this in the comments section below.

How to Find & Remove Duplicate Files in OneDrive

OneDrive is a cloud-based file hosting service by Microsoft that offers cloud storage for users to save files and other data. Sadly, many users report twin files in the cloud space. Hence, we’ll remove duplicate OneDrive files from your cloud storage and free up some space.

Why does OneDrive duplicate files?

Having two of the same file in your OneDrive cloud storage is a problem users report. It can occur for some reasons listed below:

  • Syncing the same file on two devices – Some data synchronized on one device may be available on another, prompting OneDrive to sync the file twice. Also, it can be due to other OneDrive sync problems affecting the files.
  • Uploading the same file twice – You may mistakenly upload the file twice. Usually, OneDrive picks up duplicate files and sends a prompt notifying you of an existing file.

Some of our readers also reported OneDrive creating duplicate files with copies in the file name.

Nevertheless, this article will discuss finding and removing duplicate files that may consume your OneDrive cloud storage.

How can I find & remove OneDrive duplicate files?

1. Manually find duplicate files in OneDrive

  1. Open OneDrive and click the Open folder icon on the taskbar to open the OneDrive folder in File Explorer.
  2. Right-click on a blank space, move your cursor to the Sort by on the drop-down menu to show its options, and then click on Name or Size.
  3. The duplicate files in OneDrive will display next to each other because they carry the same or almost identical names.
  4. Right-click the duplicate files and select Delete from the drop-down to remove them from OneDrive.
  5. Alternatively, hold down the Shift or Ctrl key while selecting, right-click the files, and then select Delete from the drop-down to remove them from OneDrive.

The above steps will help you find duplicate files and remove them conveniently.

2. Use third-party apps to find and remove duplicate files

You can employ third-party tools to find duplicate files in twins in OneDrive.

These tools can also delete duplicate files without any threats or risk of losing vital files to intruders or in the process of removing files.

How can I prevent OneDrive from syncing duplicate files?

Deleting duplicate files on OneDrive doesn’t help the problem, as it will reoccur during the next syncing session. Hence, follow the steps below to prevent syncing duplicate files.

1. Change the OneDrive Sync Conflicts option

  1. Click the OneDrive icon in the notification corner on your desktop, click the Settings icon (the gear), and then select Settings from the drop-down.
  2. Click on the Office tab, go to Sync conflicts, tick the radio button for Let me choose to merge changes or keep both copies, and then click OK to save the changes.

Allowing the Let me choose to merge changes or keep both copies in Sync conflict lets you decide whether to keep or discard a duplicate file during the syncing process.

You can read our article on how to exclude/unsync a folder from OneDrive on Windows 11.

2. Refresh OneDrive cached Credential

  1. Left-click the Start button, type credential manager, and open it from the search results.
  2. Navigate to the Windows Credentials tab, under the Generic Credentials section, find and select any data about OneDrive Cached Credentials, click on it and choose Remove.
  3. Restart OneDrive on your PC to refresh the necessary files for running it.

Refreshing OneDrive credentials will prevent it from duplicating files.

Alternatively, you may check our detailed guide on fixing OneDrive you now have two copies of a file. We couldn’t merge the changes in an Office file error.

Likewise, you can read how to set OneDrive files to Always Keep on This Device on Windows 11.

Also, we have a detailed guide on how to get the OneDrive Usage Report and see your activities log report.

In conclusion, you should have learned how to remove duplicate OneDrive files from its guide. If you need further assistance, kindly leave your questions in the comments section.

Best Outlook Mobile Tips and Tricks for Android

Outlook Mobile App has become an essential tool for professionals who need to manage their emails, calendar, and contacts on the go. With its powerful features and user-friendly interface, it has become a popular choice for Android users. However, not everyone knows how to make the most of this app.

That’s why in this article, we will cover the some of the best tricks and tips of Outlook Mobile App for Android users to help them manage their emails, stayed organized, and get more from their email client. Whether you’re a busy executive, an entrepreneur, or a student, these tips will help you save time and improve your productivity.

Best Outlook Mobile App Tips

1. Find Emails, People, Contacts and Events

The Microsoft graph powers the search on the mobile app. Use it to search for emails, contacts, people, and events. It displays them in different categories, and you can see everything under one heading in all category. You can also switch accounts before searching to find items from a specific email ID.

outlook for Android tips

And when typing feels like work, then you can use the voice-based search by tapping on the mic in the search bar. It lets you search through email content and even set calendar reminders for an event.

outlook for Android tips

2. Manage Notifications By Account

If you are using Outlook on mobile, then chances are that you are using more than one email account on it. When that is the case, then you can set individual notification settings for each of the email accounts.

1. Swipe from the left side of the screen to open and head to the settings through the gear icon.

outlook for Android tricks

2. Head to Notifications from the options in the settings menu.

outlook for Android tricks

3. You will find notificaiton settings from each of the added email accounts there. Set up notifications in general, do not disturb, new email sound and notifications from, etc.

outlook for Android tricks

3. Filer Emails in the Outlook mobile App

You might get a lot of emails that are needed for records but are not important enough to appear in the inbox once opened. Filter them out with the in-built mechanism in the following manner.

1. Select Inbox or other folders and then tap on Filters.

outlook for Android tips

2. Choose one of the filters – All messages, Unread, Flagged, Pinned, To Me, Has attachments, and Mentions me.

outlook for Android tips

The filter will be in place until you remove it and then all the emails will be visible.

4. Set an Automatic Reply

Setting an auto-reply on email is useful to inform people that you are currently away or unavailable, and to manage their expectations for when they can expect a response from you.

Note – This works for Microsoft 365 susbcribers or Microsoft Exchange accounts.

1. Go to Settings and select an email account.

2. Tap Automatic Replies from the options.

outlook for Android tips

3. Enable Automaic replies by sliding the button to the right.

outlook for Android tips

4. Move down and select Reply to everyone, or reply to only to my organisation. And then select Use different replies for people inside and outside my organisation.

outlook for Android tips

5.  Create/edit your automatic replies for organisation and non organisation people.

outlook for Android tips

6. Tap tick button to save changes.

outlook for Android tips

5. Turn Focused Inbox Off or On

The Focused tab contains important and relevant emails that Outlook determines based on the your behavior and interactions, while the “Other” tab contains less important or lower priority emails. This feature helps users to quickly find and respond to important emails while reducing clutter in their inbox.

outlook for Android tricks

2. Two tabs will appear in the inbox, which you can tap to switch anytime.

outlook for Android tricks


6. Listen to Emails In the Outlook App

If you are a multi-tasker, then Play My Emails would the perfect feature from Outlook. Listen to your emails, powered by Cortana to navigate you. You can ask it to reply, skip, flag, archive, or delete an email.

1. Tap on the profile picture of an email account to open the side bar.

outlook for Android tricks

2. Select the play button at the bottom to get started.

outlook for Android tricks

7. Set Do Not Disturb In Outlook App

Its an eventful monday at work and you have too many emails already to deal with. Set a Do Not Disturb to clear all the incoming distractions while you deal with everything on your plate.

1. Go to Notifications from the Settings.

2. Select Do no disturb from under a specific email account.

outlook for Android tricks

3. Select your preference for silencing the email notification. It can be set to Do Not Disturb like – until you turn it back on, for an hour or until next day at 8 AM. You can also schedule it for specific events through the Scheduled section.

outlook for Android tricks

4. All the silence email accounts will show a red colored Zz next to their profile picture, showing them in the All Accounts left bar.

Fix: Media Creation Tool Error 0x8007043c – 0x90017

Media Creation Tool is a utility tool available on Windows PCs that allows you to upgrade your PC to the latest Windows version. Users can create a Windows installation USB drive disc to perform a clean install or to repair a problematic PC.

However, users report the Media Creation tool error code 0x8007043C – 0x90017 when using it.

What causes Media Creation Tool error 0x8007043c – 0x90017?

Many factors may be responsible for the error code 0x8007043C – 0x90017 when using the Media creation tool. Some factors that can cause the error are:

  • No permission to run – The error 0x8007043c – 0x90017 from the Media Creation tool suggests it doesn’t have permission to run. Try to run the app as administrator.
  • Corrupt or missing system files – Corrupt system files can impede the Media Creation tool on your PC from running into errors.
  • Malware or virus on your PC – Malware or virus can block the communication between the tool and the system, resulting in the inability to run this software on your PC.
  • Outdated drivers and Windows OS – An outdated Windows operating system may prompt the error code 0x8007043c – 0×90017 when using the Media Creation tool.

Fortunately, you can try a couple of fixes to get the Media Creation tool working again and upgrade your OS.

How can I fix the Media Creation tool error 0x8007043c – 0x90017?

Try the following preliminary checks before proceeding with any advanced troubleshooting steps:

  • Turn off background apps running on your computer.
  • Temporarily disable third-party antivirus software.
  • Restart Windows in Safe Mode and check if the error persists.
  • Install all the new OS updates.
  • Right-click on the Media Creation Tool executable file and select Run as administrator from the list.

If you can’t fix the problem, try the solutions below.

1. Run the SFC and DISM scans

  1. Left-click the Start button, type command prompt, then select Run as administrator.
  2. Click Yes on the User Account Control (UAC) prompt.
  3. Type the following and press Enter: sfc /scannow
  4. Type the following commands and press Enter: DISM /Online /Cleanup-Image /RestoreHealth
  5. Restart your PC and check if the updates.exe still appears.

Running SFC and DISM scan on your PC will detect and repair corrupt system files causing the Media Creation tool error. Check how to fix the run-as-administrator option if it’s not working on your PC.

2. Run Windows Defender scan

  1. Left-click the Start button, type windows security, then click Enter.
  2. Click on Virus & Threat Protection from the menu and select the Scan option.
  3. Then choose Full scan and click the Scan now button and wait while the scan completes.

Running Windows Defender scan will find and remove any malware and viruses on your computer. Read how to fix the Windows Virus and threat protection not working on Windows 10/11.

3. Use Bootable media

  1. Launch your browser and go to the official Microsoft page to download Windows Disk Image.
  2. After the download, open the folder where you downloaded the ISO file.
  3. Right-click the ISO file and select Properties from the drop-down.
  4. Go to the General tab, click Change under Opens with and select Windows Explorer, then click the Apply button.
  5. Right-click the ISO file again and select Mount from the drop-down.
  6. A virtual bootable disc will be created, then double-click on it to view the contents.
  7. Double-click the setup.exe file to begin the setup process for Windows.

Upgrading from a bootable drive is an alternative to the Media Creation tool. However, there are also tools to create multi-boot USB drives that may help you.

Alternatively, our readers can check our guide on Windows Upgrade Error 0xc1900208 and how to fix it.

Also, you can read our guide on how to fix Windows Update error 0x8007043c on your PC.

In conclusion, if you encounter the Media Creation Tool error 0x8007043c – 0x90017, this guide should help troubleshoot it. For further questions or suggestions, kindly drop them in the comments section.

Google Drive: Sorry the File You Requested Does Not Exist [FIXED]

Sorry, the file you have requested does not exist. Make sure that you have the correct URL and that the file exists is a common Google Drive error that could interfere with your work. Read on to see how you can fix it.

How can I fix sorry the file you requested does not exist Google Driver error?

First, confirm that the file URL is correct. Then, go ahead and check Google apps status dashboard. Lastly, try restarting your PC. It does wonders sometimes

You can move on to the advanced fixes after you’ve tried out the basic solution above and the problem persists. 

1. Restore deleted files from Google Drive trash folder

  1. Click the Menu icon at the top left of your browser homepage and select the Google Drive icon from the resulting menu.
    Open Google drive in browser
  2. Go to Trash on the left-hand navigation to locate the file you want to restore.
    Google Drive Trash
  3. Right-click on the file you want to restore and click Restore.
    Restore Drive file

If the file you are trying to access is deleted by Google Drive, restoring it from the trash folder might not solve the problem. Follow this guide to overcome instances where Google Drive keeps deleting users files.

2. Disable Windows Defender Firewall temporarily

  1. Click Windows icon on your taskbar and go to Settings.
    Windows settings
  2. Scroll down to click Privacy & security on the left pane, then select Windows Security on the right.
    Windows security settings
  3. Next, click on Firewall & network protection.
    Firewall and network protection
  4. Select your active network.
    Firewall On on active network
  5. Toggle Off the radio button under Microsoft Defender Firewall.
    Disable microsoft defender firewall

Don’t forget to turn on Windows Firewall Defender once you have the problem solved. If you are unable to, this linked guide has helped hundreds of users who were unable to activate Windows Defender.

And if you have a third-party firewall, disable it from the software menu.

3. Clear browsing cookies and cache

  1. Open your browser, click on the Menu icon (three vertical dots) on the top right corner of your screen and select Settings from the menu.
    Chrome  browser settings
  2. Go to Privacy and security and select Clear browsing data.
    Clear browsing data
  3. Check the boxes next to Cookies and other site data and Cached images and files, then click on the Clear data button.
    clear cookies and cache

We used Chrome as an example, but the process is similar on all other major browsers.

For Windows 11 users, there are other methods to clear cache files. If you are interested, check out this post on how to quickly clear cache on Windows 11.

4. Reset your browser to default settings

  1. Open your browser, click on the Menu icon (three vertical dots) on the top right corner of your screen and select Settings.
    Chrome browser settings
  2. On the left pane, scroll down to select Reset and clean up and choose Restore settings to their original defaults.
    Reset and clean up chrome
  3. Click Reset settings on the pop up dialogue.
    reset browser settings
  4. Restart your browser and try to access your Drive file again.

How do I recover permanently deleted files from Google Drive?

Note icon NOTE
Before you start the process of recovering the file, make sure that it’s already been deleted from the Trash folder. If it’s still there, you can easily restore the file without going through any trouble.

You can recover permanently deleted files from Google Drive though the process is a little more complex than one would imagine and takes time. Also, you can only recover files that were owned by you and not simply shared.

To recover Google Drive files, head to the Support Page and sign in. Now, fill out the various details in the form and submit it. Once done, wait for a response from Google, but in all likelihood, they should be able to recover the file if it had been deleted recently.

What causes Sorry the file you requested does not exist error in Google Drive?

If you receive this message when trying to access a document shared with you or owned by you on Google Drive, then you should suspect these possible causes:

  • Incorrect URL – As indicated in the error message above, using an incorrect URL is the leading reason for the error. It happens when you input the link manually or paste an incomplete link. 
  • Deleted or moved files – If the link is correct, it might be that the file you want to access has been deleted or moved to another Google Drive folder.
  • Windows Firewall and antivirus – Firewall and antiviruses can sometimes overdo their protection job, causing serious problems, and you may get Sorry, the file you have requested does not exist in Google forms.
  • Unstable internet connection – With a poor internet connection, web pages take a lot of time to load. Hence, Google Drive errors such as this occur.
  • Google product server not available – Occasionally, some Google services undergo disruptions; problems like this are bound to happen when there’s a service outage from Google.

Now you are aware of the possible reasons why you keep on receiving the error message. Next, look at solutions to get you back on your file.

Google Drive is used by millions of people worldwide to store, share and collaborate on documents. Thanks to its wide array of features, team members can collaborate on documents.

Despite its long list of benefits, sometimes users have some nasty scenarios to deal with. One is what we’ve just proffered solution to in this guide. Another one is when Google Drive is not synching.

Does this guide help you solve the problem? Drop us a line in the comment section below.

Unallocated Disk on Windows 10: 6 Ways to Access it

If you are a Windows 10 user and have recently encountered the issue of an unallocated disk, you’re not alone. Unallocated disk space can be frustrating and prevent you from accessing your files and data.

This guide will explore the causes of unallocated disk space in Windows 10 and provide solutions to help you recover your lost data and fix the problem. So, if you are facing this issue, keep reading to learn how to resolve it and get back to using your computer usually.

Why is my disk 2 unallocated?

The issue of an unallocated disk 2 can occur due to various reasons, including:

  • Damaged or corrupted partition table – The partition table contains information about the partition on your disk, including the location and size of each partition. If the partition table is corrupted or damaged, the system may be unable to locate or access the partitions on the disk.
  • Disk errors or bad sectors – If there are errors or bad sectors on the disk, the system may be unable to read or write data to the affected areas, causing the disk to appear unallocated.
  • Incorrect disk initialization or formatting – It may appear unallocated if the disk is not initialized or formatted correctly. This can occur if the disk was not initialized or formatted during the initial setup or if there was a problem during the initialization or formatting process.
  • Malware or virus infection – Malware or virus infections can cause data corruption and damage to the partition table, causing the disk to appear unallocated.

What are other disk allocation issues?

If your second hard drive is unallocated, you might be unable to access it properly. But, of course, this isn’t the only problem with unallocated space, and speaking of issues, here are some similar problems that users reported:

  • Unallocated disk cannot format – This issue can sometimes appear with a new hard drive. If this happens, try using diskpart tool to format and set up your new hard drive.
  • Disk Management unallocated space greyed out – If this problem appears in Disk Management, you can always use third-party tools such as MiniTool Partition Wizard to set up the new hard drive.
  • Unallocated hard drive Windows 10 – This issue can appear for various reasons, and if you encounter it, be sure to try some of our solutions.
  • Second hard drive unallocated not initialized, showing, visible, detected – This problem can occur due to your drivers, so you might want to try reinstalling the hard drive drivers or updating them to the latest version and check if that solves the problem.

How can I fix the unallocated disk on Windows 10?

  1. Use a professional partition assistant software
  2. Use Disk Management
  3. Update your drivers
  4. Use Command Prompt and diskpart command
  5. Reinstall the hard drive driver
  6. Change the drive letter

1. Use a professional partition manager software

Allocating drives manually can make you lose files. So, if you want to fix the problem with the unallocated hard drive, we advise you to use dedicated software.

True, Windows has tools for creating, deleting, and resizing partitions. However, to find an unallocated hard disk, you may need to go the extra mile and use partition manager software specializing in this task.

For a good reason, many users believe that third-party tools like AOMEI Partition Assistant make such tasks easier since they do not have constraints as a native partition manager.

This software contains over 30 great-worth features to help you enhance your hard disk partition’s performance.

AOMEI Partition Assistant

Manage your hard disks and partitions in the most reasonable way and try AOMEI Partition Assistant.
Check price Visit Website

Users claim that this method won’t delete any files from the unallocated drive, but we advise you to back them up to be safe. However, many users reported that these tools helped them with this problem, so we strongly suggest you try them.

2. Use Disk Management

  1. Press Windows Key + X to open Win + X menu.
  2. Now choose Disk Management from the list.
    unallocated disk windows 10
  3. When the Disk Management tool opens, locate the unallocated space, right-click it, and choose New Sample Volume.
    unallocated disk windows 10
  4. Set the size of the new partition and choose its letter.
  5. Now you can choose to format your drive. If you have a new hard drive, make sure that you format it. Also, if your drive already has some files, choose Do not format this volume option.
    format unallocated hard drive

If you just installed a second hard drive and get a message that your hard drive is unallocated, you need to create a new volume using the Disk Management tool. This built-in tool in Windows allows you to manage your hard drives and partitions.

Remember that this method will cause file loss, especially if you already have files on your hard drive, so use it at your own risk. However, if you purchased a new hard drive, then feel free to use this method to format it and set it up.

3. Update your drivers

According to users, if the second hard drive is unallocated, perhaps the issue is related to your drivers. Missing drivers can sometimes cause this problem to appear, and to fix the issue; it’s advised to download and install these drivers.

Many users reported that this problem appeared because Virtual Disk Driver wasn’t installed. To fix this problem, visit your hard drive manufacturer’s website and download the latest drivers for your hard drive.

After you install Virtual Disk Driver, you should be able to assign the drive letter to the partition and access your files. Remember that this solution worked for Seagate hard drives but might also work for other brands.

If you don’t want to download the drivers manually, you can use a third-party tool to update all your drivers with just a few clicks automatically.

⇒ Get Outbyte Driver Updater

4. Use Command Prompt and diskpart command

  1. Press Windows Key + X and choose Command Prompt (Admin) or PowerShell (Admin).
    command prompt unallocated hard drive
  2. Now you need to input the following commands, hitting Enter after each one:
    • diskpart
    • list volume
  3. Replace X with a volume number in the following command and hit Enter.
    • select volume X
  4. Finally, run these last 3 commands. Note that the second should be used only if Disk Management can’t create a new volume.
    • delete volume
    • delete volume override
    • list volume

According to users, if your second hard drive is unallocated, you might be able to fix the problem by using the diskpart command. However, remember that diskpart is a powerful tool, so it might cause you to delete all your files if you’re not careful.

Pay attention to the size of the volumes, and be sure to select the volume with unallocated space. If you choose the wrong volume, you might cause unexpected file loss.

After doing that, start Disk Management and try to create a new volume. If Disk Management can’t make a new volume, start diskpart again and repeat the same commands. However, this time be sure to run delete volume override after delete volume command.

5. Reinstall the hard drive driver

  1. Right-click on Start and select Device Manager.
  2. Locate your new hard drive, right-click it, and choose Uninstall device from the menu.
    unallocated disk windows 10
  3. When the confirmation dialog appears, click Uninstall.
    confirm uninstall unallocated space hard drive
  4. Once you remove the driver, click Scan for hardware changes icon.
    scan for hardware changes unallocated hard drive

Doing so will install the default driver, and the problem should be resolved.

Sometimes, your hard drive can become unallocated due to a bad driver. Your driver can get corrupted, causing this problem to appear. However, you can fix the issue by reinstalling the hard drive driver.

6. Change the drive letter

  1. Open Disk Management tool.
  2. Locate the drive that’s not showing, right-click it, and choose Change Drive Letter and Paths.
    unallocated disk windows 10
  3. Click the Change button.
  4. Set the desired drive letter and click OK to save changes.
    unallocated hard drive new letter

If you’re having problems with an unallocated disk on Windows 10, perhaps you can fix the issue simply by assigning a letter to that drive. This is incredibly simple, and you can do it right from the Disk Management tool. To do that, follow these steps:

After doing that, the problem should be resolved, and you can access your drive.

Problems with an unallocated hard drive can cause various issues, such as the inability to access your files, and if you’re having this issue, you should be able to fix it with one of our solutions.

Error Code 232011: 5 Fixes if Video File Cannot be Played

The error code 232011 is a video playback error that can arise in almost any browser and cause many problems.

For some users, the error appears when playing internet videos with embedded JW players.

The error code 232011 states, This video file cannot be played. Consequently, users can’t view online videos.

Today’s guide will discuss some of the best methods to apply if you find yourself in this situation. Read on to find out more details.

What is error 232011 in Chrome?

Error 232011 is a common error in Google Chrome that occurs when a website is blocked for security reasons.

This error usually occurs when Chrome detects that the website you’re trying to access has a security certificate that is not trusted or when the website is trying to use an outdated or insecure encryption protocol. It is usually triggered by the following:

  • SSL/TLS certificate issues – When you visit a website that can not be trusted, you will most likely encounter this error. 
  • Outdated or insecure encryption protocols – Error 232011 can also occur if the website uses an outdated or insecure encryption protocol not supported by your browser. 
  • Computer clock issues – If the date and time on your computer are incorrect, it can cause security errors when accessing websites that require a secure connection. 
  • Network configuration issues – Sometimes, network configuration issues can also trigger error 232011. 

Let’s now head to the solutions for the error that worked for most users.

How can I fix This video file cannot be played (error code: 232011)

Before considering any of the solutions we recommend, we recommend using a different browser. Non-Chromium browsers like Edge and Firefox can have incompatibility issues with the JW player.

For that reason, it’s recommended that you try playing videos in alternative Chromium-based browsers, such as Opera One. Error code 232011 is less likely to arise in this browser.

Opera One has handy features and is among the most highly-rated Chromium browsers.

The browser has a distinct and original UI design, which includes a handy sidebar, that sets it apart from other alternatives. Its users can also utilize Chrome extensions along with Opera’s exclusive ones.

Opera One

Easily bypass the error code 232011 by playing videos inside this great software.

1. Clear your browser’s cookies and cache data

1.1 Opera One

  1. Launch Opera One, and then press Ctrl + Shift + Del.
  2. Now, select All Time from the Time range dropdown menu, check all three options, and then click on Clear data.Clear data to fix this video file cannot be played. (error code: 232011)

1.2 Google Chrome

  1. Press the Ctrl + Shift + Del hotkey in Google Chrome to open the Clear browsing data window.
  2. Click the Time range dropdown menu to select the All time option.All time
  3. Select the Cookies and other site data and Cached images checkboxes, then click the Clear data button.Clear data to fix this video file cannot be played. (error code: 232011)

1.3 Firefox

  1. Open Firefox, and press Ctrl + Shift + Del.
  2. Click on the Time range to clear the dropdown menu and select Everything.Everything
  3. Select all the entries here and then click on OK at the bottom.OK to fix this video file cannot be played. (error code: 232011)

1.4 Edge

  1. Launch Edge, and then press Ctrl + Shift + Del to open the Clear browsing data box.
  2. Select All time from the Time range menu, check the options here, and click Clear now at the bottom.Clear data

2. Disable browser extensions

2.1 Opera One

  1. Launch Opera One, and press Ctrl + Shift + E to open the Extensions window.
  2. Click on the Disable button to turn off an extension.
  3. Similarly, do this for all the extensions listed here.

2.2 Google Chrome

  1. Launch Chrome, click on the ellipsis near the top-right, hover the cursor over More tools, and select Extensions from the flyout menu.Extensions
  2. Click on the toggle for the extension you want to disable if it’s turned on.Toggle off to fix this video file cannot be played. (error code: 232011)
  3. Restart Google Chrome.

2.3 Firefox

  1. Press the Ctrl + Shift + A hotkey to open the Add-ons Manager, and then select Extensions from the left.Extensions
  2. Click the toggle switch to disable the extension.Turn off to fix this video file cannot be played. (error code: 232011)
  3. Restart Firefox after you’ve disabled its add-ons.

2.4 Edge

  1. Click the Extensions icon in the toolbar, then select Manage extensions.Manage extensions in Edge
  2. Click the toggle to the far right of the listed extensions to disable them.Disable
  3. Restart Edge after turning off all its extensions.

Once done, check if the Wolfstream error is fixed, and you can now play videos.

3. Disable proxy connections

  1. Press Windows + R to launch the Run command, enter inetcpl.cpl, and click OK to launch the Internet Properties.inetcpl.cpl
  2. Navigate to the Connections tab and click the LAN settings button.Lan settings
  3. Uncheck the Use a proxy server for your LAN checkbox if it’s selected, and then click OK to save the settings.Disable proxy to fix this video file cannot be played. (error code: 232011)

Once done making the changes, restart the computer, and then check if This video file cannot be played. (error code: 232011) error is fixed. If not, head to the following method.

4. Turn off hardware acceleration

  1. Press Windows + R to open the Run command, enter regedit in the text field, and click OK to open the Registry Editor.Run
  2. Click Yes in the UAC prompt.click yes
  3. Paste the following path in the address bar and then hit Enter:
    ComputerHKEY_CURRENT_USERSoftwareMicrosoftAvalon.Graphics
  4. Locate the DisableHWAcceleration entry here. If it isn’t there, right-click on the empty space, hover the cursor over New, select DWORD (32-bit) Value, and then name it DisableHWAcceleration.Dword
  5. Double-click on the DWORD, enter 1 under Value data, and click OK.Enter 1 to fix this video file cannot be played. (error code: 232011)

In addition to modifying the Registry to fix the This video file cannot be played. (error code: 232011) error, using their built-in settings; you can also disable Hardware Acceleration for different programs.

5. Uninstall VPN software

  1. Press Windows + R to launch the Run command, enter appwiz.cpl in the text field, and click OK.appwiz.cpl
  2. Select your VPN software, and then click on Uninstall.Uninstall to fix this video file cannot be played. (error code: 232011)
  3. Follow the on-screen instructions to complete the process.
  4. Restart Windows after uninstalling the software.

There’s a good chance some of those resolutions will fix the This video file cannot be played. (error code: 232011) error and eliminate any video playback issues.

As a last resort, you can reinstall your browser to ensure you’re utilizing the latest version with default settings and no extensions.

We covered similar issues in our error code 232001 and error code 232404 guides, and we recommend to check them out for more solutions.

Recently we wrote about error 101104, so don’t miss it for more useful information.

If you have any other queries or know of a method not listed here, do not hesitate to comment below.

3 Ways to Fix: The Specified File Could Not Be Decrypted

Many reported getting The specified file could not be decrypted message. This presents a significant problem, especially when decrypting previously encrypted files with EFS (Encrypting File System) feature.

The most common causes of this error are the absence of appropriate permissions to decrypt the file and a missing certificate – which happens when the file was encrypted on another computer.

Here’s how to fix it:

How to fix error 0x80071771 The specified file could not be decrypted?

Note icon NOTE
It’s worth mentioning that not every solution will work for everyone. If the file was encrypted on a different device, you might run into some access issues. That said, there are still a few steps you can try to fix the 0x80071771 error.

1. Untick the encryption checkbox

  1. Right-click on the file and choose Properties.propreties
  2. Click on Advanced.advanced to fix the specified file could not be decrypted
  3. Untick the checkbox for Encrypt contents to secure data, and click OK.encrypt contents

This may have ended in an error previously, but trying it after a while or rebooting the PC may fix the error.

2. Manually obtain full file permissions

  1. Right-click on the file that you are unable to access, and select Properties.properties
  2. Go to the Security tab, and click Edit.add to fix the specified file could not be decrypted
  3. Enter Everyone in the text field, click on Check Names, and then OK.everyone
  4. Select Everyone, make sure all the permissions are provided, and click on OK to save the changes.full permissions to fix the specified file could not be decrypted
  5. Again, open Properties, navigate to Security, and click Advanced.advanced
  6. Click Change.owner
  7. Type Everyone, click Check Names, and then OK.check names
  8. Tick the checkbox for Replace owner on subcontainers and objects, and click on Apply.replace subowners
  9. Click OK in the confirmation prompt.
  10. Navigate to the Auditing tab, and click Add.auditing
  11. Click on Select a principal.select a principal
  12. Once again, enter Everyone, click on Check Names, followed by OK.everyone to fix the specified file could not be decrypted
  13. Make sure all the Basic permissions are granted, and then click OK to save the changes.full permissions
  14. Once done, restart the computer for the changes to come into effect.

For some of you, obtaining full permissions for the encrypted file should help get rid of The specified file could not be decrypted error, or a problem is preventing this folder from being encrypted error.

3. Use Command Prompt

  1. Right-click on the file/folder throwing the error, and select Copy as path.copy as path
  2. Now, press Windows + R to open Run, type cmd, and press Ctrl + Shift + Enter.cmd
  3. Click Yes in the UAC prompt.
  4. Paste the following command and hit Enter while replacing File Path with the actual one you copied earlier:cipher /d “File Path”command to fix the specified file could not be decrypted
  5. Restart the computer once done.

Check whether you can access the files after running cipher /d when the specified file could not be decrypted. If not, there ain’t much you can do other than finding the PC where the file was encrypted, decrypting it there only, and then transferring it to your PC.

Also, you could use reliable decryption software since these, too, have helped a lot of users.

For any other queries or to share a solution not listed here, comment below.

Lenovo Laptop Won’t Turn on but Power Light is on: 5 Fixes

Many reported that the Lenovo laptop won’t turn on but the power light is on. This issue usually occurs because of a damaged laptop battery or a faulty adapter. Sometimes a battery that’s not properly connected or other hardware issues can cause this problem.

Before we start, try charging the laptop on a different outlet and disconnect all USB devices from the computer. After you manage to turn on the laptop using the solutions below, go into BIOS and reset the settings to default. This might fix the problem permanently.

What can I do if the Lenovo laptop won’t turn on?

1. Drain power and power up the laptop

  1. Unplug the Lenovo laptop from the power source.
  2. Remove the batteries of the laptop if they are detachable.
  3. Press and hold the power button for 30 seconds
  4. Plug the battery back into the laptop and press the power button to turn it on.

2. Use the Lenovo reset button

  1. Unplug the Lenovo laptop from the power source.
  2. Get a tiny straight pin and locate the Emergency Reset Hole on your laptop or check the user manual to check where it is.
  3. Press down the Reset button for ten seconds with the pin.
  4. Press the power button to turn it on.

The Emergency Reset button will close any activities that may still be ongoing or stopped abruptly, causing the laptop to clean and boot.

3. Switch to another A/C adapter

The problem can occur due to a faulty A/C adapter that can’t charge the battery.

So, changing the A/C adapter to a new one that works perfectly with another laptop should help detect if there are any problems with it.

4. Use the Lenovo NOVO button

  1. Press and hold the power button for 10 seconds.
  2. Locate the NOVO buttonhole beside the power button or on the side of the laptop.
  3. Get a straight pin and press the NOVO button to enter the Lenovo Recovery Mode.
  4. Select the System recovery option in the NOVO menu.

Wait for your laptop to boot up. The NOVO button will help boot the system into Recovery Mode when you have issues powering it up.

5. Check the Battery

  1. Unplug the Lenovo laptop from the power outlet.
  2. Remove the battery of the laptop if they are detachable.
  3. Connect the AC adapter to the laptop.

If the laptop doesn’t work when unplugged the issue is most likely the battery and it needs to be replaced.

Nevertheless, we recommend you consult a professional in the field to help you figure out the problem and fix your Lenovo laptop. Instead, you can contact your manufacturer for help.

Users may be interested in fixing keyboard issues on Lenovo IdeaPad 320 if it’s not working.

Also, you can check how to fix the Lenovo touch screen not working in a few steps.

How to Install Group Policy Management Console on Windows 10

Let us explore how to install Group Policy Management Console in Windows 10.

Windows 10 Professional and Enterprise editions have a Group Policy Editor administrator tool. That utility includes a multitude of Windows settings contained within Group Policy Objects. So, it provides various additional admin options for Pro and Enterprise users.

The GPMC is an additional feature for Group Policy Editor. That’s a management tool for the GPE with which users can search, import, export, back up, and restore GPOs. It also enables users to determine the scope of Group Policy Objects.

Group Policy Management Console is an optional Windows 10 Pro and Enterprise editions feature. You can install that feature in Windows 10 with the alternative methods below.

What is Group Policy Management Console on Windows 10?

The Group Policy Management Console is a tool for managing Group Policy Objects (GPOs) in Windows environments. It allows administrators to create, edit, and apply GPOs to multiple computers and users within an organization. Some of the key features of GPMC include the following:

  • Create, edit, and delete GPOs – Administrators can use GPMC to create new GPOs from scratch or edit existing ones. They can also delete GPOs that are no longer needed.
  • Organize GPOs – GPMC allows administrators to organize GPOs into hierarchies and containers, making it easier to manage GPOs across different departments or locations.
  • Apply GPOs to different levels – GPMC enables administrators to apply GPOs at different levels, such as domain, site, or organizational unit (OU). This makes it easier to use specific policies for different groups of users or computers.
  • Manage GPO settings – Administrators can use GPMC to manage GPO settings, such as security options, user and computer configurations, and software installation policies.
  • View GPO results – GPMC allows administrators to view the results of GPOs that have been applied to users and computers in their organization. This can help troubleshoot issues related to GPOs.
  • Backup and restore GPOs – GPMC enables administrators to back up and restore GPOs, making recovering from GPO-related issues or disasters easier.
  • Delegate GPO management – Administrators can use GPMC to delegate GPO management tasks to other users in their organization. This can help distribute the workload and ensure that GPOs are managed consistently.
  • Analyze GPOs – GPMC includes tools for analyzing GPOs, such as the Group Policy Modeling and Group Policy Results wizards. These tools can help administrators understand how GPOs affect users and computers in their organization.

Do I need the Group Policy Management Console?

If you don’t make much use of Group Policy Editor, you certainly don’t need it. GPMC is primarily a Group Policy Editor admin utility for domain-based networks. Therefore, IT administrators are the type of users who require a Group Policy Management Console.

Install it to see what you can do with Group Policy Management Console. Of course, you can always uninstall it later.

How can I Install Group Policy Management Console on Windows 10?

1. Use Optional Features

Note icon NOTE
This method is applicable for Windows 10 versions 1809 or higher.
  1. First, press the Windows and S keys simultaneously to open up the search tool.
  2. Type optional features in the search text box and click Manage optional features.
    install group policy management console windows 10
  3. Press the Add a feature button there to open a search box.
    install group policy management console windows 10
  4. Input RSAT: Group Policy Management Tools within the search box to find that utility.
    install group policy management console windows 10
  5. Click the Install button.

2. Download and Install the Group Policy Management Console

Note icon NOTE
If your Windows 10 platform version is 1809 or higher, install Group Policy Management Console with the first method.
  1. Open the Remote Server Administration Tools for Windows 10 webpage in your browser.
  2. Click the Download button on that page.
    The Download button install group policy management console windows 10
  3. Select an x64 (64-bit) or x86 (32-bit) download MSU package for your Windows 10 version.
  4. Then click Next to download the package.
    install group policy management console windows 10
  5. After that, open File Explorer’s window by pressing the folder icon on the Taskbar.
    The File Explorer button install group policy management console windows 10
  6. Open the folder you saved the Group Policy Management Console package in.
  7. Click the setup package you downloaded to install Group Policy Management Console.
  8. Press the Start button. Select the Power and Restart options on the menu.
  9. After that, right-click Start and select Run.
    The Run option install group policy management console windows 10
  10. To open Programs and Features, type the following text in Run and click OK: appwiz.cpl
  11. Then select Turn Windows features on or off.
  12. Extend the Remote Server Administration Tools and Feature Administration Tools checkboxes. Select the Group Policy Management Tools checkbox if it’s not selected.
    Windows Features install group policy management console windows 10
  13. Press the OK button to enable the Group Policy Management Console feature.

3. Install Group Policy Management Console via PowerShell

Note icon NOTE
This method will work on Windows 10 1809 or higher.
  1. Open the search box with its hotkey Windows + S.
  2. Type in PowerShell to find that tool, then click Windows PowerShell to open it.
  3. Enter this command in PowerShell:
    DISM.exe /Online /add-capability /CapabilityName:Rsat.GroupPolicy.Management.Tools~~~~0.0.1.0
    The PowerShell command install group policy management console windows 10
  4. Press the Enter key to run the command.

How do I access the group policy Management Console in Windows 10?

You can open Group Policy Management Console with the Run accessory. Press the Windows key + R hotkey to bring up Run. Next, type this command in the Open text box and press Enter:gpmc.msc

Installing the Group Policy Management Console in Windows 10 Professional and Enterprise is relatively straightforward. If you’re utilizing a Windows 10 1809 or higher, install it with methods one or three. Users with older versions should download and install it.

Some might find Group Policy Management Console a handy Group Policy management feature. For details about how to utilize GPMC, check out Microsoft’s Group Policy Management Console documentation page.

To customize your system, see how simple it is to download and install Group Policy Editor on Home Edition.

Lastly, if you have anything to add to this article or if you find it useful, let us know in the comments area below.

Fusion 360 is Crashing on Windows 11: How to Fix It

Fusion 360 is a cloud-based 3D modeling, CAD, CAM, CAE, and PCB software. It offers professional product design and manufacturing services to its users.

The platform has many users across the globe, but most of our readers complain about Fusion 360 crashing on Windows 11.

Does Fusion 360 run on Windows 11?

Fusion 360 is a cross-platform software only supported on macOS 11 & 12 and any Microsoft Windows version except Windows 7. So, it runs on Windows 11 without any requirement issues.

However, it is a topic of concern as many users complain about how bad Fusion 360 is on Windows 11. This problem prompts curiosity about the software supporting Windows 11.

Why does Fusion 360 crash on startup?

Fusion 360 not responding on startup or crashing on Windows 11 can occur for many reasons. Some probable causes are:

  • Network connectivity issues – Local network problems may prevent the platform from connecting to the servers, resulting in the software not responding or crashing.
  • Hardware limitations – Like any other app, Fusion 360 has system requirements, and if they are not met, Fusion 360 may crash on startup or freeze.
  • Interference from antivirus software – If Windows Defender Firewall blocks connection or other third-party antiviruses identify the app as a threat, Fusion 360 won’t run on Windows 11.

Other factors such as JoinerCAD add-on, memory leak, or faulty installed RAM chips can also cause the issue. Nevertheless, we’ll show you how to fix it.

What can I do if Fusion 360 keeps crashing on Windows 11?

Before proceeding with any advanced steps, try the following preliminary checks:

If all these preliminary methods didn’t fix the issue, let’s start performing the solutions below.

1. Update your Graphics driver

  1. Press Windows + R keys to open the Run dialog box, type devmgmt.msc, and click OK.
  2. Click the Display Adapters, tap on the driver from the drop-down, and click the Update driver option.
  3. Choose the Search automatically for drivers option.
  4. Restart your PC and check if the issue persists.

The graphics driver update will fix bugs and hardware compatibility issues and install the latest features to improve your app performance.

Read our detailed article on updating graphics drivers on Windows 11 if you have any issues.

2. Completely uninstall Autodesk Fusion 360 via String with Run

  1. Press Windows + R keys to open the Run dialog box.
  2. Copy and paste the uninstallation string below into the Run dialog box, then click OK: "wscript.exe" "C:\Users\VMS\AppData\Local\Autodesk\webdeploy\meta\uninstall.wsf" -a "73e72ada57b7480280f7a6f4a289729f" -p uninstall -s production
  3. Follow the on-screen instructions to complete the uninstallation process.
  4. Reinstall Fusion 360 on your PC and check if the issue persists.

Uninstalling Autodraw Fusion 360 by running the string command helps to delete the software and allow the installation of a new version. It is more efficient than the contemporary Apps and program uninstall method.

3. Check if you have the latest version of the app

Note icon NOTE
This solution can be performed only if you can start the app in Windows 11.
  1. Launch Fusion 360 and click the ? (question mark) icon in the upper right corner of Fusion 360. 
  2. Select About and take down the version number of Fusion 360 listed below the bottom-left corner of the pop-up window.
  3. Close the pop-up windows, click the ? icon again and select What’s New?
  4. This will open the Fusion 360 What’s New blog where you will see the latest version of the software.
  5. If you don’t have the latest version, update the software.

4. Perform a graphics diagnostics

  1. Start Fusion 360 and click the ? (Help) icon in the upper right corner of Fusion 360.
  2. Now, choose Support and Diagnostics and select Graphics Diagnostics.
  3. This will test if the graphics card is used properly with the app.

Further, our readers may be interested in the best furniture design software tools to download for Windows PC. Also, you can read about the best Ender 3D Printer Software to download on your PC.

In addition, we have a detailed guide on the best hard surface modeling software for graphics designers.

In conclusion, if you have further questions or suggestions or if Fusion 360 keeps crashing on your Windows 11 after this, kindly comment below.

PowerToys Not Installing on Windows 11: How to Fix It

Microsoft PowerToys is an official collection of utilities and functions for advanced users. They add new advanced features not preinstalled on Windows 11.

However, many people complain about PowerToys not installing on Windows 11, making it impossible to add the features.

Why is PowerToys not installing on Windows 11?

PowerToys install stuck occurs due to many factors affecting your PC and the installation process. Some notable causes are:

  • The installer doesn’t have enough access to install – It can occur if it doesn’t have administrator privileges, preventing it from accessing the necessary resources.
  • Another installation process is ongoing – If another software or update is being installed on the device, it can stop PowerToys from installing due to the system being busy.
  • Activities of background apps running on your PC – PowerToys not installing or stuck during installation can occur due to the activities of other programs running in the background.

Other factors can cause PowerToys cannot install on Windows 11. Nonetheless, we’ll discuss how to install it on your PC as we go further into the article.

We have a detailed guide on how to download and use PowerToys on Windows PC.

How can I install PowerToys on Windows 11?

Before proceeding with any advanced fixes, apply the following:

  • Disconnect any external device connected to your computer.
  • Delete and redownload the installer and try installing it.
  • Restart Windows in Safe Mode and check if you can install PowerToys.

If you can install the file, proceed with the following advanced troubleshooting steps:

1. Run the PowerToys installer package as an administrator

  1. Press the Windows + E key to open the File Manager.
  2. Navigate to the folder of the downloaded PowerToys installer file, right-click on it, and select Properties from the drop-down.
  3. Go to Security and Advanced securing.
  4. Then set yourself as the file’s owner.
  5. Then go to Compatibility and check the box for Run this program as an administrator, then Click OK.
  6. Restart your PC and launch PowerToys to check if the problem persists.

Running the PowerToys installer package as an administrator can fix any permissions issues impeding its installation.

If you have issues assigning administrator privileges to the package, read about what to do if you can’t run apps as administrators on your PC.

2. End tasks for background apps via Windows Settings

  1. Press the Windows + I key to open the Settings app.
  2. Select Apps from the left pane and click on Installed apps.
  3. Select the apps to end the task, tap on the three dots, and click Advanced options.
  4. Navigate to Background app permissions, click the drop-down button, and select Never.

Repeat the process for all apps you want to restrict background permissions. It stops the activities of other programs that may interfere with the PowerToys installation process.

Check ways to turn off background apps in Windows 11 if you have issues using the steps above.

3. Kill Setup.exe or Msiexec.exe processes in the Task Manager

  1. Right-click the Start button and select Task Manager.
  2. Find Setup.exe or Msiexec.exe programs and right-click on them. If the Setup.exe or Msiexec.exe programs are not in your directory, check for them under the Search folder.
  3. Then, select End Task from the drop-down and confirm to end the task.
  4. Restart your PC and check if you can install PowerToys.

Ending tasks for the MiniSearchHost will close any background search process that causes the problem.

4. Update Windows Operating System

  1. Press Windows + I key to open the Windows Settings app.
  2. Click on Windows Update and click on the Check for updates button. If there are any updates available, it will search for and install them.

Updating Windows fixes the bugs affecting the system’s performance and resolves compatibility issues, causing PowerToys not to install.

Read about fixing Windows not connecting to update service if the error occurs on your PC.

Alternatively, our readers can check how to fix This Installation Package could not be opened error on their computers.

In conclusion, the fixes outlined above should help troubleshoot PowerToys installation problems. If you have further questions or suggestions, kindly drop them in the comments below.

What is Poqexec.exe & How to Safely Remove It

If you see a sudden spike in CPU usage and observe that the process named Poqexec.exe is responsible for that, this guide will help.

What is Poqexec.exe?

Popexec.exe is a legit Windows operating system file responsible for executing and installing Windows updates and performing critical tasks related to Windows Store & Universal Windows Platform applications. 

The executable file runs in the background to install the Windows update whenever an update is available. This Windows update system component is located in the C:\Windows\System32 folder. 

However, if the file is not found in the System32 folder but stored somewhere else, then you need to remove it as it could be malicious and damage your system files. 

What can I do to remove Poqexec.exe safely?

You must follow all the steps to remove this executable file from your Windows computer.

1. Check the file’s location 

  1. Press Windows + E to open File Explorer. 
  2. Navigate to this path: C:\Windows\System32System 32 content -poqexec.exe
  3. If it is not present there, press Ctrl + Shift + Esc to open Task Manager. 
  4. Then, locate, right-click on Poqexec.exe, and select Properties. Shortcut Right click
  5. Go to the Shortcut tab on the Properties windows and click Open File location. You must remove the file to prevent damage if it is found somewhere other than the System32 folder.Open File Location POP

2. Scan your system for malware 

  1. Press the Windows key, type Windows Security, and click Open. Windows Security open
  2. Go to Virus & threat protection and click Scan options. V& T -poqexec.exe
  3. Select Full scan and click Scan now. Full scan
  4. The software will scan your computer and will list out the malicious file. You can delete them to fix the issue. 

3. Restart your computer in safe mode 

  1. Press Windows + I to open Settings.
  2. Go to System, then click Recovery. System - Recovery Windows 11
  3. Now under Advanced startup, click Restart now. Advanced Startup poqexec.exe
  4. On the Choose an option screen, click Troubleshoot. Choose an option - Troubleshoot
  5. Now on the Troubleshoot page, click Advanced options.Advanced options
  6. On the Advanced options screen, select Startup settings. Startup settings
  7. Click Restart. 
  8. Your computer will restart, and you will be given options to boot. Choose the one which takes you to safe mode. 
  9. Now locate the file and delete it.

4. Disable the file manually

  1. Press Ctrl+Shift+Esc to open the Task Manager.
  2. Go to the Details tab, locate and right-click Poqexec.exe and select End task.End task -poqexec.exe
  3. Now go to the file location and delete the file. 

5. Run an SFC scan 

  1. Press the Windows key, type CMD, and click Run as administrator.CMD elevated
  2. Copy and paste the following command and press Enter: sfc/scannowSFCSCANNOW CMD -poqexec.exe
  3. Restart your computer once the process is complete. 
  4. Type the following command and press Enter: DISM.exe /Online /Cleanup-image /RestorehealthCMD DISM
  5. Restart your computer and rerun the malware scan to ensure there are no malicious files. If the file is still on your computer, proceed to the next step.

6. Restore using System Restore point

  1. Press Windows + R to open the Run console. rstui
  2. Type rstui and press Enter to open System Restore. 
  3. On the System Restore window, select Choose a different restore point and click Next. Next Choose a different restore point
  4. On the next window, select the restore point and click Next. Choose a point -poqexec.exe
  5. Now, click Finish, and Windows will restart and restore the computer to the point chosen. Finish Restore point

So, these are the steps you need to take to delete Poqexec.exe from your computer. Please let us know in the comments section below if you have any questions or concerns. 

Microsoft Viva Engage: How to Download & Install

The COVID pandemic moved everyone to their homes. Work, schooling, and everything were mostly carried on from home. Post-pandemic, work-from-home has become the new normal. Microsoft has come up with a solution called Viva.

Microsoft Viva Engage allows employees to connect with anyone across the company from anywhere, anytime. It is also a tool for a company’s workforce to connect and socialize. In this guide, we will show you how you can download and install Microsoft Viva.

What are some of the best features of Microsoft Viva?

Below are some of Microsoft’s best features included with its new communication platform Viva Engage.

  • Leadership corner: You can create or join activities by leaders, take surveys, join the discussion, connect with leaders, and grow yourself and help others.
  • Advanced storylines: You can publish posts and stories on behalf of another user allowing you to continue the discussion.
  • Announcements: It lets you keep everyone informed and engaged in an important activity via a notification across the web and mobile apps.
  • Conversations: You can use @ to connect and converse with coworkers. Microsoft Viva Engage even lets you pin chats and build dialogue across teams and departments.
  • Virtual events: Microsoft Viva Engage brings leaders and employees together for townhall-esque virtual events, Q&A sessions, and other meaningful conversations.

How can I access Microsoft Viva?

  1. Go to the Microsoft 365 admin website.
  2. Log in with your credentials.
  3. In the search bar, type Viva.
  4. Select Microsoft Viva.
  5. Alternatively, you can go to the Microsoft 365 admin center.
  6. Select Setup on the left navigation.
  7. Click on the Microsoft Viva tile. This will take you to the Microsoft Viva admin page.

What can you do on the Microsoft Viva admin page?

Here is a list of things you can do on the admin page.

  • Licenses and roles: You can manage licenses or roles directly on the Microsoft 365 Licenses page or the Microsoft 365 Role assignments page. On the Role assignments page, you can locate Viva and narrow the roles to those specific to Microsoft Viva.
  • Plan types: You can view the Viva plan you purchased or include it with your Microsoft 365 in the Plan type column.
  • Assigned admins: It lets you see whether each app’s admin roles have been set. Also, you can check who the roles are assigned to from the Admins column.
  • App pages: From the App pages, you can select an app and jump into the app’s settings page.
  • Briefing email: You can choose to Manage briefing email. This will help you decide whether people in your organization should receive briefing emails.

How can you download Microsoft Viva Engage in Teams?

  1. Open the Teams app on the desktop or using the web browser.
  2. Select Apps from the left side of the pane.
  3. Search Viva Engage.
  4. Click on the Viva Engage app and click on Add. This will add the app to your Team clients, including mobile.

The Viva Engage is a subset of the Microsoft Viva suite of apps. You can install specific Viva apps for teams by following the steps above.

How can you install Microsoft Viva Engage as an admin?

  1. Sign in to the Teams admin center.
  2. Click on Teams apps.
  3. Choose Setup policies.
  4. Select Add.
  5. Enter a name and description for the policy.
  6. Under Installed apps, click on Add apps.
  7. In the Add installed apps pane, locate Microsoft Viva Engage.
  8. Select Add.

The end-users can install the apps if the app permission policy allows them by admin. If it is blocked, then they can request the admin portal. Also, the admins can follow the above steps to deploy Microsoft Viva Engage for the employees.

That is it from us in this guide. Feel free to let us know in the comments below if you find this helpful guide.

DoorDash Internal Server Error: 3 Fixes for Code 500

DoorDash is a widely used application for ordering food from different types of restaurants to your location. However, several users are complaining about a DoorDash internal server error prompt.

This makes it impossible to order meals and has left many people disappointed. However, if you also face this error, this comprehensive guide will walk you through how to fix it quickly.

What does 500 internal server error mean on DoorDash?

Below are some of the causes of the DoorDash internal server error:

  • Internet connection issues: The DoorDash internal server error on your PC can be caused by problems with your internet connection. You need to ensure your connection is stable and active.
  • Corrupt browser data: In some cases, corrupt browser cache and cookies can cause this problem. Clearing this data should eliminate the error code quickly.

How can I fix the DoorDash internal server error?

Listed below are some prerequisite troubleshooting steps to try before applying the sophisticated fixes:

  • Refresh the web page after a few minutes.
  • Relaunch your browser.

1. Clear browser data

  1. Launch your browser and click the menu button (three vertical dots) in the top right corner.
  2. Select More tools > Clear browsing data.
    clear browsing  doordash internal server error
  3. Now, click the Time range dropdown and select All time.
    time range
  4. Check the boxes for Cookies and other site data and Cached images and files.
  5. Finally, click the Clear data button.
    clear data

If you are experiencing the DoorDash internal server error on Chrome or other browsers, the first thing to do is to clear your browser data. This is because this data, especially the cookies, can corrupt over time.

Aside from the cookies and cache, you can also clear your browser history. This has also proved effective if you get the error on your mobile app.

If you still get the DoorDash error 500, try the following method.

2. Check the internet connection

Sometimes, this problem can be caused by an unstable or inactive internet connection. You can disconnect and reconnect your PC to the router to ensure your network is not the problem.

Also, you use internet speed test checkers like Speedtest to confirm your network is stable. You can proceed to the next solution if your network is active and stable.

3. Disable extensions

  1. Launch your browser and click the menu button.
  2. Select More tools > Extensions.
    extensions doordash internal server error
  3. Toggle the switch before each of the extensions backward to disable it.
    disable extension

Browser extensions can sometimes interfere with the DoorDash website leading to the internal server error. Hence, you need to disable all your extensions and reload the website.

If everything works smoothly, you can now enable the extensions one after the other to know the problematic one.

There is everything you need to fix the HTTP 500 internal server error on DoorDash. All that is left for you is to carefully follow the instructions in this guide, and the error code will be history.

If you can’t solve the problem after applying the fixes in this guide, you might need to wait it out, as the problem is likely from DoorDash’s end.

Besides, if you are a delivery partner, find out how to fix the Dasher must be active error.

Are you facing a similar issue in DoorDash error code 400 (bad request)? Then check our detailed guide to fix it effortlessly.

In the comments below, let us know the solution that helped you fix this issue.

You’ll soon be able to play Xbox games on Nintendo

Microsoft boss Brad Smith announces that the tech giant has signed a 10-year deal to bring all future Xbox games, including Call of Duty, to Nintendo. That means, Nintendo gamers will have access to Xbox titles the same way Xbox gamers and some on Sony’s PlayStation do.

https://twitter.com/BradSmi/status/1627926790172811264

“We are committed to providing long term equal access of Call of Duty to other gaming platforms, bringing more choice to more players and more competition to the gaming market.”

Previously, the Head of Xbox Phil Spencer said in December 2022 that the company is committed to bringing Call of Duty to Nintendo following the merger of Microsoft and Activision Blizzard King, and the deal is now here. 

What’s going on between Microsoft and Activision?

The news comes in the middle of the Microsoft-Activision saga. The tech giant has been trying to purchase the game studio for the past few months for $68.7 billion, but the deal went sideways. 

It was met with polarizing receptions from fans and experts alike, as they believe that the deal could harm the gaming industry as it’d prevent market competition due to Microsoft’s power. Now, Microsoft execs are heading towards an EU hearing to push the deal, where Google and Nvidia were also present.

The Call of Duty franchise is one of the highest selling on the market with over 400 million copies sold worldwide, so the deal could mean a lot of money and competition coming for both Microsoft and Activision. The first COD title to arrive on Nintendo is Call of Duty 3 on the Nintendo Wii in 2008.

What are your thoughts about this deal? Let us know in the comments!

Microsoft loosens the guardrails for its Bing chat bot following restrictive weekend

After a weekend in conversation jail, Microsoft is set to slowly encourage its Bing + ChatGPT bot to interact with users in a broader capacity once again.

Late last week, Microsoft pumped the brakes on the number of sequential queriers users could ask the Bing + ChatGPT bot in an effort to reduce the amount of oddball, incorrect and emotionally manipulative answers it had been delivering to some people up until that point.

Microsoft’s patchwork plan was to limit the number of chats turns per session to 5 and the total number to 50 per day. As the company admits, “this was in response to a handful of cases in which long chat sessions confused the underlying model. ”

Perhaps, due to the nature of day-in and day-out development of the platform, Microsoft’s own engineers acknowledge that their internal testing failed to imagine some of the longer and more intricate chat session scenarios that led to conversations that involved shadow personalities, argumentative tones, and gaslighting by the chat bot.

Ironically, it was the users request for the company to allow Bing + ChatGPT to continue its zany commentary that has Microsoft implementing a new testing barrier of 6 chat turns per session and up to 60 total chats a day.

We intend to bring back longer chats and are working hard as we speak on the best way to do this responsibly. The first step we are taking is we have increased the chat turns per session to 6 and expanded to 60 total chats per day. Our data shows that for the vast majority of you this will enable your natural daily use of Bing. That said, our intention is to go further, and we plan to increase the daily cap to 100 total chats soon. In addition, with this coming change your normal searches will no longer count against your chat totals. We will provide you more updates as we continue to make improvements in the model.

In addition, Microsoft will also be testing tone options that users can choose to have the chat bot deliver its results in that include, Precise, Balanced, and Creative. Evident by their naming convention precise tones will include shorter and more focused explanations while, balanced offers a bit more of a conversational tone to short and concise answers and lastly, a Creative one that will offer more chatty responses.

With the intent to get back to 100 total chats for users soon, Microsoft is quickly iterating on user feedback, and that feedback increasingly seems to imply users are here for Bing+ChatGTP’s messy evolution.

You’ll Need a New App to Open This ms-gamingoverlay Link [Fix]

Windows 10 and Windows 11 users have commonly reported coming across the You’ll need a new app to open this ms-gaming overlay error. This error is associated with the Windows Game Bar feature with Windows 10 and 11.

This error message pops up when you try to enable the Windows Game Bar using the hotkey. Thankfully, there are many ways to quickly resolve the You’ll need a new app to open this ms-gaming overlay error. Let us check out the solutions.

What is triggering You’ll need a new app to open this ms-gaming overlay error?

Before going ahead with the solutions to resolve the You’ll need a new app to open this ms-gaming overlay error; it is important to note why you are getting this error.

Per our research, you can activate the Windows Game Bar by pressing the Win + G keyboard combination hotkey.

If you have set this keyboard combination to trigger something else, you will come across this issue.

Also, if you have uninstalled Xbox and Game Bar from your PC, then Windows won’t have anything to open with the said hotkey, which will ultimately trigger the You’ll need a new app to open this ms-gaming overlay error.

How can I fix You’ll need a new app to open this ms-gaming overlay error?

1. Disable the Xbox Game bar

1.1 On Windows 10

  1. Press the Win + I keys to open the Settings menu.
  2. Click on the Gaming tab on the left pane.
  3. Select the Xbox Game Bar.
  4. Toggle off Open Xbox Game Bar using this button on a controller option to disable Xbox Game Bar.
  5. Restart your PC and check if this resolves the issue or not.

1.2 On Windows 10

  1. Press the Win + I keys to open the Settings menu.
  2. Select Gaming.
  3. Click on the Xbox Game Bar tab on the left pane.
  4. Toggle off the Enable Xbox Game Bar for things like recording game clips, chatting with friends, and receiving game invites option to disable the Game Bar.
  5. Restart your PC.

This is the simplest method to eliminate the You’ll need a new app to open this ms-gamingoverlay link error message. Disable the Xbox Game Bar on your PC and fix the issue.

2. Reinstall Windows apps

  1. Open the File Explorer.
  2. Click on View on the top toolbar.
  3. Click on Show and select Hidden items.
  4. Navigate to the below path. C:\Users\UserName\AppData\Local\Packages
  5. Press Ctrl + A to select all files inside the Packages folder and hit the Delete button to delete everything.
  6. Open the Start menu by pressing the Win key.
  7. Open Windows PowerShell as an admin.
  8. Type the below command and press Enter. Get-AppXPackage -AllUsers | Foreach {Add-AppxPackage -DisableDevelopmentMode -Register “$($_.InstallLocation)\AppXManifest.xml”}

Chances are that you have uninstalled specific Windows apps from your PC, which is why you are getting the You’ll need a new app to open this ms-gamingoverlay link error message. In such a case, we suggest you follow the above steps and reinstall all Windows apps.

3. Disable Discord Overlay

  1. Open the Discord app on your PC.
  2. Click on the gear icon next to your username.
  3. Choose Game Overlay from the left pane.
  4. Toggle the Enable in-game overlay option.
  5. Restart your PC.

Discord Overlay is a built-in feature for Windows that lets you bring up Discord when playing games. However, this has often been known to interfere with the smooth functioning of the Game Bar, which could very well trigger the error message.

4. Reset the Windows Store cache

  1. Press the Win key to open the Start menu.
  2. Type wsreset and open it. This will clear the Windows Store cache files.
  3. Restart your PC and see if this resolves the issue or not.

Often corrupt cache files can cause multiple issues with the apps installed on your PC. To fix such problems, we suggest you clear the Windows Store cache and see whether this resolves the issue.

Clearing the Windows Store cache helps users fix several issues associated with the Windows apps, including the Game Bar and Xbox apps.

5. Disable Key Binding

  1. Press the Win + R keys to open the Run dialogue.
  2. Type regedit and click OK.
  3. Navigate to the below path. HKEY_CURRENT_USER\SOFTWARE\Microsoft\Windows\CurrentVersion\GameDVR
  4. Locate a key named AppCaptureEnabled.
  5. Right-click on the AppCaptureEnabled key and select Modify.
  6. Under the Value data section, change the value to 0.
  7. Click on Apply.
  8. Navigate to the below registry path. HKEY_CURRENT_USER\System\GameConfigStore
  9. Right-click on the entry GameDVR_Enabled and choose Modify.
  10. Change the value to 0 and click Apply.
  11. Restart your PC and see if this fixes the issue or not.

We suggest you create a backup of your registry before tweaking it, as if done incorrectly, it could cause your system to crash. However, you can follow our guide that explains the steps to restore the registry without backup.

That is it from us in this guide. We have a guide to help you fix if the Xbox Game Bar is not working on your PC. For Windows 11 users, we have a specific guide that will help you fix the Xbox Game Bar not working problem.

You can also refer to our guide, which will explain 4 different ways to disable Xbox Game Bar on your PC. In addition, some users have trouble with the Xbox Game Bar capture greyed-out problem, which you can fix by following the solutions mentioned in our guide.

Feel free to let us know in the comments below which solutions helped you resolve the You’ll need a new app to open this ms-gamingoverlay link error.

How to change default keyboard layout on the login screen

Just like what Microsoft did with the WinAppSDK-powered look of File Explorer on Windows 11 Insider Build 25300, the tech giant is reportedly testing out a good feature for those with more than one keyboard layout or those who work or study in a bilingual environment.

As pointed out by Windows enthusiast Gustave Monce (@gus33000), the feature, which is currently living hidden in the classic Control Panel, renames the Language section into Keyboard and brings out a drop-down list of installed languages you can use on the login screen. 

If you’re still curious, read along to find out how you can enable this feature.

How can I change the default keyboard layout on the login screen?

1. Make sure to have the Windows 11 Insider Build 25300 installed in your system. If not, head over to Microsoft’s download page for insider builds to do so. 

2. Head over to GitHub to download the latest version of ViVeTool.

3. Once downloaded, click Extract all, select the location where you want to extract it by clicking Browse, then hit Extract. 

In this case, we extract it at C:\Users\WindowsReport\Documents\Tools\ViVeTool-v0.3.2

4. Hit ? on your keyboard, then type “cmd” and right-click on Command Prompt -> Run as administrator.

5. Type in cd + the directory where we extracted ViVeTool. In this case, it’s at C:\Users\WindowsReport\Documents\Tools\ViVeTool-v0.3.2, then hit Enter.

6. Type the following command then hit Enter.

vivetool /enable /id:34912776

7. Reboot the computer.

In the meantime, it’s still worth noting that being an insider-only feature that isn’t out for primetime yet, you may be running into some performance problems here and there, so, patience is a virtue.

Have you tried Windows 11 Insider Build 25300? Let us know your thoughts in the comments!

You’ll Need a New App to Open This Windowsdefender link [Fix]

You will find various reports where users face the You’ll need a new app to open this windowsdefender link error. This error pops up when users open the Windows Defender on their PCs. Also, this issue is triggered for some users when they upgrade their PCs to Windows 11.

If you are also facing the You’ll need a new app to open this windowsdefender link error and are looking for solutions; then this guide is just for you. Here, we will give you many solutions to help fix the problem. So let us get right into it.

What is causing You’ll need a new app to open this windowsdefender link error?

Here are some of the most common reasons users are stuck with the You’ll need a new app to open this windowsdefender link error message.

  • The Windows Security app has some bugs: Due to some bugs in the Windows Security app, you are getting this error message.
  • You haven’t installed the latest update: You should ensure you are running the latest Windows version, as the latest updates bring bug fixes.
  • The Windows Security app isn’t registered: Several issues related to Windows Security often pop up when it isn’t registered on your PC.
  • The third-party antivirus tool is conflicting: Programs of similar kinds can interfere with the functioning of each other, which could very well be the reason in our case. The third-party antivirus tool might be causing the problem.

How can I fix You’ll need a new app to open this windowsdefender link error?

1. Use Windows PowerShell

1.1 On Windows 11

  1. Open the Start menu by pressing the Win key.
  2. Open Windows PowerShell as an admin.
  3. Type the below command one by one and press Enter. Set-ExecutionPolicy Unrestricted Get-AppXPackage -AllUsers | Foreach {Add-AppxPackage -DisableDevelopmentMode -Register "$($_.InstallLocation)\AppXManifest.xml"} Set-ExecutionPolicy restricted
  4. Exit PowerShell and check if this resolves the issue or not.

1.2 On Windows 10

  1. Open the Start menu by pressing the Win key.
  2. Open Windows PowerShell as an admin.
  3. Type either of the below command and press Enter. get-AppxPackage Microsoft.SecHealthUI -AllUsers | Reset-AppxPackage Add-AppxPackage -Register -DisableDevelopmentMode "C:\Windows\SystemApps\Microsoft.Windows.SecHealthUI_cw5n1h2txyewy\AppXManifest.xml"
  4. After that, run the below command. get-AppxPackage Microsoft.SecHealthUI -AllUsers | Reset-AppxPackage
  5. Restart your PC.

This solution was suggested by one user who was also experiencing the same You’ll need a new app to open this windowsdefender link error message when opening Windows Defender.

You can follow the above solution, run the commands one by one, and check whether this fixes the issue.

2. Install the latest Windows update

  1. Press the Win + I keys to open the Settings menu.
  2. Click on Windows Update on the left pane.
  3. Hit the Check for updates button.
  4. If there is a new update available, then hit the Download & Install button.

Chances are there is a bug in the current version of Windows that you have installed on your PC. This can be easily fixed by updating your PC to the latest available version of Windows. Follow the above steps and check if the above solution works for you or not.

3. Reset the Windows Security app

  1. Press the Win + I keys to open the Settings menu.
  2. Click on Apps on the left pane.
  3. Select Installed apps.
  4. Click on the 3-dot icon on the Windows Security app.
  5. Select Advanced options.
  6. Click on Reset.
  7. Again press Reset.

Chances are there is some internal bug that is causing the Windows Defender to misbehave. In such a case, we would suggest you reset the Windows Security app and check if this fixes the You’ll need a new app to open this windowsdefender link error.

4. Uninstall third-party antivirus tool

  1. Press the Win key to open the Start menu.
  2. Open Control Panel.
  3. Click Programs and Features.
  4. Locate your third-party antivirus tool and hit the Uninstall button.
  5. Follow the on-screen prompts to uninstall the program.

You should ensure that you have only one application of one type on your PC, as having multiple apps of the same type could interfere with or interfere with each other’s functioning.

Remove the antivirus software from your PC, run Windows Defender, and check whether this fixes the issue.

5. Fix corrupt system files

  1. Open the Start menu by pressing the Win key.
  2. Open Command Prompt as an admin.
  3. Type the below command and press Enter. sfc /scannowsfc scannow pc white screen on startup
  4. Wait for the process to complete.
  5. Restart your PC.

If the system files are corrupt or missing, then this could several issues on your PC, one of which is that You’ll need a new app to open this windowsdefender link error.

You can also solve and prevent system errors by using specialized repair and optimization software to replace corrupt files with healthy ones.

6. Reset Windows 11

  1. Press the Win + I key to open the Settings menu.
  2. Click on Recovery.
  3. Select the Reset PC option.
  4. Select the Keep my files option to reset your PC without deleting your personal files.
  5. After the reset process completes, restart your PC.

As a last resort, we suggest you reset your PC if none of the above solutions works. Resetting your PC will bring PC to a state where everything works normally.

That is it from us in this guide. Finally, we have a guide explaining the practical solutions to fix the Windows Defender Engine unavailable issue.

Several users have reported that for them, the Windows Defender real-time protection isn’t turning on, which you can quickly fix by following the solutions mentioned in our guide.

If you are facing an issue where the Windows 11 security actions recommended but not found, then you should check out our guide that lists some solutions to resolve the problem.

Feel free to let us know in the comments below which solutions helped you resolve the You’ll need a new app to open this windowsdefender link error.