The 10 Best Windows 11 Launchers to Use

Are there launchers for Windows? That’s a good enough question. And we’re pleased to let you know there are quite a few good options to consider. If you’re looking for a Windows 11 launcher, read on.

Wondering how to change your phone’s look and feel? We’ve got you covered in this roundup of the best Windows 11 launchers for Android.

With so many options out there, it can be quite daunting to filter out which ones are worth our time. Fear not, we’re here to help you out. Here’s a quick preview of our favorite picks:

  • Win 11 Launcher – Best Windows 11 launcher for Android ➕ full Microsoft customization
  • Win 11 Computer Launcher – Excellent Windows 11 home screen for Android
  • Microsoft Launcher – Top Windows 11 Android launcher with cross-platform file sync
  • Computer Launcher Dark Theme – Unique Windows 11 theme for Android
  • Win 11x Launcher – Customizable Start Menu, file manager & more
  • RocketDock – Fullt-customizable Windows 11 launcher for PC
  • Launchy – Solid Windows-search alternative
  • Niagara Launcher – Windows 11 launcher #1 (minimalistic and effortless)

But what is it about these apps that makes them useful in the first place? Let’s find out together.

What is a window launcher?

A launcher is an app that manages your user interface and changes how you interact with other apps. By changing the launcher, you can customize your user interface.

The launcher allows you to change how the app drawer, transitions, icons, and other features of your device work. You could say that a launcher for your phone acts as the desktop does for a PC.

While we’re at it, know that there is no shortage of desktop app launchers for Windows. Now, a Windows 11 launcher aims to provide a Windows 11-style experience on Android, with icon packs, wallpapers, app drawer page transitions, and more.

The best launchers have many design cues from Windows 11 and offer a more cohesive experience between your desktop PC and Android device.

Luckily, several amazing apps fit the bill. With different features and customizable options, they offer a fresh look without leaving Android behind.

Which launcher is best for Windows 11?

Win 11 Launcher – Best Windows 11 launcher for Android
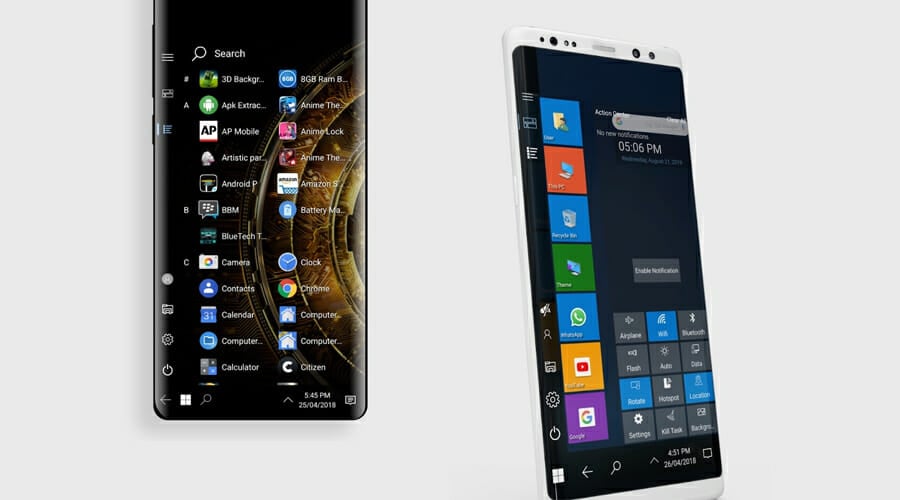
The Win 11 Launcher provides you with a fully immersive Microsoft operating system experience on your Android. The launcher is designed with the same levels of customization that Microsoft has to offer.

With this, you can expect to see the same diversity of color schemes, along with a plethora of features and functions that are exclusive to Windows 11.

The Win 11 Launcher has three main features:

  • App shortcuts with stylish designs for easy access to your favorite apps
  • Ability to navigate easily through the different screens with its smooth interface
  • Customizable theme colors

⇒ Get Win 11 Launcher

Computer Launcher – Excellent Windows 11 home screen for Android
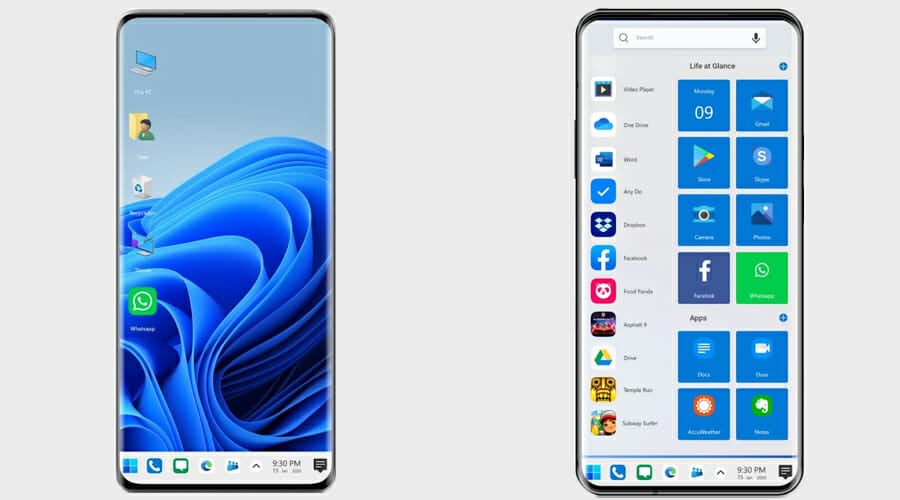
Computer Launcher, inspired by the look and feel of the Microsoft operating system, is another app that mimics the design and features of Windows 11.

It has a unique home screen layout and exquisite Jigsaw Pattern Design that give you the best phone experience ever.

Moreover, you get to customize your phone with your unique style, exploring many free themes and plugins to suit your needs.

The Computer Launcher Windows 11 has these main features:

  • Resizable home screen panel provides an easy way to navigate through the apps
  • Personalized folders with badges that give you an easier way to find what you’re looking for
  • Easy-to-use interface
  • Customizable widget panels

⇒ Get Computer Launcher

Microsoft Launcher – Top Windows 11 Android launcher with file sync
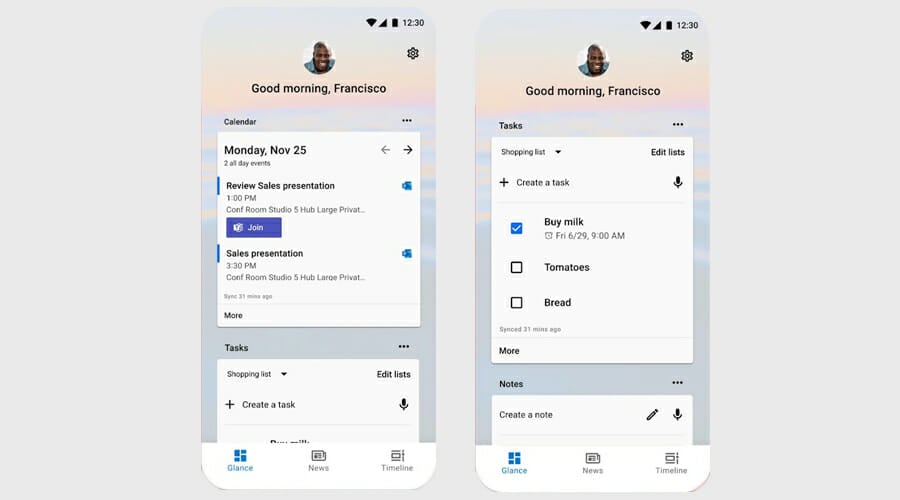
Windows Phone has been pretty much dead for quite some time now, but Microsoft fans will be happy to learn that the company has now developed a Windows 11 launcher for Android.

Although this app doesn’t offer much in the way of Windows nostalgia, it deserves a spot on lists because of its smoothly integrated features.

It provides a user-friendly interface that lets you access apps, files, and other content quickly and easily.

The Microsoft Launcher has these main features:

  • Supports both vertical and horizontal views to give you a more immersive experience
  • Minimizes battery usage, loads faster, and offers adaptive icons
  • Files, photos, and documents stored on your PC appear instantly on your Android device with the Microsoft Launcher app

⇒ Get Microsoft Launcher

Computer Launcher Dark Theme – Unique Windows 11 theme for Android
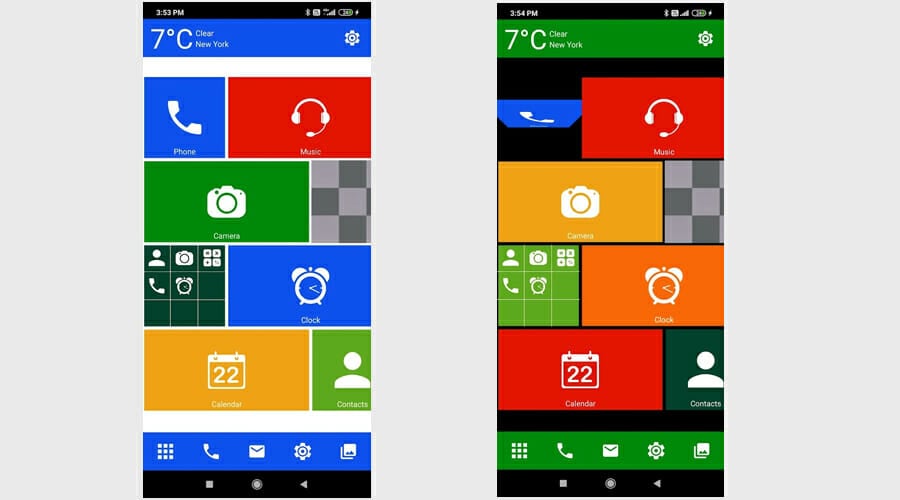
If you’re looking for an Android launcher with a dark theme, this is your best option.

It packs a Win Styled desktop, which many users find largely appealing. Moreover, it comes with a range of built-in styles, so you don’t have to do much work to create your desired home screen environment.

You can manage files with the built-in File Manager, explore apps, and contacts, create shortcuts, place widgets on the desktop, resize, drag-drop, and much more.

⇒ Get Dark Theme

Win 11x Launcher – Customizable Start Menu, file manager & more

This excellent Windows 11 launcher will emulate the look and feel of Microsoft’s latest OS to perfection.

With a fully customizable Start Menu and file manager, you will be able to manipulate your files effortlessly and make use of the splendidly executed This PC-like option.

What’s more, the developer behind this nifty Windows 11 launcher APK is feedback-sensitive and constantly updates the app based on users’ input in order to make it better with each release. What’s there not to like?

⇒ Get Win 11x Launcher

RocketDock – Fullt-customizable Windows 11 launcher for PC
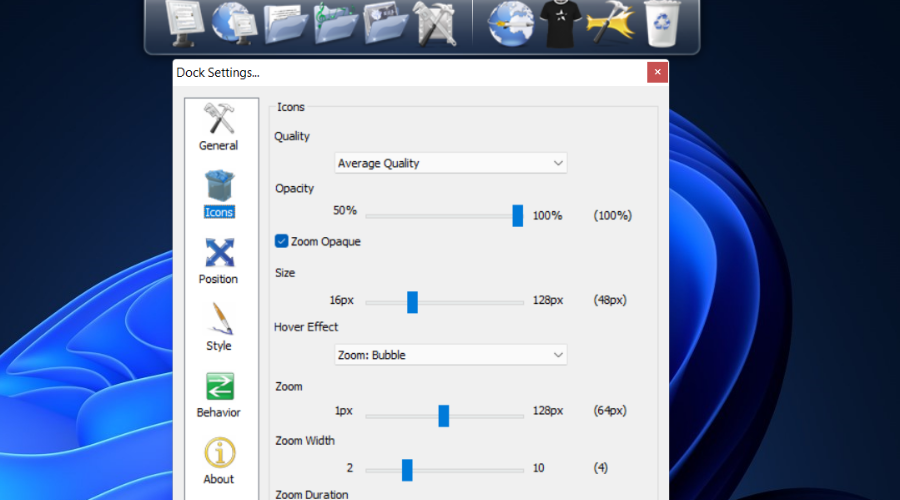
RocketDock is absolutely famous and it’s an amazing Windows 11 launcher but not for Android. It’s meant to be used on desktop machines and it sits right at the top of your screen.

This nifty app will help you better manage your shortcuts, and icons and overall, keep your programs in one place to save up space on your desktop.

You can easily install it and using it is even more simple. Enjoy customization at its finest right away.

⇒ Get RocketDock

Launchy – Solid Windows-search alternative

Just like our previous recommendation, Launchy also caters to simplicity and works perfectly on all versions of Windows, including Windows 11.

It’s ready to use as soon as you install it, you only need to type in the name of the program you want to open in the search bar and the rest is history.

You can further customize Launchy with skins and plugins to truly make it your own.

⇒ Get Launchy

Niagara Launcher – Windows 11 launcher #1 (minimalistic and effortless)

Niagara Launcher is all about efficiency and easy access. With an ergonomic design that focuses on productivity, this Windows 11 launcher for Android is easy to install and just as easy to navigate.

The minimalistic UI is reinforced by fluid animations, making it easy to access everything you need with just one hand.

⇒ Get Niagara Launcher

Tip icon Editor’s tip
Keypirinha and Listary are two more names that we simply cannot ignore.
Even though they are no longer the latest and greatest, they still put on a great performance and are strong candidates for the title of best Windows 11 launcher.

Can Windows 11 be installed on Android phones?

No, currently it’s not possible to run Windows 11 on an Android device, but that might change in the near future with the new version of Android.
However, if you like the look and feel of Windows, there are many great launchers that you can use on your phone.

If your default Android launcher seems dull, you should try using a Windows 11 launcher for Android. These apps are better than most other alternatives because they contain quality features and design.

For Windows 10 lovers, we have compiled a list of the best Windows 10 launchers for Android. Do not hesitate to take a closer look if you are one of them as well.

If you want to make your phone look brand new, download one of these launchers today. Also, do let us know your favorite Windows 11 launcher in the comments below.

Best GPU Support Bracket [Out of 5 most popular right now]

The graphics card is one of the most vital components of a gaming computer. With time, manufacturers have started manufacturing cards larger and heavier than before.

Moreover, with the change in alignment within the CPU, they need more support to prevent damage within the unit. This support can be provided by GPU support brackets available in the market. 

In this guide, we will discuss some of the best GPU support brackets to help you choose the one that suits your needs. Let’s start!

What to look for when choosing a good GPU support bracket?

Installing a GPU support bracket is a good way to prevent your GPU from sagging and protect your motherboard from stress. Here are some of the points that you need to consider before buying one:

  • Stability – The GPU support brace should be designed in a way that it can hold the GPU no matter how larger or heavier it may be and prevent it from damaging other components.
  • Easy to install – Installing the support bracket should not be complicated, so go for a minimalistic design.
  • Sturdiness – To provide stronger support, it should be of metal or heavy-duty plastic. Also, it should have either rubber pads or a magnetic base to stick it to the place.
  • Compatible with the device – When finalizing a support bracket for GPU, check the product’s dimensions to ensure that it will fit in your computer case.
  • Pocket-friendly – Another thing to consider is the price; a support brace is important to protect your PC components from future damage but investing too much money is also unnecessary, especially when you can get a decent one at a fair price.
  • Aesthetically pleasing – If you want the support bracket to blend in with the components, then buy the bracket that either comes with RGB light or is black.

What are the best GPU support brackets? 

1. MHQJRH Brace Support – Best vertical bracket

  • Anodized by Aluminium alloy CNC process
  • Support and bottom modules have anti-slip mats
  • Compatible with Chassis configuration of traditional ITX and MATX
  • It doesn’t have a magnetic base

Made of all aluminum, MHQJRH Brace Support gives strong and long-lasting support to your GPU. This GPU support bracket can easily fit inside the case as you can adjust the installation height according to your needs. It also comes with anti-slip mats for better protection.

This vertical GPU support bracket can support graphics cards of any size. Also, you can adjust the support bracket, and it is quite stable after installation. It prevents GPU from falling over and protects the PCIE socket in the motherboard.

2. nkomax Graphics Card GPU Brace Support – Minimalistic design

  • Aluminum alloy body with a magnet on button
  • Comes with an anti-scratch pad
  • Handy and can be easily installed
  • Doesn’t work with tall cases

nkomax Graphics Card GPU Brace Support is a support bracket with a minimal design that is sturdy and provides support to your GPUs. This all-aluminum brace is compatible with several chassis configurations, including traditional and long power supply bays.

The magnet at the bottom makes it more stable and prevents the GPU from sinking, protecting the motherboard from getting damaged. It has a tool-free screw design which makes it easy to install.

3. upHere Addressable RGB Brace – Best for heavy GPUs

  • Has rubber pads  
  • RHB strips and 16.8 million colors to choose
  • Sturdy design with slide rail for adjustment
  • Not good for custom build

With addressable RGB, this UpHere GPU support bracket can be used for a variety of graphics cards. It comes with a rubber pad to protect your GPU  from getting damaged. You can use it with almost all motherboards and customize RGB lights to sync with them. 

It is aesthetically pleasing, with a strong and durable metal body. This brace comes with six screws to install, which can be overwhelming for some. The support brace has a single 5-volt 3-pin for connection and comes with a 1-year warranty. 

4. EZDIY-FAB GPU Holder – Best for medium-weight GPUs

  • Sturdy aluminum alloy build
  • Adjustable with universal support arm design
  • 16 individually addressable RGB LEDs
  • Doesn’t have structural integrity

Next on the list is the EZDIY-FAB GPU Holder, which looks quite simple and can handle the weight of almost all medium-weight GPUs available. The GPU holder comes with two kinds of rubber pads; the smaller one doesn’t let the small bracket touch the fan blade of the GPU.

This support bracket is made of aluminum and can keep your GPU from sinking and prevent it from damaging the motherboard. It is horizontal and can be installed with ease.  This brace comes with a matte black look that blends in with various GPUs to maintain the overall aesthetics. 

5. Cooler Master ELV8– Suitable for RGB enthusiasts

  • 3 pins to screw and slider to adjust
  • Works with all GPUs
  • Aesthetic design with addressable RGB
  • Magnet is not that strong
  • The power cable is a bit short

With addressable RGB lightning and adjustable support, Cooler Master ELV8 protects your GPU from sagging and bending. This bracket reduces stress on your motherboard from the weight of the graphics card and can hold the heaviest GPUs with ease.

This brace comes with a tool-free slider which makes it easy to adjust it both vertically and horizontally. Also, you can personalize the lighting to be compatible with MSI and Gigabyte motherboards. The bracketed material is steel and heavy-duty plastic, and the product comes with a two-year warranty. 

So, these are the best GPU support brackets available in the market that you can choose from. Please let us know in the comments section below if you have any questions or concerns related to GPU brackets. We will be happy to help!

Windows Update Error 0x80073701 [Solved]

The Windows update error 080073701 occurs in Windows 10 and earlier platforms. That error blocks Microsoft’s cumulative updates and has been reported by multiple users.

Thus, you can’t update Windows when the issue arises. In addition, there is no specific official resolution for error 0x80073701, even though Microsoft has acknowledged the error code.

Speaking of that, users also reported similar issues involving the same code. So, let’s take a closer look to know precisely what you’re up against.

What does error 80073701 mean?

Error 0x80073701 or simply error 80073701 occurs when the system fails to perform the update process. Though it doesn’t cause any severe problems, you won’t be able to install the latest updates on your PC if this issue exists.

After some research, we have prepared a list of the most common reasons you would face the error 80073701 on your Windows 10 PC:

  • Presence of corrupt system files.
  • A third-party antivirus or malware program is interfering with the update service.
  • There is a network connection problem.
  • Presence of problematic or missing Windows update components.
  • Malfunctioning Windows update service.

Where else can this error occur, and what to expect?

  • 80073701 error code is also specific to Windows 7.
  • The install error 0x80073701 is encountered by Windows 11 users too.
  • ERROR_SXS_ASSEMBLY_MISSING 0x80073701 is a particular error code frequently associated with a more detailed description stating that some update files are missing or have problems. Thankfully, we have a guide that lists all the solutions you can apply to fix it.
  • This error also appears with a different error code, 0x800f0988. So, if you come across that, you can apply the below solutions to resolve it.

How do I fix the Windows Update error 0x80073701?

1. Run the Windows Update troubleshooter

  1. Click the Start button and select Settings.
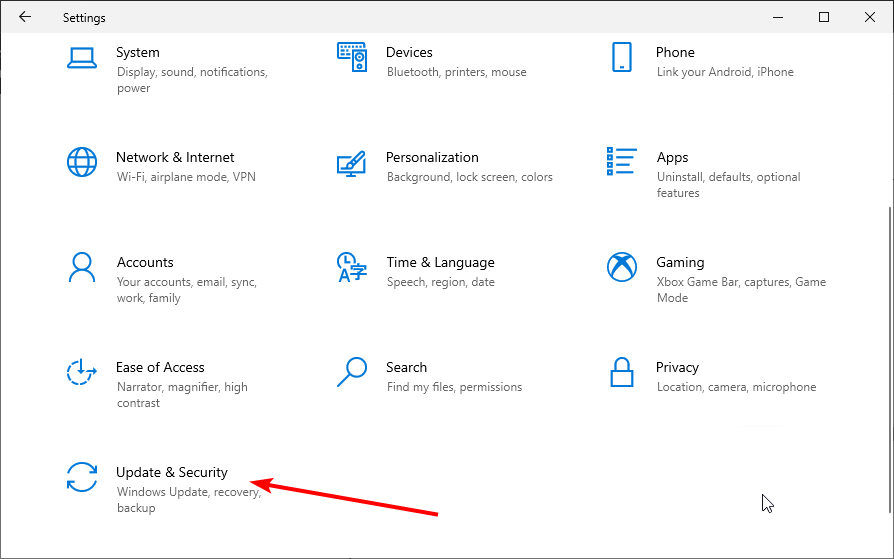
  2. Choose Update & Security.
  3. Click on Troubleshoot from the left pane and select Additional troubleshooters from the right.
  4. Click on Windows Update and hit the Run the troubleshooter button.
  5. The troubleshooter might then provide some resolutions. You can press the Apply this fix button to apply a suggested resolution.

The Windows Update troubleshooter is a built-in system tool for fixing Windows update bugs. So that might come in handy for fixing error 0x80073701.

It was reported that upon running this tool, it managed to fix some bugs but ended in displaying another error: The requested service has already been started. More help is available by typing NET HELPMSG 2182.

We’ve covered this issue in our guide on how to fix the NET HELPMSG 2182. Some of the solutions presented there also apply to the 80073701 stop code.

2. Perform a clean boot

  1. Type msconfig in the Windows Search bar and open System Configuration.
  2. Click the Services tab.
  3. Check the Hide all Microsoft services, and then select Disable all.
  4. Select Apply to apply the changes.
  5. Now, click on the Startup tab and hit the Open Task Manager link button.
  6. For each enabled item you don’t need, select Disable and close the Task Manager.
  7. Finally, restart the PC that will now load only the minimum set of services.

After this procedure, try updating Windows and see if the problem has been resolved.

3. Use the Windows 10 Update Assistant

  1. Download the Update Assistant.
  2. Launch the program.
  3. Hit the Update now button.
  4. Follow the on-screen prompts.
  5. Install the update if available.
  6. After the update is installed, hit the Restart now button.

4. Use specialized repair tools

Error 80073701 can prevent you from installing cumulative updates and upgrading your OS to a newer version. The most common reason behind this is missing or broken update files.

Fortunately, specialized tools can address file corruption and repair Windows update errors and numerous other severe system errors instantly.

Using such a program is far more accurate and time-effective than manual troubleshooting.

5. Run Deployment Image Servicing and System File scans

  1. Press the Start button.
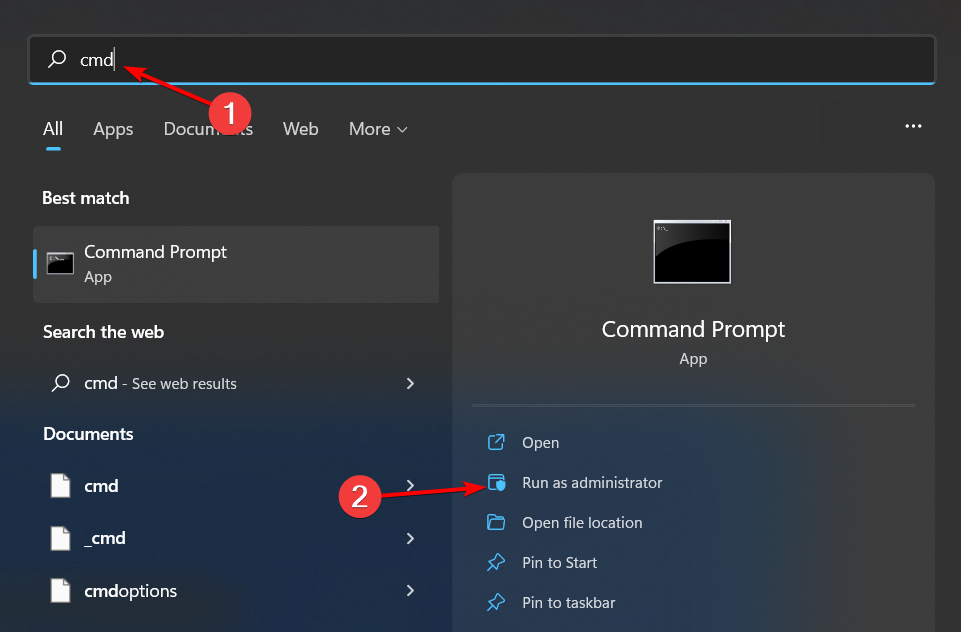
  2. Type cmd and select Run as administrator.
  3. Execute the command and press Enter: DISM.exe /Online /Cleanup-image /Restorehealth
  4. After the process ends, type the following command to launch the SFC scan and press Enter: sfc /scannow
  5. Wait until the process finishes, then restart Windows if the SFC scan does repair files.

The Windows Update error 0x80073701 might be due to corrupted system files. We recommend using the Deployment Image Servicing and Management tool to repair them.

The System File Checker also repairs corrupted system files, which will be beneficial to run.

6. Restart the Windows Update service

  1. Launch Run with the Windows + R keyboard shortcut.
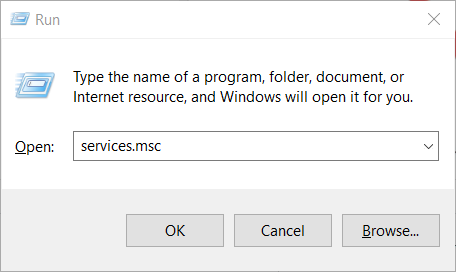
  2. Type services.msc and click OK or press Enter.
  3. Scroll down to Windows Update on the Services window and double-click the service.
  4. Press the Stop button on the window, and click OK to close the window. If the button is grayed out, the service is not started.
  5. After the service is stopped, right-click Windows Update and select Start to restart it.

7. Reset the Windows Update components

  1. Click the Windows Start button, type cmd, and select Run as administrator.
  2. Then enter the following commands separately and hit the Enter key after each one: net stop wuauserv
    net stop cryptSvc
    net stop bits
    net stop msiserver
  3. Next, rename the SoftwareDistribution folder by entering this command and pressing Enter on your keyboard: ren C:\Windows\SoftwareDistribution SoftwareDistribution.old
  4. Then, input the following command to rename the Catroot2 folder to Catroot2.old and press Enter: ren C:WindowsSystem32catroot2 Catroot2.old
  5. Enter this line to edit the SoftwareDistribution folder title: C:\Windows\SoftwareDistribution SoftwareDistribution.old
  6. Restart the stopped services by entering the following commands: net start wuauserv
    net start cryptSvc
    net start bits
    net start msiserver
  7. Then exit the Command Prompt window, and restart your desktop and laptop.

Resetting Windows Update components will restore them to their default values. So this resolution is undoubtedly worth a shot.

8. Check the Date and Time Settings

  1. Right-click the clock from your taskbar and select Adjust date/time.
  2. Select a time zone on the Time zone drop-down menu if required.
  3. You can also toggle the Set the time automatically option off and press the Change button to adjust the date and time manually.
  4. Alternatively, you can synchronize the clock with the server by clicking Add clocks for different time zones.
  5. Select the Internet Time tab, and press the Change settings button.
  6. Then you can select the Synchronize with an Internet time server checkbox and select a server from the drop-down menu.
  7. Click the Update Now button.
  8. Press the Apply and OK buttons.

Error 0x80073701 can also be due to date and time settings in Windows 10. So, ensure Windows 10’s date and time are set correctly.

Some of those resolutions might fix error 0x80073701. Also, you can check out our guide on how to fix Windows update errors for additional fixes.

If you’re dealing with related errors, this helpful guide on Windows Update error 0xxxxxxxxxx explains some common fixes you can try.

If this guide was helpful, drop us a line about your experience with the steps you used to get your device back on track.

Bluetooth Disappeared From Windows 10: Why & How to Fix

If you’re using a Bluetooth device to connect to the PC, the connection might not work due to compatibility issues, among others. One common problem users complain about is that their Bluetooth device disappeared on Windows 10.

This problem becomes serious if you rely heavily on wireless devices. Thankfully, it is a problem that can be fixed easily with the solutions in this guide.

How do I get Bluetooth back on Windows 10?

1. Reinstall drivers

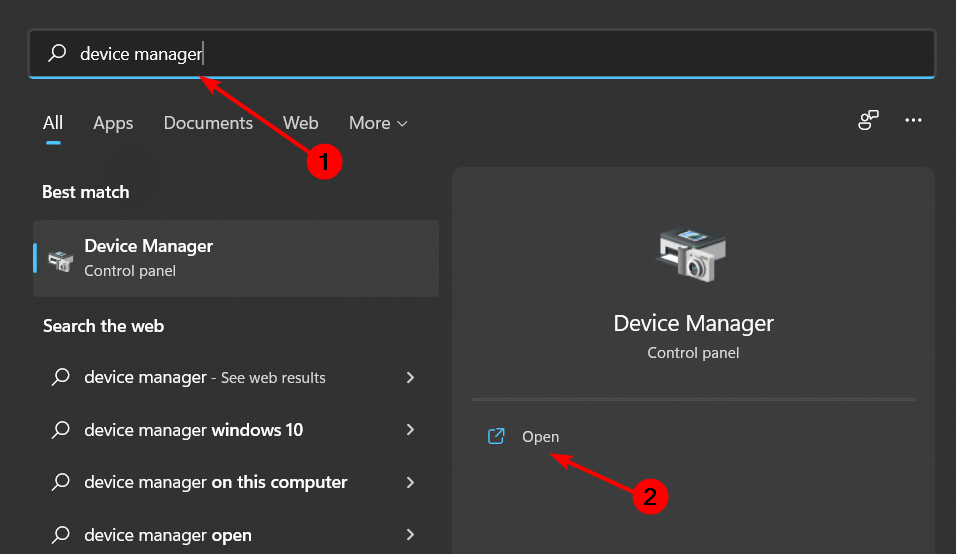
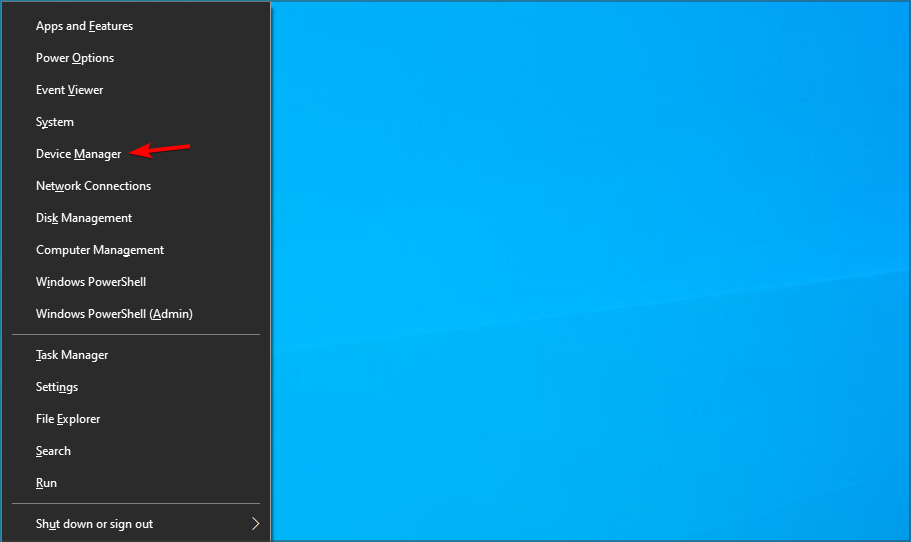
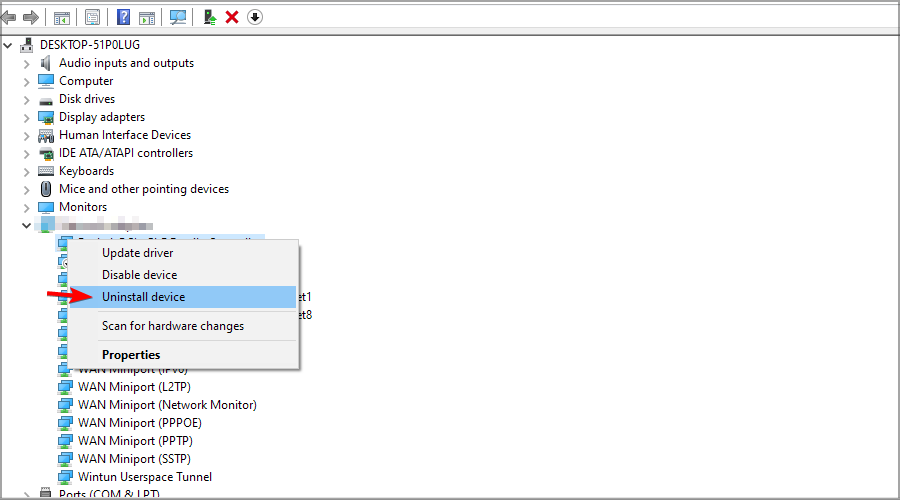
  1. Press the Windows key + X and select the Device Manager option.
    device manager bluetooth disappeared windows 10
  2. Double-click the Universal Serial Bus controllers option and right-click each device there.
  3. Now, select the Uninstall device option.
    uninstall device
  4. Click the Uninstall button to confirm the action.
    uninstall button
  5. Finally, click the Scan for hardware changes icon and restart your PC.
    scan for bluetooth disappeared windows 10

If your Bluetooth device disappeared on Windows 10, the first thing you need to do is to reinstall your USB drivers. This is especially true if you are using a receiver.

2. Restart the Bluetooth device

  1. Press the Windows key, type control, and select the Control Panel option.
    control
  2. Select Hardware and Sound.
    hadware
  3. Now, click Devices and Printers.
    devices
  4. Right-click the device that’s not working, and then choose Remove device.
    remove device
  5. Click Add, restart the device and select the My device is set up and ready to be found check box, and then click Next.
  6. If the device is not found, restart it again. When the device is found, select it and then click Next.
  7. Follow the installation instructions in the wizard.

Sometimes, you can fix the Bluetooth disappeared on Windows 10 issue by removing and adding the device again. This helps to clear any glitch that can cause this issue.

3. Restart the Bluetooth Support Service

  1. Press the Windows key + R, type services.msc, and click the OK button.
    services
  2. Double-click the Bluetooth Support Service to open its properties.
    support services
  3. Now, set the Startup type to Automatic and click the Start button.
    automatiic bluetooth disappeared windows 10
  4. Next, click the Log On tab at the top.
  5. Tick the Local System account radio button.
  6. Finally, click the OK button.
    local

There are some services that are important for the smooth running of your Bluetooth device. If these services are disabled, your Bluetooth device might disappear on Windows 10.

To fix this, you need to enable this service and restart your PC.

4. Run the Bluetooth Troubleshooter

  1. Press the Windows key + I and select the Update & Security option.
    update and bluetooth disappeared windows 10
  2. Click Troubleshoot in the left pane and select the Additional troubleshooters option.
    troubleshoot
  3. Now, select Bluetooth and click the Run the troubleshooter button.
    run
  4. Finally, wait for the diagnosis to be complete and apply the recommended fixes.

If your Bluetooth disappeared on Windows 10, the Windows troubleshooter is one of the useful built-in tools that can help you recover it. This tool will help restart all components and services and check for possible problems with your device.

5. Reinstall Bluetooth drivers

  1. Right-click the Start icon and select the Device Manager option.
    device manager bluetooth disappeared windows 10
  2. Expand the Bluetooth section and right-click the device there.
  3. Now, select the Uninstall device option.
    uninstall device
  4. Click the Uninstall button to confirm the action.
    uninstall button bluetooth disappeared windows 10
  5. Finally, click the Scan for hardware changes icon to reinstall the driver and restart your PC.
    scan for bluetooth disappeared windows 10

In some cases, issues with your Bluetooth drivers might cause the device to disappear on Windows 10. What you need to do here is to uninstall and reinstall the driver.

After restarting your PC, you can download the latest drivers to the manufacturer’s website. Once done, you can check this guide to increase the Bluetooth range.

6. Check for updates

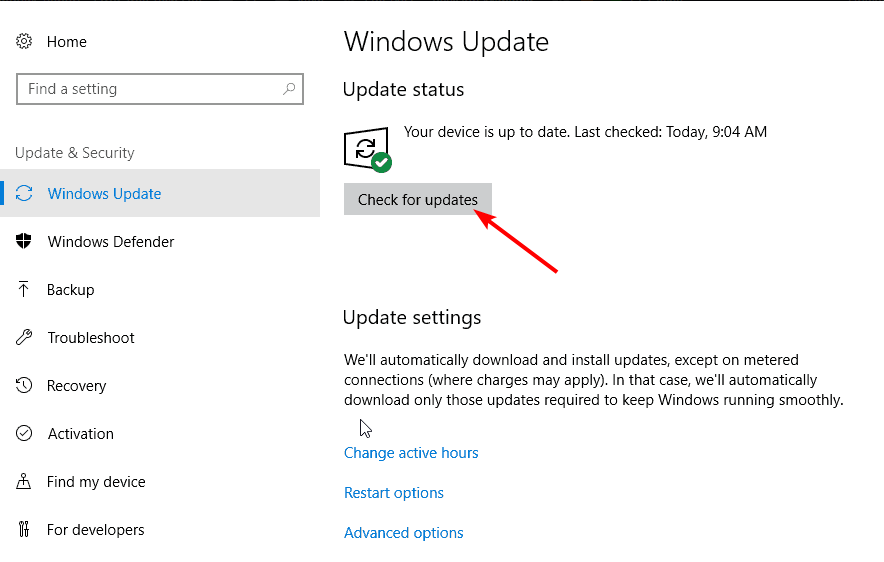
  1. Press the Windows key + I and select the Update & Security option.
    update and bluetooth disappeared windows 10
  2. Click the Check for updates button.
    check for bluetooth disappeared windows 10
  3. Finally, install any available updates, including the optional ones.

An outdated PC can cause various issues, including the Bluetooth disappeared on Windows 10 problem. While Windows 10 usually install updates automatically, you can still miss out on some.

With the steps above, you should be able to download and install updates.

7. Disconnect all peripherals

Another solution that may also work involves unplugging all peripherals and then restarting the PC. This is because the external devices might be messing with your Bluetooth.

If your Bluetooth device disappeared on Windows 10, the fixes above should help you restore it quickly. All you need to do is follow the steps carefully, and things should be back to normal.

Similarly, if your Bluetooth won’t turn on on Windows 10, check our detailed guide to fix it quickly.

Feel free to let us know the solution that helped you fix this issue in the comments below.

6 Best Games & Websites to Play Monopoly Online with Friends

Monopoly is the best-known real estate board game and the oldest. But is there an online Monopoly game? Fortunately, yes, you can also play Monopoly online with friends.

Given its popularity, the developers revamped the game and released digital versions. And we decided to list the top choices to help you pick out the best online Monopoly game.

And speaking of that, here’s a quick preview of our favorite picks:

  • Monopoly Plus – Monopoly online with friends on the same computer (3D)
  • Monopoly on Gamepix – Play it locally
  • Monopoly Casino Games – Monopoly-like game online
  • Rento Fortune – Excellent Monopoly online free multiplayer
  • Richup – Monopoly online for PCs, tablets, or phones
  • Capitalista – Best online Monopoly game for up to 20 players

Various developers also offer online monopoly games that you can play on a browser. These don’t require downloading large files over the Internet.

All it would take is a gaming-oriented browser like OperaGX, an above-average PC, and a stable Internet connection to play the best online Monopoly game.

Can I play Monopoly online with friends?

Now, we must advise that few Monopoly games are available online, apart from the official version. This is because of copyright reasons. There were, indeed, some variants of the official game launched, but they were discontinued due to copyright violations.

Nevertheless, there are still some excellent Monopoly-like games online to be discovered. If you’re looking for fun Monopoly alternatives online, you’re in the right place.

Some of these are free while others require you to pay a subscription fee or purchase in-game items. You can play Monopoly online with friends, so you might be looking for the best online multiplayer.

You can also play Monopoly online against a computer, and both options can be available either for free or upon subscription.

Regarding the various platforms available, you will be pleased to know that you can use the browser Monopoly to play online on your PC, but you can also download from the Microsoft Store app.

What’s more, you can play Monopoly online with friends on different computers or on the same computer.

Needless to say, you can also use your mobile phone (Android, iOS), or play Monopoly online with friends on Nintendo Switch, PlayStation, Xbox, and so on.

So let us dive in and help you find the very best online Monopoly game.

What is the best site to play Monopoly online?

Monopoly Plus – Monopoly online with friends on the same computer (3D)

play monopoly online

It is the classic Monopoly, launched for various platforms. It is sold as Monopoly for Nintendo Switch, and as Monopoly Plus for PC, Xbox One, PS4, and Google Stadia.

You can inspect every detail of the city center and other neighborhoods as you advance in the game and customize things to play with your own rules.

Some users complained about frequent freezing when playing the game for the first time. Apparently, logging into your Ubisoft account solves this.

Note: For mobile, you can get the app version of the game both on the App Store and Google Store, respectively.

⇒ Get Monopoly Plus

Monopoly on Gamepix – Play it locally

A very basic and free online version of the classic game. It can only be played locally, in 2 to 4 players, by tacking switches to the keyboards or console, without having to create separate accounts.

You can play full screen to not get distracted by the other games, but the image is quite pixelated. The website contains lots of other free minigames that you can play.

⇒ Play Monopoly

Monopoly Casino Games – Monopoly-like games online

Inspired by the official Monopoly game, the website contains various casino and slot games that feature Monopoly tokens. There is no connection with the gameplay in the official version whatsoever.

However, since these slot games are Monopoly inspired, perhaps they would interest you, so we figured we’d mention them anyway.

Account creation is mandatory, and as you join the community, you get a certain number of free spins and bingo tickets to get an idea of the platform. Then, you have to make a deposit to keep playing the games.

⇒ Play Monopoly Casino

Rento Fortune – Excellent Monopoly online free multiplayer

Rento Fortune is a free online Monopoly-like board game. The rules are the same, but instead of real estate, you buy and bid for countries. The game can be played by 2 to 4 players.

You can choose to go solo or play free online monopoly against computers. The games won’t start if you have an ad blocker installed and activated.

⇒ Play Rento

Richup – Monopoly online for PC, tablets, or phones

Richup allows users to either join a game that’s already going on or create a private room and play monopoly online multiplayer.

It’s a fun online Monopoly game supported across platforms, whether a computer, tablet, or mobile phone. Richup offers all the features of a regular Monopoly game, including Jail.

⇒ Play Richup

Capitalista – Best online Monopoly game for up to 20 players

Though placed last on the list, Capitalista is fun and exciting and surely one of the best online Monopoly games, free with no download.

The game supports up to 20 players simultaneously and can be played on the computer and mobile phone. Besides, it offers two board layouts so users can choose the one they find best.

⇒ Play Capitalista

Other than the ones listed here, you can play many other titles, but make sure to download them from an official source.

Also, find out the best free online games that don’t require any download.

Perhaps the original version is the best one, but if you’re experiencing the Monopoly GO restart error, this is a great alternative.

We’d like your opinion on this, so drop us a line.

Microsoft is hitting reset on 343 Industries

While many speculated that Microsoft would soon take 343 Industries behind the proverbial woodshed and finished the job it started last week of gutting the studio, a new report from Bloomberg offers a much brighter future for the company’s struggling first-party developer.

According to Bloomberg, Microsoft plans to keep making new games in the popular Halo franchise, and those games will be coming from 343 Industries. In a recent interview, head of Xbox Game Studios Matt Booty reiterated a similar sentiment about Halo staying a 343 Industries development, “343 will continue as the internal developer for Halo and as the home of Halo.”

With that being said, it’s going to be hard to keep the Halo franchise solvent after Microsoft gutted the studio and released dozens of veteran directors, producers, contractors, Q&A, and more last week. A not-so-insignificant portion of its five percent job reduction was aimed at 343 Industries and prior to the cuts at the studio, a shakeup in leadership was also another concern for gamers looking forward to future Halo releases.

Months before the massive layoffs were executed at 343 Industries, franchise stalwart Bonnie Ross left for personal reasons followed by leader of technical development David Berger also departed from the studio leaving the leadership vacuum to be filled by production lead Pierre Hintz, Bryan Koskie as GM and Elizabeth Van Wyck running business and operations.

It’s unclear at this point how this new grouping of leaders will fair with the current skeleton crew at 343 Industires but former employees have fingered the previous executive team as the main catalysts for the studio’s current situation such as designer Patrick Wren.

Leadership isn’t the only issue many saw with how the Halo franchise was being received. The more immediate problem for the franchise was arguably the underpinnings of development for Halo that included its Slipspace engine which has caused both developers and gamers frustration over the past twenty years.

According to the Bloomberg report, there are several multiplayer modes that were left out of the current Halo title but had been available for previous ones and have yet to be released due to issues with the game’s development engine. Despite being a two-decade old known quantity, Slipspace continues to be a bottleneck for the franchise and has arguably led to the poor outlook recent Halo games receive over their lifespan. Slipspace just isn’t keeping up.

While Microsoft has declined to comment on a pivot to a more plug-in-play engine such as Unreal as part of its studio reboot, it would benefit 343 Industires restart greatly to have staff and contractors working with a tool that a substantial portion of the industry understands intimately.

Fortunately, for some, Microsoft plans to continue support for Halo Infinite, while it figures out this new transitional period in the studio’s future.

Microsoft heralded Halo Infinite as a refreshing spearhead title for the next ten years of the franchise, as fans of the game, let’s hope the next time they say it, they mean it.

Microsoft has explained what caused the Azure outage last week

Even the biggest corporations and cloud operators have outages. Microsoft says an update on a public-facing router was the reason behind a muti-hour outage that impacted the Microsoft Wide Area Network last Wednesday.  The outage made parts of Azure, Microsoft 365, and Power Platform inaccessible last week.

Prior to the outage, Microsoft did warn customers of an impending update that might cause latency or timeouts around 07:05 UTC on Wednesday.  As workers in Europe started the day it became clear the outage was more than just some packet loss and latency.  The issue began impacting connections inside Microsoft Wan including those between data centers and services including ExpressRoute, Microsoft’s private network which impacted the ability to transfer data between data centers.

Microsoft says in its preliminary incident review that most services were back up and running by 9:00 UTC but not fully recovered under 12:43 UTC on Wednesday, January 25th.  The outage did also impact the Azure Government cloud according to Microsoft.  Microsoft says that it has now blocked highly impactful commands from getting executed on the devices to prevent this in the future and all commands must follow safe change guidelines.  Microsoft plans to publish a full report in a couple of weeks.

New video filters coming to Teams meetings today

Ever since the global COVID-19 pandemic triggered this new era of hybrid work, more and more people have been relying on communication platforms such as Teams.

Microsoft is doing its best to constantly update the app and bring it up to standards, but sometimes the service fails.

If you are having trouble and the breakout room isn’t working in Teams meetings, you will find all the help you need right here.

We can also show you how to use the Teams chat monitoring feature if that is something you are required to do.

Soon enough, the Redmond-based tech giant will add yet another neat functionality to the Teams app, so there will be more to fiddle with.

The new video filters are rolling out today

For some time, Microsoft’s own Skype app and rival platform Zoom have had the ability for years to make online video meetings much more interesting through several video filters.

For some reason, however, Teams was deprived of support for such visual effects for a long time. That changes today, as Microsoft has finally started rolling out new video filters for Teams.

Now, as you know, video filters in Teams aren’t exactly new. Teams desktop app allows you to tweak some basic stuff, such as the ability to control brightness.

That being said, know that Teams’ latest video filter offering aims to take the whole chatting experience to another level.

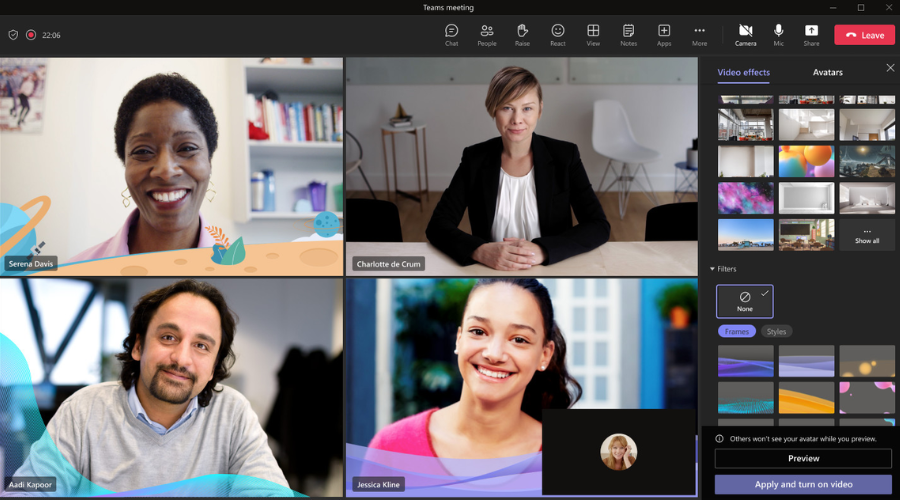
Besides the already popular brightness controller, Teams users will have the ability to add a bunch of different Frames and Styles to augment the video stream experience.

The Teams app allows users to apply video filters from the quick tray in the pre-join screen and it is also possible to apply these visual effects after joining a meeting from the meeting toolbar.

However, as you Teams aficionados know, you need to be in Public Preview to use this feature, so make sure you keep that in mind.

These video filters are available as apps developed by Microsoft and third-party partners and, as a result, applying video filters will require your consent to install the apps.

If you are wondering about platform support, know that Windows and macOS are currently the supported platforms for you to try the new visual effects.

WindowsmacOSiOSAndroidLinuxGoogle ChromeFirefoxSafariMicrosoft Edge
YesYes       

There aren’t any known issues that come with these features, but Microsoft did note that there will be some limitations to them.

First, the video filters can be enabled/disabled by app level from the Tenant Admin Center, and second, this new feature is not available to EDU tenants.

What other interesting features do you think Microsoft should consider adding to the Teams app? Share your thoughts with us in the comments section below.

Your Amazon Account got Locked? How to Unlock it [Easy Guide]

Amazon may lock the seller account if it detects any suspicious activities from the account. When trying to sign in to your Amazon account, you may encounter the Your account has been locked for security purposes error.

This isn’t the only issue, many reported An unknown error has occurred on Amazon. However, we covered that one in a separate guide.

If you are also locked out of your Amazon account, this article is needed. We have listed a couple of troubleshooting steps that you can perform to get your Amazon account unlocked.

What are common Amazon account issues that can occur?

  • We have detected unusual activity on your account and have locked it temporarily. Please contact customer service for further assistance – This can occur as a safety measure, especially if you sign-in from a different IP address.
  • Amazon account on hold – If your billing information or other personal data isn’t correct, your account might be on hold temporarily.
  • Amazon account locked suspicious activity – Sometimes you might have a high number of orders or unusual use of gift cards and that will prompt Amazon to lock your account as a safety measure.

How do I fix the Amazon account being locked for security purposes?

1. Upload documents directly

  1. Open your Email account.
  2. Find the last order dispatch confirmation email.
  3. Click on the link to access your account. The link should display most of the information except your order details.
  4. Open a product page and try to buy it.
  5. The page should show an error message saying, Your Amazon account is locked, and orders are on hold.
  6. Click on the Add document button.
  7. Upload all the required documents.

Alternatively, you try visiting the Amazon website and adding items to your basket, and you should get the same message.

Note icon NOTE
Make sure to sign in using your dispatch email account. Otherwise, you won’t be able to upload any documents.

2. Contact Amazon

Request a call

  1. Log in to your Amazon account. Next, click on Accounts & Lists.
  2. After that, navigate to Customer Service.
  3. Now choose Something else.
  4. Select I need more help.
  5. Click Request call now.
  6. Enter your phone number and click Call me now.

Alternatively, you could use one of these two numbers:

  • +1 (206)-266-2992 for US users
  • 1-888-230-4331 for outside US

Online Chat

  1. Follow the exactly same steps from above.
  2. Once you get to the option to choose between a phone call and chat, select Start chatting now.
  3. Follow the instructions given by the Amazon personnel.

3. Contact via email

Reply to the Account Specialist

Amazon will send an email to your address to let you know that your account has been locked and you cannot access it for the reasons mentioned.

Once you have read the email, reply directly to the Account Specialist’s email with the requested details for account verification.

In case you have not received the aforementioned email, proceed with the next step.

Email via Amazon help

  1. Open the Amazon page.
  2. Open the Sign-in form.
  3. Click on Need Help. Next, click on Other issues with sign in.
     
  4. Select your issue and follow instructions on the screen.

  5. Compose an email mentioning the issues you are facing with your account.

Daily, several resellers or drop shippers get their accounts locked. However, most of the time, Amazon reinstates the account after verifying the billing details.

Keep in mind that there’s a Amazon security text scam going around, so be vigilant while trying to fix your account issues. If you detect suspicious messages, report the phishing scams immediately.

Did you manage to fix this problem? Let us know which solution you use.

OnMSFT roundtable impressions: Hi-Fi Rush

A surprise reveal during last week’s Xbox & Bethesda Developer_Direct, Hi-Fi Rush arguably stole the show when it was announced that the game would release following the showcase event—and on Xbox Game Pass, no less. The style-infused rhythm-action game has since taken the gaming world by storm, with more than a few calling it an early contender for 2023’s game of the year. You can see the trailer from the Developer_Direct below.

And now we at OnMSFT deliver our impressions on this surprise Xbox hit.

Kareem Anderson

We’ll start with fellow writer here at OnMSFT Kareem Anderson, who had this to say of Hi-Fi Rush:

I thought it was fun. I loved the art style and the over-the-top story it’s building to.

I didn’t play through the whole thing, but I got in about two hours worth. It’s refreshing to play something other than 100 hr RPG or first person shooter. If I had to put money towards the game, I’d say 35-40 would have been a decent amount for it, but I’m glad it’s on game pass.

I didn’t play with that weird beat tracker on, and I suppose that helped my anxiety with matching the beat. I know some people did and complained about the game. I would recommend that during a first play through to play without it, because it’s still a button smash game at its core but to get those cool combos and animations I could see someone wanting to play with that beat matcher on it.

Hi-Fi Rush screenshot

The other cool thing is how the artwork helps ease the transitions between cut scenes and actual game play.

Also enjoyed the random platforming that appears every now and then. Nice change up.

David Allen

Agreed, I got to say, I didn’t get the time I wanted with the game over the week but I enjoyed it, just pure fun, no K/D ratios to worry with, no yelling in the microphone, I’d buy it if not on Game Pass, it’s pure fun, I have a younger nephew that once taught, jumped right in.

Robert Collins

At this point I’ve completed “Track 4,” so I am nearly halfway through the game. There’s a lot to like about Hi-Fi Rush. I love the game’s crisp cel-shaded visuals. It’s right up there with the best animated TV shows. I also like the story and characters, especially the back and forth between Chai and Peppermint. Their dialogue is definitely worth a few chuckles, and the occasional tension between them is what really drives much of the story so far.

The plot revolves around an evil corporation that is apparently up to something shady with its AI research, specifically using it as a gateway to mind control. It seems like pretty typical stuff as in what you’d find in an anime show geared toward older kids. And I guess that’s probably appropriate for the game.

In terms of the gameplay, honestly I had a little trouble getting into the swing of things in the beginning. I should say that with the caveat that rhythm games are most definitely not my forte. In fact, I downright stink at them, and this game was no exception. For the “rhythmically challenged” like myself, the game can be a tad frustrating, especially in the beginning. I eventually discovered you could just mash buttons in the combat segments and get by. But the game has all kinds of environmental obstacles that you’ll need to contend with via button pressing sequences that are, of course, synced to the beat of the game, and mastering them can be a trail and error process.

Hi-Fi Rush screenshot

I also found the tutorials to be exhausting. The tutorials are never too long in themselves, but they seem to be never-ending. It’s great that the game is constantly introducing new gameplay mechanics to mix things up, and that it takes time to explain them, but less patient gamers may get annoyed with the constant tutorials in this game, even nearing the halfway mark.

It’s nice that the game is always mixing things up between fighting and platforming bits, as well as the occasional puzzle and scripted events like obstacle-strewn rail rides. The game never does one thing long enough for it grow tiring. All in all I’ve enjoyed Hi-Fi Rush so far…to a degree. But not so much as to put it on my Game of the Year list.

And now we turn it over to you

Now that we’ve shared our impressions of Hi-Fi Rush, we want to know what you think of the game. Have you had a chance to try it out for yourself? If so, what are your impressions? Do you think it’s game of the year material? Share your thoughts down in the comments below.

Featured image via Forbes. 

Special thanks to Kareem Anderson and David Allen for contributing their feedback. 


Running out of storage on Outlook and OneDrive? Here are how to optimize your cloud storage quotas on Microsoft 365 like an expert

Starting on February 1, 2023, Microsoft will introduce changes to Outlook and OneDrive email attachments and more in cloud storage used across Microsoft 365 apps and services.

This change will not affect the storage amount of your Outlook.com mailbox, but it may reduce the amount of cloud storage available to use on OneDrive. If you reach your cloud storage quota, it could disrupt your ability to send and receive emails on Outlook.com.

Manage cloud storage quotas on Outlook and OneDrive

If you run out of storage on Outlook and OneDrive (including Outlook.com and OneDrive.com), you can follow these steps:

  1. Delete unnecessary files and folders: Go through your OneDrive.com and Outlook.com folders and delete any files or folders that you no longer need.
  2. Move files to an external hard drive: If you have files that you want to keep but don’t need to access frequently, you can move them to an external hard drive.
  3. Use cloud storage services other than OneDrive: There are other cloud storage services such as Google Drive, or Dropbox, that you can use to store files.
  4. Compress large files: Use a file compression tool to reduce the size of large files, such as videos and images, before uploading them to OneDrive or Outlook.com.
  5. Upgrade to a higher storage plan: If you find that you frequently run out of storage, you may want to consider upgrading to a higher storage plan, which will give you more space to store your files in OneDrive. outlook and onedrive
  6. Delete the items in the recycle bin: You can find the recycle bin on OneDrive.com and Outlook.com.

    outlook and onedrive
    OneDrive.com on the left and Outlook.com on the right.
  7. Use Microsoft Teams for file storage: You can store files there and it will not count toward your OneDrive storage.
  8. Remove email attachments: You can remove attachments from emails in Outlook.com and store them on OneDrive instead.

To ensure a smooth transition, the changes to cloud storage and the new quota bar will gradually roll out on or after February 1, 2023, across app settings, Windows settings, and Microsoft accounts. If you do not see the new storage experience in your settings or Microsoft account, check the change to Microsoft 365 email feature and storage or check again in the coming weeks, when it should be more generally available.

Apache for Windows 11: How to Download, Install & Configure

Apache is the most used web server software for the last 20+ years since its initial release back in 1995. It processes HTTP requests and allows us to store and deliver web pages locally or on the internet. All websites require a web server to be displayed in a web browser.

What do I need to install and run Apache?

Although it seems complicated, you will see that it’s not rocket science. Here’s what you will need to use Apache on Windows 11:

  • A PC with Microsoft Windows 11 (It also works on Windows 10, but we will focus on the new OS)
  • An internet connection to download the installer
  • Patience and a little bit of focus

The software described in this article is free and can be downloaded from their dedicated websites or authorized mirrors. The problem is that manual configuration can take some time and requires some advanced computer/server knowledge to understand what each option does.

How do I get, install, and configure Apache on Windows 11?

1. Download and configure Apache

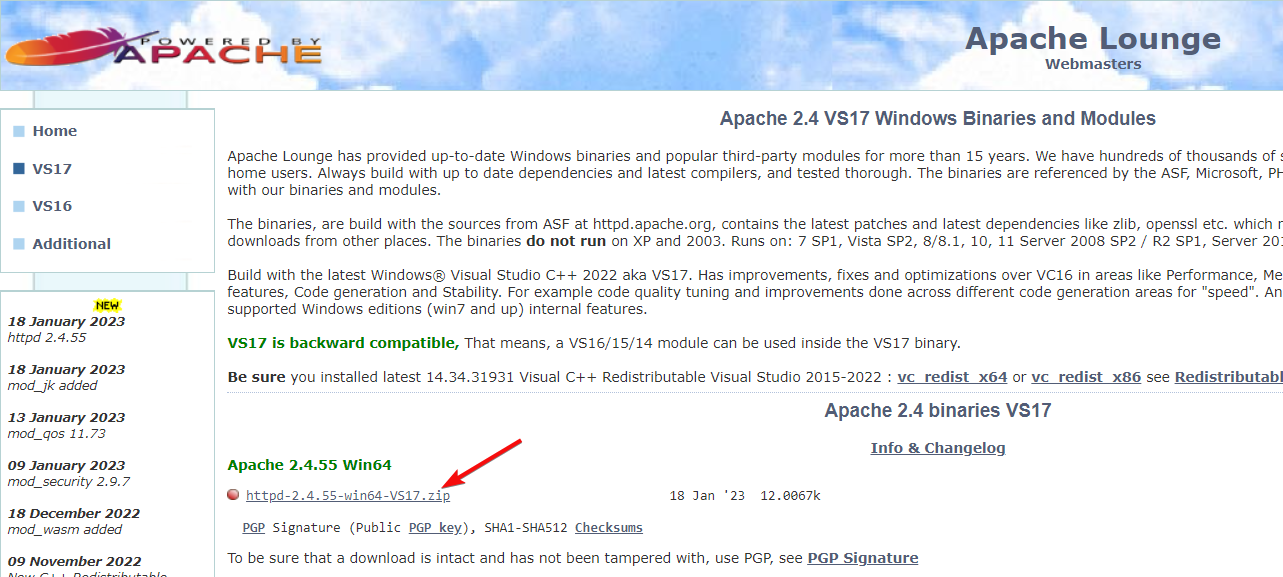
  1. Go to the ApacheLounge dedicated website and click the download link for the 64-bit version.
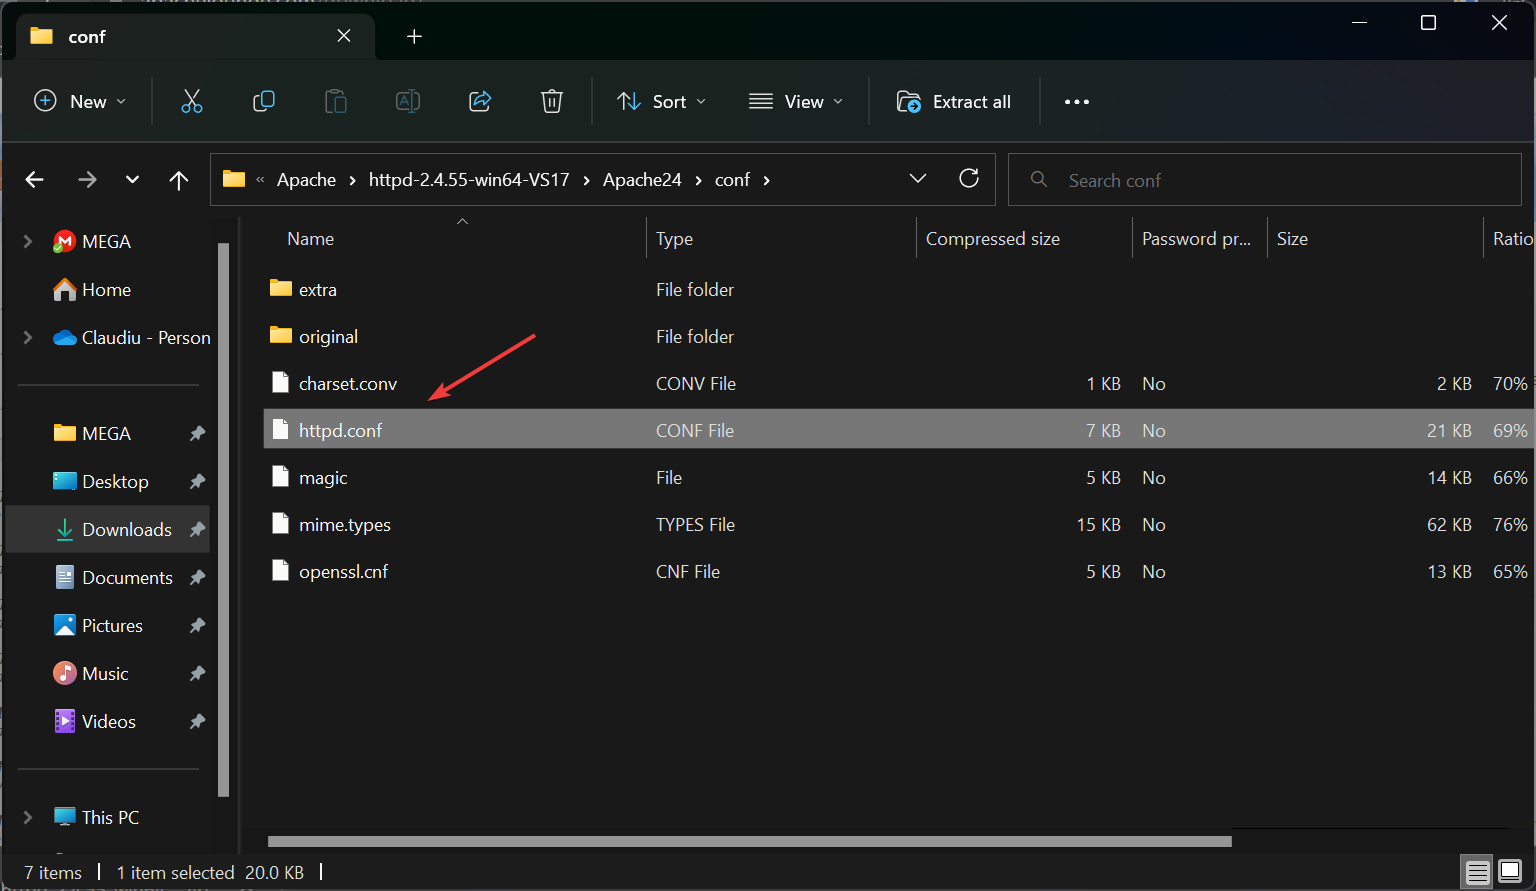
  2. Press the Windows key + E to start File Explorer, unzip the file into a new folder, and locate the httpd.conf file under the conf folder.
  3. Open it in a text editor such as Notepad.
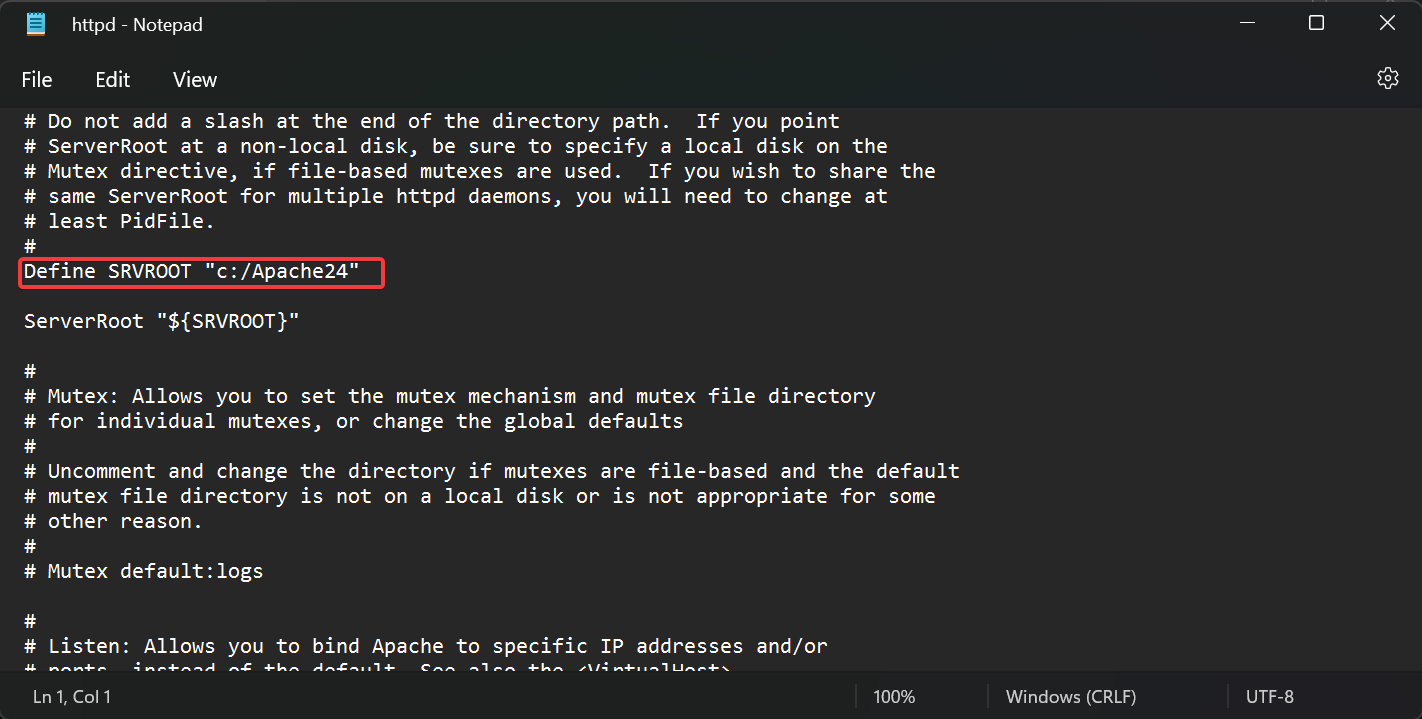
  4. The configuration file assumes you installed Apache under the C: drive directly. If not, the first thing you should do is modify that information in the conf file you just opened.
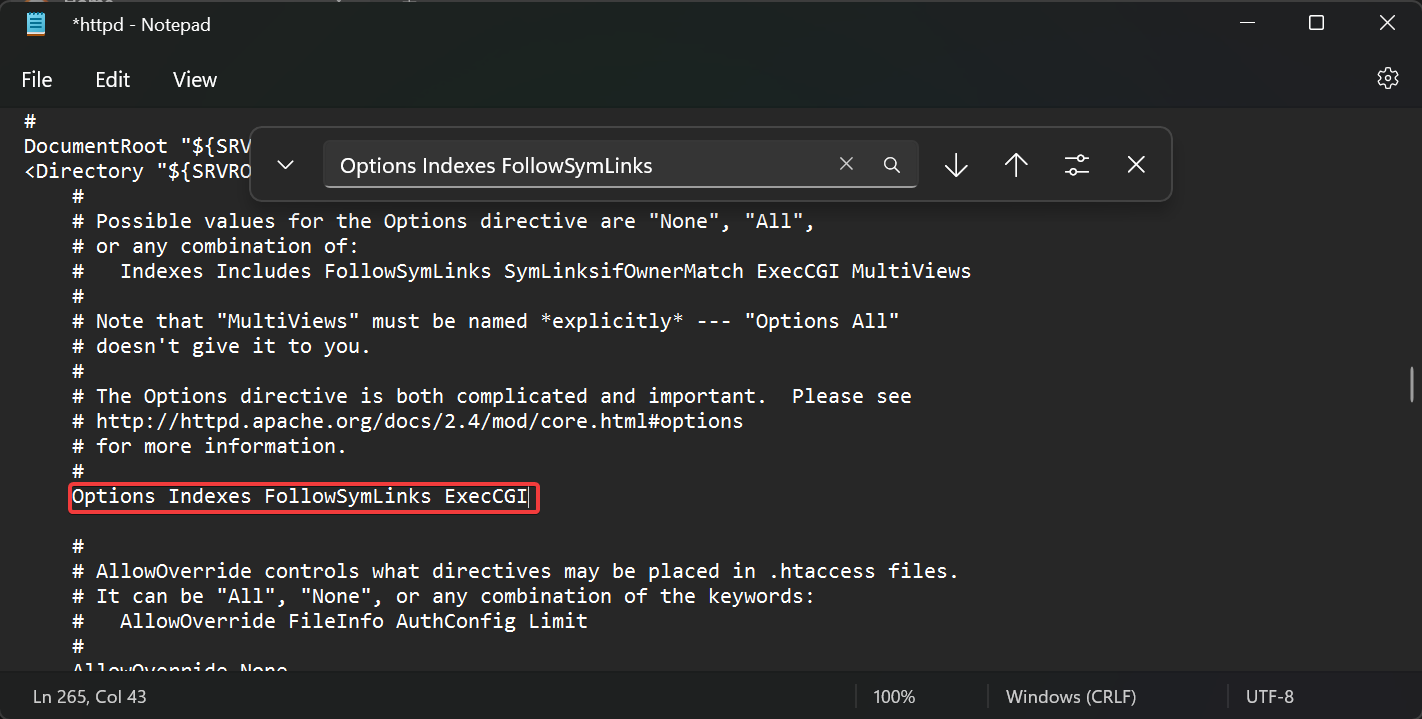
  5. Use Ctrl + F and search for the following line: Options Indexes FollowSymLinks
  6. Add ExecCGI at the end so that the line looks like this: Options Indexes FollowSymLinks ExecCGI
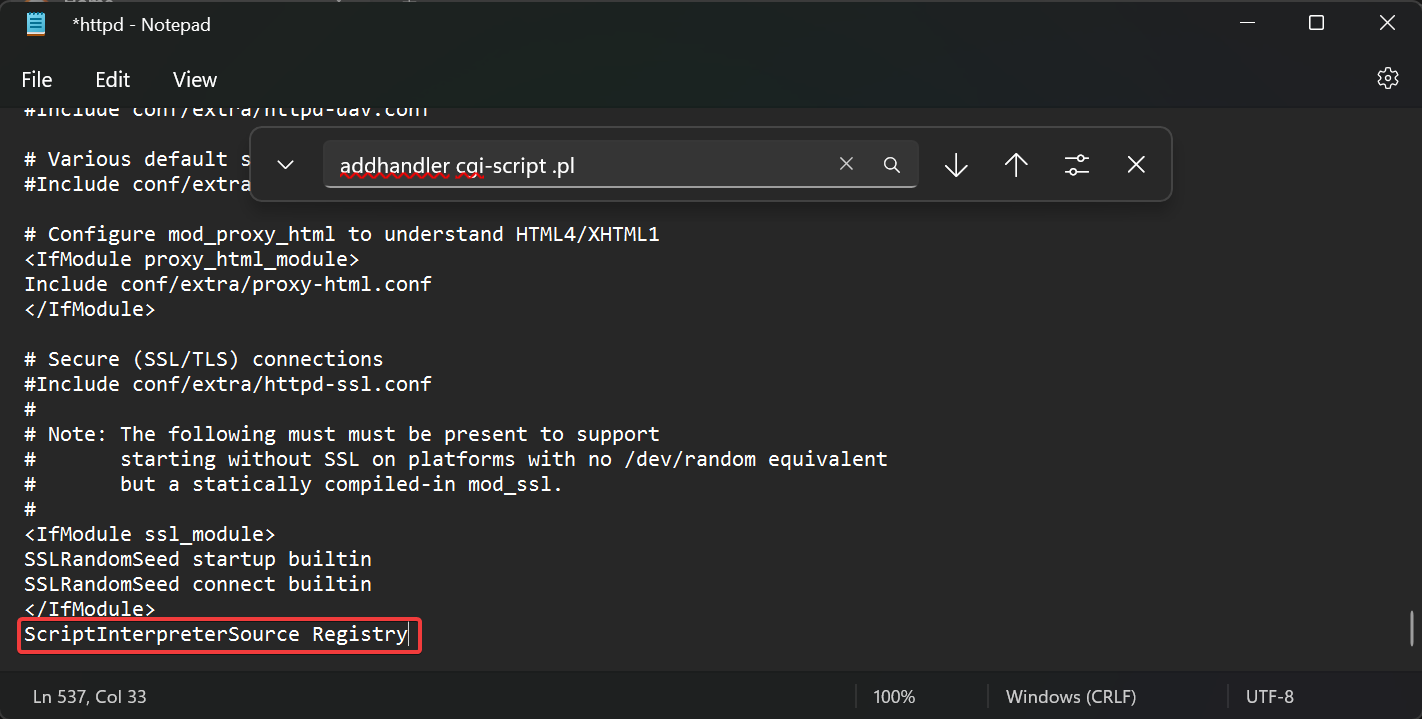
  7. Next, find the following lines and remove the # sign from the start: AddHandler cgi-script .cgi and AddHandler cgi-script .pl
  8. Add the following line at the end of the httpd.conf file: ScriptInterpreterSource Registry

2. Start the Apache server

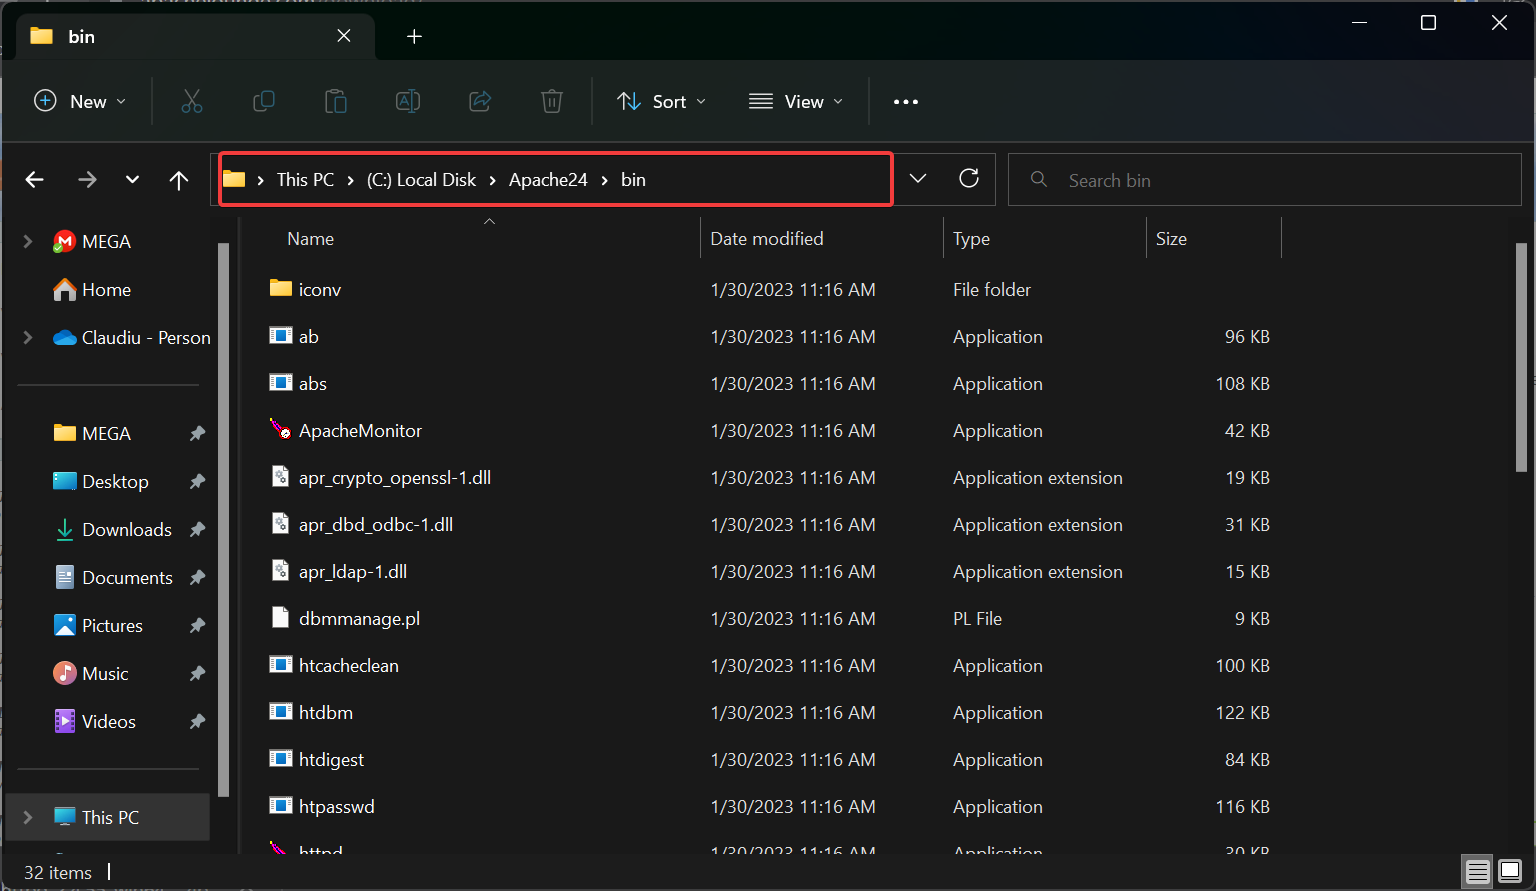
  1. Press the Windows key + E to launch File Explorer and go to the bin folder into the Apache24 folder.
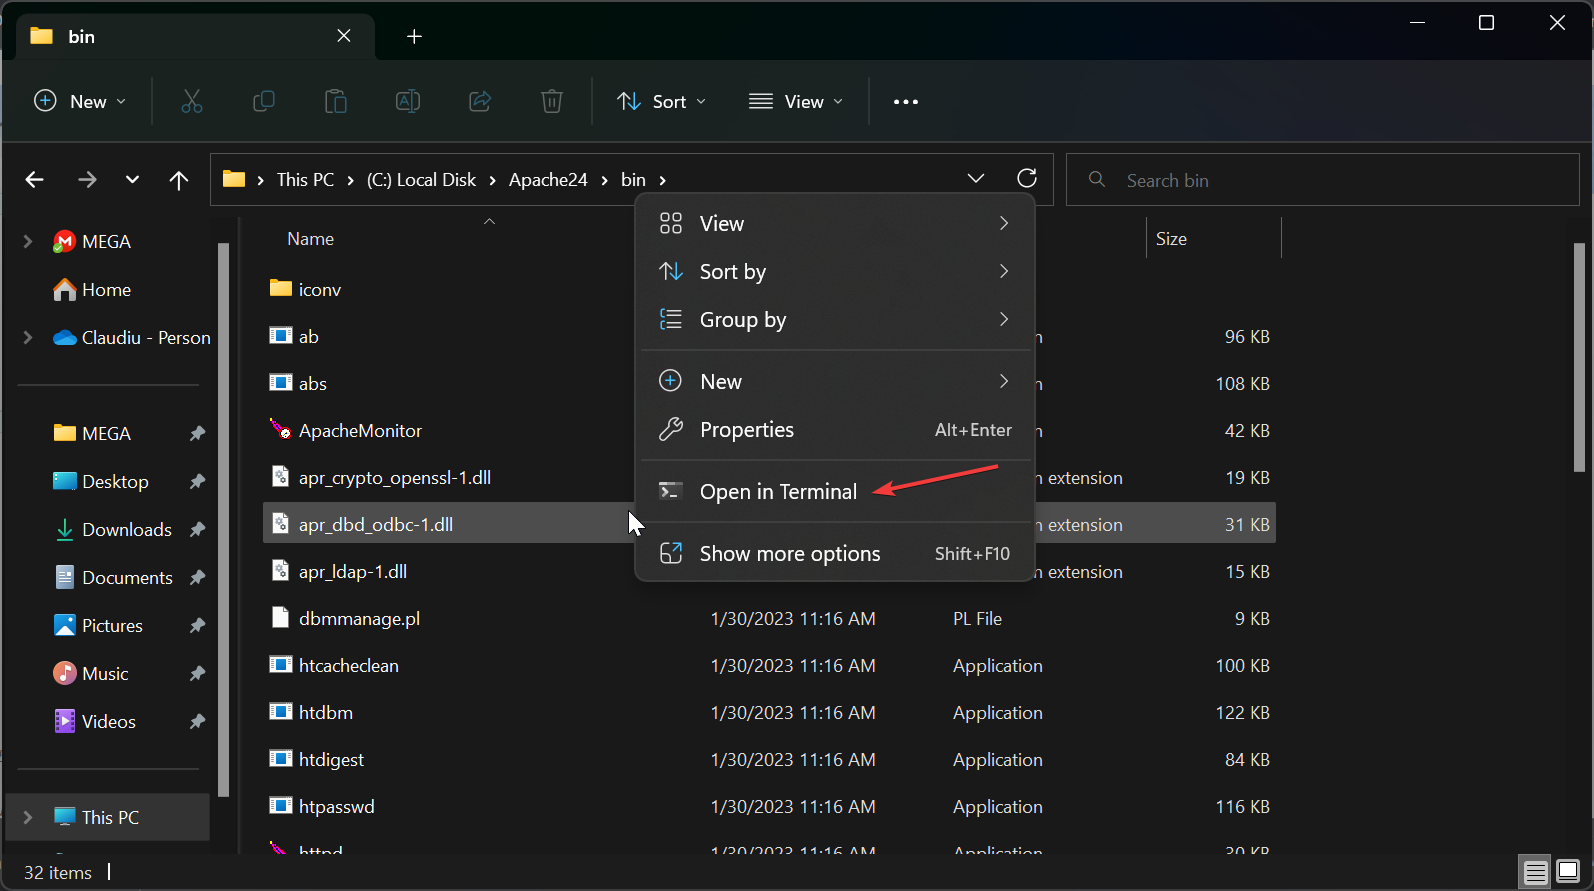
  2. Hold the Shift key, right-click somewhere on the right and select Open in Terminal.
  3. Type the following command and press Enter: httpd.exe
  4. You will be prompted to allow the installation through the firewall, and you should grant it access.
  5. To test the server, start any web browser and type localhost or the IP address of the PC into the address bar, and hit Enter. You should receive the message It works!

3. Configure the server as a system service

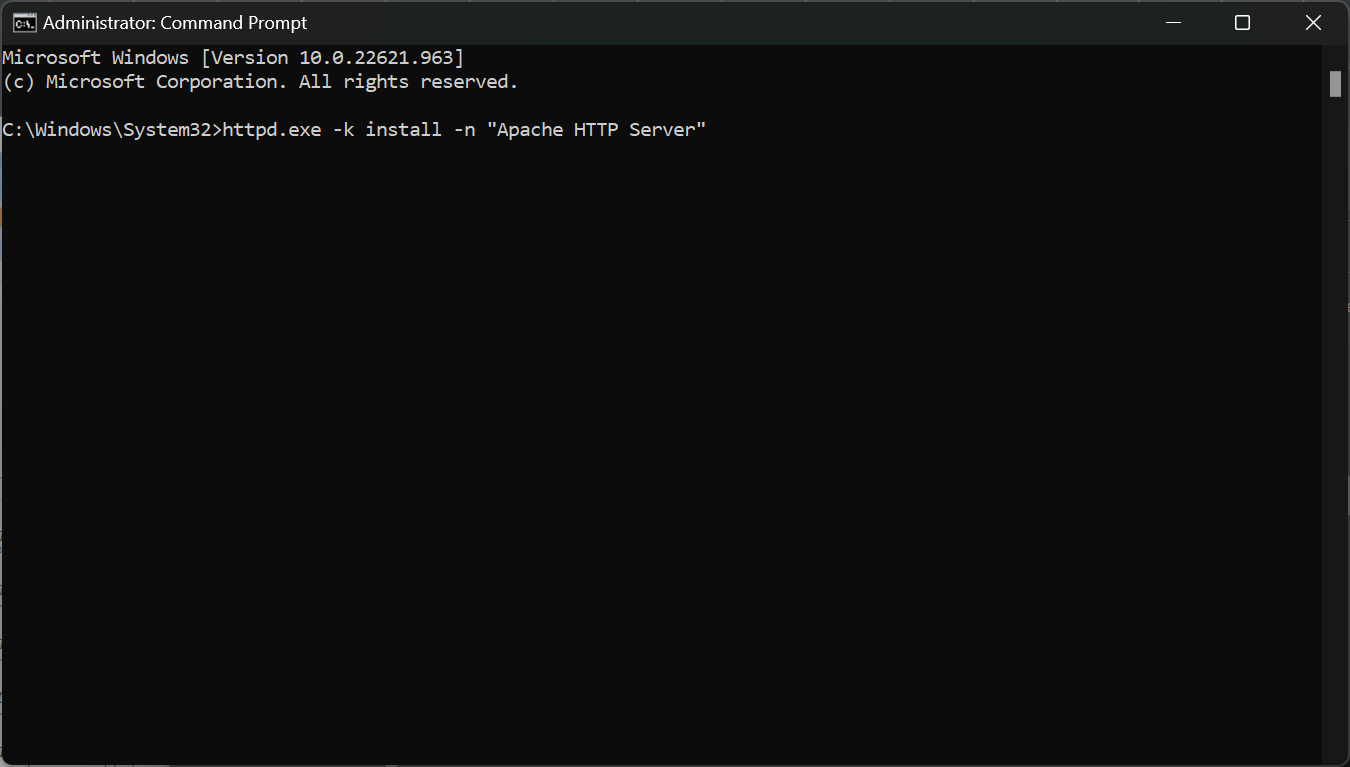
  1. Click the Search icon on the taskbar, type cmd, and select Run as administrator from the results.
  2. Change the folder to the following: C:\Apache24\bin
  3. Type or paste the following command and press Enter to run it: httpd.exe -k install -n "Apache HTTP Server"

Congratulations! You have installed the Apache server on Windows 11. You can now test and develop websites by running them locally instead of uploading each file to a web server after editing it.

Just as additional information, Ports 80 and 443, used by default by Apache, may be blocked or reserved on your machine by other applications.

For example, Skype reserves these ports in case others aren’t available and continues to reserve them even though it doesn’t use them.

You can disable this in Skype by unchecking Use port 80 and 443 for additional incoming connections under Tools > Options > Advanced > Connection.

Installing Apache helps many get rid of An exception occurred in the driver: could not find driver error. If you need more tools, we suggest you download XAMPP for Windows 11 since it also comes with Apache and all other necessary software.

If you have any other questions, please use the comment section below.

Photo Culling Software: 8 Best to Use in 2026

Do you need reliable photo culling software for your PC? This article has got you covered!

In this piece, we’ll be looking at the best photo culling software, any of which can easily be employed to expedite your photographic workflow to save time and improve productivity.

How can a photo culling software help me?

Photo culling involves organizing or sorting a collection of images or photographs, with the primary aim of separating the top-quality photos from the low-quality ones.

Specifically, photo culling seeks to eliminate duplicates, remove unclear or badly taken photos, arrange photos in desired folders and ultimately save time.

While photo culling could be carried out manually, the process would be highly exhausting and time-consuming. Hence, to speed up the workflow, photo culling software was developed.

In the next section of this article, we are going to review the best photo culling software in the market, specifically those supported on Windows PC.

What is the best photo culling software for PC?

Adobe Lightroom – Great for editing

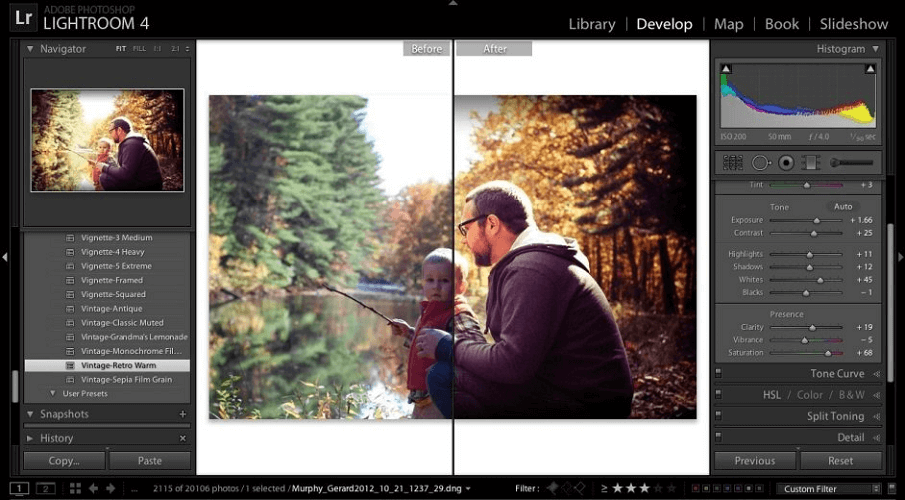
Topping out our list is an image editor that comes from the Adobe family. However, we aren’t talking about Adobe Photoshop, but its little brother, Adobe Lightroom.

As a general note, Adobe Lightroom is the tool that you need when you want to perform minor photo doctoring without wrapping your head around more complicated tasks.

In the case of Photo culling, Adobe Lightroom is perfectly capable of sorting out your photos, and the UI will allow you to perform the task as fast as possible.

Normally, Adobe Lightroom is a subscription-based program, but you can now test it for free if you apply for the 7-day trial period.

Here are some of the benefits of using Adobe Lightroom:

  • Great for those used to using Adobe Photoshop
  • The toolset makes it an excellent choice for those that want to perform minor photo tweaks
  • Great at culling photos
  • Works in great synergy with Adobe Photoshop and Adobe Illustrator
  • Batch processing images using the Quick Develop panel

Adobe Lightroom

Adobe Lightroom is the best tool for quick-fixing your photos with a very smart and simple UI.
Check price Visit website

Adobe Bridge – Best for professionals

Of course, While Adobe Lightroom may be used to sort the high-quality photos from the bad ones, you will need a tool to better organize the folders afterward.

That is where a tool like Adobe Bridge can definitely come in handy. While not as popular as the other products from the Adobe Creative Suite, Adobe Bridge was a mandatory component of it.

However, that all changed with the introduction of the Creative Cloud and the appearance of Adobe Bridge CC, when it became an optional component.

All in all, as far as photo sorting is concerned, regardless of what the criteria may be, Adobe Bridge is an excellent top choice.

Here are some of the benefits of using Adobe Bridge:

  • It can organize files by renaming a group of them at once
  • It is great at assigning colored labels or star ratings assigned to files
  • Edit embedded or associated XMP and IPTC Information Interchange Model metadata
  • Sort or categorizing files based on their metadata is also supported
  • Works well with resources imported from other Adobe products

Adobe Bridge

Adobe Bridge is indispensable if you want to keep your photos perfectly organized even by using their metadata.
Check price Visit website

ACDSee – Photo Studio Home 2022 – Good for EXIF & IPTC editing

ACDSee Photo Studio Home 2022 is an industry-class photo culling software, flexibly designed to view, edit, and organize images. The software is fully compatible with Windows OS, macOS, and iOS.

This tool offers you the opportunity to speed up your image processing and management workflow, as you are afforded the opportunity to spend as little time as possible on post-shot image processes.

The software basically offers a 1:1 Raw file editing, which makes it very ideal for fine-tuning photographs taken by digital cameras, without having to worry about quality loss.

Some of the key features of ACDSee Photo Studio Home 2022 include swift image culling, batch processing, EXIF & IPTC editing, layered editing, image caching, facial recognition, and many more.

Here are other benefits of using ACDSee Photo Studio Home:

  • Digital Asset Management for culling and organizing photos.
  • New filters and enhanced coloring process for editing stage
  • Batch Rename to change your photos name according to the client’s feedback
  • Improved batch resize meant to help you with dimension or pixels changes
  • Updated toggle options to find any picture from your stack
  • Watermark accuracy for the entire batch of your images
  • Face recognition to easily find any person you need.

ACDSee Photo Studio Home 2022

Photo Studio Home 2022 is the new pinnacle for photo editing and processing with facial detection and recognition.
Check price Visit Website

FilterPixel: Photo Culling Software – Modern and easy to use

If you’re looking for a cool and modern tool for photo culling, you can’t go wrong with FilterPixel because it uses AI to select your best photos automatically.

Whether you’re going through your family album, or you run a photo business, this tool will sort through your images with lightning speed.

If you’re a photographer, just drag and drop the folder with the RAW files or JPEGs into the app and the tool will import them in milliseconds.

As for the culling, the built-in AI automatically tags out-of-focus, blurry, blinks & all the undesired photos as rejects.

With a click of a button, the software chooses the best photo out of a similar set of photos based on composition, lighting, expressions, sharpness, and more than 20 visual parameters based on your style.

 Also, you can always sync your photos seamlessly with Lightroom, PhotoMechanic, Bridge, or any other XMP-supported editor.

FilterPixel runs processing on cloud GPUs which provides a unique advantage to offer high speed and better accuracy while culling without clogging any resources on your system.

No need to zoom in/zoom out every photo. You don’t even need to check the photo in Full-Screen. Instead, you can view all the faces as you navigate through the photos.

You have full power to overwrite AI decisions. In addition, you will be able to compare any photos side by side with the faces in them for a quick review. This feature is beneficial for comparing group photos in family portraits or weddings.

These were only a few of the best features in FilterPixel but if you test the free trial version, you will discover a lot more.

Let’s review some of FilterPixel’s best features:

  • Fast Image Imports
  • Automated Culling with AI
  • Sleek and modern interface
  • Works seamlessly on Windows and Mac
  • FaceViews, AI Sliders and Filters to organize your photos

FilterPixel

This tool uses AI to perform the culling of your photos in a fraction of the time needed for other similar apps.
Free trial Visit website

FastStone Image Viewer – Small and efficient

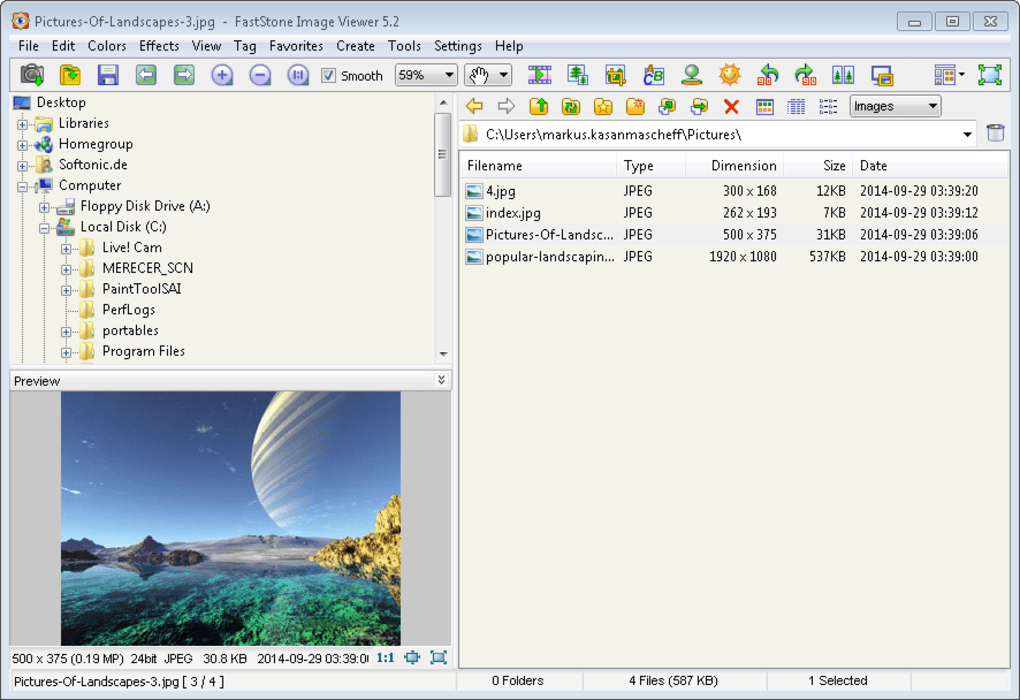
FastStone Image Viewer tops our list of best photo culling software. The software is a popular image browser, image converter, and photo editor. It is exclusively designed to run on Windows PC.

The app hosts a familiar, highly intuitive, user interface, which is a subtle imitation of Windows Explorer’s UI.

Furthermore, as the name implies, FastStone Image Viewer is optimized to cull and sort images with unparalleled speed. And you are offered every tool needed to fine-tune and finish the culled photos.

The software is designed to support all known digital camera brands, notably Sony, Fujifilm, Panasonic, Olympus, and many more.

Also, it houses support for all image file formats, including PNG, JPEG, BMP, PSD, TIFF, GIF, RAW formats (NEF, CRW, RAF, etc.), and lots more.

FastStone includes image retouching, color adjustment, JPEG transition, scanner support, image annotation, drop shadow effects, image sharing (via email), RAW format library, and many more.

The app is available for free, albeit for personal and educational uses. However, for commercial or business purposes, a commercial license is required.

Here are some of the benefits of using FastStone Image Viewer:

  • Manage, adjust colors, or retouch the photos
  • Clear and customizable one-click image magnifier
  • Browser button to find one image from the entire batch
  • Editing tools such as: blur, sharpening, adjust lighting and curves
  • Support for the most used image formats: JPEG, PNG, BMP, GIF
  • Display histograms with color counter tag

⇒ Get FastStone Image Viewer

BreezeBrowser Pro – Multi-camera support

BreezeBrowser Pro is a versatile image browser, viewer, editor, and manipulator. It is one of the most employed tools for isolating (and editing) standard images in the midst of low-quality ones.

The software is exclusively designed for Microsoft Windows PC, with support for Windows 7/8/8.1/10.

It is specially designed to speed up the workflow of professional creative artists. However, its interface is simple enough for beginners or amateur photographers to get a hold of.

As such, it is ideal for all classes of people, whether you are a professional photographer or just a lover of photography.

The app supports all known digital camera brands, including Fuji, Panasonic, Sony, Canon, and others.

It is one of the best photo culling software for sorting and managing RAW image files taken with these cameras.

Some of the noteworthy features of BreezeBrowser Pro include thumbnail view, image comparison, RAW image conversion, multiple camera support.

There is also multi-format image file support, lens correction, noise filter, image organization, and folder management, keyword editor, image printing, and many more.

BreezeBrowser Pro is available with a charge per license for all the included services. However, you can enjoy a limited free trial version on offer (for new users).

Here are some of the benefits of BreezeBrowser Pro:

  • Organize photos using sorting, drag-and-drop, selecting, ranking or comparison
  • Create web image galleries, proofs or sheets to express yourself
  • Batch processing to rename or rotate images
  • Quality photos editing with HQ sharpening algorithm
  • See image data like focus point and grid overlay
  • Additional interface views to change between

⇒ Get BreezeBrowser Pro

Photo Mechanic – Fast and efficient

Photo Mechanic is a prominent image viewer, browser, and manager, designed for Windows and Mac computers.

It is one of the most widely used software for culling photos taken via digital cameras, before sorting/managing them on PCs or MacBooks.

The software is an essential tool, which is widely used by professional photographers to create top-quality pictures.

It basically saves you quality man-hours, which could have been wasted on manual image organization and management.

This way, you are able to deliver your work quickly time and consequently improve productivity. Basically, you can optimize your workflow and edit or cull your best shots within minutes.

Other benefits allow you to personalize the process of working on your photos, including post-processing tools to manage your art at its best.

Hence, if you want software that provides efficient culling service, plus helps to sort the best pictures right away, act out confidently.

Notable features of Photo Mechanic include:

  • Swift photo culling
  • Contact sheet printing
  • Image comparison
  • Image sharing
  • Batch editing

⇒ Get Photo Mechanic

FastRawViewer – Ideal for RAW images

FastRawViewer is a special purpose RAW file viewer and manager, specially designed for culling RAW images from digital cameras and fine-tuning them on PCs. It hosts cross-platform support for Windows 7/10 PC and macOS computers.

The software currently supports more than 1000 different types of digital cameras (including Sony, Canon, Fuji, and so on), mobile phones, and tablets.

Furthermore, as an exclusive RAW image viewer/manager, it houses support for all RAW formats, notably RAF, CRW, and NEF among others.

Unlike other image viewers/cullers, FastRawViewer previews raw images in their original RAW formats. This is what makes it stand out, as one of the best photo culling software for RAW photographs.

Other key features of the app include optimized browsing speed, focus peaking, shadow boost, white balance, black-and-white previews, and more.

FastRawViewer comes with a paid version, giving support for 2 computers. The good news is that you can buy the package after you have the 30-day free trial period, checking it for yourself before the final acquisition.

Here are some of the benefits of FastRawViewer:

  • Culling RAW shots easily and really fast
  • Manage RAW files directly without any conversion
  • Dynamic evaluation with histogram details
  • Speed up image processing in Adobe Lightroom
  • Supports 1188 cameras and mobile devices

⇒ Get FastRawViewer

The solutions reviewed herein are some of the best photo culling software in the market. They have been ranked on the basis of speed, compatibility, image manipulation, photo management, digital cameras support, versatility, affordability, and so on.

Therefore, if you are looking for a tested and trusted photo culling software, to speed up your workflow, the above-outlined applications are the recommended ones for you.

If you’re looking to modify the images too, we have a list including the best photo editors for Windows that will help you enhance them in many ways.

Have you chosen a product yet or do you have any suggestions for new ones? Let us know about all that in the comments section below.

How to share new LinkedIn posts with your followers

Posting on LinkedIn is similar to posting on Facebook. Write an update, and send it right? Well, Not quite. LinkedIn has a few extra features that you can use to make sure that your post gets to the audience it was intended for.

sharing linkedin posts with followers start post screen eileen brown onmsft

It is important to make sure that you have good quality content to share and share content regularly. Getting engagement is often difficult across social media as people scroll by. However, tagging someone with their name in a post is more likely to foster engagement from the person you have tagged.

You can use hashtags to demonstrate the topic of the post. Hashtags will ensure that your content is found when searching for the hashtag, and the algorithm will also recognise the hashtag and surface it in searches.

sharing linkedin posts with followers schedule repost screen eileen brown onmsft

Rich media, i.e. posts with video and images are more likely to get engagement and clicks compared to text postings – as well as thought leadership posts looking forward in your industry. We all want to know what will happen next.

Commenting on newsworthy topics will highlight you as a thought leader in the field and bring followers to hear your thoughts about the industry.

sharing linkedin posts with followers post screen eileen brown onmsft

To post an update, click in the ‘Start a post’ dialog box at the top of your page on the LinkedIn desktop. You will see that you can adjust the audience for the post.

sharing linkedin posts with followers post screen audience eileen brown onmsft

You can share the post with anyone on or off LinkedIn, only your followers, or a particular group you are a member of. If you select the Groups option – a list of all of the groups you are a member of appears for you to choose which group to post to.

sharing linkedin posts with followers groups post screen eileen brown onmsft

If you have connected your Twitter account to Twitter you can also share your post with your Twitter followers.

You can choose to share the post with your connections only – which makes this visible to all of your first-degree connections across LinkedIn.

resharing linkedin posts with followers schedule repost screen eileen brown onmsft

You can share other content in addition to mere text. You can click the camera icon to share photos, or the video icon to share videos. If videos are your thing, keep them short and snappy with a great opening sentence, and keep the video to under two minutes if possible.

How to improve LinkedIn engagement

Videos are great for you to share tips about your industry, showcase events you attend or make your point with a demo. These videos do not need to be professionally shot. Hold your phone camera, point it at your face, hit record, and start talking. It is a good idea to use an external microphone and head[hones if possible to get a clearer sound.

You can also share documents across LinkedIn – a great way to get corporate information to your followers.

You can click on the ‘Write Article’ icon to publish posts on your company page – or a page you manage. Remember, headlines are important, so craft them well. If you wouldn’t click on the headline, then there’s a chance that no one else will too. Keep headlines punchy, concise, and meaningful, which will drive more clicks.

Try not to write articles that are too short – or too verbose either. The best articles are between 500 and 1000 words long for the best engagement.

Schedule your posts

sharing linkedin posts with followers schedule post screen eileen brown onmsft

A nifty feature recently introduced in LinkedIn is the ability to schedule posts. If you batch up your posts and want to make sure that they are sent out regularly, then use the scheduling clock icon in the post window to make sure that the post is sent at the time you choose.

sharing linkedin posts with followers schedule post list screen eileen brown onmsft

LinkedIn topics

So what could you write about? With the raft of layoffs across the tech industry, I have seen a lot of posts from previously laid-off employees offering advice on how to get through the practicalities of a layoff. The posts explain practical things you need to do to maintain connectivity with your co-workers (hint – back up your contacts list so you always have the details of your co-workers – ad make sure that your LinkedIn profile is up to date).

I even saw a post about one of my former colleagues talking about his struggle with his mental health after being let go, and what he had done to mitigate the feeling of not being valued. Posts like these could resonate with your connections who might be struggling too and may appreciate your insights if you have been through a similar event.

With the right tools like a mobile device camera and microphone, you can quickly become an engaging expert on LinkedIn. Sharing insights about your work, and events and engaging the audience will drive more viewers to your profile – and extend your reach.

Related Content:

Fix: Critical Error Start Menu Isn’t Working on a Windows PC

Start Menu is one of the most valuable components of Windows 10. It allows us to access installed apps and settings quickly. However, sometimes the feature might not work as expected, and many reported a Critical Error and that the Start menu is not working.

Besides, for some, the Start Menu kept disappearing. Regarding the problem at hand, users had an error message, Critical Error – Your Start menu isn’t working. We will try to fix it the next time you sign in, appear. So, let’s find out all about it.

What causes Critical error in Start Menu?

If your Start Menu isn’t working in Windows 11, it may be followed by an error message. This can occur if the system files are corrupt or damaged. Corrupt system files can also lead to Critical Process Died BSOD error, but luckily that’s not the case here.

Remember that these errors can affect other components; many reported a critical error in Cortana on Windows. Luckily, there are ways to fix these issues, and today we’ll show you how.

Problems with Start Menu can drastically affect your user experience. Speaking of problems, users reported the following issues with their Start Menu:

  • Start Menu and Cortana not working: Start Menu and Cortana are closely related to Windows 10. However, many users reported that both Start Menu and Cortana aren’t working on their PC.
  • Start Menu won’t open in Windows 10: In some cases, your Start Menu won’t even open. This can be a big problem, but you should be able to solve it by using one of our solutions.
  • The Start Menu won’t go away: According to users, they can open the Start Menu but cannot close it.
  • Start Menu randomly opens in Windows 10: Users reported that Start Menu randomly opens on their PC. This is an annoying problem since Start Menu will interfere with other applications on your screen.
  • Start Menu tiles missing, icons missing – Several users reported that their tiles and icons in Start Menu are missing. This can be a problem, but you should be able to fix it with one of our solutions.

What is a critical error on a computer?

A critical error is a severe issue that affects the operations of a computer. When this error occurs, it forces the computer to stop its process and makes it impossible for the affected component to continue working.

To curtail this critical error and prevent lasting damage, a computer might start freezing or restarting.

What can I do if the Start Menu is not working?

Before trying the other solutions, here are a few quick workarounds that might work:

  • Restart the computer and check if you still encounter the Critical error with the Start menu.
  • Sign out of the affected account and then log into another account. Open the Start menu, and make sure that it works. Now, log back into the previous account, and the Start menu should also work here.

If these didn’t work, head to the fixes listed next.

1. Enter Safe Mode

  1. Press Windows + I and select Update & Security.
    update and critical error start menu
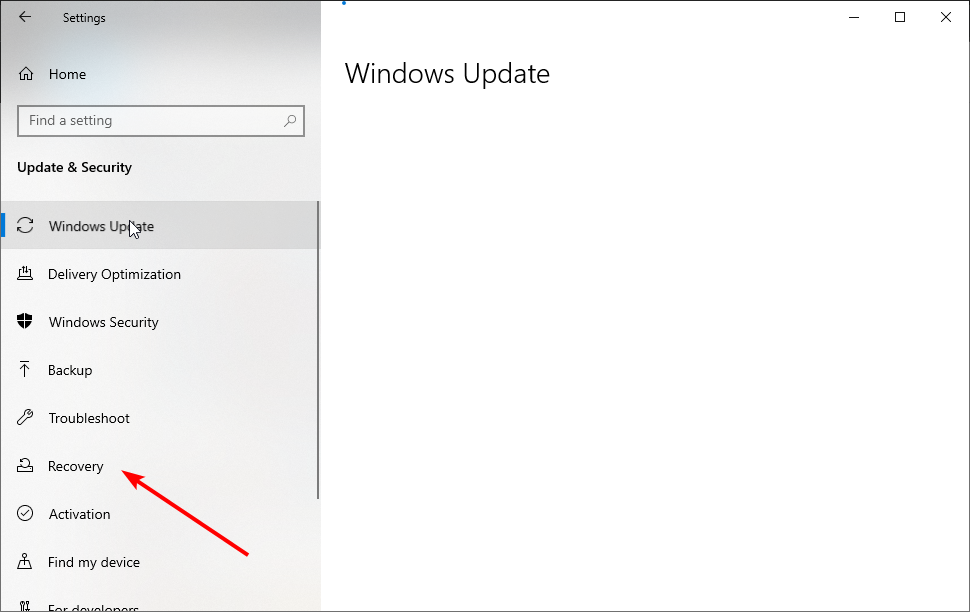
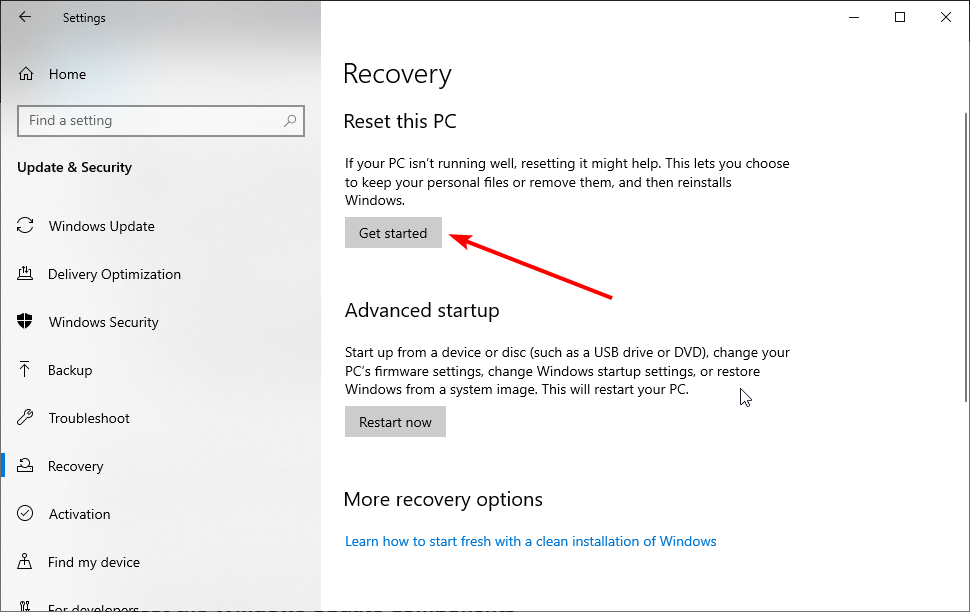
  2. Choose the Recovery option in the left pane.
    recovery
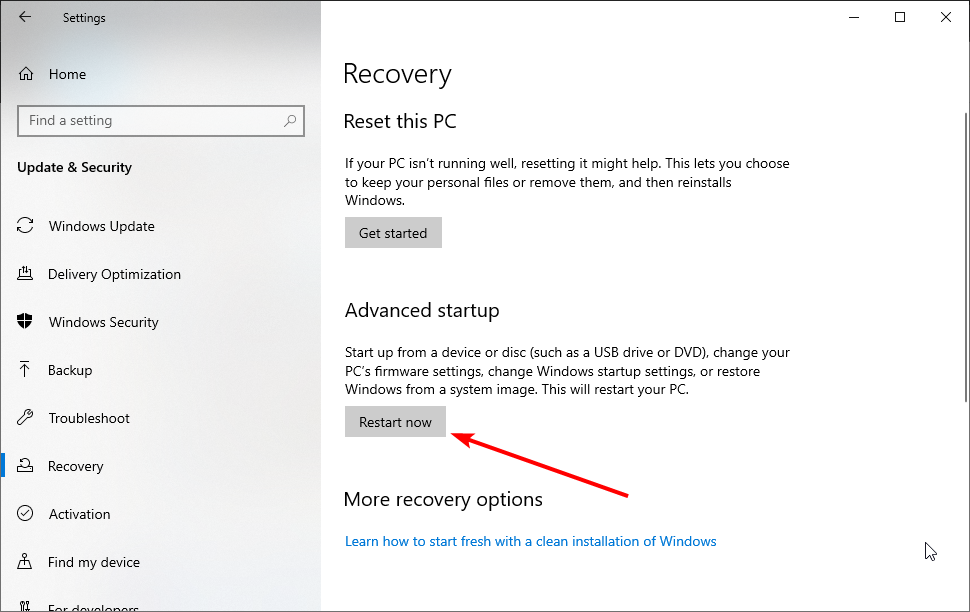
  3. Click the Restart now button under the Advanced startup section.
    restart now
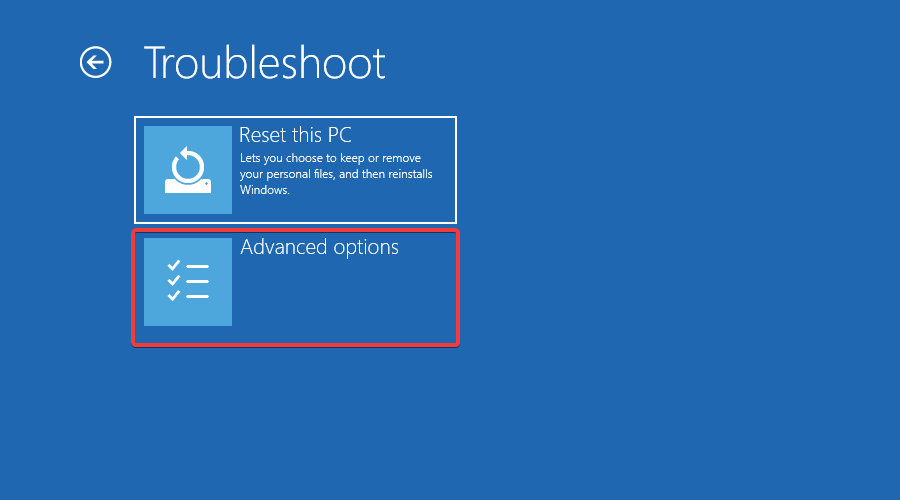
  4. When your PC restarts, click Troubleshoot.
  5. Select Advanced options.
  6. Now, click the Startup Settings option.
  7. Click the Restart button.
  8. Once your computer restarts again, press F5 to access Safe Mode with Networking.

Critical Error – Start menu not working can be troublesome, but users claim this error can be fixed by entering Safe Mode. Once done, verify if the Critical Error with Start Menu in Windows 10 is fixed.

2. Uninstall Dropbox/your antivirus software

  1. Press Windows + R to open the Run prompt, type appwiz.cpl, and click OK.
    appwiz.cpl run
  2. Locate Dropbox on the list and choose Uninstall.
  3. After you’ve removed Dropbox, restart your computer and check if the issue is resolved.

Many users reported Dropbox as the main culprit for Critical Error – Start menu not working error. To fix this issue, you have to remove Dropbox from your computer.

After doing so, check if the Critical Error Your start menu isn’t working in Windows Server 2016 error message disappears, in case you are using the particular version. The method would work on other iterations of the OS as well.

3. Temporary hide Cortana from Taskbar

  1. Right-click the Taskbar, choose Cortana, and select Hidden.
    cortana hide
  2. Again, right-click Taskbar, hover the cursor over Cortana, and uncheck Show Cortana icon.
    show cortana icon
  3. Restart your computer and check if the issue is resolved.

Some users reported that Cortana is causing the Critical Error Start Menu not working issue. Hiding the icon from your Taskbar, in this case, should fix the problem.

4. Switch to a new admin account and delete the TileDataLayer directory

  1. Press Ctrl + Shift + Esc to open Task Manager, click on File, and then choose Run new task.
    run new task in task manager
  2. Type cmd, check Create this task with administrative privileges, and click the OK button.
    run cmd
  3. Type the command below and press Enter: net user /add admin1 password1
    net user /add admin1 password1
  4. This will create a new user account named admin1 with password password1.
  5. Now, type the command below and hit Enter to provide the new account with administrative privileges: net localgroup administrators admin1 /add
    net localgroup administrators admin1 /add
  6. Close Command Prompt, and sign out of your current account.
  7. Now, go to the newly created admin1 account. Use the password1 you created to log in.
  8. Press Windows + R, enter %localappdata%, and click OK.
    localappdata run
  9. From here, locate the TileDataLayer folder, right-click on it, and select the Delete option.
    TileDataLayer delete
  10. Finally, Sign out of the new admin1 account and switch back to your regular account.

If the Critical Error – Start menu not working message is showing on one user admin account, you can fix it by switching to another account and deleting the TileDataLayer directory. You can follow the steps above if you don’t have another account.

5. End Local Security Authority Process

  1. Open Task Manager by pressing Ctrl + Shift + Esc.
  2. Scroll down on the Processes tab and locate the Local Security Authority Process, right-click on it and choose End task.
    end Local Security Authority Process in Task Manager
  3. Once done, restart the computer.

To fix Critical Error – Start menu not working, it’s advised that you end Local Security Authority Process using Task Manager. You can now restart your PC and see if the error persists.

6. Disable Internet Explorer

  1. Press Windows + R, type appwiz.cpl, and click OK.
  2. Click on Turn Windows features on or off in the left pane.
    turn off
  3. Uncheck the box for Internet Explorer 11, and click on OK to save the changes.
    disable internet explorer 11
  4. If you get a warning message, click Yes.
  5. Restart your computer and check if the issue is resolved.

7. Create two new administrator accounts and transfer the Database folder

  1. Launch Command Prompt as admin, enter the commands below, and hit Enter to create two new accounts. net user /add admin1 password1 net user /add admin2 password2 net localgroup administrators admin1 /add net localgroup administrators admin2 /add
  2. Log out of your current account, go to the admin1 account, use password1 to log in, and restart the PC.
  3. After your computer restarts, go to the admin2 account and use password2 as the password.
  4. Follow the path below: C:\Users\admin1\AppData\Local\TileDataLayer
  5. If you can’t find the AppData folder, click the View tab, and check the box for Hidden items.
    file explorer view tab
  6. Copy the Database folder in TileDataLayer.
  7. Now, go to the path below to access your main account: C:\Users\Your_username\AppData\Local\TileDataLayer
  8. Rename the Database folder to Database.old.
  9. Paste the new Database folder from admin1.
  10. Restart your computer and go back to your main account.

This process requires you to create two administrator accounts, and we have to warn you that the process might seem a bit confusing at times, so try to follow the steps closely. If the issue is fixed, remove the administrator profiles you created.

If your administrator account is disabled in Windows 10, find out how you can enable it in this helpful guide.

8. Make sure Windows is up to date

  1. Press the Windows + I keys to open the Settings app and choose Update & Security.
    update and critical error start menu
  2. Click the Check for update button.
    check for
  3. Finally, click the Install now button to update your PC.

Microsoft is aware of the Critical Error Start Menu issue, and a permanent fix might be available through Windows Update. Therefore, ensure to download all the latest updates for Windows 10.

9. Reset Windows 10

  1. Open the Settings app and select the Update & Security option.
    update and critical error start menu
  2. Choose Recovery in the left pane.
    recovery
  3. Click the Get started option under the Reset this PC section.
    get started
  4. Choose the Keep my files option.
    keep my files critical error start menu
  5. Now, follow the on-screen instructions, and choose the appropriate options when prompted to complete the reset process.

If you’re still getting Critical Error – Start menu not working message, you might want to consider resetting Windows 10. This is the last resort but has proven effective in solving the issue.

How do I fix the Critical Error Start Menu on Windows 11?

The Critical Error Start Menu not working on Windows 11 can be caused by faulty system files. Also, it might be due to glitches in some processes on your PC. This can be fixed easily by restarting your computer.

Since the causes of the issue are similar to that of Windows 10, you can apply the fixes in our guide to solve it.

How do I check Critical Errors in Windows 10?

  1. Press Windows key + R to open Run, type eventvwr.msc, and hit Enter.
    event viewer critical error start menu
  2. Click the Windows Logs folder in the left pane.
    windows logs
  3. Choose any options under the folder to view the activities in the middle pane.
    options

Critical Error – Start menu not working can be a significant problem and seriously affect your Windows 10 experience. The methods listed here would also work in the case of an HP laptop Critical Error with the Start menu.

Once you have fixed the problem, do not forget to check how to boost the PC’s performance.

If you have any other questions, feel free to drop them in the comments section below, and we’ll surely take a look.

Sony reportedly halves PlayStation VR2 sales projections, preorders made were low

According to a report by Bloomberg, Sony has halved its sales projections for the PlayStation VR2 headset. This was prompted by the low preorders made which didn’t meet the company’s expectations.

As a result, Sony is reportedly reducing its forecast for launch shipments by half transitioning it from 2 million units to 1 million units. The headset price is tagged at $549 and is expected to be launched on February 22.

The price tag and compatibility are reportedly among the top causes why the preorders made were significantly low. However, Sony is reportedly expecting to ship approximately 1.5 million units across the world to customers between March and April this year.

This month, we’ve seen Microsoft’s hardware and Windows licensing business take a hit which translates to a 39% decline though the company was able to it overall revenue income by 2% year over year courtesy of the growth in its cloud business. The same can also be reiterated when it comes to smartphone shipping as it is also at an all-time low.

It will be interesting to see how Sony takes on this issue and how it progresses well after the official launch. Will PlayStation VR2 sales get better? Share your thoughts with us in the comment section.

Windows Is Stuck on Please Wait: How to Get Past It

Windows updates are a critical process to the running of your system, but sometimes, they can cause your PC to get stuck on the please wait screen. If something like a power surge interrupts the update process, the next time you try to start your PC may be a long wait.

Still, it could be a slow boot issue, but if you’re stuck for more than 10 minutes, there might be another problem affecting your PC. If you have come across this issue, in this article we explore various ways to get past the please wait screen.

Why is Windows stuck on the Please Wait screen?

Windows can get stuck on a please wait screen for many reasons. Below are some of the most common ones:

  • Unsuccessful update – You might get stuck on the please wait screen because of an unsuccessful update or a pending install. 
  • New software issues – If you have updated any software recently, then it may be causing problems with your PC.
  • Malware infection – This can affect your operating system and make it so that it doesn’t respond as it should. Always ensure you have a comprehensive antivirus. 
  • Hardware failure – This can happen if there are problems with the motherboard or other parts of your system. It’s also possible that a hardware device has been added or removed that is causing problems.
  • Corrupt hard drive – You may also see this message if the hard drive is corrupted and cannot boot properly through the operating system. 
  • A damaged or missing DLL file – If Windows can’t find some DLL files required for programs to run properly, it displays this message if one is missing or damaged in certain circumstances.
  • App crashes – Sometimes, this can be caused by an application crashing or having trouble accessing the internet.

Other similar instances where Windows may get stuck include:

What do I do if my laptop is stuck on the please wait screen?

A few preliminary checks to try out first include:

  • Unplug all USB devices from your computer, including the keyboard and mouse.
  • Make sure that all cables are correctly connected and securely fastened into place on both ends.
  • Before restarting your PC, remove the network cable and plug it in once logged in. Also, check out what to do if your Ethernet cable is not working.

1. Run DISM and SFC scans in Safe Mode

  1. Start the PC in Safe Mode.
  2. Hit the Search icon, type cmd, and select Run as administrator.
  3. Type the following commands and press Enter after each one: dism /online /cleanup-image /restorehealth sfc /scannow
  4. Now restart your PC normally.

2. Disable Network services

  1. While your PC is still in Safe Mode, hit the Windows + R keys to open the Run command.
  2. Type services.msc and hit Enter to open.
  3. Locate the Network List Service and Network Location Awareness.
  4. For each, right-click on it and select Properties.
  5. Navigate to the Startup type, in the drop-down menu, select Disabled then click Apply and OK.
  6. Proceed to repeat the steps for the other service.
  7. Once completed, restart your PC normally and see if the issue persists.

3. Perform a clean boot

  1. While still in Safe Mode, hit the Windows + R keys to open the Run command.
  2. Type in msconfig and hit Enter.
  3. In the System Configuration window that opens, navigate to the Services tab and check Hide all Microsoft services option.
  4. Click on Disable all.
  5. Press OK, then restart your PC normally.

4. Perform a Startup Repair

  1. Hold the Shift key down and press the Power button simultaneously.
  2. Continue holding the Shift key, while the machine is powered on.
  3. When the PC restarts, you’ll see a screen with a few options. Click on Troubleshoot.troubleshoot sfc scannow not working
  4. Next, click on Advanced options.
  5. In the Advanced options menu, choose Startup Repair.
  6. Next, choose an account. You’ll need an account with Administrator privileges to continue.
  7. After entering the password, click Continue.
  8. Wait for the process to finish and restart your PC normally.

While these options have proven to work for some users, others may be down on their luck, and none of these solutions work. If that’s the case, it’s probably time to contact your PC’s manufacturer. They should be able to fix your laptop remotely if necessary.

Aside from Windows, the Microsoft Store update may also get stuck on pending. If you encounter the issue, don’t hesitate to check out our detailed guide on how to fix it.

Hopefully, this guide has helped get you out of the please wait screen. For any additional thoughts on this topic, feel free to comment below.

Xbox, Nintendo and Sony to skip E3 2023

E3’s “triumphant” return is apparently going to happen without all three major console makers as Xbox, Nintendo and Sony will each be skipping the event this year. What this means is that each of the “big three” will have no official presence at E3 2023, which will be the first live and in-person E3 in four years.

The news comes as a blow to the expo, which is hoping to reclaim its prominence—E3 has historically been the gaming industry’s biggest showcase event. E3 will return to the Los Angeles Convention Center this June.

Xbox recently announced that its annual summer showcase event would would also return to Los Angeles, and it is believed the Xbox Summer Showcase will happen alongside (but not part of) E3. According to Xbox head Phil Spencer,

Well, we pick our time for our showcase specifically so that we’re there. E3 is just, to me, one of the seminal moments of gaming. I love the history of going down to LA, thousands of people there, getting to see great new things…getting to see people in the industry, the fan events that we’ve had. I definitely want that to continue.

The Xbox Summer Showcase announcement came on the heels of last week’s Xbox & Bethesda Developer_Direct event. The first such showcase for Xbox, the Developer_Direct was by all accounts a smashing success, with almost universal praise of its no-fluff format.


How to Check if Firewall is Blocking a Port or a Program

The Windows Firewall is a built-in security application that comes with Windows OS. But many of us would want to know how to check if the firewall is blocking a port or program in Windows.

Users can configure the Windows Firewall settings as per their need to block or open ports in Windows 10 and other versions. However, at times, the Firewall may block ports or programs accidentally or due to misconfigured settings.

Why is Windows Firewall not allowing ports to access the Internet?

If this issue occurs, the port may be blocked, but luckily, there’s a way to open firewall ports in Windows, and it’s easier than you think.

Sometimes, your configuration might not be correct, causing the Windows Firewall rule to block a connection.

A few users reported that Windows Firewall is disabled, but it’s still blocking apps, and your policy settings likely cause this, so you’ll need to adjust them.

How do I check if the Firewall is blocking a port?

1. Check your Firewall Settings

    The best way to check whether your Windows Firewall is blocking a port is to check your Firewall Settings. This can be done via your PC’s built-in settings in just a few clicks.

  1. 1. Press the Windows key + R to open the Run dialog box.

  2. 2. Type control and press OK to open Control Panel.

  3. 3. Click on System and Security.

  4. 4. Scroll down and open Administrative Tools.

    Windows Defender Firewall with Advanced Security
  5. 5. In the Administrative Tools window, open Windows Defender Firewall with Advanced Security.

  6. 6. Click on Actions and select Properties.

    Action - Properties
  7. 7. Now select your preferred Profile (Domain, Private, Public).

  8. 8. In the Logging section, click on the Customize button.

    Windows Defender Firewall with Advanced Security - Properties
  9. 9. Click on the drop-down menu for Log dropped packets: and select Yes.

  10. 10. Take note of the pfirewall.log path in the Name section.

  11. 11. Click OK to save the changes.

    Customize Loggin Settings for the Domain Profile
  12. 12. Open File Explorer and navigate the following path to access the log files:C:\WINDOWS\System32\LogFiles\Firewall

  13. 13. Click on the pfirewall.log file and check for any blocked ports. In case you can’t access the folder, you might have to change the ownership in order to access files.

2. Check for Blocked Ports using Command Prompt

  1. Type Command Prompt in the Search bar, and then click on Run as administrator.command prompt
  2. Now, paste the following command and then hit Enter:netsh firewall show state
    Windows Firewall Blocked Port
  3. This will display all the blocked and active ports configured in the firewall.

How to check if Windows Firewall is blocking a program?

  1. Press Windows + R to open Run, type control panel, and then click OK.control panel
  2. Click on System and Security.
  3. Click on Windows Defender Firewall. 
  4. From the left pane Allow an app or feature through Windows Defender Firewall.
    Check Blocked Programs in Windows Firewall
  5. In the allowed app window, scroll through all the apps.
  6. Locate the app you want to check and see if the app is checked. If it is unchecked, the app is blocked on the Firewall.
  7. If your program is blocked, uncheck the app and click OK.

In the Customize Settings window, click the circle(s) next to Turn off Windows Defender Firewall for public networks, private networks, or both.

That’s about it for this article on checking if the Firewall is blocking a port or a program. Make sure you follow the solutions thoroughly and see what works for you.

And if you are facing slow Internet speed, try blocking Internet access for specific apps, especially the ones that keep downloading files in the background.

For simple per app control and live connection monitoring, consider Portmaster Firewall to block unwanted traffic and keep essential apps online.

In case you’re having issues, you might want to remove duplicate Windows Firewall rules, and we have a guide to help you with that. You can adjust Windows Firewall settings in different ways, and this guide on how to open Windows Firewall helps you reach the correct menu fast.

We also have a guide on how to allow Chrome to access the network in your firewall, so don’t miss it. Learn more about SMB ports 139 and 445 to understand how network communication works and how specific ports affect file sharing on Windows.

Feel free to send us feedback in the comment section below.

Outlook Keeps Highlighting Words: 2 Best Ways to Fix That

You might’ve noticed that Outlook is highlighting certain words in your email messages. This isn’t a big problem, but it can be slightly annoying.

We covered Outlook issues in the past, such as our recent how to keep Outlook status green guide, so be sure to check it out.

Why is Outlook highlighting words?

  • Joyful animations– Certain words are highlighted by default to give you a special effect when viewing emails.
  • Suggestions – Suggestions are designed to help you type faster and they are usually highlighted so they can be easily distinguished.

Now that you know why highlighted words appear in Outlook, let’s see how to get rid of them once and for all.

What can I do if Outlook keeps highlighting words?

1. Disable joyful animations

  1. Open the Web version of Outlook.
  2. Log in with your email and password.
  3. Now click the gear icon in the top right corner.
  4. Select View all Outlook settings at the bottom.
    view all outlook settings outlook highlighting words
  5. Now go to Mail and choose Compose and reply. In the Joyful animations section, be sure to disable Show joyful animations in the reading pane.
    show joyful animations view all outlook settings
  6. Now click the Save button to save changes.
    save changes view all outlook settings

2. Disable suggestions

  1. Open the web version of Outlook.
  2. Click the gear in the top right and choose View all Outlook settings.
  3. Select Mail and then Compose and Reply.
  4. Locate Quick suggestions section and choose Offer suggestions based on keywords in my messages.
  5. Lastly, click Save to save the changes.

There you go, a quick and easy ways to disable highlighted words in Outlook. Although highlighted words can be useful and draw attention, some users don’t want to have this feature enabled.

Outlook also has its share of issues, and many reported that Outlook autofill email address is not working, but we tacked this issue in a separate guide.

Disabling highlighted words is fast and simple, and we hope that you found this guide useful. If so, feel free to let us know in the comments section below.

I2C HID Device Driver Download & Install on Windows 11

I2C HID device in a laptop is a standard interface that allows the computer to communicate with a wide range of peripherals, such as keyboards and mice. The I2C HID driver acts as a universal driver for these devices.

Once you uninstall the driver, any connected devices will stop working. However, the next time you restart your PC, the drivers will automatically be reinstalled.

Before you install the I2C HID driver, verify that you have connected the corresponding peripherals to your PC, install the latest Windows updates and ensure you have a stable internet connection.

How do I install I2C HID?

1. Use the manufacturer’s site 

You can find the driver at the manufacturer’s site. The manufacturer’s website is the best place to start, as many will have detailed installation guides and instructions. 

You can also find additional information on how to get started and troubleshoot problems on their support pages. If the driver is unavailable, there are also third-party websites that have legitimate drivers available for download, such as Driversol.

When downloading from untrusted sites, ensure you are well-equipped with a reliable antivirus. This will ensure you don’t end up with malware in your system.

2. Use Device Manager 

  1. Hit the Windows key, type Device Manager in the search box, and click Open.
  2. Navigate to the Human Interfaces Devices option and click to expand.
  3. Find the I2C HID driver, right-click on it, and select Update driver.update-i2c-driver i2c hid device driver not working
  4. Next, click on Search for automatically updated drivers.search-automatically-i2c i2c hid device driver not working
  5. Windows will then conduct a search and either find you a new driver or tell you that the best driver is already installed.

3. Use a third-party tool

While the two above methods will still get you an updated I2C HID driver, some users may find these routes too long and high-risk. This is because many steps are involved, and you risk downloading drivers that could contain malicious code.

To avoid putting your system at risk, we recommend using a third-party driver updater. These tools have a huge database and will automatically detect missing drivers from your PC, download and install them for you in seconds. 

The best part is that you don’t have to worry about figuring out which driver is best for your system.

You may also experience a touchpad error where the I2C device is not working, so feel free to visit our comprehensive article for guidance.

Let us know which method you used to install the I2C HID device driver in the comment section below.

How to Install Windows 11 Without TPM [Bypass TPM 2.0]

Windows 11 was recently released, and according to the official hardware requirements, to use it, you’ll need to have a TPM chip.

As a result, this requirement has already caused many problems with early adopters, and many have reported TMP 2.0 errors when trying to install Windows 11.

Many users don’t have this feature available, especially on older computers, and don’t want to upgrade to try this OS.

However, there are ways to install Windows 11 without a TPM chip, and in this article, we’re going to show you how to do so on unsupported hardware.

What does TPM do?

Firstly, TPM stands for Trusted Platform Module, and it’s a small chip on your PC. This leads us to the next question, is TPM on the motherboard or CPU?

trusted platform module description
TPM chart (Source: Microsoft)

Secondly, there are several versions available, and some are on your motherboard. In contrast, others are integrated into your processor, as a physical chip, or in form of code that runs in a dedicated environment.

Moreover, for practical purposes, TPM is used for file encryption, such as BitLocker, for example, bootloader protection, and it can be used to protect your passwords against hackers.

Where can I buy a TPM chip? 

If you’re looking to buy a TMP 2.0 chip, you should be able to get it from most major PC hardware retailers.

We expect the demand for TPM chips to go up soon, so you might have to hurry and get your TPM chip before others.

Furthermore, remember that many processors have a TPM built-in, so be sure to check if your CPU supports this feature before buying a dedicated chip.

Before moving on to the list of ways to install Windows 11 without TPM, take a look at our guide on how to install Windows 11 without TPM 2.0 and Secure Boot step by step.

Alternatively, check out our guide on how to install Windows 11 on an unsupported CPU.

How can I install Windows 11 without TPM 2.0?

1. Create a new DWORD in the Registry

  1. 1. Press the Windows key + R to open the Run dialog.

  2. 2. Type regedit and press Enter o open the Registry Editor.

    regedit run
  3. 3. In the Registry Editor, navigate to the following path: Computer\HKEY_LOCAL_MACHINE\SYSTEM\Setup\MoSetup

    mosetup install windows 11 without tpm
  4. 4. Right-click anywhere in the window and expand the New menu. Select DWORD 32-bit Value or QWORD (64-bit) Value depending on which system you have.

    value registry settings
  5. 5. Enter AllowUpgradesWithUnsupportedTPMOrCPU as the name of the new value.

  6. 6. Double-click the value that you just created.

    allow upgrades with unsupported tpm
  7. 7. Set the Value data to 1 and click OK to save changes.

    value data tpm 1
  8. The first method we recommend to use to install Windows 11 without a TPM chip is to create a DWORD in the Registry Editor. This DWORD will allow you to allow upgrades with an unsupported TPM, thus fixing your issue.

Note icon NOTE
This method is approved by Microsoft, which makes it the best solution if you want to disable the TPM requirement.

2. Modify your registry from the installation media

  1. Start the Windows 11 installation and follow the installation steps until you reach This PC can’t run Windows 11 screen.
    this PC cant run windows error
  2. Press Shift + F10 on your keyboard. That should open Command Prompt.
  3. When the Command Prompt starts, type regedit.exe, and press Enter.
    enter regedit in command prompt
  4. Navigate to the following location: Computer\HKEY_LOCAL_MACHINE\SYSTEM\Setup
    regedit key setup windows 11
  5. Right-click on Setup, expand the New section, and select Key from the list. Name the new key LabConfig.
    create new key regedit
  6. Navigate to the LabConfig key that you just created. Right-click anywhere in the window, expand the New section, and click on DWORD (32-bit) Value or QWORD (64-bit) Value.
    config registry windows 11 lapconfig
  7. Create three values:
    • BypassTPMCheck
    • BypassRAMCheck
    • BypassSecureBootCheck
      bypass tpm 2 in windows 11
  8. Double-click the first value you created and set its Value data to 1. Now repeat the same steps for the other entries.
    value data tpm 2
  9. Once you’ve made these changes, exit the Registry Editor, and the installation should continue without problems.

3. Use Rufus

  1. Download the Windows 11 ISO from Microsoft’s website.
    download windows 11 64 bit version
  2. Download Rufus and run it.
  3. Select your USB flash drive and click the Select button.
    rufus selection
  4. Choose the Windows 11 ISO file that you just created.
  5. Now click on Start and wait for the process to finish.
    start rufus
  6. Make sure you check Remove requirement for 4GB+ RAM, Secure Boot and TPM 2.0. Click OK and wait for the process to finish.

By completing the above procedure, you’ll have a Windows 11 ISO ready that won’t check for TPM during the installation.

What do I do if the PC Health Check app is bugged?

If the PC Health Check App is crashing, there might be an issue with the installation. You should be able to fix that by starting the installation again.

pc health check menu

Alternatively, you can wait for Microsoft to release the updated version of the software. If this app isn’t working, you won’t be able to install Windows 11 on an unsupported PC.

What motherboards are Windows 11 ready?

Most newer motherboards support TPM, so if you’re looking for one having this feature, you should consider these gaming motherboards.

Moreover, it’s not mandatory to use a gaming motherboard, but since these are high-end models, they have all the latest features.

However, if you don’t want to buy a gaming motherboard, most newer motherboards have support for TPM, so feel free to pick any model that works for you.

Why should I use TPM?

Windows TPM provides a layer of hardware security to your device, and it can help you protect your login credentials from hackers.

This feature is also used for file encryption, so if you want to ensure that your files are safe from unauthorized access, you need to use it.

As you can see, it’s possible to install Windows 11 without TPM, but it might require that you modify the registry or modify the ISO file.

Furthermore, if you still plan to disable this feature, we recommend using the method approved by Microsoft since it will cause the least problems to your PC.

However, if you wish to buy a TPM 2.0 chip, look at our post on where to buy them and price comparisons.

Alternatively, check out the five best Windows 11 business laptops that won’t need to skip the TPM verification.

To learn more, we have an in-depth guide on TPM in Windows 11, so don’t miss it.

Have you found a different way to install Windows 11 on an unsupported device, or did you decide to buy a TMP 2.0 chip? Let us know in the comments below.
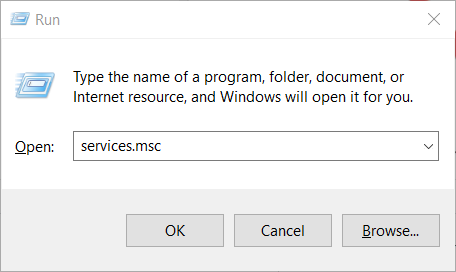
5 Best Planner Design Software for Digital Printables & Pages

Planner pages are documents for personal planning. They’re documents on which you can note down tasks or appointments for reminders and scheduling.

Planner pages can take the form of daily (single-day) or weekly planners. To set up planner pages, you’ll need software with good shape, document layout, and font tools.

Desktop publishing and design applications are very suitable for planner pages. However, you can also set up planners with spreadsheets and presentation software.

How do I make my own planner pages?

Nowadays, there are a lot of tools to create planner pages. However, there are a few preliminary steps on how to make a planner from scratch:

  • Make a plan about the contents – First, you should write down what information the planner should contain. Do you need goals, deadlines, habits, or reminders? Is it a to-do list?
  • Create a sketch of your planner – You can try to doodle a planner on an old piece of paper and structure the planner according to your contents.
  • Find other examples – You may draw inspiration from websites like Pinterest or Etsy to see what others have done or look at the templates you will find within the software presented below.
  • Use a planner design software – You will find that many of the tools below will help you design the perfect planner from start to finish, while others will provide the tools to help your knowledge.

What program should I use to design a planner? Well, below, you will find the best tools to design your own planner pages.

What is the best program to design a planner?

Adobe Photoshop Elements – Great for professionals

Adobe Photoshop Elements is a design and image-editing application. Photoshop’s fantastic image-editing tools aren’t so essential for planner pages.

However, this software also packs strong design and page layout tools that are very handy for planner page documents.

You can add both square and rounded corner rectangles to canvases with Photoshop’s shape tools. Alternatively, you can utilize Photoshop’s Custom Shape Tool or Elipse Tool if you need to add some circular shapes to your page planners.

Many users prefer using Photoshop for planner pages because of its alignment tools.

Photoshop’s Layers panel and alignment and distribution settings make it easy to align shapes. Photoshop includes six alignment options, and users can space layer contents out equally with its distribution settings.

Furthermore, Photoshop also packs in numerous types of tools for planning pages. It includes myriad font types for users to choose from.

Photoshop users can also further format typesets with bold, italic, underline, anti-aliasing, text orientation, warp, and underline options.

Other useful Adobe Photoshop Elements features

  • Stack multiple colors and patterns with the clipping masks feature
  • Includes graphics and frames to add to planner pages
  • Add photo text
  • Add inspirational quotes to your planners with Photoshop’s Quote Graphics
Adobe Photoshop Elements

Adobe Photoshop Elements

Create astonishing planner pages with this powerful and versatile software that offers a wide range of customization options.
Free trialVisit website

Adobe InDesign – Great for designing an original planner

Adobe InDesign is the foremost desktop publishing application for Windows.

It’s ideal for setting up a wide range of publication types, such as newspapers, brochures, posters, presentations, ebooks, etc.

Therefore, this application has advanced page layout tools few others can match.

InDesign’s frames and tables are invaluable for designing planner pages. You can add both graphics and text frames to documents with InDesign’s text and drawing utilities to establish layouts for planner pages.

Alternatively, you can set up page planners with formatted tables in InDesign.

Adobe InDesign’s Align panel incorporates tools for neatly aligning and distributing shapes in planner pages.

With those options, you can align objects vertically and horizontally. The Align panel also includes a Use spacing setting that you can set space between objects with.

Other useful Adobe InDesign features:

  • InDesign users can import clip art decorations for their planner pages from Adobe Stock
  • Its subject-aware text wrapping automatically detects objects
  • Users can add OpenType SVG emoji fonts to their InDesign documents
  • Enables users to add animations, forms, buttons, and other interactive elements to documents
Adobe InDesign

Adobe InDesign

Using this tool you’ll be able to create planner pages with ease that look professional.
Free trialVisit website

Canva – Best free planner editor

Canva is the best freely available web app for creating planner pages, and many other elements with different formats.

This is a very intuitive and straightforward to utilize web app with which you can set up brochures, posters, planner pages, presentations, logos, reports, cards, and invitation designs, among others.

The great thing about Canva is its immensely diverse selection of shapes and text styles. Its users can add a huge variety of different rectangle and square styles to their planner pages.

Canva also includes a multitude of visually appealing font combinations for users to add to their page designs.

Another good thing about Canva is that it includes a wide selection of planners on its Template page. Its users can select day, week, or month planners from the Template section of Canva. So, Canva users don’t need to set up planners manually.

Other useful Canva features

  • Canva’s Effects button enables users to apply shadow, lift, splice, curve, neon, and echo effects to text
  • Includes millions of themed images for users to add to pages
  • Its Background tool provides a huge selection of background presets for pages
  • Users can also add Canva animations to pages
Canva

Canva

It has never been easier to create professional-looking planner pages than using this great online tool.

Microsoft Excel – Great for automatic calculations

Microsoft Excel is the foremost spreadsheet application in the software industry.

Although it’s not desktop publishing software, this is one of the best applications for setting up visually appealing tables. Excel is ideal for users who prefer to set up planner pages in table format.

Excel users don’t need to add any shapes to pages as the application’s sheets consist of cell squares that can form the basis of planner tables.

However, Excel does include a good variety of rectangles and basic shapes users can still incorporate within their page planners.

MS Excel incorporates plenty of formatting options for cells. Its users can configure a wide range of numbers, alignment, font, border, and fill options for cells to set up visually appealing planner tables.

This application also has a cell-style feature that provides cell themes for users to choose from.

Other useful Excel features

  • It incorporates an expansive graphing utility with which you can add a wide range of charts
  • Users can download a wide variety of Excel planner templates from the Office website
  • Excel enables users to apply conditional formatting to cells
  • Includes a comment feature with which users can add notes to sheet cells in Excel
Microsoft Excel

Microsoft Excel

Try out Microsoft Excel and create efficient planner pages within a short amount of time.
Free trialVisit website

Microsoft PowerPoint – Vast collection of stock images and stickers

PowerPoint, which is a part of the MS Office suite, is one of the best presentation applications for slideshows.

This amazingly versatile application incorporates all the tools you’ll need to set up planner pages. It’s especially good for users who want to set up digital planners with hyperlinks.

You can set up a visually appealing planner page on a single blank slide in PowerPoint. This software includes a similar selection of rectangles, and other shapes, to Excel.

You can add tables to planners with PP’s table tool. PowerPoint’s selection of alternative text box styles is also a handy feature.

However, PowerPoint users aren’t restricted to just making single page planners.

You can utilize that application to set up interactive PDF digital planners, with multiple pages, that mimic paper planner books for scheduling. Then you can import a digital planner PDFs into a note-taking app.

Other useful PowerPoint features

  • It incorporates a big collection of stock images and stickers
  • PowerPoint users can add comment notes to pages
  • Includes basic draw tools
  • SmartArt enables PowerPoint users to convert text data into diagram form
Microsoft PowerPoint

Microsoft PowerPoint

Create great planner pages with this visual software and ensure productivity.
Free trialVisit website

Those are five of the best applications to create planner pages with. These software options include great shape, text, table, and formatting tools to set up a wide variety of personal or business planner pages.

So, what program should I use to design a planner, you ask? It depends on your individual needs and expectations, of course.

If you know about other useful tools, feel free to let us know about them in the comments section below.

Is Vivaldi Not Syncing: 5 Confirmed Ways to Fix the Issue

Vivaldi is a browser with a lot of unique features and performance. It works on Chromium, a web browser project employed by several other browsers. Often, users complain about Vivaldi not syncing data on their devices.

Like every other browser, Vivaldi is a work in progress with its downside and a fair share of issues, including Vivaldi not loading web pages. But problems with it are usually rare and easy to fix. So, let’s find out all about the problem at hand.

Why is Vivaldi not syncing?

Here are a few reasons you might be encountering the problem:

  • Outdated browser version: The problem was previously reported on a few versions of the browser, so make sure you are not running an outdated version.
  • Problems with the server: In some cases, you might face issues when the servers are down, though that’s a rare occurrence.
  • Password is not as per the guidelines: Some users reported that Vivaldi was not syncing since their passwords did not conform to the updated guidelines.
  • Misconfigured sync settings: If the Vivaldi settings are misconfigured, it will lower the browser’s performance and trigger issues when syncing tabs and other data.

Does Vivaldi sync across devices?

One of the pros of Vivaldi is the Sync feature. It allows you to synchronize your Vivaldi account information and data across your devices.

For example, Vivaldi syncs bookmarks for you to access them on another computer with your account. Also, Vivaldi syncs tabs, passwords, and notes across your devices.

What can I do if Vivaldi is not syncing?

Before we head to the slightly complex fixes, here are a few quick ones you can try:

  • Log out and then re-login to your Vivaldi account.
  • Make sure your account password is as per the guidelines set by Vivaldi. If not, update the password and then re-login to all the devices.
  • Verify whether you are using the same username on all devices. Even the incorrect capitalization of alphabets can trigger problems and lead to Vivaldi not syncing. So check that and make the necessary corrections, if required.
  • If you are running Vivaldi Snapshot, switch to the stable version of Vivaldi, and the sync issues should be resolved.

In case nothing worked, head to the solutions listed next.

1. Update Vivaldi

  1. Launch Vivaldi, click on the Menu icon, hover the cursor over Help, and then choose Check for Updates from the flyout menu.update to fix vivaldi not syncing
  2. If an update is available, download and install it.

2. Make sure the sync settings are in order

  1. In the Vivaldi browser, click on the Cloud icon near the bottom-left.cloud settings
  2. Now, head to the Sync Selected Data tab.sync selected data to fix vivaldi not syncing
  3. Make sure everything you want to sync is checked here, and then click on Start Syncing.check options

Once done, check Vivaldi is now syncing the data that it could not do earlier. In case the problem persists, head to the next solution.

3. Reset remote data

  1. Open the browser, and then click on the Cloud icon.sync settings
  2. Click on the Reset Remote Data button.reset remote data to fix vivaldi not syncing
  3. Finally, click on Delete Sync Data to confirm the change.delete sync data

Oftentimes, issues with the remote data can lead to Vivaldi not syncing, and a quick fix is to delete it. You may have to do it a couple of times over days, as reported by some users.

Remember, this only deletes information from the Vivaldi server, and that stored locally remains unaffected.

4. Delete the user data folder

  1. Open Vivaldi, click on the menu icon near the top-left, hover the cursor over Help, and select About.about
  2. Now, make a note of the address listed next to Profile Path.profile
  3. Press Windows + E to open File Explorer, and navigate the path found earlier until you get to the Vivaldi folder.
  4. Now, close the browser and then move the User Data folder to another location.user data folder to fix vivaldi not syncing
  5. Once done, relaunch the browser, and it will automatically recreate the required data.

That’s it! In most cases, you should be able to get things up and running when Vivaldi is not syncing by recreating the user data when it’s corrupt.

5. Manually sync Vivaldi

  1. Paste the following path in Vivaldi’s address bar on the computer from which you want to sync the data and hit Enter:vivaldi://aboutabout
  2. Now, copy the Profile Path listed here.path
  3. Open the File Explorer, and locate the Default folder using the earlier path.copy Default to fix vivaldi not syncing
  4. Close the browser (terminate all its processes), and copy the Default folder to a USB drive.
  5. Now, plug in the USB drive to another computer where you want the data to be synced, and paste the files in the same location. Make sure the browser is closed while this is done.
  6. Finally, launch the browser on the current computer, and it should show the synced data.

That’s it! If nothing previously worked, manually syncing data between the two devices should do the trick when automatic syncing is not working on Vivaldi. Also, find the best ways to lower Vivaldi’s CPU usage for optimal PC performance.

If you still encounter the problem, switch to a more reliable browser. Check our list of the best browsers for PC and choose the one that best suits your requirements.

Tell us which fix worked and share any queries you may have in the comments section below.

8 Best Apps for Cryptocurrency Live Prices [Windows & Mac]

It is essential for cryptocurrency traders to always be on top of their game. It isn’t exactly a secret that cryptocurrencies, even big names like Bitcoin, Ethereum, and Litecoin, can be extremely volatile. So, it is essential to have cryptocurrency price apps.

These applications will provide you live feed of the cryptocurrency you have invested in. This way, you can see if there are any sudden changes in the market and act accordingly. So, we tried to list the best applications for Windows.

Remember, these applications are specifically designed for you to check out the pricing of your crypto coins. Wallets or mining applications are not included in this list.

What are the best cryptocurrency price tracker apps for PC?

eToro – The best app out there

eToro-running-on-desktop-1

eToro is considered one of the pioneers in cryptocurrency trading, with over 20 million crypto transactions traded so far.

They offer the largest range of cryptos anywhere, from the best-known ones, such as Bitcoin or Ripple, to the least known – Cardano, NEO, or Stellar.

For beginners, eToro is the best place to start trading cryptocurrency. As you get more familiar with the platform, you can build a portfolio with all available cryptocurrencies.

You can start from scratch, with a fully functional demo account, to find your strategy before trading independently or copying other traders.

Once you’re on the platform, you get instant access to all the trade markets in the platform and all the ongoing crypto transactions. Everything is in real-time by default.

You have various filters that you can use to break the crypto charts as you wish and thus get the best overview of the market.

eToro USA LLC does not offer CFDs, only real Cryptocurrencies are available for US users.

eToro

Start your crypto trading actions with this outstanding trading platform for beginners.
Free trial Visit website

Disclaimer: This ad promotes virtual cryptocurrency investing within the EU (by eToro Europe Ltd. and eToro UK Ltd.) & USA (by eToro USA LLC).
Don’t invest unless you’re prepared to lose all the money you invest. This is a high-risk investment and you should not expect to be protected if something goes wrong. Take 2 mins to learn more.

ZuluTrade – Includes other investment options

ZuluTrade-running-on-desktop

ZuluTrade is a trading platform that provides trading for stocks, forex, binary options, commodities, and cryptocurrencies.

In terms of cryptocurrencies, ZuluTrade offers you the opportunity to AutoTrade the most sought-after currencies of the market: Bitcoin, Ethereum, Ripple, or Litecoin.

The ZuluTrade app is compatible with Windows, Android, and iOS and offers some great features such as:

  • Calendar – for all key events for the financial markets around the globe
  • Live Rate Charts with technical indicators
  • ZuluScript – create scripts that form the parameters for trading bots; it gives you trade automation, allowing you to execute far more trades than you ever could manually.
  • Margin Call-o-Meter – estimates the chance your account will run out of money.
  • ZuluGuard – a unique feature that protects Copy Traders if erratic trades are opened by traders they are following.
  • Automator – notifies you by email or automatically executes actions when events occur; a tool to minimize risk and free up time.
  • Over 100.000 strategies and systems to follow and copy automatically without having to monitor the market 24/7.
  • Portfolio Simulator.

With the mentioned application, you can view your performance, review new traders to copy, plus close trades manually. You have a real-time option to activate to manage your risk settings and see the live evolution of the market.

It’s recommended to practice with a ZuluTrade demo account first. This will give you an idea of how other experienced signal providers trade and communicate with their followers.

ZuluTrade

Use the ZuluTrade app to access the live trading evolution of the most sought-for cryptocurrencies on the market.

TradingView – Intuitive user interface

tradingview-running-on-desktop

TradingView is a freemium social network for traders and investors in Forex, Futures, and Cryptocurrency markets. This cryptocurrency price app offers Live quotes, stock web-based charts, and expert trading ideas.

It is best appreciated for the ease of use of its charts, having a modern, sleek and practical interface, with many functionalities in one charting package.

The cryptocurrency market has its own separate tables. On TradingView, you can get one of the best overviews for prices and traded volumes for more than 200 cryptocurrency assets, plus combine the data with a lot of technical indicators.

besides the web app, you can also get the mobile app from App Store or Google Play for 24/7 access to the world of finance. Multiple channels ensure secure and reliable data streaming.

TradingView comes in four plans. The free one offers most features you would get with the paid plans, only at a slower data flow and with fewer indicators available. Yet the free plan is great to start with.

Moving upwards with the paid plans – Pro, Pro+ or Premium, one gets access to an increasing number of charts, faster workflow, and certain exclusive features.

TradingView

Learn the ropes of cryptocurrency trading and discuss trade ideas and strategies with the TradeView app

Binance – One of the biggest players

Binance is a cryptocurrency trading platform with some of the most competitive rates available. Whether you’re a beginner or an experienced trader wanting to trade cryptocurrency, this is undoubtedly the simplest and most cost-effective path to take.

Binance Coin is one of the few cryptocurrencies that has reached its high since 2017. During that year, there was a bull market, and the prices of all cryptocurrencies soared along with it, reaching a peak before holding steady and declining in value.

Trading on Binance is quite simple and user-friendly. In addition to the Bitcoin, Ether, BNB, XRP, and Tether trading pairings, there is an incredible cryptocurrency selection accessible for trading. 

If you are a less experienced trader, you can use the basic rapid trade option, which allows you to easily convert coins at the market rate without needing charts or order books. Margin trading is provided for some trading pairs, allowing you to trade with up to 10 times leverage on particular coins.

Binance is fairly secure in terms of security. However, you may enhance privacy and keep your Binance account more secure by using additional security measures. When it comes to privacy concerns, an appropriate VPN is the easiest approach to maintain vigilant protection whenever you trade.

One of the most recent changes is that you may now purchase cryptocurrencies such as Bitcoin or Ethereum with a credit card. The cryptocurrency exchange has partnered with a third party to allow you to make credit card purchases directly on the platform.

Binance

Binance’s Trade allows you to exchange fiat currency for coins, and purchase up to 31 different currencies using a credit or debit card.
Check price Visit Website

Crypto Chart – Compatible with multiple devices

The great thing about the Crypto Chart application is that it is incredibly versatile, making it one of the best cryptocurrency price apps.

It is available not only for PC but also for mobile devices, HoloLens, and even Xbox One. Furthermore, you have a feed with numerous cryptocurrencies.

If you don’t like being overloaded with information, then you can choose to streamline your feed. In other words, you can choose to track only specific coins.

You can also move the coin cards around to your preference. Especially important cryptocurrencies can be moved to the live tile for easier access. There are also many different ways you can keep up with important alerts and news!

This application is great for those who are not intimidated by being overloaded with information. You have over 1 thousand different cryptocurrencies on this application that you can keep track of. Therefore, you will most likely find the coin you invested in.

The disadvantages? Well, some people complain that there aren’t enough decimal points. This can be important for massive cryptocurrencies such as Bitcoin.

⇒ Get Crypto Chart

CryptoTracker – Best for thorough analysis

CryptoTracker-running-on-desktop

This application is unique because it is capable of showing the whole story. You can find charts of the major cryptocurrencies such as Ripple, Bitcoin, Ethereum, and Litecoin, and find information about them for the last hour, day, week, month, year, or from the moment they started!

Knowing the history of these cryptocurrencies in graph form can help with your investments.

CryptoTracker supports USD, CAD, EUR, MXN, and CNY. The interface is also aesthetically pleasing. You can choose between a dark theme or a light theme.

I recommend this application for the veterans of cryptocurrency miners/investors. If you’ve been in this business for a long time, then you will appreciate the features offered by CryptoTracker.

⇒ Get CryptoTracker

Mammon – Supports a wide of cryptocurrencies

Mammon-running-on-desktop

This cryptocurrency price tracker app for Windows has a lot going for it. You have so many features to work with.

For example, you can view the prices of over 700+ cryptocurrencies You also have a search function that you can use to find the coin you are looking for quickly. Once you find it, you can highlight or favorite it and easily access it later. 

In addition, you are given a portfolio where you can keep track of all the cryptocurrencies you have invested in one place. This is a good way to keep track of how much you have earned or lost with each coin.

On top of that, there is a news section where you can keep up with all the latest crypto coin-related news.

There is also a feature that allows you to set notifications and reminders. Users find this function especially useful as they will be immediately notified if a currency has reached a certain target.

Finally, you can see the prices in over 30 different currencies! You can choose between the dollar, Euro, Pound, and many more.

Mammon is quite a powerful cryptocurrency price tracker app. Serious investors will certainly enjoy using it. However, it isn’t ideal for people who are looking for something lightweight.

⇒ Get Mammon

Crypto Price Widget – For easy accessibility

CriptoWidget running on desktop

As the name suggests, Crypto Price Widget is a widget you can download for both your Windows PC and Mac!

It supports over 20 currencies, visualizes your crypto portfolio, and claims to update prices every 5 seconds, making it one of the most reliable cryptocurrency price apps.

However, the most unique thing about this widget is that it is open source. If you have the know-how, you can modify and even enhance the widget.

Furthermore, there is a pro version of the widget coming soon, with even more features!

Bottom line? Well, Crypto Price Widget is a fantastic application for people who like to modify things. Even if you can’t make use of the open-source function, the widget is still very useful and convenient.

⇒ Get Crypto Price Widget

The race for a piece of the cryptocurrency pie is still hot as ever. Stay ahead of the game with these best cryptocurrency price apps for your device.

For those new to crypto, find the best VPNs for trading to have a seamless experience.

Have you tried one already? Tell us your opinion in the comments section below.

WiFi Adapter Not Showing in Device Manager (Windows 10/11 Fix)

Is your WiFi adapter not showing in Device Manager? This issue can block your PC from detecting wireless networks entirely. Here’s how to fix it quickly.

Why the WiFi Adapter Goes Missing

When your WiFi adapter is missing from Device Manager, it’s usually caused by:

  • Disabled BIOS or UEFI wireless settings
  • Corrupted or outdated network drivers
  • Windows update conflicts
  • Faulty hardware or a loose internal connection

Let’s fix it step-by-step.

How to fix Wi-Fi adapter not showing in Windows

Note icon NOTE
If the Wi-Fi adapter is not working, you will have to find an external Wi-Fi adapter temporarily or connect to a wired network.

1. Use the Internet Connections troubleshooter

    When you’re encountering issues with your Wi-Fi adapter on your PC, a reliable option is the Internet Connections troubleshooter to identify and eliminate the source of the problem.

  1. 1. Press the Windows key + I to open Settings, then head to Updates & Security.

    wifi-adapter-not-working-windows-10
  2. 2. Select Troubleshoot from the left pane and click on Additional troubleshooters.

    wifi-adapter-not-working-windows-10
  3. 3. Select Internet Connections and click the Run the troubleshooter button.

    wifi-adapter-not-working-windows-10
  4. di4. Follow further on-screen instructions and let the process finish.

  5. 5. Restart your computer.

A problematic Wi-Fi adapter may also cause the Suspect ARP Probe Failed error. Read the highlighted guide for more information.

2. Update the network drivers (Internet needed)

  1. Right-click the Start button and select Device Manager.
  2. Click on the Network adapters section, locate the Wi-Fi adapter, right-click on it, and select Update driver.
  3. Now select Search automatically for drivers.
  4. If the system finds a new driver, it will be installed, and you will be prompted for a restart.

Updating the driver will work only if you have an Ethernet cable connection besides your Wi-Fi. If unavailable, download the necessary drivers on another computer or device and run the setup on the affected PC.

3. Reset the network adapters

Note icon NOTE
Resetting the network adapter can be very effective, but remember that this procedure will erase saved Wi-Fi passwords and Bluetooth connections. So note down the passwords beforehand.
  1. Right-click on the Start button and choose Windows PowerShell (Admin).

  2. Type or paste the following lines into Windows Powershell and press Enter after each one:
    netsh winsock reset netsh int ip reset ipconfig /release ipconfig /renew

Once done, restart the computer and verify whether the Wi-Fi adapter is still not working

4. Perform a registry tweak with Command Prompt

  1. Type Command Prompt in the search bar and click on Run as administrator.
  2. Paste the following line and press Enter: netcfg –s n
  3. This command will show a list of network protocols, drivers, and services. First, check if DNI_DNE is on the list; if it is, you have a problem.
  4. If DNI_DNE is listed, type the following commands and press Enter:
    reg delete HKCR\CLSID{988248f3-a1ad-49bf-9170-676cbbc36ba3} /f netcfg -v -u dni_dne

This should solve the issue, but if you receive the error 0x80004002 after entering the command, this value needs to be deleted slightly differently.

Here’s what to do if you receive this error code:

  1. First, go to Search, type regedit, and open the Registry Editor.
  2. Navigate to the following path: Computer\HKEY_CLASSES_ROOT\CLSID\{988248f3-a1ad-49bf-9170-676cbbc36ba3}
  3. Delete DNI_DNE if it still exists.

5. Change the adapter settings

  1. Click on the Start button, type control panel, and then click on the relevant search result.
    control panel search
  2. Go to the top right corner and change the View by option to Large icons.large-icon no wifi adapters available
  3. Select Network and Sharing Center.
  4. Click on Change adapter settings.
  5. Right-click the wireless adapter and select Properties.
  6. Search for Internet Protocol Version 6 (TCP/IPv6), and uncheck the option to disable it.
  7. Click on OK and restart the computer to enforce the changes you made.

6. Reinstall the network adapter

  1. Right-click the Start button and choose Device Manager from the list.
  2. Click on the Network adapters section to expand it.
  3. Right-click your network adapter and select Uninstall device.
  4. Follow further on-screen instructions.
  5. Restart your computer, and Windows will automatically install the best available drivers for the device.

7. Reset your router

Note icon NOTE
After you reset the router, you must reconfigure it. Therefore, before resetting it, take notes of the present configuration.
  1. Look for the Reset button at the back of the device.
  2. Press and hold it for over 10 seconds until the SYS led starts flashing quickly, and release the button.

Resetting the router can do wonders, as cliche as it sounds. Though the steps to reset the router are different for each manufacturer, every router usually has a reset button. So, find the instructions for your manufacturer and finish the process.

8. Update the router firmware

Note icon NOTE
Router updates can be dangerous if not performed correctly, so always check your instruction manual for detailed instructions.
  1. Use an Ethernet cable to connect the router to your PC.
  2. Visit your router’s manufacturer’s website.
  3. Locate your model on the list.
  4. Download the latest firmware version for your model.
  5. Open your web browser and type the IP address or the router’s link (as an example, our router’s IP address is 192.168.0.1, but yours may be different).
  6. Now enter the username and password provided by the manufacturer (available in the manual or on the bottom of the device) or the ones you set.
  7. Navigate to the Firmware section and find the Choose file or Browse button to let you add the firmware you’ve downloaded.
  8. Wait for the process to finish, and do not interrupt it at any cost.

For more information, we suggest that you visit our guide on how to update your router firmware guide and avoid this and other like errors such as error code 10.

9. Switch to the Maximum Performance mode

  1. Press Windows key + S and enter power plan. Now click on Choose a power plan.
  2. Once the Power Options window opens, locate your current plan and click Change plan settings.
  3. Go to Change advanced power settings.
  4. Expand Wireless Adapter Settings, and set the Power Saving Mode to Maximum Performance.
  5. Click Apply and OK to save the changes.

Just keep in mind that the Maximum Performance mode will put some extra pressure on your device, so your laptop battery may drain more quicker. But, it should, in all likelihood, fix the problem with the Wi-Fi adapter.

Wrapping up

Once you have managed to fix things, find out how to boost the performance of a Windows PC for a better experience.

Many also reported that Ethernet works but not WiFi, so you might want to check our dedicated guide on that issue for more solutions.

We also have a guide explaining what to do if no WiFi networks are found, as well as a guide on There might be a problem with the driver for the WiFi adapter error, so don’t miss them.

Many also reported Network cable is not properly plugged or may be broken message, but we covered this issue in another guide.

You might also want to check out this guide on the “Wi-Fi action needed” error in Windows 10, especially if your connection seems active but won’t actually load anything.

If you have any comments, questions, or suggestions, let us know in the comments below.

FAQs

Why is my WiFi adapter not showing in Device Manager?

This usually happens due to hidden devices, BIOS-level deactivation, corrupt drivers, or physical hardware issues.

Can I disable the WiFi adapter in Windows by mistake?

Yes. It can be disabled from BIOS, Device Manager, or via command line. Re-enable it to restore network functionality.

How to check the WiFi adapter in Windows 10 or 11?

Use Device Manager, or run this in Command Prompt:
netsh wlan show interface.

Music Slow Down Software: 10 Best to Use in 2026

Being able to slow down music without necessarily impacting the pitch using software is quite a helpful thing, especially when you want to hear a certain riff within a song.

Some media players like Windows Media Player and VLC Player have this option, but other reliable software to slow down MP3 exists in the market.

If you want to transcribe a song or play it yourself, you can use these tools, though they don’t do the transcribing for you. However, their player programs are specially optimized for slowing down music for transcription and play-along practice.

Which are the best software tools to slow down music?

Adobe Premiere Pro – Simply the best

Adobe-Premiere-Pro platform

Adobe Premiere Pro is one of the best video editing software, with unmatched capabilities. You can use this versatile tool to edit film and TV videos or simply the videos you’re going to upload on your YouTube channel.

One of the best parts is editing your videos on any device. If you get struck by a brilliant idea, you can grab the device that’s nearest to you and get the job done fast.

Audio and music are key elements to consider if you want to mesmerize your audience. Thanks to Premiere Pro, you’ve got an all-in-one video and audio editor.

If you want to slow down music, you can use the Speed/Duration command. This feature allows you to manipulate the rate at which a video or audio is playing to speed it up or down.

Another useful feature is the Time Remapping tool. You can use it to create slow-motion or fast-motion effects, which will, of course, also affect the audio. Try it out for yourself.

Adobe Premiere Pro

Slow down your music or video with the industry-leading software from Adobe.
Check price Visit Website

Adobe Audition – The ultimate choice

Adobe Audition is the ultimate audio editing software for Windows and Mac computers. If you want to slow down music or audio, this tool won’t ever let you down.

Thanks to its intuitive built-in features, you can quickly manipulate audio without causing any audio distortion issues or audio quality loss.

To slow down a section of a song or audio track in Adobe Audition, go to Effects >Time & Pitch > Stretch and Pitch. You can use the Stretch slider to manipulate the audio to play up to 8x slower than normal.

Alternatively, you can use the Pitch Bender to mark the slowdown on the screen using keyframes. In other words, you can simply draw the curve and duration of the slowdown on the waveform.

In addition, this industry-leading audio software can provide great help to enhance the quality of your tracks and transform them into qualitative music.

That being said, you can add various effects to highlight certain song sections and enjoy the powerful tools that Audition has to offer.

Adobe Audition

Slow down and manipulate music without causing any distortion issues or quality loss.
Check price Visit Website

WavePad – Work like a pro

WavePad platform

WavePad is a great audio slowdown solution if you have many song files piled up. It’s a fully-featured professional audio editor for both Windows and Mac.

You’ll most likely appreciate WavePad is equipped with a rich set of editing tools, including the usual cut, copy, paste, delete, insert, as well as silence, compression, pitch shifting, auto-trim, and more.

What’s best about this software is its straightforward interface that’s surprisingly easy to navigate. You can load your audio file in just two clicks, slow down the speed or further edit it as you please.

Other notable features include creating ringtones from your favorite music files or recordings, restoring audio files by removing noise, or reducing vocals from music tracks.

You may even create bookmarks and regions to easily find and assemble segments of long audio files with minimal effort.

Therefore, this particular audio tool will help you to amplify or normalize your tracks immediately, transforming raw tracks into musical treasures.

WavePad

Need an inclusive tool to slow down your music? Try WavePad to do that and so much more! 
Free Trial Visit Website

Transcribe! – User-friendly interface

Transcribe! helps people who want to work out a piece of music from a recording so as to transcribe it or play it themselves.

It doesn’t transcribe in the actual sense but is optimized for transcription, with features not found on conventional music media players.

It can also be used for play-along practice as you can change the pitch and speed, plus store and recall loops to practice all keys, plus you can slow down or speed up. ‘

Conventional media players are for those who want to listen to full tracks, so they’re inconvenient for transcribing, and this isn’t their original purpose.

Transcribe can also display videos if you’re working from video files. It doesn’t, however, take any interest in MIDI files as they have explicit info on the notes to be played.

It can apply audio effects like speed or pitch change and EQ, plus you can save the modified audio under a new sound file if you so wish. It is available in Windows and other operating systems.

Other features include mono/karaoke effect, EQ filter, fine-tuning, and transposition for those who play transposing instruments, and speed variable from one-twentieth to double speed.

Transcribe!

With this software, you can edit soundtracks exactly as you desire. Get Transcribe! to master your own music creations.
Check price Visit website

Audacity – An open-source option

Audacity is a free and easy-to-use,multi-track audio editor and recorder that works with different operating systems, including Windows, with a multi-lingual interface.

It was developed by some volunteers and distributed under the GNU General Public License, so it is an open-source software as its code is free for all to study or use.

There are other such programs available, but for slowing down music, Audacity tops the rest.

Features include live audio and computer playback recording, converting tapes and records into digital CDs or recordings, editing various sound file formats, cut/copy/splice or mix sounds.

Furthermore, this open-source software can offer multiple useful features to scale up your audio tracks, applying effects to improve music accuracy.

All in all, if you need a friendly UI and a large number of sound editing options, this audio software will be the perfect helping hand.

⇒ Get Audacity

Amazing Slow Downer – Supports a wide range of formats

Amazing Slow Downer is another great audio slowdown software you might want to try. The app comes with an incredibly simple and friendly user interface that allows you to slow down any song with ease.

First, such a program can help every musician who needs to study a melody by slowing down the music and listening to a certain section. Hence, using this program, you can do exactly that.

So with this intuitive-to-use platform, you can possess the tools to change the speed of your track and get inspired by that piece of work in real time.

More so, you can slow down any song you prefer by not changing its quality and pitch, thus, you can listen clearly to specific compositions that inspire you to create original music.

It is also possible to play your tracks from a CD, MP3, WAV, AIFF, MP4, WMA, or other formats. Plus, you should benefit from features like speed up to twice the normal rate, and pitch adjustments in semi-tones or loop settings.

In conclusion, you don’t have to worry anymore about music quality and use this practical software to completely understand your music.

Regarding the features, here’s what Amazing Slow Downer offers:

  • Slow down songs to 20% of their original speed without affecting the pitch
  • High-quality sound
  • Supports popular audio formats, including DRM-protected AAC and WMA files
  • Works with audio CDs
  • Real-time adjustments
  • Loop parts of the song without changing the pitch
  • Volume control
  • 7-band equalizer
  • Works with Windows, Mac, iOS, and Android

⇒ Get Amazing Slow Downer

Slow MP3 – A lightweight option

Slow MP3 is one of the best software products to slow down music. It lets you play your favorite tracks at a slower tempo to view the used chords. You need Java to be able to run it.

The application gives you a chance to explore a few rhythms when playing music. At the same time, you can learn the chords used by the artist.

It is so light, with about 1MB of your space, and uses limited system resources, so it will run regardless of your computer’s configuration.

Once the main window is displayed, you can access all its features.

Playback buttons are visible, while volume sliders are available to adjust output decibels, and there’s a keyboard that highlights keys based on a sound.

The limiting features of this tool keep it from being a pro software, as loading can only be done via the file menu, and there are no drag-and-drop features.

Also, you can only load one song at a go, as there’s no playlist to gain quick access to more audio files.

However, one of its best features is the possibility to slow down playback speed which is great because turning on the transcribe option highlights notes so you can see the chords that were used.

You can also use a slider to transpose the playing audio file, but you can only enjoy its features while the song is loaded, as there’s no function for exporting the song with the minor edits made.

⇒ Get Slow MP3

Anytune – Only for Apple devices

Anytune is another popular tool for slowing down music that also helps you choose the perfect pitch and learn to play by ear, though the Windows version is yet to be released.

You can isolate or mute instruments or vocals, learn tricky solos, transcribe, practice tunes at slower tempos as its performance and audio quality are outstanding, and rm if you like.

It slows down your music without changing the pitch while retaining amazing audio fidelity, so you can pick out each note to learn or play along with your favorite music.

You can tune your instrument or voice, and adjust the pitch up or down by two octaves, then fine-tune by cents to match odd tuning or transcribe in a different key.

It also lets you play your music seamlessly from iTunes, import from Dropbox, and drag and drop songs, with playback and export audio from video files.

Anytune also lets you create marks for quick navigation or set reminders for upcoming projects, save multiple loops, create and share timed comments, and pinpoint your instrument.

Ultimately, you’ll feel as if you’re playing with the band using the Anytune Pro+ in combination with an adapter and practicing in LiveMix of your song and instrument or voice at your own pace and pitch.

⇒ Get Anytune

SlowGold – Feature loaded

Slow Gold is an intuitive tool to help musicians improve their skills. If you practice backing tracks, you can slow those tracks down or speed them up as you need, or even transpose them.

If you’re learning to play solos from recordings, you can focus on them a few notes at a time. Or if you’re trying to figure out the chords to a hit tune for your cover band, SlowGold has you covered.

The program can open any audio file in the common formats of .mp3, .aiff, .wav, .flac, and others, so you can basically use it with any music (or speech or another audio file) that you have.

You slice up the tune into manageable segments by inserting what the program calls Loop Points. Label Loop Points with useful text to make it easy to remember where you were the next time you open it.

Important for me is the ability to fine-tune the playback pitch, which makes it easy to work with older music. Also, the ability to easily adjust loops, so they are an exact number of beats long.

Every setting and Loop Point is automatically saved for each song, which is huge because I work on a lot of different songs each day.

One hidden treat – you can use the mouse wheel to zoom in and out on different sections of the music. It’s obvious and elegant, but most music programs don’t have it.

⇒ Get SlowGold

VLC – Simple playback slowdown

VLC is one of the most popular media players out there because it plays almost any file, you can easily include subtitles and it has a very easy-to-use interface.

However, VLC is also doing a great job in reducing the playback speed of video and audio, and it’s also very easy to do so.

After you load the file of your choice and hit the Play button, access the Playback tab and select the Speed option from the drop-down menu.

There, you will see 4 options to slow down or play faster and one to return to the normal speed.

VLC also has shortcuts for these options. Usually, there are the [ an ] keys on your keyboard, but you can change them from the media player’s settings.

However, you can only slow down the playback of a track or clip, and you can’t save it with a new speed from the player itself.

⇒ Get VLC

And when it comes to music, you can only trust the best audio booster software for a better experience.

Did your best software to slow down music make it to the list? If not, tell us which one you use or which one of these meets your needs in the comments section below.

Windows Update Error 0x80070424: 7 Simple Solutions to Apply

We’ve got you covered if you experience Windows update error 0x80070424 while running Windows updates. Since this is an update error, you can expect that it affects your ability to update the OS.

This is an error related to the Windows Update Standalone Installer. Windows Update Standalone Installer (Wusa.exe) is a built-in utility tool that downloads and installs Windows Update packages. So, let’s find out how you can fix things.

What causes the error code 0x80070424?

The most common causes of this error are:

  • WU services – For Windows Update to download and install securely, several services must be active. The error will thus be shown if the necessary services aren’t operating.
  • Problematic system files – This error may also appear if system files are corrupt or missing.
  • Issues with the server: In some cases, users encountered the error due to an issue with the update server.

Now let us discuss some of the best resolutions for this error.

How do I fix the error 0x80070424?

Before we head to the slightly complex solutions, try these quick ones first:

  • Restart the computer.
  • Make sure you have a stable Internet connection.
  • Try again in a while if the servers are currently down or overloaded.

If nothing works, head to the fixes listed next.

1. Use the Windows Update Troubleshooter

  1. Go to Start, and click on Settings.
  2. Head over to Update & Security.
  3. Click Troubleshoot, find Windows Update, and click Run the troubleshooter.
  4. Follow further on-screen instructions, then restart your computer.

You may also achieve success using some of the best Windows troubleshooting tools.

2. Repair your system

  1. Open the Start menu, press Shift, and hit the Restart button.
  2. When the options screen comes up, select Troubleshoot.
  3. Click Advanced options.
  4. Choose Startup Repair, and select Restart.

Damaged system files often generate Windows Update errors, including 0x80070424, and to solve this issue, the best way is to restore your device to a previous health point.

You can do this by choosing a dedicated tool that can eventually repair corrupted files and replace them with fresh new ones and improve your system.

3. Run SFC and DISM

3.1 Running SFC

  1. Go to Start, type command, right-click on Command Prompt, and select Run as administrator.
  2. A new cmd window appears. Type the line below and hit Enter:
    sfc /scannow
  3. Wait until the scan and repair process is finished.

It is well noted that corrupted system files cause the Windows (0x80070424) error. Hence, running the System File Checker tool might be applicable in resolving the issue.

3.2 Running DISM

  1. Go to Start, type command, right-click on Command Prompt, and select Run as administrator.
  2. A new cmd window appears. Type the line below and hit Enter:
    DISM.exe /Online /Cleanup-image /Restorehealth
  3. If the DISM can’t obtain files online, try using your USB or DVD installation. Insert media, type the command below, and hit Enter (be sure to replace C:/RepairSourceWindows with the path of your DVD or USB).
    DISM.exe /Online /Cleanup-Image /RestoreHealth /Source:C:RepairSourceWindows /LimitAccess

4. Enable critical Windows update services

  1. Press Windows + R to launch Run, type services.msc, and click OK.
  2. Locate Workstation, double-click on it, set Startup type to Automatic, and click on the Start button.
    0x80070424
  3. Similarly, run the Windows Update and Background Intelligent Transfer services.
  4. Restart your system and then continue with the Windows update.

If you experience the Windows Update error encountered 0x80070424 alert, make sure the critical services are running to fix things.

5. Register System Files

  1. Press Windows Key + R to open Run.
  2. Type the following command line-by-line and click OK afterward: regsvr32 Qmgr.dll /s regsvr32 Qmgrprxy.dll /s
  3. Restart your system and then run the Windows Update.

Important Windows system files (in .dll file format) are required to download and install Windows Updates in one piece.

Hence, if the system files are not registered on your Windows PC, the Windows Update error 0x80070424 might come up.

6. Reset Windows updates components

  1. Press Windows + X to open the Power User menu and choose Command Prompt (Admin) from the list. command prompt admin windows update error 0x80070424
  2. Once the Command Prompt opens, run the following commands: net stop wuauserv net stop cryptSvc net stop bits net stop msiserver Ren C:\windows\SoftwareDistribution SoftwareDistribution.old Ren C:\windows\System32catroot2 Catroot2.old net start wuauserv net start cryptSvc net start bits net start msiserver

Another applicable workaround to fix the update error 0x80070424 is manually resetting Windows Updates components.

After running these commands, check to see if the problem is resolved. If typing the commands seems convoluted, you can fix this problem by creating a reset script.

7. Download the update manually

  1. Go to the Microsoft Update Catalog website.windows update catalog error 0x80070424
  2. In the search box, type the update code and then hit the Enter key.
  3. From the list of matching updates, locate the update that uses the same architecture as your system, and click the Download button next to the update to download it.
  4. Once you download the update, run the setup file, and follow the installation prompts.
  5. After the update is complete, restart your Windows PC.

If you cannot update your PC due to update error 0x80070424, you can quickly fix the problem by downloading the update directly from Microsoft’s Update Catalog.

These steps should help you resolve the Windows update service missing 0x80070424 error. In case the problem persists, factory reset Windows as a last resort.

If you know any other solution or have queries regarding the topic, drop them in the comments section below.

Can A Power Outage Damage Your  PC? [4 Preventive Tips]

Our computers rely on power and voltage to stay on and work efficiently. However, if you live in an area with frequent power outages, you might wonder if power outages can damage your PC. 

This article will explain how power outages can damage your computer and what preventive measures you can take to avoid them. 

Can power outages damage computers?

Yes, power outages can damage your computer and cause data corruption and hardware malfunction. 

A sudden shutdown could end your processes in between, corrupting the system files and thereby corrupting the OS. When you try to restart the computer, the operating system will not be able to boot. 

Frequent power outages reduce the hard disk lifespan as it causes physical stress to the hard disk and other computer components.

The stress can further cause physical damage to the hard disk, including surface damage, head crashes, and spindle motor failures. 

What is the most likely consequence of a sudden power outage in a computer?

The motherboard and chips embedded inside a CPU are fragile, and if your computer shuts down suddenly due to a power outage, it can damage the components. 

The app and OS running before the power outage can also be damaged when interrupted. In some cases, the damage is so severe that you might have to reinstall your operating system. 

What happens if the power goes out while the PC is on?

If the power goes out while the PC is on, it can cause a sudden shutdown and lead to data loss and hardware malfunction. 

What can I do to prevent damage from a power outage on your computer?

1. Shutdown the PC 

If you already know there will be a power blackout in your area, don’t use your computer during that time. Also, ensure you shut down your computer and remove the power plug.

2. Use a surge protector 

You can use a surge protector to protect your computer against power surges during a power outage. The surge protector diverts the extra voltage to the ground, protecting your computer from damage. 

3. Use a UPS 

UPS - how does power outage affect computer

Getting a reliable Uninterruptible Power Supply (UPS) is an excellent way to protect your computer from power outages and surges. UPS provides backup power and prevents data corruption or loss and hardware damage.

4. Keep your drivers up to date 

  1. Press Windows + R to open the Run window. Device Manager RUN COMMAND - how does power outage affect computer
  2. Type devmgmt.msc and press Enter to open Device Manager. 
  3. Go to all the drivers listed one by one, right-click on them and click Update driver.Graphics Driver update
  4. Follow the onscreen instructions to complete the process. 

In case you require an easier method to update your drivers securely on your PC, you can utilize the automated tool Outbyte Driver Updater.

This practical software will scan the system for outdated or missing drivers and update them all at once or individually.

So, these are preventive steps you need to follow to ensure your computer is not damaged due to a power outage.

If you have any questions or concerns, please feel free to mention them in the comments below. 

Kodi Not Working / Not Opening on Windows 10 & 11: Why & Fix

Once an Xbox exclusive – nowadays a multi-platform fan-favorite media center. Kodi is one of the best multimedia players, with many different features, add-ons, and an amazing interface.

However, the app is not without issues, with users reporting that Kodi is not working on Windows 10. This can be pretty frustrating, but it is not an issue that is impossible to fix, as we will show in this guide.

How to address Kodi not working in Windows 10

1. Check drivers and DirectX

  1. Navigate to one of these sites depending on your GPU:
  2. Search for your GPU and download the latest drivers.
  3. Install your drivers and restart the PC.
  4. Now, in the Windows Search bar, type dxdiag and open the first result.
  5. At the bottom, you’ll see the current DirectX version running on your PC.
  6. The updates can be found here for all current and previous DirectX versions.
    download directx kodi not working windows 10

You need stable legacy drivers on your PC to use the Kodi player successfully. You’ll need to navigate to OEM’s official site to obtain the legacy driver for your GPU.

The lack of appropriate software support can affect Kodi’s usability, so check the drivers and DirectX, as shown above. After you’ve dealt with drivers and DirectX, check if Kodi is working.

2. Update Kodi

  1. Press the Windows key + E to open File Explorer and navigate to the path below: C:Users > <Your username> > AppData > Roaming
  2. Now, back up the Kodi folder.
    path
  3. Download the Kodi v17.4 Krypton installation file from this link.
    download kodi not working windows 10
  4. Right-click the installation file and Run as administrator.
  5. Finally, run Kodi and look for changes.

Updates are frequent, especially if you are enrolled in the beta version, and most of the time, the majority of critical issues are resolved after updates.

One of the stable versions of Kodi is 17.4 Krypton, so make sure to obtain it if you already haven’t. The update procedure equals the fresh installation, with a few differences.

3. Delete the Addons27.db file

  1. Press the Ctrl + Shift + Esc keys to open Task Manager.
  2. Right-click all Kodi-related processes and select End task.
    end task
  3. Now, copy-paste the path below into the Windows Search bar or Windows Explorer address bar: %APPDATA%KodiuserdataDatabase
  4. Select the Addons27.db option and press the Delete button.
    addon27
  5. Finally, restart Kodi.

Kodi is great, but the abundance of add-ons that are not well-optimized is risky. And most of the time, the resolution for the problem we’re addressing today is somehow related to Add-ons.

To fix this Kodi not working issue, you should delete a configuration file that stores all the add-on-related data.

Now, you should be able to locate and install the add-ons that support the latest Kodi version, which is, as we already stated, v17.4 Krypton.

4. Disable Hardware Acceleration

  1. Open Kodi.
  2. Choose the cog-like Settings icon.
  3. Now, open Player Settings.
  4. Under the left pane, click on the bottom cog until you set the Expert mode.
  5. Select Videos.
  6. Scroll down and disable Allow hardware acceleration DXVA2.
    hardware acceleration
  7. Restart Kodi and give it another go.

The system’s capabilities occasionally need a hardware push when it comes to the playback of high-resolution video files. And that push comes with the Hardware Acceleration feature.

However, this feature can cause Kodi not to work on Windows 10. In some cases, it can even lead to black screen issues. Hence, you need to disable this feature to fix this issue.

5. Reinstall Kodi

  1. Press the Windows key + R, type appwiz.cpl, and click OK.
    appwiz  kodi not working windows 10
  2. Right-click Kodi and select the Uninstall option.
    uninstall
  3. Copy-paste the path below to the Windows Search bar or Windows Explorer address bar and press Enter: %APPDATA%Kodi
  4. Delete the Kodi folder.
  5. Finally, restart your PC and start the installer.

Sometimes, you might have made changes causing Kodi not to work on Windows 10. In this case, you need to uninstall and reinstall the app.

6 Install other or older version

Finally, if none of the aforementioned solutions served you justice, you should consider switching to an older Kodi version. We’re well aware that the portable version or older versions lack the usability of the full 17.4 Krypton, but they at least work.

Additionally, there’s a chance that further updates will sort things out, so this is just a temporary solution.

There you have it: everything you need to fix Kodi if it is not working on Windows 10. All you need to do now is to follow the steps carefully.

In the same vein, if your VPN is not working with Kodi, check our detailed guide to fix it quickly.

What’s your experience with the latest Kodi release version? Tell us in the comments section below.

How to Install & Use PowerToys on Windows 11

If you are looking for a way to install PowerToys on Windows 11, you are at the right place. This guide will discuss how to install PowerToys and use them to customize Windows for greater productivity. Let’s get started! 

Does PowerToys work on Windows 11?

Yes, PowerToys work on Windows 11, and it was made available on GitHub in 2019 and Microsoft Store in 2021. You can also download it using the Winget command on Command Prompt.

How can I install PowerToys on Windows 11?

Before installing the utility, you should consider performing the following checks:

  • A user account with administrator privileges on your computer.
  • Internet access to download the PowerToys installer.

1. Use the Microsoft Store 

  1. Go to the Microsoft PowerToys on the Microsoft Store website.
  2. Click Get in Store app. 
  3. You will be directed to Microsoft app. Click the Install button. Install PowerToys Windows 11
  4. Click Yes on the UAC prompt to complete the installation. 

2. Use the Winget command 

  1. Press the Windows key, type CMD and click Run as administrator. DOS COmmand Prompt - install Powertoys Windows 11
  2. Copy and paste the following command to install and press Enter: winget install --id Microsoft.PowerToysInstall PowerToys Windows 11 CMD
  3. If you get Do you agree to all the source agreements terms prompt, type Y.
  4. Wait for a few minutes, and PowerToys will be installed on Windows 11. 

3. Use GitHub 

  1. Open the PowerToys page on the GitHub website. 
  2. Go to the latest section, and click on the PowerToys executable file to download the installer. 
  3. Now double-click the installer file to initiate the installation. 
  4. Click the Install button when prompted. 

How can I use PowerToys on Windows 11?

You can launch PowerToys using the Search bar or Windows button. In addition, various tabs are available in the PowerToys utility to customize Windows 11. Let’s discuss them one by one. 

1. General 

General - Install PowerToys Windows 11

This tab lets you modify settings, such as options to Download updates. Toggle on the switch for Download updates and Always run as administrator option for optimal usage. In addition, this section lets you make changes to the app theme and customize other settings. 

2. Always on Top

Always on top

With this tab, you can pin the window you are using to remain visible. You can also customize the border color and thickness of the selected window. 

3. Awake

Awake

With the Awake tab, you can keep your computer awake on demand. You can select either Keep using the selected power plan, Keep awake indefinitely, or Keep awake temporarily. You can toggle on the switch for Enable Awake to keep the screen on always. 

4. Color Picker 

Install PowerToys Windows 11 - Color picker

The Color picker allows you to pick out a color from any running app and copy the clipboard. You can also add a new format using this section.

5. FancyZones

Fancy Zones

This tab allows you to create an advanced layout for resizing several windows and changing Zone behavior.

6. File Locksmith

File Locksmith

With the help of the Windows shell extension, File Locksmith allows you to check which files and directories are in use and which processes are using them.

7. File Explorer Add-ons 

File Explorer - Install PowerToys Windows 11

With File Explorer Add-ons, you can get a preview pane enabled for all kinds of files, including MD, SVG, GCODE, and PDF. 

8. Hosts File Editor

With this tool, you can quickly edit the hosts’ file, containing a list of IP addresses and matching domain names.

9. Image Resizer

With Image Resizer, you can change the size of the pictures in a batch. All you need to do is select images, right-click and select Resize pictures. 

10. Keyboard Manager 

Keyboard Manager

With Keyboard Manager, you can create new keyboard shortcuts and modify the existing ones. 

11. Mouse Utilities 

Mouse Utilites

With Mouse Utilities, you can get visual feedback when you click something. You can also locate your mouse pointer when needed.

12. PowerRename 

Power Rename

With PowerRename, you can rename files and folders in bulk without using PowerShell. All you need to do is select files and folders, right-click and select PowerRename. 

13. PowerToys Run 

Run - Install PowerToys  Windows 11

With PowerToys Run, you can quickly search and launch apps, files, and folders. You can also switch between open apps and windows.

 14. Quick Accent

Quick Accent

You can enable Quick Accent if you don’t have a keyboard with accented characters. To write accented characters, hold the key for the character to which you want to add an accent.

15. Screen Ruler

Screen Ruler

With Screen Ruler, you can easily measure the pixels on your screen based on image edge detection.

16. Shortcut Guide 

Install Powertoys Windows 11 - Shortcut guide

As the name suggests, it gives you a list of shortcuts. All you need to do is press Windows + Shift + I to get it on the screen. 

17. Text Extractor

Text extractor

The Text Extractor allows you to copy text from anywhere on your computer screen, even from videos and images.

18. Video Conference Mute

Install Powertoys Windows 11 Video Conference Mute

With Video Conference Mute, you can ensure your microphone is always on mute and the camera is off. 

So, this is how you can install and use PowerToys on Windows 11. For more information, be sure to visit our guide on the best PowerToys utilities. If you have any questions about PowerToys, please let us know in the comments section below. 

Fix Motherboard Not Getting Power (Easy Steps)

If your motherboard won’t power on, don’t panic just yet. Whether you’re dealing with a Gigabyte, ASUS, or any other brand, or your PC refuses to boot entirely, it doesn’t always mean there’s a serious hardware issue. This guide walks you through beginner-friendly troubleshooting methods using only built-in Windows tools and basic checks, no advanced tech skills required.

Why Your Motherboard Isn’t Getting Power

Several basic issues can cause a motherboard not to boot or receive power, such as:

  • Faulty outlets or unplugged power cables
  • Sleep or hibernate settings blocking startup
  • A power surge or incomplete shutdown
  • PSU-related configuration or wattage mismatch

If you’re curious about power mismatches, you can check your PSU’s wattage to ensure it matches your system’s needs.


How to Fix a Motherboard Not Getting Power

1. Check the Power Cable and Outlet

Start with the simplest check.

  • Confirm the power cable is plugged securely into the PC and the wall.
  • Use a known working wall outlet rather than a power strip.
  • If your power supply has a switch, make sure it is turned on.

If you suspect a faulty PSU, you can test your power supply using software without opening your PC.

2. Try a Power Reset

Resetting the internal power can often bring an unresponsive PC back.

  1. Turn off the PC and unplug it.
  2. Press and hold the power button for 15 seconds.
  3. Wait one minute, plug it back in, and try powering on.

This helps in cases where the motherboard will not power on due to static buildup or a failed shutdown.

3. Look for Signs of Power

Check for basic indicators when you press the power button:

  • Spinning fans
  • Lights inside the case
  • A single beep or startup sound

If you see or hear nothing, the motherboard might not be receiving any power at all. For persistent cases, check out this guide on Windows 10 power supply problems.

4. Run the Built-In Power Troubleshooter

If your PC sometimes powers on but doesn’t boot properly, let Windows try to fix it:

  1. Press Windows + I to open Settings
  2. Go to System > Troubleshoot > Other troubleshootersother troubleshooters
  3. Click Run next to Power

This troubleshooter can repair corrupted power plans and startup behavior.

5. Adjust Power Plan Settings

Sleep or hibernate mode can block startup if misconfigured.

  1. Open Control Panel
  2. Navigate to Hardware and Sound > Power OptionsPower options
  3. Select Balanced or High performance
  4. Click Change plan settings
  5. Set Put the computer to sleep to Never
  6. Click Save changes

These changes help avoid power states that cause the motherboard not to start the power supply.

FAQ

Will these steps delete any of my data?

No. All of the actions are non-destructive and do not affect your files or apps.

Do I need to open my computer case for these steps?

No. This guide uses only external tools and Windows features.

Is there a way to test my overall system health?

Yes. Use a computer performance test online to assess your system’s behavior once it boots again.

Conclusion

A motherboard not getting power doesn’t always mean it’s dead. These safe, beginner-friendly steps help you troubleshoot without tools or risk. Whether your motherboard will not power on or boot, a few simple checks can often bring your PC back to life.

iTunes Won’t Launch on Windows 10: Why & How to Fix

The iTunes client for Windows 10 allows iPhone users to manage their media files and updates from the Windows computer. However, some users have reported that the app has stopped working after updating their iTunes client.

If you try to launch the app, iTunes only shows the loading icon but does not launch properly. In this guide, we will show you the easy ways to fix this issue.

Why is iTunes not launching?

There are several factors that can cause the iTunes app not to launch on Windows 10. Below are some of them:

  • Faulty app: The first thing to check if the iTunes app is not working is if the app is broken. To do this, you need to repair your installation and see if Windows finds any faults.
  • Lack of privilege: In some cases, the iTunes app might not open because you lack administrative privileges. The solution to this is to run the app as an administrator.

iTunes won’t open windows 10

1. Repair iTunes

1.1. Use Control Panel

  1. Exit iTunes launcher or any other service if running.
  2. Locate the iTunes icon (shortcut) on the desktop and delete it.
  3. Press the Windows key + R, type appwiz.cpl, and click OK.
    appwiz itunes wont launch on windows 10
  4. Now, right-click iTunes and select the Change option.
    change
  5. Finally, select the Repair option and proceed with the on-screen instructions.

iTunes has a built-in option to repair corrupted or missing system files in case an issue occurs. You can run the repair tool from the Control Panel.

1.2. Repair From Settings

  1. Press the Windows key + I to open the Settings app and select Apps.
    apps
  2. Choose the iTunes option and click Advanced Options.
    advanced options itunes wont launch on windows 10
  3. Finally, click the Repair button to repair the iTunes client.
    repair

After the repair is complete, reboot the computer. Launch iTunes and check for any improvements.

2. Launch iTunes as Administrator

Users have reported that launching iTunes as the administrator helped them resolve the error. Launching iTunes as an administrator can fix any permission-related issues with the client.

Simply right-click on the iTunes desktop shortcut and select Run as administrator. If UAC asks for permission, click on Yes.

3.  Check for Hardware / Software Conflict

If you have recently installed a Bluetooth card or WiFi adapter, the driver or the software may be creating conflict with the iTunes launcher.

If the issue appears after installing new software, try to uninstall the software and launch iTunes.

4. Other Fixes to Try

Here are a few minor yet effective fixes that can help you resolve the iTunes-related issues on your Windows 10 computer.

  • Exit BTTray.exe Bluetooth utility from Broadcom if installed. You can check for the bttray.exe process in the Task Manager. Select the process and select End.
  • Remove any SD card inserted or an external hard disk connected to the PC.
  • Try to open iTunes in safe mode by pressing Ctrl  + Shift. Press the key combo and launch iTunes.
  • Disable Third-party antivirus temporarily and check for any improvements.

If you have installed new hardware, remove the hardware and uninstall the concerned drivers. Reboot the system and launch iTunes. If iTunes works without the hardware, you may have to update the hardware driver from the device manager.

That is about it for the iTunes not launching issue. Now, you only need to follow the steps carefully, and things should be back to normal.

If you are facing other issues, like iTunes won’t install on Windows 10, check our detailed guide to fix it for good.

Feel free to let us know the solution that helped you fix this issue in the comments below.

Enable Active Directory Users and Computers on Windows 11 + Video

Here’s how to enable active users and computers in Windows 11.The normal installation doesn’t include ADUC, but you can install it. Here’s how:

How can I install Active Directory Users and Computers in Windows 11?

Download Additional features

  1. First you need to open the Settings app. You can do so by pressing the Windows + I keys from your keyboard, then go to Apps from the left menu, followed by Optional features.apps-optional enable active directory users and computers
  2. Now click on the View features button and search for RSAT: Active Directory Domain Services and Lightweight Directory Services Tools and click Next in order to continue with the installation process.

How can I enable Active Directory Users and Computers in Windows 10 alone?

On both operating systems, the procedure to install and enable Active Directory Users and Computers is the same as for the other. The only difference will be that instead of the Next button, you will have an Install button.


Consequently, you can open Settings on Windows 10, then go to Apps . Then, go to Optional features, as we did above, and install the same package named: RSAT: Active Directory Domain Services and Lightweight Directory Services Tools.

ADUC will be downloaded and configured on your computer once the installation process has been completed. To double-check, press the Start button.

The Administrative Tools folder will be on the menu bar, and it should contain Active Directory Users and Computers information.

How does ADUC work?

When it comes to administration and end-users, Active Directory makes life easier while also increasing security for enterprises.

It centralizes and manages administrative privileges and rights. Administrators have centralized control over computer and user configurations thanks to the Active Directory Group Policy feature.

After authenticating once, users can access any resources in the domain for which they got access without having to authenticate again (single sign-on).

Also, files get stored in a shareable repository. This facilitates collaboration and a safe backup.

folder enable active directory users and computers

The Active Directory Domain Services (AD DS) service is the primary Active Directory service. It is included with the Windows Server operating system.

Domain controllers (DCs) are the servers that are responsible for administering AD DS. Organizations typically have numerous domain controllers, each of which contains a copy of the domain directory for the whole directory.

The changes to the directory on one domain controller – such as changing a user’s password or deleting a user account – replicate to other domain controllers.

This ensures they are all up to date with the latest information.

It’s critical to note that Active Directory is only available for Microsoft systems that are hosted on-premises.

Azure Active Directory, on the other hand, is for Microsoft environments in the cloud. But it performs the same functions as its on-premises counterpart.

Although Active Directory and Azure Active Directory are independent, they can function together to a certain extent if your firm has both on-premises and cloud IT systems (a hybrid deployment).

What’s in the Active Directory database?

This database contains information on the Active Directory objects that are present in the domain. Users, computers, programs, printers, and shared folders are all examples of AD objects.

A number of objects can contain additional objects (this is why some places describe AD as hierachal). The categorization of them into organizational units and the streamlining of security by grouping users are two common ways in which companies simplify administration and security.

These organizational units and groups are also objects that are saved in the directory. Attributes are characteristics of objects. Some characteristics are immediately noticeable, while others are more subtle.

For example, a user object typically contains attributes such as the person’s name, password, department, and email address.

It can also contain attributes not visible to the general public. These include Globally Unique Identifier (GUID), Security Identifier (SID), and last login time.

When a database is structured, it indicates that there is a design that dictates what sorts of information are stored in the database and how that information is organized.

A schema is a type of design that organizes information. It is no exception in the case of Active Directory, whose schema comprises formal definitions of every object class that can be generated in a forest, as well as formal definitions of every attribute.

Wrapping up

Important to understand is that it’s important to prepare the schema carefully upfront, because of the critical function that Active Directory plays in authentication and authorization. Modifying the schema of the AD database can have a significant impact on your organization.

Was this guide helpful? Do let us know in the comments section below and whether you have any other solutions in mind. Thanks for reading!

How To Remove Airplane Mode In Laptop [Step-By-Step]

Airplane Mode is a usual thing in many devices nowadays. And computers using Windows 10/8/8.1 aren’t different.

Airplane Mode is a very useful feature, especially for business people who travel by plane a lot, but it also could cause some problems, and we’re here to try to solve it.

How do I remove Airplane Mode in laptop?

As I already said in the introduction, the Airplane Mode is a built-in feature of Windows 10/8.1 and later systems being very handy for those who travel by plane. It allows you to use all offline features of the system, without connecting to the internet, allowing you to avoid huge additional costs.

But once you get off the plane, and your Airplane Mode is still turned on, you’ll definitely want to turn it off again, but what if you can’t? Don’t worry, try some of these solutions, and you’ll probably solve your problem.

1. Turn Off Airplane Mode from Networks pane

First, just in case you should check if you turned off Airplane Mode correctly, to turn off the Airplane Mode, do the following:

  1. While on Desktop, move the mouse cursor to the bottom right corner of the screen and go to Settings
  2. On the opened Settings pane in the right, click the wireless network icon from the lower section
  3. On the opened Networks pane in the right, move the button under the Airplane mode section to the left to turn the Airplane mode feature off
  4. In order to turn the Airplane mode feature back on, follow the steps from 1 to 3 while moving the button under the Airplane mode section to the right

2. Via Action Center in Windows 10

  1. Press and hold Windows Key + A and open Action Center
  2. Click Airplane Mode to turn it On/Off
Turn Off Airplane Mode

3. Turn off Airplane Mode from Settings

If you want to permanently turn off Airplane Mode, you can do so by going to the Setting menu and switch it off.

  1. Hit the Windows Key and select Settings from the start menu.
  2. Click on Network&Internet
    Turn off Airplane Mode from Settings Menu
  3. On the left pane click Airplane Mode
    Turn Off Airplane Mode in Windows 10
  4. Turn it Off and close the Settings window.

What to do if you can’t turn off Airplane Mode?

In case you’re not able to turn it off at all, because the switch is grayed out, check if there’s no physical wireless On/Of switch on the device. If you find a physical switch device and it is set to Off, just switch it back to On and you should be able to turn off the Airplane mode on your laptop.

We have recently covered how to fix Airplane Mode errors, so you can find there some useful information. Some users also reported that Windows 10 switches to airplane mode on its own. If you encounter any issues, search on our site for a solution or leave a comment below.

An Error Occurred Applying Attributes Access Is Denied: Fix

Windows 10 has come with a myriad of teething problems here and there, but most, if not all of them, usually have a workaround or an accepted solution. One such is the error users get while applying attributes.

It usually appears with the message: An error occurred applying attributes to the file: Access is Denied. So, let’s find out all about the error and its solutions.

How can I fix the error occurred applying attributes issue?

1. Take ownership of a file or folder

  1. Right-click the folder that you want to take ownership, and select Properties.properties
  2. Navigate to the Security tab, and click Advanced.advanced
  3. Click Change. If you are prompted for an administrator password or for confirmation, type the password or provide confirmation.change
  4. Type the name of the person you want to give ownership to.
  5. Click Check Names. The account name for the person you assign ownership to is displayed. Then, click OK.check name
  6. If you want this person to be the owner of the files and subfolders that are contained in this folder, select the Replace owner on subcontainers and objects check box.
  7. Click OK.

Usually, the Windows 10 error applying attributes message comes up either because you don’t have the appropriate permissions or the file is encrypted. So, make changes to it, and you shouldn’t encounter an error while applying attributes.

2. Check if you have appropriate permissions

  1. Right-click the file or folder, and then click Properties.
  2. Click the Security
  3. Under Group or user names, click your name to see the permissions that you have.
windows 10 error applying attributes

To open a file, you should have the Read permission. To change the permissions of a file or folder, follow these steps (log on as an administrator to change permissions on files and folders):

  1. Right-click the file or folder, and then click Properties.
  2. Click the Security
  3. Under Group or user names click your name to see the permissions that you have.
  4. Click Edit, click your name, select the check boxes for the permissions that you must have, and then click OK.

Issues experienced when trying to access files and folders, such as Windows 10 error applying attributes, may be related to permissions, which determine whether or not you can access or change the files and folders.

3. Check if the file/folder is encrypted

  • Right-click the file or folder, and select Properties.properties
  • In the General tab, click Advanced.advanced
  • Check if the Encrypt contents to secure data check box is selected. If it is, then you will have to get the certificate that was used to encrypt the file or folder so as to open it.encryption to fix error while applying attributes

Encryption protects files and folders from unwanted access. You can’t open an encrypted file/folder without the encryption certificate, but you can easily verify the same.

4. Create a new user account

If your user profile is corrupted, Windows may prevent you from accessing files or folders, so you need to use a new user profile by first creating a local user account, which in turn creates a user profile.

Login to the new account you just created and see if you can access the file or folder. If the issue goes away, then it may mean your other user profile is corrupted. And in this case, we recommend that you switch the new account to administrator.

5. Run Microsoft Safety Scanner

Microsoft Safety Scanner is a tool designed to locate and remove malware from Windows PCs. It only scans when manually triggered, then you get to use it ten days after you download it.

However, it doesn’t replace your antimalware program. It helps remove malicious software from your Windows computer that causes the problem. To remove the Microsoft Safety Scanner tool, delete the msert.exe.

6. Recover files from Windows.old folder

  1. Press Windows + E to open File Explorer, then click This PC, and double-click the drive that Windows is installed on (typically, drive C).
  2. Now, double-click the Windows.old folderwindows.old folder to fix error while applying attributes
  3. Double-click the Users folderusername
  4. Double-click your user name.
  5. Open the folders that contain the files you want to retrieve. For example, to retrieve files in the Documents folder, double-click Documents and then move it to the concerned folder on the PC.
  6. Repeat these last three steps for each user account on your computer.

If you recently upgraded your computer to Windows 10 from an earlier iteration and did not format the hard disk, you might still be able to access your old files from the Windows.old folder.

And while we are fixing things, do not forget to check the best ways to boost the performance of Windows.

Let us know if any of these solutions helped fix the file permissions issue on your computer by leaving a comment below.