Code 9c48 Error in Windows Update [SOLVED]

Some users have posted on Microsoft’s support forum about Windows Update error code 9c48. That issue has an error message which states:

Windows Update encountered an unknown error.

This error can arise for users when they try to install specific updates, which can often be for Internet Explorer or Edge. Although error 9c48 is no longer relevant to the unsupported Windows 7, it can also arise in Windows 10 and 8.1.

How do I fix Windows Update error 9c48?

1. Run the Windows Update troubleshooter

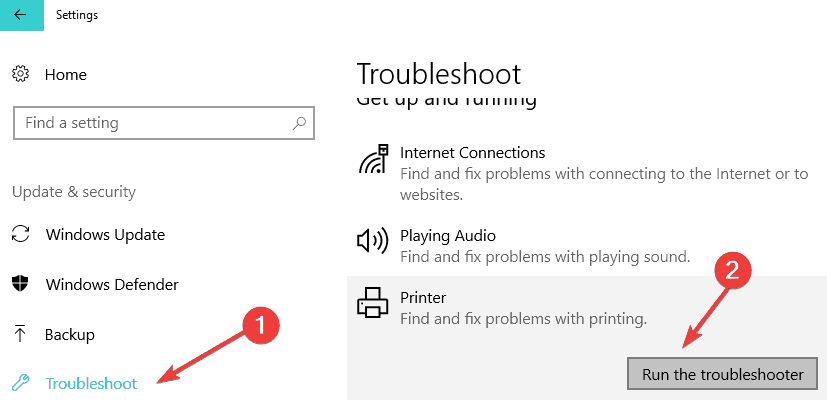
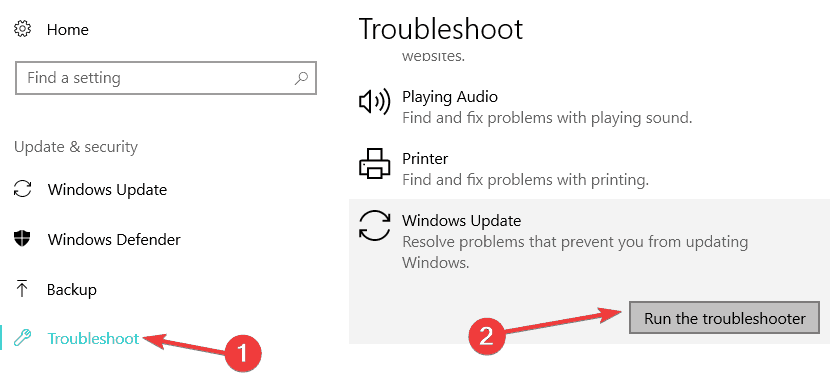
  1. Some users have said the Windows Update troubleshooter helped fix error 9c48.
  2. To open Windows Update troubleshooter, press the Windows key and S at the same time.
  3. Enter troubleshooter as the search keyword.
  4. Click Windows Update Settings to open the window as in the snapshot directly below.
    The Troubleshoot tab Windows Update Error Code 9c48
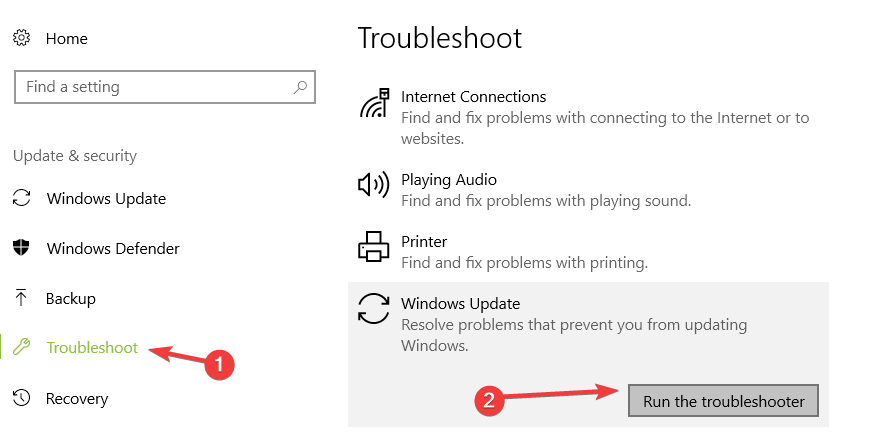
  5. Select Windows Update, and then click the Run this troubleshooter button for it.
  6. If the troubleshooter provides a potential resolution, click the Apply this fix option.
    Windows Update troubleshooter Windows Update Error Code 9c48
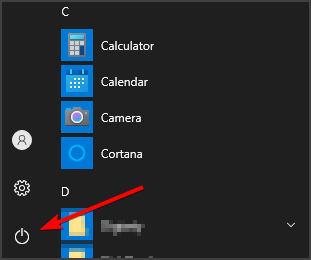
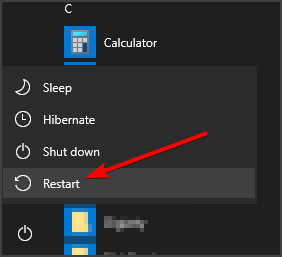
  7. Thereafter, restart your desktop or laptop.

2. Check the Windows Modules Installer

Error 9c48 can arise when the Windows Modules Installer isn’t enabled.

  1. To check if that service is enabled, open Run by pressing the Windows key + R keyboard shortcut.
  2. To open the services window, enter services.msc in the Open box and click OK.
    Services window Windows Update Error Code 9c48
  3. Double-click Windows Modules Installer to open the properties window for it.
    Windows Modules Installer Properties window Windows Update Error Code 9c48
  4. Select the Automatic option on the Startup type drop-down menu.
  5. Click the Apply button.
  6. Select the OK option.

3. Uninstall third-party antivirus software

Third-party antivirus software, such as AVAST and McAfee, can be responsible for error 9c48.

  1. To uninstall your antivirus utility, launch the Run accessory.
  2. Input appwiz.cpl in the Open box, and click the OK button.
    The uninstaller applet Windows Update Error Code 9c48
  3. Select your antivirus utility in the Programs and Features Control Panel applet.
  4. Click the Uninstall option.
  5. Select Yes to confirm, and then go through the uninstall wizard for the software.
  6. Restart Windows after uninstalling your antivirus utility.
    • Thereafter, Windows Defender can replace the uninstalled antivirus software if removing it resolves the issue.

Before uninstalling antivirus software, you can disable it to see if that fixes the update issue by right-clicking its system tray icon and selecting a disable or turn off the option.

If that does resolve the issue, uninstall the antivirus utility as outlined above.

4. Rollback Windows

Windows’ System Restore utility might fix error 9c48 if your desktop or laptop includes a restore point that predates the time error 9c48 started to stop updates on it.

  1. First, launch the Run accessory.
  2. Input rstrui in Run’s text box and click OK to open System Restore.
  3. Select the Choose a different restore option if System Restore displays that setting.
  4. Click Next to proceed to the list of restore points.
  5. Select the Show more restore points option if System Restore displays it.
    Show more restore points option Windows Update Error Code 9c48
  6. Choose a restore point that will restore the desktop or laptop to a date when error 9c48 wasn’t an issue on your laptop or desktop.
  7. If in doubt, go for the oldest restore point.
  8. Your software installed after the selected restore point gets deleted.
    • To check what software gets removed, click the Scan for affected programs option.
      Scan for affected programs window Windows Update Error Code 9c48
  9. Click the Next button, and then select Finish to confirm.

The above resolutions could fix Windows Update error code 9c48 on your desktop or laptop. As a last resort, reset Windows if the above resolutions don’t resolve error 9c48.

The Factory reset Windows 10 post provides further details for resetting the platform.

Which one of our verified methods helped you with this Windows Update error? Let us know by leaving a message in the comments section below.

0x8024002e Error in Windows Update: 5 Ways to Fix it

If you encounter Windows Update error 0x8024002e, you won’t be able to download new updates. This means that you’ll miss out on important features and security updates.

A lack of updates can cause issues and make your system vulnerable, so it’s essential to fix this error, and this guide will show you the best ways to do it.

What is error code 0x8024002?

This is a Windows Update error code, and it’s usually caused by the following:

  • Temporary glitches with Windows Update.
  • Corrupted Windows Update cache.
  • The issue can appear if the necessary services aren’t running.

How do I fix error code 0x8024002E?

1. Check the Windows registry

  1. Press the Windows key + R together. In Run window, type regedit and then hit Enter.
    regedit run window Windows Update 0x8024002E
  2. Find HKEY_LOCAL_MACHINE\Software\Policies\Microsoft\Windows\WindowsUpdate
    windows registry editor Windows Update 0x8024002E
  3. Locate DisableWindowsUpdateAccess in the right pane, double-click it, and set its value data to 0.
  4. Restart Windows Update service.
  5. Optional: Restart your PC.
  6. Check if the problem is still there.

2. Troubleshoot Windows Update

  1. Navigate to the Control Panel and search for Troubleshooting.
    troubleshooting Windows Update 0x8024002E
  2. Now, select View All.
    view all troubleshooting Windows Update 0x8024002E
  3. Then, select the Windows Update option.
    windows update troubleshooter Windows Update 0x8024002E
  4. Follow the instructions on the screen to complete the troubleshooter.

3. Perform a System Restore

  1. Press the Windows key + R and enter rstrui.
  2. Look for Show more restore points option and check it, if available. Select the desired restore point and click Next.
    system restore restore points
  3. Follow the instructions on the screen to complete the process.

4. Restart some core services

  1. Press Windows + R, type services.msc, and hit Enter.
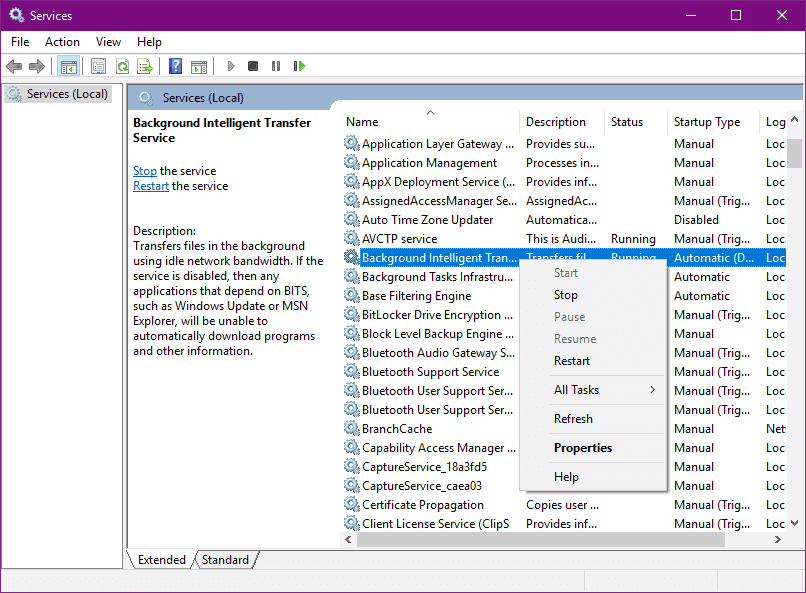
  2. Double-click on Background Intelligent Transfer Service, then set the Startup type to Automatic.
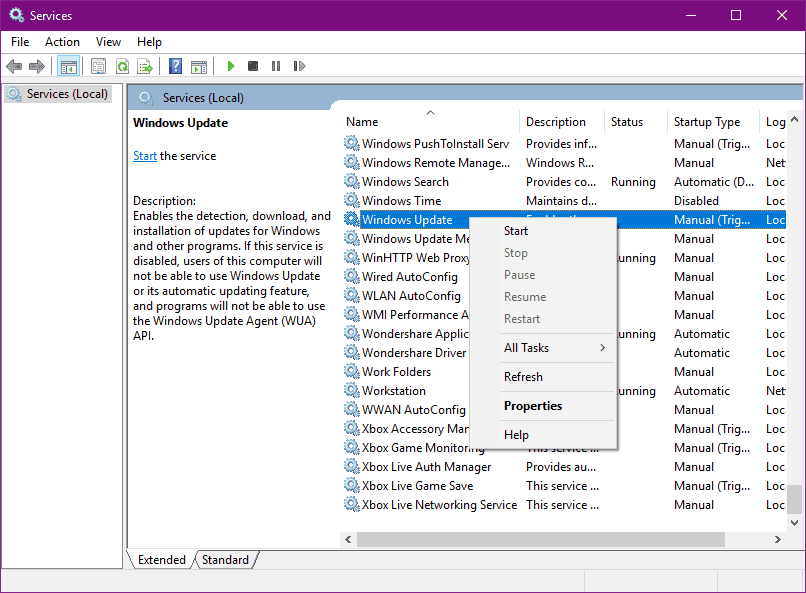
  3. Repeat step 2 for the Windows Update service.
  4. Restart the computer.

5. Delete files from the SoftwareDistribution folder

  1. Open File Explorer and navigate to the following directory: C:\Windows\SoftwareDistribution\Download
  2. Select all files.
  3. Lastly, press the Delete key to delete them.

Keep in mind that you might have to disable the Windows Update service to delete these files.

How to clear the Windows Update cache?

  1. Press Windows key + R and enter cleanmgr.
  2. Scan your C drive.
  3. When the applet starts, click on Clean up system files.
  4. Select Windows Update Cleanup and click OK.

For more information, visit our guide on how to clear the Windows Update cache.

We hope that this article has been able to help you in solving the 0x8024002E error. This isn’t the only issue; many reported There were some problems installing update messages.

Other errors, such as error code 80200056 and Windows Update error 0x80080008, were less descriptive, but we covered those in separate guides.

Please let us know in the comments section below if you found our solutions helpful.

How to Fix SharePoint not Syncing Issues in Windows 10/11

OneDrive is a cloud solution for Windows that lets you store your personal files securely, for remote access from any location, device, and at any time – plus on any browser.

It works just like Google Drive or Dropbox, but with different storage capacities and capabilities. That’s why OneDrive to SharePoint sync issues are quite debilitating.

Some of the OneDrive SharePoint sync issues include sync conflicts, item threshold, no metadata sync or inability to sync individual folders, and the ease of deleting a file or folder.

These also make for reasons why OneDrive doesn’t and SharePoint doesn’t sync, so we’ll share some solutions you can use to resolve the issues.

How do I fix OneDrive SharePoint not syncing issues:

1. General troubleshooting tips

If you want to get the most out of your OneDrive and make syncing trouble-free, some of the things you can do include:

  • Updating to the latest version of OneDrive
  • Syncing only what you need because OneDrive files on-demand let you access all files without having to download all and using up your device’s storage.
  • Check that you’re not syncing too many files simultaneously. If OneDrive is stuck for a long or shows the Processing status as 0KB of xMB then you may have many files on the drive or many files pending to be uploaded, which can drag sync time. For this, add the files to the OneDrive desktop app instead of using the Upload button on the website
  • Mark files as offline on all mobile devices, so you can read anytime even when offline (they’ll be read-only)
  • Stay within the storage limit – check and compare the OneDrive storage size you have to the available computer disk space. If they’re both limited, you have to move or delete some files or reduce the number. Alternatively, you can buy more storage, or choose which folders to sync with your computer
  • You can also stop and restart your syncing
  • Check that your file and folder names don’t have unsupported characters, and/or invalid file types
  • Ensure the file sizes, item counts, and file path lengths are within the recommended and acceptable limits.

2. Configure the new OneDrive sync client

You can fix OneDrive SharePoint sync issues by configuring and enabling the new OneDrive sync client in the SharePoint Admin center. Here’s how:

    1. Open Office 365 Admin Center
    2. Go to the SharePoint Admin center (Admin Centers>SharePoint)
    3. Click Settings and select Start the New client
    4. Click OK, and wait while the change is propagated in your environment (may take some hours)
    5. Uninstall the old sync client from the desktop as it is no longer needed – Control Panel>Programs>Uninstall
      OneDrive Sharepoint sync issues
    6. Re-sync the libraries you synchronized previously using the new client (do this for all libraries that you want to sync or resync
    7. You can select the folders you want to sync with your laptop (though this is optional)

3. Check if the issue is with a specific folder

You will know if the sync is broken when the dark blue cloud icon (OneDrive) in your system tray displays a red X on it. You can right-click on this icon to check the sync errors, which lists all files or folders that aren’t properly communicating. Here’s how to check if it’s a specific folder:

    1. Upload a new file to the OneDrive for Business library by clicking upload in the library
    2. Right-click OneDrive for Business and click Sync now.
    3. Move your mouse to the OneDrive for Business icon in the taskbar of your computer. Can you see a text similar to OneDrive for Business – Syncing files, xx remaining OR OneDrive for Business – processing changes
    4. Go to a real SharePoint document library like a team site document library.
    5. Click Sync to check whether OneDrive can sync a normal SharePoint document library.
    6. Let another person share a folder in the OneDrive for Business library with you and try syncing that library to check the outcome.

4. Get permissions at the library and site level

If you’re using a legacy OneDrive for Business sync client to sync a SharePoint online team site library, you need the proper permissions at the library and site level. Here’s how to check if you have edit or higher permissions at the library level:

  1. Go to the library in SharePoint Online > LIBRARY > Library settings > Permissions and Management > Permissions for this document library. 
  2. Click Check permissions > type your account into the box > Check Now.  If the account doesn’t have the permissions, please click Stop Inheriting Permissions.
  3. Click Grant Permissions to assign the Edit permission to the account used to sync the library.

If you are not a SharePoint admin, contact the admin or global admin to re-add your account into the Admin group of the site collection.

A SharePoint admin or global admin can go to SharePoint admin center > Site Collections > select the site collection > Owners > Manage admins > Site Collections Administrators > add your account > OK.

If there is another site collection admin, he can go to Site Settings > Users and Permissions > Site Permissions > Teamsite Owners > New > Add users to this group. 

After that, clear the OneDrive for Business cache with the Fix it Tool and stop syncing the library. Sign in again and resync the libraries.

Note: This tool can cause data loss.

To sync specific folders from a SharePoint library, do the following:

  1. On the Office 365 app launcher, choose SharePoint.
  2. Click the site that you want to sync.
  3. Select Documents or navigate to the subfolder that you want to sync.
  4. Click Sync, and then choose Sync now.
  5. Choose the folders that you want to sync, and then click Start sync.

5. Tweak the Registry

If the OneDrive SharePoint sync issues persist, please try the steps below to check the outcome:

  1. Backup all the files in your OneDrive for Business folder, if it still exists.
  2. Right-click Start and select Run
    OneDrive Sharepoint sync issues
  3. Type Regedit and press enter to open Registry Editor.
    OneDrive Sharepoint sync issues
  4. Go to HKEY_CURRENT_USERSoftwareMicrosoftOneDriveAccount
    OneDrive Sharepoint sync issues
  5. Find and delete the identities related to your business account.
  6. Open OneDrive and try to add your business account again

6. Change sync settings

To change the folders that sync for a site, or to stop syncing all files on a site, take the steps below:

  1. Right-click the blue OneDrive cloud icon in the notification area on the taskbar
  2. Click Settings. You may need to click the Show hidden icons arrow  next to the notification area to see the OneDrive
  3. Select the Account tab to see a list of all your syncing sites
  4. Click Choose folders for that library to change the folders you’re syncing, and then choose the folders that you want to sync.
  5. To stop syncing a site, click Stop sync next to the site. Copies of the files remain on your computer, which you can delete if you like.
  6. Right-click Start and select Run
    OneDrive Sharepoint sync issues
  7. Type regedit to open Registry Editor
    regedit
  8. Navigate to HKEY_CURRENT_USERSOFTWAREMicrosoftOneDrive, make sure the value of TeamSiteSyncPreview is set to 1.

7. Switch to another cloud storage solution

If you’re facing synchronization issues, it’s high time you consider using a proper, specialized tool to streamline your assets and get everything in order.

Sync is currently the best in the niche and it works like a charm allowing you to sync all your assets effortlessly. Moreover, you can store, share, and access your files from anywhere since they are securely uploaded to the cloud.

Sync’s cloud storage platform is 100% dedicated to keeping your data private and secure through powerful end-to-end encryption. Plus, similarly to OneDrive, Sync provides 5 GB storage space completely free with the possibility to upgrade at any time.

Just when you thought this tool has revealed all of its perks, Sync proves that we are merely reaching the tip of the iceberg. This powerful all-in-one software delivers supreme collaboration tools, productivity enhancements, and data recovery features to cover every single one of your needs.

Let’s quickly look at its key features:

  • Sync and back up your files in real time across all of your computers and devices
  • Encrypted cloud storage platform for supreme privacy
  • Sharing and collaboration tools and features
  • Data protection, file history, and strong data recovery features
  • Advanced share controls with password protection and granular permissions
  • Selective sync feature available

⇒ Get Sync

Did any of these solutions help? Let us know in the comments section below.

Code 66a Error Windows Update [SOLVED]

Are you wondering how to fix the Windows update error 66a? Do not worry! The Windows Report team has enlisted working solutions for you.

Windows users who experience the code 66a error reported PC crashes and slow PC processes, and the Error Code 66A .NET Framework prompt is displayed.

This error message appears during several instances, such as during Windows shutdown/startup, or while the .NET framework is running.

Meanwhile, we have compiled applicable solutions to fix the Windows update error code 66a. You can try out any of the enlisted solutions below to fix the problem.

How do I fix the error code 66a?

1. Run a SFC scan

  1. Go to Start then type cmd.
  2. Right-click on Command Prompt and select Run as Administrator.
    fix windows 10 error 0x80071a91
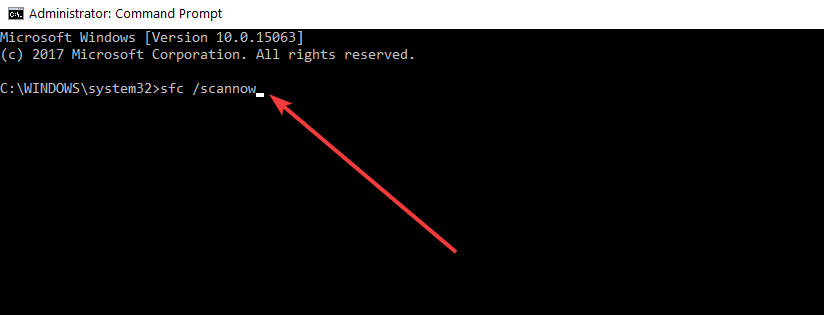
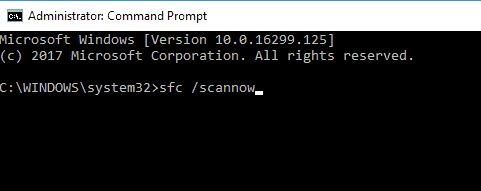
  3. Now, type the following command: sfc /scannowSFC scan
  4. Wait for the scanning process to complete and then restart your computer.
  5. All corrupted files will be replaced on reboot.

The System File Checker scans for corrupt or missing system files and repairs them. You can perform the SFC scan by following the aforementioned steps.

2. Use a registry cleaner

Software leftovers, missing DLLs, and invalid Windows registry keys can also cause Windows update error code 66a problem.

Therefore, you can also use a dedicated system restoration tool to check for file corruption or harmful software that resides on your PC. The tool will periodically scan your device and make sure everything is working.

3. Run the system restore in safe mode

  1. Shut down your PC and turn it on again.
  2. Navigate to the Run in Safe Mode option, and hit Enter.enable safe mode PC
  3. Go to Start, then type system restore, and then hit Enter.
  4. Follow the prompts to revert to a certain restore point.
  5. Wait for the process to complete, and then reboot.

Safe mode will start your PC in a diagnostic mode with only basic files and drivers running so you can perform a system restore to revert your system back to a point before you get the error message.

If you have never created a restore point before, give this helpful guide about creating Windows 10 restore points a ready, then you may proceed to the next solution to undo Windows update.

4. Revert Windows update changes

  1. Open the Settings app. You can do that quickly by using the Windows Key + I shortcut.
  2. When Settings app opens, navigate to the Update & Security section.how to fix windows update error code 66a
  3. Select the Recovery section from the left pane.
  4. Under the Go back to the previous version of Windows 10 option, click Get started.how to fix windows update error code 66a
  5. Keep your files and start the resetting procedure.
  6. After uninstalling recent updates, check if the issue still persists.

5. Scan the PC for malware

Some Windows users ignore the warning message and they click on random links in the mail which contain hidden malware.

This ends up compromising their systems due to malware infection, their data and sensitive information gets leaked to unauthorized access, or they get errors such as the Windows Update error code 66a.

The ideal step in order to prevent such things from happening is downloading and installing a third-party antivirus software that will deal with all virus-related problems.

This includes phishing, trojans, adware, spyware, and all the known and unknown threats that we usually have to deal with while browsing the internet.

Be safe, and choose a program that utilizes advanced AI and machine learning algorithms to monitor and quarantine suspicious activity.

⇒ Get TotalAV

6. Uninstall the .net framework extended

  1. Click the Start button, and then click on Control Panel.
  2. Click Programs and Features, or Uninstall a Program under the Programs category.PureVPN Windows 10 not working
  3. In the list of installed programs, search for .NET framework extended.
  4. Click the Uninstall/Change button, which appears at the top of the program list, and follow the instructions to uninstall .NET framework.

7. Reinstall .NET Framework

  1. Click the Start button, and then click on Control Panel.
  2. Click Programs and Features, or Uninstall a Program under the Programs category.PureVPN Windows 10 not working
  3. In the list of installed programs, search for .NET framework.how to fix windows update error code 66a
  4. Click the Uninstall button, which appears at the top of the program list, and follow the instructions to uninstall .NET framework.
  5. Restart your PC afterward.
  6. Download the .NET framework.
  7. Double-click on the executable file, and follow the prompts to install .NET framework.

Reinstalling .NET Framework can also fix Windows Update error code 66a problem. However, in order to reinstall .NET Framework, you have to fiddle with the Control Panel.

In addition, you may consider downloading several versions of .NET framework most especially the recent one. Check this guide dedicated to fixing .NET Framework issues for more information.

8. Rerun Windows update

  1. Go to Start, then type update in the search box, and click on Windows Update to proceed.
  2. In the Windows Update window, click check for updates, and install the available ones. Please uninstall current Bluetooth installation before continuing Dell
  3. After the update is complete, restart your PC.

An incomplete Windows update can also result in the Windows Update error code 66a problem.

Also, there are instances where the Windows Update process is halted or disrupted by the background process.

Therefore, we recommend that you rerun the Windows update; also, you should ensure the update process is completed. This should fix the Windows Update error code 66a problem.

9. Perform a clean boot

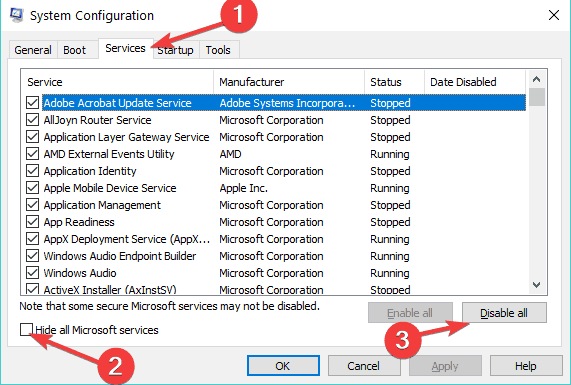
  1. Go to the Search box, and then type msconfig.
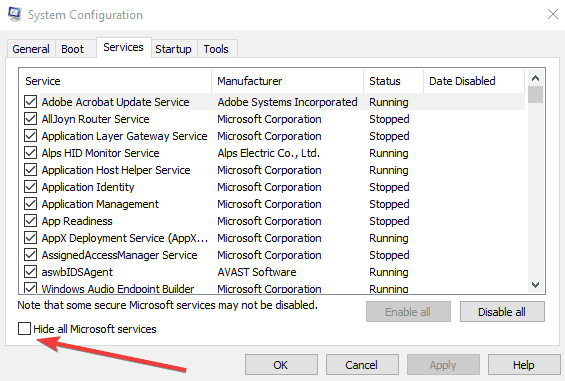
  2. Select System Configuration to open the dialog box as below:
  3. Find the Services tab, and then select Hide all Microsoft services box.
  4. Next, click Disable all.
  5. Go to the Startup tab.
  6. Click Open Task Manager.
  7. Right-click on each process, and select Disable.
  8. Close Task Manager, then click Ok.
  9. Finally, reboot your PC.

Software conflicts by .NET framework dependent applications can also cause the Windows Update error code 66a. These applications may run in the background whenever you start Windows.

Nevertheless, the clean boot starts up your PC devoid of any software conflicts. Therefore, you have to be logged on as the administrator before you proceed with these steps:

This concludes our article today. Here’s a list of the best tools to fix Windows update problems in case you need more help with the subject.

Hope you are able to fix the code 66a error in Windows Update problem by using any of the enlisted solutions above? Let us know if you have any questions. Feel free to comment below.

One Monitor Is Brighter or Darker Than the Other? Here’s How to Fix It

Even when using two identical monitors, one screen might look slightly brighter or darker, despite having the same settings. This usually comes down to panel variations or small calibration differences, not a hardware issue. Adjusting the right brightness settings on your second monitor can fix it. Here’s how you can calibrate both displays and fix mismatched screen output quickly.

Why is one of my monitors brighter than the other?

  • The age difference between monitors often affects their similarity. When a monitor is older than the other one, it may also be slightly less bright.
  • Keep in mind that the latest laptop monitors often sacrifice color reproduction for lightweight functionality.
  • Any differences in wall color or furniture color have a high impact on the light that’s arriving at the monitor. Try to compare your dual monitors under similar lighting conditions.
  • Finally, keep in mind that it’s hardly impossible to match two screens from different monitor models, manufacturers, and panel technologies as far as color is concerned.

How do I fix the brightness on my second monitor?

1. Manually adjust the difference

Gamma panel


As said before, if it isn’t happening to a professional monitor that comes with colors calibrated, you’re most likely experiencing a variation in production.

In this case, you will need to give a boost to your monitors to match each other.

That’s why we recommend manually adjusting the difference.

You could adjust Gamma/ Brightness and even color correction, either in Windows settings, monitor settings, or the Graphics card Settings Panel.

2. Calibrate display via Color Management

calibrate display via Color Management
  1. Just search for Color Management in the search box.
  2. Then follow the wizard to set up both your monitors.
  3. You need to do the same with both screens.

There is also a Color Management option in Windows which may help you out. With it, you can accurately calibrate your display colors.

Color Management lets you check the proper brightness, contrast, etc. based on the monitor, so give it a try as well and let us know if it works.

3. Use the same color profile when dual monitor colors are not matching

use the same color profile
  1. Go to Color Management again.
  2. Once it opens, select a monitor, and check the box that says Use my settings for this device.
  3. Click the Add button, then choose a color profile.

You’ve done your best, but it seems that you just can’t reconcile the differences easily. Remember that all monitors use the System’s default color profile.

If you think that the Color profile is the culprit, change the color profile as well. Do the same with the second monitor and check whether it fixes the problem or not.

4. Use the same type of ports to connect the monitors

use either DVI or HDMI port


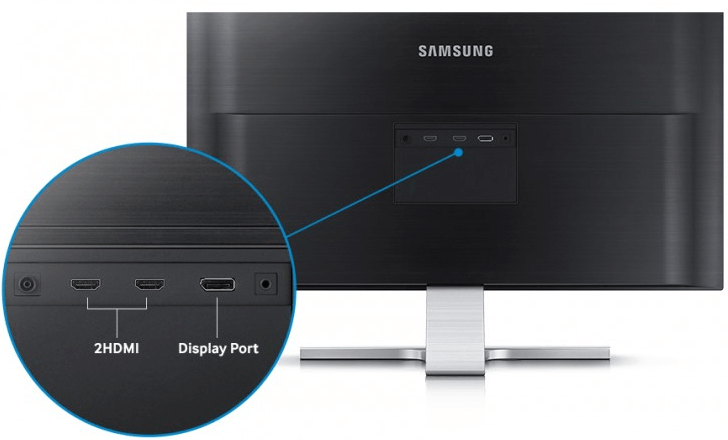
If you use different ports (DVI, VGA, HDMI) to connect your dual monitors, you may get high or low color depth and different brightness levels. Stop using the VGA port to fix this.

Instead, use either DVI or HDMI port to connect both monitors and see if you notice any improvement. Have a look at these high-speed HDMI cables while you’re at it and pick the one that best suits your needs.

Following the above tricks can bring your dual monitors as close to the brightness and color ideal as technology makes it possible these days.

If you are lucky enough, you may be pleased with the result. Nevertheless, sometimes the differences may still exist even after trying all these methods.

Windows Update Error 0x80240017 [SOLVED]

One of the most common issues that might occur while updating Windows’s built-in apps and programs is the 0x80240017 error code.

Read this article to find out how to fix it and get your updates up and running.

What causes the error 0x80240017?

The error code 0x80240017 usually appears due to the fact that your system has changed after you installed a third-party application.

It can also occur because something has changed in the registry after a reboot and you do not have the required system permissions.

This troubleshooting guide will show you what solutions you can use to fix this error once and for all.

How can I fix the Windows Update error 0x80240017?

1. Clear and reset the Microsoft Store cache

  1. Reboot your operating system.
  2. To start Windows 10, log in with your administrator account if you haven’t already.
  3. Go to your Desktop tile and hold the Windows and R buttons at the same time.
  4. Now you have the Run window in front of you.
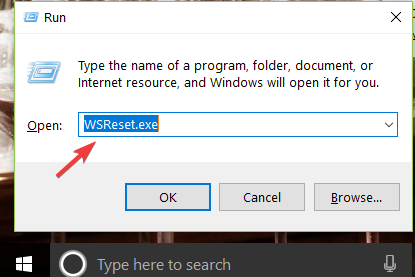
  5. In the Run dialog box, enter the WSReset.exe command.WSReset command
  6. Press the Enter key on the keyboard.
  7. Reboot your operating system once more and log in again with your administrator account.
  8. Check if the error persists.

2. Run the built-in Windows Update Troubleshooter

  1. Go to Search > type settings > double click on the first result.
  2. Go to Update & Security > select Troubleshoot.
  3. Now in the Troubleshooting window, locate the Windows Update Troubleshooter.
  4. Select the Windows Update troubleshooter and run it.windows update troubleshooter
  5. Now a scanning process will begin and it will tell you if any issues have been found and fixed.
  6. Follow the on-screen instructions to finish the troubleshooting steps.
  7. Scroll down and run the Microsoft Store Apps troubleshooter as well (follow the same steps listed above).windows store app troubleshooter
  8. Reboot your Windows 10 device.
  9. When the device starts, check if you still get error code 0x80240017 while trying to update your apps and programs.

3. Take full control over File Explorer and the WindowsApps folder

  1. Reboot your Windows 10 device and log in with your administrator account.
  2. Open the C:/ partition or wherever partition you have installed your Windows 10 OS on.
  3. Double click to open the Program Files folder.
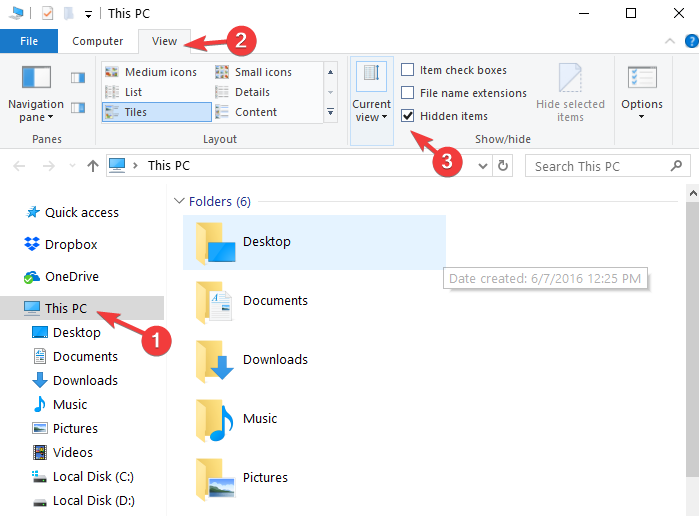
  4. Select the View tab situated on the upper side of the File Explorer.
  5. From the list that appears, check the box next to Hidden items under the Show/hide topic.
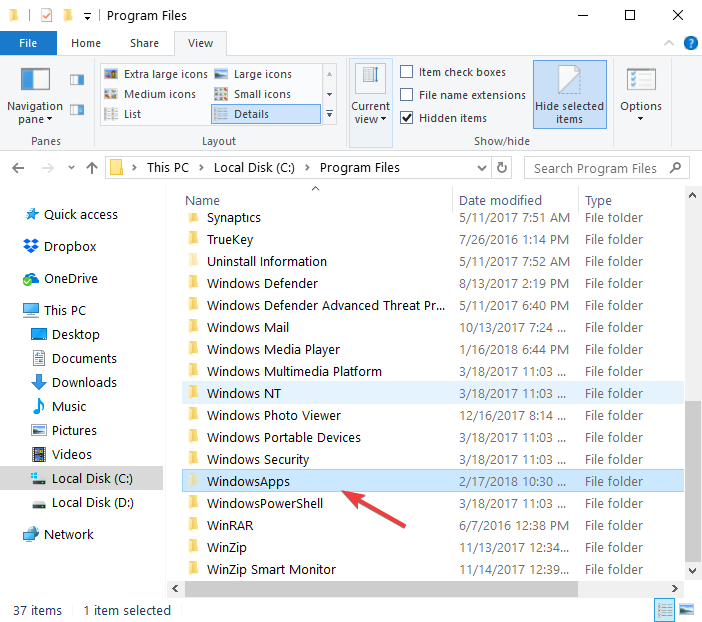
  6. Now in the Program Files folder, locate the WindowsApps folder.
  7. Select the WindowsApps folder.windowsapps folder
  8. Select the Properties feature you have on the menu that appears.
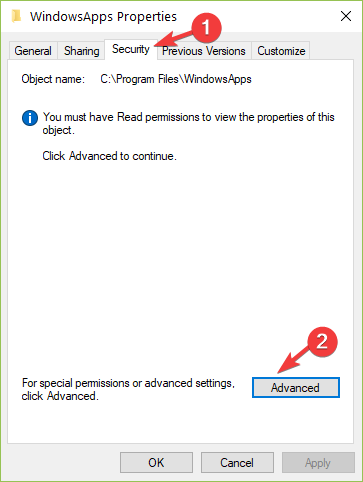
  9. Go to the Security tab situated in the upper side of the Properties window.
  10. Select the Advanced button.
  11. Double click on the username you use.
  12. Make sure that the Type field is set to Allow and This Folder, subfolders and files.
  13. Check the box next to Full Control.
  14. Left-click or tap on the OK button.
  15. Open the C: partition once more.
  16. Double click on the Users folder to open it.
  17. Double click on your username to open the folder.
  18. Double click to open the AppData folder.
  19. Double click to open the Local folder.
  20. Now, within the Local folder, search for the WindowsApps folder.
  21. Right-click on the WindowsApps folder.
  22. Left-click or tap on the Properties feature.
  23. Left-click or tap again on the Security tab.
  24. Left-click or tap on the Advanced button.
  25. Now you will need to set the permissions for this folder as you did for the one above.
  26. Left-click or tap on the Apply button again.
  27. Left-click or tap on the OK button > close all the windows you opened so far.
  28. Reboot your Windows 10 PC.
  29. After the device starts, check again to see if you still get the error 0x80240017.4.

4. Run SFC scan

If certain system files got corrupted or deleted, this may trigger update issues and errors. Fortunately, you can quickly fix this problem by running a System File Checker scan.

This tool will quickly scan your system and identify missing or corrupted files which will then replace. Here are the steps to follow:

  1. Go to Start > type cmd > right click on the first result > Run Command Prompt as administrator.
  2. Type the sfc /scannow command and hit Enter.Windows 10 white screen crash
  3. Wait until the process completes and then restart your computer > check if this workaround solved your problem

5. Reinstall the Microsoft Store app

Sometimes, the Microsoft Store itself is the culprit for all the issues and errors that you’re experiencing. In this case, the quickest solution is to simply uninstall the Microsoft Store app.

  1. First of all, log out of the app.
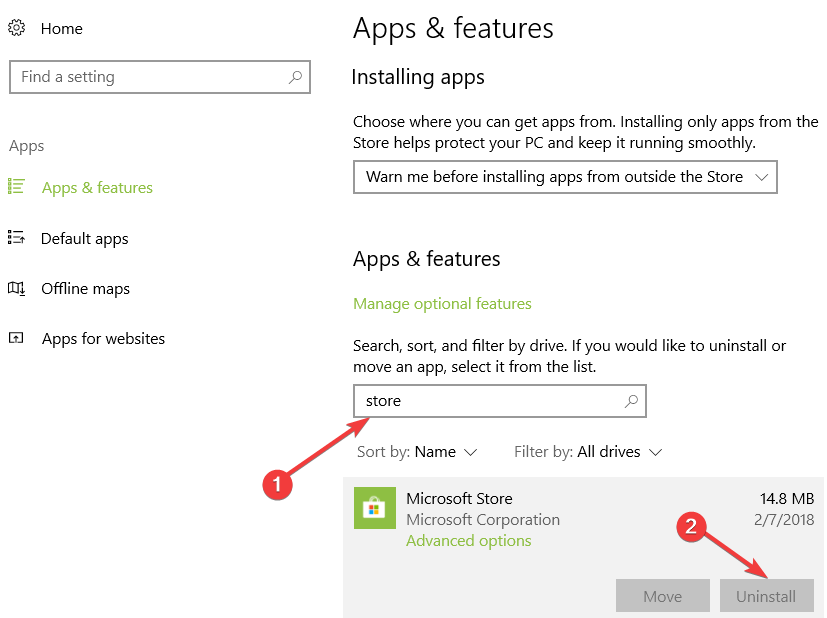
  2. Then, navigate to Start > go to Apps & features > type store in the search box.
  3. Select the Windows Store app > click on Uninstall.uninstall microsoft app store
  4. Restart your PC.
  5. Reinstall the Microsoft Store app> log in and try to install the latest app updates to see if the issue persists.

6. Scan your computer

If the error persists, try running a full system scan. Viruses, malware and other types of cyber threats could also trigger error 0x80240017 when you try to update your apps.

If you haven’t installed a reliable antivirus solution on your computer yet, check out this list of the best antivirus tools that you can use on your Windows 10 machine.

Install the one that suits your needs best, and run a full system scan.

7. Reset your PC

Note: It is recommended that you back up your files and folders before attempting the steps below

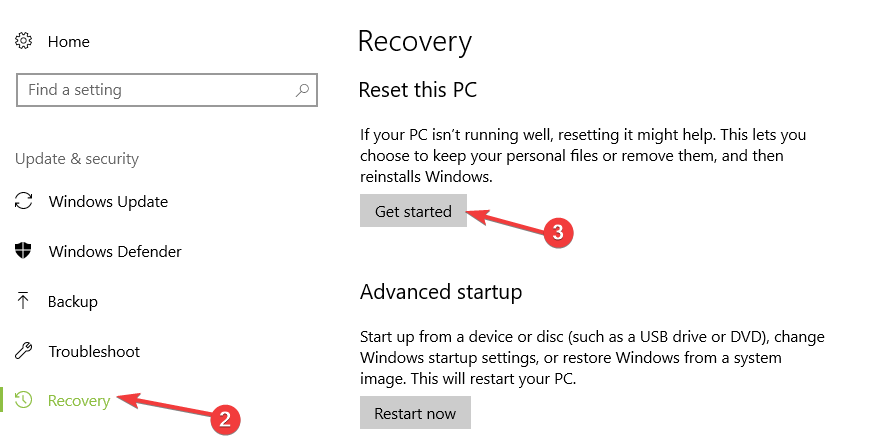
  1. Go to Settings > Update & Security.
  2. Select the Recovery feature.
  3. You will have there an option named Refresh your PC without affecting your files and under it, you will need to select the Get Started button.recovery pc
  4. Now follow the on-screen instructions finish the Reset process.
  5. Reboot your Windows 10 device.
  6. Check again to see if error 0x80240017 has been fixed.

8. Reinstall the OS

If the methods above did not work, then I would suggest you backup your important files and folders that you have in your Windows 10 directory and perform a complete reinstall of the operating system.

If necessary, check out this guide on how to fix Windows can’t automatically find new drivers.

That’s it, we hope these methods fixed error 0x80240017 on Windows 10 when you try to use the update feature.

If you do have additional questions related to this subject, you can list them in the comments section below. We will get back to you as soon as possible.

Windows Update Error 0x80004005 [SOLVED]

The error code 0x80004005 prevents Windows users from updating their operating systems. 

If you’re stuck with this error, follow the step-by-step guidelines below.

How can I fix the 0x80004005 Windows Update error?

1. Run the Windows Update Troubleshooter

  1. Press Windows key + I to open the Settings app.
  2. Choose Update & Security.
  3. Open Troubleshoot from the left pane.
  4. Select Windows Update and click on Run the troubleshooter.Windows 10 update error 0x80004005
  5. Follow the instructions until the procedure ends.

In case this solution fell short, we’ll probably need to get the big guns into play. Continue with the further steps.

2. Run SFC

  1. In the Windows Search bar, type cmd.
  2. Right-click the Command Prompt and run it as an administrator.
  3. In the command line, type the following command and press Enter:
    • sfc /scannow
  4. The scanning procedure should last approximately 15 minutes.Windows 10 update error 0x80004005

Still, if the tool hasn’t located any system errors and the problem is persistent, try the remaining solutions.

3. Reset Update services

  1. In the Windows Search bar, type cmd.
  2. Right-click the Command Prompt and run it as an administrator.
  3. In the command-line, type the following commands and press Enter after each:
    • net stop wuauserv
    • net stop bits
    • net stop cryptsvc
    • Ren %systemroot%SoftwareDistributionDataStore *.bak
    • Ren %systemroot%SoftwareDistributionDownload *.bak
    • Ren %systemroot%system32catroot2 *.bak
    • net start wuauserv
    • net start bits
    • net start cryptsvc
  4. After that, check for updates again.

4. Check your PC drivers

  1. Press Windows key + X to open the Power User menu.
  2. Choose Device Manager from the list.Windows 10 update error 0x80004005
  3. Look for the yellow exclamation point. Those are the devices without the proper drivers.
  4. Now, depending on the type of device you can:
    • For lesser devices like a webcam or universal serial bus controllers: right-click on the device and choose Update Driver.
    • For GPU and sound devices, navigate to the official OEM’s site and download certified drivers.
  5. Once you’ve dealt with the missing drivers, restart your PC and check for updates again.

4.1 Update drivers automatically

In order to prevent PC damage by installing the wrong driver versions, we recommend doing it automatically by using a specialized driver updater tool that will download and update the correct version.

⇒ Get Outbyte Driver Updater

5. Download the update manually

  1. Copy the name of the troubled update file.
  2. Go to Microsoft Catalogue here.
  3. Paste the name in the dedicated search box.error 0x80004005
  4. Download the file. Make sure that it responds to your system architecture (x86 or x64).
  5. Install the update file.
  6. Restart your PC.
  7. Check for additional updates to look for changes.

6. Clean boot your PC

  1. Go to Start > type msconfig > hit Enter
  2. Go to System Configuration > click on the Services tab >  check the Hide all Microsoft services check box > click Disable all.hide all microsoft services
  3. Go to the Startup tab > Open Task Manager.
  4. Select each startup item > click Disable
  5. You can now close Task Manager > restart the computer.disable startup programs

Let us know if you have any more questions about this error in the comments below.

Fix: Windows 11 Terminal Typing on its Own

Typing commands is a gateway to accomplishing many tasks, but when Windows 11 terminal is typing on its own, it can become very frustrating.

A few users have complained of this on the new OS, and we established that a few common triggers would lead to this situation.

Let us explore it and show you all you need to know to resolve this auto-typing issue.

Why is my Windows Terminal typing on its own?

There could be a few reasons your Windows Terminal is typing independently. At the top of the list are the following:

  • Hardware issues – It could be a hardware issue, such as a stuck key on your keyboard. Using the best keyboards will reduce the occurrence of this problem.
  • Virus – Computer viruses could manifest in several forms, and this erratic typing on the terminal is one example. We recommend using the best anti-malware tools.
  • Conflicting programs – In some cases, newly installed third-party applications could trigger this problem.

Now we have discussed possible triggers, let us introduce you to some recommended fixes.

What do I do if Windows Terminal is typing on its own?

To troubleshoot this issue, the first thing you should try is restarting your computer. This should be done before any other complicated solutions because it will often resolve any problems caused by software.

1. Scan for malware

  1. Visit the Microsoft Windows Scanner link and download the more appropriate scanner for your computer.
    windows 11 terminal typing on its own
  2. Run the downloaded file.
  3. Accept the terms, then click Next.
  4. Select Full scan and click Next.
    windows 11 terminal typing on its own

Once you’ve finished the procedures, the utility will begin scanning your computer, which will take some time. You will get a report from the tool detailing the software found and eliminated when this operation is finished.

2. Uninstall recently installed software

  1. Press Windows + R, type control panel, and hit Enter.
  2. Click on Uninstall a program.
    windows 11 terminal typing on its own
  3. Go through the program list, click on any recently added program, then select Uninstall.
  4. Follow the wizard to complete the uninstallation, then check if Windows 11 terminal is still typing.

3. Change or repair your keyboard

If none of the above solutions have worked, it is likely a hardware issue, and we recommend that you change or repair your keyboard.

The process of keyboard repair may be complicated, but you can see a qualified technician for more assistance. However, before you do that, you should check that nothing is stuck underneath your keys. Dry-blowing the keys may help.

In conclusion, we like to note that any of the above solutions may come in handy. However, since we have not written them in any particular order, you should try what seems most appropriate.

Pressing individual keys and feeling for their touch sensitivity may tell if something is stuck underneath. Also, if you already use any of the best antiviruses, you would be able to avoid virus infection that may trigger this problem.

Lastly, note that this is not specific to the new OS, and Windows 10 Terminal typing on its own is a problem some users have faced.

Tell us what worked for you in the comments below.

FIX: Power BI not connecting to SharePoint List [Guide]

Power BI Desktop is software with which users set up charts and interactive visualizations for connected data sources. SharePoint lists are data sources users can connect to Power BI with.

However, some users have stated in forum posts that they can’t connect Power BI with their SharePoint lists. The URL isn’t valid or Access to resource forbidden are two errors that arise for some BI users when they try to connect SharePoint lists.

First, double-check the SharePoint list’s URL entered in the URL text box when a “URL isn’t valid” error arises. Users need to specify SharePoint sites as follows: https://<companyname>.sharepoint.com/xyz_Test/. Make sure that the URL entered doesn’t include any typos.

Power Bi unable to connect to a SharePoint Online list

1. Enter Microsoft Account Credentials for SharePoint List

  1. Some users have fixed “URL isn’t valid” connection errors for SharePoint lists by editing the data sources’ permissions so that they include Microsoft account credentials. To do that, click the File tab in Power BI Desktop.
  2. Select Options and settings > Data Source Settings to open a Data source settings window.
  3. Select the SharePoint list in that window.
  4. Click Edit Permissions to open an Edit Permissions window.Edit Permissions window power bi won't connect to sharepoint list
  5. Click Edit to enter Microsoft account credentials.
  6. Then press the OK button.

2. Clear the SharePoint List’s Permissions

  1. Clearing permissions for SharePoint list data sources can resolve “Access to resource forbidden” connection errors. Users can do that by opening the Data source settings window as outlined above.Data source settings power bi won't connect to sharepoint list
  2. Then select the Global Permissions option.
  3. Select the SharePoint list listed within the window.
  4. Press the Clear Permissions button.
  5. Select the Close option.
  6. Then users can re-enter the credentials for the SharePoint list.

3. Try Connecting a SharePoint List With OData Feed

  1. Alternatively, users can try connecting their SharePoint lists with OData feed when they can’t connect them via the Get Data dialog window. Press the Get Data button on Power BI’s Home tab.
  2. Click OData Feed to open the window shown directly below.OData Feed window power bi won't connect to sharepoint list
  3. Enter the SharePoint list URL feed in the text box with the following format: http: //SITE_URL/_vti_bin/ListData.svc.
  4. Select an authentication method for the SharePoint list data source.
  5. Click the Connect button.

Those are a few resolutions that might resolve Power BI connection errors for SharePoint lists. For additional resolutions that might fix SharePoint list connection errors, check out the Power BI support website. Users can send Power BI support tickets by clicking the Create Support Ticket button on that site.

RELATED ARTICLES TO CHECK OUT: 

6 Best MKV File Converters for Windows 10 to Get Today

Our digital video age is full of various video formats and since developing new video formats has become the goal of some software and hardware vendors the video format list will not cease to grow.

Converting videos is not a task as complex as editing videos, but most people make the mistake of seeing video conversion as a complicated or expensive action that requires sci-fi software. But it’s not the case, as you can even convert videos for free.

There are a lot of reasons for which you need a video converter and we’ll get back to this discussion at the end of this article.

What I should know about video formats?

You should know that you need a thick book full of scientific terms to know what each video format means and to understand the details regarding how video formats are created. On the other hand, to perform a video conversion, you don’t have to be a rocket scientist, so some basic knowledge will be enough.

Most video files have at least two types – the codec and the container.

The container format is a computer file format that can contain all kinds of data which is compressed in a manner of standardized codecs. The container describes the file’s structure (where the pieces are stored, how they’re interleaved, which codecs are used by which pieces and so on).

The codec (short from compressor/decompressor) will allow you to store the digital photos, music, and movies in the form of compressed and easily manageable files that you’ll be able to open or to decompress to deliver their original content. The most popular video codecs include DivX, XviD, 3ivx, MPEG(MPEG-1,2,3,4), ReadVideo.

A video is made up of various frames (snapshots), and the frame rate is the number of still pictures per unit of time of video or FPS. Motion pictures that are shot on film do so at 24 FPS. Audio and video file resolution is measured in kilobytes per second (kbps), and this is called bitrate. The higher the bitrate, the better is the video quality.

Aspect ratio is about the dimensions of video screens and the video picture elements.

A video is made up of static images that are being flashed before our eyes in rapid succession and when we say picture resolution we mean the elements, the pixels that comprise these pictures. In theory, the video conversion will not improve the video quality, and therefore you should not expect better quality than one of the source videos.

Choosing a good video converter

A high-quality video converter is crucial to whether you can successfully finish video conversion. There are lots of available video converter apps, but excellent video conversion software can make you look like a video professional with only minimal effort.

Usually, video converter tools feature preset optimized profiles and these preloaded profiles will cover most requirements. You will be able to customize the bitrate, the frame rate, the video size, the aspect ratio, and more the make your final video look perfect.

Given the fact that most video conversion tools are trialware, you will be able to give them a try before deciding on getting something. Here are the elements that you should be looking for when purchasing video converter software:

  • Input files – the tool should accept a large variety of input files especially the source video formats.
  • Output files – you may need to output to a few file formats, but the number and breadth of output files will determine the strength of the tool’s overall performance.
  • Key features – the tool’s features should include the ability to adjust multiple options (codecs, video size, frame rates, bitrates) to ensure the highest quality possible. Even if you might think that some of the features might be only for advanced users, you’ll find out that they are essential for your success as well.
  • Ease of use – the tool’s interface should be an easy and intuitive one and non-threatening to the new user; the video conversion tasks usually involve just a few clicks.

Please note that if the MKV file is damaged, you won’t be able to convert it. The highlighted guide will help you fix it though. All this being said, here is our top converter tools list.

Which are the best MKV video converting tool?

Aiseesoft Total Media Converter

Aiseesoft Total Media Converter can easily convert between various video formats such as MP4, H.264/MP4 AVC, H.265/HEVC, MTS, MXF, MOV, AVI, DivX, WMV, MKV, FLV, WTV, VOB as well as 4K, HD and 3D video formats.

It can be as video conversion software that converts any of your videos to MP4, MP3, WMV, MOV, etc. for playback on your TV or mobile device.

Besides its enormous converting potential, this tool is very easy to use. The interface is very intuitive, and it unlocks the most needed/interesting/powerful features really easily.

Aiseesoft Total Media Converter

Use Aiseesoft to convert any video/audio file to all popular video and audio formats.
Free download Visit website

iSkysoft Video Converter

iSkysoft Video Converter is a very powerful and convenient converter tool that features high conversion speeds and amazing output quality.

The converted MP4 files can be used on your iPod, TV, iPhone, mobile phone, Android phone, and more portable devices.

The tool can convert your MKV to MP4 video format or any other video format and of course vice versa.

You will be able to customize and edit videos before conversion, and you can also upload the final videos to websites such as Facebook, YouTube, and Vimeo.

You can also download videos from more than a thousand popular websites, and the tool is compatible with the latest operating systems including the one and only Windows 10.

iSkySoft Video Converter

Convert MKV files to any format and use the built-in editor to create shareable content.
Check price Visit website

Any Video Converter

This is an excellent downloading and conversion toolkit which is so easy to understand and work with, that it is tough to believe it’s free.

You can use it to rip files from discs, and download videos from Facebook, YouTube, Vimeo, Dailymotion, and more.

Plus, you will be able to apply effects and filters and then save them or burn them to DVD in any format you want.

The video can be downloaded and converted into batches, and simple conversions can be successfully completed with just a bunch of clicks.

The tool is free to use, but when you run the installer you will see that you will be offered a security program and the program will suggest that you change your default search engine to Yahoo. In case you want to avoid this, select Click here to customize the installation and then uncheck the box.

The premium version of this tool will include more features such as the ability to remove DRM protection and to record streaming video, but the free version is fantastic as well.

Any Video Converter

Download and convert video files to any format, easily and safely.

Freemake Video Converter

Freemake has produced powerful yet very easy-to-use tools and made them available for free, and the Freemake Video Converter is no exception.

This tool can not only convert files from your hard drive to almost any existing format but it can also be used to download and convert online videos from YouTube for instance.

The software features easy editing tools to trim unwanted footage, and you also have the ability to add subtitles, to convert to and from DVD. The tool has all your daily conversion needs covered and it offers much more.

On the other hand, you should be aware of the fact that the free version of the software will add a branded splash screen to the beginning of your video. It’s not such a big deal, as the splash is not obstructive and the main video will not be watermarked.

If you can live with that, then the Freemake Video Converter might become your best friend, so give it a try and see how it works for you.

⇒ Get Freemake Video Converter

Handbrake

This is a powerful converter that is well known to Mac users and less popular with Windows users, but this doesn’t mean that you should overlook it.

This is an excellent choice for anyone who works on multiple platforms and also for everyone who is dedicated to Windows.

The tool has lots of features that will allow for fine-grained control of video conversion, and they include very precise cropping, frame rate adjustment, advanced filtering and more.

You will also find some presets for quick results in case you are interested in such a thing.

The main reason for which you’ll love the software is the fact that it’s free and open-source, and you can use it to convert videos from almost any format.

⇒ Get Handbrake

MediaCoder

This universal converter features a few cutting-edge technologies that will make video editing amazing because it lets you take control of the whole process.

The tool is updated once a week, and this means that you will come across the latest versions all the time.

MediaCoder has everything you need: ripping of CD, VCD, DVD, and BD and the filters will help improve the converted files. The tool also features transcoding parameters that will make tuning and adjusting the video parameters as easy as possible.

During the whole process of conversion, the software will make it possible to reduce the sizes of big files and also the extraction of audio from video, which is pretty great.

⇒ Get MediaCoder

Converting video files can be a tricky process, but it is useful. Besides, the tools that we mentioned above will help you to get the job done perfectly.

For more useful material on the same topic, see our MKV separate page.

Also, in our Video Hub, you’ll find a lot of guides and recommendations that might be helpful.

Fix: Windows 10 Update Error 0x800736b3

Windows Update feature is the essential part of the Windows 10 surrounding. In addition to regular updates, Windows 10 users can expect a lot from the major updates that are scheduled for release twice per year.

Nonetheless, even though the timely support has brought a lot of improvements, users still a multitude of issues with Windows Update and its features. One of those numerous issues is followed by the error code 0x800736b3. This specific error prevents downloading certain cumulative updates and mainly affects dotNet Framework. So, if you have an issue with this error code, we prepared a few workarounds worth checking out.

How to resolve update error 0x800736b3 in Windows 10

  1. Use a third-party system repair tool
  2. Use DISM and system installation drive
  3. Download offline dotNet Framework installer
  4. Check your hardware
  5. Run the Update troubleshooter
  6. Run the SFC scan
  7. Reset Windows Update components
  8. Make sure the Windows Update service is running
  9. Make sure the BITS service is running
  10. Change DNS settings
  11. Reinstall Windows 10 from scratch

1. Use a third-party system repair tool

An effective solution would be to install a trustworthy program designed to repair all Windows files in critical condition.

Let this software scan your PC and detect errors, malware, as well as other bugs that affect your PC’s performance and security.

Use the automatic repair function to enable it to start fixing all the files and compromised system settings.

2. Use DISM and system installation drive

Deployment Image Servicing and Management (DISM) is a built-in Windows tool whose main function is to scan and repair corrupted files. In order to repair this specific error, you’ll need to obtain a USB/DVD with Windows 10 setup. Some users tried with the standard update through DISM, but the SXS file was missing. That is why you’ll need the setup media or ISO. Follow these instructions to resolve this issue:

  1. Insert USB or DVD with Windows 10 installation (the same architecture as your current version).
  2. Right-click Start and run Command Prompt (Admin).
  3. In the command line, type the following command:
    • Dism /online /enable-feature /featurename:NetFx3 /Source:X:sourcessxs /all /LimitAccess
  4. Replace the X with the drive letter of the destination media setup.
  5. The process will take the needed file and your issue should be resolved.

3. Download offline dotNet Framework installer

On some occasions, the mentioned error can be related to the dotNet Framework’s failed installation. Besides updates, the lack of DotNet Framework can cause a lot of troubles with the all-around system behavior. So, your first step is to try and download the offline installer of the latest version.

  1. Find the corresponding version here.
  2. Download and save file.
  3. Start the file and confirm.
  4. The process may be a bit long.

Once the process is installed, check out the applications that utilize dotNet and see if the process is functioning.

If you are not sure where to start and need more help, we have an extended guide that explains how to download and install .NET Framework to your Windows PC.

4. Check your hardware

While the software is the probable culprit for this issue, you should check out your RAM and HDD, also. There is a large variety of third-party tools you can use to check on HDD life and boot sector errors. Furthermore, you can use similar tools to check the RAM health.

5. Run the Update troubleshooter

Microsoft introduced a handy tool for resolving various system issues including update errors simply called the Troubleshooter. This tool is certainly something you should try when resolving these problems because it can tweak the problem for you without big efforts from your side.

Here’s how to run the Update Troubleshooter in Windows 10:

  1. Go to Settings.
  2. Head over to Updates & Security > Troubleshoot. 
  3. Select Windows Update, and go to Run the Troubleshooter. 
  4. Follow further on-screen instructions and let the process finish.
  5. Restart your computer.

6. Run the SFC scan

If none of the previous solutions worked, let’s try a few troubleshooting tools. The first one is the SFC scan. This command-line tool scans your computer for potential issues and resolves them if possible. So, it might be helpful in this case, as well.

Here’s how to run the SFC scan in Windows 10:

  1. Right-click on the Start Menu button, and open Command Prompt (Admin).
  2. Enter the following line and press Enter: sfc/scannow
  3. Wait until the process is done (it may take a while).
  4. If the solution is found, it will automatically be applied.
  5. Now, close the Command Prompt and restart your computer.

7. Reset Windows Update components

According to users, sometimes this problem can be caused by Windows Update components. To fix the issue, you need to restart all Windows Update components manually. To do this, you just need to run a couple of commands in Command Prompt. To do that, just follow these steps:

  1. Start Command Prompt as administrator.
  2. When Command Prompt starts, run the following commands:
  • net stop wuauserv
  • net stop cryptSvc
  • net stop msiserver
  • ren C:WindowsSoftwareDistribution SoftwareDistribution.old
  • ren C:WindowsSystem32catroot2 Catroot2.old
  • net start wuauserv
  • net start cryptSvc
  • net start msiserver

8. Make sure the Windows Update service is running

The Windows Update service is an essential service for receiving updates. But on some occasions, it can crash and stop working. What you need to do is restart the service and see if there is an improvement in the Update protocol. Here’s how:

  1. Go to Search, type services.msc, and open Services.
  2. Find the Windows Update service. Right-click and open Properties.
  3. On the General tab, find Startup type and choose Automatic.
  4. If the service is not running, right-click and choose Start.
  5. Confirm selection and close window.

9. Make sure the BITS service is running

The same thing goes for another crucial service for delivering Windows Updates, Background Intelligent Transfer Service:

  1. Press Windows key + R. In search line type services.mscand press Enter.
  2. Look for Background Intelligent Transfer Service (BITS) and double-click it to open its properties.
  3. If the service isn’t running, click the Start button.
  4. Choose Recovery tab and make sure that First failure and Second failure are set to Restart service.
  5. Confirm selection and check for updates.

10. Change DNS settings

According to Microsoft’s community forums, changing the DNS server address could be the solution. So, that’s the workaround we’re going to try first. Here’s what you need to do:

  1. Go to Windows Search, type control panel, and open Control Panel.
  2. Go to Network and Sharing Center, and click on Change adapter settings from the left pane.
  3. Choose the network you’re currently using, right-click it, and choose Properties.
  4. Scroll down to Internet protocol version 4 (TCP/IPv4), and choose Properties.
  5. Now, choose Use the following DNS Server addresses
  6. Enter the following values:  DNS Server – 8.8.8.8 and Alternate DNS Server – 8.8.4.4
  7. Save changes, and restart your computer

11. Reinstall Windows 10 from scratch

In case your system shows signs of performance drop and the previous steps proved inadequate, you should reinstall the system from the scratch. You can use Media Creation Tool and create a bootable USB or DVD drive setup. However, make sure you back up files from the system partition and license key. The process is not lengthy as it looks and you don’t need any advanced knowledge to perform the reinstall.

What is Windows update error 0x800736b3

The Windows update download error 0x800736b3 error does not allow the newest system updates to install on your machine.

This can be caused by several culprits, including corrupt .NET Framework files or corrupt system files.

The issue may also come as a direct indicator of malware infection, so make sure to run a thorough antivirus scan.

In most cases, the problem is not major and can be easily fixed in just a few steps.

It is however essential to make sure that your updates are enabled and well-functioning, otherwise you will not be able to benefit from the latest Windows applications updates and security implementations.

Those were our solutions for this issue. In case you are having any thoughts or questions, please be free to share them with us in the comments.

Busy-on-Busy call setting coming to Microsoft Teams this year

The Redmond-based tech giant never stops tweaking the communication platform it is so popular for, meaning the Teams app.

We’ve seen a lot of improvements lately, and there are still a lot more to come, as you are about to see in this article.

For example, the web version of Teams already got fitted with background effects and Live Captions. You can also use Viva Connections through the Teams mobile app.

And, after promising to introduce an enhanced visual layout to Teams next month, Microsoft has plans to release another exciting feature this February.

Teams will soon offer better in-app call management

The software colossus is now considering bringing one of the widely-requested call setting to Teams users on both Windows and Mac.

Microsoft is now working on Busy-on-Busy end-user setting, which we will see on our apps sooner than you might think.

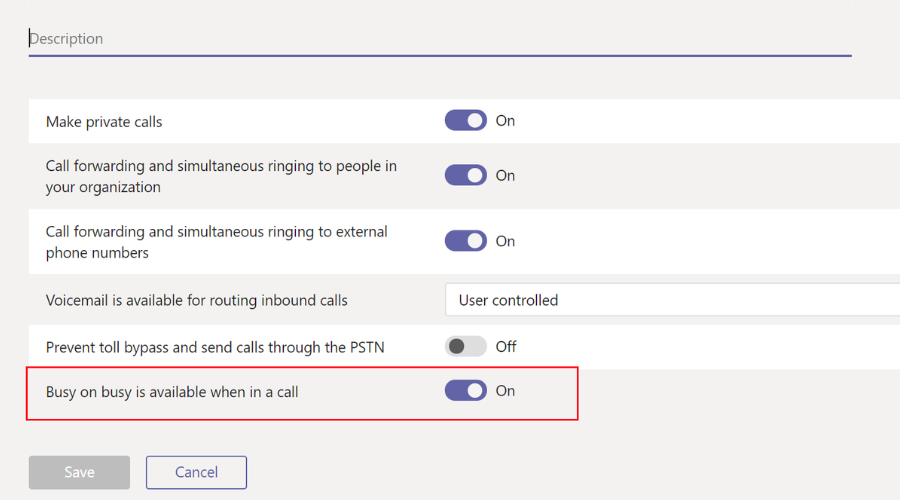
This new call setting will actually manage how incoming calls are routed when you are busy in an existing call or meeting.

Keep in mind that, in a scenario where you are busy speaking to someone else, you are allowed to choose from a couple of busy options:

  • You can let the calls come through
  • Play a busy signal
  • Redirect the call

In fact, these busy options are not entirely new to Microsoft Teams users, as administrators can already configure Busy-on-busy with a policy from Microsoft Teams Admin Center.

However, what changes next month is that besides administrators, the end user will also be able to manage their incoming calls when they are busy in an existing call directly from the Calls settings in the Teams app.

Even though not yet confirmed, the Busy-on-Busy call setting will likely be set to Disabled by default, so you will have to turn it on yourself.

For the time being, in the Calls settings in the Teams app, you can add or remove delegates, change your default mic, speaker, or camera, make a test call, set call answering rules, and more.

But, while Microsoft is targeting February to launch the busy options to Teams users for Mac and Windows, there is always a chance of the company delaying it to later months.

We’ll just have to wait and see what happens in the near future. Leave a comment below and express your opinion on other features that might enhance the Teams experience.

FIX: SharePoint Documents won’t Open in Application Solved

SharePoint is a handy collaborative platform from which users can usually open MS Office documents.

However, a few SP users have stated in forums that SharePoint documents won’t open in the application solved.

Documents don’t open when they select to open them with client MS Office software from within SP.

Here are a few resolutions that might fix SharePoint issues for opening Excel or Word documents.

What to do if SharePoint won’t open Excel/Word files?

1. Turn Off Protected View

  1. Open the Word or Excel application.
  2. Click the File tab.
  3. Select Options to open the window shown directly below.
  4. Click Trust Center on the left of the window.
  5. Press the Trust Center Settings button to open further options.
  6. Click Protected View on the left of the Trust Center window.
  7. Then deselect all the Enable Protected View settings, and press the OK button.

It might be the case that Protected View is blocking the document opening.

When that happens, a Word experienced an error trying to open the file error message pops up or the document might hang.

To fix that, you can turn off Protected View for MS Office applications as described above.

2. Try using Stellar Repair Toolkit Office

  1. Firstly, open Control Panel and go to Programs and Features section.
  2. Right-click the specific Microsoft application you’re interested in – Excel or Word.
  3. Up next, select Online Repair to start fixing the selected software.
  4. If the above procedure may take some time, you can also choose to select Quick Repair to fix potentially corrupted files.

When SharePoint refuses to open Excel or Word documents, the next thing you should do is to use the powerful Stellar Repair Toolkit Office.

This toolkit has it all, from features dedicated to repairing corrupt MS Word documents and files from dealing with corrupt MS Excel and restores data to new Excel files.

Regular users looking for convenience will most likely appreciate that it even repairs pictures inserted in Word files and preserves worksheet properties.

⇒ Get Stellar Repair Toolkit for Office

3. Restore Advanced Settings to Default

  1. Some users have confirmed that restoring advanced net settings can fix Office documents not opening from SharePoint libraries. To do that, open Cortana’s search box by clicking the Type here to search button.
  2. Enter the keyword Internet the search box, and select to open Internet Options.
  3. Select the Advanced tab in the snapshot directly below.
  4. Press the Restore advanced settings button.
  5. Then click the Apply and OK buttons.
  6. Restart your laptop or desktop.

4. Repair a Corrupted File

  1. To check if a file is corrupted, download it from SharePoint by clicking the Download option. Then try opening it from Word or Excel from the C: drive folder you saved it to.
  2. If you still can’t open the document, you can fix it with the Open and Repair recovery option in MS Office applications. Click the File tab and select Open to open the window in the snapshot below.
  3. Select the corrupted file with a single click.
  4. Click the small arrow on the right of the Open button to expand the menu shown directly below.
  5. Select the Open and Repair option on the drop-down menu.
  6. Alternatively, you can repair a corrupted MS Word document by opening this page, pressing the Choose file button to select the document, and then clicking the Secure Upload and Repair option.
  7. To repair an Excel document, open this webpage in a browser. Click Choose file to select the Excel document, and press the Secure Upload and Repair button.

Your Excel or Word file might be corrupted. If so, then you’ll need to repair the file to open it. This is how you can repair a corrupted Office document.

5. Open SharePoint in Internet Explorer 11

open SharePoint in Internet Explorer 11

If you’re utilizing SharePoint within Google Chrome, Edge, or Firefox, consider switching to Internet Explorer 11 instead.

The 32-bit Internet Explorer is the most compatible browser with SharePoint as it fully supports ActiveX controls. ActiveX is essential for launching documents in earlier SharePoint versions.

So try opening a Word or Excel file from a SharePoint document library within IE. You can launch Internet Explorer by entering the keyword IE in Cortana’s search box.

6. Check your Office Account

Office Account
  1. Open the MS Word or Excel client application.
  2. Click the user account name at the top left of the window.
  3. Then click Sign out.
  4. Select an alternative account to sign in with if there is one. Sign in with an account that matches the one you’re utilizing in SharePoint.
  5. Alternatively, you might need to add a SharePoint account by clicking Add Account. Enter your SharePoint account details, and press the Sign in button.

Note that your SharePoint account should match your MS Office client account. If you’re using different accounts for SharePoint and MS Office, that might be why SP doesn’t open Excel and Word files.

Some users have stated that they needed to add their SharePoint Online accounts again after renewing MS Office subscriptions. This is how you can check, and change, your MS Office account.

Those are some of the resolutions that might fix SharePoint so that you can open Word and Excel files directly from its document libraries again.

Also, make sure that your browser includes SharePoint Online within its trusted sites. If you have discovered another fix for SharePoint not opening MS Office documents, feel free to share it below.

Best Tools to Edit PDF for Windows 11: Top Picks in 2026

Since Windows 11 doesn’t come with a built-in PDF reader or editor, this guide will look at the best free Windows 11 PDF editors you can install on your PC to make your choice an easier one.

Here’s a quick look at them:

PDF EditorPlatformDocument SignaturePDF ConversionOCR FeatureUnique Features
pdfFillerOnlineYesYesNoMerge, split, smart tags
Soda PDFDesktop, OnlineYesYesYes24/7 support, money-back guarantee
Adobe Acrobat ReaderDesktopYesYesYesComments, annotations
MobiPDFDesktopYesYesYesFillable forms, comprehensive menus
DocHubOnlineYesYesNoPDF workflows, templates
Icecream PDF EditorDesktopYesYesNoCustom stamps, language options
SwifDoo PDFDesktopYesYesYesAnnotations, watermarking, encryption
PDF ElementDesktopYesYesYesCheckboxes, templates, collaboration
Nitro PDF Pro FreeDesktopYesYesYesQuickSign, OCR, file format support
Readiris PDF Editing ToolDesktopYesYesYesScan conversion, color texts, multi-app compatibility
PDF CandyOnlineYesYesNoWatermarking, resizing, password protection
Foxit PDFDesktopYesYesYesNotepad-like view, handwriting signature
TinyWowOnlineYesYesNoAnimated GIFs, PDF Translator

Now, let’s take a closer look

What are the best Windows 11 free PDF editors?

pdfFiller – Best online PDF editor

You don’t need to download anything because with pdfFiller you may easily edit a document right in your browser.

Actually, with this tool, you may easily fill out any PDF document on any desktop or mobile device.

You will be able to highlight, blackout, erase and insert text anywhere on a PDF. Not only that, but it’s also possible to insert images.

If you need to convert your PDF into another format, you may do so with just a few clicks. Plus, add, delete, or rearrange pages as you please.

pdfFiller also helps you merge or split PDFs and organize them using smart tags if needed.

As for storage, you have your own cloud space, but the tool also has integrations for Google Drive, Box, OneDrive, and Dropbox.

Let’s review some of its best features:

  • Document signature for authentication
  • Powerful PDF conversion
  • Full document editor
  • Very easy to use by anyone
  • Cloud-based app, available from any location or device
pdfFiller

pdfFiller

Edit your PDF documents and sign them securely with a free editor that offers all the tools you need!
Free Trial Visit Website

Soda PDF – Best PDF editor

Soda PDF is an industry-leading PDF editor with excellent PDF tools to help you modify your documents easily.

With this software’s easy-to-use tools, you can edit the text and customize the content and layouts of all your PDFs.

Soda PDF lets you insert images, links, page marks, headers, and footers, and highlight essential information in your current PDF file.

Moreover, you can reorder, rotate, delete, move, or even extract pages and identify the front from your preferred PDF document.

It also has tools that allow you to create, convert, e-sign, and secure your PDFs without compromising the content.

Other best features include:

  • 24/7 support
  • 30-day money-back guarantee
  • OCR feature
  • Online access
  • Ultra-fast and lightweight

Adobe Acrobat Reader – Versatile tool

Adobe Acrobat is one of the best PDF editors for Windows 11. It’s free, and many people use it, including businesses and companies.

With it, you can do everything you want at no cost. It has a tabbed view that enables users to open several PDFs at once.

It is the most popular used PDF editor for Windows 11. It gives users many options, e.g., using a hand tool to draw, highlight, underline, and add bookmarks to the document. 

You can share files with others and protect them from third-party users with the help of passwords and the inability to copy, edit, or print.

Some of its key features include:

  • Organize the PDF by adding new pages, cropping, rotating, extracting, etc
  • Sign electronic forms
  • Export to other formats like Word, PPT, Excel, JPG
  • Enables users to add comments, annotations, and highlights to the PDF document

MobiPDF – Modern and simple interface

If you need a PDF editor with a simple and effective interface, MobiPDF can be an excellent choice.

With this tool, you may control the entire structure of your PDF such as adding or removing pages, adding new content, handling the different objects and fonts, and many more.

Editing the text and images, rearranging the pages, or inserting bookmarks is extremely easy for anyone to do because all the menus are very comprehensive.

And when editing is done, you can convert your PDF to Word, Excel, or ePub with a single click.

With MobiPDF, you may also work with fillable forms and sign the document by writing, typing, or inserting an image.

The software also comes with a built-in OCR tool that will help you create searchable PDFs from scans.

Here are some of its key features:

  • Edit and convert PDF without any prior knowledge of document management
  • Form-filling features and digital signage
  • One-click PDF conversion to Word, Excel, or ePub
  • Modern and user-friendly interface
  • OCR scanner built-in

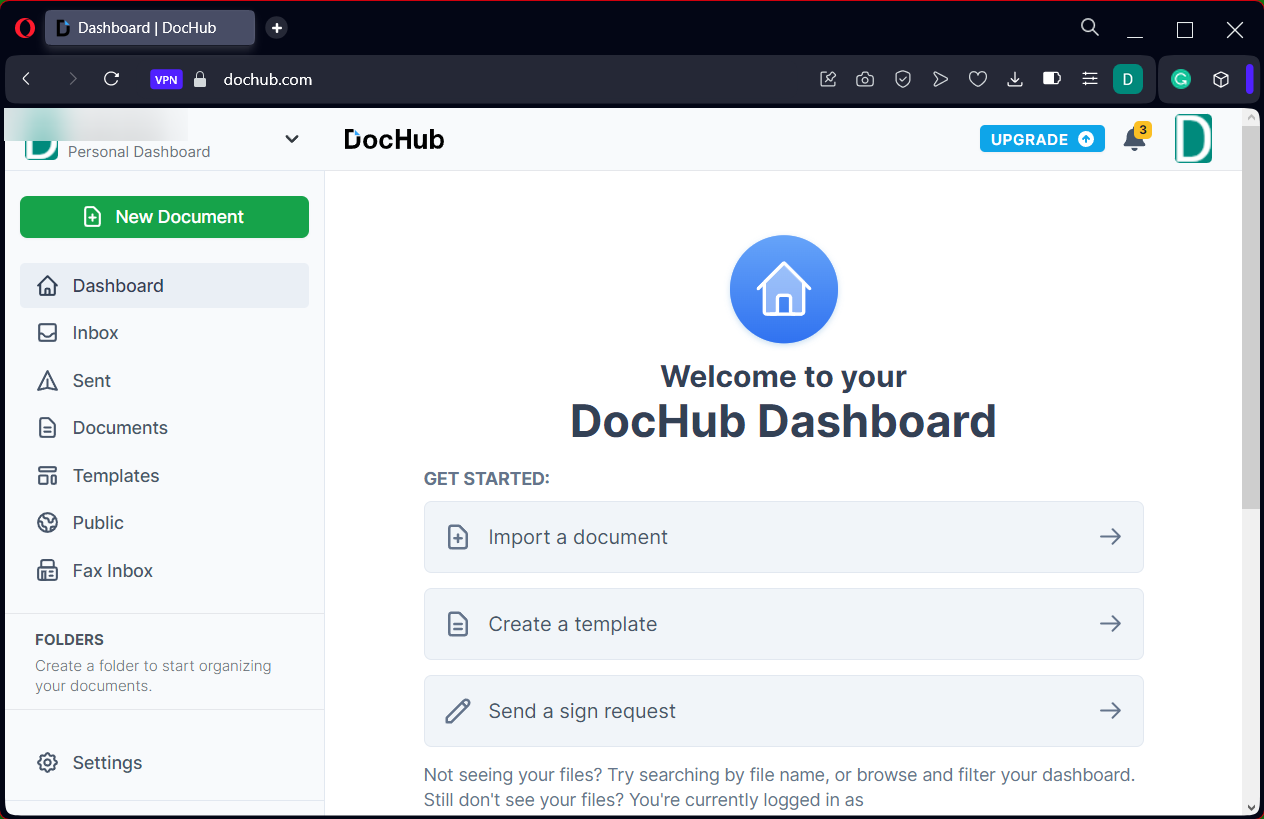
DocHub – Free PDF workflows

DocHub is not a simple online PDF editor because it offers much more, starting from digital signatures and annotation edits.

First, you should know about editing and form filling which will improve your workflow extensively. Plus, it gives the user the complete PDF experience including drawing or adding images.

If you’re going through dozens of files and need a free usage PDF tool, there is no greater tool than this. Simply create new templates and fill documents locally or directly on Gmail or Drive cloud.

Moreover, DocHub offers document-signing features so you can edit official files without any additional costs. So, you can benefit from everything for free or upgrade to the Pro version.

While the free version is beneficial, you can simplify the process even more and benefit from unlimited edits with the Pro plan.

Here are some of its key features:

  • Page annotation and PDF merge
  • Unique templates and distribution
  • Free eSignatures
  • Premium editing tools
  • 256-bit file encryption

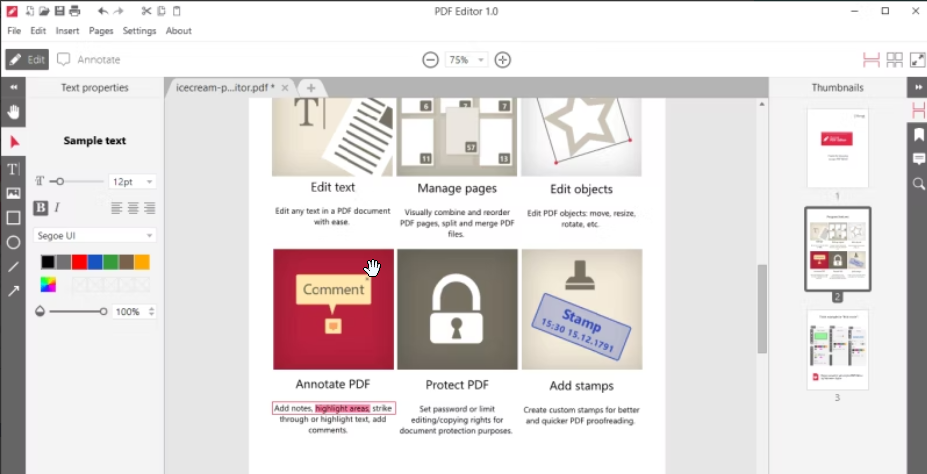
Icecream PDF Editor – Great interface

Icecream PDF Editor has both free and premium versions. It is one of the best PDF editors to use, no matter which type of document.

It has four editing modes that enable it to edit, annotate, fill forms, and manage different pages.

It gives users the ability to change to other languages like French, Spain, English, etc. It secures as it gives users the option of protecting documents using passwords.

You can also add custom stamps to your PDF documents when using the editor. It has a pretty UI making it easy to use and improving the user experience.

Other features of the editor include:

  • Ability to add and remove other pages from a document
  • You can add all types of image formats to the PDF document
  • It can draw shapes, lines, and arrows to a file
  • Easy to combine and extract PDF pages

Icecream PDF Editor

Icecream PDF Editor is an all-in-one software that allows you to edit all PDFs efficiently.
Free Trial Visit Website

SwifDoo PDF – Best annotation tool

SwifDoo is an outstanding all-in-one PDF tool that allows you to convert, create, compress, merge, and sign PDF documents instantly.

It has a powerful system for PDF annotation. It offers many practical tools to help you comment on your PDF files, including highlighting, underlining, shaping, and many others, which solves your issues easily.

You can also encrypt and decrypt your PDF files as you wish. On top of that, you can add watermarks and e-signatures to your files which can protect the copyright substantially.

Other best features of SwifDoo PDF include:

  • Only takes up 10MB of disk space
  • Intuitive tabbed interface
  • Safeguard sensitive and private information
  • Fast PDF converter

SwifDoo PDF

A PDF software with exceptional features that helps you create, convert and so much more in an easier way.
Free Trial Visit Website

PDF Element – Good PDF editing features

PDF Element is an advanced editor with many modules that make it easier to handle PDFs and it’s mostly used by businesses and Fortune companies to control their content and keep it private.

With this app, it is easier to customize it by using the checkboxes, templates, buttons, and more.

You can change the fonts, check the spelling, and use OCR to edit scanned files and create and fill PDF forms.

PDF Element can protect your files using password encryption and permissions and has lots of collaboration features.

Features of PDF Element include:

  • OCR feature
  • Create and fill PDF forms
  • Password encryption and permissions
  • Collaboration features
  • Convert PDFs into other formats like images or Word documents

PDF Element

Get a PDF editor with security to protect your files using password encryption and permissions.
Free Trial Visit Website

Nitro PDF PRO Free – Great file format compatibility

Nitro is one of the most powerful and commonly used PDF editors after Adobe and Foxit editors. It has a user-friendly interface with powerful features that makes editing PDFs easier.

It has a QuickSign feature that enables users to sign documents easily, especially forms. Even more, it comes with OCR features that help in recognizing scanned documents.

You can also improve the document’s security by sending a digital certificate to the users who need access to the file.

Other features of the editor include:

  • It supports over 250+ file formats
  • Easy to collaborate with other users 
  • Has the ability to type, draw and upload photos to the document
  • Ability to share feedback through highlights, comments, and sticky notes
  • Ability to change the orientation and color of the documents

Nitro PDF Pro Free

Get a DF editor that supports over 250 file formats and presents the OCR technology essential for editing scanned PDFs.
Free Trial Visit Website

Readiris PDF editing tool – Ideal for scanning PDFs

Readiris is a management PDF software that helps convert scanned documents into editable PDFs through OCR technology. It’s easier to install and use due to its simple user interface.

It saves time by converting files in less time due to its speed to generate tables, text, graphics, numbers, words, and not only.

It offers a 10-day free trial to test for premium features if you are interested in upgrading.

Other features include:

  • It can produce colored texts and backgrounds
  • It produces documents formats that work with over 70 applications from browsers, word processing programs, design software
  • Ability to work with image formats

Readiris PDF editing tool

Get a PDF software that converts scanned documents into editable PDFs through OCR technology.
Free Trial Visit Website

PDF Candy – Great PDF converter

It’s a free online editor with over 40 features that simplify PDF editing. These tools help in the conversion of PDFs, editing, uploading, deleting, cropping, splitting, extraction, and more.

This software solution is reliable and has important features like adding watermarks, resizing pages, adding passwords, and extracting pages.

It limits performing one task per hour for freebies and 6 USD monthly for a premium upgrade.

Some of its key features include:

  • RTF to PDF conversion
  • The option to add watermarks
  • You can extract text and images
  • PDF rotation

PDF Candy

A free online editor with over 40 features and a Jack-of-all-trades when it comes to PDF editing.
Free Trial Visit Website

Foxit PDF – Lightest PDF editor

Foxit is one of the best free PDF editors working with the Windows 11 version. Foxit is lighter and has many features compared to the other PDF editors.

It has a text viewer mode that enables text display like a Notepad-like view and simplifies the formatting. You can use this PDF editor to sign documents with your handwriting or signatures.

Some of the best features of Foxit PDF include:

  • Easy to collaborate with others when working in a team
  • It has many editing features, i.e., merging and adding PDF pages recognizing OCR documents
  • Has advanced security features that protect the PDF from unauthorized users

⇒ Get Foxit PDF

TinyWow – Free online PDF editor

TinyWow - Windows 11 free PDF editor

With advanced features like eSign, Remove Password, Split, Compress, and Rearrange, TinyWow is a free and easy-to-use PDF editor available to fulfill all your editing needs.

Add animated GIFs, dancing emojis, or even create your own mini-movies within your PDFs and bring your PDFs to life.

This tool lets you highlight, underline, and strikethrough text in vibrant colors that practically jump off the page.

You can edit PDFs, convert them to Word, Excel, & PowerPoint, merge PDFs, and even convert JPG images to PDFs without any hassle.

Its PDF Translator feature can translate the PDF document into the desired language, all you need to do is upload your PDF, and within a couple of minutes, you get the output.

Some of the best features of TinyWow include:

  • Crop, rotate, merge, and compress PDF files with ease
  • Removes the watermark from the document
  • Extracts text from PDF
  • Converts MS Outlook file to PDF

⇒ Get TinyWow

Why should I save my documents as PDF?

These editors give users, businesses, and students the ability to change PDF documents that are protected from editing.

PDFs are important when dealing with documents. It ensures that the format and layout of the document aren’t altered.

When creating PDFs, you can merge different files like images, screenshots, and Word documents to form one PDF document making it the best to use.

There are also browser-based PDF editors that can’t match the desktop editor’s features. The Internet provides many free PDF editors for Windows 11.

The web-based programs can help if you are in a hurry and want to edit the documents immediately.

Most of them limit their extensive features, which require a subscription making it hard to enjoy the benefits you would get when using installed editors on your Windows 11 PC.

Free PDF editors lack other extensive features found when using the paid version of PDF editors. Some of the features you may miss include AI editing, text recognition, and extreme formatting.

We hope at least one of the above editors caught your eye. Please give us feedback on the one you found helpful in the comments section below.

Outlook doesn’t support the connection encryption type [FIX]

Outlook users are reporting Outlook does not support the connection encryption type error after installing a new update for Windows OS and Microsoft Office 2010 and above.  This error prevents the user from sending and receiving emails on their Outlook client.

Since this error is so problematic, today we’ll show you how to fix it.

What to do if Outlook does not support the connection encryption type?

1. Check your connection

  1. This error usually occurs if the user’s computer does not have a stable Internet connection. The first thing you should do here is to check whether you have a working Internet connection.
  2. Try to open any web page and check if the Internet connection is fast enough to work with the Outlook client.

2. Check your Outlook Email Client Settings for SSL

  1. Launch Outlook and click on File.
  2. From the right pane click on Account Settings and select Account Settings from the drop-down menu.Outlook Encryption error outlook does not support the connection encryption type
  3. Next click on Change Account Settings.
    Change Account Settings - disable Encryption outlook does not support the connection encryption type
  4. Click on More Settings.
    More Settings Outlook outlook does not support the connection encryption type
  5. Open the Advanced tab.
  6. Here uncheck “This server required an encrypted connection (SSL)” option.
  7. On New version of Outlook, click the Security tab after clicking on More Settings.
  8. Uncheck “Encrypt data between Microsoft Outlook and Microsoft Exchange”.
  9. Click Apply and OK to save the changes.
  10. Click on Next to change the profile settings.
  11. Close the Account Settings window and check if you are able to resolve the error.

3. Uninstall feature update

  1. Click on Start and select Settings.
  2. Click on Update and Security.
  3. Click on Windows Update. 
  4. Click on View update history.
  5. Under View Update History, click on Uninstall Updates.
    Uninstall Features Updates outlook does not support the connection encryption type
  6. Now go through the installed updates and select the most recently installed KB update. Select the update click on Uninstall.
    Uninstall Features Update outlook does not support the connection encryption type
  7. After the updates are uninstalled, reboot the system and check for any improvements.

4. Turn Off Firewall

  1. Click on Start and select Settings.
  2. Go to Update and Security.
  3. Click on Windows Security.
  4. Click on Firewall and Network Protection.
  5. Click on current active network and turn off Windows Defender Firewall.
    Disable Windows Firewall outlook does not support the connection encryption type
  6. If you have antivirus software running, check if the antivirus program has its own firewall.
  7. Also, disable your antivirus software for an hour, and check if that helps.

5. Repair Outlook

  1. Press Windows Key + R to open Run.
  2. Type control and press OK.
  3. Now go to Programs > Programs and Features. 
  4. Select Microsoft Office and click on Change button.
  5. In the Repair Window, you will two options. Quick Repair and Online Repair. 
  6. First, select Quick Repair as it does not require Internet connection and the repair process is quick. After that, check if the Outlook client is working fine.
    Quick and Online Repair Outlooks outlook does not support the connection encryption type
  7. If that does not work, click on Online Repair and click the Repair button. Wait for the repair process to complete.

There you go, several quick solutions that might help you fix Outlook does not support the connection encryption type, so be sure to try them all.

How To Send Secure Email In Outlook [Full Guide]

Have you ever sent an email to the wrong person or meant to send it to one person but mistakenly sent it to someone else? For example, you may want to send confidential information over email, but you don’t want your message to be easily accessible. 

To prevent unauthorized access, you can use Outlook to encrypt the message. Read on to find out how to send secure email in Outlook.

Does Outlook offer secure email?

Outlook offers secure email features. Most people are familiar with the basic security features, such as the ability to password-protect emails and prevent recipients from forwarding or copying messages. But there’s more to Outlook security than that.

  • Encrypted email – Although there exists email encryption software, Outlook also offers secure mail by encrypting messages and attachments. This means that no one can read them except for the intended recipient. Encrypted emails are sent using Transport Layer Security (TLS) or Secure Sockets Layer (SSL), which is a protocol used to verify the identity of a server and create an encrypted connection. 
  • Office 365 Message Encryption – Office 365 Message Encryption is a service that lets you send and receive encrypted emails. This can be useful if you want to protect information from unauthorized access, for example, when sending sensitive documents to external parties. It also works with most email clients.
  • S/MIME certificates – S/MIME stands for Secure/Multipurpose Internet Mail Extensions and is an open standard for public key-private key encryption and signing of email messages. S/MIME uses RSA encryption technology to digitally sign and encrypt emails so that only the intended recipients can view them. 
  • Signatures – These are for adding an extra layer of protection against spoofing and phishing attacks. They make sure that each message you send is coming from an authorized account by verifying that it’s actually coming from your inbox address. You can also use email signature software if the built-in doesn’t offer much customization. Alternatively, you can add email-scanning software to check for malware.
  • Outlook add-ins – In addition to the built-in protection for Outlook, there are several third-party security add-ins available in the Office Store that can help you protect your email account. Outlook add-ins are small programs that can be used to extend the functionality of Outlook. 

How can I send a secure email in Outlook?

1. Individual email messages

  1. Launch the Outlook app and click on New email.
  2. Navigate to the Options tab and click on the arrow next to More options.
  3. In the Properties dialog that pops up, click on Security Settings.
  4. The Security Properties dialog will open and check the Encrypt message contents and attachments box.
  5. Go to Security under Security setting, and in the drop-down menu, select S/MIME certificate, then press OK.
  6. Now, when you send the message, it will be encrypted.

Outlook users who want to send S/MIME-protected emails must install a S/MIME certificate on their computer and configure their Outlook settings accordingly.

2. All emails

  1. Click on File at the top left corner of the Outlook homepage and select Options.
  2. Navigate to Trust Center, then select Trust Center Settings.
  3. Select Email Security and check the Encrypt contents and attachments for outgoing messages box.
  4. Now click on Settings under Encrypted email.
  5. Navigate to Certificates and Algorithms, and under Signing certificate, select S/MIME certificate, then press OK.

What does encrypting an email do?

Encrypting an email is a way to protect the contents of your message from being accessed by others. If you’re sending sensitive information over email, it’s essential to ensure that no one but the intended recipient can read it.

The encryption process occurs in two steps. First, you need to encrypt the message so that nobody can read it without the correct key. Then, it would be best if you decrypted it with the right key. So, how do you open an encrypted email in Outlook?

You’ll see a lock icon next to the sender’s name if you receive an encrypted email. You can open the email by clicking the lock icon. You will then be prompted to enter the security key to reveal the content of the email.

Encrypting your emails doesn’t mean you send them in secret code. It just means that only the person with the correct decryption key can open them. Now that you know encryption, you may wonder: Where is my Send Secure button in Outlook?

When you send a new email message, you can find the Send Secure button under the File option at the top left corner.

And that’s how to send emails using Outlook securely. Should you encounter any issues, such as Outlook failing to open in Windows 11, we have a dedicated guide for you.

Outlook.com is part of the Microsoft Office suite, so it’s no surprise that it offers a few email security features, among other noteworthy features you need to look out for. And should you encounter issues sending encrypted emails, check out our article.

Further, you can install multi-factor authentication software to add an extra layer of protection for all your accounts.

We also have an exciting comparison of Outlook vs. Gmail if you are in the market for a reliable email client.

Let us know what other security measures you have when sending emails below.

Fix: Printer Printing Blank Pages in Between [HP, Epson, Canon]

We print various documents frequently, but some users reported that their printer runs a blank page between every printed page.

Obviously, the printer printing blank pages in between is no standard scenario and it can be frustrating to deal with. In comes the big question: why does my printer print blank pages in between?

The issue is most likely related to your drivers, so be sure to reinstall or update them. However, the root cause is often tricky to find and you can even deal with a conjunction of factors.

Why does my printer print a blank page after every printed page?

When using your browser to print, third-party extensions can also cause havoc. If your printer prints blank pages every other page, disabling these modules could help.

Improper printer settings, debris or junk accumulated in the cartridges or trays as well as other features can be responsible for printer printing blank pages in between issues.

And speaking of printer issues, here are some common problems that users reported:

  • Printer prints blank page after each job
  • Printer skipping pages
  • HP, Epson, Brother, Canon printer printing extra blank pages, blank pages in between
  • Printer runs a blank page between every printed page
  • Printer prints blank pages every other page
  • Google Docs printing blank pages every other page – If Google Docs is not printing as it should, you might want to quickly clean up the browser’s cache.
  • Printer printing blank pages but has ink
  • Printer print a blank page first
  • Thermal, wireless printer printing blank pages
  • Printer prints blank pages but prints test page

This can be an annoying problem, and in today’s article, we’ll show you how to fix it properly. Just check out the solutions listed below.

How do I stop my printer from printing extra blank pages?

  1. Make sure that your cartridges are clean
  2. Perform a self-cleaning process
  3. Update your driver
  4. Reinstall your printer driver
  5. Clean your tray solenoid
  6. Make sure that the separators feature isn’t enabled
  7. Turn off advanced printing features
  8. Uncheck the print header/footer option

1. Make sure that your cartridges are clean

If you’re using an ink-jet printer, the problem might be your cartridges. According to users, sometimes your cartridges can get clogged, and that will lead to this problem.

To fix the issue, it’s advised to carefully clean them using a soft cloth. After cleaning the cartridges, check if the problem is still there.

2. Perform a self-cleaning process

  1. Go to the printer Control Panel and press and hold the Go button for about 3 seconds until all lights are on your printer.
  2. Once the lights are on release the Go button.
  3. When the process is finished, check if the problem is still there.

If the printer runs a blank page between every printed page, perhaps you can fix the problem by performing a self-cleaning process.

This is fairly simple to do, and in order to do it, simply follow the steps indicated above.

We have to mention that this process is different for each printer, so you might have to do a bit of research or check your instruction manual in order to see how to perform this procedure.

3. Update your drivers

Printer problems can be caused by outdated drivers, and if the printer runs a blank page between every printed page, we advise you to update your printer driver to the latest version.

To do that, visit the manufacturer’s website and download the latest drivers for your printer. As expected, you need to know the correct model of your printer and which drivers to grab.

If this sounds a bit complicated for you, there are many great third-party tools that can help you with that. Outbyte Driver Updater, for example, is a reliable software tool to take into consideration.

Long story short, it will update all your drivers on your PC with just a couple of clicks.

It can basically keep your system safe from any potential malfunction caused by the installation of the wrong driver version.

Therefore, install it right away using the link below and after your drivers are up to date, check if the problem is still there.

⇒ Get Outbyte Driver Updater

4. Reinstall your printer driver

    1. Disconnect your printer and turn it off.
  1. 2. Open Device Manager. To do that, press Windows Key + X and choose Device Manager from the list.

    win+x menu printer blank page
  2. 3. Locate your printer driver, right-click it, and choose Uninstall device.

    uninstall device blank page between every printed page
  3. 4. If available, check Remove driver software for this device and click Uninstall.

    uninstall blank page between every printed page
  4. When your printer runs a blank page between every printed page, the problem is most likely related to your drivers.

    If your driver is corrupted, that might lead to this problem. To fix the issue, users are suggesting reinstalling your printer driver.

    This is fairly simple to do, and you can do it by following the above steps.

    Once you uninstall the printer driver, restart your PC. Once the PC restarts, connect your printer and turn it on. Windows will try to install the default driver for your printer.

    If the default driver is installed, check if the problem is still there. If the problem is still there or if the driver wasn’t installed, move to the next solution.

5. Clean your tray solenoid

According to users, if the printer runs a blank page between every printed page, it’s possible that there’s an issue with your tray solenoid.

Sometimes these solenoids can become sticky, and that will cause your printer to use more paper than it needs.

To fix the problem, you need to open your printer and find these two solenoids and clean them. In addition, you might want to clean the solenoid for the duplexer as well.

We have to warn you that this is an advanced procedure, and unless you’re fairly familiar with your printer and its components, we suggest contacting a professional.

It’s also worth mentioning that this process will void your warranty, so if the device is still under warranty, perhaps it would be best to send it to the official repair center.

6. Make sure that the separators feature isn’t enabled

  1. Press Windows Key + S and choose Control Panel from the list of results.
    control panel blank page between every printed page
  2. When the Control Panel opens, navigate to Devices and Printers.
  3. Locate your printer, right-click it, and choose Printing Preferences.
    printing preferences blank page printer
  4. Go to the Paper tab and there you should see the Separators option. Set it to No Separators and save changes.

Many printers support the separators feature, and by using this feature you’ll print a blank page between every printer page.

However, this feature can be disabled easily from printer properties. To do that, just follow the above procedure.

After disabling this feature, the problem should be resolved and everything will start working again.

7. Turn off advanced printing features

  1. Open the Devices and Printer panel as we showed you in the previous solution.
  2. Locate your printer, right-click it, and choose Printer preferences.
  3. Go to the Advanced tab and disable all features.

According to users, if the printer runs a blank page between every printed page, the problem might be the printer’s properties.

Apparently, the advanced printing features can interfere with your printer and cause this problem, but you can disable them by doing as described above.

8. Uncheck the print header/footer option

  1. Click the Menu button in the top right corner and choose More tools > Extensions.
    chrome extensions printing preferences blank page printer
  2. Disable all extensions on the list by clicking the switch next to each extension.
    disable extensions blank page between every printed page
  3. After disabling the extensions, restart Chrome and check if the problem is still there.

Sometimes, such issues can appear while printing documents from Google Chrome. If your printer is printing blank pages in between, it’s possible that the Print header/footer feature is causing this issue.

To fix the problem, simply disable this option while printing from Chrome. If the problem is still there, it’s possible that the problem is caused by your extensions.

To fix this, disable all extensions and check if that solves the issue. If the issue doesn’t appear, enable extensions one by one until you manage to recreate the problem.

In case the issue is still here, you might want to try resetting Chrome to the default and check if that solves the problem.

Speaking of printer issues, many reported that printer is printing even pages first, and we wrote more about that issue in one of our new guides.

Which one worked for you? Tell us more in the comments area below.

How we Fixed Outlook Scheduling Assistant Greyed Out

Microsoft Outlook is one of the best email clients on Windows 10. Despite that, Scheduling Assistant is sometimes greyed out and users don’t know how to solve this issue.

When a certain on-premise Outlook user opens the Scheduling Assistant to set up a meeting, Free/Busy shows as greyed out. This is one of the many Free/Busy information retrieval issues and the weirdest part is that accessing the shared Calendar seems to work fine.

Only booking a meeting by using the Scheduling Assistant leads to the same annoying hash marks you’re also seeing. We are here to share with you a couple of procedures that will surely solve this problem, provided that you’re eager to take matters into your own hands.

Thus, to learn more about fixing this Outlook Scheduling Assistant error, continue reading.

What can I do if Outlook scheduling assistant is greyed out?

1. Delete the cache and let Outlook recreate it

Delete Outlook cache
  1. Open Outlook and access your mailbox.
  2. In the Outlook main window, click the File menu.
  3. Select the option for Account Settings.
  4. Select your Outlook Exchange account.
  5. Then, click on the Change button.
  6. It’s time to uncheck the option for Use Cached Exchange Mode.
  7. Up next, exit out of Outlook.
  8. Return to the Change Account settings to turn on the Use Cached Exchange Mode button.
  9. Again, close out of the menus to exit Outlook.
  10. Open Outlook for re-caching.

Note: This procedure can take up to several hours, depending on how much data you have in the cloud.

Outlook uses a feature called caching to communicate with servers for a better view of your email that resides on a collection of servers. This involves storing remote data temporarily on the local computer, so if the cache is corrupted, then lots of strange things seem to happen all of a sudden.

Scheduling Assistant appearing as greyed out could be one of them, so follow the instructions above to remedy potential Outlook caching issues.

2. Delete Outlook entry for the affected recipient

Outlook Scheduling Assistant entry

Trying to book a meeting should work like a breeze, yet those hash marks in Scheduling Assistant prove otherwise. If accessing the shared folder is working, then try deleting the entry for the affected recipient in Outlook.

After completing this simple fix, many users forget all about the corruption of that entry and everything starts working again.

3. Run Test E-mail AutoConfiguration

Outlook Test E-mail AutoConfiguration

Alternatively, you may check the WebServices Virtual Directory settings, and run the Test E-mail AutoConfiguration on the Outlook client.

Verify the URLs returned from the server. If there’s nothing out of order here, it could be a misconfiguration proxy issue.

Conclusion

Not being able to see the Free/Busy status when in the Scheduling Assistant in Outlook is frustrating. The entire row is grayed out, yet simple fixes such as the ones described here should do the trick. Browse through the page to find the right solution for you.

If you need further assistance, then you can always contact us by using the comments area below.

READ ALSO:

5 Easy Fixes to Facebook Loading Slow on PC [All Browsers]

The multitude of social media features dedicated to sharing videos and photos in real time often causes Facebook to run slow. This happens on all browsers.

While other sites might load at a regular speed, Facebook will still have issues because it is a complex platform and needs quite a few resources.

However, it’s not just something that happens out of the blue. You might, therefore, ask why Facebook is so slow sometimes. So, why does Facebook take so long to load?

Let’s take a closer look to see what that’s all about.

Why is Facebook so slow on my computer?

Loading issues are closely linked to faulty, weak, or otherwise impaired Internet connections, so you might want to start troubleshooting by closely examining your network.

If you have tested your network and it’s fast, but Facebook is still loading slowly, try closing some tabs from your browser and other unnecessary apps. Every tab and app consumes resources (CPU and RAM), and Facebook needs its fair share.

Finally, browser extensions are known to interfere with other apps and programs frequently, so you might want to rule out this possibility as well.

  • Facebook is slow on Chrome, loading slowly on Firefox
  • Facebook is slow, but the Internet fast
  • The Facebook app is slow-loading
  • Facebook loading problem
  • Facebook slow-loading pictures

In this article, we will bring a few easy solutions to help you fix this problem on your current web browser too.

How do I fix Facebook loading problems?

1. Delete the browser cache and cookies

  1. Start Chrome.
  2. Click on the Settings menu (the three vertical dots), hover on History, and then select History from the context menu.
  3. LClick on the Clear browsing data option.
  4. From the drop-down menu, select a Time range for which you want to clear the cache.
  5. Checkmark all the boxes, then click on Clear data. You may keep the Browsing history if you really need to.

When a browser or a web app starts to move slower, you should immediately think about clearing the cookies and cache files.

We have shown you how to clear the cache and cookies from Chrome, but the procedure is very similar to any other popular browser out there.

2. Disable extensions on your browser

2.1 Google Chrome

  1. Open Chrome.
  2. Click the Extensions icon (that looks like a piece of a puzzle) from the top right and select Manage extensions.
  3. Disable all the third-party toolbars installed.

Why is Facebook so slow on Chrome? Well, browser extensions are known to slow down your browsing experience and this can impact all online programs that you might be using, including Facebook.

Thus, you might want to disable these modules if Facebook is loading slowly.

2.2 Mozilla Firefox

  1. Open the browser, access the Tools menu, and select Add-ons to open a window.
  2. Select the Extensions or Plugins section.
  3. Click on the extension you want to disable and then choose Disable.

If Facebook is not working on Firefox, you might need to disable the pug-ins or complementary modules in order to give it a proper boost.

We have outlined how to disable Chrome and Firefox extensions because most readers who complain about slow Facebook are using them. However, the method is very similar if you’re using another browser.

3. Use a reliable VPN

Even if you have a good Internet connection, using a high-quality VPN is the best option for fixing Facebook running slow on all browsers.

With PIA, you get the best and most secure VPN experience thanks to features like high-speed downloads and ad-blocking services that protect your PC from ads, malware, and more.

Private Internet Access

Get PIA and enjoy a faster & overall better social media experience right away!
Check price Visit website

4. Remove and reinstall the browser

  1. Go to the Start menu, then select Control Panel.
  2. Click Add/Remove Programs.
  3. Choose the browser from the list and click Remove.
  4. Restart your PC.

Sometimes, the best way to make your browser load correctly is to reinstall it. This solution will also improve your PC performance, and your Facebook will load faster.

5. Use a different browser

Facebook is working on many browsers, and if you’re not happy with the results, even if you’ve reinstalled yours, you should consider replacing it.

Luckily, we have a selection of the best browsers for Facebook. You should test a few and see which one is better for you.

Problems with Facebook Memories may also cause this issue, so read this article for more information.

We also have a great guide on how to fix You were misusing this feature by going too fast error, so you might want to check it out.

As you can see, several issues can cause Facebook to run slow on all browsers. We’d love to hear your opinion, so don’t leave the comments section.

Starfield may release on International Day of Human Space Flight (April 12)

It is one of the most anticipated games of the decade thus far, and Starfield will most likely arrive at last sometime in 2023. While an official release date has not been announced, it seems all but certain it will fall within the first half of the year (as confirmed on the game’s newly up-and-running support page over on Bethesda.net), with many pointing to May or June.

However, some fans are speculating that Starfield’s release could come a bit sooner. On April 12th, to be exact: the International Day of Human Space Flight. The idea was first brought up on the Starfield subreddit, with one user stating on a separate subreddit that “that would be very fitting.”

While this is purely fan speculation, such a move would be perfectly in line with Bethesda’s history of aiming for memorable release dates for its games, as it did with the 11/11/11 release date for The Elder Scrolls V: Skyrim. We will just have to wait and see—though likely not too much longer—if these fans are truly on to Bethesda’s plans.

Via Game Rant. 


Catch the huge Xbox Last Chance sale before it ends

There have been a lot of big deals on Xbox games lately with the Black Friday and end-of-year Countdown sales. The season of savings continues—but only for a short time—with the massive Xbox Last Chance sale.

These deals are expected to last up to around January 10th, though individual game discounts may vary. Literally hundreds of deals on Xbox games are up for grabs, some of them as much as a whopping 80% off! While it is far too much to go into here, we’ve listed some of the highlights below. Feel free to check out all the deals of the Xbox Last Chance sale on Xbox.com.

More deals await with the Xbox Last Chance sale, and there is bound to be something for every type of gamer. Is there anything on our list that has you excited for the sale? Let us know in the comments.

Featured image via Xbox.com. 


Too Many Different Cell Formats in Excel Error: Fix it

The Too many different cell formats error message is one that can pop up for some Microsoft Excel users when they try to add formatting to a spreadsheet cell (or cell range).

Or the error message might pop up when you try to copy cells and data from another spreadsheet file or source into a sheet.

Consequently, Excel users can’t apply further formatting to the spreadsheet when that error message pops up.

The cell formats error occurs when an Excel file reaches the maximum number of cell format combinations.

Excel 2003 users can add a maximum of 4,000 unique cell formatting combinations to a spreadsheet. You can apply 64,000 unique cell format combinations in later Excel versions.

Those might be large figures but remember that unique formatting counts any kind of cell formatting for fonts, borders, alignment, numbers, fill colors, etc. So a large spreadsheet might reach the max formatting amount.

Does the Too many different cell formats error message pop up for one or more, of your Excel spreadsheets? If so, check out the “cell formats” error fixes below.

How do I fix common Excel cell format errors?

1. Clear all the spreadsheet’s cell formatting

  • Press the Ctrl + A hotkey to select all the cells in the spreadsheet.
  • Select the Home tab shown directly below.

Press the Clear button to open the submenu in the snapshot directly below.

  • Then select the Clear Formats option. Thereafter, you can apply new formatting to the spreadsheet.

Wrong formatting can also cause

2. Repair the Spreadsheet With Stellar Repair for Excel

An Excel file might also be corrupted if the cell formats error message pops up when you try to open it. You can fix corrupted Excel spreadsheets with the Stellar Repair for Excel software for Windows.

You can also try out a demo version of the software by clicking Free Download.

When you’ve installed and opened the software, you can click Select File to select the spreadsheet that might be corrupted.

Click Scan to start the scanning. After that, you’ll see a preview of the corrupted file; and can press the Repair button to fix it.

So that’s how you can fix the Too many different cell formats error. Reducing unique cell formatting in spreadsheets will certainly resolve the issue when you can edit the sheets.

If you can’t open the file in Excel, check out the Style Reduction Tool and Stellar Repair for Excel software, or try editing the spreadsheet with an alternative application.

Stellar Repair

Make sure your files are in top shape with this powerful software.
Check Price Visit Website

3. Add a standard font to all cells and remove fill colors

  • First, press the Ctrl + A keyboard shortcut to select all spreadsheet cells.
  • Then click the font menu on the Home tab to select a new font for all the cells.
  • Click the Fill Color button to open the palette as in the snapshot directly below.
  • Select the No Fill option to remove all fill colors from the spreadsheet. Then all the spreadsheet cells will have the same font and will not include any fill color formatting.

Clearing all a sheet’s formatting, however, might be a slightly drastic fix. If you prefer to retain some of the formatting in the spreadsheet, reducing the amount of unique cell formatting is a better fix.

One of the best ways to do that is to add a standardized font to the spreadsheet so that all the cells have the same font.

In addition, removing all separate fill colors in an Excel sheet might also reduce the amount of unique cell formatting.

4. Select the Clean Excess Cell Formatting option

  • Click the File tab and select Options to open the Excel Options window.
  • Click Add-ins on the left of the Excel Options window.
  • Then click the Manage drop-down menu to select COM Add-ins.
  • Select the Inquire check box in the COM Add-ins window, and then press the OK button.
  • Thereafter, you can select an Inquire tab on the Excel window.
  • Click the Clean Excess Cell Formatting button on the Inquire tab.
  • Select to clean all worksheets in the spreadsheet. Thereafter, click Yes to save the spreadsheet changes.

Remember that blank Excel spreadsheet cells can also include formatting.

For example, a column will include the same font formatting in blank cells and those with data in them if you apply the same font to the whole column.

Thus, blank cells that aren’t in use can also increase the number of uniquely formatted cells and cause # Value error; read this guide to learn more about it.

As such, removing excess formatting from a spreadsheet is another potential resolution for the “cell formats” error.

You can do that quickly with the Inquire add-on’s Excess Cell Formatting option. Inquire is an add-on in Excel 2013 and more recent versions.

5. Check out the Style Reduction Tool for Microsoft Excel

The Too many different cell formats error message might pop up when some users try to open a spreadsheet file.

Consequently, the Excel spreadsheet file doesn’t open, and the users can’t get rid of cell formatting as outlined above. In such circumstances, the Style reduction tool for Excel might be worth noting.

That’s a utility that fixes the cell formats error by reducing duplicate formatting styles.

Click the Download button to save the software to a folder. Then open the Style reduction tool window shown below, and click the File button to select the spreadsheet to fix.

Press the Analyze button to scan for duplicate styles, and click Fix to remove the formatting.

6. Open the file in alternative spreadsheet software

Alternatively, you could try opening the Excel file in alternative software. Then, you might be able to open and apply more formatting to the spreadsheet in the alternative application without any issues.

There are numerous spreadsheet software tools that also support the Excel file format. LibreOffice Calc is one application that you can open Excel files in, and you can also download that office suite.

Top 5 Best Antivirus Solutions to Use With Malwarebytes

With so many options on the market, finding the best antivirus to use with Malwarebytes can be challenging. However, we know that cyber-security is paramount these days. Planning to use a second antivirus software with Malwarebytes can be an effective way to double-check your system.

And although since the release of Malwarebytes 4, the software has become much more than a malware detector, this remains its most vital aspect. Security must constantly be reinforced, so by this read, you will have the necessary information to fight against potential threats and a more precise grasp of what Malwarebytes can do.

How do you choose the best antivirus software?

Tip icon Tip
The four main pillars to take into consideration:

➡ Protection
➡ Performance
➡ Usability
➡ Intuitiveness

They may seem abstract at first glance, so let’s break them down to see what we mean by each of them individually.

Those aspects need consideration whether you are an everyday user or a small business. Of course, large corporations will hold other criteria, as they usually don’t have to be as conservative with their resources as the average user.

Protection

This is more straightforward. It boils down to the software’s capacity to detect and effectively remove malware infections. A higher score here will tell us that the product can detect and remove most threats.

You probably heard of worms and Trojans, but here is a glimpse of the bigger picture regarding potential threats. All of the above fall under the umbrella of a Trojan infection. They’re different in terms of severity, but as you can see, there is a whole army of them.

And that’s only from a Trojan perspective. Each virus, malware, or spyware infection has a similar family tree. The more advanced the antivirus, the better it can detect all these family roots.

Performance

The performance will measure the impact of the antivirus on your device. Like all software, antiviruses run on computer resources. Some are more forgiving, while others require much of your available processing power.

Keep in mind that you will be running two different antivirus solutions. And although most of the time, you won’t be doing it simultaneously, this remains an aspect worth considering.

Usability

The final pillar will deal with the impact an antivirus solution has on the computer. So translated, we want to see if, during our scan, we can still use our PCs for daily tasks.

Now that the foundation has been laid, let’s look at our pick for the best antivirus to use with Malwarebytes. Note this list is in no particular order.

All options presented are equally impressive, so rest assured that whatever decision you make, you’ll get that coveted extra protection.

Intuitiveness

This quality refers to the general friendliness of the UI, short for User Interface. There are software examples out there, such as video editing ones, that are inherently convoluted.

That’s because they are usually intended for large-scale projects or require excellent, granular control over every detail.

The same does not apply to antivirus software. Being a general-purpose, essential piece of tech, it should be able to be used by everybody. Thus, design intuitiveness and ease of use are factors.

What is the best antivirus to use with Malwarebytes?

TotalAV – Works alongside Malwarebytes

TotalAV antivirus scan

TotalAV is a sensible companion to Malwarebytes. It provides the always-on antivirus layer, with real-time protection and WebShield for malicious and phishing sites, while Malwarebytes handles second-opinion scans. The two coexist without conflict.

On top of that, TotalAV’s tune-up tools take care of junk files, startup items and browser clutter, and one subscription covers Windows, Mac, Android and iOS. It is a simpler and cheaper suite than TotalAV, which for a companion product is a point in its favour.

  • Always-on real-time protection
  • WebShield for phishing and malicious sites
  • Coexists with Malwarebytes
  • Junk cleaner and startup manager
  • Windows, Mac, Android and iOS
TotalAV

TotalAV

Keep cyber threats at bay with this award-winning Internet Security package.
Free Trial Visit Website

Bitdefender Antivirus Plus – Proven cross-platform antivirus tool

Already a classic, Bitdefender has a proven track record of providing solid protection against most computer threats.

It includes real-time protection, meaning it will monitor any possible intrusion in your software. However, this comes at a cost, as Bitdefender may use many of your available resources.

In terms of general Internet protection, Bitdefender is one of the top choices on the market today. With the Secure Browsing feature, Bitdefender works in the background and keeps you aware of potentially harmful websites.

Nowadays, many jobs have gone remotely, so having an advanced webcam and social network protection is more imperative than ever. Bitdefender is also cross-platform supported, meaning it will run the same, regardless of your personal operating system preferences.

These features do come at a cost in terms of CPU resource consumption. Bitdefender is not the most aggressive in this regard, but specific minimum requirements will need to be met.

In terms of memory, the minimum requirement to run Bitdefender is 2GB of RAM. But, from our experience, that will provide a bad experience, rendering your PC unusable.

But, most modern devices come packed with more RAM than that, and with feature updates, software generally becomes more adequately optimized. So, this shouldn’t be a huge issue.

Bitdefender key features:

  • Advanced Threat Defense
  • Anti-Phishing
  • Safe Files
  • Webcam Protection
  • Secure Browsing
  • Social Network Protection
  • Cross-platform support
Bitdefender Antivirus Plus

Bitdefender Antivirus Plus

Protect your business and online safety with Bitdefender’s premium solution.
Check price Visit Website

Kaspersky Standard – Effective built-in malware tool

The Kaspersky family has developed a wide range of tools for multiple purposes. The one that will suit the everyday user the best is Standard.

As you may have guessed, one of Kaspersky’s key features is precisely this family tree of tools. So basically, with specialized protection in a particular area, Kaspersky has the solution for you.

We can already see that of Kaspersky’s main selling points is the granular control that it gives you. However, another point worth considering is the Vulnerability Assessment.

This can prove to be an invaluable rapport, as it grants you precious insight into your device’s susceptibility to an attack. Based on that, Kaspersky runs its algorithms to determine the best action for enhanced protection.

Apart from that, Kaspersky is also friendly in terms of resources. So, you don’t need a high-end PC to run Kaspersky and other apps simultaneously.

It also has an effective built-in malware removal which, coupled with Malwarebytes, will offer a second-opinion check of your PC.

Although it doesn’t come with a Free version, it does come with a generous 30-day trial period. That should be more than enough to get a feel of the software, as its interface and overall UI are incredibly user-friendly.

If cost represents an issue, you can always go for other similarly effective free antivirus options.

Kaspersky key features:

  • Encryption Management
  • Cloud Discovery: Monitoring cloud services
  • Cloud Discovery: Blocking access to cloud services
  • Vulnerability Assessment
  • Protection of mobile devices
  • Web Control
  • Protection against ransomware
Kaspersky Standard

Kaspersky Standard

Check all the layers of safety are in place with Kaspersky Standard.
Free Trial Visit Website

Avast Business Endpoint Protection – Advanced anti-spam features

Another great antivirus to use with Malwarebytes is Avast. Its incredibly intuitive interface makes Avast such an easy choice to recommend. On top of that, it also comes with many security options that will satisfy most of your needs.

Avast has been certified 100 on multiple trusted review platforms, making it an ideal choice for single individuals, small businesses, and large corporations.

We especially recommend the Business Endpoint version, which has enhanced security protocols to protect your business, whether small, medium, or even large corporations.

Avast is powered by artificial intelligence, so you can safely assume it uses the most cutting-edge technology currently available.

Artificial intelligence implies that Avast can adapt to the challenges provided by new and emerging malware, and figure out how to create new and better, security protocols effectively.

A specialized Wi-Fi security scan and anti-spam feature are also worth noting, as many attacks come through these networks or phishing emails.

It also comes with a free trial, so you check out all the premium features before choosing this product. Then, test it and see if it checks all your needs. We’re almost certain it will!

This versatility, paired with excellent performance, makes Avast very easy to recommend and one of the best antiviruses to use with Malwarebytes.

Avast key features:

  • AI-powered
  • Automatic Software Updater
  • Secure DNS
  • Home Network Security
  • Anti-spam features
  • Specialized scan for Wi-Fi security
  • Real-time protection
Avast Business Endpoint Protection

Avast Business Endpoint Protection

Avast is a complete solution to guard your business against cyber threats.
Check price Visit Website

Norton AntiVirus Plus – Effective and trusted antivirus

Last but not least, we have Norton AntiVirus Plus. As we’ve said in the beginning, this list is in no particular order, as Norton is one of the best choices regarding malware protection and overall security.

Norton comes with a new and improved anti-malware engine. So using it with Malwarebytes makes sense and is highly effective.

Real-time protection is also amongst the best; Norton silently monitors everything from downloads to your web activity.

Apart from this, Norton also offers a password manager to safely and securely keep all of your passwords in one place and present them to you when you need them. It also comes with a PC cloud backup option that can be handy if you wish to store important files.

It is highly effective against malware, spyware, ransomware, phishing attacks, and other modern online threats. Overall, a very versatile, compact product suited for every type of user. We recommend Norton as a top choice antivirus software to use with Malwarebytes.

Norton’s main features:

  • Built-in firewall
  • Built-in password manager
  • Effective for gamers
  • Anti-phishing and anti-spyware filters
  • Very intuitive UI
  • Protection against a wide range of threats
Norton AntiVirus Plus

Norton AntiVirus Plus

Intuitive, trusted, and effective antivirus tool that ensures complete protection for every type of user.
Check price Visit Website

Windows Defender will be the first choice for some, especially since it’s a free product already built-in into your operating system.

Although it was significantly improved over the years, we recommend you go for one of the options presented above. Performance-wise, no wonder being a Microsoft product, Windows Defender performs very well.

Defender is more than capable of recognizing most threats in terms of detection, landing a perfect 6/6 score on AV-Test. The main pain point, however, comes from false positives.

False positives are harmless files or links that are treated as threats. Apart from this, another drawback can be the lack of extra features.

For essential protection, Windows Defender can do the job, but we can’t recommend it as the best pairing solution with Malwarebytes for the abovementioned reasons.

Choosing the best antivirus to use with Malwarebytes comes down to personal preference. All of the above options are fused with cutting-edge technologies.

The price point is also another aspect worth considering. We recommend you use as many as possible in their trial version to make an informed decision.

Ultimately, your choice will be based on your context and requirements. What other options would you consider? Feel free to tell us in the comments!

Windows Upgrade Error 0xc1900208 [Easy Guide]

The error 0xc1900208 can appear while you’re trying to upgrade to the latest version of Windows 10. This happens when there is software on the computer that is incompatible with the latest Windows 10 build.

As a result, you won’t be able to upgrade at all. In today’s article, we’re going to show you how to fix error 0xc1900208 once and for all.

How to fix the error code 0xc1900208?

  1. Reset the Windows Update components
  2. Uninstall the incompatible apps
  3. Run a third-party solution

1. Reset the Windows Update components

The first way to fix error 0xc1900208 is to reset Windows Update components. This is quite simple, and you can do it by following these steps:

  1. Open Command Prompt as administrator.
  2. When the Command Prompt opens, run the following commands:
    command prompt 0xc1900208


    • net stop bits
    • net stop wuauserv
    • net stop appidsvc
    • net stop cryptsvc
  3. Enter the commands below to create the backup of SoftwareDistribution directory:
    • ren %systemroot%SoftwareDistribution SoftwareDistribution.bak
    • ren %systemroot%system32catroot2 catroot2.bak
  4. Use these commands:
    • net start bits
    • net start wuauserv
    • net start appidsvc
    • net start cryptsvc
  5. Restart your computer and try to update.

2. Uninstall the incompatible apps

Some antivirus applications are known to cause error 0xc1900208. However, you can fix this problem simply by finding and removing problematic applications.

  1. Open the File Explorer by pressing the Windows key + E and paste this C: WindowsPanther in the bar and press Enter.
  2. Right in the folder, search for the Compat*.xml file and open it.
  3. You will find the name of the app that is incompatible with your system.
  4. Uninstall that application from your PC and try to upgrade again.

Bear in mind that some applications might leave leftover files that can cause future issues, therefore it’s important to remove those files as well.

3. Run a third-party solution

If you’re going for third-party software, you might as well go for the best in the niche.

Firstly, using an uninstaller tool might be extremely beneficial to remove stubborn apps from your system. You can, of course, perform this task just using Control Panel to uninstall unwanted programs.

Yet that can leave temporary files and broken registry files behind that might cause errors. That’s why uninstaller software plays an essential role here, detecting the installed programs and permanently removing them from your computer.

Our top recommendation in this regard is CCleaner. It scans your PC for junk files and removes them in just a few clicks and it also integrates its own uninstaller.

Just locate your app in the list, select it and click the uninstall button. CCleaner will uninstall the app and completely remove any files related to it.

We hope these solutions were able to help you fix the error 0xc1900208 on your PC.

Let us know how it went for you and feel free to share any other possible solutions via the comments section below.

If you are interested in reading more about the topic, check out more handy solutions in our Windows Update Hub.

Also, for those of you that are interested in getting the best out of your operating system, don’t be shy to explore our Windows 10 Guides for more in-depth information.

Windows Update Error 0x80246017 [SOLVED]

Windows 10 users could sometimes face an error when updating their Windows 10 version to the subsequent build.

Windows 10 update error 0x80246017 appears, and the update installation gets stuck. The entire error message reads: WU_E_DM_UNAUTHORIZED_LOCAL_USER & The download failed because the local user was denied authorization to download the content.

While many users have complained about it in Windows 10, error 0x80246017 also exists on Windows 11.

Luckily, there’s a solution to this problem, and you’ll find it in this article.

How can I fix the Windows Update error 0x80246017?

1. Delete Previous Windows Installation files

The most common solution for the Windows 10 update error 0x08246017 error is deleting previous Windows installation files. To delete these files, just do the following:

  1. Open Command Prompt as admin.
  2. Type the following command and press Enter:
    • rundll32.exe pnpclean.dll,RunDLL_PnpClean /DRIVERS /MAXCLEAN
  3. Now go to Search, type disk cleanup, and one Disk Cleanup tool.
  4. Remove Temporary files and Previous Windows Installations.
  5. Reboot your computer

If this workaround didn’t get the job done, you can try with a little registry tweak, just follow the instructions shown below.

2. Reset registry keys values

Installing the new build should set the registry keys values back to normal, but if it somehow fails to, you won’t be able to install the update. Thus, the Windows 10 update error 0x80246017 or some similar error might appear. To fix this issue, just follow these instructions:

  1. Go to Search, type regedit and open Registry Editor
  2. Navigate to the following path:
    • HKEY_LOCAL_MACHINESOFTWAREMicrosoftWindowsSelfHostApplicability
  3. Find BranchName and check if it shows FBL_AWESOME1501 (If it doesn’t, change it)
  4. Locate TresholdRiskLevel and change it to low
  5. Find TresholdInternal and delete it
  6. Find TresholdOptedIn and delete it
  7. Close Registry Editor

3. Run the Update Troubleshooter

windows update troubleshooter update error 0x80246017

Windows 10 also features a built-in troubleshooting tool that can help you to fix general update issues and bugs. So, if the two methods listed above didn’t work, you can go to Settings > Update & Security > Troubleshoot and run the troubleshooter.

4. Disable your antivirus

As many Windows 10 users have found out by now, sometimes your antivirus software may trigger various update errors. The quickest way to fix this issue is to simply disable your antivirus tool and re-enable it after you’ve installed the latest updates.

That would be all, after performing one of these fixes, you should be able to install the latest build update for your Windows 10 Technical Preview build.

5. Check the status of some important Windows Services

  1. Press Windows + R, type services.msc, and hit Enter.
  2. Scroll down to the Windows Update service, double-click it, ensure it is running, and set the Startup type to Manual.
  3. Next, locate the Background Intelligent Transfer Service, double-click it, ensure it is running and set the Startup type to Manual.

If you have any questions, suggestions, or maybe you know other solutions to fix the Windows Update error 0x80246017, make sure you reach for the comments section and share your ideas.

Windows Update Error 0x80244018 [5 Ways to Fix it]

Having your Windows update halted by errors can be very frustrating, I’m sure we can all agree on that. Not being able to access new features or fix those bugs in the current version you’re running can really put a damper on things.

I know how exasperating it can be when your system throws that dreaded error message, “There were problems installing some updates.” But don’t worry, as I’m here to share a few solutions that will help you tackle this issue head-on.

This guide is packed with practical tips to resolve the Windows update error 0x80244018, so let’s dive right in and get your system back on track.

Why am I getting Windows update error 0x80244018?

After some research, we were able to list out some of the most common reasons users are getting the Windows update error 0x80244018.

How can I fix Windows update error 0x80244018?

Before you go ahead and check in with the advanced troubleshooting solutions, we would advise you to apply the below-mentioned fixes and hopefully resolve the problem quickly.

  • Shut down your PC and wait for about 5 mins before turning it on. A restart will help you reload all the system files from scratch.
  • Check if your internet connection is working perfectly fine or not.
  • If you have installed a VPN, we recommend uninstalling the program from your PC.

Now, let us apply the solutions the advanced solutions.

1. Use the Windows update troubleshooter

  1. Press the Win + I buttons to open Windows Settings.
  2. Click on Troubleshoot on the right side.
  3. Select Other troubleshooters.
  4. Click the Run button next to the Windows update option.
  5. Your system will start detecting the issues and will prompt you to apply the fixes if there are one.

Windows OS comes with a built-in troubleshooting tool, which along with another hardware troubleshooter, also features a Windows update troubleshooter.

You can use this feature by following the above steps and fixing the problem quickly.

2. Restart the update service and rename the SoftwareDistribution folder

  1. Open the Start menu.
  2. Type the command prompt and run it as an administrator.
  3. Type the below commands and press Enter after each one.
    net stop wuauserv net stop cryptSvc net stop bits net stop msiserver ren C:\Windows\SoftwareDistribution SoftwareDistribution.old ren C:\Windows\System32\catroot2 catroot2.old net start wuauserv net start cryptSvc net start bits net start msiserver
  4. Wait for the process to complete.
  5. After completion, restart your PC.

3. Delete the ThresholdOptedIn Registry Entry

  1. Press the Win + I keys to open the Run dialogue.
  2. Type regedit and press Enter.
  3. Navigate to the below path. Computer\HKEY_LOCAL_MACHINE\SOFTWARE\Microsoft\WindowsSelfHost\Applicability
  4. Delete the ThresholdOptedIn registry entry if it is available.

Windows stores all data and information regarding our installed applications in your system. If they crash, it will cause update issues, which is why you will face Windows update error 0x80244018. Follow the above steps, delete the ThresholdOptedIn entry, and check whether this resolves the problem.

4. Check whether the BITS service is running

  1. Press the Win + R buttons to open the Run dialogue.
  2. Type services.msc and press Enter.
  3. Locate the Background Intelligent Transfer Service and double-click on it.
  4. Under the Service status, press the Start button.
  5. Select Automatic for the Startup type drop-down menu.

Services such as the Background Intelligent Transfer service should run in the background to ensure that the Windows update processes are performed smoothly. When any of these services are stopped, it could trigger update errors.

5. Turn off the Proxy Settings

  1. Press the Win + I keys to open the Settings menu.
  2. Select Network & Internet from the left side pane.
  3. Click on Proxy on the right side.
  4. Under Manual proxy setup, click the Set up button.
  5. Toggle on the Use a proxy server option.
  6. Restart your PC.

6. Run SFC Scan and DISM commands

  1. Open the Start menu.
  2. Type the command prompt and run it as an administrator.
  3. Type the below command and press Enter. sfc /scannow
  4. Wait for the process to complete.
  5. Execute the below command. Dism /Online /Cleanup-Image /Check health Dism /Online /Cleanup-Image /restorehealth
  6. Let the process complete.
  7. Restart your PC.

That is it from us in this guide. However, if you are getting Windows update error 0X800f081f, then you can check out our guide that lists a bunch of solutions to resolve the problem.

Also, we have five quick solutions to resolve the Windows update error 0x800704cf. You can also check out our guide on update error 0x800f0831.

In case you have more problems, our download error 0x80248014 guide will offer you more solutions.

Let us know in the comments below which one of the above solutions resolved the problem for you.

Posted in Fix

0x8024401f Windows Update Error: 6 Ways to Fix it

The Windows Update error 0x8024401f has been discussed in numerous Microsoft forum threads. That issue arises when users check for Windows updates via Settings. Error 0x8024401f can also arise when users try to update apps via Microsoft Store.

As a result, Windows and app updates aren’t installed. The resolutions below are primarily for fixing error 0x8024401f in Windows 10, they might also resolve the issue in 8.1 and 11 using this guide.

What causes the Windows Update Error 0x8024401f?

Several potential causes for a Windows update error with the code 0x8024401f. Here are some common ones:

  • Network connectivity issues – If your computer cannot connect to the internet or the update servers, it can cause the update to fail with this error.
  • Firewall or antivirus software – If your firewall or antivirus software is blocking the update, it can cause this error. You may need to temporarily disable these programs to see if they are causing the issue.
  • Insufficient hard drive space – If your hard drive is full or almost full, it can cause the update to fail. Make sure you have enough free space on your hard drive before installing the update again.
  • Corrupted update files – Sometimes, the update files can become corrupted during the download process. You may need to delete the temporary update files and try downloading the update again.
  • Corrupted system files – If your system files are corrupt, it can cause the update to fail. You may be able to fix this by running the System File Checker tool.
  • Pending updates – If other updates are waiting to be installed, it can cause this error. Make sure to install any pending updates before installing the update causing the issue.

These are some of the most common causes of this error. I hope this helps!

How do I fix the Windows Update error 0x8024401f?

1. Run the Windows Update troubleshooter

Windows Update troubleshooter doesn’t always fix update errors, but it’s still worth a shot nonetheless.

  1. Press the Windows key + S keyboard shortcut to open the Type here to search box.
  2. Input troubleshoot in the search box, and click Troubleshoot settings.
    Troubleshoot tab Fix Windows Update Error 0x8024401f
  3. Next, click Windows Update and select its Run the troubleshooter option.
    Windows Update troubleshooter Fix Windows Update Error 0x8024401f
  4. Click the Apply this fix option if the troubleshooter presents a resolution to you.

2. Turn off third-party antivirus software

Some users have said they fixed error 0x8024401f by disabling their third-party antivirus software, such as Comodo, McAfee, and Sophos. To do so, right-click the system tray icon for your antivirus software to open a context menu.

You can usually select a disable or turn off option on an antivirus utility’s context menu. In addition, select an option to disable the utility’s firewall if its context menu includes one.

Context menu for Norton Security Fix Windows Update Error 0x8024401f

If you discover that the antivirus is causing the problem, then you should consider getting a better antivirus.

3. Don’t utilize a proxy server

  1. Click the Type here to search button (with the magnify glass icon) on the taskbar and type proxy.
  2. Click Proxy settings to open the window in the shot directly below.
    The Use a proxy server setting Fix Windows Update Error 0x8024401f
  3. Toggle the Use a proxy server option off.

4. Reset Windows Update

  1. To do that, enter Command Prompt in the Type here to search box.
  2. Right-click Command Prompt and choose the Run as administrator option.
  3. Input these separate commands:
    net stop wuauserv net stop cryptSvc net stop bits net stop msiserver
  4. Open the C: > Windows folder within File Explorer.
  5. Right-click the SoftwareDistribution subfolder there to select Rename.
    SoftwareDistribution folder Fix Windows Update Error 0x8024401f
  6. Input SoftwareDistribution.old as the new folder title, and press the Return key.
  7. Open the System32 folder, which is in the Windows folder.catroot2 folder Fix Windows Update Error 0x8024401f
  8. Then rename the catroot2 subfolder to Catroot2.old.
  9. Open an elevated Command Prompt window again.
  10. Enter these commands to restart the services:
    net start wuauserv net start cryptSvc net start bits net start msiserver
  11. Close the Command Prompt, and restart Windows.

5. Reset the Microsoft Store cache

If you need to fix error 0x8024401f for MS Store app updates, open the Command Prompt as administrator. Then enter this command: wsreset.exe. Press the Return key after entering that command.

The wsreset.exe command Fix Windows Update Error 0x8024401f

6. Reset your Windows OS

  1. Type the keyword reset in Windows 10’s search box.
  2. Click Reset this PC to open the Recovery tab in Settings.
    The Recovery tab Fix Windows Update Error 0x8024401f
  3. Click Get started to open Reset this PC.
    Reset this PC window Fix Windows Update Error 0x8024401f
  4. Click the Keep my files option.
  5. Click Next to continue, and press the Reset button.

A few users have also confirmed that resetting Windows 10 can fix error 0x8024401f.

Those are some of the most likely fixes for error 0x8024401f.  We would like to know which solutions worked best for you, so leave us your feedback in the form of a message in the comments section below.

Windows Update Error 0x80244007 [SOLVED]

The scenario of confronting with Windows updates that are not working properly are numerous. Certain users experience the lack of any new install updates, repeated installation of the same updates, endless reboot cycles, and all sorts of error codes. For example, they describe getting the 0x80244007 error code.

This happens when they try to install certain updates by using the Windows Update function. In most cases, affected users are also receiving the following error message: There were some problems installing updates, but we’ll try again later.

The good news is that in this post we will talk about some of the reasons behind the Windows Update error 0x80244007 and offer practical troubleshooting solutions to solve it.

How can I fix the Windows Update error 0x80244007?

1. Try running the Update troubleshooter

Windows Update to fix 0x80244007
  1. First of all, select Start > Settings > Update & Security.
  2. Then, open up the Troubleshooting tab of the Settings app.
  3. Once you’re inside the Troubleshooting tab, select Windows Update under Get up and running.
  4. Then, select Run the troubleshooter from the newly appeared context menu.
  5. After successfully starting the utility, wait patiently until the initial scan is complete.
  6. Depending on the issue that you’re encountering, you might be prompted to do some additional steps.
  7. Lastly, just click on Restart.

Any time you get an error code like 0x80244007 while downloading and installing Windows updates, the Update Troubleshooter can begin scanning and help to fix the problem. Make sure you have Internet access and apply the above steps.

2. Clean out junk files with Disk Cleanup

clear junk files
  1. Enter into Start > File Explorer > This PC.
  2. Up next, right-click your main hard drive and select Properties.
  3. Don’t hesitate to click the Disk Cleanup button.
  4. You’ll then see a list of items that can be removed, including temporary files and more.
  5. For even more options, click Clean up system files.
  6. Feel free to tick the categories you want to remove.
  7. Then, just click OK > Delete Files.

One of the main causes of the Windows update error 0x80244007 is that Windows couldn’t renew the cookies for Windows Update. If you’re still seeing that dreadful message, you can also clear temporary or junk files to resolve it via Disk Cleanup.

Don’t worry if you run into any Disk Cleanup issues. Just check this guide and quickly solve the problem.

3. Run the System File Checker (SFC) utility

fire up SFC scan
  1. Open up a Run dialog box by pressing the Windows key + R keyboard shortcut.
  2. Up next, type cmd inside the newly opened text box and press Ctrl + Shift + Enter to open up a Command Prompt with admin access.
  3. Right-click it and select Run as administrator.
  4. If you are prompted for the admin password, enter the password and click OK.
  5. A new completely black window should then open. You can type commands directly into this window.
  6. Type sfc/scannow and press Enter.
  7. This process could take a long time, so feel free to minimize the window and return later.
  8. When the SFC process is finished, restart your computer and see if the issue is resolved.

Instead of spending time trying to find out the core of the 0x80244007 error message, use the System File Checker tool. This is designed to quickly fix the most common issues that may be preventing your computer from updating correctly.

4. Reset the Software Distribution folder

reset Software Distribution folder
  1. Open Start.
  2. Search for Command Prompt, right-click the result, then select Run as administrator.
  3. Then, you need to type the following commands to stop the Windows Update Service and the Background Intelligent Transfer Service, then press Enter:
    net stop wuauserv
    net stop bits
  4. Next, in the File Explorer go to the Software Distribution folder.
  5. Don’t hesitate to delete the folders inside by pressing the Delete button.
  6. Once you’ve completed the above steps, Windows 10 will reconfigure the folder and re-download all the necessary components.

If you keep seeing the same Windows update error, let us finally walk you through the steps to delete the content inside the Software Distribution folder.

When it comes to fixing the Windows update error 0x80244007, there are several things that you can do, from utilizing the built-in Update troubleshooter to resetting the Software Distribution folder.

If all the previous troubleshooting steps failed, you could also try resetting all Windows Update components or performing a repair install.

Do you know any other way to bypass this Windows update issue? Feel free to share it with us in the comments section below.

Windows Update Error 0x80070663 [SOLVED]

Since the beginning, new Windows updates have been bringing a lot of issues to users. Moreover, with the introduction of Windows 10 and the mandatory updates, the problems vastly increased.

Nonetheless, the importance of updates is unchanged: your security and overall performance are substantially improved with updates.

But, what to do if the updates won’t install and you are prompted with a certain error code, in this case, 0x80070663?

Well, this code seems to show up because of, either Microsoft Office package corruption or a general update failure. So, if you have any of the 2 mentioned issues, we prepared some workarounds for you.

How can I fix the 0x80070663 error?

1. Use SFC to check the integrity of the system file

SFC tool is a valuable built-in tool with the main purpose to scan and resolve system files corruption. Due to a virus infection or misuse, certain files can get corrupted or even deleted.

That can heavily affect update features and cause errors like the one we are sorting out today.

You can use the SFC tool easily by following these instructions:

  1. Right-click Start and run Command Prompt (Admin).
  2. In the command line, type (or copy-paste) sfc/scannow
  3. Press enter to start the scanning.
  4. After the process is finished, you’ll be informed of possible errors.

If you are looking for the safest and faster solution; a specialized repair tool will scan, detect and replace any missing or corrupted file on your device with a new one one

2. Disable antivirus

You’ve probably already read numerous times that third-party antivirus programs can block Windows updates.

To make sure that’s not the case, temporarily disable your antivirus, and try to install updates.

If you can install your updates after disabling your antivirus, we recommend you try another security tool that won’t interfere with your system.

We recommend you to get one of the antivirus software with the highest detection rates because these have good threat databases and will most likely not detect false positives.

3. Reinstall Office

As we already stated, this specific error can occur due to Office update files corruption. As you are probably aware of, updates for Microsoft Office come through standard update procedure.

And they can, as same as other cumulative updates, get corrupted. Because of that, we advise you to uninstall and reinstall Office. At least temporarily, before some of the future patches fix this issue permanently.

Here’s how to do that:

  1. Open Control Panel.
  2. Choose Add or Remove programs.
  3. Find Microsoft Office and choose Uninstall.
  4. You may as well repair the installation. but that’s not your safest bet.
  5. Once the uninstalling task is finished, use CCleaner to clean remaining registry files.
  6. Restart the PC.
  7. Install Office again and check for updates.

Once it’s done, you should be able to download and install the latest Microsoft Office updates.

4. Hide the corrupted update with Show and Hide troubleshooter

Even though updates are forced in Windows 10, you can at least prevent certain, individual updates from downloading.

There so, you’ll temporarily resolve the issue and continue with the seamless updating process. Follow these steps to utilize this tool:

  1. Download Show or Hide Update tool.
  2. Save the file.
  3. Once you run the tool, it will search for available updates.
  4. Choose to hide the update file that provokes the error.
  5. Install updates.

Have in mind that some security updates are essential. So, it’s not recommended to restrict them from updating. Luckily, we have another solution that will address that sensitive update issue.

5. Manually download cumulative updates from MicrosoftCatalogue

When online updates don’t work because of various reasons, you can download and install those files manually. Microsoft Catalogue is the collection of all of the files used in updates.

Starting with small cumulative updates and leading to the major updates and patches. In case you’ve tried previous workarounds and the problem with certain files is persistent, follow these steps:

  1. Copy the name of the issued file.
  2. Go to Microsoft Catalogue here.
  3. Paste the name into the search box.
  4. Download the file. Keep mind on your system architecture (x86 or x64).
  5. Install the update file.
  6. Restart your PC.
  7. Check for additional updates to make sure the update is up and running.

6. Run DISM

If the aforementioned SFC scan didn’t get the job done, we’re going to try a perhaps more advanced troubleshooting tool. You guessed it, we’re talking about DISM.

DISM stands for Deployment Image Servicing and Management, and as its name says, it deploys the system image all over again. Hopefully, the potential issue will vanish along the way.

Here’s how to run DISM in Windows 10:

  1. Open the Command Prompt as shown above.
  2. Enter the following command and press Enter:
    • DISM.exe /Online /Cleanup-image /Restorehealth
  3. Wait for the process to finish.
  4. Restart your computer.
  5. In case the DISM can’t obtain files online, try using your installation USB or DVD. Insert media and type following command:
    • DISM.exe /Online /Cleanup-Image /RestoreHealth /Source:C:RepairSourceWindows /LimitAccess
  6. Make sure to replace ”C:RepairSourceWindows” path of your DVD or USB.
  7. Follow further on-screen instructions.

7. Run the Windows Update Troubleshooter

The third troubleshooter we’re going to try and mention in this article is Windows 10‘s built-in troubleshooting tool. You can use this tool for resolving all kinds of issues, including update problems.

Here’s how to run Windows 10‘s built-in troubleshooter:

  1. Go to Settings.
  2. Head over to Updates & Security > Troubleshoot. 
  3. Select Windows Update, and go to Run the Troubleshooter. 
  4. Follow further on-screen instructions and let the process finish.
  5. Restart your computer.

8. Uninstall previous updates

It’s also possible that the previous update you installed actually messed up your system. For example, it may disrupt the update mechanism, preventing you from installing future updates, thus leading to the error code 0x80070663.

If you doubt the legitimacy of the previous Windows update you installed on your computer, go and uninstall it.

Here’s how to do that:

  1. Go to Settings.
  2. Head over to Updates & Security > Windows Update.
  3. Go to Update history > Uninstall updates.
  4. Now, find the latest update installed on your computer (you can sort updates by date), right-click it, and go to Uninstall.
  5. Restart your computer.

9. Restart Windows Update components

Another thing we’re going to try is resetting crucial Windows Update components inside your system. Here’s what you need to do:

  1. Start Command Prompt as administrator.
  2. When Command Prompt starts, run the following commands:
  • net stop wuauserv
  • net stop cryptSvc
  • net stop bits
  • net stop msiserver
  • ren C:WindowsSoftwareDistribution SoftwareDistribution.old
  • ren C:WindowsSystem32catroot2 Catroot2.old
  • net start wuauserv
  • net start cryptSvc
  • net start bits
  • net start msiserver

10. Restart the BITS service

Speaking of crucial Windows Update components, the BITS service is one of the most important ones. If this service isn’t running, well, you won’t be able to install any updates.

So, make sure the BITS service is on:

  1. Go to Search, type services.msc, and open Services.
  2. Find Background Intelligent Transfer Service. Right-click and open Restart.
  3. Wait for the process to restart.
  4. Now, on the General tab, find Startup type and choose Automatic.
  5. If the BITS is not running, right-click and choose Start.
  6. Confirm selection and close window.

11. Make sure Windows Update service is running

The same goes for the Windows Update service:

  1. Go to Search, type services.msc, and open Services.
  2. Find the Windows Update service. Right-click and open Properties.
  3. On the General tab, find Startup type and choose Automatic.
  4. If the service is not running, right-click and choose Start.
  5. Confirm selection and close window.

With this, we complete the list of fixes for the 0x80070663 error. In case you have any alternative workarounds, questions, or suggestions, please tell us in the comments section.

Can I still Use Windows 7? How to Stay on Windows 7 Forever?

Windows 7 is somewhat the preferred OS choice of many computer users across the globe.

It is durable enough to run low-end operations while also optimized to execute high-end functions with near-perfection.

Its flexibility makes it ideal for all classes of computers, and many people see it as the best Windows version, with little regard for the newer versions (Windows 11 included).

However, Microsoft has phased out Windows 7 as of January 14, 2020. So, why are we still talking about it? There are still many loyal fans who would like to stay on Windows 7 forever.

Due to significant pushback from users worldwide, Microsoft made yet another concession; hence the Windows 7 end of life extended to 2023.

Fast forward to January 2023, the extension comes to an end. So what now: can you still use Windows 7, does Windows 7 still work? We shall try to answer all your questions, as follows.

Can I still use Windows 7?

Windows 7′ EOL is upon us, meaning there is no more official support (from Microsoft) for Windows 7 PCs.

With this, security patches and system updates are stopped, leaving Windows 7 PCs vulnerable and outdated.

What happens if you still use Windows 7?

Users are left with no choice but to upgrade their OS to a newer version. Failure to upgrade would expose their Windows PCs to malware attacks, bugs, system lags, and other security issues.

But is there really no choice to be made? We don’t think so.

If you still want to keep running Win7 on your PC for as long as possible, without official support, you can, and we will show you how to do it. But first, we have a few things to clear out.

? Does Windows 7 still work? Yes, and you will be able to stay on Windows 7 forever or until it is no longer available, which leads us straight to the next big question.

? Can I still install Windows 7? As long as you have a product key, you can install it on a compliant PC.

? Is Windows 7 still good? There is no right answer here. Technically, it is outdated, and there are better options to pick from. However, those who decided to remain loyal to this now-historical version of Windows still appreciate its stability and ease of use. To test out the iteration, use an online Windows 7 simulator.

? Can you still use Windows 7 safely? This is also debatable, you can go the extra mile and add a robust antivirus that works with Windows 7 as well as a lightweight VPN for privacy. However, the best way to keep out of trouble is to stay offline as much as possible.

In this guide,  we are going to be showing you what you can do to stay on and use Windows 7 forever, without installing Windows 10.

How can I continue using Windows 7?

1. Disable Windows 10 Upgrade

    1. Navigate to the Computer Configuration option on your PC, and click on it.
  1. 2. On the displayed window, select Policies.

  2. 3. Under Policies, click on the Administrative Templates option.

  3. 4. Select Windows Updates.

  4. 5. On the displayed window, double-tap on the Turn off the upgrade to the latest version of Windows through Windows Update option.

    disable Windows Update group policy
  5. 6. Finish the configuration by tapping on Enable.

  6. This is the first and most conventional process if you want to hang on to Win7 on your PC. Most Windows 7 PCs by default auto-update to the latest version.

    Hence, if this function is not disabled, your Windows 7 computer would automatically be updated to Windows 10.

    To disable the Windows 10 upgrade option, there is a Group Policy setting that is designed to facilitate such configurations. And this would ensure your PC blocks any form of version upgrade on your PC.

    However, the most convenient way of disabling upgrades is via the system configuration method. To disable and block Windows 10 upgrade using this method, follow the step-by-step guide provided above.

    With this action, your Windows PC would maintain its original version for as long as possible.

    However, when Microsoft pulls support, your device might become vulnerable to malware attacks, unauthorized access, and system malfunctions.

2. Continue using your Windows 7 after Windows 7 EOL (End of Life)

When Microsoft pulls out support for Windows 7, you can continue using the version, albeit at your own risk. To ensure you are not affected by the vulnerability that follows, do the following:

  • Download and install a durable antivirus on your PC. Since you are officially unprotected by Microsoft, ensure you go for reliable (tested and trusted) AV software.
  • Download and install GWX Control Panel, to further reinforce your system against unsolicited upgrades/updates.
  • Back up your PC regularly; you can back it up once or thrice a month. This is to facilitate recovery if and when required.
  • Stay informed about any new update/upgrade, and always custom-install any update you need.

By adhering strictly to the above-stated points, you can continue using Windows 7 for as long as you want. However, you have to be extra careful while surfing the internet, as your unprotected system is now vulnerable to hacks.

For a full walkthrough, you can follow this detailed Windows 7 installation guide that explains each step from start to finish.

3. Use a Virtual Machine

Virtual machines allow you to imitate an OS on another operating system. Hence, you can easily use this trick to bypass the impending Windows 7 EOL come January 2020.

There are numerous virtual machine programs out there; however, only a handful of them are durable. So, ensure you download and install a reliable one on your computer.

To continue enjoying Windows 7 after the EOL, follow the steps below:

  • Install a virtual machine program on your computer
  • Download and install GWX to prevent unsolicited upgrades
  • Install a new upgrade or a completely different OS
  • Install Windows 7 on the virtual machine software.
  • Run the imitated OS (Win7) on your PC via the VM software. The VM software interfaces between the installed Win7 and your PC

No one can say exactly what Microsoft is cooking up; if they are planning to end Windows 7 for good, they’d eventually phase it out with time.

For now, however, you can hang on to your Windows 7 especially if you’re clinging onto apps like OneDrive for Windows 7 or simply upgrade to the latest Windows 10 version.

Windows 7, according to official estimates from Microsoft, constitutes about 30% of all Windows PCs across the globe. This means that for every five Windows PCs, at least one is running Windows 7.

With this, it is one of the most reliable Windows versions out there, and users are especially impressed with its ease of usage and durability. That’s why we believe Windows 7 is the next Windows XP.

By this time, Windows 7 users would be expected to upgrade to a newer version or risk having their system’s security and patch support withdrawn.

Keep in mind that if you choose to use Windows 7 you’ll need a reliable browser to with it, and we have a great guide on how to install Thorium browsers on Windows 7, so don’t miss it.

If you’re using optical discs, we have a new article on how to create a Windows 7 installation disc, so don’t miss it. Keep in mind that Windows 7 can’t run modern apps, but this can be circumvented by using Windows 7 Extended Kernel.

So, if you still want to keep running your PC on Win7 after the impending apocalypse, the guides herein would assist you. In this article, we have succinctly described how to stay on Windows 7 forever.

Hope you find this helpful.

Fix: Printer Installation Failed in Windows 10 & 11

Windows 10 offers great tools for creating various documents of all kinds. And of course, you’ll have to print those documents from time to time. But what if you face some kind of problem with your printer? Don’t worry, there might be a solution for that.

Why is my printer installation failing?

There could be several causes why your printer installation is failing, such as outdated or incompatible printer drivers, conflicts with software, a problem with the printer itself, or a lack of permissions.

How to fix unable to install a printer on Windows 10?

1. Check your print process files

There’s a possibility that your PC is missing some print process files. In that case, you don’t have to re-install the whole system for this, all you have to do is to copy needed files from the PC without this problem and you’re good to go. Here’s exactly what you need to do:

  1. First, go to Search, type services and open Services.mscPrinter not responding to computer
  2. In Services, find Print Spooler service and stop it
  3. Now, from working PC, copy all files from the following location to the same location on the PC that has issues with the printer:
    • C:WindowsSystem32spoolprtprocsx64

Now you have to create a registry entry for your newly copied print process file. Just follow these instructions to do that:

  1. On the ‘working’ computer, go to Search, type regedit and open Registry Editor
  2. Navigate to the following path:
    • HKEY_LOCAL_MACHINESYSTEMCURRENTCONTROLSETCONTROLPRINTENVIRONMENTSWINDOWS X64PRINT PROCESSORS
  3. Right-click on Print Processors folder and go to Export
  4. Save it on an external drive
  5. Now open Registry Editor on ‘other’ computer
  6. Navigate the same path as above
  7. Go to File, Import and import the registry file from your previously saved

2. Run the printer troubleshooter

Windows 10 also features a built-in troubleshooter that allows you to quickly fix general print-related issues. To run it, simply go to Settings > Update & Security > Troubleshooter > run the Printer troubleshooter.

run printer troubleshooter windows 10

Additionally, you can also run the Hardware and Devices troubleshooter.

3. Use Clean Boot

Sometimes, some of the apps and programs installed on your device may prevent Windows 10 from detecting and installing your printer. In order to fix this issue, you can clean boot your computer so that it uses only the minimum set of drivers and apps it needs.

  1. Go to Start > type msconfig > hit Enter
  2. Navigate to System Configuration > click on the Services tab >  check the Hide all Microsoft services check box > click Disable all.hide all microsoft services
  3. Go to the Startup tab > Open Task Manager.
  4. Select each startup item > click Disabledisable startup programs
  5. Reboot your computer.

4. Uninstall your printer driver

If your printer driver is installed incorrectly or your old printer’s driver is still available on your machine, this could also prevent you from installing a new printer. In this case, you need to completely uninstall all printer drivers using Device Manager.

5. Buy a new printer

Since you’re experiencing this issue in Windows 10, there’s a possibility that your printer is not compatible with the system, especially if you’re using an older one. So if you want to print your documents in Windows 10, you’ll have to buy a new printer if your current one is not compatible.

So, now that you’ve made sure that your printer is indeed compatible with Windows 10, but you’re still unable to install it, you can try the following solution.

This isn’t the only problem, and many reported that PC can’t connect to printer, but we tackled that issue in another guide, so don’t miss it.

If you’re using a Canon device, we have a great guide on how to download the Canon LBP2900B driver that might come in handy, so don’t miss it.

That would be all, you should be able to install your printer now. We hope that one of these fixes solved the problem. If you have any questions or suggestions related to this guide, let us know in the comments below.

Windows Update Error 0x80070026: Fixed

The Windows update error code 80070026 usually appears in Windows 10 when you try to install the latest updates.

A possible reason as to why you get this error code is the fact that your C:Users folder was changed to another directory, like F:Users resulting in potential system errors with the Windows Update feature.

Luckily, there are a few very easy methods to fix error code 80070026 and resume your everyday work. So just follow the steps listed below in the order they are described and you’ll have your operating system up and running in no time.

How can I fix the Windows Update error 0x80070026?

  1. Delete the content of the Temp folder
  2. Copy the $$PendingFiles folder
  3. Check your antivirus
  4. Run DISM
  5. Refresh your PC
  6. Run the Windows Update Troubleshooter
  7. Reset Windows Updates components
  8. Install updates manually

1. Delete the content of the Temp folder

  1. Reboot your PC.
  2. Log in with your administrator account.
  3. From the “C:” partition (or your main partition) double-click the Users folder.
  4. Double-click the itnota folder.
  5. Open AppData, then go to Local.
  6. Now, open the Temp folder and delete all the contents.temp folder windows 10

Note: Before attempting the steps above backup call your important data like files and folders.

2. Copy the $$PendingFiles folder

  1. Open the Windows 10 Settings menu.
  2. Choose Update & Security.
  3. In the Recovery tab, scroll down to Advanced Startup.
  4. Click on Restart now.restart now
  5. After the reboot process has finished, you should get to a window that says Choose an option.
  6. Select Troubleshoot and look for the Advanced options.
  7. Next, click or tap on Command Prompt.
  8. Write the following command and press the Enter: dir C:
  9. Do this for all your partitions to determine which one is on the SSD or external hard drive, and which one is on the internal hard drive. (We are going to take partition G as the external hard drive and partition H as the internal hard drive.)
  10. In the command prompt window, write the following and press Enter: robocopy /copyall /mir /xj G:$$PendingFiles H:$$PendingFiles
  11. Afterward, run the following and press again Enter: rmdir /S /Q G:$$PendingFiles
  12. Now open the File Explorer and see what letter the Internal HDD has. (We are going to use C.)
  13. Write in the command prompt window the following and hit Enter: mklink /J G:$$PendingFiles C:$$PendingFiles
  14. Exit Command Prompt and reboot your device.
  15. When the device starts you will need to open your Windows Update feature and check again if you still get the error code 80070026.

Note: If some of the steps listed for the second solution are not available on your Windows 10 device, skip this solution completely and go to the next one.

3. Check your antivirus

Quite frequently, your antivirus prevents you from updating your computer. To check if your antivirus tool is the culprit, temporarily disable it and then hit the Check for updates button.

Many times, disabling your antivirus won’t be enough so you will need to uninstall it completely. If this proved helpful, that means you should consider switching to another solution.

There are numerous valuable antivirus programs available, and many of them are designed with unique and interesting features for each user’s needs.

4. Run DISM

  1. In the search dialog box, write Command Prompt and open as admin.
  2. Write the following and hit Enter: DISM.exe /Online /Cleanup-image /Scanhealthrun dism fix corrupted registry windows 10
  3. Then, run the following and press Enter: DISM.exe /Online /Cleanup-image /RestorehealthDISM Restore Health
  4. Exit and reboot your operating system once more.

See if your Windows Update feature is working correctly.

5. Refresh your PC

  1. Open the Recovery menu as shown in the second solution.
  2. In the Reset this PC section click on Get Started.refresh windows 10
  3. Follow the instructions on the screen to finalize the System Refresh and try again your Windows Update feature to see how it goes.

6. Run the Windows Update Troubleshooter

If the issue persists and you want to take a short break from any complex troubleshooting solutions, then you can run Windows’ built-in update troubleshooter.

This useful tool can help you fix general update issues so that you can finish installing the latest OS updates on your PC.

If you’re running Windows 10, go to Settings > Update & Security > Troubleshooter and run the update troubleshooter as shown in the screenshot below.

If you’re running Windows 7 or Windows 8.1, you can launch the Update troubleshooter from Control Panel.

Type troubleshoot in Contol Panel windows, open the tool and select View All to list all the troubleshooting tools. Locate and run the Update troubleshooter.

windows update troubleshooter control panel

7. Reset Windows Updates components

  1. Launch Command Prompt as admin again.
  2. Stop the Windows Update Services by typing the following commands and hit Enter after each one:net stop wuauserv
    net stop cryptSvc
    net stop bits
    net stop msiserver
  3. Rename the SoftwareDistribution and Catroot2 folder by typing the commands:Ren C:WindowssoftwareDistribution SoftwareDistribution.old
    Ren C:WindowsSystem32catroot2 Catroot2.old
  4. Restart the Windows Update Services by typing the following commands:net start wuauserv
    net start cryptSvc
    net start bits
    net start msiserver
  5. Exit Command Prompt, restart your computer and check if you can install the latest updates.

8. Install updates manually

If the Windows Update service is still not working, try to install the problematic updates manually.

For example, if you’re trying to install the latest hardware driver updates, go to the manufacturer’s website and get the updates from there.

If you’re trying to install the latest Windows patches, go to Microsoft’s Update Catalog, enter the KB number of the respective update(s) and hit the download button.

If you’ve carefully followed the methods above, you now have a working Windows Update feature on your device.

If you need further assistance, you can write to us in the comments section of the page situated below and we will get back to you as soon as possible.

3 Quick Ways to Fix WOW Addons Error Message

Besides the WoW add-ons error message is one of the more annoying error messages out there, it can also significantly impact the quality of your game.

Fortunately, most of World of Warcraft’s add-ons errors have the exact cause, and by reading through, you’ll learn how to fix them.

Why are my WoW add-ons not working?

From the experience of numerous users, we gather that this error may be triggered by some factors, including:

  • Broken or outdated add-ons – If you get an add-on error message, one or more of your add-ons are either obsolete or severely broken. Blizzard updates World of Warcraft regularly to resolve issues like high latency or disconnects.
  • Third-party add-ons – Conflicts between third-party add-ons are often one of the significant causes, especially since they may not auto-update like others that go through frequent add-on resets. Some developers will provide an update for their add-on, which you will have to update manually.
  • Disabled add-ons – In some cases, you may have disabled the specific add-on in the game, which may cause it not to function.

Usually, with a WoW add-on error message, you get an intricate piece of text that can prompt you to the add-on causing the problem.

If this isn’t the case, or if you can’t figure out the error’s path strictly, then some manual tweaking will be required.

How do I fix World of Warcraft add-ons error messages?

Before going into any of these fixes, we suggest you download all your add-ons and create a zip file containing them. This way, you may reinstall them if you lose them during any process.

1. Repair corrupted files

  1. Visit the official website and click Download for Windows to download the Battle.Net launcher.
    wow addons error message
  2. Run the app and launch it.
  3. Navigate to World of Warcraft.
    wow addons error message
  4. Navigate Options, then click on Scan and Repair.
  5. Select the Begin scan option.

This should help you solve any WoW add-ons error message.

2. Disable one add-on at a time and launch the game

  1. Download your add-ons again and create a zip
  2. Go to your World of Warcraft installation folder
    C:\Program Files (x86)\World of Warcraft\_classic_
    wow installation folder
  3. Go to Interface and access the Add-ons folder.
    wow interface and addons folders
  4. Delete one add-on, relaunch the game, and repeat the process till the game works properly.

Although it hurts, remember that you saved your add-ons as a zip file. Deleting one add-on at a time will help you track down which one is causing the error.

Tip icon Tip
If the first add-on is problematic, don’t rush to unzip it immediately. Some add-ons communicate with each other, so it’s best to wait until the end of the process.

3. Use automatic updates

Lastly, you could also install an Add-on Manager.

There are multiple options available so that you can make your pick. What’s great about an Add-on Manager is that the above process is fully automated.

The manager will automatically detect outdated add-ons and suggest an update.

Every World of Warcraft player has, at some time, encountered this WoW add-ons error message. The solutions we have discussed should help you resolve any associated problems.

Feel free to tell us in the comments what add-on gave you a headache and how you dealt with it.

0x8024ce0e Failed To Install [SOLVED]

In Windows 10 you can choose how often and when you want to update your device which for many users is a great feature.

Lately, some of them reported that when trying to update their Windows 10 th following error message appeared:

There were problems downloading some updates, but we’ll try again later. If you keep seeing this, try searching the web or contacting support for help. This error code might help: (0x8024a105)

The error 0x8024ce0e Failed To Install is not uncommon and it appears usually as a result of improper installation, a virus, file corruption, or missing files.

Luckily this error is easy and simple to fix and we will show you in this article the exact steps you need to make, so make sure to keep on reading.

How can I fix the 0x8024ce0e failed to install error?

1. Use a specialized tool

The most reliable way of solving this kind of error implies using specialized software that will scan, update, and fix any system issues.

With these tools, you will not have to make any manual settings, other than run the program itself and allow for the process to finish.

2. Reboot your device

  1. Click the Start Icon.
  2. Now click the Power icon.
  3. Choose Restart from the menu.

Although it seems as simple thing to do, it is known that rebooting your device will solve the error code 0x8024a105. In some instances, this solutions can also fix Update error 0x8024001e, so be sure to try it.

3. Ensure you have enough space

  1. Open File Explorer.
  2. Go to This PC.
  3. In the Devices and drivers section check the remaining storage space on your drivers.

In order to upgrade a 32-bit OS your device needs at least 16 GB of free space, or 20 GB for a 64-bit OS. Therefore, depending on your device specification is essential to ensure you have enough space.

You can free up space on your device by deleting the unnecessary files and folders and even deleting apps that you are no longer using.

4. Disconnect external hardware

Make sure to remove any external devices and drivers, or any other hardware plugged into your device that is not needed for basic functionality.

Once you performed this step, try to run the update again and see if you are still receiving the Windows Update error 0x8024ce0e.

5. Check Device Manager

  1. Press Windows Key + X and select Device Manager from the list.
  2. Look for any device with a yellow exclamation mark next to it.
  3. Once found, right-click the driver.
  4. Choose Update driver or Uninstall.
    0x00000002 DEVICE_QUEUE_NOT_BUSY

You can also use a specialized tool that will help you quickly update all drivers automatically.

⇒ Get Outbyte Driver Updater

That is all. We hope that one of the solutions presented above have helped you to successfully solve the Windows update error 0x8024ce0e failed to install.

If you have additional recommendations or suggestions, we would love to hear them so don’t hesitate to leave us a message in the comments section below.

Windows Update Error 0x80070020: Causes & Fixes

In this article, we’re going to talk about error code 0x80070020, which reportedly prevents users from installing a new version of Windows 10.

Since installing the freshest Windows release is highly advisable, we can’t let this error hang in there forever.

So, we’ve prepared a couple of solutions, that may be appropriate for dealing with error code 0x80070020 .

Why am I getting Windows failed to install the following update with error 0x80070020 message?

This message is quite similar to the update error 0x80070026, and if you encounter it, it’s advised to run the update troubleshooter.

Damaged Windows components can cause all sorts of issues, and update error 0x803c0109 is one of them. If you encounter it, we recommend checking if the update service is running properly.

Many have reported There were some problems installing updates message while trying to update, and we covered this issue in-depth in a separate guide, so you might want to check it out.

Error code 0x80070020 can prevent you from installing the latest updates. Speaking of update issues, users also reported the following problems:

  • Error 0x80070020 Windows 7 – This error can appear on older versions as well. Even though these solutions are intended for Windows 10, almost all of them can be applied to older versions of Windows, so feel free to try them out.
  • Download error – 0x80070020 Windows 10 – Sometimes this error can appear while downloading the latest Windows 10 builds. If that happens, restart Windows Update components and check if that helps.

How can I solve the error code 0x80070020?

1. Run the Windows Update troubleshooter

If none of the solutions listed above managed to solve the problem, you should try running Microsoft’s official Update Troubleshooter. This tool solves various update-related issues, and it might solve your problem, as well.

Here’s what you need to do to run Windows Update troubleshooter:

  1. Download the Windows Update Troubleshooter from Microsoft.
  2. Launch the tool > follow the on-screen instructions.
  3. Try to install the update again.

2. Restart the Background Intelligent Transfer Service (BITS)

Background Intelligent Transfer Service (BITS) is a Windows process responsible for delivering updates to your computer. So, if this process gets corrupt, you’ll have problems receiving updates.

In order to make it work again, we should restart BITS, and try to run Windows Update once again. Here’s exactly what you need to do:

  1. Press Windows Key +R and enter services.msc. Press Enter or click OK.
    Download error - 0x80070020 Windows 10
  2. Find Background Intelligent Transfer Service. Right-click and open Properties.
    Error 0x80070020 Windows 7
  3. On the General tab, find Startup type and choose Automatic.
  4. If the BITS is not running, right-click and choose Start.
    Download error - 0x80070020 Windows 10
  5. Confirm selection and close window.

If nothing’s wrong with BITS, move on to another solution.

3. Reset Windows Update services

Windows Update relies on various services in order to work properly, and if there are any issues with Windows Update, you might be able to fix them by resetting Windows Update services.

This is relatively straightforward, and in order to do this, you need to run a few commands in Command Prompt. To do that, follow these steps:

  1. Start Command Prompt as administrator.
  2. When Command Prompt starts, run the following commands:
  • net stop wuauserv
  • net stop cryptSvc
  • net stop bits
  • net stop msiserver
  • ren C:WindowsSoftwareDistribution SoftwareDistribution.old
  • ren C:WindowsSystem32catroot2 Catroot2.old
  • net start wuauserv
  • net start cryptSvc
  • net start bits
  • net start msiserver

After running these commands, check if the problem with Windows Update is resolved. If you don’t want to enter all these commands manually, you can perform this solution by using the Windows Update reset script.

4. Perform SFC

Although many users consider the SFC scan an overrated solution, it might be helpful in some cases. In case you’re not familiar with this tool, it scans your computer for issues and corrupted features, and tries to solve them (more or less) effectively.

Here’s how to run the sfc/scannow command in Windows 10:

  1. Press Windows Key + X to open Win + X menu. Select Command Prompt (Admin) or Powershell (Admin) from the list.
    Error 0x80070020 Windows 7
  2. In the command line type sfc/scannow
    Error 0x80070020 Windows 7
  3. The process should last a few minutes.
  4. After it’s done, close the Command Prompt.

If the SFC scan can’t fix the problem, or if you can’t run SFC scan at all, you might want to consider using DISM scan instead. To perform a DISM scan, you just need to do the following:

  1. Start Command Prompt as administrator.
  2. Enter DISM /Online /Cleanup-Image /RestoreHealth and press Enter to run the command.
    Download error - 0x80070020 Windows 10
  3. DISM scan will now start. The scan can take about 20 minutes or more, so don’t interrupt it.

Once the scan is finished, check if the problem is resolved. If the issue is still present, or if you were unable to run SFC scan before, be sure to repeat the SFC scan. After doing that, check if the issue is resolved.

Alternatively, you can rely on an automated repair tool to scan, find, and replace any corrupted and missing files on your PC.

5. Disable your antivirus

Third-party antivirus programs and Windows are not the best friends ever. Having a third-party antivirus installed on your computer can actually cause more harm than you’d hope for.

That conflict can cause malfunctions of various Windows features, including Windows Update.

If you’re using a third-party antivirus, you might want to try changing its settings and check if that helps. In some cases, you might want to completely disable your antivirus in order to solve this problem.

Even if you disable your antivirus, Windows 10 has its own antivirus in form of Windows Defender, so your PC won’t be in any danger.

In some cases, you might even have to completely remove your antivirus to solve this issue. If removing the antivirus solves the problem, you should consider switching to a different antivirus solution.

There are many great antivirus tools options fully compatible with Windows 10, that won’t interfere with it in any way.

6. Use Command Prompt to find the problematic services

According to users, sometimes certain services can interfere with your system and cause error 0x80070020 to appear. However, you can find these services by using Command Prompt. To do that, just do the following:

  1. Start Command Prompt as an administrator.
  2. Now run netstat -aon | find “:80” and netstat -aon | find “:443” commands. You’ll see a list of information. Look at the numbers at the right side. These numbers represent the ID of the processes that are using your network connection.
    Error 0x80070020 Windows 7
  3. To find a problematic process, you need to open Task Manager. You can do that by pressing Ctrl + Shift + Esc.
  4. When Task Manager opens, go to the Details tab and look at the PID column. There you should be able to find the same numbers you got in Step 2. Find the problematic process, select it and click End task.
    Download error - 0x80070020 Windows 10
  5. Now go to Services window and check the PID column for any numbers from Step 2. If you find a match, right-click the service with that PID, and choose Stop from the menu. Keep in mind that certain services are required by Windows, so be cautious while disabling services.
    Error 0x80070020 Windows 7

This is an advanced solution, so be extra cautious and follow the instructions carefully.

Can’t open Task Manager? Don’t worry, we’ve got the right solution for you.

7. Perform an in-place upgrade

If you can’t update your Windows due to a 0x80070020 error, you might want to try performing an in-place upgrade. This process will install the latest version of Windows, but it will keep all your files and applications intact.

To perform an in-place upgrade, you need to do the following:

  1. Download Media Creation Tool from Microsoft’s website.
  2. Once you download Media Creation Tool, run it.
  3. Select Upgrade this PC now.
  4. Wait while Media Creation Tool prepares the necessary files.
  5. Select Download and install updates and click Next. Wait while updates are downloaded.
  6. Follow the instructions on the screen until you reach Ready to install screen. Click on Change what to keep.
  7. Select Keep personal files and apps. Now click Next.
  8. The installation will now start. Follow the instructions on the screen to complete it.

Once the installation is finished, you’ll have the latest version of Windows installed and the issue should be resolved.

That’s about it, we hope this article helped you deal with the Windows Update error 0x80070020, and that you’re now able to install the new update normally.

In case you have any comments, questions, or suggestions, please reach us in the comments section below.

FIX: Windows 10 Monitor Not Going to Sleep [5 Ways]

Sleep is an essential part of the life of any IT equipment as it gives the machine, like your computer, time to rest and save power when idle. It was actually added to computers for the sake of preserving battery life while solving energy waste issues.
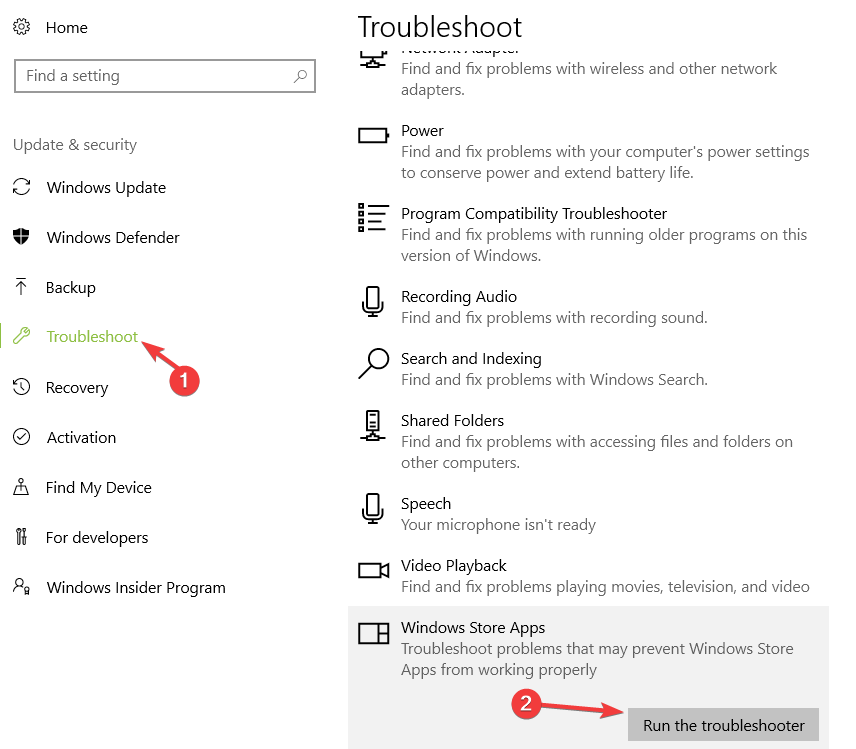
The system assumes you’re away and cuts off power to unneeded subsystems while keeping sufficient power on so you can pick up from where you left on when you resume.

So what happens when the Windows screen is not turning off?

Well, for one, the battery is drained faster and your computer consumes more energy. You could probably try to manually put it to sleep, but it’s best if it does it automatically.

What can I do if Windows 10 monitor won’t sleep?

1. Unplug any devices connected to your computer

Sometimes devices that are connected like USB flash drives, joystick, mouse or keyboard, consoles, and others can cause the computer not to go to sleep mode.

This happens due to compatibility issues between the devices and Windows 10. To avoid it, disable the device. If it’s a game controller device, do the following:

  • Right-click Start and then select Device Manager
Windows 10 won't put monitor to sleep
  • Click Human Interface Devices
  • Click HID Compliant Game controller and disable it

Note: when you disable the game controller, you may lose virtual joystick-related features in the synapse.

Some users have noted that the Skype app blocks their monitors from going to sleep mode or turning off if open in the taskbar, even if it wasn’t in use. So quit Skype and check if it helps.

Other users have noted that the issue is caused by adware, and when uninstalled, the monitor started behaving normally.

2. Disable USB Selective Suspend setting

  • Click Start
  • Select Settings
  • Select System
Windows 10 won't put monitor to sleep
  • Click Power and Sleep
Windows 10 won't put monitor to sleep
  • Go to Additional Power settings
Windows 10 won't put monitor to sleep
  • Click Change Plan settings
Windows 10 won't put monitor to sleep
  • Click Change advanced power settings
Windows 10 won't put monitor to sleep
  • Click USB settings
Windows 10 won't put monitor to sleep
  • Click USB Selective Suspend Setting and set to Disabled
Windows 10 won't put monitor to sleep

3. Update latest drivers

  • Click Start and then select Settings
  • Click Update and SecurityWindows 10 won't put monitor to sleep
  • Select Windows Update
Windows 10 won't put monitor to sleep
  • Select Check for updates

Install the latest drivers along with chipset drivers, firmware, and BIOS updates if available.

Some drivers are very hard to be found and you can put your system to risk while installing the wrong versions. However, you can avoid that by choosing to do it automatically with Outbyte Driver Updater.

This is the best-automatized solution to spot driver issues – mostly missing or outdated software.

If you want to install the latest version of your drivers without putting your system at any risk, then get it automatically with this awesome app.

⇒ Get Outbyte Driver Updater

4. Change Power Plan settings

  • Click Start and select Settings
  • Select System
  • Select Power and Sleep
  • Ensure the Sleep setting is set to the desired value
  • Go to Additional power settings
  • Select Change Plan Settings next to your option
  • Select Change advanced power settings
  • On the Power Options screen, you want to expand each setting and ensure that they allow the computer to go to sleep mode.
  • Set it to Allow the computer to sleep.

5. View event logs

  • Click Start
  • Search for View event logs in the search bar
  • Start the event logs and wait for them to load
  • Click Windows Logs System
  • Click Filter current logs on the right pane
  • Select Event Source: Power troubleshooting and click OK
  • In the middle, check the event logged when your PC woke up and check the details of the log to find the wake source

Some users have said that TeamViewer causes the monitor not to sleep, so disable all settings related to waking TeamViewer and uninstall the program.

Have any of the above solutions helped fix the problem on your computer? Let us know in the comments section below.