A First Look at the Asus ROG Ally—What are people saying about this Steam Deck challenger?

The latest contender in the mobile PC gaming device market, the Asus ROG Ally brings something to the mix that others don’t: Windows OS, native Xbox (and Game Pass) support and a direct partnership with Microsoft.

While the Steam Deck is a great option for those who gravitate toward the Steam platform (which can also run Windows and access the Xbox app, or even do so via Steam OS albeit with a workaround that some might find troublesome), those who’ve been longing for a dedicated Xbox handheld device with native Xbox Cloud Gaming and Game Pass will find the closest thing on the market in the Asus ROG Ally.

But how does the Asus ROG Ally measure up as a gaming device, especially against the Steam Deck? Find out what these reviewers had to say in this first impressions roundup.

The Verge Asus ROG Ally review

Windows handheld gaming PCs existed before the Deck, and there’s been a parade of them in the 15 months afterward. Some are more powerful. Many boast premium build quality. Almost all have higher-resolution screens. Yet none have offered the combination of battery life, portability, and price as Valve’s portable. I won’t bury the lede: the new Asus ROG Ally, officially shipping June 13th for $699.99, doesn’t change that as of today…I fundamentally believe a portable gaming PC isn’t truly portable if the battery life and user interface aren’t built for the road. If you really want a portable, maybe save a couple hundred bucks by buying a $400 Steam Deck and adding your own small SSD.

Wired Asus ROG Ally review

No matter what I did, there was a weight hanging around the neck of the Ally’s battery life. Even under the best of circumstances—which takes no small amount of effort to configure—I never reached even three hours of battery life.

Given the $700 price tag for the Ryzen Z1 Extreme version of the handheld, I expected a lot of power from the Asus ROG Ally. I just didn’t realize how much of it I would have to provide myself. While plugged into a wall, the handheld performed adequately, but as a portable console, it required so much work to get many games working that I burned through a substantial amount of my extremely limited battery life just to get started.

Polygon Asus ROG Ally review

I figured that after the review, I would inevitably return to the Steam Deck out of habit. But for now, it’s tucked into my bedside table. I’ve swapped my Octopath Traveler 2 playthrough, the Ally’s lighter build and brighter screen making this device an ideal match for long, late-night tours of fantastical worlds.

For you, dear reader: There’s no slam-dunk choice. But there’s no air ball, either. In fact, both handhelds are fantastic. Whether I carry around the Steam Deck or the ROG Ally on the regular, I’ll be happy with my choice. And I think you will be too. Having decades of video games on a device I can keep in my backpack and still have room for my laptop and water bottle — that feels like magic.

Digital Trends Asus ROG Ally review

But the main question: should you buy the ROG Ally? If you’re going up against the Steam Deck, yes. It’s not free of problems, and it’s not a strict Steam Deck killer, but it provides broader support for games, more power, and acceptable battery life. It feels like the Steam Deck 2 so many have been waiting for.
For me, at least, I haven’t touched my Steam Deck since the ROG Ally arrived. And I don’t plan on pulling it out of the drawer any time soon.

Is it finally time to jump on the handheld PC train, though? No, at least not for everyone. If the bugs turned you off from the Steam Deck, the ROG Ally isn’t any better. For as many issues as it fixes, it introduces new problems of its own. This isn’t a Nintendo Switch that can run Steam games. Still, it delivers on the promise of playing your library of PC games on the go, despite the usability hurdles it has.

What does the Asus ROG Ally mean for Xbox Game Pass?

Is the Asus ROG Ally the dedicated portable Xbox device so many have been clamoring for from Microsoft? Well…it’s the closest thing so far, the lower-priced (and lower performance) Logitech G Cloud notwithstanding. Is it a Steam Deck killer? Likely the answer for most will be a definitive ‘no.’ But what the Asus Rog Ally does have is the support of Microsoft. What does this mean? In the short term, it means buyers will receive a generous three-month subscription to Xbox Game Pass Ultimate.

In the longer term, Microsoft has been experimenting with a Windows 11 handheld mode. A device like the Asus ROG Ally would be the perfect place to debut it, if indeed the project ever comes to fruition. And let’s not forget that Microsoft hopes to launch a “next-generation” mobile Xbox store to compete with Apple and Google as early as 2024. All of which ties in to the Redmond company’s commitment to bring the Xbox brand to more platforms and more players, as it has repeatedly stated.

The Asus ROG Ally releases on June 13, and will retail at $699 USD (with a slightly less-powerful $599 edition coming later). It will be available through Best Buy and other retailers.

Featured image via Xbox Wire. 

0xc00d36b4 Error Code: How to Fix It

0xc00d36b4 Error is one of the common errors users encounter when they try to play certain music or video files in the built-in media player on Windows. This error usually indicates a problem with the codec needed to play the file.

If you encounter this problem, it is often due to a format issue. According to some users, the error appears when attempting to play files from an external device such as a USB drive or DVD.

What is error 0xc00d36b4?

Error 0xc00d36b4 is a specific error code associated with Windows Media Player and media playback issues. The error message associated with this error code may vary slightly depending on the media player you are using.

The 0xc00d36b4 error in Windows Media Player can be caused by several factors. Here are some of the most common causes:

  • Missing codecs: One of the most common causes of this error is missing codecs. If your computer does not have the necessary codecs to play the media file, Windows Media Player cannot play it.
  • Corrupted media files: If the media file you are trying to play is corrupted or damaged, Windows Media Player may not be able to play it.
  • Outdated display or audio drivers: If you are using outdated drivers, they may not be able to properly decode the media file, which can result in an error message.
  • Codec conflicts: Some third-party codecs are known to interfere with the Windows Media Player, which can trigger the 0xc00d36b4 error.
  • Windows Media Player stuck into limbo state: Another occurrence of this problem is when Windows Media Player becomes stuck in a limbo state.

How do I fix error 0xc00d36b4?

Before going into the main suggested solutions, it is recommended to give these straightforward workarounds a try:

  • Check the File Format: The 0xc00d36b4 error is often due to unsupported file formats. While Windows Media Player and Movies & TV support many popular file types, they may not support all formats. To determine if the error is caused by an unsupported file, check the list of supported file types for Windows built-in players.
  • Convert the file format: If the media player doesn’t support the file, you can convert it to a compatible format using an online or offline converter. There are many free converters available online that can do this.

1. Re-enable Windows Media Player

  1. Press the Windows key, type windows features in the search bar, and select Turn Windows features on or off.windows features
  2. On the Windows Features window, scroll down and expand the Media Features option.expand media features
  3. Then, uncheck the Windows Media Player option.Uncheck Windows media player
  4. Click Yes to confirm.click Yes
  5. Then, click OK to save the changes.click OK
  6. After disabling the feature, reboot your PC to complete the changes.
  7. Upon reboot, follow the same instructions and check the Windows Media Player option.
  8. Then, click OK and restart your computer to re-enable the Windows Media Player.

2. Change the default Audio format

  1. Press Windows + R, type mmsys.cpl in the Run command, and click OK.mmsys.cpl
  2. In the Sound control panel, go to the Playback tab, select the active sound device, and click Properties. Sound properties
  3. In the Sound Properties window, go to the Advanced tab and change the value under Default Format.
  4. Then, click Apply.change default value
  5. Click Yes in the confirmation box.click Yes
  6. Try playing the media file once more using the same media player and see if the 0xc00d36b4 error is fixed.

3. Run Windows Troubleshooter

  1. Press Windows + I to Windows Settings, go to System and select Troubleshoot.select troubleshoot
  2. Under Troubleshoot options, select Other troubleshooters.other troubleshooter
  3. Then, click the Run button next to Windows Media Player.Run Windows media player
  4. Follow the on-screen instructions to troubleshoot the player.

If that doesn’t work, you could try running the Audio and Video Playback troubleshooters.

4. Update audio and display drivers

  1. Open the Start menu, type device manager, and select Device Manager.device manager
  2. From the list of drivers, expand Display adaptors, right-click the driver, and select Update driver.Update display driver
  3. Then, follow the on-screen instructions to update the driver.
  4. After that, expand the Sound, video and game controllers, right-click the audio device, and select Update driver.audio driver

5. Play the media file in a different media player

If none of the above methods had been able to fix the 0xc00d36b4 error, you can consider using a third-party media player. Several third-party media players can handle a wide range of media formats, such as VLC Media Player, KM Player, and so on.

If Nero Codecs are installed on your computer, they may interfere with the built-in Windows player. In such cases, completely uninstalling Nero Codecs may help resolve the issue.

In case you can’t find one, do check our curated list of the best media players for Windows.

If you have more questions or suggestions, leave them in the comments section below.

0x80300001 Installation Error: 5 Ways to Fix It

The process to install Windows is usually seamless, with no error messages popping up, given your PC is configured correctly. But that’s not always the case. Many have reported the 0x80300001 Windows installation error.

The complete message reads, We couldn’t install Windows in the location you chose. Please check your media drive. Here’s more info about what happened: 0x80300001. The problem has been faced in all iterations of the OS with no effective solutions available. So, let’s find out about it!

What is the 0x80300001 installation error?

The error can be encountered when installing Windows on a PC and usually has to do with a trivial issue at the user’s end. It appears when choosing a partition and proceeding with the installation.

Here are a few reasons you encounter 0x80300001 error in Windows 10:

  • Issues with the installation media: Oftentimes, the installation media was missing certain critical files, which led to the error, and creating the bootable USB again works.
  • Problems with port: In some cases, it was a problem with the port the bootable USB was connected to, which could be malfunctioning or not offer support for the flash drive.
  • Drivers not loaded: You need several drivers on the PC to be able to install Windows, and for many users, this was the underlying cause.
  • Misconfigured BIOS settings: The BIOS settings, often overlooked, play a critical role in the effective functioning of the PC as well as the OS installation, and any unwanted changes here could trigger the 0x80300001 Windows 7 error.

How do I fix error code 0x80300001?

Before we head to the slightly tricky solutions, try these quick ones first:

  • Disconnect any additional storage devices from the PC, including disk drives, USB drives, and SD cards.
  • For those using a CD, put the Windows installation CD instead of the driver CD in the drive and proceed with the installation.
  • In case you are using a bootable USB to install Windows, connect it to another port on the PC. Say, if you are using a USB 2.0 port, switch to USB 3.0, and vice-versa.

If none work, move to the fixes listed next.

1. Update the SATA controller driver

  1. Press Windows + X to open the Power User menu, and select Device Manager from the list.device manager
  2. Expand the IDE ATA/ATAPI controllers entry, right-click on the Standard SATA ACHI Controller, and select Update driver.
  3. Now, choose Search automatically for drivers and wait for Windows to install the best one.update driver to fix 0x80300001

Often the quickest solution to fixing 0x80300001 in Windows 11 is updating the driver that’s triggering the error. And in case the OS is unable to find one, you can always look it up on the manufacturer’s website and manually install the latest driver.

If Windows is not presently installed, load the drivers from the installation disc or add them to the bootable USB. This also helps with 0x80300001 in VMware.

2. Change BIOS settings

Tip icon Tip
While in the BIOS, do not make any changes other than the one listed here, as it could result in system instability or even cause the PC to abruptly crash.
  1. Turn off the computer, then hold the power button to turn it on, and as soon as the display lights, hit the F1, F10, F12, Esc, or Del key, depending on the manufacturer, to access the BIOS.
  2. Now, look through the various available options to find the SATA settings, and make sure AHCI is selected.ahci to fix 0x80300001

3. Create another installation media

  1. Go to Microsoft’s official website and download the Media Creation Tool for Windows 11. For users running the previous iteration, the Windows 10 media creation tool also be downloaded from the official page.media creation tool to fix 0x80300001
  2. Now, run the downloaded setup and wait for it to initialize things.setup
  3. Click on Accept to agree to Microsoft’s license terms.accept
  4. Don’t change the recommended settings, and click on Next to proceed.installation media to fix 0x80300001
  5. Select USB flash drive from the options, and then click Next.bootable USB to fix 0x80300001
  6. Choose the connected USB drive where you want to download the installation files, and click on Next.bootable USB to fix 0x80300001
  7. Wait for the setup to create a bootable USB.
  8. Once done, plug the USB drive into the computer throwing the error, and try installing Windows again.

Oftentimes, it’s an issue with the installation media you created. This usually happens when using a third-party utility. So, this time around, use the Windows Media Creation Tool to create a bootable USB drive, and you shouldn’t get the 0x80300001 install error.

4. Format the partition

  1. Run the installation setup and proceed until you reach the Where do you want to install Windows section.
  2. Select the partition you want to install Windows on and click Format.format to fix 0x80300001
  3. Choose the appropriate response in case a confirmation prompt appears.
  4. Once done with the format, proceed with the installation.

In case it’s the partition that’s to blame for the 0x80300001 error, formatting the partition should do the trick. Remember, any stored data will be lost, so make sure to create a backup beforehand if Windows is already installed on the device.

5. Delete the existing partitions

  1. Run the setup, and proceed with it until you get to the Where do you want to install Windows section.
  2. Now, select any partition and click on Delete.delete partition to fix 0x80300001
  3. Similarly, remove the other partitions on the disk, and it should now be listed as unallocated.delete partition
  4. Now, select the disk, click on New, enter the desired partition size in the text field, and click on Apply. You can also create multiple partitions this way or split the disk later on.new partition to fix 0x80300001
  5. Click OK in the confirmation prompt.ok
  6. Once done, proceed with the installation.

If none of the solutions worked, the last option is to delete all the partitions on the drive and then create new ones to install Windows. Here, too, you will lose the stored files, so it’s recommended that you transfer them to an external storage device or use a cloud backup service.

After you have fixed the 0x80300001 error, check the best security settings to configure and some quick tips to make Windows faster than ever.

For any queries or to share what worked for you, drop a comment below.

0x80190193 Xbox Party Chat Error: How to Fix It

It can be quite vexing when you encounter an error code while trying to play your Xbox. Fortunately, this article aims to help you resolve the Xbox error 0x80190193.

We will show a few things to try and explore some possible causes to help you avoid a repeat occurrence of the error.

What is the Xbox 0x80190193 party chat error?

If you encounter the party chat error with the code 0x80190193 on your Xbox, it could be due to several reasons, including the following:

  • Network-related issues – Your network connection may be experiencing issues such as weak or unstable signals, router problems, or network congestion.
  • Xbox Live service disruption – There may be temporary disruptions or maintenance for Xbox Live services, which could cause party chat errors.
  • NAT settings – Sometimes, the party chat function can be disrupted by your router or network configuration’s Network Address Translation (NAT) settings. If you have a strict NAT type, it may lead to communication issues.

You may try the resolutions below.

How do I fix the Xbox 0x80190193 error?

We recommend the following workarounds before trying anything complex:

  • Restart the Xbox – A restart is often a good way to end all running processes and may be able to resolve minor bugs.
  • Restart your router or internet source – A simple modem or router restart may fix slow internet.
  • Change your internet connection – You may want to try a wired or more stable internet to eliminate any chance of the error due to a bad connection.
  • Wait it out – Giving it time may be the only way out, mainly if a server outage or update triggers the error.

If none of the above work, proceed to more elaborate solutions below.

1. Do a hard reset

  1. Turn off the Xbox.
  2. Unplug it from the wall outlet.
    0x80190193
  3. Wait about 60 seconds, plug it back in, and restart.

2. Factory reset the Xbox

Note icon NOTE
Please note that performing this procedure will result in the deletion of all accounts, saved games, settings, and home Xbox associations. You will be required to reinstall your games, however, once the specific game is installed, your saved data will be restored.
  1. To access the menu, press the Xbox button on your console.
    0x80190193
  2. Navigate to Profile & System.
    0x80190193
  3. Click Settings.
    0x80190193
  4. From the left pane, select System.
  5. Pick the Console info option and hit Reset console.
    0x80190193

3. Delete the alternate MAC address

  1. Press the Guide button located on your controller and select Settings.
    0x80190193
  2. On the left pane, click the General tab, and click Network Settings on the right.
  3. Select the Advanced Settings option.
  4. Select the Alternate MAC Address option.
    0x80190193
  5. Finally, choose the Clear option and follow the prompt to restart the console.
  6. Verify that this fixes the 0x80190193 Xbox error.

We hope you found this article helpful; if it was, do not forget to drop us a comment below and let us know which of the fixes worked.

Also, we have arranged these solutions in order of difficulty, so we recommend starting from the workarounds and walking your way down.

Device Cannot Work Properly (Code 14): How to Fix this Error

You must have stumbled upon the error message this device cannot work properly until you restart your computer (code 14) on your Windows device.

This usually indicates a conflict between the device drivers and another software component or hardware device, and we will explore the best fixes in this guide.

What causes error code 14 on the PC?

The primary causes are usually any of the following:

  • Hardware conflicts – When users have conflicts between the hardware devices on a computer, it can lead to the error.
  • Faulty hardware – If the device is defective or damaged, users may experience the error.
  • Driver-related issues – When the device drivers become outdated or incompatible with the system, they can cause conflicts leading to the code 14 error.
  • Malware or virus infections – Device drivers may be corrupted or damaged by malware, which can result in a code 14 error. Always use robust antivirus software.
  • Conflicting software – A conflict between the software installed on your system and the device driver can lead to a code 14 error.

How do I fix this device cannot work properly until you restart your computer (code 14)?

Before trying anything complex, try the following:

  • Restart the computer – The error message comes with a note to reboot, so it only makes sense to try this before any other fix.
  • Remove peripherals – If you have attached an external hard drive, USB flash, or any peripheral, you should detach them and see if that helps.

If none of the above worked, continue to the solutions below.

1. Reinstall your graphics driver

  1. Right-click on the Start menu, and select Device Manager.
    this device cannot work properly until you restart your computer. (code 14)
  2. Expand the Display adapter category, right-click on the driver, and select Uninstall device.
    this device cannot work properly until you restart your computer. (code 14)
  3. Confirm your choice, restart the computer, and relaunch the Device Manager.
  4. Click on the Scan for hardware changes icon.
    this device cannot work properly until you restart your computer. (code 14)
  5. Verify if this device cannot work properly until you restart your computer (code 14) error is resolved.

Alternatively, you may use an automatic software maintenance tool to avoid the stress of manually reinstalling or updating drivers.

⇒ Get Outbyte Driver Updater

2. Update the graphics driver

  1. Right-click on the Start menu, and select Device Manager.this device cannot work properly until you restart your computer. (code 14)
  2. Expand the Display adapter category, right-click on the driver, and select Update driver.
    this device cannot work properly until you restart your computer. (code 14)
  3. Select Search automatically for updates.
  4. When the update is complete, confirm that the error is resolved.

3. Run the Device and hardware troubleshooter

  1. Press Windows + R to open the Run dialog.
  2. Type control and hit Enter to open the Control Panel.
    this device cannot work properly until you restart your computer. (code 14)
  3. Change the View by option to Small icons and select Troubleshooting.
    this device cannot work properly until you restart your computer. (code 14)
  4. Select View all on the left pane.
  5. Select Video playback.
  6. Follow any suggestions, then return to run the troubleshooter for any other problematic hardware component.

4. Modify the Registry

  1. Press Windows + R to open the Run dialog.
  2. Type regedit and hit Enter to open the Registry.
    this device cannot work properly until you restart your computer. (code 14)
  3. Navigate to the path below:
    Computer\HKEY_LOCAL_MACHINE\SYSTEM\CurrentControlSet\Control\Class{36fc9e60-c465-11cf-8056-444553540000}
    this device cannot work properly until you restart your computer. (code 14)
  4. On the left pane, delete the UpperFilters and LowerFilters options if they exist (In the image below, they do not exist).
  5. Lastly, verify that this device cannot work properly until you restart your computer (code 14) error is fixed.

The solutions above are all you need to fix this problem. Not all of them will work in every situation, so you should start with any that feels more applicable to your situation.

You may go through our guide on opening the Registry if you face any difficulty.

In the comments section below, let us know if you have successfully resolved the error.

[Fix] Code 19 – Windows Cannot Start This Hardware Device

You must have gotten the code 19 error message Windows cannot start this hardware device because its configuration information (in the registry) is incomplete or damaged.

This is mainly a hardware-triggered error. So, in this guide, we explore the best solutions as well as possible causes so that you may avoid a repeat occurrence.

What are the causes of hardware device code 19?

  • Hardware conflicts – If there are conflicts between hardware devices in your system, it could lead to code 19 errors.
  • Incompatible or outdated drivers – If your system is experiencing code 19 errors, it could be due to an outdated or incompatible device driver.
  • Faulty hardware – If Windows cannot start a hardware device, it may be caused by a faulty or damaged hardware device.

How do I fix Windows cannot start this hardware device (code 19)?

We recommend you try the following easy workarounds first:

  • Restart the computer – A restart is often strong enough to kill problematic processes that may spark the code 19 error.
  • Scan for viruses – A simple virus scan with a robust antivirus may eliminate the chances of the error due to malware.
  • Test for hardware damage – You may try the hardware on a different computer to ascertain that it is not faulty.

After these workarounds, you may proceed to the solutions below if the error remains unresolved.

1. Run the specific hardware troubleshooter

  1. Press Windows + I to open the Settings app.
  2. On the right pane, click on Troubleshoot.
    windows cannot start this hardware device code 19
  3. Select Other troubleshooters.
    windows cannot start this hardware device code 19
  4. Search for the hardware component that triggers the error and click on its Run button.
    windows cannot start this hardware device code 19
  5. Verify if Windows cannot start this hardware device with error code 19 is fixed.

2. Update drivers

  1. Right-click on the Start menu, and select Device Manager.windows cannot start this hardware device code 19
  2. Expand any category where you have an outdated driver (they usually will have a yellow badge).
  3. Right-click on the driver and select Update driver.
  4. Select the Search automatically for updates option.
  5. Finally, verify that Windows cannot start this hardware device with device code 19 error is fixed.

If you need a quicker and more reliable method to update any drivers on the PC, there’s no better option than a dedicated app.

It helps you scan the system for outdated drivers and fix them with their official manufacturer version.

⇒ Get Outbyte Driver Updater

3. Reinstall drivers

  1. Right-click on the Start menu, and select Device Manager.
    windows cannot start this hardware device code 19
  2. Expand any category where you have an outdated driver (they usually will have a yellow badge).
  3. Right-click on the driver and select Uninstall device.
    windows cannot start this hardware device code 19
  4. Confirm your choice.
  5. Restart your computer and relaunch the Device Manager.
  6. Click on the Scan for hardware changes.
  7. Finally, verify that the error is resolved.

4. Perform a System Restore

  1. Press Windows + R, type rstrui, and hit Enter.
  2. Click the Next button.
  3. Lastly, select a restore point and hit the Next button.
    windows cannot start this hardware device code 19

That is as far as we share in this guide. As a last resort, you may reset your computer, but this is not recommended as you may lose valuable information. We have written a comprehensive guide on how to reset a Windows 11 device.

So, if you encounter Windows cannot start this hardware device code 19, try the above solutions starting from whichever you feel is most applicable.

Lastly, let us know in the comments section what fix was most effective.

Video.ui.exe: What Is It & Should You Remove It?

If you are a gamer and are familiar with Xbox Live, you may have encountered the video.ui.exe process or file. A few of our readers are confused about what this process is.

So in this article, we cover everything you may need to know about it and also explain some of the best ways to get rid of it if you want to.

What is video.ui.exe?

The Video.ui.exe is a component of Microsoft’s Xbox Live video app, which grants users access to live or recorded TV. This application was previously called Zune and can be downloaded onto a 64-bit Windows operating system from the Microsoft Store.

The program is configured to launch at startup and run continuously, but it can be terminated through the task list.

Is Video.ui.exe a virus, and should I remove it?

This file is legitimate, and you do not need to remove it. However, certain viruses may mimic genuine applications. So, you may consider doing the following to ascertain if it should be removed:

  • Scan video.ui.exe – A simple virus scan of video.ui.exe will show if it’s genuine. The built-in Windows Security or any robust antivirus will do.
  • Check for signature – It’s recommended to check the publisher of the video.ui.exe file and if it’s been signed or not. Interestingly, the authentic application should not be unsigned.
  • Monitor network activity – Based on our analysis, it appears that video.ui.exe utilizes a very small amount of data. So, if your file is consuming a large amount, it could be a virus.

How do I remove Video.ui.exe?

1. Uninstalling it from apps and features

  1. Press Windows + R, type appwiz.cpl, and hit Enter.
    video.ui.exe
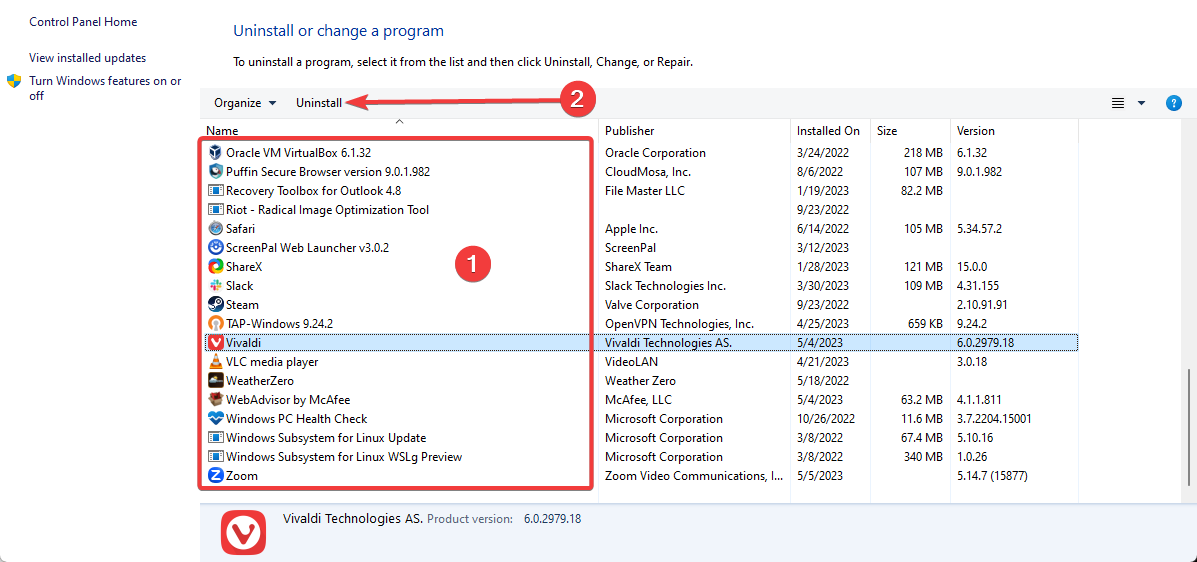
  2. Here, click on video.ui.exe from the installed apps and select the Uninstall button.
    video.ui.exe
  3. Follow the wizard to complete the process.

2. Stoping video.ui.exe with the Task Manager

  1. Press Ctrl + Shift + Esc to open the Task Manager.
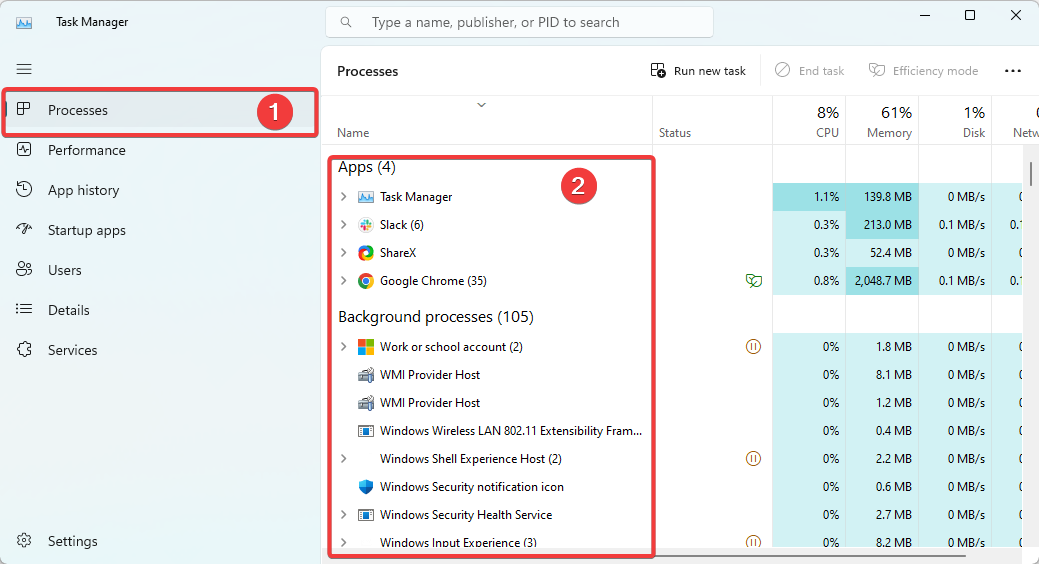
  2. To locate the running process of Video.ui.exe, navigate to the Processes tab in the Task Manager window and scroll down until you find it.
  3. Right-click the process and click Open file location to open the file in Windows Explorer.
    video.ui.exe
  4. Go back to the Task Manager, select the process, and hit the End task option.
  5. Now return to the open Windows Explorer and delete the file.

That is about as much as there is to know about the video.ui.exe file on Windows.

Remember we advise against removing it. You should get rid of it only if you are sure it is a virus program.

If you have any additional questions, please get in touch with us in the comments section below.

D3dcompiler_47.dll is Missing? 5 Quick Ways to Fix It

The file D3dcompiler_47.dll is a crucial part of DirectX, a Microsoft platform designed to handle multimedia tasks like gaming on Windows operating systems.

A few of our readers have complained the DLL is missing on their computers. So, this guide will introduce the best ways to fix this problem.

Why is d3dcompiler_47.dll missing?

There are several reasons why the Dynamic Link Library might be missing on your device. The most common causes are as follows:

  • Software conflicts – Conflict could come from 3rd-part installations or result from outdated drivers, conflicting system settings, or other software-related problems.
  • Corrupted or missing file – There are various reasons for a missing or corrupted file, such as a virus or malware infection, incorrect installation, program removal, or other system errors.
  • Outdated Windows OS – If you use an older version of Windows, you might encounter an error as the d3dcompiler_47.dll file is only present in the newer versions of the Windows operating system.
  • DirectX not installed – It’s possible that the issue could be due to the absence or outdated version of the DirectX runtime library on your computer.

How do I fix a missing d3dcompiler_47.dll?

Before attempting any intricate solutions, consider trying the following simple workarounds:

  • Restart your device – Small bugs can cause errors. Restarting your system may be enough to eliminate them and prevent the need for further troubleshooting.
  • Uninstall recent applications – To resolve the issue, it may be helpful to uninstall any applications that are causing conflicts with the software.
  • Scan for viruses – If your computer experiences a missing DLL error caused by a virus, running a scan with a robust antivirus can effectively clean the system.

If the preliminary solutions do not work, then proceeding with the following fixes is recommended.

1. Use specialized DLL repair tools

If you are experiencing DLL errors, there are a number of DLL fixers available that can assist in resolving these issues.

We highly recommend using such tools, as they guarantee the functionality of Microsoft native DLLs like d3dcompiler_47.dll with a 100% success rate.

2. Update the OS

  1. Press Windows + I to open the Settings app.
  2. On the left pane, click Windows update, then on the right click the Check for updates button.
    d3dcompiler_47.dll
  3. If any updates are found click on Download & Install.
    d3dcompiler_47.dll
  4. Finally, restart your computer for all the updates to take effect.

3. Download the DLL manually

You can manually download the d3dcompiler_47.dll file from trustworthy sources.

Remember to place it in the same directory as the affected application. Once done, you can launch the app smoothly without encountering any further issues.

Also, it’s important to exercise caution when downloading DLLs and only to use reputable sources, as malicious programs can easily gain access to your system through a DLL.

4. Install DirectX

  1. Navigate to the download page for the runtime.
  2. Click on the Download button.
  3. To start the installation, simply click on the downloaded setup. Once the installation is finished, restart your computer for the changes to take effect.
    d3dcompiler_47.dll

5. Restore your system

  1. Press Windows + R, type rstrui, and hit Enter.
    d3dcompiler_47.dll
  2. Click the Next button.
  3. Select a restore point and hit the Next button.

That is as far as we will discuss in this guide. Use any of the five solutions to fix the missing DLL problem. We recommend selecting the option that is most appropriate for your unique situation.

Finally, kindly let us know in the comments section below which approach yielded the best results for you.

What is Unifairy.sys & How to Properly Remove It?

You must have encountered an issue with one of your app files on a Windows device. In particular, you may just have gotten the error message unifairy.sys incompatible driver.

Windows users are then left wondering what this specific file is. So, we will explore what it is and show you the correct way of removing it.

What is Unifairy.sys?

The unifairy.sys is an anti-cheat file mainly associated with game applications, especially Honkai 3rd Impact game. However, it may also be bundled with Genshin Impac, and it often triggers many problems.

Disabling memory integrity core isolation is necessary to prevent related issues and errors when an incompatible driver tries to operate while memory integrity is enabled.

Regrettably, the default driver support on certain devices has locked this setting, preventing you from disabling it through regular methods. So, below is how to disable unifairy.sys and prevent further errors.

How do I remove unifairy.sys from my computer?

1. Delete the file

1.1 Uninstall the program/game using unifairy.sys

  1. Press Windows + R, type appwiz.cpl, and hit Enter.
    unifairy.sys
  2. Search through the program list for the program that uses the file (In most cases, the app you would need to uninstall is Honkai Impact 3rd).
  3. Click on it and select the Uninstall button.
  4. Follow the wizard to complete the uninstallation.

1.2 Delete the file

  1. Press Windows + E to open File Explorer.
  2. Navigate to the path below and locate the unifairy.sys file.
    C:\Windows\System32
  3. Right-click on the file and select the delete icon.

2. Using the Registry

  1. Press Windows + R to open the Run dialog.
  2. Type in regedit and hit Enter.
    unifairy.sys
  3. Navigate to the path below:
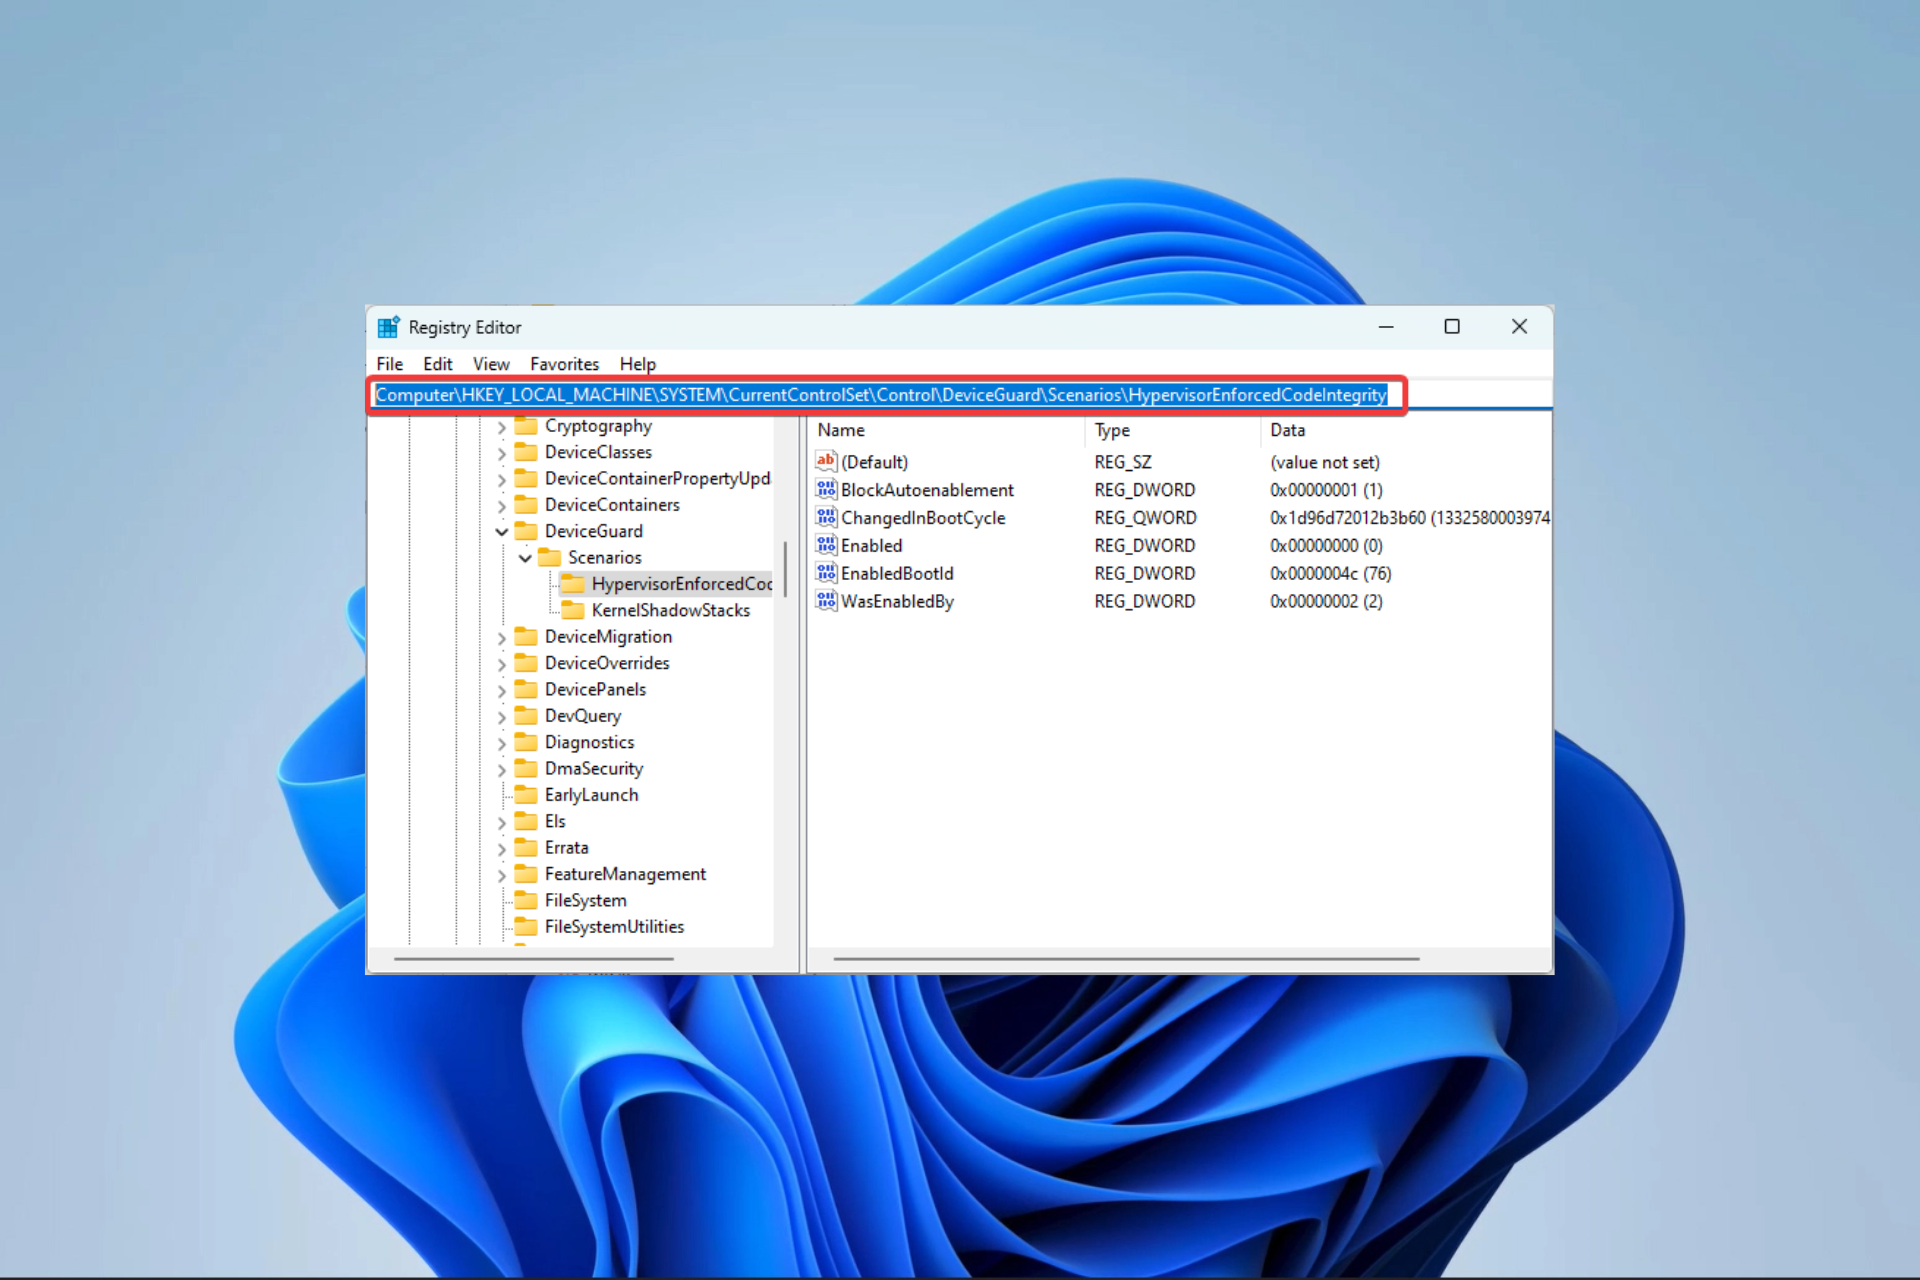
    Computer\HKEY_LOCAL_MACHINE\SYSTEM\CurrentControlSet\Control\DeviceGuard\Scenarios\HypervisorEnforcedCodeIntegrity
    unifairy.sys
  4. Double-click Enabled and change the Value to 0.
    unifairy.sys
  5. Restart the computer, and you should no longer have unifairy.sys.

While this method does not remove it from your computer, it disables the file and its ability to affect programs.

The process of getting rid of this game cheat file is quite easy. We recommend solution one as it is the most efficient, but using the second solution will also work, and both will resolve any issues of unifairy.sys incompatible driver.

We recommend reading our guide on uninstalling software on Windows 11 if you have any problems completing the first solution.

And that is it for this guide. Please let us know what worked in the comments section below.

How to Fix Transmit Error Code 1231: 5 Tested Solutions

Several readers have reported experiencing the Transmit error: code 1231 message while attempting to trace or ping a machine absent from a network location or local workgroup.

The error message appears when a Windows computer fails to connect to a network. This issue can be caused by incorrect network settings, a malfunctioning network adapter, network congestion or outdated or corrupt drivers.

How do I fix transmit error code 1231?

1. Reset the TCP/IP stack

  1. Press Windows + R, type cmd, and hit Ctrl + Shift + Enter to open an elevated Command Prompt.
    transmit error code 1231
  2. Type the script below and hit Enter.
    netsh int ip reset
    transmit error code 1231
  3. Restart your computer, and once it has booted up, open an elevated Command Prompt again, then type the scripts below hitting Enter after each one.
    netsh winsock reset
    netsh int ipv4 reset
    netsh int ipv6 reset
  4. Once you have executed these commands, proceed to restart your computer.

2. Reinstall your Network adapter

  1. Search Network on Windows search, then click on View network connections.
    transmit error code 1231
  2. Take note of the Adapter name.
  3. Right-click on the Start menu and select Device Manager.
    transmit error code 1231
  4. Expand the Network adapters category, right-click on your driver (it should be the one with the same name as found in Step 2), and select Uninstall device.
    transmit error code 1231
  5. Restart your computer and reopen the Device Manager.
  6. Click on the Scan for hardware changes icon.
    transmit error code 1231
  7. The uninstalled driver should be reinstalled, and you may finally verify that the transmit error code 1231 is resolved.

The steps above are indeed practical but it may take lots of time to reinstall the network or any other drivers.

For this purpose, dedicated driver software is the ideal way to detect problematic drivers and install the right version automatically.

⇒ Get Outbyte Driver Updater

3. Enable network discovery

  1. Press Windows + R, type control.exe /name Microsoft.NetworkAndSharingCenter and hit Enter.
    transmit error code 1231
  2. On the left pane of the Network and Sharing Center window, click Change Advanced sharing settings.
    transmit error code 1231
  3. Expand Private networks and Public networks, then toggle on the Network discovery option.
  4. Expand the All networks section and toggle off Password protected sharing.
    Password
  5. Finally, verify the transmit error code 1231 is resolved.

4. Rename the workstation

  1. Press Windows + R, type ms-settings:about, and hit Enter.
    transmit error code 1231
  2. Click on the Rename this PC button.
  3. Type in a name and click Next.
  4. After the operation finishes, restart the computer and verify transmit error code 1231 is fixed.

5. Use the System Restore

  1. Press Windows + R, type rstrui, and hit Enter.
  2. Select Choose a different restore point and click Next.
    transmit error code 1231
  3. Select a restore point from the available options and click the Next button.
  4. Click the Finish button, then wait while the restore process begins.

This process aims to take the computer to its state a few days before you noticed the error. However, you should know that some tools or apps installed after that date may be removed.

To conclude, remember that we have not made this list in any particular order. We recommend starting with any solution that seems the most applicable.

Lastly, we like to hear your feedback in the comments section below so that we will watch out for your questions or remarks.

ERR_ADDRESS_UNREACHABLE: How to Fix It in 5 Steps

The ERR_ADDRESS_UNREACHABLE error is a common error code that may appear in your web browser (usually on Google Chrome) when it is unable to establish a connection to a website or IP address.

If you are experiencing the ERR_ADDRESS_UNREACHABLE error on Google Chrome for Windows, you may use the simple solutions outlined here to resolve the issue.

How do I fix the ERR_ADDRESS_UNREACHABLE error?

Before delving into the main solutions we suggest, it’s recommended to try these straightforward workarounds:

  • Restart your computer: Sometimes, simply restarting your device can be sufficient to resolve the ERR_ADDRESS_UNREACHABLE error.
  • Check your internet connection: Make sure that your device is properly connected to the internet, and try resetting your modem or router.
  • Temporarily disable firewall or antivirus software: Temporarily disabling your firewall or antivirus software can help you determine if these programs are causing the issue.
  • Update the browser: The error could be caused by the outdated browser. Updating the browser to the newest version can fix it.
  • Check the address: If you try to access a private address from a public network, it may result in the ERR_ADDRESS_UNREACHABLE. Make sure you connect to the correct network before attempting to access a website or private IP address to prevent this error.

1. Clear the browsing data

  1. Launch Chrome browser and click the three-dot button in the upper-right corner and choose Settings.
    Chrome settings
  2. On the Settings page, go to Privacy and security and click Clear browsing data.
    privacy and settings
  3. In the Clear browsing data dialog, move to the Advanced tab and ensure the Time range is set to All time.
    Time range to all time
  4. Then, select the following: Browsing history, Cookies and other site data, Cached images and files, Site settings, and Hoster app data.
  5. After that, click Clear data.

After clearing the cache, check the website to see if you have resolved the ERR_ADDRESS_UNREACHABLE error.

2. Reset TCP/IP

  1. Press Windows + R, type cmd, and press Shift + Ctrl + Enter to run Command Prompt as administrator.
    Run
  2. Type the following commands one by one and hit Enter after each one: ipconfig /release ipconfig /all ipconfig /flushdns ipconfig /renew netsh int ip set dns netsh Winsock reset
    reset commands

3. Clear Google Chrome DNS Cache

  1. Open Google Chrome, type the following address in the address bar, and press Enter. chrome://net-internals/#dns
    type the address
  2. Click the Clear host cache button.
    Clear DNS host
  3. Then, re-launch the browser and revisit the website to see if the ERR_ADDRESS_UNREACHABLE error persists.

4. Enable or Disable/Enable Proxy server

  1. Press Windows + R, type inetcpl.cpl, and press Enter.
    inetcpl.cpl
  2. Go to the Connections tab and click the LAN settings button.
    LAN settings
  3. Then, check the box Use a proxy server for your LAN box under Proxy server.
    Uncheck proxy server
  4. You can also try using a different proxy address and port number found online.
  5. If the proxy server is already enabled, uncheck the Use a proxy server for your LAN box and click OK.

5. Change DNS Settings

  1. Press Windows + R, type ncpa.cpl in the Run command, and hit Enter.
    ncpa.cpl
  2. In the Network Properties window, right-click your network and select Properties.
    Network propperties
  3. Select the Internet Protocol Version 4 (TCP/IPv4) option and click Properties.
    IPv4
  4. Then, select the Use the following DNS server addresses option.
  5. Enter 8.8.8.8 into the Preferred DNS server box and enter 8.8.4.4 in the Alternate DNS server box.
  6. Alternatively, you can set 208.67.222.222 as the Preferred DNS server and 208.67.220.220 as the Alternate DNS server.
  7. Then, click OK to save the changes.
    change DNS server
  8. Restart the browser and check if the ERR_ADDRESS_UNREACHABLE error is resolved.

What is the ERR_ADDRESS_UNREACHABLE error in Chrome?

The ERR_ADDRESS_UNREACHABLE error typically occurs in web browsers when the browser cannot establish a connection with the website’s server. This could be due to a variety of reasons, such as:

  • Network connectivity issues: Poor internet connection or network issues can trigger the ERR_ADDRESS_UNREACHABLE error.
  • DNS (Domain Name System) issues: DNS server problems or cache corruption on your device can cause website access problems.
  • Firewall or antivirus software: Firewall or antivirus software can block connections, leading to the ERR_ADDRESS_UNREACHABLE error.
  • Website server issues: When the website’s server is experiencing problems or is down, you may be unable to establish a connection with the website.
  • Proxy settings: If you are accessing websites using a proxy connection, it may not properly handle your requests, which can result in errors.

You can modify your DNS settings on Windows either manually or by using the Cloudflare 1.1.1.1 DNS service.

FAQ

What is ERR_ADDRESS_UNREACHABLE?

ERR_ADDRESS_UNREACHABLE is a Google Chrome error that occurs when your browser is unable to connect to the server of a website, typically due to network issues, DNS misconfigurations, or server downtime.

What causes ERR_ADDRESS_UNREACHABLE?

This error can be caused by incorrect DNS settings, network misconfigurations, a down website server, or corrupted browser cache and cookies interfering with the connection.

How can I fix ERR_ADDRESS_UNREACHABLE?

To resolve this, you can check your internet connection, clear browser cache and cookies, reset your DNS settings, or restart your router, along with updating your browser or disabling any VPN or proxy.

For more information on related errors such as the “ERR_UNKNOWN_URL_SCHEME“, check out our detailed guide on how to resolve it.

It’s also a good idea to check if the website works properly on other devices or internet browsers.

If you have any questions or suggestions, let us know in the comments section.

How to Fix 0x80096004 Windows Update Error

If you’re encountering the error code 0x80096004 or 80096004, this indicates a problem with running Windows Updates on your device.

With this error, the update process may not start or will only run halfway. So we will show you the best ways to fix the problem on a Windows 11 computer.

What causes the 0x80096004 Windows update error?

From our interactions with readers, several factors may trigger this error. At the top of the list are the following:

  • Malware – Some malware is strong enough to alter specific settings and stop essential update services from running. We recommend using a robust antivirus system.
  • Corrupted files – If some system files critical to the update process are corrupted, you will experience a few update errors.
  • Registry errors – A few users have also indicated that errors or corruption with registry files may trigger the error.

Regardless of the cause, the solutions below should fix the problem.

How do I fix error code 0x80096004?

Before delving into any solutions, try these quick workarounds:

  • Restart the computer – Even though this is general, a reboot may force problematic processes to end and fix an update error.
  • Run a virus scan – File corruption is often triggered by malware, so running a scan may fix the error if it is malware induced.

If the pre-fixes do not work, proceed to our primary solutions below.

1. Run the Windows Update troubleshooter

  1. Press Windows + I to open the Settings app.
  2. On the right pane, select the Troubleshoot option.
    0x80096004
  3. Click Other troubleshooters.
    0x80096004
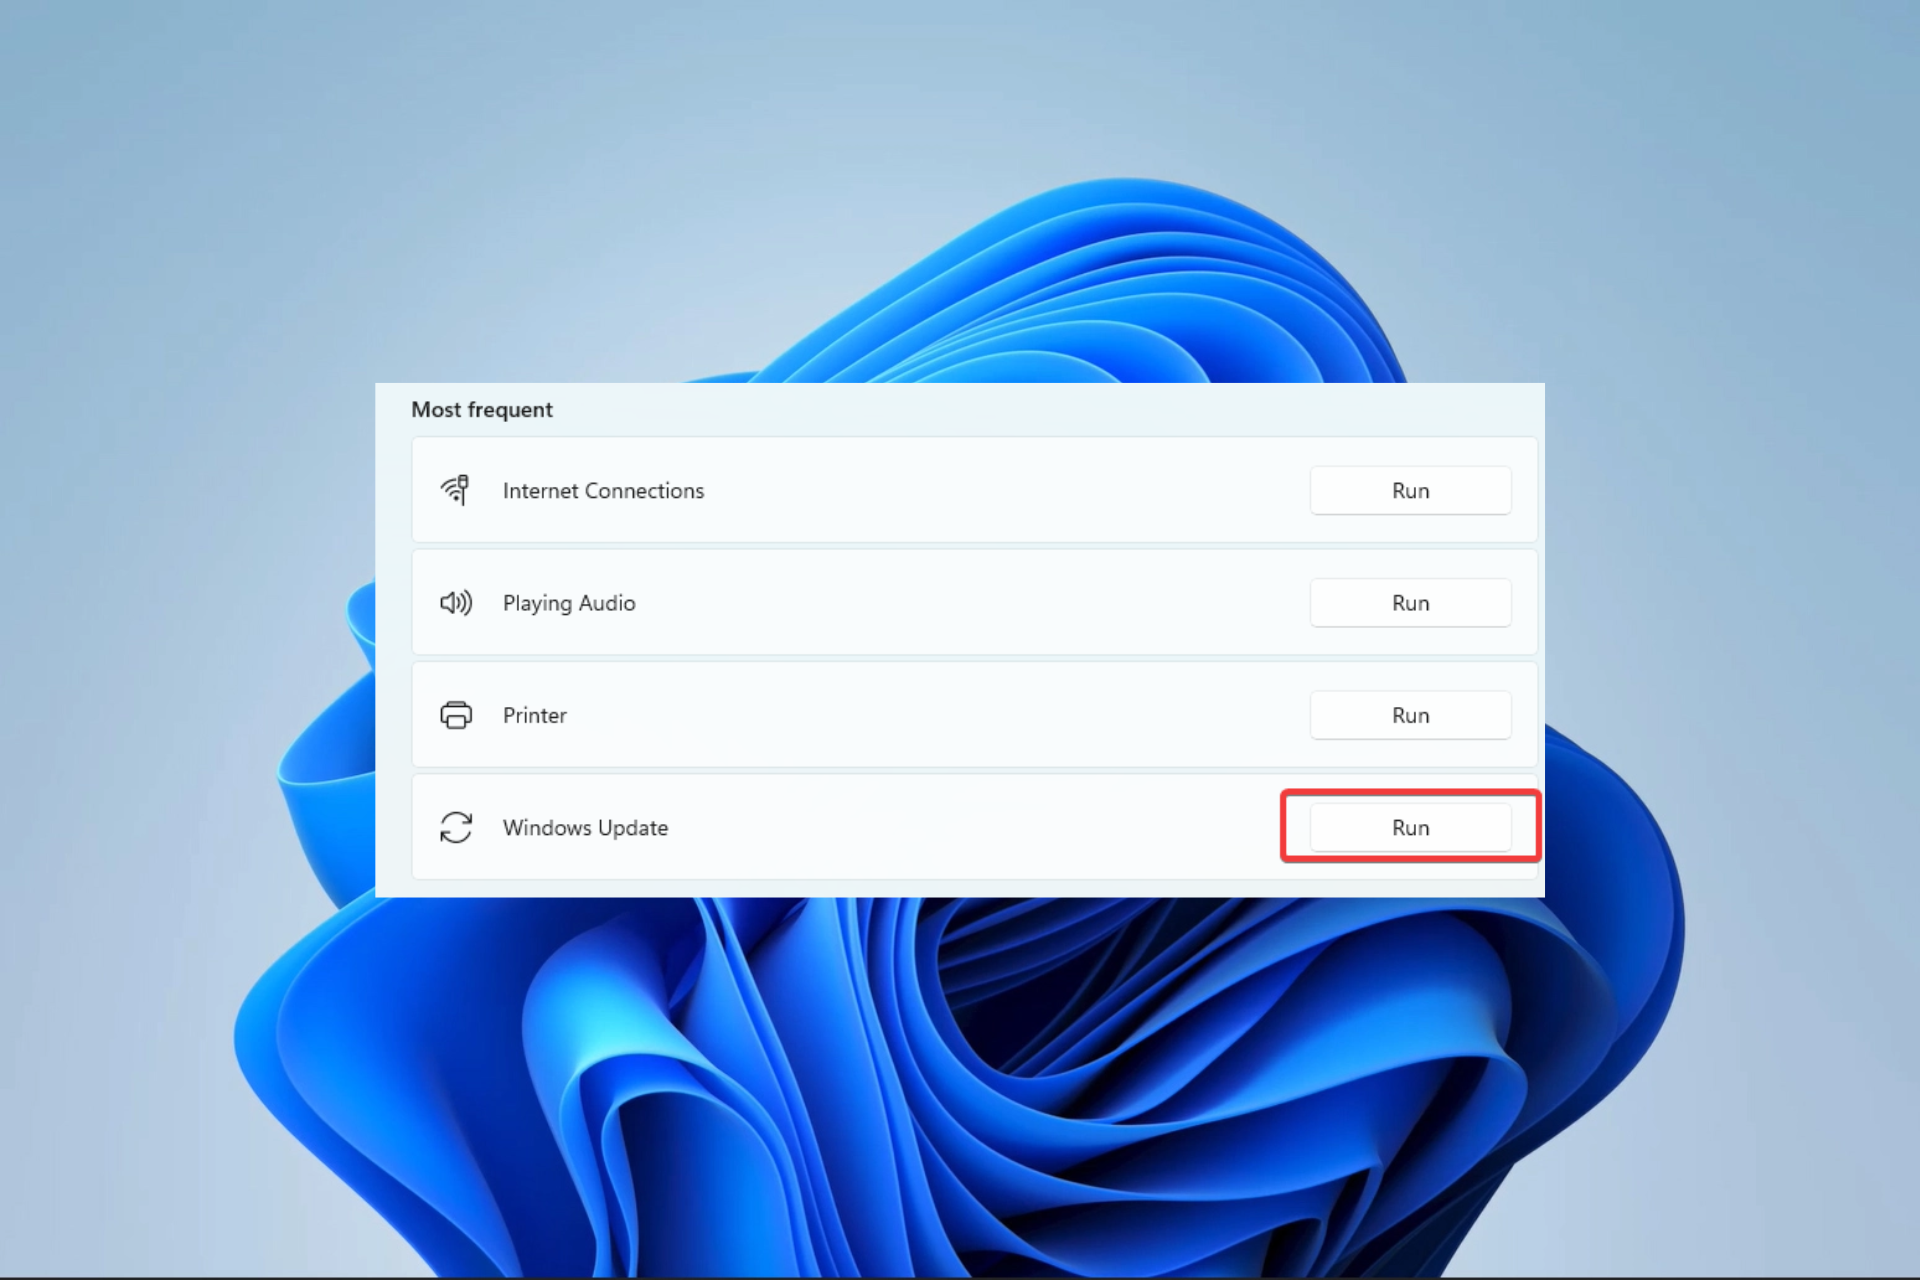
  4. Click the Run button in front of the Windows update option.
    0x80096004
  5. Follow the recommendations from the update wizard to complete the process.
  6. Restart the computer and verify if the 0x80096004 update error is fixed.

Also, if you need another way to diagnose your PC and find existent problems, it’s probably better to use dedicated software. A system repair software can detect all the damaged files and give you the full report with issues, so you can repair them in one click.

2. Restart Update Services

  1. Press Windows + R to launch the Run dialog.
  2. Type Services.msc and hit Enter.
    0x80096004
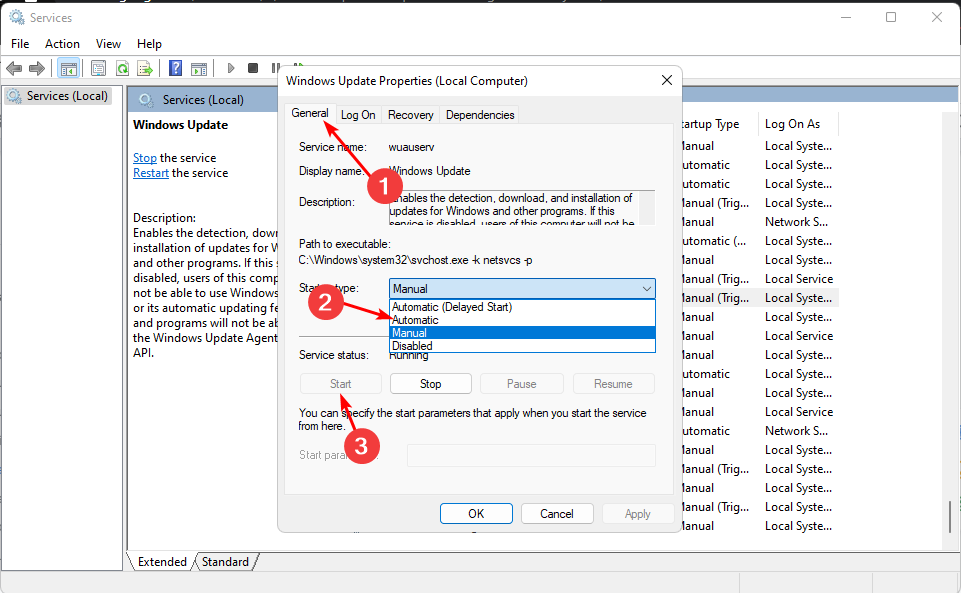
  3. Double-click on Windows Update services. Set the Startup type to Automatic, and if it is not running, click the Start button.
    0x80096004
  4. Press Apply and OK, then verify if the 0x80096004 update error is fixed.

3. Re-register your Crypt32.dll File

  1. Visit the link to download a new Crypt32 DLL.
  2. Click on Download, and save it on your computer.
  3. Replace the old crypt32.dll file in any of the paths below with the newly downloaded one.
    x86: This PC > C:\Windows\System32
    x64: This PC > C:\Windows\SysWOW64
  4. Press Windows + R to launch the Run dialog.
  5. Type cmd and hit Ctrl + Shift + Enter.
    0x80096004
  6. Type the script below and hit Enter.
    regsvr32 crypt32.dll

If you’re experiencing error 0x80096004, another option to resolve it is to re-register crypt32.dll. This file holds numerous Certificates and Cryptographic Messaging functions that will affect the update process.

4. Reset your Windows Update folders

  1. Press Windows + R to launch the Run dialog.
  2. Type cmd and hit Ctrl + Shift + Enter.
    0x80096004
  3. Type the scripts below and hit Enter after each one to stop vital update services.
    net stop wuauserv
    net stop cryptSvc
    net stop bits
    net stop msiserver
  4. Now rename the update folders by running the scripts below:
    ren C:\Windows\SoftwareDistribution SoftwareDistribution.old
    ren C:\Windows\SoftwareDistribution SoftwareDistribution.old
  5. Type the scripts below and hit Enter after each one to restart the stopped update services.
    net start wuauserv
    net start cryptSvc
    net start bits
    net start msiserver
    0x80096004
  6. Verify the 0x80096004 Update error is fixed.

You should have successfully resolved the error if you have read this far. Remember, we have not written these solutions in any particular order, so you should try what seems the most appropriate.

Finally, we love to hear your feedback in the comments section, so please let us know what fix worked best for you.

How to Record a PowerPoint Presentation (with Sound & Video)

Recording your PowerPoint presentation with audio and video can make it more attractive and exciting. This can help to keep your audience engaged and focused, making it more likely that they will stay engaged throughout your entire presentation.

Microsoft PowerPoint offers options to record PowerPoint presentations with audio and video, allowing you to present the slides while capturing your camera feed.

There are two ways to create a PowerPoint presentation with sound and video: by recording a slideshow with audio and video or by adding external audio and video to your presentation.

Can you record PowerPoint with audio?

PowerPoint allows you to record your screen along with your voiceover narration. You can either record your voice as you present the slides or add a pre-recorded audio track to your presentation.

During recording, you can turn off your camera, allowing you to include only your voice narration or background music in your presentation.

When you’re done recording, you can save the presentation as a video file or PowerPoint Show that includes both the slides and the audio.

How do I record PowerPoint presentations with audio and video?

1. Check your microphone and camera settings

  1. Connect your headset or external microphone to your computer for the best sound quality. You can also use your computer’s internal microphone.
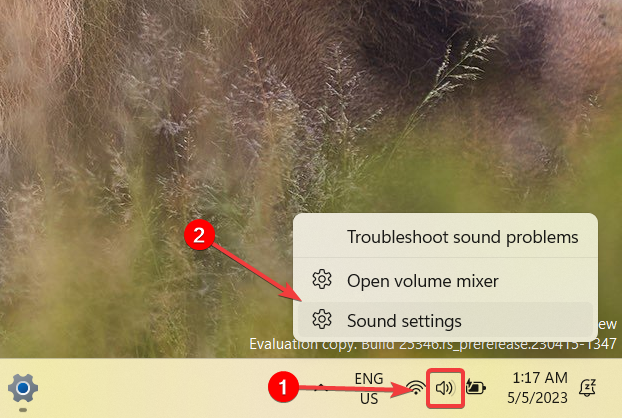
  2. Right-click the speaker icon and select Sound Settings from the menu that appears.Access Sound settings
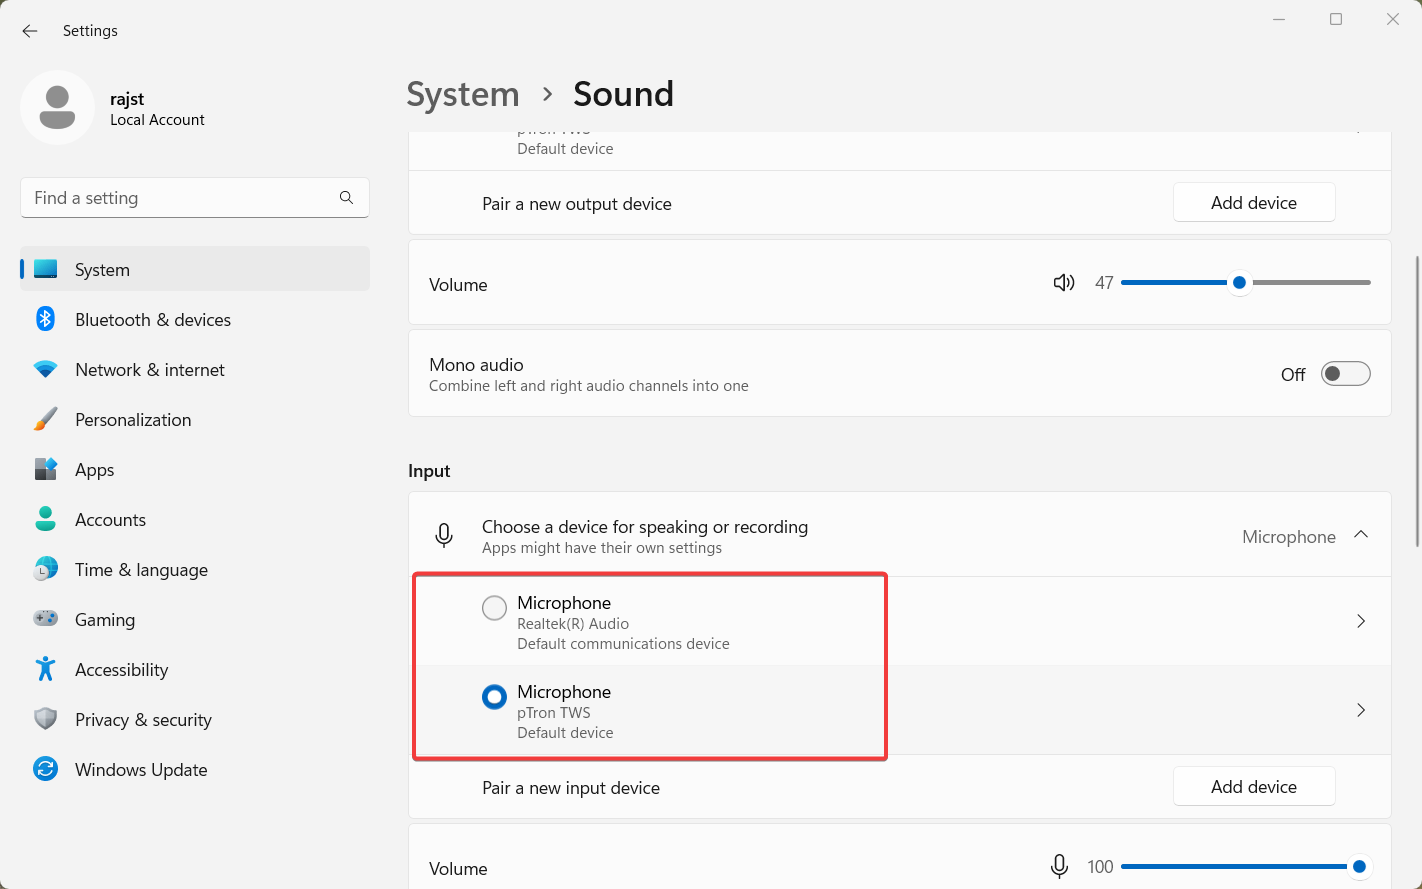
  3. Scroll down to the Input section. You will see your default microphone device is selected.
  4. To change the default microphone, simply select the microphone from the list.select microphone
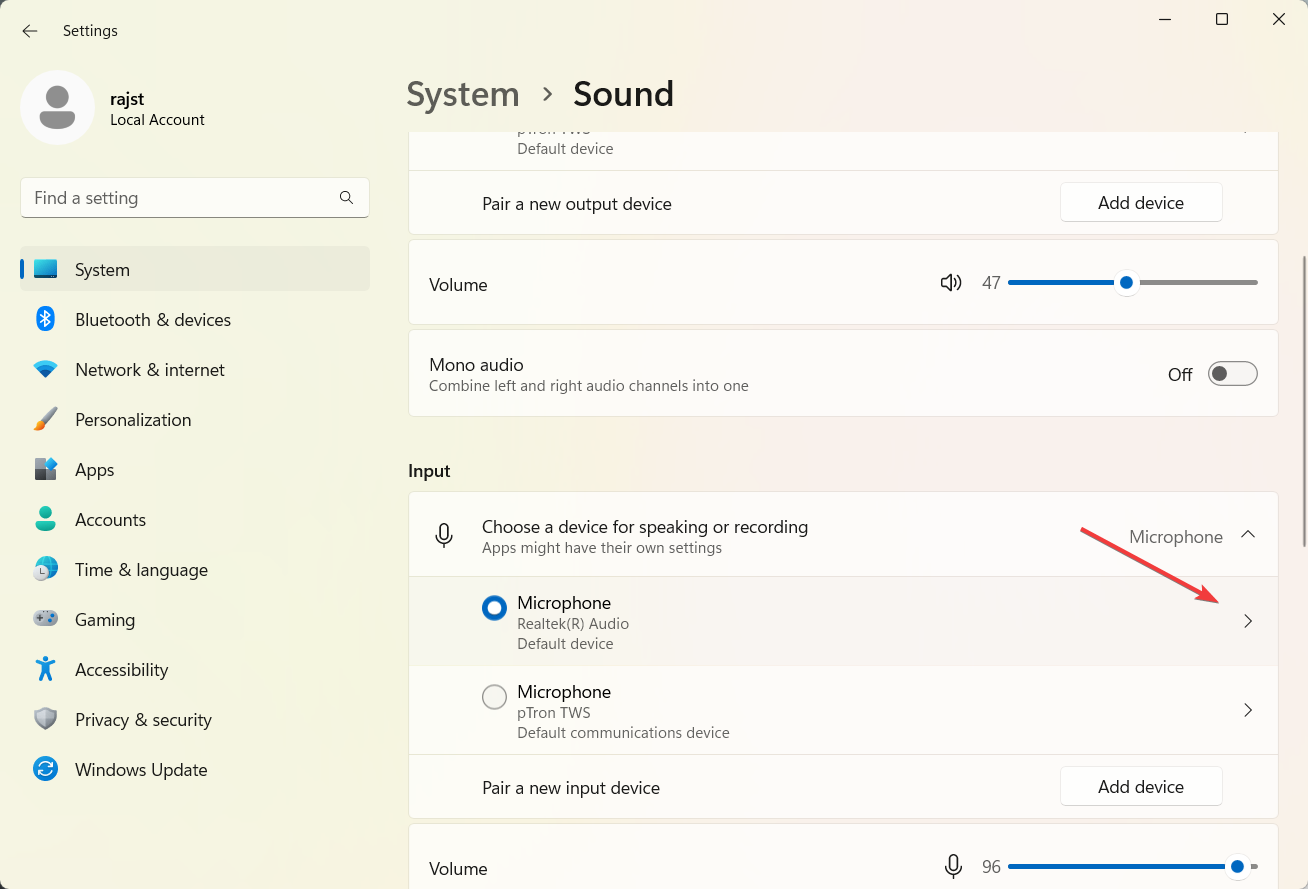
  5. Then, click the arrow button next to the microphone you want to test.change settings
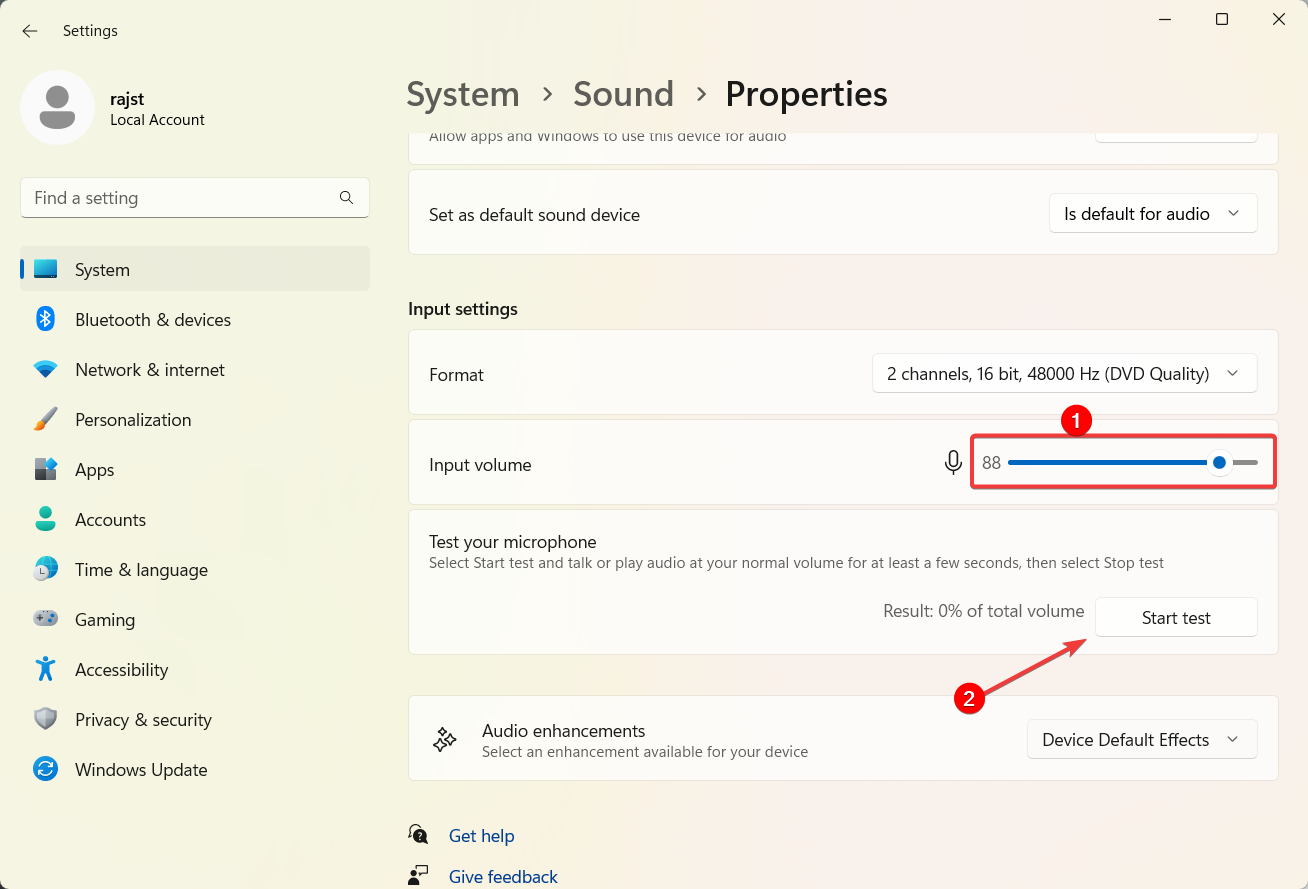
  6. Under Input settings, adjust the input volume to the correct level and click the Start test button.Adjust mic volume
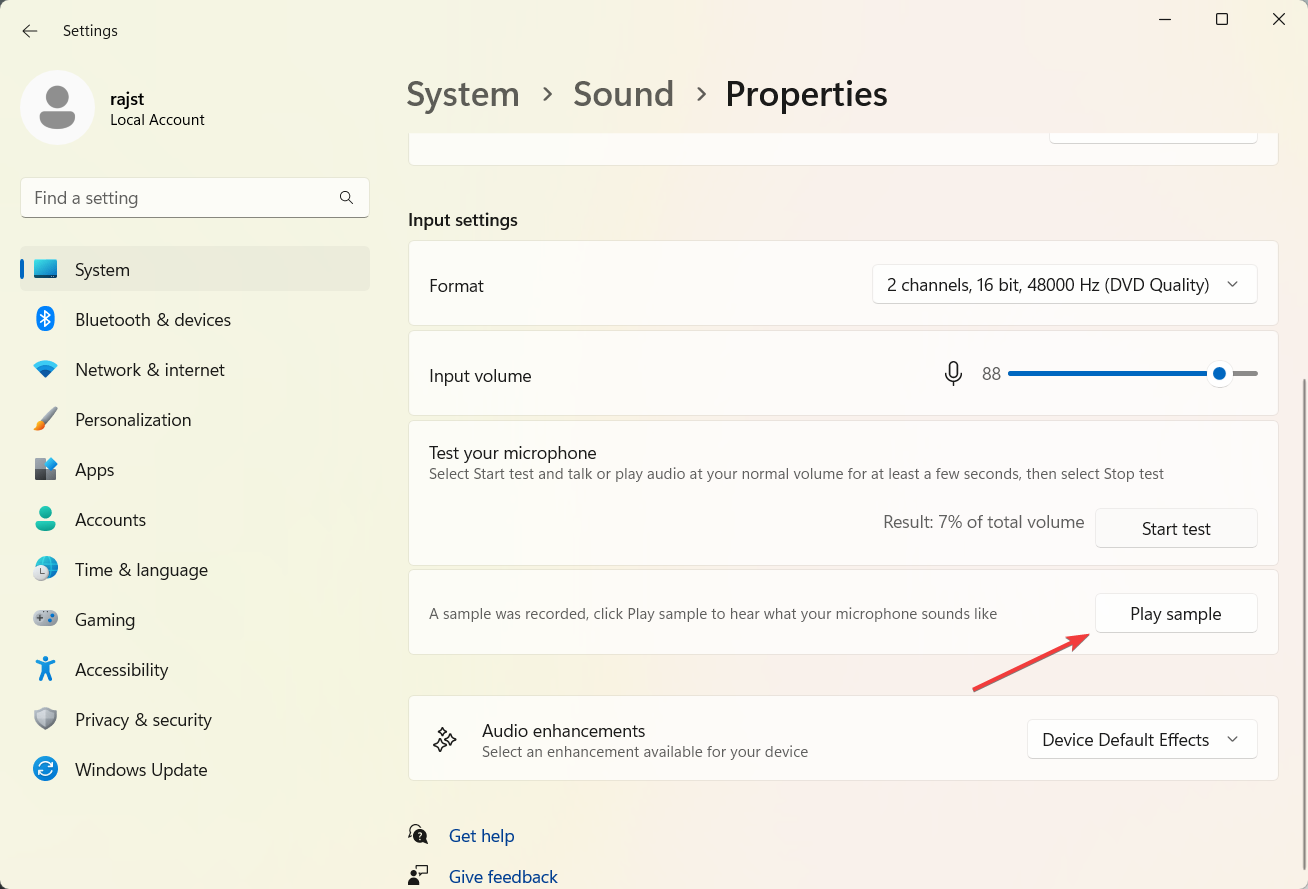
  7. Then, speak into the microphone and click the Play sample to hear what your microphone sounds like.Play sample
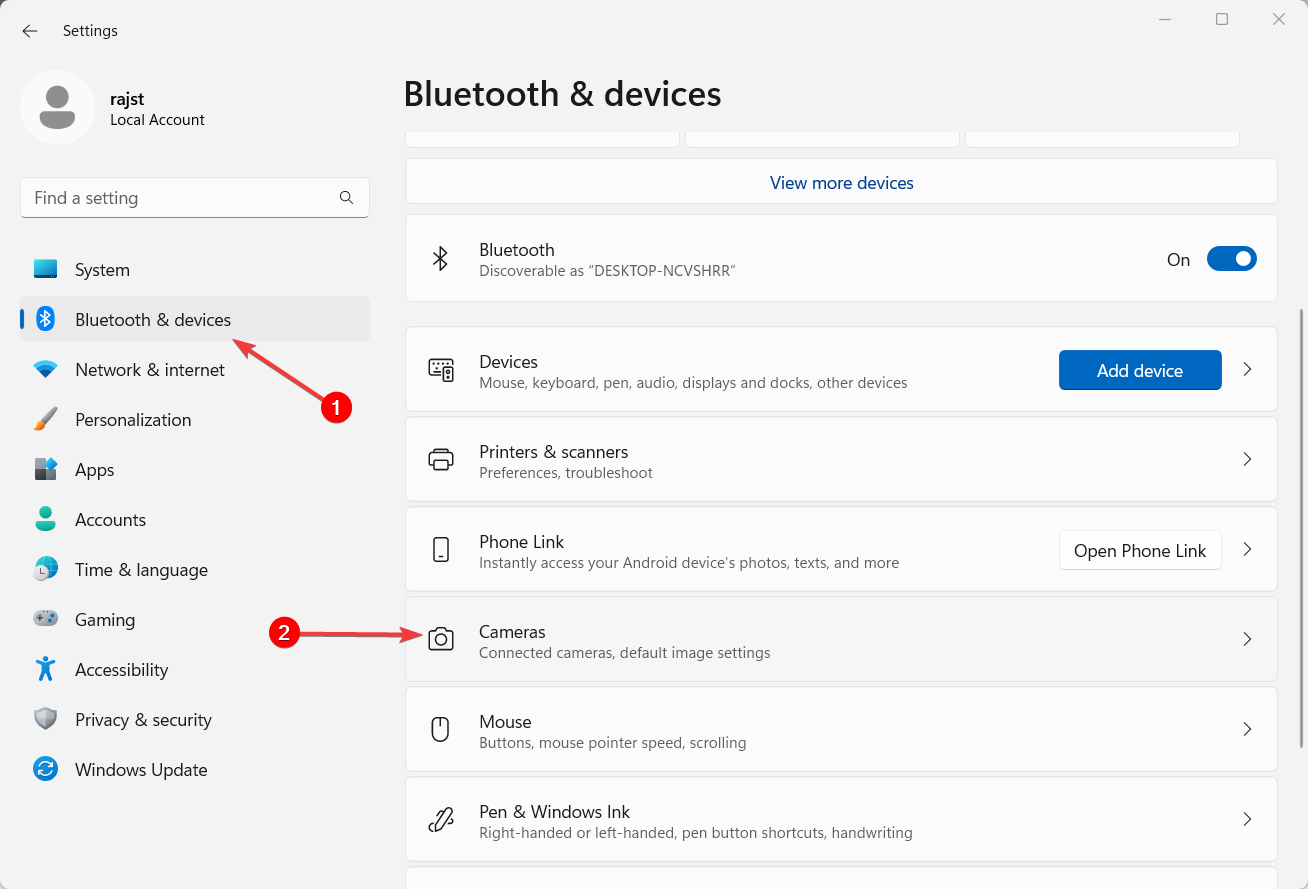
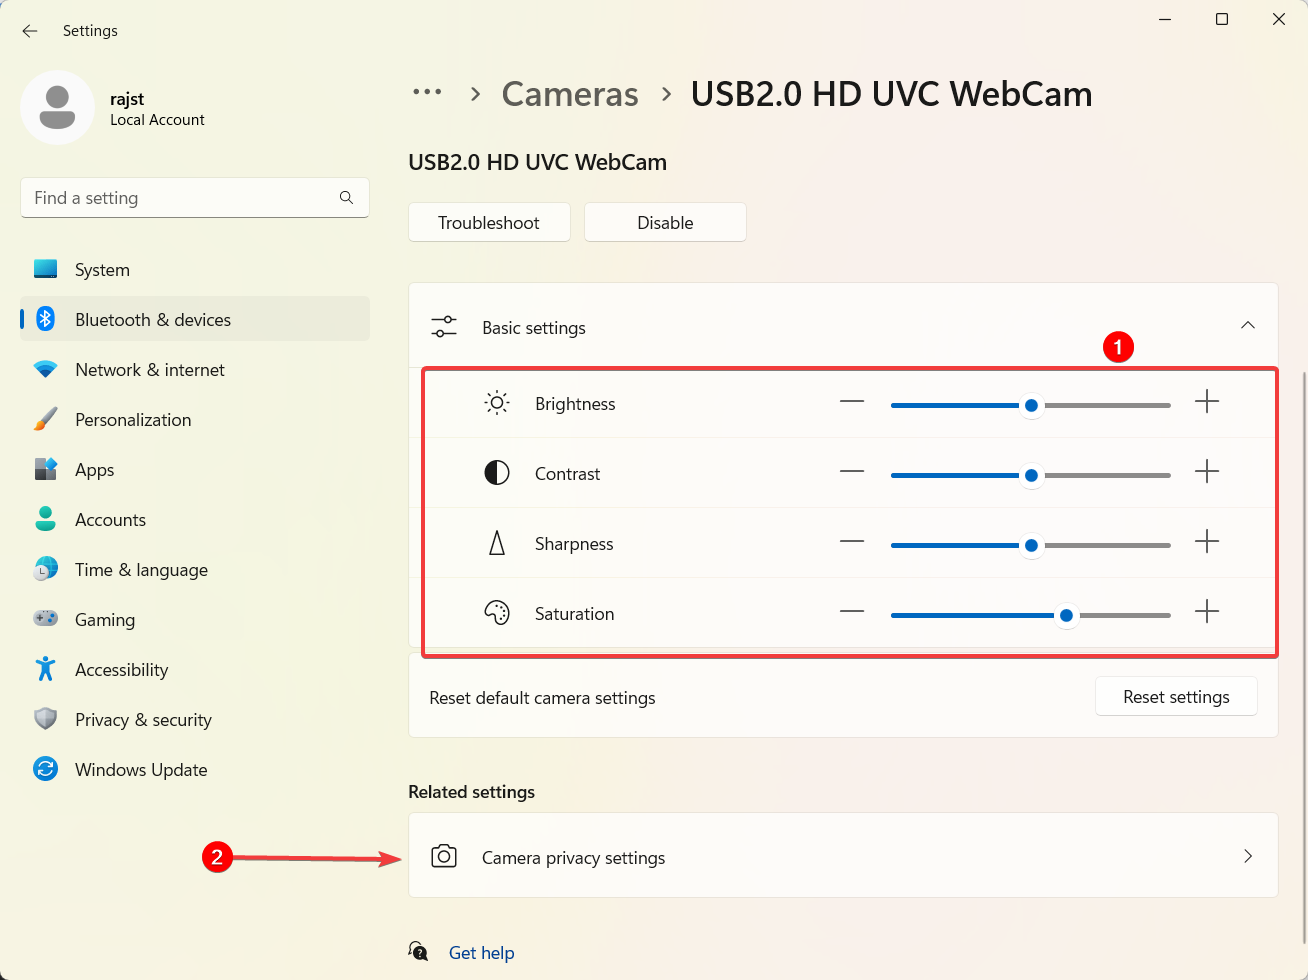
  8. After that, click on Bluetooth & devices on the left and select Cameras on the right.Camera
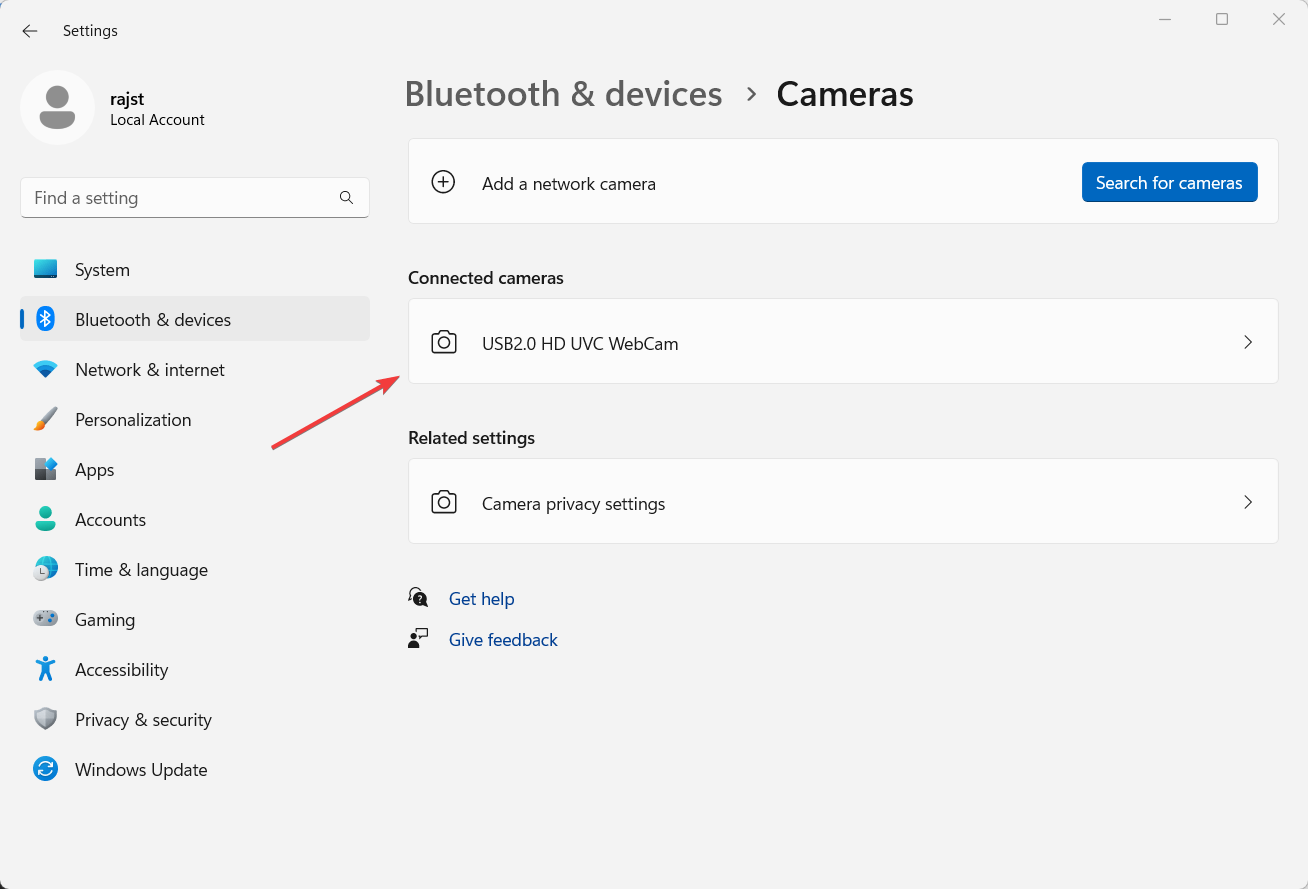
  9. Next, select the camera under Connected cameras.select camera
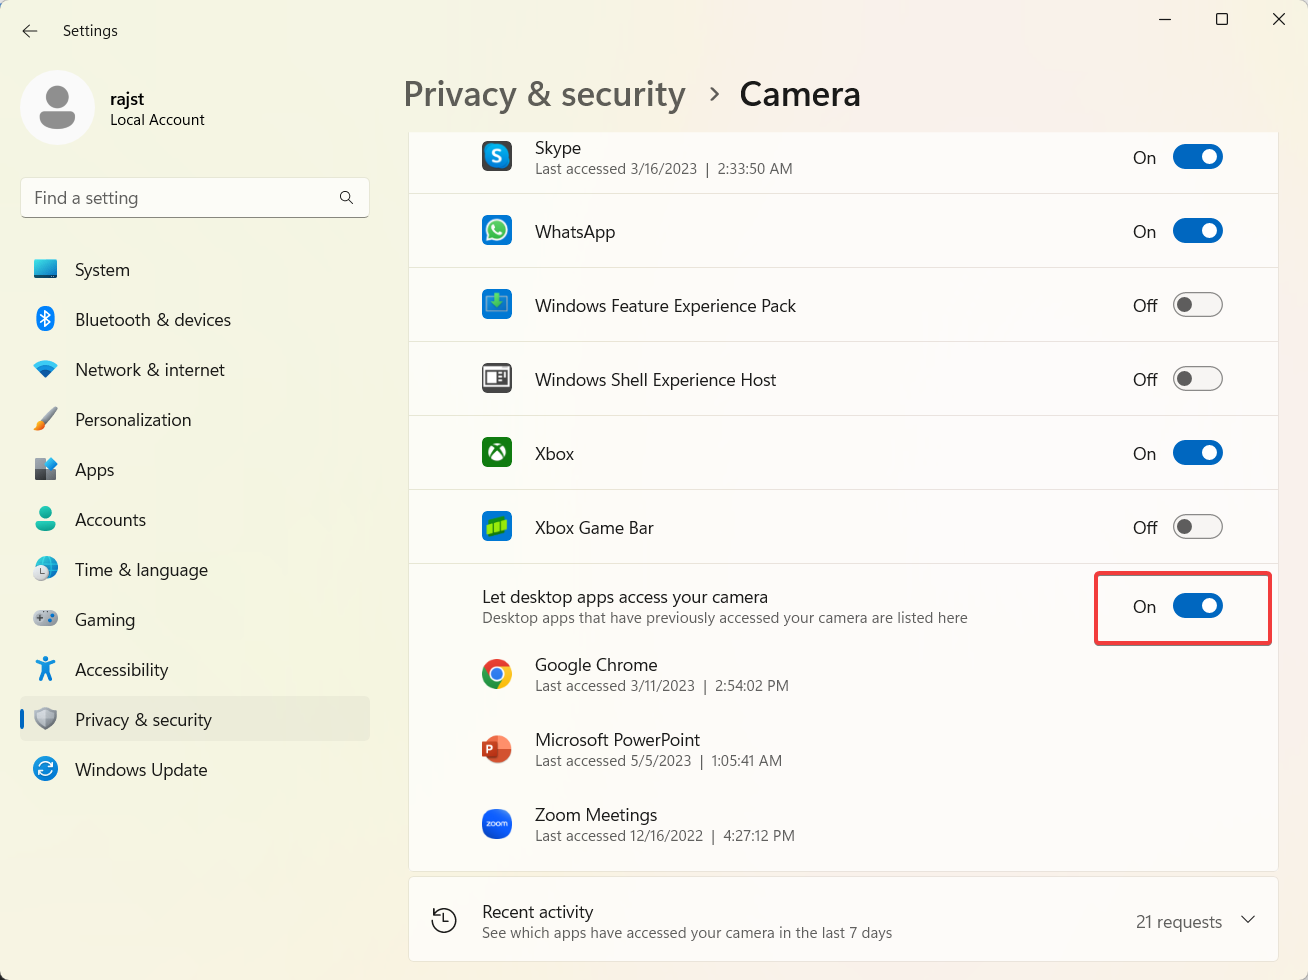
  10. Change camera settings for optimal quality and click the Camera privacy settings.camera privacy settings
  11. Now, make sure that the Microsoft PowerPoint app have access to your camera.Enable camera for MS PowerPoint

2. Convert older Powerpoint presentations

Note icon NOTE
Converting your PowerPoint presentation from an older .ppt file format to the newer .pptx file format is recommended before recording. Using the older format for recording can cause problems, such as recordings that are either missing or cannot be played back.
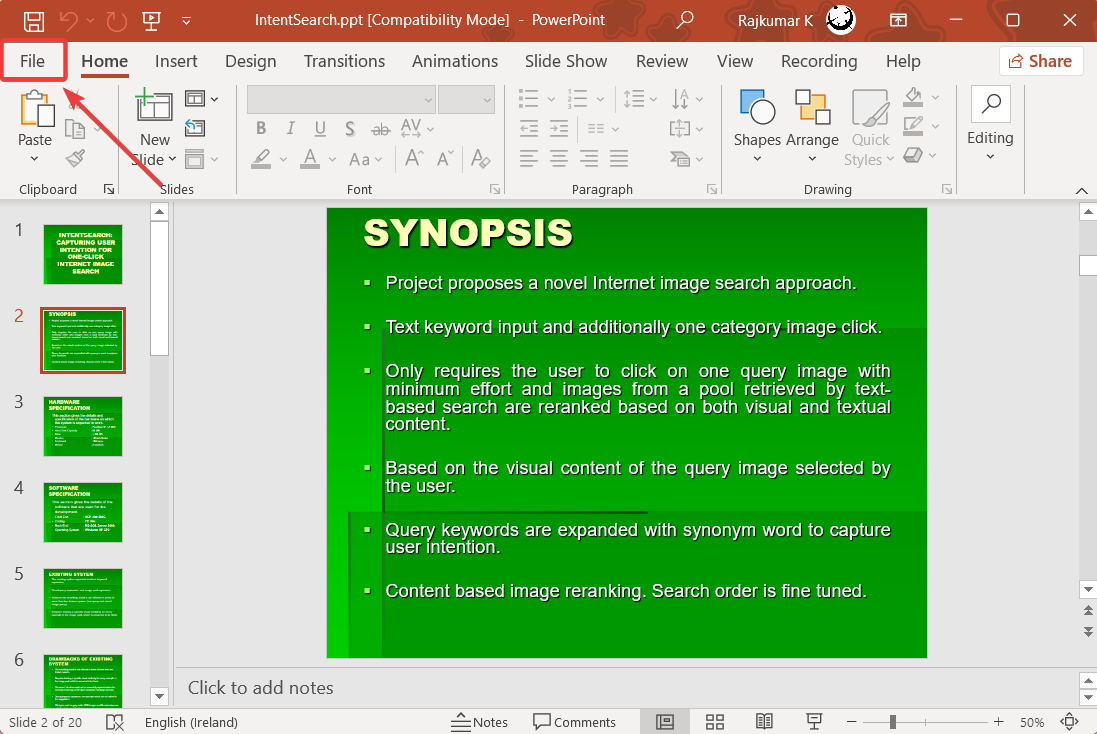
  1. Open the older PowerPoint file in the Microsoft PowerPoint app and click File.Click File
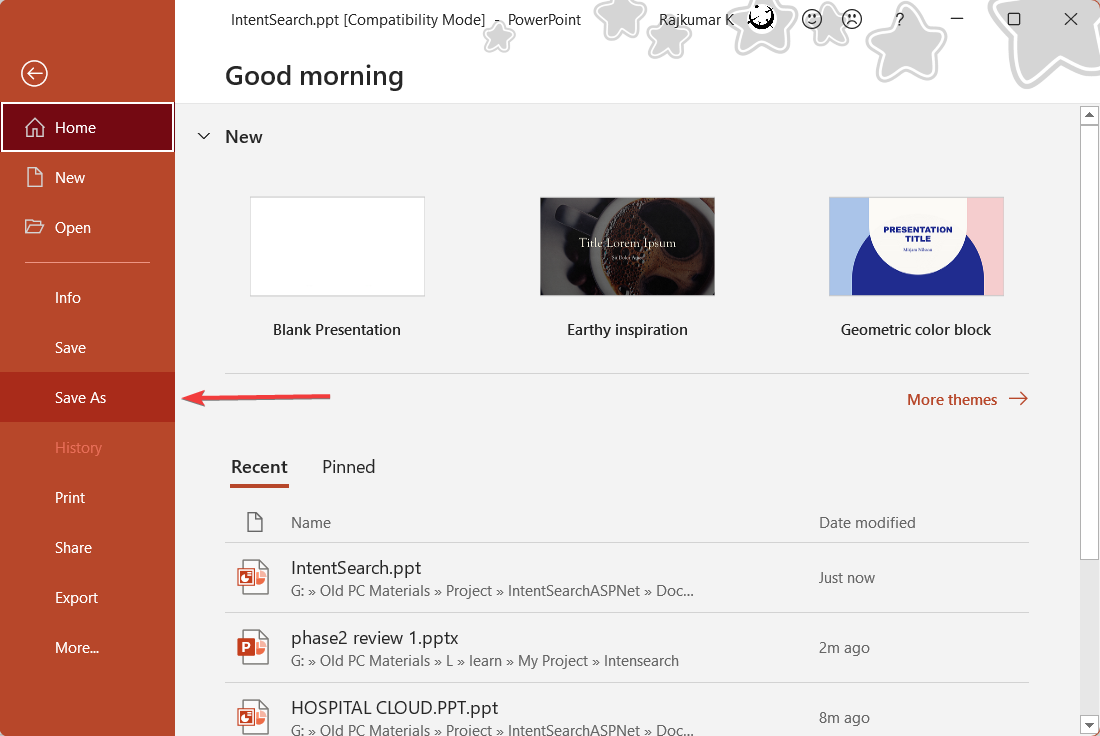
  2. Then, click Save As.Select Save As
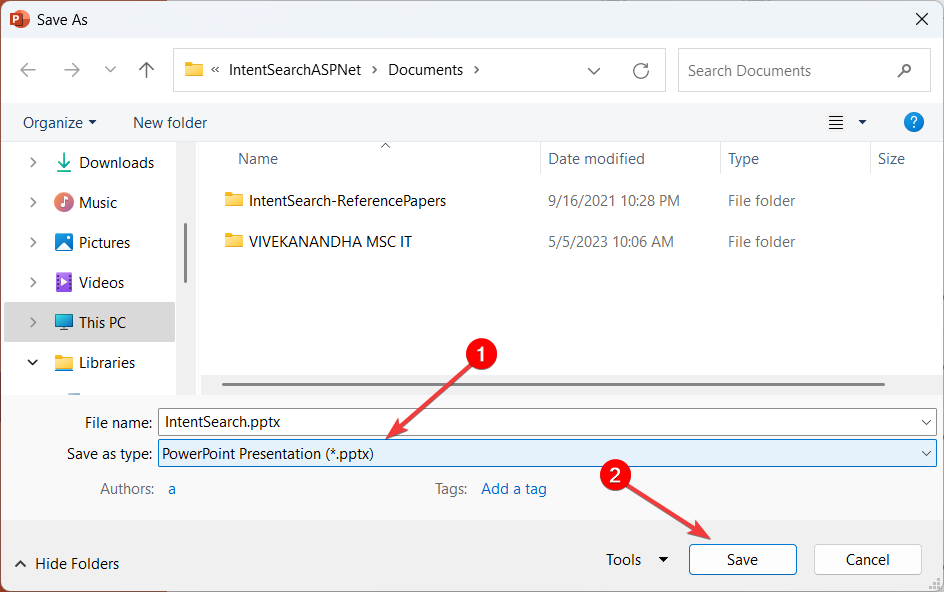
  3. In the Save As dialog window, choose PowerPoint Presentation (*.pptx) from the Save as type drop-down menu.
  4. Then, select where you want to save the new file and click Save.Select .pptx format

3. Record PowerPoint with audio and video

Note icon NOTE
You cannot record audio during animations and slide transitions in your presentation. To avoid cutting off your words in the recording, it is important to include 1-2 seconds of silence at the start and end of the narration for each slide.
  1. Open the PowerPoint presentation.
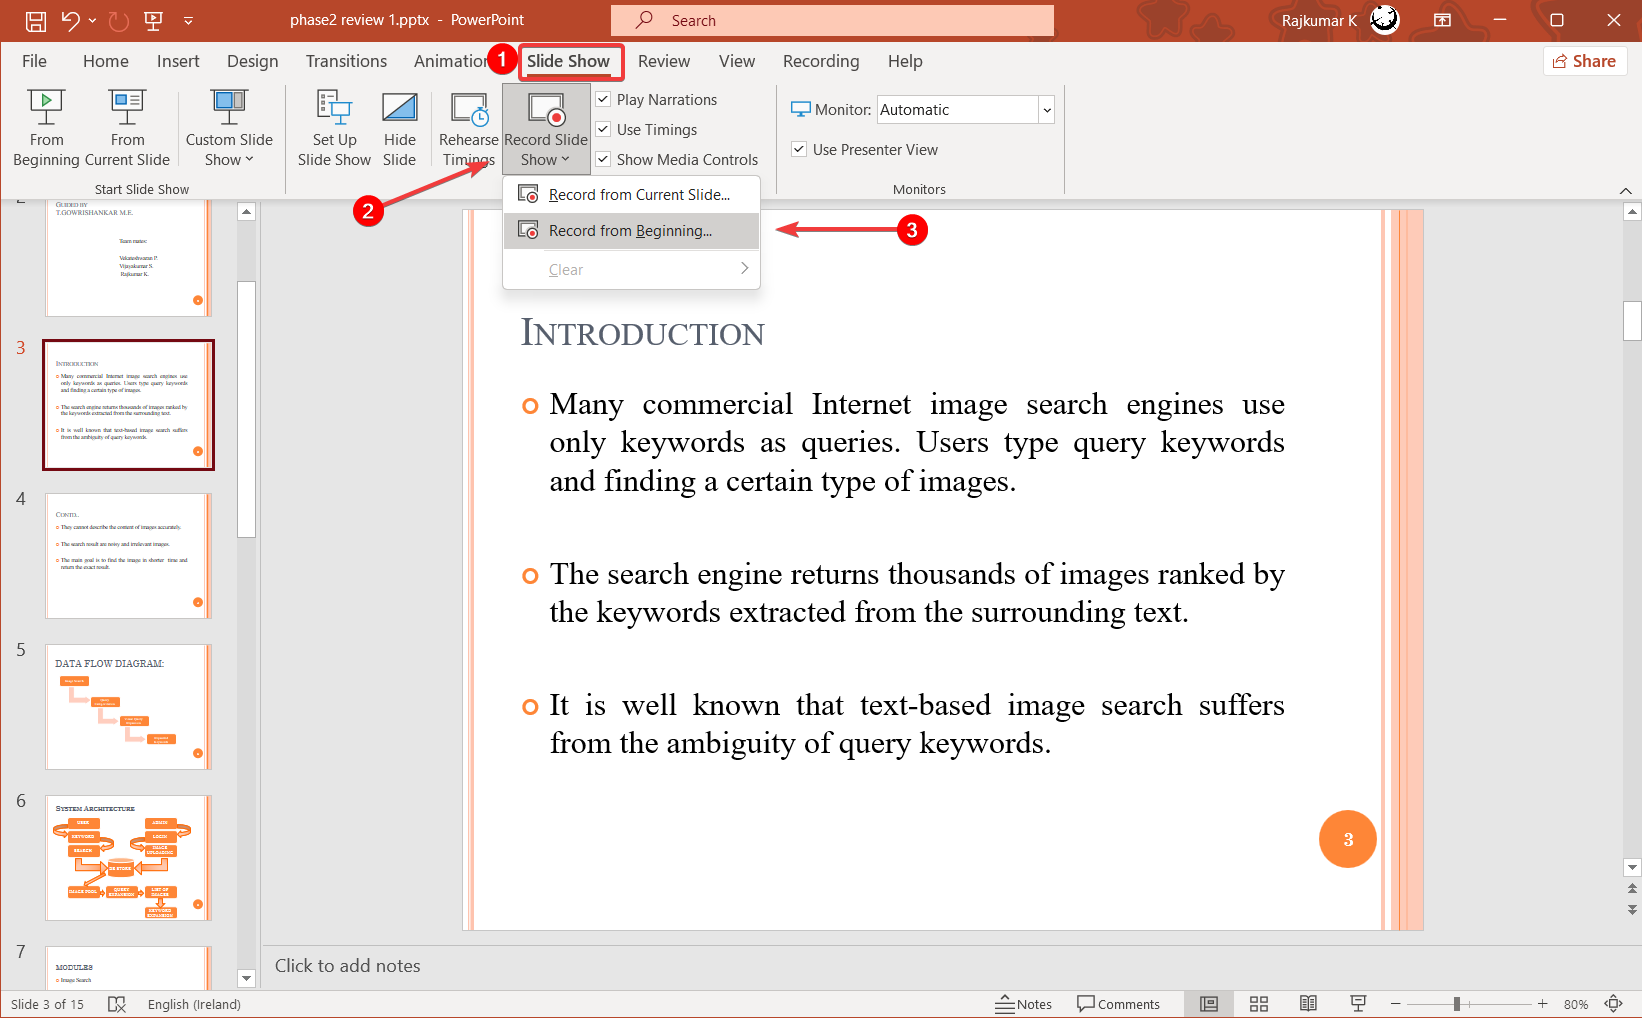
  2. Go to the Slide Show or Recording tab, click the Record Slide Show button, and choose Record from Current slide… or Record from Beginning… option. Click Record Slide Show
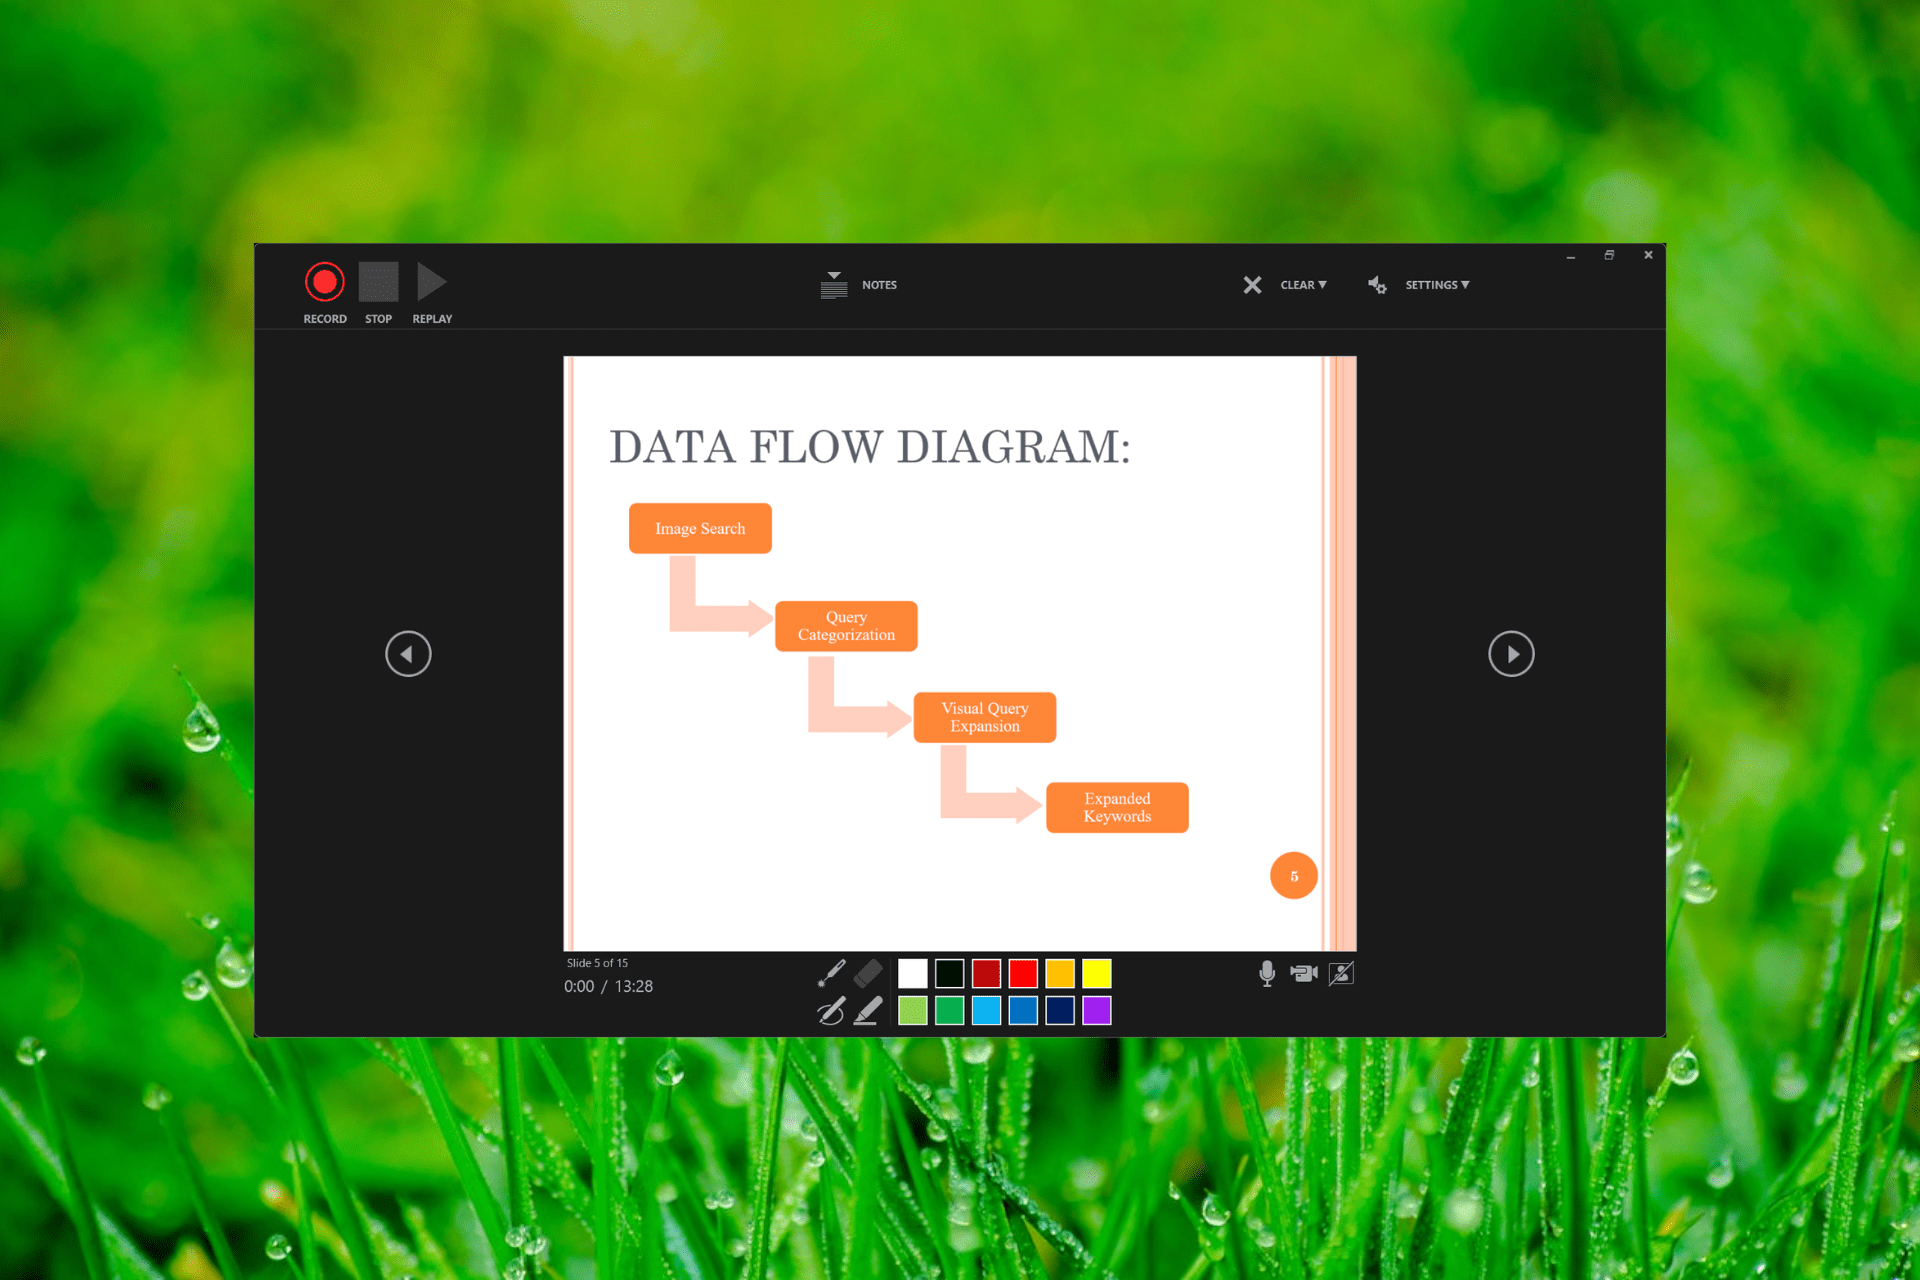
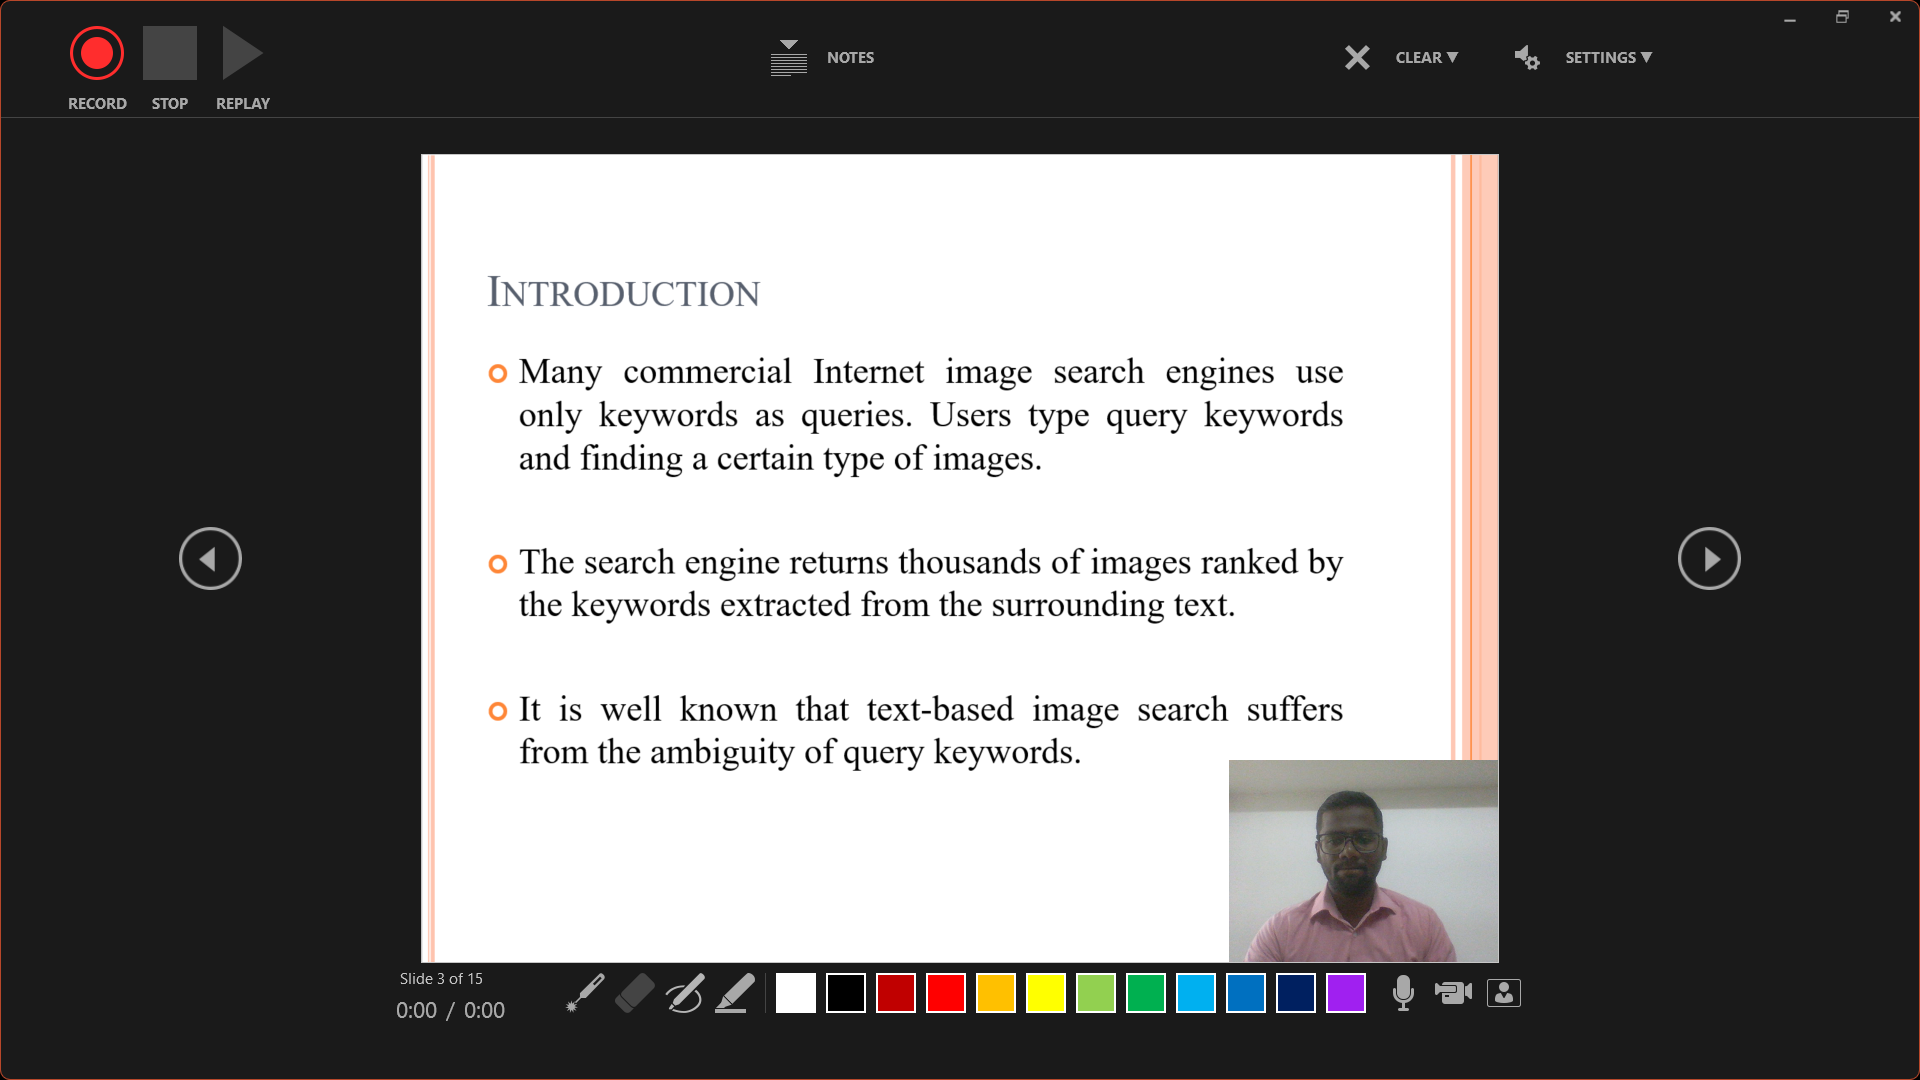
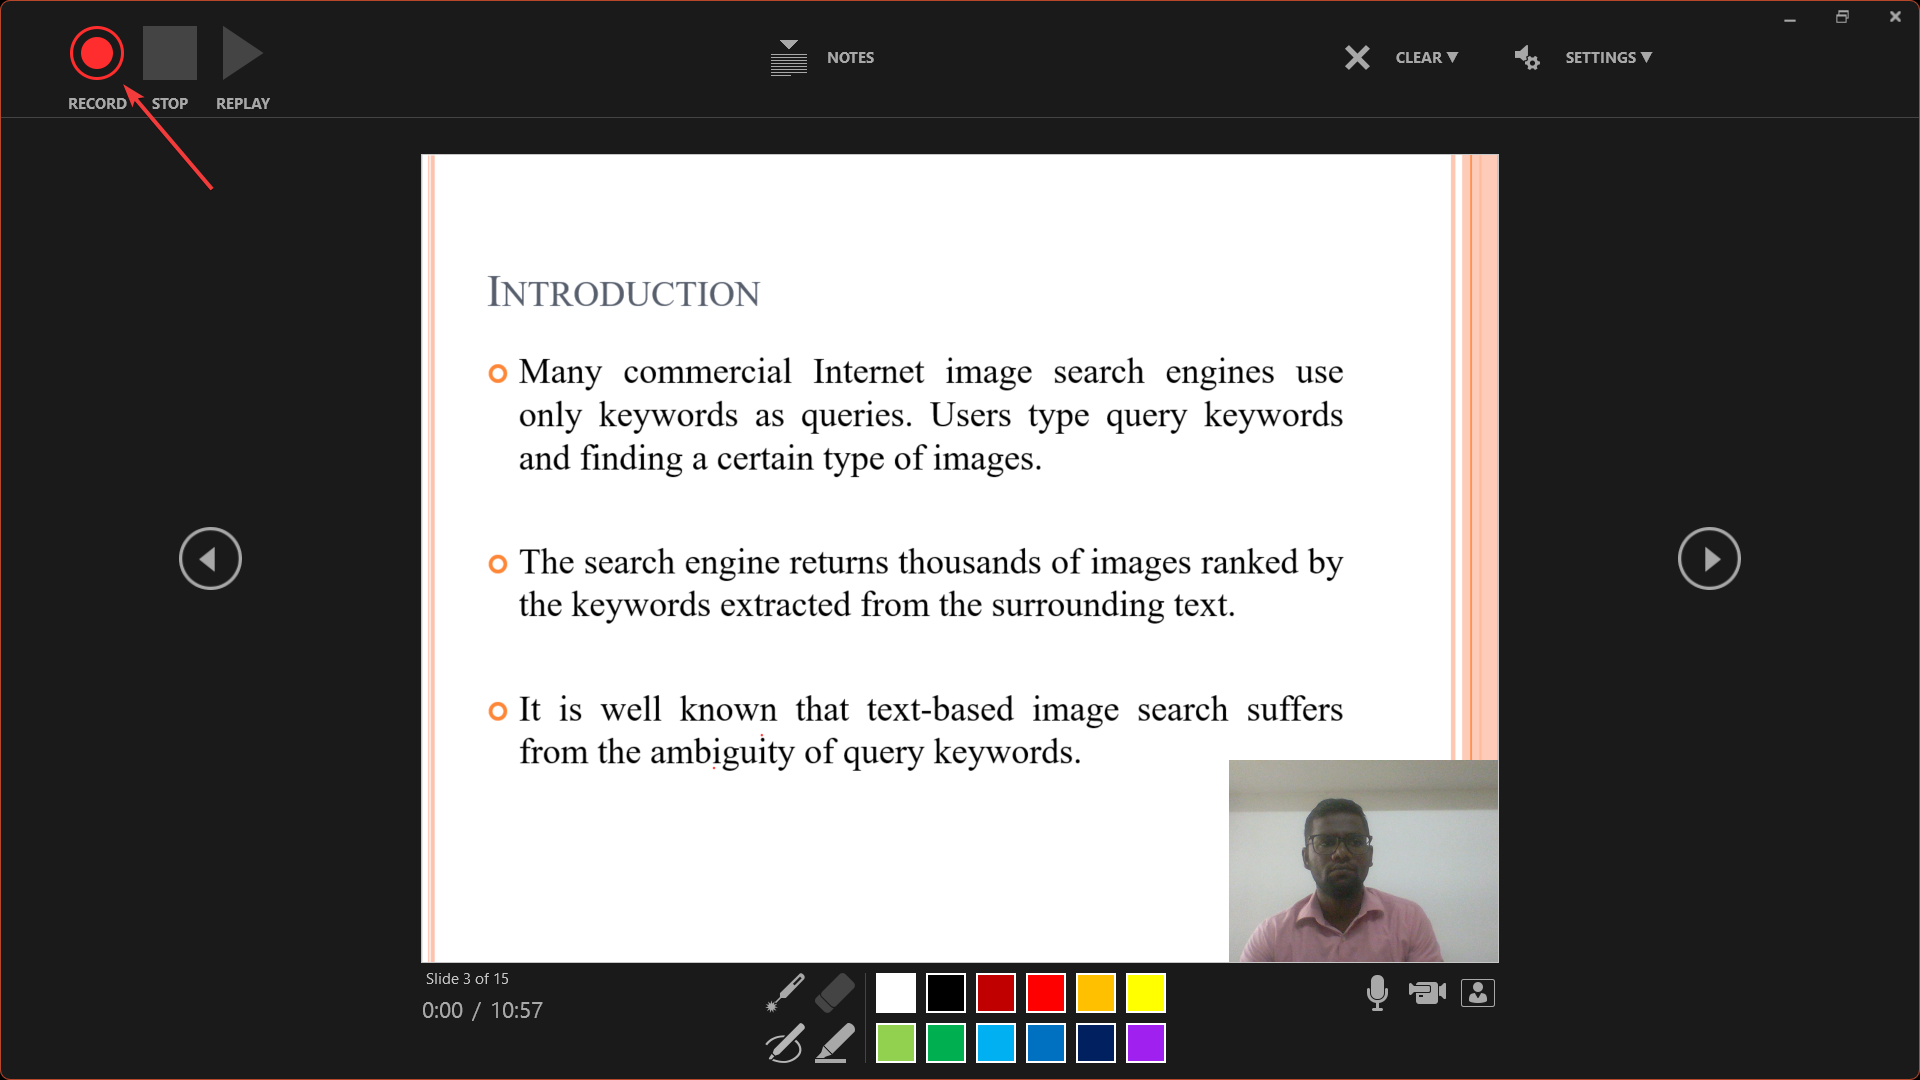
  3. Your presentation will now open in a recording window and in full-screen mode. You will also see your notes, recording controls, annotation tools, and web cam preview on the screen.Recording preview
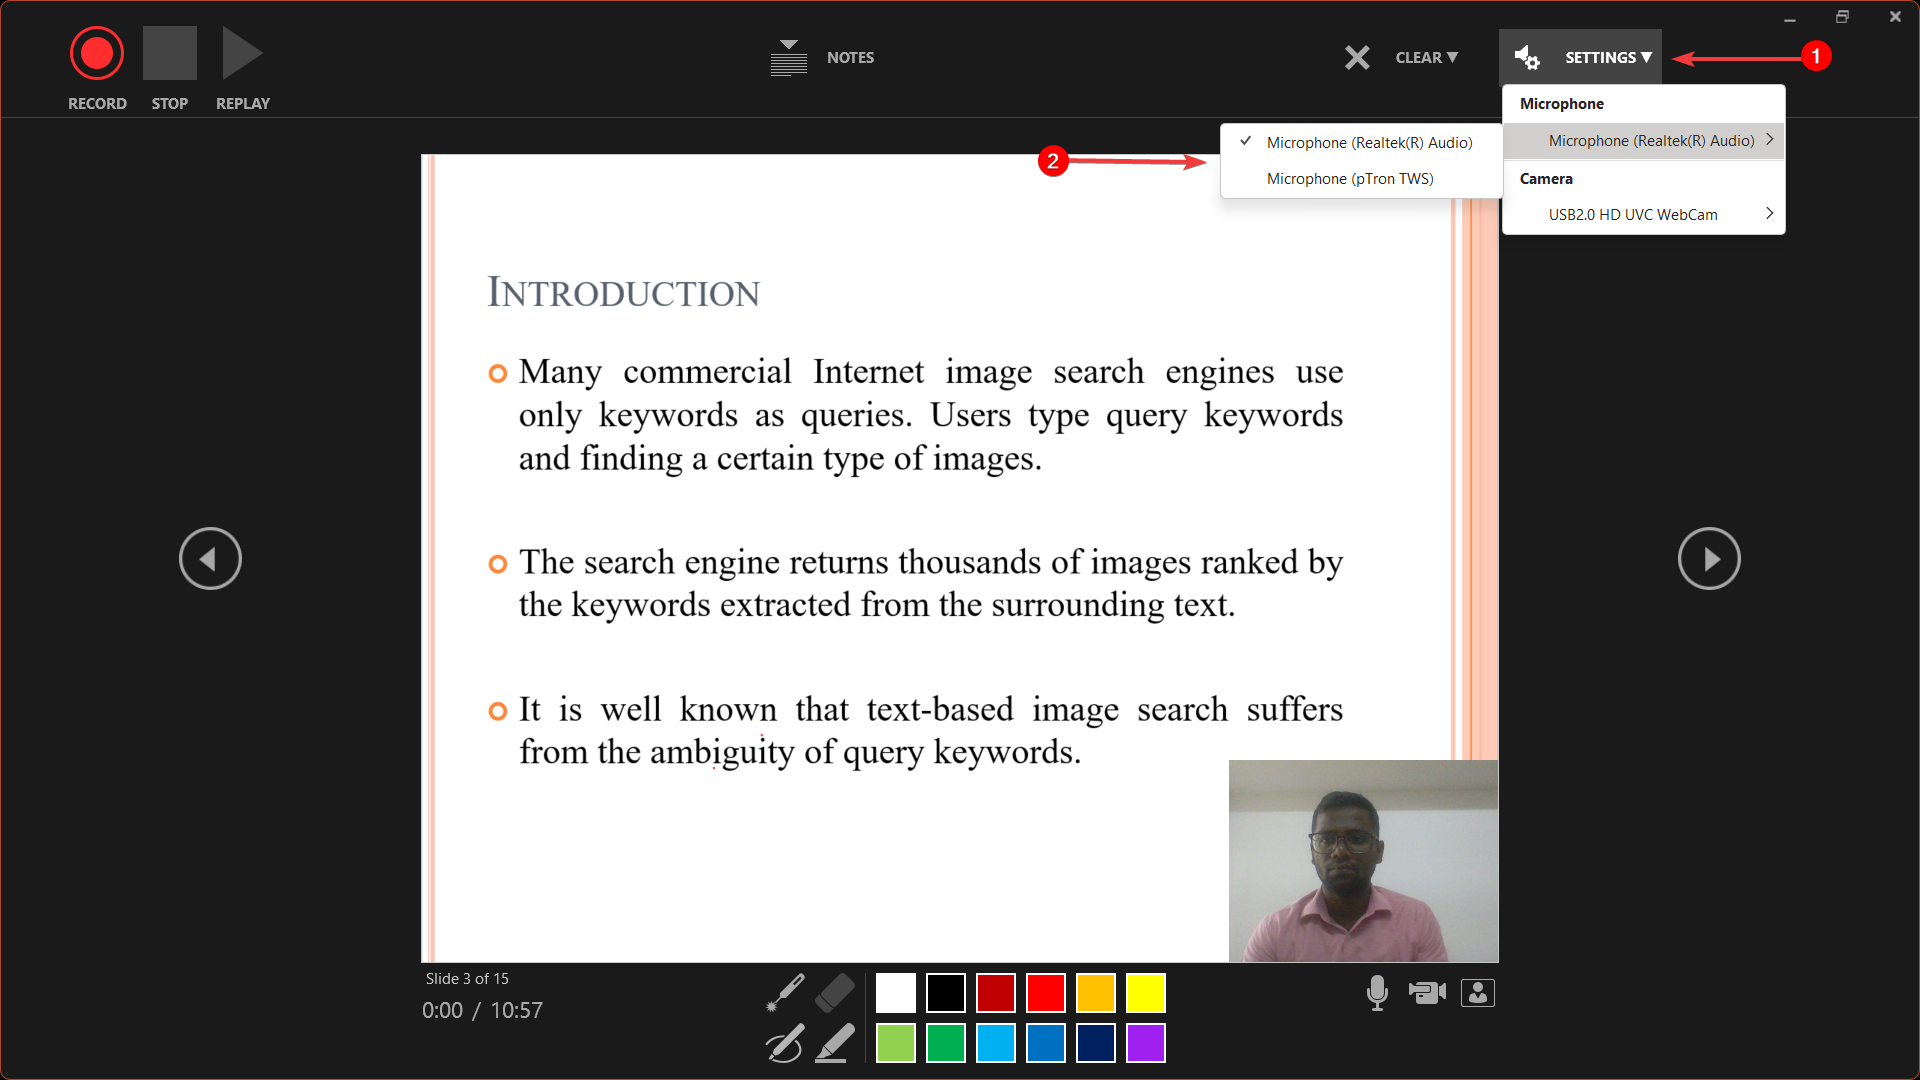
  4. Before recording, check your microphone and camera settings by clicking the SETTINGS button.connect to microphone and camera
  5. To begin recording, click the RECORD button at the top left corner and start presenting your slides.Recording
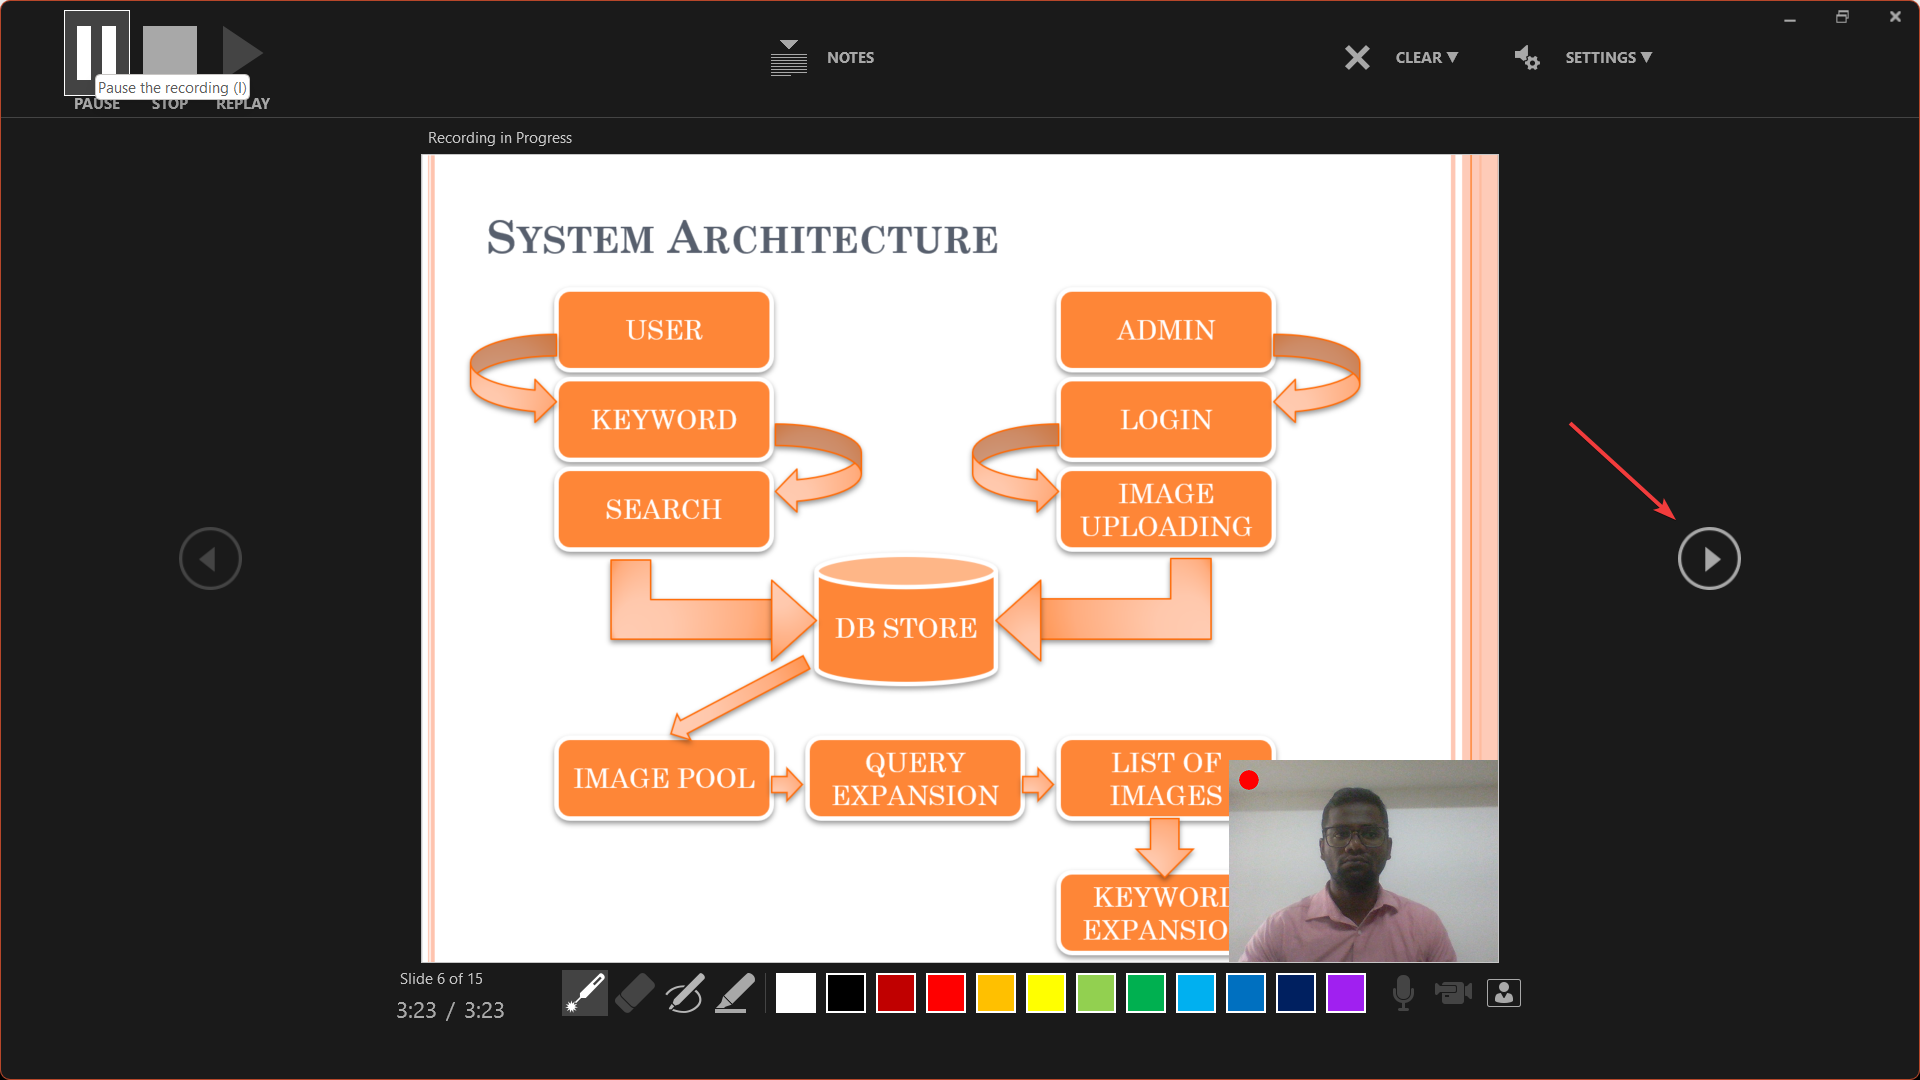
  6. Use the arrow keys to move forward, but be aware that you can’t move backward or forward to a slide that already has a recording. This is done to avoid recording over an existing recording by mistake. Advance through slides
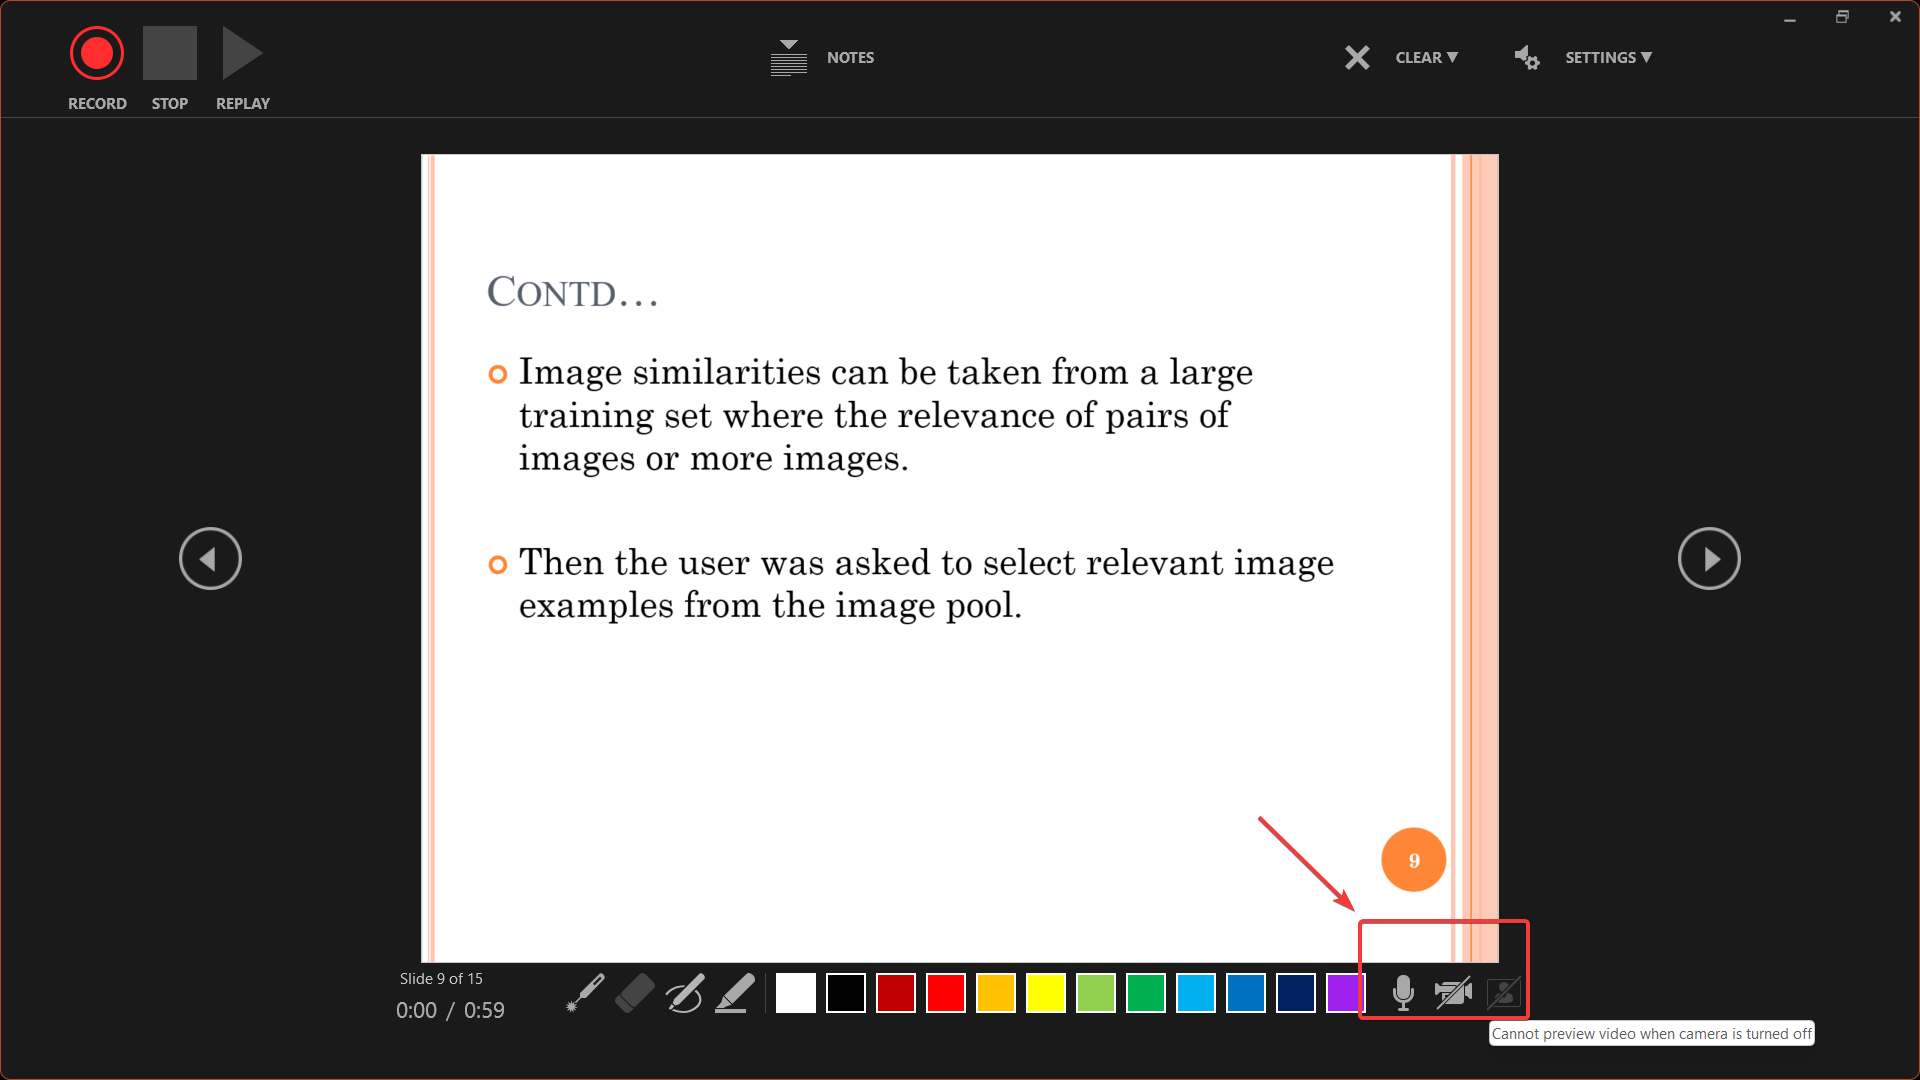
  7. From the bottom right corner of the screen, you can toggle the microphone, camera, and camera preview on or off.toggle camera and microphone
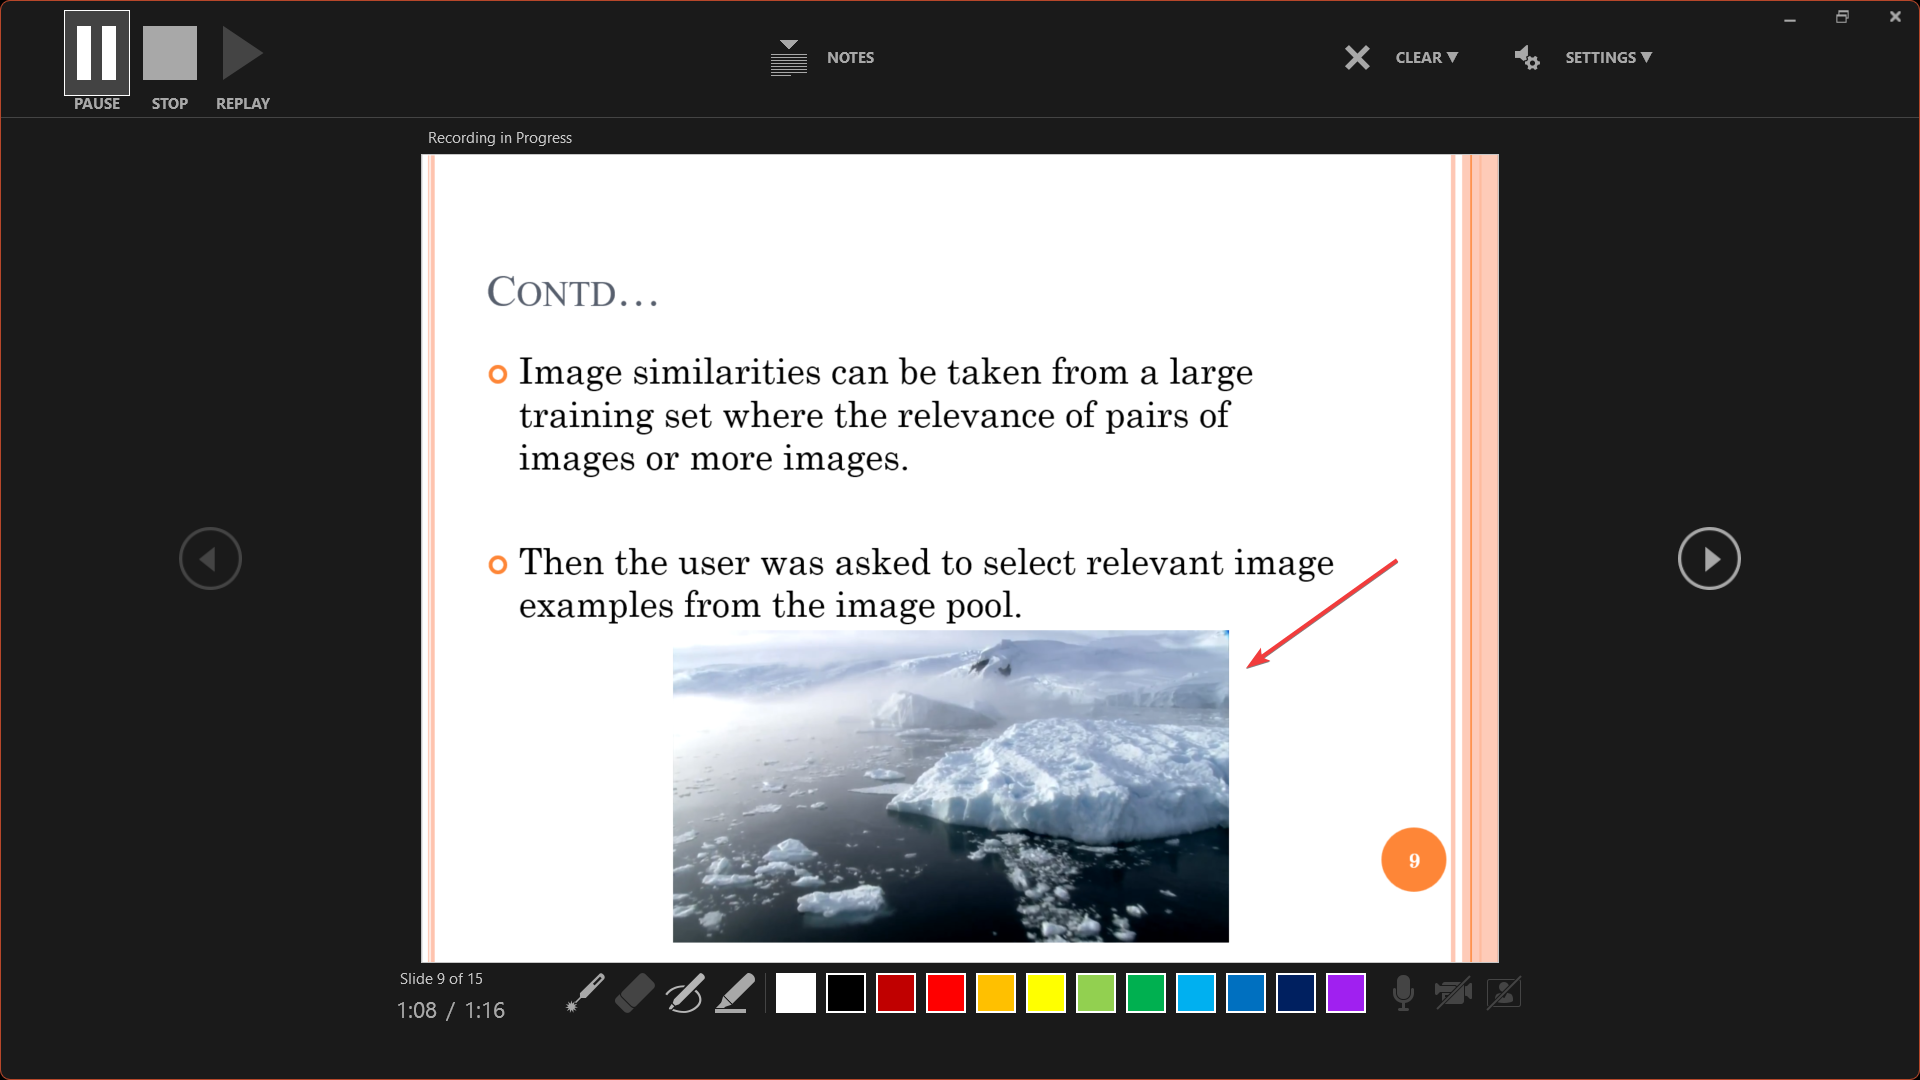
  8. If your slide has a video inserted, click on the video to start and stop playback, otherwise, the inserted video won’t be visible in the exported video.play the video to include in the recording
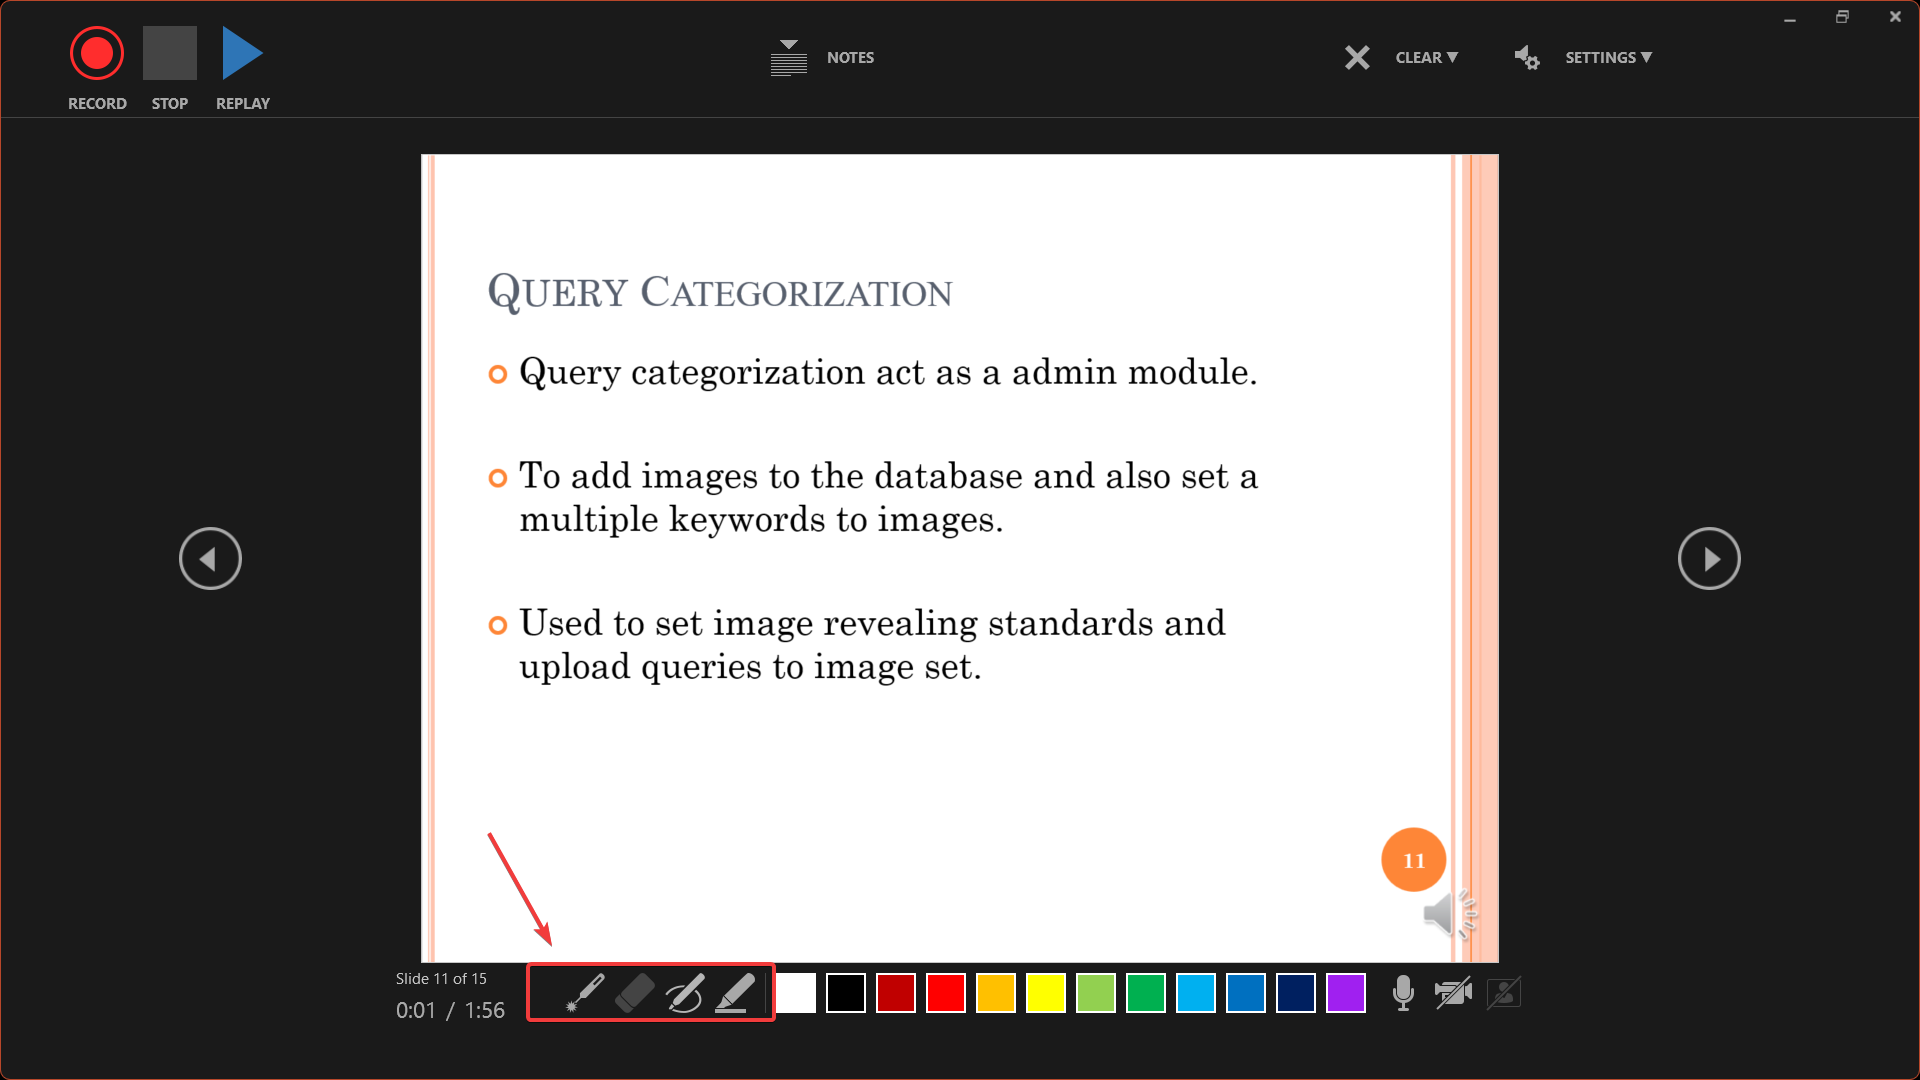
  9. Use the Pen, Highlighter, or Laser icons from the bottom right corner to annotate your slides during recording.User laser or pen
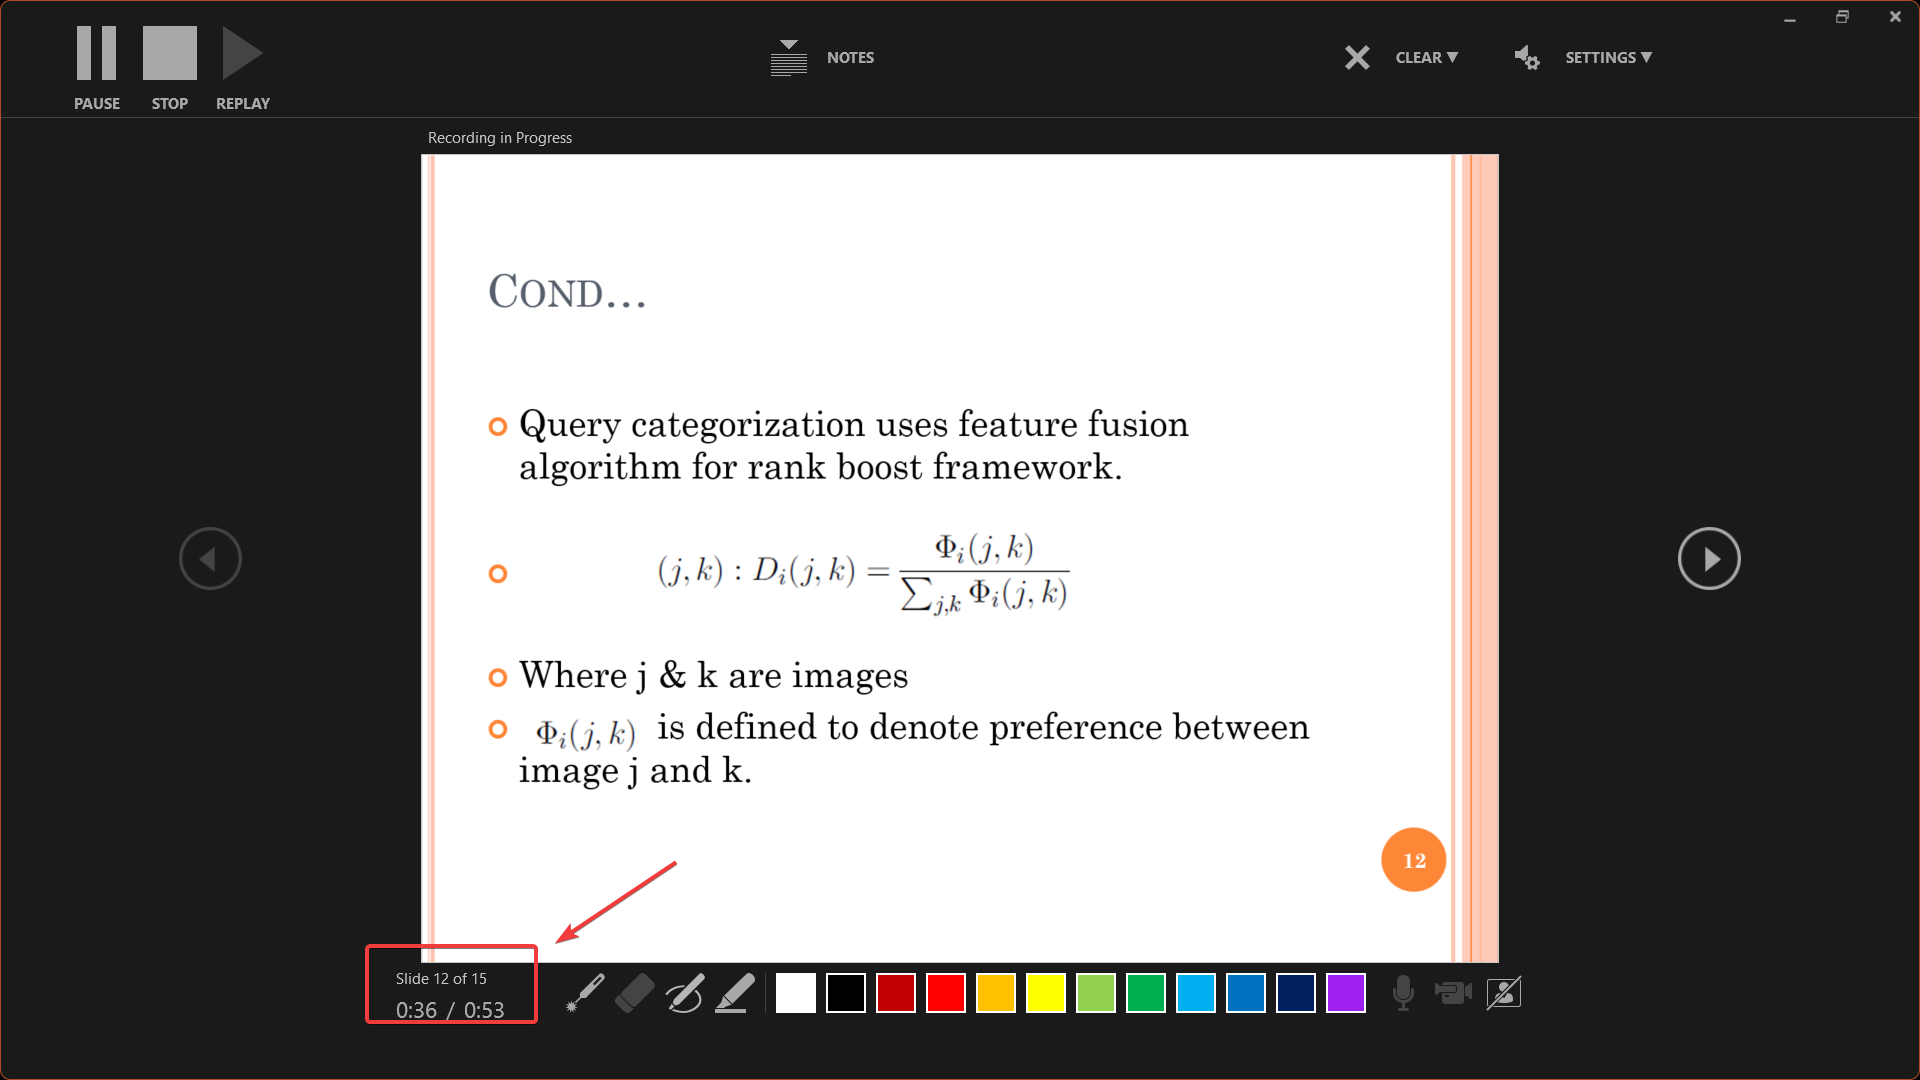
  10. PowerPoint shows two time counts when recording: one for the current slide and one for the entire presentation.check the time counts
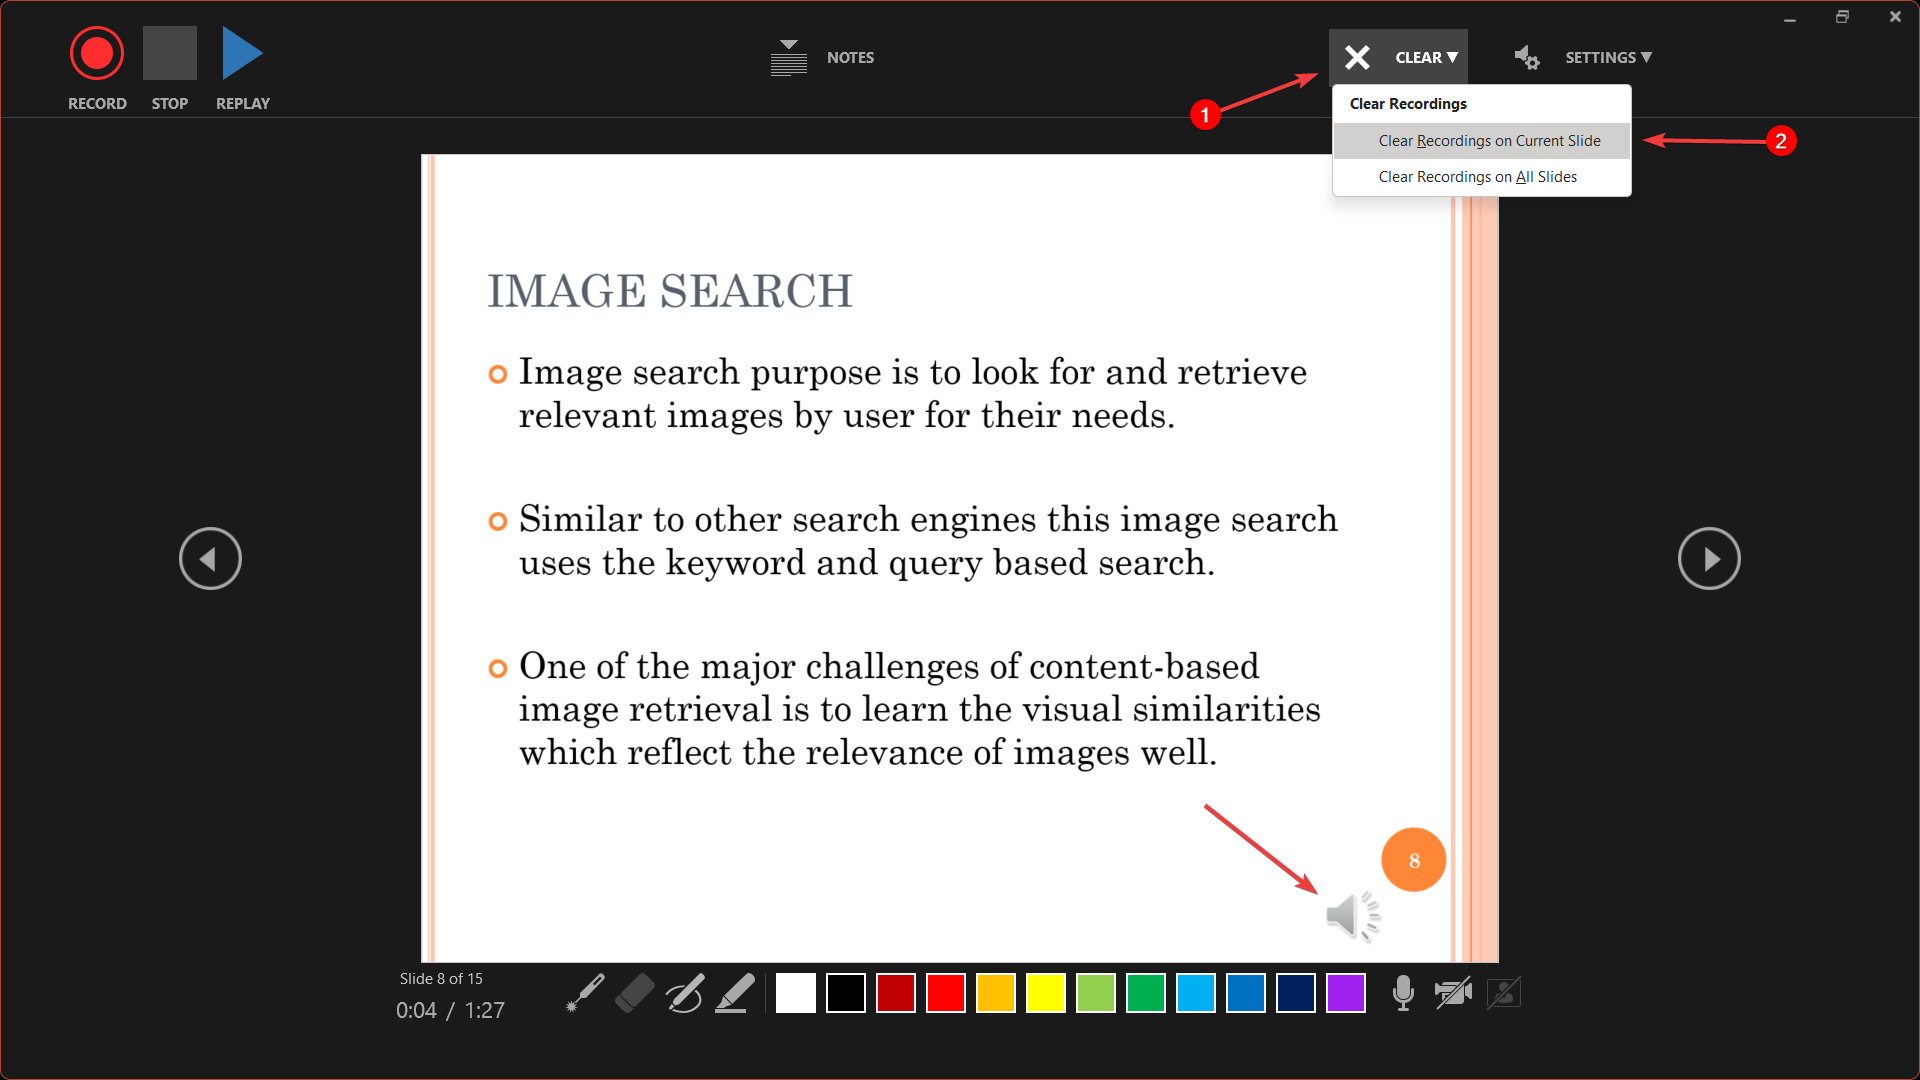
  11. To re-record a slide with an existing recording, click CLEAR at the top and select Clear Recording on Current Slides. If slide has recording, video preview or speaker icon shows at bottom right.Click CLear
  12. To delete all recordings in the presentation, click CLEAR and select Clear Recordings on All Slides.
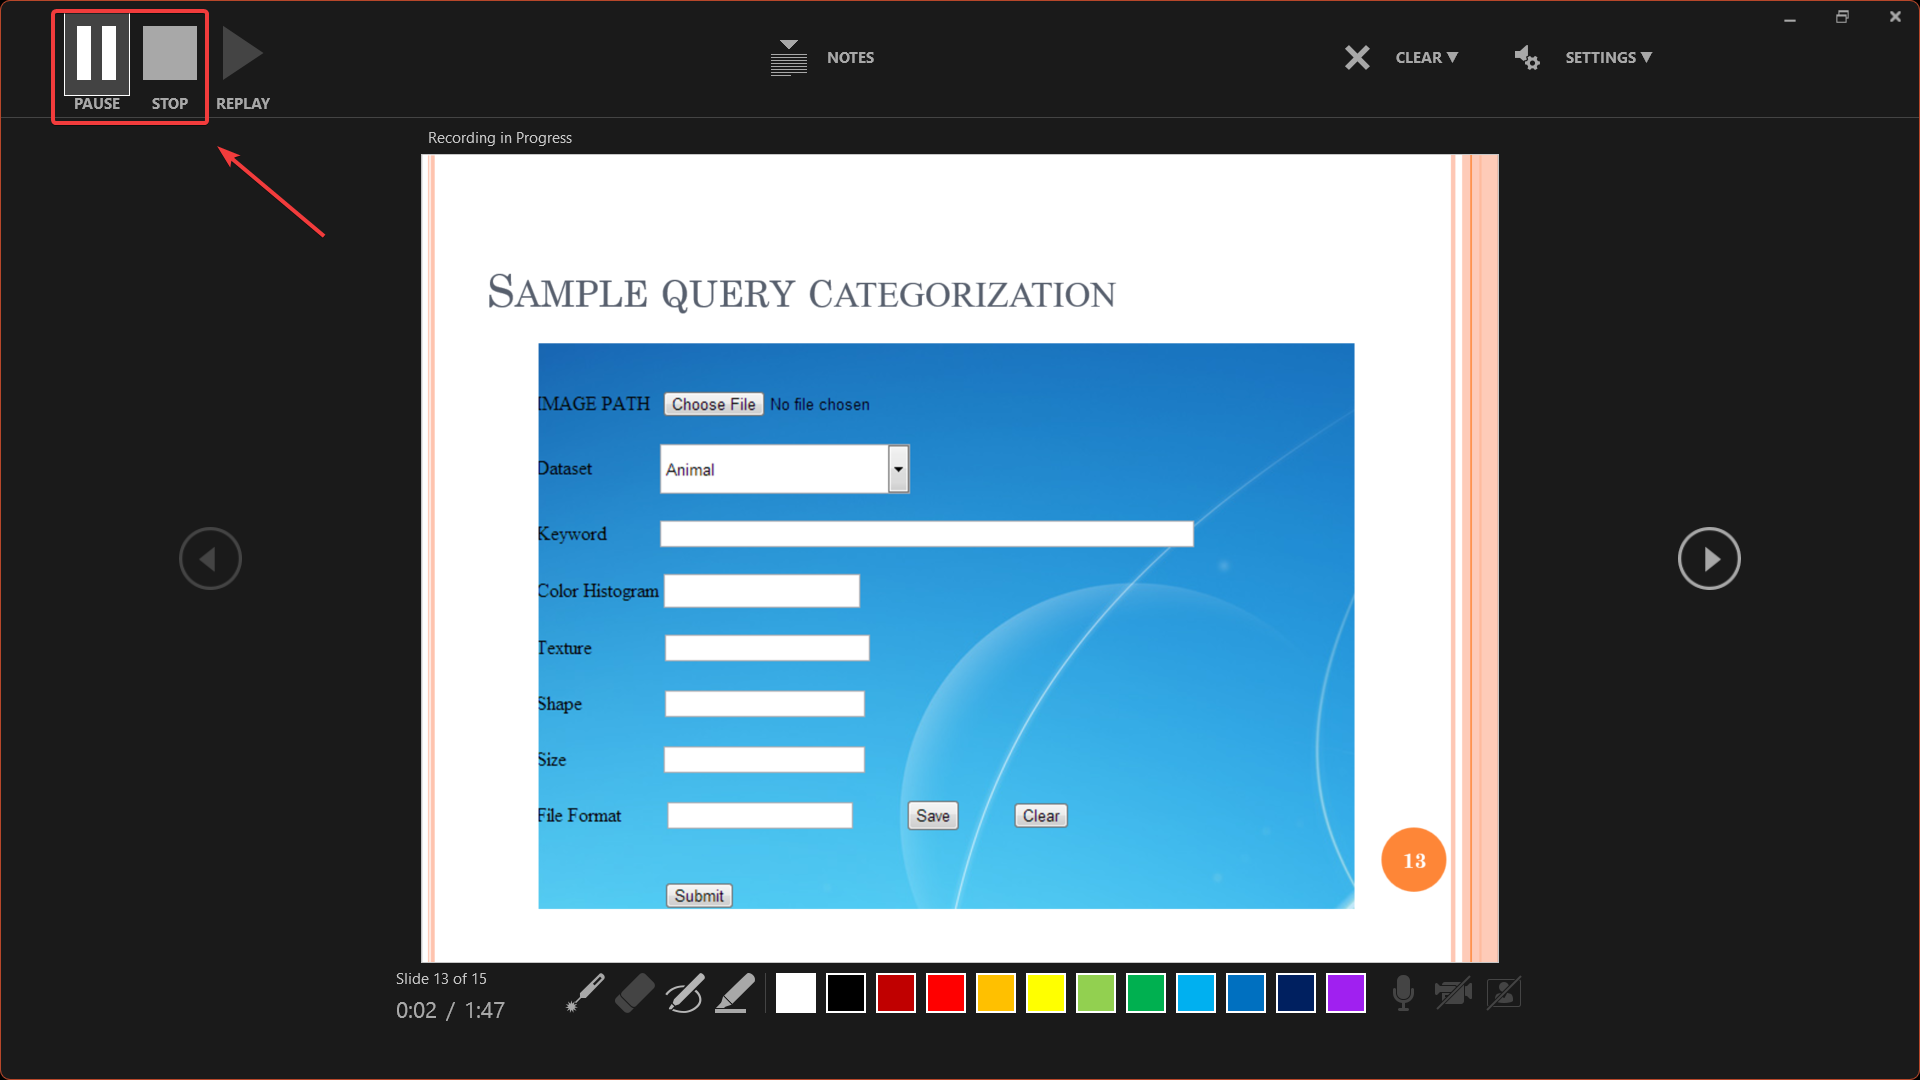
  13. You can pause or stop recording at any time with the Pause and Stop buttons.Pause or stop
  14. You can record all of them continuously without pausing, or you can record each slide individually and click pause before moving on to the next slide to begin recording again.
  15. Click Close or right-click and select End Show when you’re done recording.End Show

The recordings are added to the presentation on a slide-by-slide basis. So, if you need to modify a recording, you only need to re-record the specific slide or slides affected. 

4. Check the Recordings

Note icon NOTE
To ensure the quality and that every slide has a recording, it’s important to check the tapes before exporting the file as a PowerPoint show or video.
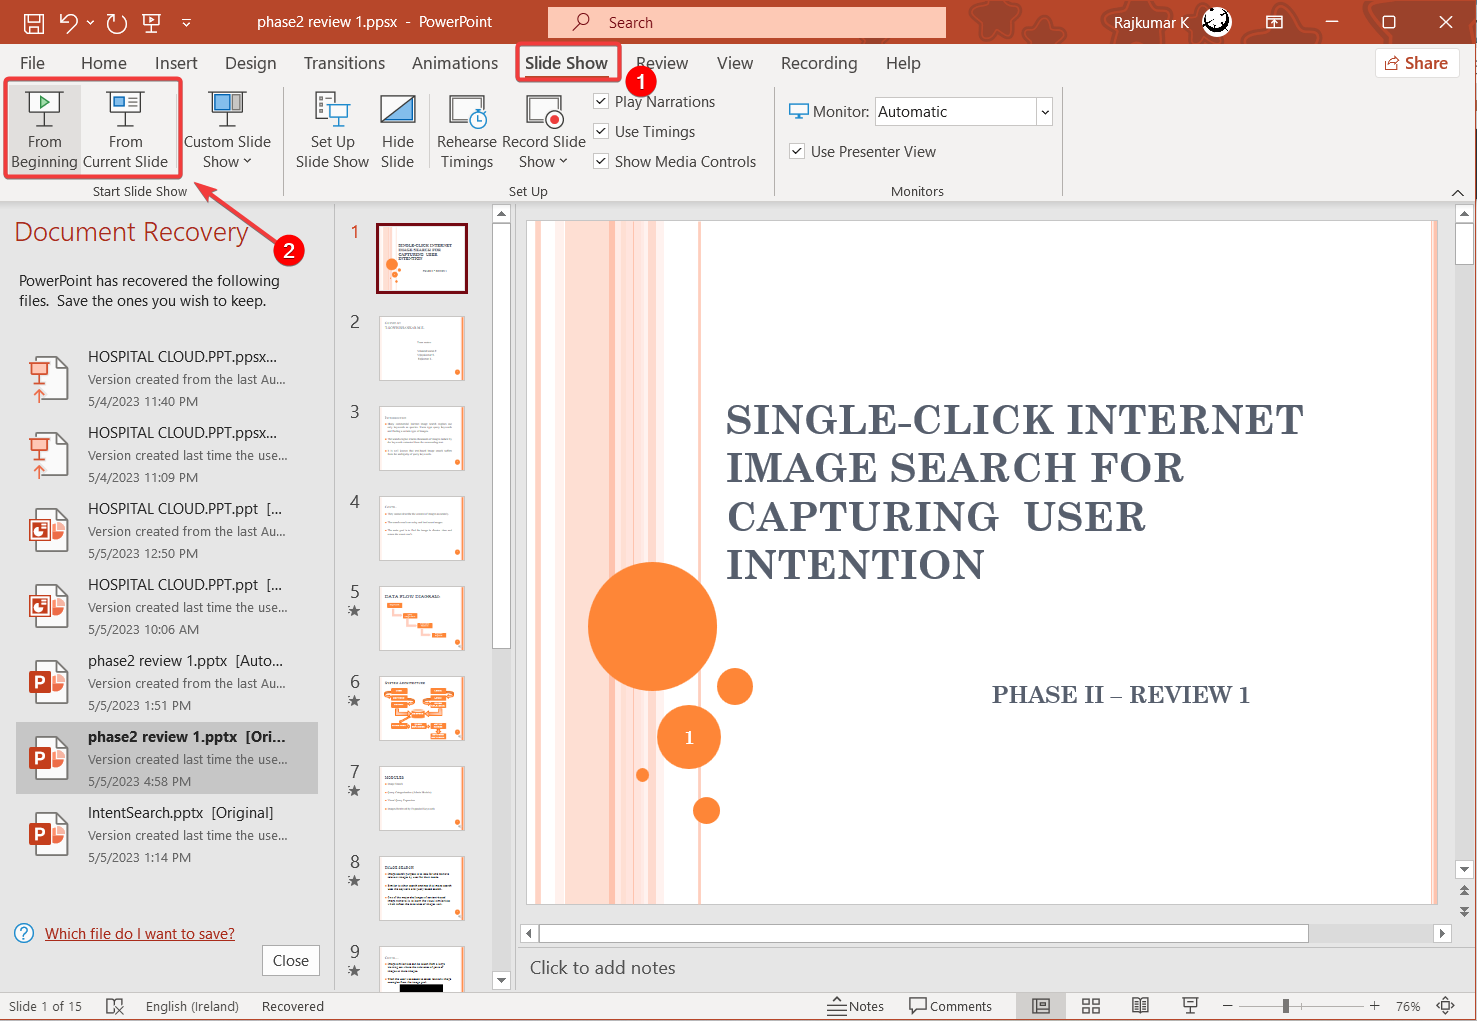
  1. Go to the Slide Show tab of the main PowerPoint toolbar and click From Beginning or From Current Slide to start the playback.Check your recordings
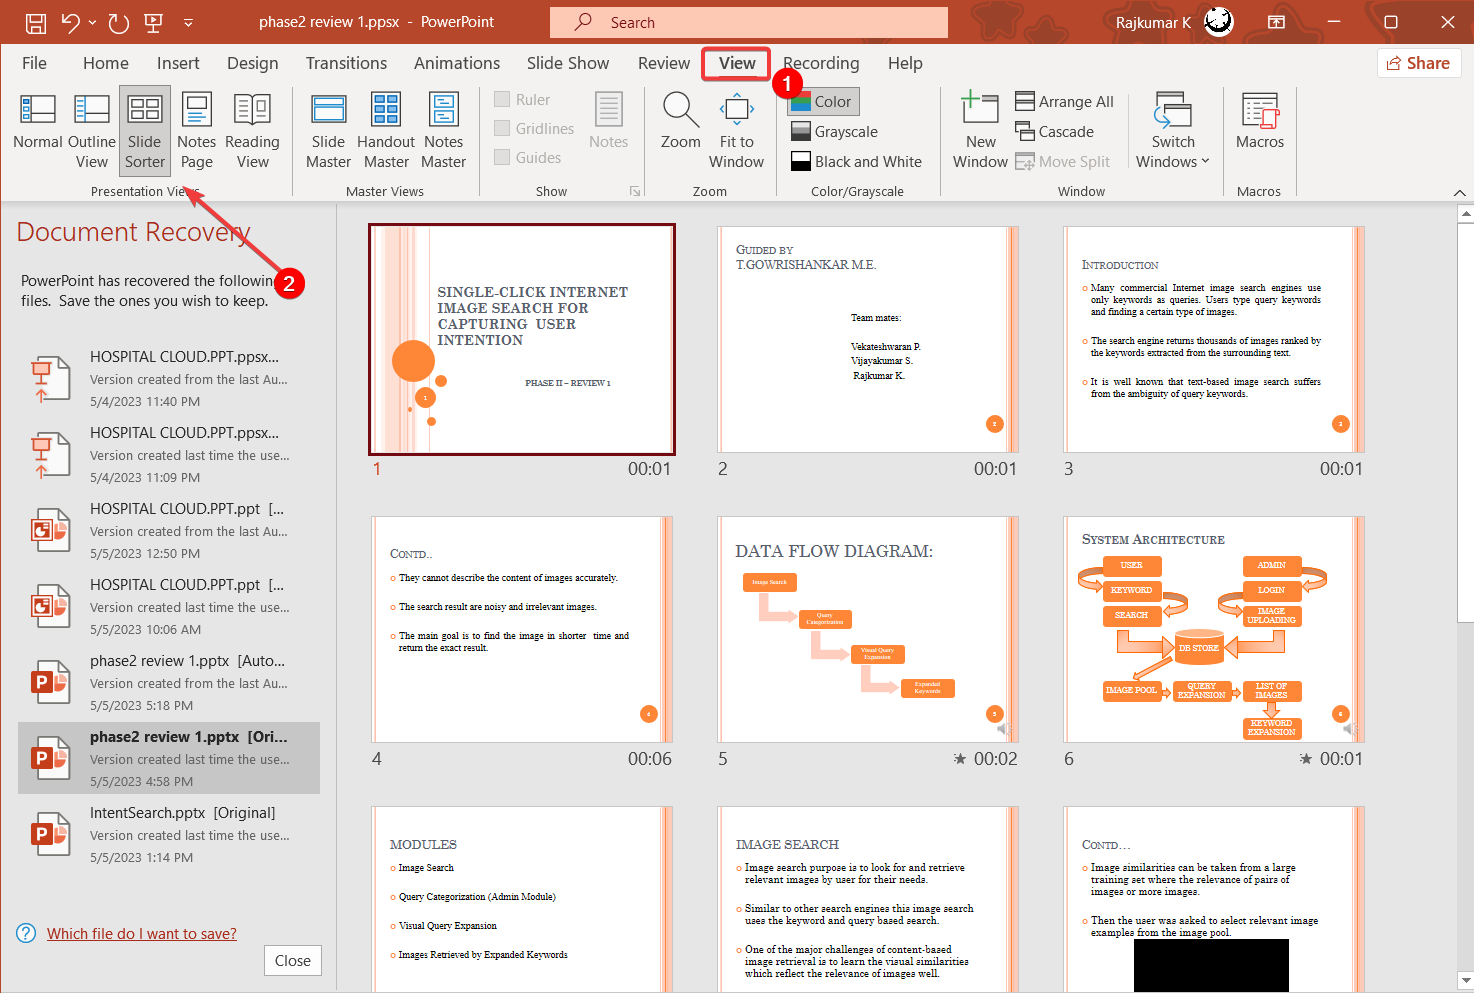
  2. To verify each slide has a recording and timing recorded, switch to the View tab and click Slide Sorter to view all slides at once. Slide sorter

For each slide, you should see a speaker icon or a thumbnail image in the lower-right corner, along with a recording time indicating how long the recording is.

Once you are satisfied with your recording, you can export the entire recorded presentation as a Slide show or a video.

5. Save the presentation as a PowerPoint Show

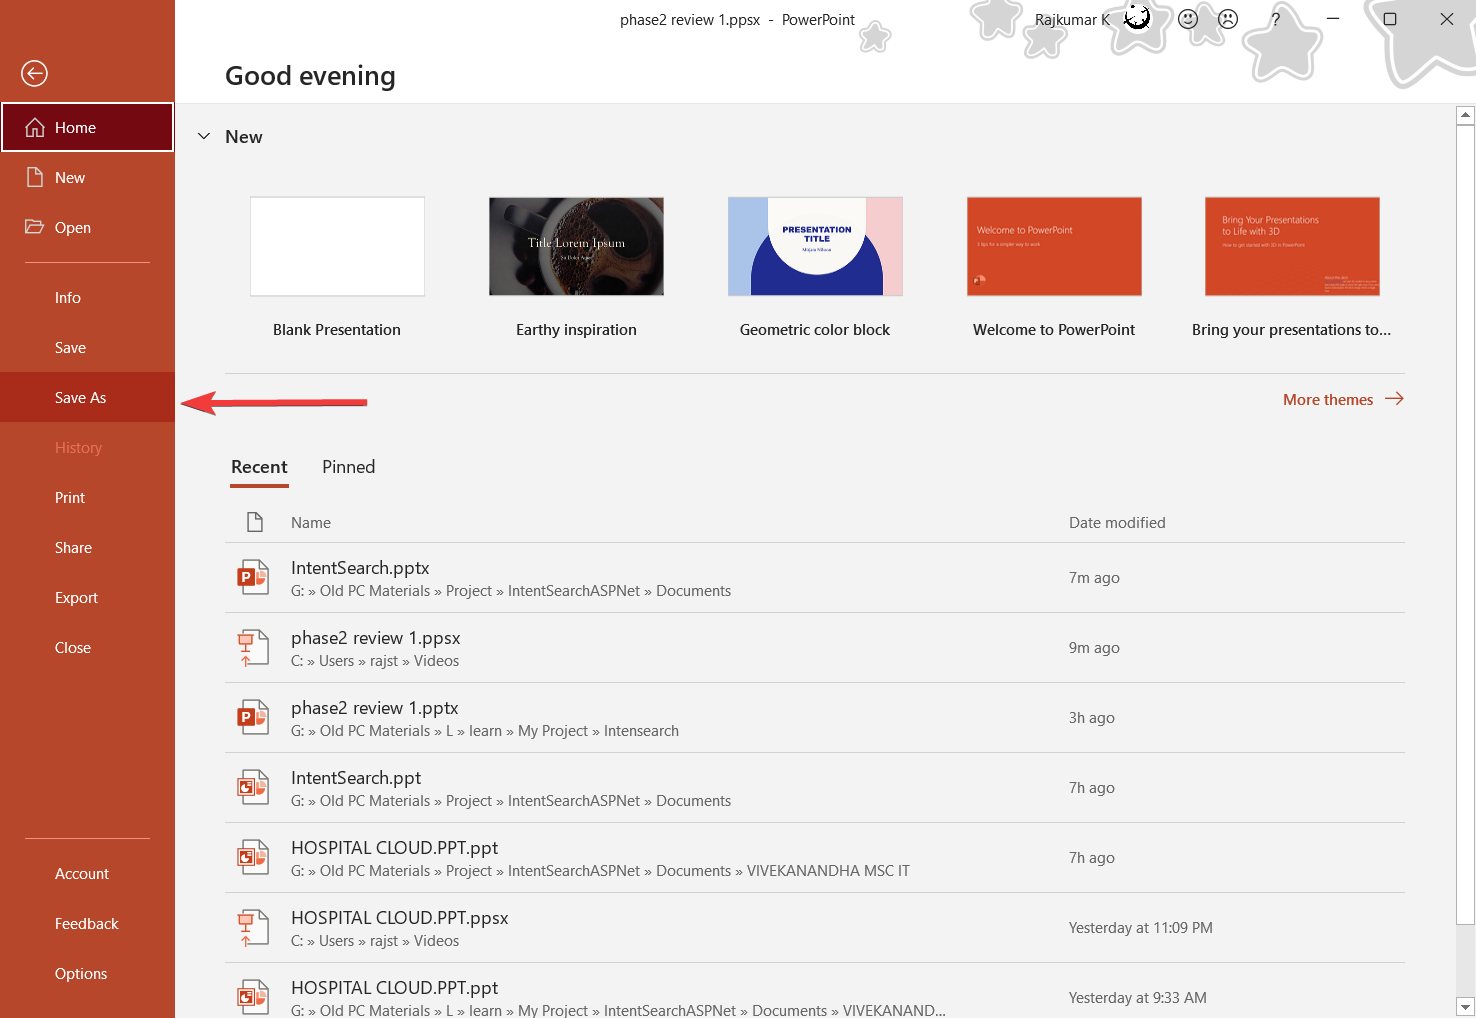
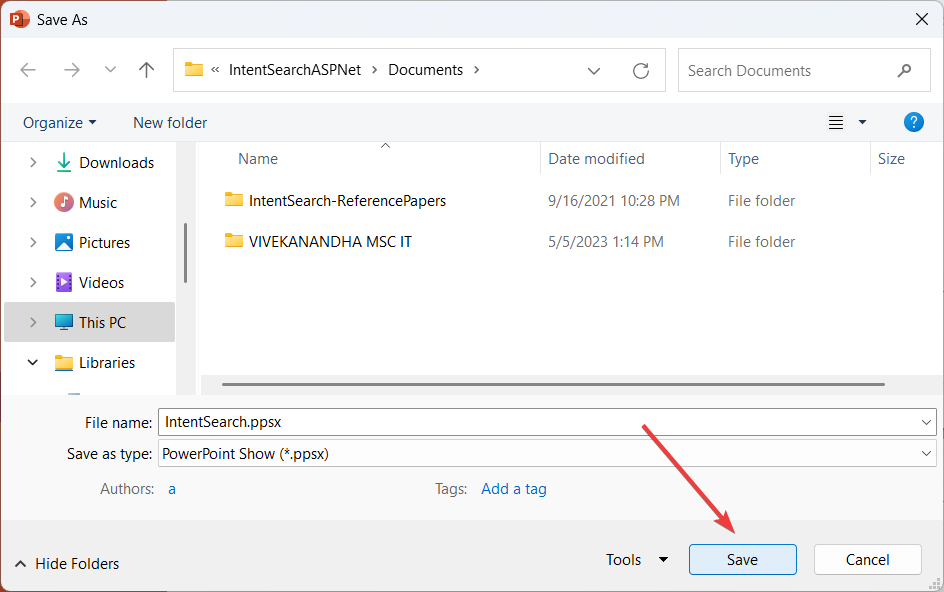
  1. Click File and select Save As.select Save as
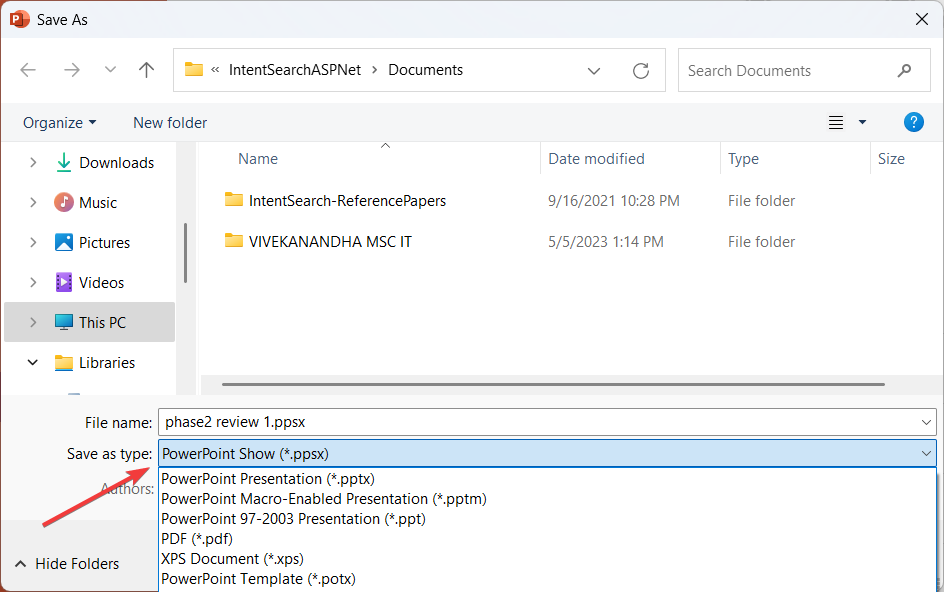
  2. Then, select the location where you want to save the file and choose PowerPoint Show (*.ppsx) from the Save as type drop-down.select .ppsx
  3. Then, click Save to save the file as PowerPoint Show.Click Save

If you’re looking for other useful tips, here’s our guide on how to print a PPT with notes with a few clicks.

6. Save the presentation as a video

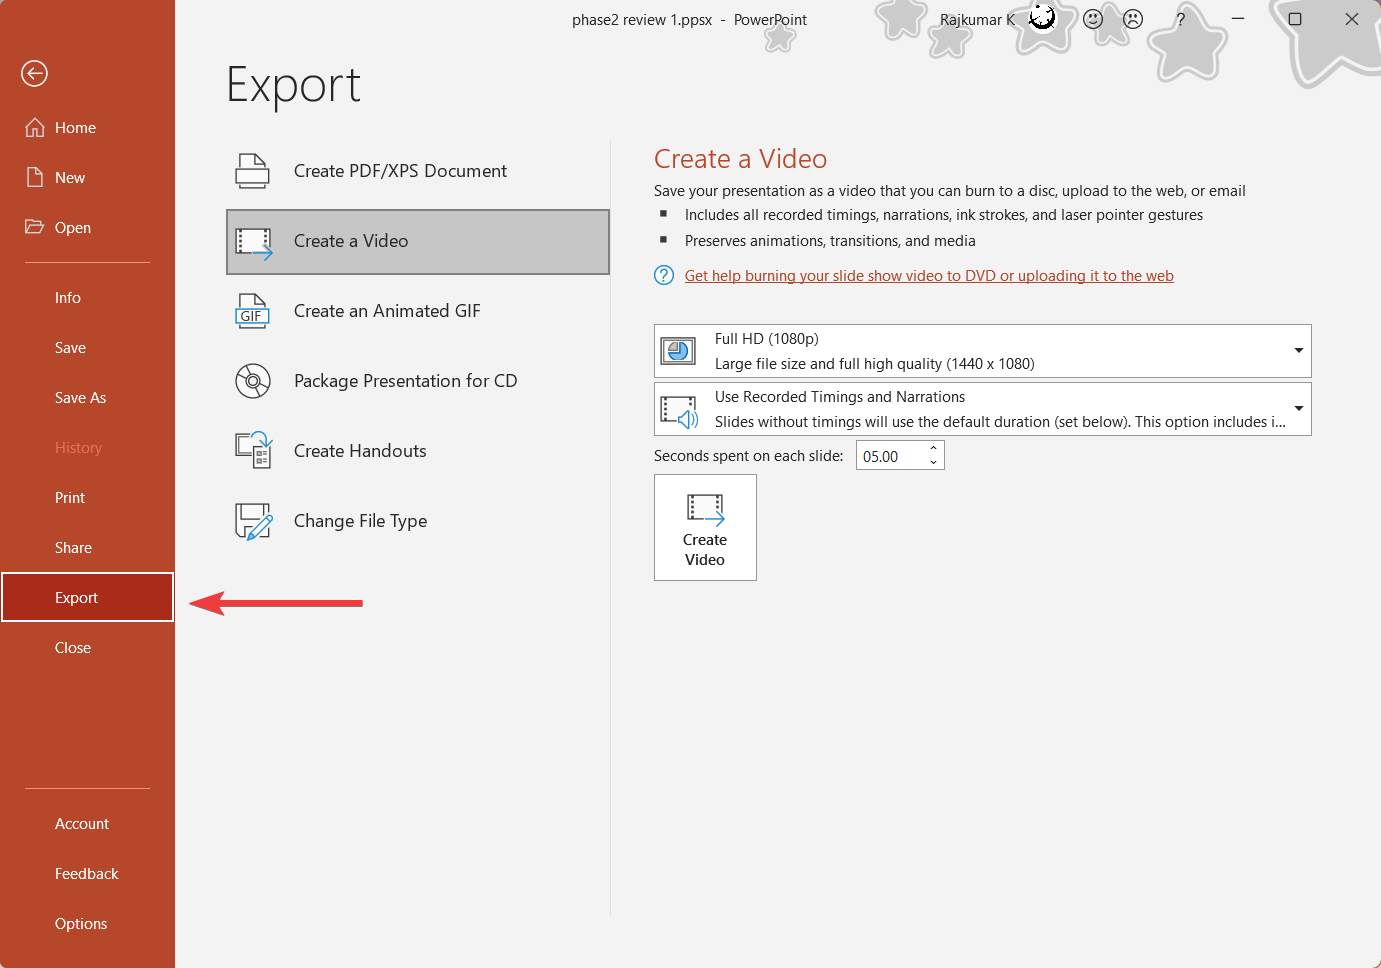
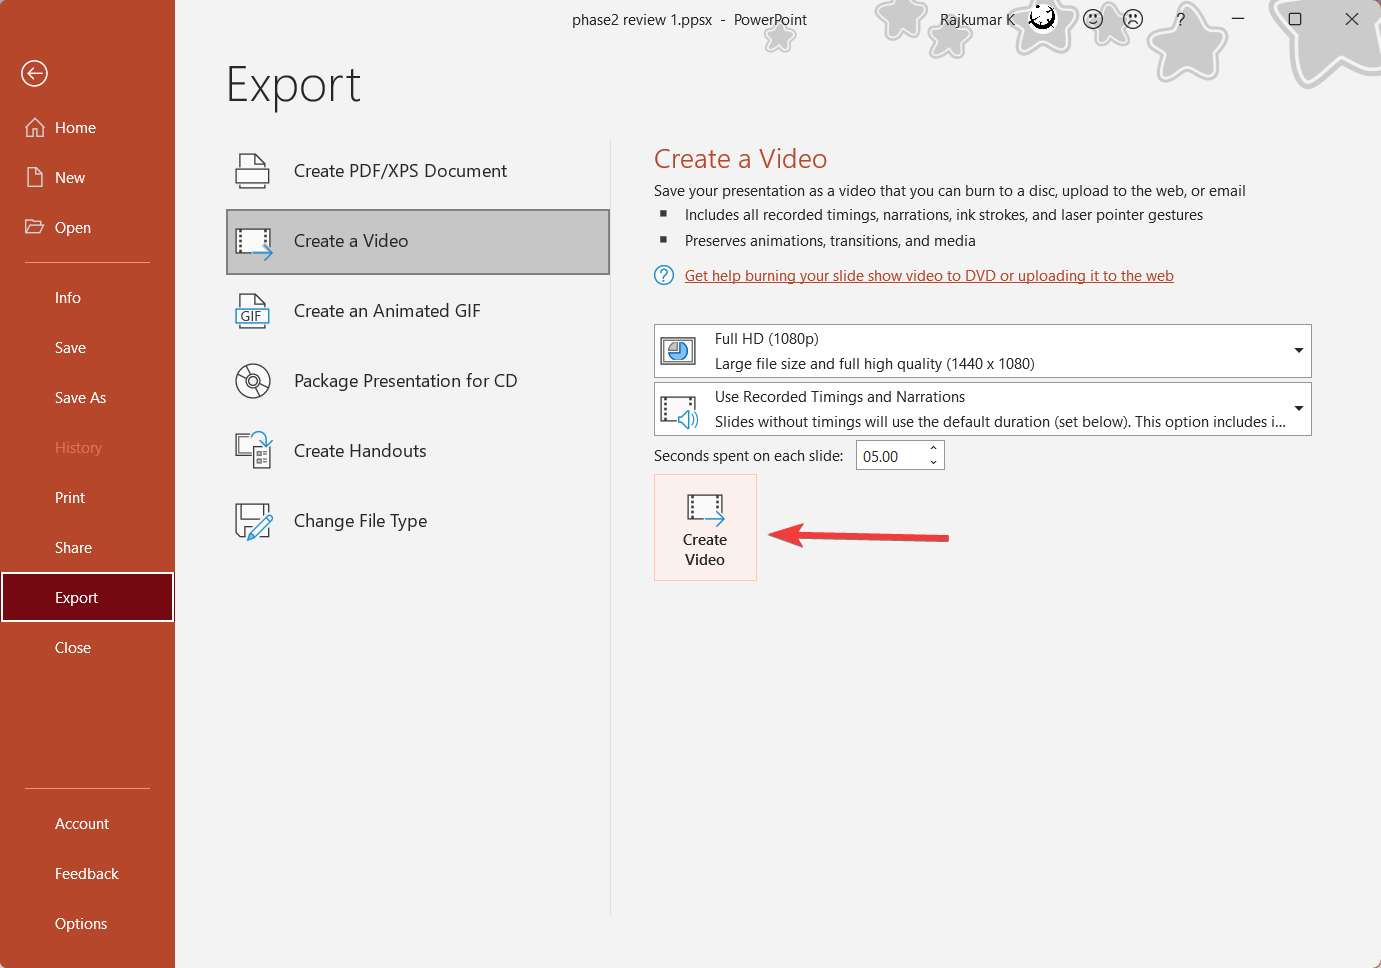
  1. Click File and select Export.select Export
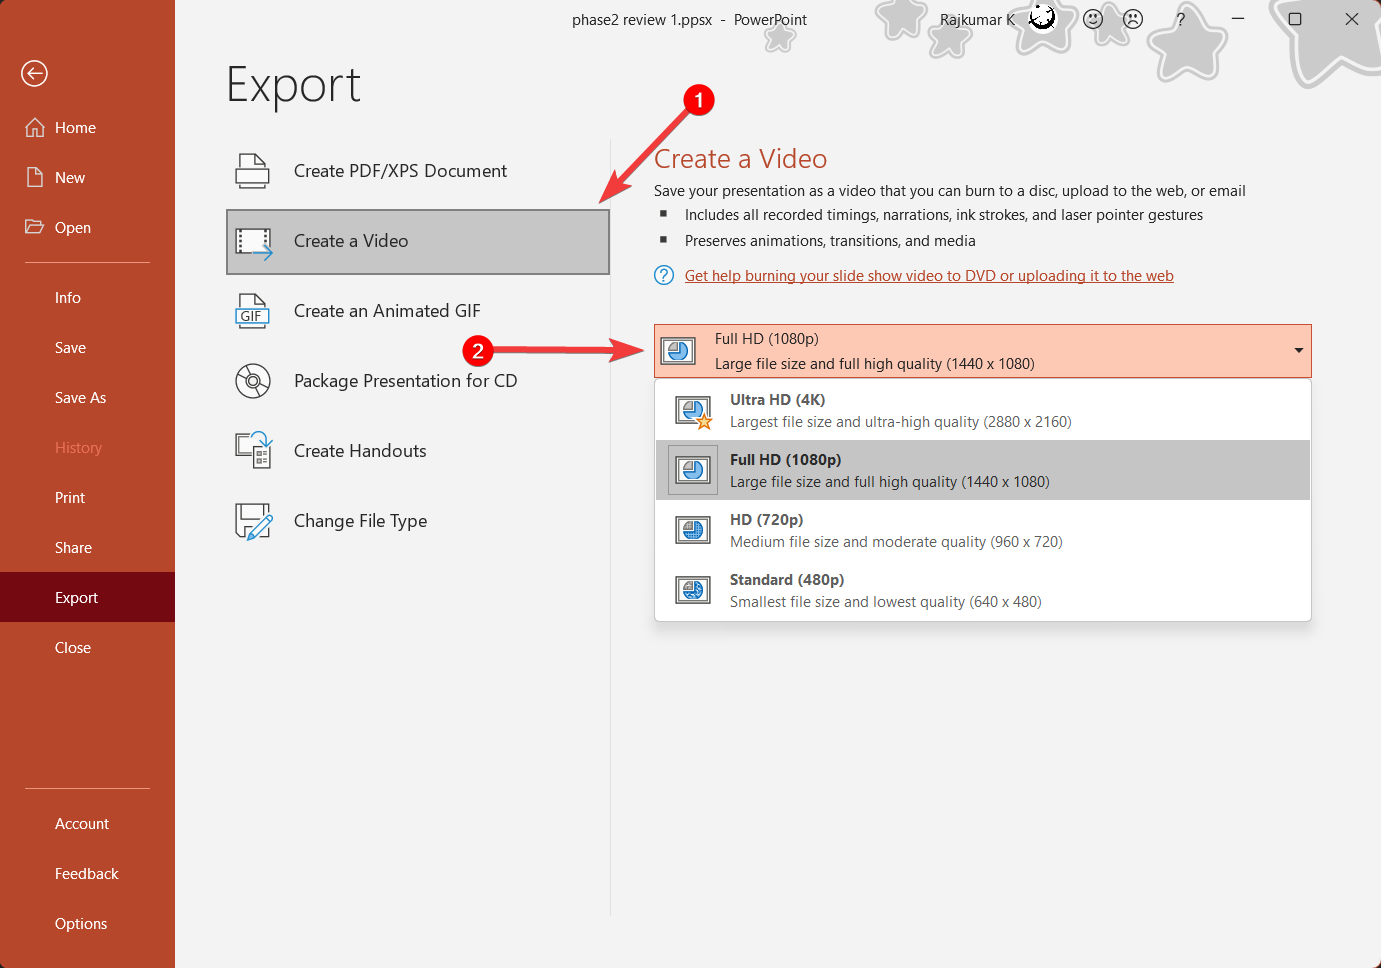
  2. Click Create a Video on the right pane and choose the video quality from the first drop-down menu. It is recommended to select Full HD (1080p).Choose a video quality
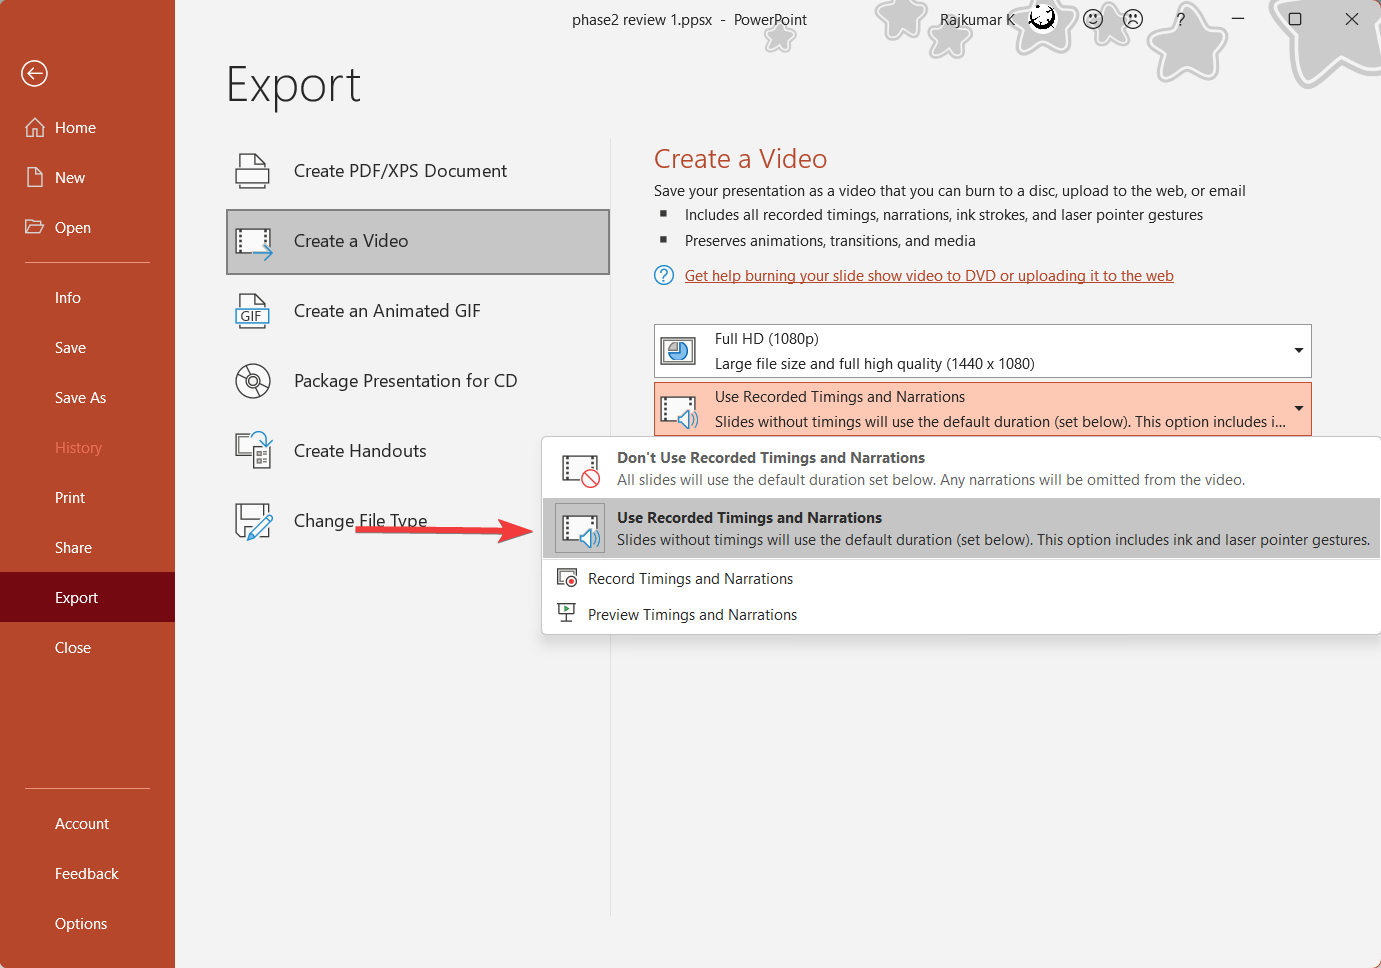
  3. Make sure the Use Recorded Timings and Narrations is selected in the next drop-down menu.Use Recorded Timings and Narrations
  4. Choose how long you want to spend on the slides without any recordings in the Seconds spent on each slide setting.
  5. Click the Create Video button and choose the location where you want to save the video. Create video

It may take some time to create the video, depending on your computer’s performance. Once the video is created, it can be played on any video player.

How to add audio and video to a PowerPoint presentation?

Instead of recording audio and video directly in PowerPoint, you can add external audio and video files to your presentation.

1. Add audio to a PowerPoint presentation

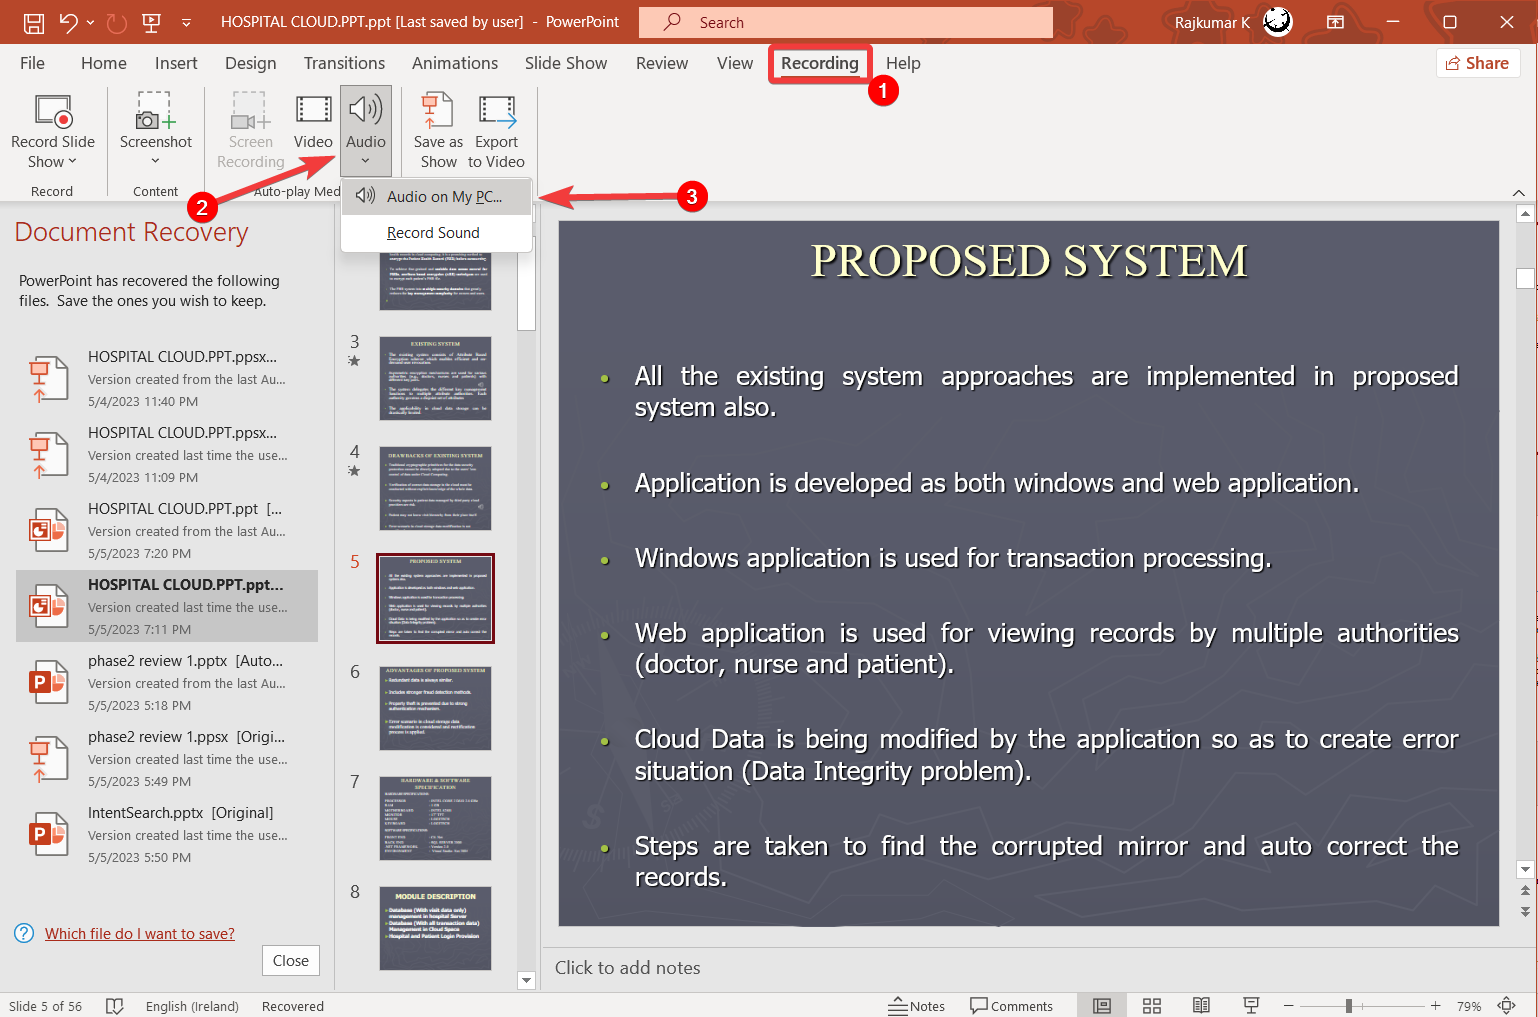
  1. Go to the Recording tab, click the Audio button select Audio on My PC… You could also select the Record Sound option to record your narration to add it to the slide.Add audio on my PC
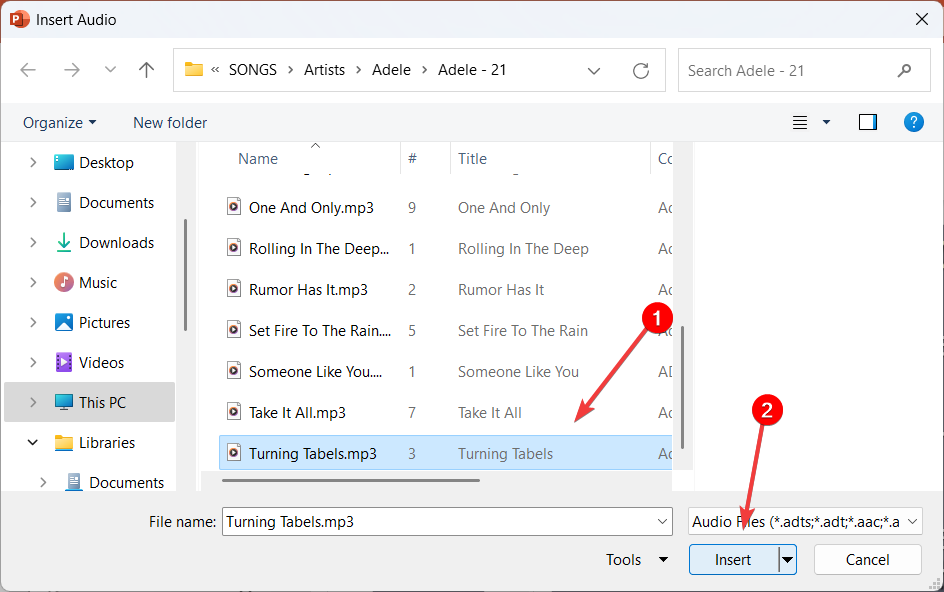
  2. Then, select the audio file from your device and then click Insert.Select audio
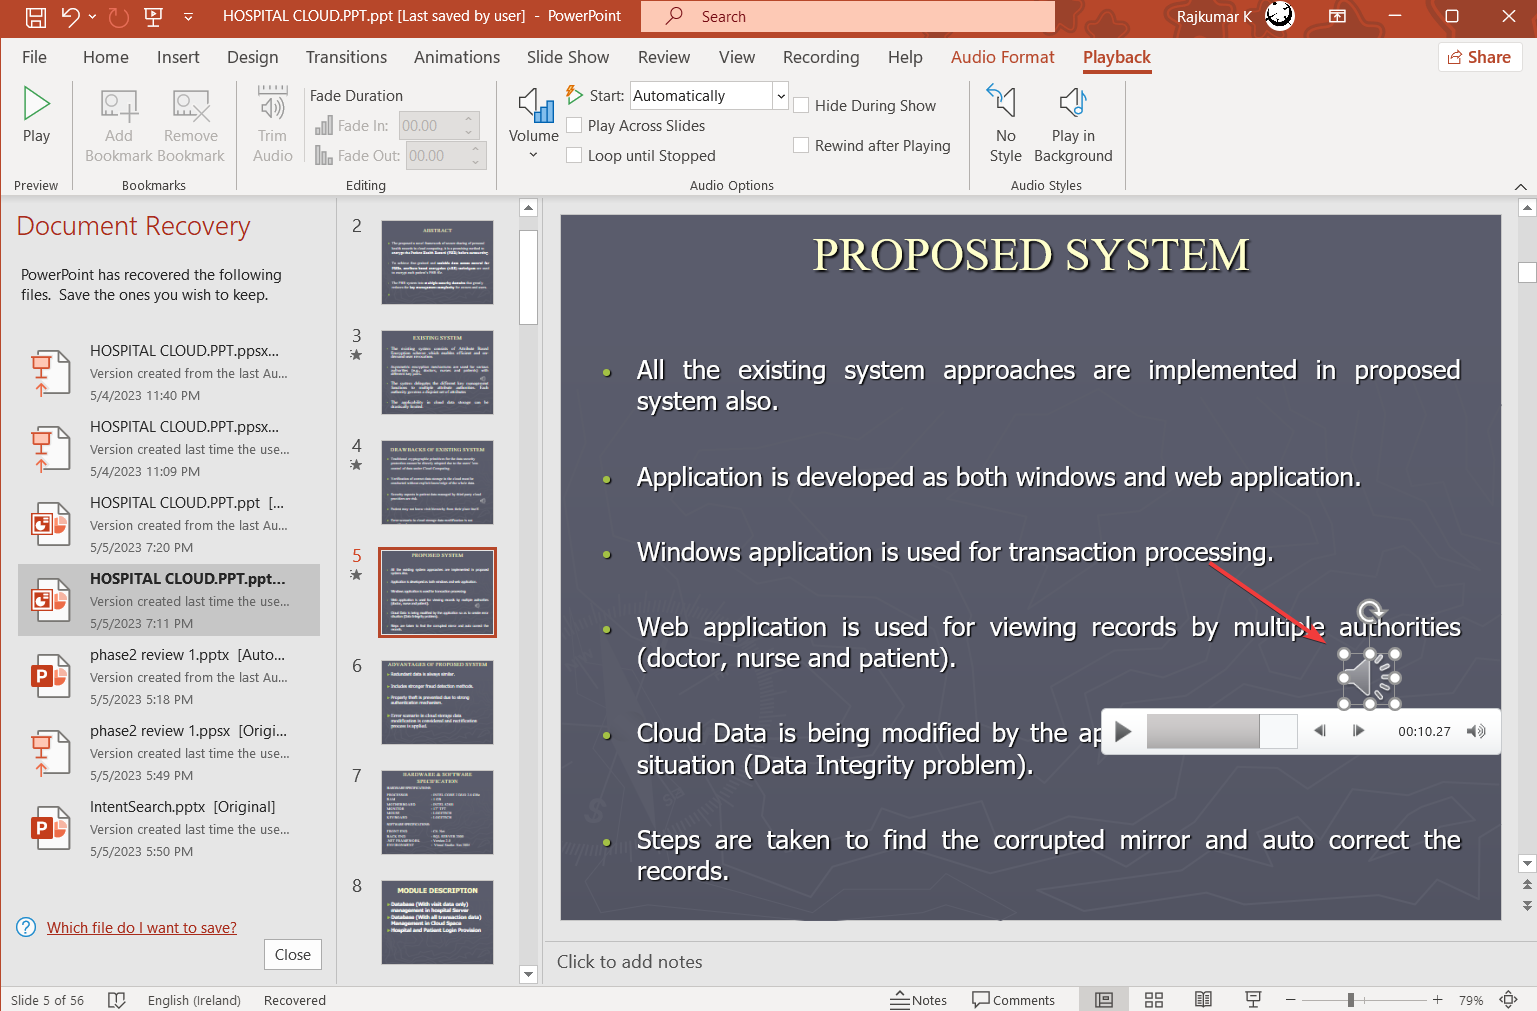
  3. The added audio will appear as a smaller speaker icon in your presentation.Inserted speaker icon

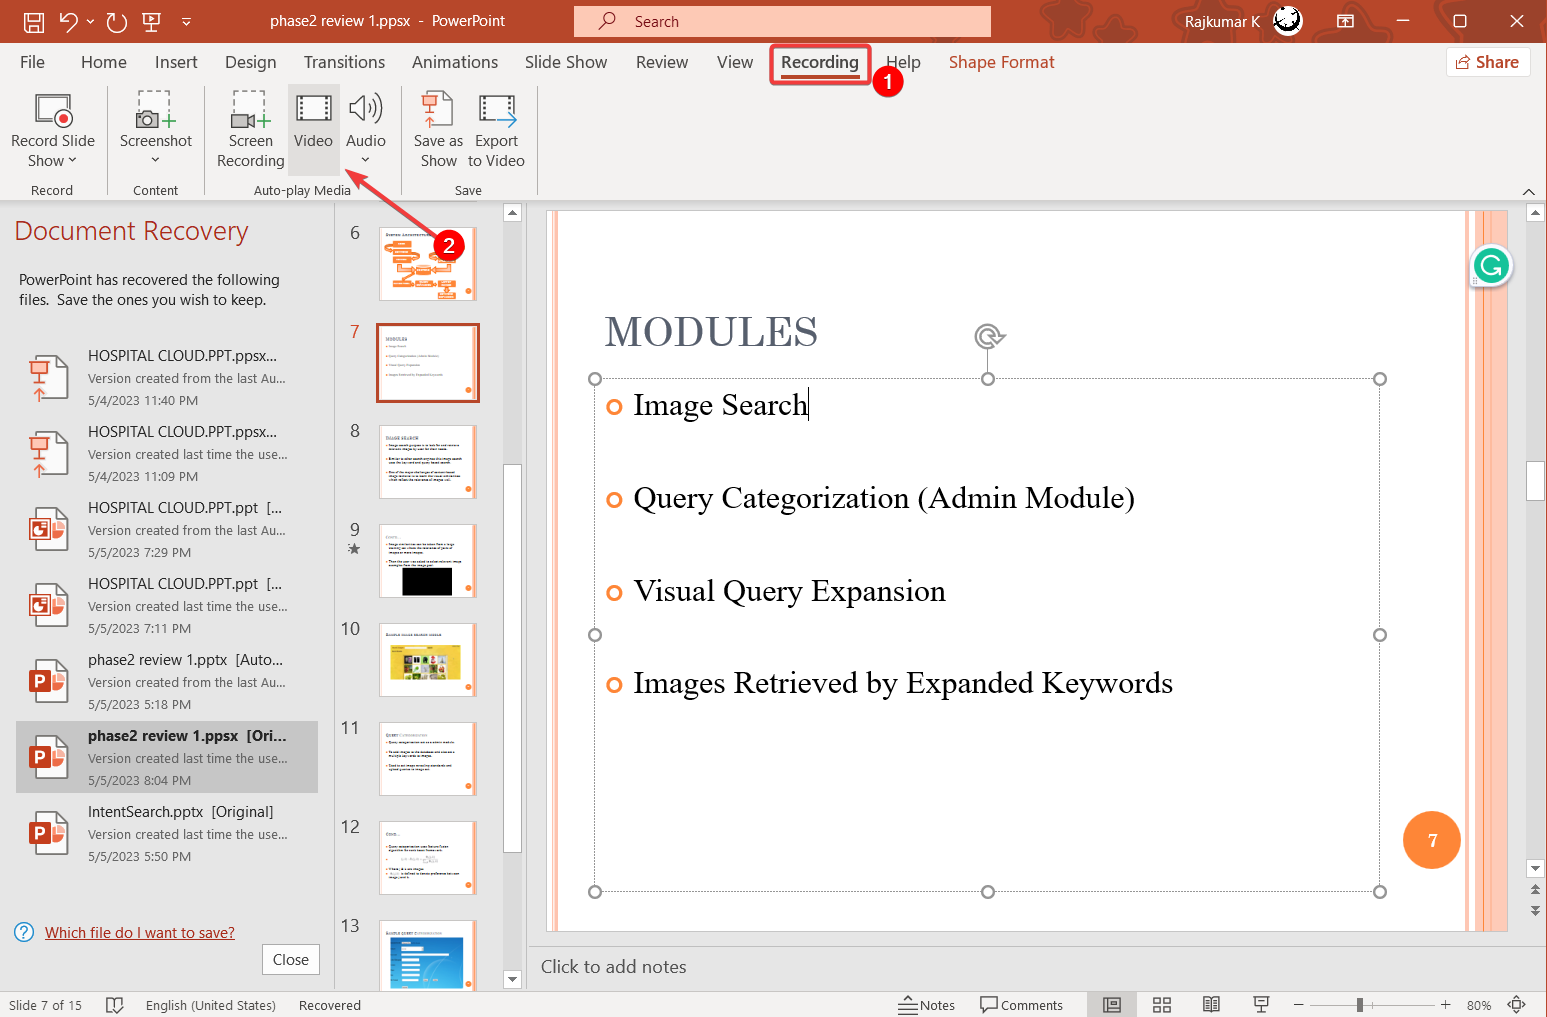
2. Add video to a PowerPoint presentation

  1. Go to the Recording tab and click the Video button.Select video from the Recording tab
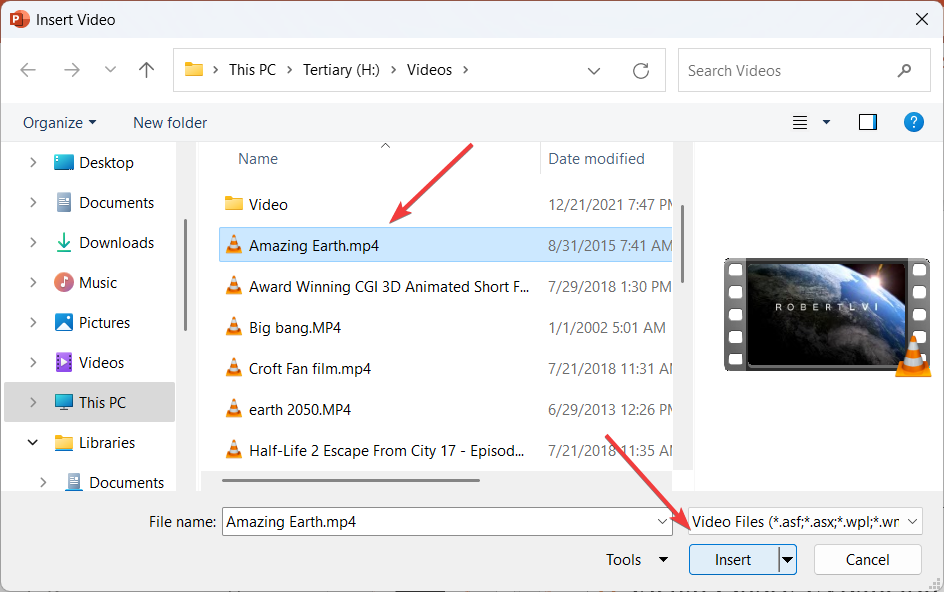
  2. Select the video from your computer and then click Insert.Insert video
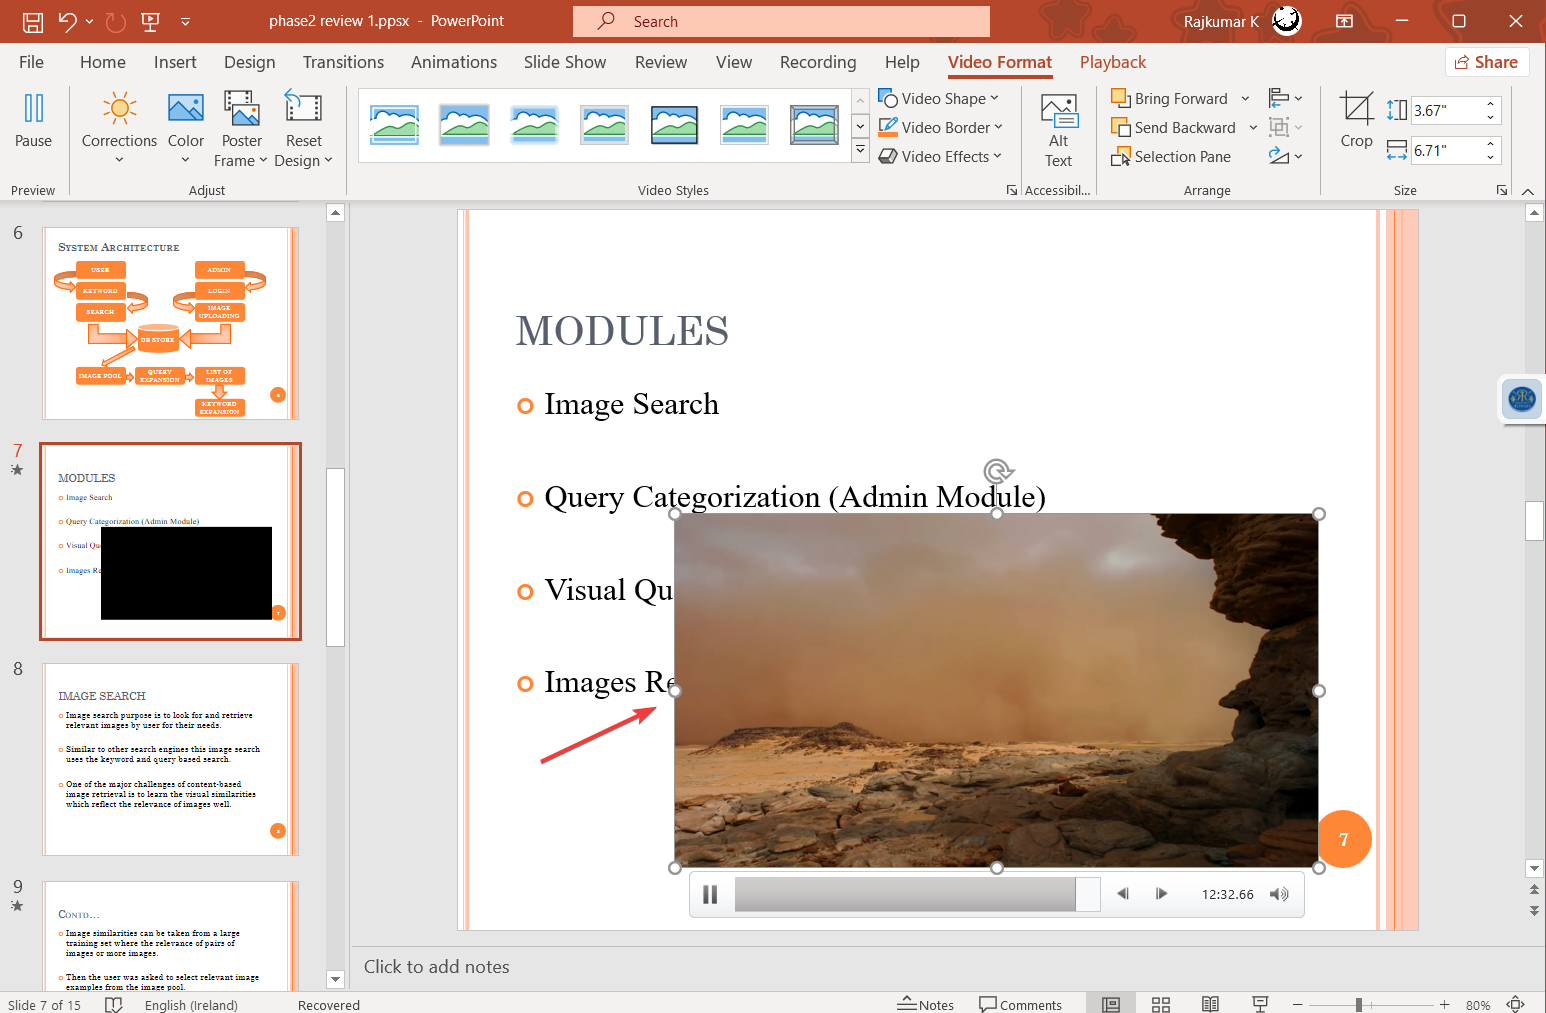
  3. Then, resize the video to your desired size.resize
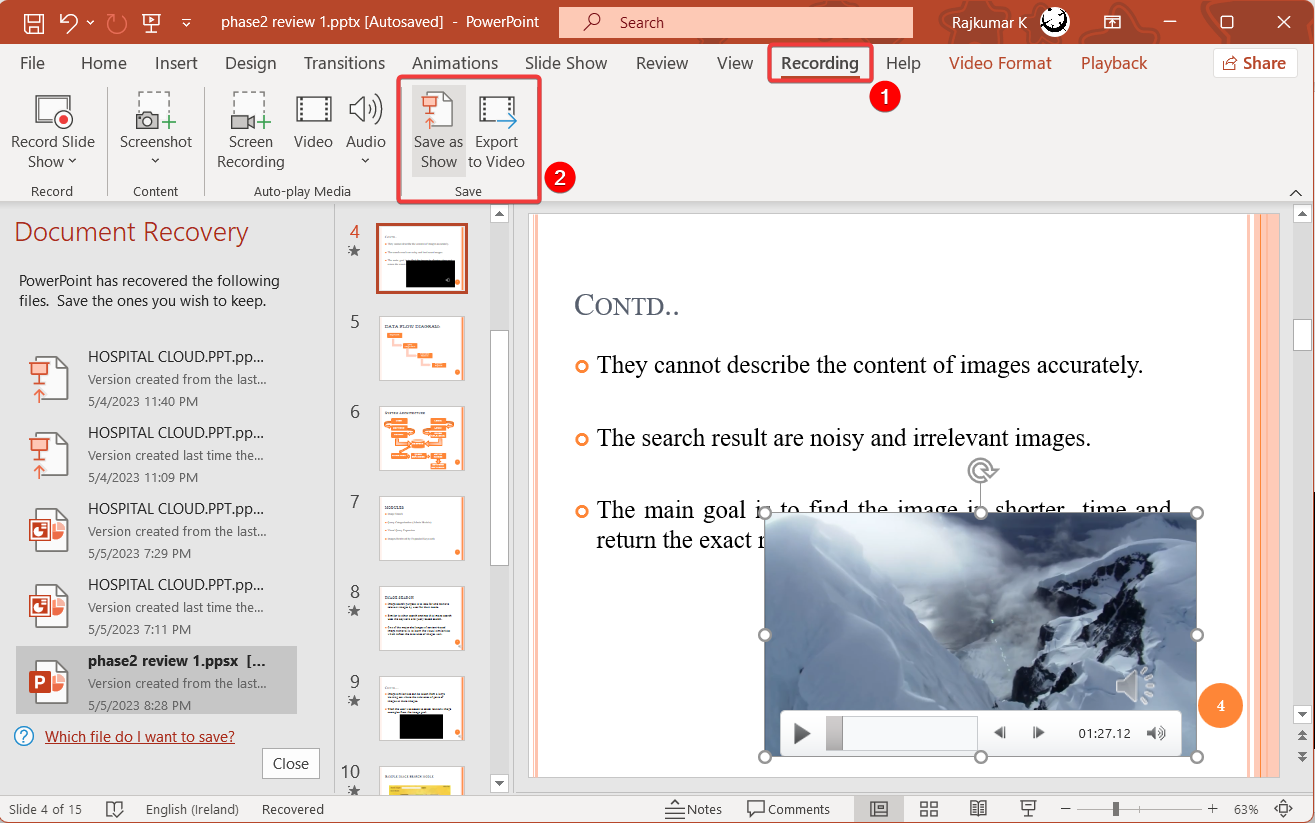
  4. Once the audio and video are inserted into the presentation, it can be exported as a video or saved as a PowerPoint show using the options under the Recording tab or File tab.Export as video

There are many advantages to recording PowerPoint presentations. They can be used as a record of a meeting that can be uploaded to the internet, shared with those who could not attend the meeting, or used as instructional videos to convey information.

Also, before you leave, find out how to make the image background transparent in PowerPoint.

If you need to jump to a slide in a long PowerPoint presentation, read the highlighted guide to learn how to do that.

To learn more about PowerPoint, we have a great guide on how to insert an Excel file into PowerPoint as icon, so don’t miss it.

If you found this guide helpful, don’t hesitate to share your experience with us by using the comment section below.

Error 193 0xc1: How to Fix This Service Issue

The 193 0xc1 error is one of the peculiar Windows issues users have faced. Unlike many other errors, you may not always be unable to pinpoint what actions triggered it.

Several readers have complained about this error, so we have taken the time to research it. This article will discuss likely causes and show you the best troubleshooting options.

What is Windows service error 193 0xc1?

If the application management system of Windows cannot locate the execution file for a program, error 193 0xc1 may occur, preventing the service from running. Here are the leading causes:

  • Naming conflicts – Another possible cause of the error is when a file or folder on the computer’s hard disk shares the same name as a file or folder in the executable file path of the service.
  • File corruption – When certain system files are corrupted, programs that depend on them to function will not run and may trigger the error.
  • Malware or virus infection – Malware can change vital file information, and this may trigger conflicts that lead to service error. We recommend using robust antivirus software.

While a few minor things may also contribute, the above are the leading causes, and we share solutions to resolve this.

How do I fix error 193 0xc1?

Before going through the more complex solutions, we recommend you do the following:

  • Run a malware scan – You may use a third-party app or Windows inbuilt security. This will eradicate the error if it is triggered by malware.
  • Restart the device – After a reboot, minor glitches may be resolved, which may fix the error.

If neither workaround works, you should continue to the more detailed solutions below.

1. Rename a duplicate Program file

  1. Press Windows + E to open Windows Explorer.
  2. Navigate to the path below.
    C:\Program Files
    error 193 0xc1
  3. If the error message includes the name of a specific application, go through its directory to see if there is any folder named Program.
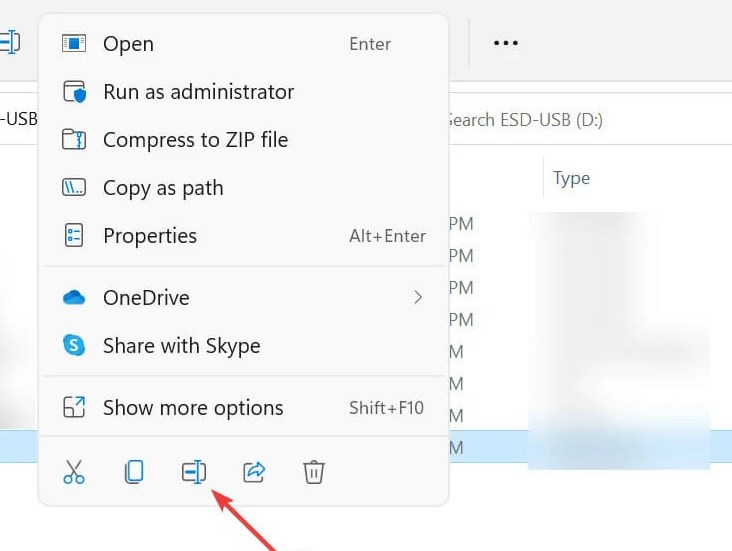
  4. Right-click on this Program folder, select the rename icon and give it a different name.
    error 193 0xc1
  5. Close Windows Explorer, launch the program, and verify the error is resolved.

2. Scan for bad files

  1. Press Windows + R to open the Run dialog.
  2. Type cmd then hit Ctrl + Shift + Enter to open an elevated Command Prompt.
    error 193 0xc1
  3. Type the script below and hit Enter.
    sfc /scannow
  4. This process would take a while but follow any instructions on the terminal and wait for it to complete.
  5. Finally, restart your computer and verify that error 193 0xc1 is resolved.

Alternatively, there is a suited method for Windows issues that requires system file restoring.

More exactly, you could employ a system repair application with enhanced technology for repairing and cleaning your PC.

3. Restart important services

  1. Press Windows + R to open the Run dialog.
  2. Type services.msc and hit Ctrl + Shift + Enter to open an elevated Command Prompt.
  3. If the error message includes the name of a specific service, search, and double-click on it.
    error 193 0xc1
  4. Click on the Start button if it is stopped.
  5. Lastly, verify it fixes the 193 0xc1 error.

4. Fix drive errors

  1. Press Windows + R to open the Run dialog.
  2. Type cmd then hit Ctrl + Shift + Enter to open an elevated Command Prompt.error 193 0xc1
  3. Type the script below and hit Enter.
    chkdsk C: /f
  4. After execution, finally, restart the computer.

In conclusion, remember that not all solutions discussed will work for every situation, so start with what feels most applicable to your case.

However, we encourage trying every initial workaround outlined in this guide, as they may save you time on extra troubleshooting.

Let us know in the comments section what worked for you.

How to Fix 0xc004f075 Windows Update Error Code

The installation error 0xc004f075 for Windows has been a source of frustration among tech enthusiasts. It’s a problem that has caused many to voice their grievances.

The subject being discussed shares similarities with the 0x8007001d Windows Update error, which we have covered in a previous guide.

Before we take any steps to address the issue, it’s important to explore the underlying cause.

What is 0xc004f075 Windows Update error code?

0xc004f075 Windows update error is a Windows error that can often be attributed to several factors:

  • Missing system files – Some missing files in your system might be the cause of this Windows update error.
  • Unexecuted Windows update components – These incomplete components can cause a range of problems, from slowing down your computer to causing it to crash altogether.

How can I fix 0xc004f075 Windows update error?

1. Fix corrupted system files

  1. Open Terminal as administrator. Press Windows key + X then click Windows Terminal(Admin).
  2. Copy each line of command to Powershell, then press enter (one line at a time):
    net stop bits
    net stop wuauserv
    net stop appidsvc
    net stop cryptsvc
    Del "%ALLUSERSPROFILE%\Application Data\Microsoft\Network\Downloader\*.*"
    rmdir %systemroot%\SoftwareDistribution /S /Q
    rmdir %systemroot%\system32\catroot2 /S /Q
    regsvr32.exe /s atl.dll
    regsvr32.exe /s urlmon.dll
    regsvr32.exe /s mshtml.dll
    netsh winsock reset
    netsh winsock reset proxy
    net start bits
    net start wuauserv
    net start appidsvc
    net start cryptsvc

  3. Reboot the system and review it once more, simply ignore any error in the command line if you encounter it.

If you’re not sure about proceeding with the manual steps and want to avoid further issues, we recommend a specialized tool.

2. Install Windows 11 ISO

  1. On your favorite browser go to the  Windows 11 Download page.
  2. Click on Select Download under Download Windows 11 Disk Image (ISO), then choose Windows 11.
  3. Next, click the Download button.
  4. Choose the product language you want, then click the Confirm button.

  5. Now you will receive a download link, and you will be able to click on the 64-bit Download button to get the Windows 11 ISO.

  6. Right-click the ISO file you downloaded and select the Mount option. Another option for this is to create a bootable USB or DVD.
  7. A new virtual drive will pop up in your File Manager window. Click on it and double-click the setup file to begin the installation process.

We sincerely hope that this guide has helped resolve your issue. If you encounter any further obstacles, we suggest referring to a similar Windows Update error 0x80070424.

I would greatly appreciate it if you could kindly comment below and share which solution proved the most effective for you.

TabTip.exe: What Is It & How to Disable It

The Touch Keyboard and Handwriting Panel Service or TabTip.exe are used for handwriting recognition, text input, and prediction in Windows. Using a tablet allows you to write on the screen using a stylus or your finger instead of a keyboard or mouse.

Although it is considered a non-essential process, it should not be terminated unless suspected of causing problems. If the latter is your problem, this article will take you through the steps to disable it.

What is TabTip? 

TabTip.exe is a Touch Keyboard and Handwriting Panel process that allows you to use handwriting input, convert text to symbols, and perform other special functions on your computer.

It allows you to write out words instead of typing them in, making it easier for users who have trouble typing on regular keyboards or prefer the ease of writing over typing.

That being said, the file is only essential to a section of users who need help typing or converting handwriting to text. 

And while there are many legitimate reasons for a file to exist on your computer, not all require you to keep the processes running. 

Therefore, if you notice that the TabTip.exe process is causing high CPU usage or affecting the performance of your PC, it is best to disable it.

Still, it is also possible for malware authors to create a file with the same name as a popular application or operating system file. The malware will be run instead of the legitimate application in this case.

This is why it is essential to keep your system secure by updating antivirus software and performing regular scans for malicious programs.

If you believe that TabTip.exe is part of a malicious program, the following steps will help you eliminate it.

How do I disable TabTip exe in Windows 11?

1. End process from Task Manager

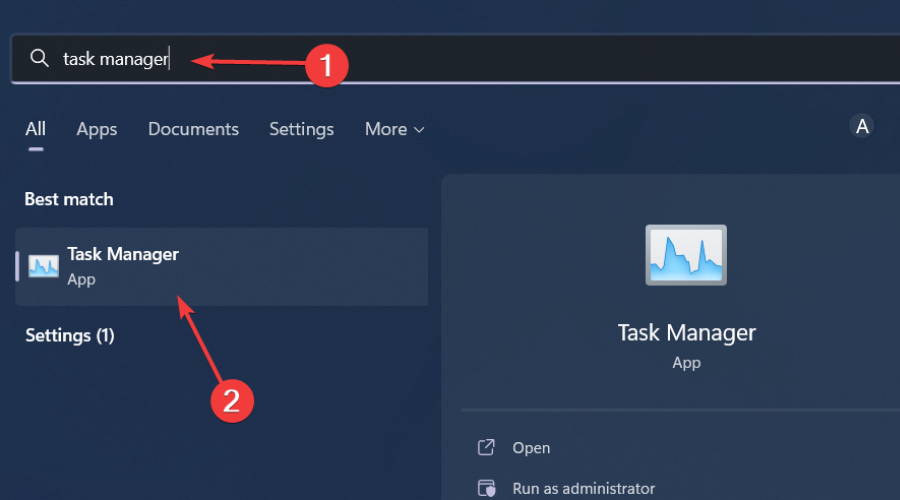
  1. Hit the Windows key, type Task Manager in the search bar, and click Open.task manager search
  2. Navigate to the Processes tab, and find the TabTip.exe process.
  3. Right-click on it and select End task.

2. Disable from Settings

  1. Hit the Windows key and click on Settings.settings windows 11
  2. Click on Bluetooth & devices, then select Pen & Windows Ink.
  3. Expand the Use your handwriting to enter text option.
  4. Under When a physical keyboard isn’t attached, select Never.

3. Disable the Touch Keyboard and Handwriting Panel services

  1. Hit the Windows + R keys to open the Run command.
  2. Type services.msc in the dialog box and hit Enter.run services.msc command
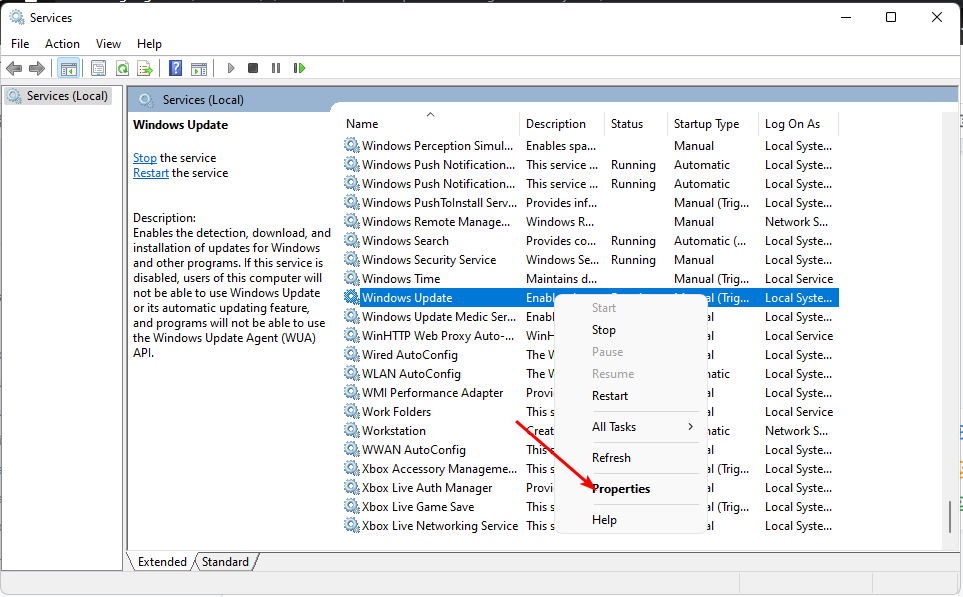
  3. Locate the Touch Keyboard and Handwriting Panel service, right-click on it, and select Properties.
  4. Navigate to the Startup type, and in the drop-down menu, select Disabled, then click on Stop.
  5. Click on Apply and OK to save the changes.

4. Run DISM and SFC scans

  1. Hit the Windows key, type cmd in the search bar, and click Run as administrator.cmd-run-admin-w11 unexpected kernel mode trap windows 11
  2. Type the following commands and press Enter after each one: DISM.exe /Online /Cleanup-Image /Restorehealth sfc /scannow

5. Scan for viruses

  1. Press the Windows key, search Windows Security, and click Open.
  2. Select Virus & threat protection.
  3. Next, press Quick scan under Current threats.
  4. If you don’t find any threats, proceed to perform a full scan by clicking on Scan options just below Quick scan.Scan options
  5. Click on Full scan, then Scan now to perform a deep scan of your PC.Full Scan Scan Now
  6. Wait for the process to finish and restart your system.

The debate on how many processes you should have running on your Windows 11 is a heated one. Every user has different devices with varying capabilities. Also, the needs are different, ranging from standard to heavy users.

However, you can still find unnecessary processes to disable and boost the performance of your PC. Make sure you check out our other article on poqexec.exe and how to remove it from your computer safely.

Since TabTip.exe is associated with the touch keyboard service, why not check our guide on how to enable the Touch Keyboard and Handwriting Panel service?

That brings us to a close on this article, but keep us engaged in the comment section with more thoughts on this topic.

How to Get Rid of 0x8004070c Chrome Installation Error

Many tech enthusiasts have expressed their grievances regarding the 0x8004070c Chrome installation error.

The matter at hand bears some resemblance to the Chrome 0xc00000a5 error, which we have previously addressed in a previous guide.

Let us first delve into the root cause of this problem before we proceed with any rectification measures.

What is 0x8004070c Chrome installation error?

0x8004070c Chrome Installation Error is a Chrome error and it’s usually caused by the following:

  • Insufficient permissions – There could be less permission that might prompt this error whenever you try to run the Chrome browser.
  • Corrupt installation setup files – The setup files might be corrupted while installing the Chrome browser on your device.
  • Interruptions due to third-party apps – Some other third-party apps in the background running might clash with the Chrome browser.

How can I fix this 0x8004070c Chrome installation error?

1. Modify the registry

  1. On your system click the Windows key and then R, type regedit, and choose OK.
  2. Once the Registry Editor opens, navigate to the following path:
    HKEY_LOCAL_MACHINE\SOFTWARE\Microsoft\Windows\CurrentVersion\Setup\State
  3. On the right panel, double-click on the ImageState entry, clear the value data, and select OK.
  4. Now, navigate to the following path:
    HKEY_LOCAL_MACHINE\SOFTWARE\Google\Update\Clients
  5. Here, locate {430FD4D0-B729-4F61-AA34-91526481799D} key, right-click on it, and select Delete.
     
  6. Restart your PC once you are finished and try installing Chrome.

2. Delete Chrome residual files

  1. Press the Windows key + E to open File Explorer.
  2. Paste the following in the address bar and click Enter:
    %LOCALAPPDATA%\Google\Chrome\User Data\
     
  3. Next, search for the folder named Default. Right-click it and choose Rename.
  4. Rename this folder as Default.old.
  5. Restart your system.

Several users have suggested the removal of Google Chrome and the deletion of associated files and folders from specific directories.

We trust that this manual has assisted you in addressing your predicament. If you come across any additional hurdles, we recommend our guide for users who can’t install Chrome.

If you could kindly comment below and let me know which solution worked best for you, it would be greatly appreciated.

What is Widevinecdm.dll & Should You Delete It?

Widevine CDM (Content Decryption Module) is a Dynamic Link Library file. It is a digital rights management (DRM) application that is used to protect content on the Windows operating system. 

This application works by encrypting and decrypting audio and video files to prevent unauthorized duplication or sharing of content. We examine what this file means to your PC and whether you need it.

What is Widevine, and do I need it?

Widevine protects and streams digital content, including videos and music, over the web. Since it is used to stream protected content like movies and TV shows in the browser, it’s not required for content you download or store locally on your device.

It licenses the ability to use its DRM technology. The Chrome browser, for example, uses Widevine to play videos in an HTML5 player, and when not enabled or outdated, you may experience error A19 on Stan.

The HTML5 player can only play encrypted media – in this case, DRM-encoded content. So, do you need it? Most DLL files are present in your computer for a purpose. Some are essential, while others are not so much. For widevinecdm.dll, it serves the following benefits:

  • It ensures high-quality streaming of videos and content on mobile devices.
  • It helps reduce piracy by protecting content owners from unauthorized access and distribution of their video files.
  • Allows viewers to view content across multiple screens or devices without compromising security or performance.

It’s important to know that the file isn’t malware or spyware. As a legitimate Windows process, it does not threaten your computer. If you’re having problems with this file, you may need to update your Chrome version or uninstall and reinstall it completely.

However, if you are not using the Widevine DRM software or suspect it may be a trojan, you may want to remove this file from your PC to free disk space and secure your system.

How do I disable the Widevinecdm.dll?

1. Run DISM and SFC scans

  1. Hit the Start Menu icon, type cmd in the search bar, and click Run as administrator.cmd-run-admin-w11 unexpected kernel mode trap windows 11
  2. Type the following commands and press Enter after each one:DISM.exe /Online /Cleanup-Image /Restorehealth sfc /scannow

Alternatively, you can make this process much simpler by using a dedicated repair tool.

2. Scan for viruses

  1. Press the Windows key, search Windows Security, and click Open.
  2. Select Virus & threat protection.
  3. Next, press Quick scan under Current threats.
  4. If you don’t find any threats, proceed to perform a full scan by clicking on Scan options just below Quick scan.Scan options
  5. Click on Full scan, then Scan now to perform a deep scan of your PC.Full Scan Scan Now
  6. Wait for the process to finish and restart your system.

3. Perform a System Restore

  1. Press the Windows + R keys, type rstui, and hit Enter.
  2. The System Restore window will open. Click on Next.
  3. Select the restore point you wish to revert to and click on Next.
  4. Now click on Finish.

Is Google Widevinecdm.dll safe?

Google Widevine CDM is a trusted Digital Rights Management (DRM) software. It’s an open-source project that allows developers to integrate DRM into their applications.

So, Yes. It’s safe to install Google Widevinecdm.dll on your computer. The program is not classified as a potentially unwanted application (PUA), meaning it doesn’t pose any security risks.

It’s not uncommon for some people to have concerns about installing this software on their computers. It’s a valid concern because of its connections with DRM protections for copyrighted material and its possible impact on performance or battery life.

Another issue is that this software may be used as a Trojan horse or malware. It can be installed on your computer without your permission or knowledge of its presence on the system.

If you want to keep your PC free of these files, we recommend using an anti-spyware removal tool.

Now that you know Widevine is entirely safe, your next question is probably: How do I enable Google Widevine CDM? The good news is that it comes automatically embedded in your browser. 

The only thing you might have to do is update your browser to the latest version to ensure you’re not using an obsolete version.

There you have it. You now know what Widevinecdm.dll does and its importance on your PC. Unless stated otherwise, or you don’t have apps depending on it, you should disable it. See also what to do if you run into a speedtreert.dll file.

In the comment section below, let us know your good and bad encounters with Widevinecdm.dll.

What is Error Code 0x800B0108 & How to Fix It

If you get an error code 0x800b0108 while running Windows Update, it means that the update service is not working as expected. This error message pops up when you try to install updates on your PC, preventing you from installing the latest patches and security fixes.

In this article, we will tell you how to fix error code 0x800b0108 on Windows Update and what actions you should take to avoid this problem in the future.

What is error code 0x800b0108 on Windows Update?

In some cases, this can be caused by a corrupted system file or a missing service pack from Microsoft.

Other possible reasons include:

  • The update is too big for your Internet connection – If your Internet connection is slow or has a low bandwidth, then it may not be able to download the large update file in time.
  • Corrupt update files – If your Windows update folder has become corrupted over time or some update files are missing, it may trigger the 0x800b0106 error.
  • Windows update service has stopped – This is a critical service required for the Windows update process to be completed, so if it has stopped, you may encounter this error.
  • Software or hardware conflicts – You may have installed incompatible software or hardware, such as antivirus programs, firewalls, or other security software.

How do I fix error 0x800b0108?

Try the following workarounds before any recommended solutions:

1. Run the Windows Update troubleshooter

  1. Hit the Windows key and click on Settings.settings windows 11
  2. Click on System and select Troubleshoot.Open system troubleshooter
  3. Navigate to Other troubleshooters.other troubleshooters
  4. Click the Run option for the Windows Update troubleshooter.windows-update-run-troubleshooter runtimebroker.exe error

2. Restart the Windows update service 

  1. Hit the Windows + R keys to open the Run command.
  2. Type services.msc and hit Enter.run services.msc command
  3. Locate the Windows Update service, double click on it and select Properties.
  4. Navigate to the General tab, under Startup type, select Automatic from the drop-down options, and click on the Start button.
  5. Next, click Apply and then OK.

3. Run DISM and SFC scans 

  1. Hit the Windows key, type cmd in the search bar, and click Run as administrator.cmd-run-admin-w11 unexpected kernel mode trap windows 11
  2. Type the following commands and press Enter after each one: DISM.exe /Online /Cleanup-Image /Restorehealth sfc /scannow
  3. Restart your PC.

If you’re not sure about proceeding with the manual steps and want to avoid further issues, we recommend a specialized tool.

4. Delete the Software Distribution folder

  1. Press Windows + S to open Search, type Command Prompt in the text field, and click on Run as administrator.cmd-run-admin-w11 unexpected kernel mode trap windows 11
  2. Paste the following command and hit Enter to stop the Windows Update service: net stop wuauserv
  3. Next, execute the following command to terminate BITS (Background Intelligent Transfer Service): net stop bits
  4. Once done, press Windows + E to open File Explorer, paste the following in the address bar, and hit Enter: C:\Windows\SoftwareDistribution
  5. Press Ctrl + A to select all the folder’s contents, then hit the Delete key. If you can’t delete the Software Distribution folder or the access is denied, restart your PC and try again.delete software distribution folder
  6. All the files in the Software Distribution folder should be deleted, but the folder should still be there.
  7. Go back to Command Prompt, and execute the following commands to restart the Windows Update service and BITS: net start wuauservnet start bits

The SoftwareDistribution folder is used by Windows Update and other features to store local copies of packages downloaded from Microsoft’s servers. If you delete it, it will be re-created the next time you try to update Windows. This just means the download process will take longer.

5. Reset Windows update components 

  1. Hit the Windows key, type cmd in the search bar, and click Run as administrator.cmd-run-admin-w11 unexpected kernel mode trap windows 11
  2. Type the following commands and press Enter after each one: net stop bits net stop wuauserv net stop appidsvc net stop cryptsvc Del "%ALLUSERSPROFILE%\Application Data\Microsoft\Network\Downloader\*.*" rmdir %systemroot%\SoftwareDistribution /S /Q rmdir %systemroot%\system32\catroot2 /S /Q regsvr32.exe /s atl.dll regsvr32.exe /s urlmon.dll regsvr32.exe /s mshtml.dll netsh winsock reset netsh winsock reset proxy net start bits net start wuauserv net start appidsvc net start cryptsv

That being said, consider installing a Windows update repair tool to better address such issues in the future because the error 0x800b0108 is not the last of Windows update errors.

Let us know if there’s a solution that is missing from our list but helped you get rid of this error in the comments below.

Fix: Cloud Files Diagnostic Event Listener Failed to Start

Many of our readers have reported coming across the Cloud Files Diagnostic Event Listener failed to start with error code 0xC0000022 on their Windows 11 PCs. This error pops up when the system files are corrupt or missing.

This issue could pop up because of various reasons which we will be discussing in this guide as well. Let us get right into it.

Why do I get the Cloud Files Diagnostic Event Listener error?

We did some research and found some reasons that trigger the Cloud Files Diagnostic Event Listener error, some of which are listed below.

  • Issues with OneDrive: Several of our readers have pointed out that because of some underlying problem with OneDrive, they were coming across this error.
  • Corrupt system files: Missing or corrupt system files can often cause multiple issues such as the error.
  • Insufficient permissions: Chances are you haven’t granted sufficient permission to the application which is why you are getting the Cloud Files Diagnostic Event Listener error.
  • Some Windows features are disabled: Some essential Windows features required for the program to run might be disabled on your PC.

Let us take a look at the solutions that will help you resolve the Cloud Files Diagnostic Event Listener error.

How do I fix the Cloud Files Diagnostic Event Listener error?

1. Disable the OneDrive Files on Demand feature

  1. Right-click on the OneDrive taskbar icon.
  2. Click the cogwheel icon and select Settings.
  3. Under the Settings tab, uncheck Save space and download files as you use them.
  4. Click OK to apply the changes, then restart your PC.

2. Reinstall OneDrive

  1. Press the Win key to open the Start menu.
  2. Type Control Panel and open it.
  3. Select Programs and Features.
  4. Click on OneDrive and select Uninstall at the top.
  5. Follow the on-screen steps to completely remove the program.
  6. Visit the official OneDrive website, download the installer, and run it to get a fresh copy of OneDrive.

Some of our readers have pointed out that reinstalling the OneDrive app on their Windows 11 PCs has fixed the Cloud Files Diagnostic Event Listener error.

3. Run the program as an administrator

  1. Right-click on the app icon and select Properties.
  2. Switch to the Compatibility tab.
  3. Check the box for Run this program as an administrator.
  4. Click Apply and OK.

The program might require some special permissions to run on your PC. In such a case, a simple fix would be to run the program as an administrator.

4. Fix corrupt system files

  1. Open the Start menu by pressing the Win key.
  2. Type Command Prompt and open it as an admin.
  3. Type the below command and press Enter. sfc /scannowsfc scan 0xc00000e
  4. Wait for the process to fix the system files and restart your PC.

Corrupt system files can cause your PC to misbehave and cause issues such as Cloud Files Diagnostic Event Listener error. Fix it by running the simple command.

5. Enable essential Windows features

  1. Press the Win key to open the Start menu.
  2. Type Control Panel and open it.
  3. Select Programs and Features.
  4. Click Turn Windows features on or off.
  5. Expand Legacy Components.
  6. Check the box for DirectPlay.
  7. Click OK.
  8. Wait for the components to load and restart your PC.

Essential components are required for some programs to function smoothly. Chances are the program isn’t able to load the required features because of which you are getting the Cloud Files Diagnostic Event Listener error.

One reader suggested that turning on the DirectPlay Windows feature helped them eliminate the error and fix it.

6. Use System Restore

  1. Press the Win key to open the Start menu.
  2. Type create a restore point and open it.
  3. Select System Restore.
  4. Click Next.
  5. Choose the restore point.
  6. Select Next and click Finish.

Do note that system restore will work only if you already have a system restore point created. We have a guide that explains how to create a system restore point.

That is it from us in this guide. We have a guide that lists some of the best tools that you can use to fix system crashes as well as BSoD errors.

Feel free to drop a comment below and let us know which solution helped you fix the Cloud Files Diagnostic Event Listener error.

Local Security Authority Protection Option Missing [Fixed]

Windows 11 has many security features, and speaking of which, users reported that Local Security Authority Protection does not exist as an option for them anymore.

In case you’re not familiar, this is a security feature in Windows Defender that protects your login credentials and sensitive data.

Not being able to use this feature can be a security risk, so in today’s guide, we’re going to show you the best ways you can use to fix this issue.

Is Local Security Authority protection necessary?

While it’s not necessary, it’s unwise to keep security features turned off. This feature is designed to protect your login credentials and handle authorization, so it’s best to keep it enabled.

What can I do if Local Security Authority Protection does not exist as an option?

Before we start fixing this issue, there’s one step you should do:

  • Update Windows – It has been confirmed that this issue is addressed in recent updates. Update your system before trying any of these solutions.

1. Update Windows Defender

  1. Right-click the Start menu and choose Windows Terminal (Admin). Make sure that it’s using PowerShell.
  2. Run the following command Get-AppPackage Microsoft.SecHealthUI
  3. Wait for the process to finish.

Once done, you’ll have the latest version of Windows Defender and the issue will be gone.

2. Modify the registry

  1. Press Windows key + X and select Windows Terminal (Admin).
     
  2. Run the following command: reg add HKLM\SYSTEM\CurrentControlSet\Control\Lsa /v RunAsPPL /t REG_DWORD /d 2 /f;reg add HKLM\SYSTEM\CurrentControlSet\Control\Lsa /v RunAsPPLBoot /t REG_DWORD /d 2 /f;
  3. Once the command is executed, restart your PC.

Once the registry is changed the Local Security Authority protection should appear again.

We hope that this guide helped you fix this problem on your PC. If you have more issues, our Local Security Authority Protection is off guide should be able to help you.

What method did you use to fix this problem? Let us know in the comments section below.

5 Ways to Fix 0x80070012 Windows Update Error

Windows update errors are somewhat common, and we have all got these at one point. But most simply vanish after a quick restart or retrying the update. But some are trickier to resolve, with 0x80070012 being encountered by many.

The error generally appears on Windows 10, but many Windows 11 users reported an Install error – 0x80070012, which appeared after updating the OS, and uninstalling the update should fix things. And for the update error, keep reading to find out the solutions!

What is error code 0x80070012 on Windows Update?

The 0x80070012 Windows 10 update error usually appears for driver updates, especially the printer driver, be it HP, Canon, or Brother printers. For some older versions of the OS, the error automatically appears when accessing the Windows Update section.

Here are a few reasons you are getting the error:

  • Corrupt system files: When the system files are corrupt on the PC, you might encounter update errors, issues with the hardware, and in some cases, a Blue Screen of Death.
  • Issues with the update components: For some users, the problem was triggered due to issues with the Windows update components, a critical aspect of the update process.
  • Third-party apps triggering conflicts: Oftentimes, a third-party antivirus or security software can conflict with the process and prevent Windows from downloading the latest updates.

How do I fix error code 0x80070012?

Before we head to the slightly complex solutions, here are a few quick tricks to try:

  • Restart the computer and retry the updates.
  • Run the Windows Update troubleshooter.
  • Switch to a different network type, say Ethernet or a mobile hotspot.
  • Disable any third-party antivirus installed on the PC. While doing so, temporarily turn off the firewall and verify whether the 0x80070012 error is fixed.

If none work, move to the fixes listed next.

1. Repair the corrupt system files

  1. Press Windows + R to open Run, type cmd, and hit Ctrl + Shift + Enter.cmd
  2. Click Yes in the UAC prompt.
  3. Paste the following commands individually and hit Enter after each to run DISM:DISM /Online /Cleanup-Image /CheckHealth DISM /Online /Cleanup-Image /ScanHealth DISM /Online /Cleanup-Image /RestoreHealth
  4. Once done, run the following command for the SFC scan:sfc /scannowsfc scan to fix 0x80070012
  5. Finally, restart the computer for the changes to come into effect.

In case it’s the corrupt system files triggering the 0x80070012 Windows 11 update error, you can run the DISM tool and SFC scan to get things up and running.

2. Uninstall the conflicting programs

  1. Press Windows + R to open Run, type appwiz.cpl in the text field, and hit Enter.appwiz.cpl
  2. Select the app(s) installed recently, around the same time the error first appeared, and click Uninstall.uninstall to fix 0x80070012
  3. Follow the on-screen instructions to complete the process.
  4. Once done, restart the computer, and try installing the affected update.

3. Reset the Windows Update components

  1. Press Windows + S to open Search, type Command Prompt, and click on Run as administrator.command prompt
  2. Click Yes in the prompt.
  3. Paste the following commands and hit Enter to stop the update-related services:net stop bits net stop wuauserv net stop appidsvc net stop cryptsvc
  4. Run this command to delete the qmgr*.dat files:Del "%ALLUSERSPROFILE%\Application Data\Microsoft\Network\Downloader*.*"reset to fix 0x80070012
  5. Use the following commands to clear the update cache: rmdir %systemroot%\SoftwareDistribution /S /Q rmdir %systemroot%\system32\catroot2 /S /Q
  6. Execute these commands to reset the BITS and Windows Update service:sc.exe sdset bits D:(A;;CCLCSWRPWPDTLOCRRC;;;SY)(A;;CCDCLCSWRPWPDTLOCRSDRCWDWO;;;BA)(A;;CCLCSWLOCRRC;;;AU)(A;;CCLCSWRPWPDTLOCRRC;;;PU) sc.exe sdset wuauserv D:(A;;CCLCSWRPWPDTLOCRRC;;;SY)(A;;CCDCLCSWRPWPDTLOCRSDRCWDWO;;;BA)(A;;CCLCSWLOCRRC;;;AU)(A;;CCLCSWRPWPDTLOCRRC;;;PU)
  7. Run this command:cd /d %windir%\system32command
  8. Now, paste each of these commands individually and hit Enter after each to re-register the critical DLLs:

regsvr32.exe /s atl.dll
regsvr32.exe /s urlmon.dll
regsvr32.exe /s mshtml.dll
regsvr32.exe /s shdocvw.dll
regsvr32.exe /s browseui.dll
regsvr32.exe /s jscript.dll
regsvr32.exe /s vbscript.dll
regsvr32.exe /s scrrun.dll
regsvr32.exe /s msxml.dll
regsvr32.exe /s msxml3.dll
regsvr32.exe /s msxml6.dll
regsvr32.exe /s actxprxy.dll
regsvr32.exe /s softpub.dll
regsvr32.exe /s wintrust.dll
regsvr32.exe /s dssenh.dll
regsvr32.exe /s rsaenh.dll
regsvr32.exe /s gpkcsp.dll
regsvr32.exe /s sccbase.dll
regsvr32.exe /s slbcsp.dll
regsvr32.exe /s cryptdlg.dll
regsvr32.exe /s oleaut32.dll
regsvr32.exe /s ole32.dll
regsvr32.exe /s shell32.dll
regsvr32.exe /s initpki.dll
regsvr32.exe /s wuapi.dll
regsvr32.exe /s wuaueng.dll
regsvr32.exe /s wuaueng1.dll
regsvr32.exe /s wucltui.dll
regsvr32.exe /s wups.dll
regsvr32.exe /s wups2.dll
regsvr32.exe /s wuweb.dll
regsvr32.exe /s qmgr.dll
regsvr32.exe /s qmgrprxy.dll
regsvr32.exe /s wucltux.dll
regsvr32.exe /s muweb.dll
regsvr32.exe /s wuwebv.dll

9. Run these commands to reset the network configuration: netsh winsock reset netsh winsock reset proxy

10. Finally, use the following commands to restart the services you stopped earlier:net start bits net start wuauserv net start appidsvc net start cryptsvc

For many users, repairing the Windows update components fixed error 0x80070012. There’s also a shorter version of it with fewer commands, but we recommend you reset everything to eliminate the problem. If the process appears time-taking, you can also run the reset script.

4. Manually install the update

4.1 For Windows updates

  1. Identify the KB (Knowledge Base) number for the update that’s failing to install.
  2. Go to Microsoft Update Catalog, paste the KB number in the text field, and hit Enter.update
  3. Click the Download button next to the update that best matches the OS iteration and architecture.download to fix 0x80070012
  4. Click on the link that appears to start the download.update
  5. Run the setup, and follow the instructions to manually install the update.manually install update to fix 0x80070012

In case the 0x80070012 Windows 10 error appeared for an OS update, you can always manually install it from the Microsoft Update Catalog.

4.2 For driver updates

When the error affects driver updates, say, the one for printers, a quick solution is manually installing the drivers. All you have to do is visit the manufacturer’s website, download the setup, and run the installer.

Here are the direct links to the driver page for major printer manufacturers:

5. Perform an in-place upgrade

Tip icon Tip
The steps here are for Windows 11. In case you are running Windows 10, download the Media Creation Tool from the official website, then use it to perform an in-place upgrade.
  1. Go to Microsoft’s official website, select the edition and product language, and download the Windows 11 ISO.windows 11 iso to fix 0x80070012
  2. Now, open the ISO file, and run setup.exe.setup.exe
  3. Click Yes in the prompt that appears.
  4. Click Next to proceed.next
  5. Now, click Accept to agree to the license terms and policies.accept
  6. Make sure the setup reads, Keep personal files and apps, and click on Install.in-place upgrade to fix 0x80070012

When nothing else works, the last option is to perform an in-place upgrade to fix the 0x80070012 update error in Windows. You won’t lose any data in the process, and it should, in all likelihood, improve Windows’ performance.

To resolve such errors in the future, you can always use a dedicated Windows Update repair tool.

Tell us which fix worked for you in the comments section below.

0x800706b5 Windows Update Error: 4 Ways to Fix It

Windows updates are essential to keep your system running smoothly and securely. However, you may encounter a 0x800706b5 error code that prevents installation updates. Thus, we will examine the cause and how to fix the error to help you update your PC.

Likewise, we have a detailed guide on fixing Windows Update error 800f0902 on your computer.

What causes the 0x800706b5 Windows Update error?

The 0x800706b5 error code appearing during Windows updates can be caused by several factors, including:

  • Software conflicts – Conflicts with third-party software, such as antivirus or firewall programs, can interfere with the Windows update process and trigger this error.
  • Corrupted system files – Corrupted system files can also cause update errors, including the 0x800706b5 error.
  • Network issues – Problems with your network connection, such as poor connectivity or a weak Wi-Fi signal, can also cause this error.
  • Windows Update service issues – The Windows Update service may be experiencing issues that prevent it from installing updates correctly.

The factors listed above vary on different PCs. Nevertheless, we will discuss how to fix the error on your computer.

How can I fix the 0x800706b5 Windows Update error?

Before trying some advanced troubleshooting methods, here are some preliminary techniques.

  • Turn off Windows Defender or another antivirus temporarily – Third-party antivirus can sometimes cause this issue, so it’s best to disable it.
  • Check the Internet connections – Network issues can lead to this and many other errors, so make sure that your connection is stable.

If the error persists, proceed with the following methods.

1. Run the Windows Update troubleshooter

  1. Press the Windows + I to open the Windows Settings.
  2. Select System, and choose Troubleshoot.
  3. Then click on other troubleshooters.
  4. Select the Windows update and click the Run button.
  5. Wait for the process to complete, close the Settings window and restart your device.

The Windows update troubleshooter is an in-built tool that detects and fixes Windows update issues. Check our detailed guide on how to run Windows Update Troubleshooter on your system.

2. Reset Windows Update components

  1. Lift-click the Windows icon, type Command Prompt, and click on Run as administrator to open it.
  2. Click Yes if the Windows User Account Control prompt appears.
  3. Type the following command in the Command Prompt interface and press Enter to stop the Windows update services: net stop bits net stop wuauserv net stop appidsvc net stop cryptsvc
  4. Input the following command to rename the Windows cache folders and press Enter: rmdir %systemroot%\SoftwareDistribution /S /Q rmdir %systemroot%\system32\catroot2 /S /Q
  5. Type the following command and press Enter to restart the Windows update services: net start bits net start wuauserv net start appidsvc net start cryptsvc
  6. Close the Command Prompt and check if the error is fixed.

The above procedure will troubleshoot issues with the SoftwareDistribution and catroot2 folders that store the update cache.

Check our detailed guide about fixing Windows Update services not running on your PC.

3. Uninstall the recently installed apps

  1. Right-click the Windows icon and select Installed apps from the list.
  2. Navigate through the list of apps and click on the recently installed apps.
  3. Select the Uninstall button and click the Uninstall button to confirm your selection.
  4. Wait for the process to complete and restart your computer.

Uninstalling recently installed apps will troubleshoot software conflicts with installed apps that can trigger the error.

4. Install the update manually

  1. Go to the Microsoft Update Catalog page, type the update code, and click the Search button.
  2. Select an update version compatible with your operating system, then click the Download link.
  3. Follow the on-screen instructions to download the update.
  4. Restart your PC and check if the update installs.

Manually installing the update will help get past issues with other updates that can prevent it from installing.

Conclusively, you can read about fixing Windows updates not working on Windows PCs. Also, check our guide about how to fix the Windows update 0xc1900223 error code on your computer.

If you have further questions or suggestions, kindly drop them in the comments section below.

How to Clean the AppData Folder on Windows 11

Many applications store their files in the AppData directory, and many users are wondering how to clean AppData folder on Windows 11.

We mentioned AppData folders briefly in our how to clean temporary files on Windows 11 guide, and we encourage you to check it out for more information.

But before we start cleaning it, let’s focus on several important questions regarding this folder.

Why is my AppData folder so huge?

This directory holds configuration files and cache for all your installed applications, so if you have many applications installed, the AppData folder will likely grow in size over time.

Can I delete everything in the AppData folder?

No, it’s not safe to delete everything from the AppData folder. Many of these files are associated with the applications that you have on your PC.

Without these files, certain applications will lose their saved data, such as user information and settings, and some applications might not work.

Keep reading to find out how to safely remove files from this directory.

For step-by-step fixes and safe cleanup methods, see our guide on AppData folder too big.

How do I clean the AppData folder on Windows 11?

1. Manually clean the folder

  1. Press Windows key + R and type the following: %LOCALAPPDATA%\Temp
     
  2. When the Temp folder opens, select all files.
  3. Choose the Delete option.

Remember that only the Temp folder is safe to remove since it holds temporary files. Other folders might hold important configuration files, so don’t touch them while you clean AppData folder on Windows 11.

If you’re not sure what each folder does, you can review this complete guide on what the AppData folder in Windows is before deleting anything important.

To understand how the Local, LocalLow, and Roaming folders differ before cleaning them, check out this helpful article: Local vs LocalLow vs Roaming Folders.

2. Use the Settings app

  1. Press the Windows key + I to open the Settings app. Next, go to Storage.
     
  2. Select Temporary files in the right pane.
  3. Make sure that Temporary files are checked and click on Remove files.

This is a pretty simple, secure way to clean AppData folder on Windows 11, so be sure to try it.

3. Use the Disk Cleanup feature

  1. Open search and enter cleanup. Select Disk Cleanup from the list.
  2. Wait for the scan to finish.
  3. Make sure you select Temporary files from the list. Next, click OK.

In case you’re not familiar with this tool, we have a great guide on how to use Disk Cleanup on Windows 11, so be sure to read it.

As you can see, cleaning the AppData folder is simpler than you think and can be done in a matter of clicks.

If you want to free up more space on your PC, we suggest using hard drive cleaner software.

What method do you use to clean the AppData directory? Share it with us in the comments section below.

Why Your Account Is Not Eligible for This Feature [New Bing]

New AI-powered Bing has been proven quite popular, but many reported Your account is not eligible for this feature while using it.

Many reported that Bing Chat is not working for them, and in the past, we already tackled several issues that Bing had.

In today’s guide, we’re going to focus solely on this issue, so let’s get started.

Why am I getting Your account is not eligible for this feature in the new Bing?

There are several reasons for this issue:

  • Issues with Microsoft – It’s possible that this is just a temporary glitch, and it’s probably going to get fixed by Microsoft soon.
  • Availability – New Bing is available in most regions, but there are a few exceptions.
  • Microsoft account settings – If your account isn’t properly configured, you might experience issues.

How can I fix Your account is not eligible for this feature message?

Before we start fixing this issue, there are a few preliminary checks to perform:

  • Make sure you’re using a Personal account – New Bing won’t work with Work or School accounts, so make sure you’re not using them.
  • Create a new account – While this isn’t the most elegant solution, it’s a viable workaround.

1. Change region

  1. Visit Bing in Microsoft Edge.
  2. Open the menu and choose Settings. Select Region.
     
  3. Select United States.
  4. Open Settings again and choose Location.
  5. Set it to any city in the United States and save changes.

2. Change your account info

  1. Select your user icon in Bing and click on Manage account.
     
  2. Now click your user icon again and choose My profile.
  3. Click on Edit profile info.
  4. Make sure that your birth date is correct and save changes.

Your account is not eligible for this feature is usually a glitch, and Microsoft will fix it on its own. But you can try to fix it on your own with these solutions.

This isn’t the only issue, and many reported Sign in to continue your chat in Bing Chat, so be sure to check that guide for more information.

What solution worked for you? Share it with us in the comments section.

Intel Rapid Storage Technology Driver for Windows 10 & 11

A PC runs several drivers for the effective functioning of the connected devices. A driver’s primary role is to relay commands between the OS and the device it’s responsible for, but these often do a lot more and boost the PC’s performance. One such is the Intel Rapid Storage Technology driver.

And ever since the driver was released, experts and tech-savvy users have recommended others to download it. The best part, the Rapid Storage Technology driver is available for all recent iterations, including Windows 7. Let’s find out all about it!

What is the Intel Rapid Storage Technology driver?

The driver’s primary role, and that of the dedicated software, is to allow users to configure the connected storage devices and enhance their abilities. The Rapid Storage Technology driver uses SATA hard drives extensively on server platforms.

For anyone wondering whether installing the Intel Rapid Storage Technology driver is necessary, the answer is no, unless you plan to set and run RAID (Redundant Array of Independent Disks) utilizing the Intel chipset on the motherboard.

For some users, the driver also resulted in high CPU usage, but that’s somewhat expected, given the process runs in the background.

Is it necessary to install Intel Rapid Storage Technology driver?

Here are a few reasons you would want to install the driver:

  • Enhanced performance: With the Rapid Storage Technology driver, you get better drive performance, faster read-write task execution, and quicker boot time.
  • Reduced power consumption: There’s an option in the dedicated software to optimize the power consumption of the drive, which extends the battery life for laptops.
  • Protection against data loss: With multiple disks, the software also significantly enhances protection against data loss by copying data to a recovery drive.

How do I download Intel Rapid Storage Technology driver?

1. Using Windows Update

  1. Press Windows + I to open Settings, go to Windows Update from the navigation pane, and then click on Advanced options.advanced options to get Intel Rapid Storage Technology driver
  2. Click on Optional updates.optional updates
  3. Now, expand Driver updates, tick the checkbox for Intel Rapid Storage Technology driver, and then click on Download & install.download Intel Rapid Storage Technology driver
  4. Once the driver is downloaded, restart the computer for the changes to come into effect.

The quickest way to download the Intel Rapid Storage Technology driver in Windows 11 HP or Dell devices is to use Windows Update. For compatible hardware, you will find the driver available under the optional updates.

And after downloading it, make sure to regularly update the driver.

2. From the manufacturer’s website

  1. Go to Intel’s official website, and then click on the Download button to get the driver setup.download Intel Rapid Storage Technology driver
  2. Run the installer, and then click Next to proceed.next
  3. Tick the checkbox for I accept the terms in the License agreement, and then click Next.accept terms to download Intel Rapid Storage Technology driver
  4. Click Next to proceed.next
  5. If you want to install the software, tick the checkbox for Include: Intel OptaneTM Memory and Storage Management app and then click Next.software for Intel Rapid Storage Technology driver
  6. Wait for the installation to complete, and then restart the computer.

If you can’t find the Rapid Storage Technology driver for Windows 10 in Windows Update, there’s always the option to manually install the driver from the manufacturer’s website. When doing so, make sure to download only from the official website since other sources are often unreliable.

Besides, you will find the Intel Rapid Storage Technology driver zip file for download on Intel’s website. Remember, there are several versions of the driver, so make sure to get the right one.

Before you leave, check the best driver updater tools to download the latest version for all the installed drivers automatically.

For any queries or to share your feedback on the driver and how it helped, comment below.

Bootstrapper.exe: What Is It & Should You Remove It?

There are many executable files running on the system, and some are causing inconsistencies with the system’s performance. The Bootstrapper.exe is one of those files, raising the contemplation of whether to remove or keep it. However, this article covers the file and why you should remove it.

Also, we have a detailed guide about Bootstrap.dll not found error and ways to fix it on Windows 11.

What is Bootstrapper.exe?

Bootstrapper.exe is an executable file that belongs to the Intel Services Manager Launcher process, which comes along with the Intel Manageability Engine Firmware Software developed by Intel software developers.

Also, Bootstrapper also belongs to Microsoft Office. It helps install additional components or software required for applications to run on Windows PCs. Microsoft signs it and helps initialize apps built using the Composite App Library.

Furthermore, Bootstrapper.exe runs when you install an app using it and checks if the necessary components are already installed. If they are not intact, Bootstrapper.exe will download and install them before proceeding with the installation.

Should I remove Bootstrapper.exe?

While the Bootstrapper.exe file is a legitimate system file, it is possible for a virus or malware to disguise itself using the Bootstrapper.exe name.

Hence, you need to check the file for malware before removing it. Further, you can check the file’s validity through its digital signature with these steps:

  1. Right-click the exe file and click on Properties.
  2. Choose the Digital Signatures tab. Check for Microsoft or any other reputable company associated with the app as the signer.
  3. If a reputable company does not sign it, it’s possible that the file isn’t authentic.

Also, some users complain about heavy CPU usage from the file. However, removing Bootstrapper.exe will be a reasonable option as it will keep the system safe from external threats and malicious attacks.

How can I remove the Bootstrapper.exe from my PC?

1. Remove the Bootstrapper.exe file

  1. Right-click the Start menu at the bottom of the screen and select Task Manager.
  2. Go to the Processes tab and locate Bootstrapper.exe. Right-click on it, and select End task.
  3. Then, right-click Bootstrapper.exe in the Task Manager and select Open file location from the context menu.
  4. Right-click the file, and select Delete from the drop-down options.
  5. Restart your PC and check if the file is no longer available.

The above steps will stop the activities of the bootstrapper.exe in the Task Manager and delete the file from the system.

2. Uninstall the program using the file

  1. Left-click the Windows button, type Bootstrapper.exe, and select open file location.
  2. In the file directory, check the program to which the process Bootstrapper.exe belongs.
  3. Left-click the Start button, type Control Panel, then open it.
  4. Click on Programs, then select Programs and Features.
  5. Find the program, right-click on it, then select Uninstall from the drop-down.
  6. Follow the onscreen instructions and Restart your PC to see if the .exe file is still running on your PC.

Uninstalling the program responsible for the file will remove its components.

Alternatively, you can read about how to fix corrupted system files on Windows 11. Also, you can check our review of the best antivirus software for Windows PCs.

If you have further suggestions or questions, kindly drop them in the comments section below.

Microsoft Vulnerable Driver Blocklist: How to Disable/Enable

To ensure the security of the OS the Microsoft Vulnerable Driver Blocklist is a critical feature in Windows.

As the name suggests, the security feature blocks vulnerable drivers from running in Windows. This boosts security, ensures performance, and reduces instances of errors.

How do I disable the Microsoft Vulnerable Driver Blocklist?

1. Via Windows Security

  1. Press Windows + S to open the Search menu, type Windows Security in the text field, and then click on the relevant search result.windows security
  2. Click on Device security.device security
  3. Then, click on Core isolation details.core isolation details to disable Microsoft Vulnerable Driver Blocklist
  4. You can now disable or enable Microsoft Vulnerable Driver Blocklist using the toggle.enable Microsoft Vulnerable Driver Blocklist
  5. Once done, restart the computer for the changes to come into effect.

Remember, the feature is enabled by default in Windows 11, and you can easily disable Microsoft Vulnerable Driver Blocklist from Windows Security.

2. From the Registry Editor

  1. Press Windows + R to open Run, type regedit in the text field, and then hit Enter.registry
  2. Click Yes in the UAC prompt.
  3. Paste the following path in the address bar and then hit Enter:HKEY_LOCAL_MACHINE\SYSTEM\CurrentControlSet\Control\CI\Configpath to fix Microsoft Vulnerable Driver Blocklist
  4. Now, double-click the VulnerableDriverBlocklistEnable DWORD.VulnerableDriverBlocklistEnable DWORD
  5. Enter the required value to enable or disable the feature:
    • Value data = 1 (Enable)
    • Value data = 0 (Disable)
  6. Then, click OK to save the changes.modify value data to fix Microsoft Vulnerable Driver Blocklist
  7. In case the DWORD is not found, right-click on the empty portion, hover the cursor over New, select DWORD (32-bit) Value, name it VulnerableDriverBlocklistEnable, and then make the required changes.create DWORD

The Microsoft Vulnerable Driver Blocklist regedit (Registry Editor) method works when the feature is greyed out or not available in Windows Security. With the Registry, you can reconfigure the settings that are often not directly available. But be cautious since a minor lapse could affect the OS.

Why is Microsoft Vulnerable Driver Blocklist greyed out?

You may often find the feature not available. And it’s primarily due to misconfigured system settings or a bug in the OS. On Windows 11, several users reported a security alert in the system tray highlighting that Microsoft Vulnerable Driver Blocklist was disabled. But, the feature was greyed out.

When faced with the problem, the ideal solution would be to turn off Memory Integrity, then disable Smart App Control, or switch out of Windows S mode. And after you are done, the Microsoft Vulnerable Driver Blocklist toggle will be available.

That’s all there’s to know. For those wondering whether to enable the feature, we recommend you do it for a more secure and error-free experience. Unless you deliberately plan to run vulnerable drivers, maybe for testing.

Before you leave, check if Windows Security is good enough or whether you need another reliable antivirus.

For any queries or to share your thoughts on the feature, drop a comment below.

Mfehidk.sys Blue Screen Error: How to Fix It

Mfehidk.sys is a virtual driver associated with the Host Intrusion Detection Link of the McAfee Security software. Unfortunately, many users reported the inability to turn on Memory Integrity in Core isolation due to mfehidk.sys Blue Screen error. This guide will discuss how to resolve the error on your PC.

Alternatively, our readers may be interested in our article about why you should disable McAfee before updating Windows on your computer.

What causes Mfehidk.sys BSOD?

Many factors may be responsible for the mfehidk.sys BSOD error impeding your system processes. Notable ones are:

  • Outdated McAfee security software – Running outdated McAfee software on your computer can cause many issues with the System. It may result in corrupt or misconfigured software because it can’t install necessary updates.
  • Corrupted or outdated drivers – When your system drivers are not installed properly, or the currently installed ones are incompatible, corrupt, missing, or outdated, they can cause the mfehidk.sys Blue Screen error to appear.
  • Hardware or software conflicts – The mfehidk.sys driver error may also be triggered after installing a new McAfee for Enterprise cybersecurity products or new hardware likely to be incompatible with the driver.

These factors are liable to vary on different computers depending on the circumstances. Regardless, we’ll take you through some steps to fix the Blue Screen error as we proceed with the article.

How can I fix mfehidk.sys Blue Screen error?

Before attempting any advanced troubleshooting steps, follow these preliminary checks:

  • Remove the Daemon Tools 4 if you have it on your PC.
  • Contact McAfee support for a manual guide.

If you can’t resolve the issue, go ahead with the steps below:

1. Update McAfee security

  1. Double-click the McAfee icon in your system tray or taskbar.
  2. Click on the Help button with a question mark in the bottom-right corner of the homepage.
  3. Click Update app/Check for updates and wait till the process is finished.
  4. Restart your PC and check if the mfehidk.sys Blue Screen error persists.

Updating McAfee will install necessary patches to fix bugs affecting it and also resolve compatibility issues.

2. Rename mfehidk.sys via advanced options

  1. Press Windows + I key to open the Settings app.
  2. Click on System and select Recovery.
  3. Go to Advanced Startup, then click Restart now.
  4. Windows will automatically restart into the Choose an option window, then click on Troubleshoot.
  5. Click Advanced Options, then select Command Prompt.
  6. Copy and paste the following and press Enter: rename d:\windows\system32\drivers\mfehidk.sys mfehidk.bak
  7. The System will boot normally, and the error should be resolved.

Renaming the file will prevent it from interfering with the system process.

3. Use Autoruns

  1. Go to the official Microsoft website and download Autoruns.
  2. Navigate to the Downloads folder, right-click the newly downloaded ZIP file, and select Extract to Autoruns from the drop-down menu.
  3. Open the extracted folder and select the appropriate version for your System:
    • Choose Autoruns.exe if you use 32-bit Windows.
    • Choose Autoruns64.exe if you use 64-bit Windows.
  4. Right-click on the appropriate exe file and select Run as administrator from the context menu.
  5. Click Yes on the User Account Control (UAC) prompt.
  6. Type in mfehidk in the search bar, right-click any entries prompted, and select Delete from the context menu.
  7. Press the Win + E key to open File Explorer.
  8. Go to the following location: C:\Windows\System32\Drivers\
  9. Select mfehidk.sys driver and press Shift + Del on your keyboard to delete it.
  10. Restart your computer to reinstall the necessary components.

Autoruns is a free utility from Microsoft that does not require installation. It helps troubleshoot and eliminate corrupt drivers that aren’t easy to deal with.

4. Uninstall McAfee antivirus with a dedicated removal tool

  1. Download the MCPR.exe file from McAfee’s official website.
  2. Double-click the file to open it and click Yes on the User Account Control (UAC) prompt.
  3. Then, click Next and the Agree button.
  4. Enter the Security Validation code and click Next.
  5. Once you see the Removal Complete message, click the Restart button to reboot your PC.

Using a removal tool provided by McAfee will remove all the app components along with mfehidk.sys by uninstalling McAfee software safely.

You can refer to our article about how to uninstall McAfee if it won’t uninstall for more detailed steps.

In conclusion, you can check our guide on fixing the McAfee error communicating with the Event Log on Windows 11.

Should you have further questions or suggestions, kindly drop them in the comments section.

Here’s why Together mode in Teams is better now

Microsoft first introduced the Together mode feature in Teams back in 2020 at the height of the pandemic. At the time, a lot of organizations were transitioning to hybrid work and needed a collaboration tool that would help maintain the flow of communication.

The feature is designed to help reduce fatigue during remote collaboration. It virtually places participants in a shared background to make it feel like they are sitting in the same room as all other meeting participants.

And now, to build on the feature’s capabilities, Microsoft is introducing a set of new improvements designed to make the Together mode experience “more inclusive and easier-to-understand.” Here’s everything you need to know:

First up, users will now be able to see the name labels that support status icons, such as a microphone, active speaker, spotlight, or pin within the meeting as long as the feature is enabled.

Together mode with visible reactions

Next up, it will also be easier for users to spot raised hands and reactions within the meeting view. Additionally, Microsoft will be doing away with your own video in the gallery in a bid to avoid duplication of the self-preview.

However, it is worth noting that these improvements are not available in general availability yet. You’ll need to be part of the Teams Public Preview program to access them on the Windows or macOS Teams client.

To be able to use this feature, users need to be members of the Teams Public Preview and use the Windows or macOS Teams client. Other users are not required to be members of the Teams Public Preview.

To enable Together mode, you’ll need to first join a Teams meeting and head to the View section, and select Together mode.

Do you use Together mode during a Teams meeting? Share your experience with us in the comments.

Bthhfenum.sys BSoD Error: 4 Ways to Fix It

Bthhfenum.sys is an essential Windows file that refers to the Bluetooth Hands-Free Audio and Call Control HID Enumerator file. Many users have reported a SYSTEM_THREAD_EXCEPTION_NOT_HANDLED (bthhfenum.sys) BSoD error indicating the file. Hence, this guide will discuss fixing the error on your PC.

Alternatively, you may be interested in our guide about what Bthmodem.sys BSoD error is & how to fix Its crashes.

What causes Bthhfenum.sys BSoD error?

A couple of factors can bring about the BSoD error on your computer. They include:

  • Outdated or corrupted device drivers – The Bthhfenum.sys error can occur when your device drivers are outdated or corrupted. It prevents them from fixing bugs and installing updates to improve their functions.
  • Hardware issues – You can also experience issues with the Bluetooth Hands-Free Audio and Call Control HID Enumerator file if the hardware it works for isn’t working or has configuration problems.
  • Windows update issues – Not installing the latest updates for your PC can affect its performance and that of the drivers and devices running on it. Also, installing a faulty update can cause a BSoD error.

The factors may be different for numerous users depending on why it occurs. Regardless, you can fix the error by following the steps highlighted below.

How can I fix the Bthhfenum.sys BSoD error?

Before trying any advanced troubleshooting steps, follow these preliminary checks:

  • Perform a clean boot on your PC.
  • Reconnect the audio devices connected to the computer.
  • Run the SFC/DISM scans.

If you can’t fix the error, proceed with the solutions below:

1. Reinstall audio drivers

  1. Press Windows + R key to open the Run dialog box, and type devmgmt.msc, then press Enter to open the Device Manager.
  2. Expand the Audio inputs and outputs category, right-click on the Microphone and Speakers device drivers, then select Uninstall device from the drop-down menu.
  3. Click Uninstall to confirm it.
  4. Restart the PC and open the Device Manager.
  5. Click the Actions tab at the top of the screen, then select Scan for hardware changes.
  6. When the scan results are ready, click Install driver. The system should detect and install the latest Audio drivers compatible with your OS.
  7. Repeat the steps above for the Bluetooth module drivers.

Reinstalling these devices’ drivers will fix corrupt or outdated drivers issues causing the BSoD error. Also, you can read about how to reinstall devices in Device Manager Windows 11.

On the other hand, we advise you to handle driver issues with dedicated support from an automatic expert application that will scan your PC and install the right driver version instantly.

⇒ Get Outbyte Driver Updater

2. Rename bthhfenum.sys

  1. Press the Windows + E keys to open the File Explorer.
  2. Search for the bthhfenum.sys, right-click on it and select Open file location.
  3. Right-click the file and rename it to bthhfenum.sys.bak.
  4. Then, restart your PC to effect the change.

By renaming this, the PC will auto-reinstall the driver on startup and fix the issues prompting the BSoD error. If it doesn’t, you can try to reinstall it in Device Manager.

3. Perform a System Restore

  1. Press Windows, type restore, and click on Create a restore point.
  2. Click on System Protection and select System Restore.
  3. Click Next in the Restore system files and Settings page.
  4. Choose the restore point you want to restore from and click Next.
  5. Then, click Finish and restart your PC.

Performing a System Restore will backdate the system and retract recent alterations and changes interfering with the Bluetooth Hands-Free Audio and Call Control HID Enumerator file.

Check our guide on how to fix Restore Point if it’s not working on your PC.

4. Update Windows OS

  1. Press Windows + I key to open the Settings app.
  2. Click on Windows Update and click the Check for updates button. Wait while the system automatically searches for available updates.

Updating Windows will resolve bugs and compatibility issues that may affect the audio drivers running on your PC.

Read about how to fix Windows not connecting to update services if you have any issues with the update process.

Conclusively, you can check our article on everything you need to know about what causes BSoD errors on your PC. We also have a new article that tackles Bc Bluetooth Verifier Fault, so you should check it out for more solutions.

If you have further questions or suggestions, kindly drop them in the comments section.

Microsoft news recap: ads coming to Bing Chat apps, base salaries frozen for 2023, and more

Microsoft news recap is a weekly feature highlighting the top Microsoft news stories of the past week. Sit back, grab some coffee, and enjoy the read!

CallRail Launches Integration with Microsoft Teams

CallRail has launched a new integration with Microsoft Teams that makes it quicker to respond to new leads, such as notifications for new calls, texts, and form submissions, as well as a host of other features to provide a smooth experience in handling incoming leads.

Microsoft eyes partnership with Firefox to make Bing its primary search engine

Mozilla’s current contract to have Google as the default search engine on Firefox is due to be renewed this year, and a new report suggests Microsoft is looking to clinch the default search engine contract for its Bing search engine, as it continues to see success with its Bing Chat.

Microsoft skips raises for salaried employees in 2023

An internal memo from Microsoft said that, due to the economic conditions, full-time salaried employees at Microsoft will not receive a raise this year. Despite this, bonuses and stock awards can still take place.

Ads are coming to Bing Chat apps – new API for publishers released

It was inevitable at some point, but Microsoft has released a new API for publishers that will allow ads into Bing Chat apps.

That’s it for this week. We will be back next week with more Microsoft news.

Qcamain10x64.sys BSOD: 4 Ways to Properly Fix It

When you see the Qcamain10x64.sys file,  it indicates the Qualcomm Atheros Wireless LAN device driver. Many of our users have reported errors with the file, resulting in a Blue Screen of Death error. Thus, we will discuss the cause of the Qcamain10x64.sys BSOD error and how to fix it.

Likewise, check our detailed guide about fixing Wdfilter.sys BSoD error on Windows.

What causes Qcamain10x64.sys BSOD?

The Qcamain10x64.sys BSOD (Blue Screen of Death) error can be caused by a variety of factors, including:

  • Outdated or corrupted wireless network adapter – If the driver that controls the Qualcomm Atheros wireless device is outdated or corrupted, it can cause a BSOD error.
  • Conflicting drivers – Installing a driver incompatible with the wireless devices can cause the error.
  • Faulty hardware – If the wireless network adapter or any other hardware component is damaged, it can cause the Blue Screen error.

Nonetheless, we will provide probable solutions to fix it below.

How can I fix the Qcamain10x64.sys BSOD?

Before attempting any advanced fixes, apply these:

  • Reconnect network devices connected to your PC.
  • Perform a system restore.
  • Try to use a USB Wi-Fi adapter instead.

Proceed with the following advanced troubleshooting if the error persists.

1. Update or reinstall the wireless driver

  1. Right-click the Windows icon and select Device Manager from the list.
  2. Expand the Network Adapters entry. Right-click on Qualcomm Atheros Wireless from the list and select the Update driver button.
  3. Select the Search automatically for driver option. Wait for the process to complete, and follow the on-screen prompt to install it.
  4. If it prompts that The best driver for your device is pre-installed, follow the step from 1-2 and select Uninstall Device.
  5. Wait for the process to complete, close the Device Manager and restart your PC to auto-download the uninstalled driver.

Updating the Qualcomm Atheros Wireless will fix bugs and outdated driver issues caused by the Qcamain10x64.sys BSOD error. Check our guide about how to reinstall devices in Device Manager on Windows.

Regardless of the manual steps, we also encourage you to speed up the process and update or repair your PC driver automatically and securely with an industry-standard application.

⇒ Get Outbyte Driver Updater

2. Disable Atheros in startup and services

  1. Press Windows + R to open the Run command. Type msconfig and click OK.
  2. Click on Services, uncheck Qualcomm Atheros Wireless, click on Apply, and select OK.
  3. Then, click on Startup and select Open Task Manager.
  4. Select Atheros from Startup and click Disable.

Since it is possible for the Windows WLAN driver to clash with the Atheros drivers when fighting for the same resources. Hence, disabling this will give full access to the Windows driver to control the Wi-Fi connection.

3. Uninstall the 3DP Net Software

  1. Right-click the Windows icon and click on Installed apps from the list.
  2. Navigate to the 3DP Net 18.12, click on it, and select Uninstall.
  3. Select Uninstall from the sub-context menu to confirm your choice.
  4. Wait for the process to complete and restart your computer.

The steps above will fix any issues with the 3DP Net software impeding the device driver.

4. Remove recent updates

  1. Left-click the Start menu and select Windows Settings.
  2. Select the Windows Update tab and click on Update history.
  3. Choose Uninstall updates.
  4. Then select the recent updates and click on Uninstall.
  5. Restart your PC to take effect.

Often, this error may be triggered when the new security protocols are updated on the PC. Hence, removing the recent updates will auto-troubleshoot the issue.

Furthermore, do not hesitate to read about Netwtw10.sys Blue Screen error and how to fix it on your Windows. Also, check our guide about deleting the Cpuz149_x64.sys driver file on your PC.

If you have any questions or suggestions, kindly drop them in the comments section.

80092004 Windows Update Error: How to Fix It

Windows Update errors are uncommon and usually point toward an issue at the user’s end. But there have been cases when the update itself was buggy and, subsequently, the problem was widespread. One such is the 80092004 update error.

When unable to install updates, the situation becomes problematic, given users miss out on the latest features and security patches.

But our experts did manage to identify the problem and came up with solutions that helped others. Keep reading to find out!

What is error code 8009204 Windows Update?

The code 80092004 indicates that the PC couldn’t find the correct cryptographic values in the update and, as a result, rejected it. This is because Microsoft stopped signing packages with SHA-1 and only uses SHA-2 ever since August’19. And if Windows looks for the former, the error code appears.

Here are a few reasons you might encounter the error:

  • Problems with the update: In a few cases, the problem appeared only while installing specific updates for all users, which points to a bug in the update itself. So, you should verify whether others, too, are facing the problem.
  • Corrupt system files: Even corrupt system files are likely to affect the update process and may trigger the 80092004 error in Windows 10.
  • Issues with the update components: Windows Update Components are critical for installing updates, and misconfiguration here can lead to a range of errors.

How do I fix error code 80092004?

Before we head to the tricky fixes, here are a few quick ones:

  • Restart the computer and retry the update.
  • Disable the built-in Windows Security or any third-party antivirus installed on the PC. If that works, uninstall the program to fix things for good.
  • Make sure you have fast Internet speed.

If none work, move to the solutions listed next.

1. Run the built-in troubleshooters

  1. Press Windows + I to open Settings, and click on Troubleshoot on the right in the System tab.troubleshoot to fix 80092004
  2. Click on Other troubleshooters.other troubleshooters
  3. Click on Run next to Windows Update.troubleshooter to fix 80092004
  4. Wait for the troubleshooter to run and follow the on-screen instructions to complete the process.troubleshooter
  5. Similarly, run the Network Adapter and Internet Connections troubleshooter.

The quickest way to fix the 80092004 update error in Windows is to run the built-in troubleshooters. These built-in utilities automatically identify and resolve the underlying cause, requiring minimal effort from the user.

However, you have more effective methods to troubleshoot your PC, and that is with dedicated system repair software that can fix faulty files in minutes.

2. Run the DISM and SFC scan

  1. Press Windows + R to open Run, type cmd, and hit Ctrl + Shift + Enter.sfc scan to fix 80092004
  2. Click Yes in the UAC prompt.
  3. Paste the following three commands individually and hit Enter after each:DISM /Online /Cleanup-Image /CheckHealth DISM /Online /Cleanup-Image /ScanHealth DISM /Online /Cleanup-Image /RestoreHealth
  4. Next, execute the following command to run the SFC scan:sfc /scannowsfc scan
  5. Once done, restart the computer for the changes to come into effect and retry updates.

Corrupt system files are another reason for the problem, and running the DISM tool and SFC scan should get things up and running.

3. Reset Windows Update components

  1. Press Windows + S to open Search, type Command Prompt in the text field, and click on Run as administrator.command prompt
  2. Run the following commands to stop the related services: net stop bits net stop wuauserv net stop appidsvc net stop cryptsvc
  3. Now, use this command to delete the qmgr*.dat files: Del "%ALLUSERSPROFILE%\Application Data\Microsoft\Network\Downloader*.*"delete files
  4. Execute the following two commands: rmdir %systemroot%\SoftwareDistribution /S /Q rmdir %systemroot%\system32\catroot2 /S /Q
  5. Use these commands to reset the BITS and Windows Update services:sc.exe sdset bits D:(A;;CCLCSWRPWPDTLOCRRC;;;SY)(A;;CCDCLCSWRPWPDTLOCRSDRCWDWO;;;BA)(A;;CCLCSWLOCRRC;;;AU)(A;;CCLCSWRPWPDTLOCRRC;;;PU) sc.exe sdset wuauserv D:(A;;CCLCSWRPWPDTLOCRRC;;;SY)(A;;CCDCLCSWRPWPDTLOCRSDRCWDWO;;;BA)(A;;CCLCSWLOCRRC;;;AU)(A;;CCLCSWRPWPDTLOCRRC;;;PU)
  6. Now, run this command:cd /d %windir%\system32command
  7. Once done, execute these commands individually to register the critical DLL files:

regsvr32.exe /s atl.dll
regsvr32.exe /s urlmon.dll
regsvr32.exe /s mshtml.dll
regsvr32.exe /s shdocvw.dll
regsvr32.exe /s browseui.dll
regsvr32.exe /s jscript.dll
regsvr32.exe /s vbscript.dll
regsvr32.exe /s scrrun.dll
regsvr32.exe /s msxml.dll
regsvr32.exe /s msxml3.dll
regsvr32.exe /s msxml6.dll
regsvr32.exe /s actxprxy.dll
regsvr32.exe /s softpub.dll
regsvr32.exe /s wintrust.dll
regsvr32.exe /s dssenh.dll
regsvr32.exe /s rsaenh.dll
regsvr32.exe /s gpkcsp.dll
regsvr32.exe /s sccbase.dll
regsvr32.exe /s slbcsp.dll
regsvr32.exe /s cryptdlg.dll
regsvr32.exe /s oleaut32.dll
regsvr32.exe /s ole32.dll
regsvr32.exe /s shell32.dll
regsvr32.exe /s initpki.dll
regsvr32.exe /s wuapi.dll
regsvr32.exe /s wuaueng.dll
regsvr32.exe /s wuaueng1.dll
regsvr32.exe /s wucltui.dll
regsvr32.exe /s wups.dll
regsvr32.exe /s wups2.dll
regsvr32.exe /s wuweb.dll
regsvr32.exe /s qmgr.dll
regsvr32.exe /s qmgrprxy.dll
regsvr32.exe /s wucltux.dll
regsvr32.exe /s muweb.dll
regsvr32.exe /s wuwebv.dll

8. Run these two commands to reset the network settings: netsh winsock reset netsh winsock reset proxy

9. Finally, use these commands to restart the services you disabled earlier: net start bits net start wuauserv net start appidsvc net start cryptsvc

10. Once done, restart the computer for the changes to apply.

Fixing the corrupt update components should help with the 80092004 Windows Update error, and you should now be able to install the latest version. Also, if this seems too complex, you can always run a reset script.

4. Use the Microsoft Update Catalog

  1. Identify the KB (Knowledge Number) number for the update that failed to install in the Update History.kb number
  2. Go to Microsoft Update Catalog, paste the KB number in the search bar, and hit Enter.microsoft update catalog to fix 80092004
  3. Click on Download next to the version that matches the system architecture and OS iteration.download to fix 80092004
  4. Click on the link in the popup window to start the download.update
  5. Run the setup and follow the instructions to install the update.

When the previous methods fail to fix 80092004 in Windows 11, you can always manually install the update from the Microsoft Update Catalog.

5. Perform an in-place upgrade

Tip icon Tip
The steps listed here are for the latest iteration. In case you are running Windows 10, head to the official page, download the installation media and use it perform an in-place upgrade.
  1. Go to Microsoft’s official website, choose the required edition and product language, and download the Windows 11 ISO.windows 11 iso
  2. Now, run the ISO file, and click Open in the confirmation prompt.open
  3. Launch the setup.exe file.setup to fix 80092004
  4. Click on Next in the setup window to proceed.next
  5. Now, click Accept to agree to Microsoft’s license terms.accept
  6. Verify that the setup reads Keep personal files and apps, and click on Install.in-place upgrade to fix 80092004

As a last resort, you can always perform an in-place upgrade to get rid of 80092004 and a bunch of other issues without losing the saved files and apps. Besides, the process boosts the system’s performance by eliminating many minor problems.

After you have fixed the error, check the best Windows security settings for a safer OS experience.

For any queries or to share another solution with us, drop a comment below.

Invalid Operation for Device 0: How to Fix It

Have you ever come across this kind of error message Invalid operation for device 0 while trying to expand the disk on your virtual machine? Well sit tight and scroll down for more info.

Vmware is a virtual machine software, but just like any other application, it can experience problems. We will take you on step-by-step troubleshooting methods on how to fix this issue.

What is Invalid operation device 0?

Invalid operation device 0 is a Vmware error, and it’s usually caused by the following:

  • Improper configuration – In case the virtual machine has not been configured correctly, it is possible that you may encounter this error.
  • Issues with snapshots – The snapshots should be omitted, if they are not removed you might experience this specific error.

How can I fix this Invalid operation device 0?

  • Use decimal number when resizing disk – To avoid this issue, use decimal number when resizing disk in VMware.

1. Use powercli

  1. Open powercli.
  2. Run this Get-HardDisk -vm MyVMName | where {$_.name -eq “Hard disk 1“} | Set-HardDisk -capacityGB 100.
  3. Close powercli. 
Note icon NOTE
Be sure to replace the appropriate VMname, disk name, and capacity when using this command.

2. Consolidate disks in VMware

  1. Right-click the VM name in the VMware vSphere client.
  2. In the menu, click Snapshots.
  3. Lastly, select Consolidate.

Note icon NOTE
When it comes to consolidating VMware disks, there may be a risk of losing data. To mitigate this, it’s recommended to create a backup of the VMware VM by copying all files to a separate folder on a datastore before proceeding with the disk consolidation process.

3. Remove the snapshots in VM

  1. Select Inventory and click on Virtual Machine.
  2. Next, pick Snapshot, and select Snapshot Manager.
  3. Choose a snapshot by clicking it.
  4. Click Delete. After deleting, the data is permanently saved and added to the parent data, while simultaneously removing the specific snapshot that was selected.
  5. Click Yes in the confirmation dialog
  6. Click Close to exit the Snapshot Manager. 
Note icon NOTE
Deleting all snapshots when you have limited disk space can lead to a depletion of disk space, failing all virtual machines with an existing snapshot.

We hope that this guide has helped resolve your issue. Many users reported that Vmware is not working on Windows 11, and we covered this issue in a separate guide, so be sure not to miss it.

We would be grateful if you could kindly let us know which solution proved most effective in your case by leaving a comment below.

Wsqmcons.exe: What Is It & Should You Disable It?

With each version of Windows that has been released, there has been an improvement in features, interface, and overall performance. However, this doesn’t take away the fact that whatever version you’re using, there are some common OS problems.

If Microsoft were to improve its software, it’d need user feedback. That’s where the Windows System Quality Monitor or wsqmcons.exe comes in. Do you need it? Find out here.

What is Windows SQM?

Windows SQM, also known as Windows Consolidator, is a data collection and analytics solution that helps developers, and Microsoft understand how people use Windows apps.

It is a feature that helps Microsoft improve Windows and is designed to collect information about how you use Windows and other Microsoft products and services, including how you interact with the websites you visit. 

Other benefits include:

  • Quality monitoring – Getting feedback allows you to measure, monitor and analyze the quality of your software portfolio, especially if you’re a developer.
  • Tracking – As a developer, you will also be able to track software quality attributes like security incidents, product defects, and customer issues to better respond promptly.
  • Report generation – The data collected on software will help you keep an analysis and performance report on your software to check whether it is improving or deteriorating.

Collecting this information helps keep your PC running at peak performance. The main purpose of SQM is to help Microsoft improve its software products and services. 

For example, the data collected by SQM help Microsoft understand the reliability issues most relevant to its customers so that it can prioritize fixes. 

Microsoft can include such features in upcoming updates by generating suggestions for new features or improvements.

How can I disable the wsqmcons.exe file?

To disable the wsqmcons.exe legitimate file, you need first to check its location. If it’s in the C:\Windows\System32\ directory, it is in the correct location.

Still, you may want to opt out of the Windows Customer Experience Improvement Program (CEIP). If so, go with solutions 1 and 2. 

However, if it is in any other location, it is most likely a virus, and you should perform the steps from solution 3.

1. End process from Task Manager 

  1. Hit the Windows key, type Task Manager in the search bar, and click Open.task manager search
  2. Navigate to the Processes tab, and find the wsqmcons.exe process.
  3. Right-click on it and select End task.

2. Disable process from Task Scheduler 

  1. Hit the Windows key, type Task Scheduler in the search bar, and click Open.
  2. Click on Task Scheduler Library and find Customer Experience Improvement Program on the right pane.
  3. Right-click on it and select Disable.

3. Scan for viruses 

  1. Press the Search icon, type Windows Security, and click Open.
  2. Select Virus & threat protection.
  3. Next, press Quick scan under Current threats.
  4. If you don’t find any threats, proceed to perform a full scan by clicking on Scan options just below Quick scan.Scan options
  5. Click on Full scan, then Scan now to perform a deep scan of your PC.Full Scan Scan Now
  6. Wait for the process to finish and restart your system.

As an alternative, you may use an efficient antivirus solution that can deliver enhanced security and detection rate for malware threats.

The software below can offer machine learning tools for detecting and removing all kinds of threats, plus secure your online data from phishing attacks.

⇒ Get TotalAV

4. Perform a System File Checker

  1. Hit the Windows key, type cmd in the search bar, and click Run as administrator.cmd-run-admin-w11 unexpected kernel mode trap windows 11
  2. Type the following commands and press Enter after each one: DISM.exe /Online /Cleanup-Image /Restorehealth sfc /scannow

Do I need wsqmcons.exe?

In today’s advanced world of technology, most people are wary of any company collecting their data. It’s a valid concern as your data can get into the hands of unauthorized parties. 

There is also the possibility of hackers exploiting users by sending out trojans, malware, and viruses with similar names to the wsqmcons.exe file, especially if you don’t have a comprehensive antivirus.

You have nothing to worry about for Windows SQM, as it doesn’t collect any personal information. It does not collect any content from your files or emails or record what you type while writing a document or email message. 

Windows SQM only collects non-personal device data such as hardware settings, application usage patterns, and reliability information.

Its main role is to provide feedback on the quality and reliability of your PC by collecting telemetry data from users. This data helps improve future versions of Windows by highlighting issues that are most important to you.

In addition, SQM provides detailed information about app usage for Windows Store apps that are distributed through the Windows Store. This includes how frequently apps are opened and how long they’re used.

Developers can then use this information and make improvements based on that information. Since this is a Windows Customer Experience Improvement Program (CEIP) opt-in program, you can always opt-out if you don’t want to participate in such surveys.

Now that you know you can give feedback on the software you use in Windows, it’s a personal decision on whether you should disable wsqmcons.exe or not. 

Also, learn about twdsuilaunch.exe and whether you should remove it from your PC.

Leave a comment below for any comments or queries.