The Windows 11 clipboard is far much better compared to other versions in terms of features. It also comes with an emoji and GIF section that makes it more interesting and fun.
The quickest way to open Clipboard on Windows 11 is to press the Windows key + V, as shown below. Check out our comprehensive article to find out how to use the Windows 11 clipboard.
How can I open the Clipboard in Windows 11?
1. Use the clipboard shortcut on Windows 11
The easiest method to access the Clipboard feature on Windows 11 is to use the clipboard shortcut. You simply need to use Windows + V in that regard.
The Clipboard will open, showing all the text and images you have opened lately.
1. Enable clipboard history on Windows 11
1. Press the Windows + I keyboard shortcut to open Settings.
2. Click on System on the left pane.
3. Select Clipboardon the right pane.
4. Toggle the Clipboard history button on.
5. Clipboard history is now enabled on your device and you can use the Windows + V clipboard shortcut to open it.
Before you can use the dedicated Windows 11 clipboard shortcut to open the clipboard, you need to ensure that the feature is enabled via Settings.
Do keep in mind that Windows 11 only allows a maximum of 25 entries so if you exceed that number, the oldest entries will be deleted. If you however wish to keep copied items on your clipboard for longer, you can choose to pin them.
Pinning helps you keep your selected items even after you clear your Windows Clipboard history. Simply click on the pin icon next to the item you wish to keep.
How can I clear my clipboard history?
Sometimes, you may not want other people to access your history especially if using a shared computer. To clear your Windows 11 clipboard history, follow the steps below:
Press the Windows + R keys to open the Run command.
Type the following command in the dialog box and press Enter:cmd /c echo.|clip
Your clipboard history is now cleared.
Alternatively, you can also clear from Settings by clicking on Clear clipboard data.
If you find yourself using the clipboard feature more often, it would be useful to also install a great clipboard manager to help you stay organized.
What’s even better is that a majority of these clipboard managers come with enhanced features that are absent in the Windows 11 clipboard such as data encryption and lots of customization options.
Should you encounter any other issues such as the clipboard history not working, we have a handful of fixes for you to try to get back to copying and pasting seamlessly.
Do you have any other clipboard tips that you use to make your work easier? Let us know in the comments section below.
We already knew that Microsoft was getting ready to update the Surface Duo the latest Android 12L operating system.
During the 2022 Ignite conference, Microsoft revealed that it’s finalizing the update and preparing to ship it in the next few weeks.
And, after learning that Surface Duo and Duo 2 are getting a new Android, the tech giant also stated other interesting facts about this upcoming update.
Android 12L update inspired by the Windows 11 Fluent Design
It was said that the Android 12L for the original and second-gen Surface Duo foldable devices will introduce design elements borrowed from Windows 11.
The idea, it seems, is that the company now wants to move away from this paradigm and focus on making the Surface Duo smartphones an extension of our Windows PCs.
Recently leaked pictures reveal the first look at the upcoming Android 12L update for the original and second-gen Surface Duo devices.
We can see a Windows 11-like control and notification center will blurred backgrounds and new buttons, and a set of icons for the Settings app pulled from Microsoft’s operating system.
From the pictures, we can also see additional customization settings, such as color palette and accent colors, and there is a new feed section with widgets similar to those in Windows 11.
Clearly, Microsoft wants to make its Surface smartphones look as similar as possible to Windows 11 to provide a seamless experience and it’s not a bad job, to begin with.
Unfortunately, for the time being, we do not know whether the upcoming update will introduce notable changes for the curved display near the hinge or bring something similar to the taskbar-like dock found in Samsung’s latest Galaxy Z Fold.
There are also claims that Microsoft is working on an alleged Duo Connect mode, which is supposed to be a spiritual successor to the long-dead Continuum on Windows 10 Mobile.
Apparently, Duo Connect will let enterprise customers connect the smartphone to a larger display and use it in pair with the Windows 365 service.
At this moment, there is no information on whether Duo Connect will be a part of Android 12L or if it will arrive in future updates.
To summarize everything, Android 12L will be available for the first and second-gen Surface Duodevices, as announced at Ignite.
We don’t have an exact release date but expect it to land later this month or in early November. It’s safe to say this is a realistic release window.
This new Windows OS is allegedly going to be ready for release, or at least testing, in 2024. We’re eager to learn new details on the matter and keep you posted.
What other improvements do you think are coming with Android 12L? Share your opinions with us in the comments section below.
If you are new to ASIO and are looking to download the ASIO driver on your Windows 11 PC, then this guide will help you with that.
ASIO driver helps your PC communicate perfectly well with the connected audio devices. It also facilitates providing low-latency recording preventing audio latency issues with connected devices.
Let’s see how you can set it up.
How to download and install the ASIO driver in Windows 11?
Editor’s tip
A quicker possibility to download the correct ASIO driver is to let a professional tool, like Fortect Driver Updater, do the job for you. Besides choosing the right drivers, it can also provide a detailed list of your missing or outdated drivers and find them the latest update from its constantly revised database.
Version 2.15 is the official version that supports Windows 11. Click on the driver in your language.
Save it in the appropriate location on your PC.
Now that you have downloaded the ASIO driver installer, you can follow the next section that will help you to install the driver on your Windows 11 PC.
Select the location where you would like to install the ASIO driver by hitting the Browse button.
Click Install.
ASIO driver will begin the installation process.
Once the process is complete, the ASIO drivers will be installed on your PC.
What is an ASIO driver?
ASIO in short stands for Audio Stream Input/Output. It is designed by the German music company Steinberg, who is also behind the popular audio workstation Cubase.
Most sound cards come with their own version of ASIO preinstalled, however, you can install it separately on your PC.
When ASIO is not used, the audio device that you plug into your PC’s jack is connected through DirectSound, which acts as a link for the signal path.
But DirectSound may not be featureful for a professional user. Because often DirectSound may not provide efficient processing, in turn resulting in latency. In such scenarios, the ASIO driver comes into the picture.
What ASIO does is it bypasses the normal audio pathway, that DirectSound uses and routes your audio connection to your PC, reducing latency.
Our readers also complained about an audio rendering problem in Windows 11. We also have a dedicated solution for the ASIO driver that may come in handy.
ASIO is after all software, and you would come across multiple problems as you use it. Here are a few of the problems and solutions that you would face using ASIO:
ASIO4ALL is not visible in the audio menu: This could possibly be because you haven’t installed the ASIO driver as an administrator. Simply uninstall the previous version and now install the program as an administrator and check if this fixes the issue or not.
Audio device flagged as Unavailable or Beyond Logic: Close any browser window that is open and playing video or audio. You can also fix this issue by unplugging and replugging the device.
Another application isn’t playing sound when ASIO is active: This is because ASIO is designed this way because it prevents mixing and thus reduces latency.
In some cases, you might even run into specific errors like when you can’t open asio3.sys due to a system conflict, which can prevent your DAW from launching or detecting audio hardware.
Let us know in the comments below if this guide helped you download and install ASIO drivers on your Windows 11 PC.
Microsft has designed the new Windows 11 OS to offer an easy-to-use and good-looking interface that will work efficiently and provide quick access to all of its settings. This is exactly what Windows 10 was missing: fast access to the most basic settings without having to go through multiple menus to modify them.
In this age, when everything happens so fast and the main goal is to complete all our tasks as quickly as possible, this is a breath of fresh air.
How can I change the system language in Windows 11?
1. Switch the Windows 11 display language to an existing language pack
Right-click the Windows logo on your taskbar, and choose Settings.
Click on Time & language.
Choose Language & region from the list of options.
Under the Windows display language section, click on the dropdown and choose the new display language.
2. Change the Windows 11 language to a new language pack
1. Click the Windows iconfrom the taskbar.
2. Choose the gear Settingsicon.
3. Click on Time & Languagefrom the sidebar.
4. Choose the Language & region option.
5. Click the Add a language button.
6. Search for your preferred language, select it from the list, and press Next.
7. Choose any options you want from the Optional features section.
8. Tick the box next to the Set as my Windows display language.
9. Click Install.
If you want to change your system display language on Windows 11 to a different one that is not included in the pre-existing ones, you can easily do so.
You can manually install the preferred language, as well as all related optional features. After, all that’s left to do is set that language to be your Windows display language, and you’re done.
How can I change the keyboard language on Windows 11?
NOTE
For these options to be available, you will need to have the language pack already installed on your PC. If you don’t, simply follow the steps presented in the solution above and add the language you need first.
1. Use the taskbar
Click on the language button, situated on the bottom right of the taskbar.
Select what language you want to switch your keyboard to.
2. Using a keyboard shortcut
Press the Windows + Space once to activate the taskbar Keyboard layout.
While holding the Windows key pressed, tap space to choose the next available language.
You may also use the Alt + Shift combination but if Alt + Shift is not working, read the highlighted guide for fixes.
Region settings can influence which display and keyboard languages are available, so adjust them as needed using this guide on how to change location in Windows 11.
Why is the Language Switcher missing from my Windows 11 taskbar?
There might be situations where the language bar (switcher) is nowhere to be found in your Windows 11 taskbar, which implies that it has been deactivated.
Untick the box next to the Use this desktop language bar when available.
Your Language Switcher should not appear in the taskbar.
As you can see, Windows 11 language customization is not a complicated process; you can access the settings using your keyboard or mouse. In case it keeps reverting to the default settings, try removing the unwanted display language in Windows 11.
What kind of language settings can I change in Windows 11?
Like other OSs before it, Windows 11 has two main settings categories for the language used on your PC.
➡ System (display) language – The system language, also known as the display language option, allows you to customize the language in which your operating system is presented. This includes the language displayed when observing any native menu, app, and option.
➡ Keyboard language – As the name suggests, the keyboard language is the language in which you will use your keyboard to write texts. This is a more localized option, enabling you to have your system’s language in your native language while writing texts in another language.
Switching between different keyboard languages is very easy by using the Alt+Shift hotkey, and we will also tackle this element in this guide.
Welcome to Xbox Classics Revisited. In this new series we aim to take a look back at the previous three generations—the original Xbox, the Xbox 360, and the Xbox One—of Xbox games. These mini-retrospectives serve as a tribute to some of the best gaming that Xbox has given us over the last 20+ years.
For those who were lucky enough to have been there for all of it, read on and savor the nostalgia. For those Xbox fans too young to remember Maude Flanders or Pepsi Twist: get ready to meet your Xbox gaming backlog.
Jet Set Radio Future (Xbox)—2002
The sequel to the Sega Dreamcast title Jet Set Radio as well as a reimagining of it, Jet Set Radio Future brought tons of style to the original Xbox. It had an eye-popping cel-shaded visual style (cel-shading was still a novelty at the time) and a killer soundtrack with rock, indie pop, and hip-hop thrown into the mix. All of this was set in an open-world futuristic Tokyo, with a gang of quirky, roller-skating characters with which to grind, powerslide and go aerial while covering the town in graffiti. All this is done to push back against the oppressive Rokkaku Group Corporation that is stifling free speech in Tokyo.
The game has been made backward-compatible with Xbox 360 but not, unfortunately, with the newer Xbox consoles. The series has been dormant for 20 years at this point. But fans of the game should take heart, for there may be reason to get excited once again in the near future. Read on and find out more later in the post.
Sunset Overdrive (Xbox One)—2014
Sunset Overdrive is one of the most recognizable Xbox One classics, not to mention one of the most distinct games of its generation. It was created by storied developer Insomniac Games, and pulled inspiration from a trove of sources including comic book character Tank Girl, the Richard Matheson novel I Am Legend, vintage Halloween masks, and even Lego.
Set in an open world Sunset City in the year 2027, the game combines third person shooting with fast-paced exploration in which the player utilizes a range of abilities including wall running, air-dashing, zip lining, and more to get around.
The prospect for a sequel remains up in the air. Insomniac Games was acquired by Sony in 2019. Since that time there has been conflicting information from Sony executives regarding the status of the franchise.
Ollie Ollie World (Xbox One, Series X|S)—2022
This third entry in the side-scrolling skateboarding series is a real treat for fans of the genre and of indie games in general. With its colorful, hand-drawn visual style and satisfying gameplay, Ollie Ollie World has personality to spare, not to mention the makings of a modern classic. The game’s creative director, John Ribbins, has cited Jet Set Radio as a big inspiration.
While Ollie Ollie World may not have taken over the world when it released back in February 2022, it does currently enjoy a Metacritic score of 85 for both Xbox One and Series X|S versions.
Bonus: Bomb Rush Cyberfunk
Bomb Rush Cyberfunk is an indie-developed, undisguised love letter to the Jet Set Radio franchise. It comes courtesy of Dutch game studio Team Reptile, creator of Megabyte Punch and Lethal League. The game will be released in 2023 for Nintendo Switch and PC Steam, and possibly other platforms. Check out the trailer below; it speaks for itself.
Wrap up
We hope you’ve enjoyed these mini-retrospectives. What are some of your favorite classic Xbox, Xbox 360 and Xbox One games? Are any of them on this list? Let us know about your favorite Xbox gaming experiences in the comments below. And thanks for reading.
Microsoft’s recent expansion of Cloud Financial Services features should help the 41.1 percent of financial service respondents to an IDC survey deliver digital services faster while they accelerate their shift to the cloud.
As part of Microsoft’s Cloud Financial Services feature expansion, the platform will now offer a Compliance Program for Microsoft Cloud that includes the following:
Ask an Expert: Directly engage with Microsoft’s subject matter experts to address top-of-mind compliance concerns as well as accelerate regulatory assessment and approval cycles.
Risk and Control Mapping: Get support from Microsoft with cloud risk assessments to help you meet your due diligence needs.
Compliance Community: Learn about the latest regulatory compliance developments directly from Microsoft experts, industry peers, and thought leaders via ongoing virtual sessions, summits, and webcasts.
Proactive Risk Assurance: Receive proactive communication from Microsoft’s experts on external audit results, ongoing updates of Microsoft’s cloud estate, and changing regulatory compliance requirements.
In addition, a new banking customer agreement feature that offers customers self-scheduling of meetings on preferred channels called Intelligent Appointments is out of preview and generally available to customers. With Intelligent Appointments generally available to customers it can be paired with Virtual Appointments which is used in Microsoft Teams to send text reminders to join custom branded virtual appointments through mobile devices along with a few other admin scheduling tools to manage on-demand virtual appointments.
Microsoft is also putting a few newer features into preview (US and UK availability) that should help financial institutes leverage common data models, extract insights, derive new business models, and deliver differentiated customer experiences such as:
Onboarding application (retail banking and other verticals): Delivers a flexible and intelligent product onboarding experience with automated document workflows enriched by AI analysis to assist the document verification process.
Unified client profile (wealth management): Helps deepen client relationships with meaningful advice, providing relationship managers with a good understanding of a client’s financial status, investment portfolios, financial goals, important life moments, and other personal attributes.
Property and casualty insurance data model (insurance): A dedicated property and casualty insurance data model captures new attributes including policy and coverage information, claims, and insurance providers and producers.
Wealth management data model (wealth management): An extension to the banking data model that captures new attributes including financial goals and investment instruments specific to wealth management.
Small business data model extension (retail banking SMB): Extends the data model foundation of Microsoft Cloud for Financial Services to represent individuals and allows linking small businesses to individual financial holdings.
Lastly, Microsoft’s Cloud Financial Services has also expanded its partner ecosystem to provide customers with systems integration (SIs) from Accenture/Avanade and PWC as well as independent software vendors (ISVs) ArganoArbela, ASC, Bambu, BioCatch, Mambu, Thought Machine and Wealth Dynamix.
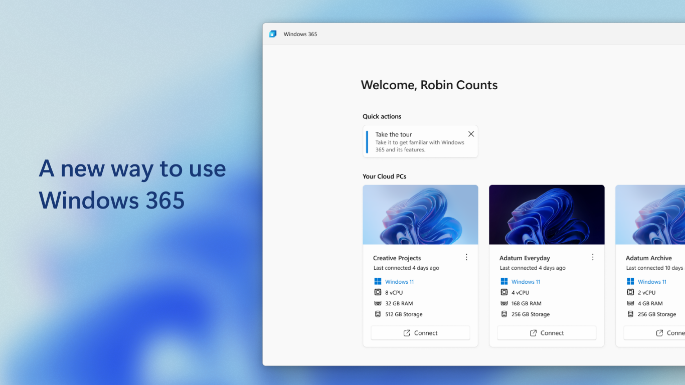
This year, during Microsoft’s annual conference for developers and IT professionals, Ignite 2022, the company made a lot of announcements as well as enhancements to its products and services. Narrowing it down to Windows 365, it was announced that a new app was being launched, the Windows 365 app, and further indicated that it would be available on Microsoft Store for Windows 11.
The Windows 365 app is designed for Windows 11 users to access their cloud PCS conveniently from their devices. Users can get to enjoy its offerings by downloading it from the Microsoft Store as it is now available in public preview.
With Windows 365 app, you can access your Windows 365 Cloud PC from the taskbar or the Start menu, enjoying a full Windows 11 experience while moving between your local and Cloud PCs. Supported by all Windows 11 devices, the app delivers high-performing and reliable experiences optimized for Microsoft Teams and your other Microsoft 365 apps.
The Citrix HDX Plus for Windows 365, was introduced this year during Inspire 2022 to enhance support for a broader range of endpoint devices and peripherals and security and policy controls. The Windows 365 add-on is now available in public preview and set to reach broad availability later on in the year. It is currently available for all customers in the Microsoft Intune console.
Update
In March 2023, the Windows 365 app shipped to general availability for Windows 10 and Windows 11 users to download. Microsoft also indicated that the Windows 365 app will start shipping as part of Windows 11. Once this is in effect, you’ll no longer need to download it from the Microsoft Store.
At the beginning of this month, PowerToys version 0.63.0 shipped. It was considerably smaller compared to the previous version, and focused on stability and efficiency on top of a couple of tweaks.
And now, two nifty features are set to ship to future versions of PowerToys. First up is the Settings backup feature, which will let users backup and restore their settings with just a single click at any time they want.
The feature can be accessed by users through the “General” setting page, where they can also get to select where to backup their data.
Next up is a feature that will let the users edit hosts file. Currently, users depend on the Notepad to work on the file, but with the new feature unpacks a user interface which in turn enhances efficiency and effectiveness.
The feature also adds new capabilities such as adding new entries and repositioning, filtering, disabling and pinging existing addresses. What’s more, users can add comments to the entries made. It has not yet been confirmed when and if these features will come to Powertoys.
Facebook is one of the most popular social networks with millions of users. Just like any other social network, Facebook has its own instant messenger.
Sometimes you need to ignore certain Messenger messages on Facebook, and in today’s article, we’re going to show you how to do that.
How can I ignore messages on Messenger on my PC?
1. Ignore messages from the Facebook browser page
1. OpenFacebookin your web browser and log in to your account.
2. Now open the chat window with the person or group that you want to ignore.
3. Click the down arrow next to their name and select Ignoremessages from the list of options.
4. When the confirmation dialog appears, click on the Ignore Messages button.
5. You will no longer receive notifications for messages from that person from now on.
An easy method to ignore Messenger messages on your PC is to do so directly via Facebook. Given the fact that Messenger is a built-in app from Facebook, it is natural that you can configure its settings from it.
This method ensures that you don’t need to install the Messenger app on your PC, since you can simply modify chat settings from your web browser.
2. Ignore Messenger messages without opening a conversation
You can also ignore messages from the web Messenger by doing the following:
Click the Messenger icon in the top right corner and click the expand button.
When the Messenger opens, click the three dots next to a chat that you want to ignore and choose Ignore Messages.
When the confirmation dialog appears, click on Ignore Messages.
After doing that, all future messages from this person will be moved to the Filtered Requests section, so you’ll need to go there to see them.
While it’s possible to do this in any web browser, we recommend using Opera One. The browser is perfect for social media because it has integrated Facebook messenger.
In addition to Facebook, there’s also WhatsApp, Telegram, and VKontakte messenger available out of the box.
Other social networks such as Twitter and Instagram are also available, so you won’t ever miss anything from social networks.
The browser also has a snapshot tool, so you can take screenshots of any website and share them with others.
Adblocker is also available, and it will permanently block ads on all websites. For extra security, there’s a free and unlimited VPN available as well.
Opera One is built on the Chromium engine, so it’s quite similar to Chrome, and it even works with Chrome extensions. If you want a fast, reliable browser that is optimized for social networks, give Opera one a try.
How can I see the ignored messages from Messenger?
After you ignore a conversation with a person or a group conversation, the messages will be stored in a section called Spam, under Message requests.
That is where all your spam Facebook messages can be accessed from. This includes messages from people that you ignored and messages from people who don’t have you on their friend list (as long as you configured this setting).
Can I undo ignore messages on Messenger?
Luckily, you can easily undo ignoring messages on Messenger. All you need to do is go to the Spam section under Message requests, open the conversation with the person you want to un-ignore, and send then a message.
The conversation will go back to normal and you will receive notifications from that conversation in the future.
Ignoring Messenger messages on Facebook is pretty simple, and you can do it simply by selecting the contact that you want to ignore and then choosing the Ignore messages option.
After following the steps from this guide, you won’t ever have to see any unwanted messages on Facebook.
We hope you managed to find out how to ignore messages on your PC or laptop. Write down in the comments section any questions you have about this topic.
If your volume mixer keeps resetting, you are not alone. This is a common issue and many users have been complaining about the issue over the years.
The volume mixer issue usually arises after a recent Windows Update, after a clean install, and can also occur with the Discord app.
Why does my volume mixer keep changing?
If the volume mixer on your Windows 11 PC keeps resetting, it could be due to a few reasons as stated below:
Inaccurate sound settings – It could be possible that the sound settings are not set correctly.
Outdated or faulty audio drivers – Since drivers are responsible for connecting the hardware devices to the system, and so, when they are corrupt, the system may malfunction.
A fault with the user account – Sometimes there could be an issue with the current user account.
Hardware-related issues – Chances are that there is a problem with the built-in audio device.
A problem with the PC – Sometimes the PC may have accumulated malware and potentially unwanted programs over time that may create conflict with the sound system.
Fortunately, we have found some effective methods to help you fix the volume mixer that keeps resetting issue.
How do I stop my volume mixer from resetting?
Before you proceed with the below-mentioned advanced troubleshooting methods, you must run some preliminary checks and see if it helps fix the issue:
Restart your PC.
Remove third-party apps causing the issue.
Run an antivirus scan using an offline antivirus to check for malware.
Try the Realtek sound control panel to set the volume.
If the above solutions do not help you fix the volume mixer keeps resetting issue, then you can move on to the below methods.
1. Change communication settings
Press the Win + R keys together to open the Run console, type mmsys.cpl, and hit Enter.
Go to the Communications tab in the Volume Mixer and select Do nothing.
Press Apply and OK to save the changes and exit.
Now, open your volume mixer, set your desired volume, restart your PC and check if you are still facing the sound issue on your Windows 11 PC.
2. Update/reinstall/rollback audio drivers
2.1 Update audio drivers
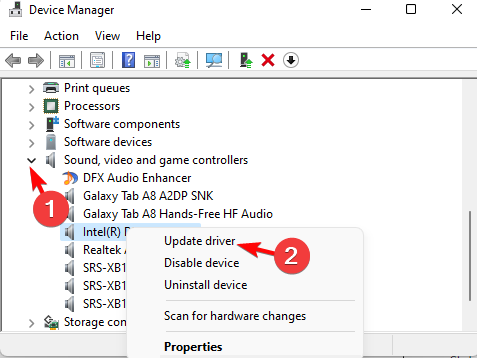
Open the Run console by pressing Win + R hotkey, type devmgmt.msc, and hit Enter.
Expand the Sound, video, and game controllers section, right-click on the device, and select Update driver.
In the Update Drivers window, click on Search automatically for drivers. Wait for Windows to detect the latest version and install the driver automatically.
You can also uninstall the device driver, visit the manufacturer’s website, download the latest version and install the driver manually to fix the issue.
If you want to update all drivers without going to each manufacturer’s website, we recommend using Outbyte Driver Updater, an automated solution that finds and updates all drivers.
Outbyte Driver Updater
By keeping all your drivers up to date and your system running optimally, you won’t have any problems.
Press the Win + I keys at the same time and Windows Settings will open. Here click on Accounts on the left and select Family & other users on the right.
Next, go to Other users, and under Add other user, click on Add account.
In the new window, select I don’t have this person’s sign-in information.
On the next screen, click on Add a user without a Microsoft account.
Now, enter a username and password, click Next, and follow the on-screen instructions to finish creating a new user account.
Once done, you can sign in using the new user account credentials and now, the volume mixer issue should be fixed.
4. Change the sound scheme to Windows Default
To open the Run console, press the Win + R keys simultaneously. Type in mmsys.cpl and hit Enter.
In the Sound settings window, click on the Sounds tab, go to Sound scheme, and select Windows Default.
Press Apply and OK to save the changes.
Now, open the volume mixer and check if it’s now saving the settings or if you are still facing the issue.
5. Disable exclusive control of this device
Press the Win + R keys together to open the Run console. In the search bar, type sndvol and hit Enter.
In the Volume Mixer panel, go to Device and click on the icon.
Navigate to the Advanced tab in the Properties dialog, uncheck Allow applications to take exclusive control of this device, and Give exclusive mode applications priority.
Press Apply and OK.
This method should fix the volume mixer that keeps resetting issue. But, if Windows 11 has no sound at all, you can refer to our detailed post for more information.
6. Adjust the app volume and set the correct output & input device
Press the Win + I shortcut key combination to open Windows Settings, type sound mixer in the search box on the left, and click on Sound mixer options.
Under the Volume Mixer settings, go to Apps and move the slider under System sound or under the specific app to the left or the right to adjust the volume.
You can also expand the section and set the correct Output device and Input device.
You can now restart your PC and the volume mixer settings should remain the same.
7. Run the Windows audio troubleshooter
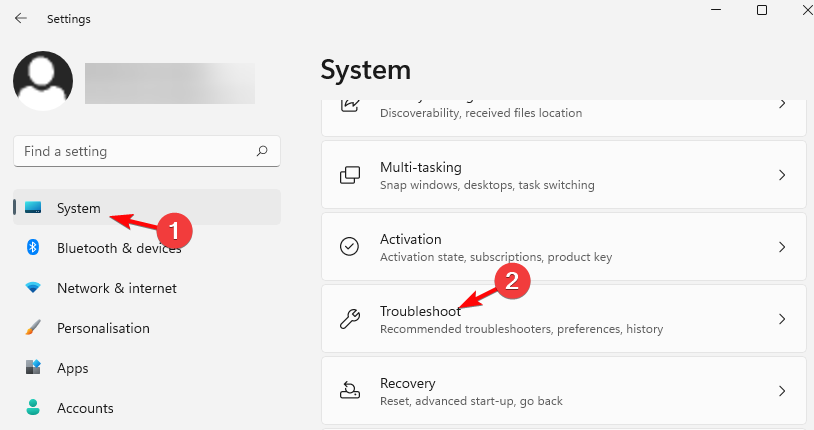
Press the Win + I keys simultaneously to launch Windows Settings. Click on System on the left and then on Troubleshoot on the right.
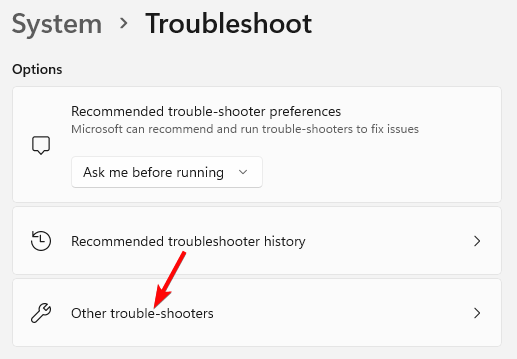
Next, click on Other trouble-shooters on the right.
Now, on the next page, go to Playing Audio and click on Run. Windows will now look for issues and if found will apply the fix automatically.
Restart your PC and now, the volume mixer that keeps resetting issue should be fixed.
However, if the volume mixer keeps resetting due to corrupted system files, you can use the SFC and DISM tools to repair and restore corrupted system files on Windows
System Firewall – Windows Defender Firewall might also cause Windows hotspots not to assign IP.
Wrong IP configuration – Windows need a valid IP configuration to assign IP. There’s a chance that your IP configuration is wrong. Fortunately, resetting your IP configuration on the network adapter can resolve this issue.
Third-party antivirus – Many users have complained that third-party antivirus affects their windows IP configuration.
But don’t worry too much, whatever the underlying cause of the issue, we’ve put together a list of solutions to fix Windows if it’s not assigning IP.
What can I do if Windows hotspot is not assigning IP?
Before you attempt any of the fixes in this article, you can try these preliminary solutions and see if they could resolve the issue:
Check to ensure internet access is available.
Make sure Windows hotspot is switched on.
Restart your PC to start afresh.
Disable or uninstall third-party antivirus temporarily.
If Windows hotspot is still not asssigning IP, you can proceed to the methods below to fix the problem.
1. Start the WLAN AutoConfig service
Click on the Search Icon on your taskbar, type Services in the search box, and select the Best match result.
Scroll down to locate WLAN AutoConfig, right-click and select Properties.
Change the Startup type to Automatic.
Click on Start and ensure the Service status changes toRunning.
Press Windows + X keys on your keyboard and select Device Manager from the resulting menu.
Click on Network adapters to see the list of available adapters.
Double-click on the adapter you are using from the list.
Go to the Driver tab, and click on the Update Driver.
Choose your preferred method to update your driver. Either allow windows to automatically search and update your driver or browse your computer to locate a driver file and install it manually.
Restart your computer once the driver installation is complete.
Most of the problems we encounter are caused by outdated drivers. To keep all your drivers up to date, we recommend using a tool called Outbyte Driver Updater.
Outbyte Driver Updater detects all outdated drivers and lets you choose which ones to update. Works with all kinds of drivers and uses his regularly updated database of over 18 million driver files.
Outbyte Driver Updater
Keep your system in top shape without any hassle by updating all your drivers.
Click on Search icon on your taskbar, type Control Panel into the search box and select the Best match result.
Click on the Network and Internet tile.
Select Network and Sharing Center.
Click Troubleshoot problems.
Follow the on-screen instructions to fix any errors and issues found by the troubleshooter.
5. Reset Windows Firewall to default settings
Input Firewall into the Search box and select Check firewall status.
Choose Restore defaults on the left, and click Restore defaults again on the next screen to confirm.
After restoring the default settings, connect to the network again to see if it works.
There you have it! 5 straightforward ways to deal with Windows not assigning IP.
If by chance, you try any of the above steps and it doesn’t seem to work, it might be that the system is yet to save your new changes. In such a case, you might need to restart Windows again.
After you are done with the solution, check if Windows hotspot can now assign IP to other devices. If it can’t, it might be that other devices don’t have a valid IP configuration. They need to be fixed as well.
Are there other solutions not mentioned here that worked for you, let us know in the comments section below.
Using file sync software is essential for enterprises because most users work on more than one Windows computer. These programs also act as backup tools, which can be very handy in the case of an unexpected event. Thus, you may avoid data loss in case of corruption or deletion of your files.
How to pick a reliable sync solution for Windows 10?
Sync solutions are great for all companies, no matter how big or small and they also cover some basic needs for backup.
However, you should watch a few important aspects when getting such a solution for your company.
Select a solution easy to implement – The software should work seamlessly on all of your systems and the GUI should be user-friendly and intuitive, whether you’re an experienced user or a beginner.
Check the features of the software – You will still need some basic features such as schedulers but also some advanced sync features and file compression. For instance, you should match the workflow (how many files you process/unit of time) with the capabilities of the software.
You need a stable software – As a golden rule, the technical issues should be rare events and should be immediately fixed. Try to do a test run and throw as much as you can on it to see how it copes. Make sure you have great communication with the customer support team and that the maintenance help is always there for you.
To help you decide which file sync software to install, we’ll list the best Windows 10 & 11 file sync software, so keep reading.
SyncBack is the best Windows backup and synchronization program on the planet, according to its developers.
This tool is reliable, flexible, and robust, and its performance has been constantly improved thanks to all the upgrades it received since its launch in 2003.
One of its best perks is that the UI is really simple and comprehensible and that you can create and restore backups very easily.
It offers you three options: SyncBackFree – a basic, free solution for casual users, SyncBackSE – a more complete edition for home users, SyncBackPro – ideal for professionals.
You can install all three versions on your computer to better compare the tools and spot the differences.
SyncBack certainly deserves its spot when it comes to reliable Windows 10 file sync software.
Here are the key features of SyncBack:
Copy files to synchronize any two folders
Create and restore backups easily
Run programs before and after profiles
Schedule backups at fixed times
Unicode enabled for non-English filenames
Process unlimited filename lengths
Simple and Advanced mode
SyncBackSE
The perfect home backup software for Windows, with clever operations and technical assistance.
Sync.com provides you with an encrypted cloud storage platform where you can securely store and access your data whenever you want.
The program allows you to share files of any size with other people, even if they don’t have a Sync account. Moreover, it makes teamwork easier by enabling multiple people to work from the same folders at the same time.
Sync developed apps for Windows, the web, Mac, Android, and iOS systems, and its advanced technology backs up your files automatically, making it possible for you to sync and use all the files whenever you want, from any device.
If you consider the options, Sync is the best cloud storage for businesses because it offers great balance between security and management features.
On top of that, with a Business plan, you will benefit from unlimited storage and preview virtually any of your documents online, including the Office documents.
Plus, you can add multiple administrative accounts to manage all the users’ activity, reset passwords, add users, and more.
Other key features of Sync.com include:
End-to-end data encryption
Automatic backup
Strong account security measures like two-factor authentication and granular user permissions
Slack integration, admin controls, Microsoft Office integration, custom branding and phone support
Automatic sync and restore
Advanced share controls
Modern and user-friendly interface
No third-party tracking
Monthly billing
Sync
Back up and sync all of your devices automatically, with a collaborative cloud and end-to-end encryption to keep your data safe.
Easy2Sync keeps your data synced between your computers. It is rather a specialized software that comes in two variants: Easy2Sync for files and Easy2Sync for Outlook.
Easy2Sync for Files has a dedicated wizard to help you get started. All data is kept on your computers, no third-party elements are involved in the sync process.
Don’t hesitate to set the tool to sync your files silently or prompt dialog pop-ups when necessary. It’s a great Windows 10 file sync software solution.
This software allows you to sync and share your Google calendar, sync the Exchange server with Outlook, back up your Outlook emails, and more.
If you have two computers that you want to sync, with this tool, you can set everything up in just a few minutes.
The best features of Easy2Sync include:
Easy2Sync supports all file types: Office files, mp3, images, movies, and any other file types
Unlimited folders/number of files
Various sync filters supported
Update your homepage: simply synchronize your files with the (s)FTP server and all changes will be recognized and transferred.
FreeFileSync is a free and open-source software solution, one of the best for file sync jobs on Windows 10. It saves your time by setting up and running backup actions.
Install FreeFileSync, customize your settings, and let this tool do its job. The user interface is very intuitive, full of colors and you can easily see what each option does.
Here’s how it works: instead of copying every file every time, this tool identifies the differences between a source and a target folder and transfers only the needed data.
The interface looks a little bit cluttered and complicated but once you set up the source and destination folders, it’s all smooth sailing.
The list of FreeFileSync ‘s features is impressive and includes:
PureSync synchronizes your files and folders automatically in the background. This file sync software solution works great with Windows 10.
This tool supports local drives, server volumes, FTP, some MTP devices, WebDAV and can copy open/locked files, and run synchronization/backup with another user.
It can also restore files from a Windows restore point and supports photo-syncing for digital cameras.
Some of the various automatic sync/ backup options include scheduled, drive connected, modification of a file at logon/logoff, or custom events.
Other features of PureSync include:
Transfer files from one computer to another
Automatic adaption to the folder at the destination
Filenames/path with more than 260 characters are supported
Not many Windows users have heard of Synchredible, but this tool is an impressive file sync software, one of the best for Windows 10.
You can sync individual files or an entire drive. A user-friendly software wizard will assist you to set up the sync options.
Synchredible also synchronizes folders via an external network or when using a USB device. This tool backs up your files as well, transferring them to your preferred location.
If you’re keen on using your native language, you’re in luck because the software supports nine languages for its user interface.
Other important features of Synchredible include:
One direction and bi-directional file sync support
Synchronizes subdials, changed and unchanged files
Allway Sync is a file sync tool with a very well-designed and easy-to-use interface. It’s one of the best for Windows 10 PCs.
It is one of the most complex file sync software solutions available on the market and uses innovative synchronization algorithms to synchronize your files.
You can easily sync them between PCs, laptops, USB drives, remote FTP/SFTP and WebDAV servers, and other storage platforms.
Allway Sync doesn’t contain any spyware, adware, or malware, unlike other free file sync tools. Also, there is no limit regarding the number of computers you can install it on.
Some of the most important features of Allway Sync include:
Automatic, on-screen, context-sensitive hints
The multilingual user interface supports more than 30 languages
File modifications and deletions are tracked in a database
GoodSync backs up and syncs your files between any device or platform without storing them in the cloud.
Thanks to the innovative technology it uses, GoodSync offers reliable bi-directional synchronization for all your files.
Setting up this Windows 10 file sync software is easy and takes less than a minute. All you need to do is click on the Analyze button and review the proposed changes.
GoodSync can connect two computers directly, in a peer-to-peer style, without using intermediate servers, and sync the files between them.
It can analyze a task with 1 million files and folders on each side in less than 10 minutes on only 500 Mb of memory.
Key features of GoodSync include:
Sends over only changed blocks of big files, thus improving the transfer speed
It detects file/folder renames and executes them as Move commands
The tool can run sync in several threads, working in parallel to achieve faster file transfer speed
Files can be excluded from synchronization based on name pattern, size, mod time
SyncBreeze is a powerful file sync solution and one of the best for Windows 10. It works with local disks, network shares, NAS storage devices, and enterprise storage systems.
This software offers many sync options users can choose from, such as one-way and two-way file sync modes, periodic file sync, compressed file sync, real-time file sync, specific file sync, and more.
Power users and IT professionals may use the command-line utility, which is available for SyncBreeze Ultimate and SyncBreeze Server.
It is constantly updated, and the latest improvements brought support for multi-language Unicode file names, improved the file properties dialog, synchronization preview reports, and the UI.
Let’s see some of its best features:
Command-line capabilities
Professional-level sync app
Continuous updates
It works with local disks, network shares, NAS, and enterprise storage systems
Second Copy is mainly a backup software, but you can also use it as a file sync software tool on Windows 10.
This program monitors the source files and keeps the backup updated with new or changed data. You don’t have to customize it all the time as it silently runs in the background with no user interaction.
Second Copy’s setup wizard helps you define different profiles, with different sets of files and rules regarding backing up and syncing the data.
After you set up the source and the destination locations, you don’t have to start copying the files over again if there’s a problem.
Other features of Second Copy include:
Copy data between work and home computers automatically without using any storage media
Modify files on the work computer and synchronize them with the home computer
Save storage space and backup files by using compression
We like Buddha Backup the best as an all-around effective file synchronization and backup solution.
It’s excellent as a complement to cloud backup or for local backup purposes alone and has a simple and intuitive user interface. It also comes with an evaluation period so you can try before you buy.
In Simple Mode, you use a wizard to set up a backup easily and quickly. Once you know your way around you can do this in less than a minute which is great for IT pros trying to set up backups quickly.
In Advanced Mode, perfect for technical and power users, you create individual backup jobs and customize them as desired for when you need that extra flexibility and power.
Also perfect for technical and power users is the Control Job mode which creates a visual display of the differences between two directories.
Buddha Backup offers a unique new way to keep a file history for backups so you have access to all of the data you’ve ever backed up.
Snapshot Browsing allows you to browse through snapshots of those backups to access only files that were present at the time of each backup.
Backing up feels like driving a Ferrari with all the progress indicators for backups, including elapsed time, time left, average speed, speed, and 4 progress bars tracking all parts of a backup.
While Buddha Backup’s interface is not as colorful as the ones from other solutions, we think most users will appreciate the simplicity.
Take a look at some of Buddha Backup’s best features:
Simple & Advanced Mode to cater to any user
Archive Backup with file history
Snapshot Browsing of file history in archive backups
Auto Purge to free up space from archive backup for new files to be backed up
A file backup log to keep track of everything being backed up
A friendly and intuitive interface that prioritizes the options that really matter
Buddha Backup
Buddha Backup doubles as both a simple data backup system and a powerful file sync program to serve both the most technophobic and tech-savvy among us.
You might be wondering: How do I use the Sync Center tool from Windows? Not many users know that there is actually a File Sync tool in Windows that you can use for free.
It’s not as sophisticated as the software we highlighted on our list and it’s a bit more complicated to set up but it works.
Without other further introduction, here’s how you can use it:
Click the Start button, type sync center and select the app from the results.
Now, choose Manage offline files.
Hit the Enable offline files button and click OK. You will need administrative privileges to do that.
Restart your PC for the changes to take effect.
Now, to share a folder, right click on it and select Always available offline.
From the Offline Files menu, you can also set up how much disk space to allocate, encrypt the files or choose how to use the network.
There are many file sync products you can choose from. Many features are common to all the file sync software packages we listed in this article, while other features are supported only by certain tools.
It’s important to say that all the tools we outlined above will also work seamlessly on Windows 11 as well.
You can choose the file sync software that best suits your needs. If you have any other suggestions or questions, feel free to leave them in the comments section below.
Users report that they encounter the error message: Group Policy cannot create a file when that file already exists. It may occur when performing several actions as editing file status or moving files.
Furthermore, the error can occur in many instances on the PC like Command Prompt (cmd), File Explorer, etc. You need not panic if you are experiencing the problem, as we’ll discuss how to fix the problem in this article.
What is causing GPO cannot create a file when that file already exists?
The error shows up when a file with the given name already exists in the Group Policy registry. It occurs due to numerous Windows glitches that can randomly affect your PC. However, other causes are:
Issues with Windows updates: users complain about running into many problems with recent updates. So, it may affect the Group Policy. One frequent update installation error is We couldn’t install this update, but you can try again yet you may solve it right away.
Duplicate file issues: the Group Policy may not be able to resolve which one to go with between the item you are creating and the existing one. So, it can result in errors like this.
Device startup errors: you can experience errors when your device is not running correctly. It can affect its files and directory in the Group Policy.
How can I fix it if there is already a folder with the same name as the file name you specified?
Before proceeding with any troubleshooting on your device, ensure you observe the following checks:
Power cycle the computer to see if the error persists.
1. Boot your PC in Safe Mode
Press (or hold, depending on your PC) the power button to turn on the PC.
Press the F8 key to prompt the Advanced Boot Options menu.
Select Enable Safe Mode and press Enter.
Wait for your PC to reboot, then check if you’re able to fix the cannot create a file when that file already exists in C error.
The procedure for safe booting may differ for some users. However, please read our article about how to start Windows 11 in Safe Mode without issues.
2. Update Windows
Click on Start.
Select Settings from the Start menu.
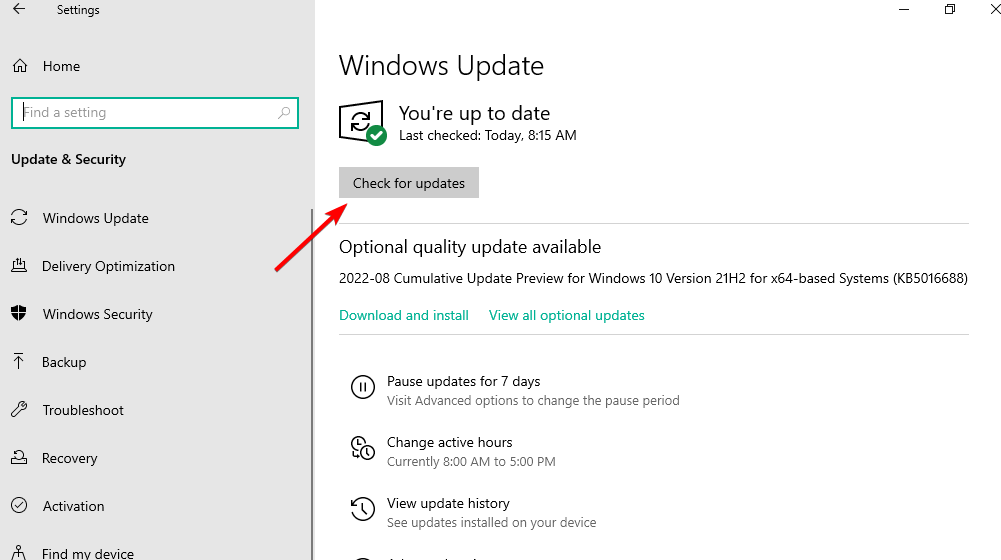
Click on Windows Update, then select Check for updates (Windows will automatically search and download updates if any are available for your PC).
3. Run a System File Checker (SFC) scan
Press the Windows + R keys to open the Run window.
Type cmd in the text space and press Enter to prompt the Command Prompt.
Type the following and press Enter: sfc /scannow
If you can’t repair the detected issue, add the following command and press Enter: exe /Online /Cleanup-image /Scanhealth
Then add this and press Enter: exe /Online /Cleanup-image /Restorehealth
Restart your computer to help it sync correctly and see if you can fix the issue. The scan will detect any problems affecting your files.
Sometimes Windows won’t detect any problems even though some errors persist. In this case, we recommend using a third-party tool for a full scan and repair of corrupted files.
4. Check the device’s Registry
Press the Windows + R keys to open the Run window.
Type Regedit in the text box and press Enter to open the Registry Editor.
Copy and paste the following path in the address bar: HKEY_LOCAL_MACHINE\Software\Microsoft\Command Processor
Check for any AutoRun key; if there is, click on Delete or Modify to clear the data.
We recommend you restart your PC and check if you cannot create a file when that file already exists error in CMD persists.
Cleaning up data from the Registry requires precise knowledge of the process. Hence, we have a detailed guide on how to clean the Registry in Windows 11 and why you should do it.
In conclusion, editing the Group Policy’s data and files can be dangerous to the system if not done correctly. However, you can read how to edit the Group Policy in Windows 11.
If this guide has been helpful to you, kindly leave feedback in the comments section. Should you also have other suggestions that have worked for you, we’d like to hear them.
During the deluge of Microsoft news pouring out from Redmon yesterday, the announcement of the Xbox app for Windows now updated to support ARM64 natively, was a bit overshadowed.
Earlier this week, Google and its partners announced a series of Chromebooks aiming to satiate the niche gaming crowd looking to leverage cloud-based gaming. While Google’s own cloud gaming services is in the midst of being shuttered, the company highlighted other services such as Nvidia GeForce Now, Amazon Luna, and Microsoft’s xCloud.
Yesterday, Microsoft seemingly endorsed Google’s gaming Chromebook initiative by delivering the very tool that will make it a far more pleasant gaming experience on these upcoming low-end laptop offerings.
The library of AAA games joining Game Pass and xCloud continue to grow and now gamers on ARM powered devices will get console-like gaming experiences with titles such as Halo Infinite, Forza Horizon 5, and Microsoft Flight Simulator in over 28 countries without having to worry about compatibility or native performance issues.
Supporting ARM64 development also means the continued expansion of the Xbox Cloud Gaming service and as such, Xbox Game Pass Ultimate, to more devices which will now include iOS, select smart TVs, Xbox One, Xbox Series X|S, Logitech’s G Cloud handheld, Meta’s Quest VR headsets, NVIDIA Shield’s, Windows PCs and Chromebooks.
A total of 85 security patches were released for October 2022, of which 15 were rated as Critical, 69 were rated as Important, and only one as Moderate.
There are also updates for Windows 7 and Windows 8.1 if you haven’t yet upgraded to a more recent version of the OS, although recommended.
And, there are even rumors of a brand new Windows operating system currently being in development and Microsoft accidentally leaked a screenshot of Windows 12’s UI.
Now, however, Windows 11 Insiders on the Beta Channel are getting to test builds 22621.746 and 22623.746 starting today.
What changes after you update and install KB5018490?
First of all, Windows Insiders who were previously on Build 22622 will automatically get moved to Build 22623 via an enablement package.
We’re not looking at anything special with this release, simply some fixes, and some known issues and that’s about it.
However, these tasks were pending and needed Microsoft’s attention, so it’s nice to know that we’ve got the out of the way.
Changes and Improvements in Build 22623.746
[System Tray]
This build includes preliminary support to rearrange System Tray icons for Insiders who have the System Tray updates that began rolling out with Build 22623.730. Further improvements for this experience are coming soon. As a reminder, these System Tray updates are still rolling out and are not available to all Insiders just yet. If your PC does not have these changes, your System Tray experience will remain the same as before.
Fixes in Build 22623.746
[Tablet-optimized taskbar]
Fixed an issue where the gesture to slide the Start menu open from the bottom of the screen using touch might stop following your finger.
[System Tray Updates]
NOTE
These fixes will only show if tablet-optimized taskbar with System Tray updates is enabled on your device. Tablet-optimized taskbar and System Tray is still rolling out to Windows Insiders and not yet available for everyone.
Fixed an issue for Insiders with automatically hide the taskbar enabled, where right-clicking app icons in the system tray was unexpectedly making the taskbar dismiss.
Fixes for BOTH Build 22621.746 & Build 22623.746
Enabled the ms-appinstaller Uniform Resource Identifier (URI) to work for the DesktopAppInstaller.
Fixed an issue that affects the Windows Search service. Indexing progress is slow when you use the service.
Known issues
[General]
Looking into reports that audio stopped working for some Insiders in recent Beta Channel builds.
[Tablet-optimized taskbar]
The taskbar sometimes flashes when transitioning between desktop posture and tablet posture.
The taskbar takes longer than expected to transition to the touch-optimized version when switching between desktop posture and tablet posture.
When using the bottom right edge gesture to see Quick Settings, the taskbar sometimes stays stuck in the expanded state, instead of dismissing to collapsed state.
[System Tray Updates]
Dragging the system tray icons may cause explorer.exe to crash for some Insiders.
What can I do if I can’t install KB5018490?
Press Win+ I to access Settings.
Select the System category and click on Troubleshoot.
Press the Other troubleshooters button.
Press the Run button next to Windows Update.
As always, make sure to report any other issues you might come across, in order for Microsoft to address and improve the overall OS experience for us all.
This is everything you can expect if you are a Windows Insider. Leave a comment below if you found any issues since installing this Insider build.
We all know how frustrating it can be when faced with Windows has restarted your GPU driver due to a problem.
Users experience Windows restarting their GPU driver mainly due to a problem. Outdated or corrupt graphics drivers to outdated OS, unnecessary background apps, overclocking issues or physical damage to the CPU can also lead to the error.
How do I fix Windows restarting my GPU driver error?
1. Update your operating system
Click on the Start button.
Select Settings from the drop-down and click on Windows Update.
On the Windows Update tab, select Check for updates (if there are any updates available, Windows will search for and install them).
Updating your OS can fix bugs affecting your PC and causing it to restart the GPU driver.
Alternatively, giving high priority to games like League of Legends in the Task Manager can fix GPU issues that may occur during the game. Hence, read how to prioritize specific apps in the Task Manager to improve performance.
3. Update the graphics driver
Press the Windows + R keys simultaneously to prompt the Run window.
Type the following into the search space: devmgmt.msc, and click OK.
Click on the Display adapters from the search results.
Select the display driver you want to update from the drop-down, then right-click on it.
Click the Update driver software option, then select Search automatically for drivers.
Wait for Windows to search and install the driver updates. Restart your computer after the update process is complete, then check if the issue persists.
Additionally, if no updates are found, we recommend trying a tool that specializes in updating drivers such as Fortect Driver Updater which gets its updates directly from the manufacturer.
Click on the Start button, input Control, and select the Control Panel.
Select Hardware and Sound from the menu and click on Power Options.
Click on Change Plan settings.
Click on Change advanced power settings to open the Power Options tab.
Expand the Processor power management option.
Click on the Maximum processor state tab and set the values for both On battery and Plugged in as 99%.
Click on the Apply button, then OK to save the changes.
Restart your PC to initiate the changes.
Underclocking your GPU will help improve its performance and can fix issues affecting it. Hence, check how to safely underclock your GPU without affecting your computer.
This solution is the last you should consider as it requires technical expertise. Replacing your GPU will fix the error: Windows has restarted your GPU driver due to a driver upgrade or physical removal.
A faulty GPU affects its performance and can also result in other issues with the computer. You may encounter the AGP_GART_CORRUPTION error.
However, we have a detailed list of the best graphics cards for gaming that you can buy. For users who’d like to use external GPUs instead, check our article about the best USB-C external GPUs you can get for your PC.
Conclusively, issues with the GPU can cause other problems like game stuttering on Windows 11 and others. We recommend you check the link above to see how you can fix the problem.
For more questions or if you have other suggestions, kindly drop them in the comments section. We’d like feedback from you.
Tired of having to hold down the Fn key every time you want to use your function keys on Windows 11? You’re not the only one. Some laptops let you toggle Fn Lock with shortcuts like Fn + Esc, Fn + Caps Lock, or Fn + Num Lock—but they don’t always work.
No worries though! If those don’t do the job, we’ve got reliable ways that work on pretty much any device, using your settings and BIOS to fix it for good.
How can I disable the Fn key in Windows 11?
1. Use the keyboard shortcut to lock the Fn key
Press the Fn key + Esc on your keyboard.
If that doesn’t work, try using Fn + F2.
Keep in mind that the key might be different on your PC, but it’s usually represented by a small lock icon.
Certain manufacturers may use the Caps Lock or the left Shift key for the Windows 11 function lock key, so be sure to check your device manual for more information.
2. Lock the function keys via the Control Panel
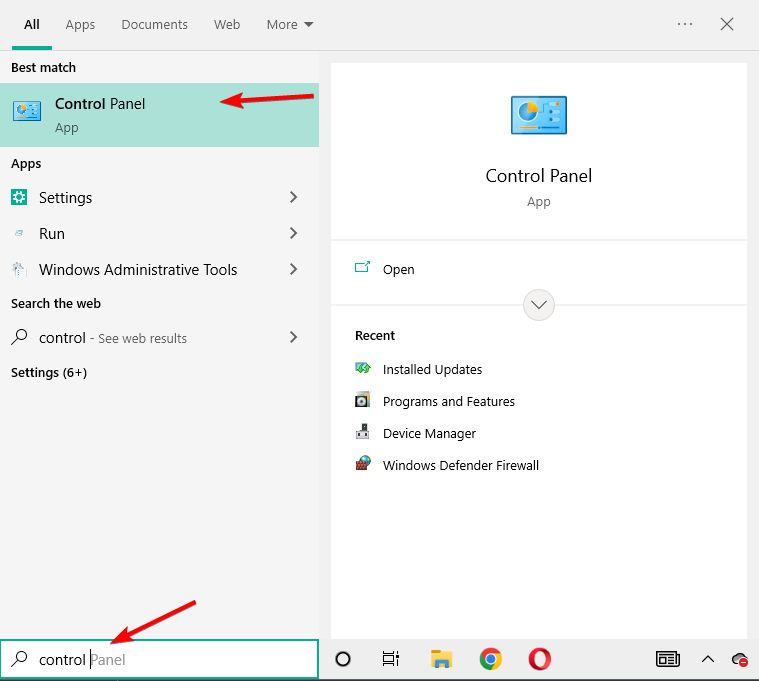
Press Windows + S to launch the Search menu, enter Control Panel in the text field at the top, and click on the relevant search result that appears.
Next, click on the View by dropdown menu, and select Small icons from the list of options.
Click on the Windows Mobility Center entry here.
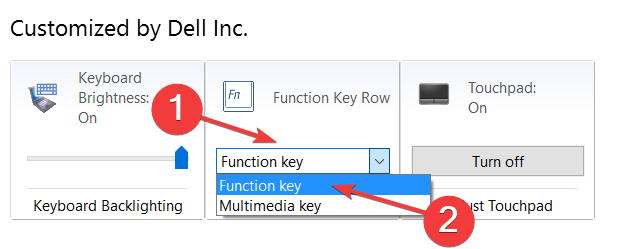
Now, click on the Function Key Row dropdown menu, and select Function key.
But the option to change these settings is not available on all computers, and if that’s the case, you may either try the first or last method listed here to turn off the function key in Windows 11.
You can also explore how other system keys work by checking our guide on the Pause key.
Now you know how to disable Fn key on Windows 11 on HP, Lenovo, Acer, and other brands. Keep in mind that steps might different depending on the brand, so always consult your manual.
Tweaking and changing Fn keys in Windows 10 lets you customize your laptop’s keyboard behavior so it works the way you want. Fn keys often confuse people because their default behavior varies depending on your laptop brand and settings.
The good news is, Windows 10 and your laptop’s software or BIOS give you ways to flip the switch and get those keys working exactly how you want.
How can I change the function key settings in Windows 10?
1. From BIOS
HP
Turn off the computer by pressing and holding the Power button for at least five seconds.
Press the F10 key repeatedly when the device restarts, to open the BIOS Setup Utility.
Press the right or left arrow key to select the System Configuration menu.
Next, select the Action Keys Mode.
Press the Enter key to display the Enabled / Disabled options.
Dell
Reboot your device and press F2 to enter the BIOS settings.
Go to the Advanced tab, using the arrow keys.
Scroll down to the Function Key Behavior option.
Change the setting to the Functions key.
Press Exit.
ACER
Simultaneously hold theF2key andPowerbutton.
In the BIOS screen go to the System Configuration Menu.
In the Action Keys Mode option press the Enter key to display the Enable/Disable menu.
Select the desired mode.
Press Exit when you’re done.
Lenovo
1. Click the Start icon and selectSettings.
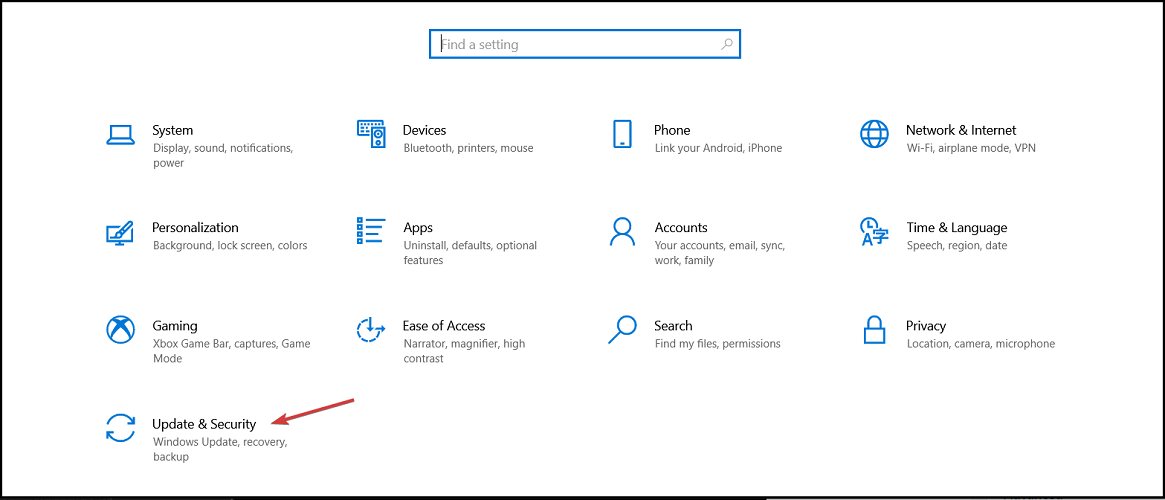
2. Next, click onUpdate & Security.
3. Click on Recovery and then select Restart now.
4. From the Options menu, selectTroubleshoot.
5. Click UEFI Firmware Settings and choose Restart.
6. In the BIOS menu, select the Configuration tab.
7. Select Hotkey Mode and set it to Enabled or Disabled, depending on your preference.
8. Save and Exit the BIOS menu (press F10 and then Enter).
Depending on your device, the process of changing function key settings in Windows 10 can be slightly different, but the steps are mostly the same.
Basically, you need to restart your PC, access BIOS, and then navigate to the Configuration menu. From there, you can easily change Fn key settings in just a few clicks.
Another method that you have at hand, in case you want to use the Function Keys without pressing the Fn Key, is to use the keyboard shortcut.
This is a fairly easy method to use, as you don’t have to go into the BIOS settings in order to make the change.
First, make sure you locate the Fn lock key on your keyboard, and once you find it all you need to do is simultaneously press the Fn key along with the standard F1, and F2 keys that you wish to use.
And that was all, now you can use the function keys, without pressing the Fn key. Whenever you want to switch back, you will only need to make the same steps you did previously, and that will disable the function.
3. Change UEFI settings
Click On Start Menu, and type Settings to launch Windows Settings
Click on Update & Security from the list and go to Recovery on the left side
Click on the Restart now button. Your laptop will now restart and it will open the UEFI settings
Click the Troubleshoot option once your Windows boots into recovery mode
Under Troubleshoot choose Advanced Options
Next, choose UEFI firmware Settings under Advanced Options and click on Restart.
Once you completed the above steps, you will be able to search for the function key option and make sure to disable it in the UEFI settings.
4. Use Control Panel
You will find the option to change the function keys as standard, in the Boot Camp configuration panel.
For example, if you are using Dell this option will be found in the Windows Mobility Center. Other manufacturers may have the option in the same place, so make sure to check that out.
In order to access it on Windows 10, make sure to right-click on the Start button and simply select the Mobility Center option.
It’s also possible to have this option in the keyboard setting configuration tool which can be found in the System menu or right in the Start menu.
If you are using ASUS you will see that it comes with preinstalled ASUS Keyboard Hotkeys that can be found in the Windows app.
No doubt about it can be really frustrating not being able to use the brightness or volume keys. Fortunately enough the fix for this issue is fairly simple and you can reverse the Fn functions within just a few clicks.
As you can see in the above-presented solutions, you can either make these changes from the keyboard, if you can locate the Fn key on your device.
Otherwise, you can go into the BIOS settings, and depending on which device model you are using, there are some specific steps you can make in order to make the change.
Let us know in the comments section below which one worked for you and, if you have additional recommendations or suggestions we will be happy to read them.
Computer maintenance is incredibly important in making sure everything on the system runs smoothly; however, most people just aren’t well-versed in taking care of their computers.
At some point, most will notice their computer’s performance degrading, but are unable to understand why.
A likely reason because every time you do something on your computer, it leaves behind a trail. Whether you’re installing an app or even changing something slightly, junk files can begin to clutter up your device. Uninstalling apps can also bloat the registry.
That’s why it’s important to utilize a registry cleaner app to sweep out all the junk in a computer. Windows 11 already has its registry in the form of the Windows Repair app.
But like with a lot of the native apps on Windows 11, there’s is a third-party app that does it much better. While registry cleaning apps aren’t something that a lot of people pay attention to, they can be game-changing.
Does Windows 11 have a built-in registry cleaner?
Windows 11 doesn’t come with a built-in registry cleaner, leaving users to handle registry edits manually. This manual process can be quite tedious and time-consuming. For a more efficient approach, consider using one of the specialized registry cleaner tools highlighted in our list below.
Is a registry cleaner that important?
Registry cleaners are more than just a convenience: they’re essential for maintaining your computer’s performance. Over time, junk files accumulate and can slow down your system, making these tools as crucial as antivirus programs. They’re safe to use and highly recommended for regular computer maintenance. Most of these apps offer both free trials and premium versions with additional features, so you can choose the one that best suits your needs.
What are the best registry cleaner options for Windows 11?
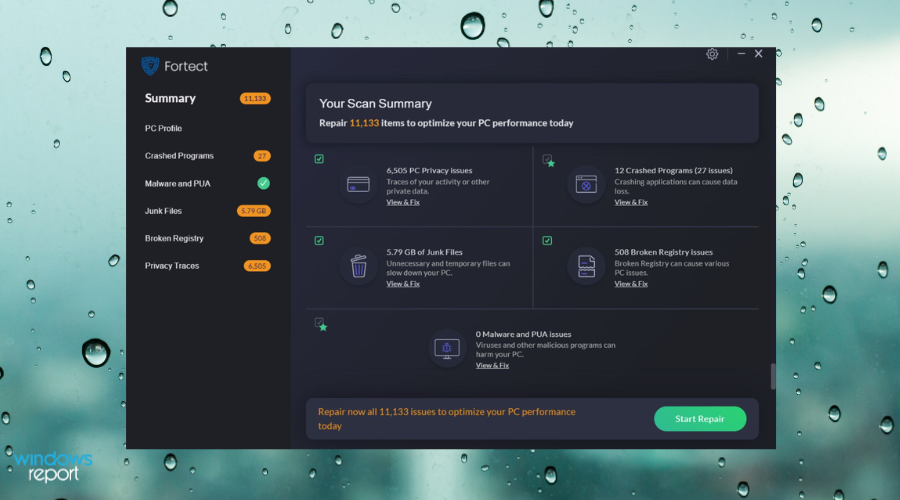
Fortect is a repair and cleanup tool that has multiple advanced features to help you maintain your PC clean and healthy.
You can let Fortect run an extensive scan of your system, which will take no longer than five minutes, to see your device’s condition and capacities.
After the scan procedure, this software will provide you with a detailed diagnostic review of your system compared to a healthy one to find the deficiencies and build-ups that can damage your PC.
After that, Fortect will help you clean up your Registry by removing all of the junk files, build-ups, and unwanted apps to achieve more free space and boost your PC health.
Furthermore, this app can automatically repair and replace any damaged and missing files, such as DLLs, and registry keys, and eventually enhance your operating system.
Another great feature that Fortect has is its ability to scan and detect faulty or incompatible hardware that may cause errors in your system if not replaced.
You can select from three pricing options, all of them being affordable. It just depends on how many devices you wish to keep in shape.
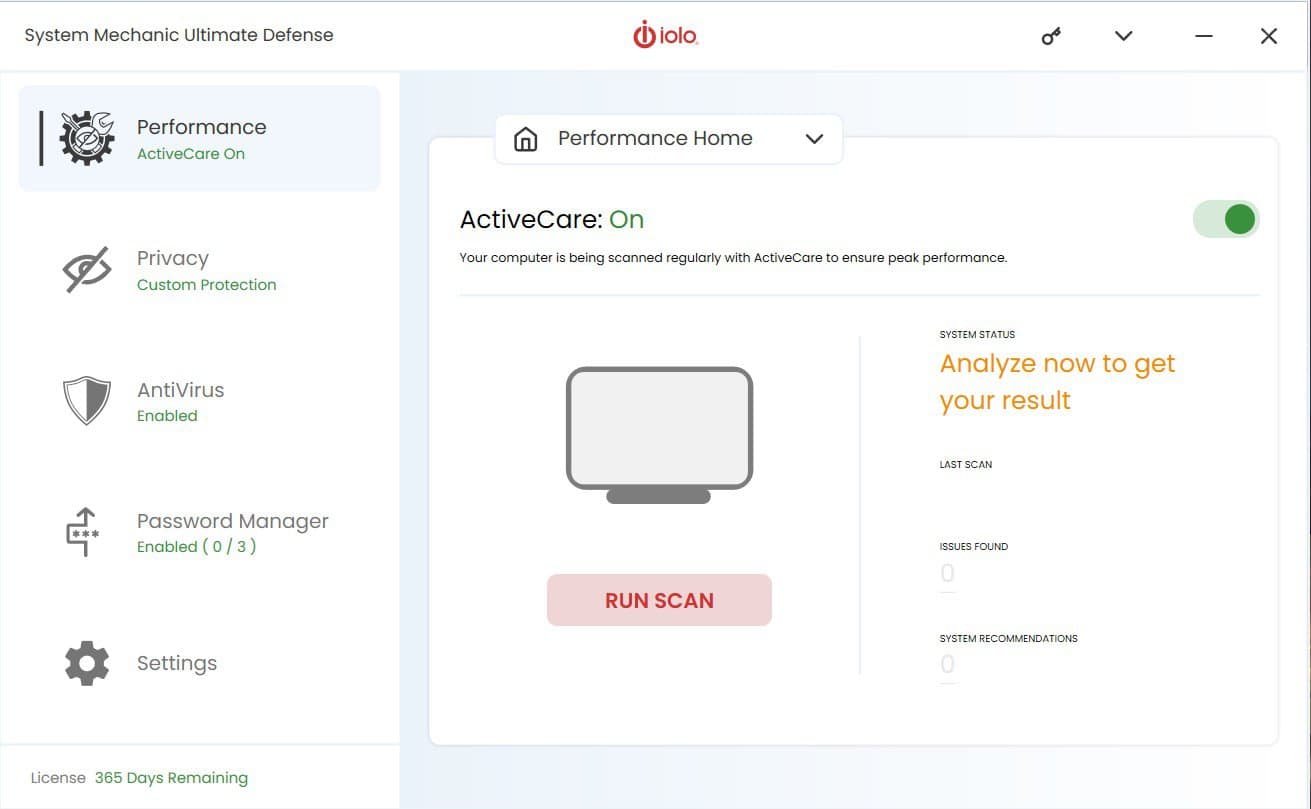
System Mechanic Ultimate Defense is an excellent tune-up utility that will improve your PC’s performance by defragging the hard drive, tweaking CPU and RAM usage in real time, repairing Windows’ Registry, and more.
It is compatible with all systems running Windows XP and later, of course, including Windows 10. Also, Iolo System Mechanic allows you to install the program on any number of systems.
Its interface is built to be easy to use even for beginners so there is no need for previous knowledge.
The Privacy Shield suite allows you to disable Wi-Fi Sense, SmartScreen Service, Microsoft Data Collection, and Telemetry Services and will prevent the involuntary collection and sharing of your data.
Another useful tool is Commonly Redundant or Unnecessary Decelerators and Destabilizers which can remove unwanted files from your system and create more space for important apps.
ActiveCare offers real-time system analysis and repair while LiveBoost unlocks more CPU and RAM to enhance your system’s performance.
Iolo System Mechanic is one of the 7 software products included in the comprehensive security, privacy, and optimization package Phoenix 360.
Iolo System Mechanic Ultimate Defense
Iolo System Mechanic Ultimate Defense is the perfect tool if you want to speed up your PC.
Wise Registry Cleaner is one of the better-looking cleaner apps with an easy-to-understand user interface; something not many other tools have.
Sometimes a registry cleaner can be not user-friendly and look intimidating. But Wise’s clean and simple layout earns it big points.
The tool creatively uses its layout. When done scanning, Wise presents its findings in a sheet, similar to how Microsoft Excel displays its information.
It has fast registry scans that can be scheduled for any time, which come in two separate modes: Fast Scan and Deep Scan. Fast Scan is the quicker option while Deep Scan takes its time as it scours through the machine, looking through the nooks and crannies of a PC.
Wise Registry Cleaner is a little light on advanced features, even for its pro versions. But it can be run from the Windows 11 command line, something that most registry cleaners are unable to do. And once you buy it, you don’t have to keep the subscription going.
Most other cleaner apps only allow you to own the tool for a set amount of time before you have to renew your license. Wise Cleaner does not do this and is unique in this regard. Once you buy it, it’s yours to keep forever.
It also offers a registry defrag option. Defragmentation, or defragging, organizes the contents on the Windows 11 registry into regions as a way to optimize the system and improve performance.
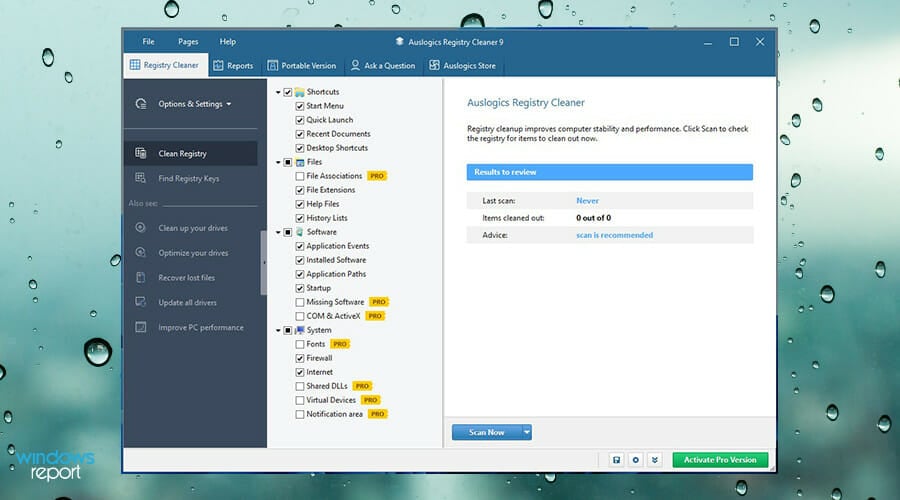
Auslogics Registry Cleaner is another easy-to-use app. The tool has the distinct feature of the Rescue Center in its settings menu which is a list of registry backups made before each cleaning.
You can edit these settings to backups of the Windows 11 registry if you never want to lose them. As stated previously, registry cleaner apps can overdo it and get rid of things you didn’t mean to delete.
Rescue Center saves those settings in case you want to go back to them.
The user interface is simple and clean, and scanning can be activated at the press of a button. It can be paused at any time and continues later. And one of the nicer things about this app is how it categorizes its findings in a list form.
Auslogics has the unique feature of creating a portable version. Auslogics Portable is a defragging that you can upload to a portable device like a USB drive and take to another computer, be it a Windows 11 machine or not.
The portable version doesn’t have all the features the desktop version has, but it has most of them.
Like Wise Cleaner, everything is situated in a simple format. However, there is an issue with Auslogics that must be mentioned. Upon installation, Auslogics will try to install additional apps during the setup.
While these programs aren’t bad, they can be annoying, but it’s easy to deselect them.
IObit Advanced SystemCare is a tool specialized in system care and maintenance. It finds all problems your system might have and solves them, so you can run at peak performance.
One of Advanced SystemCare’s main features is the advanced registry cleaning process. With a scan beforehand, it knows exactly what is wrong and what must be repaired and cleaned
With AI that learns from your optimization habits, you can create a personalized plan to scan for and remove tons of junk files, unnecessary logs and files, leftovers from uninstalled apps, and more.
Advanced features allow this tool to clean up even the junk files from Dropbox, Steam, Java, Adobe Photoshop Lightroom, Spotify, and MS OneDrive
Another amazing feature is that you can optimize startup programs to reduce boot time by up to nearly 50%. The faster your Windows boots the better the experience.
IObit Advanced SystemCare comes with a total of 30+ troubleshooters to defragment, and clean junk files, leftovers, etc, which are used clean your computer and speed it up.
One click is enough to update all outdated third-party software on your computer. It optimizes speed for everything you use on a daily basis.
Advanced System Care focuses on improving your PC’s performance by optimizing every part of your computer. No matter how old it is, there are always some spots you can optimize.
IObit Advanced System Care
Always there to improve the speed of your PC and keep all its aspects optimized.
CCleaner has the distinction of being one of the oldest and most popular registry cleaner apps in the world with over 2.5 billion downloads and counting.
It can delete unwanted files left behind by certain programs such as Microsoft Edge, Adobe Acrobat, and WinZip.
CCleaner can also delete unwanted browsing history data, recycle bin leftovers, system caches, and various other forms of data. You can even use it to uninstall programs from the app’s interface.
The app has a hard disk and registry cleaner that is exceptional at fixing DLL problems. It comes with a Missing Shared DLLs checkbox that searches for and locates missing or broken DLL files that it can replace.
Best of all, the tools come with a startup manager that can manage which apps open when you turn on your computer, a handy way to not have a ton of windows pop up upon startup.
CCleaner comes with a free trial and three paying tiers that each come with various features. The most expensive option, Professional Plus, gives a two-year license for up to three separate PCs and additional services like the ability to recover deleted files.
If your only problem is registries, then Glarysoft Registry Repair is the perfect choice for your system.
Quickly scan your Windows registry with comprehensive analysis thanks to our fast, complete and secure scanning engine. A quick scan takes very little time.
Also, the results of high-speed cans are very accurate and don’t require a second scan. With just a few clicks and a scan, you can have your registry cleaned.
It can analyze different areas in your registry and identify up to 18 types of errors. It can also fully scan your Windows Registry for errors, invalid entries, Regedit optimizations, and more.
Every time you repair the registry it will make a backup copy of it and add safe registry keys to the white list so that you can roll back the registry to its current state in the event of a system failure.
Glary Registry Repair is a great program for keeping your registry in good shape. Detect errors and remove invalid entries. Automatic backups allow you to restore previously deleted keys in case something goes wrong.
Glarysoft Registry Repair
Fast, simple, and straightforward, a perfect solution to safely scan, clean, and repair registry problems.
Argente Registry Cleaner looks a little intimidating at first with its dense-looking user interface, but it uses a wizard to help guide you.
A software wizard, for those who don’t know, is a piece of software that can either simplify a complicated task or serve as a tutorial.
For Argente, its wizard functions as more of a tutorial, guiding you through the process of setting it up so that suits your needs. You won’t have to try and somehow figure out how the registry cleaner works.
With this wizard, Argente scans and repairs the registry on its own. It’s pretty adept at finding out what to get rid of without needing you to configure it. And before deleting corrupt files, the tool lays them all out in an easy-to-understand list.
You won’t have to worry about backing up your data either as Argente has an Undo changes feature that can restore the Windows 11 registry.
Sometimes a registry cleaner can be overzealous and delete things it shouldn’t be deleted, but Argente gives you that extra form of control, so you can undo mistakes.
What are some other ways to better take care of a Windows 11 computer?
As stated earlier, many of the Windows 11 native apps do an alright job at what they do but aren’t the greatest. They lack many of the amazing features third-party apps have.
For example, Microsoft Edge is a decent web browser, but horrible if you are someone who plays a lot of video games.
If you or someone you know plays a lot of video games, you’ll need a web browser that doesn’t take up a lot of computer resources. You’ll need something that eats less RAM like Opera or Firefox if you want the ability to customize with browser extensions.
You may encounter some issues like getting stuck on the Preparing Windows screen. One minute you’re updating the computer and the next it’s stuck on a neverending loop.
How do I clean up a broken registry in Windows 11?
You can delete a broken registry manually (if you know the parameters of the registry file) by opening the Registry Editor, searching for the file, and removing it. Alternatively, you can use one of the tools from the list above. We’ve already written an extensive guide about this.
We recommend Fortect as it’s the easiest to use and can remove any broken registry files in just a couple of clicks.
How do I fix a corrupt registry in Windows 11?
While it is possible to do it manually, in the Registry Editor app, it’s extremely complicated and time-consuming. It requires technical knowledge and it’s risky, as deleting/modifying the wrong registry file can lead to fatal system errors.
The simplest way to fix a corrupt registry is with an automated solution like Fortect, CCleaner, or Wise Registry Cleaner.
It’s important to learn about solutions when even the most basic of Windows 11 functions fail. Sometimes it’s as simple as restarting the computer, but other times it may require a finer touch.
Feel free to leave a comment below if you have any questions about other Windows 11 apps. Also, leave comments about guides that you’d like to see or information on other Windows 11 features or list guides like this.
Microsoft wants gaming to be accessible to everyone. Xbox has made big strides in the past few years to make gaming not only more accessible, but to allow those with special needs to be able to game when they want, where they want, and with who they want. Today at the 2022 Xbox Accessibility Showcase, Xbox is celebrating the Disability community alongside the people and organizations that continue to remove barriers to make gaming more accessible.
This year Microsoft hosted the Xbox Accessibility Showcase at the Microsoft Inclusive Tech Lab on its Redmond, WA campus. The lab was intentionally built with accessibility in mind from the ground up. This was done to encourage designers and developers to be all-inclusive with building their products and show how they allow everyone to participate. Gamers with disabilities look for a few things to make the experience more engaging, the importance of a wide variety of accessibility options, including text, subtitles, and difficulty settings. It’s also important to include those with disabilities not only in the design process but as an audience as well. Today Microsoft is announcing several updates that encourage all gamers to create, play and create through gaming.
Create
Microsoft launched the Microsoft Gaming Accessibility Testing Services in 2021 (MGATS) Since then hundreds of titles have had their accessibility validated against the Xbox Accessibility Guidelines with feedback from those gamers with disabilities. This month Xbox is launching a new offering called MGATS – Players with Disability focus for studios that aren’t ready for Xbox Accessubilty Guideline testing yet. This service is designed for developers to get feedback from those with disabilities around core issues in games such as menus and settings. The XAGs have also been updated this month to include better guidance around touch-based gaming on mobile devices, with such things as bigger targets and swipe sensitivity.
Connect
The Xbox Ambassador Program is introducing a new and free Xbox Ambassador Accessibility Explorer Path. This path is designed to teach Xbox Ambassadors about those players with disabilities. Including trying out game accessibility features, as well as discovering best practices. Xbox plans to add more missions throughout the season to allow Ambassadors to increase their knowledge.
Xbox has redesigned the support hub on Xbox.com to make it easier for players to learn about accessibility features on console and Windows devices. Players can now compare the features between Xbox and the console. New articles are coming in October that will include narrator shortcuts using both keyboard and controller.
Play
Experiences and memories are made through play. we experience new worlds and perspectives sometimes not otherwise possible. For that to be possible games must be accessible and easy to find along with their accessibility features. A few titles that have recently, or will be launching soon are, As Dusk Falls, Pentiment, Grounded, and many more. These titles mentioned have changes to text, menu, and control functions to make them more accessible.
Working Together
We must all work together to make gaming accessible, It takes a collective effort from gamers, designers, developers, and publishers that believe everyone should have access. Organizations like SpecialEffect help put the fun back in video games, and maximize game control. The Royal National Institute of the Blind is the UK’s leading charity for those will loss of sight. Xbox works directly with them to support those gamers who are blind or partially sighted. It doesn’t stop there, this year Xbox worked with gamerscon 2022 to make sure everyone had access to the event. The team focused on making sure events had English Auto Descriptions as well as interpretation for both broadcast and in-booth experiences. Xbox also had Adaptive Controllers available at all stations for those who requested them.
Microsoft has developed a new, modern, feature-rich terminal application called Windows Terminal. It’s meant to gather all the command-line tools like Command Prompt and PowerShell in one place.
This is quite a nifty idea, and in the opinion of many Windows 10 users, long overdue. Although it’s initially intended for developers, anyone who wants to enter a few command lines is welcome.
Not only that but regular updates and constant development are promised.
While Windows Terminal is officially out, Microsoft only allows you to install it via Microsoft Store in Windows 10.
What does Windows Terminal do?
One of the main features of this new terminal application is multiple-tab support. Windows 10 users have asked for this forever, and now it’s finally happening.
What this actually means? It means that you will be able to open, for example, Command Prompt, PowerShell, WSL, and Raspberry Pi all at once, each on a separate and connected tab. And all that under a single Windows Terminal window.
Other notable features include a new text rendering engine that will allow the display of a lot more symbols, text characters, glyphs, and even emojis and a new open-source monospaced font.
Along with this, many more customization options and profiles with different font styles, colors, transparency, and other things, let you decide how Windows Terminal looks and feels.
What does my PC need to run Windows Terminal?
Before you start, there are some very important prerequisites:
To run Windows Terminal, you have to be on Windows 1903 (build >= 10.0.18362.0) or above.
You must have the 1903 SDK (build 10.0.18362.0) installed.
You need Visual Studio 2017 or above.
Some Workloads need to be installed from the Visual Studio installer: Desktop Development with C++, Universal Windows Platform Development, C++ (v141) Universal Windows Platform Tools (individual component).
How can I install Windows Terminal without Microsoft Store?
1. Download the .msixbundle file from the latest release for Microsoft Terminal from GitHub. It is available in the Assets section.
2. Launch a Powershell window to the file location of the downloaded file.
3. Type this command, and replace [name] with the full name of the downloaded file : Add-AppxPackage [name]
In our case, the command looks like this: Add-AppxPackage Microsoft.WindowsTerminalPreview_Win10_1.16.2641.0_8wekyb3d8bbwe.msixbundle
4. Press Enter to run the command.
5. Windows Terminal has been installed and you can now use it on your PC.
If you don’t want to install Windows Terminal from the Microsoft Store, there is a quick workaround for this. You can install it directly from the source code.
Yes, that’s right. Windows Terminal it’s open-source and you can find all the things you need on GitHub’s dedicated page for it.
If something isn’t right or you can’t find certain things, there is a README file as well as some scripts in the /tools directory.
As you can see, it’s pretty simple to take an early look at Microsoft’s new Windows Terminal. Just head over to GitHub and clone, build, test, and run the Terminal in any way you want.
Of course, if you find any bugs or issues with the source code for GitHub’s Windows Terminal, share them with the world so everyone may contribute and get rid of them.
How can I install Windows Terminal from Microsoft Store on Windows 10?
If you would rather use the Store to install this tool, feel free to do so. This is the fastest way of getting the tool on your PC. This is what you need to do:
Launch Microsoft Store.
In the search box, type Windows Terminal.
Click on the result for the Windows Terminal app.
Press on the Get button. The app will start downloading and installing in no time.
Hope that the wait was worth it. Are you excited about the new Windows Terminal or it’s not that important for you? Leave the answer and any other questions you may have in the comments section below.
Three more games are available to play for free this weekend for subscribers to Xbox Live Gold and Xbox Game Pass Ultimate via Xbox Free Play Days. The Free Play Days event will run from today, Thursday October 13, through Sunday, October 16. Here are this week’s Free Play Days selections.
Fight for the yellow jersey in the official game of the Tour de France, available this weekend during Free Play Days!
Another solid lineup for Xbox Free Play Days this week. Which has you the most excited to jump into? Let us know in the comments section. You can learn more about Xbox Free Play Days here.
Office 365 comes with antimalware and antispam protection as Microsoft introduced the world to the Advanced Threat Protection feature for Office 365.
Some of the benefits that came with this new solution include antimalware protection, real-time protection against malicious links, as well as rich reporting and tracking capabilities for URLs.
If you’re an Office 365 user with mailboxes hosted on Microsoft Exchange Online, then your email messages, both incoming and outgoing are automatically protected from spam and malware.
Office 365 has a built-in antispam filtering feature that protects inbound and outbound emails from malicious software and spam. This technology is enabled by default.
However, if you still feel the need for another antivirus for Office 365, there are myriad options you can choose from to suit your needs.
What is the best antivirus for Office 365?
TotalAV – Best browsing security and system maintenance
TotalAV is an award-winning antivirus and security software created to protect and maintain your PC running at the highest performance. It offers antivirus protection, safe web browsing, blocking of tracking cookies, and intrusion prevention detection.
All downloads, installations, and executables are checked before opening to prevent malicious scripts from accessing your computer. Reliable protection in real-time.
The software uses Total AV and its intelligent protection system to protect you from viruses, malware, ransomware, and phishing software that try to attack your data.
Total AV offers WebShield in your browser so you can browse the internet safely. WebShield is a line of defense against fake, deceptive, or phishing websites designed to take advantage of unsuspecting users.
For browsers, Total AV also allows you to take control of your browsing experience. Never see annoying ads again with our built-in ad blocker for websites and videos.
Also, the key features of TotalAV are:
Great real-time protection
WebShield for browser protection
Data breach monitoring
Compatibility with Mac, Android, and iOS
Blocking of tracking cookies
Smart protection for all your devices with simple yet clever antivirus online and offline protection across the internet.
TotalAV
Try this complete package of protection and security with plenty of additional features.
Bitdefender is the leading antivirus for Office 365, which protects against any sophisticated threats. It is powerful, simple, and ideal for business use, plus it has consistently ranked first in independent tests.
The GravityZone tool is adaptive, layered endpoint security designed for cloud and virtualization, that protects from advanced targeted attacks.
The GravityZone feature executes its protective functions through its monitoring and revolutionary hypervisor introspection architecture.
This endpoint protection against cyber threats can detect advanced persistent threats, offers protection from ransomware, and defeats exploits, and zero-day attacks.
Check out more key features of Bitdefender:
Heuristic monitoring
Regular updates on malware definitions
Autopilot features to adjust defensive posture.
Immunize important files from ransomware attacks
Password Manager
You’ll find it easy to install and monitor remotely from a single, powerful cloud console, plus it is also very cost-effective.
Bitdefender Total Security
Use this powerful antivirus compatible with Office 365, with a VPN included and great customer support.
ESET HOME Security Essential is the best choice one can make, to secure all online activities and as well the Office 365 account.
It is a modern multiplatform solution, that can be used to secure all your devices with a single license. No matter if you run on a Mac, Windows, Android, or Linux.
The Anti-Phishing tool protects your privacy and assets against attempts by fraudulent websites to acquire sensitive information such as usernames, passwords, or banking details.
This is a great plus because it protects you from fake news from seemingly reputable sources, and homoglyph attacks (replacing characters in links with ones that look similar but are actually different).
Here are the perks of using Internet Security:
Active web-browsing protection
Ransomware and spyware shield
Gamer Mode
Online banking & payment protection
Suitable for Windows, macOS, and Linux
The software is available in three extensions: antivirus, basic internet security, and smart security.
Once installed, the solution is lightweight, discreet, and efficient. ESET HOME Security Essential protects your online operations, monitors your connected devices, and works continuously in the background to ensure seamless protection.
ESET HOME Security Essential
Protect your Office 365 with comprehensive security and online privacy solutions from ESET.
Avast Free Antivirus is a solution to protect your computer and Office 365 account, against viruses, malware, and your home network against intruders.
This antivirus protects your devices against havoc-wreaking ransomware so you don’t become the victim of digital extortion.
One of the most interesting features is Behavior Shield. With this feature, Avast monitors the behavior of individual apps on your computer to counter any suspicious activity.
Avast Omni, Premium Security, and Free Antivirus have a CyberCapture feature that automatically detects suspicious files and sends them to the cloud for inspection.
The Game Mode now called Do Not Disturb Mode, will block distracting popups whether you’re gaming, watching movies, or presenting a PowerPoint document on full screen.
Here are Avast’s key features:
Protection of public Wi-Fi and threat prevention
Limited resource footprint
Tune-up tools for your computer
AntiTrack for protecting your privacy online
Works silently during gaming and movie-watching sessions
Avast scores first in malware blocking and anti-phishing testing, as well as scanning the network.
Avast Free Antivirus
Protect your Office 365 with a free solution against viruses, malware, and network intruders.
Avira antivirus is another freeware security solution that will protect you from online scams, identity theft, and any possible risks that you might be exposed to when online.
Avira takes free protection to another level, offering VPNs, ad blockers, even password managers, and system backups. Plus, it blocks all online threats like malware, ransomware, and spyware.
In addition, it has a comprehensive interface, which was designed for non-tech enthusiasts that have no background knowledge, having a pretty simple and integrated interface.
Your Office 365 mailbox as well as your social network accounts will be protected from phishing with the Anti-Scam tool.
Let’s have a look at Avira’s main features:
Premium tune-up tools
Integrated Free VPN and ad-blocker
Advanced web & ransomware protection
App locker
Avira also has a built-in PC Cleaner that erases your digital footprint from your browsers and apps so no one can track you.
Overall, Avira Free Security offers real-time protection with very low memory usage. Optimize some aspects of your PC and protect against all threats.
Avira
Check this amazing free antivirus with a great anti-scam feature for your Office 365 mailbox.
Emsisoft Anti-Malware is the perfect security extra-layer for your PC or laptop. It works perfectly on any hardware configuration and supports both x32 and x64 platforms.
This tool has a dual-engine scanner that keeps safe all your files and reacts instantly when a file has an unknown modification or source.
Its anti-malware and anti-ransomware security will keep you safe while surfing. Another great feature is its Behaviour Blocker. This tool detects even not-yet-known threats and unknown signatures.
Emsisoft Anti-Malware is a great tool that comes at a great price, around $20, which is a better price than other popular antiviruses.
Some of Emsisoft’s main key features are:
Web protection that blocks any malicious website
File guard so every downloaded file is scanned
Behavior Blocker to detect and block new malware
Finds and removes unwanted programs
Remote management
It also has great rankings in many independent tests. You can find more information and download it in the link below.
Emsisoft Anti-Malware
With multiple protection layers, Emsisoft will block any online threats and protect your Office 365 app.
Panda’s Cloud Protection is an antivirus for Office 365 that comes with endpoint cloud-based antimalware and firewall protection, plus email traffic filtering.
It also guarantees the highest protection for endpoints and emails, using its collective intelligence tool that ensures files are constantly and automatically updated.
The firewall is personal or managed, plus it has cloud-based antispam filtering.
It is easy to use, has minimal maintenance costs, and optimizes the consumption of bandwidth and endpoint resources while avoiding inoperative traffic and minimizing server load.
Features include a hosted web console, profile-based protection, flexible installation, detailed email reports, vulnerability and threat assessment, plus management delegation among others.
Check out more impressive features that are included in Panda antivirus:
URL, web monitoring, and filtering
Automatic USB protection
Lightweight and easy on the system’s resources
Antispyware and antivirus engines
Parental control
It supports multimedia mode and gaming as well
For email protection, you get hosted email spam filtering, guaranteed availability, quarantine management, unlimited domain alias, plus so much more.
Panda Dome
Keep your Office 365 secure with real-time monitoring and personal firewall from this great antivirus.
AVG Antivirus – Great scanning options and virus prevention
Another solid antivirus software that you might want to consider is AVG Antivirus. This antivirus offers protection against standard threats including viruses, spyware, and ransomware.
In addition, this tool will block unsafe links, downloads, and malicious email attachments. It also supports real-time security updates, and it can even scan your PC for performance problems.
Another great feature available is an Enhanced Firewall, so you can easily monitor your online traffic and choose which applications have access to the Internet.
AVG Internet Security also has anti-phishing protection so it can easily detect malicious websites and prevent them from stealing your data.
It’s worth mentioning that this tool is available on the Android platform as well, so if you need to protect your Android device, you might want to consider this tool.
The benefits of using AVG are:
Verify any Wi-Fi network security and connect safely to it
Block all unsafe websites before entering them
Improve storage and performance with built-in tune-up tools
Use the AVG VPN to maintain your privacy when browsing
Block any phishing attempts
Overall, AVG Antivirus offers solid features, and if you’re looking for basic protection, you might want to try the Free version. But if you need full system protection along with some advanced features, you might want to consider getting the Internet Security version.
AVG Antivirus
AVG will block unsafe links, downloads, and email attachments, assuring great protection for your Office 365.
With Kaspersky antivirus for Office 365, you are able to protect your mailboxes managed through this cloud app.
Your email messages are also scanned for viruses and other malware threats that may be transmitted via email, including spam and phishing.
Kaspersky for Microsoft Office 365 features antivirus, antiphishing and antispam protection, and attachment filtering.
It can scan incoming and outgoing mail for malware, filter spam from user mailboxes, scan email messages for phishing and malicious links, and filter attachments in email messages.
The perks of using Kaspersky are:
Light resource usage
Transaction protection
Built-in password manager
Works for PC, Mac, and mobile devices
Ease-of-use and intuitive interface
Additionally, it will move messages to backup to prevent data loss risks, notify the system admin about messages with malicious objects or filtered attachments, and display app activity statistics.
Kaspersky Standard
Use this reliable antivirus for your Office 365, and prevent crypto mining malware infections from affecting your device.
This antivirus for Office 365 protects your sensitive data from loss or theft, protects user accounts, prevents threats in your emails, and blocks advanced attacks.
It works quietly in the background, minimizing the strain on your system’s resources. This can be verified with tools such as Task Manager.
Besides, it allows you to respond quickly to security incidents with comprehensive log data.
What sets Norton apart is its multi-layered approach to protecting your device from attacks by identifying dangerous files, preventing downloads, and removing viruses, and malware such as worms and Trojan horses.
Here are some of the perks of using Norton antivirus products:
Efficient real-time protection
Built-in VPN to enhance privacy
Parental control features
Built-in password manager
Low system impact
There is a VPN included to protect your privacy while surfing online and also multiple layers of protection for your devices, game accounts, and digital assets.
Norton
With continuos malware scanning and a power eraser that blocks suspicious files, your Office 365 will always be safe.
Primarily, yes. You can benefit from integrated anti-malware, phishing attack protection, or no spam shield.
Is Microsoft Defender free with Office 365?
Yes, you have Microsoft Defender included in specific subscriptions but not in all of them. It is possible to get it for free if you purchase the plans that include it.
Are you ready to secure your business with any of these best antiviruses for Office 365? Share your favorite and why by leaving a comment in the section below.
Microsoft is in the midst of reorganizing its flagship productivity suite while simultaneously invoking a rebranding of its software stack across platforms with a new single Microsoft 365 app.
If you’re scratching your head at yesterday’s Ignite announcement about a rebranded Office 365 app and thinking “hasn’t Microsoft already used the Microsoft 365 brand ubiquitously with its various Office and cloud services?”, you’d be correct.
Roughly two years ago, Microsoft began identifying its paid Office 365 users as part of its Microsoft 365 family, which mainly highlighted the subscription base of the platform. However, it seems Microsoft is ready to make a bigger play at rounding up all its services under an easier to understand grouping and simply identifying a single service as Microsoft 365, ala Amazon Prime.
Microsoft now states that “Microsoft Office is changing to Microsoft 365,” and what that means for Office users is that along with the seemingly odd naming convention, there will be a new consolidated experience in organizing and communicating across a larger suite off Microsoft software experiences.
In the coming weeks, Microsoft will rebrand the recently launched Office 365 app on Windows and mobile to simply Microsoft 365 and invoke a new logo to represent the consolidation. Along with the subtle visual change to the new Microsoft 365, users are expected to gain more features that include:
New types of content creation and templates: Create is your place to quickly start on projects across several Microsoft 365 apps either from blank templates or try recommended templates for quicker inspiration. The Create module is already available to all users on the web, Windows, and mobile, with more template types arriving for consumers next year.
New Apps module: Discover, launch, and pin the tools you use the most across Microsoft 365. Available next month to all users on the web and Windows, and on mobile in the coming months.
Welcome Badging: Allows you to see your Microsoft 365 subscription status and track storage usage in one easy place. Available next month to consumer users on the web and Windows.
My Content: A popular feature for business customers, now available for personal use, My Content is a central location to view and access all your content – created by you or shared with you – regardless of where it’s stored. Available next month to all users on the web and Windows.
Feed: Relevant content based on who you work with and what you work on is surfaced through an easy-to-digest interface to simplify your workflow. Available today for commercial users on the web, Windows, and mobile.
Tagging: A new way to group and organize your content with custom tags across all types of content. Available today for commercial users on the web and Windows.
Adding a cherry on top, each of the old Office 365 apps will be bestowed with their own refreshed icons to signify their accension to Microsoft 365 status. The first visual changes to the Office 365 apps are scheduled for some time in November and will first appear on the web with Windows, iOS, and Android following.
As previously mentioned, Microsoft’s move to umbrella its Office 365 apps under this larger brand also works in highlighting disparate app situations like Teams and Stream as part of the ecosystem family and may help boost cross app engagement.
At the end of the day, “Office”, “Office 365”, or “those damn Microsoft products,” will colloquially remain the same for most people. The changes announced yesterday are more or less a positioning for Microsoft’s future where the company can consolidate more of its product categories under easy to recognize brands while also bundling even more services together.
Judging by yesterday’s announcement, it appears Microsoft envisions a future where people will simply have “Microsoft 365” subscriptions that bundles products such as the Office suite, any future creative apps, Azure, a transferable virtual Windows license and Game Pass for various pricing tiers.
During yesterday’s Surface event Microsoft showed off iCloud Photos integration with Xbox and Windows 11. The rollout of the new Photos app with iCloud integration has begun for Windows Insiders in the Dev channel (version 2022.31100.9001.0).
The Microsoft Photos app allows you to view, share, and organize all your photos from your PC and Onedrive. This update adds your Icloud photos alongside photos from other sources in the redesigned “All Photos” gallery view. You can also see a dedicated page of your iCloud photos from the navigation pane. To get started follow the easy steps in the Photos app, You will need to make sure you have the iCloud for Windows App, you’re signed in and all photos are selected.
Dropbox is a cloud storage service you can utilize entirely within your web browser. However, you can also add a Dropbox folder to File Explorer.
That folder will then sync with Dropbox so that you can drag and drop files into your cloud storage via Explorer.
There are also a few other ways you can integrate Dropbox with the Explorer file manager in Windows, and we will tell you all about them in our article.
Where is the Dropbox folder on my PC?
After you install Dropbox, you should see the app in File Explorer. However, in case you changed its name or installed it in a different location other than its default one, you might have trouble finding it.
You can find the Dropbox app’s file location by opening File Explorer and typing the following in the address bar: %HOMEPATH%/Dropbox
How can I get Dropbox in File Explorer on Windows 10/11?
1. Install Dropbox on your Windows PC
To add Dropbox to File Explorer, you’ll need the app for it.
If you don’t already have a Dropbox account, open the DB login page.
Click the create an account page link.
Fill in the required text boxes for the user account setup.
After setting up an account, you’ll be prompted to download the Dropbox software.
Click Download Dropbox to do so.
Then run the installer to add the Dropbox software to Windows.
If you already have a DB account but haven’t installed the software for it, open the Dropbox app’s download page in a browser.
Then you can download the app from there to install it.
2. Add files and folders to the Dropbox folder
Press the Windows key + E keyboard shortcut to open File Explorer.
Now you’ll see a Dropbox folder on the left side of File Explorer’s window.
Click that Dropbox folder to open it.
Drag-and-drop files into the Dropbox folder to add them to your cloud storage.
You can add new folders to Dropbox in Explorer by right-clicking within the DB folder and selecting
New. Then select the Folder option.
3. Add the Dropbox folder to File Explorer
1. Press the Windows key + E keyboard shortcut for File Explorer.
2. Now you’ll see a Dropbox folder on the left side of File Explorer’s window.
3. Right-click on the folder to bring up a menu with multiple options.
4. Select Pin to Quick access.
5. Dropbox is now added to File Explorer.
After yo
If you want to get Dropbox in File Explorer, you can easily add it to the latter’s Quick Access section. You can do this by right-clicking on the DB folder and selecting the Pin to Access option.
4. Change the Dropbox folder path
You can change the path location of your Dropbox folder.
To do so, click the Dropbox system tray icon to open its system tray menu.
Click the Access and manage Dropbox settings button at the top right of that system tray menu.
Select the Preferences option.
Then click the Sync tab shown directly below.
Click the Move button.
Then select an alternative path for Dropbox on the Browse for Folder window, and click the OK button.
Press the Apply button.
5. Add Dropbox to File Explorer’s Send to menu
To further enhance Dropbox’s File Explorer integration, add it to the Send to submenu on the context menu.
To do that, open File Explorer.
Enter %APPDATA%/Microsoft/Windows/Send To in File Explorer’s path bar, and press the Return key.
That path will open the SendTo folder shown directly below.
Left-click the Dropbox folder on the left of File Explorer and hold the mouse button.
Then drag Dropbox into the SendTo folder, and release the left mouse button.
Now you’ll find Dropbox on the Send to submenu.
Right-click a file in Explorer and select Send to on the context menu.
Then select to move the file to Dropbox on the Send to menu.
Now your Dropbox cloud storage will be an extension to File Explorer. With Dropbox added to File Explorer, you can move files into and out of the cloud storage without opening a browser.
2. Select the desired Windows 10 Update version, and double-click on it.
3. The system will check if the update has been installed before or not. If it’s available on your PC, the installation will begin. All you need to do is follow the on-screen instructions.
4. After the installation, restart your PC.
5. After the installation, restart your PC.
A great method you can use to update Windows 10 offline is to make use of Windows 10 .msu/exe update files, available for download on the Microsoft website.
This will ensure that you can install the OS without requiring an internet connection, in a very short period of time.
2. Install Windows 10 offline update with the Portable Update
This method requires the user to install a freeware called Portable Update.
The advantage is that you can install the same update files on multiple PCs or on one PC multiple times.
The program will use the standard Windows Update API Service for updating.
If you don’t like the updated Windows 10, you can roll back to your previous Windows system.
What are the advantages of updating Windows offline?
Offline updates are more stable lowering the chance of the update failing to install. These types of updates are often faster and can be completed at any time.
Do keep in mind that you’ll need to download the update file first, but the installation process won’t require an Internet connection.
In this article, Windows users found detailed instructions for an easy and safe Windows 10 offline update. We also have a guide on how to manually install Windows 10 updates, so don’t miss it.
When Windows throws an error, most of us just click it away. But your error logs quietly record everything: what failed, when it happened, and which program caused it.
Learning to read these can help you fix crashes faster, avoid repeat issues, and even spot deeper problems before they get worse.
How do I view error logs in Windows 11?
Here are a few ways to see error logs in Windows 11:
DIFFICULTY
Easy
DURATION
4 minutes
WHAT YOU NEED
Windows 11, Event Viewer
It’s pretty simple and quick to access the error logs on your Windows 11 OS, but in case you didn’t used before, the steps below will surely help you find them.
1. Press Windows + S to launch the Search menu, enter Event Viewer in the text field at the top, and click on the relevant search result.
2. Double-click on Windows Logs in the navigation pane on the left.
3. You will now find the five different categories. Select any of these, and all the error logs under it will be listed on the right.
4. Now, click on any of the error logs to view all the relevant information about them.
You now know how to check the Windows 11 error logs, but just knowing that won’t suffice. To better understand the logs you are viewing, take a look at what a CBS log file is and how it stores information about Windows updates and system repairs.
There’s still a lot out there to understand before you can actually make some sense out of these logs, and use them to your advantage.
How to understand Windows 11 error logs?
When you view a Windows 11 crash log, the general details and the Event ID is critical in identifying and eliminating the error. Apart from that, there’s an Event Log Online Help link at the bottom, which may provide some valuable insights.
For instance, here’s a Windows 11 error log when the relevant driver for a device failed to load.
Log in Event Viewer
The 219 Event ID helped find out a lot of information along with the relevant fixes for the problem.
We just did a Google search for this Event ID and there were a plethora of results. But this requires a proper understanding of Windows 11 error logs.
But, it’s important to mention here that not all error logs will be as descriptive. Some might have things that you wouldn’t be able to comprehend or use jargon excessively. No matter the case, a simple Google search would suffice.
When you go through the Windows 11 error logs, there are three important categories, referred to as Event Level, under which these are placed.
And, the categories define the severity of the event for which the log is created. The three categories are as follows:
Information: These are created when an operation goes through successfully. For instance, when a driver is loaded or an application is launched without encountering any issues.
Warning: These are created when the OS finds an issue with the system. These issues do not pose an imminent risk, but could be problematic in the future. For instance, if you are running low on disk space, a log will be created.
Error: These indicate a major problem, though most of the time, Windows takes care of these as well. For example, an error log will be created if a driver or service does not load. But, these are the most critical ones of all.
If you are identifying problems with the PC, ignore the Information logs, go through the Warning logs, but pay special attention to the ones categorized as Error, since these are most likely to record the problem you are looking for.
When you open the Event Viewer in Windows 11, it will list out all three. The view will remain the same if you have not changed the Windows 11 Error Reporting logs location in the in the Group Policy.
However, identifying all logs for one of these levels will take up a lot of your time. This is where filtering error logs come to your aid. Check the next section to find out how you can do that.
How can I filter error logs?
Open the Event Viewer, navigate to the particular category of logs from the left, and then click on Filter Current Log on the right.
Next, click on the Logged dropdown menu to select the duration for which you want to check the logs.
Now, select a time duration from the list of options. You can also choose the last option to create a custom range.
Once done, tick the checkboxes for the EventLevels that you want to filter.
Finally, click on OK at the bottom to filter the error logs.
All the errors logs that fall under the choosen filters will now be listed.
We selected the duration as 24 hours, and level as Error, and filtered the logs. Event Viewer then listed the four Windows 11 error logs that were created during that time.
How to create a custom view to check a particular category and level of logs in Windows 11?
Open the Event Viewer and click on Create Custom View on the right.
Next, select the duration and Event Level, as you did earlier when creating a filter.
With the By logs option selected, click on the Event logs dropdown menu, double-click on the Windows Logs entry to expand and view the various categories, and tick the checkboxes for the desired ones.
Now, click on OK at the bottom to set filters for the new custom view.
Enter a Name and Description for the custom view and click on OK.
The new custom view will now be listed on the left, and all logs falling under it on the right.
How can I clear error logs in Windows 11?
Launch the Event Viewer, navigate to the relevant category, and click on Clear Log from the list of options on the right.
You now have two options, either Save and Clear the error logs or directly Clear them. Choose the desired option.
If you selected Save and clear, choose the location for the file, add a name for it and click on Save.
Once saved, they error logs will be cleared right away and there will be none listed under that particular category.
In case you saved the error logs before deleting them, these can be found under Saved Logs in the navigation pane on the left.
The OS creates thousands of logs for each type of event, be it the successful launch of a driver and service or the most fatal errors. Like any other file, these too consume space on your hard disk, no matter how small it is.
So, if you are running out of space, or just want a more organized Event Viewer, clearing the Windows 11 error logs may help.
Checking the error logs can help you understand the BSoD errors like 139, and point you in the right direction to fix it.
How do I create my own log file in Windows 11?
Press Windows + S to launch the Search menu, enter Notepad in the text field at the top, and click on the relevant search result that appears.
Enter .LOG in the very first line of the Notepad.
Click on the File menu, and select Save from the list of options.
Next, choose the location and name for the file, and click on Save at the bottom. Now, close the Notepad.
Once the log file is created, the current date and time will be mentioned everytime you open it, and you can enter whatever you want to and hit Ctrl + S to save it.
Now, when you open the same log file the next time, the previously added entry will be listed under that date and time, and the current date and time will again be mentioned below the last entry.
A log file is used to record data. Windows uses it for errors, warnings, and information, while you can use it for other purposes.
Creating a log file is simple, and so is maintaining it. Say you want to record the progress for a book you are reading, just create a log file and enter the number of pages you read each day, or as you may please.
Why do I need to check Windows 11 error logs?
Error log for a service that got terminated unexpectedly
Checking error logs on Windows 11 allows you to find the underlying cause of an issue such as a BSOD (Blue Screen of Death).
That’s all you need to know about Windows 11 system logs. From now on, identifying the underlying cause of errors should no longer be a problem.
Has the New > Folder option disappeared from your desktop and File Explorer context menus so you can’t create a new folder on your Windows PC? We’ll show you how to get it back.
It’s most likely due to corrupted registry keys or system files. Misconfigured settings in the antivirus or permissions sector could also play a role.
What to do if you can’t create a new folder in Windows
First, try creating a new folder with keyboard shortcuts: Ctrl + Shift + N keys. This worked for some users who didn’t have the New Folder option. If this won’t work, try the more advanced steps below.
1. Edit the Registry manually
1. Press the Windows key + R, type regedit, and click OK.
2. Browse to the key below in the Registry Editor window:ComputerHKEY_CLASSES_ROOT\Directory\Background\shellex\ContextMenuHandlers.
3. SelectContextMenuHandlersin the left pane and right-click an empty space on the right.
4. Now,select New, then Key.
5. EnterNewas the title for the key.
6.Select the New key and double-click Default on the right to open the Edit String window.
7. Enter{D969A300-E7FF-11d0-A93B-00A0C90F2719} in the Value data box and click OK to close the window.
8. Now, close theRegistry Editorwindow and right-click the desktop to set up a new folder.
If you can’t access the Registry, we have an expert article that will help you fix that problem right away.
2. Uninstall problematic applications
Press the Windows key + I to open the Settings app and select the Apps option.
Locate and click on the app you want to remove and click the Uninstall button.
Finally, follow the onscreen instructions to complete the process.
If the problem started happening soon after you installed a new app, try uninstalling it. Some apps may interfere with File Explorer.
3. Run an SFC scan
Press the Windows key + S, type cmd, and click on Run as administrator to start Command Prompt as administrator.
Copy and paste the command below and hit Enter: sfc/ scannow
Wait for the scan to complete and try to create a new folder again.
Running the SFC tool will identify and fix file corruption. Alternatively, you can use a dedicated tool to get your system files back to normal.
4. Use Command Prompt to create a directory
Launch Command Prompt as administrator.
When Command Prompt starts, type cd / and hit Enter to navigate to the root directory.
Now, enter the command below and hit Enter in order to create a new directory: mkdir FolderName
By doing that you’ll create a new folder on your C drive.
After doing that, you should be able to create new directories without any issues. Several users reported that they managed to fix the problem simply by using Command Prompt to create a new folder on their PC.
5. Run a System Restore
Enter system restore into the Cortana search box and select Create a restore point.
Click System Restore in the System Properties window.
Click the Next button.
Choose a restore point when the New folder option was working fine and click Next.
Finally, click the Finish button to complete the process.
Restoring your PC to a point when the new folder option was working well can get rid of the error.
6. Remove problematic updates
Press the Windows key + I and select Update & Security.
Choose the View installed update history option.
Select Uninstall updates to open the Control Panel.
Now double-click the update you want to remove to uninstall it.
Sometimes an update can cause this problem to occur, and if that’s the case, you can roll it back.
Press the Windows key + X and select the Task Manager option.
Right-click on Windows Explorer and select the End task.
Now, try to create a new folder. If it still does not work, press the Windows key + R to open the Run utility.
Type SYSDM.CPL and hit Enter.
Click the Advanced tab at the top, followed by the Settings button under the Performance section.
Click the Advanced tab at the top and set Adjust the performance of: to Programs in the Processor Scheduling section.
Now, go to the Virtual Memory section in the same window and click the Change… button.
From here, check the box for Automatically manage paging file sizes for all drives.
Finally, click the OK button.
8. Perform a clean boot
Press the Windows key + R, type msconfig, and click OK.
Click the Services tab at the top, then check the box for Hide all Microsoft services, and click the Disable all button.
Click the Startup tab, followed by Open Task Manager.
Right-click each of the services there and select Disable.
Now, go back to the services window, click the Apply button followed by OK and restart your PC.
Third-party apps running in the background are among the major causes of this issue. Performing a cleaning boot starts your system with only the required processes.
Now, you can try creating the new folder again.
9. Disable controlled folder access
Press the Windows key + S and type controlled folder.
Choose the Controlled folder access option.
Toggle the switch before Controlled folder access backwards to disable it and close the Window.
So those are our solutions to effectively fix and restore new folder options if you can’t create new folders on your Windows PC.
Feel free to let us know if you were able to fix this issue with any of our solutions in the comment below.
Hyper V or hypervisor is Microsoft’s product that lets users create and manage virtual machines. You can check out our guide to understand how to enable Hyper V in Windows 11.
In this guide, we will give you a bunch of solutions that will help you resolve a common Hyper V not authorized to connect error. Let us check it out.
What causes Hyper V not authorized to connect error?
The Hyper V services aren’t enabled: Some third-party programs might have disabled the Hyper V service, because of which you are experiencing the problem.
Incorrect system settings: You might not be running the Hyper V without sufficient privileges. In such a case, run Hyper V as an administrator.
The presence of bad sectors can also cause this issue: Due to missing or corrupt system files, it could create multiple issues.
Failed Windows updates: If you tried updating your PC, and it failed because of any reason, then it could cause multiple problems, one of which is the Hyper V not authorized to connect error.
How can I fix the Hyper V that is not authorized to connect error?
Here are a few preliminary checks that we would advise you to apply before proceeding with the advanced troubleshooting solutions mentioned in this guide:
Check if the Hyper-V Virtual Machine service is running.
Make sure that you run the Hyper-V Manager using an account in the Administrators group otherwise, you will be denied access.
Restart your PC and Hyper-V server.
Install the latest available Windows update.
Reinstall Hyper V from Windows feature updates.
If you checked all the boxes above, let’s see how we can fix this problem with the solutions below.
1. Tweak the system settings
Click the Search icon, type security, and click on Window Security.
Click on App & Browser control.
Select Exploit protection settings.
Switch to the Program settings tab.
Locate C:\WINDOWS\System32\vmcompute.exe in the list and expand it.
Click Edit.
Scroll down to Control flow guard (CFG) and uncheck Override system settings.
Click the Windows Search button, type powershell, and open the app from the results.
Execute the below command on PowerShell: net start vmcompute
Restart your PC.
2. Update drivers on your PC
Click the Search icon on the taskbar, type device manager, and click the app from the results.
Expand each section and right-click on it.
Select the Update driver option.
Pick Search automatically for drivers and if the system finds any new ones, it will install them.
Often, we forget to update drivers and because of that not only your PC’s performance will be hampered but it will also trigger issues such as Hyper V not authorized to connect errors.
The above solutions require you to manually check for updates, which is quite time-consuming. A better alternative is to use a trusted third-party tool to update all drivers for you automatically.
We would recommend you check out Outbyte Driver Updater. It scans your PC for all faulty drivers; all you need to do is select all the ones you would like to fix, and everything else will be done automatically.
Outbyte Driver Updater
Enhance your device’s health by keeping all your drivers up-to-date with this great tool.
Locate the Hyper-V related services, right-click on each, select Stop, then Start again.
Often a service runs into an error due to continuous usage and settings tweaks. In such a case, it is required that you restart the service, which allows it to reload all of its files from scratch.
Launching the relevant services also helps get rid of the An error occurred while attempting to connect to server. Check that the Virtual Machine Management service is running and you are authorized to connect to the server error.
Click the Search icon, type cmd, and click on Run as administrator.
Type the below command and press Enter: MOFCOMP %SYSTEMROOT%\System32\WindowsVirtualization.V2.mof
Restart your PC and check if this fixes the issue or not.
5. Run Hyper V as an administrator
Right-click on the Start menu and select Computer Management.
From the left side, expand Local Users and Groups and double-click on Groups.
On the right side, select and open Hyper-V Administrators.
Click on Add, and in the Enter the object names to select field, enter your user account name.
Press OK, then click Apply and OK to acknowledge the change.
Restart your PC.
Running as an administrator will help in the case of the Hyper-V You might not have permission to access it error. You can try reinstalling the Hyper-V feature from Windows Features. Check if a new Windows update is available. If yes, then install it.
Also, you can uninstall problematic updates if the Hypervisor error appeared after performing a Windows update. You can check out our guide that will help you easily uninstall updates in Windows 11.
Run SFC Scan and DISM commands to fix or repair missing/corrupt system files. Use System Restore to turn Windows to a previous state in which the Hypervisor worked.
That is it from us in this guide. We hope the above solutions helped you fix the issue, and do not forget to let us know which one resolved the issue.
Windows 11 captured everyone’s attention with an extra sheen of polish that we’ve all been waiting for.
The story is quite the same for most of us: Windows remains the place where we discovered the pure joy of gaming, edited our very first photos, realized how simple it is to connect with our loved ones, and so much more.
Is Windows 11 ISO available for download?
If you want to reinstall Windows 11, you’re going to need an ISO file, and the good news is that you can download it for free from Microsoft’s website.
Microsoft released a list of all system requirements for the latest iteration of their OS on its official Windows 11 page, along with this statement:
There may be additional requirements over time for updates, as well as requirements to turn on specific features within the OS.
For now, the basic requirements for installing Windows 11 on your PC are as follows:
Processor: 1 GHz or faster with 2 or more cores and 64-bit capability
System memory: 4 GB minimum
Storage: 64 GB minimum
System firmware: UEFI, Secure Boot capable
TPM: TPM 2.0 is required
Display: 9-inch minimum in diagonal, High definition (720p), 8 bits per color channel
Graphics: DirectX 12 API, WDDM 2.0
As long as your computer or laptop meets the minimum requirements, you can update to Windows 11 the same way you usually update to new versions of Windows 10.
Also, remember that Windows 11 download size is 9 GB, as per Microsoft, but you need more free space to install updates released in the future.
The good news is that the OS will be offered as a free upgrade for all Windows 10 users. However, OEMs will still have to pay for a Windows 11 license.
Windows 7 users were offered free upgrades to Windows 10 when it was released, and things are no different when it comes to the new OS.
If you’re still using them, you will receive a free upgrade this time as well. However, you will need to do a clean install or reinstall the OS before being eligible.
Besides knowing how much Windows 11 will cost, also note that for Windows 11, the company is planning to return to the normal schedule of one content update per year.
Can I download Windows 11 now? – that’s most likely the question that you also have in mind, given the circumstances, so let’s discover together the precise answer.
Discover if your PC is eligible for a free upgrade
First of all, see if your PC is eligible for the free upgrade to Windows 11. In that regard, you should simply download PC Health Check.
Click the Check Now button and you’ll either be informed that This PC can run Windows 11 and you will be notified when it becomes available, or you’ll continue to receive Windows 10 updates.
PC Health Check app was temporarily removed by Microsoft, as the app was not fully prepared to share the level of detail or accuracy, but the Redmond giant brought it back again and it’s available for download.
There’s also an alternative to Microsoft’s PC Health Check App named WhyNotWin11, which offers an even more detailed system view.
Is Window 11 worth upgrading?
For most, Windows 11 should be worth upgrading. The revamped UI and various other user-friendly changes are bound to enhance your Windows experience.
Windows 11 has a seamless Settings app, a new File Explorer with various options suitably placed, an intuitive Start menu, and an advanced Action Center, amongst other changes. So, if you are up for a neater OS, Windows 11 is worth a try!
We have covered the changes in Windows 11 in a later section, so do check it out.
Will upgrading to Windows 11 delete my files?
No, it won’t, as long as you choose the right settings during the upgrade process. Make sure to select the Keep personal files and apps option in the Windows 11 Setup.
Windows 11 is available to download under an ISO file format. You can download Windows 11 ISO directly from the Microsoft official website, therefore it is a very safe and secure download. Here is what you need to do:
2. Click on Select download under Download Windows 11 Disk Image (ISO), then choose Windows 11.
3. Now hit the Download button.
4. Select the product language you desire, then click the Confirm button.
5. After that, you will receive a download link and you will be able to click on the 64-bit Download button to get the Windows 11 ISO.
6. Right click the ISO file you downloaded and select the Mount option. An alternative to this is to create a bootable USB or DVD.
7. A new virtual drive will appear in your File Manager window. Just click on it and then double-click the setup file to start the installation process.
2. Upgrade to Windows 11 using Windows Update
Click the Start button and select Settings.
Now select Update & Security.
Just click on the Check for updates button and you should see the Windows 11 Insider Preview Build as a regular Windows update.
It will start to download and then, the installation will begin. You will also be prompted for a restart.
You will get a Windows 11 Installation Assistant executable file. Running it will start the installation process. Click on Accept and install after you read the terms of agreement.
Windows 11 will start downloading and installing so wait patiently until the process is over, then go through with the instructions on the screen to finish.
This is the easiest way to install Windows 11 if your PC is meeting all the requirements because the Installation Assistant will perform all the tasks for you.
For this solution, you will need a USB drive with at least 8 GB of free space.
Go to the Windows 11 Downloads page and click on Download now under Create Windows 11 Installation Media, to download the Windows 11 Media Creation Tool.
Run the downloaded file to start the Media Creation Tool app. Start by accepting the license terms.
Uncheck the Use recommended box if you want to change the Windows language, then hit the Next button.
Next, you can choose whether you want to create a bootable USB drive or just to save the Windows 11 ISO and use it later. If you select the first option, make sure you inserted a USB drive before clicking Next. Since you already know how to download the Widows 11 ISO, we will select the first option, to create a bootable USB drive.
No select the drive you prepared and hit Next.
The app will start downloading Windows 11, then verify the download and ultimately creating your Windows 11 bootable media you can use to install the new OS.
If your PC is not prepared with TPM 2.0 and Secure Boot, this solution will not work for you because when the installation starts, those requirements will be checked.
Keep in mind that you might encounter issues during setup due to a lack of Internet connection, but you can easily install Windows 11 without internet.
After the downloading process is complete and you finished creating the bootable drive, you can install Windows 11 using it.
You should also know that Rufus has an option in the Boot section to select an ISO image that bypasses TPM 2.0 and Secure Boot verifications.
So, if you don’t meet these requirements, you will still be able to install Windows 11 without any issues.
6. Join the Windows Insider Program
If you can’t install Windows 11 natively, you can also try to join the Windows Insiders Program and try that way. You will even be able to test the new features ahead of others.
Click on the Start button and open the Settings app.
Select Update & Security.
Then click on Windows Insider Program from the left pane.
You might get an error but you can get through if you go to Settings, Privacy, then Diagnostics & feedback and select Optional diagnostic data.
Now click on the Get started button from the Windows Insider window.
If you already have an account, you just need to click on the Link an account option and specify the user account. If you don’t, you will see a Register button that will take you to a registration procedure.
Of course, if you already signed in with the right Insider account, you won’t be prompted to do anything, and you will switch automatically.
Next, you will need to join the Dev Channel or Beta Channel because only the insiders from those channels can upgrade to the Windows 11 Preview Build so select the Dev Channel or the Beta Channel and click on Confirm.
You will have another confirmation window, and then you will be prompted for a restart.
Joining the Dev Channel or Beta Channel of the Windows Insider Program can be the key to trying Windows 11, so follow the steps above to get it done.
And if you find this process taking an excruciatingly long time, you can opt for an unattended installation.
What are some of Windows 11 new features?
When designing the new OS, Microsoft’s main focus was giving its users an overall better experience, starting with an improved user interface redesign, more collaborations for the App Store, and a unique gaming experience.
The streamlined new design has pastel-like colors and rounded corners, a revamped Start menu, as well as larger touch targets for an improved PC tablet experience, to name a few.
On the right, you can see the new Notifications interface
With support for Android apps through the Amazon Store and a new way to see your interests at a glance thanks to the Widgets feature, upgrading to the new OS is tempting.
But the vision for Windows 11 is best presented by Panos Panay, business executive, and chief product officer for Windows+ devices at Microsoft:
The past 18 months brought an incredible shift in how we used our PCs, we went from fitting the PC into our life to trying to fit our whole life into the PC. Our devices weren’t just where we went for meetings, classes, and to get things done, but where we came to play games with friends, binge watch our favorite shows and, perhaps most meaningfully, connect with one another. In the process we found ourselves recreating the office banter, the hallway chatter, workouts, happy hours, and holiday celebrations – digitally.
We have described how you can upgrade from Windows 10 to Windows 11, but you can also do that by using an ISO, as shown above.
When the right time comes, before jumping to the actual procedure, remember to use the best backup data software and ensure you have a stable Internet connection.
Besides the fact that you’ll be able to download the latest version and then upgrade your PC, note that you’ll also have the option to create a bootable USB drive. Just use a USB drive with at least 8GB of storage in that regard.
While upgrading the operating system, you can choose which programs to keep. Do that for all, save them to a new location, or delete everything from the system and enjoy a fresh start.
As for any Insider Preview builds, do note that we strongly recommend installing them on a second tester device, as bugs will most likely be part of the package.
Windows 11 is the most significant change in years, so it’s only natural to want to enjoy it as soon as possible. As for those worried about getting a message saying This PC can’t run Windows 11, rest assured that it can be easily solved.
Let us know in the comments below if you like the idea of an early beta version as part of the Windows Insider Program or if only the full version is the one you have in mind.
OneDrive is undeniably great; however, at times, users encounter the Application failed to start because no QT platform plugins could be initialized. Reinstalling the application may fix this problem trying to launch certain apps.
Why does the OneDrive QT platform error occur?
OneDrive QT platform error is a frequent concern of the users who stores the data online. There are multiple reasons and factors for this issue; let’s know the most repeated one.
Corrupted system files– One of the reasons for the QT platform error is damaged or corrupted system files. These files are necessary for proper functioning.
Certain apps need reinstallation – There might be some apps that you recently installed and uninstalled that are conflicting with the working of other apps or causing issues with the registry.
Absence of Update.xml file – This file is very important for the functioning of OneDrive. If this file is not in your system, you are bound to experience various errors, including QT platform errors.
After the above checks, let’s move toward the actual solutions to fix this problem.
1. Examine system file corruption
Press the Search icon in the taskbar, type cmd, and click on Run as administrator to start Command Prompt with full privileges.
Copy and paste the following command next to the last command present in the window, and then hit Enter. chkdsk /f /r
Once you have added the command, restart your PC, and your system files corruption will be examined automatically.
Repairing corrupted system files will most probably help you clear the error. Try more solutions if the error is still present on the screen.
As you can see, there is a manual method, but some third-party tools do that automatically.
These tools are an excellent option in this case because they can scan your device thoroughly and fix or replace each broken element of your operating system.
2. Try a clean boot
Click on the Search icon and type msconfig, then click on System Configuration.
Click on the Services tab, check the Hide all Microsoft Services option and click on Disable all.
After that, click on Apply.
A popup appears; click on Restart, and you are done.
Search for runin the Search bar and click on the Run app.
Copy and paste the following command in the dialogue box that will appear on the screen, and then press OK: %localappdata%\Microsoft\OneDrive\onedrive.exe /reset
Special effects aren’t always about adding elements to the screen. Instead, many are looking at how to remove something from a video.
There are plenty of software tools that can be used for this purpose. More so, if you make good use of them, you’ll be able to do it in a completely seamless manner.
Of course, you can’t use just any software tool for this, especially if you value quality above all else. That is why we’ve created this list of the best video editing tools that you can use if you want to remove objects from a scene.
The entries were chosen based on multiple criteria, such as price, how easy they are to use, how popular and widespread they are, and more.
What is the best software to remove objects from videos?
When it comes to professional video post-production, few software tools come close to what Adobe Premiere Pro is capable of.
Thanks to its expanded toolset, pretty much anything you can think of can be achieved, as long as you know how to use it.
In fact, something as simple as removing an object from a video is a piece of cake thanks to Adobe After Effect’s dedicated Cloak tool.
Accessing the Cloak menu is all that you need to do in order to remove any moving objects from your videos, and the end result will look seamless and non-edited.
If you’re not sure whether to invest in this program or not, you should know that you have the possibility of opting for a 7-day trial of the entire Adobe Creative Cloud, and when you are truly satisfied with the product, you can opt for the full license.
How do I remove objects from videos with Adobe After Effects?
Using Adobe After Effects to remove an object from a video is very simple and only takes a few minutes. The app allows you to have full control over what you want to edit out of any frame from the video.
1. Download Adobe After Effects.
2. Install the program on your PC and then launch it.
3. Upload the video you want to remove an object from.
4. Select the video layer you want to edit.
5. Click the Pen tool and use it to draw a mask around the distracting object. Press M to reveal the Mask Path properties.
6. Toggle the stopwatch on to set a keyframe at the playhead’s position. Readjust the mask’s position or shape to keep the object contained.
7. Change the mask’s blend mode from Add to Subtract.
8. Choose Window > Content-Aware Fill to open that tool’s panel. For the FillMethod, select Object if it moves within the shot.
9. Select the range you want to fix and then click Generate Fill Layer.
10. Play the composition to make sure the object is no longer there.
If you notice a shadow cast by the now-invisible object, expand the mask to include it and then click Generate Fill Layer again.
Here are some of Adobe After Effects’ main features:
You can try it for free for 7 days
Their website is full of great guides
Professional-level toolset
Can easily handle tasks the removal of objects from videos
You can enrich it with a wide library of plug-ins
Adobe After Effects
Video editing is an art and Adobe can help you achieve seamless results with removing objects from your footage.
If Adobe After Effects is what you plan on using when adding special effects to an already existent video, then Adobe Premiere Pro is what you use when you want to create the video from the ground up.
This timeline-based video editor is the ultimate tool for creating, editing and composing videos of various sizes and purposes.
In fact, Adobe Premiere Pro is used in many professional-level videos, such as Hollywood movies, TV shows, commercials, and music videos.
As far as cropping objects out of videos is concerned, the program can handle that as well, although the process is not as straightforward as with After Effects’ Cloak feature.
Additionally, you can test the product before deciding whether to buy it or not during the 7-day trial that you can gain access to.
Here are some of Adobe Premiere Pro’s main features:
If you remember Sony Vegas Pro, then you probably know that it changed its name into Magix Vegas Pro a while back. However, while the name did change, it didn’t affect the high standards of the original program.
This video editor stays true to its legacy, allowing powerful video editing features, among which we can also mention cropping out objects from videos.
The end result looks quite spectacular, as you can never tell if the video was doctored or not. However, this is the intended purpose after all.
Here are some of Magix Vegas Pro’s main features:
Constantly updated with new and powerful tools
Great cross-platform support
Seamless video editing
Quite user-friendly compared to other tools
Has a history of being one of the best tools in the industry
Of course, professionals need help with video special effects as well, and that is when you need to pull out the big guns in terms of software tools.
DaVinci Resolve 16 is one such software tool that has become a staple of movie production and editing around the world.
This translates into a massive toolset that allows you to perform pretty much any task imaginable as long as you know how to use it. However, this comes at the cost of not being a very user-friendly program.
More so, you will need a very beefy PC in order to perform the more advanced video editing tasks.
Here are some of DaVinci Resolve 16’s main features:
Professional-level software used in large-scale video productions
Wide range of tools and features
Can perform seamless video editing if your hardware supports it
As mentioned before, sometimes special effects involve removing elements from the screen, and not just adding them. That being said, programs that can efficiently and seamlessly remove objects from the video are hard to find.
However, there are a few options out there of tools to remove an object from a video, so make sure that when choosing which one you buy that you are getting the best deal.
The Event ID 6008 error is triggered if the computer was shut down forcefully using a remote shutdown tool or automatically by a third-party program without the user’s request.
This error can affect any version of Windows from Windows XP to Windows 11 and occurs due to several reasons. To fix the Event Viewer error 6008, you should follow the steps below.
What is Event ID 6008?
This event error could be recorded in the System event log if you restart the computer after an application that makes use of the InitiateSystemShutdownEx function has previously caused the machine to shut down automatically.
Event IDs uniquely identify a given event. Each event source can specify its own unique numbered events, as well as the description strings that will be mapped to those events in the message file that it creates.
What can cause an event 6008?
It is possible that you will experience this issue if the computer has been locked or it is set up with a screensaver that requires a password to be accessed.
And if a program that employs the InitiateSystemShutdownEx function with the force flag is the one that is responsible for the automated beginning of the shutdown procedure.
In this scenario, the Event Log service is not informed about the shutdown occurrence, and as a consequence, the shutdown operation is wrongly regarded as an unexpected event by the Event Log service.
How do you see what caused an unexpected shutdown?
Press the Windows key + S, type event, and select the Event Viewer option.
Click Windows Logs in the left pane and right-click on the System option.
Select the Filter Current Log… option.
Enter the ID of the issue you want to research in the <All event IDs> box and click OK. For example, type the event id 6008 to see the cause of an unexpected shutdown.
You can now select a log in the next window to confirm the information there.
How do I fix Event ID 6008?
Before moving to any complicated fixes, it is recommended to check your hardware if they are working well. Below are some of the preliminary checks you can carry out:
Check if your CPU is overheating. You can check the CPU temperature using any third-party app.
If on a desktop computer, check if the Sink fan is working.
Try to clean the heat sink fan by removing the dirt using compressed air.
If the issue still persists after these preliminary steps, you can proceed to the fixes below:
1. Use the Roll Back Driver button
If you are facing the event id 6008 while gaming accompanied by a blue screen, it might be caused by your displaydriver. In case you just updated your driver before noticing the issue, the ideal solution is to roll it back to the previous version.
1. Right-click the Start icon then select Device Manager.
When clicking on Start icon, a box will expand and you have to select Device Manager.
2. Click the arrow next to Display Adapter to expand it, then right-click on your Graphic Card Driver and select Properties.
After you clicked Device Manager, a list with devices will be shown. Just click on Display Adapter, right-click on your Graphic Card, then on Properties where you’ll find the Roll Back option.
3. Go to the Driver tab and click the Roll Back Driver button.
Clicking the Driver tab you’ll find the Roll Back Driver button. The roll-back will begin right after pressing the button.
4. Restart your PC.
After the driver is rolled back, reboot the system and check if the Event log 6008 error still appears.
Press Windows + I then go to the Update & Security section.
Next, click the Check for updates button.
If you are getting the Event ID 6008 with qualifier 32768 in the event log, it might be due to an outdated PC. After the update is installed, check if it is triggered again or if your system is freezing.
If the issue is prevalent then it is possible that Microsoft may have released an update to fix the problem. Check for any pending Windows updates, if you haven’t done them already.
3. Uninstall Feature Updates
Press Windows, input control, and select Control Panel from the results.
Select Uninstall a program under the Programs option.
Select the View Installed Updates option.
Now, select the most recently installed update that caused the problem and Clicking Uninstall.
Reboot the system and check for any improvements.
You should try this solution if the error 6008 occurred during a previous Windows Update download, so we advise you to uninstall the KB update from the Control Panel. This would also help when encountering Event ID 6008 in Windows 7.
Additionally, make sure that software updates are checked for on a regular basis and that you are using genuine software versions, which are more stable and include fewer bugs.
As we’ve shown in this article, it is possible to solve the Event ID 6008 and 41 issues by yourself. Though for Windows 10, the solutions here would help fix Event ID 6008 in Windows 11 as well.
Sometimes it can be as easy as downloading the latest Windows updates, while certain situations may require hardware maintenance. We hope that this guide helped you fix the error.
We’d like to hear more from you on this subject, so feel free to drop a comment in the section below.
One standard error issued by the Windows 11 system (which cannot be fixed using classic troubleshooting processes) refers to low virtual memory.
This message refers to low virtual memory, a problem that can lead to lags and malfunctions on your Windows device, not to mention that it is also quite stressful to get the same alert over and over again.
What causes computer to run out of memory?
This happens when certain apps on your computer require an excessive amount of RAM to be allocated to them.
There is also the possibility that an out-of-date BIOS in the system causes the issue. Moreover, if you are using an older computer, the operating system may not be able to access all of the RAM installed.
Memory leaks in Windows can also cause this problem, but this can be prevented by frequently updating applications and your operating system.
This troubleshooting guide will show you how to fix this annoying issue in the following instances:
Your computer is low on memory (but it’s not) – Many users report that when this alert appears, PC memory works correctly. Instead, it seems that the computer somehow misinterprets various memory indicators.
Your device is running low on memory Task Manager – When the system is running low on resources, it’s always a good idea to see which applications are necessary and which ones you can disable, so prioritize them.
Your computer is low on memory in Teams – You can try restarting your computer, and if it does not fix the problem, you will need to uninstall Teams and then reinstall it on your PC.
Your computer is low on memory for Claymore – This cryptocurrency miner uses too much memory, triggering low memory alerts.
Your computer is low on memory which leads to black screen issues – Sometimes, the standard memory error also triggers black screen issues, forcing users to reboot their PCs.
CutePDF Your computer is low on memory alerts – CutePDF is a PDF converter that often displays low memory alerts.
Your computer is low on memory for Excel – Sometimes, saving an Excel file may become challenging due to the low memory error message.
Your computer is low on memory for EZCAD2, Dying Light, Call of Duty, WoW, and more – If you’re a gamer, you have probably encountered this error message quite a few times. Games use large chunks of memory, and for this reason, they often trigger low memory errors.
The following troubleshooting steps will prove helpful in the cases listed above and other similar ones.
How do I fix my computer running low on memory?
1. Close the programs that are using too much memory
Click the Memory tab to sort the processes based on the amount of memory they are using. Then click the top ones that you are ok with closing, then select End task.
Close the Task Manager app and see if the problem still persists.
If you run into low memory issues on your PC and need to repair it quickly, the first solution we suggest is to close the apps that take too much memory. The steps above show you how.
When closing specific programs, you will be prompted to confirm ending them. In those cases, select the Yes button to free up your RAM.
2. Kill processes using Commit size
The commit size is the total amount of RAM that has been committed and is used (either physical or page file). Close the processes applying the steps below. The Your computer is low on memory issue in Windows 10 will be solved.
1. Press Ctrl + Shift + Esc to open Task Manager, then go to the Details tab. Next, Right-click the Name column, then click Select columns.
2. Please scroll down the new window until you find Commit size, then tick the box next to it and click Ok.
3. You will see a new column labeled Commit size. Next, click the Commit size column to sort the processes based on their commit size. Click the top processes and select End task to free up more space.
Press Windows, type advanced system settings, then click the top result, which will be View advanced system settings.
Under the Advanced tab and the Performance section, click Settings.
Next, navigate to the Advanced tab, and click Change under the Virtual memory section.
Uncheck the Automatically manage paging file size for all drives option, then select the Drive that you want to change. Next, select Custom size, then enter the number of MB inside Initial size or Maximum size. Lastly, click Set and Ok to save the changes made.
A paging file refers to a section of the hard disk that Windows users can utilize as if it were RAM instead. Once you’ve followed the above steps, the Your computer is low on memory switch to a different device error will be solved.
How do I increase my RAM on Windows 11?
RAM cleaners and optimizers are software programs designed to make more memory available on your personal computer.
You have the option of using any of them to boost the amount of memory that you have in Windows 11, which is a more cost-effective method than purchasing additional RAM altogether. However, buying new RAM is just as effective.
If you couldn’t fix the Your device is running low on memory issue, as well as the others, after using these guidelines, you should consider expanding your RAM. If you have any questions or need extra help, leave us a message in the comments field below.
After updating your PC to the latest version, you expect everything should work perfectly. However, users are complaining that they are prompted by a Microsoft Visual C++ runtime error.
This message reads: This application has requested the runtime to terminate it in an unusual way. Just like with the Microsoft Visual C++ error 0x80070666 error, you can fix this issue with our solutions.
Still, you won’t need to worry because we have a fix to the Visual C++ runtime library error in Windows 10 and you can continue your normal use of the operating system afterward.
What is the Microsoft Visual C++ runtime library error?
There’s also a chance that the Visual C++ feature is broken or corrupt. In this case, we recommend a third-party tool to automatically download all the outdated drivers on your PC.
What is a C++ runtime error?
A program is said to have a runtime error if its syntax is proper yet it has a bug that can only be found while the program is being executed.
This error could be brought on by the absence of Runtime components of Visual C++ Libraries, or it might be the result of a fault with the software.
What causes Microsoft Visual C++ runtime error?
Visual C++ is a basic component of many applications, and if it gets damaged, you’ll get various error messages on your PC.
Many users reported that they Cannot install Visual C++ 2015, and that can negatively impact all applications that require this component.
These issues affect every version of Windows, and many reported Runtime error in Windows 11 as well. Luckily, there are ways to fix these problems, and this guide will show you how to do that.
The Microsoft Visual C++ runtime error can be problematic, and speaking of errors, users reported the following issues as well:
Microsoft Visual C++ runtime error r6025, r6034, r6016, r6030, r6002 – When this error comes with an error code, it can be due to corrupt files.
Microsoft Visual C++ runtime error in explorer.exe, qbw32.exe, atibtmon.exe, csrss.exe, nvvsvc.exe: This is caused by a problem with a particular application that depends on the Visual C++ feature. You can fix it by reinstalling the application.
AMicrosoft Visual C++ runtime error in Excel, Internet Explorer, Skype, Steam, Java: In this case also, the error occurs due to an application that depends on one of the Redistributables.
Microsoft Visual C++ runtime error on startup: This is usually caused by your startup applications.
Microsoft Visual C++ runtime error in Nvidia: This version of the error is caused by outdated or faulty drivers.
The Microsoft Visual C++ setup failed, not installing: Several users reported that they can’t install Visual C++. According to them, the setup fails to complete on their PC.
Microsoft Visual C++ unspecified error: This can be a big problem, but you should be able to fix it using one of our solutions.
Microsoft Visual C++ keeps crashing: This can also be caused by broken or missing files. You need to reinstall Visual C++ Redistributables to fix it.
Microsoft Visual C++ runtime error assertion failed: This problem is usually down to the app that gives the error while trying to run it.
A Microsoft Visual C++ runtime error abnormal program termination: If you encounter this issue on startup, it might be down to one of the startup programs.
Microsoft Visual C++ runtime error stray: This is an error that occurs if you are missing one of the Redistributables on your PC.
Mechwarrior 5 Microsoft Visual C++ runtime error: This is another error that occurs if one of the runtime redistributable is missing on your PC.
Microsoft Visual C++ runtime error games: Sometimes, the error occurs in games because of an outdated or broken Microsoft Visual C++ runtime version.
Can we uninstall Microsoft Visual C++?
Yes, you can uninstall some of the Microsoft Visual C++ Redistributables but it is not advisable. This is because there are software and programs on your PC that rely on one or more of them.
So, when you uninstall any one of the Redistributables, the software that relies on it stops working.
How do I fix the Microsoft Visual C++ runtime library error on Windows 10?
1. Perform a clean boot
Press the Windows key + R, type msconfig, and click OK to run it.
Click the Services tab in the top and check the box next to Hide all Microsoft services.
Now, click the Disable all button.
Select the General tab at the top.
From here, tick the Selective startup box and uncheck the box next to Load startup items.
Finally, click Apply and OKto save changes. and restart your system.
Sometimes, third-party and startup applications can interfere with your system and cause Microsoft Visual C++ runtime errors to appear. To fix this problem, you need to perform a clean boot.
If you do not get the error anymore you will have to do this step, but this time disable the applications one by one and see exactly which of them is causing this error to appear.
2. Remove your graphics card driver
Type device manager in the Search bar and select Device Manager from the list of results.
Expand the Display adapters section, and right-click your graphics card.
Select the Uninstall device option from the menu.
Check Delete the driver software for this device and click on Uninstall.
Finally, restart your PC and the driver will be reinstalled automatically.
Your graphics card driver can often cause Microsoft Visual C++ runtime error, and to fix it you need to reinstall your graphics card driver.
If you do not then it means that you need to update your graphics card driver to the latest version that is compatible with your Windows 10 system version.
To see how to update your drivers, we advise you to check out our detailed guide on how to update your graphics card driver.
Another solution is to automatically update your graphic card drivers using a dedicated tool that keeps you away from harming your PC by updating or installing the wrong drivers.
With Fortect Driver Updater, you can update all of your drivers quickly and safely with only a few clicks.
Restart your PC several times during the boot and select Troubleshoot > Reset this PC.
Choose whether to keep your personal files or Remove everything.
Insert Windows 10 installation media, if you are asked to do so.
Select the installed version of Windows and choose Only the drive where Windows is installed > Just remove my files.
Now, click the Reset button.
Finally, follow the instructions on the screen to complete the reset.
If the problem still persists, your only option might be to reinstall Windows. Before you do that, try to access your files and back them up. To reinstall Windows 10, you’ll need a Windows installation media.
To create one, you’ll need to use Media Creation Tool on a working PC. After creating an installation media, follow the above steps.
After you successfully reinstalled the operating system, you will have to make sure that you do not update your PC until Microsoft fixes the issues with Visual C++ runtime error.
4. Reinstall Microsoft Visual C++ Redistributables
To fix the Microsoft Visual C++ runtime error, you can learn the simple but efficient method to reinstall your Visual C++ Redistributables. To do that, follow the steps detailed below.
1. Press the Windows key + S, enter Control panel and select Control Panel from the list.
2. Choose Uninstall a program under the Programs option.
3. Locate Microsoft Visual C++ Redistributable, and double-click it to remove.
4. Finally, click the Yes button when prompted to complete the process.
Once you remove all Redistributables, you have to download them from Microsoft’s website. Keep in mind that you’ll have to install all available Redistributables in order to fix this problem.
Instead of reinstalling the Redistributables, you can also repair your installation by following the steps below:
1. RepeatSteps 1 and 2from above, and click on the Redistributable to repair.
2. Click the Change button at the top.
3. Click on the Repair button in the setup windows and follow the onscreen instructions to complete the process.
Keep in mind that not all Redistributables support repair. If the Change option from step 2 isn’t available, your only option is to remove the selected Redistributable.
This might be a bit tedious solution, but many users reported that reinstalling Visual C++ Redistributables fixed the problem for them, so be sure to try it.
Press the Windows key + I to open the Settings app, and select Accounts.
Click Family & other people in the left pane and select Add someone else to this PC.
Click on I don’t have this person’s sign-in information.
Now click on Add a user without a Microsoft account.
Enter the desired name for a new account and click on Next.
If you’re still getting Microsoft Visual C++ runtime library error, you might be able to fix the problem simply by creating a new user account.
After creating a new account, you need to sign out from your current account and switch to a new one. If the problem doesn’t appear, it means that your old account is corrupted.
To fix the problem, move your personal files to a new account and use it instead of your old account.
6. Turn off the Compatibility mode
Right-click the app causing the problem and choose Properties from the menu.
Go to the Compatibility tab and uncheck Run this program in compatibility mode for.
Now, click on Apply and OK to save changes.
Compatibility mode is a useful feature that allows you to run old applications on your PC. However, this feature can sometimes cause Microsoft Visual C++ runtime error to appear.
To fix the problem, you need to disable Compatibility Mode by following the above steps. After doing that, try to run the application again and the error message shouldn’t appear.
7. Reinstall the problematic application
Press the Windows key + I and select Apps.
Click on the app to remove, select Uninstall, and follow the onscreen instruction to complete the process.
Finally, download and install the app from official sources.
If you’re getting the Microsoft Visual C++ error while trying to run a specific app, you might want to try reinstalling that application. Sometimes your files can get corrupted, and that can cause this error to appear.
You are done, the steps above will fix your Microsoft Visual C++ runtime library error in the shortest time possible.
If you encounter any other troubles along the way, you can write us below in the comments section of the page and we will help you further with this issue.
Also, please leave there any other suggestions or questions you may have.