If you are a member of the Office Insiders community and you are on the Current Channel(Preview) then you will have access to the new Outlook for Windows starting today. Windows Insiders will gain access in a few weeks via a toggle in the Windows Mail app.
Accessing the new Outlook for Windows is easy if you’re an Office Insider and running the Beta Channel or Current Channel(Preview just slide the Try the New Outlook toggle located in the top right corner of your existing Outlook. From there just follow the onscreen instructions. You can always switch back to your previous Outlook by sliding the toggle back and relaunching the app without any data loss.
What’s new in Outlook for Windows?
The ability to add Microsoft Accounts
Now you can add your personal outlook.com, hotmail.com and Windows Live personal email accounts to the new Outlook for Windows.
Quick Steps
Got a task you do often in Outlook? You can save time with the Quick Steps feature which is a personalized list of actions used frequently such as cleaning and organizing your inbox or keeping important files within reach.
Dynamic calendar column widths
Now you can adjust the width of your calendar to make sure you see all the information about your day. You can customize how much space you give each day and see your weekly schedule.
Simplified Ribbon options
Now you can see a sleeker ribbon, making common daily tasks easier to see and access.
Tips in Outlook
Now you can take advantage of tips to let you know when new features roll out and how to take advantage of them right away. You can see tips in the calendar board view and be able to plan everything in one place.
These updates are in addition to the updates previously announced. To take advantage of the new Outlook for Windows you must have at least Windows 10 Version 1809 (Build 17763) and a Microsoft work, school, or personal account at this time. These features are rolling out to Office Insiders running Beta Channel or Current Channel (Preview) Version 2209 (Build 15629.20058) or later of Outlook for Windows.
Is Logitech G Hub not detecting your headset? You’re not alone. While G Hub allows you to customize your experience for Logitech G Gaming devices, for example, G Pro X, G 432, etc., it is prone to hardware issues.
It might also not be connected properly. Regardless, here’s how to fix it:
How to Fix Logitech G Hub if it’s not detecting the headset?
1. Update/reinstall the device drivers
1.1 Update the device drivers
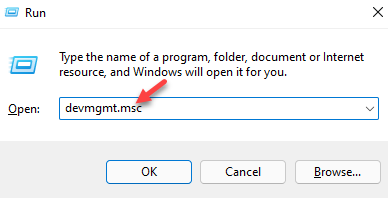
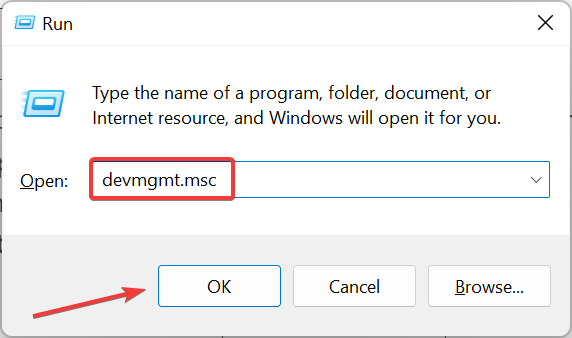
Press the Win + R keys simultaneously to launch the Run console.
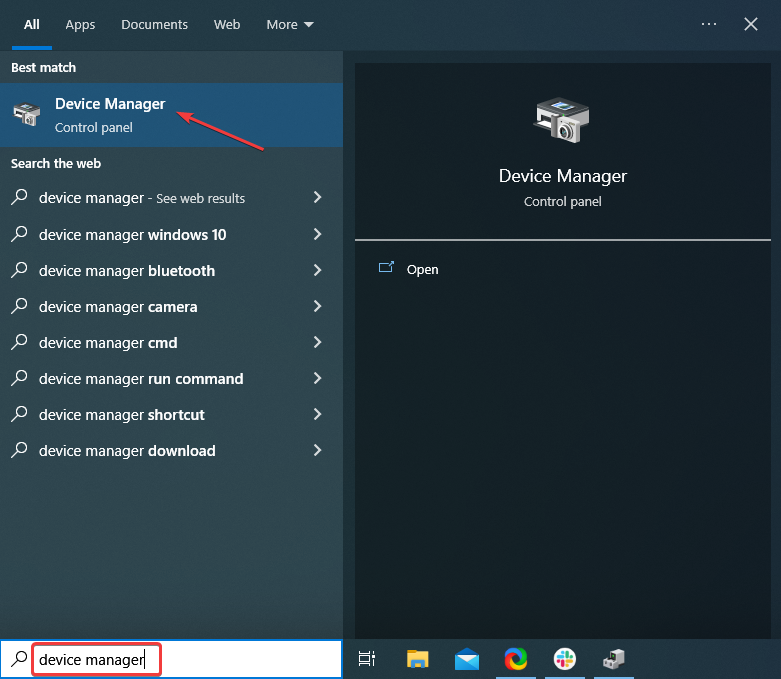
In the search field, type devmgmt.msc and hit Enter.
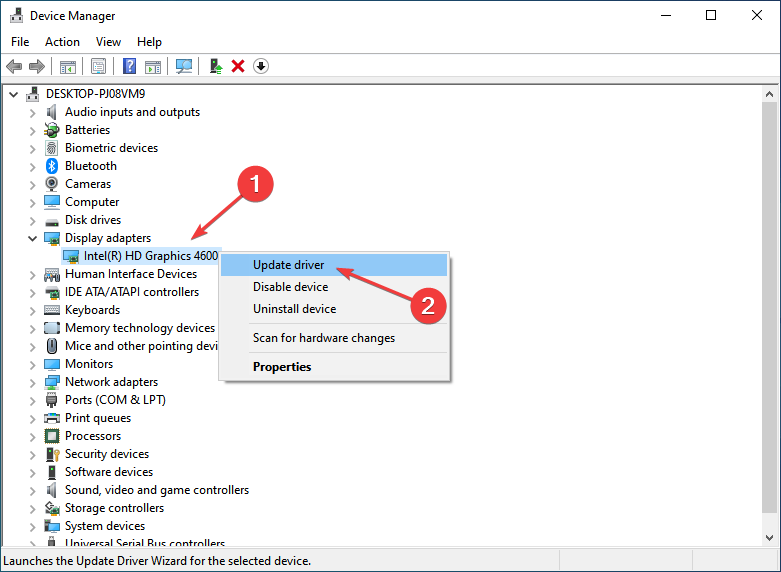
Expand the Universal Serial Bus Controllers section, right-click on the device, and select Updatedriver.
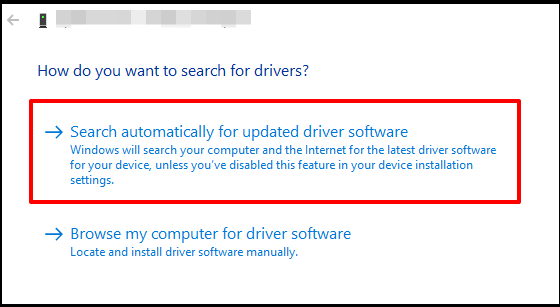
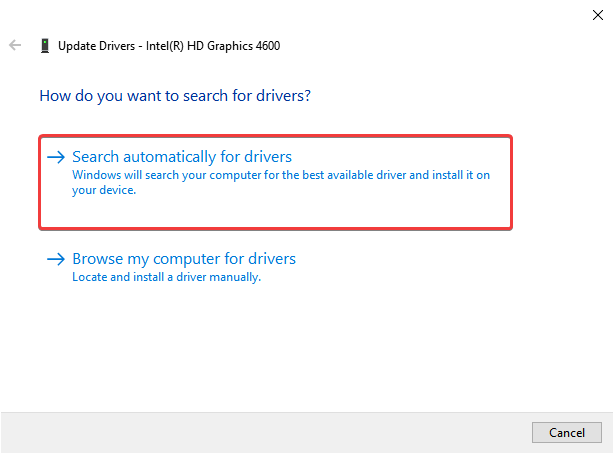
Now, in the Update Drivers window, click on Search automatically for drivers.
Windows will start looking for any latest driver versions and if available, will finish installing automatically.
Once done, close Device Manager, reboot your PC, and check if G Hub can detect your headset now.
Alternatively, you can also visit the headset manufacturer’s website, and download the latest driver version, and install it manually.
1.2 Reinstall the device drivers
Open the Run console by pressing the Win + R shortcut keys.
Type devmgmt.msc in the search bar and hit Enter.
Click to expand Universal Serial Bus Controllers, right-click on the device and select Uninstall device.
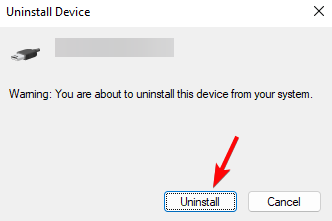
In the Uninstall Device prompt, press Uninstall again to confirm.
Once the device is completely uninstalled, click on the Action tab, and select Scan for hardware changes.
This should reinstall the latest device version.
Now check if the issue is resolved or if you are still facing the Logitech G Hub not detecting headset problem.
Otherwise, you can use a tool specialized in driver updates that will scan your PC for all outdated drivers and automatically update each one of them. Plus you can use this software for the long-term maintenance of your system.
3. Disable & enable the device in Sound properties
Press the Win + R hotkeys to open the Run console.
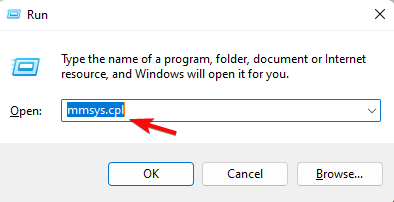
Type mmsys.cpl in the search box and hit Enter to open the Sound window.
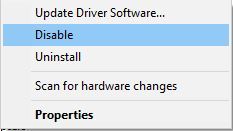
Here, select the Recording tab, right-click on Microphone (one that shows your headset name), and select Disable.
Now, wait for a while, right-click on the same Microphone once again, and select Enable.
Once again, select the same Microphone and click on Set Default at the bottom. Press OK.
Now, go to G Hub and check if you can now see your headset and if it’s connected.
4. Run G HUB with the default settings
Close G Hub from the system tray, and press the Win + E hotkey to open the File Explorer.
Here, go to the below location: C:\Users\%UserProfile%\AppData\Local\LGHUB.
Locate settings.json/settings.db, copy this file and save it on your desktop.
Now, delete the settings.json file in the LGHUB folder.
Now, run G HUB, where all the settings will be set back to default, and you should not face any issues with the headset.
5. Revert to previous settings
Exit G Hub and press the Win + E keys together to open File Explorer.
Now, navigate to the below location: C:\Users\%UserProfile%\AppData\Local\LGHUB
Find settings.json/settings.db, copy the file, and save it on your preferred location, for example, desktop.
Next, go back to the G Hub folder and delete settings.json/settings.db.
Now, return to the desktop, copy the settings.json/settings.db file that you saved in step 3, and paste it back into the G Hub folder in the location mentioned in step 2.
Now, launch and run G HUB, and your previous settings should be restored.
How do I connect my headset to my G hub?
To connect your headset to Logitech G Hub on Windows, you can follow the below instructions:
Boot your PC and connect your headset to one of the USB ports.
Wait for a while till the device is installed automatically.
Now, click on the Sound icon located on the right side of the taskbar and click on the arrow next to the volume bar.
Select the connected Logitech USB headset in the Volume menu.
The Logitech headset should now work with your G Hub application and you should not encounter any more issues.
At the same time, make sure you plug in the microphone securely and also press your PC connectivity cable into the correct jack harder until you feel two firm clicks.
You can also connect your headset to another computer to test. But, if it fails to work, chances are the headset is physically damaged, and you should contact Logitech for further assistance.
Why is G Hub not detecting my headset?
Most commonly, G Hub may not detected devices when your drivers are outdated or corupted, when you have compatibility issues, using an older version of the device or you have pending updates. Improper set up can also be at fault.
With the steps outlined above you should be able to make it detect devices.
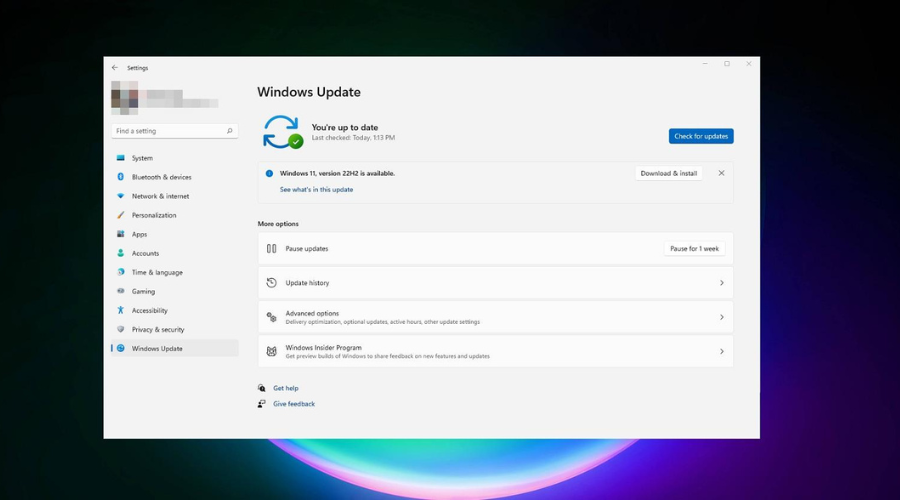
Don’t act surprised, as we were all expecting the first major update for Windows 11 to have some problems right at the start.
As you surely remember, last week, the Redmond tech giant released version 22H2 for Windows 11, with a lot of new features and improvements.
However, right when users were trying to install this update, they were greeted by error message 0x800f0806 when the setup process failed time and time again.
Back then, Microsoft provided a temporary workaround, but there is no need for that anymore, as the tech company fixed the issue via KB5019311 (build 22621.525).
What is new with Windows 11 build 22621.525?
We are not looking at a long changelog for this cumulative update, as we got accustomed to, as this update was only designed for the installation issue.
Right after the release of version 22H2, when users were trying to do an in-place upgrade via Windows Update in Settings, the whole process would fail with error 0x800f0806.
Judging from early reports, manually downloading and installing the update seems to bypass this problem caused by trying to do an upgrade via Windows Update.
Another user affected by this Windows 11 installation error said that running the Windows 11 Installation Assistant also resolves the problem.
However, you don’t need to worry about this issue anymore, as Microsoft’s latest cumulative update is said to completely eliminate it.
Keep in mind that, since we aren’t talking about Patch Tuesday, this non-security update includes quality improvements only.
So, through this cumulative update, Microsoft addresses localization issues for some setup files, which might stop you from creating installation media for non-English languages.
Also, please keep in mind that, since it is an OOB update, it can be downloaded manually on Microsoft’s Update Catalog website.
That being said, only install it in case you are facing issues with creating installation media for Windows 11 22H2 on non-English languages.
Needless to say, for other users that have nothing to do with the above-mentioned problem, this cumulative update is completely non-essential.
As a reminder, lately, we’ve also been looking at KB5017389 (Release Preview Channel), and build 25206 (Dev Channel).
And, since we’re talking about Windows 11 version 22H2, Microsoft also released a fix for Nvidia graphics card errors associated with the new OS version.
Also, please note that the Windows 10 equivalent for this version, 22H2, is officially coming to all users in October, according to Microsoft.
What can I do if I can’t install KB5019311?
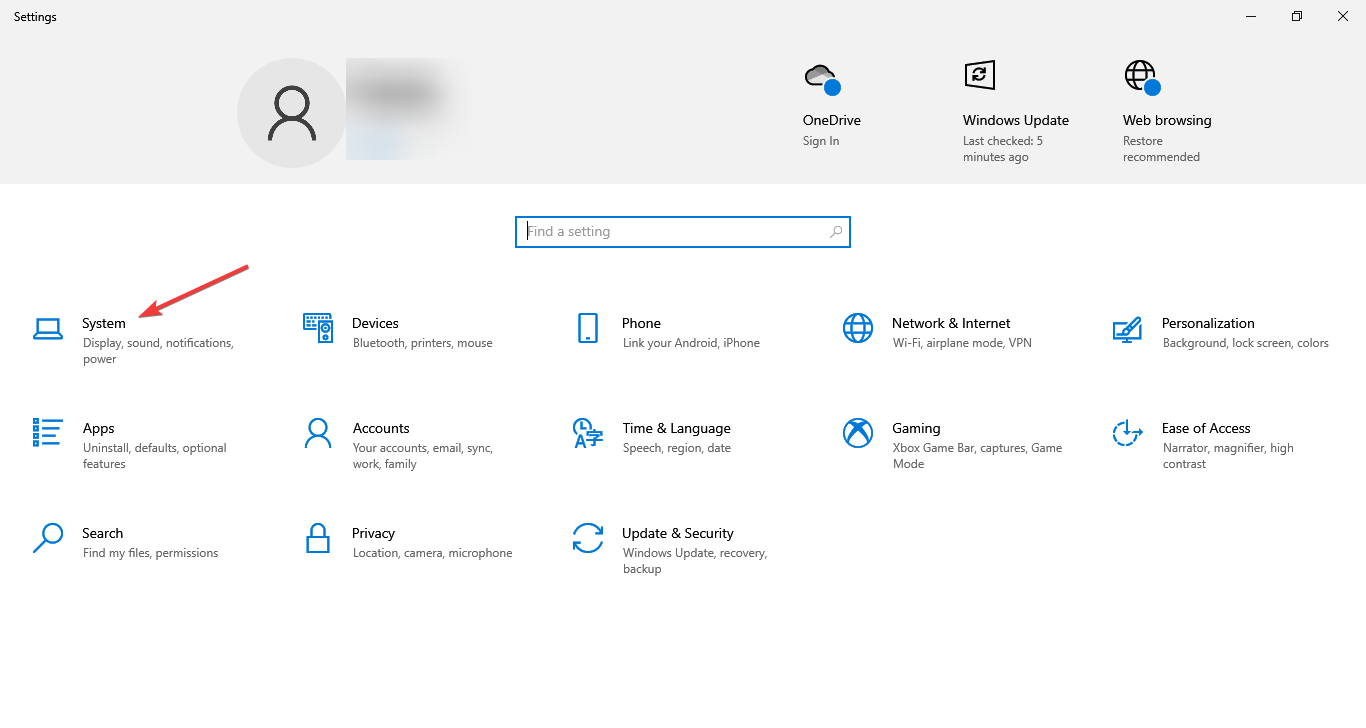
Press Win+ I to access Settings.
Select the System category and click on Troubleshoot.
Press the Other troubleshooters button.
Press the Run button next to Windows Update.
Also, make sure to report any other issues you might come across, in order for Microsoft to address and improve the overall OS experience for us all.
This is everything you can expect if you are a Windows Insider. Leave a comment below if you found any issues since installing this build.
The hardware and devices troubleshooter missing issue on Windows is a problem users may encounter on their PC. It indicates that the Windows in-built troubleshooting tool is not available or working on the computer.
Windows hardware and devices troubleshooter is a built-in tool for detecting and analyzing hardware and device issues on the PC. It comes in handy when you have difficulties with your computer’s hardware and devices, such as Bluetooth, keyboard, audio, printer, Internet connection, battery, etc.
However, the troubleshooter used to be a single app running diagnostics on all hardware and devices on the computer.
The advancement of Windows 10 resulted in the split of its functionality, making the tool inaccessible directly from the Settings app.
Furthermore, the hardware and devices troubleshooter in Windows 11 can be missing for reasons we’ll discuss in this article.
Also, we’ll take you through how you can fix the Windows 10 hardware troubleshooter missing problem on your PC.
Why is the hardware and devices troubleshooter missing on my PC?
The hardware and devices troubleshooter in Windows was accessible in settings for end-users as a single tool for troubleshooting hardware components of the device.
However, the tool may be missing on your computer due to the decision of Microsoft to hide the hardware and device diagnostics tool in Windows 10 1809.
Because most users are using Windows 10, the troubleshooter may not be accessible to the end-user. Instead, deeper toggling needs to be done to access the tool.
Likewise, issues like the Windows update troubleshooter is missing may occur due to update errors encountered during installation.
Nonetheless, Microsoft’s decision to remove the hardware and devices troubleshooter or other factors doesn’t mean users can invoke the troubleshooting tool on their computers.
What can I do to fix the hardware and devices troubleshooter when it is missing?
1. Access the troubleshooter via the command line
Click on the Start button.
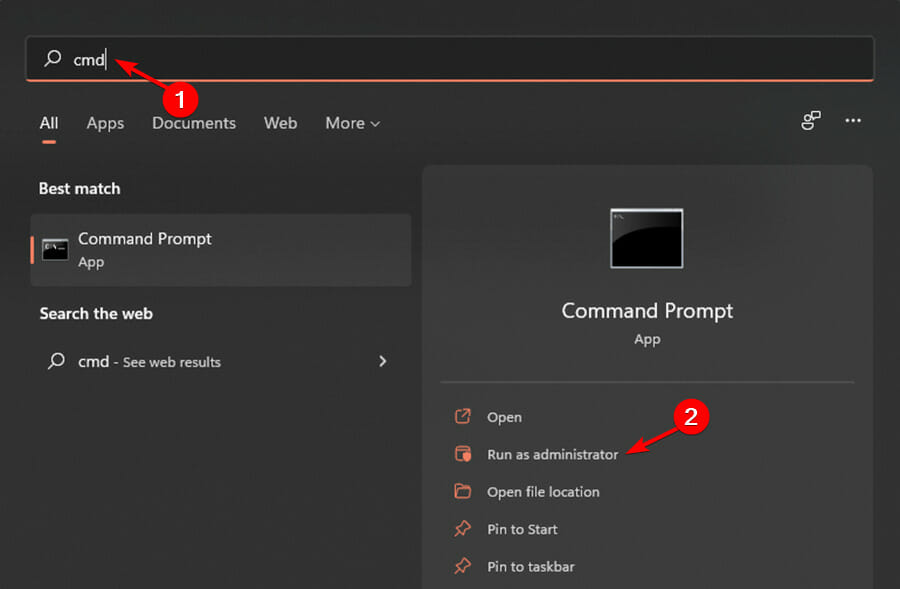
Type cmd in the search box, then press Enter.
Select the Command Prompt from the search results.
Type the following in the Command Prompt: msdt.exe -id DeviceDiagnostic
Press Enter to invoke the Hardware and Devices Troubleshooter.
Once the troubleshooter appears, you’ll be able to troubleshoot various hardware issues on your computer.
You can learn more about how the Hardware And Devices Troubleshooter works and what it can repair when this tool opens through command line access.
2. Use the hardware troubleshooter command
Click on the Start button.
Type cmd in the search box, then press Enter.
Select the Command Prompt from the search results.
Type the following in the command prompt: mysdt.auxiliary diagnostic device
Press Enter to prompt the Windows Hardware and Device Troubleshooter.
Click Next to proceed with the analysis and troubleshooting process.
Accessing the troubleshooter via CMD is an alternative if the Windows 10 hardware troubleshooter is missing.
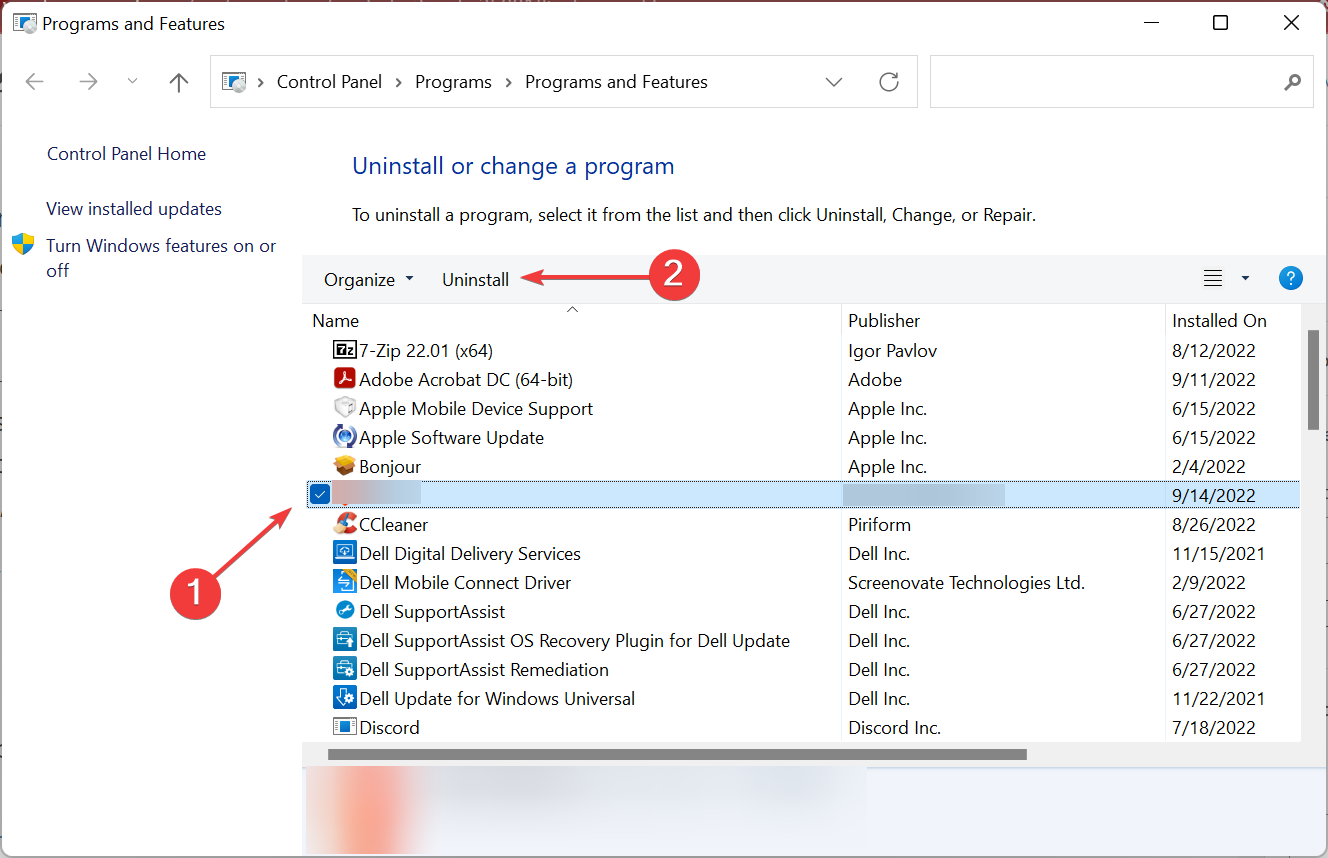
3. Uninstall recent Windows updates
Press Windows + I to open Settings.
Go to Windows Update and select Update history.
Click Uninstall updates and select the most recent update.
Click on Uninstall.
Uninstalling the recent Windows update should help fix any issue with the Windows troubleshooter.
4. Use an alternative troubleshooting tool
Sometimes, you may require the aid of an external tool to help diagnose and troubleshoot issues like this.
You may use a multi-purpose tool designed to solve most problems that users cannot solve. A system repair tool focuses on damaged registries, system files, and DLL files. It also offers malware scanning and other security features.
Scanning your PC will detect and fix all these errors. If the file is corrupted, it will be replaced with the original Windows version.
Using such a troubleshooter will save you the hassle of fixing the problem.
5. Restart Windows in Safe Mode
On the sign-in screen, press Shift while clicking the Power button.
Press shift to prompt the Advanced Recovery Options window.
Click on Troubleshoot and select Advanced options.
It works much the same way that gamer handles do on other platforms; users can create a unique public username that is ubiquitous across all games, and is separate from a user’s Netflix username and profile picture. The gamer handle is also what will display in online leaderboards and in multiplayer games.
As Mobile Games Product Manager for Netflix Sophia Yang said,
(The launch of Netflix gamertags) Is only the beginning in building a tailored game experience for our members around the world. We’ll continue to adapt and evolve our service to meet the needs of our members…”
Does this suggest the forthcoming arrival of other features like the ability for users to show online status and invite others into the games they are playing? As has already been reported by TechCrunch, the code for such implementation is present within the app.
It is needless to talk about the importance of a computer’s microphone. Just think about all your video chat sessions on Skype or Zoom and the like, and you already realize how much you depend on a functional microphone in your Windows 11 device.
As such, it may be tough to think of a situation where your microphone is not working. However, issues with the microphone can occur for various reasons. One common issue is when updates are improperly installed; this can cause inconveniences like yours.
Another possible cause of your problem could be hardware-related, and in such cases, it’s best to consult a technician as soon as possible.
It is also worth noting that when you upgrade your device to Windows 11, it might affect the functionality of your microphone.
What causes a microphone to stop working?
It may fail to work because of a variety of issues with its settings, configuration, and even conflicts with other hardware.
To fix the laptop’s microphone, you’ll have to troubleshoot problems in each of these categories.
Here are the most common issues that may be behind the microphone not working on your laptop:
Poor microphone hardware: Defective or aging microphone hardware or problems with internal wiring may be to blame
Outdated drivers: If your computer’s driver is out of date, you may still be able to use it but with degraded performance, or it may not work at all
Other issues: Simple problems, such as a muted microphone or an incorrectly configured device, often cause this problem.
Why is my mic not working but I can hear?
It’s possible that your microphone is working just fine, but the volume of your microphone may be turned down too low, and people cannot hear you.
Check the volume of your microphone (sometimes referred to on your computer as the recording or input device) to be sure that you are audible enough and able to pass the information you want to put across.
What can I do if the Intel SST microphone isn’t working in Windows 11?
1. Unplug then plug in the mic
Laptops have the ability to switch automatically between the built-in microphone and external hardware when an external microphone is plugged in.
If you’re listening to sound through your speakers and not through a headset and can’t get any sound from your audio device, try unplugging and plugging your audio device back in.
Or you may try plugging an external input into the device and then unplugging it if you need to change the input. Doing so may cause the software to switch to the correct input.
If you still cannot enable your microphone, it may be due to a hardware or driver conflict.
In either case, running the troubleshooter or updating the device driver may allow you to enable your microphone. We recommend Outbyte Driver Updater as a reliable option that has a huge database of drivers that are scanned and safe to use.
Outbyte Driver Updater
A reliable solution that helps you scan your PC drivers and maintain them up-to-date to prevent this kind of issue.
If the microphone isn’t working, check to ensure it’s securely connected to your PC. If the connection feels a little loose though it appears to be plugged in all the way, it will not work correctly. Pull out the cable and plug it back in.
Internal or external microphones require a separate audio cable; ensure you purchase a cable that’s at least three meters long. Outgoing audio jacks are often green, while microphone input jacks are often pink; but sometimes they’re the same dull color.
Some microphones have a mute switch that can be enabled. For example, PC headsets often include a mute switch on the cable leading to the microphone.
If the microphone uses a mute switch, it won’t function unless you enable the wire-mounted switch. Therefore, be sure to check that out before trying any of these fixes.
3. Ensure it is compatible with your device
If you can use both the audio and microphone jacks on your headset, and they are separate jacks (one is not simply a combination of the other), then your computer should also have audio and microphone ports.
However, if you have only one jack on your computer, you will need to either purchase a headset with a single jack or purchase a converter that converts the double 3.5mm jacks found on most headsets into a single 3.5mm jack.
If your headphones only have a single 3.5mm jack, and you are using it with a computer or laptop that only has one port for audio input and output, you will need an adapter to capture both the audio signal (into the computer) and the microphone signal (for use with programs like Skype).
Here is a list of some of the common microphones available:
A headset with 2 separate 3.5mm jacks: one for the microphone, one for the audio
Potentially, a headset or earphones with only one jack: 2 in 1 (microphone and audio in the same 3.5mm jack)
A USB headset with a microphone
Bluetooth headphones with a microphone
4. Make sure the app you are using has access
On your keyboard, press the Windows logo key and type microphone, then click on Microphone privacy settings.
Under the Let desktop apps to access your microphone section, make sure the toggle is On so that you can allow apps access to your microphone.
Scroll down to the Choose which apps can access your microphone section and make sure the toggle for the app you’re using the microphone with is turned On.
Check the mic and see if the microphone not working on the laptop issue has been resolved.
Apps you install on your device might request permissions to access the microphone. If you have not granted that permission, the microphone will not be working.
5. Troubleshoot audio recordings
Press Windows + R, type Control Panel, then click on OK.
Select Large icons from the View by dropdown menu, and click on Troubleshooting.
Then, click on Troubleshoot audio recording.
Wait for the system to resolve the problem.
If you’re still having trouble after trying the solutions here, it’s time to check the computer for hardware problems. And it’s best that you let an expert handle things with the hardware.
Moreover, if the microphone works on another computer, you should contact the vendor of your laptop for advice.
6. Check your device for malware
If you find that your microphone’s volume level is reset to 0, you might have malware on your PC. Certain malware can interfere with the way your computer handles your microphone, and this could cause the volume level to drop.
This problem, however, can be fixed by scanning your machine using an antivirus. Although there are many great antivirus applications on the market, if your current antivirus can’t fix this problem, you might want to consider making a switch to the best solution available.
You can install any of the most reliable antiviruses for Windows 11 and fix things with the microphone and along with other malware-related problems.
If you are a music lover or passionate gamer, chances are you would be interested in a system-wide sound equalizer. Find out how to add a sound equalizer for Windows 10 since the steps may also be applied in Windows 11.
Were you able to restore the functionality of your Intel SST microphone? Share your thoughts with us in the comment section below.
Using a Chromebook allows you to get your tasks done faster and easier, but you can experience many difficulties with the device. The Chromebook microphone not working is one of the problems users complain about when using the tablet.
Many people are imbibing the idea of using Chromebook for work and school purposes, making it more sorted. It is a laptop that runs on the Linux-based Chrome OS as its operating system.
It uses web apps like Google Chrome browser for performing tasks and also can install & run Android and full-fledged Linux apps.
However, running into issues with the Chromebook is not surprising as users complain about numerous problems plaguing the device. Some are the Chromebook camera and microphone not working.
Furthermore, you may experience the microphone not working on the Chromebook in several instances.
The Chromebook microphone can stop working in apps Zoom and Chrome that use the microphone. However, the issues can occur for many reasons, and we’ll discuss how to fix them in this article.
Where is the microphone on Chromebook?
The Chromebook’s microphone is beside the camera at the top of the screen. It looks like a small hole, protecting the device from being damaged.
Why is the microphone not working on Chromebook?
Startup errors on the Chromebook: Chromebook users may experience issues with devices on their Chromebook, like microphones and cameras, because of startup issues. The device can encounter numerous difficulties during boot that may affect how it interacts with its components and peripherals. Likewise, shutting down the Chromebook suddenly causes malfunctions and can impede its performance.
Issues with the app using the microphone on Chromebook: There is a chance that the app you’re trying to use the microphone on is not running correctly. It can result in the Chromebook microphone not working on apps like Zoom and Meet. Also, the microphone may not work on Chrome if it’s not working correctly.
Outdated Chromebook: An outdated Chromebook can cause many issues with its functionality and performance. It can result in bug infestations that affect the device. The Chrome OS updates and patches help you fix bugs that may be affecting the Chromebook. So, if the Chromebook is not up-to-date, it won’t have access to such patches.
Issues with audio input settings on Chromebook: You may experience problems using the microphone on Chromebook if the audio input is disabled. It prevents your device from using the audio input feature in the microphone. So, the HP Chromebook microphone not working can be due to audio input settings issues.
Low microphone sensitivity: Low sensitivity can also make your Chromebook microphone not work. If the microphone sensitivity on your Chromebook is low, it’ll be hard to pick up sounds, making it seem like the microphone isn’t working.
The problem you’re experiencing may be limited to only the app you’re currently using. So, we recommend you try using the microphone in another app to check if the issue persists.
Although this is not always the case, this can not be ruled out as an option. If you try the microphone on a different app and it works fine, you may need to reinstall or troubleshoot the previous app.
7. Disable interfering extensions
On the Chrome browser, click the menu button.
Select More tools from the menu and click on Extensions.
Disable an extension and try if your microphone works.
If it doesn’t, enable the disabled extension and repeat the process for other extensions.
Don’t know what to play on Game Pass? With literally hundreds of games available on the service across just about every genre imaginable, it can be tough figuring out where to start. Lucky for you, we have you covered with these Game Pass recommendations for those who love a great hidden gem. These games are some of the most underappreciated titles not only on Game Pass, but in all gaming. But here we give them a chance to shine. Read on and discover your next all-time favorite that’s just waiting for you down below.
Alice: Madness Returns
Eleven years ago Alice lost her family to a horrific fire. Afterwards Alice struggled to face her demons by escaping to Wonderland.
Based on the immensely influential classic poem, Dante’s Inferno takes you on an epic quest of vengeance and redemption through the Nine Circles of Hell.
Go big or never go home! The game’s full release has finally arrived!
Paradise Killer
Paradise Island, a world outside reality. There’s been a murder that only “investigation freak” Lady Love Dies can solve. You can accuse anyone, but you’ll have to prove your case in trial to convict.
In Prey, you are the subject of an experiment but things have gone terribly wrong. Your ability to survive a hostile alien onslaught will depend on your wits, weapons, and newfound abilities.
A 2D Metroidvania-style game developed under the supervision of Ryo Mizuno, depicting the story of Deedlit and the events leading up to Record of Lodoss War: Diadem of the Covenant.
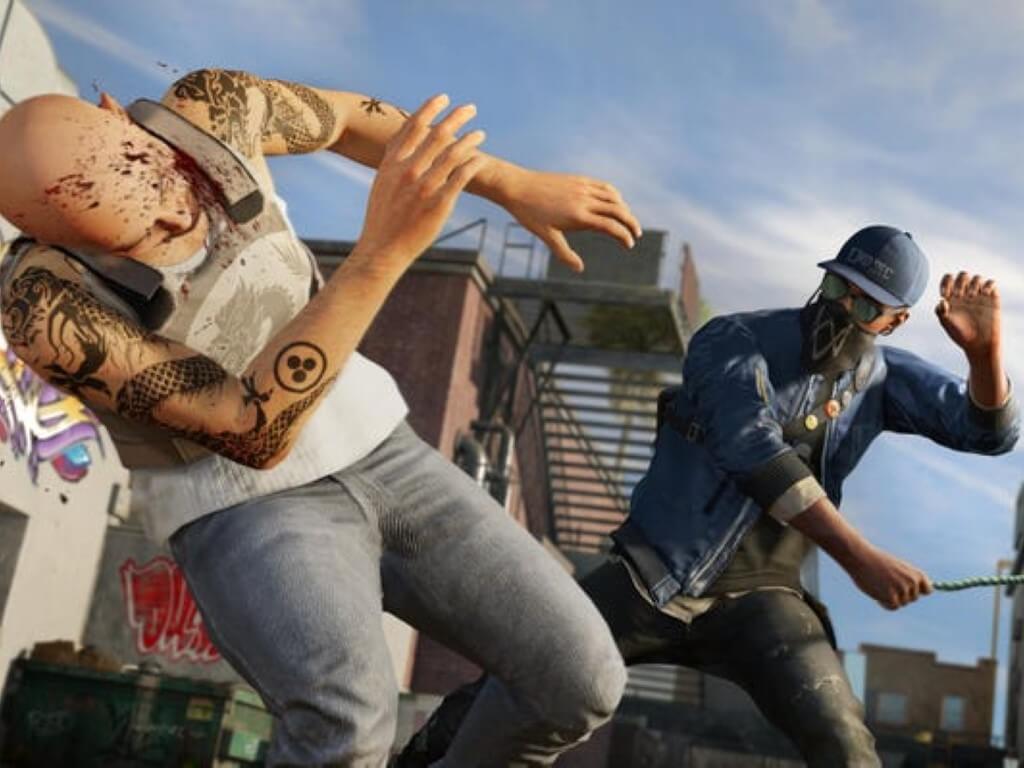
Welcome to San Francisco. Play as Marcus, a brilliant young hacker, and join the most notorious hacker group, DedSec. Your objective: execute the biggest hack in history.
Now that you’ve scoured our list of the most overlooked hidden gems on the Xbox Game Pass library, which are you most excited to try out? Have you already discovered any of these underrated games on your own? Tell us about your experiences in the comments section.
And if you don’t already have an Xbox Game Pass subscription, you can sign up here. Learn more about the service over on the Xbox Game Pass FAQ page. Don’t forget to check out our other “What to play on Game Pass” posts for other Xbox Game Pass recommendations. And thanks for reading.
During the pandemic, most companies shifted their focus and resources towards developing and improving their web conferencing tools.
Because social distancing became the norm, everyone had to adapt. People started working and attending school from their bedrooms.
Corporate giants such as Google invested in their conferencing platforms. Google Meet is the go-to choice of institutions most of the time, so you can imagine that there are countless meetings taking place as we speak.
However, even the most used app on the market can encounter some issues from time to time.
People have reported that, when their meeting includes a substantial amount of people, their microphones get automatically turned off/disabled.
How can I fix sound issues on Google Meet?
1. Unmute yourself manually
Click on the microphone icon at the bottom.
Your microphone should now be unmuted.
While this is an obvious solution, sometimes all you need to do to fix an issue is right in front of you.
Even if the app muted you due to the increased number of participants, you can simply mute yourself and it should fix the issue most of the time.
2. Troubleshoot the microphone
Press Windows + I to open Settings, and click on System.
Select Sound from the navigation pane on the left.
Scroll down to the Input section, and select the device you want to troubleshoot from the dropdown menu.
Click on Troubleshoot.
Follow the steps that pop up on the screen.
Fortunately, Microsoft has already implemented a solution to detect and potentially solve your microphone problems.
Following these steps should ensure that your microphone is working properly. This setup will identify any possible problems with your device.
If it does not encounter anything unusual, it means your problem is probably software-related because your input device is not malfunctioning.
3. Restart the browser
It’s not unusual for the browser or the meeting itself to act up. Make sure you close and open them again. Also, make sure you save your unsaved progress before closing any open tab.
You can also try using a different browser. Sometimes applications work better on different browsers, so don’t hesitate to give a try to this tip as well.
One of the browsers with the best response rates on the market is Opera. It is stable and secure, and it has a very minimalistic, but resourceful user interface.
Opera ensure a great browsing experience with integrated social-media add-ons, free VPN, and tons of other free add-ons that you can install to enhance your experience.
Opera
Enjoy browsing the internet without any impediments by giving Opera a try.
If simply restarting your browser won’t fix the problem, try restarting your device.
Sometimes the plugged chords of your different input/output devices can get their signals messed up, resulting in malfunctioning. A fresh start should settle everything.
There you go. These easy and simple solutions should cover up all the possible issues you could have with your microphone during Google Meet calls.
Most of them do not require elaborate fixes since the problem usually solves itself after restarting your system. In case the problem lies with the OS itself, find out how to fix microphone issues in Windows.
Do not hesitate to give us feedback about the solutions written above. Also, feel free to leave a comment if you have any questions.
Printers are a staple device in many households, and it can be frustrating when they don’t work properly. Users report that they are unable to install the driver for their Canon printer. Here are five solutions on how to easily fix this issue.
Many users reported receiving an error that the driver for their Canon printer was unavailable and unable to install on their PC. If you’re having issues with the Bluetooth not working on your Canon printer, we offer solutions for that as well.
Printer problems can be extremely frustrating and inconvenient. Keep reading to find out how to quickly fix your Canon printer and install the driver.
Why is my Canon printer driver not installing?
One of the main reasons why the driver for a Canon printer might not install or is unavailable is because the driver is outdated. The driver might be unavailable because it’s not compatible with your laptop and your computer doesn’t recognize it.
There could also be an issue with the Setup CD-ROM disk that came with your Canon printer. If it’s not installing properly, you can find the driver you need for your printer on Canon’s website.
How do I fix my Canon printer driver if it’s not installing?
1. Temporarily turn off firewall and antivirus
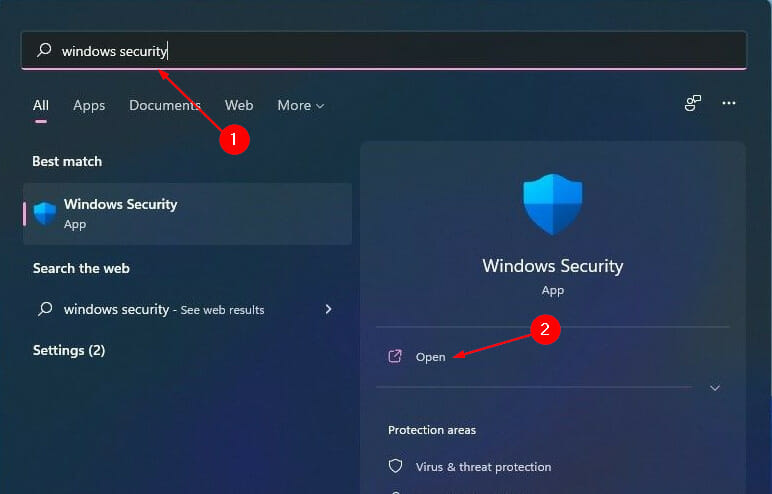
Click on Start and search Windows Security, then hit Enter.
Select Firewall & network protection then click on Private network.
Toggle Microsoft Defender Firewall to off.
Try installing the Canon printer driver after temporarily disabling the Microsoft Defender Firewall. Also, disable any third-party anti-viruses you may have on your PC. These security features may be interfering with the installation process.
Remember to turn the firewall and antivirus back on once you install the driver.
2. Update Windows
Click on Start and open Settings (or press Windows + I).
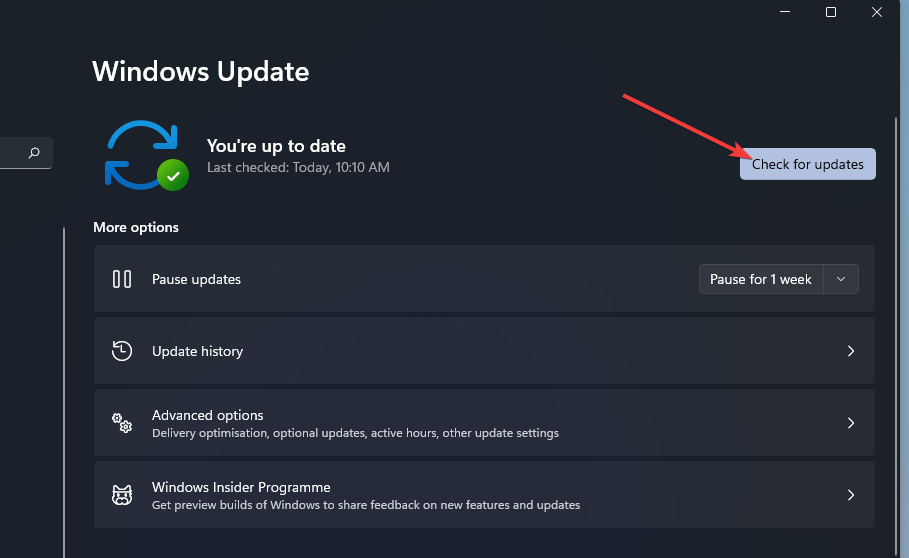
Select Windows Update and check for updates.
Perform any available updates.
Click on Advanced options.
Under Additional options, click on Optional updates.
Perform any additional updates.
If your PC is out of date then the Canon printer driver may not install. Try updating your computer and performing any optional updates and then try installing the driver.
3. Restart Print Spooler
Right-click on Start and select Run.
Type services.msc and then click OK.
Scroll until you find the Print Spooler and right-click on it.
Select Restart.
The Print Spooler handles interactions with your printer. If you’re having issues with Canon not being able to install drivers, then restarting the spooler may help fix this problem.
4. Remove other printers
Click on Start and search for Control Panel then hit Enter.
Under Hardware and Sound click View devices and printers.
Right-click on a printer that isn’t the Canon and select Remove device.
Repeat step 3 on all other printers that aren’t the Canon printer.
Other printers may be interfering with the Canon printer and may not allow the driver to install. Try removing other printers and then install the driver.
Scroll down to Software & Drivers and enter your operating system and version.
Download the Full Driver & Software Package.
If you were trying to install the Canon driver using the Setup CD-ROM and it’s having installation issues, try downloading the driver directly from Canon’s website. That way you get the latest version of the driver and don’t have to deal with the disk.
If you own the Canon G3110 model, you can skip the manual search and go straight to this Canon G3110 driver download guide for the correct package and installation instructions.
How do I manually update my printer driver?
Click on Start and search Control Panel then hit Enter.
Select Hardware and Sound then click on Device Manager.
Scroll down and open the dropdown menu for Printers.
Right-click on your printer and select Update driver.
Click Search automatically for drivers.
Regularly update your drivers to avoid any issues like download driver failed. You can also update drivers through regular Windows updates if you don’t want to individually go through and check for updates for each driver.
Windows updates won’t update every driver you have since it’s only focused on Windows apps. If you want to automatically update all your drivers regularly, you should use a specialized tool.
Hopefully, one of the above solutions helped you fix your Canon printer if the driver wasn’t installing on your PC. If you’re having issues with your Canon printer not scanning in Windows 10 or 11, we offer a guide for that as well.
According to a write up by TechCrunch, Space and Time managed a $20 million round of funding recently with Microsoft’s M12 venture fund leading the investment pile.
Among M12’s investment parties for the Time and Space’s vision of automated business logics are Framework Ventures, HashKy, SevenX Ventures, Foresight Ventures, Polygon and Avalanche’s Blizzard ecosystem fund.
As CEO and co-founder of Space and Time Nate Holiday puts it, M12 is investing in “…a world where smart contracts will operate the business logic of the world through advance automation.” Holiday and co hopes to achieve its goals by using its “Proof-of-SQL” cryptography, which would automate the business logic used in traditional centralized systems and applying that directly to smart contracts and eventually into Microsoft Azure to give users access to its blockchain data.
Ultimately, Space and Time’s technology is intended to give blockchain developers the tools needed to build multi-chain decentralized apps (dApps) at lower cost and scale Web3 into a more robust and safer platform.
Space and Time will roll out a limited preview for DeFi and gaming protocols at the end of the year with an eye on a test net phase scheduled for Spring 2023 and a possible production launch at the end of next year.
Destiny 2 is a free-to-play online multiplayer first-person shooter video game on multiple platforms. However, several Windows users have reported the graphics runtime detected a crash or loss of device error after or during the launch.
Ok I really need help, so basically for the past 2-3 hours I have been trying to fix the Freeze and Crash issue with my computer but nothing seems to be working, you name it I’ve tried it, it hasn’t worked
The error can occur due to a third-party software conflict or hardware issues. This article provides some troubleshooting tips to help you fix the Destiny 2 graphics runtime detected error in Windows.
Why am I getting a graphics runtime error in Destiny 2?
Wrong NVIDIA software settings sometimes cause the graphics runtime error on Destiny 2. You can fix this by changing the settings from the control panel.
Also, if you are using GPU monitoring software, it might be affecting your game. You might need to temporarily uninstall or disable the software.
How do I fix the Destiny 2 graphics runtime detected error?
1. Change NVIDIA software settings
Right-click on your desktop and select the NVIDIA control panel.
Go to Manage 3D Settings.
Click the Restore button to set all the settings to base settings.
Next, open GeForce Experience.
Click the Tool icon next to the Revert button.
Change your screen resolution and type to windowed mode and the smallest screen size available.
Save the changes and exit GeForce Experience.
Launch the game and check for any improvements.
If everything went right, you could change the 3D settings in the NVIDIA control panel again. However, if the issue persists, do the following:
Open the NVIDIA control panel.
Under the Display section, select the Change Resolution option.
Make sure you have chosen your primary monitor on which you play games.
Scroll down and check the Use NVIDIA Color Settings option.
Click Apply to save changes.
Try relaunching Destiny 2 and check if the issue is resolved.
2. Check your GPU monitoring software
If you are using a GPU monitoring and tweaking software like the Precision XOC, try disabling or uninstalling the software.
Destiny 2 seems to have issues with the tuning software, resulting in crashes.
Destiny 2 users could resolve the crashing issues by monitoring their GPUs using the MSI Afterburner utility. You may also want to check if your GPU uses a single PCIe cable.
High-powered graphics cards like the RTX 2080 may require using two PCIe cables for better stability. You may also try underclocking your overclocked GPU to see if that helps you resolve the issue
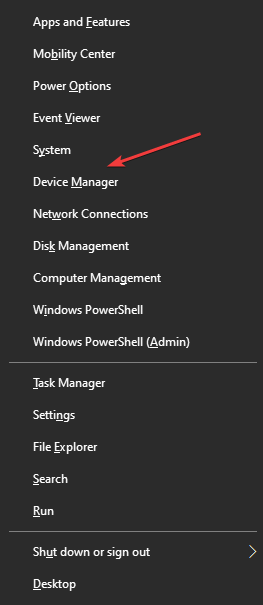
Press the Windows key + X and select Device Manager.
Click the arrow next to the Display adapters option to expand.
Right-click each of the NVIDIA drivers there and select Uninstall device.
Now, click the Uninstall button when asked to confirm the action.
After the restart, download and install NVIDIA GeForce Experience to install the latest drivers.
Try relaunching Destiny 2 and check for any improvements.
You can easily make the driver updating process less of a chore with dedicated software such as Fortect Driver Updater. This tool can scan your computer, identify any outdated drivers, and replace them with fresh ones in just a few minutes so you can return to your game in no time.
Make sure your GPU is not experiencing hardware failure resulting in crashes. To do this, try launching a game other than Destiny 2.
Play the game for some time, see if the runtime error occurs, or look for any crashes. You may need to check your graphics card for hardware failure if the issue occurs on multiple games.
Take the GPU to a service center for better assistance.
Is Destiny 2 GPU or CPU bound?
Destiny 2 is a superb game that boasts many excellent features. It thrives in how it distributes the load across the CPU cores.
However, while it uses the CPU well, it depends more on your GPU. So, to improve things, it boasts a series of customization features for GPU-intensive tasks. With this, you can be sure it won’t wear down your GPU.
The graphics runtime error on Destiny 2 can be exasperating, as it stops you from playing the game. However, with the solutions in this guide, you should be able to fix the issue quickly.
Similarly, if Destiny 2 is stuck, be sure to check our dedicated guide that addresses this issue.
Feel free to let us know if you were able to solve this issue using one of our solutions in the comments below.
Do you want to prevent email forwarding in Outlook? You can easily disable the ability for an email recipient to forward a message in Microsoft Outlook by removing the Forward function.
This basically prevents recipients from forwarding or copying emails you send through Outlook.com, with all the attachments encrypted.
Let’s, though, assume that the recipient eventually downloads your attached file and sends it to someone else. Even so, it can’t be opened. The same thing happens if the recipient saves your email as a file and sends it as an attachment.
3. Set the permission in Outlook to not forward emails
1. Open Microsoft Outlook.
2. Log in to your account using the credentials.
3. Click on New Email.
4. Compose the new email that you want to send.
5. Navigate to the Options tab.
6. Click on the Permission section.
7. A drop-down menu will open with possible permissions you can set on your email.
8. Choose Do Not Forward from the list of options.
9. Send the email.
10. Your recipients will not be able to forward the email after receiving it.
An easy way to prevent an email from being forwarded in Outlook is to reconfigure permissions using the built-in options. The recipient will receive a warning message that they cannot forward the email, and have the option disabled for them.
Interested in the email forward prevention Outlook feature to better secure messages? The above procedure shows you how to keep data exchanged between you and the recipient private.
We would love to know if you managed to prevent forwarding emails by using the procedures mentioned in this article. Leave your thoughts in the comments section found below.
If you’re an avid user of Thunderbolt, then you know that it’s great technology. It gives you the ability to connect multiple devices at the same time and transfer data at high speeds but it doesn’t always work at optimum levels in Windows 11.
It is primarily used to connect external peripherals to a computer. However, it has been found that some users are reporting problems when trying to use Thunderbolt on their Windows 11 PCs.
Thunderbolt is primarily used on Macs, but you can also find it on laptops and desktop computers from other manufacturers. The main problem with these devices is that they require special cables to connect them to your computer.
This however doesn’t have to be a limitation for you as you can easily get yourself a USB-C adapter. These adapters are equipped with every modern port so that you can enjoy the high data transfer speeds that Thunderbolt has to offer.
Does Windows 11 support Thunderbolt?
Yes, Windows 11 supports Thunderbolt with ready Thunderbolt drivers. The Thunderbolt standard is used in Apple’s MacBooks, but it also works with Windows computers. Thunderbolt is a high-speed technology that can be used to connect devices such as monitors and hard drives to your PC.
It’s also used to connect external graphics cards to laptops, allowing you to use more powerful GPUs in more compact systems. This makes it perfect to use with Windows 11 as the latest iteration from Microsoft that is focused on speed and security.
How do I know if I have Thunderbolt Windows 11?
There are several ways to find out if you have Thunderbolt ports on your Windows 11 PC. Some of them include:
Check the sticker on your computer – Most modern PCs will include a sticker with the product name and model number. If the product name contains Thunderbolt or Intel® Thunderbolt™, then it’s likely that your computer has Thunderbolt Windows 11 installed.
Check the UEFI BIOS – This is the section of your computer’s advanced startup screen. It lists all of the hardware components in your PC, including any special features like Thunderbolt support.
Look up the compatibility list – If you are not sure, you can head over to Intel’s official website and check against your device’s model number to see if it is supported.
Check USB-C ports – You can check your USB ports and see whether they support Thunderbolt. You will however need to be an expert in this area and even so, not all USB-C ports support Thunderbolt so it may not be a reliable method to check for compatibility.
Now, let’s delve into some common problems you may encounter and how to troubleshoot them.
What are some of the common Thunderbolt problems and how can I fix them?
1. Cannot detect Thunderbolt device
This can happen if you have not updated your drivers or are running an outdated version of Windows. Check if there are any Thunderbolt drivers available for your device online and install them if necessary.
Make sure that you have installed Windows Updates and that they are up to date before trying again. If there aren’t any drivers available for your device yet, contact the manufacturer for support.
2. Thunderbolt device isn’t working
If you’re having trouble with a Thunderbolt device not working on Windows, make sure it’s compatible with your computer. This can be caused by loosely connected cables.
Sometimes, if the cable is loose or damaged in any way, it won’t work properly and may not transfer data between devices correctly or at all.
Make sure there aren’t any bends in the cable where they shouldn’t be. Also, check all connectors on both ends of the cable for damage before attempting to use it again.
The USB-C port may also not be working so try other ports too. If the problem persists, try restarting your computer. This will reset the connection between your computer and the device.
3. The Thunderbolt port isn’t working
This could be a result of a bad cable or an incompatible device. To fix this problem, try using another cable to connect your device to your computer, or try using the same cable with a different device.
Also, make sure that the cable you’re using is actually compatible with your computer and dock or adapter. You can check its specifications online. If it doesn’t match up with your computer’s specifications, there’s no point in trying to use it because it won’t work anyway.
If everything matches up correctly and still nothing works, try plugging another device into your computer using its regular USB port — if that works then you know there’s nothing wrong with your computer’s ports.
4. Slow data transfer speeds
If you’re experiencing slow file transfer speeds between your Thunderbolt device and your computer, there are a few things you can try before doing anything drastic.
First, check for any software updates for your computer or your Thunderbolt device that may have been released since your purchase. If there are any updates available, install them and restart your computer before trying again.
5. Devices keep disconnecting
Check whether there is any interference from other devices. Wireless routers or cordless phones could be causing interference with the signal between your computer and the external display.
If there is no interference from other devices, your computer may not have enough power to supply all its ports while being connected to an external display at the same time. In this case, you need to connect only one device.
6. Thunderbolt device works intermittently or stops working
Sometimes, your Thunderbolt device works intermittently or stops working altogether. This can be caused by a number of issues, including outdated drivers or software, incompatible hardware and faulty cables.
To fix it, you should first determine whether the problem is caused by your computer or by the Thunderbolt device. Try connecting another Thunderbolt device to the same port and see if that device works properly.
If it does, then you need to update your system BIOS and drivers for your motherboard and monitor. If another device works but yours doesn’t, then try replacing the cable that connects between the computer and your Thunderbolt device.
7. Thunderbolt device freezes or crashes
If your Thunderbolt device freezes or crashes, it may be due to incompatible drivers, corrupted data on your drive or a bad cable connection. To fix this issue, simply update the driver for the device.
If it is a result of corrupted data, you should use a disk utility to check if there are any errors on the disk and repair them before trying to use it again. For a bad cable connection, make sure that both ends of your cable are connected properly.
8. Unable to transfer files
If you’re having trouble transferring files via the Thunderbolt port, it could be caused by a number of things. The cable being used may not be compatible with your computer or device. It could also be a corrupt file system, or your device doesn’t support the Thunderbolt protocol.
It is also possible that the destination computer does not have enough free space for the file. To fix this problem, try moving some files off of your hard drive and onto an external drive or cloud storage service.
You can fix the cable compatibility issue by purchasing a new cable or trying another one that you have on hand. If the issue is a corrupt file system, you can run the chkdsk command.
9. Thunderbolt ports do not show up
If your Thunderbolt ports don’t show up, it is possible that your USB ports are not working or you have a faulty cable. Also, check that it has the latest firmware installed then try connecting the dock to another computer to see if it recognizes the Thunderbolt ports.
If not, then it’s likely that there is an issue with your computer’s BIOS or UEFI firmware. For example, if you are using a laptop and upgrading from an older version of Windows your laptop may require a new BIOS update before it can recognize Thunderbolt devices.
In such a case, try updating your motherboard firmware to the latest version to help it recognize the peripherals connected at a faster rate.
10. Computer doesn’t support Thunderbolt technology
This can be a strange problem as you could have been connecting Thunderbolt to your PC all along then out of the blue, you get a message that your computer doesn’t support Thunderbolt technology.
First off, ensure that your PC meets the minimum requirements for Thunderbolt technology. If it doesn’t, then you won’t be able to use any of the devices. Most of the time, it’s just your operating system that is outdated and an upgrade will get rid of this error.
In case you experience any of the above errors but none of the solutions listed work for you, do not hesitate to contact Thunderbolt support.
Extenders often come in handy when your router is unable to cover a large space. Also, if there’s a weak connection in certain parts of the house, a great extender may come to your rescue. However, several users reported that their Netgear extender won’t connect to the router.
When it comes to Wi-Fi extenders, Netgear is one of the first names that comes to mind. And, encountering an error with it comes as a shock to many.
However, the problem is not limited to Netgear but is encountered with other extender manufacturers as well. You can expect to face similar issues with the brands listed below:
TP-Link – Remove the wireless network profile from the range extender and reconnect it if just one end device is unable to connect to the range extender’s Wi-Fi.
D-Link – Move in the direction of the reset button to restart the D-link extender. Rebooting your router requires waiting 2 to 3 seconds after pressing it for 5 seconds with the paper clip.
Linksys – Your range extender’s Reset button should be pressed and held for five to ten seconds, or until the LED begins to blink.
Now, that you understand that the Netgear extender won’t connect to your router is not a complex problem, let’s walk you through the most effective fixes for it in the following sections.
Do Wi-Fi extenders make the Wi-Fi better?
First, understand that an extender is not the answer to every Wi-Fi network-related issue but only comes in handy in certain situations.
For instance, if there is a particular room that does not receive a Wi-Fi network, just install an extender and you are good to go. But in case it’s the whole house to be covered, what you require is a good mesh router system.
So, what does an extender actually do? As the name suggests, it basically extends the signal to a point the router cannot cover. You just put it between the router and the point without network coverage. And, it will receive the signal from the former and push it to the latter.
However, there’s a considerable loss in Internet speed in the process. For some, it was 50% or more. The loss certainly depends on the model, and the distance between the router, the extender, and the area to be covered.
So, in all, an extender does make the Wi-Fi better by enhancing its coverage in small to medium-sized houses. But if there’s a major loss of speed or there’s a large area to be covered, an extender wouldn’t be a viable option. Also, you can use your PC as a Wi-Fi extender and save some money.
What do I do if the Netgear extender won’t connect to the router?
1. Restart both your router and the extender
The first thing you should do in case the Netgear extender won’t connect to the router is to restart both devices.
This will fix trivial issues that are preventing the connection or create any conflicts. Restarting the device eliminates all such issues right away.
Unplug both from the power source, wait for at least a minute, and then replug them. Once done, your Netgear extender should now connect to the router. If the problem persists, try the next method.
2. Ensure there are no obstructions in between
Another common reason behind the Netgear extender not connecting to the router is the presence of obstruction between the two, or if they are kept far apart.
There is a particular distance up to which a router can transmit signals and similarly, an extender can catch these. So, if these two are placed at a large distance, bring them closer and make sure that there are minimum or no walls separating the two.
If possible, use an ethernet cable to connect the extender and router. This will fix any issue with the connectivity.
3. Keep electronic devices away
Many electronic devices are known to interfere with the signals and if there are any around, the Netgear extender won’t connect to the router. These could be a microwave, wireless telephones, baby monitors, or Bluetooth devices, amongst others.
So, if you have any of these or other similar items in the vicinity, turn them off for a while and check if the extender now connects to the router. In case it does, you now know what’s causing the issue and can take the appropriate remedial measure.
How to set up a Netgear extender?
NOTE
The steps listed here could change in the coming days or may be different for various models, though the concept remains the same. In case you come across a step that’s not listed here, just follow the on-screen instructions.
Plug in your extender and wait for the Power light to turn on. Now make sure that the Power Link LED light is green or amber. In case it’s red, connect the extender to a location closer to the router.
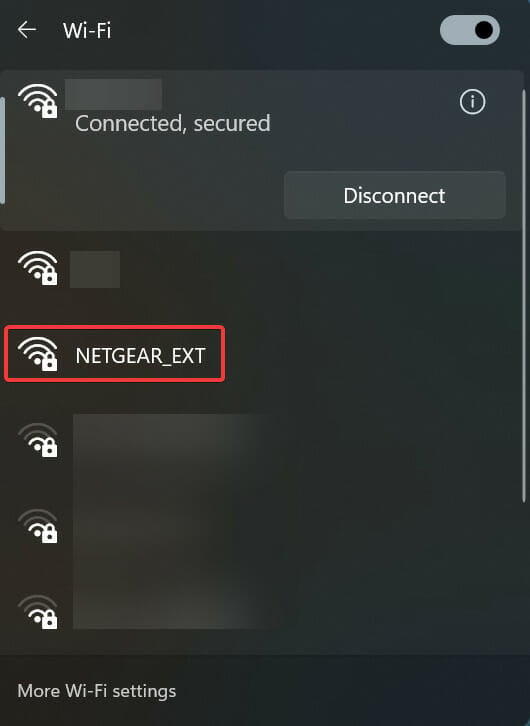
Now, use a device (mobile, tablet, or computer) to connect to the extender’s network. It will most likely appear as NETGEAR_EXT. Although there’s generally no password set, enter the word password, if it asks for one.
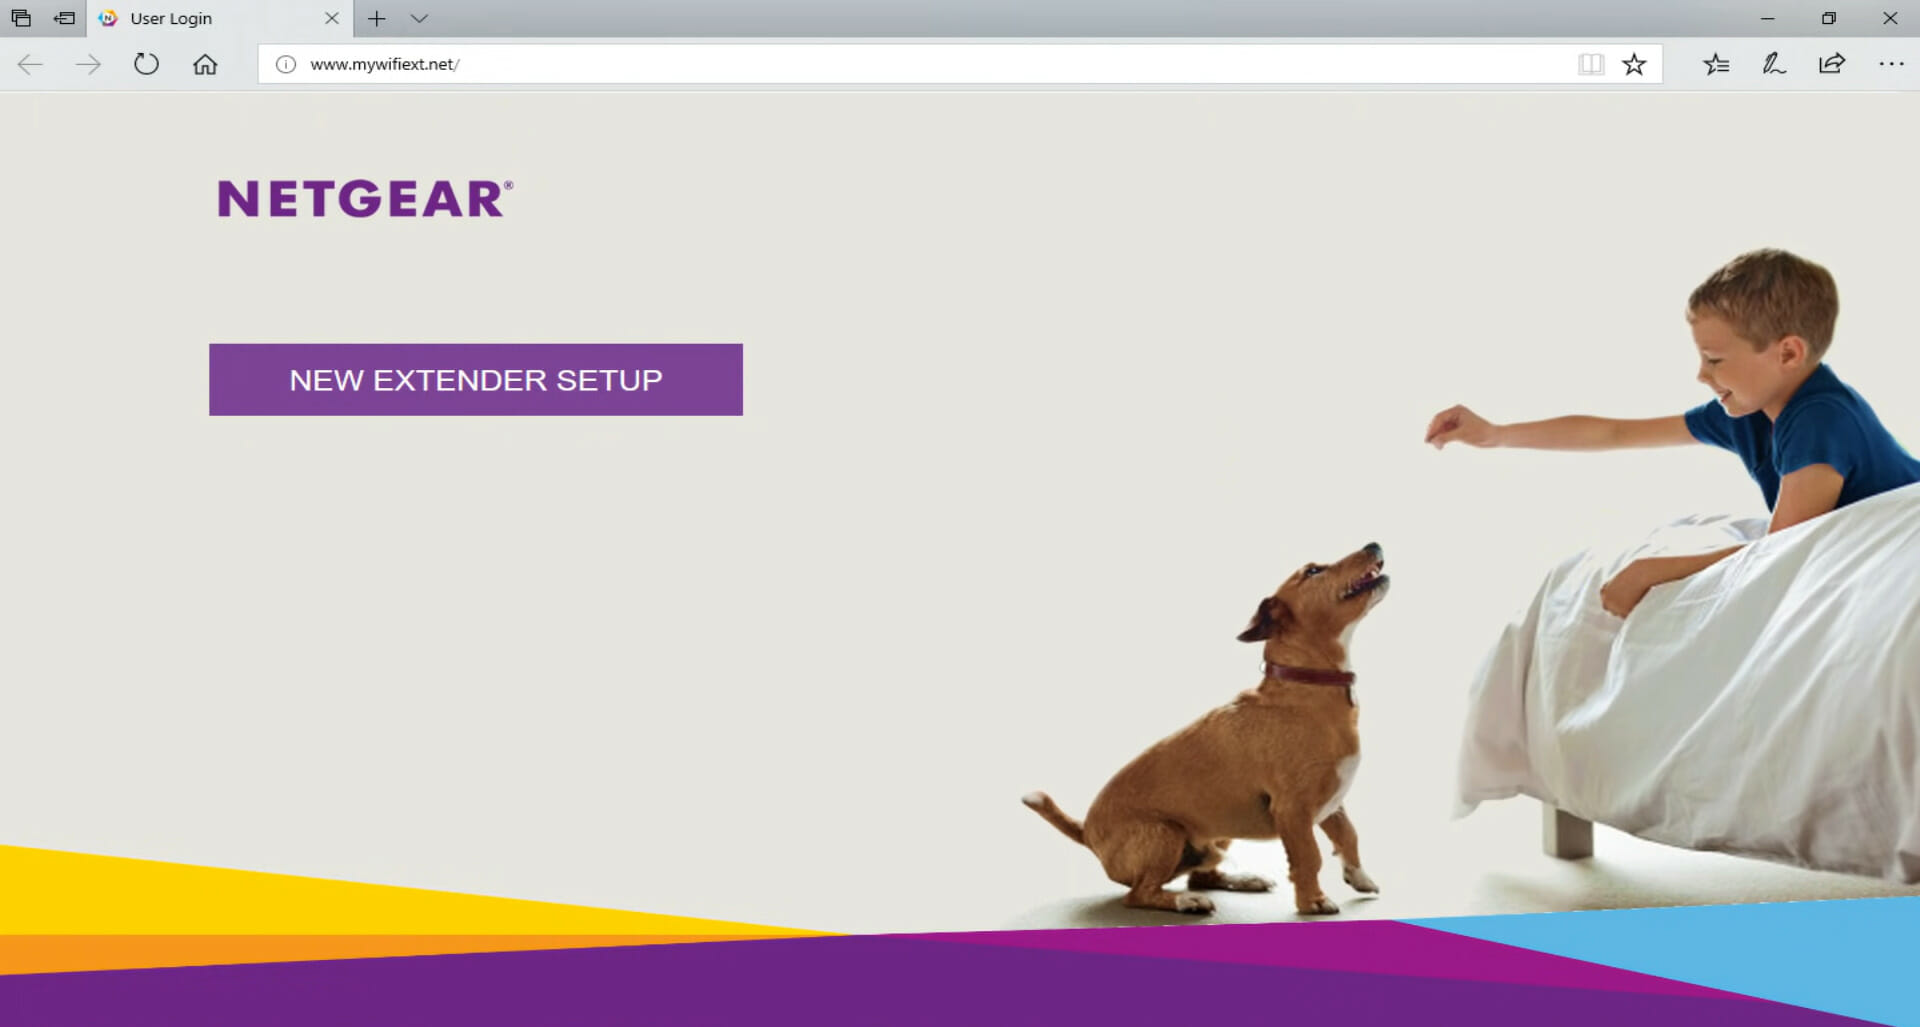
If the Netgear Extender Setup page is not opened automatically, do so manually by clicking on the link.
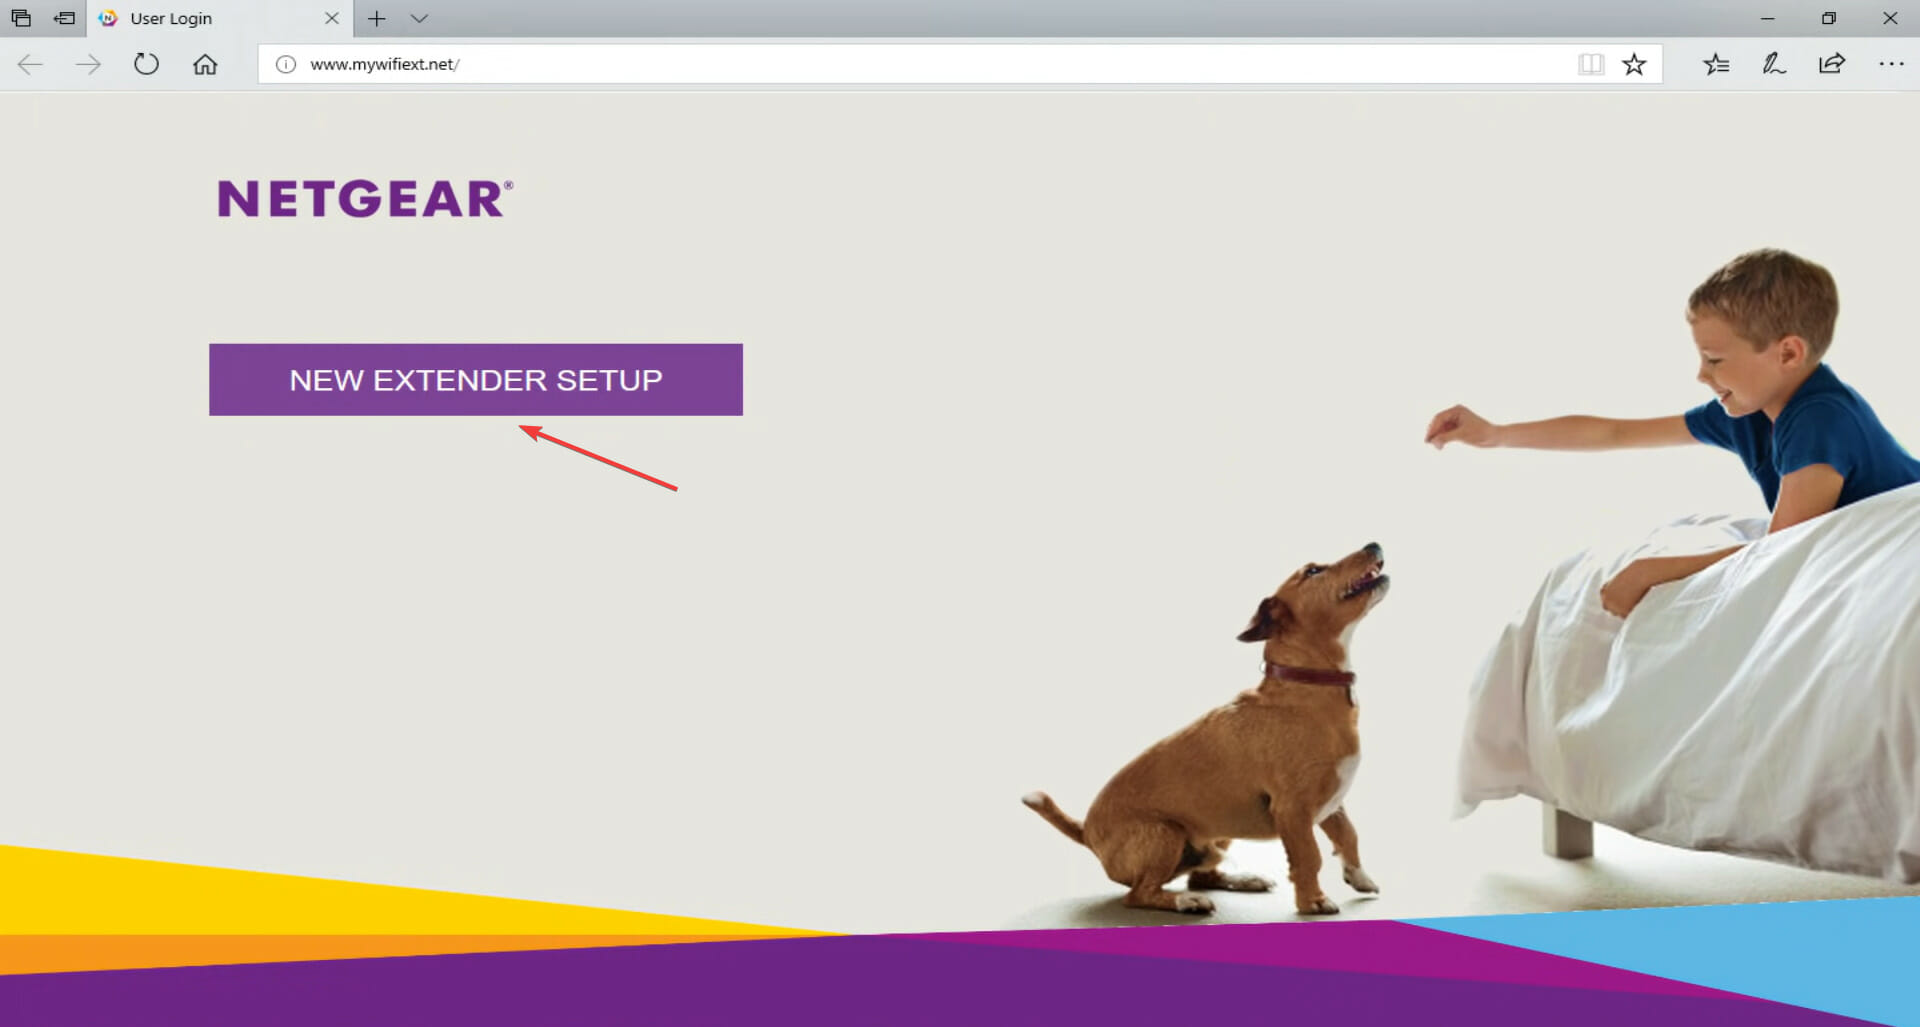
Now, click on the NEW EXTENDER SETUP button.
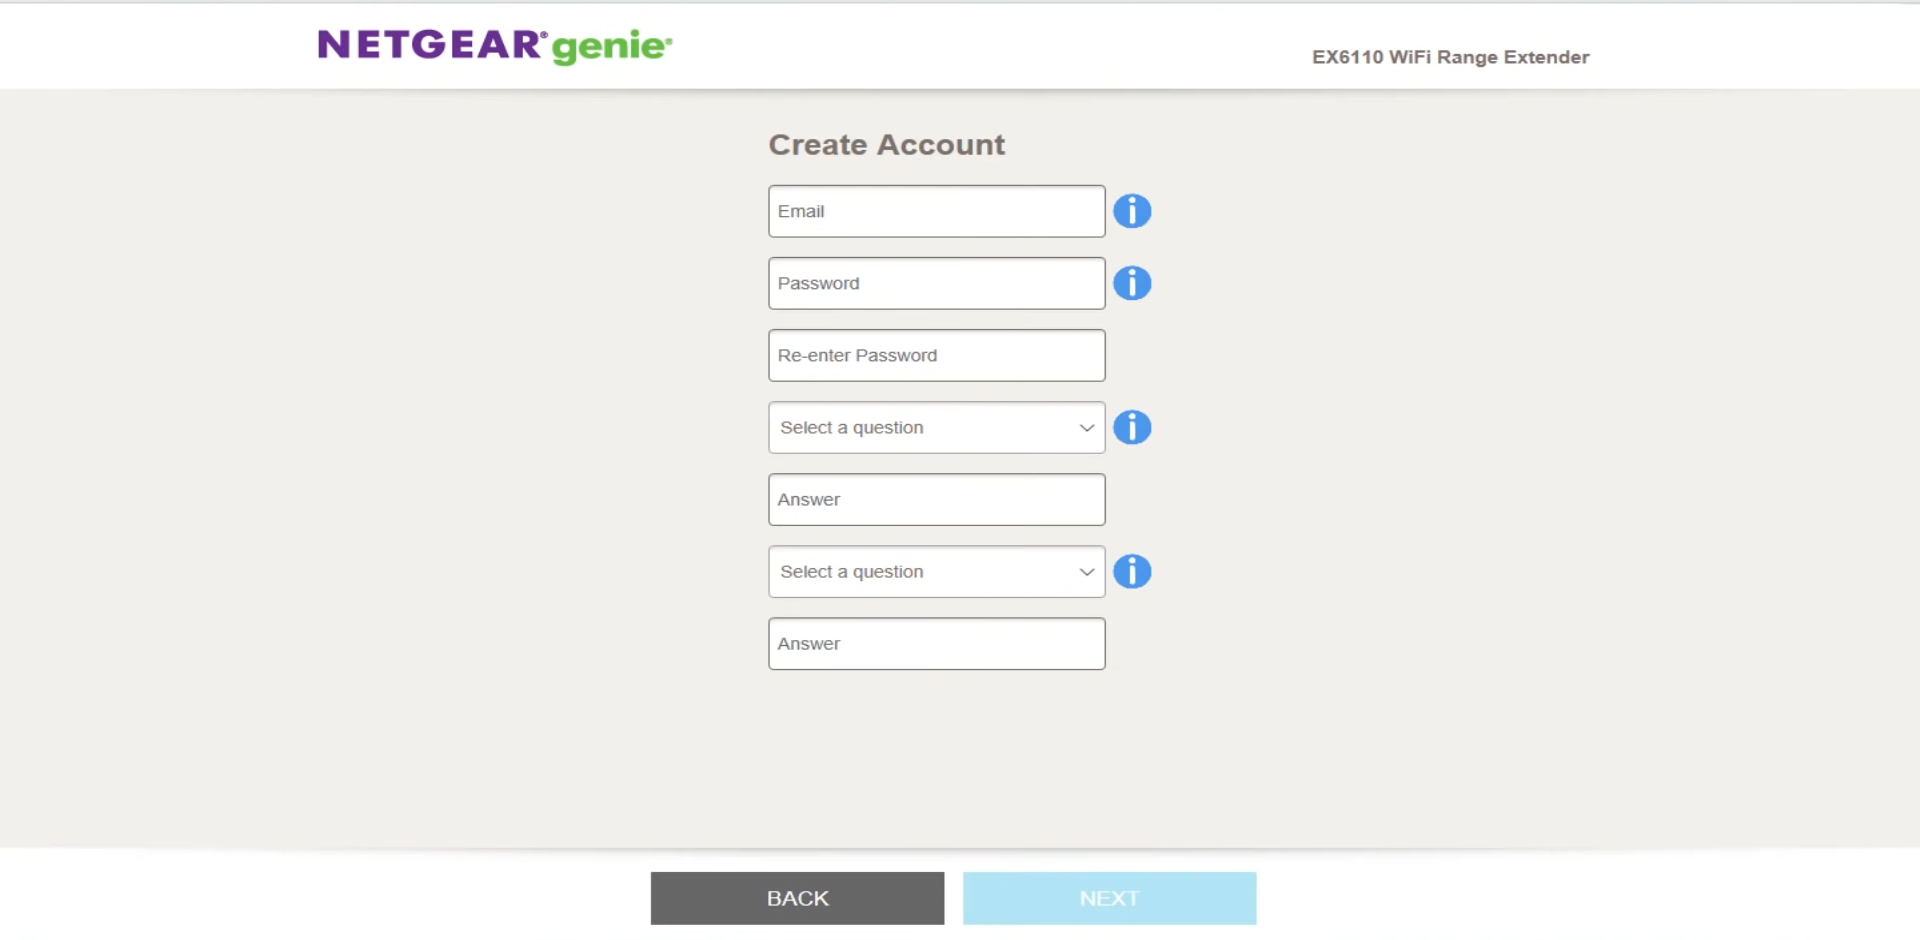
Enter the credentials in the text fields, and once done, click on Next at the bottom.
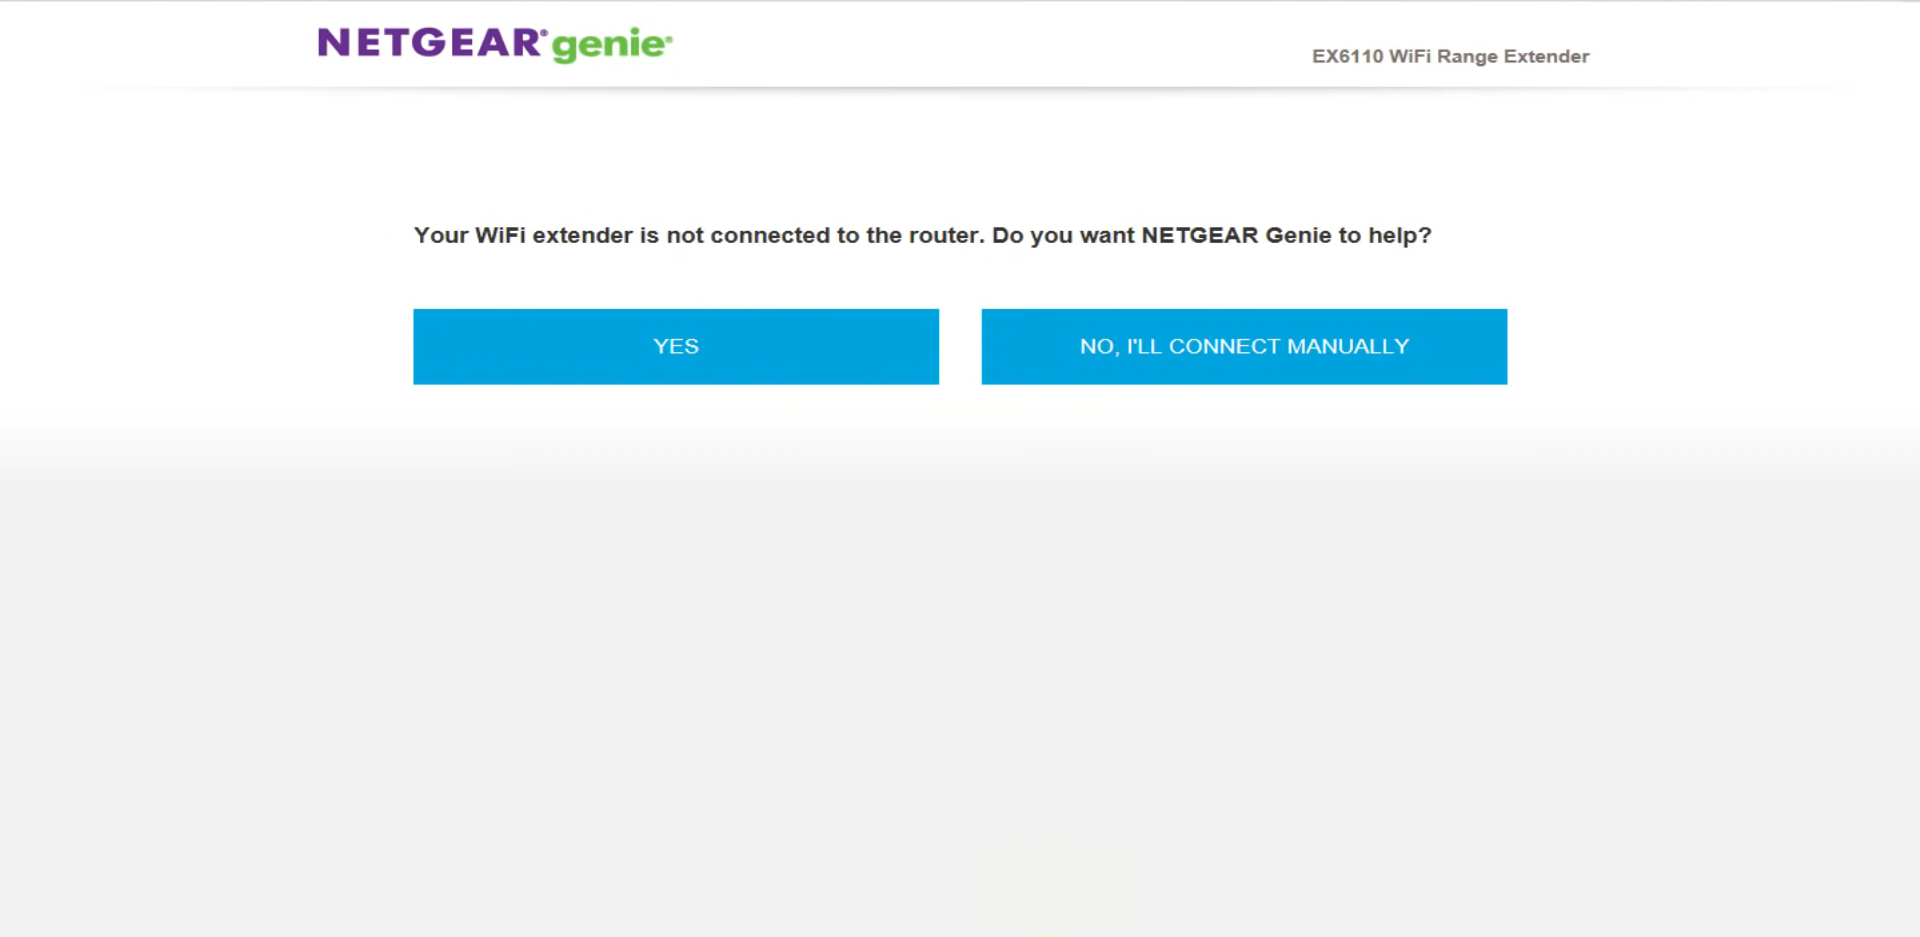
Next, click on Yes to use NETGEAR Genie, a tool that simplifies the process, to connect to the router.
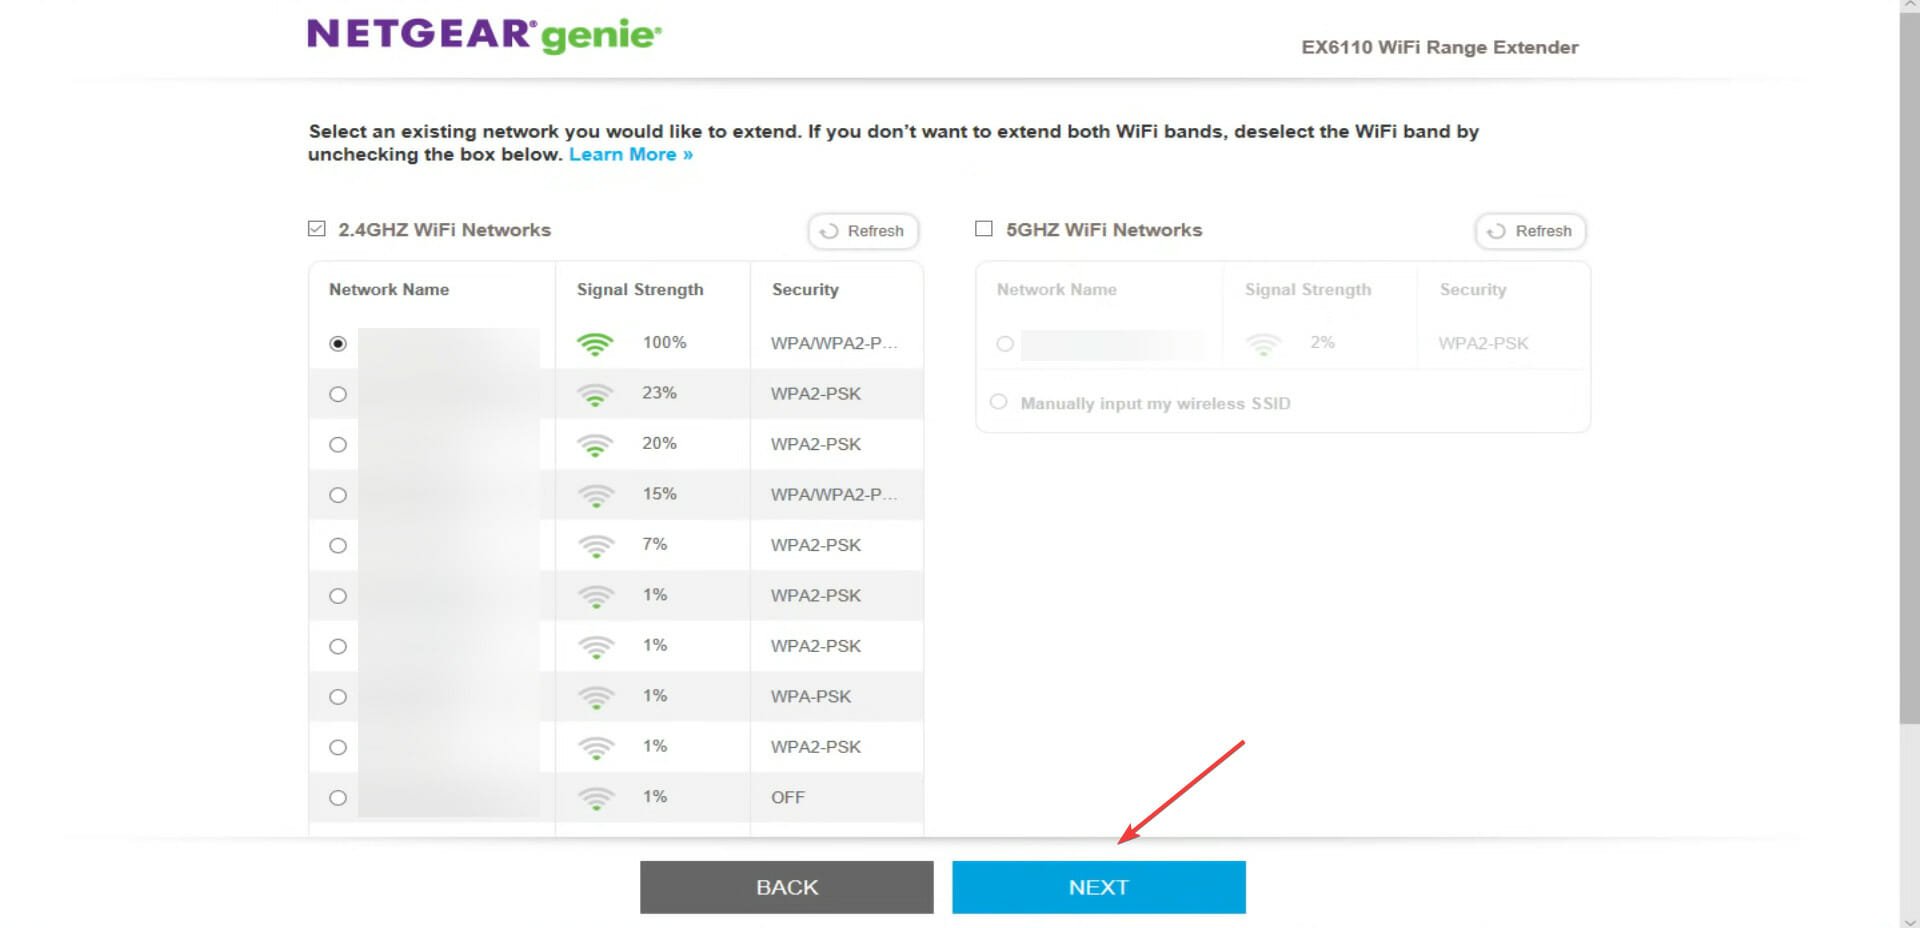
Choose your Wi-Fi router from the list, when it appears, and then click on Next.
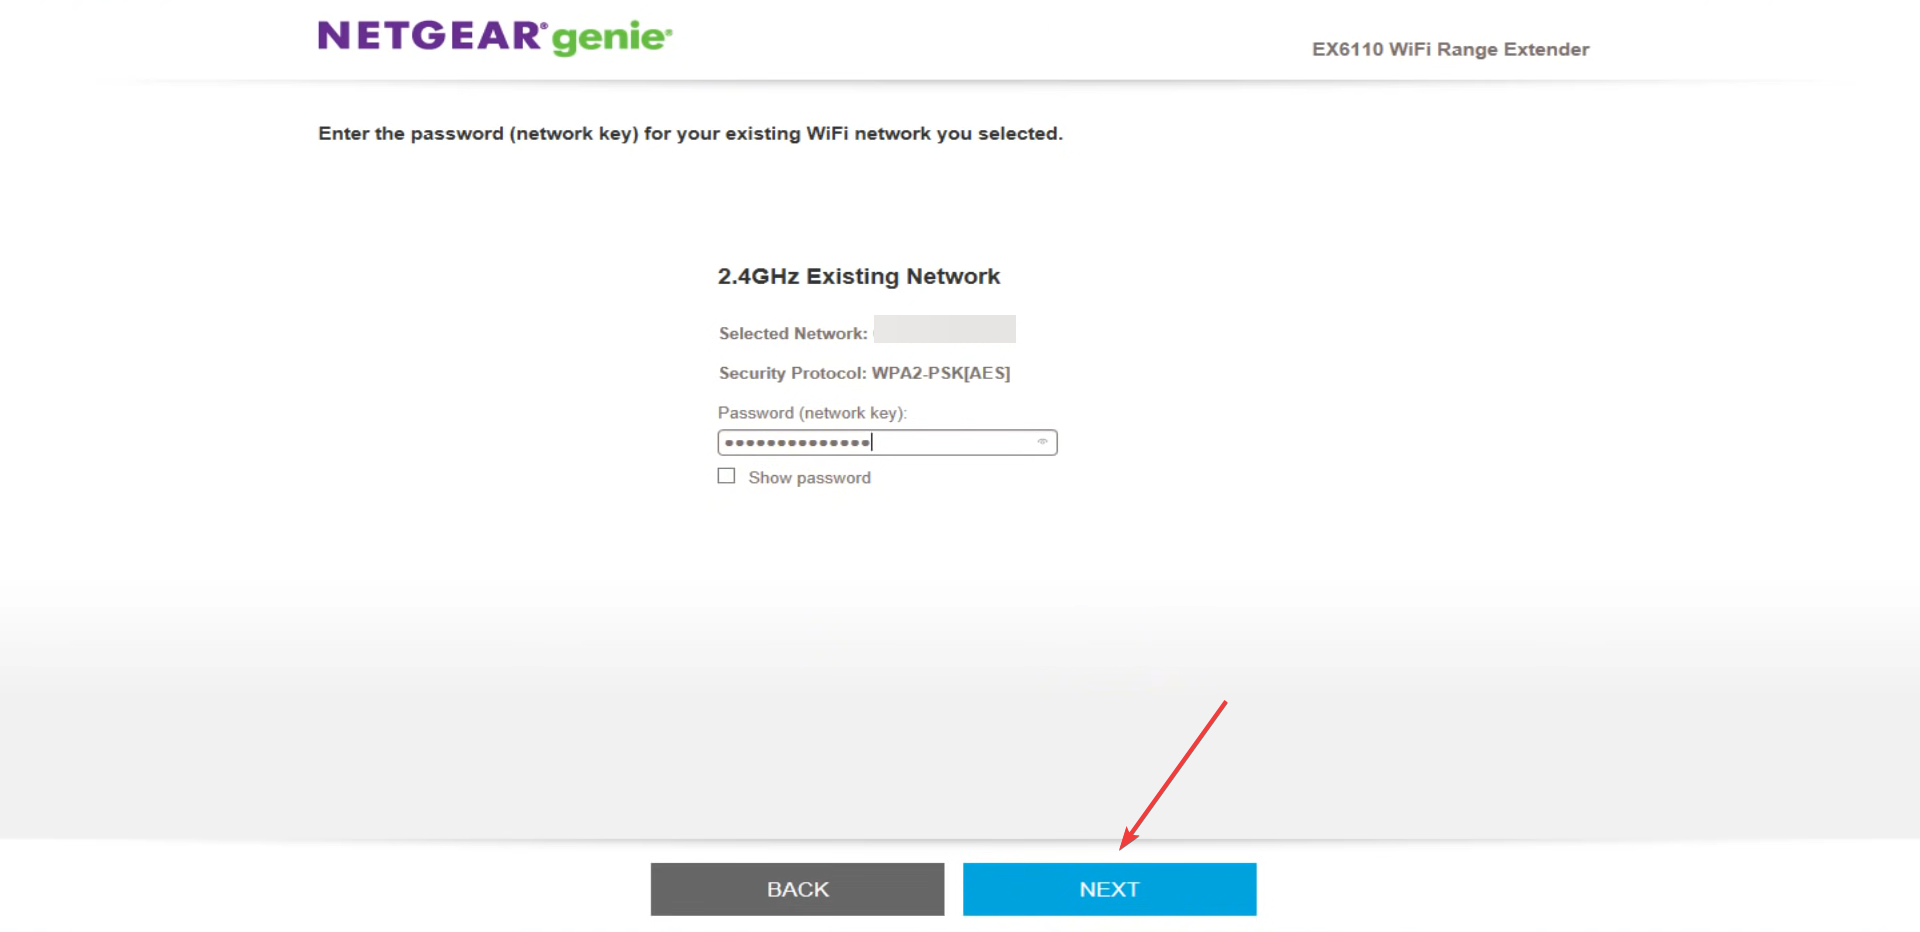
Enter the password for your router’s network and click on Next.
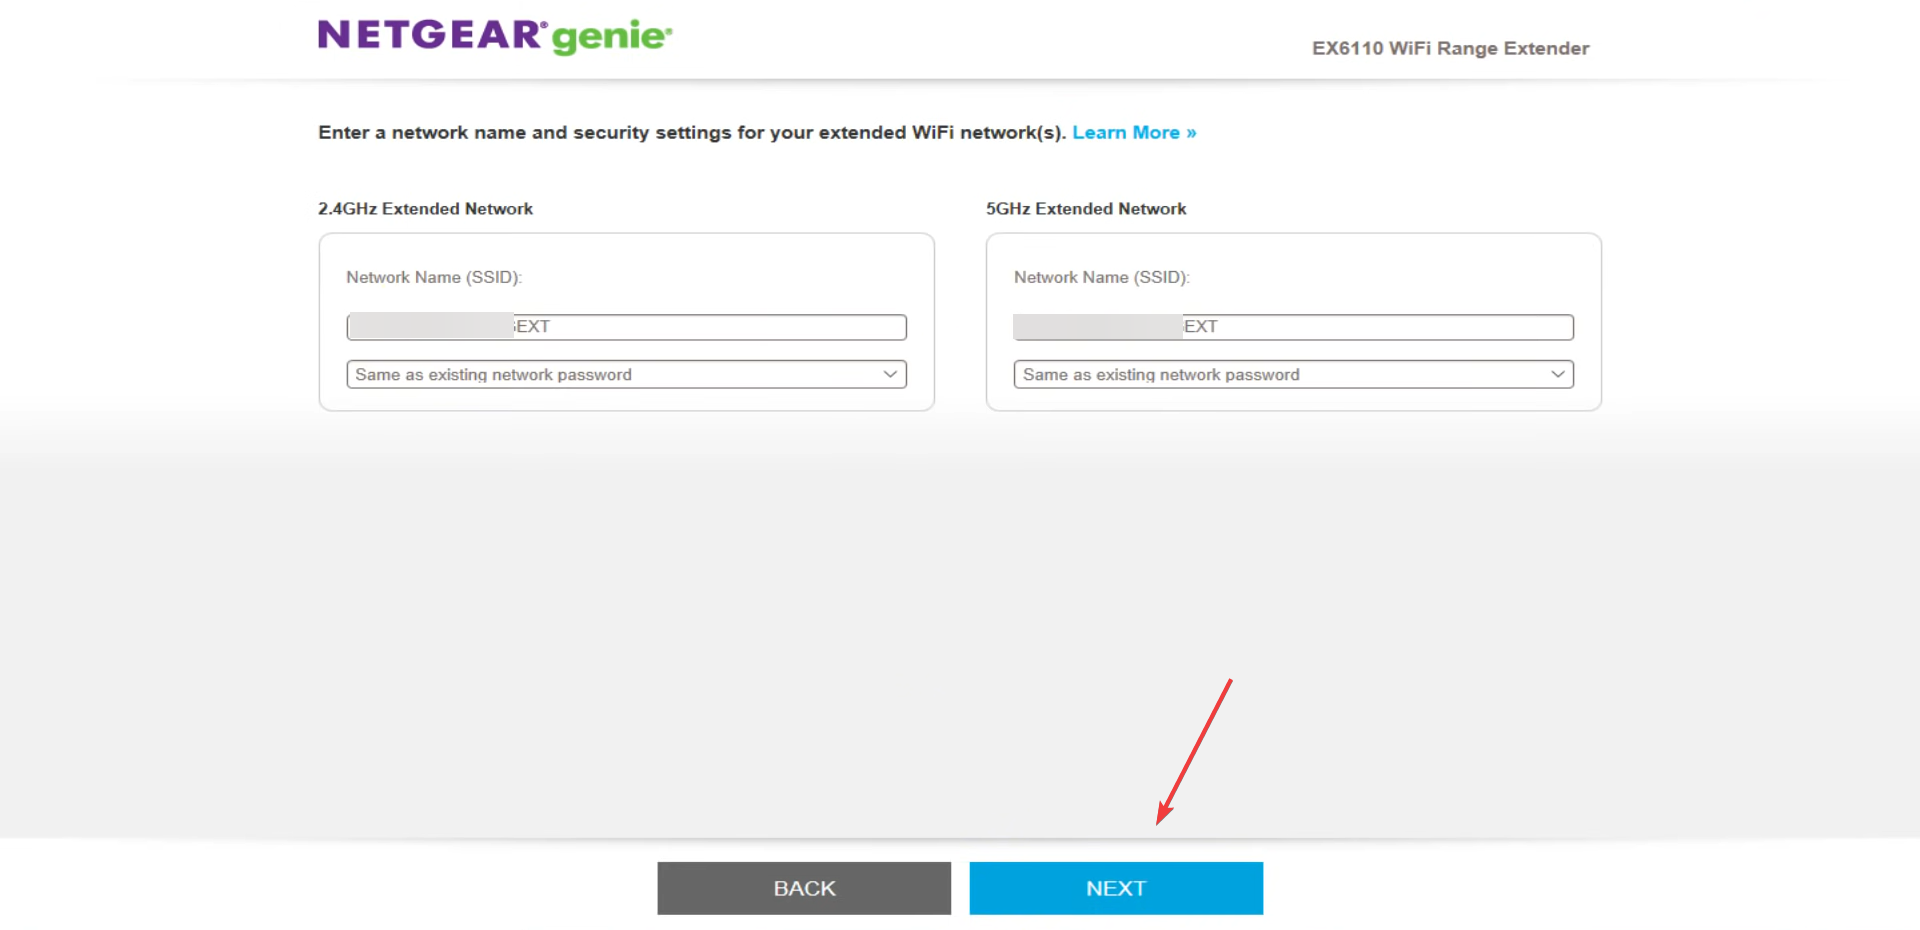
Now, enter the network name, choose the password setting from the dropdown menu for both bands, if applicable, and click on Next.
It will now list the current network settings. Click on Continue at the bottom to complete the process.
You can now connect the device to your extender just like you connect it to the router, and access the Internet.
By the time you reach this part of the article, the Netgear extender won’t connect to the router issue must be fixed, and you also know how to set up one.
In case the above methods don’t work, there is likely a problem with the extender or router themselves. In this case, you may purchase another reliable Wi-Fi extender or look for a good Netgear router to eliminate compatibility issues.
Sid Meier’s Civilization VI is a turn-based strategy game, where you can build and expand your empire to dominate the world.
You can advance to the next age, fight enemies, and make alliances. It’s possible to choose from 20 historical leaders.
You can play Civ 6 offline in single-player mode. However, the best way to fully experience it is by switching to multiplayer mode to enjoy it online with your friends.
Many players report Civ 6 lag when playing the game online.
It’s an unfortunate event that may occur on all platforms due to various reasons, such as limited bandwidth in restricted networks, bandwidth throttling, incorrect network configuration settings, or game server issues.
Luckily, you can fix Civ 6 lagging by downloading and installing a powerful virtual private network solution. With a Civ 6 VPN, you can connect to a server optimized for gaming so that you can reduce high ping, eliminate lag, and get rid of latency.
Why is Civ 6 so laggy?
The more information we have about your problem, the closer we can get to resolving it. So some questions must be raised here. Do you have a large map? Are you in the final round? Are you using any mods?
If you answered yes to at least one of them, you can bet that 87% of the other players are asking the same questions.
Late game, when there are a lot of movement computations or wars being played out, the game can bog down some people’s systems. That sometimes subsides when those wars end or there are fewer units on the board.
The best practice to fix Civ 6 lag is to install a VPN for routers or switch to a wired connection instead of Wi-Fi. Moreover, do not stream too many apps when playing the game. It will stutter.
NordVPN is an excellent solution for fixing Civ 6 multiplayer lag. Operated by Tefincom & Co., this VPN app has something that others do not: obfuscation mode. You can use it whenever your VPN traffic gets blocked by the remote server.
NordVPN offers a fast and easy solution for minimizing jitter and resolving Civ 6 computer lagging issues. It supports OpenVPN, and private DNS, together with an ad and malware blocker.
Another facility offered by this VPN is unlimited streaming of your favorite content online. You can access unrestricted content or games regardless of your location.
ExpressVPN is a reasonably popular VPN service that is becoming increasingly popular among gamers. This VPN company’s creators claim to have the best and most secure VPN servers for gaming on the market right now.
A 4096 SHA-512 RSA certificate (for server and client authentication in SSH connections), as well as strong AES-256-CBC encryption and HMAC protection against regular data alteration, ensures privacy.
You can choose between five protocol variants: OpenVPN/UDP, OpenVPN TCP, L2TP-IPSec, PPTP, and Lightway, the latter of which is best for gaming.
There is also an Automatic option, which allows ExpressVPN to select the best protocol for your network.
Furthermore, ExpressVPN offers DNS leak protection and even runs its own 256-bit encrypted DNS on each of its servers for added security.
Check out ExpressVPN’s most notable features:
More than 3,000 servers in 94 countries
Netflix, Amazon Prime Video, BBC iPlayer, Hulu, and YouTube compatibility
Money-back guarantee for 30 days
5 simultaneous connections
Router setup assistance
ExpressVPN
It has apps for all platforms, whether you play on a PC, Mac, console, or mobile device in optimized servers.
If you’re looking for the easiest way to stop Civilization 6 lagging, then Private Internet Access (PIA) is your best bet. It’s a virtual private network solution owned by Kape Technologies, which can provide a quicker route to the game server.
PIA lets you pick between static and dynamic IP addresses. It has a large network of servers, a kill switch, and 24/7 live chat support. You can use it on all major platforms, including Windows, Mac, Linux, Android, and iOS.
Check out PIA’s most notable features:
+3,300 servers across 47 countries
Optimized for gaming, streaming, and torrenting
10 simultaneous connections
No identifying logs
Ideal for Civilization 6 lags when meeting leaders
30-day money-back guarantee (no free trial)
Private Internet Access
Get rid of Civilization 6 production queue lag and other connectivity issues with the help of PIA.
Another virtual private network solution worthy of your attention is CyberGhost VPN. It can not only fix packet loss but also deal with Civilization 6 UI lag issues that prevent you from enjoying the game.
Also owned by Kape Technologies, CyberGhost VPN has a bigger network of servers than PIA. It has an ad and malware blocker, kill switch, split tunneling, and DNS leak protection. The tool supports all major OSes.
Another excellent Civ 6 multiplayer lag reduction solution is provided by Surfshark. We’re talking about an easy-to-use virtual private network service that not only reduces Civ 6 lag but also fixes network congestion.
Developed by Surfshark LTD, this VPN runs plenty of servers and enables exclusive DNS on each one. With support for OpenVPN, IKEv2, Wireguard, and L2TP, Surfshark is ideal for gaming.
If you’re having trouble with Civilization 6 multiplayer lagging out, you don’t have to exit the game and come back later. Instead, use one of the VPN solutions we presented above to reduce Civ 6 lag and fully take advantage of the online version with your friends.
Visit our Sid Meier’s Civilization VI Hub for more useful articles. To use VPN solutions with other games, join our Gaming VPN section.
And, if you can’t decide, we suggest going with ExpressVPN which can fix Civ 6 lags during gameplay and lower your ping time in order to improve your gaming experience, even on Steam and Discord.
The NTFS File System error is a Windows 11 BSOD (Black Screen of Death) issue that some users have reported. That error displays a message with the NTFS_File_System stop code. That message states:
Your PC ran into a problem and needs to restart. We’ll restart for you… If you call a support person, give them this information: NTFS_File_System.
This BSOD error arises during system startup, which is bad news. Windows 11 doesn’t start up when the issue occurs. Things were no different for NTFS_File_System errors on Windows 10.
The NTFS_File_System code indicates this is a hard drive issue. It can arise from outdated or faulty hard drive drivers or bad disk sectors. Or your PC’s HDD could have a corrupted NTFS file system partition.
Corrupted system files, malware, and other device driver issues are also possible factors behind the NTFS_File_System error. Do not hesitate to check out what can cause a Blue Screen of Death for more details.
What does NTFS mean on a drive?
NTFS, which stands for New Technology File System, is the latest file system introduced and is used for storing files on drives, both HDD and SSD.
A file system is a set of rules that dictate how a file will be saved, stored, updated, and retrieved from the drive.
NFTS is relatively better when compared to FAT32 or the other file systems introduced by Windows and has far lesser limitations.
How can I fix the NTFS File System error in Windows 11?
1. Scan system files
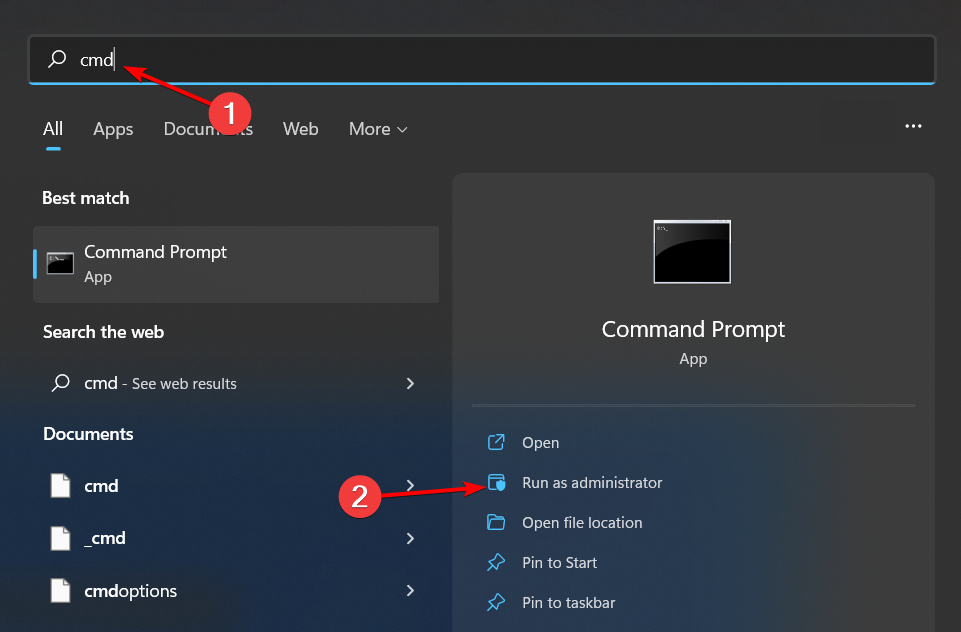
Press Windows + S to open the Search menu, enter cmd in the text field, and click onRun as administrator.
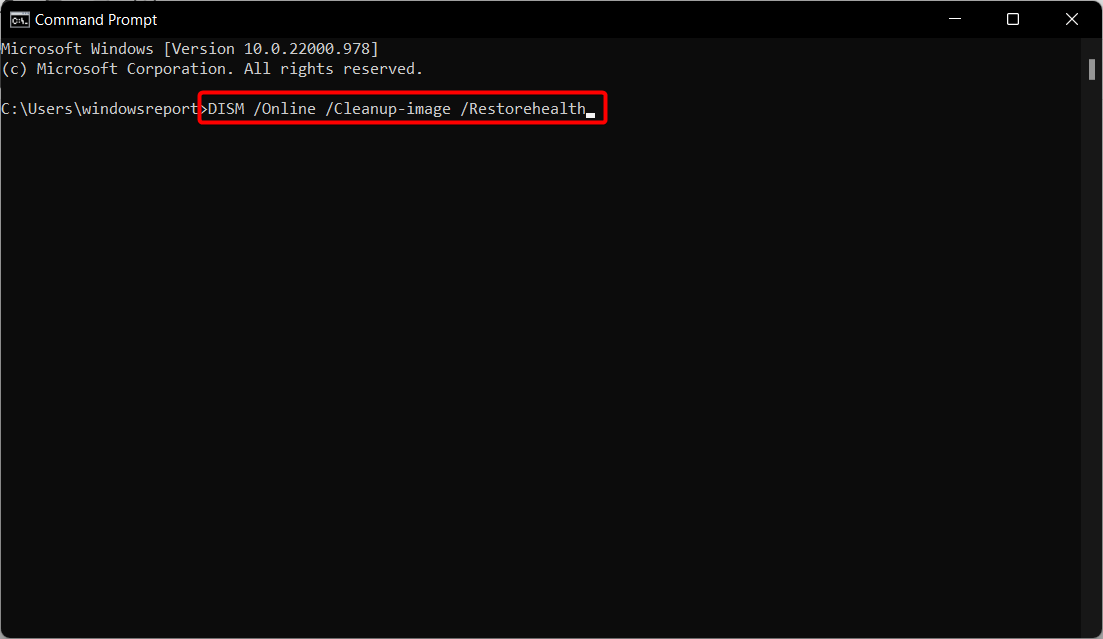
Type in this command and hit Enter: DISM.exe /Online /Cleanup-image /Restorehealth
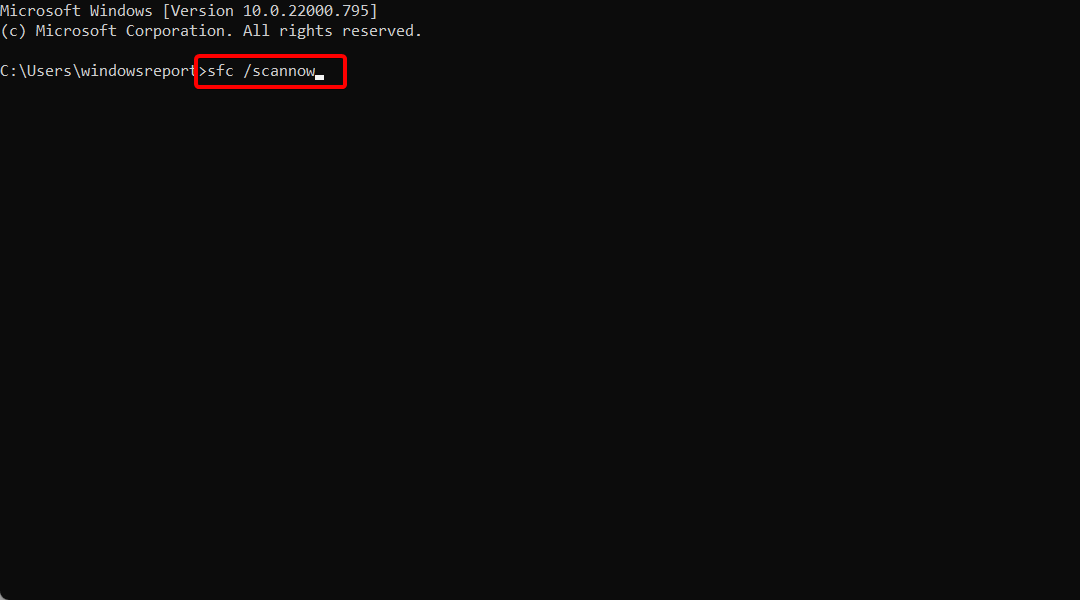
When the Deployment Image Servicing scan is complete, input this command and press Enter: sfc /scannow
Wait for the System File Checker scanning to finish.
For more advanced features and system scanning capabilities, we recommend using a specialized tool that will scan your PC for damaged system files and missing DLLs which are the most common cause of Windows errors.
2. Run a disk scan
Press Windows + R to open Run, type cmd, and hit Ctrl + Shift + Enter.
Then type this Check Disk command and press Enter: chkdsk /f c:
Press Y and then hit Enter.
Open the Start menu, click the Power button, and select Restart to initiate the scan.
After the computer turns on, verify if the NTFS file system error on HP devices running Windows 11 is fixed.
3. Run an antivirus scan
Double-click the Windows Security icon in the system tray to bring up that app.
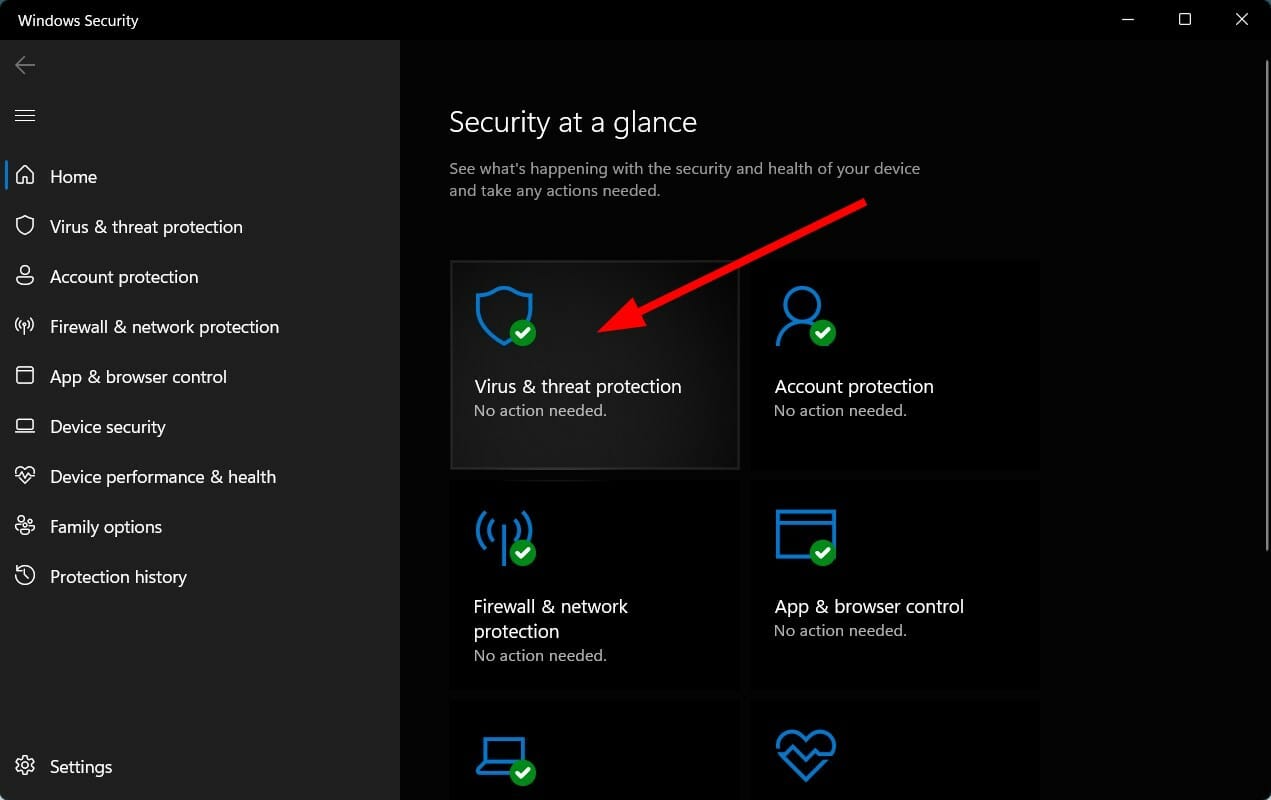
Next, select the Virus and threat protection tab on the left.
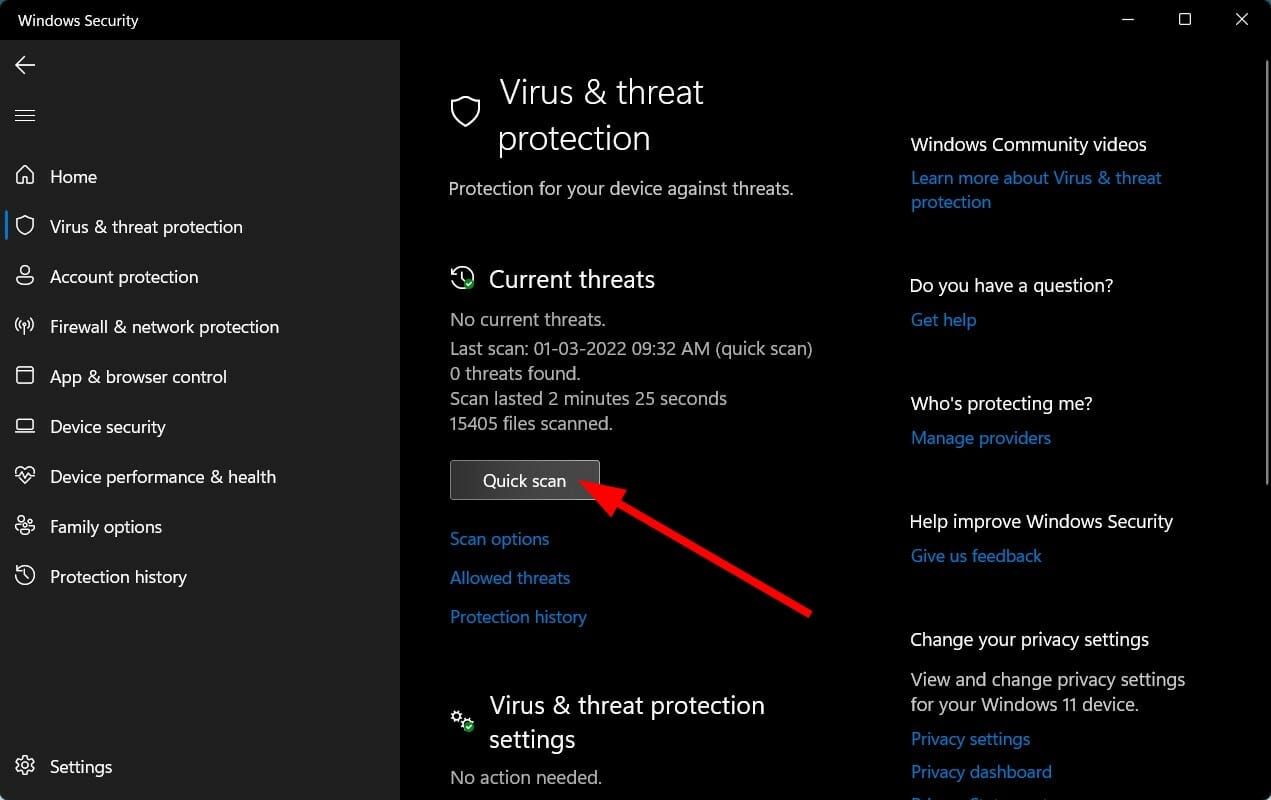
Click the Scanoptions to bring up those settings.
Then select the Full Scan radio button.
Press the Scan now button to start.
After the scan is complete, restart the computer and verify if the NTFS file system blue screen on Startup is fixed.
4. Run Startup Repair
Press Windows + I to open Settings, and click on Recovery on the right in the System tab.
Click Restartnow for the Advanced startup option.
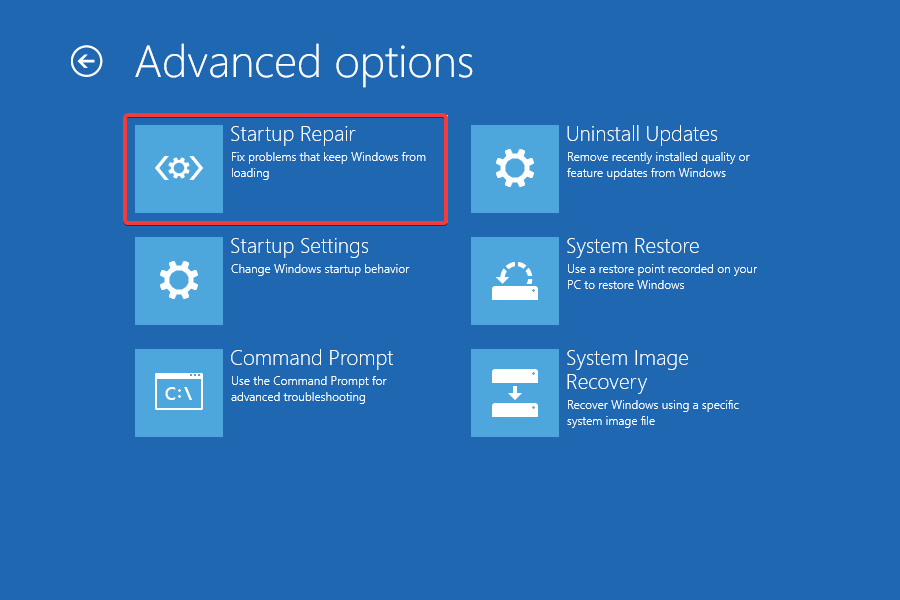
Select Troubleshoot and Advanced options to bring up the menu that you can see below:
Choose the Startup Repair option there to run that tool.
After running the Startup Repair, check if the NTFS file system error blue screen in Windows 11 is fixed. If not, head to the next solution.
5. Rebuild the boot manager
Right-click Start to select a Run shortcut.
Enter this command in Run’s Open box: cmd
Press the Ctrl + Shift + Enter key combination.
Then type in these four separate commands, pressing Enter after each one:bootrec.exe /fixmbrbootrec.exe /fixbootbootrec.exe /rebuildbcdbootrec /scanos
6. Reset Windows 11
Open your Start menu, and select the pinned Settings app.
Click Recovery to view more options.
Press the Reset PC button within the recovery options.
Select Keep my files in the Reset this PC window.
Then choose the Cloud download or Local reinstall option.
Click the Next and Finish buttons.
Once the reset process is complete, you will have the NTFS.sys failed in Windows 11 error fixed for good. If nothing else worked, try this since many were unable to resolve the blue screen of the NTFS file system after resetting.
How do I enter Windows Recovery Environment and Safe Mode?
To fix this BSOD error outlined above, you might need to enter Safe Mode from Windows Recovery Environment. You can enter WindowsRE by restarting your PC three consecutive times. Then, press the Power button on a logo for five to 10 seconds during system startup.
The Windows Recovery Environment includes numerous troubleshooting tools. For example, you can apply the Command Prompt, Windows 11 reset, and Startup Repair resolutions. To apply them within Safe Mode, however, follow the steps below:
First, select Troubleshoot on the Choose an option menu.
Choose Advanced options to bring up that menu.
Then select Startup Settings on that menu.
Click the Restart option.
When Windows 11 restarts, you’ll see a Startup Settings menu. Press the F5 key to select the Enable Safe Mode with Networking option.
After that, you can apply all the resolutions above as instructed within Safe Mode. Those resolutions are among the best methods for fixing Windows 11’s NTFS File System error.
However, we can’t guarantee they’ll resolve this black (blue in Windows 10) screen error for everybody. If those potential resolutions aren’t enough, your PC might need a new hard drive. In this case, consider returning your PC to its manufacturer’s repair service or reputable alternatives.
Microsoft’s blue screen error troubleshooter might also come in handy for fixing the NTFS File System error. That’s a troubleshooting page you can open in your browser. Go through that troubleshooter’s BSOD suggestions to apply more potential fixes.
Do I need NTFS?
Yes, in most cases, you do! Even otherwise, NFTS is one of the most advanced file systems and allows modifying permission to dictate which files are accessible and the ones that are not to other users.
Also, it automatically repairs files in case of power failure or other issues. Besides, you can compress files with it, thus saving storage space and boosting the computer’s performance. And NTFS is compatible with most iterations of the OS, while the other ones are not.
Before you go, please find out how to fix File System error 1073545193 on Windows 10 since many reported encountering it. The solutions detailed in our article may also be applied by Windows 11 users.
To discuss the NTFS File System error, feel free to add some comments below. Also, if you’ve found a different way to fix this BSOD issue, which isn’t specified above, you’re more than welcome to share it.
Virtual Private Networks or VPNs are becoming more and more popular these days.
They have various uses starting with regular Internet users who just want to circumnavigate geo-blocking restrictions to companies or larger organizations that plan to provide enhanced functionality to their work-from-home employees.
If you’re a Chrome user, it’s great to have a VPN within the browser. There are various options of VPNs available on the market, and we picked out five of the best to narrow your choices.
Check out their features and get the one that seems to fit your needs best.
NOTE: The solutions listed below are also available as stand-alone software. For enhanced privacy and data protection, we recommend downloading the stand-alone tools.
However, if you want to download and install the browser extension only, you can find the download link below as well.
What are the best Chrome VPN extensions to get?
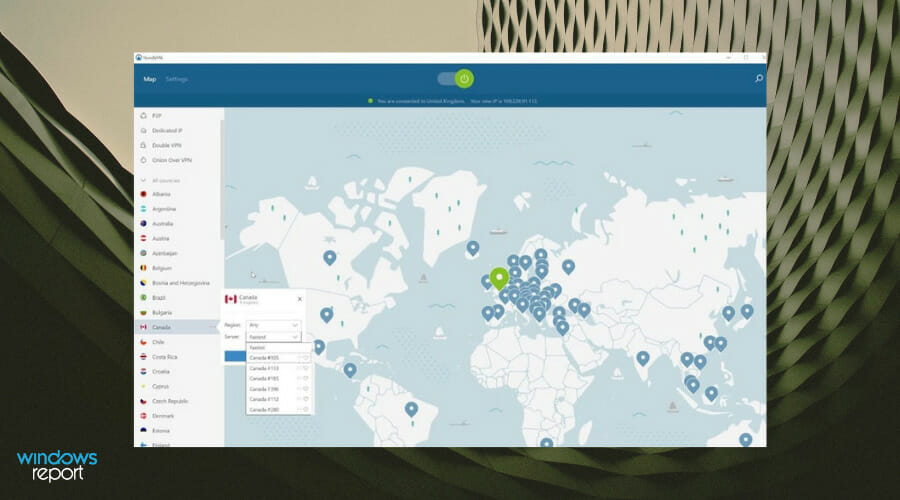
NordVPN – Integrated anti-malware features in the extension
Another great VPN service that has its own Chrome extension is NordVPN developed by Tefincom & Co., S.A. This service has more than 5000 servers located in 62 different countries around the world, which means that you can easily get access to any geo-restricted content.
As for security, you should know that all your traffic is encrypted, and thanks to the 256-bit encryption, third parties won’t be able to see your browsing data.
Regarding the supported protocols, this service uses IKEv2/IPsec and OpenVPN protocols. NordVPN also has a CyberSec feature available that can block dangerous websites and ads.
If you require additional protection, there’s a double VPN feature available. Thanks to this feature, you can route all your traffic through another VPN server and encrypt it once again for extra protection.
It’s worth mentioning that NordVPN has a strict no-logs policy, which means that NordVPN won’t keep any logs related to your online activity.
In order to protect your identity online, NordVPN has an Automatic Kill Switch that will automatically block your device in case the VPN connection is broken, thus ensuring your privacy.
There’s also a DNS Leak Protection available that should prevent your ISP or other DNS provider from keeping track of the websites you visit.
For extra security, there’s also an Onion Over VPN feature that will allow you to easily connect to the Onion network.
Overall, NordVPN is a great VPN client, and if you’re looking for a VPN that is available on multiple platforms and it has both Firefox and Chrome extension, we suggest that you try out NordVPN.
Overview:
Over 5000 servers in 62 different countries
256-bit encryption
Support for IKEv2/IPsec and OpenVPN protocols
Double VPN feature for extra protection
DNS Leak and Automatic Kills Switch features
Onion Over VPN
Available on all major platforms
Extensions for Chrome and Firefox
The NordVPN extension is free to install from the Chrome web store, but you have to be subscribed to the service to use its features.
The browser extension allows you to hide your IP, and use virtual locations from 60 different countries. It blocks intrusive ads and has anti-malware security. It doesn’t keep a log of any user activity or any other sensitive information.
NordVPN
NordVPN is one of the greatest VPN services that pack an equally effective Chrome extension.
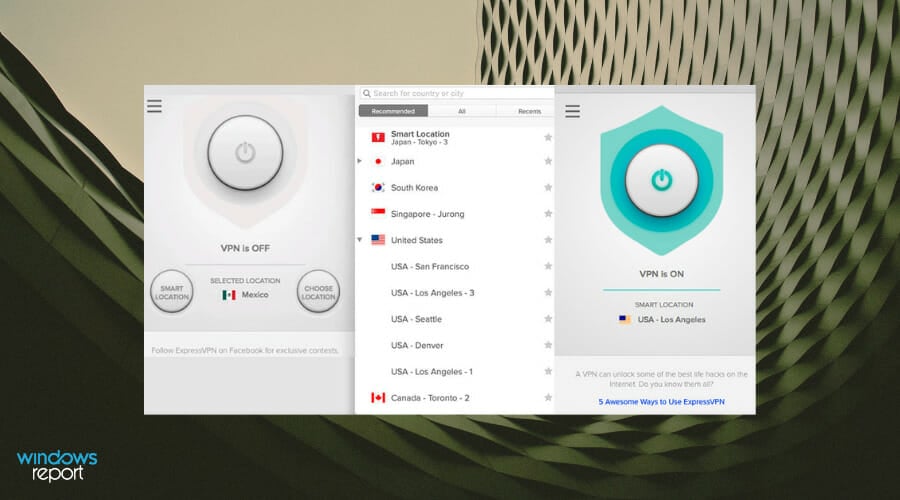
ExpressVPN is another popular VPN software with an impressive set of features. It comes with a Google Chrome extension which establishes good compatibility with the browser.
This VPN service is very secure with advanced encryption and a well-defined privacy policy. You are very well protected from potential intruders and your identity is completely private.
In addition to the above-mentioned features, here’s a comprehensive list of what the software has to offer:
Compatibility with all devices and operating systems
Never reveals your true IP address
160 server locations in 94 countries
Surpasses geo-restricted content on streaming platforms
VPN split-tunneling which lets you route some device traffic through a VPN while some traffic still accesses the Internet directly
Network Lock Killswitch which protects your data in case your connection drops
Private DNS for a safer and faster connection
Speed Test feature which helps you choose the fastest server location for your network
Public Wi-Fi safety
Can be used on 5 devices simultaneously
Unlimited Bandwidth
ExpressVPN is a subscription service with a variety of plans and payment options. It can be tried for free as part of its 30-day trial.
In order to get the ExpressVPN Chrome extension, you have to already be subscribed to the service. You can download it here.
ExpressVPN
Secure your Chrome connection and browse faster with ExpressVPN.
Topping out our list is a VPN product developed by Kape Technologies that has proven its efficiency over and over in our tests, and we looked specifically to see how well it faired with Chrome during our tests since Chrome is one of the most popular browsers out there after all.
Fortunately enough, Private Internet Access is the type of VPN service that covers pretty much every platform that it can. This includes Windows, macOS, Linux, Android, and more.
Of course, Windows users will be happy to know that PIA comes in the form of both a downloadable client and a browser extension, one specifically made for Chrome for that matter.
However, it doesn’t matter how many platforms a service covers if users can’t navigate through it. Fortunately enough, that isn’t the case with Private Internet Access, since all versions of the program boast an incredibly simplistic UI.
In the case of Chrome users, simply make sure that the extension is installed and running before you access a particular website, and that’s pretty much it.
Here are some of the perks of using Private Internet Access:
Doesn’t slow down your Chrome browser
You won’t feel a difference in connection speed
Your data is encrypted
Your Internet activity is completely private
Over 3400 servers in 45 countries offer perfect location masking
Incredibly affordable price
The PIA Chrome extension can easily be downloaded here. It offers WebRTC blocking, a Website URL whitelist, sorts gateways by latency, and can be turned on/off with a convenient switch. If you, however, decide that you need the full set of features, you can opt for buying the premium version.
Private Internet Access
Keep your browsing habits private with this amazing VPN, now at a discounted price for a limited time only!
ZenMate VPN – Unlimited and fully encrypted VPN bandwdith
ZenMate VPN is created by ZenGuard a company based in Berlin, Germany.
This service provides an easy-to-use VPN that is ideal for users who want to secure their privacy and watch Netflix without having to deal with all kinds of complicated setup procedures and security issues.
Take a look at more impressive features that come with this service:
ZenMate provides a free plugin that offers a VPN secure tunneling service for both browsers (including Chrome, of course) and mobile devices.
The VPN comes in a free version, but there is also a fully paid premium version available.
The premium version offers functions also outside of the browser for VoIP needs and downloads.
The VPN tunnel is designed to offer exceptional security for your browsing activity, downloads and any sensitive information that you may transmit.
If you decide to sign in for the free service, you will not have the ability to choose the server location. To be able to have that choice, you have to get the premium package.
There are more than 20 locations for you to choose from. Premium users will also gain access to exclusively enhanced speeds.
The ZenMate Chrome extensions come with the following free features: unlimited bandwidth, fast connection speeds, strong and secure encryption, it hides your IP address so you can surpass geo-restrictions. Download it here. For more advanced features, you can purchase the full version.
ZenMate VPN
Still searching for a VPN with a trustworthy Chrome extension? You should give ZenMate VPN a try.
Surfshark VPN – affordable VPN solution with unlimited connections
Surfshark is a full-featured VPN service with a Chrome extension available in the webstore.
It is very easy to use and light and it offers access to over 3 000 servers worldwide.
The Surfshark VPN Chrome extension will allow you to seamlessly surf the web by blocking intrusive ads and trackers.
This VPN puts much emphasis on your privacy and security. Not only has it a very strict no-logs policy, but it also uses a private DNS on each server.
After you install the extension to your browser, you will be able to access geo-restricted content around the globe in just one click.
The tool also has some anti-malware features that block suspicious websites before they get a chance to infect your PC.
Other key features of Surfshark VPN include:
Open VPN
Military grade encryption
Cookie popups blocker
The Surfshark Chrome extension is free. If you want to get the full VPN package, you will have to get a subscription, then download the Chrome extension from the Surfshark official page.
Surfshark VPN
Browse privately, keep your data private and surpass any ISP or geographical restrictions.
Our second entry in this list is another product from Kape Technologies called CyberGhost VPN, and it is one of the best VPNs out there. Check out the best features that are included in this service:
This service can bypass China’s Firewall, and this is because the company does not have any servers in the area to stay away from the government’s area.
CyberGhost also manages to unblock a lot of streaming services including Netflix. It’s one of the best VPNs for Netflix UK.
CyberGhost is an excellent VPN with reliable connections and speed as well.
It has the ability to connect five devices at the same time.
The company offers a Live Chat and email service.
The website provides tons of guides to help you troubleshoot if you have problems.
CyberGhost also offers a 30-day money-back guarantee.
The affordable prices of CyberGhost VPN and the various servers make this an excellent service. You can check out more of its features on its official website.
The CyberGhost free Chrome extension offers online data encryption, hidden IP, access to geo-encrypted websites, and secure Wi-Fi connections. It also blocks malicious content.
These are five of the best Chrome VPN extensions that you will currently find on the market.
There are free and paid versions as well, and it’s best if you head over to their official websites to analyze their complete set of features before deciding which VPN Chrome extension works best for your needs.
Do you need to connect your laptop to VPN? Having a good and reliable VPN is important, and in today’s article, we’ll show you how to connect your PC to a VPN network on your device.
Using a VPN surely has its benefits. It protects your online information including real name, location, and online activity, not to mention vital data such as your card info.
The VPN acts like a shield between you and the internet, making sure that no one can track you down and get access to your private information.
When you want to use a VPN on your laptop, there are a few things you need to do to get to that point.
Why would I use a VPN on my laptop?
Whether it’s for work purposes or your own personal use, a VPN or virtual private network, gives you a more secure connection to your network and the Internet, as if you’re working from a public place.
➡️ Protect all your online activity – all traffic is fully encrypted, so no one can spy on you or track you down
➡️ Bypass geo-restrictions – with a VPN you can connect to virtual locations across the world and get access to websites and platforms that aren’t available in your area
➡️ Stop ISP throttling – if you have an Internet provider that throttles your bandwidth or doesn’t offer unlimited data, you can use a VPN (with unlimited data) to browse the web without limits
Therefore, it is recommended to use a VPN to protect yourself from prying eyes on the internet. Read on to find out how to do this.
How can I connect to a VPN on my laptop?
In order to successfully connect your laptop to VPN, you need to have a VPN profile on your laptop.
You can do this either by creating one by yourself or by setting up an office or work account so as to get a VPN profile from your workplace.
1. How to setup and use the built-in VPN on your laptop
1.1. Create a VPN profile for your laptop
Here are the steps you can take to create a VPN profile on your laptop if you don’t have one:
If the VPN profile you want to create is for your work account, check the VPN settings, check for a VPN application within the intranet site in your workplace, or check with your company’s IT support person about it.
However, if the VPN profile is for a VPN service you’re subscribed to for personal use, go to the Microsoft Store and check whether there’s an app for the VPN service, and then go to the VPN service website to see if the connection settings are listed therein.
Once you have either the VPN for work or VPN for your personal account confirmed, click theStart button.
Select Settings.
Click Network & Internet.
Select VPN.
Select Add a VPN connection.
Under Add a VPN connection, go to VPN provider.
Choose Windows (built-in).
Go to the Connection name box and type any name, for example, My Personal VPN for the VPN connection profile. This is the same name you will look for when you want to connect in the Server name or address box.
Type the address for the VPN server.
Under VPN type, choose the VPN connection type you want to create. This means you need to know which type your company or VPN service uses.
Under Type of sign-in info, choose the type of sign-in info or credentials to use, such as username and password, certificate, one-time password, or smart card used to connect to a VPN for work. Type your username and password in the boxes.
Select Save.
If you want to edit the VPN connection information, or additional settings specifications like proxy settings, choose the VPN connection then click Advanced options
1.2. Connect to VPN on your laptop
1. Go to the right hand side of the taskbar.
2. Select the Networkicon (with the Wi-Fi symbol).
3. Choose theVPN connectionyou want to use.
4. Based on what happens when you select the VPN, either selectConnect(if the connect button is displayed under the VPN connection) or, ifVPN in Settingsopens, select the VPN connection from there and then clickConnect.
5. Type your username and password (or other sign-in credentials) if prompted to.
6. If you want to see whether you’re connected, select Network icon, and then check if the VPN connection displays the word Connected under it.
As long as you downloaded a VPN and created a VPN profile for a work account or personal use, you are all set and ready to connect your laptop to a VPN. You can do this via your device’s built-in Network Settings.
Once you’re connected, you will see the VPN connection name displayed with the word Connected under it.
2. How to install & use third-party VPN software on your laptop
Decide on a reputable VPN. We use ExpressVPN because it’s fast, reliable, and offers unlimited access to thousands of servers.
Launch the app and log in with your credentials or activation code.
Click on the big power button to connect to a server.
That’s how you install the VPN & how you connect with it on a laptop. It’s very simple and straightforward, as you can tell.
The next methods described will seem a bit complicated, in comparison to this one. Here you just download the app, log in with your credential and that’s it.
As far as VPN services go, we highly recommend Express VPN, owned by Kape Technologies.
It provides really good services, with thousands of servers around the world which basically means it can offer good Internet speeds wherever you are.
ExpressVPN
Try one of the best VPNs that you can get for your laptop, for increased security and privacy online.
Packet loss is a naturally occurring phenomenon in networking and happens whenever one or more data packets never make it to their destination.
As a result, the server throws a desync your way and might affect your overall online experience more or less, depending on its severity.
The bad thing about packet loss is that there are a lot of potential factors that could cause it.
Ranging from having old Ethernet cables and network congestion to outdated network adapter drivers, everything can play a role in packet loss occurrence.
What causes Comcast packet loss?
Although leaking packets can happen for a lot of reasons, there’s one cause that outweighs them all: network congestion. The good news is that, if that’s the case, you don’t need to do anything about it, since it fixes itself after a while.
But that’s also the bad news; sometimes you might not be able to just wait it out.
In many areas, Comcast is the only high-speed Internet provider and is preferred by many when signing up for an Internet subscription plan.
That’s why you might experience packet loss during peak hours, and why the situation slowly fixes itself after a while.
Servers are generally designed to be able to stand some heat. But even a server that runs at half capacity (50 out of 100 maximum connections, for instance) can leak packets if bandwidth consumption is high.
That’s why oftentimes ISPs throttle bandwidth, to cut some costs and so that their servers can accommodate more users at the expense of speed.
You can use a VPN such as ExpressVPN to improve packet loss or perform some manual troubleshooting on your network.
Grant the app permission to use your location (more accurate results)
Click the Go button
Wait for the speed test to complete
Click the More button
Select the completed test from the list
Check the packet loss percentage
To check packet loss in Comcast’s home Internet plan you can use one of our suggestions such as pathping or Ookla’s packet loss test to run a packet loss test.
Configure the test settings (packet size, frequency, duration, delay)
Hit the Start Test button and wait
Check the results (upload/download packet loss, late packets, total packet loss)
Also, check the average latency and jitter values
Although all of the tests above will give you accurate packet loss test results, only the manual test (using pathping) will also show you the hops and each of their packet loss values.
It might not seem important at first, but you can’t locate a packet leak on your connection without knowing which hop is, in fact, leaking packets.
Connect to a fast server of your choice (choose a low ping one or recommended location).
Launch Comcast.
Run any of the tests above.
Check if the problem still persists.
ExpressVPN is a great all-around VPN from Kape Technologies. It can quickly take care of packet loss and high ping issues, but there’s a catch.
In order for this quick fix to work, the issue must be on your ISP’s side. ExpressVPN comes in handy with its OpenVPN protocol for streaming, and the Media Streamer for devices that are not natively adapted to install a VPN.
In this case, if you’re sure that your packet loss is caused by Comcast and it’s not because you have outdated equipment or outdated drivers, go ahead and give it a try.
However, that’s not the only thing a trustworthy VPN can achieve. It can also give you a much-needed boost of privacy, secure your connection, and even circumvent any geo-restrictions.
All in all, if you experience intermittent packet loss with Comcast, it’s probably caused by network congestion. Notice if there’s a certain timeframe when the packet loss occurs, and run a test to zero in on this factor.
This issue happens to users of Comcast’s subsidiary Internet Service Provider as well.
To sum it up, you can use a VPN to improve packet loss, but only if the issue occurs on your ISP’s side.
If you are also facing issues with your inbox, here’s a complete guide on Comcast email not working.
However, you must make sure that the issue is not on your side by manually troubleshooting your side of the connection, piece by piece.
How did you manage to resolve packet loss in Comcast? Leave us a comment in the area below.
If the data sent to the printer is corrupted or interrupted, you may notice the HP and other printers printing gibberish instead of the source document.
This printing of random symbols is a common issue and can happen with any printer, as reported by several printer users in the Microsoft Community Answers.
Actually, I’m going to install HP laserjet 5L in my laptop. and of course I used the Windows update which is in the Add a Printer tab, and install the laserjet 5L driver. the problem is when I’m trying to print a document it appears like symbols and random letters.
Why is my printer printing garbled text?
This is usually when the data reaching the printer isn’t adequately interpreted or is corrupt. This is typically when you run incorrect, outdated, or corrupt printer drivers.
Besides, misconfigured print settings, issues with the connection, or even damaged ports and cables (for wired connection) can be behind HP printer printing gibberish.
How can I fix my printer if it’s printing random symbols?
1. Run the Printer troubleshooter
Press Windows + I to open Settings and select Update & Security.
Select the Troubleshoot tab and then click on Addition troubleshooters on the right.
Locate the Printer option here, click on it, and select the Run the troubleshooter button under it.
Follow the on-screen instructions and choose the appropriate response to complete the process.
This is an easy solution that can be applied to fix this problem by most when the network printer is printing random symbols. However, it doesn’t work for all the users, and if you’re among them, go for the next solution.
2. Update the printer driver
Press Windows + R to open Run, type devmgmt.msc in the text field, and click OK.
Double-click on Print queues to expand the section and view the devices under it.
Right-click on your printer and select Update Driver.
Select Search automatically for drivers.
Windows will look at any pending updates for the driver and install it.
If the updates are installed, reboot the computer and check for any improvements.
This looks like a straightforward solution to update the drivers, but it doesn’t work every time. For example, Windows 10 will load a generic driver that might not be the best working driver for your printer.
You can also go to the manufacturer’s website and get the correct driver for your printer, but that takes time, and if you’re not installing the exact one, you will be back to square 1.
3. Clear the Printer Queue
Press Windows + R to open Run, type Control Panel, and click OK or hit Enter.
Click on View devices and printers under Hardware and Sound.
Now double-click on your printer.
Cancel all the print jobs assigned to the printer.
Now try to print again and check for any improvements.
Clearing the printer queue can help remove any unwanted printing tasks that may create issues with the printer data. Once done, try printing another page and verify if the printer is still printing symbols.
4. Uninstall and reinstall your printer
Open the Control Panel, and select View devices and printers under Hardware and Sound.
Now right-click on the problematic printer and select Remove Device.
Click Yes to confirm the action.
Once it is removed, you need to again add the printer, and from now on, it will work fine without printing gibberish.
Here are some of the printers you are bound to come across the issue with:
HP Laserjet P2035n printing gibberish
HP M404 printer printing gibberish
Epson printer printing gibberish
Canon printer printing gibberish
How do I fix the HP printer if it’s printing gibberish on Windows 11?
Whenever you find an HP printer printing gibberish in Windows 11, your primary approach should be to cancel printing then proceed to update the printer drivers. Also, check for connections and make sure the cable is not damaged.
Besides, a user reported that using a surge protector caused the issue, and directly plugging the printer into the power source fixed things. And if nothing else works, resetting the printer would be your last hope.
How do I reset my HP printer?
Power off the printer and disconnect the cable for at least 30 seconds.
Reconnect the power cable and turn on the printer while pressing the Resume button for 10-20 seconds.
Once the Attention light turns on, release the Resume button.
Now, wait a few moments while the Attention and Ready lights blink, indicating that the reset is being processed.
Your HP printer will now be reset to the factory defaults. Also, this is not the only way to perform the reset; there are several others you might be more comfortable with. So, check the manufacturer’s website and the printer manual for more.
That’s it! The HP printer printing gibberish problem should be fixed by applying these simple solutions. Some of these solutions may also apply when your printer is printing ASCII characters. If not, you should contact your manufacturer for technical support.
Many gamers have played Counter-Strike Global Offensive, but not all of them may remember Counter-Strike 1.6, CS: GO‘s ancestor. To be fair, Half-Life would be the ancestor of both, but let’s stick to our version for now.
Counter-Strike 1.6 was a sacred monster back in the day. Internet Cafes (another trip down the memory lane) would be overcrowded with players that would come to crush their opponents in lengthy, rage-inducing matches.
Not at all surprising is the fact that Counter-Strike 1.6 still has some popularity left in its raggedy old bones. People still play it, albeit not like back in the day, but it still has a bit over 14,000 players as we speak.
Unfortunately, like any other awesome multiplayer game, it has its shortcomings. Connectivity issues, such as the dreaded packet loss, still haunt several players from all around the world.
What is packet loss in Counter-Strike 1.6?
Packet loss happens whenever data packets that travel throughout your connection never reach their destination. Whether the packets’ target is you or the game server’s host, if some of them never reach their destination, we call it packet loss.
It looks a lot like high latency, but we assure you that they’re quite different. For once, high latency means the packets take longer to arrive, but ultimately they do reach their target.
You may have experienced packet loss if:
?Your in-game latency started spiking suddenly and quickly came back to normal.
?The menus were responding slowly or not at all.
✨You experienced rubberbanding (got stuck then teleported to a random spot on the map).
?Voice chat didn’t send your messages properly.
?Text chat failed to deliver your messages or sent them at a later point.
?You got suddenly disconnected from the game and it wasn’t an admin who did it.
Why do I have loss in CS?
If there are other people streaming or torrenting on the same network, CS 1.6 loss and choke problem could be due to a congested server. This is easily solvable if using VPN with stable split tunneling.
Try using the following commands:
net_maxroutable
This command on your console changes the maximum byte size of a single packet. The default value is 1200. All of the packet loss choke CS 1.6 Steam can be eliminated by lowering the value to 1100.
This should have no effect on your CPU usage. If 1100 does not work for you, try lowering it in 100-point increments until you find a value that does. However, going too low can significantly increase the number of packets sent.
net_graph 0
In order to fix CS 1.6 FPS, in, out loss on-screen use the above command on the console.
It’s one of many ways to keep track of how many frames per second you’re rendering, as well as how good or bad the server you’re playing on is.
Using an old router that can’t handle your connection speed properly
ISP bandwidth throttling
Game server host issues
A lot of things can cause packet loss in Counter-Strike 1.6, ranging from subpar connection to using Wi-Fi instead of Ethernet or having outdated drivers on your system.
How to detect packet loss in Counter-Strike 1.6?
Note down the IP address of the CS 1.6 server you want to test
Launch CMD on your Windows PC
Type pathping x.x.x.x (replace x.x.x.x with the game server’s IP address)
Wait for the test to come to an end
Check if and where the packet leak occurs
Note that the pathping test also works with hostnames instead of IP addresses. So if the game servers look something like xxx.zapto.org, you can also use that instead of the IP address.
Use the screenshot above to identify which part of your connection is affected by packet loss, in case you notice any leaks. As a rule of thumb, the first node is always your PC, while the last one is the machine that hosts the server.
How to fix Counter-Strike 1.6 connection issues?
1. Use a VPN with split tunneling
Sign up for a premium VPN subscription. (We recommend ExpressVPN)
Download the VPN and install it on your PC.
Log into your account using your credentials and verify your email.
Launch the VPN client and go to Options before connecting to it.
In General tab under Split Tunneling check Manage connection on per-app basis and click Settings.
In the settings select Only allow selected apps to use VPN and add CS 1.6 in the list.
Go to the Protocol tab and select Lightway – UDP (It’s the best option for games like CS 1.6).
Close the settings.
Connect to a recommended server.
Launch Counter-Strike 1.6.
Check if there’s any improvement after one hour of playing.
More often than not, using a VPN such as Kape Technologies’ ExpressVPN can solve many connectivity issues such as packet loss.
However, note that the issue must be somewhere in the middle (i.e. caused by your ISP) and not on any ends of the connection.
So, if you suspect that your ISP is throttling your bandwidth, that might be the cause of your connectivity issues. Thus, a VPN will definitely help you sort it out by re-routing your traffic away from your ISP’s limitations.
If you are not prone to set manually the commands in-game, ExpressVPN will reroute the traffic and take care of congested servers automatically.
ExpressVPN
Use the split tunneling feature on Lightway protocol and you are not going to lose packets anymore in CS 1.6.
Flushing your DNS is always our go-to fix whenever we notice our connection acting strange. The awesome thing is that it works more often than not.
Cached data build-ups lead to unhealthy connection behavior such as slowdowns, crashes, and compatibility errors.
3. Perform some manual troubleshooting
Although these manual troubleshooting tips aren’t guaranteed to solve your packet loss issue, they will give you some edge as far as quality connection goes.
Inspect your home network thoroughly and look for anything out of place
Replace or fix your Ethernet cables if they’re damaged or old
Update your system drivers to avoid any compatibility issues
Restart the game
Connect to another server to rule out server host issues
Restart your PC, router, and/or modem as needed
Always use Ethernet instead of Wi-Fi if possible (Wi-Fi packet loss happens more often)
Call your ISP and ask them if they can take a look and maybe even fix the issue
Make sure your router’s firmware is up-to-date
Upgrade your Internet plan, if that’s an option
A well-maintained connection is less prone to issues such as packet loss, and it wouldn’t hurt to do it from time to time.
4. Use CS 1.6 Command-List to reduce choke
Choke and loss issues in Counter-Strike 1.6 can be improved with better configurations and settings.
So, perform a Counter-Strike 1.6 config to gain a competitive advantage by reducing choke and increasing FPS, and try the following commands:
cl_updaterate 101
The maximum you should set it to is 101, and if you have a choke, you should always lower it until you get a choke.
So, if you were getting 20 chokes per second, reduce the update rate by typing cl_updaterate 70. After about 20 seconds, check to see if you still have a choke. If you do, lower it even further.
cl_cmdrate 50
This setting should be around your average frame rate. Put it at 50 if your average is between 40 and 50. If the server returns a constant 100, you enter 101.
If you have your fps set to fps max 101 and your fps drops to 40-50 and fluctuates wildly, change it to fps max 75. Reduce the setting gradually until it is fairly constant.
rate 20000
The rate setting is heavily debated, but if you want the best performance, use 20000. Many people say 25000, but they don’t realize it’s a LAN setting.
Should I worry about packet loss CS 1.6?
All things considered, if you can’t enjoy a nostalgia-inducing Counter-Strike 1.6 session because of connectivity issues, don’t rage-quit just yet.
Make sure you understand where the problem occurs before attempting to fix it.
Moreover, check out our Gaming Hub to learn more about the benefits of using a VPN while gaming.
Although a VPN is quite popular when it comes to solving connectivity issues, it’s also worthless if your ISP is not the one who’s causing the leak.
Last, but not least, make sure your end of the connection is in top-notch condition. It may not solve packet loss every time, but at least you’ll know it’s not you who caused it.
Users have reported getting a black screen with a cursor on Windows 10, which appeared at various stages, including while turning on the computer or running an application.
The problem is quite simple and can easily be fixed, but many possible underlying causes make troubleshooting a time-consuming affair.
So, let’s find out why you are encountering Windows 10 black screen with a cursor and its solutions.
You can also watch our video troubleshooting guide below to learn what methods to use to fix black screen issues on Windows 10.
Why am I getting a black screen with a cursor on Windows?
A black screen with a cursor issue usually arises due to connection problems with the display. If the cable is not correctly plugged in at both ends or is damaged, you will likely encounter the issue.
Also, an outdated or corrupt display driver is likely to be an underlying cause. In addition, problems with the display adapter can be a reason behind the issue.
Besides, third-party applications creating conflicts, enabling fast startup, and misconfigured display settings, among other issues, can cause Windows 10 black screen with a cursor.
And the error itself has several variations and won’t appear the same for all. Here are a few of these:
Windows 10 black screen with cursor, where Ctrl + Alt + Deldoesn’t work
Black screen with cursor and no Task Manager in Windows 10
Windows 10 black screen with cursor and Start menu
Tip
After solving this issue, we strongly recommend that you use Outbyte Driver Updater to keep your system updated at all times. This software will prevent it from appearing in the future by constantly updating your drivers, thus increasing your computer’s health.
How do I fix the Windows 10 black screen with cursor error?
NOTE
The first ten solutions here are aimed at getting the computer in a working connection, i.e., getting rid of the black screen, and the ones that follow will eliminate the root cause. So, make sure to try them all.
1. Check the connections
The first thing you have to do when fixing Windows 10 black screen with the cursor issue is to identify and rectify any connection issues. Then, check the cable for damages, and unplug and replug it after blowing light air into the ports. And make sure you are using a compatible one.
Also, if you have a spare cable, use it to verify whether the problem lies with the other one you have been using. If nothing works, it’s not the connections behind the issue. So, head to the next solution.
2. Change projections to switch displays
Press Windows +P shortcut to open the Project menu.
The project menu will now open, but you won’t be able to see it. Don’t worry, that’s perfectly normal.
Now press the Up or Downarrow keys a few times and press Enter.
If you are successful, the screen should appear. However, in the problem persists, you might have to repeat this step a few times.
If you’re getting a black screen with a cursor in Windows 10, you might want to try changing the projection mode.
After updating to Windows 10, your project mode might change to Second screen only, and you need to change that by following our instructions.
We’ve had this issue, and it was fixed after 6 or 7 tries, so you must be persistent.
If you get the Windows black screen with a cursor before login and your account is protected by a password, you’ll have to log in first. To do this, press Space or Ctrl, enter your password, and Enter.
This can be tricky because you’ll be doing this on a black screen so that it might take you a few tries.
3. Connect your monitor with both cables to the monitor
This is an unusual solution, but users have reported that it fixes the black screen before the login problem.
According to users, if you have a monitor with two connectors, such as DVI and HDMI, you need to connect your monitor using both DVI and HDMI cables.
After that, you can turn on your computer and check if the problem is resolved.
Some users also suggest that you might be able to fix this issue by attaching an additional monitor, so if you have an extra monitor, try connecting it to your PC.
Even if this doesn’t fix the problem, your second monitor should work without any issues.
4. Update your BIOS
Some users claim you can fix the black screen with the cursor by updating your BIOS.
Updating BIOS is a procedure for advanced users, and if you don’t do it properly, it can cause permanent damage to your hardware, so please keep that in mind.
To perform a BIOS update, you need to go to your motherboard manufacturer’s website and download the latest version of BIOS for your motherboard.
In most cases, there should be an instruction manual on updating the BIOS, so make sure you read it carefully. If you don’t know how to update your BIOS, please ask an expert to do it for you to avoid any potential damage.
5. Disable Dual monitor from BIOS/disable CPU Graphics Multi-Monitor
While your computer boots, press F2 or Del (it might be a different key on your computer) to access BIOS.
You need to find and disable CPU graphics or Dual monitor functions.
Save changes and restart your PC.
6. Update your drivers
Type Device Manager in the Search bar, then click on the relevant search result.
Now, expand the Display adapter section.
Right-click on your graphics device and select Update Driver.
Select the Search automatically for drivers option.
Windows will now search for any pending update and download it.
Once the update is installed, check if Windows 10 fit the screen.
Updating drivers manually is a serious procedure that can be a bit time-consuming, and it does not assure you that the system will find the latest drivers.
You can update your drivers by using a unique third-party software tool. We recommend using dedicated software because it can automate the task almost entirely, saving time and hassle.
7. Disconnect your second monitor
In some instances,the black screen with cursor error on Windows 10 can be fixed by unplugging your second monitor.
Nvidia users have reported that unplugging the second monitor fixed this issue for them, so make sure you try it out.
8. Set display output to IGFX
While your computer boots, keep pressing F2, F4, or Del to access BIOS.
Locate the Display output setting, and set it to IGFX. This will make your integrated graphics the first display.
Save changes and exit.
9. Check your graphic card settings in BIOS
Enter BIOS and ensure your graphic card is set to use the PCI-E slot. Sometimes this setting might get changed to PCI, and if that’s the case, switch it to the PCI-E option and save the changes.
This effective solution has worked for many, and we recommend giving it a try.
10. Remove the computer battery and reset your BIOS
If other solutions don’t work, you might want to remove your computer’s battery and reset your BIOS. When you do this, the computer’s warranty will be terminated immediately, so keep that in mind.
If you don’t know how to do this properly, maybe it’s best to hire an expert to do it for you.
11. Check additional displays
Make sure you don’t have other displays such as monitors or TV connected to your HDMI port.
If you have a device connected to the HDMI port, Windows 10 might use it as the primary display during the installation, so before you start your building, make sure you’re using only one display.
In addition, you can always connect your monitor using the HDMI cable to fix this problem, or you can disconnect the other display.
By now, we expect that you have managed to get rid of the black screen with cursor in Windows 10 and have your PC up and running. But the root cause may still be present, so you must try the solutions listed below to eliminate the issue completely.
Press Windows + R to open Run, enter devmgmt.msc in the text field, and click OK.
Double-click on the Display adapters entry here.
Right-click on the graphics card, and then select Uninstall device.
Tick the checkbox for Attempt to remove the driver for this device and click on Uninstall.
If the problem lies with the graphics adapter, uninstalling the device will make Windows revert to the generic ones. Though the performance wouldn’t be as good, you will undoubtedly encounter fewer issues and will be able to fix Windows 10 black screen with a cursor.
Once you find the right driver for the graphics adapter, install it.
13. Disable onboard graphics from Device Manager
Launch Device Manager, locate the onboard graphics, right-click on it, and select Disable device.
Click Yes in the confirmation prompt that appears.
If your computer has both onboard and dedicated graphics, make sure you disable your onboard graphic from Device Manager to fix the black screen with cursor in Windows 10.
14. Uninstall problematic applications
Press Windows + R to open Run, enter appwiz.cpl in the text field, and click OK.
Select the program you want to remove, and click on Uninstall.
Now, follow the on-screen instructions to complete the process.
If you are facing a black screen with cursor in Windows 10, certain applications such as antivirus, third-party firewall, iCloud, Cisco VPN client, or IDT Audio can cause this problem.
However, you can also count on third-party uninstaller software that removes problematic applications and automatically cleans up leftovers from your device, even those left behind by other software.
15. Change display brightness
Press Windows + S to open the Search menu, type Power Options, and click on the relevant search result.
Find your current plan, and click Change plan settings.
Now click on Change advanced power settings.
Locate the Display brightness setting and set it to 99% or 98% when your device is plugged in.
Save changes and restart your PC.
Users have reported a black screen on Windows 10 after they connect the AC adapter to their laptops. In most cases, the computer works fine, but the screen goes dark after the user connects the AC adapter.
This is caused by the display brightness problem and can easily be fixed with this solution. Find out what to do if you are unable to change the display brightness.
16. Disable the secondary output
Press Windows + X and select Device Manager from the list of options.
Click View, and select Show hidden devices.
Locate Secondary Output, right-click it and choose Disable.
Confirm the action and then restart your PC.
Now, check if the issue is resolved.
If you have a black screen with a cursor problem in Windows 10, this can happen if you use two or more monitors on your PC. And the simplest solution is to disable all the secondary devices.
17. Change primary display
Press Windows + I to open Settings, and then choose System.
In the Display section, you should see several displays available. Select the display you wish to use as the main one and click Make this my main display.
Click Apply to save changes.
If you have problems with a black screen with a cursor before login in on Windows 10, you might want to try connecting your monitor to your PC with an HDMI cable.
Users have reported that you can use an HDMI connection instead of DVI, which will fix black screen issues.
If you connect both HDMI and DVI cables, your PC might see the DVI connection as the second monitor (even if you have only one monitor), and if that’s the case, you need to set your main display.
18. Disable/enable dedicated card from BIOS
Some users have reported that enabling or disabling dedicated graphics fixes this issue for them. To do that, you need to enter BIOS and locate Graphic settings.
Now choose between Switchable or Discreet options, depending on which one you want to use. Choose the Discreet option for example, if you enable a dedicated graphic card.
19. Disable Fast Startup
Press Windows + R to open Run, enter Control Panel in the text field, and click OK.
Click on System and Security.
Now, click on the Change what the powers buttons do.
Click on Change settings that are currently unavailable.
Untick the checkbox for Turn on fast startup (recommended) and click on Save changes.
In some cases, Fast Startup may trigger the black screen with a cursor issue in Windows 10. In this case, you can quickly fix this problem by simply disabling this option.
20. Connect your monitor to an integrated graphic card
In certain situations, Windows 10 might not recognize your dedicated graphic card. So the only solution is to connect your monitor directly to your integrated graphic card.
After that, the black screen with the cursor problem in Windows 10 will be fixed.
Using your integrated graphics card is not such a big deal. Still, if you need more power and don’t want to use the dedicated card, you can increase the VRAM on the integrated one.
21. Uninstall problematic software before the upgrade
If you’re planning to upgrade to Windows 10, you might experience a black screen with a cursor problem during installation if you don’t delete specific programs.
Sometimes your antivirus or firewall can cause this problem during the installation, so you might want to remove them temporarily.
In addition, if you use any tools that change the looks of your Windows, such as OldNewExplorer or ClassicShell, you should uninstall them before upgrading to Windows 10.
22. Start File Explorer with administrative privileges
Press Ctrl + Shift + Esc to open the Task Manager, click on the File menu at the top-left corner and select Run new task.
Enter explorer.exe in the text field, check the Create this task with administrative privileges box, and then click OK.
As bizarre as it may seem, some users fixed the issue by starting File Explorer with administrative privileges, so you might as well try that too.
Whenever you encounter the issue, the primary approach should be to verify that the connections are in order and that the connected devices are all compatible.
Once you are sure of these, move to the software-based solutions, for instance, updating the driver, uninstalling conflicting applications, or disabling fast startup, among others.
Some users also reported Windows 11 black screen with cursor and no Task Manager, and the solutions remain the same.
As you can see, the black screen with a cursor on Windows 10 can create many problems. But in most cases, you can fix it by disconnecting additional monitors or connecting it to a different port.
If Outlook is not attaching files, it usually means the program is hitting size limits, blocking certain file types, or running into profile, add-in, or cache problems. This guide explains why it happens and how to fix it quickly.
Outlook may refuse attachments if the file is too large (over 20–25 MB). Certain file types like .exe, .bat, or .js are also blocked for security. Add-ins or a corrupted Outlook profile can interfere with attachments, while weak internet or a nearly full mailbox may cause failures. Sometimes antivirus software blocks outgoing files, or corrupted cache and temporary folders disrupt the process.
What can I do if Outlook is not attaching files?
1. Compress files for attaching into a ZIP Archive
Press the Windows key + E to access File Explorer.
Open a directory that includes the files you can’t attach to an Outlook email.
Hold the Ctrl key to select all files to include in your attachment.
Right-click and select Compress to ZIP file.
Enter a title for your ZIP.
Then try attaching the ZIP archive to an Outlook email.
2. Disable compatibility mode for Outlook
Right-click an Outlook shortcut icon or its EXE application file to select Properties.
Select Compatibility on Outlook’s Properties window.
Uncheck the Run this program in compatibility mode box if that setting is selected.
Press Apply and OK to save the reconfigured settings.
NOTE
This resolution is recommended if you see an Operation failed message when trying to attach files to Outlook emails.
3. Change the email message’s format
Click Outlook’s File tab.
Select Options to bring up a Settings window.
Click the Mail tab.
Select HTML or Plain Text in the compose format drop-down menu if Outlook is set to Rich Text.
Press the Outlook Options window’s OK button.
4. Run Outlook in its Safe Mode
Bring up Windows 11’s Run command dialog by clicking Start with the right mouse button and selecting that accessory on the Win + X menu.
Input this Safe Mode command: Outlook.exe /safe
Click OK to launch Outlook in Safe Mode.
Try attaching attachments to an email again.
5. Disable Outlook add-ins
Open Outlook, and click its File tab.
Click Options on the File tab.
Select the Add-ins tab.
Then click COM Add-on on the Manage drop-down menu.
Press the Go button.
Uncheck the checkboxes for enabled Outlook add-ins.
Select OK on the COM Add-ins window.
What is the maximum attachment size in Outlook 365?
The maximum attachment size for Outlook 2019 and 2016 is 20 megabytes. That limit applies to single or multiple files irrespective of the email server.
So, check if files for an attachment eclipse the 20-megabyte mark before you try to attach them to an Outlook email. If they do, try compressing the files in an archive as outlined for solution one.
However, that 20 megabyte doesn’t apply to users with Exchange Server accounts. Instead, Outlook applies an Exchange server limit. You can change that limit in the Exchange Management Console.
Those are some more probable potential fixes for Outlook not attaching files. Updating Outlook, disabling third-party antivirus software, and repairing that app’s PST data file are other potential resolutions worth trying.
Have you fixed Outlook not attaching files with a resolution not specified above? If so, feel free to share your solution for that issue in the comments section below.
A Windows 11 file system error is a common issue for Windows users. Sometimes, it’s a temporary problem that corrects itself when you restart your PC or refresh the page. However, your browser, operating system, or computer might have more severe problems.
Your file system organizes files and directories on storage media (such as hard disks and optical discs). Without a file system, your computer cannot read data from your storage media.
It also manages the available space on your hard disk and the files stored on it so that the operating system can easily access the files. Unfortunately, file system errors are quite common in Windows.
When such an error occurs, you may find that basic computer tasks such as opening or saving files are impossible, which is caused by the operating system not being able to read the data on your hard drive successfully.
What causes file system errors?
These errors can occur for several reasons, such as corruption of system files, a virus infection, lack of disk space, etc. The errors manifest as error codes such as (-2147219196), which could prevent you from accessing your files.
File system errors are common, but most of them can be fixed with ease:
Corrupt files – File systems can become corrupt due to various factors. Typically, this happens when the file system becomes damaged due to unexpected shutdowns or power failures and loses its ability to organize data properly.
Malware – The other leading cause of a corrupted file system is the actions of malware. Malware can be designed to alter or damage the files stored in the file system, causing it to lose its ability to work effectively.
Hardware issues – In some cases, the Windows 11 file system error can also occur due to a hardware issue. If you are experiencing this error on your system, consider replacing your hard drive with a new one and check if the problem is still there.
Invalid registry entries – Your computer may have many registry files, and any of these files can be damaged for various reasons, such as malware infection, power surges, incorrect uninstallation, etc. When the registry files are damaged, your computer will fail to access them.
If you have ever encountered this error, you will understand how frustrating it can be to see it appear on your screen.
You may have lost valuable data due to this problem and will be desperate to fix it to avoid further damage and recover your data. If so, proceed with our solutions below.
How can I fix a Windows 11 file system error?
1. Use a third-party tool
If you are looking for an advanced optimization tool that can repair various errors on your PC safely and securely, this program is the best.
2. Check for viruses
Press the Windows key, search Windows Security,and click Open.
Select Virus & threat protection.
Next, press Quick scan under Current threats.
Wait for the process to finish and restart your system.
3. Check for Windows Updates
Press the Windows key, search Check for updates, and click Open.
Hit Check for updates.
If you have any pending updates, proceed to Download & installand restart your system.
4. Uninstall recent Windows Updates
Press the Windows + I keys simultaneously to open Settings.
Navigate to Windows Updates and go to Update history.
Click onUninstall updates.
Select the most recent update, then click Uninstall.
5. Run DISM
Press the Windows key, type cmd on the search bar, and click Run as administrator.
Type in the following command, then press Enter: DISM /online /cleanup-image /scanhealth
Press the Windows key, type cmd on the search bar, and click Run as administrator.
Type in the following command, then press Enter: chkdsk:/f
7. Repair or reset the problematic app
Press Windows + I to open Settings, and select Apps from the navigation pane.
Click on Apps & features on the right.
Now, locate the problematic app, click on the ellipsis next to it, and select Advanced options.
Scroll down, click on the Repair button, and wait for the process to complete.
If that doesn’t work, click on Reset.
Again, click Reset in the confirmation prompt to initiate the process.
Once done, the Windows 11 File System Error should be fixed, and you will be able to open the desired files.
What can I do if I experience the ms-settings file system error in Windows 11?
Press the Windows + I keys to open the Settings app.
Select App Settings.
Scroll down and select Reset.
The ms-settings file system error happens when a user tries to open any settings from the Start menu. This can also occur when you try to open settings from the taskbar or Action Center.
You can try resetting the Settings app if you encounter such an error with the steps above.
How can I fix the Windows 11 NTFS file system error?
Press the Windows + I keys simultaneously to open Settings.
Select theRecoveryoption on the Systemtab.
Click Restart now for the Advanced startupoption.
Select Troubleshootoption.
Next, select Advanced options.
Choose the Startup Repair option.
Windows uses the NTFS file system to store and retrieve files on your hard drive. The two main reasons for file system errors are hardware issues, such as bad sectors or sudden power loss, and software problems, such as disk cleanup software not working correctly.
Another possibility is that there are NTFS permissions blocking access to this location. Unfortunately, your options will be minimal if this is the case.
Changing permissions on operating system files and folders can cause massive problems if they’re not done correctly or reverted afterward.
You can try a Startup Repair and attempt to remedy the situation by following the steps above.
If you were experiencing a file system error, we hope you were able to salvage the situation by using one or more of our solutions.
Secure your device with an antivirus solution, as your system is vulnerable to malware and viruses, exposing you to frequent file system errors.
We also have a guide on Refs_File_System error, so be sure to visit it for more useful information.
In the comment section below, let us know which method worked for you. Also, leave any thoughts or additional solutions that may have worked for you.
Unexpected_Kernel_Mode_Trap is a BSoD error sometimes accompanied by the 0x00000007F error code. When it appears, a black screen that includes the Unexpected_Kernel_Mode_Trap error message, and Windows restarts. The issue can be caused by incompatible hardware, outdated drivers, or corrupted system files.
How can I fix the Unexpected_Kernel_Mode_Trap error?
1. Check for hardware problems
The Unexpected_Kernel_Mode_Trap BSoD is commonly caused by hardware failures so you should first check the CPU and GPU fans and also the memory. If you have a desktop PC, look inside and see if the fans are working properly and the components are not overheating.
The same can also happen to laptops and if it heats up more than usual, we recommend turning it off and ask for professional help. Overheating can eventually damage the components so it’s an urgent matter to deal with. Also, try reseating the RAM modules on a desktop PC and check if that solves the issue.
Did the Unexpected_Kernel_Mode_Trap error arise on your desktop or laptop shortly after you installed (added) new hardware? If so, it’s feasible that the newly installed hardware has generated the issue.
Therefore, it’s recommended that users who need to fix the Unexpected_Kernel_Mode_Trap Windows 11 error disconnect and uninstall recently installed devices from their PCs.
Then restart your computer to see if the issue persists. If not, the new hardware might not have been incompatible with your computer’s software.
3. Run a System File Checker scan
First, press the Windows key + S simultaneously to bring up a search box. Enter cmd within the search box to locate the Command Prompt. Click Run as administrator for the Command Prompt search result.
Next, input this command and hit Enter: DISM.exe /Online /Cleanup-image /Restorehealth
When the Deployment Image Servicing scan is complete, type in this command and press Enter: sfc /scannow
Now wait for the System File Checker scan to reach the 100 percent complete mark.
If you want a more thorough integrity scan of your Windows files, you should use a specialized tool to find and repair any corrupted or damaged files.
4. Check for malware
Double-click the Windows Security system tray icon.
Click the Virus & threat protection tab on the left Windows Security.
Select the Scanoptions navigation link.
Then click the Full scan radio button followed by Scan now.
NOTE
You can also purge malware with third-party malware scanner software. For example, Malwarebytes Premium is one of Windows’s best-known and most efficient third-party anti-malware tools.
5. Stop overclocking your PC
Have you overclocked your PC’s processor with third-party overclocking software? If so, that could be why you need to fix the Unexpected_Kernel_Mode_Trap error on Windows 11.
This potential resolution, unsurprisingly enough, is to reverse all the overclocking you’ve applied to your computer. Instead, restore your PC’s processor to its default clock speed. To do so, look for a restore system default option within your overclocking software.
6. Run the CHKDSK scan
Press Windows, then enter cmd inside the Windows search box and select the Run as administrator option under the result on the right.
Type in this command and press Enter: chkdsk c: /f
Then press the Y key to confirm, then reboot your computer.
7. Update device drivers
Right-click the Start menu icon and select Device Manager to open that window.
Look for devices with yellow exclamation marks beside them.
If there’s a device with a yellow exclamation mark, right-click it, and select the Update driver option.
Then select the Search automatically for updated drivers option within the Update drivers tool.
If you can’t find a device with a yellow exclamation mark in Device Manager, try updating your PC’s graphical, chipset, network, and input device drivers.
Then you can try updating them with the driver updater utility, manually or via Device Manager. Even if the tools from our list are dedicated to Windows 10, most of them are compatible with the new OS as well.
The best way to update device drivers is to utilize driver updater software. Outbyte Driver Updater is a tool that will scan your PC and list all the devices for which you need to update drivers.
Outbyte Driver Updater uses a frequently updated database of over 18 million driver files ready to be safely installed to replace your outdated drivers.
Outbyte Driver Updater
Update all drivers and keep your system running optimal.
To find the Windows Memory Diagnostic tool, click the magnifying glass button for the search tool.
Enter Windows Memory Diagnostic in the search box.
Then select the Restart now and check for problems option.
After that, wait for the diagnostic check to finish after the restart.
If you don’t see a Windows Memory Diagnostic notification display the results, right-click the Start button to select Event Viewer.
Next, click Windows Logs, then System within the Event Viewer window.
Select the Find option.
Input MemoryDiagnostic within the search box and click the Find Next button.
Then you can view a General tab for MemoryDiagnostic results.
NOTE
If Memory Diagnostics shows there’sbad RAM, replace your PC’s ailing RAM module with a new one.
9. Restore Windows 11 to an earlier date
Press the Windows key + X simultaneously, and select the Run option on the menu.
Enter this text in Run’s window and click OK: rstrui
If you can select the Choose a different restore option, select that radio button and click Next.
Select the Show more restore points checkbox if you can.
Then choose a restore point date that will roll back Windows 11 to when you didn’t need to fix the Unexpected_Kernel_Mode_Trap error. Alternatively, select the oldest restore point you can.
Click Next to proceed.
Press the Finish option to restore Windows 11 to the date selected.
You might need to reinstall some software after rolling back Windows 11. You can check what software a selected restore removes by clicking Scan for affected programs in System Restore.
10. Reset Windows 11
NOTE
Resetting Windows 11 restores the OS to its factory settings, which also means you’ll have to reinstall third-party software that didn’t come preinstalled on your PC. Therefore, we recommended resetting Windows 11 as a last resort solution only.
Press Windows + I to open the Settings app, then scroll down and select the Recovery section.
Press the Reset PC button to bring up that tool.
Then choose the Keep My files option on the Reset this PC window.
Select the Local reinstall or Cloud download option (whichever you prefer).
It’s a bit technical, but the Unexpected_Kernel_Mode_Trap error’s bug check highlights that the Windows OS kernel failed to capture a trap generated by a PC’s CPU. Unfortunately, that means your computer might have faulty or mismatched hardware.
For example, your PC could have faulty RAM (system memory). Or some of the included drives and disk controllers might be incompatible with Windows 11.
This error can also arise because of outdated or incompatible device drivers on your PC. Unfortunately, this often happens after upgrading to Windows 11.
Aside from that, corrupted system files, overclocked CPUs, and malware are other potential causes for the Unexpected_Kernel_Mode_Trap error in Windows 11. Therefore, as expected, there are quite a few common causes of Blue Screen of Death errors.
Our readers reported other cases where the Unexpected Kernel Mode Trap error appeared, and some of them are the following:
Halo InfiniteUnexpected Kernel Mode Trap in Windows 11 – The Unexpected Kernel Mode Trap error is typically associated with the drivers on your system or the memory on your system, and it is followed by the stop code of 0x0000007F.
Unexpected Kernel Mode Trap Ryzen – Check the validity of newly inserted hardware or recently installed software.
Unexpected Kernel Mode Trap while gaming – The problem Unexpected Kernel Mode Trap may have been brought on by a faulty hard drive or data that has become corrupted.
Warzone Unexpected Kernel Mode Trap – In the event that you are playing Warzone and your computer freezes up and displays blue screens, you should immediately restart the device.
Along the route, it connects you to valuable resources and steps. Check the radio buttons next to the appropriate answers that suit your case.
How can I enter Safe Mode for troubleshooting?
Try entering the Windows Recovery Environment if you can’t log in to Windows because of the Unexpected_Kernel_Mode_Trap error. To do so, press and hold the Power button for 5-10 seconds during startup (preferably at a logo) to force shutdown. Do that three times to enter recovery mode.
When you’ve entered the Windows Recovery Environment, you can select enter Safe mode. This diagnostic (troubleshooting) mode for Windows starts the OS in a basic state with minimal drivers and files. You can enter that mode via WinRE as follows:
First, select the Advanced Options button on the Startup Repair screen.
Select Troubleshoot on the Choose an option menu.
Then choose Advanced options.
Select the Startup Settings button.
Press the Restart button to reboot.
After restarting, press the F5 keyboard key to choose the Enable Safe Mode with Networking option.
After that, you can apply the above resolutions in Safe Mode.
These are some of the most potential fixes for the Unexpected_Kernel_Mode_Trap error. Of course, that doesn’t mean they’re guaranteed, but there’s a good chance they’ll resolve the issue.
Microsoft also has a Blue Screen of Death troubleshooter, which might help some users fix the Unexpected_Kernel_Mode_Trap error. You can check out that troubleshooter by opening its Troubleshoot blue screen errors webpage.
Also, don’t hesitate to check out this guide on how to solve the startup error 0x0000000F. Windows 11 users can also apply the tips mentioned here for Windows 10.
If the resolutions in this guide don’t fix your computer’s Unexpected_Kernel_Mode_Trap error, your PC could have a deeper hardware issue, such as a failing power supply or faulty motherboard component. In this case, consider returning it to its manufacturer’s repair service.
If you found this guide helpful, we appreciate your feedback. How did you solve the error? Don’t hesitate to let us know in the comments area below.
The Remote Desktop tool in Windows allows users to access and connect to a computer in another environment. Also, you can see the desktop’s screen and interact with it from your computer.
Connecting a Remote Desktop to a host computer is an easy task anyone can do as long as you verify the identity. However, it can be annoying to encounter difficulties when the Remote Desktop can’t connect or access the host device.
Furthermore, the Remote Desktop cannot verify the Remote computer’s identity for several reasons. They may vary depending on the nature of the concern.
Nonetheless, this article will discuss why the Remote Desktop cannot verify the identity of the computer you want to connect to and how to fix the problem.
Why is the Remote Desktop not connecting or verifying the identity?
Time and date difference between Remote Desktop and the remote computer: Remote Desktop cannot verify the remote computer’s identity because there is a time and date difference between your computer and the remote computer, an error message users encounter. It indicates that your computer has a different time zone from the Remote Desktop. Therefore, it cannot connect to or verify the Remote Host’s identity.
Issues with the Windows update: Users complain about their Remote Desktop connection issues after updating their Windows OS. Likewise, the Remote Desktop cannot verify the Remote Host’s identity may occur after the macOS update.
Windows Defender Firewall interference: It is common to have difficulties with external connections when the Windows Defender Firewall is running. However, it can impede the Remote Desktop connection by wrongly detecting the process as a threat. Hence, Remote Desktop cannot verify the remote computer’s identity in Windows if the Firewall is on.
What can I do if Remote Desktop cannot verify identity?
1. Ensure that your time and date are set correctly
As said earlier, the Remote Desktop may encounter errors connecting with the Remote Host device due to different times and dates.
Also, if the error message specifies this, change the Remote computer’s time zone to match that of the Remote Desktop.
2. Disable Windows Defender Firewall
Click on Start and type Windows Security in the search box.
Select Windows Security from the search results.
Click on Virus & threat protection from the Windows Security tab.
Then select Manage settings under Virus & threat protection settings.
Turn off Real-time protection.
Restart your computer for the changes to take effect. Then, try connecting the Remote Desktop and check if the verification error persists.
3. Uninstall the recent Windows update
Press Windows + Ikeys to prompt the Settings app.
Go to the Windows Update tab and select Update history.
Click Uninstall updates and select the most recent update.
Click on Uninstall.
Uninstalling the recent Windows update can fix any issues that might occur during the update.
Type in gpedit.msc and press Enter to open the Local Group Policy Editor.
Navigate to the Computer configuration, then select the Administrative Templates.
Click on the Windows Components option and Remote Desktop Services.
Select the Remote Desktop Session Host option, then click on Connections.
Double-click the Allow users to connect remotely using the Remote Desktop Services option.
Click on Enable and OK.
Allowing users to connect remotely using Remote Desktop Services through the Local Group Policy can help establish remote connections without verification errors.
5. Use the private network profile
Press Windows + I key to open Settings.
Click the Network & Internet tab and select Ethernet or Wi-Fi (depending on your connection type).
Expand the connection and click on the Private option button.
For users who have uninstalled Remote Desktop from their PCs, you can reinstall it on your computer by following the steps below:
Click Start and right-click on the computer.
Select Properties and the Remote Desktop menu, then select Allow.
Click OK and restart your computer.
The Remote Desktop will reinstall itself, and you’ll be able to access it.
These are the best fixes to fix the Remote Desktop cannot verify identity issue. The highlighted steps should be followed strictly for optimal results.
You must have found this article because your Thunderbird client is slow; here is all you should know.
Thunderbird is a popular email client, and many Windows 10 users utilize it. Despite its popularity and simplicity, some users reported that Thunderbird is slow on Windows 10.
We love to explore this problem and suggest the most efficient solutions for you on Windows 10. So let’s see if we can fix that problem.
Why is Thunderbird so slow?
When your email client is slow, there could be a few reasons. So, if you were wondering why Thunderbird is freezing or is slow, here are the likely reasons.
Add-ons – You may want to try the client in safe mode to determine if it is an add-on problem.
An outdated email client – Outdated apps will naturally display different faults.
Corrupted msf files – These files may occasionally become corrupt, slowing down Thunderbird.
Oversized cache – As with any other browser, Thunderbird will accumulate a rather large cache file, preventing it from running properly. So, before anything, clear its cache and cookies.
While this is not an exhaustive list, they represent the common triggers, but regardless of the cause, we shall show you the best fixes.
How can I fix Thunderbird if it’s slow?
1. Start Windows 10 in Safe Mode
Open the Start menu, click the Power button, hold the Shift key, and choose the Restart option.
Your PC will restart and see three options on the screen.
Select Troubleshoot.
Now choose Advanced options > Startup Settings.
Click the Restart button.
When your PC restarts, you’ll see a list of options available.
Select Safe Mode with Networking by pressing F5 on your keyboard.
After Safe Mode starts, you need to locate and run Thunderbird. If Thunderbird works without problems, the issue is caused by a third-party application or your configuration settings.
2. Start Thunderbird in Safe Mode
Hold the Shift key on your keyboard and start Thunderbird.
The Thunderbird Safe Mode window will now appear. If you want, you can choose to Disable all add-ons or Reset toolbars and windows sizes.
Click the Continue in Safe Mode button to start Thunderbird in Safe Mode.
You can also access Safe Mode in Thunderbird simply by clicking the Help menu and choosing the Restart with Add-ons Disabled option. After that, click the Restart button, and Thunderbird will start again in Safe Mode. The Safe Mode may help when you see Thunderbird’s slow search.
Once Thunderbird starts in Safe Mode, check if everything is in order. If there are no problems, your Thunderbird configuration or one of the installed add-ons is causing this issue, so be sure to change your settings and disable unnecessary add-ons.
Some users also suggest starting Thunderbird Safe Mode while in Windows 10 Safe Mode, so be sure to try that as well.
3. Change your email client
This might seem like a drastic solution, but it’s practical.
If you do not want to deal with the hassle of a troubleshooting process, switching email clients is the logical step, and we have a powerful recommendation for you.
If Thunderbird is slow to send emails or download attachments, this non-lagging software will feel like a breeze.
Mailbird is a top-rated email client designed to complement the Windows 10 structure to the point where it seamlessly blends with the OS’s architecture.
This email client features an uncluttered and intuitive interface that allows you to easily manage your emails, attachments, and contacts in one unified Inbox.
Speaking about that, the incredible Attachment Search feature allows you to quickly and effortlessly track down even year-old attachments.
By adding integrations to the table (and Mailbird indeed allows you to connect all your favorite email, calendar, task, and messaging apps into one), you will enjoy many functionalities to cover all your communication needs.
In addition, you have easy email and contact management from a unified Inbox, seamless app integrations (Facebook, Twitter, Whatsapp, Dropbox, Google Calendar), or custom sound notifications for incoming and outgoing emails.
There is a snooze feature to separate and prioritize your emails, so you always stay on top of endless tasks in your mailbox.
Mailbird
A new and simpler way to manage all your business and personal emails.
If your Thunderbird is slow on Windows 10, ensure you have the latest updates installed.
The community is working hard on Thunderbird, and if you’re having specific issues with it on Windows 10, we strongly advise that you check if you have the latest version installed.
Some versions might suffer from specific issues, so it’s highly recommended that you download and install the latest version to fix those issues. Many users found Thunderbird 102 slow, and updating to the latest version did the trick.
Downloading a previous version of Thunderbird is an intricate process requiring a basic technical understanding. Besides, it’s not the best option to download a previous version. However, this might work if it’s a bug or a patch that has not yet been released.
Head to the Thunderbird Release Notes on the official website and check the previously installed version, which was stable.
Once you have the version number, you will need to modify the following URL by replacing Version with the one you want to install:https://download.mozilla.org/?product=thunderbird-Version-SSL&os=win64&lang=en-US
Say you want to download Thunderbird Version 102.0.1. So the link becomes:https://download.mozilla.org/?product=thunderbird-102.0.1-SSL&os=win64&lang=en-US
Simply paste it into the browser’s address bar and hit Enter to download the installed. All that’s left is to run the setup and follow the on-screen instruction to complete the installation process.
6. Delete the MSF files
Launch the client.
Navigate Tools, Account Settings, and Server Settings on the Thunderbird app, then copy the Local directory path.
Open the File Explorer, paste the copied path into the Address bar, and then hit Enter.
Now locate the MSF files and remove them. Be sure only to remove MSF files from that folder.
If deleting MSF files manually seems complicated, some users recommend using the ThunderFix tool, so you might want to try it.
With this tool, you need to select your profile and click the Fix profile button, and all msf files will be removed.
7. Use Config Editor
Navigate to Settings, choose Options, and click on Config Editor.
When Config Editor opens, set the following values to true: gfx.direct2d.disabled layers.acceleration.disabled
Save the changes, and the problem should be resolved entirely.
Some versions of use Direct2D hardware acceleration, which can sometimes reduce your performance, mainly if you use a low-end graphic processor on your PC, and you may face the Thunderbird slow typing problem.
A few users reported that they fixed the problem simply by using the layers.acceleration.disabled option, so you might want to try doing that.
8. Turn on the Automatic Compacting of Folders
Go to Tools, and select Options.
Navigate to the Advanced tab and select Network & Disk Space.
Select Compact folders when it will save over option and enter the desired size in MB. For example, 20MB is usually a good option, but you can use a lower value if you want compact to perform more frequently.
If you decide to use a lower value for Automatic Compacting, set mail.purge.ask to true using Config Editor in Thunderbird.
9. Add Thunderbird to the list of exclusions
Specific antivirus tools closely monitor your email client and scan all your emails. This is an excellent feature since it scans all your emails for malicious attachments, but despite its usefulness, sometimes you can experience performance issues with Thunderbird.
If Thunderbird is slow to delete messages or even in general, add it to the list of exclusions in your firewall and check if that fixes the problem.
Remember that adding Thunderbird to the list of exclusions can be a security risk sometimes, so be sure not to open any suspicious emails or attachments.
If that doesn’t fix the problem, you might consider temporarily disabling your antivirus software and checking if that solves the issue.
If the issue is resolved by disabling your antivirus, switch to different antivirus software and check if the problem persists.
10. Make your messages available offline
Go to the menu, then Account Settings.
Click on Synchronization & Storage, tick Keep messages in all folders for this account on this computer, then click the Advanced button.
Tick the Inbox option, and click the OK button.
By enabling this option, all your messages will be downloaded to your hard drive, and you’ll be able to open them instantly while having all advantages of an IMAP account. If you want, you can also make other folders available offline.
11. Change the Maximum number of server connections
Go to the menu, then Account Settings.
Click on Server Settings, then select the Advanced option.
Locate Maximum number of server connections to cache and change it to 1, then click the OK button.
The issue is caused if the number of connections is higher than 1. If this value is higher than 1, Thunderbird tries to connect multiple times to the server. Therefore, Thunderbird may be stuck on loading your message if you do not change this value.
After the server rejects all these connections, the entire process might slow down; therefore, be sure to change the Maximum number of server connections to 1.
12. Keep your folders small
According to users, having more than 1000 email messages in a folder can lead to some issues on your PC. To fix this problem, be sure that you frequently delete contents from the Trash folder.
If you want to keep your folders small, you can permanently delete an email simply by holding the Shift key and choosing the delete option. Do this if you find Thunderbird slow with large mailboxes.
How can I make Thunderbird run faster?
If you are wondering how do I optimize Thunderbird, here are a few quick tips that might help:
Disable antivirus scanning of your Email folder
Clean your Thunderbird index files
Set up interface options like layers.acceleration.disabled = true
Disable AeroGlass
These are quick tips that will make the client faster.
Having performance issues with Thunderbird can be a big problem, but we hope you managed to fix the problem using one of our solutions. These solutions will be great if Thunderbird is slow to send your email or Thunderbird is slow in downloading messages.
The Van9001 and Windows 11 Valorant anti-cheat errors are two of the most widely cited Valorant issues, associated with the following errors:
Vanguard anti-cheat has encountered an error. Please relaunch the client to restore anti-cheat function. Van 9001: This build of Vanguard requires TPM version 2.0 and secure boot to be enabled to play.
Find below easy to follow ways to fix them:
How can I fix the Valorant Vanguard Windows 11 errors?
Fixes for the Van 9001 error
1. Enable both secure boot and TPM 2.0
Press the Start taskbar button.
Click the pinned Settings app to open it.
Select Recovery on the System tab.
Press the Restart now button for the Advanced startup option.
Select Troubleshoot on the blue menu.
Then select Advanced options to bring up the options shown directly below.
Click UEFI FirmwareSettings there.
Then select Restart to enter UEFI Firmware options.
Locate and select Secure boot within the UEFI Firmware settings to enable that option.
Find and enable the TPM setting, which could be on an Advanced or Security tab.
Our Fix: TPM device not detected error guide also provides details for enabling TPM within BIOS settings. However, UEFI Firmware and BIOS menu layouts vary between PCs.
Your motherboard manual might include more specific instructions for enabling TPM 2.0.
2. Select the Allow BitLocker without a compatible TPM option
Right-click the Start menu and select Run.
To open Group Policy Editor, input this command and click OK: gpedit.msc
Double-click Computer Configuration and select Administrative Templates in Group Policy Editor.
Select Windows Components and BitLocker Drive Encryption on the right of the window.
Then double-click Operating System Drives to bring up policy settings.
Double-click the Require additional authenticationat startup policy there.
Select the Enabled radio button.
Then select the Allow BitLocker without a compatible TPM checkbox.
Press the Apply button to save your new Group Policy options.
NOTE
Local Group Policy Editor is not included with Windows 11 Home edition. However, Windows 11 Pro and Enterprise users can configure Group Policy settings.
Fixes for the Windows 11 Valorant Vanguard anti-cheat error
1. Run Valorant as an administrator
Open File Explorer by clicking the taskbar icon shown directly below.
Then open Valorant’s installation folder.
Right-click Valorant’s EXE to select Properties.
Select Run this program as administrator on the Compatibility tab.
It’s also recommended that you select the Disable full-screen optimizations option on that tab.
Click Apply and OK to save the selected options.
NOTE
You can also run Valorant with elevated rights by right-clicking a shortcut for it and selecting Run as administrator. For Valorant to always run with elevated rights, however, you’ll need to configure it as outlined above.
2. Check the VGC service is enabled and running
Click the magnifying glass taskbar button, and enter services within the search box.
Select the Services app.
Next, right-click the VGC service and select Properties.
Select the Automatic startup option if it’s not selected.
Click Start on the properties window if the service isn’t running.
Press the Apply button to confirm.
NOTE
If VGC is already enabled and running, try restarting that service by right-clicking it and selecting Restart.
3. Allow Valorant through Windows Defender Firewall
Open the search tool in Windows 11 from the taskbar.
Input the keyword Windows Defender Firewall within the search text box.
Select the Allow an app or feature through Windows Defender Firewall option on the left side of the Control Panel.
Press the Change settings button.
Click the Allow anotherapp option.
Press the Browse button to select Valorant, and click the Open option.
Then click Add.
Select the Private and Public checkboxes for Valorant within the firewall’s settings.
Click the OK option.
4. Disable third-party antivirus software
If you have third-party antivirus software installed, it’s recommended that you disable that utility before playing Valorant.
To do so, right-click the system tray icon for your antivirus utility and select a disable option on the context menu. Select to disable the antivirus shield for a few hours if possible.
If you can play Valorant after disabling your antivirus software, the antivirus utility’s shield or firewall likely conflicts with the game or its anti-cheat software. In this case, consider adding Valorant and Vanguard to your antivirus utility’s exceptions list to get rid of this and other errors like Valorant error code 57.
Next, click the three-dot button for Riot Vanguard to select Uninstall.
Select Restart on the Start menu.
After that, open the Valorant client to reinstall the Vanguard anti-cheat software.
Do Valorant’s connection errors have anything to do with Vanguard?
The Valorant Connection error that arises when some players launch the game is often due to Vanguard. If you ever need to fix that error, try uninstalling and reinstalling Vanguard as outlined within the last potential resolution above.
However, that connection issue can also arise for other reasons. For example, there could be an issue with your internet connection. In this case, running the Internet Connections troubleshooter or restarting your router might also help.
Can you play Valorant without Vanguard?
Riot Vanguard would have to be enabled during VALORANT gameplay to maintain the integrity of players’ games. Your ability to play, however, might be impacted by unforeseen conflicts with either the Vanguard driver or the Vanguard client on your device.
Even if you want to uninstall the game, you first need to exit Riot Vanguard, uninstall Vanguard first, and then the game to completely get rid of it.
Nevertheless, you cannot play Valorant without Riot Vanguard in Windows 11. The driver keeps going, although you aren’t playing the game.
So, that’s how you can fix the Vanguard 9001 and anti-cheat errors in Windows 11. Unfortunately, those are two of the most common issues Valorant players have needed to fix on Microsoft’s latest desktop platform.
The fix for the 9001 error is pretty clear-cut. You must enable TPM 2.0 and secure boot on your PC to resolve that issue. If you can utilize Group Policy Editor, selecting the Allow BitLocker without a compatible TPM option might also work.
However, how you can fix the Vanguard anti-cheat error isn’t quite so obvious. That error often occurs because of firewall and antivirus software blocks. Try applying all the potential resolutions above for the Windows 11 Valorant anti-cheat error to get it fixed.
If you have questions about those Valorant Vanguard errors, please add them below. In addition, you can discuss those Vanguard Windows 11 errors and share other potential resolutions for them in that comments section.
With Microsoft ceasing support for Windows 7, many users are left wondering what their next step should be. While most will most probably upgrade to Windows 10, some may opt to remain with Windows 7.
If they choose to opt for the Windows 7 Extended Support, they will be able to continue using Windows 7 safely for another 2 years. However, some may choose to keep both Windows 10 and Windows 7, albeit on different drives.
While Windows 10 may be better optimized for older hardware, those that wish to use Windows 7 can compensate for the lack of optimization by migrating it to an external SSD.
Naturally, this operation isn’t just a mere Copy and Paste operation, and requires that you use certain methods, especially if you want to conserve all user data, or if you don’t want to reinstall it again.
Read on to find out how to move the Windows 7 OS to SSD using two different methods, according to your preferences.
How do I move Windows 7 to an SSD?
1. Migrate Windows 7 to an SSD using third-party tools
This option is by far the fastest and the easiest, as it drastically reduces the number of steps taken. One such example is by using AOMEI Backupper Professional.
This tool makes everything all the easier to handle, and it drastically reduces the time wasted.
By following these steps, you should be able to successfully migrate your Windows 7 OS and user data to a new SSD without any data loss or the need to reinstall.
Did you find this article useful? Let us know in the comments section below.
You can play Apex Legends on Steam, but you might stumble upon connectivity issues now and then.
So, if you’re looking for a way to fix Apex Legends lag spikes, high ping, FPS drops, or latency issues on your PC, we’re here to help.
Users reported the issue on many instances, and the Apex Legends lag in firing range was a common observation.
Check out our complete guide below to significantly improve your gaming experience without buying a new PC.
In addition, we prepared a list of foolproof solutions you can try at the software level of your computer.
Why do I keep having lag spikes in Apex?
If you’re experiencing Apex Legends lag spikes on your PC, you may be connecting to a server that’s too far away. That will result in high latency and possibly lag. Also, problems with your network connection will cause lag spikes to occur.
Outdated drivers can also be a problem, so ensure that your graphics and network drivers are up to date. If the issue is caused by network problems, such as your ISP, you can fix it with specialized tools.
What is a good ping for Apex Legends?
Low ping is beneficial for enhanced gameplay, and in Apex Legends, you should try to have it in the 20-50 ms range.
You may witness a spike when changing servers or a slow Internet connection. But anything under 80 ms should do for a game like Apex Legends.
How do I fix lag in Apex Legends?
1. Choose a different in-game region
Apex Legends lag spikes, and high ping could be caused by too many players on the same server.
If you notice peak hours when this happens, like in the evening or at the weekend, this is probably the reason why your entire game is slowed down.
You might not even be able to connect to a server. To resolve the matter, connect to another region in Apex Legends and try again. If the issue persists, keep changing regions until you exhaust all options.
This issue helps if you’re experiencing Apex Legends lag spikes on Xbox or PS5, so try it. Besides, it helps get rid of the Apex game logic error.
2. Use a gaming VPN
You can improve your ping and enhance your gameplay using an Apex Legends VPN. First, of course, you must connect to a VPN server closer to the region you’re playing it.
We recommend ExpressVPN because it’s the most used in the business and improves your connection and gaming speed.
Created by Kape Technologies, it can protect your computer from DDoS attacks and defend your home router from hackers. Express is also the best VPN choice to fix Apex Legends packet loss.
Plus, this VPN has OpenVPN with 256-bit encryption to secure your data. As a result, it enables your devices to keep a consistent internet connection with fast protocols such as Lightway.
Our tests show ExpressVPN works well with Xbox One, Android phones, and PS consoles. As a result, you can confidently choose it as the finest VPN for Apex Legends.
Furthermore, in such cases, you can use the virtual server functionality to access blocked websites and games. Express comes with servers in 94 regions.
ExpressVPN
Use this fast and optimized VPN for gaming to fix Apex Legends lag issues.
It’s impossible to enjoy a smooth-free online game if your Internet connection is not strong enough to sustain it.
Try running a speed test to determine if your network connection is slower than usual. You could also temporarily launch a different game to see if it has lag spikes like Apex Legends.
If your Internet connection is faulty, you can try restarting your PC and terminating any high-consuming background processes or services needed online, like web browsers, torrenting clients, or download managers.
In addition to that, you can fix your slow Wi-Fi or switch to Ethernet mode.
4. Use Nvidia Control Panel
If you’re experiencing Apex Legends lag spikes due to GPU issues, you can use Nvidia Control Panel to optimize your PC for gaming.
It integrates the most critical PC settings into a user-friendly interface, which you can easily enable or disable for gaming. Besides, the tool is entirely free to use. However, it only works for Nvidia GPUs.
5. Update your drivers to the latest version
Your device drivers are responsible for everything on your computer, including graphics and sound.
So if you often have to deal with FPS drops in Apex Legends, check if your drivers are updated to the newest edition, especially regarding your GPU.
On top of that, there’s always the risk of getting incompatible drivers that could harm your operating system. So instead, it’s better to resort to driver update software.
To avoid damaging your system, you can update outdated drivers with Outbyte Driver Updater, a tool that specializes in finding and updating them. The process is safe and will only take a few moments to find old drivers.
6. Update Apex Legends, Steam, and Windows
Whether we’re talking about the operating system or gaming platform, your software is only as good as its latest updates. So make sure to update Apex Legends and Steam to the newest version.
Remember that this isn’t a 100%-effective solution, and many reported Apex Legends lag after the update.
However, it would help if you stayed away from Steam beta updates. Although they are newer, they don’t guarantee stability.
The same goes for Windows. If the system update service doesn’t run automatically on your PC, you should check Windows Update for any new critical fixes or security patches at least once a week.
Then, restart your PC several times until all updates get installed, and try running Apex Legends to check for lag spikes.
We know it’s not ideal, but reducing graphics settings while playing Apex Legends usually fixes high-ping issues. But do this only after updating your GPU driver.
A good Internet connection doesn’t eliminate lag since several factors are at play here. A high packet loss or low bandwidth is just as likely to be responsible for the problem.
Also, a wireless connection isn’t as stable, and many managed to fix things by switching to Ethernet.
Besides, if you have several programs running in the background, some of these might be accessing the Internet, leading to the increased Apex Legends lag spikes on PC. Terminate these, and you should be good to go!
Using the abovementioned solutions, you should have fixed Apex Legends lag spikes and other latency problems.
If you have been tired of finding solutions for an unknown error that has occurred on the game Dead by Daylight, you are at the right place. This article has featured the best ways to troubleshoot this error.
Do you have a passion for multiplayer and horror games? If yes, you are probably playing Dead by Daylight. It is one of the most exciting MP games in the industry. However, the excitement fades away when you face problems while playing this title.
The unknown error has occurred is one of the common and mysterious problems in this game. It may occur every time before starting a match or during the gameplay.
If you want to fix this problem, you should know the reasons before that. It will help to troubleshoot the issue in a better way.
Why does dead by daylight keep saying an unknown error has occurred?
Even though this problem has been bugging gamers around for a few years, the reasons are still unclear in the community. However, our team has found some possible causes.
These are network problems, incorrect time and date, and outdated or corrupted components, etc. There may be other reasons as well.
If you can take care of these things, you will be able to fix this unknown error with Dead by Daylight easily. You will learn how to do it in the next part of this article.
How do I fix an unknown error has occurred on Dead by Daylight?
1. Update the game
Open the game launcher like Steam or the one where you have purchased the game.
Click on the Dead by Daylight.
It should automatically update the game.
2. Correct Time and date
Press Win + I to open Settings.
Go to Time & language and click on Date & time.
Enable Set time automatically and ensure that the Time zone is in the correct state.
If necessary, restart your PC after making the above changes. Then, try to run the Dead by Daylight. Hopefully, you won’t face the unexpected problem again.
3. Reset network
Go to Windows settings like before.
Go to Network & internet.
Click on Advanced network settings.
Go to Network reset.
Click on Reset now and follow any on-screen steps.
You also should consider updating the network driver and taking other steps to solve any network-related issues. We have a different section for this type of problem. Visit this Network issues page to get a lot of relevant troubleshooting guides.
4. Use better DNS
Go to Windows Settings.
Go to Network & internet as shown before.
Click on the connection you are using, like Ethernet.
Next, click on Edit next to the DNS server assignment.
Set it Manual and enable IPv4 or IPv6 depending on the DNS you are trying to use.
Type your preferred DNS addresses and click on Save.
If you don’t know any good DNS server addresses, use 8.8.8.8 and 8.8.4.4.
After making the changes, make sure to flush the DNS on Windows. If necessary, restart your device. Then, see if it fixes Dead by Daylight: An unknown error has occurred or not.
Right-click on the Dead by Daylight and go to its Properties.
Go to Local files.
Click on Verify integrity of game files.
If you face this problem due to some game components problem, doing the above things will fix it. If not, follow the next solution.
6. Try on a different network
In many cases, this unknown error with Dead by Daylight occurs due to network-related issues. So, if you encounter this problem frequently on your home network, I suggest you try a different network, like using a mobile network, and see what happens.
For the best experience, you also can use Private Internet Access (PIA) or ExpressVPN. These two are amazing gaming VPNs with tons of servers around the world.
If your existing ISP fails to provide a good gaming experience, these VPNs can save you from very sluggish online gaming performance.
Why does dead by daylight say Cannot connect to store?
When DBD cannot connect to the store, it is clearly a network-related problem. However, there may be something else as well.
If the anti-cheat software is outdated and cannot work properly with Steam, you will encounter store connectivity issues. The same problem may appear on Xbox and PlayStation too. The primary solution is to update the game regularly to the latest version.
If you use a pirated copy of the game, the problem may appear more as you cannot keep your game up to date regularly. As a result, you will face an unknown error has occurred or cannot connect to store-like errors more on DBD.
So, you should always use a genuine copy of the game for your safety and to avoid unwanted problems.
This article has featured the best ways to fix an unknown error has occurred in the Dead by Daylight game. If you know any other methods that may help, let us know in the comment box.
If you cannot change your desktop background on your Windows 10 computer, it could be the setting is disabled, or there’s another underlying cause.
Several users have reported not being able to change the background on their Windows 10 and Windows 11 PCs, ultimately not allowing them to customize their PCs as per their requirements.
If you’ve tried all the basic fixes you know and nothing seems to work, then you can check out some of the workarounds below and see if one of these does the trick for you.
Why can’t I change my background on Windows 10?
Here are some common reasons you can’t change the background on your Windows 10 PC.
Check if your copy of Windows 10 is activated.
Some critical system files might be corrupted or missing.
There is a presence of a virus or malware.
The wallpaper that you are trying to set is not supported.
The TranscodedWallpaper file might have gone corrupt.
Prevent changing desktop background group policy might be enabled.
There is some issue with your registry settings.
The power options have some issues.
What do I do if I can’t change the background on Windows 10?
Check if you have installed a third-party customization software, as it could restrict you from changing the desktop background. If so, uninstall it and restart your computer, then try to change the background again.
Reinstall Windows again from your recovery key.
2. Check that your Windows 10 is activated
Press Win + R to open the Run dialogue.
Type explorer shell:::{D555645E-D4F8-4C29-A827-D93C859C4F2A}\pageEasierToSee and press Enter.
Go to the Make the computer easier to see option.
Uncheck the Remove background images (where available) checkbox.
Click OK when done.
Reboot your computer and try changing the background again.
3. Create a new user profile with admin rights
Press the Win + I buttons to open Settings.
Click Family and Other people.
Select Accounts.
Click Add someone else to this PC.
Fill in the form with the username and password. Your new user account will be created.
Click on Change account type.
Click the drop-down arrow and choose Administrator to set the account to administrator level.
Restart your computer.
Login to your new account and set the desktop background again.
4. Delete TranscodedWallpaper or slideshow file in Registry editor
Open File Explorer.
Paste this path in the address bar: %USERPROFILE%\AppData\Roaming\Microsoft\Windows\Themes
Double-click the slideshow.ini file and open it in Notepad.
Empty the contents of that file in Notepad by selecting all the text and deleting it.
Select DWORD and name it as NoChangingWallPaper. The DWORD value 1 will restrict change in desktop wallpaper. To allow change give it a value of 0.
Restart your computer.
6. Perform a clean boot
Log on as an administrator, and type msconfig in the search box.
Select System Configuration.
Find Services tab.
Select Hide all Microsoft services box.
Click Disable all.
Go to the Startup tab.
Click Open Task Manager.
Close Task manager, then click OK.
Reboot your computer.
7. Disable the video driver
Right-click Start and select Device manager.
Right-click your graphics card.
Select Disable device.
Restart your computer.
Try to change the background image again.
8. Use Ease of Access center
Press the Win + I buttons to open Settings.
Select Ease of Access.
Click Optimize Visual Display.
Scroll down and find Make the computer easier to see section.
Make sure that Remove background images (where available) are unchecked.
Click Save, Apply, and Exit.
9. Check that Plugged In option in desktop background settings is available
Open Control Panel.
Click Hardware and Sound.
Click Power Options.
Select your power plan.
Click Change plan settings.
Click Change advanced power settings.
Select Expand the desktop background settings.
Click Expand slideshow.
Set the Plugged In option to Available.
10. Use Group Policy Editor
Right-click Start and select Run.
Type gpedit.msc and press Enter.
Go to User configuration.
Select Administrative Templates.
Double click Control Panel.
Double Click Personalization.
Look for the policy Prevent changing desktop background.
Double-click on it to access its properties.
Select Not Configured or Disabled to enable changing desktop background. If it is enabled, disable it.
11. Activate the Show Windows Background option
Open Settings.
Select Ease of Access.
Click More Options.
There’s a slider that reads Show Windows Background.
Activate it and change the background again to see if it works.
What do I do if I can’t change the background on Windows 11?
You can also apply all the solutions mentioned above for Windows 11 PC, where you cannot change the desktop background.
However, if nothing works, we suggest you perform a clean install. Not only will this eliminate all the bugs, glitches, viruses, or malware that might be present on your PC, but it will also replace the corrupt or missing system files.
How do I reset my desktop background?
Press the Win + R keys to open the Run dialogue.
Type regedit and hit Enter.
Navigate to the below path. HKEY_CURRENT_USER\Software\Microsoft\Windows\CurrentVersion\Explorer\Wallpapers
On the right side, select the BackgroundHistoryPath0, BackgroundHistoryPath1, BackgroundHistoryPath2, BackgroundHistoryPath3, and BackgroundHistoryPath4 string values, right-click on them and select Delete.
Click Yes to confirm the changes.
Close the Registry Editor.
Did any of these solutions help you restore the change background feature? Let us know by leaving a comment in the section below.
Starting with build 22557 and above, Windows 11 requires an Internet connection to complete the first setup, and often users are blocked by aka.ms/networksetup message. However, there’s a quick way to bypass it.
1. Create a bootable USB flash drive with the Windows 11 installation media on it.
2. Restart your PC with the bootable USB flash drive which has Windows 11 on it.
3. Click on theInstall now button then follow the onscreen steps to start the installation process.
4. Press the I don’t have a product key button from the bottom side of the window if you don’t have one available and choose the Custom installation option when they ask you what type you want to perform.
5. Select your region, and keyboard layout then once you get theOops you’ve lost Internet connectionscreen, pressSHIFT+F10from your keyboard to open aCommand Promptwindow.
6. Type the following command and press Enter: OOBE\BYPASSNRO
7. Your computer will automatically restart and enter the Let’s connect you to a networkscreen. Here press theI don’t have Internet button.
8. Next, click the Continue with limited setup button and proceed with the setup process. That’s it!
You can setup Windows 11 without internet by using a bootable USB flash drive with the OS’s installation media on it, as well as a special command in Command Prompt.
Basically, you can force the installer to skip the network setup and finish installing Windows 11 without any network connections.
There are several points of failure in wireless networks, which makes them complicated. Finding the source of a network failure, which might be anything from a faulty Wi-Fi switch to a software conflict, a router issue, or an ISP issue, can be challenging.
Misconfigured network settings and physical distance from the network source are two of the most typical reasons why Windows is unable to connect to one.
However, there are a number of additional probable explanations, such as the Wi-Fi has been switched off, a piece of software has caused a connection to become unreliable, the network has been configured to demand unique authentication, or the network is overloaded.
You can begin by restarting your computer to get things going again. When debugging electronic devices, restarting is a frequent first step. It is possible that it will be sufficient to resolve the Windows 11 network problem.
We are happy to see you’ve decided to upgrade to Windows 11 since it brings new features and design just for you. There are also various security measures that ensure your computer’s privacy.
This iteration of Windows includes improved multi-monitor support, which means that when you disconnect a second display, Windows will remember all of the apps that were running on it previously.
As soon as you plug in the secondary screen again, all of the programs that were running on the external display will open up again, allowing you to carry on from precisely where you left off.
If you’re looking for more than just a quick workaround and want a full walkthrough, this step-by-step guide to installing Windows 11 without internet covers everything from downloading the ISO to bypassing network requirements and setting up a local account.
If you also want to skip creating a Microsoft account during setup, you can follow this step by step tutorial on installing Windows 11 without a Microsoft account. This method lets you complete installation offline and add your account later if needed.
FAQs about aka.ms/networksetup
What is aka.ms/networksetup?
aka.ms/networksetup is a Windows 11 setup screen that asks you to connect to a network before continuing installation. It ensures updates and account verification.
Why does Windows 11 require Internet during setup?
Windows 11 requires Internet to download essential updates and verify your Microsoft account. Without a network, setup may pause at the “Let’s connect you to a network” screen.
Can I install Windows 11 without internet?
Yes. You can complete installation offline and connect later. Use the offline bypass command or follow a guide for installing Windows 11 without internet access.
You may often notice that when trying to launch a game on Steam, the game won’t stop running.
This is a known issue and you may see the error message, Failed to start the game (app already running) on Steam.
While there could be quite a few reasons why you may bump into this error, this problem mainly occurs when you shut down your last game, but it still did not.
But, if your Steam game is not launching, you can refer to our guide for some quick workarounds that can help you fix the issue.
Why is my game still running on Steam?
Sometimes Steam may be working but the client interface may not be visible! Some game files may get corrupted somehow and this can further raise the issue.
Other reasons may include:
If the previous game failed to shut down properly
You forgot to exit the last game
If a high-end game has been opened on a low to mid-end computer
Corrupted game files
Compatibility issues
A glitch with the Steam app
You can uninstall and reinstall Steam or try disabling the compatibility modes to find some handy solution.
Why does Steam say a game is running when it isn’t?
If Steam says your game is still running, but it isn’t, then it could be that you closed the previous game but Steam did not register it.
There can be other reasons as well, for example, a glitch with the game or Steam may require administrator rights, 3rd party app interference, and more.
As a first resort, you can restart the app or your PC, and this helps fix the issue in some cases. This can also fix New World won’t stop running issue on Steam.
However, if your Steam game won’t stop running, then you can follow the below workarounds to fix the issue.
How do I force a Steam game to stop running?
1. Exit the game from the Task Manager
Right-click on Start and select Task Manager.
Select the Processes tab and go to the Apps section.
Look for Steam, right-click on it and select End task.
Once you have closed the Steam app from Task Manager, you can launch it again if you are still getting the same error.
2. Verify the integrity of the game files
Launch Steam and click on Library at the top.
Next, right-click on the game that’s having the issue and select Properties.
Now, on the left, click on Local Files.
Navigate to the right and click on Verify integrity of game files.
Now, relaunch Steam and check if you are still facing the game won’t stop running issue.
3. Run Steam as an administrator
Go to the location where Steam is saved, right-click on it and select Properties.
In the Steam Properties dialog, select the Compatibility tab.
Here, go to Compatibility mode, uncheck all the boxes except Run this program as an administrator. Press Apply and OK.
Many users have been reporting an issue like, Steam says I’m playing a game when I’m not. This is because the game overlay is still not closed.
You can wait for the overlay to close, and this should fix the issue, or running Steam as an administrator can help you avoid this problem in the future.
Next, right-click on the game and select Properties.
Under game properties, click on Local Files on the left.
Now, on the right side, click the Browse button.
Double-click on the game’s .exe file.
Next, try to connect to a server, and if it’s stuck while negotiating a connection, click on Cancel.
Now, close the game by pressing the button at the bottom of the screen.
While the method is applicable for all games, it also applies if Steam says Rust is running .
5. Opt-out from the Steam Beta Program
Launch Steam, navigate to its menu, and click on Settings.
Next, under Settings, click on the Account tab on the left.
On the right, go to Beta Participation and click on Change.
Now, in the Beta participation dialog, select NONE – Opt-out of all beta programs from the Beta Participation drop-down.
Press OK to save the changes.
Hit OK again to apply the changes and exit.
This method is for those who are participating in the Steam beta program and hence, not for all users.
6. Remove client registry.blob from Steam folder
Close Steam, and then go to the default location of Steam which is usually in the C: drive.
Locate the client registry.blob in the Steam folder, copy this file, and paste it onto your desktop.
Next, in the Steam folder, delete all the files, except Steam.exe and the Steamappsfolder.
Now launch Steam, allow the update, and once it restarts, it will begin the update and fix all the issues.
7. Reinstall the game
Launch Steam and click on Library.
Locate the problematic game, right-click on it and select Uninstall.
In the confirmation prompt, click on Uninstall again to remove the game.
Wait till the game is removed completely. Once done, download and install the game again.
Now, check if the game starts normally or if it still says that it’s running in the background.
Is Steam always running?
Unless you have changed the settings, Steam is automatically running in the background for the convenience of the player.
So, whenever you want to play a Steam game, you can have quick access to the platform and directly launch the game.
However, not everyone may be comfortable with Steam running in the background due to memory issues that may slow down the PC’s performance.
In such a case, you can follow the below instructions to stop Steam from always running:
LaunchSteam, click on its menu in the upper left, and select Settings.
Under Steam settings, click on Interface on the left.
Next, on the right, uncheck Run Steam when my computer starts and press OK.
Now, exit Steam, restart your PC and the app should not be running in the background anymore.
Why does Steam take up so much CPU?
Steam is known to cache a lot of user data for each game you play. Also, the big picture mode turns out to be heavier on the PC memory.
Moreover, if Steam is set to download and install updates automatically, the CPU usage will be automatically high. This holds true, even when Steam is idle.
At the same time, you can also disable or remove any 3rd party apps that usually interfere with Steam’s functioning.
For example, you can remove or disable a 3rd party antivirus or firewall, VPNs, download managers, IP filtering or blocking applications, etc.
If none of the above methods works, you can uninstall Steam and reinstall it to check if this helps fix the Steam game won’t stop running issue.
But if you are trying to launch a Steam game and it doesn’t launch on clicking play, you can follow the guidelines in our detailed post here.
For any other queries related to Steam or any errors associated with it, you can leave a message in the comments box below.
Keeping your PC updated and clean is the key to running it for a long time without any software issues.
However, constant file deletions, registry installations, uninstallation, and other sort operations can eventually mess with your system’s integrity.
When that happens, you shouldn’t be surprised if you get an error message that starts with:
Faulting Application Path…..
What is causing the Faulting Application Path?
If your computer shows that it has a Faulty Application Path, it is possible that the software was not deleted from your system correctly in the past.
There are several reasons why an issue occurs; sometimes, this may be caused by some DLL files or components that are broken or missing from the system. For example, some users reported that they are encountering the following issue:
I am getting this critical event notification under security and maintenance, reliability monitor of my computer.
Since error messages like this are persistent, we’ve created a step-by-step guide that will show you precisely what needs to be done to overcome them.
How do I fix Faulting Application Path errors?
1. Run a third-party DLL fixer
There is no shortage of third-party software that can repair or restore DLLs that have been damaged or lost; most of these products live up to their claims.
You can either disable it by going to the Firewall settings, followed by Intrusion Detection and then deselect the Use Intrusion Detection option or uninstall the software.
More generally, finding out what process is faulty and replacing it with another built-in Windows alternative or better third-party antivirus software can fix the issue.
3. Run the SFC scan
Press Windows to open the Windows Search function, then type cmd and select Run as administrator.
Paste or type the following command and press Enter. Then, wait for the process to finish before rebooting your PC: sfc /scannow
The Windows System File Checker, known as SFC, is a utility that may be found in all current editions of the Windows operating system. Using this utility, you may restore corrupted system files.
Since we have mentioned before that one of the most common causes of the Faulting Application Path error is corrupted or broken system files, this solution is essential to implement.
Tap Windows, input cmd into the search bar, and select Run as administrator.
Once the window opens, paste the following command, press Enter, and wait for the process to finish. Note that it can take a while: DISM /Online /Cleanup-image /Restorehealth
The DISM command is only one of the many troubleshooting tools that are available to users of Windows 10 to restore functionality to damaged files and programs.
Start by pressing the Windows + I keys, then select Update & Security.
Next, select View all optional updates.
Expand the Driver updates section, select all the updates listed, then click Download and install.
When operating any program or game, problems and failures caused by outdated drivers can often be a contributing factor. Updating your Windows drivers can solve the Faulting Application Path error.
A faster way to update your drivers is using a dedicated tool. Outbyte Driver Updater can help you do that by performing a comprehensive scan of your device drivers and updating them instantly with the most suitable version from the online database.
Our readers reported similar Faulting Application errors that can be solved by following the above solutions. Some of the most common ones are the following:
Explorer.exe Faulting Application Path – Windows 10 users reported that by updating their OS, they were able to fix this issue.
W3wp.exe Faulting Application Path – A Windows process called w3wp.exe, known as an Internet Information Services (IIS) worker process, is responsible for running web applications.
Svchost.exe Faulting Application Path – The System File Checker tool will take care of fixing them automatically.
Kernelbase.dll Faulting Application Path – The system subdirectory of the Windows operating system contains a DLL file known as KernelBase.dll.
Faulting Application Path in Event Viewer – When you try to run a program and receive the error Faulting Application Path, it indicates that the software in question needs to be updated or replaced.
By following these steps, you should be able to run any process on your Windows PC without encountering any Faulting Application Path error messages.
Additionally, keeping your PC clean and following some simple rules will guarantee that this error will no longer appear in the future.
If you know of any other way to solve this problem, share it in the comments section below so that other users can also try it.