5 Best VPNs for Minecraft to Bypass IP Ban & Join Any Server

There are a lot of games in this world, but only a few have managed to experience such a lengthy evolution as Minecraft.

Fans have been addicted to it for years, and they enjoyed the pleasure or in some cases tasted the horror of hosting their own servers.

One of the main reasons why it’s recommended to use a VPN for Minecraft is that you may want to play on a restricted or blocked access network.

Another reason is the fact that you will be able to create a private and secure LAN server of your own.

IP bans are obviously another factor that calls for a VPN for Minecraft.

We gathered the best VPNs for Minecraft that are currently available on the market just to make your choice much easier.

Check out their sets of features and decide which one is the best for your own needs.

Can you join a Minecraft server with a VPN?

Yes. You can use a VPN to access Minecraft and unlock geo-blocked servers from anywhere. But you will need a good VPN with powerful encryption to do it.

Users report not being able to log in to Minecraft when using a VPN and getting an error message.

So if you’re wondering why Minecraft keeps saying Can’t connect to server, the fact that your VPN is detectable may be the reason.
If you can’t login in Minecraft when using a VPN, we recommend trying a different server.

Make sure you use a VPN with unbreakable encryption and additional privacy features like double VPN and obfuscation.

Does Minecraft block VPNs?

Yes, Minecraft players report having problems accessing the game when on a VPN or proxy. Most commonly, you will get a Minecraft can’t connect to server error on the VPN.

That’s why using an untraceable VPN is important, a VPN that can bypass Minecraft restrictions. 

VPNs can help you get access to more gaming servers, improve speed, and also bypass IP bans in Minecraft, so make sure you check our recommendations below for the best clients.

What is the best VPN that works with Minecraft?

NordVPN – Best for obfuscation

This is a great service that allows you to play your Minecraft games without having any problems. You can access more than 3299 servers from all over the world using NordVPN, and you won’t have to deal with all kinds of logs policies.

NordVPN is based in Panama and was developed by Tefincom & Co., S.A., and it’s a popular choice for Minecraft users. This service is also the recipient of a lot of praise coming from various experts.

Besides being able to play Minecraft without a care in the world, you can also watch Netflix, and this is quite a rare feature these days,

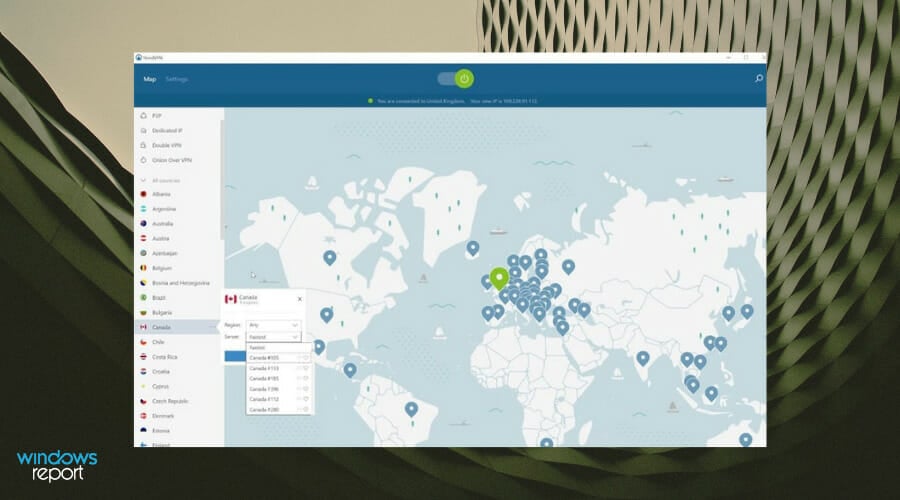
When you first launch NordVPN, you are confronted with a world map and also a marker for each one of the countries where there’s a server or more.

The map is zoomed-in by default, and this is great because otherwise, it would be pretty difficult to choose from so many servers that are located all over the world.

You will also be able to connect to the closest Minecraft server, and all you have to do is to hit the Connection Wizard button.

This VPN also allows you to connect up to six devices at the same time and you can enjoy high-speed unlimited bandwidth.

It’s best to head over to NordVPN’s official website to check out the pricing plans and more features that are packed in this service.

NordVPN

Want to keep private while playing Minecraft? Try NordVPN
Check price Visit website

ExpressVPN – Fastest servers

ExpressVPN is one of the best VPNs for gaming, thanks to its very fast, yet secure servers.

You will be able to successfully access Minecraft from anywhere in the world and get a fast connection because ExpressVPN has thousands of servers in 94 different countries.

By connecting to an ExpressVPN server that is close to your location, you have the chance to increase Internet speed.

As opposed to some ISPs, ExpressVPN offers unlimited traffic and data, so you can play Minecraft as much as you want, no limitations.

On top of that, thanks to its encryption, all your activity and data will be hidden from third parties, including your ISP.

This means that even if your Internet Service Provider throttles traffic, it won’t be able to do so with you, because all your data is hidden.

We must also mention that ExpressVPN is available on all major devices, with dedicated apps for Windows and macOS.

It’s fairly easy to install and set up and you can even install it directly to your router and secure your entire household.

ExpressVPN

Enjoy Minecraft to the fullest by connecting to ExpressVPN’s fast servers!
Free trial Visit website

Private Internet Access – Most US serves

Tests have shown that it is an excellent VPN for use in Minecraft, especially since it is a game where lag can ruin everything.

Created by Kape Technologies, (the same company that created CyberGhost), the product offers the same quality standards, but with even more worldwide coverage.

The service’s interface is simple, but it’s packed with lots of functionalities and features. Your online security while you are gaming is assured, and your Internet traffic is protected.

Your IP will be protected all the time while you are playing and you will receive an anonymous VPN IP.

Using this service, you will be able to effortlessly blend in with the crowd.

You can also say goodbye to geographic restrictions, and the encryption will keep you safe even when you’re playing or surfing the Internet on public Wi-Fi.

If you come across any problems installing the client or if you are not able to find the necessary information that you need, you can always contact customer support.

These are only a few of the many great features that come with Private Internet Access VPN. To check out more cool functionalities that will help you while playing Minecraft, head over to the service’s official website.

Private Internet Access

Looking for a sturdy VPN that works flawlessly with Minecraft? PIA could be what you need.
Check price Visit website

CyberGhost VPN – Beginner-friendly apps

CyberGhost server locations

CyberGhost is one of the best VPN providers in the world, and the reason is simple. It provides such a massive range of handy features that other competitors cannot handle the battle.

The functionalities and functions provided by CyberGhost include amazing speeds and enhanced security along with smooth performance.

The interface of this VPN is effortless to understand and use by customers with all possible skills.

Installing the client is effortless, and it doesn’t take more than just a few minutes.

It will turn out incredibly efficient while you’re playing Minecraft because it provides cool features such as anonymous surfing, hiding your IP, and more.

Your original IP address will be replaced with another one from the CyberGhost network and this way it will become impossible for third parties to track you online.

By connecting to CyberGhost’s servers, you will have access to content from all around the world.

You can also block malicious content and protect the security of your system using this VPN.

Your online activity will be encrypted with the 256-AES bit technology.

CyberGhost supports all major operating systems including Windows, and this is great for a VPN these days.

Another cool feature of CyberGhost is that it provides the possibility to pick and set preferred Wi-Fi connections and add them to your protected list.

On the VPN’s official website, you can check out more exciting features of CyberGhost and the pricing plans as well. Enjoy online gaming and browsing without having to be afraid of hackers, online behavior tracking, and mass surveillance.

CyberGhost VPN

CyberGhost VPN can protect your privacy 24/7, even while playing Minecraft.
Check price Visit website

Hotspot Shield – Top-level encryption

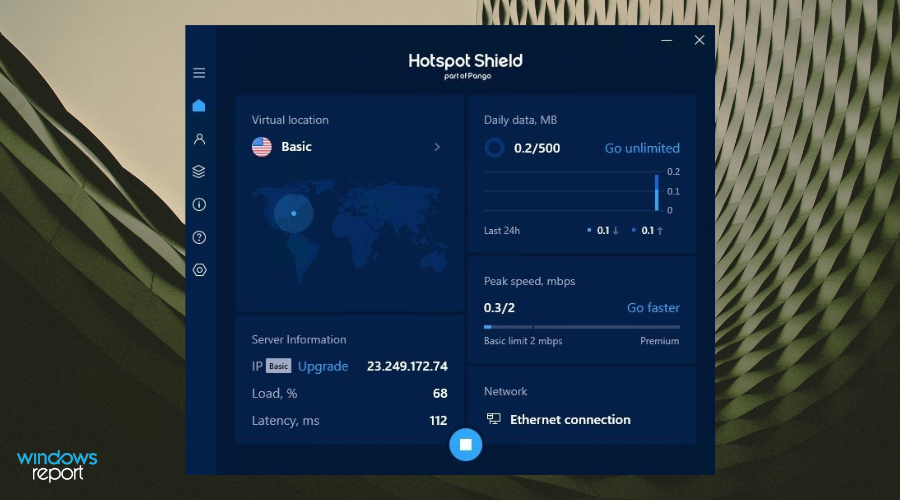
Hotspot Shield is another piece of jewelry in terms of Minecraft that was developed by AnchorFree. From now on, you will be able to unlock the game using one of the best VPN services out there.

With Hotspot Shield, you can unblock Minecraft, and all you have to do is to download the service without any risks and then connect to one of the service’s servers in order to receive another IP address.

After that, you will be able to play Minecraft all day and night while at the same time keeping your IP address, identity, and location hidden, and all the sensitive data secure.

Using this VPN, you will be able to get around all kinds of content blockers that are installed at your work or school.

You will get the opportunity to change the IP address in order to keep playing after you have been banned if that’s the case.

Hotspot Shield allows you to protect the valuable information that goes and comes to and from the Internet to your system.

This VPN will also allow you to use servers that are close to the game’s server and this way users will successfully reduce lag.

You will be able to enjoy your Minecraft game anywhere including on public Wi-Fi or in other countries.

If you do decide to use Hotspot Shield VPN to play Minecraft at the location of your choice, this service will definitely provide you peace of mind and enhanced privacy. It’s essential also to note the fact that this VPN does not keep track of your online activity, personal data, and IP address compared to other services.

Check out more cool features that are included in Hotspot Shield by heading over to its official website. If you are thinking about better security, we strongly recommend you choose the paid plan which has enhanced security, more functions, and better support.

HotSpot Shield

Tired of Minecraft not working with your current VPN? Check out Hotspot Shield.
Check price Visit website

These are our top picks for the best VON for Minecraft and whatever your choice will be, we guarantee that your gaming will be worry-free. Make your decision and start playing.

What is Win32:Bogent [susp] and How to Remove it

Even if your antivirus has alerted you of removing the Win32:Bogent virus software, it can also be a false positive.

Several Steam users have reported that their third-party antivirus has quarantined Win32:Bogent when launching the Steam client.

Before dismissing the alert as a false positive, make sure to take some measures to ensure that the Win32:Bogent is not harmful.

In this article, we take a look at what is the Win32:Bogent file and how to remove it from your system if required.

How do I remove the Win32:Bogent [susp]?

1. Check for a false positive

What is Win32:bogent detection
  1. Launch your antivirus and open the Quarantine tab.
  2. Note the Win32:Bogent file path: C:Program Files(x86)Steamsteamappsdownloading236850pdx_browser32libcef.dll
  3. Go to the VirusTotal website.
  4. Click the Choose file button.
  5. Select the file quarantined by your antivirus.
  6. Wait for Virus Total to complete and find the information provided by multiple antivirus solutions.
  7. Analyze the final score to see if the file is a potential threat.
  8. Multiple engines will detect any potential threat.
  9. If only AVG and Avast have detected the file, it could be a false positive.

2. Use a different antivirus software

control panel windows
  1. If the issue is occurring when you try to update or open Steam, and AVG or Avast detects the virus, you are most likely dealing with a false positive.
  2. To make sure it is a false positive, try uninstalling your third-party antivirus and run the scan using Windows Defender.

We recommend a reliable antivirus program that protects your computer against viruses, Trojans, malware, spyware, and other Internet dangers such as rootkits or ransomware.

TotalAV is a combination of a classic virus scanner, behavior-based adware detection, and also cloud functionality that ensures accuracy and prevents false alarms like the Win32:Bogent.

This great software uses advanced Artificial Intelligence technologies to anticipate, detect, and instantly block even the newest threats.

⇒ Get TotalAV

2.1 Uninstall the current antivirus

  1. Press the Windows key + R.
  2. Type control and click OK.
  3. Select Uninstall a program.
  4. Go to AVG/Avast from a list of installed apps and click Uninstall.
  5. Wait for the program to complete and restart your PC.

2.2 Run Windows Defender to remove Win32:Bogent

    To make sure Win32:Bogent virus is a false-positive, you can run the scan using the built-in antivirus on your Windows device, as opposed to a third-party one.

    The built-in antivirus is called Windows Defender and is both easy and perfectly safe to use. It can scan and remove the virus within minutes.

  1. 1. Click on Start and select Settings.

  2. 2. Go to Update & Security.

  3. 3. Open Windows Security.

  4. 4. Make sure your Windows Defender software is up to date.

  5. 5. Click on Virus and threat protection.

  6. 6. Go to Scan options.

  7. 7. Select the Full Scan option.

    Window BSOD error
  8. 8. Select Scan Now to start scanning.

  9. 9. Wait for the scan to complete and check if Windows Defender detects the Trojan.

  10. 10. If the Trojan is detected, then the possibility of a false positive can be ignored. Windows Defender will help you remove the Win32:Bogent virus.

2.3 Remove the virus using a dedicated tool

  1. Download and install the antivirus software of your choice.
  2. Launch the antivirus tool and perform a complete scan.

If you are unsure about a tool that can assist with thorough malware cleanup, we recommend that you browse our list of dedicated antimalware solutions to narrow down your options.

The Win32:Bogent is most likely a false positive if detected by Avast or AVG when launching the Steam client.

To get rid of the persistent errors that attack your PC, we recommend trying one of the programs in our guide of the best antivirus tools with a lifetime license.

Before discarding it as a false positive, follow the steps in this article to make sure it is not a potential threat, and let us know if you solved the problem by leaving a message in the comments section below.

Hulu Video not Available in This Location [3 Tested Fixes]

Hulu is an excellent video-streaming service you can use to watch original movies and T.V. shows. Unfortunately, not all Hulu videos might be available at your location.

If you stumble upon an error that prevents you from watching specific movies or T.V. series on Hulu, you might be tempted to drop this video-sharing website and replace it with something else.

Before doing that, however, try using a VPN to get past the geographical restrictions and watch Hulu from anywhere in the world. Although it’s tempting to use a free VPN, we strongly advise against it because it comes with many risks.

But a premium VPN is different. You can trust it to secure your network traffic, protect your online privacy, and defend yourself from hacker attacks.

Why won’t Hulu let me change my home location?

There are a few reasons why you may be interested in changing your location on Hulu, but sadly some users have found this impossible. Usually, this could be because of any one of the following:

  • You have maxed the number of available changes – In a calendar year, you can not change your location more than 4 times. So if it is your fifth change, you should be wary of this.
  • You Live outside the U.S. – This goes without saying. However, since the service works in the U.S., it may be complicated to try a home located outside the U.S.
  • Connecting with a mobile network or commercial Wi-Fi – This has triggered many users’ errors, and you should change to a different network.
  • You are using a proxy or VPN – If you use a VPN, you must use one strong enough to bypass Hulu surveillance; if not, you may get restricted and wouldn’t be able to change your home location.

Is Hulu live T.V. region-locked?

Hulu + Live T.V. transmits about the broadest range of local networks on any streaming service, including NBC, Fox News, ABC, CBS, and Telemundo.

Regional sports coverage is also available, including the local NBC sports stations. And you may view the local channels via the service T.V. guide.

How do you bypass this content that is not available in your location?

1. Use a paid VPN service

  1. Get a subscription plan for a premium VPN (We recommend ExpressVPN).
  2. Download, set up, and launch the VPN.
  3. Connect to a VPN server outside of your country.
  4. Start watching Hulu.

ExpressVPN is one of the best VPNs you can use to watch blocked content. With this VPN, you can get a new IP location almost anywhere in the world with just a few clicks.

You can choose one of the VPN servers in more than 90 countries so you can watch content from anywhere you want, on any platform you want.

ExpressVPN offers advanced user features like split tunneling, kill switch, and threat manager, as well as detailed guides for basic user features with easy changing of IP location, and unlimited bandwidth.

Importantly, you’ll not get the error – Hulu is not available in your region or you may be using a VPN.

What else you must know about Express:

  • Advanced leak protection
  • VPN split tunneling
  • No-logs policy
  • Network Lock kill switch
  • Best-in-class AES 256-bit encryption
  • Private DNS

ExpressVPN

Watch anything you want on Hulu, Netflix, HBO Go, and many others.
Check Price Visit Website

2. Change your VPN server

If you are using a VPN already, but a Hulu video is still unavailable in this location, this solution may help. First, log into your VPN and connect to a different server.

This is helpful because you may sometimes be connected to a restricted country server and have forgotten to change back to a U.S. server before accessing Hulu. Once you change the server, you should have unrestricted access.

3. Use Browser extensions

  1. Launch your browser (we use Chrome).
  2. Navigate to the Chrome Store.
  3. Type Hulu VPN in the search box and hit Enter.
  4. Select one of the options, we suggest Wachee, but there are several others you may try.
  5. Click the Add to Chrome button.
    Hulu video not available in this location
  6. Click Add extension to confirm.
  7. Now click on the extension icon, make sure the location is set to the United States, then click Connect.
  8. Now you can stream Hulu.

Note that you will have a streaming limit if you use the trial version. However, this option is an easy Hulu location trick.

4. Use proxy websites

Using a proxy is different from a VPN. While both aim at hiding your I.P. address, a proxy website will not encrypt your data. But browsing Hulu via one is sometimes successful.

However, we must note that while some users have tried to use a proxy to bypass location restrictions, most users have gotten the message: You appear to be using an anonymous proxy tool. Disable any anonymous proxies you may use, then try streaming Hulu again.

So this would not be your preferred alternative all the time.

How often can I change my Hulu home location?

You can now update your Home network or use Hulu’s streaming selection of T.V. episodes and movies.

However, in 12 months, you are allowed to switch the Home network a maximum of four times. However, you should contact Hulu support if you need further support, and they may be able to help you.

That is as far as we will discuss in this article. However, using these solutions helps you avoid a Hulu location error.

To summarize, you can use a reliable VPN like PIA to ensure your online privacy and digital security to unblock videos on Hulu and any other video-sharing platform. A VPN will also be helpful if the Hulu app is unavailable in your region or Hulu is not working on a smart TV.

A VPN is also practical for keeping you safe from cyber-criminals, especially if you frequently travel and must connect to public Wi-Fi hotspots that aren’t password-protected.

In the comment section, let’s know if you have succeeded in using a VPN on Hulu.

17 Easy Fixes for VPN Error 691 in Windows 10/11

Many use VPNs in order to protect their privacy online. VPN tools are a great thing to have these days, and Windows 10 also supports VPN natively, so you won’t need any third-party software.

Issues with VPN can still occur and users reported Connection failed with error 691 error message. This can be a problem if you want to use a VPN, but there are a few ways to solve it.

How to fix the VPN connection failed with error 691?

1. Install Private Internet Access

Private Internet Access logo


While the native Windows solution is fairly easy to use and covers basic VPN needs, if you rely extensively on VPN usage you might want to consider upgrading to premium software.

By coupling your PC with PIA you will definitely enjoy a myriad of features and never have to worry about failed connection errors. If anything, this well-rounded VPN will streamline your connection, eliminate server buffering and ISP throttling and enhance your download speeds.

Packed with unlimited bandwidth and more than 3292 servers strategically placed across the globe, PIA will let you choose the server closest to you, and route your traffic towards it via highly encrypted VPN tunnels.

2. Use Microsoft CHAP Version 2

VPN uses different protocols, and in order to fix Connection failed with error 691, you need to use Microsoft CHAP Version 2. To do that, follow these steps:

  1. Press the Windows key + X to open the WinX menu. Choose Network Connections from the menu.
    error 691 connections menu
  2. When the Network Connections window opens, locate your VPN connection, right-click it and choose Properties from the menu.
  3. Navigate to the Security tab.
  4. Select Allow these protocols and check Microsoft CHAP Version 2 (MS-CHAP v2).
  5. Click OK to save changes.

After enabling Microsoft CHAP Version 2, check if the problem still appears.

3. Uncheck the Include Windows logon domain option

Sometimes Connection failed with error 691 messages can appear if your VPN connection isn’t configured properly, but you can fix that problem by disabling the Include Windows logon domain option.

To do that, follow these steps:

  1. Open Network Connections. For detailed instructions on how to do that, check the previous solution.
  2. Locate your VPN connection, right-click it, and choose Properties from the menu.
  3. Navigate to the Options tab and uncheck the Include Windows logon domain option.
  4. Click OK to save changes.

4. Change the LANMAN parameters

    According to users, you can fix the VPN error 691 on your PC by simply changing the LANMAN parameters.

    This can be done via the Group Policy Editor, a built-in tool on your Windows device. It is easy and perfectly safe to use.

  1. 1. Press the Windows + R keys to open the Run dialog and type gpedit.msc in it.

    enter gpedit.msc and press enter
  2. 2. Click on OK to run the command.

  3. 3. The Local Group Policy Editor will now start. In the left pane, go to Computer Configuration > Windows Settings > Security Settings > Local Policies > Security Options.

  4. 4. In the right pane, locate and double-click on Network security: LAN Manager authentication level.

    open Network security: LAN Manager authentication level
  5. 5. Go to the Local Security Setting tab. Choose to Send LM & NTLM responses from the list. Click Apply and OK to save the changes.

    Choose to Send LM & NTLM responses
  6. 6. Now double-click on Network Security: Minimum Session Security for NTLM SSP.

    double click Network Security: Minimum Session Security for NTLM SSP
  7. 7. Be sure to disable Require 128-bit encryption option and enable the Require NTLMv2 session security option.

    disable Require 128-bit encryption option and enable Require NTLMv2 session security
  8. 8. Click Apply and OK to save the changes.

  9. 9. Restart your PC.

5. Check if your username and password are correct

Sometimes Connection failed with error 691 messages can appear if your username or password isn’t correct. To ensure that your password is correct, we advise you to check if you have the CAPS LOCK option turned on.

In addition, be sure to enter your email address as your username.

6. Update Network drivers

The next thing we’re going to try is updating your network drivers. Here’s how to do that:

  1. Go to Search, type devicemngr, and open the Device Manager.
  2. Expand Network adapters, and find your router.
  3. Right-click your router and go to Update driver. update driver device manager
  4. Follow further on-screen instructions and finish installing drivers.
  5. Restart your computer.

Update drivers automatically

If you don’t want the hassle of searching for drivers on your own, you can use a tool that will do this for you automatically. Of course, as you’re not able to connect to the internet at the moment, this tool won’t be useful.

However, once you get online, it will help you to keep all your drivers up to date, so you won’t be in this situation anymore.

An automatic driver updater tool will help you update drivers automatically and prevent PC damage caused by installing the wrong driver versions. 

After several tests, our team concluded that this is the best-automatized solution.

⇒ Get Outbyte Driver Updater

7. Check your connection’s security settings

Connection failed with error 691 messages that can appear if your security settings aren’t properly configured.

To fix this problem, you need to check your connection’s security settings by following these steps:

  1. Open the Network Connections window.
  2. Locate your connection, right-click it, and choose Properties from the menu.
  3. Navigate to the Security tab and make sure that the Typical (recommended settings) option is selected.
  4. In Validate my identity as follows section, make sure that Allow unsecured password is selected.
  5. Go to the Options tab and make sure that the Include Windows logon domain option isn’t checked. Click OK to save changes.

After making the necessary changes, check if the problem is resolved.

8. Leave the domain name blank for the outside connection

Users reported that their VPN works while using the internal network, however, Connection failed with error 691 appearing when trying to connect to VPN via an Internet connection.

This is a strange problem, but it seems that the solution is rather simple. According to users, they fixed the issue simply by leaving the domain name blank for the outside connection.

To fix the problem just enter your username and password and leave the domain name blank. Click the Connect button and everything should work without problems.

9. Use the rasphone command

If you have problems connecting to the VPN, you might be able to fix them by using rasphone command. You can run this command by following these steps:

  1. Press Windows key + X and choose Command Prompt (Admin) from the menu.
    command prompt as admin
  2. When Command Prompt starts, enter rasphone -d Name of your VPN connection.
  3. Press Enter to run the command.

10. Check if there are other active VPN connections

Connection failed with error 691 messages can appear if there are active connections. To fix this problem, be sure to check if there are any other VPN connections running.

If so, be sure to disable these connections and check if that solves the problem.

11. Check your domain name

A few users reported that this issue occurs because your domain name isn’t correct. According to users, the issue appears if your domain name uses the company.local format.

In order to fix the problem, you need to remove .local from the domain name. For example, if your domain name is Company.local switch it to Company and check if that fixes the issue.

12. Use a different Logon ID

Sometimes Connection failed with error 691 messages can appear if your Logon ID profile is damaged. If that’s the case, create a new Logon ID and try using it instead.

13. Change your username

A few users reported that Connection failed with error 691 message appearing due to their username. According to them, both username and password are correct, but the issue still appears. If you have the same problem, you might want to try adding the domain name to your username.

To do that, simply add @YourDomainName to your user name. For example, if your current username is Username, you need to change it to Username@YourDomainName. After doing that, try to connect to the VPN again.

14. Delete and add your VPN connection to fix error 691

If you’re getting a Connection failed with error 691 messages, you can fix it simply by deleting and creating your VPN connection again. This is quite simple in Windows 10, and you can do it by following these steps:

  1. Press the Windows key + I to open the Settings app.
  2. When the Settings app opens, go to the Network & Internet section. Now navigate to the VPN tab.
  3. In the VPN section, you should see all your available VPN connections. Select the connection you want to remove and click the Remove button.
  4. Now you need to add a new VPN connection. To do that, click Add a VPN connection button.
    add connection
  5. After doing that, enter the necessary information to set up your VPN connection.

After creating a new VPN connection, try to connect to it and check if the issue still persists.

15. Use PAP instead of LDAP

Users reported that you can’t use the MS-CHAP v2 protocol with an LDAP server setup. By doing so, you’ll cause Connection failed with error 691 messages to appear.

To avoid this problem, simply switch from the LDAP server setup to PAP and the problem will be fixed.

16. Add ports to WAN/virtual server port forwarding

This error can appear if you’re trying to use a VPN in your network. According to some users, you can fix Connection failed with error 691 error message by adding ports to the WAN/virtual server port forwarding.

If you’re not a network administrator, be sure to contact your network administrator and ask him to make the necessary changes.

17. Contact your ISP

Sometimes Connection failed with error 691 messages can be caused by problems with your ISP. A few users reported that the error was caused by their ISP, but after contacting the ISP the issue was resolved.


Connection failed with error 691 messages can prevent you from using your VPN, and if you have this problem, we encourage you to try some of our solutions.

Let us know how it worked for you in the comments section below.

5 Ways to Fix YouTube VR if It’s Not Working on Oculus Quest

Is YouTube VR not working on Oculus Quest? We have come up with helpful information and the most effective solutions for you.

Facebook’s virtual reality headset is a perfect and affordable choice for VR lovers. There are countless apps and games on VR. However, like any other device, these apps or VR have problems.

One of the most common issues with this VR you may face is with YouTube. You may find that this video streaming app is not working on this device.

We have shown solutions to fix Oculus Quest 2 charging problem in another article. This article will feature solutions that will help to solve YouTube VR-related issues.

Can I watch VR videos on Oculus Quest 2?

Yes. You can easily watch any virtual reality or 360 videos on Oculus Quest 2. There are apps like YouTube, Prime Videos, Netflix, etc. You will also find dedicated 360 video apps on this VR.

So, you won’t have to worry about watching VR videos on this device.

Why is YouTube VR not working on Oculus Quest?

If you cannot watch YouTube VR videos on this device, it may have several reasons. These are:

  • A known bug with this app
  • Problematic cache or process on VR
  • Oculus Quest software is outdated

But don’t worry. You can try several solutions to fix YouTube VR not working issue on Oculus Quest. You can find them in the next part of this post.

How do I get my YouTube VR to work with Oculus Quest?

1. Relaunch the YouTube VR app or watch from the browser

The first thing you can do is relaunch the YouTube VR on Oculus Quest. You can try this method if you can open the app but cannot watch videos. If the app doesn’t open, you can continue watching YouTube videos on the browser.

Another thing is you may not be able to watch 360 videos from a browser. In this case, you can skip and go through the following methods.

2. Restart the Quest

Restarting Oculus Quest is an excellent way to deal with any error. After running it for a while, some internal issues may appear. If you restart the device, it will clear the corrupted cache and restore other things.

As a result, if any of these things cause YouTube VR, not working problem, a simple restart will fix it quickly.

3. Re-install the YouTube app

3.1 Uninstall YouTube

  1. Go to Quick Settings.going quick settings oq
  2. Go to Settings.going settings oq
  3. Next, go to Storage.
  4. Click on the Delete/Uninstall button next to the YouTube VR from the list of apps.
  5. Click on Uninstall on the popup.

3.2 Install YouTube VR again

  1. Go to Store.going store oq
  2. Search for the YouTube VR.
  3. Click the app from the Search results.
  4. Click the Install button.

The above steps should fix YouTube not working on Oculus Quest and Oculus Quest 2, and you can try to watch YouTube VR videos again.

4. Update Oculus Quest

  1. Go to Oculus Quest Settings like before.
  2. Navigate to the Software Update.going software update
  3. If you find any available updates, click on the Update/Install button.

After updating, you will need to restart the device. Then see if it has fixed YouTube VR not working issue on Oculus or not.

5. Factory reset

  1. Turn off your Oculus Quest VR.
  2. Press the Power and Volume down buttons together and hold until you see a menu.
  3. Go to Factory reset and complete the process.boot device oculus factory reset

There are other ways to do a factory reset. But, this one is the easiest method. Of course, after resetting, you may need to set up the VR headset again. Nevertheless, using the YouTube VR app on Meta’s virtual reality headset may also fix your problem.

What VR video apps work on oculus quest?

Oculus Quest has amazing VR video apps. You can find almost all popular video streaming apps on this platform. These are the most mentionable ones:

  1. YouTube VR
  2. Netflix
  3. ShowTime
  4. Prime Video VR
  5. ESPN
  6. BigScreen
  7. Skybox VR
  8. Vudu
  9. National Geographic

You can find even more in its app store. Indeed, there are enough apps to give you an excellent VR video experience.

Oculus Quest 2 YouTube VR low quality

Low-quality video playback on YouTube VR is a widespread problem on platforms like Oculus Quest. In many cases, it is related to the internet bandwidth you have. Else, it may be because you have manually selected low resolution.

We suggest you have a decent internet connection and manually select the best resolution. You also should ensure that the VR headset software and the YouTube VR app are up-to-date.

Ensuring these things will help eliminate low-quality video issues on YouTube VR on Oculus Quest 2.

If interested, you can learn how to fix Oculus not working on Windows 11.

This article has mentioned the steps and methods to fix Oculus Quest YouTube VR not working problem. Let us know in the comment box if you know any other better ways to troubleshoot this problem.

How to Turn Any Book Into an Audiobook

An audiobook is an audio narrative version of a book that you can play on your desktop, mobile, or tablet. You can listen to the books on your mobile much the same as any other audio file whilst jogging in the park, washing dishes, etc

These aren’t really something new, but the audiobook industry has expanded considerably since the rise of ebooks. There are now myriad audiobooks retailing on Amazon.

However, you can also convert your e-book collection into audiobooks with text-to-speech software, and we will show you exactly how to do it yourself.

How can I turn my book into an audiobook?

  1. 1. Download the Balabolka tool from the official website. The downloaded file will be in .zip format.

  2. 2. Open the ZIP in File Explorer, and press the Extract all button to decompress it.

  3. 3. Launch the setup wizard from the extracted folder.

  4. 4. When you’ve installed Balabolka, open the software’s window.

    open balabolka app
  5. 5. Click File > Open and then select to open the e-book file you need to convert into an audiobook.

  6. 6. Press on the SAPI 5 tab and select Microsoft Hazel Desktop from the drop-down menu.

  7. 7. You can test the converted book now. Press the Read Aloud button on the toolbar to play the book.

  8. 8. Further configure the audio narrative by adjusting the Rate, Pitch and Volume bars.

  9. 9. To configure the audio file output, click Options > Audio Files to open the window directly below. There you can adjust the bitrate settings for various audio formats.

    adjust audiobook settings
  10. 10. Click File > Save Audio File to convert the e-book to an audiobook.

  11. 11. Select the MP3 format for the audiobook from the Save as type drop-down menu.

  12. 12. Choose a folder to save the audiobook to and press Save.

  13. 13. Now you can play your new audiobook in a media player.

  14. There are freeware TTS programs that turn eBooks into audiobooks. Our recommendation is Balabolka, a freeware text-to-speech tool that supports numerous e-book formats, which include EPUB, AZW, AZW3, HTML and LIT.

Create Your Own Audiobooks With Audacity

create audiobooks with audacity

Balabolka is fine if you only need to convert ebooks to audiobooks for your own playback. However, authors will need recording software to set up an audiobook for distribution on Amazon or Audible.

You can submit your own audiobooks (that you hold rights to) for distribution on Amazon or Audible to the Audiobook Creation Exchange (ACX). ACX only accepts audiobooks with recorded narratives.

What is Audacity?

Audacity is among the best audio-recording software for Windows that has plenty of post-production options to edit recorded output with. So you can record a narrative for your audiobook from the original text manuscript with that software and a PC microphone.

Some laptops have built-in microphones that you can record with. Click on Audacity 2.1.3 installer on the website page to add the software to Windows.

Then you can record your narrative for the audiobook with Audacity’s recording tools and microphone. Record each of the chapters separately and save them as MP3s.

Each file should be no larger than 170 MB. The official web page provides further ACX audio submission details.

When you’ve recorded the book, click Sign Up Now on the ACX website to set up an account. However, note that ACX is only open to audiobook submissions from Americans.

If the audiobook meets the required specifications, you can accept a distribution agreement and upload each chapter.

So that’s how you can transform e-books into audiobooks with text-to-speech and recording programs. Now you can playback the e-books with media players or audiobook player software. Alternatively, you can submit your own recorded audiobook to ACX.

Let us know in the comments section below if you managed to turn your favorite books into audiobooks and whether you have any questions regarding the process.

Windows 11 Thinks I Have 2 Monitors: 5 Quick Ways to Fix It

Having more than one monitor is helpful for productivity and makes multitasking seamless and easy. However, users report that their Windows 11 thinks they have two or more monitors connected to their PC. Follow the steps below to remove a false monitor easily.

If you need to multitask while using a PC, then a second monitor is a must. But if you’re PC thinks you have more than one display connected, it can create frustrating issues.

Keep reading to find the solution to this issue quickly. If you’re having an issue with Windows 11 not detecting a second monitor, we offer solutions for that as well.

Why does my PC say I have two monitors?

If your PC indicates that you have another monitor, it could be due to communication issues between your PC and the Windows update servers. If your mouse goes off the screen as if there was a second monitor, it might be because of updated or corrupted graphics card drivers.

Be sure to remove any display cable from your PC if you have previously connected another monitor. If you’re experiencing your mouse getting stuck when using multiple monitors, we have a guide on that.

How do I get rid of the second screen in Windows 11?

1. Adjust display settings

  1. Click on Start and open Settings (or press Windows + I).
  2. Under System, select Display. Open display settings.
  3. Click on Extend these displays to open the dropdown menu.
  4. Select Show only on 1. Show only on 1 display if windows 11 thinks you have 2 monitors.

Switching your display settings from extending the display or duplicate display to show only on your computer, then it may fix the issue.

2. Disable monitors

  1. Click on Start and search Control Panel, then hit Enter. open control panel.
  2. Select Hardware and Sound then click on Device Manager. open device manager.
  3. Expand Monitors and check if there are any Generic PnP Monitors.
  4. If there are, right-click on the Generic PnP Monitor and select Disable device. Disable monitor if windows 11 thinks you have 2.
  5. Restart your PC.

If your computer is detecting a false monitor, it would be displayed as a Generic PnP Monitor in the device manager. Make sure you disable it and not uninstall it. If you uninstall it, then your PC will automatically reinstall it upon restart.

3. Update the graphics driver

  1. Click on Start and search Control Panel, then hit Enter.
  2. Select Hardware and Sound then click on Device Manager. open device manager.
  3. Expand Display adapters.
  4. Right-click on your graphics card then select Update driver. update driver if windows 11 thinks you have 2 monitors.
  5. Click Search automatically for drivers. search automatically for drivers.

If your graphics card driver is out of date, then it will result in an issue with your screen. Thus Windows 11 may think you have two monitors. If updating the driver doesn’t work then try re-installing it as shown in the next step.

4. Reinstall graphics driver

  1. Click on Start and search Control Panel, then hit Enter.
  2. Select Hardware and Sound then click on Device Manager. open device manager.
  3. Expand Display adapters.
  4. Right-click on your graphics card then select Uninstall device. uninstall driver if windows 11 thinks you have 2 monitors.
  5. Restart your PC to automatically reinstall the driver. restart windows 11.

Reinstalling the driver will get rid of any corruption in the driver. After you uninstall a driver, restarting your PC will reinstall the driver by default. If it doesn’t, you can download the driver from the graphics card manufacturer’s website.

5. Roll back the driver

  1. Click on Start and search Control Panel, then hit Enter.
  2. Select Hardware and Sound then click on Device Manager. open device manager.
  3. Expand Display adapters.
  4. Right-click on the graphics card and select Properties. select properties.
  5. Click on the Driver tab, then select Roll Back Driver if available. roll back driver if windows 11 thinks i have 2 monitors.
  6. Click OK.

The Roll Back Driver button should be available if your PC detects any problems or failures with it. If the button is greyed out, try updating the driver first as detailed in the above solution. Rolling back the driver will revert to an older version, but keep in mind that this will cancel any future automatic updates.

How do I reset multiple display settings?

  1. Right-click on Start and select Run.
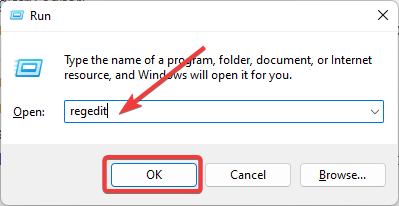
  2. Type regedit then click OK. open regedit.
  3. Copy and paste the following file path into the navigation bar then press Enter: Computer\HKEY_LOCAL_MACHINE\SYSTEM\CurrentControlSet\Control\GraphicsDrivers
  4. Locate the Configuration key and right-click on it then select Delete. delete config key if windows 11 thinks i have 2 monitors.
  5. Repeat for the Connectivity key and ScaleFactors key. repeat step 4.
  6. Restart your PC.

Deleting the Configuration, Connectivity, and ScaleFactors key will remove any multiple display settings. Upon restarting your PC, the keys will be created again and thus clearing any configuration for multiple displays.

on a second monitor in Windows 10 effortlessly.

If your app is opening on the wrong monitor in Windows 11, you need to edit the display settings; read this guide to know more.

We hope the solutions in this article helped you fix the issue of Windows 11 thinking you have two monitors. Let us know in the comments below which solution worked for you.

8 Simple Methods to Fix Acer Swift 7 Touchpad Not Working

Many people have reported that their Acer 7 Swift touchpad is not working, and many of us have experienced how aggravating it is to be unable to use the touchpad.

Acer Swift 7 is one of the finest laptops with an on-clicky touchpad. However, for some reasons, such as liquid spilling on your trackpad, it may not work. Also, there are software issues as well, causing the problem for many users.

So, let’s find out why Acer Swift 7 touchpad is not working and the solutions that fixed things for most users.

What causes Acer Swift 7 touchpad not to work?

Your touchpad may malfunction due to hardware defects or an outdated driver. In this case, you need to run a full scan on your driver.

Also, there may be some stuff, such as dust or even liquid, stuck in your trackpad. Additionally, your touchpad may not work because of some system misconfiguration.

In case you encounter left or right-click touchpad issues in Windows 10 and 11, these, too, are easy to fix.

What can I do if Acer Swift 7 touchpad is not working?

1. Update the touchpad driver

  1. Press Windows + S to open the Search menu, type Device Manager in the text field, and click on the relevant search result.
  2. Now, expand Mice and other pointing devices.Mice and other pointing devices
  3. Right-click on your touchpad device and select Update driver.Updating driver
  4. Now, you have two options ahead: Search automatically for updated driver software and Browse my computer for driver software. Updating driver
  5. If you have already downloaded your drivers manually from official websites, opt for the second choice and manually locate and install them. If not, choose the first option and let Windows automatically detect the trackpad drivers.

We recommend installing Outbyte Driver Updater if you’re not tech-savvy. This tool is an astonishing lightweight software to scan your system for reinstalling or updating missing drivers.

After you install Outbyte Driver Updater, it will automatically detect and download the most recent Acer touchpad driver and maybe fix the Acer touchpad not working problem.

Outbyte Driver Updater

A specialized program that helps you update your drivers automatically and increase your PC’s condition.
Free Trial Download now

2. Reinstall the touchpad driver

  1. Press the Windows + R to open Run, type devmgmt.msc in the dialogue box, and hit Enter.Type in Run
  2. In the Device Manager window, double-click on the Mice and other pointing devices category.Mice and other pointing devices
  3. Then, right-click on your driver and choose Uninstall device.Reinstalling Acer Touchpad
  4. Click Uninstall in the confirmation prompt that pops up.uninstall to fix Acer Swift 7 touchpad not working
  5. Restart your system.
  6. Your computer will automatically reinstall the driver after it boots up. If this does not happen, return to the device manager and click the Scan for hardware changes icon.Scan for hardware changes

You can also use Outbyte Driver Updater to reinstall the most recent version of the Acer touchpad driver after uninstalling it.

3. Change touchpad settings in BIOS

  1. First, restart the OS, and when your system boots up, repeatedly press the BIOS key. It can be F10, F2, F12, F1, or DEL, depending on the system manufacturer.
  2. Then, use arrow keys to navigate the Main tab.BIOS Main tab
  3. Now, look for the Touchpad option and press Enter.Touchpad menu in BIOS
  4. Following that, choose the Basic option and then saves your changes.Acer touchpad Basic option in BIOS
  5. Reboot your system.

Configuring the touchpad via BIOS is one of the best ways to fix the Acer Swift 7’s not working touchpad.

4. Enable your touchpad

  1. Press Windows + I to open Settings, select Bluetooth & Devices from the left, and then click on the Mouse option in the right pane.mouse to fix acer swift 7 touchpad not working
  2. Now, click on Additional mouse settings.additional mouse settings
  3. After that, from the Mouse Properties menu, switch to the last tab (This tab is named after the touchpad, which in this case is ELAN).Acer Elan touchpad properties
  4. Uncheck the Disable when external USB pointing device plug in option to enable the touchpad.Disable when external USB pointing device plug in
  5. Finally, click on Apply and then OK to save changes, and restart your system.

The problem could be caused by the touchpad being disabled unintentionally. If that’s the case, enable it and verify if the Acer Swift 7 touchpad starts working.

5. Install a PC repair tool

The failure of your Acer touchpad could be caused by a problem with your computer’s operating system. To resolve this, you must either reinstall the Windows operating system or use a dedicated repair tool.

After the installation of a system repair tool, the app scans your computer for any problematic system files and replaces them to resolve the issues. Other features that these tools may include are the removal of malware threats, the detection of harmful websites, and the freeing up of disk space.

6. Disconnect Bluetooth devices

Sometimes, Bluetooth devices connected to your system interfere with other devices. In this case, you need to unpair every non-critical device and peripherals, such as the controllers, speakers, and printers, among others.

Removing Bluetooth devices

Also, disconnect the USB devices, which may create conflicts. A simple trick would be to remove them all at once and then connect them one at a time until the problem reappears. This way, you would be able to identify the device behind Acer Swift 7 touchpad not working.

7. Update your OS

  1. Press Windows + X to open the Power User menu, and select Settings.settings to fix acer swift 7 touchpad not working
  2. Now, choose Windows Update from the left pane, then click on Check for updates.Checking for updates
  3. Install the available updates, and then restart the computer for the changes to come into effect.

8. Remove dust or dirt

Last but not least, cleaning the touchpad can help you resolve the issue. Are you one of those people who eats lunch at their desk? Have you ever spilled something on the touchpads, water, coffee, or any other item?

Cleaning away grime or dust will help your touchpad regain its functionality. Isopropyl can be used to eliminate dirt specks, which can then be wiped away with a soft cloth.

9. Re-enable touchpad using keyboard

Simply press Fn + F6 or F7 keys together. The use of the Fn key here depends on whether the function key is locked or unlocked.

The keyboard shortcut is used to enable/disable the touchpad. And if nothing else has worked, you may as well give it a try.

If the Acer Swift 7 touchpad is still not working, the issue may be due to hardware failure, and we recommend taking the laptop to a reliable repair shop.

Also, find out the best settings for improved performance in Windows.

In the comments section below, let us know the method that fixed the Acer Swift 7’s malfunctioning touchpad.

How to Access Firefox Task Manager

Mozilla Firefox has been around for some time now and has eventually made its way into being one of the most popular web browsers on the market today.

This is mostly due to the fact that it is extremely modern, resource-efficient has extensive add-on support, and the fact that it is frequently updated by its developers.

Speaking of which, one update that Mozilla Firefox received included a new feature called the Process Manager.

The guide below will show you in a step-by-step manner what you need to do in order to access the Process Manager. More so, we will be providing you with some information about what does it.

What is Firefox Process Manager?

Firefox has a built-in process manager that lets users view overall memory and CPU usage by this web browser.

The usage details are available for any open and active tabs, extensions & add-ons, and some other services running on this browser.

Is the Firefox Process Manager reliable?

Yes. Firefox’s process manager is very much reliable. Even though you can view CPU, Memory, and Network usage details for any browser in Windows Task Manager or Mac’s Activity Monitor, these will not show you as many details as the built-in process manager of this browser.

In that sense, we can say that this process manager is reliable.

Quick Tip:

Opera One’s process manager or task manager is as reliable as Firefox’s. The difference is that Opera One uses the Chromium engine and has some additional controls.

Opera One reduces resources allocation due to it’s many built-in features, such as VPN, Ad Blocker, AI, social media and messaging apps.

Opera One

You can view what processes are active by using Opera’s internal task manager.
Free Download Visit website

How do I access Firefox Task Manager?

1. From the menu

  1. 1. Launch the Mozilla Firefox browser on your PC.

  2. 2. Click on the three vertical dots in the top right corner.

    going more tools firefox menu
  3. 3. Select More Tools from the options.

  4. 4. Click on Task Manager.

    opening task manager firefox via menu
  5. 5. You can now use Firefox Task Manager to check which processes are running, as well as how much memory and CPU they use.

    example for firefox task manager processes
  6. If you’re not sure what is affecting your computer’s performance, you can check the Firefox task manager. It can be easily accessed via Firefox’s built-in menu.

    This method applies to the latest versions of Firefox. Older versions may have a slightly different option for accessing it, but it should be pretty similar.

2. Using the address bar

  1. Type the following address in Firefox’s address bar and press Enter: about:performance
  2. It will open the Task Manager.firefox task manager

This is the best shortcut way to open Firefox Task Manager.

Mozilla’s Process Manager vs. Task Manager

Firefox has another similar tool that can also show you CPU and memory usage details. That is Process Manager. It doesn’t only show the CPU and Memory usage for active tabs and extensions but also the GPU usage details.

Keep note that Mozilla Firefox Task Manager focuses on memory and energy usage of opened tabs and active add-ons.

However, Task Manager has even more differences if you compare it with the Process Manager. It shows only a few details.

The process manager shows resource usage details for any services the browser is using. That makes it a more appealing option.

If you want to open this tool, you will need to follow these steps:

  1. Type the following address in the address bar and press Enter: about:processesfirefox process manager
  2. It will open the Firefox Process Manager, where you can view CPU, GPU, and Memory usage details.

Available with Mozilla Firefox version 78 and later, this feature is a welcome addition to a browser that is already at the top of the best browser list of many Windows 10/11 users.

Alternative browsers with similar tools to Firefox’s Task Manager

Another amazing web browser that has a similar feature is Opera GX, and this one is recommended to common users, not just devs.

This is all because Opera GX advertises itself as the world’s first web browser for gamers and thus comes with gam-boosting tools like a memory and RAM limiter via the GX Control Panel.

This way, you can enjoy running other programs in the foreground without having to worry that your browser is eating up all of your RAM, regardless of how many tabs are open.

More so, GX Control lets you monitor in great detail which process is taking up the most memory and which are the ones that take up most of the bandwidth.

Do you find Mozilla Firefox‘s Process Manager useful? Let us know what you think about this feature by leaving us a message in the comments section below.

How to Disable Reserved Storage in Windows 10

Microsoft released many new Windows 10 builds in January that provide a further glimpse of what spring’s 19H1 update has in store for the platform.

Reserved storage (otherwise Storage Reserve) is one of the new things that preview build showcases to Windows Insider users.

The reserved storage holds back a certain amount of hard drive storage to ensure there’s enough HDD space for Windows 10 updates.

What is reserved storage used for?

Windows 10 requires some space to be able to operate correctly. Though it can do a lot with a small amount, being close to your storage limit is likely to restrict performance and result in failed updates that could contain critical fixes.

Reserved storage is a new feature introduced to Windows to combat that method. The new reserved storage consists of reallocated temporary files.

Those temporary OS files will then be erased when Windows 10 needs the storage space for its updates. The current default value for reserved storage is about seven gigabytes.

How do I disable reserved storage in Windows 10?

  1. 1. Press the  Windows + R hotkey on your keyboard to open the Run dialog.

    run-empty open group policy management console windows 11
  2. 2. Enter regedit in Run, and then press the OK button.

    hkey local machine registry editor
  3. 3. Navigate to the following:HKEY_LOCAL_MACHINE\SOFTWARE\Microsoft\Windows\CurrentVersion\ReserveManager

    reserve manager in registry editor
  4. 4. Double-click the ShippedWithReserves DWORD to open its Edit DWORD window.

  5. 5. Adjust the value in the Value data box to 0.

    edit dword to turn off reserved storage
  6. 6. Click OK to close the Edit DWORD window.

  7. 7. Finally, close the Registry Editor window.

  8. Reserved storage can be easily disabled using the built-in Registry Editor. In just a few clicks, you can perform the Registry tweak and get rid of the unwanted feature.

    Note, however, that Windows Insiders need to enable reserved storage by adjusting the ShippedWithReserves DWORD value to 1.

    Thus, Windows Insider users don’t need to turn off reserved storage unless they’ve already enabled it.

How can I manage reserved storage in Windows 10?

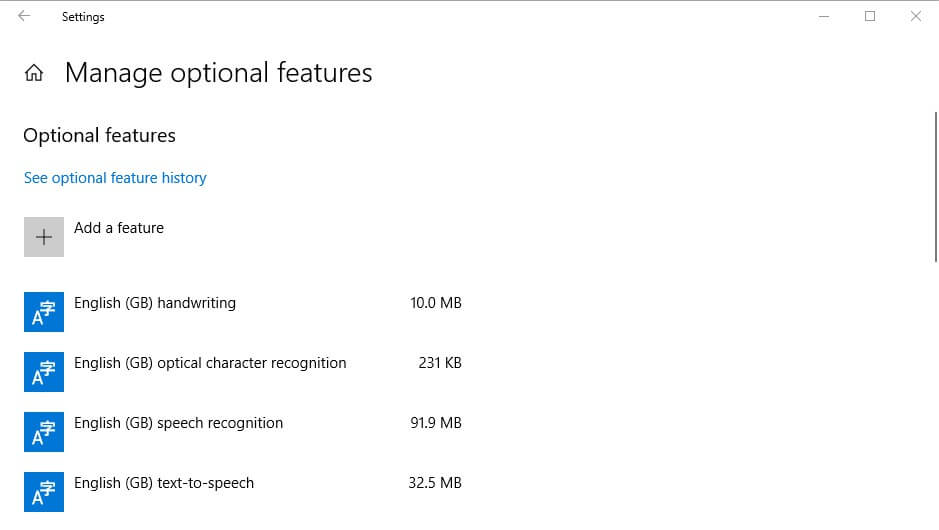
manage optional features in windows 10 menu

The amount of reserved storage primarily depends on pre-installed optional features. As such, users can configure the amount of reserved storage by removing optional features.

To do that, enter the keyword optional in Cortana’s search box. Then users can click on Manage optional features to open the menu from which they can manually uninstall optional features one by one.

It is more useful to manage your reserved storage space than entirely disabling it. You can organize it by removing the installed optional features that are no longer needed.

Nevertheless, reserved storage will be enabled by default in Windows 10 version 1903.

Let us know in the comments section below if you found this article useful and managed to disable reserved storage from your Windows 10 PC.

3 Ways to Fix PuTTY Software Caused Connection Abort Error

PuTTY is a cross-platform program that uses SSH (Secure Shell) protocols to provide secure communication between networks, systems, and applications over an unsecured network. But many reported the Software caused connection abort error in PuTTY.

There can be several reasons why you may receive this specific error message, but one of the most common is a shaky Internet connection. If your Internet connection isn’t as stable as it could be, it will cause intermittent interruptions in your session that could result in this error message.

Another reason you might get this error message is if you leave your session open for an extended period. PuTTY can be configured to abort the connection when it has been left open for a specified time. 

PuTTY is a utility that can be used to transport data in order to send and receive files swiftly and securely. The program also allows for serial port connections, which support Telnet, rlogin, SCP, SFTP, and other protocols.

PuTTY has several advantages, especially while working remotely. It’s simpler to set up and more reliable than VNC or other protocols built into the operating system.

It is also more persistent in comparison to others, as a remote connection can be resumed as soon as the connection is restored after an interruption. It is a completely free and open-source software package and has an easy-to-use graphical user interface.

Now that you have a basic understanding of the tool, let’s find out how to fix the Software caused connection abort error in PuTTY.

How can I resolve the Network error: Software caused connection abort in PuTTY?

1. Check your Internet connection

  1. Press Windows + R to open Run, enter cmd in the text field, and click OK.cmd to fix Software caused connection abort in Putty
  2. Paste the following command while replacing the IP address with yours, and then hit Enter: ping IP address -tRun ping command
  3. If you see more than one message like Request timed out, press Ctrl+C to stop the operation, and note the Lost rate in the ping statistics.Note Lost Packages

The lost packets will tell you the Internet’s condition, packet loss, and connection drop rate. The simple way to combat an unreliable Internet connection is to restart PuTTY and re-establish the connection.

If you still encounter the Software caused connection abort error in PuTTY, try the following method.

2. Configure PuTTY to enable TCP keepalives

  1. Open the PuTTY software, and then select Connection from the navigation pane on the left.configure PuTTY connection
  2. Mark the checkbox for Enable TCP keepalives (SO_KEEPALIVE option) under Low-level TCP connection options.enable TCP keepalives
  3. Next, set the value of Seconds between keepalives(0 to turn off) to somewhere between 5 to 30 seconds.Set Keepalives value
  4. Click Open and check if the idle connection remains open for the set duration.

Your network routers and/or firewalls usually keep track of all the connections. However, they may assume that a connection is dead if no data is transferred in either direction after a certain time.

This happens because the firewall software has a timeout, closes the connection after that timer runs out, and leads to the Software caused connection abort error in PuTTY.

You can solve this issue by configuring PuTTY to send null packets and TCP keepalives every few seconds. It will make sure that the session does not abort even if the connection is not transmitting data.

It is recommended to keep the keepalive value comparatively low. The keepalives are not always helpful and can make things worse. Because it will increase the probability of PuTTY attempting to send data during a break in connectivity.

3. Switch to static IP

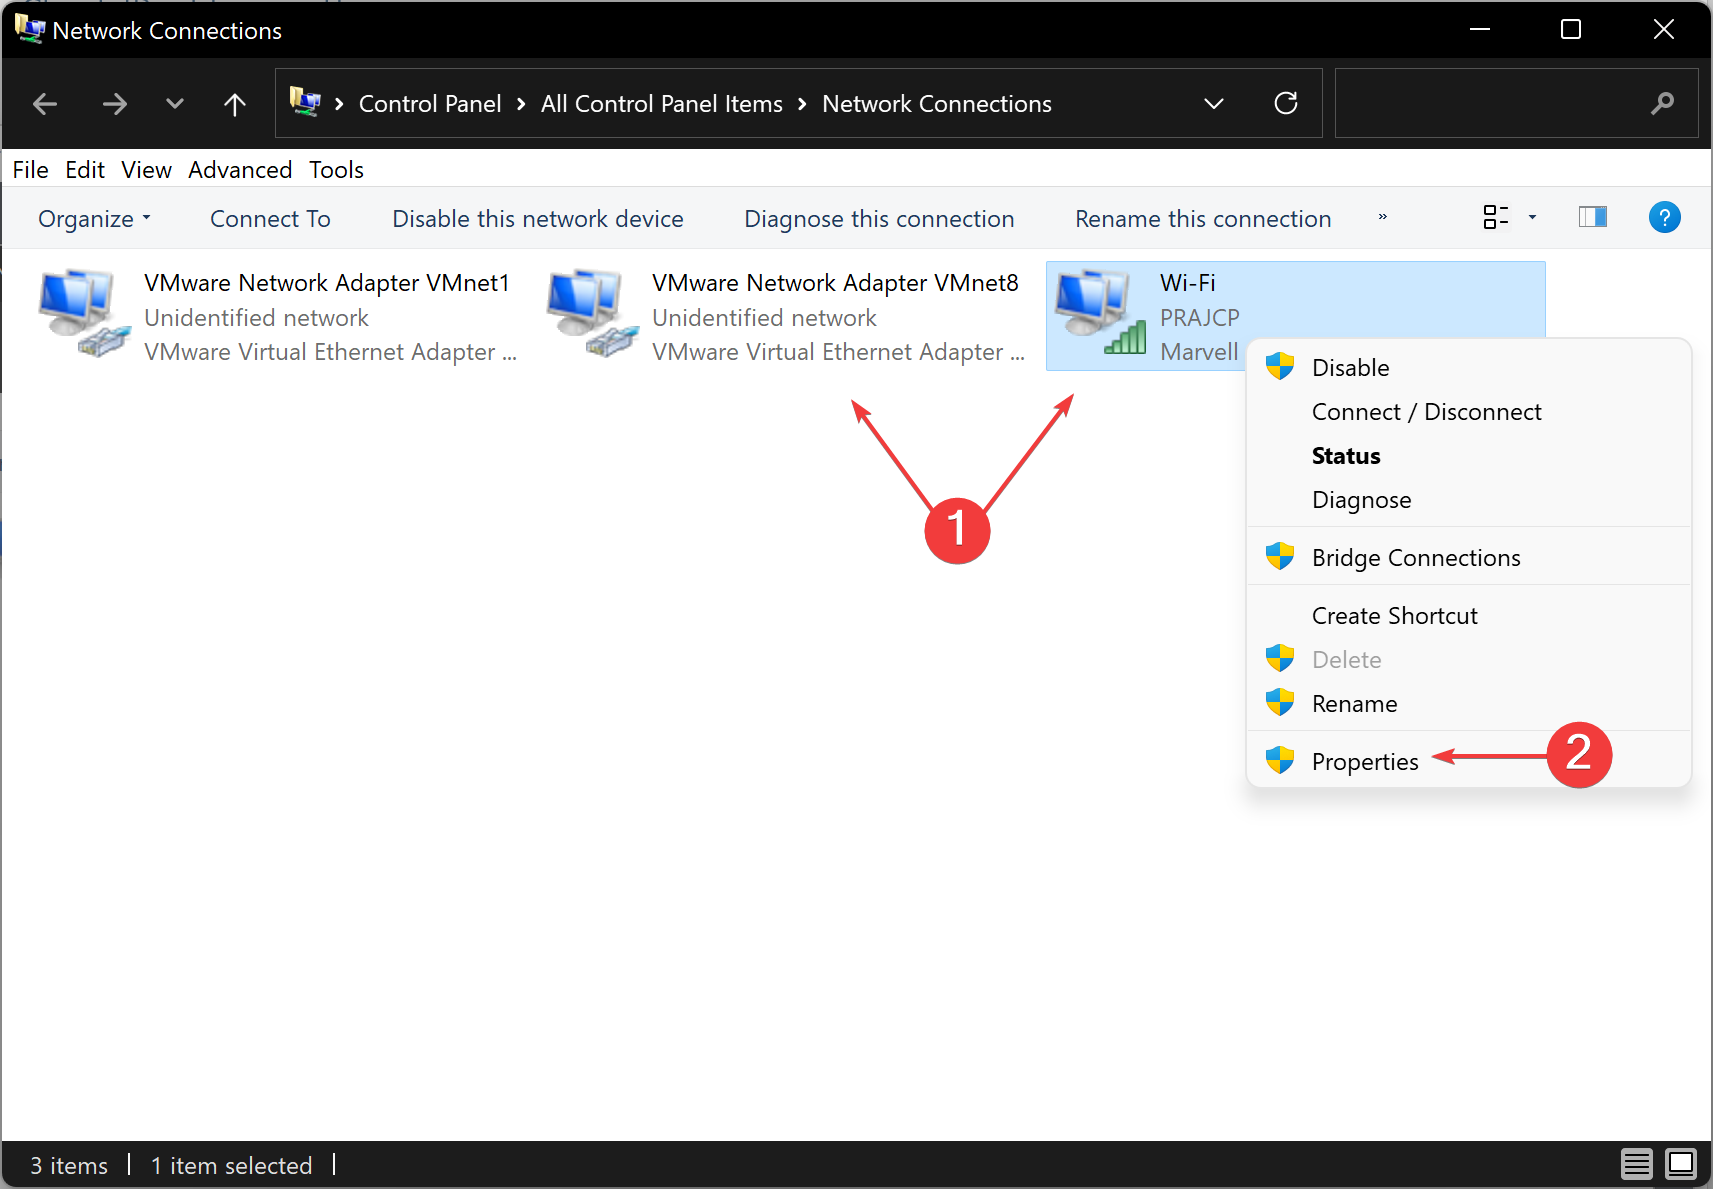
  1. Press Windows + R to open Run, enter ncpa.cpl in the text field, and click OK.ncpa.cpl to fix Software caused connection abort in Putty
  2. Right-click on the active network, and select Properties.properties
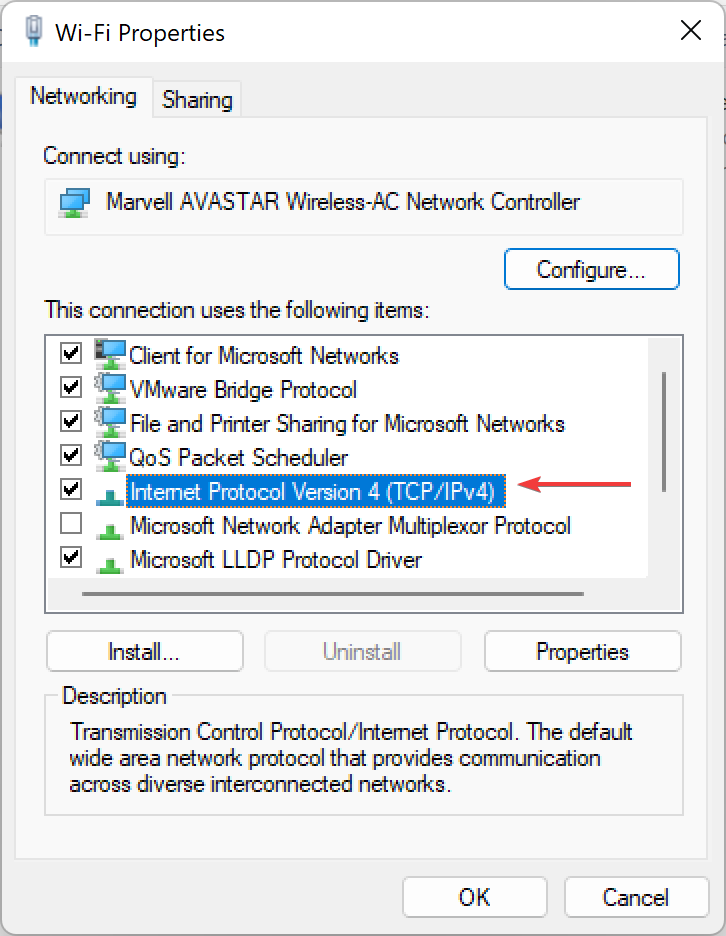
  3. Next, select Internet Protocol Version 4 (TCP/IPv4), and click on Properties.IPv4 properties to fix Software caused connection abort in Putty
  4. Select the Use the follow DNS server addresses, enter the following values in the provided field, and click on OK.
    • Preferred DNS server: 8.8.8.8
    • Alternate DNS server: 8.8.4.4manually enter DNS server to fix Software caused connection abort in Putty

Once done, flush the DNS cache, and things should now be up and running.

That’s it! You would have the Software caused connection abort error fixed in PuTTY by now and the utility up and running like before.

Also, find out how to fix the Connection timed out Network error in PuTTY, another common issue reported by many.

Which one of these solutions works for you? Share your experience in the comments section below.

VGA Extender Not Working? 3 Quick Ways to Fix it

There is nothing more annoying than trying to go about your day and something malfunctions just as you were getting ready to use it.

Although most devices we have today actually connect with monitors and TVs via HDMI, there are still some older gadgets that still use a VGA connection.

Luckily, there are adapters and extenders that can make your life easier. But what happens when these extenders don’t want to work properly?

Well, we are about to show you what you can do in such a situation. Before we do so, make sure to check out the article on how to fix your VGA light if it’s not turning on.

How can I transmit the VGA signal to another place?

Well, the best way is to utilize a VGA extender, which includes a signal transmitter and receiver and is optimal for this job.

When using it, the transmitter that is linked to the main engine will convert the VGA signal into the TCP/IP standard and transmit it over the Internet.

And, as you might have expected, the receiver connected to the screen will convert the standard TCP/IP signal into the VGA signal.

Now that this is out of the way, let’s see exactly what you can do when this process fails to work as it really should. Don’t worry, this won’t take long.

How can I fix my VGA extender if it’s not working?

1. Check/replace the cables

Even though we explained that the signal goes through the internet and comes back to you, there are a lot of cables involved when dealing with a VGA extender.

That being said, cables are not indestructible and can sometimes be the cause of why everything is falling apart instead of functioning properly.

Inspect the cables you are using and check for any frays or other visible damage. If you find any, you will have to replace the cable. Also, be careful with uninsulated cables, as they represent a major health hazard.

2. Check/replace the VGA extender

These devices don’t just run on air, and they require electricity to actually turn on and function as they were intended to.

That being said, as with any other devices we use, they can sometimes break or simply come defective from the factory, which is why it’s important to check.

Plug it in and check for any lights or other indicators that the device is still running properly. If you aren’t getting any signs of life, it is time to buy another VGA extender.

3. Check IP address settings

  1. Hold Windows + R keys to open the Run search box.
  2. Open the Start menu, type ncpa.cpl and then press Enter.112
  3. In the new pop-up window, right-click on Wireless Network Connection if you are using Wi-Fi or Local Network Connection if you are using cable Internet, then tap Properties at the bottom.123
  4. Double-click on Internet Protocol Version 4 (TCP/IPv4).rqwrqw
  5. In the new window, check if both Obtain DNS server address automatically and Obtain an IP address automatically are selected. If not, make sure they are. After that, click OK.12345

Does cable length influence quality?

Yes, it certainly does. Since you want to use a VGA extender, we’re going to guess that the receiving end is not that close to the source.

Although you can transmit over long distances, we strongly recommend that you limit the cable length used, for better quality.

Yes, specifications for some extenders go to hundreds of meters, but for the optimal experience, 200-300 meters is way too long.

Also, when using VGA extenders, make sure the cables being used in the process are not obstructed, or that there aren’t any heavy items on them. This can also prevent it from working.

Has this article been useful to you? Make sure your share your experience in the comments section below.

VGA Light Not On: Causes & How to Fix it

Out of all of the things that can malfunction when it comes to PCs, this has to be amongst the worst scenarios, as it involves a lot of hardware troubleshooting as well.

Even a software troubleshooting process can sometimes prove overwhelming for some, and most of us lack the skill or time to fiddle with our device’s innards.

Yes, we’re talking about the VGA light on your motherboard, which some users reported not going on anymore, so we decided to come and lend a helping hand.

We can also help if your laptop’s VGA signal when it’s not working. Even more, you can find information on how to download and install FTDI drivers on Windows 10 & 11.

Does my motherboard have a VGA light?

Yes, it does. In fact, VGA lights on motherboards are present there to indicate malfunctioning hardware, if there is any. 

The GPU (Graphics Processing Unit) is known to be susceptible to malfunctioning, so if that is the case, the light will turn on and remain on until the error is fixed.

Now, depending on the manufacturing year, motherboards may have multiple LEDs on the board for specific CPU components to detect the issue quickly. 

You should also know that older models mostly have one light on their motherboards, and whenever the light is turned on, it is required to inspect the PC components to detect what is wrong.

Newer PC/laptop models come with several LEDs on the motherboard connected with different parts of the computer, such as the CPU, RAM, GPU, and Boot.

However, before we get to these fixes, make sure that the motherboard and the GPU are compatible, as there are situations when they simply aren’t.

How do I fix the motherboard VGA light not turning on?

1. Check/replace the power supply

As we all know, the power supply unit is the main component of the CPU that helps provide power to the parts for them to work.

Please keep in mind that low-wattage PSU (Power Supply Unit) for your system can stop some parts from functioning, in this case, the graphics card.

Be absolutely sure that is properly plugged in and that the voltage is set to the correct level because if it is not, you will most likely need to replace the power supply.

Various online Power Supply Calculators show the requirement of your system’s supply, so you might want to check that out as well.

2. Boot PC without hardware

Now another proven method for solving this annoying situation would be for you to remove all peripheral hardware connected to your PC.

Why? Because removing all unnecessary hardware and booting up your PC will help you narrow down where the problem arises, so eject any USB devices, hard drives, and PCIe cards. 

Just power on your PC only using the CPU, CPU fan, and RAM and, if the device turns on normally, reconnect the devices one at a time to determine which parts are causing the issue.

3. Inspect GPU or PCIe Slots for stains or damage

Another intricate and annoying part of this troubleshooting process is actually taking the PC apart and inspecting all these small details.

Don’t worry, fixing the VGA lights on the motherboard is not a daunting task, however, there are many possible reasons for this issue, therefore many solutions.

Know that damages on either the PCIe slots or the GPU can stop the motherboard from detecting the graphics card, or prevent the VGA light from going on.

You might not know it, but your PC’s GPU has a PCIe Express x16 connector that might get damaged, so you might want to have a look.

Also, dust can settle on the slot and can obstruct data flow between GPU and motherboard, so we recommend you clean this area thoroughly and carefully, maybe with some compressed air.

4. Reset BIOS

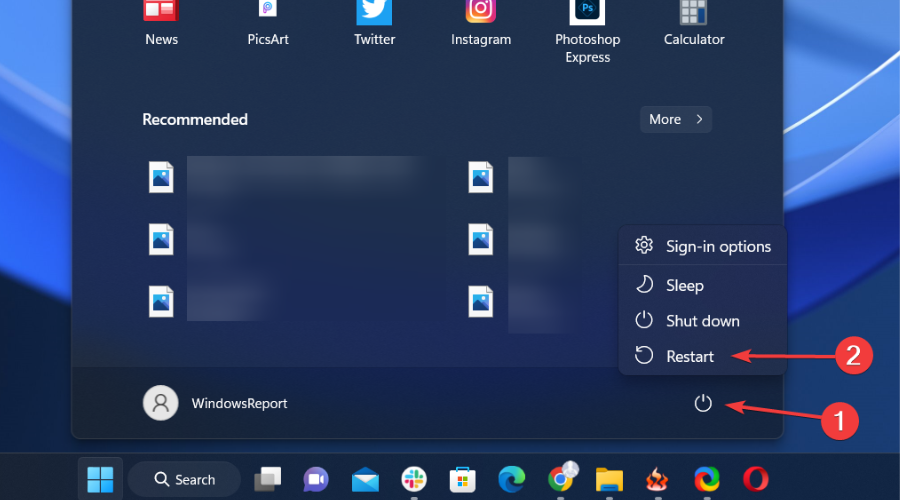
  1. Click on the Power button, in your Start menu, and select Restart.start
  2. Press F10, F2, or F12 to access the BIOS menu on your PC (depending on the PC you have).
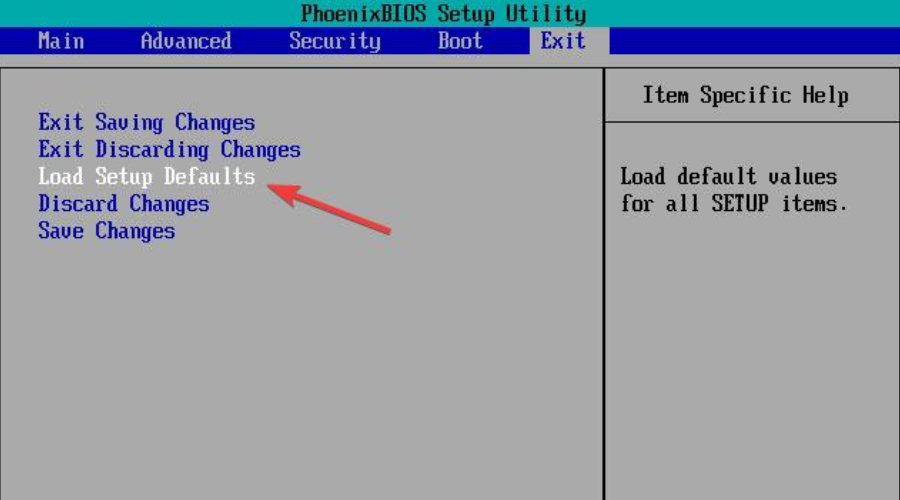
  3. Go directly to the Exit tab.
  4. Select Load Setup Defaults, then press Enter.BIOS
  5. Select Yes.

5. Replace CMOS

This is the absolute last step in today’s troubleshooting process, and it will involve you leaving the house or ordering something off the internet.

If resetting the BIOS, as shown above, did not fix the issue, you can also replace the motherboard CMOS itself.

The Complementary metal-oxide-semiconductor (CMOS) is a small amount of memory on a PC’s motherboard that stores the Basic Input/Output System (BIOS) settings.

So, as the final solution, make sure you remove the CMOS from the motherboard and replace it with another one. 

What if my VGA light never turns off?

As we said, this VGA light stays on when there is a problem. Everything can be working fine, but if one little detail is out of place, this will happen.

If this is the case, please consider resetting the jumper. Also, you should also think about reseating the graphics card, just to be sure.

If that doesn’t work, try powering up your device without the GPU altogether, and see if that works for you.

Has this article been helpful to you? Please make sure to share your experience in the comments section located below.

How to View Saved WiFi Passwords [Android, iPhone]

Wi-Fi is the most used type of connection on your phone, and you’ve probably connected to dozens of different Wi-Fi networks.

It’s not an unusual thing to forget your WiFi passwords. We might tend to use stronger passwords to make our WiFi network safer. Occasionally, you forget your WiFi password and if you want to connect to a new device, you’ve to remember it.

However, sometimes you need to view saved WiFi passwords, and there’s an easy way to do that on both Android and iPhone.

How can I view the saved WiFi passwords on my phone?

1. Use the Share Wi-Fi option on Android phones

  1. 1. On your Android phone, go to Settings > Network & Internet.

    network and internet android settings
  2. 2. Now select Wi-Fi.

    wifi settings android
  3. 3. Click the Saved network option at the bottom, or tap the cogwheel icon next to the network name.

    navigate to saved networks android
  4. 4. Select the desired network.

  5. 5. Choose the Share option.

    share wifi android option
  6. 6. Verify your identity if asked.

  7. 7. Now you should see a QR code along with the network’s password.

    share wifi password qr code
  8. You can easily view your saved WiFi passwords on your Android phone by using the Share WiFi option. When the QR code is generated for sharing, the screen will also show you the specific WiFi’s name and password.


2. Use the Keychain Sync for iPhones

  1. Go to Settings > iCloud > Keychain on your iPhone.
  2. Now enable the iCloud Keychain feature.
    keychain icloud view saved wifi passwords iphone, android
  3. Wait for a couple of minutes for the data to sync.
  4. Go to your Mac and navigate to Applications > Utilities and start Keychain Access from there.
  5. In Keychain Access, type the name of the Wi-Fi network whose password you want to see.
  6. Double-click the Wi-Fi network from the list of results.
    keychain access view saved wifi passwords iphone, android
  7. Now check the Show password checkbox.
    show password view saved wifi passwords iphone, android
  8. If needed, enter your administrator password.
  9. After doing that, a network password will appear.

For this method to work, iCloud Keychain sync needs to be enabled on your Mac. To do that, follow these steps:

  1. Click the Apple menu and choose System Preferences.
  2. Select iCloud.
  3. Make sure that Keychain is checked. If it isn’t checked, check it and wait for a couple of minutes to sync.

It’s not possible to view saved Wi-Fi passwords on iPhone without jailbreaking your phone and using third-party apps, so this is the best legitimate way to do it.

To view saved WiFi passwords on your Android, you just need to go to the Saved networks section and choose the share option for the desired network.

On the other hand, the iPhone is a more closed system, and the only way to view saved Wi-Fi passwords is to enable Keychain sync and then view them on your Mac computer.

If you’re a Windows user, we have a similar guide on how to view Wi-Fi passwords on Windows 11, so don’t miss it.

For even more information our guide on how to find Windows 11 Wi-Fi passwords can be helpful.

Let us know in the comments section below if you found our article helpful and managed to find our desired Wi-Fi passwords.

3 Easy Ways to Crop in GIMP

GIMP is a great image editing software; as such, it has all the standard features of other image editing tools.

Speaking of which, in today’s article, we will show you how to crop images in GIMP. After reading this guide, you can crop images like a pro.

How do I crop an image in GIMP?

1. Use the Rectangular Select Tool

  1. Open the image that you want to edit in GIMP.
  2. Click on Rectangle Select Tool. You can also just press the R button on your keyboard.
    select tool crop gimp
  3. Now select the area that you want to crop.
    selection GIMP crop gimp
  4. You can click the corner boxes to resize and move your selection.
    resize selection crop gimp
  5. Now go to the Image menu and select Crop to Selection.
    crop to selection crop gimp
  6. Your image will now get cropped.

This method is pretty simple, but it also offers some advanced features while selecting. To change the selecting options, do the following:

  1. Click the Rectangle Select Tool.
  2. You’ll now notice a Rectangle Select Here you can change various settings, but we’ll briefly mention the most useful ones:
    • Fixed-size: By using this option you can select fixed width, height, aspect ratio, or even size for your selection. This is incredibly useful if you need to crop an image at a specific size.
      aspect ratio crop gimp
    • Position and size: You can manually set the position of the selection or its size in px or any other unit.
      selection settings position crop gimp
    • Highlight and guides: With these features, you can highlight your selection and make it easier to crop the image. You can also choose several different selection guides.
      highlight selection crop gimp

2. Use the Crop tool

  1. 1. Open GIMP.

  2. 2. Now click on File > Open and select the image that you want to edit.

  3. 3. Click on the Crop tool from the toolbar. You can also use the Shift + C shortcut.

    crop tool in gimp
  4. 4. Choose the area that you want to crop. If needed, move and resize your selection.

    crop selection on website example
  5. 5. Press Enter to crop your selection.

  6. Another method to crop in GIMP is via the built-in crop tool. It allows you to easily select an area to crop and perform the action within a few clicks.

    Moreover, the crop tool has a few unique features that you can apply while editing your image in GIMP:

    • Current layer only: By checking this feature you can only crop the image on the current layer. Other layers won’t be affected.
    • Delete cropped pixels: This feature will delete non-locked layer data.
    • Allow growing: Using this feature you can actually expand the canvas if needed.

3. Use Crop to Content and Zealous Crop

  1. Open the image that you want to crop.
  2. Go to Image > Crop to Content.
    crop to content crop gimp
  3. Your image will be automatically cropped.

Using this feature, you’ll remove empty space larger than your image. You can also use the Zealous Crop feature that works almost the same, but it removes empty space around and between the image.

Cropping in GIMP is incredibly simple, and you can do it using these three different methods. In our opinion, cropping with the Crop tool is the best option because it’s the fastest and offers the most features.

If you’re not a fan of GIMP, you can always crop images using built-in Windows 11 tools or any other free image editing software.

Let us know if you found this article helpful, and write down any comments you might have in the comments section below.

Xfinity Blocking VPN? Fix Comcast & Xfinity VPN Issues

The Net Neutrality repeal and history of issues with the monopolized broadband market in the United States made a good reason for users to turn to VPN solutions.

Comcast is one of those providers (AT&T and some local providers) who is frequently criticized for geo-restrictions and throttling the internet speed when users try to use Peer-2-Peer services.

However, even though a VPN tool should help you avoid possible obstacles just fine, we need it to work to do so.

And, seemingly, some Comcast routers don’t support PPTP protocol, which is a commonly used (less encryption, but less latency and faster bandwidth) VPN encryption protocol.

Hence, VPN traffic being blocked by Comcast is relatively standard.

To address this, we prepared some equally common solutions, both recommended by Comcast’s support and knowledgeable users around the web.

If you cannot run a VPN with Comcast equipment or are facing VPN access being blocked in the Comcast network, make sure to check the steps we provided below.

Can Xfinity see my VPN?

Xfinity (Comcast) can get a hold of your online activity through data provided via your ISP modem, for example. This is why it is important to choose a VPN that bypasses ISP throttling; otherwise, related apps like Adult Swim may stop working.

➡️ Does Xfinity/ Comcast block VPN?

In the past, Comcast was infamously renowned for such practices that led to Xfinity not working with VPN.

Consequently, many Comcast/Xfinity users report Comcast dropping the VPN connection or blocking VPN ports.

​Nevertheless, their policies have changed lately, and you can officially use VPNs with Comcast routers by enabling the Bridge mode in the XFINITY router’s settings.

How to set up a VPN on an Xfinity router?

  1. Get a VPN subscription. For fast Internet, secure connection, and access to servers from 94 different countries, we recommend ExpressVPN.
  2. Open the Xfinity Admin Tool page on your PC and enable bridge mode.
  3. Confirm your change by clicking Ok.
  4. Download the suitable ExpressVPN firmware for this router and upload it.
  5. Wait for the firmware to install and save your settings.

How can I fix VPN issues with Comcast?

1. Make sure you’re using a proper VPN

This is quite important. As we already said on various occasions, choosing a proper VPN solution that suits your needs isn’t exactly a walk in the park.

Especially, when we take into consideration the fact that all valid solutions are mostly premium. Of course, if you only need to hide your IP address once in a while, going on a spending spree isn’t recommended.

On the other hand, if you want a permanent solution to avoid bandwidth throttling, privacy infringement, and geo-restrictions, you’ll need to invest some funds in a monthly subscription.

Going premium does not come free, but it does not necessarily mean you will have to break the bank. Considering what it offers, ExpressVPN is a very cost-effective option.

Comcast-wise, this best-in-class VPN solution is your best bet as it can overcome ISP blockages, allow you to access all geo-restricted content you need, and it does so without latencies and data limitations.

Boasting ultra-fast download speeds, unlimited bandwidth, and an impressive network of thousands of servers located in 94 different countries, ExpressVPN is ideal for Xfinity/ Comcast.

Unblock one website after another, regardless of your physical location, eliminate online censorship and enjoy a smooth, buffering-free Comcast experience.

ExpressVPN keeps your identity private, your browsing anonymous, and your data protected with the highest level of encryption.

ExpressVPN

Enjoy unlimited streaming, remove ISP throttling and browse any webpage around the globe with ExpressVPN!
Free trial Visit website

2. Update the router’s firmware

As the official source confirmed, a certain router model (Technicolor Wireless Gateway for XFINITY Internet Service) has had issues with the PPTP security protocol.

The problem is, allegedly resolved by updating your router’s firmware.

We can’t say with certainty that this was dealt with, as there’s no abundance of user feedback.

However, it’s worth a try, and hopefully, after you update your router’s firmware, the VPN solution should work as intended.

On the other hand, Xfinity blocking VPN traffic is a known matter. If you were wondering how to update the firmware on the Comcast XFINITY router, this is automatically done after restarting your devices.

Just wait for some time until upgrades are installed and try connecting via VPN tunnel again.

Also, if by chance, you have your own router, you can use it to bridge the connection, avoiding possible evasive measures.

Any third-party router would work, and the only thing you should do is enable the Bridge mode in XFINITY router’s settings.

  1. In the address bar, type your IP address (Comcast changed private internet subnet to 10.x.x.x from 192.x.x.x)
  2. Log in with your credentials.
  3. Go to Gateway.
  4. Select At a Glance.
  5. Toggle the button to Enable next to Bridge Mode.

3. Change the protocol, change VPN encryption and switch servers

There are two protocol suits which are covering the same thing in a different manner.

TCP (Transmission Control Protocol) is a standard network and internet communication protocol, and there’s also UDP (User Datagram Protocol), a more app-oriented and faster protocol.

A lot of users who were using the latter have had issues with Comcast router blocking VPN. Therefore, even though it’s seemingly slower, TCP should be your communication protocol. You can configure it in the router settings.

➡️ Protocols

Besides that, we recommend changing two variable options in the VPN itself. Firstly, we recommend changing your encryption protocol to OpenVPN or L2TP/IPsec instead of PPTP. That should be an easy task to perform, as most VPN solutions offer a variety of alternative encryption protocols.

➡️ Encryption

Keep in mind that the encryption level is reversely proportional to speeds—basically, the better the encryption, the slower the bandwidth.

OpenVPN is in the middle, with both formidable encryption levels and average latency.

➡️ Server

Finally, we recommend switching to an alternative server or location or IP address.

Namely, even though we’re addressing the Comcast blocking VPN issue, there’s still the chance that your current server is overcrowded or unstable.

Give an alternative a try, and look for improvements.

Which VPN works best with Xfinity?

There are several options that work well with Xfinity routers (among others), such as ExpressVPN PIA or CyberGhost VPN , all owned by Kape Technologies or NordVPN.

That’s a wrap-up. In case you have any questions or suggestions on how to resolve the issues with VPN on Comcast, feel free to tell us in the comments section below.

You can also verify service interruptions in your region by checking this guide on Xfinity outages in my area to confirm whether the problem comes from the Comcast network.

Application Was Unable to Start Correctly 0xc0000005: 5 Ways to Fix

The Application was unable to start correctly (0xc00005) error will prevent you from running certain apps on your PC, and this issue can be tedious. Luckily, there are a few ways to fix it, and we’ll show them to you in this guide.

What is 0xc00005 error?

The issue appears if there’s a problem with the necessary DLL files. In some cases, malware infections, or problems with registry can lead to this problem.

How do I fix The application was unable to start correctly 0xc00005?

Before we start fixing this issue, ensure that your Windows is up to date. Deleting spam emails can sometimes help, so try that as well.

1. Scan your PC

  1. Type Windows Security in the search bar and select it from the search results.
  2. In the Windows Security window, click on Virus & Threat Protection.virus and threat protection
  3. Click on Quick Scan in the Virus & Threat Protection section.quick scan virus and threat protection
  4. Wait for the scan to complete and review the results.

Alternatively, if you want more advanced protection, we recommend using a third-party tool like TotalAV.

It is very light on your system, offers very strong online and data protection, and will not interfere with your system or software.

TotalAV

The TotalAV solution not only will help you remove any malware from your PC, but it will also ensure perfect online protection.
Free trial Visit Website

2. Activate Windows Firewall

  1. Press Windows + S to open the Search menu, enter Control Panel in the text field, and click on the relevant search result.windows defender firewall
  2. Next, click on Turn Windows Defender Firewall on or off from the left.turn windows defender firewall on or off to fix the application was unable to start correctly 0xc00005
  3. Select Turn on Windows Defender Firewall under both Private network settings and Public network settings, and then click on OK to save the changes.turn on Firewall to fix the application was unable to start correctly 0xc00005

3. Use System Restore

  1. Press Windows + S, type create a restore point, and then click on the relevant search result.
  2. Next, click on the System Restore button.
  3. Select Choose a different restore point and click on Next.
  4. If available, check the box with Show more restore points, select the desired one, and click on Next.
  5. Verify the restore details and click on Finish to complete the process.

4. Check RAM

  1. Press Windows + R to open the Run dialog.
  2. Type mdsched.exe and press Enter to open the Windows Memory Diagnostic tool.mdsched
  3. Choose “Restart now and check for problems” to run the test immediately or “Check for problems the next time I start my computer.”windows memory diagnostic tool
  4. Follow the on-screen instructions and wait for the test to complete. Review the results for any issues with your RAM.

One of the solutions we have discussed here should help solve The application was unable to start correctly (0xc0000005). Click OK to close the application error.

5. Check for System File Corruption

  1. Open Command Prompt as an administrator.run cmd as admin
  2. Type sfc /scannow and press Enter.sfc scan
  3. Wait for the scan to complete. It will attempt to repair any corrupted system files.

As this issue may be caused by spam, you should consider using one of the best e-mail scanning software available today to get rid of it.

This error comes with several different codes, and we covered the 0xc000012d application error and application error 0xc0000142 in separate guides.

Another issue from this family of errors is error 0xc00007b, and we have an in-depth guide on it.

Remember, you can always seek the help of an expert if you are unsure of yourself. If you have any other questions, don’t hesitate to leave them in the comments section below.

Headphones Recognized as Speakers on Windows 11 [Fix]

If you’ve connected your headphones but Windows 11 recognizes them as speakers, the sound will still play through the speakers, even though the headphones are plugged in.

What causes headphones to be named speakers are usually outdated audio drivers, boot errors, or faulty hardware. Luckily, none of these are unsolvable, and below we’ll explain all you can do, step-by-step.

How do I fix my headphones being detected as speakers?

1. Update the audio driver

  1. Right-click on the Start button and select Device Manager.
  2. Select your audio device and right-click on it.
  3. Select Update driver from the options.

If there are any updates, the installation wizard will install them automatically. Restart your computer after the installation is complete.

If Device Manager won’t detect new drivers or the process seems to complicated, you can use a third-party tool instead. Software such as Fortect Driver updater will simplify the process and keep your drivers updated in the long term with the help of scheduled scans.

⇒ Get Fortect Driver Updater

2. Restart your computer

  1. Click on the Start button on your screen.
  2. Select Power options.
  3. Click on Restart and OK.

Restarting your computer will help fix any boot errors that may prompt audio mistakes.

3. Uninstall Realtek drivers on your computer

  1. Press Windows + R keys simultaneously to prompt the Run window.
  2. Type devmgmt.msc in the search space and press Enter.
  3. Navigate to the Sound, video, and game controllers option and double-click on it.
  4. Right-click on the Realtek High Definition Audio device and select Uninstall.
  5. Confirm any additional prompts that pop up.

Restart the computer. Windows will have the proper drivers installed on the next startup. Hence, whatever causes Windows to think headphones are speakers will be fixed.

Users may be interested in reading our article about how to fix Realtek audio issues in Windows computers.

4. Set Headphones as the default audio device

  1. Right-click the Volume Control icon on the taskbar and select Sounds.
  2. Navigate to the Playback tab.
  3. Right-click on Headphones in the Playback device windows and set it as the default device.
  4. Click on OK to save the changes.

We recommend you restart your device for proper syncing of the changes.

The above fixes are the most efficient ways to solve the problem if Windows thinks headphones are speakers. Ensure to follow the steps strictly for optimal results.

However, we recommend you check our article about the causes and fixes for no speaker or headphones plugged-in issues. So, you can check out our list of the best speakers for PC.

If you have any questions or suggestions, you can leave them in the comments section below.

How to Change Your Skype Name

Skype is a great tool to connect with potential employers and build a professional online image. Of course, business etiquette imposes certain rules.

You need to have a professional-looking email address and Skype name to inspire trust and professionalism.

However, many Skype users didn’t have this detail in mind when they created their Skype accounts. As a result, many used various nicknames which then became their official Skype username and ID.

That’s not a problem as long as you use your Skype account to connect with family and friends.

But if you’re planning to use Skype as a means to get a job, you need to use a professional-looking Skype user name and ID.

What is the difference between a Skype name and a Skype display name?

Your Skype name is your username, which you chose upon creating your account. It is your unique ID, with which others can look up your account via Skype search.

On the other hand, your display name is, as its name says, the name that shows up on your account, next to your username. It is what people see when they talk to you via Skype.

Can I change my Skype ID?

Due to Skype‘s increasing influence in the job market, many users are wondering what steps to follow to change their Skype account name and Skype ID.

How do I change my Skype account name as my current Skype name is not professional to be giving to recruiters and colleagues.

Unfortunately, we have bad news for you: Skype account usernames can’t be changed. Microsoft explains that:

Legacy (old) Skype account “names” or “nick-names” could not be changed prior to being transitioned to Microsoft accounts in September 2016, and neither can they be changed now. The only way to change how you are found on Skype is to create a new Microsoft account and a new e-mail address as part of the new account set-up process.

The solution to having a professional-looking Skype username and ID is to simply create a new one. Indeed, by creating a new user, you’ll lose all your contacts.

However, you can change your Skype display name, and we will show you how to do that in our guide.

How can I change my Skype display name?

  1. 1. Launch the Skype app on your device.

  2. 2. Click on your profile image in the upper-left corner of the window.

    skype profile settings
  3. 3. A menu will open. Under Manage, select Skype profile.

    manage skype profile click
  4. 4. Click on the Pencil icon.

    click on edit pencil skype name change
  5. 5. Select the section where your current display name is and type a new one in it.

  6. 6. Click on the Pencil icon again to save the changes.

  7. Although you cannot change your Skype name, you can modify your display name. This can  be done both on the web and via the PC app, in a few clicks.

    You can change your Skype display name as many times as you want using this method.

As a quick reminder, Skype now allows employers to test the coding skills of candidates in real time. Read our dedicated article to find out more.

To wrap it up, once a Skype ID is registered, it can never be changed. What you can do is change your Skype display name.

We hope that this article cleared out the confusion around Skype usernames and IDs. Let us know in the comments section below if you have any questions.

File Deleter Software: 5 Best We Tested [2026 List]

When you delete files with File Explorer, they’re usually sent automatically to the Recycle Bin folder.

Thus, they’re not really deleted until you empty them. Even then you might still be able to restore some erased files with file recovery software.

Therefore, it’s better to add some third-party utilities to Windows 10 and 11 if you want to ensure your files will be permanently deleted.

How can file deletion software help me?

It’s all about your sensitive data and the needed measures you have to take in order to protect personal or valuable information. Nonetheless, performant tools combat the risks of file leaking very efficiently.

Hence it doesn’t matter if you need to delete your personal files completely or to highly protect your work, using the right methods will bring anyone mind-peace.

These are the best software packages for Windows 10, and other platforms with which you can erase files more thoroughly.

What are the best tools to erase data and files on Windows 10?

BitRaser File Eraser – Best for deleting online traces

BitRaser File Eraser is useful for erasing sensitive files, folders, application traces, system traces, Internet activities, or volumes from Windows-based systems and supported storage devices beyond the scope of recovery.

Unlike similar tools, this one is 100% safe for the system, as it never makes the mistake of erasing operating system files.

This isn’t just a simple file eraser. Aside from its data deletion key feature, it offers advanced options to schedule file eraser tasks at a predefined date and time. 

Moreover, it guarantees file erasure beyond recovery via two simultaneous verification methods – Random Verification and Total Verification.

Don’t hesitate to evaluate and extensively use the software free trial to get rid of any confidential files that you want to eliminate.

In addition, you can use the software to keep your files on the cloud repository and eliminate any traces from your PC. And on top of that, it offers erasure certification for your deleted files.

Therefore, make the best use of the intelligent functionalities offered by this file eraser. No matter how you choose to manage your confidential files, you got a helping hand on your side.

Let’s see some of its most important features:

  • Advanced options to schedule file eraser tasks
  • File erasure beyond recovery
  • Two simultaneous verification methods – Random and Total Verification
  • Eliminate any traces from your PC

BitRaser File Eraser

Easily delete all your unwanted data and schedule future file eraser tasks with BitRaser!
Check Price Visit Website

IObit Unlocker – Very easy to use

IObit Unlocker can manage all your files and folders to keep them safe and available. The user interface is incredibly easy to use and there are no complex operations required in order to manage it.

If you want to delete, unlock, rename, move, copy, and so on, according to your specific needs, you just drag and drop the locked file or folder into the IObit Unlocker interface and choose the delete option.

So, you can forget about files impossible to delete from your PC, using powerful tools to protect against any digital risks.

With various features to manage inaccessible files, this software excels in helping to do this.

As we said before, it’s just drag-and-drop work to eliminate your precious and confidential data once and for all. Hence, it’s no need for more complicated operations to fix it.

With its new features, the software can terminate all related processes that lock one file when running in Force mode. Plus, it can unlock multiple files or folders at once.

Thus, a tool like this deserves a change by any person who takes data confidentiality seriously and tries to protect valuable self-data.

Let’s have a look at some of IObit Unlocker’s best features:

  • Easily unlock all files
  • Keep files safe and secure
  • Manage user permissions: run, copy, read, move, delete, modify

IObit Unlocker

Delete all files and keep them protected with the incredibly easy-to-use IObit Unlocker!
Free Trial Visit Website

Kernel File Shredder – Great for scheduling file shredding

Kernel File Shredder is another great utility for more thorough file deletion and even scheduled tasks.

The tool provides an easy alternative to completely erase confidential or no longer wanted files from your PC.

By putting the advanced file shredding algorithms on which the software relies to work, you prevent any unauthorized access to sensitive data.

You can even schedule file shredding tasks, rename the files before shredding them, and create log files to store shredding operation information.

File Shredder has a straightforward UI that enables users to erase files in just a few clicks.

Hence with this software, the process of shredding unwanted files is working efficiently and helps the users to restrict access to any undesirable characters.

Thereby benefit from superior services of file removal, assuring activity log or renaming files features as well for complete confidentiality of your information.

Take a look at its best features:

  • Simple and easy-to-use UI
  • Schedule file shredding tasks
  • Completely erase confidential documents and other files
  • Advanced file shredding algorithms

Kernel File Shredder

Hit the button to get Kernel File Shredder and have no concerns about your unwanted and confidential PC files. 
Check Price Visit Website

Secure Eraser – Good for registry and system cleaning

This is a great multipurpose file eraser that also makes the most of high-end deletion algorithms. Secure Eraser is a versatile utility with a decent UI design.

The software has a freeware version, but also a professional one. Depending on your needs, you can best use this software to shred your files forever.

Aside from its thorough deletion of selected files and folders, the software can erase partitions and drives. It includes a registry cleaner and a system cleaner for deleting junk files.

Secure Eraser can also generate HTML deletion reports, which isn’t something every file deletion utility provides. Also, once removed the data can’t be restored even with the most powerful tools.

Other worth mentioning details entails powerful overwrite capacity of files, folders, or drives up to 35 times to completely erase any traces.

Let’s see some of its key features:

  • Built-in Registry and system cleaner
  • Generates HTML deletion reports
  • Removes the sensitive data completely
  • Simple user interface

Secure Eraser

For a safer solution, check out Secure Eraser for a complete deletion of your sensitive and confidential data or drives!
Check Price Visit Website

CCleaner – Great for PC optimization

going registry ccleaner

CCleaner is an award-winning utility that the Piriform website proudly boasts has had more than 1.5 billion downloads.

It has an intuitive UI, extensive options for deleting files, and consumes minimal system resources.

You can add a freeware version to Windows, and CCleaner also has a Professional version that includes many more options.

The freeware version alone is a great utility. Its Cleaner tool scans for both Windows system and third-party software junk files to free up considerable disk space.

You can scan and clean the registry with CCleaner. It includes Uninstall and Startup tools to remove software and startup entries.

Among the optimization and security traits, this popular tool has the capacity to clean your sensitive files without traces in no time.

Hence confidently use this tool cleaning services to permanently delete your sensitive files, improving your system health to run smoothly as well.

The Professional and Plus versions also provide scheduled cleanup and disk defrag options.

CCleaner

Get CCleaner to delete junk files from your system with a minimum of used resources.

Now you can really delete your files with these terrific utilities for Windows. They have the most efficient deletion techniques to purge documents and folders.

With these secure file deletion software for Windows 10/11, you may also erase lots of Windows systems and junk files to free up some disk space.

Now, you should also check our list including the best software to force delete locked files on Windows 10/11.

Let us know which one worked best for you by leaving your feedback in the comments section below.

How to Install the Epson Scanner Driver for Windows 10

Drivers represent the most important software components which allow our PCs and apps to run optimally. Thus, proper installation is the essential step you should consider.

There is a wide variety of options that can prove useful to install your scanner drivers. Fortunately, you don’t have to be trained to understand them.

In this guide, you will find a selection of the best-proven solutions dealing with the Epson scanner driver error. 

How can I install the Epson scanner driver on Windows 10?

1. From the manufacturer’s website

  1. 1. Access the Epson official support website.

  2. 2. Select your current region from the list, if prompted.

  3. 3. Hover your mouse over the Support section from the top menu.

    hover support section epson website
  4. 4. Choose Printers from the drop-down menu that opened.

    go to printers section epson
  5. 5. Search for your product name and select the exact model.

    search for epson scanner driver windows 10
  6. 6. Click on the Download button.

  7. 7. Follow the on-screen steps to complete the installation.

  8. The best place to download Epson Scanner Drivers from is the manufacturer’s website, which is the Epson official website. The drivers in there are always up to date and perfectly safe to use on your Windows 10 PC.

    In order to install the Epson driver for your device, you need to download it and then follow the on-screen installation wizard. It will automatically install the driver for you.

2. Via Device Manager

  1. Open Device Manager.device manager open
  2. Expand Print queues.print queues device manager
  3. Right-click on the one you need, and select Properties.
  4. Select the Driver tab and click on Update Driver.
  5. Choose to Browse my computer for drivers.browse computer for dirvers
  6. Navigate to Let me pick from a list of available drivers on my computer.choose from PC drivers
  7. Click on Have Disk…, and locate your driver file.
  8. Select Next and wait until the installation is completed.

Alternatively, you can download the driver from the official website and manually install it via Device Manager.

This is recommended to do in case you encounter any problems using the traditional installing method.

3. Use third-party software

The methods presented above imply using manual steps in order to install the Epson scanner driver. We have one solution for you that will definitely save much more of your time.

Using dedicated third-party software will automatically install and update any driver you need.

Moreover, it will provide the latest compatible driver for your hardware components, straight from the manufacturer.

It is also important to mention that operating with specialized software is easy to use for everyone. Its friendly and intuitive interface allows you to understand anything you need to know.

You should know that with specialized tools you have all the support regarding problematic drivers, plus an extensive database with millions of driver versions.

To conclude, we advise you to employ an automated driver updater like this for maximum performance of your device.

These were our recommended suggestions that will help you to install the Epson scanner driver on Windows.

In order to keep your components safe, you can always check a full guide about how to update drivers in Windows 10.

Also, leave a comment in the section below and let us know which of the listed options suited you the most.

How to Reset your PC using Cloud Download on Windows 10

Starting with the new Windows 10 version 2004, you can use the new cloud download option to get Windows from the cloud to reinstall.

If you have a strong Internet connection, resetting your PC with the cloud option can be faster and even more reliable.

In other words, you won’t need to download Windows 10 and create a bootable USB stick. The cloud download feature is already built-in.

What do I need for a cloud download?

Make sure you have more than 4 GB of free space on your drive, as the Cloud download option can use more than 4 GB of data.

For the same reason, you want to be connected to a reliable, paid Internet connection where you don’t have data restrictions.

How can I use cloud download to reset my Windows 10 PC?

    If you have a Windows 10 Insider Preview Builds 18970 or newer, you can select the cloud download option using Settings.

    All you need to do is navigate to the Reset this PC section via Settings, choose cloud download as your preferred method of reinstalling Windows 10, and then follow the instructions on the screen to complete the operation.

  1. 1. Press the Start button and choose Settings from the list (the cogwheel above the Power button).

  2. 2. Click on Update & Security, then click on the Recovery option from the left pane.

  3. 3. Press on the Get started button below the Reset this PC option.

    get started reset pc windows 10
  4. 4. You will be prompted to keep your files or to remove everything. After you validate your selection, you will see the option to Cloud download in the next window.

    choose cloud download windows 10
  5. 5. After you hit the Cloud download button, Windows will start the preparation phase, checking if you have the necessary requirements.

  6. 6. If all is OK, you will see the image below.

    Ready to reset this PC option
  7. 7. When you click on the Reset button, the download will begin. After this, everything will continue without anything to do from your part.

  8. 8. When the download completes, the system will reboot into Windows RE and start applying the image that was downloaded.

    If you selected the option to keep your files, the system will get the user profile from the previous OS and will apply it to the new OS.

  9. 9. Next, it will apply the optional features and languages to the new OS. It Switches the OS root folder from the previous OS to the new OS and it deletes the downloaded payload.

  10. 10. Finally, it will reboot into the new OS and apply the drivers and OEM settings, including preinstalled Windows apps.

    If you didn’t choose to keep your files, the system will reboot to the Out-Of-Box-Experience (OOBE). If not, it will skip OOBE and jump directly to the login screen.

What is the difference between cloud download and local reinstall?

A local Windows reinstallation uses the installation files that are already on your HDD. You don’t need anything special to be able to use it, not even the internet.

On the other hand, a cloud download installs a new fresh image of Windows 10 via the internet. In other words, it uses installation files downloaded directly from Microsoft’s official website.

Did you encounter any problems when performing this operation? Let us know about your experience in the comments section below.

USB Selective Suspend on Windows 11: How to Enable it

Selective suspend is one of the programs that helps Windows laptops conserve energy and extend their span. Whenever the Selective suspend runs, it stops the USB port to save power.

The USB selective suspend setting enable or disable feature determines whether your computer will recognize or read any USB devices you have connected.

Likewise, users complain about the USB selective suspend Windows 11 missing. So, we’ll discuss how to enable and disable the USB selective suspend on Windows 11.

What does the USB Selective suspend setting do?

The USB Selective suspend settings in Windows 10/11 determine which USB device the computer to turn off to save power. Some USB devices connected to your ports are set in a low-power state, which minimizes unnecessary power consumption.

Hence, Select suspend is a system that helps your computer select and choose which USB devices to turn off when they are inactive.

However, the USB Selective suspend feature isn’t necessary when the computer charges, but it is more functional while on battery power.

You won’t find this feature on a PC because it has no battery. So, if you have a PC, the guide is not for you.

Users may be interested in reading how to improve computer performance in Windows 10/11.

How do I enable or disable USB selective suspend?

1. Use Power Options

  1. 1. Click on Start and search for the Control Panel in the search box.

  2. 2. Open the Control Panel and go to Hardware and Sound.

    hardware and sound in control panel
  3. 3. Select Power Options and click on your selected Power Plan.

    change power plan button
  4. 4. Click on Change Plan Settings.

    power plan settings
  5. 5. Press on Change advanced power settings.

  6. 6. Expand the USB settings option and enable or disable the USB selective suspend.

    enable or disable usb selective suspend windows 11 setting
  7. If you’re looking for ways to enable or disable the USB selective suspend setting on your Windows 11 device, you need to look no further than your PC’s built-in setting.

    Via Power Options, you can toggle the setting on and off for when your laptop is on battery or plugged in.

2. Use Windows Registry

  1. Press Windows + R keys to prompt the Run dialog.
  2. In the Run dialog box, type Regedit and press Enter to prompt the Registry Editor.
  3. Navigate to the registry key path below: HKEY_LOCAL_MACHINE\SYSTEM\CurrentControlSet\Services\USB
  4. On the right pane of the screen, double-click on SelectiveSuspendEnabled or the DisableSelectiveSuspend entry.
  5. Double-click on the entry to edit its properties and input 1 as the Value.
  6. Click OK to save the change, then exit the Registry Editor.

We recommend you restart your computer to help it sync the changes properly. Likewise, the registry will fix the USB selective suspend setting missing issues.

You can check our article about how to create a macOS bootable USB media on Windows 10.

Can you overload a USB port?

The simple answer to the question is Yes. Although a single USB host controller can support up to 127 connected devices, it may run out of bandwidth if many devices are used simultaneously.

Hence, it can lead to overloading. Consequently, overloading a USB port can result in temporary shutdown and permanent damage to both the host and the USB peripherals.

However, a single USB hub counts as a USB device address. Every device connected to the USB hub adds to the number of allowed addresses for a single host controller.

It means the number of devices on the USB hub counts towards the allowed USB addresses allocated to that host controller.

So, if the allocated USB address is filled and many devices are used simultaneously, it can cause overloading. Users may be interested in how to turn off the S-mode in Windows 11.

You can leave your questions and suggestions in the comments below.

5 Ways to Fix the System Reserved Partition Not on SSD Issue

System Reserved partition is created in a computer disk whenever Windows Operating System (OS) is installed. It usually occupied the unallocated space of the disk.

The files in this partition are typically inconspicuous as they normally cannot be found among typical files in File Explorer. This is to prevent deleting them mistakenly, and that could cause issues for your system.

The sizes of the files stored in the System Reserved partition vary along with the version of Windows OS installed. For instance, the size of such files in Windows 7 is approximately 100MB. It may be as high as 500MB in some other iterations like Windows 10.

Why does my PC need a System Reserved partition?

The System Reserved partition houses the Boot Manager Code, Boot Configuration Database (BCD), and Windows Recovery Environment. It also has some reserved space for files to startup your system when you use BitLocker to encrypt your disk.

  • Boot Manager and BCD – There are two major files in here: The bootmgr file and the BOOTSECT.BAK file. When any or both of these files are missing, the computer will be unable to start. This is the reason you might be experiencing the same issue at present.
  • Startup files for BitLocker Drive Encryption – In case you had encrypted your hard drive with BitLocker, Windows will use unencrypted files stored in the System Reserved partition to boot successfully.

Without further ado, let’s see what you can do if the System Reserved partition is not on your PC’s SSD. Follow along!

What can I do if my System Reserved partition is not on my computer’s SSD?

1. Use Disk Management

  1. Launch Run by pressing Windows key + R. Type the command below or copy and paste (to avoid errors): diskmgmt.msc
  2. In the Disk Management window, there will be a list of available disks and colors representing whether allocated or not.
  3. Select the disk you will prefer the System Reserved partition to be stored. Next, right-click on the unallocated space on the disk. Select New Simple Volume. Then follow the system prompt to finish the setup.
  4. In an instance whereby there is no unallocated space on the disk of your choice, you can first Shrink Volume of the partition.
  5. Assign a letter to the new and original System Reserved partition. This will make them accessible in File Explorer.
  6. Next, copy all the files in the old including bootmgr, BOOTSECT.BAK and the Boot folder. Paste them into the newly created System Reserve partition.
  7. Remove the letters assigned to the partitions (old and new). Then select Mark Partition as Active for the new System Reserve partition to be bootable.
  8. Now, restart your PC. If it starts without any issue, then, you can delete the old System Reserved partition.

2. Remove your antivirus

  1. Press Windows + I then go to the Apps section followed by Apps & features.apps-features salesforce not loading in chrome
  2. Search for your antivirus program, click the three-dot button next to it and select Uninstall.unisntall-avast System reserved partition not on ssd

There are certain independent anti-virus and security applications that write to the SRP, which might cause it to get full. As a result, we strongly suggest that you remove your current antivirus software.

3. Reset the PC

  1. Open the Windows Settings by pressing the Windows key + I. Then select System followed by Recovery.
  2. Select Reset PC.
  3. Choose the preferred option whether to Keep files or Remove everything.
  4. Follow the System Prompt to complete the Reset.

4. Restart the system from a USB drive

  1. Download Windows Installation Media to a bootable USB drive. If you are not sure how to do that, check out our guide on how to create a bootable USB drive.
  2. Open Settings by pressing Windows key + I. Then select System followed by Recovery.
  3. In the Advanced startup, select Restart now.
  4. Plug the USB drive into your system.
  5. Follow the on-screen steps to set up your PC.
  6. When prompted to choose Which type of Installation do you want? select Custom: Install Windows only (advanced). If you get a driver error at this stage, restart the setup process.custom-install system-reserved-partition-not-on-ssd
  7. Choose the partition to install Windows. In case there is more than one available, delete others and leave the one at the top usually Drive 0.
  8. When you get the prompt To ensure Windows features work correctly, Windows might create additional partitions for system files. Select OK.
  9. Wait for Windows to complete installation.

5. Use dedicated tools

To save the stress in the method highlighted above, you can make use of third-party dedicated tools like AOMEI Partition Assistant, Paragon Partition Manager, among others.

Aside from the fact that these tools can help you with the migration of your System Reserved partition files, they are also efficient in helping you back up and restore system files.

Due to the possibility of complications during the execution of the processes highlighted above, it is advisable to back up your system files before using any of them. This will make it easy to restore system settings and files if there is an issue.

Let’s know if this method works for you. Don’t hesitate to share any alternative method that helped fixed the problem on your computer.

How to Transition from Aperture to Lightroom on Mac

As you might know, Aperture doesn’t work in the latest version of Mac OS. For that reason, users had to switch to a different application for photo management software.

Many users switched to Lightroom, and in this article, we’ll show you how to migrate from Aperture to Lightroom.


Quick Tip:

For the procedure to go as smoothly as planned, make sure that you’re using the latest Photoshop Lightroom version.

You plan to migrate full-size JPEG previews of your edited images and all your metadata – flags, star ratings, keywords, GPS data, faces, info panel, hidden files, and Aperture color labels included.

Therefore, it isn’t the ideal time to take any chances. Just visit the official Adobe page and hit the Download button with no hesitation.

Adobe Lightroom

Adobe Lightroom

Adobe Lightroom will bring your photos to the next level with great customization features!
Free trialVisit website

How can I migrate from Aperture to Lightroom?

1. Use the Lightroom plug-in

Adobe Lightroom
  1. 1. Launch Lightroom.

  2. 2. Choose File.

  3. 3. Select Plug-in Extras.

  4. 4. Choose to Import from Aperture Library.

  5. 5. Your libraries should be detected automatically. If you want, you can click the Options button to configure the process further.

  6. 6. Now click the Import button.

  7. 7. Bear in mind that the process to migrate from Aperture to Lightroom could take a while depending on the number of data that you have, so be patient.

  8. Migrating from Aperture to Lightroom used to be a complicated process, especially since you had to do it manually, but Lightroom developers decided to streamline it.

    They developed a special automated tool that helps you transfer your photos. By using this tool you’ll import your images as well as metadata to Lightroom with ease, as described above.

    It’s worth mentioning that all your metadata will be imported. Organization data is also transferred, including Aperture Stacking, project hierarchies, iPhoto events, folders, and albums.

    However, certain Aperture features aren’t compatible with Lightroom, so they won’t be transferred. These include image adjustments, smart albums, color labels, stacks, PSD files, and your creations.

That being said, migrating from Aperture to Lightroom isn’t as hard as you might think, and it takes you just a couple of clicks to get started.


2. Export the photos by dragging them to Adobe Lightroom

Most likely, you succeeded in migrating your photos to Adobe Lightroom by using the elegant procedure described above.

However, in case you can’t do that for some reason, there is also the option of exporting the photos by simply dragging them and then integrating them in Adobe Lightroom.

To do that, you just drag the photos from the Browser to the desktop or a designated location in the Finder.

Of course, you can proceed in the same way with other elements like folders, albums, or projects from the Library Inspector.

However, you need to know that your Facebook and Flickr albums cannot be exported by dragging them.

When you’re actually dragging a photo you will export its JPEG preview stance. And if the actual photo doesn’t have a JPEG preview, you won’t be able to drag it.

For instance, if you drag more photos at the same time, only the ones with JPEG previews will be dragged out.

If you run into errors while migrating from Aperture, take a look at this Lightroom not working guide for additional troubleshooting tips.


3. Export the photos using the Export command

  1. Select a photo in the Browser.
  2. Select File, then Export, and click on Versions.
  3. Browse to the location where you want to save the photo.
  4. Choose an export preset, a name format if needed, and click on the Export Versions button to export the photo.

Note: If you will perform this for a large number of files, the process will take longer. However, you can check the Show alert when finished box to get a notification when the process is over.

If you encounter too many limitations while migrating or prefer exploring other tools, check out our Lightroom alternatives guide for more flexible options.

We hope that our guide helped you in transitioning your photos to Adobe Lightroom. You may also let us know how the procedure went for you by using the comments area below.


Best television shows inspired by video games: The Witcher

In this article

Andrzej Sapkowski’s fantasy series is one of the latest in the genre to get the Netflix treatment. Though in reality the show probably takes equal amounts of inspiration from both the books and CD Projekt Red’s acclaimed video game adaptations. To be sure, fans of either can find much to love in this streaming series from showrunner Lauren Schmidt Hissrich, who also served as producer on Marvel’s Daredevil, Marvel’s Defenders, and The Umbrellas Academy, among other shows.

The Witcher follows the saga of the title hero, Geralt of Rivia. Geralt (played by Henry Cavill) is a monster hunter endowed (or perhaps cursed) with supernatural abilities. The show features the sorceress Yennefer (Anya Chalotra) and Princess Ciri (Freya Allan), whose destinies are closely intertwined with that of Geralt. Also part of the show’s cast are Eamon Farren as The Black Knight, and Joey Batey as Geralt’s friend and traveling bard, Jaskier. Anna Shaffer portrays the sorceress Triss Merigold, Kim Bodnia plays Geralt’s mentor Vesemir, and MyAnna Buring is Tissaia de Vries.

Seasons 1 and 2 of The Witcher are currently available on Netflix, and comprise eight episodes each. Shooting for Season 3 began in April 2022 and wrapped up in early September, and is currently in post-production at the time of this writing. Also set for a 2022 release is a prequel miniseries titled The Witcher: Blood Origin.

All episode images and synopsis data via netflix.com.

Season 1

Episode 1: The End’s Beginning

Hostile townsfolk and a cunning mage greet Geralt in the town of Blaviken. Ciri finds her royal world upended when Nilfgaard sets its sights on Cintra. 


Episode 2: “Four Marks”

Bullied and neglected, Yennefer accidentally finds a means of escape. Geralt’s hunt for a so-called devil goes to hell. Ciri seeks safety in numbers. 


Episode 3: Betrayer Moon

Geralt takes on another Witcher’s unfinished business in a kingdom stalked by a ferocious beast. At a brutal cost, Yennefer forges a magical new future.


Episode 4: Of banquets, bastards and burials

Against his better judgment, Geralt accompanies Jaskier to a royal ball. Ciri wanders into an enchanted forest. Yennefer tries to protect her charges. 


Episode 5: Bottled Appetites

Heedless of warnings, Yennefer looks for a cure to restore what she’s lost. Geralt inadvertently puts Jaskier in peril. The search for Ciri intensifies.


Episode 6: Rare Species

A mysterious man tries to entice Geralt to join a hunt for a rampaging dragon, a quest that attracts a familiar face. Ciri questions who she can trust. 


Episode 7: Before a Fall

With the Continent at risk from Nilfgaard’s rising power, Yennefer revisits her past, while Geralt reconsiders his obligation to the Law of Surprise. 


Episode 8: Much More

A terrifying pack of foes lays Geralt low. Yennefer and her fellow mages prepare to fight back. A shaken Ciri depends on the kindness of a stranger. 


Watch the season 1 trailer on Netlflix.com!

Season 2

Episode 1: A Grain of Truth

Geralt sets off with Ciri on a journey that leads him to an old friend. After the Battle of Sodden, Tissaia shows no mercy in her search for information. 


Episode 2: Kaer Morhen

Seeking a safe place for Ciri, Geralt heads for home, but danger lurks everywhere — even Kaer Morhen. Yennefer’s dreams could be the key to her freedom. 


Episode 3: What is Lost

Impatient with Geralt’s methods, Ciri braves major obstacles to prove her mettle. Scheming and suspicion among the Brotherhood make Yennefer a target. 


Episode 4: Radnian Intelligence

A guest at Kaer Morhen extends a guiding hand to Ciri — and an invitation to Geralt. On the run in Redania, Yennefer seeks safety below ground. 


Episode 5: Turn your Back

As a powerful mage joins the hunt for Ciri, she cuts a deal with Vesemir over his extraordinary discovery. Geralt explores the mystery of the monoliths. 


Episode 6: Dear Friend…

A close friend is lost — and another found — as Geralt helps Ciri learn more about her power. Cahir warns Fringilla to focus on their primary mission. 


Episode 7: Voleth Meir

Geralt turns to a humble bard for help, Yennefer realizes just how special Ciri is, and tensions rise on the eve of Emperor Emhyr’s visit to Cintra. 


Episode 8: Family

Geralt faces off with a demon targeting his nearest and dearest while the most powerful players on the Continent ramp up their pursuit of Ciri.


Watch the season 2 trailer on Netflix.com!

Wrap up

If you haven’t checked out this series, there’s no better time to start than right now. Especially if you are a fan of fantasy or just good TV in general. And no: you don’t need any prior knowledge of the books or even the games to get started. Just fire up your Netflix account and dive right in.

VGA Sound Not Working? 5 Ways to Quickly Fix it

There are numerous modes of connecting your computer to external devices like monitors for video output. The VGA, also known as the Video Graphics Array, is a standard connector that transmits visual display data from the CPU to the monitor or projector.

It has a cable port on the computer and the client device (monitor or projector). However, issues like the VGA audio not working can occur while using the VGA.

The VGA audio not working problem indicates that the visual transmission is working, but the audio is not working with VGA.

However, several things may be responsible for the sound not working through the VGA cable issue. It can be hardware, computer, cable, or even a problem with the monitor or TV you are connecting to.

Nevertheless, we’ll discuss why sound is not working through the VGA cable and how to fix the problem. Users can read through our article about how to fix DisplayPort to VGA Adapter not working / no signal.

Why is audio not working with VGA?

  • Computer boot errors: You can encounter many issues due to boot errors on your computer. They prevent the computer from functioning correctly as it should. However, it can cause the monitor audio not to work and other VGA-related issues on your computer.
  • Issues with the sound drivers: When your sound drivers are outdated, they can cause many problems with the sound components on your computer. Likewise, a corrupt or broken driver impedes the computer from initiating a smooth audio connection with the VGA connector.
  • Outdated Windows: Outdated Windows indicates that the computer lacks essential updates and patches to help it work properly. Hence, it is causing issues with its components, like sound. It is a culprit for the sound not working with VGA and other sound issues like monitor sound not working HDMI.

There are many other causes of the VGA audio not working in Windows 10/11. However, the above are the common causes of the issue. 

What can I do if VGA audio is not working in Windows 10/11?

1. Restart your computer

  1. Click on Start at the bottom of the screen.
  2. Click on Power.
  3. Select Restart.

Restarting your computer will fix any boot errors that occur during startup. It is the best fix for the Viewsonic monitor with no sound HDMI issue.

2. Update Windows

  1. Click on the Start button.
  2. Select Settings from the options.
  3. Click on Windows Update and select Check for updates.

Windows will automatically search and download updates if there are any available. You may be interested in reading our guidelines on what to do if VGA stops Working After Windows 10/11 Update.

3. Update your sound drivers

  1. Press Windows + R to prompt the Run dialog.
  2. Type in devmgmt.msc and press ENTER.
  3. Click the drop-down button against the Sound, Video, and game controller option.
  4. Right-click on the audio service driver and select Update driver Software.
  5. Select the Search Automatically for Updated driver software option.

The computer will automatically search for driver updates and install them. Alternatively, you can get all drivers updated on your computer with Outbyte Driver Updater. It can automatically detect and download your devices’ latest and most suited drivers.

Outbyte Driver Updater

Scan and find the latest update for your device drivers with Outbyte Driver Updater for better PC performance.
Free Trial Download now

4. Change the audio output channel on your computer

  1. Press Windows + I keys to open the Settings app.
  2. Select System, locate sound, and expand Input.
  3. Navigate to Choose a device for speaking or recording.
  4. Select your desired output channel and click on Set Default.
  5. Click OK.

5. Switch to HDMI

Switching to HDMI (High definition media interface) will help you detect if the issue is coming from the computer or the VGA cable. If the HDMI connection works smoothly, you can stick with it to save time and stress.

Likewise, users may consider using a VGA to audio jacks like HDMI. It is another way of fixing the issue.

Is VGA better than HDMI?

The obvious answer is no. HDMI cables transmit audio and video, while VGA connectors can only handle the visuals. Also, HDMI cables perform the transmission task smoothly and faster than the VGA cable.

In short, the VGA cable is disadvantaged because it only carries the video signal, while the HDMI cable handles the audio and video signals simultaneously.

Nonetheless, users can check our article about how to fix a laptop’s VGA signal when it’s not working.

Leave your suggestions and questions in the comments section. We’d love to hear from you.

Fix: You Don’t Have Permission to Save in This Location

Computer errors are relatively common; several users reported they got the You don’t have permission to save in this location error on their PC.

The complete error in Windows 10 message reads: You don’t have permission to save in this location. Contact the administrator to obtain permission.

This error will prevent you from saving specific files in the desired folders. The error message directs you to contact the system administrator for permission without pointing out the ways to fix the issue.

A few instances of the error are listed below:

  • PowerPoint You don’t have permission to save in this location: Encountered when saving PowerPoint files, and changing the permission should fix the error
  • Hosts File You don’t have permission to save in this location: Arises due to problems with the UAC (User Account Control) settings. Modifying it should do the trick
  • Photoshop You don’t have permission to save in this location: Users can’t save Photoshop files to the desired folder
  • Excel You don’t have permission to save in this location: The error shows up when saving Excel files on the computer
  • Matlab You don’t have permission to save in this location: Matlab throws the error when saving files in a location you don’t have access to or if the program itself lacks the privilege
  • System32 You don’t have permission to save in this location: You come across this error when saving files in the System32 folder

So, today we’ll show you how to fix the You don’t have permission to save in this location error in Windows.

Why do I not have permission to save in this location on Windows?

The error generally shows up due to a lack of permissions. For instance, you might try to save files in folders reserved for system files or other critical programs.

Also, certain modifications are only available to the administrators. For example, if you are not using an Administrator account in Windows, it would throw the You don’t have permission to save in this location error.

Besides, misconfigured permission, even for folders where you can store files, are a likely cause, and simply modifying them should do the trick for most.

How do I get permission to save files to my hard drive?

To have the relevant permissions to save to your hard drive, you must ensure that the concerned user has complete control over the folder to save files.

You can do it from the folder’s security settings or head to the Advanced settings to make provisions for special permissions. This could be done for any folder, given you are logged in as an administrator and can make the changes.

How do I fix You don’t have permission to save in this location?

1. Use a third-party system restoration tool

If you have problems with your Windows Registry files, you can fix them quickly with a specialized third-party program that will restore them to you.

The software will scan your computer for malfunctioning files and replace or restore them if they’re corrupted while protecting your PC from malware threats.

2. Give Full control to Administrators over the problematic folder

  1. Right-click the problematic directory and choose Properties from the menu.
  2. Go to the Security tab and click on Edit.
  3. Select Administrators from the menu and check Full control in Allow column. If it is already checked, select the Deny column and then check Full Control in the Allow column again. Once done, click on OK to save changes.
  4. Now repeat these steps for the Users group if it’s available in the Security tab.

If you’re getting the You don’t have permission to save in this location error message while trying to save files to a specific location; you might be able to fix the problem simply by giving Full control to the Administrators group on your PC.

Changing the security permissions is an advanced procedure, so you should avoid changing permissions for system folders.

Also, changing permissions can cause other issues to appear, so be cautious and try not to modify the security permissions of system directories and files.

After giving Full control to the Administrators group, the problem should be resolved entirely, and you’ll be able to save files to this directory without any issues.

Several users claim that you can fix this problem by giving Full control to your user profile. This is relatively simple, and you can do it by following these steps:

  1. Navigate to the Security tab, as shown in the previous steps, and click on the Edit button.
  2. Now click on Add button.
  3. Enter the object names to select the text field, enter your username and click on the Check Names button.
  4. If everything is in order, click on OK to save changes.
  5. Now select the Full control option and save changes.

Few users reported they fixed the problem simply by giving Full control to the Everyone group. Unfortunately, this isn’t the safest choice, especially if you share your PC and its files with other users or if you’re a part of a network.

However, you might want to try this solution if you’re the only user and not a network member.

3. Disable the User Account Control

  1. Press Windows + S to open the Search menu, enter user account, and select Change User Account Control settings.
  2. Move the slider down to Never notify and click on OK to save changes.
  3. Click Yes in the UAC prompt that appears.

Windows comes with a helpful feature called User Account Control. This security feature will notify you whenever you or any application tries to perform an action requiring administrative privileges.

Even though this is a valuable security feature, it can sometimes interfere with your system and cause the You don’t have permission to save in this location error to appear.

Disabling User Account Control might be a slight security risk, but it won’t make your PC more vulnerable in most cases. Once you disable this feature, the error should be resolved entirely.

4. Use a different web browser

Users reported this error while using their browsers to save images from the web. According to users, the error appeared while trying to save files using Microsoft Edge.

A temporary glitch with your browser can cause this, and if you’re having this error, we advise you to try using a different browser.

You can use any other browser for this purpose. Still, we recommend trying out a browser built on the Chromium engine, with a strong focus on user security and privacy, so be sure to try it out Opera One.

⇒ Get Opera One

5. Run the program as an administrator

  1. Locate the problematic application that doesn’t allow you to save files to the desired folder.
  2. Right-click on it and choose Run as administrator from the menu.run as administrator to fix you don't have permission to save in this location

According to users, You do not have permission to save files to this location error can appear if you’re using it without administrative privileges.

To fix the issue, simply run the application giving you this problem as an administrator; after that, you should be able to save files without any issues.

Remember that this is a temporary solution, so you’ll have to repeat it every time this problem appears. This can be tedious, but you can set the application to always run with administrative privileges.

To do that, follow these steps:

  1. Right-click the problematic application and choose Properties from the menu.
  2. Go to the Compatibility tab, check Run this program as an administrator option, and click OK to save changes.

After that, the application will always run with administrative privileges, and your problem should be permanently fixed.

6. Check your antivirus software

In some cases, your antivirus software can cause this problem to appear. For example, many antivirus tools lock specific folders to prevent malicious files from accessing them.

However, your antivirus tool can sometimes prevent you from accessing these directories.

To fix the You don’t have permission to save in this location contact the administrator error in Windows 10 we advise you to check your antivirus settings and turn off features that prevent file access.

Users reported problems with BitDefender, and according to them, BitDefender was blocking the application from making changes to a folder.

To fix the problem, you just have to open BitDefender settings and add the problematic application to the list of trusted applications. After that, you should be able to access any folder without issues.

If you can’t find this feature, you can try temporarily disabling your antivirus and check if that solves the problem. If disabling the antivirus doesn’t help, you can uninstall your antivirus and switch to a different solution.

7. Disable the Protected Mode feature

  1. Press Windows + R to open the Run command, enter inetcpl.cpl, and click OK.
  2. Go to the Security tab, uncheck Enable Protected Mode option, and click OK to save changes.
  3. After doing that, restart your browser.

If you’re getting this error message while using your web browser, you might be able to fix the problem simply by disabling Protected Mode. However, check if the problem persists once you have made all the necessary changes.

8. Create a new directory and move all your files to it

  1. Locate the problematic folder, for example, Folder 1, and go to its parent directory.
  2. Now create a new folder in the parent directory and name it Folder 2.new folder
  3. Navigate to Folder 1, press Ctrl + A to select all files, and then hit Ctrl + C to copy them.
  4. Paste the files to Folder 2.
  5. Now try to save a new file to Folder 2. You can use any application, such as Word, to save the file.
  6. If you can save files to Folder 2, you need to delete Folder 1 from your PC.
  7. Now rename Folder 2 to Folder 1, and that’s it.

If you can’t save your files because you don’t have permission to keep them in this location error, you might be able to fix the problem using this workaround. However, remember that this solution requires you to remove specific directories, so don’t use it on system files.

9. Save the file to a different location and move it

  1. Save or download the file to any directory on your PC.
  2. Now locate the file and move it to C: drive or any other directory on your PC.

According to users, you might be able to circumvent this problem simply by saving your file to a different directory and then moving it.

Users claim they cannot save files to the C: drive directly, but you can circumvent this problem if you follow this solution. This is a quick and simple workaround, so feel free to try it out.

10. Stop sharing the folder

  1. Locate the problematic directory.
  2. Right-click the directory, hover the cursor over Share with, and select Stop sharing.

You might want to stop sharing the folder if you can’t save files to a specific directory. This issue sometimes affects shared folders; you need to stop sharing if you want to resolve the problem.

After you stop sharing the directory, the problem should be fixed, and you’ll be able to save files without any issues.

11. Change the owner of the directory

  1. Locate the problematic directory, right-click, and choose Properties from the menu.properties
  2. Navigate to the Security tab and click on Advanced.advanced
  3. Now you’ll see the owner of the directory. Next, click on the Change button.change
  4. Enter Administrators in the text field, and click on Check Names. You can also use your Microsoft account’s user name or email address.check names
  5. If everything is in order, click on OK.ok
  6. Check the Replace owner on subcontainers and objects and Replace all child object permission entries options, and then click on OK to save the changes.tick checkboxes

If you’re having issues with this error message, you might be able to fix it by changing the owner of the directory, which is relatively simple.

You can also change the owner by using the Command Prompt. This method is faster but requires you to be familiar with Command Prompt syntax. Here’s how you can do that:

  1. First, press Windows + X and choose Command Prompt (Admin).
  2. Click Yes in the UAC prompt.yes to fix you don't have permission to save in this location
  3. Once the Command Prompt starts, paste the following command and hit Enter while replacing path_to_problematic_directory with the one in your case:icacls "C:path_to_problematic_directory" /setowner "Administrators" /T /C

After executing the command, you’ll become the directory owner and gain unlimited access. Remember that you shouldn’t change ownership of system directories because that can lead to other issues.

12. Share the problematic directory

  1. Locate the problematic folder, right-click it and choose Properties.Properties
  2. Go to Sharing tab and click on the Share button.share to fix you don't have permission to save in this location
  3. Enter Administrators and click on Add.administrators
  4. The Administrators group will now be added to the list. Set Permission Level for it to Read/Write.read/write
  5. After that, click Share.share

According to users, you might be able to solve this issue simply by sharing the directory with the Administrators group.

After sharing the directory, you should be able to access it without any problems. However, remember that this is a workaround; you’ll have to repeat it for all problematic directories.

Several users reported that you could fix this problem by sharing the folder with Everyone, so you might want to try that.

You can also try sharing the problematic directory with your user profile and check if that solves the issue. If your PC is part of a Homegroup, you might be able to fix the problem by changing the permission level for HomeGroup to Read/Write.

13. Use the Compatibility troubleshooter

  1. Locate the problematic application, right-click it and choose to Troubleshoot compatibility.
  2. Choose Troubleshoot program option.
  3. Check The program requires additional permissions option and click on Next.
  4. Now follow the instructions on the screen to finish the troubleshooting.

Sometimes specific applications aren’t fully compatible with Windows, and that can cause You don’t have permission to save in this location error to appear.

However, you might be able to fix the problem simply by using a Compatibility troubleshooter. After you finish the troubleshooting, you should be able to save files without any issues.

14. Use the Easy Context Menu

  1. Download Easy Context Menu. This is a portable application, so you don’t have to install it on your PC to run it.
  2. Now run EcMenu_x64.exe if you’re running the 64-bit version of Windows.
  3. If you’re using the 32-bit version, run EcMenu.exe.
  4. When the Easy Context Menu starts, scroll down and check Take Ownership in the Folder Context Menu section. You can also check the Take Ownership in the File Context Menu section if you want.
  5. Now click on Apply Changes icon to save changes.

After that, you’ll have the Take Ownership option in your context menu. So now you just have to right-click the problematic directory and choose to Take Ownership from the menu to fix the problem for a specific folder.

Easy Context Menu is a simple application that allows you to customize your context menu by adding or removing features from it.

The application supports many features, one of which allows you to take ownership of any folder or file. This feature is somewhat helpful if you’re having this problem.

Remember that you shouldn’t take ownership over system directories because that can sometimes lead to more problems.

15. Add your account to the Administrator groups

  1. Press Windows + R to open the Run command, enter netplwiz, and click OK.netplwiz
  2. Now select your user profile and click on Properties.properties
  3. Go to the Group Membership tab, select the Administrator option, and click OK to save changes.administrator to fix you don't have permission to save in this location
  4. After making those changes, restart your PC and check if the problem is resolved.

Usually, this problem appears if you don’t have administrative privileges on your PC. For example, this can happen if your user account isn’t a member of the Administrator group.

16. Format the drive as NTFS

  1. Make sure that your removable storage is connected. We strongly advise you to back up your files before formatting the drive, so be sure to do that.
  2. Open This PC, locate the problematic drive, right-click it, and choose Format from the menu.
  3. When the Format window appears, choose NTFS as the desired File system and enter the desired label. Now check the Quick Format option and click on Start.
  4. Wait for your drive to format.

If you see the You don’t have permission to save in this location error while trying to save files to removable storage, you might want to try formatting your drive.

Remember that formatting your drive will remove all files, so be sure to back them up beforehand.

As you might know, there are two file systems, NTFS and FAT32. Unfortunately, FAT32 is an older file system that suffers from certain limitations.

On the other hand, NTFS is newer and doesn’t have the same limitations as FAT32. So in most cases, it’s better to use the NTFS file system, and if you’re having this problem, you might want to try reformatting your drive.

Once your drive is reformatted as NTFS, the error should be resolved entirely. However, remember that you should use this solution only with removable storage.

If you want, you can also use this solution with internal drives. But be sure to back up your files to prevent file loss.

17. Disable OneDrive and unsync your files

  1. Press Windows + R to open the Run command, enter gpedit.msc, and click OK.
  2. When Local Group Policy Editor opens, navigate the following path using the pane on the left:Computer Configuration > Administrative Templates > Windows Components > OneDrive
  3. In the right pane, double click Prevent the usage of OneDrive for file storage option.
  4. Select the Enabled option and click on OK to save changes.

OneDrive is a helpful app allowing you to access cloud storage from your Windows PC.

This is a built-in feature of Windows 10, but according to some users, it can cause the You don’t have permission to save in this location error to appear. To fix this problem, you need to disable OneDrive altogether.

Remember that this method works only for Windows Pro or Enterprise. If you have Windows Home Edition, you’ll have to disable OneDrive using Registry Editor. To do that, follow these steps:

  1. Press Windows + R to open the Run command, type regedit, and click OK.
        
  2. Click Yes in the UAC prompt that appears.
  3. Modifying the registry is potentially dangerous, so before you make any changes, we advise you to back up your registry. To do that, simply click on File, and select Export.
  4. Select All as Export range, enter the desired file name, choose the safe location for your file, and click on the Save button.
  5. If any problems occur after you modify your registry, you can simply use the exported files to restore your registry to the original state.
  6. Now, paste the following path in the address bar and hit Enter:HKEY_CLASSES_ROOT\CLSID\{018D5C66-4533-4307-9B53-224DE2ED1FE6}paste path
  7. Next, double-click the System.IsPinnedToNameSpaceTree DWORD in the right pane.
  8. Set Value data to 0 and click OK to save changes.
  9. If you’re using the 64-bit version of Windows, go to this key:HKEY_CLASSES_ROOT\Wow6432Node\CLSID\{018D5C66-4533-4307-9B53-224DE2ED1FE6}
  10. Now, locate System.IsPinnedToNameSpaceTree and set its Value data to 0.
  11. Close Registry Editor and check if OneDrive is disabled. If not, restart your PC.

18. Simply log out and log back into your account

  1. Open the Start Menu and click your user profile icon.
  2. Choose Sign out from the menu.
  3. Now select your user account and log back in.

According to users, the You don’t have permission to save in this location can occur if you have two or more user accounts on your PC. You just have to sign out of your account and log back in to fix the problem.

This is an unusual workaround, but it works according to users, so try it out. Remember that this isn’t a permanent solution, so you might have to repeat it whenever the problem appears.

19. Enable inheritance

  1. Locate the problematic directory, go to its parent directory, right-click it, and then choose Properties.
  2. Go to the Security tab and click on the Advanced button.
  3. Now click on Enable inheritance button.
  4. Set the desired permissions for users and groups. In most cases, you should give Full control to your user account and the Administrators group. After you’re done, click on OK to save changes.

Your security settings are usually inherited, but sometimes subfolders might not have the same security settings as their parent folder. Therefore, you must enable inheritance for the problematic folder to fix the issue.

After that, all security permissions from the parent folder will be inherited by the subfolders, and the problem should be fixed entirely.

20. Verify your identity

  1. Press Windows + I to open the Settings app and select the Accounts section.
  2. If you see a Verify option on the right, click on it.
  3. Now you’ll be asked to enter your email address. After you submit it, a security code will be received at your email address.
  4. Enter the received code, and your account will now be verified.

According to users, you might be able to fix this problem simply by verifying your identity. For example, this problem can occur if you use your Microsoft account to log in to Windows 10.

After verifying your account, this error message should disappear, and you’ll be able to save files without any problems.

21. Run Notepad as an administrator and try to access host files again

The error You don’t have permission to save in this location mostly appears when trying to modify the host’s file. This is a system file, and Windows protect it by default.

However, if you want to modify the host file, you just need to run Notepad as an administrator and use it to open and edit the host’s file.

22. Use Safe Mode

Safe Mode is a segment of Windows that runs with default settings, so it’s perfect for troubleshooting. Several users suggested that you could avoid this problem simply by booting Windows in the Safe Mode.

Keep in mind that entering Safe Mode won’t permanently fix your problem. This is a simple workaround, and it can be helpful if you need to save a couple of files quickly. If you’re looking for a long-term solution, you might need to try something else.

23. Create a new user profile

According to users, this error message might be caused by a corrupted user profile. This usually occurs after a significant upgrade, and if you’re having this problem, try creating a new local account on the PC.

If switching to a new account fixes the problem, you might want to keep using the new account instead of your old one. In addition, you’ll need to move all your files to the new account as well.

24. Check if your permissions apply to both folders and subfolders

  1. Find the problematic folder or its parent folder, right-click it and choose Properties.properties
  2. Go to the Security tab and click on Advanced.advanced
  3. When the Advanced Security Settings window opens, locate your user profile and check Applies to column. If Applies to isn’t set to This folder, subfolders and files, you need to double click your user name on the list to change its settings.
  4. Set Type to Allow, choose This folder, subfolders and files in the Applies to dropdown, tick the checkbox for Full control, and click OK to save changes.

As we mentioned in our previous solutions, your security permissions are inheritable, but sometimes subfolders might not have the same permissions as their parent folder.

Once you save changes, your permissions will apply to all folders and subfolders, and you should be able to save files without any limitations.

25. Disable OneDrive from automatically starting with Windows

  1. Press Ctrl + Shift + Esc to open Task Manager and navigate to the Startup tab.startup
  2. Right-click Microsoft OneDrive and choose Disable.disable to fix you don't have permission to save in this location

According to users, it seems that OneDrive can cause this problem, and to fix it, you need to prevent OneDrive from starting automatically with your System.

How do I get administrator permission?

Running a program as an administrator is simple, right-click the launcher, and select Run as administrator from the context menu.

Besides, you can configure an app to run automatically with administrative privileges when launched. This would help with critical apps that require several permissions and the ones that you don’t want to throw errors.

What is a file permission error?

Encountered on Microsoft Word, the File permission error prevents users from saving files. The error appears when you try to keep files without the relevant permissions, access the folder, or save the file in the first place.

Also, if the file is stored on the network shared folder, you will receive the error. Other than that, many reported that the installed antivirus caused the problem, and disabling it fixed things.

Though, we do not recommend keeping the antivirus disabled for long. If it’s indeed the antivirus behind the error, we recommend switching to a more reliable and effective antivirus solution.

The You don’t have permission to save in this location error can be a severe problem, and it can appear on almost any PC. Security permissions usually cause this error, but you should be able to solve it by using one of our solutions.

Also, find out how to boost the System’s performance in a few easy steps and never worry about running low on resources.

Tell us which fix worked for you in the comments section below.

Discord Voice now available to everyone on Xbox Consoles

Discord Voice is available on all Xbox Series X|S and Xbox One series consoles.  This update allows you to chat with anyone on Discord via group channels or voice calls.  directly from your console.  This means you will be able to see who is on the call and speaking directly from your Xbox console.  You’ll also be able to adjust between Discord voice chat and Xbox game chat during your game.

Microsoft announced the integration, which works by connecting your Discord account on your mobile device to your Xbox, back in July for Xbox Insiders, but now it’s ready for general release.

To get started head over to the Discord mobile app and link your Xbox account.  You’ll need to do this again even if you’ve done it before.  After that, you can join any Discord voice chat or call and transfer it to your Xbox.


Confirmed: Goldeneye 007 on Xbox will be a 4K remaster, but without online multiplayer

There has been a lot of confusion surrounding the big Goldeneye announcement in yesterday’s Nintendo Direct event, with Microsoft making a similar announcement the same day. What we know is that the classic first-person shooter Goldeneye 007 will be coming to both Nintendo Switch and Xbox—in the latter case via Xbox Game Pass.

We also know that the Xbox version will be a remaster of the game, with support for 4K resolution. What it will not have, however, is online multiplayer. That feature will apparently be exclusive to the Nintendo Switch online service. It will mark the first time the game has gone online. Xbox players will still be able to enjoy local multiplayer for up to four players—which was one of the things that made the original Goldeneye such a blast in the first place.

To recap and hopefully clear up any confusion:

  • The Xbox release of Goldeneye 007 will be a completely different, remastered version of the game, and will be available on Game Pass. It will include local multiplayer as in the original game.
  • The Switch version will be a re-release of the original game with (exclusive) online multiplayer.

It didn’t help that both Nintendo and Microsoft chose to unveil their versions of the game on the same day. Maybe they were trying to steal each other’s thunder? Anyhow, it seems the game will be “coming soon,” although no specific release date has been given.

Module Not Found: Can’t Resolve React-Router-Dom [Fixed]

If you are a React programmer who builds web applications, you will need a dedicated router to help your users navigate through them.

But it can sometimes crash and display the message module not found: can’t resolve react-router-dom and you might have no idea as to how to fix it.

Today we’ll help you fix one of the most common errors of the React router. Keep reading to find out!

What is a React Router Dom?

The React Router is a full-fledged client-side to server-side routing library for React. The React Router Dom uses dynamic routing in a web app that helps users navigate efficiently. 

Developers who build React web apps use the React Router Dom to build single-page applications on the web. That is, a web application with many pages or components is never refreshed; rather, content is fetched dynamically.

React Router DOM v6 — Part — I. React enables us to develop single-page… |  by Arjun Vaidy | Nerd For Tech | Medium
Source: Medium

The react-router offers a better user experience as it is extremely quick when compared to traditional page navigation and also offers better app performance overall.

Now that you know what routing is and why programmers use React Router Dom, there’s still one thing you should know. There are three types of React Router, and each serves its purpose.

Difference between React Router VS React Dom VS React Native

If you are a React developer, you have three libraries to choose from. All three are almost identical, but they have their use cases. We’ll go over each one of them so you can understand their differences.

  • React-router – Includes all the custom components and features from the react-router-native and react-router-dom libraries.
  • React-router-dom – Mainly used for web applications that are built with React.
  • React-router-native – Built for the React Native framework that is used to create mobile applications using React.

Without further ado, let’s see what you can do if you are getting the module not found error message. Follow along!

What can I do if seeing the error module not found message?

1. Install the dependencies properly

  1. Check if you correctly typed react-router-dom or if you typed react-dom or react dom because the latter two are incorrect.
  2. If the dependencies are not properly installed, use the command react-router-dom to install the dependencies.react router dom error
  3. If the error module is not found: can’t resolve react-router-dom persists even after installing the correct dependency, then try the following commands: npm install react-router-dom --save or npm install -S react-router-domnpm-install module-not-found-cant-resolve-react-router-dom

By using the commands that are mentioned above in the console, you add a dev dependency on your package.json file. This allows you to resolve the error and simultaneously install the dependency on other computers that show module not found: can’t resolve react-router-dom

2. Update the NPM to version 5

  1. To update the NPM to version 5, use the command npm update -gnpm-update module-not-found-cant-resolve-react-router-dom
  2. Confirm now if you are still facing the error module not found: can’t resolve react-router-dom.

Before version 5, NPM by default installed a package under node_modules.

If you are trying to install dependencies for your module/app, you will have to install it and then add it to the dependencies section manually to your package.json. By updating to version 5, you can also resolve issues such as Can’t resolve Axios and the NPM err could not find executable to run.

3. Check if you have the correct dependencies installed

  1. Press and hold the Ctrl button and left-click on the react-router-dom word. react-router module-not-found-cant-resolve-react-router-dom
  2. After clicking, you should be redirected to the origin node_modules file of the dependency. If you don’t get redirected, install it again.
  3. You can install it using the command npm install react-router-dom --save or npm install -S react-router-domnpm-install module-not-found-cant-resolve-react-router-dom

The Can’t resolve in the React Router is usually because of improper installation. And this is usually common when you don’t have the correct dependencies installed on the application that you are trying to use.

The React Router helps create web apps by keeping the UI and the URL of your application in sync. These applications are much easier to deploy, run efficiently, and significantly improve the user experience.

But like most things, the React Router can sometimes crash or show an error code, and you can fix it with proper help. As for those of you worried about a similar issue, this guide dedicated to the NPM error on Windows: How to fix it is what you are looking for.

We hope we helped you resolve the error and would love to hear back from you regarding the same in the comments below!

Fix Samsung Laptop if It is Not Booting After Software Update

Though Windows is an advanced operating system, it too comes across errors. And, the worst of these are the ones that prevent your device from booting. One such error is encountered on Samsung laptops when it stops booting after a software update.

The fact that the laptop doesn’t boot after an update indicates an issue with the latest installed version itself. It could be either an update for Windows, a driver, or an application.

But, fret not! The problem is easily fixable and we have listed the most effective solutions if your Samsung laptop is not booting after a software update.

Why is my Samsung laptop not starting up?

The most common reason behind the problem is incompatibility. If the installed version is not compatible with the device, it may fail to boot and the Samsung laptop will not be starting Windows.

Apart from that, it could be a bug in the latest version itself. Oftentimes, a new version introduces some kind of instability to the system and your Samsung laptop won’t boot past the logo.

In some cases, it could have to do with issues with the laptop itself. For instance, problems with the battery, charging cable/port, or motherboard. Also, display issues could lead to this error.

Now that you have a basic understanding of why your Samsung laptop is not booting after an update, let’s walk you through the solutions for it.

What do I do if my Samsung laptop is not booting after a software update?

1. Perform some basic checks

The first thing you have to check is whether the hardware components work fine. If the battery in your laptop is already dead, make sure that the charging port and cable work fine, since these will be the only source of power.

Also, you may use a different battery to verify if the problem lies with one currently connected to the PC.

Another thing you can do is connect a spare monitor to your laptop. This will help identify if the problem lies with the laptop’s display or whether it’s a software issue leading to the problem.

If none of the methods listed here have worked, head to the next one.

2. Uninstall the recent update

  1. Press the power button on your laptop and wait for the display to light up. As soon as you see the manufacturer’s logo, hold the power button to force shut down the computer. Repeat the process 3-4 times until the Automatic Repair process starts.
  2. Click on the Advanced options button on the Automatic Repair screen.Advanced options to fix samsung laptop is not booting after software update
  3. Next, click on Troubleshoot.Troubleshoot
  4. Again, select Advanced options.Advanced options
  5. Click on Uninstall Updates from the six options that appear here.Uninstall updates to fix samsung laptop is not booting after software update
  6. Select the type of update you want to uninstall, Quality, or Feature.Type of update
  7. Now, click on the Uninstall feature update (we selected feature update earlier) button.Uninstall to fix samsung laptop is not booting after software update
  8. Wait for the update to be uninstalled, and once that’s done, restart the computer.

In most cases, it’s the problematic latest version behind your Samsung laptop not booting after a software update. You can easily uninstall the latest update from the Recovery Mode, even when Windows doesn’t boot.

In case the Samsung laptop recovery is not working, try the other ways to access the Recovery Mode. Also, if this method works, do not right away update whatever you did the last time, and wait for the next version of it to be released.

3. Run the SFC scan

  1. Turn on your Samsung laptop and as soon as the display lights up, hold the power button to turn it off. Repeat the same process 3-4 times until Automatic Repair kicks in.
  2. Click on Advanced options.Advanced options
  3. Next, click Troubleshoot to proceed to the recovery options.Troubleshoot to fix samsung laptop is not booting after software update
  4. Click Advanced options.Advanced options
  5. Select Command Prompt from the various options here.Command Prompt
  6. Paste the following command and hit Enter to run the SFC scan:sfc /scannowSFC scan to fix samsung laptop is not booting after software update

After the scan is complete, restart the computer. The Samsung laptop not booting after the software update error in Windows 10 will be fixed.

The SFC (System File Checker) scan is highly effective at locating and replacing the corrupt system files on the computer. In some cases, these files may corrupt during an update process, which is when running the SFC scan might do the trick.

If this doesn’t work, try the next method.

4. Perform a system restore

  1. Press and hold the power button to turn on the Samsung laptop. Now, as soon as the display lights up, again hold the power button to force shut down the laptop. Repeat the process 3-4 times, until you see the Automatic Repair screen.
  2. Now, click on Advanced options here.Advanced options
  3. Click Troubleshoot.Troubleshoot
  4. Next, again click on Advanced options.Advanced options
  5. Select System Restore from the six options listed here.System restore to fix samsung laptop is not booting after software update
  6. Click on Next in the System Restore window to proceed.Next
  7. Choose a restore point from the list and click Next.Select point
  8. Now, verify the restore details, and click on Finish to start the process.Finish to fix samsung laptop is not booting after software update
  9. Click Yes in the confirmation prompt that pops up.Yes

System Restore is an advanced troubleshooting method that helps effectively eliminate the underlying cause when your Samsung laptop is not booting after a software update. Make sure to choose a point created before you first encountered the issue while booting Windows.

Also, find out how to create a restore point in Windows 11 since these come in extremely handy when you encounter such errors. Though with the right settings in place, Windows will automatically create a restore point before undergoing any major changes.

If you want to choose a much easier way to restore your system, you can always use specialized software that performs these steps automatically.

5. Reinstall the Windows

If none of the methods listed here have worked, you are left with no option but to reinstall Windows. Here, it’s recommended that you do a clean install.

There are various ways you can reinstall Windows 11 or Windows 10, depending on the iteration installed. Most users prefer the bootable USB drive method but you can also try the other ones to reinstall the OS.

6. Use a dedicated third-party tool

A relatively simpler and quicker way to fix boot issues is to use a dedicated third-party tool. We recommend using Windows Boot Genius by TenorShare, a highly effective software tool that not just fixes boot problems but also a plethora of BSOD (Blue Screen of Death) errors.

Also, Windows Boot Genius can help recover data from an unbootable hard disk, apart from fixing a corrupt Registry, and recovering the Windows password or product key.

⇒ Get Boot Genius

That’s it! By the time you reach this part of the article, the issue behind your Samsung laptop not booting after a software update should be eliminated.

For more information and potential solutions, check out our post on what to do if your laptop is not booting up after a Windows update.

Alternatively, users found our guide on laptop is not booting up after RAM upgrade, very helpful since the issue was similar with the one presented above.

Tell us which fix worked for you in the comments section below.

Dell 2K Webcam Review: Straightforward clarity

Starting at $134.99

While PC manufacturers are slowly coming around to updating their integrated webcam experiences, external solutions continue outpace development and performance of the out-of-the-box conferencing hardware, and Dell’s Pro Webcam (WB5023) is the perfect example.

Dell currently offers a 4K Ultrasharp webcam for $199, but now the company is introducing its 2K QHD variant that can capture 30fps at that resolution or 60fps at 1080p for $134.99 (both webcams are currently on sale from Dell).

Dell 2K webcam package

With most conferencing software capping their resolutions at 720p of 1080, the (WB5023) is closer in line with current support but offers a bit more clarity for anyone who might also want reasonably priced streaming cam as well.

In addition to the 2K QHD resolution the (WB5023) also offers a 78-degree field of view (FOV), up to 4 times digital zoom, HDR, AI auto-framing, and a moderately effective microphone.

Specifications
Resolution FPS 2K QHD/30fps; Full HD/30fps; HD/60fps
Diagonal Field of View 78 degrees
Zoom 4x digital
Autofocus Yes
HDR Yes
Microphone Built-in noise reduction mic
Connection USB-A (non-detachable)
Mount Built-in monitor clip with tripod mounting point
Dimensions (L x W) 3.6 x 1.73 inches (92 x 44 mm)
Weight 0.34lbs / 155g
Software Dell Peripheral Manager
Special Features AI Auto Framing


Look and Feel

The (WB5023) is a hefty cylinder-shaped webcam that has very few lines, a single connecting wire, and a large unobstructed lens with attachable magnetic cover. My review unit came in a dark grey, almost matte black color with a retractable rubber-covered mount slip that also contains a 1/7 slip at its bottom to help further secure the webcam to most monitors and laptop lids.

For professionals, there is also a screw-in mount that can be applied to a retratracble desk arm or tripod.

Dell 2K Pro Webcam Front

The single connecting wire is permenately attached to the back of the webcam and stretches roughly five feet and ends in a USB-A connector to help support the lowest common dennomenator port on newer and older devices.

Aside from its unique barrel shape, there is not much more the design of the (WB5023), such as sliders, lights, switches or buttons which helps it blend into most backgrounds and desktop setups.

Performance

Under mosf office florescent lighting, the (WB5023) does a decent job at adding in black and contrast levels automatically to keep subjects from looking washed out initially. The 2K resolution is a mixed bag however, with the clarity feeling almost amped up with overly artificial sharpness which is noticable when a subject moves too quickly for the sensor to trace.

Dell 2K Webcam

The (WB5023) outpeformed my Logitec C920x and Streamcam when lighting comes from above and behind the camera’s sensor.

When in less than ideal conditions, the (WB5023) struggles but less than other webcams, especially when trying to find white balances between backgrounds and darker skinned subjects. Without a light ring (which many webcams come with) the 2K clarity picks up the darker areas in focus much more and produces a darker capture than what may actually be in the room.

Dell 2K webcam - lens

There is software the accompanies the (WB5023) that allows users to tweak brightness, sharpness, contrast, HDR, Auto White Balance and even camera controls among other presets. Users can head to Dell’s website to grab the software for free and go through the five-minute set up to gain access to more granular controls over FOV, Zoom, and capture settings. However, using the Dell Peripheral Manger to adjust clarity, contrast, or even sharpness does minimal to change the overal image quality.

Dell 2K webcam - in office

Ideally, users are relying on dedicated microphones or even modern computer mics than leaning on the use of the (WB5023) as it’s hollows out the sound in a room and puts an auditory distance between the users and their audience. In my experience hosting the OnPodcast for an episode using the mic, listeners said my audio was too low at times despite being less than two-feet away from the camera.

Summary

If you already own a Dell PC, it’s a recommended buy, the software and hardware play very well with one another and if you’re business looking for an easy fleet purchase ofr employees, it’s also a very office aesthetic.

Dell 2K Webcam dark room

The 2K out-of-the-box clarity is miles ahead of 80% webcams sold individually or integrated into hardware and while the software controls leave a lot to be desired, they remain a last minute option to squeeze out a really professional looking capture from the (WB5023).

Where I have pause further recommending it to the average Zoom warrior is both in price and realistic utility. As I mentioned, most conferencing software taps out at 1080p support and while 2K looks great pre-capture, compression algorithms will chop up and churn out a very different picture. Unless you’re into streaming or using conference software that supports resolutions higher than 1080p, you might find a better value from something under $100 online.

Best PDF Merge Software: 7 Best in 2026

Manually transferring information between two PDF files can be an extremely stressful task, especially when both documents contain several pages. And this is where the best PDF merge software comes into the picture.

If you ever found yourself in a situation where you needed the information contained in two PDF files to be transferred into one document but don’t have the time to do it manually, the next few minutes will simplify the whole experience.

In this article, we will explore some of the best free software to combine PDF files that allows you to combine the data from two PDFs without corrupting it in any way.

What is the best software to combine PDFs easily?

Soda PDF – Very efficient software

Soda PDF is one of the best PDF combiner tools that can merge PDF files with ease. Merging or combining documents is a very popular feature of Soda PDF.

You can keep the size and orientation of all the pages within the original files even though you add multiple files together.

By using the PDF combiner and PDF joiner, you can still make alterations to the document. If you want to change the order of the pages of your PDF, you can easily do it.

Before or right after merging two or more PDF files, you can use the split tool to remove any page you want from your original document that you don’t need in the final PDF file.

If you never did this before, Soda PDF has accurate information for combining PDF files on their website so that it can be easy for you to use the software.

Choose to use Soda PDF for a quick and easy experience of combining PDF files.

Soda PDF

Edit, compress, split, secure, and merge PDF files!
Check price Visit website

Adobe Acrobat DC – Best PDF tool

Adobe Acrobat DC is the best software option that gives you the power to easily merge one or more PDF files.

One of the best features found in this software is its ability to transfer the file with a link, so it will be easy to open, review, and edit the PDF file. Moreover, it is a platform adapted for team collaboration.

A greatly useful feature found in Adobe Acrobat allows you to merge files from Microsoft Office format and images (JPG, PNG, etc.), in order to have a single organized PDF that is easy to share with others.

Adobe Acrobat has an intuitive interface and is easy to use due to the drag-and-drop features where you can manage the pages from your files in order to look organized on the final PDF document.

As Adobe is the most powerful tool in the drawing and designing industry, you can benefit from adding and eliminating customized backgrounds and watermarks for a better aspect.

To combine files in Adobe Acrobat DC, you have to go to the Combine files tab and select Add files. Select whatever files you want to add, edit, and merge and then rearrange them with drag and drop features.

After you have the final variant of your work, click Combine files and then Save.

Adobe Acrobat DC

Combine and merge your PDF files with one of the best software tool for PDF management.
Free trial Visit Website

SwifDoo – All-in-One PDF

SwifDoo is a software that can help you edit PDF documents in many easy ways. It is an affordable program with an intuitive tabbed interface.

It is an excellent option to merge PDF files. You can easily combine multiple PDF documents into one file, which makes it easier for you if you want to share them with others.

It also helps you organize your documents and decrease time spent reentering data from different files. Moreover, it offers a multitude of useful features to control your PDF files. Some that are worth mentioning are editing, compressing, converting, and merging PDF documents.

Other great features that this software offers are annotating, signing, and even protecting your documents in a matter of seconds.

The good thing about the program is that it doesn’t require you to follow a complicated process of combining files. Instead, you can download the software and start merging files immediately.

Other notable features you should be aware of:

  • Split PDF pages instantly
  • Insert links, pages, and images
  • Change font, style, and colors
  • Select and crop PDFs
  • Compress without degrading document quality

SwifDoo

Exceptional software with various features that helps you get the most out of merging, editing, converting, and compressing PDFs.
Free Trial Visit Website

PDF Merge – User-friendly interface

PDFmerge is a powerful online tool that can also be used offline if downloaded, which can help you easily combine two or more PDF files.

The user interface of both the website and the downloadable application is very user-friendly and is designed to make every option easy and comprehensive.

One of the downsides of using PDFmerge is that it has a limit of 15MB size files. In case you have a large number of PDF files to merge, you would have to take the files one by one.

This can cause efficiency issues when working with a large number of files. If you find yourself in this situation, it is recommended that you use other software options from this list.

The process of merging two PDF files is easier than ever. Just choose the files you want to merge by clicking the ‘choose file’ buttons, and then you can simply click Merge.

You can also process batch PDF files by using PDFmerge. In order to do this, you will need to select the multiple files you want to process and then click on More files to be able to combine 5 or more files into one document.

Depending on the size of your documents, the process should take less than 30 seconds. After the processing is complete, you can download your newly merged file on your PC or any other device.

The process of uploading your files to the PDFmerge servers is done by using a secure transfer with an encryption connection, so you don’t need to worry about any third party having access to the data inside.

More than that, all uploaded and processed documents and deleted after a maximum of 24 hrs from the last login session.

⇒ Get PDFmerge

PDF Combine – Simplest application

PDF Combine is another great software option that allows you to easily merge two or more PDF files with ease.

In order to get started with using PDF Combine, you can add files to this software by either using the Add button, dragging & dropping files into the window, or clicking Add Folder to import an entire folder.

The next step is to adjust the way your PDF files will be combined into one. Choosing this is essential as this is the process in which you build your final PDF document.

In order to reorder the PDFs found in the list on your screen, you can just select the desired file and then move it by using the up and down arrows on the side of the window.

Now you want to set up the location in which PDF Combine will export your final documents. You can do so by clicking on the Output Path button on the lower left side of the window.

After everything is set up, you can click on the Combine Now! button. The task will start instantly and will begin to process the entire range of information contained in your files.

After the process of merging is complete, you will notice a pop-up window that will announce to you that the process is done successfully.

⇒ Get PDF Combine

PDFMate Free PDF Merger – Free great features

PDF Mate is another very powerful PDF merger-free software that contains a wide range of other useful features as well. You can use this app to join, combine, and break apart PDFs into usable pieces.

Using this software gives you the power to upload and process large PDF files, delete specific pages from your document if needed, and combine specific elements of two or more PDFs.

Furthermore, you can rearrange the information to suit your needs and can also convert scanned files. Also, with PDF Mate, you can combine multiple pdf files fast and select which pages to be merged.

You can convert BMP, JPG, PNG, and TIF to PDF. Moreover, you can choose between 2-in-1 or 4-in-1 page layouts, so you can reduce paper waste and the time spent editing.

In addition, you can create an encrypted final PDF file. This allows you not to worry about anybody gaining access to your personal data.

Here are some of the features of the free version of PDF Mate:

  • Can convert all scanned PDFs to be used as editable and searchable text
  • Can convert files into multiple formats – PDF to Text/ EPUB/ Html/ Image/ SWF/ Word
  • Converts JPG to PDF
  • Allows you to customize every aspect of the way the program runs so you keep everything under control
  • Can personalize the PDF file size, edge, and direction
  • Can set up administrator permissions and choose who can edit, copy or print out the documents
  • Combines batch PDF files into one with just one click

⇒ Get PDF Mate

Combine PDF – Easy to use

This is a very easy-to-use and fast online website tool that doesn’t have a great range of features that the previous software options do, but it still does its job perfectly.

You can find other useful tools on the same website, like modules that allow you to convert your PDF files to DOC, DOCX, Text, PNG, etc.

This site can process up to 20 PDF files at once, and you can drag and drop them with ease in the merge window. You can, of course, edit the order of the files to be merged and then simply click on the Combine button.

The process should only take a short amount of time.

⇒ Get Combine PDF 

In this article, we explored some of the best pdf merge software options to use when you need to combine two or more PDF files into a single file.

You can choose between fully online PDF combiner software, or download free software to your PC, so you quickly get access to it even if you are not online.

We would love to find out what software option you chose from this list and how that worked out for you. Please feel free to let us know what you think in the comments section below.
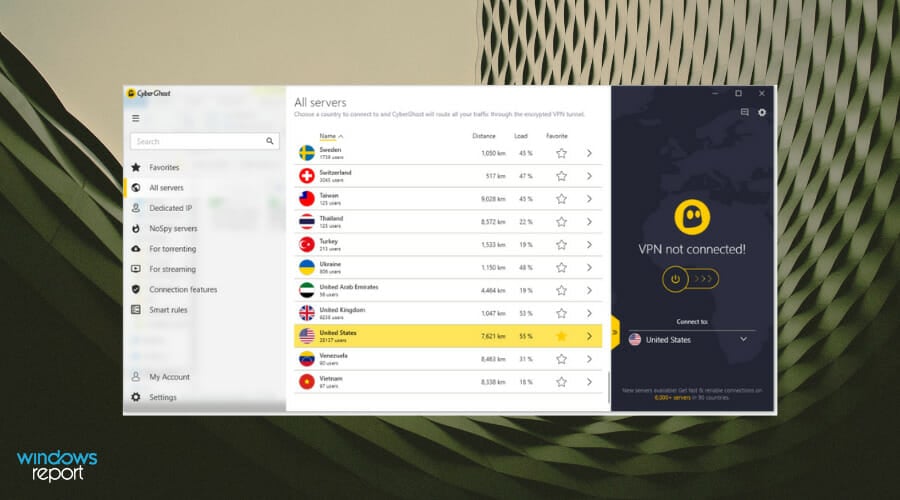
Marvel’s Midnight Suns has a new release date and it’s this year

After Midnight Suns had its release date delayed until “sometime before March 2023” last month, most expected the Marvel Comics video game to come out sometime in early-2023. It was a bit of surprise this past week when, at the first Disney and Marvel Showcase, the game was given the new release date of December 2nd this year for both Xbox Series S and Xbox Series X.

Unfortunately for Xbox One console owners, the release for the last-gen version is still TBA, however.

Marvel’s Midnight Suns is a rather dark and mature action roleplaying game that brings together a variety of Marvel characters from Wolverine, Spider-Man, and Blade to Ghost Rider, Magik, and Scarlet Witch.

After more Xbox news? Follow us on Twitter and Facebook.

Get the September 2022 Adobe Patch Tuesday updates

Many of you have surely been anxiously waiting for the Adobe Patch Tuesday rollout, and we’re here to make it a bit easier for you to find what you’re looking for.

No, Microsoft isn’t the only company that has such a rollout on a monthly basis, so in this article, we’re going to talk about Adobe and some of the patches for their products.

And, as you know we do every month, we will also include links to the download source, so you don’t have to scour the internet to find them.

Adobe releases updates for 63 CVEs

However, before we begin, let’s also take a look at what happened in August 2022, when Adobe released 25 CVEs in four patches for Acrobat and Reader, Commerce, and FrameMaker.

The highlight of last month’s release was definitely the FrameMaker update which addressed a combination of six CVEs, five of which could lead to code execution.

It should absolutely go without saying that the most severe of these could allow code execution if an attacker convinces a target to open a specially crafted PDF document.

Now that that’s out of the way, let’s get back to the present and explore what the company has prepared for its users as a part of the September batch of patches.

This month, September 2022, we are looking at security fixes for software such as Bridge, InDesign, Photoshop, InCopy, Animate, and Illustrator.

InDesign

We are going to start with the update for InDesign this time, which is also the largest patch this month for Adobe products.

Adobe had to fix eight Critical-rated and 10 Important-rated vulnerabilities, the most severe of these could lead to code execution if a specially crafted file is opened on an affected system

Affected versions

ProductAffected versionPlatform
Adobe InDesign17.3 and earlier versionsWindows and macOS 
Adobe InDesign16.4.2 and earlier versionsWindows and macOS 

Photoshop

There are so many people using Adobe Photoshop that this message should be treated with the upmost importance.

This month’s Photoshop patch fixes 10 CVEs, 9 of which are rated Critical. As well as in the case of InDesign, an attacker can get code execution if they can convince a user to open a malicious file.

Affected versions

ProductAffected versionPlatform
Photoshop 202122.5.8 and earlier versions     Windows and macOS
Photoshop 202223.4.2 and earlier versionsWindows and macOS

InCopy

We’re now going to look at some Adobe software that isn’t as popular or widely used as Photoshop or Reader but needed fixing nonetheless.

For September 2022, Adobe issued a fix patch for InCopy, meant to address fixes five similar code execution bugs and two info disclosure bugs.

Affected versions

ProductAffected versionPlatform
Adobe InCopy  17.3 and earlier versionWindows and macOS
Adobe InCopy  16.4.2 and earlier versionWindows and macOS

Animate

Yes, this month we are also getting an Adobe Animate patch, even though this software hasn’t been susceptible to attacks in quite some time now.

That being said, know that, for September, Adobe Animate also receives patches for two Critical-rated code execution bugs.

Affected versions

ProductVersionPlatform
Adobe Animate 202121.0.11 and earlier versions
      
Windows and macOS
Adobe Animate 202222.0.7 and earlier versionsWindows and macOS

Bridge

Next, we’re going to take a closer look at the update for Adobe Bridge, one that corrects 10 Critical-rated code execution bugs and two Important-rated info disclosure bugs.

Some pretty nasty bugs got fixed in this month’s Patch Tuesday release, so it makes you wonder what else Adobe is hiding behind closed doors.

Affected versions

ProductVersionPlatform
Adobe Bridge  12.0.2 and earlier versions Windows  and macOS
Adobe Bridge  11.1.3 and earlier versions Windows  and macOS

Illustrator

We can’t end this article without also taking a peek at the updates that Adobe has prepared for the Illustrator application.

Thus, one of the three Illustrator vulnerabilities getting fixed could also lead to code execution, which really comes as no surprise anymore.

Just as in the cases described above, a user would need to open a malicious file with an affected software version in order for the attack to begin.

Affected versions

ProductVersionPlatform
Illustrator 202226.4 and earlier versions Windows and macOS
Illustrator 202125.4.7 and earlier versions Windows and macOS

Also, Adobe managed to patch Experience Manager as well, and addressed 11 Important-rated bugs, primarily of the cross-site scripting (XSS) variety.

Remember that none of the bugs fixed by Adobe this month are listed as publicly known or under active attack at the time of release.

This is what you are looking at in terms of Patch Tuesday releases for Adobe for the month of September 2022, so hurry up and get the software.

What’s your take on this month’s release? Share your thoughts with us in the comments section below.