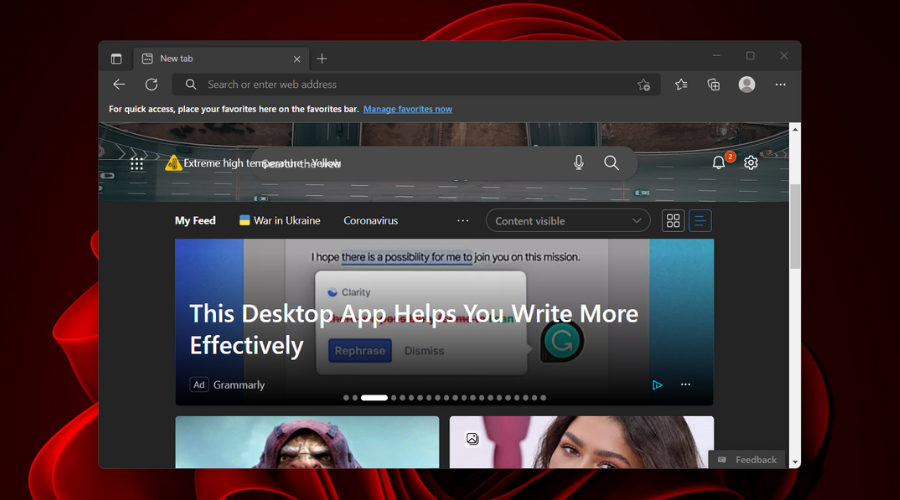
Edge Collections sync problem is under investigation
Through a Reddit post, representatives of the Redmond tech giant have confirmed that the Edge browser is currently experiencing problems with syncing Collections.
In fact, many users have reported issues such as the inability to toggle on or off collections sync in the profile settings and changes not appearing on other devices.
Hey friends! First and foremost, I wanted to apologize sincerely for this inconvenience, but also send a huge thank you to all of you for always being so proactive in posting anything you run into when using MS Edge. It helps us see what you’re enjoying and what you’d like to see improve.
Now, even though some of you might not have heard of such issues, allow us to remind you that this isn’t a particularly new problem for the browser.
As a matter of fact, you can trace it back to several versions of the software, even a couple of years back if we look deep enough.
The most recent reports, however, surfaced about a month ago, when Edge 102 was released to the general public.
Reports varied from the status in the menu saying Not syncing, to not being able to enable Sync, while some users said that logging out of their account and signing in did not resolve the problem.
The silver lining here, if we can call it that, is that Microsoft is now officially aware of the above-mentioned issues, and the necesary bug fixes are on their way.
According to the Reddit post, Microsoft will fix the broken Collection sync button in the next Android release.
As far as other issues go, such as changes in Collections not appearing on other devices, they should be gone in Edge 104, which will be released next month (August).
But wait, there’s more. Along with fixing these known and annoying known bugs, the Microsoft team is busy adding new features to Collections in the browser.
Microsoft also recently announced several new productivity-focused capabilities, such as collaborative editing, images, and video support, and a feed with ads recommended content.
We are waiting on Microsoft to confirm a fix for the above-mentioned Collection problem and we will keep you posted as soon as new details are available.
Have you also been experiencing Collections sync problems while using Edge? Share your experience with us in the comments section below.
Windows 10 users reported that their keyboard isn’t working in Chrome, but it seems that this issue isn’t related only to Chrome. Other web browsers have this problem too.
Recently Firefox users are starting to complain that their keyboard is not working on the browser. This prevents them from typing in the address bar and also using shortcuts.
As always, we have gathered proven fixes to help solve the problem without breaking a sweat. You only need to follow the instructions, and you will be fine.
Why is my keyboard not working in Firefox?
There are several reasons your keyboard, whether navigation, shortcuts or the media keys, is not working on Firefox. Below are some of the well-known causes:
Interference from another app
Faulty browser extensions
Broken, missing, or outdated driver
Outdated browser
Quick Tip:
Are you looking for a more stable browser? Then you should consider the Opera One browser. It is indeed one of the most private browsers you can have, thanks to its built VPN and ad blocker.
As a smart alternative to Firefox, it features all the good stuff you’ve been dreaming of. This includes a Crypto Wallet, Workspaces, Tab Islands, native AI and modular AI-ready design for integration with current and future AI technologies.
Opera One
Where Firefox fails to meet your expectations, this lightweight browser thrives.
Antivirus software can sometimes interfere with your applications and can even cause your keyboard to stop working in Firefox.
According to users, the cause of this problem is the Kaspersky antivirus and its Safe Money feature. After disabling the Safe Money feature in Kaspersky, the keyboard started working again in Firefox.
This issue is not limited to only the mentioned software, as other antivirus applications can cause this problem to appear. So, if you can’t type text in fields or your keyboard is not working in Firefox, you should temporarily disable your antivirus software.
Lastly, if you need an antivirus that won’t mess with your PC, you can try the award-winning ESET NOD32. This fast and light software solves security problems without creating new ones elsewhere.
2. Reinstall Firefox
Press the Windows + I keys to open your PC Settings.
Select the Apps option.
Click on Mozilla Firefox and select the Uninstall option.
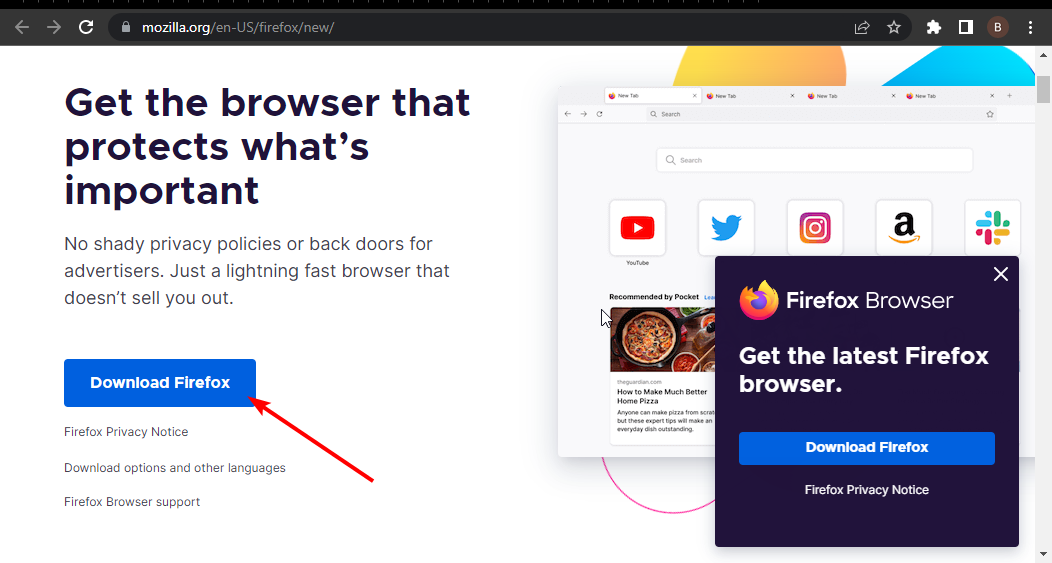
Now, go to the official website to install the Firefox installer.
Click the Download Firefox button.
Lastly, click on the downloaded file and follow the simple onscreen instructions to complete the installation.
Sometimes this issue can occur if your Firefox installation is corrupted. However, you can easily fix this problem simply by reinstalling Firefox.
Aside from the manual steps above, you can also use one of the best uninstaller software to make the process easier. After completing the process, check to see if Firefox still won’t let you type in the address bar.
3. Use Windows Key + Shift shortcut
Dell laptop owners reported that their keyboard isn’t working in Firefox, and according to them, the problem was caused by pressing Windows + Fn keys.
According to them, you can easily fix this problem by using Windows+Left Shift keys shortcut. After using that shortcut, your keyboard should start working in Firefox again.
Also, another reported keyboard shortcut for solving this issue is pressing the Windows + F9 keys a few times. So, you can try these key combinations and see if they work for you too.
4. Remove the add-ons
Open Firefox and click the Menu button in the top right corner.
Choose Add-ons from the menu.
Go to the Extensions tab, and locate the extension you want to disable.
Click the Disable button next to it. Repeat this step for all installed extensions.
After disabling all extensions, restart Firefox.
Many web browsers support add-ons that extend their core functionality, but sometimes add-ons can cause certain problems.
Users reported that when their keyboard was not working in Firefox, they managed to fix it by disabling the add-ons.
5. Refresh Firefox
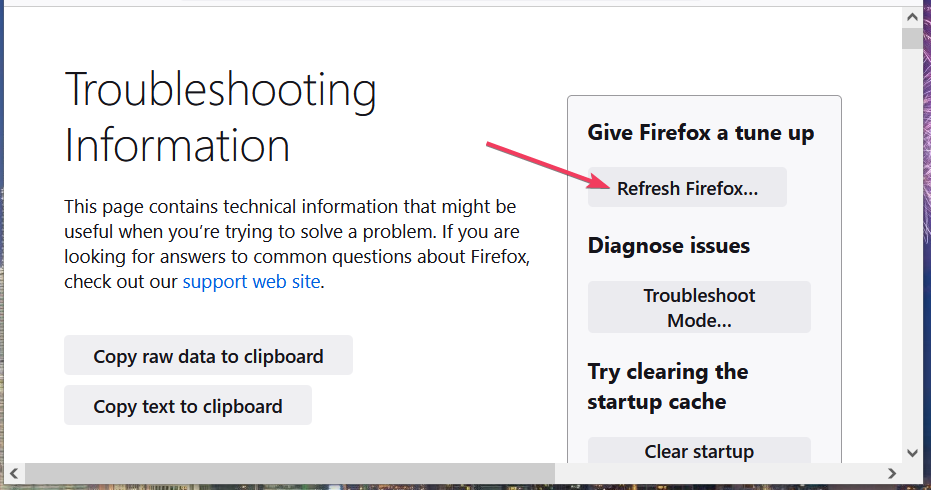
Type about:support in the Firefox address bar and press Enter.
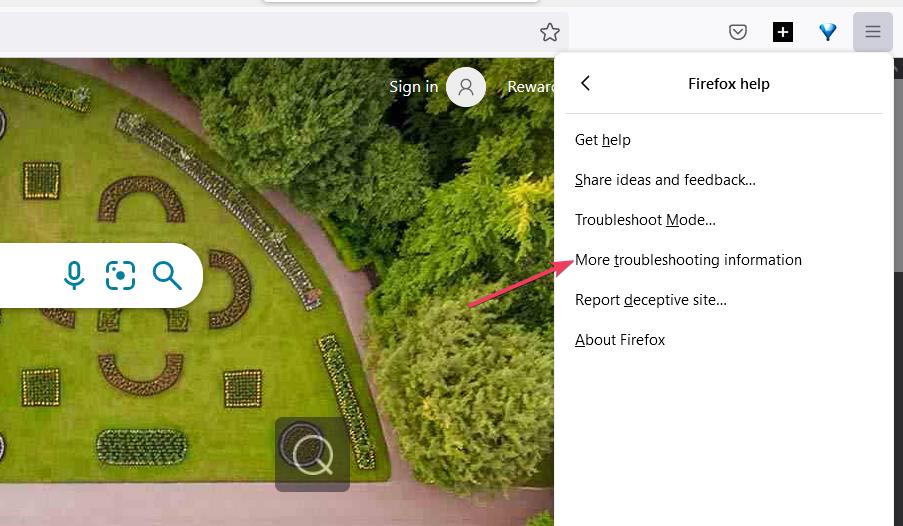
Now click the Refresh Firefox button.
A dialog box will appear. Click Refresh Firefox again.
Your browser will now automatically restart.
According to users, you can fix this problem by refreshing Firefox.
By using this option, Firefox will be restored to default, and all your extensions will be removed. However, your data, such as bookmarks and passwords, will be saved.
After the refresh process is completed, check if the problem with your keyboard is resolved.
6. Reinstall the keyboard driver
6.1. Reinstall driver manually
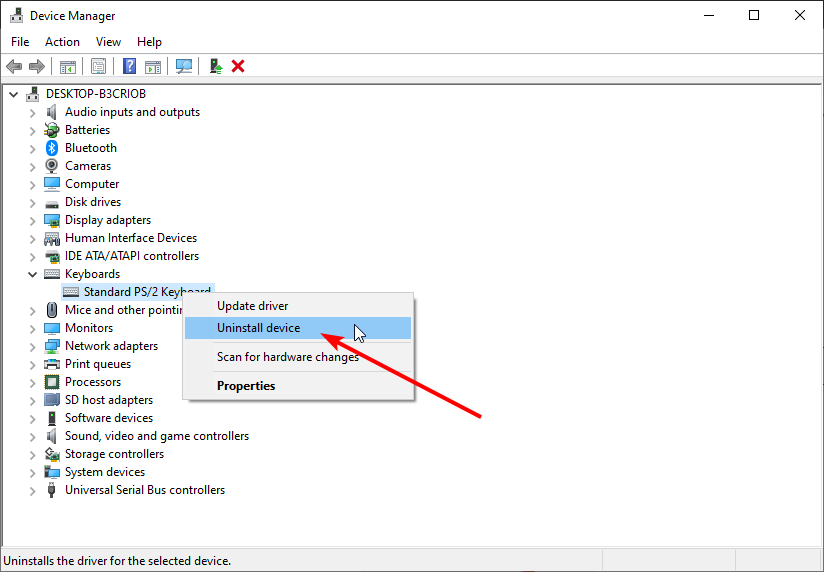
Press Windows key + X and choose Device Manager from the list.
Double-click on the Keyboards option to expand it.
Right-click on the driver under the keyboards and choose Uninstall device.
Click the Uninstall button to confirm.
Restart your PC.
After your PC restarts, the default driver will be installed, and the issue should be resolved completely. Several users reported that this solution worked on their laptops, so you might want to try it out.
6.2. Reinstall driver automatically
Instead of going through the stress of reinstalling your keyboard driver before fixing it, you can automatically use the Outbyte Driver Updater driver updater to solve the problem.
Outbyte Driver Updater is a software tool that optimizes your PC drivers for top performance. It automatically scans and fixes broken, missing, and outdated drivers.
What’s more, it has over 18 million trusted drivers from reliable sources in its database. With this, you are sure it has all it takes to ensure your PC never suffers any driver issues.
Sometimes the simplest solutions are the best, and if your keyboard isn’t working in Firefox, a simple restart might fix the problem.
This is because issues with software such as KeyScrambler can cause the problem. In this case, restarting your PC should help solve the problem with the keyboard and Firefox.
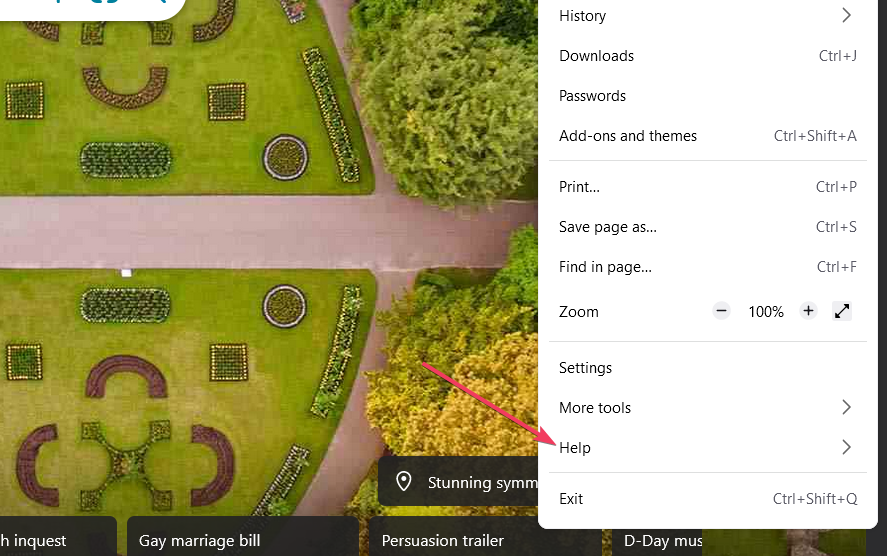
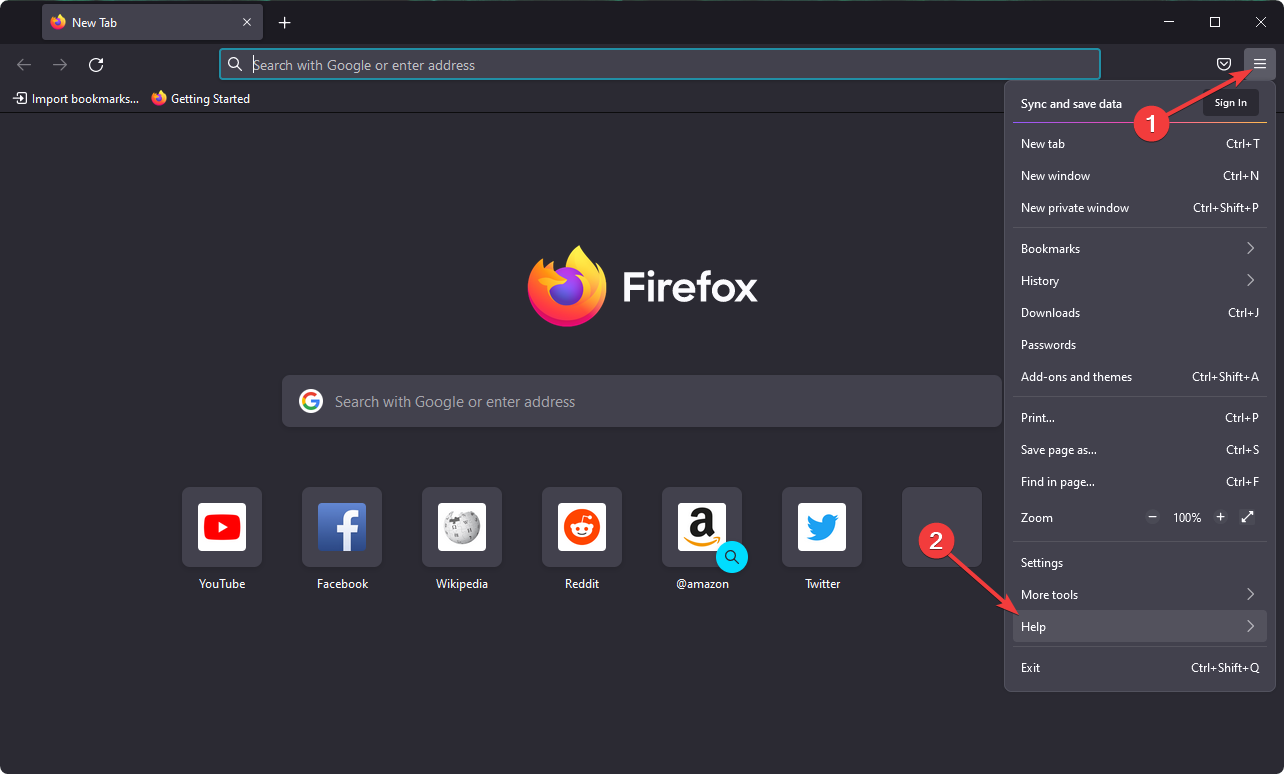
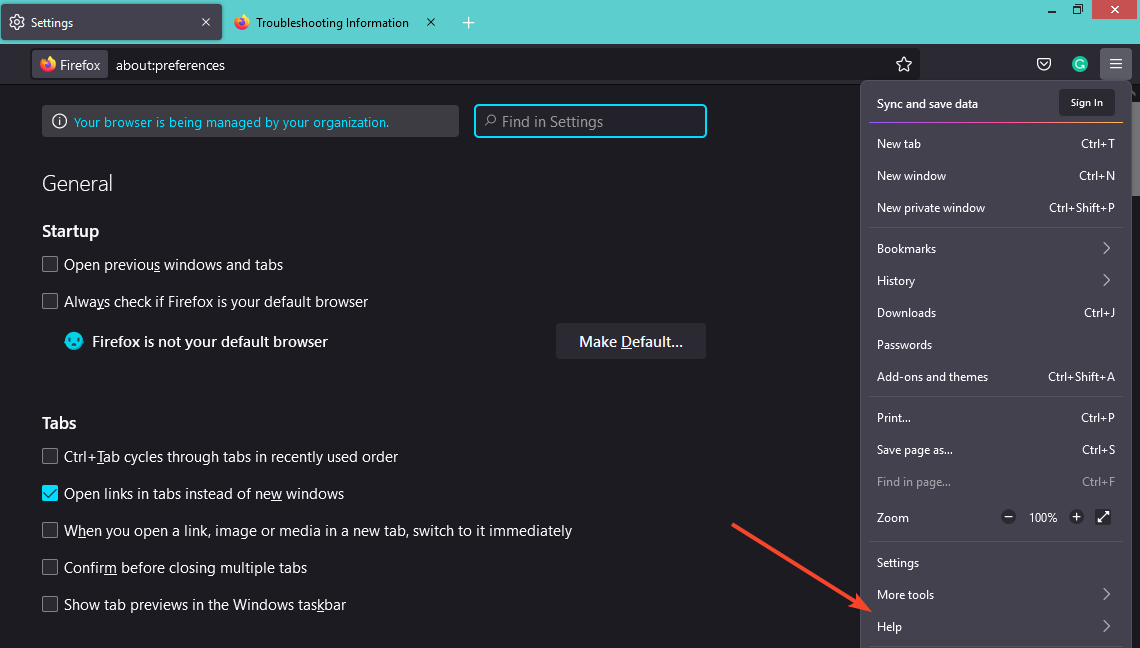
Click the menu icon in the top right corner and choose Help.
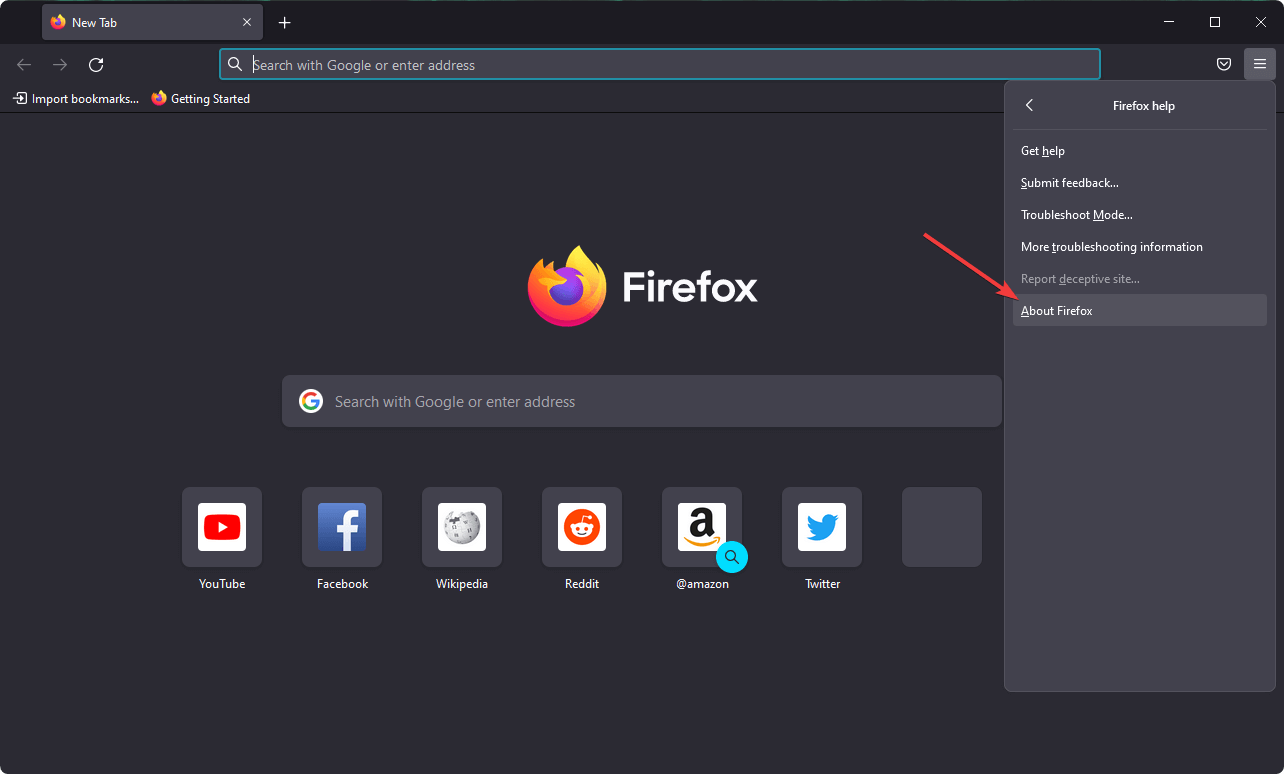
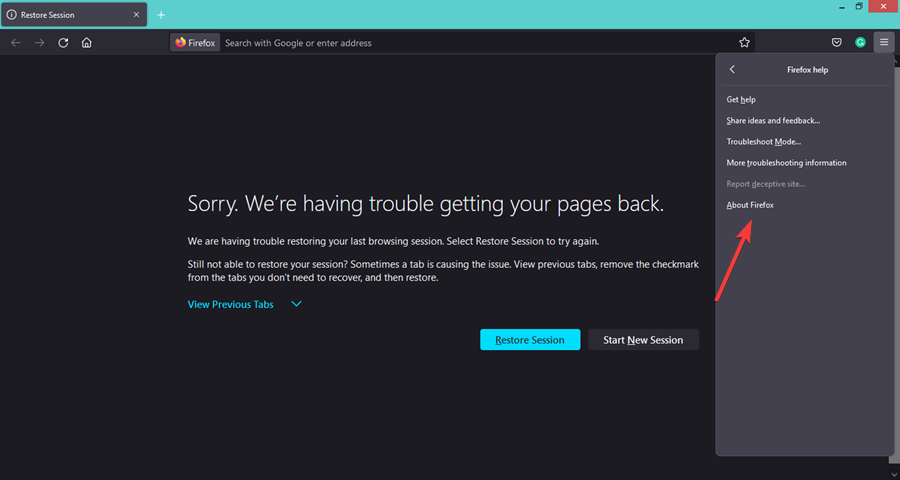
Choose About Firefox from the menu.
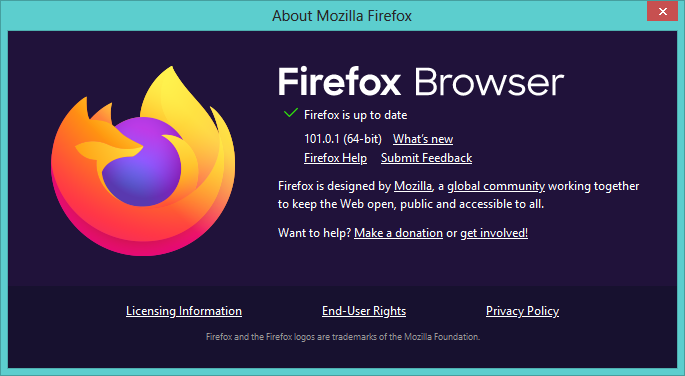
A new window will now appear and check for updates. If any updates are available, they will be installed automatically.
If the keyboard isn’t working in Firefox, a certain glitch may prevent the application from working properly.
To fix this problem, it’s advised that you install the latest updates for Firefox and check if that helps.
Usually, Firefox automatically installs the updates, but you can check for updates on your own by doing as above. After updating Firefox to the latest version, check if the problem is still there.
9. Use the 32-bit version
According to users, the keyboard issues in Firefox occur only on the 64-bit version for unknown reasons. As a workaround, users are suggesting switching to the 32-bit version instead.
Simply install the 32-bit version on your PC, run it, and check if that solves your problem. Remember that to install the 32-bit version, you might have to remove the 64-bit.
It’s worth noting that a 32-bit version might not offer the same performance as the 64-bit version, but you won’t be able to tell the difference for the most part.
10. Try using the Beta or Nightly version
If the keyboard isn’t working in Firefox, you might consider trying the Beta or Nightly version.
The Beta version offers the latest updates and sometimes new features, so if the issue is resolved, the Beta version will likely get fixed first.
The Nightly version has some experimental features and the latest patches, so if you want to test the latest fixes as soon as they are released, you might want to try the Nightly version.
Despite having the latest updates, Beta and Nightly versions can sometimes introduce new issues. So, be wary of that too.
A keyboard that’s not working in Firefox is a frustrating problem. It stops you from achieving so many things on your browser. Thankfully, it is not the most difficult issue to fix, as shown in this guide.
If Opera GX is stuck in fullscreen, you’ll have issues switching to different apps and that will negatively impact your browsing experience. Luckily, this can be easily fixed.
How do I get Opera GX out of fullscreen?
Try starting another instance of Opera. By doing so, you might be able to close the one that i running in full screen mode.
1. Use shortcuts
First, try using the F11 key.
If that doesn’t work, can try pressing the Alt + Space buttons. This will open a context menu on top, from where you can select Minimize, Maximize, or Close options.
Alternatively, you can try pressing Win + D keyboard shortcut to go back to your desktop home screen. Once you are on your home screen, you can close the instance of Opera.
Few users suggested using Ctrl + H to open the History tab to exit the fullscreen.
2. Use the context menu
Right-click on the blank page of the webpage.
From the context menu, select the Exit full screen option.
If the menu isn’t available, go to the Settings page and try using it there.
To benefit from all the Opera features and get the best experience possible, make sure you always use the latest version. A corrupt or old browser may give you some headaches.
The current version of Opera gives you multiple options on how to enter and close the full screen. Plus, it includes a battery saver, an adblocker, and many other useful and performance-oriented features.
3. Reinstall Opera
Open Control Panel.
Select Programs and Features options.
Click on Opera from the list of apps.
Hit the Uninstall button at the top.
Once Opera is successfully uninstalled, restart your PC to remove all remaining files.
That’s it from us in this guide. We hope the solutions in this guide helped you resolve the issue of the Opera browser being stuck in the full screen mode.
For some users, Opera GX isn’t even opening, but we have an article that can help you fix that. Before you go, you might want to learn more about Opera Tablet Mode, so be sure to check our dedicated guide on it.
Let us know in the comments below which solutions helped you resolve the problem. You can share other solutions that worked for you as well in the comments below.
Google Chrome dominates the browser market, but many great lesser-known browsers such as Opera and Brave exist.
Both apps are some of the best cross-platform browsers that offer unique user security and privacy features. Today, we’re going to Opera and Brave to show the one that boasts the right feature combinations.
While the browsers two are quite similar, they have some unique differentiating features. So, let’s take a closer look and compare these two browsers.
How do I choose which browser to use?
Some features must be present on every modern browser you want to use. It must thrive on privacy and security, boasts respectable browsing speed, and be easy to use.
Also, there are unique features that depend on what you want in a browser. Features like customizability, integrations, and interface simplicity are good-to-have but will depend on your preferences.
Opera’s defining trait as a browser is its plethora of tools. It is well-known for developing features such as private browsing, tabbed browsing, pop-up blocking, and the ability to reopen recently closed tabs.
These are now widely regarded as essential characteristics of any useful browser.
Opera
If you seek great functionality and a straightforward organized browsing experience.
Press the Windows + I keys on your PC to open the Settings app.
Click the Apps option.
Choose Default apps on the left pane.
Scroll down to the Web browser section and click on the browser there.
Choose the browser to make the default.
The steps above show how to change your default browser using your PC settings. Also, most modern browsers, like Opera, Chrome, and Firefox, have in-app options for changing your browser.
Opera or Brave, which is a better browser for you?
1. A quick introduction
Opera has been present in the browser market since 1995, which makes it one of the oldest web browsers.
Despite being an older browser, Opera has changed significantly over the years. The browser used its own Presto layout engine, but in 2013, Opera switched to the Chromium engine.
In terms of availability, Opera covers almost every modern and legacy platform, so you should be able to run Opera on Windows, Linux, macOS, iOS, Android, and legacy phones.
Brave Browser first appeared in 2019, and ever since its release, it got major popularity due to its unique privacy features.
The browser is based on the Chromium engine, so it’s similar to Chrome’s user interface. Still, the two couldn’t be more different regarding security and privacy.
Brave Browser is currently available for Windows, macOS, Linux, iOS, and Android, so you should be able to run it on almost any platform.
2. Interface and customization
2.1. Opera: Clean and customizable
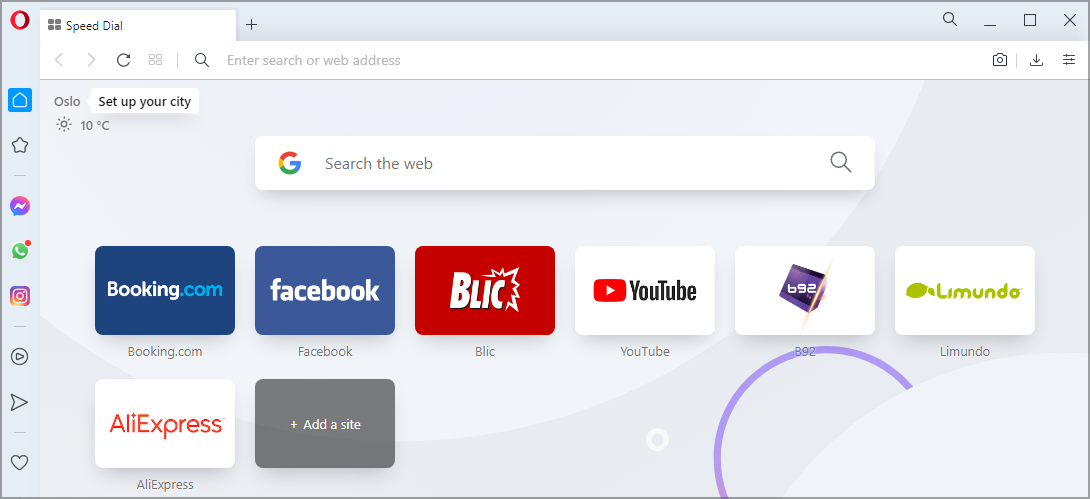
As soon as you start Opera, you’ll be greeted with a clean and simple user interface. Since the browser is based on Chromium, you’ll notice that it shares a similar look with Chrome.
The interface is divided into two segments, and the left pane is reserved for browsing while the right pane holds the Sidebar.
The Sidebar allows you to quickly access certain features, such as browsing history, bookmarks, settings, or some of the more unique features that Opera offers.
The left pane hosts your most visited websites, allowing you to access them quickly. Of course, you can rearrange this list any way you want, and you can even add any website in a matter of moments.
Regarding the customization, you can choose which items will appear in the Sidebar, or if you don’t want to use the Sidebar, you can hide it completely.
Opera also has an Easy setup pane that you can use to enable certain features or customize the look of your browser.
You can choose between two available themes, and you can decorate your Speed Dial page with a couple of pre-installed wallpapers, or you can use custom ones.
As for customization, you can change the title size or choose if you want to have browsing suggestions on your Speed Dial page. You can also show News and Weather information on the start page.
Overall, Opera has a clean and simple-to-use interface and is considerably better than Brave here. The Sidebar is a great addition, but users that want to keep their user interface minimalistic might not be too keen on this feature.
We wish that there was an option to auto-hide the Sidebar for the users that want more working space, and we’re hoping to see that feature in one of the upcoming versions.
2.2. Brave Browser: Easy to use but a bit overwhelming
When you first start Brave Browser, you’ll see a list of your favorite websites, and you can rearrange them or add new websites to the list with a couple of clicks.
The browser also comes with some unique wallpapers, and you’ll get a new wallpaper every time you open your browser. We’re not too fond of wallpapers, but if you want a fresh look in your browser, you’ll love this feature.
Brave Browser also shows you useful stats in the top left corner, such as the number of blocked trackers and ads and the amount of bandwidth and time you saved by blocking ads.
The right side of the browser is reserved for cryptocurrency and Brave Rewards, but if you’re not trading or using cryptocurrency, you won’t find this feature that useful.
Lastly, we have to mention Brave Today, which works like a news feed for your start page. While this feature is useful if you want to check the news quickly, the thumbnails are too large and take too much precious space.
It’s important to mention that you can customize the start page and choose to show or hide any element on the start page.
This means you can disable features such as Brave Today and Cards if you don’t want to read the news or are not interested in cryptocurrency.
Overall, Brave Browser offers a solid interface, but the start page feels overwhelming the first time you open it. Luckily, you can customize it and disable wallpapers and other elements you don’t plan on using.
3. Brave vs Opera: Speed
The difference between Brave and Opera in speed is not too wide. Brave loads pages slightly faster than Opera when the two browsers open the same number of tabs.
But in terms of startup speed and resource usage, Opera perform better than Brave. But the two apps are Chromium-based browsers. So, the difference here is minimal.
4. Opera vs Brave: Unique features
4.1. Opera: Optimized for productivity and entertainment
Opera offers some unique features, and while some are aimed at user productivity, others are for social media and entertainment.
The first feature that we have to mention is the Workspaces feature, and with it, you can separate tabs into different workspaces.
By doing so, you can easily organize tabs and improve your productivity. Switching between workspaces is simple, and you can do it from the Sidebar or by using a keyboard shortcut.
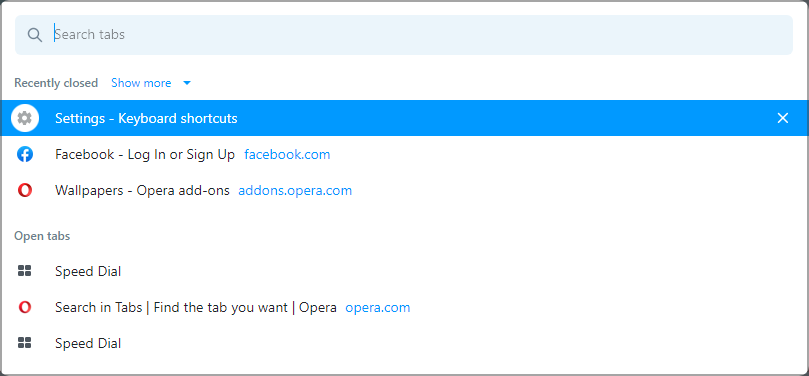
Another productivity feature that deserves mention is the Search in Tabs. With this feature, you can find any tab quickly based on its name or content. You can also search for recently closed tabs, which can come in handy.
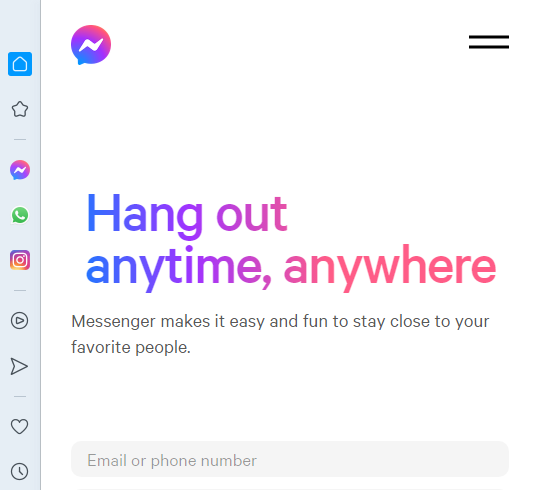
Opera also has messenger integration and works with Facebook Messenger, WhatsApp, Telegram, and VKontakte.
This means that you can use any of these messengers right from the Sidebar while browsing. This is useful since you won’t have to keep any of these websites open in separate tabs or check your phone for messages.
Social media integration is also available, and Opera offers both Twitter and Instagram support so that you can check your feed at any time, right from the Opera’s Sidebar.
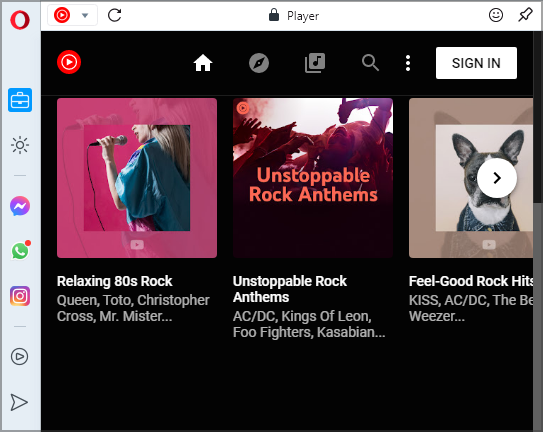
Opera also integrates with popular music streaming services such as Apple Music, Spotify, and YouTube Music, so you can listen to your favorite artists while browsing the web.
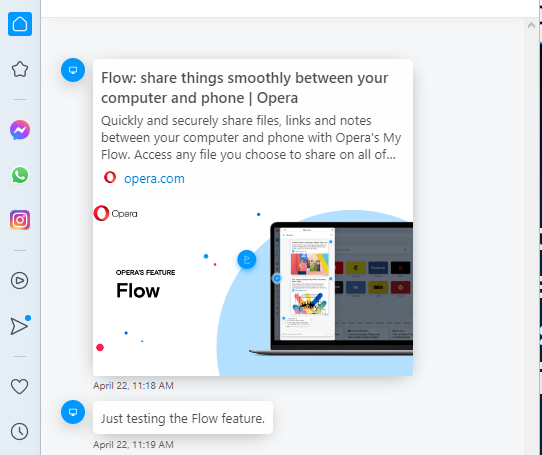
Another feature we liked is the Flow feature that allows you to send files, texts, links, and other data seamlessly to your phone.
This feature works almost like an instant messenger, allowing you to send text and files quickly and easily between devices. It’s an incredibly useful feature, and we hope other browsers will implement it.
Opera offers some unique features, and we were pleased with how useful features such as Workspaces, Search in tabs, and Flow is.
Try out these features if you want to improve your productivity or organize your tabs better.
Even if you’re a multitasking user, or just a casual user that likes chatting and social media, Opera will surely have something to offer to you.
4.2. Brave Browser: A security powerhouse
Unlike Opera, Brave Browser doesn’t have many flashy features. Instead, it focuses heavily on user security or privacy so you won’t find features such as integrated messenger and file sharing.
Brave has a tab management feature, allowing you to group multiple tabs into groups. You can change the color of the tab groups, name them, and even minimize them to save space.
This is a welcome feature and a solid alternative compared to the Workspaces feature in Opera.
However, we found that the Workspaces feature is a bit more streamlined regarding tab management.
Brave also has its Search Tabs feature, which works similarly to Opera’s Search in tabs feature. It shows your current and recent tabs and lets you search them by their name.
However, there’s one major difference, and while Opera can search both the tab title and its contents, Brave’s search feature is limited only to tab titles.
This isn’t a dealbreaker, but we did like the search feature better in Opera. As we already mentioned, Brave doesn’t have too many flashy features, so we can’t compare it to Opera.
However, when it comes to security and privacy, Brave packs a wide array of features, and we’ll explore them in detail in the next section.
5. Brave vs. Opera: Privacy and security comparison
5.1. Opera: Great browser with solid security features
Regarding security and user privacy, Opera offers a couple of great features. First off, there’s a built-in adblocker.
The adblocker will block all ads and trackers that keep a log of your browsing activity to give you personalized ads.
You can easily see the number of blocked ads and trackers for the current page at any time. If you want, you can even see the names of individual trackers.
The browser also has its Ethereum-based crypto wallet. This feature is available on mobile and desktop versions, but to use it, you first need to create your wallet on the app’s mobile version and then connect it to your PC.
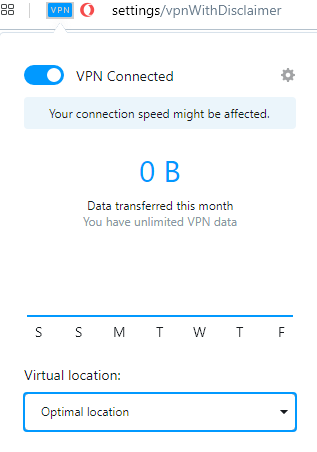
Lastly, the browser has a VPN to protect your IP address from hackers. By using this feature, you can make your browsing sessions completely private.
It’s worth mentioning that the VPN offers three locations to choose from, and the speed can vary depending on the location that you prefer.
It’s important to mention that the VPN is free and comes with no data caps. So, you can browse the web privately without any restrictions.
The VPN feature isn’t enabled by default, and to allow it to, you’ll have to dive into the settings page and help it manually from there.
Opera offers some solid security and privacy features, and we did like the inclusion of a built-in VPN and adblocker, but we wished there was a way to enable them with a single click.
5.2. Brave Browser: A privacy powerhouse
Right off the bat, Brave Browser comes with adblocker enabled, so you’ll start blocking those pesky ads as soon as you start your browser.
You can open the Brave Shields section at any time and see how many items have been blocked on the current page.
There are different categories that Brave Browser will block, and those include trackers, scripts, cookies, and there’s even fingerprinting protection.
Each section can be expanded, allowing you to easily see all individual blocked items by their name. Also, you can choose if you want certain scripts to run on the page while blocking the rest.
Most settings can be customized, so you can choose how strict the ad and tracking protection will be. The same applies to fingerprinting protection.
The same applies to cookies, and you can choose what type of cookies to store, or if you want, you can block cookies altogether.
Brave Shields feature also allows you to upgrade website connections to HTTPS for an extra layer of security if the website isn’t already using HTTPS.
Unlike some web browsers, Brave won’t collect your personal or browsing data and sell it to advertisers.
As for advertisers, Brave offers a Brave Rewards feature that will give you a small commission by viewing privacy-oriented ads, and all the ads are based on your interests and not on your browsing activity.
You can then use these rewards to tip content creators and publishers, or you can redeem them for gift cards if you want.
Brave also has its own Crypto Wallet, so you can easily trade or store cryptocurrency. But a comparison here would be fair for Brave vs Opera Crypto Browser, a dedicated cryptocurrency browser.
In addition to the standard private browsing feature, the software also has private browsing with Tor. In case you’re unfamiliar, Tor is a private browsing network, and you’ll get a truly personal browsing experience by using it.
This is similar to browsing with a VPN. But instead of using a server, Tor is based around volunteers worldwide. It offers multiple layers of protection and better protection than a VPN.
However, Tor is slower than a VPN, so if you plan to browse the web anonymously, be prepared for slowdowns. We also have to mention that the private browsing mode uses DuckDuckGo. This keeps your online searches safe.
Overall, Brave Browser offers some great features in terms of security and privacy. It has an extensive adblocker and tracking protection, allowing you to monitor trackers and scripts closely.
Private browsing with Tor also deserves praise, and privacy enthusiasts will find it useful.
We wrote Opera GX vs Brave vs Vivaldi guide not long ago, so we’ll keep the comparison short. If you want a more detailed comparison, check the aforementioned guide.
Opera GX is another version of Opera intended for gamers, and it comes with a couple of unique features. Some of the included features include a highly customizable design and Twitch and Discord integration.
This version also has a Hot Tab Killer feature that allows you to see all currently open tabs, along with their CPU and memory usage.
Using this feature, you can quickly close any tab with just a single click and free up some of your resources.
The software also has a GX Control feature that will allow you to limit RAM and CPU usage in your browser and ensure that your browser doesn’t take away resources from other, more important applications.
If you want to learn more about Opera GX, we recommend you check our Opera vs Opera GX article for an in-depth comparison between the two.
Since Opera GX has all the same features as regular Opera, it has all the advantages and disadvantages compared to the Brave Browser.
The only thing that stands out in Opera GX vs Brave comparison in terms of RAM usage is its GX Control and Hot Tabs Killer feature, and we wish that other browsers would also add those features.
7. Brave vs Opera Mini
7.1. Opera Mini: Minified version of Opera with few flaws
Opera Mini comes with a simple and friendly user interface, and the first thing you’ll notice is the list of top websites you can change any way you want.
The main window also has a useful news section to choose which topics you want to follow. This section also holds some sponsored content; we weren’t a fan of this.
As for additional features, Opera Mini supports offline reading, which can come in handy if you’re on the go.
The browser also has a data saving feature that will save up to 90% of your data and load pages faster. To top it off, an ad blocker is available right off the bat.
Opera Mini has some decent features, but we weren’t fans of the sponsored content. This isn’t a dealbreaker, but some users might not like this.
7.2. Brave Browser: Safe and privacy-oriented
Brave Browser offers speed and security in abundance. According to its developers, it is two to four times faster than other browsers, saves battery, and reduces data.
We must mention that the Brave Shields is also available in this version. It offers extensive tracking protection and is just as configurable as the desktop version.
Brave Rewards also makes an appearance, which might come in handy if you want to support your favorite content creators.
As for the design, it’s clean, and it doesn’t have any unnecessary elements. Favorite websites are hidden behind the stats screen; you can easily reveal them if needed.
Although Opera Mini offers users more features, we feel its interface is a bit cluttered. On the other hand, Brave Browser provides a more streamlined interface and more advanced security features.
8. Closing thoughts on Opera and Brave Browser
8.1. Opera: Lightweight, fast, and feature-rich
Opera is a great browser that works without any slowdowns. Also, it offers some great productivity features.
We especially loved the Workspaces and Search in tabs features and wished that more browsers would implement these features.
Opera Flow is also a great addition, and it’s one of the easiest and fastest ways to share data, texts, and links between your PC and phone.
VPN and ad blocker worked perfectly during our testing, but we wish there was a faster way to enable these features.
This is especially true for the VPN, and we wish that there would be a button in a toolbar that would allow us to enable and disable VPN more quickly.
Music Player is a solid addition, especially if you want to listen to your favorite tunes while browsing the web. Social media and messenger integration are also handy, especially if you’re a heavy social media user.
Pros
Available on all major platforms
Clean and easy to use interface
Workspaces
Built-in adblocker
Unlimited VPN
Cons
Minor interface issues
Overall, Opera is a great browser with a lot of functionality, especially if you want an ad-free and secure browsing experience, so be sure to consider Opera.
Opera
Thanks to all these amazing features, Opera is the secure browser you’re looking for!
Brave Browser doesn’t have many innovative features, but it makes up for that with its security and privacy protection features.
The Brave Shields give incredibly extensive control over ad blocking and trackers, and it’s enabled out of the box so you can browse the web without any distractions.
Private browsing deserves mention, and it’s great to see that the browser relies on DuckDuckGo and Tor to provide maximum privacy protection to its users.
Brave Rewards is also a great idea for an alternative monetization method without relying on privacy-invasive ads.
We felt that the interface was slightly overcrowded, especially the start page. Also, the Brave Today feature took too much space, making it harder to read.
Pros
Extensive privacy configuration
Private browsing with Tor
Based on Chromium
Compatible with Chrome extensions
Easy to use
Cons
Interface could be more streamlined
We love our user interface to be on the minimalistic side. Luckily, you can disable all the elements you don’t need on Brave with just a couple of clicks.
We conclude this comparison by stating that when it comes to overall performance and feature set, Opera is your best bet.
We tested the features and usability of both browsers, and Opera scores higher regarding ease of use, customization options, and performance.
If you want a browser that offers great features and it has integrations with social media services and messaging services, then Opera might be a perfect choice for you.
Brave Browser has no flashy features, but it has some outstanding security and privacy features.
If you’re a casual user that uses social media frequently or messaging apps as your primary method of communication, then Opera is a perfect choice for you.
That being said, if the main asset you want from a browser is security and privacy, Brave may be a better choice for you as it offers more options.
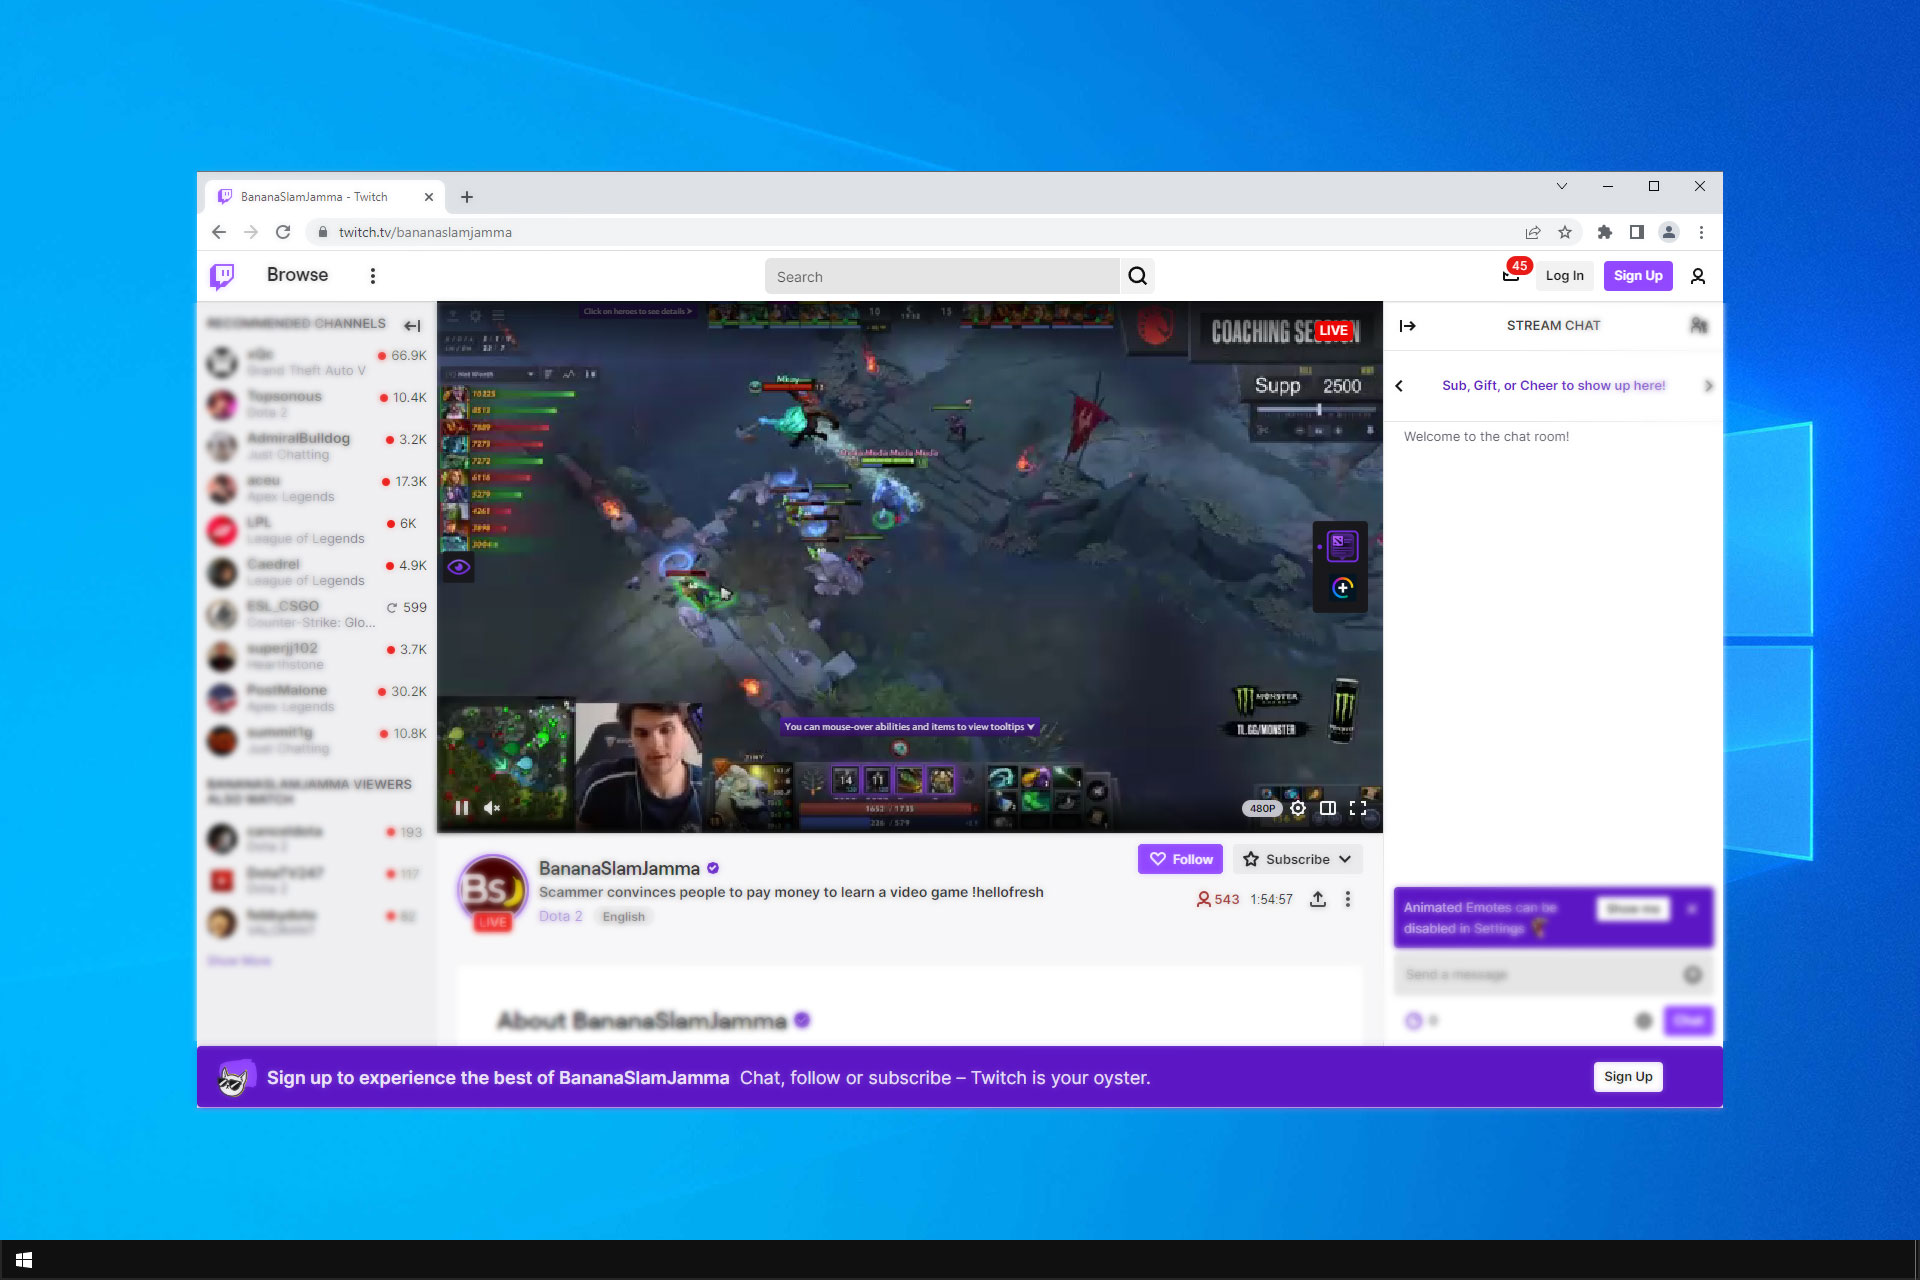
Some users reported that Twitchfailed to load a specific module in Chrome? If it’s happening to be in the same boat, make sure you read this guide thoroughly. It is dedicated only to you.
Twitch.tv is one of the biggest live streaming platforms on the Internet, known to be focusing on game streaming. The app also started giving more attention to IRL and eSport competition broadcasts.
Unfortunately, there is one frequent issue that often bugs Twitch users. For example, the error message Failed to load module may sometimes prevent streams from loading.
We came up with a series of methods to fix this frustrating error. Since this issue is prevalent for Chrome users, we’ll refer specifically to this browser.
Why Twitch failed to load modules?
Because it is essential to be aware of the causes of our presented problem, we’ve compiled a helpful list:
Extensions, cookies, or cache blocking the app – This is annoying and can also determine Twitch not loading on Chrome or Firefox. Fortunately, we have the perfect solution to disable them.
Wrong quality settings – Remember that these settings come with the Auto mode. In this case, you should configure them according to your own needs.
Browser-related bugs – Like any other app or program, your browser might randomly get into trouble. However, we strongly recommend using a reliable option that will never disappoint while streaming on Twitch.
How do I fix failed to load a module on Twitch?
1. Switch to Opera GX
Before you start troubleshooting, as the Failed to load module error is specific to Chrome, ask yourself if you wouldn’t prefer a dedicated gaming and streaming browser like Opera GX.
For starters, Opera GX has a built-in Twitch feature waiting for you on the sidebar so you can keep up with all the live streams conveniently, with just a click.
What do you want when you’re streaming? A fast browser! Opera GX blocks cookies and trackers automatically to get you superior browsing speeds.
Opera GX is not only an ideal choice for streaming but was also designed with gaming in mind. And when it comes to gaming, it’s all about tweaking.
Try the GX Control feature that lets you manage how many resources your browser can access. For example, you can decide exactly how much CPU power, RAM, and bandwidth your Opera GX will use.
In other words, you can create ideal conditions for your gaming experience in a browser with radical UI and design.
Just give it a try because it’s free. You will convince yourself about all these and more.
Check out other Opera GX impressive features:
Free VPN
Ad-blocker
Dedicated to streaming and gaming apps
Easy to use and user-friendly interface
Safe and private
Opera GX
Consider this gaming browser to navigate your Twitch content without loading issues.
Click the Windows key, type Chrome, and open the first result.
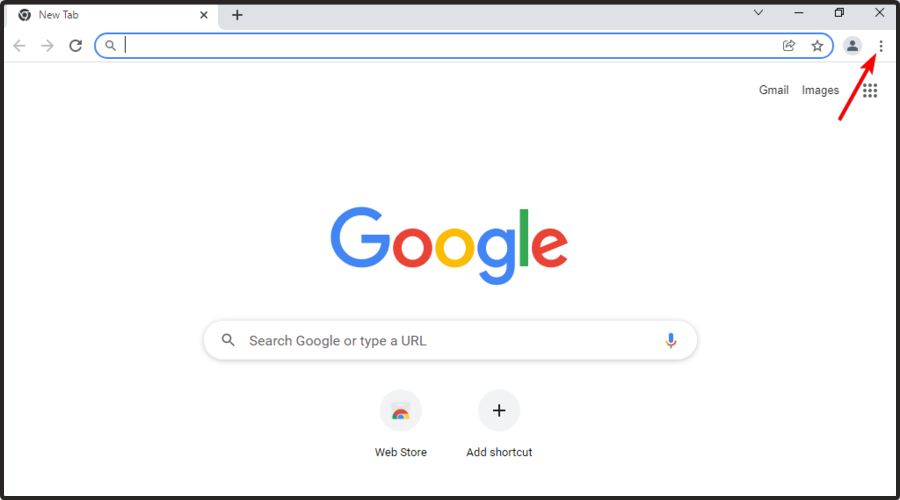
Click the three dots in the top right corner of Google Chrome.
Select New incognito window from the list of options.
Open Twitch in Incognito Mode and see if the streams are now loading.
3. Disable all Chrome extensions
Hit the Windows key, type Chrome, then open the first result.
Press on the three dots in the top right corner of Google Chrome.
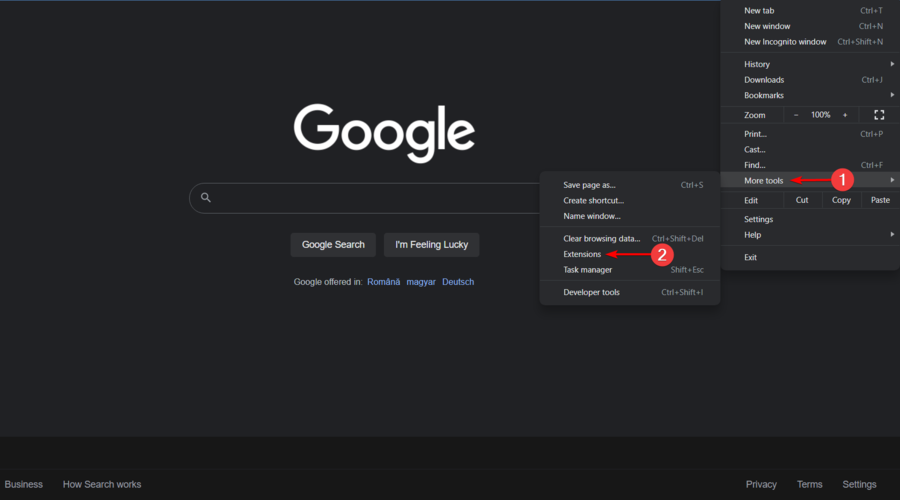
Hover the mouse over More Tools, then select Extensions.
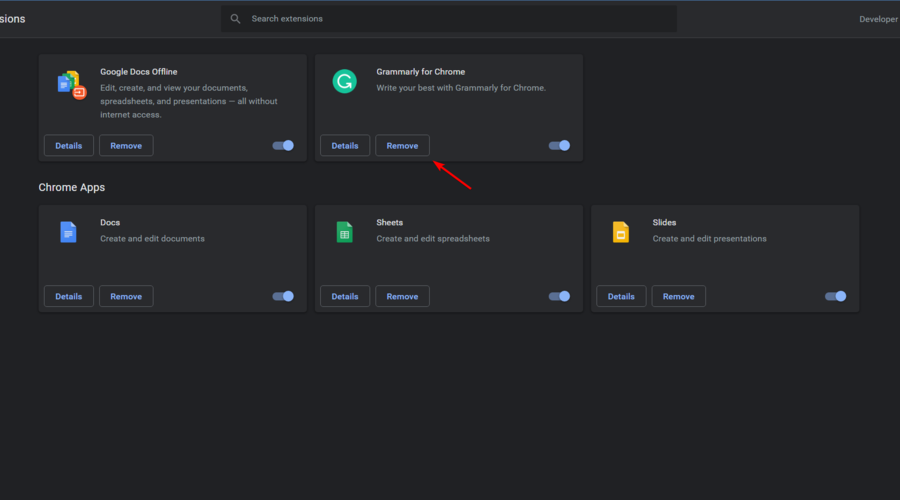
Now, you’ll see a list of extensions. Click on the Remove button.
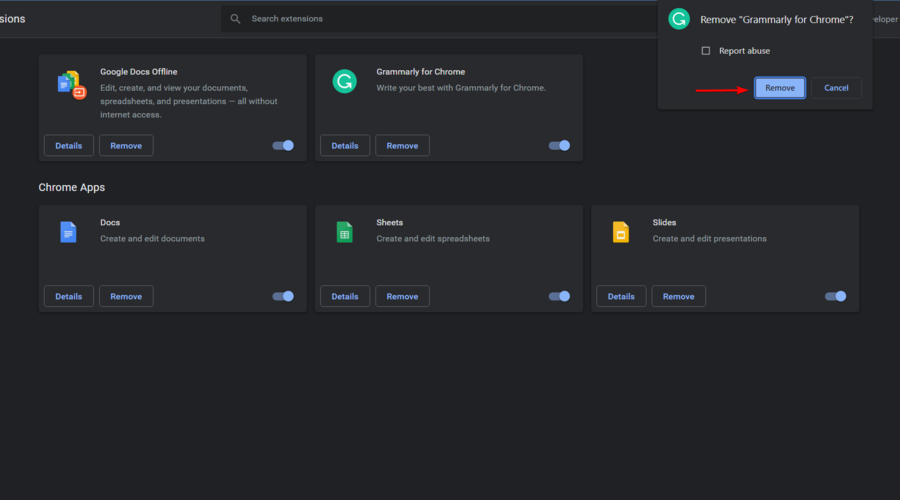
Confirm by clicking again on Remove.
Repeat the process for all your extensions.
Go to Twitch and check to see if the stream is now loading.
This is a valid solution if Twitch failed to load a module in Chrome.
4. Clear the cache, cookies, and history in Google Chrome
Hit the Windows key, type Chrome, then open the first result.
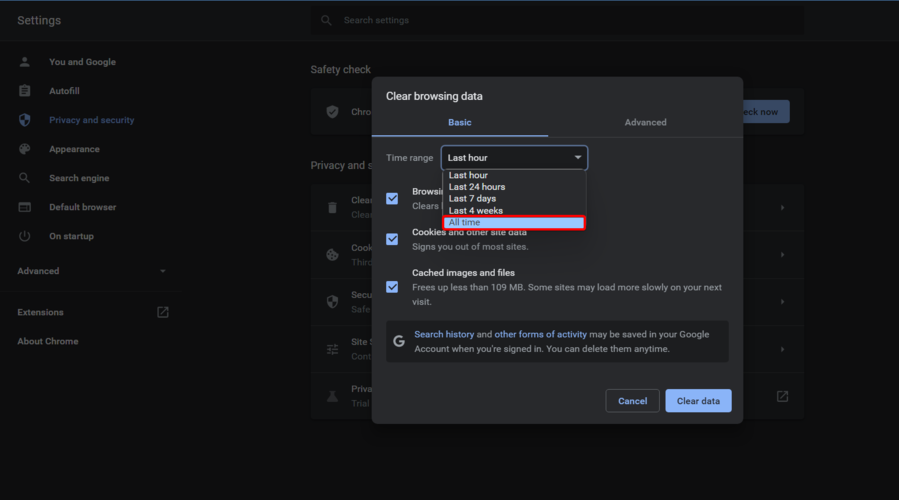
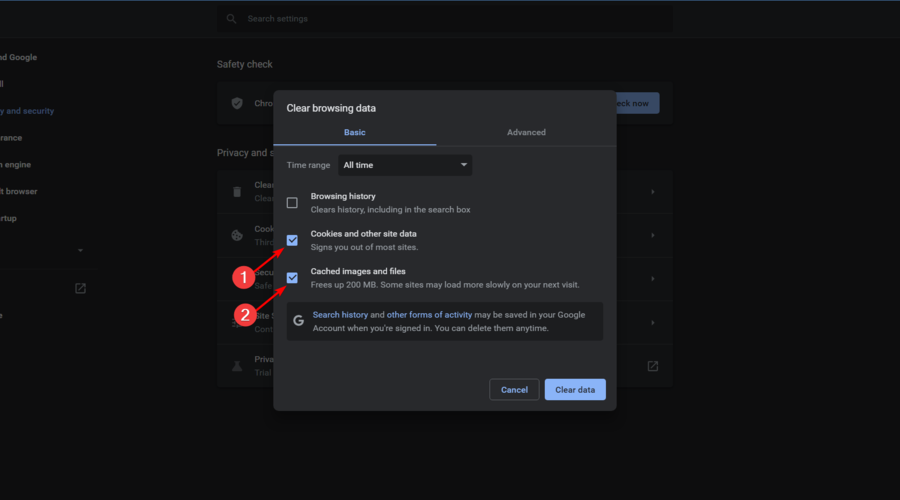
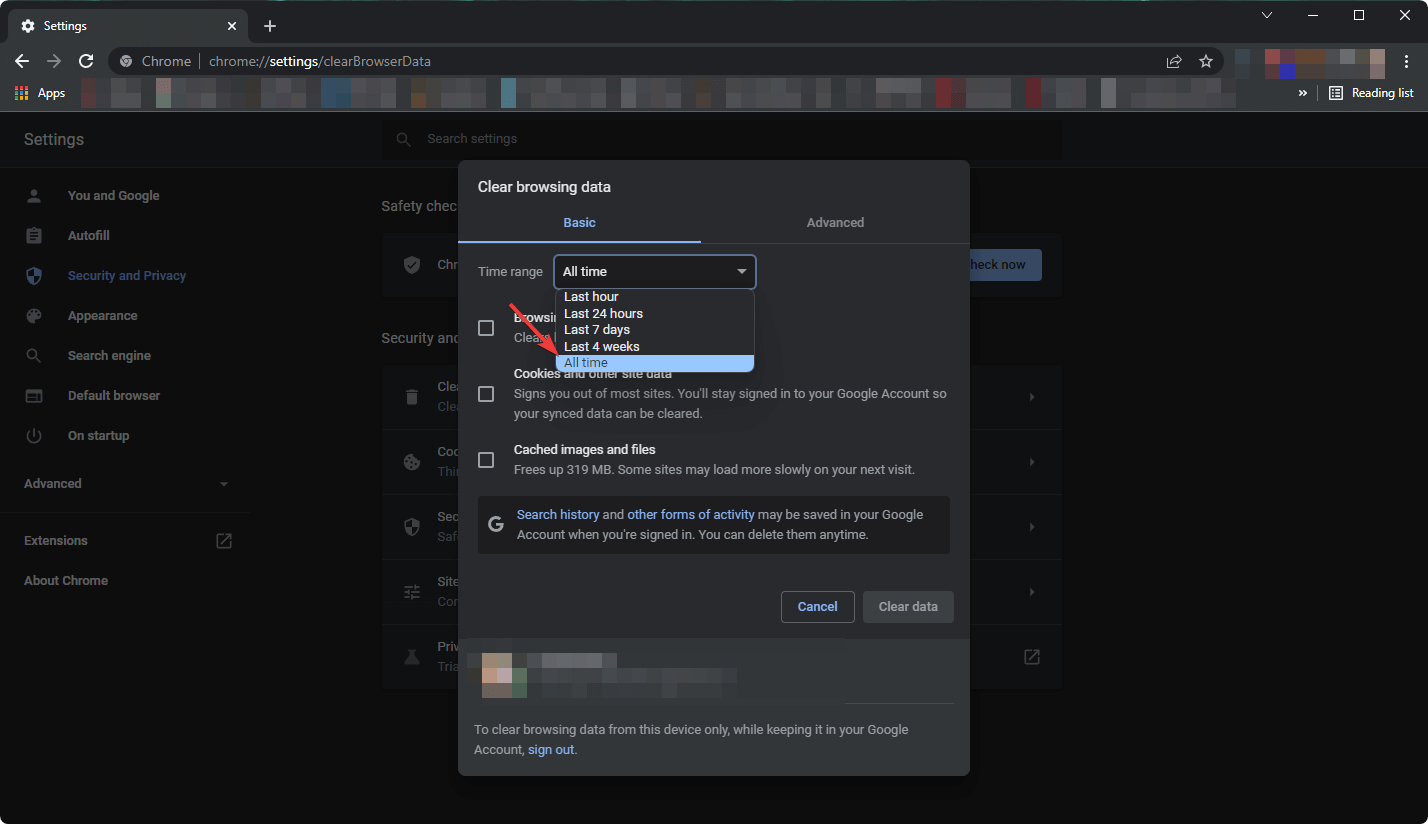
Use the following keyboard shortcut to open the Clear browsing data menu: Shift + Ctrl + Delete
Select All time as the time range.
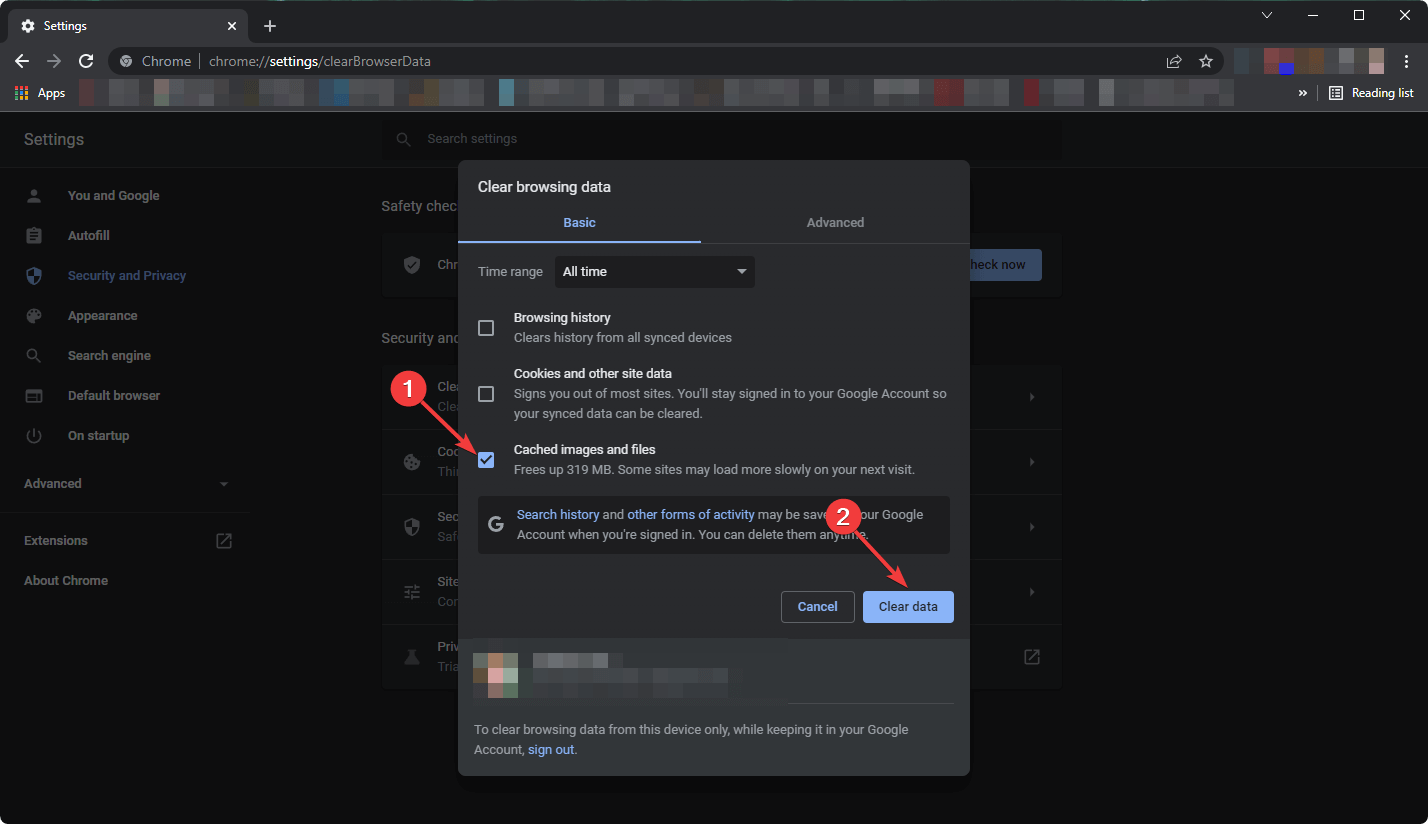
Check the boxes next to Cookies, other site data, and Cached images and files.
Now, click on Clear Data.
Now check if the error whereTwitch chat failed to load the module still exists. While this solution is adapted for Chrome, you may also clear the cache if Twitch failed to load a module in Firefox.
Browse something, and while the stream is loading, you will need to click the Settings icon in the bottom right corner (it is marked as a gear).
Then you need to expand the Quality setting.
Choose a different resolution.
Complete this process before receiving the error message; otherwise, it will not work. If you cannot perform this task fast enough, refresh the stream and try it again.
If Twitch.tv failed to load a module, you should try this solution.
6. Get the Twitch desktop app
If you can’t get the Twitch streams to open in Google Chrome, your last resort is to download the desktop app.
The Twitch desktop app is known to have many improvements compared to its web version.
As it is a stand-alone app, it has better responsiveness and offers some extra tools and features.
Which browser is best for Twitch?
Twitch is a very resource-intensive application. It means that running it on the most resource-efficient browser is paramount.
Opera GX is our recommended choice. Apart from being light on resources, it also offers seamless native integration for the service. With this, you do not need to close tabs to get the best out of Twitch, and you can multitask.
In today’s guide, you’ve discovered what you should do if Twitch failed to load modules. However, several other loading problems might occur while running the app. To prevent them effortlessly, make sure you check the following list:
Chat can not connect – Many people reported that Twitch chat is not loading. You should know that it isn’t a big problem, but it can be annoying, especially if you want a complete experience.
We hope that our simple solutions brought you a positive result. If our solutions worked out for you, leave us a comment in the comments section below.
It’s just about that time of the year again, with a new school year right around the corner. And no back to school preparation would be complete without adding some back to school gaming into the mix.
Thankfully, we’ve got you covered with our back to school Game Pass guide. The following is a lengthy list of great games across Xbox Game Pass and PC Game Pass that have great educational value. So fling those pesky books aside and grab your Xbox controller (or gaming mouse & keyboard) because we have quite a lineup in store for you. You can search for any of the titles in Game Pass, or check out the ones we highlighted below:
Back to School games to get the school year started off right
Banjo Kazooie nuts n bolts (E10+)
Before we leave (E10+)
Bejeweled 2 (E)
Bejeweled 3 (E)
Bridge Constructor Portal (E)
This engineering puzzle game blends together two awesome franchises into one great game with double the awesomeness. Not only is Bridge Constructor Portal a blast to play, it also is a great tool for building some critical thinking and problem-solving skills. It also makes for a great (very) early STEM unit in engineering, despite the game not really being designed for educational purposes.
Cities: skylines: Xbox one edition (E)
Farming simulator 22 (E)
Forager (E10+)
Gorogoa (E)
House flipper (E)
Human fall flat lumber (E)
Minecraft (E10+)
Moonglow bay (E)
My time in Portia (E10+)
Overcooked! 2 (E)
Culinary chaos is back in everyone’s favorite cooking simulator. Overcooked! 2 serves up more chefs, more kitchens, more recipes, and more co-op multiplayer madness. With online multiplayer accommodating up to four chefs, there is no such thing as too many cooks in the kitchen. And the steaks have never been higher as you must save the Onion Kingdom once again.
Overcooked! 2 dishes out a veritable buffet of fun for younger kids in addition to a hearty helping of learning. Particularly, the game can help develop time management and flexibility skills. And with its multiplayer co-op inclinations, the game can also help kids learn about teamwork and interpersonal skills.
Peggle (E)
Peggle 2 (E)
Pikuniku (E)
Screamride (E10+)
Simcity 2000 special edition (E)
Simcity 4 deluxe edition (E)
Simcity complete edition (E)
Slime rancher 2 (E10+)
Spore (E10+)
Starbound (E10+)
Stardew Valley (E10+)
Lone developer Concerned Ape’s farming/life simulator has an incredible level of educational value. Organizational skills are essential here, especially as the game progresses, with inventory management being a core component of the gameplay.
Perhaps even more critical in Stardew Valley in time management. There is only so much time in the in-game days. And with so much to do – hoeing and watering crops, mining for resources, interacting with NPCs, clearing land, and so on – planning and using one’s time wisely to get the most out of each day are key to success in the game.
There is also a social aspect to Stardew Valley, which has the player character moving to a new village at the start of the game. This means you will have to work to get to know your fellow villagers, and navigating this part of the game will require the use of some interpersonal skills.
Terraria (T)
Tetris effect: connected (E)
Totally reliable delivery service (E10+)
Townscaper (E)
Trailmakers (E10+)
Train sim world 2 (E)
Tropico 6 (T)
Two point hospital (E10+)
Unpacking (E)
Zoo tycoon: ultimate animal collection (E)
After class
These 36 games that we have featured here all offer something of value in terms of helping students build foundational “soft” skills. And better yet, they do it in a way that is fun and engaging for students. Many of these games have been used as part of education programs to teach students a variety in a variety of areas of learning.
The best part of all is that these great educational games are all available on Game Pass. If you don’t already have a subscription to the best gaming service out there, you can sign up here. There’s no better way to get your back to school gaming on. If you would like to learn more about Xbox Game Pass, visit the FAQ page for more info. While you’re at it feel free to check out our other “What to play on Game Pass” posts for other Game Pass recommendations.
Browsers are essential tools for surfing the Internet. Also, the interface of any browser is crucial for providing a user-friendly experience.
However, this feature is not always error-free. Many users complained that their PNG image is not displaying in their browser.
This is a major issue because users can’t utilize a browser that doesn’t show images. Take for example a case in which Chrome is not loading Facebook images. Facebook is all about images, without them, it loses its essence.
One user reported the following issue on a forum:
W10 with the latest updates. Noticed that a website to which .jpg photos have been uploaded are only showing placeholders, cannot display the actual images. The problem is across the following browsers: Edge, IE11, Firefox. Do not have chrome installed, so cannot check.
So, this user said that the images are showing only the placeholders. The problem appears on many browsers, such as Firefox, Microsoft Edge, and Internet Explorer.
Why are pictures not loading on my browser?
To begin, the photos might not be able to be shown depending on the settings for your Internet connection. This prevalent circumstance was taken into consideration when developing our initial solution, which may be found below.
Another typical cause is that your Internet browser’s temporary files have a flaw or error that prevents images from being shown. These files can be found on your computer’s hard drive.
Quick Tip:
If you continue having problems with your current browser, try Opera One instead. It’s frequently updated and offers enhanced privacy with built-in features like a VPN and anti-tracking.
It is compatible with all major platforms and offers quick and easy ways to transfer all your data. It also has social media integrations, customized workspaces, and more.
Opera One
Upgrade to a reliable and responsive browser that’s able to load any type of page with no issue!
If you are not seeing any images at all, the problem is most likely on your end and not on the website that you are currently viewing. To be more precise, it can be because of the settings in your browser or an incompatibility across browsers.
Follow the steps below only after you have checked that your Internet connection is operational by visiting a website that you have never been to before.
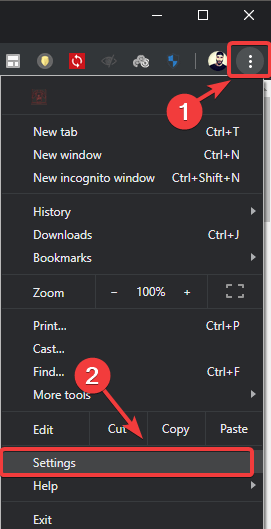
Open your browser, we will use Chrome to showcase the process, then go to its Settings by clicking on the three-dot menu followed by Settings.
Next, navigate to Privacy and security followed by Site settings.
Scroll down the page and click on the Images section.
Lastly, make sure the Sites can show images option is selected.
Not seeing any images in your browser is a major issue. Without visual experience, surfing the Internet is extremely difficult.
Luckily, there are some easy solutions that you can implement right away and get back to enjoying the web again.
Did you find our solutions useful? Do let us know in the comments section below!
Many users reported that their Opera browser is open but not visible, and this makes it completely unusable. Today we’ll show you how you can fix this problem.
What can I do if my Opera browser is open but not visible?
Before trying anything else, if you’re using multiple monitors, use the Windows key + P to switch to a PC screen only mode.
1. Use Windows shortcuts
Close Opera browser.
Re-open Opera and make sure nothing else is open.
Press Alt + Space buttons.
Select Full screen or Maximize, from the menu that appears floating somewhere on your screen.
You can also try pressing Win + D buttons multiple times to get to the Windows you are looking for to reappear.
For some users using Windows + Left Arrow key worked, so try that as well.
To learn more about shortcuts, we have a whole guide dedicated to Opera shortcuts, so don’t miss it.
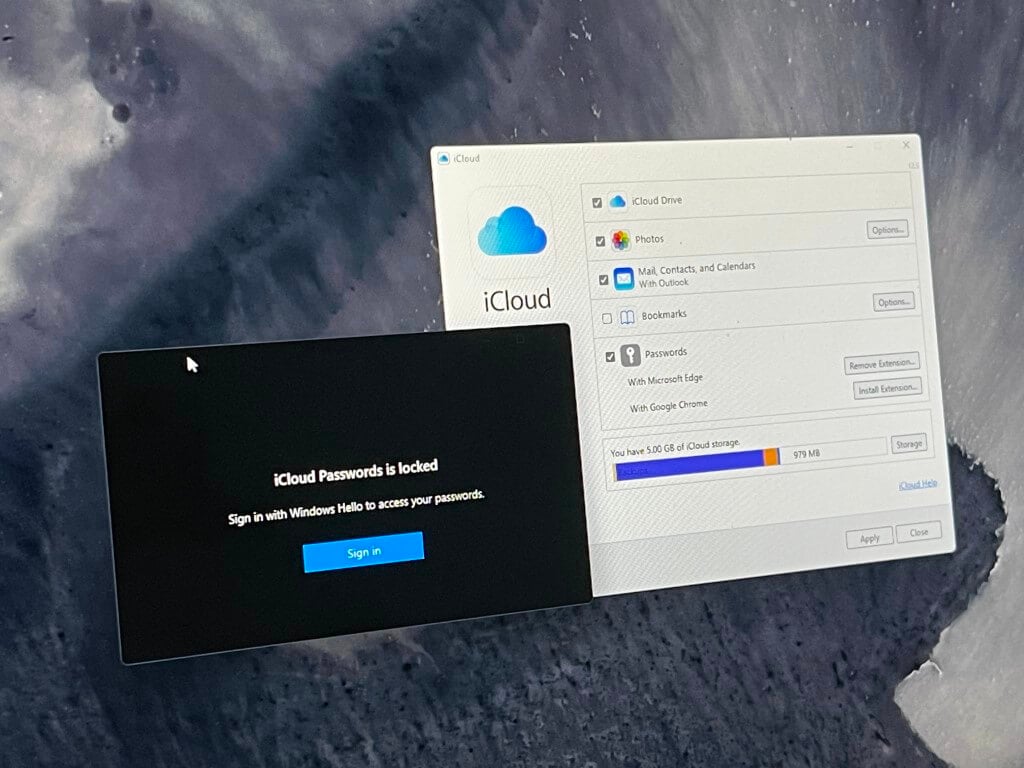
If you are currently using iCloud for Windows as your password manager, then you should know that it has received a cool new update. As spotted by a user on Reddit, the iCloud for Windows client can now generate two factor authentication codes.
We saw Apple rolling out this feature to both iCloud Passwords in iOS 15 and macOS Monterey sometime last year, and it has finally been rolled out to Windows 11 and Windows 10. Essentially, this means that users will get an extra layer of security which will help keep attackers at bay and at the same time prevent them from accessing your personal credentials.
However, iCloud Passwords is currently available on Microsoft Edge and Google Chrome. It can also be used on Chromium based browsers. This means if you prefer to use a different browser, you will be required to open the iCloud Passwords utility each time you need to generate a 2FA code with iCloud Keychain.
Spotify is currently the most popular music streaming service in the world with more than 240 million users worldwide.
Although it’s available on all major platforms, some users prefer using Spotify in their web browser since it’s more convenient for them.
In today’s article, we’ll show you how to enable Spotify in your browser, so let’s get started.
What is the difference between Spotify and Spotify web player?
A significant number of Spotify users access the music catalog using the online player. In a similar vein, a sizeable proportion of users choose the second available choice, which is the desktop client.
You will need nothing more than a Spotify account in order to use a web player. You are able to listen to music no matter where you are or when you want to. You may even use a device belonging to a buddy to manage your account instead of your own.
It is more inconvenient than using a desktop client since it needs you to bring a personal computer with you wherever you go.
When compared to the desktop version, the Spotify online player often provides a lesser bitrate for users. Free users of Spotify may only receive a bitrate of 128 kbps through the online player, but premium users receive a bitrate of 256 kbps.
On the other hand, users with free desktop client accounts have access to a maximum of 160 kbps, while customers with paid accounts have access to a very high quality of 320 kbps.
Which is better Spotify web or Spotify app?
Having considered the aforementioned distinctions between the Spotify desktop player and the online player, the Spotify web player is the superior option due to its mobility, and availability.
If you want to listen to your favorite songs on Spotify when you are on the road, you do not need to have your personal computer with you.
You will, however, need to use the Spotify desktop client in order to take advantage of offline playback and improved audio quality. So, the better option is the one that suits your need best: portability vs audio quality.
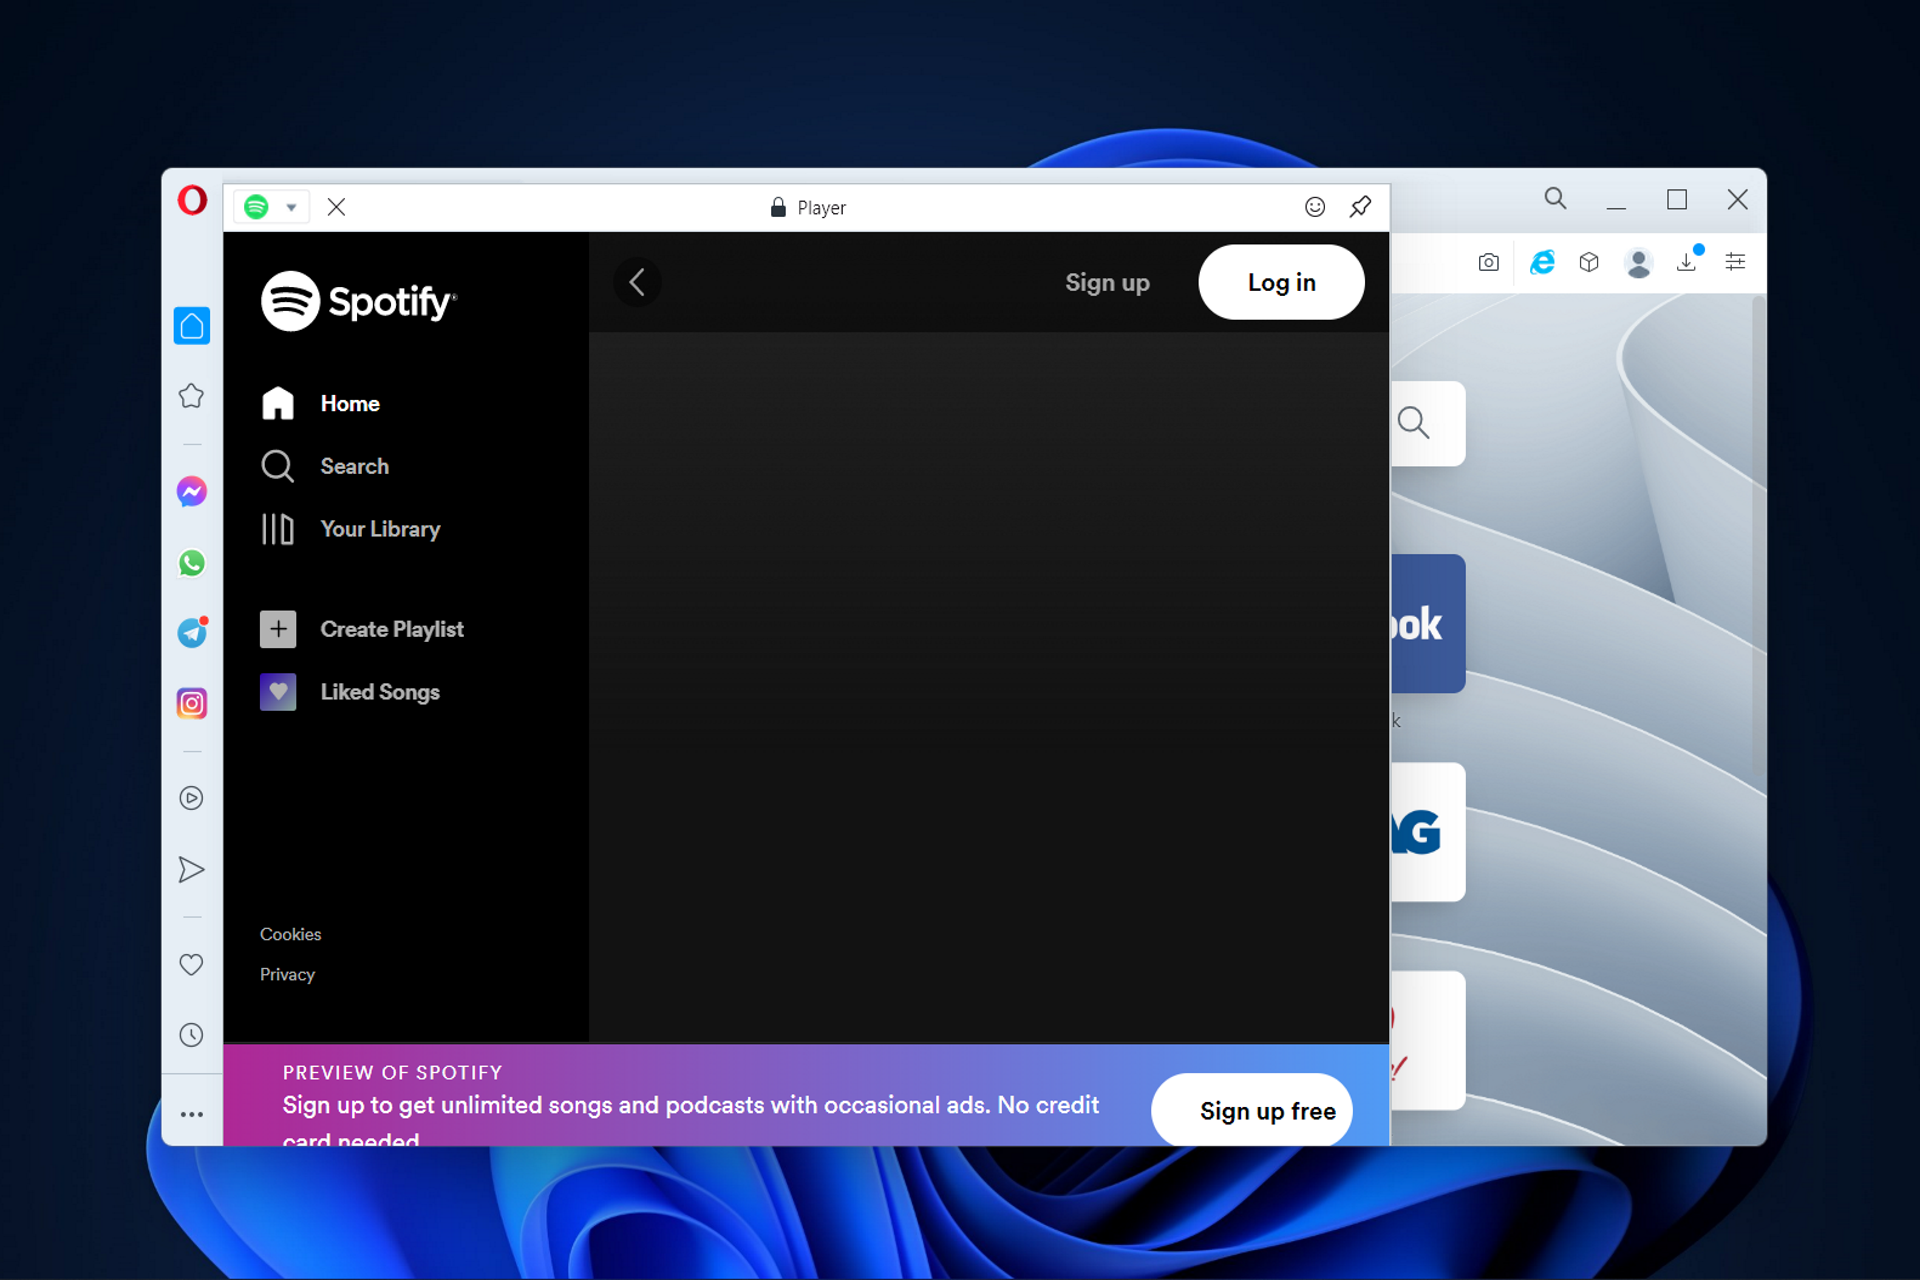
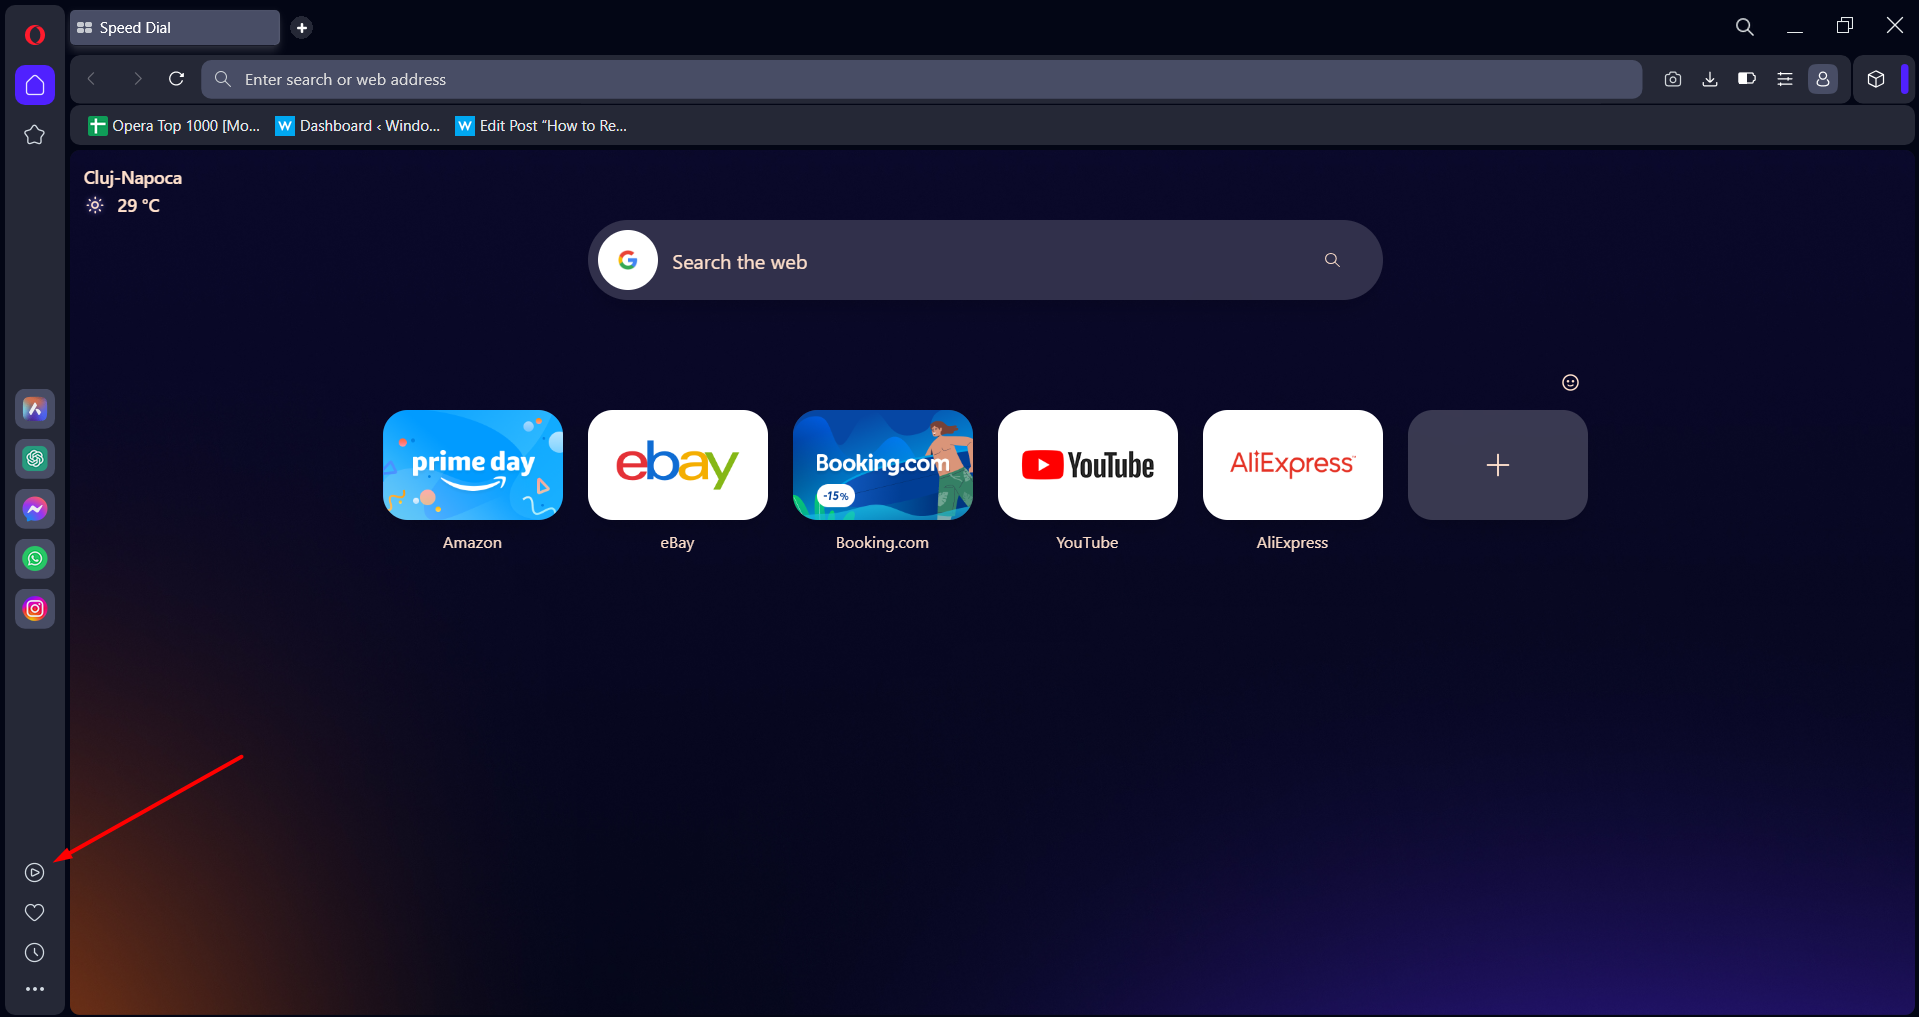
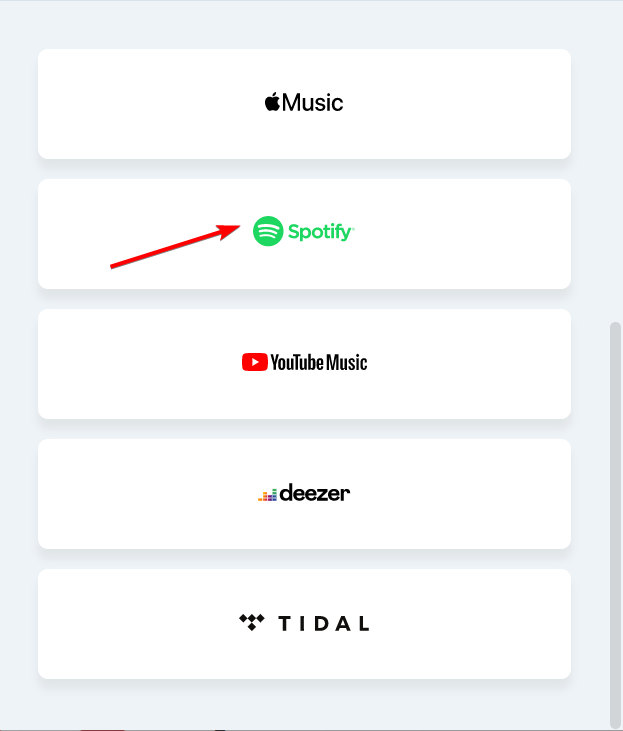
Open Opera One and click on the player icon from the left panel.
Select Spotify from the list of players displayed.
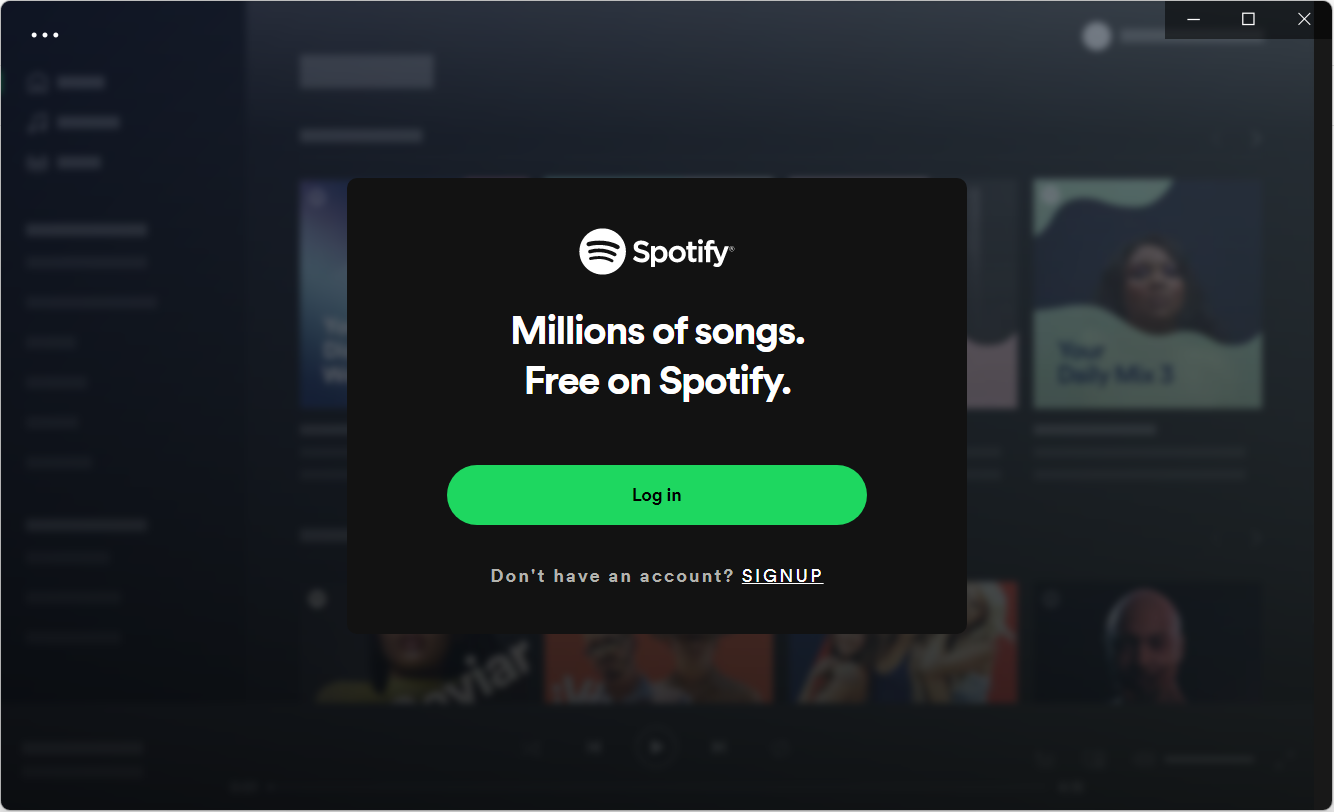
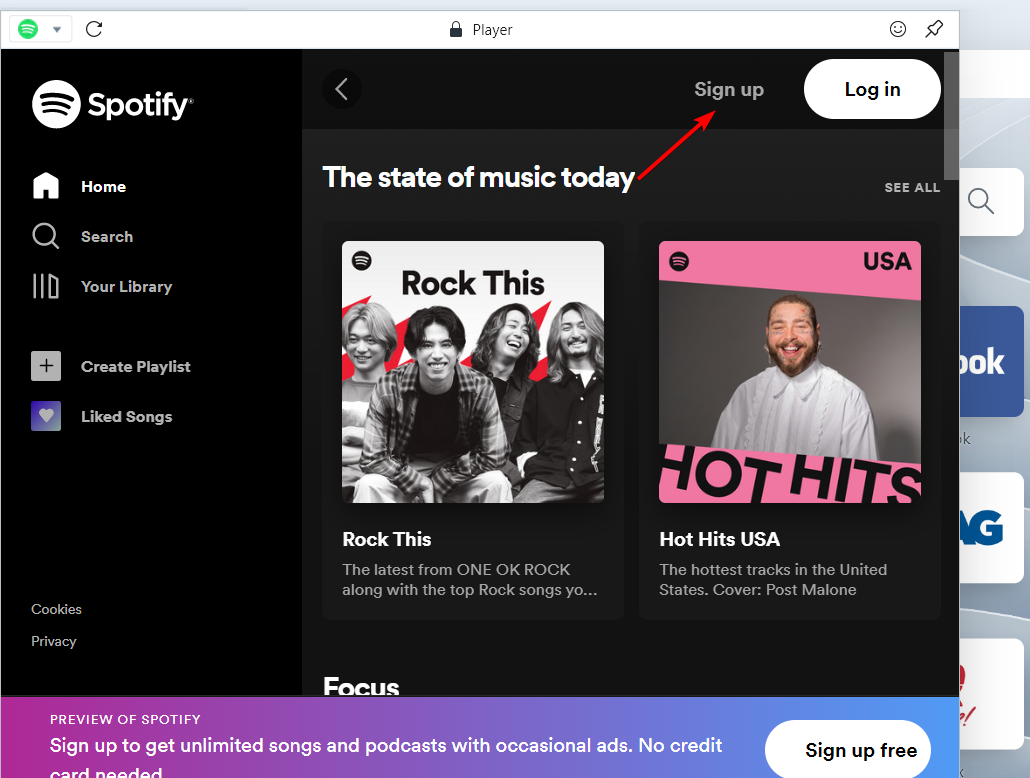
Click the Sign up or Log in button, enter your credentials then start playing your favorite music!
As you can see, listening to Spotify in your web browser is incredibly simple, and you just need a Spotify account and a good browser that can offer a shortcut for the app.
For this guide, we used Opera One browser because of its low hardware requirements. As a result, you can keep Spotify open in a separate tab and it won’t affect your performance in any way.
In addition, Opera One has a built-in ad blocker, which might come in handy if you’re a Free Spotify user.
Lastly, a built-in VPN with unlimited bandwidth can be useful for trying out Spotify, especially if it’s not available in your region.
Opera One
Listen to your favorite songs and playlists on Spotify from within this ultra-modern web browser!
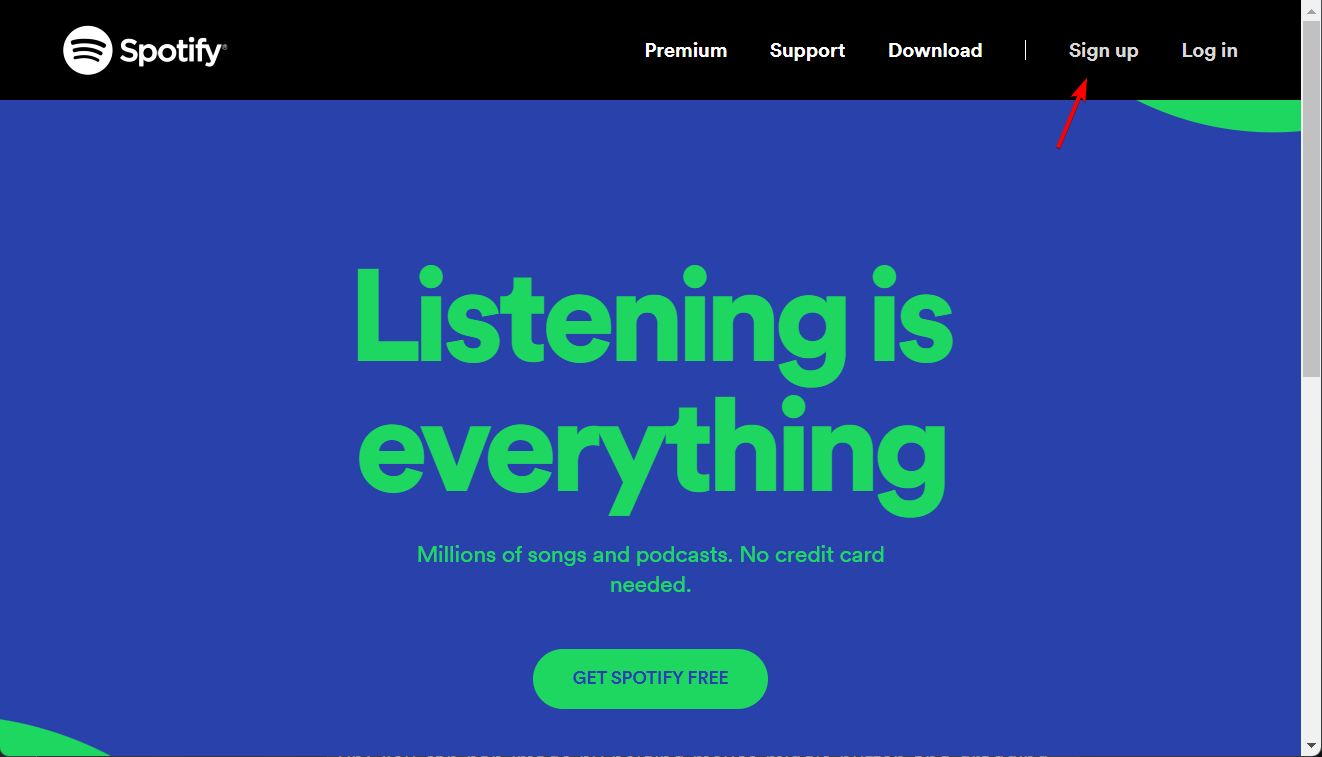
Follow the instructions on the screen to create your account then log into it.
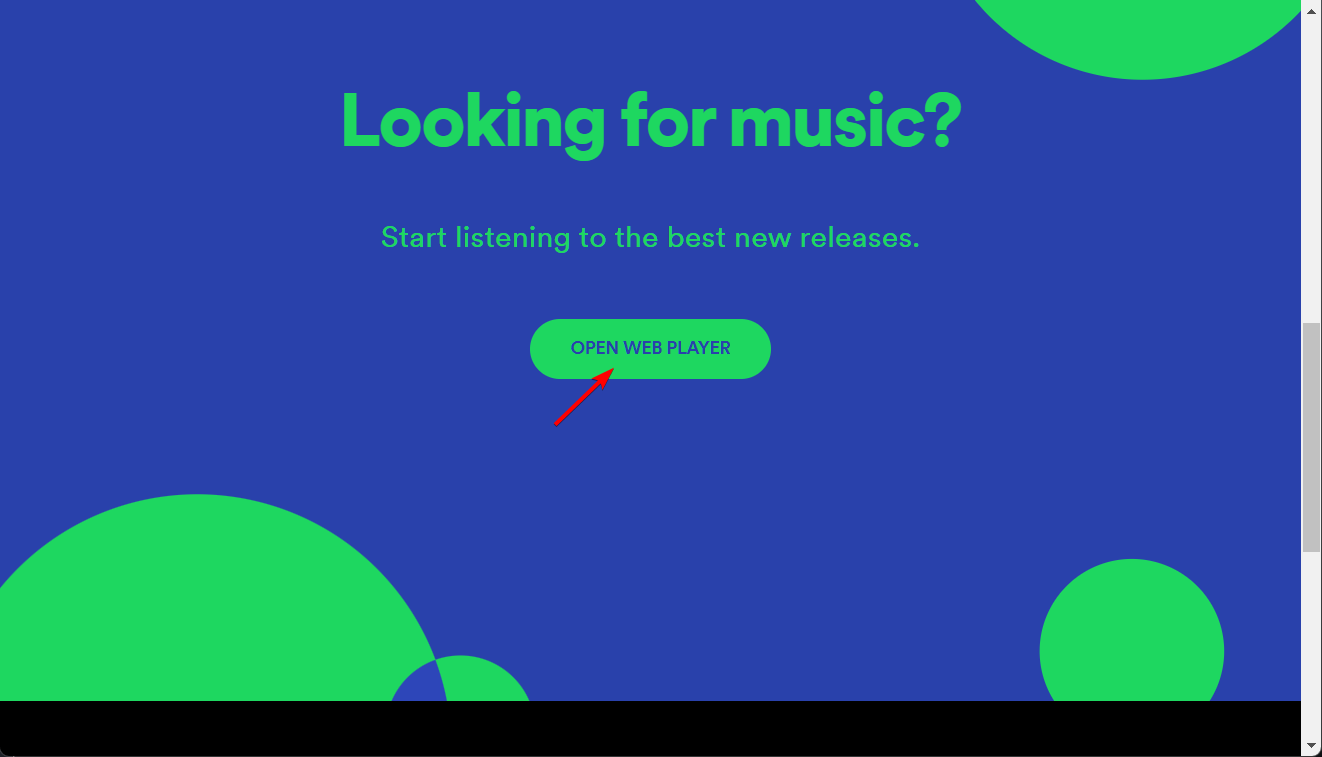
Click the Spotify logo to go back to the main page then scroll down and click the Open Web Player button.
After doing that, a Web Player will appear.
Listening to Spotify in your web browser is incredibly straightforward. The first thing that you need to do is to create a Spotify account as shown above.
Keep in mind that signing up for Spotify is completely free, and you can use the free version as long as you want. However, the free version comes with ads and lower sound quality, so keep that in mind.
The free version also has certain limitations for both Android and iOS apps. For example, you won’t be able to choose specific songs that you want to play on your phone.
This limitation isn’t available if you’re using Spotify in your web browser though. Once you’ve created your Spotify account, you need to sign in before you can use the Web Player.
Why is the Spotify web player not working?
It is likely that you are unable to use Spotify because you are using a browser that is not supported by Spotify, or you have a faulty ad-blocker, cache files, or your browser does not have the playback content feature activated.
There you go, a quick and easy way to enable Spotify secure playback in your Opera One browser. Did you find this guide helpful? If you did, feel free to let us know in the comments below.
Steam is the largest gaming platform on the desktop with hundreds of multiplayer games. Tons of worldwide users choose it to enjoy their day-to-day gaming experience, so it is no longer a surprise that it is great, especially for professional gamers.
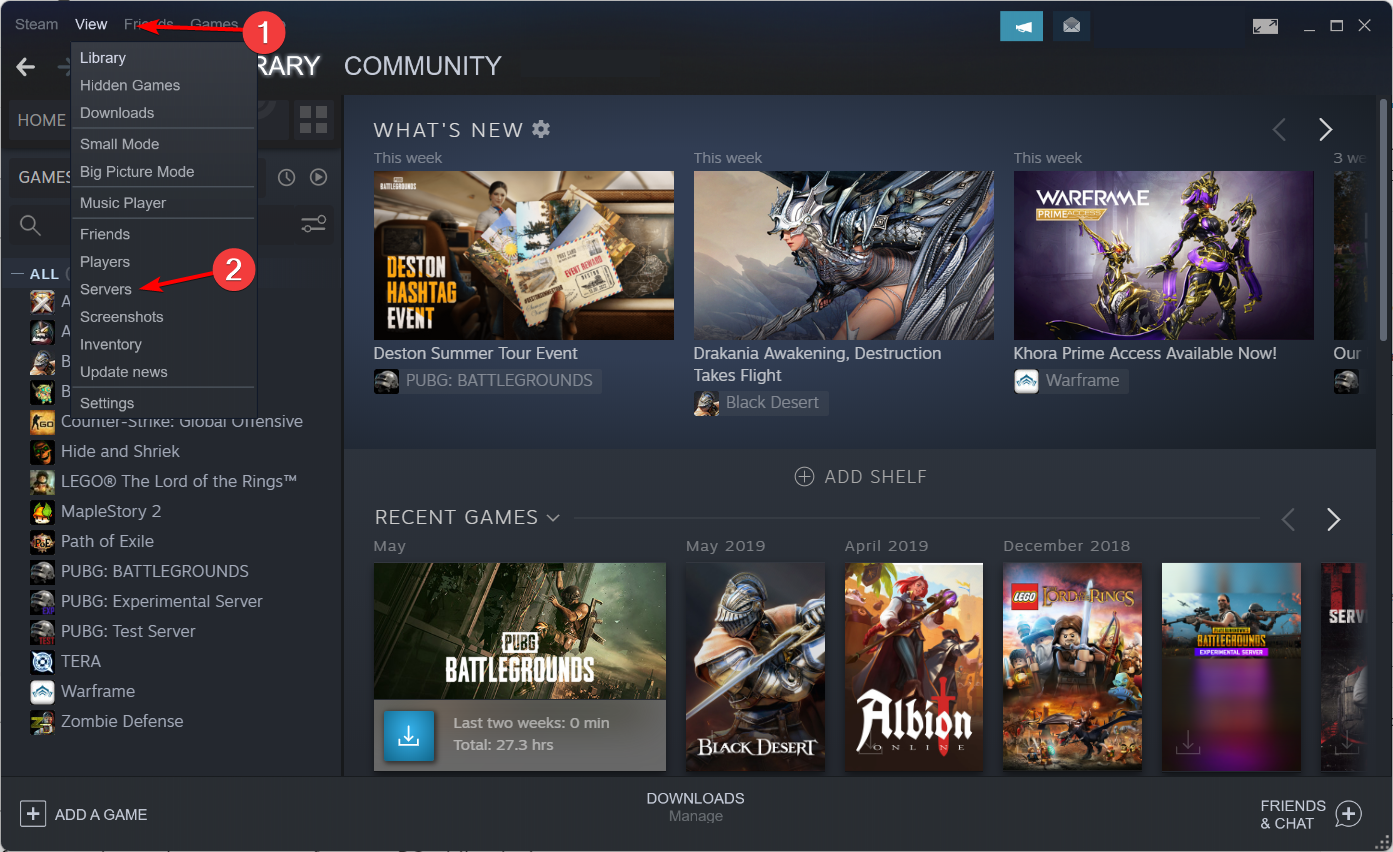
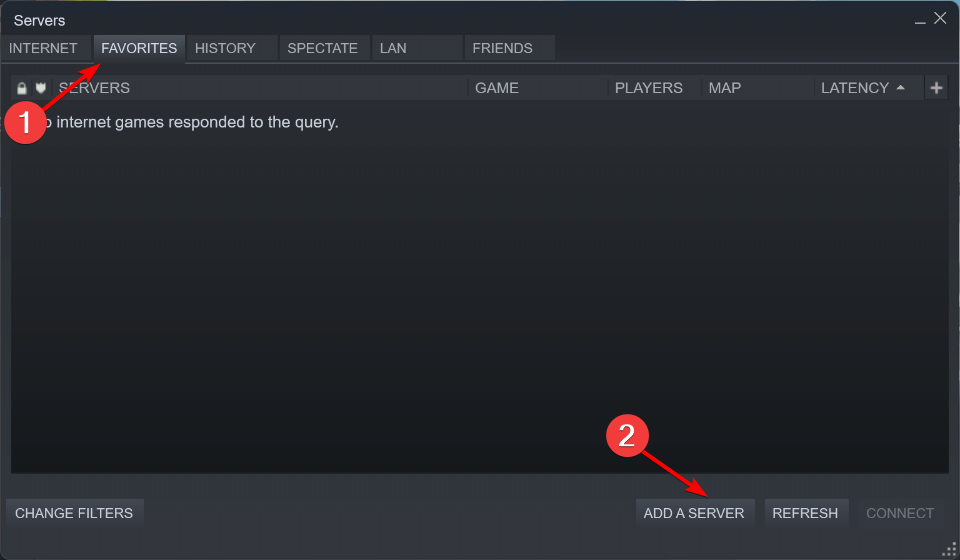
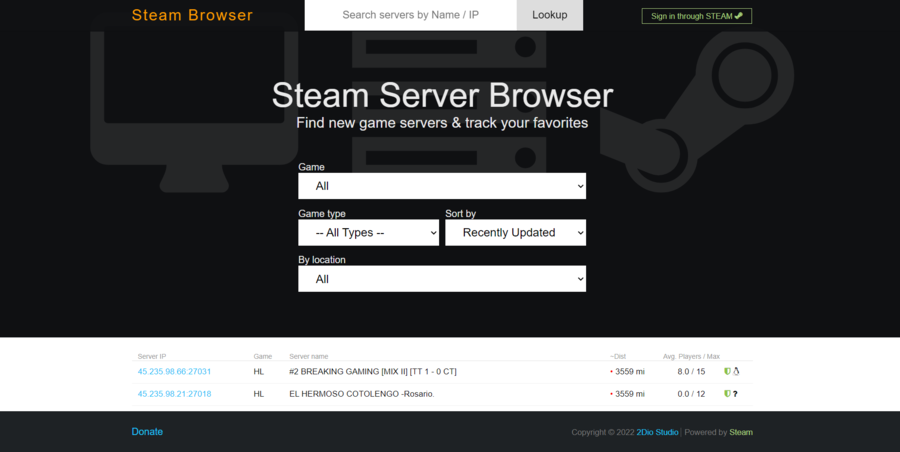
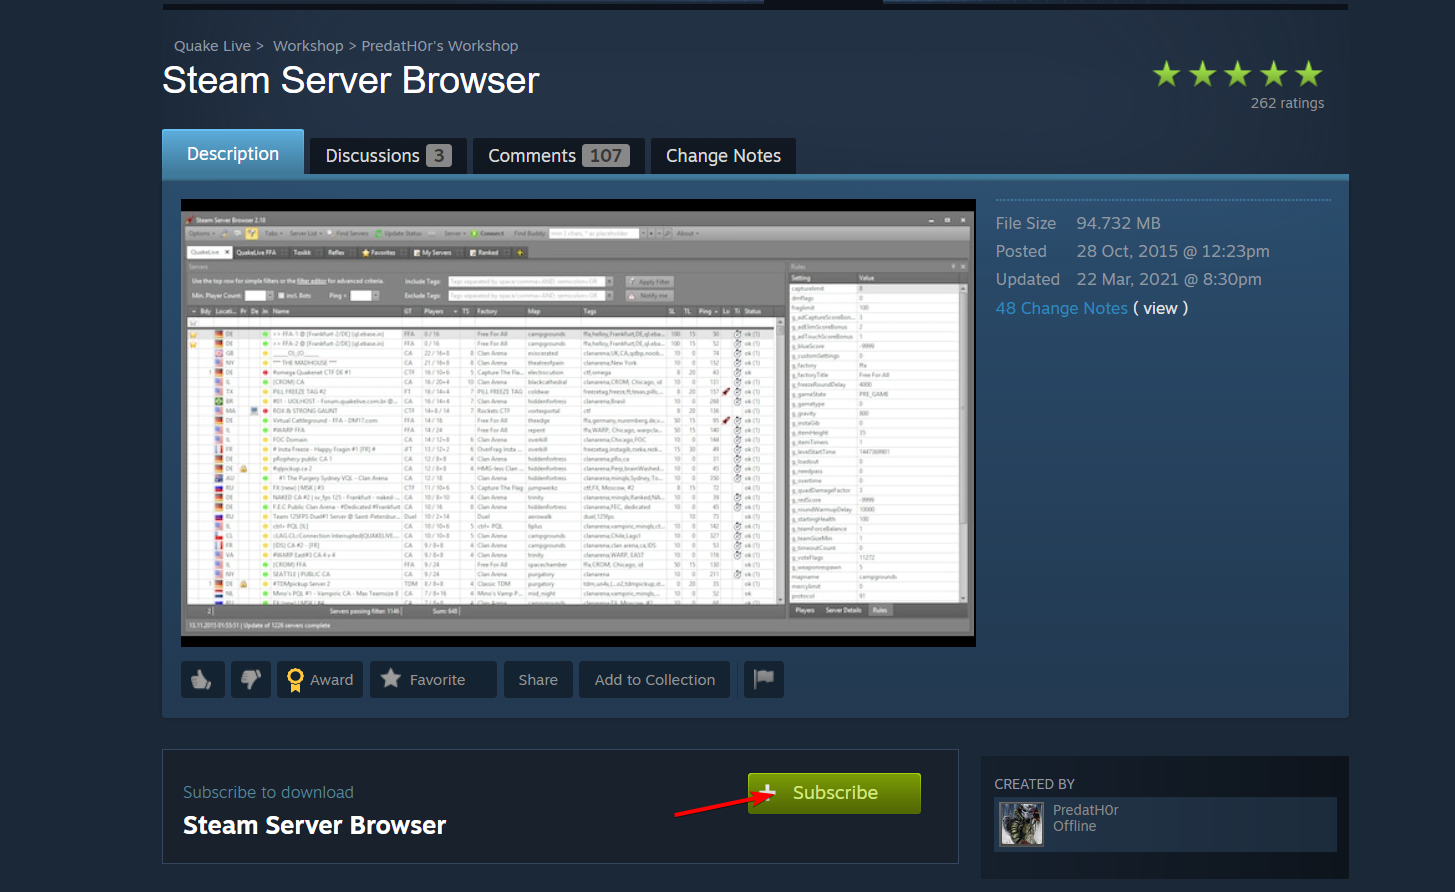
Speaking of multiplayer games, sometimes it’s hard to find a proper server to play on. This is where the Steam Server Browser comes in, and in today’s article, we’re going to show you how to use it properly.
What is the Steam Server Browser?
Everything you need to set up dedicated servers for your game is included in the Steam Game Servers API. You have the option of hosting these gaming servers yourself, or you may delegate that responsibility to the members of your community.
This is the optimal option for games with extremely high levels of competition, such as Dota 2, or games with permanent servers, which continue to operate even after players quit (such as Team Fortress 2).
Can Steam host servers?
For those of you who are wondering if Steam has its servers, well, you have to know that there are tons of these types of servers available all around the world. From Dota 2 to Ark, Steam Server Browser offers connectivity for users.
The whole idea behind the CDNs (Content Delivery Networks) is to put servers everywhere, so that no matter where the user is, he/she can get a good connection.
Steam specifically uses Akamai. This has deployed the most pervasive, highly-distributed content delivery network (CDN) with more than 216,000 servers in over 120 countries and within more than 1,500 networks around the world.
With this technology, Steam Server Browser ensures pings don’t exceed a maximum limit that would put the game on hold.
Quick Tip:
Another way to access Steam servers is on the Opera GX browser through Discord channels and the built-in VPN that offers several private virtual networks.
The live check for RAM and CPU usage and bandwidth limiters are important for a day-by-day gaming session to avoid lags and high pings outside the browser.
Opera GX
It can ease resource consumption when browsing and have the minimum impact over Steam sessions.
Locate the desired server, copy its IP address, and paste it into the game in order to join.
Using the Steam Server Browser is a great way to find and join a server for a specific game, and if you already haven’t tried it, this might be a perfect time to do it.
What can I do if the Steam Server Browser is not working?
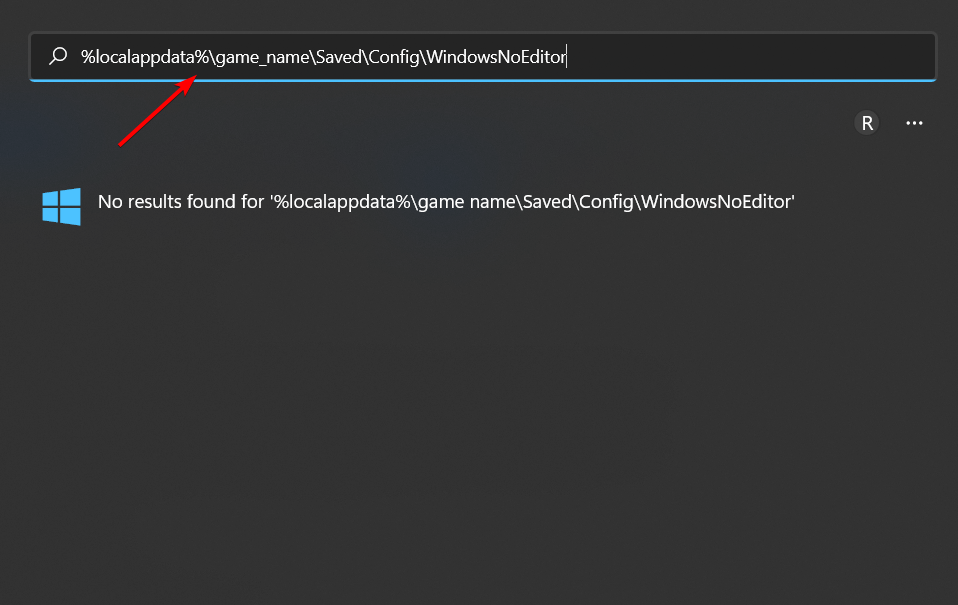
Open Windows Search by pressing on the magnifying glass icon and type the following command where you change game_name to the name of the game you are having issues with %localappdata%\game_name\Saved\Config\WindowsNoEditor then press Enter.
Next, you need to open Engine.ini with notepad and add the following lines at the bottom of the file: [OnlineSubsystem] PollingIntervalInMs=100
Save the file then try to access the server you want again.
How can I make my own Steam server?
1. Choose a game
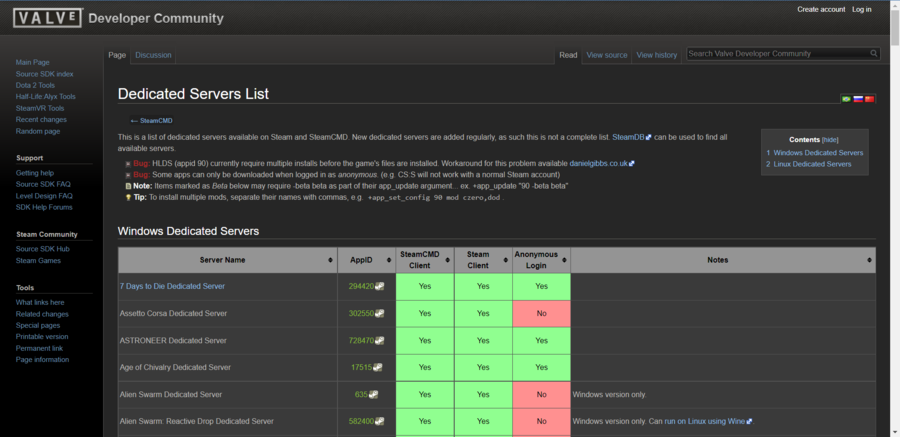
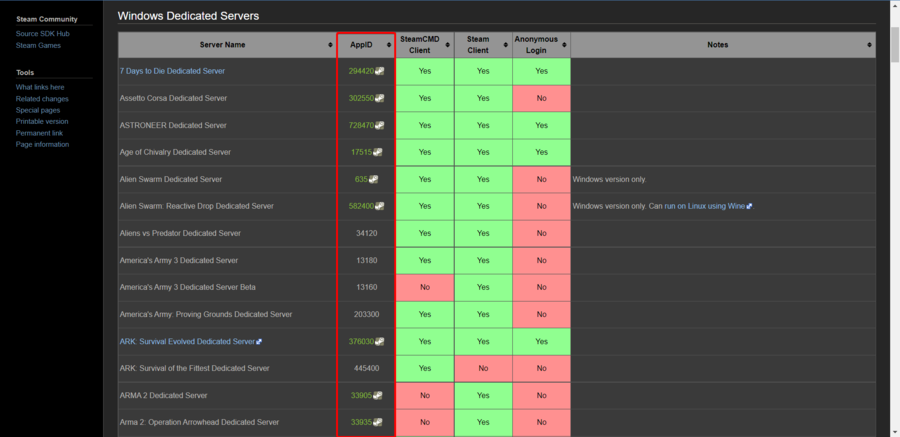
To set up a Steam server, you’ll first need to check if the game you want to host has dedicated server support. In this matter, navigate to the Steam servers’ official page.
Their list is extremely varied and is continuously growing. There, you can find popular single and multiplayer options la CS: GO, ARK: Survival Evolved, Space Engineers, and many others.
2. Install and run SteamCMD
The second step to set up your server requires Valve’s official command-line tool for running Steam games and game servers, known as SteamCMD.
To download it, navigate to the official SteamCMD page, then go to the Downloading SteamCMD section. If you’re using Windows, download the steamcmd.zip file and extract it to a folder.
Users who want a complete walkthrough for installing, updating, and managing dedicated servers can check this guide on how to use SteamCMD for detailed instructions.
To run SteamCMD, follow the steps below:
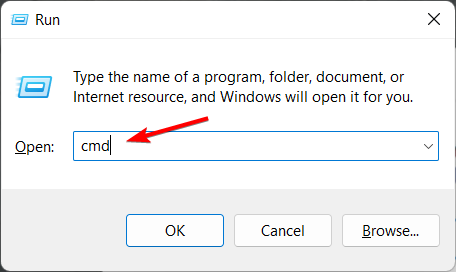
Use the following keyboard shortcut to open the Windows run dialog box: Windows + R.
Type cmd, then hit Enter.
Navigate to the folder where you unpacked the steamcmd.zip file.
Now, in the Command Prompt window, input the following command, then hit Enter: steamcmd
SteamCMD automatically updates to the latest version each time you run it.
Some games require the use of Steam credentials to run a server. Others can be hosted anonymously.
To use your Steam login credentials, type in: login anonymous
To log in with an account, type in: login <username>
Do not forget to replace <username> with your Steam username, then press Enter and type in your Steam account pass when prompted.
3. Download the game server files
To download the server files for a game, first choose an installation directory for the server with the command: force_install_dir <path>
Keep in mind that <path> is the full path to the folder where you want to install the server.
Also, do not forget that <app_id> is the AppID for the game. This command downloads and validates the server files.
Your server is now ready to be configured and launched. We hope that this information helped you to use the Steam Server Browser properly.
If you have any other information or questions concerning the Steam Server Browser on the Windows platform, feel free to tell us in the comments section below.
Some users have posted on Mozilla’s forum about Firefox’s tabs crashing. Those users have said Firefox crashes with a Gah, Your tab just crashed error message.
Web pages don’t open when that error arises, and this can have a variety of implications both for your personal and professional.
For this reason, in today’s guide, we will explore the best way to resolve this issue and get back to exploring the web using Firefox. Read on for more details.
What causes a Firefox tab to crash?
There are a few reasons why you may experience a Firefox tab crash. A few of the more common culprits include:
Too many concurrently opened tabs
Malfunctioning or incompatible browser add-ons
An outdated browser version
Unstable update releases
While this is not an exhaustive list, these account for 90% of crashes while using the browser. Whatever the case will be, you should be able to solve it using the solutions in this article.
Quick Tip:
Use a more responsive browser. A good alternative that’s less prone to errors is Opera One. It gets frequent updates and uses few system resources which ensures a more seamless browsing experience.
Opera One includes a battery saver mode that limits unnecessary tasks, making your browser perform better. On the topic of performance, note that it also has an adblocker and a hardware acceleration feature.
Opera One
Make tab crashes a thing of the past with this performance-oriented browser.
Click the menu or three horizontal lines, then select Help.
Select the Troubleshoot Mode.
Click the Restart button.
In the Open Firefox in Troubleshoot Mode windows, click the Open button.
2. Turn off all your Firefox add-ons
Launch the Firefox browser.
Click the menu or three horizontal lines, then select Add-ons and themes.
Toggle all the switches found on the page to close all add-ons.
Once these steps are done, check to see if the browser issues are fixed.
3. Disable multi-process tabs
Enter the path below in Firefox’s URL bar, and pressEnter key, then click Accept the Risk and Continue: about:config
Click on Show All.
Search for browser.tabs.remote.autostart and set the value to False.
Next, search for browser.tabs.remote.autostart.2 and set the value to off.
Then restart your browser.
4. Change your Firefox version
Launch the browser.
Click the menu and select Help.
Click About Firefox to open the window shown directly below.
If Firefox gets updated, restart the browser.
5. Try browsing with an older Firefox version
Alternatively, try browsing with an older version of Firefox by opening the Index page for previous Fox releases.
Click a Firefox release version to download.
Click either Win32 (32-bit Windows) orWin64 (64-bit Windows), or whatever other platforms you’ll utilize the browser on.
Next, select a language setting for the browser, such as en-US.
Then click the Firefox Setup executable link to download the setup wizard.
Open the setup wizard to install the older Firefox version.
These are some of the confirmed fixes for the Gah. Your tab just crashedFirefox error.
Many users have said that turning multi-process tabs off, as outlined in resolution three, can resolve the issue.
However, if you still need to fix the issue, try sending a crash report. These reports help the dev team understand error trends and prepare the best solutions during new update rollouts.
The Gah. your tab just crashed. we can help Firefox support, as they may be able to get you immediate solutions without the need to wait for an update.
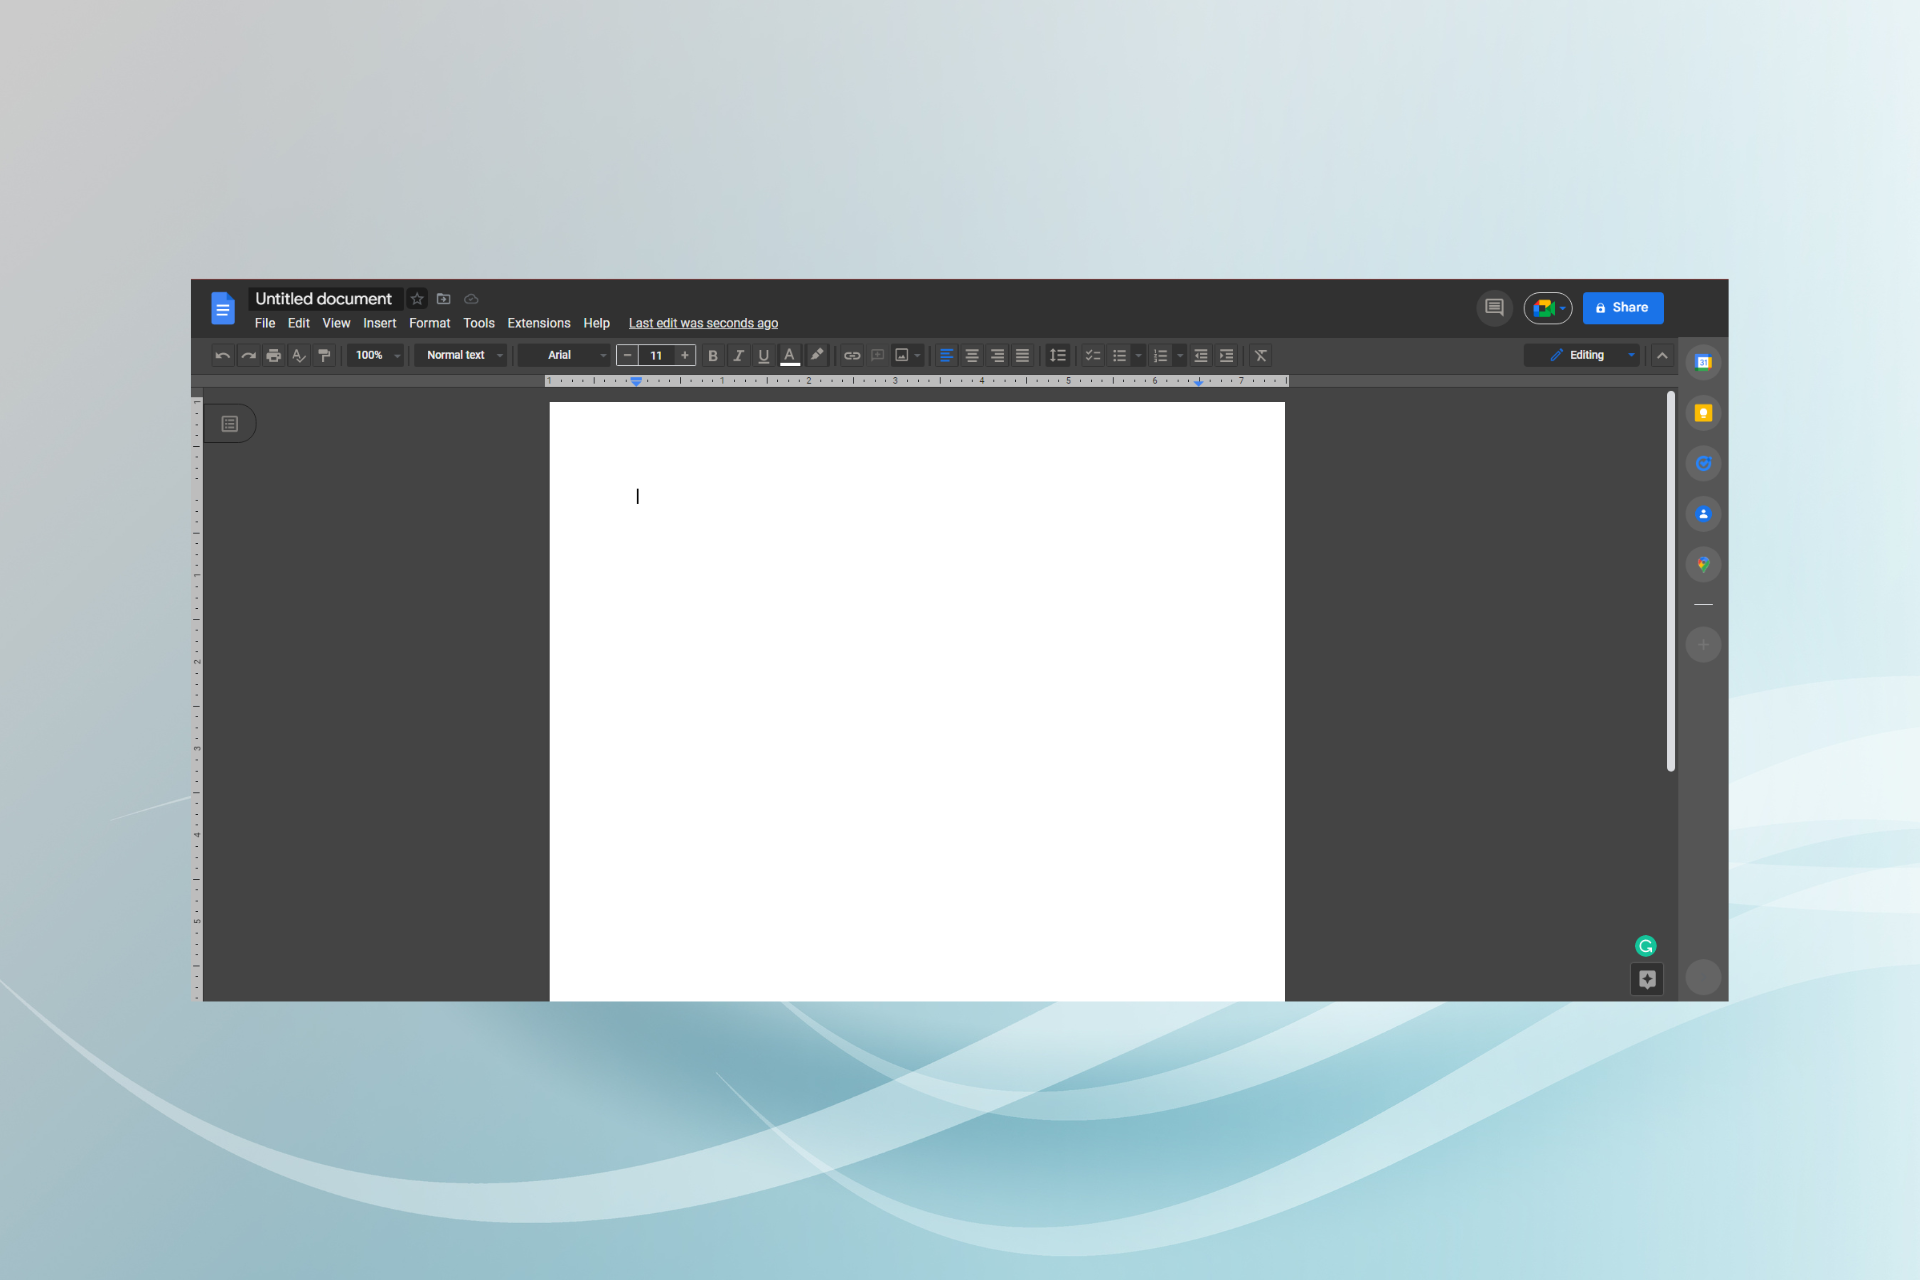
The Dark Mode theme is bliss, especially when working at night in Google Docs files and folders.
Dark Mode has become popular in recent years, with almost every major platform and application offering a built-in option for it. This includes Google Workspace, formerly called Google Suite.
There are several ways you can turn on Dark Mode in Google Docs, and in this article, we will explore the exact steps you need to follow.
Is Dark Mode better for your eyes?
Dark is certainly better for your eyes, as it helps reduce the strain and enhances readability. If you stay long hours on the computer, Dark Mode would be a better choice.
Also, Dark Mode helps reduce the chances of dry eyes, a common problem amongst people due to reduced blinking when staring at the screen for an extended period.
But, it certainly doesn’t have as many benefits as one may expect. Though there’s no harm in switching to Dark Mode, and it should be your preferred setting.
Which browsers support Dark Mode?
Almost all major browsers support the Dark Mode functionality, be it Opera One, Chrome, Firefox, Edge, or Vivaldi. As mentioned earlier, most platforms are now incorporating this feature due to the increased demand.
If you were planning to switch to a browser that supports Dark Mode, we recommend Opera One. Its Dark Mode is soothing to the eyes. Besides, the browser offers a bunch of other useful built-in features, for which you will have to install an extension in other browsers.
Also, you could try Dark Mode on Google Docs in Opera GX, another amazing browser, though it’s more gaming oriented.
Quick Tip:
Opera One is our recommended browser when it comes to dark theme customization. You will benefit from a large array of options, created specifically for your productivity and comfort.
Opera One is a reliable, and easy-to-use browser where you can work on your Google Docs files with ease, selecting the dark theme from the main screen. You can also install additional extensions if you want.
Opera One
Enjoy all the dark themes that this browser has to offer in order to maximize efficiency.
On the other hand, if you are using Edge, you can install the dedicated Edge Google Docs Dark Mode extension, and you will have the exact desired outcome.
Firefox
On Firefox, as well as for the other browsers, you can install the Darkdocs extension, and then all the Google Docs interfaces will turn dark.
Regardless of the browser you are using, all you have to do is install the extension on your device and enjoy working on any online documents, including Google Docs, in the Dark Mode.
What do I do if Google Docs Dark Mode is not working?
Since there isn’t a built-in way to enable Dark Mode on Google Docs just yet, you might come across issues with it. And it all depends on the method you have chosen.
Flags are temporary features and can often run into issues. Similarly, extensions too are prone to problems. So, you may try re-enabling the flag or reinstalling the extension used to enable Dark Mode in Google Docs to fix things.
But, it’s best that you go with a browser that already offers a polished version of the feature to eliminate the likelihood of encountering issues with the Dark Mode. So, use Opera One for Dark Mode in Google Docs.
As seen in this article, you can easily enable Dark Mode on Google Docs in Windows 10/11 to make it easier to view and work with the files online. Moreover, using the dark theme is also great since it will help you save battery life.
If you find that your browser automatically opens advertisement websites, your computer might be infected with malware.
This type of infestation of your PC can happen if you browse the internet without using secure browsers that keep you safe online. Also, you can face this issue if you don’t have any security tools on your PC.
Here’s how users described this issue on the Microsoft Answers forum:
Recently, websites have been opening automatically when I try to open my usual websites or click on a link. How can I resolve this problem?
In this article, we will explore the best way to avoid this issue and how to remove any adware software from your PC.
Why is my browser opening ads?
The most well-known reason your browser automatically opens advertisement websites is the presence of malware. These viruses cause all sorts of issues, including hijacking your browser.
Below are some of the other causes:
Insecure browser
Absence of ad blocking features in the browser
Outdated browser
Quick Tip:
If your browser opens another website with advertisements when you open a different website, you should switch to a secure browser like Opera One. This software was created specifically with online privacy in mind due to the built-in VPN and Ad blocker.
Not only is Opera One great for your security and privacy, but it also offers some unique features to improve your browsing experience, such as built-in AI, battery saver, crypto wallet, workspaces, tab islands, and many more useful things.
Opera One
The ad-blocker and the vast library of available extensions will prevent unwanted ads.
How do I stop web pages from opening automatically in my browser?
1. Use registry cleaner tools to remove cookies
Another solution to apply if your browser opens automatically with ads resolve browser is to delete cookies or cache.
So to clean up your PC efficiently and remove cookies, an efficient method is to consider specialized registry cleaner tools that will erase the residual files.
You have the chance to free up your browser from all accumulated data and thus optimize your PC speed instantly.
2. Enable the built-in pop-up blocker from your browser
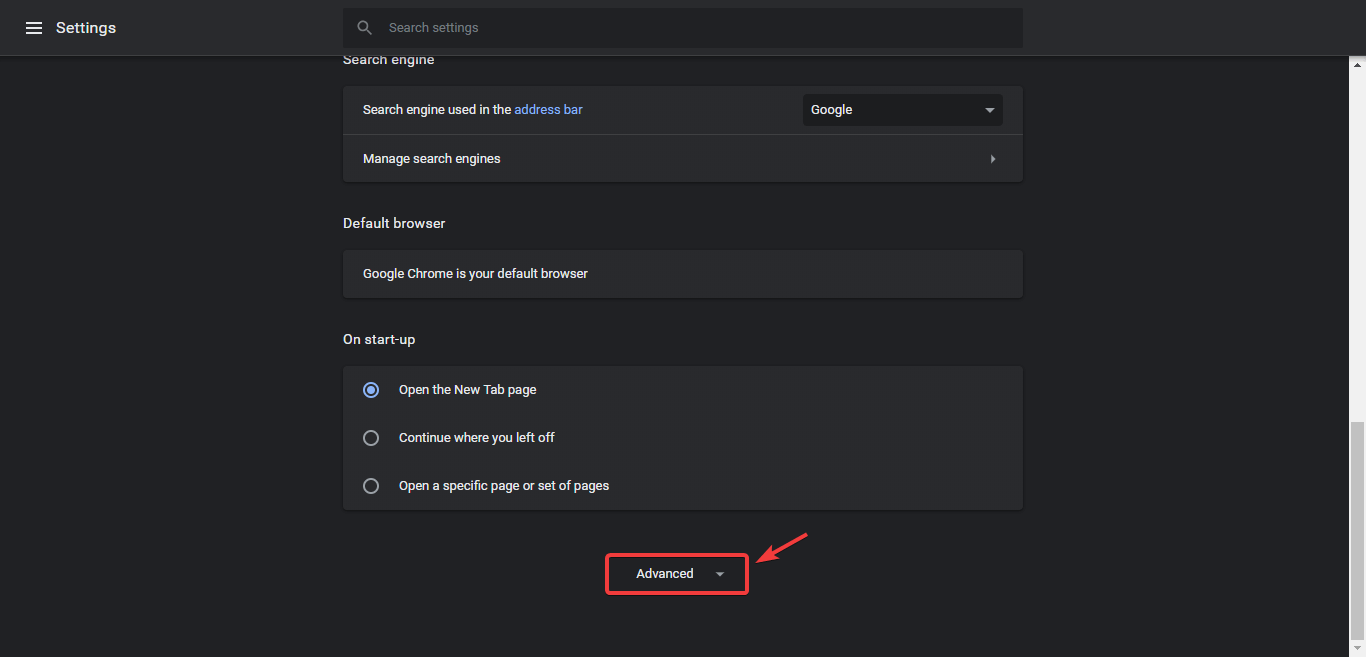
Click the three dotsicon andselect Settings.
Inside the settings window, scroll to the bottom and click on Advanced.
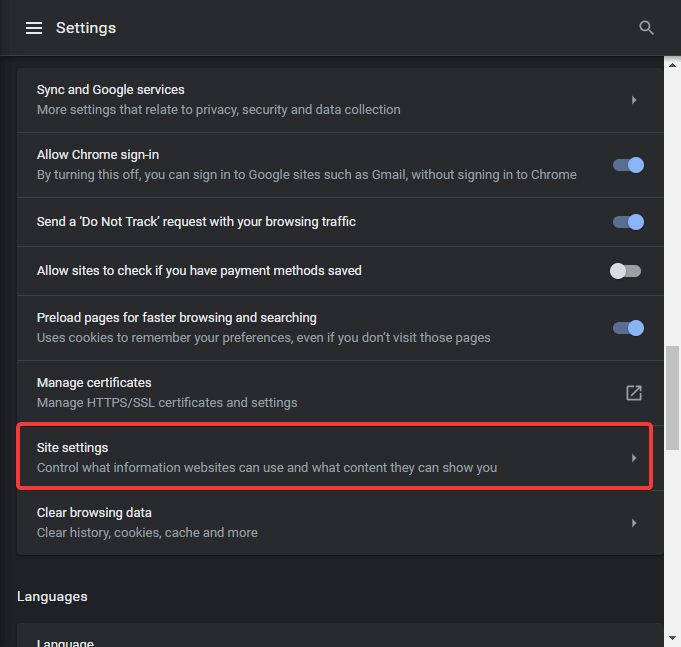
Select Site Settings.
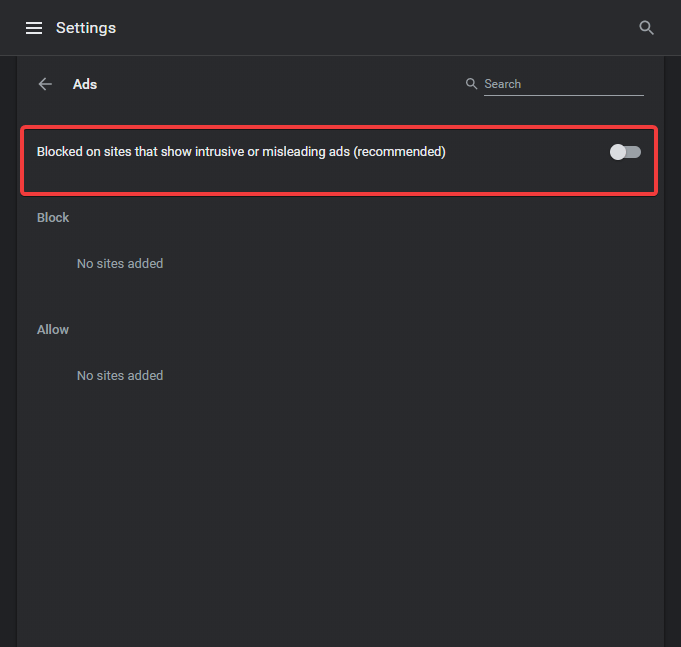
Select the Ads option.
Make sure that the button is toggled to Off.
Click OK and check to see if sites still open ads.
The built-in pop-up and ad blocker on your browser are there for a reason. Always enable these features except for trusted websites to keep yourself safe online.
This article explored some of the best ways to stop browsers from automatically opening websites on your PC. With the fixes above, this issue should be history for you in no time.
Yahoo Search engine has been around for years, but Yahoo never made an official web browser that uses Yahoo Search. This is unlike the Google Search engine, which is the default for the best browsers on all devices.
However, you can still use Yahoo Search in some modern browsers. While it is not straightforward, you can still set it as your default search engine.
This guide will show you how to set Yahoo Search as your default search engine in all modern web browsers.
What is the most popular search engine?
Google is the most popular search engine by a wide margin. It holds over 70 percent share of the search engine market.
Also, it has the widest reach, with an unmatched database. However, search engines like DuckDuckGo are the go-to options in terms of security.
Why should I change my search engine to Yahoo?
Yahoo is one of the search engines with the widest reach. It provides you access to information on almost all subjects you search for.
Using Yahoo on your web browser also gives you access to information at various levels of study. Lastly, whether you are a new or veteran web user, this search engine gives you access to millions of web pages.
How do I make Yahoo my default search engine?
1. Opera
Open theOperamenu by clicking its icon in the top left corner.
Select Settings from the menu.
Go to the Search engine.
Click the dropdown box, and select Yahoo from the list.
If you’re unfamiliar with Opera, you should know that this browser has tracking protection and a built-in ad block. Thanks to these features, your web pages will open faster than ever.
The browser also has advanced tab management and the ability to organize tabs into workspaces. Lastly, the built-in free VPN offers unlimited bandwidth and an extra layer of protection.
Opera
Get Opera, the finest browser for a lightweight, fast, and personalized Yahoo experience!
Open the Firefox menu by clicking the menu icon in the top right corner.
Now select Options.
In the left pane, select Search.
Go to the Default Search Engine section in the right pane and select Yahoo.
Unlike most other browsers, Firefox does not have Yahoo search as part of the options. So to set it as the default search engine, you need to download Yahoo from the add-ons store.
There you go; these are the methods you can use to switch to Yahoo Search in your favorite browser. While it is not the most option, it still offers access to thousands of websites and millions of web pages.
If you try to reach a certain webpage, but it simply cannot load, you need to find the perfect network troubleshooting solution.
Furthermore, you might see this annoyingly familiar error message stating that this website is not available right now.
The below guidelines can fix this particular network connection error regardless of what web browser you are currently using – it can be Google Chrome, Microsoft Edge, Firefox, and so on.
So, without further ado, let’s check out how to rid you of the webpage not available error.
Why are some websites not available?
The reason a website is not available varies. It might be due to network problems or issues with the page you are trying to visit.
Below are some of the common causes:
Website server issue
Faulty browser
Location restricted website
Presence of virus
Quick Tip:
The website or web page is not available to issue usually associated with Chrome. So, an easy fix to the problem is to change your browser. And there is no better alternative to Chrome than Opera One.
Moreover, it has a built-in VPN feature that allows you to access location-based content. With this, you can fix this website that is not available in your country issue.
Opera One
A modern browser that loads pages with a respectable browsing speed.
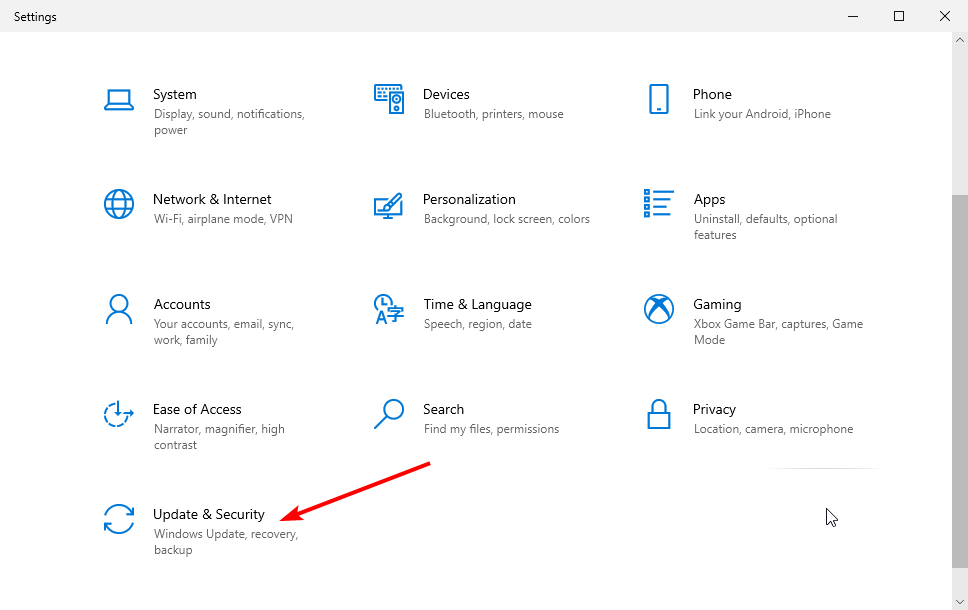
Press the Windows + I keys to open the Settings app.
Choose the Update & Security option.
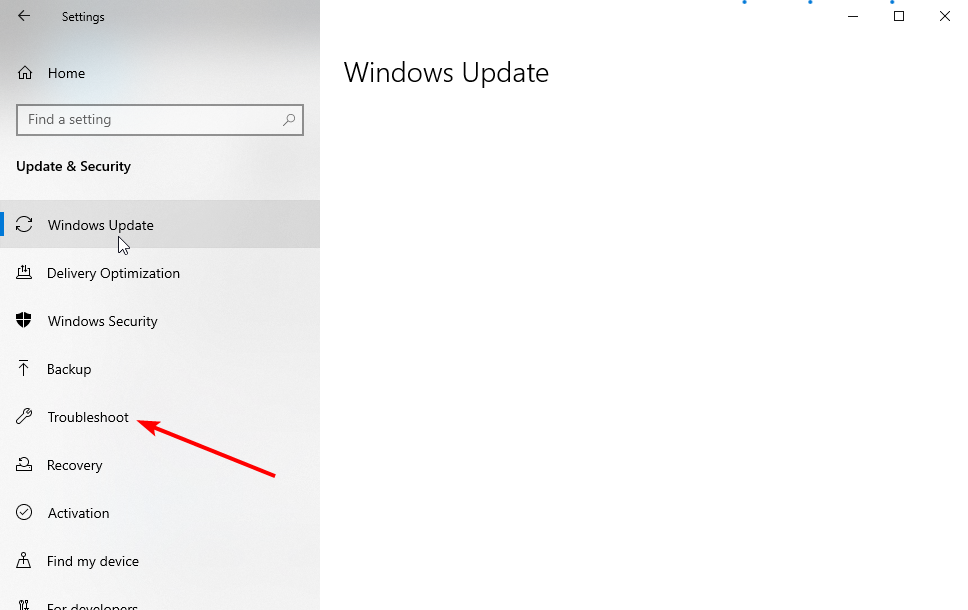
Select Troubleshoot in the left pane.
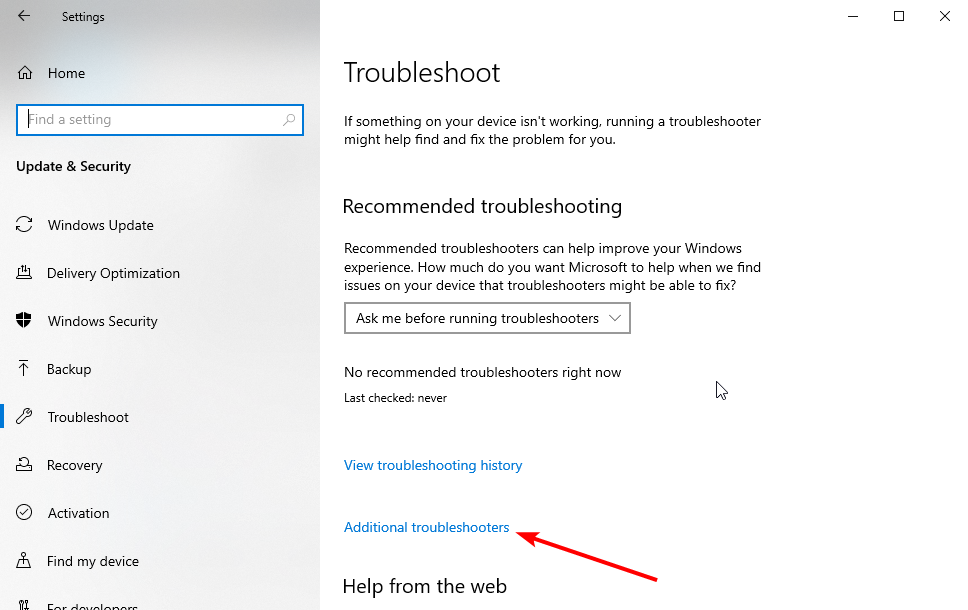
Choose the Additional troubleshooters option.
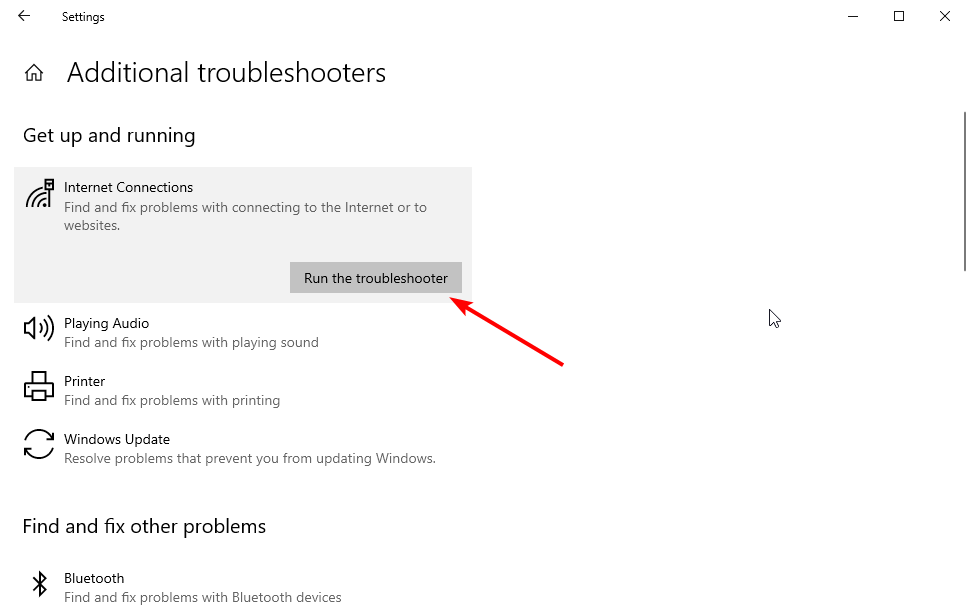
Select Internet Connections.
Finally, click the Run the troubleshooter button.
The first solution to this website that is not available is the default one. Let Windows scan your network settings to find what went wrong automatically. Sometimes this might work.
If the troubleshooter does not find any problems, resume the guidelines below. Before doing so, restart your Wi-Fi router if you currently use a wireless connection.
2. Change your antivirus
Sometimes, if your website shows this site is not available currently can be due to firewall activities. This can be due to your antivirus software blocking the website.
If you don’t have antivirus software, you can always use Windows Defender, as it is easy to use. However, if you are using third-party antivirus, you might need to change it to a more friendly one.
We will recommend the award-winning ESET NOD32 antivirus. This software is extremely easy to use and boasts high online and offline security.
It does not unnecessarily block websites and allows you to whitelist a trusted website. Lastly, it is extremely fast and light on PC resources. So, it will only make your system faster.
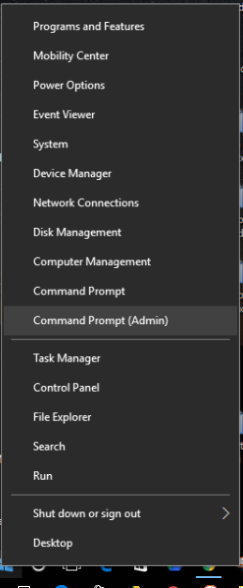
On your computer, open the elevated command prompt – right-click on the Windows button and select Command Prompt (Admin).
In the cmd window, enter the following commands one by one and press Enter after each entry: netsh int ip reset c:resetlog.txtnetsh winsock reset catalogipconfig /flushdns
Wait while these processes run and when done, close the cmd window.
Also, restart Windows and retry the connection process.
Assign DNS settings
Launch the Search engine on your Windows 10 machine – click on the Cortana icon near the Windows Start icon.
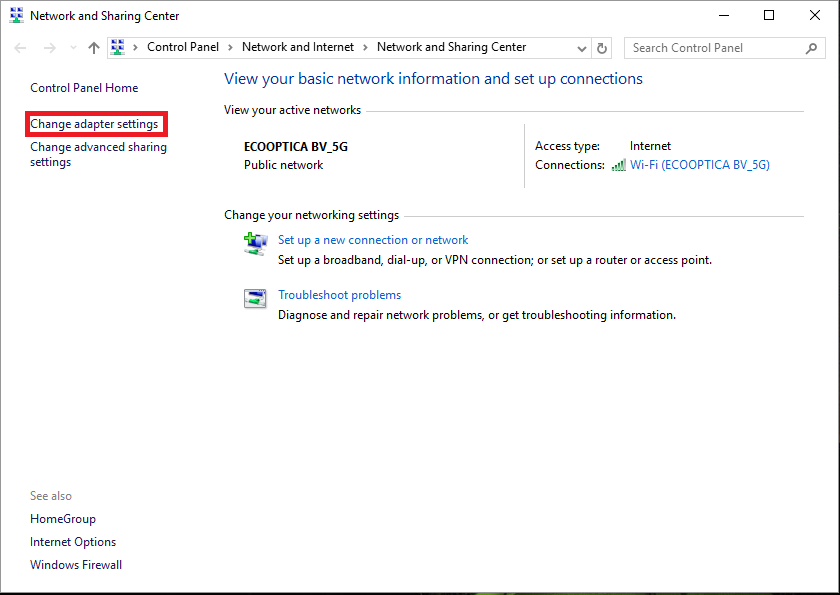
In the Search field, enter Network and Sharing Center and click OK.
From the left panel of this window, click on the Change Adapter settings entry.
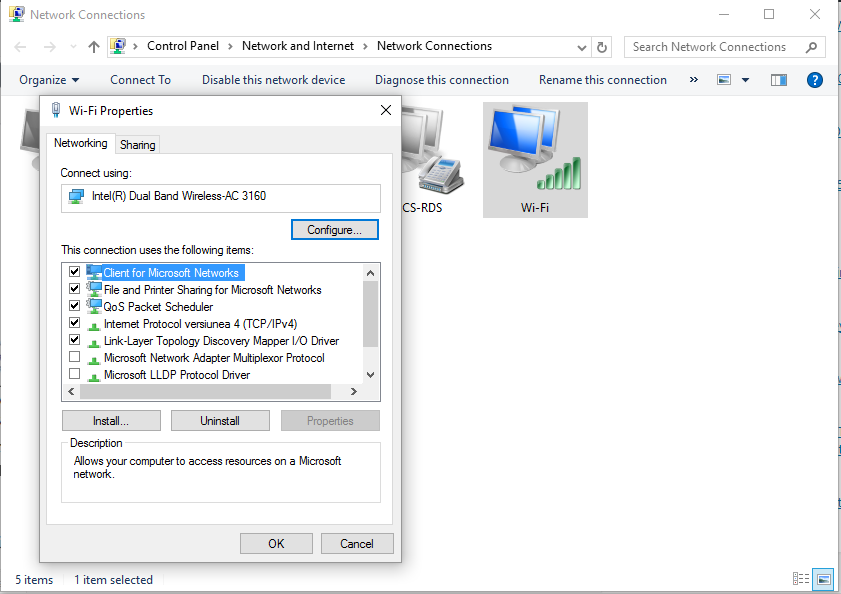
Right-click on your active network connection and choose Properties.
From Properties, switch to the Networking tab.
Select Internet Protocol Version 4 and then choose Properties from beneath.
Click on Use the following DNS server address and type Google’s Public DNS servers: 8.8.8.8, respectively 8.8.4.4.
Save your new settings and close this window.
The Windows troubleshooting process should automatically start. Now your network problems should be addressed.
You can also choose to restart your computer before checking if you can once more use your web browser service.
If you face this page is not available right now, it might be due to wrong DNS settings. Using Google’s Public DNS servers should help solve this issue easily.
Why can I suddenly not access a website?
If a website that was previously available suddenly becomes unavailable, it is most likely due to network issues. You can fix this with the network troubleshooting solution provided above or by changing your connection.
Another known cause is a temporary server issue on the website’s part. In this case, there is nothing you can do but wait till it is resolved.
The website not available issue can be frustrating, as it might make you miss out on important information. But with the fixes in this guide, you should be able to solve it effortlessly.
Sometimes, when you find an interesting information on the Internet, you may want to print the respective webpage. But you’re only interested in the information available on the respective page, and you don’t really need all those ads, markups, navigation bars, and extra clutter. What’s even more annoying is that all that clutter often ends up printed on tens of pages.
The good news is that there is a way to strip web pages all of the unnecessary items before hitting the Print button. Before we dive in, it is worth mentioning that some of the solutions listed in this article may not apply to all the browsers out there. In this case, you can temporarily switch to a different browser.
Quick Tip:
In contrast to other browsers that allow you to directly print to PDF, Opera One allows you to save a web page as PDF and then print it.
Although Opera One does not feature a reader view, you may print pages without most advertising by unchecking the box next to Background graphics on the print preview. Plus, it comes with native AI.
Opera One
Print through keyboard shortcuts or from the menu, easily and faster than on most browsers.
No matter whether you prefer Mozilla, Chrome or Edge, there is a way for you to remove all the unnecessary items on a page and print it. Depending on the browser you prefer to use on your PC, there are different methods to do clutter-free printing.
Choose Print. This will launch a page preview window.
Now, go to Headings and footer and select the Clutter-free printing option from the drop-down menu.
To enable the Clutter-free printing option, simply click on the Settings button in Microsoft Edge and go to Print. This will launch a page preview window. Now, go to Headings and footer and select the Clutter-free printing option from the drop-down menu. You can now hit the Print option to print ad-free pages.
2. Clutter-free printing in Google Chrome
Google Chrome is the most popular browser in the world but it doesn’t offer a Simplify Page option. Actually, the browser supported a similar option up until a few years ago, but Google decided to remove it. However, there are still plenty of extensions available in the Chrome Web Store that allow you to print clutter free webpages. We’ll list two of of the most reliable ones.
ThePrint Friendly & PDF extensionis available for Google Chrome as well and features all the options that we mentioned above. So, you can preview webpages before printing them out, save pages as PDF, email webpages, delete any images and text that you don’t want to print, as well as change the font size. You candownload the Print Friendly & PDF extensionfrom the Chrome Store.
PrintWhatYouLikeis another interesting Chrome extension that lets you edit webpages before printing them. You can skip all the ads and items that you don’t want to print. This extensions lets you edit and resize any webpage parts and use a different font and text size when printing.
Website backgrounds have only an aesthetic role, so if you’re interested only in printing valuable information, you can also remove the backgrounds and margins. You can then save the respective webpage as a PDF or HTML file. You candownload PrintWhatYouLike from the Chrome Store.
3. Clutter free printing in Mozilla Firefox
Mozilla Firefox offers a built-in clutter free printing option that you can enable after selecting the print button. However, this option is not always available. When it’s not supported, it’s simply grayed out and you cannot check the ‘Simplify Page’ button.
In this case, you need to install a dedicated extension to remove clutter and ads from webpages, such as the Print Friendly & PDF extension.
So, this is how you can enable clutter free printing on Edge, Chrome and Mozilla Firefox. As you can see, not all the browsers feature a dedicated option to simplify webpages before printing, but you can always install an extension that can help you remove the clutter.
You can also install a dedicated browser extension that removes ads, the navigation bar all that junk before printing. For example, you can install PrintFriendly and PDF.
This extension also optimizes your pages for an eye-friendly reading experience. You can change the text size depending on your needs. If you want to print only the text, you can remove all the images or just individual images.
So, this is how you can enable clutter-free printing on Edge, Chrome, and Mozilla Firefox. As you can see, not all browsers feature a reliable option to simplify web pages before printing, but you can always install an extension that can help you remove the clutter.
If you need to declutter your Windows 10 computer further, check out the guides listed below:
IO or browser games are very popular among gamers, and they do not require you to break the bank for every new game compared to console games. Equipped with your PC and a good internet connection, you are good to go.
Shell Shockers falls under this niche and has recently grown in popularity. However, as with tech, the gameplay experience may not be 100 percent every time and will often require troubleshooting.
Users have been reported to face the complication of the game not loading or loading too slowly. So, in this article, we explore this issue and recommend the best fixes.
Remember that by using any of the best browsers for gaming you would enjoy the best possible gaming experience.
We have used the Chrome browser to test Shell Shockers in this article, and it has worked well. However, if you have issues with the game loading, it could mean that your browser is not compatible, and in such cases, you should try a different browser.
Quick Tip:
The Opera GX browser fits well here. It is robust and offers a lot of support for troubleshooting. It also has a very extensive extension library, which helps improve the user experience.
More importantly, it is the first and most robust browser dedicated to gaming; hence you will enjoy gaming features like RAM and CPU limiters.
Opera GX
Play Shell Shockers and never miss a shot in this game-changer browser.
Blue Wizard Digital’s Shell Shockers is a multiplayer first-person shooter game.
You can play the game as egg characters and compete against other eggs to win matches. When an egg dies, it respawns and is ready to battle again.
The game has two basic modes of play: Team Deathmatch and Free For All.
Why is Shell Shockers so laggy and not loading?
When visiting Shell Shockers’ official website, you may notice that the page is irresponsive and doesn’t load or takes much time before loading.
Several things may make it impossible for the game to load correctly.
However, most of the time, these problems are caused by your browser and some of the settings, but occasionally it may be something else on the game server. So if Shell Shockers cannot connect, please first try tweaking things on your browser.
Also make sure that Shell Shockers is unblocked.
What should I do when Shell Shockers is not loading?
1. Refresh the browser
Right-click on the browser tab.
Select the Reload option.
Give it some seconds to reload.
Alternatively, you use the hotkeys Ctrl + F5 or click the refresh icon at the top left corner of the browser.
2. Clear your browser cache and cookies
Click on the ellipsis at the top right corner of your browser.
Select the More tools option, then click on Clear browsing data.
On the pop-up, click on the Basic tab, then from the Time range dropdown menu, select a time range.
Check the options for Browsing history, Cookies and other site data, Cached images and files, then click on the Clear data button.
If your uploads and downloads are slow, restart your router or change your ISP.
The internet connection and speed can easily cause the issue of Shell Shockers mouse not working. If you are on a wireless network, you may consider switching to a wired one, as they are generally a faster option.
Depending on how bad your internet speed is, you will experience issues ranging from slow loading times to no loading. If you have the Shell Shockers servers down, then there is nothing you can do on your end to make the game load. You will have to wait for the servers to come back up.
Click on the ellipsis at the top right corner of your browser.
Click on the Settings option.
On the left pane, expand the Advanced option and select the option to Reset and clean up.
Select the Restore settings to their original defaults option and click on the Reset settings button.
At the end of the reset, restart your browser.
Resetting the browser has proven to fix errors with Shell Shockers not working.
How do you make Shell Shockers load faster?
We have discussed a few fixes in this article, but it would be better if you could avoid the problem of Shell Shockers not loading or loading slowly altogether.
If you need guaranteed speed, here are our recommendations:
Free up space on your PC – You may have to close all other open tabs or open applications.
Stop or pause downloads – Downloading is a data-intensive operation. If you have downloads running while playing the game, you will experience lags if the internet connection is not fast.
Use a wired connection – These are preferred to wireless as they generally allow more bandwidth.
Restart the computer before gameplay – This process makes sure that all running processes that are not essential are shut down.
There you go. If your Shell Shockers is not loading, you should be back playing in no time by following the steps in this guide. Remember that the fixes have not been written in any particular order, but we advise you to walk your way down from top to button.
Remember that by applying the best practices to make your browser games run fast, you will enjoy the best possible gaming experience.
We hope you have found this article useful. Let us know your thoughts in the comments.
Google Drive might be the world’s foremost cloud storage, but that doesn’t mean it always works perfectly. For instance, users can encounter issues when trying to download files from Google Drive.
Some have said on Mozilla’s forum that they can’t download their Google Drive files in Firefox. That issue has even been reported as a bug on the Mozilla Bugzilla tracker for Firefox.
Whenever that issue occurs, Firefox doesn’t download users’ files in Google Drive storage when they select to do so. Yet, users might be able to download files from Google Drive ok in other browsers.
Is the same Google Drive download issue occurring within your Firefox browser? If it is, you might be able to fix Firefox’s downloading from Google Drive with the methods outlined below.
Why won’t files download from Google Drive?
If you can’t download from Google Drive in all browsers, the issue probably isn’t browser-related. A more general Google Drive download error could be due to third-party antivirus (security) software or an internet connection issue.
Why is Firefox not allowing downloads?
A more specific issue of Firefox now allowing downloads can arise because of blocked cookie data. Some users have said they’ve needed to adjust cookie settings to fix that issue.
Other users have confirmed disabling Enhanced Tracking Protection can fix Firefox not allowing Google Drive downloads. That Firefox feature blocks some tracking cookies and scripts.
This Google Drive download issue might also occur because of Firefox add-ons that block web content. Disabling extensions in Firefox could be another solution for some users.
Quick Tip:
If Firefox fails to download files from Google Drive for any reason, you should try another browser. The Opera One browser allows you to manage your downloads and give a destination for the same purpose.
It allows you to keep track of your computer storage and swap between disk locations by displaying the percentage of available space. Opera One also comes with built-in VPN, Ad blocker and AI.
Opera One
When Firefox fails, Opera One is a great alternative to download files from Google Drive.
We also recommend users clear Firefox’s cache and cookies. To do so, press the Ctrl + Shift + Del key combination. Click Everything on the Time range drop-down menu. Select the Cookies and Cache boxes. Then press OK to clear.
Those are some of the confirmed ways to fix Google Drive downloads not in working Firefox. Utilizing Firefox in incognito mode and reinstalling that browser are two other possible fixes you can try.
Remember that you can always utilize Google Drive outside of Firefox and other browsers. Download and install the Google Drive desktop app to sync the cloud storage with your PC.
You’re welcome to add any comments about Google Drive downloads not in working Firefox below this page. Feel free to add any questions or other potential resolutions for that Firefox issue there.
Comodo is a known antivirus developer, but the company has released its Comodo Dragon Browser browser.
Surfing the web over the years has gone through a lot of changes. With the possibility of accessing more information comes the risk of losing personal data to internet attacks and schemes. This has necessitated the need for improved security in browsers.
While every browser may not need your specific privacy and security requirements, a few boast of offering the best protection, and the Comodo Dragon browser falls within this category.
In today’s article, we’ll look closely at the Dragon Browser and see what it can offer its users.
The Comodo antivirus company develops Comodo Dragon Browser based on the Chromium engine.
The browser has SiteInspector malware scanning technology that will protect you against online threats, and it’s worth mentioning that the browser also has a built-in Secure DNS service.
The Dragon Browser is similar to Chrome; if you have used Chrome, you’ll feel comfortable with its user interface.
As for privacy, various privacy enhancements are available to make your browsing experience more secure.
Comodo Dragon can also block tracking cookies, and thanks to the Domain Validation technology, you can easily detect weak SSL certificates.
You will have the option of a Comodo Dragon browser 64-bit or 32-bit download.
This browser packs a lot of security features, and it also comes for free. You would be able to download a Chrome-styled version (Comodo Dragon) and a Firefox-styled browser (Comodo IceDragon).
Is the Comodo Dragon browser safe?
Generally speaking, the Comodo browser is safe. The finest aspects of Chrome are all there in the Dragon. It incorporates Chromium technology, which was created to provide online users a superior browser to others, and stability, notably in terms of functional speed and convenience.
Quick Tip:
If you are worried about your online privacy and security, Opera One is a good choice over Comodo Dragon. It’s designed to meet our most important needs in terms of multi-tab management sidebar integrations.
Opera One guarantees confidentiality and includes tools such as an integrated ad blocker and VPN. It also remains the most customizable browser serving as a model for all major browsers out there.
Opera One
Advanced security features and organized multi-tab manager all in one place.
As we said, this browser is based on the Chromium engine and offers all Chrome functionality and the unrivaled security and privacy that only Comodo can give.
More privacy is provided than using Chrome technology since Comodo organizations are known to provide internet security and trust assurance solutions.
However, the browser lacks other features some browsers may have, such as Opera One.
Opera One is also based on Chromium; it’s easy to use and fully supports Chrome extensions. In addition, the browser has tracking protection so that it will block all tracking scripts and cookies.
By doing so, your webpage loading time will decrease. For additional security, there’s protection against crypto-miners as well.
Opera’s highlight is its VPN, and the browser offers free and unlimited VPN to all its users for an extra layer of protection.
As for other features, the browser has advanced tab management, support for workflows, built-in instant messenger, and Instagram integration.
We also believe that Opera One UI is much nicer than Comodo’s Dragon.
Comodo Dragon Browser offers some exciting features in terms of security, but in our opinion, it lags behind other browsers in terms of usability and features.
You may also try the Comodo IceDragon browser, but we have focused this review on the Chrome-styled counterpart.
ActiveX is a proprietary feature from Microsoft for Internet Explorer, designed to provide exclusive controls required to access and display certain web content.
However, there are times when ActiveX malfunctions or is not existent (in every other browser basically) and you’ll see the Your browser does not support or has disabled ActiveX error.
Note that as Internet Explorer has been replaced by Microsoft Edge, the latter doesn’t offer support for ActiveX either.
In today’s article, we explain how to troubleshoot this situation and get back to your normal tasks. Follow along!
Why is ActiveX not supported?
ActiveX was a gateway technology that bridges the significant gap between technologies found on desktops and those found on the web.
The distinction between content controls and data controls has been rethought because of the development of modern browsers such as Microsoft Edge and Google Chrome. In this age, segmentation is more important than ever.
ActiveX needed to be deprecated as a logical course of action now that the web has progressed to distributed and more secure technology stacks.
What browser supports ActiveX?
ActiveX controls are utilized by a wide variety of Microsoft Windows applications, including a number of Microsoft’s own, such as Microsoft Office, Microsoft Visual Studio, and Windows Media Player.
These apps not only build their feature sets by utilizing ActiveX controls, but they also wrap their own functionality into ActiveX controls, which can subsequently be embedded within other applications. This allows the applications to share their functionality with other programs.
Unfortunately, no browser supports ActiveX natively anymore, but you can use extensions in your browser to use it.
How do I make my browser support ActiveX?
1. Try using another browser
It’s true that we mentioned that ActiveX is not integrated with any other browser, however, there are ways to activate this tool.
This is why we recommend switching to a browser that has more to offer than IE, namely Opera.
Switching from your current browser to Opera is easy and takes only a couple of minutes. You can install Opera for free, using the button below.
Opera
ActiveX content can be viewed in Opera as well with just a couple of tweaks.
Then, if you have certain settings or bookmarks saved, you can import them to Opera with just a couple of clicks.
To enable ActiveX, you’ll need a separate extension called Open in IE. With the aid of this plug-in, you can open any tab you want in Internet Explorer. Without the need to manually copy and paste links or to open the respective browser.
Double-click install.bat to install the package and you’re done.
The extension will show in the dedicated menu in the upper right corner menu (the black box). Pin it to the bar, for easier access.
Whenever you need to open a program that uses ActiveX content and you get the error message, right-click on the extension icon and choose to open the tab in IE.
2. Enable ActiveX in Chrome
Download the IE Tab extension to simulate Internet Explorer on Chrome from its web store by clicking on Add to Chrome.
When you get to the ActiveX-related websites, just click on the IE Tab icon in the top right corner to run it in the Internet Explorer engine.
We hope you found this post helpful. If you have further suggestions on viewing ActiveX content in other browsers than IE, drop us a line in the comments section and we’ll surely take a look.
Nowadays, every browser has countless features and customization options. One might say that they have too many of them. But features that provide an end-user with an uncluttered interface are more than welcome. Microsoft Edge has various selling points, diligently advertised by Microsoft.
But there’s this one thing which, for me personally (and I hope there’s more of us), makes Edge not that bad. Namely, where Google Chrome fails with the Fullscreen mode, Edge does it very well.
And it allows users to auto-hide the Address bar, which is, unironically, an amazing little feature.
The guide below will show you exactly how you can enable these features so that you can better experience full-screen mode in Microsoft Edge.
Why does my address bar keep disappearing
The steps written below will also help if you are interested in the following topics:
Edge hide address bar
Hide address bar on Edge
Microsoft Edge no address barissue
Microsoft Edge hide address bar issue
How to hide the address bar in Microsoft Edge
Quick Tip:
Opera One is the name of the browser, and it boasts speed, reliability, extensive customization features, and a library of extensions that rivals even with Chrome.
As far as the aforementioned customization features, Opera One allows you to rearrange UI elements in whatever way you want, including the ability to auto-hide the address bar.
Opera One
Hide the address bar, group together your favorite tabs, and reposition your menu icons.
How to auto-hide the Address Bar in Microsoft Edge
Edge’s full-screen vs Chrome’s full-screen
Let’s start by being perfectly honest: Microsoft Edge isn’t a real threat to Chrome or Firefox. At least at the moment. The market shares show that Google Chrome and Mozilla Firefox are far and beyond more prominent solutions when it comes to browsers.
However, the devil is in the details and there are certainly some things that Microsoft Edge can offer to users.
One of the widely-asked-for features is the auto-hide option for the Address bar, but Chrome developers somehow miss it with every new update. If you have a smaller display, the clean interface while browsing is more than welcome.
And that’s one thing which, seemingly, Microsoft Edge team did well. The fullscreen option on Chrome doesn’t make too much sense, since you’ll need to get out of the fullscreen in order to access, well, anything.
On the other hand, by simply pressing the F11 key while browsing on Edge, you get a clean and uncluttered interface. After that, just move your pointer toward the top (where the Toolbar usually resides), and the Address bar will pop up.
That simple but quite nifty way to browse the internet in a clean manner. Personally, I really like to auto-hide the desktop Taskbar and this fits so well as you can take the full size of the screen.
This might not be the selling card for everyone to suddenly turn the bandwagon towards Microsoft’s native browser. But it still can make a change. And if the auto-hiding Address bar (Toolbar, as well) is your cup of tea, make sure to give it a glance.
Either way, we can wrap it up. So, just open Edge, press F11, and enjoy the simplicity. If you have any comments you’ll like to share, the comments section is just below.
Learn how to update Outlook signature on both the desktop app and web version. From branding updates to meeting compliance standards, this guide shows you exactly how to change your Outlook signature in Windows, macOS, the mobile app, and the Web version.
If you wonder how to change a signature in Outlook, open the app then navigate to File, and then Options.
Click Mail, and then Signatures.
Select the desired Signature by clicking on it.
Use the Edit signature box to make your modifications.
Click Save and then OK when finished.
You can also follow these steps to add a new signature in the Outlook app. But before selecting a signature in the Signatures section, you must select the New option.
NOTE
If you want to go beyond Outlook’s basic signature features, like limited formatting, consider trying Adobe Acrobat Pro. It lets you create polished, reusable digital signatures, customize them to match your brand, and even update signed PDF attachments before sending.
On Mac:
Start Outlook.
Select Preferences from the menu in Outlook.
Select Signatures under Email.
Choose the Signature you want to change from the list underthe Signature name.
Update your Signature by clicking Edit underneath in the left pane.
The above steps demonstrate how to change the signature in Outlook Mac or any other device based on macOS.
On Web version:
Open your Outlook Web account and log in.
Choose Options after selecting the gear icon in the top-right corner.
Choose Settings from the left-hand menu.
In the Email Signature field, enter your Signature. If desired, choose the checkbox next to Automatically include my signature on messages I send.
Outlook Web Access (OWA) is a browser-based way to access your Microsoft Outlook email. You can access and change your signature from your browser using this version of Outlook.
Change Signature in Outlook Mobile App
Note: Outlook for iOS and Android supports only plain-text signatures.
Open the Outlook app on your phone.
Tap your profile icon > Settings gear.
Select your email account.
Tap Signature.
Edit the text and hit the check mark to save.
How to set up a signature in Outlook?
To add a signature in Outlook, log into your account then go to the Settings menu, then click View all Outlook settings. At the very top of the page, you can see all of Outlook’s options.
Choose Mail then Compose to respond to the email.
Under Email signature, you can change the appearance of your signature by typing in your signature and using the many formatting options that are available.
When you are finished, select the Save option.
To manually add the signature, do the following:
Go to your inbox and select New message from the menu.
After you have finished composing your message, scroll to the bottom of the compose window and select the More actions followed by the Insert signature option.
Select the Send option once your email message is complete.
Alternatively, take a look at how to get your signature back if it keeps disappearing in Outlook.
What can signatures contain in Outlook?
You may include text, images, a logo, your electronic business card, or even a picture of your handwritten Signature in your Outlook signature.
FAQs
Why can’t I change my Outlook signature?
If Outlook won’t let you add a signature, your profile may be corrupted. Create a new one and check if signatures work. Make sure the signature feature is enabled. Customizing it helps your emails look more polished. Once set, your default signature should appear automatically in new emails.
How do I set different signatures for replies in Outlook?
Use the “Replies/Forwards” dropdown when editing your signature in the desktop app to assign a different one from new emails.
Can I use HTML in my Outlook signature?
Yes, on desktop and web you can format with HTML, add images, links, and style fonts.
Why doesn’t my new signature show up on mobile?
Outlook mobile requires a separate update. It only supports basic text, not rich HTML like desktop/web versions.
Summary
Updating your Outlook signature is quick and ensures your emails look professional and consistent. Outlook’s built in options are advanced, but if you want more personalization options, check our top for best third party signature apps.
Whether you’re using the desktop app, web, or mobile, follow the steps above to keep your contact details and branding up to date.
Fortunately, we have a couple of quick workarounds that will help you to fix the Autoplay not working issue in Firefox right away.
Why is Firefox not playing videos?
There could be different reasons why the videos are not playing on Firefox or if the Autoplay is blocked in Firefox:
Autoplay is not enabled
Hardware acceleration is turned on
Browser cache, cookies, and site data
Interference by the add-ons
A problem with the browser itself
Below are a few troubleshooting methods to help you fix the Autoplay not working issue in Firefox.
Quick Tip:
The most helpful controls are located in the popped-out video in the Opera One browser, allowing you to effortlessly control your motion picture while multi-tabling.
The video pop-out in Opera One is easily controlled and independent from your tab navigation. Plus this browser comes with additional goodies, such as built-in VPN, Ad Blocker and even AI.
Opera One
The video-pop out is easily manageable and you have full control over any videos played.
How do I keep videos from automatically playing in Firefox?
However, if you do not want the videos to play automatically in Firefox, you would need to turn off the Autoplay feature as shown below:
Click on the three lines (menu) on the upper right of the Firefox window and select Settings.
Next, on the left, select Privacy & Security.
On the right side, find Permissions and
Go to Autoplay and press the Settings button next to it.
In the Settings – Autoplay window, next to Default for all websites, select Block Audio and Video from the drop-down.
Click on Save Changes.
Alternatively, you can also search for the specific website and select Block Audio and Video from the drop-down next to it.
Press Save changes.
NOTE
Likewise, you can enable the feature using the above two methods for a specific website and/or all websites and fix the issue if Autoplay is not working for Firefox.
Alternatively, you can also try opening the problem website in private mode to check if it plays normally.
If it does, then it could be a problem with one of the extensions, and hence, you must remove the extension causing this.
Moreover, make sure Firefox is updated to the latest version. If that doesn’t work, then you can uninstall and reinstall the browser to check if this helps fix the Autoplay not working issue.
Twitch. tv is one of the biggest streaming platforms but many users reported You may not change your display name, only the capitalization of it message when trying to alter their username.
The codename for this message is Twitch error 403 and it’s a minor but rather annoying issue that can occur on any device.
Here’s how users describe the issue:
I wrongly mistakenly changed my username some two months ago. After that, it said I wasn’t going to be able to change my username until 59 days. Now, when those days have passed, I’m trying to change my username to something desirable… but I’m getting the following error (which is unrelated to the original issue of waiting a certain amount of days until next possibility to change my username):
Fortunately, we have managed to come up with a simple guide to fix this issue. This isn’t the only problem that users reported, and if Twitch keeps buffering for you, check our dedicated guide to fix it.
Why is Twitch not letting me change my display name?
This issue can occur if there’s a glitch with your account, so sometimes all that you have to do is to log in again to fix the issue.
Corrupted browsing data and cache can also cause this problem. However, clearing the cache might be able to help you with that.
How can I change my Twitch Display Name?
You can easily change your Twitch Display Name, by navigating to Profile Settings and customizing the Username section.
The process is incredibly simple, and you can perform it in a matter of seconds, as long as you follow the instructions carefully.
How many times can I change my display name on Twitch?
Changing the display name on Twitch is simple, and you can change it once every 60 days.
This is the only limitation, so keep it in mind if intend to change your username. If you get You can only modify the capitalization of your display name message, it means that your username has already been changed in the past 60 days.
However, if you’re unable to change your Twitch Display Name and you get the Twitch error 403 messages, make sure you keep on reading.
How do you fix you may not change your display name only the capitalization of it in Twitch?
1. Log out and log back into your account
Hit the Windows key, type Twitch, then open the first result, or simply navigate to the Twitch web version page.
From the top-right corner of the window, click on your avatar.
Choose to Log Out.
Open again the app, then look at the upper-right corner of the page, and click on the Log in button.
Enter your Twitch credentials, then click on Log in.
This is a simple workaround, and it might work if Twitch can’t change the display name.
2. Clear your browser’s cache and cookies
2.1 Google Chrome
Hit the Windows key, type Chrome, then open the first result.
Use the following keyboard shortcut to open the Clear browsing data menu: Shift + Ctrl + Delete.
Choose All time as the Time Range.
Focus on deleting Cookies and other site data and Cached Images and files.
Finally, click on the Clear Data button.
2.2 Mozilla Firefox
Use the following keyboard shortcut to open the Windows search box: Windows + S.
Type Firefox, then click on the first result.
Once your browser is opened, press simultaneously on the following keys: Shift + Ctrl + Delete.
Set the Time range on Everything.
Now, checkmark only the Cookies and Cache options, then click on Ok.
2.3 Microsoft Edge
Press on the Windows key, typeEdge, then open the first result.
Use the following keyboard shortcut to open the Clear browsing data section:Ctrl + Shift + Delete.
Check the Cookies and other site data and Cached images and files section, then click on Clear now.
If you can only customize the capitalization for your username, then there might be a cache problem. Clear the cache and try again.
Moreover, the message stating You may not change your display name only the capitalization of it isn’t the only one that users have encountered.
What other Twitch 403 error-related issues can I encounter?
As of lately, besides Error 403 when trying to change the username on Twitch, they also complain about:
The remote server returned an error (403) forbidden Twitch – The world’s largest streaming platform is clearly prone to errors. As it seems, this one is on their end.
Twitch error authorization source: playlist code: 403 – This is another common issue related to authorization sources. If other cast enabled-apps from your device function properly, contact the in-app support and let them know about the problem.
Twitch error 403 Chromecast – Chromecast is an open-source platform, so there’s no wonder that the casting experience isn’t always as smooth as desired. Contact in-app support with no hesitation.
What does it mean you may not change your display name? – This is probably one of the most requested features ever on Twitch, so things shouldn’t remain like that for too long. Just apply the above steps to correct the issue.
This concludes our guide, and we hope that you managed to fix this issue with our instructions.
There are many other issues you can experience on Twitch, and we already covered Twitch error 2000 in one of our older guides, so be sure to check it out.
If you face any additional questions regarding your Twitch display name, feel free to leave a comment in the section below.
Scroll wheel not working in Chrome? Don’t worry, you’re not the only one! In fact, quite a few Chrome browser users have reported that their mouse wheel is not scrolling in Windows.
Here’s somebody complaining on Google Product forums that they have issues with the mouse functionality while using the Chrome browser in Windows.
Here’s how the issue is described in the forum thread:
Since the update to Windows 8.1, the mouse wheel doesn’t work in Chrome in Metro mode, no scrolling, no zoom (with ctrl). Only the wheel click works. In desktop mode, it works perfectly fine. I tried with and without extensions, especially the Logitech smooth scroll (which I only installed after the beginning of the issue), no change.
Apparently, the Chrome version is the latest version, and the issue happens only when Chrome is being used in the Modern user interface (or Metro, as some still call it).
While using the Chrome browser in Desktop mode in Windows, no issues have been detected. Here are some suggestions to help you fix the mouse scroll not working in Chrome.
Quick Tip:
While you’re busy trying to figure out what is wrong with Chrome, you should have a backup browser that you can use, and none is better than Opera One.
As for the scrolling experience, you can further enhance it through extensions, such as those that allow Smooth Scrolling. Even when you have 20 tabs opened, it has better tab management features.
Opera One
Organized tab management, and sidebar integration for better browsing.
When your mouse is not scrolling in Chrome, the first thing to verify is whether the problem is limited to Chrome or affects the whole system. In case it’s the latter, the problem lies with the mouse itself. Check if there’s something lodged in the device, and replace the batteries.
Also, outdated drivers are often the reason behind the Chrome mouse scroll not working, in which case updating the drivers should do the trick. Besides, certain system settings have too be found to affect the normal functioning of the PC, leading to this error.
Oftentimes, users found that misconfigured browser settings or conflicting extensions led to the mouse button not working in Chrome.
The solutions below address all the issues, and by the time you are done with these, the problem should be long gone.
How do I fix my scroll on Google Chrome?
1. Enable and disable Scroll Inactive Windows a few times
Press Windows + I to launch the Settings app, and select Bluetooth & devices from the left.
Click on Mouse on the right.
Go to the Scroll inactive windows when hovering over them option and disable it.
Wait for a few seconds and then enable it again.
Repeat this action a few times and check if the mouse wheel is now responsive on Chrome.
2. Disable browser extensions
Click on the Extensions icon in the Toolbar, and select Manage extensions from the menu.
Next, turn off the toggle under the extensions you want to disable.
Some users confirmed that disabling browser extensions helped them fix this problem. If the scroll wheel not working in Windows 10 issue occurred shortly after you installed a particular extension, begin by disabling that one.
If the problem persists, try disabling all your Chrome extensions. Then, check if the Chrome mouse scroll not working issue has been solved.
3. Enable smooth scrolling
Paste the following path in Chrome’s address bar and hit Enter:chrome://flags/
Now, search for Smooth Scrolling, click on the dropdown menu, and select Enabled from the list of options.
Click on the Relaunch button for the browser to restart and the changes to come into effect.
Once done, check if the scroll wheel not working problem in Chrome is solved.
Flags are experimental features in Chrome and usually are temporary. So, if you are unable to find the Smooth Scrolling flag, head to the next method.
Now, click on the Add extension button in the confirmation prompt.
If you use a Logitech mouse, try installing the Smooth Scrolling extension. Many users confirmed this solution worked for them, so try it out as it may do the trick for you.
Once the extension is installed, verify if the scroll wheel now starts working in Chrome.
5. Restore Chrome to default settings
Launch Chrome, paste the following path in the address bar, and hit Enter:chrome://settings/reset
Select Restore settings to their original defaults.
Click on the Reset settings button in the confirmation prompt.
If nothing worked, resetting Chrome would do the trick.
There you go! By following these steps, you should be able to fix things if the scroll wheel is not working in Google Chrome.
Do you know of any other workarounds that might fix the scroll wheel not working in Chrome issues? If so, don’t be shy to share your experience with us via the comments section below.
Plenty of users describe that they are in the unfortunate position of wanting to open a ZIP file, just to discover that it has been corrupted after download.
It gets even more frustrating since the same ZIP seems to open correctly for others. That’s a sign that the issue may not be with the original file.
The corruption could happen during the download or even at a later point, in the storage. Therefore, it’s most likely related to your file archiver, the antivirus that you use, and not only.
So, if a ZIP file is corrupted after download through Java, or any other way, here’s what yo need to do.
Why is my ZIP file corrupt?
Don’t worry, it’s not at all your fault. Actually, ZIP files can get corrupted during the download process itself, without us having any contribution.
It could also be that the ZIP file was already corrupted from other sources before you even downloaded it to your device.
How does a ZIP file get corrupted?
If for any reason, the download was interrupted, due to either a power outage or an unexpected program closure even for a moment, that’s when it happens.
Why? Because unreadable data can very well end up becoming part of the downloaded ZIP file, making it difficult for said data to be extracted.
Quick Tip:
Another option is to try on another browser to download the ZIP file. Opera One is very much capable of downloading files at great speed and doesn’t compromise the quality of any ZIP files.
Moreover, every data is verified prior to being allowed to cling to your PC and cause more issues. The built-in VPN allows secured downloads with any type of file format.
Opera One
Test your ZIP file in Opera One and download it safely.
Imagine yourself facing the same situation of downloading large ZIP files, trying to unzip them, and eventually getting the same corruption notification over and over again.
To prevent that from happening, make sure that you use a reliable file archiver, such as the one developed by WinZip Computing.
WinZip can easily finish downloading and unzip all major file formats, including zip, rar, gzip tar, and cab, while your private data can be password-protected and encrypted with 256-bit AES encryption.
Other useful options are maximum flexibility to zip files and folders, easy management of files on your system, cloud, and network, along with decoding capabilities for B64, HQX, and UUE files.
Computer malware, Trojans, and worms can easily damage your personal computer, steal your private data, and not only. So using an antivirus tool is mandatory.
However, if your antivirus of choice slowly checks the files you’re downloading bit by bit, it could delay the entire process and cause ZIP file corruption issues.
Temporarily turn it off to confirm this scenario and later on, think of a different option. Today’s Internet provides a variety of open gates for virus attacks, yet TotalAV closes them all.
This is possible thanks to an unbeatable daily updates mechanism of antivirus database definitions, not to mention that it’s speedy and never interferes with your system.
This happens all the time when using other tools, so the change most likely sounds like music to your ears.
3. Configure Internet Explorer
Click Start and open the Control Panel.
Don’t hesitate to change the Control Panel view if it is in the Category view.
Up next, open Internet Options from the Control Panel.
Click the Advanced tab.
While here, untick the HTTP 1.1 box.
Confirm your action by clicking Apply, and then OK.
Internet Explorer used to be the most popular web browser, yet things have changed drastically in the past few years.
It has been successfully replaced by Microsoft Edge as the default browser in Windows 10, with the promise of more productivity and continuous browsing from your phone to the PC.
So, if you still have Internet Explorer, do note that it frequently causes all sorts of issues. Therefore, you can try to configure Internet Explorer as described above or switch to Opera One in no time.
4. Verify Internet connection
Another common reason for these issues is precisely the lack of stable Internet speed for the download itself.
Fortunately, you can use one of these great Internet speed testers for a precise answer that could nail down the culprits’ list.
If you do confirm an unstable Internet connection issue, this clearly turns into a problem for downloading ZIP files. Also, don’t hesitate to make sure that your cable is not damaged.
5. Redownload the ZIP from the FTP server via FTP
If the ZIP file corrupted after the download issue is still there, perhaps you need to try downloading it from the FTP server via FTP rather than HTTP.
As you can see, that’s a standard network protocol dedicated to transferring files from one host to another host over a TCP-based network, so do give it a go.
What can I do if everything I download is corrupted?
This can happen because of conflicts between IDM and other applications. That being said, when IDM seeks to write received data to a file, security software first passes all data through internal buffers.
That is done in order to scan it for possible viruses. When IDM opens multiple files quickly in one thread, some firewalls or antiviruses happen to mix the data of different connections.
And, because they mix file parts in that manner, it often leads to data corruption, unfortunately. Keep this in mind next time you are in a similar situation.
Now you possess the necessary knowledge on how to fix corrupted download files, or how to deal with ZIP files corrupted after downloading through C#.
If you happen to discover any other useful tips, please let us know in the comments section below.
Many users are missing games on Windows, and this is why many are wondering if there’s a Purble Place available on Windows 11. Today we’re going to answer this and all other questions that you may have.
Can we play Purble Place on Windows 11?
This game doesn’t come preinstalled with newer versions of Windows, however, you can download Purble Place on Windows 11 for free.
Several web browsers dominate the web browser market, but how do they compare one to another? In today’s guide, we’re comparing Opera One vs Firefox to find out which is better.
We’re going to test the performance on a low-end computer, so even the users that aren’t using the latest hardware can find out how each browser will work on their PC.
In addition to the performance, we’re going to compare the unique features that both Firefox and Opera One offer, as well as their security and privacy features, so let’s get started.
Many are wondering which is the better browser, and both browsers have pros and cons. Opera One and Firefox have been present on the market for years, and each offers a unique set of features.
Opera One has a little advantage over Firefox in terms of sidebar integrations, messengers, Crypto wallets, and customizable speed dials.
If you spend more time online than offline and you are an organized persona, Opera One might be a better choice for you than Firefox since it is better structured.
We prefer Opera One for these features, but that doesn’t mean Firefox isn’t fancy in its sense.
In today’s guide, we’re going to take an in-depth look and analyze the features, as well as the performance of each browser, and find out which is the better choice for you.
Opera One vs Firefox, an in-depth feature, privacy, and performance comparison
A short history lesson and introduction
Opera One: Browsing veteran from the ’90s
Opera One browser first appeared in 1995, and in the beginning, it used the Presto layout engine. The company made a switch to Chromium in 2013, and ever since Opera One has been running on Chromium.
The browser is now available on all desktop and mobile platforms, constantly getting new features and users.
Opera One
Combo of speed, privacy, and user experience that make browsing more fun and engaging.
The first version of Firefox was released in 2002, and in the early days, the browser used to run on the Gecko engine. In 2017, Mozilla switched to a new and improved Quantum engine.
Firefox is open-source software, and as expected, do note that it is available for all desktop and mobile platforms.
Now that we’re familiar with our contenders, let’s see how do they compare.
Visual interface
Opera: Sleek and Chromium-based
Opera One comes with a simple visual interface that resembles Chrome. This is no surprise since the browser is based on Chromium, and if you ever used Chrome, you’ll file like at home with Opera.
The main difference between Opera One and Chrome is the sidebar. Thanks to you can quickly access certain features or switch between workspaces.
Some users might not like this feature, and if you want to save some space, you can turn the sidebar off from the settings.
Regarding the customization, the browser has an Easy setup pane that you can use to switch to a light or dark theme. You can customize the browser with several available wallpapers, but you can also download more wallpapers or add your own.
The easy setup pane lets you customize your home page. You can do so by changing the size of the titles, showing Speed Dial suggestions, or enabling the news feed at your start page.
Firefox:Extensive interface customization
Firefox also has a clean interface, but we must admit that Opera’s interface looks more streamlined. The home page has a web search bar, a list of your most visited websites as well as browsing highlights.
The highlights section includes visited pages, bookmarks, recent downloads, and saved pages. This makes them accessible with a single click.
You can customize the Top Sites section and add any website to it. Of course, you can minimize the entire section or hide the section completely if you want.
Regarding the highlights, you can choose what type of content will appear there. If you want, you can also hide the entire section.
You can even manage how many rows both the Top Sites and Highlights sections will have, which is welcome.
Firefox offers extensive customization, and you can customize the toolbar any way you want.
You can remove items from the toolbar, rearrange them or add only the most essential icons. You can also make icons smaller and choose between one of four available themes.
Browser features
Opera: Instant messengers, social network integration, and more
In terms of features, Opera One works like any other web browser. However, it does come with a unique share of features that some users might appreciate.
One of the most useful features in Opera One is the workspaces feature. With this feature, you can easily organize all your open tabs, which is perfect for multitasking.
Want to separate your work tabs and personal tabs? Simply move them to that workspace, and that’s it. Regarding the workspace switching, you can switch to the desired workspace with a single click on the sidebar.
If you prefer, you can assign keyboard shortcuts and use them to switch to the desired workspace instantly.
You can have multiple workspaces, and each workspace can have a unique name and icon. This allows you to distinguish between workspaces easily.
Another great feature that will help you manage your tabs is the Search in Tabs feature. By using it, you can easily search for any open tab and find it in a matter of moments.
Use the search icon or the keyboard shortcut to open the search window. Type the name of the tab and it will instantly appear on the list. It’s simple as that.
The search can also recognize website content so that you can search for any string. If there’s a match, you’ll see all open tabs with that specific string in their content.
These two features are incredibly useful, especially if you’re multitasking.
Opera One also allows you to easily share files and links with your mobile device thanks to the Flow feature. Simply install it on your phone, pair it with your PC, and that’s it.
You can share links, text, and files from the browser simply by clicking the Flow icon in the toolbar. The feature reminds us of instant messenger, so it feels like you’re sending texts to yourself.
Overall, it’s a quick and simple way to send data and links to your mobile device. Of course, you can send data from your phone as well.
If you want to stay in touch with your friends, there are several instant messaging services available. This includes Facebook Messenger, WhatsApp, Telegram, and VK.
You can open these from the sidebar and chat with your friends while browsing the web. If you’re more of a social media person, you might find built-in support for Instagram and Twitter more interesting.
Thanks to this feature, you can always keep an eye on your social media feed and ensure you don’t miss anything.
For all the music fans out there, we’re pleased to inform you that Opera One has a built-in music player. With it, you can play music from multiple streaming services.
The supported services include Spotify, Apple Music, and YouTube Music. You can minimize it at any time, and you can control the music playback from the sidebar with ease.
Opera One also has a dedicated news reader, but it’s not enabled by default, so you’ll need to manually enable it.
Once you enable this feature, you can choose from the list of sources. Alternatively, you can add your RSS feeds and keep track of the latest news from the sources you prefer.
Pinboards is a new feature in Opera One that lets you save content and favorite pages. When you find a page you want to save, just click the Pinboard icon and that’s it.
Once you add the pinboard, you can assign it to a specific group to organize it better. Remember that you’re not limited to websites, and you can add notes or even screenshots to pinboards.
One last feature that we need to mention is the Snapshot tool. With it, you can take screenshots of web pages that you visit.
After taking a screenshot, you can add pointers, and text, blur certain sections or add highlights. This is perfect if you don’t want to rely on third-party tools.
Opera One packs an abundance of features, and while certain features, such as Workspaces and Tab Search are extremely useful, others might seem a bit gimmicky to some.
We tend to use only the essential and productivity features, but for more casual users, adding a music player, messenger, and social media integration might come in handy.
And even if you don’t plan to use these features, you can disable them completely.
Firefox: Only the bare essentials
In terms of features, Firefox offers fewer features than Opera. This means you won’t find flashy features, such as music players or social media integration.
Instead, Mozilla decided to keep the minimalistic approach, for the most part, thus trying to improve the browsing experience.
With Firefox, you’ll find all the standard browsing features, so we’ll focus on the more unique ones. First off, there’s a Sync feature that will store your browsing data in the cloud and allow you to continue browsing on any device.
With this feature, you can also send tabs to your phone, and while this feature is useful, it doesn’t work as well as Opera’s Flow feature.
With this feature, you can’t send files or texts; you can only work with links. Sharing interface is also pretty basic since it relies on the context menu, so you can’t see the history of shared links.
Firefox comes with Pocket integration allowing you to easily save any website and read it later on any device. All that you have to do is to click the Pocket icon in the address bar and sign up for a Pocket account, and that’s it.
Pocket as a service is pretty decent, especially if you tend to read a lot, so it’s perfect if you want to create a collection of articles to read.
Firefox Lockwise is another great feature that works as a password manager for Firefox. Using this feature, you can see all your saved passwords in Firefox.
There’s even a dedicated mobile app available so you can have all your Firefox passwords available on your phone.
This feature supports importing, allowing you to import all saved passwords from other browsers easily. Of course, you can create your logins manually, but in most cases, Lockwise will ask you to save your login information for you when signing up to any website.
The feature will also generate a unique and secure password for any website that you sign up for, thus ensuring that your password is strong and unique.
Although this feature is incredibly useful, it has a couple of issues. For example, if you click the suggested password, it will be automatically saved to Lockwise, however, your username or email won’t be saved.
This can be frustrating since you have to update the data manually. To avoid this, you can use the arrow keys to select the suggested password. After doing that, enter your username, and the password and username should be memorized.
This is a small glitch, but it can affect your browsing experience, and we hope it will be improved in future versions.
Once your password is saved, it will be suggested to you while trying to log in to that website. For an extra layer of security, there’s an option to set up a master password so that others can’t see or use your passwords without a master password.
Another feature that deserves a mention is the screenshot tool in Firefox. By using it, you can easily create a screenshot of a specific section, or you can take a screenshot of an entire webpage.
The tool will automatically select sections of a webpage to make the process faster, but you can also manually select the region that you want to capture in the screenshot.
Sadly, there’s no screenshot editing, so you can’t crop or blur parts of your screenshot. This is a pretty basic screenshot feature compared to Opera’s screenshot tool, but it will get the job done as long as you don’t need to edit anything.
Another useful feature is the Reading Mode, and by using it, you’ll remove unnecessary clutter from pages, thus focusing only on the most important parts.
After you switch to the reading mode, you can adjust the font type, font size, paragraph width, line spacing, and color theme.
There’s also text to speech feature, so you can have your PC read the articles aloud. Of course, you can adjust the reading speed and skip certain paragraphs if you want to.
How secure is Opera One vs Chrome vs Firefox?
When it comes to security, all three browsers offer similar features and use sandboxing to separate tabs into processes, so if you visit a malicious website, it will be contained in that tab.
The browsers share similar privacy features, but there are some differences between them that you should know about.
Opera: Chromium-based, built-in VPN and adblocker
Opera One has a built-in ad blocker and anti-tracking feature, and even though it isn’t enabled by default, you can enable it with a single click.
By using this feature, you can improve the page loading time, and thanks to the anti-tracking protection, you’ll block websites from tracking your browsing habits.
Sadly, Opera One doesn’t use Google Safe Browsing, instead, it relies on other services. This isn’t a major issue, as long as you don’t visit any sketchy websites and you have a reliable antivirus.
The browser has a built-in VPN that offers unlimited bandwidth, and while this feature will give you an additional layer of privacy from your ISP, you should know that free VPNs have their share of issues.
Free VPNs are known to keep logs of user activity, which can be a concern for some users. In addition, some privacy advocates are having issues with Opera’s privacy policy and data collection.
Since the browser isn’t completely open-source, there’s no way to determine how Opera One uses this data.
However, Opera One has recently introduced a premium version of their VPN that encryptions your data and collects no browsing data.
The premium service offers more than 3000 VPN servers, and you can use it simultaneously on 6 different devices.
Overall, Opera One offers solid security and is perfectly safe for everyday tasks. However, if you’re extremely concerned about your online privacy, you might have a few issues with Opera.
Chrome: Google’s browsing juggernaut
Google Chrome has been known to be a secure web browser that is updated frequently, so there’s no need to worry about your security when using Google Chrome.
Google did introduce the Do not track feature and its ad blocker, but these features are hidden deep in its settings, and less informed users probably won’t even find them.
In addition, Google has a history of data collection and tracking for showing personalized ads, which is one of the reasons why many privacy advocates are concerned about Google Chrome.
While the browser is one of the safest on the market, Google’s privacy policy and data collection could be a problem for some.
Firefox: Privacy-oriented and open source
A non-profit company owns Firefox, and since the software is open-source, users can verify the code and ensure that their data isn’t sold to third parties.
The software comes with Enhanced Tracking Protection out of the box that will block tracking cookies and certain ads.
Firefox also has phishing and malware protection, and it can also block crypto miners. There’s even a simple password manager available in Firefox that will generate a secure and unique password for every website that you sign up for.
Overall, Firefox offers a lot in terms of security and privacy, and since it’s open-source, it’s one of the best choices for users that are concerned about their privacy and security.
Opera One vs Firefox RAM usage
Lastly, we need to talk about performance, and for this segment, we decided to measure the performance of Firefox and Opera One on a low-end computer.
Opera: Optimized for performance
When it comes to performance, we were pretty surprised by how little memory Opera One uses. While being idle on the home page, the browser used no CPU and only 129MB of RAM.
We tried watching full HD video on YouTube while having five tabs open in Opera, and the CPU usage went up to 80% at times, while the memory usage was around 510MB.
This is perfectly normal while pages are loading, and we haven’t noticed any major slowdowns while using the browser.
If you want to improve your performance, we suggest enabling the ad blocker that will block ads and make your pages load even faster.
Opera One also has a Tab Snoozing feature that will put inactive tabs to sleep, thus saving your memory. This feature is more than welcome, especially on low-end PCs.
Firefox: A lightweight alternative
While being idle on the start page, the browser used 0% CPU and about 248MB of RAM, which is a bit more than Opera.
We repeated the same test with five open tabs and YouTube HD video loading in the background. During this test, Firefox used almost 700MB of RAM and up to 60% of CPU.
This is less CPU usage from Firefox, however, but the memory usage was slightly higher. As for other performances, we didn’t notice any major slowdowns while using Firefox.
As you can see, Opera One uses less RAM at all times, while the CPU is slightly higher than on Firefox. Overall, we were pleased with how both Opera and Firefox performed on our low-end computers. For a more comprehensive Opera vs Firefox CPU usage analysis, check out our article.
When it comes to Opera vs Firefox speed compression, Opera One performs better according to our tests.
Opera One vs Firefox: Conclusion
Opera: Abundance of features and low memory usage
The browser offers some great and unique features, most notably the Workspaces feature, and the Tab Search feature that will surely come in handy to anybody that works with multiple tabs. There’s so much more to enjoy about it!
Pros
Based on Chromium
Advanced tab management features
Low RAM usage
Built-in adblocker and tracking protection
Built-in VPN
Cons
Some features might be unnecessary
Opera Flow is also a welcome addition since it’s one of the easiest and most user-friendly ways to share files and links from one device to another.
Adblocker and tracking protection are welcome features that will improve your performance and protect your privacy online.
Speaking of which, the built-in VPN will also come in handy and provide another layer of security and privacy while browsing the web.
Features such as instant messenger and social media integration can be useful if you’re a heavy social media user, but we found them nonessential.
The media player can come in handy, especially if you listen to music online while browsing the web.
Overall, Opera One offers some unique features, and thanks to the low memory usage, it’s one of the better browsers for low-end PCs.
The only flaw might be minor privacy concerns, but that shouldn’t worry you too much.
Opera One
With so many unique features on the table, Opera seems to be the ideal browser choice for you!
The greatest strength of Firefox is its security and focus on user privacy. The software is open-source, so you can rest assured that your personal data isn’t collected.
Pros
Open-source
Developed by non-profit company
Advanced tracking protection
Comes with only the essential features
Built-in password manager
Cons
No built-in adblocker
With the available tracking protection, you’ll prevent websites from following you and ensure that websites can’t collect your browsing data.
Firefox also has a useful password manager that should help you protect all your online accounts with a secure and unique password.
The browser doesn’t offer any flashy features, and you’ll only find the essential features in Firefox. Regarding memory usage, it’s slightly higher than in Opera, but nothing too concerning.
With its low memory usage, Firefox should be a perfect pick for low-end PCs. If you’re looking for a privacy-oriented browser with only the essential features, Firefox is the way to go.
No, Opera One doesn’t steal your data, and it doesn’t collect your data, so you’ll be perfectly safe while using Opera.
You can rest assured that all your data will be safe and private while using Opera.
Overall, both Firefox and Opera One are great in their terms, and if you’re looking for something with new and exciting features, then Opera would be the right choice.
When it comes to Opera One vs Firefox resource usage, Opera One uses fewer resources, so it’s a great choice for any low-end or older PC. Plus, it offers a wide array of unique features.
There’s another version of Opera available, and if you want to learn more about it, we suggest reading our Opera vs Opera GX guide.
What is your browser of choice? Let us know in the comments section below.
If you encounter MeteMask not showing a balance error, you can follow the instructions given in this article.
MetaMask is a trendy cryptocurrency wallet to interact with the Ethereum blockchain. It is also used to sign in to many blockchain services. Decentraland, the virtual world game that lets gamers earn cryptos, recommends this wallet primarily.
But, the problem begins when MetaMask doesn’t show or update the balance properly. A significant number of users have already reported this problem in various forums. So we are lucky that there are ways to fix this problem.
But, before knowing about the troubleshooting methods, we should have a good idea about this unexpected problem.
Quick Tip:
If the MetaMask extension in your primary browser is not working expectedly and not updating the balance, you should try a different browser. Then see if it solves the problem or not.
We recommend trying Opera One, which is highly customizable and compatible with Metamask. With Opera One, you have slimmer chances of MetaMask showing the wrong balance or showing 0 balance.
Opera One
The add-on support in Opera One is reliable, and MetaMask passed our tests successfully.
Some specific reasons cause MetaMask not to show or updating balance issues. Usually, this error can result from any problem from your end or the server-side. However, according to our research, we have found the following as the most significant reasons.
Browser problem
MetaMask network problem
Improper permission
Problematic extension
Corrupted browser data
If you can take steps to overcome these situations, you will be able to get rid of this problem. For your convenience, we have prepared the troubleshooting methods with proper instructions below.
How long does it take for funds to show on MetaMask?
Blockchain transactions typically take a few minutes, unlike conventional banking, where money transfers might take as much as 3 or 5 working days.
However, transactions might take a long time, depending on network use and your gas preferences. Therefore, we recommend checking transactions on the blockchain explorer to see whether it has made it there.
Users have experienced this problem on different coins and tokens. Some of the most common iterations of the issue are:
MetaMask not showing balance BSC
MetaMask not showing balance BNB
ETH balance not showing in MetaMask
MetaMask not showing FIAT balance
MetaMask not showing USDT balance
The MetaMask not showing MATIC balance
MetaMask app not showing balance
MetaMask not showing token balance
How can I fix MetaMask if it’s not showing the balance?
1. Restart the browser
When you see that MetaMask is showing an incorrect balance or doesn’t show it at all, the first thing you should do is restart the browser. In many cases, it will fix your problem.
However, If the problem happens frequently and you need to restart the browser often, you can follow the next methods.
2. Update browser
2.1 Update Chrome
Open Google Chrome.
Click on three vertical dots on the top right corner and Settings.
Click on Advanced, then select About Chrome.
Chrome will check for updates and install automatically.
Relaunch Chrome.
2.2 Update Firefox
Click on three vertical lines and go to Help.
Select About Firefox.
It will update the browser automatically.
Updating browsers will make sure that the browser is compatible with the extension. As a result, MetaMask not updating the balance problem may get solved.
3. Try a different blockchain network
Click on the MetaMask icon on the top right corner of the browser.
Click on the Dropdown icon next to the network name, usually Ethereum Network, and then on Add Network.
Now, provide your preferred trusted network details and save.
If somehow the default network has issues with MetaMask, using a different network will fix the problem. As a result, you will be able to see the balance properly.
4. Give proper privileges to the MetaMask extension
Right-click on the MetaMask icon on your browser.
Hover your cursor on This can read and change site data and choose On all sites.
Try checking the balance again.
If the extension doesn’t have access to all sites, you may often encounter problems related to the MetaMask balance. So, To fix MetaMask not showing balance, you should give it the proper permission as shown above.
5. Update extension
5.1 Update chrome extensions
Open Google Chrome.
Type the address below in the Address bar and press Enter. chrome://extensions/
Turn on developer mode and click on Update.
Try rechecking the Metamask balance.
5.2 Update Firefox add-ons
Open Mozilla Firefox.
Type the address below in the address bar and hit Enter. about:add-ons
Click on the gear icon and then select Check for updates.
If the current version of MetaMask is problematic and has known issues with the latest browser you are using, updating it will solve all its problems at once.
6. Clear browser cache
Open your browser.
Press CTRL + Shift+ Del on your keyboard.
Choose All time as the time range.
Check Cache images and files and then click on Clear data.
Browsers often may show you a cached data version if something is wrong, and clearing the cache will force it to fetch the latest updates of data, particularly the MetaMask balance. After clearing the cache, Refresh the MetaMask balance.
MetaMask balance may be outdated
It is not uncommon for MetaMask to display an outdated balance notification.
When this happens, it most likely means that the extension can not fetch your actual balance for some reason. If this is the case, you should double-check that your internet connection works properly or restart the browser.
Can MetaMask wallet be hacked?
With crypto and many other online services, your safety depends on the tech and user habits. With the use of seed phrases, and other password encryption tech, it is tough to have your wallet compromised.
However, if you are careless with these details or store them online, the chances of having a hacked MetaMask become larger.
Is MetaMask safe?
MetaMask is open-source crypto-wallet software available as a browser extension or mobile app and is the most popular wallet for non-techie crypto users. In short, it is safe.
It uses proper encryption methods to secure your data. Only your password can decrypt the data you have with this crypto wallet. Another thing is it doesn’t control the keys, unlike other similar wallets. It stores them locally. So, You have complete control over the keys.
In past years, we have not found any hacking incidents on MetaMask. It also has a huge community and a group of highly qualified developers. MetaMask is going through continuous updates with bug and security fixes, making it a very secure wallet.
The methods shown above effectively resolve MetaMask not updating or showing balance problems. You may know about any other techniques that may help others. In this case, you can let us know in the comments box.
The Interrupted virus detected message in Opera will prevent you from downloading files even if they are perfectly safe, so let’s see how we can fix this problem.
This message appears if you don’t have any antivirus installed on your PC. Sometimes security settings or browser cache can cause this issue. Let’s see how to get rid of it.
How do I fix Opera interrupted virus detected error?
1. Enable your antivirus
Press the Windows + I keys together to prompt the Settings app.
Select Privacy & security, then click Windows Security.
Click on Virus & threat protection, then select Manage settings.
Uncheck the Real-time protection box.
If you don’t use Windows Defender, make sure you have third-party antivirus enabled and installed. Here are some great antiviruses that work with Opera, so give them a try!
2. Add the file to the list of exceptions
Press the Windows key + S and enter windows security. Select Windows Security from the menu.
Navigate to the Virus & Threat Protection section.
Locate the file that was blocked and select Allow on device and save changes.
NOTE
Only use this option with files you know are 100% safe and from a reliable source.
Press the Windows key + S and type internet options. Select Internet Options from the list of results.
Navigate to the Security tab. Select Internet and click the Custom level button.
Locate Launching applications and unsafe files and set it to Prompt. Click OK.
Click Apply and OK to save changes.
5. Clear your browsing data on Chrome
Launch the Chrome browser on your computer.
Press the Ctrl+Shift+Del keys simultaneously to prompt the Clear browsing data window.
Set the Time range to All time, select all options, and click on Clear data.
In some instances, Chrome’s cache can interfere with Opera, so if you have both browsers installed, clear the cache on Chrome. You can also get the same error in Chrome.
If you don’t have it, clearing Opera’s cache might help.
6. Modify the registry
Press the Windows key + R and type regedit.
Navigate to the following path: HKEY_LOCAL_MACHINE\SOFTWARE\Microsoft\Windows\CurrentVersion\Policies\Attachments
Double-click on ScanWithAntiVirus DWORD.
Set the Value data to 1 and save changes.
By making this change you’ll disable Windows from checking if there’s an antivirus installed, so use this solution only if others don’t work.
Does Opera have a virus scan?
No, Opera doesn’t have a virus scan, but it does have a database of suspicious websites that spread malware, so you might get a warning from a browser if you visit those websites.
One of the best features of the Opera browser is speed. However, some users complain about Opera download speed slow issues.
For a long time, Opera has been one of the best browsers in the market. It is because of its consistency in keeping its features intact and relevant. Likewise, it uses an advanced system to speed up browsing sessions and downloads.
However, it occasionally takes a long while for downloads to complete. For instance, it can take more than 3-4 minutes for a file of 250 MB to download. If it’s taking too long, or not moving from a point for a long time, there is certainly an issue.
Nonetheless, the issue is not critical, and you shouldn’t panic if you are experiencing it. This article will explain how to fix the Opera browser’s slow download speed and make it faster.
Why is my Opera download speed so slow?
? Poor internet connection
One of the most common reasons for slow download speed in browsers is a poor internet connection. Whenever there’s an issue with your router or Wi-Fi, it influences how your browsers work.
It is because they need a stable Internet connection before downloading your files smoothly. So, issues with your router or cable will impact your browser download speed.
? Third-party apps interference
Applications like antivirus and VPNs can cause problems with your browser activities like downloading.
Antivirus apps help keep your device safe. However, in the course of doing this, the antivirus might block the free passage of your download. It occurs when it detects a threat in the connection.
There are other ways third-party apps can interfere with your browser. We’ll show you how to fix it as we go into the article.
? Too many apps running in parallel with the Opera browser
Some apps use lots of internet connections. Likewise, some take lots of devices’ storage. These apps can be responsible for making your browser downloads slow.
? Outdated version of browser
Running an outdated browser prevents the browser from functioning as much as it should. However, updates are always made available for apps like the Opera browser.
They help to patch the loopholes in the previous version and also fix the bugs affecting it. So, not having these updates can cause the Opera download to be slow.
? Old caches and cookies problem
Some browsers collect information from your browsing sites and store them in your browser’s caches and cookies. This information helps you load websites faster and more smoothly.
However, they can be threatening to your browser when they become old or corrupt. So, having old caches and cookies on your browsers can slow your download speed.
How can I speed up my Opera download speed?
1. Check your internet connection
Connect to a stable internet connection: It will help your browser surf the internet smoothly and download files without interruptions.
If you’re using a wired internet connection, you should switch to a wireless connection for a faster internet speed. Also, restarting your router can help.
2. Close other parallel running apps
On the Windows Start menu, search for Task Manager and launch it.
Select Details from the options.
Select Network from the drop-down.
Click on the apps you want to end tasks for and click on End Tasks.
It will close apps sharing your network connection and make your download speed faster.
3. Clear browser browsing data
Launch Opera browser.
Press the Ctrl+Shift+Del keys to prompt the Clear browsing data page.
Ensure you select Cache images and files.
Click on Clear data.
How do I make my Opera download speed faster? Clear Opera browser’s cache and cookies: Doing this will clear old and corrupt data causing issues from your browser.
Launch the Opera browser and click the Menu button.
Select Update and recovery from the drop-down.
Wait while Opera Update searches for updates.
If there’s any available, it’ll automatically install.
5. Close tabs you’re not using during downloads
When you have multiple tabs open on your browser, it can affect your download speed. Closing tabs that are not useful at the moment will increase the internet speed in your browser.
So, close tabs that you don’t use in order to release more internet speed for your downloads. In addition, you can also turn on the Turbo mode to make Opera download faster.
Where is Opera Turbo mode and how to enable it:
Launch the Opera browser and click on the Menu button.
Select Settings, then click on Preferences.
Click on Advanced and select Features from the drop-down.
Select Opera Turbo, then toggle on the Enable Opera Turbo option.
Restart your browser and enjoy the Opera turbo feature.
NOTE
Kindly note that this option will only be available for Opera versions released up until 2019. Further editions have discontinued the Turbo mode.
Opera GX download speed slow
When it comes to how to make opera GX download faster, you can pretty much apply the same steps provided for the Opera main browser.
In addition, you can also enable the Parallel downloads feature by simply pasting this address in GX’s URL address bar: chrome://flags. Search for the indicated feature in the list and use the drop-down menu to select Enabled.
You can also try disabling extensions and see if that has a positive impact on Opera GX’s slow download speed.
Further reasons can be hardware issues, browser issues, and outdated apps or OS. Also, this issue affects every part of the browser because a slow download speed means the internet speed is relatively low.
In conclusion, we recommend that users check through our article on the best browsers for downloading large files. It will help them download large files faster and easier.
If you are a programmer and have been coding for some time, you must have encountered a situation where an event listener is not working in your Firefox browser. Event listeners, like all other APIs, are not cross-browser compatible and may present some problems.
An event listener is a function that is called when an event occurs. It can be associated with an element in the DOM, such as a button or a link. It is why you need a browser dedicated for web development for the best outcome.
When an event listener is created, it is attached to the DOM element with a specific ID. So if you have multiple elements on your page with the same ID, only one listener will be called when the element receives an event.
While you expect things to run smoothly, sometimes your browser may present problems, and your event listener may not be firing up as it should.
Why are my event listeners not working?
If your event listeners are not working, here are some possible reasons why:
No ID – The first thing to check is that the element you’re trying to listen for events on has an ID or class set. If it doesn’t, then there is no way for your script to find it; thus, there’s no way for it to listen for events.
Delay in actions – The other possibility is that your event handler isn’t being called because the event hasn’t been fired yet. When you click on the button or link, the associated function is called. This can happen if there’s some time delay between when an action occurs and when you want it to fire your event handler function. For instance, If a user clicks a button after having clicked another button first.
Undefined event – The most common reason for this is that the event listener is not being added to the correct element on the page. This means that the element does not exist on your page, or it may be hidden off-screen by another element. Check the DOM inspector for any missing elements.
How do I know if an event listener is working?
You can use the Firefox Dev Tools to inspect the DOM and check for the presence of your custom attributes.
If your code is wrong, then the event listener won’t work. But if your code is right, then there’s no way to tell whether an event listener will work until after it’s been used in a real-world situation with real-world requirements.
Quick Tip:
Another solid browser that supports event listeners is Opera One. The browser can schedule events in the document queues more effectively with passive event listeners.
This is particularly handy in touch and wheel interactions, as it prevents the browser from generating redundant scroll events. Furthermore, Opera One comes with build-ins such as VPN, Ad blocker and AI.
Opera One
Passive event listeners can easily be managed in Opera One, test it yourself.
What can I do if event listeners are not working in Firefox?
1. Update your browser
Launch your Firefox browser and click on the three horizontal ellipses in the top right corner.
Select Help.
Click on About Firefox.
If your browser is up-to-date, you will get the following dialog box.
2. Check your code
The first thing to check is the syntax of your code. Make sure that you have written it correctly and that you have included all of the required code.
It is possible that the event listener was not attached to the right element. For example, if you’re listening for clicks on buttons, ensure that your code is actually attached to a button.
3. Enable JavaScript
Launch your Firefox browser and navigate to the following address: about:config
In the page that appears, under Proceed with Caution, select Accept the Risk and Continue.
Type Javascript in the search box, then double-click until it turns to true.
If you have tried all the solutions, but your event listener is still not working in Firefox, try using a different browser. If the event works in one browser but not another, it might be a problem with how the browser handles events or how it renders your page.
You can also try using code writing software to help you get the job done easily and minimize any mistakes.
At the start of the pandemic, Lenovo announced a pared down digital assistant called the Lenovo Smart Clock Essential which bucked the trend of mini tablets retrofitted into stationary speakers and displays.
Despite Google’s lead on a simplistic home speaker nod that was accessible and intended to be interacted with through simple voice commands, the industry seemed to be in a fever pitch to toss ever increasing touch screens on home speakers as part of a feature race that ultimately went nowhere for the vast majority of users.
Circling back to Lenovo’s Smart Clock Essential line, it seemingly reintroduced the original vision of the smart home assistant with a visual compromise best suited for its value proposition.
A smaller LCD screen with big, bright, bold monochrome numbering that explicitly displayed only the time and outside temperature.
In Lenovo’s follow up to the Smart Clock Essential for 2022, the company continues to refine the concept of a bare bone’s digital assistant but with a bold new twist, it’s no longer letting Google quarterback the day-to-day interactions and instead is showcasing Amazon’s Alexa smart AI platform.
Look and Feel
There are some immediate visual changes to the Smart Clock Essential (2022) that come in the way the overall design of the clock. While it’s mostly still a wedge shape design, the bottom had been placed on a more rectangular bottom as it now supports additional docking stations.
The original Smart Clock Essential resembled a wedge of cheese wrapped in fabric cloth, this time around the cheese has been put on a thick cutting board.The color options remain the same with a blue-ish grey and clay red option to choose from.
The screen is slightly larger this time around roughly 3.4-inches and offers an arguably crisper LED-led contrast between blacks and whites.
There isn’t much to clutter up the screen beyond an alarm indicator, weekday indicator, decibel alert (for those with light sleepers), outdoor temperature indicator, weather icon and time.
Around back, customers lose out on the additional USB-A port that came with the original Smart Clock Essential, and instead are greeted with a single DC-in port and mute switch only.
Another loss is the embedded light ring that was wrapped around the back of the clock in the previous version and instead leaves the lighting to Lenovo’s first party docking solutions that come in bubbles and crab-like bottoms. I’ll explain later.
On the top of the device, the Volume, Alarm and dedicated Alexa button look and feel more pronounced than on the previous model as they stand out in white against the colored fabric of the Essential Clock 2022.
Performance
I’m new to using Alexa as a digital assistant. I’ve spent years gathering and organizing Google Assistant powered devices and while they can be a pain to set up at times, once in place they operated pretty seamlessly.
Fortunately, Amazon and Lenovo have combined to make a device that works pretty seamlessly out of the box. Once the Alex Assistant app is downloaded to either a mobile phone or PC (many Lenovo devices come with it pre-installed) it’s a matter of 30 secs to a minute for the device to be found and paired.
From there, the Smart Clock Essential is off to the races, easily able to spit out detailed temperature forecast and readings, as well as set alarms and reminders.
Where I ran into some issues is with using the Smart Clock Essential (2022) as my morning news brief as I had done with its predecessor. As I mentioned, I’m invested in the Google ecosystem, so I used Google Podcasts to stream my morning news briefs, and while Amazon supports Spotify, Apple Music, and Amazon Music, it didn’t seem to have tie-ins to my podcasts from Google.
I was able to ask Alexa to stream specific podcast but the integration Google Assistant had with paused states for podcasts means I can pick up a podcast from the last time I listened to it in the car, on a walk, or in the office, unfortunately I lose a bit of that with the switch to Alexa.
However, Alexa was able to quickly find my podcast request when I could give a full title and pulled up each one without an issue. The same could be said for listening to music. I normally build playlists in YouTube Music, but as long as I knew the name of the artists, song titles or albums, I was right back to comfortably playing music on the 3W full-range speaker which got plenty loud without losing too much fidelity in the mids and highs.
It’s not listed in any of the product papers or notes, but many outlets say there is supposed to be an update in 2022 to enable image display and tie-in to Google Photos albums, I’m not sure if that’s a great additional or if I’ll even use it, but I thought I would note it.
The simplicity of the LED screen as is, is more than enough for me and should work well for a device that’ meant to help get you up and going or to sleep quickly.
Speaking of sleep, aside from some Lo-Fi playlists I zone out to before bed, the tie-in to audiobooks through Audible is another nicety the Smart Essential brings to the table thanks to being powered by Alexa this year.
Yes, you could cast your Audible books through Google Assistant and Android devices, it’s just nice to be able to speak them into existence sans any other hoops to jump through.
Lastly, just like Google Assistant and supported devices, Alexa can tie together a number of smart home devices and software that allow you to control or automate your living situation.
From turning down smart lights to grabbing details about actors from your favorite show, you can do it all pretty effortlessly with your voice and the Smart Clock Essential (2022).
Pogo-pins and Accessories
The other addition to this years model is extended support for the Lenovo Smart Clock docking ecosystem.
There are some colorful and kid-friendly bubbles (Squid version) and Sea-Lion docking solutions this time around that help provide a night-light aspect to the Smart Clock Essential.
There is also a more straightforward docking station that offers a secondary wireless charging port for smartphones or earbuds.
I don’t know the actual wattage for the wireless charging but as with most wireless charging solutions, this takes a while to charge and I would venture to guess is meant for overnight use.
Summary
When it was first announced and released the Smart Clock Essential (2022) was billed at $59.99 and for that people got an oversized Google Home with the ability to read the time from far away.
At its current $39.99 it’s a much better deal, and may even be the ideal price for someone to venture out of the Google ecosystem to try out a device that offers many of the upsides of a hyper-focused digital assistant.
A thumbnail cache is how your Windows records the diverse thumbnail images it has for the different kinds of files on your PC. By always having specific thumbnails for videos, photos, and other files with you, you don’t have to recreate your images repeatedly.
At times, however, your default thumbnails might stop working properly. Instead of a regular, original thumbnail, you might encounter a corrupt dizzy version of it. The reason could be anything; database corruption by an abrupt shutdown, a malware problem, and so on. There’s no clear, apparent reason in sight. What’s sure, though, is that there are well-laid-out ways to clear your thumbnail problems without any hassles.
Let’s look at them all.
How to clear thumbnail cache on Windows 11
You can manually clear your thumbnail cache on Windows 11 without any hassles. The first option on your plate is Disk Cleanup.
The default disk cleanup utility from Microsoft can help free up space on your Windows. To get started with it, head to the Start menu search bar, type in ‘disk cleanup,’ and select the best match.
The Disk Cleanup dialog box will be launched. There, uncheck all the radio boxes except the one for Thumbnails, and click on OK.
You’ll then get a dialog box asking if you want to delete all the files. Click on Delete Files. Do this, and your thumbnails will be deleted.
Clear your thumbnail cache through Command prompt
If the above method doesn’t work, you can then rely on the Command prompt to rescue you. To clear your thumbnail cache with the Command prompt, follow the steps below:
Head to the Start menu search bar, type in ‘cmd,’ and run it as an administrator.
From there, type in the following command in your cmd and hit Enter. taskkill /f /im explorer.exe
Finally, to delete your files, enter the following command in your cmd and hit Enter again. del /f /s /q /a %LocalAppData%\Microsoft\Windows\Explorer\thumbcache_*.db
Do this and the cmd will clear your thumbnail files instantly. Give your PC a restart, and you can check if that’s the case.
Clearing your thumbnails on Windows 11
That’s it, folks. If you’ve followed the above steps correctly, your default corrupt thumbnails should be removed now. Although problems like this rarely arise, you can use the thumbnails to rid yourself of your thumbnails.
Chrome is a champion in the browser market. It is a fast and reliable browser with lots of features. A big part of Google Chrome is security and privacy. It is a Chromium-based system with an advanced system of security. However, Chrome has its own authority in controlling how it functions.
The Chrome certificate has been revoked error is one of the common errors users encounter. More so, it can occur for different reasons which we are going to enumerate as we go further into this article.
So, absence or difficulty with them can cause several problems. However, we have listed some fixes that you can use to solve this error.
What does it mean when a certificate has been revoked?
Google Chrome uses certificates to check how safe websites are for the users and also the credibility of the site for the website owners.
However, when a certificate is revoked, there’s something wrong with it. It can mean that the certificate is not from a valid authority, issued wrongly, is outdated, or any other random SSL certificate issues.
Although net: err cert revoked all browsers is an error common to every browser, it’s more aggressive in Chrome. Hence, it signifies that the website certificate has been revoked by the SSL certificate authority.
What causes certificate revocation?
1. The private key of your SSL certificate is insecure: Every SSL certificate that is issued to website owners comes with a private key that helps it be more secure. However, if there’s any issue or compromise with this key, it will prompt the Chrome certificate has been revoked error.
2. The SSL certificate may be wrong issued: It can happen if there was a mistake or unclear activity when the certificate was issued to the website owner.
3. SSL certificate revocation request: SSL certificate revocation can mean that someone has requested for it to be revoked. Hence, the error is a response to someone’s request. It can be by the owner of the certificate or someone else.
Quick Tip:
A practical method to bypass this revoked certificate issue is to switch your browser to another effective one like Opera One.
With this experienced browser, you benefit from the latest browsing support and easy access to site control settings that may help you fix this case in minutes. Plus, it comes with it’s own AI.
Opera One
Take full advantage of this flexible browser with enhanced security and VPN privacy.
What can I do if my certificate is revoked on Google Chrome?
1. Adjust date & time settings
Right-click the time and date on the right side of your Taskbar.
Click on Adjust time/date from the options listed.
Toggle on the Set time zone automatically.
For users, a solution to this error is setting the correct date and time. The revocation can result from the incorrect time on your device.
2. Update Google Chrome
Click on the Menu button in the top right corner of the screen.
Click Settings, then select Help from the drop-down.
Select About Google Chrome.
Chrome will check for updates, and if available, it’ll automatically install them.
3. Bypass Certificate Revocation Warnings
Click the Windows button and search for Internet Options.
In the Internet properties tab, select Advanced.
Go to Security and uncheck the box for Check for publisher’s certificate revocation and Check for server certificate revocation.
Click Ok to save the changes you just made.
However, this solution can leave your browsers vulnerable to internet threats and hackers. So, we don’t recommend it as the best option, but it can fix the chrome certificate has been revoked error.
Another solution you can try is to uninstall and reinstall Google Chrome on your computer. Though it can clear your user data, it still works.