How to Improve Sound Quality on Your Windows 10 PC

Windows 10 offers many audio enhancement features to help you improve the sound quality on laptops and PCs.

While an expensive laptop with better speakers will definitely sound better, there are a few tweaks that you can make to your Windows 10 laptop to make it perform better when it comes to audio. Things are no different for Windows 11 devices.

Whether it’s activating audio upgrades, sound effects, or using third-party tools, there’s something for everyone.

In this article, we explore all the options to help you get the best sound quality on a laptop and PC. Follow along!

On what operating systems can I improve the sound quality?

Users have been asking how they can make their laptop’s audio sound better on different OS iterations, some of which are the following:

  • How to improve sound quality on Windows 7 laptops – Updating your audio drivers will work even on this Windows iteration. Alternatively, opt for third-party audio-enhancing software.
  • How to improve sound quality on Windows 11 laptops – You can use Boom 3D Desktop to enhance the audio, since it supports Windows 11 as well.

This being said, let’s see why your laptop audio sounds muffled and then look at five solutions that you can implement. Keep on reading!

Why does my laptop audio sound muffled?

Unfortunately, speakers and headsets tend to malfunction. When the cone of a speaker is damaged, it might result in muted sounds. The quickest way to determine whether or not this is a problem is to use a different set of speakers or a pair of headphones with the PC.

It’s almost certain that the first audio device is causing the problem if these two tests are successful. The majority of computer audio (at least in gaming PCs) is generated by a specialized graphics processing unit (GPU).

The user can uninstall their graphics drivers and reinstall them if they are experiencing audio problems on their computer. Sometimes all it takes to recover from muffled audio is a little patience and some software tweaks.

How do I improve the sound quality in Windows 10/11?

1. Enable Spatial Sound

  1. Right-click on the speaker icon in the Taskbar and hover over Spatial Sound in order to select the Windows Sonic for Headphones option.spatial-sound improve sound quality laptop windows 10
  2. You can turn it off in the same manner as in the first step.

Spatial Sound is an enhanced immersive audio experience where sounds can flow around you, including three-dimensional virtual space.

It offers an enhanced atmosphere which the traditional surround sound formats cannot. Moreover, it works with your headphones.

Apart from Windows Sonic for Headphones, you can also install third-party software like Dolby Atmos for Headphones and DTS Headphones.

However, the additional software is part of the premium utility section that you can purchase from the Microsoft Store.

2. Use an audio equalizer

There isn’t a more suitable choice to level up your PC sound than with a dedicated sound improvement app. With this, you’re able to define the sound on both Windows and Mac devices.

So, Boom 3D is a computer application that allows you to achieve immersive 3D surround sound and a complete equalizer board.

This pro-audio enhancement app is designed to play your media sound with surround volume and unique 3D sound technologies.

In addition, the software also allows you to use the built-in smart audio player to play your locally stored songs and access 20,000+ radio stations all over the Internet.

  • 31-band equalizer presets
  • Volume booster to safely increase the volume
  • 3D surround sound technology
  • Apps volume controller to individually control app value

Regardless of your sound system, Boom Sound 3D will help you make the most out of your audio equipment.

Boom 3D

Try this powerful equalizer software to bring your PC’s sound quality output to the next level.
Free trial Visit Website

3. Change sound effects

  1. Right-click on the speaker icon in the Taskbar and click on Sound.
  2. Open the Playback app and right-click on your Speakers in order to select Properties.prop microphone not showing up in device manager
  3. Navigate to the Enhancement tab and check the Bass Boost, Virtual Surround, Room Correction, and Loudness Equalization options.sound improve
  4. Try experimenting with enabling one or two enhancements to find the perfect mix of loudness and bass boost.

You can further tweak the enhancements by accessing the equalizer. In the Sound window, select Equalizer in the Enhancement tab and click Settings. Change the Graphic EQ as you prefer and click Save.

Using the sound enhancements can help you make the most out of your external speaker connection, thus resulting in improved sound quality in Windows 10.

4. Update audio drivers

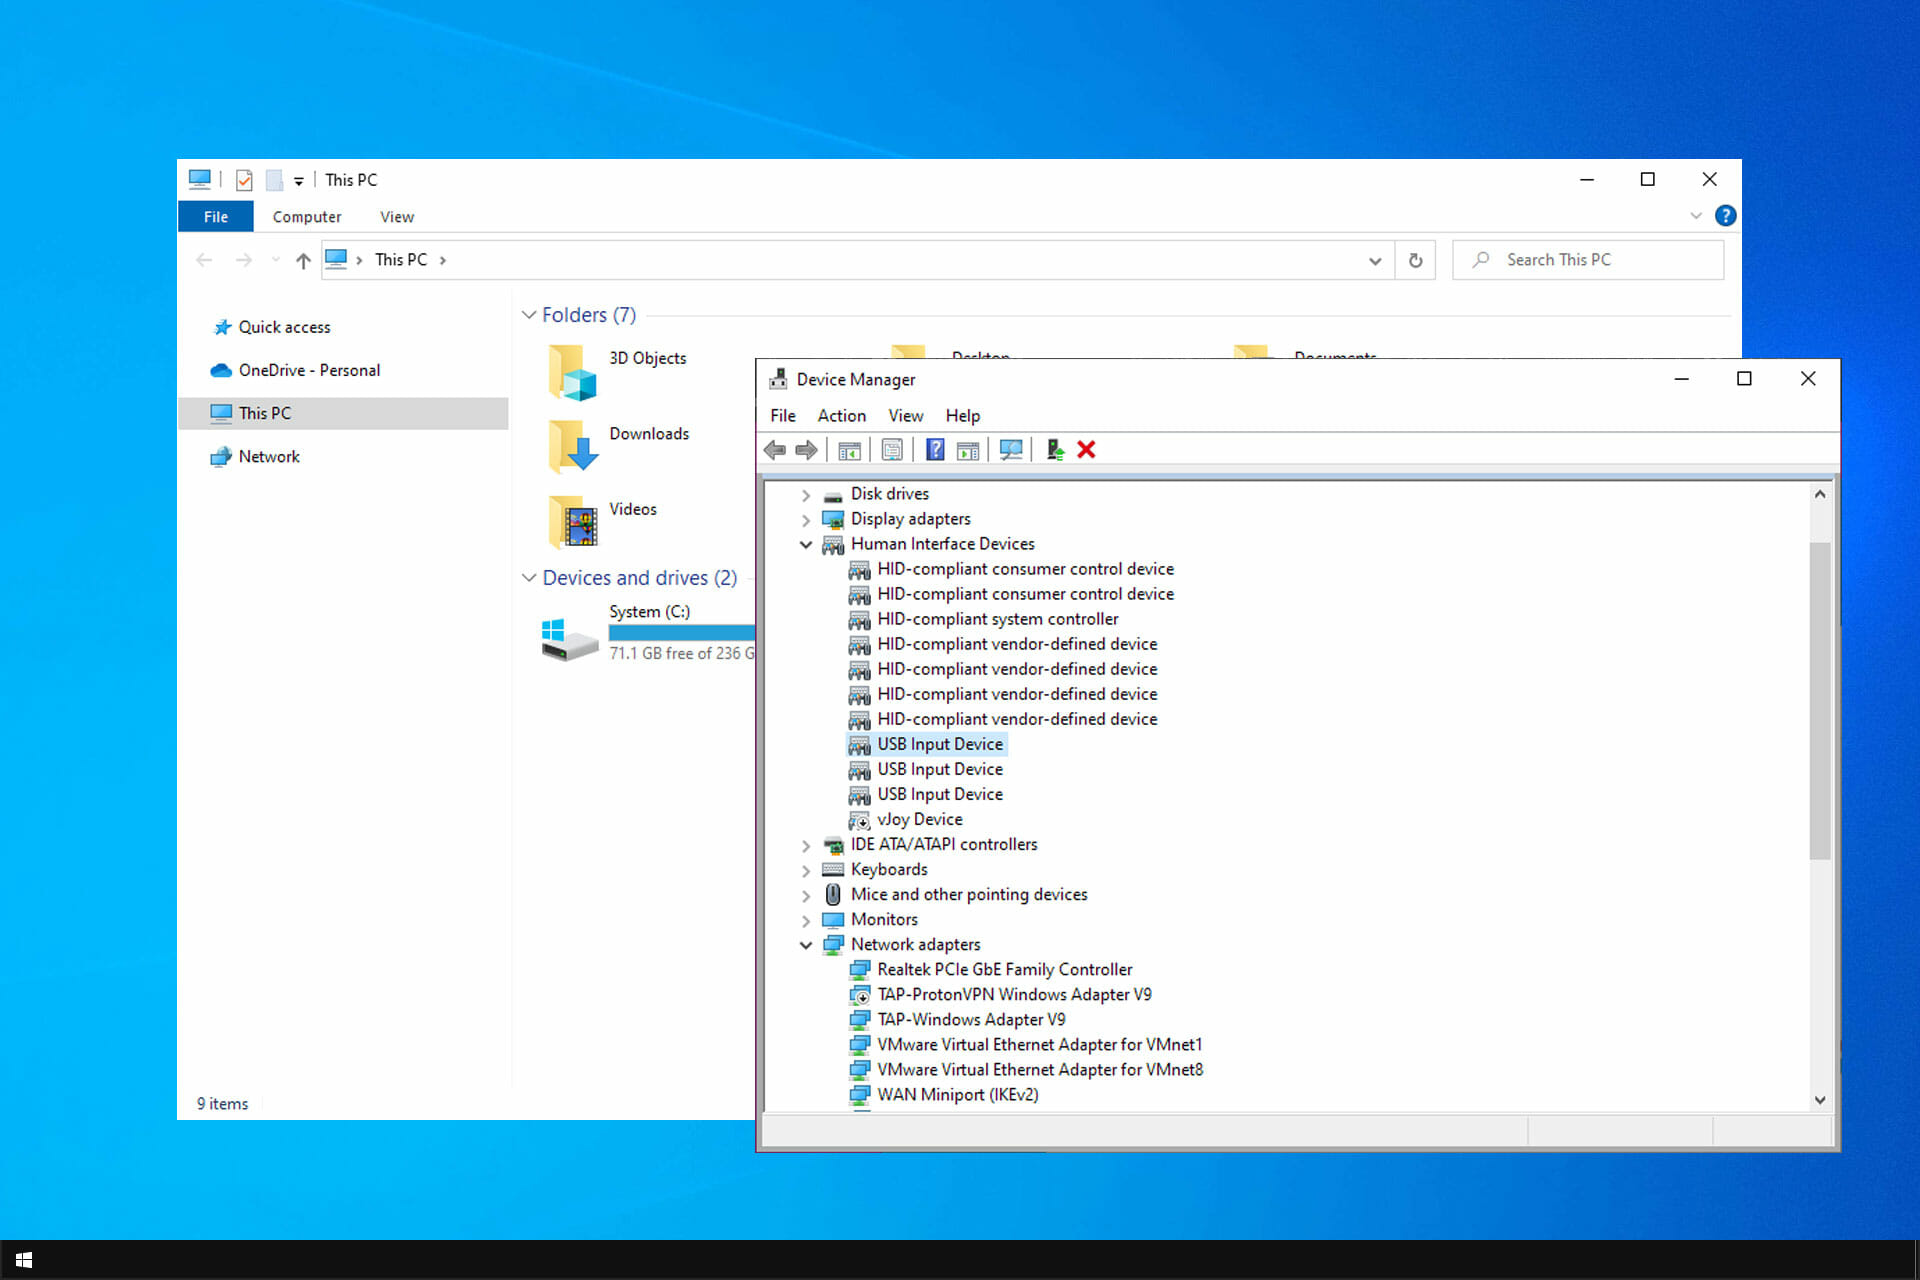
  1. Press the Windows + R in order to open a new Run window, type devmgmt.msc, and click OK. dev-run improve sound quality laptop windows 10
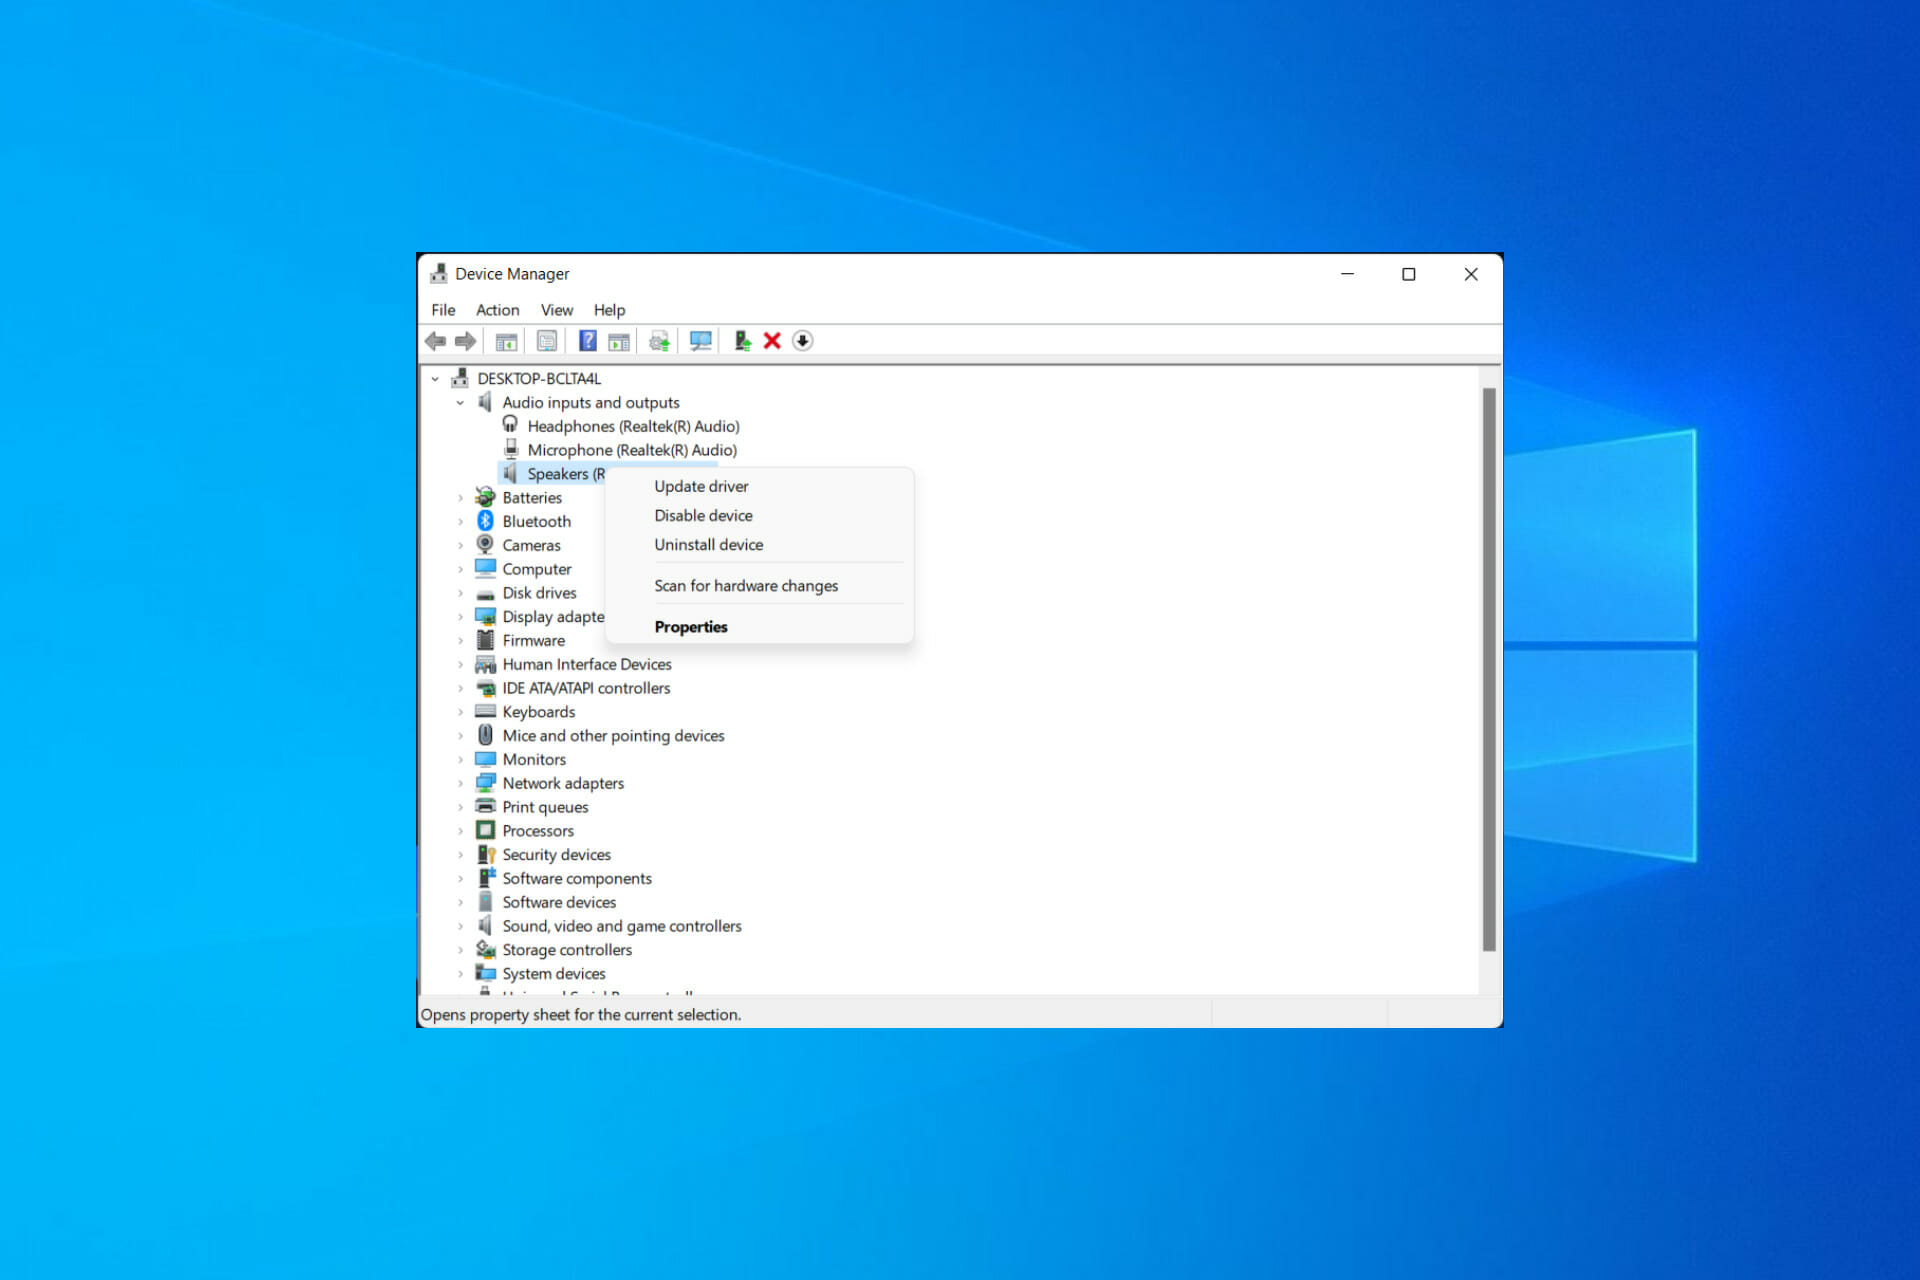
  2. Expand the Audio inputs and outputs category in order to right-click on the Speakers driver and choose Update Driver.speaker-update improve sound quality laptop windows 10
  3. Select Search automatically for updated driver software and wait for the process to finish.automatic-search improve sound quality laptop windows 10
  4. Repeat this with the Headphones and Microphone drivers under the Audio inputs and outputs category as well.update-driver improve sound quality laptop windows 10
  5. Windows will download and install if any driver update is available.

Driver updates for your audio device can enhance audio capabilities and new features. So, make sure you have the latest audio drivers installed.

Consequently, you have to manually update your audio drivers for the latest version to get improved sound quality.

However, you can opt for an automatic way to update your device drivers and save your time by using dedicated software.

5. Try audio enhancement software

If you still think your system speakers can sound better, there are third-party Windows 10 audio enhancement utilities that you can install to personalize every bit of your speaker output.

Beginning with the audio equalizer software to balance the frequency. You can also try some speaker calibration software or go full out and try the hardware-based USB audio equalizer.

So, these are the ways to improve sound quality on a Windows 10 laptop and PC. Make sure to enable the Windows Sonic spatial sound effect if you use your headphones to listen to the media.

How can I improve the sound quality in Windows 11?

  1. Open Settings by pressing Windows + I and navigate to System followed by Sound.system-sound edit
  2. Next, click on the right arrow next to the output source that you use and turn on the Enhance audio option.enahnce audio

Sound can easily get distorted hence why your audio may get muted when you get on a call.
For more information and methods to improve your audio, check out our post on the four best ways to improve MP3 sound quality in Windows 10/11.

Alternatively, take a look at how to improve your headphone sound quality in Windows 10 and get the best out of them.

Was this guide useful to you? Don’t hesitate to tell us what you think in the comments section below. Thanks for reading!

4 quick tips for fixing Bugsnax not loading

Got bored of FIFA, Elden Ring, and Call of Duty? Even though these games are among the most awesome out there, we can grow bored of them as well.

Sometimes, we all find ourselves in a situation where we long for simpler, more fun games. Now, we’re not saying we should all go back to Super Mario 64.

There are other, more recent games that can help take the edge off and stir all those precious childhood memories.

People that played A Bug’s Life years ago can now become melancholic with Bugsnax and explore a mysterious island and attempt to find and capture the eponymous half-bug-half-snack creatures.

However, if the title’s not losing at all, you might want to take some measures and fix this situation before you get frustrated and uninstall it.

We prepared four easy solutions for exactly these types of scenarios, so lay back and carefully go through our elaborate troubleshooting process.

How Can I Fix Bugsnax Not Loading On My PC?

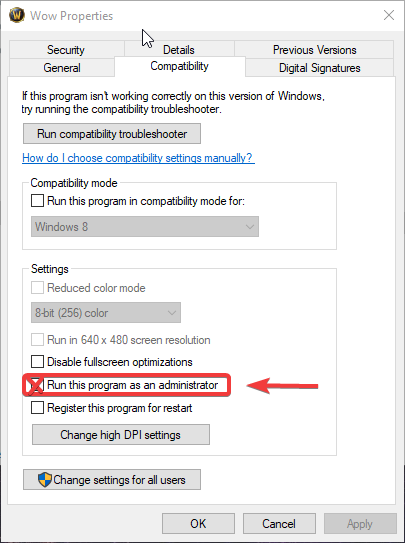
1. Run Bugsnax as an administrator

  1. Locate the folder where Bugsnax is installed.bugsnax install folder
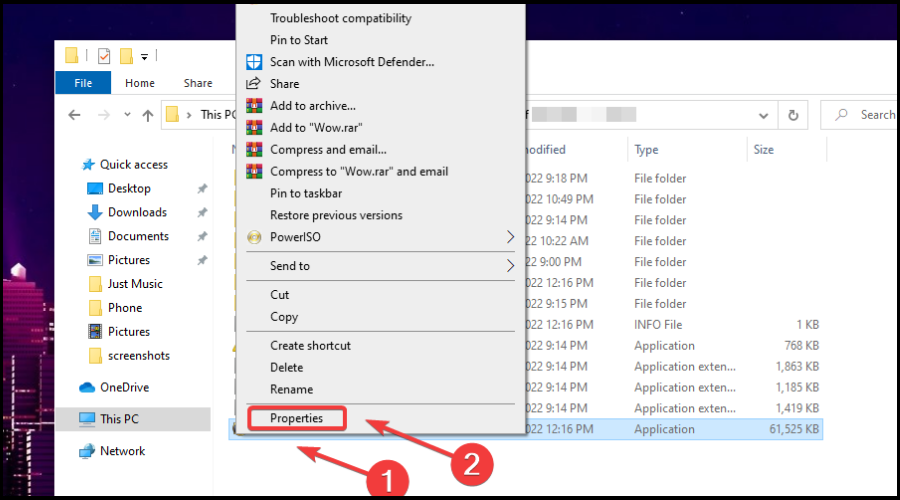
  2. Right-click on the Bugsnax executable and click on Properties.propreties
  3. Select the Compatibility tab and check the Run this program as administrator box.run werid west as admin

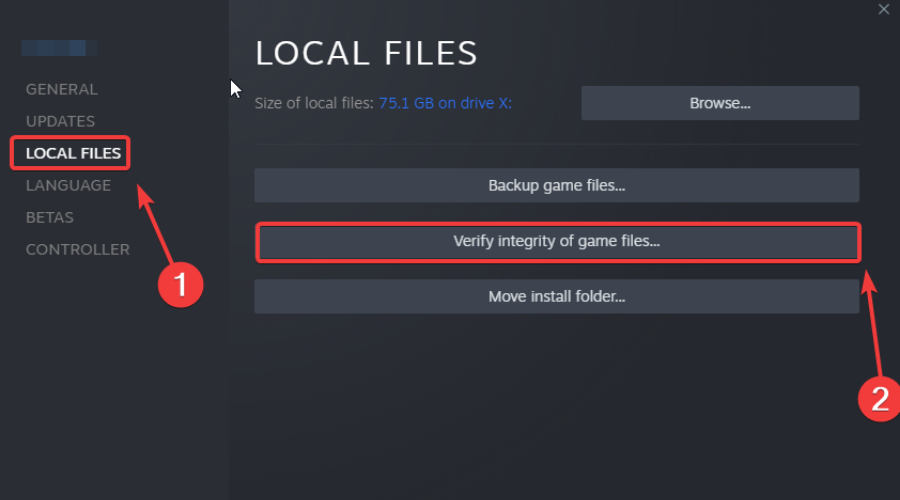
2. Check game file integrity

  1. In Steam, right-click Bugsnax and select Properties.dying light steam properties
  2. Select the Local Files tab and click on the Verify integrity of game files.game file integrity

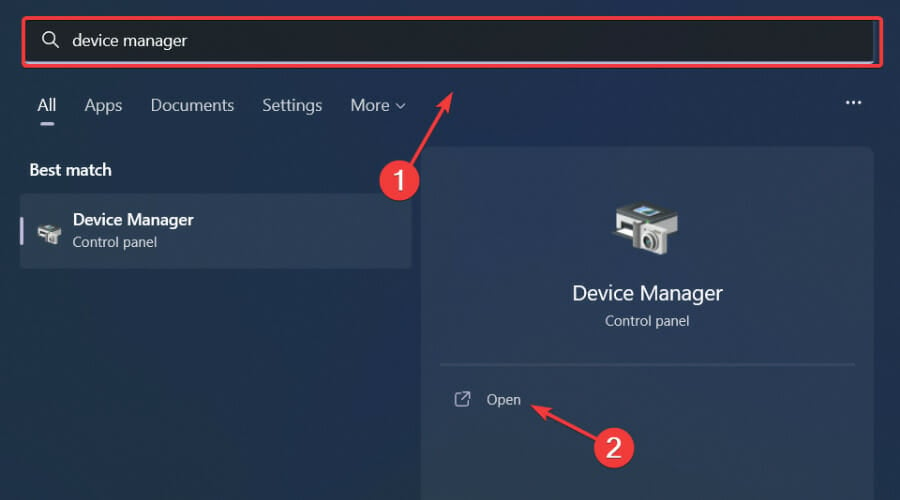
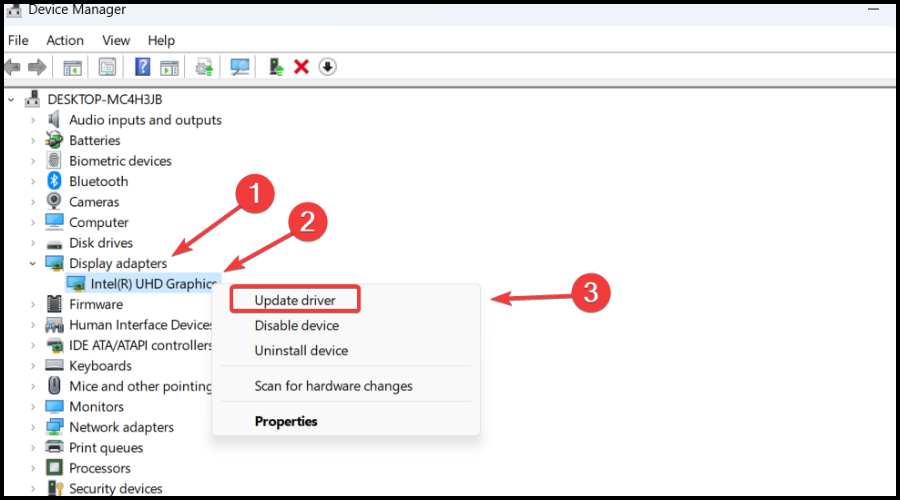
3. Update your graphics driver

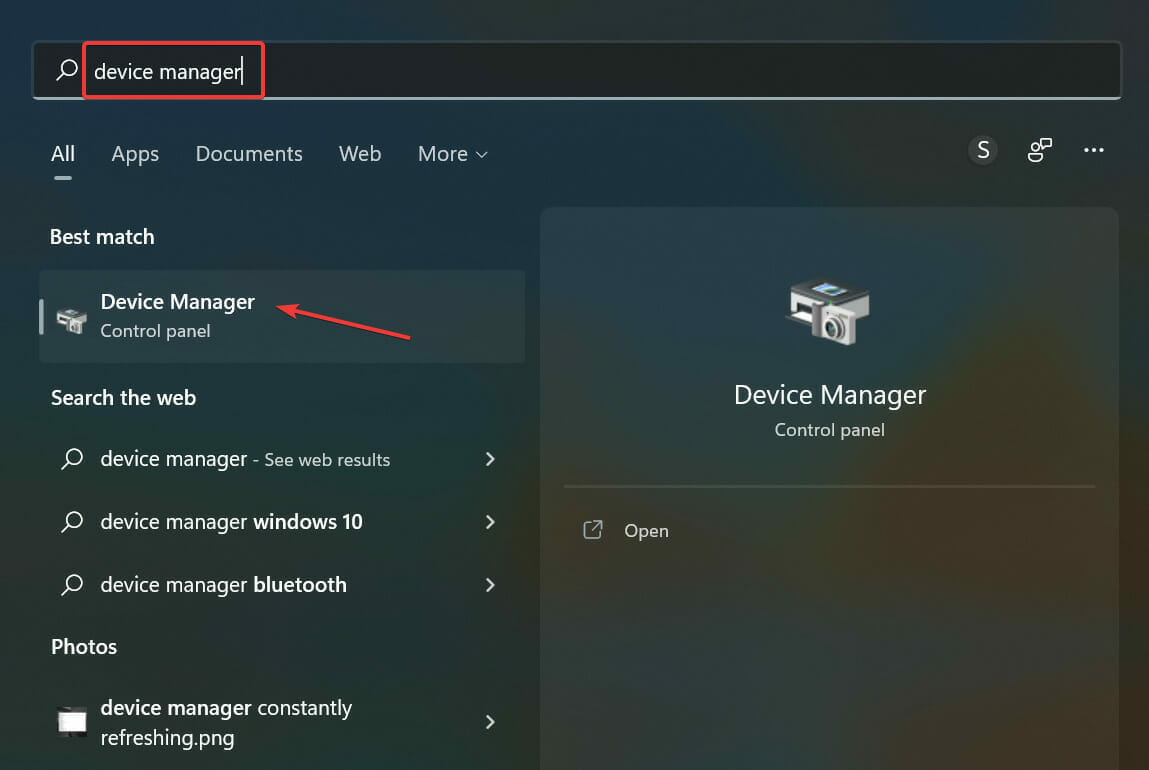
  1. Press the Windows key, search for Device Manager and click on Open.run device manager
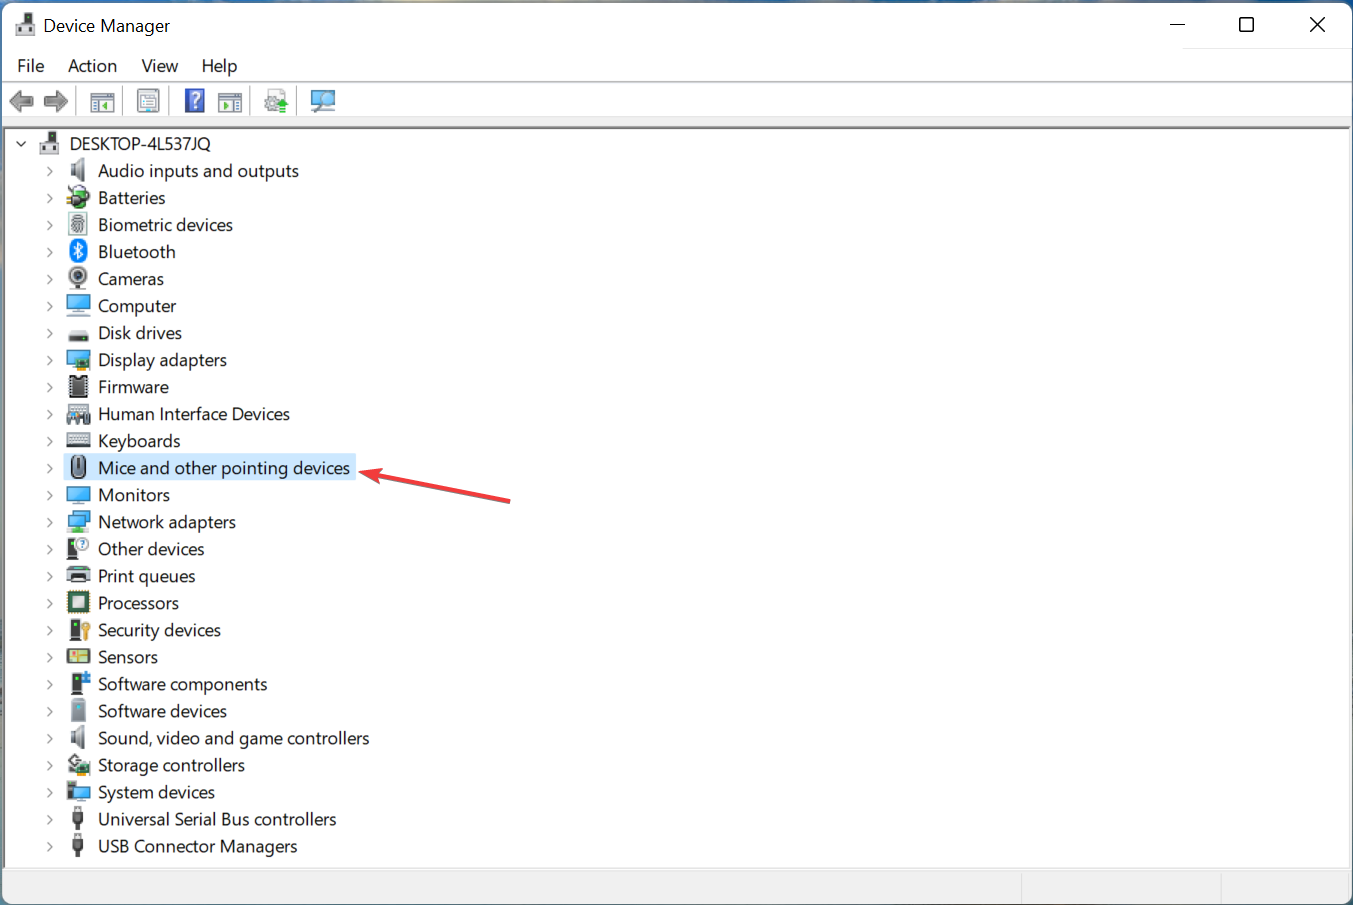
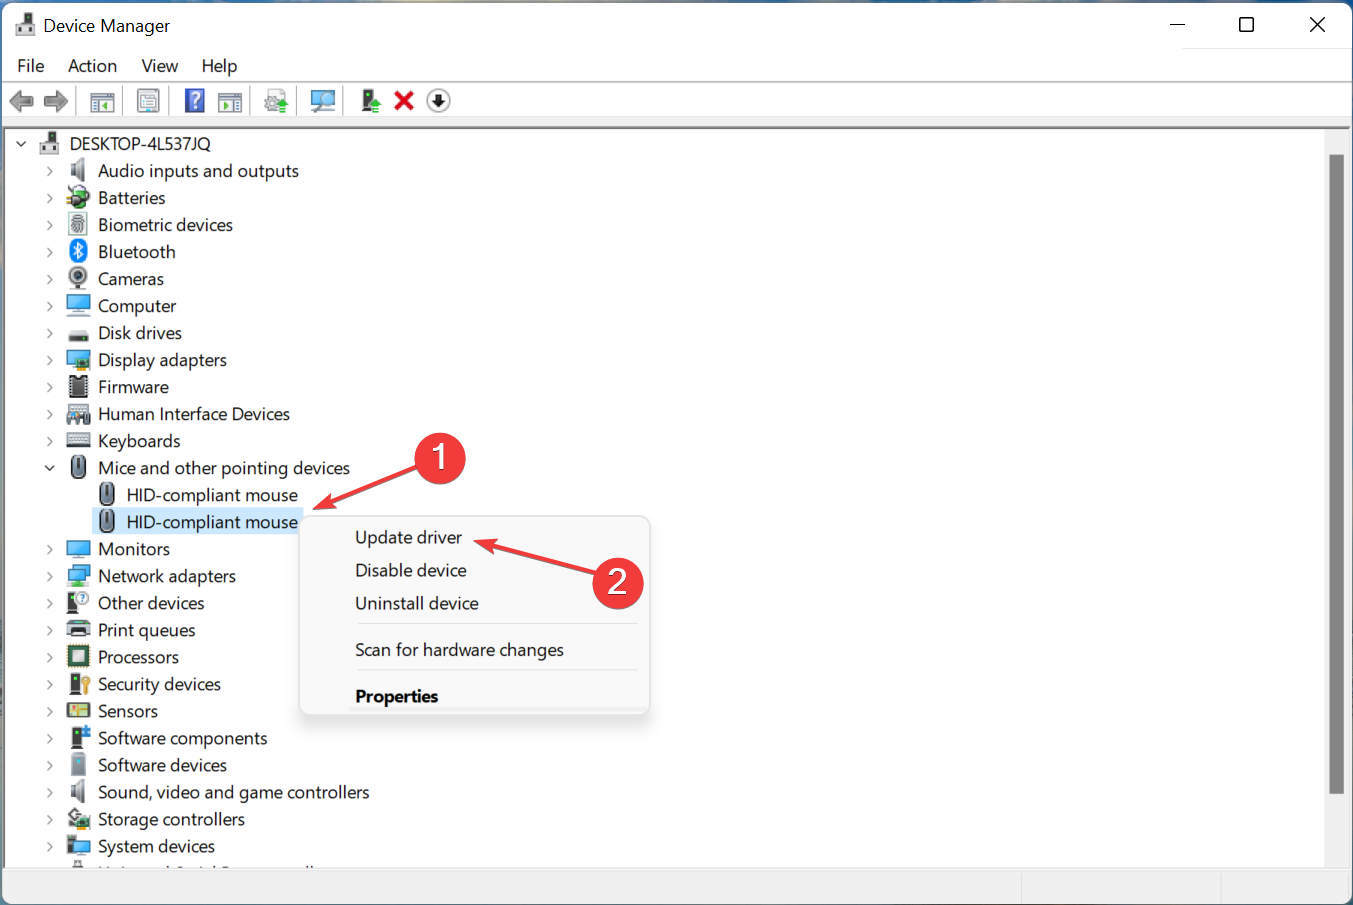
  2. Expand Display Adapters, right-click on your GPU and select Update driver.update gpu
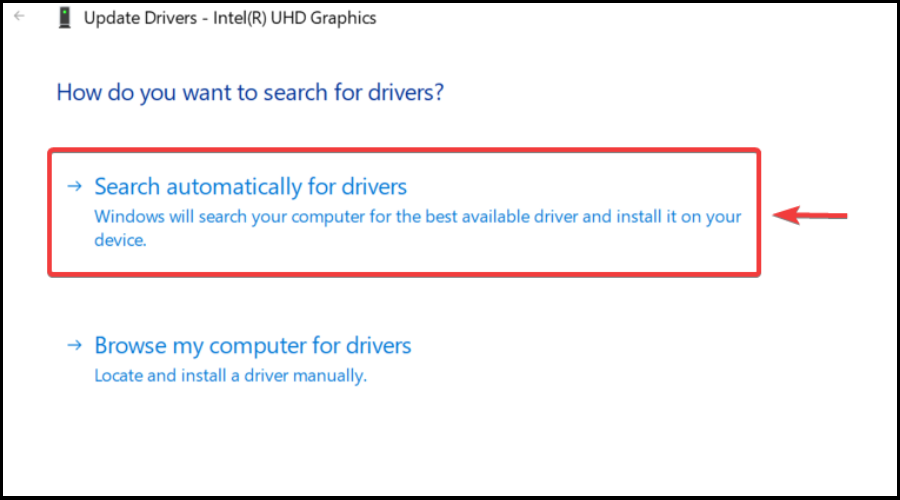
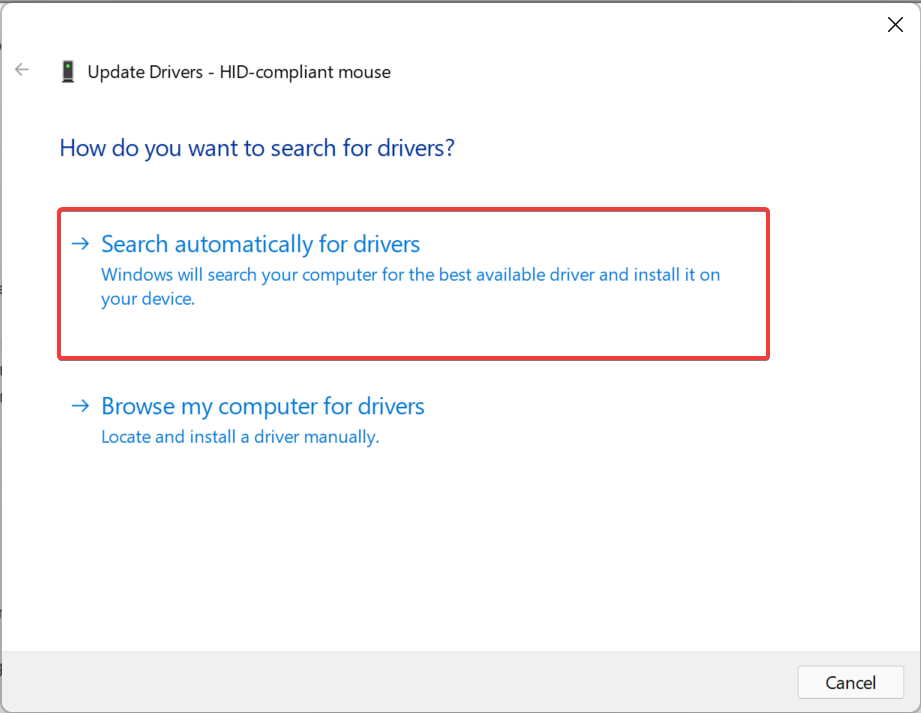
  3. Select Search automatically for drivers.search for driver automatically

Gaming can be enjoyed without any crashes, lags, or freezes by keeping all drivers up to date and error-free easily. 

Sometimes, manual checks are hard to perform, that’s why we recommend using an automated assistant that will scan for fresh driver versions daily.

In case you’re a beginner, you don’t have to worry! Outbyte Driver Updater is smart, simple, engaging and its user interface was built to make your life easier.

⇒ Get Outbyte Driver Updater

4. Update Windows to the latest version

  1. Press Windows + I to access Settings.
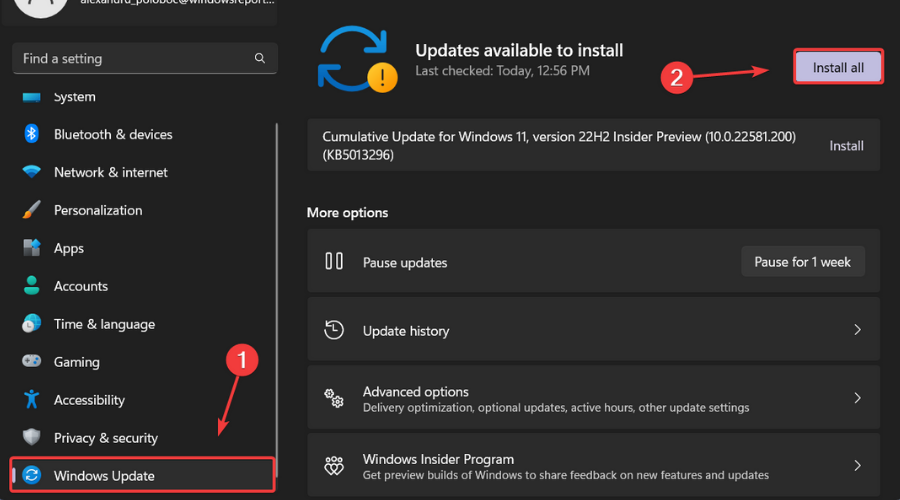
  2. Select the Windows updates tab and click Install all.install Windows updates
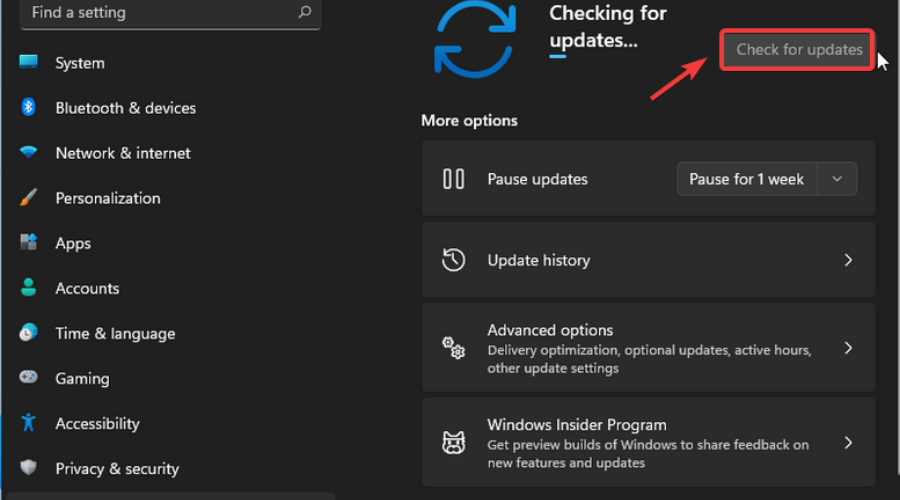
  3. If no updates are queued for installation, press the Check for updates button.check for updates

So, with this information at hand, it’s up to you to spend the next minutes and fix your new favorite game and keep enjoying it.

Please be sure to take a few seconds and tell us about your experience in the dedicated comments section located below.

Microsoft’s Power Apps portals are being renamed to “Power Pages”

Microsoft’s templated low-code website builder Power Apps Portal is yet again being renamed to Power Pages with a refocus on improved cross-site search functionality.

Once again, The Walking Cat has unearthed some references to the name change of Power Apps Portal to the more comprehensible Power Pages and posted them via Twitter.

When following the breadcrumbs via the listed URL in the attached video, customers are taken to a preview site where previous Power Apps Portals credentials are required.

As ZDNet’s Mary Jo Foley reports, Microsoft’s 2019 project originally named Dynamics 365 Portals is on the cusp of being renamed a third time and right before the company’s dedicated developer’s conference, wherein many expect the branding pivot to cater to the less code-savvy and more towards the broader educational, governmental and larger enterprise customers.

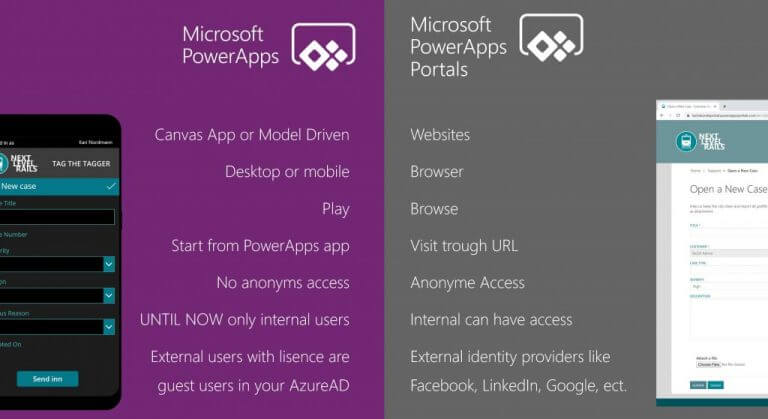
PowerAppsPortal

As evident by the short video, Power Pages will continue the trend of streamlining quick site building for both heavily trafficked pages as well single use destinations such as COVID-19 vaccination scheduling, user managed return portals, warranty registration or authentication sites.

Presumably, Microsoft will officially announce Power Pages at BUILD where the announcement will be accompanied by the introduction of Dataverse search, enabling customers to tap into improved tools for managing user generated data.

8 Best Mouse Pads for Hyperhidrosis [Waterproof/Washable]

Do you need the best mouse pad for hyperhidrosis because all your other mouse pads have been worn out due to excess sweat coming from your hands?

Hyperhidrosis is the situation in which you excessively sweat, but not because of heat or exercise. This type of heavy sweating disrupts normal day-to-day activities.

People who suffer from hyperhidrosis sweat so much that they soak their clothes. If they sit at computers for so long, their mouse pads get worn out very soon.

Read this article to find out the best mouse pad for hyperhidrosis. These mouse pads are either waterproof or easily washable.

How to clean your gaming mouse pad?

Even if you have the best mouse pad for hyperhidrosis, you still need to clean it regularly if you sweat excessively.

To clean your mouse pad, you can put it in a bath filled with warm water and soap. Then, you can use a sponge to rub the mouse pad surface gently.

One other way is to toss your mouse pad in the washing machine and add soap or detergent. You need to set it to cold and low tumble.

What are the best mouse pads for sweaty hands?

Amazon Basics SBD86WD – Available in a variety of sizes

  • Easily washable
  • Non-slip surface fabric
  • Non-slip base rubber keeping mouse pad in place
  • Durable, smooth material
  • Emitting Polyurethane smell at first

Amazon’s Basics SBD86WD is one of the best choices for hyperhidrosis. It has a smooth fabric and comes in a variety of sizes.

Its non-slip surface helps people with sweaty hands have a more seamless time. This mouse pad is made of a durable fabric and can be easily washed.

Since it’s washable, there’s no risk in giving it a thorough washing every now and again.

JEDIA – Made of aluminum and PU leather

  • Double-sided
  • Easily cleanable (with a wet towel)
  • Waterproof
  • Durable material
  • Might generate noise when using certain types of mice

Jedia mouse pad is another item on our list of the best mouse pad for hyperhidrosis. It is a double-sided mouse pad that can help people with hyperhidrosis not need cleaning for a long time.

You can use one side till it soaks with sweat, and then turn it around and use the other side. One side of it is made of aluminum, and the other is made of PU leather.

This mouse pad is waterproof; therefore, cleaning it would be super easy.

Besky – Natural, non-toxic material

  • Sweatproof
  • Easily cleanable
  • Anti-fray
  • Optimized for all types of mice
  • Not double-sided

Next up is a mouse pad from Besky. It is 3mm thick, which can reduce uneven surface effects.

It is durable, waterproof and sweatproof, and easily cleanable. Using a wet cloth, you can easily clean your sweat off of it.

The material is natural and non-toxic, and you do not need to worry about it slipping on any surface. Also, its anti-fray material makes you not worry about it wearing out soon.

INeworld – Ideal for a firm grip

  • Non-slip rubber base ensures a firm grip
  • Edge stitching increases durability
  • Heat-resistance prevents the warmth of your hands from ruining the cloth fabric
  • The cluttered design not being appealing to everybody

The fourth item on the list is a mouse pad introduced by the INeworld. With 3mm of thickness, you will not feel the surface below it.

Its material prevents it from deforming and degumming even after being in contact with sweaty hands for a long time.

Furthermore, INeworld’s sublimation heat-transfer inks offer a long-lasting print, unlike some other products.

Perixx DX-1000L – Very easy to clean

  • Not fraying after long usage and contact with sweaty hands
  • Fabulous performance for gamers
  • Easy to clean (moist cloth and shampoo)
  • Very heavy

Perixx DX-1000L is made of fabulous fabric, it will not fray, even if you put your sweaty hands on it all day long.

Its non-slip rubber base enables it to form a tight grip on your desk and reduces unwanted movement. Additionally, it is coated with water-repellent fabric.

It doesn’t matter how much you sweat or how many cups of coffee you spill on it.

Vaydeer ‎Xunli-0007 – Ideal for both work and gaming

  • Metal side will not be damaged by sweaty hands
  • Compatibility with all types of mice
  • Noiseless
  • The rubber base can slip with hand motion

Vaydeer ‎Xunli-0007 mouse pad with its double-sided design allows for longer time usage and less damage to certain parts of the mouse pad.

One side is made of aluminum and the other side is PU leather. Because it has a smooth metal surface, the user may use it for both gaming and work.

You can carry it in your backpack or even in your hands because of its slim and attractive design.

Cooler Master Masteraccessory MP750 – The best choice for gamers

  • Splash damage resistant
  • Precision
  • Improved stitching
  • Not compatible with Aura sync

Cooler Master MP750 is one of the best pads for sweaty hands because of its water-repellent coating.

Alongside its improved stitching, this makes for an endurable mouse pad for those who suffer from sweaty hands.

Moreover, the RGB borders make it an excellent choice for gamers in search of a water-resistant mouse pad.

How to dry your mouse pad after washing it?

There are many ways to dry your mouse; however, you should go with the ones that do not damage or wear out the fabric of the mouse pad.

The best way is to let your mouse pad air dry inside after being washed. You can hang it out in the sun as well, but you should remember not to leave it there for too long.

If you are in a hurry and need to get back to your project or gaming soon, you can use a hairdryer to dry out your mouse pad.

However, you need to ensure that you are using the lowest degree of heat and that you distance the hairdryer from the mouse so that you do not damage the fabric.

If you do not want to pay more money for the best mouse pad for hyperhidrosis or take care of your sweatproof mouse pad, you can go for other solutions.

You can put up a fan in front of your hand to cool it and stop it from sweating excessively and ruining your mouse pad.

Furthermore, you can attach a small fan to the front of your mouse to make the fan blow directly at your hand when your hand moves around.

Check out this article if you’re looking for the best computer mice.

What mouse pad did you choose and why? Please share your thoughts in the comments section below.

Amazon Appstore Not Available in Your Country [Windows 11 Fix]

If you came across the error – Amazon Appstore is not available in your country on Windows 11, you are not alone.

Microsoft launched the Windows 11 OS, publicizing the Android subsystem as the main attraction. It would allow you to run Android applications on your Windows OS powered by Amazon.

However, after the launch, users eventually discovered that the Amazon Android app was missing from the OS. We already showed you how to install Amazon Appstore on Windows 11 outside the US and this post will cover another quick approach.

What can I do when getting the Amazon Appstore is not available in your country error?

1. Sideload Windows subsystem for Android

  1. To install the Windows Subsystem for Android on Windows 11, you can visit a dedicated website (verified) to download the setup file.
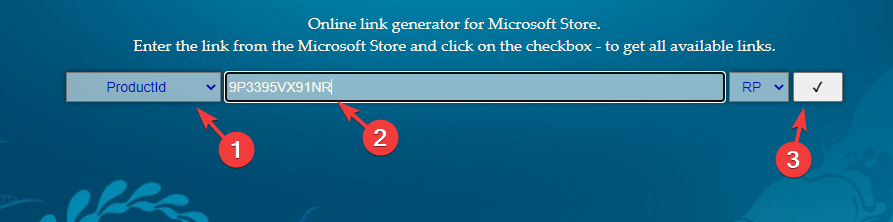
  2. As the Online link generator for the Microsoft Store page opens up, select ProductId from the drop-down.
  3. Next, copy and paste 9P3395VX91NR in the box next to ProductId and press the checkmark box. Enter product id in the Online link generator for the Microsoft Store
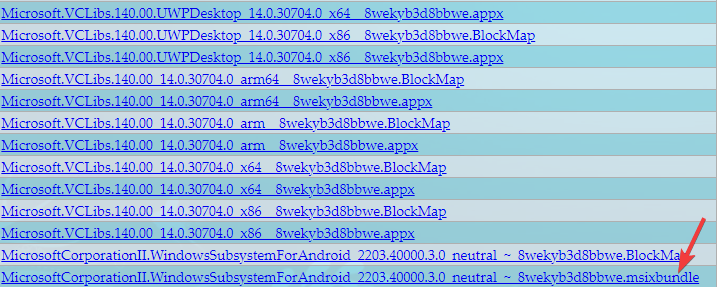
  4. Find and click on the file with the .msixbundle extension. click on the file with .msixbundle extension
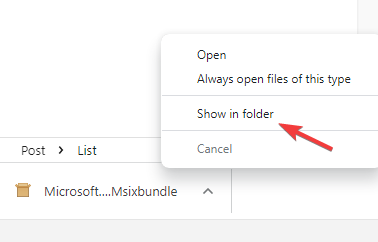
  5. Once the file is downloaded, right-click and select Show in folder. Note down the path. Right click on Msixbundle file and select show in folder
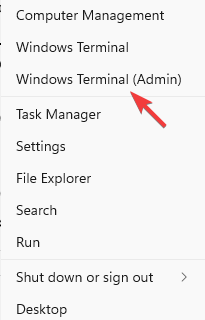
  6. Right-click on the Start button and select Windows Terminal (Admin) to open the Terminal in admin mode. Open Windows Terminal (admin) through Start
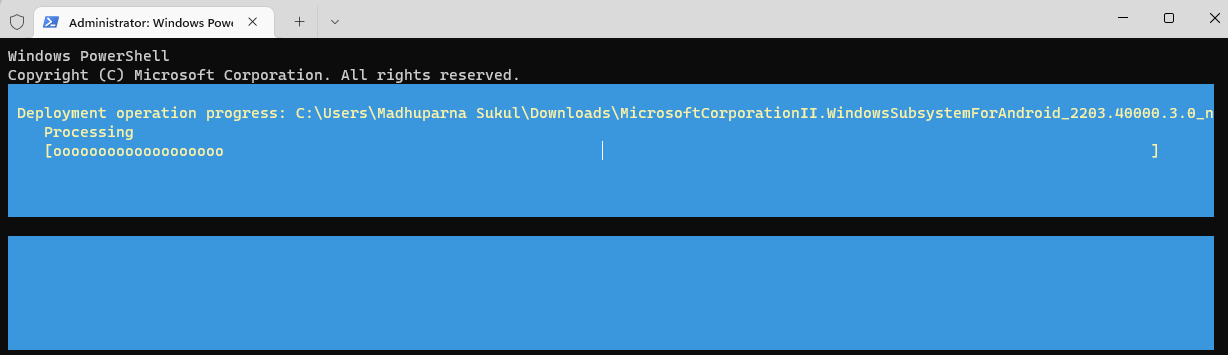
  7. Here, run the below command and hit Enter to install the Windows Subsystem for Android: Add-AppxPackage -Path <path_to_msixbundle_file>
  8. Replace <path_to_msixbundle_file> with the downloaded path for the .msixbundle extension that you copied in Step 5. Run command in Powershell to add Windows subsystem for Android
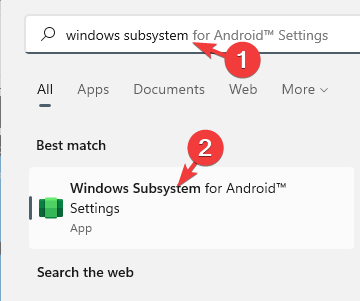
  9. Once the package is successfully deployed, type Windows subsystem in the Windows search and you should see the search results. look for Windows subsystem for Android in Windows search

However, if you are not in the US, you would need to bypass the region restriction. You can follow the below method to get the Amazon Appstore download for PCs in your region.

2. Bypass the region restriction of Amazon Appstore

  1. To sideload the apps using ADB, follow the instructions in this article to know how to sideload Android APKs on Windows 11.
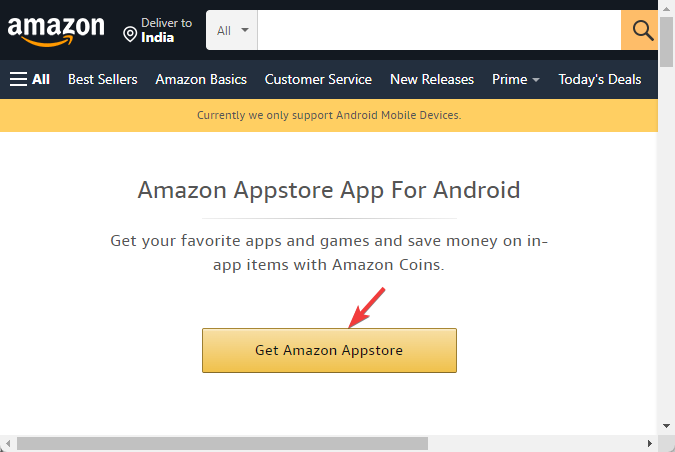
  2. Now, visit Amazon’s official page to download the Amazon Appstore. Click on Get Amazon Appstore. Get amazon appstore
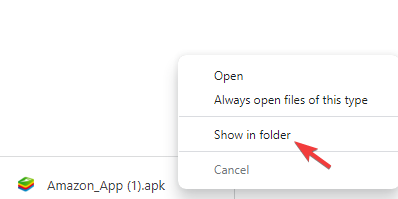
  3. Right-click on the .apk file and select Show in folder. Copy the path where it is downloaded. right click on amazon app store apk and select show in folder
  4. Now, right-click on Start and select Windows Terminal (Admin) to open the Terminal window. Open Windows Terminal (admin) through Start
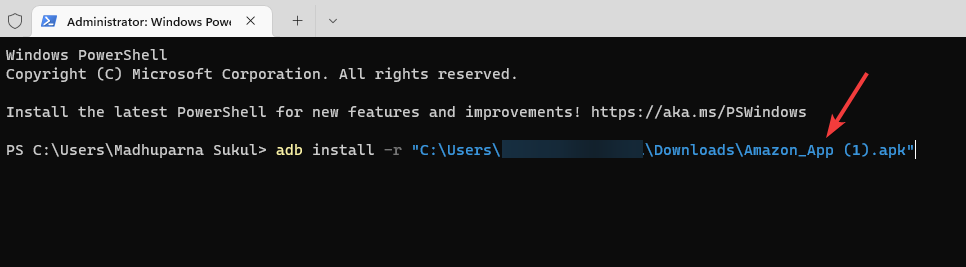
  5. In the Powershell window, run the below command and hit Enter: adb install -r <full_path_to_the_APK_file>
  6. Replace the <full_path_to_the_APK_file> with the downloaded .apk file that you copied in Step 3. run command on Powershell to install apk
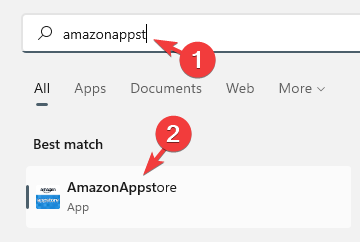
  7. Once the command is successfully executed, look for Amazon Appstore in the Windows search and it should be there. search for amazonappstore in Windows search
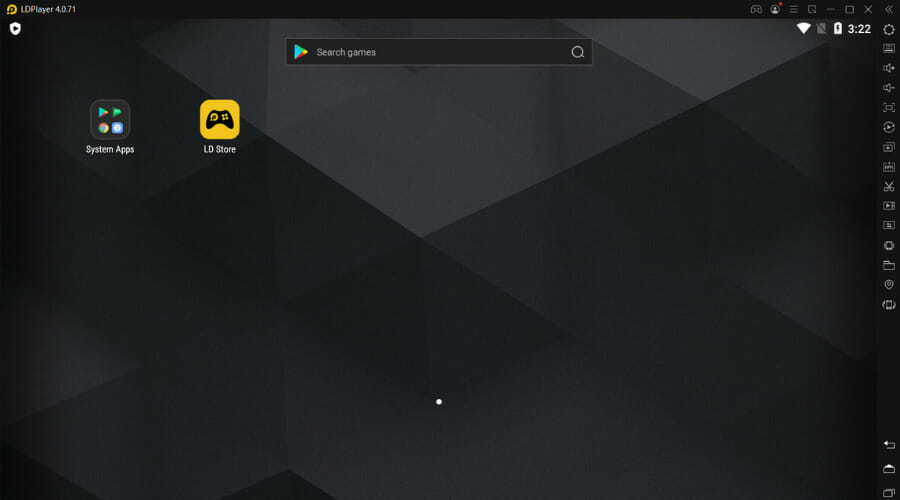
  8. However, if the Amazon Appstore download is not working, you will need to install an Android emulator to open the app (for this example, we used LDPlayer).

2.2 Use a specialized tool

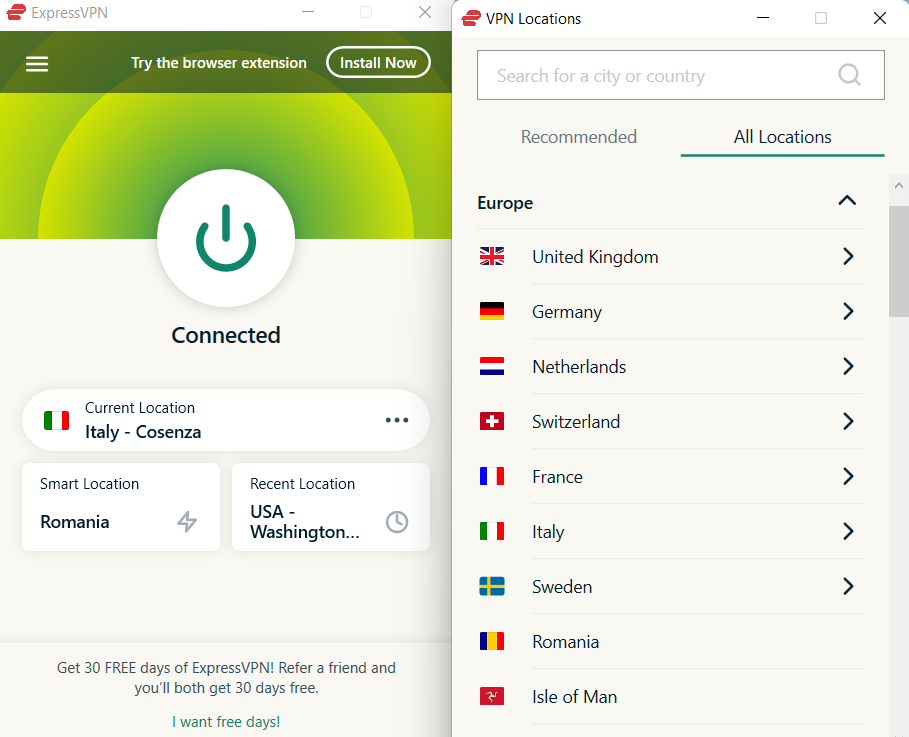
If you need another method that doesn’t take too much time and can bypass Amazon restrictions regardless of your region, you can use effective VPN software.

The most suited VPN for this task is ExpressVPN due to its unbreakable online privacy and hyper-fast server connection.

Using this VPN software, you can also access unlimited content globally without geo-blocking, a no-log policy, and 24/7 technical support.

⇒ Get ExpressVPN

Note icon NOTE
Please make sure that you use a US-native email ID to log in to the Amazon Appstore, or you may encounter the same error again.

You have now successfully bypassed the region restrictions and downloaded the Amazon Appstore apk in your region.

The Amazon Appstore is currently not available in your country on Windows 11 error message should not appear anymore.

You can refer to our guide when you want to uninstall the Android app installer (WSA) on Windows 11. We also have a great guide on how to fix This app is not available in your country message, so don’t miss it.

Whether you are in the US or not, you should now be able to download the Android apps easily. However, if the issue persists, please leave your ideas in the comments box below.

How Much Space Does Windows 11 Take? [Hardware Requirements]

Several Windows users have reported problems upgrading to Windows 11 and it seems to be due to its space requirements.

Windows 11 was introduced in October 2021 and it came with a slew of new features for gamers and other elements like a redesigned Start menu or the ability to create a group of windows that can be minimized and restored from the taskbar.

Before installing this OS, you should be aware of its pace requirements, since they will almost certainly be more than your prior operating system due to the added functionalities.

However, it should be noted that the computer space is not the only requisite for the installation of Windows 11.

The Windows 11 system requirements include a processor of 1 gigahertz (GHz) or faster with 2 or more cores on a compatible 64-bit processor or System on a Chip (SoC), 4GB RAM, and so on.

In this article, we’ll be discussing Windows 11’s space requirements and a few other reasons why your PC might not be compatible with this OS. Follow along!

What are some of Windows 11’s new features?

Windows 11 comes with a bound of new features which make its storage size larger than that of the subsequent Windows OS. The features on Windows 11 include:

  • Newly designed Start menu and taskbar

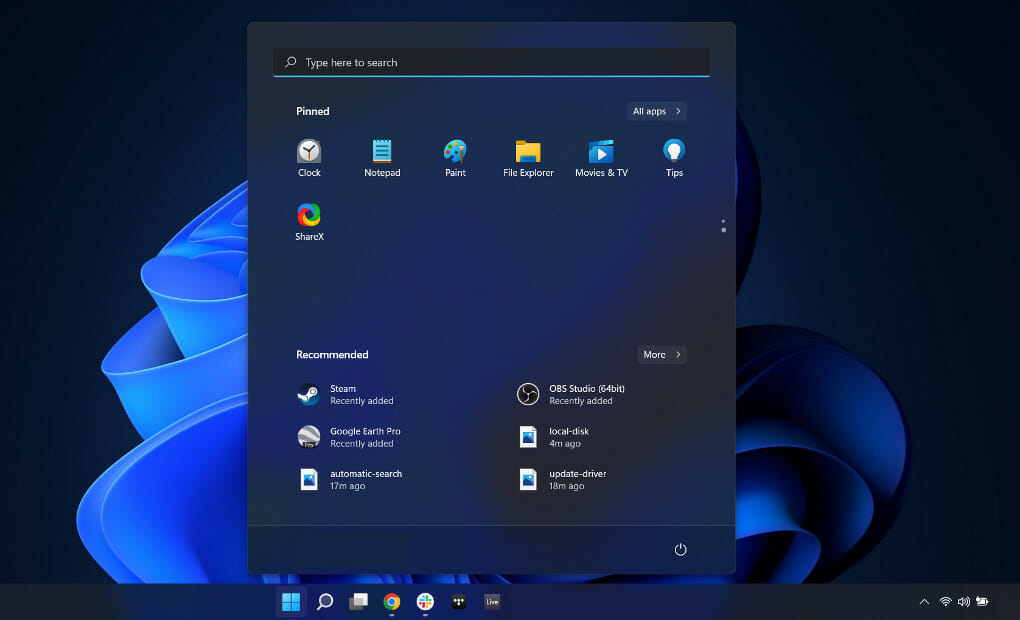
The most obvious difference between Windows 10 and Windows 11 is the Start menu. On the former, the Start menu is anchored to the left-hand bottom of the screen but this has been changed with the latter. 

Moreover, the Start menu has been moved to the center of the screen, just above the taskbar, which has also been redesigned to be at the center of the screen. However, Windows 11 only lets you pin the taskbar at the bottom of your screen.

  • Multitasking features for developers and gamers mostly

Multitasking was added to Windows 11 to allow users to run many applications at the same time to increase productivity.

Also, do not hesitate to check out some gaming settings that you need to enable in order to ensure top graphics performance.

  • Widgets that can be easily customized

As mentioned earlier, Windows 11 was created to better explore Windows OS on your PC. Most of the changes made are just an upgrade of what was on Windows 10.

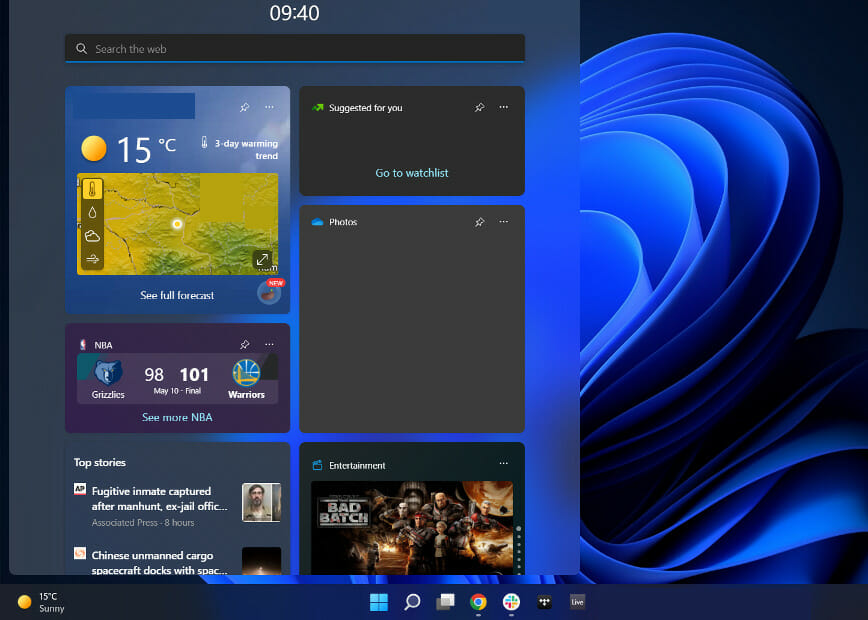
On the Windows 11 taskbar, there is an option for Widget which shows a large panel of updates on weather, news, sport, and a lot more. Each of the widgets can be easily customized or even removed depending on the user’s discretion.

However, since the feature takes up a lot of space on the screen, you may choose to disable widgets in Windows 11.

What are Windows 11’s space requirements?

Knowing the Windows 11 disk space requirements beforehand is quite necessary to have a problem-free installation of the operating system.

Among other requirements, the OS needs an ample amount of space from your PC for it to be launched. 

Windows 11’s minimum space requirements listed by Microsoft is 64GB. However, the installation actually takes something around 27GB depending on the edition you are installing.

Microsoft recommends 64GB mainly because installing an operating system requires a lot of space to move around, so it’s better to keep up with this requirement to get a better experience.

But the Windows 11 installation requirements page also says: Additional storage space might be required to download updates and enable specific features.

To see the Windows 10 vs Windows 11 space requirements check out the article linked. Note that it also includes a comparison between the system requirements as well.

How much space does Windows 11 take on SSD?

An average new Windows 11 installation will take up approximately 27 GB of disk space on your hard drive.

How come Microsoft, on the other hand, requires more for Windows 11 upgrade? The 64 GB of disk space needed for Windows 11 is necessary in order to assure a successful update.

How much space does Windows 11 take in C drive?

Although it is not known how many gigabytes of space Windows 11 will consume on drive C, a general generalization may be made: a fresh installation of Windows 11 will take up around 27 GB of space on drive C.

The vast majority of the files are system files or system reserved files in some way. Furthermore, the pre-installed applications on Windows take up approximately 3 GB of disk space.

How much RAM does Windows 11 take?

Microsoft is most likely correct in stating that 4 GB of RAM is required in the minimum specifications for Windows 11. Because, yes, it is the bare minimum requirement to be able to operate it.

Initial performance is excellent, but when you have 4 GB on your PC, you really can’t expect much more from it than that. You can only truly conduct light work on it before it becomes unable to even do the most basic system activities without crashing.

In order to have a truly enjoyable experience, 16 GB is definitely the optimal setting. While it enables you to open Chrome and a number of other programs at the same time.

You’ll likely find it difficult to achieve significant levels of utilization, at least at first. Check out the five best RAM cleaners and optimizers for Windows 11 before you buy an additional one.


How much space does Windows 11 Pro take?

Windows 11 Pro will also take around 30 GB of space. But it is recommended to have a minimum of 64 GB in order to be sure there is enough for additional updates and features added.


How much space does Windows 11 Home take up?

The size of the Windows 11 Home installation is not fixed. An average new Windows 11 Home installation will take up approximately 27 GB of disk space on your hard drive.

But, as before, 64 GB of disk space is necessary for Windows 11 Home, in order to ensure a successful update.

Why is my PC not compatible with Windows 11?

If you are trying to install Windows 11 on your computer but you keep on getting error messages saying This PC can’t run Windows 11, you might consider checking these things out:

  • Trusted Platform Module (TPM) 2.0
  • UEFI, Secure Boot capable

Making sure these specifications are enabled can help or fix your Windows 11 not working.

There are several other reasons why the latest Windows OS is not compatible with your machine which include your PC not meeting up with Microsoft requirements for Windows 11. 

As a result, it’s a good idea to check the official Microsoft website for Windows 11 prerequisites before attempting to install it on your computer. As long as the requirements are met, the procedure should be a breeze. 

Can 4GB of RAM be enough for Windows 11?

The most technical answer to this question is yes. According to Microsoft’s requirements, 4GB RAM is the minimum needed to run Windows 11.

So, if you are using 2GB RAM, you can consider upgrading it to 4GB to be able to install this operating system on your PC.

Discover Windows 11’s PC Health Check app

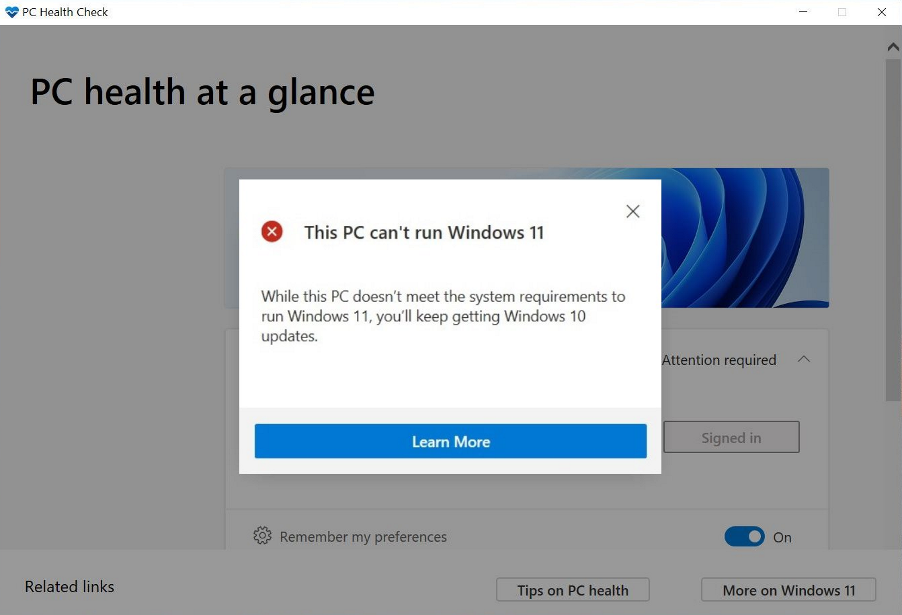
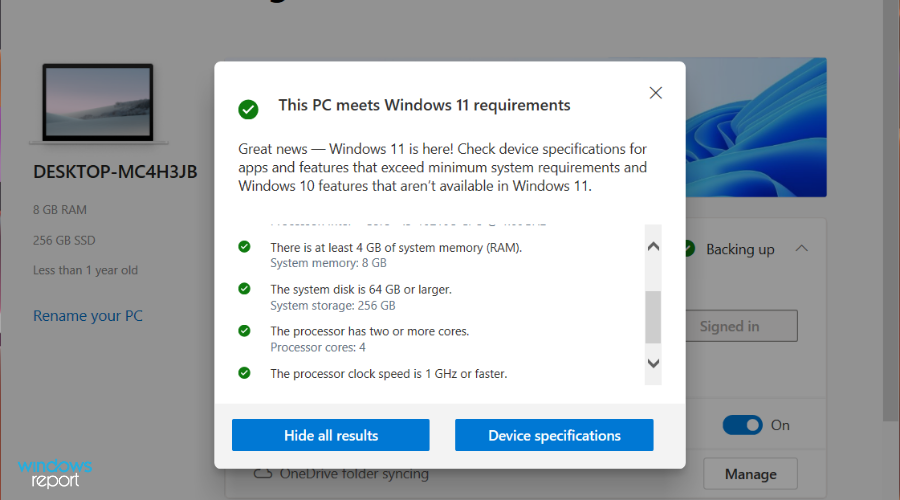
PC Health Check can be used to know if your computer has all it takes to install Windows 11. To confirm if your device is compatible with the OS or figure out what’s causing the incompatibility of the computer with it, download the PC Health Check app and run it on your device. 

If your computer isn’t compatible with the OS, you’ll get a pop-up message that says: This PC doesn’t currently meet Windows 11 system requirements.

Also, you will get a detailed report on the reasons why your PC can’t install Windows 11 and hopefully how to fix it. With this, you can be sure of why your PC isn’t running the operating system.

You’ll almost certainly run into issues if you try to install Windows 11 on an outdated computer because modern PCs are the ones that come equipped with the necessary characteristics to install Windows 11.

However, if the problem is fixable, you can easily go around it using the guidelines provided above. Let us know how the procedure went for you in the comments area below. Thanks for reading!

How to Remove Malicious Extensions from Chrome

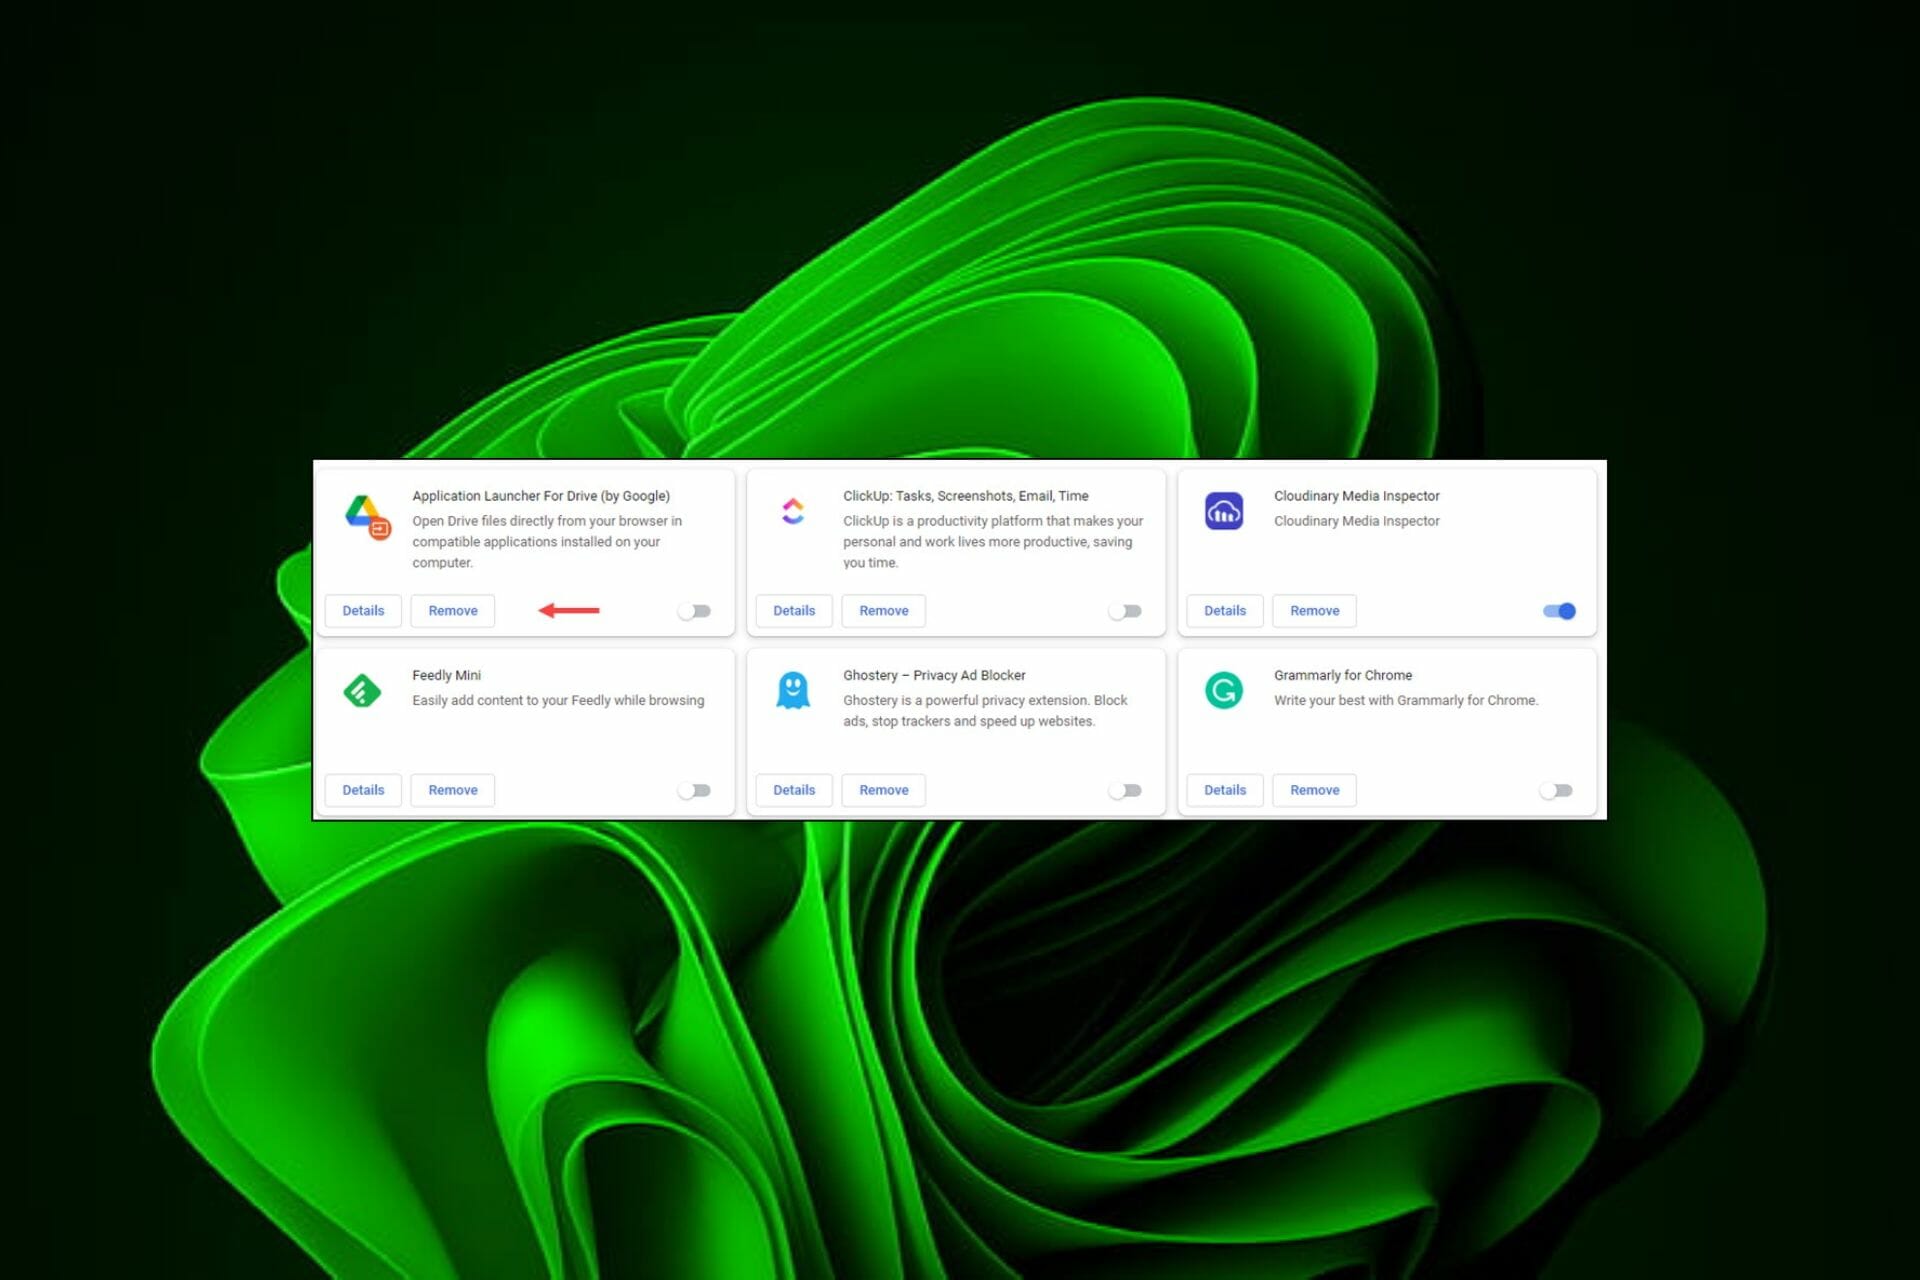
If you use the Google Chrome browser a lot, you may have encountered some malicious extensions and wondered how to remove them.

Chrome is a popular browser that has millions of extensions available for download. Some extensions are legitimate and valuable, but others may be malicious.

Malicious browser extensions are usually created by cybercriminals who want to steal your data or use your computer for other illegal activities. These extensions can be installed on your browser without your knowledge, and they can do a lot of damage to your PC.

You may start experiencing problems with your Internet connection or even instability in your system. The most common malicious browser extensions are fake antivirus software or other security programs. 

These programs will usually tell you that your computer is infected with viruses and offer to scan it for free. You may also be redirected to phishing sites or malware downloads without your knowledge.

Although Chrome has a built-in antivirus security feature that can prevent malicious extensions from running on your computer, sometimes it’s not enough.

What is a malicious extension in Chrome?

A malicious browser extension in Chrome is an add-on that changes your browser’s settings or displays ads on websites you visit. It may also install additional software onto your device. They are a type of malicious software that is installed on the user’s computer without their knowledge. 

You can easily spot a majority of the malicious extensions, but some of the signs to look out for include:

  • Excessive permission – Some extensions require access to sensitive information like browsing history or bookmarks to work properly. But others request more permissions than they need. If an extension asks for too much access, it could be trying to steal your passwords or financial data, among other things.
  • Unusual behavior – If the extension does something unusual when you install it, it could be malicious. When installing any program on Windows, you’ll often see a window asking if you want this program to make changes to your computer (such as installing software). If an extension doesn’t ask permission before doing something unusual — like changing the default search engine on Chrome, you need to double-check its source.
  • Suspicious source – The safest bet is always to download extensions from their official stores — in this case, the Chrome Web Store. If an extension is from an unverified source, it could be malicious.

How can I remove malicious extensions from Chrome?

1. Install a Chrome extension to detect malicious code

Guardio is a browser extension that works inside Google Chrome. Its real power comes from its ability to detect malicious code even before it is installed on your computer.

It works in real-time to identify the risk of any link you click on the web. The best part is that Guardio doesn’t require any installation or configuration on your part — just open the Chrome Web Store and install it in seconds to protect yourself against phishing attacks immediately!

⇒ Get Guardio

2. Use the Remove option

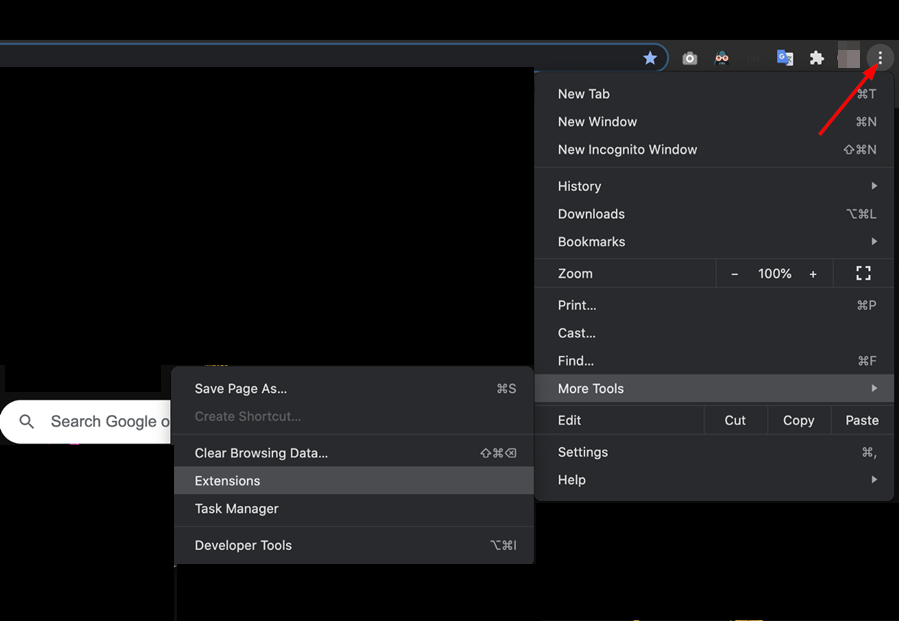
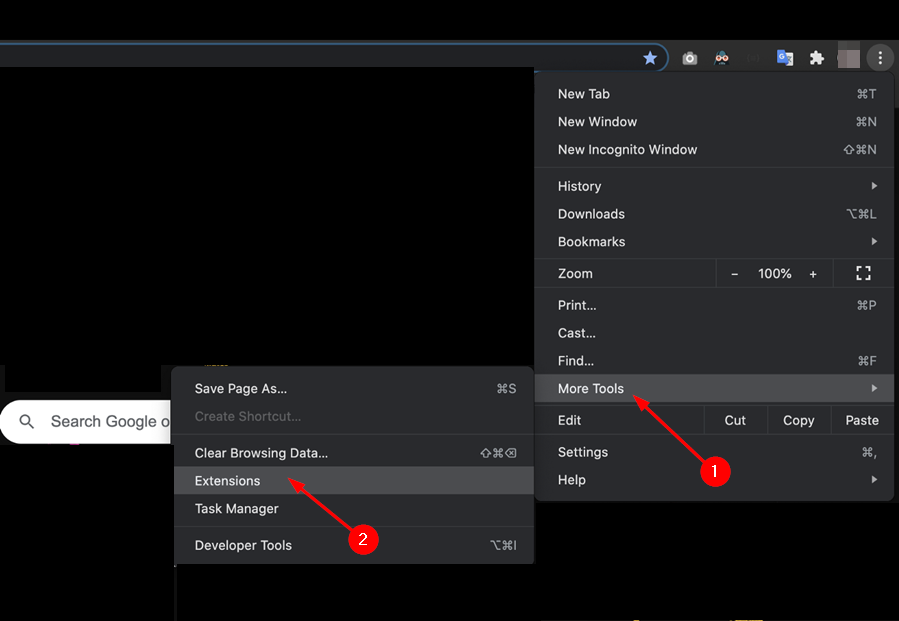
  1. Navigate to your Chrome browser and click on the three ellipses at the top right corner.
  2. Select More tools then click on Extensions.
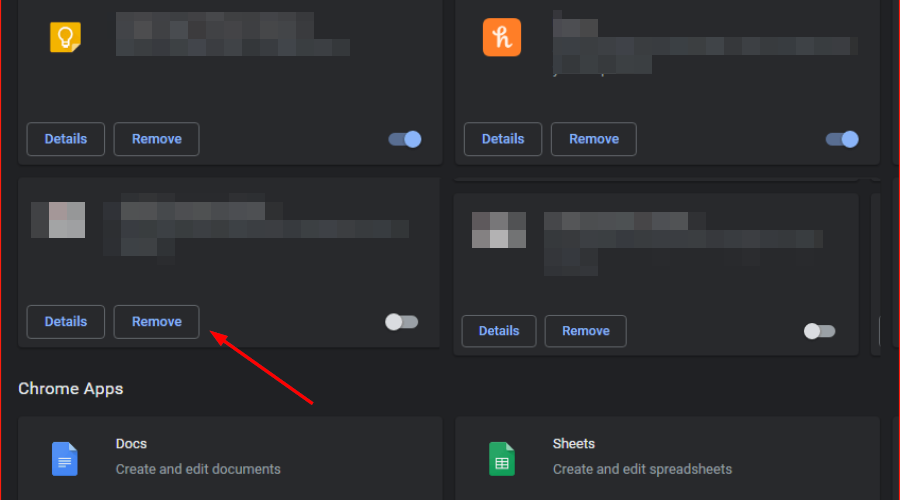
  3. Navigate to the extension you wish to remove then click on Remove.
  4. Confirm in the new pop-up dialog box that you wish to remove the extension.

3. Reset Chrome

  1. Navigate to your Chrome browser and enter the following address in a new tab: chrome://settings/reset
  2. Select Restore settings to their original defaults.
  3. Click Reset settings in the next dialog box.

You can also uninstall and reinstall the Chrome browser to eliminate any malicious extensions.

How to remove pop-up ads on Windows 10 desktop?

The appearance of ads on the desktop can be very annoying, especially when working with important documents or browsing the Internet for something important.

To remove them, follow the steps below:

  1. Press the Windows + E keys simultaneously to open File Explorer.
  2. Navigate to the View tab at the top of the window and click on Options at the far right.
  3. Click the View tab in the new window and under Advanced settings, uncheck the Show sync provider notifications box then press OK.

How do I scan Chrome extensions for malware?

One of the most common ways for hackers to gain access to your computer is through malicious browser extensions.

The best way to protect yourself from these threats is to use a good antivirus program on your computer and run regular scans or install dedicated Chrome antivirus extensions to protect your browser.

How to stop pop-up ads in Chrome?

To stop pop-up ads on your Chrome desktop browser, follow the steps below:

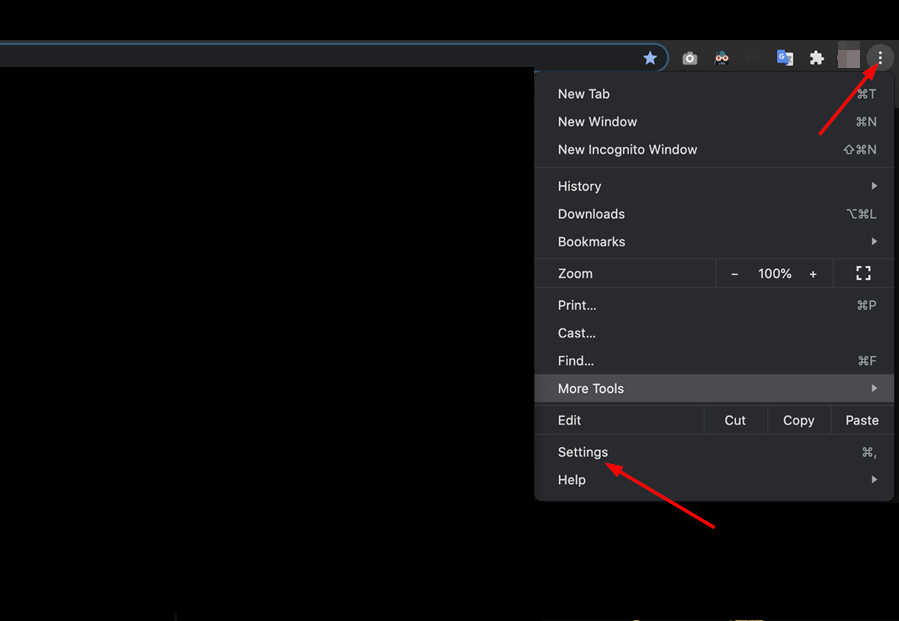
  1. Navigate to your Chrome browser and press the three horizontal ellipses in the top right corner.
  2. Select Settings.
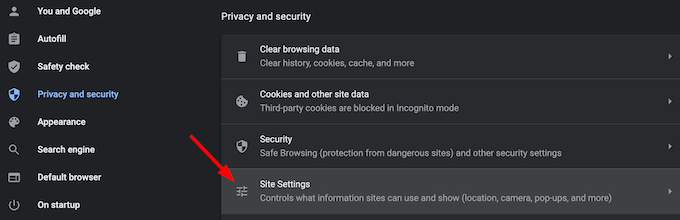
  3. Click on Privacy and security then select Site Settings.
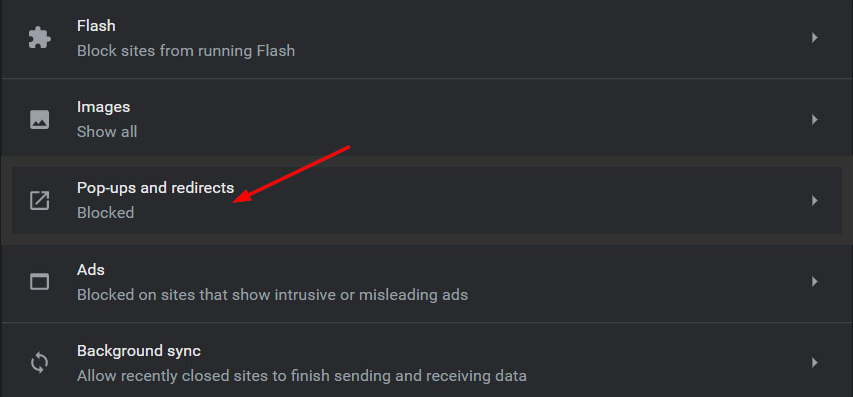
  4. Scroll down and select Pop-ups and redirects.
  5. Check the Don’t allow sites to send pop-ups or use redirects box.

How to stop ads in Google Chrome on your Android device?

To stop ads in the Chrome browser on your smartphone, follow the steps below:

  1. Open your browser and tap the three ellipses on the top right corner.
  2. Click on Settings.
  3. Scroll down and select Site settings.
  4. Navigate to Ads.
  5. Toggle off the Ads buttons to block ads on your browser.

We hope that from this guide, you have been able to remove those annoying Chrome extensions that could potentially put your PC at risk.

Should you encounter any other issues, such as Chrome running slow, be sure to refer to our expert guide for a quick fix.

Clearing the browser cache and disabling unwanted extensions can help you fix issues like error code 403, while visiting websites like Fox Sports.

As always, we love your feedback, and this time, we would like to know whether you have encountered a malicious extension before and what action you took to secure your PC. Let us know in the comment section below.

Its time to say goodbye to Windows 10 version 20H2

Do you remember when Microsoft said it’s planning to end service for the 20H2 version of Windows 10? Well, just in case you forgot, this is finally happening.

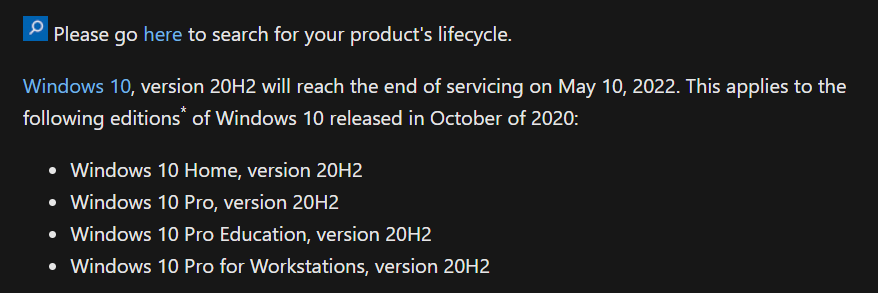
Today, May 10, 2022, the Redmond-based tech company is going to fulfill that. Thus, the above-mentioned version of the OS is now out of service.

If you were planning to switch to a newer version of the Windows 10 operating system, this is a perfect time to do so.

Windows 10 20H2 users should consider upgrading

You might not know, but 20H2 was the first version of Windows 10 to ship with Chromium-based Edge.

And if you’re wondering what the end of servicing really means, we can tell you exactly what this is about and what you can expect.

It entails that a PC running this version of Windows 10 won’t receive any security update and any customer who contacts Microsoft for support regarding it will be instructed to update to a supported version of the OS.

As a result, the following SKUs are affected:

  • Windows 10 Home, version 20H2
  • Windows 10 Pro, version 20H2
  • Windows 10 Pro Education, version 20H2
  • Windows 10 Pro for Workstations, version 20H2

Please keep in mind that Windows 10 version 20H2 for Enterprise, Education, and IoT Enterprise are still supported until May 9, 2023.

And, on the off chance you’re running an SKU of Windows 10 version 20H2 that is about to reach the end of service, make sure to head over to Windows Update to manually trigger the update.

Also important to take away from all this is that Microsoft will force-update eligible 20H2 PCs to 21H2 in order to train its machine learning model.

Sony set to buy back stock after PS5 sales fall below estimates

According to Sony’s earnings report, they have managed to sell 19.3 million consoles of their Playstation 5 entry. Sony sold 2 million PS5 units this last quarter, which is considerably low compared to last year’s first quarter when they sold 3.3 million units. However, they did manage to capitalize on game sales which saw a significant improvement from last year’s 61.4 million to 70.5 million. (via Engagdet}

According to a report by Bloomberg, by the fourth fiscal quarter, Sony was reportedly operating at a 138.6 billion yen profit which in the grand scheme of things falls short of the 148.5 billion yen predetermined estimate. “The company forecast operating income of 1.16 trillion for the current fiscal year, also shy of estimates of 1.2 trillion yen.” As such, Sony said that it plans on buying back around $1.5 billion of its own shares after falling below the estimates.

From  Engadget:

Overall, its Game & Network Services (GSN) division earned 665 billion yen ($5.1 billion) this quarter, up slightly over last year. Sales for the full 2021 year were flat, up just 2 percent over 2020, and profits also changed little.

However, Sony is positive that sales will improve in the next quarter by 34%. This increase is attributed to the expected easier availability of chips that will allow them to manufacture more PS5 entries. The sale of third-party games is also expected to play a major role. Gamers should also expect the launch of PlayStation Plus Extra and Premium later in June as we had earlier reported which is also expected to help Sony tap into new markets.


Failed to Enumerate Objects in the Container [Error Fix]

When trying to change the permissions of a file or folder, you may often encounter an error – Failed to Enumerate Objects in the Container access is denied.

While, as the Administrator, you can change the access, sometimes even the admin may come across the same error message.

This is a common error and is often raised by users on different forums. In this case, even the admin is unable to change the permission for a specific user or other user groups when access is denied on Windows 10/11.

Moreover, many users also encounter the Failed to enumerate objects during Azure file share which can be apparently fixed by assigning a proper RBAC role (Storage File Data SMB Share Elevated Contributor role).

In this post, we will discuss 7 ways to fix the Failed to enumerate objects in the container access is denied for shared folders.

Why do I see the Failed to enumerate objects in the container error?

Some of the reasons why you may encounter the Failed to enumerate objects in the container on Windows 11 error are:

  • No admin access – If the ownership for the file or folder is not the correct one, or you are not the administrator and you still try to make changes to the file or folder, the permission error pops up.
  • Folder settings configured incorrectly – When some other user made any changes to the settings of the file or folder, either accidentally or intentionally.
  • Conflict due to another program – Chances are, that a conflict arises between the folder you want to access and another program. This ends up removing the default permission entries.
  • Obsolete account as the owner – If an account that is now obsolete is set as the owner of the file or folder for some time, leaving behind the obsolete permission entries.

So, answering your question – How do I give administrator permission? below are a few methods that may help you add permissions for the problem folder.

How do I fix Failed to enumerate objects in the container error?

1. Take the ownership of the file or folder

1.1 Add admin account and change permissions

  1. Right-click on the problem file or folder and select Properties. right click on folder and select properties
  2. Go to the Security tab and click on Advanced. Click on advanced in the security folder in properties
  3. In the Advanced Security Settings window, click on Change next to Owner. Click on Change in Advanced Security Settings
  4. This will open the Select User or Group dialogue box, type the user account name, and select Check Names. Enter user account name and check names
  5. Once you see an underline below the account name, press OK to save changes and return to the Advanced Security Settings window.
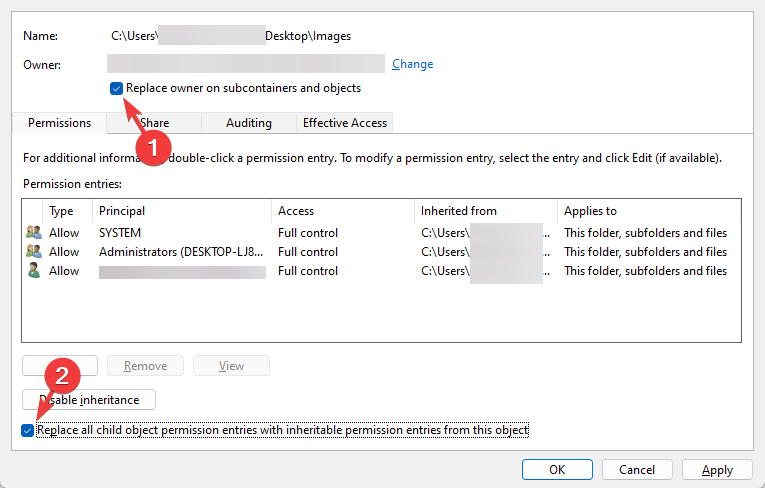
  6. Here, check the box next to Replace owners on sub containers and objects.
  7. Next, select the box next to Replace all child object permission entries with inheritable permission entries from this object. check Replace owners on sub containers and objects and Replace all child object permission entries with inheritable permission entries from this object
  8. Press Apply and then OK to save the changes and return to the Properties dialogue box. Under security tab in Properties,. click on Edit
  9. Here, under the Security tab, go to the Permissions field below, and click on Edit. Click on Edit under Security in Properties
  10. Now, next to Full control, select Allow. Check allow next to full control under permissions
  11. Press Apply and OK to apply changes and exit.

1.2 Add your user account name

  1. Go to the problem folder, right-click and select Properties. right click on folder and select properties
  2. Now, back in the Properties tab, under the Security tab, click on Advanced. Click on advanced in the security folder in properties
  3. In the Advanced Security Settings window, go to Permissions and click on Add. Click on Add under permissions in advanced security settings
  4. As the Permissions Entry window opens, click on Select a principal. Click on Principal under Permission entry
  5. You will now see the Select User or Group dialogue box.
  6. Here, go to the Enter the object name to select field and type your user account name.
  7. Press the Check names button. Press OK to save the changes. Enter user account name and check names
  8. Exit the Properties window.

Now, try opening your file or folder and check if you still encounter the Failed to enumerate objects in the container access is denied error still persists.

2. Disable User Account Control

  1. Press the Win + R shortcut key combination to launch the Run command.
  2. Type useraccountcontrolsettings in the search bar and hit Enter. Type useraccountcontrolsettings and press OK
  3. In the User Account Control Settings window, move the slider down and set it to Never notify. set UAC to Never Notify
  4. Press OK to apply the changes and exit.

Once you have disabled the notification option, you should now be able to modify the permissions for the file/folder and the error pop-up should not show up again.

3. Update your drivers and BIOS/UEFI firmware

3.1 Update drivers via manufacturer website

  1. Open your browser and visit the PC manufacturer’s website.
  2. Go to their driver download page and look for the latest driver versions.
  3. For example, for chipset, display adapter like Nvidia drivers, audio, USB3, Bluetooth, network adapter, etc. Go to PC manufacturer's website - install drivers
  4. Now, download and install the driver on your PC.

Restart your PC and check if the Failed to enumerate objects in the container access is denied error on Windows 11 is resolved.

3.2 Update drivers automatically

In order to repair Failed to enumerate objects in the container error, and if doing a driver repair manually seems too time-consuming, we recommend an automated solution.

Missing drivers are often known to cause issues, and manually searching for a driver takes time and needs extensive knowledge of the drivers you are looking for.

A driver repair and installation program, such as Outbyte Driver Updater, will assist you in automatically updating drivers and preventing PC harm caused by installing the incorrect driver version.

In addition, you will obtain a completely thorough report detailing the precise condition of your Windows missing, damaged, or obsolete drivers.

With a few clicks, the program will scan your PC’s hardware and peripherals for potential driver upgrades. Use one to save yourself some valuable time.

⇒ Get Outbyte Driver Updater

3.3 Update the BIOS/UEFI firmware

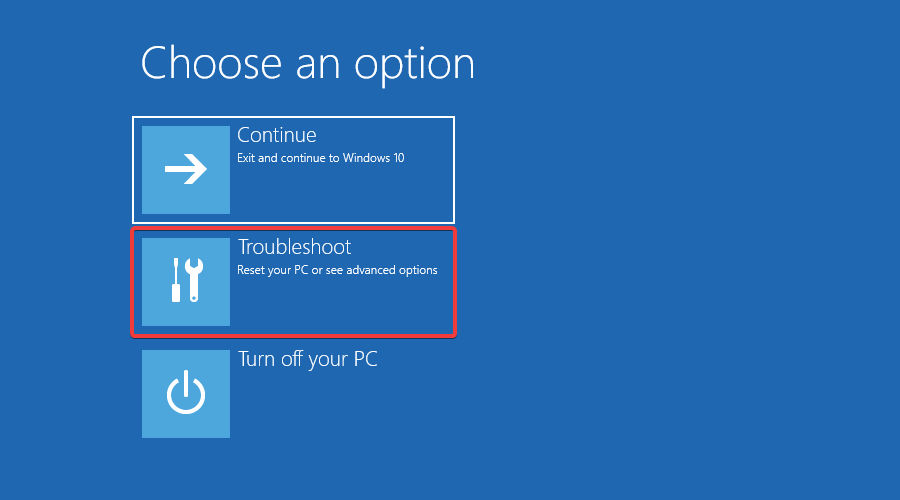
  1. As the PC boots up and you see the Sign-in screen, hold down the Shift key and click on Restart.
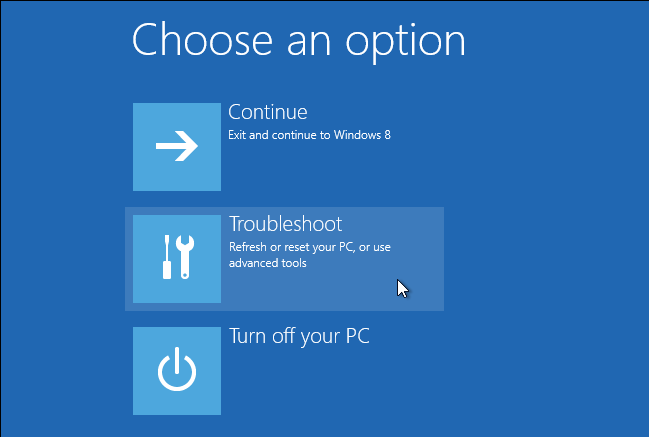
  2. You will now see the Choose an option screen. Click on Troubleshoot. Windows failed to start. A recent hardware or software change might be the cause
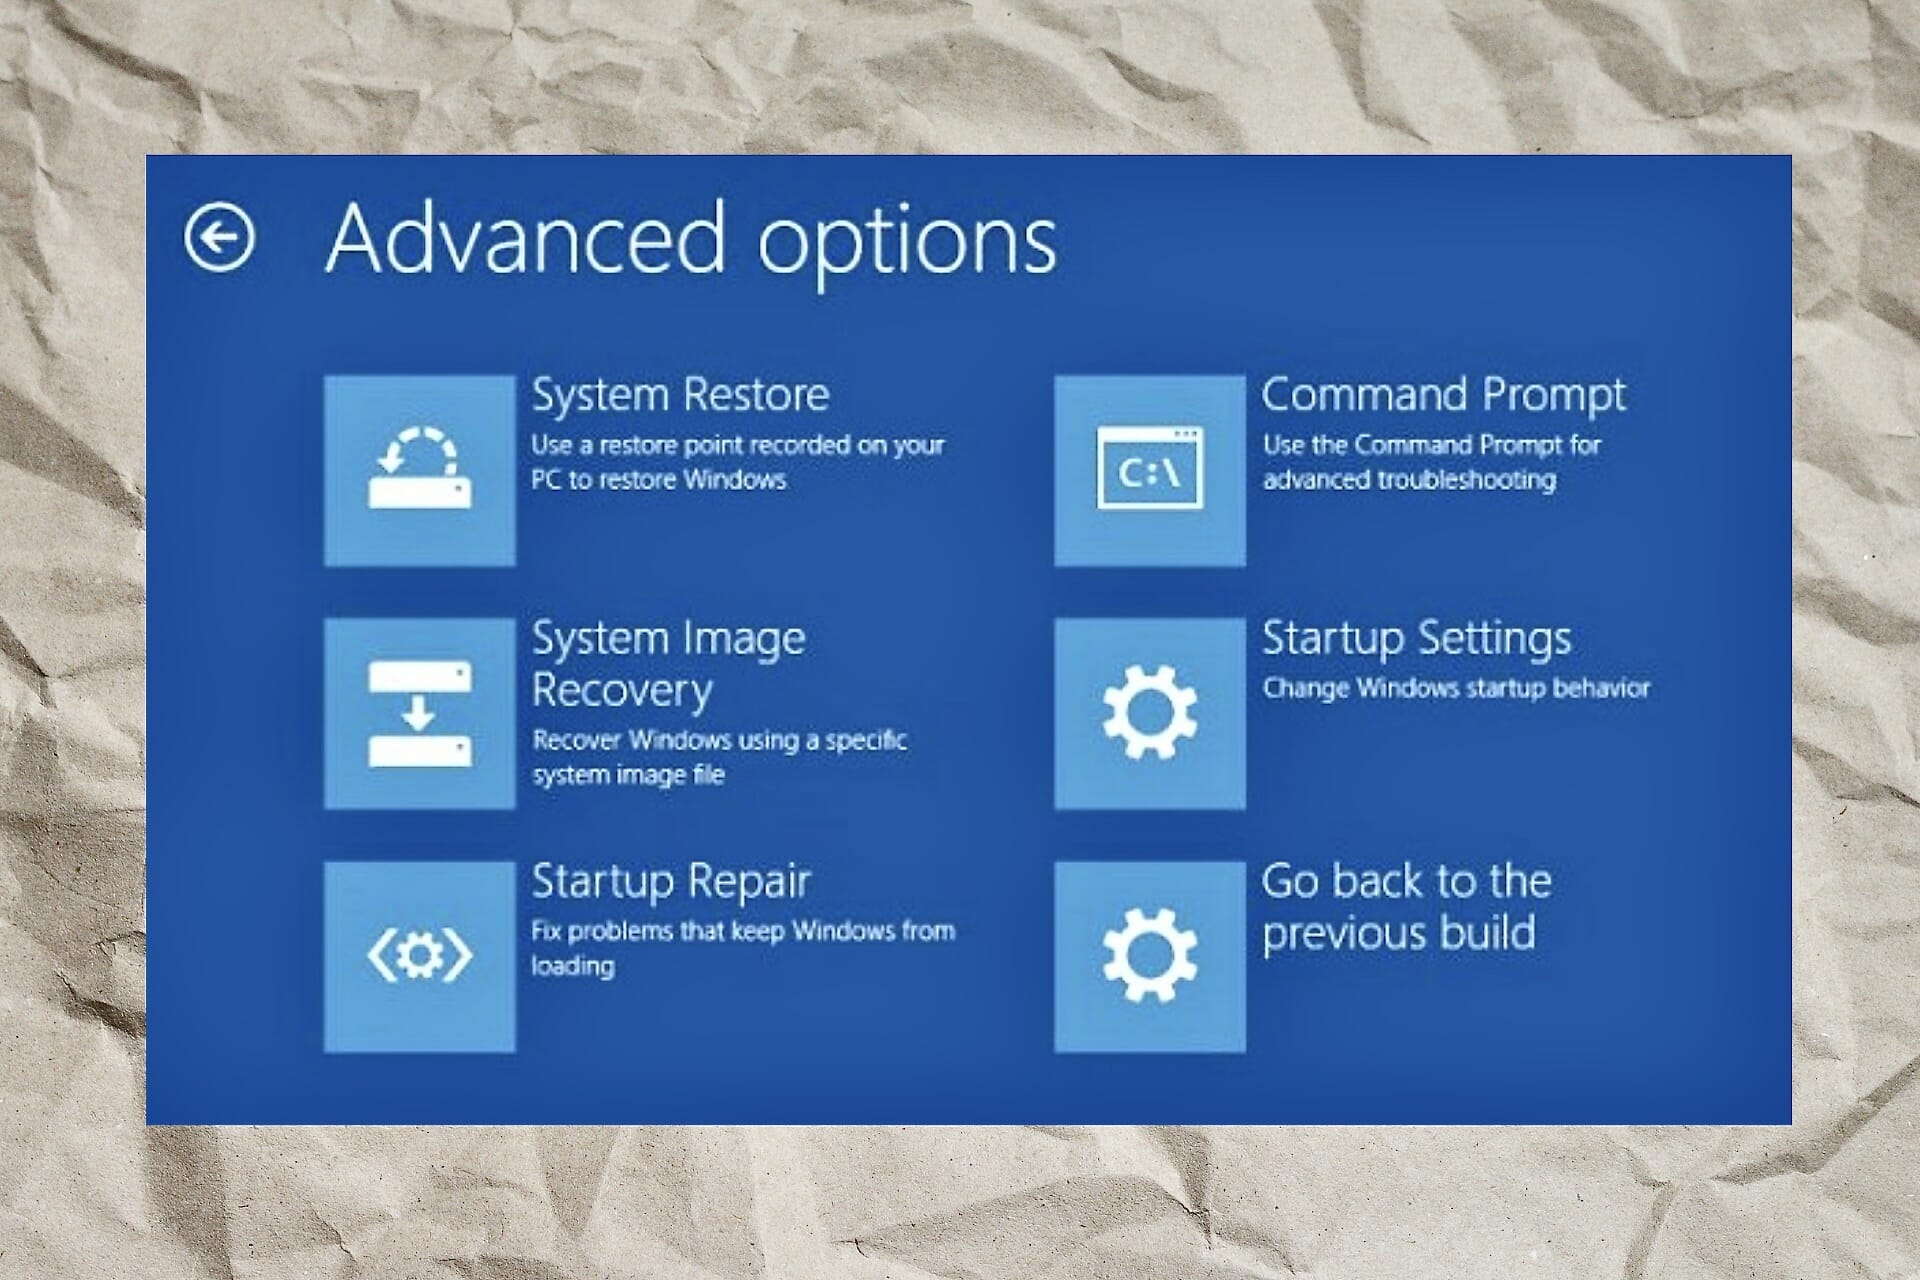
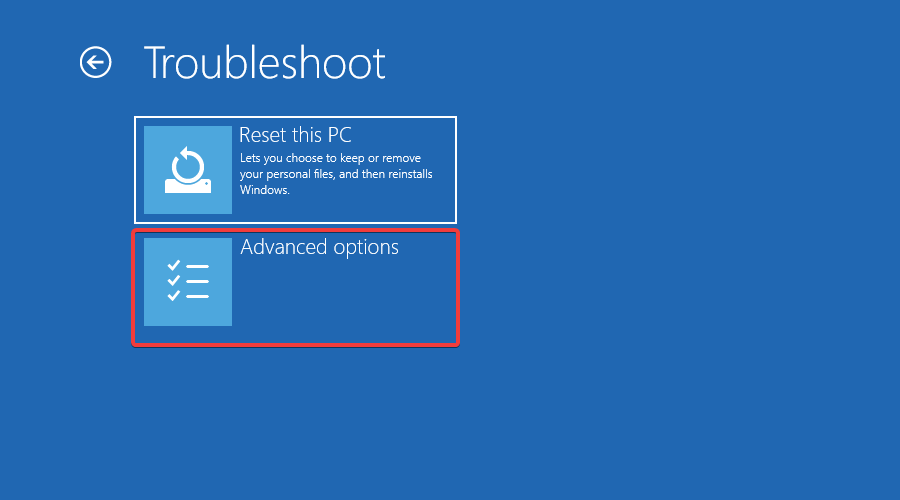
  3. Next, click on Advanced options. enable secure boot windows 11 user mode
  4. Now, for more info, follow our guide on how to update BIOS or UEFI firmware to the latest version.

Once done, reboot your PC and check if you now have permission for the folder.

4. Run a chkdsk scan

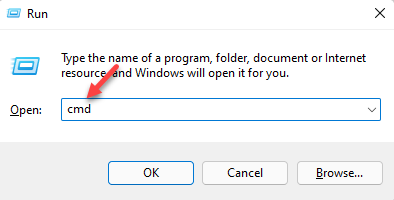
  1. Press the shortcut key – Win + R and the Run console opens up.
  2. In the search bar, type cmd and press the Ctrl + Shift + Enter keys together to launch Command Prompt with admin access. open elevated command prompt by pressing Ctrl + Shift + Enter together
  3. Now, execute the below command and hit the Enter key (replace D: with the actual letter of the drive if needed): chkdsk D: /F /R run chkdsk command in cmd
  4. The chkdsk utility will now scan the drive (which contains the problem file/folder) for any errors and fix them instantly.

Once done, restart your PC and the Failed to enumerate objects in the container access is denied error should be fixed.

5. Use the Command Prompt to provide permissions

  1. Press the Win + R hotkey to open the Run command.
  2. In the search field, type cmd and press the Ctrl + Shift + Enter keys together to launch the elevated Command Prompt. open elevated command prompt by pressing Ctrl + Shift + Enter together
  3. Now, run the below commands one after another in the Command Prompt window and hit Enter after each one:
    • takeown /F "FULL_PATH_TO_FOLDER" takeown /F "FULL_PATH_TO_FOLDER" /r /d y icacls "FULL_PATH_TO_FOLDER" /grant Administrators:F icacls "FULL_PATH_TO_FOLDER" /grant Administrators:F /tRun command to take ownership of file or folder
  4. Replace FULL_PATH_TO_FOLDER with the path of your user folder, for example, with C:\Windows\System32.
  5. Once the commands are executed, close Command Prompt, restart your PC, and check if you now have the permission.

You can also run the above commands to fix the Failed to enumerate objects in the container error on Windows Powershell.

6. Start Windows in safe mode

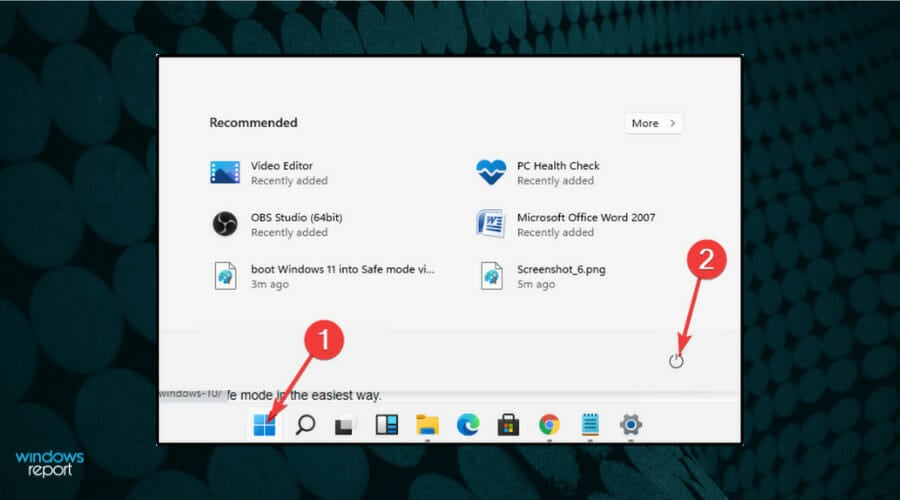
  1. Go to the Start menu, click on it and then click on the Power icon.
  2. Press and hold the Shift key on your keyboard, then click on Restart.
  3. Once you reach the Choose an option, select Troubleshoot.Windows failed to start. A recent hardware or software change might be the cause
  4. Next, click on Advanced options.enable secure boot windows 11 user mode
  5. In the Advanced options screen, click on Startup Settings.
  6. On the Startup Settings screen the Restart button.click on Restart on Startup Settings
  7. After your PC restarts, press the number 4 or F4 on your keyboard to start your PC in safe mode.

This will help you identify if any third-party programs are interfering with the folder you want to have access to causing the Failed to enumerate objects in the container error.

Safe Mode helps you to easily identify the program and get rid of it to fix the issue.

7. Perform repair upgrade

  1. Visit Microsoft’s official web page to create a Windows 11 media creation tool. create Windows 11 media creation tool
  2. Now, mount the bootable ISO image file on your PC.
  3. As you reach the installation wizards, follow the on-screen instructions to complete the installation. Run repair upgrade for Windows 11
  4. To know more, follow our guide on how to perform repair install/upgrade.

This will help you reinstall Windows 11 without losing important files, applications, and most of the settings.

Additionally, to make sure that your Windows OS is correctly installed if any repairs are required and if it is optimized for the best performance, you can follow this checklist.

At the same time, if you are wondering how to fix error application security for Windows 10/11, you can refer to our detailed guide on it.

One of our readers suggested that a corrupt Recycle Bin might be the source of this problem. In that case, follow the highlighted link to fix this problem quickly.

You can also follow the same methods to fix the Failed to enumerate objects in the container error on Windows 10.

However, if you do find an alternative solution to deal with the error, do share it with us in the comments box below.

Microsoft introduces new Adaptive Accessories, more at Ability Summit

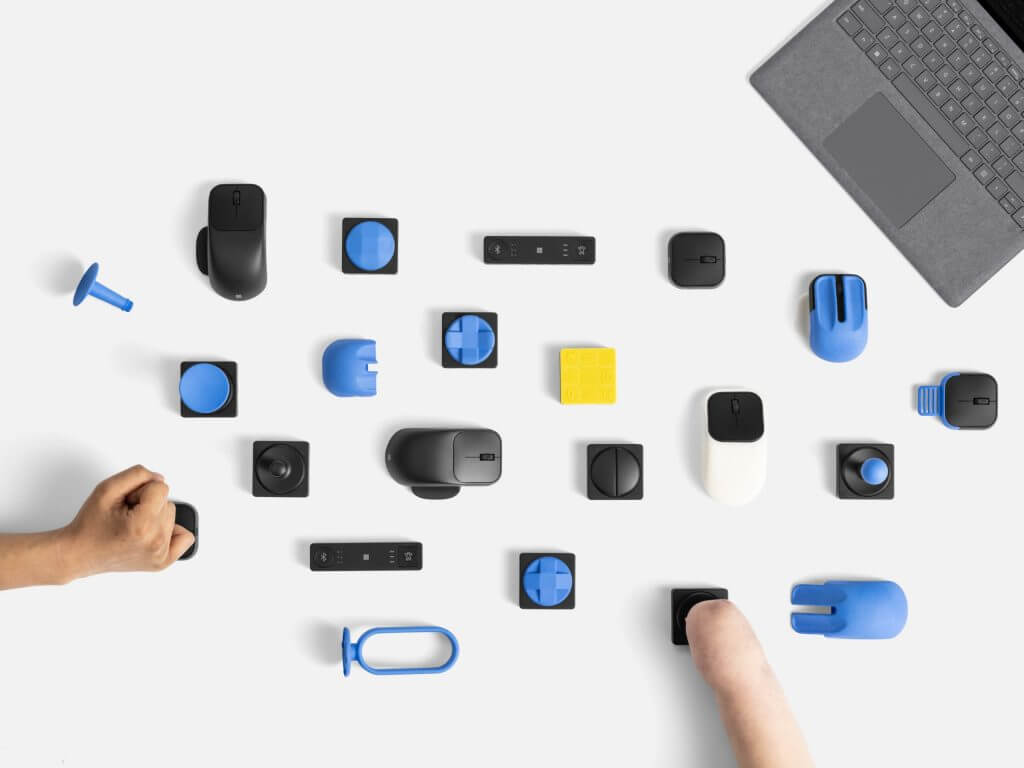
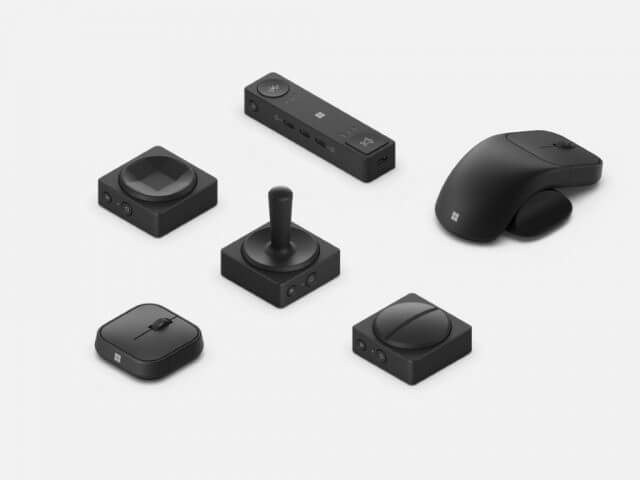
After Microsoft’s successes with the Xbox Adaptive Controller and last fall’s introduction of the Surface Adaptive Kit, and lots of work making computing and gaming available for people of all abilities, the company has taken the next step with the introduction of Adaptive Accessories for Windows. The components, starting with a Microsoft Adaptive Mouse and a set of accessories that connect to a Microsoft Adaptive Hub in a similar way to how the Xbox Adaptive Controller works, except that the customizable Microsoft Adaptive Button can be connected wirelessly to the Hub.

In addition, the buttons and the mouse can be further customized with 3D printed components, adding the ability to customize mouse “tails” or button toppers to accommodate an even wider variety of special needs. The mouse and the hub and buttons will work with any Windows PC, according to Microsoft.

Along with the new accessories comes a new Inclusive Tech Lab, a successor to the original lab started by the Xbox team in 2017. The new tech lab space is designed to be “highly modular,” and to be an “embassy for people with disabilities,” providing accessible technologies for both physical and virtual visitors:

…it is an inclusive design incubator where Microsoft and disability communities can ideate and evaluate product design and direction. It is a space where our designers can challenge assumptions while learning to recognize the exclusions and constraints faced by people with disabilities. We harness that understanding to create new ideas, designing for “one” and extending to many.

Microsoft is also highlighting the work being done in Windows 11, including Live Captions, voice access, and Natural Narrator, features available now in Windows Insider builds and showcased at the recent Future of Hybrid Work event.

Along with the work in Windows, Microsoft is also using the Ability Summit to feature a number of improvements to Microsoft Edge focused on accessibility. These include automatic image descriptions, auto generated Alt tags, read aloud and Immersive Reader, and Editor.

Microsoft continues to be a leader in inclusive design, and it’s good to see the work done with the Xbox Adaptive Controller come to a wider Windows audience, both with the hardware, and the design lab interactions that give those with disabilities a real voice in how they interact with technology.

7 Best Chroma Key Settings & Tips on OBS Studio

Finding the ideal Chroma Key settings in OBS studio may take some trial and error, but once discovered, it can have a significant impact on your videos.

There are various How to Set Up Chroma Key Settings in OBS instructional videos available, which users may use to set up this function in the software.

This post, however, will present you with the best chroma key settings and tips for a green screen setup.

How does the Chroma Key works in OBS?

Simply described, the OBS Chroma Key plugin entails photographing a subject against a solid-color background.

Then the background can be exchanged with transparency in post-production. The subject can then be positioned in front of any new background.

So, if you’re asking how do I set the Chroma Key in OBS, we’ve got all the answers and more below.

What are the best Chroma Key settings for OBS Studio?

1. Set the Chroma Key on white background

  1. Open OBS Studio.
  2. Add your camera source by right-clicking on the Source and then choosing the Video Capture device option.adding video capture device to source- 1. chroma key settings obs studio
  3. Right-click on your Video Capture Source and click Filters.accessing the filter setting for the camera
  4. In the bottom left-hand corner of the window that just popped up, click the Plus symbol and then choose the Color key and select OK.choosing chroma key filter - chroma key settings obs studio

Many users prefer white backgrounds to green screens, but keep in mind that they won’t be able to use the Chroma Key filter in this scenario.

When working with a white background, it’s essential to use the Color Key filter rather than the Chroma Key to properly set up the background.

2. Use the OBS Chroma Key without a green screen

  1. Download the background removal plugin.website to download the plugin
  2. Open the plugin.zip file and copy the files. copy files to obs
  3. Locate the OBS studio folder (you should find it in Program Files) and paste the files.paste files to obs studio file
  4. Go into OBS studio and select a camera source then right-click on it and choose Filter.accessing the filter setting for the camera
  5. Add Audio/Video filter and then select Background Removal. You may need to restart OBS studio if it was open at the time of copying plugin files.select background removal filter in OBS studio
  6. Adjust the Parameters until the background color changes from Black to Green.
  7. Now you have your virtual green screen.

3. Tweak the Chroma Key settings

  1. Open OBS studio and select a source camera as shown in the first tip.
  2. Right-click on it and select Filter.accessing the filter setting for the camera
  3. There you can select the Chroma Key filter.choose chroma key from filters in OBS studio
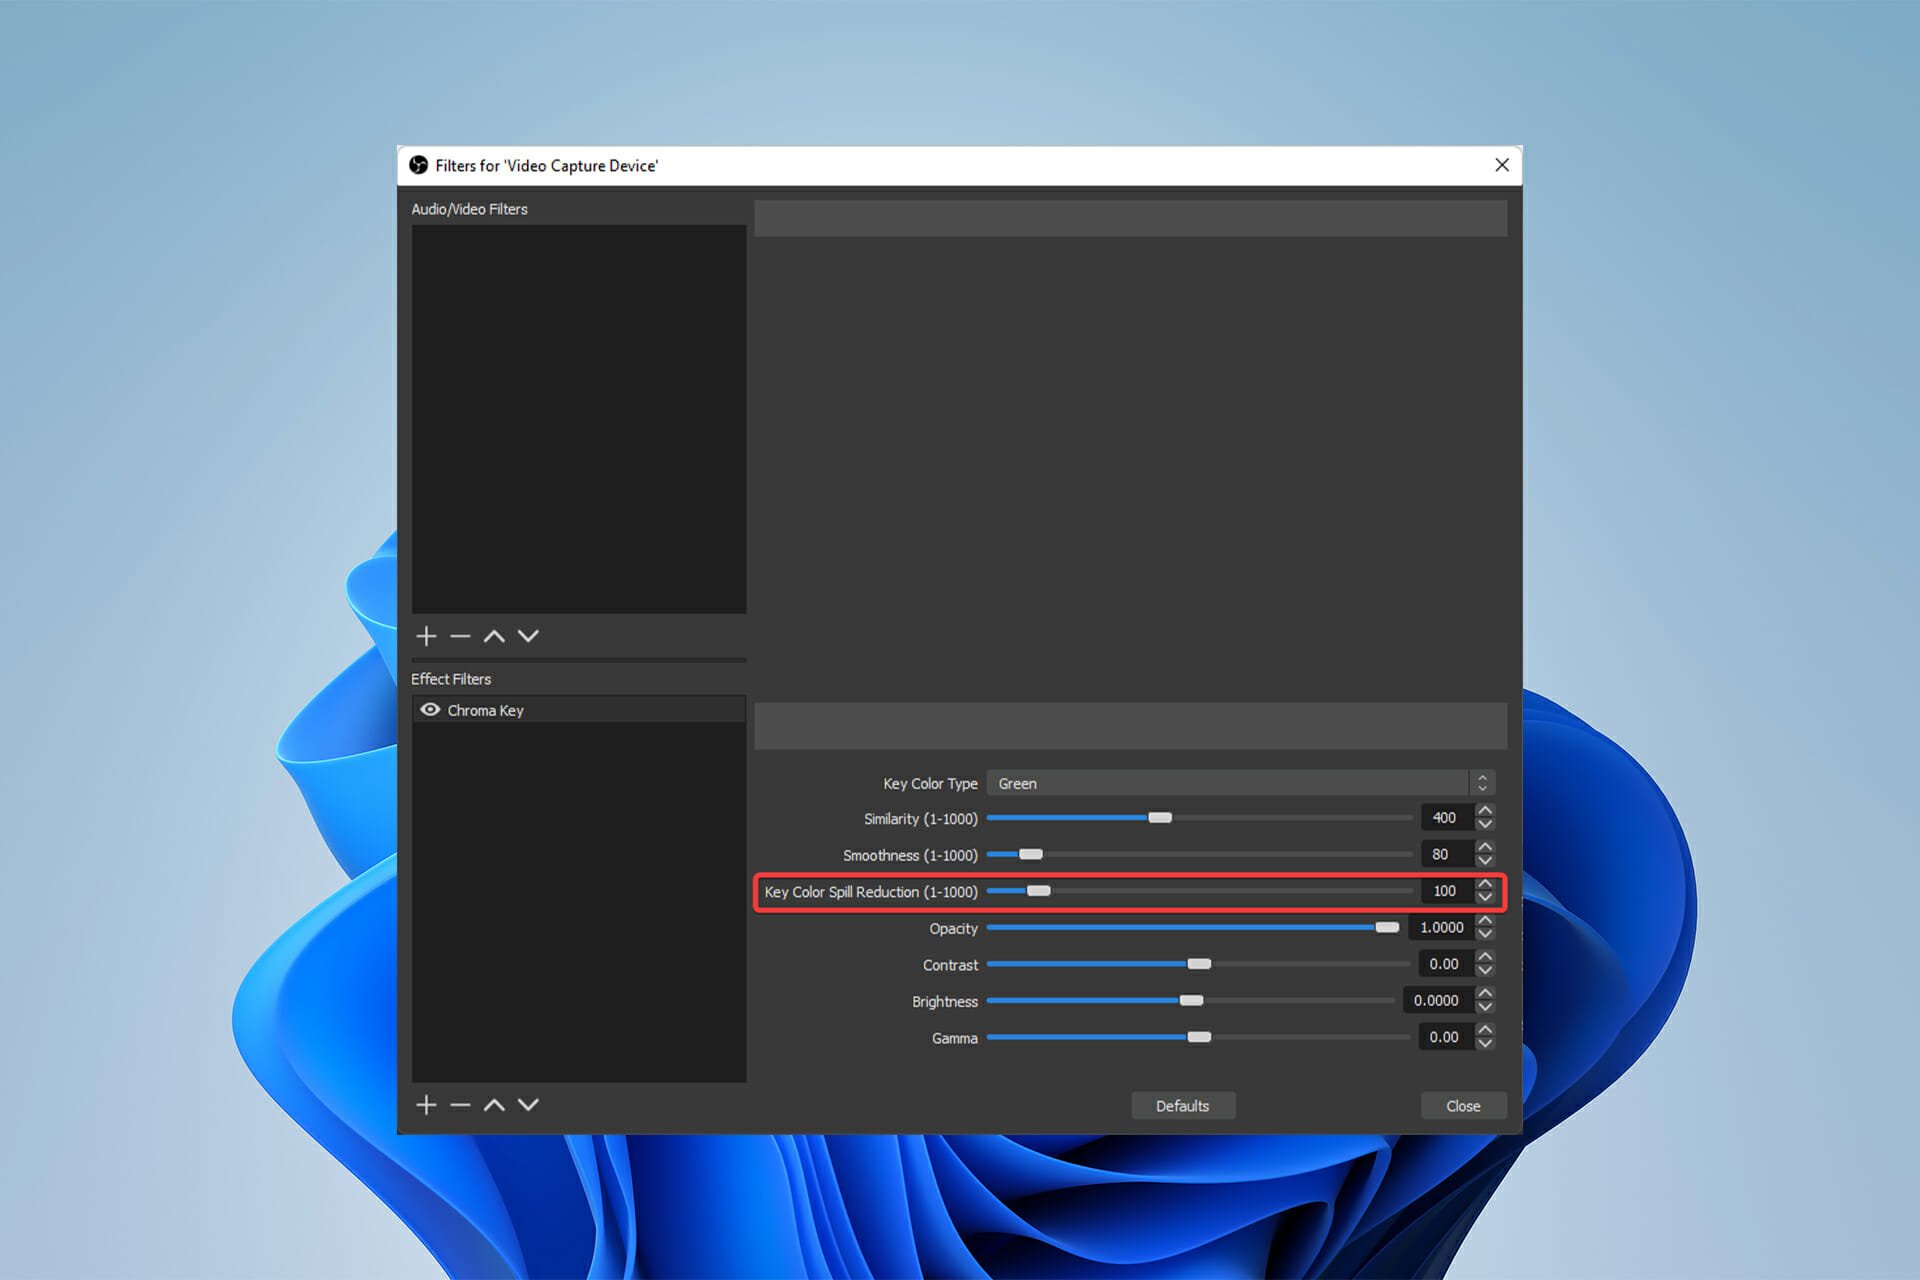
  4. Once in the settings of the filter, adjust the parameters to the recommended numbers.
     smoothness and othe roptions in chroma key settings
  • Similarity to 300-400.
  • Smoothness to 20-80.
  • Key Color Spill Reduction to 20-100.

Keep in mind that if you’re utilizing a solid green screen, these options will improve the chroma key settings in Obs Studio.

4. Fix the color spill

  1. Open OBS studio and select a source camera as shown in the first tip.
  2. Right-click on it and select Filter.accessing the filter setting for the camera
  3. There you can select the Chroma Key filter.choose chroma key from filters in OBS studio
  4. Increase the Key Color Spill Reduction value until the trace of the green screen is gone.key Color Spill Reduction setting in OBS studio

When your green screen reflects onto the back of your subject, this is known as the color spill. It might frequently give your subject a green glow or outline.

5. Set multiple Chroma Key filters

  1. Open OBS studio and select a source camera as shown in the first tip.
  2. Right-click on it and select Filter.accessing the filter setting for the camera
  3. There you can select the Chroma Key filter.choose chroma key from filters in OBS studio
  4. Do this process 2 more times and key out different shades of green.

If your room’s setup makes illumination challenging, you can use multiple chroma keys to key out distinct colors of green.

6. Use the Chroma Key to add a virtual background

  1. Open OBS studio and select a source camera as shown in the first tip.
  2. Right-click on it and select Filters.accessing the filter setting for the camera
  3. There you can select the Chroma Key filter.choose chroma key from filters in OBS studio
  4. Then, from Windows Explorer, drag a virtual set to your source list. As background sources, OBS supports MP4, JPG, PNG, and a variety of other file types.drag the video and drop in the source
  5. Double-click the video name to see the input properties if you’re using a looping video as your background. You may configure the clip to loop in the properties.enable loop on the video in obs studio

Even if you don’t have a green screen, you may create a virtual background by following the second tip and merging it with this one.

How do I fix the Chroma Key if it’s not working?

  1. Reinstall OBS Studio and try again.
  2. Check the lighting of the room you are trying to record a video in.
  3. Verify that Windows has been updated recently or that the auto-update feature has updated the camera driver.
  4. Examine the green screen cloth to ensure it is clean and undamaged.

The chroma key filter is extremely sensitive to lighting and green screen color, thus any changes to the parameters will cause the filter to fail.

What is the difference between the Color key and Chroma Key in OBS studio?

Color Difference keys keep track of pixels based on how dissimilar they are to the desired color. Chroma Key discards pixels based on how similar they are to the target color.

The Chroma Key is significantly more complex and powerful in practice. The color difference here is probably most useful when dealing with computer-generated imagery.

Following the solutions in this post will fully remove any problems or troubles you may have with OBS’s Chroma Key feature.

Green screen setup can also be made easier by watching relevant tutorials on YouTube or other comparable sources.

If you have an issue with the obs chroma key not working, it is almost always due to the room lighting, not the program.

As a result, the room in which you’re trying to record a video with the chroma key filter should be well-lit and suitable for green screen footage.

OBS Studio is just one tool capable of this feature so you might be interested in our list including the best green screen software.

Let us know if you have any chroma key settings or tips for OBS Studio in the comments section below.

Happy 10th Anniversary to Minecraft: Xbox 360 Edition

In the very beginning, Minecraft started out as a PC game, although the original console port was for the Xbox 360. Later on, Microsoft went ahead and acquired Mojang, and the rest is history.

We are now celebrating 10 years of Minecraft having made its debut on May 9, 2012, on Xbox 360.

Of course, over time technology has evolved and the game is not as popular on Xbox 360, which is why 4J Studios ported the game to Xbox One and multiple other platforms. Essentially, what this means is that gamers can get to experience the game on Microsoft’s latest consoles such as the Xbox Series X|S.

Minecraft for Windows 11: How to Download & Install

Minecraft is a sandbox game in which players can build their very own 3D worlds. It’s the highest-grossing game ever, and you can now download it on Windows 11 as well.

If you haven’t enjoyed Minecraft before, maybe now is the time to change that and discover all it can offer.

Of course, the recent release of Windows 11 has raised some compatibility questions. Some players have wondered if Minecraft is compatible with Windows 11.

Can I play Minecraft on Windows 11?

Neither Microsoft nor Mojang has provided any official confirmation that Minecraft runs on Windows 11. Nor is the OS iteration specified within the game’s official system requirements. Many players will no doubt prefer to stick with Windows 10 if the game doesn’t work on the latest platform.

However, some players who have installed Minecraft on Windows 11 have confirmed the game runs just fine on that platform.

So, rest assured Minecraft is compatible with the OS. If you’ve recently upgraded to it, you can also download Minecraft on Windows 11 for free just to make doubly sure the game runs on your PC. The Minecraft trial reputedly lasts about 90-100 minutes.

What are the different Minecraft versions?

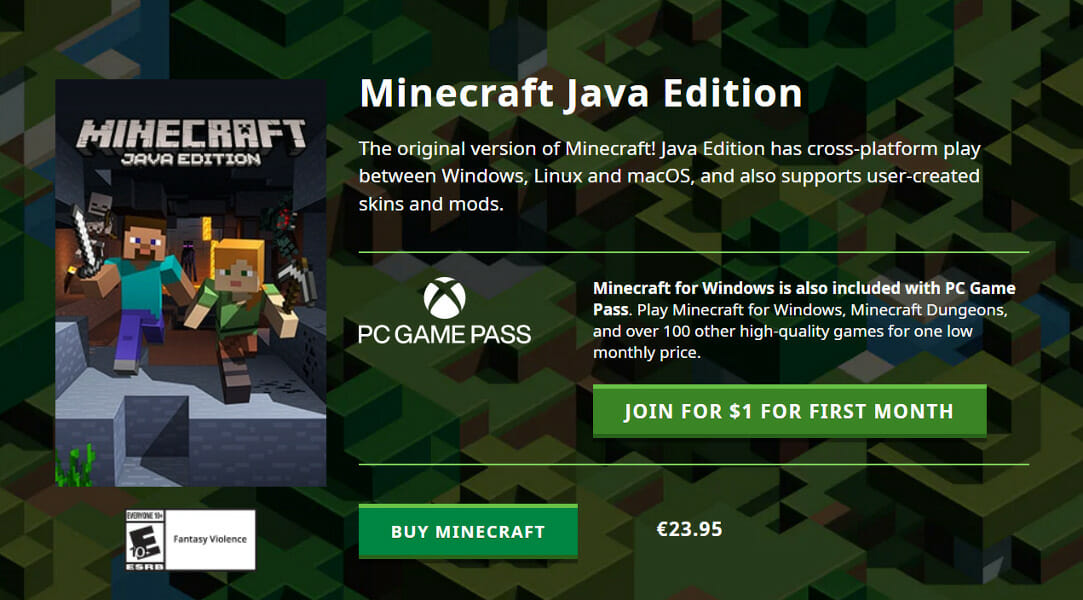
There are two primary Minecraft versions you can play on Windows. Minecraft Java is one version of the game you can download from the game’s website. As its title implies, that version of the game runs on Java, which comes installed with it.

One advantage of Minecraft Java is that it’s more customizable than its alternative version. Players can modify the game with downloadable mods. Furthermore, players can make their skins instead of purchasing them from Minecraft’s marketplace.

Java Edition (Source: Minecraft)

Minecraft Bedrock is the alternative version of the game you can get from the MS Store. That’s a non-Java edition for Windows and consoles. Bedrock is the multi-platform version of the game.

The good thing about it is that it enables cross-play multiplayer. That means you can play Minecraft Bedrock multiplayer on Windows with console players. Minecraft Java doesn’t support cross-play multiplayer.

Does Minecraft Java work on Windows 11?

The quick answer is that sure, it does work. If you install Minecraft Java on Windows 11, it will function properly.

Don’t forget to download and install Java first, as this is required. Refer to the anchored link for instructions on how to accomplish this.

Keep on reading as we will see what Minecraft’s requirements are and then look at how you can install it on your Windows 11 PC.

What are Minecraft’s system requirements?

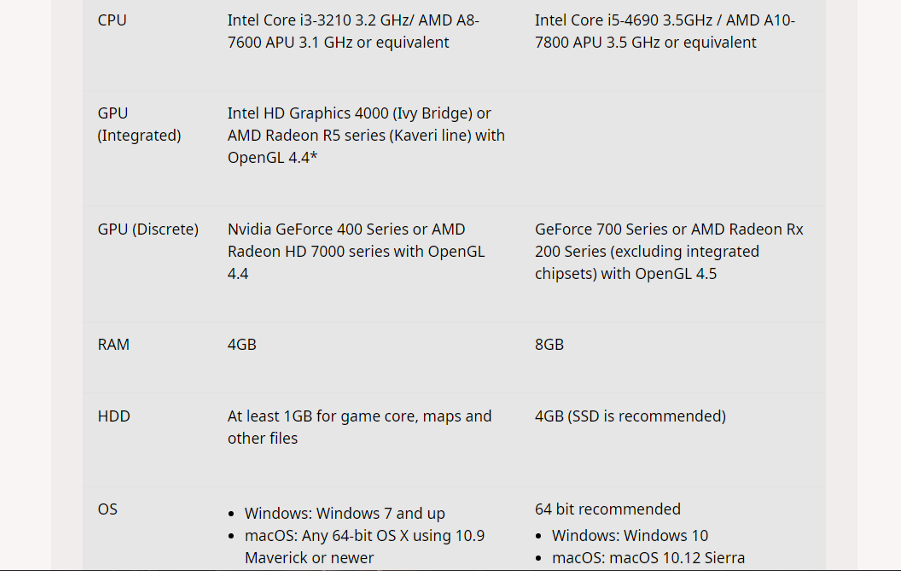
Before you get any game, it’s worth checking the system requirements. Minecraft is not a system-resource intensive game, but the Java version does have higher requirements. The screenshot below shows the minimum system requirements for Minecraft Java:

If your PC meets the system requirements for Minecraft: Java, it can run the Bedrock version for sure. To play Minecraft with ray-tracing graphics, however, you’ll need a PC with an NVIDIA or AMD GPU, such as those of the GeForce RTX 20 and the Radeon RX 6000 series.

This being said, let’s see how you can download the Minecraft launcher on Windows 11 and enjoy one of the best games ever.

How can I get Minecraft for Windows 11?

1. Get the Minecraft Bedrock Edition

  1. First, make sure you’re signed in to your Microsoft account, which you’ll need in order to download MS Store apps.
  2. Bring up the Start menu by clicking its Windows 11 taskbar icon then select Microsoft Store.
    The Start menu minecraft download windows 11
  3. Type Minecraft in the MS Store’s search box and select Minecraft for Windows + Launcher.
    minecraft w11
  4. Click on the Free trial button in order to try out the game without paying for it.
  5. Press the Play button on Minecraft’s MS Store page when the trial package has been downloaded and installed. Alternatively, you can enter Minecraft in Windows 11’s search box to find and run the app.
    minecraft-search

2. Get Minecraft Java Edition

Download Minecraft Java

  1. Open the Minecraft website in your browser and click Games at the top of the Minecraft website.
    Games link minecraft download windows 11
  2. Select the Minecraft package.
    Minecraft package minecraft download windows 11
  3. Click the Try it free link.
    The Try in free link minecraft download windows 11
  4. Scroll down to and press the Download Now button for the Windows platform on the Minecraft free trial page.
    Download Now button minecraft download windows 11
  5. Select a folder to save the Minecraft Java installer on and click on the Save button in order to start the downloading process. This is how you can download Minecraft Java on Windows 11.

Once you’ve installed the game, you might also want to explore experimental builds. For that, check this Minecraft D1 guide to learn more about snapshots and early versions.

Install Minecraft: Java

  1. To install Minecraft: Java, click Windows 11’s File Explorer taskbar button.
    The File Explorer button minecraft download windows 11
  2. Access the folder you downloaded Minecraft’s installer on and double-click the MinecraftInstaller.msi file to open the setup wizard.
    The Minecraft Launcher window minecraft download windows 11
  3. Click on the Next button from the setup window then press the Change button to select a folder to install Minecraft: Java on. Alternatively, you can just stick with the default directory specified in the path box.
    Change button minecraft download windows 11
  4. Select the Create a shortcut on the desktop checkbox. 
    Create a shortcut on the desktop checkbox minecraft download windows 11
  5. Finally, click the Install button to confirm.
    The Install button minecraft download windows 11
  6. Select Yes on any UAC confirmation prompts that might pop up and then press the Finish button.
  7. Open the Minecraft Launcher window by clicking its desktop shortcut.
  8. If you don’t have a Microsoft account, set one up by clicking the Create a new Microsoft account link on that window.

Now that you have the game installed, you might be eager to improve the graphics and immerse yourself in stunning landscapes. To achieve this, consider adding shaderpacks.

Is there a freemium Minecraft edition?

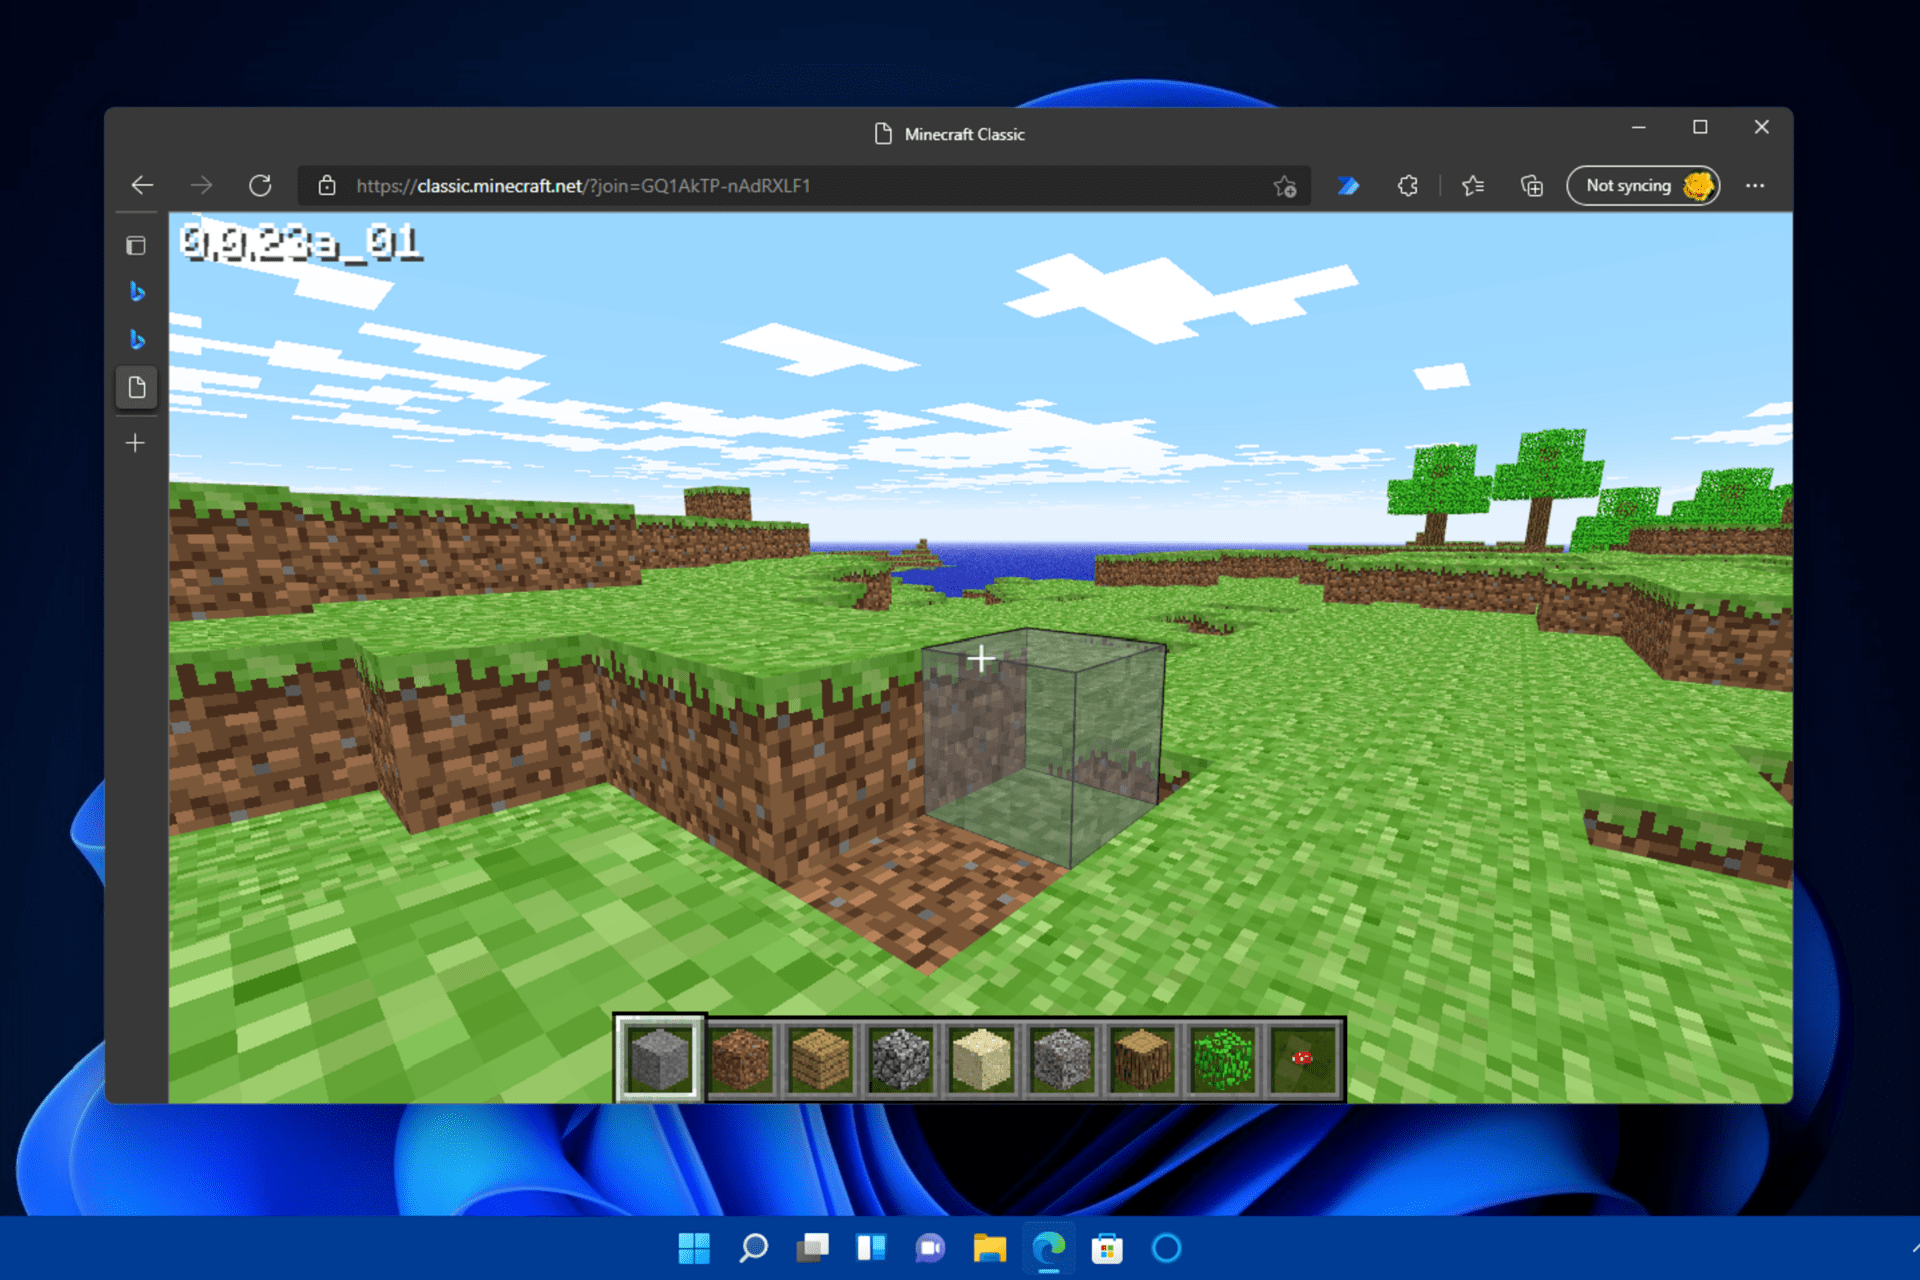
There isn’t any freemium Minecraft game version you can download and install on Windows 11. However, you can play the original Minecraft 2009 game in your browser. Mojang released that browser version of the game to commemorate its 10th anniversary.

Minecraft Classic is the game in its earliest form. It includes only 32 blocks to build worlds with. You can play that Minecraft game as much as you like with no time restriction.

Even more, keep in mind that playing Minecraft on a web browser is easy, but you will need one that can consume fewer resources. Take a look at the best browsers to play Minecraft and make a choice.

There can be little doubt that Minecraft is something of a phenomenon. Millions of players across the globe love the game’s open-ended gameplay, memorable blocky graphics, and detailed crafting system.

Don’t hesitate to check out our post on what to do if Minecraft failed to authenticate your connection in case you experience such issues.

Even more, take a look at how to fix common Minecraft errors in Windows 10 when you encounter issues in Windows 11.

If you haven’t played Minecraft yet, what are you waiting for? You can enjoy the game on Windows 11 much the same as on other PC platforms. At the very least, download and install Minecraft to play the free trial.

Was this guide useful to you? Let us know by leaving a comment in the section below and sharing your thoughts with us. Thanks for reading!

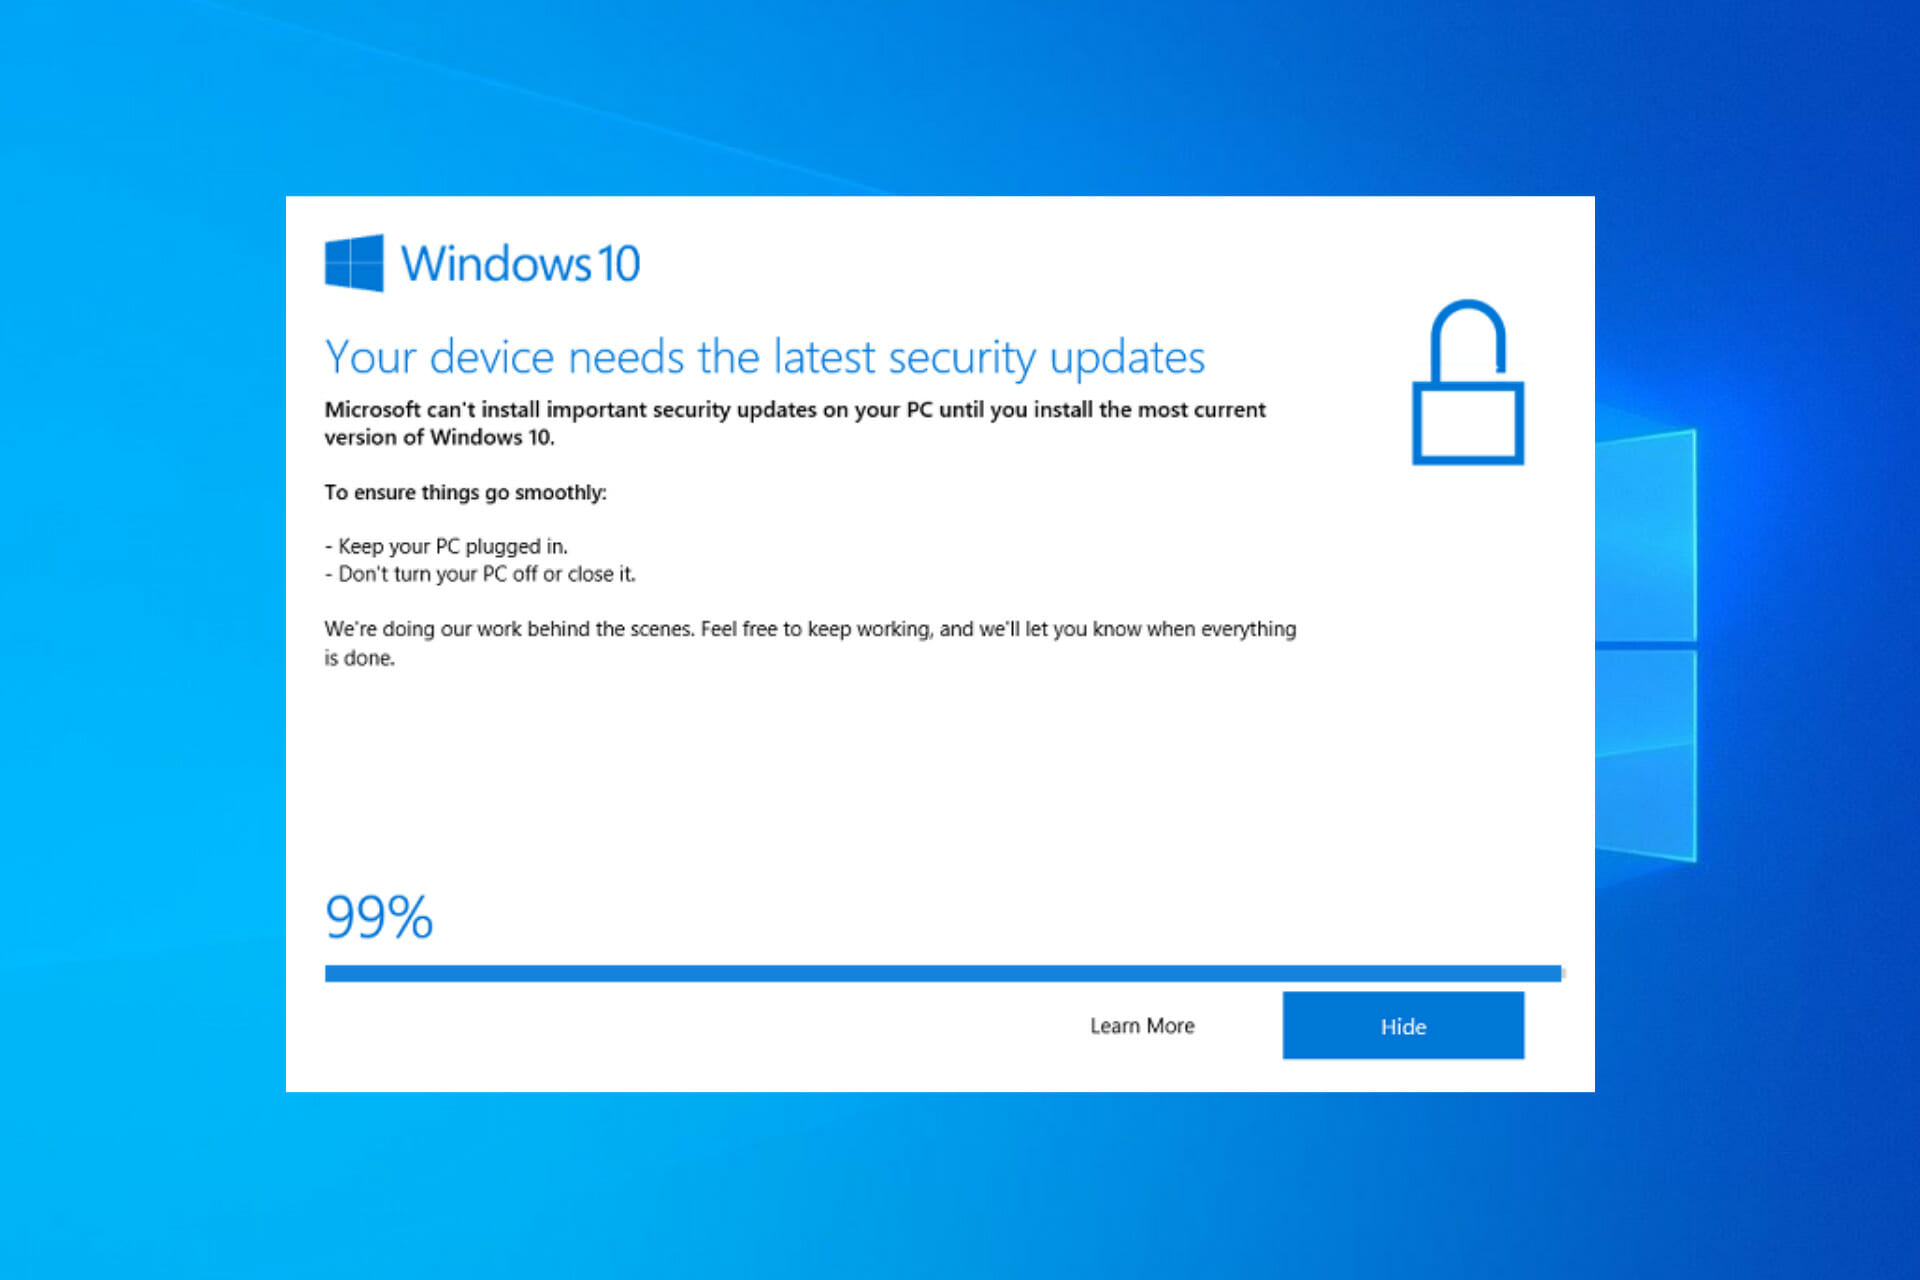
Windows 10 Update Assistant is Stuck at 99 %: 5 Quick Fixes

Worried that Windows 10 Update Assistant is stuck at 99 percent? Apparently, the setup download procedure works as intended, but problems arise in the final installation segment.

Sometimes a hefty dose of patience is all you need. As stated by Microsoft technicians, this isn’t an error. Basically, if there’s an upgrade error at hand, you’ll be timely prompted. Therefore, if your Windows Update Assistant is stuck at 99 %, you can wait and have a little faith in it before acting.

Since this occurrence isn’t followed by any kind of error prompt, we can concur that all you should do is simply wait and Windows Upgrade Assistant will finish the installation.

On the other hand, certain Windows 10 users reported that the 99 % installing stuck issue lasted up to 24 hours which is, to say the least, ludicrous. With that in mind, we advise you to wait up to 20 minutes.

If the Assistant is still stuck at 99 %, it’s time to take action. For that purpose, we prepared a list of possible solutions in order to help you troubleshoot this issue.

In case you want to download the Windows 10 Update Assistant, you can do so by following the link anchored.

When can Windows 10 Update Assistant get stuck?

Users have reported different scenarios in which the Windows 10 Update Assistant got stuck. Some of them are the following:

  • Windows 10 Update Assistant stuck at 0 – The solutions below will also address issues that happen in the first stage of the process.
  • Windows 10 Update Assistant stuck at 92 – Users have been stuck at the 92 % mark as well, which can be fixed by following the same procedures as below.
  • Windows 10 Update Assistant stuck at 93 – Even though the causes are unknown, the solutions are straightforward and easy to use even in this case.
  • Windows 10 Update Assistant stuck at 99 – This particular case is the main issue we have addressed today and don’t worry as you will get it fixed right away.

This being said, let’s see what you can do about this issue and get back to using your computer. Follow along!

How do I fix Windows 10 Update Assistant stuck at 99 %?

1. Temporarily disable any third-party antivirus

Even though Windows Defender is great protection-wise, some people are more fond of third-party antivirus solutions. That’s a reasonable choice for various reasons.

But, on the other hand, third-party anti-malware solutions occasionally tend to create a stir within the system. Some of them might even block the upgrade process.

Now, don’t get us wrong, we don’t advise you to ditch a third-party solution in favor of Windows Defender. However, you can disable the real-time protection for a limited period of time, until the upgrade installs, or even remove it.

We recommend you try a more stable antivirus that does not interfere with other processes or apps on your PC. Check out some antivirus software with free trial versions, so you can test them before switching to a new one.

2. Unplug peripheral devices

The fact that Windows Update covers drivers as well hints that they could be the cause of the problem. Too many outdated peripheral devices can certainly cause turmoil in the upgrade process.

So, just for the sake of trying, make sure to unplug all peripheral devices from USB ports. Additionally, if you have the USB-C SD card reader or any other similar device, unplug those, too.

Of course, this doesn’t include a mouse and keyboard. Once the procedure is finished, you can plug in all your devices and deal with drivers later on. You may then update your drivers as well since it is a necessary action in order to ensure your PC’s functionality.

If the Windows 10 Update Assistant stuck at 99 percent issue is persistent and the upgrade is stuck, give it another try, but this time without the peripheral devices. In case it still misbehaves, continue with the troubleshooting method below.

3. Temporarily disable your Internet connection

Some users were able to resolve this issue by disabling their Internet connection. For some odd reason, the network connection negatively affects the upgrade process.

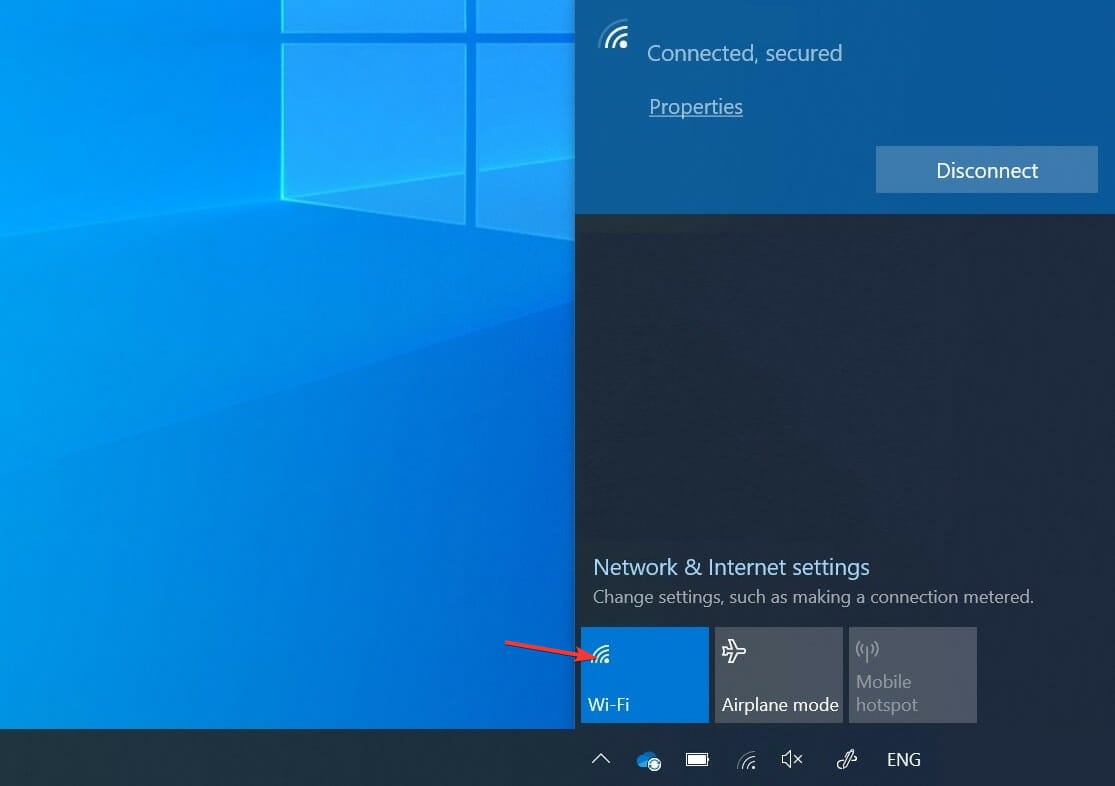
So, you can try unplugging your Ethernet cable, or disabling your Wi-Fi, and then look for any changes with the updating process. They should be visible immediately after the connection is disabled.

If that’s not the case, you can restart the upgrade procedure and, right after the download is finished, cut the Internet connection again. Nonetheless, this might not work for everyone.

4. Restart the Windows Update service

  1. In the Windows Search bar, type services, and open the Services app.
  2. Scroll down until you reach the Windows Update service and right-click on it in order to press Stop. Repeat the action but click on Start instead.stop-service windows upgrade stuck

Another valid troubleshooting step is to restart the Windows Update service. This covers all update-related processes thus fixing the Windows 10 Update Assistant not working issue.

Occasionally, this service can stop working for no apparent reason and this will, consequently, prevent the upgrade operation from finishing.

5. Perform a clean system reinstallation

  1. Download the Media Creation Tool for Windows 10 by following the link anchored and then plug in your compatible USB flash drive. Note that you will lose all your data, thus we recommend backing it up.
  2. Run the Media Creation Tool and accept the License Terms.
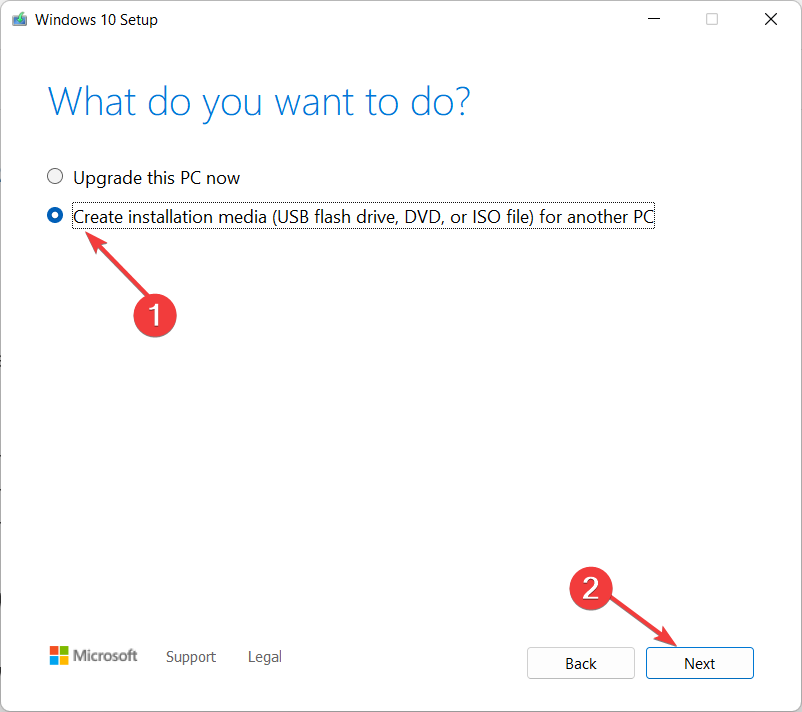
  3. Select the Create installation media (USB flash drive, DVD, or ISO file) for another PC option.create-inst windows upgrade stuck
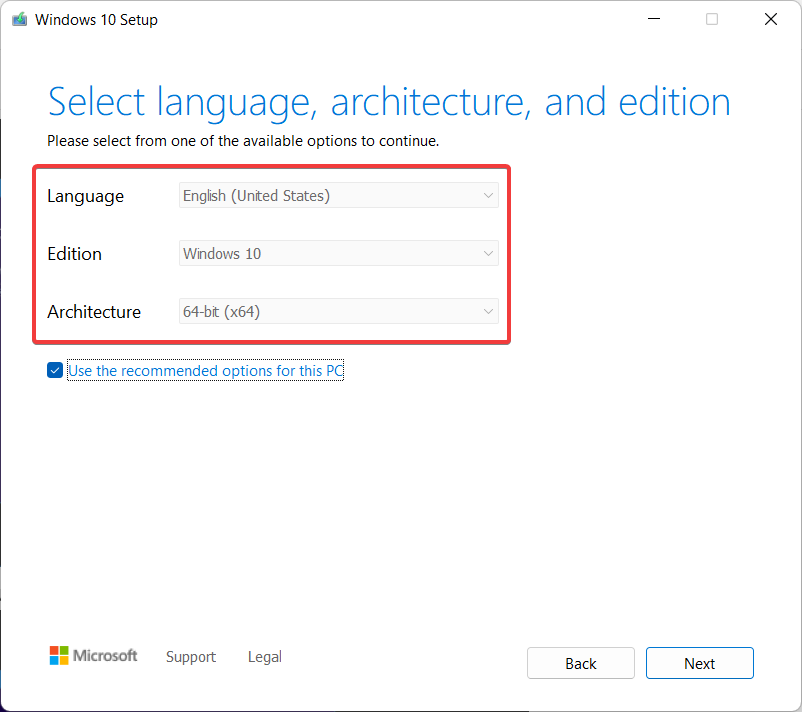
  4. Choose the preferred Language, Architecture, and Edition, then click Next.language-others windows upgrade stuck
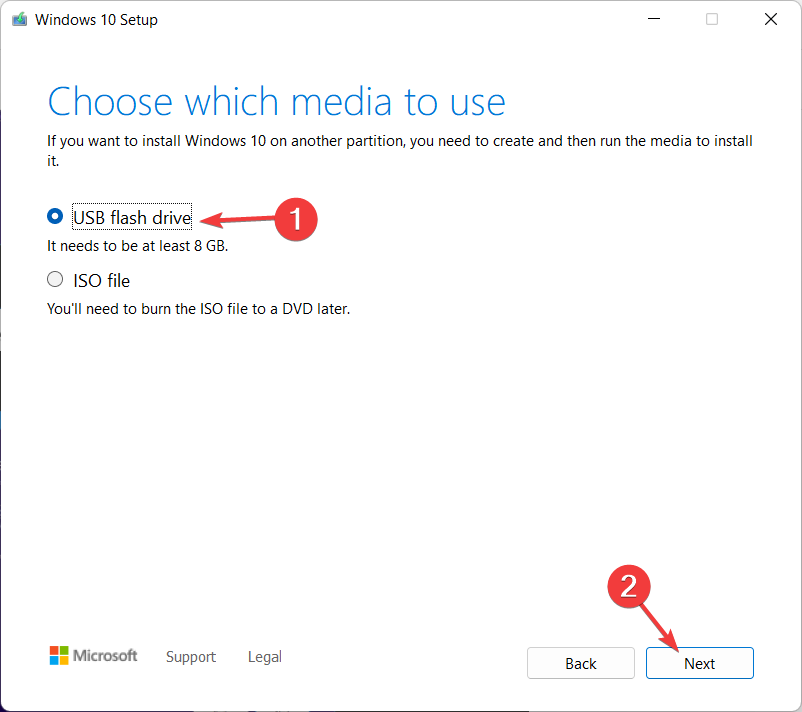
  5. Choose the USB flash drive option and click Next.usb-flash windows upgrade stuck
  6. Media Creation Tool will download the setup and copy the installation files on the USB flash drive. Restart your PC once you’re done with the above steps.
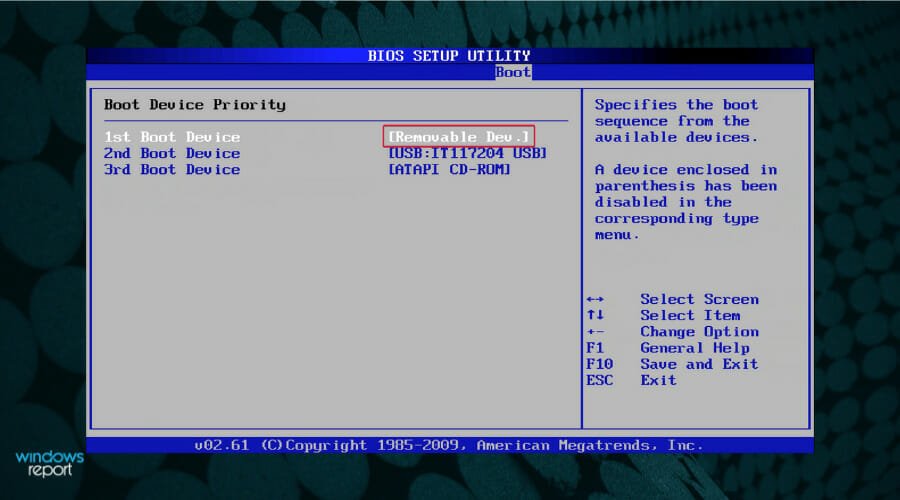
  7. In the initial boot screen, press F10, F11, or F12 to access the Boot menu. It differs depending on your motherboard.
  8. Choose the USB flash drive as a primary bootable device. The Windows 10 Setup should commence immediately. Follow the on-screen steps and that’s it.

Finally, if you’re repetitively unable to upgrade your system, the last resort lies in a clean reinstallation. Ages ago, reinstallation was a lengthy and complicated procedure, but that’s not the case in Windows 10.

Besides the bootable media, like USB or DVD, it takes only the Media Creation Tool to make it work.  Note that you’ll need a USB flash drive with at least 4 GB of free space in order to create a bootable installation drive.

Of course, before you start, it’s of supreme importance to backup your data on the secondary partition or to an external drive, since you’ll wipe clean the system partition.

In addition, backup your license key because you might need it later on. You may use some of the best local data backup software tools of the moment in that regard.

In order to avoid or fix a slow Windows 10 Update Assistant, take a look at our post on how to stop Windows 10/11 from being unresponsive and make it faster.

That should do it. In case you have any questions regarding this Windows 10 Upgrade Assistant issue, make sure to post them in the comments section below. Thanks for reading!
How Long Does Windows 11 Take to Install and Download?

If you are considering upgrading your OS, you have probably asked yourself: How long does it take to download Windows 11?

This is a valid question especially if you are frequently using your PC and want to avoid interruptions for an extended period.

Before you download Windows 11, you need to make sure your device meets the minimum system requirements.

How long does it take to install Windows 11?

How long does it take to install Windows 11 on a new PC?

In most cases, installing Windows 11 on a new computer will take between 10 and 20 minutes. It varies, though, depending on the computer specifications that you have available. The higher the quality of the computer, the faster Windows 11 will install.

Having said that, take a look at the top five best Windows 11 budget laptops to buy right now.

What factors affect how long it takes to download Windows 11?

1. The speed of your Internet connection

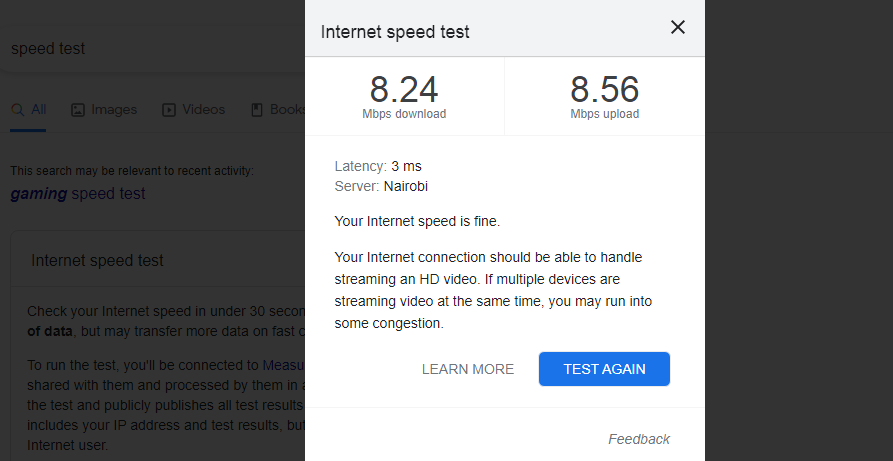
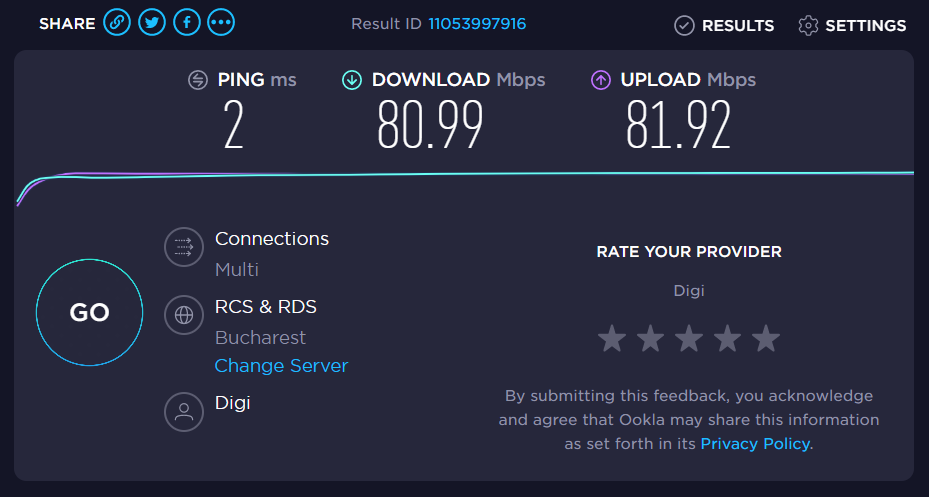
Internet speed plays a huge role in download time. Depending on your Internet connection, the download could take anywhere from a few minutes to a few hours. 

The first step is to determine what kind of Internet connection you have (cable, DSL, or fiber optics) and how fast that connection is.

You can use an Internet speed test site to see how fast your download speed currently is. You need to fix your slow Internet connection or else the file could take hours to download.

Connecting your PC with an ethernet cable and disconnecting other devices on the network can also help speed up your download time.

2. The size of the file being downloaded

Downloading files can be large, especially when downloading a new operating system like Windows 11. A large file is going to take longer to download than a smaller one. The setup file is about 4GB so be prepared to wait for a while.

3. The speed of your computer to process the download

Your computer’s memory (RAM) also plays a part in the download time. If you only have 256MB of RAM or less, the installation will take longer because your computer has less memory available to run the setup program. 

On the other hand, if you’ve got more than 16GB of RAM, it’s going to be much faster because your computer can handle more at once.

4. Your location in relation to the host server

If a host server is located far away from your physical location, this can also affect download speed because data will take longer to travel back and forth between your computer and the host server.

How long does it take to install Windows 11 from Windows 10?

If you decide to upgrade from Windows 10 to Windows 11, the complete procedure will take up to 2 hours, during which time you will be able to use your computer as normal.

You will be prompted to restart your computer and wait for the installation procedure to be completed before continuing. This will take around 25 minutes, during which you cannot use your device in any capacity.

How long does it take to install Windows 11 on HDD?

Installing Windows 11 on a hard drive computer normally takes 15 to 20 minutes, and installing Windows 11 on a solid-state drive computer typically takes 8 to 10 minutes.

How long does it take to install Windows from USB?

The installation of Windows 11 via a bootable USB drive may take up to 30 minutes to complete depending on your computer’s speed and computer configuration.

If you encounter issues during the process, take a look at what to do if Windows 11 won’t install from USB.

Why does it take so long to install Windows 11?

The present state of your machine may be taken into consideration. In the event that your computer is infected with viruses or malware and is already running at an abnormally slow speed, the update process to Windows 11 may be significantly longer than usual.

However, the processor and the hard drive are the two most critical elements affecting the time it takes for Windows 11 to update. If your computer has a powerful CPU, you can anticipate it to update more quickly.

In the case of an SSD, you should expect significantly faster installation and update times than with a conventional disk drive. Fortunately, most modern computers are equipped with solid-state disks (SSDs).

How can I make Windows 11 install faster?

  • Clean up your hard drive – Removing files that you don’t need anymore is a great way to give your PC a little extra speed.
  • Disable startup programs – If you don’t need a program to start automatically, select it and click Disable. Disabling a program won’t remove it from the list, but simply prevent it from running at startup. 
  • Uninstall bloatware – If you have a lot of bloatware and other random software installed on your computer, it can make it run slower. A lot of times, your computer will come with unnecessary or unwanted software pre-installed but if you don’t use them, get rid of them.

We hope that from this guide, you were able to get a clear picture of how long it takes to download Windows 11. Another easier method would be to perform an unattended installation especially where multiple PCs are concerned.

If you are still on the fence about which OS to go for, we have a side-by-side comparison of Windows 10 and Windows 11 to help you make that decision.

Let us know in the comments section which method of installation you used and how long the download took.

These 4 video games join Xbox Game Pass today on console, PC, and cloud

Today’s a big day for Xbox Game Pass subscribers with four new titles coming to Microsoft’s video game subscription service.

NHL 22 is now available to play for Xbox Game Pass users via EA Play on Xbox One and Xbox Series X console generations. Here’s its official game description:

Powered by Frostbite, EA SPORTS NHL 22 gets the superstar treatment. For the first time ever, experience EA SPORTS NHL on one of the industry’s most powerful game engines bringing unrivaled visual detail to every hit, deke and shot. Superstar X-Factors lets you feel the personality and power of NHL superstars with an all-new ability system that unlocks the unique skills of the league’s most elite players. Authentic to real player skill and style, the stars of the NHL truly come to life in EA SPORTS NHL 22 making their time on ice more influential than ever . From HUT to World of Chel, Superstar X-Factors brings new class based strategy to every game mode. EA SPORTS NHL 22 is an all new game for a new generation, giving you more ways to play and compete than ever before. This is breakthrough hockey.

The second game is Eiyuden Chronicle: Rising. This game actually launches today and is playable for Game Pass Subscribers on Xbox One and Xbox Series X console generations, Windows PCs, and Xbox Cloud Gaming.

Eiyuden Chronicle: Rising combines a thrilling adventure through ancient ruins with the tale of one town’s rise from the ashes. Drawn by lenses and other treasure in the nearby Runebarrows, our heroes learn that the town is struggling to rebuild after an earthquake and decide to help. Along the way, they’ll resolve disputes between eager adventurers and wary locals who don’t think the Barrows should be disturbed. And they’ll learn more about each other’s reasons for seeking treasure, deepening their bonds in the process.

As you will learn, these Runebarrows hide a great secret that has fateful implications for one of the characters. What begins as a simple treasure hunt turns into a dark conspiracy that will shake the world and plant seeds that carry over into the main story of Eiyuden Chronicle: Hundred Heroes. The game will introduce a portion of Eiyuden Chronicle’s cast of characters in an original story with thrilling action and engaging town-upgrading elements. There will be some perks for players that link the game with Eiyuden Chronicle: Hundred Heroes.

Also now available on Xbox consoles, Windows PCs, and Xbox Cloud Gaming is Danganronpa 2: Goodbye Despair Anniversary Edition. This game, which also launches today, is a 10th anniversary re-release of the original Danganronpa 2 game for modern platforms.

Deadly Island Vibes: Murder is the only means of escape when you’re trapped on this island paradise. As your fellow classmates start dropping like coconuts, you’ll need to delve into each murderous incident, forage for clues, and interview your classmates to reveal the opportunity, motive, and means behind each killer case!

The fourth and final game coming to Xbox Game Pass today is This War of Mine: Final Cut, yet another Day One launch for Game Pass subscribers. This rather serious game is available on Windows PC, Xbox Cloud Gaming, and the modern Xbox Series X generation of Xbox consoles.

The Remastered Final Cut version for Xbox Series X|S is finally here! In This War Of Mine, you do not play as an elite soldier, rather as a group of civilians trying to survive in a besieged city; struggling with a lack of food, medicine and constant danger from snipers and hostile scavengers. During the day you need to focus on maintaining your hideout: crafting, trading and taking care of your survivors. At night, take one of your civilians on a mission to scavenge for items that will help you stay alive. Make life-and-death decisions driven by your conscience. Try to protect everybody from your shelter or sacrifice some of them for longer-term survival. During war, there are no good or bad decisions; there is only survival. The sooner you realize that, the better.

It’s not all good news though. Grand Theft Auto: San Andreas: The Definitive Edition is leaving Xbox Game Pass today so those that want to continue playing it will need to buy it now.

Want more Xbox Game Pass updates in your feed? Follow us on Pinterest, Twitter, and Facebook.

Fix the Microsoft Rewards Error: 5 Ways To Crack The Code

A lot of users are reporting a Microsoft Rewards error while trying to access the portal or redeem rewards. Most users encounter the issue on their Xbox devices.

To promote its gaming platform, devices, browser, etc. Microsoft came up with a concept called Microsoft Rewards. You can also redeem your Microsoft Rewards for a Robux card.

How to fix the Microsoft rewards error?

1. Check if Microsoft Rewards is supported in your country

  1. Open your browser. 
  2. Visit the Microsoft Rewards website.
  3. Check if your country is on the list.

Microsoft Rewards would seem to be a great earning opportunity for many people around the world, but it is not available throughout the globe.

Users from the countries in which the rewards are unavailable will be able to notice the option but upon clicking on it, they will get the error this option is not available in your country.

In case they try accessing the Microsoft Rewards redemption portal, they will get the same error.

However, you can fix the error Microsoft Rewards not available in this country or region by going through our guide on the same issue.

2. Hard Reset the Xbox

  1. Press the Power button and hold it for 10 seconds before releasing it.
  2. Now, remove the power for the Xbox device for at least 10 seconds.
  3. Connect the power again and press the Power button to restart it.

Once you are sure that the region and language are correct, you can try resetting the Xbox. Since a soft reset may or may not resolve the problem, a hard reset will be advisable.

Doing this will most probably eradicate the Microsoft rewards not redeeming error.

3. Check for server issues

  1. Open up your browser.
  2. Visit the Xbox server status website.
  3. Check the status of the Xbox server to isolate the cause.

Though it is rare, at times, the Microsoft Server could be down. Even more, Microsoft suspends a few features due to scheduled maintenance.

4. Wait for the issue to get fixed automatically

If the problem is from the server end or Microsoft is aware of it, there isn’t anything you can do by localized troubleshooting. In case the problem with the server is due to scheduled maintenance, you would probably notice a time mentioned till the server would be down.

Whether the issue is with the server or a troublesome update, Microsoft will most probably fix it with time. So, the best policy would be to wait for a day and check if the problem gets resolved by itself.

5. Contact Microsoft

Since you have earned the Microsoft Rewards points, the money belongs to you, and you have every right to redeem it. So, if you have tried all the above-mentioned solutions and still do not get results, you can contact Microsoft Support and ask them to help redeem your points.

You can contact the Microsoft support team through their official website, you can also contact them via email, and can also send feedback as a way of addressing any of your queries.

Why are my Microsoft rewards not working?

Under this program, you will earn rewards for playing games, shopping from the Microsoft Store, searching through Bing, etc. You can use these rewards for further shopping from Microsoft.

Users encounter the Microsoft Rewards points stuck error on Xbox mostly while trying to access the redemption page or redeeming the points.

While the error could have many types, they are mostly related to issues with the server or the feature itself. Furthermore, sometimes Microsoft Rewards can cause the Xbox app crashing on the PC for some users.

How much is 10000 Microsoft points worth?

Note that points earned in this program have no cash value. However, the points conversion equates to 1 point being worth $0.001, so 10,000 points are worth $10 in eligible rewards.

Microsoft points are a form of virtual currency that is used to buy premium content on the Xbox live network. They can be used to purchase downloadable games, Xbox live subscriptions, system themes, and avatars.

Why was my Microsoft Rewards account suspended?

Microsoft has been banning users when trying to redeem rewards while using a VPN or other services that try to get around geo-restrictions.

Other than this, if you earn rewards on more than one account using the same method, your rewards are at risk of being suspended as well.

This could also lead to your Microsoft rewards point not updating which can be frustrating to some users.

You may also want to check our guide if your Xbox one games and apps won’t open, be sure to click on the link for the resolution.

We hope the methods listed in this guide have helped you fix the Microsoft rewards error issue. If you have any questions, don’t hesitate to ask them in the comments section below.

Roblox Won’t Let You Move? Here’s What To Do [2023 Update]

Even though it is a fairly well-optimized game and works fine on low-spec systems, you may realize all of a sudden that Roblox won’t let you move.

It’s not a flawless application. That’s the reason why the majority of errors are concerning the network or the browser in which you play the game.

The perfect example is when the controls freeze suddenly, both on the loading screen or during the gameplay.

When facing this issue you may be wondering why can’t I move in Roblox? As mentioned, in most cases, there’s an underlying network problem, but that is not always the case.

Sometimes, your system may be overwhelmed by too many tasks and processes and is not able to handle an application like Roblox as it should.

We enlisted some possible solutions, so make sure to go over them one by one. By the end, you should resolve the error at hand and unstuck your character.

What can I do if Roblox controls freeze?

  1. Check the connection
  2. Disable background apps and processes
  3. Check the server status
  4. Allow Roblox through Windows Firewall
  5. Check time and date
  6. Reduce the graphics quality
  7. Use a driver updater software

1. Check the connection

Since this is an obvious sign of possible connection issues, we’ll need you to confirm that everything is fine on your side.

The easiest way to find out whether your network is working properly is to connect to an alternative website. If everything is fine, the server might be down.

On the other hand, if your internet is completely down or working slow, follow the steps we provided below. Try again after every new step and look for improvements.

➞ Restart router and/or modem.

➞ Restart your PC.

➞ Disable VPN or proxy.

➞ While in a browser, press Ctrl + Shift + Delete and clear the browsing data, or use CCleaner for the job. Avoid clearing saved passwords.

➞ Check your browser. Roblox only works on the latest version of the Internet Explorer, so update it. For a seamless experience, use one of the best browsers for Roblox.

➞ Update router’s firmware.

➞ Check your Data package loss. The SpeedTest should be of use.

➞ Check the cables. Stick with the wired connection instead of the wireless one. The latter has large packet loss and it’s unstable. Thus, not suitable for gaming.

Since this is an obvious sign of possible connection issues, we’ll need you to confirm that everything is fine on your side.

The easiest way to find out whether your network is working properly is to connect to an alternative website. If everything is fine, the server might be down.

On the other hand, if your internet is completely down or working slow, follow the steps we provided below. Try again after every new step and look for improvements.

Before going through the troubleshooting steps, make sure you can login to Roblox properly, as account access issues may sometimes appear similar to control freeze problems.

2. Disable background apps and processes

  1. Right-click Start and open Task Manager from the Power User menu.
  2. Open the Startup tab.
  3. Disable all programs and confirm changes.
  4. Switch to the Processes tab and scroll to the Background Processes section.
  5. Right-click on each unnecessary process and select End Task.
  6. When you are finished, try to reopen Roblox.

Another possible reason for Roblox stuttering is to be found in background apps and processes. Especially the ones which integrate with the game itself, like the Discord client.

Also, the emphasis is on connection-dependent applications, like Skype and torrent clients. When you do not use them, there is no reason to keep them running in the background.

The same thing is true for unnecessary processes. Don’t worry about disabling an important process, as Windows will give you a warning prompt if you are about to.

Lots of users resolved the issue at hand by simply disabling the apps from working in the background. At least, while playing the game.

Disabling background apps is simple, just follow the steps we provided above.

3. Check the server status

Another important thing is to check the server status and confirm that’s up and running.

There’s a chance that the issue is still somewhat on your side, but due to a sheer load of players playing, the server tends to go down.

In addition, there are frequent maintenance sessions, so have that in mind as well. All of this can cause spikes and you won’t be able to move your character.

You can check the server status by using the Downdetector.

4. Allow Roblox through Windows Firewall

  1. In the Windows Search bar, type Allow and open Allow an app through Windows Firewall.
    roblox won't let me move
  2. Click Change settings.
    roblox won't let me move
  3. Allow Roblox to freely communicate with Public and Private networks. It should be on the list.
  4. Confirm changes and restart the game.

For Roblox to work in a seamless manner, it obviously requires unobstructed communication to its dedicated servers.

But, there are reports about Firewall blocking it and you might need to configure this by hand. Firstly, you need to allow the program to communicate through Windows Firewall.

In addition, if you have a third-party antivirus with the associated firewall, make sure to either disable it or add an exception for Roblox, as well.

We prepared this solution with a few simple steps to allow Roblox through Windows Firewall.

5. Check time and date

  1. Right-click Start and open Settings from the Power menu.
  2. Select Time & Language.
  3. Under the Date & Time section, enable the Set time automatically and Select time zone automatically.
    roblox won't let me move
  4. Close Settings and restart your PC.

Furthermore, similar issues can emerge due to a discrepancy between the server time and your system time. Therefore, we need you to double-check the time and date settings in Windows 10.

Here’s how to confirm that the date and time are properly set: follow these short and simple steps.

6. Reduce the graphics quality

Finally, even though Roblox is far from a demanding game, you can try reducing the graphics settings. The processing load will reduce substantially and the issue with the character movement should be gone.

Just open Roblox Studio and navigate to Tools > Settings > Rendering. While there, select Rendering and reduce the QualityLevel option to lower values.

Have in mind that this will affect the looks of the game and might downrate the overall experience.

7. Use a driver updater software

Sometimes, you will encounter different errors if your computer has driver issues. Thus, if you have missing, damaged, or outdated drivers, then the Roblox can’t move error will appear.

We recommend you use dedicated updater software in this regard. Outbyte Driver Updater is based on innovative technology, allowing you to update your drivers with a single click.

After you have downloaded and installed it, this solution will scan your operating system. After this process has ended, you will be notified about any missing or outdated drivers.

Use the report from this app to download and install one or all the outdated drivers. When all of them are updated, then the Roblox can’t move error should disappear.

That’s it. You’re free to post alternative solutions or confirm some of these we provided work.

In addition, don’t forget to update your version in time, and, share the extensive in-game issues with the developer. That way they’ll know what’s wrong and fix it on time.

Where do Snips & Screenshots Go on Windows 10 & 11

Where do snips and screenshots go in Windows 10 & 11? This is a question we get from some of our readers who probably just installed their new OS or using the Snipping Tool for the first time.

This tool is designed to take a screenshot of any or all portions of a computer screen. To put things in context, the Print Screen key will take the full snap of your screen, but the Snipping Tool is adjustable to only grab the area you prefer.

Where Do Snips & Screenshots Go on Windows 10 & 11?

By default, on both versions of Windows, snips & screenshots are saved to the clipboard of the computer. This means to retrieve them, you only need to paste them into the application you want such as Microsoft Paint, Photoshop, Microsoft Word, and others.

They can also be saved on your PC for future access. Read on as we highlight the easy steps to do this.

How do I take screenshots and save snips on Windows 11?

  1. Open Windows Search by pressing the Windows key + S.
  2. Type Snip in the search box. Select Snipping Tool in Best match and then click Open.
  3. You can also launch the Snipping Tool by pressing the Windows key + Shift + S.
    Windows Logo Key
  4. Select New. Then choose the preferred Snip.
  5. Next, drag the cursor over the areas you want to screenshot.
  6. Click on the three-dotted icon in the menu bar to display more options. Choose Save.
  7. Type the name you want for the new file, then select the location of choice to save the Snips in Windows. After this, click Save.

If the Screenshots folder is missing or you can’t find where your snips are being saved, restore the Screenshots folder in Windows 11 to fix the saving location and recover your captures.

How do I take screenshots and save snips on Windows 10?

The snipping tool is also included on Windows 10 and the app and usage are absolutely identic.

Even the opening process is the same on the old OS so all the solutions above will still apply to Windows 10 as well.

How to access the clipboard and paste the snips or screenshots?

  1. Go to the app where you want to paste the snip or screenshot.
  2. Press the Windows key + V on your keyboard.
  3. You will see all the items you copied on the clipboard in the reverse time order so you will find the latest first. Just select it and it will be pasted automatically.

So, if you don’t save the snip or screenshot manually, it will automatically be copied on the clipboard where you can access it by using the above key combination.

This method will also work on Windows 10 as well. Even though the Clipboard app looks a little bit different, it still has the option of copying and pasting the content.

Aside from the method we highlighted above for snips, we also have an article written on other ways you can take screenshots on Windows 11 and how to install Snipping Tool on Windows 11.

You don’t need to worry because Snipping Tool for Windows 11 is available for free download.

If you can’t find the app, read our guide on what to do if the Snipping Tool is missing from your system and fix it.

Let us know in the comment section if this guide works for you. We also welcome your suggestions if you’re using another method that’s not discussed in this article.

FIX: Jackbox Error Joining this Room in 4 easy ways

There’s nothing like some games to help take your mind off everything you had to deal with during another day of work.

However, not all people are into Call of Duty or Elden Ring, and some prefer to unwind with some friends by playing activity games.

And you probably already heard of Jackbox Games, the party game-making studio best known for hit games like You Don’t Know Jack, Quiplash, Fibbage, Drawful, and Trivia Murder Party, among others.

With such a variety of games designed to appeal to everyone in the room, Zoom call, or Twitch stream, the drawing, writing, trivia, and hidden identity games quickly became really popular.

Now, provided you already bought a party pack and would like to get the game going with your friends but are unable to, we can lend a helping hand.

Here are the steps you need to go through if you get the error joining this room message while trying to host.

How Can I Fix Error Joining This Room For Jackbox Games?

1. Check the Jackbox server status and uptime

  1. Open your go-to browser.
  2. Visit the Downdetector and check server status.downdetector

2. Troubleshoot your internet connection

  1. Press Windows + I to open Settings.
  2. Select System and then click on Troubleshoot.troubleshoot
  3. Click on Other troubleshooters.other troubleshooters
  4. Press the Run button next to Internet Connections.internet troubleshooting
  5. Select Troubleshoot my connection to the Internet.troubleshoot my internet connection
  6. Restart your PC.

3. Turn off Windows Firewall

  1. Open the Start menu, type Firewall, and open Firewall and network protection.open firewall
  2. Click on Turn Windows Defender Firewall on or off.turn firewall on or off
  3. Select Turn off Windows Defender Firewall for both Private and Public networks.turn firewall off

4. Reinstall Jackbox Games.

  1. Press Windows + I to open Settings
  2. Select Apps and then click on Installed apps.installed apps
  3. Search for Jackbox, then click on the three dots next to it and select Uninstall.uninstall jackbox
  4. Install Jackbox.

To make sure you keep your PC in top shape, we recommend using CCleaner, which is one of the most well-established tools for cleaning and optimizing your device.

Using it, you can clean up redundant junk files from Windows, Android, Mac, and more than 300 applications, free up some space and help fix problems.

⇒ Get CCleaner

If you were in a situation where you couldn’t play because of the error joining this room message, you now know how to solve it.

Carefully follow the steps in our guide and you’ll be back to enjoying your favorite games before you can actually say Jackbox.

Has this guide been useful to you in solving this issue? Let us know in the comments section below.

Quick Tip to Easily Install Windows 11 With Ventoy

Although many are in love with the idea of upgrading to a new operating system, today, it is not the same case. It’s a well-known fact that Windows 11 caused both frustration and confusion among users. However, there is a way to install Windows 11 with Ventoy, which we’ll tackle shortly.

The discontent comes mainly because the system requirements it comes with, prevent a lot of people from being able to install it on their current setups.

Unsurprisingly, many have already expressed their anger online. Explaining their devices are perfectly capable of running Windows 11. And yet, the company isn’t offering the free upgrade because it thinks their hardware is not eligible.

If your computer is equipped with a TPM, you can turn it on in the BIOS settings of your computer. On some AMD motherboards, this feature is referred to as fTPM.

In case your machine does not have a TPM and you wish to install Windows 11, we can use Ventoy to boot to a Windows 11 ISO. And circumvent the TPM, RAM size, and Secure Boot tests by supplying an XML file to the program.

Follow along as we will show you step by step how to do this, right after we see in more detail how Ventoy works.

How does Ventoy work?

Just as expected, it was only a matter of time until someone came up with a way to install Windows 11, even on unsupported computers.

Ventoy is an application that allows you to install the latest OS while also bypassing the verification for system requirements. This means you can install the operating system no matter if your device is eligible or not.

Some more good news is that the software is also already available for download. It can be used to create bootable USB media from a variety of image formats, including ISO, WIM, IMG, and VHD.

What sets Ventoy apart from most solutions, including Rufus and Universal MediaCreationTool, is that it places image files directly on the USB media without extraction. And that multiple image files may be added to boot different systems.

Remember that Microsoft’s PC Health Check app is still the first option to find out if a system is compatible with Windows 11.

You won’t be able to install the OS if you don’t get the thumbs up. But there are options to install Windows 11 without TPM 2.0 and other requirements.

On what systems does Ventoy work?

Using the installer, you will be able to complete the installation process just as if you had made a specialized USB stick from the ground up. The tool can be used to download multiple operating systems such as the following ones:

  • Ventoy Windows 11 – We will showcase today how you can use Ventoy to download and install Windows 11 on unsupported devices.
  • Ventoy Windows 10 – Just like with Windows 11, you can follow the same steps but use different files in order to get the 10 iterations on your PC.
  • Ventoy Windows 7 – You will be able to install Windows 7 on any device that you wish to have it installed without Microsoft detecting it.
  • Ventoy macOS – Mac users reported they were able to install macOS on their computers and use it without any hindrance.
  • Ventoy Linux – Ventoy has released a native GUI program for the Linux operating system. All supported architectures include x86 64, i386, arm64, and mips64. GTK and QT are both available, with GTK being the default.

This being said let’s see how to download and install Windows 11 on unsupported devices with Ventoy and start using it today.

How can I install Windows 11 on unsupported devices with Ventoy?

  1. Head to Ventoy’s GitHub repository and download the Windows zip file.windows-zip windows 11 ventoy
  2. Once it is downloaded, right-click on it in order to Extract the folder in the current location.extract-allwindows 11 ventoy
  3. Next, open the extracted folder and click on the subdirectory named Ventoy. Right-click anywhere on the window to create a new text file named ventoy.json. Copy-paste the following text inside it and save the file: { "control": [ { "VTOY_DEFAULT_MENU_MODE": "0" }, { "VTOY_TREE_VIEW_MENU_STYLE": "0" }, { "VTOY_FILT_DOT_UNDERSCORE_FILE": "1" }, { "VTOY_SORT_CASE_SENSITIVE": "0" }, { "VTOY_MAX_SEARCH_LEVEL": "max" }, { "VTOY_DEFAULT_SEARCH_ROOT": "/ISO" }, { "VTOY_MENU_TIMEOUT": "10" }, { "VTOY_DEFAULT_IMAGE": "/ISO/debian_netinstall.iso" }, { "VTOY_FILE_FLT_EFI": "1" }, { "VTOY_DEFAULT_KBD_LAYOUT": "QWERTY_USA" }, { "VTOY_WIN11_BYPASS_CHECK": "1" } ] }new-text windows 11 ventoy
  4. By setting the last argument to 1, the machine will be able to avoid certain registry checks. Such as Windows 11’s Secure Boot with Ventoy.ventoy-file windows 11 ventoy
  5. Now head to Microsoft’s page to download the Windows 11 Disk Image ISO.download-w11 windows 11 ventoy
  6. Select the OS version, and the language, then click on the 64-bit Download button.64bit windows 11 ventoy
  7. Next, head back to the extracted Ventoy folder and double click on the Ventoy2Disk file. Then insert your USB drive in order to format it.ventory2disk windows 11 ventoy
  8. You will be prompted with a new window in which you will be able to select the USB you inserted and then choose Install.device-isntall windows 11 ventoy
  9. Now, copy the Windows 11 ISO on the Ventoy drive and reboot your computer in order to enter BIOS. Change the boot sequence so that the USB has the boot priority and continue with the installation process.boot-priorit windows 11 ventoy

That’s it. Ventoy will allow Windows 11’s TPM verification to be passed, along with others as well, resulting in a successful Windows 11 installation.

It is possible to install Ventoy on a USB flash drive, a local disk, an SSD, an NVMe, or an SD Card. And it will boot immediately from the .iso, .wim, .img, .vhd(x), or .efi files that have been uploaded.

Ventoy does not copy the picture file(s) to the USB drive, rather, it uses them directly from the USB drive. It is possible to store many ISO images on a single device. Then select the image to boot from a menu that appears shortly after Ventoy starts up.

For more methods to install Windows 11 without a TPM, check out the article linked and keep on trying. Users succeeded in downloading it without a TPM, and so should you. Further, performing an unattended installation can help shorten the installation time.

Alternatively, take a look at our post on four confirmed tips to install Windows 11 on an unsupported CPU chip.

Was this guide useful to you? Don’t hesitate to comment in the section below and tell us what you think. Thanks for reading!

Windows 11 Boot Menu: Simple Steps to Open it

The boot options are a safe zone in the Windows 11 system and can help you recover from the majority of the software issues.

You can back up your files, boot into Safe Mode, uninstall faulty updates and restore your Windows 11 system to a previous secure point.

In this article, if you’re a new user, we’ll show you where to find the boot options in Windows 11. It’ll help you easily navigate your settings and save your system in case of any mishaps.

How can the boot options help you in Windows 11?

The Recovery mode or the Troubleshooting mode in Windows gives you access to all the options to restore or repair your windows, booting options, and a lot more.

Essentially, the advanced boot settings allow you to troubleshoot your system

As you can see from our screenshot, this mode helps you troubleshoot your system or reset your PC to factory settings.

Actually, the Recovery mode in Windows 11 is the same as the one from Windows 10 and it comes with the following functions:

  • Startup Repair – A way to check any Windows startup issues
  • Safe Mode booting – It is very useful when you need to boot your system without loading all the Startup software and troubleshoot third-party software interference
  • System Restore – This feature is useful for restoring your system to a previous restore point
  • System Image Recovery – If you have a system backup file, you have the option of restoring your system using it
  • Command Prompt – Advanced users can launch Command Prompt for command-line troubleshooting

For more information on what these Windows 11 recovery methods are intended to do, check the Microsoft page on the subject. If what you truly want to do is just enter it, all you have to do is follow one of the below methods.

How can I access the boot settings in Windows 11?

1. Use Windows 11 Settings menu

  1. Press the Windows key and open Windows Settings from the menu.
    Open windows settings option
  2. Select System settings and click on Recovery settings.
    Windows recovery settings
  3. In the Advanced startup option click on Restart now.
    Windows advanced startup options
  4. Your system will now restart into the boot settings.

2. Use the Windows Start menu

  1. Press the Windows key and click on the Power button in the bottom right corner.
    Windows settings power button
  2. Hold the Shift key and select the Restart option.
    Windows restart option menu
  3. Your system will bypass the traditional restart and boot into advanced startup options.

3. Using Windows Quick links.

  1. Press Windows Key + X together. You’ll see a pop-up window with various options.
    Windows quicklink menu
  2. Move your cursor on the Shut down or isgn out option.
  3. Press and hold the Shift key and click on the Restart option.
    WIndows quick link restart

4. Use Command Prompt

  1. Press the Windows key and type command prompt. Click on the Run as administrator option.
    Windows command prompt menu
  2. Select Yes in the pop-up window that appears. It’ll now open the Command Prompt in administrator mode.
  3. Type the following command in the window and press Enter. shutdown /r /o /f /t 00
    Windows boot menu command
  4. After executing the command, your system will restart the Windows 11 boot settings.

5. Use the reagentc command

  1. Press the Windows key and search for the command prompt. Click on the Run as administrator option.
    Windows command prompt menu
  2. Select Yes in the pop-up window that appears to open the command prompt in administrator mode.
  3. Type the following command in the window and press Enter. reagentc /boottore
    Reagent command
  4. You’ll get a confirmation informing you that the operation was successful.
  5. Restart your Windows 11 from the power menu, and you’ll enter the boot settings.

6. Hard Reset your Windows system

  1. Press and hold the Power button of your PC till the system reboots.
  2. Once you see the Windows logo on the screen, press and hold the Power button again to restart Windows.
    windows loading screen
  3. Repeat the steps till your Windows 11 enters the boot settings.

7. Use a bootable Windows 11 installation media

  1. Prepare a bootable USB drive for Windows 11.
  2. Switch off your PC and insert the USB drive into your PC.
  3. Power on your PC, and you’ll see a Windows setup pop-up window.
  4. Select the Repair your computer option in the bottom left corner. Your system will boot into its advanced settings option.

If your PC is not booting from the USB drive, check the following solution on how to change the boot order.

How to change the boot order on my PC?

If you want to boot from another source, like your USB, DVD, or another drive it’s not enough to get into the advanced booting options, you will have to access your BIOS.

There is an option for that in the Recovery mode and we will explain how to do that here:

  1. After you get into Recovery mode using any of the methods described above, click on Troubleshoot.
  2. Select Advanced options.
  3. Now, click on UEFI Firmware Settings.
  4. This will take you to your BIOS. Switch to the Boot tab and under Boot Option Priorities, and follow the instructions to change the boot priority to another source.
  5. Next, go to the Exit tab, then choose Save and Exit, and press Enter.

Having trouble getting the OS chooser at startup after changing BIOS priorities? Enable Windows Boot Manager to show the menu and streamline access to recovery and boot options.

If you need more information on this procedure, read our guide on how to change the boot order in Windows 11.

However, sometimes, this is not enough, and when you exit the BIOS, you will find out that the PC is still not booting from the drive you specified.

In this case, we have another article on what to do if Windows 10/11 PC ignores boot order to sort this out for good.

That’s it. You can now easily find all the settings you need to get your system up and running again.

There are various options in the Windows 11 boot settings that you can use to fix any issue or recover your system to a working condition again.

For more questions or suggestions, access the comments section below and leave us a note. Your opinion counts!

Can’t Access iPhone Photos on PC: 7 Easy Ways to Open Them

Apple and Microsoft are the market pioneers and have revolutionized it in the last few decades. But the integration between the two has been a troublesome affair for users. One such problem is when users can’t access iPhone photos on a Windows PC.

The issue has long been present, with many reporting that Windows 11 is not recognizing the iPhone. And there are no sure-shot solutions to the problem since it all boils down to the underlying cause. So, let’s first find out why you can’t view iPhone photos on Windows!

Why can’t I see iPhone photos on a PC?

Here are a few reasons you can’t open iPhone photos on a PC:

  • Improper connection: This is one of the most common reasons you can’t view photos on an iPhone from a PC. It could be a damaged cable, a malfunctioning port, or a loose connection.
  • Outdated drivers: For any device to work efficiently, the PC should have updated drivers. If outdated drivers are installed, you will encounter similar issues every now and then.
  • Missing permissions: You need to trust the computer and allow it to access files to view photos on the PC.
  • No photos on iPhone to import: In some cases, users realized that there were no photos stored on the iPhone, probably due to syncing with iCloud or when the device is new.
  • Incompatible iTunes app: Running an older version of the iTunes app or one not meant for the installed OS can also trigger issues when connecting your iPhone to a Windows PC.

What can I do if I can’t access iPhone photos on PC?

Here are a few preliminary checks and quick tricks we recommend you try first:

  • Make sure the iPhone is unlocked when you connect it to the Windows PC.
  • Disconnect the cable from the two, restart both the iPhone and the PC, and then connect them again.
  • Use a different USB cable or plug it into another port on the PC since it could be a malfunctioning port or damaged cable to blame when you can’t access iPhone photos on the PC.
  • Check the Photos app on the iPhone and make sure the photos you are trying to access or import are available there.
  • Install any pending Windows update since there was a bug in the OS that prevented users from accessing photos on the iPhone, and a patch for it is expected.

If none work, move to the solutions listed next.

1. Allow the PC to access photos and videos

When faced with the issue, most users realized that the PC never had permission to access photos on videos on the iPhone. They often overlooked the prompt that appeared.

So, when you connect your iPhone to the PC, tap on Allow or Trust in the prompt and enter the passcode to confirm.

The prompt appears when you have the device unlocked while connecting and is vital to access iPhone photos on the PC.

2. Use a media manager and set the downloader to open automatically

Adobe Bridge software is a powerful media manager that you may have used before. However, has it occurred to you that the quickest solution to your issue resides in downloading it to your computer?

Well, Bridge is mostly known for its flexible batch processing features, drag-and-drop file flexibility, and quick organization and stacking of panoramic and HDR images.

Installing it is a job of mere seconds, so there’s nothing stopping you. Then, set it, so the downloader opens automatically when you plug in your iPhone.

If iPhone is not showing up in File Explorer, Adobe Bridge might be a great alternative, so be sure to try it out.

3. Authorize the computer

  1. Launch iTunes, click on the Account menu, hover the cursor over Authorizations, and select Authorize This Computer.authorize this computer to fix can't access iphone photos on pc
  2. Enter the Apple ID and password in the provided fields, and click Authorize.credentials
  3. Wait for the confirmation to appear.confirmation

When you can’t access or import iPhone photos on the PC, try authorizing the computer to acquire the missing permissions and get things in order.

4. Reinstall iTunes

  1. Press Windows + R to open Run, type appwiz.cpl in the text field, and hit Enter.appwiz.cpl
  2. Select iTunes from the list of apps here, and click Uninstall.uninstall to fix can't access iphone photos on pc
  3. Follow the on-screen instructions to complete the process.
  4. Once done, open Microsoft Store, search for iTunes, and click the Get or Install button to download the app.itunes
  5. Launch iTunes, and now connect the iPhone to the PC.

Often an incompatible or outdated version of iTunes could be responsible when you can’t access iPhone photos on the PC, and simply doing a fresh install of the latest version should do the job.

5. Check the iPhone settings

  1. Tap the Settings icon on your iPhone.settings
  2. Scroll down and select the Photos app.photos
  3. Go to Transfer to Mac or PC settings, and select Keep Originals.keep originals to fix can't access iphone photos on pc

6. Use the Photos app

  1. Connect your iPhone to the PC using a functional USB cable, and allow the PC to access photos on the device.
  2. Open the Photos app on your PC, click the Import option at the top, and choose your iPhone from the list.photos app to fix can't access iphone photos on pc
  3. Wait for the photos to load.loading
  4. Now, either select the ones you want to import or tick the Select all checkbox, and then click on Add.select all
  5. Choose the folder where you want to add the photos, and click Import.import to fix can't access iphone photos on pc
  6. The import process will start right away.

If you can’t access iPhone photos on the PC, using the Windows Photos app to import them should work. It’s a quick and seamless way to import iPhone photos, and you wouldn’t have to rely on File Explorer again.

7. Reinstall the Apple Mobile Device driver

  1. Press Windows + X to open the Power User menu, and select Device Manager from the list.device manager
  2. Expand the Universal Serial Bus devices entry, right-click on Apple Mobile Device USB Device, and select Uninstall device.uninstall device to fix can't access iphone photos on pc
  3. Tick the checkbox for Attempt to remove the driver for this device, and click Uninstall.attempt to remove the driver for this device

When nothing else works, a driver issue is likely the culprit when you can’t access iPhone photos on the PC. If reinstalling it doesn’t work, you can manually install the latest driver version to get things up and running.

If the problem persists, you can use a reliable PC to iPhone file transfer app to seamlessly import photos.

Users who have fixed the issue with alternative methods can share their resolutions below.

Mouse is Lagging When Downloading on Chrome: 7 Best Fixes

Problems with the mouse are common in Windows, and fixing them is usually simple. But, there are cases when things go beyond our imagination, and one can’t exactly pinpoint the issue. Mouse lagging when downloading on Chrome is one of these cases.

Here, while the mouse works fine throughout, as you soon start to download a file on Google Chrome, it will lag and stutter. We went through a lot of such posts by users, and most of the solutions listed there don’t really help.

So, we present to you the best of these to help eliminate mouse lag with Chrome when downloading. Read the following sections to find out all about it.

Why does my mouse lag when downloading on Chrome?

The most common reason behind the problem, though most users fail to identify it, is interference between the mouse and the wireless network. Your router and wireless mouse may both be on 2.4 GHz, and this leads to interference.

Other than that, the problem may lie with the mouse or Google Chrome. Outdated drivers, misconfigured settings, hardware acceleration, or even sluggish system performance may cause mouse lag when downloading on Chromebook.

Some models of mice too can lead to the problem, due to a hardware or compatibility issue. But that should be the last thing you check since replacement is the only viable solution here.

So, now that you have a basic understanding of the underlying causes, let’s walk you through the most effective fixes for mouse lagging when downloading on Chrome.

What do I do if my mouse is lagging when downloading on Chrome?

1. Check for interference (wireless mouse)

If the mouse is lagging when downloading large files on Chrome, it could be interference. Since large files lead to more wireless communication, the interference between the two signals increases, thus resulting in lag.

The first step is to identify if it is indeed the inference to be blamed. To do that, connect to the 5 GHz band on your router to avoid interference between the Wi-Fi card and the dongle, though every router may not support it.

Or, you can use a wired mouse and check if the lag goes away. If yes, reconnect the wireless mouse, but this time, make sure to keep the wireless adapter and the dongle at a little distance. For instance, if the wireless adapter is placed at the back, plug in the mouse’s dongle to the front of the CPU.

In case the problem persists with a wired mouse, you are encountering it on a laptop, or it’s the touchpad and not an external mouse, try the methods listed next.

2. Terminate background processes

  1. Press Ctrl + Shift + Esc to launch the Task Manager, and locate the high-resource consuming programs and processes here.Task Manager
  2. Once done, right-click on these individually, and select End Task from the context menu.End Task to fix mouse is lagging when downloading on chrome

Now, check if the mouse lagging when downloading on Chrome on a PC problem is resolved. Also, remember not to terminate any critical process since it might affect the functioning of the OS. If you find one that you are unsure about, search the web for it.

3. Update the drivers

  1. Press Windows + S to launch the Search menu, enter Device Manager in the text field at the top, and click on the relevant search result.Device Manager
  2. Double-click on the Mice and other pointing devices entry.Double-click to fix mouse is lagging when downloading on chrome
  3. Locate the problematic mouse, right-click on it, and select Update driver from the context menu.Update driver to fix mouse is lagging when downloading on chrome
  4. Next, select Search automatically for drivers from the two options that appear here.Search automatically for drivers
  5. Wait for the best driver on the computer to be installed for the mouse.

Outdated drivers are just likely to cause mouse lagging when downloading on Google Chrome on a laptop. Other than the mouse driver, also make sure to update the graphics driver.

In case the Device Manager method doesn’t work, you can try to manually install the latest driver version in Windows. Also, remember to check the official manufacturer’s website in case it’s the Logitech mouse lagging in Windows 10.

To minimize mouse lags in Windows 10, make sure you’re running the most recent versions of your peripheral drivers.

There are third-party tools, such as Outbyte Driver Updater, that can search and install suitable drivers automatically for you. With a few clicks, the program will scan your PC’s hardware and peripherals for potential driver changes.

Outbyte Driver Updater’s download manager indicates download progress, and the driver backup feature allows you to back up drivers and install missing peripheral drivers even while you’re not connected to the internet.

⇒ Get Outbyte Driver Updater

Once done with the update, verify if the problem is fixed. If not, head to the next method.

4. Turn off hardware acceleration in Chrome

  1. Launch Google Chrome, click on the ellipsis near the top-right corner, and select Settings from the flyout menu. Alternatively, you can press Alt + E and once the flyout menu appears, hit S to directly open the Settings.Chrome Settings
  2. Now, click on Advanced in the navigation pane on the left to expand and view the other tabs.Advanced
  3. Select the System tab.System tab to fix mouse is lagging when downloading on chrome
  4. Now, click on the Use hardware acceleration when available toggle to disable it.Disable toggle to fix mouse is lagging when downloading on chrome
  5. Click on the Relaunch button to restart the browser for the changes to fully come into effect.Relaunch

If the mouse is lagging when downloading on Chrome, there’s a good chance that hardware acceleration has got something to do with it. Though it’s meant to boost the performance, the feature can sometimes be counterproductive, and disabling it should help.

5. Limit the download speed for Chrome

  1. Open Google Chrome, click on the ellipsis near the top-right, hover the cursor over More tools in the flyout menu, and select Developers tools. Alternatively, you can hit Ctrl + Shift + I to launch the tool.Developers tools to fix mouse is lagging when downloading on chrome
  2. Next, click on the Settings icon at the top of Developers tools.Settings
  3. Select Throttling from the list of tabs on the left.Throttling to fix mouse is lagging when downloading on chrome
  4. Click on the Add custom profile button.Add custom profile
  5. Now, enter the details here as per your Internet plan, but make sure to choose a lower speed, and click on Add. Also, check the units and accordingly enter the speed.Add to fix mouse is lagging when downloading on chrome
  6. Once you have created a custom profile, all you have to do now is enforce it before starting a download. To do that, open a new tab, and before entering the address for the website, hit Ctrl + Shift + I.
  7. Now, click on the arrow and select the Performance tab.Performance to fix mouse is lagging when downloading on chrome
  8. Finally, click on the Network dropdown menu, and select the profile you created earlier from under Custom.custom profile

Once done, the new speed limit would be enforced. Now, verify if the mouse is lagging when downloading on Chrome, which it most likely shouldn’t.

Also, if you need help choosing the right speed to enter here, check your Internet speed, and then set a figure lower than that for the custom profile.

6. Reinstall Goole Chrome

  1. Press Windows + R to launch the Run command, enter appwiz.cpl in the text field, and either click on OK or hit Enter to launch the Programs and Features window.appwiz.cpl
  2. Locate Google Chrome from the list of applications here, select it, and then click on Uninstall.Uninstall to fix mouse is lagging when downloading on chrome
  3. Follow the on-screen instructions to complete the process.
  4. Once done, restart the computer, and you can now safely download and install Google Chrome.

If the problem lies with Google Chrome and has been there since the very start, there could an issue with the installation. In this case, reinstalling Google Chrome should do the trick. This will also be evident if Chrome is lagging and freezing all the time.

7. Purchase a new reliable mouse

If none of the methods listed here have worked, the fault lies with your mouse. So, purchase a new reliable mouse, connect it to the computer, and the problem should be fixed. And if possible, go with a wired mouse since there is no interference with it.

After following the seven methods listed here, the mouse lagging when downloading on Chrome problem should be resolved.

Also, find out what to do if the cursor jumps, freezes, or disappears in Windows since many users have reported encountering this issue. Besides, check the effective fixes for mouse lagging in Windows 11.

If you have any other queries or know of a method that’s not listed here, drop a comment in the section below.

How to Fix Could Not Connect to Steam Network Error

Steam is a must-have for PC gamers, as it is one of the most well-known platforms for purchasing and playing games. However, it can malfunction from time to time resulting in errors such as the Could not connect to Steam network one that we will address today.

There are thousands of games to pick from, and you can even share games with your friends, so it will be simple to accumulate a large game library using the Steam platform.

In addition, network problems manifest themselves in a variety of ways, including choppy video conversations, slow application or network speeds. Or even delayed downloads, poor quality, and no Internet connection.

However, every error has a solution, and we found 6 methods in which you can solve Steam connection errors. Follow along as we will first see why Steam is not connecting, then jump into the list of solutions.

Why is Steam not connecting?

Occasionally, network difficulties can be caused by broken hardware, such as routers or switches. Or by unanticipated usage patterns. Such as network bandwidth surges, and changes in the application configuration.

However, the error thrown by Steam could also be caused by their servers or security breaches that they have encountered.

Troubleshooting network issues can be time-consuming, and if left untreated, they can have severe effects on your computer.

Furthermore, to prevent this from happening, it is critical to understand what might go wrong with your network and to regularly monitor network performance.

In what systems does Could not connect to Steam network error occur?

User reports show that today’s error is not specific to a certain Windows iteration. But that it shows in multiple systems such as the following:

  • Could not connect to Steam network in Windows 10 – Don’t worry as the methods in which you can fix the problem presented below will be similar to apply in this OS iteration as well.
  • Could not connect to Steam network in Windows 11 – The solutions below have been showcased in Windows 11, so you can follow the steps easily.
  • Could not connect to Steam network when using Mac – For those who have encountered it on their Mac computers, we recommend that they reinstall Steam and make sure their network connection is stable.
  • Could not connect to Steam network when using Linux – The same goes for Linux users. Additionally, check whether your firewall or antivirus software doesn’t cause any issues.

This being said, let’s see how you can fix the network connection issue and get back to playing your favorite Steam games. Keep on reading!

How can I fix the Could not connect to Steam network error?

1. Troubleshoot your network connection

  1. Begin to restart your router (make sure you unplug the power cord and leave it for 30 seconds switched off).
  2. Open a new Command Prompt window by clicking on the magnifying glass icon from your Taskbar. Then typing cmd inside it.cmd-run could not connect to steam network
  3. Now type or copy-paste the following commands one by one and press Enter after each: ipconfig/release ipconfig/all ipconfig/flushdns ipconfig/renew netsh winsock resetipconfig-cmd could not connect to steam network
  4. Once the processes are done, restart Steam to see if it works now.

2. Ensure that your network driver is up-to-date

  1. Right-click your Start icon from the Taskbar and choose Device Manager.device-man could not connect to steam network
  2. Expand the Network adapters category and right-click on your network adapter in order to choose Update driver from the context menu.network-update could not connect to steam network
  3. Next, restart your computer after you have updated it in order to make sure the changes are applied. Then test Steam to see how it behaves.

Alternatively, you could head to your network adapter’s official website and try to find the latest drivers for your device.

After you’ve updated your drivers, check to see if you have any pending Windows updates. If so, let them download and apply them.

Moreover, if your system is up to date, then there is a high likelihood that the Could not connect to Steam network error message will disappear.

An outdated or damaged network adapter driver may interfere with your network connection and slow down your download rates.

Another approach to increase your download speeds and avoid the Could not connect to steam network error is to automatically and safely update or reinstall your network adapter driver.

If manually looking for network adapter drivers seems tedious, and you want to avoid any damaged registry entries, we recommend using Outbyte Driver Updater automated driver installer and updater.

A driver updater, such as Outbyte Driver Updater, ensures that drivers are updated and prevents PC harm caused by installing the incorrect network adapter driver version.

3. Reinstall Steam

  1. Back up the Steamapps directory if you want to save all your installed games.
  2. Next, open Settings by holding Windows + I together and go to Apps followed by Apps & features.apps-apps&features could not connect to steam network
  3. Search for the Steam app, then click on the three-dotted menu and choose Uninstall.steam-uninstall could not connect to steam network
  4. Head to Steam’s website to download and reinstall their app and test it again.

4. Check your firewall

  1. Open Windows Security by typing its name inside the Windows Search function and clicking on the topmost result.windows-security-search could not connect to steam network
  2. Go to Firewall & network protection and select the Allow an app or feature through Windows Defender Firewall option.allow-appp could not connect to steam network
  3. Find Steam in the list and make sure the box next to it is ticked then click on OK.

5. Disable VPN / use split tunneling

If you are running with a VPN, pause it and try starting Steam again. In case your VPN caused a conflict with Steam, it could be the very cause for the Could not connect to the Steam network error.

In this case, you can either pause the VPN and check if Steam behaves normally, or use split tunneling.

Split tunneling is an awesome feature that allows you to exclude certain apps or services on your PC from the VPN tunnel.

Therefore, if you add Steam to the exclusion list and the VPN is indeed causing the error, you might even get away with not disabling your VPN.

A good example of a split-tunneling-ready VPN service is Private Internet Access. Using this proficient VPN solution, you have firm encryption for your network. Plus infinite servers you can choose from to avoid network errors on your Steam service.

6. Start Steam using TCP

  1. Use Task Manager by pressing CTRL + SHIFT + ESC to close all Steam processes which are currently running under the Details tab.details could not connect to steam network
  2. Head to the location of Steam in File Explorer. Or if you have a shortcut of it on your Desktop, go there and right-click on it to choose Properties.steam-prop could not connect to steam network
  3. In the Target field, add -tcp at the end, after the quotation marks, and click OK. Start Steam again to see if the Could not connect to Steam network error is gone.tcp could not connect to steam network

The solutions provided above should fix the Could not connect to Steam network error without too much effort.

However, if you need further assistance, check out our post on 3 quick ways to fix the Steam no Internet connection error.

Alternatively, take a look at how to prevent the Internet from disconnecting in Steam while playing a game that needs an online connection.

Let us know in the comments section below which method worked best for you and how easy it was to apply it. Thanks for reading!

We Couldn’t Update the System Reserved Partition [Windows 11 Fix]

When updating Windows 11 or upgrading from Windows 10 to Windows 11, you might encounter the error We couldn’t update system reserved partition.

This might be accompanied by error codes 0xc1900104, 0x800f0922, or 0xc1900201.

What is causing the System Reserved Partition error?

This may be caused by a full System Reserved Partition (SRP) that can’t be written into anymore.

Additionally, some third-party security and antivirus applications write into the SRP and can quickly fill it up. Dual-booting with Linux could also be the reason for the error.

Also, if you are running a new Legacy install, bypassing the Windows 11 requirements, you may have a System Reserved Partition with only 50 MB, too small.

What is the Function of the System Reserved Partition?

The SRP is a hidden partition in the system drive that contains crucial boot and system recovery information.

The data includes boot manager code and boot configuration data as well as the startup files used for BitLocker Drive Encryption. In Windows 10, recovery environment data is also stored in this partition.

Note icon NOTE
Tampering with the System Reserved Partition might require advanced skills using the command line. Any incorrectly entered commands might result in a no-boot situation and potential data loss on the device.

What can I do if Windows 11 couldn’t update the system reserved partition?

1. Find out what is your partition type

  1. Right-click the Start button and select Disk Management from the list.
  2. Now, right-click your main partition and select Properties.
  3. Click on the Volume tabs and you should see the Partition style on the list. In this case, it’s GPT.

Although usually, you can only install Windows 11 on a GUID Partition Table (GPT), it is possible to do that on MBR.

That’s why we first need to check what we’re dealing with because the solutions for the two cases are slightly different.

2. Delete the font files

2.1 For GUID Partition Table (GPT)

  1. Click the Start button, type cmd, and select Run as administrator.
  2. Type the following command to assign drive letter Y to the System Partition and press Enter: mountvol y: /s
  3. Type Y: and press Enter to switch to the Y drive.
  4. Navigate to the Fonts folder by typing the following command: cd EFI\Microsoft\Boot\Fonts
  5. Then, delete the font files therein using the following command, followed by Enter: del *.*
  6. Type Y if prompted by the system to continue the deletion of the files.

Apparently, by removing the fonts, you should now have enough space in the SRP to continue with your upgrades or installation.

2.2 For MBR (BIOS)

  1. Right-click the Windows button and choose Disk Management from the list.
  2. Right-click the System Reserved Partition, select Change Drive Letter and Paths and press Add.
  3. Choose Y as the drive letter and finally click OK to apply the changes.
  4. Next, click the Search icon, type cmd, and click on Run as Administrator from the resulting overlay menu.
  5. Type Y: and press Enter to switch to that drive.
  6. Type the following command to change the folder to the Fonts: cd Boot\Fonts
  7. Paste the following command to recover access privileges to files in the folder: takeown /d y /r /f
  8. Then, save the permission to the drive by pasting the following command and pressing Enter: icacls Y:\* /save %systemdrive%\NTFSp.txt /c /t
  9. To display the name of the current user account type whoami then press Enter.
  10. To grant access to the user type the following command and press Enter: icacls . /grant <the username you got from whoami>:F /t
  11. Delete all files in the folder by typing the following command and pressing Enter: del *.*
  12. To restore permissions, type in the following command and press Enter: icacls Y:\ /restore %systemdrive%\NTFSp.txt /c /t
  13. Then, revert the access control list (ACL) to the system by typing the next command and pressing Enter: icacls . /grant system:f /t
  14. Lastly, hand ownership of the drive back to the System by pasting the following command and pressing Enter to run it: icacls Y: /setowner “SYSTEM” /t /c

The System Reserved Partition should now have more free space. You can confirm this by checking the Disk Management console, where you should then proceed to remove the drive letter.

To remove the Y drive letter, right-click the System Reserved Partition in the Disk Management tool and select Change Drive Letter and Path just like you did within the solution.

But this time, choose the Y: drive, and select Remove, then click OK to save the changes.

Restart the computer (if needed) and proceed with your upgrade or update. The error We couldn’t update system reserved partition should be gone.

3. Extend the System Reserved Partition with third-party Software

If you find the above method daunting, then third-party tools like the MiniTool Partition Wizard and AOMEI’s Diskpart can help solve the problem.

Such tools avail graphical interfaces and near-one-click operations to carry out the various fixes.

In particular, the MiniTool Partition Wizard clearly shows the partition style and other relevant properties for each partition.

Whether it’s a GPT or MBR disk, the software includes intuitive tools to help you extend or shrink the partitions. Just be sure to follow their documentation to the letter.

Note icon NOTE
On some third-party partition management tools, GPT disks may be displayed as EFI system partitions (ESP).

In a nutshell, these tools help you shrink the main C: drive and extend the System Reserved Partition with the resulting Unallocated Space.

As a last resort, you might want to consider performing a clean install of the affected Windows version.

Essentially, a clean install resets the hard drive and creates a fresh System Reserved Partition out of the main system drive. Remember to back up all your data before proceeding with a fresh install.

Xbox services suffered multiple outages this past weekend

The Xbox Network experienced a major outage over the weekend that left users unable to access network features for at least a 12-hour period, with issues still being reported as of Monday. During the outage, which began early Friday, Xbox users were unable to purchase or launch many digital games or content. Users were also unable to use Xbox Cloud Gaming services or make subscription purchases such as for Game Pass or Xbox Live Gold. Some users reported being unable to access their accounts altogether.

The Xbox Support Team shortly addressed the issue and began to make fixes throughout the day, posting regular updates on its official Twitter account.

However, it wasn’t until more than seven hours later that Xbox Support declared the issues resolved…partially.

And it wasn’t for several more hours until Xbox Support announced that the outage had been remedied more than 12 hours after it began, though even as of Sunday there were users reporting network issues. (Those still experiencing issues at this point should try rebooting their Xbox console).

The event has led some to criticize how the industry uses Digital Rights Management (DRM) software, which in this case prevented players from accessing games they had purchased and installed on their consoles.


Microsoft “aware” of leaked Outlook for Windows, warns against using it & to wait for beta

Microsoft’s upcoming “One Outlook” client recently leaked online, and many people have already used the app, adding work or school Microsoft 365 accounts to it. However, it turns out that the IT admins that have to deal with the security issues of users emailing with an unfinished app aren’t exactly pleased with this. That’s why Microsoft has issued a warning in the Microsoft 365 admin message center catered around the new Outlook for Windows (via Tero Alhonen/ Twitter.)

Titled MC376710, Microsoft’s warning message mentions that some users might have accessed an unsupported early version of the new Outlook for Windows. The message goes on to mention that this early version is “missing some of the features” and enhancements that will be coming later in the Beta Channel.

Microsoft even goes as far as to encourage customers to wait for a beta version to be released, mentioning timeframe for a specific release date. “We expect to provide more news in the coming weeks about our Beta release,” mentions the company.

In the meantime, Microsoft is providing some instructions on what IT admins can do to block users from connecting Microsoft 365 accounts with the leaked app. It involves preventing syncing, but not preventing downloads. This can be done for either a single user or the entire organization. 

All that said, it definitely seems as though a more polished version of the One Outlook app could be on the way soon. But, for now, it might be best to avoid using the app and causing your IT admin headaches. With Build 2022 now just a couple of weeks away, we won’t be surprised if we hear more about the app then or get an official beta client

How to Add Browser Source to OBS Studio [Step-by-step]

The software is a screencasting and live streaming application that is free and open-source. Thus, today we will show you how to add browser source to OBS Studio. So that you can get the best out of the app’s interface. But if you need help downloading OBS Studio, check out our article

It is written in C/C++ and built with Qt. Thus allowing for real-time capture, scene composition, recording, encoding, and broadcasting over the Real-Time Messaging Protocol. RTMP-enabled destinations such as YouTube, Twitch, Instagram, and Facebook are all supported by the software.

OBS Studio can encode video streams into the H.264/MPEG-4 AVC or H.265/HEVC formats. By using the x264 transcoder, Intel Quick Sync Video, Nvidia NVENC, and the AMD Video Coding Engine.

Moreover, it has the capability of encoding several tracks of audio in AAC format. Those who are more experienced can download any codecs and containers offered in libavcodec and libavformat. Or they can send the stream to an FFmpeg URL of their choosing.

This being said, let’s see how you can get your sources, followed by how to add a browser source to OBS Studio.

How do I get browser source on OBS?

  1. In order to see the current browser source on OBS Studio, click on the Docks button at the top and select the Sources dock to show.docks how to add browser source to obs studio
  2. Now, you can double-click on the Browser source you already have and see all the settings that you can change.browser how to add browser source to obs studio
  3. You will also be able to see the URL of the browser that you had included.url how to add browser source to obs studio

Browser Sources can be added to your streaming software’s scenes to allow you to use web-based content. Such as Flash and JavaScript programs, websites, and so on, as well as edit them using CSS.

Everything that can be built to run in a traditional browser can be implemented directly into OBS (within reason, of course).

If you wonder how to add new sources, keep on reading as we will show you how to do so in the next section. Follow along!

How can I add browser source to OBS Studio?

Use the plus button

  1. Make sure that the Sources dock is selected under the Docks drop-down menu.docks how to add browser source to obs studio
  2. Now, click on the plus button under the Sources dock and select the Browser option from the list displayed.browser-dock how to add browser source to obs studio
  3. Enter the browser’s name that you want to add, then click on OK.browser-name how to add browser source to obs studio
  4. Finally, enter the URL of the browser that you want to display and configure its layout settings then click on OK.set-url how to add browser source to obs studio

A source that is listed above another source in the list will appear on top of the others and may obscure what is listed below it. Using this method can also be handy in cases where you want something to appear on top of another source, such as a camera appearing over your gameplay.

How does browser source work on OBS?

The main user interface is divided into five sections: scenes, sources, audio mixer, transitions, and controls. Each component has its own set of controls. Scenes are collections of different types of materials, such as live and recorded video, text, and audio.

It is possible to muffle sounds and alter volume with virtual faders on this panel. As well as add effects by hitting the cogwheel adjacent to the mute button.

There are buttons for starting and stopping a broadcast or recording, along with a button to change OBS into a more professional Studio Mode. A button to open the settings menu, and a button to exit the application on the control panel’s left side.

But, Scenes and Sources are the heart and soul of OBS Studio’s functionality. You can use this section to configure your stream layout and add your games, webcams, and any other devices or media that you want to appear in the output.

You can re-align sources in the preview and modify their order by dragging and dropping them in the list, or by using the up and down arrow buttons on your keyboard.

The browser source is one of the most versatile sources accessible in Open Broadcaster Software (OBS). This enables you to conduct a variety of unique layouts, images, videos, and even audio operations.

If you need help installing OBS Studio, don’t hesitate to follow the article linked and learn how to use it right away.

Alternatively, if you encounter issues while using OBS Studio, take a look at what to do if OBS keeps crashing in Windows 10 & 11.

Was this guide useful to you? Let us know by leaving a comment in the section below and sharing your thoughts. Thanks for reading!

3 Easy Tips to Fix This Email is Part of a Reserved Domain

Many Microsoft accounts can be managed with one main account. Although security improves when using input devices, Microsoft perceives changes as threats to an existing Microsoft account. 

Whether these changes are from Hotmail, Outlook, OneDrive, or adding a new account and something goes else goes wrong while trying to manage from the main account, Microsoft tries to be sure that your account is safe and they put in measures to cross-check these. 

However, these security measures do not stop you from setting up your email, so you can read them on multiple platforms.

Why am I getting This email is part of a reserved domain?

There are reasons why you would get this response if you are using a Windows domain. Some of the reasons are:

  • You used a third-party domain email address to create a Microsoft account
  • Chances are you deleted your Hotmail account and wanted to migrate to Outlook
  • You deleted an account from a computer and would like to add it back as a new user
  • You want to manage all your Microsoft accounts from one mailbox

If the case is any of these, here are things that you can do to fix this issue and stop receiving this response.

What can I do when seeing This email is part of a reserved domain?

1. Create an alias account

  1. Go to Gmail.
  2. Click on Create an account.
  3. Enter your phone number on the signup form and then click on Next.
  4. A verification code will be sent to the phone number provided.
  5. Another form asking for your personal information will appear, fill that up.
  6. Review the privacy policies and click on agree.
  7. Your Gmail will be created. 

To create an alias account that can work without any hitch, create an account that isn’t a Microsoft account. This is because you cannot set up an active Windows account as an alias for another Microsoft account, or you risk a This alias cannot be added to your account error.

Using a Google or Yahoo account as an alias account is best. Also, you cannot use a third domain that is registered in Windows Live Admin as an alias account. 

Now that you have created an alias account that is not linked to a Microsoft account go back to the tab and type in the Gmail account. The good thing is that you can use the same password for your alias account, and all your information, contacts, and messages are synced.

2. Use your domain name with outlook.com

  1. Login to your Microsoft account.
  2. Click on Your Info.
  3. Click on Manage your sign-in email or phone number.
  4. Enter your already existing password.
  5. Click on add email.
  6. Enter your email address using your domain name and @outlook.com.

This should work just fine. With this method, all your contacts are synced, and the primary email is picked up. You do not lose any vital information as all the settings and OneDrive files are also synced across. 

It could be that it allows you to log in with account.live.com, on another computer, and on your OneDrive. However, when you add it as a new user on any computer, you will keep getting: The email is part of a reserved domain. Please enter a different email address as a response. 

This could be because the account you are trying to use is registered on a custom domain. For this, you can use an alias with outlook.com.

3. Avoid unnecessary third party emails

  1. Open Outlook.
  2. Sign in with your existing Hotmail account.

You want to stop getting the error: Email is part of a reserved domain response, and you do not want to get an alias from Google or Yahoo. Having other aliases not linked to Microsoft doesn’t make sense when you have decided to use Microsoft emails. 

Using Windows Live Mail allows you to use Outlook to create an alias account, which means you are using a Microsoft account as your alias account and not a third-party email.

Outlook also allows you to send and receive emails from other POP accounts. You can have up to 15 aliases with a maximum of 5 per year, and you can receive emails from all the aliases and access them with only one inbox. 

It is important to note that if you have permanently deleted your Hotmail address, it cannot be reverted or reused. You can also not use it as an alias because it is already part of a reserved domain. The reversal from Hotmail is not possible because Hotmail has migrated to Outlook.

Many users have wondered why they have to use aliases when trying to access their Microsoft account in cases when they upgrade or try to manage from one mailbox, and Microsoft has explained that it is a matter of security. 

When users complain, Microsoft has explained that linked accounts aren’t safe if one is hacked. And this is why they advise that aliases are better when they are third-party email accounts like Google or Yahoo.

Windows 11 Kiosk Mode: What is it & How to Use it

It has been a long time since Windows has had a feature called Kiosk mode, which changes a regular device into a single-purpose device that can only run one application. Thus, today we will show you how to set up Kiosk mode in Windows 11.

The most common application for this feature would be to set up an internet-accessible computer as a kiosk machine for guests to use to access the Internet. Or fill out an application, and convert an existing device into an interactive digital sign to demonstrate a product or promote a business to customers.

Follow along as we will show you how to enable and disable Kiosk mode in Windows 11, right after we see in more detail what it is and how it works.

What is Windows Kiosk mode?

Windows enables you to create fixed-purpose devices like ATM machines. Or point-of-sale terminals, medical devices, digital signs, and kiosks using the Microsoft Azure platform.

Using Kiosk mode on these fixed-purpose devices, you may provide a dedicated and locked-down user experience to your customers.

Kiosk capabilities (Source: Microsoft)

In order to provide a more secure environment for public or specialized usage, Windows provides a number of various locked-down experiences. Including assigned access single-app kiosks, assigned access multi-app kiosks, and shell launchers.

Depending on the kiosk configuration, either assigned access or a shell launcher is used. In accordance with your responses to the following questions, you can select from a variety of different kiosk configuration approaches.

Alternatively, if you only want a single program running on your kiosk that anybody can see or use, consider an assigned-access single-app kiosk that runs either a Universal Windows Platform (UWP) app or a Windows desktop application.

Keep on reading our Windows 11 Kiosk mode guide to learn how to enable and disable it whenever you want.

How can I enable & disable Kiosk mode in Windows 11?

1. Enable it from Settings

  1. Hold Windows + I to open the Settings app and go to Accounts followed by Family & other users.account0family windows 11 kiosk mode
  2. Under the Set up a kiosk section select the Get started button.get-kiosk windows 11 kiosk mode
  3. Enter the name of the kiosk then click Next.name-next windows 11 kiosk mode
  4. Select the app that you want to use in the Kiosk mode then click on Next and continue with the configuration settings.
  5. After you complete the steps, sign out of the primary account then sign in with the Kiosk account to enter the mode.

Using the CTRL + ALT + DEL keyboard shortcut will bring up a menu of alternatives for exiting the session. Such as shutting down the computer, restarting the device, or signing in with another account.

Note that there is no Windows 11 Kiosk mode for multiple apps, as the feature is only available in Windows 10. If you need to use the multiple apps kiosk mode, check out how to roll back to Windows 10.

2. Disable it with your admin account

  1. Press Windows + I to access Settings and navigate to Accounts followed by Family & other users.account0family windows 11 kiosk mode
  2. Under the Set up a kiosk section select the Remove kiosk button. Once you’ve done this, the kiosk will be removed from your Windows 11 computer.


Does Windows 10 have a Kiosk mode?

Windows Kiosk mode is supported for Windows 10 Pro (there’s also Windows 11 Pro Kiosk mode), Enterprise and Education editions, and Windows 11. Kiosk mode is not available for Windows 10 Home edition devices.

However, there is a Kiosk mode in Windows 11 Home. If you decide to upgrade to it, don’t hesitate to use our guide on how to download or upgrade to Windows 11 as a reference.

For more information on the differences between Windows 10 and 11, take a look at our post on some of the features that were removed from Windows 11.

It is especially useful for locking down Windows 10 and 11 devices that are used for a specific purpose. Such as self-check-in kiosks at airports, point-of-purchase (POS) terminals at self-service restaurants, and digital signage used for advertising.

Moreover, it ensures that users cannot modify device settings and access other features or apps on the device. Or use it for purposes other than those for which it was intended.

Check out the five best kiosk software for Windows 11 / 10 to keep track of regular entrances, exits, and visits in your building.

Was this guide useful to you? Let us know by leaving a comment in the section below. Thanks for reading!
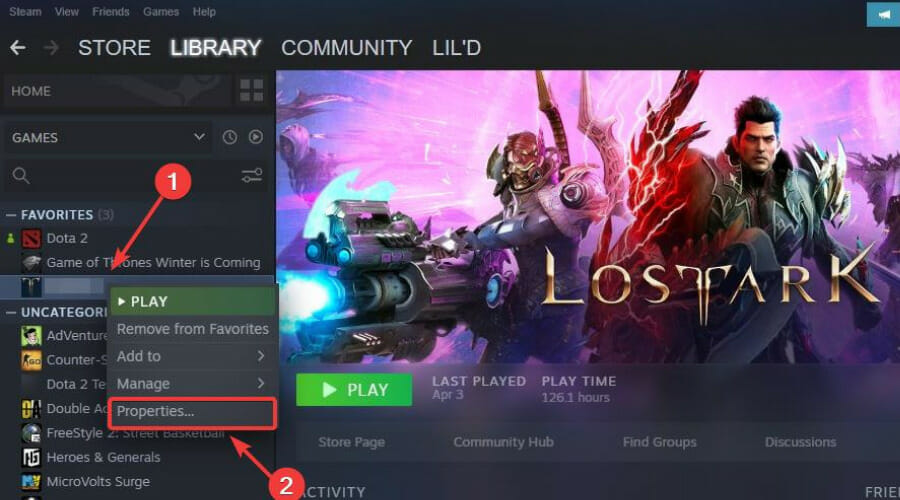
5 Ways to Fix Wacom Pen Pressure not Working

Artists, illustrators, and graphic designers say using the Wacom tab and pen is a more efficient work method that produces seamless results.

Even photographers adopt it as running your cursor with a mouse over an image can be less exciting than using a pen on a tab that gives a feeling of physical work. 

However, having a Wacom error or glitch and experiencing unresponsive pressure from the pen is not fun. The reason for getting the device in the first place is defeated if the user cannot use it.

Devices come with pressure sensitivity support, enabling the Wacom to connect with your laptop or PC.

Why is Wacom pen pressure not working?

  • Window ink disabled – chances are that there is no interaction between the Windows ink and the Windows software. 
  • The battery of the pen is too weak to function – face it, you may be too busy to notice the battery of your pen and how weak it may be. Between doing that great design for Disney or designing the next character for that big blockbuster movie, you may forget that your pen battery needs changing. Wacom pen lasts for five months and you may need to change it after that period.  
  • Dirt accumulated on the Wacom and pen is encountering interference – it may sound basic, but your Wacom may accumulate dirt over time, and this could interfere with the pen’s responses. 
  • Pressure capabilities not turned on – applications come with built-in support for pressure sensitivity. If this feature is not turned on in the application, your pen pressure may not work.
  • Faulty mouse or touchpad driver – if a part of your hardware is faulty like the mouse, it may interfere with the functionality of the pen pressure on the Wacom. Think of it this way, the function that your mouse is to do is what your Wacom is doing with all the extra features. If the mouse is not functional, your device interprets Wacom as your mouse. You don’t want this either, because it robs you of all the other functionalities. 
  • Missing or outdated Wacom driver – the Wacom driver you are currently using may be outdated, and you may have to update the drive. If the driver is not updated, the pressure pen will not function.
  • A lack of synchronization – you would think that when the software or Wacom driver is updated, there will be synchronization with the software, Wacom device, and your PC but it is not often the case.  

What apps support pen pressure sensitivity?

Here is a list of apps that support pen pressure sensitivity. And because they do, you may also experience a lack of pen sensitivity or lack of pen pressure, when there is an error.

  • Adobe Photoshop – the error in Adobe Photoshop shows up with a triangle warning box with a message that says: Pen sensitivity is not available.
  • Autodesk – in Autodesk, an error in pen pressure sensitivity occurs when the pen acts like you are using full pressure when you are not.
  • Corel – users experience errors in Corel in the form of a lag in the tab and an unsmooth drawing.
  • CLIP STUDIO PAINT PRO – pen pressure in the Clip Studio Paint PRO app often presents as a disappearance in the pen drawing visibility. Instead of pen drawing, it erases.
  • Boris FX Optics – users experience a lack of pen pressure in this app when light pressure is interpreted as heavy pressure when drawing.
  • Adobe Sketch – pen pressure error in Adobe sketch occurs when pressure is incorrectly interpreted. Light pressure is interpreted as heavy pressure, and heavy pressure is interpreted as light pressure.
  • Concepts – pen pressure sensitivity error in Concepts can be experienced when there is no fluidity in the lines drawn by the user.
  • MediBang Paint – users experience pen pressure in Medibang Paint, in the form of glitches.
  • Bamboo Paper – the error in pen pressure as experienced in Bamboo Paper often shows up in the pen causing a left click, instead of its actual function, which is to draw, illustrate or create on the tablet.

There are many ways to get your Wacom pen to work, depending on the software that is used at the time.

Several users have experienced difficulty in one rule fitting all the software. Still, there are basic things that you can do to fix your pressure pen not working, whether you are using Photoshop, Autodesk, or one of the programs mentioned above. 

How do I fix my Wacom pen pressure?

1. Inspect your hardware and software

  1. Inspect the battery of the pen.
  2. Check the connection of the Wacom to your device.
  3. Unplug the USB cable to the Wacom tablet and plug it in again.
  4. Change the portal and see if this works, and if it doesn’t, find a cable that works and ensure that it is properly plugged in. 
  5. Ensure that the pressure sensitivity of the software you are using is turned on.
  6. Open the Photoshop software.
  7. Click on the icon at the top right corner to get the right kind of pressure from your pen.
  8. Click on the other icon at the top left to control the opacity of the pen.
  9. Inspect the battery of the pen.
  10. Check the connection of the Wacom to your device.

Furthermore, use a towel and a cleaning detergent that contains 75% propyl alcohol and thoroughly wipe your Wacom tablet and the pen.

2. Enable window ink

  1. Go to Settings by clicking on the Windows key on your keyboard.
  2. Search for system icon, and click on the turn system icon on or off.
  3. Turn on the Windows Ink icon.

3. Uninstall the Wacom program from my PC or laptop

  1. Type the R and Windows button on your keyboard, to access the Run command system.
  2. In the tab, type in services.msc and click on Enter.
  3. Select Wacom professional services, right-click, and select the Restart option.
  4. Ensure that all the preferences you may have configured are backed up.
  5. Save and close all your work before you get started.
  6. Try to remember the username and password of your PC and keep it handy. 
  7. Click on the Control Panel and click on Programs.
  8. Go to Programs and Features.
  9. An option to Uninstall or change a program will come up.
  10. Select the Wacom tablet.
  11. Click on Uninstall.
  12. Restart your PC and type in your username and password.

There is another way to uninstall specific software or applications from your system entirely, and that is with professional tools.

iObit Uninstaller is the proper method to remove applications from your PC without leaving junk or registry entries behind.

4. Update the Wacom driver

  1. Visit the Wacom website.
  2. Click on Support.
  3. Go to Drivers & Software.
  4. Click on Drivers & Download.
  5. Confirm download.
  6. You may now start the installation.
  7. Accept the Terms and conditions.
  8. Then click on Restart.

Similarly, updating the driver also works when XP-PEN pressure is not working in Photoshop.

5. Revert the WinTab functionality

  1. Go to Settings by clicking on the Windows key on your keyboard.
  2. Unable Windows Ink.
  3. Disable Windows Ink from the drive.
  4. Go to a text editor and create a file. 
  5. Type in UseSystemStylus 0.
  6. Save the file name as PSUserConfig.txt.
  7. Follow these steps on your PC: Cdrive:\Users\[User Name]\AppData\Roaming\Adobe\Adobe Photoshop CC 2015\Adobe Photoshop CC 2015 Settings
  8. Put (copy) the file into the Photoshop settings folder.
  9. Restart Photoshop. 

In all, these steps should enable your pen pressure to work. There is a synchronization between these software apps, Windows, and Wacom, however, if there is a glitch, one should not panic.

These issues can be resolved as long as the appropriate steps are followed, just like users fix things when XP Pen is detected as a keyboard.

This issue can often be related to a wintab32.dll error, and in our latest guide, we’re taking a closer look at it, so why don’t you check it out?

Let us know which solution worked for you in the comments area below.

Microsoft Rewards Account is Suspended? 3 Ways to Fix it

If you are trying to unsuspend your Microsoft Rewards account that recently got suspended, then you are at the right place.

Users often raise a concern when they have been trying to redeem the Microsoft Rewards in the morning or the day after, and all of a sudden, the platform says their account is suspended.

This is a common issue, where they first come across an error while trying to redeem the rewards, and then they are banned abruptly.

Therefore, while you must pay attention to the terms stated in the Microsoft Service Agreement, here are a few suggestions on how to unsuspend your Microsoft Rewards account if it already is.

Why is my Microsoft Rewards account suspended?

Microsoft keeps changing its rewards account rules every so often, and hence, you must stay updated at all times. Make sure that you review the Microsoft Service Agreement once every month to check if there are any new changes.

Some of the common reasons related to the agreement that may lead to the rewards account suspensions are:

  • Have multiple Microsoft Rewards accounts with different email addresses
  • Trying to use points beyond the limit
  • You have already redeemed 550,000 points per calendar year in the Program as per the agreement
  • The number of points or Rewards per person, per household, exceeds the set limit
  • Have multiple accounts on your mobile phone number
  • If you use a bot to perform searches
  • Using a VPN circumvents any restrictions on access to or availability of the Services
  • Online fraud, like phishing, account theft, etc.

So, if you are now wondering: How do I unsuspend my Microsoft Rewards account?, the below methods answer your question.

How to get unbanned from Microsoft Rewards?

1. Contact Microsoft Rewards Support

  1. Visit the Microsoft Rewards Support page and contact them about the issue.
  2. Under Describe the issue, enter the Issue Title. Enter the issue title in Microsoft Rewards support page
  3. Then proceed to enter your First Name, Last Name, the e-mail address where they will respond to you, and the email address associated with your Microsoft Account. Add the name, email address details in About You fields
  4. Next, go to What would you like assistance with? field and select your problem from the drop-down list. select problem from What would you like assistance with drop down
  5. Select Time Zone and then under the Please explain further section, fill in all the details related to your issue and click on Submit. Enter time zone and other details and submit
  6. They will investigate the account and determine whether or not it should have been suspended.
  7. When you receive an email from the support, save it to a folder for future reference, if the account remains suspended.

So, to answer your question – how long will my suspension last on Microsoft rewards? It may take 2 months or more to get unbanned. But you can get unbanned from Microsoft Rewards.

However, if it still doesn’t, move on to file an arbitration request.

2. Fill out the Binding Arbitration form

  1. To file an Arbitration request with Microsoft, begin by reading the Microsoft Services Agreement.
  2. Go to the Microsoft Rewards section and check the clauses if you have violated any of the requirements. Read the Microsoft Rewards clauses in the agreement
  3. If according to you, you have not broken any rules, navigate to the Binding Arbitration section.
  4. Click on the Arbitration and dispute resolution link in this section. open arbitration form link under Binding-arbitration
  5. Go to Demand for arbitration, expand, and download the Notice of Dispute form (PDF).download Notice-of-Dispute-form pdf
  6. Fill out the form and mail it to Microsoft. Then wait for 60 days for the dispute to be resolved.
  7. If unresolved after 60 days, download the Demand for Arbitration form (PDF). Fill it out and mail it to Microsoft. download Demand for arbitration form pdf
  8. Follow the rest of the process as mentioned in the section.
  9. An unbiased panel will be assigned to resolve your case, once they have all the facts in place.

Now, wait till the Microsoft Rewards support team gets back with an email response.

Note icon NOTE
Filing an arbitration with Microsoft is completely free unless you hire an attorney.

3. Turn off the VPN

If you are wondering, why did my Microsoft Rewards disappear, it could be well due to the fact that you are using a Virtual Private Network (VPN).

Considering that many of us are now working from home, using a VPN is common these days. It could also be possible that you are trying to use rewards from a country using a VPN, where it’s not officially supported.

Your Microsoft Rewards account may also get banned if you use a VPN to earn rewards on more than one account. Besides, it could also be due to an ad-blocker, some of which work actually work as VPNs.

In such a case, you can temporarily turn off the VPN when using the Microsoft Rewards website.

But if you are technically proficient, you can try and exclude all Microsoft apps and any browsers or other programs you might use to search Bing from your VPN.

What else can I do to fix my suspended Microsoft Rewards account?

If you performed all the steps above and you have contacted the Microsoft Rewards support team about the account suspension, please be patient till they revert.

However, here are some additional tips you may find useful:

  • Make sure to save all the emails you receive from the team in a separate folder
  • If you do not receive an answer from them that’s good enough, proceed to file the Arbitration form and include all the emails you’ve received from them
  • Before that, makes sure you read the Microsoft Services Agreement carefully, especially the Microsoft Rewards section
  • This will help you identify if you have breached any of the terms mentioned in the agreement

This issue is also reported with the Xbox game pass, and hence, in such cases also, you may contact Microsoft Rewards support.

To learn more about Microsoft Rewards, we have a guide that answers if it’s possible to get Microsoft Rewards without a phone number, so don’t miss it.

If you know any other reason why your Microsoft Rewards account is suspended or a solution for it, do leave a comment below in the comments box.

Windows news recap: Nvidia GeForce Now gains 4K 60 FPS streaming, Internet Explorer users urged to move on before it’s phased out, and more

Welcome back to our Windows news recap, where we go over the top stories of the past week in the world of Microsoft’s flagship operating system.

Nvidia GeForce Now gets 4K 60 FPS streaming on PC and Mac

The native Nvidia GeForce Now apps on PC and Mac have received support for streaming at 4K 60 FPS on compatible devices, allowing higher quality game streaming.

Nvidia GeForce Now gets 4K 60 FPS streaming on PC and Mac - OnMSFT.com - May 5, 2022

Outlook on Windows is getting a notification pane to help you find your @mentions

A notification pane is to be added to the Outlook app on Windows, in an effort to make it easier to find mentions, so that you can keep on-top of what requires your attention. The feature is expected to launch in June.

Microsoft Outlook Windows 10

Microsoft urges users to stop using Internet Explorer before it’s phased out

Internet Explorer is set to be retired on June 15, but some are still holding onto the web browser despite this looming end of life. Microsoft has pushed users still using Internet Explorer to switch to another browser, such as Microsoft Edge, ahead of the actual retirement date, rather than waiting for the date to roll around.

Internet Explorer IE 11

That’s it for this week. We will be back next week with more Windows news.

Logitech G Hub Not Detecting Mouse: Best Ways to Fix It

The Logitech G Hub not detecting the mouse is a common problem. Luckily, it’s easy to fix and we’ll show you how.

It might not detect your mouse due to admin privilege issues, multiple app instances, OS or app updates, or sudden detection issues after a restart. Follow the steps below to make it work.

How do I get my Logitech G Hub to recognize my mouse?

1. Run the software as an administrator

  1. Right-click Logitech G Hub and choose Open file location.
  2. Right-click the Logitech G Hub exe file and choose Properties.
  3. Go to the Compatibility tab and check Run this program as an administrator and save changes.

After doing that, the software will always start with administrative privileges, and the problem should be gone.

2. Close additional G Hub apps

  1. Click the arrow icon in the system tray.
  2. Look for G Hub application.
  3. If you notice two applications available, right-click one and close it.

This can be annoying, but it’s usually easy to fix as long as you follow the instructions from this guide.

Once G Hub recognizes your device, you can change the DPI on your Logitech mouse to adjust sensitivity and make the most of its features.

If Logitech G Hub is not working in Windows 11, check out the article linked to fix the issue and get back the sound functionality.

Was this guide useful to you? Don’t hesitate to tell us what you think in the comments section below. Thanks for reading!