If you have encountered error code 6: config error while launching or playing Soul Knight Prequel on your phone, this guide can help!
We will discuss the probable causes and offer WR experts tested solutions to fix the issue so that you can enjoy your favorite game without interruption.
What causes the error code 6 on Soul Knight Prequel?
Outdated app or pending operating system updates.
Corrupted game cache.
How can I fix the Soul Knight Prequel error code 6?
Before we go to the advanced fixes to resolve error code 6, here are a few preliminary checks you should do:
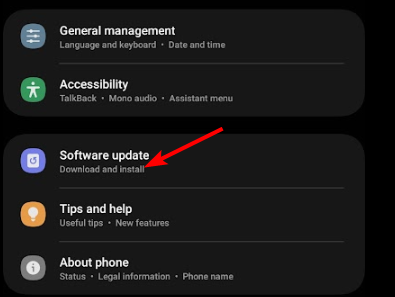
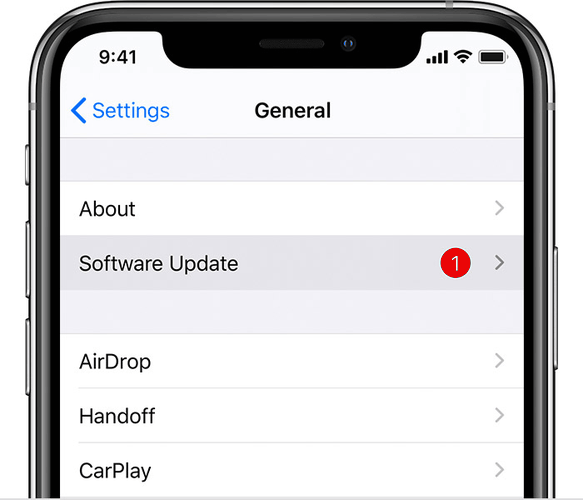
First, restart the game and ensure there is no pending update for your phone OS.
Verify you have a stable internet connection, and try using a VPN.
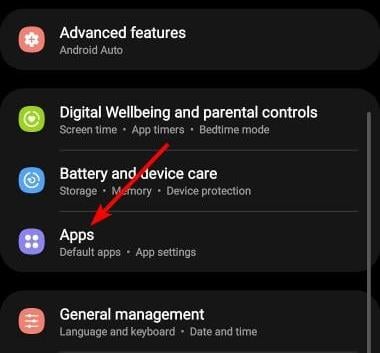
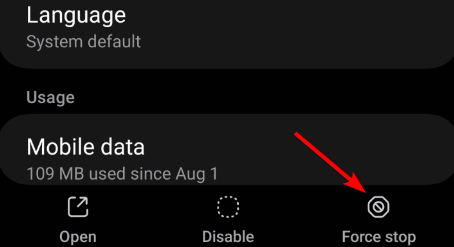
From the home screen, press and hold Soul Knight Prequel to get options.
Tap Uninstall (Android) or Remove app (iOS).
Go to the Google Play Store or App Store and search for Soul Knight Prequel.
Tap the Install or Get icon to install the game.
If nothing worked for you, you must contact the Soul Knight Prequel customer support team and tell them about the error & fixes you tried for further assistance.
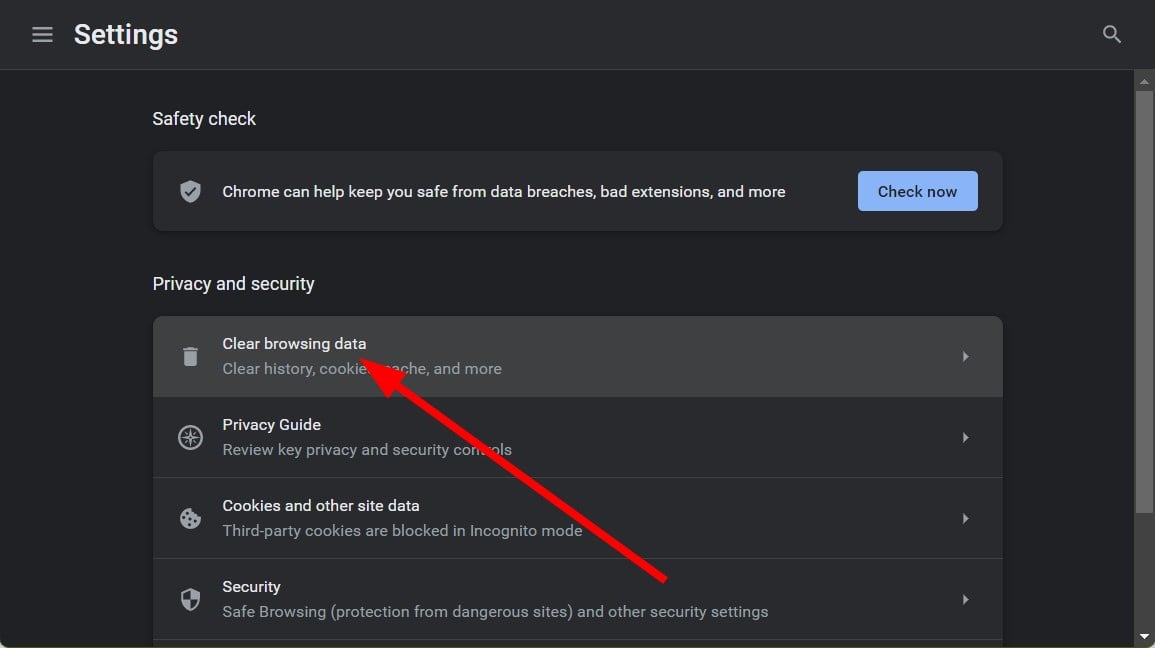
To sum up, to fix the error code 6 while playing Soul Knight Prequel, ensure your game is up to date, the internet connection you are using is stable, and clear the app cache from time to time.
If you are looking for a way to try out Android games on Windows 11, you need to follow a few steps; read this guide to learn more.
You can also use an Android emulator for Windows 11 so that you can play mobile games on the computer; read this guide to choose which one to try.
In case you have questions or suggestions about the subject, feel free to mention them in the comments section below.
First, we need to restart the computer in safe mode using the Windows Recovery environment; for that, follow these steps:
Restart your computer, and when you see the manufacturer logo, press & hold the Power button for about 5-7 seconds to turn off your PC.
Press the Power button to turn on your computer.
When your computer restarts, as you see the manufacturer’s logo, press & hold the Power button again to restart. Repeat the steps twice until you see Windows Preparing Automatic Repair.
Click Advanced options.
On the Choose an option screen, select Troubleshoot.
Next, choose Advanced options.
On the Advanced options screen, select Startup Settings.
Now, select Enable Safe Mode with Networking by pressing F5 and click Restart.
Your computer will restart in safe mode, then follow these steps to run the diagnostic check:
Press the Windows key, type windows memory diagnostic in the search box, and click Open.
Select Restart now and check for problems (recommended).
Your computer will reboot, and the diagnostic tool will run the test.
Once the computer restarts, you need to log in, and the results of the scan will appear on the screen. If you can’t see the test results, you can open Event Viewer to check the details.
In case the test comes with an error, there is a problem with memory modules, try reseating the RAM & remove dust & debris, then run the diagnostic check again. If the scan results come up with errors, you might have to replace one or more modules.
Running a diagnostic scan can also help you fix issues like the BSoD error 0x00000154; read this guide to learn about other solutions.
2. Block automatic restart
First, restart your computer in safe mode using the steps mentioned in Solution 1.
Press Windows + I to open the Settings app.
Go to System, then click About.
Select Advanced system settings.
On the Advanced tab, under the Startup and Recovery option, click the Settings button.
Locate System failure, remove a checkmark next to Automatically restart, click Apply, then OK.
3. Use SFC & DISM scans
If you are stuck on the BSOD screen, follow these steps to open the Command Prompt and run the commands:
Restart your computer, and when you see the manufacturer logo, press & hold the Power button for about 5-7 seconds to turn off your PC.
Press the Power button to turn on your computer.
Repeat the steps twice until you see Windows Preparing Automatic Repair, then click the Advanced options.
On the Choose an option screen, select Troubleshoot.
Next, choose Advanced options.
Select Command Prompt from the Advanced options window.
Type the following command to repair the damaged system files and press Enter: sfc /scannow
Copy & paste the following command to restore your Windows image and hit Enter: Dism /Online /Cleanup-Image /RestoreHealth
Reboot your computer to let the changes take effect.
If this process seems overwhelming, you can always rely on specialized software because it can proceed with this task automatically.
4. Run the chkdsk command
Open the Command Prompt window using the steps from 1-6 mentioned in Solution 3.
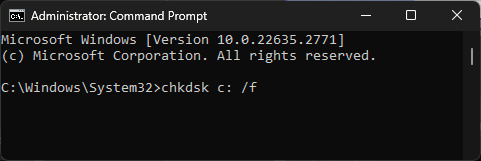
Copy & paste the following command to check and repair the file system issues on the system drive of a Windows computer, then hit Enter: chkdsk c: /f
Close the Command Prompt window, then restart your PC.
First, restart your computer in safe mode using the steps mentioned in Solution 1.
Press Windows + I to open Settings.
Go to Windows Update, then select Update history.
Under the Related settings section, select Uninstall updates.
Go to the latest update, and click Uninstall.
If the problem appears after installing new Windows updates, uninstalling the updates can straighten things out.
Moreover, it can also help you fix other BSoD errors like 0x00000078 BSOD in Windows 11; read this guide to learn about other solutions.
6. Update/reinstall your drivers
First, restart your computer in safe mode using the steps mentioned in Solution 1.
Press Windows + R to open the Run window.
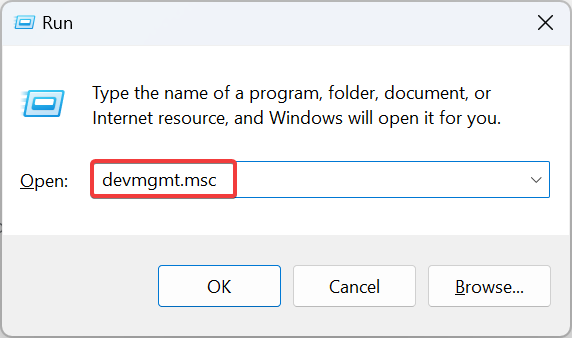
Type devmgmt.msc and click OK to open the Device Manager app.
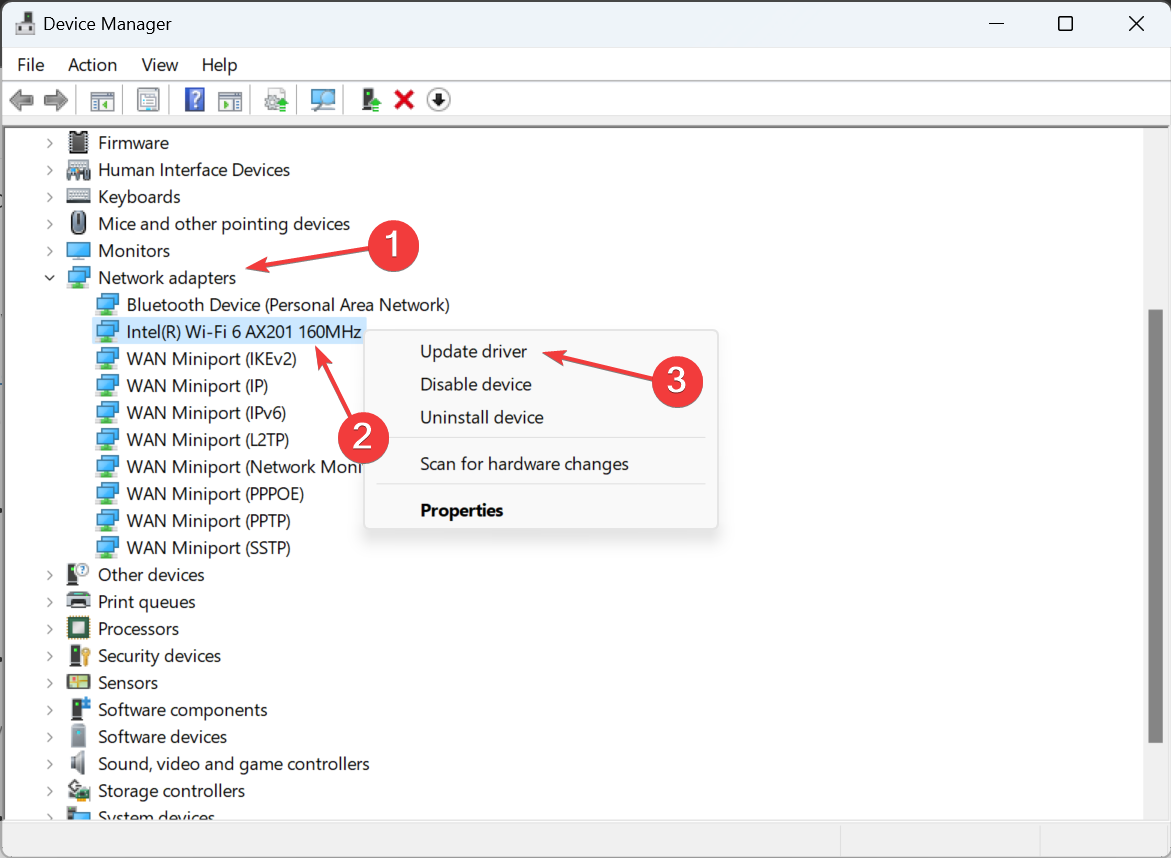
Look for a yellow triangle with an exclamation mark next to drivers or the categories listed, right-click it, and choose Update driver.
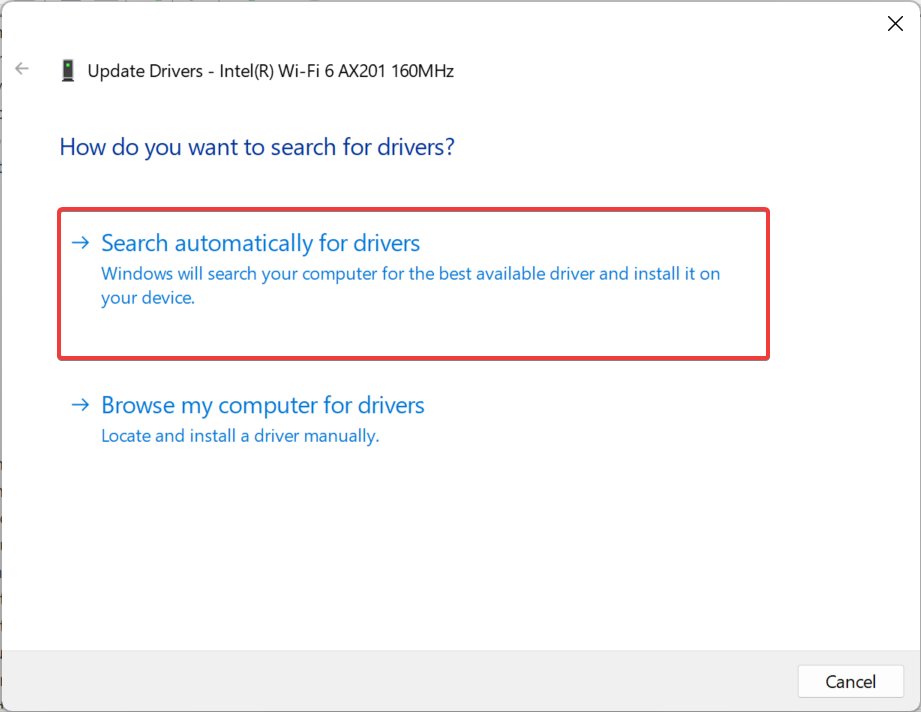
Select the Search automatically for drivers option.
Follow the on-screen instructions to complete.
In case there is no update available, follow these steps to reinstall the driver:
Go to the driver with a yellow triangle with an exclamation mark, right-click it, and select Uninstall driver.
Once the driver is uninstalled, go to Action, then select Scan for hardware changes to reinstall it.
Restart your computer to confirm the changes.
7. Perform a system restore
Restart your computer, and when you see the manufacturer logo, press & hold the Power button for about 5-7 seconds to turn off your PC.
Press the Power button to reboot your PC.
Repeat the steps twice until you see Windows Preparing Automatic Repair, then click the Advanced options.
On the Choose an option screen, select Troubleshoot.
Next, choose Advanced options.
Select System Restore from the Advanced options window.
Select Choose a different restore point and click Next.
Choose the selected restore point and click Next.
Click Finish.
Your computer will restart and restore it to the selected version. If the System Restore didn’t complete successfully, it could be due to driver issues; read this guide to learn more.
If nothing worked for you, you might want to reset your computer to fix all the system inconsistencies once and for all.
To conclude, to fix the INVALID_AFFINITY_SET BSoD error on Windows 11, update your Windows to the latest version, ensure there are no outdated drivers, and run an SFC scan to repair corrupted files.
To learn more about the BSoD errors, and causes to prevent it from interrupting your computing experience, read this guide.
Did we miss a step that helped you to fix this BSoD error? Don’t hesitate to mention it in the comments section below. We will happily add it to the list.
The Wake on Magic Packet is critical for users who employ the Wake on LAN (WoL) functionality, but for a few, it’s missing in Windows. The problem appeared on both Windows 10 and Windows 11 and usually had the same underlying cause.
When Wake on Magic Packet is not found in the network adapter’s Properties, users may be unable to remotely wake up the device. And this needs an immediate resolution!
Why is the Wake on Magic Packet missing?
If you recently upgraded the operating system and had the Wake on Magic Packet property available on the earlier iteration, it’s generally the driver’s incompatibility to blame. Besides, there’s also the likelihood that the functionality is not supported by the network card or the motherboard, both equally critical.
What can I do if the Wake on Magic Packet is missing?
Before we start with the slightly complex solutions, try these quick ones:
Make sure both the network adapter and the motherboard support Wake on Magic Packet and Wake on LAN. You can check the manufacturer’s website to verify the same.
Ensure you are running the manufacturer’s dedicated network drivers, not Microsoft’s generic ones.
Check for any available Windows updates and install them.
1. Update the driver
Press Windows + X to open the Power User menu, and select Device Manager.
Double-click on Network adapters, right-click the affected adapter, whether Wi_Fi or Ethernet, and select Update driver.
Select Search automatically for drivers and wait for Windows to install the best available one.
If a new driver is installed, reboot the device for the changes to apply.
If Windows can’t find a better driver, head to the manufacturer’s website, locate the latest version, and manually install the driver. Make sure to do this because some updates are only available online and not released via Windows Update.
2. Roll back the driver update
Press Windows + R to open Run, type devgmtmt.msc in the text field, and hit Enter.
Expand the Network adapters entry, right-click on the affected device, and select Properties from the context menu.
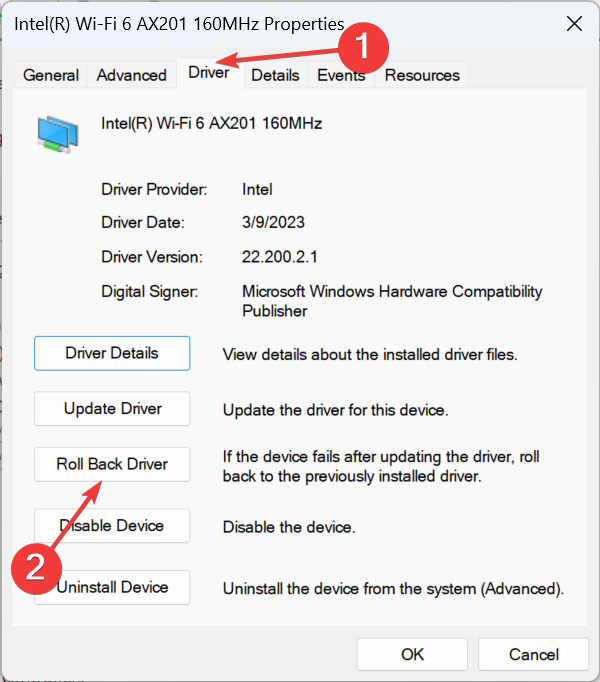
Go to the Drivers tab, and click the Roll Back Driver button.
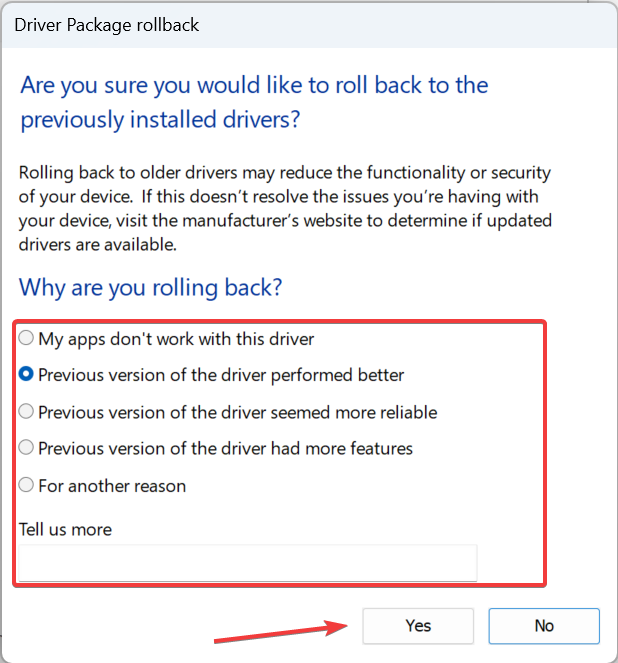
Choose a reason for the roll-back or select the For another reason option and enter one in the field, and finally, click Yes.
Once done, reboot the device and check whether the Wake on Magic Packet property reappears.
3. Turn off Fast Startup
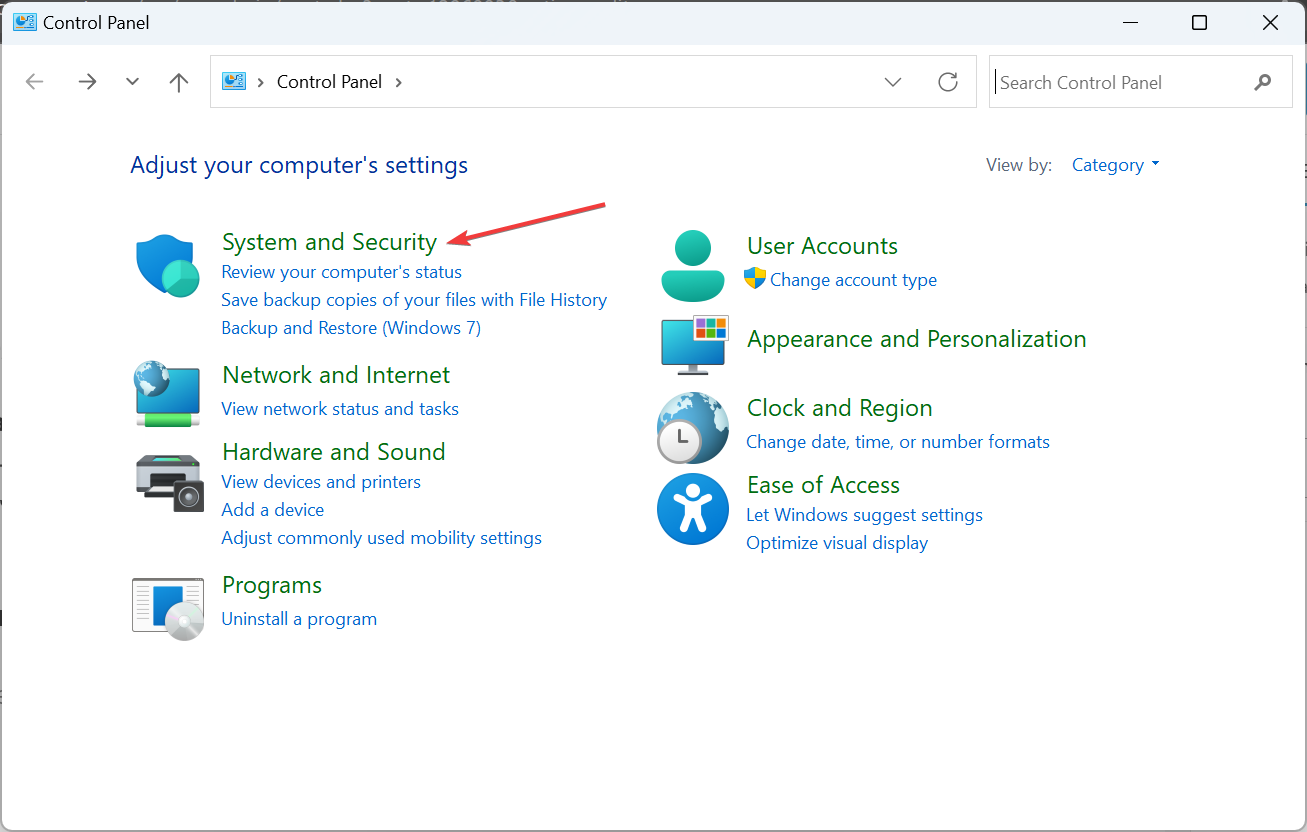
Press Windows + S to open Search, type Control Panel in the text field, and click the relevant result.
Click on System and Security.
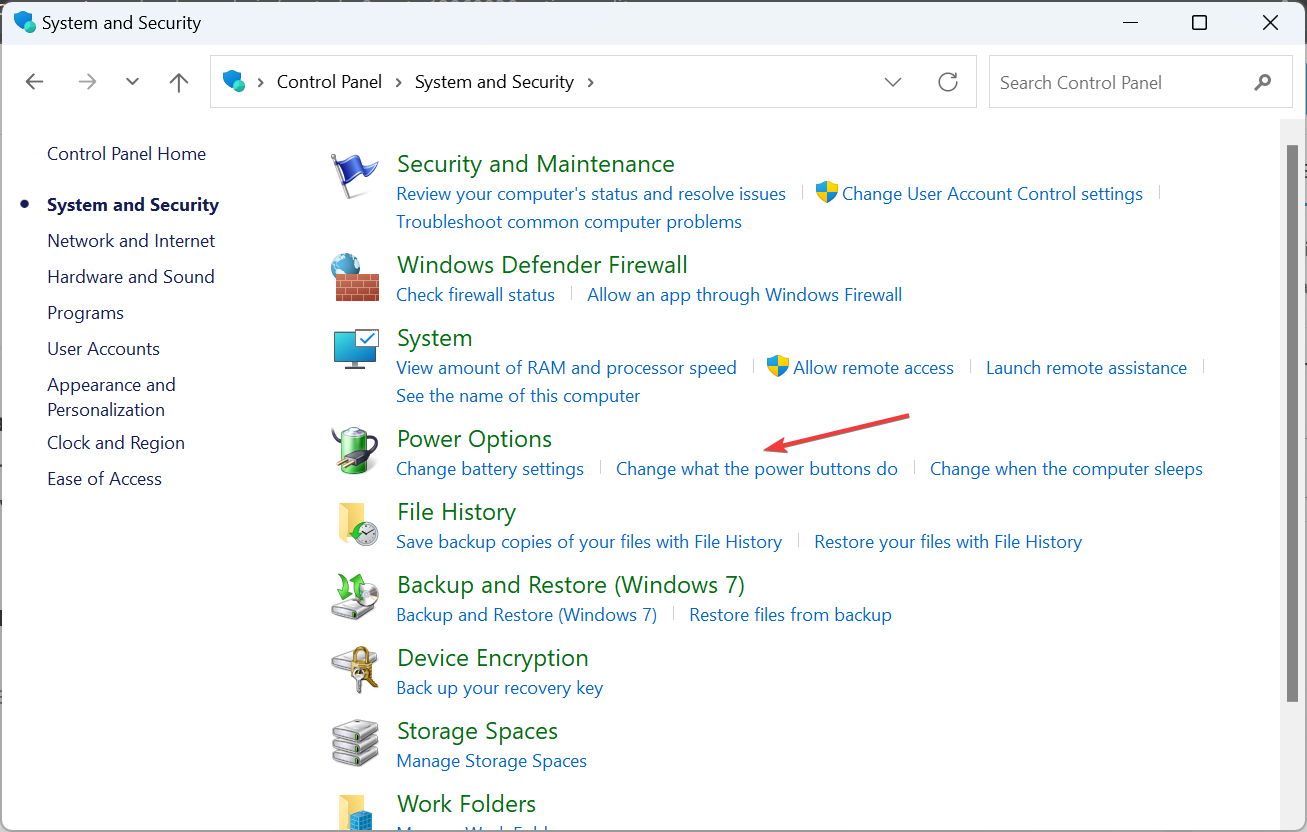
Now, click on Change what the power buttons do under Power Options.
Click on Change settings that are currently unavailable at the top.
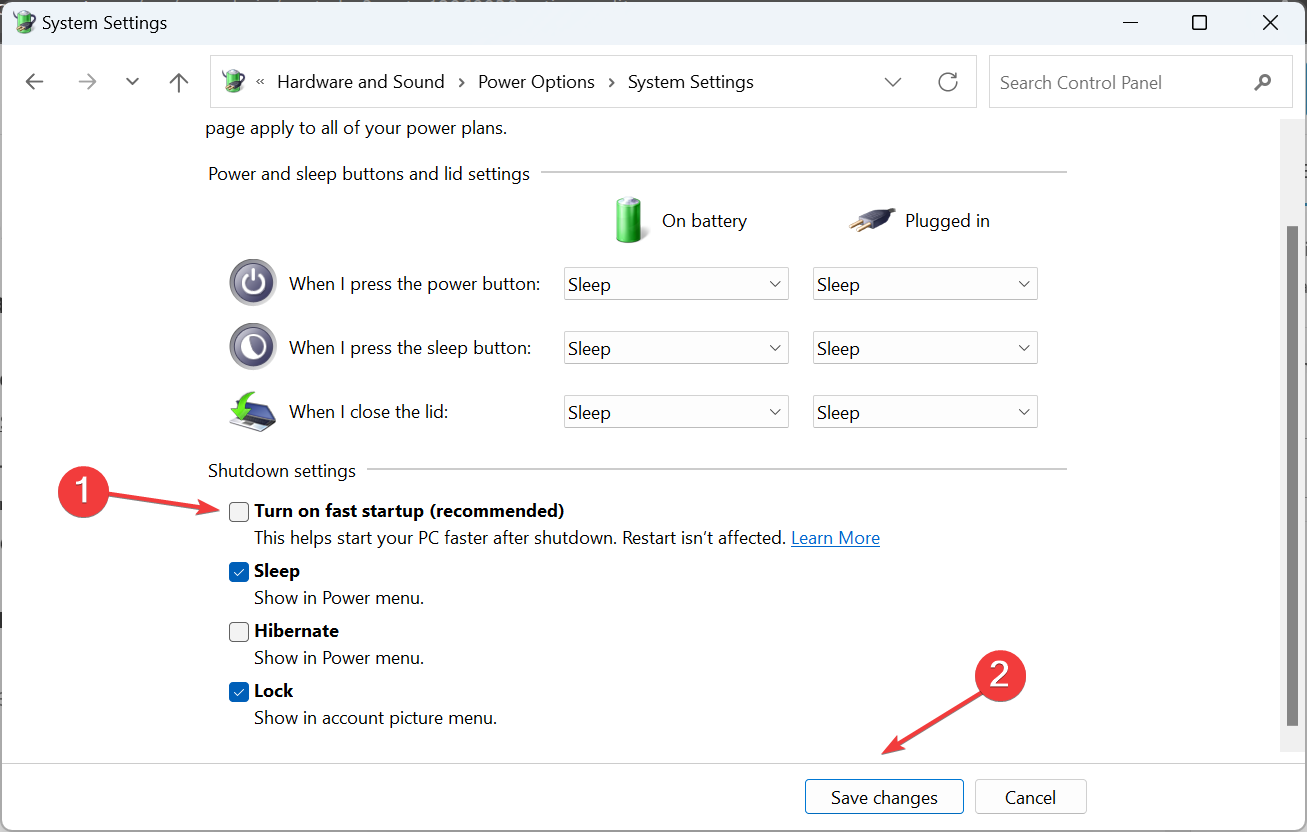
Untick the checkbox for Turn on fast startup (recommended), and click on Save changes.
As per forums, disabling fast startup worked for many when Wake on Magic Packet was not showing. This could be because fast startup prevents the computer from completely shutting down and, instead, puts it in hybrid mode where a few critical processes are running.
4. Fix issues with the BIOS
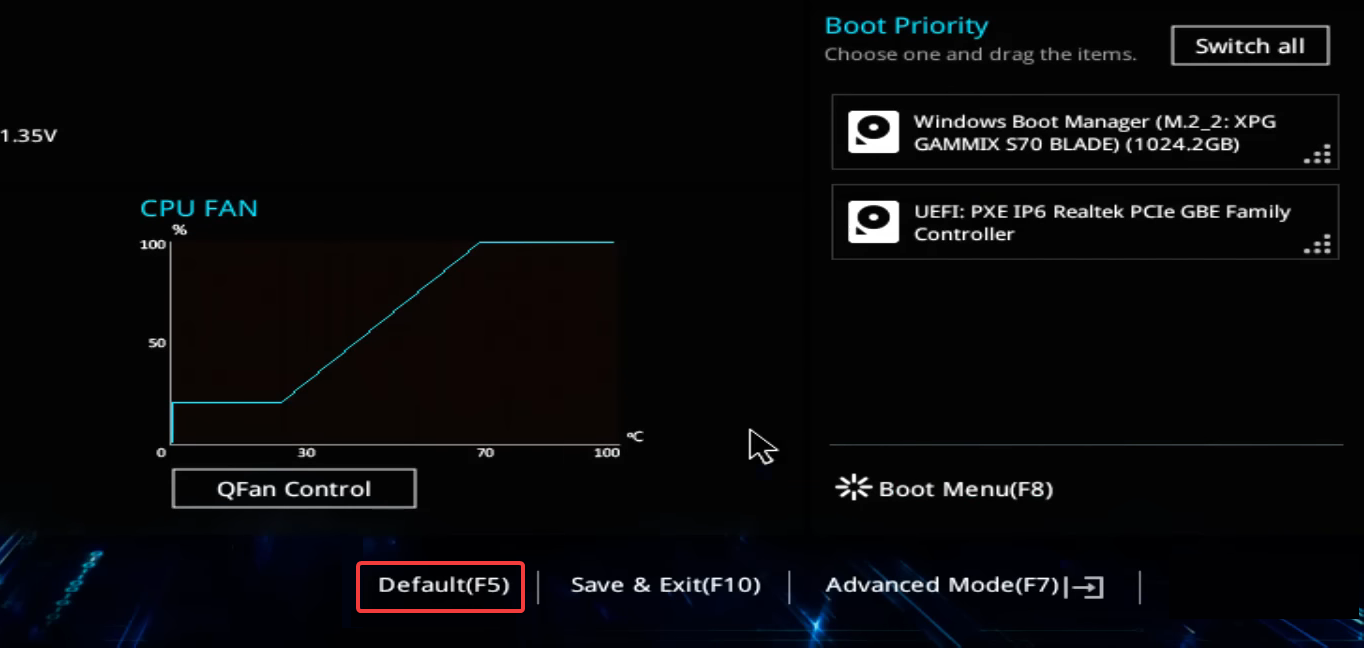
When the previous solutions didn’t work, access the BIOS, and make sure that the Deep Sleep is disabled in the BIOS. Also, if you recently made any changes to the BIOS, reset it to defaults. There’s usually an option for for reset on the main screen.
Resetting BIOS
Besides, if there are any newer versions available, update the BIOS. Remember, it’s a critical process. Any power outage during the update will render the PC useless, and you will subsequently have to reinstall the BIOS.
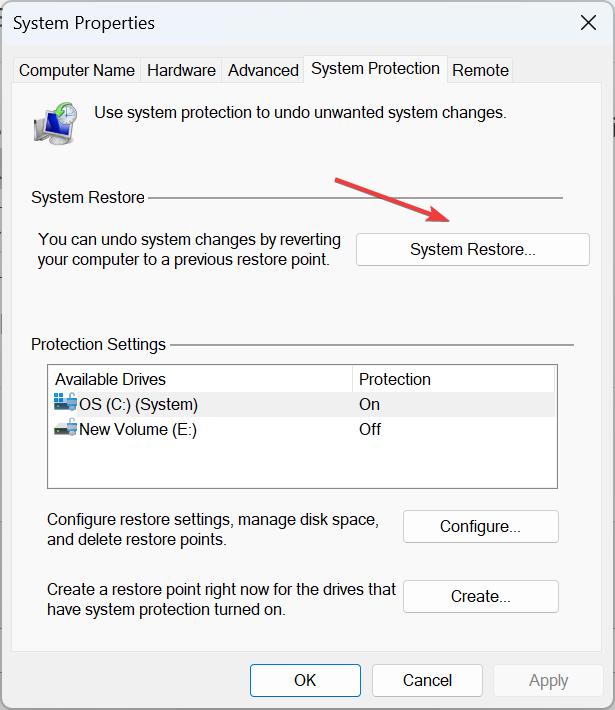
Press Windows + S to open the Search menu, type Create a restore point, and click the relevant result.
Click the System Restore button.
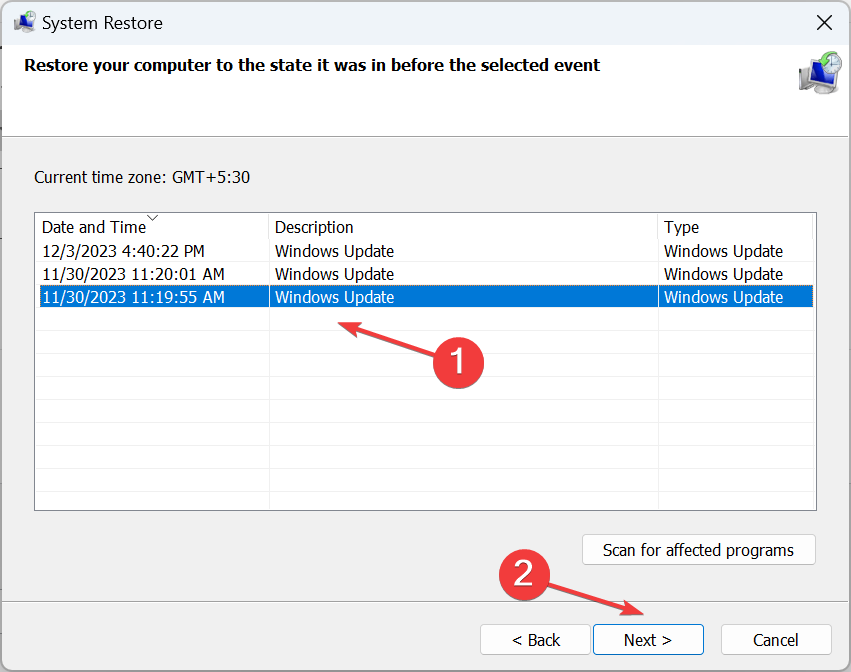
Select the Choose a different restore point option and click Next.
Pick the oldest restore point from the list and click Next.
Verify the details and click Finish to start the process.
In case a recent change led to Wake on Magic Packet go missing, and you can’t identify it, a system restore will do the job. It helps take the PC back to a stable state where the error didn’t exist. Though highly unlikely, if things don’t work out or complicate further, undo the system restore.
Remember, the problem is usually caused due to incompatibility or outdated drivers. So those two should be the aspects you primarily work on. Nevertheless, one of these solutions will help when Wake on Magic Packet is missing.
If you’re itching to play your favorite PS2 games on a PC, you’ll need an emulator that’s both fast and stable. Nobody wants lag or crashes messing up the fun. In this article, we’ll dive into the top 3 PS2 emulators that strike the perfect balance between speed and reliability—so you can enjoy smooth gameplay without the hassle.
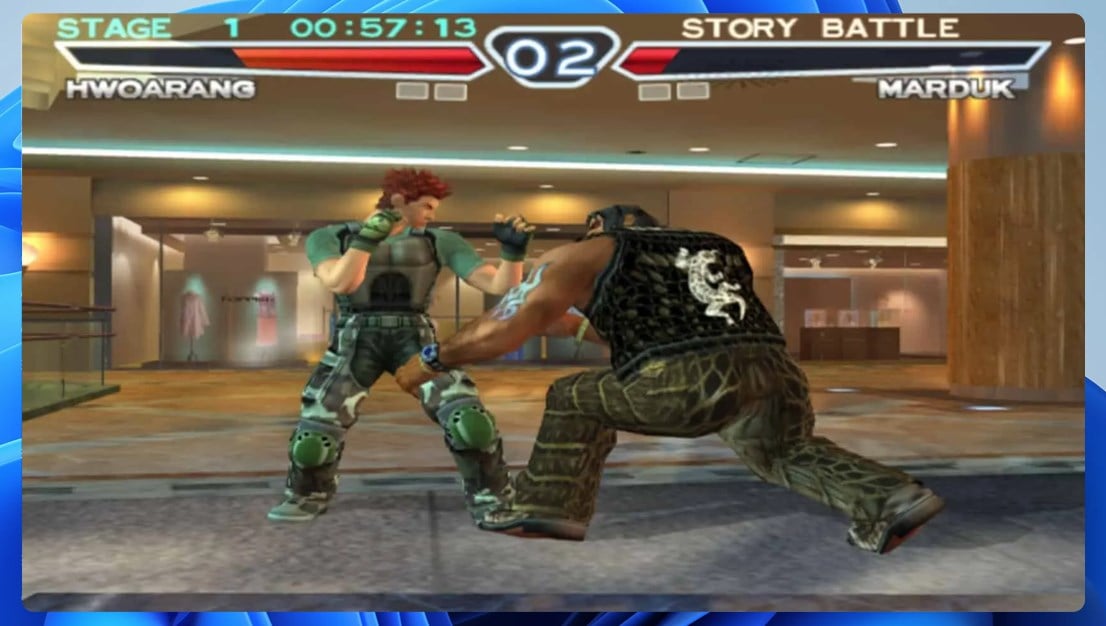
When it comes to PlayStation 2 emulation, PCSX2 is one of the best-known emulators, and rightfully so. The emulator supports 99% of games, but keep in mind that some compatibility issues or glitches may occur.
PCSX2 comes with humble requirements, and it should work great even on older PCs. However, certain games can be more demanding and you may experience performance issues if your hardware can’t handle them.
The software supports custom resolutions and upscaling that can make even older games look sharp. Overall, it’s one of the best PS2 emulators for PC, so be sure not to miss it.
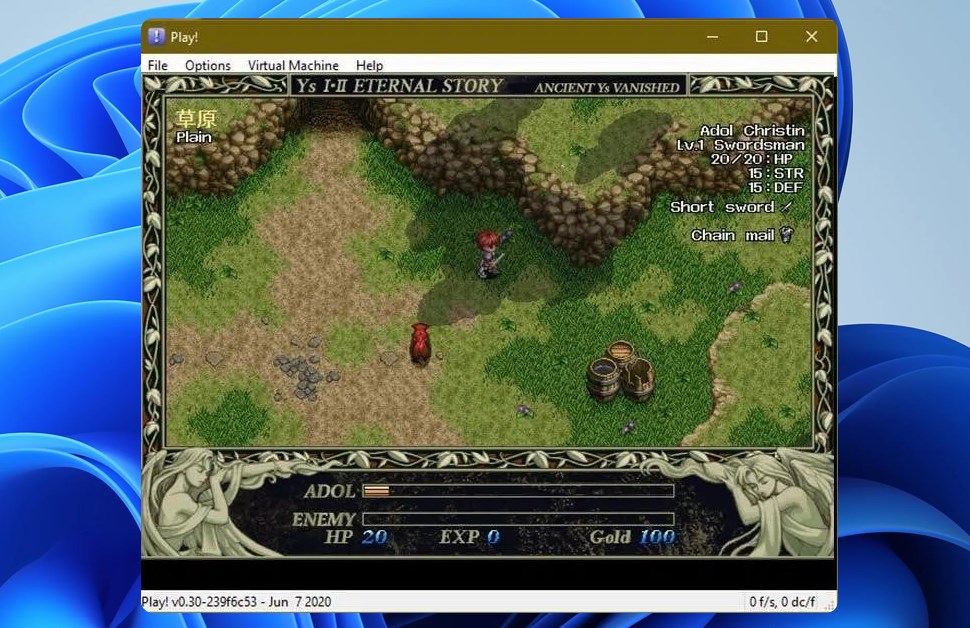
If you’re looking for an open-source and high-level PS2 emulator, then this might be the right choice for you. Since this is a high-level emulator, it doesn’t require a BIOS dump, which is a plus.
The software also doesn’t have plugins thus allowing you more streamlined access to the settings. It’s worth mentioning that not all games are compatible with this application, so you’ll encounter many games that won’t run properly.
While Play! has several advantages, its compatibility is somewhat limited, so it might not be able to run all PS2 titles without issues, which can be a problem for some users.
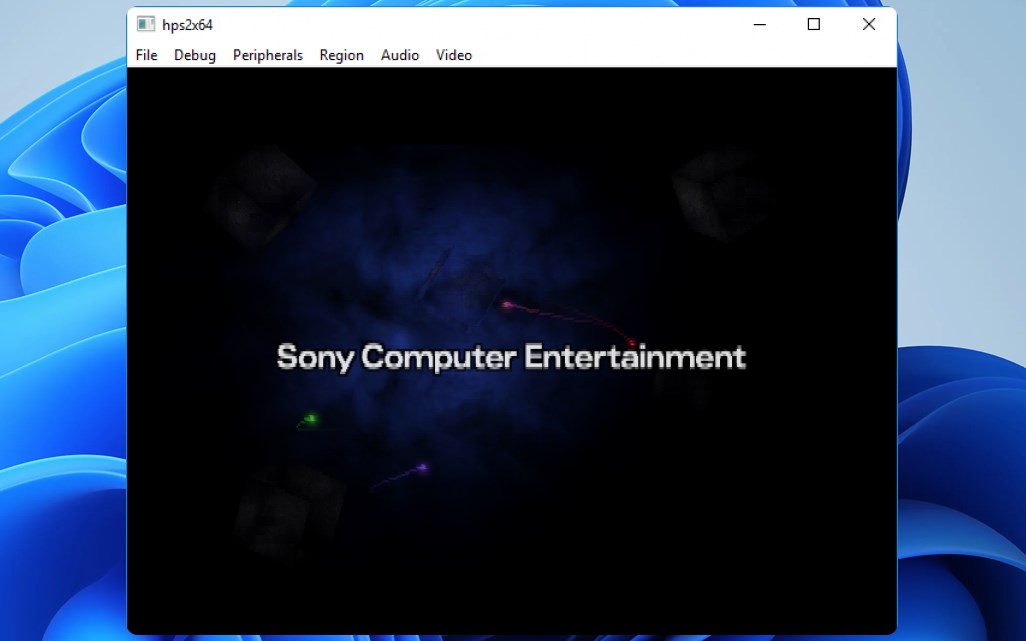
This is one of the lesser-known emulators, and according to the developer, it’s still highly experimental, so many of its features are a work in progress.
Compatibility is pretty limited, and only a handful of PS2 titles can run on this emulator. The software supports different disc image files as well as save states, so you can save your game at any time.
It’s important to mention that there’s joystick support, but you might encounter some issues while using it. We have to admit that hpsx64 is still in the early stages of development, and it lacks many features, but the developer is still working on it, so we expect to see many improvements in the future.
PCSX2 and all other emulation software are legal to download and use. However, it’s not legal to download PS2 games, so you can only use the emulator with the games you already own.
Is it safe to use PCSX2?
PCSX2 has been present since 2001, and it’s considered one of the best PS2 emulators. The software is perfectly safe, as long as you download it directly from the developer’s website.
Unfortunately, there are just a handful of PS2 emulators for PC that are still actively developed. If you’re looking for a stable emulator with great compatibility, then the only option is PCSX2.
If you’re a fan of old PlayStation games, you might want to consider using PS1 emulators instead. Of course, a PS3 emulator for PC is available as well.
For last-gen consoles, there are also a couple of great PS4 emulators, but make sure you have enough hardware power to handle them.
If you’re interested in playing newer titles, you can check out how to play PS4 games on PC using official streaming services. For the latest consoles, our guide to the best PS5 emulator for PC will help you get started with top options available today.
What’s your experience with PS2 emulation? Share your experiences with us in the comments!
Often, the laptop keeps switching between AC and battery when gaming. The issue is present on all iterations of the OS, including Windows 10 and Windows 11, and was primarily encountered on Asus laptops. It can be verified by checking the battery-report.html file.
Automatic switching of the power source results in a sudden change in brightness and the game’s performance, affecting the gameplay. And in most cases, using another charger didn’t help.
Why is my laptop changing between charging and not charging?
This happens when running power-intensive tasks if the laptop can’t get enough out of the power cord (charger) due to the limit set by the manufacturer. Subsequently, it switches to battery power. Remember, during extensive gaming, it’s your graphics adapter that consumes maximum resources.
What can I do if the laptop is switching between AC and battery when gaming?
Before we start with the slightly complex solutions, try these quick ones:
Check for any pending Windows updates and install them.
Press Windows + R to open Run, type devmgmt.msc in the text field, and hit Enter.
Double-click the Batteries entry, right-click on all the devices listed here individually, and select Update driver.
Choose Search automatically for drivers and wait for Windows to install the best locally available version.
Similarly, update the driver for other devices, and reboot the laptop.
If your laptop is switching between AC and battery power when gaming, updating the battery drivers should do the trick. Also, while you are at it, update the graphics driver since it often turns out to be the underlying cause.
The steps listed here are for the Nvidia Control Panel. If you are using another graphics adapter, look for an equivalent setting and make similar changes.
Open the NVIDIA Control Panel, and go to Manage 3D settings from the navigation pane.
In the Global Settings tab on the right, scroll down, look for Power management mode, and select Prefer maximum performance from the dropdown menu.
Save the changes and verify whether the laptop still keeps switching from battery to power.
5. Uninstall problematic Windows updates
Press Windows + I to open Settings, go to Windows Update from the left pane, and click on Update history.
Scroll down to the bottom and click on Uninstall updates.
Click the Uninstall option next to the update installed around the same time the problem first appeared.
Again, click Uninstall in the confirmation prompt and wait for the process to complete.
Press Windows + S to open Search, type Create a restore point, and click the relevant result.
Click the System Restore button.
Select Choose a different restore point and click Next to proceed.
Pick another restore point from the list, preferably the oldest, and click Next.
Verify the details and click Finish to start the restore process.
A system restore reverts your PC to a working state where everything worked fine. Remember, the files remain unaffected during the process, but recently installed apps or drivers may be downgraded or removed.
7. Get the hardware inspected
In case your laptop still keeps switching between AC and battery when gaming, it’s most likely a hardware problem to blame. So, if you haven’t yet tried another charger, do it first.
When that doesn’t work, consult a hardware expert or the official laptop manufacturer and get every power-related part inspected for damages or loose connections.
These solutions will help when your laptop keeps switching from battery to power or vice-versa. Remember, as per our research, more often than not, it was a hardware issue to blame. But we still recommend you modify the relevant settings first and check for improvements.
If your sounds on other apps get automatically muted when you get on a call and you’d like to change this behavior, we dive deep into what you should do.
Why is my audio automatically muting?
Your speakers are probably set up incorrectly and the most common issue is that they’re plugged into the wrong port. Another issue could be outdated sound card drivers or an obsolete operating system causing these issues.
What can I do to stop sound from automatically muting in Windows 11?
Start your troubleshooting with the following steps:
Check that your headphones are properly connected to your computer and turned on and test your microphone.
Try pressing the volume up or down button on your keyboard. If you hear a sound, your speakers are not muted but if they’re not muted, there could be another issue with your sound card.
1. Run the audio troubleshooter
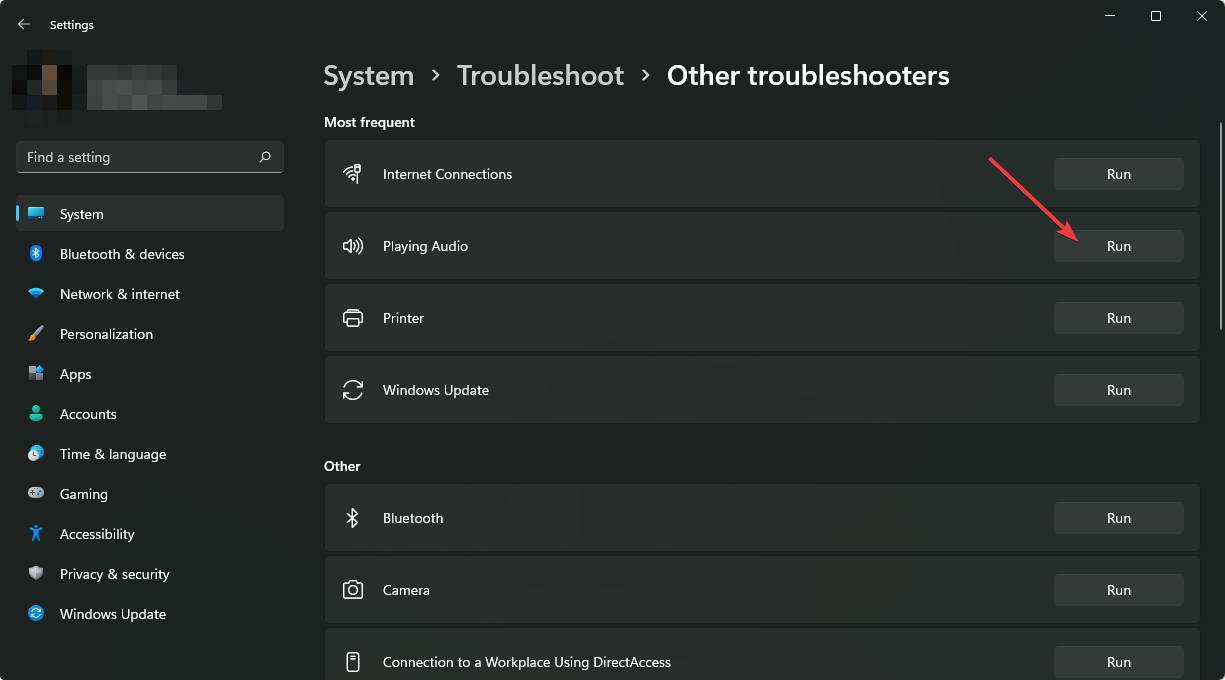
Press the Start Menu key and select Settings.
Click on System on the left pane, then Troubleshoot on the right pane.
Select Other troubleshooters.
Locate the Playing Audio troubleshooter, and click on the Run button next to it.
2. Reinstall audio drivers
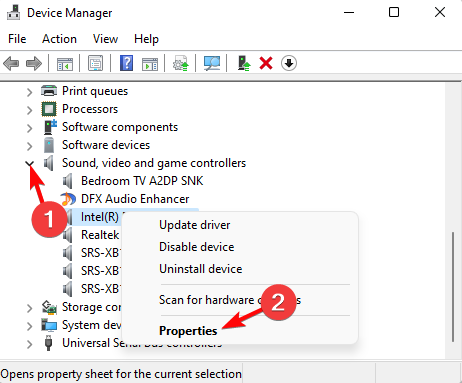
Hit the Windows key, type Device Manager in the search bar, and click Open.
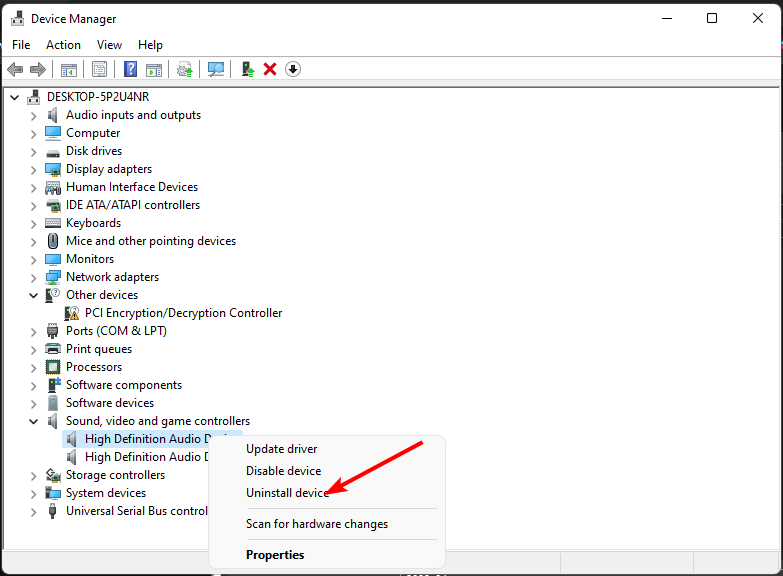
Navigate to Sound, video, and game controllers to expand, right-click on your audio device, and select Uninstall device.
Confirm on Uninstall.
Restart your device, and the drivers will automatically reinstall themselves.
3. Update audio drivers
Hit the Windows key, type Device Manager in the search bar, and click Open.
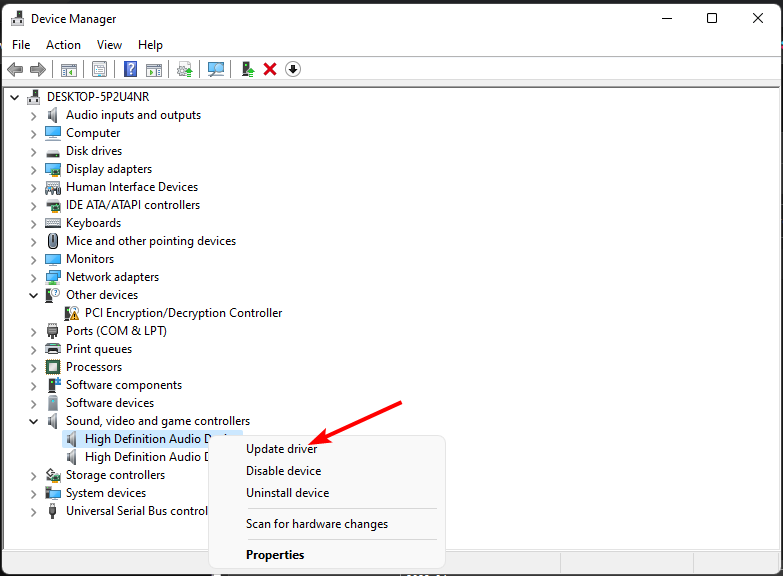
Navigate to Sound, video, and game controllers to expand, right-click on your audio device, and select Update driver.
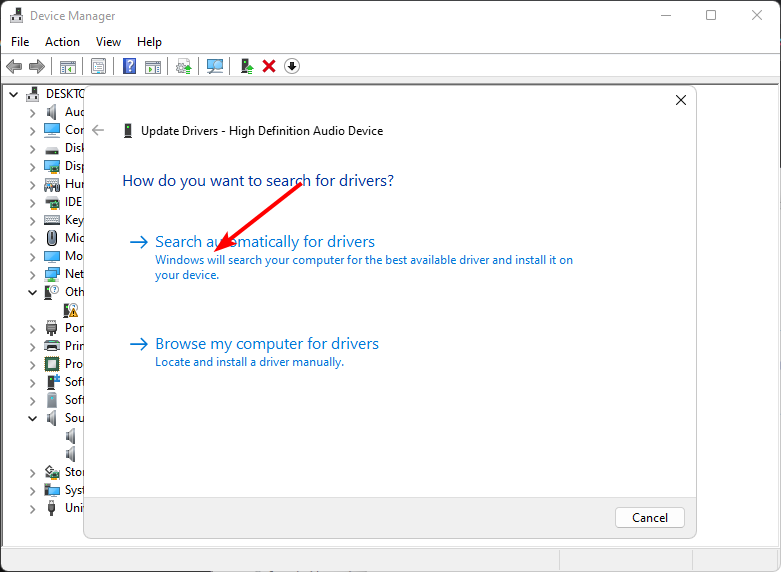
Select Search automatically for drivers.
Restart your PC and try reconnecting.
4. Change the Sound Enhancement Settings
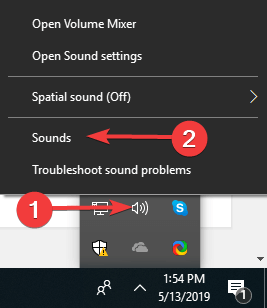
Right-click the Sounds icon in the bottom right corner of the desktop and select Sounds.
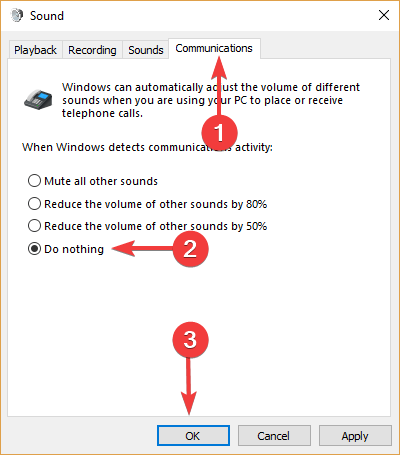
Click the Communications tab at the top.
Now, tick the radio button for Do nothing and click OK.
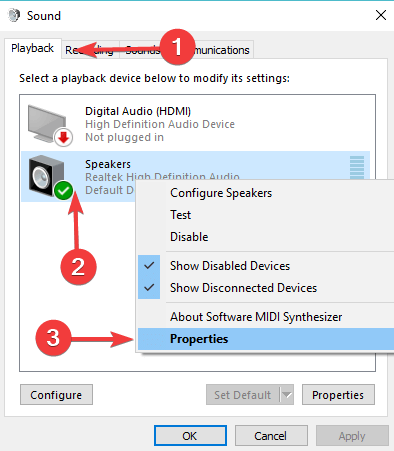
Next, click the Playback tab.
Right-click on Speakers/Headphones and select Proprieties.
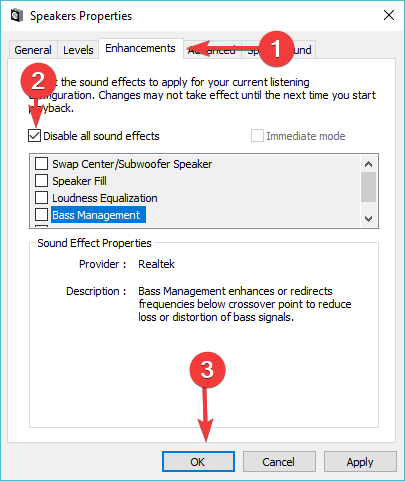
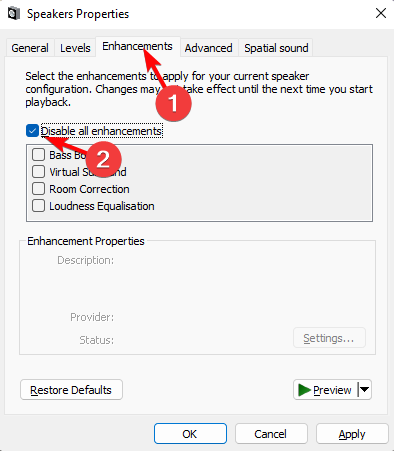
Go to the Enhancements tab.
Now, tick the box next to Disable all sound effects and click OK.
Lastly, check to see if this change had any impact.
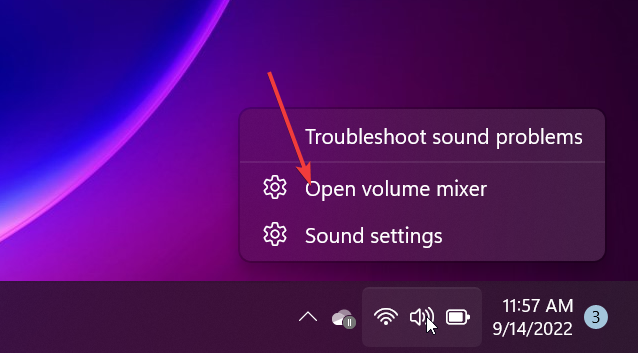
Right-click on the sound icon at the bottom right corner and select Open volume mixer.
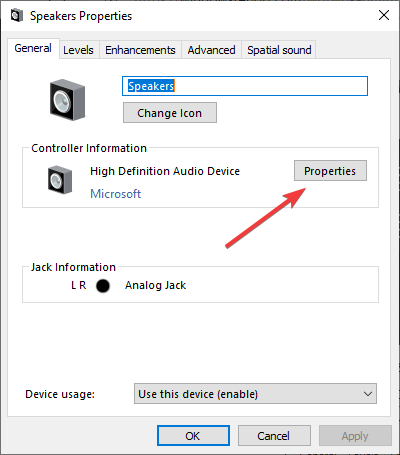
Click on your playback device and select Properties.
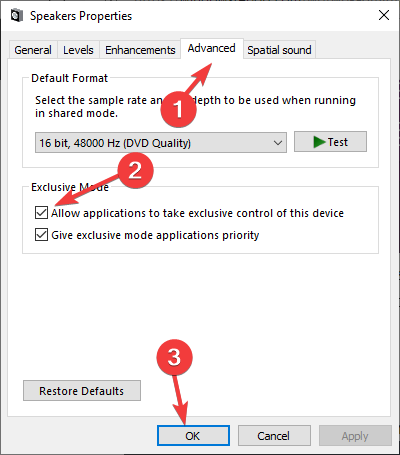
Navigate to the Advanced tab, check Allow applications to take exclusive control of this device option, and click OK.
6. Disable audio enhancements
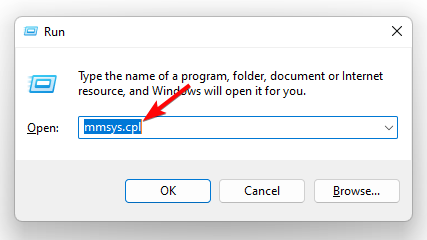
Press the Win + R keys to open the Run dialog. Type mmsys.cpl and hit Enter to open the Sound dialog.
In the window pop-up, right-click on your audio device, and select Properties.
Next, in the Properties dialog, go to the Enhancements tab, and check the box next to Disable all enhancements. Press Apply and OK.
7. Reset and update BIOS
7.1 Reset BIOS
Restart your computer and repeatedly pressESC/F1/F2/F8 or F10 during the startup to get into the BIOS menu.
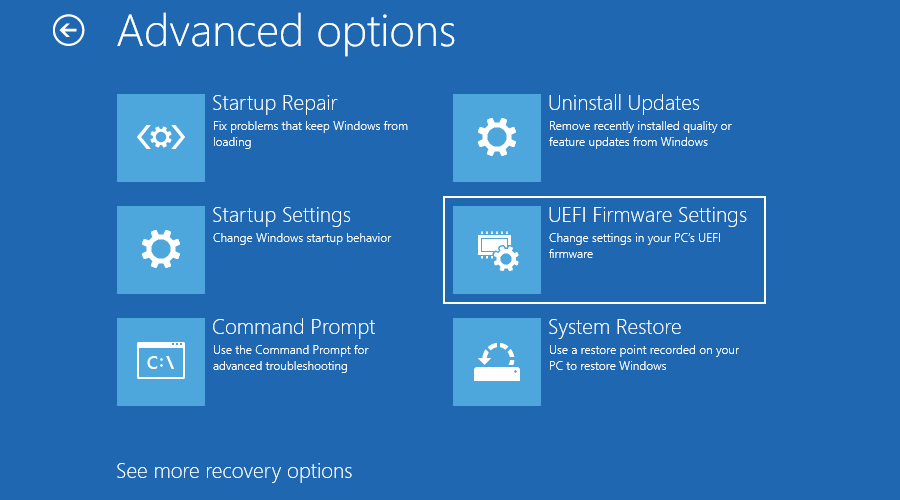
Hit the Windows + I keys to open the Settings app and click on System>Recovery>Advanced startup. Go to Troubleshoot > Advanced Options > UEFI Firmware Settings and click on Restart.
Once you are in the BIOS menu, press F9 to open the Load Default Options dialogue box.
Select Yes using the arrow keys to reset BIOS settings to factory default.
Exit and restart the computer and check for any improvements.
7.2 Check the BIOS version
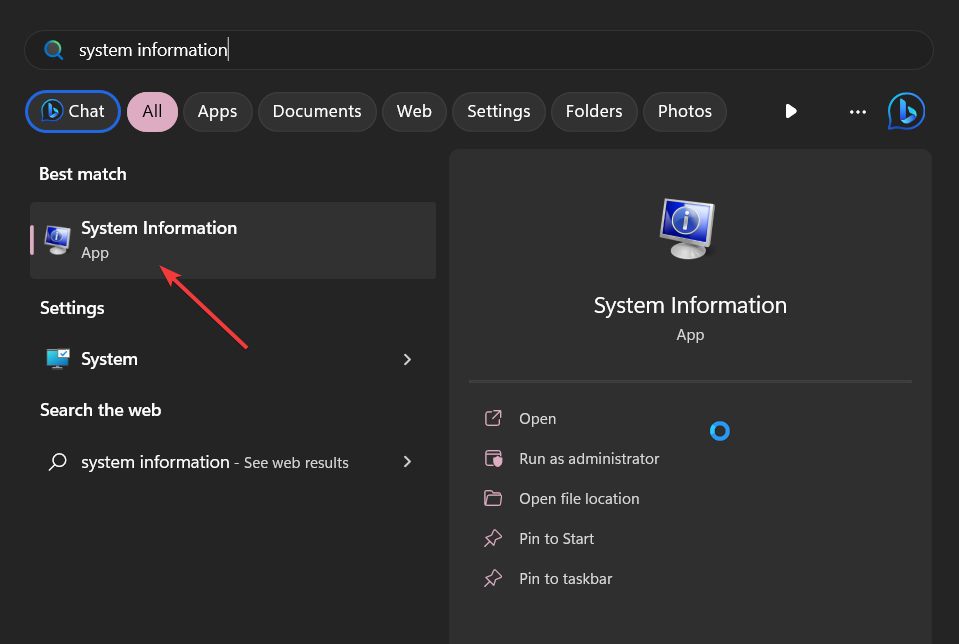
Open the Start menu by pressing the Windows key.
Type System Information and open the top result.
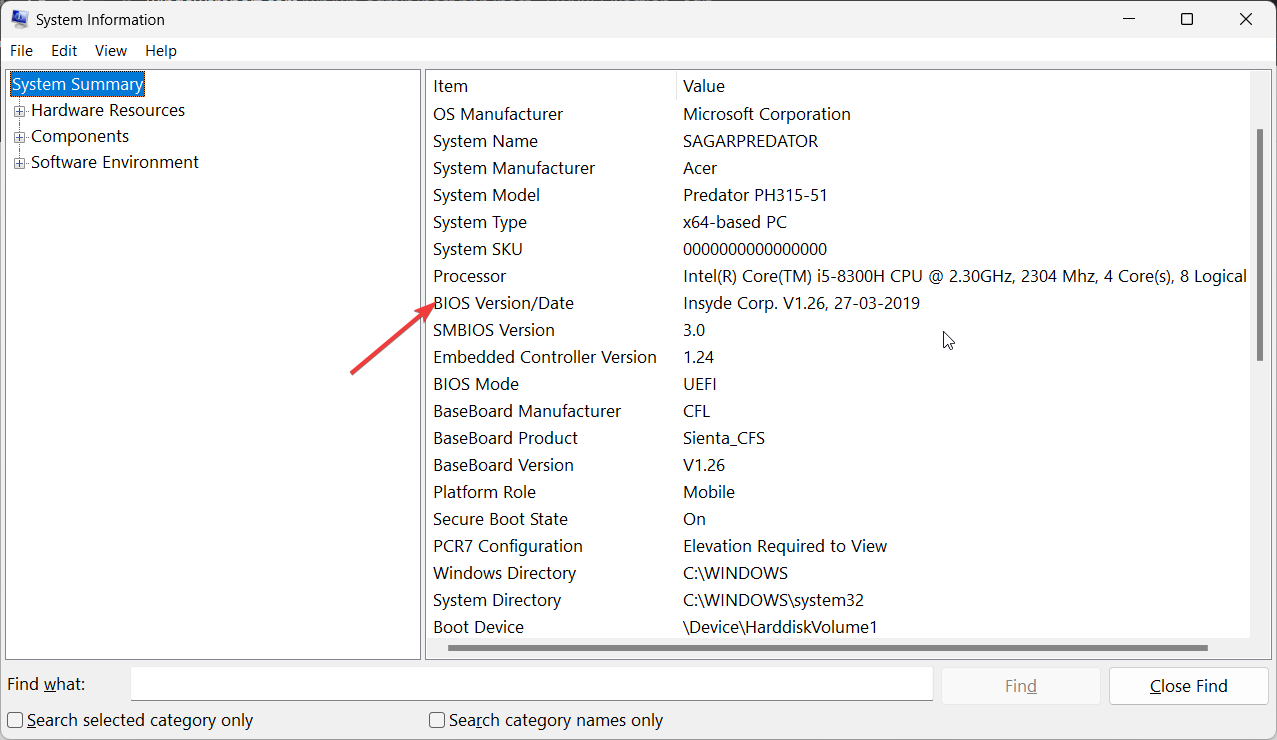
Locate BIOS Version/Date section on the right side.
7.3 Update BIOS
The process of updating BIOS will differ depending on your motherboard. For this step, we shall be updating the HP motherboard.
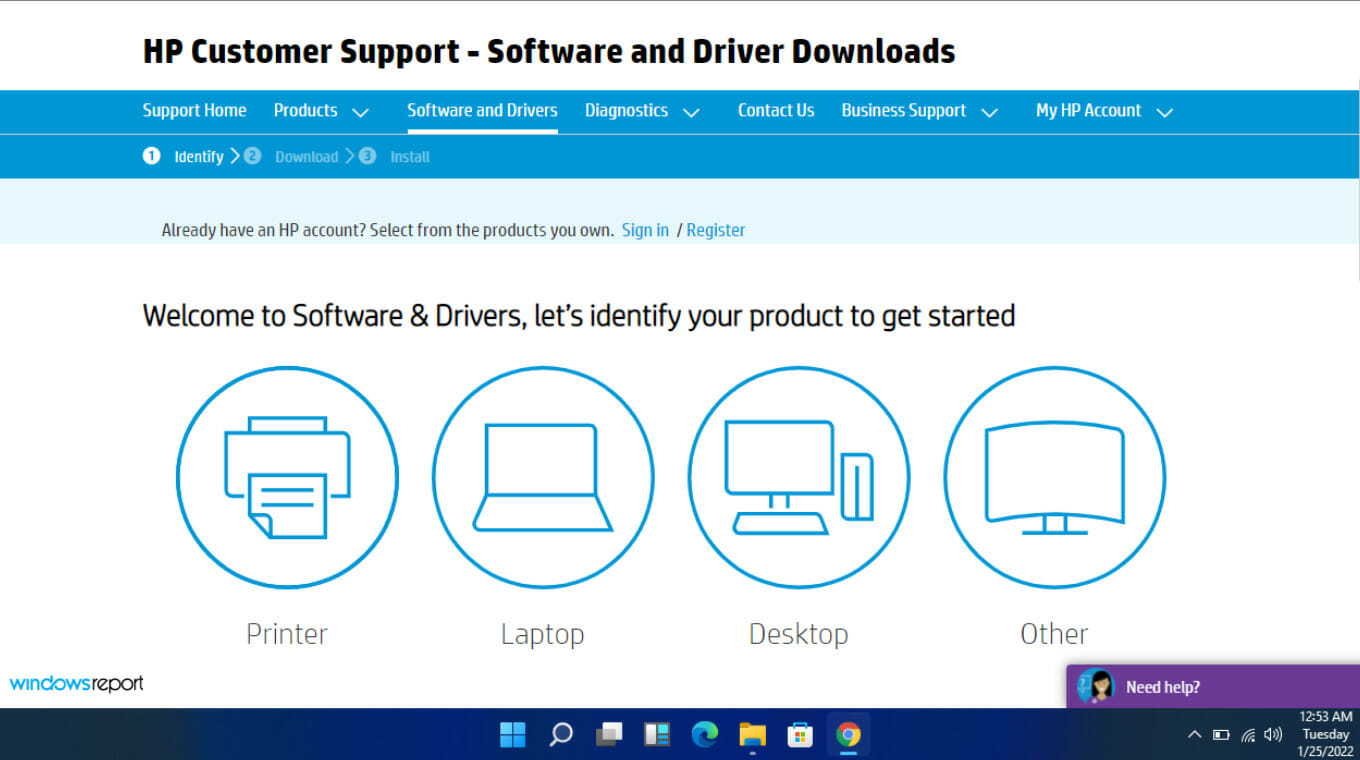
Choose laptop or desktop, depending on the type of computer you’re using.
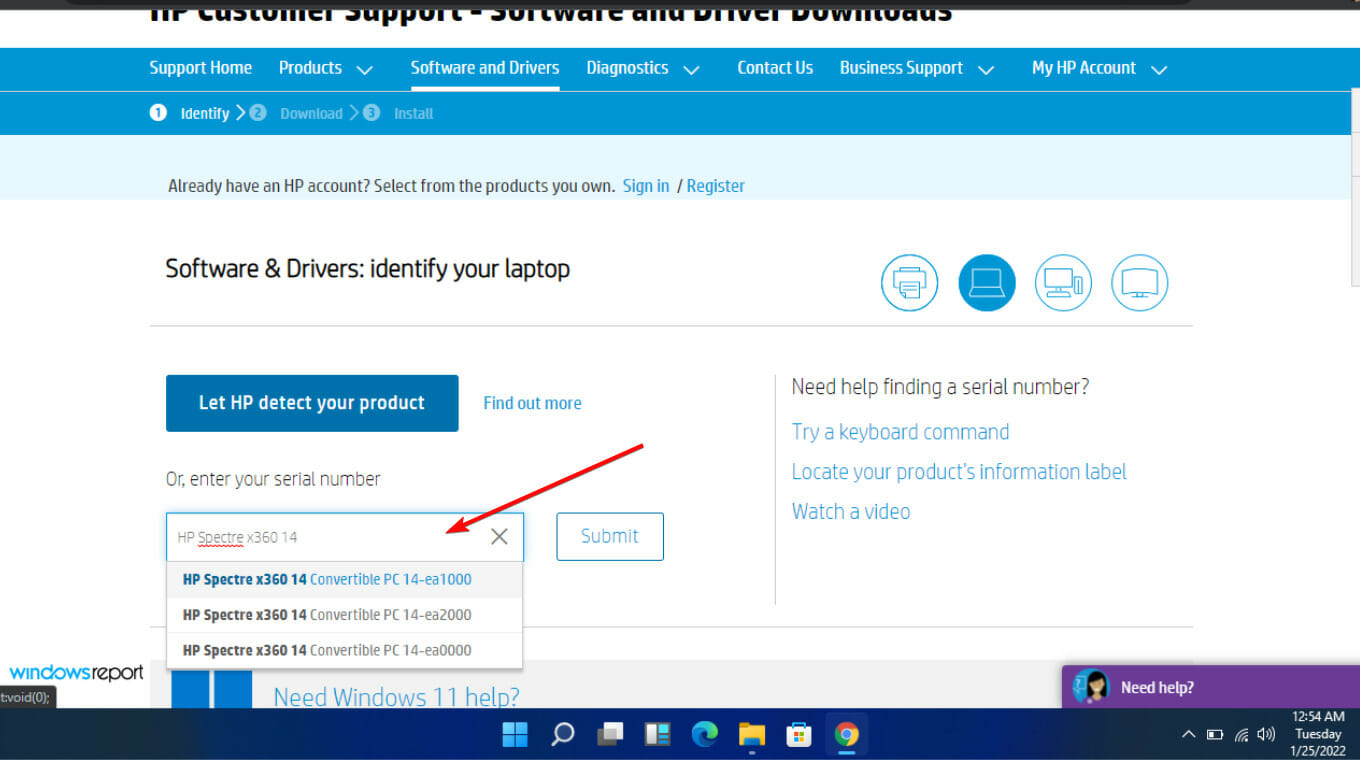
Enter your exact serial number or your exact computer model.
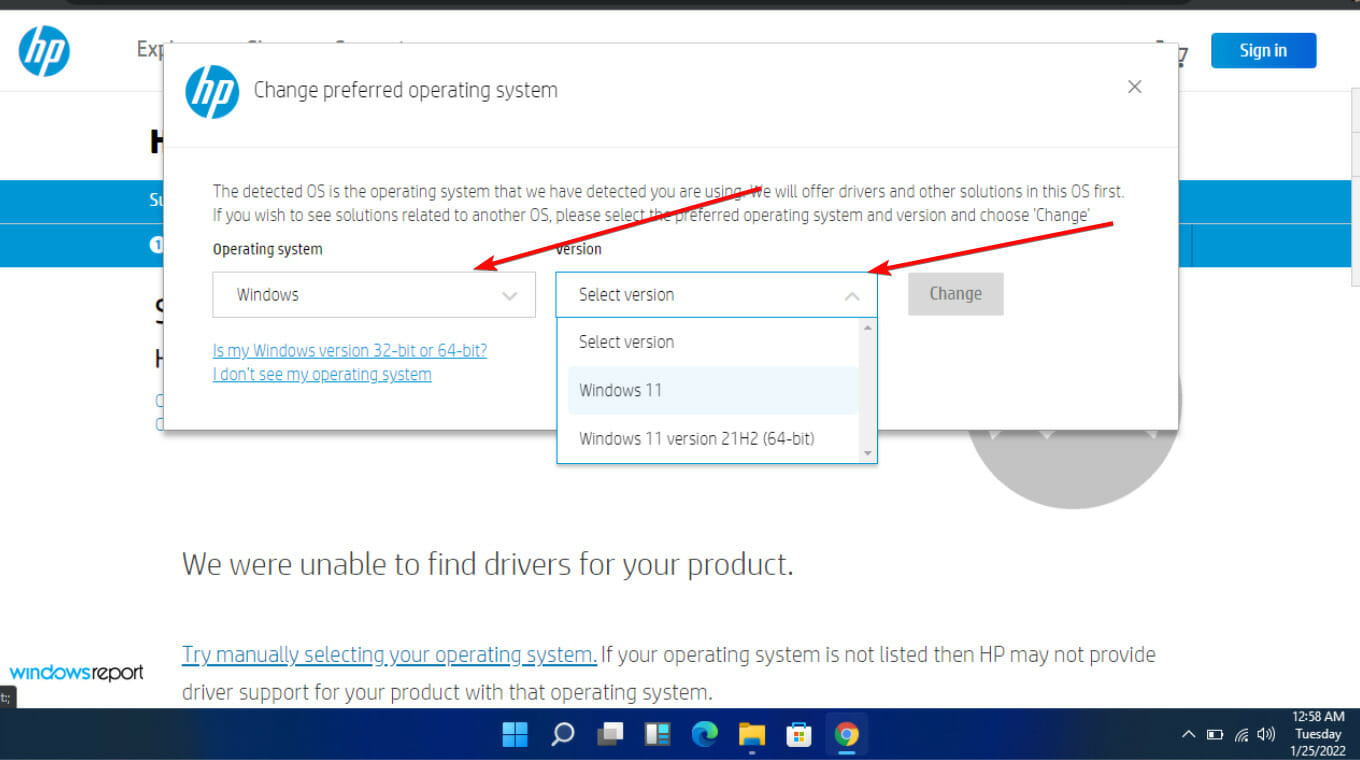
Select your OS and OS version, then click Submit.
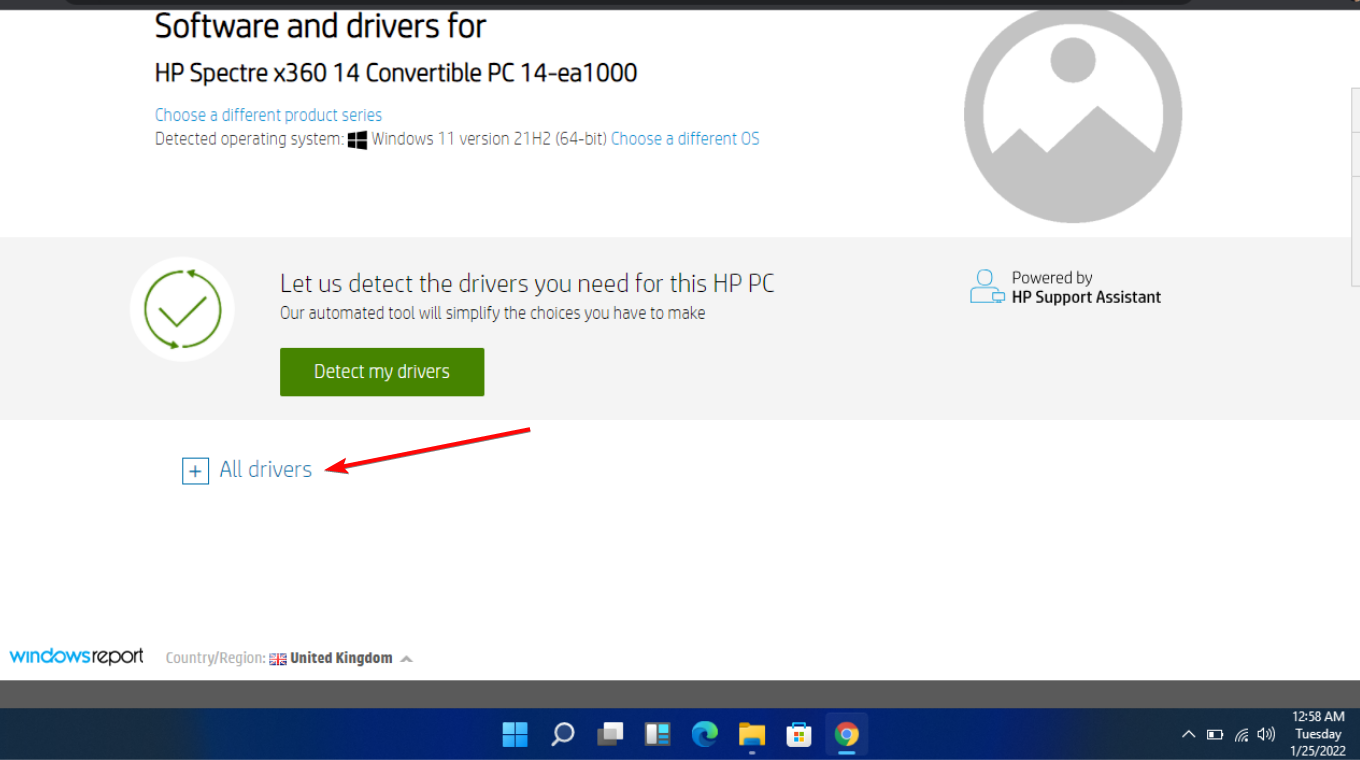
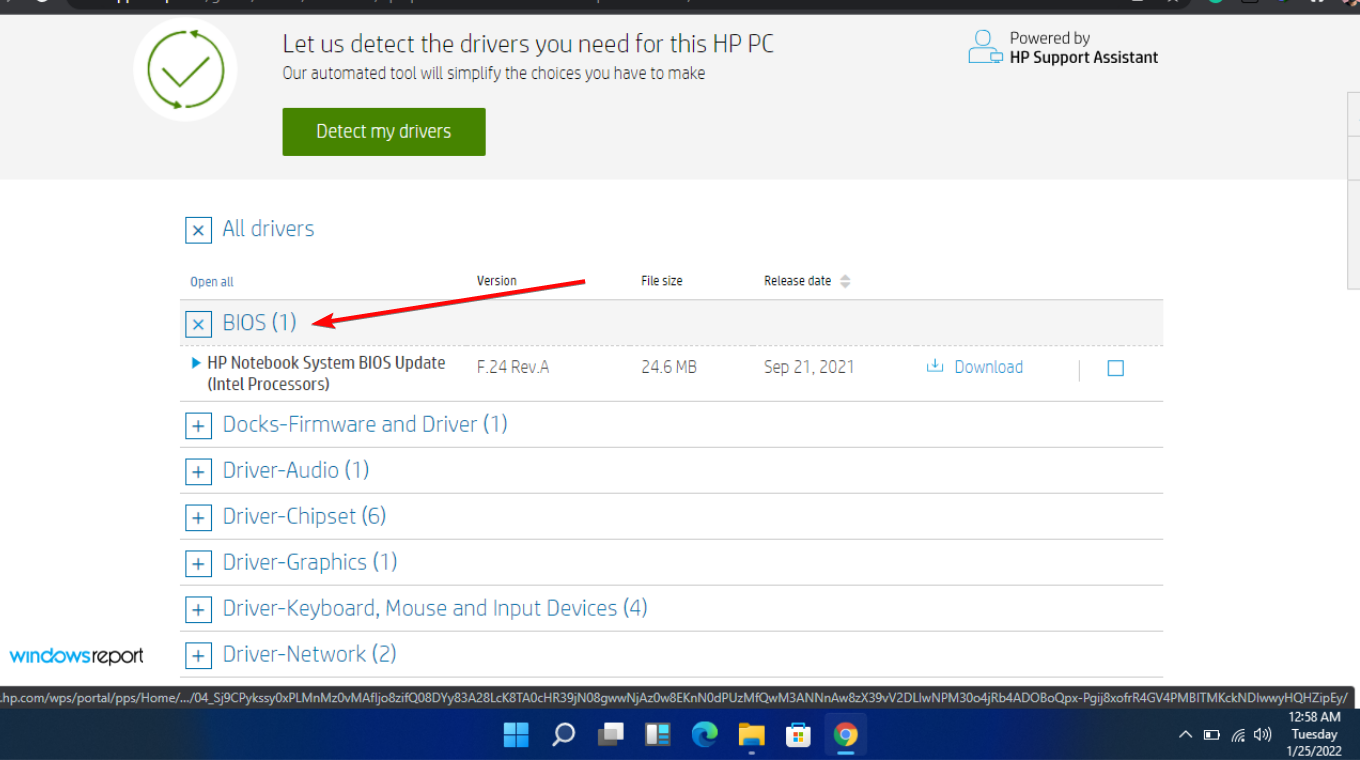
Click on All drivers and then expand BIOS to see available updates.
Click the download icon.
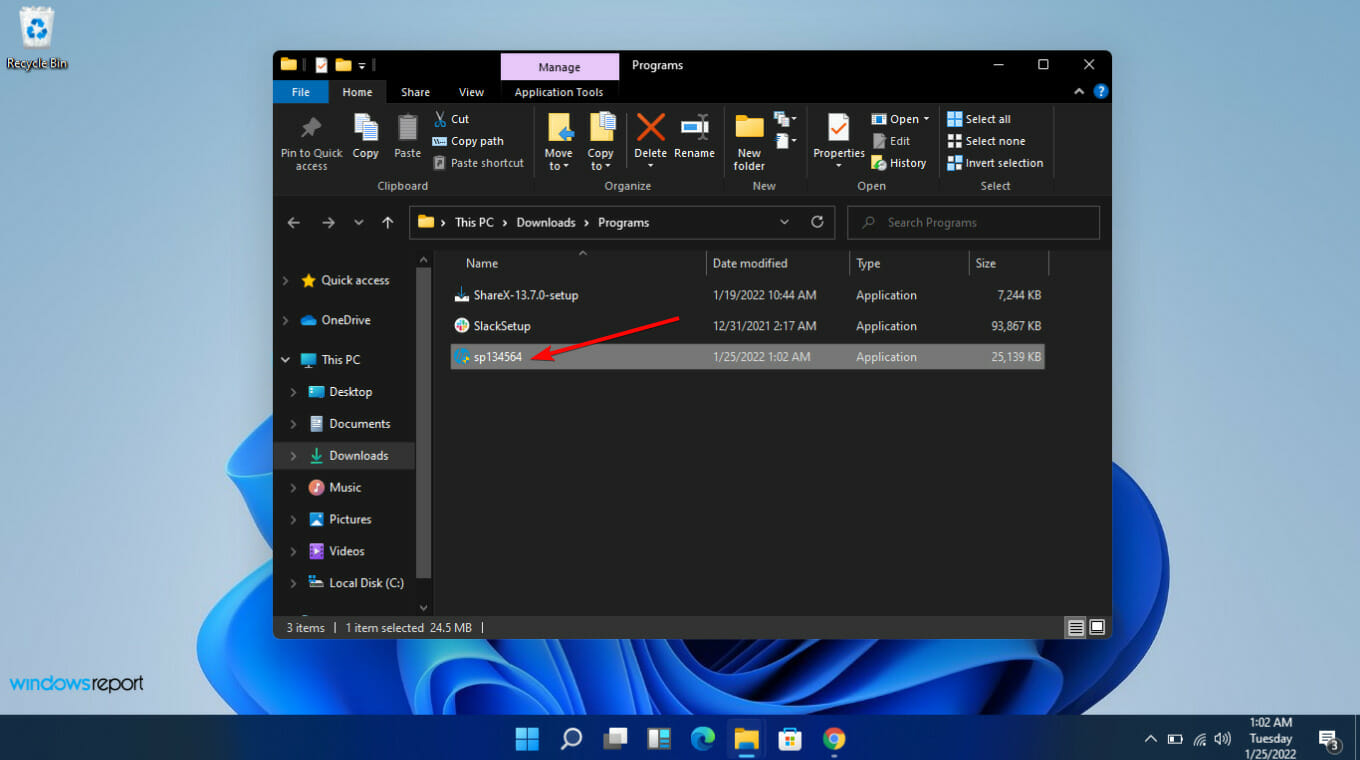
Install the .exe file, following the on-screen instructions.
Restart your PC.
8. Reinstall the problematic app
Discord was the most popular app where sounds were getting automatically muted when on a call so you can try to uninstall then install it again and see if there are any changes. Sometimes, when you can’t hear anyone on Discord, you should try it on a browser.
Although muting other sounds reduces distractions that may occur when on a call, it may not be overall beneficial and doesn’t present a real convenience for Windows users.
Still, there are several technologies available that can help improve the sound quality of a call, but muting all your other apps isn’t necessarily a good thing. You can mute a single app if you wish to but all we’re saying is you should have absolute control of your sound.
Hopefully, with these tips, the next time your call interrupts an important event such as a movie or podcast, you won’t be stuck wondering how to switch it back on again.
Do you prefer to have your sounds muted when you get on a call or would you like continuous playback with the volume turned down? Let us know in the comment section below.
If you want to play classic PlayStation 1 games on your Windows PC, a reliable PS1 emulator for Windows PC is essential.
Whether you’re looking for the easiest PS1 emulator or a complete PS1 emulator for PC with all the features, this guide has you covered.
We’ll show you how to use an emulator, find compatible games like Final Fantasy VII, Crash Bandicoot, and Metal Gear Solid, and get started with your favorite titles fast.
If you need an emulator for PS1, then look no further than DuckStation. This is a free and open-source emulator, so it can be used without restrictions.
The emulator offers outstanding emulator accuracy, an easy-to-use visual interface based on Qt, and great compatibility, so most games should be able to work without any extra configuration.
As for availability, you can get DuckStation on all desktop platforms, Android, Xbox One, and even Switch. If you’re looking for an emulator with great compatibility and features, be sure to give DuckStation a try.
For users who want to try another reliable option, you can also follow our detailed guide on how to run ePSXe on Windows and learn how to install, configure, and optimize the emulator for smooth PlayStation gameplay.
Minimalistic emulators are also available, and if you need something that doesn’t have a graphical interface, and uses just the command line, then Mednafen is just what you need.
If you want, you can also get a third-party frontend for the visual interface, if you’re not a fan of the command line. Regarding the features, this application offers support for a physical joystick and gamepad, so you can use a controller out of the box.
There are various graphics filters and scaling modes available, save states, real-time game rewinding, screenshot and video recording, and even network play.
Mednafen is an advanced application, and it’s perfect for users who don’t mind using the command line, so you might want to consider it.
Other great features:
Supports PS1, NES, SNES, Sega, and other platforms
Many gamers like speedrunning, and if you’re one of them, this might be a perfect application for you. It has support for libretro cores as well as joypad compatibility.
Control mapping is also available, allowing you to customize your controls as you wish. Auto or rapid fire option is also available, thus making gameplay a bit easier.
It also offers audio and video recording, bullet-proof recording, and rewinding. Custom plugins and Lua scripting are available, allowing you to customize the emulator.
Even though BizHawk is great for speedruns, it can be used by regular users without any problems, so be sure to give it a try.
Other great features:
Supports PS1, Nintendo 64, NES, SNES, GameBoy, and other gaming platforms
If you’re looking for an emulator that can run PS1 games as well as games from other platforms, then RetroArch is what you need.
The software comes with a sleek interface that reminds us of the PS3 interface, and it looks visually impressive. To simulate the original console, this emulator has zero latency, so it’s perfect for fast-paced games.
Thanks to shader support, you can customize how the games look and replicate the look from old CRT TVs. It’s also worth mentioning that online multiplayer is available, so you can play with others.
RetroArch offers amazing features, but it does require a bit of configuration, so less experienced users might run into some issues while setting it up.
MAME is a well-known arcade emulator that can emulate a variety of arcade machines. Besides arcade games, it can also run PlayStation and Nintendo 64 titles without any issues.
The software is written in C++ and it’s focused on accuracy, and this is why you might run into compatibility issues once in a while.
It’s important to mention that MAME has been in development since 1997 and it’s one of the emulators with the longest history.
While it supports various systems, its primary intention isn’t to run PlayStation games, so be prepared for some minor issues if you choose to use it.
Emulator software is perfectly legal to download and use. Keep in mind that you can only legally emulate PS1 games that you own.
Is it legal to download PS1 ROMs?
No, it’s not legal to download PS1 ROMs since that is considered a copyright infringement.
If you’re looking for a PS1 emulator for PC then we suggest giving a DuckStation a go since it offers great functionality and features, and it’s perfect for first-time users.
If you want to dive into newer games, check out our guide on the best PS5 emulator for PC for smooth gameplay on your Windows machine. You can also explore how to play PS4 games on PC using official streaming or emulators.
Nintendo Switch is one of the most popular handheld consoles ever released, with approximately 130 million units sold worldwide. But many don’t want to be limited to the console and want to play Nintendo Switch games on another device. For PCs, a Nintendo Switch emulator comes to the rescue!
There are also Nintendo Switch emulators for Android, namely, Yuzu and Skyline.
Can I play Nintendo Switch on PC?
Even without any emulator, you can cast the Switch’s screen to a PC or a TV and enjoy seamless gameplay. You will need a compatible HDMI cable or screen mirroring software for this.
What are the best Nintendo Switch emulators for PC?
Yuzu is one of the most popular free Nintendo Switch emulators for PCs. It is an experimental open-source emulator from the developers of Citra and is available for all three: Windows, Linux, and Android.
Given that Yuzu is written in C++, you get enhanced compatibility across operating systems, but the number of games it can run is limited. Even for the games that run on Yuzu, a few are offering a barely playable experience.
Remember, Yuzu builds are actively maintained, meaning the developers will polish out any inconsistencies or misconfiguration. Besides, if you witness slow loading or poor performance, switch to Vulkan in the Graphics settings or update the graphics driver.
Key features of Yuzu:
1872 playable games (counting those rated Perfect, Good, and Okay)
Ryujinx remains the most compatible Nintendo Switch emulator for PC when it comes to games. It can run over 3400 games, a significant figure by any standard, though not all of these offer the same performance. However, there’s minimal loss of FPS in comparison to other emulators.
Written in C#, Ryujinx is also an open-source emulator available for Windows, MacOS, and Linux. Besides, Ryujinx is best for users with little technical acumen since it offers a simple user interface and allows easy game setup and loading.
NSEmu is an open-source Nintendo Switch emulator specifically for the Windows operating system. Remember, the emulator is still under development, and a few features and functionalities are presently missing.
But as for performance, NSEmu gives stiff competition to accomplished products in the space. The seamless functioning and easy-to-understand interface have made NSEmu one of the most popular options, especially among newcomers.
Besides, if you can understand the intricacies of gaming and emulators, you can contribute to the under-development project.
Key features of NSEmu:
Open source
Excellent graphics and sound
Seamless, lag-free performance
Offers user-oriented options such as rendering quality, anti-aliasing, and shading
These are our recommendations for the best, most user-friendly Nintendo Switch emulators for PC. Remember, performance issues with specific games are typical for emulators, and you must choose the right one compatible with the title.
If you are looking for emulators for other Nintendo versions, like Nintendo 3DS emulators, we have a guide for you. Or if you are looking for multiple options in a single software, consider using an all-in-one emulator.
Comment below for any queries or to share your favorite Nintendo Switch emulator.
We know that Windows 12 is expected to roll out sometime in 2024. Now, Taiwan’s Commercial Times has reported a more specific launch window: June 2024. In its report Commercial Times states,
Microsoft Windows 12 will be launched in June 2024 and is expected to introduce a large number of AI technologies and become the leader in AI PCs.
But that latter point on AI PCs is of particular interest. Many are pointing to 2024 as a breakout year for AI PCs, such as Quanta Computer founder and Taiwanese billionaire Lin Baili (also known as Barry Lam). Baili commented while attending the Taiwan Medical Technology Exhibition on the recent AI boom, saying that “AI will continue to improve next year.”
Baili also suggested that the demand for AI PCs will surge next summer as Microsoft rolls out its next operating system. (The Commercial Times report did not give a source for its June 2024 release target for Windows 12 other than Baili’s comments). That date is a bit earlier than the H2 2024 mark many are expecting.
Baili adds that he intends for Quanta to be at the forefront both in terms of AI PCs and AI server technology, saying “it is a good opportunity” for the computing industry at large. The next iteration of Windows is expected to further leverage AI technology and expand its capabilities.
Windows Phone Link is an application that allows Windows 10 and 11 users to link their Android and iOS mobile devices to their PCs. The app has several useful capabilities like displaying notifications and text messages right on your PC. Users can even make phone calls via the Phone Link app.
One thing the app currently lacks however is the ability to view a linked devices camera through the app. That may be about to change though as Microsoft is reportedly testing such a feature. According to these reports, a forthcoming update (v1.23102.190) contains code which indicates that video streaming on the app through a linked device will be implemented.
If this does come to fruition, it means that users could view their phone’s camera on PC, and could be used as a webcam. The code even lists support for camera effects such as soft focus, HDR, face retouch and auto framing.
There is no word at this point on what apps might be supported, or on whether this feature will ultimately become available for that matter. But the ability to use your smartphone as a webcam on Windows would be a great addition to this already nifty application.
Filling taxes can be a daunting task; however, with the right app like TurboTax to help you, things can get much smoother.
In this comprehensive review, we will discuss TurboTax’s features, user experience, different plans, and whether it lives up to all the hype in 2023.
What features should an ideal tax filing app have?
It should be easy to use and come with guided step-by-step instructions.
Must allow users to import financial data from sources like investment accounts, W-2 forms, & other documents.
Assist in identifying potential deductions and credits for maximum tax savings.
Powerful security features to ensure all personal and financial information is safe.
Comes with e-file tax returns, direct deposit options, and automatic updates for Law changes.
What makes TurboTax the best tax-filing app?
1. Guided process to file taxes
TurboTax asks you simple questions about your life, income, and investments and then guides you throughout the process of filing taxes. Downloading TurboTax is also based on your tax situation.
When inputting information related to your income, investments, and other life changes, you can either fill out the form manually or upload a picture of the document to let the platform autofill the details.
If you have opted for the premium version, you can upload the 1040 form similarly and get the information auto-filled.
2. Accessibility
Whether you are using a browser or have downloaded an app on your Android or iOS device, TurboTax allows you to file your taxes seamlessly.
Moreover, if you started filling out the form on your computer and want to continue filling it out on your mobile device, you can switch devices and pick up where you left off.
All taxes filed using the TurboTax app or platform come with an audit support guarantee. So, If the IRS contacts you, the tax expert from TurboTax will help you understand the audit and respond to it. However, the experts can’t represent you legally.
It also promises to provide the maximum refund you deserve and claims that you get a larger refund using any other tax filing app; they will refund you the plan price.
Also, if you are unsatisfied with the services, the app comes with a 60-day money-back guarantee; all you need to do is contact customer support.
Many users find it challenging to enter information into the tax filing portal as they need to mention all their sensitive and personal information.
However, with TurboTax, you can secure your account through multi-factor authentication, including a password and one-time code.
The platform or the software uses TLS encryption to keep your data safe when sending a return to the CRA.
5. Additional features
Instant refund ticker – When you enter the information into the app or portal, you will see the refund pr tax owning.
Pension optimizer – It helps you figure out how to split pension income between you and your spouse to optimize your tax return.
Year-Over-Year transfer – If you used TurboTax last year, you can import the information from the previous year, thereby reducing errors and saving you time.
Auto search for deductions – TurboTax stays updated with all the latest tax changes and searches more than 400 credits to find the relevant ones for you.
Pricing plans
NOTE
Prices are subject to change. Check the prices directly on the provider’s website before making any purchase.
Category
Package Name
Price
DIY options
Free
Free filing for tax returns for qualifying users
DIY options
Deluxe
Federal -$69 $59 per State
DIY options
Premier
Federal -$99 $59 Per State
DIY options
Self-Employed
Federal -$129 $59 Per State
TurboTax Live
Basic
$99 Federal & State
TurboTax Live
Deluxe
Federal -$139 $64 Per State
TurboTax Live
Premier
Federal – $189 $64 Per State
TurboTax Live
Self-Employed
Federal – $219 $64 Per State
Full-Service
Basic
$219 Federal & State
Full-Service
Deluxe
Federal – $269 $64 Per State
Full-Service
Premier
Federal – $379 $64 Per State
Full-Service
Self-Employed
Federal – $409 $64 Per State
Pros
Easy to use with simple questions to help file your taxes
Impressive chat, phone or email customer support
Upload your W-2 forms and the platform fills out the fields automatically
Updated with the latest tax laws
Cons
Free version has limitations and the paid one is very expensive
Tax expert assistance available for an additional cost
The website is slow and can be unresponsive at times
Sign up and create an account to get started with.
Click Get Started and prepare to complete the questionnaire about income, investments, purchases, charity, and more.
You can either mention the details related to your W2 and investments or take a picture of the document and upload your tax slips to autofill the information.
Explore the tax-saving opportunities and choose the one that suits you. Once you have filed in the information, the experts from TurboTax will review the work (if you have selected the Premium plan), and point errors if found.
Once done, you can file your taxes.
The whole process is split into simple steps, which makes tax filing much easier; however, the constant upselling prompts can irritate you sometimes.
If you want to learn about other tax-filing apps before making a decision, check out this list of tax-filing software.
TurboTax
Try TurboTax and let its experts fill in all the right tax forms without worrying about them anymore.
TurboTax is a robust and intuitive tax filing app that is a convenient way to file taxes with complete guided instructions.
When we first used it, we were able to seamlessly fill in the information and file the taxes, but it kept on trying to upsell my plan.
Also, we faced issues logging in, and the website took some time to load while we filled in the information.
However, its intuitive interface, comprehensive features, and step-by-step guidance make the intimidating process more manageable when it comes to filing taxes.
Moreover, its ability to handle a variety of tax situations, from basic returns to more complex ones, further solidifies its appeal.
In case you are not able to e-file taxes using TurboTax as the portal is throwing you the error, read this guide to learn more.
What do you think about tax filing software? Tell us about your experience in the comments section below.
The LiveKernelEvent Code 1a1 in the Reliability Monitor highlights a critical issue with the PC. And while the description reads, A problem with your hardware caused Windows to stop working correctly, it could just as well be a software-related problem.
The error code is often coupled with poor system performance, random crashes, slow boot time, BSOD (Blue Screen of Death) errors, or the keyboard or mouse not working, amongst other issues.
What causes the LiveKernelEvent Code 1a1?
The error can be caused both by software and hardware problems, and it’s primarily overclocking or third-party app conflicts to blame. Also, memory (RAM) issues or running an outdated, corrupt, or incompatible driver may trigger the LiveKernelEvent Code 1a1 error.
How do I fix LiveKernelEvent Code 1a1?
Before we start with the slightly complex solutions, try these quick ones:
Disable overclocking and revert to the default configuration. Also, uninstall any app meant to boost the PC’s performance.
Check for any pending Windows updates and install them.
Make sure all the connections are in order. Also, if you know how, unplug the RAM modules, clear the dust accumulation, and reseat them.
Tip
If you have a fair understanding of the Windows ecosystem, check the minidump file to ascertain the underlying cause and take suitable measures. Otherwise, follow the solutions listed next to get things running!
1. Uninstall any third-party antivirus
Press Windows + R to open Run, type appwiz.cpl in the text field, and hit Enter.
Select any third-party antivirus installed on the computer, and click Uninstall.
Follow the on-screen instructions to complete the removal process.
Reboot the PC and check for improvements.
Remember, the built-in antivirus, Windows Security, can protect your PC from malware and other threats. Running two or more different antiviruses can trigger conflicts and lead to LiveKernelEvent Code 1a1 in Windows 11.
Also, if the problem remains unresolved, it could be the leftover files or Registry entries to blame. In this case, use an effective software uninstaller tool to get rid of both!
2. Repair the corrupt system files
Press Windows + R to open Run, type cmd, and hit Ctrl + Shift + Enter.
Click Yes in the UAC prompt.
Paste the following three commands individually and hit Enter after each: DISM /Online /Cleanup-Image /CheckHealthDISM /Online /Cleanup-Image /ScanHealthDISM /Online /Cleanup-Image /RestoreHealth
Execute this command to run the SFC scan: sfc /scannow
Reboot the PC and check for improvements.
To repair the corrupt system files, it’s best that you run the DISM commands and the SFC scan. The two will replace any such files with their cached copy and fix issues with the Windows image. However, if you want to save some time and effort, or you simply want to automate the process, you can try a specialized tool.
3. Reset the BIOS to system defaults
NOTE
The steps listed below are meant to provide an understanding of the process since it will vary for each system. For the exact steps, check the manufacturer’s website.
Turn off the computer, then power it on, and repeatedly press F1, F10, F12, Del, or Esc, depending on the system manufacturer, to access the BIOS.
Now, click on Defaults at the bottom.
Click the OK button to Load optimized defaults.
Once done, exit the BIOS, and load Windows.
4. Reinstall or update the graphics driver
4.1 Reinstall
Press Windows + X to open the Power User menu, and select Device Manager from the list.
Expand the Display adapters entry, right-click on the active adapter, and select Uninstall device.
Tick the checkbox for Attempt to remove the driver for this device, and click Uninstall.
Reboot the PC and check for improvements.
4.2 Update
In the Device Manager, double-click on Display adapters, right-click on the active one, and select Update driver from the context menu.
Choose Search automatically for drivers and wait for Windows to install the best available version.
Restart the computer.
Often, updating the graphics driver will do the trick when faced with LiveKernelEvent Code 1a1, if you are presently running an outdated or incompatible version. If Windows can’t find a better version, head to the manufacturer’s website and install the latest driver manually.
To resolve the underlying cause triggering LiveKernelEvent Code 1a1, use MemTest86, a reliable open-source program that runs comprehensive tests on the RAM modules and fixes most issues. Remember, the software will take some time to install. So, it’s best that you let it run overnight.
Your next approach should be to reduce overheating in Windows 11. For this, a quick tip is to keep the number of active processes to a minimum or upgrade the hardware.
Besides, if you find the PC heating up at random intervals, manually control the CPU fan and run it at optimal speed at these points to effectively dissipate the heat.
7. Contact the manufacturer
If nothing else works, the last option is to contact the device’s manufacturer because it’s most likely a hardware malfunction to blame.
In this case, it’s best that you get the PC inspected and the problematic part repaired or replaced, which will fix LiveKernelEvent Code 1a1 for good!
Many users noticed the VolSnap 25 error in the Event Log on their PC. This is usually a silent error and it doesn’t interfere with your system in any way.
However, if you don’t resolve it, it can potentially cause issues in the future, so in this guide, we’re going to take a closer look at this error and show you how to fix it properly.
What is a VolSnap 25 error?
This error can occur if you try to back up certain drives that have issues.
If the shadow drive on your disk has issues, you’ll encounter this problem.
A small paging size can sometimes lead to this error.
How do I fix the Volsnap 25 error?
1. Switch to volume copy and exclude certain drives
Open the software you’re using to create backups.
Next, switch to the volume level backup.
Check if the problem is resolved.
You can also exclude certain drives, such as HP Tools or similar, and check if that helps.
2. Place a shadow copy on another disk
Press the Windows key + S and type cmd. Choose Run as administrator.
Next, run these two commands, but be sure to replace the drive letters accordingly: vssadmin add shadowstorage /For=D: /On=E: /MaxSize=UNBOUNDED vssadmin resize shadowstorage /For=D: /On=E: /MaxSize=UNBOUNDED
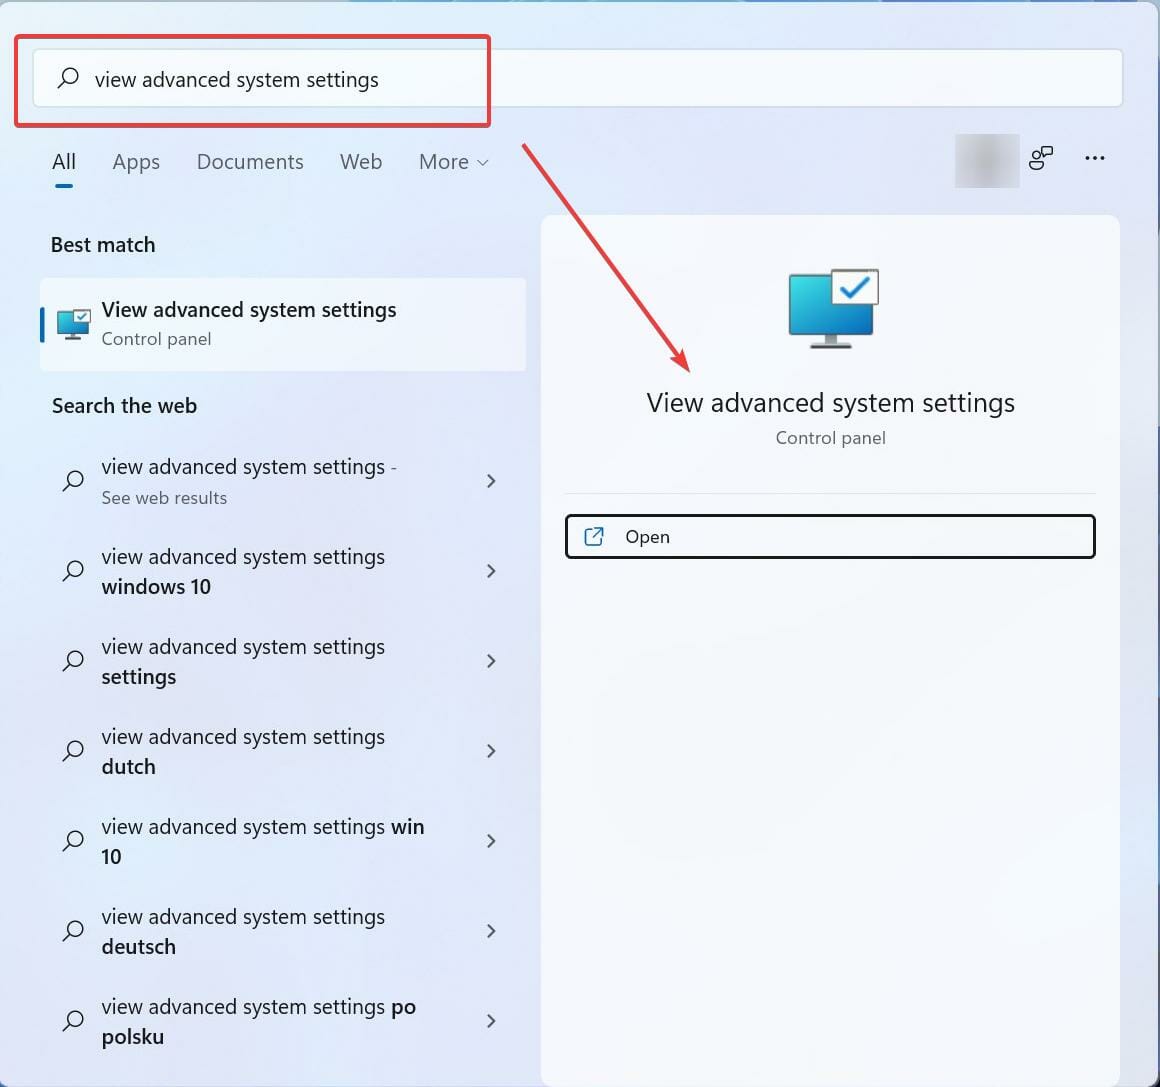
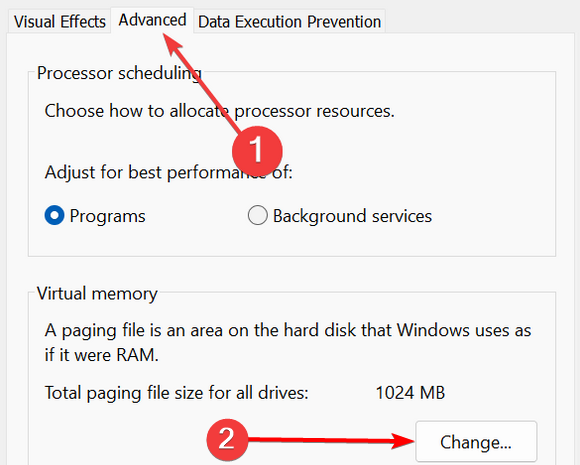
Press the Windows key + S and type advanced. Select View advanced system settings.
Click the Settings button in the Performance section.
Next, go to Advanced and click on Change.
Uncheck Automatically manage paging file size for all drives.
Select the drive that has shadow volume on it and choose Custom size.
Set the Maximum size to 1.5 times your current amount of RAM in MB. You can keep the Initial size lower.
Click on Set and then OK. Restart your PC to apply the changes.
What does the Volsnap do?
Volsnap is associated with the Volume Shadow Copy service.
It can create shadow copies that are used for restoring files or system backups.
This service is often used by various backup software.
It uses snapshot provides to create and manage shadow copies.
Volsnap 25 error usually just appears in the Event Log, and as such, it won’t cause too many problems. However, if you notice issues with your backup software, be sure to change your backup settings or try our other solutions.
Want to revisit the PS3 era without digging out old hardware? The best PS3 emulators for Windows let you play classic titles right on your PC, often with better graphics and smoother performance.
In this guide, we highlight top options, what your system needs to run them, and the key features to look for, like controller support, visual enhancements, and overall stability.
RPCS3 is an open-source multi-platform PlayStation 3 emulator for various operating systems, including Windows, Linux, macOS and FreeBSD.
Right after installing the emulator on your device, you can access more than 3000 PS3 games, including God of War: Ascension, Red Dead Redemption, & The Last of Us, and the list of the games available keeps changing.
The developer of this emulator has beautifully preserved the essence of PlayStation 3, so if you liked PS3 more than its successors, this is for you.
Also, they continuously try to update the software, add more games to keep it relevant, and take users’ input to improve further.
RPCS3 has a minimum specification requirement to use the software but to experience immersive gameplay, you need 8 GB of dual-channel RAM, SSD Storage, Windows 10 22H2 with a CPU of 6 cores and 12 threads.
The only downside of this emulator is the setup process is quite complicated; however, once you set it up, it is quite easy to use.
More about RPCS3:
With the recommended specs, you will experience no lag
Mednafen is a portable, utilizing OpenGL and SDL, command-line driven multi-system emulator, including PlayStation, SuperGrafix, GameBoy, and Sega Master, but can only be installed on Windows PC.
It comes with remap hotkey functions and virtual system inputs to a joystick and a keyboard or both simultaneously.
However, Mednafen uses a threaded model of emulation and limitation of SDL; you should use a joystick instead of a keyboard to avoid latency.
It allows you to record audiovisual movies in the QuickTime file format and supports various lossless codecs.
To run this emulator without issues, you must have the latest version of Windows, irrespective of architecture, with Intel or AMD Dual Core Processor 3 GHz processor, 1 GB RAM, and 1 GB hard disk free space.
The only downside of this emulator is as it uses a command line interface, it might be challenging for people who have never used an emulator like this.
More about Mednafen:
Is available for free and is in active development
Allows you to take snapshots while in-game and save them in PNG format
RetroArch – Can also be installed on Android phones
RetroArch is an open-source, cross-platform frontend emulator for PS3, which can be installed in Windows, macOS, Linux & even on Android and iOS, making it different from the ones in the list so far.
This PS3 emulator for PC is fast, doesn’t hog your system resources, and doesn’t need any additional resources to run. It can run on Windows 7 with Pentium 4, 32 MB RAM, and any compliant OpenGL 2.x.
RetroArch allows you to run classic games on various computers and consoles and has an intuitive user interface.
This emulator has advanced features like shaders, rewinding, machine translation, next-frame response times, and blind accessibility. It also lets you run your original game discs.
You can browse the game collection via the beautiful set-top box-like menu with thumbnails and animated backgrounds.
However, the presence of excessive options can overwhelm a user and can also be seen as a disadvantage of this emulator.
More about RetroArch:
Comes with a Recording/Streaming option via Twitch.tv, YouTube, or Discord
Easily customizable and has multiple controller support
Is available for free and is in active development
Available in popular stores like Google Play, Amazon App, Steam, & Samsung Galaxy Store
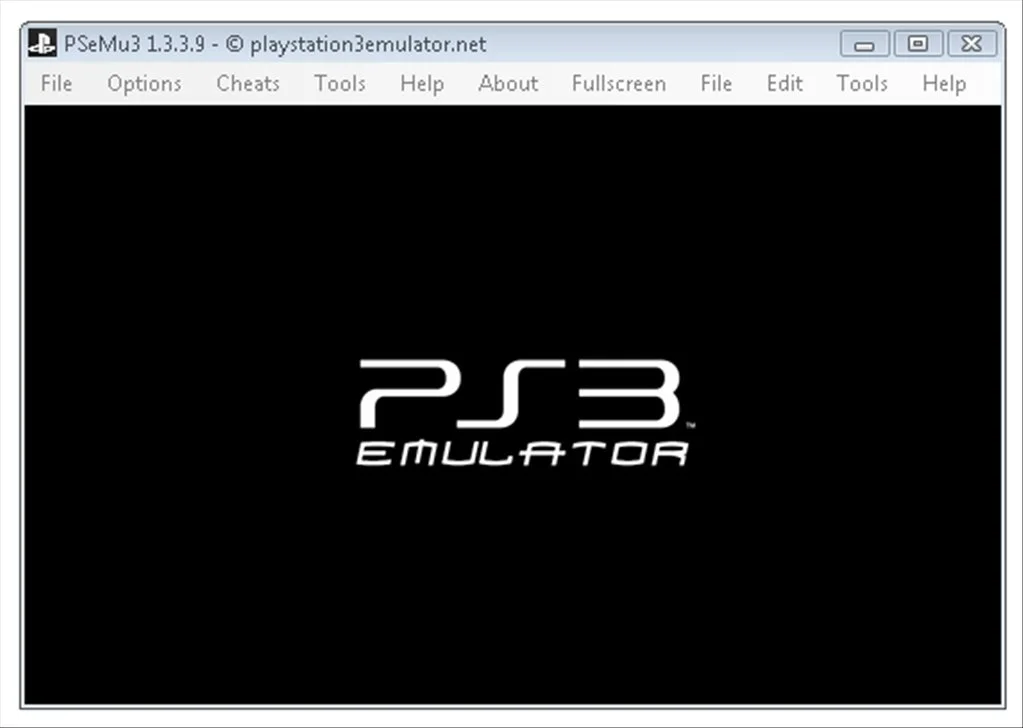
Another suitable PS3 emulator, PSeMu3, not only lets us play games for PlayStation 3 but lets you play the legacy games from PS1 and PS2.
With a user friendly and intuitive user interface, this emulator is simple to use and requires no technical knowledge to use.
All you need to do is download this PS3 emulator and drag & drop the game you want to play; the software will handle the rest.
You can run the original and copy of Blu-ray discs of the game or even launch them from the ISO images.
To run the emulator, the minimum requirements are 2GB RAM and a Core 2 Duo processor; however, if you have a high-end PC, you will get a better gaming experience.
The only downside of this PS3 emulator is that it only works for Windows computers, so you need a proper PC.
More about PSeMu3:
Free and is only 50MBs in size
Can be installed on Windows XP, 7, 8, 8.1, and 10
Runs at a top frame rate of 30fps at 720p
Allows you to play the most popular PlayStation 2 games
BizHawk – Comes with full re-recording & debugging tools
BizHawk is a powerful and easy-to-use emulator for Windows, which supports various platforms like PlayStation 3, Super Famicom, Nintendo 64, Super Nintendo, Virtual Boy, and ZX Spectrum.
It supports hotkey mapping, Lua scripts, & game note support with power tools and memory editors.
It has a long list of supporting platforms, including Nintendo DS/DSi, Atari 2600, Arcade machines, Nintendo 64, Virtual Boy, Game Boy, Super Game Boy, and Game Boy Color.
The emulator comes with tools and features that help speedrunners optimize the gameplay.
More about BizHawk:
Allows gamers to rewind and correct mistakes
Complete controller control
Supports re-recording for each of the emulation cores
To sum up, these are some of the best PS3 emulators available for your Windows computer. RPCS3 has continual developments, extensive gaming compatibility, and enhanced graphics options which makes it the best of all.
While Mednafen has its accuracy and multi-system support, RetroArch unites multiple emulators under one roof for a seamless gaming experience.
PSeMu3 provides authenticity and lets you play legacy games, Nucleus offers simplicity and ease of use, and BizHawk comes with tool-assisted gameplay.
Choosing the one for your PC depends on your preferences, system capabilities, and the gaming experience you want. Also, you can always check the official website for an emulator to understand if it is a fit.
Vinted, a popular platform for buying and selling new and pre-owned clothing items, is throwing a Server error for many. The problem is encountered on both the website and mobile devices.
Several users, as a result, reported being unable to upload photos or make the payment. Others found that the Vinted app won’t load or sometimes read, No items found.
Why do I get a Vinted Server error?
The error usually appears when the Vinted servers are down or undergoing maintenance. Besides, missing permissions, running an outdated version of the app or OS (Android or iOS), or a corrupt cache can just as well trigger the server error.
How can I fix the Vinted server error?
Before we start with the slightly complex solutions, try these quick ones:
Verify whether the Vinted servers are down. Use a real-time monitoring platform like UpdownRadar to check the same.
Make sure you have a stable Internet connection. If the Vinted website is not working, switch to a wired network (Ethernet) and check for improvements.
If you are facing the Server error while signing in to Vinted, use the email address instead of your username.
Tip
The solutions listed here are for an Android device and the Vinted website. If you are using the iOS app, apply the equivalent measures to get things running.
1. Re-enable permissions
Open the device Settings, and go to Apps.
Select Vinted from the list.
Tap on Permissions under App settings.
Select any listed under Allowed.
Choose Deny.
Similarly, Deny all other permissions to the app.
Reboot the device and then select Allow for the permissions you disabled earlier.
Open the web browser used to access Vinted, and press Ctrl + Shift + Delete.
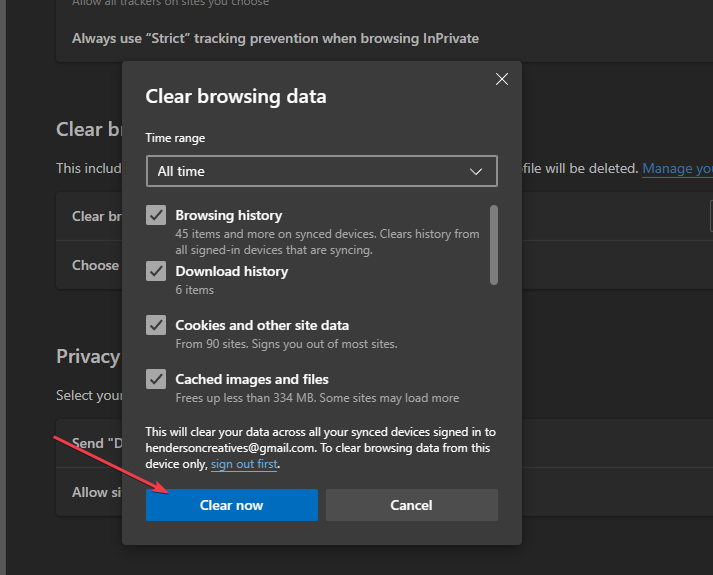
Select All time from the Time range dropdown menu, tick the checkboxes for Cookies and other site data and Cached images and files, then clear the Clear data button.
Relaunch the browser, then visit the Vinted website again, and it shouldn’t throw the Server error anymore.
For many users, reinstalling Vinted helped get rid of the Server error. This is usually the case when the previous installation is corrupt.
5. Contact support
When nothing else works, the last option is to contact Vinted support. You will have to submit a ticket highlighting the problem, and they should respond within 24 hours with a solution or share a timeline if it’s a server-related issue.
These are all the ways you can fix the Vinted Server error on the mobile app and website. As per our research, the problem was fixed by itself within a few hours for most users. So, wait for some time, and only then, begin manual troubleshooting!
If the DTS:X Ultra app is not working properly and can’t detect my headphones, this guide can help! We will discuss the probable causes and offer WR expert-recommended solutions to fix the issue in no time.
How can I fix the DTS:X Ultra not working?
Before trying anything else, download DTS Sound Unbound and configure your sound settings properly. Also keep your audio drivers up to date at all times.
1. Check if the Windows Audio service is running
Press Windows + R to open the Run window.
Type services.msc and click OK to open the Services window.
Locate Windows Audio, and double-click it to open the Properties window.
Check the Service status; it should be Running. If it is stopped, click Start.
Wait for a minute, the service will be initiated, then close the Services app.
2. Re-enable the speakers
Right-click on the Speaker icon and select Sound settings.
Click on the More sound settings option.
Go to the Playback tab, right-click the Speaker and select Disable.
Wait for a minute, then right-click the speaker and choose Enable.
Re-enabling the speakers configures the settings again and can be quite beneficial if you are facing issues with audio output devices.
3. Modify the spatial sound settings
Press the Windows key, type control panel, and click Open.
Select Category for View by, then click Hardware and Sound.
Click the Sound option.
Next, go to the Playback tab, select speaker and click Properties.
Go to the Spatial sound, under Spatial sound format, select DTS:X Ultra
To conclude, the DTS:X Ultra not working on Acer Nitro 5, Asus TUF, or any other device is due to missing app files or outdated drivers, so to fix it, you need to make sure the app is working fine, and that both the operating system & drivers are updated to the latest version.
Many users have reported that their Event Viewer has logged errors related to WMI-activity with an event ID 5858.
In this guide, we will discuss probable causes and offer recommended solutions by WR experts to get rid of the issue.
What is Event ID 5858?
The WMI activity event ID 5858 indicates that the files related to Windows Management Instrumentation (WMI) are corrupted, thereby causing system crashes and slow performance. The leading causes are:
Corrupted system files or malware infection.
Pending Windows updates or outdated drivers.
How can I fix Event ID 5858?
Before moving to any troubleshooting methods to get rid of event ID 5858, make sure you follow these preliminary checks:
Restart your computer and update your Windows to the latest version.
First, open Event Viewer, then check the event ID and its description to understand the cause.
1. Run your computer in a clean boot environment
Press the Windows + R to open the Run window.
Type msconfig and click OK to open the System Configuration window.
Go to the Services tab, place a checkmark next to Hide all Microsoft services, and then click Disable all.
Next, switch to the Startup tab and click the Open Task Manager link.
Go through the list of Startup items, look for Enabled items, select them one by one, and click Disable.
Close Task Manager, go to the System Configuration window, click Apply, then OK to save the changes.
Click Restart when prompted to boot your computer in clean boot.
Once you reboot your computer in clean boot, your system will operate with minimal drivers and startup programs. You can enable services and startup items to identify the source of the problem.
Once identified, reverse engineer the steps to boot your computer in normal mode to ensure you can run it at full throttle.
2. Run SFC & DISM scans
Press the Windows key, type cmd and click Run as administrator.
Type the following command to to scan and repair damaged or missing system files on a Windows operating system, then hit Enter: sfc /scannow
Once the command is executed, copy & paste the following command to restore the Windows image health by checking for corruption in the system files, then hit Enter: DISM /Online /Cleanup-Image /RestoreHealth
Reboot your computer to let the changes take effect.
Restoring the corrupted files of your Windows 10/11 computer can help you fix other issues like Event ID 1008; to learn more, read this guide.
Alternatively, you can use automatic repair software to solve this issue within seconds and prevent further errors from occurring.
3. Update your graphics drivers
Press Windows + R to open the Run dialog box.
Type devmgmt.msc and click OK to open the Device Manager app.
Go to Display adapters and click it to expand it. Right-click the driver, and select Update driver.
Choose Search automatically for drivers.
Follow the onscreen instructions to complete the process.
Now go to the Network adapters, expand it, and update the driver under it too, using the same steps mentioned above.
Press the Windows key, type cmd and click Run as administrator.
First, copy & paste the following command and press Enter: net stop winmgmt
To verify the consistency & integrity of the Windows Management Instrumentation repository on Windows, and hit Enter: winmgmt /verifyrepository
If the WMI repository is inconsistent, copy & paste the following command and press Enter: winmgmt /salvagerepository
In case the repository is corrupted, type the following command and hit Enter: winmgmt /resetrepository
Now, to start the service again, copy & paste the following command and press Enter: net start winmgmt
Restart your PC to save the changes.
5. Perform a system restore
Press Windows + R to open the Run dialog box.
Type rstrui and click OK to open the System Restore window.
On the System Restore window, select Choose a restore point and click Next.
Select the event before the issue started and click Next.
Click Finish to initiate the process.
Windows will restart and restore your computer to the chosen restored point. If the system restore doesn’t complete successfully, it could be due to conflicting programs or driver issues, read this guide to learn more.
So, the key to fixing the event viewer errors is to first check the description to understand the reason for the issue.
Also, to avoid the Event ID 5858, you need to ensure that there are no pending Windows updates and that all the system drivers are updated to the latest version.
Moreover this could also help you avoid other critical errors which could hamper your system performance.
If you have any questions or concerns about the event ID 5858 WMI-activity, feel free to mention them in the comments section below.
Many users complained about facing the Apex Legends Anti Cheat error, The client is not running the anti-cheat or has failed the anti-cheat authentication after installation or while playing the game.
In this guide, we will explore the common causes and discuss the WR experts’ recommended methods to fix the issue.
Reasons for the Anti-cheat error:
Server outage or technical issues as well as outdated game or corrupted game files can cause this. Problems with EasyAntiCheat can also lead to this issue.
How do I fix the Anti Cheat error in Apex Legends?
Before proceeding with any steps check the game server status, then restart your device and router. Also, ensure your PC meets the game’s requirements.
1. Paste the necessary DLL files
Open File Explorer and navigate to Apex installation directory. By default it should be: C:\Program Files (x86)\Origin Games\Apex
Next, go to the EasyAntiCheat folder.
Select EasyAntiCheat_x86.dll and EasyAntiCheat_x64.dll and copy them.
Go back to the Apex folder and paste the files there.
Check if the problem is resolved.
2. Update your network drivers
Press Windows + R to open the Run dialog box.
Type devmgmt.msc and click OK to open the Device Manager app.
Go to Network adapters and click it to expand. Right-click the driver, and select Update driver.
Choose Search automatically for drivers.
Follow the onscreen instructions to complete the process.
Follow the same steps for the categories mentioned in Device Manager to ensure all the device drivers are updated to the latest version.
Speaking of updating drivers, make sure your graphics drivers are up to date so that your game can run without any high CPU usage issues and overheating.
3. Run Apex Legends and EA as administrator
Press Ctrl + D to go to the Desktop.
Locate & right-click Apex Legends, and select Properties.
Go to the Compatibility tab, and place a checkmark next to Run this program as administrator.
Click Apply, then OK.
Also, right-click the game again and select Open file location.
On the following Windows Explorer window, right-click the EasyAntiCheat_Setup.exe and choose Run as administrator.
Now click Repair to restore the damaged files, if any.
Now, find the EA launcher on the desktop and follow the same steps to ensure it always runs with administrator privileges.
Press the Windows key, type control panel, and click Open.
Select Category from View by and click System and Security.
Click Windows Defender Firewall.
From the left pane, click the Turn Windows Defender Firewall on or off.
Next, place a checkmark next to Turn off Windows Defender Firewall (not recommended) for both Public & Private network settings.
Click OK to save the changes.
If after disabling the Windows Firewall, the game works fine, then you need to add the game and the anti-cheat services to the exclusion list of your antivirus. To do that, follow these steps:
Press the Windows key, type windows security in the search box, and click Open.
Go to the Virus & threat protection option, and choose Manage Settings.
Scroll down the page to find Exclusions, then click the Add or remove exclusions link.
Click Yes on the UAC prompt, then the Add an exclusion button.
Select Folder from the drop-down menu.
From the following window, select the game and click Add to add it to the exclusion list.
Now, repeat the exclusion process to add the anti-cheat service of the game to the list.
Once done, restart your computer and reverse engineer the steps mentioned to disable Windows Firewall to turn it back on.
6. Reinstall Apex Legends and EA client
Press the Windows key, type ea, and click Run as administrator.
Go to Library, then right-click Apex Legends and select Uninstall.
Close the launcher and reboot your PC.
Press Windows + E to open the File Explorer window and navigate to the file location in the system drive: C:\Program Files\EA Games
Search for Apex Legends, select it, and click the Delete icon.
Open the EA launcher again, go to My Game Library, then right-click Apex Legends and choose Install, then click Next.
Once reinstalled, check if the issue persists; if the issue is still there, then the problem could be in the client app. To reinstall EA games, follow these steps:
Press Windows + I to open the Settings app.
Go to Apps, then click Installed apps.
Locate EA, click the three dots, and select Uninstall.
Click Uninstall to confirm.
Once done, restart your computer. Press Windows + E to open the Windows File Explorer.
In the address bar, type %ProgramData% and press OK to open the Program Data.
Locate and select the EA folder, then click the Delete icon.
Now type %AppData% and hit Enter, find, and delete the EA folder from the Roaming folder in this directory as well.
Next, come out of the Roaming folder in the AppData directory, and go to the Local folder, find and delete the EA folder.
Go to the EA official website, click the Download the EA app button double-click the downloaded file, then follow the on-screen instructions to complete the installation.
Right-click EA, select Run as administrator and then sign in using your credentials.
Go to My Game Library, then right-click Apex Legends and choose Install.
If nothing worked for you, you need to go to the EA customer support page, then under Game Support, select Apex Legends, and mention your issue for further assistance.
To conclude, Apex Legends’ Anti-cheat error could occur due to firewall interference, corrupted game files, or server outage issues.
Also, a slow internet connection could be one of the reasons for the interruption, as it is known to cause lags in the game.
To fix it, first, check the server status; if it is up & running, add the game & anti-cheat executable file to the exception list of your antivirus, and repair or reinstall your game.
This isn’t the only error caused by anti-cheat software, and we wrote about EasyAntiCheat.sys BSOD in our previous guides.
Did we miss a step that helped you? Feel free to mention it in the comments section below. We will happily add it to the list.
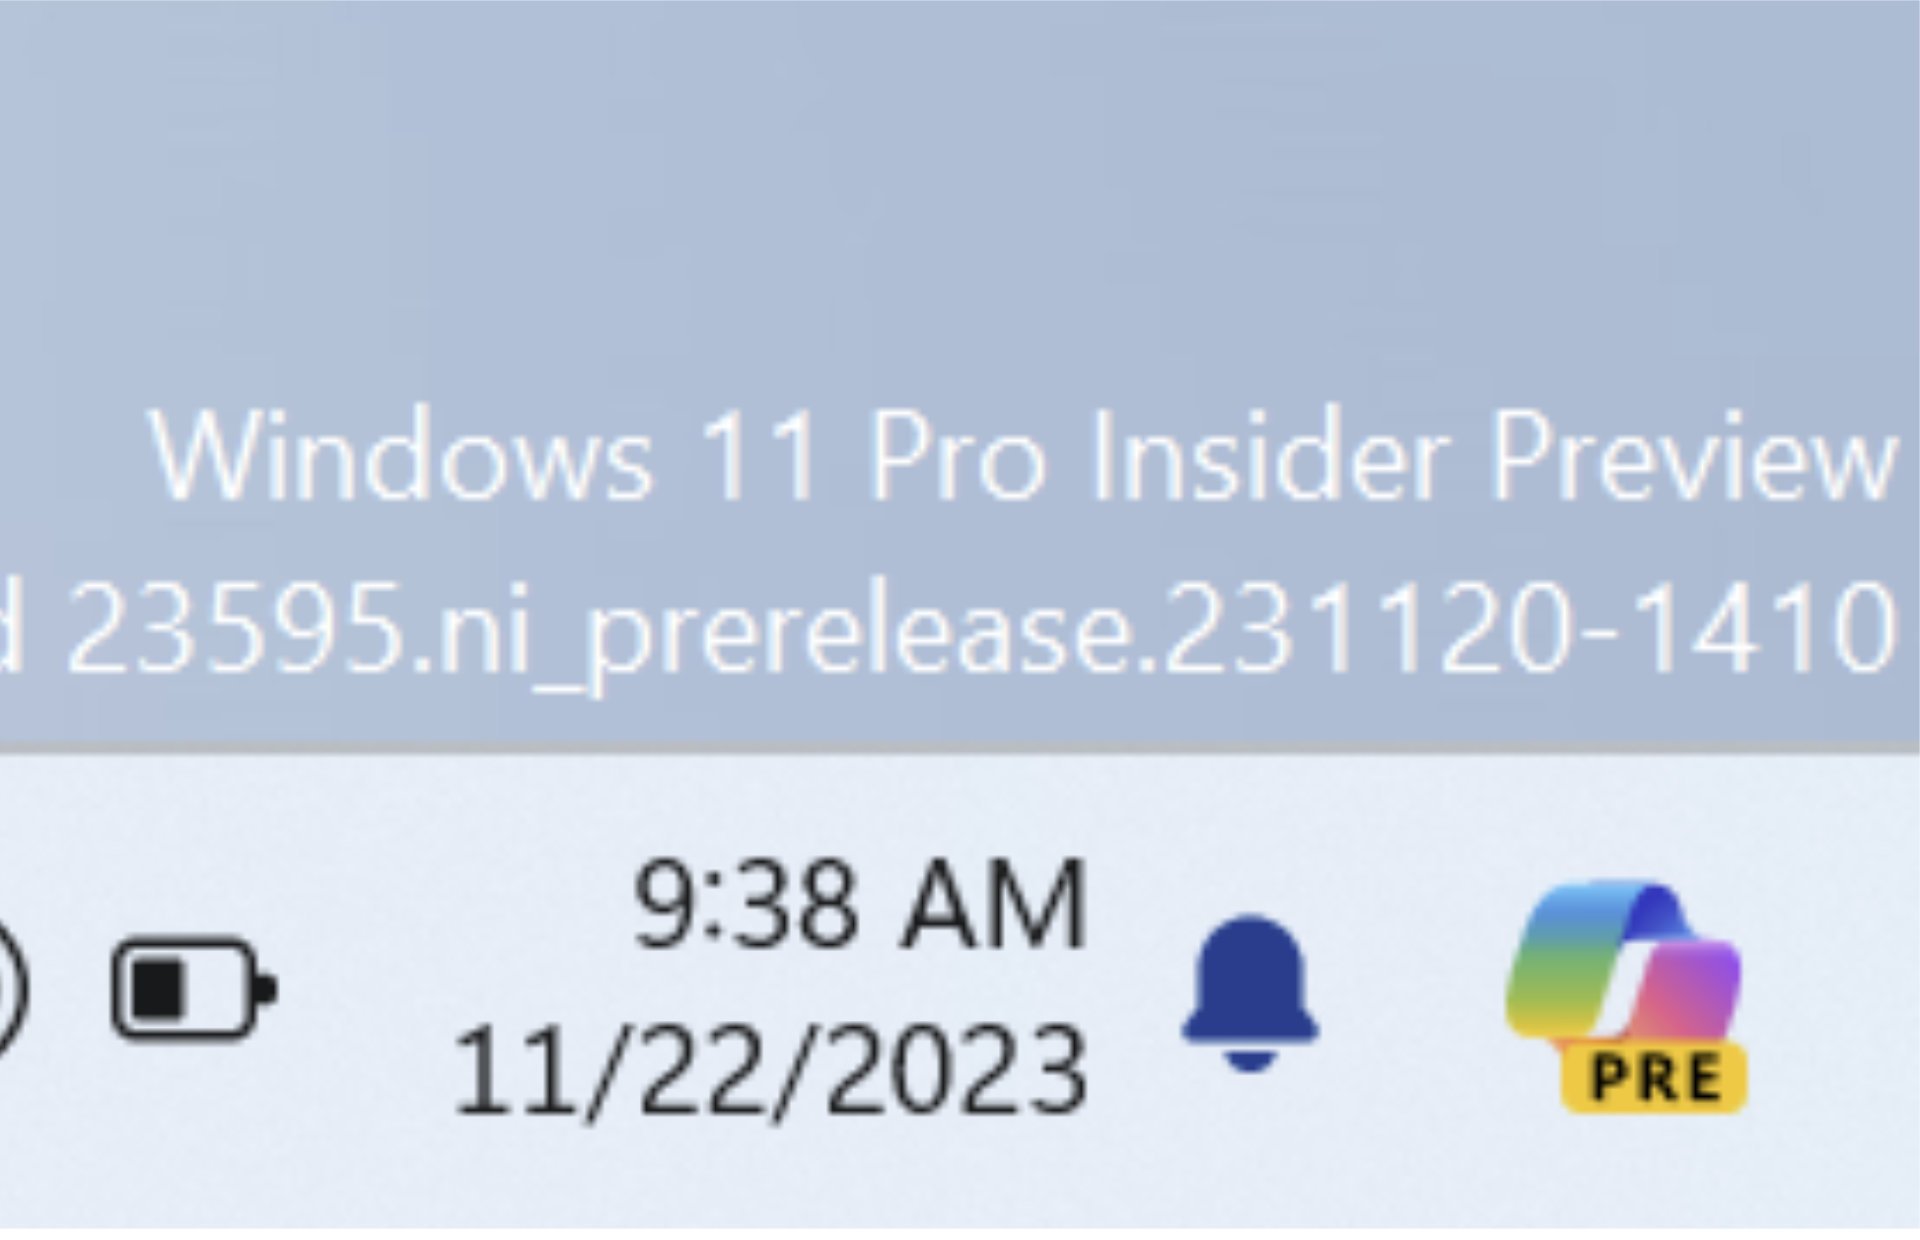
Microsoft released its latest Windows 11 Insider Preview build and it looks like the Windows team is moving around its Copilot icon to be a more intuitive experience, but at the expense of ‘Show Desktop’ functionality.
With the latest Windows 11 Insider Preview build 23595 being released to its Dev Channel of testers, the Windows team notes that it’s looking to make “Copilot more clear and easily accessible.”
Windows 11 Insiders in the Dev Channel will now see Microsoft Copilot moved from the left of the Search icon/bar to the far right corner of the Task Bar just before the “Show Desktop” view position.
Sitting the Microsoft Copilot icon in the far right corner also alters the way users interact with the previous “Show Desktop” functionality in Windows. Insiders will now need to venture into the Settings menu to reenable the “Show Desktop” functionality as it is now set to OFF as a default in the new build.
[Copilot in Windows*]
We are making a change where the Copilot icon is shown on the right side of the system tray on the taskbar to make the entry point to Copilot more clear and easily accessible by being closer to where the Copilot pane opens. As part of this change, we have defaulted the “show the desktop” behavior for the far-right corner of the taskbar to off and this can be re-enabled in the taskbar behaviors section under Settings > Personalization > Taskbar (you can simply right-click on the taskbar to get to this).
Users can access the Show Desktop Settings in two ways with the first being a right-click along an open space on the Task Bar.
Another way is to use the new Start Menu in Windows 11. Most often the Settings Icon is visablly placed somewhere in the Start Menu by default, but can also be added to the bottom of the menu after some configuration.
After getting into the Settings Menu, users will need seek out Personalization
Seek out the Task Bar Settings and select
Under the Task Bar Settings is Task Behavior that will have several options to choose from.
Check the Select the far corner of the taskbar to show which will be unchecked now by default.
Adding the Copilot icon to the far right of the Windows taskbar is a move that feels more intuitive as the dialogue window appears to the right of the screen by default. For users who have their task bar center or left-aligned and then have to scroll across the screen to engage with Copilot may find the repeated task bothersome enough to forego the experience for a quicker browser based experience.
In addition, Microsoft has stated its intentions to bring Copilot to Windows 10 where the Action Center still plays a significant role as a hub for notifications and settings. Adding Copilot to the right side of the task bar in Windows 10 will just make sense.
However, the Show Desktop functionality has been a staple since Windows 95 and is sure to ganrer some feedback if Microsoft eventually moves forward with the change.
Installing OpenCL (Open Computing Language) gives your hardware the power to accelerate diverse computing tasks, like graphics rendering.
In this step-by-step guide, we will walk you through the steps to install OpenCL on your Windows 11 computer to get enhance computational efficiency.
What is OpenCL?
Open Computing Language or OpenCL is a free and open standard framework with parallel programming of diverse accelerators found in personal computers, mobile devices, and embedded platforms.
The goal of OpenCL is to help developers harness the computing power of processing units like CPUs, GPUs, and accelerators in a unified manner to improve performance.
How do I install OpenCL on Windows 11?
Before proceeding with any steps to install OpenCL on Windows 11, go through the following preliminary checks:
Ensure you have the Visual C++ Redistributable package installed.
Check if your computer meets the minimum requirements to run the OpenCL app and the OpenCL runtime.
Once done, follow these steps in the same order as mentioned.
1. Update your graphics driver
Press Windows + R to open the Run dialog box.
Type devmgmt.msc and click OK to open the Device Manager app.
Go to Display adapters and click it to expand it. Right-click the driver, and select Update driver.
Choose Search automatically for drivers.
Follow the onscreen instructions to complete the process.
Specialized software, such as Fortect Driver Updater can help you keep your drivers up-to-date and maintain them by automatically scanning your computer and notifying you when they are going out of date.
Press Windows + E to open the Windows Explorer window box.
Navigate to this path: C:\Windows\System32
Locate the OpenCL.dll file. If it is there, it means you have OpenCL runtime installed on your computer.
If you can’t find Opencl.dll there, it could be because due to outdated drivers; read this guide to learn the solutions.
3. Download C/C++ compiler
Press the Windows key, type powershell, and click Run as administrator.
To install a C/C++ compiler like Visual Studio Build Tools 2022, type in the following command and hit Enter: winget install "Visual Studio Build Tools 2022"
Once you see Successfully installed message, you will have the app installed.
Now, to get the minimum configuration using the command line, copy & paste the following command and press Enter: & "C:\Program Files (x86)\Microsoft Visual Studio\Installer\setup.exe" install --passive --norestart --productId Microsoft.VisualStudio.Product.BuildTools --channelId VisualStudio.17.Release --add Microsoft.VisualStudio.Component.VC.Tools.x86.x64 --add Microsoft.VisualStudio.Component.VC.Redist.14.Latest ---add Microsoft.VisualStudio.Component.Windows11SDK.22000
You can use the command as it is mentioned above if working on Windows 11; however, replace –add Microsoft.VisualStudio.Component.Windows11SDK.22000 with –add Microsoft.VisualStudio.Component.Windows10SDK.19041 for Windows 10.
4. Install Git, CMake, and Visual Studio Code
Press the Windows key, type powershell, and click Run as administrator.
Type the following command and hit Enter: winget install Git.Git
Copy & paste the following command to install CMake and press Enter: winget install Kitware.CMake
To install Visual Studio Code, type the following command and hit Enter: winget install "Visual Studio Code" --source msstore
You can skip these steps if you already have Git, CMake, or Visual Studio Code installed on your computer.
5. Get OpenCL SDK & install Vcpkg
To develop native OpenCL apps, you need C or C++ compilers, OpenCL headers (C & optionally the C++ headers), and Dynamic library (OpenCL.dll) & Export library (OpenCL.lib)
Press theWindowskey, typegit, and clickOpen.
Type the following command to clone a Git repository related to the OpenCL SDK, then configure the project using CMake, and finally build & install it via Visual Studio 2022, then hitEnter:
To setup & initialize Vcpkg, copy & paste the following command and pressEnter:
git clone https://github.com/microsoft/vcpkg.git
cd vcpkg
.\bootstrap-vcpkg.bat
6. Install OpenCL
Now that the Vcpkg command-line utility is built type the following command to search for available packages matching the specific name in PowerShell, in this case, it is OpenCL and hit Enter:
.\vcpkg.exe search opencl
…
opencl 2.2 (2017.07…. C/C++ headers and ICD loader (Installable Client Driver) for OpenCL
Next, copy & paste the following command to install the OpenCL library for the x64 Windows platform and press Enter: .\vcpkg.exe --triplet=x64-windows install opencl
In case you want to target 64-bit ARM, replace –triplet=x64-windows in the command with –triplet=arm64-windows
In conclusion, integrating OpenCL in a Windows 11 environment can unlock the potential for accelerated computing across various applications.
To get it installed on your computer, you must have Visual Studio Code and Visual C++ Redistributable package installed; in case you are facing problems like can’t install Visual C++ Redistributable; read this guide.
Stuck somewhere while following the steps? Feel free to mention your queries in the comments section below. We will be happy to help!
Outlook error 1001 will prevent you from using Outlook on your PC, and this can be a problem if you’re using it for communication or to organize and plan meetings with your coworkers.
Since your email client is such an essential tool, in this guide we’re going to show you a couple of methods that you can use to fix this problem on your PC.
What is error code 1001 in Outlook?
This is a sign-in error, and it will prevent you from accessing the service.
It can be caused by incorrectly configured registry or corrupted cache files.
Problems with certain Windows components and apps can also cause this issue.
How do I get rid of error code 1001 in Outlook?
1. Modify your registry
Press the Windows key + R and enter regedit.
Navigate to the following key: HKEY_CURRENT_USER\Software\Microsoft\Office\16.0\Common\Identity\Identities
Delete everything from the Identities key.
Start Outlook again.
2. Delete OneAuth and IdentityCache folders
Open the Run dialog with Windows key + R and enter %localappdata%\Microsoft
Locate OneAuth and IdentityCache folders.
Select each of them, cut them, and move them to Desktop.
Lastly, restart Outlook and check if the problem is gone.
Some users are suggesting navigating to the following path in the Run dialog: %systemroot%\system32\AppLocker
After that, just delete all files from the AppLocker folder.
3. Use a PowerShell script
Open Notepad and paste the following code: $Appsusers=Get-ChildItem HKLM:\SOFTWARE\Microsoft\Windows\CurrentVersion\Appx\AppxAllUserStore\ foreach($Appsuser in $Appsusers){ if ($Appsuser.Name -match "S-"){ Remove-Item $Appsuser.PSPath}}
Go to File and select Save as.
Set Save as type to All files and name as reset.ps1
After doing that, run reset.ps1 file as administrator.
In the Search bar, enter powershell. Select Run as administrator.
Once it opens, run Get-AppxPackage | Foreach {Add-AppxPackage -DisableDevelopmentMode -Register "$($_.InstallLocation)\AppXManifest.xml"}
This will repair default apps and components and the issue should be gone.
5. Use the Command Prompt to remove registry keys
Press the Windows key + S and type cmd. Choose Run as administrator.
Run the following commands: reg delete HKEY_LOCAL_MACHINE\SYSTEM\CurrentControlSet\Services\SharedAccess\Parameters\FirewallPolicy\FirewallRules /va /f reg delete HKEY_LOCAL_MACHINE\SYSTEM\CurrentControlSet\Services\SharedAccess\Parameters\FirewallPolicy\RestrictedServices\Configurable\System /va /f reg delete HKEY_LOCAL_MACHINE\SYSTEM\CurrentControlSet\Services\SharedAccess\Parameters\FirewallPolicy\RestrictedServices\AppIso\FirewallRules /va /f
After doing that, check if the problem is resolved.
How do I clear my Outlook cache?
Open Run dialog with Windows key + R and enter: %localappdata%\Microsoft\Outlook\RoamCache
Select all files inside that directory and delete them.
Start Outlook again.
Outlook error 1001 is one of the more serious Outlook errors, however, the problem can be resolved by making adjustments to the registry or by deleting certain folders and letting Outlook recreate them.
The new Energy Saver mode is intended to enhance the Battery Saver feature in portable devices running Windows 11, thereby reducing energy usage. This is done by reducing system performance in certain areas, so there is a bit of a trade off when using Energy Saver. As per the Windows Insider Blog post,
Starting with this build (Build 26002), we are introducing energy saver, which extends and enhances battery saver. It is an easy way to extend battery life and reduce energy use by trading off some system performance. It can be toggled on and off via Quick Settings in the system tray or configured to run automatically whenever the device reaches a certain battery percentage. While optimized to extend battery life, energy saver will be available when PCs are plugged in (this includes desktop PCs) for those aiming to conserve energy all the time.
Of course, the mode is optional and can be toggled on or off as mentioned via Quick Settings, accessed via the system tray.
Also, users can go to Start > Settings > System > Power & battery. There you will find options to activate Battery Saver at a certain battery level percentage. Energy Saver will also be available when a device is plugged in.
There is no word yet on when the new Windows 11 Energy Saver feature will roll out to the general public, but it’s safe to say it will eventually be available for those not in the Insider Canary channel. For the meantime, those users can avail themselves of their device’s built-in battery-saver feature. These efforts are part of Microsoft’s ongoing sustainability commitments, as the company endeavors to become a zero waste, water positive and carbon negative company by 2050.
Many users reported getting a MicrosoftSecurityApp.exe – Bad Image error, where it states that the System.Xml.Linq.ni.dll file is either not designed to run on Windows or it contains an error.
The error message appears before signing into the PC and is encountered on Windows 11. Even with the error, other apps and processes, both built-in and third-party, continue to run fine.
What is a Bad Image error?
A Bad Image error appears when the files required to run the program are missing or corrupted. Besides, the problem also arises when other apps conflict with the program or access the same set of shared files simultaneously.
How do I fix the MicrosoftSecurityApp.exe Bad Image error?
Before we start with the slightly complex solutions, try these quick ones:
Restart the PC and check for improvements.
Check for any pending Windows Updates and install them.
Disable any third-party antivirus or similar security software installed on the PC.
1. Uninstall the other Microsoft Defender app
Press Windows + I to open Settings, go to Apps from the navigation pane, and then click on Installed apps.
Locate Microsoft Defender or Windows Security from the list, click the ellipsis next to it, and select Uninstall.
Again, click Uninstall in the confirmation prompt.
Once done, reboot the PC and check whether the MicrosoftSecurityApp.exe Bad Image error disappears.
The most common reason you get the Bad Image error is due to the presence of multiple instances of the built-in antivirus, Windows Security/Microsoft Defender, existing on the PC. So, uninstall the app, and things should be up and running!
2. Repair the corrupt system files
Press Windows + R to open Run, type cmd, and hit Ctrl + Shift + Enter.
Click Yes in the UAC prompt.
Paste the following three DISM commands individually and hit Enter after each: DISM /Online /Cleanup-Image /CheckHealthDISM /Online /Cleanup-Image /ScanHealthDISM /Online /Cleanup-Image /RestoreHealth
Once done, execute this command to run the SFC scan: sfc /scannow
Finally, reboot the PC for the changes to come into effect.
You will need to repair the corrupt system files in order to fix the MicrosoftSecurityApp.exe Bad Image error. So, run the DISM commands and SFC scan, and the two will automatically replace all problematic system files with their cached copy.
3. Replace the problematic DLL
If it’s the DLL file to blame, you can replace it with another copy from a healthy PC with the same configuration.
Copy the System.Xml.Linq.ni.dll file to a USB drive on the other computer, and then paste it in the following path on the affected PC after deleting the existing version: C:\Windows\assembly\Nativeimages_v4.0.30319_64\System.Xml.Linq\a3c635436ca5e274374c4389b2f1132d\
An easier fix is to use an effective DLL repair tool because it can proceed with this action automatically and spare you further errors.
4. Switch out of S Mode
Press Windows + I to open Settings, select System from the navigation pane, and click on Activation on the right.
Expand the S mode section, and click the Open Store button.
Click on Get under Switch out of S mode.
Once the confirmation prompt appears, reboot the device and check for improvements.
A few who faced the Bad Image Error Status 0xc0e90002 with Microsoft Office or other third-party apps fixed it by switching out of S Mode, a slightly restrictive OS environment with enhanced security and speed. So, you may try that!
Go to Microsoft’s official webpage, select the OS edition and product language, and then download the Windows 11 ISO.
Run the ISO file and click on Open in the confirmation prompt.
Double-click the setup.exe file.
Click Yes in the UAC prompt.
Click Next to proceed.
Now, click on Accept to agree to Microsoft’s license terms.
Finally, verify that the setup reads, Keep personal files and apps, and click the Install button to start the in-place upgrade. It may take 1-3 hours to complete.
After the in-place upgrade, you shouldn’t encounter the MicrosoftSecurityApp.exe Bad Image error anymore. Remember, this is as good as reinstalling Windows. It will re-download all the critical system files, DLLs, and other built-in components but won’t affect the stored data.
Once you have fixed things, make sure no other DLLs are missing to prevent any app from throwing similar errors.
For any queries or to share what worked for you, drop a comment below.
BorrowBox is a service that helps you rent physical books from your local library but sometimes it’s not working. If this sounds familiar, find out ways you can easily bypass this error.
Why does BorrowBox not work?
The BorrowBox app is not available for all devices, so your device is probably not among the supported ones. It is also a geo-restricted application which makes it unavailable in certain regions.
Other common issues include internal server errors, expired accounts, a low credit score or you’re yet to return borrowed books.
What can I do if BorrowBox is not working?
Check off the following basic steps first:
Ensure your device meets the system requirements to run BorrowBox.
Verify that you have a working internet connection.
Restart your BorrowBox app and device.
1. Update your device’s OS
1.1 Android
Locate Settings on your device. (We’ll be using the Samsung model for this step).
Go to Software update.
Tap on Download and install.
Wait for the update to finish installing if available, and retry your BorrowBox app.
1.2 iPhone
Make sure that your device is connected to a power source and Wi-Fi.
Go to Settings > General.
Select Software Update.
Now tap on Download and Install.
Follow the instructions on the screen to complete the update.
Tap on Force stop at the bottom then reopen the app.
3. Clear cache
3.1 Browser cache
For this step, we shall be using the Chrome browser.
Launch your Chrome browser and click the three vertical ellipses in the top right corner.
Select Settings.
Click on Privacy and security, then select Clear browsing data.
Check Cookies and other site data and Cached images and files, then hit Clear data.
3.2 App cache
Tap on settings on your phone.
Next, tap on Apps.
Find the BorrowBox app and tap on it.
Scroll down and select Storage.
Tap on Clear data and Clear cache,then try again.
4. Turn off your VPN
Press the Windows key and select Settings.
Next, select Network & internet and click on VPN in the right-side menu.
Select the VPN connection you want to disable, click on the drop-down and select Remove.
Additionally, if you’re in a location where the BorrowBox app is not available, you may have to enable your VPN. We recommend a VPN with IP-masking capabilities to avoid frequent disconnections.
Click on Network & Internet on the left pane, then scroll down and click Proxy on the right pane.
Select Edit next to Use a proxy server option in the Manual proxy setup section, toggle off Use a proxy server and click on Save.
6. Reinstall the app
Try to uninstall and reinstall the app. This will not only get rid of any bugs or glitches that may have affected your experience with the app, but it will also make sure that there aren’t any corrupt files on your device.
After reinstalling it from the app store and BorrowBox is still not working, it is possible that your current version is having issues and the next step can help fix that.
7. Try an older version
If your BorrowBox app started having problems after a recent update, it could be a sign of a buggy update. In this case, you’ll have to roll back to a previous version as you wait for the developers to address the issue.
You will not find an older version from your dedicated app store but a lot of third-party sites have these older versions. All you have to do is navigate to your browser and download the older BorrowBox version. Just ensure you have an up-to-date antivirus solution that can detect any threats before you install it.
NOTE
WindowsReport is not affiliated with Apkpure.com so do your due diligence before you install any apps from the site.
8. Report the issue
If you can access the BorrowBox app, head over to Settings>Send Feedback and an email addressed to BorrowBox support will be created with the detailed logs of the issue. However, if it’s another issue that prevents you from logging in, you can send an email directly.
If you are having similar issues, know a way around this problem, or would like to share your BorrowBox experience, don’t hesitate to reach out to us in the comment section below.
When the bottom of the laptop screen goes black, it’s usually a gradual process. First, there is a thin line or bar which will slowly expand, and after a while, you will find that half of the laptop screen is black.
Remember, a black screen in Windows is a common problem, and in most cases, it can be quickly fixed, given you are able to identify the underlying cause.
Why is the bottom of my screen black?
The issue, most often, appears due to a hardware malfunction or a failing display. Also, an outdated or corrupt graphics driver, incorrect display resolution or refresh rate, and problematic system files can cause the bottom of the laptop screen to go black but still run.
How do I fix the black screen at the bottom of my laptop?
Tip
To identify whether it’s a software or hardware problem, access the BIOS and check whether a part of the screen remains black. If it is, the issue lies with the display. But in case the display appears fine, this is an OS-related issue.
Before we start with the slightly complex solutions, try these quick ones:
Press Windows + Ctrl + Shift + B to reset the graphics adapter and check for improvements. This also helps when the entire screen is black in Windows 11.
Reboot the OS if the bottom half of the laptop screen is black.
Disconnect all non-critical peripherals and uninstall apps that were recently downloaded to the PC.
If the problem is limited to an app, say a black bar at the top or bottom of the screen in Chrome, uninstall all add-ons (extensions in Chrome).
1. Change the display resolution and scale
Press Windows + I to open Settings, go to System from the navigation pane, and click Display on the right.
Select another option from the Display resolution menu, preferably one that says, Recommended.
Now, select 100% or 125% from the Scale menu.
Often, a misconfigured display resolution can cause the bottom of the laptop screen to go black. And getting the right display settings for Windows will do the trick!
2. Reinstall the graphics driver
Press Windows + X to open the Power User menu, and select Device Manager from the list.
Expand the Graphics adapter entry, right-click on the active display adapter, and select Uninstall device.
Tick the checkbox for Attempt to remove the driver for this device, and click Uninstall.
If you have multiple graphic cards, uninstall the current driver for each.
Now, reboot the device, and Windows will automatically install a fresh copy of the driver.
3. Update the graphics driver
Press Windows + R to open Run, type devmgmt.msc in the text field, and hit Enter.
Double-click the Display adapters section, right-click on the graphics adapter, and select Update driver.
Choose Search automatically for drivers and wait for Windows to install the best available version.
Finally, reboot the laptop and check for improvements.
Press Windows + R to open Run, type cmd, and hit Ctrl + Shift + Enter.
Click Yes in the UAC prompt.
Paste the following commands individually and hit Enter after each: DISM /Online /Cleanup-Image /CheckHealthDISM /Online /Cleanup-Image /ScanHealthDISM /Online /Cleanup-Image /RestoreHealth
Now, execute this command for the SFC scan: sfc /scannow
Once done, restart the laptop.
To repair the corrupt system files in Windows, the best option is to run the DISM commands and SFC scan, as the two identify and replace all problematic files with their cached copy. Or, even better, you can use dedicated repair software to proceed with this task automatically.
5. Lower the refresh rate
Press Windows + I to open Settings, and click on Display on the right in the System tab.
Scroll down and click on Advanced display under Related settings.
Finally, select 60 Hz or lower from the Choose a refresh rate menu.
For a few users, lowering the refresh rate from 144 Hz to 60 Hz did the trick when there was a black bar at the bottom of the screen in Windows 11.
Double-click the downloaded ISO file and click Open in the prompt.
Run the setup.exe file.
Click Yes in the UAC prompt.
Click Next to proceed in the Windows 11 Setup.
Read Microsoft’s license terms and click Accept to acknowledge them.
Make sure the setup reads, Keep personal files and apps, and click Install to start the repair upgrade. It may take a few hours to complete.
To eliminate all software-related issues causing a black bar at the bottom of the laptop screen, an in-place upgrade will help. It’s the same as reinstalling Windows, but you can’t lose the stored files.
7. Get the display checked/replaced
If nothing else works, it’s likely an issue with the screen. Over time, the screen may have dead pixels, but on a new laptop, it’s usually a manufacturing defect unless damaged by the user.
The best option in this case is to contact the manufacturer or take the laptop to a local repair shop. They will take a look and identify whether the screen can be repaired or the entire display has to be replaced.
Nevertheless, this should fix things if you find the bottom of the laptop screen black. Also, if you have an external display connected, learn how to find the monitor specs and name and seamlessly fix similar issues in the future.
Edge keeps logging you out of Google? You’re not alone, and you’re not in big trouble either because this issue is easy to fix.
We’ll give you step-by-step instructions on how to stop all potential causes of this mess. So, if you’re tired of having to re-enter your credentials each time you open your browser, keep reading:
How do I stop Edge from automatically signing me out?
1. Allow cookies and site data
Launch the Edge browser.
Type in the path below in the Address bar and click Enter. edge://settings/content/cookies
Lastly, toggle on the option for Allow sites to save and read cookie data.
Scroll down, click on the Add button, type in google.com, and hit OK. Ensure you check the Include third-party cookies on this site box too.
Cookies are stored on your computer and allow websites to recognize you when you visit them again. Disabling all cookies will prevent most sites from working correctly.
2. Check whether Google cookies are blocked
Launch the Edge browser.
Type in the path below in the Address bar and click Enter. edge://settings/content/cookies
Scroll down to the Block section and delete any google.com site listed.
You may also want to check whether it’s a specific page blocked by Edge because of your browser settings. If you’re worried about tracking cookies, turn on web filtering and change your security setting to Balanced.
3. Clear cache and cookies
Launch the Microsoft Edge app on your computer. Further, click on the three dots on the top right side and select Settings.
Now, select the Privacy, search, and services option on the left side panel menu,
Further, navigate to the Clear browsing data section, and select the Choose what to clear option.
Then, select All Time from the time range at the top, check the boxes next to Cookies and other site data, and the Cached images and filesoption. Then click on Clear now.
4. Reconfirm sync
Launch the Edge browser.
Type in the path below in the Address bar and click Enter. edge://settings/profiles
click on Profiles and select Sync.
Scroll down and under Re-sync now, click the Re-sync button.
Open Microsoft Edge and click on the three horizontal ellipses at the top right corner.
Click on Extensions, then select Manage extensions.
Locate any recently added extensions and toggle the off button. Ad blockers are the most popular culprits so start off with those.
6. Repair Microsoft Edge
Hit the Windows key and click on Settings.
Click on Apps on the left pane, then Apps & features on the right pane.
Locate the Microsoft Edge app, click on the three vertical ellipses, and select Modify.
Click on Repair.
7. Reset Microsoft Edge
Open Microsoft Edge and click on the three horizontal ellipses at the top right corner.
Click on Settings.
Select Reset settings and hit Restore settings to their default values.
Confirm Reset in the dialog box that appears.
8. Reinstall Microsoft Edge
Hit the Windows key and click on Settings.
Click on Apps on the left pane, then Apps & features on the right pane.
Locate the Microsoft Edge app, click on the three dots, and select Uninstall.
You can download Microsoft Edge from the Microsoft Store or its official website.
Hopefully, the above fixes helped you deal with Edge logging you out of Google.
As always, if you’re having any sort of difficulty with your Edge browser and none of the solutions above has addressed the issue, head on over to the Microsoft Support site to see if your problem is being actively addressed.
Also, feel free to leave a commend below telling us your specific situation and where exactly you get stuck. We may be able to help!
It’s a sign-out from us but keep it interactive in the comment section. We’d like to hear about your solutions.
Server error (5xx) in Google Search Console can prevent Google from properly indexing certain pages, and if you don’t resolve it, Google will reduce the crawl rate for your website.
This can be a big problem since Google can remove links that keep returning this error, therefore in today’s guide, we’re going to show you a couple of methods you can use to fix this problem.
What is the cause of the 5XX server error?
Issues with the server are the biggest culprit.
Server downtime and issues with hosting.
Misconfigured .htaaccess files.
Errors in your website code.
How do I fix server error 5XX in Google Search Console?
1. Check your server logs
Open your Terminal. If you’re on Windows, you’ll need to use a WSL or SSH client.
Run the following command: tail -f /var/log/syslog
The log file will now appear and you should be able to see error 500 and possibly its cause.
Syslog isn’t the only file that contains your logs, and depending on your server, it can be stored in one of the following files as well:
auth.log
nginx/access.log
apache2/access.log
2. Use the Inspect tool
Open Google Search Console.
Paste the URL that is giving your error 500 in the search bar.
Now click on the Test Live URL.
You should see all the available information about this page and hopefully find the cause of the error.
Check your server downtime, since it’s possible the server was down while Google was trying to index the page.
Your server might be having issues handling the traffic which results in this error.
Other server problems can cause error 5XX, so it might be best to contact your hosting provider.
What is a common meaning of HTTP 5xx response code?
500 Internal Server Error – This is a common error that indicates a general problem with the server.
502 Bad Gateway – You can get this error if a server that acts as a gateway or a proxy receives an invalid response from the upstream server. This is often caused by upstream server issues.
503 Service Unavailable – This error means that the server wasn’t able to handle the request. The reasons for this are server overload or maintenance.
Server error (5xx) Google Search Console can cause a lot of trouble, and if you encounter it, first check your server logs to find the issue. You can also try SEO software and use it to diagnose issues and optimize your website.
Ralix Reinstall is a surprisingly popular software on Amazon that claims to fix boot issues on Windows. There’s a dedicated option for all iterations of the OS, from Windows XP to Windows 10. But should you buy Ralix Reinstall? Read this honest review of Ralix Reinstall to find out!
Does Ralix Reinstall really work?
As per reviews from verified customers on Amazon, the product doesn’t work for all. It’s got like a 50% success rate and is primarily popular amongst users with little technical acumen. But for the ones that it did work (as per the reviews), Ralix Reinstall allowed all four: Repair, Recover, Restore, and Reinstall.
Is Ralix Reinstall good?
We have assessed Ralix Reinstall on several critical parameters and share our findings in the following sections. Customer reviews form a major basis for this assessment.
Ability to repair the PC
Ralix Reinstall performs a set of advanced repair functions that are pre-built in Windows. Basically, it provides you with a set of detailed instructions on the official website to troubleshoot boot errors while utilizing the already available resources in the OS.
Ralix Reinstall claims to work in the following situations, as per the Amazon listing:
Though mentioned vaguely in the product listing, Ralix Reinstall doesn’t allow resetting the PC to factory defaults. Most of the time, it will simply install a fresh copy of the OS. Remember, you will need a Windows product key to activate the installed version.
Also, there’s another problem. Ralix Reinstall will install an outdated version of Windows, and you will have to download the available updates manually.
Some users claimed that the installed version lacked wireless Internet support, and they had to switch to a wired connection initially. Though Wi-Fi worked after the updates were downloaded.
These are all major downsides to a program that claims to fix boot errors and get things running quickly!
User-friendliness
It’s not a very user-friendly tool since you will have to execute a wide array of repair commands manually. And unless your PC can’t boot due to the same issue as the ones addressed by the command, Ralix Reinstall won’t work.
Most users purchase the repair tool after reading the reviews on Amazon, and the team has surely marketed it pretty well. Whether or not Ralix Reinstall works depends a lot on the underlying cause, and this can only be verified by the end-user after inserting the software’s DVD.
Compatibility
While we can’t guarantee the effectiveness of Ralix Reinstall, it scores pretty high on compatibility. There’s both a 32-bit and 62-bit version for Windows 10.
Besides, you will find a dedicated repair option for Windows XP, Windows Vista, Windows 7, and Windows 10. Even if these are all the same product, marketing individually to a dedicated segment is surely phenomenal.
Pricing
At the time of writing, Ralix Reinstall is priced at $11.99. For a PC repair tool that claims to fix most, if not all, boot errors, this is surely a steal deal. Though, is that really the case?
Ralix Reinstall’s Amazon listing
We came across reviews where users claimed that Ralix Reinstall fixed a practically dead PC. But there are a few factors to consider. First, this could be a paid review. Not everything you read on the Internet is true!
Secondly, a dead PC, for most, is one that just won’t boot. It could be a simple boot error that can be quickly eliminated. To fix these, you don’t necessarily need a third-party tool. The built-in repair options and functionalities work just fine.
For instance, the OS may not load due to an incorrect boot order, and reconfiguring it would do the trick!
Ralix Reinstall does offer a 100% refund if the repair tool doesn’t work. You just have to contact the support team ([email protected]) and share your concern, and if the provided solutions don’t work, a refund is issued, at least in theory.
Going back to the Amazon reviews, many claimed to have recovered their money. Others reported to have never received a response from the Ralix Reinstall official support.
Our take is that Ralix Reinstall’s official website looks shady. It persistently asks users not to leave negative reviews on Amazon, which is not expected from an effective PC repair solution. Besides, they don’t have any contact details or a clear refund policy listed, meaning you could lose all $11.99 and not be able to claim a refund.
When faced with boot issues or other problems, it is best that you employ the built-in repair features and not go with unreliable third-party options.
Microsoft offers a solution for most software-related problems, be it Windows Security, Windows Memory Diagnostics, Optimize Drives, the Check Disk utility, and the DISM and SFC scans, amongst others.
For any queries or to share your review of Ralix Reinstall, drop a comment below.
Samsung Internet now has a desktop app for Windows, available on the Microsoft Store as a free download. And you’ll be glad to know that it’s available for all x64 version Windows 10 and 11-powered desktop and laptop machines, Samsung or otherwise.
Samsung Internet does have a few advantages of its own, however, such as a built in ad-blocker (which must be turned on manually) and the ability to force dark mode on websites, even those that don’t natively support it. Samsung Internet also features native picture-in-picture support.
At this time Samsung Internet for Windows does appear to have some limitations, which isn’t too surprising for this launch. Reportedly syncing browser data between phone and PC is limited to search history, bookmarks, saved pages and open tabs, while password syncing is currently unavailable.
While support for extensions is built in, it appears to be non-functional at this early stage with the install button greyed out on all add-ons. Users have reported underwhelming performance on the browser, with laggy scrolling, and some UI elements appear in Korean.
There’s little doubt that these issues will be addressed by Samsung in the future. However, the Samsung Internet browser still has a ways to go on both mobile and desktop before it can truly compete with Google Chrome.
Starting a global business podcast is a big undertaking. While you can sign up to create podcasts almost anywhere, you need the proper equipment and setup to be prepared to make your podcast great. You also need to know some great marketing techniques to boost your listeners and get your podcast in front of more people.
Building your digital presence is vital for a business, and a podcast will help you do so. Check out this guide with tips designed to help you create a global business podcast and be successful.
Marketing Matters
Are you prepared with the appropriate tools and requirements to market your podcast? Before you go to the hard work of creating a podcast and content, you need to make sure you can share the content. You can post your podcast to a favorite podcast site, but we also recommend you share it on your platforms.
You’re going to want to plug that podcast into your business through social media and your website. If you haven’t built a website, you need to do so. You can take a look at these top 10 web hosting services to help set you on the right track.
The success of your podcast depends on having marketing tools and putting them to use. Post podcasts on your site and share them on all of your social media. Share sneak peeks and tidbits to get people to listen!
Plan the Target Audience
While it would certainly be awesome if you could reach every person in the world, you need a more focused approach. This comes from establishing a target audience. Who is it that your podcast is going to be most effective for? What population do you hope to reach the most?
Use these details to specify a target audience and work from there. It’s acceptable for people outside the target audience to listen to the podcast. This just helps to set some parameters so you can create focused content that is geared towards your target audience. It should be part of your strategy.
Establish a Podcast Platform Account
Even with a website, you’re going to need an account for a podcast platform. You can do the research to choose one, or you can even see if your web host has an option. Before you settle on a podcast platform, make sure that it will be compatible with your feed, your website, and your sharing requirements.
There are a lot of different podcast platforms like Spotify, Stitcher, Audible, and more. We recommend you take the time to check into and compare the different options so that you can choose which one will work best for you.
Recording and Editing Equipment
Before you start recording, you’re going to need some equipment. What you invest in may depend on your budget. Even if you need to start with cheap basic supplies, you’re going to want some sound equipment to make your podcast great. We get it; not everyone can spend $10,000 to set up. But you can still invest in this podcast with some accessories.
A podcast microphone should be your first accessory outside of a phone or device to do the recording. Many people just use their laptops or tablets, but your recording devices are totally up to you. Using a separate microphone will help to provide better sound for your listeners.
Don’t forget the software to edit your podcast. Your device may already have something on it, but you can also consider premium software for a small fee.
Get Started!
Now, it’s time to record your first podcast to get started. It may take more than one try to get it right. It’s a good idea to write a basic script so that you aren’t left floundering while you’re live recording. Even if you just have an outline with some basic notes, this could help keep you on track during the recording process.
When you mess up, have an extended pause, or even stumble a little bit, these things can generally be fixed with editing. You can also hire someone for editing if that seems like a better choice.
Once your episode is recorded and edited, you can name it, give it a great description, and publish it on your podcast platform.
Now, take the time to promote it and source it to your website! The hard part is done. The rest of the gig just requires making consistent, quality content and knowing your marketing avenues. While it will take some time to build a following, your global business podcast will take off with hard work and consistency.
Microsoft recently integrated Windows Copilot into Windows 11, enabling you to manage various OS tasks. Bing Search comes with the Start Menu in Windows, providing information from the web in the Start menu when you search. If you find both Copilot and Bing Search in the Start Menu unnecessary, you can disable them.
Copilot in Windows 11 is an AI-powered intelligent assistant that helps you adjust Windows 11 settings and organize your Windows with Snap Assist. It saves you time and makes you more efficient. To open and use Copilot, click the Taskbar icon or press the Win + C key combination.
Unsurprisingly, Microsoft added Bing Search to the Windows 11 Start menu, like Internet Explorer and Microsoft Edge. It allows you to search and find specific information from the start menu without opening a web browser.
If you don’t want to use Copilot AI and Bing Search in the Start Menu, you can disable both of them. There are various ways to do that. Windows 11 Settings helps you to a certain extent, and you must also make changes to the Group Policy.
How do I disable Windows 11 Copilot and Start Menu Bing Search?
1. Remove Copilot from the Taskbar
Click the Windows icon and select Settings.
Choose Personalization from the left pane and click on Taskbar from the right.
On the right, you will see Copilot Preview, and you will be able to turn it off right away from the dedicated switch.
After this, you won’t see the Copilot icon on your taskbar but you can still bring up the app using the Win + C shortcut.
2. Remove Copilot using the Group Policy Editor
Press the Windows key + R to start Run, type gpedit.msc, and press Enter.
Now, go to Administrative Templates>Windows Components and click on Windows Copilot.
Now, double-click the Turn Off Windows Copilot policy from the right pane, select Enable, then click Apply and OK.
Log off and log back in on your Windows machine to see the changes.
You might be tempted to click on Disable, but the policy is called Turn off Windows Copilot. So, if you want to disable Windows Copilot, you need to enable it, not disable it.
Of course, if you change your mind, you may track back the steps above to disable the policy and get back Windows Copilot.
3. Remove Bing Search from the Start menu
You may actually remove Bing from Windows 11 altogether, but that will imply changing a key in the Registry.
Extract the files to a folder and run the BloatNosy.exe app
Uncheck all checkboxes, and under Taskbar and Start Menu, watchfully select Disable Windows Copilot and Start Menu Bing Search
Click Apply, that’s it.
To restore these at any time, select the required options in the app and click Restore.
Web browsers and antiviruses may detect it as a virus, but it’s a false positive. Utilize the tool carefully and create a system restore point before making any changes to the system.
To summarize, to disable Windows Copilot, you can use the Taskbar settings or remove it from the Group Policy Editor. To remove Bing Search from the Start menu, you will have to edit the Registry.
Do you use Copilot and Bing Search in the Start Menu on Windows 11? Let us know your thoughts in the comments below
When it comes to trade shows and tech events, they don’t get much bigger than CES (Consumer Technology Association), and 2024 might be the most exciting iteration yet. Why? Well, with all the new developments in AI and VR/AR, we expect to see a lot of new cool devices that most certainly will use bleeding-edge tech and the latest advancements to transform our everyday experiences.
Dell and its gaming subsidiary, Alienware, are longtime CES participants, always at the forefront of Innovation Awards for incredible design and build quality. And for the 2024 tech event, thanks to our trusty source, we can glimpse what’s to come (spoiler: Alienware’s new monitors are straight from a gamer’s paradise!)
Dell’s new XPS lineup for 2024 gets Ultra CPUs
XPS is already a well-known family of laptops and a long-standing product recognized for its slim design and powerful internals. For 2024, Dell is going with much of the same, with significant performance upgrades for its XPS 13, XPS 14, and XPS 16 laptops.
The XPS 13 is focused on ultra-portability and performance, perfect for those looking for a small, premium laptop. For 2024, the 13-inch device gets a much-needed refresh, previously passed on because of the XPS 13 Plus launch.
The lineup’s middle ground is definitely the brand new XPS 14, Dell’s new take on the XPS 15, featuring the design language we already know and love. While downsized from 15 inches, the XPS 14 has a real shot of becoming the go-to in the XPS family, primarily thanks to the (not-so) recent popularity of 14-inch devices. Both XPS 13 and XPS 14 come with new Intel CPUs and Nvidia RTX graphics.
As expected, the new XPS 16 is the most powerful out of the bunch, most likely replacing the previous 17-inch XPS (has Apple started a new trend?). The laptop gets the iconic XPS design but with new Intel Core Ultra CPUs and RTX 40 series graphics. While the size doesn’t scream portability, the XPS 16 is aimed at professionals who can take advantage of all that power while on the move and still be able to use it as a desktop replacement. It’s also a fantastic choice for those who want to game, the size and thermals making it more than well-equipped for long-stress sessions.
Alienware goes all out on gaming, with a pinch of productivity
You can’t talk about gaming laptops without mentioning Alienware, and for 2024, the company is making some changes to its lineup, starting with the Alienware m16 R2. The updated device will feature Intel Core Ultra H processors and Nidia graphics, with a redesigned chassis and updated thermals to keep it cool through those long gaming sessions.
Maybe the most interesting thing is the addition of Stealth Mode, which seamlessly transitions from gaming to productivity. We’ve seen this feature before on Dell laptops, but Alienware’s decision to include it on gaming devices seems odd. Basically, you’ll be able to tone down the gaming features (RGB, display response time, CPU boost, fan speed, etc.) of your laptop with a quick shortcut and use it as a workstation. Stealth Mode is also configurable, so you’ll be able to choose the exact features to disable or enable.
This kind of feature makes sense for students or gamers who use a single device for all their workflows, keeping the laptop gamer-ish at home and not so obviously Alienware in class or at the office. Whether that’s enough or not it remains to be seen, but keep in mind that there is nothing stealthy about a 16-inch plus laptop.
This one’s a banger: Alienware x16 R2! Yes, Alienware’s most premium laptop also gets an upgrade. Besides the all-metal chassis, x16 R2 gets the new Intel Core Ultra CPUs and dedicated graphics. And don’t forget about the AlienFX lighting; if you want to stand out, this is your best choice.
Finally, the Alienware m18 R2, one of the biggest gaming laptops on the market, is getting upgraded with 14th Gen Intel Core processors and Nvidia RTX 40 Series graphics, making it the ultimate gaming machine for those looking for a huge screen that’s also portable (sort of).
According to our source, all the laptops will be available on January 11th.
Pro gaming with Pro monitors: Alienware accessories
Also on January 11th you’ll be able to get the new updated Alienware gaming monitors and a Pro bundle for those looking for a keyboard-mouse combo. The Alienware 27 360Hz Gaming Monitor features a QD-OLED display with QHD resolution, incredible response time and color coverage, and, as the name implies, a 360Hz refresh rate that makes it perfect for any fast-paced game. The always-present RGB lighting completes the package, alongside the side headphone mount and sturdy stand.
The updated Alienware 32 4K QD-OLED Gaming Monitor features a QD-OLED curved display with a 4K resolution, infinite contrast ratio, and Dolby Vision HDR. It’s perfect for those looking for immersion and pixel-perfect colors. It also comes with HDMI 2.1 FRL, which makes it fantastic for switching between PC and console gaming.
The Dell UltraSharp 40 Curved Thunderbolt Hub Monitor completes the monitor lineup. Yes, that’s right, a 40-inch 5K monitor that takes gaming and productivity to a whole new level. While the front-accessible hub hints more toward productivity, alongside the TUV 5-star certified eye comfort features, you can still use it for gaming and complete immersion. Keep in mind that you’ll need a pretty big desk for it.
Lastly, a well-known Alienware gaming bundle gets an upgrade. The Alienware Pro Wireless Keyboard and Mouse include the 75% sized hot-swappable keyboard tailored explicitly for gamers and the ultra-light mouse weighing less than 60 grams. The mouse also has 4Khz/8Khz polling rate modes, which means an incredible response time, perfect for shooters and fast-paced games. And don’t forget the RGB; lots of it!
All the accessories will be available on January 11th, with Dell’s UltraSharp 40 Hub Monitor possibly even sooner. Considering the current lineup of laptops and accessories, the life improvement upgrades seem solid, especially regarding the new CPUs and GPUs. Although there are no price mentions yet, we expect most devices to come around the same price as this year’s lineup, with maybe slight changes to Alienware’s family of laptops.
The EXIF (Exchangeable Image File Format) data is a critical piece of information that helps us identify the various details of an image, be it the picture’s mode, aperture, shutter speed, focal length, location, and copyright, amongst others. Also, you can easily edit the EXIF data in Windows.
Remember, some of the information may not be editable, and that’s easy to find out. But, being able to identify and edit the metadata is vital from a privacy point of view. It helps remove identifiable information, such as the coordinates of your location, from the picture.
Is EXIF data accurate?
Given that a user can easily edit or remove certain parts of the EXIF metadata, it’s not always accurate. The location might be incorrect, copyright information might have been modified, and the creation date may have been altered. Besides, the device may sometimes make an error while registering the information.
How do I edit EXIF metadata in Windows?
1. Via File Explorer
Press Windows + E to open File Explorer, locate the image for which you want to modify the EXIF metadata in Windows, right-click on it and select Properties.
Navigate to the Details tab.
Click on the various values listed here, and any that open an editable text field or a dropdown menu are modifiable.
Once done with the edits, click on Apply and OK to save the changes.
Remember, you can only edit a limited set of EXIF data with the Windows File Explorer. This includes Camera maker, Camera model, Metering mode, Flash mode, Exposure program, White balance, and EXIF version, amongst others.
But File Explorer doesn’t allow editing the GPS data, i.e., the Lattitude, Longitude, and Altitude.
There are several effective photo viewers for Windows, most allowing users to edit or modify the EXIF data.
Go with a reliable option that offers the functionality and doesn’t corrupt the image while making the changes.
FileViewer Plus is a great third-party app that will allow you to open and edit over 400 file types. This tool will also bring a powerful file converter and file browser. All this is packed in a modern and easy-to-use interface.
FileViewer Plus
Make sure you are able to open and edit any type of file with this powerful tool.
Though you could use a third-party tool to remove the EXIF data, Windows offers a seamless built-in functionality, and we recommend using that.
Right-click on the image for which you want to remove the EXIF metadata, and select Properties.
Go to the Details tab, and click on Remove Properties and Personal Information at the bottom.
If you want to remove every piece of metadata, choose Create a copy with all possible properties removed, and click OK.
In case you want to remove specific parts of the EXIF data, select Remove the following properties from this file, tick the checkbox for all the information you want to delete, and click OK.
While removing or deleting the EXIF data, you should select every piece of information that can compromise security or privacy.
Also, most online photo-sharing platforms, say Instagram, Facebook, or Twitter, automatically remove this information when an image is uploaded. But for others, this has to be done manually and is critical!
The Alt-Tab is one of the most used shortcuts in Windows 11 but sometimes you may want to disable this function. While this feature can be useful, especially when you have a lot of windows open, it can also be distracting.
If you are playing a game or using some other app that needs all of your attention, it’s better to turn it off.
How do I turn off the Alt-Tab option in Windows 11?
You will be directed to app. Click the Install button.
Click Yes on the UAC prompt to complete the installation.
Launch the app and go to Keyboard Manager > Remap a shortcut.
Under Physical Shortcut, select Type and from the drop-down menu, select the Alt + Tab combination. Also, under MappedTo, select Disable from the dropdown menu.
Double-click the downloaded AutoHotkey setup file to launch it.
Navigate to File > Edit Script.
Delete the default script entries and Enter: ;Disable Alt+Tab
Click Save as to bring up that window and select the All files option.
Choose a folder location, and click Save.
AutoHotkey will automatically disable the Alt-Tab combination whenever you launch this script.
And that’s not all you can do with the AutoHotkeys feature. If you’d like to change the behavior of other keys, you can check out the Mouse and Keyboard section to fine-tune or make custom combinations.
Open the Run dialog box with the Windows + R key combination.
Type regedit in the dialog box and press Enter to open Registry Editor.
Navigate to the following path: Computer\HKEY_CURRENT_USER\Control Panel\Desktop
Locate the CoolSwitch entry, double-click on it, and set the Value data to 0.
Close the Registry Editor and restart your PC for the changes to take effect.
Note that the CoolSwitch entry may be unavailable in Windows Home and Pro editions. Unfortunately, this process varies depending on what version of Windows you have running.
How do I disable Alt-Tab from showing Edge tabs?
If your aim is to show Windows only when you press the Alt-Tab combo and not your recent browser tabs, you can do so from the Settings app. Simply navigate to System>Multitasking and in the Alt-Tab option, select Open Windows only from the drop-down menu.
All in all, it may not be feasible in the long run to keep this feature on. You might find that it is much better for you to have focus as you don’t accidentally switch to any other window and also if you want to play any games with a separate window.
That is it, now whenever you want to escape Alt-Tab hell simply use any of the above methods and you will never have to deal with that problem again. It’s a simple change but one that makes navigating a bit easier.
Which of the methods do you find easier to follow? Let us know down below.
A crosshair stuck on the screen is a common problem encountered by users. For some, it could be moved across the display, while others reported that it remained fixed.
Also, the crosshair may not be visible if you try capturing a screenshot. This is because it’s not related to the OS or any program but is the monitor’s built-in functionality.
Why is there a crosshair stuck on my screen?
The crosshair usually appears on a gaming monitor if you inadvertently press the dedicated key or change the monitor’s built-in options. Besides, the problem could be related to misconfigured settings within a game or app.
How do I get rid of the crosshair on my computer screen?
Before we start with the slightly complex solutions, try these quick ones:
Look for the dedicated crosshair switch or button on the monitor and disable it. For some devices, it’s the right arrow button at the bottom of the screen. You could check the monitor’s manual for help.
Press Fn and the Down arrow key (works only with specific models).
Restart the device.
1. Disable crosshair in the monitor settings
Access the monitor’s Settings through the dedicated button.
Make sure the Aim point setting is set to Off.
Once done, the crosshair shouldn’t be stuck on the screen anymore.
The steps might be different depending on the manufacturer. For Acer monitors, open the menu > go to Gaming > and set Aim Point to Off to get rid of the red crosshair stuck on the screen.
2. Perform a clean boot
Press Windows + R to open Run, type msconfig in the text field, and hit Enter.
In the Services tab, tick the checkbox for Hide all Microsoft services, and then click on Disable all.
Go to the Startup tab, and click the Open Task Manager link.
Identify all programs that read Enabled under the Status column, then select them one at a time and click on Disable.
After making the changes, click on Apply and OK in the System Configuration window.
Finally, click Restart in the confirmation prompt.
After the PC starts in a clean boot environment, check whether the crosshair disappears.
If it did, re-enable the startup apps and services one at a time, and when the crosshair appears, the app/service enabled last is the problem. So, keep it disabled or uninstall altogether.
A clean boot in Windows 11 loads the OS with only the critical processes. No third-party apps or services run in this environment, making it ideal for troubleshooting such issues. After the problem is fixed, make sure to switch back to normal startup.
3. Change the affected program’s DPI settings
Identify the program/game triggering the crosshair, right-click on its launcher (.exe file), and select Properties.
Go to the Compatibility tab, tick the checkbox for Run this program as an administrator, and then click on Change high DPI settings.
Tick the checkbox for Override high DPI scaling behaviour, then select Application from the dropdown menu underneath, and click OK.
Finally, click on Apply and OK to save the changes, reboot the device, and check whether the crosshair stuck on the screen disappears.
This solution only applies when you are using FPSAimTrainer. If not, head to the next method.
Launch the FPSAimTrainer and open its Settings.
Go to the Weapons tab, untick the checkbox for Crosshair Bloom, and click Save to apply the changes.
5. Uninstall the problematic application
Press Windows + R to open Run, type appwiz.cpl in the text field, and click OK.
Select the application you believe is triggering the crosshair, and then select Uninstall.
Follow the on-screen instructions to complete the process.
Once done, reboot the PC and check for improvements.
If this doesn’t work, use a reliable software uninstaller to delete any leftover files and Registry entries, which might still be responsible for the green crosshair stuck on the monitor screen.
When nothing else works, and you are certain that it is a third-party program or game behind the stuck crosshair on the monitor, factory reset Windows.
Though this will wipe out all stored files and installed apps, it’s the best bet against the problem and will get things up and running!
One of these solutions should help if there’s a crosshair stuck on the screen, no matter the colour or shape!
The good thing about temporary errors like error 15 in Yahoo Mail is that they don’t last forever. However, since there’s no given timeline on when they’ll be fixed, we took the initiative to hasten the process, and here’s what you can do.
What is Yahoo Mail temporary error 15?
Temporary errors can mean anything from a server issue to a problem with your computer or internet connection. You may be facing issues while sending and receiving emails on your Yahoo account or can’t log in to your account.
The usual culprits are browser or app cache, you’re signed into more than one browser or device simultaneously. It can also happen when you’re in a different location as sometimes Yahoo doesn’t work well with a VPN.
How do I fix temporary error 15 in Yahoo Mail?
Here are some preliminary fixes you can try until the issue is resolved:
Sign out of other active sessions on other browsers or devices, close the browser, and reopen it.
Verify that you have internet connectivity by opening another site in your browser.
Check for any new updates for your operating system and apps.
1. Delete cache
1.1 Browser cache
For this step, we shall be using the Chrome browser.
Launch your Chrome browser and click the three vertical ellipses in the top right corner.
Select Settings.
Click on Privacy and security, then select Clear browsing data.
Check Cookies and other site data and Cached images and files, then hit Clear data.
1.2 App cache
Tap on settings on your phone.
Next, tap on Apps.
Find the Yahoo Mail app and tap on it.
Scroll down and select Storage.
Tap on Clear data and Clear cache,then try again.
2. Switch to a supported Yahoo Mail browser
To experience the full benefits of Yahoo Mail, you need to use one of its supported browsers. If you’re using a supported browser, keep in mind that not all versions of these browsers are compatible with Yahoo Mail.
It is possible it’s an older browser version whose support has ended hence causing the temporary error 15 message. We recommend that you update to the latest version.
3. Use the native app
There are two ways to access your Yahoo Mail account: the native app and the web browser version. You can download Yahoo Mail on your computer or phone instead of using a web browser. This might be faster and more reliable than using the web version.
If you’re using a third-party email client, such as Outlook, make sure it’s configured to use IMAP (or its equivalent). If it isn’t, it won’t be able to sync messages correctly and you’ll encounter the temporary error 15.
Hit the Start menu icon, type Windows Security in the search bar and click Open.
Click on Firewall & network protection, then select Public network.
Locate Microsoft Defender Firewall and toggle the off button.
Some antivirus programs may be blocking access from outside sources, which could prevent you from using Yahoo Mail. If this fixes the issue, you should allow the Yahoo Mail app through your firewall or help upgrade any security features that may be causing problems with Yahoo Mail.
5. Reset your browser
Open your Chrome browser and click on the three vertical ellipses at the top right corner.
Select Settings.
Next, click on Reset and cleanup, then select Restore settings to their original defaults.
Confirm Reset settings in the next dialog box.
And if that doesn’t work, re-install the Yahoo Mail app on your device. This will refresh all of its settings to their default values and hopefully get rid of the temporary error 15.
If you’ve tried everything above and still can’t access your Yahoo Mail account, remember that an online service is only as good as the provider. Yahoo Mail may be temporarily down with this error or other problems. You can contact support for help.
And that’s a wrap. Hopefully, now your Yahoo Mail is running smoothly again and you can avoid the dreaded temporary error 15 in the future. You never know when it will come up again, but if it does, we hope you’ll know what to do.
Let’s continue the conversation in the comment section below as you let us in on any other tricks or tips to avoid such errors.