Formovie isn’t new to the projector sector, but its latest Theater UST 4K laser projector may be the company’s best offering to-date while also checking every feature box along the way.
While the Formovie Ultra Short Throw 4K projector is chalked full of value-adds with its list of features, the question for most people might be, why pay almost three times more for a projector over a standard TV screen, and I believe for projector enthusiasts this UST triple laser projector sells itself.
Specifications
Dimensions
Recommended picture size
550 × 349.2 × 107.5 mm/21.7 × 13.7 × 4.2 in
80’’ to 150’’
Weight
Keystone
9.8 kg/21.6 lb
8-Point
Color
HDR
Cosmos grey
Dolby Vision, HDR10, HDR10+ Decoding
Display
Refresh rate
TI DLP®
60 Hz
Light engine
Contrast ratio
Laser whit ALPD® by Appotronics
3,000: 1
Native Resolution
Color space
4K UHD(3840×2160)
107% BT.2020
Brightness
Audio codec
2800 ANSI lm
Dolby Atmos, Dolby Audio, DTS:X, DTS-HD
Throw Ratio
Speakers
0.23: 1
Full range×2 + Tweeter×2 (30W)
By Bowers & Wilkins
Look and Feel
Formovie’s ultra-show throw (UST) projector comes in a rather large box to accommodate its larger-than-average footprint at 55 x 34.92 x 10.75 cm (21.7 x 13.7 x 4.2 in) which equates to the size of an old school audio receiver.
In addition, the Formovie also weighs a hefty 9.8 kg’s or (21.6 lbs.), however, the projector isn’t meant to be moved after setup, so the weight is negligible and in-line with other dedicated home projector theaters of this caliber.
The mostly plastic chassis of the Formovie is well constructed and dense feeling which houses the device in a “Cosmos Grey” exterior equipped with a large front facing speaker arrangement, two smaller speakers on either side, 3 HDMI 2.1 slots, 2 USB-A 2.0 ports, audio out, and Ethernet connection.
The connection ports all support the latest technology such as enhanced audio return (eARC) for HDMI 2.1 and 4K at 60 FPS as well as quick data transfers from the USB-A 2.0 ports for connected devices such as external hard drives, consoles, or streaming sticks.
As is the case with most UST projectors, the Formovie also houses its triple-laser array nestled at the top of the device near the front and is equipped with a light disturbance sensor that powers down the projection when the light source is interrupted by objects.
There are vents that flank the device and were audible during some streaming sessions.
Unfortunately, the Formovie isn’t equipped with onboard controls, which forces users to operate the theater using the proprietary remote.
The remote is sleek and straight forward with large enough buttons and dials that can be operated in the dark or from muscle memory as well as a dedicated YouTube button for users who haven’t jumped aboard the streaming stick train just yet.
Performance
Of all the projectors I’ve tested over the past three years, the Formovie was among the best thanks in part to its color calibration, clarity, and its implementation of Android TV 11.0.
At 2800 ANSI lumens the 4K clarity offers parity with LED, Plasma, LCD OLED, MicroLED and QLED screen reproduction in darker environments, and in brighter lighting conditions the picture quality is still substantially impressive on the Formovie out of the box.
For fans of sharp contrast and vibrant colors the Formovie may produce more matte color tones but the HDR10+ support helps to punch up picture quality a notch when desired.
It takes a bit of exploring and fiddling with the several picture modes, calibrations, and settings to nail a screen equivalent reproduction, but not by much.
Content such as Into the Spiderverse, Amazon’s Invincible, and Max’s Harley Quinn animated show really pop with the Formovie’s wide color gamut. The Formovie also does very well when rendering video game images while also keeping FPS high.
The downside of gaming on the Formovie is when boosting games with its motion-smoothing MEMC technology which presents an exceptionally smooth image but introduces noticeable input lag.
Acknowledging that using the Formovie paired with a dedicated projector screen plays a big part in image reproduction quality, a flat unobstructed wall should help maintain the projector’s quality as well.
With the Formovie coming in at $3K, adding another couple hundred may or may not be in the cards for an add-on sound system, but thankfully the onboard system holds up well.
The two 15w speakers tuned by Bowers & Wilkins produced a robust bassy sound and particle sounds are distinguishable just above 70% sound for most content that doesn’t include Michael Bay-like action or explosions. Fortunately, for audiophiles, there is also support for external audio set ups.
The entire Formovie package offers a great viewing experience, except for the noticeable fan noise during quieter scenes. I live in a home that’s constantly running the AC, but when the climate settles and the house is quiet, the projector can be heard throughout the viewing experience depending on the scene.
The fan noise seems to be independent of the settings, content, or position of the projector, and ramps up from near quiet to annoying rumba randomly.
Summary
At $3K+ the Formovie offers the high-end experience the price tag it accompanies with an intuitive interface powered with Android TV 11 alongside. As the company works out its out of the box Netflix situation, most customers will appreciate the bevy of other streaming content at their fingertips that includes Disney+, HBO, Hulu, and YouTube.
While there are other options in and around the same price as the Formovie, few offer the same sleek packaging or feature set. Getting past the fan noise, the lack of Netflix support, out of the box color calibration, the Formovie is worthy contender for purchase among the LG’s, Sony’s and Samsung’s of the industry.
On the 9th of August, 2023, Microsoft rolled out a new Windows 11 test build—25926, in the Canary Channel for enthusiasts. This build brought with it a clandestine feature, a new “System Components” settings page, which did not find a mention in the official release notes.
Interestingly, this elusive System Components page was discovered by Windows enthusiast PhantomOfEarth on Twitter. It is hidden by default but can be forced into visibility, thanks to the ViVeTool app, a third-party tool.
Build 25926 includes a new (hidden) System Components settings page. (feature SettingsSystemComponentsPage)
— PhantomOcean3 ???????? (@PhantomOfEarth) August 9, 2023
Getting Deeper into the Page
The hidden page is a platform where you can manage various system components such as drivers, services, and stock apps. Interestingly, it was noticed that each app installed through the System Components settings page would appear twice – both on the component’s page and on the “Apps > Installed apps” panel. This discovery was made during a test where Minecraft Launcher was installed.
As this new feature is still in development, it raises some intriguing questions. Will the apps still be visible under “Apps” in Settings once the setting is fully established? Furthermore, what is the purpose of these duplicate entries in the meantime?
Enabling the Hidden Settings
Although Microsoft has hidden the System Components setting and new Snipping Tool features, suggesting that they are currently being tested in an undisclosed environment, it is still possible for technology enthusiasts to enable them on their PCs. This can be accomplished by utilizing the ViVeTool app.
Execute the command vivetool /enable /id:44702824 in the command console, and voila! You are in.
Since the said features are under scrutiny, not all Canary insiders have direct access to them. However, thanks to the ViVeTool application, any eager user can start playing around with them for feedback or learn about upcoming features in Windows 11.
In conclusion, there’s significantly more to Windows 11 build 25926 than meets the eye. As the potentially powerful yet surreptitious System Components settings page continues to gather attention, it might just be the opening act of a series of exciting developments in the future builds of Windows 11.
Recently, we have received numerous complaints from our readers about Minecraft not adding friends and other issues relating to friend requests. The problem can affect the ability to enjoy multiplayer, so it’s important to fix it.
Due to the importance of this issue, it is essential to understand the potential causes and how to mitigate them, and that’s what we’ll do in this article.
Why can’t I add friends on Minecraft?
Not having the correct username of the friend you’re trying to add can cause problems because usernames are case-sensitive.
If you and your friend are playing different versions of Minecraft, it might prevent you from adding each other.
In case either of you has strict privacy settings, it could prevent friend requests from being sent or received on Minecraft.
Poor internet connection or server problems can cause the inability to add new friends or receive requests from other players.
If you or your friend have issues with your Mojang account, you won’t be able to add one another.
Server issues like downtime or routine maintenance can cause limitations regarding adding friends or receiving requests.
Interference from other games are apps on the device can cause issues with Minecraft’s functionality.
What can I do if I can’t add friends on Minecraft?
Before attempting any troubleshooting steps for fixing the problem, go through the checks highlighted below:
Restart Minecraft and your device to resolve temporary glitches affecting the friend-adding process.
Ensure you have the correct and case-sensitive username of the friend you want to add.
Verify that you and the friend you want to add are playing on compatible platforms to avoid platform restrictions on cross-platform limitations.
Power cycle your router or modem or connect to a stable internet network to resolve network-related problems.
Ensure both you and your friend have functioning Mojang accounts without any issues.
If you or the other user have blocked each other in the past, unblock each other to allow friend requests.
Check the status of the Minecraft server for any maintenance or downtime.
1. Update the Minecraft client on your PC
Left-click the Start button, type Microsoft Store, and click to open it.
Tap the Library.
Select the Get updates option and select Update all to allow all your installed apps, including Minecraft, to update.
Updating Minecraft will fix compatibility issues and ensure both players are running the same versions.
In today’s digital age, our reliance on online services has grown immensely. One such service that many of us use on a daily basis is Microsoft’s suite of products, across Windows 11, Microsoft 365, and Xbox. From email to cloud storage, Microsoft offers a plethora of services that require secure access through verification codes. However, there are times when these codes might cause issues, leading to frustration and confusion. In this guide, we’ll delve into the various troubleshooting methods to address verification code issues that include using Microsoft.com/link.
Understanding Microsoft Account Verification Codes
Verification codes play a crucial role in securing your Microsoft account. They act as a second layer of protection, ensuring that only authorized users can access your account. These codes are typically sent to your registered email or phone number and must be entered before you can successfully log in. While this extra security is essential, it can sometimes lead to issues that prevent you from accessing your account.
Common Verification Code Issues and Solutions
1. Not Receiving the Verification Code
If you’re not receiving the verification code, it could be due to various reasons such as incorrect contact information, network issues, or email filtering. To resolve this:
Double-check your registered email and phone number.
Verify your spam or junk folder for the code.
Ensure you have a stable internet connection.
2. Code Expired Too Quickly
Verification codes have an expiration period for security reasons. If the code expires too quickly:
Make sure your device’s time and date settings are accurate.
Request a new code if the previous one expires.
3. Entering Incorrect Code Repeatedly
Entering the wrong code multiple times can result in access denial. To rectify this:
Double-check the code before entering.
Request a new code if you’re unsure about the current one.
4. Code Already Used
If the code you’re entering has already been used, someone might have accessed your account. In such cases:
Change your password immediately.
Enable two-factor authentication for added security.
Troubleshooting Verification Code Issues
https://microsoft.com/link used to verify codes
1. Clear Browser Cache and Cookies
Sometimes, cache and cookies can interfere with the verification process. To resolve this:
Using a VPN or proxy can sometimes prevent the verification code from reaching your device. Try troubleshooting this by temporarily disabling these services and try again.
Frequently Asked Questions (FAQ)
1. Can I use the same verification code multiple times? No, verification codes are typically one-time-use codes for security reasons. Once used, they expire and cannot be used again.
2. How often should I update my contact information? It’s advisable to review and update your contact information whenever there are changes to ensure that you receive verification codes without any disruptions.
3. Can I choose not to use verification codes for my Microsoft account? While it’s recommended for security reasons, you may be able to disable two-factor authentication, but it’s not advisable due to the increased risk to your account.
4. What should I do if I suspect unauthorized access to my account? If you suspect unauthorized access, change your password immediately, and review your recent account activities. Enable two-factor authentication for enhanced security.
5. Are there alternative methods for account verification? Yes, Microsoft may offer alternative methods such as sending verification codes to a backup email or using an authenticator app for added convenience and security.
So, while verification codes add an extra layer of security to your Microsoft account, they can occasionally lead to issues that hinder your access. By understanding the common problems and implementing the troubleshooting methods mentioned above, you can navigate through verification code issues effectively and regain access to your account without unnecessary hassle.
Many users wonder how to update an Outlook invite without notifying everyone because they don’t want to send notifications after making small adjustments to the original meeting.
We’re pleased to say this is possible, and today, we will show you several ways to do that.
How do I update an Outlook meeting without notifying everyone?
1. Use the Save feature
Locate your meeting in Outlook and open it.
Make the desired changes.
Now click the Save button and click Close.
After doing that, the meeting will be updated without alerting the attendees.
If you want to learn more about Outlook meetings, check our guide on how to add BCC to meeting invite.
NOTE
Remember that this method works only if you change the meeting note, and it won’t work if you change any other information.
2. Change Send Update to Attendees settings
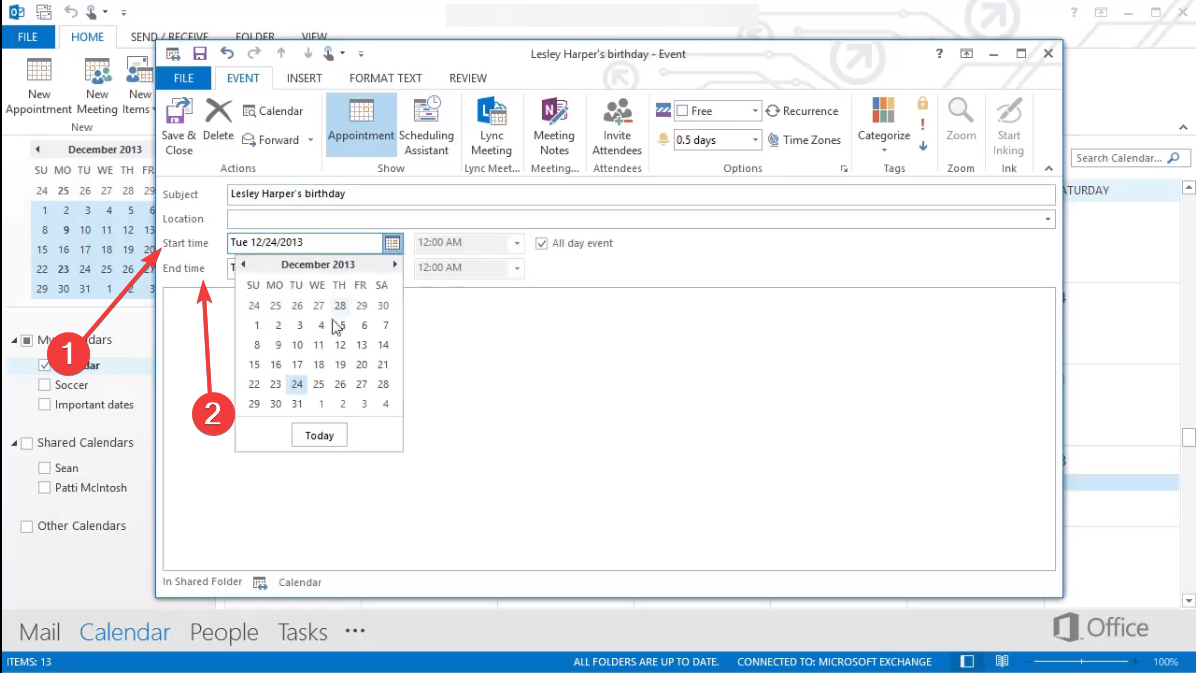
Locate your meeting and add a new attendee.
Save the changes.
Send Update to Attendees window will appear. Select Send updates only to added or deleted attendees.
Click OK.
If this option isn’t available, you might have to use Save changes and send update option, and then select the option to send updates only to deleted or added attendees.
After doing that, only the added attendee will be informed about the meeting.
In case you’re organizing or attending a meeting, we have a guide on how to check meeting attendees, so be sure to check it out.
NOTE
This feature isn’t available for Outlook for Web because it doesn’t send updates to all attendees by default.
Next, select Account Settings and then choose Account Settings again.
Double-click the account you use.
Choose More Settings and then Advanced.
Uncheck Turn on shared calendar improvements.
Save changes.
Does forwarding an Outlook invite notify everyone?
No, only the meeting organizer will be informed if you choose to forward an invite.
As you can see, although it’s not as straightforward to update Outlook meetings without sending an update, these methods are still possible. Remember that these methods won’t work in Outlook for the Web or in some versions of Outlook.
While the meeting feature is incredibly useful, it does have problems. However, we already showed you how to fix Outlook Meetings issues in one of our previous guides, so be sure to check it out.
What method do you use to change meeting information without sending an update? Share it with us in the comments section below.
Searching for emails with an empty subject line could be tricky and time-consuming, but this guide can help. We will explore two methods, the Instant search feature and the Advanced search option, to quickly search for emails with blank subject lines, making better email organization possible.
What does it mean when an email has no subject?
When you receive an email with no subject line, it means the sender either forgot or didn’t mention the description of the email’s content.
The Subject field in an email tells you the purpose or context of the email to the recipients before you read it, so it is an important part of email etiquette.
How do I search inbox by subject line?
Press the Windows key, type outlook, and click Open.
Go to the Outlook Search dialog box, click the drop-down menu & mention the subject line in the Subject field.
You can add the email address of the sender or recipient, folder path, attachments, or date to refine the search.
Once done, click Search to get instant results.
You can sift through the email messages listed in the result and find the ones you are looking for.
If you are facing issues like Inbox not showing recent emails, we recommend you read this informative guide to refresh and get the latest email messages in your mailbox.
How do I search for a blank subject line in Outlook?
1. Use the Instant Search feature
Press the Windows key, type outlook, and click Open.
Locate the Search bar from the top of the window, and click on the drop-down menu to refine your search.
The drop-down menu has several options, including Search In, Attachments, From, Body, Received, Subject, and To.
Search In – Select any folder options, including Current Folder, Subfolders, Current Mailbox (Spam folder & Junk folder), All Mailboxes, & All Outlook Items to refine the search.
Attachments – Mention if the email has an attachment
From – Enter the email address of the sender
Body – Content in the email body
Received – Date on which you received the email
Subject – Mention the subject line
To – Enter the email address of the recipient
Since you are looking for emails without a subject line, you can skip the email Subject field but enter other details like the sender’s or recipient’s email address & date, then click Search.
Once the search is completed, you can get emails without subject lines listed from all the email addresses in all the folders, including the Spam folder & Junk folder. However, this method doesn’t always work, so follow the next method for precise results.
Press Ctrl + Shift + F to open the Advanced Find dialog box.
On the Advanced Find window, click the Browse button.
Now on the Select Folder(s) window, select the folder or folders you want to search for the email. You can also choose the Search subfolders option. Once done, click OK.
On the Messages tab, you can also mention the email address in the fields like From and Sent to narrow down the search.
Switch to the More Choices tab, and click Categories.
Now, select a category, and click OK.
Next, in the More Choices tab, you can also mention details for options like Only items that are, Only items with, Whose importance is, Only items which, and Match case.
You can mention the size of the email in the Size field
Switch to the Advanced tab, go to Define more criteria, for the Field dropdown menu, select the field, and add a Condition and Value. Click Add to List.
Click Find Now.
Once complete, you will get the list of emails without subject lines from the selected email address.
While Edge is not the most popular browser in the world, Microsoft makes sure to keep it updated with some incredible features that only make it run faster. For example, a much darker mode is coming to Edge in future updates. This will make it the perfect browser for work and school projects.
Plus, Bing Chat is also on Edge, and the AI tool is probably one of the most performant ones out there. Its Windows counterpart, Copilot, will arrive on Windows 11 later this year. Although, you can already use it if you’re in the Windows Insider Program.
But coming back to Edge, Microsoft makes sure to integrate the browser with other Microsoft products. For example, you’ll soon be able to use the Teams chat while browsing on Edge, without having to go back and forth between apps.
And, starting in September, you’ll be able to use Edge’s newest Web Content Filtering feature, which will allow you to monitor and filter certain content on the Edge browser. This feature will make it perfect for IT admins and school managers to control the Edge browsers on their local network. And guess what? It’s not hard to enable it.
How to enable Edge’s Web Content Filtering feature
In Microsoft Intune, you’ll be able to set up different policies for different groups when it comes to browsing on Edge. You’ll also be able to name exceptions from these policies by using the allow-list and block-list policies.
In Microsoft Intune Admin Center, go to Devices, and select the local network you want to enable the Web Content Filtering policies on Edge.
Once you’re there, configure your Web Content Filtering policies under the Configuration Settings panel.
When you’re done, you can review them and then save them by clicking the Review + save button.
Microsoft says this feature will be rolling out in September and it will be very important in schools settings.
To ensure schools can stay safe with internet content, we’re adding category-based Web Content Filtering solution built right into Edge. It ensures students are in a safe environment not only in the school network but also even when they are outside of a school network.
Microsoft
What do you think about it? Let us know your opinion.
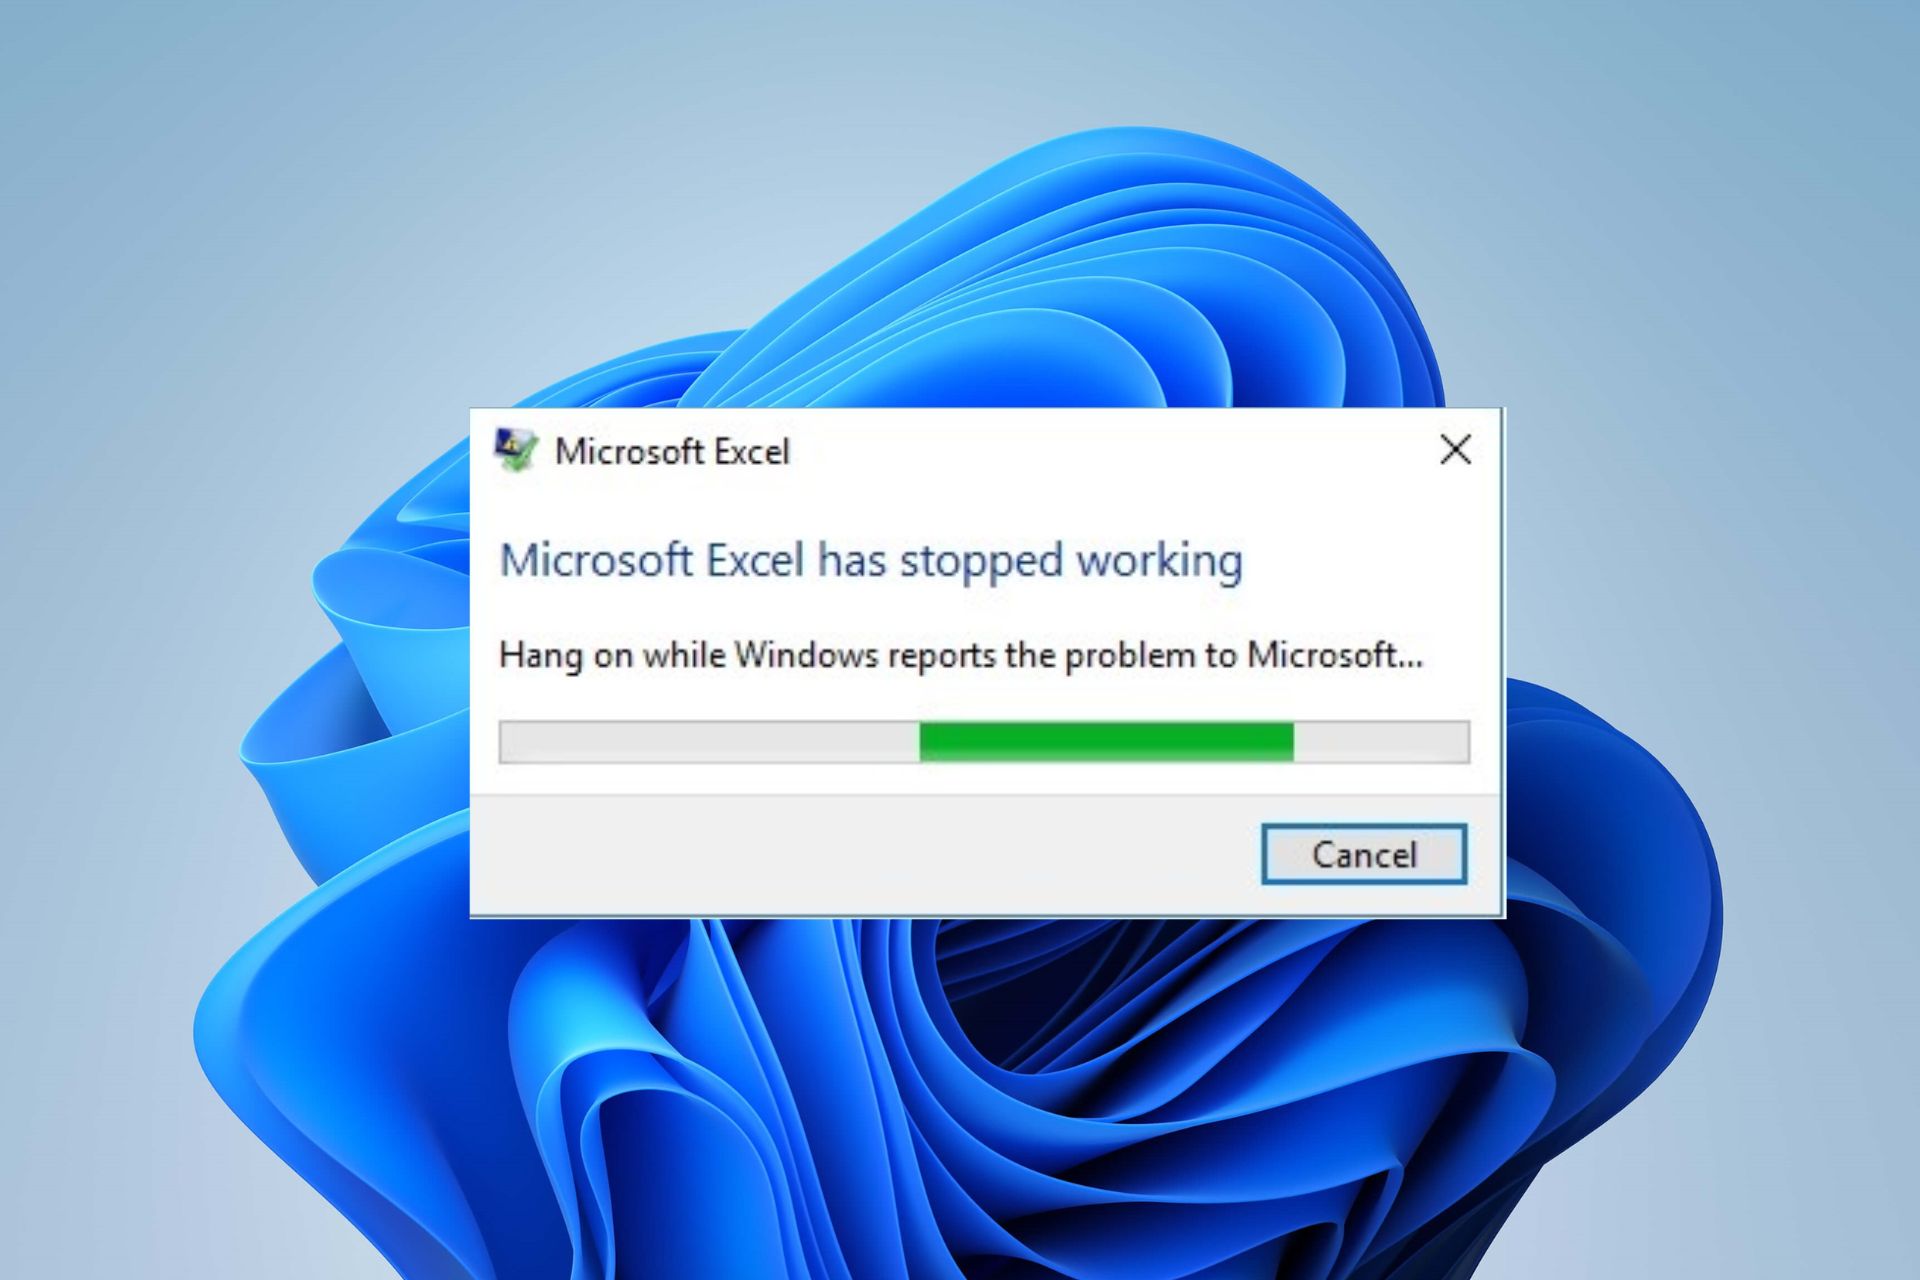
Excel crashing is a problem that many individuals complain about and have struggled with due to its persistence. It renders the app useless and makes the files inaccessible.
Hence, the looming question remains what to do if Excel keeps crashing? Thus, we recommend you read this guide, which will provide steps for fixing the error message.
What causes Excel to keep crashing?
Working with large or complex spreadsheets that contain numerous formulas, charts, and data can cause Excel to crash.
Third-party add-ins or poorly coded macros installed on Excel can make it unstable, causing crashes when they conflict with the application.
If your Excel lacks memory, RAM, CPU power, or disk space, it may struggle to handle your tasks, resulting in crashes.
An outdated version of Excel or running the app on an outdated operating system can cause compatibility issues and crashes.
Incompatible or outdated graphics drivers can trigger Excel to crash when using features like charts, graphs, or other visual elements.
Problems with MS Office installation can affect its apps, including Excel, causing it to crash.
Working with complex conditional Excel formatting rules can cause Excel to work beyond its resource constraints, leading to a crash.
1. Start Excel in Safe Mode and disable Excel Add-Ins
Press Windows + R key to open the Run dialog box, type following and click OK: excel.exe /safe
Click on File in the top menu bar, then click on Options from the menu on the left.
Tap on Add-in on the right, select Excel Add-ins, then tap Go.
Uncheck the boxes next to the faulty Add-Ins and click OK to save the changes.
Restart Excel and check if the problem persists.
Starting Excel in Safe Mode helps with interference from third-party apps and services running on the computer in normal mode.
Likewise, disabling the problematic Add-ins will fix any issues with corrupt add-ins causing MS Excel to crash.
2. Repair Microsoft Office
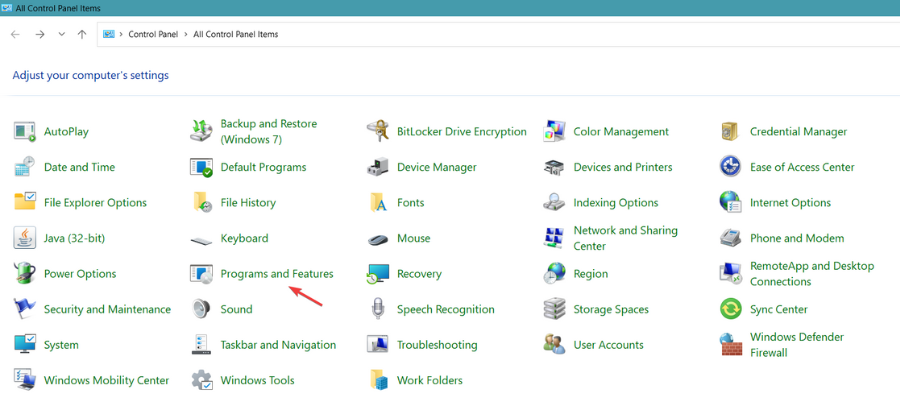
Press Windows + R key to open the Run dialog box, type the control panel, and click OK.
Click on Programs and Features.
Right-click on Microsoft Office and click on Change from the drop-down.
Select the Quick Repair option in the new window, then click Repair.
If Quick Repair can’t fix it, select Online Repair.
Restart your computer and check if the problem persists.
Repairing Microsoft Office will fix any missing or corrupt app files that can cause Excel to crash randomly or when opening a file. It may also fix access issues with Excel.
Launch Excel, click on Files in the top menu bar, then select Options from the menu on the left.
Click on Advanced.
Select Display, check the box for Disable hardware graphics acceleration, and click OK to save the changes.
Restart Excel to see if there are any changes in how fast it runs.
Disabling Hardware Graphics Acceleration improves the computer’s speed and influences its response time when using Excel. It will fix performance issues and graphics glitches that can cause Excel to crash.
Launch Excel and click on Files in the top-right corner.
Click on Account from the menu on the left, click Update Options, then tap on Update Now.
If any update is available, it will automatically install it.
Restart your PC and check if Excel works better.
Updating the Excel client will fix bugs that may be causing issues with its performance and install the latest patches that will resolve most issues.
5. Reinstall Excel
Open the Settings app using Windows key + I shortcut.
Select Apps and navigate to Installed apps.
Locate Microsoft Office on the list, click the more button and select Uninstall.
Follow the steps on the screen to complete the process.
Once the Office is removed, install it again.
This is a drastic solution, but it can be used as a last resort if you’re having issues with Excel. Elsewhere, if you’re unable to launch your Excel sheets because of the personal.xlsb being locked for editing, we have a fix for that.
Legacy Boot is the boot process is used by the BIOS firmware to initialize hardware devices on the system. However, if the Legacy boot is greyed out, selecting and using this option is impossible.
However, if you want to use dual-boot on your computer, it’s necessary to enable this feature properly. Thus, this article will discuss the causes of this problem and show you the ways to fix it.
Why is Legacy boot greyed out?
When secure boot is enabled, the Legacy boot option might be disabled, as it conflicts with the secure boot mechanism.
If your computer runs in UEFI (Unified Extensible Firmware Interface) mode, the Legacy boot option may be unavailable in BIOS.
In case your system lacks Compatibility Support Module (CSM), or it’s not enabled, the Legacy boot option might be inaccessible.
The Legacy boot might be greyed out in the BIOS because it is incompatible with some newer hardware components.
An outdated BIOS or firmware might not support Legacy boot or could have bugs preventing the option from being accessible. If that’s the case, you might have to update BIOS on your PC.
What do I do if the Legacy boot is greyed out?
We recommend you go through the following preliminary checks to see if you can fix the problem:
Power cycle the PC to drain its power and check if that helps with the problem.
Check your motherboard manufacturer’s website for BIOS updates. If available, check your BIOS version and download the latest update.
Ensure your hardware components are compatible with Legacy Boot.
1. Disable Secure Boot
Right-click on the Start button and select the Power button from the menu.
Press and hold the Shift key, then click Restart.
After the PC boots into the Recovery menu. Go to Troubleshoot and click on Advanced options.
Click on the UEFI Firmware Settings option, then select Restart to boot into the Startup Menu.
In the Startup Menu, press F10 to open the BIOS Settings. It may prompt other options depending on your computer’s manufacturer.
Use the right and left navigation keys to open the Boot options tab in the BIOS Utility.
Use the up and down arrow keys to highlight the Secure boot option and press Enter to view more options.
Select Disabled from the options.
Press the F10 button to save the changes and disable Secure Boot.
Since Secure Boot can interfere with the functionality of the Legacy Boot, disabling it will help if the Legacy boot is greyed out.
2. Disable Platform Trusted Technology
Repeat steps 1-3 to boot into the Windows Recovery Menu.
Enter your BIOS utility.
Use the right and left navigation keys to access the Security tab.
Select the TPM State option and press Enter. If you don’t have the TPM option in the Security tab, find the PTT option.
Select Disabled to turn off the TPM on your device, press F10 to save the change, and exit.
Disabling the Intel PTT feature will enable the Legacy Boot option and fix the greying-out issue in the system BIOS.
Press Windows + R key to open the Run dialog box, type Notepad, and press Enter to open a new Notepad file.
Copy and paste the following script into the Notepad file: Windows Registry Editor Version 5.00 [HKEY_LOCAL_MACHINE\SYSTEM\CurrentControlSet\Control\Power] "PlatformAoAcOverride"=dword:00000000
Click on File in the top-left corner and select Save As.
Enter the File name as Disable_Modern_Standby.reg, click the Save as type drop-down, select All files, and then click Save.
Double-click on the Disable_Modern_Standby.reg file and click Yes when prompted by UAC.
Restart your PC to apply the changes.
The steps above will disable the Modern Standby and fix any power mode interfering with the Legacy Boot option.
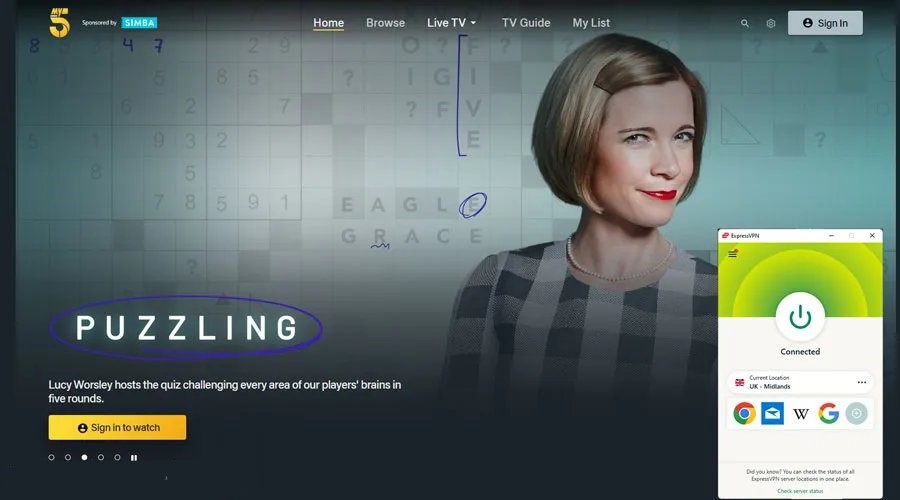
A VPN can hide your real location and make it seem like you are in Italy, allowing you to access RaiPlay content from anywhere in the world.
But what happens when your VPN stops working with RaiPlay?
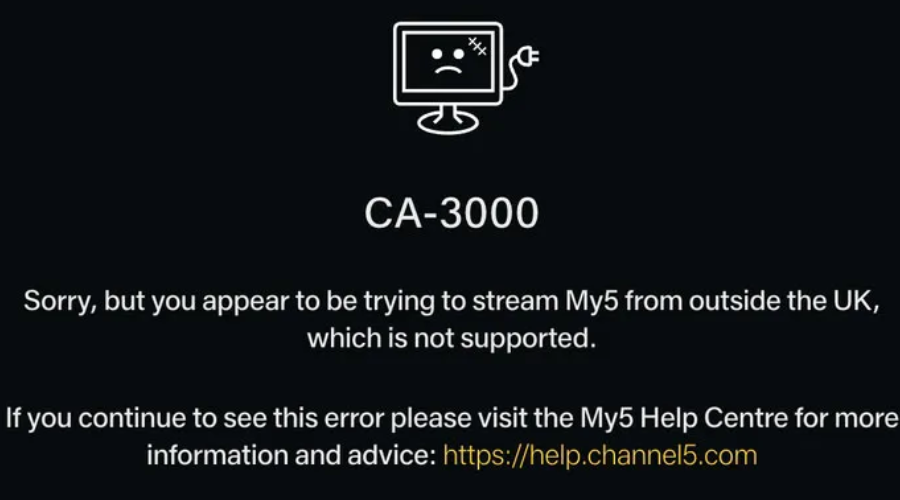
You may encounter an error message that says The streaming of this content is available in Italy only. Or have a blank screen altogether.
Geo-blocking error message on RaiPlay
Unfortunately, this prevents you from streaming your favorite shows.
This means that RaiPlay has blocked the IP address of your VPN server and detected your use of a VPN.
Don’t worry, though. I’ve compiled a list of some easy fixes you can try to solve this problem and enjoy RaiPlay again with your VPN.
Check them out below.
RaiPlay not working with VPN? Try This!
There are several reasons why your RaiPlay is not working with VPN.
➡️ These include a wrong server connection, stored cookies, or a weak VPN.
But some quick steps can solve the issue and get you back to streaming on RaiPlay.
Here they are.
1. Switch to a different Italian server
If you have issues watching RaiPlay with your VPN, it may be that the IP address you’re connected to has been blacklisted or blocked.
Changing to a different server will give you a new IP address. If the new address isn’t blocked, you’ll get access to RaiPlay. For the best experience, we recommend getting a VPN with multiple Italian servers.
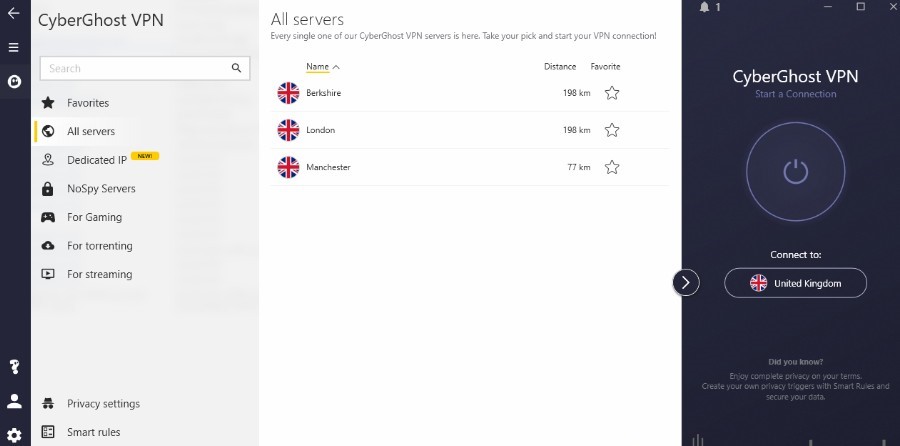
Here’s how to do that using CyberGhost
Disconnect from the current VPN server.
Choose another Italian server from your VPN provider’s options.
Reconnect to the VPN using the new server.
Launch RaiPlay and check if it is now functioning properly.
Note that you may need to try a few Italian servers in different locations to find the best one that works for you.
2. Clear your browser cookies
Some streaming services use cookies to store information about your location.
As a result, websites still identify your location as your home country, even with an active VPN.
However, clearing cookies and caches eliminates the stored information, browsing history, and location data.
To clear your browser cookies on Chrome, simply follow these steps:
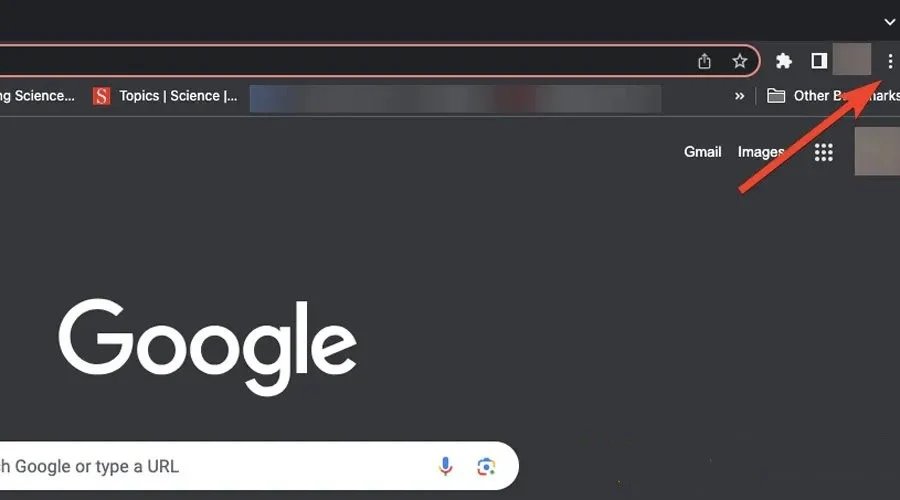
Click on the three dots at the top right edge of your browser.
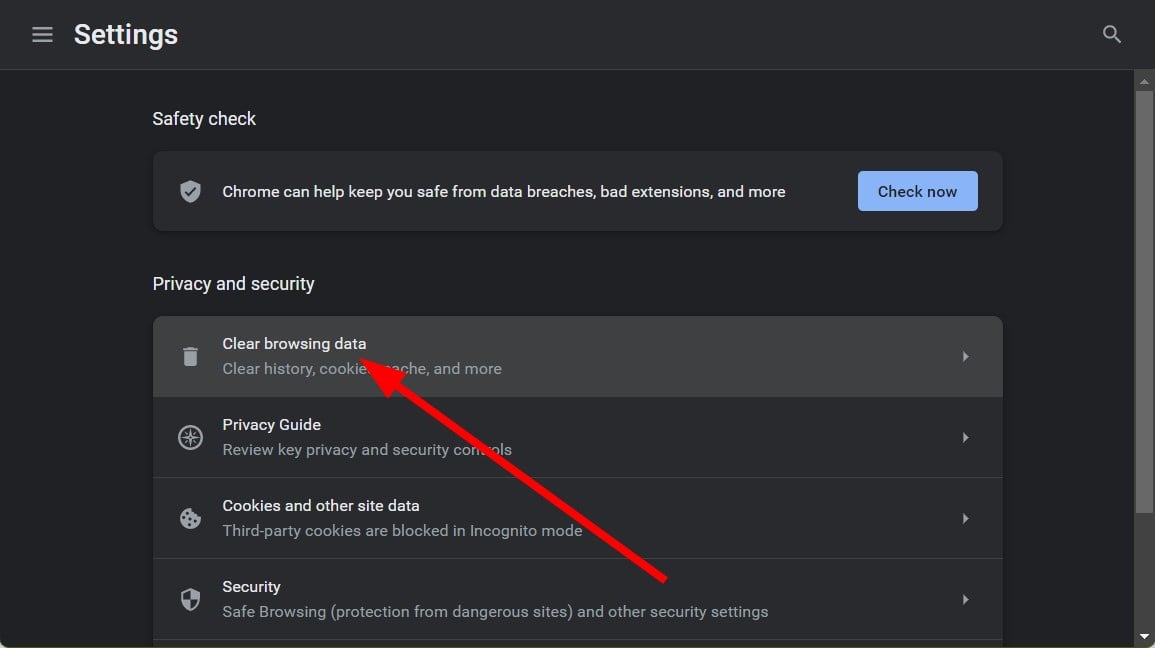
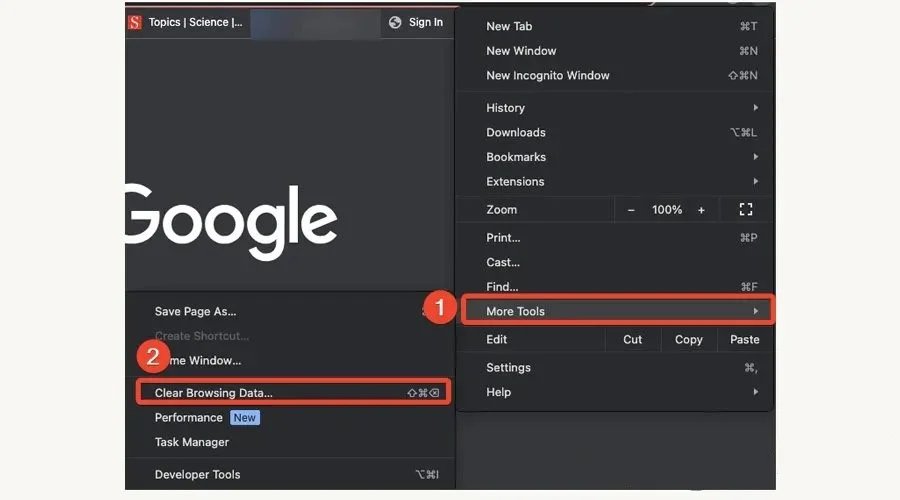
Go to More tools, and select Clear browsing data.
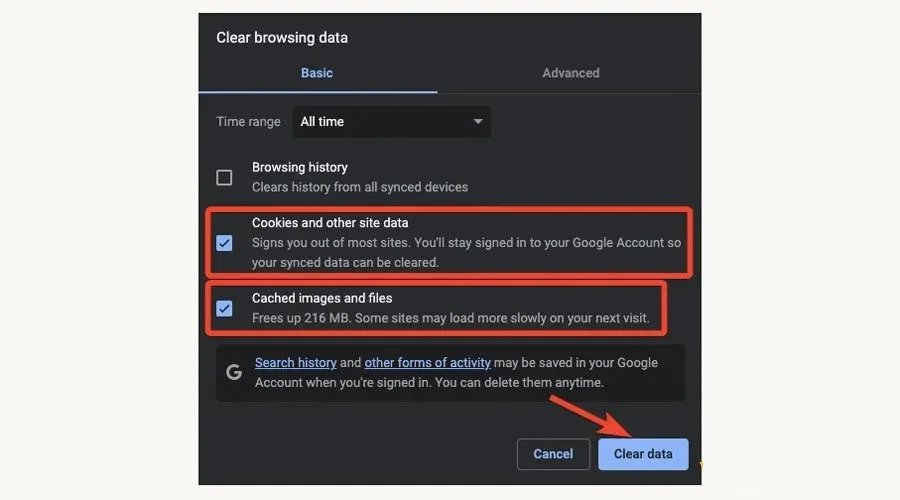
Choose the time range from the drop-down list. Use All time to delete everything.
Check the boxes for Cookies and Cached images and files.
Click Clear data.
Try opening Raiplay again. It should work by now.
Apart from resolving issues with VPN, this fix can also enhance your browsing speed and secure your privacy on the internet.
Remember that I’ve used Chrome as an illustration, but you can follow similar steps on other popular browsers like Edge, Opera, or Firefox.
3. Change your DNS settings
Typically, your internet-connected device uses your ISP’s DNS servers to handle requests.
But, if your ISP’s DNS servers are slow or not correctly configured for caching, it can result in slower connections. This can lead to interruptions with RaiPlay.
Some VPNs have their own private DNS servers. If you have a subscription to one of those, contact your provider to help locate them. Alternatively, you can use free DNS servers from reliable third parties.
Here’s how to change your DNS settings on your PC:
Right-click the network icon (or the WiFi icon if you are connected to WiFi) in the taskbar notification area and select Network and Sharing Center.
Select Change adapter options.
Right-click on your TAP adapter and choose Properties.
Select Internet Protocol Version 4 (TCP/IPv4) and click Properties.
Select Use the following DNS server addresses and enter the addresses you’ve obtained. In this case, we used Google’s DNS address.
Repeat steps 3-5 for your physical network adapter, Ethernet or WiFi.
Try reconnecting to RaiPlay again.
If you want free, safe DNS, I recommend Google or Cloudflare. Here are 2 reliable DNS addresses from them:
➡️ Google DNS: 8.8.8.8 or 8.8.4.4
➡️ Cloudflare DNS:1 .1.1.1 or 1.0.0.1
4. Reinstall your VPN
If your VPN app is corrupted or outdated, it may fail to hide your IP address or connect to your desired server.
A simple solution to try is doing a full reset of the VPN software. You can do this by uninstalling the VPN and then reinstalling it.
Here is how to do it on Windows:
Click the start button at the bottom left of your screen, search for the Control Panel, and open it.
In the Control Panel, click on Uninstall a program under the Programs tab.
You will then see a list of all the applications on your device. Find your VPN app alongside the TAP and TUN adapters.
Right-click on the app and select Uninstall.
In the new pop-up, select Yes.
Complete the uninstallation process for the VPN app TAP and TUN drivers as well.
Visit your provider’s website to download it again.
Install the app by following the on-screen instructions of the install wizard.
Log in with your credentials.
Connect to an Italian Server and try streaming on Raiplay again.
This will also update your app to the latest version, ensuring you have the latest security features, bug fixes, and improvements for a smoother and safer VPN experience.
5. Change your VPN provider
If Raiplay is not working with VPN after trying the fixes above, the last resort is to switch to a different VPN provider.
Some VPNs, especially free ones, may have IP leaks, DNS leaks, or fewer servers that are often overloaded.
This can result in slower speeds and Railpay suspecting and blacklisting the server.
Essentially, I recommend CyberGhost for its market standard in speed and numerous Italian servers.
Once connected to the server, try streaming on RaiPlay again.
CyberGhost works fine with Raiplay, but before tying it out, remember to clear your browser cookies.
Also, change your DNS settings to direct your DNS requests from your ISP’s DNS servers to the more secure ones I recommend above.
Does RaiPlay block VPNs?
Yes, RaiPlay blocks VPNs as part of its geo-restriction policy.
So, if you try to access the platform from outside Italy with a blocked VPN, you will likely see an error message that says streaming is allowed only for connections from Italy.
This is because RaiPlay doesn’t have the necessary licenses to broadcast its content internationally.
How does RaiPlay detect my VPN?
RaiPlay detects your VPN using various techniques such as IP filtering, deep packet inspection, and browser fingerprinting.
These methods allow them to look at various factors, such as your IP address, your DNS requests, your browser settings, and your network traffic.
If any of these factors indicate that you’re using a VPN, RaiPlay will block your connection and show you an error message.
For example:
If your IP address belongs to a known VPN server or a data center, it will blacklist and deny you access.
Also, when your DNS requests don’t match your IP location, it will suspect you’re using a VPN and block you.
If your browser settings reveal that you’re using a proxy or a VPN extension, RaiPlay will fingerprint you and prevent you from streaming.
Lastly, if your network traffic shows signs of encryption or tunneling, RaiPlay will inspect it using the deep packet inspection and stop it.
Does RaiPlay work with a VPN?
Yes, RaiPlay works with a VPN if you use a reliable and reputable VPN service that can evade its blocks.
A good RaiPlay VPN will have an extensive network of servers in Italy, a fast and consistent performance, strong encryption and security features, and a user-friendly interface.
However, not all VPNs work with RaiPlay. Some VPNs are too slow, weak, or outdated to bypass RaiPlay’s blocks.
These VPNs will either fail to connect to RaiPlay or get detected and blocked by RaiPlay.
Therefore, choosing a VPN that works with RaiPlay is crucial.
To save you the hassle of searching for one, in the next section, I have compiled a list of the best RaiPlay VPNs that worked great for me.
Check them out!
Best VPNs for RaiPlay
So, I tested several top VPNs to access RaiPlay here from Nigeria.
From these evaluations, I have compiled a list of the five best ones.
My selection of these VPNs is based on the following set of criteria:
CyberGhost VPN is my top choice for streaming on RaiPlay. Connecting to one of its high-speed servers in Italy is just a few clicks away.
It has over 210 Italian servers in Milan and Rome, which gives you plenty of options to choose from.
This means you’ll never have to worry about picking a crowded one!
You’ll also enjoy unlimited bandwidth, fast VPN protocols like WireGuard®, and streaming-optimized servers that use 10 Gbps speeds in high-traffic locations.
That’s great for uninterrupted streaming on RaiPlay.
But there’s more. CyberGhost protects your online activity with its powerful 256-bit AES encryption, ensuring your sensitive data is safe from prying eyes and cybercriminals.
Also, its Kill Switch blocks all traffic if you get disconnected from the VPN until you can reconnect safely.
This ensures your actual location is not revealed to RailPlay.
Additionally, with just one subscription, you can connect up to 7 devices simultaneously.
So, you can enjoy CyberGhost’s user-friendly VPN apps on all your devices, including Windows, macOS, Linux, Android, iOS, Android TV, and Amazon Fire TV Stick.
And if you ever need assistance, its friendly 24/7 Customer Support team is available via live chat or email to provide guided walkthroughs and help you.
✅ Pros:
Streaming servers that unblock RaiPlay
Add-ons, including antivirus, data compression, and dedicated IPs
User-friendly interface
Has a 45-day money-back guarantee
Cons:
Issues with connecting after sleep mode or in China
Has customer support unavailable in some languages
CyberGhost
Fire up CyberGhost and never miss out on RaiPlay’s exclusive content!
ExpressVPN – Seamless 4K streaming without annoying delays
ExpressVPN is another great choice for bypassing geo-restrictions on RaiPlay. It has several servers in Napoli, Cosenza, and Milan. So, you can always find an Italian server to rely on.
The attractive part is that it uses robust encryption like the 256-bit AES encryption and advanced leak protection to ensure your connection is secure while streaming.
Moreover, ExpressVPN offers a unique feature called MediaStreamer, which allows you to connect VPN protection to devices that do not support VPN connections natively.
This includes smart TVs, gaming consoles, streaming media players, and other devices without VPN apps.
And it also works flawlessly on popular devices such as Windows, Android, macOS, iOS, and Linux.
Additionally, your streaming experience is further enhanced by its reliable and secure protocols, ensuring smooth playback without interruptions.
Taking your privacy seriously, ExpressVPN follows a strict no-logs policy and utilizes the TrustedServer feature, which wipes server data after each session.
To top it all off, it offers a risk-free 30-day money-back guarantee. So, you can try it out and see if it suits your needs without any worries.
With ExpressVPN, streaming on RaiPlay becomes easy and worry-free, allowing you to enjoy your favorite shows without restrictions or privacy concerns.
✅ Pros:
Best leak protection on the market
Consistently fast and stable
Apps for all conceivable devices
❌ Cons:
Not the cheapest
Its servers occasionally get blacklisted due to its popularity
Only five device connections at a time
ExpressVPN
Keep up with everything on RaiPlay even outside Italy by spoofing location with ExpressVPN!
With PIA, you’ll experience lightning-fast speeds with a wide selection of over 87 Italian servers to choose from.
No more frustrating lags, buffering, and freezing, all thanks to its powerful 10 Gbps NextGen servers. This means you’ll enjoy seamless 4K streaming without annoying delays.
The best part is it offers unlimited bandwidth, so you can stream your favorite content on Railplay without worrying about data caps or restrictions.
Additionally, PIA employs strong encryption methods to keep your data secure to enhance your streaming sessions.
Plus, you can choose between 128-bit or 256-bit AES encryption ciphers, adding an extra layer of privacy and security.
With that, rest assured that your ISPs, third parties, or even RaiPlay cannot track your online activities.
For your convenience, PIA offers a Smart DNS feature, which allows you to change your virtual location directly from your Smart TV.
Although it won’t encrypt or redirect your data, this feature ensures your connection speeds remain unaffected.
Alternatively, you can install the VPN directly on your router to secure your entire network and protect all your devices.
✅ Pros
Works with major streaming services
Excellent streaming speeds
Supports unlimited device connection
❌ Cons:
Live chat isn’t very responsive
PIA
Get PIA to catch all the Italian entertainment on RaiPlay in just a few clicks!
Surfshark – Excellent security at an affordable price
Surfshark offers excellent security at an affordable price, and it has two server locations in Italy – Milan and Rome.
One of its standout features is the ability to have unlimited data and unrestricted bandwidth, allowing you to connect as many devices as you want simultaneously.
With Surfshark, you can stream on RaiPlay worry-free, with no data restrictions or caps.
You’ll even enjoy your favorite shows and movies in high-definition or even 4K quality without any interruptions.
When it comes to ensuring your online security and privacy, Surfshark uses top-notch protocols like OpenVPN, IKEv2/IPsec, and WireGuard, all equipped with the powerful AES-256-GCM algorithm.
This advanced encryption keeps your data safe and hidden from prying eyes, and the best part is that it doesn’t slow down your connection – in fact, it’s even faster than using AES-256 alone!
Also, Surfshark provides a kill switch feature that automatically cuts off your internet connection if the VPN connection drops.
This ensures that your data remains private and your identity stays protected.
Additionally, you can enjoy features like CleanWeb, which blocks ads, trackers, and malware to give you a clean and uninterrupted streaming experience.
With user-friendly apps available for various platforms like Windows, Mac, Android, iOS, and more, setting up and using Surfshark on your preferred devices is a breeze.
So, why wait? Enjoy secure and private streaming with Surfshark’s impressive features and affordable pricing.
✅ Pros:
Connect unlimited devices
Excellent streaming speeds
Extra features like virus protection
❌ Cons:
Inconsistent P2P performance
Surfshark
Get access to Rome & Milan servers to pass geo-restrictions and watch RaiPlay anywhere!
It is certainly possible to downgrade Firefox to a previous version safely. Well, there can be many reasons why you want to do so. You might be facing some issues with the new build or you simply don’t like the new UI changes.
The guide to restoring the previous version of the browser is simple. Just download the older build, install it, and enjoy your browsing. But, you will also need to disable the automatic updates so that you could avoid upgrading to the newest build in the future. However, it’s not officially recommended.
Alternatively, you can also switch to a completely new browser like Opera if you think Firefox is throwing troubles or even downgrading isn’t helpful. It’s faster, reliable, and includes so many built-in features like VPN and adblocker.
Opera
Ready for a Change? Opera is the smart choice for a more efficient browsing experience!
It’s worth mentioning that you can revert to an older version of Firefox but it’s not recommended. Mozilla clearly states on its support page that downgrading to an older version can invite unknown vulnerabilities.
The developers do not support the older versions so you will be left with an insecure version.
How do I download an older version of Firefox?
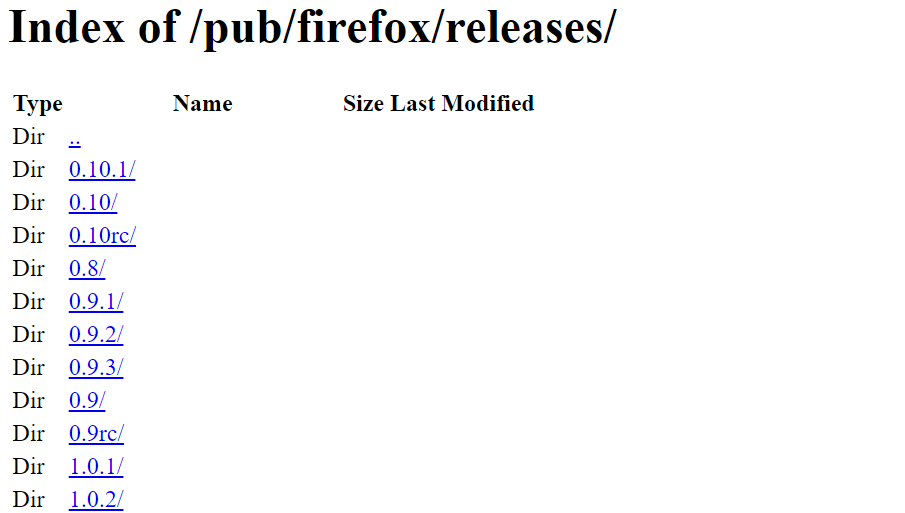
Going back to a previous version of Firefox is easy. You just have to go to the directory of Firefox builds and download the version.
Below you can find detailed instructions on how you can download the older build and install it on your Windows system.
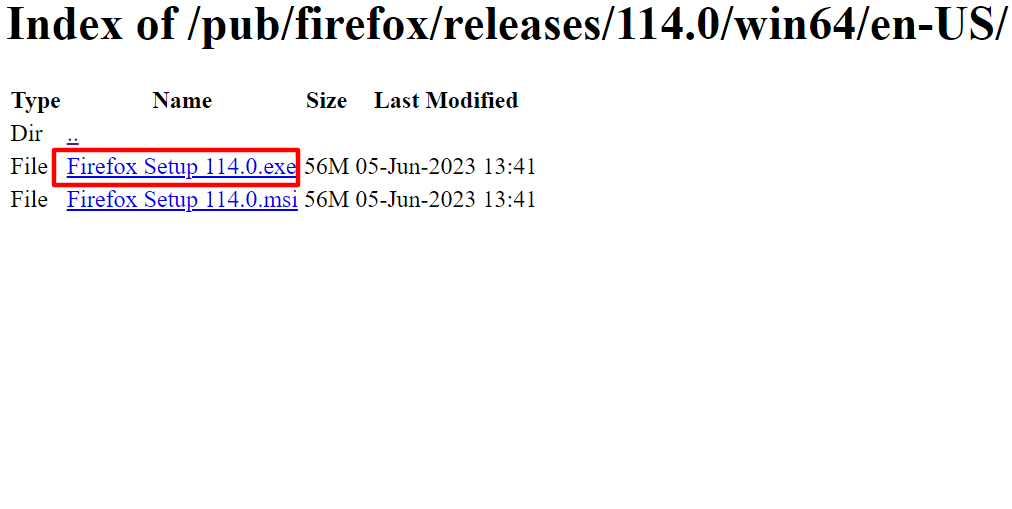
Go to the Firefox repository of older builds and releases. You will find many builds, some even dating back to 5-6 years. But don’t choose the oldest ones as they can invite scams and risks.
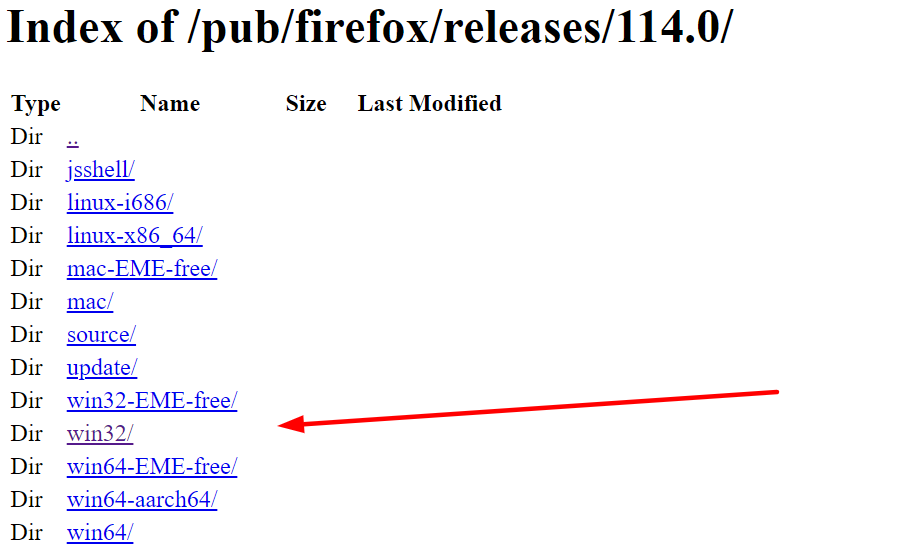
Click on the version you wish to download. Here, we are taking the example of version 114.
Next up, choose the right system architecture – 32-bit or 64-bit that matches your Windows system.
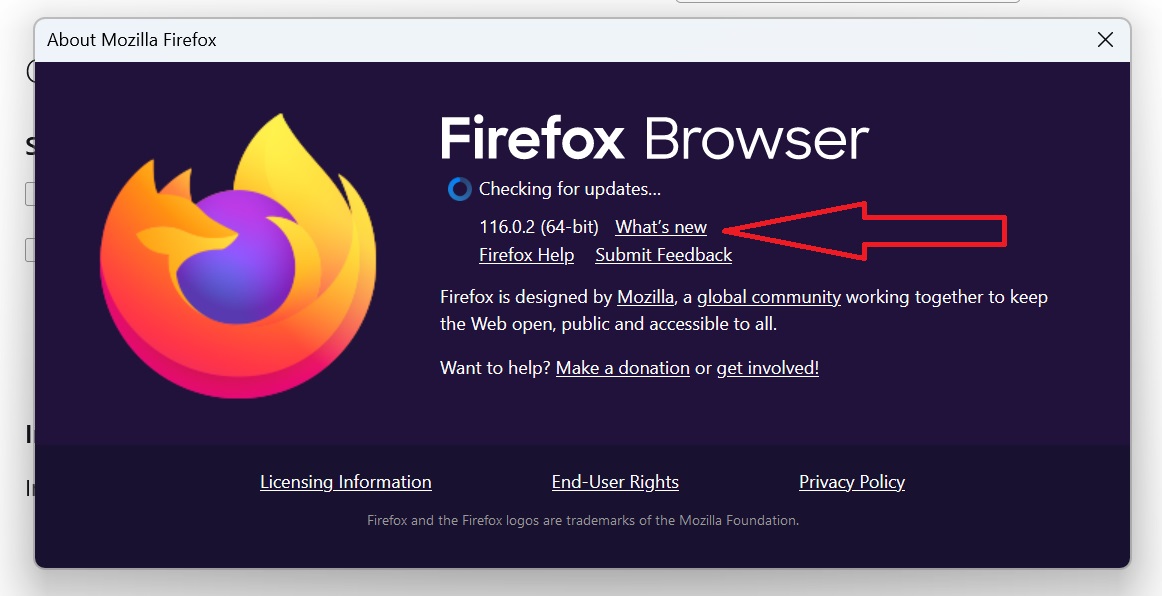
In case you don’t know how to check the system architecture, then tap on the Menu button, provided at the top-right corner of the Firefox toolbar. Click on Help and select About Firefox.
A new window will open that will tell you the system architecture.
Choose the language and region.
Finally, download the .exe file of the build.
This is how you successfully download the older Firefox version on your system.
How do I install the older Firefox version?
Now that you have downloaded the previous version of Firefox on your Windows device, it’s time to install the version.
Follow the below steps in order to roll back to the previous version of Mozilla Firefox. Before following the installation guide, make sure to uninstall the latest version of Firefox from your system.
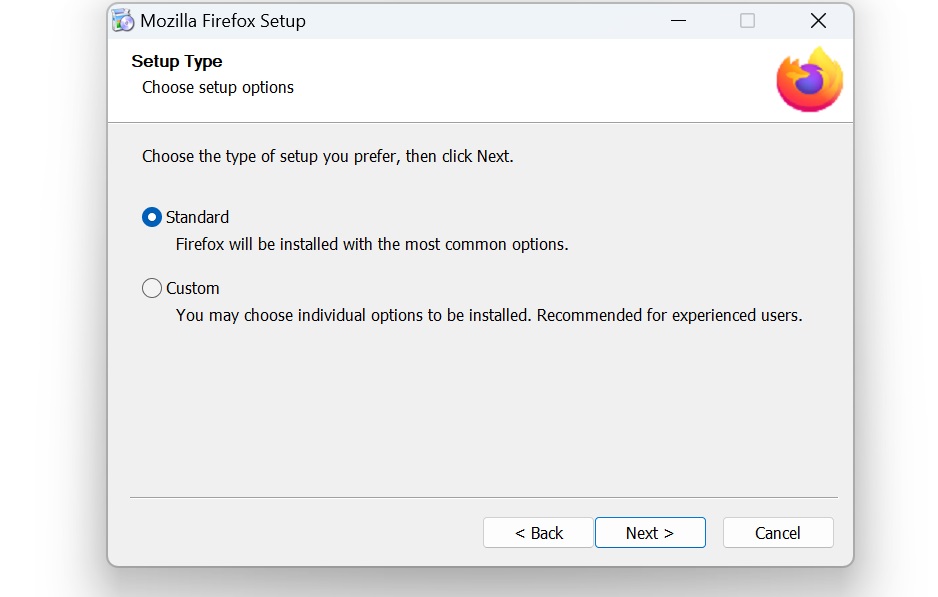
Double-click on the downloaded Firefox Installer .exe file and follow the wizard.
Set up window will open with options Standard and Custom. By default, the Standard option is selected. Click Next.
Select the location where you want to install the Firefox older version.
Once you select the location, Firefox will ask for your confirmation.
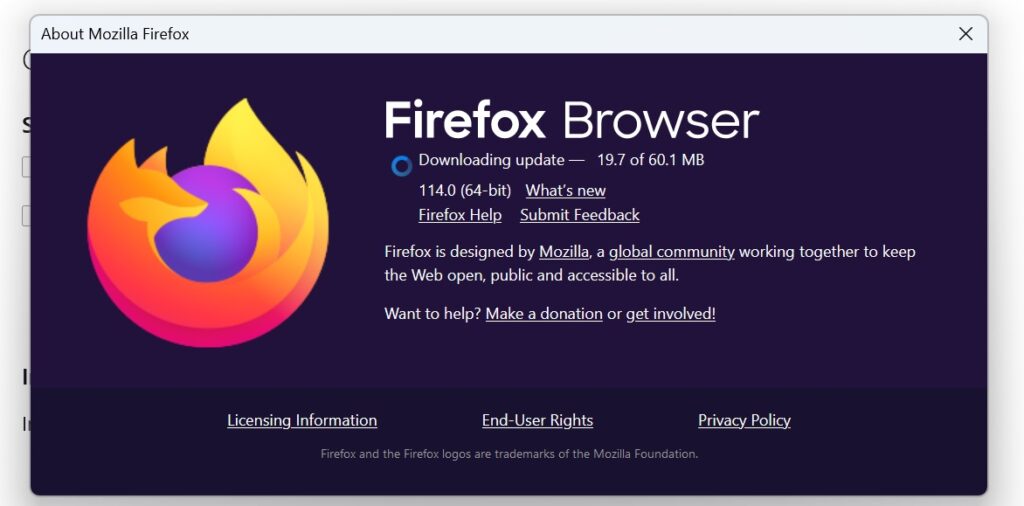
You can check the update version by going into the Help section under Settings.
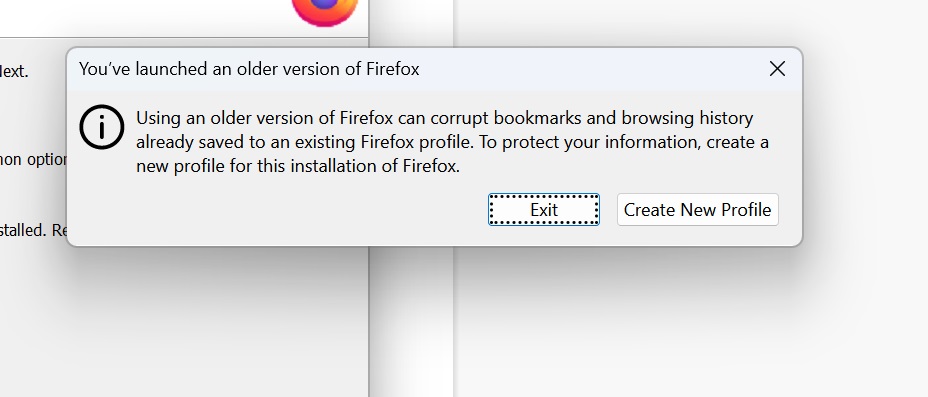
Once you have installed the older version, Firefox will show you this warning. Click on ‘Create New Profile’ in order to get started.
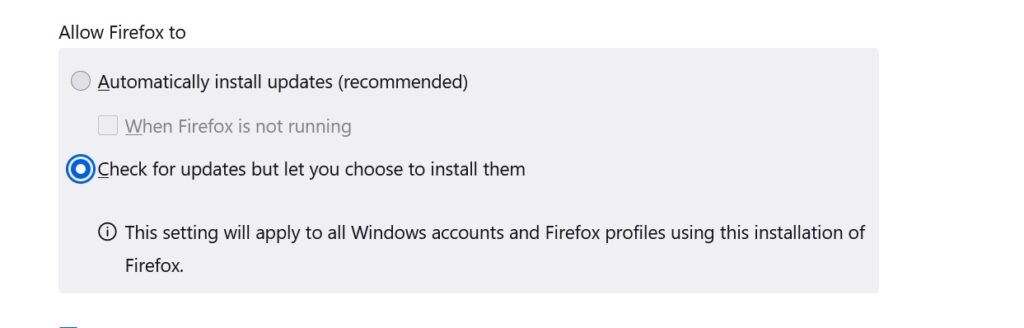
Important – Here is one crucial step while installing an older version of the browser. You have to disable auto-updates first, otherwise, Firefox will download to the latest version automatically.
How to disable auto updates?
Go to the Menu provided on the top-right corner of the Firefox toolbar, select Settings, and under General Settings scroll down to find Firefox Updates option. Deselect Automatic installed updates and select “Check for updates but let you choose to install them.”
While this option will look for the newest updates, it will not install them without your confirmation.
Can I keep my bookmarks and settings when downgrading Firefox?
Downgrading to a previous version of Firefox doesn’t affect your bookmarks. You can revert to a previous version of Firefox by keeping your profile intact.
However, it’s still recommended to back up your bookmarks and settings before downgrading to avoid any kind of mishap.
Here’s how you can do it –
Open Firefox and click on the “Bookmarks” menu.
Click on Manage Bookmarks or press Ctrl+Shift+O
In the Library window, click on “Import and backup” and select “Backup…”
Choose a location to save the backup .json file and click “Save.”
To restore your bookmarks and settings after downgrading, follow the same steps but select “Restore” instead of “Backup.”
So, this was a simple guide on how you can downgrade Firefox to your favorite version. If the problem still persists, you can uninstall this version and try any other recent version from the directory and follow the steps again.
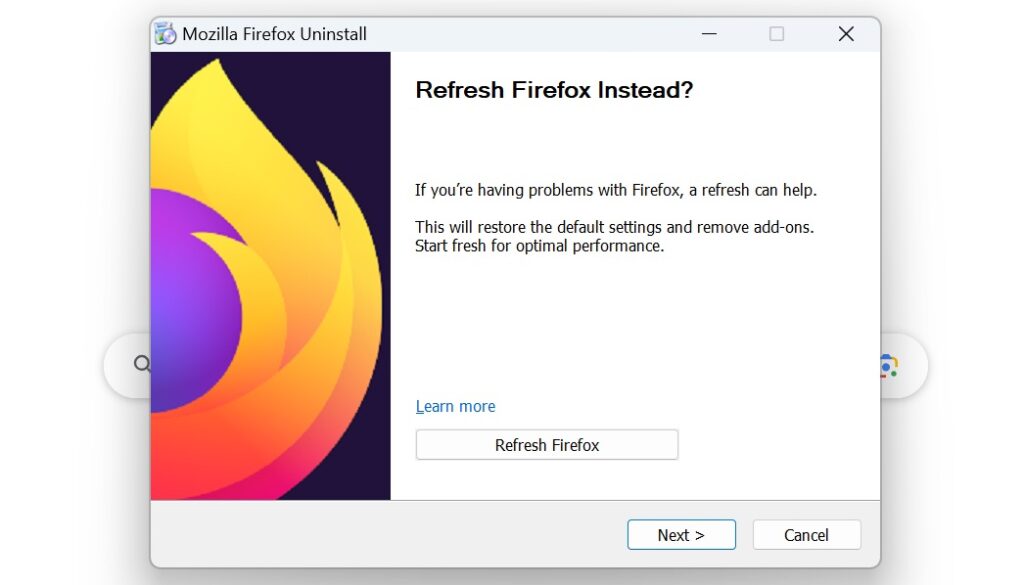
Alternatively, Mozilla also suggests that some problems can be solved with the help of the Firefox Refresh feature. it restores the browser to the default state while saving the essential information. This also comes as an alert while uninstalling the browser.
Let us know in the comments if you are able to roll back.
You need to be careful, especially if you don’t speak the default display language shipped with your Windows license. You could end up stuck with an OS you don’t understand. If you find yourself in this predicament, we’re here to help you.
What does license supports only one display language mean?
Your OS supports only one language, and it not changing the display language is different. You can add more languages for the latter, but if your Windows version only allows one language, it is locked to the license and cannot be changed.
The main reason for this restriction is to prevent you from getting a cheaper license for a specific language version.
However, some little-known factors could provide a loophole and enable you to change your display language on your Windows device. These include:
Location – If the location on your device does not reflect your current status, changing it can allow you to update your Windows display language.
Trial version – If you were in the testing phase of Windows to get a feel of the OS before fully committing, when activating your copy, you can change the display language.
How do I enable multiple languages in Windows?
1. Add language packs
Press the Windows + I keys to open Settings.
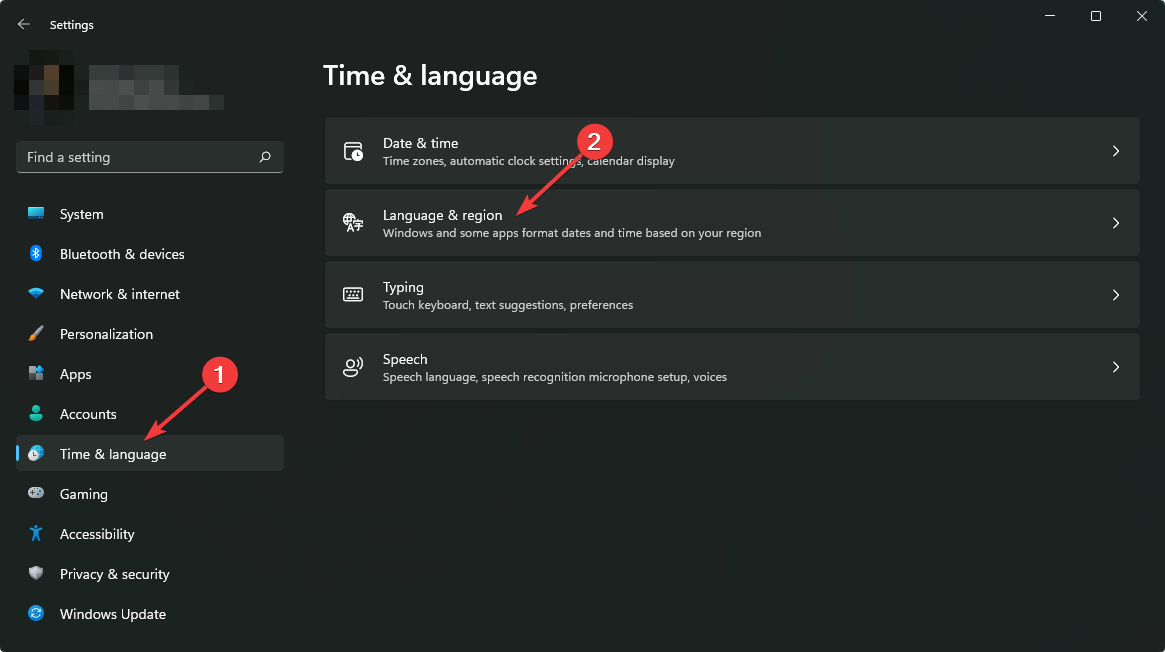
Select Time & language on the left pane then click on the Language and region option.
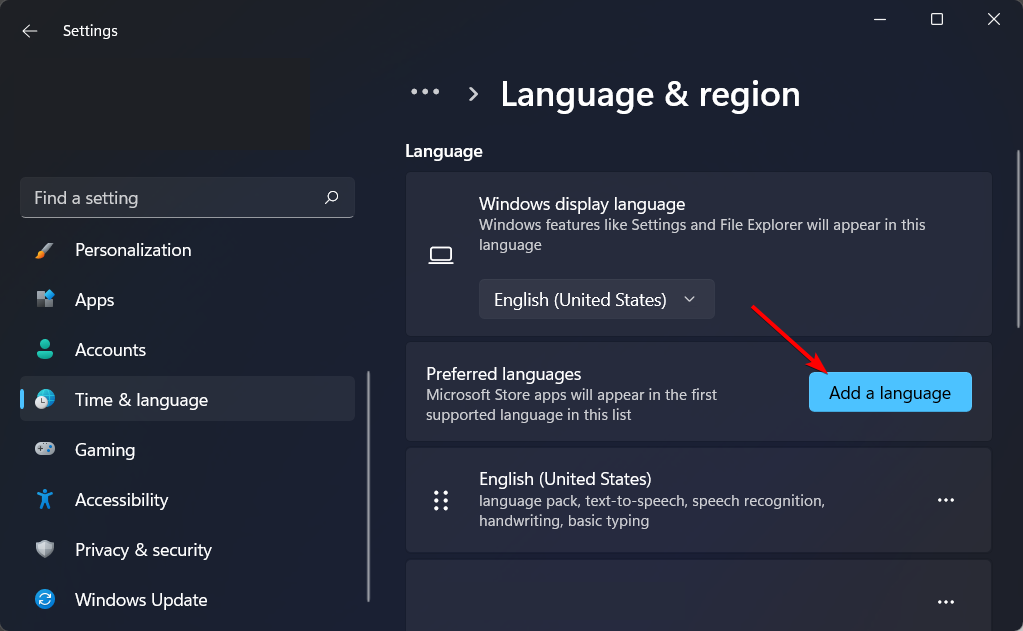
Click the Add a language button.
Select your preferred language and press Next.
Check the box for Set as my Windows display language then press Install.
Restart your PC to effect the changes.
2. Change your region settings
Press the Windows + I keys to open Settings.
Click on Time & language then select the Language and region page on the right side.
Under Country or region, update your location if applicable.
Next, go back to the Administrative language settings.
Select Change system locale button then press OK.
Specify the new language, check the Beta: Use Unicode UTF-8 for worldwide language support box and then click the OK button.
Restart your PC and try changing your display language again.
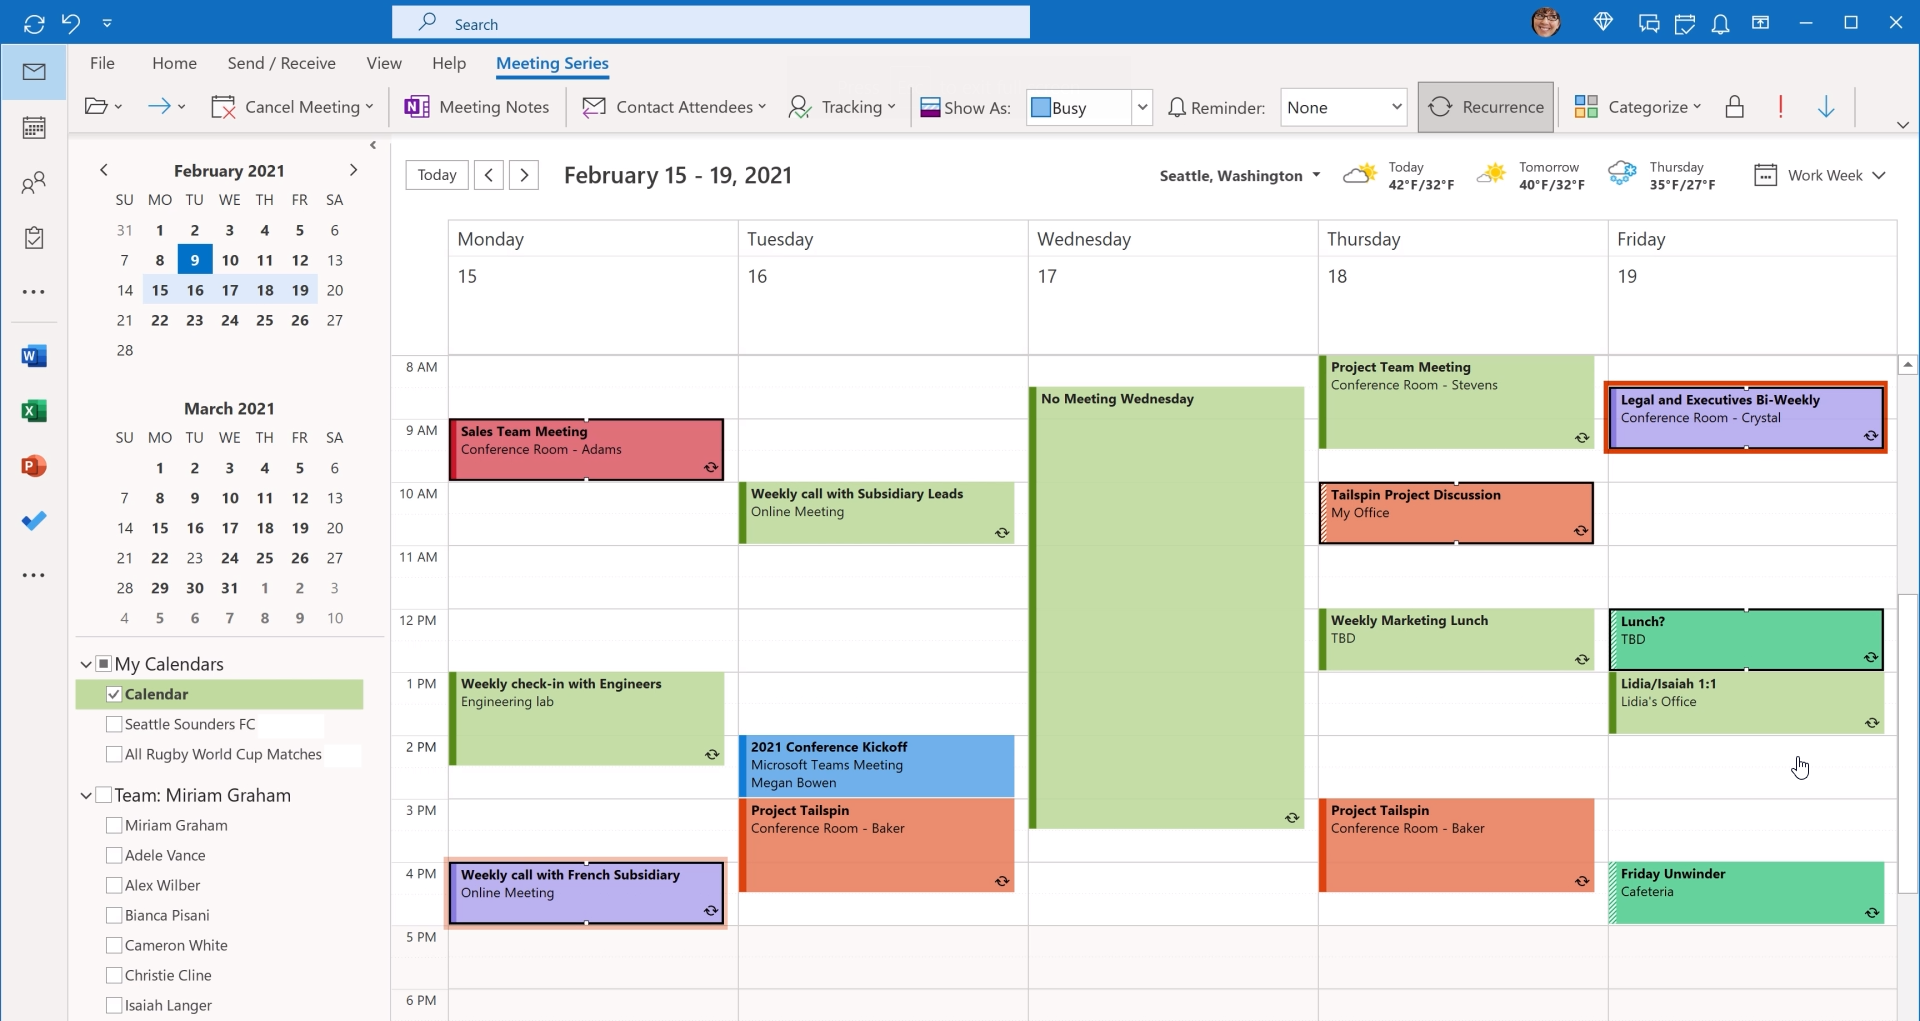
Organization comes in many forms; for some, it involves color coding your events on your Outlook calendar. This is not only a playful way of setting schedules but also a way to help you remember important dates.
The only issue is that sometimes, your Outlook calendar may not be color-coded, or the colors are not working. If so, this is how to navigate through this issue.
Why is my Outlook calendar not showing color categories?
If color categories are enabled, you should see them by default when viewing your calendar. However, if it’s not working, below are some possible reasons behind it:
You’re using a third-party add-in – Some third-party add-ins that display calendars have their own settings and can often override the default settings from Microsoft.
Outdated app – If your Outlook application has not been updated in a while, this could be the issue causing your calendar not to be color coded.
Unsupported version – It is possible that even though you’re using a newer version of Outlook, your calendar may still not show color-coded categories because it’s an incompatible version.
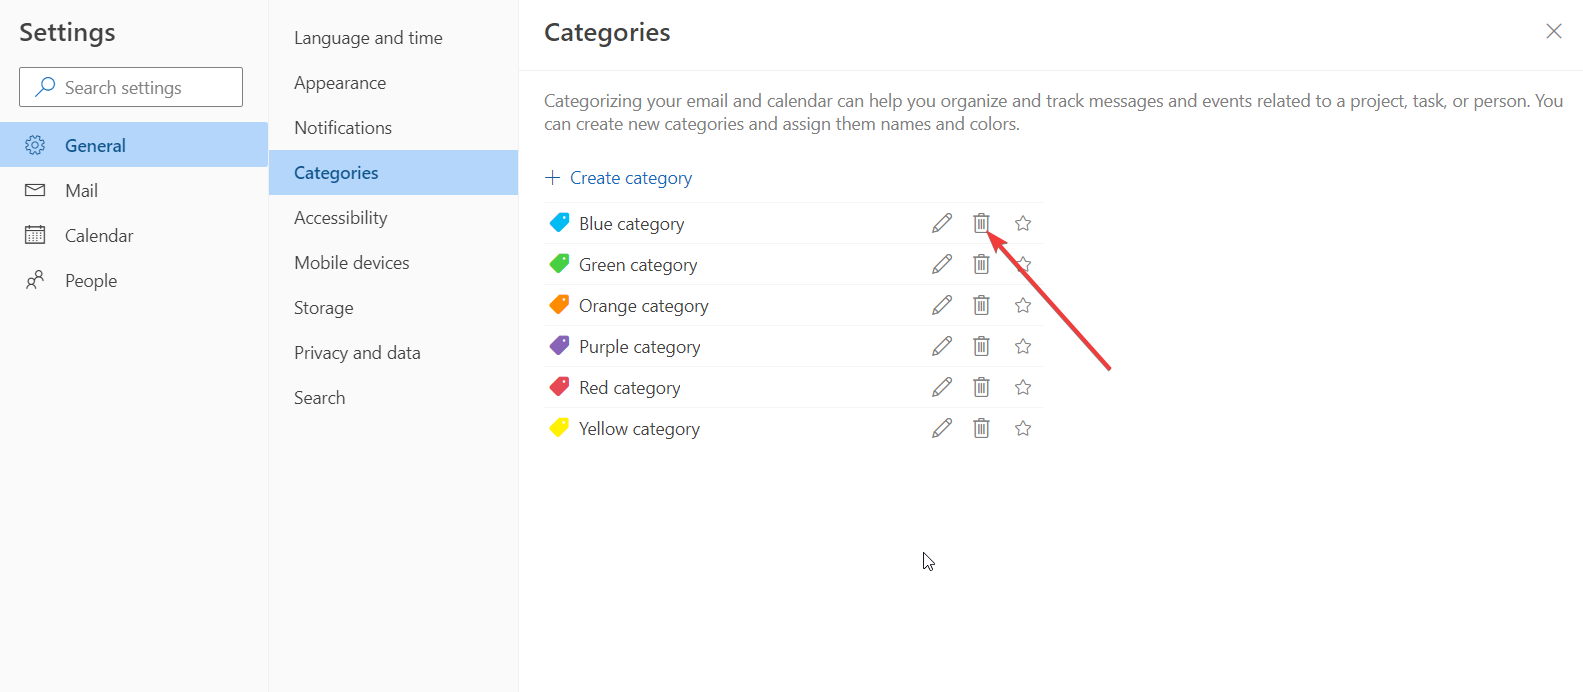
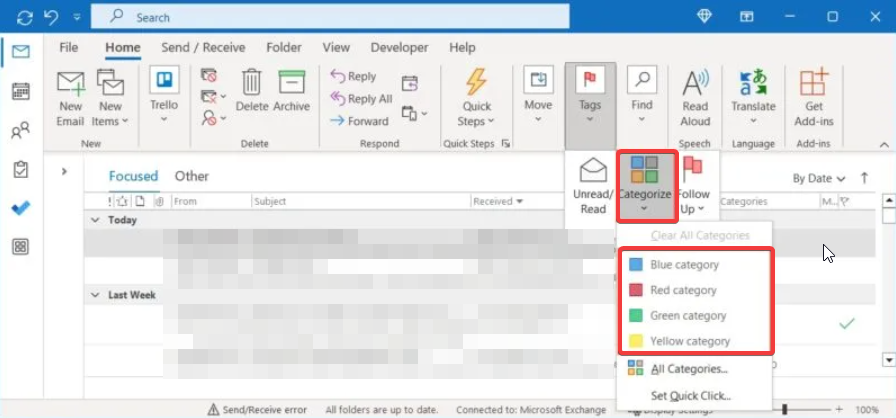
Missing color categories – If you don’t see any color categories in your calendar view, then it’s likely because they’ve been disabled, missing, or deleted.
Virus infection – We all know the capabilities of viruses whenever they take control of your system, so this may be one of those times a virus is altering how things work.
Corrupt data file – The data file that stores your Outlook calendar settings may have been corrupted or is no longer available on your computer. It’s either because it was deleted or moved to another location.
Insufficient permissions – If your work or school manages your account, your Outlook calendar color sync is probably failing because you don’t have enough permissions.
How do I enable color categories in Outlook calendar?
Begin by checking off the following preliminary steps before any technical troubleshooting:
Ensure your Outlook application is the latest version.
If you have multiple accounts configured on your computer, ensure you have activated the correct account.
Check whether your Outlook version supports color categories. IMAP accounts do not have this feature.
Get in touch with your administrator to ensure you have all the requisite permissions to view and change the color in the calendar.
Try clearing the Outlook cache.
1. Start Outlook in Safe Mode
Press Windows+ R to open the Run dialog box.
Type Outlook.exe /safe and click OK to open Outlook in safe mode.
2. Disable problematic add-ins
Launch Outlook.
Click Get Addins from the top right corner of the menu.
From the left pane, select My add-ins.
Locate the add-in you suspect that may be causing this issue, click the three ellipses at the bottom, and select Remove.
3. Scan for viruses
Press the Windows key, search Windows Security, and click Open.
Select Virus & threat protection.
Next, press Quick scan under Current threats.
If you don’t find any threats, perform a full scan by clicking on Scan options just below Quick scan.
Click on Full scan, then Scan now to perform a deep scan of your PC.
Wait for the process to finish and restart your system.
Press Windows + R keys to open the Run dialog box, type %LOCALAPPDATA%\Microsoft\Outlook\, then click OK.
Right-click the RoamCache folder, select Copy, then paste it into another folder.
Double-click the actual RoamCache folder, select all the items in the folder, or press Ctrl + A, then press the Delete key.
Restart your PC and launch Outlook to check if the error persists.
5. Turn on shared calendar improvements
Launch Outlook.
Click on File in the top left corner.
Select the Account having problems, click on it, and select Account settings.
Click on Change.
Check Use Cached Exchange Mode to download email to an Outlook data file option.
Navigate to the Advanced Tab, under the Microsoft 365 Features section, check the Turn on shared calendar improvements (preview) option, and click OK.
Close Outlook and restart your PC to effect the changes.
This appears to be the most upvoted solution for the Outlook calendar not color coded error as per the comments on the Spiceworks forum. Hopefully, it will work for you too. If not, proceed to the next steps.
5. Repair MS Office
Hit the Windows key, type Control Panel in the search bar, and click Open.
Navigate to Uninstall a program under Programs.
Locate MS Office, click on it, and select Change.
Select the Online Repairoption and click on the Repairbutton.
If none of these solutions apply to your situation, then a fresh install of your Outlook app may do. Otherwise, contact Microsoft Support for assistance in resolving this issue.
While you’re still here, check out what to do when you can’t add an account in Outlook mail. And that sums up this article but do leave any other additional suggestions or thoughts regarding this topic in the comment section.
It would appear that after a certain Google Chrome update, tabs are not displaying names. This is not the first instance where Chrome is behaving a certain way.
We have already discussed what to do when your Chrome icon is missing, so check that out. In this guide, we get down to the bottom of this problem.
Why are my Chrome tabs not showing names?
Chrome users have plenty to love about the browser. Its speed, simplicity, and security features make it a top choice for many. However, sometimes, you can easily forget about all these good things and focus on the problem.
When working on a project in your Chrome browser, you’ll probably have several tabs open. This will allow you to switch between them easily and compile all the information you need promptly.
However, when tabs are not displaying names, it can be hectic playing guessing games to reach out for the tab you want to open. So why does this happen? Below are some possible reasons:
Corrupt extensions – We all love extensions for their added functionality, but not all bring good tidings. Some can alter how your browser works and cause such issues.
Faulty browser update – If your browser was working fine, but after a recent update, it stopped showing tab names, this could be the issue.
Browser crash – It’s no secret that Chrome is a memory hog. When you have too many tabs open on your Chrome browser and not enough memory, some tabs may start crashing, and their names will disappear.
Site issue – In some cases, the site you’re visiting has an issue of not displaying the title. If other tabs display title names, you can conclude it is a site-related problem.
Memory saver – Chrome has a memory save feature that kills any tabs in the background that are not in use. However, when you click on the tab again, the name is displayed. This could be the reason your tab names are not showing.
What can I do if Chrome tabs are not showing names?
A few simple workarounds to try before the main solutions include:
Wait it out.
Try using Incognito mode and see if the issue persists.
Launch your Chrome browser and click the three vertical ellipses in the top right corner.
Select Settings.
Click on Privacy and security, then select Clear browsing data.
Check Cookies and other site data andCached images and files, then hit Clear data.
4. Reset your browser
Open your Chrome browser and click on the three vertical ellipses at the top right corner.
Select Settings.
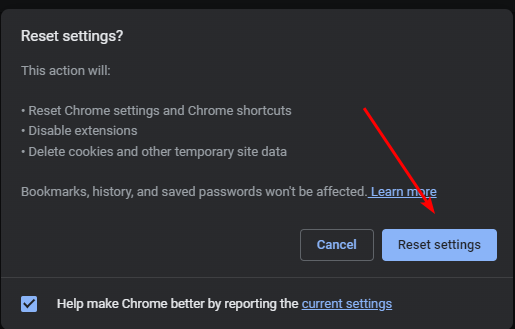
Next, click on Reset and cleanup, then select Restore settings to their original defaults.
Confirm Reset settings in the next dialog box.
5. Rollback previous Chrome version
If the latest update was the reason for Chrome tabs not showing names, you may have to downgrade to an earlier version until Google solves this issue. The steps for downgrading vary depending on whether you’re a single user or on Chrome Enterprise.
For single users, you can easily uninstall the current version and download a previous one from a trusted site. Those on Chrome Enterprise must downgrade following the steps outlined on the Google help page.
Both users must remember to temporarily disable auto-updates so that they’re not automatically upgraded to the problematic version again.
Whenever you click on the speaker icon on your taskbar in Windows, you expect a display of all the apps currently using sound. However, some users have reported that Minecraft does not appear in the volume mixer.
If it’s a name not available in volume mixer error, refer to our guide on how to address this issue, but for a detailed step-by-step on how to solve the Minecraft issue, here is how to go about it.
Why is Minecraft not appearing in Volume Mixer?
It’s not uncommon for the volume mixer not to show all programs. However, this can be strange when it’s a particular app that’s not showing. This is the case that Minecraft users are experiencing.
Minecraft is a game that largely depends on audio for an immersive experience, so no sound or the inability to control it from the volume mixer can be a letdown.
Below are some reasons why this may be happening:
Third-party interference – If you have installed additional software such as bass enhancers, these could cause conflicts with other programs as they tend to override any default settings when enabled.
Faulty Windows update – Some users pointed out that the issue of Minecraft not appearing in the volume mixer started shortly after updating their OSes. This could indicate a corrupt Windows update that is causing these issues.
Driver errors – If your sound card drivers have somehow become corrupted or incompatible, you may experience this issue.
Incorrect settings – If you’ve not set your PC to allow other apps to take control of your sound, they may not appear in the volume mixer. Other times, your volume mixer settings won’t save.
Virus attack – If your system has been compromised, some options may be wiped out, especially if it’s a conflicting app.
How do I fix Minecraft not showing up in Volume Mixer?
Start off with the following basic checks before any technical troubleshooting:
Do a sound test to ensure your audio is working.
Uninstall any sound enhancers or other conflicting apps.
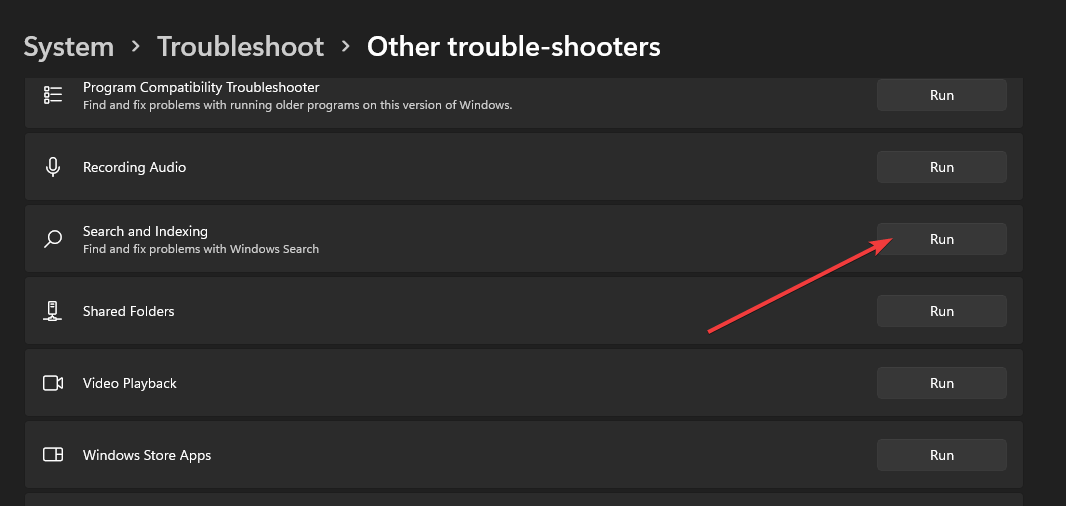
Click on System on the left pane, then Troubleshoot on the right pane.
Select Other troubleshooters.
Locate the Playing audio troubleshooter, and click on the Run button next to it.
2. Update audio drivers
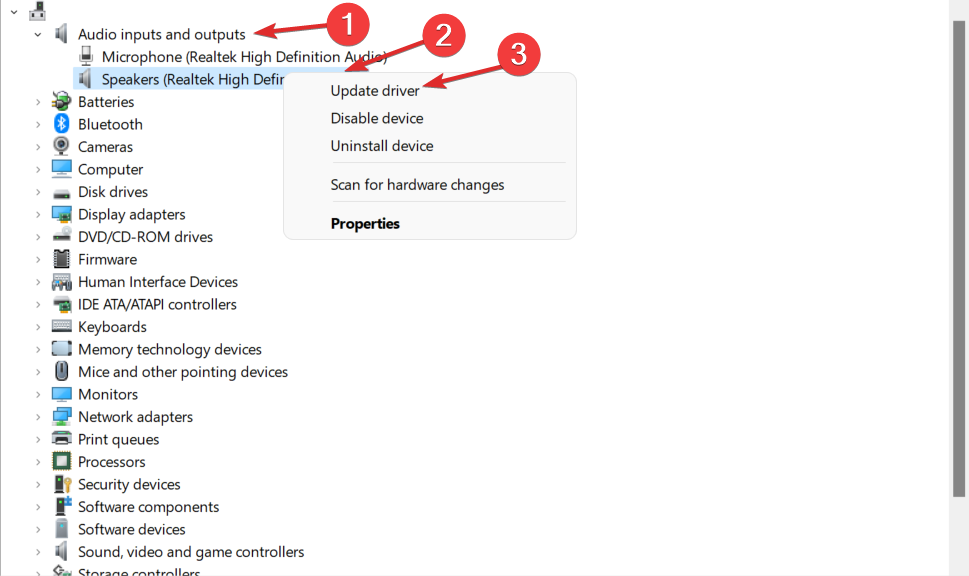
Hit the Windows key, type Device Manager in the search bar, and click Open.
Navigate to Sound, video, and game controllers to expand, right-click on your audio device, and select Update driver.
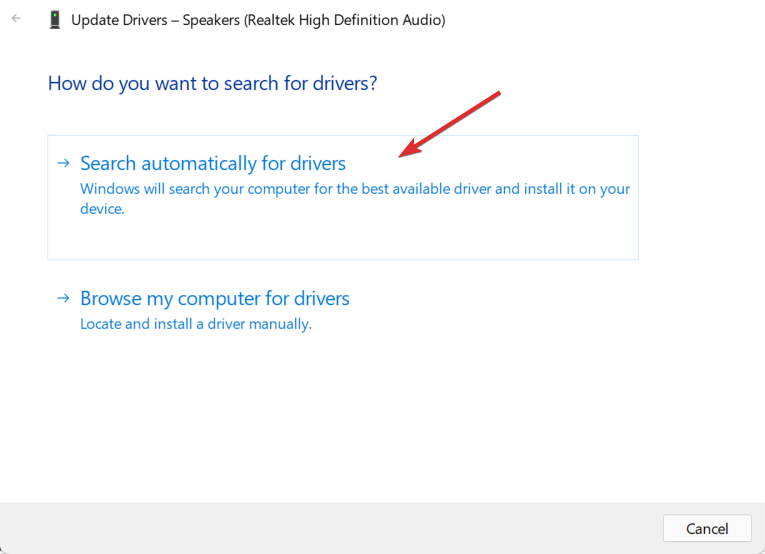
Select Search automatically for drivers.
Restart your PC and try reconnecting.
Since the Windows route doesn’t always go as planned, you may still end up with the wrong drivers. A more sure way is to use a driver updater utility.
Outbyte Driver Updater is the tool you need as it automatically scans for any missing, damaged, or incompatible drivers and then replaces them with the correct ones.
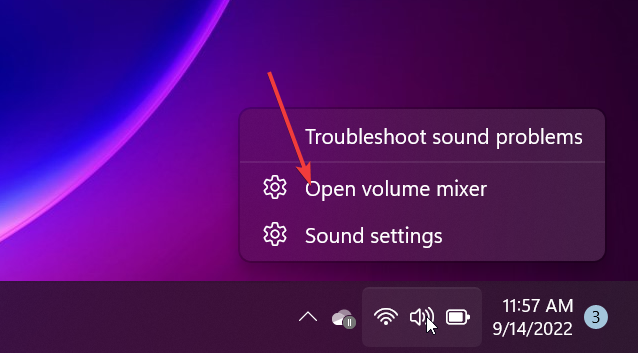
Right-click on the sound icon at the bottom right corner and select Open volume mixer.
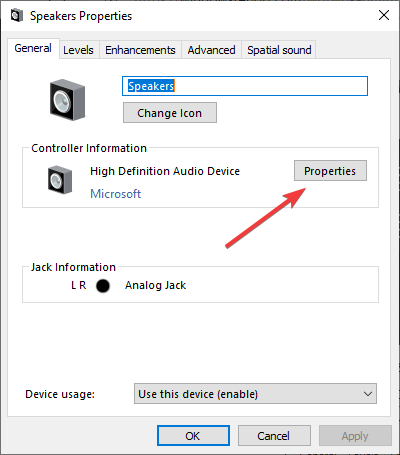
Find Minecraft from the list and select Properties.
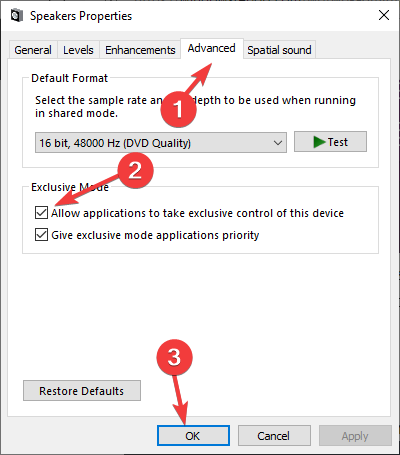
Navigate to the Advanced tab, check Allow applications to take exclusive control of this device option, and click OK.
5. Scan for viruses
Press the Windows key, search Windows Security, and click Open.
Select Virus & threat protection.
Next, press Quick scan under Current threats.
If you don’t find any threats, proceed to perform a full scan by clicking on Scan options just below Quick scan.
Click on Full scan, then Scan now to perform a deep scan of your PC.
Wait for the process to finish and restart your system.
6. Reset Windows
Hit the Windows key and click on Settings.
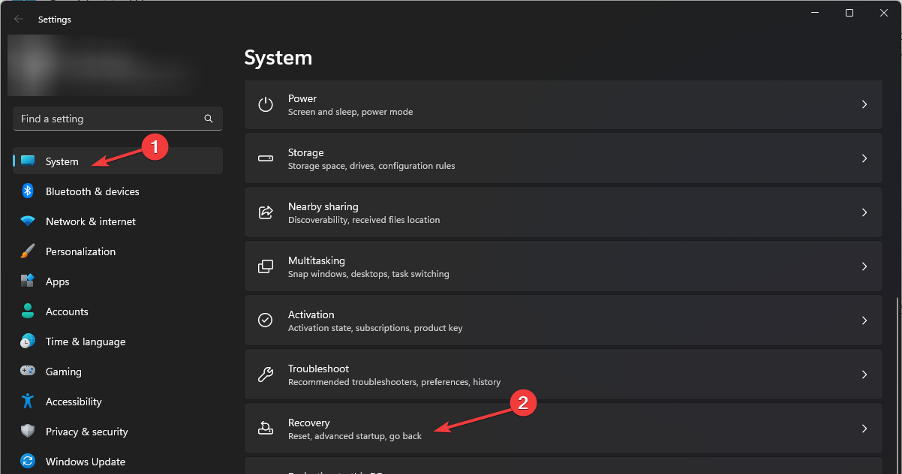
Select System and click on Recovery.
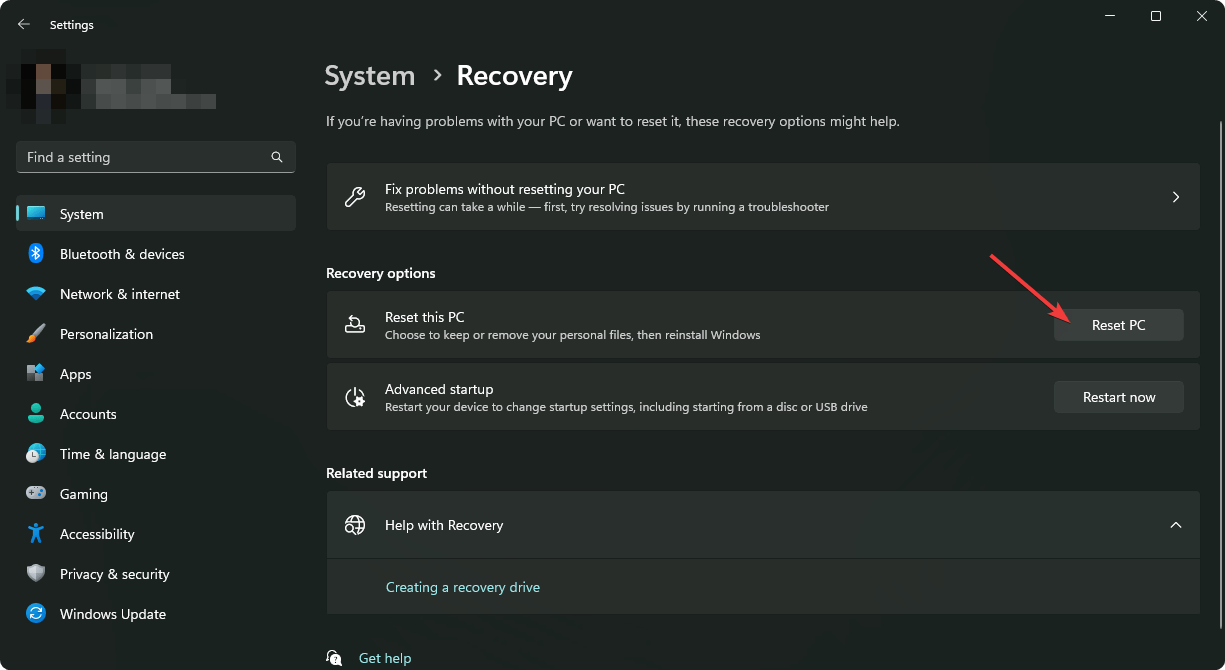
Click on Reset PC.
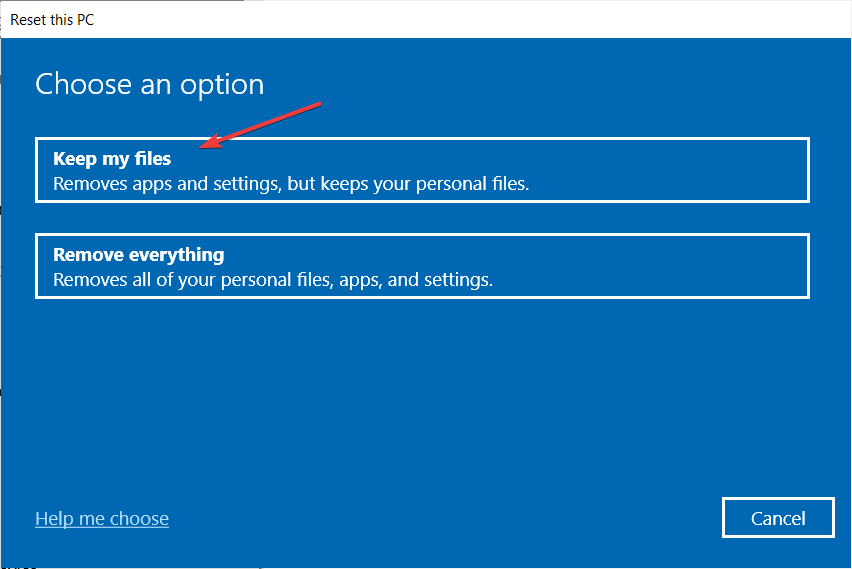
Choose the type of factory reset you need. You can keep your personal files, or perform a complete deletion of all the files, apps, and settings on the PC.
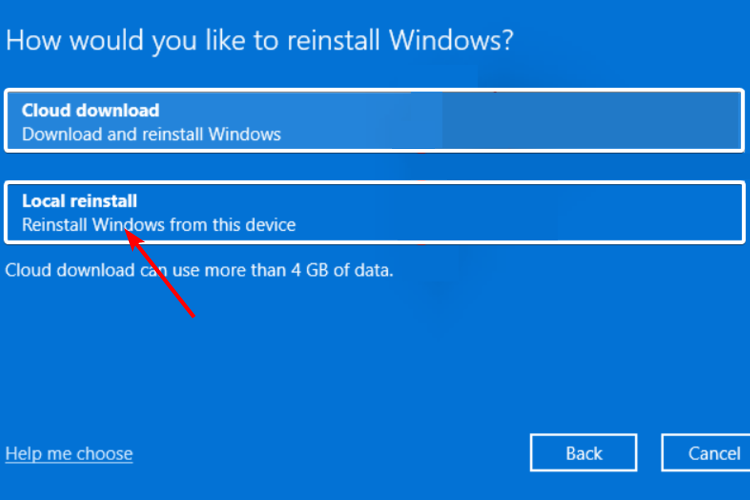
Select the option you want to reinstall Windows: Cloud download or Local reinstall.
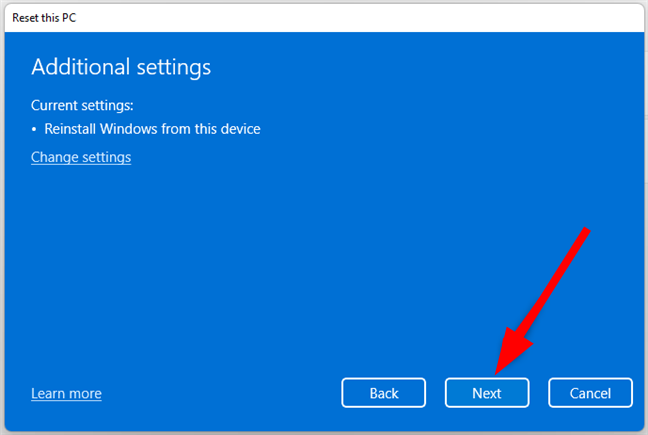
Click on Next.
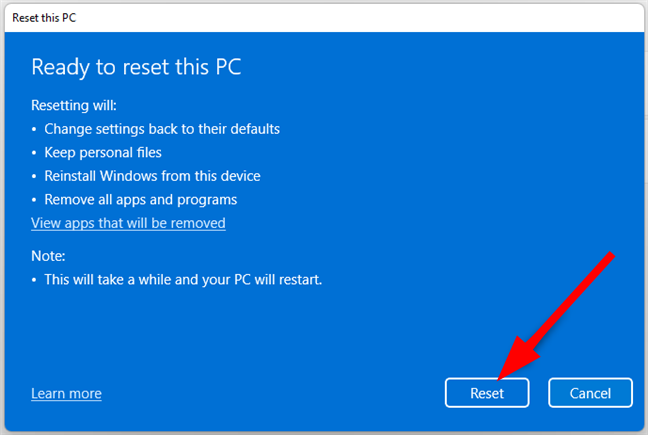
Finally, press the Reset button.
If the reset option does not work, you may have to perform a clean install. It may seem extreme, but it is one of the solutions upvoted as a success.
And that’s how to fix the issue of Minecraft not showing in the volume mixer. If you have attempted any other solution not mentioned here that was a success, we’d love to hear about it. Drop us a comment below.
Sending emails should be as easy as clicking the send button on one of the many email clients available. Receiving the same email on the other end of the user should also be as easy, provided you have a strong connection.
However, some users have reported encountering the TLS is not available due to local problem error message. This is not the usual email problem as it involves the server, so here’s how to go about it.
What is TLS not available due to local problem?
Before understanding what this error means, we must understand the basic terms such as TLS. TLS stands for Transport Layer Security, a security protocol that exists on common email servers.
Its main role is to provide authentication and encrypt the exchange of messages between the sender and receiver so you might require it to enable SMTP server for Office 365.
You may have wondered whether the emails you send and receive are safe, so here is your answer. They are. Provided the security measures in place are working.
The TLS not available due to local problem may pose a threat to the security and privacy of your emails. This error means that a device cannot connect to a server because of an issue with the local network.
Some of the reasons why you may come across this error include:
Expired certificate – The certificate on the server may have expired, or been revoked by its issuer. In either event, you will need to obtain a new certificate from your administrator before you can connect to the server again.
Invalid certificate – Your computer uses certificates to verify that the website you are connecting with is who it says it is. If there is no certificate installed on your computer, then you will see this message when trying to connect with a website that has TLS enabled.
Unsupported hardware – It is possible that the installed version of TLS does not support your PC hardware configuration/operating system version.
Security breach – If a trusted and verified authority did not issue your TLS certificate, the security of your connection cannot be guaranteed. This can also happen if you have recently changed the server location.
If your clock is in sync and you find out that the TLS not available due to local problem is still appearing, you may need to generate a new certificate.
It is possible that your computer will not be able to verify the authenticity of the server’s certificate and thus refuse to communicate with it. You can generate a fresh SSL certificate from several different providers.
Currently undergoing testing in Canary, the experimental channel of the browser, is a fresh button that enables the export of browsing data in Edge, as seen on Twitter. Adding a dedicated button for exporting browsing data and the ability to filter and select specific items for export seems like a user-friendly improvement. This should simplify the process of exporting browsing data and make it more accessible to users.
Previously, exporting browsing data in Edge seemed a bit complicated, as users had to navigate through the Settings section and manually select the data they wanted to export. As described on Twitter, this new button in the History hub appears to address this issue and provide a more straightforward method for exporting data.
…Basically Microsoft added a toggle in Settings that has the exact same purpose as the button in the History hub, if the button is OFF the toggle is disabled, and if the button is ON the toggle is enabled, it has nothing to do with supposed “offline reading" capabilities: pic.twitter.com/X9Xcv4Qmwp
How to export Microsoft Edge browsing history to a CSV file
Navigate to edge://settings/help update Microsoft Edge Canary to version 117.0.2026.0.
Press Ctrl+H or click on the Menu button and select History.
On the History flyout, click the three-dot menu to expand and select “Export Browsing Data.”
Select the CSV format and choose a location to save the file.
Click on the Export button.
There was recent confusion over an experimental toggle suggesting screenshot functionality. Microsoft quickly clarified that the toggle only displayed screenshots when hovering over history entries rather than capturing screenshots of every page visited.
Email has become an indispensable part of our daily lives, facilitating communication across the globe. However, we’ve all been there – the dreaded moment when you accidentally send an email to the wrong person or with errors. But fear not! In this comprehensive guide, we’ll help you enable a feature called Undo Send on Outlook.com, granting you complete dominance over your communications. Let’s get started!
Understanding the importance of recalling a message on Outlook.com
Sending an email that contains errors, sensitive information, or is simply meant for the wrong recipient can be a nerve-wracking experience. The ability to recall an email is a feature provided by Outlook that allows users to retrieve an email from the recipient’s inbox if certain conditions are met. This feature is invaluable for those moments when you realize a mistake immediately after hitting the “Send” button.
Unfortunately, email recall is not available on Outlook.com so unless you meet the requirements above, you won’t be able to recall an email on Outlook.com, so if you have an email address ending in @outlook.com, @hotmail.com, @live.com, or @msn.com, you can’t use this feature, but read on, you can still set up a delay to catch those pesky errors, even in Outlook.com.
Initiate an Email Recall
To initiate an email recall, the following conditions are required:
The sender and recipient must both be using Outlook.com or Microsoft Exchange email accounts.
The email must have been sent within the same organization or domain.
The message must not have been read or opened by the recipient.
Both the sender and recipient must have an active internet connection.
Email Recall Limitations
It is essential to be aware of the limitations of the email recall feature in Outlook.com:
Recall Unsuccessful: Despite initiating the recall process, the email might still reach the recipient’s inbox if it has been read or if the recipient’s server doesn’t support recall requests.
Recall within the Same Organization: Email recall works best within the same organization or domain. For external email addresses, recall success may vary.
Recall Timing: Once the recipient accesses the email, the recall feature becomes ineffective. Acting promptly after sending is crucial.
Set up Undo Send on Outlook.com instead
While email recall isn’t available on Outlook.com, the Undo Send feature can delay actual sending, here’s how to set it up:
Go to Outlook.com and log in to your account.
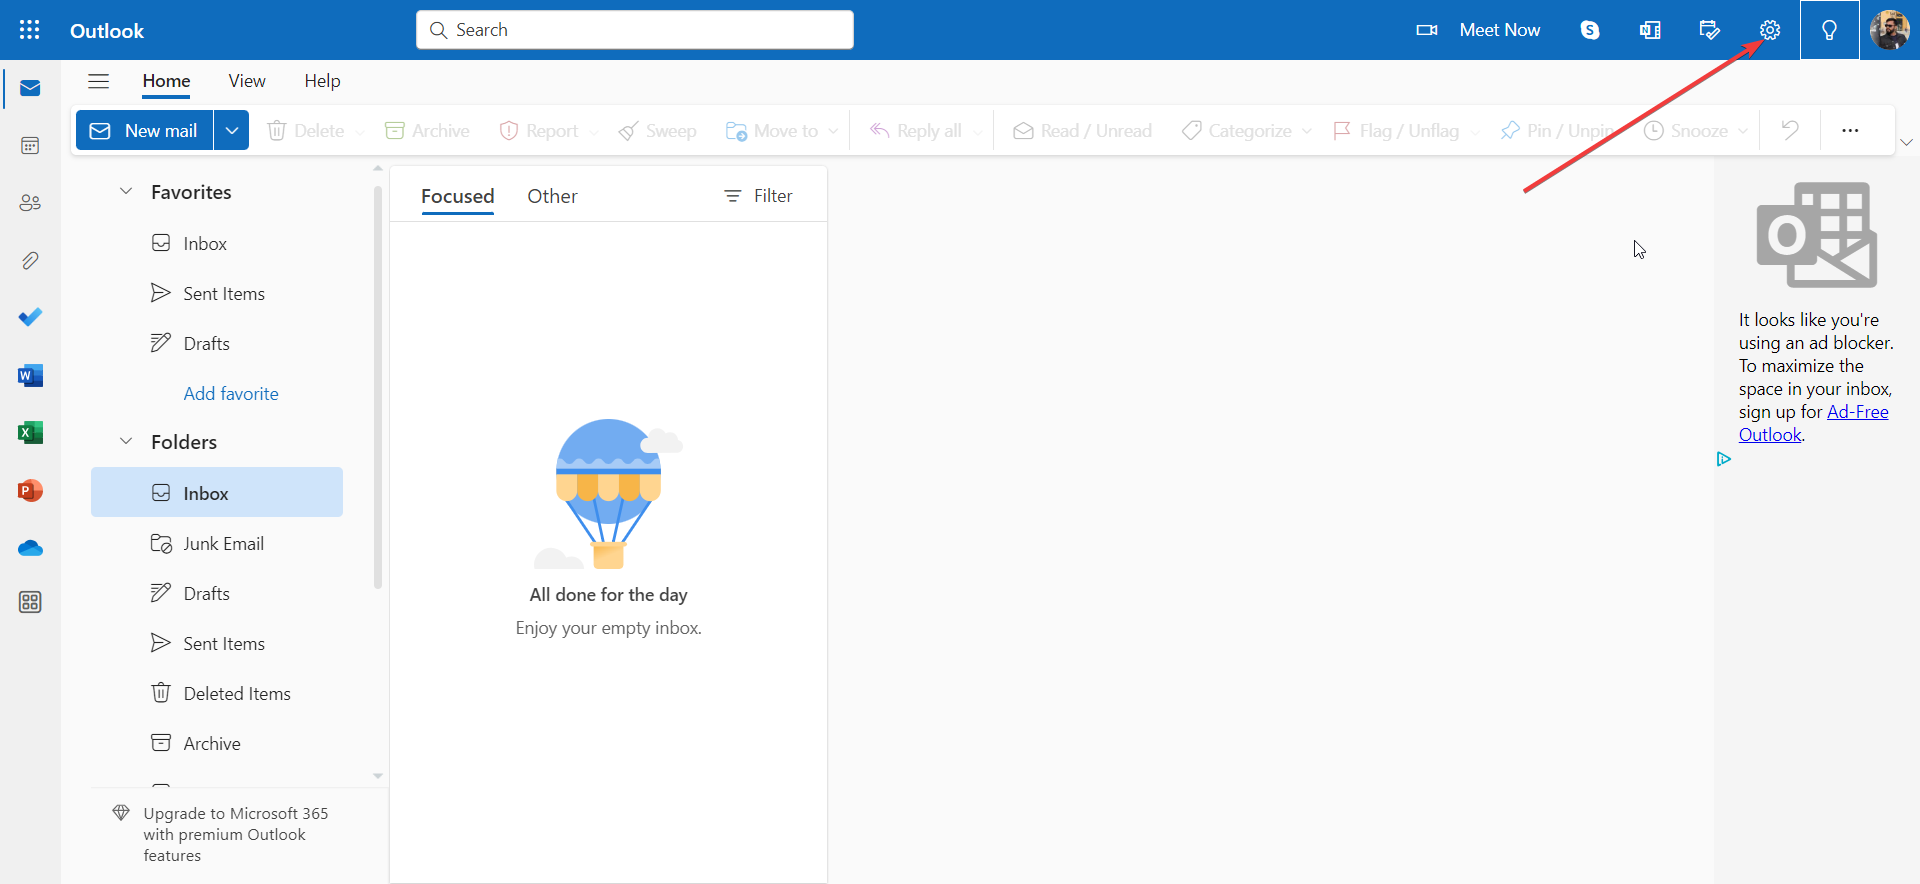
Click on the Settings gear icon to open the settings menu in the top-right corner.
In the Settings menu, Click on Mail in the left sidebar, then choose Compose and reply.
Look for the Undo send option and select the delay time (5 or 10 seconds) for sending emails.
Click Save to apply the changes.
Once enabled, a prompt appears after sending new emails. You can undo sending within the time you set in “Compose and reply” settings. Click the Undo button for a brief window to cancel sending the message.
The Importance of Double-Checking
While Undo Send provides a buffer, always double-check before hitting “Send.” Review the recipient’s address, subject line, and email body for errors. This saves you from recalling emails later.
Accidents happen, and email blunders occur. While Outlook.com lacks full recall support, Undo Send offers some control. For comprehensive email recall, Outlook for Windows lets you retract and replace emails post-sending. Always double-check and use tools to ensure smooth communication.
Many users want to know how to block no-sender emails in Outlook because they can pose a security risk to their PCs and online accounts.
This is relatively simple to do, and in today’s guide, we will show you a couple of methods you can use to block these types of emails permanently.
What are no sender emails?
No sender emails are unwanted messages that have no specified sender.
Malicious users will sometimes remove their email addresses to protect their identity.
These types of emails are usually fraudulent, so you shouldn’t open them.
How do I block emails from no sender?
1. Create email rules to filter out no sender emails
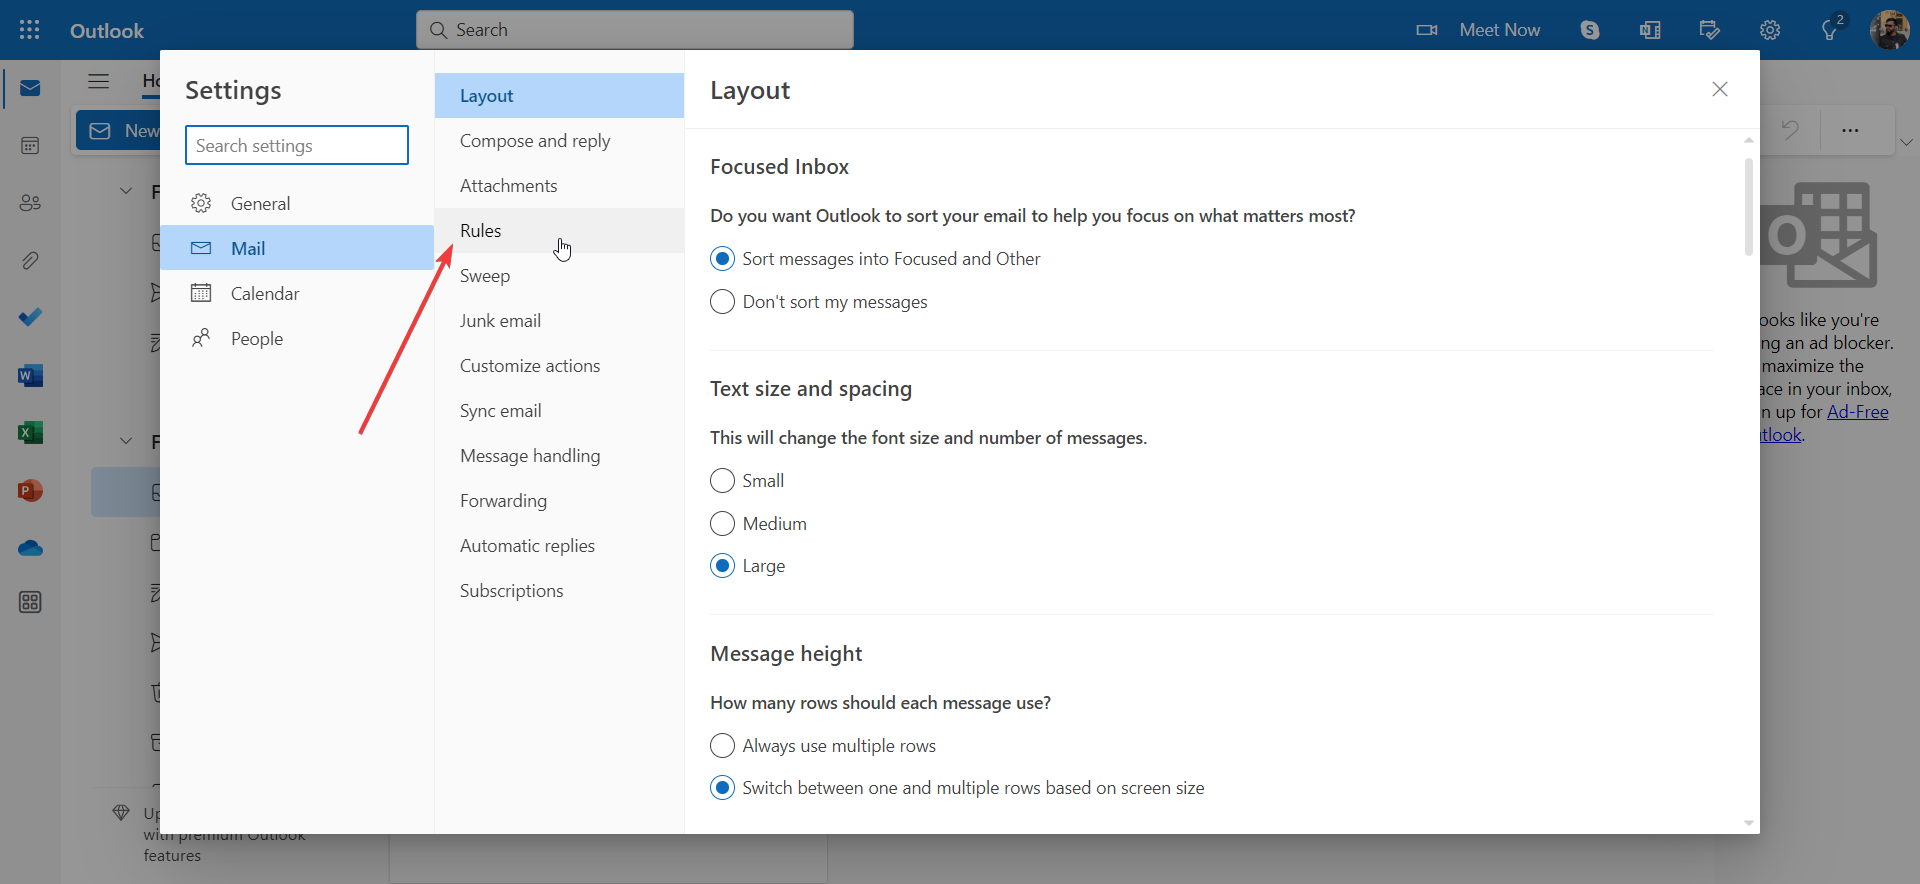
Open the Outlook webpage and log in with your account.
Click on the gear icon to open Settings.
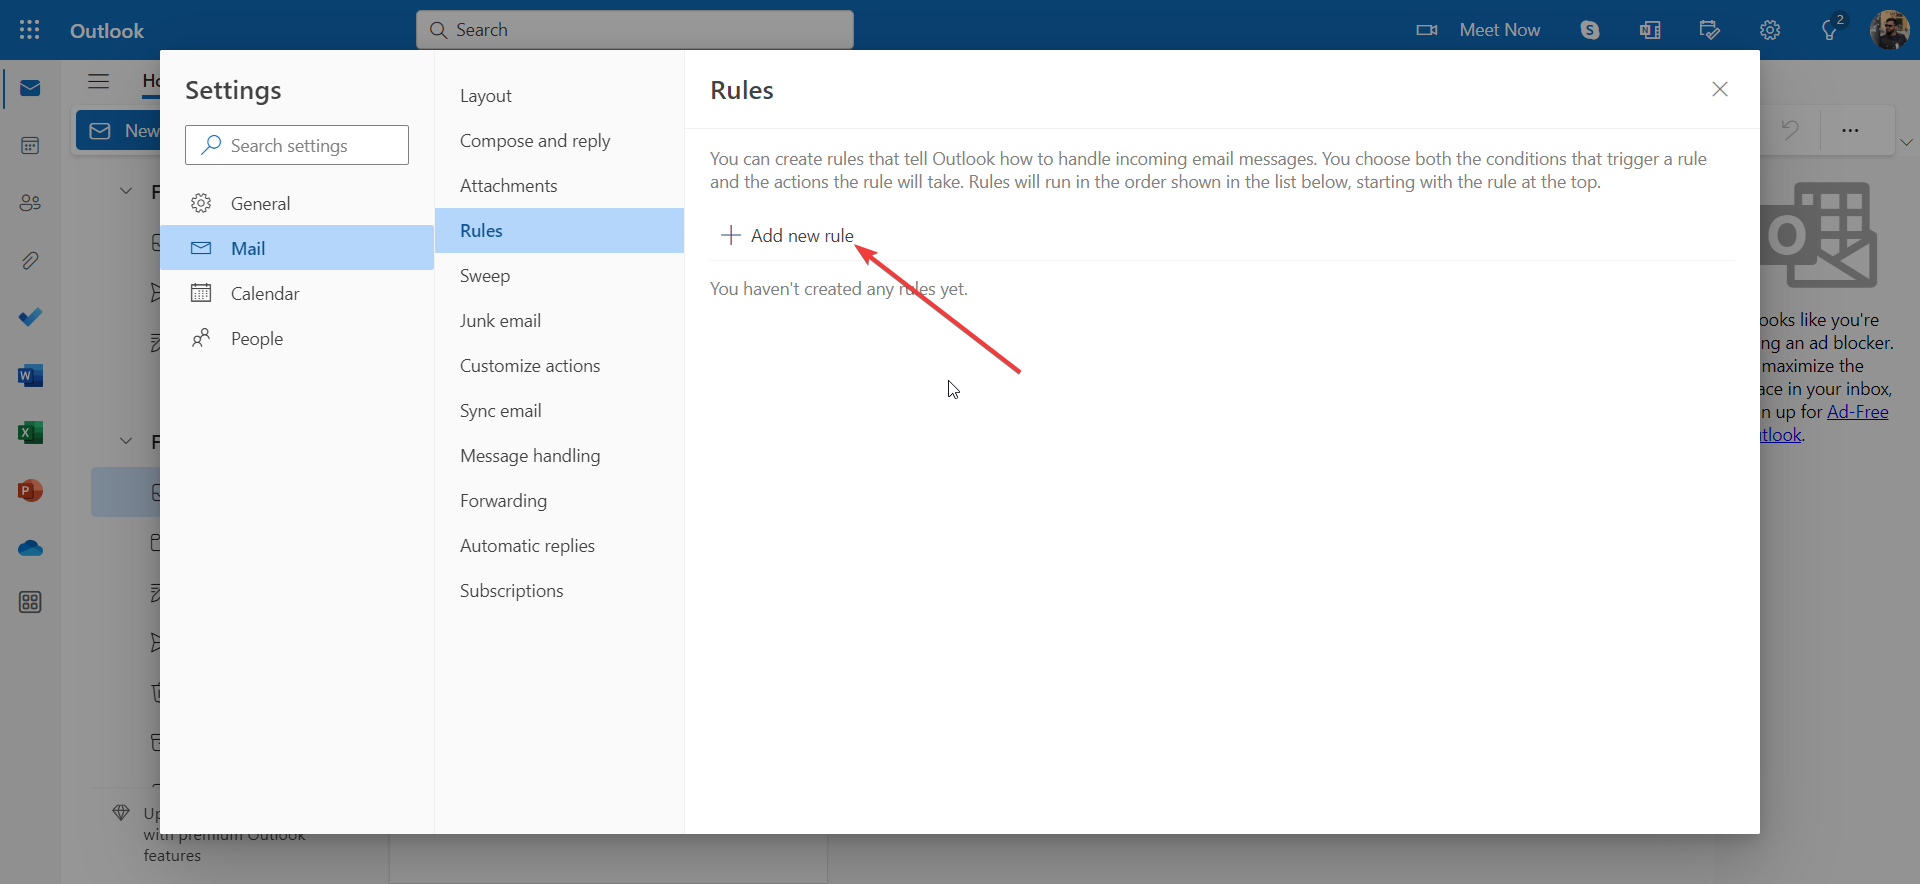
Select the Rules option.
Click on Add new rule.
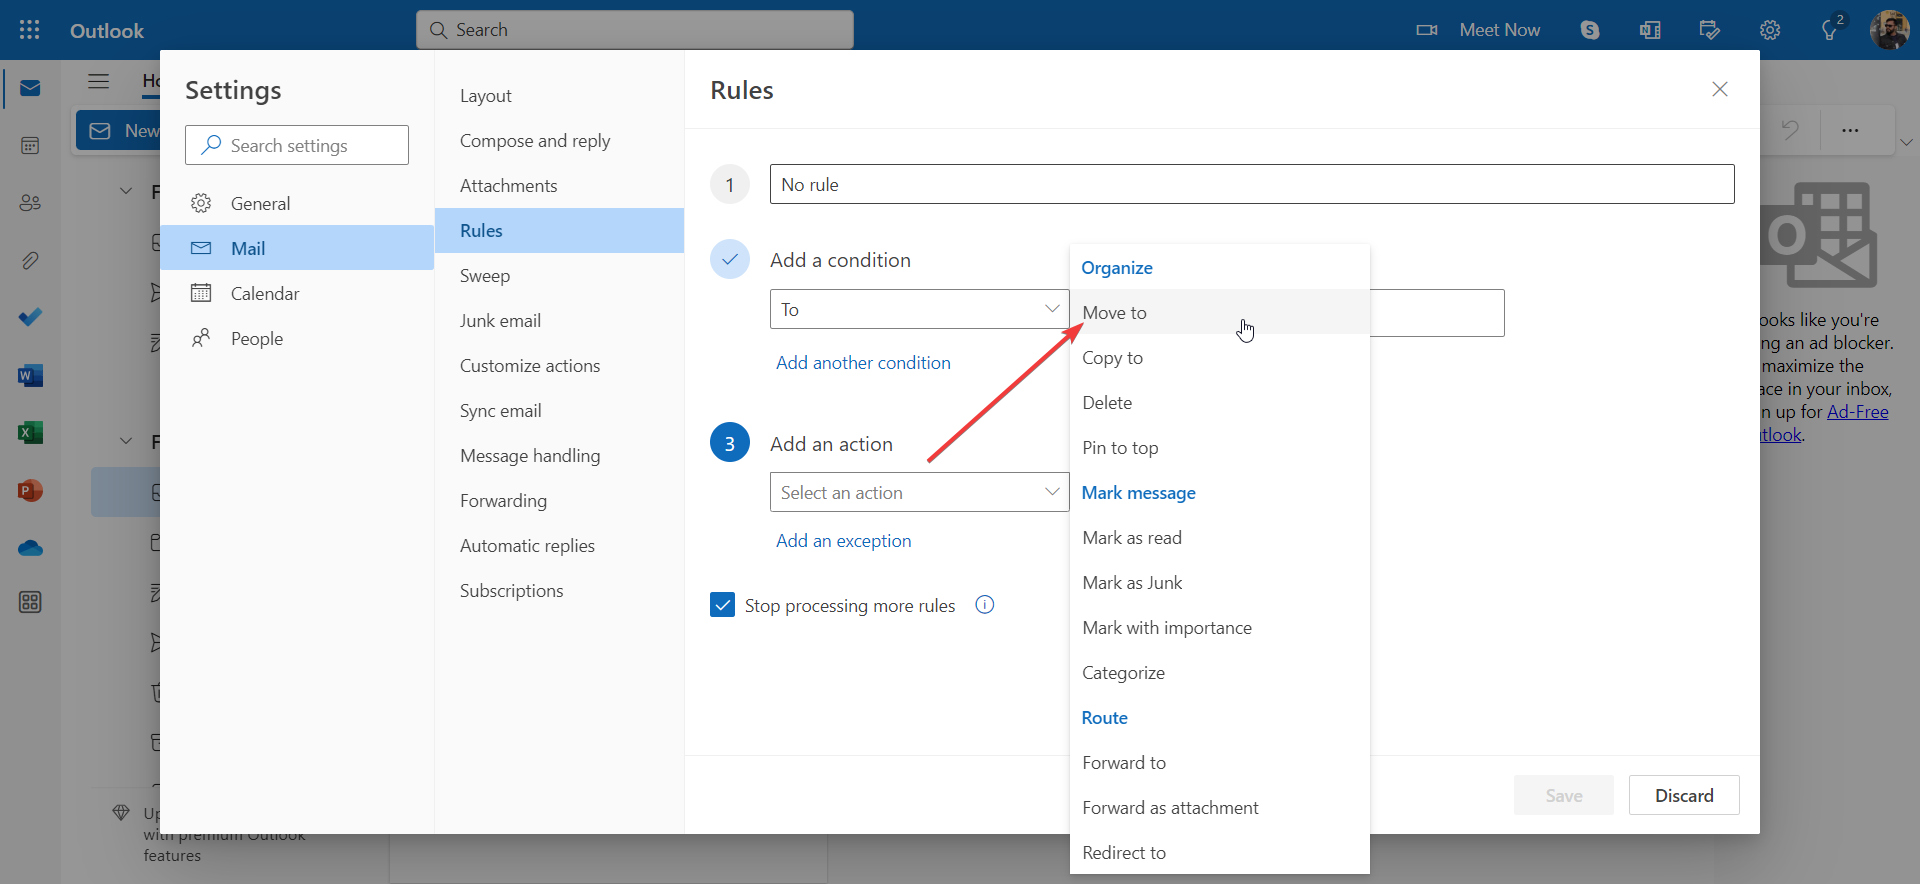
In Line 1, you need to add the name of the new rule that you want to set. We have named the new rule No sender.
Line 2, requires you to select a condition. Select to in the first drop-down menu and then add your email address as the recipient.
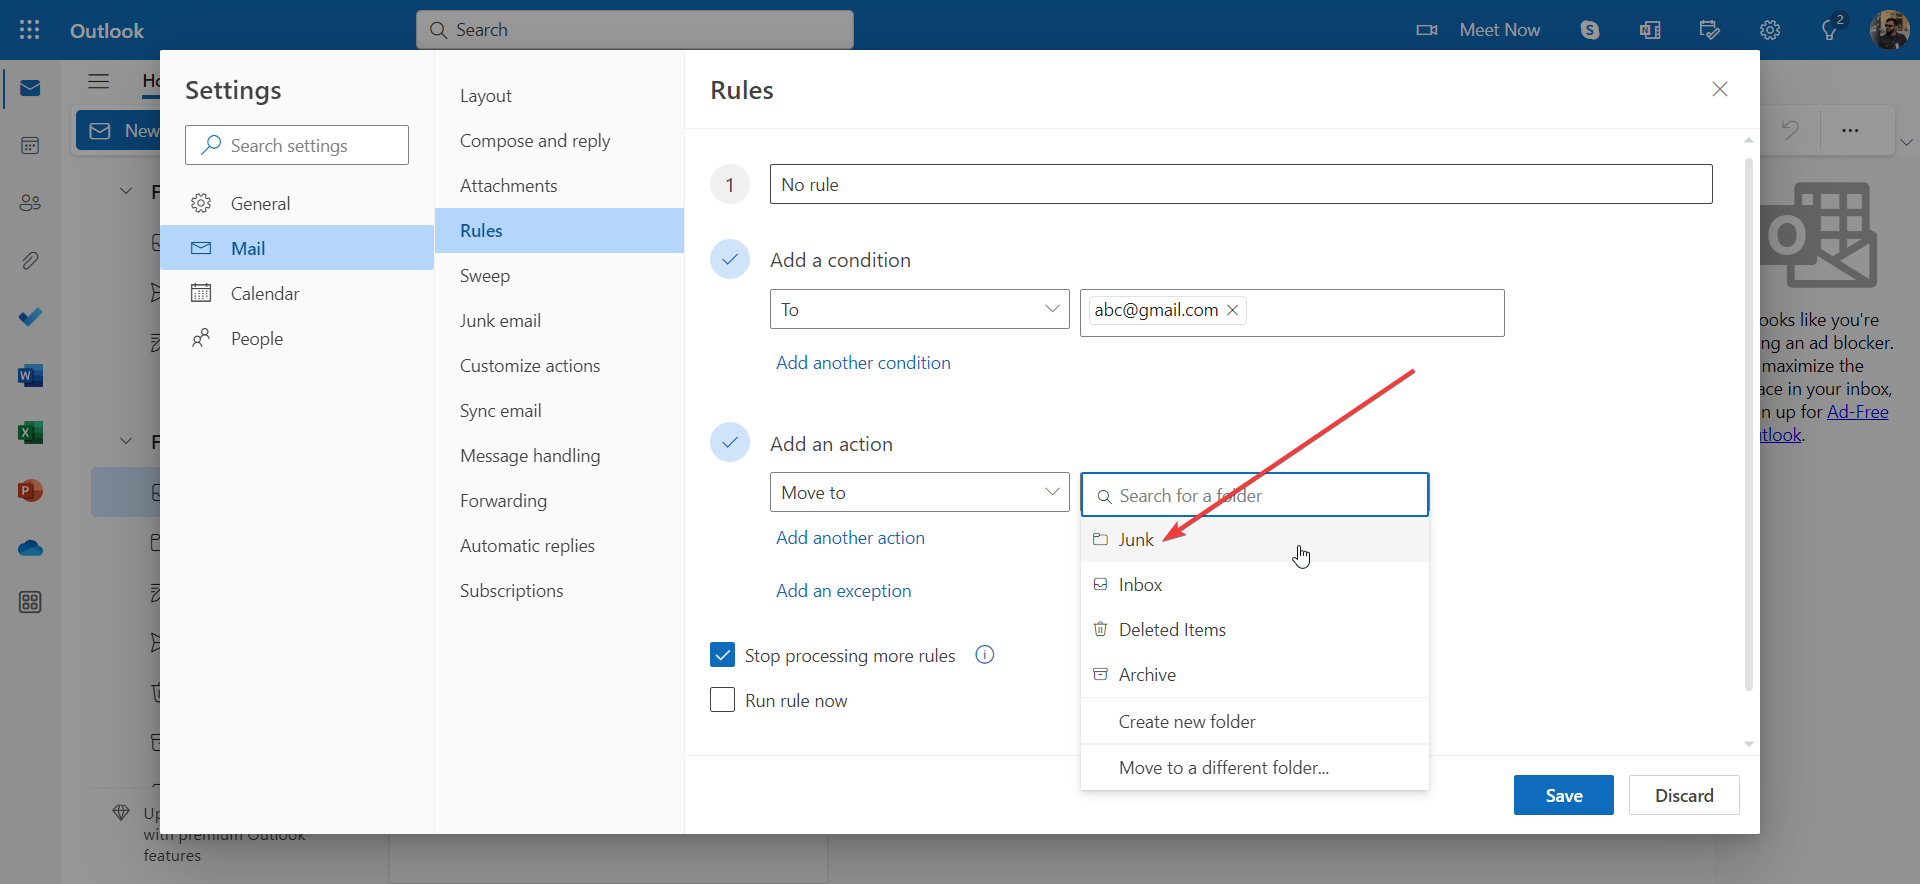
Line 3 requires you to select an action such as deleting unwanted emails or annoying emails or moving them to a specified folder. Select Move to in the first drop-down.
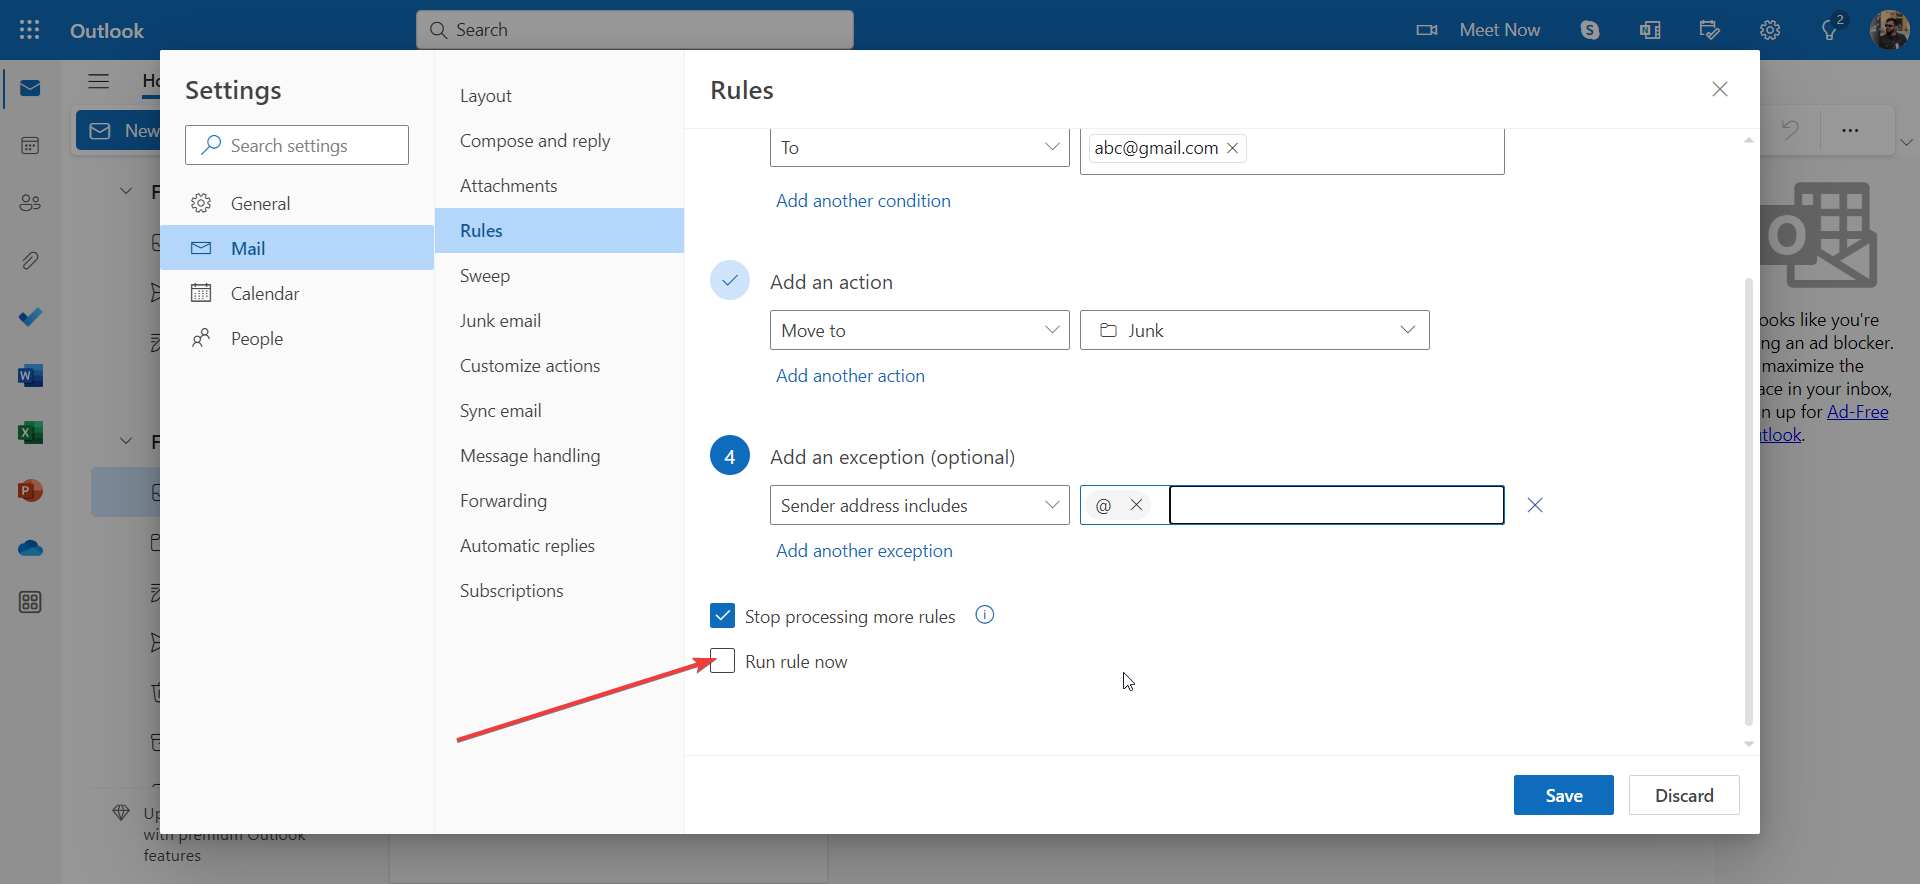
Select the Junk folder in the next drop-down. If there is no Junk folder, then create a new folder and name it Junk. You can also create a Spam folder.
Click on Add an exception.
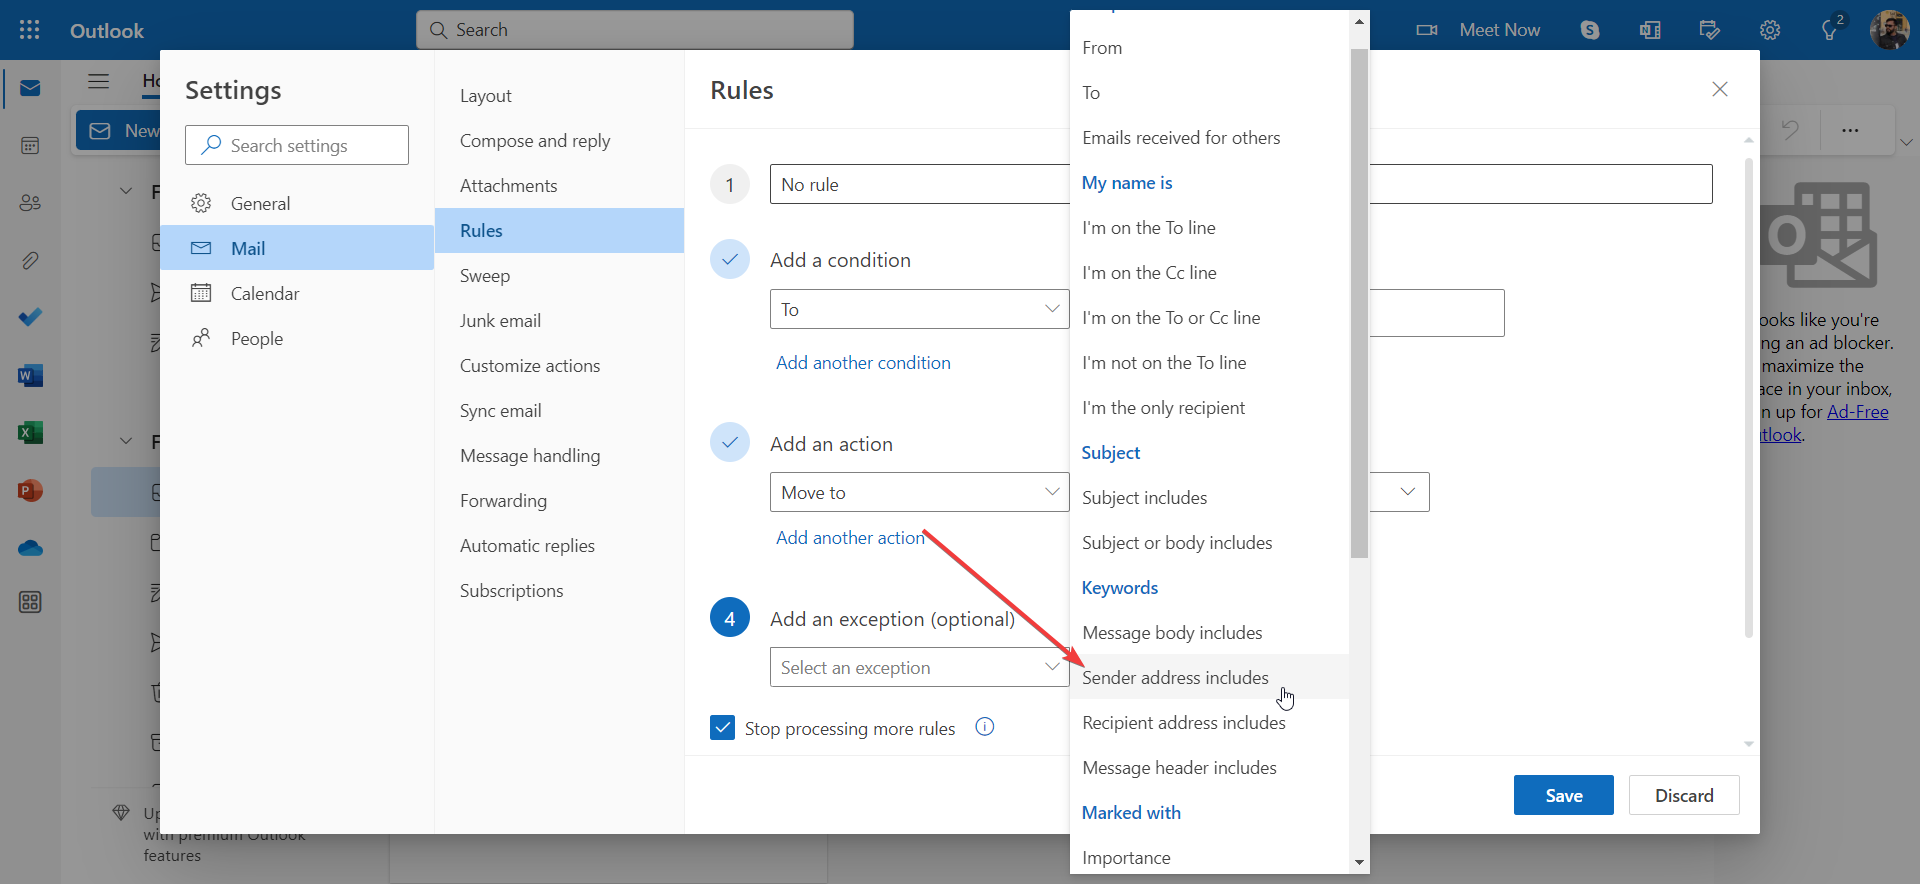
Select Sender’s address includes from the first drop-down.
In the Enter all or part of an address field, type @.
In case you wish to run the rule immediately and clean your mailbox of unwanted emails or annoying emails, you can click the Run rule now checkbox.
Hit the Save button to save this new rule in your MS Outlook.
It will return to the Rule and Alerts interface, and the website will slow down and ask you to leave the website for the changes to take effect.
2. Find the sender from the message source
Right-click the email header and choose View message source.
In the From section, you should be able to see the email of the sender.
Add this address to the list of blocked contacts, and that’s it.
Alternatively, you can use a dedicated email client software, usually, they come with extra features that make it more secure and easy to handle.
eM Client is an excellent choice for this task, it has been highly reviewed by both professionals and home users. This email client is super fast, has very powerful encryption, and comes with features that will help you block unwanted emails.
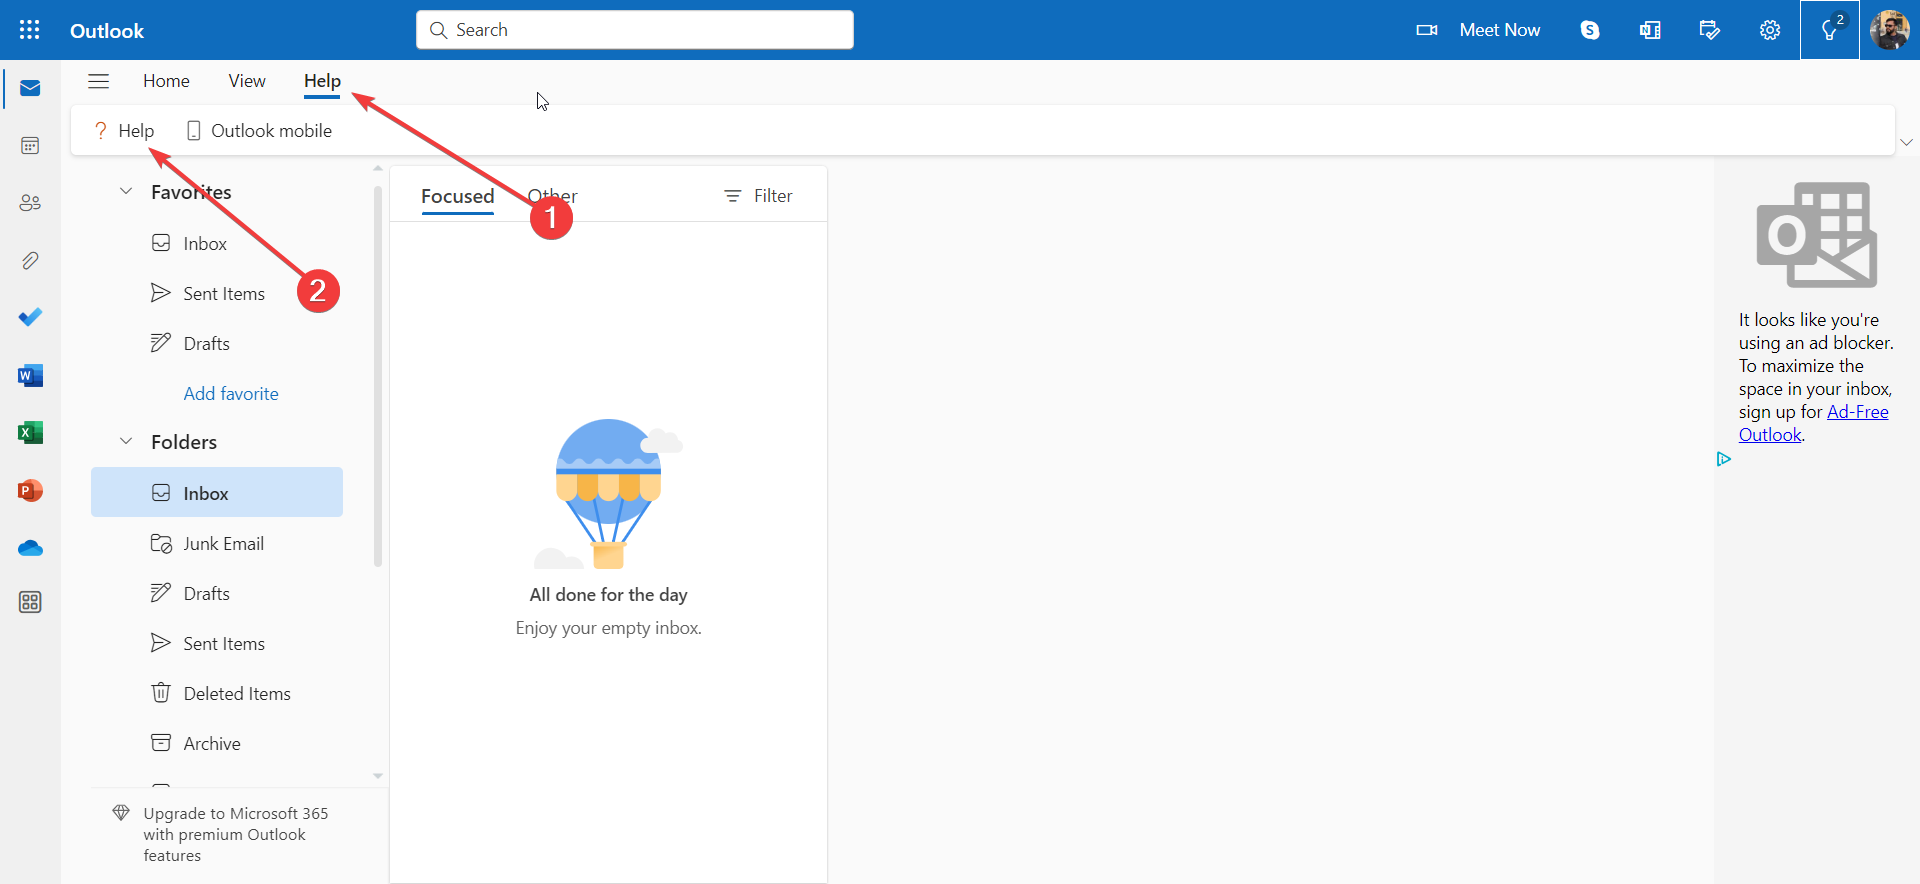
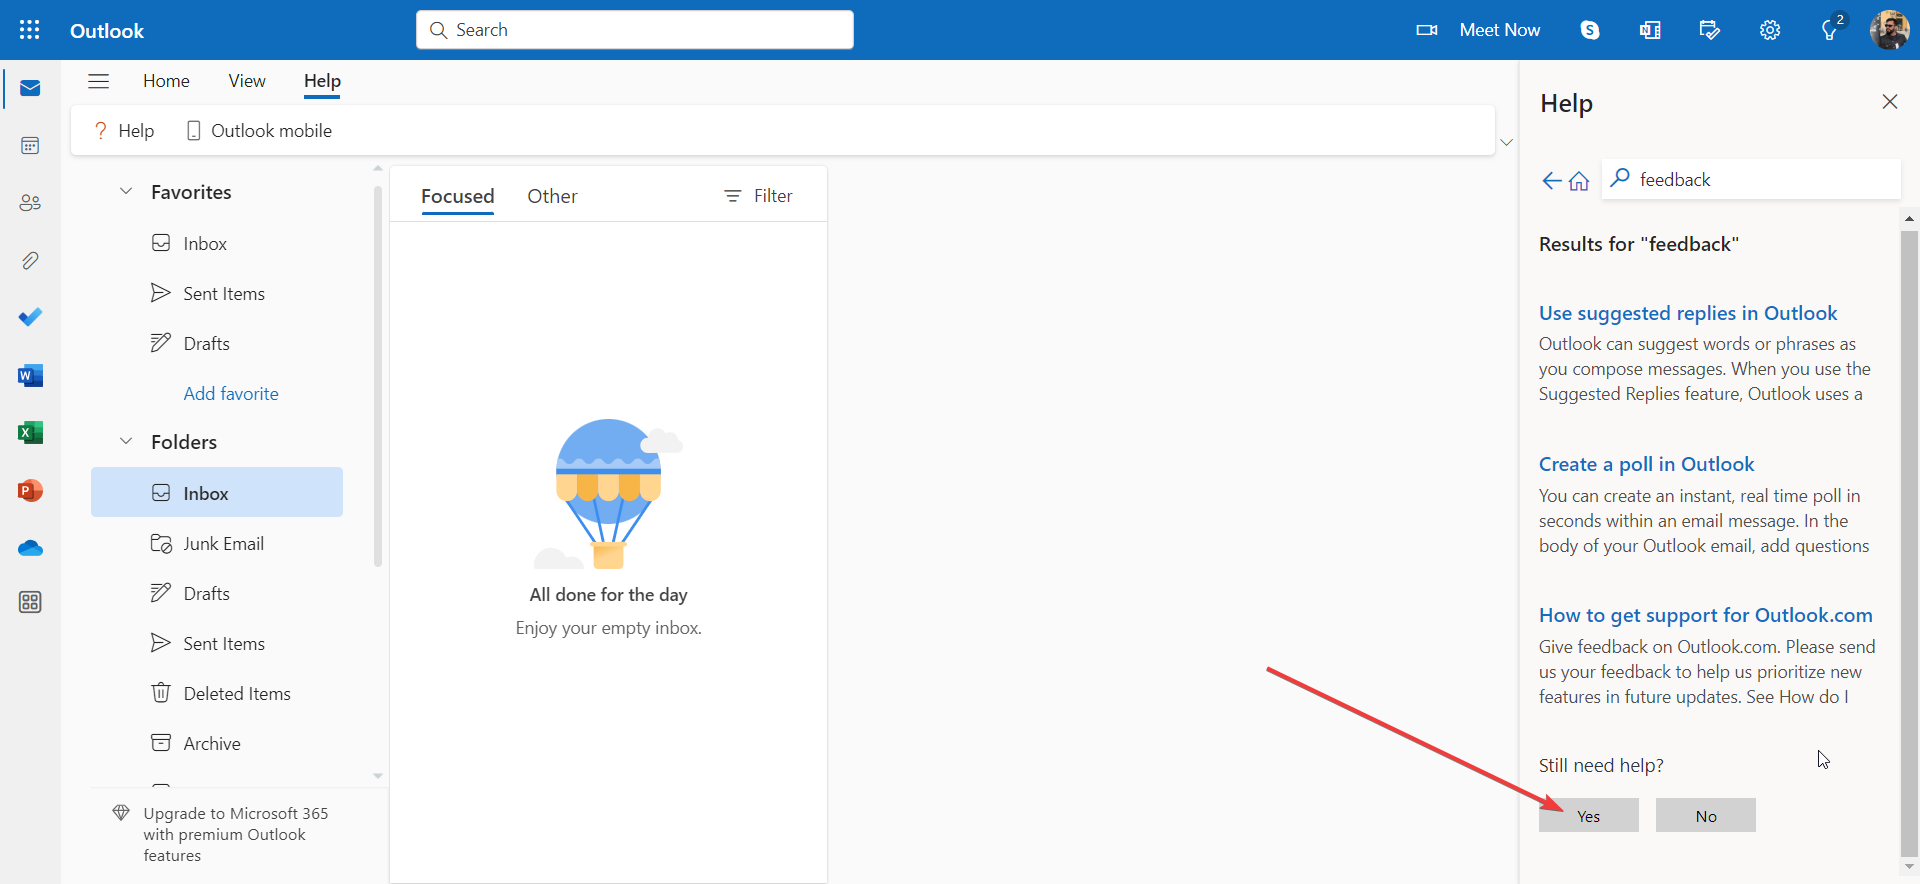
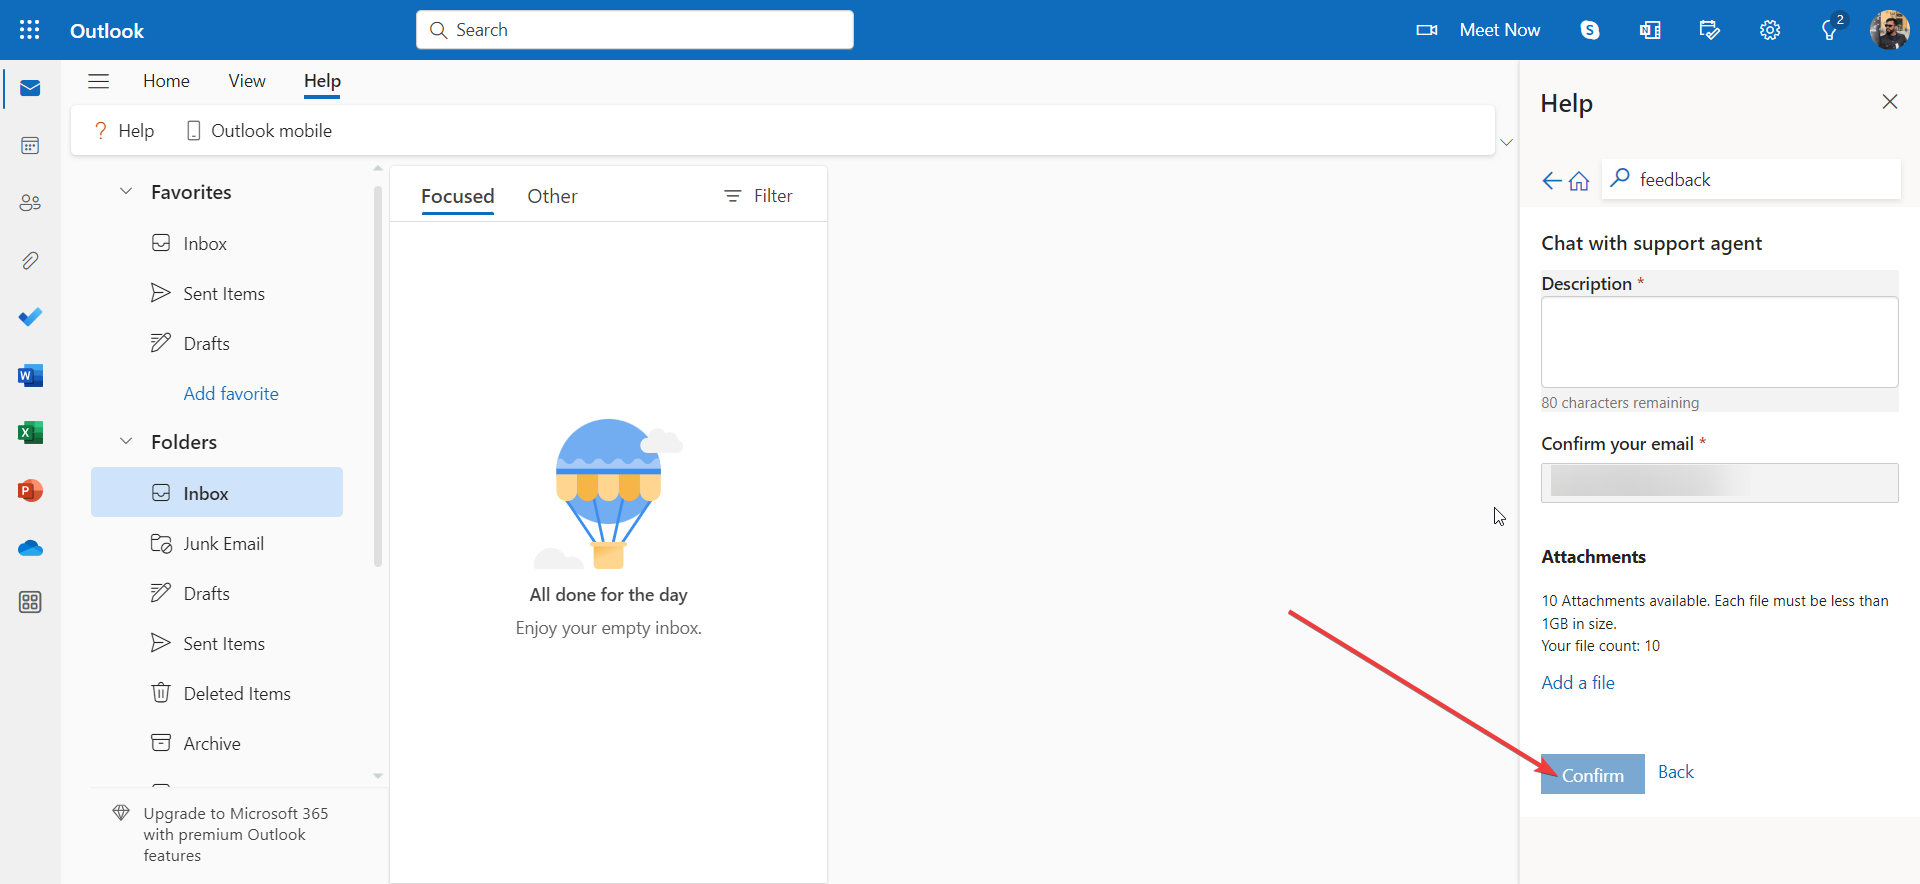
Click on the Help tab on the top menu and select Help.
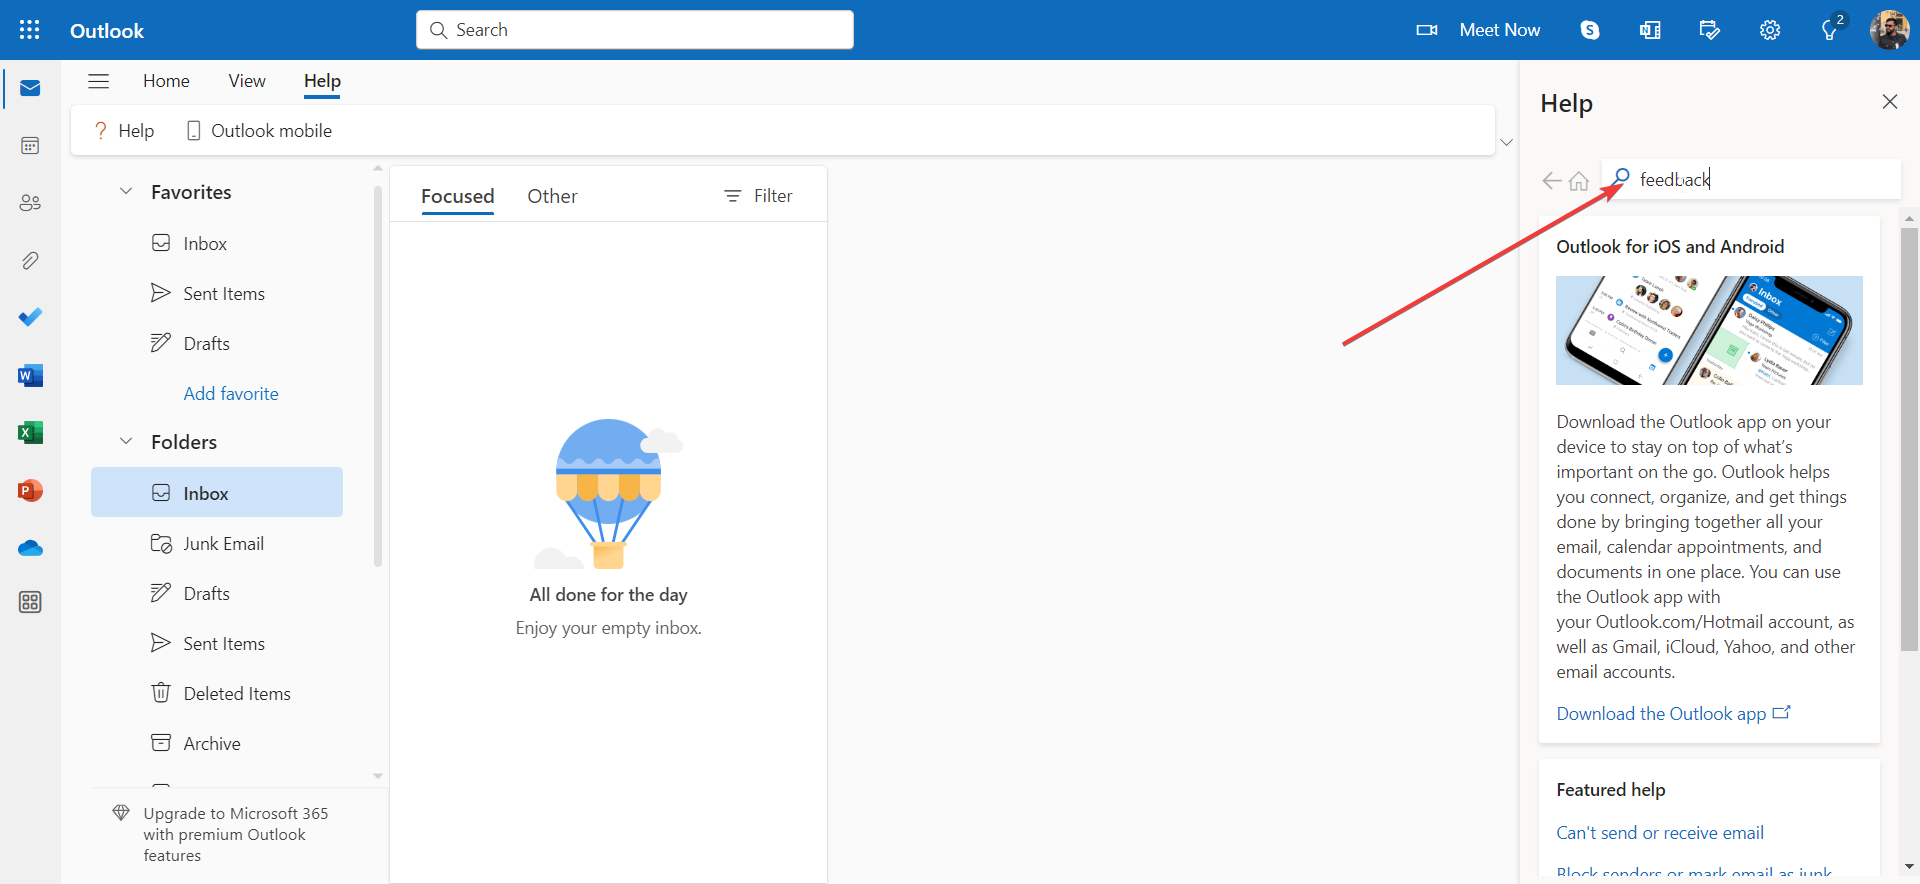
In the search box, type Feedback.
Scroll down and click on the Yes button under Still need help? question.
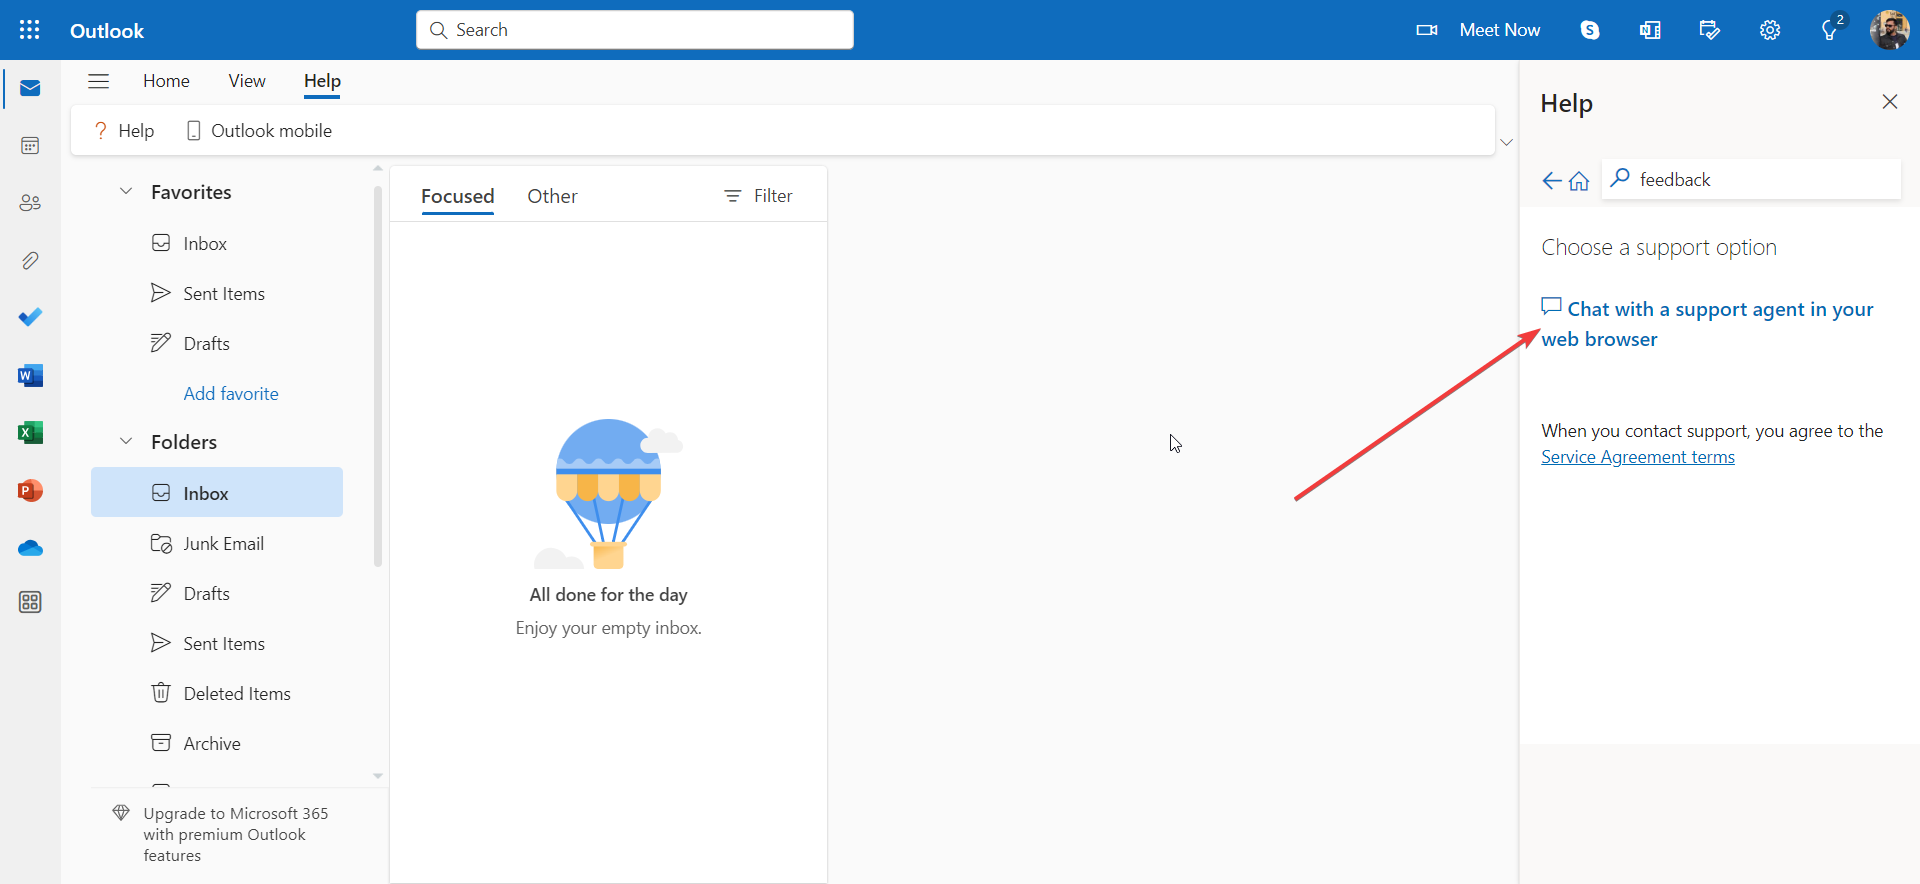
Click on Chat with a support agent in your web browser option.
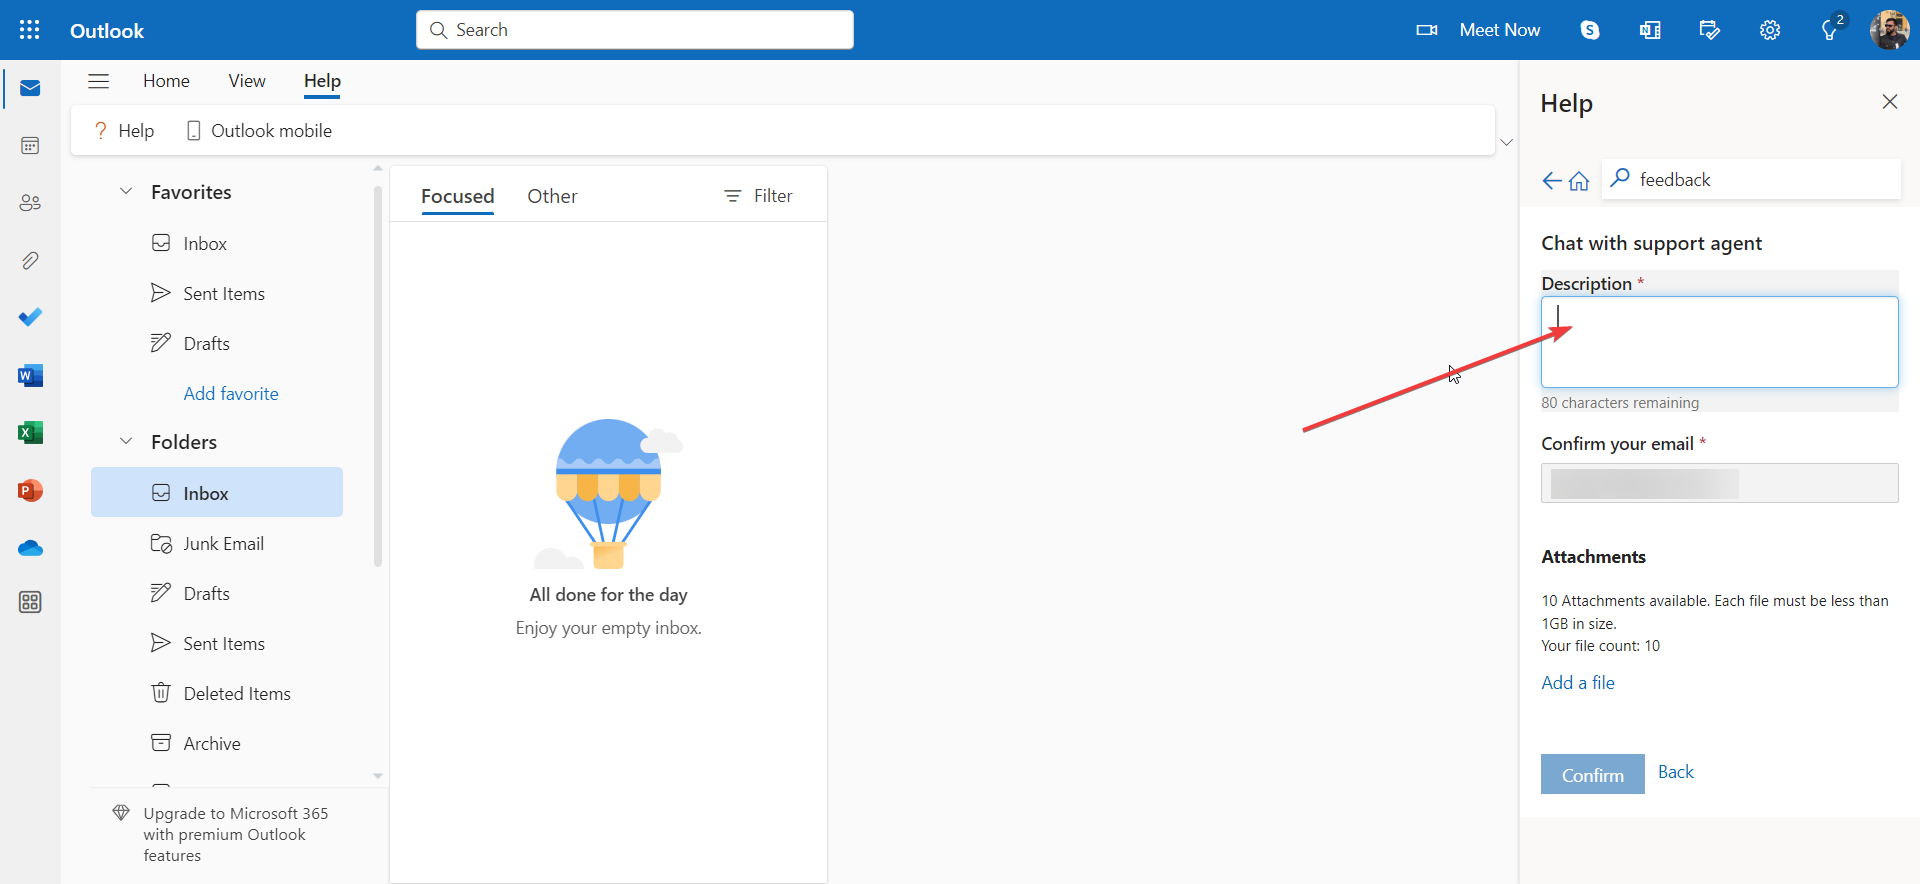
Type your problem in the Description text field. Explain your issues clearly.
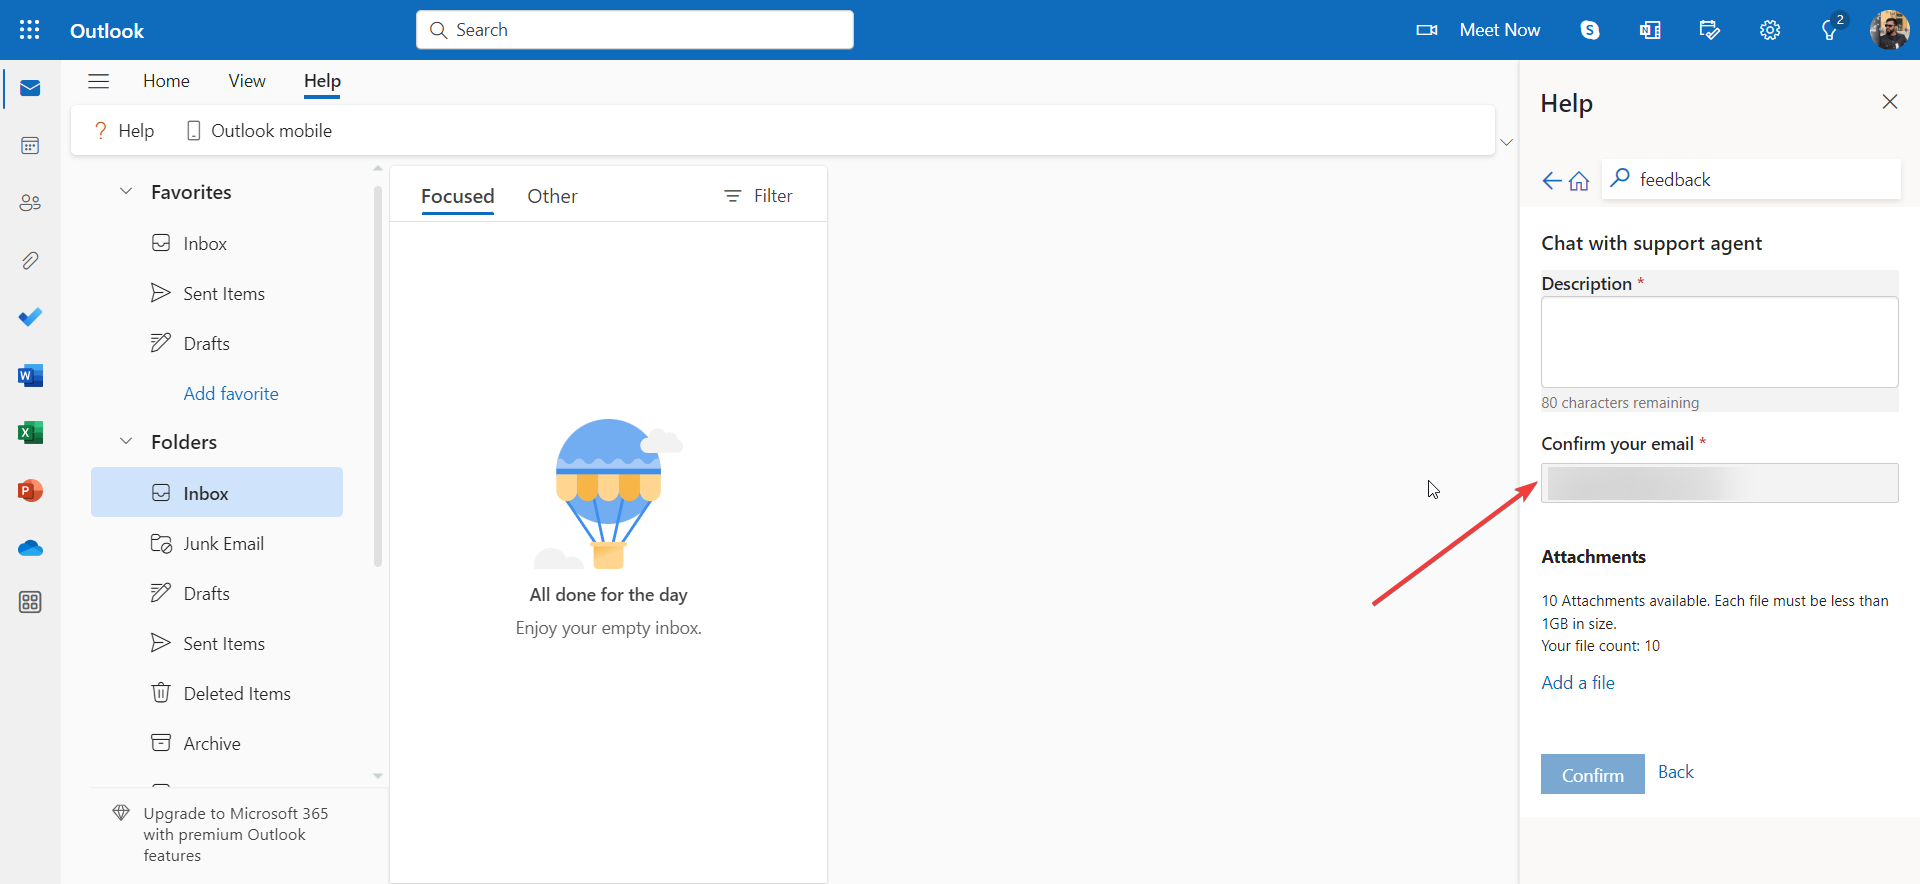
Confirm your email address with which you are facing issues of unwanted messages with no sender.
You can also attach any images that you have to give more credibility to your issue and make the support staff understand your situation better.
Hit the Confirm button to send your query and start chatting with a support agent.
The support team will come back with a response to your query. You need to then follow the advice that they give you to block no sender email on Outlook.
How do I block a no reply email?
Locate the no reply email and right-click it.
Choose Block and then Block sender.
Click on OK to confirm.
Several of our readers have reported that they could block unwanted messages with no sender addresses by contacting Outlook support. You can also do that and protect yourself from such future messages.
That is it from us in this guide and we hope you managed to block the no-sender emails in Outlook successfully.
Another common problem that Outlook users come across is that the sender’s name does not show in the inbox. This can be fixed by applying the solutions mentioned in our dedicated guide.
Moreover, you can also apply the solutions that will help you resolve the Outlook not blocking junk mail problem in your PC.
Feel free to let us know in the comments below which one of the above methods you followed to resolve your query on how to block no-sender emails in Outlook.
A compelling new partnership has just been announced between Microsoft and Aptos Labs. The collaboration is set to create an AI-powered tool named Aptos Assistance, rumored to compete with OpenAI’s popular platform, ChatGPT.
The Integrative Efforts
Microsoft is no novice to the AI world; it has been consistently pushing the boundaries of ChatGPT and blockchain technology, investing billions into OpenAI, one of its principal supporters. Notably, earlier this year, the software giant integrated ChatGPT into several products, inclusive of its native browser Bing.
Now, this new strategic alliance with Aptos Labs seeks to further explore the confluence of AI, blockchain, and cloud services held by Microsoft’s Azure platform. This joint effort underscores a key shift in approach, emphasizing integrative technological solutions directed at aiding developers and users in accessing data on the Aptos ecosystem.
As part of the partnership, Aptos Labs has planned to migrate some of its validators to Azure. Moreover, Microsoft is inclined to include the cryptocurrency’s programming language, known as Move, into GitHub. The company is steadily advocating for its utilization with notable financial institutions.
Rashmi Misra, the General Manager of A.I. and emerging technologies at Microsoft shared her excitement about the pioneering initiative.
The intersection of AI and blockchain is one of the most interesting combinations of emerging technologies. By fusing Aptos Labs’ technology with the Microsoft Azure Open AI Service capabilities, we aim to democratize the use of blockchain, she said, as reported by Fortune.
The CEO and co-founder of Aptos Labs, Mo Shaikh, shares Misra’s enthusiasm. Shaikh asserts that AI and blockchain technologies can operate harmoniously and potentially limit the frequency of false statements. He discerns that blockchain, with its verified information, can provide an added layer of integrity that might sometimes be lacking in AI models.
If you look at a lot of the large models out there, they’re ingesting a lot of information that may or may not necessarily be true. What a blockchain provides is real information, verified information. We didn’t want to go off onto the side and just hack something together just for the hype of A.I., Shaikh told Fortune about their partnership with Microsoft.
The collaboration between Microsoft and Aptos Labs, and the impending launch of Aptos Assistance, indicates an exciting new frontier in the world of AI and blockchain technology.
Microsoft Outlook is a personal information manager software system from Microsoft, which comes with Microsoft Office & Microsoft 365 software suites.
If you use Outlook often to send or receive emails, schedule meetings, and check tasks, then you must know the popular keyboard shortcuts that can help you get by & increase your efficiency.
This guide will discuss some of the Outlook keyboard shortcuts that will help you streamline your workflow.
Next, click General from the left pane and select Accessibility from the right.
Under Keyboard shortcuts, for the Select which options you’d like to use option, you will find five options:
Outlook.com – Enable shortcuts for Outlook
Yahoo mail – Yahoo! Mail keyboard shortcuts in Outlook.com
Gmail – Gmail keyboard shortcuts in Outlook.com
Outlook – Standard Outlook shortcuts
Turn off keyboard shortcuts – Disable shortcuts in Outlook.com
Select any of the options you find suitable and click Save to confirm the changes.
Choosing these options will affect how the shortcuts work on your OWA app only. The Outlook desktop will work on Outlook shortcuts.
If you are encountering common issues, such as Outlook not opening, we advise you to check out this detailed guide to get rid of the problem.
Can you create keyboard shortcuts in Outlook?
Since Outlook 2016, you can’t create your custom keyboard shortcuts for Outlook but can undoubtedly use the already assigned ones.
However, you can move between categories using Ctrl + Function keys, and Outlook lets you define which function key works with what category. To know more, move to the last section.
Also, you can use keyboard shortcuts from Gmail and Yahoo! mail by enabling the feature on the Outlook Web app.
What are the best Outlook keyboard shortcuts you can use?
1. Frequently used shortcuts
Keyboard shortcuts(Windows)
Keyboard shortcuts(Mac)
Action
Ctrl + Y
–
Open the Go to Folder window
Ctrl+N
Cmd + N
Creates new calendar event or opens a new message window
Ctrl + Enter
Cmd + Return
Sends an email message
Shift+Enter
Cmd + O
Opens chosen message in a new window
Delete
Delete
Delete a message
Ctrl + F
Cmd +J
Forwards a message
Ctrl+Shift+R
Cmd + Shift + R
Chooses the Reply All option
Ctrl + 2
Cmd + 2
Opens the calendar
Ctrl+R
Cmd + R
Reply to an email
Alt+Down
Down arrow
Takes you to the next mail on the list
Alt + Left
–
Takes you back to the previously selected folder
Alt + H
–
Takes you to the Home tab
Alt + S
Cmd + Return
Sends an email
Alt + N
Cmd+E
Inserts a file
Ctrl+Shift+K
Cmd + N
Opens a new task request
Ctrl + E
Cmd + Option + F
Opens search
Esc
Esc
Close
Alt+ J +A
Alt + F + M
Opens Attachment save as window
Ctrl+Shift+A
Cmd + N
Creates an appointment
2. Edit & format text
Keyboard shortcuts(Windows)
Keyboard shortcuts(Mac)
Action
Ctrl+C
Cmd + C
Copy the selected text to the clipboard
Ctrl+X
Cmd + X
Cut the selected text
Ctrl+K
Cmd + K
Add a hyperlink
Ctrl+V
Cmd + V
Paste the text from the clipboard to the selected location
Ctrl+Y
Cmd + Y
Repeat the recent action
Ctrl+Z
Cmd + Z
Undo the recent change
Ctrl+B
Cmd + B
Applies bold formatting
Ctrl+U
Cmd + U
Underlines selected text
Ctrl+I
Cmd + I
Applies italics formatting
Backspace
Delete
Deletes the selected text appearing on the left of the cursor
Ctrl+Backspace
Fn+Delete
Delete the word to the left of the cursor but not the space before the word
Selects the current and next message & you can use this to select multiple emails in the list
Home/Ctrl+Home
Selects the first message in the current folder
Shift+Up
Selects the current and previous messages & you can use this to select multiple emails in the list
3.4 Reading list
Keyboard shortcuts
Action
Esc
Closes a new message
End
Go to the last message in the list
Ctrl+N
Creates a new message
Home
Go to the top of the email list
Ctrl+F
Forward the selected email
Ctrl+R
Reply to the selected message
Page down
Moves down one page in emails which has two or more pages
Ctrl+Shift+R
Replies to all the recipients of the selected email
Page up
Moves up one page in emails which has two or more pages
Ctrl+Enter
Sends the email
4. Calendar keyboard shortcuts for Outlook
4.1 Common shortcuts
Keyboard shortcuts(Windows)
Keyboard shortcuts(Mac)
Action
Ctrl+N
Cmd + N
Opens or creates a new calendar item on Windows, but with Command Key on Mac, it creates a new appointment
Ctrl+2
Cmd + 2
Opens the Calendar view
Delete
Delete
Removes the selected event
Tab
Shift+Control+Right bracket (])
Move to the next event in the current view
Enter
Shift+Control+Left bracket ([)
Opens the selected item in the calendar
Shift+Tab
–
Moves to the previous appointment
F6
–
Moves you to a different region in your calendar
4.2 Calendar broad view
Keyboard shortcuts(Windows)
Keyboard shortcuts(Mac)
Action
Alt + Up arrow key / Alt + Down
Cmd + Option + Left arrow/ Right arrow
Takes you to the previous week /next week (Week view)
Alt+Page up / Alt + Page Down
Cmd + Option + Left arrow/ Right arrow
Takes you to the previous month/next month (Month view)
Alt+Home
–
Takes you to the start of the week.
Alt+End
–
Takes you to the end of the week.
Ctrl+0
–
Reset pan and zoom
Ctrl+Shift+Left, Right, Up, or Down arrow key
–
Move the selected item left, right, up, or down
Ctrl+Left, Right, Up, or Down arrow key
–
Pan left, right, up, or down
Esc
Esc
Deselect the selected items
Shift+Alt+6
–
Opens the Broad view
5. Contacts keyboard shortcuts on Outlook
Keyboard shortcuts(Windows)
Keyboard shortcuts (Mac)
Action
Ctrl+1
Cmd + 1
Go to Mail
Ctrl+2
Cmd + 2
Go to Calendar
Ctrl+3
Cmd + 3
Go to People
Delete or Ctrl+D
Delete
Deletes a contact or contact list
Ctrl+E
Cmd + 0
Searches for a contact
Ctrl+N
Cmd + N
Creates new contact
Ctrl+S
Cmd + S
Saves a contact or contact list
Ctrl+A
Cmd + A
Selects all contacts or contact lists
Esc
Esc
Discard contact/Unselect all contacts or contact lists
Shift+E
–
Edit a contact or contact list
Down arrow
–
Move down in the contact list
Up arrow
–
Move Up in the contact list
Shift+Question mark (?)
–
Shows the list of People keyboard shortcuts
Ctrl+L
–
Create a new contact list
Alt+H
–
Shifts the focus to the Home tab
Alt+V
–
Shifts the focus to the View tab
6. Tasks keyboard shortcuts
Keyboard shortcuts(Windows)
Keyboard shortcuts(Mac)
Action
Ctrl+C
Cmd + C
Accept a task request
Ctrl+D
Delete
Decline a task request
Ctrl + E
–
Opens a search box
Ctrl+Y
–
Opens Go to Folder dialog box
Ctrl +N
–
Creates a task in the Tasks view
Ctrl+O
Cmd + O
Opens the selected item
Ctrl+P
Cmd + P
Prints the selected item
Ctrl+Shift+Alt+U
Cmd + N
Create a task request
F6
–
Switch between the Tasks list, To-Do bar, and Folder pane
Insert
–
Flag an item or mark complete
7. Basic navigation shortcuts
Keyboard shortcuts(Windows)
Keyboard shortcuts(Mac)
Action
Alt + F4
Cmd + W
Closes the active window
Ctrl + 4
Cmd + 4
Opens the Tasks view
Ctrl + 5
Cmd + 5
Takes you to Notes
Ctrl + 6
Cmd + 6
Switch to the Folders list in the folder pane
Ctrl + 7
Cmd + 7
Switches to shortcuts. For Mac, it opens the Sync status window
Ctrl + .
–
Takes you to the next open email
Ctrl + ,
Cmd + ,
Takes you to the previous message. For Mac, it opens the Outlook Preferences window
Ctrl + Tab
Cmd + Tab
Allows you to move around message header lines in the Folder pane
Arrows
Arrows
Allows you to move around in the Folder pane
Alt + Left
–
Takes you to the previous view in the main Outlook window
Alt + Right
–
Takes you to the next view in the main Outlook window
Ctrl + Shift + W
–
Chooses the Infobar and shows commands menu if applicable
Ctrl + Shift + Tab
–
Move between Folder, Outlook, To-Do Bar, and Reading pane
Alt + F
–
Switch to the File tab
Alt + JS
–
Switch to the Send/Recieve tab
Alt + V
–
Takes you to the View tab
Alt + E
–
Switches to the Help tab
Apart from knowing the best Outlook shortcuts, learning how to create a task from an email can help save time and enhance productivity.
How to create your own Outlook keyboard shortcut (Categories)?
Press the Windows key, type outlook, and click Open.
Go to the Home tab, locate Categories.
From the dropdown menu, select All Categories.
On the Color Categories window, you will see the list of categories.
You can add new, rename, or delete the existing ones.
.Once done, select the Category, locate the Shortcut key option from the dropdown menu, and choose Ctrl + any function key.
Click OK.
Now, you can switch between categories using keyboard shortcuts.
So, these are some of the keyboard shortcuts on Outlook that can help you enhance productivity and streamline your workflow. And if you’d like to take it a notch higher, you can manage your Outlook email efficiently with better organization tips.
Much of that decline can be attributed to Sony’s life insurance and movie businesses, particularly the former. While Sony Pictures had a solid quarter with the release of Spider-Man: Across the Spider Verse, which took home over $600 million, it saw an overall slump in profits for its motion picture division compared to the previous quarter. Sony cited the ongoing WGA strike as a primary reason for the decline.
On the bright side for Sony is its PlayStation business, which continues to thrive with 3.3 million PlayStation 5 units sold throughout the quarter, a 38% boost year-over-year. No doubt this is because of better supply availability for the PS5, which was particularly harmed by hardware shortages throughout its first two years on the market.
In its investor’s report Sony raised its sales forecast for its gaming division by 7% for the year, spurred by optimism in its current-gen PS5 console. Sony said it expects to sell 25 million PS5 units this fiscal year (ending in March 2024).
Even though it is one of the best browsers available today, Chrome isn’t flawless, and a big problem many users face is the tabs not loading in the background.
This is most likely the memory-saving feature backfiring. The browser isn’t using too many resources, but performance is lacking. So what can you do?
You can disable tab discarding, and also check for corruption and other possible issues that interfere. Find all the answers you’re looking for below.
Why are the background tabs not loading in Chrome?
By default, the Chrome browser prioritizes active tabs to conserve memory and processing power; this can prevent background tabs from loading very slowly or not loading at all.
Aside from Chrome’s default settings for background tabs, the following reasons can also prevent background tabs from loading in Chrome:
Extensions – Some browser extensions might affect the loading of background tabs in Chrome; if so, you’ll need to disable the installed extensions to fix the issue.
Corrupt browser data – Corrupt browser data, i.e., cookies and cache, may cause problems for Chrome. Clearing your cookies and cache might help resolve the background tabs not loading.
Outdated Chrome app – If you’re running an outdated version of Chrome, you can experience performance issues due to bugs; updating the app can improve performance.
Now that we know what we’re dealing with, let’s apply the solutions below to fix the problem.
How do I keep Chrome tabs running in the background?
Before we proceed with more advanced solutions, here are a couple of quick fixes you can apply:
If the issue persists even after applying the above quick fixes, the following are advanced troubleshooting techniques that can fix the background tabs not loading error.
1. Disable the tab discarding
Press the Windows key, type Chrome in the search bar, and hit Enter.
Copy and paste the following into the Chrome app into the search bar, and hit Enter: chrome://flags
In the next window, search for automatic tab-discarding, and set the flag to disabled.
Copy and paste throttling in the search box and hit Enter.
Locate the setting labeled Throttle expensive background timers and click Disable.
Copy and paste parallel downloading in the search tab, hit Enter, then select Enable.
Click the Relaunch Now button on the bottom right corner of the window to restart Chrome.
Tab discarding is a feature developed by Google that suspends random background tabs to reduce memory usage if the system memory is low; this prevents background tabs from loading. Disabling the feature can help fix the Chrome error.
Press the Windows key, type Chrome, and hit Enter.
In the Google Chrome app, click on the three dots at the top right corner of the window, select More tools, and click on Extensions from the drop-down menu.
On the Extensions page, you’ll see a list of installed extensions, locate the one you wish to disable, and click the toggle switch next to it to disable it.
Repeat this process till you’ve disabled all the extensions on Chrome, and check if the background tabs are loading correctly.
Extensions are installed on browsers to improve the browsing experience of users, but they can also trigger errors on the app if they conflict with the app’s functionality.
Press the Windows key, type Chrome, and hit Enter.
Click the three dots in the upper-right corner to open the menu and click on Settings.
Then, click on Advanced. Under the System section, ensure that Continue running background apps when Google Chrome is closed is enabled.
Chrome usually conserves memory by eliminating a lot of its background usage; this can prevent background tabs from opening.
Though the browser isn’t short of issues, including opening new tabs every time you click, following tailored steps like the ones above should help you fix the problem in no time.
Chrome is one of the best browsers available, with few flaws. However, it throttles performance to increase the browser speed; this can prevent background tabs from loading. Luckily, this article has provided the steps to help you fix the Chrome error.
If you’ve got any questions or suggestions, please let us know in the comments below.
Microsoft Edge is currently in the process of testing a new feature that allows users to save screenshots of visited web pages directly to their browsing history. This development is part of Microsoft’s ongoing efforts to enhance the functionality of its browser. The feature, referred to as “Save screenshots of the site for History,” is currently available for testing on the Canary and Dev channels of Microsoft Edge version 117.
The purpose of this feature is to provide users with the ability to revisit websites they have previously accessed by capturing screenshots of those sites and storing them in the browsing history. By enabling this feature, users could potentially access these screenshots even when they are offline, ensuring continued accessibility to web content.
However, the naming and description of the feature have caused confusion among users. The name “Save screenshots of the site for History” has led some to believe that the browser will automatically take screenshots of every webpage they visit. This ambiguity in naming has raised questions about the intended functionality of the feature.
Additionally, concerns related to user privacy and security have surfaced with the introduction of this feature. As of now, Microsoft has not provided specific details about how the captured screenshots will be handled in terms of privacy and data security. Users are keen to understand the measures in place to protect their sensitive information.
The feature is currently in its testing phase and is not activated by default. Users who are using the Canary or Dev channel of Microsoft Edge version 117 can access the feature by navigating to Settings > Privacy and Services.
The latest iteration from Microsoft, Windows 11, is touted to be one of the most advanced and user-friendly and comes with a range of new features, but several users wish to make it look more like Windows 10.
This is primarily because they got used to Windows 10, and the sudden transition seems a bit of a hassle. And to be honest, that’s completely normal. So, let’s find out how you can make a Windows 11 desktop look like Windows 10
1. Change the desktop background
While many suggest it as the last change, we recommend that you start with the background wallpaper since it’s the most critical aspect. The wallpaper is stored in the following location: C:\Windows\Web\Wallpaper\Windows
So, copy the wallpaper from there, and move it to a PC running Windows 11. In case you don’t have access to a Windows 10 computer, several websites offer the wallpaper for download. Go with one of these.
2. Move the Taskbar
Press Windows + I to open Settings, go to Personalization, and click on Taskbar on the right.
Now, click on Taskbar alignment, and choose Left from the Taskbar alignment dropdown menu.
If you wanted to make the Windows 11 taskbar look like the one in Windows 10, switch the alignment to the left, and all the icons would be left-aligned. Though not exactly the same, it would give a good impression of Windows 10.
If you don’t like the new Taskbar at all, you can still change it as you please with a dedicated software recommended below.
With this tool you can change the appearance of the Taskbar completely. You can even modify its transparency, effect and color.
The most important feature of the app is however that it can combine states and instances as you use your PC. So, you can restore it to the Windows 10 looks or transform it as you wish.
Before editing the Registry, make sure to create a restore point. Also, these changes work on the previous versions of Windows 11 and not the latest ones. So, you will have to verify that.
Press Windows + R to open Run, type regedit in the text field, and hit Enter.
Click Yes in the UAC prompt.
Paste the following path in the address bar and then hit Enter:HKEY_LOCAL_MACHINE\SOFTWARE\Microsoft\Windows\CurrentVersion\Shell Extensions
Now, right-click on Shell extensions, hover the cursor over New, select Key, and then name it Blocked.
Once done, right-click on the right pane, hover the cursor over New, and choose String Value. Name it {e2bf9676-5f8f-435c-97eb-11607a5bedf7}.
Now, restart the computer for the changes to come into effect.
If you were wondering how to make Windows 11 File Explorer look like Windows 10, there’s a simple registry tweak for that. If you ever wish to revert the change, simply delete the Blocked key.
4. Get the old context menu back
1. Press Windows + S to open Search, type Registry Editor, and click on the relevant search result.
2. ClickYesin theUACprompt that appears.
3. Navigate the following path or paste it in the address bar and hit Enter: HKEY_CURRENT_USER\Software\Classes\CLSID
4. Right-click on CLSID, hover the cursor over New, choose Key and name it {86ca1aa0-34aa-4e8b-a509-50c905bae2a2}.
5. Next, right-click on key you just created, choose New, click Key, and name it InprocServer32.
6. Once done, double-click on Default on the right under the InprocServer32 key to modify it.
7. Now, make sure the field under Value data is empty and click OK to save the changes.
8. Restart the computer for the changes to come into effect.
That’s it! You would now have the classic context menu, the way it used to be in the previous iteration and you would be a step closer to making Windows 11 look like Windows 10.
This tweak doesn’t work on all versions of Windows 11, so there’s no certainty as to whether the changes would reflect. But, you can give it a try, and delete the entries created if things don’t work out.
Press Windows + R to open Run, typ regedit, and click OK.
Click Yes in the UAC prompt that pops up.
Type/paste the following path in the address bar and hit Enter:HKEY_CURRENT_USER\Software\Microsoft\Windows\CurrentVersion\Explorer\Advanced\
Right-click on the right pane, hover the cursor over New, choose DWORD (32-bit) Value, and then name it Start_ShowClassicMode.
Double-click on the entry you just created.
Now, enter 1 under Value data and click on OK to save the changes.
Restart the computer for the changes to become visible.
If you want to make Windows 11 Start Menu look like Windows 10, this Registry hack would come in handy.
6. Remove additional Taskbar icons
Press Windows + I to open Settings, choose Personalization from the left, and click on Taskbar.
Now, turn off the toggle for all the entries under Taskbar items.
If you want an uncluttered Taskbar, the way it was in Windows 10, disable every item in the list, and it will now somewhat resemble the previous iteration.
7. Use a third-party app
While the methods listed here do a fine job, you can use a third-party app, StartAllBack, to make Windows 11 look like Windows 10.
StartAllBack app
StartAllBack is a useful tool which will help get the old Start menu, the classic Taskbar, the conventional Windows Explorer ribbon, and the previous context menu, amongst a range of other changes.
By now, you would be able to make Windows 11 look like Windows 10. And the inverse also holds true. Using the same idea, you will know how to make Windows 10 look like Windows 11 without software.
Also, you may find a Windows 10 theme for Windows 11, but we recommend against it, since the changes it makes will be unknown. And do not forget to read our comparison of Windows 11 and Windows 10 to better understand the differences between the iterations.
If you have any other queries, drop a comment below, and we will get back at the earliest.
Microsoft users wonder how to rotate the screen in Windows 11, and today’s guide will bring up a few simple options you should definitely try.
The OS offers you some handy methods to customize your display orientation. Fortunately, they are extremely similar to what we know from Windows 10’s screen rotation.
You can perform this action in the same main modes: landscape, portrait, and flipped mode. We’ll explain each of them at the end of this article. Thus, make sure you read it thoroughly.
How can I rotate the screen in Windows 11?
1. Rotate your screen via Display Settings
1. On your Windows 11 desktop, right-click on any empty space, then select Display Settings from the list of options.
2. Go to the Display orientation section.
3. Click on the button next to Display orientation to open a drop-down menu with multiple options.
4. Choose the desired option from the list: Landscape, Portrait, Landscape (flipped), and Portrait (flipped). Once you pick one of the options, your screen will rotate in the orientation you chose.
5. Click on Keep changes on the pop-up menu that asks you to confirm the changes.
Modifying Display Settings is the easiest way to change your Windows 11 screen orientation. With the OS’s desktop, you’ll automatically jump into the Display page, without going through the main Settings menu.
From the Display orientation section, you can choose your desired orientation and apply it to your screen within seconds.
2. Use the Windows Taskbar to flip your Windows 11 screen
Click on the Windows icon from your desktop taskbar and open the Settings menu.
Click on System, then navigate to Display.
Look again for the Display orientation section, then open the drop-down menu, and choose any model you need.
To save the adjustments, click on the Keep changes button.
This option has the same effect as the previous one. However, as you can see, it requires additional steps to get on the Display page.
3. Use the device manufacturer’s Control Panel to rotate your Windows 11 screen
Most of the time, the screen rotation option should be displayed as a drop-down menu or a slide bar.
4. Use a shortcut to rotate the screen on Windows 11
We left this option here because these shortcuts don’t work on all computers. However, if you have an Intel graphics card, here are the keyboard shortcuts:
Press Ctrl + Alt + Up arrow to rotate the screen to normal landscape mode
Press Ctrl + Alt + Left arrow to rotate the screen 90 degrees to the left
Press Ctrl + Alt + Right arrow to rotate the screen 90 degrees to the right
Press Ctrl + Alt + Down arrow to rotate the screen upside down (180 degrees)
4.1 Activate system hotkeys
We also need to mention that even if you have an Intel graphics card, the shortcuts might not work because you don’t have the System hotkeys activated.
Here’s how you can activate them:
Click on the Windows Search tab, type graphics command center, and click on the app from the results.
Now click on the System icon from the left and toggle the Enable System Hotkeys to On.
To set these shortcuts, you need to go to Intel Graphics Command Center. Then turn on System hotkeys or set the above shortcuts.
What should I know about screen modes?
Landscape – As you observed in our recommended steps, the default option is the Landscape one. It refers to the horizontal orientation of your screen but also can be also used for specific documents or images. This is the most used option because it creates a full perspective, ideal for PCs or laptops.
Portrait – This feature is also known as the upside-down landscape. Take a look at the picture below to see what it would look like.
Flipped mode – It is available for both mentioned designs. If you choose the flipped landscape mode, your screen will get upside-down or switch to 180 degrees. The flipped portrait option will rotate your screen 90 degrees, making it vertical and upside-down.
What are other Windows 11 screen features?
Besides the screen rotation, Windows 11 also allows you to adjust some other options that will definitely create a more personalized workplace:
Size – The screen size represents nothing but the physical measurement of the screen in inches. Keep in mind that screens with the same sizes may have different resolutions.
Rotation – This feature refers to the clarity of the text and to the images displayed on your screen. With a higher resolution, your items would appear sharper. At lower resolutions, fewer items will fit on the screen, but they will look larger.
Display background – The background displayed on your screen is one of the most important Windows 11 design features. It creates a unique environment; your experience is considerably improved.
For those who were wondering how to rotate the screen in Windows 11, make sure at least one of the listed options will support you.
You can choose any time to customize this feature. And whenever you change your mind, you’re allowed to make adjustments. If you’re a Mac user, learn how to rotate your screen on MacBook.
Since the Windows Anniversary update, Microsoft simplified the process of activating Windows as you don’t have to worry about keeping track of the product key. If you have a genuine copy of Windows, all you need to do is link the product key to your Microsoft account, and you’re good to go.
This article will show you how to link your Windows license to your Microsoft account.
Is my Windows license tied to my Microsoft account?
Typically, a Windows license is not tied to a single Microsoft account; instead, you can associate it with specific devices you activate it on.
However, from Windows 10 upwards, you can link a Microsoft account to your license. This can help activate and transfer your license to a new device during reinstallations or hardware changes.
How do I know if my Windows license is transferable?
Depending on the type of license you purchased, Windows licenses can be transferable or nontransferable. There are three basic types of licenses on Microsoft: Retail, OEM, and Volume licenses.
Retail licenses are usually transferrable; you can move them from one computer to another.
OEM licenses are tied to the computer they were installed on and are nontransferable; these types of licenses come preinstalled on computers purchased directly from the manufacturer or reseller.
Volume licenses are typically not for individual use; businesses and organizations use them. This license type is not for individual retail sales but might have specific terms and conditions related to transferability.
Further, to determine if your Windows license is transferable, refer to the terms and conditions of your Windows product or visit the official Microsoft documentation page.
How do I link my Microsoft account to the Windows digital license?
1. Check if your Windows license is activated
Press the Windows key + I to open the Settings app.
Click on System and click on Activation.
The Activation page should read Windows is activated with a digital license (or product key). This shows that the activation is working properly.
Once you’ve verified your Windows Activation status, follow these steps to link your Microsoft account to your Windows digital license.
2. Link your Microsoft account to the license
Press the Windows key + I to open the Settings app.
Then, click on Accounts, and click Your Info.
Click the link that reads sign in with your Microsoft account instead.
Then, enter your correct sign-in information in the next window, and click Sign In.
Then, enter your current password, and click Next.
Click the Set a PIN button or the Skip this step link to finalize the process.
Once you’ve completed the above steps, the Windows Activation page should now read Windows is activated with a digital license linked to your Microsoft account.
In the past, Windows users with local accounts would need to manually submit a product key to activate their Microsoft account.
However, now, the activation process is a lot easier. You can reinstall Windows without entering your product key.
Now that you know how to link your Microsoft Account, check the method to know the license type to ensure you can transfer your Windows license if needed.
If you’ve any questions or suggestions about this article, let us know by commenting below.
The Microsoft Outlook calendar lets users schedule and modify events, appointments, or meetings.
Several readers complained about the Outlook calendar not allowing edits. This can occur due to synchronization issues or server problems. In this article, we will take you through simplified steps in resolving the Outlook calendar not allowing edits issue.
Why is Outlook Calendar not allowing editing?
There are some prominent reasons reported by IT professionals why the Outlook calendar is not allowing edits. Below are some of them:
Permission issues – If you don’t have/grant others the necessary permissions to edit events on a calendar, you may encounter restrictions or Outlook errors on a shared calendar.
Outdated software – Outdated versions of the Outlook application could cause compatibility issues and restrict edit capabilities.
Clear the cache and cookies of your browser, as this can help fix various issues.
If the issue persists after attempting the above checks, try the following advanced tweaks.
1. Update the Outlook app to the latest version
Open the Microsoft Outlook app.
Select File and click on Office account.
Select Update Options and click on Update now.
Wait for the updates to finish, and restart your Outlook app.
Updating your Outlook app to the latest version helps address the Outlook calendar without allowing editing issues and bugs. You can alternatively uninstall the Outlook app and visit the Outlook download page to reinstall the latest version.
2. Change the Outlook calendar permissions
Launch the Outlook app and click on the Calendar icon at the bottom-left corner.
Right-click on the calendar you want to share and click on Properties from the context menu.
Navigate to the Permissions tab.
Select the username which you will allow to edit your shared calendar under the Name section or click on Add to add permissions for a new user.
Next, select Can edit from the Permission Level drop-down list.
Click the OK button to exit the dialog box.
Users you’ve given the Outlook calendar editing permission should now be able to edit your shared calendar. Try the next fix if you still can’t edit the Outlook calendar.
Firstly, open Outlook and navigate to File and click Account Settings.
Double-click on the Microsoft Exchange account used to manage someone else’s calendar and click Change.
Click on More Settings, and then go to the Advanced tab.
Tick the checkbox beside Turn on shared calendar improvements.
Then, press the OK button and restart your Outlook app.
Note, however, that the shared calendar improvements option is available only to Office 365 subscribers using the latest version of the Outlook app or those using the Outlook Web App.
The folder or item should now be removed from read-only mode, allowing you to edit and make necessary changes. If prompted, confirm your action. Additionally, you can disable your workbook from read-only mode using our guide.
Hopefully, you can now resolve the Outlook calendar not allowing edits issue, having followed these instructions.
If this guide has helped you, share it with anyone who might benefit. Also, don’t hesitate to use the comments section below if you have any questions or suggestions.
My5 is a UK-based streaming service with an extensive content library, covering all sorts of genres.
With My5, you can enjoy the most demanded movies and TV shows in its library, such as Lie With Me or Million Pounds.
However, My5 is region-locked, which means that due to the licensing policies, the service is only limited to the UK audience.
That’s why users outside the UK face the following message: Sorry, but you appear to be trying to stream My5 from outside the UK, which is not supported.
Luckily, we’ve provided three tried-and-tested solutions.
Let’s dive in!
My5 Not Working with VPN? Try these solutions
VPNs route your traffic through a global server network, encrypting your data in the process.
They assign you a new IP address from a virtual location which helps bypass content restrictions implemented by online services.
However, if you find My5 not working with VPN, we can assume that yourserver is blacklisted, preventing you from accessing this platform.
That usually happens when your VPN isn’t hiding your location correctly, leading to error messages like the one below:
But don’t worry. Below, you’ll find the top fixes to get you right back on My5.
1. Change your VPN server
Like many other streaming services, My5 has systems in place to identify when a customer is connecting over a VPN.
When multiple people access the platform through the same IP, the system recognizes VPN usage and blocks the IP.
So, a viable solution is to switch to a VPN server you haven’t used before.
Here’s how to do it on ExpressVPN:
Open the VPN app.
Hit the Ellipsis symbol, pick a server in the UK you haven’t used before, and connect.
Enjoy streaming on My5!
Note: Keep in mind that you might need to try several different servers before finding one that works.
2. Clear browser cookies and cache
Cookies and cached files provide a smoother online experience, but they aslo contain information about your real whereabouts.
So, when you connect to a VPN, My5 detects the conflict between your actual and virtual location and stops you from accessing it.
So, here’s how to clear cookies and cache, using Chrome as an example:
Open Google Chrome.
Expand the Kebab menu, go over More Tools, and pick Clear browsing data.
Choose a Time range, check the box by Cookies and other site data, and click Clear data.
Restart your PC.
Connect to your VPN and enjoy streaming on My5!
3. Change Your VPN Provider
Some VPNs simply lack the necessary privacy and security features to bypass My5’s geo-restrictions. This could be due to blacklisted servers, weak protocols, or accidental data leaks.
Whichever the case, if none of the above methods worked, you should consider switching to a more reliable VPN provider.
During our tests, ExpressVPN did a flawless job at unblocking My5.
Pick the preferred payment method and click Join Now to purchase the license.
Then, go to the ExpressVPN download page to get the relevant app for your device.
Follow the on-screen guideline to Install the software.
Open the app, and connect to a server in the UK.
Enjoy streaming My5 without restrictions.
Does My5 block VPNs?
Yes, My5 blocks VPNs to uphold its licensing agreements.
That is why the streaming service employs various VPN detection mechanisms to identify and block VPN activity on the platform.
However, with a reputable VPN provider, you can conveniently go around the geo-restrictions and enjoy the My5 content worldwide.
How does My5 detect my VPN?
VPNs leave various traces online, and streaming services, including My5, employ systems to identify these footprints.
Here are some of the approaches My5 uses:
IP detection: My5 relies on IP addresses to monitor incoming traffic. As VPNs provide the same IPs for many users, My5 can easily track and block them.
DNS tracking: As it’s common for free VPNs to have leaks, My5 can detect the DNS, IP, and WebRTC leaksto find users’ actual locations. And users must always opt for a VPN provider with top-notch security features to avoid data leakage.
GeoIP databases: Every time users log into their My5 account, servers find their IP address through the GeoIP database, which is like a flagged IP center. This way, IPs that are on the list are instantly blocked.
Does My5 work with a VPN?
Yes, My5 works with VPN. However, the type of service you use is crucial.
This streaming platform can work with high-quality VPNs with high-end security features and encryptions, capable of bypassing its restrictions.
In contrast, free VPN services can’t effectively go around the VPN blocks, and that’s why your connections get blocked.
So, we decided to curate a list of the top services that have proven to work with My5:
Best VPNs for My5
While dozens of reputable VPN providers are available, some work better than others with streaming services like My5.
Below are some of the best VPN choices for the platform:
This US-based VPN is another perfect choice for unblocking My5 from anywhere outside the UK, as it provides over 30,000 servers, with a lot of options in the UK.
PIA allows unlimited simultaneous VPN connections making it the best selection for families or users with many devices.
Additionally, PIA’s no-log policy, kill switch, split tunneling, and leak protection can testify to its security.
Finally, you can also pay for a dedicated IP address, which further makes your connection even more trustworthy for restricted streaming services.
Pros:
Highly-customizable
Servers in 80 countries worldwide
Verified no-logs policy
Dedicated IP address
Cons:
Inconsistent speeds
Private Internet Access
Make quick work of My5’s geo-restrictions and stream on all your devices with PIA.
CyberGhost VPN has more than700 UK servers, making it more convenient to access British streaming platforms.
This VPN has an always-on kill switch to prevent accidental data leaks. And you get a large variety of streaming-optimized servers to ensure the smoothest viewing experience.
The VPN accepts payments via Bitcoin, doesn’t log personal data, and has IPv6 and DNS leakprotection to provide maximum security.
Finally, CyberGhost is available for Mac, Android, Windows, Linux, and Amazon Fire TV devices.
Pros:
Numerous servers in the UK
Buffer-free connection
No-log policy
Cons:
A bit basic compared to other providers
CyberGhost VPN
Benefit from streaming-optimized servers for smooth playback with CyberGhost.
The UK-only streaming app My5 is a perfect platform for on-demand series, TV shows, and movies.
As it only works in the UK, users worldwide connect through VPNs to access My5’s movie library.
However, a lot of services seem to be failing at unblocking it properly. To fix that, you can clear your browser’s cookies or switch to a new VPN server.
But if My5 is not working with your VPN, opt for a reputable VPN provider with better features, such as ExpressVPN, PIA, and CyberGhost.
You don’t need any technical knowledge to block clipboard access on popular browsers like Chrome or Opera. The process is simple and straightforward. You just have to tweak one simple browser setting in order to prevent the clipboard access on the browser.
You might have encountered a message like “Do you want this website to access your clipboard?” This is when a website asks for permission. However, not every Chromium-based browser asks for this clipboard permission.
Google Chrome, for example, can read copied information if you’re allowing it. A website can take your browser’s clipboard and read the sensitive content. In addition, desktop users may use the clipboard option to temporarily store the information. Take for instance, when entering a password or pasting a text from a site to a search engine.
Chrome has multiple settings such as the autofill option that risk the leak of your sensitive information. This is when you have to protect your clipboard from malicious websites.
How do I know if a website is accessing my clipboard?
It’s better to block websites from reading or modifying your clipboard. But, how can you detect it? Well, there are some tips to protect your clipboard:
Browser settings – There is a browser setting you need to configure in order to disable websites from accessing your clipboard. It’s also worth mentioning that most secure browsers notify you whenever you’re visiting a new website.
Developer Tools – You can tap on Developer Tools and look for the “Network” tab and look for the requests with the type “Clipboard.”
Install Clipboard Manager – You can install an extension that will monitor clipboard activity.
Using an Antivirus – Some smart antivirus software can also detect and block access to your clipboard by websites. They keep logs of which websites users are browsing.
So, in case you had allowed websites to access your clipboard before, you can simply delete the clipboard history as well. Just go to your browser’s settings and clear your browsing data.
How do I turn off clipboard events in Chrome?
Below is a quick way how to deny website access to the clipboard on the Chrome browser. The guide is simple to follow.
Open a new window on Chrome and access any website.
In the URL search bar, click on the locker icon.
Click on the last option called Site Settings.
Now, scroll down in the settings until you find Clipboard.
Click on the drop-down arrow to expand it and modify it.
Select Block and click on the screen again, and then exit the settings.
From now on, the clipboard events are not allowed in the browser.
?️ Note: You can selectively block websites from accessing the clipboard on Chrome. But, this feature may not be available on all web browsers. In the guide below, we’re showing you how to perform this on the most used browsers out there.
It’s recommended to use this browser solution for more private navigation and more flexibility regarding app integrations and AI-powered search. This is how to block websites from reading or modifying the clipboard on Opera.
Launch the browser and open a window.
Go to any webpage and select the locker icon, similar to Chrome.
Click on the last option named Site Settings.
Scroll down in the settings until you find Clipboard.
Click on the drop-down arrow to expand it; and choose the Block option.
Exit the Settings and verify if you can still copy information on the clipboard.
Block clipboard access on Mozilla Firefox
Open a Firefox browser tab and type about:config in the URL bar.
Click on Accept the Risk and Continue warning button.
Search with a clipboard query to find the setting.
Find the dom.event.clipboardevents.enabled option and select it.
Press on the Toggle button on the right side and set it to False.
Now, close the configuration page and navigate without clipboard access.
From now on, painlessly use copy-paste function in Chrome or other browsers without the fear of exposing your data to malicious websites or third parties.
In Outlook, recalling an email is an attempt to unsend or delete a sent email message from the recipient’s mailbox. On the other hand, resending an email message is used to send the original message or its edited version to the same or different recipients.
Recalling the email can only be successful if it has not been read or forwarded to other recipients by the original receiver.
The permanent recall feature is only available on a Windows PC. Mac users will have to use the Undo toggle, which gives them up to a 10-second grace period to edit or recall an email after sending it.
Remember these tips when using the resend and recall feature in Microsoft Outlook for Mac. Further, let’s explore the steps to resend an email in Outlook below.
1. Via the Recall This Message feature
Launch your Microsoft Outlook app, and sign into your account.
In the folder pane, click on Sent Items.
Open the sent email that you want to recall.
On the Message tab, in the Move group, click on Actions, and then select Recall This Message from the options.
A dialog box will appear with two options: Delete unread copies of this message and Delete unread copies and replace them with a new message.
Choose the appropriate option and click OK to initiate the recall process.
While these steps have proven successful in this email window, using them may not be universally effective across other email clients.
Meanwhile, some Outlook users have reported that recalling Outlook emails almost never works. In case you are experiencing similar issues, check out this guide to know what the cause could be.
2. Use the Resend This Message feature
Follow steps 1 to 2 in the method provided above.
Double-click on the email template you want to resend to open it in a new window.
In the new window, navigate to the Message tab, and click on Actions in the Move group.
Select Resend This Message from the drop-down menu.
A new email template will open with the original email content.
If you want to resend the email to the original recipient, make the necessary changes, and press the Send button.
If you want to resend the email to new recipients, clear the original recipients from the To, Cc, or Bcc fields, add the new recipients, and press the Send button.
Recalling an email allows you to retract or delete a message sent to a recipient before they read it, provided they are using Outlook and meet certain conditions.
How do I recall an email in Outlook?
Open the Sent Items folder, double-click the message, click on Actions > Recall This Message, choose to delete or replace the message, and click OK.
Can I recall an email if the recipient has already read it?
No, Outlook only allows you to recall an email before the recipient opens it. Once opened, the recall attempt will fail.
Does recalling an email work with all email services?
No, recalling works only within the same Exchange email system. If the recipient uses Gmail or another email service, the recall will not be effective.
Should you get Outlook not sending emails issues, you can explore our detailed step-by-step guide to fix the error.
Need help configuring your Mediacom account for Outlook before using recall or resend features? Visit Mediacom Outlook settings to check the correct IMAP, SMTP, and port configurations.
Windows 11 has been out for almost 2 years now, but the operating system is still not the most popular Windows. On the contrary, Windows 10, whose current version is also its last version, is still the most popular Windows around. On every thread everywhere, users are still asking if Windows 11 is worth it.
Well, we can tell you for sure that yes, Windows 11 is worth it. While the operating system is still updated regularly, its AI features, including Windows 11 Copilot, steal the whole show.
However, not all users agree on this. A Reddit user, for example, made an experiment with both Windows 10 and Windows 11, and they found something interesting.
They installed Windows 11 on their PC and used the operating system for a year. Then, they went back to Windows 10, and there was an important difference between these two Windows versions.
Windows 10 and 11 difference: File Explorer
According to the user, there is a major difference between Windows 10 and Windows 11. And that is the speed of the File Explorer and Task Manager. In Windows 10, both the File Explorer and the Task Manager run faster than on Windows 11.
I really don’t know what happened with W11, and I don’t think it’s a problem depending on my hardware, but opening the File Explorer or the Task Manager takes much longer and is generally much slower.
While several solutions can significantly speed up your File Explorer in Windows 11, the user ultimately chooses Windows 10 as their main operating system.
Although I appreciated some changes in the GUI, and even some features, including the not very polished feature of tabbing (Unable to move tabs to another FIle Explorer window), I decided that I prefer speed over aesthetics.
However, it’s good to know that Windows 10 will reach end-of-life support in 2025. While there is no hurry yet to update, you need to take into consideration that most games and software apps will be designed for Windows 11 from now on.
Plus, the Redmond-based tech giant will ensure Windows 11 becomes more stable and faster with each update. Microsoft has been fixing many of Windows 11’s issues, including hundreds of vulnerabilities so in the long run, Windows 11 is the OS to go.
However, you should stay on Windows 10 for now, if you that’s what you want. Especially if you feel that your device is better suited for it, but remember 2025.
Are you on Windows 11 or Windows 10? What’s your overall experience with Windows? Let us know in the comments section below.
This is a comprehensive guide on how to create and use categories in Microsoft Outlook. We have explained all the details that will help you understand the benefits of using categories, and step-by-step instructions on how to create, rename, and delete categories.
Apart from this, you will also learn how to assign categories to emails, meetings, contacts, and tasks. The article will also provide tips on how to sort and filter messages by default category.
What are Outlook categories?
Many people are confused between what is an Outlook category and what is an Outlook folder. Although, they know that there are multiple ways of customizing Outlook and the app itself provides different ways to sort messages, search folders, sort folders, and much more.
However, there is always some confusion between Outlook categories and folders. Outlook folders let you organize your inbox and store messages.
When you move messages into your folders, you are moving them from the inbox into these folders. Then to locate the messages, all you need to do is enter the category folder and search it.
On the other hand, Outlook categories are a way to visualize and change the color code of the messages in your inbox.
When you assign a category to a message, it doesn’t leave the inbox instead they are assigned a category color. Using the color category, you can easily find out the message that you are looking for from the category list.
Many users have reported that they are unable to use categories in Outlook. One of the main reasons the Category button is not available for IMAP accounts is that they do not sync back to the server.
Besides, you won’t be able to assign a color category to IMAP accounts as Outlook 2016 has a limitation on the color categories feature. To fix this, you need to change the IMAP account to a POP3 account.
How to create and use Outlook categories?
1. Create Outlook categories
1.1 Desktop client
Launch the Outlook desktop app.
In the Tags section click Categorize.
From the drop-down list select All categories.
Hit the New button in the Color Categories box.
In the Add New Category box, name your category by typing it in the text field.
Choose a custom color from the Color drop-down menu.
Using the Shortcut Key, add a shortcut key for your category.
Click OK to close the Add New Category box and again click OK to save your preferences.
Right-click on the email, click on Categorize and select a category from the pop-out menu.
Once assigned, you can view the color of the category as well as the name of the category in the Categories column of your inbox.
Following the above method, you can easily assign Outlook categories to one or multiple messages. This will help you focus on the messages related to a category. For example, you can focus and deal with work-related messages when inside the Work category.
4.2 Add a category to your calendar event
Launch the Outlook app on your PC.
Right-click on the calendar event and select Categorize from the drop-down list and choose a category. If you do not see your preferred category, click on All Categories.
After selecting the category, you will see the name of the category and the color applied to the calendar event.
You can apply the categories to your contacts, appointments, and other events in the Outlook desktop app or the web app.
How to Sort and Filter Messages by Category?
After assigning a category to your emails, you can simply sort the messages by hitting the Categories column in the horizontal bar that appears above the Outlook messages.
Under the Categories section, you can expand or close a certain category using the small triangle button in the Category header.
The above steps will help you sort and filter the Outlook inbox categorically. Some of the important benefits of the category feature in Outlook are listed below.
Categories let you quickly find a specific message related to a specific topic
You can easily locate a particular message by looking at the category color if it is assigned a category
You can keep your Outlook inbox organized by assigning a category to your messages, calendar events, or even contacts
Categories are more beneficial for users than folders, as you can assign multiple categories to a message
Once assigned, it is easy to categorize
There is no limit to how many categories you can have in Outlook
If you’ve ever wondered how to add holidays to the new Outlook calendar, you’re not alone. Adding a country-specific holidays calendar in Outlook helps you stay on top of important dates without manual entry.
Whether you want to include national holidays, regional observances, or religious celebrations, Outlook’s country holidays calendar feature makes it easy to customize your schedule and plan ahead. In this guide, we’ll show you step-by-step how to add these holidays to your Outlook calendar quickly and effortlessly.
How do I add holidays to my Outlook calendars?
1. Outlook Desktop app
Launch the Outlook desktop app on your PC.
Click on the File tab on the top menu.
Choose Options to open Outlook Properties.
Click on Calendar options and select Add Holidays… button.
Locate your countries from the list.
Check the box beside your country name and click OK. This will import holidays to your calendar.
Click OK in the calendar dialog box and exit Outlook properties.
To open the calendar, click on the Calendar options at the bottom left.
You can select or deselect the added holidays from the My Calendars section.
If you have added multiple holidays, Outlook will show all holidays side by side in the calendar by default for the current month.
Select Add calendar option under the calendar of the current month.
Choose the Holidays option.
Check the box for the country whose holidays you would like to add to your calendar.
You can see the added holidays under the My calendars section. Also, you can enable and disable the holidays.
The above methods will allow you to add holidays to the Outlook calendar for specific countries or countries within the app.
Do note that the added holidays will be the ones that are officially declared by the country. For adding specific holidays, we have discussed the steps in the later section of this guide.
How do I add holidays to a shared Outlook calendar?
1. In the Outlook desktop app
Add the holidays in the default calendar as shown in the above section.
Go to the Calendar view and click to open the default calendar.
Click on the View option at the top menu.
Select Change view and click on List.
Again click on the View option and select Categories in the Arrangement group to sort all calendar items.
Under My Calendars, right-click on the holidays that you would like to add to the shared calendar and select Move and Copy to Folder.
In the Copy Items dialog box, select the destination calendar where you would like to add the holidays and hit the OK button.
Hit the OK button in the warning message that pops up.
Under My calendars, right-click on your holiday, select Move to and select the shared calendar.
Note that in order to add holidays to a shared Outlook calendar, you need first to add the holidays to the default calendar folder.
Once the holidays are added, you can move the calendar to other calendars, i.e., the shared calendars. Moreover, you need full permission to share the holiday calendars with others.
How do I add custom holidays to my Outlook calendar?
Launch MS Outlook.
Click on the Home tab on the top context menu and select New Appointment.
Insert the name of the holiday in the Subject field, for example, John’s Birthday, and leave the Location field empty.
Check the All day event box.
In the Start time drop-down menu, select the date and make sure that the End time drop-down is also selected as the same date.
On the Event tab, click on Recurrence.
Under the Recurrence pattern, click Yearly.
Insert 1 for Recur every option. In our case, it will ensure that the alert appears every 1 year on December 10th.
Under the Range of recurrence, make sure to check the radio button for No end date and click OK.
Click Save & Close.
You can now send the holidays to everyone in your organization, and they will be notified about this custom holiday every year.
Adding custom holidays follows the same steps as the one you follow for adding an appointment.
That is it from us in this guide. We have a guide that explains all the steps you need to take to make the Outlook calendar private.
Also, you can refer to our guide that explains how to set an Outlook vacation message. We have explained 3 different ways to do that task.
If you didn’t know, you can use the Bing Chat mobile app on your smartphone. It is available for Android and iOS, and you can use it alongside Edge.
The Bing Chat is retaining all the features of its desktop version, including the amazing visual input that you can both give and get from this AI tool.
Even more, Bing Chat is very versatile as an app. You can control Edge from it, although the feature is only available to the desktop version so far. It might, however, arrive on the mobile version as well.
You can record up to 4000 characters on the Bing Chat mobile app on Edge
The user spotted this new feature while using Bing Chat mobile on Edge. And apparently, Bing lets you record up to 4000 characters in audio inputs. Even more, the AI tool will sometimes stop to edit your input or completing it.
The user claims that this is a new feature that appears in the UK region while using the Bing Chat app on the mobile Edge browser.
I’m just shocked but it seems that New interface of Bing on mobile edge will let you not only use voice typing longer (all 4k characters), but stop for a moment and complete or edit it with keyboard. It seems cool, but I think It’s only available for UK IPs to test.
Update: Bing Chat Mobile is coming to other browsers as well
As reported by The Verge, following a blog post by Microsoft, Bing Chat Mobile is coming to other browsers, including Chrome, Opera, and Safari. For now, as we mentioned earlier, Bing Chat Mobile is only available on Edge, but that’s about to change soon.
With so many new, useful features now a part of Bing, we’re excited to announce you can start experiencing the new AI-powered Bing in third-party browsers on web and mobile soon.
Microsoft
The Bing Chat Mobile app will also have enhanced AI capabilities and several new features coming up soon. However, as it happens on the desktop version, the Bing Chat Mobile app will have limited conversations on other mobile web browsers.
What do you think about it? Let us know in the comments section below.