To use Hulu, you must be logged into Xbox Live. However, you do not need an Xbox Live Gold subscription to watch Hulu on your device. Xbox Live account is at the silver level and is free while Xbox Live Gold is paid.
Hulu is one of the best and most popular subscription apps in the world today. It would be frustrating if you were not able to enjoy its services especially when you had an upcoming show that you wanted to watch.
Before you go, you might want to check Hulu error code P-DEV320 since it’s pretty common on Xbox.
Fortunately, as you can see above, you can easily fix the problem with the Hulu app not working on your Xbox. Please leave a comment below with your questions and concerns, and we will do our best to assist you. In addition, let us know about any other solutions that might not be discussed in this article.
NBA 2K is one of the most popular video games in the world, but even the best games have their glitches. One such glitch that has been plaguing NBA 2K players for months now is error code 4b538e50.
What is this enigmatic code, and how can you fix it? Here, we’ll explain everything you need to know about error code 4b538e50 and how to solve it.
What does error code 4b538e50 mean on 2K22 & 2K23?
There is a problem with our connection to our online services – thiserror occurs when playing online. There may be several reasons that should be considered and expected, which are,
Not enough space on your disk
The version of your game is not updated
Your firewall might be blocking it
Now, as you know the reasons behind this error, there are some methods by which you can try and fix it.
How do I fix error code 4b538e50?
1. Free up your disk space
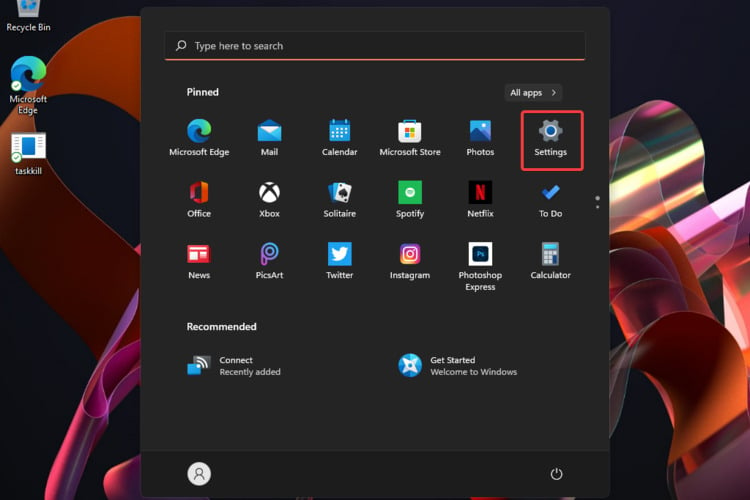
Click on the Start button and then click on Settings.
Select the System tab and click on Storage.
Click on Temporary files.
Check all checkboxes and click on Remove files.
Now your disk has enough space to install new features update. Now, your game will not show the error code 4b538e50.
2. Update your game to the latest version
Open the game and click on FEATURES.
After some time, the UPDATE REQUIRED message shows up.
Once the update message pops up, you can go to the main menu, and the game starts updating automatically.
After some time, when the game update will be completed, you will be in a lobby in no time.
Once the game is updated, you will no longer see the code 4b538e50 on your Windows 10/11 PC.
3. Turn off your firewall
Click on the Search icon, type windows defender, and then select Windows Defender Firewall.
Click on Turn Windows Defender Firewall on or off.
Then, click on both options of Turn Off Windows Defender Firewall(not recommended).
Click OK, and you are done.
Now, you will no longer see error code 4b538e50 and start playing the game.
We hope this guide was helpful and you were able to fix the error code 4b538e50 on NBA 2K22 & 2K23. You might also be interested in our list of the best VPNs to fix any lag problems in NBA 2K.
If you have any other questions, feel free to ask in the comment section below and we will get back to you as soon as possible.
Microsoft news recap is a weekly feature highlighting the top Microsoft news stories of the past week. Sit back, grab some coffee, and enjoy the read!
Xbox head Phil Spencer responds to latest Activision deal criticism
Sony has claimed that even if Call of Duty remained on PlayStation following the acquisition of Activision Blizzard, it would still stifle competition as the title would be on Xbox Game Pass, giving players the choice of playing CoD on with a Game Pass subscription or paying $70 per game to play on PlayStation. In response, Xbox’s Phil Spencer said:
When I look at something like Game Pass specifically, I think it’s the output of competition in our market.
Competition is about driving competitors to innovate, driving competitors to do new things like cloud, like subscriptions, like building new intellectual property. And everything we’ve been focused on is how do we compete effectively, how do we deliver more value to our customers.
A brand-new service that brings the power of the Microsoft Cloud to wherever you need it most.
Announcing the General Availability of Azure Orbital Ground Station
Since the launch of Azure Space in October 2020, we have talked about Azure Orbital Ground Station. Today, alongside our partner network, including KSAT, we are making this service available to all satellite operators, such as Pixxel, Muon Space, and Loft Orbital.
Advancing the digital transformation of satellite communication networks
The first demonstration of a fully virtualized iDirect modem.
Together with SES we are announcing a new joint satellite communications virtualization program.
Discord Voice now available to everyone on Xbox Consoles
All players across Xbox Series X|S and Xbox One consoles can now take part in group channels or voice calls with the addition of Discord Voice.
Microsoft Cloud could reach $100 Billion annual revenues this year
Many users encountered The VGA card is not supported by the UEFI driver and if that happens, you might encounter issues with your graphics card. Luckily, this can be fixed and this guide will show you how to do it.
Why does UEFI mode BIOS not support a VGA card?
This happens if the card is compatible with UEFI. Outdated BIOS or shader cache can also cause this problem.
What can I do if the VGA card is not supported by UEFI driver?
Before trying other solutions, disconnect Oculus Rift from your PC since sometimes it can be interpreted as the primary monitor.
1. Enable CSM
Enter BIOS. You can do that by restarting your PC and pressing Del or F2 during the boot.
Navigate to Boot or Boot options.
Look for the Compatibility Support Module or Legacy Boot and enable it.
Save changes and restart.
Some users recommended removing the GPU, installing it again and then enabling CSM in BIOS if the VGA card does not supporting UEFI.
2. Clear the GPU cache
Open the Nvidia Control Panel and go to Manage 3D settings.
Locate Shader Cache Size and set it to Disabled.
Press Windows key + R and type %localappdata%/Nvidia/GLCache
Delete all files from it.
Next, press Windows key + R again and type %appdata%/LocalLow/NVIDIA/PerDriverVersion/DXCache
Delete all files from this folder.
Optional: Run Disk Cleanup, choose the option to delete system files and select DirectX Shader Cache.
Lastly, enable Shader Cache in Nvidia Control Panel.
3. Update BIOS
Make sure you know the exact model of your motherboard.
Visit the motherboard manufacturer and download the latest BIOS version for that model.
Next, follow the instructions from the website on how to install BIOS.
Keep in mind that this process can differ depending on motherboard brand and model, but if ASUS UEFI is giving you VGA not supported message, you need to update ASUS BIOS, and we have a guide to help you with that.
It’s safe to say that pretty much all of us heard at least once about Naraka: Bladepoint since this title first came out.
We’re talking about a battle royale game that includes 60 players in a match and offers players a wide range of weapons and characters with powerful abilities.
And, since we are talking about aging, allow us to lend a helping hand and show you the best mouse settings for improved gaming on Windows 11
Circling back to the topic at hand, just like any other PC game, Naraka Bladepoint users are also reporting getting stuck on the loading screen when they try to run the title.
Today, however, we’re going to look at some fixes for scenarios when Naraka Bladepoint keeps freezing, so you can go back to gaming ASAP.
Why do I keep getting stuck on loading screen in Naraka Bladepoint?
This can happen for multiple reasons. For example, your gaming rig might not be at all compatible with the game, thus it freezes all the time.
You might not have enough RAM memory to run Naraka Bladepoint, or your GPU might not be updated to the latest version.
Even Windows not being updated can cause similar scenarios, so make sure you keep that in mind the next time you run into this issue.
Furthermore, a weak internet connection can cause problems such as Naraka Bladepoint failing to connect to the server. We’re going to take a look at all this right now.
How do I fix Naraka Bladepoint if it gets stuck on loading screen?
1. Check system requirements
It should go without saying, but you should really do this for every game out there that you’ve decided to buy, download, and install.
There’s no point in spending money on a title your PC isn’t strong enough to run. Of course, you can decide to upgrade your rig, but until then, make sure you look at the requirements.
Even though you can play Naraka Bladepoint on Windows 7 as well, developers recommend at least Windows 10 64-bit.
Let’s have a closer look at the game’s requirements and you can decide for yourself if you can run it properly or not.
2. Verify game files integrity
Open Steam.
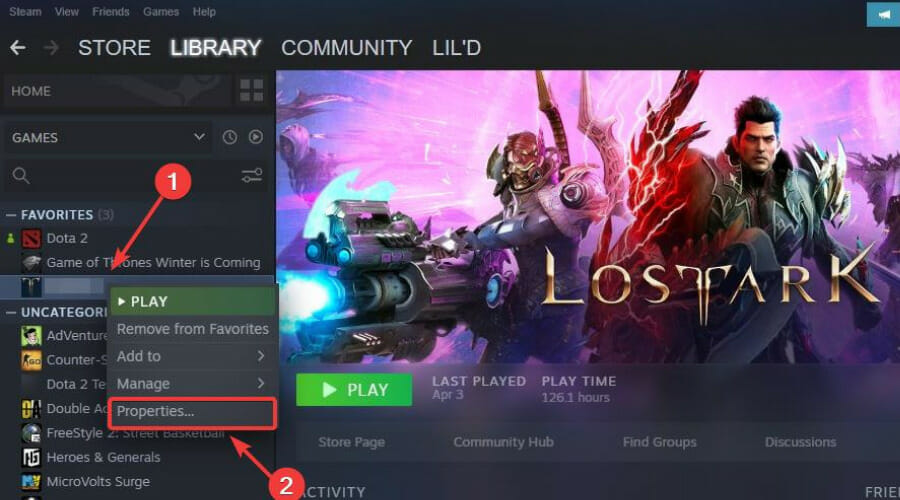
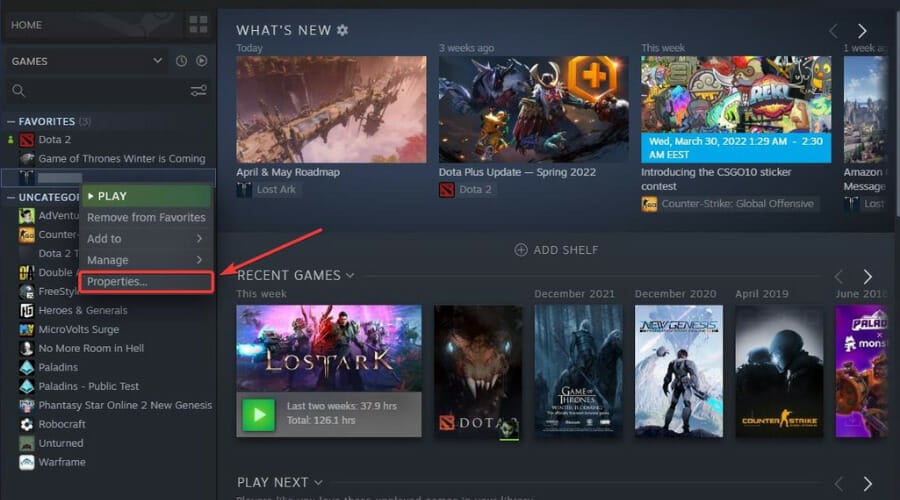
Right-click Naraka Bladepoint and select Properties.
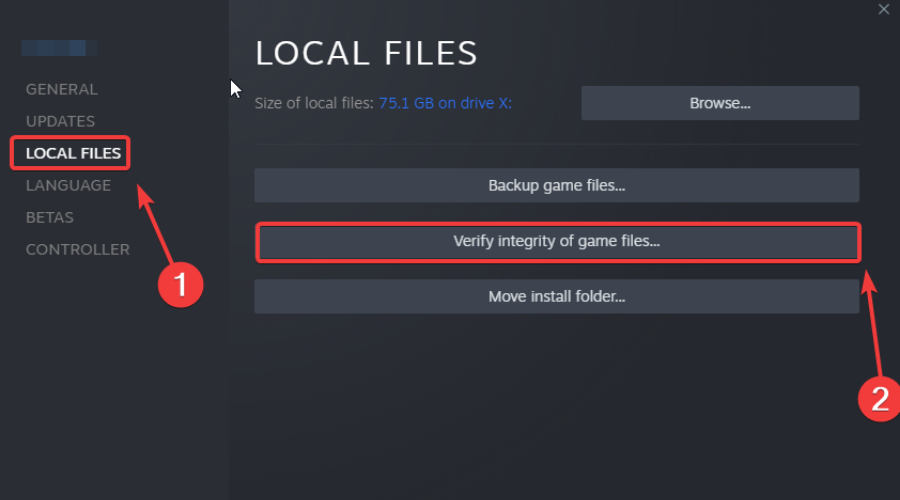
Select the Local Files tab and click on the Verify integrity of game files.
3. Disable Xbox Game Bar
Press Win + I to access Settings.
Select the Gaming tab, then click on Xbox Game Bar.
Disable the Xbox Game Bar overlay.
4. Update Naraka Bladepoint
Open Steam.
Right-click Naraka Bladepoint and select Properties.
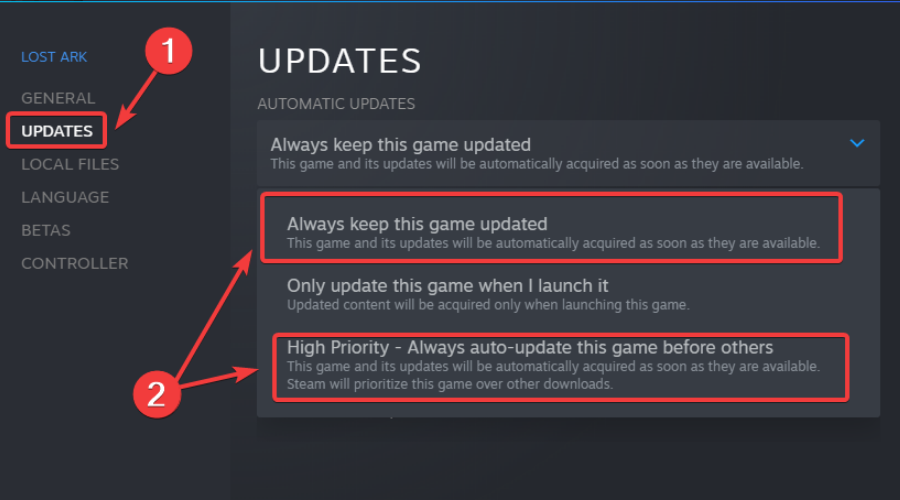
Select the Updates tab and activate one of the two Auto-update options.
5. Update your GPU
Search for Device Manager and open the app.
Expand Display adapters, right-click the one you are using, and select Update driver.
Select Search automatically for drivers.
Windows might not find the latest drivers issued by the GPU manufacturers, so we recommend a specialized driver updating tool that scans for all outdated drivers and updates them to their latest versions.
How can I increase my FPS in Naraka Bladepoint?
Well, as with all PC games, better FPS means that you might need to reach into your pocket and buy some upgrades for your rig.
We say that because, in order to get more FPS, you will need more virtual memory (RAM), a better graphics card, and a solid CPU.
That being said, if you are happy with your current setup, just turn off some of the visual options you don’t really care about, and select Super Performance from Settings.
Closing all of the background processes on the PC and disabling the Discord or other overlays can also be of great help in the race to gain more FPS.
The lack of some of the above-mentioned tweaks can lead to Naraka getting stuck on the 24 Entertainment logo when you run it.
Naraka Bladepoint can get stuck on loading screen non your Xbox console as well, so this is not just a PC problem for the title.
Has this guide been helpful to you? Be sure to let us know in the dedicated comments section located below.
If a Chrome tab is unresponsive and you are unable to close it, it could be due to:
An infinite loop created in JavaScript while coding
A bug preventing the tab/s to close
The tab has crashed
Insufficient memory due to multiple open tabs
Pending Chrome updates
The good news is, that we have a few ways that can help you fix the Google Chrome tab not closing issue.
Quick tip:
A great alternative to solve this situation is switching to a new browser. Opera One is a safer and faster browser that offers amazing features. It has a built-in Ad Blocker that detects and blocks intrusive ads when you enter a webpage.
It also has a free VPN built into the browser that doesn’t collect any information or log your activity. This browser also features a built-in AI and a modular AI-ready design.
Opera One
Outstanding features to improve your browsing experience and get the most out of it.
You can now check if the tabs are working fine and you can close all tabs normally.
How do you force close an unresponsive tab in Chrome?
If you encounter a Chrome tab that simply won’t close, no matter what you do, you can force close it. This can be easily done via Task Manager, in a few clicks.
1. Launch Google Chrome on your device.
2. Click on the three dots on the upper right side of the browser.
3. Press on More tools and then select Task manager.
4. UnderTask, look for the tab, and select it.
5. Now, press End process towards the bottom right.
6. You have now successfully closed the tab and the unresponsive tab issue is resolved.
If you are still facing the same issue where the Chrome tab is not closing, you can check for any latest updates for the browser.
As you proceed to check for updates, Chrome will automatically look for the latest version and install the update automatically.
At the same time, make sure you disable or remove any Chrome extension that may be causing the tab to be unresponsive.
Many PC users are looking for fresh new software. And the software industry is one of the few in which lots of things come for free, so we might as well make the most of freeware.
There are some terrific freeware packages for almost every software category. These are the best freeware programs you can run on Windows 10 and 11 and other platforms.
Just a note of caution: while there is genuine excitement about getting valuable products for free, there is the danger of picking up malware along the way, so we recommend you use good antivirus software while exploring free stuff on the internet.
What is the difference between freeware and free apps?
Although the terms appear to be very similar, there is a fine distinction between freeware and free apps, and we need to clear that up.
Free apps are software you can download and fully use with all the included features without any payment commitment.
Usually, these apps display ads inside the program or invite you to donate to support further development.
Freeware software tools are usually free versions of the full software that provide primary or limited features.
We would also need to mention the third type, the free trial apps that offer a free preview or the software with all the features available but only for a while.
Is freeware free software?
Just like we have mentioned above, they may not be free software, but they are the free versions of software that you may initially have to pay for.
That said, here’s our compilation of the best Windows 10 and 11 freeware apps for your PC.
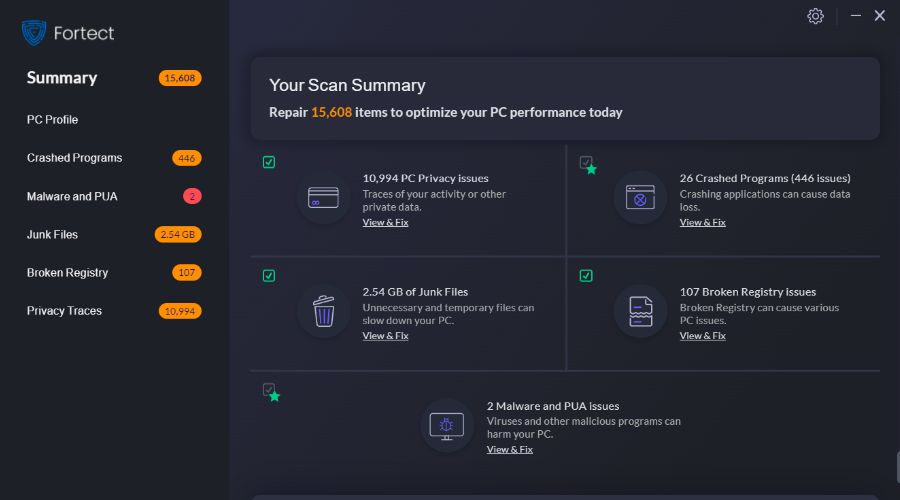
Fortect is not only a great repair tool but a significant system optimizer as well that has a multitude of advanced features.
It helps you run an assiduous scan of your computer, which takes a maximum of five minutes, to find out its condition and the broken parts that may slow down its performance.
This software has a complex OS repair technology that shows you a comparison between your system and a healthy system to determine the deficiencies and further correct them effortlessly.
It can repair or replace all the damaged or missing OS files, including DLLs and Registry Keys, and upgrade your operating system to an optimal state.
You can use Fortect for a cleanup procedure too as it will remove junk files from your folder, disk, and hard drive, which can instantly boost your computer’s health.
Take a look at Fortect’s key features:
Detects and removes files affected by viruses
OS rehabilitation
Exhaustive scan
Optimize Windows Registry
Fortect
Restorate your operating system in no time and watch how your PC’s performance is remarkably increased.
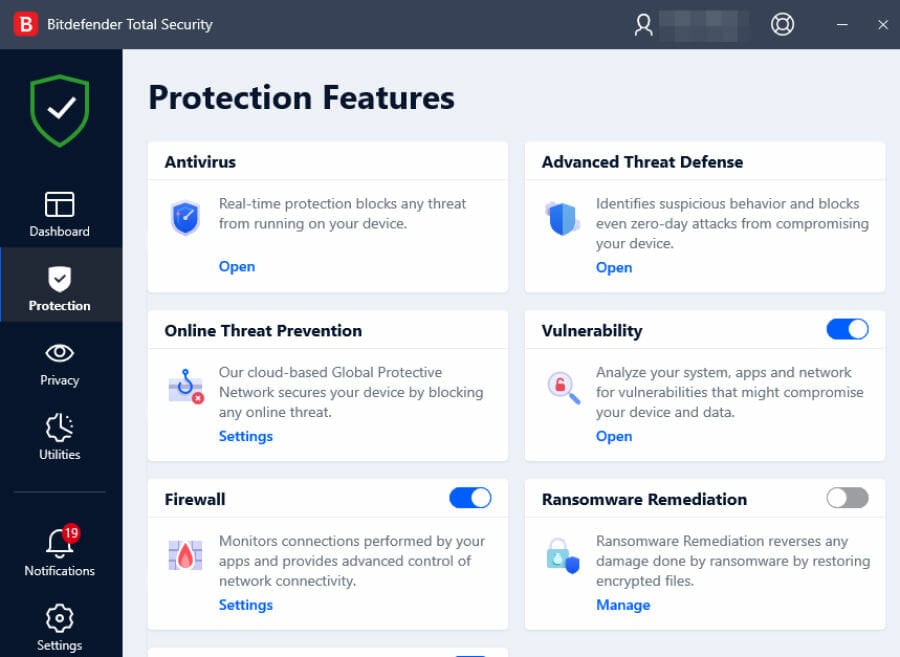
Bitdefender is a renowned antivirus utility for Windows. It has a full suite of scanning and detection tools for killing off malware and other viruses.
The publisher has already released the latest version, so now might be a good time to add this utility to Windows 10.
For a full-featured version of Bitdefender antivirus, we suggest you choose one of the paid options, which comes with good tech support.
Bitdefender includes antiphishing, USB auto-scans, email, and ransomware protection tools.
It includes a handy gamer mode that temporarily suspends scans and notifications to free up system resources for the game. The tool also scans for outdated software and helps you update antiquated programs.
Here are the top features of this tool:
Minimal resource utilization
Award-winning detection technology
Ransomware and phishing protection
Dedicated Game Mode system optimization
Multi-layered scanning and detection
Bitdefender Free Edition
A cyber-security solution meant to defend systems and devices from all forms of malware, spyware, Trojans, and viral assaults.
If you want to save space on your PC or group or compress files you’re planning to send; we recommend using good file archiver software.
Windows has its file archiver built into File Explorer, and while this archiver is good for the most basic tasks, it doesn’t have many features that WinZip has.
This awesome tool supports all popular compression formats, and the list includes RAR, ZIP, CAB, LHA, LZH, TAR, GZip, ISO, BZIP2, VHD, VMDK, IMG, and 7-Zip formats.
As for the speed, WinZip offers a faster compression speed than its competitors.
The application can recognize the type of files you’re compressing and offer you the best compression method based on the files you’re working with.
A handy feature is its ability to split archives, so you can easily send your archive in pieces. For example, this is incredibly useful if you have a file size limit for your email attachments.
Another great feature that separates WinZip from other file archivers is the ability to encrypt your files using 256-bit encryption. As a result, you can safely archive your files and ensure that only the people with the correct password can access them.
Overall, WinZip offers many great features; it supports a wide range of formats and offers great compression, as well as file encryption.
Here are the top features of this tool:
Support for popular compression formats
Simple and efficient UI
Smart compression
Ability to split archives
256-bit encryption
WinZip
WinZip is the best file archiver and has excellent cloud storage integration.
Diving into the gaming experience, on the top of our list is the Android emulator LD Player, which isn’t just a freeware that runs apps but also a breaking barrier between PC and mobile games, with a neat interface.
Using few resources for lightspeed performance, the emulator is compatible with minimum requirements of 2GB RAM and hard disk space of 36GB, efficiently operating games like PUBG or Clash of Clans.
LD Player is the newest mirroring software on the market, which allows you to use custom control with a mouse and keyboard for your favorite Android games.
It also allows you to execute scripts that manage the game automatically and power up your gameplay with high FPS/graphics.
Here are the top features of this tool:
Emulates large Android games on Windows
Multitasking operating controls
Fast and powerful
Support from developers
Can play all the latest games
LD Player
This software is a tailor-made solution for any gamer who needs to emulate games from Android on PC.
Speccy is another Piriform program that is bundled with CCleaner Plus. This is one of the most detailed system info utilities that provide details you might not find listed on the Windows System Information app.
It is a fairly essential freeware package for anybody planning on upgrading hardware, and you can add it to Windows from the CCleaner website.
Speccy provides one of the most comprehensive system overviews. The software gives you detailed reporting for RAM, CPU, OS, motherboard, graphics card, storage, drives, audio, and more.
Usually, these kinds of apps are cryptic and designed for specialists, but with this tool, anyone can access and comprehend the PC specifications.
Here are the top features of this tool:
System detail export
Detailed reporting for all PC components
See real-time temperatures of components
Friendly user interface
Light on your system
Speccy
Learn about your PC’s specs with this friendly and rich tool for Windows.
MailBird is email client software compatible with Windows platforms from XP to 10 and 11. This intuitive and straightforward email application is easy to set up and configure accounts with.
The freeware version is restricted to three email accounts but boasts a decent feature set.
MailBird is email software with which you can open Yahoo, Gmail, Hotmail, iCloud, and Outlook.com emails.
The client has a unified inbox so that you may easily open emails from multiple accounts in one place.
The software has many email formatting options, including customizable themes and layouts for the inbox.
Here are the top features of this tool:
Integrated Google Calendar, Dropbox
Unified inbox for multiple accounts
Great Windows integration
Modern and easy-to-use UI
MailBird
Manage all of your emails and contacts from various accounts in one consolidated Inbox.
World of Tanks isn’t a new Windows game, but this is still one of the best MMO (Massively Multiplayer Online) blasters.
When the game was at its peak, it set a world record for the number of players online on a single MOG server. So, if you haven’t already played World of Tanks, you’ve got to check it out.
This freeware tank game runs on Windows platforms from XP to 10 and 11, and you can get its installer for free.
Anybody remotely interested in mobile warfare will love World of Tanks. The game pits heavyweight tanks from World War One to the early Cold War era in one-on-one or team battles.
The title has six game modes: random, tank-company, historical, stronghold, and team battles.
However, perhaps the best thing about the game is its tech tree and the amount of tank customization it provides for players.
Players start with essential tanks and can build them into formidable, armored monsters.
Customizing the tanks is essential to victory in the multiplayer battles, and building them up is half the fun in World of Tanks.
Here are the top features of this tool:
Incredible selection of armored vehicles
Windows 11 compatible
Customizable weaponry
Multiplayer
World of Tanks
Play alone or in teams, compete for dominance and climb the leaderboard, or form your clan and rule the world.
Icecream Password Manager is a freeware password manager that has been getting rave reviews. This is ideal software with which to save website login details.
You may add Password Manager to Windows platforms from XP to 10 and 11 for free by clicking on the link below.
Password Manager users can save website login details, credit card, and bank account details with the software, which has its master password.
However, this software is a little more than a password manager as it comes with a form filler with which you may fill out repetitious website forms.
You can also save notes, attach files, and set up automatic backups with Password Manager. In addition, the software has Chrome and Firefox extensions that you should feel free to save website passwords.
Here are the top features of this tool:
Fully Windows 10 and 11 compatible
Chrome and Firefox dedicated extensions
Form filer for repetitious website forms
Excellent security protection
Automatic backups setup
Icecream Password Manager
With the aid of plugins for Chrome and Firefox, you can generate passwords, keep secure notes, and automatically fill out web forms.
Advanced SystemCare is system optimization software to give your Windows laptop or desktop an excellent clean. This is five IObit utility applications wrapped into one single package.
There is a notable difference between Advanced SystemCare’s Free and Pro versions, but the freeware package still offers excellent value.
The software incorporates IObit’s Uninstaller, Driver Booster, malware, and hard disk defrag software.
You can also scan for empty folders, completely erase documents, remove startup programs, and fix invalid shortcuts with the software.
However, the best thing about Advanced SystemCare is its all-in-one Clean & Optimize scan that will delete junk files, clean the registry, and optimize the Windows startup.
It also fixes shortcuts in one sweep, which isn’t something you get in CCleaner or many other software tools.
Here are the top features of this tool:
Complex and complete PC cleaning and optimizing solution
Built-in uninstaller, Driver Booster, malware, and hard disk defragmenting software.
Start-up programs removal
Invalid shortcuts fixing
fast Registry cleaner tool
Advanced System Care
All-in-one PC optimizer that cleans trash files, scans for privacy traces and speeds up starting.
Office suites are among the essential software. There are numerous freeware office suites, and WPS Office Free is one worth noting.
WPS Office includes a word processor, spreadsheet, and presentation application.
This office suite has premium and professional versions, including extra split and merge options for PDFs. In addition, you can add WPS Office Free to Windows platforms from XP to 10 and even 11.
For more features, you may consider the paid version. It’s not so expensive, but it’ll be worth every penny.
WPS Office Free has an intuitive tabbed UI similar to the MS Office UI design. However, unlike LibreOffice, the software opens multiple documents in separate tabs instead of multiple windows.
The WPS word processor is more like desktop-publishing software, as you can drag and drop paragraphs to alternative page positions.
Here are the top features of this tool:
Built-in PDF conversion tool
1 GB of cloud storage included
Over 100,000 templates
Sharing documents using links
Modern look, tabbed UI
WPS Office Free
Get free customizable Word templates, spreadsheet reports, and presentation slides.
E-books are no longer limited to just e-book readers and tablets. You can embrace e-books with the Icecream Ebook Reader software for Windows, which supports various e-book formats.
The software has a pro version with more extensive options, but the freeware version is still a nifty bit of kit that you may download for free.
Ebook Reader supports all the primary e-book formats, such as MOBI, EPUB, CBR, PDF, and FB2. In addition, the software enables you to both import and export e-books to other devices.
Users can set up bookmarks, customize fonts and themes and add notes for certain sections of e-books. Translate is another of Ebook Reader’s handy options with which you can translate selected passages if required.
Here are the top features of this tool:
Wide variety of e-book formats
Importing and exporting across devices
Built-in translation tool
Simple and modern design
Customizing fonts and setting-up bookmarks
Icecream Ebook Reader
Manage your digital e-book library in FB2, EPUB, PDF, and MOBI formats, translate, export, and annotate.
CCleaner is among the most highly rated system maintenance software for Windows that Piriform boasts, and it has more than two billion downloads.
Although the CCleaner freeware version might lack features such as scheduled cleaning, and a software and driver updater, it still packs plenty of handy system optimization options.
If you want to try these features, you can do that with the Pro version, which is available for a free trial. However, a registry cleaner is one thing Windows lacks, and CCleaner fills that void with its flexible registry utility.
The registry cleaner enables users to customize scans by selecting various registry categories and can fix numerous software issues.
Here are the top features of this tool:
PC optimizer
Startup manager
Duplicate file finder
Browser plug-in manager
Disk analyzer
CCleaner
Optimize your system performance with this award-winning software for a healthier PC.
Yes, freeware may have adware, key loggers, spyware, trojans, back doors, bots, and trojans. You should thus be careful.
However, we have shared only the ones we know are safe. But, like we earlier said, you should use a good antivirus always on your computer to guarantee your privacy and security.
However, it is wrong to say they all contain malware; you must get suitable freeware from the right sources.
Those are just a few of the best freeware programs you can add to Windows 10 and 11.
We tried to cover all the possible needs for PC usage, including productivity, security, and even gaming, that will improve your experience.
Even though some of them might lack a few options and features in their proprietary versions, they still offer terrific value.
Also, all the apps above are Windows 11 compatible, so if you switch to the new OS, you can enjoy them seamlessly.
Have you tried any of the products, or do you have better ideas? Please leave us a line in the comments section with your thoughts about our list.
Users of Windows are once again being distracted by the infamously annoying global.iris service in Windows 11.
The process that appears in the Task Manager, even if the service itself often doesn’t impact the system, can be highly bothersome. The worst thing is that you can’t discover or turn it off from the services menu.
What even does this service do? Do you have to disable it, or can it run safely in the background? Let’s find out.
What is the global IRIS service?
Users are looking for information on the service on well-known platforms like Reddit since there is a shortage of information about it.
All that is currently known about global.iris is that it is a component of Windows Spotlight and is in charge of the Bing wallpaper of the day, lock screen recommendations, and other things.
Should I disable global.iris service in Windows 11?
Unfortunately, even if you wanted to, you couldn’t disable this service from within Windows.
The best option right now is to download a third-party service disabler that will let you get rid of this pointless service, according to Reddit users who have addressed this issue.
But when it comes to third-party software, there is always a chance for infections and illegal access to system files. We should also mention that Services often don’t consume enough resources to impact system performance significantly.
You can download a third-party service disabler to remove the global.iris service if you have a computer issue you are certain is caused by this service.
You are better off letting the service function in the background if it is not creating any big issues.
What services can I disable on Windows 11?
Here is a list of Windows 11 services to disable without the operating system performance taking a hit.
While this isn’t one of Microsoft’s official services, it behaves like any other service because it won’t damage your computer or violate privacy settings.
This service only cares about wallpapers; it has no access to personal data or Windows files.
Opposing a far greater threat than allowing the service to function in the background of your operating system is trying to download a program to stop it.
Many readers encounter an issue with the webcam settings which keep resetting and reverting to the default settings, each time they restart their PC.
So, every time they try to use the camera, they need to set it up manually using the webcam Properties window, for example, if you are using OBS Studio.
While uninstalling and reinstalling the external webcam may help fix the issue sometimes, in most cases it does not.
Many readers complain that their camera settings change to the default settings every time you reboot your PC.
Some webcam models are designed to work with their own drivers and hence, using a 3rd party webcam with a standard UVC driver may lead to a glitch.
So, if your webcam settings keep resetting every time you reboot your PC, here we have some workarounds for you.
How do I change my webcam settings permanently?
1. Update drivers to generic drivers
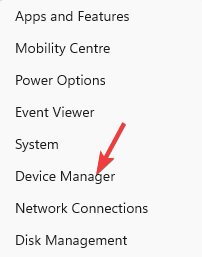
Right-click on Start and select Device Manager.
Expand Cameras, right-click on Integrated Webcam and select Update driver.
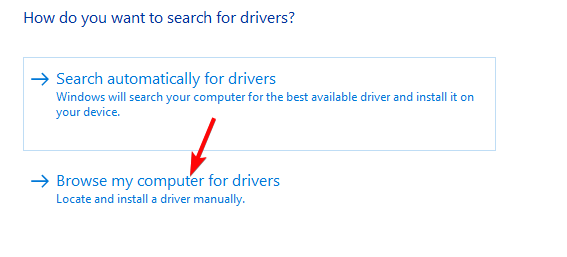
Next, click on Browse my computer for drivers.
Click on Let me pick from a list of available drivers on my computer.
On the next page, select USB Video and click on Next to finish installing the driver.
Once done, exit Device Manager, restart your PC, and now check if the webcam settings still keep resetting.
In case you want a faster and safer option, you can always opt for a software that will perform these steps automatically. Outbyte Driver Updater scans your device drivers and immediately updates them with the latest version.
Outbyte Driver Updater
A dedicated program that improves your PC performance by keeping your drivers updated.
Now, wait for the software to complete installation.
Next, connect your Logitech camera to the G HUB and go to the Webcam settings on the left.
Here, you can add a new camera mode, and configure other camera settings.
This will help you to save your settings and will override your system’s default software for your web camera. So, when you restart your PC, the webcam settings won’t keep resetting.
3. Save the webcam settings
1. Create the cam_sett.cfg file
If you are facing a webcam issue with OBS, open the app, and double-click on your camera to open its Properties.
Next, click on Configure Video, then modify the settings as per your requirement.
Now, download the WebCameraConfig.exe, and save this in a location like Documents/Downloads.
Once done, press the Win + R keys simultaneously to launch the Run console.
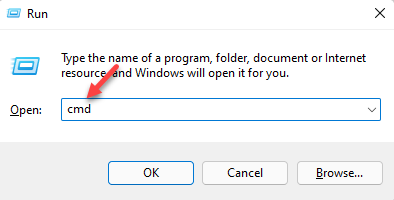
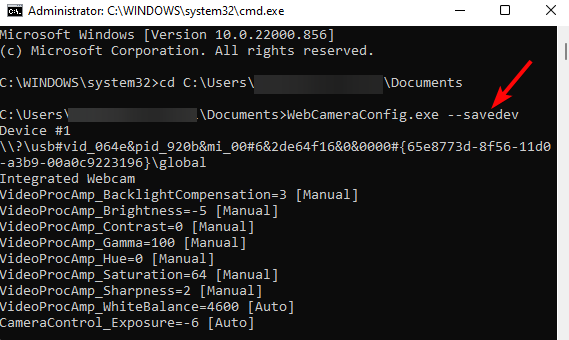
In the search field, type cmd and press the Ctrl + Shift + Enter keys together to open the elevated Command Prompt window.
Now, in the Command Prompt, type the below path (You can replace the location Documents with where you saved it): C:\Users\%UserProfile%\Documents
Next, run the below command: WebCameraConfig.exe --savedev
A file named cam_sett.cfg will now be created next to WebCameraConfig.exe.
You can now configure the OBS webcam settings to test the output.
2. Create a .bat file and make it automated
Open Notepad, and type the details in the same format as shown in the image below.
Make sure to replace the highlighted parts with your username and location.
Also, add your OBS path, based on where the app is saved on your PC, in the below format: C:\Program Files\obs-studio\bin\64bit
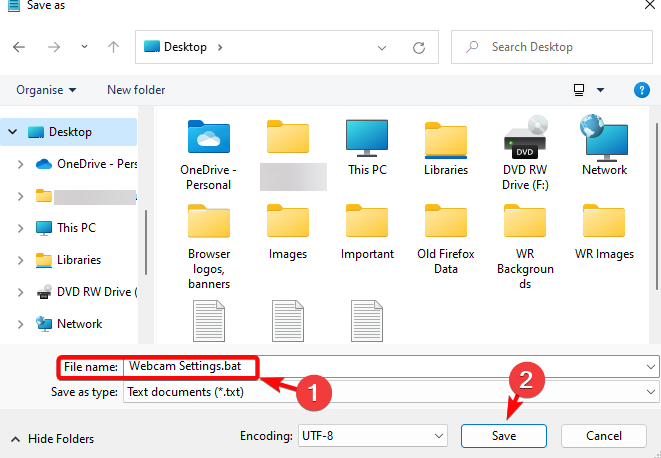
Now, save the file with .bat as the file extension. For example, Webcam settings.bat.
Once done, double-click on this .bat file and it should automatically change the webcam settings and launch OBS.
The next time you boot your PC and run OBS, you can simply run the script instead. This will open the OBS, with the saved webcam settings and won’t reset again.
4. Lock the webcam settings
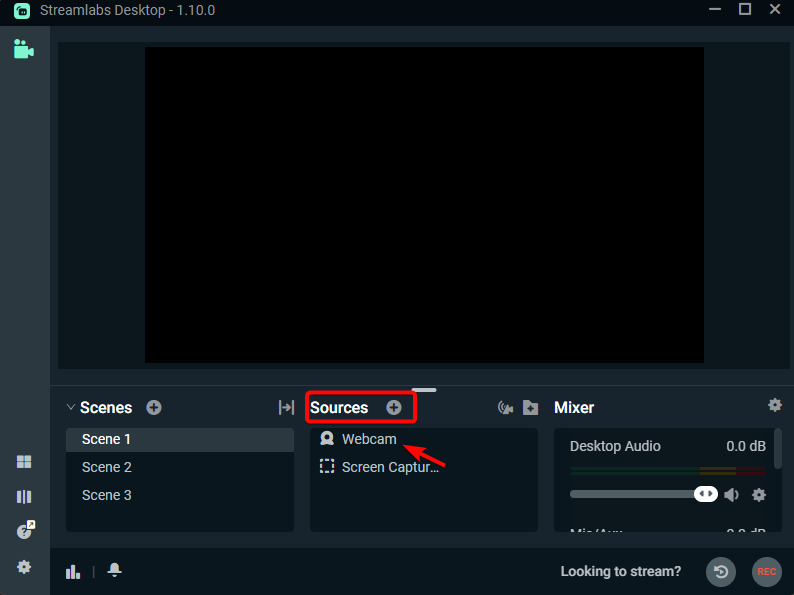
If you are using OBS, launch the app and go to Source.
Here, double-click on the webcam to open its Properties.
Make changes to the settings as per your requirement.
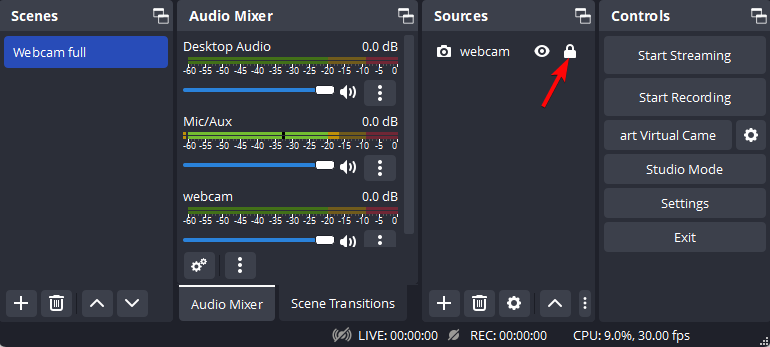
Now, return to the main page, and next to the webcam, click on the Lock icon.
Once you have locked the webcam settings, it should not keep testing back to the default settings on the next restart.
5. Reset webcam settings
Press the Win + I keys together to launch Windows Settings.
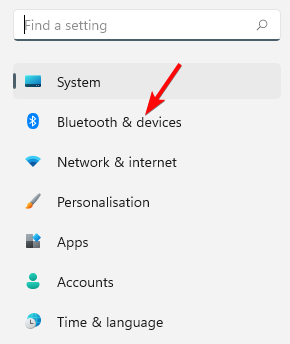
Next, click on Bluetooth& devices on the left.
Now, on the right, scroll down and click on Cameras.
Again, on the right, under the Connected cameras section, click on the webcam.
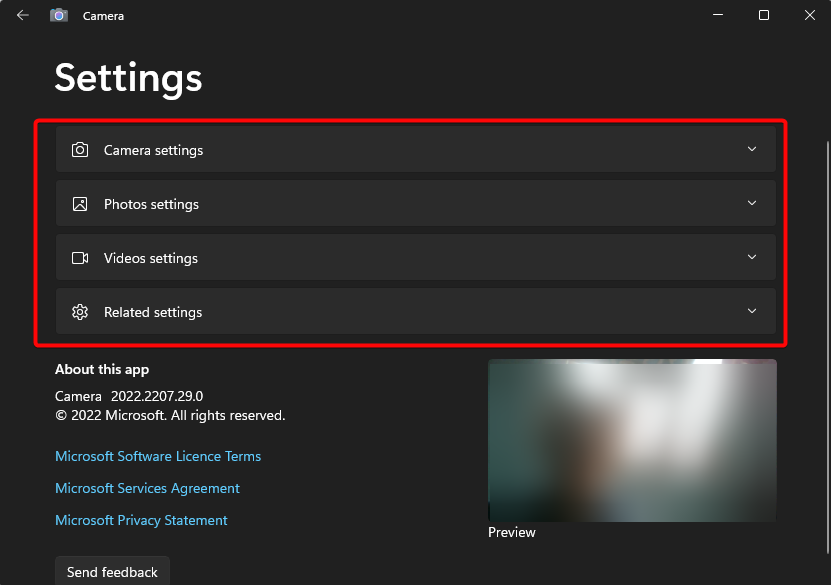
On the next screen, go to Reset default camera settings and click on Reset settings.
Once the Camera is reset, restart your PC and check if the webcam settings have changed again or are still the same.
Additionally, make sure that your webcams are plugged straight into the PC USB port, and not into the USB hubs as this may limit the bandwidth available.
You can also configure the settings in something like Logitech Capture and start this before you stream to reload the settings to fix the issue.
For more doubts and queries on the webcam settings, you can leave a message in the comments box below.
Your PC can’t project to a second screen. Try reinstalling the driver or using a different video card error is usually caused by outdated drivers. Also, the problem might be with the connection between your PC and the second screen, or broken files.
Here’s how to fix it:
What to do if your PC can’t project to another screen?
1. Reinstall your video drivers
Press the Windows key + X and select Device Manager.
Double-click the Display adapters option to expand it.
Right-click on your display driver and select Uninstall device.
Now, click the Uninstall button to confirm the action.
Finally, click on the Scan for hardware changes icon.
You can also try automatic driver updater software to complete this process easier. This tool will detect all outdated or missing drivers and find the latest versions from a massive vault.
Under the Find and fix problems section, select Hardware and Devices or Display.
Click on Run the troubleshooter and follow the on-screen instructions.
You should also check the cables you are using for establishing your connection with your external monitors.
So, before moving to other sophisticated solutions, ensure all parts are correctly connected.
3. Run an SFC scan
Press the Windows key and type cmd.
Select the Run as administrator option under Command Prompt.
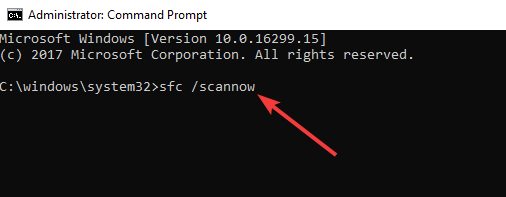
Type the command below and hit Enter. sfc /scannow
Wait for the scanning process to complete, and then restart your computer.
Your PC can’t project to another screen issue might be due to corrupt system files. To fix this problem, you need to run an SFC scan. The System File Checker utility quickly analyzes and repairs system file issues.
Alternatively, you can use a dedicated system repair tool to perform a deep scan and fix all faulty files. This tool not only fixes broken and corrupt files but also ensures your PC is in perfect condition.
4. Clean boot your computer
Press the Windows key and type msconfig.
Select System Configuration.
Select the Services tab at the top.
Check the Hide all Microsoft services check box, and click the Disable all button.
Now, select the Startup tab and click Open Task Manager.
Right-click each startup item, and select the Disable option.
Now, go back to the Services tab and click the Apply button, followed by OK.
Sometimes, various apps and programs may interfere with your projector causing your laptop to show that your PC can’t project to another screen error message.
To fix this, you must start your computer using only a minimal set of drivers and programs by following the above steps.
If you’re using a multiple account computer, keep in mind that not all the user accounts available on the respective machine may have access or permission to project to another screen.
Using a different user account may fix your problem, so try it out. Anyway, try the above troubleshooting solutions and see if you can fix your technical issues.
What to do if the PC can’t project to another screen on Windows 11?
Like on Windows 10, this issue is mainly caused by driver issues. To fix your PC that can’t project to another screen on Windows 11, try reinstalling the graphics driver.
Also, you can confidently apply all other solutions in this guide to solve this issue.
How do I project to another screen in Windows 10?
Connect the displays you want to use.
Press the Windows key + P to open the Project menu.
Select the Extend option to project your screen on all available displays.
With this, the content of your Windows 10 screen will be shown on the other screens.
Your PC can’t project to another screen can be frustrating, as it takes away a vital screen-sharing feature. But we hope you can fix the issue with the solutions in this guide.
NBC Sports is a platform where users can watch live sporting events like the French Open, Football League, etc.
Recently, many subscribers have received an authentication error. The message writes We’re sorry it looks like you’re not a subscriber to this channel. Please contact your provider. This prevented the subscribers from accessing the NBC Sports channel.
Why is my NBC app saying not authorized?
When NBC Sports users try to sign into the NBC Sports app using their credentials, it throws an authentication error, and the reasons for causing this error are listed below.
Poor Internet connection – When a subscriber’s internet connection is unreliable, such mistakes will occur in the system.
Corrupted browsing data – Any web browser’s corrupted data, such as cache and browsing history, may create similar problems.
A problematic NBC Sports app – If an application is installed incorrectly on a system, it becomes troublesome and generates such problems.
An outdated NBC Sports app – An outdated application causes various issues, including authentication errors.
If you are experiencing trouble authenticating to the NBC Sports channel, the three quick solutions below will help you.
How do I fix the NBC Sports authentication error?
Before going through the fixes, make sure you do the following:
Check your internet connection – If you have a terrible connection, simply changing it may save you any troubleshooting headaches.
Restart your computer – If the issue is with the device or system you are attempting to access the NBC Sports application or channel, rebooting the device may be beneficial.
1. Update the NBC Sports app
Open the Microsoft Store app on the system.
Click the Library option on the left bottom panel of the Microsoft Store.
Choose the Get updates button on the right end of the Library page.
This starts to search for all the updates available for the applications installed from Microsoft Store.
2. Clear the Chrome browsing data
Open the Chrome browser.
Press the Alt and F keys together and then press the S key, which opens the Settings page.
Select Privacy and security on the left panel and click Clear browsing data.
Now, click the Browsing history, Cookies and other site data, and Cached images and files checkboxes.
At last, click the Clear data button.
This clears the Chrome browser’s browsing history, cache, and cookies.
We showed you how to perform this action in Chrome, but the process is similar for most significant web browsers.
3. Reinstall the NBC Sports app
Open the Settings app by pressing the Windows and I keys together.
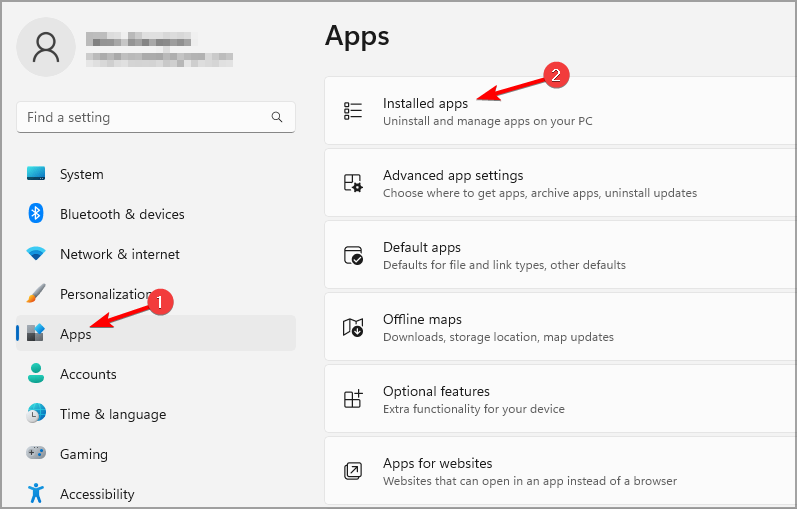
Click Apps on the left menu, then select the Installed apps option on the Apps page.
Once on the Installed apps page, search for the NBC Sports app from the list and click the three horizontal dots.
Choose Uninstall from the list.
Confirm it by clicking Uninstall again.
This starts with uninstalling the NBC Sports app.
Now open the Microsoft Store app.
Type nbc sports in the Search bar on top and select the NBC Sports app from the results.
Click the Get button on the NBC Sports page.
This will start downloading and then installing the NBC Sports app.
Once done, you can try launching the app and signing in.
It appears that NBC Sports may be accessible not just through cable or service providers but also without them.
The NBC Sports programs are available on services like YouTube TV, Fubo TV, Hulu + Live TV, and others, so you don’t necessarily need a cable subscription. However, a cloud path authorization error may appear at times, so a quick re-login should do.
We also have a complete guide on streaming NBC Sports online on your laptop and watching your favorite games.
Please let us know in the comments section below if you have any other questions.
Windows allows you to control your computer as much as you can. However, the level of control or access you can use depends on the kind of account you use on it. By default, Windows computers come with two types of user accounts called the Administrator and the Standard user.
These accounts perform different functions depending on how you set them up. Hence, this article will discuss the differences between Windows 11 Administrator vs the Standard user.
What is the difference between an Administrator and a Standard user?
The Windows Administrator user account allows you high control and access over the computer. It is the highest level of access a user can have to the computer as it permits you to add and remove applications, change user account permissions, and delete/modify folders on Windows 10/11.
Furthermore, the user with the Administrator account can perform tasks that relate to configuration on the computer. Some configuration access the Administrator user has are parental control settings, firewall settings, removal, and addition of user accounts, etc.
Also, the Administrator’s changes affect other users on the computer since it has the most access rights.
Conversely, the level of access that a Standard user possesses is low compared to that of the Administrator user.
The Standard user can access and make changes on the computer but can’t make any significant changes. It spans around the normal operations on the computer as using web browsers and opening office apps.
However, changes in the system files are impossible because you don’t have an Administrator user privilege. But, the Standard user account helps protect your system from users. It prevents users from making changes that affect everyone using the computer.
In short, the Standard user can access and make changes on the computer but can’t make changes in the system files.
They are not allowed a high-level impact on the computer. On the other hand, the Administrator user has high-level access and control over the computer.
It gives the user administrative privilege to make changes in system files, and its changes affect every user on the computer. Hence, the main difference between the Standard user vs Administrator in Windows 10 is the access level and security exposure.
Can you change user account on Windows 11?
The answer is yes. Users can change their user account in the Account settings on Windows 11. It allows you to switch the status and access level of the user account from either Administrator to Standard or vice versa.
Which account is better: Standard or Administrator?
The Standard user account is strict on security and will drastically reduce your exposure to threats. So, we highly recommend the Standard account.
Also, getting the Standard user control even while using the Administrator account is advisable to increase your security. Hence, the two accounts can cohabit on the same computer for better performance.
Several users faced an issue with the Discord application where permissions (roles) are not working properly. They were not able to join some servers in Discord.
Why are permissions (roles) not working in Discord?
The factors which can be responsible for this issue in Discord are listed below:
Discord’s corrupted files – When the files of the Discord application and its cache get corrupted, it might create problems related to permissions
Permission feature of members – The issue arises if the permissions (roles) have not been set properly for most of the server members
Poor Internet connection – The weak and unstable Internet connection creates problems like those mentioned above
There are a few fixes mentioned below in this article that can resolve this problem.
How do I fix Discord when permissions (roles) are not working?
1. Check your Internet connection
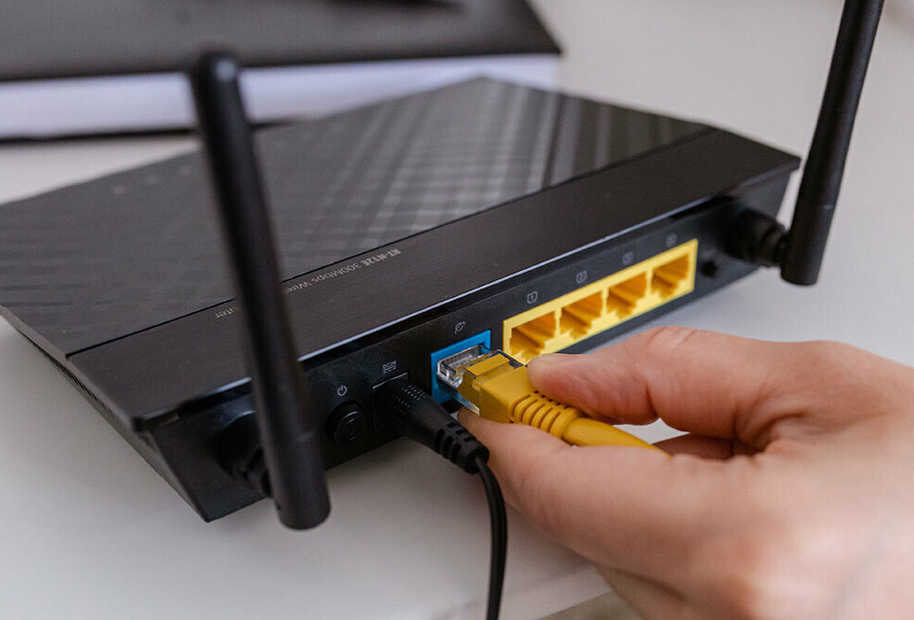
Try rebooting your Wi-Fi router and reconnecting it to the system. Also, unplug the ethernet connection wire from the system and replug it after some time.
This will re-establish and stabilize the Internet connection on the system. Call your service provider if nothing works.
2. Override the channel
The only way you can override any channel is to add a single admin role to the server. After doing this, you need to enable the Manage Messages option for that server.
Once you do these changes, the permissions in Discord will work again normally.
3. Verify every member’s role
There are around 250 roles that you can assign to each and every member of the server group.
When too many users have the same role assigned, it will create such issues and those permissions won’t be working.
So, make sure every member has a role assigned to them they deserve and is fair to other members.
4. Clear Discord’s cache
Press the Windows and R keys together and type %appdata%\discord and press the Enter key.
In the Discord folder, delete Cache, Code Cache, and GPUCache folders by selecting them and pressing the Delete key.
Now go to Desktop (Win + D) and right-click on the Recycle Bin and click Empty Recycle Bin from the menu.
This will clear the Discord application’s cache on the system.
5. Reinstall the Discord app
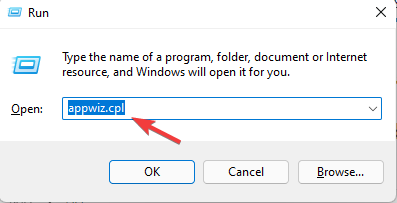
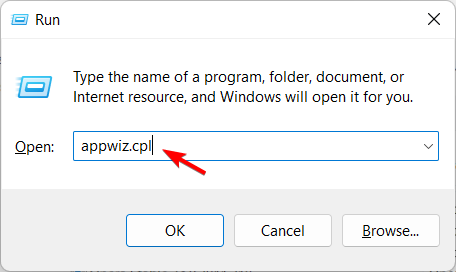
Press the Windows key + R to open the Run console, type appwiz.cpl, and press the Enter key.
Select Discord from the list and click Uninstall.
This will start uninstalling the Discord application.
After that, install the Discord app by double-clicking the DiscordSetup file and then following the onscreen instructions.
Can you remove your own roles on Discord?
No! You can never remove or change your own roles in Discord. The admin or the moderator of the server will be able to do it for you. You need to request someone who has higher power than you can do it.
Peacock TV is the go-to streaming service owned and regulated by NBCUniversal. The American video streaming service provides viewers with plenty of exclusive Peacock original titles, live sports events, classic NBC shows, the latest news, and pay-per-view content.
However, despite its popularity, users have recently reported that the Peacock TV has streaming problems as it keeps buffering for several days.
The problem may come from Peacock TV itself, while at other times, it could be the internet connectivity. Regardless, you can work down this article to find a suitable fix.
Why does my Peacock keep buffering?
Slow internet connection: On most occasions, the internet connection may be why Peacock TV keeps buffering. Whenever the network is poor, it can result in peacock streaming problems. This is also the reason behind Peacock’s Generic Playback error.
Server issue: The Peacock TV servers may experience downtime due to maintenance or other issues. This may also result in Peacock TV error code PAS_41004.
VPN/ other third-party apps interference: If you use the VPN to surf the internet for almost all purposes, you have to consider not using VPN for Peacock TV. It would help if you disabled your VPN to use Peacock TV because sometimes, the servers may consider your device suspicious. After all, the VPN keeps changing your IP address.
Multiple devices connected to one account: There are endless possibilities that your account may be connected to multiple devices simultaneously. So, you must ensure that you control your account and know how many devices are trying to access your Peacock account simultaneously.
Quick Tip
A helpful option for this contextual problem is using a trustworthy VPN service. ExpressVPN can reduce ping, resolve ISP throttling, and lower latency, solving packet loss.
It can allow you to change your server location and enhance your streaming experience by boosting your internet speeds. Thanks to its split tunneling feature, you can also choose which programs and devices you prefer to route your connection over the VPN server.
ExpressVPN
A VPN service that helps you increase your streaming experience thanks to its exceptional features.
Too many programs running in the background of your device or numerous tabs opened in your browser can wear down your device. Also, this can cause your device to freeze, slow down and lag.
The best option is to close unnecessary programs and tabs to allow the Peacock streaming service to run correctly.
2. Restart your device
Restarting your device is one of the best fixes for almost all software issues. Your device may be experiencing an overload of programs, hence the need to restart it.
Doing this refreshes your device and makes it more efficient, giving optimal performance.
3. Power cycle your streaming & network devices
Close the Peacock app and force the shutdown of your device.
Unplug your modem and router.
Please wait for a few minutes before you plug them back in.
Connect to the Internet.
Power on your devices and relaunch the Peacock app.
When you power cycle your devices, it helps restart them without the residual issues that might underline or cause the Peacock TV keeps buffering issue. Hence, this is one of the best options to consider as a fix.
For more solutions, you can also check our full guide on why is Peacock not working, covering region errors, buffering, and playback fixes.
Launch the Chrome browser and click the More button.
Select More Tools, then Clear browsing data.
Select the Advanced option.
Choose the time range you want to clear and check the boxes for Cookies and other site data & Cached images and files.
Click Clear data.
5. Check Peacock TV’s support channels
When Peacock TV has issues such as buffering, freezing, or slowing down, it is advisable to check the Peacock TV social media channels to know if other users are experiencing the same issue.
You may find the announcement on how to resolve the issue on social media. To this, you should check Peacock TV’s Twitter platform.
If none of these fixes work, you can contact Peacock TV customer support and explain your issue. It could be an isolated problem that could be fixed from their side.
How can I improve my Peacock streaming?
Although all the above fixes can help improve your Peacock streaming, there are other minor details to consider. Streaming in 4K is highly selective and may not be worth it if your network connection cannot load it without stress.
Other tips you can consider are:
Ensure you are using Peacock TV within a serviceable region
Disable ad-blockers and VPN services when streaming via Peacock TV to avoid contradicting their rights to display ads
Remove some of the devices your Peacock TV account is connected to
These are the best solutions to fix the Peacock TV’s buffering or freezing problem. If the above fixes are followed holistically, the problem should be solved.
However, it is also possible that you encounter other Peacock TV issues. You can check our detailed guide on how to fix Peacock TV payment issues.
If this article has been helpful, you can leave your suggestions and questions in the comments section. We’d like to hear from you.
For many of us, coming home from work, having a great meal, and playing our favorite video game can be the most relaxing vibe ever.
That is why, having the upper hand whenever your favorite game decides to act up can be the difference between fixing the problem and continuing playing, or giving up and uninstalling it.
Before we continue, since we mentioned gaming, be sure to check out the best browsers for gaming, just in case you ain’t happy with the one you are currently using.
Coming back to why we are here, if you are playing Black Desert Online and you notice your CPU getting overwhelmed, we’ll show you how to tweak the Black Desert Online settings.
How much RAM does BDO use?
We’re just going to say that, your PC needs at least a GeForce GTX 970 or a Radeon RX 480 alongside an Intel Core i5-650 to properly run the game paired with 8 GB of RAM to run on high graphics.
As developers mentioned time and time again, for the bare minimum requirements that Black Desert Online has, you need at least 4 GB of RAM.
Now, if you want to run it smoothly and not worry about anything, as we said, at least 8 GB of memory will be necessary.
Make sure you always check the system requirements for the game you want to purchase and download, just to avoid any issues.
If your gaming rig barely qualifies for the minimum set of requirements, we recommend you upgrade your device first.
Why is my CPU running so high?
It can be multiple causes for why this is happening, but the most common one is some software you have open on your device.
There are apps or games that require a lot more than your CPU can handle, so that’s when you are going to experience this.
Also, make sure you constantly update the drivers, in order to keep everything running fine and smooth, just as it is supposed to. On this matter, software like Outbyte Driver Updater is just what you need to keep all your drivers constantly up to date.
How do I lower my CPU usage BDO?
You need to understand something when it comes to Black Desert Online. BDO uses Both CPU and GPU-based 3D rendering and it is a graphics-intensive game.
Now, the Pre Remastered BDO was highly optimized for CPU rendering so the lower your graphics settings the higher demand it puts on your CPU.
Before we show you what to change in the game itself to lower your CPU’s usage, make sure to close all background processes when playing Black Desert Online.
1. Disable UI elements
It doesn’t sound ideal, but disabling as many UI elements that you’re comfortable parting with, like icons next to the minimap, the quest widgets, icons at the bottom of the screen such as mailbox, and challenges.
In truth, all these little extra settings and UI elements present on your screen take up a tiny bit of CPU’s power, and it all adds up.
2. Disable attack decisions
Enter Settings.
Select the Game tab, deactivate Show Attack Decisions Effects, then press the Apply button.
As an extra tip, make sure you are comfortable with combat before you deactivate this setting, just so you don’t get overwhelmed by your foes.
3. Switch minimap from 2D to 3D
Another tip for improving FPS and lowering CPU usage is switching the minimap from 2D to 3D mode or disabling it entirely.
You might not know this, but the 2D minimap actually has the largest impact out of anything on your UI because it’s loading so many icons that are all taking up CPU and ultimately harming performance.
Many players also stated that the 2D version of the minimap causes stutters for them, so avoiding it might be recommended.
4. Tweak Effects Optimization
Access Settings.
Select Performance Settings, then click on Optimization.
Under Prioritize Effects, move the dial closer to Prioritize Performance.
5. Change your PC’s performance settings
Press Win + I to access Settings.
Select the System tab, then click on Power & Battery.
Under Power Mode, select Best performance.
And, since you are in this area of the Settings menu, make sure to also deactivate the Battery saver option, just to avoid problems.
How can I make BDO run smoother?
As we said, it all comes down to how much stuff you have cluttering your game’s UI, and the graphics settings you are using.
Just use the solutions above and you will have better control over Black Desert Online’s CPU usage and FPS.
If while playing BDO the power usage is very high, exit the game, let your PC breathe for a second, and refer to this guide.
That being said, remember that if BDO is sometimes stuttering in combat, this is a big game and even gamers with decent rigs will sometimes experience it.
Surround sound means a stereophony system that surrounds the listener with three or more speakers to create a more realistic effect.
However, a Windows 11 HDMI surround sound issue is common among Windows 11 users. In this article, we are going to discuss what to do if surround sound isn’t working through HDMI on Windows 11.
Any audio player might have this problem on both 7.1 and 5.1 surround sound systems. Your system won’t produce sound through your rear speakers if this problem arises.
The affected consumers claim that the Realtek sound card is typically to blame for this problem. Other sound card users could, however, also experience this issue.
Does Windows 11 support surround sound?
Yes, it does! Windows 11 gives you the option to choose between three alternative spatial sound providers: Windows Sonic for Headphones, Dolby Atmos for Headphones, and Dolby Atmos for Home Theater.
However, this is only the software part. For the full experience, you will also need a surround sound board installed on your PC.
What can I do if surround sound isn’t working through HDMI on Windows 11?
1. Run the Audio troubleshooter
Type audio troubleshooter into Windows Search and press Enter.
Click on Advanced and then turn on the Apply repairs automatically checkbox.
Click Next and follow the on-screen instructions to execute the audio troubleshooter.
Look for your device’s HD Audio Codecs and download them.
Run the installation file and follow the on-screen instructions to install the audio codecs.
4. Unmute any device
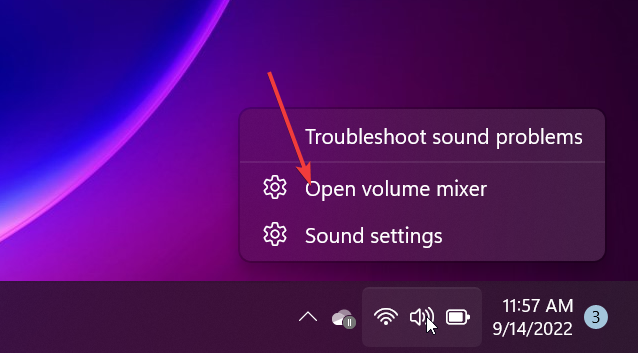
Right-click the taskbar Speaker icon and then choose Open Volume mixer.
Unmute any devices whose volume is currently muted.
5. Restart the audio services
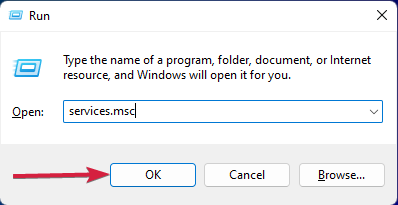
Press the Windows + R hotkey to start the Run command box.
Enter services.msc and click OK.
Right-click on the Windows Audio service and choose Restart.
Do the same with the Remote Procedure Call (RPC) and Windows Audio Endpoint Builder services.
6. Check your surround sound speaker’s configuration settings.
Press Windows + R key combination to launch the Run window.
Type mmsys.cpl and then select OK.
Select the Playback tab and choose your speaker.
Choose Set as Default Device. If the option is grayed out, that means that it’s already set as the default device.
Choose Configure from the menu.
Depending on the sort of speakers you are using, choose 5.1 or 7.1 Surround in the speaker settings and then click Next. If you don’t have these options, your soundboard is either not installed or doesn’t have surround capabilities.
Select the check boxes next to Center, Subwoofer, and Side pair, and then click Next.
Hold off until the configuration is finished and click Finish to finish the configuration after that.
7. Switch on Speaker Fill.
Press Windows + R key combination to launch the run window.
Type mmsys.cpl and then select OK.
Right-click on your speaker under the Playback tab and choose Properties.
Select the Enhancements tab and then activate the Speaker Fill or Surround sound settings.
8. Attempt various audio formats.
Press Windows + R key combination to launch the Run console.
Type or paste mmsys.cpl just like in the previous solutions and hit Enter or click OK.
Choose your speaker from the list and then click Properties.
Select a different audio format from the drop-down box on the Advanced tab.
First, get the Dolby Access app from the Microsoft Store to enable Dolby. The setup process is quite simple, and the software will walk users through it.
Choose With my home theater if you have both a receiver and a home entertainment system.
If you own headphones, pick With my headphones instead. The app will request that Dolby Atmos is enabled for headphones when the trial has been activated.
Surround sound not working with HDMI on Windows 11 is a common issue among many Windows 11 users.
When you are faced with this issue, you do not have to seek help from a technician. As you can see above, you can fix the problem on your own without any problems.
You should always ensure your camera settings are correct, whether you are attempting a business meeting or getting ready to contact a pal for some chatting. But, what if the webcam settings are greyed out?
You should run some troubleshooters before running out to buy a new webcam and presuming that your camera is broken.
Try the following fixes to test whether the webcam will function again or if you can access the settings.
Why is the camera greyed out?
The most frequent cause of Windows 10/11 camera settings greyed out is because your computer’s privacy settings have disabled camera access for desktop apps.
Windows turns off the Camera as a safety precaution so that unsafe websites you visit can’t use it to their advantage and get you into trouble.
How do I turn my webcam settings on?
1. Update drivers
Press the Windows + X keys and select Device Manager.
Expand the Camera or Imaging Deviceand look for the Camera driver.
Right-click and select Update.
Select Search automatically for drivers.
Windows often updates driver software on its own, but the system won’t put certain optional upgrades in place since they were created for computers with issues with the particular device.
This implies that you must manually upgrade the camera driver.
If you’d prefer a faster, more efficient approach, you can always rely on specialized third-party software, like Fortect Driver Updater. This powerful tool will allow you to scan for and update all your drivers in just a few minutes.
To get started, either search for your webcam’s model and brand on Google or go directly to the product page for your webcam on the manufacturer’s website.
The next step is to download the previous driver version.
Now, press Windows + Xkeys and choose Device Manager.
Expand the Camera or Imaging Device and right-click on the Camera driver, and select Update.
Select Browse my computer for driver.
Click on Let me pick from a list of available drivers from my computer.
Finally, choose the old driver version downloaded earlier.
Have you recently updated your drivers, or did Windows do it for you? After the updates, some users may experience problems, such as Dell webcam central settings being greyed out.
Therefore, you may try reverting your drivers to an earlier version to fix the issue.
Press the Windows + X keys and select Device Manager.
Expand the Camera or Imaging Device. Right-click on the Camera device and Uninstall.
Once uninstalled, go to the webcam manufacturer’s website and download and install the driver.
Try reinstalling the drivers as a final resort for driver fixes. If you face Logitech G Hub webcam settings greyed out, you should visit Logitech’s official website to download the drivers after uninstalling the default one.
4. Reset the camera app
First, press Windows + X keys and select Settings.
Click Apps, then Apps and Features.
Look for the Camera App and click Advance Options.
Scroll down and select Reset in the Camera section.
The camera app is the primary program in charge of managing your computer’s camera hardware. The device won’t operate properly if the program encounters flaws or failures.
5. Allow apps access to the camera
Right-click on the Windows icon and select Settings.
Click on the Privacy and Security tab in Settings and select Camera.
To turn on camera access for this device, click the slider on the right for the desired app on the list.
Windows restricts some programs or services from accessing the Camera, as was previously described in private.
So, if you encounter problems like a grayed-out webcam option, you can determine whether or not the program you are using has access to the Camera.
How do I find my webcam driver for Windows 10 & 11?
You may find the webcam drivers in the Device Manager’s cameras category. If your webcam isn’t showing up, click View in the top panel. Then choose Show Hidden Devices.
Also, don’t forget to check whether your webcam is connected properly if you can not locate it.
Grayed-out camera settings can only mean that your PC’s webcam drivers are incompatible with the software you’re trying to utilize the webcam with or that the app can’t access your imaging device.
Reinstalling your camera drivers will be the best option, in any case, to see if it makes a difference.
It is unlikely that your webcam is faulty since, if it were, your computer wouldn’t even recognize it, and you wouldn’t be able to utilize it through a camera program.
Remote Desktop is a cool feature and practical software that has recently gained popularity because of the pandemic. However, this capability could have certain flaws, like Windows 11’s remote audio not working.
The root cause of this problem might be anything from a simple audio problem to a driver update or compatibility problem. Whatever the root of the issue, there is a straightforward solution.
By reading the article, let’s examine the common causes and solutions for remote audio not working in Windows 10 and Windows 11.
Why is my audio not working on a remote desktop?
When you remotely access a computer, Windows Remote Desktop Connection often allows you to play sound from that computer on your local PC. There are three common reasons you might not be able to hear the sound from the remote PC.
The option for audio and video playback redirection is disabled
You have disabled Allow audio recording redirection
How do I fix my audio if it’s not working on a remote desktop in Windows 11?
1. Enable Windows Audio Service
Enter Services in the Start menu search box to access Services.
Find Windows Audio. Double-click it.
In the Startup type menu, select Automatic.
If Windows Audio Service is disabled in this list, you will face Windows 11 remote audio not working after the update.
2. Restart the Windows Audio Service
Once again, go to the Services list and right-click on Windows Audio.
Select Restart.
3. Check the Group Policy setting on the host computer
To launch the Local Group Policy Editor window on the host remote computer, press Win + R to open the Run dialog box, type gpedit.msc, and then click OK.
Follow this path: Local Computer Policy, Computer Configuration, Administrative Templates, Windows Components, Remote Desktop Services, Remote Desktop Session Host, Device and Resource Redirection.
Click on Device and Resource Redirection, then click on Allow audio and video playback redirectionand Allow audio recording redirection, and make sure they are Enabled.
The Group Policy setting is complicated enough for new users to get lost in it, so follow the instructions mentioned above.
4. Check the Group Policy setting on the client’s computer
On your local computer, open the Group Policy Editor window.
Follow this path: Local Computer Policy, Computer Configuration, Administrative Templates, Windows Components, Remote Desktop Services, Remote Desktop Connection Client, RemoteFX USB Device Redirection, Allow RDP redirection of other supported RemoteFX USB devices from this computer.
Select Allow RDP redirection of other supported RemoteFX USB devices from this computer, and make sure it isEnabled.
5. Restart your PC
Open the Start menu.
Select the Power icon and choose Restart.
As a last resort to fix the remote desktop microphone not working, restarting the PC might fix the issue if there are any active bugs in the system.
How do I enable audio devices in Windows 11?
Open Run by pressing Win + R.
Open the Sound control panel by entering control mmsys.cpl and click OK.
Right-click on the disabled device and select Enable.
To save the changes, click Apply and then OK.
By following the instruction above, you may be able to fix the issue without any professional help. The issue usually comes from permission problems; that’s why the group policy settings need to be checked to see if everything is in order or not.
Depending on what application you are using to access your computer remotely, Anyviewer or Anydesk, it would help if you checked the application settings before attempting any fixes.
We usually tend to ignore simple things like checking the settings and rush to the internet to find some technical fixes for the issue.
In the comment section below, let us know if you were able to fix Windows 11 remote audio not working issue.
Telus provides access to the Internet and various related services for both individuals and businesses. This company disables some services, such as Telus blocking IPTV, as a safeguard.
IPTV (Internet Protocol television) is a service that provides access to television shows and other visual content through the Internet rather than through cable, broadcast, or satellite TV signals.
ISPs frequently block IPTV for unknown reasons. However, there are ways to prevent this from happening.
Does Telus block any ports?
For various security concerns, Telus, by default, restricts several ports. The company adds these ports to the block list to safeguard users since hackers often use them to access a network.
Setting up port forwarding serves no service since Telus blocks all incoming ports; this is done in addition to preventing unauthorized access to the network.
How do I stop Telus from blocking IPTV?
1. Use a different DNS
Enter your router’s admin panel. You may find this information under the modem or in the router manual.
Enter the admin username and password for your router.
Find and modify the DNS settings to utilize the Smart DNS proxy DNS IPs. Now, save the settings.
Restart router.
2. Use a VPN
Download ExpressVPN(or any VPN you trust), double-click on the file, and install it on your PC.
Run the application and wait for it to connect.
Retry the IPTV service and see if you can watch your favorite show.
Your internet provider won’t be able to impose content-based service restrictions or throttle your connection speed since it allows you to watch IPTV secretly and securely.
With ExpressVPN you can easily connect to servers in over 90 different countries. Keep yourself anonymous and watch whatever you want safely.
ExpressVPN
Get access to content from any country safely and fast.
Click on the Start menu, type Command Prompt, and select the appropriate result.
Type ping, followed by a space, your website’s address (including the “www.”), and then add with a space -t. For example, ping www.google.com -t.
This will show you your network’s ping. Therefore, if you observe big numbers (more than 200ms), there is an issue with your ISP’s servers. You should contact your ISP’s customer service to rectify this issue.
Connect to your VPN before starting Tor to provide the highest level of internet security. Being one of the most widely used browsers, this one is available for Windows, Mac, Linux, and Android.
How do I check if my ISP is blocking streaming?
The best way to determine whether your ISP blocks streaming is to use the Opera browser. When you enable the built-in VPN, a new IP address is acquired. Your service provider is tricked into believing you are connected through a different provider.
You may enable VPN in Opera’s settings. Use the browser to access the streaming service.
Your ISP has blocked access to this content for you if you can watch any show. If the service doesn’t load, another reason must exist.
Many customers are impacted by the Telus IPTV settings bans. Thankfully, one of the solutions above on how to stop ISP blocking IPTV can assist you in resolving this issue.
The issue with Telus restricting IPTV is well-known, and many users claim that the issue is resolved by using a VPN before accessing the service.
This is why you may rest easy knowing that this problem may be easily fixed, so you can resume watching your favorite shows.
Let us know if you were able to stop Telus from blocking IPTV in the comments section below.
Netflix is becoming increasingly popular among people of all ages, particularly the younger population. As a result, the odds of scammers and fraudsters targeting Netflix users are growing.
We have received many reports from Netflix users claiming they are getting a text message which says Your Netflix account will be locked because your payment was declined, along with a link leading to a webpage for updating the user’s credit card information.
If a Netflix user falls victim to this fraud and enters all their credit card information on the link provided in the text message, the scammers will steal every penny from the account.
Can I get scammed for replying to a text?
Yes! The chances of getting scammed by the frauds are high if you reply to their text messages.
Usually, these scammers send different types of text messages to many unknown numbers.
If they get a reply from a number, they get to know that the mobile number is active. Later, they start planning their scam.
Why is Netflix telling me to update my payment method?
Generally, Netflix won’t bother their users with text messages or emails regarding payment issues or renewal of their Netflix account details.
Also, the scammers send these text messages from a phone number that Netflix never sends to their subscribers.
How do I get rid of the Netflix payment declined scam?
1. Change your Netflix password
1. Open any web browser.
2. Navigate to the Netflix login page.
3. Select theEmail radiobutton and provide yourNetflix Email IDin the textbox below.
4. Next, click Email Me.
5. After this, you will receive an email to reset your Netflix password.
6. Go to your mail inbox and open the email sent by Netflix.
7. Follow the onscreen instructions from there and change your Netflix password.
Given the fact that the Netflix payment declined message is a scam, it is recommended to change your account password. This will ensure that your account is safe and secure.
2. Notify Netflix about the text
If ever you get this kind of text message from scammers, please notify Netflix by emailing the text message to [email protected].
They will act by finding out about the scammers, and you will also help prevent this from happening to others.
3. Block the number
The best way to avoid such fraud is by not replying to such text messages.
There are a lot of third-party applications available that could be used to block the numbers from which you received the text message on your phone.
How can I prevent the Netflix payment declined text scam?
Unfortunately, there is no possible clear solution to prevent you from being targeted by such phishing scams.
The only efficient way of avoiding such problems is to stay alert and refrain from clicking on links that look and feel wrong.
You also need to get an excellent third-party antivirus that may detect phishing websites and warn or block you from loading them.
Did you find this article to be informative? Let us know in the comments section below.
Sky is one of the world’s many internet service providers (ISPs). While it has a vast user base, the service has some unpleasant security features, such as Sky blocking IPTV.
Sky Broadband Shield is one such feature. It’s a web filter designed to block harmful and inappropriate websites. It was created with excellent intentions but restricted far too much traffic. As a result, many are looking for ways to avoid it.
A VPN is an excellent tool for this (Virtual Private Network). But there are also other ways to bypass this unnecessary shield. Let’s get into the article to learn more.
How do I check if my ISP is blocking the streaming services?
The simplest method is using the Opera browser to check if the ISP restricts streaming. Opera browser includes a free VPN. You acquire a new IP address when you enable the VPN.
You can enable VPN in Opera’s Settings. Enter the streaming service with the browser. If you can watch any show, your ISP has blocked access to this content. If the service doesn’t load, there must be another cause than sky-blocking streaming sites.
Retry the IPTV service and see if you can watch your favorite show.
As mentioned, the first option would be to use a VPN service to bypass the Sky shield blocking IPTV.
It allows you to view IPTV securely and privately, which means your internet provider cannot ban services or reduce your connection speeds based on content.
ExpressVPN
Watch IPTV securely and privately thanks to ExpressVPN’s amazing features.
Click on the Windows Start icon, type Command Prompt, and select the appropriate result.
Type ping, followed by a space, your website’s address, and then add with a space -t. For example, ping www.google.com -t.
This will provide you with the ping of your network, so if you see high numbers (over 200ms), there is a problem with your ISP servers and not Sky Sports blocking IPTV.
To resolve this issue, you should connect to the customer support of our ISP.
4. Use a proxy
Click on the Windows Start menu, type Command Prompt, and select it.
Type ping, followed by a space, your website’s address, and then add with a space -t. For example: ping www.google.com -t.
This will provide you with the ping of your network, so if you see high numbers (over 200ms), there is a problem with your ISP servers and not Sky Sports blocking IPTV.
To resolve this issue, you should connect to the customer support of our ISP.
This browser is available for Windows, Mac, Linux, and Android, making it one of the most popular browsers.
Can you put a VPN on the Sky router?
A VPN cannot be installed or set up directly on a Sky router. Since Sky provides your router, they don’t offer many customization options beyond getting you online.
There isn’t much you can do regarding sky router IPTV settings except change your DNS or use VPN on your computer.
Most ISPs are renowned for banning IPTV, affecting many consumers. Fortunately, one of the options above can help you solve this problem.
The issue of Sky banning IPTV is well-known; many customers have stated that using a VPN before accessing the service addresses the problem. Remember that these issues can affect set-top boxes as well, and we covered that issue in our Sky Mini Box not working guide.
The Doom Eternal login not working is a frequent problem that gamers face when attempting to open the game from the launcher, even with the right credentials.
When you first launch Doom Eternal, you’ll be prompted to log in to your Bethesda account before you can play the game.
You can easily log in by either clicking I already have an account at the top of your screen.
If you do not have an existing account, you can click on create account to sign up. But what could be more frustrating than having to forfeit playing a game because you’re unable to log in?
Requiring that players must compulsorily log in is already a problem on its own.
A lot of players have voiced their frustrations about not being able to connect to the game. Some are left on an endless connecting screen, and others report Doom Eternal freezing at login.
If you’re experiencing the same problem, then we have a couple of solutions you can try out. This article will show how you can tackle this problem and successfully log in.
Why can’t I log in to Doom Eternal?
→ The first place you should look if you can’t log in to Doom Eternal is your username and password.
Be sure there is no key in an incorrect username or password. If you have forgotten your password, you would need to reset the password before you can log in. Also, make sure you don’t experience any issues while connecting the Bethesda account to Steam.
→ Also, another area you need to look into is account verification. If your account hasn’t been verified, you will be unable to log in fully to play Doom Eternal.
There are two factors that may cause you verification issues:
If you had linked your account through another game such as Fallout 4 or Skyrim but did not complete the full verification
If you created an account but did not click on the verification link sent to your email
These aside, there are other possible issues that cause login errors in Doom Eternal, and we’ll discuss them and explore how we can fix them below.
How to fix Doom Eternal login not working
1. Reset password
Even if you do not get the “invalid password” error message, the issue might be related to an invalid password.
So the first thing you should do is reset your password to be sure the error isn’t coming from there.
An invalid password could also trigger error messages like Doom Eternal: something went wrong or Doom Eternal: please try again.
If you’re getting these error responses, then it’s likely you are keying in an incorrect password.
When resetting your password, make sure you have an alphanumeric password. Use at least 8 characters. And remember, certain characters are not accepted so avoid using them as part of your password.
2. Use a VPN
Some players have reported that using a VPN helped them fix the issue.
The issue could be due to the inability of your device to connect to Bethesda’s server or a connection problem from your ISP. A premium VPN will help you fix this.
For this type of issue, we suggest using Express VPN as an option because it has over 3000+ super-fast servers that you can connect to.
Find the Doom Eternal app in the list and select it.
Pick Advanced options.
Click on the Reset button.
Clearing your launcher and game’s cache gives it a chance to reset and remove bugs and errors that may accumulate over time, such as the login error or even with Doom Eternal high ping and latency.
4. Contact Bethesda support
If nothing still works after trying all these solutions, consider contacting Bethesda support.
You can reach their support by going to the bottom of their official website or by sending a direct message to their Twitter handle.
How do I complete Doom Eternal account verification?
Go to your login page and click on Help find my account.
Enter your email in the box and click on Send email.
Bethesda would send the verification link to your email.
Open the mail and click the verification link to verify.
At this point, your account should be verified and you’ll be able to log in.
Why can’t I play Doom Eternal offline
If you are finding it difficult to play Doom Eternal offline on Xbox, it means you have not set the console as your home console.
On PC, the reason could be that you haven’t switched Steam to offline mode.
But if you’ve switched Steam to offline mode but can’t still play offline, try finishing the game while connected to the internet. You should be able to play offline after that.
A lot of players have complained about having to log in before they can play Doom Eternal.
We are hoping that Bethesda will fix this soon by totally removing the login requirement. But while we wait, we hope that one of these solutions helps you fix the problems you’re having with Doom Eternal login.
Today’s connected world demands a higher level of security for devices and endpoints, which is why there’s a surge in antivirus software that is better, more sophisticated, and stronger than its predecessors.
One thing that may never go away is the antivirus with a trial version because most customers want to do a test run before they can make the decision to get a paid version for their home or business use.
Trial versions may, or may not come with the full features as the paid version, but you can be sure they’ll carry out the basic routine checks and security measures you need until their expiry.
The difference is that paid versions grant you full access to all product functions plus tech support while performing background and on-demand protection as your computer runs.
The trial version won’t give you this, at least not after expiry – it won’t update virus definition files either so you’re vulnerable to threats once it expires.
Here is the best, top-level security antivirus with a trial version you can get ahead in 2021:
What is the best antivirus with a trial version for Windows PC?
ESET HOME SecurityEssential is the perfect software to protect your privacy for your online shopping, banking, communication, and work.
This tool is the perfect companion for modern computer users, being compatible with multiple devices, and protecting their Windows, Linux, Android, and Mac devices.
You won’t have to worry anymore about the safety of your private data such as passwords, online payments, and other sensitive data. All data is stored under many layers of protection.
ESET HOME Security Essential uses multilayered security in order to keep you safe from any threat. Furthermore, it aids system performance by scanning when your computer is not in use so it detects in advance any potential threat.
It also provides advanced machine learning that runs locally and was designed to detect advanced, never-seen-before malware and other viruses.
ESET HOME Security Essential’s main key features are:
Advanced anti-malware, anti-phishing, and ransomware protection
Parental control options
Webcam protection
Advanced settings for power users
Banking and payment protection
Real-time security with advanced machine learning
ESET HOME Security Essential
Ensure top protection of your PC from risky malware and keep your private data secure.
Kaspersky gives you a free 30-day trial period so you can discover just how smart it is in protecting everything on your PC.
Protection includes defense against viruses and other malware types without slowing you down, plus online control with simplified security.
The program will guard you against hackers, and attackers while helping you keep your private life private, and boosting security as you shop or bank online.
There are three options you can choose from this antivirus with a trial version: Kaspersky Total Security for family and device protection, Kaspersky Antivirus, and Kaspersky Internet Security.
Kaspersky Standard
It defends your operating system against viruses and malware while protecting your private data.
Bitdefender has multiple antivirus versions, with different prices and features, but all of them have 30-day trial periods.
We encourage you to try Bitdefender Total Security, an antivirus that works on different platforms, such as Windows, MAC, IOS, and Android.
Enjoy full multilayered protection for up to 5 of your devices, and that’s not all. This version of the software comes with a PC cleaner and optimizer tool.
With Bitdefender Total Security, you will be safe from all existing and emerging threats, thanks to the advanced AI that constantly improves and denies access even to the most hidden viruses.
If you’re using an older OS, Bitdefender provides protection with no impact on system performance, blocking all threats. Additionally, the app has a parental advisor and a two-way firewall to prevent device breaches.
Here are some other core features that you should expect from the program:
Anti-malware, ransomware, and adware protection
Anti-phishing protection
Online banking security
Web privacy
Lightweight
Special optimization for gaming
Multi-platform protection
Bitdefender Total Security
Bitdefender protects your computer against ransomware, privacy invasion, malware, and other threats.
Guardio is not an antivirus solution in and of itself, but rather your real-time defender who detects and stops all threats in real-time in your browsers. It is free to install, and also provides a 7-day free trial for additional features.
Traditional antivirus software attempt to eliminate dangers after they have infected your computer, while Guardio prevents threats from reaching your browser. Guardio defends in real-time, so there’s no need to manually scan for threats or apply updates.
This browser extension does not consume excessive resources, and it works well alongside other security tools without interfering with them.
Guardio warns you not to open shady emails or visit misleading websites where hackers can rapidly install harmful malware on your computer. Because your browser is a trusted application, a basic antivirus solution may overlook harmful extensions; Guardio detects and eliminates them.
Guardio warns you before you read an email that contains a threat. Guardio can identify a breach of your personal data, whether malicious intent or human error, and help you avoid identity theft. Furthermore, the security addon purges your browser of potentially harmful viruses and spyware.
The benefits of using Guardio are:
No additional downloads or software to install
Real-time web browsing protection
Automatically blocks harmful sites
Information leak monitoring
Removes suspicious extensions
Never see annoying notifications and pop-ups
Guardio
An advanced lightweight browser extension with real-time detection and prevention.
TotalAV is award-winning antivirus software that comes with some amazing security features for your computer and for online browsing.
One of the main features is WebShield, a tool that protects you when browsing in real-time. You will be safe from phishing software, suspicious websites, links containing scripts and all your data will remain anonymous.
When searching for something, TotalAV will show you verified website listings, so no scam websites can trick you.
On top, with advanced features, no one will be able to track you or find any single detail about you. Your privacy is safe with TotalAV.
As for your PC, its in-depth scanning will find even the most hidden file that might pose a threat to your PC. With advanced anti-malware and ransomware, this antivirus will keep all threats away from your system.
And TotalAV is compatible with all your devices, so you can use it for your phone, tablet, or laptop, and your personal information will be safe even when connected to public WiFi.
While using TotalAV, you gain the following perks:
Real-time protection for downloads and pages you access
Remote firewall, allowing you to easily block or unblock connection requests
Anti-adware to block aggressive ads and pop-ups
Compatibility with all your devices
TotalAV
Your bodyguard for your PC and when browsing and accessing web pages.
Avira Free Security protects your computer from hackers and scammers and optimizes its performance. It does a great job checking your operating system and the networks you use for online threats.
Avira Free Security will also clean your browsing history and improves the privacy of your system.
This intelligent software has a direct positive impact on your computer. It frees up precious disk space and makes your computer faster.
Another important feature Avira Antivirus offers you is to improve the life of your battery. Create, schedule, and run scans to keep your system virus-free.
The program will detect and clean viruses, malware, and many more threats from your operating system.
After finding suspicious files, Avira Free Security will quarantine them, allowing you to choose which must be deleted and which should be restored.
This software has a built-in firewall, allowing it to block network ports that may be used by malware or hackers to cause harm to your computer.
Avira Free Security
This secure tool will protect your computer from hackers, scammers, and different types of viruses.
Emsisoft Anti-Malware is now one of the most recommended security tools. This antimalware software is designed to work on all types of PC or laptops (even those with low specs) and supports both x32-bit and x64-bit platforms.
Getting straight to the question, Emsisoft Anti-Malware has a 30-day trial version that you can use in order to consider buying this excellent tool.
It protects your PC like all other antimalware tools, but it has some extra things in it. Firstly, you have the Behavior Blocker feature which protects you against yet unknown signatures and keeps you safe even if the attack came out not from the internet.
Another notable feature is the 4-layer protection in real-time. The tool also gives you the previous logs so you can monitor all the actions that happened on your PC or laptop. Running a scan does not take longer than a couple of minutes.
Emsisoft Anti-Malware is the budget version for full protection and we recommend it for all users.
Emsisoft Anti-Malware
Developed to secure your PC in real-time against malware and complex unknown threats.
Panda Security Essential trial version offers a free one-month trial, with protection in three options: Basic, Advanced, and Complete.
The basic option protects devices from viruses and other threats, plus you can browse the web safely.
Advanced protection does what Basic offers, but also lets you download and share files without nasty surprises, on an unlimited number of devices.
Complete Protection combines both Basic and Advanced protection, but also optimizes and makes the most of your devices, letting you shop and pay online with zero risks while protecting children from dangerous sites.
Panda Security Essential
Keep your computer protected from viruses and threats while safely browsing the Internet.
This antivirus with a trial version offers a 14-day risk-free trial that downloads in seconds and doesn’t interfere with your current security software.
Webroot SecureAnywhere Antivirus protects against threats soon as they emerge, has no endless popups and alerts, secures up to 3 PCs while protecting you from identity theft, and has no time-consuming updates or slow scans.
Webroot SecureAnywhere Internet Security Complete has all features of internet security including eliminating traces of online activity, 25GB of secure online storage, protection from threats as they emerge, and no endless popups or alerts, plus it secures up to 5PCs, smartphones, and tablets.
Webroot Antivirus
This is an antivirus that shields your device against threats, with no annoying popups and alerts.
This is one of the strongest and best antivirus with trial version brands in the market.
It protects against all types of malware, with fast and efficient security that doesn’t slow down your computer.
You also get secure internet surfing with browser protection, and family protection with parental control to protect kids online.
F-Secure Internet Security comes with a 30-day free trial, but you have to submit a form to download it.
You don’t however have to provide any credit card or banking details. It is the best protection for surfing, banking, and shopping online, worry-free, with automatic protection against malware, hackers, and identity theft.
F-Secure antivirus also comes with a free 30-day trial, protecting your PC from viruses and malware, with automatic security updates, and you can use your computer safely without it slowing down.
F-Secure
F-Secure protects your computer against all malware types and offers additional browser protection.
Avast Free Antivirus features advanced protection based on machine learning that will constantly improve, gather data, and take old and newly emerged threats alike.
With this software, you won’t have to worry about your device getting infected by spyware, ransomware, adware, and other dangerous software.
Besides having a powerful defense, the program will also remove any viruses it finds on your device after scanning it. This includes even the most hidden malware, such as Trojans.
Let us take a look at some of the software’s core features:
Behavior shield that constantly keeps an eye on suspicious apps
Some users have reported that they are having some issues with Hulu, such as Hulu not casting to Chromecast. Others claim they cannot cast their favorite shows or movies onto Chromecast.
Hulu is a popular subscription-based movie streaming platform. It presents you with a wide range of content from various movies, Hulu Originals, live channels, TV shows, kids’ shows, etcetera.
It is available on most operating systems and supports Chromecast to watch your favorite shows on the big screen.
Fortunately, there are simple troubleshooting steps to fix the connection issues. You can work your way down this article to find which of the fixes works best for you.
Why is Hulu not casting to Chromecast?
Poor internet connection: One of the significant reasons that may hinder Hulu from casting to Chromecast is if there is no functional internet connection. Whenever there is a temporary network outage in your area, then, you can’t cast Hulu to Chromecast.
Server outage: On other occasions, the problem may not result from a poor internet connection. Instead, Hulu servers may be experiencing some downtime due to maintenance or other issues.
HDMI connection error: To make Hulu cast to TV through Chromecast, there are several mandatory connections you need to put in place. First, you must connect the streaming device to the TV via HDMI Port. However, if the HDMI cable is broken or the port is damaged, Hulu may not cast to Chromecast.
Power supply: To make Hulu cast to TV, another thing to ensure is that your TV is connected to an Uninterrupted Power Supply. Check if the power supply is not cut and if your TV is plugged directly to the source, without which Hulu will not cast to Chromecast
How do I fix Hulu if it’s not casting to Chromecast?
1. Re-sign into your Hulu account
Launch your Hulu application or visit hulu.com on your browser.
Click on your Profile on the bottom menu.
Click on Log out.
Wait for about three minutes, then log back into your Hulu account on the same device.
This method will clear your current session by logging out of your Hulu account and back in.
2. Clear Chromecast app Cache and Data
Access the Quick Menu of your Android TV using your remote.
Navigate to the Apps tab.
Select Show System Apps.
Select the Chromecast Built-in option.
Next, click on Clear Cache.
Then confirm by clicking OK.
Finally, click on Clear Data and click on the OK button.
Ensure that your device’s internet connection is enabled.
Launch your phone’s Google Home app.
Select the Settings menu.
Select the Reboot option.
Wait for the Chromecast device to update automatically.
5. Manually factory reset the Chromecast device
Ensure the Chromecast device is correctly plugged into the TV.
Press and hold down the reset button on the back of the Chromecast as it starts flashing.
Release the reset button only when the light stops flashing and stays solid.
This will enable Chromecast to Reboot and Reset itself to factory default settings.
Will Hulu work on any TV?
Hulu currently works with all the major smart TV brands, such as Samsung, LG, Sony, and Vizio, to name a few.
However, Hulu can still work on various devices, including streaming players, smart TVs, smartphones, tablets, gaming consoles, and your browser.
If none of the above fixes works for you, you can check our detailed guide on how to fix the most common Hulu connection errors for further assistance.
You may often need to open multiple files on your Windows 10 PC. So, it would be great if File Explorer included a file list feature with which you could set up saved lists that you could click to open all files included in them.
Then you could open multiple images, documents, music, spreadsheets, and even .exe files within the saved list with a single click.
Well, Microsoft has not incorporated such a feature into File Explorer. Nevertheless, you can still set up file lists with which to open multiple files at once.
This is how you can open multiple files at once with a batch file or third-party software on Windows 10.
How can I open multiple files at once in Windows 10?
1. Set up a batch file and create a shortcut for it
1. Press the Windows + S hotkey on your keyboard to open the search box.
2. Enter Notepad in the search box, and then select to open that text editor.
3. Write @echo off’ at the top of the text file, as in the snapshot shown directly below.
4. Then enter the open file command as follows: start <file title> <full file path>
For example, to open the CCleaner software, users would enter something like this in the text editor: start CCleaner64 “C:Program Files (x86)CCleanerCCleaner64.exe”
5. Note that the file title that precedes the path in the command doesn’t need to include the file’s extension as well. After entering all the required start commands in the batch, clickFileandSave As.
6. SelectAll Fileson the Save as type drop-down menu.
7. Then enter File list.bat in the File name text box.
8. Select to save the batch to the desktop.
9. Press theSavebutton.
10. Click the File list.bat file on the desktop, which will open all the files you programmed it to.
11. To assign a hotkey to a file list batch, right-click it and selectCreate a shortcut. That will add a duplicate batch file shortcut to the desktop.
12. Users can move the original batch file saved to the desktop into a folder, if they prefer.
13. Right-click the batch file shortcut and select Properties.
14. Click the Shortcut key box on the Shortcut tab, then press a keyboard key to set up a shortcut for it. For example you can choose Ctrl + Alt.
15. Press theApplyandOKbuttons.
16. You can now press the Ctrl + Alt hotkey for the batch file to open its file list.
Although Windows 10 does not provide a built-in option to open multiple files at once, there is a workaround for this. You can set up a batch file to do the job via Notepad.
After you create the batch file, you can assign a specific shortcut to it for quick access. This means that you’ll be able to open those files in the future with a simple keyboard shortcut.
Alternatively, users can open multiple files at once from a list with Instant File Opener. Click Free Download on the Instant File Opener webpage to save the setup file for that software.
Then open the installer to add Instant File Opener to Windows.
Open the Instant File Opener window shown directly below.
Click the Add file, folder, or program to the list button.
Then users can select a few files to add to the list with the Ctrl key.
Press the OK button.
Press the Save list disk button after adding all required files to it.
Select to save the file to the desktop.
Enter a title for the file.
Click the Save button.
Thereafter, users will spot an IFOL file on the desktop. Click that to open its file list window shown directly below.
Then users can click Open All.
To open files in the list during startup, select the Open at System Startup option on Instant File Opener window.
Users can also select Auto-Run on the List Type menu to automatically open all files without the list window opening.
So, it’s relatively straightforward to set up a file list even with a batch file. You can set up numerous file lists to quickly open any combination of software, image, document, music, and spreadsheet files at once.
If you have any other questions or suggestions, leave them in the comments section below and we’ll be sure to check them out.
If you’ve been a customer of Charter.net (Charter Communications) for some time now, you should know that they have been rebranded. They did not alter the email domain, though, so no modifications here.
On the other hand, if you’re a new customer, you might have learned that the Internet and cable television provider has an integrated email service that you can benefit from along with other services.
Charter (now Charter Spectrum) also offers the same services for business clients. Part of their business line, depending on the package you select, they provide between two and 25 email accounts for your business to use.
You can access these accounts via their webmail interface, or you can integrate your Microsoft Outlook desktop client with Charter, via IMAP/ SMTP.
How can I set up a Charter email in Outlook 2016?
1. Create a personal Charter email account
Sign upfor Spectrum.net services and create a username and password.
Sign in to your Spectrum account.
Go to theMenuicon in the top left corner of the page and selectManage Account.
ChooseServices >Internet.
ChooseCreate Email Address and create a new username.
Then selectCreate Mailbox (it can be something like [email protected]).
Enter your Spectrum.net password >Finish.
If you’re using the service for business purposes, you need a registered domain name with Spectrum Business and a Spectrum Business Internet subscription.
2. Add your Spectrum account to Outlook 2016
1. Launch Outlook on your device.
2. Go to Fileand click on Add Account.
3. Enter your full Charter email address.
4. Click on Advanced options and choose Let me set up my account manually.
5. Press on Connect.
6. SelectPOPas the account type.
7. Add the following:pop.charter.net(Incoming Mail Server),port: 110, andsmtp.charter.net(Outgoing Mail Server),port: 25.
8. ClickConnect.
9. In the login box that appears, enter your Charter email and password and press OK.
10. That’s it! Now you should be able to access your Charter email directly from yourOutlookaccount.
As long as you own a Charter email, you can easily integrate it to your Outlook 2016 email. This can be done via Outlook’s built-in options.
We hope you managed to successfully configure your Charter email settings for Outlook 2016 following our guide. Let us know if you encountered any difficulties by writing in the comments section below.
Python is designed to build websites, software, and more using a high-level programming language. However, users have recently reported receiving a permission denied error in Windows 11. Here’s how to fix PermissionError [Errno 13] Permission denied error in Python.
Because Python uses a general-purpose language, it can be used to build various programs rather than focusing on a specific variable.
For those wanting to learn more about developing and coding, Python is one of the easiest programming languages to learn, making it perfect for beginners.
Why do I get the permission denied error in Python?
Users encounter PermissionError: [Errno 13] Permission denied error if providing Python with a file path that does not have permission to open or edit the file. By default, some files do not allow certain permissions. This error may also occur if providing a folder rather than a file.
If the file is already being operated by another process, then you may encounter the permission denied error in Python. If you’re receiving the Python runtime error, we offer solutions for that as well.
How do I fix the Python permission denied error in Windows 11?
1. Check file path
One of the leading causes of PermissionError: [Errno 13] Permission denied is because Python is trying to open a folder as a file. Double-check the location of where you want to open the file and ensure there isn’t a folder that exists with the same name.
Run the os.path.isfile(filename) command replacing filename with your file to check if it exists. If the response is false, then the file does not exist, or Python cannot locate it.
2. Allow permissions using chomd
If the file does not have read and write permissions enabled for everyone, then you may encounter the permission denied error in Python. Try entering the chomd 755 filename command and replace filename with the name of your file.
This command gives everyone permission to read, write, and execute the file, including the owner. Users can also apply this command to entire directories. Running the ls -al command will provide a list of files and directories and their permissions.
3. Adjust file permissions
Navigate to the location of your file in file explorer.
Right-click on the file and select Properties.
Click the Security tab then select your name under Group or user names.
Select Edit and go through and check permissions.
Click Apply then OK.
Adjusting the permissions of the file that you’re trying to open will allow Python to read, write, and execute the file.
Click on Start and open Settings (or press Windows + I).
Open Apps then select Apps & features.
Open the drop-down menu next to More settings.
Click App execution aliases.
Locate the two App Installers for python.exe and python3.exe and toggle both to Off.
Python was added to the Microsoft Store for version 3.7 which introduced permission denied errors because it created two installers: python.exe and python3.exe. Disabling the Microsoft Store versions of Python should fix the permissions denied error.
5. Update Windows and drivers
Click on Start and open Settings (or press Windows + I).
Scroll down and select Windows Update.
Perform any available updates.
Select Advanced options.
Under Additional options, click on Optional updates.
Run any driver updates.
If you’re suddenly encountering the Python permission denied error and none of the above solutions worked, then check for any Windows 11 updates and perform any available driver updates.
What is the latest version of Python?
As of the release of this article, the latest version of Python is 3.10.7, which is available for Windows 10 and newer and is not compatible with older versions, including Windows 7. Python supports Windows, macOS, Linux/UNIX, and more.
However, If users want to use older versions of Python, they can access releases 2.7 and newer, or they can download a specific version of a release.
Hopefully, one of the above solutions helped you fix the Python permission denied error in Windows 11. Let us know in the comments which step worked for you or if you have any suggestions for a different solution.
Recently, Microsoft released the new Microsoft Editor for Microsoft Office 365Word and Outlook and a Microsoft Editor extension for Chrome and Edge.
By offering AI-powered writing suggestions, Microsoft Editor goes beyond the usual corrections and becomes more powerful than its competitors.
The AI-based tool aims to improve your writing in Word, Outlook, Chrome, and Edge. Below, we’ve compiled a few steps for using and installing it.
How can I use Microsoft Editor?
1. Use the Editor in Word
Microsoft Editor is included in Word for the web. Once you sign in to your Microsoft account, you should see the editor in the menu bar immediately.
To use the Editor, go to the Home tab and choose Editor. You can now use Microsoft Editor to check your document on issues such as clarity or grammar.
2. Use Microsoft Editor for Outlook
1. Launch Outlook.
2. Navigate to Settings.
3. Go to Account.
4. Click on Editor to toggle it on or off.
5. If you decide to use the Editor, you can select or deselect suggestion types (Spelling, Grammar, or Writing Refinement).
The Microsoft Editor is included on the Outlook app by default or with a Microsoft 365 subscription for Outlook.com. However, if it is not turned on, you can to it manually turn the Editor on via the app’s Settings. Likewise, it can be turned back off just as easily.
Sign in with your Microsoft Account (or register a new one)
5. Use the Microsoft Editor on Mac
You can use the Editor on Mac as long as you have purchased a Microsoft 365 subscription. It can be found when you press the Home button in Word.
We hope this guide was useful. You can easily install and start writing using the AI grammar assistant, Microsoft Editor. You can also install Grammarly forMicrosoft Office apps if you want other advanced features.
RAM refers to Random Access Memory and represents a physical chip installed on the motherboard of your PC.
This piece stores all the temporary information to access all the programs and software stored on your computer. Also, it functions as primary storage.
It seems like Microsoft users are interested in finding out how to check RAM on Windows 11. Before anything else, you should know that the available methods won’t require experience.
Today’s article will show you the easiest ones, which will definitely help you whenever you need to check the Random Access Memory. But let’s see first why you should do it.
Why should I constantly check the RAM on Windows 11?
The RAM capability is one of the most significant Windows 11 requirements. So it is always important to verify it and make sure it allows your OS to run in proper conditions.
Remember that running out of RAM can get your device into trouble, affecting its performance. In these terms, constantly checking it represents efficient prevention.
Hit the Windows key, then navigate to the Settings menu.
Click on System, then, in the right window pane, scroll down until you find the About section, then click on it.
Under the Device specifications section, you’ll be able to see the installed RAM on your PC.
2. Check how much RAM you have via System Information
Use the following keyboard shortcut: Windows + R.
In the opened run dialog box, type msinfo32, then click on OK.
Click on System Summary listed in the left window pane.
On the right window side, look at the following information: Installed Physical Memory (RAM), Total Physical Memory, Available Physical Memory, Total Virtual Memory, Available Virtual Memory.
If you wonder what each of the above memory information means, take a look at the following list:
Total Physical Memory – It refers to the fact that some amount of your installed RAM is allocated for the hardware to function. So it will always be less than your installed RAM and will be the exact amount your OS would be able to access.
Available Physical Memory – In this case, the amount of RAM is the same as the one currently not already in use by your device. It’s available to be allocated to other programs and/or services. Here, the value depends on the specifications of particular machines.
Total Virtual Memory – It hasn’t any physical form on the motherboard. It is an unused part of your hard drive used as an addition to the physical memory to compensate for the amount of Physical Memory your computer lacks.
Available Virtual Memory – This one indicates the Virtual Memory is not currently in use. It is available to be allocated to programs and services.
3. Use Task Manager to check RAM
Click on the Windows icon (from your desktop taskbar).
Search for Task Manager, then click on it.
Press on the Performance tab.
From the left window pane, select Memory.
In the right upper section, you’ll be able to see the total available RAM for your system along with the RAM type.
If you take a look at the lower right side of the window, you’ll see specific sections.
4. Check RAM type in Windows 11 via CMD
If you’re looking for a more in-depth analysis of your RAM, you should use the built-in command tool available on your device. No matter whether your default terminal is Command Prompt or Powershell, both can do the job just well and tell you all you want to know about your RAM in Windows 10.
1. Press simultaneously onWindows+R.
2. Type cmd, then press on OK.
3. Copy and paste the following command, then press Enter:systeminfo | findstr /C:"Total Physical Memory"
4. Wait a bit, then Command Prompt will display the total physical memory in MB (Megabytes).
5. If you want to check memory speed, type the following command in the same screen, then press Enter:wmic memorychip get devicelocator, speed
6. To verify the type of memory you have installed in your system, run the following command, then hit the Enter button:wmic memorychip get devicelocator, memorytype
Note that after running the memory type command, a numerical value will be returned. To be prepared, take a look at the list below and find what each number stands for:
0: Unknown
1: Other
2: DRAM
3: Synchronous DRAM
4: Cache DRAM
5: EDO
6: EDRAM
7: VRAM
8: SRAM
9: RAM
10: ROM
11: Flash
12: EEPROM
13: FEPROM
14: EPROM
15: CDRAM
16: 3DRAM
17: SDRAM
18: SGRAM
19: RDRAM
20: DDR
21: DDR2
22: DDR2 FB-DIMM
24: DDR3
25: FBD2
What should I know regarding RAM usage in Windows 11?
There might be some of you that are wondering what are the normal terms for RAM usage on the newest operating system.
According to Microsoft, to keep Windows 11 running in proper conditions, you’ll need a minimum of 4 GB. But please have more than that.
Your OS holds some of the memory in reserve right off the top, even if there is no need for it currently. It does this in anticipation of being used. This reserve can be anywhere from 1.8 to 2.4 GBs of RAM.
If your PC has a high memory usage error, it may freeze while running a program, popping up specific error messages.
If your computer runs low on RAM, it uses a part of the storage drive called the page file. Now you have a complete guide that supports you in checking RAM on Windows 11 using some simple methods.
In truth, few things in this world annoy us more than those instances when technology backfires and prevents us from doing what we need.
Software nowadays is a lot more stable and reliable, but not perfect. That’s why, when something goes wrong, we take it upon ourselves to provide the fastest, most efficient solutions.
Like, for example, when you are trying to watch something on and you realize that there’s something wrong with the Hulu account settings for Home Location.
We’re going to show you how to get around the Hulu home location error on PC, and know that this can also be found on TVs.
Also, don’t forget to take a quick look at how to fix the Not Included in Subscription Error error, just in case you ever need the information.
Why does Hulu say I’m not at home?
Well, the moment you sign up as a Hulu subscriber, one of the first things you must do is set up a home network for your account.
The company recommends that you do so within 30 days so that you can start streaming both regional and local channels.
There are multiple reasons why Hulu is not able to locate your home, among which are:
VPN connections
Shared Wi-Fi connections
Internet provider failed to be recognized by Hulu
The current device is incompatible with Hulu
Let’s look at the solutions to this problem and show you what to do in case your Hulu check in at home process fails.
How do I bypass home location on Hulu?
1. Connect to your home network
If you skipped reading the terms and conditions, know that your device must be connected to the same home network you registered on Hulu.
That means that, if you’re trying to connect elsewhere using your personal account, it is possible to switch your home network from the settings.
However, there are Hulu home location limit changes in a year, so you can’t really switch that often. When you are home, make sure that your device isn’t accidentally connected to another network.
Furthermore, if your smartphone is connected to both Wi-Fi and mobile data, disable the mobile data option to avoid any network connectivity conflicts.
Needless to say, Hulu is able to identify your home network by your IP address and there is software that can block access to it.
Thus, if you have a VPN or proxy server enabled on your desktop, laptop, or tablet, don’t forget to turn it off before attempting to connect to Hulu.
3. Contact your Internet Service Provider (ISP)
Here’s another scenario. Let’s say you set your home location on the Hulu account page and then switched Internet service providers. This means that you have a new IP address.
So, now there’s nothing else you can do besides registering a new home network on Hulu, and there’s no avoiding that.
Keep in mind that if you have a dynamic IP address, then it regularly changes, contributing to what causes this location error on Hulu.
You can try and set a static IP on a Windows PC., or simply get in touch with your ISP to see about using a static IP address.
Can I share my Hulu account with my family in a different home?
Subscribers to the streaming platform are able to stream from two different screens at one time, unlike Netflix where you have four.
There will be no more fighting over the remote because each can just watch whatever series they are binging at the moment.
We hope this article has been helpful in getting rid of this annoying error. Share your thoughts with us in the comments section below.
We already know that the fresh, fluent look that Microsoft introduced to the world with Windows 11 is much appreciated by many users that were already expecting a whole makeover for Windows 10.
However, since the upcoming OS is still in its testing phase, some apps that we’ve grown accustomed to using still haven’t made it to the new system, or made it and don’t share the same fluent aspect.
We are now going to talk about Steam since it’s such a used app, and teach you how to add a Windows 11 skin to it.
Can I add a new Windows 11 skin to Steam?
You might be pleased to know that a Steam user has developed a patch that will bring that Windows 11 look to your beloved application. It is called Metro for Skin, also known as Fluent for Steam.
This patch will bring an Overlay with new icons to adapt to the new style of windows 11, to your Steam app.
This idea comes from a Reddit user by the name of elpurogamer, who recentlyshared an image of the patch in action and also added instructions on how to download and use it.
The user has designed this patch and also did some work on Steam’s download section, where he also performed a few tweaks and brought the fluent look as well.
Before you take any action, make sure you read and understand the important specifications of the patch you are about to use.
To get your hands on this software, head over to GitHub and follow the instructions that its developer listed.
Remember that this is not an official Valve software product.
If you decided that you want to use it and customize your Steam application, the next thing you have to do is carefully follow the steps required for installing it.
How can I install a Windows 11 skin on Steam?
If you also want to use the Windows 11 skin for Steam patch, you have to download the Metro for Steam skin. After that, you have to swap some files around to get the new look.
The tool is available for download on GitHub and is perfectly safe to use. Do remember to use it properly, according to what its developer says in the release notes.
1. Navigate to the Metro for Steam official website click on the Download button from the right side of the screen.
Another important aspect to keep in mind is that this is the first release of the patch, so you may run into some bugs.
So, if you are already using Microsoft’s new operating system and want Steam to look the same as everything on your desktop, download and apply this patch.
Have you already redesigned your Steam app to look more like a Windows 11 native? Share your experience with us in the comments section below.
Several users have reported that the Hulu buttons are not working, which they experience while trying to stream their favorite Hulu show or movie.
Some lament they could not get past the login page due to the Hulu login button not working. For others, they claim the Hulu play button may not work or the Hulu pause button not working is the issue.
If you encounter any of these problems, worry less, as this article will provide you with quick ways to fix your Hulu buttons not working.
Why can’t I click any buttons on Hulu?
Incorrect Hulu Account: The primary reason why some users complained about the Hulu login button not working issue is that the login details are wrong. If you enter the wrong Hulu account username or password, this error will continue to repeat itself. Moreover, errors are bound to happen since there are multiple online services to keep track of.
Expired Hulu Subscription: Another reason you experience Hulu not showing a play button is that your Hulu account is on hold or your subscription has ended.
Server Problems: There are times when streaming servers experience downtime. It is possible that your Hulu buttons will not work. You only need to be patient until the servers are restored for good service.
How do I fix my Hulu buttons if they’re not working?
1. Reload your Hulu web page
Swipe down from the top of your Web page or click the reload icon of your browser.
Alternatively, you can press Ctrl + R simultaneously (for Windows).
Also, you can close your Hulu page and log in again.
Any of the steps above can be employed to reload your Hulu page. You can now try using your Hulu buttons to see if the problem persists.
PCs and cell phones are getting more and more connected every year, especially with Windows 10 and its cross-compatibility.
And one of the most common questions people have is how to send text messages from a computer to a smartphone. So, we prepared a couple of ways in this article.
How can I text from Windows 10?
1. Send messages through the Windows Mail app
Probably the simplest way to send messages from your Windows 10 computer to a cell phone is through email. You can use the built-in Windows Mail App for this and simply compose the message as you would on a phone.
When your friend replies to your text message, you’ll also get it in your Mail inbox.
1. Open the Mail App on your device.
2. Click onNew Mail.
3. Now just enter the number you want to send the text message to and input the code of your provider.
4. Write the message as you would a normal email.
5. When you’re done, hit Send.
Here are the message codes of some popular providers you can use:
Alltel: @message.alltel.com (or @mms.alltelwireless.com for picture messages)
AT&T: @text.att.net
Sprint: @messaging.sprintpcs.com
T-Mobile: @tmomail.net
Verizon: @vtext.com (or @vzwpix.com for photos and video)
A lot of mobile carriers offer you an option to send free SMS messages from your computer for free. Depending on the carrier, you’ll be able to send text messages to other users of that carrier’s services, or even users of other networks.
So just go to your carrier’s website, log into your account, find the option for texting, and send the text message from your computer.
3. Use a free SMS website
There are literally a ton of websites that offer the possibility to send SMS messages for free. But using some of these websites isn’t always the best solution, because a lot of them are scams.
And even legit ones have their own cons, for example, you’ll get bombarded with a lot of ads, you won’t be able to receive text messages on the site directly, and you’ll have to leave your personal info, which is not recommended.
You might be familiar with this popular email client that offers tons of features including email syncing, customizable layouts, an intuitive interface, and seamless integration with a plethora of third-party apps.
Speaking of which, what you might not know is that you can send and receive text messages on Windows 10 by integrating Mailbird – winner of Most popular mail alternative of 2020, together with WhatsApp.
As a matter of fact, you can do more than just send an SMS by combining the two; you can add an instant messenger right on your desktop to avoid switching devices.
Let’s quickly look at its key features:
Unified Inbox to manage all emails from multiple accounts
Simple, uncluttered, and intuitive interface with numerous customization options (free color themes and layouts designed for Windows)
Seamless app integrations (including Facebook, Twitter, Whatsapp, Dropbox, Google Calendar, Asana, and many more)
Snooze features to prioritize and separate important communications
Speed Reader and Custom Sounds for email and/or chat notifications
A powerful attachment search feature
Intuitive keyboard shortcuts for archiving, composing, replying, and forwarding
WPL files contain the .wpl file extension. Microsoft’s Windows Media Player commonly uses these files, the default application that can open them.
However, you can open such files using other software that allows users to listen to and view media data.
To avoid problems when opening WPL files, you should understand that they don’t contain media files. Instead, they store references to audio or video files.
By opening a WPL file, you will be playing a list of audio or video files that can be located in different folders.
Essentially, the WPL file is a playlist of songs. This also means that you should not alter the video and audio files contained in the WPL playlist. If you do, the application playing the file won’t locate them.
How do I open WPL files?
1. Adobe Audition
We recommend using Adobe Audition to open almost all types of audio files and edit and add effects.
It is a professional audio editor that seamlessly integrates with other Creative Cloud apps, such as Premiere Pro to make content creation a breeze.
Supporting Multitrack and Waveform views, you can easily cut, inspect, and enhance the audio tracks. Additionally, it can help restore audio content to make it sound like it was recorded in a pro studio.
Adobe Audition
Open and edit your WPL audio files like a professional with industry-leading software for audio editing.
Download the latest version of ZOOM Player MAX Media Player from the Inmatrix website.
Open ZOOM Player MAX Media Player.
Locate the folder icon at the bottom center of the media player interface, and click on it.
A pop-up window will appear where you can browse through your computer’s files. Search for the WPL file you want to play. After selecting file, click Open.
The WPL file will start playing.
3. Microsoft Windows Media Player
1. Open MicrosoftWindows Media Player.
2. SelectFile in the menu bar. On the drop-down menu that appears, click on Open.
3. A pop-up window appears where you can browse through your computer’s files. Search through it for the WPL file you want to play.
4. Select the file and click Open.
5. The WPLfilewill start playing.
A very useful built-in Windows application is none other than Windows Media Player. It allows you to open WPL files within a few clicks, without you needing to install other third-party apps.
4. VLC Media Player
Download a free version of the latest VLC Media Player from the VideoLAN website.
Open VLC Media Player.
Select Media in the menu bar. A drop-down menu will appear where you can then click on Open file…
Browse through your computer’s files for the WPL file you want to play. Select the file and click Open.
The WPL file will start playing.
5. AllPlayer Media Player
Download the latest version of the AllPlayer Media Player from the AllPlayer website.
Open AllPlayer Media Player.
Click the folder icon at the bottom left corner of the media player interface and a menu will appear.
Select Open video file or Open audio file, depending on which type of files are in the playlist of the WPL file you want to open.
Search for the WPL file you want to play. Select it and click Open.
The WPL file will start playing.
6. Maxthon 5 browser
Search for the WPL file on your computer.
Once you find the WPL file, right-click on it. A drop-down menu will appear.
Move and hover your cursor on the Open with option. Here, another drop-down menu will appear next to the first one. Check if the Maxthon option is available and click on it.
In case, the Maxthon option isn’t available on the second drop-down menu, select Choose default program…
A pop-up window will appear where you can browse and select the appropriate application you wish to use; in this case, the Maxthon browser.
After clicking on the Maxthon browser option, your WPL file will start playing on the browser.
Yes, that’s right. You can simply use your browser application to open media files.
Of course, certain browsers work better than others and they typically use browser extensions from specific media players, such as VLC Media Player.
The Maxthon 5 Browser is one such multi-talented browser you can use to open WPL files. Go to the Maxthon Cloud Browser website and download the latest browser version.
7. Mozilla Firefox
Search for the WPL file on your computer.
Once you find the WPL file, right-click on it. A drop-down menu will appear. Move and hover your cursor over the Open with option. Here, another drop-down menu will appear next to the first one. Check if the Firefox option is available and click on it.
After clicking on the Firefox browser option, your WPL file will start playing on the browser.
You can also use Mozilla Firefox to open media files. It uses browser extensions from specific media players, such as VLC Media Player. Hence, this multi-talented browser can open WPL files.
Go to the Mozilla Firefox Browser website and download the latest browser version.
8. Convert WPL to M3U
Search for the WPL file on your computer.
Once you find the WPL file, right-click on it. A drop-down menu will appear. Move and hover your cursor over the Open with option. Here, another drop-down menu will appear next to the first one. Check if the Windows Media Player option is available and click on it.
Once you click on the Windows Media Player option, the WPL file will start playing on the application. As the WPL file is playing, click on the Switch to Library icon at the top right corner of the media player.
The media player interface will change.
Now click on the File option in the menu bar and select Save Now Playing list as…
A new window will appear with folder options for saving the playing list. It also has an option for selecting the format in which you’ll save the playing list.
You can change the file name to any other name you wish. And also select the M3U Playlist (*.m3u) option in the Save as type section. Now, save the document.
You can then open the M3U file using a wider range of media players that can’t open WPL files.
You can use WindowsMedia Player to convert your Windows Media Player-generated playlists (the WPL files) into M3U playlists.
The M3U playlists can then be opened by a wider range of media players, even those who can’t open WPL files.
Using these useful options, you’ll no longer have issues opening WPL files. For other complex audio files, check out how you can open VRF files.
Please comment below which solution worked best for you or if you have any suggestions or solutions that we should add to this guide.
USB flash drives are great backup tools used to store and transfer data. Sometimes, files on your USB drive may be corrupted or you accidentally deleted your files.
Today we are going to show you how to recover files from USB drive.
However, we have compiled applicable methods that you can use to recover deleted files from the USB drive.
How can I recover deleted files from a USB flash drive?
1. Use Command Prompt to recover hidden files from USB
1. Plug your USB drive (where the files were deleted from) into your PC.
2. Press the Windows and R keys to launch the Run program.
3. Type cmd and hit Enter key to open Command Prompt window.
4. In Command Prompt’s window, type the following command, and replace H with the drive letter of the USB drive: chkdsk H: /f
5. Press Enter to run the command.
6. Now type the following command: ATTRIB -H -R -S /S /D H:*.*
7. Press Enter to run it.
8. Wait for the process to complete.
9. After this procedure, you will find all deleted files on a newly created folder on your USB drive. You can change the file extension back to a normal format so as to make those found files functional again.
The simplest way to recover deleted files from flash drive is to use Command Prompt. Command Prompt is a built-in Windows application. If you don’t have it, you can use Powershell instead.
You can also try out this fix on your SD, HD, or another external storage device.
You can use data recovery tools as well to recover deleted files from your USB drive. Recovery tools are computer programs that are used to recover permanently deleted files on your Windows PC.
There are several recovery tools in the computer world, some of which are free and others are largely premium.
However, these tools scan your USB drive using an efficient algorithm and recover deleted files and folders on your USB drive.
We strongly recommend Stellar Data Recovery in order to perform this action. This tool will recover corrupted and deleted videos, images, documents, and music files.
If you want to know more about this tool, don’t hesitate to take a look at our awesome Stellar Data Recovery review. You’ll see whether it is worth the money or not.
For now, do keep in mind that the Deep Scan function is designed to recover data from formatted or corrupt storage.
If the software is not able to find the data in Quick Scan, it automatically switches to Deep Scan.
Here are a few of its key features:
Recovers lost data on all Windows devices & storage media
Built-in support for data recovery on RAW drive volumes
Recovers documents, PDFs, photos, videos, & more
Allows selective recovery of files for your choice
Previews recoverable files for precise recovery
Stellar Data Recovery
This powerful tool can help you recover any files from a USB storage device.
Also, we recommend that you back up your files on cloud storage services so as to increase your options for file retrieval. If you are using Windows 8, check our dedicated guide on the best data recovery software for Windows 8 for higher success rates and compatibility tips.
Hope we have been able to help you recover deleted files from your USB drive. If you have any questions, you can comment below.
Whether you’ve lost your laptop charger or you’re looking for a replacement for your broken one, finding one that works across different laptops is not easy.
The best USB-C laptop charger not only works with different laptops but also provides the minimum power needed for your machine. It will also be compatible in many ways than just the USB-C connector.
A general rule of thumb is to use the laptop charger that came with your laptop from the manufacturer. Otherwise, incompatibility can lead to a slow charging process, or it’ll fry up your laptop’s battery.
If your laptop’s manufacturer has no laptop chargers or there are no certified partners available, it will be difficult to find it.
However, if you don’t mind using a third-party USB-C laptop charger, there are plenty in the market that you can choose from. They may not be the same wattage or size as the one that came with your laptop, but they still do a good job.
The good thing is that they come with more options for plugging in multiple devices simultaneously, plus some have higher power supply ratings, so your laptop will juice up faster.
Here are our top picks for the best USB-C laptop charger to power up your machine.
The Anker 747 GaNPrime charger comes with the Anker Advantage, which is basically more than 20 million+ happy users (and counting), powered by this leading USB charging brand.
Its features include fast-charging technology that enables you to charge any USB-C device at very high speeds with the Power Delivery port. You can choose to charge 2 laptops at a very high speed at the same time.
Added to that, you can use the 4 available ports to charge 4 devices at the same time, but with reduced power, or you can charge a single device at super speeds, while also saving the environment with the GaN technology, which is included.
During our tests, we made sure to explore all the charging options available, including 4, 2, and one-device charging tests. The charger has performed very well in all these categories and thus has made it at the top of our list.
The Razer USB-C GaN charger provides you with 130W of power, making it one of the best chargers on the market at this point.
This handy and portable device ensures that you can take it with you wherever you go, and thus ensures that your devices will be protected and ready to be used at all times.
The Safe Power Delivery system not only charges your devices up fast but also ensures that the charge is kept at an optimal level across time, while also ensuring that no short circuits and overcurrent can affect your item.
Even more, the GaN technology used in this device ensures that you are also taking a stand against the overuse of technology, and millions of kWh can be saved per year.
During our tests, the Razer USB-C device has proven very efficient in all charging situations, while charging 4, 2, and one device by using it.
The only downside to this device is the steep price, but if you’re a fan of Razer and want to take advantage of all its features, you can’t put a price on this one.
The UGREEN Nexode 140W charger allows you to charge up to 3 devices simultaneously, with 2 included USB-C ports which can deliver 65W of power for two laptops, making the charging process easier and faster.
This charger also comes with a USB-C to C charging cable that is capable of 240W without issues, and you also have access to another USB-A port for another device.
The UGREEN Nexode ensures that your MacBook Pro 16” will be charged up extremely fast, as this item uses the cutting-edge PD 3.1 protocol, which ensures that your devices will be charged at maximum speed, while also eliminating any possibility of damage.
During our tests, we managed to charge a MacBook Pro 16” from 0% battery to 56% in about 30 minutes. We were not disappointed in this product’s performance, and we’re sure you won’t be either.
The WOTOBEUS 200W charger features 3 USB-C ports, and another extra USB-A port, making it very versatile when it comes to charging your devices.
This device can also be used as a laptop AC powerline, by using the 5ft AC power extending line, making it very versatile, and ensuring that you can charge your laptop using the USB-A and C wall charger, but also a notebook power adapter.
The USB-C charger from Baseus offers you access to 4 ports, including 2 Type-C ones, and another 2 USB normal ports.
Using the Shared Charging System enables you to save time, while also not wasting even a drop of power in the process.
It takes about 2 hours to fully charge the MacBook Pro 16” with 96W of power, while two normal laptops can be charged simultaneously with great results.
Includes a variety of fast charging protocols: PD3.0, QC3.0, PPS, Samsung Super Fast Charging, and more.
Have you settled on the best USB-C laptop charger for yourself? Let us know your choice, or if you know a good one that deserves to be on this list, share it with us in the comments section below.