Chrome is one of the best browsers with adblocker currently available. While the adblocker helps to improve your browsing experience, it is proven to be one of the causes of Chrome error blocked by client.
This is because it checks every URL you try to load on your browser and runs it through its filters. If the URL matches the ad blocker’s flagging requirements, it automatically blocks it. Hence, the error blocked by client prompt.
This guide will help you solve this error, displayed as ERR_BLOCKED_BY_CLIENT, and allow you to revisit your valuable websites without restrictions.
How can I solve the blocked by client error on Chrome?
1. Disable extensions
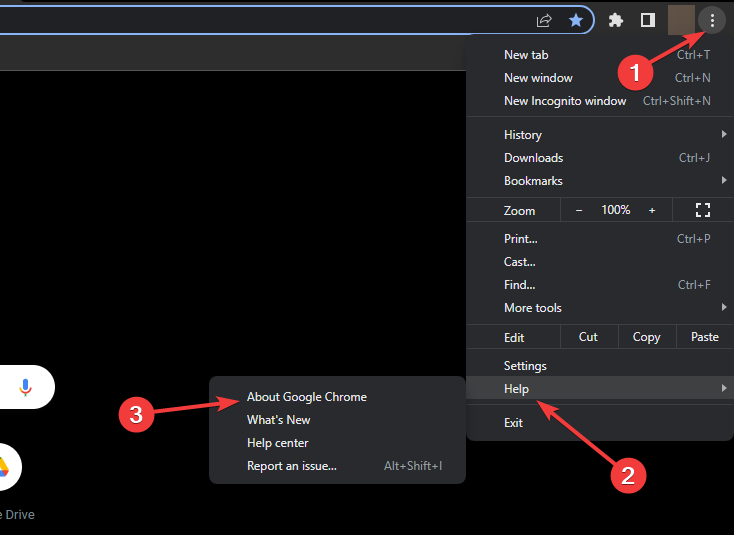
Click the menu button (the three vertical dots) in the top right corner.
Select the More tools option.
Choose Extensions from the options displayed.
Now, toggle the switch of the Extensions backward to disable them.
Finally, close and relaunch Chrome.
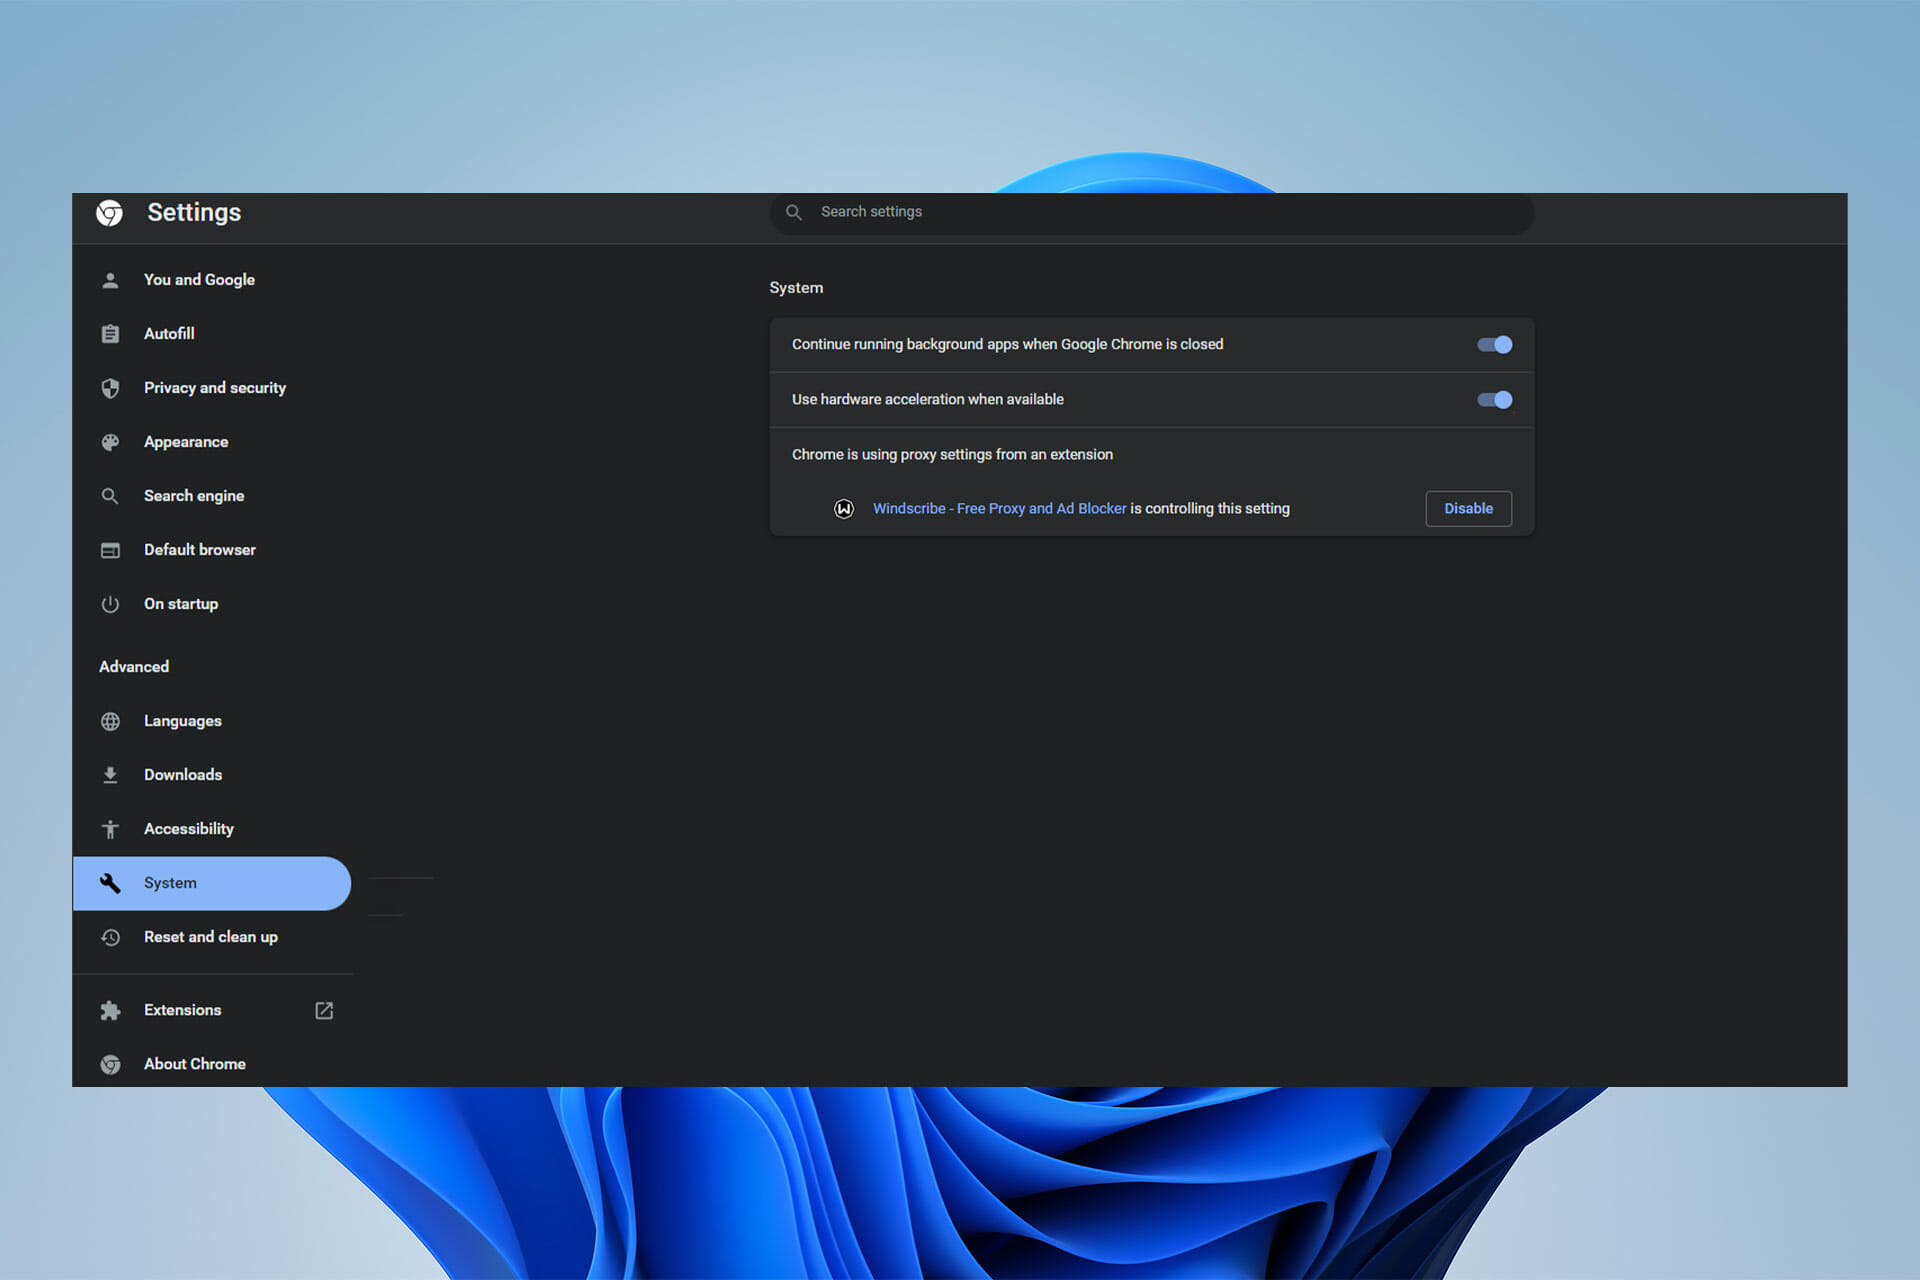
Your target extensions to be disabled should be the adblocker and other security-related ones since they are the chief causes of the failed to load resource: net::err_blocked_by_client issue.
But you can also disable all the extensions and check if the issue is solved. If Chrome works fine, you can start enabling them one after the other to know the one causing the problem.
2. Clear browsing data
Click on the menu button and select the More tools option.
Select the Clear browsing data… option.
Check the checkboxes for Browsing history, Cookies and other site data, and Cached images and files.
Now, click the Clear data button and restart Chrome.
If the net::err_blocked_by_client image still appears after attempting all the fixes above, you might want to try out another browser in Opera One.
Opera One is a versatile browser based on the same Chromium engine as Chrome. Hence, it boasts the speed and other performance features associated with Chrome.
It has an intuitive interface that you can customize to your taste. Thanks to its free VPN and other privacy and security features, it is also one of the most secure browsers.
While it is true that Opera One has a built-in ad blocker, it is fully customizable and can be disabled to allow you to visit any website.
Opera One also brings some unique features that will make your browsing experience more organized, like workspaces, tab islands, social media and messaging buttons, and built-in AI.
It just gives you the security and speed you need without facing errors frequently.
Being unable to load a popular page like YouTube due to the ERR_BLOCKED_BY_CLIENT can take the fun out of your browsing session. Though it can be pretty annoying, the solutions are simple and direct. This issue affects other browsers, and many also reported This page has been blocked error in Brave.
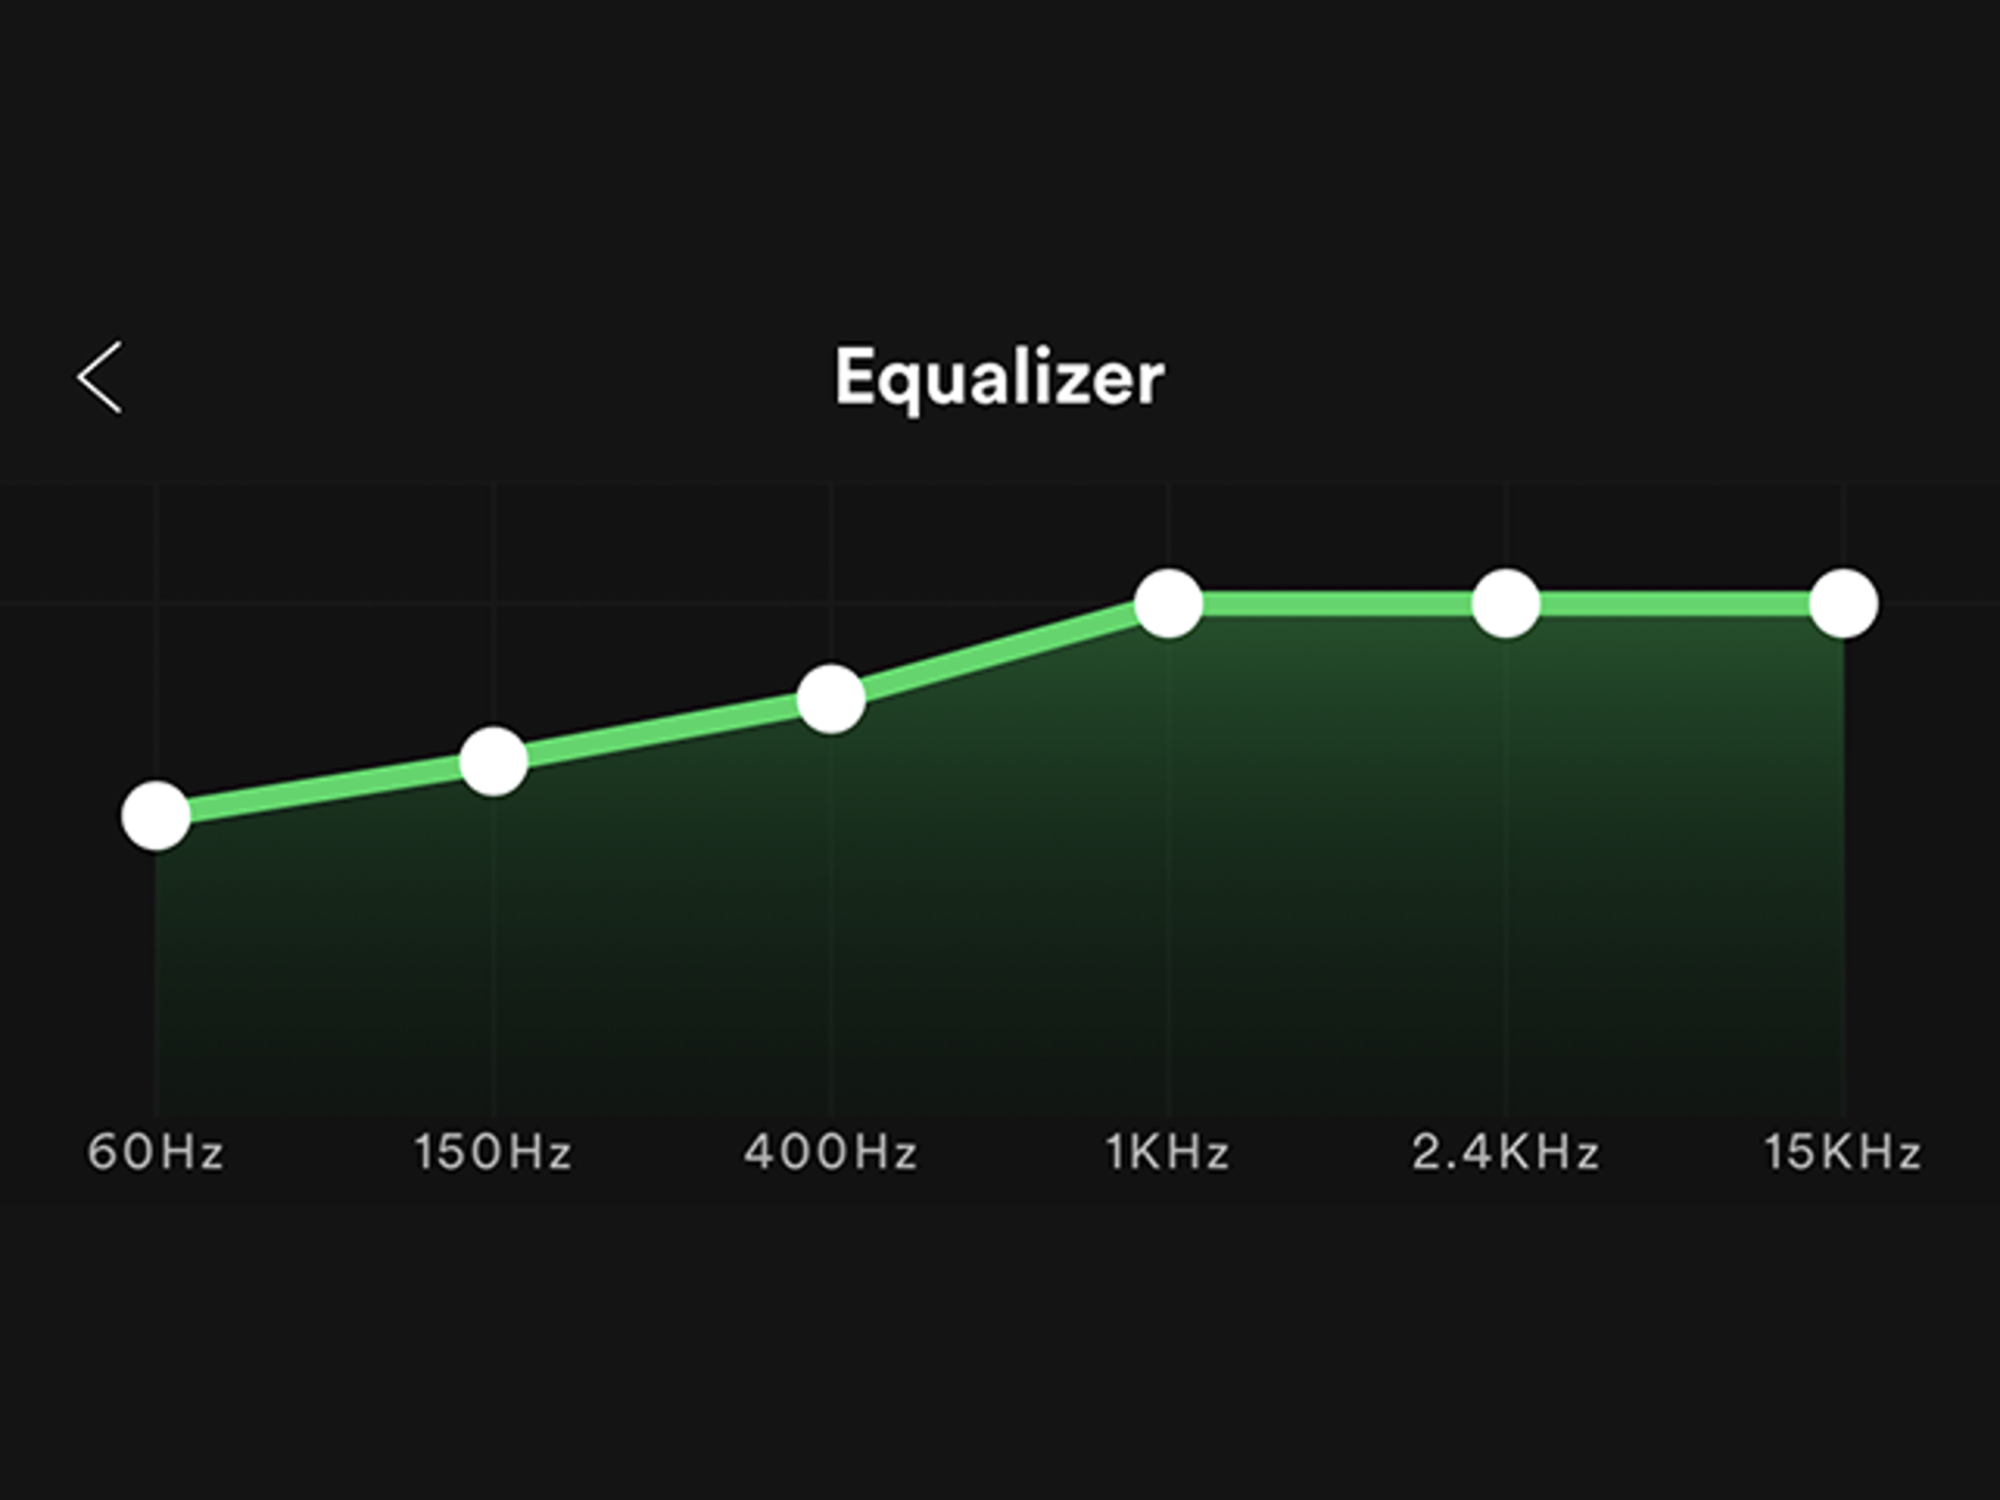
You can attain the best sound possible when listening to Spotify by using an equalizer combined with a quality stereo system. Spotify comes with an inbuilt option that allows users to set the sound to their preferences.
You can also gain more control over the quality of the sound by switching to third-party Spotify equalizer PC software. One that offers more advanced features and customization options. However, most are premium. If that’s out of your reach, then stick to the Spotify equalizer to enjoy high-quality audio on your PC right out of the box.
I’ll guide you on how to set up Spotify equalizer on your Windows and troubleshoot the problems that arise. Furthermore, I’ll also briefly look at the best 4 third-party equalizers for Spotify that you can use.
Read on for more.
Is there an equalizer on Spotify PC?
No. Spotify doesn’t have an in-built equalizer for the Windows app, but it has one for Android and iOS. If you want an equalizer, you’ll be better served by more advanced third-party options. They have better control over the adjustments.
The Spotify equalizer on Android and iOS comes with 12 sound options, bass boost, and surround sound.
How to download & use the Spotify equalizer on a PC?
Find a compatible 3rd-Party equalizer for Windows PC (you can find some suggestions below).
Download and install. If it’s a premium version then create an account and choose the appropriate price plan.
Select one of the presets or customize your own EQ settings manually by moving the sliders up or down.
Once you have set your preferred settings, click Apply to save your changes and start enjoying your music with better sound quality.
What are the best Spotify equalizer apps to download for my PC?
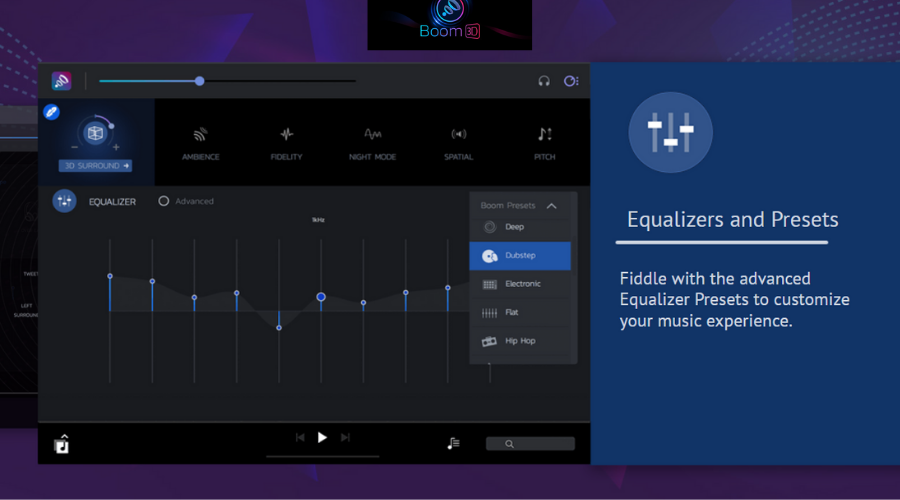
Boom 3D is a comprehensive equalizer application for PC, Mac, and mobile. It offers both pre-made presets for a quick setup, and advanced manual sound tweaking settings.
It is a standalone application that works as a settings panel for all your other apps with audio output, including Spotify.
Changes you make in Boom3d are automatically applied to Spotify and you can tweak the sound in real-time while listening.
The Windows application has a modern interface that’s easy to navigate. You get quick access to all the features available.
You can use the equalizer feature to fine-tune your audio or browse around presets. The app has plenty of genre-specific settings that include dubstep, jazz, rock, and electronic music.
The effects and setups of the equalizer let you adjust the pitch, the 3D soundscape, ambiance, and more. Besides the equalizer, Boom 3D also includes a media player. You can use it to manage and organize downloaded audio files.
Boom 3D
Make the best out of your playlist with this powerful audio-equalizer app!
Bongiovi DPS is a powerful audio processor. It has become an increasingly popular option for PC users looking to improve sound quality. Especially for music streaming services like Spotify.
It is designed to mimic the effects of expensive hi-fi equipment and studio mastering. Bongiovi DPS uses advanced algorithms to optimize your computer’s sound output. This effectively reduces distortion and improves clarity and detail.
It has an easy-to-use interface and a wide range of settings and customizations. Bongiovi DPS makes it simple to enhance your listening experience on Spotify or any other music service you use.
Therefore, if you’re looking for more bass, a better balance between different frequencies, or just smoother overall sound quality, Bongiovi DPS delivers.
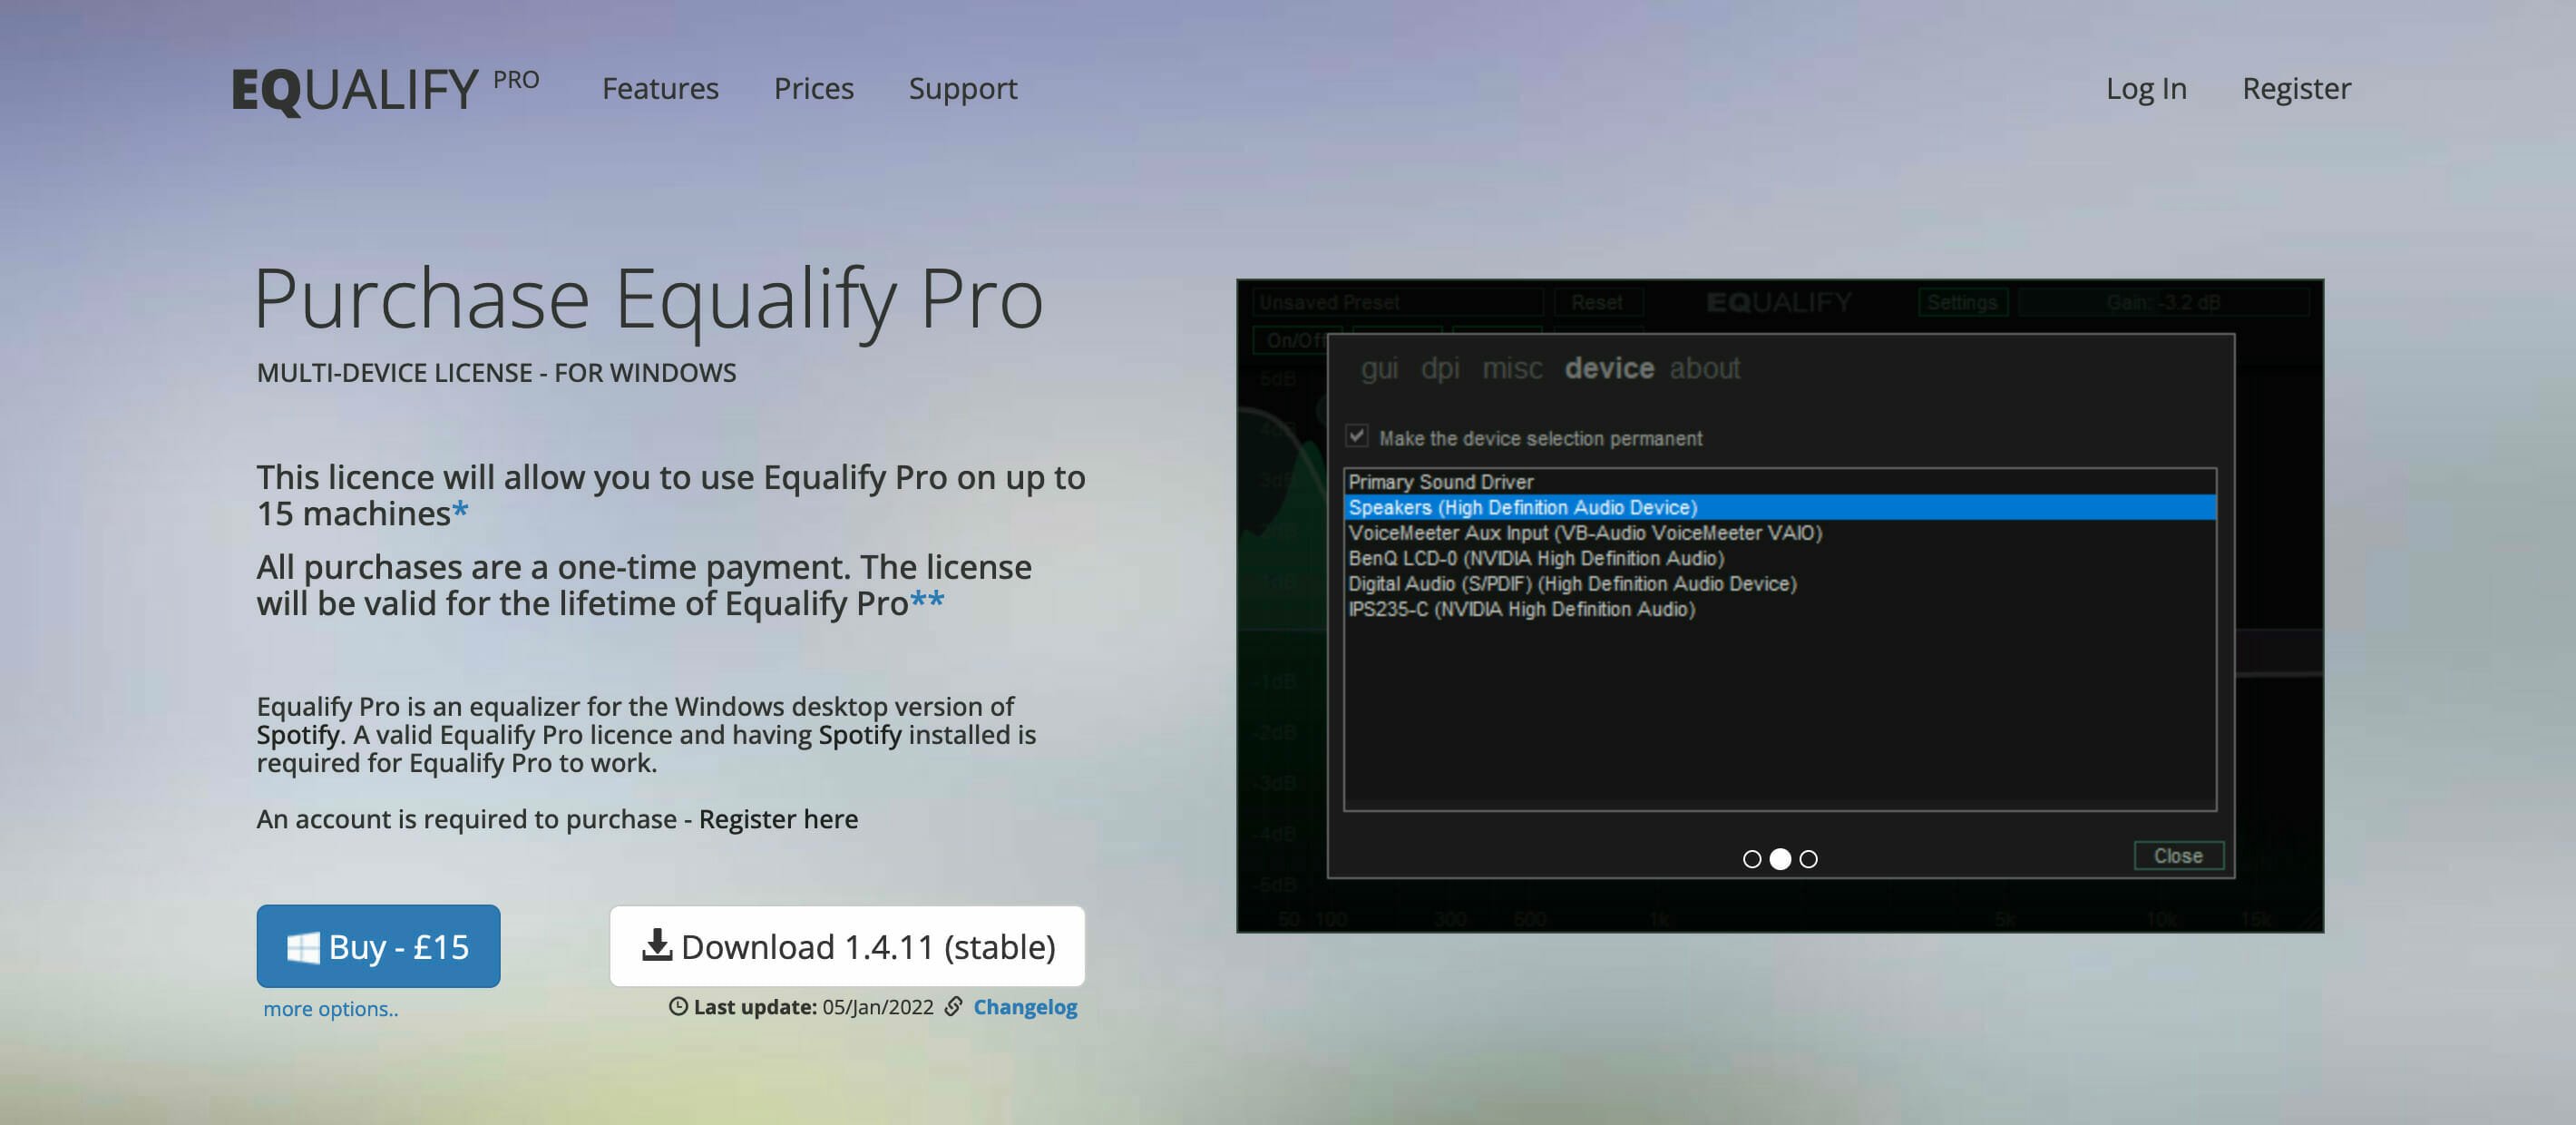
Equalify Pro is a powerful and popular equalizer for PCs. It allows you to customize your listening experience on Spotify. With its intuitive interface and wide range of features, it’s an ideal choice for anyone looking to take their music listening to the next level.
Some of the key features of Equalify Pro include customizable EQ presets, multi-channel control, manual adjustment capabilities, and more. Whether you’re a casual listener or a serious audiophile, Equalify Pro has something for everyone.
A potential drawback of Equalify Pro is that it doesn’t work with the web version. Therefore, if you’re using Spotify primarily through your browser, this isn’t the right equalizer for you.
EqualizerAPO is a popular music equalizer for PCs. It is implemented as an Audio Processing Object (APO) introduced with Windows Vista. A system effect can be applied globally to all audio playback on the computer, or individually to specific programs.
It offers a range of different presets and customization options. They allow users to fine-tune their audio experience and get the most out of their music. Additionally, it’s easy to use and works seamlessly with Spotify. This makes it a great choice for anyone looking to enhance their listening experience.
However, it can be quite resource-intensive at times. It may cause slowdowns or other performance issues on your PC.
Is Spotify equalizer PC not working? Troubleshooting guide
➡ Outdated Spotify version
One possible reason why the Spotify equalizer is not working on your PC is that you don’t have the latest version of Spotify installed. Most times, Spotify automatically updates itself the moment a new version drops. However, it doesn’t hurt to check that to rule it out.
➡ Outdated sound drivers
Another possible reason why the Spotify equalizer is not working on your PC is that your sound drivers are out of date. To check if this is the case:
Open up the Device Manager.
Expand the Sound, video, and game controllers section.
Right-Click on each sound driver and choose the Update driver option.
Equalizers enhance the music experience. Spotify has a vast library of music, and using a reliable equalizer will make things more fun for you.
We hope this article helped you troubleshoot why the Spotify equalizer might not be working on your PC. Feel free to check out our website for more tips and tricks for solving common Windows issues.
It can be frustrating to find out that your internet connection has stopped working or is having a problem connecting to the router.
This is often too common in every household. It could be a problem on your Internet Service Provider’s end, a small outage, or your router could be damaged.
But there is a fix for every problem, and we’ll go over them briefly and help you restore your internet connection in no time!
Most common situations in which this issue occurs:
Router not connecting to the internet after reset: If you’ve pressed the reset button on your router, you have reset the router to its default settings. This means that you have erased all the configurations, and you have to re-set it up to connect to the internet.
The routerwon’t connect to the internet after the power outage: Unplug the router from the power outlet and plug it back in after a few seconds. Once it turns on, try visiting any website and see if your router is working correctly now.
Unable to use the internet with the current settings: Open the task manager and check if any program consumes extremely high bandwidth in the network tab. If so, you should terminate it and scan your computer for viruses.
What are some of the most commonly affected platforms?
Spectrum Internet is not connecting with the router: It could be due to a glitch in the router that can be fixed by restarting it.
Xfinity Internet not working with my router: If you are an Xfinity user and cannot connect to your router, restart the router and check if the Ethernet cable is properly attached. If nothing helps, you should immediately call your ISP.
Does this issue appear on multiple devices?
The answer is yes, as routers are no different from each other, and they are all the same. But, it can be fixed as most of the time, it is due to a minor glitch since they run 24/7 nonstop.
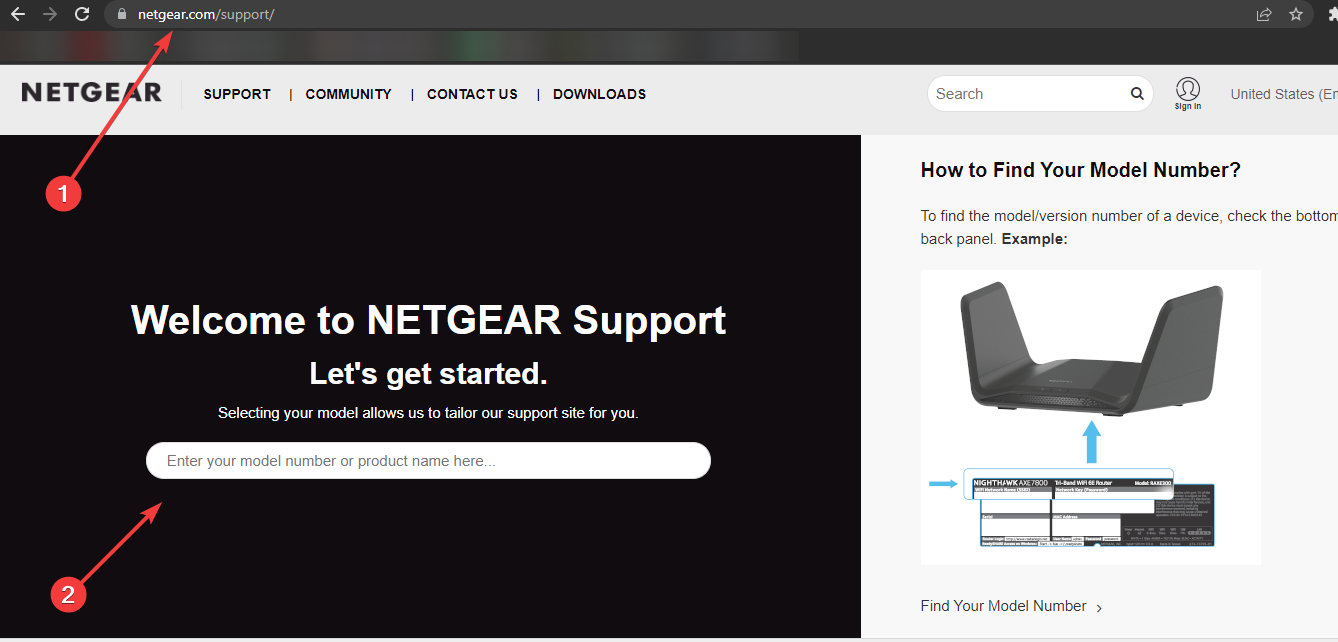
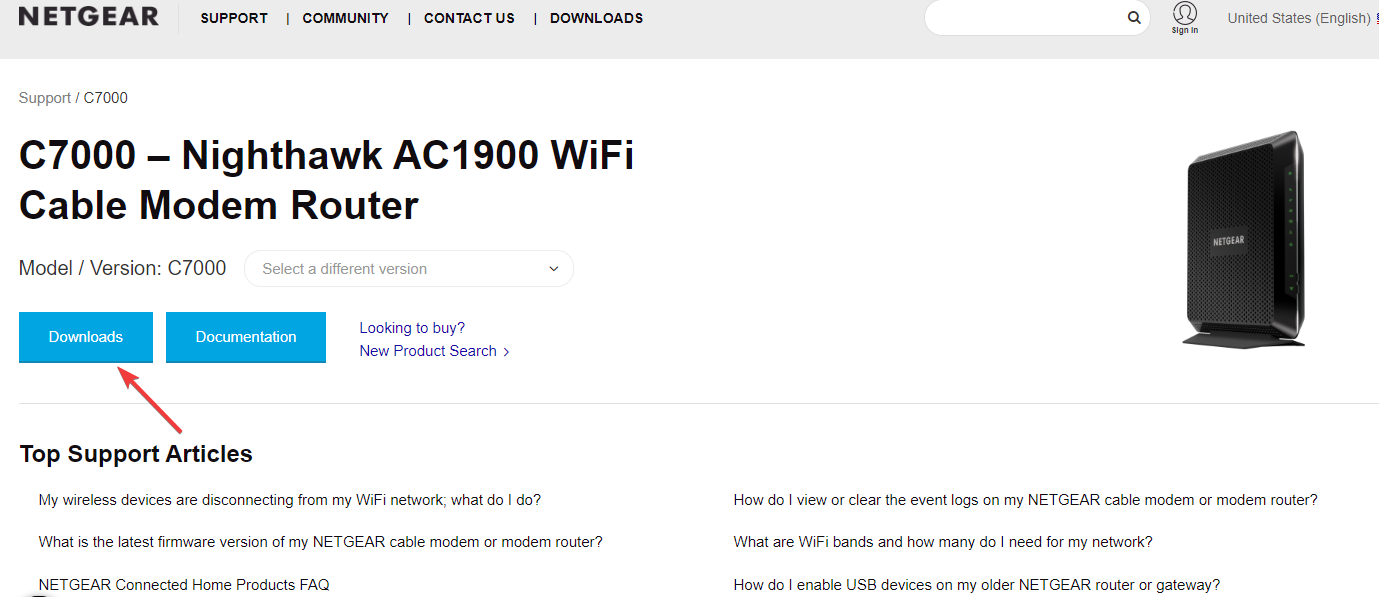
Netgear and Netgear Nighthawk routers couldn’t connect to the internet: It could be due to outdated firmware, overheating, misconfigured settings, or an internet outage. To fix this, first, reboot your router, then confirm that the settings are properly configured.
Asus routers couldn’t connect to the internet: If your Asus router couldn’t connect to the internet, it could be for the same reasons as a Netgear router, such as outdated firmware installed, overheating, etc.
TP-Link router not connecting to the internet: If your TP-Link router has trouble connecting, follow the troubleshooting steps below to fix the issue.
TalkTalk router not connecting to theinternet: Restart your Wi-Fi router.If this didn’t help, connect your computer to the router using the Ethernet cable and check if it works now.
What can I do if my router won’t connect to the internet?
1. Check to see if your router’s internet connection is active
The first step is to confirm if all the LED indicator lights are glowing green.
If any of the LED indicator lights are glowing red or orange, restart your router.
To restart, turn off your Wi-Fi router by unplugging it and wait 20–30 seconds.
Now, plug it back in and allow 15–30 seconds for the router to power back on and detect the internet connection.
2. Try connecting with an Ethernet cable
Try connecting the Ethernet cable and confirm if the internet is working.
Connect one end of the Ethernet cable to your computer and the other end to your router.
Confirm now if you can access the internet connection using the Ethernet cable.
Mostly, the issue could be with the Wi-Fi, but the LAN can be functional. Hence, by connecting your computer with the Ethernet cable, you can confirm if it is only your Wi-Fi that isn’t working, or the router itself.
If this still doesn’t help, you should try troubleshooting the internet connection.
3. Troubleshoot the Internet connection
Press the Start button and search for Settings.
Now, scroll down under System and locate Troubleshoot.
Click on Other troubleshooters.
Now locate the Internet connection and run troubleshoot.
Allow a few moments for the troubleshooter to detect the problem and fix it.
4. Check your computer for viruses and malware
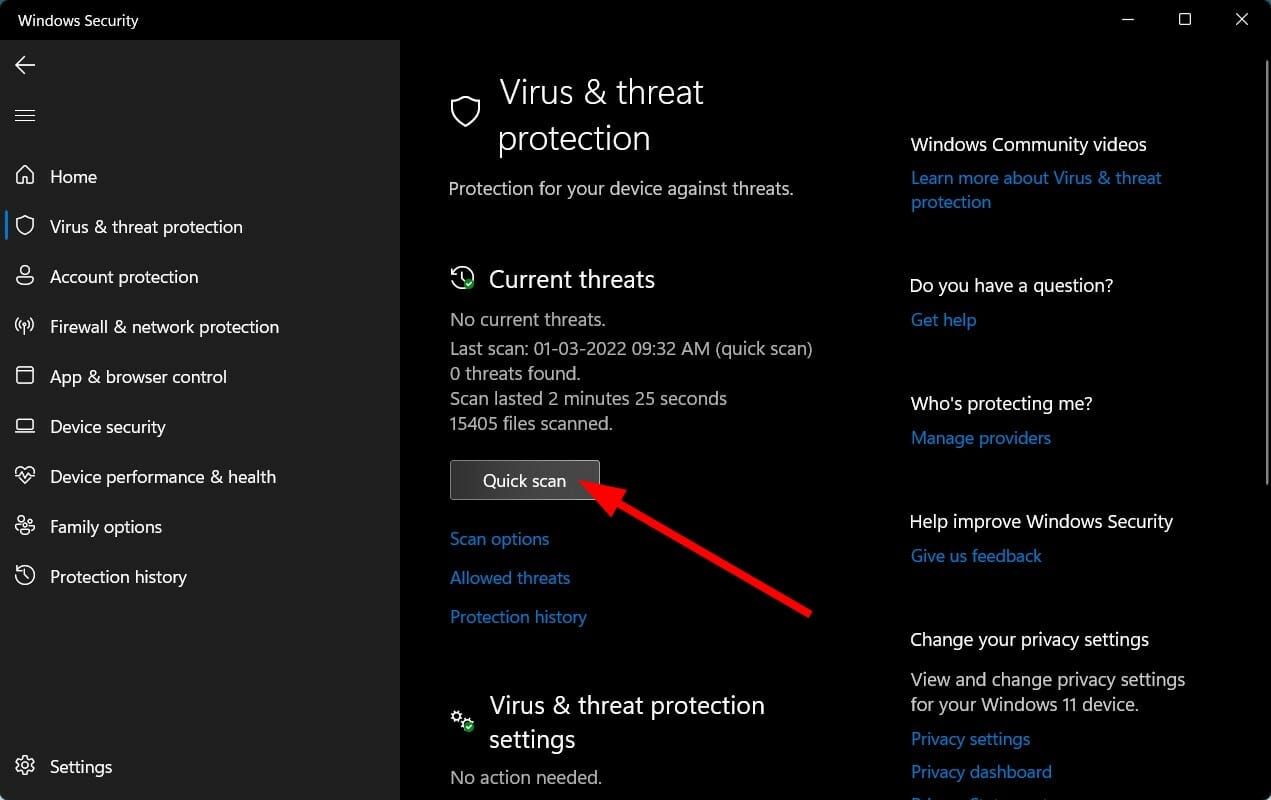
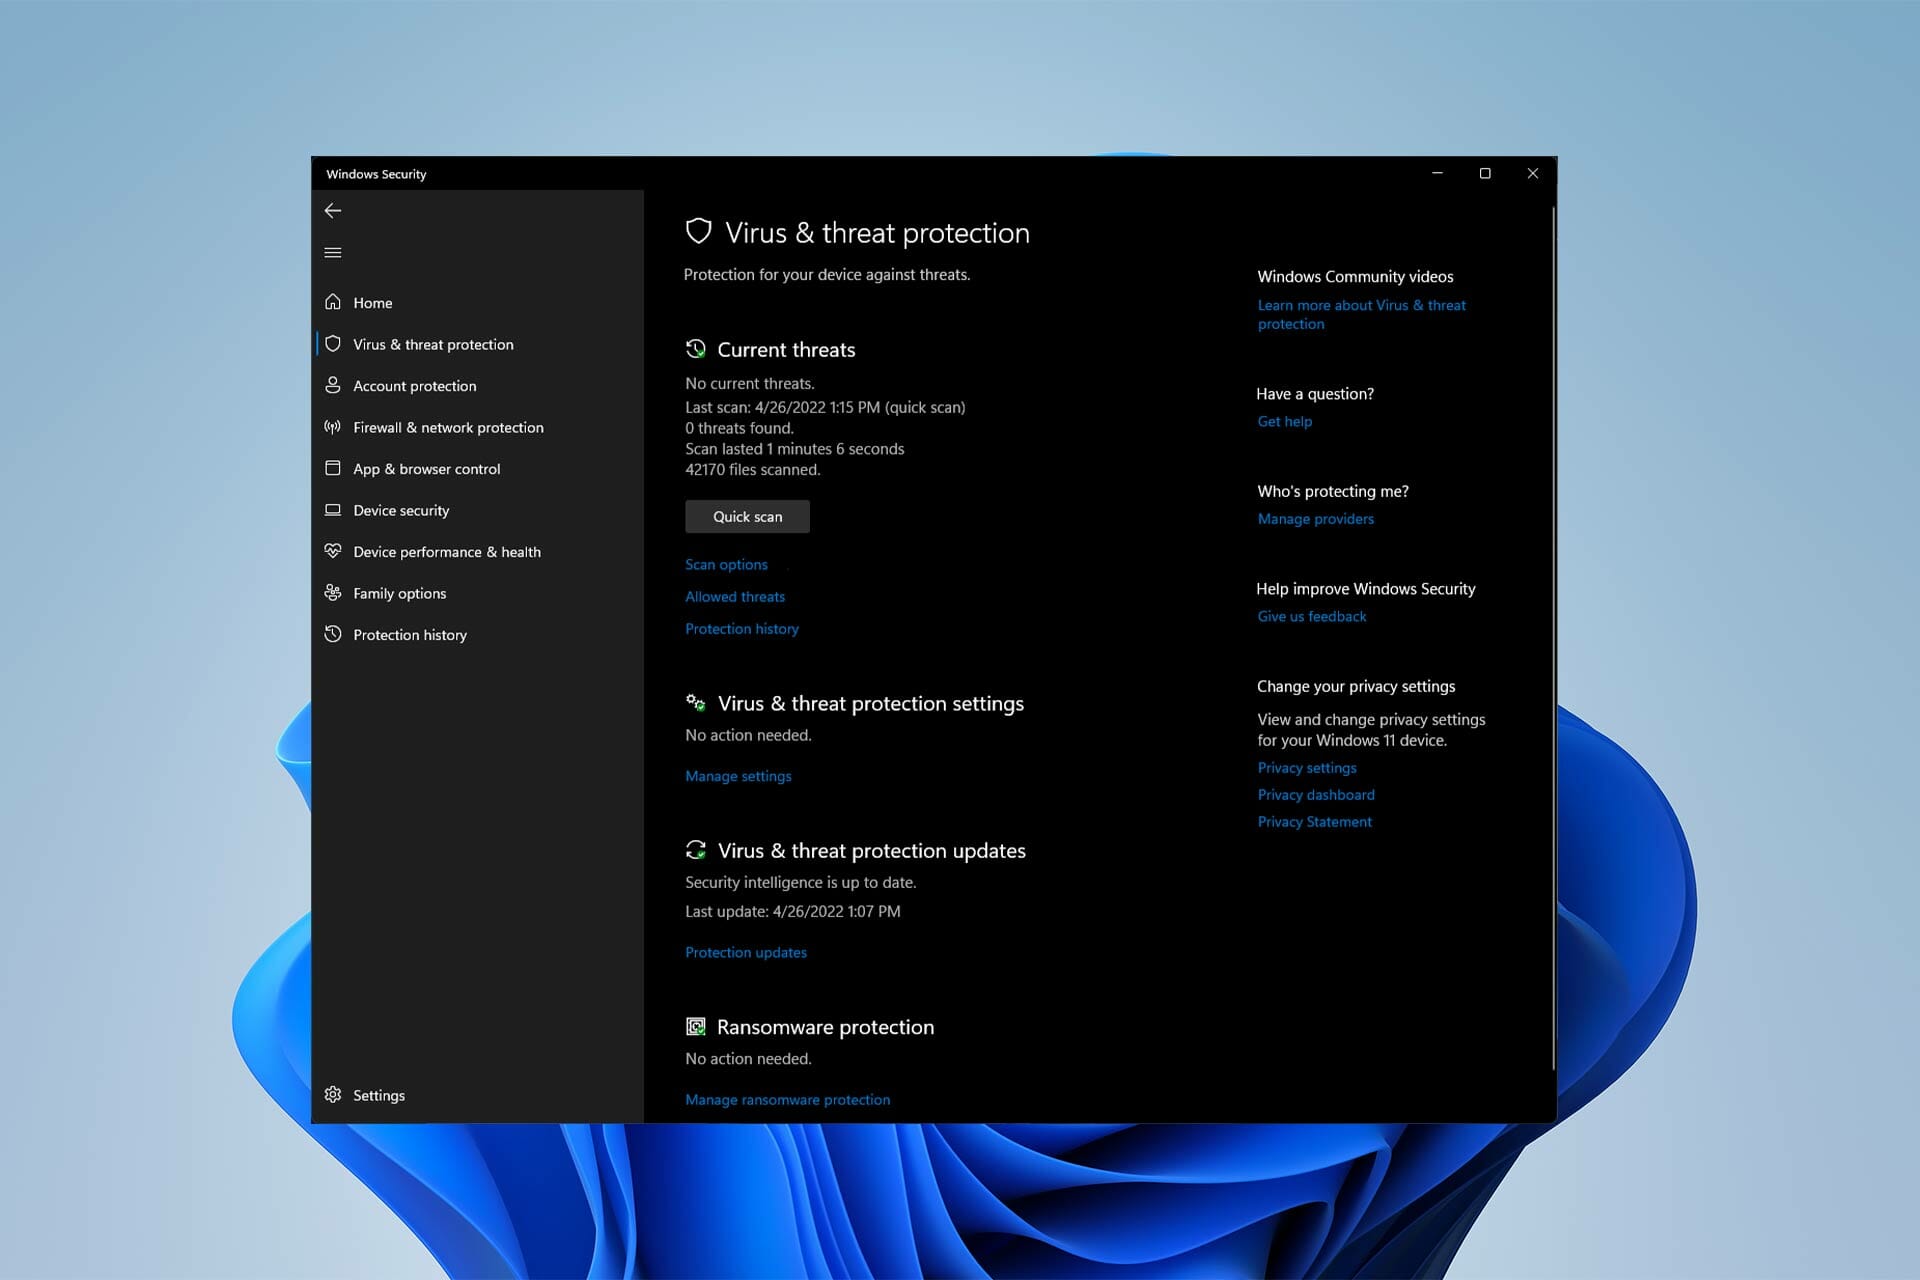
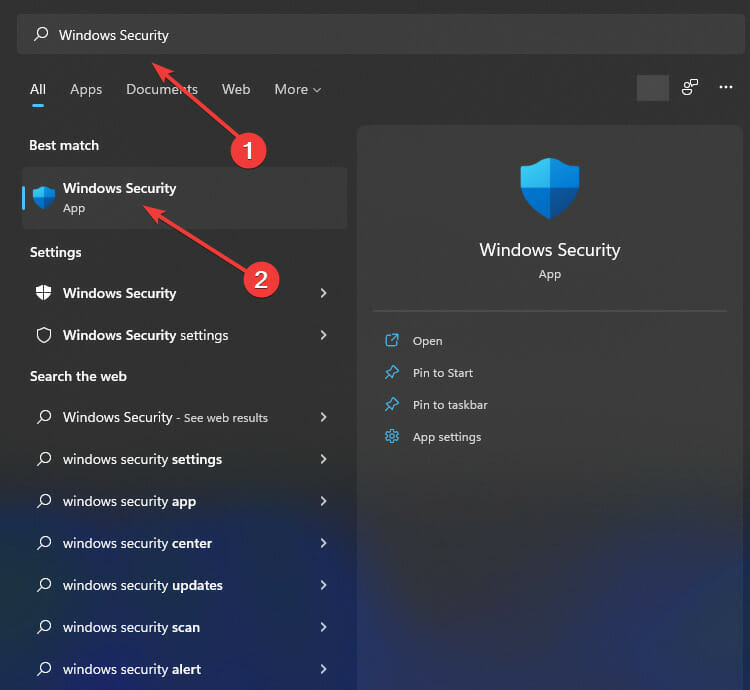
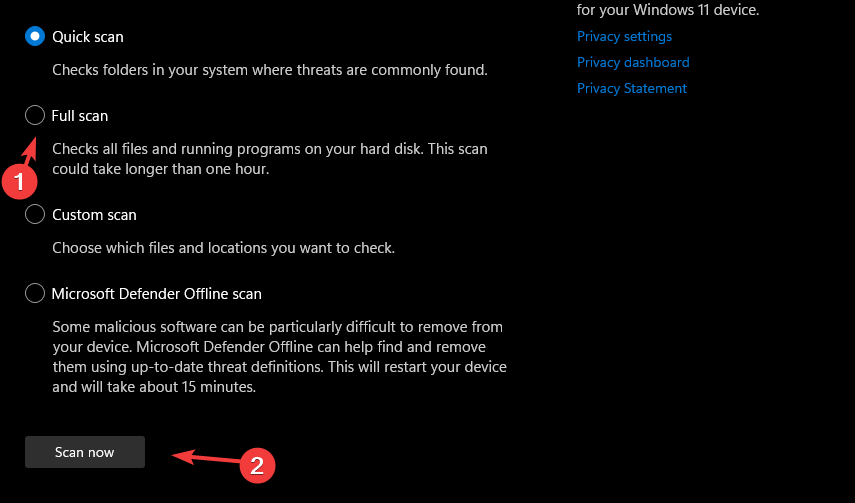
From the Start menu, search for Windows Security.
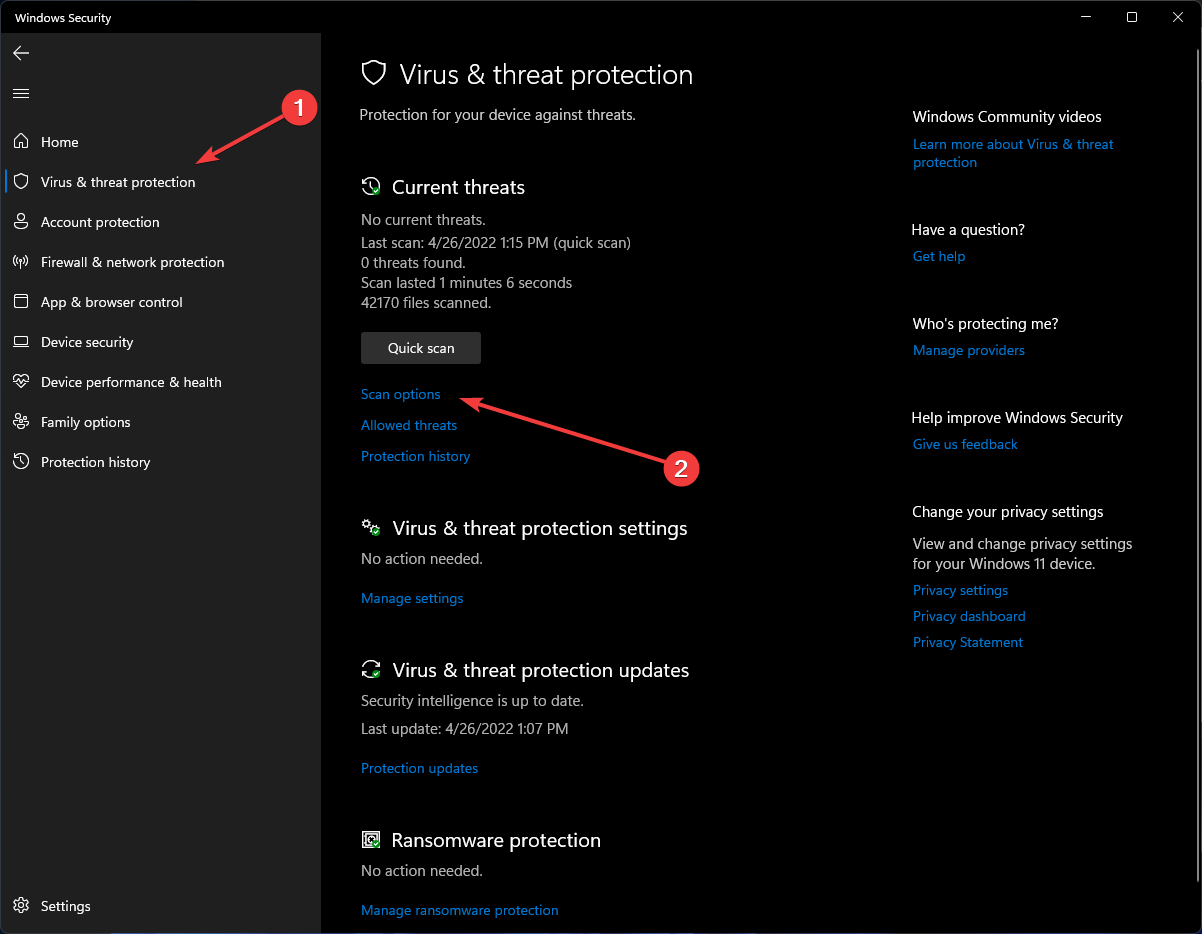
Click on Virus & threat protection.
Now, click on Quick scan.
Use the Windows built-in antivirus software, Windows Defender, to scan your computer for any viruses or malware. If your computer is infected with a virus or malware, it could eat up a lot of bandwidth or block the internet connection completely.
Alternatively, you can also install a standalone and superior antivirus program such as TotalAV to block all malicious threats from your PC.
Press the Start button and search for the Command Prompt.
Type ipconfig/flushdns and press the enter key.
6. Use other devices
When your PC fails to connect to the internet, and your router doesn’t show any problem with the internet connection, connect to the internet using your mobile phone, or another PC or computer.
If your device connects to the internet but your main PC can’t, the problem could be with your PC.
If you tried all the above solutions and the router won’t connect to the internet, you should contact your ISP and let them know you are having trouble accessing the internet.
Maybe you could be facing some downtime, or something might have gone wrong. When you report, you raise an issue, and the team will work on diagnosing and fixing it.
How can I fix my new router if it’s not connecting to the internet?
1. Check if your internet connection is working
Suppose you already have an internet connection at home and have decided to upgrade your router. In that case, you should first confirm if the internet connection is working on the previous router before you install the new one.
There is a possibility that the new router won’t connect easily without proper configuration. It is best to confirm if the internet connection is working on your old router before you fiddle with your PC or your new router’s settings, complicating the process further.
2. Turn on your router
Connect the LAN and power cable to your router.
Press the power on/off button on your router.
Allow a few moments for it to boot.
Once you turn on your router, the indicator lights will blink a few times and also change colors while you are setting them up. Also, During the setup process, the indicator lights will blink multiple times.
After 1-2 minutes, the internet connection light should light up in green, suggesting the router is recognizing the internet connection and it is ready to be used. If it shows orange, it means the router recognizes the internet connection but has trouble connecting to it. If the color is red, it means your router is failing to connect to the internet or the internet is not working.
But, if your router is failing to connect to the internet, it can be because it is not configured properly.
3. Configure your network
Connect your PC to the router using an Ethernet cable.
Open the browser that you use and enter your router’s IP address. You can find the IP address on the label that is attached to the bottom of the router.
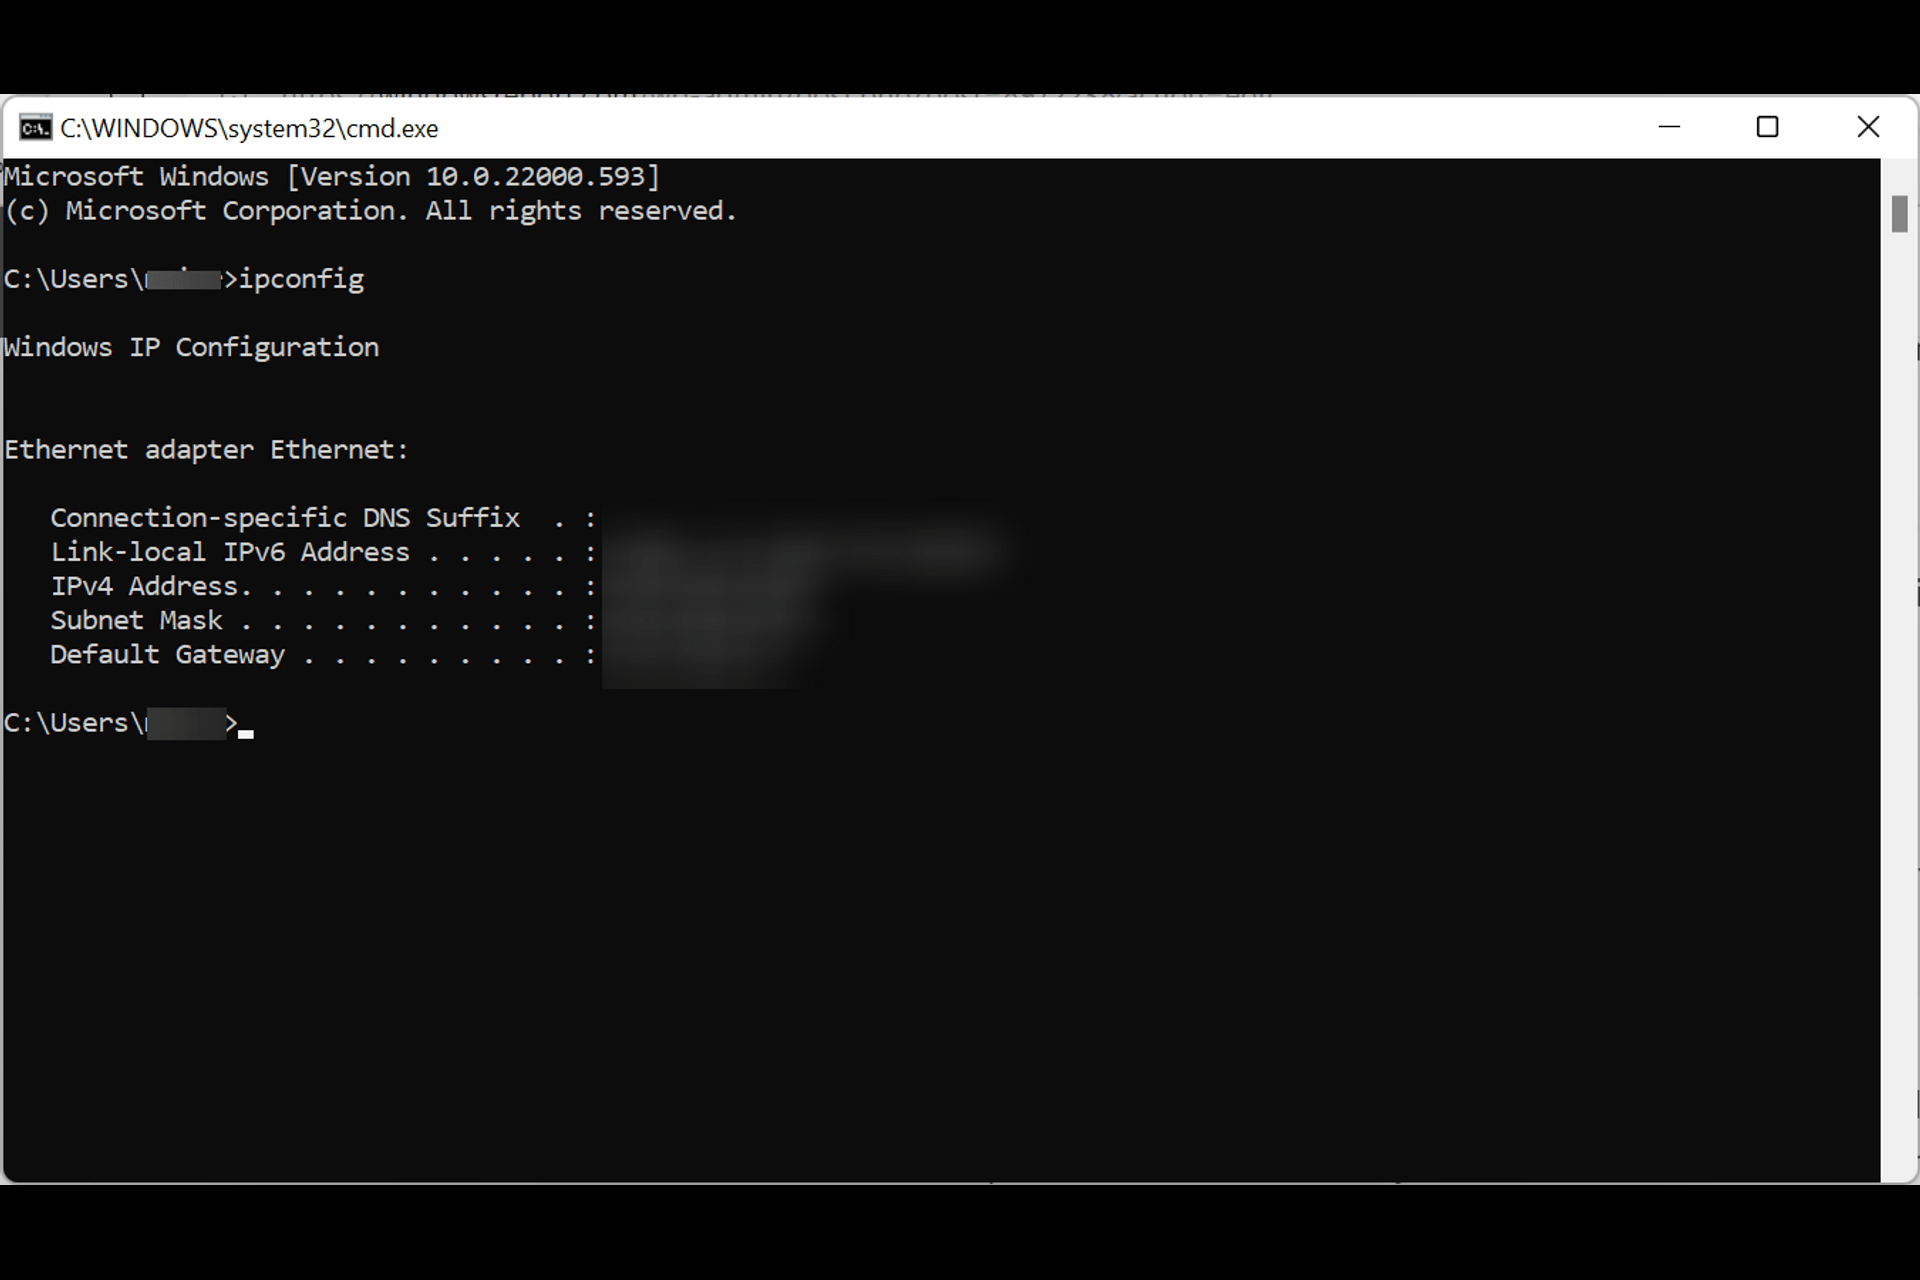
Alternatively, you can also confirm the IP address by opening the command prompt and typing ipconfig. You will find your IP address under Default Gateway.
Go to your router’s login window. To do that, check the router’s manual for the login windows link.
Enter the username and password of the router (you should also find this information in the manual).
Check if your router is properly configured.
If you corrected the settings, save the changes by clicking on save and exit.
Restart your router to reconnect your PC and other devices to the internet.
4. Configure Wi-Fi
Now that you have set your router up, you will need to set up your Wi-Fi now.
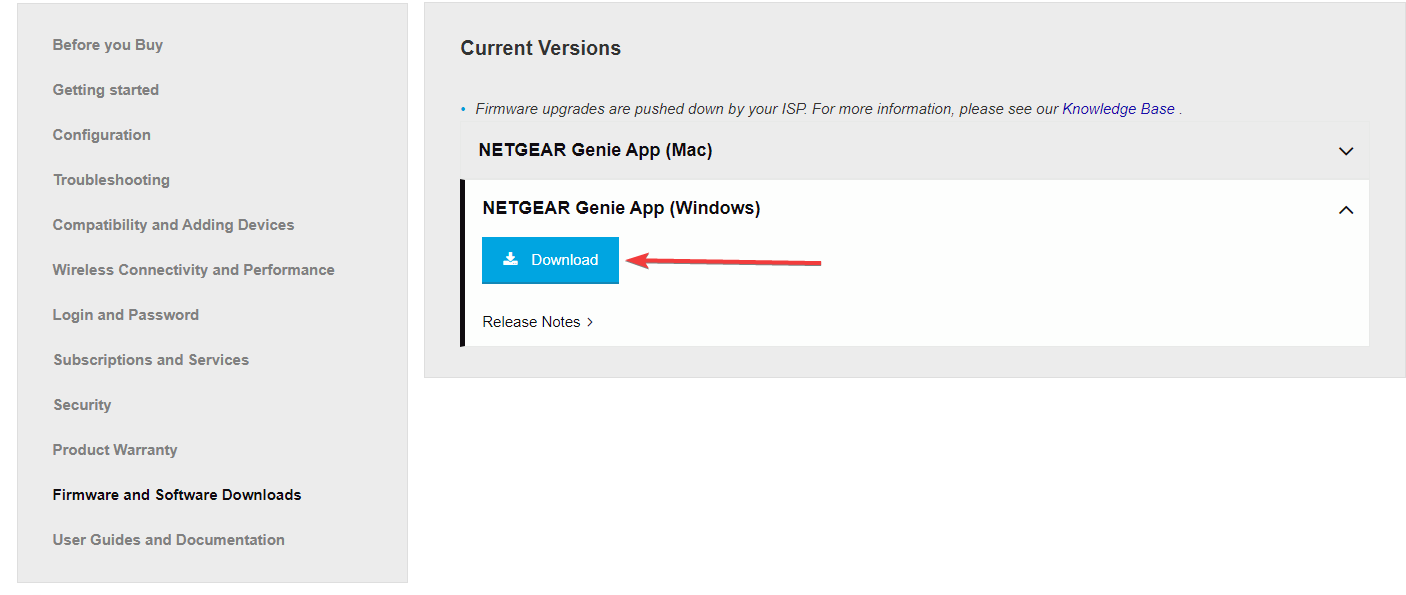
Download the router manufacturer’s app on your smartphone and log in to your router.
Create a password for your 2.4 GHz and 5 GHz networks.
Wherever possible, make use of auto-configuration tools.
Enable firewalls and web filtering. Use access controls to safeguard yourself against malicious traffic.
Once you have completed the setup process, you can now connect your devices to the router.
Your router can at times stop working. It could be due to various reasons, such as downtime, your router malfunctioning, and more.
This isn’t the only issue that can be caused by your router, and many reported that only Google works on their Internet, but we tackled that issue in another article.
You can fix the issue by following the above steps, if it doesn’t help, you should immediately call your ISP for help.
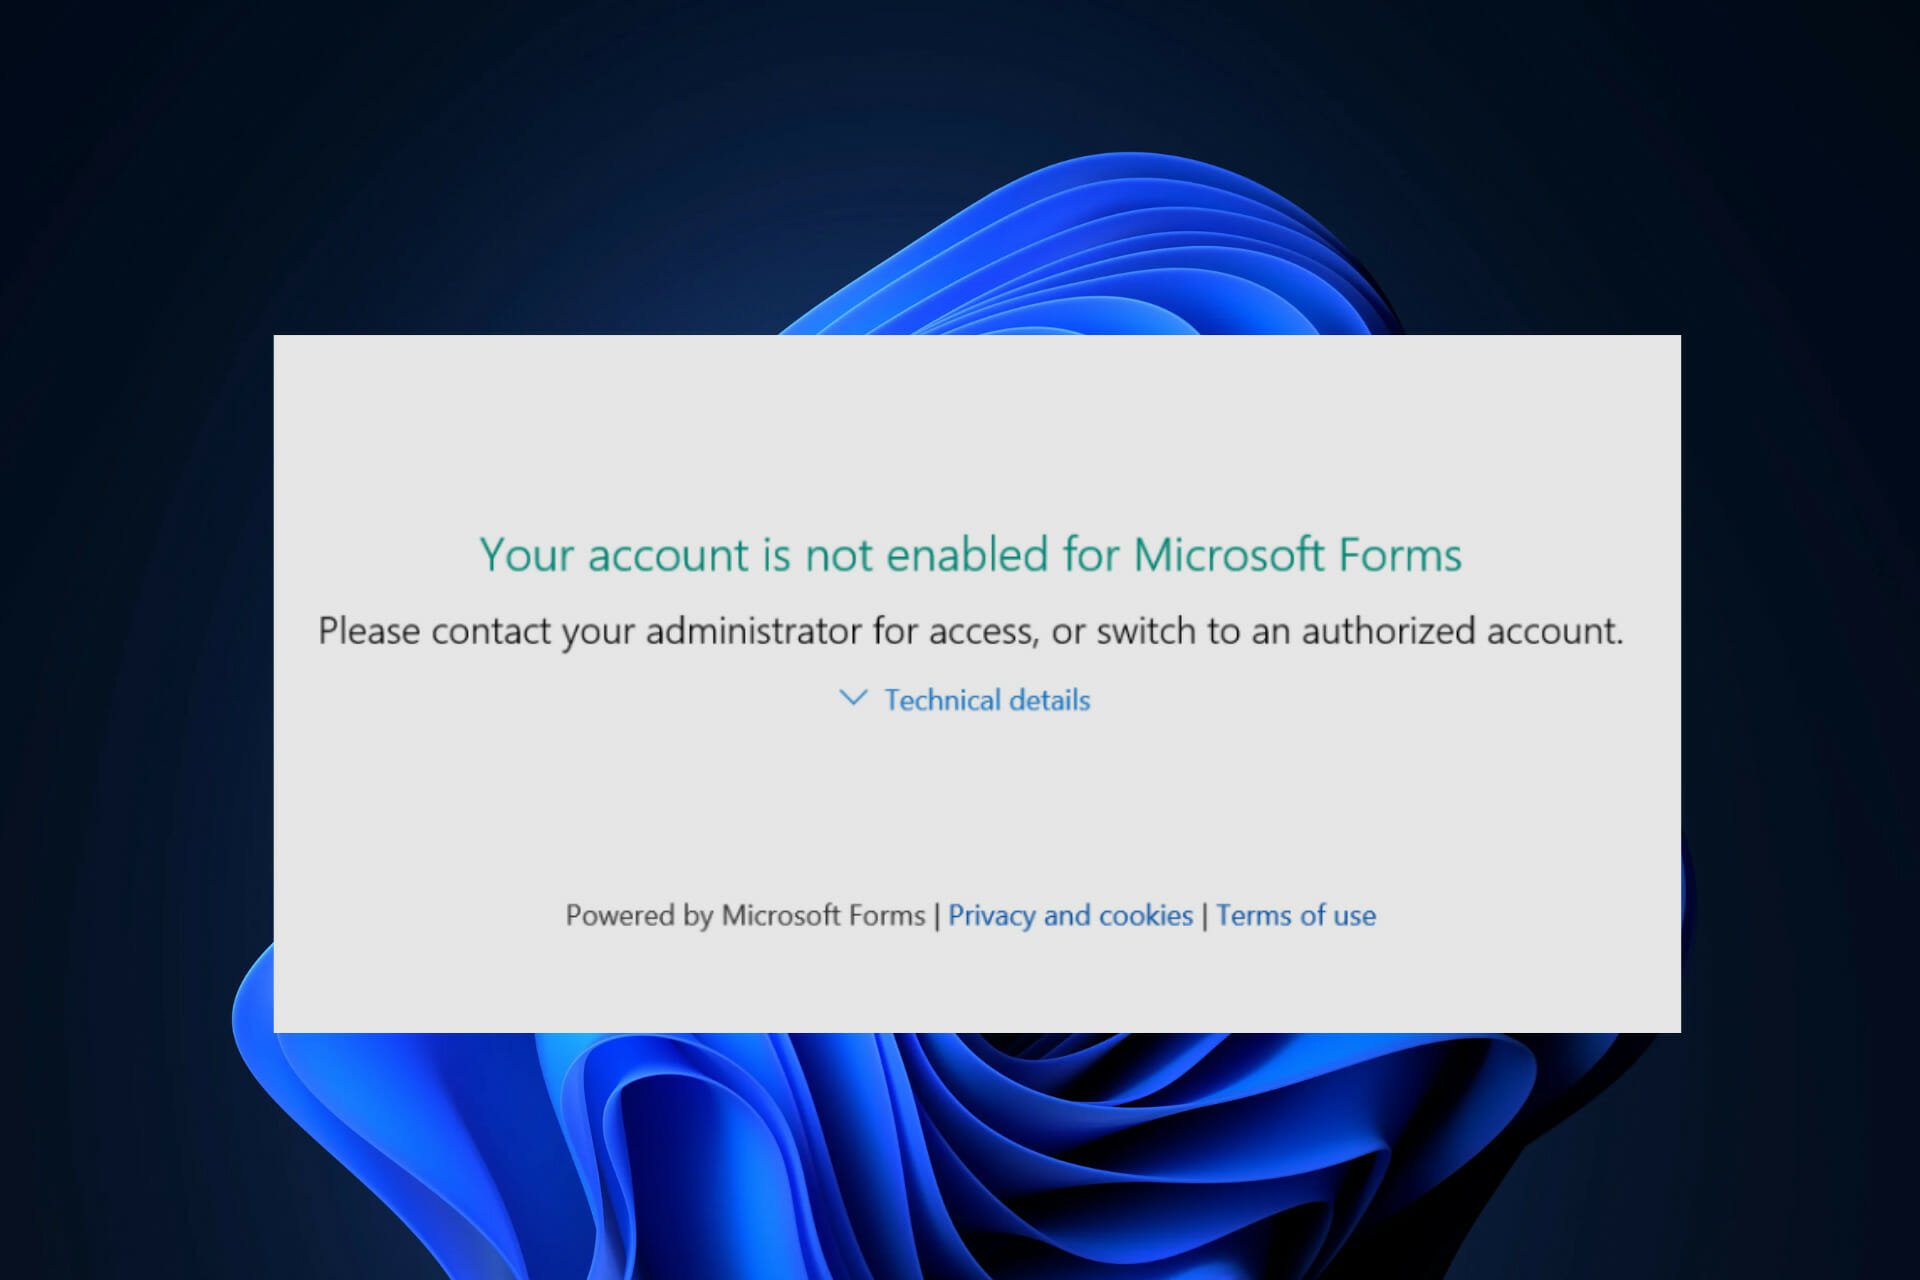
Sometimes, when you try to create a form with a business account, you may come across an error with the message – Your account is not enabled for Microsoft Forms.
Usually, a specific user can have access to and even edit your Microsoft Forms in an organization. However, it’s a common scenario when you come across the account not enabled error.
This can be a bit frustrating, especially for people working for an organization who may not be the admin. If you are the admin, then it becomes easier for you to set up Forms and have control over it.
At the same time, the admin should ensure that the user has the correct Microsoft Forms license and that the feature is enabled for the user.
Since, as an admin, you have special permissions for the Microsoft Forms, you can disable it and then enable it back again for the entire organization or just an individual.
But, if you are not the admin, you may need to speak to your admin to allow access to Microsoft Forms.
So, if you are wondering why is Microsoft Forms not working on Windows 10 or Windows 11, this post will help you with your quandary.
How do I enable a Microsoft Forms account?
Forms is enabled by default for everyone in the organization. However, sometimes, you may encounter the error message – Your account is not enabled for Microsoft Forms.
This message can also come up when you recently updated Windows and Microsoft Forms need to be set up before you get access to it.
So, if you want to know how to enable a Microsoft forms account when you update windows, firstly, you must have access to Microsoft Office and should be the administrator.
Once the update is applied, boot into Windows and follow the setup process mentioned on Microsoft’s official page to configure Microsoft Forms.
Microsoft Forms is available for Office 365 Education customers, Microsoft 365 Apps for business customers, and customers with a Microsoft account (Hotmail, Live, or Outlook.com).
However, if you are wondering how to enable Microsoft Forms for a user in Office 365 or for everyone in the organization, follow the below methods.
How do I fix Your account is not enabled for Microsoft Forms?
1. Enable Microsoft Forms account for specific people in your organization
Expand the portal menu on the left side of the pane and click on Azure Active Directory.
Next, on the left side again, click on Enterprise applications.
On the right side, go to the Application Type, click on it and you will see a drop-down list.
From the drop-down select CollabDBService.
Next, select CollabDBService in the search results list.
Again, from the Application Type drop-down list, select Microsoft Applications.
Under the Application Type drop-down list, type Microsoft Forms in the search field.
In the search results list, select Microsoft Forms.
Now, for both CollabDBService and Microsoft Applications, follow the process below.
Go to the left side and under Manage, click on Properties.
Next, on the right side, go to the option – Enabled for users to sign-in? Move the toggle switch to No.
Press Save when done.
Now, the account is enabled for everyone in your organization and the Microsoft Forms error should disappear.
3. Deselect and select Microsoft Forms
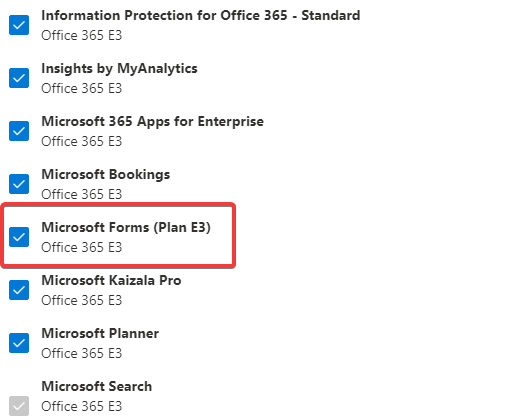
Go to MicrosoftForms and deselect the box next to it. Press Save changes.
Now, select it again and click Save changes.
Wait for some time for the changes to take effect.
So, if the Microsoft forms was not opening still for everyone in the organization, they should be available to everyone now.
NOTE
For this method, firstly, check if the Microsoft Forms option is already selected. If it’s already checked and you are still receiving the error message, then follow the above steps.
What can I do if the Microsoft Forms account is still not enabled?
There are situations when even after you have enabled the feature for everyone in the organization or for an individual, the error still comes up. This could be due to:
➡ Too many admin privileges
Your Microsoft Forms may not be working if your organization is offering too many admin privileges.
In such cases, the admin can remove all privileges except the global admin account. This will give you all the privileges by default and so, the other accounts don’t need to be disabled separately.
You can then restart everything and should not come across the message – Your account is not enabled for Microsoft Forms anymore.
➡ Enable SharePoint service
At the same time, make sure that the SharePoint service is also enabled for the organization. This will automatically allow all users in your organization to access Microsoft Forms.
➡ Wait for at least 24 hours
Moreover, in most cases, waiting for 24 hours after the initial failure seems to resolve the issue on its own. So, having patience might be a virtue after all.
Microsoft Forms is an essential Office 365 app for most organizations these days. While it’s common to come across different Microsoft Forms errors we hope that our solutions helped you clear them. You can read our comparison with Google Forms to see which service fits your needs best.
If you encounter any other issues and want to know how to access Microsoft forms, then let us know in the comments box below.
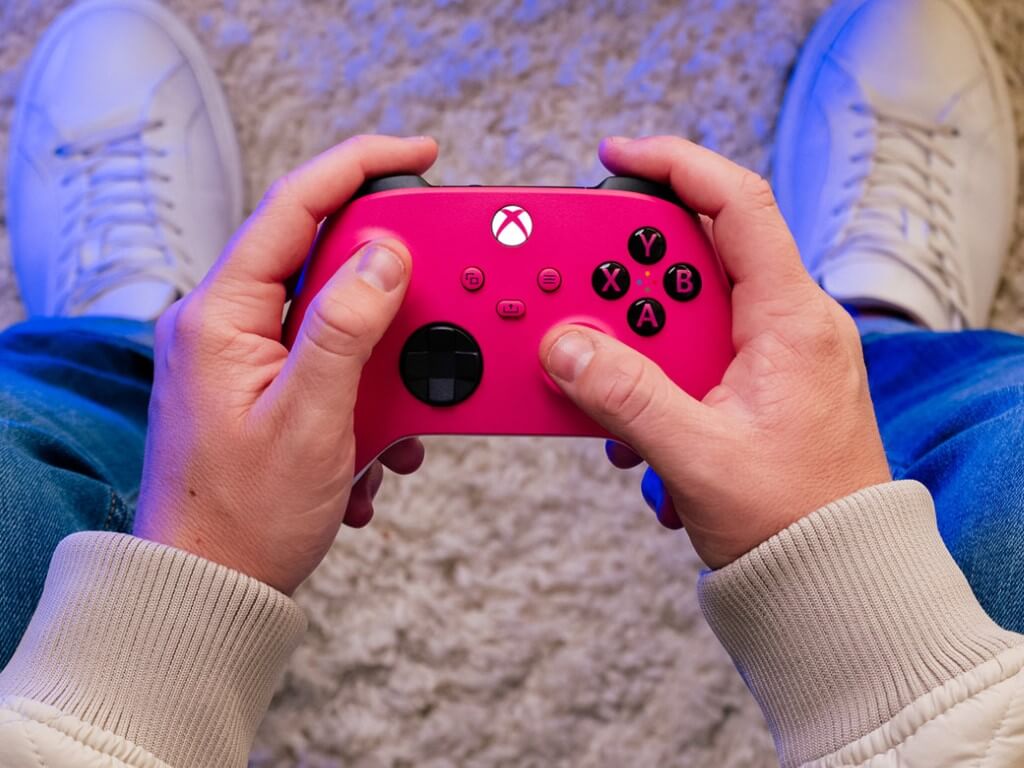
The new Xbox Wireless Controller now comes in another color. This time around, it’s a Deep Pink option, joining the lineup of five other colors that you could already buy.
As the name of the controller suggests, this new controller has a pink thumbstick, as well as pink A, B, X, and Y buttons on top of a clear black finish. The body is also all pink in the front, with white grips in the back. The D-bad and triggers, or bumpers, meanwhile, are all black, but the main pink color is a first for Microsoft, from outside the Xbox Design lab, according to Thurrott.com.
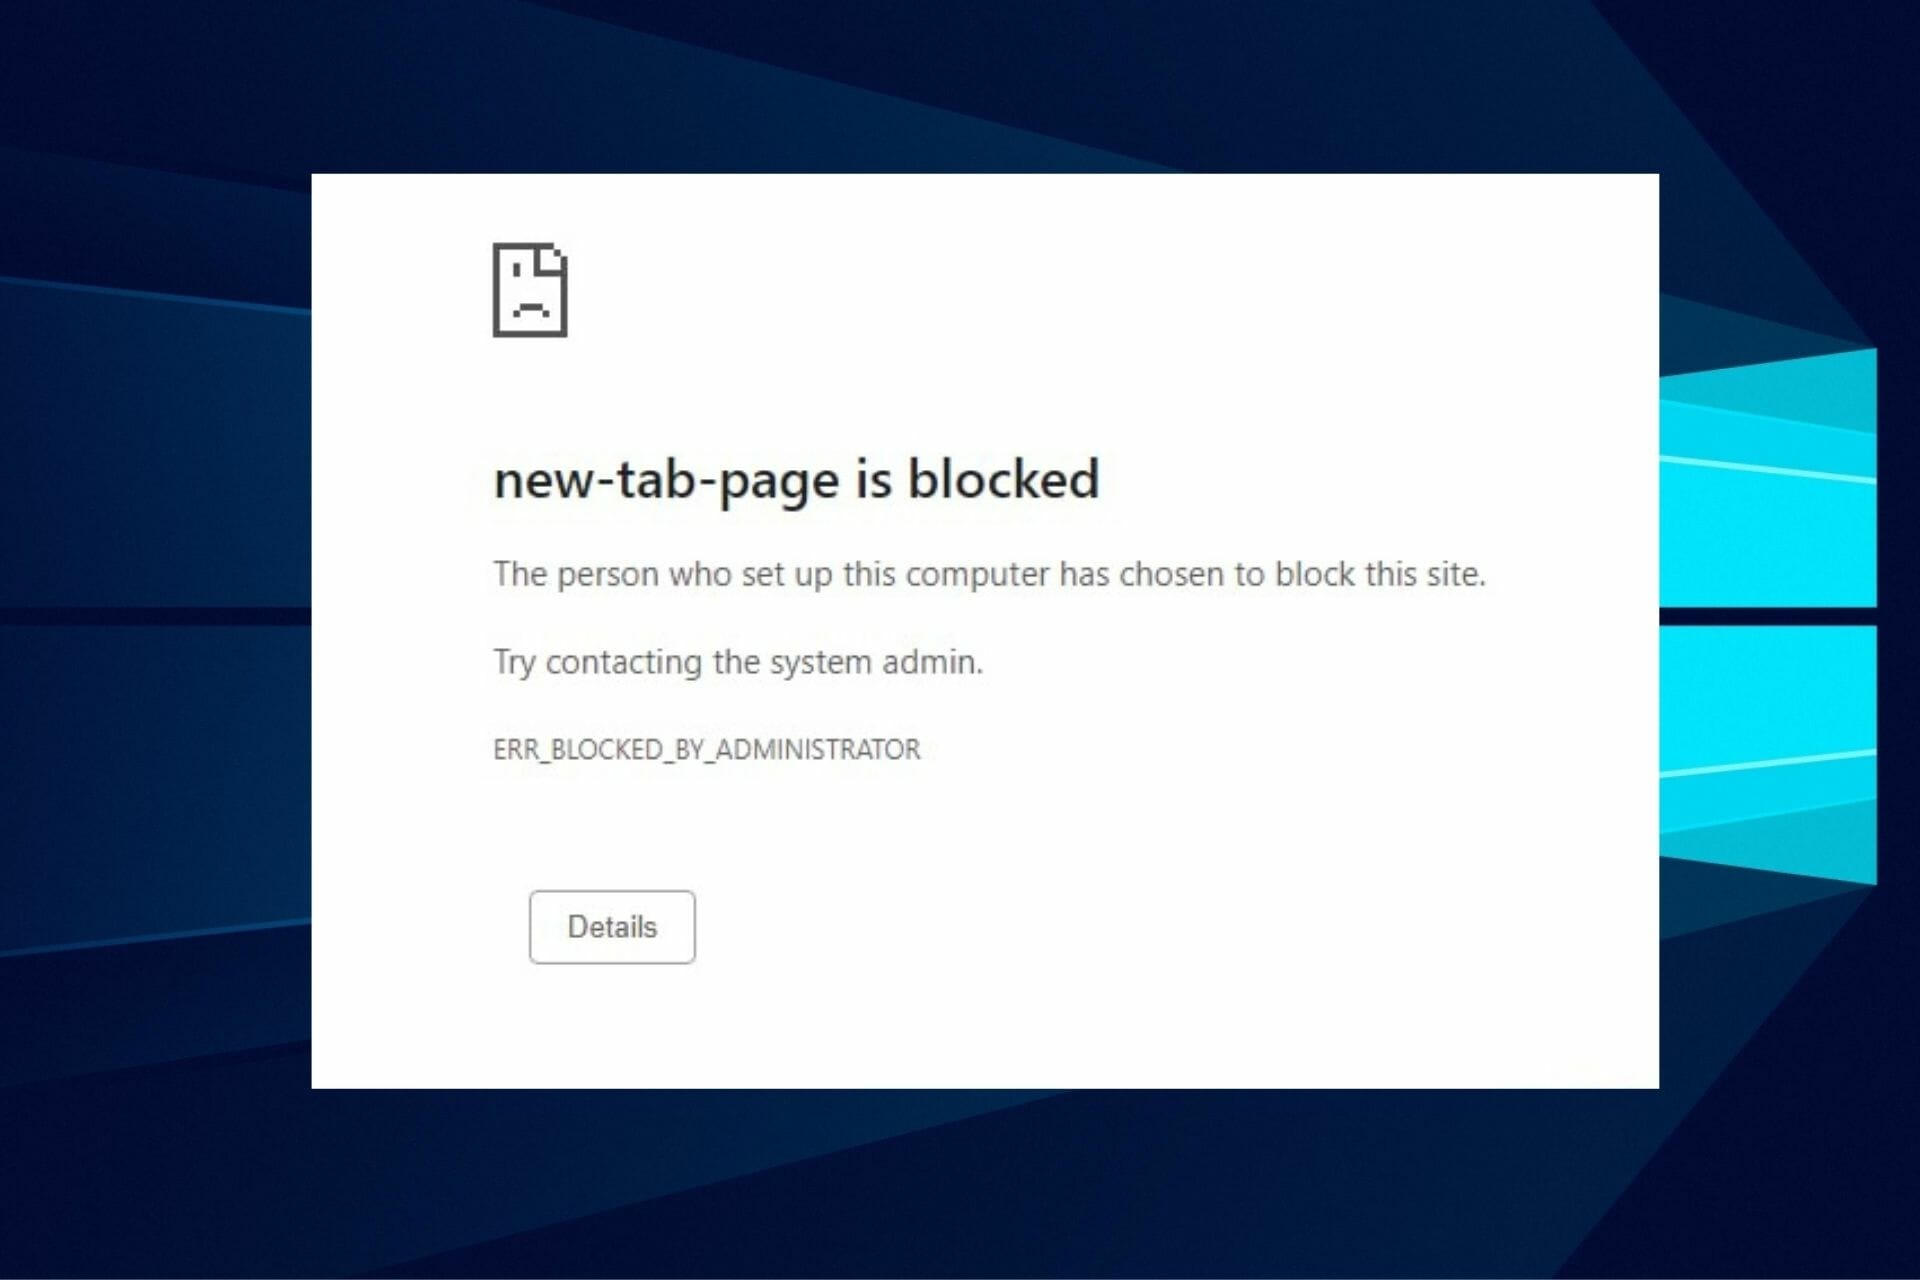
Many users have reported that they encountered Err_blocked_by_Administrator while trying to access some sites on their Chromium browsers.
Getting a restriction in using your device to surf the internet due to administrator settings can be quite frustrating. However, some administrators take this measure for controlled access to what the device can be used for.
Different reasons could cause this error message to pop up. Hence, before providing the solutions, we will explore the potential causes of this error.
What are the most common causes for getting this error?
This error could be prompted by a web filtering mechanism set up by your company’s admin to limit access to some websites viewed as improper.
It could also be a result of using a domain network with blocked access to port and web application programs.
In the case that you are the administrator, the error could stem from policy settings within your browsers and devices.
The troubleshooting fixes provided below are grouped to provide solutions depending on the device you are using. So, follow the instructions strictly for optimal results.
What can I do if I get the Err_blocked_by_Administrator error on my PC?
➡ Browsers
Chrome
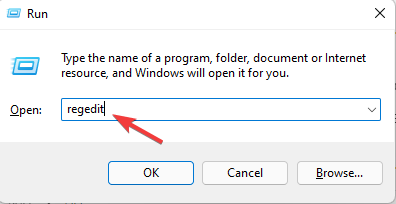
Press Windows + R to launch the Run box, input Regedit in the box, and press OK.
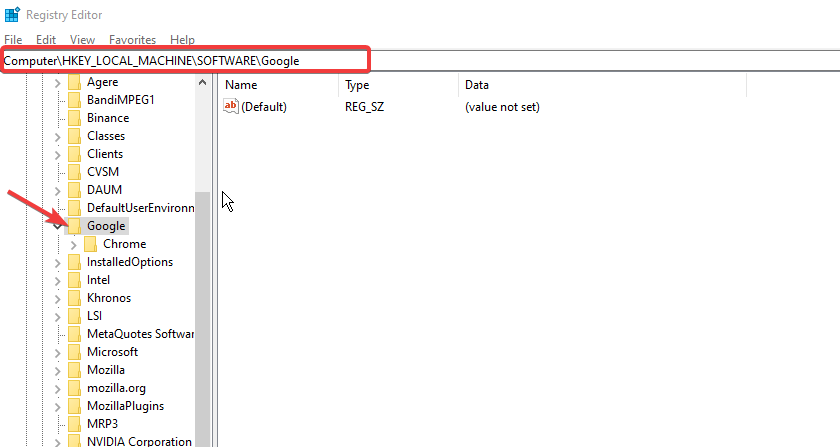
Navigate using the following directory or paste it to the search space above and press enter: Computer\HKEY_LOCAL_MACHINE\SOFTWARE\Google
Expand Google.
Locate Chrome and right-click, then press delete.
Restart PC to take effect.
This will empty all your previously stored data on Chrome. So it is advisable to backup your Chrome before trying this fix as it will restore everything to factory default.
Edge
Press Windows + Rto launch the Run box, input Regedit in the box, and press OK.
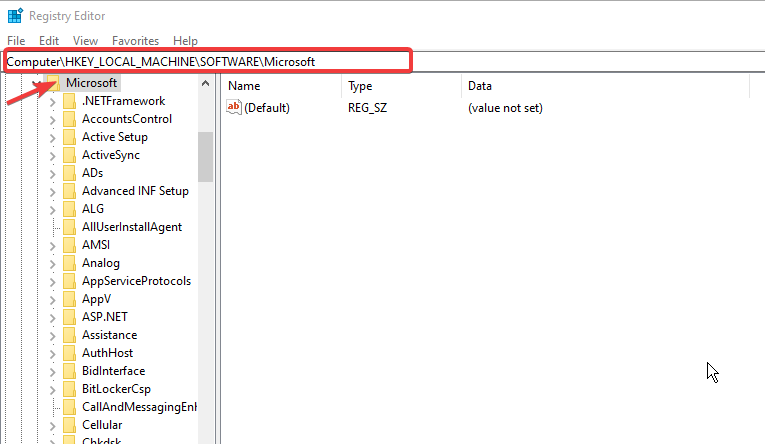
Navigate using the following directory to open Registry Editor: HKEY_CURRENT_USER\Software\Microsoft\
Expand Edge, right-click the folder inside, and click delete.
Restart PC to take effect.
Similar to chrome’s approach, by clearing this, your previous administrator’s limitation will be lifted and you can access the previously barred sites.
➡ Devices
Mac
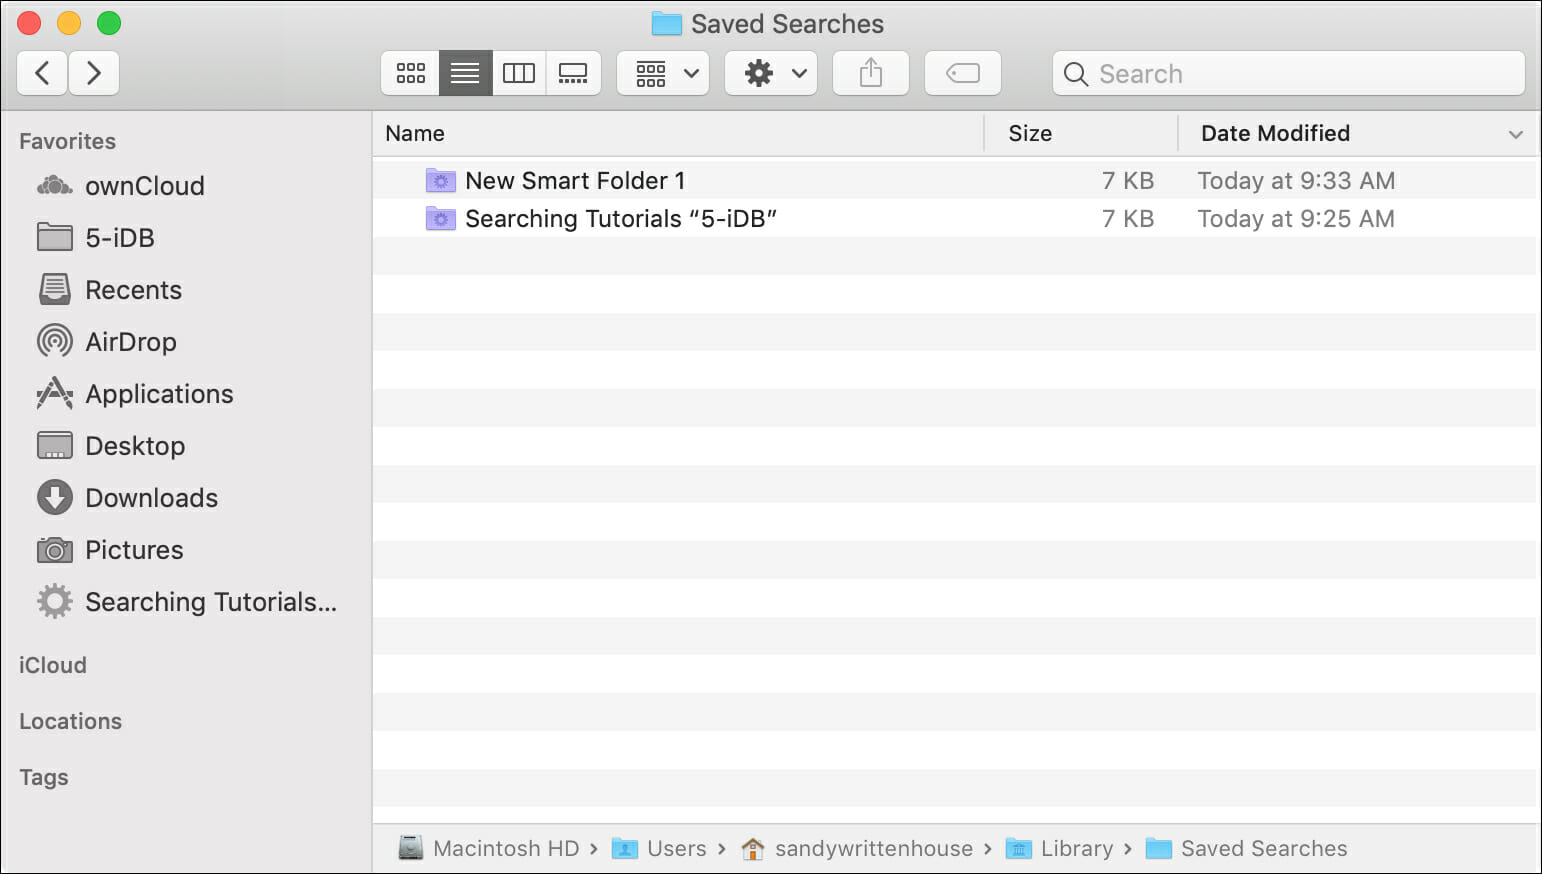
Press Option + Command +Spaceto open the Finder search window.
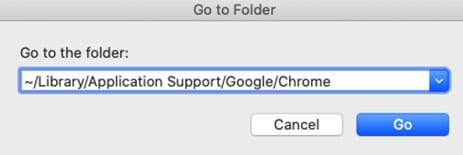
Select go to the folder, and input the following directory or navigate using this: Go ~/Library/Application Support/Google/
Select Chrome folder, then move it to trash
Windows 11
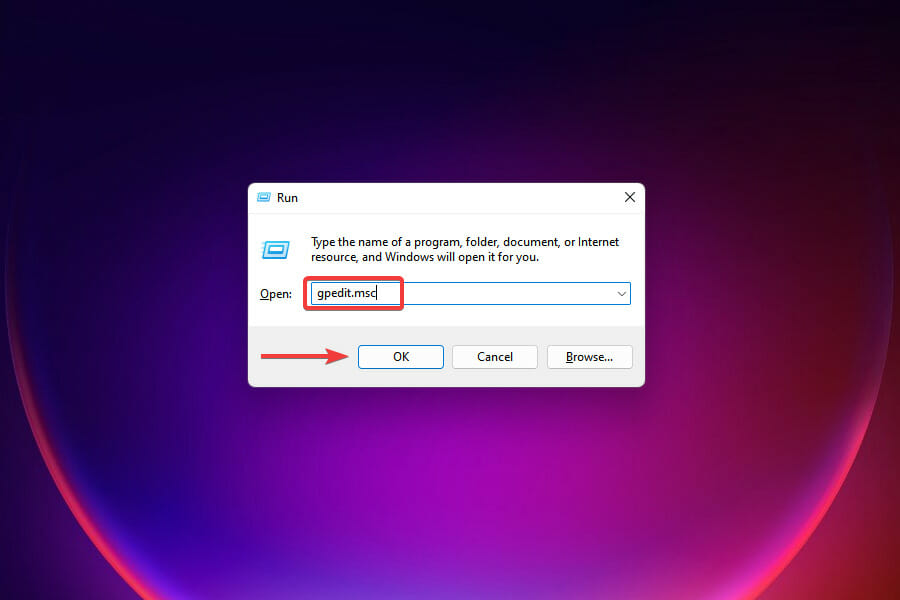
Press Windows + R to open the Run box, input gpedit.msc and click OK.
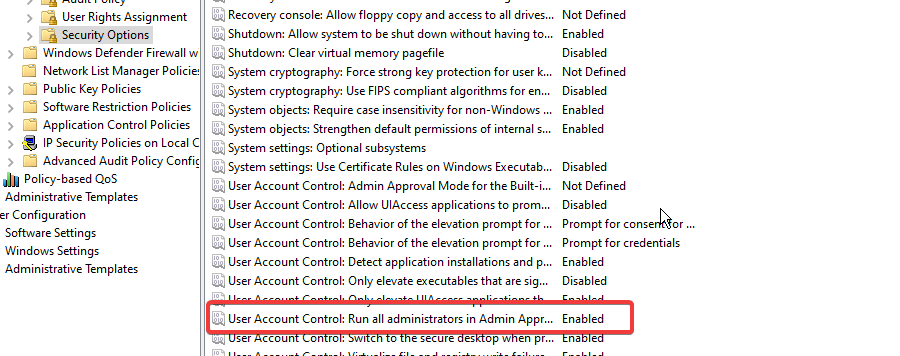
Expand using the following: Computer configuration>Windows settings >Security Settings > Local policies.
Open Security options, double click User Account Control: Run all administrators in Admin Approval Mode.
Choose disable and click OK.
Windows 10
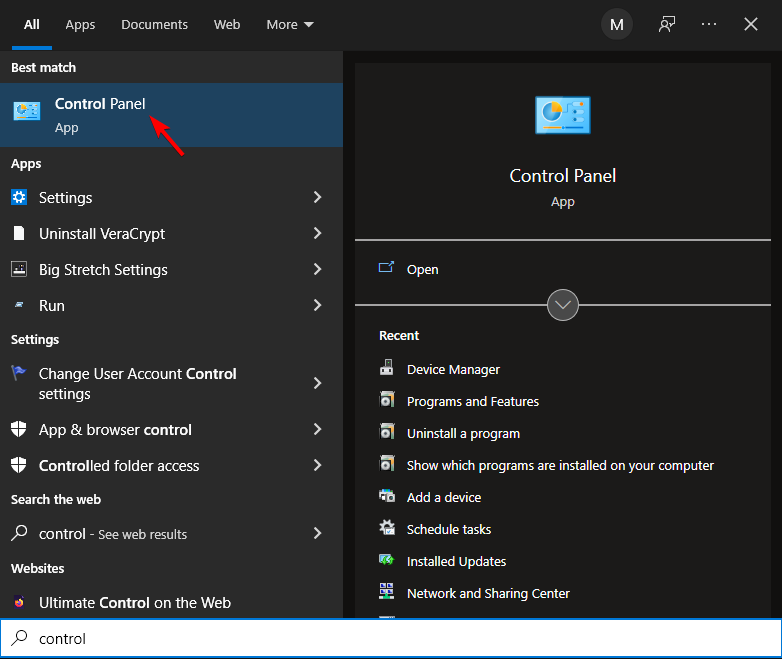
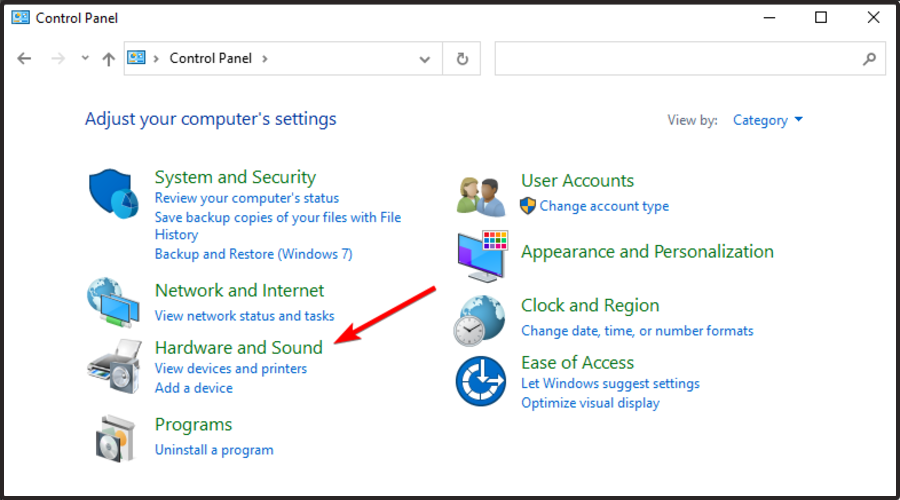
Press the Windows key, type the control panel, and press Enterkey.
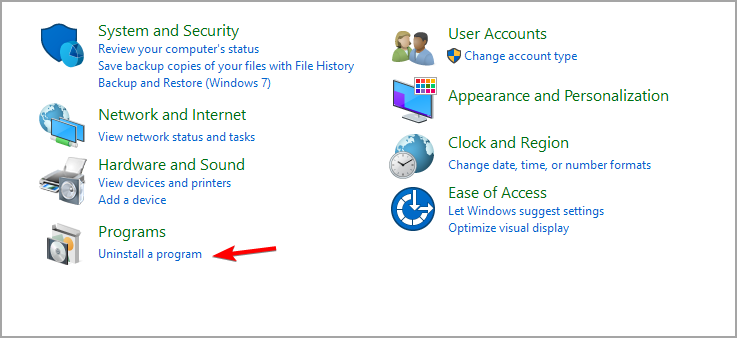
Choose Uninstall a program under the Programs section.
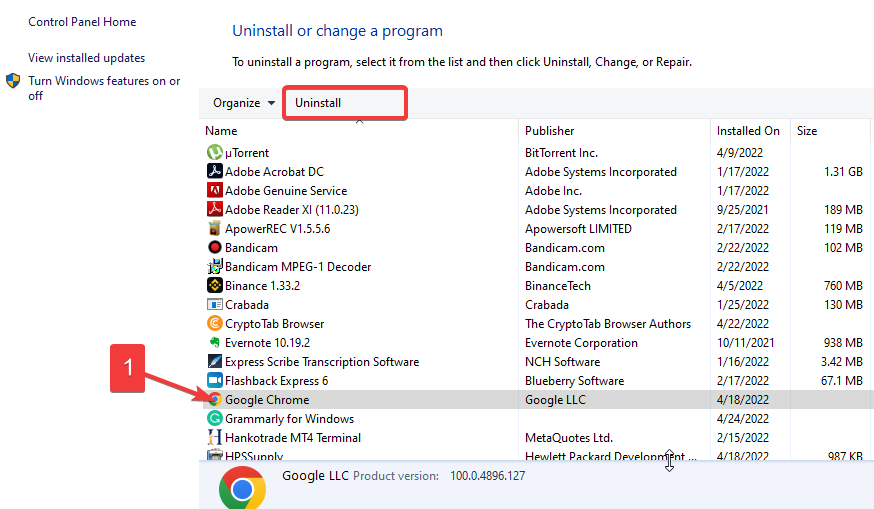
Locate Google Chrome or Microsoft Edge from the list and select it.
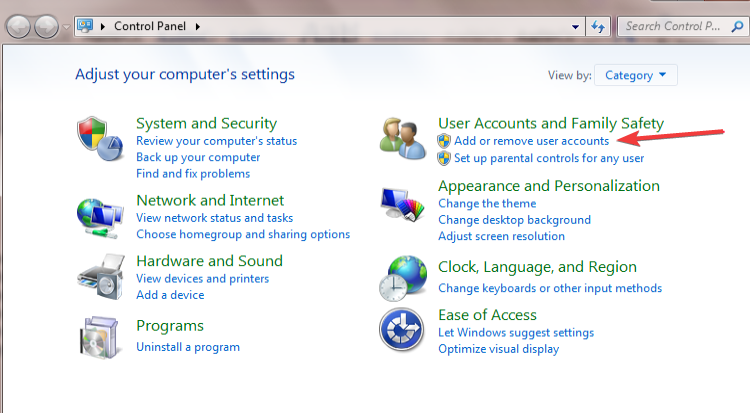
Select User account & family safety and double-click Add or remove user accounts.
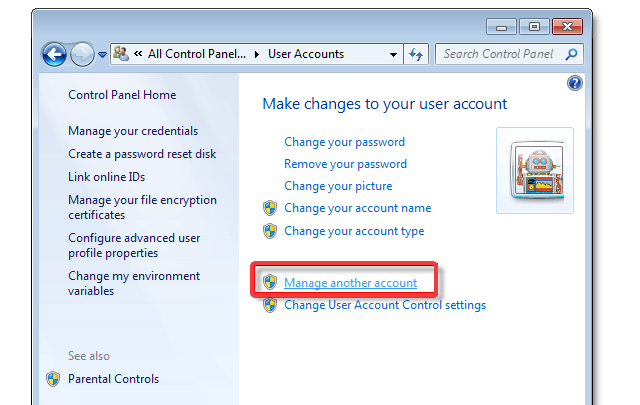
Click on Manage another account, and click Change account type.
Choose Administrator and click OK
Restart PC to take effect
Once you have changed your account to the Administrator, it will overwrite all other previous administrator settings to default. Hence, the error message should stop.
Chromebook
Launch Chrome, click the three dots, and choose Settings.
Expand Advanced, and click open proxy settings.
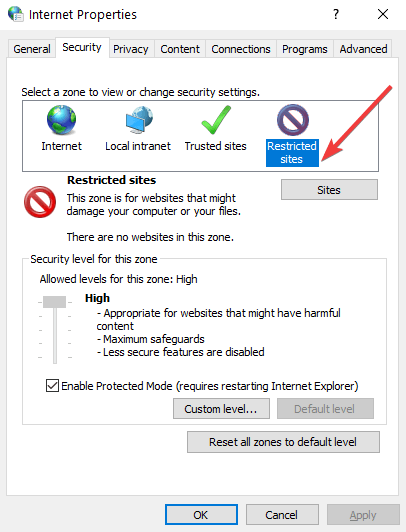
Choose the Security tab, then click Restricted sites and press Sites.
Select the websites, click on Remove and choose OK.
Restart Chrome to take effect.
Often, when sites are blacklisted on Chromebook, it can lead to the error message blocked by the administrator. Hence, by manually removing the site from the restricted list, the error should be resolved.
These are the best solutions to fix the Err_blocked_by_Administrator error based on the device or browser you encounter the error from.
Also, our guide on what to do if your IT administrator has limited access is worth checking out for additional information on administrator-related problems.
Tell us what worked best for you from the options provided above in the comments section. We’d love to hear from you.
Often, when sites are blacklisted on Chromebook, it can lead to the error message blocked by the administrator. Hence, by manually removing the site from the restricted list, the error should be resolved.
However, if you already have enough points and still the Microsoft rewards Robux are not showing up, it can be frustrating.
In this post, we offer a few solutions that Microsoft rewards users found useful. This may help resolve your concern too.
What happened to Robux on Microsoft rewards?
Many Windows users ask this question – Is Microsoft Rewards Robux real? To answer this, yes, it’s real and it’s the only legitimate way to earn Robux gift cards.
However, there could be many reasons why you can’t find them in Microsoft Rewards. Here, we will outline the most important causes of this issue:
➡ No more Robux codes
In some cases, Roblux runs outs of the Robux codes temporarily. So, they remove the stocks till they re-stock.
That means you have to be patient and wait for a new batch of Robux and redeem your card.
➡ Someone else used the Robux
If you have a family account or someone else has access to your account, there is the possibility that they’ve used it already.
So, you could pop the question to whom you gave access or check the latest purchases and see if that’s the case.
➡ Server issues
If the server is hit by an outage right when you redeem your code, there is the possibility for your transaction to be stuck or postponed.
Therefore, you should wait a few minutes and refresh your app or website again later and check what happens.
There have also been cases with hijacked accounts so if you have reasons to believe that this happen, change your password as soon as possible.
That being said, let’s see what you can do if the Robux rewards are not showing up.
What can I do if the Microsoft Rewards Robux is not working?
1. Make sure you logged into the correct Microsoft Rewards account
If you are not using the same account to buy Robux on the Microsoft Store as the one you used to redeem the Microsoft gift card, then the gift cards may not show up.
This can happen more often than you think, especially if you have more than one account.
Therefore, it’s recommended to log in using the same account and you should see the Robux gift card options.
2. Roblox Digital Code back in stock with bigger amounts
Next, download Roblox on Microsoft Store. All your activities on this app are automatically transferred to the Roblox app or the web version.
You can now purchase Robux on your Roblox account using the Microsoft gift card balance.
So, this is how to redeem a Microsoft gift card on the Roblox app and have fun using them.
NOTE
Make sure that you sign with the same account that you use to buy Robux on the Microsoft Store app and that you used it to redeem the Microsoft gift card.
5. Buy Robux with Microsoft Gift Card on the Xbox store
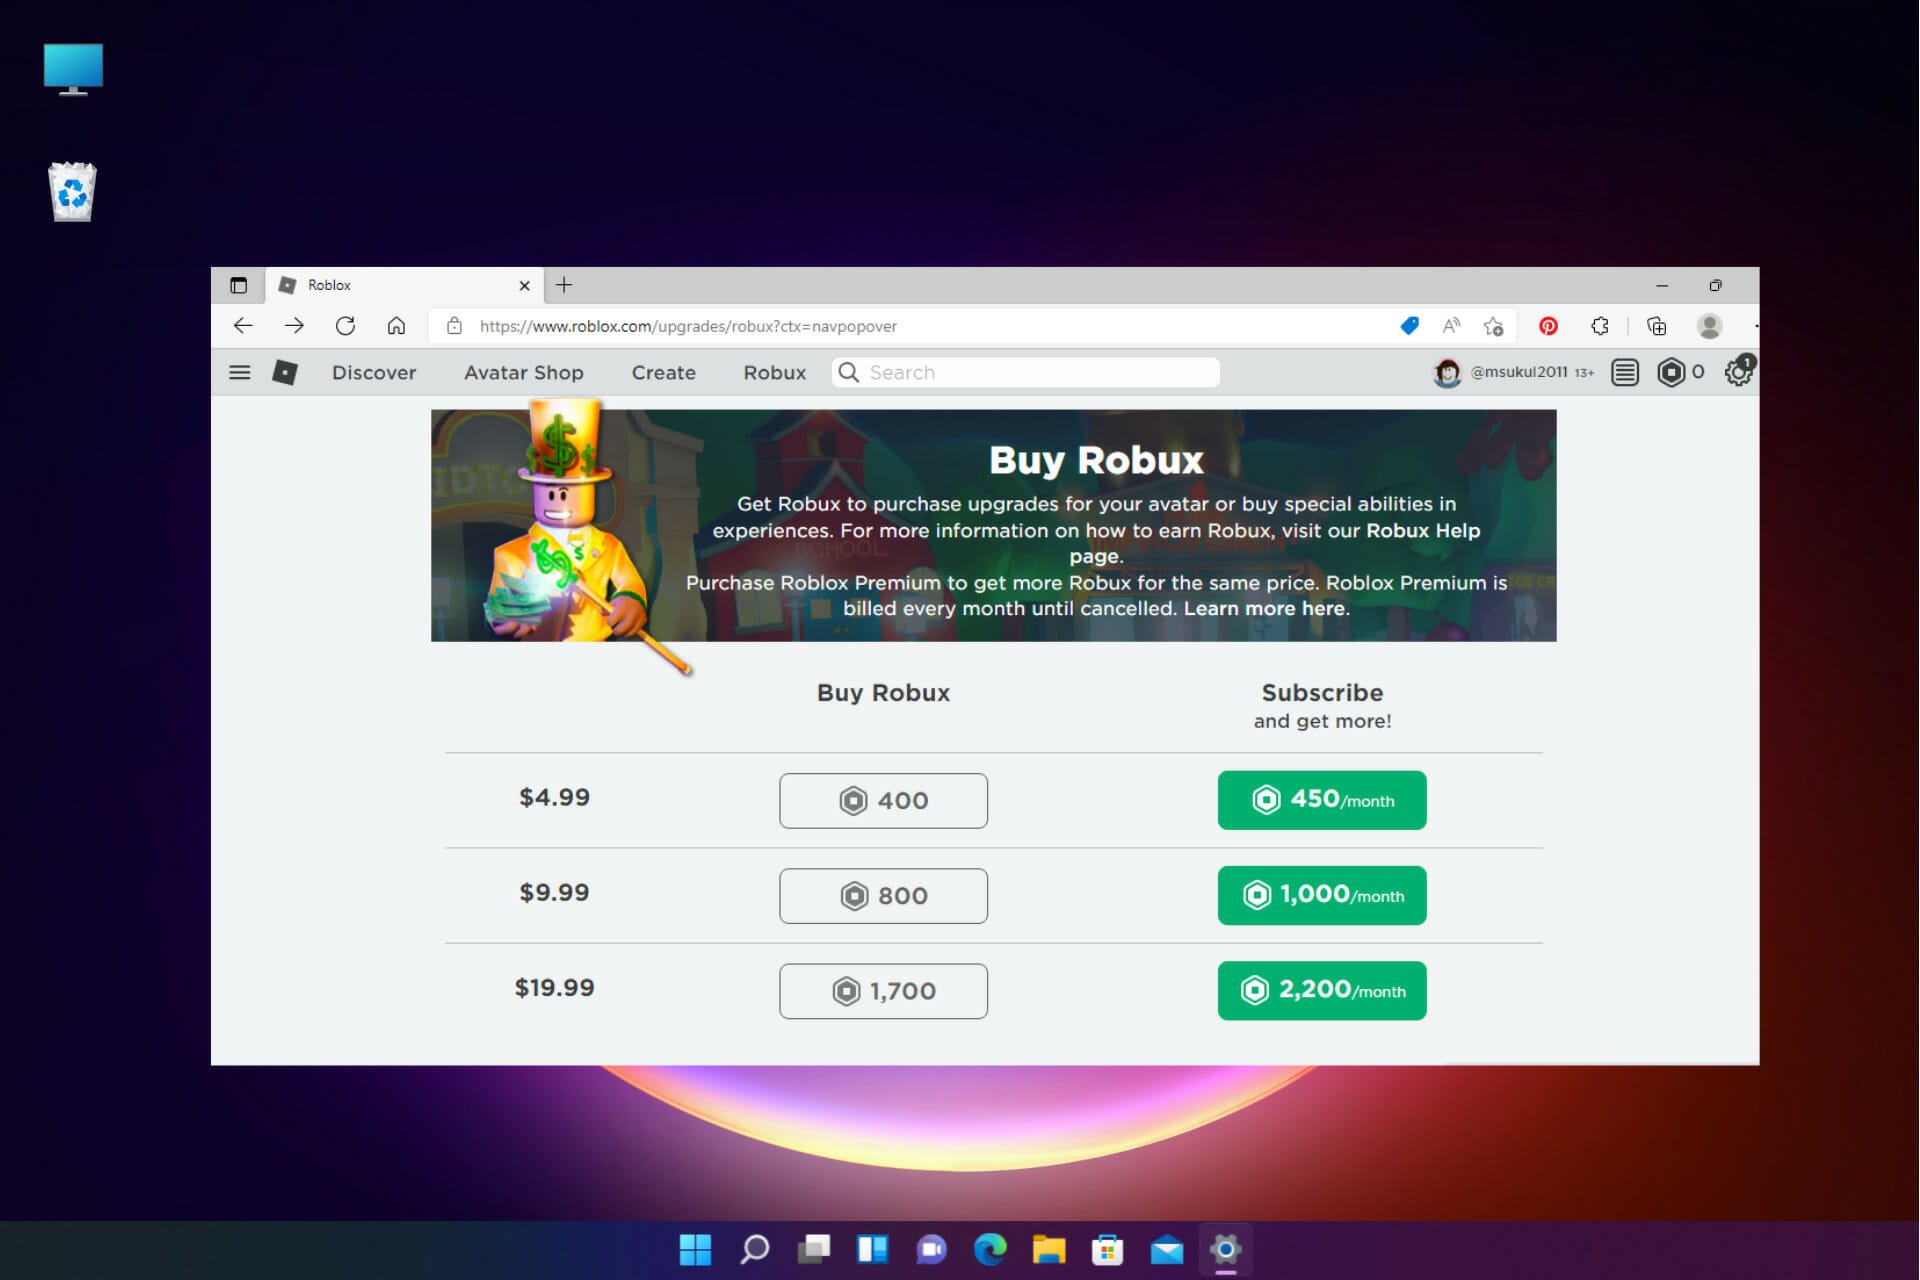
Once done, go to the Roblox website and click on the hexagon icon at the top right side and select Buy Robux.
On the Buy Robox page, select the subscription amount.
The payments page will offer a payment option that shows your Microsoft account and the balance.
Select it and click Confirm.
The Robux credit should be in your Roblox account and your Microsoft Rewards Robux not working issue should be resolved.
NOTE
To log in to the Roblox website, you must only use the Microsoft Edge browser. Also, make sure that to access the Microsoft Rewards on the Xbox Store, you have downloaded Roblox for Xbox.
Peripheral Component Interconnect or PCI is the local computer bus needed to connect hardware devices to a computer’s motherboard, like an audio card. If the installation goes well, then you will see the PCI device in the Device Manager.
However, problems may arise. The PCI drivers may be corrupted or outdated which will cause those components on your PC to stop working. This is why you should keep your drivers updated.
Where do I find PCI drivers?
PCI drivers can usually be found under Other devices or System devices in the Device Manager app and may appear with a specific name or called Unknown device. The latter is because your computer doesn’t recognize it.
This guide will show how to recover your Unknown device and ensure they work on your Windows 11 computer. These solutions will also solve problems with the PCI Serial Port.
Windows 10 users have also run into the same problem in the past. For the older system, the solutions are similar to this guide as they both may require downloading drivers from the manufacturer.
How to recover my Unknown devices and update PCI drivers?
1. Download and update PCI drivers
Click on the magnifying glass icon to bring up the search bar.
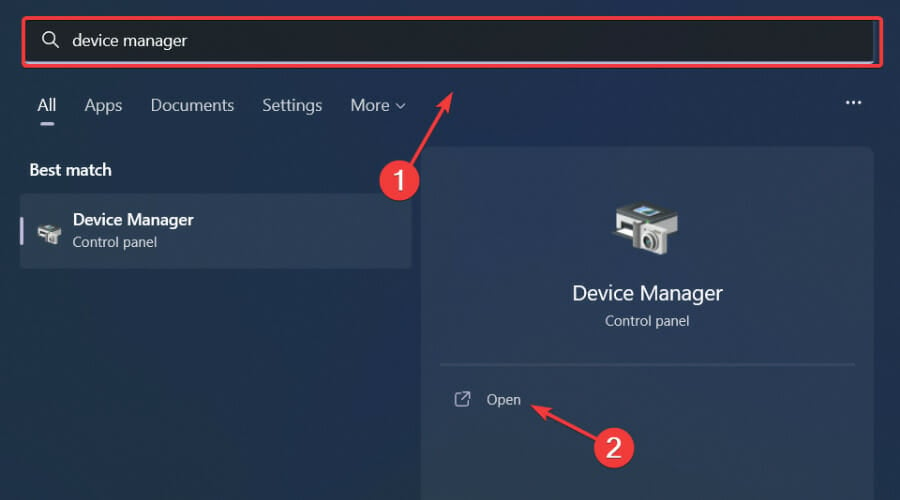
Search for the Device Manager and click the entry that appears.
You will have to search for the PCI drivers. They’re usually found under Other devices or System devices.
For this guide, the PCI drivers are found under System devices so that will be selected.
Scroll down and locate the PCI drivers.
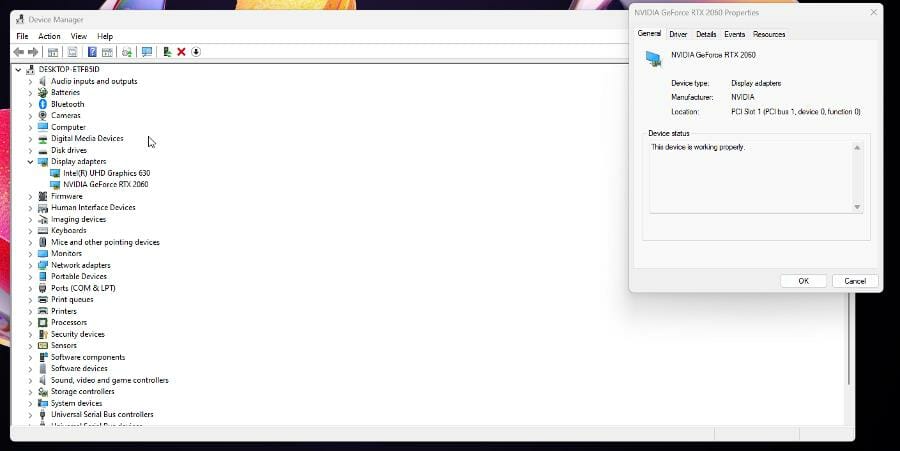
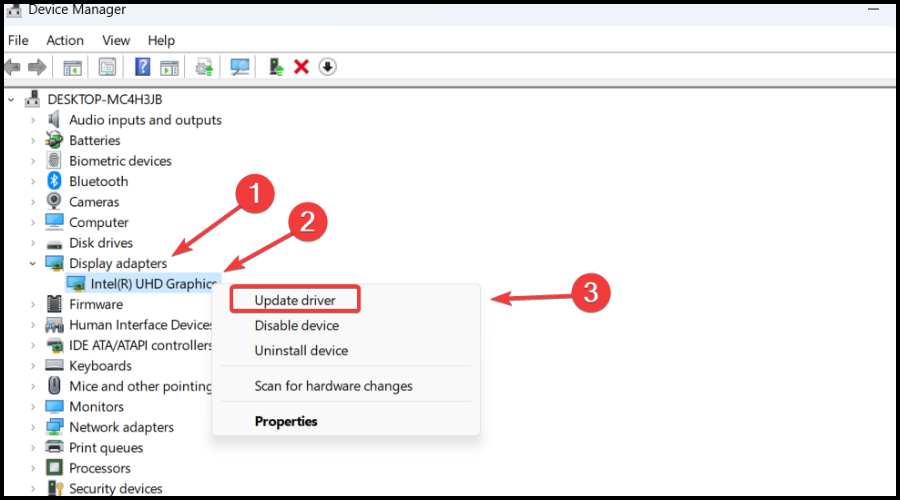
Right-click it to make a context menu appear. Select Update driver.
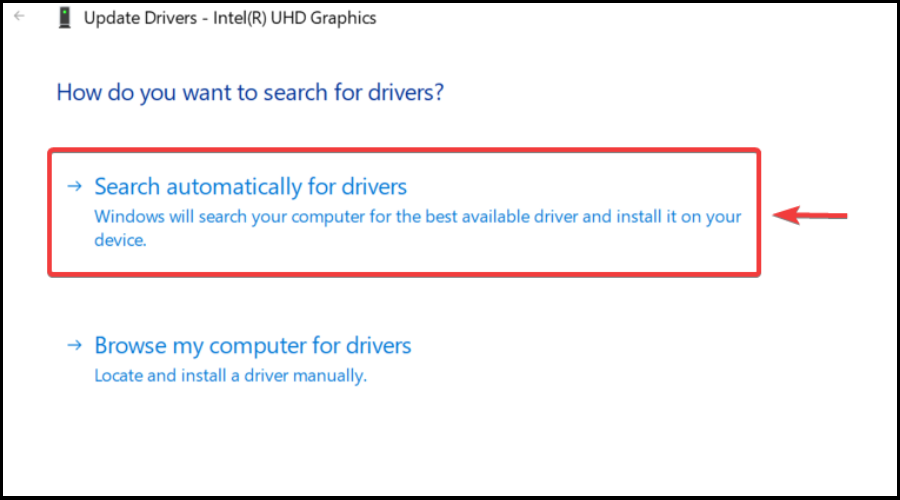
A new window will appear with two choices: Search automatically for drivers and Browser my computer for drivers. Click the first one.
Doing so will automatically update the PCI driver. If everything is up to date, you’ll get a message stating the best drivers are already installed.
If the problem still persists, go to the Settings menu.
Click on the Windows Update tab found in the left hand menu.
If there’s an update available, install it.
After installation, restart your PC as that should fix the problem.
It’s recommended that you don’t select Browse my computer for drivers as all the choices there will be older drivers. You need new ones.
If the problem still persists or a yellow exclamation mark appears signifying that it isn’t recognized, then you’ll have to download the driver from the manufacturer.
Return back to the Device Manager and locate the problematic driver, might be called Unknown driver.
Right click it to make the context menu appear and select Properties.
In the Properties menu, click the Details tab.
Click the drop down menu under Property.
In the menu, select Hardware Ids.
You will need to get the Hardware ID of the problematic driver which are the numbers after VEN_ and DEV_.
VEN stands for Vendor ID and DEV stands for Device ID. The numbers will vary depending on your computer, but in this example, the numbers are 8086 and 15DA.
Once you have those numbers, open a web browser and search for PCI Lookup. It’s a website telling you where you can find the PCI drivers that you need.
Click the PCI Lookup result and you’ll see two bars where you can enter in the Vendor ID and Device ID numbers.
Enter the ID numbers and hit Submit.
Next, you will see the hardware that has the faulty driver. In this case, it’s the JHL6340 Thunderbolt 3 Bridge by Intel.
Now that you know the specific name of faulty piece of hardware, search for its corresponding drivers in a web browser.
As an example, “jhl6349 thunderbolt 3 driver” was typed into the search bar and the results show Intel’s page for the drivers.
Click the corresponding result for your computer’s faulty driver and download it.
3. Update the PCI device driver automatically
There are third-party tools like Outbyte Driver Updater that can automatically update PCI drivers without the need for manual intervention.
Follow these steps to set up Outbyte Driver Updater to do this task for you:
Install and launch Outbyte Driver Updater.
Wait for the software to perform an initial analysis of your PC.
Select the PCI device driver to update or fix.
Wait for Outbyte Driver Updater to download and install the missing PCI drivers.
Follow the PCI individual driver’s install instructions.
Reboot your PC for the changes to take effect.
Otherwise, as seen in prior solutions, doing it manually takes time and needs extensive knowledge of the drivers you are looking for.
The two solutions above will solve the majority of your problems with faulty PCI drivers. However, there are still a few solutions that you can try out if the previous one don’t work out.
Run Hardware and Device Troubleshooter
The Troubleshooter has a good chance of solving driver problems by locating and fixing them automatically.
Run antivirus software
Malware may be getting in the way of your PCIs. It’s recommended that you run antivirus software to get rid of it.
Run SFC Scan
A System File Checker scan will zero in on the faulty driver and repair the problem right after with DISM.
Perform a Clean Boot
A Clean Boot will restart your computer with the bare bones set of apps and drivers, and should be a last ditch effort.
Contact technical support
When all else fails, contact the manufacturer’s technical support for further support.
What I do if I run into other installation issues with the PCI drivers?
You may run into the infamous Blue Screen of Death. Errors like these may be caused by the PCI BUS DRIVER INTERNAL error. It’s an annoying problem that can be easily solved by updating drivers, but you may have to check your hardware.
Another failing may be attributed to the device needing further installation. This can be caused by poor driver management. Fortunately, the solutions for this problems are simple.
Feel free to leave a comment below if you have any questions on other Windows 11 apps. Also, leave comments about reviews that you’d like to see or information on other Windows 11 features.
If you use Microsoft Authenticator, you can even sign into your Microsoft account without using a password at all. If you want to make a more secure Windows 11, follow this guide.
Secure Windows 11 using Microsoft Authenticator
For security, the Microsoft Authenticator app can use a fingerprint, face recognition, or a PIN. And don’t worry if you forget your PIN, your password will still work if you need to sign into your Microsoft account.
If you need even more security, you can require a password to use along with a fingerprint, face recognition, or PIN. This is called two-step verification. For personal Microsoft accounts, you can turn two-step verification on and off and reset your password.
For a work or school account, your IT administrator will decide if your organization will use two-step verification, and there may be additional registration steps required.
The Microsoft Authenticator also supports the industry standard for time-based, one-time passcodes, also known as TOTP or OTP. As a result, you can add any online account that supports this standard to the Microsoft Authenticator app.
Two-step verification is more secure than just using your password. Two-step verification requires something you know (a Microsoft Authenticator code) plus something you have (your Android or iOS device). Two-step verification makes it much harder for hackers to gain access.
Turn on two-step verification
Regardless of which mobile device you use, you need to turn on two-step verification on your Microsoft account first. Here’s what to do.
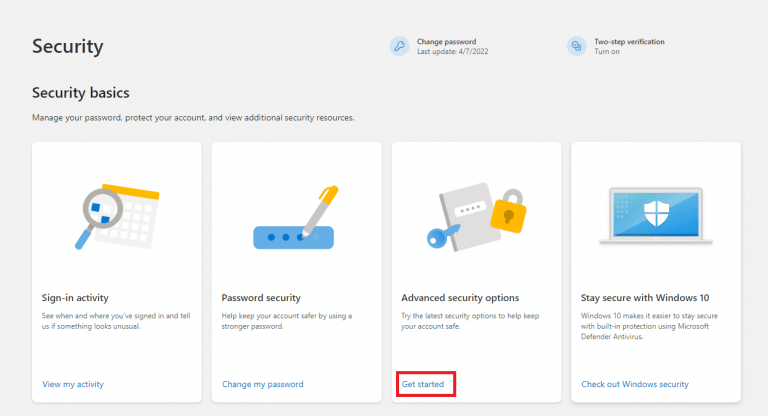
2. Go to Advanced security options and click Get started
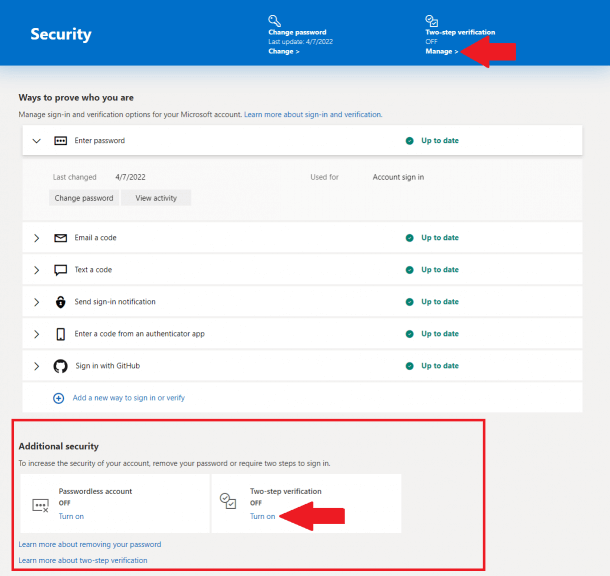
3. Go to Additional security and click Turn on next to Two-step verification. Alternatively, you can also manage Two-step verification by clicking Manage at the top of the page.
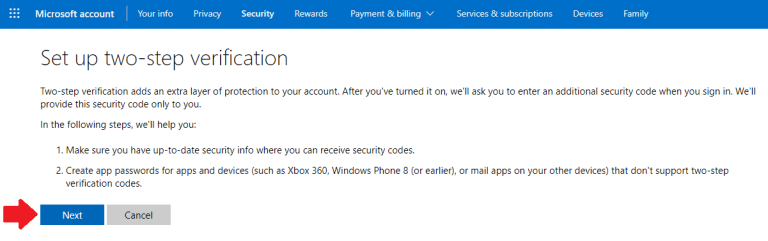
4. From here, you will see a “Set up two-step verification” setup screen, click Next.
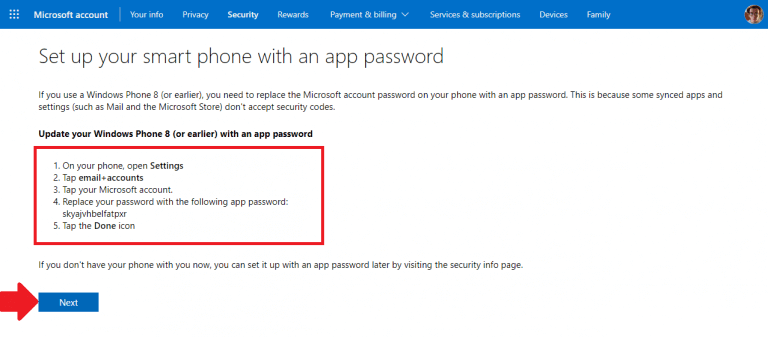
5. Follow the “Set up your smart phone with an app password” instructions as shown on your Android or iPhone. When you are finished, click Next.
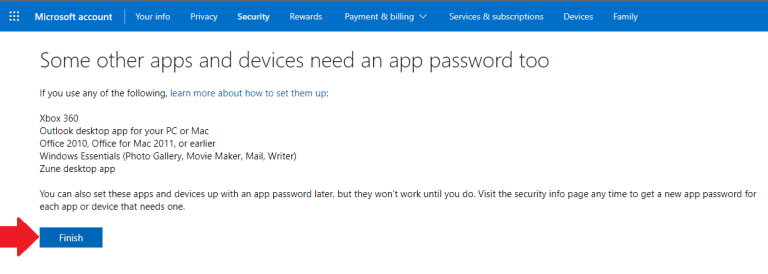
At the final screen, you will see apps that may require an app password. You can set up app passwords and devices for these apps now or later. However, without an app password, these apps might not function properly until you do.
6. Click Finish to complete the two-step verification setup process. Now that two-step verification is turned on, you’ll get a security code sent to the Microsoft Authenticator app on your phone every time you sign in on a device that you isn’t trusted.
When two-step verification is turned off, you will need to verify your identity with security codes periodically, when they might be a risk to your Microsoft account security.
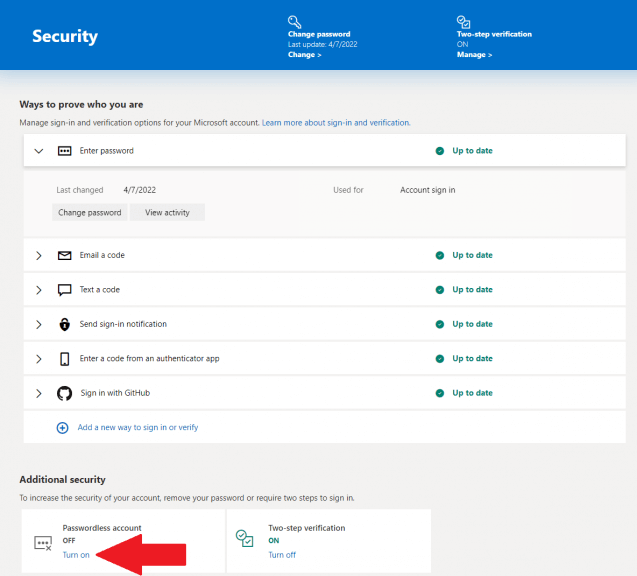
Another way you can have a more secure Windows 11 is by going passwordless on your Microsoft Account.
2. Under Additional security, click Turn on under “Passwordless account”
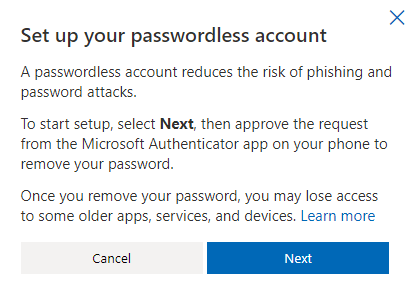
3. A window will pop up that you want to go passwordless on your Microsoft account, click Next to set it up.
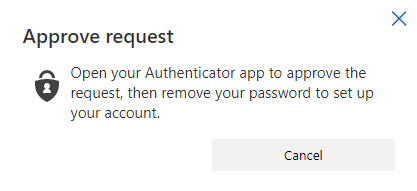
4. Open Microsoft Authenticator on your Android or iOS device to approve the request. On your browser, you should see a screen like this one, waiting for you to approve (or deny) the request on your phone.
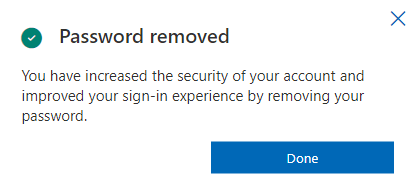
5. Once you approve the Microsoft Authenticator request on your phone, you will see the following confirmation on your browser.
Now that your password is removed, you can approve (or deny) access requests using Microsoft Authenticator on your Android or iOS device.
Did you know that you can create a bootable Windows 10 USB on Linux? It might sound crazy to create a bootable USB for a different operating system, but the process isn’t that complicated. In this article, we’ll dive into the exact process of creating a bootable Windows 10 USB on Linux.
Creating a bootable Windows 10 USB on Linux
The first thing we need to have, even before we get started with the mounting process, is a Windows ISO file. For that, you will need to head to the official Windows 10 downloads page to get the ISO in Linux.
Once it’s downloaded
Mounting the ISO file on your USB stick
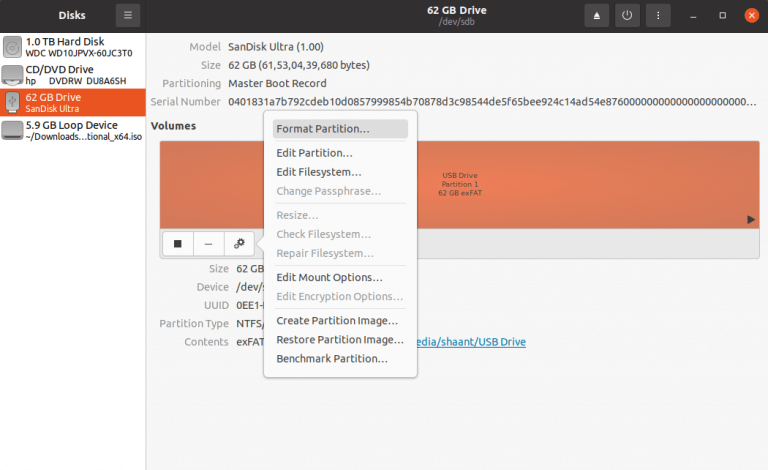
Now that you have the ISO file with you, all you now need to do is mount the .iso Windows file on your USB disk in Linux. Before you do that, though, it’s best to format your USB stick first. Insert the USB stick into your PC. Then go to the search menu, type in ‘disks,’ and select the best match.
In the disk tool, right-click on your USB disk and select Format Partition…
Choose either of the partitioning scheme and hit Format…
Your USB will be formatted in a few seconds.
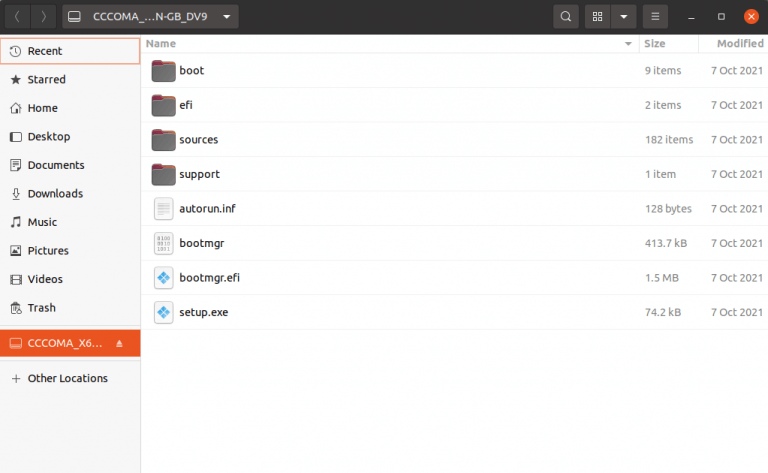
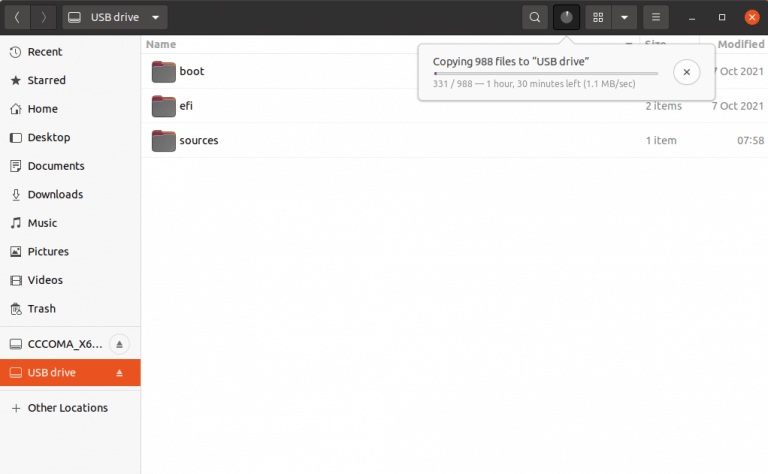
Right-click on the earlier downloaded ISO file, and select ‘Open with other application’. From the applications list, select the Disk Image Mounter. This will mount the ISO file. If you can’t find it, click on Other Locations, and you’ll see the content of ISO file.
Copy all files from there and paste them onto the USB drive. Now you have created a bootable Windows 10 USB. From here onwards, the process is quite straightforward. Insert the USB into the PC you want to use, then restart and boot up from the USB stick to proceed with the installation.
Creating a bootable Windows 10 USB on Linux
If you’re thinking of switching to Windows 10, then there’s perhaps no easier method than using a bootable USB stick. All you need is a formatted USB stick and the Windows 10 ISO file, and you’ll be set.
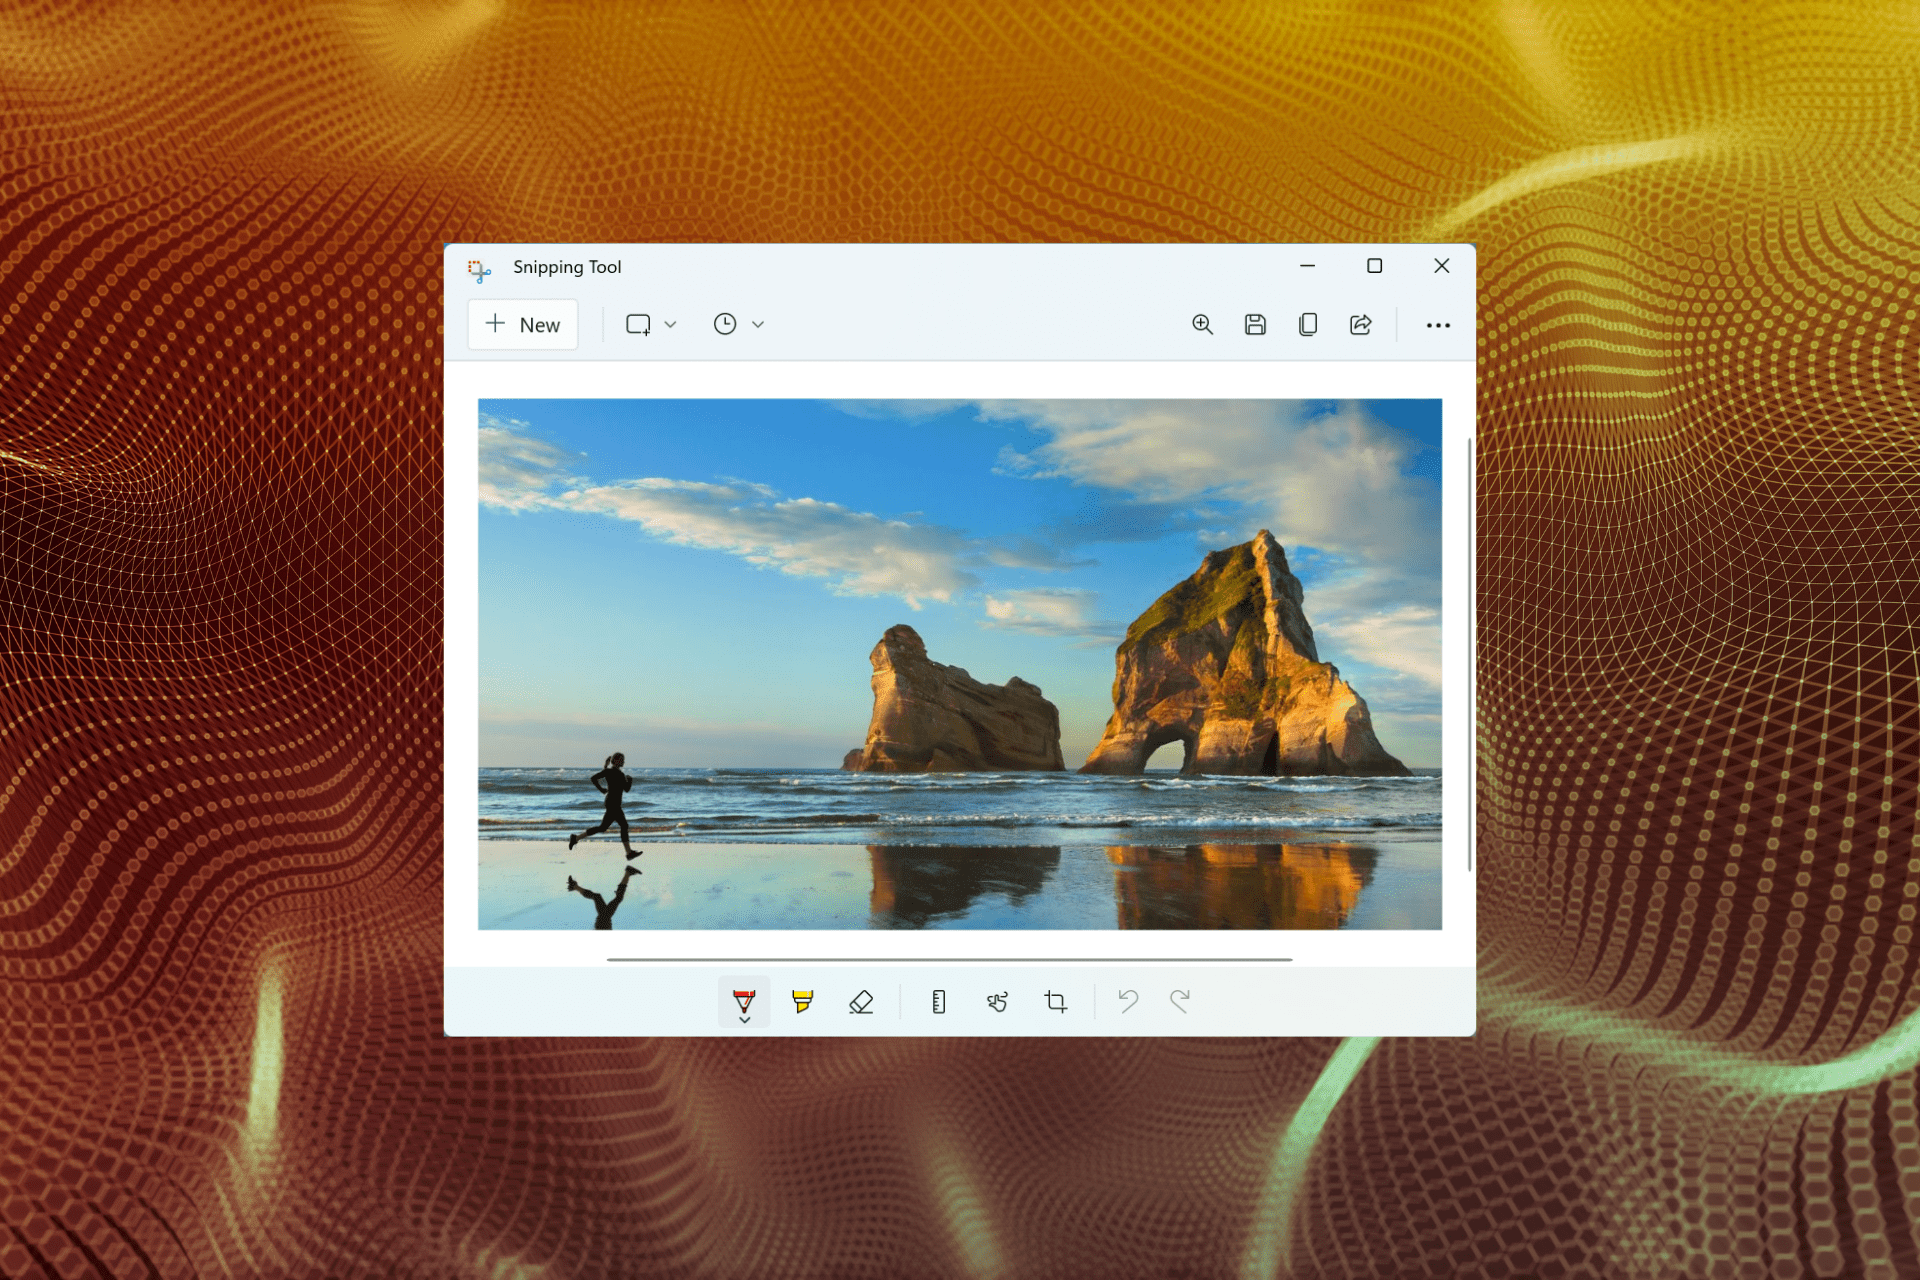
The Snip & Sketch or Snipping Tools allows users to quickly and easily capture screenshots in Windows with a dedicated keyboard shortcut. But, several users reported that the Windows + Shift +S is not working in Windows 11.
While there are a bunch of third-party snipping tools available, many still rely on Snip & Sketch due to the very fact that it’s easily accessible, offers a bunch of ways to capture screenshots, and provides the option to annotate and edit the screenshot.
However, when hitting the keyboard shortcut does not launch the tool, users are left perplexed due to the lack of available information on the subject. So, read the following sections and find out what to do when Windows + Shift + S is not working in Windows 11.
Why is Windows + Shift + S not working in Windows 11?
There could be a few reasons behind the problem, but the most common still are minor issues with the keyboard. It doesn’t require the whole keyboard to malfunction, but if any of the three keys in the shortcut stopped working, you wouldn’t be able to use it.
Other than that, misconfigured settings, issues with the Registry, conflicting external devices, and internal applications too could lead to the issue.
Many users also reported that Windows + Shift + S is not working after update, which is likely due to a bug in the latest version.
No matter what the underlying cause is, just follow the methods listed in the next section to get Snip & Sketch/Snipping Tools up and running in no time.
What do I do if Windows + Shift + S is not working in Windows 11?
1. Some basic checks
The very first thing you must check is that the keyboard is properly connected and that there’s nothing stuck under the keys. Press the keys and identify if it feels different than the others. Because, if that’s the case, there’s something stuck under them.
You can blow light air to dislodge the stuck particles or use a can of compressed air for the purpose. Also, verify that the Windows key has not been disabled unintentionally, since certain manufacturers provide a shortcut for that.
In case these tricks don’t work, connect a different keyboard to the computer and check if the Windows + Shift + S is now working in Windows 11. If it does, the problem was with the previously connected keyboard and you should get it repaired or replaced.
But, if the issue persists, it’s the system settings to be blamed, and you should try the methods listed next.
2. Restart the Windows Explorer process
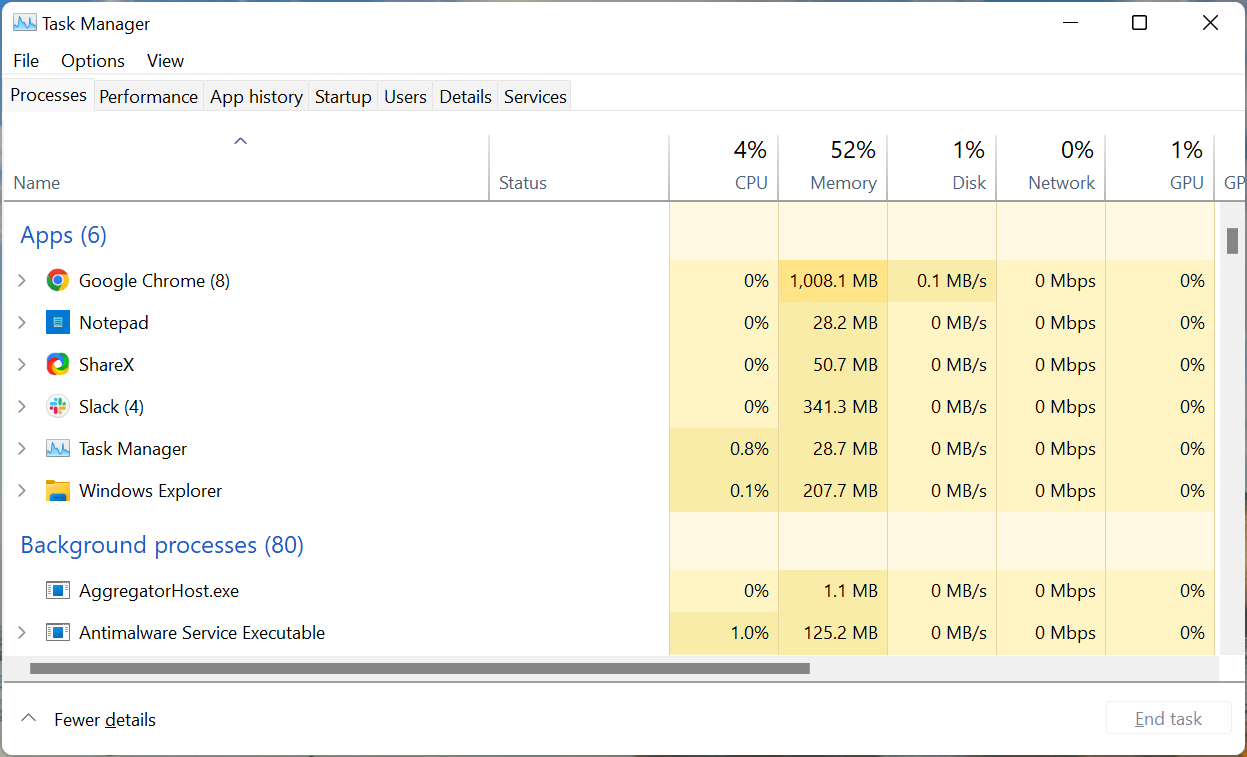
Press Ctrl + Shift + Esc to launch the Task Manager.
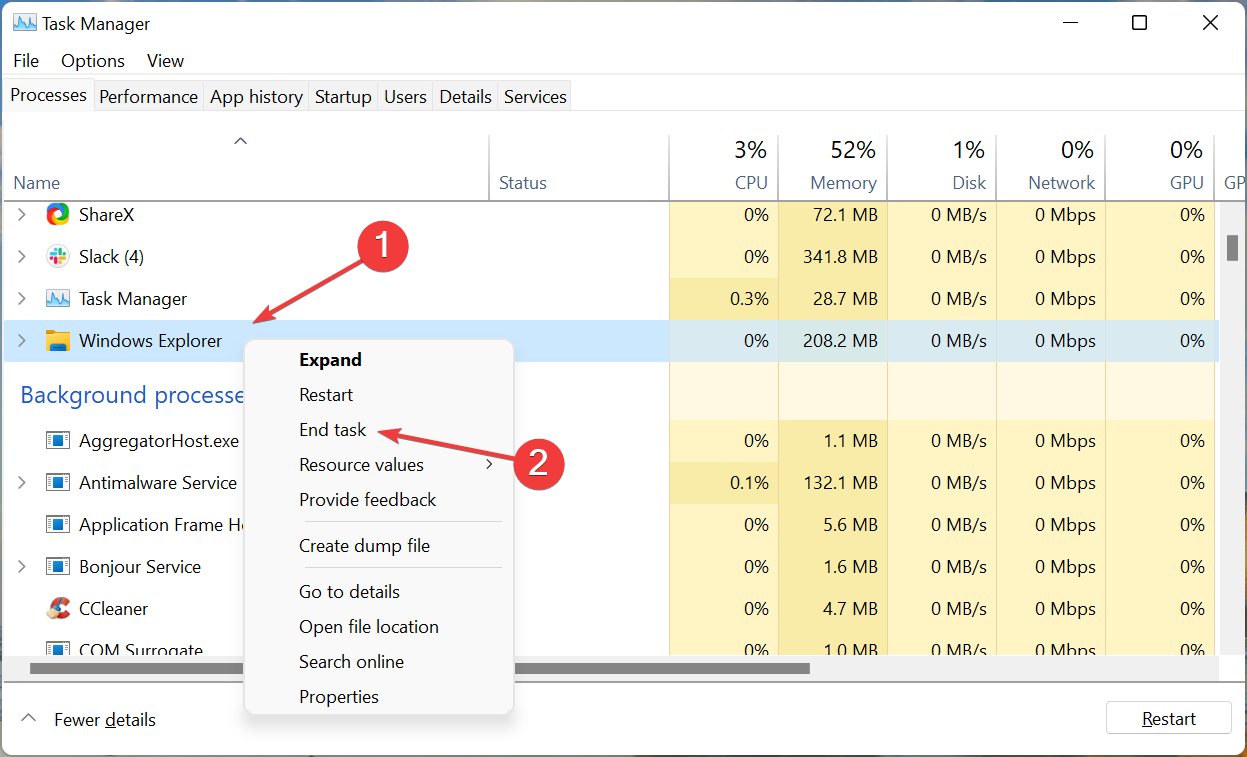
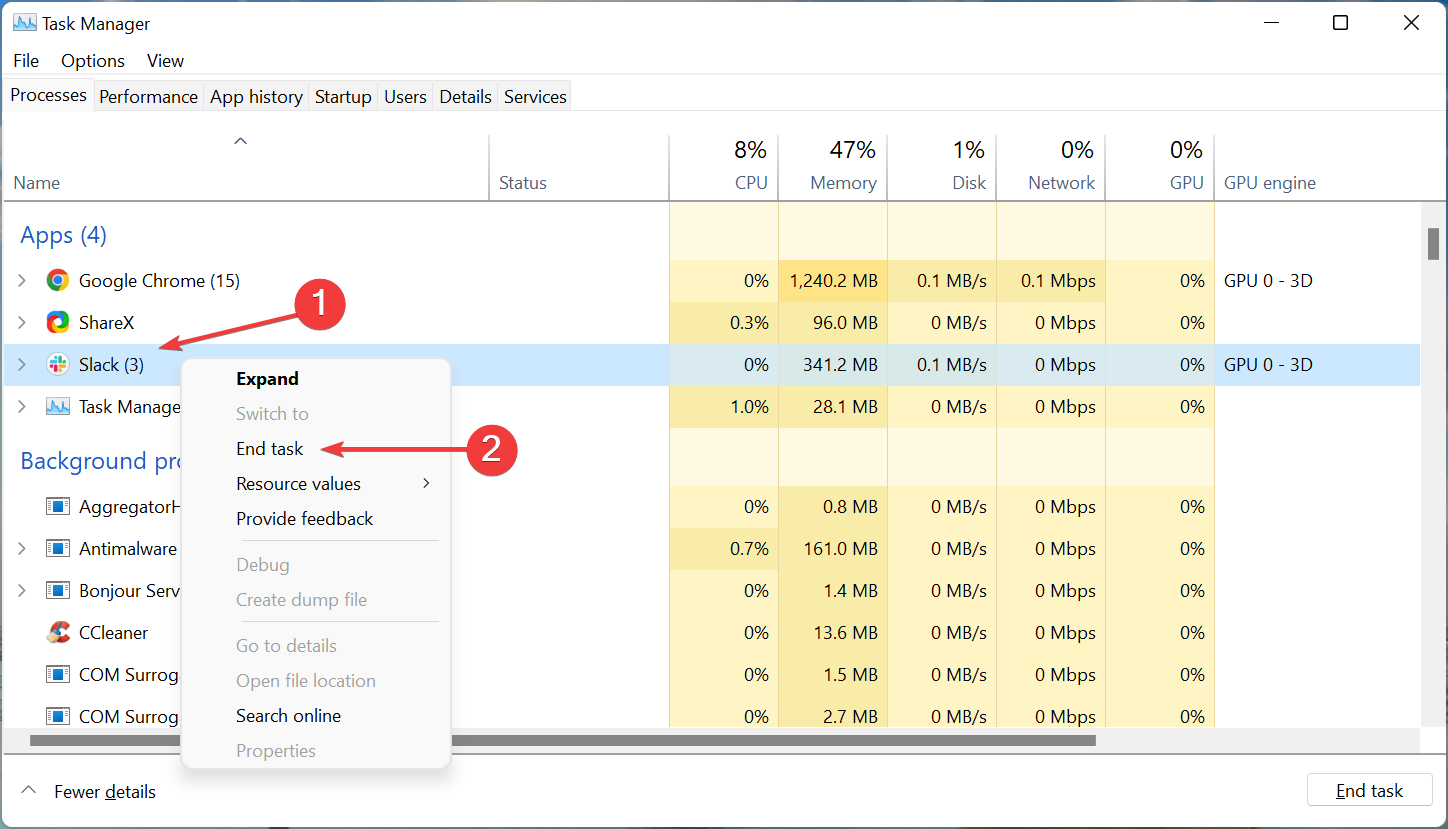
Now, locate the Windows Explorer process, right-click on it and select End task from the context menu.
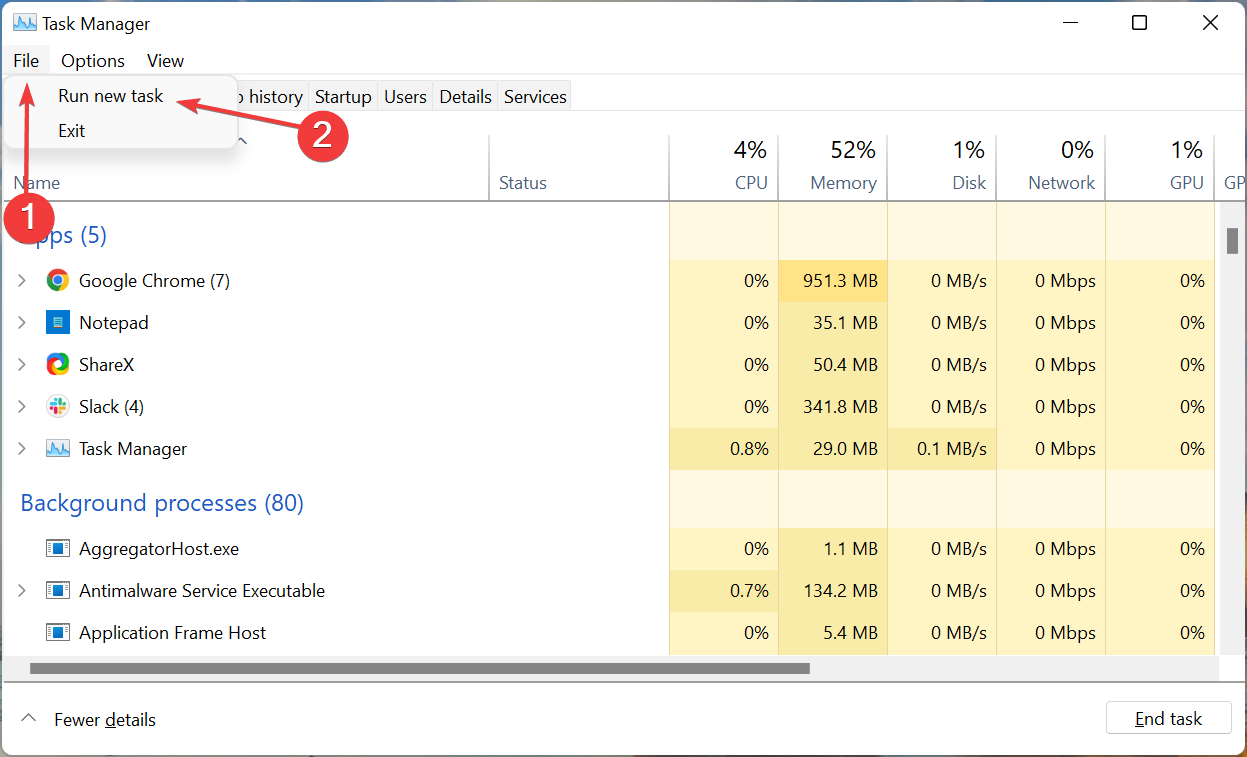
Next, click on the File menu near the top-left, and select Run new task.
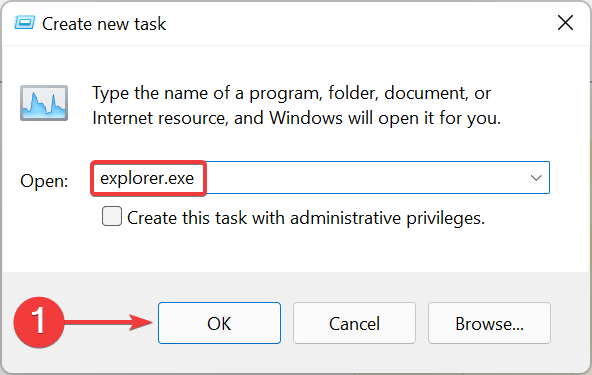
Enter explorer.exe in the text field, and click on OK at the bottom.
While executing these steps, the background and the Taskbar may go black momentarily when the Windows Explorer task is terminated. But don’t worry, that’s a part of the process. Once done, check if the Windows + Shift + S not opening Snip and Sketch problem is resolved.
3. Turn on notifications for Snip & Sketch
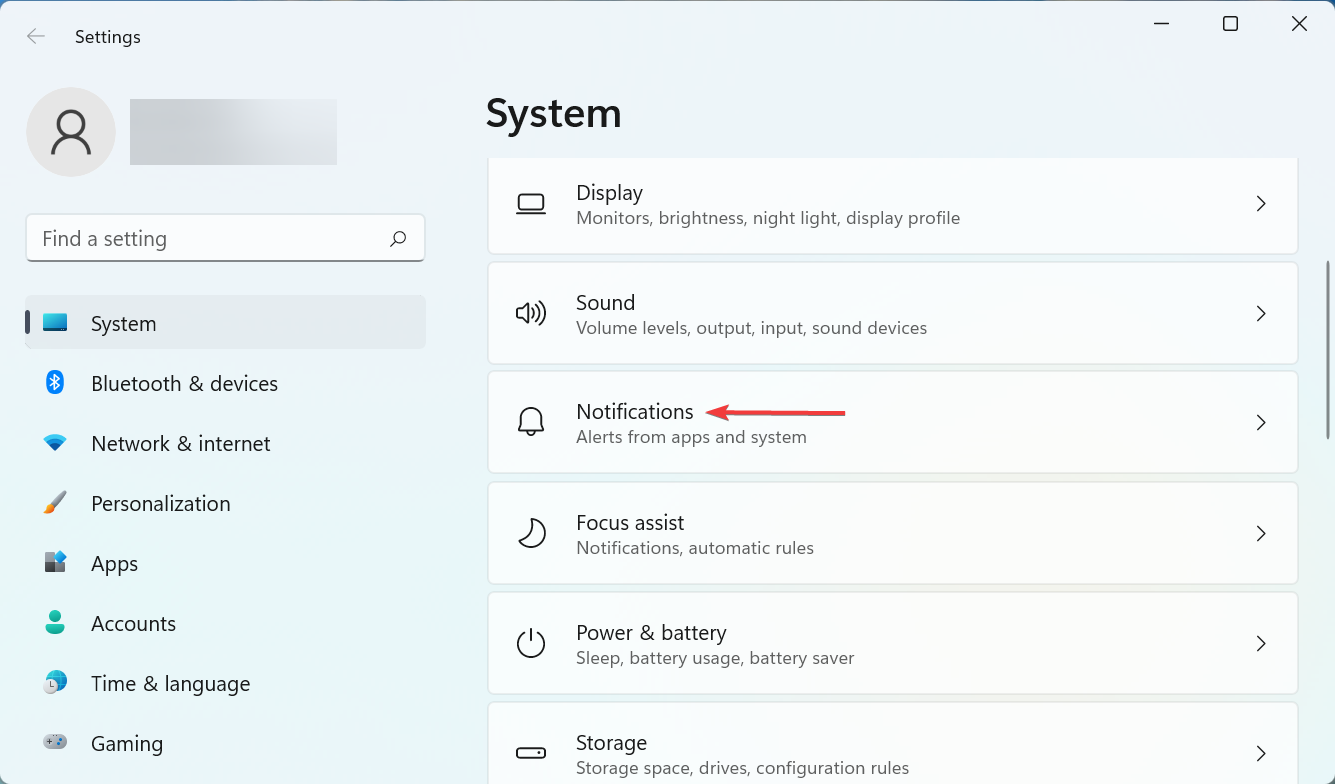
Press Windows + I to launch the Settings app, and click on Notifications on the right in the System tab.
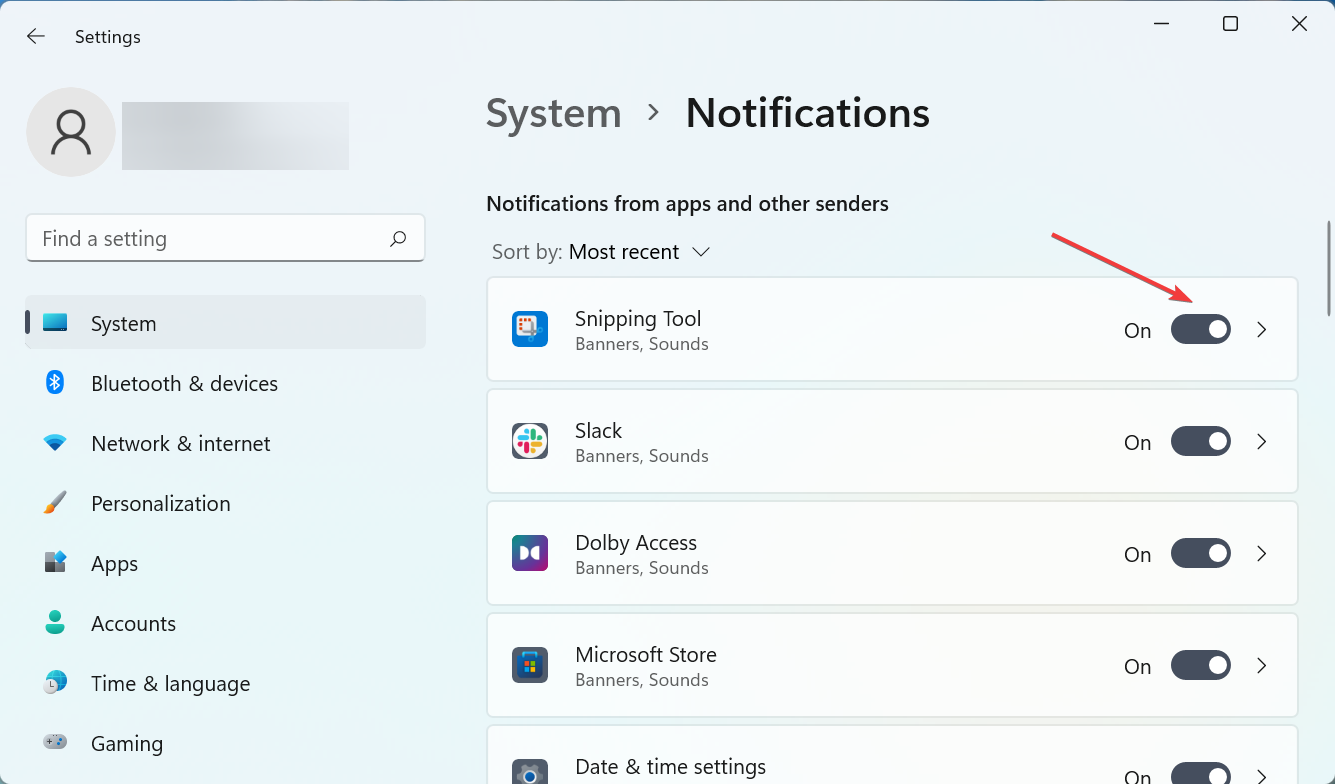
Now, locate the Snipping tools entry, and make sure that the toggle for it is enabled.
If the notifications for Snipping Tool are disabled, it may appear as if Windows + Shift + S is not working in Windows 11, but that’s not the case. The screenshot will still be copied to the clipboard. To avoid any confusion, turn on the notifications for the tool.
Press Windows + S to launch the Search menu, enter Device Manager in the text field at the top, and click on the relevant search result.
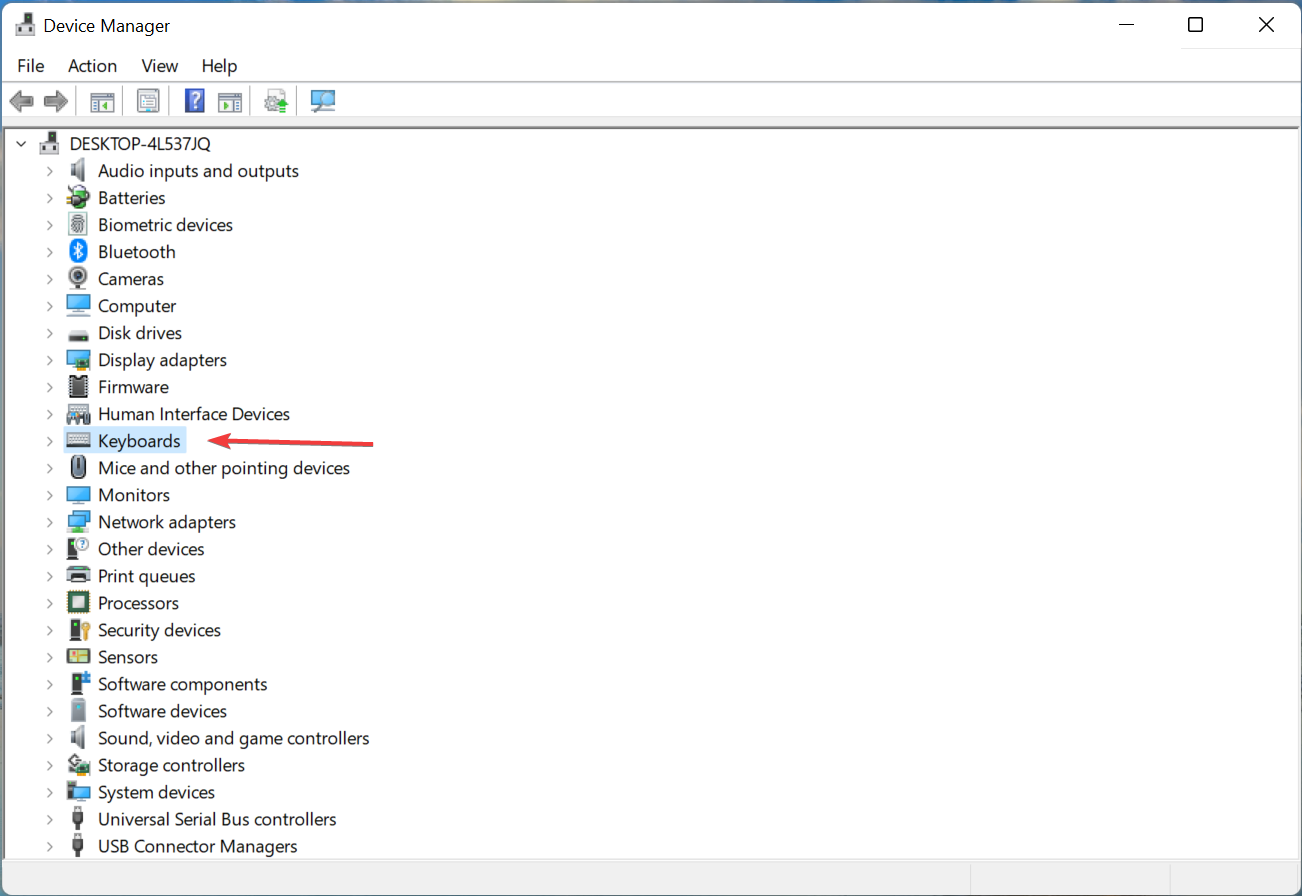
Double-click on the Keyboards entry.
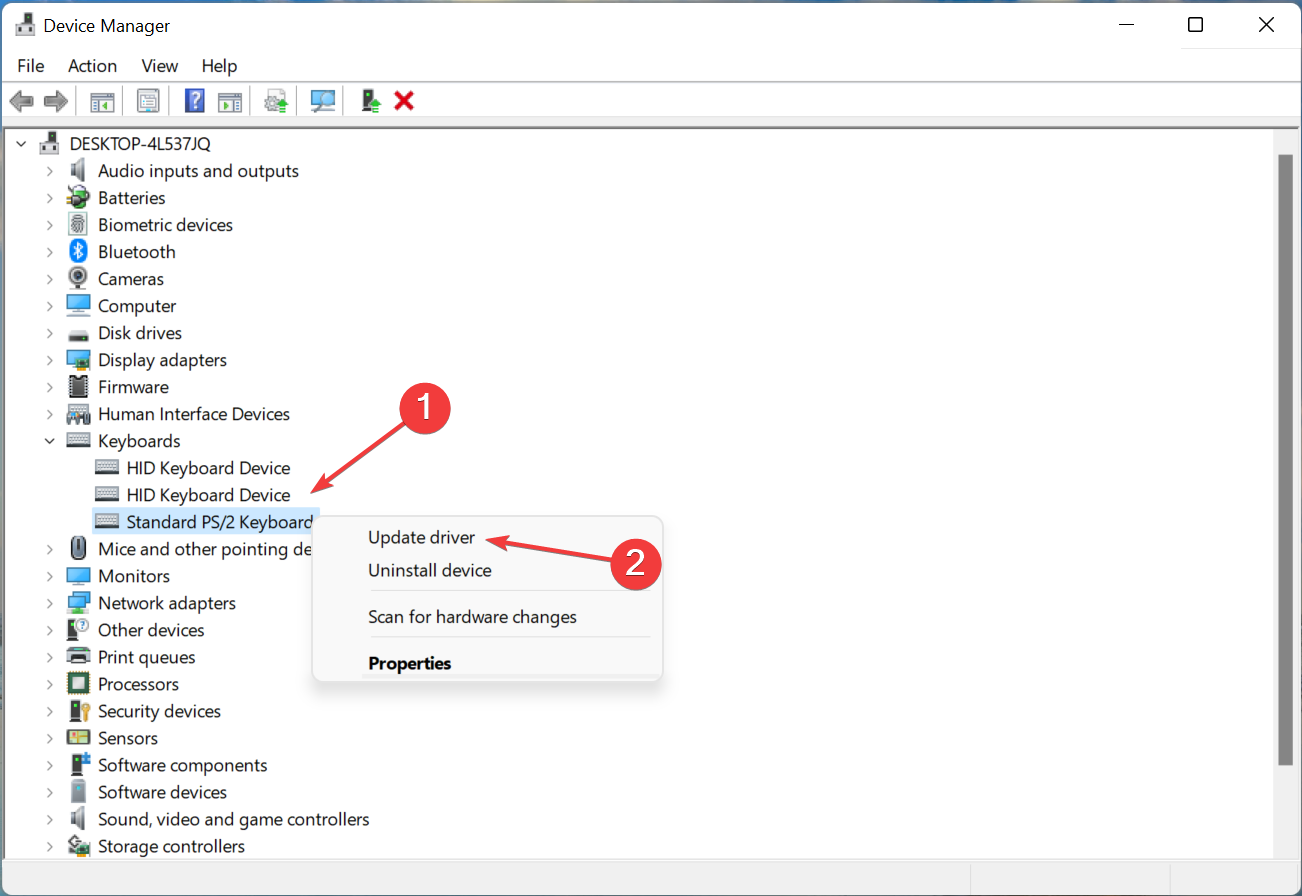
Right-click on the problematic keyboard and select Update driver from the context menu.
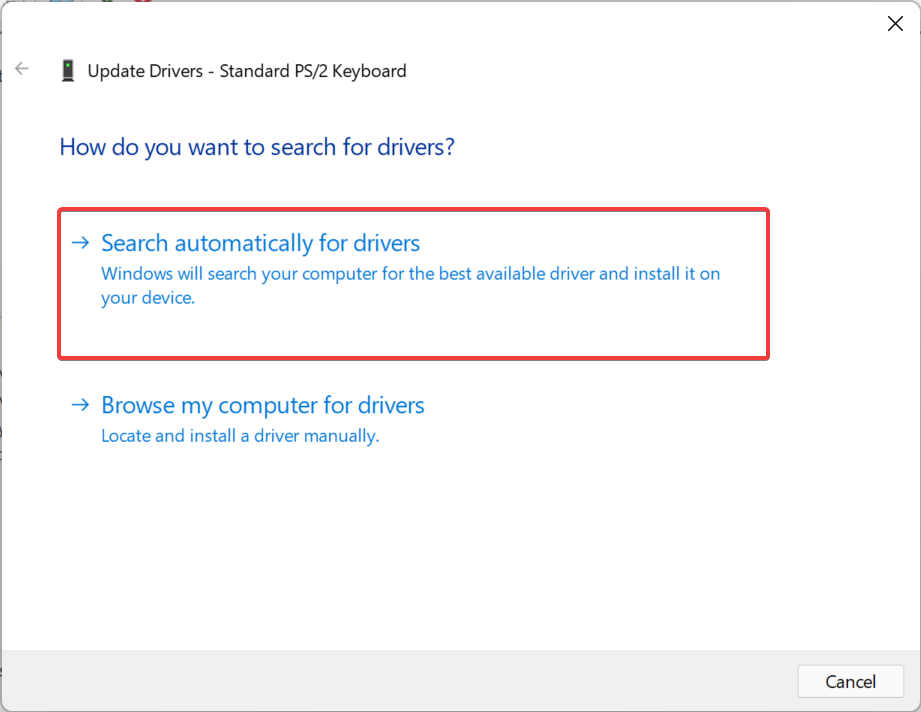
Select Search automatically for drivers from the two options.
Now, wait for Windows to locate the best available driver on the system and install it.
Outdated drivers are one of the primary reasons behind issues with devices. Whether it’s a trivial issue or one that prevents the device from working altogether, updating the driver should do the trick.
If you are unable to find an update using the Device Manager, try the other methods to manually install the latest driver version in Windows 11. Some manufacturers directly release the driver updates on their official website and you have to manually get them.
If you think that is too much work, you can also use a dedicated driver updater like Outbyte Driver Updater. The tool keeps track of all new driver updates and automatically installs them to your PC as soon as they become available.
5. Repair and Reset the tool
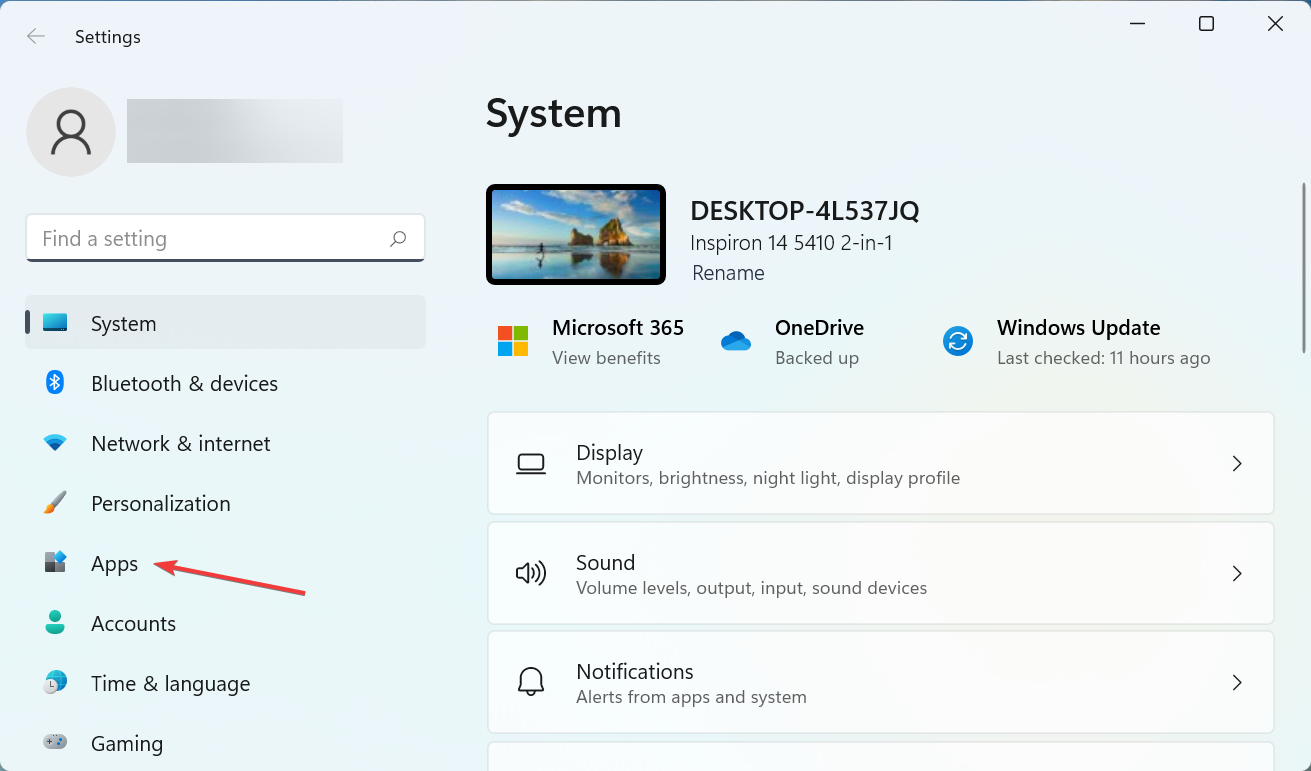
Press Windows + I to launch Settings, and select Apps from the tabs listed in the navigation pane on the left.
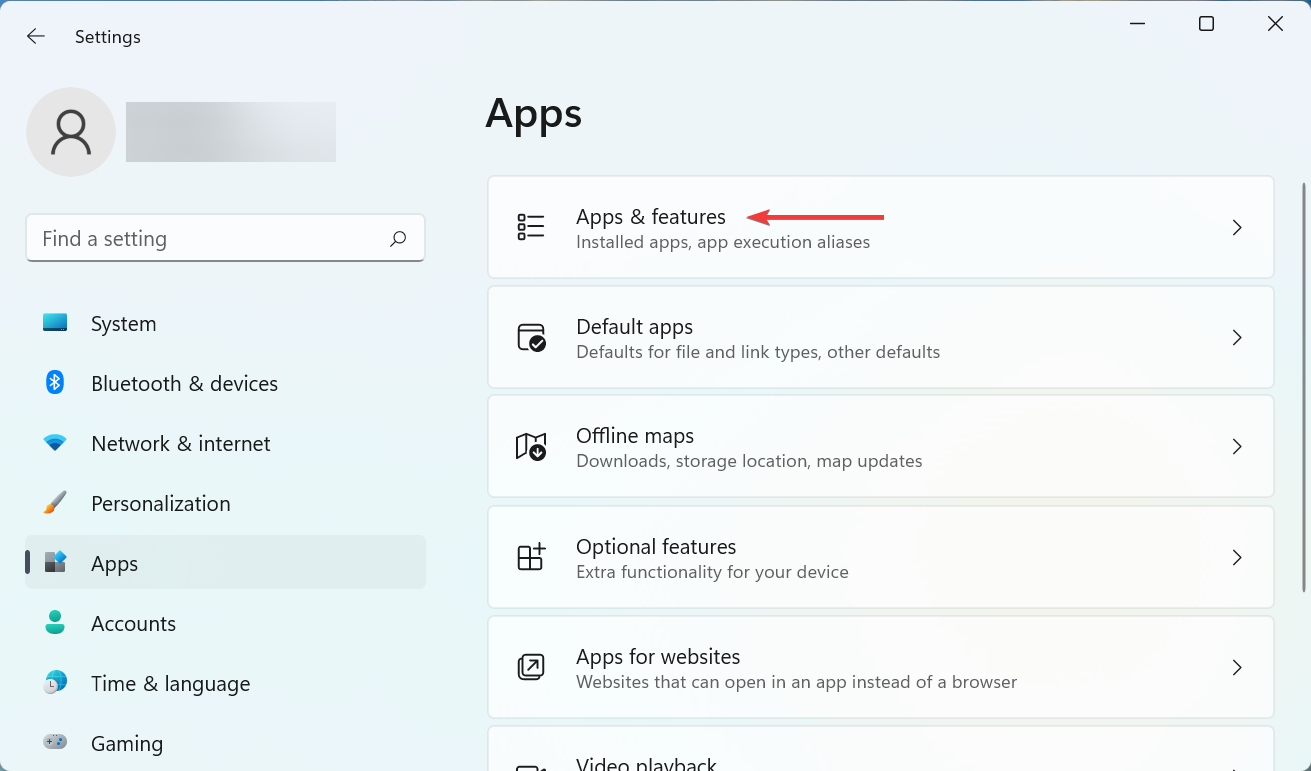
Next, click on Apps & features on the right.
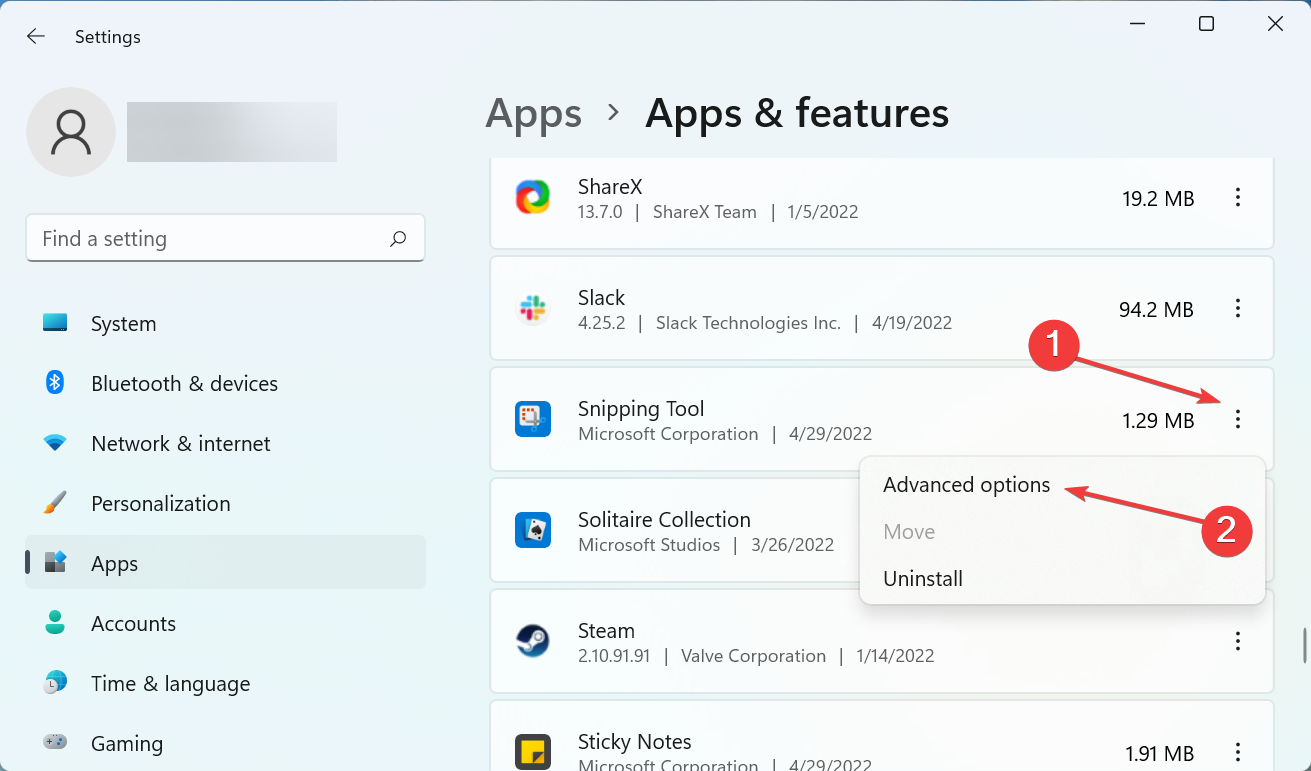
Locate the Snipping Tool program, click on the ellipsis next to it, and select Advanced options from the menu.
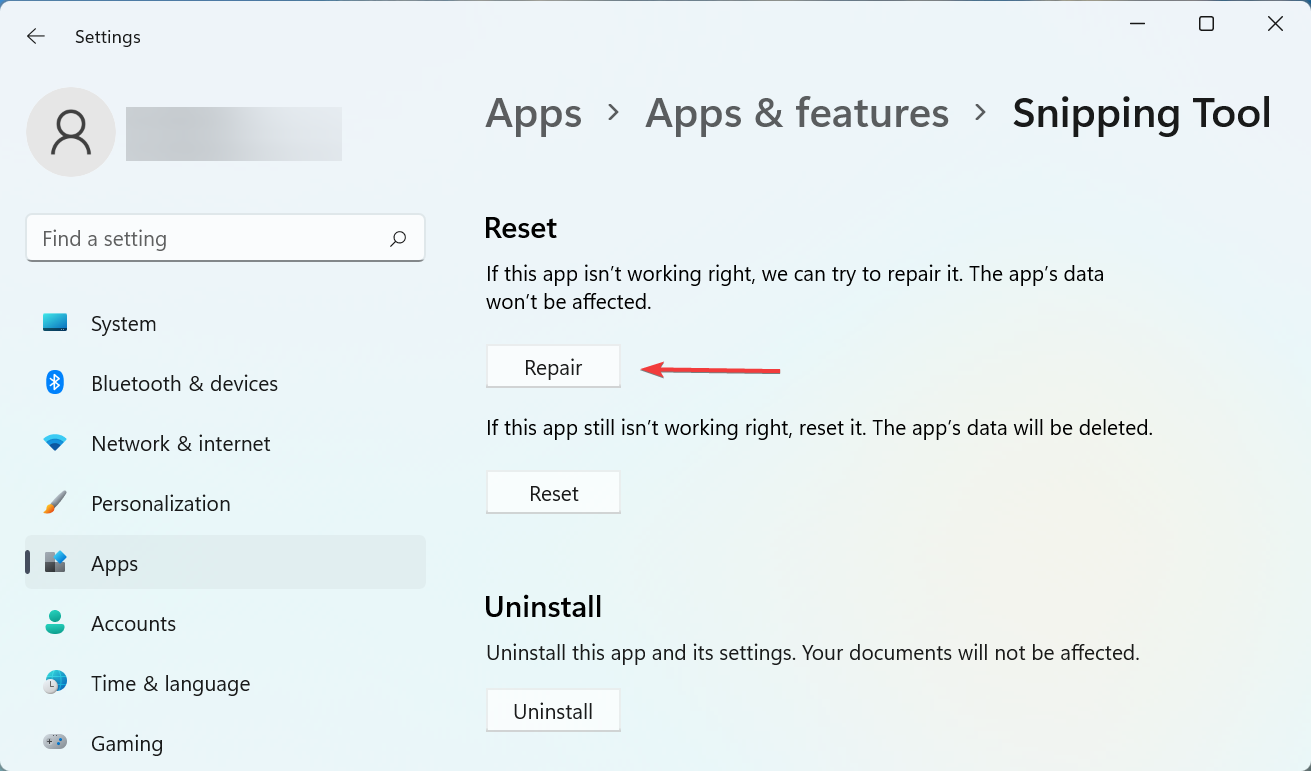
Now, click on the Repair button and wait for the process to complete.
Once done, restart the computer and check if the problem is fixed.
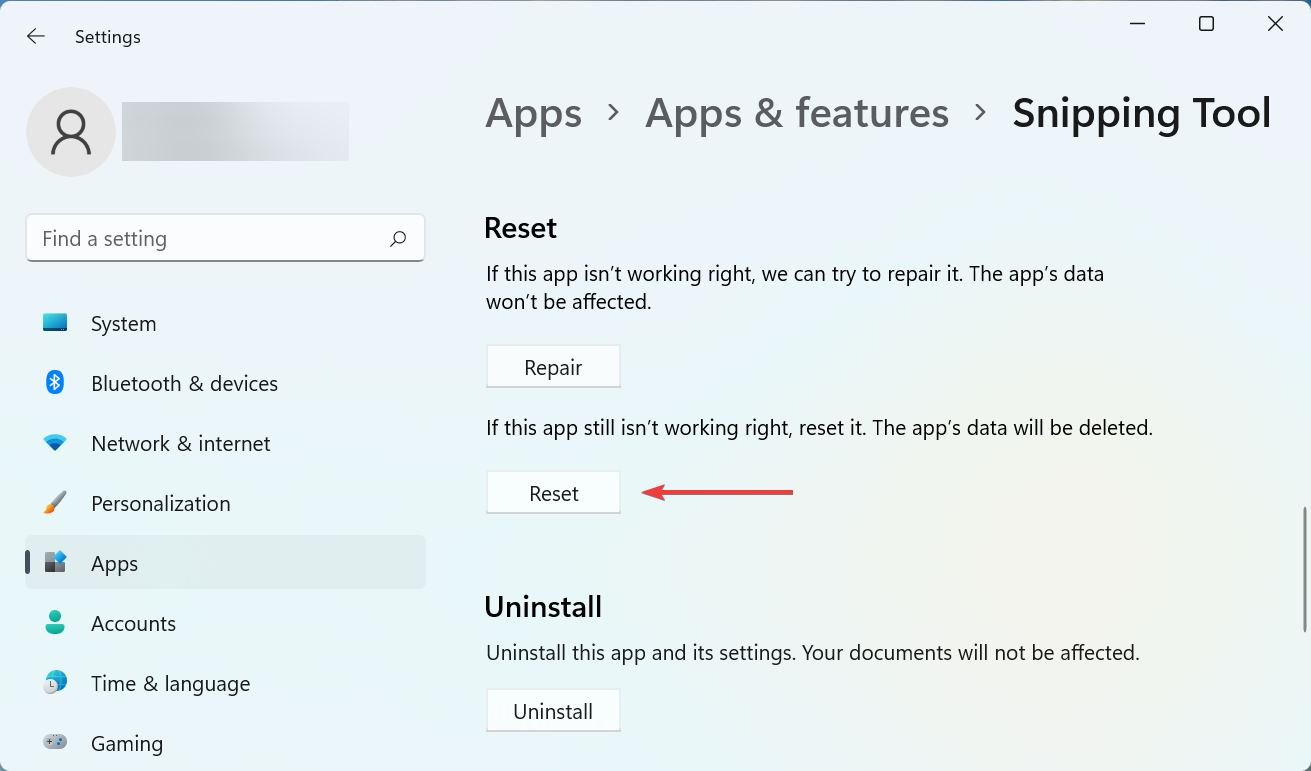
In case it persists, again head to Advanced options for Snipping Tool and click on Reset this time.
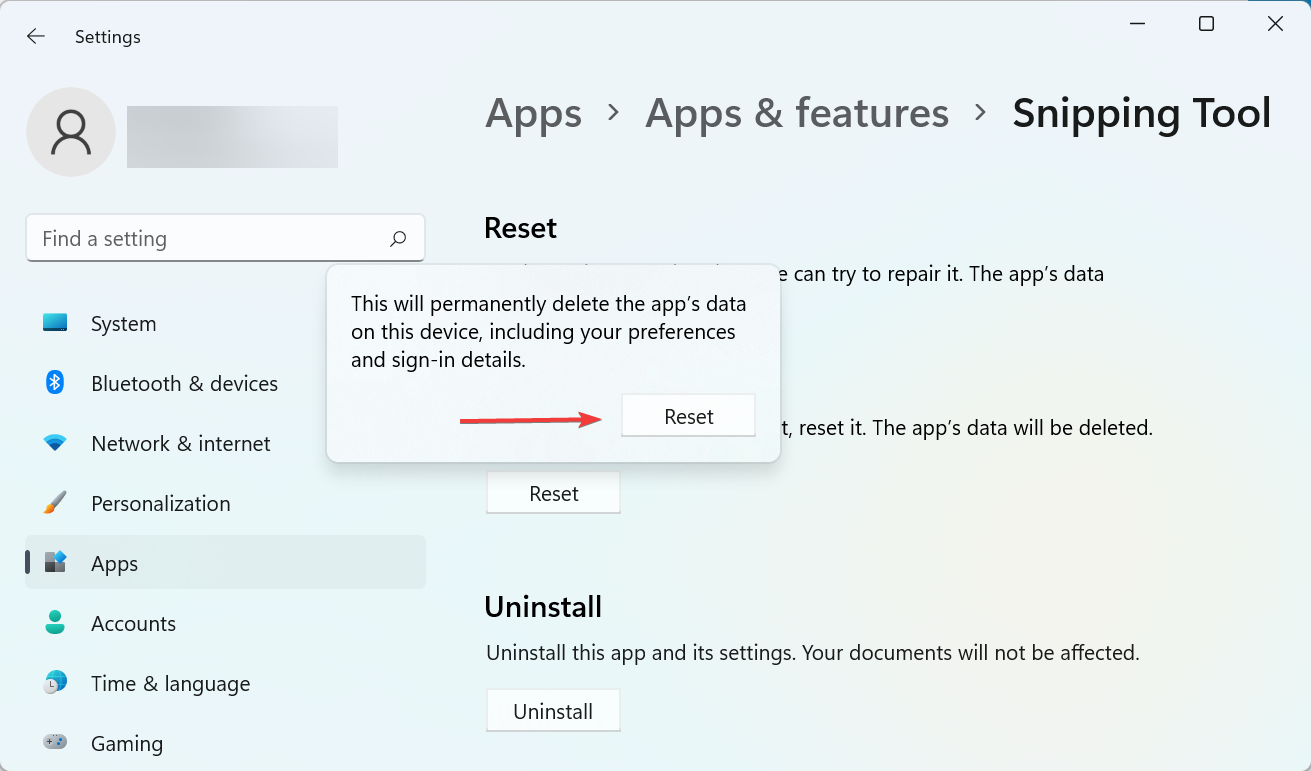
Click Reset in the confirmation prompt that pops up.
The reset and repair process can quickly help eliminate issues with any app on the computer. So make sure to run two, and check if Windows + Shift + S not working sometimes in Windows 11 error is fixed.
6. Uninstall the recent Windows update
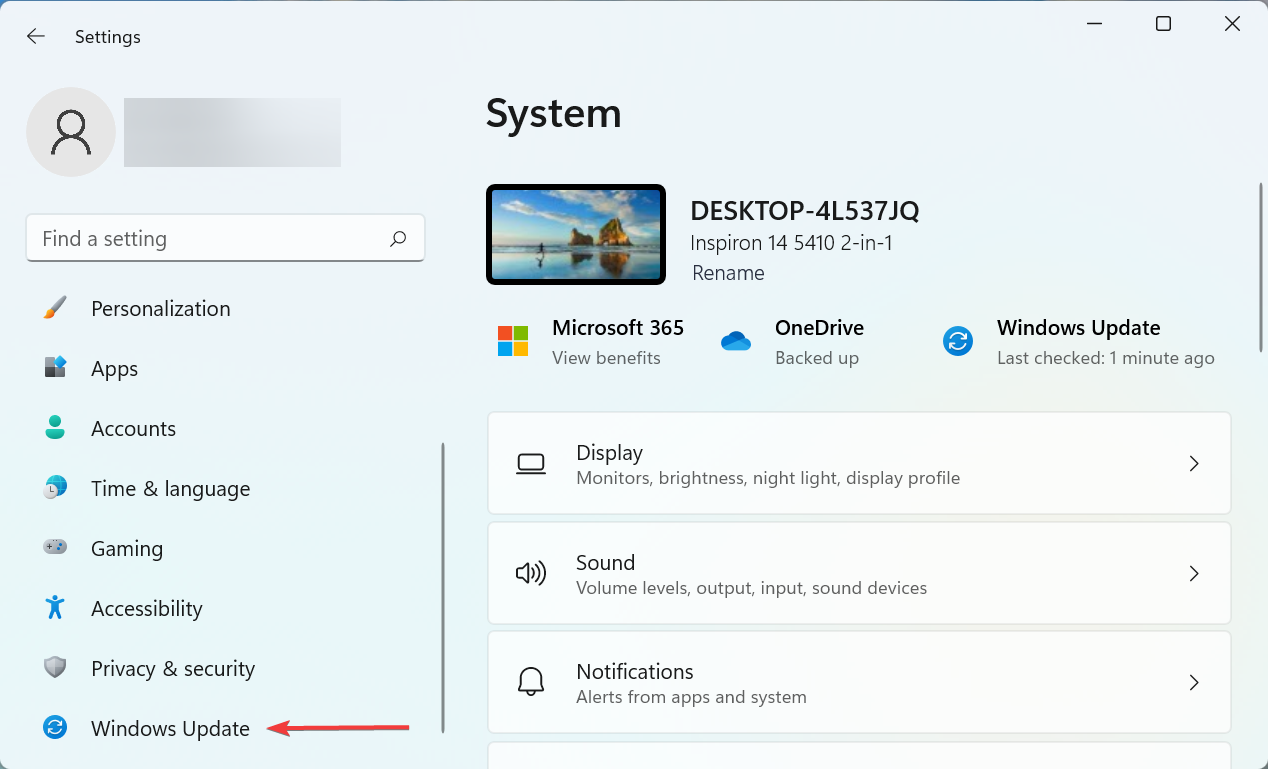
Press Windows + I to launch the Settings app, and then select the Windows Update tab from the left.
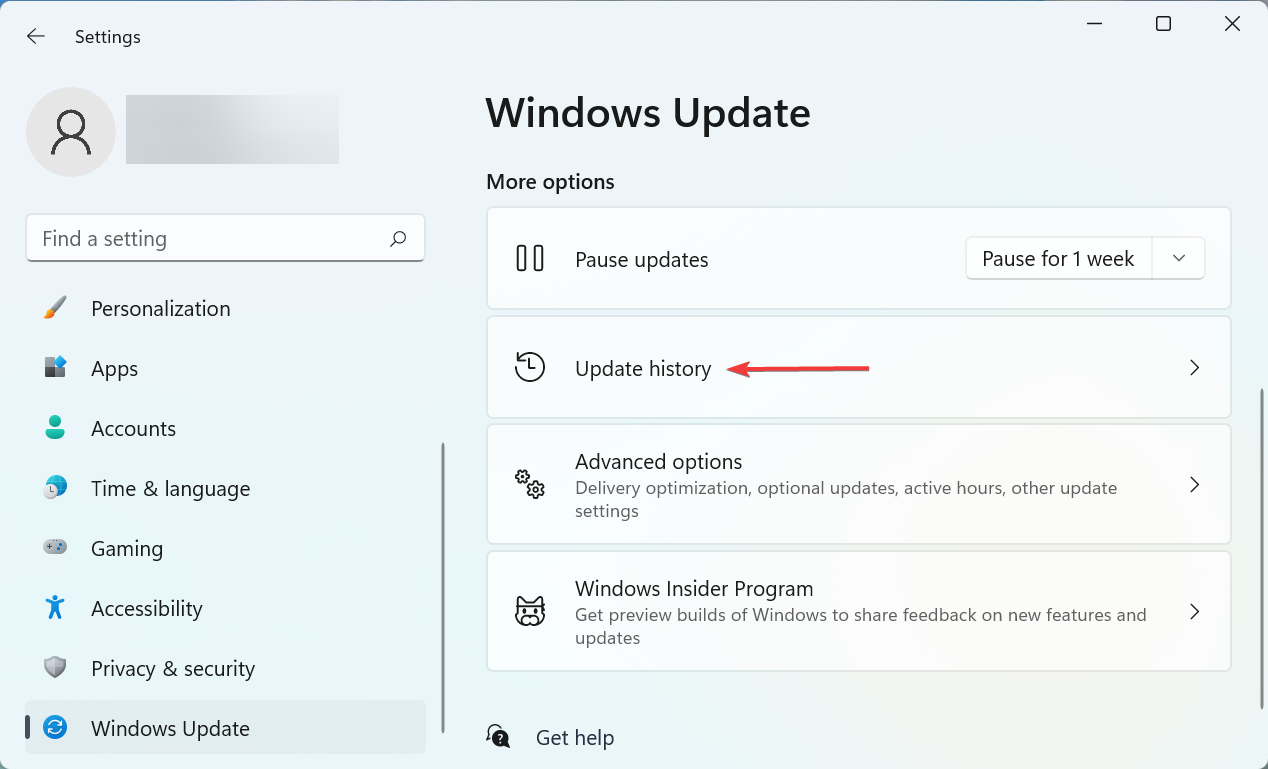
Next, click on Update history on the right.
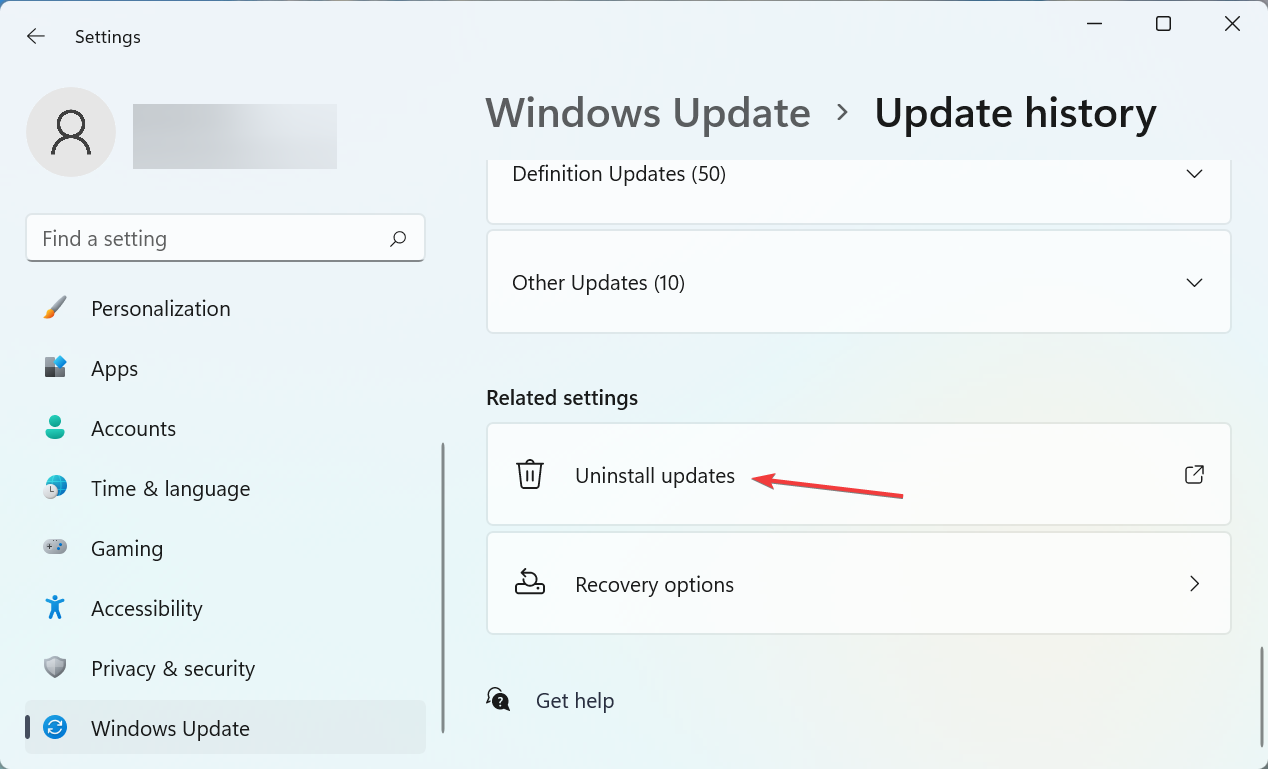
Scroll down to the bottom and click on Uninstall updates.
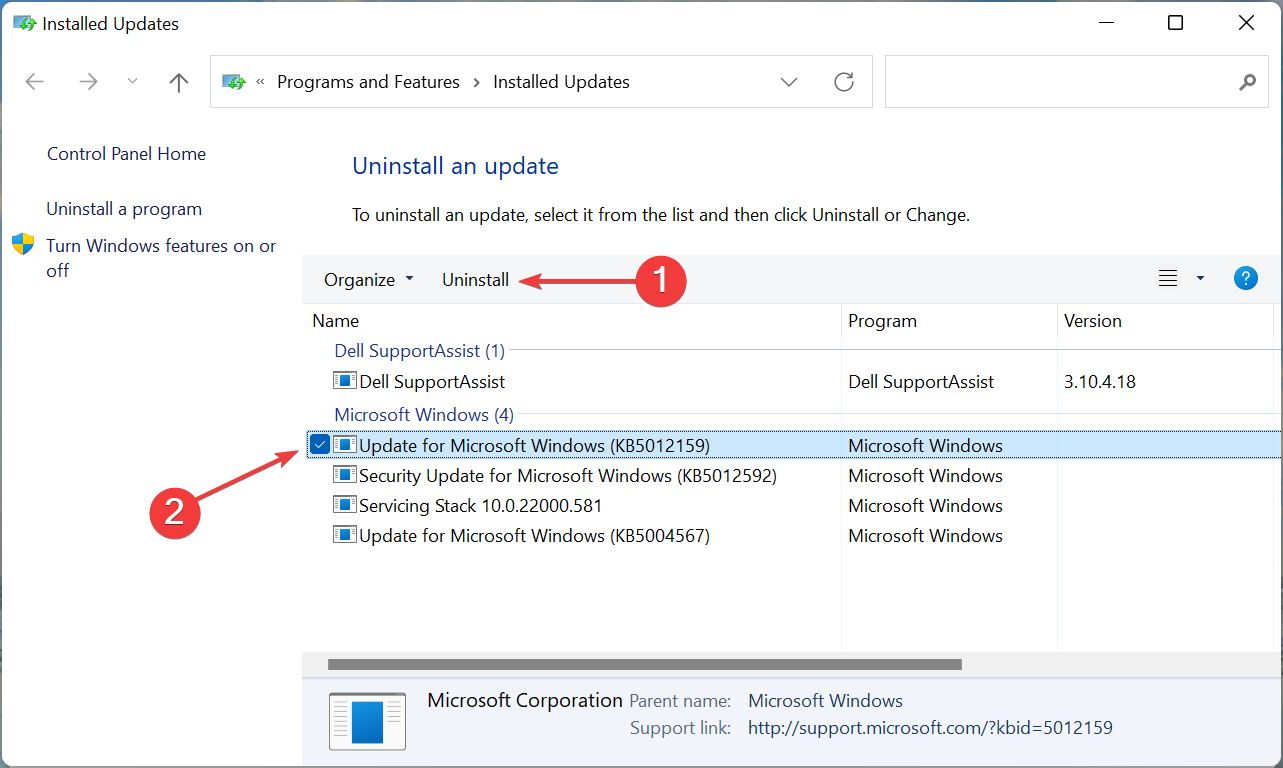
Now, locate the last installed update, and click on Uninstall at the top.
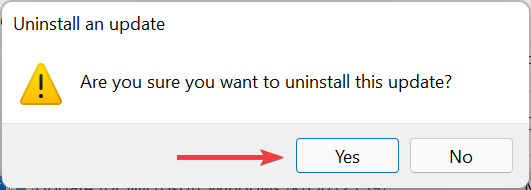
Click Yes in the confirmation prompt that pops up.
If the Windows + Shift + S started not working after an update, it’s time you uninstall the current version and revert to the previous stable build. Oftentimes, bugs in the latest releases can introduce instability and cause conflict with the apps and programs.
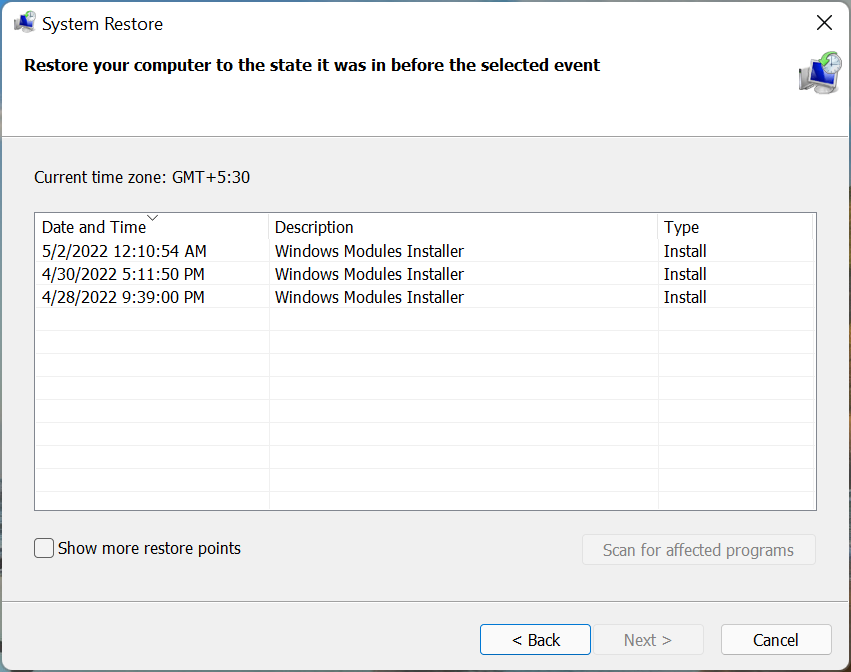
7. Perform a system restore
If none of the methods listed here have worked, you are left with no option but to perform a system restore. It’s an effective way to revert all recent changes on the PC, including app installations and changes in settings, though the stored file won’t be affected.
The process would take 15-60 minutes depending on the files stored, changes to be made, and the system configuration. But, if System Restore is taking a long time, try running an SFC scan or using a different restore point.
These are the seven most effective ways you can fix the problem. Also, remember that these methods would help resolve Windows + Shift + S not working on Windows 7, as well as on the other later iterations of the OS.
Windows Defender order scams are a common way for crooks to get your money. Cybercriminals have devised this method to steal your personal information.
Once they access your details, they gain unauthorized access to your computer or use your computer to distribute malware. It’s a way they get you to do what they want so they can get what they want.
Although Microsoft has made significant strides in the security of Windows with advanced technology, scammers are also getting more creative with their methods. It is important to stay vigilant lest you fall for one of these scams and end up losing some money or personal data.
What does a Windows Defender order scam mean?
A Windows Defender order scam is an attempt to trick you into paying for a subscription to Microsoft Defender Antivirus software.
This normally happens if you’re not running a genuine version of Windows on your PC. You may also fall victim if you’re running an older version of Windows that doesn’t include built-in virus protection.
Windows Defender is a free in-built program for Windows computers that helps protect your PC against viruses, spyware, and other malicious software.
The scam can be very hard to spot, especially if you’re not familiar with how Microsoft and its products work. You can find out more about Windows Defender in our comprehensive article to be better prepared.
Quick Tip
Phishing scams rely on collecting personal information like name, date of birth, social security number, and others to steal your identity which leads to massive financial consequences.
To protect you from that, you can try an automatic data removal program that helps you delete your data from numerous databases to fully secure your privacy.
Incogni
Let Incogni handle your removal requests and save you a lot of time and effort.
A Windows Defender scam can manifest itself in various ways. It can be in the form of a fake antivirus. You may also be duped into downloading and installing a program on your computer.
Scam techniques can be broken down into three categories:
Trick you into giving them access to your computer. For example, you might receive an email about a software update for your computer, and when you click the link it takes you to a page that asks for administrator privileges on your device.
Trick you into downloading malware. For example, someone may send you an email with a malicious attachment that looks like it’s from someone you trust, such as your bank or a family member. Once you click on the link, your PC becomes infected with malware. Microsoft products are available on the official website or Microsoft Store. You can only download Windows Defender from trusted platforms.
Trick you into revealing personal information. For example, someone may call claiming to be from Microsoft and saying there’s a problem with your computer. The scammers then use this information to access your personal computer, emails, or even bank accounts.
How do tech support scams work?
Tech support scams work in various ways. However, the end goal is always to get you to buy something that you don’t really need. It could be a tool, an upgrade, or a service that’s being sold.
While some tech support scams are run by phone alone, others use pop-up messages on your computer.
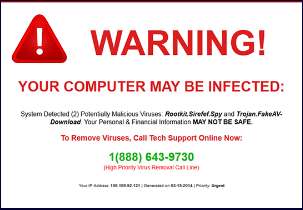
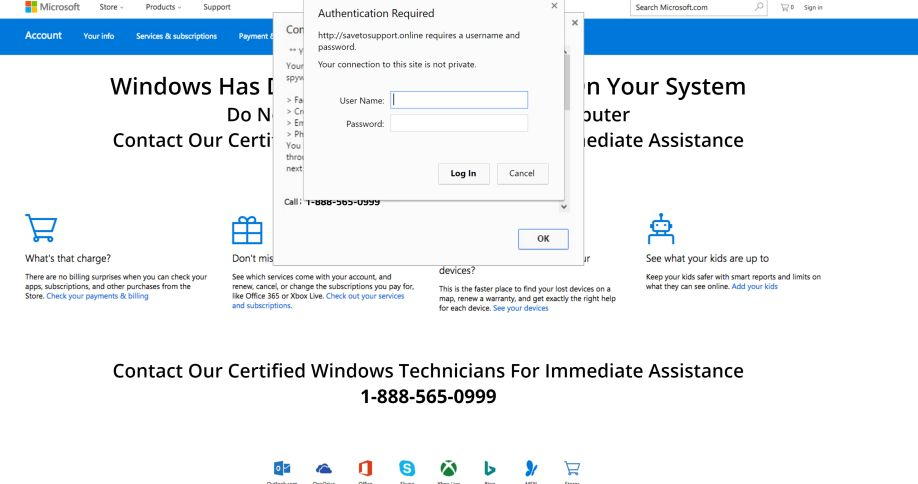
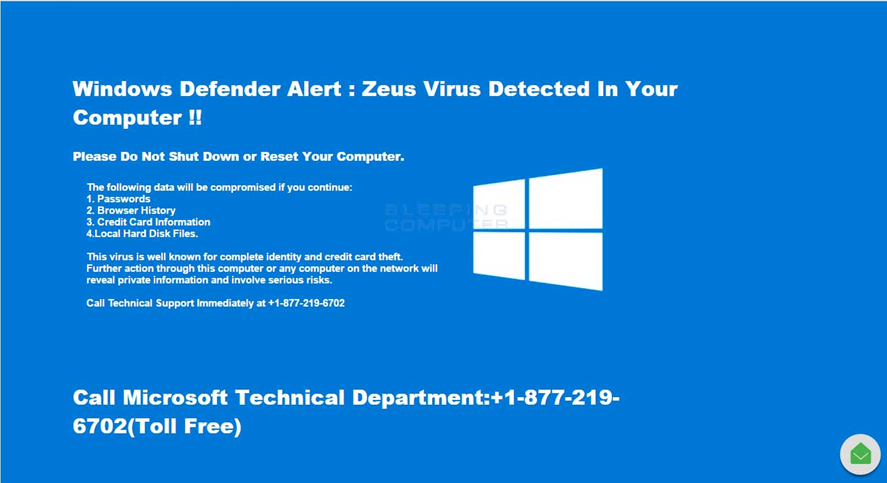
Some of these messages seem to come from legitimate companies like Microsoft. They always say that you need to call their support line immediately. These messages often freeze your computer so that you can’t close them unless you restart your system.
The best way to spot a scam is to know what it should look like in the first place. Here are a few tips to spot a Windows Defender order scam:
How can I spot a Windows Defender order scam?
1. Unsolicited orders
If you did not order for anything, anyone calling or emailing you about a Windows Defender order is obviously a scammer. Windows Defender cannot be bought because it is free.
2. Grammar mistakes
One of the most obvious signs is bad spelling and grammar. Spammers often don’t have native English speakers writing their emails, which can lead to mistakes that could give them away. Check for typos and weird-looking sentences.
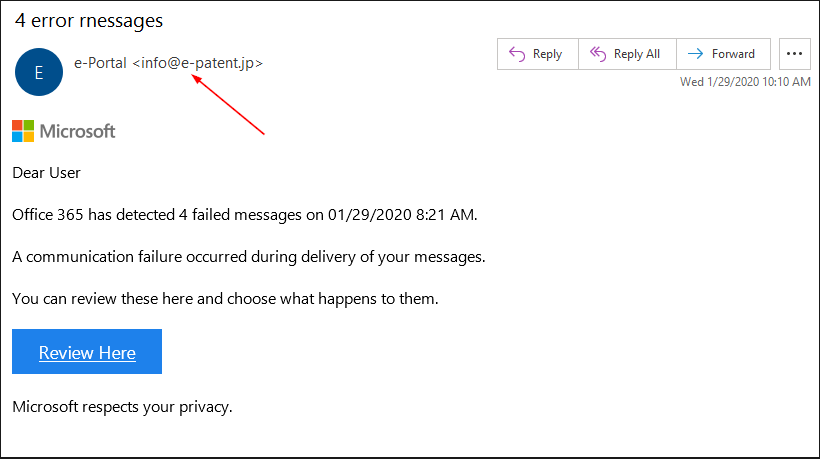
3. Fake URL
Another red flag is the URL of the website in the email. Scammers like to use URLs that look very similar to legitimate ones. Usually, they will only change a single letter or number to differentiate it from the official company’s email.
Examine each letter closely and compare it to the one given on Microsoft’s website since they can be easy to miss at first glance.
4. Wrong website names
Hover over any links using your mouse to see what web address will be displayed. Microsoft links will always show a preview of the official website with the correct website name. If you notice any suspicious characters, the email could be a scam.
5. Suspicious pop-up ads
If you’re getting pop-up ads online that tell you to call a number to get help with your Windows Defender order, there’s a good chance it’s a scam. The scammers will try to trick you into calling the number and giving up your personal information.
6. Unsolicited phone calls
If you receive an unsolicited email or phone call. The scammer will tell you that they’re from Microsoft. They will also claim that they need remote access to your computer to cancel your Windows Defender order because there’s something wrong with it.
The scammer might also tell you that if you don’t let them access your computer, your device will be disabled or even that it was hacked by someone else.
What can I do if I have already fallen victim to a Windows Defender scam?
If you think you may have fallen victim to a Windows Defender scam, there are a few things you can do:
The first thing you should do is change the passwords on all your accounts. This is to prevent someone from accessing your accounts and taking your money or credit cards. Your bank and credit card companies will be able to help you if this has already happened, but it’s best to be safe and change your passwords right away.
Report the scam to your local police department immediately. There is no guarantee that they will be able to help, but it is important to have a record of the crime in case additional victims come forward.
If any of your bank accounts were compromised, it would be a good idea to call the financial institution to disable your account or block any transactions until they can verify it is you. That way, if the scammers try to access them again they’ll be denied. It is also important that you unplug the computer from the internet while performing this scan and throughout this process. This will reduce the chances of the scammer causing more damage.
Your computer may have been infected by malware as a result of the scam. In this case, use an anti-virus program such as ESET HOME Security Essential to scan it for viruses and other malicious software.
Call your phone company and ask them to block future calls from the number that made the call. This will ensure the scammer doesn’t contact you again.
Inform Microsoft of the Windows Defender order scam or report it via their report scam page. They may take it upon themselves to inform their users so that they can be aware of such scams.
What can I do to protect myself from Windows Defender order scams?
In the future, you will need to stay vigilant so that you don’t fall prey to such scams. Below are some tips to help you protect yourself:
Never provide payment information to someone contacting you through unsolicited phone calls or emails. If someone contacts you and claims to be from Microsoft and they ask for your credit card number under the pretense of verifying your identity, this is a scam. Microsoft will never ask for personal information in such a way.
Don’t pay for a product or service without checking it out first. It’s important to do your research on any product or service before you pay for it, especially when it comes to your computer. Check if the said product is available on the official website before making a purchase.
One of the best ways of protecting yourself from a scam is to ask lots of questions. If a scammer says they’re calling from Microsoft and want to work on your computer, ask them for their name, department, and company ID number. Chances are they will hesitate or hang up.
Avoid clicking on suspicious links. Do not click links in emails or text messages that purport to be from Microsoft Windows Defender. Always manually type in the URL for Windows Defender’s website and log into your accounts directly.
Don’t download any files or programs that someone emails or sends over an instant message unless you trust the sender – even if they say they work for Windows Defender or Microsoft.
Set up two-step verification or two-factor authentication on all of your online accounts that offer it. This helps protect your account even if someone else gets hold of one of your passwords.
As seen, it is really easy for criminals to make it look like you’ve been hit with a Windows Defender order.
The internet is a wild and dangerous space especially if you don’t know basic scam checks. In the end, these con artists are really just trying to steal from the unsuspecting.
It’s common for scammers to use the trust of a well-known brand or popular product to trick you into visiting a website and handing over your information.
Back in 2004, the browser market was pretty much a one horse race. Microsoft had come to dominate with Internet Explorer after quashing Netscape Navigator some years before, and IE6 had some 95% of PC market share. But Firefox 1.0 was released to give the monopolist some competition, eventually reaching some 32% share of its own before Google’s Chrome (released in 2008) began to take over.
Firefox released Picture-In-Picture in 2019 with version 71, and has continued to enhance the feature, making it available across Windows, Mac, and Linux, and adding support for multiple Picture-In-Pictures. Today, Firefox is adding subtitles and captions to Picture-In-Pictures, a request coming from Mozilla Connect, a feedback and ideas hub for Firefox.
Picture-In-Picture subtitles and captions will be initially be available for videos on YouTube, Prime Video, and Netflix, and websites that support the WebVTT format, including Twitter.
New mobile browser wallpapers
To celebrate version 100, Firefox is making two new mobile wallpapers, originally released for Android and iOS in the United States, globally. You can get the new wallpapers, Beach vibes and Twilight hills, by checking the wallpapers feature in your Settings.
Clutter-free tabs and history on Android and iOS
Firefox 100 is introducing a new simplified and clutter-free way to organize your tabs and history:
For clutter-free history, instead of an endless sea of URLs leaving you feeling overwhelmed, we’ve organized it for you in an intuitive way. One of the ways we’ve done this is by grouping history items by the original item, for example if you’re looking for shoes and you’ve looked at several models, you can find them grouped in one folder under your search term. Another way we’ve organized your history is removing duplicate sites thus reducing the visual clutter. Lastly, you can now search within your history. Keep in mind that we are doing this in a privacy preserving way so you can rest assured that your data isn’t being sent back to Mozilla.
Clutter-free tabs and history are available for Firefox on Android today, and will roll out on iOS later this week.
HTTPS-only mode on Firefox for Android
Firefox first introduced HTTPS-only mode in their companion privacy-first Firefox Focus app, and now their bringing it to Firefox for Android. The feature automatically converts urls to https:// whenever available, meaning you’ll get the most secure connections to websites you visit, regardless of whether you used an https url or not.
More features: first-run language switcher, and credit card autofill to more countries
Firefox 100 is making it easier to set your default language when you first set up the browser, allowing you to choose from over 100 languages if your browser default language and your device’s default language don’t match.
The new browser version will also bring credit card autofill to more countries; first introduced in North America, the feature is now coming to the UK, France, and Germany.
There have been several complaints from users about using OBS Studio. Like OBS Studio not picking Discord audio, and so forth.
OBS Studio is arguably the most popular live-streaming encoder. It is completely free and open-source, and it has lots of useful features to help you stream OBS to Discord with audio.
Regardless, if after installing it on your PC it is not working naturally as expected, then you need to tweak your PC or OBS Studio settings to fix it.
If OBS Discord audio is quiet, worry less. We have covered a few useful fixes to help you solve the problem.
You don’t need to try them all; just work your way down the list until you find the one that fixes the Discord audio low OBS issue.
What can I do if OBS Studio is not picking Discord audio on PC?
1. Unmute OBS in the Volume Mixer
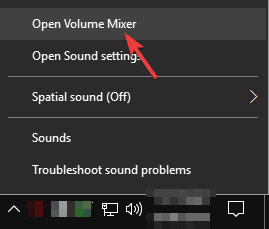
Right-click the Speaker icon at the Taskbar and click Open Volume Mixer.
Select the Speaker iconunder OBS to unmute the applications.
If your OBS Studio application is muted in the Volume Mixer, there’s no way you’d hear a sound when using it on Discord.
Hence, after unmuting OBS, check if the OBS audio is back on your Discord recording. Also, try this same step and see if your Discord application is muted. If it is, unmute it.
2. Modify the OBS Studio audio settings
Launch OBS.
Click File at the upper left corner and click Settings.
Click Audio on the left pane. Then, select Stereonext to Channels.
Scroll to Global Audio Devices and select the actual device you’re using for Desktop Audioand Mic/Auxiliary Audio.
Alternatively, you can select the Default options on those drop-down menus to configure the software for your default sound devices.
Restart OBS studio and launch Discord to check.
Selecting the proper devices in the audio settings on the OBS application can fix the OBS studio not picking Discord audio problem.
3. Turn off the microphone’s Exclusive Mode
Click the Start button and select Settings.
Now, choose System.
Click on the Sound tab from the left, then look for the Input section on the right and select Device properties.
Click on Additional device properties.
Select the Advanced tab and uncheck the Allow applications to take exclusive control of this device feature.
If Obs is not picking up the mic sound, this solution will restore things to normal and it will also clear the microphone problem with Discord.
Also, it might be worth learning the best OBS settings for recording on PC. This can be helpful in getting optimal performance when recording your discord voice chat.
Feel free to use the comment section if you have further questions or suggestions on this article.
The number of users experiencing the TikTok profile picture won’t change issue keeps increasing by the day. While this could be pinpointed to a stricter profile photo review from TikTok, some users still find it difficult to upload simple pictures.
Considering that some people need to unblock TikTok in their countries to use it, facing problems with simple tasks like uploading a profile picture becomes more frustrating.
As always, we have gathered workable fixes that will solve the problem and allow you to get back to displaying some of your best and updated pictures to your followers.
What are the common TikTok profile picture issues?
There are different forms of profile picture issues on TikTok. They are caused by various reasons, all leading to the profile picture not changing. Below are the common problems faced by users:
TikTok keeps displaying No internet connection prompt when trying to upload a new profile picture. This could be due to problems with your internet connection.
The account keeps displaying the default photo despite uploading a new one. This could be due to corrupted app data.
TikTok keeps displaying Profile photo/video updates are possible at this time. Thanks for your patience! prompt. Problems from TikTok’s end usually cause this.
How can I fix the TikTok profile picture won’t change issue?
1. Check TikTok server
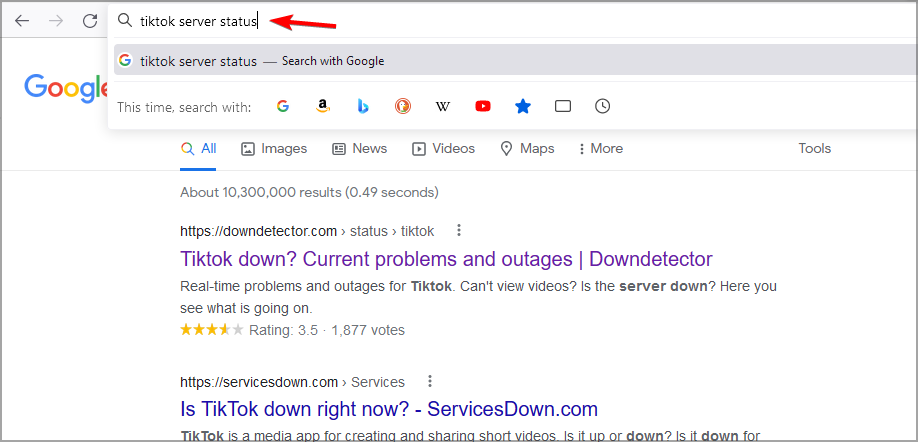
Open your browser and type tiktok server status in the Address bar.
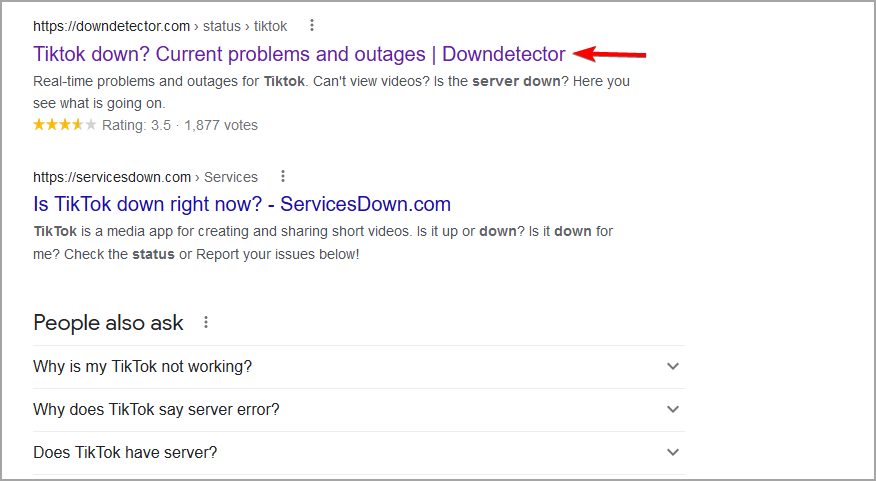
Select one of the first options like the Downdetector website.
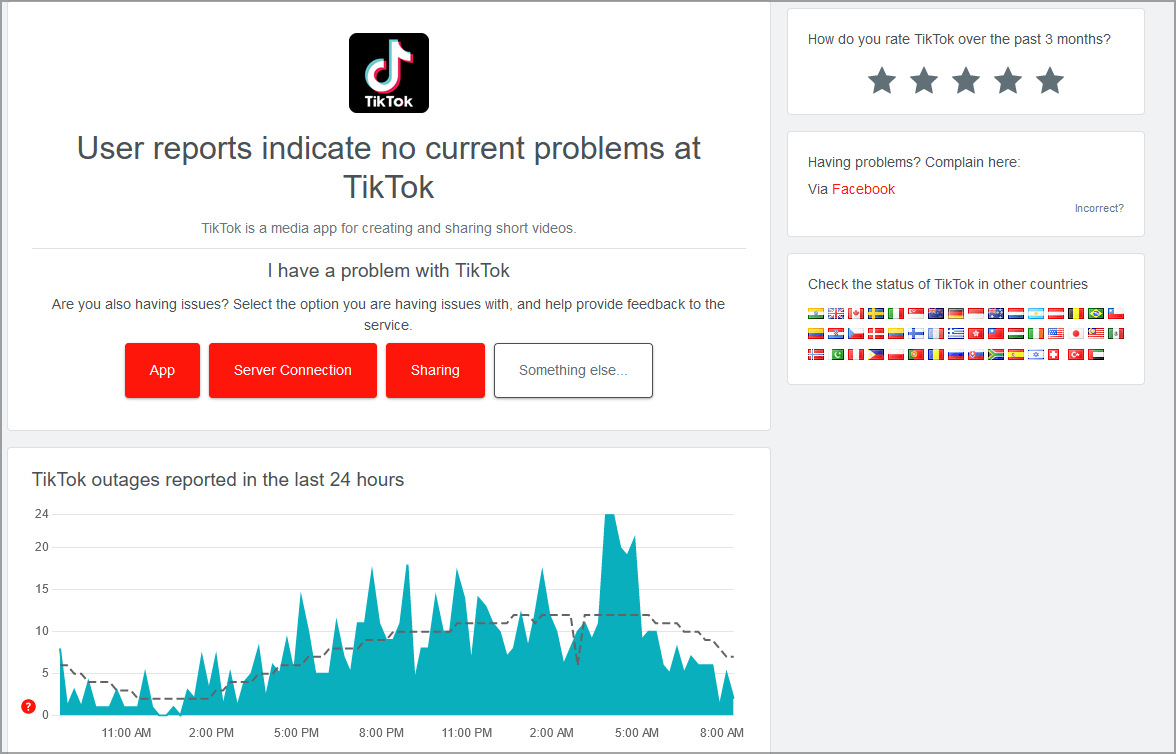
It will display a live TikTok status update for you.
Server downtime might be the reason you can’t change TikTok profile picture. Unfortunately, there is no official way to find out, as TikTok does not provide server status updates.
Also, you can find out on Twitter by typing keywords like #tiktokdown, #tiktokserver, and #tiktoksupport in the search box.
If the problem is due to the server, there is little to nothing you can do than wait for it to be resolved.
2. Restart the app
On Android
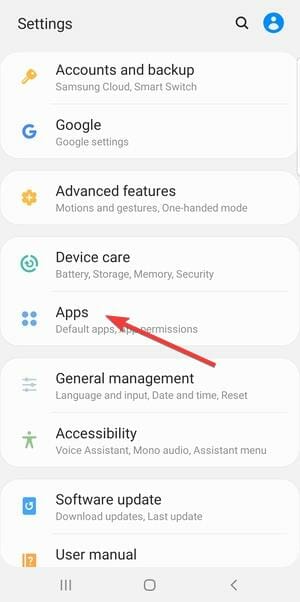
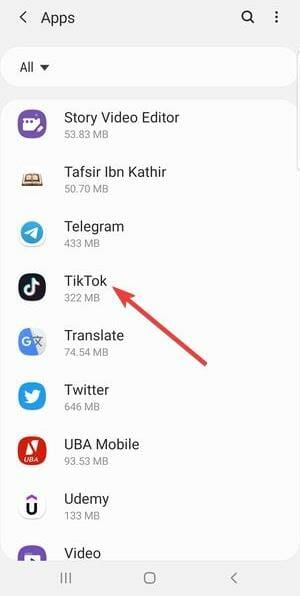
Open the Settings app and select the Apps option.
Locate TikTok and tap on it.
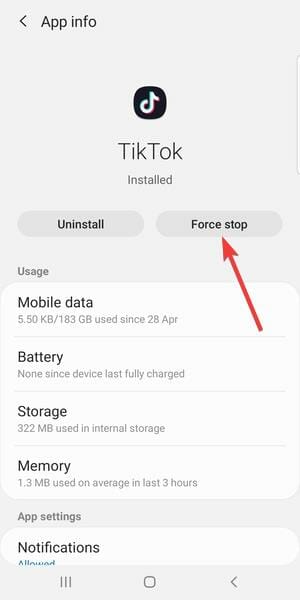
Tap the Force stop option.
From here, relaunch TikTok and try changing your profile picture.
On iPhone
Swipe up slightly from the bottom of your phone’s screen to launch the App Switcher. If it is an iPhone with a home button, double-tap the button.
Locate the TikTokapp and Swipeup on it to stop it.
Now, relaunch TikTok and try changing your profile picture.
3. Try a different picture
TikTok has recently introduced a stricter profile picture review system. This is because numerous bots are starting to use obscene pictures as their profile photo.
This has led to problems with some of the usual pictures that users could use in the past. And this might be the reason your TikTok profile picture won’t stay.
If TikTok won’t upload a profile pic, you should try a different picture with different characteristics. If it fails, you can proceed to the next fix.
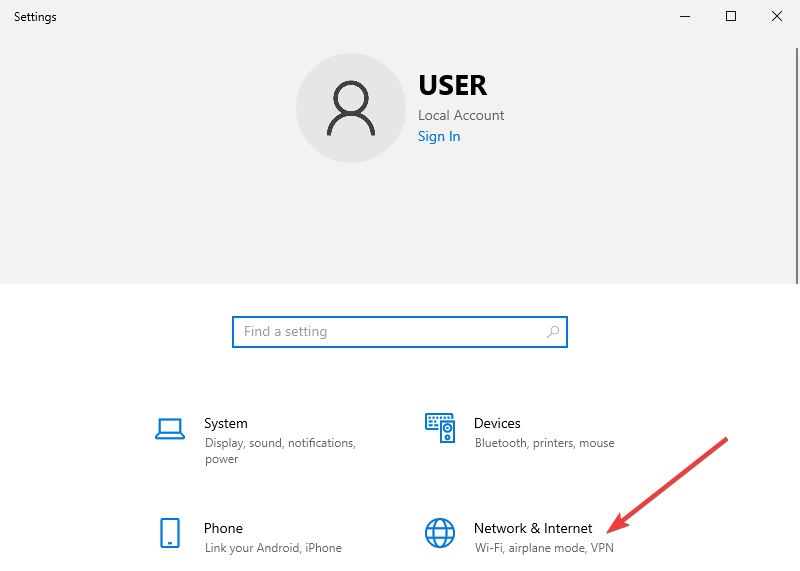
Press the Windows + I keys to open the Settings app.
Select Network & Internet.
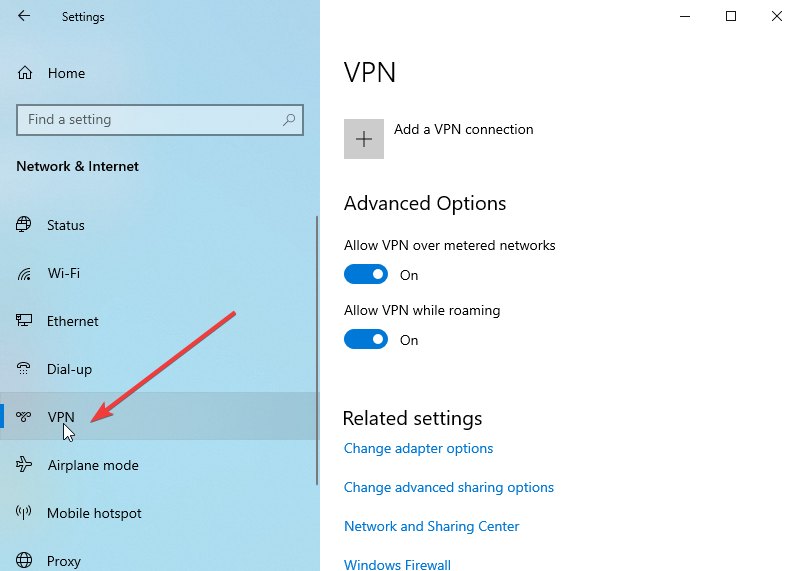
Choose VPN on the left pane.
Select the VPN service you want to disable and click the Disconnect button.
If you are using VPN and a TikTok profile picture won’t save on Windows PC, you should try to disable it temporarily. Your VPN might be preventing you from using some features of TikTok.
This may be due to the current location it is routed to or other privacy features. After disabling VPN, you can try to access TikTok. If it works fine, you can activate your VPN again.
5. Clear browsing data
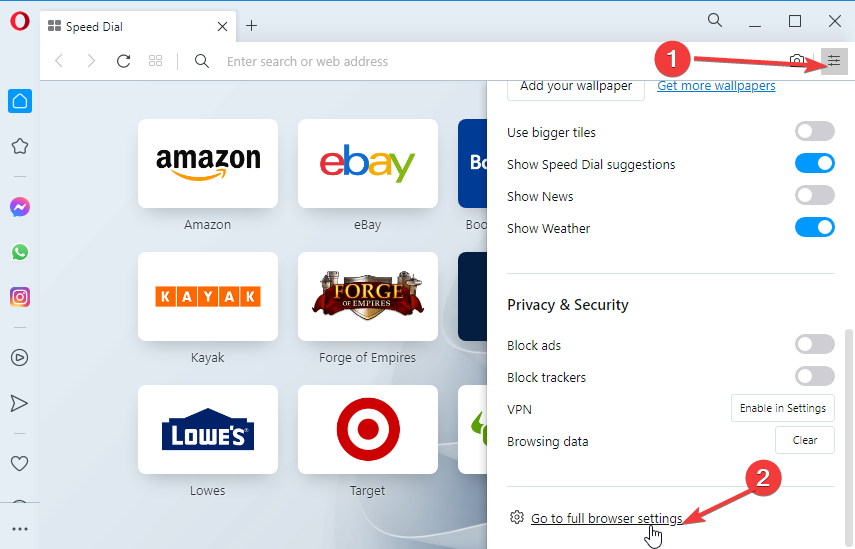
Click on the menu button (the three horizontal lines) in the top right corner. And choose Go to full browser settings.
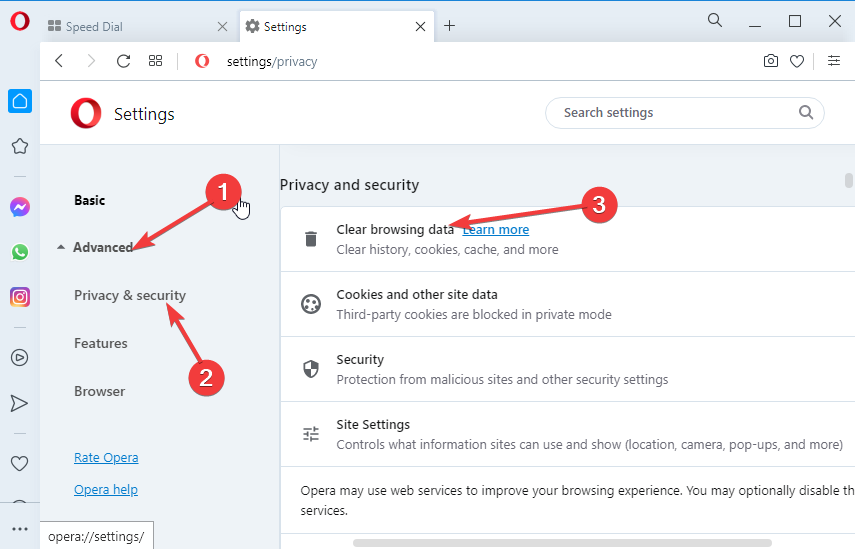
Select the Advanced option on the left pane.
Select Clear browsing data.
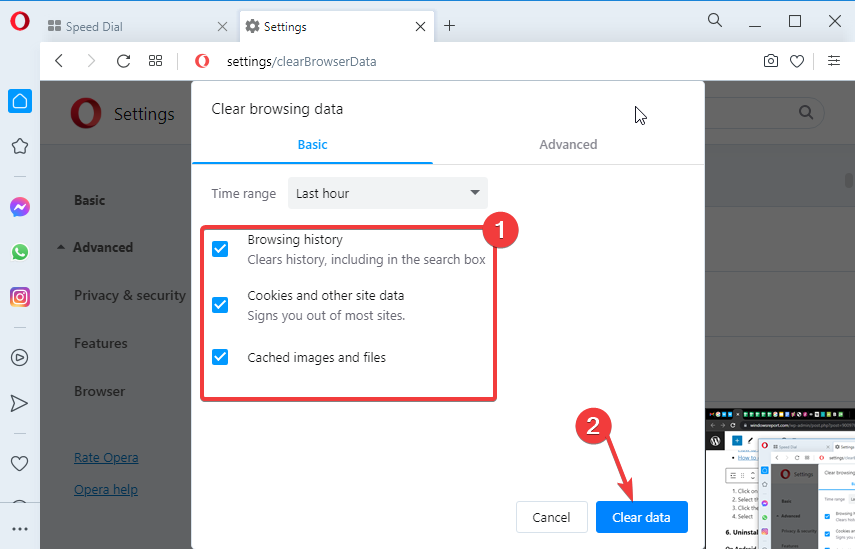
Check the boxes for Browsing history, Cookies and other site data, and Cached images and files.
Click the Clear data button.
Sometimes, the reason TikTok won’t upload a new profile pic on your PC is because of corrupt browser data.
While this data improves your navigation and general experience when using TikTok on your browser, it can lead to different problems if it is faulty.
Note that you need to restart your browser after clearing the data to effect the changes.
You can use an efficient method to clear out browsing data and cookies using a well-known cleanup software like CCleaner.
Using this tool, you’re able to scan your PC and detect additional or broken Internet data that may cause this issue, and erase all browsing data with a single click.
Afterward, you should be able to change your TikTok profile picture from your browser without any problems.
6. Uninstall and reinstall TikTok
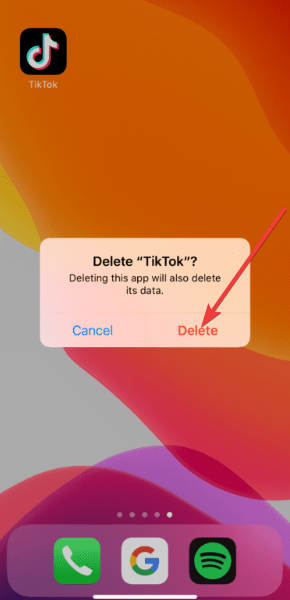
On iPhone
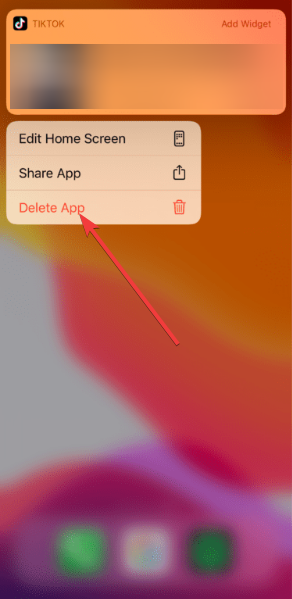
Go to the Home screen, press, and hold the TikTok app.
Select the Delete App option.
Tab on the Delete option when prompted to confirm the action.
Open App Store and search for TikTok.
Select the app and tap the Get button.
Finally, verify your ID as required to start downloading the app.
On Android
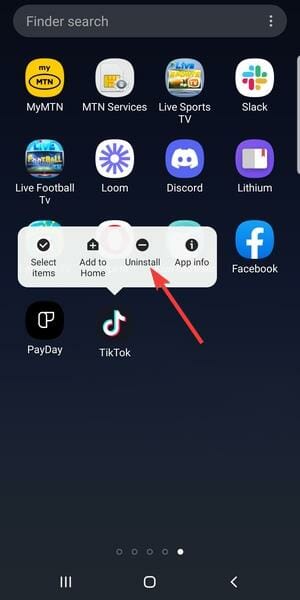
Go to the app menu and long-press the TikTok app logo.
Select the Uninstall option.
Open Google Play Store and search for TikTok.
Tap on the app followed by the Install button.
Wait for the process to be complete and launch the app again.
Being unable to change your profile picture on TikTok can be an annoying experience. Thankfully, we have discussed five effective fixes to this problem.
We hope you can get back to displaying updated pictures to your users on one of the liveliest apps.
If you would like to use TikTok on your browser instead of dealing with the problems that come with an app, you check our extensive guide on the topic.
Feel free to discuss the fix that solved the problem for you in the comment section below.
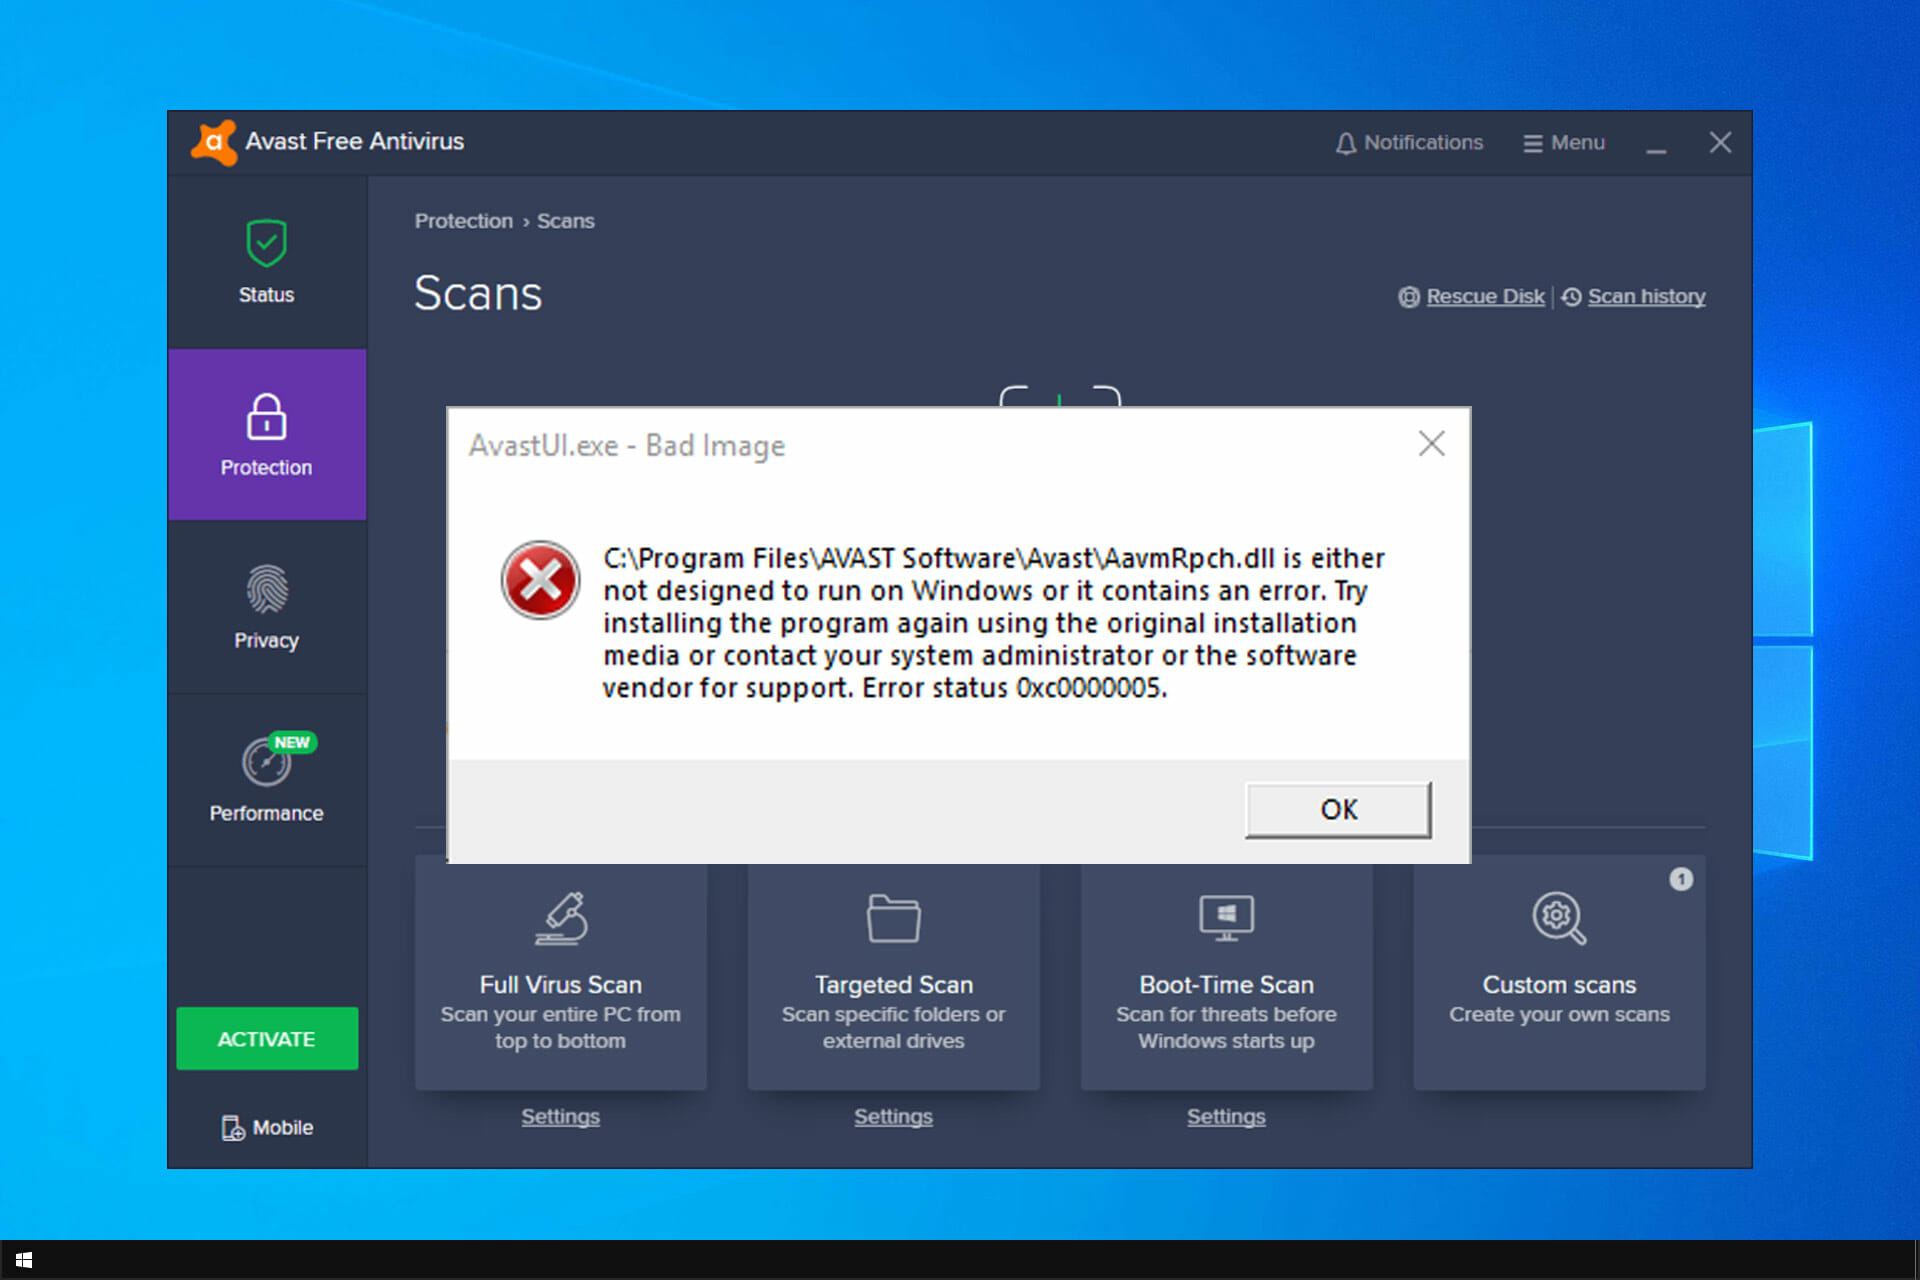
The avastui.exe is an executable file part of the avast antivirus that launches the software’s user interface. A corrupted file can cause the avastui.exe error to interfere with your computer’s usage.
A bug in the latest Avast update can cause an error like Avast error 42102. It’s also possible for third-party software to cause a conflict with the antivirus software.
You’ll get many error messages when avastui.exe isn’t working correctly. Here are some of the more common errors:
Avastui.exe bad image: This happens when errors are in the latest Avast update.
Avastui.exe application error: You’d see this message when the registry entries are corrupt.
Avastui.exe cannot start correctly: It’s primarily because of bad registry entries.
Avastui.exe high CPU usage: The Avast software performs many background operations, which can consume high CPU power.
Avastui.exe is missing or corrupt: It means Avast couldn’t find a necessary file at startup.
Windows failed to start Avastui.exe: An error that results from Avast’s incompatibility with Windows.
Avastui.exe is not running: When you see this error, it’s usually the interference of other software.
How can I fix the avastui.exe application errors?
1. Uninstall and reinstall the Avast antivirus program
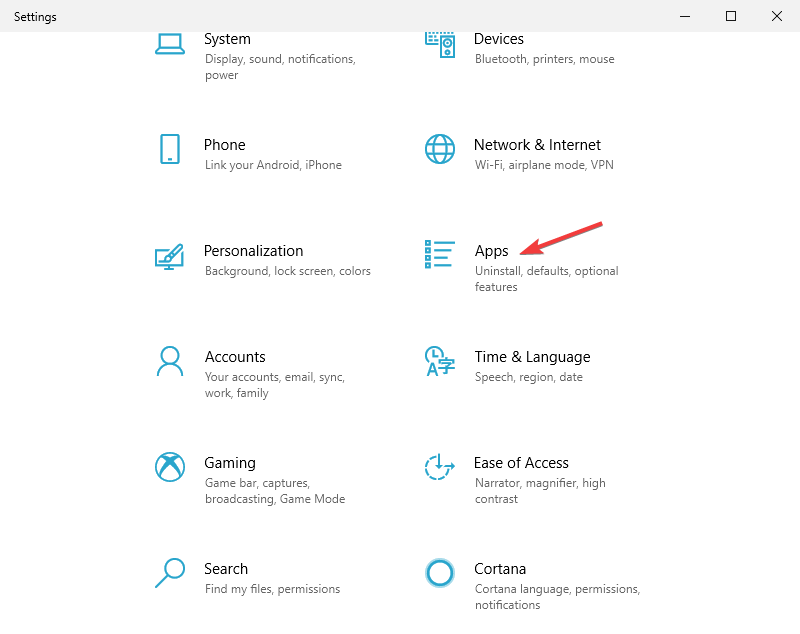
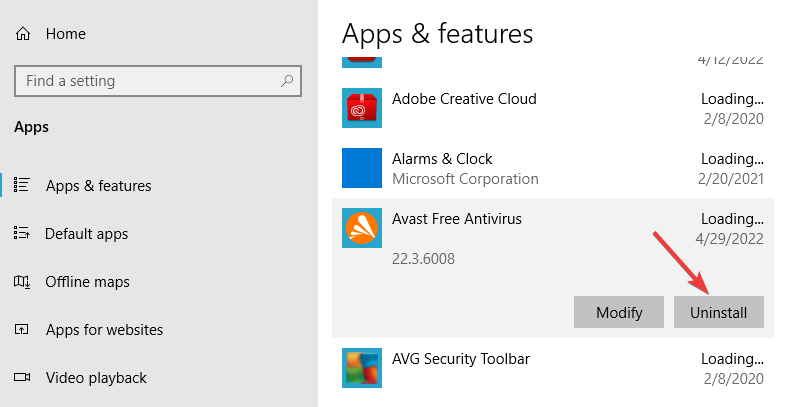
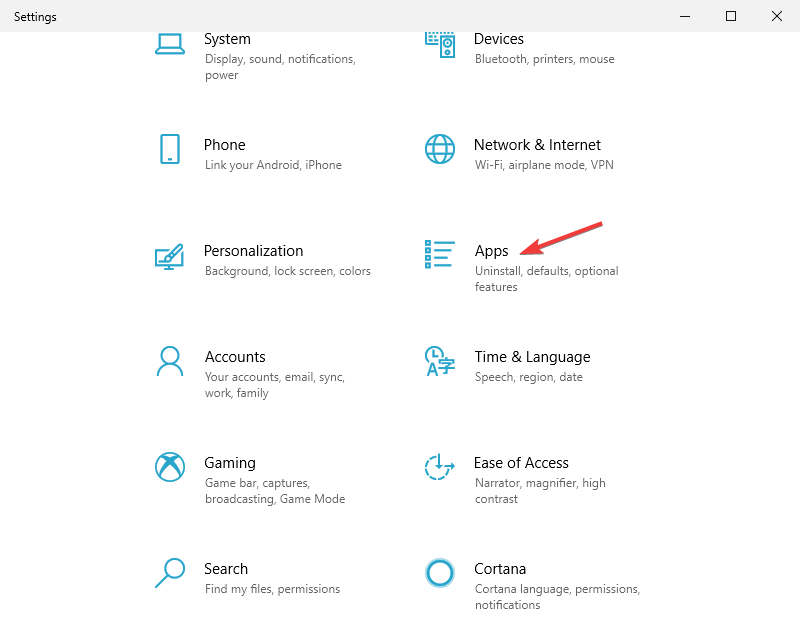
Press Windows + I to open the Settings app.
Click on the Apps from the Settings app.
Locate Avast and click on it.
Select Uninstall or Repair.
Follow the instructions on the screen to uninstall.
You can often resolve the Avastui.exe application error by uninstalling and reinstalling it. After uninstalling, go to the Avast official website and download the latest avast antivirus. Then install the software.
2. Repair Avastui.exe entry point not found
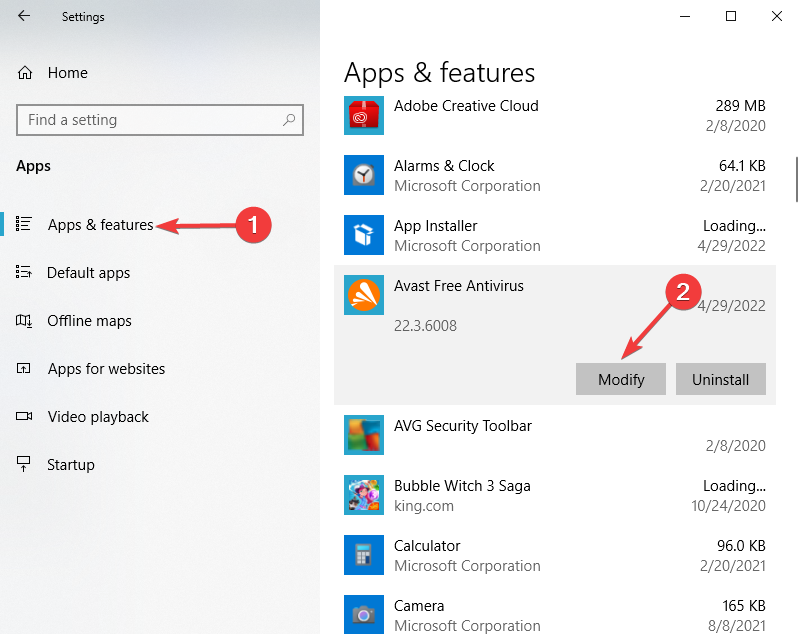
Press Win + I to open the Settings app.
Click on the Apps from the Settings app.
Locate Avast and click on it.
Select Modify.
Follow the instructions on the screen to repair.
Usually, repairing the software will remove the error message. However, if that doesn’t work, check the next solution.
Other executable files can experience issues as well, and we suggesting reading our nvwmi64.exe errors guide if you want to learn more.
3. Using Avastclear.exe to fix the avastui.exe error
Download avastclear.exe from Avast’s website.
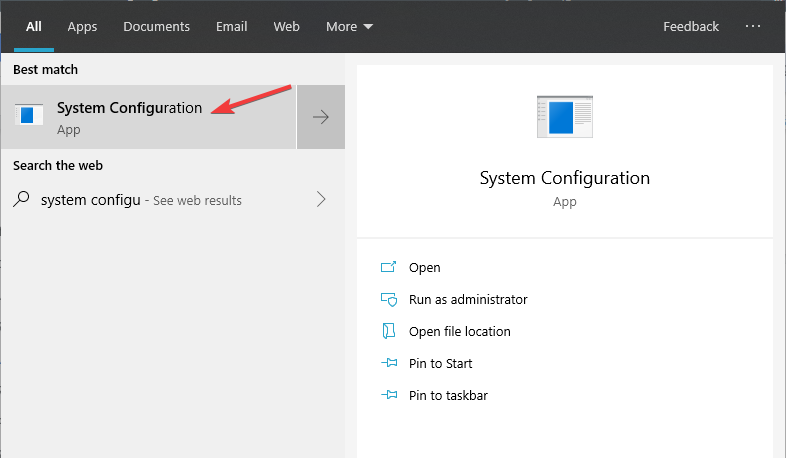
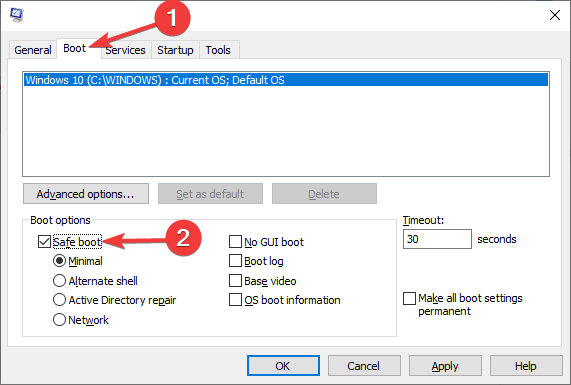
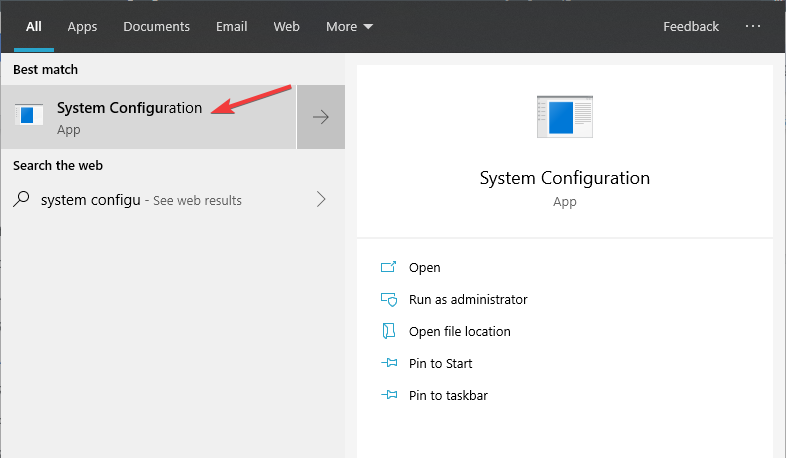
Type System Configuration into the search box and Enter.
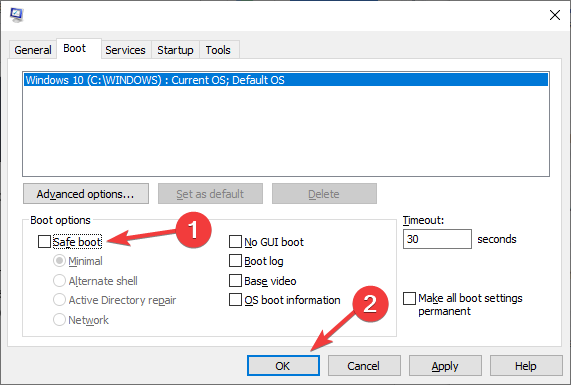
Select Boot.
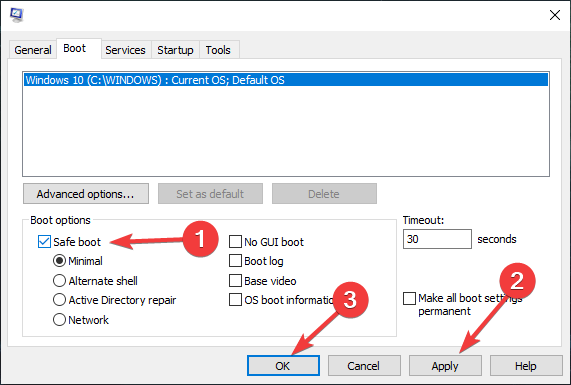
Click on Safe Mode.
Click on Apply, then OK.
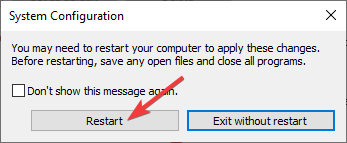
Click on Restart.
Running the avastclear.exe in safe mode
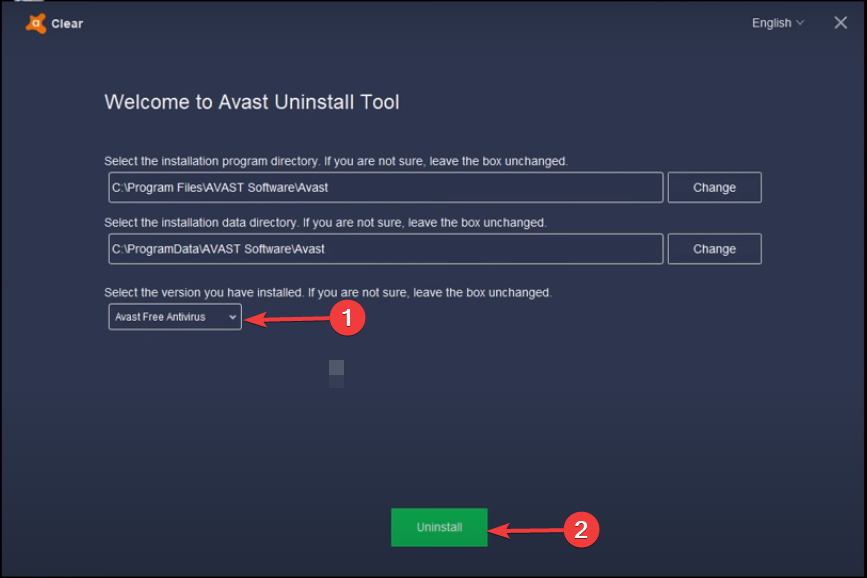
Open avastclear.exe as Administrator.
Make sure the Directory shows the Avast folder.
Select your Avast version.
Click on Uninstall.
Click on Restart later.
Type system configuration into the search box on the taskbar.
If you can’t uninstall the software the standard way, use a specialized tool like CCleanerto automate the process.
4. Perform a Windows update
Press Win + I to open the Settings app.
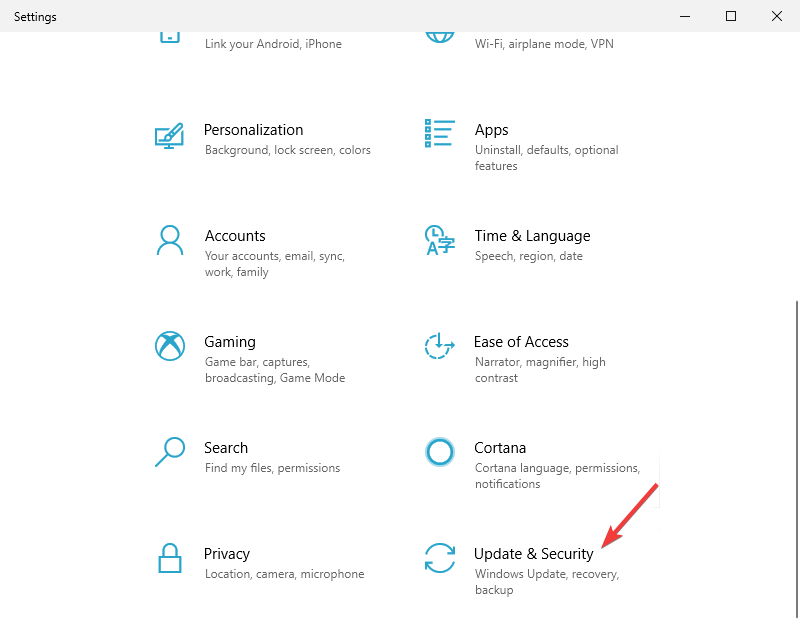
Select the Update and Security icon.
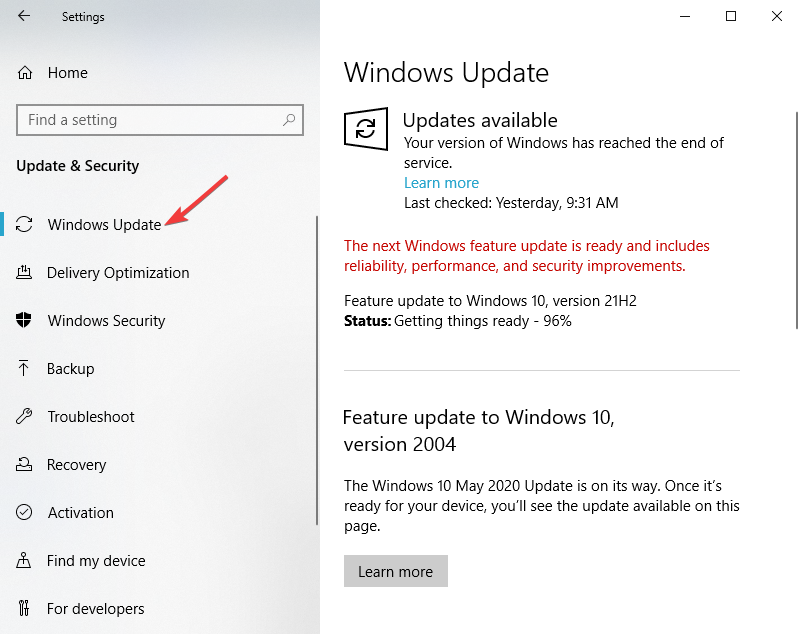
Select the Windows update on the left side of the screen.
Click on the check for updates button to download the latest version of your Windows 10 OS.
Sometimes outdated Windows 10 operating system can cause the avastui.exe application error.
5. Restore from a system restore point
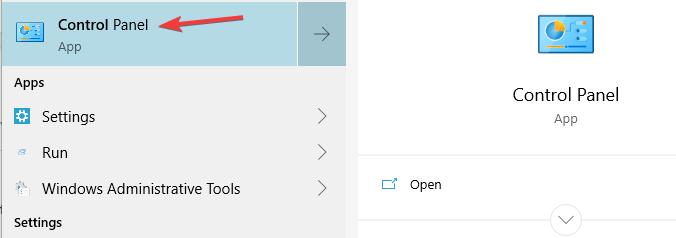
Type control panel into the search box taskbar and click Enter.
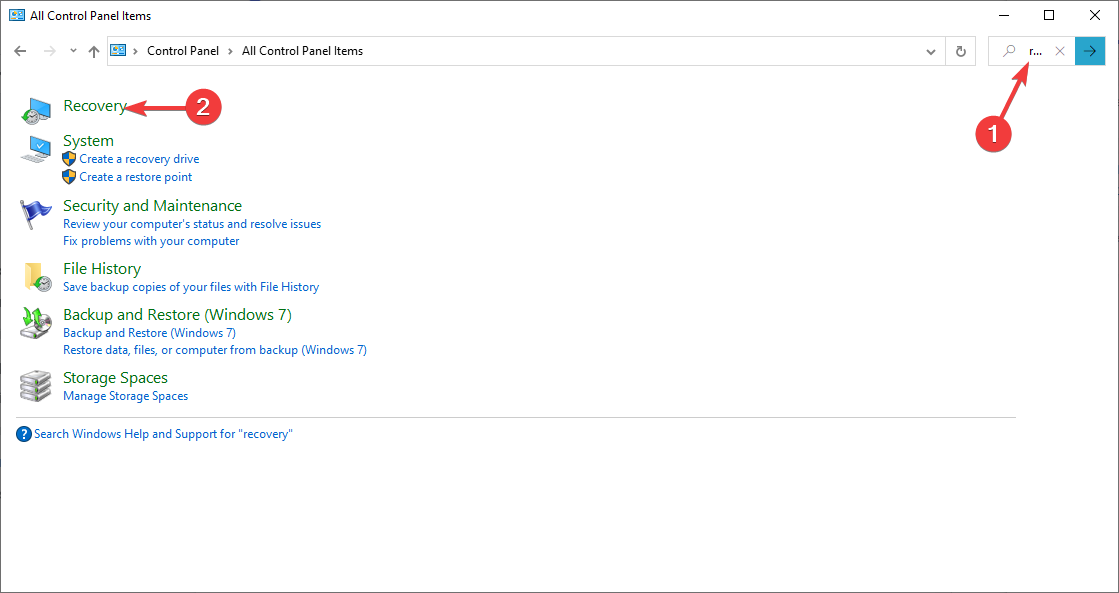
In the Control Panel search box, type recovery and press Enter.
Select Recovery.
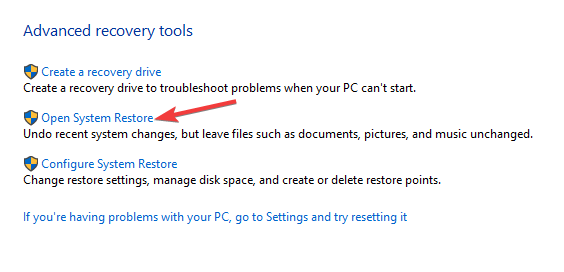
Select Open System Restore.
In the Restore system files and setting box, click Next.
Select the restore point you want to use in the results list and select Scan for affected programs.
You’ll see a list of items that will delete if you remove the restore point. Suppose that’s Ok select Close.
Click on Next, then Finish.
The system restore point should be the last resort since it can cause a lot of the software and files to be deleted. If you want to use this solution, it’s essential to back up your files.
The above methods can help you resolve the avastui.exe application errors. If you’re facing other Avast antivirus errors, like the Avastip.dll missing, there are articles on this website that will help you troubleshoot the problems.
Did you find a different solution for this problem? Share it with us in the comments section below.
Every League of Legends enthusiast is well aware of this error. You’re having fun playing the game, and from nowhere, an error message pops up – PvP.net patcher kernel has stopped working.
Crashes in the game are a result of this error. To put it mildly, it is very irritating. Additionally, the client program would not reopen after the crash and reinstalling it will not always work.
This is a very random error, and there is not one particular circumstance that causes it. It frequently occurs when patch files get corrupted, or the program is launched as an ordinary user rather than an administrator.
As a result, there are numerous options for resolving this PvP.net patcher kernel problem. In this article, we’ll walk you through the best solutions.
This isn’t the only error that users encountered, and many reported League of Legends error 004 on their PC as well.
How can I fix PvP.Net patcher kernel if it’s not responding?
1. Launch League of Legends as an admin
Locate the application on your computer, right-click on it and select the Run as administrator option.
If the problem disappears, exit the game and proceed to the next step.
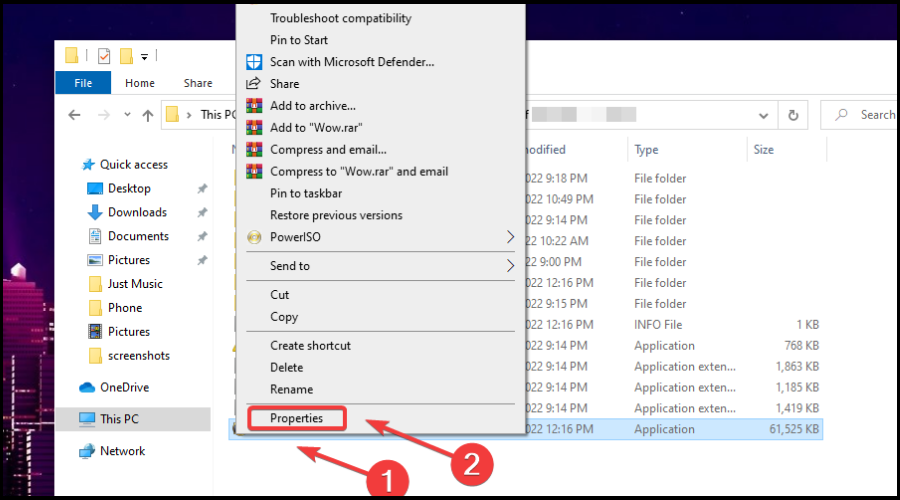
Right-click on the game icon and select the Properties option.
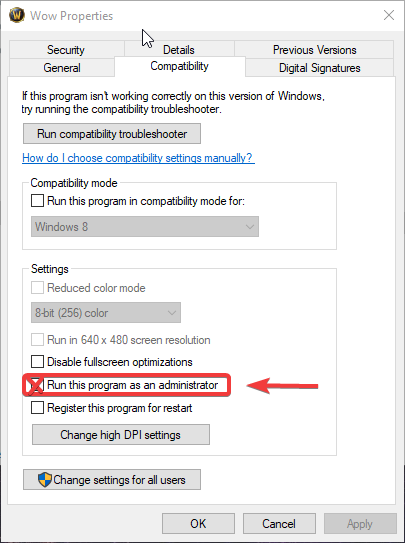
Click on the compatibility tab, under the Settings menu, check the option for Run this program as an administrator, then click the OK and Apply buttons.
This is the simplest solution to the error. While you give a program administrator rights, it can conduct its activities without being hampered, bypassing the system’s checks and firewalls that would have been mandatory while running it in the regular mode.
2. End the task
Right-click on the Start menu and select Task Manager.
Look for the League of Legends processes in the Task Manager, right-click on them and select the End task option.
Restart the program again to see if the problem is fixed.
Another fast solution that has been effective for many customers is stopping and restarting the games’ app and processes on Windows 11’s Task Manager. When this is done, it closes all of its windows and deletes all the data stored in the PC memory.
On your PC, locate the League of Legends’ directory and open the RADS folder.
In this folder, navigate: projects/lol_air_client/releases
Now delete the releasemanifest and S_OK files.
Finally, double-click on the Deploy folder and delete the logs, META-INF, LoLClient.exe, and lol.properties files.
If the first two fixes did not work, you should try deleting certain League of Legends game patch files. It’s conceivable that the patch files have been corrupted or their defaults have been altered.
Whenever a patch file is deleted from the game, the program will download it again in place of the created space.
All three solutions are easy fixes to apply.
However, suppose you are adopting the third fix, we recommend paying close attention to deleted files or folders because you would want to avoid deleting folders that are integral to starting the game’s processes.
Note that relaunching the game will not work when you have a pvp.net patcher kernel error, and you will need to take different steps if League of Legends won’t launch.
We hope you can now play League of Legends without a recurring PvP.net patcher kernel error. Let us know which of these solutions have been most helpful in the comments.
Are you facing the Scribd error 1001 repeatedly? To solve this problem, you will find some amazing instructions in this article.
Scribd is a very popular e-book and audiobook subscription service that includes countless titles for its subscribers. However, the problem begins when you face unexpected issues while accessing any of your favorite titles.
One of the most common errors is #1001. When it appears, it may show you the following message:
This title failed to load (error #1001 ). Please try again later or contact Scribd support.
This error appears mostly when you try to access an audiobook using the Scribd app. It has apps for smartphones and tabs only. Though its competitor Audible has apps for Windows and Mac too.
However, if you want to fix the problem we are talking about, there are some excellent ways given below.
How can I fix the Scribd error 1001?
1. Clear cache and data
Go to Settings of your Android device.
Navigate to Apps.
Find Scribd and tap on it.
Go to Storage.
Tap on Clear Data. It will erase both cache and data.
If you are using iOS, re-installing the app will do the same. In case you are encountering this problem on a desktop, using a different browser may help.
If you are an Android user, you can install and use CCleaner for more options. The tool will scan your phone and give you a report on your app data for each app.
Find Scribd and select everything you want to remove, then press the Finish Cleaning button. If you want to clean up your PC, they also have a desktop app.
2. Update the app
Scribd audiobooks often suffer from playback issues on outdated apps. To get rid of this issue, updating the app to the latest version is the only way.
On smartphones and tabs, you can easily update all apps on your device using the app store. Then, try to access the problematic title. You will not face error #1001 again.
Restarting smart devices does many things, including freeing up occupied memory and CPU resources and clearing many temporary data. It helps to solve problems related to any apps or services like Scribd.
4. Use a VPN
VPN is probably one of the most effective ways to fix Scribd error 1001 on both smartphone/tab and desktop. However, a wrong virtual private network may create additional issues.
We recommend Private Internet Access (PIA) for Scribd. This service has countless powerful servers in different locations in different countries that can provide solid performance for any purpose.
If your existing network has issues with Scribd, the PIA’s premium VPN network will surely help.
Private Internet Access
Private Internet Access is one of the best VPN services you can use for any purpose, including reading ebooks and listening to audiobooks.
Restarting the router and modem of your home network will release the current IP address and lease a new one. This method can solve the problem if the Scribd error 1001 appears due to some connectivity issues.
These are the most effective ways to solve this Scribd error 1001. If you know any other methods to troubleshoot this problem, you can write them down in the comment box.
Are you trying to watch your favorite shows on ABC but can’t due to an annoying ABC error 400-2?
ABC, also known as American Broadcasting Corporation is among the most popular platforms entertainment platforms in the US and around the world.
Its collection of TV series, movies, and endless Live stream recordings of sports, documentaries, and more make it a worthy entertainment option for many.
Therefore, when you experience such an error when trying to catch up with your favorite shows, it can be a little disappointing.
What causes the error 400-2 on ABC?
Error 400-2 is an authorization error that’s usually generated when trying to view locked content or live streams on TV.
Your TV provider is responsible for this error due to reasons such as
Incorrect credentials.
System errors on their end.
An unauthenticated fire stick.
Luckily, it is easy to solve this error and go on to watch your favorite TV shows.
Here are a few options if you are planning to watch your favorite shows on the ABC platform but can’t because of error 400-2.
How can I fix the error 400-2 on the ABC app?
1. Connect and Reconnect your TV provided from the ABC app
Go to the menu and select settings.
Click on the Disconnect provider link.
Force close your app after disconnecting the TV provider.
Restart the app and go back to the Menu.
You should see a Connect your TV provider now.
Click on it and then click on “Allow” before entering your credentials.
Check whether the error is resolved.
2. Re-authenticate ABC on Firestick
Go to the ABC app and click on the Account option.
Click Sign out under your TV provider.
Confirm that you want to sign out again by clicking Sign out and OK to confirm.
Force quit the app.
Once done, restart your app and activate it.
If your app stops working for any reason after this process, clear the app cache and data.
Restart the Firestick.
Uninstall and reinstall the app before restarting your Firestick.
Press and hold the Select and Play/Pause buttons for a couple of seconds and check whether ABC error 400-2 is gone.
Experiencing problems with League Of Legends is no longer something new, and some players are so fed up that they just feel like giving up sometimes.
But don’t think that it’s all that bad. It’s just that, from time to time, the game tends to drive players crazy due to some pretty obnoxious technical issues.
Let’s get right into it, take a closer look and determine how you can get back to playing your favorite game in no time.
Why do I get the 0U error code in League of Legends?
The League of Legends error code 0U indicates that the PBE client is not loading, which implies that the game location on your PC is unable to locate new features and updates for your game.
When you encounter this problem, you may notice a black loading home screen, no summoner icons, rumbled client tabs, or a missing friend list.
Apart from patching, it appears that anything they modified broke all client connectivity when this bug started worming around.
The PBE enables you to eliminate any bothersome bugs you come across along the way, ensuring that new content is well-tuned and glitch-free before it goes live. In a nutshell, you should open a ticket to inform the player support staff of the error code 0U.
The earliest mentions of the error go back to 2020, and Riot Games was quick to acknowledge the issue and confirmed that it’s working on a fix.
However, that could take some serious time, and we want to play right now. Luckily, there are some workarounds that you can use to restore game functionality.
The League of Legends PBE desktop client should be reinstalled to resolve the error number 0U. Simply giving it a chance to fresh restart it may increase the likelihood of avoiding glitches and in-game issues.
Because the client Public Beta Environment is hosted on a League server that is constantly filled with new upgrades and content, fresh versions of the setup files are uploaded with each patch.
Reinstalling League of Legends from these files will result in a completely updated version of the game.
Every third-party program or application that you install on your computer leaves a significant trace in the Registry after removing it.
When you remove all traces of the PBE client from your computer’s Registry, you completely remove League of Legends files and leftovers. This is where a third-party uninstaller like CCleaner can come in handy, as it can remove all traces in the Registry and smooth the way for a new reinstall of the League of Legends PBE client.
Obviously, if you have any doubts, you can leave us a comment and we will be happy to assist you in any way that is necessary.
That’s all you can do for the moment, as far as the 0U error code for League of Legends is concerned. Everyone is still waiting on Riot to solve the problem.
Until then, players that ran into this problem said they fixed it using the two above-mentioned methods.
If you are a tech person affected by Parkinson’s disease, you need to have the best computer mouse for Parkinson’s to be able to work without any issues.
Parkinson’s disease is a disorder that happens in the brain. It leads to trembling, rigidity, and hardship in balance and coordination. Unfortunately, those affected have problems using a normal mouse. Accidental clicks and unwanted mouse movements are just some of their issues.
This article explores the best computer mouse for Parkinson’s sufferers to help you use the computer without worrying about accidental clicks and other actions that hamper the flow and experience.
How can I use my normal mouse and keyboard when I have Parkinson’s?
Many may want to explore other options before purchasing a new mouse. And we have listed a few quick changes you can make to help exercise better control over the mouse:
Change the mouse speed: Adjusting the mouse speed on your computer can help personalize it for your degree of control and minimize unwanted mouse movements.
Modify the keyboard configuration: Customizing the keyboard configuration can help optimize your experience when using the keyboard.
Customize click times: Determining the length of each click and the timing of your double clicks can prevent accidental clicks and opening the wrong applications.
Use a third-party application: Applications such as Steady Mouse remove the excessive shakes and trembles and block unintentional mouse taps.
NOTE
Remember, these tips will only fine-tune your experience to a certain degree but won’t deliver the optimal experience. For that, we recommend purchasing a new mouse.
BIGtrack 2.0 is a USB type A mouse that can be easily plugged into the computer and has a large 3-inch trackball. The larger the trackball is, the less skill and control it needs to operate, making it the best computer mouse for hand tremors.
With its oversized left and right-click buttons, you can ensure you never press the wrong click again, and there will be no accidental taps.
Using the drag-lock feature implemented in this mouse, you can lock onto an object on the screen and drag it with your mouse without continuously holding its button down.
Kensington’s Orbit trackball mouse is a high-quality, reliable, and innovative accessory and is often the first choice for Parkinson’s disease computer mice.
The 40-mm trackball is designed for those with Parkinson’s disease because its internal red optics technology precisely tracks this trackball’s movements.
Accuracy, productivity, efficiency, and the ambidexterity that comes with this mouse, combined with the cursor and scrolling speed customizability, diminish the consequences of dealing with Parkinson’s.
Kensington Orbit is a wireless mouse that helps you put it in the desired position without worrying about your distance from your computer.
ELECOM 2.4GHz is another one of the best computer mice for Parkinson’s, which was made for gamers originally. However, due to its features and designs, it is a great choice for the affected people.
This mouse is similar to the ELECOM wired finger-operated mouse DEFT series 8. However, this one is wireless which is a better option for people with Parkinson’s because they can put the mouse where they want.
Its fabulous optical tracking technology provides precise cursor movement and increased accuracy. This leads to less hand movement, more efficiency, and productivity.
Furthermore, you can easily change the speed of your cursor to suit your needs. The DPI is adjustable between 500, 1000, and 1500.
Wondering what product is best for those who are passionate about art but are affected by Parkinson’s? 3Dconnexion SpaceMouse is the answer.
3Dconnexion has patented a 6-Degree-of-Freedom (6DoF) sensor. This sensor manipulates digital content or camera positions into CAD applications.
You can push, pull, twist, or tilt its controller to pan, zoom, and rotate your 3D project. Plus, SpaceMouse is so compact that it fits any desk. It comes with a brushed steel base that ensures stability.
ELECOM wired finger-operated trackball is another item on our list for Parkinson’s that has been designed for gamers originally.
ELECOM designed this trackball after conducting extensive research on different types of hand muscles and bone structures. This design will not fatigue your hands at all.
The optical tracking that comes with this mouse is optimal due to the high accuracy that the red color sensor provides. This mouse uses a red ball to achieve that.
Furthermore, customization buttons and a DP switch (that lets you alter the cursor movement speed between 750 and 1500 counts) enable you to choose what suits you best.
The last item on our list of best computer mouse for Parkinson’s is the Kensington Orbit scroll ring optical trackball, which focuses on the comfort of its users more than anything.
The ergonomic, ambidextrous design of this mouse helps those affected with Parkinson’s use the mouse without worrying about having pain in their hands.
Also, the high precision that comes with this mouse due to optical technology and the low effort you need to put into using it, turns this mouse into a suitable candidate for those with Parkinson’s.
Finally, it is worth mentioning that this trackball does not need to be cleaned at all. This, in turn, helps people with Parkinson’s take their minds off of going the extra mile to keep their mice in perfect condition.
In addition to using the best computer mouse for Parkinson’s, affected people can also use voice recognition to perform actions on their computers seamlessly.
Also, the head mouse and foot mouse received negative ratings because they felt alien to the users since many preferred the common mouse options to be there.
Windows 10 offers many useful features and user-personalized services, all by collecting huge amounts of data about you: what websites you visit, your location, the files you access, what you search for on search engines, and much more.
However useful these personalized services may be, there has got to be a clean line between data usefulness and privacy.
How many of you are aware of how much information Microsoft knows about you?
How many of you know what kind of data the tech giant is continually storing about its Windows 10 users? Here is a list of such data just to give you an idea:
1. Windows 10 has a built-in keylogger which means Microsoft can record everything you type on the keyboard. Of course, this is not a malicious keylogger but nevertheless, the thought of Microsoft knowing what you’re typing is just scary.
2. Passwords — the company collects passwords, password hints, and similar security information you use to access your account. Bad news: somebody else knows your password 123456789 now.
3. Content from emails, files, chats, and so on. This could be the most annoying, privacy-breaking practice of all but all this is thoroughly explained in Microsoft’s Privacy Statement:
We collect content of your files and communications when necessary to provide you with the services you use.
[…]Examples of this data include: the content of your documents, photos, music or video you upload to a Microsoft service such as OneDrive, as well as the content of your communications sent or received using Microsoft services such Outlook.com or Skype, including the:
subject line and body of an email,
text or other content of an instant message,
audio and video recording of a video message, and
audio recording and transcript of a voice message you receive or a text message you dictate.
4. Contacts and relationships: this is done if you use a Microsoft service to manage contacts or to communicate or interact with other people or organizations.
5. Location data via GPS coordinates.
6. Usage data such as the items you purchase, the web pages you visit, and the search terms you enter, data about your device and the network you use to connect to their services, including IP address, and device identifiers (IMEI number for phones).
7. Payment data, like the payment instrument number and the security code associated with it.
8. Interests and favorites: the teams you follow in a sports app or the favorite cities you add to a weather app.
The data collected can be divided into two categories: general, non-intrusive data, and highly intrusive personal data.
Luckily, there are dedicated apps that allow you to limit the kind of data Microsoft can collect about you.
What are the best privacy protector software for Windows 10?
On the very top of our list is a VPN created by Kape Technologies the most efficient at what it does: protecting your privacy.
How? By providing state-of-the-art, multi-layered security with advanced privacy protection using VPN tunneling.
Private Internet Access is extremely efficient at changing your IP address with a personally generated one. Your location will also change and you will get to choose one yourself.
Changing your location means that you will be able to access any content throughout the world without any restrictions.
This means that you will benefit from anonymous browsing. Your virtual IP address will make you untraceable, even location-wise.
Not even your Internet Service provider will be able to detect your activity or the fact that you use a VPN.
Here are some real advantages of using Private Internet Access:
You can install it on many possible operating systems
Mobile applications
Super-fast connection speeds
10 devices simultaneously
3303+ servers in 48 countries
Private Internet Access
With this amazing VPN, your browsing remains private, now at a discounted price for a limited time only!
Incogni is one of the most reliable software when it comes to protecting your digital identity from all kinds of malicious threats.
Data brokers typically collect your sensitive information in order to sell it to other parties, exposing your identity at danger.
As a result, Incogni handles this scenario by negotiating with data brokers and permanently erasing your data from their databases.
It is totally automatic, which means you will save a lot of time and work in keeping hackers, invasive profile shadows, and cyber-attacks like phishing or identity theft at bay.
Other best features of Incogni include:
Counterbalance all broker types
Considerable time saver
Completely automated
Intuitive interface
Incogni
Shield your online privacy and safety by using the Incogni software.
Nord VPN -Threat Protection is a newly popular feature of NordVPN source for data privacy that has the capability to safeguard your digital activity.
You don’t actually need to connect to a VPN server to enjoy the performance of this feature, all you need to do is to enable it from the settings tab.
Once Threat Protection is enabled, you can browse the internet safely and securely, as all intrusive ads, trackers, or malicious URLs will be blocked instantly.
Alongside this feature, you have included a bulletproof internet connection, high-end confidentiality, or unlimited bandwidth to be completely free online.
Other key features of NordVPN include:
Split tunneling lets you use both VPN and local traffic at the same time
Automatic killswitch in case the connection drops
DNS leak protection
DoubleVPN to make sure you stay undetected
More so, choosing NordVPN implies a very simplistic experience of securing your data, while also offering the most efficient service of all.
NordVPN – Threat Protection
Protect your online identity and access everything securely using NordVPN Threat Protection.
DeleteMe is a program that comes in handy when you want to keep your privacy intact and safe from data brokers.
Data brokers are companies that collect your personal information such as name, address, email, photos, social media, and other details to incorporate profiles or listings with them, which puts your identity in danger.
The effect of DeleteMe in this context consists of experts reviewing your request for personal information removal and automatically deleting your mentioned details from numerous databases.
It offers a detailed report of the removal process and will continue to delete your data every three months, guaranteeing that your identity will remain safe and secure.
Other best features of DeleteMe include:
Very efficient and accurate reports
Excellent customer service
Intuitive interface
In-depth process of deletion
DeleteMe
Ensure a successful information removal and try DeleteMe for automated procedures.
TotalAV pairs its antivirus engine with a set of privacy tools, which is why it belongs on a privacy list. The higher plans include a Safe Browsing VPN that hides your traffic on public networks, an ad and tracker blocker, and data-breach monitoring that warns you if your email address turns up in a leak.
The browser cleanup tool clears cookies and tracking data, the password vault keeps logins out of your browser, and the antivirus side handles malware, spyware and phishing sites through WebShield.
Safe Browsing VPN in the higher plans
Ad and tracker blocker
Data-breach monitoring for your email address
Browser cleanup for cookies and tracking data
Password vault
TotalAV
Choose wisely when it comes to your personal identity online thus you need this effective privacy shield.
It should come as no surprise that most cybersecurity attackers are hosted by the web, which is why a browser security tool can make a world of a difference.
Guardio is a browser extension that acts as an antivirus but on the web. This means that attackers are blocked from the get-go before they get a chance to reach your PC.
Although it’s not software in the classical sense, Guardio proves to be a very helpful prevention tool. The web is full of unsecured websites that can lead to malware infections, phishing attacks, and data leaks.
If your browser is compromised, chances are that all accounts you access from it will suffer as well. Hackers may access your browsing history, cookies, bank information, email, and even personal documents.
Guardio uses cloud-based technologies to protect you against these concerning risks. It detects malicious scripts and websites, removes suspicious browser extensions, and is able to detect data breaches.
Not only that, but this tool can identify phishing attacks and not allow you to provide your private information to suspicious emails or web pages.
Other key features of Guardio include:
Indexes Chrome extensions to easily identify malicious extensions
Scheduled scans and real-time monitoring
Restore hijacked browser settings in one click
Guardio is a great addition to your security system. It’s available for Chrome, Firefox, and Edge and it can work well side by side with your antivirus for unbreakable security.
Guardio
Stop attackers from the get-go with this secure anti-malware and anti-phishing browser extension.
This premium software comes with a 10-day free trial period, then you will have to pay if you want to keep it. Given its plethora of options, the price is just fair.
It blocks or removes more than 37 tracking services, disables the keylogger, and disables Cortana to prevent background collection and transmission of data recorded with your microphone and webcam.
It also lets you uninstall a series of non-removable Microsoft apps among many other things. Plus, it has a very easy-to-use interface.
It is fair to say this is one of the best Windows privacy protection software out there and comes with a price tag that reinforces this idea.
Other key features of Windows 10 Privacy Protector include:
Clears and disables DiagTrack Log
Prevents Cortana from collecting data
Lets you uninstall OneDrive
Creates automatic restore points before making a change to the system
Compatible with Windows 11 too
Quality always comes with a price tag and we guarantee that Privacy Protector for Windows 11 will not let you down.
Windows 11 Privacy Tool
Using this data privacy software you can control what information Windows can store about you, so check it out today!
GiliSoft Privacy Protector is designed as a very powerful privacy software that encrypts sensitive files on your computer in order to keep them safe from unauthorized users.
Just get ready to invest a little effort to get it up and running and you won’t regret it. You’ll get the chance to clear your browsing history or even the entire Windows history, along with any third-party software traces.
This privacy software will not only ensure your files are read-only or invisible, but it provides a secondary layer of security for your documents, photos, videos, or audio files.
They remain private and no hackers or malicious software can reach them.
Other key features of Gilisoft Privacy Protector include:
Password protect files and folders
Secure file shredder
Compatible with Windows 7, 8, 10 and 11
This combination of effective protection and a variety of features makes Gilisoft Privacy Protector an ideal privacy utility you can download today.
GiliSoft Privacy Protector
Recover the rights for your own digital presence from companies that require sensitive data. All using this powerful software.
This free software receives constant updates in order to provide the best privacy protection experience. With O&OShutUp10 you decide what data are collected digitally.
New features are added constantly. It comes in a portable version, there is no installation required.
With a lively interface, it allows you to choose what data-collecting apps you want to disable.
More so, another attribute that helps the user to protect confidential data are related to security settings, location control, or simply privacy protection.
As you may know, Microsoft requires sensitive personal data like addresses in order to deliver efficient services to users.
Other key features of O&O ShutUp10 include:
Control location services
Portable version
Disables user data and diagnostics
Multi-language support
Hence with such antispy software, it’s very simple to control which data you want other applications to track about yourself.
O&O ShutUp10
This privacy protection tool helps every user to get complete security regarding personal or confidential data, so try it out now!
This free software lets you configure security settings, disable location services, and prevent Windows 10 from sending diagnostics and usage data to protect your privacy.
The user interface is very simplistic featuring a list of privacy settings and a short description for each. You can enable privacy settings individually or all at once.
You can use Ashampoo Antispy to fully cover your data circulation within Windows 10 services and applications.
For instance, if you want to use a personal assistant like Cortana while organizing your activity, you clearly need control over personal data.
Other key features of Ashampoo Antispy include:
Webcam protection controls
Block advertising ID
Disable WiFi Sense trackers
Hence it is recommended to carefully disable reporting actions for intrusive services that may use sensitive data, and you can perform it with one click thanks to this software.
This protection tool was launched on September 14, 2015, and has been constantly updated ever since. The developers added new languages and features to protect both users and data.
SODAT uses a combination of the most powerful encryption, access control, and user-behavior monitoring tools currently available.
It does not require installation, you download it and the tool will do its magic right away. It’s a reliable portable solution, you can easily add it to removable media and use it whenever needed.
The tool has an easy UI that can be easily configured by any user. You can select which tracking functions you want to disable.
This includes Cortana, and Bing in the start menu, your webcam, microphone, and many more.
This protection tool features:
Disable Telemetry and Data Collection
Disable Autologger and Diagnostic Tracking
Disable WAP service
Multilanguage support (5 languages)
This application is compatible with all Windows operating systems starting with Windows 8.1 and higher. It supports both 32-bit and 64-bit systems.
This is the most popular Windows 10 privacy software with more than 250K downloads. With optimized and elaborated algorithms, it runs smoothly on your OS.
The software lets you choose whether you want to enable or disable updates, hides your IP address, and removes spying apps and METRO applications.
It also gives you the possibility to uninstall native Windows apps such as Solitaire, OneDrive, and Calendar and clean host files.
The app allows users to customize a few features and is rather suited for beginners since they can simply launch it without settings specific parameters.
Therefore, you can choose this solution if you’re searching for an efficient antispy protector. You thus assure data privacy and eliminate all services that track your persona.
This app is also able to remove Office 2016 telemetry and other similar inbuilt trackers that collect data about your activity.
Other key features of Destroy Windows Spying include:
Open-source
Available for Windows 7, 8 and 10
Lightweight
It is important to mention that as of late this app has not gotten any updates and it may not be as relibale and secure as it used to be. It may also not work on newer, upgraded versions of Windows 10.
DoNotSpy 10 offers a straightforward solution in terms of online privacy. The most surprising fact about this software is the long list of privacy features it supports.
It disables automatic system updates, biometrics, the Lock Screen Camera function, location, OneDrive, Cortana, web search, application access to certain computer functions (camera, calendar, microphone), and others.
With its new features, Windows 11 needs data from users in order to perform good service in return. Upgraded versions of Windows 10 have similar requirements as well.
Other key features of DoNotSpy10 include:
Multi-language support
Manage targeted ads
Simple UI
Uses System Restore before applying changes
This tool can practically help the user to choose what personal data are allowed to be tracked by different services, or even Microsoft.
Chances are your antivirus might block this software from downloading, so you need to turn it off during installation.
This free software is developed by a volunteer team that has been working in the internet security industry for many years. It is a standalone tool and is very simple to use.
All you have to do is click on the Immunize button and the app disables all tracking features Microsoft included in the operating system.
If something goes wrong, you can quickly undo the changes by clicking the Undo button.
The mission stated by Spybot is to prevent Windows users from regarding their tracked data by powerful companies like Microsoft.
The tool has a simple and modern user interface. It works like a scanner that identifies privacy and tracks related vulnerabilities within your system.
It displays them in a list view of everything found and you can choose whether you want to update your settings or keep them as they are.
Other key features of Spybot Anti-Beacon include:
Browser telemetry block
Stops Google Analytics from storing your data
Multi-language support
Thus you can use the features of this software and immunize your system from complex strategies to store confidential data on your Windows 10 PC.
Although this software offers only eight privacy settings, it still remains a very useful app. We recommend it to those Windows 10 users who are mainly interested in blocking various tracking apps.
If you want to also block Microsoft from collecting data via other means such as your laptop’s camera or your computer’s microphone, choose one of the privacy tools listed above.
This application is focused on the trackers that are built within the operating system.
These are for the most part harmless, in the sense that they do not impose risks as malware does, but if you want to keep your data more private, it’s best you remove them.
Key features of this app include:
Disables Windows Defender automatic sample submission
Stops credential share and open-ness from WiFiSense
Disables the registries that keep OneDrive pinned in Windows explorer
The tool offers you the possibility to either delete or disable tracking services. By disabling them, you temporarily stop them and can turn them back on, whereas deleting them permanently removes tracking services.
This app is one of the best privacy software available taking into account the number of issues it can fix. The program is developed by a German company and comes in English as well.
According to its developers, the primary focus is on Windows 10 settings and Windows 10 apps, especially on its Edge browser. The program will be expanded to Windows 8 in the future.
Moreover, if you get an alert from your Windows Defender or firewall regarding the activity of the software, that is because of changing various PC settings.
The explanation is simple and it’s because of adjusting certain settings in the registry or other system-relevant areas.
Other key features of W10 Privacy include:
Easy-to-navigate interface
Useful step-by-step assistance online
Compatible with Windows 10 and 11
Therefore, the virus topic is stated by the software developers as nonexistent, reassuring users that W10Privacy is completely secure for download.
You can select the options you want for several categories such as microphone, speech & typing, contact, calendar, messaging, account info, and other devices.
Unlike other privacy software that simply blocks updates, by manually personalizing the native privacy settings you choose how updates are delivered and installed.
No matter which Windows 10/11 privacy software you choose, remember that as annoying as Microsoft data collection practices might be, the company does not use it maliciously.
The information collected from all Windows 10/11 users helps the tech giant to improve its products. The choice is yours.
This article will also help you with the following 3 problems:
Windows 10 & 11 are great operating systems and they come with a pack of useful features, one of them being the Calendar app.
While the native Windows Calendar serves its purpose well, some of us may want more customization options and extra features. Others may want it simpler, perhaps with striking looks and fancy live tiles.
Whatever the case, there are a lot of calendar apps for Windows to choose from out there.
What Microsoft app is best for calendars?
Although Windows comes with its own Calendar app, it has basic features and it’s not as advanced as the third-party apps.
However, if you really want a Microsoft calendar app, the best is the one included in the Outlook email client.
We didn’t include it in our list below because it’s so popular that everyone knows already about its features.
However, we did research the market and outlined the best ones, which come with additional options, are highly customizable, and offer various view options.
Some of these apps are available on Windows PC as well as on mobile devices, giving you all the flexibility you need in and out of the office.
In this article, we will discuss the best calendar apps for Windows 10 and 11 that give you extra options to play with.
Efficient Calendar will impress you with its intuitive interface. You will find the most important features you need in this type of tool on the left side of the dashboard.
The calendar, tasks, or events are easily accessible. You also have an assistant-like tool that pops up so you can select the dates of your planned events.
The app helps you prioritize your tasks in order to simplify the decision-making process, especially during working hours.
This calendar allows you to invite others to join your events and to manage their acceptance. You also can add documents and files to your meeting events, to have them handy at any time.
Time Doctor – Best calendar with multiple integrations
Time Doctor is a very efficient productivity app with CRM functionalities that can be perfect for work-from-home teams. It is primarily used as employee-racking software.
Besides the basic time-tracking capabilities, the app includes distraction alerts or offline tracking tools, to make the most of one’s working hours.
At the same time, a few basic project management features help to bring in one spot actions such as creating tasks, assigning projects, and reviewing progress for each team member.
The app is perfectly integrated with Asana, Google Calendar, Basecamp3, or Wrike, and works on Windows, Mac, Linux, Android, iOS, and Chrome operating systems.
Overall, this might be the perfect app for rigorous businesses with stricter company rules and tight calendars.
Hailed as one of the most beautiful calendar apps for Windows 10, Chronos Calendar + is stylish and comes with a ton of attractive features.
The unique synchronization between all your calendar accounts is more than welcome. You can even customize the calendar appearance to match your style.
Its clean interface invites you to experience different calendar views and even rich live tile customizations.
Additionally, you can add moon phases and zodiac calendars to the main dashboard, if you’re an astrology fan.
The smart add feature allows you to jot down quick texts when adding new events while the live tile customization allows you to change the background color, font size, as well as the content you want to be displayed.
One Calendar is a smartly dressed app that lets you pull all your calendars under one roof.
Available for Windows and mobile devices, One Calendar is highly customizable and comes with a ton of attractive features.
It offers a central place for you to view all your calendars like Google calendar, Exchange calendar, Live/Outlook calendar, as well as Facebook events.
One Calendar allows you to add, delete, and update appointments with the day, week, month, and year.
Some of its most attractive features include a lock screen, customizable support, live tile, semantic zoom, calendar themes, and an easy search that allows you to quickly search all your appointments.
However, most of these features are available with the premium version.
One Calendar supports multiple languages, and the best part is that you don’t need an Internet connection to view and manage appointments.
My Calendar is one of the best calendar apps for Windows. The app is highly customizable and comes with a ton of useful features.
You can switch between calendar views, depending on how you prefer to organize your days. For each view, there are several beautifully designed live tiles to choose from.
My Calendar app comes in two versions; free and paid. The free version is ad-supported and comes with great features.
The pro version is ad-free and comes with additional features such as task management, an enhanced internal birthday calendar, and enhanced calendar views.
If you’ve got a Google account, the Calendar app will be right there when you need it and it’s already integrated with your email.
Also, if you are using other Google Workspace apps, Google Calendar will fit right there, integrated with all of them.
In the Google calendar app for Windows, you can set tasks, share them with others on your list of contacts and personalize your calendar with a lot of other add-ons like Zoom, Teams, and a lot more.
Overall, the web app is great because you can use it on any browser and it’s right there on any platform.
And, best of all, it’s very simple to work with because the interface is clean and comprehensive, typical for Google apps.
Calendly – Best free calendar app for any platform, including Android
Let’s face it! One of the most important features of a calendar is to schedule appointments and most calendars don’t offer that feature or don’t do it properly.
Calendly is a web app designed exactly for that purpose and it will help you set up meetings professionally, without any problems.
The best feature of this app si that when you make a new appointment, it only offers the times and dates that are free across all your calendars because it syncs with them.
In fact, it does more than that because it offers the attendee more slots, and when they accept, the meeting is already set, without any back-and-forth communication needed.
Then, everything runs on autopilot because the app sends automatic reminders and even thank-you notes so you can keep focusing on what’s important.
The app is free for personal usage but for the Enterprise version, you will need to apply for a plan.
If you’re using the Thunderbird app as your email client, you already know that it comes with the built-in Lightning Calendar.
Unfortunately, it is not available as a separate app so if you’re using a better email client, this calendar is not for you.
However, if you want to make the change, the built-in feature is great for managing multiple calendars, creating daily tasks, inviting friends to events, and subscribing to public calendars.
The user interface is very straightforward and friendly so you will get the hang of it pretty quickly.
SavvyCal is not just a calendar, but a great app to access all your calendars and set up meetings easily, without any communication issues.
The web app allows the attendee to overlay their calendar on top of yours to find mutual free time for the meeting.
You will also be able to make team schedules with just a few clicks and add the teammates in a blick of an eye.
And if you’re a busy person, you should avoid overbooking. SavvyCal helps you with that by setting limits for how many meetings can be booked in a set time period.
Most calendars are targeted at professionals, managers with busy schedules, and so on but students also have complicated timetables and My Study Life is dedicated to them.
So, this app comes with scheduling features to accommodate your classes but also with your free time or extracurricular work.
And yes, there is a dedicated section to schedule your exams and you can set notifications so you don’t miss any of them and prepare in advance.
The best part about My Study Life is that you can access it on any device because it’s web-based and it also works offline.
Cal.com is another web app that reads all the events from your existing calendars to help you schedule tasks and meetings without double booking.
Then again, with this tool, you create templates for the events you schedule regularly with availability, locations, and then control how and when you get booked.
If you’re working for a website, it’s easy to share your personal link to simplify the process of booking a meeting at a time that works for both of you.
The app has a very simple user interface, available for access on any device, thus it can be used by anyone without any training or further explanations.
These are the best calendar apps for Windows 10 and 11 in both appearance and features. They also integrate well with your other calendars, allowing you to view them all from one central console.
Some of the apps on our list don’t even need you to download anything because they are cloud-based and can be accessed on any device with a browser and Internet connection.
We hope that this article gave you an insight into the best calendar app for your Windows devices and you were able to opt for the most relevant for your needs.
Not everyone is interested in looking for antivirus protection from other companies, and would rather stick with Microsoft’s security solutions.
Defender was recently rated pretty high for the services it provides, so that’s not a bad thing at all, considering how much time the company puts into perfecting it.
However, Defender users are not having such a great time lately, as the software is causing all sorts of major issues for the Windows 20H2 users.
Black screens and high memory usage on Windows 20H2
To be more exact, Microsoft Defender for Endpoint is apparently the root cause of some pretty nasty problems for some client systems with the 20H2 version of Windows 10.
According to Borncity, this is not something that happened overnight, as these severe issues have been observed for almost a month.
Thus, if you are also running the above-mentioned version of the OS, don’t be surprised if you experience very high memory usage.
Furthermore, you can expect black screen issues after logging in. There’s also a high chance that Word 2016 and newer will fail to open or will take a long time to do so.
Not to mention that Windows Event Viewer takes a really long time to show events, both remote as well as local.
Security experts believe that the high memory usage issue is likely caused by a memory leak bug. However, the problem is not new and Microsoft had fixed the issue once earlier.
Keep in mind that the high memory usage by Defender’s Antimalware Service Executable process (MsMpEng.exe) is a quite common bug.
That being said, a temporary workaround to reduce the memory consumption is to disable the Real-time Protection, just in case you were wondering.
So, if you were experiencing any of these situations, know that it is a known issue and it is being currently worked on.
Have you had any trouble with Defender on your Windows 20H2 machine? Let us know in the comments section below.
Several NVIDIA Graphics Card users have reported that the NVIDIA Control Panel is missing in Windows 11. There are several possible causes for this, including a faulty graphics card driver, outdated software, missing registry subkeys, and values, or random errors here and there.
In addition to providing control over NVIDIA graphics driver settings, the panel also allows you to access and use other NVIDIA utilities that you may have installed on your system.
It is recommended that you download and install the NVIDIA Control Panel on your device as soon as you have obtained the necessary drivers to operate your graphics card.
The use of this software is particularly beneficial for those who work with 3D applications or who are avid Windows gamers. You can go into great detail about how your system handles rendering elements when using this program.
Follow along as we will see how to fix the NVIDIA Control Panel missing in Windows 11 right after we see what it is used for.
What is NVIDIA Control Panel used for?
One thing all GeForce graphics cards have in common is the NVIDIA Control Panel, which is found on nearly every computer with this GPU.
Using this seemingly inconsequential collection of checkboxes, sliders, and drop-down menus, you can get the most out of your graphics card or customize the appearance of a game to your exact specifications, among other things.
With a few simple tweaks, you can dramatically improve the visual appearance of games, as well as make them run more smoothly. You can configure Nvidia’s G-Sync technology so that it works in both games and on your computer’s desktop.
However, understanding what those settings do and where to find them can be difficult, so it is important to understand which sections of the Control Panel to pay attention to.
This being said, let’s move on to the list of solutions. Note that they can also address the NVIDIA Control Panel missing in Windows 10 issue as well.
What to do if NVIDIA Control Panel is missing in Windows 11?
Make sure it is not hidden
Press Windows + R on your keyboard in order to open a new Run box and type control in.
On the top-right corner, under View by: select Large icons.
Select NVIDIA Control Panel and then hover over the Desktop option to check the Add Desktop Context Menu option. This should fix the NVIDIA Control Panel missing display settings problem.
Right-click on your desktop to see if the NVIDIA Control Panel appears now.
It is possible that your NVIDIA Control Panel has been hidden by Windows during an upgrade from a previous version, or that it has been hidden by software that has unintentionally altered the graphics settings.
Update your graphics card drivers
Right-click on the Start icon and choose Device Manager.
Next, click on the Display adapters option and right-click on the NVIDIA driver. Lastly, choose Update driver and follow the on-screen steps.
The majority of the time, the NVIDIA Control Panel disappears because you are using the incorrect graphics driver or because it is out of date. As a result, you should check to see if your graphics adapter is running the latest driver and, if necessary, update it.
As an alternative, you have a time-saving solution that can support you to install or update any driver in your Windows 11 OS.
Using a driver updater like Outbyte Driver Updater will first scan the system for out-of-date or missing drivers and proceed to update them automatically.
More so, it can update your graphics card drivers individually or select all the outdated drivers in a bulk for the update.
Note that this solution works specifically for the NVIDIA Control Panel missing after driver update. Right-click on the Start icon and choose Device Manager.
Here, expand the Display adapters section to right-click on the NVIDIA driver and choose Uninstall device.
Restart your computer in order to automatically reinstall the driver, and right-click on your desktop to check if the error is gone.
Open the Windows Search function by clicking on the magnifying glass icon from your Taskbar then type Microsoft Store inside.
Once you open the app, type NVIDIA Control Panel inside the search bar and click on the top result.
Lastly, hit the Get button and proceed with the installation process.
Restart the NVIDIA services
If the NVIDIA Control Panel is missing on your PC, you should restart all the NVIDIA services from Control Panel. It is important that all of these services work properly in order for the NVIDIA app to also properly function.
1. Hold the Windows and R buttons at the same time to open the Run dialog.
2. Type services.msc.
3. From the list of services look for the ones that start with NVIDIA. Right click on each one of them, separately, and choose Restart.
4. If any of the services are not currently running, right click on them and press theStartbutton.
5. Check if the problem is solved and you can find NVIDIA Control Panel.
In the case of PC gamers who use an NVIDIA graphics card, there is a good chance that you are familiar with either the NVIDIA Control Panel or the GeForce Experience.
Users frequently get the two programs mixed up, wondering which is the superior tool for controlling your graphics settings and how to use them together.
You can use both the Control Panel and the GeForce Experience to control and modify various graphics settings, as well as to update drivers and make other performance improvements.
Users these days generally go with a high-end laptop because they don’t want to compromise on performance or encounter regular problems. But that’s not always the case. Many who purchased the Dell XPS 17 reported overheating issues with it.
When a laptop overheats, it not just affects the performance but could also damage the various built-in components. You can also manually check the CPU temperature, and if it reaches around 85°C, turn off the computer right away.
Many faced the issue when running the laptop, while for some, the Dell XPS 17 started overheating while sleeping.
There is a chance of the problem lies with the hardware, but before you go around fixing that, try the methods listed below. These have helped eliminate the problem for a lot of Dell XPS users.
What do I do if Dell XPS 17 is overheating?
1. Disable fast startup
Press Windows + S to launch the Search menu, enter Control Panel in the text field, and click on the relevant search result.
Click on the System and Security option here.
Next, click on Change what the power buttons do under Power options.
Click on Change settings that are currently unavailable.
Untick the checkbox for Turn on fast startup (recommended), and click on Save changes at the bottom.
Fast boot is a feature that reduces the boot time for Windows by storing some critical data on the disk before the previous shutdown. However, it’s known to cause conflicts with the functioning of the OS and applications, and you may consider disabling it.
Once done, restart the computer and check if the Dell XPS 17 overheating issue is fixed.
2. Terminate non-critical apps and processes
Press Ctrl + Shift + Esc to launch the Task Manager, and locate the programs that are consuming a large volume of resources.
You can also click on the top of the column to arrange the programs and processes in the decreasing order of consumption of that resource.
Now, right-click on the non-critical apps, and select End task from the context menu.
Once done, wait for a few minutes for the laptop to cool down. Though this method will not exactly eliminate the Dell XPS 17 overheating issue, it will get the system up and running so that you can execute the other methods.
Press Windows + R to launch the Run command, enter control panel in the text field, and either click on OK or hit Enter to launch it.
Select System and Security.
Click on the Change what the power buttons do option.
Now, make sure to choose Hibernate from the dropdown menu for the situations when the laptop heats up, and then click on Save changes at the bottom.
Hibernate and sleep, both store the files that you are working on, but while the former stores it on the disk, the latter does so on the RAM. As a result, it also takes slightly longer to load the Windows from hibernation as compared to sleep.
Going with Hibernate mode instead of Sleep mode has been found effective to fix the Dell XPS 17 overheating problem.
4. Purchase a cooling pad
If the methods listed here have not worked, you can purchase a cooling pad for your Dell XPS laptop. A cooling pad helps facilitate proper airflow and ensures that the laptop’s temperature does not shoot.
There are several effective cooling pads available on the market and you can purchase one of these.
Besides, you may contact Dell customer support, by either calling on the dedicated number for your country or using the other available channels.
Also, find out what to do if the Dell XPS 17 laptop is freezing since several users have reported encountering the problem.
Tell us which fix worked for you in the comments section below.
As you might already be aware, Microsoft is set to retire Internet Explorer come June 15, this year. Some users have already made the transition to Microsoft Edge or a third-party browser which is now easier to set as default in Windows 11.
However, Microsoft has yet again come out to plead with users to make the transition before they cut their support for IE. and set their own retirement date instead of waiting for the actual date to get here.
Through the blog post, Microsoft has provided a detailed account that users can follow through to achieve the same:
Ensuring that the IE mode is set up– Microsoft encourages organizations to set up and test out IE mode with sites identified to be IE-dependent. This will help identify any compatibility issues that may face them in the future before IE is retired.
Set your own IE retirement date as an organization– Once you are confident as an organization that you are ready for a broader rollout of IE mode, you can then set a date to disable your IE policy.
Have users import their data– If you have everything set up, then it is time to inform users of the changes. Microsoft has provided resources such as IE retirement end-user adoption resources that will assist with the transition.
Microsoft has gone ahead and recommended Microsoft Edge, which will help foster the best experience for users. Remember, they had updated the browser’s IE mode to facilitate this anticipated change. “To easily import their data, users can copy and paste edge://settings/importData into the Microsoft Edge address bar, then choose “Microsoft Internet Explorer” from the selections under “Import from”. These steps are also included in the IE retirement end-user adoption resources email series.”
Tell us if you find this scenario familiar. You’re sitting at your desk, minding your own business, and enjoying some quality Risk of Rain 2 gameplay when, all of a sudden, the game crashes with a blue screen.
No warning, no prior symptoms, just a blue screen of death crash and a message that says WHEA Uncorrectable Error.
Now, the first thing you need to do is not punch your PC. Secondly, you need to understand why this problem has happened in the first place.
The WHEA Uncorrectable Error is displayed by the system during blue screen crashes and is usually related to hardware failure.
A failing hard drive, defective memory, improperly seated CPU, and a variety of other hardware issues can all result in a WHEA uncorrectable error, so it’s not the game causing it.
Even though this sounds pretty serious, there are things you can do to actually fix it. And, in this article, we’re going to show how to do just that.
How do I fix the Risk of Rain 2 WHEA uncorrectable error?
1. Check integrity and stability of installed hardware components
Now, this happening should also be a warning sign to you, meaning that you might want to check some of the hardware parts on your rig.
Thus, be sure to physically inspect your computer hardware because you may have a physical defect or failure in one of your hardware components.
Check whether your cooling system is hooked up and functional, your RAM is securely seated in place, components like your CPU haven’t come loose, and everything is securely connected.
If everything appears to be in place and working accordingly, we can move on to the next steps of the troubleshooting process.
2. Update Windows to the latest version
PressWindows+Ito access Settings.
Select the Windows updates tab and click Install all.
If no updates are queued for installation, press the Check for updates button.
3. Update your drivers
Press theWindowskey, search for Device Manager and click on Open.
Expand Display Adapters, right-click on your GPU and select Update driver.
Select Search automatically for drivers.
Be sure to do this for all of the installed drivers, not just for graphics one as we showed you above.
Would you like to also enjoy quality gaming without being worried about any crashes, lags, or freezes by keeping all drivers up to date and error-free easily.
Manual checks can sometimes be hard to perform, that’s why we recommend using an automated assistant that will scan for fresh driver versions daily.
In case you’re a beginner, you don’t have to worry! Outbyte Driver Updater is smart, simple, engaging and its user interface was built to make your life easier.
Press F2 or F12 (depending on your PC) to enter BIOS.
In the BIOS (or UEFI) menu, go to the Advanced tab.
Go to Performance.
Look for an option that specifies overclocking or something similar.
If it is enabled, which should be the case if your CPU is overclocking, then disable it.
Save the settings and press YES to any confirmation dialogue box.
Exit the BIOS menu and restart your computer system.
That’s pretty much what you’re looking at if you want to fix this error yourself. The process itself isn’t too hard and it won’t take up too much of your time.
Has this guide proven to be helpful in solving your issue? Be sure to let us know in the dedicated comments section below.
This 2013 game is beyond any doubt a fan favorite and experiencing problems that can seriously affect gameplay or ruin it completely are not really what anybody wants.
No, we’re not talking about The Las of Us, Dota 2, or Grand Theft Auto V. We’re actually referring to The Stanley Parable, which although lacks in astounding graphics, makes up with quality gameplay.
This interactive drama video game carries themes such as choice in video games, the relationship between a game creator and player, and predestination or fate.
Need we say more? However, there are The Stanley Parable players that say they can’t even start the beloved title.
Well, we decided to take some time off from whatever projects we were working on and bring this much-needed fix, just in case you find yourself in a similar situation.
Thus, if you’re trying to launch this game and nothing happens, here’s what you need to do in order to get things back on track and resume having fun.
What can I do to fix the Stanley Parable not launching?
There’s no 1005 sure reason as to why this keeps happening, but the methods we are about to describe in this guide will surely be of assistance.
Other Stanley Parable players that went through this troubleshooting process reported the game working after.
1. Check system requirements
The Stanley Parable minimum requirements (Windows)
Memory: 2 GB
Graphics Card: Intel HD 2000
CPU: Intel Core 2 Duo E8400
File Size: 3 GB
OS: Windows XP/Vista/7/8
The Stanley Parable Mac OS system requirements (minimum)
Memory:2 GB
Graphics Card:NVIDIA GeForce 8600M GT
CPU:Intel Core 2 Duo E8400
File Size:Unknown
OS:Mac OS X 10.8 or higher required
The Stanley Parable Linux system requirements (minimum)
Memory:2 GB
Graphics Card:AMD Radeon HD 2600 XT
CPU:Intel Core 2 Duo Q6867
File Size:4 GB
OS:Ubuntu 12.04
2. Run the game as an administrator
Locate the folder where The Stanley Parable is installed.
Right-click on the Diablo 2 Resurrected executable and click on Properties.
Select the Compatibility tab and check the Run this program as administrator box.
3. Check game file integrity
In Steam, right-click The Stanley Parable and select Properties.
Select the Local Files tab and click on the Verify integrity of game files.
4. Update your GPU
Press theWindowskey, search for Device Manager and click on Open.
Expand Display Adapters, right-click on your GPU and select Update driver.
Select Search automatically for drivers.
If you’re into gaming, surely you can do without all the crashes, lags, or freezes by keeping all drivers up to date and error-free easily.
Sometimes, manual checks are hard to perform, that’s why we recommend using an automated assistant that will scan for fresh driver versions daily.
In case you’re a beginner, you don’t have to worry! Outbyte Driver Updater is smart, simple, engaging and its user interface was built to make your life easier.
After completing these steps, your game should launch properly and you can go back to playing what makes you happy, without having to worry about any issues.
has this guide been of help to you? Be sure to let us know in the comments section below.
Today, we’ll show you a few ways to enable Windows 11 mobility center:
using the search bar
from the battery icon
using the power menu
or even the Run dialog box
Once you reach it, you’ll be able to easily perform easy tasks like adjusting screen brightness, audio volume, and more.
We’ll get to the steps ASAP, but first, let’s clear some things out:
What is the Windows Mobility Center?
First introduced in Windows Vista, Windows Mobility Centeror WMC is a built-in Windows component that centralizes information and settings most relevant to portable and mobile devices.
Some of said information and settings include audio settings, battery life and power schemes, display brightness, and wireless network strength and status, amongst other things, depending on the device’s hardware.
Regrettably, WMC is inaccessible on desktop devices. However, this limitation can be bypassed by modifying the Windows Registry.
How can I access the Windows Mobility Center on Windows 11
1. Use the search bar
1. Hit the Windows key or click on the Start button.
2. Type Windows Mobility Center into the search bar.
3. Click on Windows Mobility Center.
2. Use the battery icon in the system tray
1. Locate the battery icon in the system tray and right-click on it.
2. One of the available options will be Windows Mobility Center. Click on it.
3. Try the Power User menu
1. Open the Power User menu by pressingWindows + X or right-clicking on the Start button.
2. Find Mobility Center and click on it.
4. Use the Run dialog
1.Open the Run window by pressing Windows + R.
2.Type mblctr.exe in the dialogue window and press Enter or click on OK.
How do I access Windows Mobility Center on a desktop?
1.Open the Power User menu by pressing Windows + X or right-click on Start.
2. Locate and click on Command Prompt (Admin) or Windows PowerShell (Admin).
3. Type thefollowing command into the console, then hit Enter.
4. Next, type the second command into the console,then hit Enter.
How can I create a desktop shortcut for Windows Mobility Center?
1. Right-click on a space on your desktop.
2. Hover your mouse cursor over New,then click on Shortcut.
3. Type mblctr.exe in the text field, and then hit Enter or click on Next.
4. Type Windows Mobility Center in the text field, then hit Enter or click on Finish.
Hopefully, this guide has been of help to you. Let us know which of these steps was most helpful to you.
And if you know of other ways to enable and access the Windows Mobility Center, don’t hesitate to share them with us down in the comments section below. We’d love to hear from you.
Looking for how to get Paramount Plus for free in 2025? With rising subscription costs, many users are searching for promotional codes, free trials, and smart bundling methods to enjoy Paramount+ without paying full price. This guide walks you through all the ways to watch Paramount Plus without paying.
Step-by-Step Ways to Watch Paramount Plus Without Paying
Call of Duty: Vanguard is the most recent installment in the Call of Duty series and one of the most popular video games released in recent memory. Despite the fact that the game is significantly improved over its previous editions, it still contains some glitches such as the Dev Error 10323.
Both the cause and the solution are currently unknown, and the developers have also failed to acknowledge the existence of the problem. However, one thing that the players have noticed is that this issue can be solved by tweaking the texture streaming settings.
Although other users have not yet experienced the Dev Error 10323 problem, there is no guarantee that they will not do so in the near future.
As a last resort, you will probably have to uninstall and reinstall your game altogether due to the lack of information about this specific error. But first, let’s see what’s new in Vanguard and then jump into the list of solutions.
What’s new in Call of Duty: Vanguard?
A number of gameplay mechanics introduced in Modern Warfare 2 are carried over into Vanguard’s campaign, including the ability to mount wielded weapons to flat surfaces, interact with doors, and carry out takedowns.
Players will be able to employ a more advanced tactical approach in combat thanks to new gameplay features such as blind firing from behind cover, breaking through destructible environmental elements, and creating new paths to complete objectives by scaling walls.
However, while the core gameplay of Call of Duty remains unchanged, fans can look forward to a few new features and game modes this year such as the Patrol mode.
This game mode is similar to Hardpoint, with the exception that instead of static capture points that appear randomly throughout the map, the capture point moves along a predetermined path.
There will be a total of 20 maps available: 16 of those maps will be dedicated to the core 6v6 game modes, while the remaining four will be dedicated to 2v2 games.
Gunfight returns as well, this time with the addition of Champion’s Hill, which consists of a series of mini-games between eight different groups of players.
How can I fix Vanguard’s Dev Error 10323?
1. Disable texture streaming
There have been several solutions proposed to this problem, but this is the first one that the players have suggested. Some of them, on the other hand, asserted that it was effective for them personally.
Because of this, you can also try this method to resolve the Vanguard Dev Error 10323. Those experiencing the problem should turn off texture streaming and then go to the settings menu to free up the reserved space, before moving on to other methods.
Right-click on Vanguard’s shortcut from your Desktop in order to see more options.
Here, choose the Run as administrator option and click Yes on the next prompt that asks for your permission.
3. Reinstall the game
Open Settings and navigate to Apps followed by Apps &features.
Here, type Call of Duty Vanguard inside the search bar then click on the three-dot menu in order to choose Uninstall.
Once you have fixed the Dev Error 10323, you will be thrust into visceral combat, which is set during World War II and will take you from Europe to North Africa as well as the Eastern Front and the Pacific.
The developers behind Call of Duty: WWII’s predecessor, Call of Duty: WWII: Black Ops, have promised a visually stunning experience in Call of Duty: Vanguard, and rest assured that they kept their promise.
Was this article helpful to you? Leave us a comment in the section below and tell us what you think. Thanks for reading!
When it comes to wifi routers, Netgear routers are among the best, yet users have experienced issues such as Netgear router login not working.
This makes it impossible for users to log into routerlogin.net. Fortunately, there are ways to solve this problem, and we will show you how in this guide.
Why is my Nighthawk router login page not working?
Below are some of the potential causes of this issue, as reported by users:
Wrong login details: In most circumstances, the problem is caused by a user typing the wrong username and password. You need to double-check and probably make the password visible while typing.
Outdated browser: Even the best browsers for all devices misbehave when they are outdated. Hence, you need to update your browser to ensure it is not the cause of this issue.
Presence of malware: Sometimes, this problem can be down to the activities of viruses. The solution to this is to perform a malware scan with top-notch antivirus software.
How do I find my Netgear router login?
Finding the Netgear router login page is pretty straightforward. You only need to visit routerlogin.net on a browser on any device connected to the router.
Another option is to type https://192.168.1.1 in the address bar on your browser and hit Enter. This will bring up the login page.
How can I fix the Netgear router login if it’s not working?
Listed below are some basic troubleshooting steps to try before proceeding to the sophisticated fixes in this section:
Restart your router and PC.
Power cycle your router.
Double-check your credentials.
Change the device you are trying to login with.
Use a different connection mode (switch wired connection from wireless and vice versa).
If this does not work, you can now delve into the solutions below:
1. Update the firmware
Connect your computer to your router with an Ethernet cable.
Visit NETGEAR Support and enter your router’s Model Number or Product Name.
Click Downloads.
Select a firmware version and click Download.
Unzip the file if needed.
Enter routerlogin.net into a web browser, and a login page displays.
Type in the router admin username and password.
The default username is admin. The password is the one you specified the first time you logged in. The username and password are case-sensitive.
Select ADVANCED, then Administration.
Now, select Firmware Update or Router Update.
Click Choose File or Browse, then locate and select the firmware file that ends in .img or .chk.
Finally, click the Upload button.
Some models might use slightly different navigation, like Settings and then Administration.
Do not attempt to go online, turn off the router, or do anything else with the router until it has completed the firmware update.
2. Update your web browser
2.1. Chrome
Open the Google Chrome browser.
Click the Chrome settings in the upper-right corner of the screen.
From the drop-down menu that appears, select Help, then select About Google Chrome.
Chrome checks for updates in the next window and displays the most recent version.
2.2. Mozilla Firefox
Open the Mozilla Firefox browser.
Click the Open menu button in the upper-right corner of the screen.
In the menu that appears, click the Help option at the bottom. Select About Firefox.
Firefox looks for updates and presents the current version in the next window.
2.3. Microsoft Edge
Open the Microsoft Edge browser.
Click the Microsoft Edge More menu in the upper-right corner of the browser window.
Move the mouse pointer over Help and feedback near the bottom of the drop-down menu that appears, then select About Microsoft Edge from the side menu.
If Edge isn’t up to date when the next window starts, it will update automatically.
Out-of-date browsers may cause the Netgear router login default not to work. Thus, keeping the browser up to date may solve the issue.
In addition, you can try fixing the router login issue by clearing your browser cache to erase accumulated data or cookies. To perform this task successfully, it’s advised to use the most efficient cookie and cache cleaner software.
If you need to resolve the Netgear login error and navigate without interruptions, you can switch to a more secure browser like Opera.
You will enjoy future-proof functionalities like free VPN security and ad-blocker, social media integrated apps, or seamless file-sharing options.
Search for Windows Security in the Start menu and click the top result to open the app.
Click on Virus & threat protection. Under the Current threats section, click on Scan options.
Select the Full scan option to check the entire system for viruses and any other type of malware.
Click the Scan now button.
Several new malware strains attach themselves to drivers to avoid detection by anti-malware scanners.
If malware was linked to a WiFi driver and disrupted its processes, your computer will be unable to connect to WiFi, resulting in the Netgear router admin login not working.
For those seeking a professional antivirus, we recommend downloading ESET NOD32 software.
While it can defend you against various viruses with multilayered proactive protection, unlike most antiviruses, it does not slow down your computer, making it one of the best anti-virus programs available.
We have reached the end of this detailed guide on fixing the Netgear router login not working issue. Hopefully, you were able to solve the problem before exhausting the solutions therein.
As you try to multitask with Chrome, your default browser, and realize that the address bar disappears when you resize it, it’s quite annoying.
The problem has existed for a long time, but despite Google’s knowledge of the problem, it remains that way.
This issue can usually happen due to the excessive number of extension installations or improper Google Chrome settings.
How can I fix the Chrome address bar after losing it on resize?
1. Disable hardware acceleration
First, click the three dots and then open Settings.
Select Show Advanced Settings andscroll down to System then uncheck Use hardware acceleration when available.
Hardware acceleration makes use of your computer’s graphics processing unit (GPU) to handle graphics-intensive operations such as watching films or performing computations faster.
Usually enabling this option can cause problems like when the Chrome address bar disappears on resize.
2. Remove unneeded extensions
Open Chrome.
At the top right, click the three dots (More) then More tools, and then Extensions.
After that, on to the extension you want to remove, click Remove, and then confirm by clicking Remove.
This workaround is only for Chrome users who have an excessive number of plugins and extensions installed, making it difficult for Chrome to change the layout on smaller windows.
Click on the Start menu, type Control Panel in the search bar and choose Control Panel.
Then, select Uninstall a program under the Programs setting.
Find Chrome and select Uninstall.
Finally, reinstall the application using the official Chrome page.
Uninstalling and then reinstalling is the oldest trick in the book that may fix the issue.
Remember to take note of your settings if you have modified the Chrome settings before because uninstallation will set the settings to their default.
Are there any good Google Chrome alternatives?
Vivaldi browser is the perfect alternative to Google Chrome and has even more options than the original browser of your computer.
It includes capabilities such as Notes, Screen Capture, Image Properties, and crazy amounts of settings like custom address bar location and tab organization.
If you already have Vivaldi but are having problems with it, such as pages not loading, see our article.
Google has never provided an official solution to this problem, but the thread shows that it is aware of the Chrome address bar disappearing on resizing problem.
While there might be no official fixes from Google, many users have shared their workarounds and solutions to this bug.
Using a different browser can be the easiest solution due to the huge amount of browser applications available for download on the web.
Let us know if you were able to successfully fix the Chrome address bar disappearing on resizing in the comments section below.
Microsoft news recap is a weekly feature highlighting the top Microsoft news stories of the past week. Sit back, grab some coffee, and enjoy the read!
LinkedIn can now add a website link at the top of your profile
LinkedIn users with creator mode enabled are getting the ability to add a website link to the top of their profile, in an effort to help increase visibility for business and personal websites.
Microsoft details “Microsoft Edge Secure Network” a built in VPN for Edge
A built-in VPN for Microsoft Edge could be in the works after a webpage surfaced which provides details of a “Microsoft Edge Secure Network” feature. According to the page, Microsoft has partnered with Cloudflare on the project.
Xbox Cloud Gaming has now been streamed by over 10 million people, says Microsoft
Is the System Reserved Partition not showing in Disk Management on your Windows 10/11 device? The System Reserved Partition or SRP is a small partition on your hard drive that stores Windows Boot information. If the file gets deleted somehow, OS boot issues may occur.
Usually, this issue occurs if the partition size is less than 600 MB. The System Reserved Partition is available in Disk Management as Windows doesn’t assign a drive letter to it. So it won’t be visible inside the File Explorer, unlike other drives do.
Things could get serious if the System Reserved Partition is removed from Disk Management. If this happens, users may not be able to update Windows to its latest version, or in the worst-case scenario, your device won’t boot up, and the message Operating System not found will appear on the screen.
As it’s an issue of concern, it’s essential to fix it. In this guide, we will be looking at some troubleshooting methods that may help fix this problem.
What can I do if the System Reserved Partition is not showing in Disk Management?
1. Use Command Prompt
Click on Start and open Settings.
Scroll down and click on Recovery.
Click on Restart now beside Advanced Startup.
Once your device restarts, a blue screen will appear. Click on Troubleshoot.
On the next screen click on Advanced Options followed by Command Prompt.
Enter the following commands one by one and hit Enter. bootrec/scaros bootrec/fixboot bootrec/rebuildbcd
Reboot your device and check if the System Reserved Partition not showing in Disk Management issue is fixed.
Boot into system recovery options, and select Troubleshoot.
Then click on Advanced options followed by Command Prompt.
Type bcdboot c:\windows /s c: and hit Enter. Doing so will create a boot configuration file on a system drive instead of the System Reserved partition.
Once the command is executed, Boot files successfully created message will appear.
Again, type the following and hit Enter. bootrec /fixmbr
If the Element not found message appears, you’ll have to make the partition active using a partition assistant.
Once you’ve rebuilt the file using the partition assistant, follow step 1 to rebuild the BCD file.
If the System Reserved Partition is missing from Disk Management, the only way of recovering it is by command lines using Windows installation media. You can also perform a partition recovery if you accidentally format or delete it. Here is the list of best partition manager softwares that may help you.
Also, both the troubleshooting methods mentioned above require you to get into the Recovery mode, also known as the Advanced Startup Options menu in Windows. By entering the Recovery mode, you will be able to access a range of diagnostic repair utilities outside the OS.