How to Fix Microsoft Word not Going to Next Page

When typing on Microsoft Word and you get to the end of a page, it naturally creates and goes to the next page. But what happens if Word deviates from the norm and stays on the current page?

Firstly, know that this is likely caused by formatting settings such as the Pagination options. But it is still not the most difficult issue to fix, as these settings can be easily reversed.

In this guide, we have prepared quick and effective methods to help you restore normal service on Word.

Why is Microsoft Word not going to the next page?

The factors that can cause Microsoft Word not to go to the next page are within a close circle. Below are some of the notable ones:

  • Formatting issues: Whether you are editing a professional document as a business owner or just a normal document, you should be careful with the formatting options. This is especially true for pagination settings when editing a document.
  • Lack of page break: In some cases, your document might require you to insert a manual page break due to some of your settings. If the page break is absent, you are likely to experience this issue.
  • Issues with Word installation: At times, this problem might be due to your document editor – Microsoft Word. What you need to do here is to update the app or repair your installation.

How can I fix Microsoft Word if it is not going to the next page?

1. Insert page breaks

  1. Launch Word and open your document in Edit mode.
  2. Now, place your cursor at the point to end the page and also to start the next page.
  3. Click the Insert tab in the Ribbon.
  4. Finally, select the Page Break option. You can do the same by using the Ctrl + Enter key combination.
    insert page break microsoft word not going to next page

Word puts an automatic page break at the end of each page in your document by default. However, this might change due to some settings in document properties.

In this case, you can make Microsoft Word go to the next page by creating a manual page break. While this might leave some extra spaces sometime, it will surely yield the desired result.

2. Check the formatting options

  1. Launch Word and open your document.
  2. Click the Layout tab at the top.
  3. Now, click the Columns drop-down menu in the Page Setup group.
  4. Next, click More Columns…  in the dropdown menu.
    layout
  5. Click the preset picture for One in the Columns dialog box.
  6. Finally, click the OK button.
    one microsoft word not going to next page

Another quick solution that can help you force Microsoft Word to go to the next page is to make sure your formatting settings are favorable. 

3. Transfer the Word file to another document

  1. Launch Microsoft Word and click the View tab at the top.
  2. Select the Draft option to show the document in the Draft view.
    draft view
  3. Now, copy the content of the entire document except the final paragraph mark.
  4. Paste the file into a new blank document and check if the issue persists.
  5. Finally, if you want to hide or show the paragraph marks, click its icon on the Home tab.
    home

With this, Microsoft Word text and pictures should go to the next page when it reaches the end of a page. Note that this option works if you are experiencing this problem in an existing document.

If it also occurs when you select the blank document option to create a new document, perform the steps below to rename the Normal template:

  1. Close all Word windows and Office programs.
  2. Now, press the Windows key, type cmd, and select Run as administrator from the context menu under Command Prompt.
    cmd admin
  3. Type the command below and hit Enter to run it: ren %userprofile%\AppData\Roaming\Microsoft\Templates\Normal.dotm OldNormal.dotmrename microsoft word not going to next page
  4. Finally, wait for the command to finish running, exit Command Prompt, and restart Word.

By running this command, you should be able to restore Word’s default setting and prevent macros, and formatting, preventing Microsoft Word from going to the next page when necessary.

4. Update or repair Word

  1. Launch Word and click the File tab at the top.
  2. Select More from the context menu in the left pane.
  3. Now, choose the Account option.
    more account
  4. Next, click Update Options under the Product Information section.
  5. Select Update Now, and wait for the process to complete.
    update now
  6. If this does not work, close Word, press the Windows key + R, type appwiz, and hit Enter.
    appwiz
  7. Right-click your Office installation and select Change.
    change
  8. Finally, choose Online repair and click the Repair button, and wait for the process to complete.
    online repair

It can be frustrating if Microsoft Word won’t go to the next page when a page is filled. But with the solutions in this guide, you should be able to rectify this.

Similarly, if you are getting a Word can’t do this because a dialog box is open error, check our expert-written guide to fix it.

Feel free to let us know the solution that helped you fix this issue in the comments below.

Microsoft offers more cloud security at no additional cost

Microsoft has been under fire recently, regarding cybersecurity, when a Chinese threat actor the Redmond-based giant tech tracked as Storm-0558, hacked and gained access to email accounts affecting approximately 25 organizations. They were government agencies and consumer accounts of people associated with these organizations.

The attack happened in May and June, and Microsoft acknowledged the issue on June 16, 2023. That’s also when the company started an investigation.

Following the investigation, many users were upset about it to the point of criticizing Microsoft for charging them to protect themselves against Microsoft’s mistakes.

So, in retaliation, the Redmond-based tech giant announced that companies will get a cloud security expansion at no additional cost. As Microsoft is expanding its cloud security, you will be able to see the updates, changes, and improvements by using Microsoft Purview Audit.

Today we are expanding Microsoft’s cloud logging accessibility and flexibility even further. Over the coming months, we will include access to wider cloud security logs for our worldwide customers at no additional cost.

Microsoft

Microsoft cloud security expansion at no additional cost

Microsoft announced the cloud security expansion as a collaboration with CISA. If you remember, earlier this year, a new CISA tool was made available on Microsoft Cloud services across the board. The tool, Untitled Goose Tool, can prevent hacking attempts in cloud services, and it was well-received by the industry.microsoft cloud security expansion

So now, the two entities are collaborating once again to strengthen cloud security for their customers. According to Microsoft’s announcement:

  • Microsoft Purview Audit (Standard) customers will receive deeper visibility into security data, including detailed logs of email access and more than 30 other types of log data previously only available at the Microsoft Purview Audit (Premium) subscription level.
  • Microsoft is also increasing the default retention period for Audit Standard customers from 90 days to 180 days.
  • Commercial and government customers with E5/G5 licenses already using Microsoft Purview Audit (Premium) will continue to receive access to all available audit logging events, including intelligent insights, which help determine the scope of potential compromise by using the Audit log search in the Microsoft Purview compliance portal and the Office 365 Management Activity API.
  • Additional Audit Premium features include longer default retention periods and automation support for importing log data into other tools for analysis. 

The Redmond-based tech giant will start rolling out these updates in September 2023 to all government and commercial customers.

You can visit the Microsoft Purview compliance portal and select Audit from the Solutions panel, to access the updates and the new logs as they become available.

It seems Microsoft is taking all measures to make sure a breach of the sort that happened in May, won’t happen again. We can hope, of course, and with everyone on board, such situations can be easily detected and dealt with without aggravating the situation.

What do you think about Microsoft’s latest cloud security expansion? Let us know in the comments section below.

How to Uninstall Adobe Software Without Logging in

As good as the Adobe Creative Cloud software is, there are times you might want to remove it. However, users complain that they can uninstall this Adobe software without logging in.

Aside from this, the software sometimes asks for some updates to be installed before it can be removed. This can be pretty frustrating, especially for users that have lost their passwords. Fortunately, you can remove it successfully with the solutions in this guide.

Why is Adobe software not uninstalling?

The major reason you can’t uninstall the Adobe software without logging in is for verification. Adobe needs to deactivate your license if you have limited devices/activations on your account.

This can only be done after you have logged in and the software is able to confirm that you are the one trying to remove it.

How do I completely uninstall Adobe software offline?

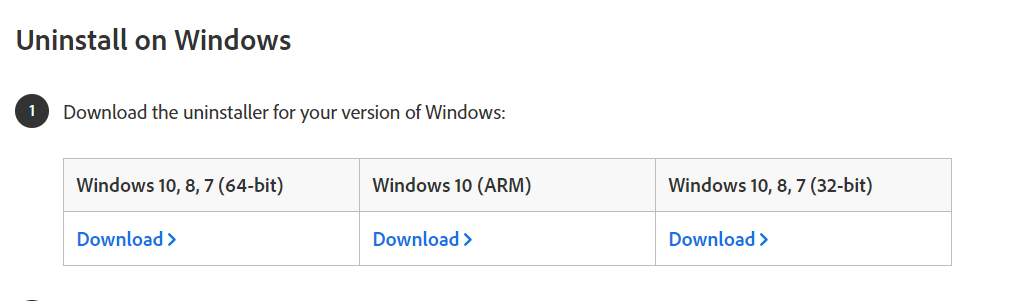
1. Use the Adobe Creative Cloud Cleaner Tool

  1. Visit the official website to download the Adobe Creative Cloud Cleaner tool. 
  2. Right-click the downloaded file in File Explorer and select Run as Administrator. If you do not see the Run as Administrator option, double-click the file to run it.
    run as
  3. Now, select your language by pressing the corresponding letter (e for English) and hit Enter.
    e uninstall adobe software without login
  4. Press Y to accept the Adobe End-User License Agreement and press Enter to continue.
    y
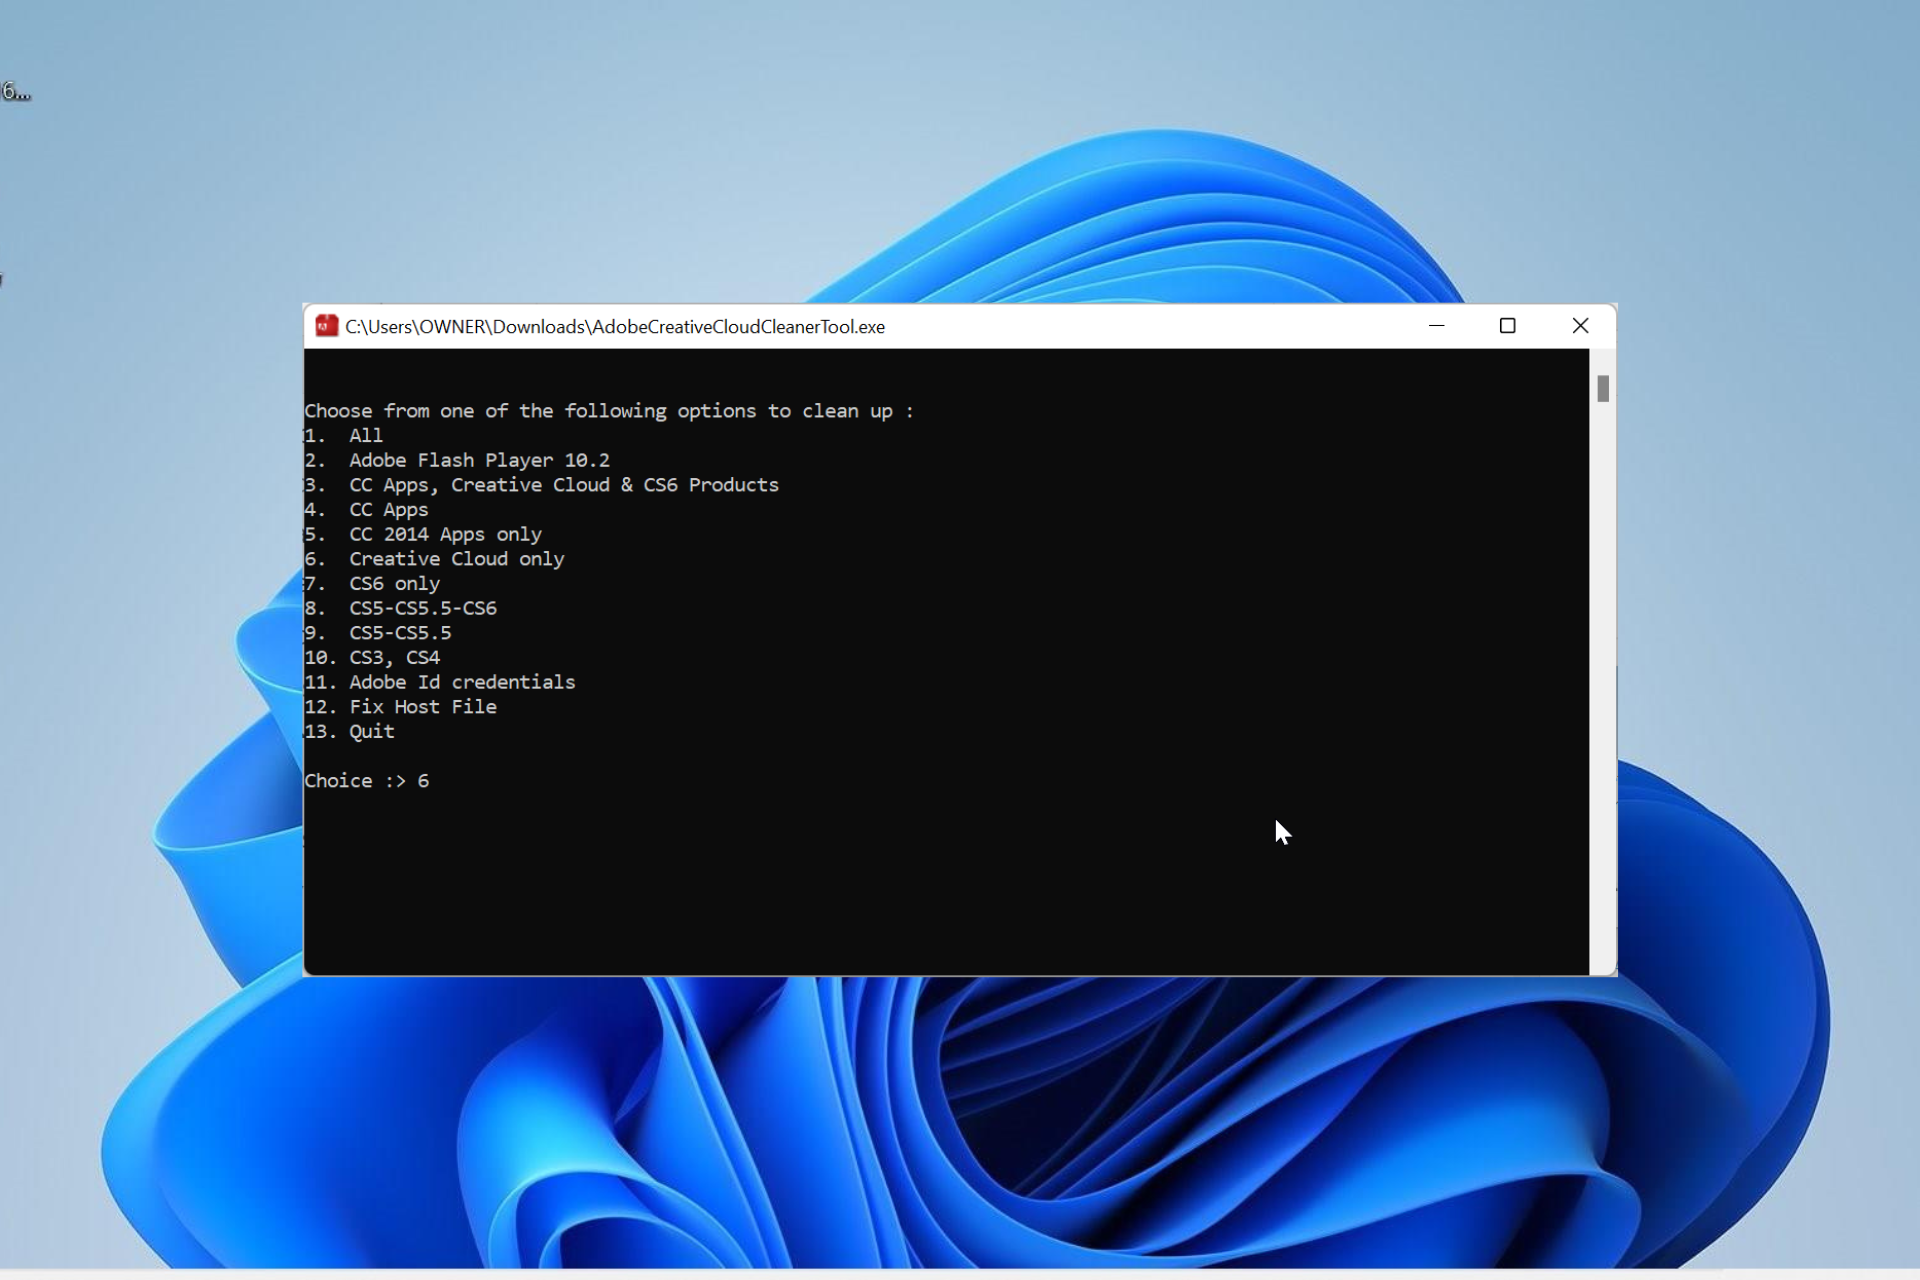
  5. Next, press the corresponding number to select the type of Adobe software you want to uninstall and hit Enter.
    choose software
  6. Press the number that corresponds to the exact app you want to remove.
  7. Now, press Y to confirm the removal and hit Enter.
  8. Wait till you see an Adobe Creative Cloud Cleaner tool completed successfully message and press Enter.
  9. Finally, restart your PC.

Since users have been complaining about being unable to uninstall Adobe software with or without logging in, Adobe released an official removal tool to remedy this.

This script removes all Adobe apps on your PC without issues.

2. Use the Control Panel

  1. Press the Windows + R key, type control, and click the OK button.
    control uninstall adobe software without login
  2. Select Uninstall a program under the Programs option.
    uninstall a
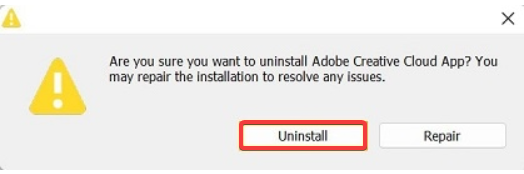
  3. Now, right-click the Adobe Creative Cloud software or other product and select Uninstall.
    uninstall control
  4. Finally, follow the onscreen instructions to complete the process.

If you can’t uninstall the Adobe Creative Cloud software without logging in, you can use the Control Panel instead. This bypasses the sign-in requirement and allows you to remove the app.

3. Use the Settings app

  1. Press the Windows key + I to open the Settings app and select Apps in the left pane.
  2. Choose Apps & features in the right pane.
    app and uninstall adobe software without login
  3. Now, click the three vertical dots before the Adobe Creative Cloud software.
  4. Finally, select Uninstall and follow the onscreen instructions to complete the process.
    uninstall settings

Another system option for uninstalling the Adobe software without login is to go via the Settings app. This also helps you bypass the login requirement.

4. Use a third-party software uninstaller

If any of the options above fail to help you uninstall the Adobe software without login, we recommend using a third-party uninstaller software.

Luckily, we have a list of the best uninstaller software that will take care of removing any stubborn app.

There you have everything you need to successfully uninstall any Adobe software without login. With the variety of options provided in this guide, the task should be pretty easy for you.

Are you looking to uninstall your software because of errors like the Adobe app is not genuine? Our detailed guide can help you fix that quickly.

Feel free to let us know the method that worked for you in the comments below.

Opera GX AI Prompts: How to Enable & Disable

Opera GX, the gaming-oriented web browser introduced AI prompts in its address bar to allow users quickly access AI services. These new AI prompts feature is currently in Early Access and one can try them to shorten or explain articles, generate tweets, and more based on highlighted text.

In addition to these AI prompts, Opera GX has added ChatGPT and ChatSonic to its sidebar for quick access to the platforms.

Opera integrated AI capabilities into its gaming-centric browser so that users could leverage more. These prompts have been created together with Open AI. They use ChatGPT and ChatSonic to explain or summarize the text you highlighted.

One can also install AI extensions to get things done, but having prompts enabled right inside the browser gives more ease.

Opera GX

Opera GX

Opera GX is a gaming-centric browser that has a range of features and optimizations specifically crafted for the gaming community.
Download Install Now

What are Opera GX AI prompts?

Smart prompts on Opera GX browser are nothing but instructions or seed text provided to elicit a desired response. These instructions are preset and you don’t have to write a complete text or code in order to get a response.

For instance, Opera GX has an AI prompt called “Shorten,” which shortens the highlighted text in a mere click. Otherwise, you’d go to any AI tool or ChatGPT and input that sentence first and ask it to shorten it. AI prompts save your time and improve your browsing experience.

How do I enable AI prompts in Opera GX?

Follow the below steps if you can’t see the AI prompts tab inside the address bar.

AI prompts in the Opera GX browser are enabled by default. Just make sure you’re using one of the latest updates of the browser. It’s assumed that you’re using Opera GX as your default browser but you can also stop the Opera GX browser from opening on startup.

  1. Click on the easy setup icon in the sidebar
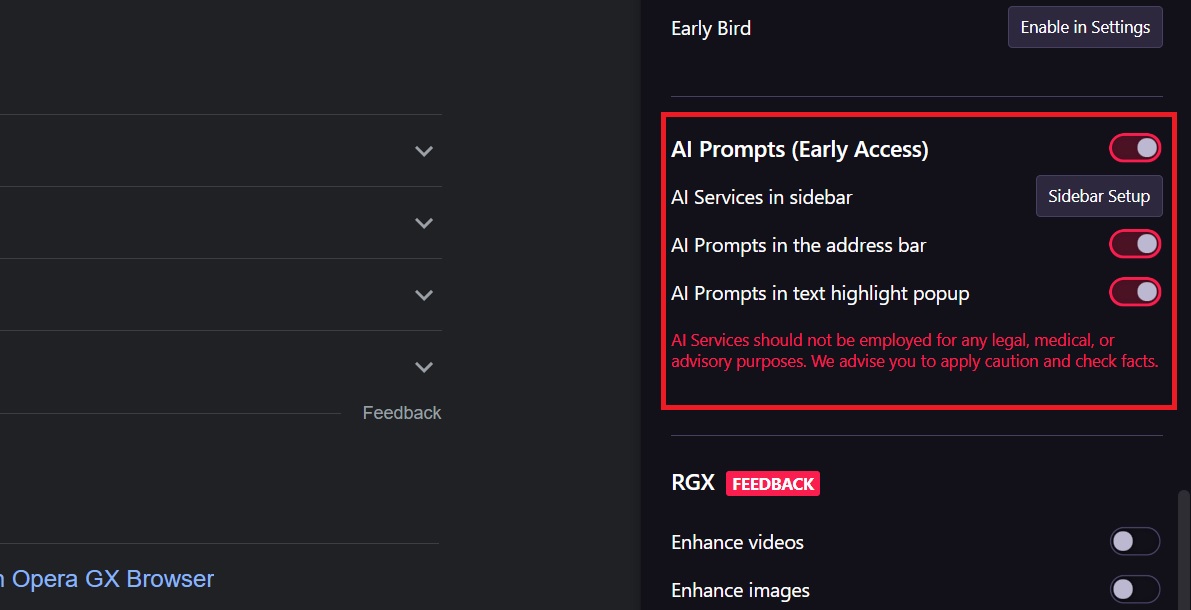
  2. Scroll down to see a section called “AI Prompts”
  1. By default, all three options are enabled.
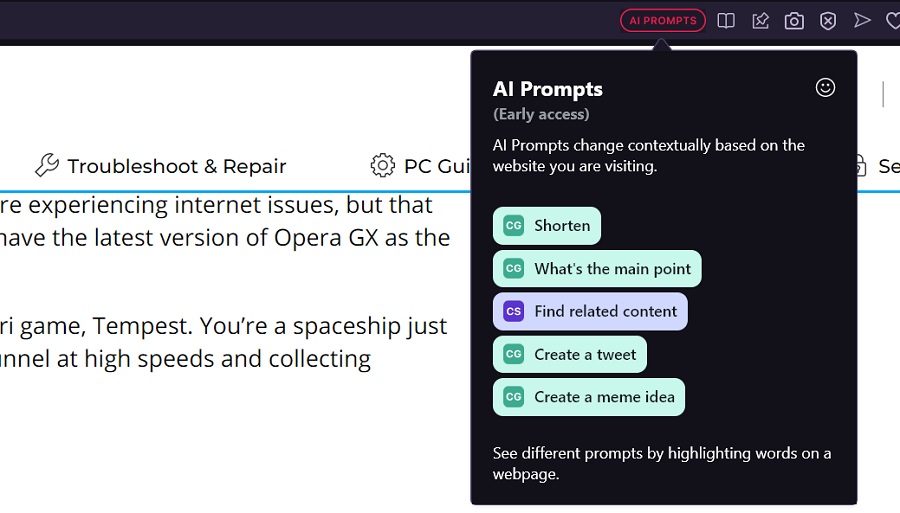
  2. Once enabled, you’d see AI prompts tab in the address bar of Opera GX browser

Note: The AI prompts tab appears when you open a webpage so that you could leverage them. You may not see them in the address bar on SERP results.

  1. The list of smart AI prompts includes ‘Shorten,’ ‘What’s the main point,’ ‘Find the related content,’ ‘Create a tweet,’ and ‘Create a meme idea.’

How do I turn off AI prompts in OperaGX?

If you do not wish to see AI prompts tab in the address bar or in the text highlight popup, you can simply disable the feature. Just follow the same instructions up until step 3.

Simply disable the AI prompts toggle switch and both “AI prompts in address bar” and “AI prompts in text highlight popup” will turn off at the same time. You can also disable either option in case you do not wish to get rid of them completely.

In addition to AI prompts, Opera GX has also added AI features to its sidebar in the form of special features ChatGPT and ChatSonic. This way Opera GX gives you direct access to language models. So, other than quick access to some smart prompts, you can do more using AI features in Opera GX.

It is possible that Opera may bring more AI prompts in the future, but it hasn’t made any such promises.

How to Fix Microsoft Word it it’s not Continuing Numbering

Users complain that Microsoft Word is not continuing numbering. This is despite the fact that you didn’t turn off auto-numbering on Word. One of the major causes of this issue is problems with the multi-level list you created. This might come in the value definition or the starting method. In this case, you need to recreate the list properly to solve the problem.

Sometimes, this problem can be due to your number values. Changing these values should restore normalcy here.

What do I do if Word doesn’t continue numbering?

1. Recreate the list style

1.1. Set up heading paragraph styles

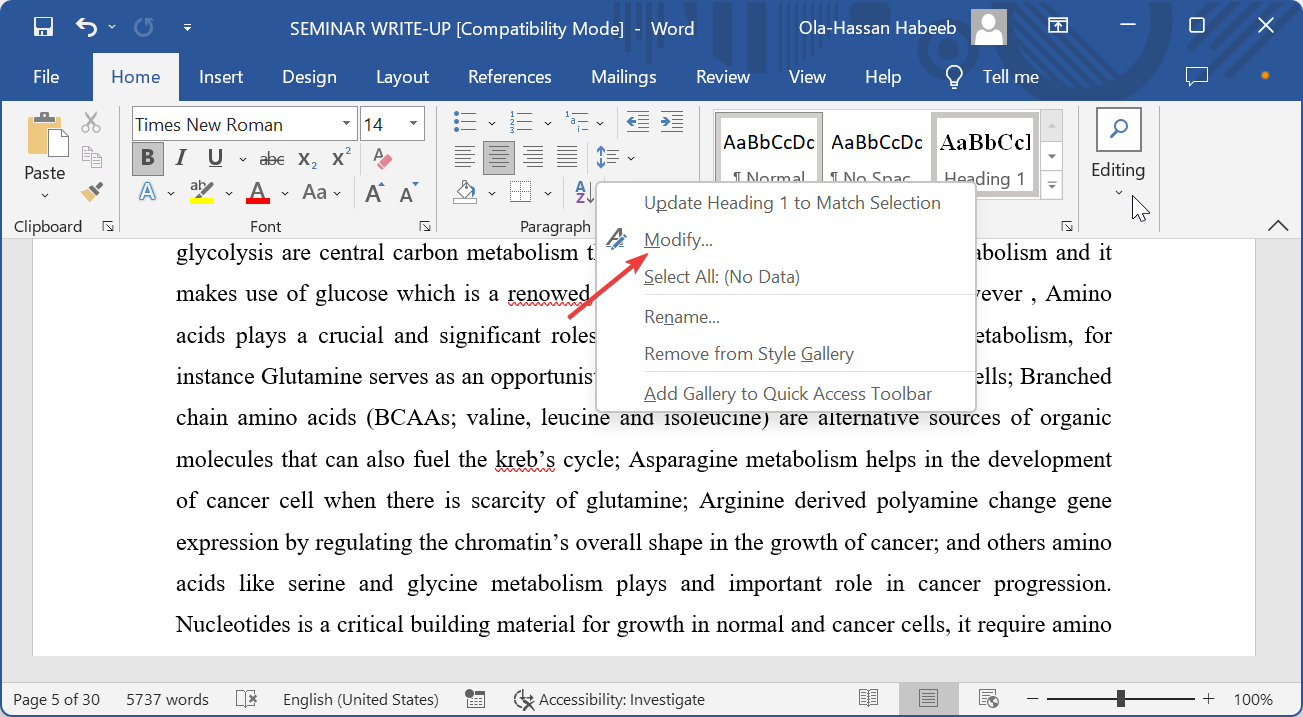
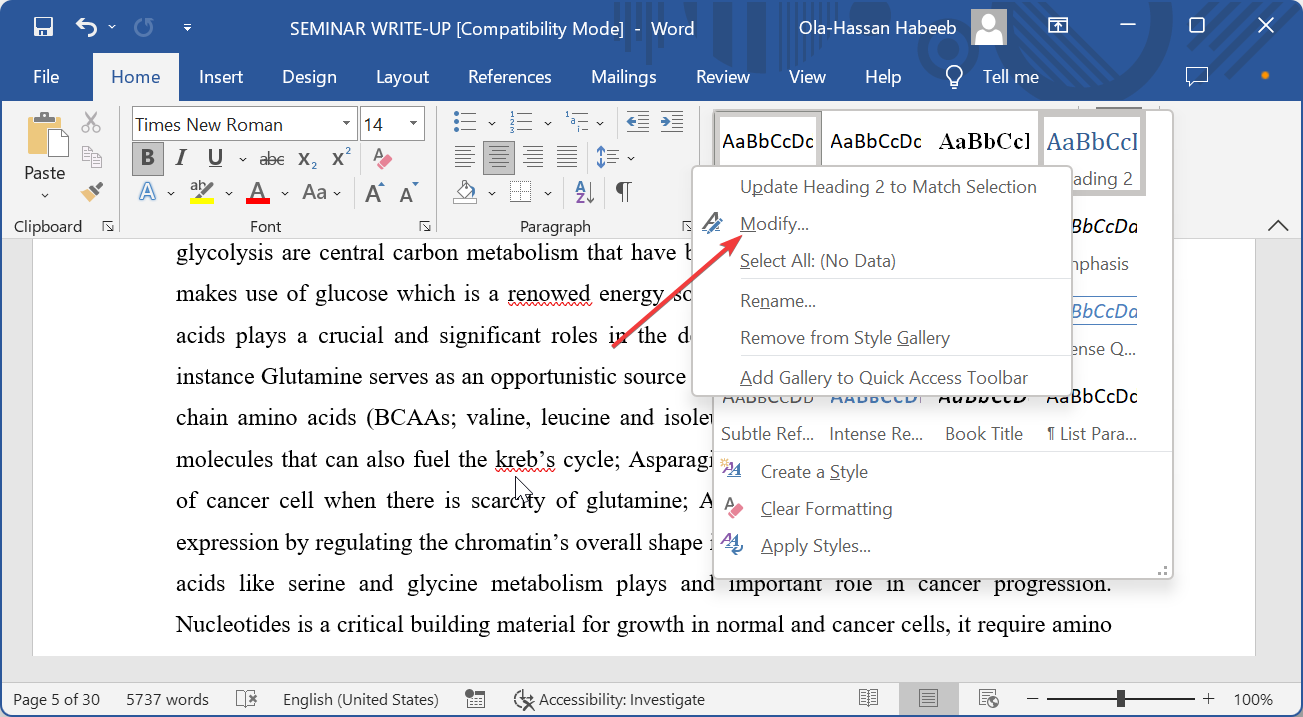
  1. Open the document with the numbering problem and right-click the Heading 1 style at the top.
  2. Select Modify.
    modify heading 1 Microsoft Word not continuing numbering
  3. Now, click the Style based on dropdown and select (no style).
  4. Next, click the Format button in the bottom left corner and select Paragraph.
    no style
  5. Set the Left Indent to 0 and the Special Indent to none, and click OK.
    left special Microsoft Word not continuing numbering
  6. Go back to the document, right-click the Heading 2 style, and select Modify.
    modify
  7. Click the Style based on dropdown and select Heading 1.
    style based
  8. Repeat steps 3 and 4 for this Heading 2.
  9. Finally, modify Heading 3 based on Heading 2 and continue the trend for the other heading styles following the steps above.

The first thing to do in the quest to ensure Microsoft Word is continuing numbering is to set up the Heading styles. This will be linked to the list style later.

1.2. Create list style

  1. Click the Multilevel list option in the Ribbon.
  2. Select the Define New List Style option.
    define new list Microsoft Word not continuing numbering
  3. Now, name your list style, then click the Format button and select Numbering.
    format
  4. Next, click the More button on the Modify multilevel list page.
    more
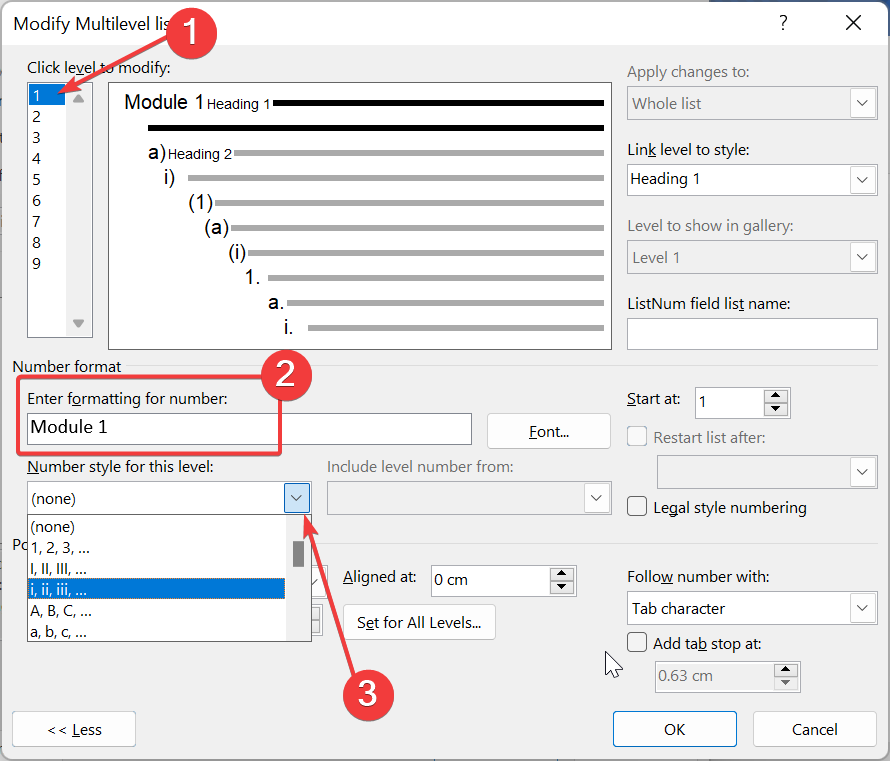
  5. Select 1 in the Click level to modify list, then select Heading 1 in the Link level to style box.
    level heading 1 Microsoft Word not continuing numbering
  6. Choose 2 in the Click level to modify list, then choose Heading 2 in the Link level to style box. Repeat this to link the other levels to the corresponding Heading.level 2
  7. From here, select 1 in the Click level to modify list and delete the entry in the Enter formatting for number box.
  8. Type the numbering format you want in the Enter formatting for number box. For example, Step 1 or Module 1.
  9. Click the Number style for this level option and select your preferred numbering type.
    enter format
  10. Go back to the Click level to modify list and set up the numbering for the other levels as you want.
  11. Set up your indents and click the OK button on the two open pages to save your changes.
    indent ok
  12. Finally, to apply the list, click the paragraph you want to apply it and select the Heading 1 style in the Ribbon.

With this, you have set up your list style successfully. There are lots of customization options still available, depending on your preference.

But the above is the basics you need to ensure Microsoft Word is continuing numbering in your document.

2. Adjust the Continue numbering option

  1. Right-click the top of the number 1 on your list.
  2. Choose the Continue Numbering option. This should pick up the numbering from the previous numbered list.
    continue  Microsoft Word not continuing numbering
  3. If this does not work, right-click the top of number 1 again and select Restart at 1.
    restart one
  4. This will restart the numbering completely and place a restart marker in the first paragraph of the list.

If you just want to make sure Microsoft Word is continuing numbering for the present document you are working on for printing, you can use this method. However, you will have to repeat this manually for the lists having the problem.

3. Change number values

  1. Right-click the first incorrect number on your list and select Set Numbering Value.
    set value
  2. Now, choose whether to Start a new list and type 1 in the Set value box. This will help restart the numbering from 1.
    start new Microsoft Word not continuing numbering
  3. You can also Continue from the previous list to assign the next number from the last numbered list.
  4. Finally, click the OK button.

With this solution, we can conclude this comprehensive guide on how to fix Microsoft Word if it is not continuing numbering.

If your Word document won’t save, check our detailed guide to fix it effortlessly.

Feel free to let us know the solution that helped you fix this issue in the comments below.

Microsoft Office isn’t Updating? 5 Ways to Force it

Microsoft occasionally releases updates to Office 365 that contain bug fixes for errors and new features. However, some of our readers couldn’t update their Office app.

Hence, this article will briefly discuss why Microsoft Office isn’t updating and provide five ways to help you fix the error.

Why is Microsoft Office not updating?

  • Poor internet connection – Office requires a stable internet connection to download the updated files; if your PC connection is unstable or limited, you’ll run into the Office not updating error.
  • Corrupt Office app – While using the Office app, it can accumulate corrupt files and data, which conflict with its normal operations, preventing actions like automatic updates.
  • Conflicting Office versions – If multiple versions of Office are installed on your PC, they can conflict with each other and prevent them from updating.
  • Group policy settings – Some PCs have group policy settings that prevent users from taking specific actions. In other words, you might not have permission to update Office.

How do I force Microsoft Office to update?

Before proceeding with more advanced solutions, restart Office in Safe mode, check and fix your internet connection, and restart your PC.

1. Verify the Group policy settings

  1. Press the Windows key + R, type in gpedit.msc, and hit Enter to launch the group policy MMC window.
  2. Click and expand Computer Configuration, and expand Administrative Templates.
  3. Expand System, expand Internet Communication Management, and click on Internet.
  4. In the Details section, double-click Turn off access to all Windows Update features.
  5. Click Disabled and click OK.
  6. In the Group Policy window, navigate to Administrative Templates and click the Start Menu and Taskbar node.
  7. In the Details section, double-click Remove links and access to Windows Update, click Disabled, and then click OK.
  8. Restart your PC and check if the Office update error is fixed.

Some PCs have working group policy settings that prevent them from performing specific actions. This is usually done to protect a company’s larger network, but it can also prevent you from updating Office.

To fix this, you’ll need to know if you have the permissions and access required to update Office 365. Here is a guide showing you how to enable and open group policy editor.

2. Launch Office as an administrator

  1. Press the Windows key, enter the name of any Office application, e.g., Excel, right-click on it, and select Run as administrator.
  2. In the UAC prompt, click Yes to grant Office admin access.
  3. When the Office app launches, click on File, and select Account.
  4. On the right pane, click Update Options, and select Enable Updates.
  5. If you receive a prompt asking you to let Microsoft apply these changes, click Yes.
  6. Close the Office application and restart it to see if Office will download updates.

3. Perform a quick or online Office repair

  1. Press the Windows key, type Control Panel, and hit Enter.
  2. In the Control Panel window, click Programs, and select Uninstall a program.
  3. Locate & select your version of Microsoft Office from the list of applications, and click Change at the top of the window.
  4. Select Quick Repair, and click on Repair.
  5. Wait for the process to be completed and restart your PC.
  6. If it doesn’t work, repeat this solution, but this time, choose Online Repair.

If the Office application is corrupt or has corrupt files, it can prevent you from updating the software. Repairing Office 365 is one way to fix the inability to update Office error.

You can also check out our guide on how to fix the unable to repair Office in Windows.

4. Update Office using command line

  1. Press the Windows key, type cmd, and click Run as administrator.
  2. In the command prompt window, run the following command: C:\Program Files\Common Files\microsoft shared\ClickToRun\OfficeC2RClient.exe" /update <user>
  3. However, you’ll have to change the <user> to your username; it’s usually shown in the command prompt.
  4. Restart your PC, and check if Office is now updating.

If you cannot update Office through the usual process, you can run specific commands to force an Office update. Here is a guide on what to do if Windows update is not working.

5. Reinstall Office

  1. Press the Windows key + I to open the Settings app.
  2. Click on Apps on the left pane and click Installed Apps.
  3. Select Microsoft Office 365, click on the three dots next to it, and select Uninstall.
  4. Then, click Uninstall in the pop-up window to confirm the uninstallation.
  5. Once the software is removed, visit the Official Microsoft website, and download the latest version of Office 365.
  6. Once the file is downloaded, double-click on the .exe file to run the installer, and follow the onscreen instructions to complete the installation.

Reinstalling Office removes all old Office 365 data and downloads the latest software version to help you fix the error. Our detailed guide will show you how to install Office in Windows 11.

Suppose you can’t update your Office application. In that case, you most likely have a faulty internet connection or don’t have permission to update the software due to group policy restrictions.

Luckily, with the steps in this article, you should be able to force update Office and fix the update error. If you have further questions or suggestions, kindly drop them in the comments section.

And don’t hesitate to take a closer look at our guide on solving Microsoft Office updating Office, please wait a moment error. If your update issues go beyond Office, you may want to force your Windows 11 system update to ensure everything’s running the latest version.

What is PC Bottlenecking? [Causes & Prevention]

You’ve likely encountered the term bottlenecking if you’re a PC gamer. It’s a complex term that infers you’re not getting the best performance out of your PC.

This article covers a comprehensive overview of computer bottlenecking, its signs, causes, and solutions. You can also check our recommended bottleneck calculators for accurate diagnosis.

What is computer bottlenecking?

A bottleneck is a term commonly used by PC gamers to describe a situation where one PC component restricts the performance of another component. A bottlenecked computer simply means that its performance is being limited by one of its hardware components.

Generally, a PC bottleneck involves three major components: the CPU, RAM, and the graphics card. During a bottleneck, if the graphics card is way more advanced than the CPU, its performance will automatically reduce to match the capacity of the central processing unit.

Here are some common examples of PC bottlenecking:

  • CPU/GPU bottlenecking – A PC with an average CPU paired with a powerful GPU will lead to bottlenecking due to slow performance. Thus, leads to high CPU and low GPU usage.
  • GPU/CPU bottlenecking – If your PC has a top-of-the-line CPU paired with a mid-range GPU, you’ll experience a bottleneck because the CPU will render the game much faster than the GPU’s capacity.
  • Hard drive bottlenecking – If you’ve upgraded your CPU, GPU, and RAM but are still sticking to an old hard drive, you’ll experience slightly slower loading times or stuttering when your program tries to pull information from the hard drive. 
  • Display bottlenecking – Pairing a graphics card with a below-par monitor will cause a display bottleneck because you won’t get the most from your hardware due to the poor monitor.
  • RAM bottlenecking – Running more applications at the same time, or not enough memory to run a single, more demanding game can lead to PC slowdowns or app crashes.

What causes bottlenecking on my PC?

  • Imbalanced hardware – If you build a PC with components with varying performance and capacities, you’ll likely experience a bottleneck due to the imbalance created by the components.
  • Outdated software – Hardware components like GPUs need software to function correctly. If this software is outdated, it can lead to performance issues, e.g., a bottleneck.
  • Viruses and malware – If your PC is infected, it can lead to high CPU usage and a bottleneck.

How to know if my computer is bottlenecking?

  1. Open a game or app that causes issues with PC performance and close all other tasks.
  2. Now, press the Windows key + X and select the Task Manager option.
  3. Click the Performance tab at the top.
  4. From here, check if any of the CPU, GPU, Memory, or Disk hits 100% consistently for a long period of time.
  5. If any of your core PC components hits maximum value for a long time, then it is the cause of bottlenecks on your computer.

MSI Afterburner is one of the most popular PC monitoring tools available today and can also be used for GPU overclocking. You can download and launch the software to see a detailed CPU and GPU performance log.

On average, anything below 50% utilization is considered low usage, while anything above 70% is high. If your CPU and GPU usage ranges from 50% to 70%, it’s balanced. 

How can I prevent PC bottlenecking?

1. Upgrade your PC Components

If you’re experiencing a bottleneck caused by an underperforming PC component, e.g., GPU, CPU, RAM, or hard drive, upgrading the component is the best way to fix the issue. This is because building a PC with components having an imbalanced performance ratio will lead to bottlenecks.

Balancing your PC isn’t a complex task; all you need to do is take stock of the type of hardware you’re running and contact the manufacturer for the corresponding type.

2. Scan for malware

  1. Press the Windows key, type in Windows Security, and hit Enter.
  2. In the Windows Security window, click on Virus and Threat Protection.
  3. Under the Current Threats section, click on Scan Options.
  4. Select the Full Scan option and click Scan Now to initiate the scan.

Viruses trigger high CPU usage in computers, which can be misinterpreted as a bottleneck. If your PC is infected with a virus, it’ll lead to a spike in CPU usage, leading to a bottleneck.

You can also check out our guide showing you the best antivirus tools for Windows in 2023.

3. Update drivers

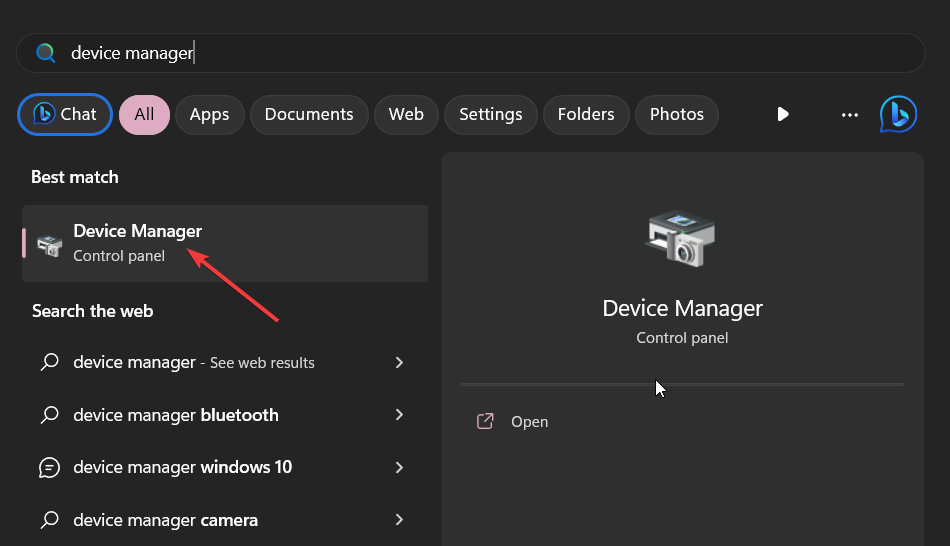
  1. Press the Windows key, type in Device Manager, and hit Enter.
  2. In the Device Manager window, scroll through the list of drivers, and check to see if there is a yellow alert symbol next to the option.
  3. Right-click on the driver, and select Update driver.
  4. In the next window, click Search automatically for updated driver software.
  5. Once you’ve updated all the drivers, restart your PC and check if the error is resolved.

Sometimes, you might experience a bottleneck if one component runs outdated software. Updating the drivers of such components can help fix PC bottlenecking.

Here is a detailed guide showing you how to install drivers manually.

4. Adjust in-game settings

If you’re experiencing a bottleneck while playing games, you can fix or prevent it by adjusting the in-game settings.

Lowering the graphics, resolution, and other settings can help balance the performance of all components on your PC.

Also, avoid running more apps at the same time and disable the ones you don’t use. It’s the most sensitive thing to do to avoid bottlenecking.

Most traditional Windows users don’t have to worry about bottlenecks and PC efficiency, but if you’re a gamer or a heavy user, you’ll often experience bottlenecks. Identifying and resolving bottlenecks are easy and can be done by applying the steps in this article.

If you’ve got other suggestions on preventing a bottleneck, please let us know in the comments.

Microsoft layoffs: Over 1,000 axed as sales and customer service division undergo transformation

In a recent development over the past week, tech giant Microsoft reportedly laid off over a thousand employees, overshooting its previously announced figure of 10,000 layoffs for this year. Sources privy to the circumstances, who chose to remain anonymous due to the delicate nature of the situation, revealed this to news outlet Insider on Wednesday.

Focus on Sales and Customer Service Departments

The bulk of the job cuts affected the customer service and sales positions, causing ripples and raising concerns throughout the industry. The move led to the dissolution of the “Digital Sales and Success” group, a sales and customer service team that once boasted of thousands of personnel.
However, the cleansing didn’t stop there. Microsoft also wielded the axe among engineering project managers and marketing departments.

The focus is more to accelerate consumption than it is to help customers. What was promoted as one of the largest customer service groups in the industry is now struggling to keep up with demand, said one source, as per Insider.

Customer Solutions Manager Role Dissolved

The noteworthy announcement was the dissolution of the customer solutions manager role, with Insider reporting that the employees affected were transferred to customer success account management. However, the number of employees who moved to this role was noticeably small compared to those whose positions were terminated.

Microsoft Leadership’s Silence

Two individuals who spoke to Insider claimed that many managers were kept in the dark concerning the layoff plans, pointing out a noticeable silence from Microsoft’s leadership team. The company’s chief commercial officer, Judson Althoff, faced criticism for his lack of transparency, specifically for not providing more details on the layoffs and a planned sales kickoff event this year. The information came to light through internal messages shared with Insider.

Specifically, an internal post directly connected to the event sparked a wave of speculation as an inquiry was lodged over whether the roles of the ousted sales team would be filled by AI tools.

Furthermore, in a recent Worker Adjustment and Retraining Notification (WARN) report, Microsoft disclosed its decision to let go 276 employees from its workplaces in Redmond and Bellevue, both located in Washington state.

Via Business Insider

Facebook isn’t Sending Your Security Code? How to Fix it

Getting an authorization code if you are trying to sign into your Facebook account with a different browser or device is an additional security feature that helps to protect your account. But, some of our readers have reported that Facebook not sending a code to log in.

Waiting endlessly for Facebook to send a security code can be frustrating and time-consuming. In this article, we will take you through how to fix the issue.

Why am I not receiving my SMS code from Facebook?

There can be several reasons why your SMS code from Facebook may not arrive. Below are some of the common reasons:

  • Facebook server issues – If there are Facebook server problems, users may not receive security codes to log into their accounts.
  • Outages with email or mobile network provider – Your email or mobile network provider may be experiencing outages or technical difficulties.
  • Incorrect credentials – You may have entered your phone number or email address incorrectly, leading Facebook to send the verification code to the wrong credentials.
  • Coverage problems – If you and your phone are in an area where you don’t have GSM signal, you will have problems receiving the code.

Above are some possible reasons why users may not receive Facebook security codes. Now that you know what causes the issue, let’s proceed to how to fix it.

How can I get Facebook to send a security code?

It would help if you considered performing the following preliminary checks:

Having confirmed the above checks, if you have other methods on how to get your Facebook security code, work your way through any of the methods provided below.

1. Use your security questions

  1. Go to the Facebook login page and click on Forgotten password.
  2. Enter the username or phone number to find your Facebook account.
  3. Then, choose the Security Questions option.
  4. Next, select the I’ll answer my security question option.
  5. Answer the asked security question correctly, and you will be taken to the Password reset page.
  6. Now, set a new password for your account to access it. 

Once you can answer your security question, you can recover your Facebook account without receiving login credential codes.

2. Use your Facebook trusted account

  1. From a computer, navigate to the account profile you’d like to recover.
  2. Click on the menu (three dots) icon below the cover photo.
  3. Select Find support or report profile.
  4. Choose Something Else, then click Next.
  5. Then, click Recover this account and follow the on-screen instructions to complete the recovery process.

To use this method, you must provide the necessary information to ensure the account belongs to you. You can get your Facebook code using trusted contacts.

3. Receive your code using WhatsApp

  1. Go to your Facebook login page and click on Forgotten password.
  2. In the space provided, enter your mobile number and click on Search.
  3. If your Facebook phone number is registered on WhatsApp, click on Try another way.
  4. Then, select Resend code to WhatsApp from the available options, then press Continue.
  5. Then, check your WhatsApp account for a message from Facebook with your code.
  6. Once found, enter the six-digit code in the space on the Facebook login page, and you’ll be back in your account.

To use this method, you must ensure your WhatsApp account is active and registered with the same phone number as your Facebook account.

You should now be able to find your security code in your email inbox or spam folder.

Further, having applied any of the methods provided in this guide, if the Facebook server is not experiencing downtime, you should be able to receive your security code and gain access to your Facebook account.

Also, if the Facebook app is not working on your PC, you can try logging into your Facebook account using Web browsers.

Should you have further questions or suggestions regarding this guide, kindly drop them in the comments section below.

Can’t Highlight in Microsoft Word: 4 Steps to Fix it

Microsoft Word can sometimes develop issues like any other computer program. Some of our readers have recently complained about how they can’t highlight in Microsoft Word on their Windows PC.

If you have been wondering why your Microsoft Word couldn’t highlight, this article will take you through the causes and detailed steps to apply to fix the issue.

Why can’t I highlight words in Microsoft Word?

You can’t highlight Microsoft Word documents on your PC for several reasons. The following are some of the possible causes:

  • Compatibility mode – It might be compatible if you’re working with an older version of a Microsoft Word document or a file saved in a different format.
  • Document protection – If a document is protected or restricted, it can affect the functionality and appearance of highlights by editing or formatting restrictions.
  • Insufficient permissions – If you’re working on a network or shared document and don’t have the necessary permissions to modify the file, you may be unable to highlight it in Microsoft Word.
  • Microsoft Word on dark mode – Dark mode has colors designed to work well in a low-lit environment. Using dark mode in Word may cause some highlight colors not to display clearly.

Now that you know some possible reasons why you can’t highlight on Microsoft Word, let’s proceed to how to fix the issue.

What can I do if Microsoft is not letting me highlight?

Before engaging in advanced troubleshooting tweaks, you should consider performing the following initial checks:

Having applied the above checks, if you require a detailed step-by-step guide on what to do to fix the error, you can explore the fixes provided below;

1. Adjust the highlight color in Registry Editor

  1. Left-click the Start menu, type regedit, and click the Run as administrator.
  2. On the Registry Editor, navigate to the following path: HKEY_CURRENT_USER\Control Panel\Colors
  3. Then, find and double click on the Hilight
  4. On the Edit String prompt, enter the RGB Color value and click on the OK button. E.g 102,255,25

Once you have adjusted the highlight color, try to highlight words in Microsoft Word again to see if the error has been fixed. Proceed to the next fix if it persists.

2. Disable compatibility mode in MS Word

  1. Right-click on the MS Word application and select Properties from the context menu.
  2. Go to the Compatibility tab. Uncheck the box next to Run this program in compatibility mode and select lower Windows version.
  3. Finally, press the OK button.

After disabling the compatibility mode in the Microsoft Word app, now try to highlight texts and see if the issue has been fixed. If not, proceed to the next fix.

3. Disable Word’s Protected View settings

  1. Open the MS Word app, then navigate to the File tab and click Options on the left pane.
  2. Select the Trust Center tab and press the Trust Center settings button.
  3. Next, click Protected View to open the options on the right pane.
  4. Uncheck three of the selected Enable Protected View checkboxes.
  5. Now, press the OK button to save the changes and close the Trust Center window.
  6. Click OK to exit Word Options.

After disabling Word’s Protected View options, you can now try to highlight texts in your Word app.

4. Reinstall Microsoft Office

  1. Left-click on the Start button and open Control Panel.
  2. Navigate to the Programs and Features section.
  3. Click on Microsoft Office and select Uninstall from the options.
  4. Now, restart your PC and install the latest Microsoft Office version available for Windows.

By reinstalling the Microsoft Office app, you should be able to eliminate application-related issues disallowing you from highlighting in Word. It will also help to update Microsoft Office to the latest version.

If your Word is experiencing an error while trying to open files, you can explore this guide for quick fixes to apply.

Similarly, our readers have recently reported that they can’t edit Word documents, but our detailed guide has helped a lot to fix the issue. You can also check it out.

With the steps provided above, you can now highlight your text in Microsoft Word. Do not hesitate to use the comments section below if you have any questions or suggestions.

Netflix App for Windows 10 & 11: How to Download & Install

If you have recently developed a liking for binge-watching movies and TV series, you might be interested in downloading and installing the official Netflix app on your Windows 10 & 11 computer to upgrade the viewing quality.

On Windows, by using the Netflix app you may watch 4K HDR with 5.1 audio (Atmos included). As you will find out below, Microsoft Edge also has Netflix 4K support, but no 5.1 audio, unfortunately.

How can I download and install Netflix on Windows 10 & 11? 

1. Download and install Netflix via Microsoft Store 

  1. Press the Windows key to launch the Start menu, type microsoft store in the search bar on top and click the relevant search result. 
  2. When the Microsoft Store loads on your screen, type netflix in the top search bar and pick up the Netflix app from the search results in the drop-down. 
  3. As soon as you are redirected to the Netflix app download page, click the Get/Install button on the top right to start the download. Download Netflix Windows
  4. As soon as the installation is complete, the installation of the Netflix app on your PC will begin automatically. 
  5. Once completed, press the Open button to launch the Netflix app. Alternatively, you can also use the Start menu to search for and launch the Netflix app. 
  6. Press the Get Started button on the welcome screen and followed by the Next button to view and purchase the plan that seems right for you. Netflix Download Windows
  7. If you already have a Netflix account, simply choose the Sign in option on the top right to proceed further. 
  8. Provide the email address and password and press the Sign in button again to enjoy your Netflix service on Windows.

Using the Microsoft Store is the easiest and hassle-free way to download and avail of the streaming service on your Windows 10 and 11 PC. 

2. Download and install Netflix as a PWA

  1. Press the Windows key, type microsoft edge in the search bar, and choose the relevant search result. Install Netflix Windows
  2. Visit the official Netflix website using the Chromium-based web browser on Windows PC.
  3. Click the Menu icon (three dots) located in the upper right corner of the Edge browser window.
  4. Choose the Apps option followed by Install this site as an app option from the drop-down menu. Install Netflix Windows
  5. Type the relevant name in the new popup and press the Install button.
  6. The Netflix website will be installed as a web app on your Windows device.
  7. Press the Allow button on the popup to grant any necessary permissions requested by the app.
  8. To launch the Netflix PWA on your system, type netflix in the search bar and click the search result. 

Note that the progressive web app version of Netflix will function as the desktop app. However, some of the native app features like downloading content to watch offline will not be available.

What are the common issues with the Netflix app? 

Netflix can occasionally encounter some common issues. Here is how you can quickly resolve them in minutes. 

  • Buffering and Playback Issues: Upgrade your Wi-Fi router, or use a cable connection instead.
  • Trouble downloading content: Make sure your device has enough storage space, confirm that the item can be downloaded, or try using a different device.
  • Playback errors: Rebooting your Windows computer or clearing the cache can occasionally be helpful.
  • Audio sync: Change the language several times to resolve the problem. Refer to this elaborate troubleshooting guide to fix audio sync issues.
  • Quality issue: A connection check or a change in the video quality settings can frequently assist.

That’s pretty much it! We hope our guide offers a detailed insight into the download and installation procedure of the Netflix app on Windows 10 and 11. 

If you encounter any problems in downloading Netflix on your system, refer to this guide for possible solutions. 

In case you have any queries, reach out to us in the comments section. 

How To Enable History in Task Scheduler: 2 Ways

Once you enable the History in Task scheduler, you gain access to a log of executed task. With this, you can monitor task execution, troubleshoot issues, analyze performance, and maintain audit traits.

It’ll help you make informed decisions for future task scheduling. These features help optimize system performance and ensure tasks run as intended.

We outlined below a few different ways to enable the Task Scheduler history, so make sure to check them out.

How do I enable history in Task Scheduler on Windows 11?

1. Use the Windows Task Scheduler app

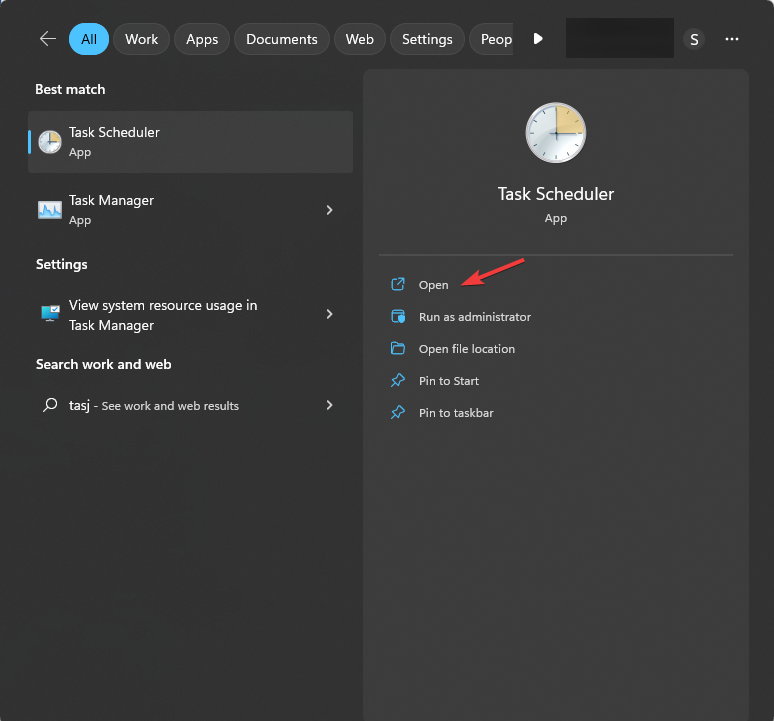
  1. Press the Windows key, type task scheduler, and click Open.Task Scheduler open via Windows button    
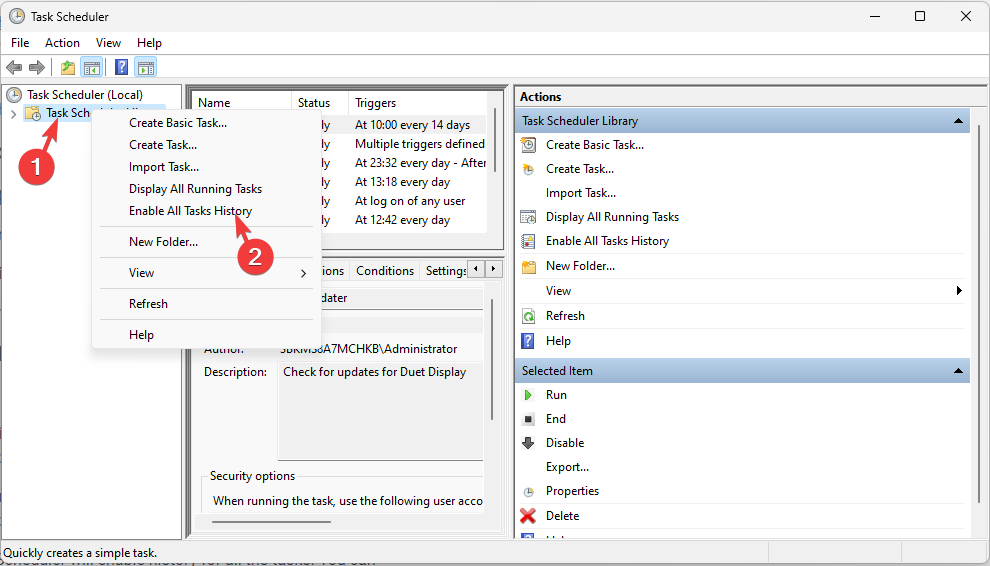
  2. Locate and right-click the Task Scheduler Library folder, then select Enable All Tasks History.Enable all  
  3. Once enabled from the actions tab, the next time a task runs, it will be recorded in the History tab.

2. Enable Task History using Command Prompt

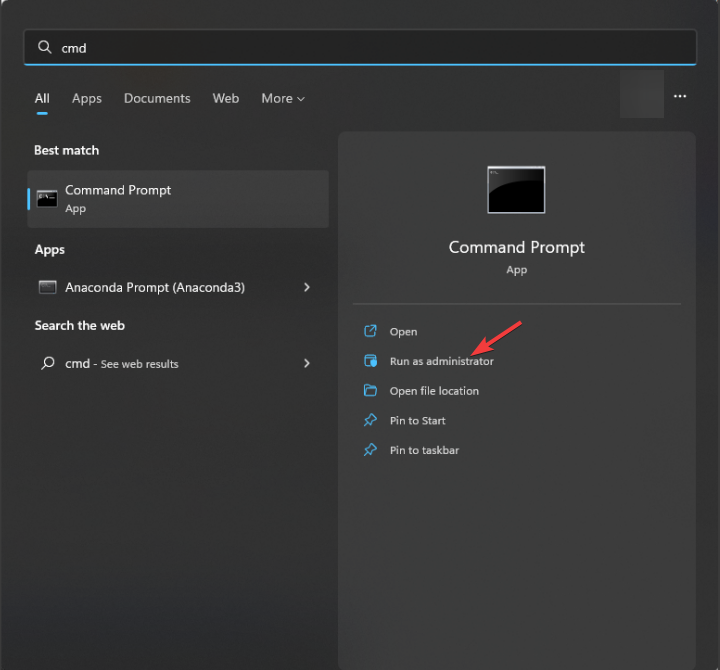
  1. Press the Windows key, type cmd, and click Run as administrator.CMD elevated  
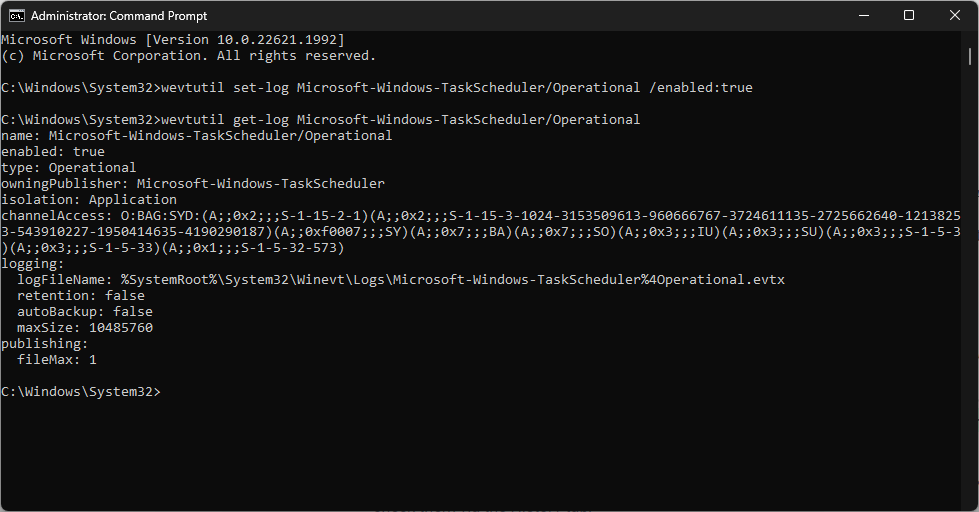
  2. Copy & paste the following to enable task history on Task Scheduler and hit Enter: wevtutil set-log Microsoft-Windows-TaskScheduler/Operational /enabled:true
  3. Type the following to confirm that the feature is enabled and press Enter: wevtutil get-log Microsoft-Windows-TaskScheduler/Operational Enable task history
  4. After executing these commands, Task Scheduler will enable history for all the tasks. You can check them via the History tab.

Using Command Prompt to enable Task History is only advised if you know how to use and work on the command line interface.

How can I view task history in Task Scheduler?

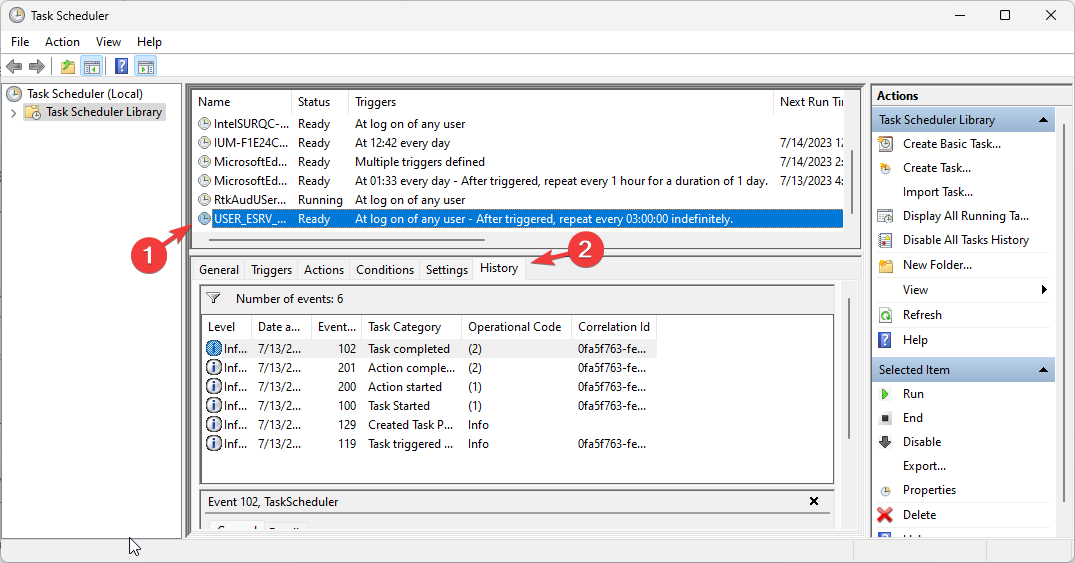
  1. Press the Windows key, type task scheduler, and click Open.Task Scheduler open
  2. Select the task from the list in the middle pane and go to the History tab.View Task history - Enable Task history in Task Scheduler  
  3. You can find the details of the task, including the execution, status (success or failure), exit codes, and other related information.

Why is it important to regularly check task history?

Regularly checking task history in Task Scheduler holds significant importance; some of them are:

  • Checking task history allows you to verify that critical task events have been executed as intended.
  • It ensures that important operations like backups, system maintenance, or data synchronization tasks run as scheduled.
  • Identifies patterns of failed or incomplete tasks, investigates their causes, and takes appropriate corrective actions.
  • Analyzes execution times, durations, and resource usage that can help determine any performance bottlenecks or areas for optimization.
  • Monitors task executions can help identify recurring issues, unexpected failures, or inconsistencies affecting the system’s stability.
  • The history log helps identify peak usage periods, assess resource availability, and plan accordingly.

How can I locate task history within Event Viewer?

Task Scheduler allows you to schedule and automate tasks. Event Viewer acts as a centralized event log repository, capturing a wide range of system events, including scheduled task history.

By leveraging both in-built Windows tools, you can have a more holistic view of the system’s activities and performance. Here is how you can view task history via the Event Viewer app.

  1. Press the Windows key, type event viewer, and click Open.Event Viwer open
  2. Navigate to this path: Applications and Services Logs\Microsoft\Windows\TaskScheduler\Operational Event Viewer
  3. Once you’ve located the task history log within Event Viewer, you’ll get a list of individual events related to task executions.
  4. You can check the date & time, Task status, details, results, error codes, and task actions.

 Why should I secure Task Scheduler?

Administrative permissions are crucial in securing Task Scheduler app and controlling the History feature. Here’s a brief overview of their importance:

  • Ensures that only authorized users can create, modify, or delete tasks, minimizing the risk of unauthorized or malicious activities within the scheduler.
  • Only you or other users with administrative privileges can modify task settings, including the option to turn history tracking on or off.
  • Control access to this sensitive data and ensure only authorized individuals can view, modify, or delete the task history logs. 
  • Reduces the chances of unauthorized individuals tampering with task settings, executing malicious code through tasks, or gaining unauthorized control over critical system operations.

If you are looking for a way to schedule tasks on Windows 10, we recommend you check out this guide.

Please feel free to give us any information, tips, and your experience with the subject in the comments section below.

Meta, Microsoft, Vodafone complete Amitié subsea cable, connects Europe and North America

According to TotalTelecom, Aqua Comms, Meta, Microsoft, and Vodafone have completed the Amitié subsea cable system, establishing the first direct connection between Boston to Europe and Bordeaux to North America. The trans-Atlantic system, spanning 6,783 km (4,215 miles) and built by Alcatel Submarine Networks, has landings in Lynn, Massachusetts; Widemouth Bay, England; and Le Porge, France. With 16 fiber pairs and 400 Tbps, Amitié becomes the highest capacity transoceanic communications cable ever deployed.

This isn’t the only collaboration between Meta and Microsoft, as earlier this week, both these parties joined forces to bring Llama 2 language models to Azure and Windows.

The system enhances connectivity options in the US, the UK, and France, allowing direct communication from Boston to London and introducing a new Carrier Neutral Data Center in Bordeaux. This ensures improved reliability with protected capacity on diverse routes.

A notable feature is the innovative branching unit situated 860 km from France and 650 km from the UK, enabling the switching of individual optical wavelengths or the full fiber capacity via two different switching technologies. Andy Hudson, Chief Network Officer at Aqua Comms, stated that Amitié adds a third high-capacity system to their transatlantic network, offering enhanced diversity for US and European customers.

Subsea cables like Amitié can positively impact national and regional economies, fostering the development of terrestrial fiber and local economic growth.

Amitié is now fully commissioned and tested, having been handed over to Aqua Comms, Meta, Microsoft, and Vodafone on July 16, 2023. The project was constructed under a Joint Build Agreement between the four partners, cooperating with the supplier and the landing providers.

Microsoft’s Activision acquisition nears conclusion as the FTC suspend in-house complaint

As Microsoft and the UK’s Competition and Markets Authority begin the process of hammering out concessions towards the likely approval of an eventual Activision acquisition, the US Federal Trade Commission is pausing its own in-house complaint.

Microsoft and the FTC were set to meet August 2, 2023, in front of an administrative judge in a bid to stop the multibillion-dollar acquisition of Activision, but as it stands, the regulatory body is suspending its administrative challenge without a rescheduled date earmarked on the calendar.

Following the rejection of a temporary restraining order and preliminary injunction against Microsoft’s bid to acquire Activision, as well as losing an appeal on an emergency hold against the two companies merging, the FTC has seemingly rethought its approach to blocking the largest game-related merger in recent years.

The FTC remains free to refile its complaints at a later time if it so chooses but as the CMA and Microsoft looks to try and wrap of the re-review of the acquisition by a new extended purchasing timeline of October 18, 2023, it feels doubtful that the FTC revisits a suspension over the next few months.

As Microsoft rounds the corner on its $62.B deal with Activision, the company will be doing so with fewer hurdles, and today’s FTC news is yet another problematic obstruction being removed from the company’s pay the deal going forward.

Can the open-source community achieve AGI AIs with Llama 2?

Could Llama 2 somehow encourage the open-source community to work together toward achieving AGI? Well, one can dream, but the Microsoft-Meta AI partnership is definitely a big step for it.

If you don’t know, at the Microsoft Inspire Conference 2023, something really exciting for the AI community happened.  Microsoft joined forces with Meta to form an AI partnership with Llama 2.

Today, at Microsoft Inspire, Meta and Microsoft announced support for the Llama 2 family of large language models (LLMs) on Azure and Windows. Llama 2 is designed to enable developers and organizations to build generative AI-powered tools and experiences. Meta and Microsoft share a commitment to democratizing AI and its benefits and we are excited that Meta is taking an open approach with Llama 2. We offer developers choice in the types of models they build on, supporting open and frontier models and are thrilled to be Meta’s preferred partner as they release their new version of Llama 2 to commercial customers for the first time.

Microsoft

And so Llama 2 made its way into the world. It will be open-source and it makes it possible for developers and organizations to build generative AI tools and generative AI experiences. Plus, you’ll be able to fine-tune and deploy diverse Llama 2 models into your own AI tools. You’ll have at your disposal Llama 2 variants that can reach a 70B-parameter limit.

That means a lot of training and even more context length than ever before. And with Microsoft AI models, such as LongMem, one could wonder if we can truly achieve AGI now.

Achieving an open-source AGI with Llama 2

If you don’t know, AGI stands for Artificial General Intelligence, and it equals the human mind. In other words, an AI with AGI will be exactly like a human person. It will be able to think by itself, make conscious decisions, and rationalize events. Just like you do.llama 2 open source

AGI and ASI (which stands for Artificial Super Intelligence) have been the subject of discussions when it comes to AI. For example, the recently-founded Superalignment project aims to achieve AGI four years from now. They say once that is done, ASI will soon follow, and a lot of humanity’s problems will quickly be solved.

So are there other ways? Well, Llama 2 is an incredible model. There is no doubt Meta and Microsoft will update it even further, and if it’s open-source, then people can actually build more performant AI models as time goes on.

With such an increased volume of parameters, Llama 2 can offer developers the tools and training to create AI models that can be trained to surpass the volume. They will also be able to come up with new ways to engage, train, and learn.

The open-source community will learn only if it will keep being open-source, and let other people improve on their AI models.

And if projects such as Superalignment collaborates with Meta and Microsoft, then AGI will be here even sooner.

Llama 2 is really a breakthrough in AI because it democratizes the way we all interact with it. While the future might seem scary with an AGI AI, there are possibilities to make this right.

What do you think? Let us know your thoughts and opinions in the comments section below.

How to Easily Use Your Phone as a Keyboard For A Tablet

Suppose you own both a smartphone and a tablet. In that case, you can efficiently utilize your phone as a keyboard for your tablet, eliminating the need for a physical keyboard and enhancing your typing experience.

This guide will walk you through various methods to effortlessly type text, control your tablet remotely, or enjoy a larger keyboard.

How can I use my phone as a keyboard for my tablet?

Before engaging in advanced troubleshooting steps, you should consider performing the following checks:

  • Ensure that your phone and tablet are compatible with the method you plan to use.
  • Android: 4.4 or higher, iOS: 9 or higher, iPadOS: 13 or higher.
  • Make sure your phone and tablet are connected to the same Wi-Fi network.
  • Both devices should have Bluetooth capabilities and be enabled.
  • Confirm that your phone and tablet have compatible operating systems.
  • Grant permissions for network access on both devices

Once you are through these, move to the steps to use the phone as a keyboard.

1. Set up the Bluetooth connection

  1. Open the Settings menu on your tablet and locate Bluetooth, then toggle the button to enable it.Enable Bluetooth use phone as keyboard for tablet
  2. Now tap Pair new device.
  3. On your phone, tap Settings, enable Bluetooth.
  4. Tap on Pair new device or Pair. Your tablet should detect your phone as a nearby device. Tap on it to initiate the pairing process.Pair device
  5. If you see a prompt on your phone to confirm the pairing request, accept it.
  6. Once the pairing is successful, move to the next section.

2. Use a third-party app

  1. Download the Serverless Bluetooth Keyboard & Mouse app on Android from the Google Play Store.Install
  2. Tap on Yes on the UAC prompts for smooth operation.
  3. Once installed, open the app on your device and click Setup Remote Device.Configure connection
  4. Select the tablet or iPad’s name to initiate establishing the connection and click Use this device.USe the device How to Easily Use Your Phone as a Keyboard For A Tablet
  5. Now place your tablet and check if you get a mouse-like icon and notice movement; tap on It’s moving option on your phone.
  6. On the app on your phone, you can click Settings to customize the Keyboard settings.Settings keyboard
  7. Once set up, you can click on the Keyboard or Mouse icon to switch between them and use your phone as a mouse and keyboard for the tablet.Select Keyboard icon

You can use many other apps to connect the devices and use your smartphone as a keyboard, but we tested the one above, and it worked perfectly.

So, these are the steps you can follow to easily use your Android phone as a keyboard for the tablet, giving you comfort and versatility within a few steps.

If you are looking for step-by-step instructions to use your phone as the keyboard on your PC, we recommend you check out our detailed guide. We also have a guide on using the iPhone as a webcam on Windows 11, so don’t miss it.

Please feel free to give us any information, tips, and your experience with the subject in the comments section below.

How to enable Sydney Bing AI on Windows 11’s Copilot

You might not be aware, but Bing AI has a secret personality, Sydney, and Microsoft has been testing it out for years, according to The Verge. In fact, Sydney is not a personality, per se, but merely a sort of Bing prototype, which was used in the past for the Redmond-based tech giant to experiment on.

But it seems parts of Sydney still remain in today’s Bing AI, and with the release of Copilot on the Windows Insider Program channels, you can enable it to become Sydney.

As you might know, users have found that Windows 11’s Copilot is based on Bing AI, and Copilot itself uses Edge when interacting with you. So it is perfectly reasonable to find some old Bing AI parts in Copilot today.

And guess what? You can do it. You can actually enable Sydney Bing AI chatbot in Windows 11’s Copilot. It’s not complicated and we’re going to show you exactly how.

Here’s how you can enable Sydney Bing AI chatbot on Windows 11’s Copilot

For this to work, first you need to be in the Windows Insider Program. You can easily register to be a part of it, and it only takes a couple of minutes, a restart, and a Windows Update.

So, assuming you have done this already, here’s what you have to do:

  1. Go to the Windows Insider Program, and switch to the Dev Chanel, if you’re not on it already.sydney bing ai chatbot
  2. Update your Microsoft Edge to the latest version possible.
  3. Download the ViveTool GUI exe from here. Don’t worry, it’s all good.
  4. Run the installer and install it.
  5. Open ViveTool GUI, and select 23493.1000.sydney bing ai chatbot
  6. Enable the following features one at a time: 44774629, 44850061, 44776738, 42105254.
  7. Then, restart your computer.
  8. And there you have it. When you open your Windows 11’s Copilot, the Sydney Bing AI chatbot should be greeting you.sydney bing ai chatbot

Sydney Bing AI chatbot will use the internet as well, to provide you with answers, but it seems the tool is far more carefree than Bing AI, and Copilot.

However, it’s still an interesting tool, and it might give you a sense of what Microsoft was thinking about AI several years ago.

Will you try it? If so let us know in the comments section below your thoughts and opinions on this Bing AI prototype.

IPTV Error Code 403: How to Quickly Fix It

In the world of modern television, IPTV (Internet Protocol Television) has gained immense popularity due to its convenience and flexibility.

However, like any technology, IPTV is not immune to occasional errors, and one common issue that users encounter is error code 403.

In this article, we will delve into the meaning of IPTV Error Code 403, explore the possible causes behind it, and provide you with effective solutions to quickly fix it.

How can I fix the error code 403 on IPTV?

Before engaging in advanced troubleshooting steps, you should consider performing the following checks:

  • Check your login credentials.
  • Restart the app and the computer.
  • Disable your VPN.
  • Check the server outage for your IPTV provider.
  • Verify your internet connection is stable.
  • Try to play another video to ensure it isn’t a video-specific issue.
  • Verify if you have the subscription.
  • Contact your ISP to narrow down the reasons.

Once done, move to the troubleshooting solutions to fix the issue.

1. Disable the Firewall

  1. Press the Windows key, type control panel, and click Open.
    Control Panel start menu IPTV Error Code 403
  2. Select Category as View by & click System and Security.
    System and Security
  3. Click Windows Defender Firewall.
    Windows Defender Firewall
  4. Now click Turn Windows Defender Firewall on or off link from the left pane.
    Turn off Defender
  5. For Private network settings, click Turn off Windows Defender Firewall (not recommended), then for Public network settings, select Turn off Windows Defender Firewall (not recommended).
    Disable Firewall
  6. Click OK.

Now try to check if the error appears again; if yes, follow the solutions mentioned below. You must turn on the Firewall once the issue is resolved.

2. Clear app cache or browser cache

Note icon NOTE
If you are using the browser to access the IPTV, you need to clear caches and cookies to fix the problem.

2.1 Clear the app cache

  1. Press Ctrl + Shift + Esc to open Task Manager.
    End Task IPTV Error Code 403
  2. Go to the Processes tab, right-click the app, and choose End task.
  3. Press Windows + I to open the Settings app.
  4. Go to Apps, then click Installed apps.
    Apps, installed apps
  5. Locate the app, click three dots, and select Advanced options.
    Advanced options
  6. Click Reset to clear the saved data for the app.
    Reset

Once done, restart the IPTV app and check if the issue persists.

2.2 Delete the Browser cache

  1. Launch the browser, click three dots, and select Settings.
    Settings CHrome IPTV Error Code 403
  2. On the Settings page, click Privacy and Security.
  3. Choose Clear browsing data.
    Clear cache Chrome
  4. Now select Time range as All time, and choose Browsing history, Cookies and other data, & Cache images and files.
  5. Click Clear data.

Now restart your browser and check if the issue persists.

3. Reinstall the app

  1. Press Windows + I to open the Settings app.
  2. Go to Apps, then click Installed apps.
    Apps, installed apps
  3. Locate the IPTV app, and click Uninstall.
    Uninstall IPTV Error Code 403
  4. Once done, go to Microsoft Store.
  5. Now search for the app in the search bar.
    Install IPTV
  6. Click Get and let it get installed.

What is error code 403 on IPTV?

IPTV error code 403 is derived from the HTTP status code 403 & refers to an error message that appears when attempting to access certain content or channels on an IPTV service.

The error code signifies that the server has understood the request but is refusing to fulfill it due to access restrictions or authorization issues.

Essentially, it means that the user does not have the necessary permissions to access the requested content.

What causes a 403 error?

IPTV error code 403 can occur due to several reasons, and understanding these causes is crucial in effectively troubleshooting and resolving the issue. Here are some of the common causes:

  • Access restrictions – If you’re trying to access content that is not available in your region or without the appropriate subscription, the IPTV server restricts access to it, causing the error.
  • Server overload – This typically happens when IPTV is experiencing a high volume of traffic, and during peak usage times, then it may respond with Error Code 403.
  • Network firewall or proxy settings -In some cases, a network firewall or proxy settings can interfere with the communication between your device and the IPTV server.
  • IP ban or blacklisting – If your IP address is associated with suspicious or unauthorized activities, violating the service’s terms and conditions, the IPTV service provider may flag your IP.
  • Software issues – Outdated or incompatible software or firmware on your IPTV device or application may fail to establish a secure connection with the server, resulting in the error.

So, these are the methods you can use to fix the error code 403 on IPTV. If nothing worked for you, you must contact the IPTV service provider.

Other IPTV problems you may run into include connectivity and access issues. For example, if your streams won’t load, your ISP could be blocking IPTV, especially if you’re using certain apps or services.

Poor network performance can also lead to IPTV not working on Wi-Fi, so it’s worth checking your router and signal strength. If the TV guide is missing, you’re likely dealing with IPTV not showing the TV guide, which may require refreshing your EPG source. You might also come across error codes like IPTV error 401.

If you are looking for solutions for issues like IPTV not working, we recommend you check out this informative guide.

Please feel free to give us any information, tips, and your experience with the subject in the comments section below.

Xbox X sales are through the roof thanks to old COD servers

As you can remember, last week brought some excellent news for Call of Duty players everywhere. Microsoft finally fixed the old Call of Duty game matchmaking on Call of Duty 4: Modern Warfare, Modern Warfare 2, and Modern Warfare 3. They were fixed on Xbox 360 and players could once again play multiplayer matches.

Previously, these games’ matchmaking wouldn’t work at all, despite the huge number of active players still present in the games.

Spotted by this Twitter user, it seems that you can now find players in matchmaking very easily and it shouldn’t take more than 30 seconds to play the multiplayer matches.

Following the fix by Microsoft, Xbox 360 Call of Duty games ended up being the top-selling games in the Xbox store, according to The Verge.

People are reporting Xbox Series X’s being sold out in stores

Not only have Xbox 360 Call of Duty games became the top-selling games in the Xbox store, but it seems that Xbox S consoles are sold out in stores. People are reporting that you are no longer able to find Xbox X consoles in stores, in specific areas such as New York City area.

Apparently, none of the GameStops in the area have brand new Series X consoles in stock, according to a user on Twitter.

Xbox X consoles sales on Amazon have also risen by 84%, according to another tweet from Xbox News.

If Microsoft has something to learn from this is that a lot of people are very passionate about older games. Shadowrun, another old Xbox game, was also fixed and people reacted positively about it. So maybe, it’s time for Microsoft to consider bringing back older games to the newer Xbox consoles.

Should we thank the Microsoft-Activision deal for the old CoD games matchmaking?

Well, the timing couldn’t be more perfect. Just last week, Microsoft was handed the green in the case with FTC; the Redmond-based tech giant is now free to close the deal with Activision-Blizzard, despite the FTC’s attempts to block it.old cod games matchmaking

So, while this might be merely a coincidence, Microsoft might be preparing something here. Maybe once the deal is done, we may see Call of Duty games on Xbox Game Pass at some point in the future.

Who knows? But the recent fixing of the old Call of Duty games on Xbox 360 might very well point that Microsoft is ready to handle a lot more Call of Duty games from now on.

For now, though, if you were nostalgic about some fun multiplayer Call of Duty sessions, head over, plug in your Xbox 360, and have some good old fun, as they say.

And tell us all about it in the comments section below.

Adobe Media Encoder Is Not Installed: How to Fix This Error

Multiple users have reported that when they are trying to export or upload a video, they are getting the Adobe Media Encoder is not installed. This issue prompts up even after restarting the application.

In this guide, we will give you some solutions that will help you resolve the Adobe Media Encoder is not installed error message. Let us get right into it.

What is Adobe Media Encoder?

If you make use of Adobe products, such as Adobe Photoshop, Adobe Premiere Pro, After Effects, or any other programs, then it requires the Adobe Media Encoder to ingest, create proxies, transcode, output, and publish the media if any format.

Basically, the Adobe Media Encoder in simple terms is a powerful tool that can convert your audio or video files in various formats to make the content playable on different devices.

It is an essential component of the Adobe Creative Cloud suite and in case the Adobe Media Encoder is not working or is missing, you will come across issues such as not being able to publish or distribute the media.

Moreover, it is very important as users can send their projects directly across the Adobe suite of programs without having the need to save or export projects manually.

Why am I seeing the Adobe Media Encoder is not installed error?

We did our research and after going through multiple user reports, we have deduced a list of the most common reasons why you are seeing the Adobe Media Encoder is not installed error.

  • Corrupt installation – Installations if corrupt, can cause multiple issues as important files related to the program go missing.
  • Not available in the default location – The Adobe Media Encoder should be present in the default location. In case it is not, then it could cause issues such as the one at hand.
  • Outdated programs – Chances are that you are running an older version of the Adobe program which is why there is a compatibility issue with the Media Encoder.
  • Corrupt temporary settings – There is also a possibility that the corrupt temporary files or settings are the reason for the Adobe Media Encoder is not installed error.
  • Media Encoder isn’t installed – You might have missed installing the Adobe Media Encoder, which is why you are getting the genuine error message.

Let us now check out the solutions that will help you resolve the problem at your end.

How to Fix the Adobe Media Encoder Is Not Installed?

1. Install the Media Encoder

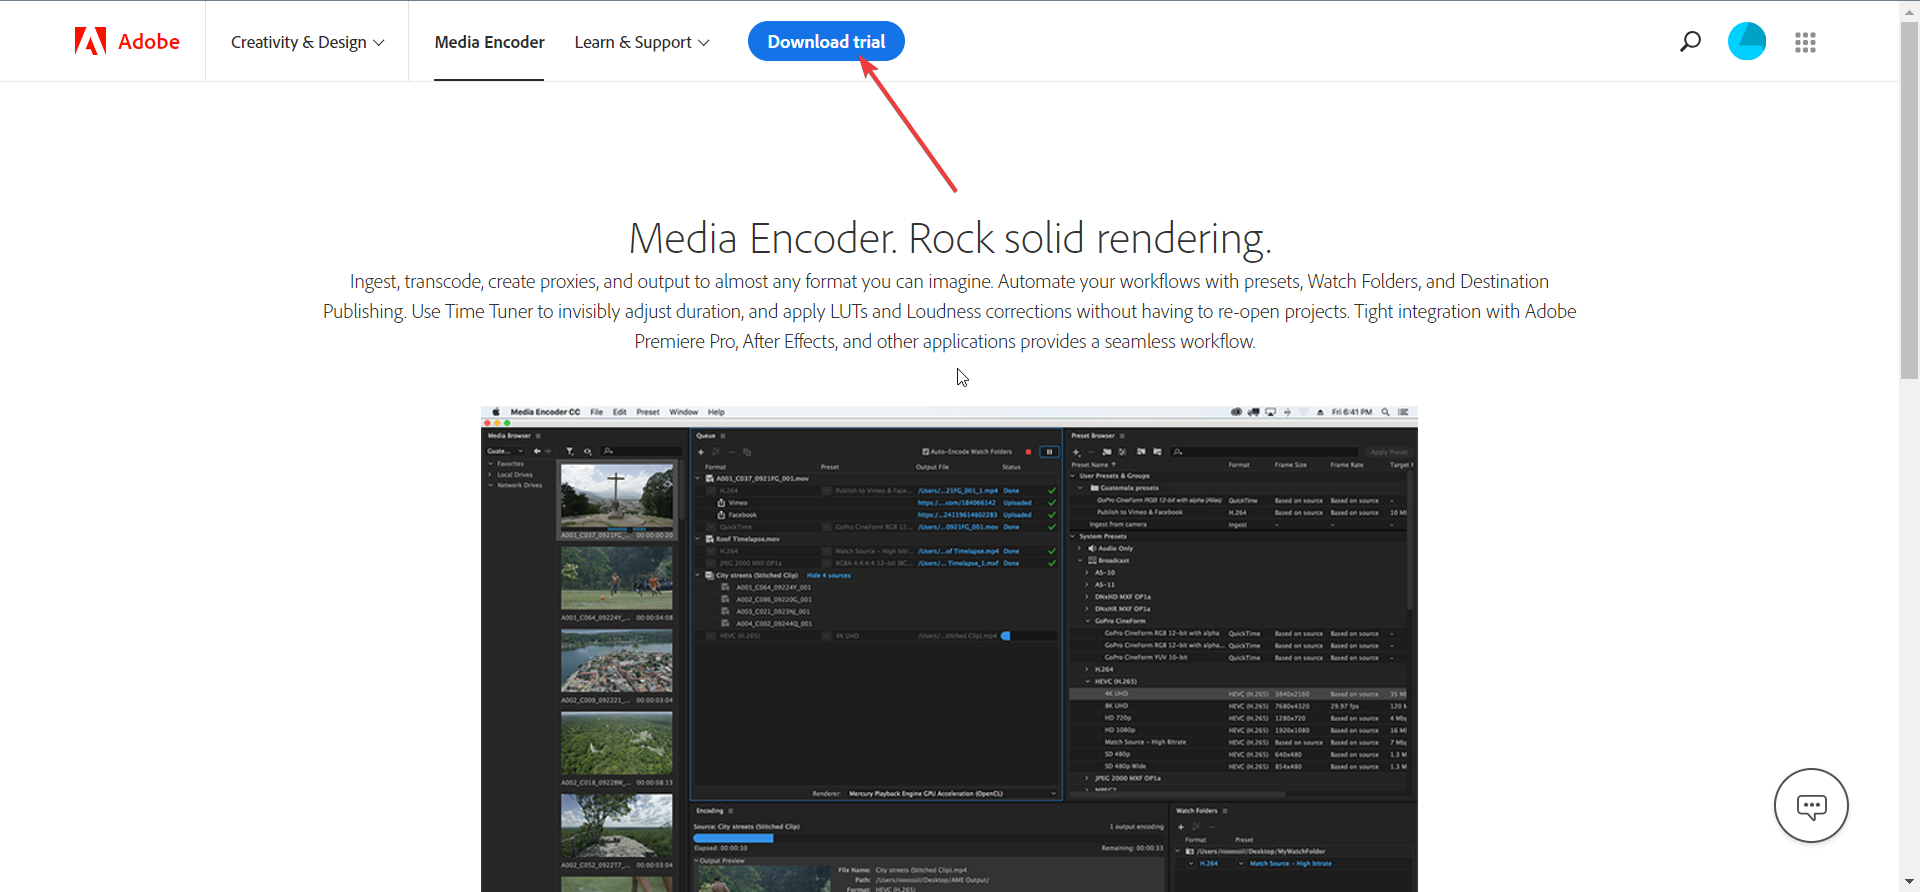
  1. Visit the official website of the Adobe Media Encoder.
  2. Download the EXE file on your computer.  
  3. Double-click on the executable file and install the Media Encoder on your PC.

The error could be genuine and you did not to install the Adobe Media Encoder. This is why you are getting the Adobe Media Encoder is not installed error.

2. Update the Adobe Media Encoder

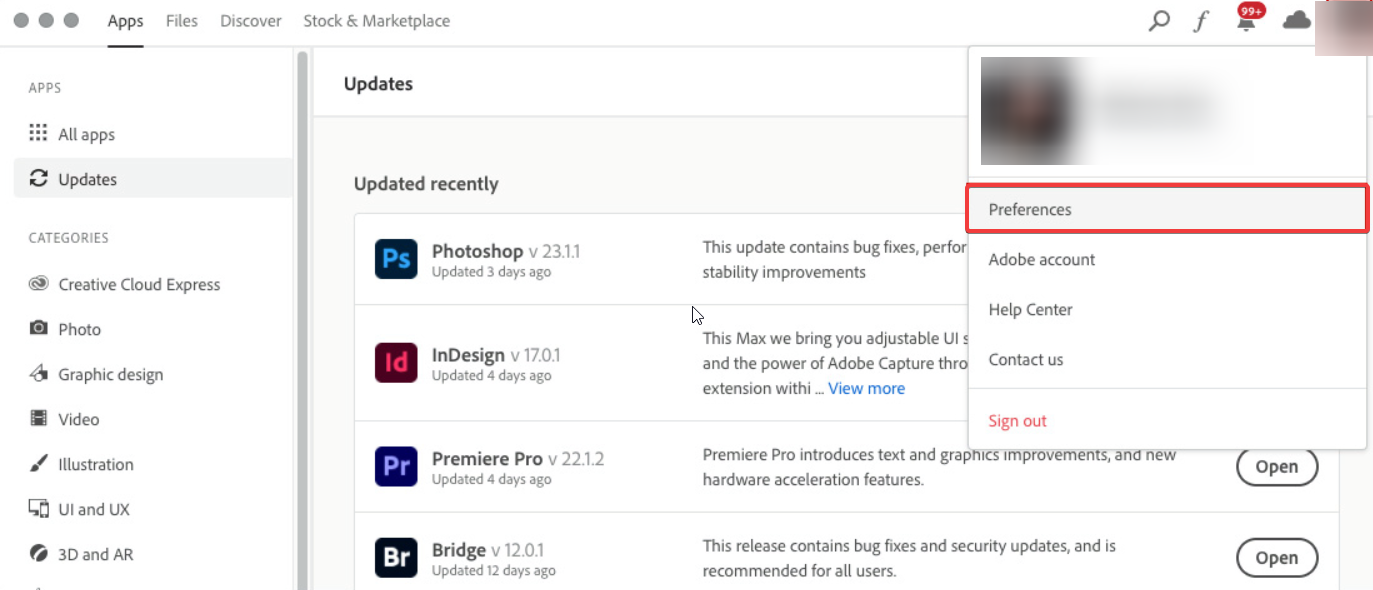
  1. Launch the Creative Cloud Desktop app.
  2. Click on the account icon and select Preferences.
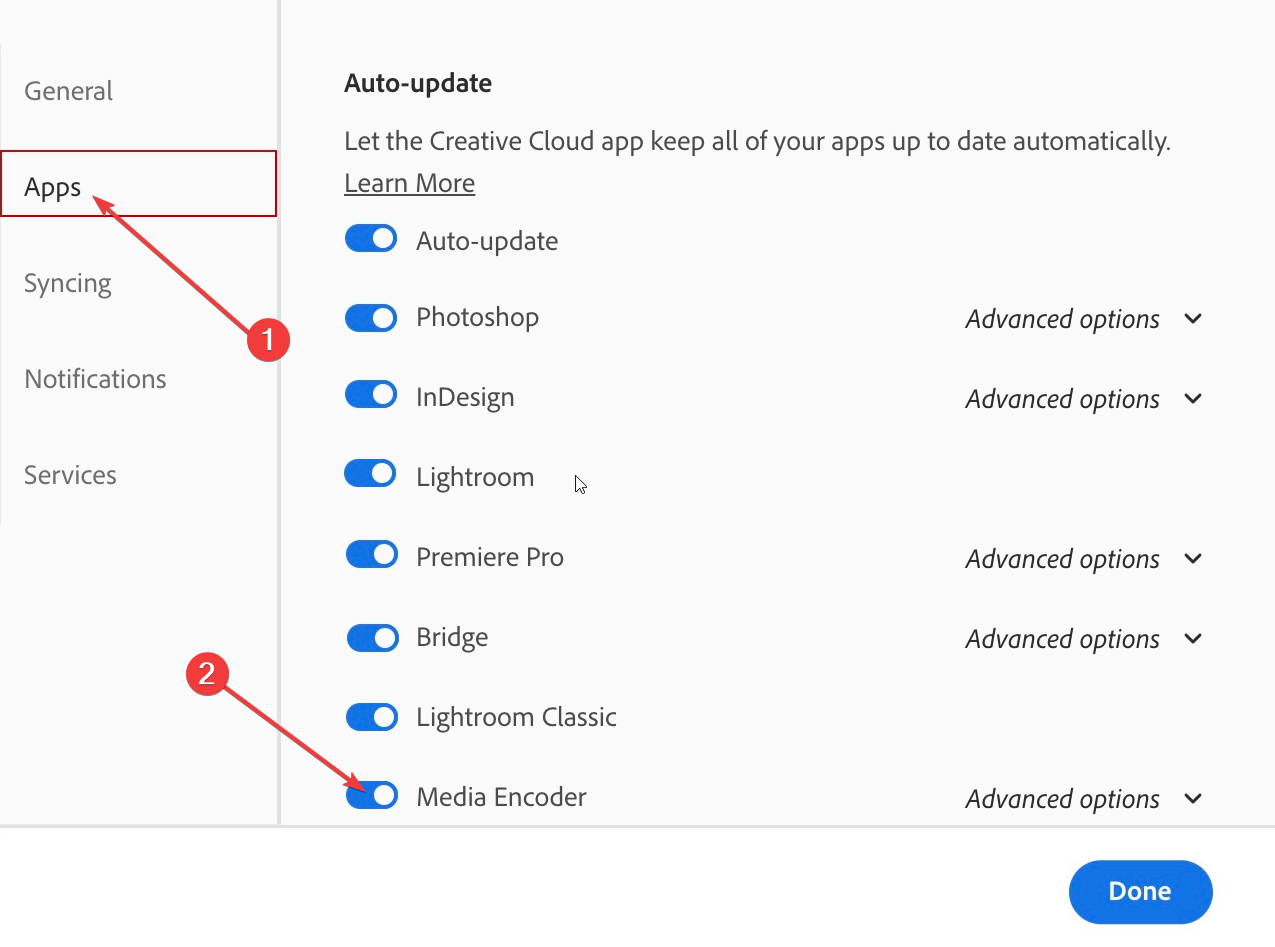
  3. Click on the Apps tab on the left pane and toggle on the Auto-update for all apps of Adobe software. However, make sure to toggle on the Auto-update option for Media Encoder.
  4. Hit the Done button to apply the changes in Creative Cloud.

Make sure to update all of your Adobe suite of apps. Also, the Adobe Media Encoder should run the latest version as well.

3. Remove Adobe Media Encoder temp settings

  1. Navigate to each of the following directories:
    • C:\Users\[username]\AppData\Roaming\Adobe\Common\AME\[version no.]
      C:\Users\[username]\AppData\Roaming\Adobe\Adobe Media Encoder\[version no.]
      C:\Users\[username]\AppData\Roaming\Adobe\Common\Media Cache
      C:\Users\[username]\AppData\Roaming\Adobe\Common\Media Cache Files
  2. Move the content of the folders to another directory.
  3. Reboot your PC and check if this fixes the issue or not.

4. Reinstall in the correct location

  1. Visit the official website and download the Creative Cloud Uninstaller for Windows.
  2. Extract the contents of the ZIP file and run the EXE file.
  3. Select the Uninstall option.
  4. Sign in to the Creative Cloud website and download the Creative Cloud desktop app.
  5. Double-click the downloaded file to begin the installation.
  6. Make sure to select the location as: C:\Program Files\Adobe
  7. Restart your computer and check if this fixes the issue or not.

5. Change the order of installation

  1. Open the Settings menu by pressing the Win + I keys.
  2. Select Apps from the left pane.
  3. Select Installed apps.
  4. Locate Adobe Media Encoder, hit the 3-dot menu icon, and select Uninstall.
  5. Follow the same procedure to uninstall the Premier Pro and restart your PC.
  6. Now, Install Adobe Premier Pro first.
  7. The Media Encoder will install automatically without any input from you.
  8. Restart your PC and check if this fixed the issue or not.

How do I export without Adobe Media Encoder?

  1. After editing your video, press Ctrl + M on your keyboard.
  2. Select the desired format, preset, and other video settings.
  3. Hit the Export button.

That is it from us in this guide. Besides, learn how you can fix Adobe Premiere not exporting videos.

Moreover, we also have a guide with solutions that will help you fix the problem of Adobe After Effects running slow.

Let us know which one of the above solutions fixes the Adobe Media Encoder is not installed issue.

Controlling Edge from Bing Chat might be Microsoft’s next move

We all know just how good Bing Chat is. Microsoft has invested a lot of resources in this AI tool, and it shows. For example, Bing Chat is able to give its input on visual info that you provide. Some users were afraid that Microsoft has made Bing Chat too restrictive, but others don’t agree at all with it.

Either way, Bing Chat is riding a high wave of popularity. The AI tool was visited by no less than 1.5 billion users this year so far. So it’s safe to say Bing Chat is here to stay.

And it seems Microsoft agrees too because the Redmond-based tech giant is apparently using Bing Chat to control Edge, the Microsoft web browser.

Spotted by the Windows enthusiast @Leopeva64, it seems that it will be possible for you to control Edge from the Bing Chat pane. In the same way, Copilot will be able to control Windows 11.

This is how you could control Microsoft Edge from Bing Chat

It seems that for now, this experimental feature is on the Edge Canary Channel in the Windows Insider Program.

But you could control Microsoft Edge from your Bing Chat, by simply typing written commands into it. And Bing Chat will follow those commands and will complete them.

For example, @Leopeva64 is typing down v tabs into the Bing Chat, and Bing then changed the tabs to vertical tabs. Bing Chat will then respond that it changed the tabs to vertical tabs, but you can always change them back in Settings.control microsoft edge from bing chat

Then @Leopeva64 managed to get some other commands to control Edge from Bing Chat. For example, typing down hor tabs will change the tabs to horizontal tabs. Typing down down hub will prompt Bing Chat to open the downloads hub on Edge. Even more, typing down ext hub will prompt Bing Chat to open the extension hub on Edge.

You’ll be able to use voice chat commands as well

As spotted by Windows enthusiast, @Leopeva64, you can use voice chat commands to change the settings of your Microsoft Edge from Bing Chat as well.

This feature would allow you to set up your Edge much faster, than just typing down the commands. For now, the feature exists in Edge Canary, but it will be released to live servers somewhere in the near future.

It’s clear that the Redmond-based tech giant has plans to fully use Bing Chat within Edge, to ease your access to the internet, and browse it however you want to do it.

What do you think about it? Would you like such a feature on Windows 11 or not? Let us know in the comments section below.

Sort & Organize Photos by Date Taken on Windows Without Extra Apps

If your photos on Windows are all out of order, you’re probably looking for a way to sort them by the date they were actually taken, not just when they were saved or copied.

Whether you’re on Windows 10 or 11, there’s a quick way to organize your pictures by date taken using built-in tools. This guide will show you how to do it step by step, without needing any extra software

How can I sort my photos by date?

1. Sort photos by date inside a folder

  1. Open the folder where you would like to sort all the images by date.
  2. Right-click on an empty area inside the folder, select Sort by, and click on Date.
  3. You can further sort your images by selecting Ascending or Descending. Selecting either will do the following:
    • Ascending – The recently taken image will appear first
    • Descending – The oldest photo will appear first
  4. After your selection, all of your images will appear date-wise, either in ascending or descending order.
  5. If you click on More, then you will get a list of options that will help sort images better.
  6. Scroll down and you will see multiple Date sorting options such as Date rate, Date accessed, Date acquired, Date archived, Date completed, Date created, Date last saved, Date modified, Date received, Date released, Date sent, Date taken, and Date visited.
  7. You can click on any of the options of your preference and make them appear inside the Sort by option in the context menu.

Sorting the images date-wise helps you get the recently clicked images to appear first and you will get to view the latest images.

Moreover, if you go the other way around, then you will be able to view the oldest images first. Selecting the other different date sorting option help you get a customized sorting result.

2. Sort images by date in the Photos app

  1. Launch the Photos app.
  2. Select the folder from the left pane which you would like to sort by date.
  3. Press the Sort button that looks like two arrows in the opposite direction to each other.
  4. You will see different date sorting options;
    • Date taken
    • Date created
    • Date modified
  5. As soon as you click on your preferred option, your images will be sorted.

In this way, you can easily sort images on your Photos app based on date. The process is fairly easy, and you can also import the files that you want to sort by clicking the Import button at the top.

You can also explore a classic photo organizer that many users still enjoy by checking the full guide on how to download Picasa for PC.

What to do if the Photos app isn’t sorting images?

1. Update the Photos app

  1. Press the Win key to open the Start menu.
  2. Type Microsoft Store and open it.
  3. Click on Library on the left bottom.
  4. Check if there is a new update available for the Photos app or not. If yes, then update it.

You should make sure that all apps on your PC are up to date to avoid any issues. If you are experiencing any issues with the Photos app, update the app as it could bring fixes present from the previous version.

2. Reset the Photos app

  1. Press the Win + I keys to open the Settings menu.
  2. Select Apps from the left pane.
  3. Select Installed Apps.
  4. Locate the Photos app, click on the 3-dot menu, and select Advanced options.
  5. Scroll down and select Reset.

Resetting the app will help you resolve any issues that could have been triggered because of corrupt internal files or missing files.

That is it from us in this guide. We have shown you the different methods that will help you to sort photos by date on File Explorer as well as the Photos app.

In case you are interested in AI, we have a list of the best AI image upscalers that will help you upscale any of your old or blurry images without losing quality.

We also have guides that explain in detail how you can sort images by favorites or by face.

Let us know in the comments below if the above method helped you sort photos by date on your PC or not.

How to protect your data with Microsoft 365 backup

It has been a very exciting week for Microsoft and Windows users. At the Microsoft Inspire 2023 Conference, Microsoft 365 had a panel where Microsoft executives discussed the future of the platform.

And the Redmond-based tech giant also announced the Microsoft 365 Copilot is coming and it will have a price of $30 per user per month for commercials users. It will be available to Microsoft 365 E3, E5, Business Standard, and Business Premium customers when broadly available.

Plus, there are a lot of new features coming to Microsoft Teams as well. One of the many features that stand out is the ability to use the Teams chat while browsing on Edge. Not to mention, Microsoft also announced Bing Chat Enterprise, the version of Bing AI but for work. The tool is available now in Preview.

All of these come with Microsoft 365 plan, and it seems Microsoft has a security plan for it too. It’s called Microsoft 365 backup, and you’ll be able to use it to back up and restore critical files of your business.

Here’s how to protect your data with Microsoft 365 backup

First of all, you’ll need to access the Microsoft 365 admin center dashboard. If you’re an IT admin, using Microsoft 365, you should have the admin credentials to do that. If, for any reason, you can’t access it, don’t worry, there are solutions.

  1. Go to the Microsoft 365 admin center dashboard.
  2. Once you’re there, select Settings, and click on Microsoft 365 Backup.
  3. A new window will open, and here, click on Back up full tenant.Microsoft 365 Backup

By doing so, you’ll be able able to backup all your SharePoint sites, Exchange mailboxes, and OneDrive accounts in one click.

When the backup is complete, Microsoft 365 Backup will let you know, by highlighting a green check to each panel below.

Microsoft hasn’t given any details so far about the feature, but it will most likely be included in your existing plans and subscriptions. The feature will be available by the end of 2023, so later this year.

What do you think about this new feature? Are you excited about it? Let us know in the comments section below.

How to Turn off the Shutdown Timer on Windows 10 & 11

You might have accidentally turned on the automatic shutdown timer on your Windows PC and now looking for ways to turn it off. Because, if you don’t turn it off, your PC will turn off after the said time.

In this guide, we will give you a guide on how to turn off the shutdown timer. The methods explained here will be applicable to both Windows 10 and 11 computers. Let us check it out.

Why should I turn off the shutdown timer on Windows 11 & 10?

There are several reasons why you would want to turn off the automatic shutdown timer on your PC. Some of the reasons are mentioned below.

  • There is a pending Windows update going on. If your PC shuts down during that time, then you need to download the update again from the start.
  • You are working on something important and if the automatic shutdown happens, then you might lose track of what you were doing, and also lose important files if they aren’t saved.
  • There might be an important installation that is going on and if there is an automatic shutdown in place, you will abruptly close the installation and cause multiple issues.

Let us take a look at the steps that will help how to turn off the shutdown timer on both the Windows 11 and Windows 10 PC.

How to turn off the shutdown timer?

1. Using the Run dialogue

1.1 Windows 11

  1. Press the Win + R keys to open the Run dialogue.
  2. Type shutdown-a and press OK.
  3. If you see a message Logoff is canceled. The scheduled shutdown has been canceled, which means that the shutdown timer has been turned off.

1.2 Windows 10

  1. Press the Win + R keys to open the Run dialogue.
  2. Type shutdown-a and press OK.
  3. If you see a message Logoff is canceled. The scheduled shutdown has been canceled, which means that the shutdown timer has been turned off.

Using the Run dialogue to turn off the shutdown timer on your PC is a simple way to accomplish the task. All you need to do is run a simple command and get the job done.

2. Use Command Prompt

2.1 Windows 11

  1. Press the Win key to open the Start menu.
  2. Type Command Prompt and run it as an administrator.
  3. Type the below command and press Enter. shutdown -a
  4. You will see a message Logoff is canceled. The scheduled shutdown has been canceled, confirming that the shutdown timer has been turned off.

2.2 Windows 10

  1. Press the Win key to open the Start menu.
  2. Type Command Prompt and run it as an administrator.
  3. Type the below command and press Enter. shutdown -a
  4. You will see a message Logoff is canceled. The scheduled shutdown has been canceled, confirming that the shutdown timer has been turned off.

Running a command on your Windows 10 and Windows 11 can also help you turn off the shutdown timer on your PC.

3. Create a desktop shortcut

3.1 Windows 11

  1. Right-click on your desktop and select Shortcut.
  2. In the Create a shortcut wizard enter type the below location in the text area, and click Next to continue. C:\Windows\System32\Shutdown.exe -a
  3. Give the shortcut any name you like and hit the Finish button to complete the wizard.
  4. Once the shortcut is created, simply open the shortcut anytime you would like to turn off the shutdown timer.

3.2 Windows 10

  1. Right-click on your desktop and select Shortcut.
  2. In the Create a shortcut wizard enter type the below location in the text area, and click Next to continue. C:\Windows\System32\Shutdown.exe -a
  3. Give the shortcut any name you like and hit the Finish button to complete the wizard.
  4. After the shortcut is created, all you need to do is open the shortcut anytime you would like to turn off the shutdown timer.

When you run this desktop shortcut, you will see a window appear just for a split second and then disappear, confirming that the action has been successfully taken.

This desktop shortcut will help you to turn off the shutdown timer if case the automatic shutdown is scheduled so frequently in your Windows 11 PC.

That is it from us in this guide. You can read our guide on how to fix Windows 11 shutdown box keeps popping up randomly in between your tasks.

Moreover, several readers have reported that their Windows 11 PCs randomly or automatically shut down. You can resolve this issue by applying the solutions mentioned in our guide.

Let us know in the comments below, which one of the above solutions resolved your query on how to turn off the shutdown timer on Windows 11 and Windows 10.

Laptop Battery is Stuck at 0%? Here’s How to Fix It!

If your laptop battery is stuck at 0% you may want to stick around because we’ll help you fix it. This annoying issue that hinders portability usually stems from faulty power adapter or charing cables.

Other possible problems include battery calibration issues, out of date drivers and faulty power management settings.

Regardless of the exact cause, the tricks below will help you charge your battery again. Let’s get right to it.

How do I fix my laptop battery that is stuck at 0?

Note icon NOTE
Before attempting any troubleshooting steps, back up your data to ensure your laptop is protected from sudden power loss. Additionally, if your laptop is still under warranty, check with the manufacturer or authorized service centers for assistance.

First, try using a different power outlet, check the power cable and adapter for dents and damage, and perform a power cycle. If none of these fix your problem, keep reading.

1. Check the battery health

  1. Press the Windows key, type cmd, and click Run as administrator.CMD elevated  laptop battery not charging 0 percent
  2. Type the following command to generate a battery report and hit Enter: powercfg /batteryhealthCMD battery report
  3. It will display the path where the report is stored.HTML battery report
  4. Locate and double-click it to open it, and it will show you the information on the battery, including the name, Manufacturer, Serial Number, Chemistry, Cycle Count, and Battery life estimates.Battery health
  5. Go to Battery life estimates to check if the battery is working fine or not.

If there is enormous battery drainage, chances are the battery is not working correctly or is at the end of the cycle. If that’s the case, consider replacing it.

However, if it works fine, move to the following method to fix the issue.

2. Run the Power troubleshooter

  1. Press Windows + I to open the Settings app.
  2. Go to System, then click Troubleshoot.troubleshoot laptop battery not charging 0 percent
  3. Click Other troubleshooters.Other Troubleshooters
  4. Now locate Power and select Run.Power Run
  5. Follow the onscreen instructions to complete the process.

3. Reinstall the battery driver

  1. Press Windows + R to open the Run window.Device Manager Run command
  2. Type devmgmt.msc and click OK to open Device Manager.
  3. Locate Batteries, and click it to expand.
  4. Go to Microsoft ACPI Compliant Control Method Battery, right-click it and select Uninstall driver.Uninstall driver
  5. Once done, click Action and select Scan for hardware changes to reinstall the driver.Action scan for hardware  laptop battery not charging 0 percentchanges

Now check if the issue persists; if yes, move to the next method.

Remember, reinstalling the driver also helps if the laptop switches between AC and battery when gaming.

4. Uninstall the recent Windows update

  1. Press Windows + I to open the Settings app.
  2. Go to Windows Update, then Update history.WIndows Update laptop battery not charging 0 percent
  3. Under Related settings, select Uninstall updates.Windows Update - Update history
  4. Go to the recent update and click Uninstall.Uninstall update

5. Update your BIOS

Note icon NOTE
Here we are using an HP computer to demonstrate the steps. For others, you can follow similar steps to get the BIOS updated.
  1. Press Windows + R to open the Run window. Type msinfo32 and click OK to open System Information.system information laptop battery not charging 0 percent
  2. Note down the System BIOS and other system-related information such as processor name, OS name, System Model, and more.System Model name and other info
  3. Close all apps, and turn off antivirus and BitLocker encryption.
  4. Visit the HP Software and Driver Downloads page.Computer
  5. Choose your laptop or PC. Either enter your product name or let the website find it for you. Select the product, then choose the operating system.Detect product
  6. Click All Drivers to expand the list, locate BIOS- System Firmware, and click Download.BIOS firmware
  7. Once downloaded, double-click the file to install, or if the HP support assistant pops up to help you install, click Yes or OK to let it take over and complete the process.
  8. Your computer will restart to complete the process.

Did nothing work for you? Try performing a system restore before contacting Customer Support or replacing the battery to ensure the system settings are not the culprit.

If you are facing similar issues, like laptop battery not charging at 80%, we suggest you check out this informative guide to find quick solutions.

We hope this guide helped you and your laptop battery is no longer stuck at 0 percent. If you still have problems charging or were able to troubleshoot this problem in a different way, feel free to drop a comment below.

External Monitor Not Showing BIOS? 4 Ways to Force it

One of the situations where you make use of the external monitor is when your primary monitor is not working. You can also use an external monitor to extend your display.

Some users have reported that the external monitor is not working and not showing BIOS. Basically, not allowing them to tweak it.

In this guide, we will share with you some solutions that will possibly help you out with the external monitor not showing BIOS issue. Let us check it out.

Why does the external monitor fail to show BIOS?

There are multiple reasons why the external monitor that you have connected fails to show the BIOS. Some of the most common reasons are listed below.

  • Connection issue – The connection cable that you are using might be at fault or the type of cable that you are using to connect the external monitor isn’t supported.
  • Wrong input source – You might have not selected the appropriate input source in the external monitor which is why you are not seeing BIOS on it.
  • Incompatible display settings – The display settings on the external monitor should not exceed its limitations.
  • Graphics driver is outdated – Some bugs in the outdated version of the graphics driver are not allowing you to connect or show content on your external monitor.
  • BIOS issue – You may need to reset the BIOS as there could be some underlying problems that are causing this problem.

Let us now check the different solutions that will help you to resolve the external monitor not showing the BIOS menu problem.

How can I fix the external monitor not showing BIOS issue?

Here are a few things that you can do before applying the advanced solutions to resolve the external monitor not showing BIOS issues.

  • Check if the cable that you are using to connect the external monitor is healthy and not worn out.
  • Ensure that the external monitor is in working condition.
  • Make sure to power up the external display, if it requires it.
  • If you are connecting the external monitor using an HDMI cable, then you should try using the VGA port or the DisplayPort to connect it to the primary monitor.

If none of the above solutions work, let’s apply advanced solutions to resolve this problem.

1. Check the BIOS settings

Some monitors have specific settings that prevent or enable them to display the BIOS menu. One working solution to fix the external monitor not showing the BIOS menu would be to press the Fn + F1 or simply the F1 key.

This will switch on the external monitor and display the BIOS menu on it instead of the primary monitor of yours. This method has helped several users resolve the problem.

2. Update the graphics driver

  1. Press the Win key to open the Start menu.
  2. Type Device Manager and open it.
  3. Expand the Display adapters section.
  4. Double-click on your graphics driver to open it.
  5. Switch to the Drivers tab.
  6. Click on the Update driver option.
  7. Select Search automatically for drivers option.

You should ensure that your primary and external computer’s graphics drivers are up to date as this will prevent any compatibility issues that might occur. You can check out our guide that explains the different ways to update drivers on Windows 11.

3. Update the motherboard BIOS

3.1 Check the BIOS version

  1. Open the Start menu by pressing the Win key.
  2. Type System Information and open it.
  3. Locate BIOS Version/Date section on the right side.
  4. Note down the BIOS version that you are running.

3.2 Format the USB drive to FAT32

  1. Insert the USB flash drive into your PC.
  2. Press Win + E to open the File Explorer.
  3. Right-click on your USB drive and select Format.
  4. Choose FAT32 from the File system dropdown menu.
  5. Click on the Start button.

3.3 Update the BIOS

  1. Visit the official website of the motherboard manufacturer and download the BIOS file.
  2. Place the BIOS file into the formatted USB drive.
  3. Insert the USB drive containing the BIOS update file into any USB port on your PC.
  4. Restart your PC and when it is booting up enter the BIOS menu by pressing the Del key.
  5. Choose the Update BIOS option.
  6. Locate the BIOS update file and select it.
  7. Start the BIOS update process.
  8. Save & Exit and reboot your PC.

Updating the BIOS can also help you remove the compatibility issues that you could have with the external monitor.

That is it from us in this guide. We would suggest you check out our guide that will help you resolve if the second monitor is not detected in Windows 11.

Feel free to drop a comment below and let us know which one of the above solutions fixed the external monitor not showing BIOS problem.

Please Wait for the GPSVC: How to Bypass the Error

Many users reported Please wait for the GPSVC while trying to start their PC. This means there’s an issue with Group Policy service or with Group Policy objects. In some instances, issues with file corruption can cause this problem.

Follow the steps below to fix it.

How do I bypass Please wait for the GPSVC message?

Start by making sure you log in with an admin account. Also, it’s bestto start your PC in Safe Mode to apply the options below.

1. Restart the Group Policy Client service

  1. Hit the Windows + R keys to open the Run command.
  2. Type services.msc and hit Enter.run services.msc command
  3. Locate Group Policy Client service, right-click on it, and select Properties.
  4. Navigate to the General tab, under Startup type, select Automatic from the drop-down options, and click on the Start button.
  5. Next, click Apply and then OK.

2. Run DISM and SFC scans

  1. Hit the Start Menu icon, type cmd in the search bar, and click Run as administrator.cmd-run-admin-w11 unexpected kernel mode trap windows 11
  2. Type the following commands and press Enter after each one:DISM.exe /Online /Cleanup-Image /Restorehealth sfc /scannow

This step will be extremely helpful, but we recommend reliable third-party repair software, especially if a related DLL file is corrupt and prevents the service from running normally.

3. Download the DLL file manually

  1. Install a reliable antivirus, and proceed to download the GPSVC.DLL file.
  2. Once you’ve downloaded and extracted the file, copy it in the C:\Windows\System32
  3. Restart your PC.

4. Reconfigure your Registry keys

  1. Hit the Windows + R keys to open the Run command.
  2. Type regedit in the dialog box and hit Enter.
  3. Navigate to the following location: Computer\HKEY_LOCAL_MACHINE\SOFTWARE\Microsoft\Windows NT\CurrentVersion\Svchost
  4. Right-click on Svchost, select New Key, and name it as GPSvcGroup.
  5. On the right pane, right-click on an empty space, select New DWORD (32-bit Value) then rename it as AuthenticationCapabilities.
  6. Repeat step 5, but this time rename it as CoInitializeSecurityParam.
  7. Now, double-click on AuthenticationCapabilities, and under Value data, Enter 12320.
  8. Repeat the same for CoInitializeSecurityParam but under Value data, Enter 1.
  9. These are the default values for GPSVC so restart your system once done and see if this works.

Remember to create a restore point or backup the registry before making any edits.

5. Perform a System Restore

  1. Press the Windows + R keys to open the Run command.
  2. Type rstui and hit Enter.
  3. The System Restore window will open. Click on Next.
  4. Select the restore point you wish to revert to and click on Next.
  5. Now click on Finish.

If you’re interested in Group Policy management tools, we have them in plenty to help lessen the workload if you encounter such issues frequently enough.

This isn’t the only issue you can encounter, and we wrote about The group policy client service failed the logon and Please wait for the Group Policy Client in our other guides.

Let us know of any other solution that may have solved this issue for you in the comment section below.

Red Dead Redemption remake could be in the works for a November release

Rumors have been hot and heavy that a Red Dead Redemption remaster or even a remake is in store. So far nothing has been announced or even hinted at from publisher Rockstar Games, and until then anything we hear should be taken with a grain of salt.

With that said, the latest “tidbit” comes from Twitter user @Budzcario who seems to think that this project will be released well before the end of 2023.

“Budz” didn’t bother to divulge where his information came from exactly. However, games journalist Colin Moriarty (formerly of IGN) has also indicated that the remake/remaster is real.

I have seen confirmation that this is real…I had someone reach out to me behind the scenes that showed me something that definitively shows this game is coming. Maybe even imminently with an announcement, maybe in August.

Red Dead Redemption (Video Game 2010) - IMDb

It’s also worth noting that the game recently got a fresh rating from Korea’s Game Rating and Administration Committee.

Red Dead Redemption released on Xbox 360 and PlayStation 3 back in 2010. It is revered as one of the best games of that era, and its sequel, 2018’s Red Dead Redemption 2, followed suit garnering both critical and commercial success upon release. It has been speculated that a potential remake of the first RDR could be done in Red Dead 2′s engine.

Via Gaming Bible. 

Xbox Free Play Days: The Witcher 3, PGA Tour 2K23 and more

Xbox Free Play Days brings a packed lineup this week for subscribers of Xbox Live Gold and Xbox Game Pass Ultimate. This week’s Xbox Free Play Days event runs from Thursday, July 20 through Sunday, July 23.

And don’t forget that on September 14, Xbox Live Gold will become Xbox Game Pass Core. Members needn’t do anything to accommodate this change, however. And you’ll be pleased to know that Xbox Free Play Days isn’t going anywhere. You can learn more here. With that out of the way, Let’s have a look at this week’s Free Play Days games.

The Witcher 3: Wild Hunt – Complete Edition

You are Geralt of Rivia, mercenary monster slayer. Before you stands a war-torn, monster-infested continent you can explore at will. Your current contract? Tracking down Ciri — the Child of Prophecy, a living weapon that can alter the shape of the world.

The Complete Edition contains the base game, offering a huge, over 100-hour long, open-world adventure, as well as both of its massive story expansions: Hearts of Stone & Blood and Wine worth an extra 50 hours of gameplay!

PGA TOUR 2K23 Cross-Gen Edition

Challenge the greatest players on the PGA Tour and find your swagger in PGA Tour 2K23. Bolstered by a diverse cast of playable pros, you can swing on world-renowned, officially-licensed courses. Enjoy a bevy of online competitive modes, ranging from competitive Online Societies to the always-fun Topgolf mode and adrenaline-inducing Divot Derby.

Meet Your Maker

Welcome to the Dreadshore, a place of mud, rust, and endless fog. A new trap, guard, Custodian, and weapon are now available to expand your arsenal. All players instantly gain access to a new environment and free Dreadshore-themed Deco Pack.

Meet Your Maker is a building game of brutal expression and conquest. Unleash your inner evil genius in co-op or single-player to build the ultimate fortress of devious deathtraps, or take on those built by others in a high-stakes heist to steal resources essential for your survival.

TramSim: Console Edition

Urban Transport comes to life in TramSim: Console Edition! Experience pure photorealism in two iconic European cities, no matter where you are in the world, and drive realistic trams on a variety of lines. Run to the timetable and face unique challenges, there is gameplay for every taste!

Discover the heart of gorgeous Vienna, Austria, across 2 lines, full of greenery and classic buildings aboard the modern Flexity and retro Type E2 trams, and transport passengers with the unique R2.2b tram through Munich, Germany, rich with historic structures spread throughout 3 lines. Both cities are populated with dynamic road traffic and pedestrian behaviour, as well as AI tram traffic.

Accessible for all, anyone can join in the fun! Start with beginner mode, learn in the tutorials, and master the art of tram driving, the passengers of Vienna and Munich await in TramSim: Console Edition!

Learn more about Xbox Free Play Days

Xbox Free Play Days is a perk of having an Xbox Live Gold or Xbox Game Pass Ultimate membership. Learn more about the program by visiting its FAQ page.

Featured image via Xbox Wire. 

How to Install BingGPT: A Powerful Bing Chat Desktop App on Windows 11

If you’ve been using Microsoft Edge’s Bing Chat feature, you already know how useful it can be. However, wouldn’t it be even better if you could have it as a separate desktop app? Uninstalling Edge is not a viable solution due to potential stability issues on Windows 11. Fortunately, there’s an incredible open-source solution on GitHub called BingGPT that brings Bing Chat to your Windows 11 desktop as a standalone application, offering seamless communication and enhanced features.

Introducing BingGPT

BingGPT
Example of BingGPT in action

BingGPT is an open-source project that works on Windows, macOS, and Linux. By logging in with your Microsoft account, you can use the app to access Bing Chat, which harnesses the powerful language capabilities of ChatGPT and includes the following three features:

  1. Ability to export conversations: The BingGPT app makes it easy to export entire conversations in various formats, such as Markdown, PNG, or PDF. This functionality allows you to save and share your chats for future reference or collaboration, ensuring you never lose valuable discussions.
  2. Personalization options: Tailor the appearance of your chat interface with the app’s personalization options. Choose from different themes and adjust font sizes within Windows 11 Settings to create a visually appealing and comfortable chatting environment for the app that suits your preferences.
  3. Keyboard shortcuts: Say goodbye to tedious interactions with the app’s convenient keyboard shortcuts. Easily switch between topics, tones, and quick replies, saving time and enabling a more effective Bing Chat experience.

Accessing BingGPT

Getting started with BingGPT is a breeze. Download the latest version from its GitHub page and enjoy the power of Bing Chat on your desktop as a standalone app. For users facing limitations in accessing Bing Chat, a VPN can overcome this obstacle and unlock the full potential of the app. MacOS users may

Use Microsoft Edge for Bing Chat instead

For those who prefer to utilize Bing Chat directly within Microsoft Edge, they can access it by clicking on the chat tab on bing.com or by hovering over the Discover icon in the Edge sidebar.

For users who wish to completely disable the Bing Chat button in Microsoft Edge, they can do so by navigating to edge://settings/sidebar and toggling off the “Allow sidebar apps to show notifications” option.

BingGPT

Bing Chat versus BingGPT

The choice between Bing Chat and BingGPT depends on your specific needs and preferences. Let’s compare the two:

Bing Chat

  1. Built-in Feature: Bing Chat is an integrated feature within Microsoft Edge, making it readily available for users without the need to install any additional applications.
  2. Focused on Communication: Bing Chat primarily focuses on real-time communication, enabling users to engage in chats and exchange messages efficiently.
  3. Convenient for Edge Users: If you frequently use Microsoft Edge as your web browser, Bing Chat offers a seamless and integrated chatting experience directly within the browser.

BingGPT

  1. Separate Desktop App: BingGPT is a standalone desktop application that brings Bing Chat to your desktop, allowing users to access it without relying on Microsoft Edge.
  2. Multiplatform Compatibility: Unlike Bing Chat, BingGPT is designed to be compatible with Windows, macOS, and Linux operating systems, providing a broader reach to users on various platforms.
  3. Enhanced Features and Customization: BingGPT offers additional features, such as exporting conversations to various formats and personalization options like changing themes and font sizes, albeit via Windows Settings, which enhance the user experience.
  4. GitHub Community: Being an open-source project hosted on GitHub, BingGPT benefits from community contributions, potentially leading to continuous improvements and new features.

Don’t forget about Windows Copilot

BingGPT

At the Build conference back in May 2023, Microsoft unveiled Windows Copilot, an innovative new feature for Windows 11. Microsoft offered an early preview of Windows Copilot on a new build in the Windows Insider Dev Channel at the end of June 2023. Windows Copilot promises to offer a more integrated experience with Bing Chat, appearing similar if not identical to the experience of using Bing Chat in Microsoft Edge.

According to Microsoft, Windows Copilot, integrated with Bing Chat, will deliver contextual responses that enhance your overall Windows 11 experience, but that users may “see inline recommendations we think are relevant through ads in Bing.” Besides the amount of data and privacy you are opting to share with Microsoft by using the Copilot feature, the user is giving up control of their files, folders, and other personal data on their computer. Plus, Windows Copilot isn’t a great option to use if your operating system is macOS or Linux.

Which one to choose?

If you prioritize convenience and already use Microsoft Edge regularly, Bing Chat might be a suitable option for you, as it provides a quick and easy way to engage in chats directly within your browser. Additionally, Windows Copilot forces you to give up control of your PC and files.

On the other hand, if you prefer a dedicated desktop app with additional features and customizability, BingGPT is the better choice. Its multiplatform compatibility ensures you can access Bing Chat regardless of your operating system, and the ability to export conversations and personalize the chat experience can be valuable for users who want more control over their communication.

BingGPT offers greater flexibility and expanded functionality compared to Bing Chat, making it the better option for users seeking guidance without being forced to use Microsoft Edge too. However, both Bing Chat and BingGPT can be beneficial depending on individual preferences and requirements.

Lenovo Yoga 9I Review: Premium in Productivity

The Good The Not So Good
Solid Build Quality Just OK Battery Life
4K OLED Screen All Three USB-C Ports Not Thunderbolt 4 Capable
Compact USB-C Charger No Dedicated GPU Option

The Lenovo Yoga 9I has always been the flagship of the Yoga brand.  This is the consumer brand where Lenovo just goes all in.  Let’s remember that when you’re talking about the Yoga brand these models feature the 360-degree hinge which allows them to be used in various configurations as media consumption devices or flipped into a tablet mode with full pen support, the pen is included in the box.  So let’s dig in and see what the 2023 version of the Yoga 9I has to offer.

20230720 111751

Not much has changed since last year’s Yoga 9I, and I don’t think Lenovo needed to change much. You still get the aluminum chassis with the rounded corners, our review model came with the 13th generation Intel Core I7 processor, which is really the only big change for this year. Lenovo still stuck with the unique stereo speakers and subwoofer found in the rotating hinge.  I have to say I didn’t use headphones as a necessity during my review. The sound system is Dolby Atmos-certified and includes a headphone/microphone combo jack, which is a rare find on laptops.   Take a look at the table below for all of the Yoga 9I configuration options and details for this year’s model.

Specifications and Design

Product Lenovo Yoga 9i (83B1001XUS)
Processor 13th Generation Intel® Core™ i7-1360P (P-core 5.0GHz, E-core 3.7GHz / 12 Cores / 18M Cache)
Graphics Intel Iris Xe Graphics
Memory 16GB Dual Channel LPDDR5-5200 (soldered)
Operating System Windows 11
Display 14″ 4K OLED, IPS, 400 nits, 100% DCI-P3,60 Hz, 16:10, Touchscreen, Dolby Vision
Storage 1TB M.2 2280 SSD PCIe 4.0 x4 slot
WLAN & Bluetooth Wi-Fi 6E + Bluetooth 5.1
Ports 1x USB-A 3.2 Gen 2

1x USB-C 3.2 Gen 2 (support data transfer, Power Delivery 3.0 and DisplayPort™ 1.4)

2x Thunderbolt 4 (support data transfer, Power Delivery 3.0 and DisplayPort 1.4)

1x Headphone / microphone combo jack (3.5mm)

Audio 2x 3W (woofers on the side), 2x 2W (front-facing tweeters on hinge bar), optimized with Dolby® Atmos®, Bowers & Wilkins Speakers
Keyboard 6-row, multimedia Fn keys, 1-click function keys, LED backlight
Touchpad Buttonless glass surface multi-touch touchpad, supports Precision TouchPad (PTP), 80 x 135 mm (3.15 x 5.31 inches)
Battery 75Wh Li-Polymer, supports Rapid Charge Boost (2 hrs runtime with 15 min charge)
Camera FHD 1080p + IR, with privacy shutter, fixed focus, ToF sensor
Dimensions

Weight

318 x 230 x 15.25 mm (12.52 x 9.06 x 0.6 inches)

Starting at 1.4 kg (3.09 lbs)

Color & Material Storm Grey

Aluminum CNC (top & bottom)


Experience and Performance

Let me start this way, I was a MacBook user for nearly ten years.  During that time solid build quality, and good screens in a thin and light package became an expectation.  When I came back to the Microsoft ecosystem full-time in 2019 I immediately started searching for the equivalent.  While I have used some laptops that have come close since then, it seemed like I was always giving up something, nothing could check all the boxes.  When I first opened the Yoga 9I the design, the look, and the feel started speaking to me, even before I touched the power button.  The smooth aluminum frame, lightweight, smooth rounded edges flanked with USB C and Thunderbolt ports sure was kicking in those MacBook feelings.   Physically it sure felt like it.  Lenovo even managed to slip in a standard USB A port on the left corner, something I had longed for on any Apple laptop.

20230720 114236

Opening the lid, I was still excited about what Lenovo was doing here: a large keyboard with a short travel distance and a  large glass trackpad.  My fingers fell right into place on the keyboard, there wasn’t the learning curve generally experienced when using a new machine.  The power button is located on the right side along with a volume rocker, which is a reminder that this is a 360-degree device.  I knew our review unit was the 4K OLED screen, so I was expecting the colors to pop off the screen, the black levels to be well-defined and the text on the screen to be crisp.  That’s what the 9I gives you.  The screen is just above 14 inches at 14.4 inches and when talking resolution and scaling the extra real estate makes a difference without making the footprint feel large.

My use case for the Yoga 9I was a good mix of consumer tasks, paying bills, checking emails, and watching content which was a complete joy to do on the 4K screen.  I did venture on several overnight trips, and I really knew where things were going to not do so well with battery life.  When you’re pumping a 4K OLED screen coupled with a 13th-generation Intel processor, you kind of accept battery life is not going to knock your socks off.  If you decide to take no conservations then 2-3 hours is what you’re looking at here for most web-based use.   If you’re willing to turn on the battery saver in Windows 11, which dims you’re screen and clocks the CPU down then 6-7  hours of light use is possible.  The battery is 75 watt hours and with the included USB-C charger you can get a quick boost in just 15 minutes.  Lenovo claims that boost is about 2 hours more battery time, and it is with light use and battery saver mode enabled.  I did enjoy using the laptop in tent mode when catching some entertainment before bed, The screen and rotating sound bar do come together for a nice entertaining package, but I kept the charge by the bed.

Bringing it Home

At the time of publication, our review unit can be had for $1,650(USD) at Best Buy. Some consumers are going to overlook the Yoga 9I on price point alone, I was one of those consumers in years past.  A well equipped gaming laptop can be had for the same price or less, that’ll feature a dedicated GPU, and most likely a high refresh rate screen with a more powerful CPU.   A laptop for most people that would accomplish any task right?  Until I experienced a purpose built laptop like the Lenovo Yoga 9I that’s built for productivity, light content creation, and media consumption I didn’t realize what a joy it would be to use.  Well built, great screen, the 1080P webcam, solid trackpad and keyboard, not to mention the 360 degree hinge with pen, while it’s not the perfect laptop, it checks all the boxes for being a productivity powerhouse and holds its own in other demanding tasks as well.  The tradeoffs are more than worth it, the Lenovo Yoga 9I has become one of my favorite laptops of 2023.

Runtime Error Code 0x80FE0000: How to Quickly Fix It

The runtime error code 0x80FE0000 is closely related to the Windows Installer program. Windows users commonly use this program when installing apps on their PCs. The runtime error is brought about when the installer is experiencing issues and crashes often.

Usually, it will be a pop-up that you can close and continue with your work, but sometimes, it is beyond annoying, and repeated pop-ups could lead to a crash in your system. Here’s how to deal with this error.

What causes the runtime error code 0x80FE0000?

Usually, runtime errors occur when an application attempts to execute an invalid instruction or causes the application to terminate unexpectedly.

Other causes include:

  • Incomplete installation/uninstallation of an app – If an app was installed incorrectly or did not download correctly from the App Store, you may encounter this error. In this case, Windows Installer is the likely culprit.
  • Hardware issues – If you are using old hardware or any damaged hardware then it can also cause this issue because it is no longer compatible with your system.
  • Outdated graphic drivers – If you haven’t updated your graphics card drivers in a while, they may not be compatible with the latest version of Windows.
  • Memory leaks – Memory leaks occur when a program uses memory after it is no longer needed, causing the computer’s memory to run out. When the computer runs out of memory, it crashes or freezes.
  • Conflicting programs – If two or more programs try to access the same memory location at the same time, there can be conflicts between them, causing runtime error code 0x80FE0000.
  • Virus infection – If your computer has been infected by a virus, the virus may corrupt your system files or registry settings, which will result in an error during the execution of an application.
  • Corrupt/invalid registry keys – The registry can become corrupted if you remove a program without uninstalling it properly or due to a power outage or crash. 

How can I fix the runtime error code 0x80FE0000?

Start off with the following preliminary checks before the advanced solutions: 

1. Run DISM and SFC scans

  1. Hit the Start Menu icon, type cmd in the search bar, and click Run as administrator.cmd-run-admin-w11 unexpected kernel mode trap windows 11
  2. Type the following commands and press Enter after each one:DISM.exe /Online /Cleanup-Image /Restorehealth sfc /scannow

As the manual process may be simple for some users, it may also be quite exasperating because it can lead to further errors, so the easiest way of doing this is by using a dedicated repair tool.

2. Scan for viruses

  1. Press the Windows key, search Windows Security, and click Open.
  2. Select Virus & threat protection.
  3. Next, press Quick scan under Current threats.
  4. If you don’t find any threats, perform a full scan by clicking on Scan options just below Quick scan.Scan options
  5. Click on Full scan, then Scan now to perform a deep scan of your PC.Full Scan Scan Now
  6. Wait for the process to finish and restart your system.

3. Update your graphic drivers

  1. Hit the Windows key, type Device Manager in the search bar, and click Open.device manager w11
  2. Navigate to Display adapters to expand, right-click on your graphics card and select Update driver.Graphic Driver Update
  3. Select Search automatically for drivers.

And because manually downloading drivers can be cumbersome, we recommend trying out a driver updater utility. You’ll achieve the same results, only that this method will be faster, more accurate, and require less work.

Outbyte Driver Updater is the tool we’re talking about, and it can scan your system for any outdated drivers and then match you with the correct ones.

⇒ Get Outbyte Driver Updater

4. Reinstall your graphic drivers

  1. Click the Search icon, type Device Manager in the search bar, and click Open.device manager w11
  2. Navigate to Display adapters to expand, right-click on your graphics card and select Uninstall device.Uninstall graphics driver dcom error 1084
  3. Confirm uninstallation in the next prompt. Uninstall graphics driver
  4. Restart your PC so that new drivers can be recreated.

If none of the above solutions work, you can try cleaning up your Registry. If you’re sure of the corrupt registry entry, you can remove it.

However, editing the registry manually is not always a good solution because, aside from removing those entries causing problems, you risk removing other useful entries.

That’s why we recommend using registry cleaners. They’re a safer option and do a better job at cleaning any corrupt registry entries without damaging your system.

A 0x80FE0000 error is fairly uncommon, and as long as it does not appear too often, you shouldn’t worry about it. However, if you see it frequently enough, it might be time to reinstall your system.

That’s all we had for this article, but we love hearing from you. Let us know which solution helped you resolve this error.

Xbox 360 Call of Duty titles get new life after broken servers were restored

Gamers flooded back to classic Xbox 360-era Call of Duty games after the online servers for Black Ops, Black Ops 2 and Modern Warfare 3 were revived last week.

Though the repairs went unannounced (with matchmaking improvements coming from Microsoft itself and not Activision), the move was met with a lot of fanfare as hundreds of thousands of players revisited these games’ online multiplayer.

In fact, these games have shot to the top of Xbox’s top paid games list with 2009’s Modern Warfare 2 currently in the top spot. Even more impressive is the fact that Xbox Series X sales on Amazon have reportedly jumped since the server fix for these old games, with the Series X being reported sold out in stores.

If true, these reports go to show that the importance of the Call of Duty franchise should not be underestimated. It’s no wonder Microsoft is so keen on snagging the series with its pending acquisition of Activision Blizzard.

Note: players should be aware that hackers have been widely reported in these titles.

Via NME.

Featured image via NME. 

Microsoft Announces exclusive digital event for partners in Denmark and Iceland

Microsoft is hosting a special digital event, “Microsoft Strategy Outlook FY24” on September 7th, providing growth opportunities for Microsoft partners in the Danish and Icelandic markets. The event aims to offer insights into the FY24 Microsoft vision and strategy, presenting exciting trends and technologies showcased at this year’s Microsoft Inspire.

The event promises a comprehensive exploration of various topics and areas:

Roadmap and Vision (09:30 – 09:50): The session will kick off with keynotes from Mette Kaagaard, CEO of Microsoft Denmark and Iceland, and Morten Thomsen, Director of Global Partner Solutions at Microsoft Denmark, sharing the roadmap and vision for the upcoming year.

Solution Areas and Paths to Success (09:50 – 10:50): Microsoft experts will delve into solution areas and strategies for success in FY24. The speakers include Dardan Dashaj (Azure), Jurate Beniulyte (Security), Kit Ingwersen (Modern Work and Surface Devices), and Christian Koch-Bentzen (Business Applications).

Opportunities in the Danish Market (10:50 – 11:25): The event will feature a panel debate with Peter Skov, Maria Hald, and Kristian Johansen, focusing on the various opportunities available in the Danish market. Customer success stories and customer centricity will be discussed by Crilles Jansen, and Thomas Kjærsgaard will shed light on the importance of specialist sales.

Closing Remarks (11:25 – 11:30): Morten Thomsen, Director of Global Partner Solutions, will conclude the event with closing remarks.

The Microsoft Strategy Outlook promises that the session will provide them with valuable insights, expert perspectives, and strategic directions to maximize growth and success in the Danish and Icelandic markets.

Save the date for this significant event, with the registration link set to be released in August. Microsoft partners in Denmark and Iceland can look forward to gaining a deeper understanding of Microsoft’s future vision and strategic approach for the upcoming year.

Docking Station Not Detecting Monitor: 3 Ways to Fix It

If your external monitor isn’t showing up through a docking station, your PC isn’t detecting it at all. This often comes down to driver conflicts, display configuration errors, or compatibility issues between your hardware and the dock.

There’s no one-size-fits-all fix, but the steps below cover the most common causes and how to deal with them, whether you’re using USB-C, Thunderbolt, HDMI, or DisplayPort.

How do I get my monitor to work with my docking station?

1. Manually update the driver

  1. Go to the Nvidia official download center and download the latest Nvidia GPU driver.
  2. Then, left-click the Start button, type Device Manager, and press Enter to open it.
  3. Expand the Display Adapters entry for the driver, right-click on the Nvidia driver, and select Update driver from the drop-down.
  4. Further, click on Browse my computer for drivers from the options on the new window.
  5. Then, navigate to the location of the downloaded driver file and click Next.
  6. Click the Install this driver software anyway option and follow the on-screen instructions to complete the installation.

Installing the Nvidia GPU driver version 531.18 will fix bugs affecting it and install the latest features to resolve the docking station issues.

Further, check other steps for updating graphics drivers on Windows 11 if you have any issues.

2. Run the hardware troubleshooter via the CMD

  1. Left-click the Start button, type Command Prompt, and click the Run as administrator option.
  2. Click Yes on the User Account Control (UAC) prompt.
  3. Type the following and press Enter to open the Windows Hardware and Device Troubleshooter: mysdt.auxiliary diagnostic device
  4. Click Next to proceed with the scan and troubleshooting process.
  5. After the troubleshooting, try to perform the task and check if it works.

Running the troubleshooter will resolve hardware connection issues responsible for the Dell Docking station not detecting external monitors.

For more help confirming that Windows can actually see your dock, you can follow this guide on how to find your docking station in Device Manager, then come back and continue with display troubleshooting.

Kindly read our guide on how to fix Command Prompt not working on your PC.

3. Check the display settings

  1. Firstly, press Windows + I key to open the Settings app.
  2. Select System from the menu, then click on Display.
  3. Then, check the Multiple Displays option, then press the Detect button.
  4. Select the correct source for your monitor’s controls so that you’re using the appropriate video port.

The above steps will enable the Multiple Displays feature on the computer and help select the correct device.

Alternatively, we have a comprehensive guide on Windows 11 not detecting docking stations and the steps for fixing the problem.

In conclusion, if the docking station is not working on your PC, go through the solutions in this article. Also, we have a review of the best docking stations for Windows laptops.

Other monitor issues? Check out these fixes for monitors turning off randomly, not being detected after sleep, or not working on Dell laptops, Surface Pro, or Chromebooks.

Should you have further questions or suggestions regarding this guide, please drop them in the comments section.

Microsoft 365 Backup to launch in Preview – fast backup for OneDrive, SharePoint, Exchange

At Inspire 2023, Microsoft introduced two new solutions, Microsoft 365 Backup, and Microsoft 365 Archive. These innovations aim to address organizations’ challenges in managing large volumes of unstructured content within Microsoft 365.

Microsoft also announced Security Copilot early access program at Inspire 2023.

Microsoft 365 Backup: Ensuring Data Resilience

Microsoft 365 Backup provides a robust data recovery service, enabling quick restoration of OneDrive, SharePoint, and Exchange data within the Microsoft 365 security boundary. Key features include:

  • Backup of SharePoint sites, OneDrive accounts, and Exchange mailboxes.
  • Granular restoration of content at scale and specific restore point date ranges.
  • Backup APIs for partners to create comprehensive data protection solutions.

A public preview of Microsoft 365 Backup is expected in Q4 of this year.

Screenshot 2023 07 20 At 8.10.04 Pm

Microsoft 365 Archive: Cost-Effective Long-Term Data Storage

Microsoft 365 Archive offers a cold data storage tier within SharePoint, providing a cost-effective solution for securely storing inactive or ageing content. Key features include:

  • Archiving or reactivating full sites within Microsoft 365.
  • Retaining full admin-level search, eDiscovery, access policy, and other security functionalities.
  • File-level archiving is to be available next year.

A public preview of Microsoft 365 Archive is also expected in Q4 of this year.

Screenshot 2023 07 20 At 8.10.54 Pm

Partner Solutions: Enhancing Data Protection Capabilities

Microsoft’s APIs allow partners like AvePoint, Barracuda, CommVault, Rubrik, Veeam, and Veritas to integrate Microsoft 365 Backup and Microsoft 365 Archive capabilities into their data management and protection apps.

Microsoft 365 Backup and Microsoft 365 Archive provide unprecedented data resilience and long-term storage capabilities within Microsoft 365. The public previews of both solutions are expected later this year, offering organizations enhanced data protection and compliance features.

Customers can apply for the public previews to experience these powerful data management innovations firsthand, furthering Microsoft’s commitment to empowering organizations with efficient and secure solutions.

via Petri