Windows 11 latest preview build teases energy usage tracking feature for desktop PCs

Windows 11 users may soon have access to a new feature that provides insights into the power consumption of their desktop PCs and individual applications. The latest preview build of Windows 11, specifically version 23506 from the Dev channel, has hinted at this functionality, although it remains hidden and in development.

A keen Windows enthusiast on Twitter by the handle name PhantomOfEarth, discovered the feature using ViVeTool. While it’s unsurprising that Microsoft has hidden these features as they are still a work in progress, the glimpse shows promising potential.

According to the tweet, in build 23506, Microsoft is reportedly transforming the Battery Usage panel into Energy (& Battery) Usage. This change will broaden its utility beyond just laptops and battery information, extending its reach to display power usage data for desktop PCs as well.

The upgraded panel will offer a breakdown of energy consumption for the entire Windows 11 PC, providing valuable insights into which applications are consuming excessive energy. This means that users can easily identify power-hungry software on their systems, allowing them to optimize energy usage and potentially extend battery life on laptops.

For those using laptops, fear not; Microsoft is not removing the battery level information. Users will have the option to switch between viewing energy usage and battery level data, ensuring that they can still keep track of their laptop’s power status.

In addition to individual app power usage, Microsoft also intends to include overall energy usage and emissions data. However, it appears that this aspect is still a work in progress, as the current display shows placeholder readings.

While this feature is not yet fully functional and may have some quirks to iron out, it holds promise for both desktop and laptop users alike. As Windows 11 continues its development journey, we can look forward to more refined and comprehensive power management tools that empower users to make informed decisions about their devices’ energy consumption.

Via: Techradar

Microsoft Inspire 2023: How AI is moving to a whole new level

Are you ready for this year’s Microsoft Inspire 2023 Conference? Because we are, and it seems Microsoft is coming off with some big announcements.

Please join us at #MSInspire tomorrow, as we announce groundbreaking products and partnerships to create new opportunity across our ecosystem in this new era of AI.

Satya Nadella, Microsoft’s CEO

The conference brings together Satya Nadella, Microsoft CEO, Judson Althoff, Microsoft CCO, Nicole Dezen, Microsoft CPO, Charles Lamanna, Microsoft Corporate Vice President, Yusuf Mehdi, Microsoft Consumer CMO, Nick Parker, Microsoft Industry&Partner Sales President.

The conference will take place digitally and offline, on July 18-19, and if we’re to make anything out of it, is that this year, the conference will be all about AI.

You are able to register for the event online if you want to participate. The last conference brought Rust into the Windows 11 OS, so this year we will witness the groundbreaking AI products coming from Microsoft to all of you.

Microsoft Inspire Conference 2023 will be all about AI

We all know just how many resources Microsoft is investing in AI research. For example, Microsoft has announced Windows Copilot is coming to Windows 11 sooner than we thought. The AI is already in the Windows Insider Program and it seems users are excited about it.

Even more, the Redmond-based has invested a considerable budget into AI research and the results are very promising. Orca 13B is a small AI model that gave promising results in tests, and it will become open-source, so you can learn from it and build your own AI model.

And LongMem is another good point in AI research that Microsoft funded: it is the answer for unlimited context length and it might be available to the general public very soon as well.

But Microsoft has not stopped meanwhile: the Redmond-based tech giant has been at the forefront of AI innovations. Models such as phi-1, Kosmos-2, or the more recent CoDi, promise a new era for AI. And they’re all happening now.

So this conference will be all about the next steps for AI. Please remember that the Microsoft Inspire Conference presents a 12-month roadmap for the company. This means there will be some very big announcements coming from Microsoft when it comes to AI.

Here are all the announcements on Microsoft Inspire day 1

Bing Chat Enterprise

  • Bing Chat Enterprise is giving organizations an AI-powered chat for work; it comes with commercial data protection.
  • It’s available in preview to certain licensed organizations and will be offered as a standalone service as well for $5/user/month.

Microsoft 365 Copilot Pricing

  • Copilot in Office 365 suite offering different capabilities in Word, Excel, Powerpoint, and more.
  • Pricing will start at $30/user/month.

Meta-Microsoft Partnership

  • Microsoft partners with Meta to release their new Open Source LLM – Llama 2.
  • They will support the 7B, 13B, and 70B parameter models in Azure for commercial usage.

Azure OpenAI expanded availability

  • Microsoft increased availability to North America and Western Europe and rolled out availability to Asia for the first time.

Microsoft AI Cloud Partner Program

  • You’ll be able to leverage AI to build your Business plan. You’ll also be able to create complex Marketing strategies using AI.
  • Microsoft will also introduce Industrial Metaverse into the program.

Are you excited about it? Let us know in the comments section below.

What can you do with Bing’s new visual input feature?

It’s a big week for Bing fans: Bing’s new visual input feature is hands down, one of the most exciting features in technology recently. The initiative to upload a picture and get Bing’s input on it has been announced several months ago, and it was related to the Bing Search bar.

But now, in Edge, you can actually upload a picture very easily and Bing will shortly get you a complex input about it.

Previously, it was announced that Bing will be able to show you images when you ask for them. You just have to ask Bing to show images of a cat, for example, and it will show you just that.

With this new feature, the interactions are similar. You upload pictures, images, and photos in the Bing chat box, and the AI tool will then explain to you what the images are all about.

In a Reddit thread, a user actually uploaded images of anatomical structures, and Bing was perfectly capable of explaining them to the user.

What else is also coming to Bing

Besides Bing’s new visual input feature, the Edge Ai-tool is also getting a feature where you can access a new menu, Ask Bing Chat.

As spotted by the Windows enthusiast @Leopeva64, there is a new menu with 5 options that you can choose from.

According to the new menu, you can ask Bing Chat to Explain, Summarize, and Expand any specific words that you selected. Even more, Bing Chat can also help you Comment like a pro or Generate a creative story based on the words that you just selected.bing visual input

This way, you can easily gather your information, especially if you’re working on a school project. The AI Bing will offer you all the tools to ease your work.

The feature is still in testing, but it will soon be available to Edge and Bing users everywhere. With it, it seems that Microsoft is really keeping its promise to enhance every Windows app with AI.

As you can remember, the Redmond-based tech giant said that Windows Copilot is coming on Windows 11, sooner than you might think. So it’s good to know that eventually, all these features will also be part of Copilot.

Last month, Microsoft promised to take AI to the next level with Windows 11, Edge, and Bing. It seems that the tech giant is holding up to the promises.

You are now able to search with images on Bing

At the Microsoft Inspire 2023 conference, Microsoft announced that you can search on Bing with Images. So the new visual input evolved into a visual search engine as well.

Leveraging OpenAI’s GPT-4 model, Visual Search in Chat lets anyone upload images and search the web for related content. Take a picture, or use one you find elsewhere, and prompt Bing to tell you about it — Bing can understand the context of an image, interpret it, and answer questions about it. Whether you’re traveling to a new city on vacation and asking about the architecture of a particular building or at home trying to come up with lunch ideas based on the contents of your fridge, upload the image into Bing Chat and use it to harness the web’s knowledge to get you answers.

Microsoft

It’s called Visual Search in Chat, and it is available now via desktop and the Bing mobile app.

We’re certainly excited about the new visual input feature from Bing, and it seems the feature is taking AI models to the next level as well.

What do you think about it? Will you use it for work or school projects? Be sure to let us know your opinions in the comments section below.

Fix: Internet Explorer is Not Displaying XML Correctly

An XML file is a structured text file with tags to define elements and their relationships, allowing for representation, storage, and exchanging structured data. However, there are reports that Internet Explorer is not displaying XML correctly.

So, this guide will proffer solutions to solve this issue. Alternatively, you can read our detailed guide about the best XML viewer and XML file reader on a Windows computer.

Why is my XML file not opening in Internet Explorer?

  • The XML file association may not be associated with Internet Explorer on your system.
  • An outdated Internet Explorer version on your PC may not support rendering XML files directly in the browser.
  • Specific Internet Explorer settings can prevent the XML file from opening on your computer.
  • XML file errors or corrupt files that are distorted contain errors. In such cases, Internet Explorer won’t parse and display the file.
  • If the compatibility mode that emulates older browser versions is not enabled, it may affect the rendering of XML files.

What can I do if Internet Explorer is not displaying XML correctly?

1. Edit the XML file

  1. Navigate to the XML file, right-click on it, and select Edit from the context menu.
  2. Add <Root> element at the top and </Root> element to the bottom of the file.
  3. Press Ctrl + S to save the file and close it.
  4. Drag and drop the file to Internet Explorer stated above.

Adding the root element to the XML file will make the file accessible on Internet Explorer.

2. Enable native XMLHTTP support

  1. Launch the Internet Explorer on your computer and click on the Tools menu.
  2. Select Internet Options and click on the Advanced tab.
  3. Select Security and check the box next to Enable Native XMLHTTP Support.

Enabling the native XMLHTTP support will give access to allow Internet Explorer to read the .xml file.

How do I view XML files in Internet Explorer?

1. Via Windows File Explorer

  1. Press the Windows + E key to open the Windows File Explorer and navigate to the XML file you want to open.
  2. Right-click the file and select Open With from the context menu. Click on Internet Explorer from the sub-context menu and wait for the file to load.

File Explorer to open an XML file makes it easier to navigate. You can read about fixing Windows File Explorer crashing on Windows.

2. Drag and drop the file

  1. Open the Internet Explorer on your PC.
  2. Navigate to the XML file, double click and hold the file.
  3. Drag and drop the file into the opened Internet Explorer interface.

Dragging and dropping the XML file into Internet Explorer helps in opening it. Check our complete guide on how to install and use Internet Explorer on Windows 11.

Similarly, XML not valid may occur on Outlook as well. Thus, you should check out our overview of ways to fix it.

Also, check our complete guide about fixing Internet Explorer not connecting to the Internet on your computer.

If you have further questions or suggestions, kindly drop them in the comments section.

Meta-Microsoft AI model has 70B parameters, the most so far

At the Microsoft Inspire 2023 Conference, something exciting happened. Microsoft joined forces with Meta to form an AI partnership with Llama 2.

Today, at Microsoft Inspire, Meta and Microsoft announced support for the Llama 2 family of large language models (LLMs) on Azure and Windows. Llama 2 is designed to enable developers and organizations to build generative AI-powered tools and experiences. Meta and Microsoft share a commitment to democratizing AI and its benefits and we are excited that Meta is taking an open approach with Llama 2. We offer developers choice in the types of models they build on, supporting open and frontier models and are thrilled to be Meta’s preferred partner as they release their new version of Llama 2 to commercial customers for the first time.

Microsoft

It makes sense, as the first day of the conference was all about AI. Microsoft announced a lot of things AI-related aside from its Meta AI partnership. Azure OpenAI Service is now available in Asia after recently being released in North America and Europe.

Bing Chat Enterprise was also announced, and it’s the version of Bing AI but for work. The tool is available now in Preview. And, Microsoft Cloud Partner Program gets an AI update. You can now use AI to develop your business plan or marketing strategy while leveraging it to build a portfolio.

So when it comes to AI, Microsoft has been at the forefront of it right from the start. And now, the Redmond-based tech giant partnership with Meta can be the next big thing in the AI world.

Meet Llama 2 AI – Microsoft x Meta partnership

As it was mentioned earlier, Llama 2 makes it possible for developers and organizations to build generative AI tools and experiences.microsoft meta llama 2 ai

You will be able to fine-tune and deploy the 7B, 13B, and 70B-parameter Llama 2 models easily and more safely on Azure.

Plus, you need to know that Llama will be optimized to run locally on Windows. And if you’re a developer who works on Windows, you’ll be able to use Llama by targeting the DirectML execution provider through the ONNX Runtime.

Windows developers will also be able to easily build new experiences using Llama 2 which can be accessed via GitHub Repo. With Windows Subsystem for Linux and highly capable GPUs, you can fine-tune LLMs to meet your specific needs right on their Windows PCs.

What do you think about this partnership? Let us know in the comments section below.

Fix: Gpedit Startup Script is Not Running or Working

Gpedit (Group Policy Editor) is a powerful management tool utilized by system administrators to configure policies and settings on Windows computers. However, many reported that Gpedit startup script is not running.

Thus, we provide practical solutions to fix it, allowing you to leverage Gpedit in managing your Windows environment. Also, we have a detailed guide on fixing the Gpedit shutdown script not running on Windows.

Why is the gpedit startup script not running?

  • Incorrect script location or path specified in the Group Policy settings.
  • Insufficient permissions for the user or group running the startup script.
  • An incorrect Syntax or typos errors in the GPO script itself.
  • The startup script is not enabled or configured correctly in the Group Policy settings.
  • Conflicting or overriding policies interfering with the startup script.
  • Dependency on external resources (e.g., network drives, services) unavailable during system startup.
  • System or software restrictions that block the execution of specific scripts.
  • Errors or warnings in system logs or error messages indicate issues with the startup script.

The above causes vary in different circumstances. However, we discuss step-by-step details to troubleshoot the error.

How do I run a startup script in group policy?

  • Confirm if you have Implemented a user policy instead of a computer policy in the given context.
  • Temporarily block inheritance to isolate the problem to a specific OU to reduce the complexity of identifying conflicting policies.
  • Log in to the computer with administrative privileges to access and modify Group Policy settings.
  • Manually execute the script to ensure it runs successfully without any errors before configuring it in Group Policy.

What can I do if Gpedit startup script is not running?

1. Add folder to startup

  1. Right-click the Windows icon and select Run from the pop-up menu to open the Run dialog box.
  2. Type gpedit.msc into the dialog box and press Enter.
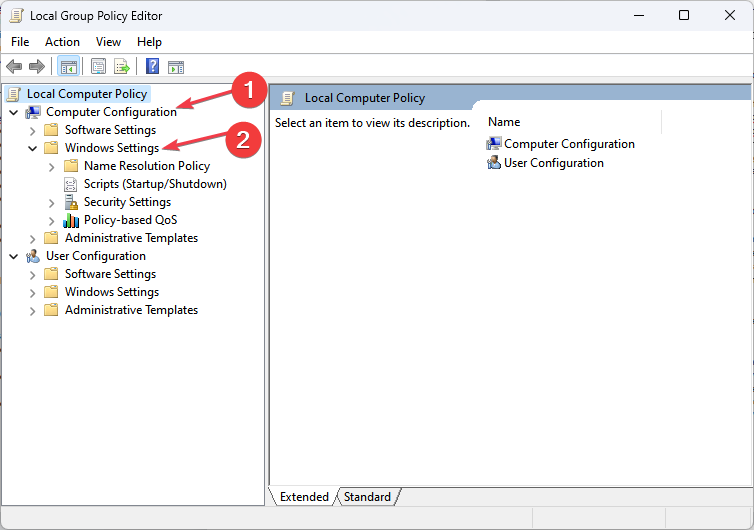
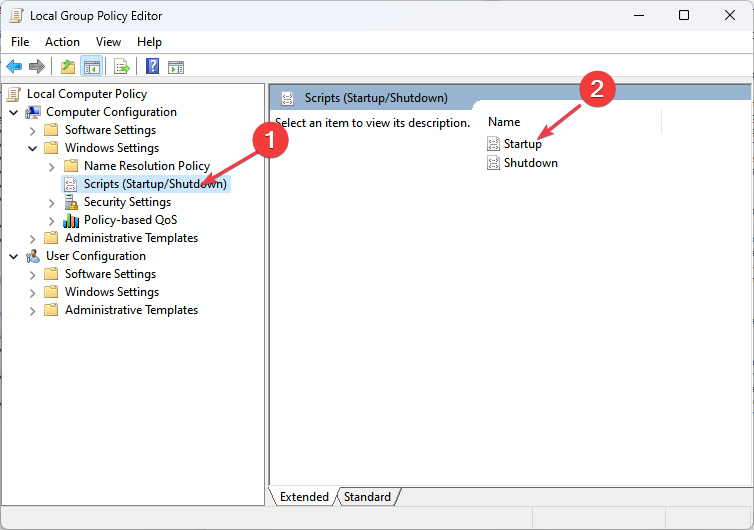
  3. Then, click the Computer Configuration drop-down arrow, expand Windows Settings, and select Scripts.
  4. Double-click on Startup.
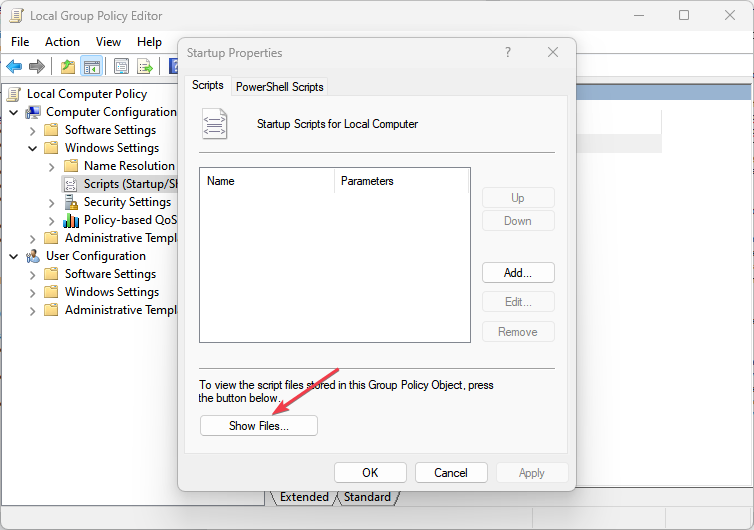
  5. Then, select Show Files.
  6. Copy and paste your file into the folder and select the Add button on the startup property.
  7. Select the Browse button, double-click on your script to choose it, and click OK to enable settings.

Adding folder to startup troubleshoot GPO startup script not working on Windows.

2. Reset Group Policy

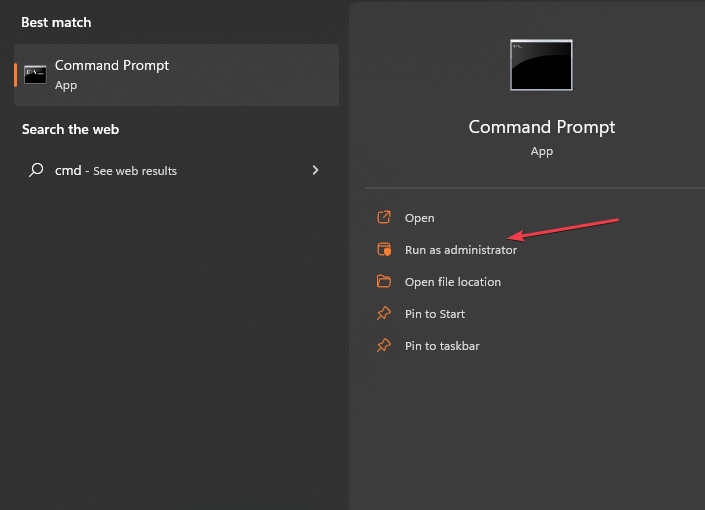
  1. Left-click the Windows icon, type CMD, and select Run as Administrator.
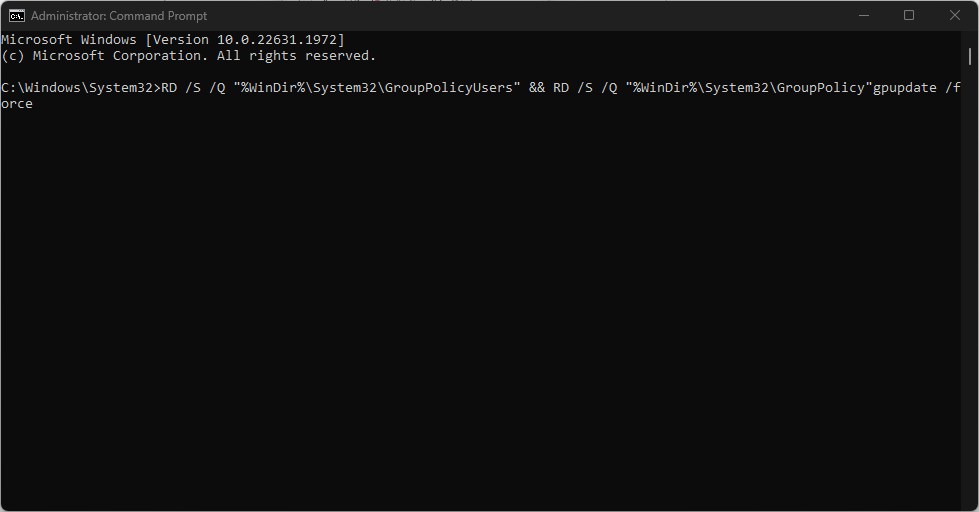
  2. Then, type the following command into the Command Prompt and click Enter: RD /S /Q "%WinDir%\System32\GroupPolicyUsers" && RD /S /Q "%WinDir%\System32\GroupPolicy"gpupdate /force
  3. Close the interface and reset your PC.

Resetting the GPO aids in troubleshooting issues related to Group Policy, resolving conflicts, or rectifying unintended consequences caused by misconfiguration.

3. Force restart the GPO

  1. Left-click the Windows icon, type Command Prompt, and select Run as Administrator to open it.
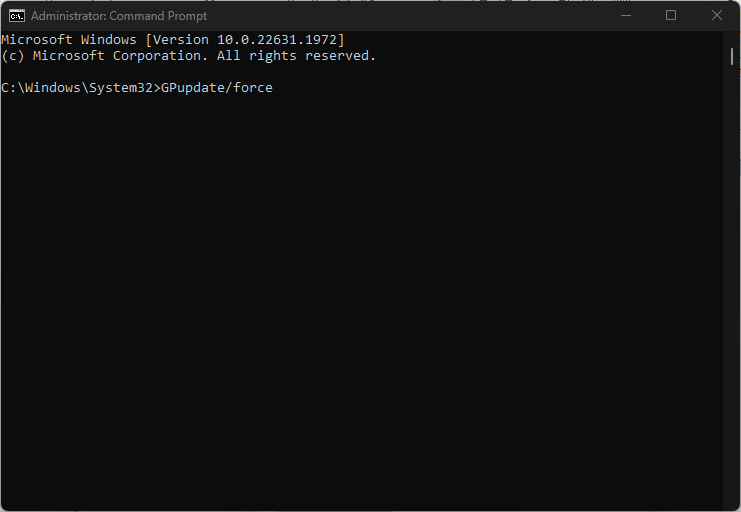
  2. Copy and paste the following command and press Enter: GPupdate/force
  3. Then, close the Command Prompt and restart your computer.

Restarting the GPO allows the seamless and timely deployment of new policies and updates, reducing and enhancing overall system management.

4. Activate the PowerShell script

  1. Press the Windows + R key to open the Run dialog box and type gpedit.msc into the dialog box and press Enter.
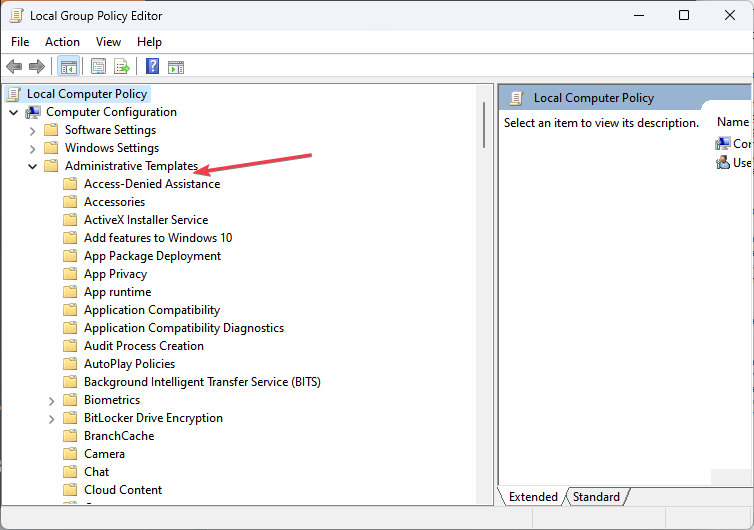
  2. Click the Computer Configuration drop-down arrow from the navigation pane and expand the Administrative Templates folder.
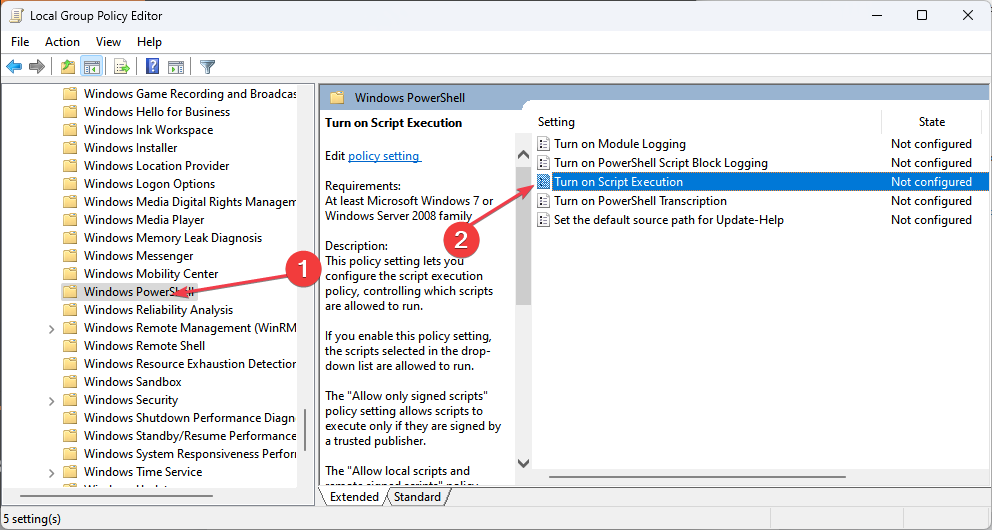
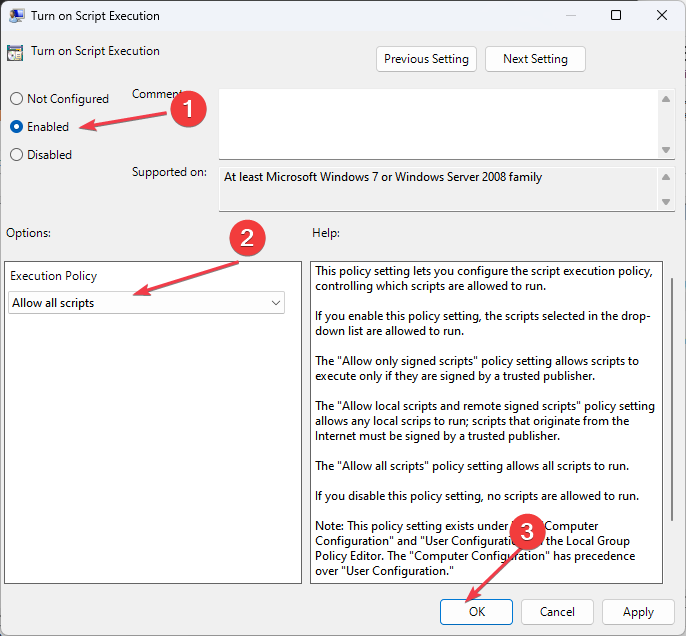
  3. Select Windows components, navigate to Windows PowerShell, and click on it.
  4. Double-click on Turn on Script Execution and click on the Enabled radio button.
  5. Then, click the Execution drop-down arrow and select Allow all scripts.
  6. Select the OK button, close the Windows, and restart your PC.

Activating the PowerShell startup script will troubleshoot issues with the GPO startup script not running PowerShell.

Check our guide about fixing PowerShell if it’s not working or opening on Windows.

In conclusion, please read our detailed guide about disabling fast startup on Windows 11. Also, we have a complete guide on fixing Group Policy errors on your Windows computer.

Should you have further questions or suggestions, kindly drop them in the comments section.

How to use the Teams chat while browsing on Microsoft Edge

At the Microsoft Inspire 2023 Conference, AI is the center of every panel and discussion. Microsoft announced a lot of things AI-related on the first day of the conference.

For example, Microsoft has made Azure OpenAI Service available in Asia, expanding this product further. Bing Chat Enterprise was also announced, and it’s the version of Bing AI but for work. The tool is available now in Preview.

And, Microsoft Cloud Partner Program gets an AI update. You can now use AI to develop your business plan or marketing strategy while leveraging it to build a portfolio.

In one of the most exciting news of the day, Microsoft 365 Copilot is coming to Teams too, and even though its pricing might be a bit too high, Microsoft says that soon no one will want to work without it. One of the many features that stand out is the ability to use the Teams chat while browsing on Edge.

Here’s how to use the Teams chat in Microsoft Edge

To be able to use the Teams chat while in Microsoft Edge, you’ll need to open a webpage link from your Teams Chats.teams chat in microsoft edge

If you’re already browsing with Edge as your default browser, then the chat windows will you to the Edge browser, and you can view the content and chat side-by-side. This way you can continue the conversation while keep browsing. Think of it as a sort of Teams add-on for Edge.

You will be able to access your most recent chats, and even start new chats directly from the embedded chat pane in the Edge sidebar. This way, you won’t have to go back and forth between apps.

This feature will be available to everyone later this year.

Microsoft is releasing a lot of AI features to Microsoft Teams, and most of them will be available with Microsoft 365 Copilot. As we mentioned earlier, the pricing for 365 Copilot is $30 a month.

That might not be so much, considering Copilot will get work done easier and faster.

What do you think about it? Let us know in the comments section below.

How to Automatically Detect LAN Settings Windows 10

Every device should be able to automatically detect LAN settings with Windows 10. LAN is short for Local Area Network, and it basically defines your personal Internet space.

In the course of this article, we will detail exactly what options need enabling in order for Windows 10 to automatically detect and assign the correct proxy settings for your LAN.

We will mention some technical terms such as LAN, proxy, and Internet Protocol, quite repeatedly throughout the course of the article.

We will explain each of them individually, so by the end of this read, you will have a clear grasp of not only how to automatically detect LAN settings in Windows 10, but also what this process fully implies.

But, before we get to that, let’s see exactly how to tweak those settings in order to obtain that automatic connection. The process is twofold but easy to follow.

How to automatically detect LAN settings in Windows 10?

1. Change your Adapter Settings to automatically detect LAN and proxy settings

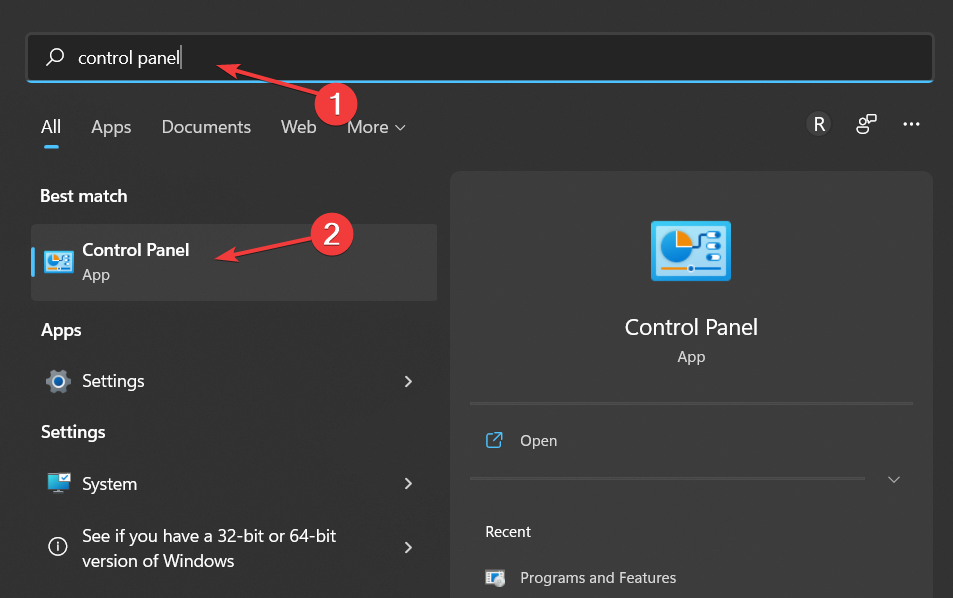
  1. Click the Start button, type control panel, and click on it from the results.
  2. Go to Network and Sharing Center.
  3. On the left menu, choose Change Adapter Settings.
  4. Double-click to open your Ethernet connection and click Properties.
  5. Select Internet Protocol 4 TCP IPv4 and click Properties again.
  6. Enable automatic detection for both IP and DNS addresses.

Be careful not to select Internet Protocol 6 TCP IPv6. That’s a completely different protocol that doesn’t need any manual intervention as of yet. We will go over the differences between the two later in this article.

2. Changing the LAN settings to automatic detection

  1. Click on the Windows icon, type control panel, and open the app from the results.
  2. Now, select Internet Options.
  3. In the top bar, select Connections and click on LAN settings.
  4. Tick the Automatically detect settings box, and leave the Proxy server one unchecked.

We want a proxy server to be automatically assigned, that’s why we will leave that box unchecked. Or, if for any reason, yours is checked, make sure to uncheck by simply clicking on it.

Now that those settings are in place, Windows 10 should automatically generate your LAN settings. We went over some technical terminology, so maybe now it’s time to explain it a bit.

What is the difference between IPv4 and IPv6?

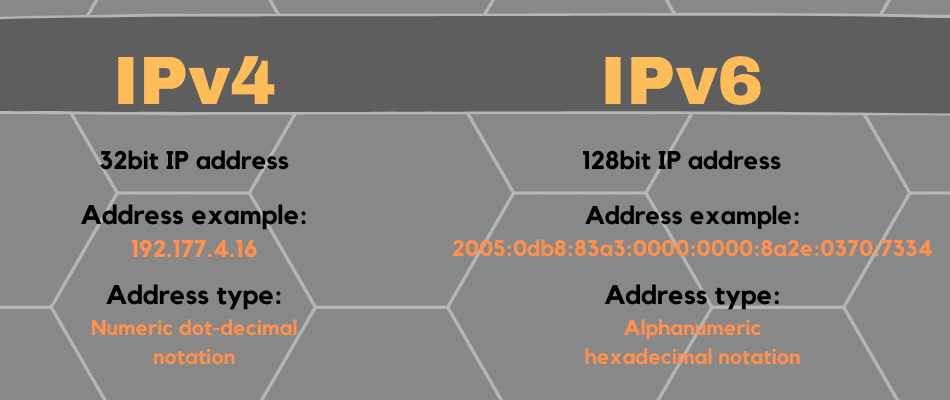
difference between ipv4 and ipv6 internet protocols

We already mentioned we’re gonna walk you through the difference between these two. So, IPv6 is still an Internet Protocol, but a newer version.

Why is this required? To put it simply, because there are a lot of people using the Internet and not a whole lot of IP addresses.

As you can see, IPv4’s address is much shorter. That’s because it uses a 32bit technology, whereas IPv6 uses a 128bit one. So that’s 2^128.

IPv6 automatically generates LAN settings in Windows 10, without you having to manually intervene. That’s part of the reason we said to leave it as it is.

Another reason is that although IPv6 is a newer technology, most devices still communicate through an IPv4 protocol. If Windows could not detect a network’s proxy settings, IPv4 is most likely the culprit.

That’s about it from us. Now you have a clearer understanding of how the setting changes you perform interact with each other, and what they ultimately represent in the larger picture.

We also recommend reading our guide on what to do if the Automatically detect settings option keeps being checked for the proxy.

What are your thoughts on this? Please feel free to let us know in the comments below!

Microsoft 365 Copilot Pricing: Is It Too Expensive?

Microsoft Inspire 2023 is happening now, and AI is at the heart of the conference. On the first day, AI was everywhere, in every discussion and every presentation, and Microsoft announced a lot of things AI-related.

For example, Azure OpenAI Service is now available in Europe, NA, and Asia, effectively expanding this product even further. Microsoft also announced Bing Chat Enterprise, the version of Bing AI but for work. The tool is available now in Preview. And, Microsoft Cloud Partner Program gets an AI update.

You will now be able to use AI to develop your business plan, or marketing strategy, while also leveraging it to build a portfolio.

With the release of Bing Chat Enterprise, which is free for now, but will be released as a stand-alone product with a $5/month subscription, the Redmond-based tech giant also announced the Microsoft 365 Copilot pricing.

Microsoft 365 Copilot brings a whole new way of working – reasoning over all your business data in the context of your enterprise, including the ability to ask questions and get answers from the web.

Microsoft

Microsoft 365 Copilot pricing: how much?

According to Microsoft, Microsoft 365 Copilot will be available for commercial customers for $30 per user per month for Microsoft 365 E3, E5, Business Standard, and Business Premium customers when broadly available.

Microsoft says that soon no one will want to work without Microsoft 365 Copilot. And they’re not far from the truth. The tool is capable of handling multiple tasks on its own reasoning. It will generate multiple forms of content, from images to copywriting texts.microsoft 365 copilot pricing

Even more, the Redmond-based tech giant says that 365 Copilot has the capabilities of Bing Chat Enterprise, and much more. So that means that you can freely use Copilot at work without worrying that your data will leak.

Here’s what you need to know:

  • Copilot inherits your existing Microsoft 365 security, privacy, identity, and compliance policies.
  • Your data is logically isolated and protected within your Microsoft 365 tenant and always within your control.
  • At the tenant level, Copilot respects individual and group permission policies.

Microsoft has released Windows Copilot with the latest update of Windows. If you already tried the feature and didn’t like it, check out this step-by-step guide to remove it from your PC.

Another great AI assistant available in the preview for Microsoft Security Copilot, explains Microsoft is all about adapting the latest technology to help people and enterprises.

So, do you think Microsoft 365 Copilot is expensive? Let us know in the comments section below.

How to sign up & use the new Claude 2 AI

There is a new AI model in town, Claude 2 AI, and it seems that this model could end up outperforming ChatGPT, and Bing AI, as well.

Developed by Anthropic, Claude 2 AI is the next version of Claude AI, a model that the company released earlier this year.

We are pleased to announce Claude 2, our new model. Claude 2 has improved performance, longer responses, and can be accessed via API as well as a new public-facing beta website, claude.ai. Think of Claude as a friendly, enthusiastic colleague or personal assistant who can be instructed in natural language to help you with many tasks.

Anthropic

The new Claude also comes with some very exciting stats about it: the AI model scored a 76.5% on the multiple-choice section of the Bar exam, a 71.2% score on the Codex HumanEval, a Python coding test. The model is also proficient in math: on GSM8k, a large set of grade-school math problems, Claude 2 scored 88.0%.

And Anthropic says that the AI model is also safer: in a test, Claude 2 AI proved to be 2x better at giving harmless responses, when compared to the previous version. So it’s safe to say that the AI model is good. And now, you can use it. But first, you need to sign up and receive your credentials.

Here’s how to sign up & use the new Claude 2 AI

Here’s what you need to do to sign up for Claude 2 AI:

  1. Go to the Anthropic official website and click on the Request Access or Talk to Claude button.claude 2 ai
  2. Once you’ve done that, you should now complete all the details in the sign-up form.
  3. Check the Terms and Conditions box.
  4. Finally, click on the Submit or Sign-up button.
  5. And you’re done.

To log in to Claude 2 AI, you’ll need to do the following:

  1. Go to the Claude 2 AI login page on the official website.
  2. Enter the email address that you used for the sign-up along with your password.
  3. Then, just click on the login button.
  4. Now you’re in and you can use Claude 2 AI.

It’s good to know that if you want to use it to build apps and software, then you can access it through an API. You’ll be able to integrate the AI model into your platforms, applications, and services. Check out their website for more.

You should also check out claude.ai, the new public-facing beta website, where you can submit your feedback and opinions on the AI model.

As for using, once you’re in, you can experiment with the model however you want. You can make it write short stories for you since its writing abilities are renowned. You can even have Claude 2 AI summarize entire novels for you.

But using it should be as easy as using any other AI tool, so if you’re familiar with ChatGPT and Bing AI, you’ll have no problems with this model.

What do you think about this new AI model? Let us know your opinions in the comments section below.

HP Computer is Not Connecting to Wi-Fi? Fix it in 4 Steps

Being able to connect your computer to a wireless network connection helps you get access to the internet. However, many users have complained about their HP computer Wi-Fi not working or the system not connecting to it. This article will outline potential causes and fixes for the problem.

Alternatively, you can review our detailed guide on why Windows can’t find Wi-Fi networks and the steps to resolve the problem.

Why isn’t my HP computer connecting to Wi-Fi?

  • The switch may not be turned on in your HP computer.
  • Outdated or corrupted Wi-Fi drivers can prevent your laptop from detecting networks, causing the HP computer Wi-Fi adapter not to work.
  • If your laptop is in airplane mode, it will disable all wireless connections, including Wi-Fi.
  • Wi-Fi network settings on your laptop might be configured incorrectly, or you’re connecting to the incorrect SSID (network name) and entering the incorrect security key (password).
  • Issues with the router or modem not booting correctly or malfunctioning can cause your HP computer not to detect it.
  • Sometimes, the Wi-Fi network may be undetectable if you are too far from the router or if physical obstacles interrupt the signal.
  • There may be hardware issues with your laptop’s Wi-Fi adapter impeding it from finding the available Wi-Fi network.

What can I do if Wi-Fi is not working on my HP computer?

Before proceeding with any advanced troubleshooting steps, go ahead with the following preliminary checks:

  • Restarting your computer can resolve temporary software glitches affecting your Wi-Fi connection.
  • Power cycle your Wi-Fi router and modem before trying to connect again.
  • Ensure that the Wi-Fi adapter on your computer is turned on.
  • Forget the problematic network by selecting it and choosing Forget or Remove option, then try reconnecting to the Wi-Fi network.
  • Turn off background apps and temporarily stop any antivirus or firewall software on your computer to prevent interference.
  • Ensure no physical objects, such as walls or furniture, block the Wi-Fi signal between your computer and the router.
  • Update the Windows OS to fix any bugs in the current version preventing the HP PC from establishing a Wi-Fi connection.

1. Update the wireless network driver

  1. Press Windows + R keys to prompt the Run window, type devmgmt.msc, and click OK.
  2. Expand the Network adapters, right-click on the wireless device, then select Update driver from the drop-down.
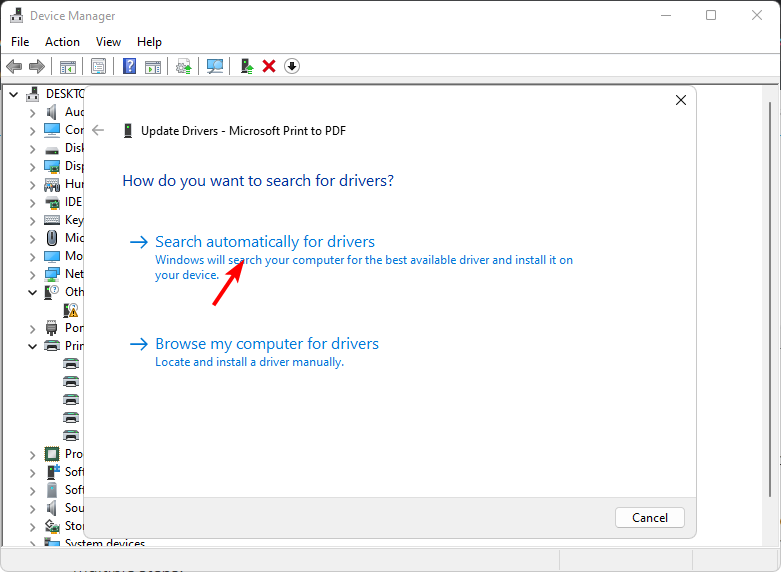
  3. Select the Search automatically for drivers option and wait till the update finishes.
  4. Restart your PC and check if the error persists.

Updating the network adapter drivers from the manufacturer’s website can help resolve outdated firmware and bugs affecting Wi-Fi functionality.

Check other steps for updating drivers on Windows 11 if you have any issues.

2. Reset network components via Command Prompt

  1. Left-click the Start button, type Command Prompt, and click Run as administrator.
  2. Click Yes on the User Account Control prompt.
  3. Type the following commands into the Command Prompt and press Enter: ipconfig/flushdns ipconfig /release ipconfig /renew netsh winsock reset netsh int ip reset
  4. Restart your computer to effect the reset process with your network settings.

Running the above commands resets TCP/IP Stacks on your HP laptop and fixes Wi-Fi network problems. Check our complete guide on how to reset network settings on Windows PCs.

3. Change your DNS server address

  1. Press Windows + R key to open the Run dialog box, type ncpa.cpl, then click OK to open the Network Connection page.
  2. Right-click your Network adapter and select Properties from the drop-down.
  3. Select Internet Protocol Version 4 (TCP/IPv4) and click Properties.
  4. Tick the box for the Use the following DNS server addresses option, type 8.8.8.8 in the Preferred DNS server and 8.8.4.4 for the Alternate DNS server, then click OK to save settings.
  5. Restart your PC, then check if the Wi-Fi connection is established.

Changing your DNS server address can help fix network issues. Read more about checking and changing the DNS server on Windows 11 if you’re having trouble with the steps.

4. Reset the network settings

  1. Press Windows + I keys to open the Settings app.
  2. Click on Network & Internet and click advanced network settings.
  3. Then, click on Network reset at the bottom.
  4. Click the Reset now button to confirm.
  5. Restart your PC and check if the issue persists.

The above steps will restore your network settings to default and resolve any configurations causing problems.

Conclusively, check how to fix network connection issues on Windows PCs. Also, read about slow internet on one computer but fast on another or how to resolve HP laptop won’t connect to WiFi error on Windows 11.

Should you have further questions or suggestions regarding this guide, kindly drop them in the comments section.

Epson Scan 2 Not Enough Memory Error: How to Fix It

If you use the Epson scanner, you may have encountered its not enough memory error when using the Epson Scan 2 application. A few of our readers complained about this, and we will bring some practical solutions in this guide.

You may consider using alternative scanner software for Windows devices as a workaround rather than continue troubleshooting the current one.

Why does Epson Scan 2 say memory is not enough?

You may get this error for any of the following reasons:

  • The scanner is scanning a very large image.
  • You do not have enough free memory on your computer. 
  • There is a problem with the scanner driver. We have a comprehensive guide on updating drivers on Windows 11 devices if you need to.

What do I do if Epson Scan 2 does not have enough memory?

Before going into the core solutions, try these workarounds:

  • Ensure you are using the latest version of Epson Scan 2.
  • Disable any unnecessary programs that are running in the background.
  • Scan the image in multiple parts.
  • Free up some memory by terminating other applications or using a memory cleanser.
  • Restart your computer.

You may proceed to more detailed fixes below if the above tips do not help.

1. Reduce the resolution of the scan

  1. Restart the scan.
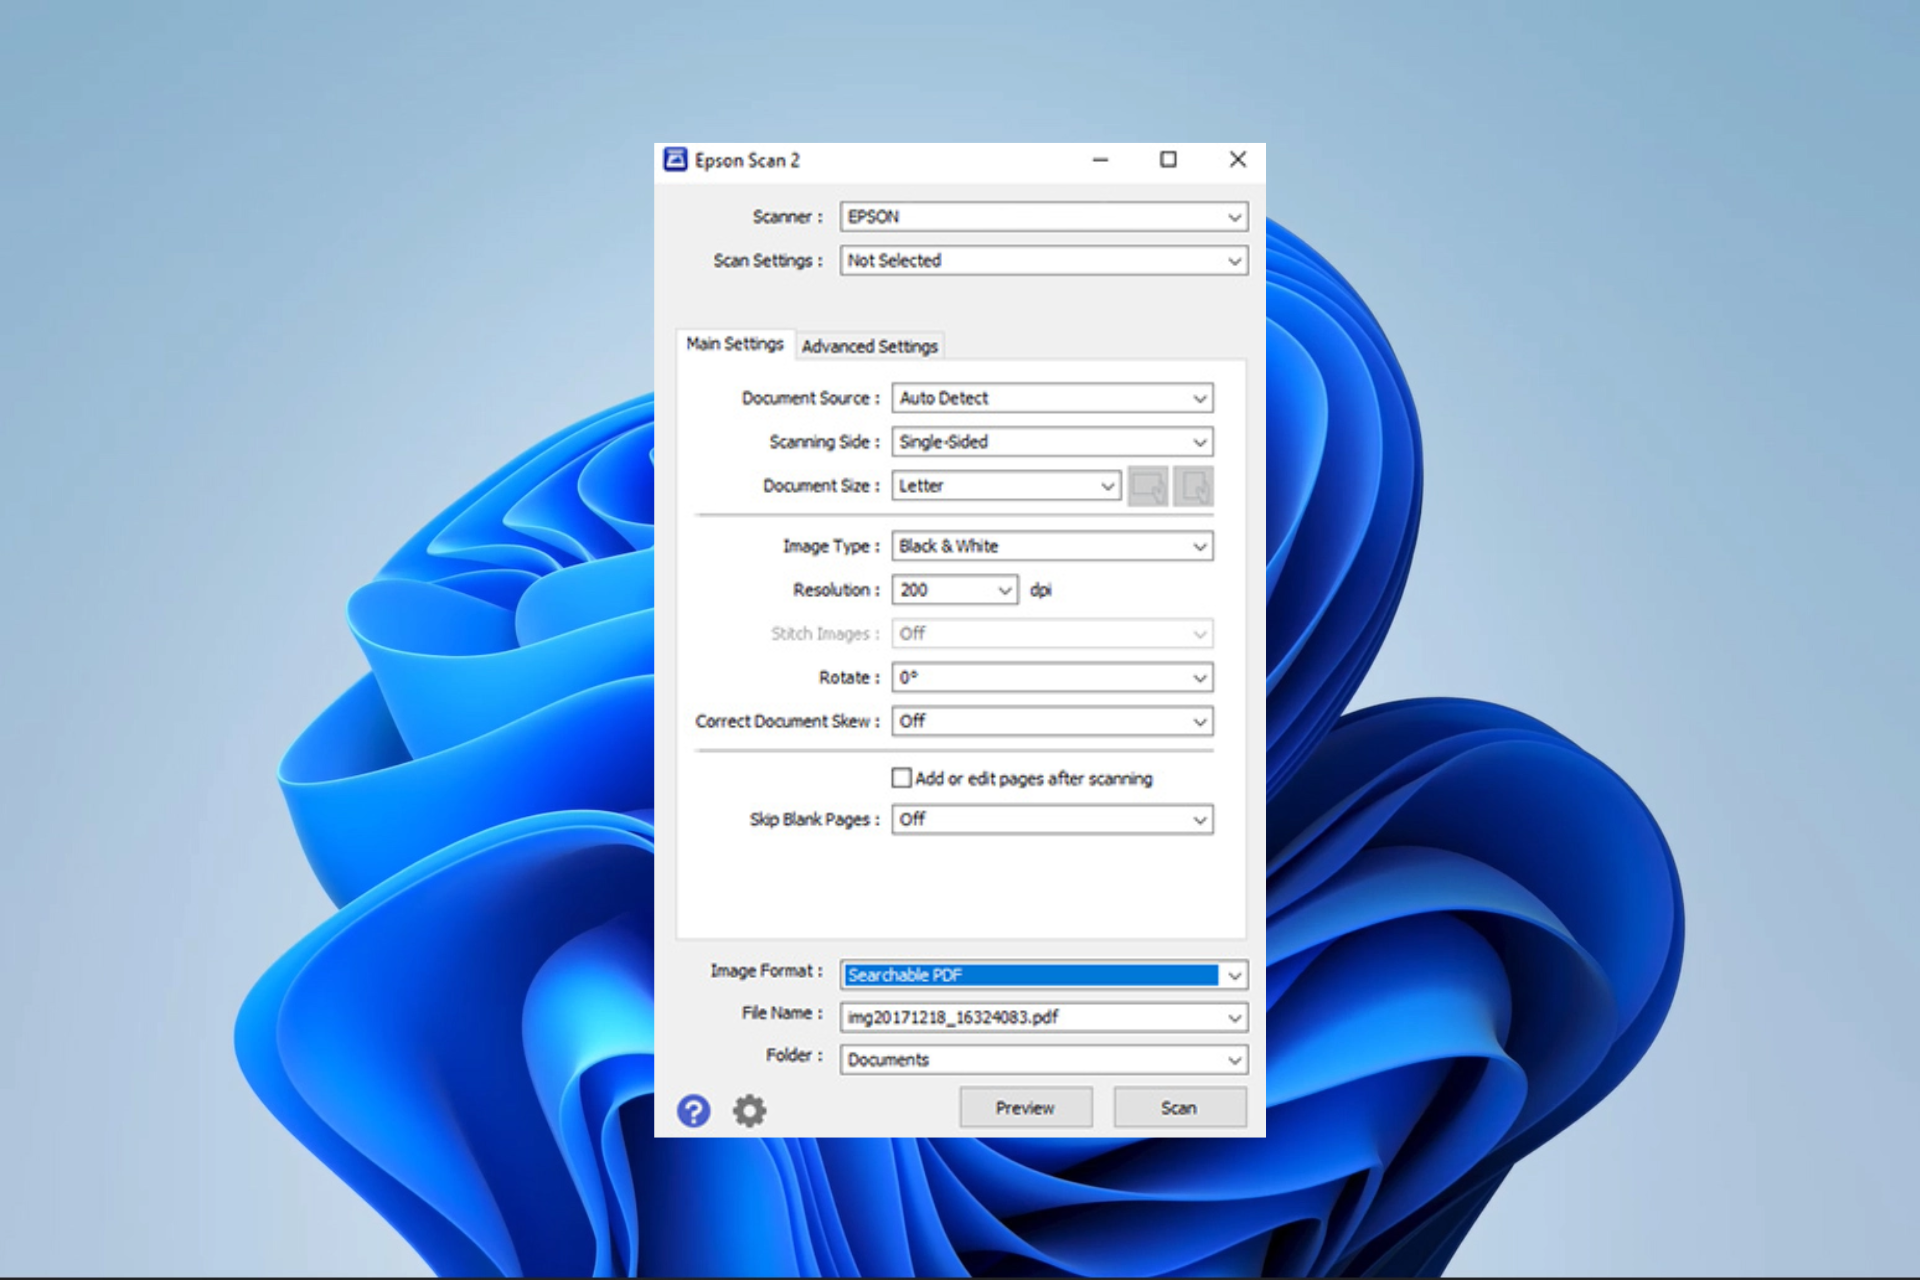
  2. Click on the resolution dropdown and select a lower value.
    epson scan 2 not enough memory
  3. Click Scan and verify it fixes the Epson Scan 2 memory problem.
    epson scan 2 not enough memory

2. Update Epson Scan 2

  1. Press Windows + R to open the Run dialog.
  2. Type appwiz.cpl and hit Enter.
    epson scan 2 not enough memory
  3. Click Epson Scan 2 and select Uninstall.
  4. Follow the wizard to complete the uninstallation, then download and install a new copy.

As a long shot, you may also reinstall the driver, but the solutions above should suffice. First, the goal should be to free as much space as possible before retrying the scan.

You may check out our other extensive guide if your Windows 11 device can not detect the scanner.

If you’re setting up the software for the first time, check out this guide on how to download and install Epson Scan 2 on Windows 11.

And if you run into the E425-B101 error during installation or use, this troubleshooting guide for fixing Epson Scan 2 error E425-B101 walks you through the solution step by step.

In conclusion, reach out to us in the comment section and let us know which solutions worked best for you. If you have additional fixes, we also love to hear them.

Microsoft’s Cloud Partner Program gets an AI upgrade

Microsoft Inspire 2023 is taking place this week on July 18-19, and AI is the main character at the conference. Every subject and presentation had something to do with AI, on the first day of the conference, and Microsoft announced a lot of things AI-related.

For example, the Redmond-based tech giant announced the new Microsoft AI Cloud Partner Program, the next generation of the Microsoft Partner Program.

Microsoft has been very keen on adopting AI everywhere, and the tech giant has been at the forefront of AI research. Products like Orca 13B, LongMem, and Kosmos 2 have been helping shape AI, and Microsoft is all behind them. The tech giant has even conducted a study on how to use AI to grow your company.

It’s only natural that AI would be part of the next generation of Microsoft Partner Program. According to Nicole Dezen, Microsoft Corporate Vice President, the Microsoft AI Cloud Partner Program aims to bring together the entire partner lifecycle, including onboarding, skilling, go-to-market, incentives, and co-selling.

As Satya Nadella announced today, the Microsoft AI Cloud Partner Program brings together everything across the entire partner lifecycle, including onboarding, skilling, go-to-market, incentives, and co-selling. Partners get all the value and benefits of the previous program, plus access to new offerings and benefits specific to AI. And there is no action for a partner to take to move to the new program — we’ve moved all our existing partners into the new program effective immediately and partners will maintain their existing benefits and designations.

Nicole Dezen

What could Microsoft AI Cloud Partner Program mean for you?

Basically, the Microsoft AI Cloud Partner Program provides partners with a comprehensive portfolio of investments for all partner business models, at every stage of maturity, according to Microsoft.Microsoft AI Cloud Partner Program

You’ll be able to use the program to develop marketing campaigns and to build your own solutions and services which will be powered by Security Copilot. You’ll also be able to build your business plan using AI, and many more business-related documents to prove your expertise on the market.

Plus, Microsoft will bring more updates tailored for partners, including ISV designations, Training Services designations, and Support Services designations. And by the end of this year, Microsoft will also introduce the industrial metaverse to the Program.

The industrial metaverse blends the digital and physical world with the scope of accelerating efficiency through engineering, manufacturing, and field service. The concept is still in the early stages, but the goal is for it to enable real-time collaboration and connectivity in industrial environments. So it seems Microsoft is really ready to take it to the next level.

What do you think about this program? Let us know in the comments section below.

How to set up & use Bing Chat Enterprise

Microsoft Inspire 2023 is taking place this week on July 18-19, and it is all about AI. The subject was at the center of all discussions and presentations, on the first day of the conference, and Microsoft announced a lot of things AI-related.

We all know that Bing AI is Microsoft’t native AI tool. The Redmond-based tech giant has invested a lot of resources into it and it shows. For example, Bing AI is currently, the world’s second most popular AI tool. Over 1.5 billion people visited and used it in the last months. Some even agree that Bing AI might soon become the most popular AI tool, globally.

And this is thanks to the features Microsoft is implementing on it. For example, Bing AI can give its input on any images that you upload now. And Microsoft really wants you to use it together with Edge, so you’ll be able to use Bing AI to set up your Edge browser soon, too.

It’s clear that we all love Bing AI, but Microsoft has something else in mind too. At the Microsoft Inspire 2023 conference, the Redmond-based tech giant announced Bing Chat Enterprise.

We’re significantly expanding Bing to reach new audiences with Bing Chat Enterprise, delivering AI-powered chat for work, and rolling out today in Preview – which means that more than 160 million people already have access.

Microsoft

And it turns out, you can easily set up and use Bing Chat Enterprise. Here’s how.

Here’s how to set up & use Bing Chat Enterprise

All you need to know is that Bing Chat Enterprise is the organizational version of your Bing Chat. So, in simpler words, Bing Chat Enterprise is Bing Chat for work.bing chat enterprise account

You don’t have to worry about privacy because personal data and company data are protected in Bing Chat Enterprise.

To set up your Business Chat Enterprise account, you just need to log in to Bing Chat with your work account. Bing Chat will then automatically turn into Bing Chat Enterprise. It’s that simple.

Once you’re on Bing Chat Enterprise, you can ask Bing to prepare your documents and presentations using sensitive data. Once again, you don’t need to worry about the data leaking, because the conversations are encrypted, and no one can see it.

This way, you’ll get work done much faster, and more efficiently, as well. For now, Bing Chat Enterprise is rolling out in preview today and is included at no additional cost in Microsoft 365 E3, E5, Business Standard, and Business Premium.

But Microsoft plans to release it as a stand-alone offering for $5 per user, per month.

What do you think about this new product? Will you use your Bing Chat Enterprise account? Let us know in the comments section below.

Qualcomm Bluetooth Driver not Working: 4 Ways to Fix it

With the importance placed on wireless connectivity, many users are affected when the Qualcomm Bluetooth driver is not working. Unfortunately, that is the reality, as various users have issues using their Bluetooth devices due to driver issues.

The fortunate part of it all is that this issue can be easily fixed with a few tweaks here and there. If you are troubled by problems with the Qualcomm Bluetooth driver, follow the solutions in this guide, and things will return to normal.

Why won’t my Qualcomm Bluetooth driver work?

Several factors can be responsible if the Qualcomm Bluetooth driver is not working. Listed below are some of them:

  • Outdated driver: One of the major causes of this problem is a faulty or outdated Bluetooth driver. You can fix this quickly by updating your driver to the latest version.
  • Disabled service: While there are some Windows services that can be disabled, Bluetooth Support is not one of them. This is because it stops your Bluetooth devices from functioning well.
  • Outdated PC: Another notable reason you might get an error while using a Bluetooth device is an outdated operating system. Some users experienced this issue on older versions of Windows but were able to fix it after updating their PC.

How can I fix my Qualcomm Bluetooth driver if it is not working?

1. Perform motherboard reset and reinstall the faulty USB driver

  1. Shut down your PC completely.
  2. Remove the power cable in your desktop or the battery in your laptop.
  3. Now, press the power button for about 10 seconds. Wait for about 20 seconds after.
  4. Connect the power cable or battery again and power on your PC.
  5. This should fix the issue. If the issue persists, press the Windows key + X and select Device Manager.
    device manager qualcomm bluetooth driver not working
  6. Next, double-click the Universal Serial Bus controllers option to expand it.
  7. Right-click any Unknown USB device there and select Uninstall device.
    uninstall usb
  8. Now, click the Uninstall button to confirm the action.
    uninstall
  9. Finally, repeat steps 1 to 4 again.

The most common factor that makes the Qualcomm QCA9377 (and other versions) Bluetooth driver stop working on Windows 10 and 11 is minor issues with the motherboard. A simple power reset has proved to solve this issue.

If power resetting is not enough, check if you have any faulty USB device in Device Manager and uninstall it.

2. Update PC

  1. Press the Windows key + I to open the Settings app and click Windows Update in the left pane.
  2. Click the Check for updates button.
    check updates qualcomm bluetooth driver not working
  3. Now, download and install all available updates.

An outdated operating system is an island of different issues, and it will not be surprising if it is the reason the Qualcomm Bluetooth driver is not working. So, ensure to always check for and install the latest Windows patches.

3. Update the Bluetooth driver

  1. Visit your PC manufacturer’s website and search for your device model.
  2. Go to the Driver section or something related, select your operating system, and locate your Qualcomm Bluetooth driver.
  3. Now, download the driver and extract its content if it is zipped.
  4. Press the Windows key + X and select the Device Manager option.
    device manager qualcomm bluetooth driver not working
  5. Double-click the Bluetooth section and right-click the Qualcomm driver under it.
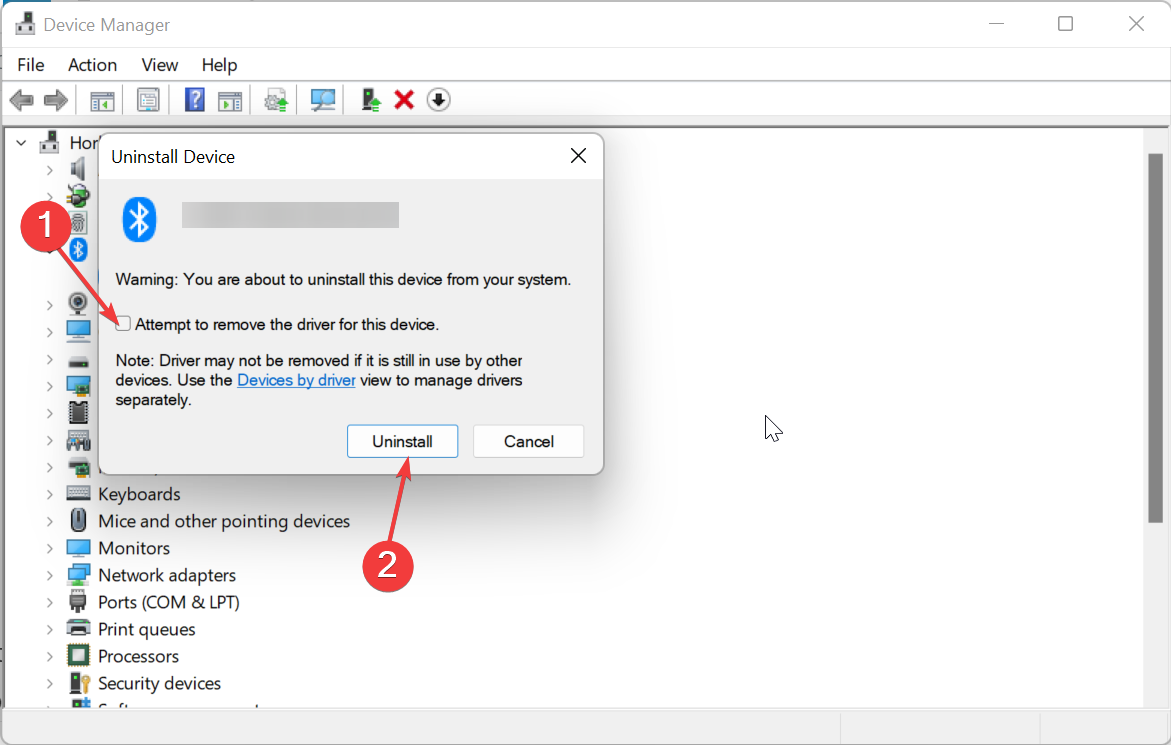
  6. Now, select the Uninstall device option.
    uninstall device
  7. Check the box for Attempt to remove driver for this device and click the Uninstall button.
    uninstall attempt qualcomm bluetooth driver not working
  8. Finally, go double-click the Setup file for the driver you downloaded and follow the onscreen instructions to complete the installation.

If the Qualcomm Bluetooth driver is outdated, it might stop working. Hence, you should try to keep it updated.

Instead of using the manual method above, we recommend using an automatic driver updater in Outbyte. With this, you can eliminate the risk of downloading the wrong driver, which can lead to further problems.

⇒ Get Outbyte Driver Updater

4. Restart the Bluetooth Support service

  1. Press the Windows key + R, type services.msc, and click OK.
    services
  2. Double-click the Bluetooth Support Service to open its properties.
    option support
  3. Now, set its Startup type to Automatic and click the Start button.
  4. Finally, click the Apply button, followed by OK.
    auto qualcomm bluetooth driver not working

When the Bluetooth Support service is disabled or runs into an issue, you might get errors like the Qualcomm Bluetooth driver not working.

So, you need to enable it if it is disabled or restart it if it is running.

We can now conclude this detailed guide on how to fix the Qualcomm Bluetooth driver if it is not working. We believe you now have all the information you need to solve the problem.

In the same vein, if you are errors like Qualcomm QCZ9565 Bluetooth 4.0 has a driver problem, our guide will help you fix it effortlessly.

Feel free to let us know the solution that helped you fix this issue in the comments below.

Word is Not Displaying Images? 4 Ways to Quickly Fix It

MS Word is one of the most popular word-processing utilities. It does more than accept typed words and is helpful for documents, including several images. Sadly some readers have complained that Microsoft Word is not displaying images.

Let us walk you through some solutions. You may, however, consider using some other word-processing alternatives.

Why is Microsoft Word not displaying images?

The primary causes are any of the following:

  • The images are not embedded or linked correctly.
  • Your images may be in an unsupported format. 
  • There is a problem with your copy of Word. 
  • Vital image settings are misconfigured.
  • The viewed document is in Outline or Draft view.
  • There is a problem with your computer’s graphics card. 

You may consider updating the graphics driver. In a related guide, we show you how to update drivers on Windows 11.

What do I do if Microsoft Word is not displaying images?

Before going into the solutions, try these workarounds:

  • Update your graphics driver.
  • Delete the picture and try reading it.

If the problem persists, continue to the fixes below.

1. Enable Show drawings and text boxes on screen

  1. Click on File at the top left corner.
    microsoft word not displaying images
  2. Select the Options menu at the lower left pane.
    microsoft word not displaying images
  3. On the left pane, click Advanced, under the Show document content menu tick Show drawings and text boxes on screen, then click OK.
    microsoft word not displaying images

2. Enable Print drawings created in Word

  1. Click on File at the top left corner. microsoft word not displaying images
  2. Select the Options menu at the lower left pane. microsoft word not displaying images
  3. Click the Display option, under the Printing options section, tick Print drawings created in Word, then hit OK.
  4. Finally, verify if the issue of Microsoft Word not displaying images is resolved.

3. Enable Use draft quality

  1. Click on File at the top left corner. microsoft word not displaying images
  2. Select the Options menu at the lower left pane. microsoft word not displaying images
  3. On the left pane, click Advanced; under the Print menu, unmark Use draft quality, then click OK.

4. Disable Picture Placeholders options

Note icon NOTE
The Picture Placeholders option affects pictures and objects only when using the In line with text option in all views except Full Screen Reading.
  1. Click on File at the top left corner. microsoft word not displaying images
  2. Select the Options menu at the lower left pane. microsoft word not displaying images
  3. On the left pane, click Advanced; under the Show document content menu, unmark Show Picture Placeholders, then click OK.
    microsoft word not displaying images
  4. Finally, verify if the issue where Microsoft Word is not displaying images is resolved.

If the issue continues, you may be facing a hardware problem and may need to change your graphics card. Some users may want to try enabling hardware acceleration. This is, however, a long shot.

We are, however, optimistic that if you have read this far you should have successfully fixed the image displaying error on Microsoft Word.

Please reach out to us in the comment section and tell us what solutions worked for you.

Fix: Adobe Creative Cloud Previous Versions Not Showing

A few of our readers have complained that previous versions of Adobe Creative Cloud are not showing. Some users get this problem after reinstalling CC on a newly formatted hard drive.

If you belong to this category, you may want to check out some of the best ways to transfer Adobe Creative Cloud to a new computer. However, this article gives you practical solutions to see previous versions.

Why are Adobe Creative Cloud previous versions not showing?

The following are the primary reasons for this problem:

  • You may not be logged in with a paid Creative Cloud plan.
  • The OS version you use is not supported.
  • You may be logged in with a single app or a team/enterprise plan.
  • Previous versions may have been removed from the Adobe servers.

Users have complained about a few other issues, like the Adobe Creative Cloud’s high CPU usage, so you may read our other guide to learn how to fix it.

How do I access older versions of Creative Cloud?

Before exploring any solutions, try these workarounds:

  • Contact your Adobe account manager and verify your access to previous versions.
  • Make sure your OS is compatible with previous versions of Adobe apps.
  • Log in with a paid Creative Cloud plan.

If the problem persists, try the solutions recommended below.

1. Copy files from an old working version

  1. Log into a laptop where you may have the old CC apps installed.
  2. Copy the folders below:
    C:\Program Files\Adobe
    C:\Program Files x86\Adobe
    adobe creative cloud previous versions not showing
    C:\Program Files\Common Files\Adobe
    adobe creative cloud previous versions not showing
    C:\Program Data\Adobe
    C:\Appdata\Roaming\Adobe
    C:\Program Files x86\Common Files\Adobe
    adobe creative cloud previous versions not showing
    C:\Appdata\Local\Adobe
    adobe creative cloud previous versions not showing
  3. Copy the folders in the paths above to the corresponding locations on the PC where you have the problem.
  4. Press Windows + E to open file explorer on the problematic computer, navigate to the path below, then double-click Creative Cloud.
    C:\Program Files (x86)\Adobe\Adobe Creative Cloud\ACC

2. Enable older version

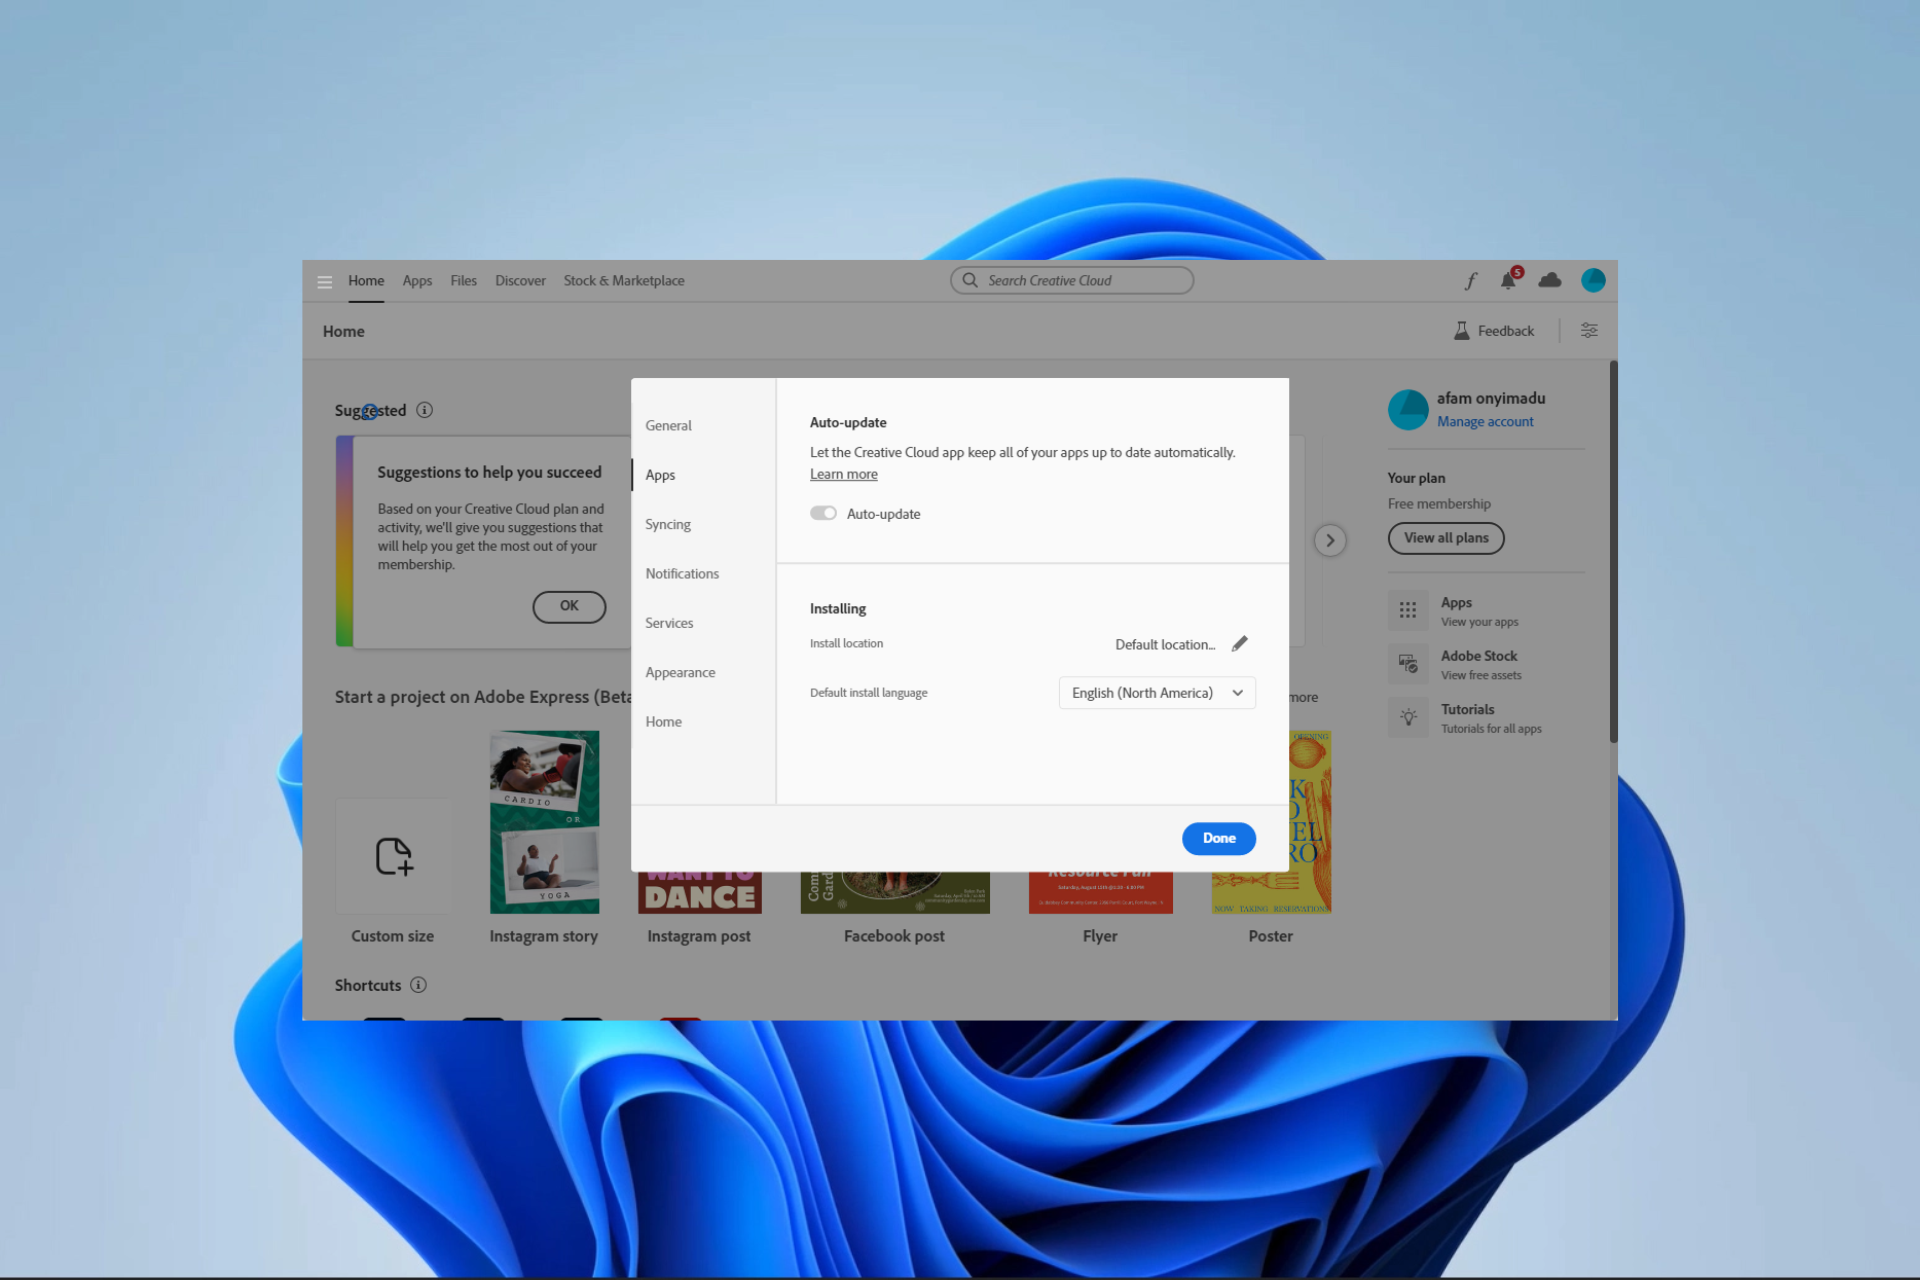
  1. Click on the Creative Cloud hamburger at the top left, select File, then Preferences.
    adobe creative cloud previous versions not showing
  2. Click the Apps tab, toggle on Show Older Apps, and click Done.
  3. Now if you check for older apps, they should be visible.

If you have followed any of the solutions in this guide, you should be able to see the previous versions showing your Adobe Creative Cloud.

In most cases, copying the files from an old installation is most effective. Our other guide may be helpful if you encounter any Adobe Creative Cloud download errors.

If you know of any other solutions, our readers would love to hear from you in the comment section below.

Web Page is Not Centered on Screen: 2 Ways to Fix it

A web page serves as a digital gateway, presenting information, services, or products to users across the internet. However, people have had frustrating experiences with uncentered web pages while browsing. Therefore, we will examine ways to fix a web page if it is not centered on the screen.

Alternatively, you can check our detailed guide on fixing unresponsive web pages in all browsers on your computer.

Why is my screen not centered on a web page?

  • The webpage’s CSS rules or layout may affect the web page centering of the screen.
  • The browser zoom settings might be causing the page to appear off-center.
  • Web pages’ responsive design may have different layouts for different screen sizes, leading to variations in centering.
  • The content alignment specifics within the page might not be centered, even if the overall layout is.
  • Browser Compatibility can cause different browsers to interpret CSS rules differently, resulting in inconsistent centering.

How do I center a web page on my screen?

1. Assign a default level for specific websites

1.1 Chrome browser

  1. Open Chrome browser on your computer, click the three horizontal dots, and select Settings.
  2. Click on the Privacy and Security tab and select Site Settings.
  3. Click on Additional content settings and select Zoom levels.
  4. Set the site Zoom level to your preference, or click on the X button to remove the Zoom level.

Note that you can adjust the zoom level with the keyboard by pressing Ctrl with the + or - key.

1.2 Mozilla Firefox

  1. Launch the Mozilla Firefox on your PC and click the three horizontal lines to open the menu.
  2. Scroll to Zoom, click the -/+ sign, and set the zoom level to your choice to adjust.

Firefox will save the zoom settings level and help center each web page. You read our guide about ways to fix Firefox encountering a problem error message on Windows.

2. Utilize extensions for configuring automatic zoom on websites

2.1 Chrome browser

  1. Navigate to the Chrome web store and search for Zoom for Google Chrome extension.
  2. Select one of the options and click Add to Chrome.
  3. Then, click on Add extension in the pop-up window.
  4. Now, load the website and click on the extension at the upper right corner of your browser to center the page.

Installing the Zoom add-on for Microsoft Edge will auto-align the web page on your screen.

2.2 Mozilla Firefox

  1. Navigate to the official Firefox web page to download the Fixed Zoom add-on.
  2. Select the Add to Firefox button and click Add from the pop-up menu to confirm your selection.
  3. Wait for the installation to complete and reload the browser.
  4. Locate the add-on at the upper left corner, then click on Fixed Zoom. Then enable it by toggling it on.
  5. In the new window, use the -/+ to adjust the screen to center it.

Fixed Zoom is a similar extension to Microsoft Edge Zoom that auto-resizes web pages to fit the screen.

Remember, it’s easy to centrally position an app in Windows 11 and you can do it quickly!

In addition, you can check our detailed guide on fixing the Firefox web page slowing down on Windows PCs. Also, we have a comprehensive guide about resizing web pages to fit your screen on your computer.

If you have further questions or suggestions regarding this guide, leave them in the comments section.

Security Settings Blocked Self-signed Application [Fix]

Java applets have been around for some time now. However, many reported Your security settings have blocked a self-signed application from running messages while using them.

The issue is quite similar to the Application blocked by Java security message we covered not long ago.

Since this issue blocks the functionality of Java-based apps entirely, we’ve decided to create a guide that will help you easily bypass it.

Why are Java applications blocked by security settings?

  • The applet you’re trying to run isn’t added to the exceptions list.
  • Security settings can often cause this problem to appear.
  • The application isn’t signed properly, therefore, it’s blocked.
  • The Java applet comes from an untrusted authority.
  • The Jar file is missing permission attributes.

How do I unblock a Java application this is blocked by security settings?

1. Make an Exception Site List

  1. Press Windows + R and type in control.exe.
  2. Click on Programs, and that click on Java.
  3. Go to the Security tab and click on the Edit Site List.

  4. Inside the Exception Site List, click on Add button.
  5. Paste the URL of the Java applet that you have issues with.
  6. Click OK.
  7. Click Continue when prompted by a security warning.
  8. Try to open the applet again.

In essence, any URL that you insert within the exception list should now work without any issues, and it will help you get rid of Your security settings have blocked a self-signed application from running error.

2. Set the applet’s security level to High

  1. Press Windows + R and type in control.exe.
  2. Click on Programs and then on Java.
  3. Go to the Security tab, and under Security level, select the High option.
  4. Restart the browser that you want to run the applet it

By following any of these methods, any self-signed applets should now be able to run easily on your browser. However, remember that this is a workaround that should only be used when dealing with applets you trust.

This is because you are disabling security features within your PC, but it should help with Your security settings have blocked a self-signed application from running error.

This isn’t the only issue you can encounter, and we wrote about outdated Java message in a separate guide, so be sure to check it.

If you’re aware of another way to solve this problem, share it in the comments section below so that others can also try it.

Microsoft’s latest Excel update enables pictures to act as cell values

According to Microsoft, they have introduced a new feature in Excel that allows pictures to become the actual cell value, remaining attached to the data even when the sheet’s layout is modified. This feature enables users to use images in tables, sort, filter, and include them in formulas.

Recently, Microsoft launched the IMAGE function, allowing users to place web pictures in cells using URLs based on valuable user feedback. Now, they have implemented the ability to insert local pictures directly into cells from devices or stock image libraries.

Here’s how it works

  1. Select the cell where you want to place the picture.
  2. Go to Insert > Pictures > Place in Cell, and choose one of the available sources:
  • This Device
  • Stock Images
  • Online Pictures

Switch between picture types

Users can select an existing picture inserted using the “Place over Cells” command and click the “Place in Cell” button next to the image to switch between picture types. The “Place in Cell” command can also be found in the right-click context menu or the Picture Format contextual tab.

Paste a picture from the clipboard into a cell

For those who prefer to paste a picture from the clipboard directly into a cell, use the Paste > Paste Picture in Cell option on the Home tab or in the right-click context menu. The default Paste command will paste the picture over cells, not into a cell.

These capabilities are currently available to Insiders running:

  • Windows: Version 2306 (Build 16529.20000)
  • Mac: Version 16.75 (Build 23070901)

Soon, these features will be available in Excel for the web, in Excel for iOS, and in Excel for Android.

Excel is a part of the Microsoft 365 bundle, and Microsoft is set to launch affordable Windows 365.

Microsoft’s enterprise Copilot solution pushes company stock to all-time high

Despite the news that Microsoft plans to lay off of another hundred plus employees and was forced by regulators to renegotiate its acquisition timeframe for Activision Blizzard, the company’s stock is at an all-time high thanks to a new artificial intelligence subscription service.

Microsoft has been touting the free consumer version of its generative pre-trained transformer (GPT) powered Copilot services across its lineup of platforms since early January of this year, and now the company is set to deliver an advance version of the same Copilot program to enterprise customers, for a price.

During Microsoft’s Inspire conference yesterday, the company announced early access to Security Copilot as well as pricing for a subscription-based Copilot solution dubbed Bing Chat Enterprise for E3 and E5 Microsoft 365 customers that comes in at $30 a month per user.

Bing Chat Enterprise makes use of the Microsoft graph combined with Large Language Models trained by OpenAIs ChatGPT4 to offer over verifiable answers with citations, visual analysis with auto-generated charts and images throughout many of Microsoft’s Office products such as Excel, Word, Teams, and more.

The news of a new way for Microsoft to bilk Microsoft 365 customers of up to 50% more per seat with an additional value-add in Bing Chat Enterprise raised Microsoft’s stock as much as 5.8% yesterday and led to a stock price of $365 up from $345 just the day prior.

While the media and some journalists are preoccupied with the company’s regulatory drama, Microsoft has quietly continued to improve the company’s portfolio with consistent cloud service gains as well as timely investments that now include its plunge into GPT solutions to both infuse its own platforms with as well as benefiting from the licensing to third parties through its partnership with OpenAI.

Microsoft is currently testing a consumer version of Bing Chat in Windows 11 and plans to really explore the GPT platform in Windows 12, which begs the question of what economical cost the resource draining solution could be handed to users of the company’s next flagship operating system.

If it’s going to cost $30 per user for enterprise, how does Microsoft balancing offering a similarly functional version to a potential billion users?

Google has also made moves to imbue its own services with versions of its large language models and GPT offerings, but due to the nature of its partnering rather than forging creating an in-house solution, Microsoft seems to be beating Google to the punch as far as marketing ready-made products.

A Webpage Is Not Printing? Here’s What You Can Do to Fix It

Printing is as easy as clicking a button, but it is not always straightforward. For instance, printing a webpage may not be as easy as you think. Some web pages may not print, no matter how hard you try, and even make your printer unresponsive.

There are many reasons why this might happen, but with the right knowledge and some troubleshooting skills, fixing the problem should be easy enough.

Why won’t a webpage print?

Have you tried printing a webpage, but it’s not printing? Below are some possible reasons behind this error:

  • Webpage settings – Some websites use non-standard code that won’t work with most printers.
  • The page is too big – Printing large pages may cause problems. The webpage may have exceeded your printer’s maximum capacity.
  • Outdated browser – If you’re using an older version of a browser, it may not support the latest features that many sites rely on hence why your webpage is not printing. 
  • Missing/outdated/damaged drivers – The most common reason you can’t print is that you’re having driver issues, and the one you need isn’t installed on your computer.
  • Insufficient permissions – You probably don’t have administrative privileges to access any printers on your system.
  • Addins or plugins are blocking access – Some plugins, such as ad blockers, are designed to block certain types of content from being printed.
  • Firewall settings – If you’re using a firewall on your computer, it might be blocking certain pages from printing.
  • The web designer has disabled printing – Some web designers disable printing because they don’t want people printing copyrighted material or sensitive information.
  • Your computer doesn’t have enough memory – If your PC has too many programs running, it may not be able to handle all the graphics on a page to print successfully.

How do I print a website that is not printable?

Try the following basic workarounds before any advanced troubleshooting:

1. Run the Printer troubleshooter

  1. Hit the Windows key and click on Settings.settings windows 11
  2. Select System on the left pane, then click Troubleshoot on the right.Open system troubleshooter
  3. Click on Other troubleshooters.other troubleshooters
  4. Find the Printer troubleshooter and click the Run button next to it.0x0000052e System Troubleshooter - Printer - Run

2. Restart the Print Spooler service

  1. Hit the Windows + R keys to open the Run command.
  2. Type services.msc in the dialog box and hit Enter.run services.msc command
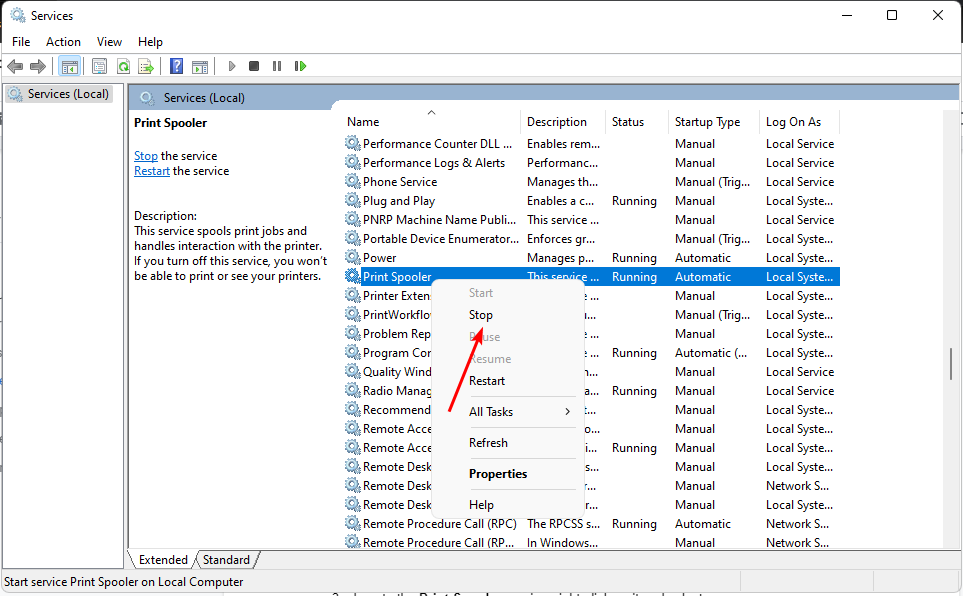
  3. Locate the Print Spooler service, right-click on it, and select Stop.
  4. Right-click on it again, then select Start.start service

3. Update the Printer drivers

  1. Hit the Windows key, type Device Manager in the search bar, and click Open.device manager w11
  2. Navigate to Printers and locate your printer.
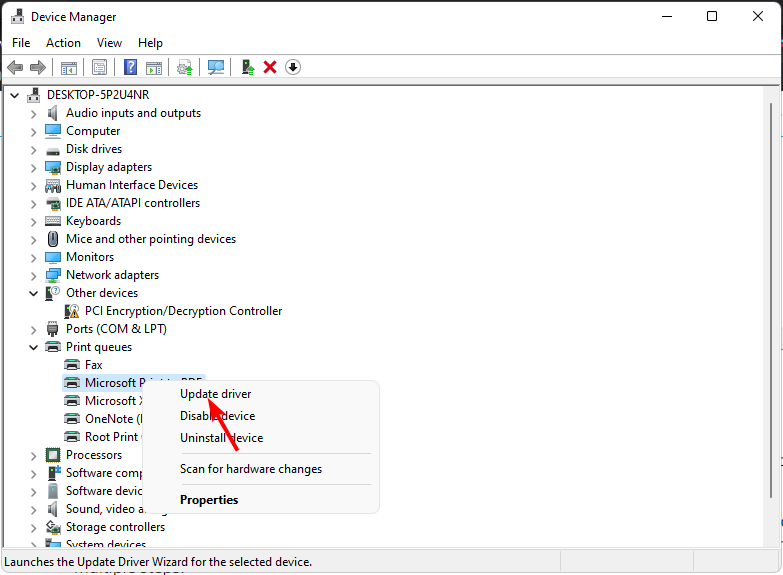
  3. Right-click on it and select Update driver.
  4. Select Search automatically for updated drivers.
  5. Windows will find the most suitable driver and recommend you install it.

The above process is easy but is not as straightforward as using an automatic tool. You’re also not guaranteed that Windows will match you with the appropriate driver.

That’s why you may need driver updater software. Outbyte Driver Updater can scan and detect any missing, corrupt, or outdated drivers and replace them with the correct ones.

⇒ Get Outbyte Driver Updater

4. Disable your antivirus temporarily 

  1. Hit the Windows key, type Windows Security in the search bar, and click Open.
  2. Click on Firewall & network protection, then select Public network.league of legends black screen after champion select
  3. Locate Microsoft Defender Firewall and toggle the off button.turning off Microsoft Defender Firewall Windows

5. Scan for viruses

  1. Click on the Start Menu icon, search Windows Security, and click Open.
  2. Select Virus & threat protection.
  3. Next, press Quick scan under Current threats.
  4. If you don’t find any threats, proceed to perform a full scan by clicking on Scan options just below Quick scan.Scan options
  5. Click on Full scan, then Scan now to perform a deep scan of your PC.Full Scan Scan Now
  6. Wait for the process to finish and restart your system.

It’s way too easy to equate a website with physical printing. And while it should be as straightforward as printing other documents, it isn’t always guaranteed.

Hopefully, if you’re encountering an issue with printing a website, this article will give you the solution you’re looking for. Otherwise, your printer may just not be working, and you need to upgrade to a modern printer.

Still, there may be one or two points we haven’t covered that you are wondering about. If that’s the case, feel free to comment, and we will do our best to update the article accordingly.

Microsoft and Activision agree to October merger deadline extension

Microsoft and Activision have agreed to extend their merger deadline to October 18 as negotiations continue with the CMA. The original deadline expired yesterday, July 18.

The two companies also agreed to up the termination fee from $3 billion to $3.5 billion if either party should walk away from the deal (which at this point would be extremely unlikely).

At present, Microsoft and the U.K. market regulator have agreed to pause litigation of Microsoft’s appeal (the CMA blocked the deal back in April) as the two parties work to reach a compromise over the CMA’s concerns over the cloud gaming market. Some are speculating that Microsoft may elect to sell off rights to its cloud gaming services in the U.K.

Microsoft president Brad Smith tweeted that the extension would “provide ample time to work through the final regulatory issues…We are confident about our prospects for getting this deal across the finish line.”

In all likelihood the deal will finally close much sooner than this new deadline. The CMA’s final order date is now August 29.

Featured image via Forbes. 

Microsoft partners with Capgemini and Splunk to drive AI and cloud innovation

In an announcement by Capgemini, Microsoft and Capgemini introduced the Azure Intelligent App Factory, a solution to revolutionize business intelligence across various industries. This innovation empowers organizations to scale AI responsibly and sustainably by leveraging generative AI capabilities, ensuring their AI investments reach their full potential with speed and security.

The partnership combines Capgemini’s industry knowledge and resources with Microsoft’s technologies, including the Microsoft Cloud, Azure OpenAI Service, and Github Copilot. Businesses gain access to transformative AI solutions through the Azure Intelligent App Factory, hopefully. setting new standards for responsible AI implementations.

Yesterday, Meta and Microsoft joined forces to bring Llama 2 language models to Azure and Windows.

Aiman Ezzat, CEO of Capgemini, underlined the importance of reliable, ethical, and compliant AI solutions to unlock the value of generative AI investments for businesses. The partnership is dedicated to enabling clients to implement AI solutions successfully, fueled by their shared commitment to ethical principles.

Judson Althoff, EVP, and Chief Commercial Officer at Microsoft, expressed delight at the prospect of Capgemini’s Azure Intelligent App Factory empowering customers across industries with generative AI applications that are both secure and efficient. This collaboration represents a pivotal step towards realizing business transformation and growth through cutting-edge AI technology.

Simultaneously, in an announcement by Splunk, Microsoft joined with Splunk Inc., solidifying their strategic partnership and introducing Splunk’s enterprise security and observability offerings on Microsoft Azure. For the first time, Splunk solutions will be available on the Microsoft Azure Marketplace, allowing joint customers to benefit from advanced digital resilience. This combined effort enables businesses to remain secure and up and running throughout their cloud journey, fostering a strong foundation for future innovation and growth.

Gary Steele, President and CEO of Splunk, underscored the significance of this partnership in delivering mission-critical solutions powered by Splunk AI and built on Azure. The collaboration offers customers unparalleled flexibility in deployment options, embracing a truly hybrid approach that caters to individual business requirements.

With thousands of joint global customers now able to access Splunk Enterprise, Splunk Enterprise Security (ES), and Splunk IT Service Intelligence (ITSI) through the Microsoft Azure Marketplace, the reach and impact of this partnership are poised to be tremendous.

In summary, these strategic alliances seemingly demonstrate Microsoft’s commitment to driving AI innovation and delivering robust cloud solutions, aiming to enable businesses worldwide to thrive in the ever-evolving digital landscape.

Outlook is Not Dismissing Reminders? 4 Ways to Fix It

We can all attest to how valuable reminders help us with our busy schedules. However, we don’t need them once we’re done with them. Well, Outlook mail seems not to dismiss reminders and keeps them lingering.

It can be frustrating when you keep getting a buzz about something you already took care of, so we’re here to help you end these annoying reminders.

Why can I not dismiss reminders in Outlook?

Do you keep dismissing reminders on Outlook but to no end? Well, what could be the reason? Below are some possible causes:

  • Corrupt reminder folder – A reminder folder can become corrupt, and Outlook will have trouble loading your reminders. If you experience a power outage while Outlook is running, this can cause corruption in your reminder folder.

One user was livid because the reminders kept reappearing.

Every time when I open the app I receive reminder notifications regarding the same calendar entries. When I try to individually dismiss them it doesn’t work but when I dismiss them all they disappear (but reappear the next time the app is launched).

  • Duplicate reminders – If you have a lot of duplicate reminders or two reminders with the same title, then this could be why your Outlook reminders keep popping up.
  • Your network connection is slow or unstable – A slow network connection will cause applications to run slowly and cause synchronization to fail.
  • Multiple versions of Outlook – If you have more than one version of Microsoft Outlook installed on your computer, you may be using different data files or databases, resulting in synchronization issues.

How do I permanently dismiss a reminder in Outlook?

If you can’t dismiss a reminder in Outlook, there are some preliminary steps you can take to resolve the problem:

1. Reset the Outlook reminder folder

  1. Hit the Windows + R keys to open the Run command.
  2. Type outlook.exe /cleanreminders in the dialog box and hit Enter.

Resetting your reminder folder lets you start fresh with a clean slate. Once this folder has been deleted, it will automatically be recreated the next time you set up reminders. 

2. Repair the PST file

  1. Press the Windows + E key to open File Explorer.
  2. Navigate to the following path depending on where your Outlook files are located: C:\Program Files\Microsoft Office\ OfficeXX 
  3. Double-click on the SCANPST key to launch the SCANPST.EXE utility.
  4. On the Microsoft Outlook Inbox Repair utility page, click Browse, and choose the PST file.
  5. Click the Start button to scan the PST file and check for errors.
  6. If the scan detects any error, click the Repair button.

The PST file stores all email messages, contacts, calendar items, notes, and other relevant information. It is created by default when you install Outlook on your system. If you have lots of data, the PST file size can grow very large, especially if you don’t delete the old items.

Unfortunately, this makes it easy to get corrupted, hence the need for repairs. If the above manual method does not work, you can use a third-party tool to repair the PST file.

⇒ Get Stellar Repair for Outlook

3. Scan for viruses

  1. Click on the Start Menu icon, search Windows Security, and click Open.
  2. Select Virus & threat protection.
  3. Next, press Quick scan under Current threats.
  4. If you don’t find any threats, proceed to perform a full scan by clicking on Scan options just below Quick scan.Scan options
  5. Click on Full scan, then Scan now to perform a deep scan of your PC.Full Scan Scan Now
  6. Wait for the process to finish and restart your system.

If you have mistakenly dismissed Outlook reminders, check out this quick guide to find easy workarounds.

4. Create a new Outlook profile 

  1. Hit the Windows key, type Control Panel in the search bar, and click Open.control-panel-search Windows 11 lid close action
  2. Type Mail in the search bar and click to open.
  3. Next, click on Show Profiles under Profiles in the Mail setup window that pops up.
  4. A list of Outlook profiles registered on your PC will appear. Find the one that was shaving problems, click on it, then select Remove.
  5. A confirmation dialog box will appear, so click Yes to confirm.

This step will not necessarily stop the Outlook reminders from popping up, but it will be a step closer to helping you determine whether your profile is the problem.

And that brings us to the end of this article. With these tips, you should be able to dismiss Outlook reminders without reappearing. To learn more about reminders, we suggest checking our guide on how to set reminders in Outlook for more information.

We also have an interesting article on how to set working hours in Outlook if you want to stay focused.

If you solved this issue with any other unmentioned solution, let us know in the comment section below.

WhatsApp is Not Showing Contact Names? Fix it in 3 Steps

WhatsApp has millions of users, but even such a large platform can have issues. Speaking of which, many reported that WhatsApp is not showing contact names.

If this issue appears, you won’t be able to find contacts quickly, making your communication much harder than needed.

It’s worth mentioning that WhatsApp is available on Windows 11, and we have a great guide on how to download and use it.

In today’s guide, we will tackle this issue and show you how to fix it properly, so let’s get started.

Why are my contacts showing up as numbers?

  • WhatsApp isn’t allowed to access your contacts.
  • Phone numbers aren’t in the correct format.
  • Temporary glitches with certain contacts.

What can I do if WhatsApp is not showing contact names?

Before we start fixing this issue, there are a few quick checks and workarounds to perform:

  • Install Google Contact sync if you use a custom ROM on your phone.
  • Make sure that WhatsApp is allowed access to your contacts.
  • Check if phone numbers are in the correct format. Having double country codes in a phone number can cause this issue.
  • Rename the affected contacts in the Contacts app.

1. Delete contacts in the Contacts app and add them to Whatsapp

Note icon NOTE
This solution requires you to delete contacts. Make sure you write the contact information before proceeding.
  1. Open the Contacts app.
  2. Select all contacts that are affected.
  3. Now tap Delete.
  4. After that, go to WhatsApp and add the contacts again.

Remember that this solution works if you only have several contacts affected by this issue.

2. Clear WhatsApp data

  1. Open the WhatsApp app info page.
  2. Select Clear data.
  3. Confirm your choice.
  4. Force close WhatsApp and start it again.

After doing that, check if Whatsapp is still not showing contact names.

3. Adjust WhatsApp permissions

  1. Close WhatsApp completely.
  2. Open Settings and go to Apps.

     
  3. Locate WhatsApp on the list.
  4. Next, go to Permissions.
  5. Select Contacts.

  6. Choose Don’t allow.
  7. Start WhatsApp again and close it.
  8. Repeat the same steps and allow Whatsapp to access contacts.

After doing that, the issue should be gone. If you have further issues, we have a great guide on WhatsApp issues that you might want to check out.

These are just a couple of solutions that can help you with WhatsApp not showing contact names, so be sure to try them.

Did you find a different solution? If so, share it with us in the comments below.

Modern Warfare 2 GPU Driver Version Error: 4 Ways to Fix

Modern Warfare 2 GPU driver version error can prevent you from playing the game, so it’s important to fix it.

This isn’t the only issue, and many reported that Modern Warfare 2 is stuck on loading screen. However, we tackled this issue in a separate guide.

Today we’re going to focus on driver issues, so let’s get started, shall we?

Why am I getting the GPU driver error in Modern Warfare 2?

  • Outdated version of Windows can cause issues and glitches with the game.
  • Graphics card drivers can lead to this problem, so update graphics card drivers.
  • DirectX issues can cause this problem, so you might have to reinstall DirectX.
  • Your GPUs cache can lead to this problem in some cases.

How can I fix the GPU driver error in Modern Warfare 2?

1. Clear the GPU cache

  1. Open File Explorer.file exporer
  2. Type the following command into the address bar, then press Enter: %localappdata%local app data
  3. Locate the NVIDIA folder, open it, then open the DXCache folder and delete all the items in it.nvidia cache
  4. Go back, open the GLCache folder and delete all the items in it.glcache
  5. Go back to the Local folder and find the NVIDIA Corporation folder, then open it.nvidia corporation
  6. Open the NV_Cache folder and delete all the files in this folder.NV Cache
  7. Restart your PC.

2. Update your GPU driver

  1. Search for Device Manager and open the app.device manager
  2. Expand Display adapters, right-click the one you are using, then select Update driver.update display driver
  3. Select Search automatically for drivers.search automatically for display drivers

After doing that, check if Modern Warfare 2 GPU driver version error is still here.

3. Install the latest DirectX version

  1. Visit the DirectX download page.
  2. Select the desired language, then click the Download button.directx
  3. Open the executable you downloaded, agree with the terms and click the Next button.install directx
  4. Follow the on-screen instructions.
  5. Restart your PC.

4. Update Windows

  1. Press Win + I to access Settings.
  2. Click on the Windows update tab, then click on Search for updates.windows update
  3. If Windows found any updates, click on the Install now button.

That is all you have to do when facing the above-mentioned situation. You don’t need to scour the internet for solutions, as all you need is right here.

If you’re having more problems, visit our Modern Warfare 2 Vault Edition not working guide to see how to fix it.

Was this article helpful to you? Be sure to let us know by leaving a comment in the designated area located just below.

Facebook Error App Not Active: What It Means & How to Fix

A couple of our readers have complained about getting an app not active error while accessing Facebook applications. This may happen when launching the app or during use, and it will restrict you from continuing any process.

We have compiled the best solutions in this guide. Before diving in, you may get help from our related guide if your Messenger app is not working.

What does it mean when Facebook says app not active?

The FaceBook app not active error implies that the app you need to access is unavailable. Any of the following triggers this situation:

  • You are accessing an app unavailable to the public and still in development mode.
  • You are accessing a deleted Facebook app.
  • Facebook has suspended the app for violating the platform’s terms of service.
  • The app has been dormant for more than 90 days.
  • There is an issue with your internet connection.

You may try to speed up a slow internet connection using the steps in our other guide.

What do I do if I get an app not active Facebook error?

Before proceeding to the solutions, try these workarounds;

  • Ensure you are connected to the internet.
  • Verify the requested app is still available on Facebook.

If the app is inactive on Facebook, continue to the solutions below.

1. Restore access to the app

  1. Navigate to the Facebook for developers page.
  2. Select My Apps from the top right bar.
    facebook error app not active
  3. Select your app from the list.
    facebook error app not active
  4. Click on the Restore access button.
    facebook error app not active
  5. This may take a while, but wait patiently and follow any prompts given to complete the process.

2. Include a privacy policy in the app

  1. Navigate to the Facebook for developers page.
  2. Select My Apps from the top right bar.facebook error app not active
  3. Select your app from the list.facebook error app not active
  4. On the left pane, select Settings, then Basic.
  5. Add a link to your privacy policy in the Privacy Policy URL field.
  6. Lastly, press Save changes.

3. Edit public_profile

  1. Navigate to the Facebook for Developers page.
  2. Select My Apps from the top right bar.facebook error app not active
  3. Select your app from the list.facebook error app not active
  4. On the left pane, select App Review, then Permissions and Features.
    facebook error app not active
  5. Scroll to public_profile, and click the Request advanced access option.

There you have it. Once you have followed any of the solutions above, you should no longer get the Facebook app not active error. You would, however, need to be an admin to be able to use any of the solutions explored.

You may need to fix your Facebook app that is not working, so we have another guide to help you through the process.

Besides, if you are new to the dating game, our quick guide to fixing things when Facebook Dating is not showing up will help!

Besides, if you are new to the dating game, our quick guide to fixing things when Facebook Dating is not showing up will help! You can also check our detailed fixes for Facebook Dating not working to get it running again.

Lastly, please reach out to us and let us know what worked for you. We would love to read about it in the comment section if you discover other ways to fix the error.

Fix: Windows 11 Taskbar is Not Disappearing in Full Screen

One of the notable features of the Windows 11 Taskbar is its ability to auto-hide, allowing users to maximize their screen real estate when working with full screen applications or media.

However, some Windows 11 users have reported an issue where the taskbar fails to auto-hide when they enter full screen mode, causing an unwanted distraction and reducing the immersive experience.

In this guide, we will explore the possible causes behind this behavior and provide you with effective solutions to resolve the issue.

Why is my Windows 11 Taskbar not going away in full screen?

The issue of the Taskbar not disappearing in full screen mode on Windows 11 can be caused by several factors. Here are some possible reasons for this behavior:

  • Taskbar settings – If the auto-hide feature is disabled or if the taskbar is set to be always visible, it will remain on the screen even when you enter full screen mode.
  • Software compatibility – Certain software applications or utilities running on your computer can conflict with the Taskbar auto-hide feature.
  • File Explorer not working – If the File Explorer is not working properly, it could cause the Taskbar to behave unnaturally. Try restarting Windows Explorer.
  • System glitches or bugs – Windows 11, like any operating system, may have its own glitches or bugs that affect the behavior of certain features, including this one. Ensure your Windows is updated.

Now that you know the causes, move to the troubleshooting methods to fix the problem.

How do I make the Taskbar go away in full screen?

Before engaging in advanced troubleshooting steps, you should consider performing the following checks:

  • Restart your computer.
  • Ensure your Windows is up to date.
  • Try to use the F11 key to enter full screen and see if the taskbar is still present.
  • Check if there are any notification alerts on the app icon on Taskbar.

Once you are through, check out the solutions mentioned to resolve the issue.

1. Restart Windows Explorer

  1. Press Ctrl + Shift + Esc to open the Task Manager app.
  2. Go to the Processes tab, locate and right-click Windows Explorer, then select Restart.Restart Windows 11 Taskbar is Not Disappearing in Fullscreen
  3. The Taskbar and other File Explorer windows will disappear, then appear.

2. Check the Taskbar settings

  1. Press Windows + I to open the Settings app.
  2. Go to the Personalization tab and select Taskbar.Taskbar settings Windows 11 Taskbar is Not Disappearing in Fullscreen
  3. Go to Taskbar behaviors, check if there is a checkmark next to Automatically hide the taskbar. If not, then place a checkmark.ApplicationFrameHost_LPhI9EvEgF
  4. Also, uncheck Show badges on taskbar apps.

3. Run SFC and DISM scans

  1. Press the Windows key, type cmd, and click Run as administrator.
  2. CMD elevated Windows 11 Taskbar is Not Disappearing in Fullscreen
  3. Type the following command to detect and repair problems with system files with a cached copy located in a compressed folder called the Windows component store (WinSxS folder) and hit Enter: sfc/scannowSFCSCANNOW CMD
  4. Copy & paste the following command to repair the Windows image and restore system health and press Enter: Dism /Online /Cleanup-Image /RestoreHealthRestore health
  5. Wait for the command to complete and restart your computer to confirm the changes.

You can execute this process easier and faster to prevent multiple stability errors from occurring ever again by using reliable third-party repair software.

4. Remove a registry key related to Taskbar

  1. Press the Windows key, type cmd, and click Run as administrator.CMD elevated Windows 11 Taskbar is Not Disappearing in Fullscreen
  2. Copy & paste the following command to delete the registry and hit Enter: reg delete HKCU\SOFTWARE\Microsoft\Windows\CurrentVersion\IrisService /f && shutdown -r -t 0cmd_delete registry
  3. Now reboot your computer to let the changes take effect.

5. Use Group Policy Editor

  1. Press Windows + R to open the Run box.GPEDIT MSC RUN Windows 11 Taskbar is Not Disappearing in Fullscreen
  2. Type gpedit.msc and click OK to open the Group Policy Editor.
  3. Go to User Configuration, then select Administrative Templates.
  4. In the next window, choose Start Menu and Taskbar.Lock the taskbar gpo
  5. Locate Lock the Taskbar, double-click it, and select Disabled.enable-lock-the-taskbar-setting
  6. Click Apply, then OK to save the changes.

6. Re-register the Taskbar package

  1. Press the Windows key, type powershell, and click Run as administrator.Powershell 2 Windows 11 Taskbar is Not Disappearing in Fullscreen
  2. Type the following command to re-registry taskbar package and hit Enter: Get-AppXPackage -AllUsers | Foreach {Add-AppxPackage -DisableDevelopmentMode -Register"$($_.InstallLocation)AppXManifest.xml"}powershell_Taskbar package
  3. Reboot your computer once done.

So, these are methods that you can use to fix Windows 11 Taskbar is not disappearing in full screen.

If you are facing issues like Taskbar not working on Windows 11, we recommend you check out the solutions mentioned in this guide,

Please feel free to give us any information, tips, and your experience with the subject in the comments section below.

Is Warcraft x Minecraft a real possibility now?

As you may know, Microsoft won the case against FTC and now the Redmond-based tech giant is free to close the acquisition with Activision-Blizzard. Following the news of winning, Microsoft fixed the old Call of Duty games’ matchmaking, which pleased a lot of gamers.

Owning the Activision-Blizzard catalog means that Microsoft now has access to games such as Diablo, Call of Duty, and Warcraft and its massively popular spinoff, World of Warcraft.

Microsoft has already close a deal with PlayStation to allow Call of Duty games on that console. But when it comes to Blizzard games, it seems that they won’t be on Game Pass any time soon, per a deleted tweet from Mike Ybarra.

However, there is a real need for a Warcraft x Minecraft game or at least a sort of crossover. And players have been wondering about it, ever since the news of Microsoft being free to close the deal hit.

Is Warcraft x Minecraft a possibility now?

As you may know, Minecraft is developed by Mojang, which has been a Microsoft subsidiary since 2014. Minecraft is already the world’s best-selling video game ever, with over 238 million units sold. The game is still very popular, and it currently has 140 million monthly active users.

On the other hand, Blizzard has developed the Warcraft franchise. And Warcraft 3 is still incredibly popular after 20 years from its original release.warcraft minecraft

The game got a reforged version in 2020, but it was panned, both by critics and players alike. However, despite this, World of Warcraft, which is based on the game, is still the world’s most popular MMORPG.

Now that Microsoft owns Blizzard, there might be the possibility of a crossover between the two games. But not in the literal sense. There won’t be a Warcraft mode in Minecraft, or vice versa.

But there is a strong possibility that you’ll see elements and toys and playable items from one game into the other. We’re talking about gear, items, and transmogs inspired by Minecraft in World of Warcraft or Warcraft 3 Reforged and vice versa as well.

In fact, Blizzard has a tradition of taking elements from one of their game and putting those in another of their game. For example, in World of Warcraft, there are a lot of mounts and clothes taken directly from the Diablo universe.

This exact thing might happen with Minecraft as well. And the chance is strong, given that Blizzard often releases special mounts on special occasions that are linked to one of their collaborators or business partners.

So yes, Warcraft x Minecraft is definitely a real possibility now. Just not in the way you’d expect it to be.

Are you excited about it? Let us know in the comments section below.

What Does Archive is Corrupted Mean? [+Common Causes]

Trouble opening your archive could maybe mean it’s corrupted. Data corruption can do a lot of damage, only part of which is losing personal information. That’s why you have to act quickly.

So, what does archive is corrupted mean? What causes it, and how to fix it? Let’s get right to it.

What does archive is corrupted mean?

An archive contains multiple files into one – something that’s extremely useful for data storage or transfer. But what happens if one is damaged? A corrupt archive is a broken one – you will be denied access and extraction to its content.

So, we’re looking at loss of important information at best and system corruption at worst. One can (accidentally) damage an archive while editing, deleting, or transferring. Typically, something interrupts the writing or encoding of the file.

Not having access to your files can be pretty frustrating, especially when you don’t know the reason. Let’s explore the most common causes of archive corruption:

Why do archive files get corrupted?

  • Incomplete download: The most common reason behind archive corruption. An interruption of the download process (be it due to an unstable network connection, power outage, abrupt program shutdown, or other issue) will most likely result in a corrupt file.
  • Errors during file transfer: The transferring process leaves the file vulnerable. Even a small part getting damaged while transferring the archive from one device/storage to another could render the entire archive unusable.
  • Damaged files: The archive could contain damaged files even before you download them to your device.
  • Malicious files: Malware can do a lot of damage to your archive – it can infect it, modify its key components, or even delete some of it. This puts your entire computer at risk!
  • Inaccurate header file: The reader could not recognize the file’s header, which could damage the entire archive.
  • Software issues: Faulty programs can result in data loss or corruption.
  • Bad sectors: Even storage devices can turn corrupt. They could develop a bad sector, which means there are areas on the drive where data cannot be saved and stored. Subsequently, this could significantly damage the archive files.
  • Incorrect file size: If the archive file grows too big, this could lead to archive corruption.

Thinking your information is lost forever could be discouraging when faced with a corrupted archive issue. Keep reading for some valuable tips on how to try to recover it:

How do I fix a corrupted archive?

1. Download the archive again

If an interrupted download process or a transfer error damaged the archive, you could try downloading it again. Alternatively, you can use a different source if we’re talking about online software or data.

This way, you may not have to revert to actual archive corruption recovery attempts.

2. Repair the archive with WinRAR

  1. Open WinRAR on your PC. If you haven’t yet downloaded it, get it from the official software page and follow the on-screen instructions to install it.download-winrar
  2. Click on File and then Open archive. Open your corrupted file.open-corrupted-archive
  3. Select the archive and choose Repair on the right.repair-archive
  4. Pick a new location for the repaired file. Select the archive type and press OK. Wait for the process to finish.archive-recovery

WinRAR is a valuable program not just for viewing archive files. You can also use it to convert, virus scan, encrypt, (force) extract data, backup, or even repair your files.

However, the degree of success depends on the severity of corruption, so in some complex cases, this may not be enough.

3. Force-extract the files

  1. Launch WinRAR and press Ctrl + O. Choose the archive you want to open.
  2. Find the Extract To option and click on it.extract-archive
  3. Choose the destination path and tick the box next to the Keep broken files option.keep-broken-files
  4. Click OK to begin the extraction process. If any errors pop up, ignore them.

4. Use third-party repair software

Sometimes, when data corruption is too severe, the above solutions won’t lead to successful results. If that’s the case with your files, it might be time to try trusted third-party recovery software.

There are excellent free tools to help fix corrupt archive files. You can even find reliable online alternatives.

Though, remember that even if you finally manage to access your file, it’s still possible that they might be infected. Scan them with a reliable antivirus program to make sure you’re safe.

What does archive is corrupted mean? Congrats, now you know not just the answer to this question but also what causes it and how to fix it.

It might also be helpful to learn what to do if you can’t extract your ZIP files.

We hope you found this article useful and that it helped solve your problem. If you need further assistance or information, don’t be shy to use the comment section below.

6 Quick Ways to Fix Outlook Notification Sound Not Working

Not receiving a notification for an incoming email in MS Outlook can cause you to miss important events. In this guide, we will share with you some effective solutions to fix the notification sound not working issue in MS Outlook.

Why is the Outlook notification sound not working?

Sound notifications help us to stay productive as you don’t have to fiddle around with multiple apps to check if you received a new message or an email.

Just like other email clients, MS Outlook also lets the user set different notification sounds for an incoming email, outgoing email, etc.

Here are a few of the common reasons that could potentially be the reason why the notification sound is not working in MS Outlook on your PC.

  • The notification sound is turned off – You might have accidentally disabled the email notification sounds in the MS Outlook app or on your PC.
  • Outlook is restricted from using the speaker – Chances are that the MS Outlook application is not allowed to use your computer’s speaker to notify you of incoming emails.
  • Focus Assist is enabled – There is a high chance that the Focus Assist feature is turned on and muting the notifications.
  • Incorrect sound settings – You might have disabled the options to play a sound for New Mail Notification and Desktop Mail Notification settings on your PC.

Let us now check out the solutions to resolve the problem of notification sound not working in MS Outlook.

How do I get my Outlook notification sound back if it’s not working?

Before we jump ahead with the advanced solutions, let us apply the simple fixes and hopefully resolve the sound issue with MS Outlook notifications.

  • Restart your computer as this could be a temporary bug that is blocking the notification sound.
  • Relaunch the MS Outlook app on your PC. There might be an underlying bug that is not playing the sound notifications.
  • Check the volume levels of your speakers and make sure it isn’t set to mute.

If nothing works, then apply the solutions below and resolve the problem.

1. Enable the Play a Sound setting in Outlook

  1. Open the Microsoft Outlook app on your computer.
  2. Click on the File menu.
  3. Select Options from the left pane.
  4. Choose Mail from the left pane in the Outlook Options window.
  5. Check the box for the Play a sound option under the Message arrival section.
  6. Click OK to apply the changes and relaunch MS Outlook.

2. Tweak the Windows notification sound settings

  1. Press the Win + I keys to open the Settings app.
  2. Select System from the left pane.
  3. Click on Notifications on the right side.
  4. Locate the Outlook app and turn on the toggle next to it.
  5. Click on the Outlook app to view more settings.
  6. Toggle on the Play a sound when a notification arrives option.

Enabling the feature as mentioned above will play a sound when a new email arrives in Outlook. You can also change the notification sound in Windows 11 by following the steps in our guide.

If you are experiencing similar issues on mobile, here is a guide on fixing Outlook notifications not working on iPhone.

3. Disable Focus Assist

  1. Press the Win + I keys to open Settings.
  2. Click on Focus on the right side.
  3. Click on the Stop focus session option to get sounds for all notifications on your PC.

Multiple users have fixed the Outlook notification sound not working problem by disabling the Focus Assist option on their PC.

We have shown just one way to disable the Focus Assist on your Windows 11 PC. You can check out our guide to learn other different ways to turn off Focus Assist.

4. Tweak the system sound settings

  1. Open the Start menu by pressing the Win key.
  2. Launch Control Panel.
  3. Click on Sound.
  4. Switch to the Playback tab, and double-click on your speaker to open Properties.
  5. Click on the Advanced tab.
  6. Check the Allow applications to take exclusive control of this device checkbox.
  7. Hit OK to apply the changes.

5. Turn on New Mail Notification and Desktop Mail Notification settings

  1. Open the Start menu by pressing the Win key.
  2. Launch Control Panel.
  3. Click on Sound.
  4. Switch to the Sounds tab.
  5. Select Windows Default in the Sound Scheme drop-down menu.
  6. Under the Program Events section, locate and select Desktop Mail Notification.
  7. Under the Sounds section, select the notification sound and hit the Test button, and check if the sound is audible or not.
  8. Click Apply.
  9. Scroll down and select the New Mail Notification option.
  10. Under the Sounds section, select the notification sound and hit the Test button, and check if the sound is audible or not.
  11. Click Apply.

6. Create a new Outlook Inbox Rule

  1.  Launch Microsoft Outlook.
  2. Click on File.
  3. Select the Manage Rules & Alerts option.
  4. Click on New Rule.
  5. Select Play a sound when I get messages from someone and click on Next.
  6. Deselect the from people or public group.
  7. Scroll down and select on this computer only option.
  8. Follow the steps to complete the process and click on the Finish rule setup option.

Get back the notification sound in Outlook

That is it from us in this guide. Notification sounds are important as several professions require dealing with multiple messaging apps, and if the sounds are disabled then it could prove problematic in whatever task that the professional is involved in.

If you’re dealing with broader alert problems, you may also want to follow this complete guide on fixing Outlook notifications not working

Multiple users have reported that the Outlook view changes itself every time they launch it. Resolve the problem by applying the solutions in our guide.

You can also read our guide to fixing the Outlook not updating inbox issue on your PC. Let us know in the comments below, which one of the above solutions resolved the problem for you.

Is PC Health Check Safe and Legit?

PC Health Check is a Microsoft app that helps you monitor and optimize your PC’s performance, but some users wonder if it’s really safe and trustworthy, especially after Microsoft started force-installing it via updates.

Originally made to check whether your device qualifies for Windows 11, the app now offers broader diagnostic and troubleshooting tools.

So, is PC Health Check legit or just another unnecessary program? In this article, we’ll break down what it does, why it’s safe, and if you actually need it on your PC.

Is PC Health Check safe and legit?

In brief, yes. The app is legit, developed, and published by Microsoft, which makes it secure enough. Additionally, it processes your information locally, so it won’t be distributed to the company or any third parties.

Hopefully, that answers your wondering if PC Health Check could be a virus. Though, remember that there’s always a possibility that malicious software could be posing as a legitimate app. The best way to check that is to observe the app’s behavior by entering your Task Manager.

pc-health-check-legit

You can also verify its digital signature by opening the file’s properties and checking if Microsoft’s put down as its signer under the Digital Signature tab.

Tip icon Tip
Use reliable antivirus software regularly to ensure your system is protected.

The app is available as an optional download for Windows 11 users. To get the PC Health Check app, all you need to do is visit Microsoft’s website to download the file and follow the on-screen prompts to install it.

However, if you’re still using Windows 10, Microsoft has probably force-installed it on your device through a software update. This begs the question:

Is PC Health Check necessary?

So, is PC Health Check really helpful or just bloatware? That’s on many users’ minds after noticing Microsoft pushing the app on their devices.

The app helps improve your PC performance, but if you already use a health check software or have upgraded to Windows 11, does it make sense to keep it on your device?

The choice is yours: PC Health Check might not offer something new or different, but it’s a safe and easy way to ensure your device is in good condition. Also, it starts up only after you allow it to, meaning it doesn’t run in the background, clogging up your system.

Alternatively, you can always leave the app installed and not use it, but some users are not fans of Microsoft forcing software on them. So, if you find it redundant, you can always uninstall it.

PC Health Check main features

  • Device specs: Quick information about your device and its condition, plus the option to easily rename it.
  • Backup & sync: Protect your data and keep your preferences across all your devices by syncing up with your OneDrive and a Microsoft account.
  • Update status: Find out about recent updates and what to do next. Remember that frequently updating your Windows OS keeps your PC safe and secure.
  • Battery capacity: Useful tips on battery performance, capacity, and life improvement.
  • Storage capacity: The PC Health Check app allows you to manage your storage settings easily and provides practical cleanup recommendations.
  • Startup time: Get details about your device’s startup time and what affects it. You can also manage your startup programs to improve your PC performance.
  • Tips on PC health: Overall recommendations about protecting your device and ensuring its optimal performance for a longer time.

Can I uninstall Windows PC Health Check?

  1. Press Windows + I key to open Settings. Go to Apps, then choose Installed apps if you’re on Windows 11 and Apps & features for Windows 10.
    windows-apps
  1. Locate the Windows PC Health Check app. Click on the three horizontal dots on the right and then choose Uninstall.
    uninstall-pc-health-check

The app isn’t vital to your PC operations, meaning you can delete it without risk. However, some users report it keeps reinstalling by itself after they’ve removed it.

According to Microsoft, that’s a glitch, but if it happens to you, you might think about using uninstaller software to remove pre-installed apps.

That was for today! Now you know that the PC Health Check app is safe. Whether you want it on your device, however, is your choice.

Once you are done, consider removing other bloatware in Windows 11 for faster PC performance.

We hope you found the article helpful. Contact us in the comment section if you have questions or need further assistance.

Auto-GPT vs. ChatGPT: Which One’s Better? [Key Differences]

Like others, you’re probably mind-blown by the rapid development of artificial intelligence. Among all, however, two tools stand out – Auto-GPT and ChatGPT. So, by now, you’re probably wondering who wins in the Auto-GPT vs. ChatGPT battle.

The former made quite a sensation with its emergence, and many have dubbed it the future of AI. On the other hand, the latter is reportedly the fastest-growing app of all time.

But which one’s better, and how do they measure against each other? Keep reading to find out.

Auto-GPT vs. ChatGPT: Which one’s better?

Before we can answer that, we need to explore the contestants a bit deeper. So, for anyone who isn’t that familiar with the technology or needs some brushing up, here’s a quick recap.

GPT (Generative pre-trained transformer) is a type of large language model trained on text datasets to generate human-like content. The most popular example is ChatGPT.

As impressive as such AI tools may sound, they come with a significant limitation – they could complete one task at a time before requiring more human interaction (known as prompt).

Reportedly, that changed with the emergence of Auto-GPT – a technology that claims to automate the process of generating natural text without human intervention.

Is that the case? Let’s further explore Auto-GPT vs. ChatGPT to find out.

What is ChatGPT?

The AI-powered chat tool ChatGPT was developed by OpenAI to understand and respond to language in a human-like way. You know the drill – you ask questions, and it provides answers conversationally.

chatgpt-vs-autogpt

That’s its primary purpose – it’s trained on conversational data and texts to provide contextually relevant replies that learn from feedback and improve over time.

What is Auto-GPT?

Auto-GPT is also based on the GPT model and trained on huge text datasets. However, as opposed to ChatGPT, it requires little human intervention, as it can make decisions on its own. It can act autonomously by self-prompting the actions required to finish the task at hand.

auto-gpt-chatgpt

The tool manages to do so with the added feature of AI agents – they are programmed to make decisions and act based on predefined rules and goals. It’s widely considered the first glimpse of artificial general intelligence (AGI).

The two AI tools come with their own set of strengths and weaknesses. In the following paragraphs, we’ll dive deeper into those to help you decide which suits your needs better.

In the meantime, you might like to learn how ChatGPT measures up against Google’s Bard or who wins the head-to-head battle between ChatGPT and Microsoft’s Bing.

Auto-GPT vs. ChatGPT [Key Differences]

1. Autonomy and user interaction

The first and maybe most crucial difference between the two.

ChatGPT relies on human interaction – it considers the user’s input and prompts and models the response to them. Its primary goal is to stimulate human-like dialogue and produce coherent and contextually relevant content.

Auto-GPT, on the other hand, requires just a single prompt – setting the goal where the user gives the initial requirements. It then relies on its AI agents to make decisions, take action, and complete the task in a coherent way.

2. Training source and methods

Another key point in the Auto-GPT vs. ChatGPT battle is the methods and type of data used to create them.

ChatGPT’s sources come from conversational data, enabling it to respond appropriately in a conversational context.

In contrast, Auto-GPT sources are much more diverse – they include books, articles, and websites. It uses this information to generate content by predicting the next work in the sentence.

3. Use cases

AI tools are here to help with task automation, but no one wants to read a robotic text devoid of human-like interaction. Both Auto-GPT and ChatGPT aim for more realistic and coherent content.

Auto-GPT is more of a general-purpose AI tool. You can use it to:

  • create storylines,
  • assist in content creation,
  • or help with your creative writing.

Chat-GPT, on the other hand, is more suited for interactive conversations – it better understands the structure and context of a conversation. This makes it perfect for:

  • chatbot apps,
  • virtual assistant-like tasks,
  • and customer support.

4. Contextual understanding

Closely related to the previous point, here’s how Auto-GPT vs. ChatGPT battle unfolds when it comes to understanding context.

Auto-GPT is considered better at understanding general context. It was created to generate text more closely related to the initial prompt.

In contrast, ChatGPT is better at understanding conversational context, which allows it to create more engaging and natural-sounding content.

5. Performance

Typically, Auto-GPT takes longer to complete a task, as more complex algorithms structure it and is looking for information from a much larger source. Keep that in mind if you’re looking for quality over quantity.

However, one of Chat-GPT’s major advantages is that it’s fast and efficient. It’s best for simpler tasks, prioritizing speed over sophisticated content.

6. Real-time data

Currently, ChatGPT sourced its information from before September 2021. OpenAI announced an integration with Microsoft’s Bing to provide real-time data to its users. Though, this feature will only be available to paying customers for the time being.

In contrast, Auto-GPT provides real-time insights with access to the web and verification if the source is legitimate. Moreover, it can access any website online and perform a variety of tasks on them.

7. Availability and ways of access

ChatGPTAuto-GPT
Available to everyone onlineHas to be installed locally
Accessible with an Internet connection and an accountRequires programming knowledge to set up and use
Free version + subscription planFree to install but needs payment for most projects
Established in the market and used by manyStill an experimental project

Chat-GPT is open to anyone. You just need a reliable internet connection and an account. Even though it’s a fairly new app, it’s now established on the market, becoming the fastest product to reach 100 million daily users.

OpenAI has subsequently introduced a subscription plan with additional benefits, but most users are pretty happy with what the free version offers.

In comparison, Auto-GPT is still an experimental project that requires specific software and programming knowledge. It’s currently a free, open-source AI app, though it’ll require payment if you intend to use it for large-scale projects.

It’s available as a Python library and can be downloaded freely from GitHub. Its (current) requirements are Python 3.8 or newer version, an OpenAI API key, a Pinecone API key, and an ElevenLabs key (for text-to-speech projects).

Auto-GPT vs. ChatGPT Summary

In summary, Auto-GPT and ChatGPT are built on the same technology, but their difference comes down to functionality and use cases. The primary one is that Auto-GPT is created to function autonomously, while ChatGPT requires human prompts to complete tasks.

Say, you want to plan a party for your parents’ 20th anniversary. With ChatGPT, you’ll have to issue a specific prompt, e.g., Help me plan a surprise anniversary dinner for my parents’ 20-year anniversary. It will then generate a list of ideas to keep in mind and tasks to perform.

chatgpt-prompt

Auto-GPT, on the other hand, will receive your initial prompt and take it from there – it will single-handedly develop a theme, send out invites, make reservations, get gifts, etc.

It sure sounds exciting, right? Though remember, as of now, the project is still experimental, requires programming knowledge (and possibly payment), and is reported to produce way less engaging content than its opponent.

Conclusion

Now, onto the question on everybody’s mind: Who wins in the Auto-GPT vs. ChatGPT battle?

Well, that depends on your specific requirements and needs. Auto-GPT is created for completing more complex tasks and creating more sophisticated content. ChatGPT is focused on interactive conversations and simpler tasks.

If you’re set on the former, you will need to learn how to install Auto-GPT. While if you prefer the other, you can look into ways to expand your ChatGPT knowledge.

Additionally, if ChatGPT isn’t available in your country and you are still hesitant to try Auto-GPT, you might want to try some other alternatives to ChatGPT or get familiar with other reliable AI tools on the market.

Overall, if you have to pick a side in the Auto-GPT vs. ChatGPT clash, it boils down to personal preferences. Leave it to us to provide the objective and relevant information, and we’ll leave it to you to decide.

Have you tried the AI tools? Which one do you prefer? We’d love to hear your opinion! Share it in the comment section below:

5 Ways to Fix Windows Photo Viewer Not Enough Memory Error

If you are still using Windows Photo Viewer on Windows 11, it may sometimes not display any images and you see a message saying not enough memory.

In such a case, we have a list of recommendations about the best Photo Viewer software for Windows 10/11 in our detailed post here.

Why does Windows Photo Viewer say not enough memory?

If you encounter the Windows Photo Wiewer not having enough memory error, it could be due to the following reasons:

  • Corrupted system files – it could be possible that the system files are corrupted or damaged and stop functioning as they should.
  • If the app does not support the photo format – If the photo is not in BMP, JPEG, JPEG XR, PNG, ICO, GIF, and TIFF file formats, it won’t display.
  • Outdated app version – Chances are that the Windows Photo Viewer is not updated to the latest version.
  • The picture file is too large – The picture file will fail to open if it’s more than 100 megapixels in size.
  • Incorrect display settings – If the color management settings are not selected properly.
  • A problem with the Windows Photo Viewer – There could be a glitch with the app itself.
  • Outdated graphics drivers – It could be possible that graphics drivers have not been updated for a while.
  • Pending Windows updates – If there are any pending Windows updates waiting to be installed.

However, we have a few workarounds that may help you fix the Windows Photo Viewer not enough memory issue.

How do I fix Windows Photo Viewer memory errors?

Before you proceed with the below methods, make sure to perform a few preliminary checks and this may help you fix the issue sometimes:

  • Restart your PC.
  • Use an offline antivirus to check for malware.
  • Check if all the cables are properly connected to their ports.
  • Remove any external monitors that may be interfering with the app.
  • Try using another monitor or external display.

If you’ve gone to these prerequisites, let’s start troubleshooting this problem using the solutions below.

1. Run SFC/DISM commands

  1. Press the Win + R keys simultaneously to launch the Run console, type cmd, and press the Ctrl + Shift + Enter keys together. run command prompt command
  2. In the elevated Command Prompt window that opens, run the below commands one after another and hit Enter after each one:
    • DISM.exe /Online /Cleanup-image /Scanhealth
    • DISM.exe /Online /Cleanup-image /Restorehealth
    • DISM.exe /online /cleanup-image /startcomponentcleanup run dism command
  3. The process takes a while, so wait till it’s over and you see the success message. Then, run the below command and hit Enter: sfc / scannowrun sfc /scannow command
Wait patiently till the SFC scan process is over and you see the success message. Now, restart your PC and check if you see the same error with the Windows Photo Viewer.

Alternatively, you can also use the best Windows 11 repair tools that we recommend for fixing damaged or corrupted system files and more.

2. Change the Colour Management settings

  1. To open the Run console, press the Win + R keys together, type in colorcpl, and hit Enter. run colorcpl command
  2. In the Colour Management window, select the primary monitor from the drop-down, or you can also click on the identify monitors button below. select display or identify monitors
  3. Now, check the box next to Use my settings for this device, and select the profile name under the Profile associated with this device section. Click on Remove. select profile
  4. If there’s no profile name, click on the Profile button at the bottom right and select Reset my settings to the system defaults.Reset my settings to the system defaults
  5. Now, go to the Advanced tab and change all the settings to System default. change all system settings to default

Now, reboot your PC and check if it’s the Windows photo viewer is displaying an image or still showing the not enough memory error.

3. Repair/Reset Windows Photos Viewer

  1. Press the Win + I keys together to launch Windows Settings, select Apps, and then click on Apps and features. Click on Apps & features in App settings
  2. Look for Microsoft Photos, click on the three dots next to it and click on Advanced options. microsoft photos advanced options
  3. Next, go to Reset and click on Repair to start the process. You can also choose Reset to reset the PC. repair or reset microsoft photos

Once the Reset/Repair process is over, your PC will restart automatically and you can check if the Windows Photo Viewer is displaying pictures now.

But, if it’s Windows 11’s Photos App that’s not working, you can follow our post for some quick solutions.

4. Get updates in Microsoft Store

  1. Go to Windows search, look for Microsoft Store, and click on the result to open the Store. search for microsoft store
  2. Click on the Library on the left and next, click on Get updates on the top right. get updates on store
  3. It will download and update the apps automatically, including the Store itself.

Now, reboot your PC and this should fix the not enough memory error in the Windows Photo Viewer.

5. Install any pending Windows updates

  1. Open Windows Settings by pressing the Win + I keys simultaneously.
  2. Click on Windows Updates on the left and then select Check for updates. Check for updates
  3. Windows will display all the pending updates below. Click on Download & install to download the update. download & install

Once done, restart your PC to finish installing the update. The Windows Photo Viewer should now show the images.

How do I enable Windows Photo Viewer in Windows 11?

Windows Photo Viewer is no longer part of Windows 11 and neither of Windows 10 for that matter.

However, if you still want to use it, you may enable the Windows Photo Viewer on your Windows 11 PC by following the steps below.

  1. Open Notepad, and copy and paste the code as shown below (after the steps).
  2. Next, click on the File and select Save as. save notepad file
  3. Save the file as a .reg file, name it Enable Windows Photo Viewer.reg, and select All files as Save as type. save .reg file
  4. Now, double-click on the Enable Classic Photo Viewer.reg file, and in the warning prompt, click Yes.Enable Enable Classic Photo Viewer.reg
  5. You will now see the confirmation prompt that the registry entries have been successfully added. Press OK. confirmation
  6. Now, right-click on the image, select Open with, and click on Windows Photo Viewer in the menu. open with windows photo viewer

Copy and paste the code as per the instructions shown in Step 1 above:

Windows Registry Editor Version 5.00 
 
[HKEY_LOCAL_MACHINE\SOFTWARE\Microsoft\Windows Photo Viewer\Capabilities\FileAssociations] 
".bmp"="PhotoViewer.FileAssoc.BITMAP" 
".dib"="PhotoViewer.FileAssoc.BITMAP" 
".jpg"="PhotoViewer.FileAssoc.JPEG"
".jpe"="PhotoViewer.FileAssoc.JPEG" 
".jpeg"="PhotoViewer.FileAssoc.JPEG" 
".jxr"="PhotoViewer.FileAssoc.JPEG"  
".jfif"="PhotoViewer.FileAssoc.JFIF" 
".wdp"="PhotoViewer.FileAssoc.WDP" 
".png"="PhotoViewer.FileAssoc.PNG" 
".gif"="PhotoViewer.FileAssoc.TIFF" 
".tiff"="PhotoViewer.FileAssoc.TIFF" 
".tif"="PhotoViewer.FileAssoc.TIFF" 

; Bitmap
    
[HKEY_LOCAL_MACHINE\SOFTWARE\Classes\PhotoViewer.FileAssoc.BITMAP] 
"ImageOptionFlags"=dword:00000001 
"FriendlyTypeName"=hex(2):40,00,25,00,50,00,72,00,6f,00,67,00,72,00,61,00,6d,\ 
   00,46,00,69,00,6c,00,65,00,73,00,25,00,5c,00,57,00,69,00,6e,00,64,00,6f,00,\ 
   77,00,73,00,20,00,50,00,68,00,6f,00,74,00,6f,00,20,00,56,00,69,00,65,00,77,\ 
   00,65,00,72,00,5c,00,50,00,68,00,6f,00,74,00,6f,00,56,00,69,00,65,00,77,00,\ 
   65,00,72,00,2e,00,64,00,6c,00,6c,00,2c,00,2d,00,33,00,30,00,35,00,36,00,00,\ 
   00 
    
[HKEY_LOCAL_MACHINE\SOFTWARE\Classes\PhotoViewer.FileAssoc.BITMAP\DefaultIcon] 
@="%SystemRoot%\\System32\\imageres.dll,-70" 
    
[HKEY_LOCAL_MACHINE\SOFTWARE\Classes\PhotoViewer.FileAssoc.BITMAP\shell] 
    
[HKEY_LOCAL_MACHINE\SOFTWARE\Classes\PhotoViewer.FileAssoc.BITMAP\shell\open] 
    
[HKEY_LOCAL_MACHINE\SOFTWARE\Classes\PhotoViewer.FileAssoc.BITMAP\shell\open\command] 
@=hex(2):25,00,53,00,79,00,73,00,74,00,65,00,6d,00,52,00,6f,00,6f,00,74,00,25,\ 
   00,5c,00,53,00,79,00,73,00,74,00,65,00,6d,00,33,00,32,00,5c,00,72,00,75,00,\ 
   6e,00,64,00,6c,00,6c,00,33,00,32,00,2e,00,65,00,78,00,65,00,20,00,22,00,25,\ 
   00,50,00,72,00,6f,00,67,00,72,00,61,00,6d,00,46,00,69,00,6c,00,65,00,73,00,\ 
   25,00,5c,00,57,00,69,00,6e,00,64,00,6f,00,77,00,73,00,20,00,50,00,68,00,6f,\ 
   00,74,00,6f,00,20,00,56,00,69,00,65,00,77,00,65,00,72,00,5c,00,50,00,68,00,\ 
   6f,00,74,00,6f,00,56,00,69,00,65,00,77,00,65,00,72,00,2e,00,64,00,6c,00,6c,\ 
   00,22,00,2c,00,20,00,49,00,6d,00,61,00,67,00,65,00,56,00,69,00,65,00,77,00,\ 
   5f,00,46,00,75,00,6c,00,6c,00,73,00,63,00,72,00,65,00,65,00,6e,00,20,00,25,\ 
   00,31,00,00,00 
    
[HKEY_LOCAL_MACHINE\SOFTWARE\Classes\PhotoViewer.FileAssoc.BITMAP\shell\open\DropTarget] 
"CLSID"="{FFE2A43C-56B9-4bf5-9A79-CC6D4285608A}" 


; JFIF

    
[HKEY_LOCAL_MACHINE\SOFTWARE\Classes\PhotoViewer.FileAssoc.JFIF] 
"EditFlags"=dword:00010000 
"ImageOptionFlags"=dword:00000001 
"FriendlyTypeName"=hex(2):40,00,25,00,50,00,72,00,6f,00,67,00,72,00,61,00,6d,\ 
   00,46,00,69,00,6c,00,65,00,73,00,25,00,5c,00,57,00,69,00,6e,00,64,00,6f,00,\ 
   77,00,73,00,20,00,50,00,68,00,6f,00,74,00,6f,00,20,00,56,00,69,00,65,00,77,\ 
   00,65,00,72,00,5c,00,50,00,68,00,6f,00,74,00,6f,00,56,00,69,00,65,00,77,00,\ 
   65,00,72,00,2e,00,64,00,6c,00,6c,00,2c,00,2d,00,33,00,30,00,35,00,35,00,00,\ 
   00 
    
[HKEY_LOCAL_MACHINE\SOFTWARE\Classes\PhotoViewer.FileAssoc.JFIF\DefaultIcon] 
@="%SystemRoot%\\System32\\imageres.dll,-72" 
    
[HKEY_LOCAL_MACHINE\SOFTWARE\Classes\PhotoViewer.FileAssoc.JFIF\shell] 
    
[HKEY_LOCAL_MACHINE\SOFTWARE\Classes\PhotoViewer.FileAssoc.JFIF\shell\open] 
"MuiVerb"=hex(2):40,00,25,00,50,00,72,00,6f,00,67,00,72,00,61,00,6d,00,46,00,\ 
   69,00,6c,00,65,00,73,00,25,00,5c,00,57,00,69,00,6e,00,64,00,6f,00,77,00,73,\ 
   00,20,00,50,00,68,00,6f,00,74,00,6f,00,20,00,56,00,69,00,65,00,77,00,65,00,\ 
   72,00,5c,00,70,00,68,00,6f,00,74,00,6f,00,76,00,69,00,65,00,77,00,65,00,72,\ 
   00,2e,00,64,00,6c,00,6c,00,2c,00,2d,00,33,00,30,00,34,00,33,00,00,00 
    
[HKEY_LOCAL_MACHINE\SOFTWARE\Classes\PhotoViewer.FileAssoc.JFIF\shell\open\command] 
@=hex(2):25,00,53,00,79,00,73,00,74,00,65,00,6d,00,52,00,6f,00,6f,00,74,00,25,\ 
   00,5c,00,53,00,79,00,73,00,74,00,65,00,6d,00,33,00,32,00,5c,00,72,00,75,00,\ 
   6e,00,64,00,6c,00,6c,00,33,00,32,00,2e,00,65,00,78,00,65,00,20,00,22,00,25,\ 
   00,50,00,72,00,6f,00,67,00,72,00,61,00,6d,00,46,00,69,00,6c,00,65,00,73,00,\ 
   25,00,5c,00,57,00,69,00,6e,00,64,00,6f,00,77,00,73,00,20,00,50,00,68,00,6f,\ 
   00,74,00,6f,00,20,00,56,00,69,00,65,00,77,00,65,00,72,00,5c,00,50,00,68,00,\ 
   6f,00,74,00,6f,00,56,00,69,00,65,00,77,00,65,00,72,00,2e,00,64,00,6c,00,6c,\ 
   00,22,00,2c,00,20,00,49,00,6d,00,61,00,67,00,65,00,56,00,69,00,65,00,77,00,\ 
   5f,00,46,00,75,00,6c,00,6c,00,73,00,63,00,72,00,65,00,65,00,6e,00,20,00,25,\ 
   00,31,00,00,00 
    
[HKEY_LOCAL_MACHINE\SOFTWARE\Classes\PhotoViewer.FileAssoc.JFIF\shell\open\DropTarget] 
"CLSID"="{FFE2A43C-56B9-4bf5-9A79-CC6D4285608A}" 


; Jpeg

    
[HKEY_LOCAL_MACHINE\SOFTWARE\Classes\PhotoViewer.FileAssoc.JPEG] 
"EditFlags"=dword:00010000 
"ImageOptionFlags"=dword:00000001 
"FriendlyTypeName"=hex(2):40,00,25,00,50,00,72,00,6f,00,67,00,72,00,61,00,6d,\ 
   00,46,00,69,00,6c,00,65,00,73,00,25,00,5c,00,57,00,69,00,6e,00,64,00,6f,00,\ 
   77,00,73,00,20,00,50,00,68,00,6f,00,74,00,6f,00,20,00,56,00,69,00,65,00,77,\ 
   00,65,00,72,00,5c,00,50,00,68,00,6f,00,74,00,6f,00,56,00,69,00,65,00,77,00,\ 
   65,00,72,00,2e,00,64,00,6c,00,6c,00,2c,00,2d,00,33,00,30,00,35,00,35,00,00,\ 
   00 
    
[HKEY_LOCAL_MACHINE\SOFTWARE\Classes\PhotoViewer.FileAssoc.JPEG\DefaultIcon] 
@="%SystemRoot%\\System32\\imageres.dll,-72" 
    
[HKEY_LOCAL_MACHINE\SOFTWARE\Classes\PhotoViewer.FileAssoc.JPEG\shell] 
    
[HKEY_LOCAL_MACHINE\SOFTWARE\Classes\PhotoViewer.FileAssoc.JPEG\shell\open] 
"MuiVerb"=hex(2):40,00,25,00,50,00,72,00,6f,00,67,00,72,00,61,00,6d,00,46,00,\ 
   69,00,6c,00,65,00,73,00,25,00,5c,00,57,00,69,00,6e,00,64,00,6f,00,77,00,73,\ 
   00,20,00,50,00,68,00,6f,00,74,00,6f,00,20,00,56,00,69,00,65,00,77,00,65,00,\ 
   72,00,5c,00,70,00,68,00,6f,00,74,00,6f,00,76,00,69,00,65,00,77,00,65,00,72,\ 
   00,2e,00,64,00,6c,00,6c,00,2c,00,2d,00,33,00,30,00,34,00,33,00,00,00 
    
[HKEY_LOCAL_MACHINE\SOFTWARE\Classes\PhotoViewer.FileAssoc.JPEG\shell\open\command] 
@=hex(2):25,00,53,00,79,00,73,00,74,00,65,00,6d,00,52,00,6f,00,6f,00,74,00,25,\ 
   00,5c,00,53,00,79,00,73,00,74,00,65,00,6d,00,33,00,32,00,5c,00,72,00,75,00,\ 
   6e,00,64,00,6c,00,6c,00,33,00,32,00,2e,00,65,00,78,00,65,00,20,00,22,00,25,\ 
   00,50,00,72,00,6f,00,67,00,72,00,61,00,6d,00,46,00,69,00,6c,00,65,00,73,00,\ 
   25,00,5c,00,57,00,69,00,6e,00,64,00,6f,00,77,00,73,00,20,00,50,00,68,00,6f,\ 
   00,74,00,6f,00,20,00,56,00,69,00,65,00,77,00,65,00,72,00,5c,00,50,00,68,00,\ 
   6f,00,74,00,6f,00,56,00,69,00,65,00,77,00,65,00,72,00,2e,00,64,00,6c,00,6c,\ 
   00,22,00,2c,00,20,00,49,00,6d,00,61,00,67,00,65,00,56,00,69,00,65,00,77,00,\ 
   5f,00,46,00,75,00,6c,00,6c,00,73,00,63,00,72,00,65,00,65,00,6e,00,20,00,25,\ 
   00,31,00,00,00 
    
[HKEY_LOCAL_MACHINE\SOFTWARE\Classes\PhotoViewer.FileAssoc.JPEG\shell\open\DropTarget] 
"CLSID"="{FFE2A43C-56B9-4bf5-9A79-CC6D4285608A}" 

; PNG
    
[HKEY_LOCAL_MACHINE\SOFTWARE\Classes\PhotoViewer.FileAssoc.PNG] 
"ImageOptionFlags"=dword:00000001 
"FriendlyTypeName"=hex(2):40,00,25,00,50,00,72,00,6f,00,67,00,72,00,61,00,6d,\ 
   00,46,00,69,00,6c,00,65,00,73,00,25,00,5c,00,57,00,69,00,6e,00,64,00,6f,00,\ 
   77,00,73,00,20,00,50,00,68,00,6f,00,74,00,6f,00,20,00,56,00,69,00,65,00,77,\ 
   00,65,00,72,00,5c,00,50,00,68,00,6f,00,74,00,6f,00,56,00,69,00,65,00,77,00,\ 
   65,00,72,00,2e,00,64,00,6c,00,6c,00,2c,00,2d,00,33,00,30,00,35,00,37,00,00,\ 
   00 
    
[HKEY_LOCAL_MACHINE\SOFTWARE\Classes\PhotoViewer.FileAssoc.PNG\DefaultIcon] 
@="%SystemRoot%\\System32\\imageres.dll,-71" 
    
[HKEY_LOCAL_MACHINE\SOFTWARE\Classes\PhotoViewer.FileAssoc.PNG\shell] 
    
[HKEY_LOCAL_MACHINE\SOFTWARE\Classes\PhotoViewer.FileAssoc.PNG\shell\open] 
    
[HKEY_LOCAL_MACHINE\SOFTWARE\Classes\PhotoViewer.FileAssoc.PNG\shell\open\command] 
@=hex(2):25,00,53,00,79,00,73,00,74,00,65,00,6d,00,52,00,6f,00,6f,00,74,00,25,\ 
   00,5c,00,53,00,79,00,73,00,74,00,65,00,6d,00,33,00,32,00,5c,00,72,00,75,00,\ 
   6e,00,64,00,6c,00,6c,00,33,00,32,00,2e,00,65,00,78,00,65,00,20,00,22,00,25,\ 
   00,50,00,72,00,6f,00,67,00,72,00,61,00,6d,00,46,00,69,00,6c,00,65,00,73,00,\ 
   25,00,5c,00,57,00,69,00,6e,00,64,00,6f,00,77,00,73,00,20,00,50,00,68,00,6f,\ 
   00,74,00,6f,00,20,00,56,00,69,00,65,00,77,00,65,00,72,00,5c,00,50,00,68,00,\ 
   6f,00,74,00,6f,00,56,00,69,00,65,00,77,00,65,00,72,00,2e,00,64,00,6c,00,6c,\ 
   00,22,00,2c,00,20,00,49,00,6d,00,61,00,67,00,65,00,56,00,69,00,65,00,77,00,\ 
   5f,00,46,00,75,00,6c,00,6c,00,73,00,63,00,72,00,65,00,65,00,6e,00,20,00,25,\ 
   00,31,00,00,00 
    
[HKEY_LOCAL_MACHINE\SOFTWARE\Classes\PhotoViewer.FileAssoc.PNG\shell\open\DropTarget] 
"CLSID"="{FFE2A43C-56B9-4bf5-9A79-CC6D4285608A}" 

; WDP
    
[HKEY_LOCAL_MACHINE\SOFTWARE\Classes\PhotoViewer.FileAssoc.WDP] 
"EditFlags"=dword:00010000 
"ImageOptionFlags"=dword:00000001 
    
[HKEY_LOCAL_MACHINE\SOFTWARE\Classes\PhotoViewer.FileAssoc.WDP\DefaultIcon] 
@="%SystemRoot%\\System32\\wmphoto.dll,-400" 
    
[HKEY_LOCAL_MACHINE\SOFTWARE\Classes\PhotoViewer.FileAssoc.WDP\shell] 
    
[HKEY_LOCAL_MACHINE\SOFTWARE\Classes\PhotoViewer.FileAssoc.WDP\shell\open] 
"MuiVerb"=hex(2):40,00,25,00,50,00,72,00,6f,00,67,00,72,00,61,00,6d,00,46,00,\ 
   69,00,6c,00,65,00,73,00,25,00,5c,00,57,00,69,00,6e,00,64,00,6f,00,77,00,73,\ 
   00,20,00,50,00,68,00,6f,00,74,00,6f,00,20,00,56,00,69,00,65,00,77,00,65,00,\ 
   72,00,5c,00,70,00,68,00,6f,00,74,00,6f,00,76,00,69,00,65,00,77,00,65,00,72,\ 
   00,2e,00,64,00,6c,00,6c,00,2c,00,2d,00,33,00,30,00,34,00,33,00,00,00 
    
[HKEY_LOCAL_MACHINE\SOFTWARE\Classes\PhotoViewer.FileAssoc.WDP\shell\open\command] 
@=hex(2):25,00,53,00,79,00,73,00,74,00,65,00,6d,00,52,00,6f,00,6f,00,74,00,25,\ 
   00,5c,00,53,00,79,00,73,00,74,00,65,00,6d,00,33,00,32,00,5c,00,72,00,75,00,\ 
   6e,00,64,00,6c,00,6c,00,33,00,32,00,2e,00,65,00,78,00,65,00,20,00,22,00,25,\ 
   00,50,00,72,00,6f,00,67,00,72,00,61,00,6d,00,46,00,69,00,6c,00,65,00,73,00,\ 
   25,00,5c,00,57,00,69,00,6e,00,64,00,6f,00,77,00,73,00,20,00,50,00,68,00,6f,\ 
   00,74,00,6f,00,20,00,56,00,69,00,65,00,77,00,65,00,72,00,5c,00,50,00,68,00,\ 
   6f,00,74,00,6f,00,56,00,69,00,65,00,77,00,65,00,72,00,2e,00,64,00,6c,00,6c,\ 
   00,22,00,2c,00,20,00,49,00,6d,00,61,00,67,00,65,00,56,00,69,00,65,00,77,00,\ 
   5f,00,46,00,75,00,6c,00,6c,00,73,00,63,00,72,00,65,00,65,00,6e,00,20,00,25,\ 
   00,31,00,00,00 
    
[HKEY_LOCAL_MACHINE\SOFTWARE\Classes\PhotoViewer.FileAssoc.WDP\shell\open\DropTarget] 
"CLSID"="{FFE2A43C-56B9-4bf5-9A79-CC6D4285608A}"

If you are unable to open JPG files in Windows 11, you can follow the solutions in our detailed post here.

Alternatively, you can also visit the manufacturer’s website and download & install the latest version to update the graphics drivers.

At the same time, you can also repair and restore the corrupted system files using the system file check or the SFC/DISM tool.

If you have any other queries related to the Windows photo viewer, do let us know in the comments box below.

Meta and Microsoft join forces to bring Llama 2 language models to Azure and Windows

Meta and Microsoft have announced their collaboration at Microsoft Inspire to introduce support for the Llama 2 family of large language models (LLMs) on Azure and Windows. Llama 2, developed by Meta, empowers developers and organizations to build AI-powered tools and experiences. This partnership reinforces both companies’ commitment to democratizing AI. Here’s Meta’s official statement.

Last week Meta announced that they are set to launch a commercial AI model and aim to compete with OpenAI and Google in the generative AI race.

Azure customers can now fine-tune and deploy the 7B, 13B, and 70B-parameter Llama 2 models on Azure, renowned for supporting open and frontier models. Additionally, Llama will be optimized to run locally on Windows, enabling Windows developers to integrate Llama into their applications seamlessly.

Microsoft’s partnership with Meta

Meta and Microsoft have a longstanding partnership in AI, including integrating ONNX Runtime with PyTorch. The latest collaboration expands Microsoft’s open model ecosystem and further solidifies Azure’s position as the world’s supercomputing platform for AI.

Azure’s purpose-built AI supercomputing platform, designed to handle demanding AI workloads, supports the Llama 2 models. Developers gain access to powerful tools for model training, fine-tuning, inference, and AI safety.

Integrating Llama 2 models in Windows elevates Windows as the go-to platform for building AI experiences tailored to specific needs, leveraging tools like Windows Subsystem for Linux, Windows Terminal, and Microsoft Visual Studio.

Expanding Azure AI model catalog and Windows availability

Llama 2 is the newest addition to Azure’s growing AI model catalog, enabling developers and ML professionals to quickly discover, evaluate, customize, and deploy pre-built large AI models at scale. The record eliminates infrastructure management hassles and supports optimization techniques like DeepSpeed and ONNX Runtime.

Windows developers can create new experiences using Llama 2 through the GitHub Repo. With Windows Subsystem for Linux and powerful GPUs, developers can fine-tune Llama 2 models on their Windows PCs.

Building responsibly with Azure

Microsoft’s responsible AI approach ensures AI safety through iterative, layered measures. Customers can test Llama 2 with their data, utilize prompt engineering and retrieval augmented generation (RAG) techniques, and leverage Azure AI Content Safety for a safer online experience.

Expanding the model catalog with Llama 2 and the partnership with Meta emphasize a responsible and open approach to AI.