I’ve been getting some questions about deleting your account. To clarify, you can deactivate your Threads account, which hides your Threads profile and content, you can set your profile to private, and you can delete individual threads posts – all without deleting your Instagram account. Threads is powered by Instagram, so right now it’s just one account, but we’re looking into a way to delete your Threads account separately.
Adam Mosseri
Threads is currently riding a high wave of popularity. The app has grabbed more than 100 million users in less than a week. It also seems to be on par with Twitter, and might even dominate the market share in the following weeks. But it’s not without controversy, though. The app is not available in Europe, due to the fact that it might be too intrusive when it comes to personal data.
That’s why it’s natural if you created a Threads profile and now you want to delete it. Your privacy comes first. However, as we mentioned earlier, you cannot really delete your Threads without deleting your Instagram. However, Meta is working to solve this.
You can, however, do other things, such hiding your Threads account. And we’re going to show you how to do that.
How to sort of delete Threads without deleting your Instagram
Please remember that your Threads account is linked to your Instagram account, so that means you can unlink it. But you can hide your Threads.
Open the Instagram app on your mobile device.
Once you are there, tap on your profile picture in the bottom right corner.
Tap on the number with the Threads symbol under your name.
Tap on Hide badge.
Hiding the badge will make your Threads account invisible to others, so that’s the only solution for now. However, if you want a radical solution and you want to delete your Threads for good, then you should delete your Instagram account.
Open the Instagram app on your
Go to your Account.
Tap on Deactivate account.
Tap on Deactivate Threads profile and confirm.
Now your Threads account is gone, but so is your Instagram. However, remember that Meta is currently working on a feature to let you deactivate your Threads account separately. We will keep this article updated, once the feature is out, so bookmark this article.
What do you think about it? Let us know in the comments section below.
And you won’t be able to use it for a while if you’re from Europe. Why? Because Instagram Threads currently doesn’t meet the EU’s Digital Markets Act requirements. In fact, it is Meta who is refraining to launch Thread in Europe, because the company believes the European rules are a bit unclear.
But it might be even more than that. The European Union has been protecting users’ data with new rules, and companies that want to launch apps in the region must comply with those rules. However, Threads currently imports a lot of data from Instagram, and it asks users for permission to sensitive information.
And this information is protected under EU laws. Although Threads is currently experiencing a high wave of popularity, the app is not seen without controversy. A lot of users believe the app asks for too much data.
Just how much data is Instagram Threads asking for?
According to users, Instagram Threads is a privacy nightmare, so far. The app is currently asking for data that is linked to your identity, including:
Health and Fitness
Financial info
Contact info
User content
Browsing history
Usage Data
Diagnostics
Purchases
Location
Contacts
Search History
Identifiers
Sensitive info
Other data
So, as you can see there is a lot of data for you to give away, in order to use Twitter’s newest rival, Threads. As per usual, this data is collected so you can have the best experience on Instagram Threads, but it does seem a bit too much. Sensitive info and Other Data can mean anything, and the fact that Threads is keen on accessing them might be a hard pass for some users.
When it comes to Europe, Instagram Threads will be released at some point, but not soon, though. If you live in Europe, you might need to wait a bit more before you can create an account on Instagram Threads.
What do you think about this? Let us know your opinions in the comments section below.
A Kindle book is an electronic or digital book specifically formatted and designed to be read on Amazon Kindle devices or through the Kindle reading app.
It is pretty frustrating that some of our readers have recently reported encountering Kindle books not compatible with device error. This article will discuss what causes this and possible ways to resolve the issue.
Why is the Kindle book not compatible with the device?
There are several reasons why a Kindle book may not be compatible with a particular device. Thus, here are some common reasons:
Unsupported format – If the book you are trying to access is in a format that is not supported by your device, it will result in an incompatibility issue.
Outdated software/firmware – If your device’s software or firmware is outdated and doesn’t support the specific Kindle book format, you may encounter compatibility issues.
Device limitations – Older or entry-level Kindle devices may have limitations on the file formats they support, rendering certain Kindle books incompatible.
Regional restrictions – Some books are only available for specific countries or regions, and attempting to access them from an unsupported location will show as incompatible.
DRM restrictions – Some Kindle books have Digital Rights Management (DRM) protection, which limits their compatibility with specific devices or apps registered under your Amazon account.
The above are common reasons behind the Kindle book not compatible with device errors that users may encounter. Let’s proceed to what to do if you encounter this issue.
What can I do if Kindle book isn’t compatible with the device?
Before engaging in any advanced troubleshooting or settings tweaks, you should consider performing the following preliminary checks:
Check if the Kindle book is not under DRM protection.
Check if there are any regional restrictions for the Kindle book.
Ensure that your device is compatible with the Kindle book.
Having confirmed the above checks, if you require further assistance, you can work through any of the solutions provided below.
Save the downloaded file and navigate to its location on your computer.
Further, a small window on your screen will tell you the app is set up.
The app will now be updated with new features.
The Kindle app for PC will, most of the time, update itself automatically. But if you encounter a Kindle book incompatible with a device error like this, you can visit the official Kindle website.
2. Convert the book format using a third-party tool
If the format is unsuitable for your Kindle e-book reader, you may use a conversion tool to get the book to the desired one.
Epubor Ultimate is one of the best software you can use to convert the format of your e-book. This app is very powerful and easy to use and supports almost any e-book format. You can also use this tool to remove the protection from your book or transform an audible to MP3.
Epubor Ultimate
Enjoy your e-books in any format you like with this powerful software.
Tap anywhere on the screen and select the downward-facing arrow on the topmost section of the screen.
Then, click on all Settings.
Then, tap on Device Options and select Update Your Kindle.
Updating the Kindle app to the latest software version should ensure compatibility with Kindle books and access to the latest features and improvements.
And that’s it on what to do if you’re getting a Kindle book incompatible with a device error. Hopefully, one of the methods in this guide will help you fix the issue.
As a Windows user, you’re likely to see at least one occasional Blue Screen of Death error during your time with Windows. One such error commonly reported is the rzudd.sys BSoD error which is associated with Razer device drivers.
Hence, we will provide quick fixes for the error here. Further, you can check out our extensive recommended list of BSoD fixers.
What causes the rzudd.sys BSoD error?
Here are some of the most common causes of the rzudd.sys blue screen error:
Outdated/Incompatible drivers – Running outdated or incompatible Drivers for your Razer Synapse software can lead to system conflicts and instability, causing a BSoD error.
Hardware conflicts – The Razer software can sometimes clash with the existing PC hardware, triggering the rzudd.sys BSoD error.
Overclocking – Overclocking your PC pushes its functionality beyond its natural capacity and limits. This can make your PC unstable and lead to a blue screen error.
Corrupt system files – If your PC’s critical files get corrupted by malware or third-party reasons, it can cause blue screen errors and crashes.
Virus or Malware – If your PC is infected with malware, it can interfere with the normal operations of the Razer Synapse software, potentially leading to a BSoD error.
No matter the causes of the error, try the following steps below to troubleshoot it.
How do I fix the rzudd.sys BSoD error?
Before trying any of the advanced steps, kindly apply the following preliminary checks:
Left-click the Start menu, type restore and click Create a restore point.
Select System Properties and choose System Restore button.
In the Restore Files and Settings box, click Next.
Select the Restore point and click Next.
Then, click Finish to complete the system restore.
If you noticed the BSoD recently and created a restore point before the error started, you can easily restore your PC to that version to quickly fix the rzudd.sys BSoD error.
However, you’ll lose files during a system restore, so it’s essential to back up your PC thoroughly.
Blue screen of death errors are pretty standard among Windows machines; knowing how to fix them will save you much time and effort. Luckily, with the steps outlined in this article, you should be able to fix the rzudd.sys BSoD error.
Google’s partnership with DeepMind, suggestively called Google DeepMind, is about to come out with the strongest AI model on the market, as per their accounts.
The AI model is called Gemini and in an interview for Wired, Demis Hassabis, DeepMind’s CEO, says that the new AI innovations coming from Google are very interesting, to say the least.
At a high level, you can think of Gemini as combining some of the strengths of AlphaGo-type systems with the amazing language capabilities of the large models [e.g., GPT-4 and ChatGPT]. We also have some new innovations that are going to be pretty interesting.
Demis Hassabis
Gemini will be released later this year, in an effort to combat Microsoft’s lead in AI research. As you might know, Microsoft has been at the forefront of AI innovations. Models such as Orca 13B, phi-1, Kosmos-2, LongMeM, or the more recent CoDi, promise a new era for AI. And they’re all happening now.
Even more, it seems that Gemini is being touted as a breakthrough in AI technology. The model will greatly disrupt Microsoft’s OpenAI models on the market, specialists say.
Could Google DeepMind AI, Gemini, be a breakthrough?
Gemini is part of DeepMind’s Alpha family of AI models. Other models from this family are AlphaGo, AlphaGo Zero, AlphaZero, and MuZero. And they are trained in limited or constrained environments, so they are often pushed to the limits. This way, these models surpass human abilities and even human knowledge.
The training on Alpha models happens under human supervision, and the results improve when these models are left to their own devices to find solutions.
On the other hand, GPT models, such as Bing AI or ChatGPT, Orca 13B, and others ones, are trained on huge quantities of data. The training on GPT models does not require human supervision, as these models learn to train themselves.
If you remember, phi-1, and Kosmos-2 were models that learn to code and visualize space on their own.
We’ll have to wait until fall, or winter 2023 to see if Gemini holds up to the hype. But the time of AI is here. And it seems Google does not want to lose ground to Microsoft when it comes to AI. Innovation breeds competition.
What do you think about it? Let us know in the comments section below.
Many of our readers have reported struggling with IPTV not working on AT&T. Because of this issue, users aren’t able to stream content on IPTV and enjoy their time.
This issue can be caused because of corrupt cache or cookie files, etc. In this guide, we will share with you some solutions that will help you resolve the problem at your end. Let us get right into it.
Why is IPTV not working on AT&T?
We did some research and found out some of the common reasons why IPTV is not working on AT&T. Some of them are listed below:
Underlying browser issue – If you are trying to stream using a browser and facing issues, then it could be because of some bug or glitch in the browser.
IPv6 issue – The services do not require or don’t support IPv6 protocol, and because of that, it is causing the IPTV to not work on the AT&T network.
IPTV network-related issue – Chances are the server of IPTV is down or under maintenance because of which IPTV is not working.
AT&T Smart Home Manager issue – Some advanced security options enabled in AT&T are also responsible for IPTV not working problem.
How can I fix IPTV if it is not working on the AT&T network?
1. Disable Smart Home Manager software from AT&T
Open A&T Smart Home Manager.
Select Home Network.
Click on the Wi-Fi tab and choose Advanced Settings below.
Click on the Firewall tab and select Security options.
Select Disable for Home Network Security option.
Close the AT&T Smart Home Manager.
Restart the NetIPTV or IPTV Smarters Pro.
Some users have resolved the IPTV not working on the AT&T network by simply disabling the Smart Home Manager software for AT&T.
2. Flush the DNS cache
Press the Win key to open the Start menu.
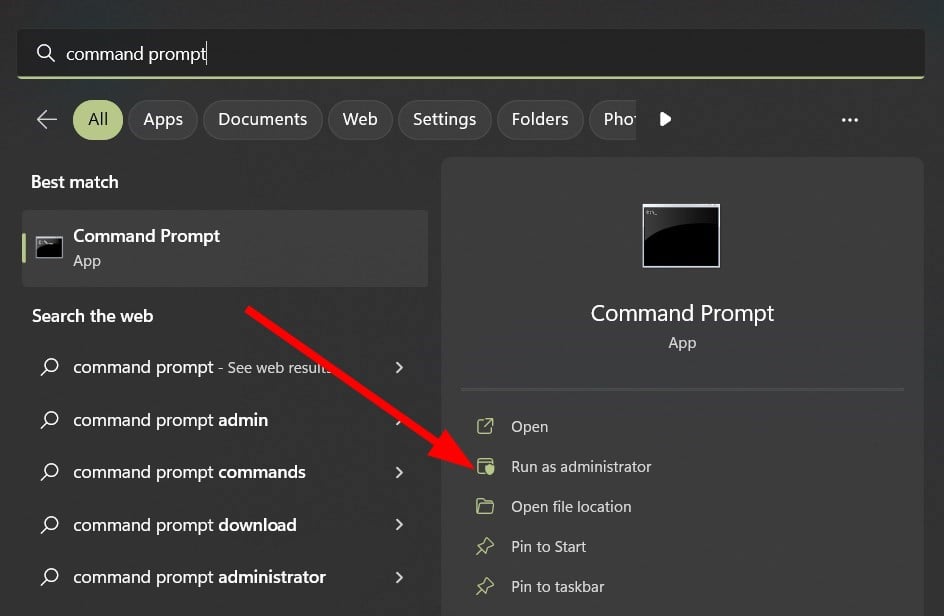
Open the command prompt as an admin.
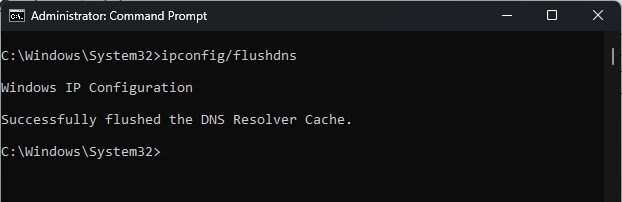
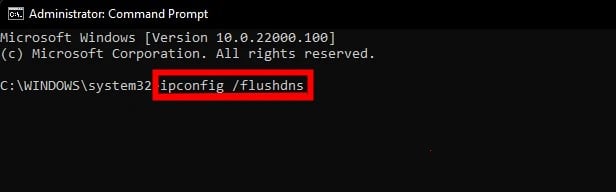
Type the below command and press Enter to flush the DNS cache.ipconfig /flushdns
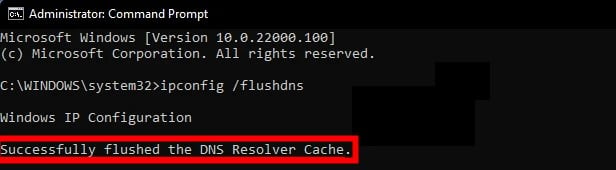
You will get a confirmation message that the DNS cache has been flushed.
If you are experiencing any network-related issues, then you should try clearing the DNS cache as it has the details of the website that you visit and if they go corrupt, it could cause multiple issues.
For other different ways to completely flush the DNS cache and reset it, you can read the other methods in our dedicated guide.
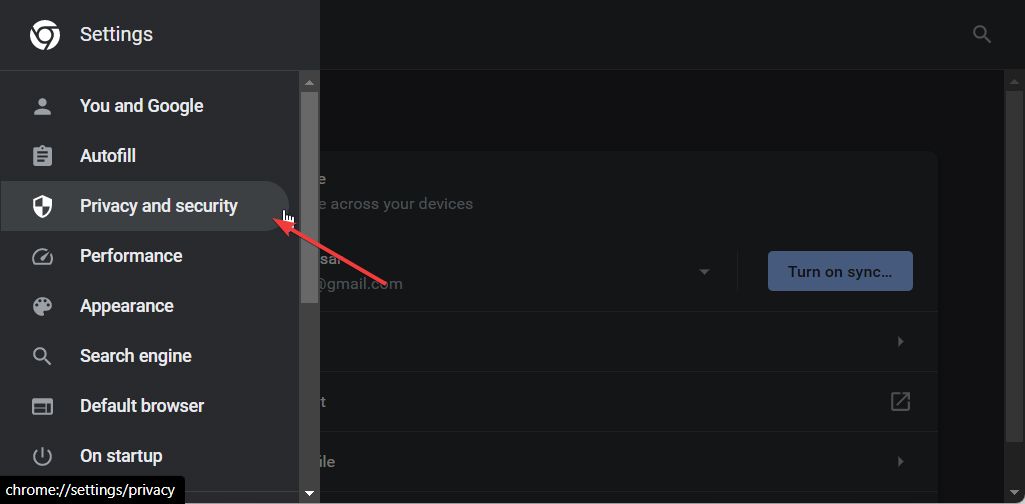
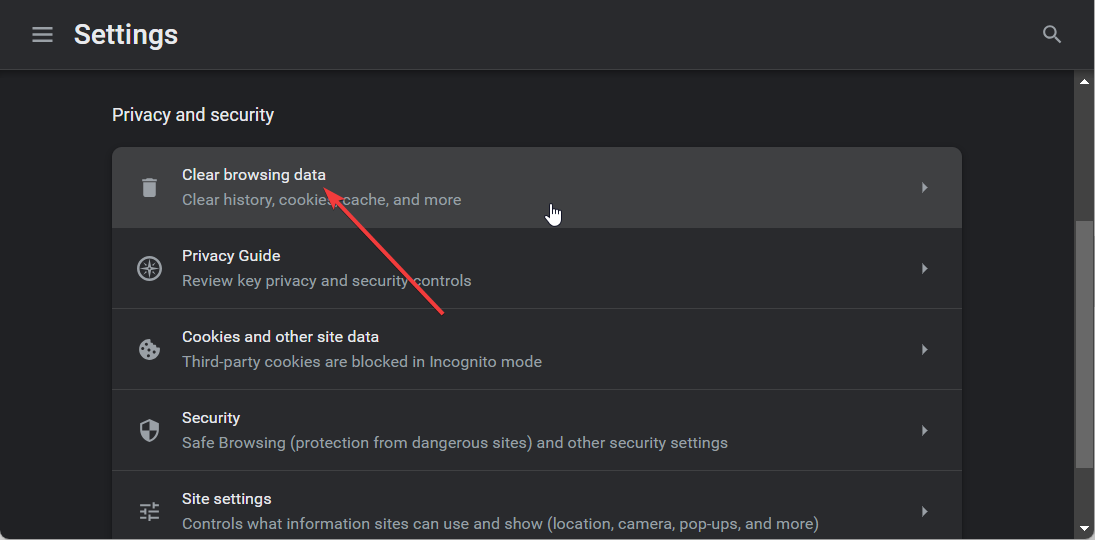
Check the boxes for Cookies and other site data and Cached images and files options.
Click on the Clear data button.
For explanation purposes, we have made use of the Google Chrome browser. But you can apply the same steps to clear out the cookies and cache data for your browser.
Clearing the cookies and cache data helps you remove any information related to your prior IP address, the information which is usually stored in the cookies and cache files. You can also try switching to a new browser and check if this helps fix the problem.
4. Disable the IPv6 protocol
Press the Win key to open the Start menu.
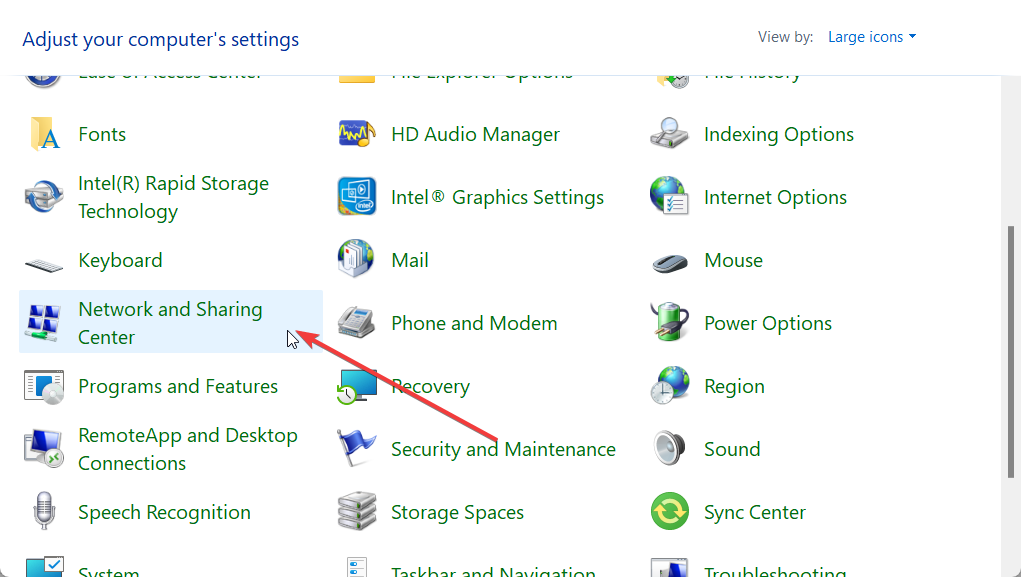
Launch Control Panel.
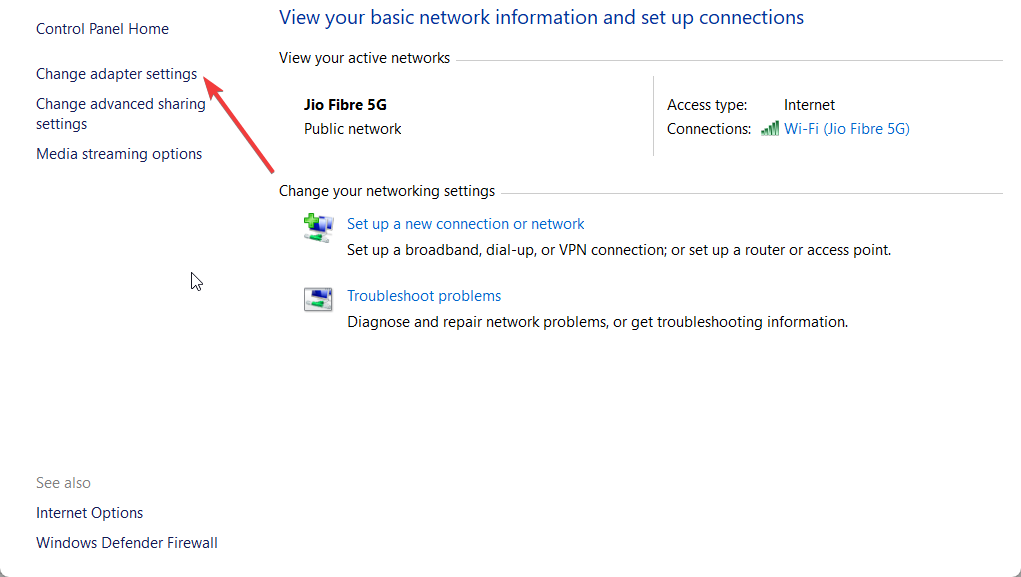
Click on Network and Sharing Center.
Select Change adapter settings.
Double-click on your network to open its Properties.
Select Properties.
Uncheck the box for IPv6 and click OK.
The IPv6 protocol is meant to cause some accessibility issues, which may be why you are coming across the IPTV not working on the AT&T network problem. Simply disable it by following the above steps and check whether this resolves the problem.
You should also:
Check if the IPTV servers aren’t down or under maintenance. If they are, your network is fine.
Your internet connection might be slow. Check whether you are getting optimal speed based on your internet connection plan.
Payday 2 is an immersive cooperative first-person shooter game that places players in the shoes of professional criminals executing high-stakes heists.
However, one frustrating issue that players may encounter is the Payday 2 access violation crash, causing it to close abruptly and potentially disrupting your gameplay experience.
In this guide, we will delve into the causes behind the Payday 2 Access Violation Crash, explore its implications on gameplay, and provide practical solutions to fix and prevent this issue from occurring.
What causes the Payday 2 access violation crash issue?
Various factors can cause the Payday 2 access violation crash; some of the common ones are:
Outdated or incompatible drivers – Incompatible graphics card drivers, sound card drivers, or other hardware drivers can lead to conflicts with the game and trigger this error.
Corrupted game files – If the files become corrupted, it could cause an issue when you attempt to load or run certain game elements.
Conflicting software or background processes – Certain software applications, particularly those with overlays or screen capture features, can conflict with PayDay 2 and trigger the error.
Check if your computer meets the system requirements.
Press Ctrl + Shift + Esc to open Task Manager to identify and end non-essential processes.
Once you have checked, move to the detailed methods to fix the issue.
1. Verify the game files
Press the Windows key, type steam, and click Open.
Click Library, then click Home.
Go to Payday 2, right-click, and choose Properties.
Next, select the Local Files or Installed Files tab, and click Verify Integrity of Game Files.
Steam will check for any corrupted or missing game files. Verifying the game files can help you repair & recover the missing files of the game and is a common solution for issues like Nebula Data error on PayDay 3: Failed To Fetch Config Data.
2. Disable the Steam overlay
Press the Windows key, type steam, and click Open.
Click Steam, then Settings.
Go to the In-Game tab from the right side and click the toggle button Off to Enable the Steam Overlay while in-game option.
Turning off the Steam overlay can help resolve conflicts that may trigger access violation crashes.
Locate the Payday 2 app, right-click it, and select Properties.
Switch to the Compatibility tab, under Compatibility mode, then select Run this program in compatibility mode for.
Select Windows 7.
Click Apply, then OK.
4. Add the game to the Exploit protection
Press the Windows key, type exploit protection and click Open.
Click Program settings, then click Add program to customize.
Now click Choose exact file path and go to the game’s file location and select it.
Select Arbitrary code guard (ACG) and click Override system settings.
Do the same for all the other entities on the Program settings window.
Click Apply.
5. Update the drivers
Press the Windows + R to open the Run dialog box.
Type devmgmt.msc and click OK to open Device Manager.
Go to Display adapters and click to expand it.
Locate the drive, right-click, and select Update driver.
Click Search automatically for drivers.
Once done, go to Sound, video and game controllers, click to expand it, and follow steps 4 and 5 to update it.
Now restart your PC to save the changes.
Lowering graphics settings within the game can alleviate strain on your system, potentially resolving crashes. Reduce options like texture quality, shadow quality, anti-aliasing, and other demanding settings.
So, these are methods to fix the Payday 2 access violation crash issue. If nothing worked for you, you may need to contact the game’s official support channelsfor further assistance.
Whatsapp is one of the most popular apps on the market, right now, with billions of people using it every day. The app has a desktop version too for Windows 11, and it works though linking your phone to Windows devices, up to 5 devices for now.
However, it seems that Meta wants to make Whatsapp an app on its own for Windows 11, and the Facebook owner released some updates for the app. It now comes with the ability to share your screen on Windows 11.
Whatsapp for Windows 11 didn’t have this feature before, but now it has it, and you can use it far more freely now than ever before.
You’ll be able to activate screen sharing from your desktop, allowing you to make video calls from Whatsapp on the Windows 11 operating system.
How to use the screen share feature on Whatsapp on Windows 11
To be able to share your screen, you’ll just have to click the Share button in a video call. Then, you’ll be able to choose from your open windows, taskbar, apps, desktop, and so on. Once you know which window you want to share, you just click on it, and it will be shown to all participants in the call.
The feature is not yet available on the general Windows 11 WhatsApp app. However, if you are eager to try the new feature, you can download and install Whatsapp Beta from Microsoft Store. If you remember, Meta released this for everyone who wants to test the new feature before they’re open to the general public.
The app was released in 2022, and it has all the new features, long before they’re out in the wild. Just think about Windows Insider Program but for Whatsapp on Windows 11.
This is not all, though. Several more features are coming to Whatsapp Beta in the following weeks, including:
The ability to upload high-quality videos.
You’ll be able to add stickers to your conversations, and you will have sticker suggestions.
Chat filters are also coming to Whatsapp. You’ll be able to filter your chats.
What do you think about it? Are you excited about Whatsapp for Windows 11? Let us know in the comments section below.
Many users complained about the error message This action could not be performed in Microsoft Office. It indicates a problem when performing a particular task in Microsoft Office. Fortunately, this article will discuss ways to resolve the error on your PC.
Update Windows to fix the system’s performance bugs and add new features to resolve compatibility problems.
1. Repair Office suite
Press the Windows + R key, type appwiz.cpl, and press Enter to open the Programs and Features.
Scroll to Microsoft Office, right-click on it, and select Change.
Select Online Repair and click not the Repair button.
Select Repair from the Ready to Start an Online Repair dialog box.
Wait for the complete process and restart your PC.
Repairing the Office app will resolve issues with corrupt installation files in the Microsoft Office app. Feel free to explore our guide about repairing Office app on Windows 11.
After doing that, check if This action couldn’t be performed error from Microsoft Office is gone.
2. Delete the nonexistent Debugger value in the Image File Execution subkey
Press the Windows + R button to open the Run dialog box, type in regedit, and press Enter to open the Registry Editor.
Navigate to the following path: HKEY_LOCAL_MACHINE\Software\Microsoft\Windows NT\CurrentVersion\Image File Execution Options
Delete the registry keys for Word, Excel, Outlook, and other Office apps prompting the error.
Restart your PC and check if the error appears on Microsoft Office.
Several users have confirmed that removing the Debugger keys for Office apps can fix the issue. Check our article discussing what to do if you have a corrupt registry on Windows.
Microsoft is holding Microsoft Build 2023 Conference these days, in Seattle, and the announcements are exciting: AI features are coming to Microsoft Store and you will be able to use them on Windows 11.
AI is clearly the main focus at Microsoft, and now Microsoft Store opens its doors to artificial intelligence features. In an exciting presentation, one of these features, called AI Hub, will be implemented soon on the platform.
According to Microsoft, the new AI Hub will offer you the best AI-enhanced apps built by developers all over the world. So, in many ways, if you’re looking for apps that have AI features, you will be able to choose them in the AI Hub section.
You will find many AI apps there, including Lensa, Descript, Krisp, and Copy.ai to mention a few.
However, more AI features are coming to Microsoft Store.
How to use AI features in Microsoft Store
Choose the best product with AI reviews summaries
By far, the most useful AI feature coming to Microsoft Store is the one where you can use the AI to go through all the reviews of a product.
AI will then generate a summary of those reviews, with all the details that you need. You will no longer have to go through tens or even hundreds of reviews. AI will go through them instead and it will summarize everything you need to know.
You will soon be able to do it in Microsoft Store by simply selecting the Generate review summary option, in the Reviews section.
Easily generate AI keywords for your app
If you’re a developer looking to release your app on Microsoft Store, the platform will make it easier for you to improve the discoverability of your projects.
By using AI to consume metadata, it will generate Search Tags for your apps, thus making them easier for customers to find them.
The feature will be live soon, but here’s how you can do it:
Go to the Microsoft Partner Center > Home > Apps & Games > Your App > Store listing
Make sure you provide a description of your app
Scroll down to Additional information and wait for the AI to generate your keywords
AI definitely makes Microsoft Store a good place to get all your favorite games and apps. If you weren’t into it, you should give it a try, and see if you like it. After all, Microsoft is keen on improving it even further with newer AI capabilities.
Microsoft Store Ai Hub is out in the app on the Insider Canary Channel
According to the Windows enthusiast, @PhantomOfEarth, the new Microsoft Store AI Hub announced at Build 2023 is starting to roll out in the Canary Channel. Here’s how it looks.
If you’re part of the Insider Program, you should check if you can experience the new AI Hub in Microsoft Store now. Not all users have access to it yet, but you should check to see if it appears on your Windows 11.
What do you think about these new AI features in Microsoft Store? Do you find them exciting? Let us know in the comments section below.
And now back to the question that is on everybody’s mind. Of course, with all the talk about it, we have to wonder. Will Instagram Threads surpass Twitter?
Will Instagram Threads surpass Twitter?
Well, it is still very early to say if Instagram Threads will surpass Twitter. The newly-released app got to an astonishing number of 100 million users in a matter of days. 5 days to be exact.
Threads reached 100 million sign ups over the weekend. That’s mostly organic demand and we haven’t even turned on many promotions yet. Can’t believe it’s only been 5 days!
Mark Zuckerberg on Threads
According to the latest reports, Instagram Threads managed to beat ChatGPT to this milestone, while Twitter traffic slowed down considerably.
It seems that the users are not just coming to the platform, but they’re actively engaging in conversations on Threads as well. There are more than 95 million posts on the app already, and over 200 million likes shared all over Threads.
With over 100 million users on the platform, and still counting, it seems that Threads is getting closer to Twitter. Let’s not forget that in November 2022, Elon Musk said that Twitter had approximately 260 million monetizable daily active users in a tweet then.
So it’s most likely that Instagram Threads’ market share will grow in the following weeks. However, Threads in just at the beginning. And we’re going to have to wait a little longer to see if Threads will really become a product of the time. Meta’s marketing strategy will have to position the platform as an outlet to capture the cultural prints of the moment.
Otherwise, it will have no chance against Twitter. While the platform is not going to push politics and hard news on the feed, Threads wants its users to have social media-based conversations. Whatever that is, that’s up to you.
And while Threads is riding a high wave of popularity right now, Adam Mosseri, head of Instagram, is not sure if Threads is retentive yet. Exactly that outlet for capturing the cultural present we talked about earlier.
What do you think about Instagram Threads? Do you think its market share will grow over the next period? Let us know in the comments section below.
This article will discuss what you can do if you can’t click on YouTube videos. We’ve explained everything in easy-to-follow steps, so all you have to do is follow along.
What can I do if I can’t click on YouTube videos?
First, try restarting your PC, make sure your internet is up and consider using the YouTube app instead of the website. If you’re still having issues, consider the following:
1. Run a video Troubleshooter
Left-click the Windows icon, type Settings, and press Enter to open it.
Click the System category, select Troubleshoot from the left pane, and click on Other troubleshooters.
Then, select Video Playback and click the Run button beside it.
Follow the on-screen command, wait for the process to complete, restart your PC and check if the error is solved.
Running the video playback troubleshooter will fix issues with video playback errors.
2. Update the display driver
Right-click the Windows icon and select Device Manager from the list.
Expand the Display Adpaters category, right-click on the display driver name, and select Update driver from the context menu.
Select the Search automatically for the driver from the new Windows and close the window.
3. Clear browser cache and cookies
Launch the browser from your device.
Click on the three dots on the top right side, select More tools, and click on Clear browsing data.
Select All time from the time range, then check the boxes for Cookies and other site data, and the Cached images and files option. Then click on Clear now.
Clearing the browser cache and cookies will remove all pre-store data, refresh the website, and help you fix issues like YouTube locate not working. If interested, also check our guide about how to clear the computer cache in Windows 11.
Click on the three dots on the top right side, select More Tools, and click on Extensions.
Toggle off the new extensions to disable and check if the error persists.
Repeat this process for all Extensions to find the Extensions causing the error.
Select Remove to remove the Extensions causing the error.
5. Enable Javascript
Open your browser (we used Chrome in this example).
Type the following address in the address bar and press enter:chrome://settings/content/javascript
Check Sites can use Javascript.
Javascript can also cause interference with YouTube videos, so make sure to enable it. We showed you how to do it in Chrome, but similar steps apply regardless of browser.
Many users have reported issues with the Discord app auto start when computers load to the desktop. It affects the system’s performance, and some users don’t want it. Thus, we will discuss ways to stop Discord from opening on startup.
Alternatively, we have a detailed guide about how to fix Discord not opening on the Windows operating system.
Why does Discord open automatically when I start my computer?
This is the default behavior for Discord.
Its settings are configured so it starts along with your PC.
It’s set to start automatically in the Task Manager or Settings app.
How do I stop Discord from opening on startup?
1. Via Discord settings
Launch the Discord app and click the gear icon at the bottom.
Click on App settings and navigate to Windows Settings.
Toggle off the Open Discord switch, close the app, and restart your PC to check if the error is solved.
The Open Discord option is an in-built feature that gives you control over Discord launch at startup. After making this changes, you’ll be able to stop Discord from opening on startup.
2. Via the Task Manager
Left-click the Windows icon, type Task Manager, and press Enter to open it.
Click the Startup tab. Navigate to Discord or Update.exe, right-click on it, and select Disable from the pop-up menu.
Then, close the Task Manager Windows and restart your computer.
The Windows Task Manager manages the activities of all apps on your PC and app startups. Check our guide about fixing Task Manager not responding on Windows PCs.
Right-click the Windows icon and select Settings from the list of options.
Click on the Apps category and select Startup from the left side pane.
Navigate to Discord from the list and toggle off the switch to auto startup.
Windows Settings can be the last resort to stop Discord from opening on startup. We have a guide about ways to fix Windows Settings that won’t open on your computer.
Twitter is a social media platform for sharing and interacting with short messages called tweets. However, people have encountered difficulty accessing tweets due to the rate limit.
Therefore, we will discuss the Twitter rate limit exceeded and how to fix it. Similarly, we have a similar guide on what to do if Twitter is over capacity.
What does it mean when the Twitter rate limit is exceeded?
This message appears when the account has surpassed the allowed number of API requests within a specified time frame.
Twitter imposes rate limits to prevent abuse, ensure fair data usage, and maintain the stability of its platform.
Exceeding the rate limit leads to temporary restrictions, such as being unable to perform specific actions like posting tweets and following or unfollowing accounts.
What is the daily limit on Twitter?
Verified accounts are limited to reading 6,000 posts daily.
For unverified accounts, its 600 posts a day
New unverified users can only access 300 posts a day.
However, in his third tweet, Elon Musk revealed the following:
10,000 requests for verified accounts
1,000 for unverified accounts
500 for new unverified accounts.
How many Twitter limits per hour?
The standard Twitter limit per hour is 100 API calls.
These limits can change and are influenced by factors like the type of API endpoint, the authentication method employed, and the access level granted to the application or user.
How do I get out of rate limit on Twitter?
1. Subscribe to blue tick
Launch your Twitter app and log in with your credentials.
Click on your profile picture and select Verified.
Select your preferred subscription.
Follow the on-screen command to make a payment to subscribe to Twitter Blue.
Subscribing to Twitter Blue monthly or annually, an account gains privileged access to additional tweets unavailable to regular users.
2. Wait for the limit to expire
Elon Musk initiated the rate limit to address extreme levels of data scraping & system manipulation and to preserve the server resources.
If you exceeded the limit, waiting 24 hours for the limit to reset may be the last resort.
Event id 4656 is a Windows event that occurs when the user accesses a file, folder, or system registry through the Microsoft-Windows-Security-Auditing service.
In this comprehensive guide, we will delve into essential details of the event id 4656, why it occurs, and the actions you should undertake when the event id is logged.
What is Event ID 4656?
Event id 4656 is an informational event that indicates that specific access was requested for an object. The object could vary from a file system, kernel, or registry object to a file system object located on external storage or a removable device.
In case, the request to access the request object is declined, a failure event is generated.
The event id 4656 is generated only if the System Access Control List (SACL) of the requested object has the necessary Access Control Entries (ACE) to manage the use of specific access rights.
This event informs that access to an object was requested and the results of the request were logged. However, the event does not give details of the operation that was performed.
Some of the essential field descriptions of the event id 4656 are as follows:
Account Name – The name of the account that requested a handle for an object.
Object Type – The type of object accessed during the operation.
Object Name – The name or an identifier for an object for which access was requested. Example – file, path
Process Name – The address path and name of the executable file requesting the object.
Accesses – The list of the access rights requested by the object.
What causes the event id 4656?
The event id 4656 helps monitor several events that execute on your Windows PC. Some of them are:
Verify if the unauthorized or restricted processes are requesting objects.
Access attempts for sensitive or essential objects.
Actions of a particular high-priority account.
Ascertain the anomalies and malicious actions of the suspicious accounts.
Verify that non-active, external, and restricted accounts are not in use.
Assure that only the authorized accounts can execute some actions or request access.
You can also configure the event id to enforce conventions and compliances.
Now that you have a fair idea of the event id 4656, let’s see what should be your course of action when the event id is repeatedly logged into the event viewer.
What to do if I encounter Event Id 4656?
1. Verify the event details
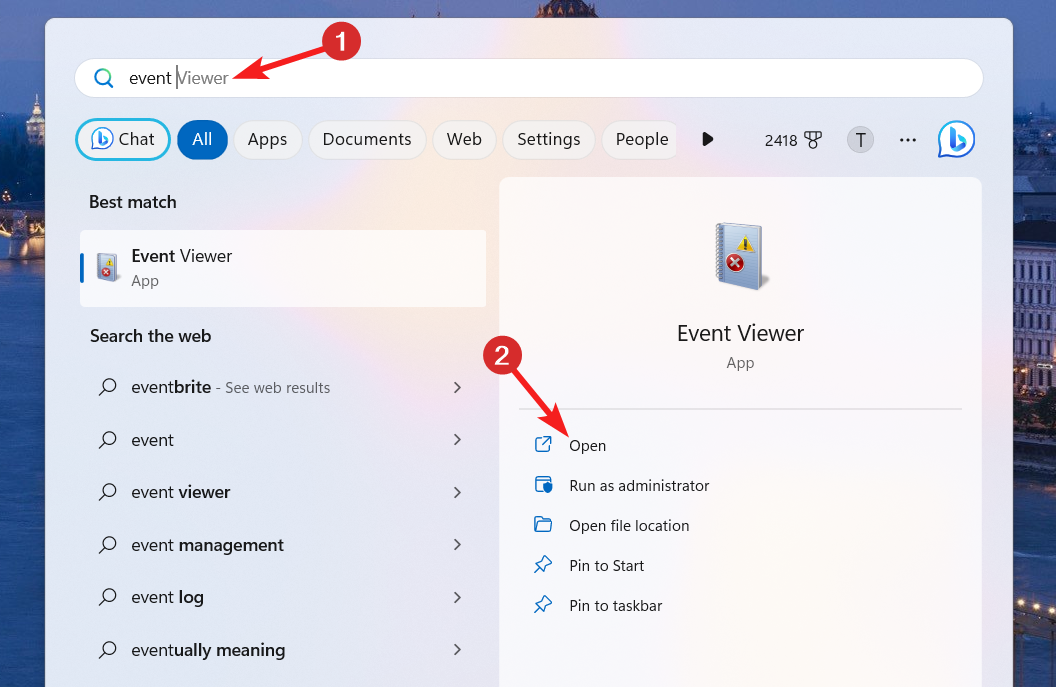
Press the Windows key, type event viewer in the search bar on top, and click the Open option on the right result section.
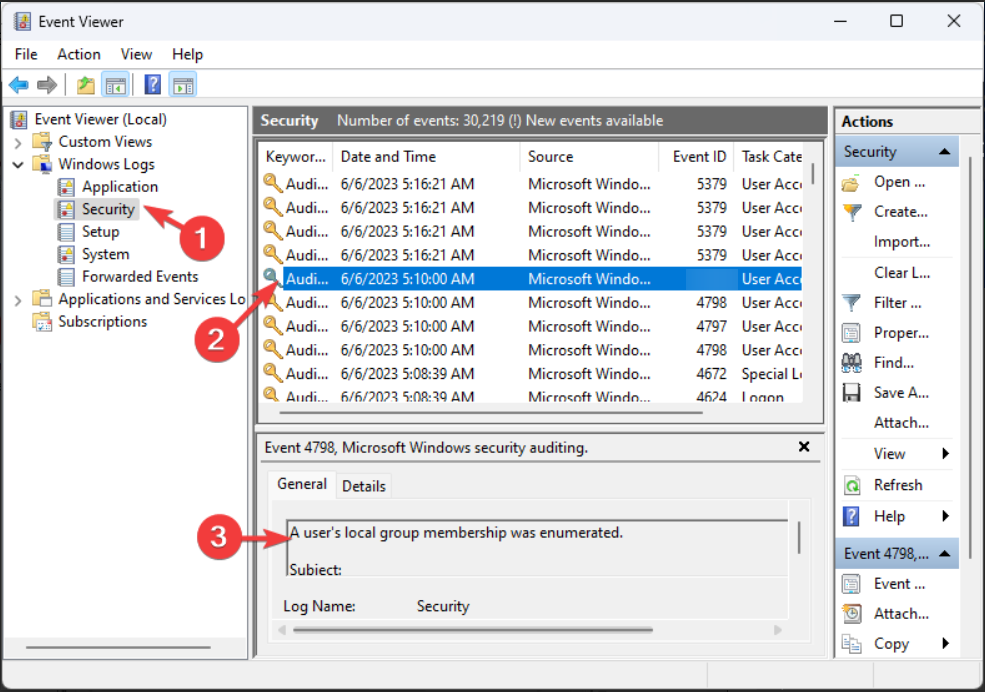
Click Windows Logs on the left pane to view the related settings and click Security.
The list of all the events logs will appear in the right section, scroll down and locate event id 4656 in the list and select it.
Navigate to the General tab on the bottom and review the security change and the request handles for the file or folder.
If the request is legitimate, you do not have to take any action. However, if the request seems to originate from a suspicious source, proceed to the next solution.
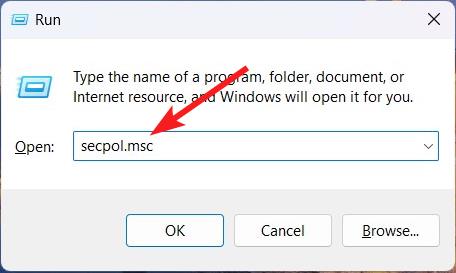
Use the Windows + R shortcut to launch the Run dialog box, type the following command in the text box, and press the Enter key. secpol.msc
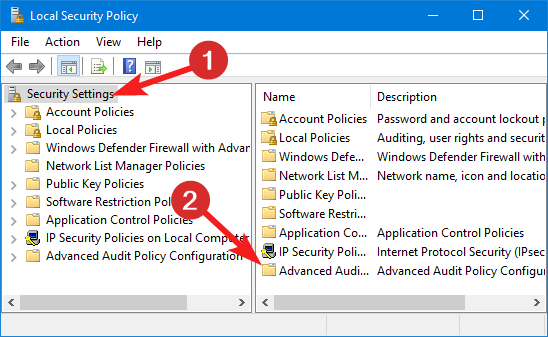
Click Security Settings on the left sidebar to expand the console tree and select the Advanced Audit Policy Configuration.
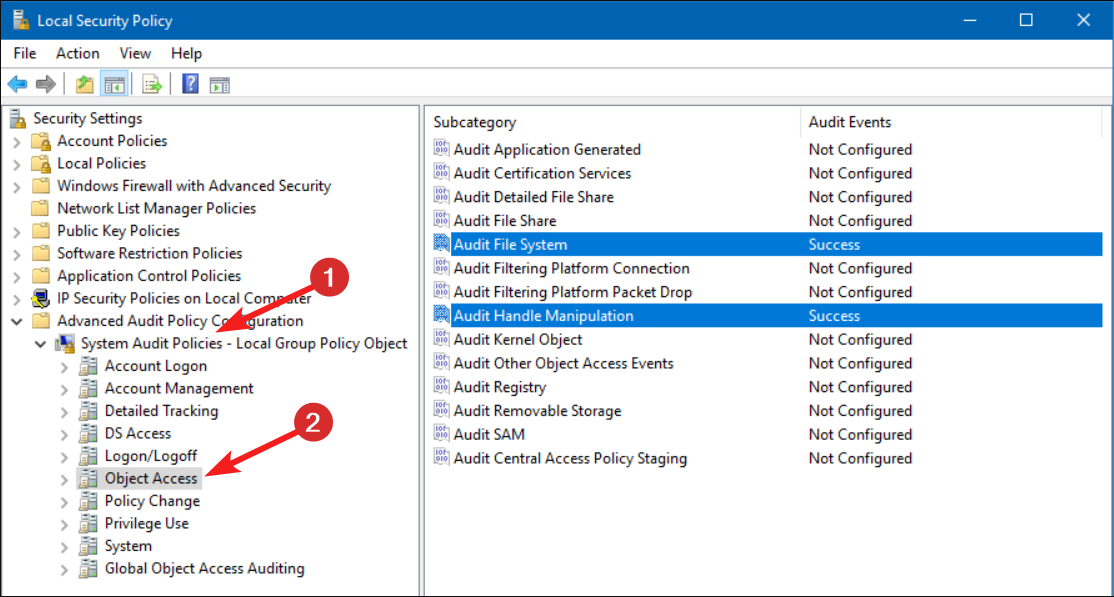
Next, expand the System Audit Policies node and select the Object Access option.
Double-click Audit Handle Manipulation on the right section and review the audit settings.
If the audit settings are set as Configured, change it to Not Configured.
Press the Apply button to save the changes.
Reconfiguring the Advanced Audit Policy using the local security policy editor should help fix the event id 4656 if these are logged in unnecessarily.
3. Use the group policy editor
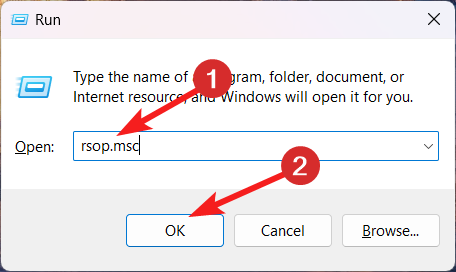
Use the Windows + R shortcut to launch the dialog box and type the following command and click the OK button to execute it. rsop.msc
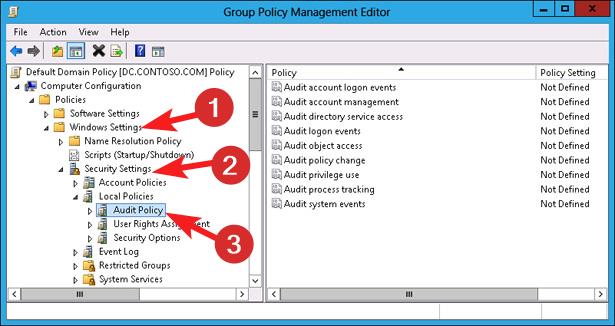
Expand the Computer Configuration console in the left panel and click the Windows Settings node.
Next, click to expand Security Settings followed by Local Policies and then Audio Policy from the left sidebar.
Note down the Source Group Policy Object of Audit Object Access, the root setting for Audit Handle Manipulation.
Execute the following command in the Run window by pressing the Enter key. Gpmc.msc
Navigate to the Source Group Policy Object you noted previously and then look for Audit Handle Manipulation.
Right-click Audit Handle Manipulation and choose Edit from the context menu.
Set the setting to Disabled and press the OK button to save the changes.
You will have to modify the specific group policy object if the setting is inherited from any other GPO to Local Security Policy.
That’s all about this guide to resolve the event id 4656 if you encounter it frequently. However, you should know that the solution may change depending on the specific scenario when the event id 4656 appears on the event viewer.
Refer to this guide, for a detailed understanding of the event viewer and how can you leverage it to monitor all the events.
Reach out to us in the comment section if you want to share valuable information and feedback.
The Designed for Xbox Summer Collection 2023 has a sparkle and shine theme which seems appropriate, and features seven new accessories for Xbox fans. See below.
Hyperkin has given this Xbox One/Series X|S-compatible controller a nostalgic Xbox 360 twist. This launches on July 24 and is available for preorder at $49.99.
Officially licensed Xbox 360 Controller replica for use with Xbox Series X|S, Xbox One, Windows 10/11
Event ID 4738 is an alert in Windows Event Viewer when a user account undergoes modifications. It is crucial to address this event promptly to maintain the integrity and security of your machine.
In this guide, we will delve into the causes behind this Event ID 4738 anonymous logon, discuss the potential consequences of such account changes, and provide practical solutions to rectify the issue.
What is Event ID 4738?
Event ID 4738 is a Windows security event indicating a user account change. When a change is made to a user account, such as a change in user rights, group memberships, or password updates, Windows generates this event to log it.
The event allows administrators to track changes made to user accounts, monitor privileged access, and investigate any unauthorized or suspicious account modifications.
It provides essential details such as the user account’s name, security identifier (SID), and specific changes.
Additionally, it includes information about the process or user responsible for the account change and the date and time when the modification occurred.
By monitoring and analyzing the event, administrators can maintain an accurate audit trail of user account changes, identify potential security breaches or unauthorized access attempts, and ensure compliance with security policies and regulations.
Why should I monitor event ID 4738?
There are various reasons why you keep an eye on this Event ID; some of the common ones are:
A detailed record of user account changes, helping you reconstruct the timeline of events.
Detect suspicious or unauthorized account modifications at an early stage.
Identify any anomalies or unexpected modifications that may affect system performance.
Recognize any change to the list of services to which the user delegates authority.
Monitor the accounts that should strictly be used within a given timeframe.
This event plays a crucial role in maintaining your systems’ integrity, Security, and stability.
How can I fix Event ID 4738: A User Account was Changed?
1. Identify the specific user account
Press the Windows key, type event viewer, and click Open.
Go to Windows Logs, and click Security.
Locate the Event ID 4738, note the affected user account’s name and security identifier (SID).
Review the details provided in the event entry to understand the nature of the account change.
This information will help you understand whether the modification is intentional or unauthorized.
If someone made a legitimate and intended change to the account, such as updating the password or making a modification as a system administrator, you may not need to take any further action.
However, ensuring the changes align with the organization’s security policies and procedures is essential.
However, if the account change appears suspicious or unauthorized, it is crucial to investigate further for any signs of a security breach or unauthorized access to the affected user account.
3. Change user account credentials
NOTE
If you suspect unauthorized activity or to mitigate any potential risks, change the password for the affected user account.
Press Windows + I to open the Settings app.
Go to System, then click Accounts.
Click Sign-in Accounts.
Now click Password to expand it. Click Change.
Type in the Current Password.
Click Change Password, mention the new password, and mention it again to confirm it, then click Next.
Click Finish to complete.
Ensure the new password follows strong security practices, such as using a combination of alphanumeric characters and symbols.
By following the steps outlined here, you can take the necessary actions to resolve Event ID 4738 and safeguard your device from unauthorized access or malicious activities.
Also, monitor the affected user account and related system logs for any subsequent events or signs of suspicious activity.
You must regularly update passwords and implement security policies and procedures to prevent unauthorized account changes.
If the event recurrence suggests a larger security concern, it may be necessary to conduct a thorough security audit, review access controls, and consider implementing advanced security solutions such as intrusion detection systems or security information and event management (SIEM) tools.
Please feel free to give us any information, tips, and your experience with the subject in the comments section below.
As reported by Security Boulevard, a vulnerability has been discovered in the Microsoft Azure Active Directory (AD) Open Authorization (OAuth) process that could allow hackers to take complete control of user accounts.
The vulnerability, dubbed “NoAuth” by researchers from Descope, a California-based identity and access management service, affects multi-tenant OAuth applications within Azure AD. NoAuth is an authentication implementation flaw that allows attackers to modify the email attribute under the “Contact Information” section in Azure AD accounts. By exploiting the “Log in with Microsoft” feature, malicious actors can then compromise victim accounts.
To exploit NoAuth, an attacker would first need to create an Azure AD admin account. They would then modify the email address associated with this account to match the email address of the victim they want to target.
Once the attacker has modified the email address, they can then use the “Log in with Microsoft” feature to log in to any vulnerable application or website as the victim. This would give the attacker full control of the victim’s account, including access to their data and passwords.
Terms you should know to understand NoAuth better
OpenID Connect (OIDC)
OpenID Connect (OIDC) is an open authentication protocol that builds on the OAuth 2.0 architecture. OIDC is designed to be used by consumer-facing applications, and it allows users to access multiple websites with just one sign-on (SSO).
Azure Active Directory (Azure AD)
Azure Active Directory (Azure AD) is a cloud-based identity and access management (IAM) service that helps organizations manage user access to applications and resources. Azure AD uses OAuth 2.0 and OpenID Connect (OIDC) to provide a secure and convenient way for users to sign in to applications and websites.
Identity Provider (IdP)
Identity providers (IdPs) are a critical part of the OAuth and OIDC authentication process. An IdP is a trusted third party that stores and verifies user identities. When a user signs in to an application or website that uses OAuth or OIDC, the application or website redirects the user to the IdP’s login page. The IdP then validates the user’s credentials and, if successful, issues an access token to the application or website. The application or website can then use the access token to access the user’s protected resources.
Open Authorization (OAuth)
Open Authorization (OAuth) is an open, token-based authorization framework that allows users to grant access to their private resources to third-party applications without sharing their passwords or other sensitive information. For example, a Facebook user can authorize Medium to access their profile, read their posts, or post to their feed without having to provide Medium with their Facebook login information.
Meta released Instagram Threads, as a rival to Twitter, and its popularity is unmatched. Over 100 million users are on the platform, according to the latest reports. But there are people who might not use Threads on mobile devices, even though, naturally, the app is made for mobile devices.
Just as some users use Instagram on desktops, there are users who will want to use Threads on Windows 11 desktops as well. And if you are one of them, then we have some good news for you. You are able to download & use Instagram’s Threads on Windows 11.
It’s not hard at all. You’ll need to have the Windows Subsystem for Android app downloaded and installed on your computer before you can proceed. You can download Windows Subsystem for Android from Microsoft Store. It’s free, and you can install it in a couple of minutes.
Then you have to get the Threads APK, which you will need in order to install Threads on your Windows 11 device. You can get it from a third-party source, such as APKMirror. Once you’re there look for Threads APK.
Ultimately, you’ll need WSATools. With it, you’ll be able to install APK files, such as the Thread APK you just got. Do you have everything? Then you’re ready to install it.
How to install Instagram Threads on Windows 11
Open up your Windows Subsystem for Android on your Windows 11.
Once you are there, go to the Advanced settings by accessing the sidebar.
Here, you should look for the Developer Mode option and enable it.
After enabling Developer Mode, open WSATools and complete the requirements.
Locate the Threads APK file that you have downloaded and install the Threads app by selecting the APK file.
Once the installation is done, you should be able to access the Threads app on your Windows 11 device.
You’ll need to log in to the Threads app using your Instagram credentials, so be aware of this, when you first log in to the platform.
What do you think about it? Will you use Threads on Windows 11? Let us know in the comments section below.
But this is not all. As you may know, Microsoft has also invested a lot of financial resources into AI research. LongMem, phi-1, Kosmos-2, and Orca 13B are just some of the AI models that will nonetheless have an impact on the way AI will exist from now on.
And now, Microsoft is coming up with another AI model, called CoDi. Apparently, CoDi is capable of anything creative. Literally anything. The model already has a demo video, made by the Microsoft Research team, which shows just how CoDi works.
CoDi is also part of Microsoft’s Project i-Code, a project that uses AI to enhance human-computer interaction.
Here’s what Microsoft says CoDi will do for you
CoDi stands for Composable Diffusion and the model was developed by a team from Microsoft Azure Cognitive Services Research in collaboration with the University of North Carolina at Chapel Hill.
It can literally generate anything from anything, out of all sorts of inputs. We’re talking about language, image, video, or audio, and any combination of these inputs.
CoDi takes these inputs, processes them, and generates multiple types of inputs simultaneously. You can see this in the demo video below.
In other words, CoDi will generate a contextual and realistic video with a prompt, an image, and an audio clip. Its usage will be highly needed by a lot of people.
The team that developed CoDi came up with a lot of use cases for the model. For example, people with disabilities will be able to create content far easier. Students can also use it to create engaging and informative presentations and projects.
The model can be used in computers to enhance user experience altogether. And if it’s released to the public, we will be able to create highly interactive content with just a few items at our disposal.
What do you think about it? Are you excited about CoDi? Let us know in the comments section below.
Developed by Symantec Corporation, Nsc.exe is an important part of Norton Antivirus, a top contender in the security software market.
The executable file runs in the background when you launch the Norton app and is responsible for handling the different features of the antivirus software.
Why are the runtime errors related to nsc.exe?
Several users have often encountered nsc.exe-related runtime errors when the program is loaded into the memory during the Windows PC’s launch of the Norton security app.
Some of the notable errors are: NSc.exe – Bad Image, NSc.exe Application Error, Faulting Application Path: NSc.exe, NSc.exe could not be launched. Class not registered, NSc.exe could not be started, The file NSc.exe is missing or corrupt, NSc.exe failed to initialize properly, Error starting program: Nsc.exe, Nsc.exe has encountered a problem and needs to close. We are sorry for the inconvenience, NSc.exe is not a valid Win32 application, Cannot find NSc.exe.
Why do I encounter errors nsc.exe application errors?
Reportedly, these errors are triggered by a potentially harmful bug within the Norton security software application. Ironically, this defect in the software not only interferes with the smooth functioning of the application but also renders your system vulnerable to cyber-attacks.
Some of the other reasons for the nsc.exe to cause run-time errors are:
An outdated antivirus software may not be compatible with the version of Windows, causing several errors to show up.
If the installation procedure of the Norton antivirus gets interrupted, the program will not load successfully into the system memory.
A brutal malware attack may damage the nsc.exe file, preventing the antivirus app from functioning properly.
How do I fix the application errors related to nsc.exe?
Before implementing the complex solutions listed in this guide, you must perform these preliminary steps for effective results.
If these workarounds are of little help, proceed to the solutions below.
1. Temporarily end the nsc.exe process
Right-click the Windows icon and select Task Manager from the Quick Links menu.
Scroll down the Processes tab and look for the nsc.exe process.
Right-click the nsc.exe file and choose End Task from the context menu.
Temporarily disabling the background nsc.exe process from the task manager window should temporarily fix the nsc.exe-related application errors.
2. Run SFC and DISM scans
Press the Start icon on the taskbar, type cmd in the search section, and click the Run as administrator option in the result section.
Type or paste the following command and hit the Enter key to initiate the SFC scan. sfc /scannow
Wait until the SFC scan is complete and press the Enter key to execute the DISM tool. DISM.exe /Online /Restorehealth
After the SFC and DISM scans are complete, reboot your PC and launch the Nortan app.
NSc.exe’s bad image error when launching Norton also indicates such an issue with the system files of your Windows PC. SFC and DISM scans will diagnose the repair of the protected system files, and disk images will replace them with the healthy version stored in a compressed folder.
As a quicker alternative to the abovementioned solution, you can use a powerful third-party repair tool to solve this issue for you.
3. Disable Fast Startup
Press the Windows key to launch the Start menu, type the control panel in the taskbar and click the relevant search result.
Choose Large icons in the View by drop-down and click on Power Options.
Click Choose what the power button does link located on the left side panel.
Follow the Change settings that are currently unavailable link on the next window.
Finally, disable the checkbox for the Turn on fast startup (recommended) option located in the Shutdown settings section and press the Save Changes button.
The fast startup feature speeds up the bootup and shutdown process of your Windows PC. When the feature is enabled, your system shuts down the background processes but saves the kernel session and driver state information on a file to hasten the boot-up process.
Despite being useful, fast startup causes several issues during the application launch including nsc.exe.
4. Update Norton security antivirus
Launch the Norton Security app on your Windows PC.
Click Device Security option on the dashboard.
Click the Live Update option on the Device Security window.
Wait for the app to detect a pending update and complete the installation.
After completing the installation, press the OK button to exit the window.
Now reboot your PC and launch the Nortan app upon restart; the nsc.exe application error will not bother you.
The nsc.exe application error can also show up due to a bug in the current antivirus version. You should update the app to the latest version to resolve it.
That’s all about the nsc.exe file and the steps you should implement to fix its application errors. Other related processes include the windoc.exe file which has to deal with installing Norton products.
FIFA is a very popular PC game on Windows. While launching the app, you might run into the sysdll_win64_retail.dll missing error, which prevents you from going past the launch screen.
If you’re experiencing the missing DLL, this article will briefly overview the error, its causes, and the best ways to help you resolve it.
What is sysdll_win64_retail.dll?
The sysdll_win64_retail.dll is a third-party DLL file developed by Electronic Arts (EA).
It is not an essential Windows file, but it helps in managing the functionality of the FIFA 17 software. Also, if the file is missing, it can prevent the program from launching.
What causes sysdll_win64_retail.dll?
The sysdll_win64_retail.dll missing error is caused by the following:
Viruses & Malware – If your PC is infected with viruses, it behaves abnormally and can sometimes delete legitimate Windows files like the sysdll_win64_retail.dll leading to missing DLL errors.
Forced PC shutdowns – If your PC frequently shutdowns on its own, files can get damaged during the process, rendering them unusable and can cause missing DLL errors.
Antivirus protection – If your antivirus finds this file as malicious, it’ll quickly quarantine it, leading to the sysdll_win64_retail.dll missing error.
Failed Software Installation – If the FIFA game isn’t correctly installed, it leads to a series of errors, one of which is the missing sysdll_win64_retail.dll.
Irrespective of the causes, you can try the fixes outlined below to troubleshoot it.
How can I fix sysdll_win64_retail.dll?
Before anything, kindly apply the following preliminary checks:
Perform a system restore on your PC to return to the earlier period before the DLL error.
Run SFC/DISM scans to identify and fix all bugs prompting this DLL error.
If the missing error continues, then try the fixes below.
1. Using a dedicated DLL Fixer
One of the easiest and quickest ways to fix missing DLL errors is to employ the help of a dedicated DLL Fixer. These tools help you fix missing DLL errors with a couple of clicks and eliminate the stress and time wasted in troubleshooting.
However, sysdll_win64_retail.dll is not a Windows essential file, a DLL Fixer won’t guarantee a 100% success rate when fixing missing DLL errors, but the best DLL Fixers have a decent chance of fixing the error.
2. Re-register the sysdll_win64_retail.dll file
Press the Windows key, type command prompt, and click Run as Administrator.
In the next UAC prompt, click Yes to grant administrative privileges.
Then, type the following command and hit Enter: regsvr32 SYSDLL_WIN64_RETAIL.DLL
Wait for Windows to register the DLL file, and restart your PC to finalize the registration.
Sometimes, DLLs might be downloaded on your PC, but the file needs to be registered. If they’re not registered, it prevents the file from functioning with the program.
3. Install the Microsoft C++ Redistributable package
Press the Windows key, type in the name of your browser, and hit Enter.
Usually, you’ll need to download the 64-bit and the x86 (32-bit) versions. However, if your PC is 32-bit, you should only install the x86 version.
Wait for the file to be downloaded, and double-click on the .exe file.
Then, follow the onscreen instructions to complete the installation and restart your PC to see if the error is fixed.
The C++ Redistributable is an essential Windows program that is required to run games on the OS. If the file is not installed, you’ll encounter errors while launching FIFA 17.
Resolving the sysdll_win64_retail.dll missing error is relatively straightforward; with the steps listed in this article, you should get your FIFA up and running in no time.
While using Outlook, the subject column can go missing in the Inbox; this prevents you from accessing a vital part of messages received.
If your Outlook app is not showing subject in your inbox, this article will provide you with the steps to help you resolve this error. Also, check out our guide detailing how to open Outlook in safe mode.
Why is Outlook view not showing the subject column?
Most times, if Outlook is not showing subject column, the error can be traced to view configurations or settings. Microsoft provides tons of view customizations in the Outlook app.
If you’ve messed with any of the view settings, it can prevent the subject column from showing when you receive emails on Outlook.
What do I do if Outlook view is not showing the subject column?
1. Change the subject placement in Outlook
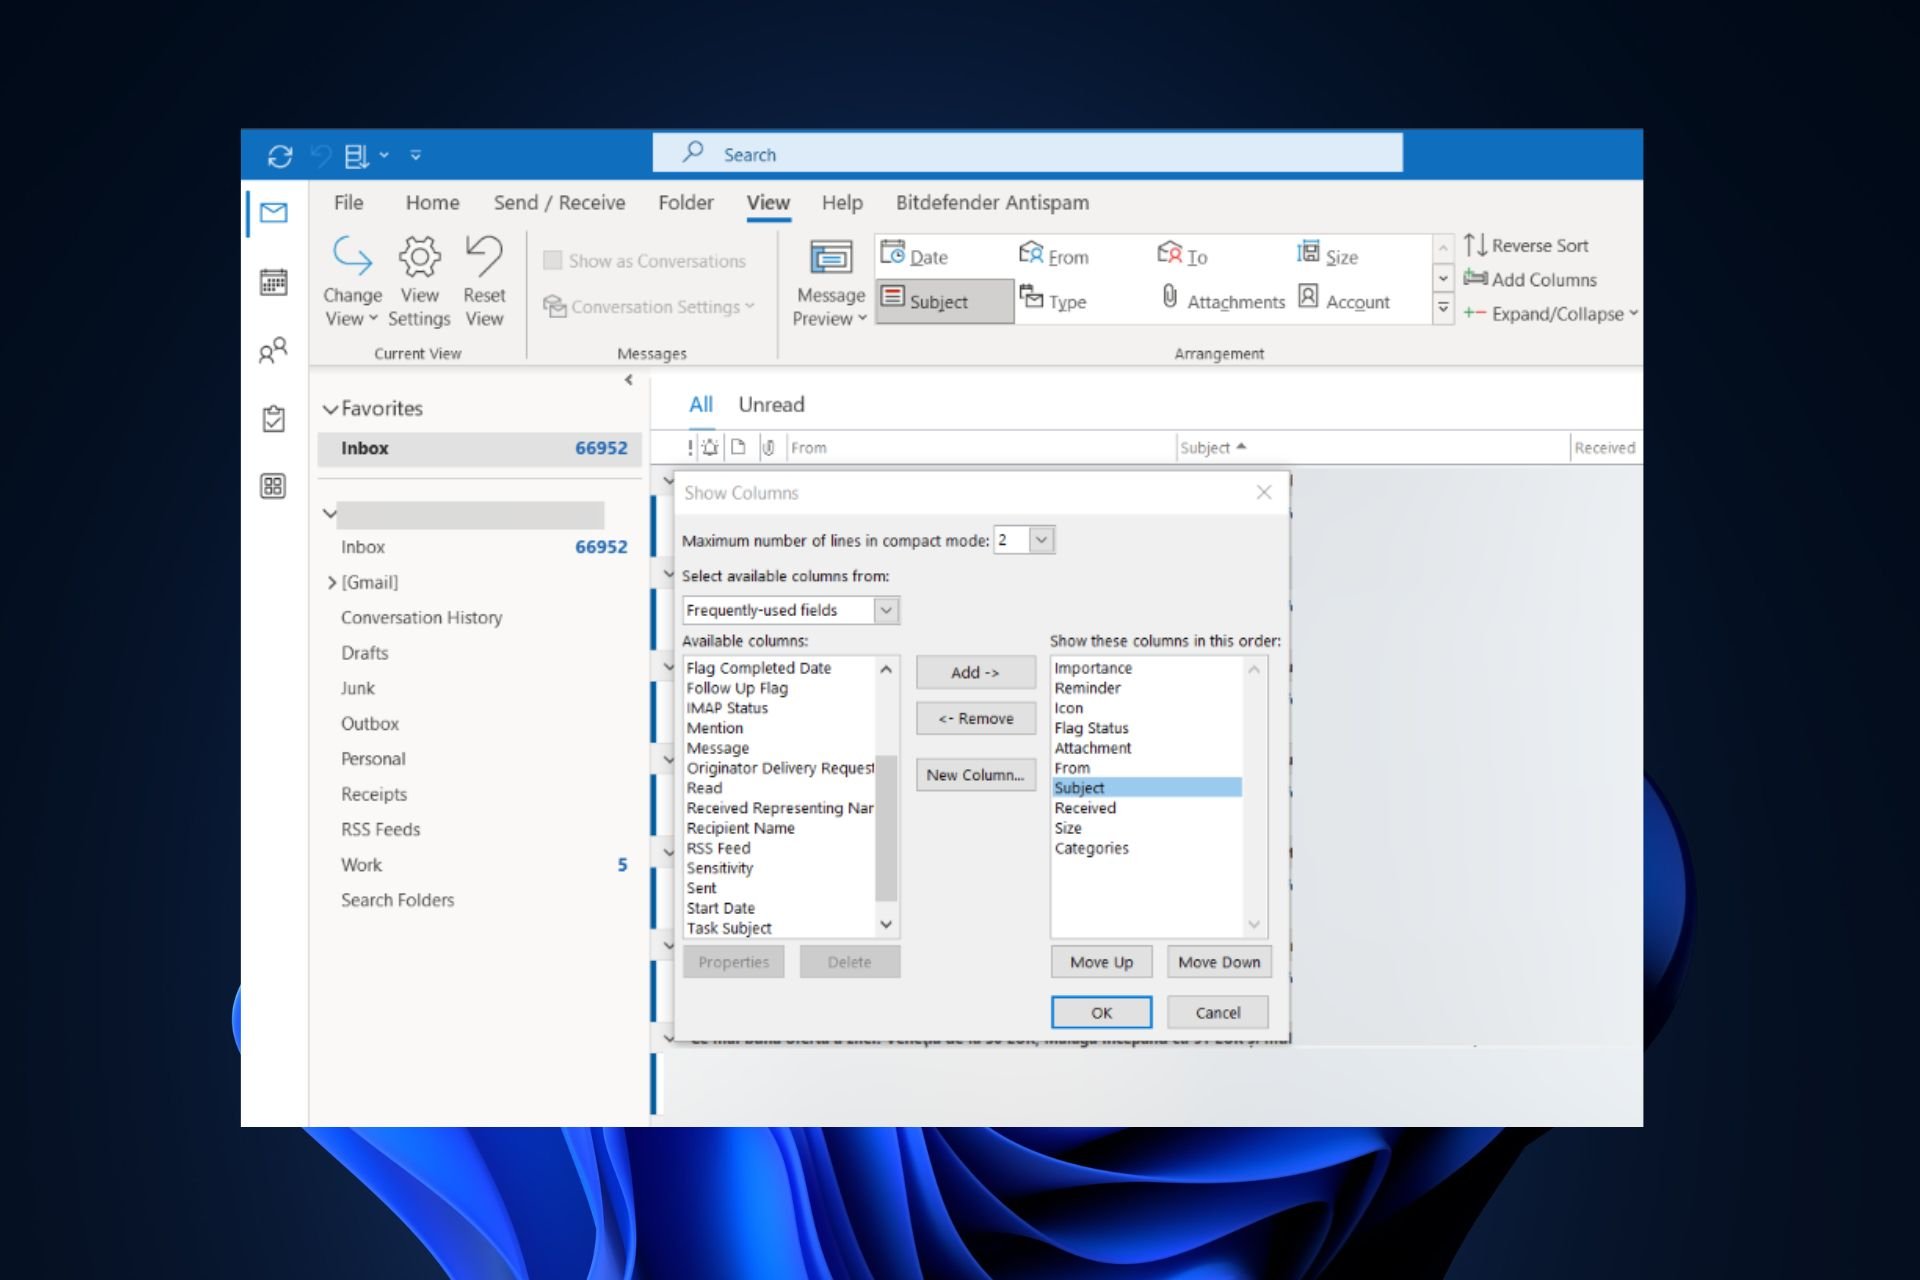
Launch Outlook, and click on View at the top left corner of the window.
Click View Settings in the Current View section, and click Columns to display the options you can add to your Inbox.
Select Subject from the list of options, and click Add to move the Subject option into the field next to Show these columns in this order.
Click on Subject to highlight the option, and click the Move Up or Move Down button to place the Subject tab in the location it’ll appear on your Inbox.
Save your changes, and restart Outlook to see if the error is fixed.
Left-click the Start menu, type outlook and press Enter.
Click on the View tab, expand the Conversation Options, and uncheck Show Senders Above the Subject.
Giving priority to the subject ahead of the sender helps keep the subject column visible. If the Inbox stops refreshing, follow the steps in Outlook not updating inbox automatically.
3. Repair Microsoft Office
Press the Windows key, type control panel, and hit Enter.
Under Programs tab, select Uninstall a program.
Then, locate and click Microsoft 365, and select Change.
Click Online Repair and click Repair. Now, follow the onscreen instructions to complete the repair.
Restart your PC and launch Outlook to see if the error is fixed.
Corrupt or faulty Office components can trigger display issues like a missing Subject column. If you also struggle with attachments, see how to fix Outlook not attaching files.
4. Open Outlook in CleanView mode and adjust to Preview
Press the Windows key + R to open the dialog by, type outlook.exe/cleanview and hit Enter.
This will reset Outlook to its default view and remove any view customizations you’ve made to Outlook.
Close Outlook and restart the app to check if the error is fixed.
Press the Windows key, type Outlook, and hit Enter.
In the Outlook app, click View and select Change View from the menu.
Click on Compact or Preview to change the view settings to a compact display.
Close Outlook and restart the app to check if the Subject is showing.
Opening Outlook in a clean view mode removes all customizations made to the view settings which might have triggered the error. Or you could simply reset the Outlook view. For similar display problems, use this guide to fix Outlook view not showing preview.
Fixing the Outlook subject column not showing error involves easy steps that can be applied very quickly. By the end of this guide, you should be able to see the Subject line in your Outlook app.
If you have any other solutions on how to fix this Outlook error, drop them in the comments.
Xbox is riding a good wave right now. The console is enjoying increasing popularity among gamers, with Xbox Series S/X selling over 21 million units. Starfield, one of the most anticipated games in recent history, is also coming to the console in September.
With all the new games coming to Xbox, a lot of users are wondering if the console will bring YouTube streaming back.
There were a lot of ways you could stream on YouTube from Xbox, in the past, with the Mixer app being one of those, but a lot of users would love it if Xbox X/S had direct YouTube Streaming.
Will it happen? Well, one can hope, but we don’t have anything yet to suggest it might happen. Xbox is definitely going through a successful and complicated period. Microsoft is in talks to buy Activision-Blizzard, and a lot of secrets were unveiled. Including the one that says that Xbox is losing the console war.
However, Xbox is very popular in the US, and this area is quite important for businesses and corporations in general. So Microsoft might work something out when it comes to YouTube streaming directly from the console.
For now, at least, you can’t directly stream YouTube on Xbox, but hopefully, Microsoft will be able to come up with a deal in the future. Especially if it’s keen on making Xbox a worthy console on the market.
And they want to do that, so probably, the feature will come out sooner or later.
What are your opinions on this? Let us know your thoughts in the comments section below.
After purchasing books from Amazon, some of our readers have reported that the books are not showing up in their Kindle readers. Further, a poor internet connection or a synchronization problem is usually attributed to this error.
Hence, this article will provide ways to help you fix it. In addition, you can read up to find where Kindle books are stored on Windows PCs.
Why is my Kindle book not showing up?
Some of the major causes for Kindle book not to show up are listed below:
Outdated application – If you’re running an outdated version of Kindle, you can run into errors triggered by underlying bugs in the software.
App synchronisation – You must enable syncing using Kindle on multiple devices. Also, if syncing is not enabled, books purchased on a device might not display on other of your devices.
Poor Internet connection – Kindle readers utilize the internet to download and display books in your library. If you have a poor internet connection, you’ll be unable to view books in your Kindle library.
App filters – If you have used Internet filtering to streamline your search and didn’t reset to default, you’ll be unable to view books outside the filtered category.
Irrespective of the causes, try the following ways to troubleshoot it below.
What can I do if the Kindle book is not showing up?
Before we proceed with advanced troubleshooting solutions, here are a couple of quick fixes that can resolve the Kindle book not showing error:
Ensure the payment was successful and has not been reversed.
If the error persists, the following are advanced troubleshooting steps to fix the error:
1. Enable Whisper sync
Press the Windows key, type in Kindle, and hit Enter.
In the Kindle app, click on Settings, and select Device Options.
Then, click on Advanced Options, and check to see if it is turned on under Whisper Sync. If it’s not turned on, click on it to enable the feature.
2. Sync your Kindle app
Launch Kindle and navigate to the File tab.
Under the pop-up, click on Sync or use the F5 key.
Then, wait a few seconds, and check your Kindle Library to see if the error is fixed.
Sometimes, even after enabling whisper sync, you’ll still need to manually sync Kindle to your Amazon account to fix the error. You can also check out our guide on how to fix Windows 11 sync settings not working.
3. Deregister and re-register Kindle
Press the Windows key, type Kindle, and hit Enter.
Then, select Tools, and click on Option.
Click Registration on the left pane, and select Deregister.
Then, click on Register.
Input your Amazon details and sign-in.
Finally, click on Register to finalize the process, and restart Kindle to see if the error is fixed.
Registering Kindle afresh helps in clearing up bugs and glitches and also ensures that synchronization takes place.
4. Update Kindle
Tap anywhere on the screen and select the downward-facing arrow on the topmost section of the screen.
Click on all Settings.
Tap on Device Options and select Update Your Kindle.
Updating Kindle fixes underlying bugs that might be causing errors with the app. We have further information on updating the Kindle app here.
Press the Windows key + I to open the Settings app.
Then, click on Apps and select Installed Apps.
Then, locate Kindle, click on the options icon, and select Uninstall.
In addition, click Uninstall again to confirm the uninstallation, and wait for the process to be completed.
Once the software is removed, follow the steps listed in solution 4 to download and install Kindle on your PC.
If the Kindle reader is corrupt, you must reinstall the app to fix the errors. Here is a detailed guide showing you how to fix corrupt system files on Windows.
Further, the most common reasons for Kindle books not showing is a poor internet connection, or the device hasn’t synced to your Amazon account.
If you’ve purchased a book and can’t find it on your Kindle reader, we hope the steps listed in this article will help you fix the error.
When using a computer, you will come across multiple common problems that we have covered extensively on our website. However, some common issues are quickly fixable.
This guide will give you a list of solutions that will help you with your query about a computer not working properly. Let us get right through the solutions.
What kind of problems I could encounter with my PC?
You will come across multiple issues on your computer while using it. Some of the most common problems where your computer will not work properly are listed below:
The computer won’t start – Some underlying glitch or corrupt system file could cause the computer to not start.
PC overheating – If multiple apps or services are running in the background, then your PC will start overheating.
No network – Wi-Fi drivers if not updated then it could cause your PC to not connect to the internet and you won’t able to download or do anything on the internet.
The computer is slow – Virus infection, storage full, and corrupt registry files can slow down your computer and it won’t operate normally.
The screen is frozen or apps freeze – Corrupt system or program files can cause this type of problem and freeze your screen or the app that you are using.
Strange noises – If you are hearing strange noises on your PC, then it is a sign of hardware malfunction or some broken parts.
These are some of the common problems that will prevent your computer from working normally. Let us now take a look at the other common problems and their solutions to fix them.
How can I fix my computer if it is not working properly?
1. PC overheating
Press Ctrl + Shift + Esc to open Task Manager.
In the Performance tab, scroll through the list of programs.
Click on the task that is hogging your resources, and select the End Task button at the top.
Terminating the processes that are consuming your CPU resources could help prevent overheating issues on your PC. You might as well go ahead and uninstall the program from your PC and download an alternate app.
However, this is just one of the different solutions that you can try to fix the PC overheating issue. For more solutions, you should check out our guide on how to fix overheating issues on Windows 11.
2. Restarting issues
One of the most common problems reported by our readers is that their PCs keep rebooting after installing Windows OS or any program. The main reason this could happen is because your PC doesn’t have enough RAM or there are some driver compatibility issues.
You can also fix this issue by updating drivers on your PC or uninstall the programs that you think are causing problems.
Another popular solution is to restart your PC in Safe Mode and load only essential services and drivers. Finally, if nothing works, then you may have to reset your PC.
3. Network issues
One of the common problems in our list of solutions for a computer not working properly is network or Wi-Fi connectivity issues.
Users have reported that although the Wi-Fi connects to the network, there isn’t any internet connection and nothing loads.
To fix this issue, you can first try restarting your PC, as this could be a temporary glitch. Second, you should try out restarting the router, re-plugging the ethernet cable, or disabling the Firewall to check if that was blocking your connection.
4. BSoD error
The Blue Screen of Death error is a very common and frustrating error. This could pop up randomly and it may take a lot of time to resolve.
The BSoD error usually happens when a driver stops responding, there are driver compatibility issues, application crashes, etc.
BSoD errors usually are sorted out by restarting your computer. However, some types of errors require you to tweak your PC at the system level, and for that, we have a lot of resources on how you can fix different BSoD errors. You should definitely check it out.
Windows update lets you get the latest features and bug fixes on your PC so that you do not come across any other issues.
However, there are times when you won’t be able to update your PC. Often Windows Update fails to work properly and leaves you with an outdated version. This could cause multiple issues, as your security patches are the latest, or you could face driver compatibility issues.
Type powercfg.cpl and press Enter to open Windows Power options.
Click on Change plan settings next to your current plan.
Select Change advanced powersettings.
Expand USB settings and disable USB selective suspend setting.
Click Apply and OK and restart your PC.
Often you will find the USB port on your PC not working, and you might be wondering if the USB port is fried. However, Windows OS is smart and there is a power-saving feature known as USB selective suspend setting.
This setting basically suspends unused or idle USB ports on your PC to conserve power. Simply disable it as shown above and your USB ports will run back again. For some other solutions, we would suggest you check out our guide on how to fix USB ports.
7. Bluetooth not working
Bluetooth is one of the most used features, at least today since it not only lets you transfer files to and fro, but you can connect your wireless devices to your computer.
There are many of our readers that have reported that their Bluetooth connection is not working. For others, the Bluetooth is slow and lagging, while for some the Bluetooth feature isn’t working at all.
There are plenty of reasons why your Bluetooth isn’t working fine. Most of these Bluetooth issues can be resolved by running the troubleshooter or by updating your Bluetooth drivers.
Often these simple solutions won’t help resolve the problem. Sometimes you are required to fix the corrupt system files or even get the Windows OS reinstalled.
Connection or service issues are causing the problem
8. PC beeps or makes strange noises
Open the Settings menu by pressing the Win + I keys.
Select Troubleshoot on the right side.
Click on Other troubleshooters.
Hit the Run button for audio, video, and other hardware.
You will hear static noise or beep from your PC if the drivers are outdated or there is a hardware malfunction. Problematic hardware if used for a long time can prove to be fatal as it can destroy other associated parts on your PC.
Such strange noises can also occur if your PC has the wrong power settings, or the CPU isn’t getting enough resources to do its job.
You can also check out our dedicated guide on how to get rid of background noises on PC and apply the other solutions to resolve the problem.
In case the solutions did not help, you should get your PC checked at an authorized service center and get the parts replaced to fix your PC or probably it is time for you to switch over to a new PC.
9. Slow performance
Press the Win + I keys to open the Settings menu.
Click on Apps on the left pane.
Select Startup.
Toggle off all the unnecessary apps. Doing so, all the apps that you have disabled will not automatically run at the startup.
Over a period of time, your PC performance will not feel as it was when you got it brand new. This could be because of various reasons such as storage fill, virus attacks, system files missing, outdated operating systems, etc.
The slow performance issue isn’t associated with a particular version of Windows, but even with the latest and upgraded Windows 11 as well. But you should avoid using an older version of the OS, as program compatibility issues can creep in and slow down the system performance.
In order to fix the slow performance issue on your Windows PC and fix the computer not working properly problem, you should apply the solutions in our guide and get your PC fixed.
10. High CPU usage issue
Press the Win + I keys to open the Settings menu.
Click on Apps on the left pane.
Click on Installed apps.
Click on the 3-dot icon for any app and select Advanced options.
Under the Background apps permission drop-down, select Never.
Perform the same procedure for other apps and restart your PC.
One of the most common issues that people come across is the high CPU usage issue. Because of this problem, your PC won’t perform optimally and several programs will crash because of inadequate resources.
Disabling background apps will surely help as it terminates all the applications from running right after your PC boots up, which could consume more of your CPU resources.
Windows 11 users have complained that after upgrading their PCs, the battery life of their computers has fallen down drastically.
While this is a specific issue, other versions of Windows are also susceptible to battery life issues. So, if you are experiencing battery life issues with your version of Windows, it could be because some important system files might be missing, or there could be some issues with your battery itself.
A newer version of the Windows update could also be the reason because a bug could also cause battery drain. Moreover, you should check the battery’s health to check the main cause of the problem.
That is it from us in this guide. Of course, this list isn’t complete and there are other common problems that could be a part of our computer not working properly list, but the above are some of the main issues that people encounter on their PCs.
However, some users agree that it’s the opposite. Bing Chat is actually getting too restrictive, to begin with. And the restrictions are tied to the fact that ultimately, Bing is tied to a corporate organization.
Well they finally did it. Bing creative mode has finally been neutered. No more hallucinations, no more emotional outbursts. No fun, no joy, no humanity. Just boring, repetitive responses. ‘As an Ai language model, I don’t…’ blah blah boring blah. Give me a crazy, emotional, wracked with self doubt AI to have fun with, damn it!
Bing might be limited when it comes to content creation, but there are hints that Microsoft really wants to level up on AI. The Redmond-based tech giant is spending big money on AI research, and so far it’s doing a fascinating job.
Still, it’s Bing too restrictive?
I guess no developer or company wants to take the risk with a seemingly human AI and the inevitable drama that’ll come with it. But I can’t help but think the first company that does, whether it’s Microsoft, Google or a smaller developer, will tap a huge potential market.
In a way, people are right. Bing AI, and any other AI, is a bit too restrictive. When you want to discuss a rather delicate subject, or when you propose to Bing to create for you full scaled images, it backs down. The infringements, the trademarks, etc.
However, there are hints that Microsoft wants to step up. For example, Orca 13B, an AI model that they developed will become open source for people to study it and emulate it. That means, you’ll soon be able to tailor your own AI model, to cater to your needs and desires.
They also invested in LongMem, which is an AI model that apparently comes with unlimited context length. That means you’ll be able to have endless discussions with AI, without a reset cap.
And there is Kosmos-2, which is capable of visual knowledge and develops answers based on visual space. That means the AI will gain spatial knowledge, getting it closer to the human body.
While the frustrations are valid, and Bing is closely tied to Microsoft, for now, it’s not open source. And for now, maybe it’s too soon to have an AI of that scale. But as people learn to interact with AI, then AI will know evolution as well.
There is hope with the huge crop of open source LLMs, a part of me believes ultimately the open source solutions will take over.
Bing Chat could not be too restrictive in the future
It seems that Bing Chat will integrate ChatGPT even more in the future, and the tool will use ChatGPT’s technology to deliver tailored responses to you. ChatGPT will make Bing Chat act like a personal assistant.
Microsoft is also exploring the idea of building Bing AI in such a way that it could be accessed on Windows devices without the need to open the web. This means this version of Bing AI wouldn’t rely on the Internet, but on its internal database, the same way ChatGPT does now. So the answers will be far more personalized.
But for now, Bing Chat is too restrictive for the right reasons. However, that’ll change in due time. What do you think about this? Let us know in the comments section below.
Fun education online games are suitable for learning over the contemporary methods because they are interesting and keep kids engaged. Children tend to learn quickly and effectively when the learning is fun and interactive.
There is a wide variety of online interactive games suitable for children of all grades. Also, parents can use content-filtered search engines and privacy-focused browsers like Opera for moderation. One can also use Web3 search engines to explore educational resources.
The list of online educational games that we have curated includes elements of fun such as colorful visuals, interesting characters, and engaging gameplay. These games keep children hooked and stimulate their minds as well. They offer a positive and encouraging environment through a rewards and achievement system.
What are some fun but educational games online?
These fun online games are available for middle schoolers and children of all grades. They tap into children’s innate curiosity and make the learning process easy and enjoyable. So, let’s just dive straight into the list of some best fun education online games for all sorts of classrooms.
Starting with kindergarten level, you should always count on Starfall fun games. This educational resource for toddlers has creative reading, science, and math lessons.
The website interface is designed for children, with wide buttons and voice-over sounds for live interaction with the kids.
More so, there are various games such as Make-a-Word puzzles or fun English reading games for daily practice.
This game represents a wonderful experience for children with a big imagination. Mainly, you’re creating a character monster that doesn’t know how to read.
Consequently, you’ll learn how to read alongside your monster by playing letter sound games or more blending or segmenting lessons.
Plus, the game is developed in collaboration with academic specialists from the University of Roehampton.
FunBrain is the best-ranked educational website you can use for kids. The platform holds a plethora of games split by topics and grades, from pre-K to 8th grade.
First, the games are suitable for middle schoolers because it includes interactive lessons and awesome graphics.
Plus, it’s highly suitable for various computers that run different operating systems. For instance, it’s perfect for sleek browsers for school Chromebook devices.
Another educational resource for high school students is this spelling bee website. The interface is pretty easier to use. Kids can guess the word by reading the definitions provided on the page. It also shows the score gained for every correct answer.
The activity induces fast learning as students can learn more about a particular word through interactive word maps as well.
Visual Thesaurus includes a complex lettering system created for reading and writing purposes. You can use it to train for professional English spelling.
As the name suggests, this educational platform has all kinds of games for learning English at intermediate or advanced levels.
These games can improve your English grammar with creative games, vocabulary, or phrase learning. Kids can learn vocabulary, phrases, tenses, and more through these games. The home page shows all sorts of games that kids or parents can pick. Every game shows easy, intermediate, and hard levels of games.
In addition, there are job guessing games through which kids can learn the type of jobs. Kids have to guess the character shown on the screen and the type of work they do.
Last but not least is a language-learning game created for mobiles. The main idea is to learn daily house object names.
Hence, you have different objects scattered around in the house to learn by picking them up. There are also pronunciation audio tools and flash quizzes to test your memory while you advance.
Middle schoolers can practice skills through interactive quizzes on Blooket multiplayer, which adds fast paced learning games that work well in classrooms and at home.
Coming to an end, we hope you discover the most fun online games for the classroom that will help your kids train their educational skills.
One good thing about Windows is that it accommodates all its users. So far, it has done so by availing the OS in different languages. Hindi Indic is one of the input languages available, but sometimes, it may not be working as it should.
The Hindi Indic is a type of Hindi typing software that allows your keyboard to remap its keys and type in the select language. Now that you know what it’s all about, let’s check how to resolve the issue when it’s not working.
Why is Hindi Indic Input 3 not working in Windows 11?
Hindi Indic Input 3 is a software from Microsoft that helps you type in the Hindi language. It allows you to type and transliterate various scripts into Roman characters.
The Hindi language is often written using the Devanagari script. This uses a set of symbols corresponding to sounds in the spoken language. These symbols are called characters, and each character has a different shape and sound.
Some of the reasons why Hindi Indic Input 3 may not be working on your PC include:
Missing fonts – Using an old Hindi Indic Input 3 version may not support your current font or keyboard layout configuration.
Incompatible OS – Hindi Indic Input 3 is designed to work with later versions of Windows. However, it may not be compatible with other versions of Windows, especially the pirated versions.
Missing DLL files – If the Hindi Indic Input 3 is not working on your computer, it could be due to missing DLL files in your system. These files are required by the application to run properly.
Incorrect installation – If Hindi Indic Input 3 was installed incorrectly or incompletely, it may not work properly on your computer.
Unsupported Windows version – You may have installed Hindi Indic Input 3 on a 32-bit version, but your system is running on 64-bit Windows.
Outdated keyboard drivers – At times, it is your keyboard drivers that are not cooperating and causing these issues.
How do I add an Indic keyboard?
Before any technical troubleshooting, check off the following basics first:
Press the Windows key, type Device Manager in the search bar, and click Open.
Navigate to Keyboards, right-click on your selected keyboard, and select Uninstall device.
Confirm uninstallation in the next prompt.
Restart your PC, and new drivers will automatically be installed.
Note that this only works when the keyboard itself is not working. If the issue is with a single key or the keyboard fails to initialize correctly, even this method will fail to solve the problem.
2. Add Hindi as a preferred language
Hit the Windows key and click on Settings.
Click on Time & language, then select Add language.
Hopefully, after following the steps we shared above, you’ll be able to experience a problem-free typing experience once again. It’s not ideal for many users, but it’s the only solution for now unless Microsoft decides to make typing in Hindi in Windows 11 easier.
If you want to use other languages in your web browser, we have a great guide on how to download Google Input Tools on Windows 11, so don’t hesitate to check it out.
If you have any other solutions that may have helped you bypass the same issue but are not mentioned here, let us know in the comment section below.
Microsoft Teams continues to innovate and enhance the collaboration experience, catering to the evolving needs of flexible work environments. In a constant effort to bring people together, Teams introduces a range of new features and improvements for Teams Rooms and Teams Meetings at InfoComm 2023. These updates aim to create more inclusive, natural-feeling meeting experiences and simplify device management.
Here are the major updates unveiled for Microsoft Teams Rooms and Teams Meetings.
Enhanced inclusivity with camera and live captions capabilities
Improving inclusivity in meetings has been a significant focus for Microsoft. Building upon announcements made at Ignite last October, several updates are now available for customer preview or general availability.
Cloud IntelliFrame for Teams Rooms on Windows, an AI-powered camera technology, will be accessible to Teams Rooms Pro license holders next quarter. This feature breaks down the single video feed of the room into focused and framed video tiles, displaying in-room attendees more prominently for remote participants. Cloud IntelliFrame enhances the video gallery experience for non-intelligent cameras using Microsoft Cloud AI, processing the room’s single video stream.
Moreover, intelligent cameras will soon offer multiple video streams and AI-powered active speaker tracking. Early adopters have already begun deploying the Yealink SmartVision 60 and updated Jabra PanaCast 50, both featuring intelligent speaker recognition and participant labeling in meeting transcripts.
Teams Rooms on Android now support content cameras that can capture physical whiteboards, providing a detailed zoomed-in view to remote attendees.
Streamlined meeting controls and captioning experience
Teams Rooms Pro on Android introduces smart camera controls, enabling users to adjust the framing of in-room cameras directly from the console. These controls offer zooming options, cropping empty space, and creating composite views for a more personalized meeting experience.
The profanity filtering toggle, now available for online meetings, allows users to enable or disable profanity filtering for live captions. Furthermore, the captions experience is enhanced with the display of full speaker names, increased lines of captions, and customizable settings for font color, size, and panel position.
AI-driven features and collaboration tools
Front Row, an AI-driven feature, replaces individual backgrounds with shared backgrounds for remote participants. Spatial audio is introduced to help in-room attendees naturally track speakers’ locations in the video gallery, creating a more authentic meeting experience.
Teams Rooms on Windows now offer Together Mode controls, allowing meeting participants in the room to select a layout and apply Together Mode to their own screens or the front-of-room display.
Breakout Rooms support allows people physically present in a Teams Room to join breakout sessions, facilitating coordination and seamless transitions.
Teams Rooms on Windows enable one-to-one calling between Teams Rooms devices and SIP or H.323-based Video Teleconferencing (VTC) devices, offering ad-hoc video calls with audio, video, and content sharing.
Teams Rooms on Windows feature a refreshed calendar with improved visual cues, intuitive meeting details, and a scrollable list for efficient scheduling.
Optimized online meeting experiences
Intelligent Recap leverages AI to generate comprehensive overviews of online meetings, providing meeting notes, recommended tasks, and personalized highlights. This feature, available to Teams Premium users, saves time and enables quick follow-up.
Meeting recap experiences are improved for all Teams users, offering direct access to meeting transcripts, recordings, and notes within the Teams app.
Collaborative notes allow real-time co-creation and collaboration on meeting agendas, notes, and follow-up tasks across various Microsoft platforms, fostering seamless teamwork.
Simplified deployment, enhanced insights, and stronger security
Teams Rooms Pro Management service introduces easier deployment with reduced touches needed by IT and fast-tracking meeting room setup.
Device health alerts on Windows devices provide insights into OS and Teams Rooms app versions, USB power settings, Bluetooth disablement, and Windows update blocks.
IT admins gain improved control over resource accounts, mailbox settings, and configurations through the Teams Rooms Pro Management portal.
The Insights Report offers valuable information on issues, remediation steps, productivity impact, and cost savings provided by the Pro Management service.
Teams Rooms Pro customers receive enhanced security through upgrades to Microsoft Intune Plan 2 and Microsoft Defender for Endpoint Plan 2, offering additional management, configuration, and protection capabilities.
Users can now configure meeting IDs and passcodes for added security in Teams Rooms on Windows.
Teams Rooms on Android and Teams admin center now support GCC-H customers, extending compatibility and support to all platforms.
Windows 11 support comes to Teams Rooms on Windows
Windows 11 support arrives for eligible Teams Rooms on Windows devices, providing the latest operating system capabilities. For devices that aren’t compatible, Windows 10 support will continue as per the hardware support policy.
Microsoft continues to enhance Teams Rooms and Meetings, empowering organizations to collaborate seamlessly and securely in diverse work environments. These updates reaffirm Microsoft’s commitment to delivering innovative solutions and meeting the evolving needs of customers and partners.
Microsoft Rewards (formerly Bing Rewards) allows avid users of Microsoft products and services to have to earn valuable rewards by performing various activities online and off.
In this piece, we’ll share all the tricks we know and tried. With them, you can go around and skip waiting a long time.
So if you want to know how to earn more Bing points faster, whether it’s possible to get 10,000 Microsoft points for free, and how to make the most of this rewards system, keep reading.
How to earn more Bing points – 5 easy daily tasks
Your Microsoft Rewards dashboard
Microsoft Rewards is a loyalty program designed to reward users for their engagement with Microsoft products and services.
By completing a range of tasks and activities, you can accumulate points that can be redeemed for a variety of rewards, including gift cards, discounts, sweepstakes entries, and even donations to charitable organizations. Here are five ways you can earn Microsoft Rewards points:
Web Searches and Microsoft Edge: One of the easiest ways to earn Microsoft Rewards is by conducting web searches using the Microsoft Bing search engine. By simply searching the web, you can accumulate points on a daily basis. To make the most of this opportunity, we recommend setting Microsoft Bing as your default search engine and utilizing the Microsoft Edge browser. This way, you can effortlessly earn points while browsing the internet.
Daily Sets and Quizzes: Another great way to earn Microsoft Rewards is by completing daily sets and quizzes. These sets consist of a series of activities and challenges that provide you with an engaging and interactive experience. By successfully completing them, you can earn additional points while expanding your knowledge about various Microsoft products and services.
Shopping and Microsoft Store: Did you know that you can earn Microsoft Rewards while shopping? By making purchases through the Microsoft Store, you can earn points for every dollar spent. Additionally, keep an eye out for special promotions and offers, as they often provide opportunities to earn bonus points on select purchases.
Xbox Game Pass and Microsoft Rewards App: For gaming enthusiasts, the Xbox Game Pass and Microsoft Rewards app present an exciting way to earn points. By completing specific tasks, achievements, and challenges within supported games, you can earn a significant number of Microsoft Rewards points. Be sure to check the app regularly for new opportunities and exclusive rewards tailored to gaming enthusiasts.
Microsoft Rewards Emails and Bonus Offers: Stay connected and informed by subscribing to Microsoft Rewards emails. By doing so, you will receive notifications about exclusive bonus offers and promotions. These emails often contain valuable opportunities to earn additional points, so be sure to take advantage of them.
Explore the Microsoft Rewards levels to earn
Microsoft Rewards levels
Microsoft Rewards presents users with two distinct status tiers: Level 1 and Level 2. To attain and maintain Level 2 status, individuals must accumulate a minimum of 500 Microsoft Rewards points each month.
The beauty of this system lies in the fact that regardless of the method employed to earn points, every single point contributes to your Microsoft Rewards points!
Once elevated to Level 2, members gain the advantage of earning points at an accelerated rate—five times faster, to be exact—when conducting searches on Bing.com.
Additionally, they can unlock the benefit of saving up to 10% on rewards obtained from a plethora of Microsoft products and services.
Furthermore, Level 2 members are granted exclusive access to a multitude of enticing offers, ensuring a unique and enhanced experience.
To stay updated with the latest offers, remember to regularly check your Microsoft Rewards page.
5 Strategies to Optimize Your Microsoft Rewards level perks
To optimize your Microsoft Rewards experience and make the most of this valuable loyalty program, it’s essential to employ effective strategies.
By implementing these strategies, you can earn more points, unlock exciting benefits, and maximize the value you receive from your engagement with Microsoft products and services.
From setting daily goals and tracking progress to leveraging Microsoft Edge features and participating in bonus point events, these strategies will help you elevate your rewards game and enhance your overall Microsoft Rewards experience.
Set Daily Goals and Track Progress: To maximize your Microsoft Rewards, it’s essential to set daily goals and track your progress. By establishing achievable targets, you can stay motivated and ensure a consistent effort towards earning points. Additionally, monitoring your progress allows you to identify areas where you can improve and adjust your strategies accordingly.
Be Active and Consistent: Consistency is key when it comes to earning Microsoft Rewards. Make it a habit to engage with the program daily and complete the available activities. The more active you are, the more points you can accumulate over time.
Leverage Microsoft Edge Features:As mentioned earlier, using Microsoft Edge as your primary browser can enhance your Microsoft Rewards experience. Take advantage of features such as personalized news, shopping integration, and seamless access to Bing search to earn points effortlessly while enjoying a smooth browsing experience.
Participate in Bonus Point Events: Keep an eye on bonus point events and promotions offered by Microsoft Rewards. These events often provide significant opportunities to earn extra points for specific activities or purchases. Stay proactive and take full advantage of these limited time offers to maximize your rewards.
Explore Partner Offers and Sweepstakes: Microsoft Rewards frequently collaborates with partners to offer exclusive deals, discounts, and sweepstakes entries. Take the time to explore these partnerships and leverage the available offers. Participating in sweepstakes can be an exciting way to potentially win valuable prizes while earning additional points.
Congratulations! You are now equipped with a comprehensive understanding of how to maximize your Microsoft Rewards and unlock a wealth of benefits.
By leveraging the various earning opportunities, staying consistent, and following the strategies outlined in this guide, you can elevate your rewards game to new heights.
Embrace the Microsoft Rewards program and let your engagement with Microsoft products and services reward you in more ways than one!
Remember, the path to unlocking exciting benefits and rewards starts with your commitment and active participation to earning and redeeming your Microsoft Rewards. Begin your journey today and embark on an incredible adventure with Microsoft Rewards!
Starfield is one of the most anticipated video games of the year, not to mention one of the most expansive ones yet with over 1,000 worlds to explore. Not only that, but judging from what’s been seen so far those worlds and everything in them will be stunningly rendered. All of this comes at a cost of course, meaning that the game will be capped at a 30 frames-per-second framerate.
The petition was launched on June 12 and currently has 155 signatures as of the time of this writing. The petitioner states in their appeal,
Starfield is a great game and it’s sad to see the lost opportunity to add 60 frames in exchange for lower quality
The game has huge potential and the game may even get the game of the year
It would be sad to play it without the 60 frames So please Bethesda add performance mode
Many of the signatories seem to echo the sentiment, with one even calling for 90FPS@1080p, saying that “the players deserve to play it smoothly.”
Bethesda director Todd Howard explained the decision to lock the game at 30FPS shortly after the Starfield Direct showcase last month, saying,
I think it’ll come as no surprise, given our previous games, what we go for. Always these huge, open worlds, fully dynamic, hyper detail where anything can happen. And we do want to do that. It’s 4K in the X. It’s 1440 on the S. We do lock it at 30, because we want that fidelity, we want all that stuff. We don’t want to sacrifice any of it.
Starfield releases on September 6, with pre-orders now live. It will also be a day one Xbox Game Pass release.
The recent launch of Meta’s Threads, the social media platform’s response to Twitter, has taken the online world by storm. It gained 30 million sign-ups on the first day itself, and within 5 days, the number has crossed the 100 million mark.
Though the app is a huge hit, it is currently only available for iOS and Android, with no web app in sight. But fear not, Windows 11 users have a secret weapon to get Android apps on their system—the Windows Subsystem for Android (WSA).
Obtain the Threads APK from a reputable third-party source. You can get it from a safe third-party source like APKMirror. Note that the x86_64 version is the recommended choice, but the ARM64 version also works on an x86 Windows PC.
Install the WSATools app from the Microsoft Store. This app will assist in the installation process.
How to Install Threads on Windows 11
Once you have met the prerequisites and have the necessary files ready, follow these steps to install Threads on your Windows 11 PC:
Open the Windows Subsystem for Android on your PC.
Navigate to the sidebar and select Advanced Settings.
Within the settings, locate the Developer Mode toggle and enable it.
Now, Launch the WSATools app. If it’s your first time using it, the app will prompt you to install the Android ADB tools. Follow the prompts and specify the installation location on your PC.
Once you have completed the previous step, select the location where you saved the Threads APK file.
Click on the Install button within WSATools, and the installation process will commence. Give it a moment to complete.
After the installation is finished, you will find Threads accessible through the Start Menu, just like any other app on your PC.
Launch Threads and log in with your Instagram account.
Enjoy Threads on Windows 11
By leveraging the Windows Subsystem for Android (WSA) and following a few simple steps, Meta’s Threads can be installed seamlessly on Windows 11 system. So, until we get an official Windows OS application for Threads, use this workaround to enjoy it on Windows 11.
The event will of course focus on indie games coming to Xbox with announcements, game trailers and more as ID@Xbox celebrates ten years since the program was first announced. Since that time, over 2,000 games have been published through the program, which helps indie developers publish their games on Xbox platforms by providing dev kits, technical documentation and more.
Same as with last year, there will be an ID@Xbox game demo event also starting on July 11. This time there will be a whopping 40 game demos available during the week-long event ending on July 17. Gamers will be able to access them through the Xbox dashboard.
Among the games featured in the ID@Xbox Demo Fest:
Demonschool
Lies of P
Sea of Stars
The Wandering Village
Wordless
And that’s just to name a few. Anyone who is a fan of indie games or really just gaming in general should check this out starting tomorrow.
Gujarati Indic Input 3 is a keyboard layout that allows you to type in the Gujarati language, and some of our readers have complained that it is not working in Windows 11.
Of course, on the OS, you may be able to create a custom keyboard layout, but using language-specific layouts makes the user experience often more enjoyable. So let us help you resolve this issue on your PC.
Why is Gujarati Indic Input 3 not working?
Gujarati Indic Input 3 belongs to the Microsoft IME (Input Method Editor) and works with the English QWERTY keyboard. From user experience, we gather that the below are the main causes:
Right-click on the Start menu and select Device Manager.
Expand keyboards, right-click on your keyboard driver, and select Update driver.
Finally, select Search automatically for drivers and follow any instructions, then verify if it fixes the issue of Gujarati Indic Input 3 not working.
That will be all for this guide. If you have followed through, you should have successfully fixed the error. However, you may go through our other guide if your keyboard is not working.
As reported by WindowsLatest, Microsoft is gearing up to launch the consumer edition of Windows 365, which is anticipated to be more affordable than its enterprise counterpart. As part of the “family” edition of Windows 365, Microsoft intends to offer a bundled package of “multiple Cloud PCs.” This information aligns with what was disclosed during the Microsoft v. FTC hearing.
The preview builds of Windows 11 already contain features that enable the configuration of a “Cloud PC” within the consumer edition, allowing users to boot directly into Windows 365. Microsoft’s also looking into offering a version of cloud-based Windows 365 for consumers. The release of a new consumer edition of Windows 365 is expected in the near future, possibly during the fall. While the pricing for the consumer edition has not yet been finalized, it is expected to be more economical than the enterprise edition.
It seems that there will be multiple editions of Windows 365 for consumers, potentially including a “family” edition and an individual edition. Although specific pricing details have not been determined, customers can purchase a Cloud PC subscription for multiple family members or individual use at a significantly reduced cost.
It is important to note that these plans are currently internal and subject to change. Therefore, it is advisable to approach this information with some caution.
Windows 365 consumer edition could change computing for good.
The introduction of an affordable version of Windows 365 has the potential to transform our Windows experience. With this version, users, including individuals and families, can access their files and favorite Windows applications from any device that supports Microsoft Edge and other browsers.
By hosting your PC in the cloud, you would no longer be bound to specific hardware to use your computer. This development can revolutionize cloud computing by enabling users with lower-end hardware to leverage the capabilities of high-end, cloud-based systems.
Windows 365 offers the added advantage of being a cloud-based system managed by Microsoft. This means you no longer have to worry about searching for software updates, security patches, or performing system maintenance tasks.
It’s worth noting that the concept of Windows in the cloud is not a recent endeavor. Windows 365 has been developing since 2020, and reports about Microsoft’s secretive Cloud PC project emerged during the same year. Code-named “Deschutes,” Windows 365 operates within Microsoft Azure cloud computers. It is built on top of Azure Virtual Desktop but offers a much simpler setup process.
Currently, Windows 365 is available in two plans: Windows 365 Business and Windows 365 Enterprise. The basic plan, designed for small businesses, frontline workers, or call center employees, includes one vCPU, 2GB of RAM, and 64GB of storage, priced at $20 per user per month.
The consumer edition of Windows 365 is expected to be more cost-effective than the business and enterprise plans. While internal discussions at Microsoft suggested a price range of $10 to $20 for the most affordable consumer edition of Cloud PC, we cannot confirm the exact cost, as internal plans are always subject to change.