0x800CCE05 Outlook Unknown Error: 4 Ways to Fix It

Outlook is a popular email client with various features for efficient communication and organization. However, like any other software, it is not immune to errors. One of the common errors is 0x800CCE05 Unknown Error.

This guide will explore several methods to fix the problem and get your Outlook back on track.

What causes the Outlook 0x800CCE05 Unknown Error?

There could be various reasons for this Outlook error; some of the common ones are listed here:

  • Corrupted Outlook data files – If the Outlook data files, such as PST or OST files, are damaged, you may encounter the error.
  • Conflicting Outlook Add-ins – Certain add-ins installed in Outlook can interfere with the normal functioning of the app, especially email sync, thus triggering the error.
  • Antivirus or firewall interference – Some security software or aggressive firewall settings can interfere with Outlook’s functioning, resulting in issues.
  • Outdated Outlook version – An obsolete or incompatible version of the app could result in various errors, including this one. Try updating Outlook.
  • Damaged Outlook profile – A corrupted Outlook user profile due to system glitches, incorrect profile settings, or other factors can cause various errors, including the 0x800CCE05 error.

So, now that you know the causes of the issue, let us check out the solutions to fix it.

How can I fix the Outlook 0x800CCE05 Unknown Error?

Before engaging in advanced troubleshooting steps, you should consider performing the following checks:

  • Try restarting the computer.
  • A reliable internet connection.
  • Ensure your Windows is up to date.
  • Check if Outlook is updated.
  • Reinstall the Outlook app.

Once you finish these, move to the next section to resolve the problem.

1. Run an SFC scan

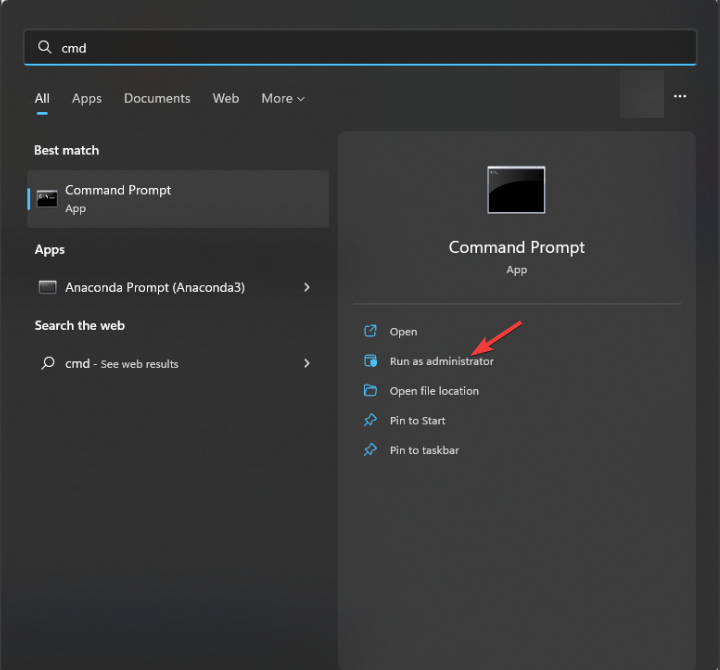
  1. Press the Windows key, type cmd, and click Run as administrator.CMD elevated 0x800CCE05
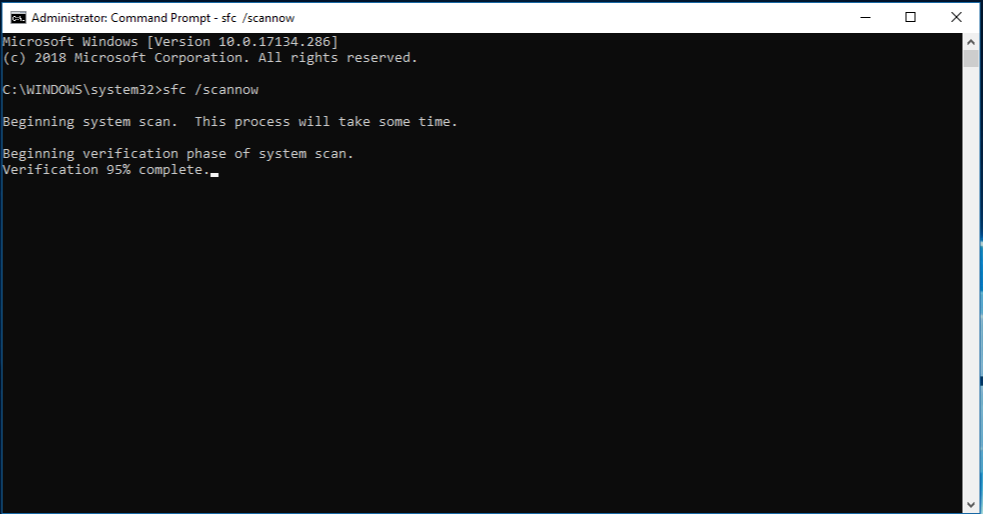
  2. Copy & paste the following command to repair system files and press Enter: sfc/scannowSFCSCANNOW CMD
  3. Wait for the process to complete, then restart your computer.

2. Repair your Outlook PST

2.1 Locate the corrupted data files

  1. Close the Outlook app if it is open. Press the Windows key, control panel, and click Open.Control Panel start menu 0x800CCE05
  2. Select Large icons as View by and click Mail.
  3. Click the Show Profiles button.Show profiles
  4. Select the affected profile and click Properties.Properties
  5. Click Data Files.Data profiles
  6. On the Data Files window, locate the one with the black circle checkmark and note down the path.Locate the path

2.2 Run the SCANPST.EXE tool

  1. Press Windows + E to open File Explorer.
  2. Navigate to either of these paths:
    • C:\Program Files\Microsoft Office\root\Office16
      C:\Program Files (x86)\Microsoft Office\root\office16
  3. Locate and double-click the SCANPST.EXE.Locate file
  4. Click Browse and go to the path you noted down in Solution 2.1.Start browse
  5. Click Start and wait for the process to complete.
  6. Click Repair when prompted.

This tool will help repair problems related to the personal folder (. pst) files, thereby fixing the issue.

3. Create a new Outlook profile

  1. Press the Windows key, type Outlook and click Open.Outlook open 0x800CCE05
  2. Select File.Click File
  3. Click Account Settings, then Manage Profiles.Manage Settings
  4. Choose Show Profiles.Show profiles
  5. Click Add.Add profile
  6. On Create New Profile window, type a name under Profile Name and click OK.Create new

A new profile for Outlook will be created; try accessing it to check if the error persists.

4. Add Outlook to the firewall

  1. Press the Windows key, control panel, and click Open.Control Panel start menu 0x800CCE05
  2. Select Category as View by & click System and Security.System and security
  3. Under Windows Defender Firewall, click Allow an app through Windows Firewall.Windows Defender
  4. Click Change settings.
  5. Now click Allow another app.Change app
  6. Click Browse and locate Microsoft Office Outlook.Browse1
  7. Click Add.ADD
  8. Once added to the list, select Private and Public for Microsoft Office Outlook. Click OK.Click OK

Now try to use Outlook and check if the issue persists.

5. Reset the security software

  1. Press Windows + I to open Settings.
  2. Click Apps, then select Installed Apps.Apps, installed apps 0x800CCE05
  3. Locate Windows Security, click three dots, and select Advanced options.Advanced options
  4. Under the Reset option, click the Reset button.Reset

So, these are the methods to troubleshoot the Outlook 0x800CCE05 error. If the error persists, contact Microsoft support or your IT department for further assistance, especially if it involves server or network-related issues.

If you face similar issues, such as Outlook won’t open on Windows 10, we suggest you check out this informative guide to find solutions.

Please feel free to give us any information, tips, and your experience with the subject in the comments section below.

How to Fix Printer Installation Error 0x00000057

Encountering printer installation errors can be frustrating, especially when trying to set up a new printer or reinstall an existing one. One common error that Windows users may come across is the 0x00000057.

This guide will walk you through the steps to fix the printer installation error and get it up and running quickly.

What causes the printer installation error 0x00000057?

There are several reasons for this printer error; some of the common ones are mentioned here:

  • Incompatible printer driver – If the printer driver installed on your PC is inconsistent with the OS or specific printer model, you may see this error. Try updating the drivers.
  • Corrupted printer driver files – Damaged printer driver files can prevent the printer from being installed properly, leading to this printer error.
  • Incorrect printer configuration – Incorrect printer configuration settings, such as the wrong port or an outdated driver, can prevent the printer from being installed properly.
  • Registry issues – If problems with the Windows Registry related to printer settings or configurations can lead to an error. Try a registry cleaner to fix the problem.
  • Conflicting printer software – Sometimes, other printer software or third-party applications can interfere with the printer installation process, causing conflicts and triggering the error.

So, now that you know the causes of the issue, let us check out the solutions to fix it.

How can I fix the printer installation error 0x00000057?

Before engaging in advanced troubleshooting steps, you should consider performing the following checks:

Once you finish these, move to the next section to resolve the problem.

1. Restart the Print Spooler services

  1. Press Windows + R to open the Run dialog box.
  2. Type services.msc and click OK to open the Services app.
  3. Locate Print Spooler service, right-click it, and select Stop.Stop Printer Spooler
  4. Once the service is stopped, press Windows + R to open the Run dialog box.
  5. Type printui.exe /s /t2 and click OK to open Print Server Properties.Run command
  6. Select the printer causing the issue and click Remove, then OK.printui_3KBTpg8gKi
  7. Now open the Services app, locate Print Spooler service, right-click it, and select Start.Start Print Spooler 0x00000057

The service will start again; now, try to add or reinstall the printer.

2. Update the Printer driver

  1. Press Windows + R to open the Run dialog box.Device Manager Run command
  2. Type devmgmt.msc and click OK to open the Device Manager app.
  3. Locate and click Print queues to expand it.Update drivers Print queues
  4. Right-click the printer and select Update driver.
  5. Select Search automatically for drivers.Update driver 2
  6. Follow the onscreen instructions to complete the process.

In some cases, this method may not find the compatible driver version to update the printer. However, you could use a standalone driver manager.

This tool will scan your PC in less than 5 minutes and give a list of all outdated drivers you can instantly update.

Outbyte Driver Updater

Solve all your driver-related issues using this effective tool.
Free trial Download now

3.  Add a local printer through Network

  1. Press the Windows key, type control panel, and click Open.Control Panel start menu 0x00000057
  2. Select Category as View by and choose Hardware and Sound.Hardware and Sound
  3. Under Devices and Printers, click Add a device.Add a device Control Panel
  4. Click Printer & scanners.Add  a device
  5. Now click Add a device.aDD DEVICE pRINTER
  6. Select Add manually.Device and Printers
  7. On the Add Printer page, select the printer and click Next.Select printer and click Next
  8. Now, on Choose a printer port, select Local Port from the drop-down for Create a new Port.Select Local port
  9. Enter the Network Path on the Port Name and click OK.
  10. Now choose the printer from the list and click Next.Update driver
  11. Select the version of the driver you want to use and click Next.printui_UDY65kn4Nx
  12. Type a printer name and click Next.
    printui_D54d2Xn178
  13. On the Printer Sharing window, choose the option suitable and click Next.Click Next
  14. Click Finish.Finish

The printer is added to your computer without any issues.

4. Copy the FileRepository folder content from a working machine

Note icon NOTE
This method will help you if you’re trying to install printers on several devices. If some get installed successfully, and others fail, you can copy the driver directory from the working ones to fix it.

4.1 Copy the InfPath Value data

  1. On the machine that has a working driver, press Windows + R to open the Run dialog box.Regedit 0x00000057
  2. Type regedit and click OK to open the Registry Editor app.
  3. Navigate to this path: Computer\HKEY_LOCAL_MACHINE\SYSTEM\CurrentControlSet\Control\Print\Environments\Windows NT x86\Drivers\Version-3regedit_InfPath
  4. Locate the printer causing the issue, click it, locate InfPath, and double-click it. Note down the path mentioned in the Value data.

4.2 Copy the content to FileRepository

  1. Press Windows + R to open the Run window.DriverStore file
  2. Type this path: C:\windows\System32\DriverStore\FileRepository, and click OK to open FileRepository.
  3. Copy the content of the FileRepository folder to a USB drive.Copy the content
  4. Now move over to the computer with driver issues; press Windows + R to open the Run dialog box.
  5. Type the path C:\windows\System32\DriverStore\FileRepository, and check if the folder is empty.
  6. If yes, then you need to take ownership of this folder.

4.3 Take ownership of FileRepository

  1. Right-click the FileRepository folder, and select Properties.Click Properties
  2. Go to the Security tab and click Advanced.aDVANCED
  3. Click Change.Change 0x00000057
  4. Now click Advanced.
  5. Select Find Now and click Administrator, then click OK.Find Now and select Admin
  6. Again, click OK.Click OK
  7. Place a checkmark next to Replace owner on subcontainers and objects and click OK.
  8. Again, open Properties, go to the Security tab, and click Edit.
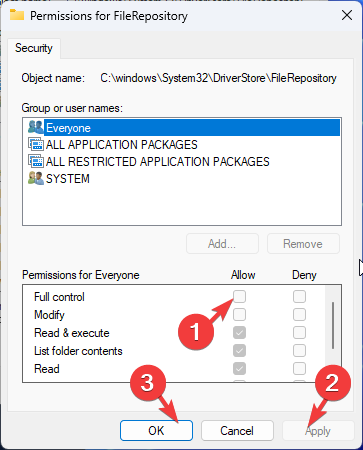
  9. Under Permissions for Everyone, for Full control, select Allow. Click Apply, then OK.Full control

Close all the windows running on your computer and restart your machine.

5. Add local server from Print Management

  1. Press Windows +R to open the Run window.MMC Run command
  2. Type mmc and click OK to open Microsoft Management Console.Remove add snap in  0x00000057
  3. Go to File and click Add/Remove Snap-in.
  4. Navigate to this path: Print Management\Custom Filters\DriversPrint Management 0x00000057
  5. Locate the driver and delete it.Driver delete

Now check if you can install the printer and drivers on your Windows.

6. Rename the driver files

  1. Press Windows + R to open the Run window.explorer_LgbkDBRgRr 0x00000057
  2. Type the following path: %systemroot%\system32\driverstore and click OK.
  3. Locate the following files and rename them:
    • infcache.1
      infpub.dat
      infstor.dat
      infstrng.dat
  4. If you are not able to rename them, take ownership of the files following the steps in Solution 4.3

If you are looking for solutions to fix Windows that cannot connect to the printer, we advise you to check out the informative guide.

So, these are the methods to fix the printer installation error 0x00000057. Please feel free to give us any information, tips, and your experience with the subject in the comments section below.

0x80040c97 Error: OneDrive Couldn’t be Installed [Fix]

OneDrive is a Microsoft file hosting service that allows registered users to synchronize and share their data. However, issues like the 0x80040c97 error will restrict its installation on your device.

There are a few practical solutions, and in this guide, we will share them and some probable causes.

What causes the OndeDrive 0x80040c97 error?

  • Corrupt setup files – If there are corrupt system or app files, the installation may not go through, triggering the OneDrive error 0x80040c97. Note that corruption may be a sign of malware.
  • Antivirus or Windows firewall – Your antivirus Windows Firewall may be blocking OneDrive’s setup files from installing, thereby triggering the error. We recommend using only a compatible antivirus.
  • Incorrect permissions – If you do not have the right to install the app, you may also get this error.
  • Corrupted Windows registry – If your Windows registry is corrupted or edited, it can cause various problems, including this OneDrive error.

How do I fix error 0x80040c97?

We recommend you first start with these easy workarounds:

  • Scan for malware with reliable antivirus software.
  • Disable your antivirus or firewall temporarily, as it may block the installation.
  • Try installing OneDrive with an administrator account.
  • Have your hardware checked to rule out the error due to a bad device component.

However, if after the above pre-solutions, the error persists, proceed to the more detailed steps below.

1. Properly uninstall any old OneDrive installation

  1. Press the Windows key, type PowerShell, and click on Run as administrator.
    0x80040c97
  2. Paste the script below in PowerShell and hit Enter.
    taskkill /f /im OneDrive.exe
    0x80040c97
  3. If you use a 32-bit system, paste the uninstall script below and hit Enter.
    %SystemRoot%\System32\OneDriveSetup.exe /uninstall
  4. While for a 64-bit device, paste the script below and hit Enter.
    %SystemRoot%\SysWOW64\OneDriveSetup.exe /uninstall
    0x80040c97
  5. Try reinstalling the app and see if the 0x80040c97 error is fixed.

2. Edit the DisableFileSyncNGSC registry value

  1. Press Windows + R to open the Run dialog.
  2. Type regedit and hit Enter to open the Registry Editor.
    0x80040c97
  3. Navigate to the path below:
    HKEY_LOCAL_MACHINE\Software\Policies\Microsoft\Windows\OneDrive
  4. On the right pane, double-click DisableFileSyncNGSC and change the value to 0.
  5. Restart the installation or any process that triggered the error and see if it is fixed.

3. Give the current user full admin control

  1. Press Windows + R to open the Run dialog.
  2. Type regedit and hit Enter to open the Registry Editor. 0x80040c97
  3. Navigate to the path below:
    HKEY_CURRENT_USER\Software\Classes\CLSID
    0x80040c97
  4. Right-click on CLSID and select Permissions...
  5. Click on your user, give it Full control, and click Apply and OK.
  6. Restart the computer and rerun the process that triggered the error to verify it is fixed.

We love to refer you to our guide on opening the Registry if you encounter difficulty accessing this Windows utility.

These solutions have been the most helpful for most of our readers, so you should be able to fix the error with any of them. We recommend you start from the first and walk your way to the bottom.

Lastly, if we have left out any solution, please indicate in the comments section, as we update our guides regularly to ensure our readers always know the best fixes.

0x80041013 SCCM Error: How to Quickly Fix it

System Center Configuration Manager (SCCM), is a management tool extensively used by administrators but often throws errors. One such is the ccmsetup failed with error code 0x80041013 message. Another is Failed to get mdm_configsetting instance, 0x80041013 error.

Encountered during the SCCM Client installation, the 0x80041013 error is primarily linked to the SCCM files already on the computer conflicted with the installation, which triggered the error. Also, if the certificates are not signed or self-signed, you are likely to face issues with installing SCCM.

Often, it’s the set boundaries or related parameters to blame for the error. For a few users, it was a problem with the WMI (Windows Management Instrumentation) that served as the underlying cause, and rebuilding it did the trick.

Before we move to the slightly complex solutions, restart the device and then install SCCM. Try rebuilding WMI and make sure the certificate signatures are in order. If you find any issues with one, remove that certificate. Also, remove any older certificates since this worked for some users.

Disable the firewall, in case you have set it up, and verify whether the SCCM installation error 0x80041013 disappears. Make sure the IP address is added to the SCCM boundaries. If none work, move to the fixes listed next.

How do I fix the 0x80041013 SCCM error?

1. Use the Program Install and Uninstall troubleshooter

  1. Go to Microsoft’s official website, and click on the Download troubleshooter button.troubleshooter
  2. Once downloaded, run the Program Install and Uninstall troubleshooter.
  3. Follow the on-screen instructions and choose the appropriate options when prompted to complete the process.troubleshoot to fix 0x80041013

Often the quickest fix to SCCM install error 0x80041013 is to run the dedicated troubleshooter. It will identify the underlying cause, be it corrupt registry entries, misconfiguration of any kind, or third-party conflicts preventing you from installing SCCM.

2. Completely reinstall SCCM

  1. Remove SCCM either using CCMClean.exe or any other method.
  2. Press Windows + E to open File Explorer, paste the following path in the address bar, and hit Enter:C:\Windows\SMSCFG.inipath
  3. Delete the SMSCFG.ini file.
  4. Press Windows + R to open Run, type regedit in the text field, and hit click OK.registry to fix 0x80041013
  5. Now, navigate this path or paste it in the bar at the top, and hit Enter:HKLM\Software\Microsoftregistry
  6. If you find the CCMSetup or SMS key, delete them.
  7. Now, delete all files in the following three directories, if any exist:C:\Windows\CCM C:\Windows\CCMSetup C:\Windows\CCMCache
  8. Restart the computer once done, and then try to install SCCM.

The 0x80041013 installation error could be due to existing files or present Registry entries configured incorrectly. So, in this case, the best option is to remove the management tool, along with all related files, and then install it from scratch.

Reinstalling SCCM is also an effective fix against CcmSetup failed with error code 0x80004005.

3. Repair the OS

When nothing else works, users found that reinstalling the OS was the only option. While it may not be viable to some, the solution does work when unable to identify the underlying cause.

So, create a bootable USB drive, and reinstall Windows on the affected PC to get rid of the 0x80041013 SCCM installation error.

And once done fixing the error, check some easy ways to increase the SCCM client cache size.

For any queries or to share the solution that worked for you, drop a comment below.

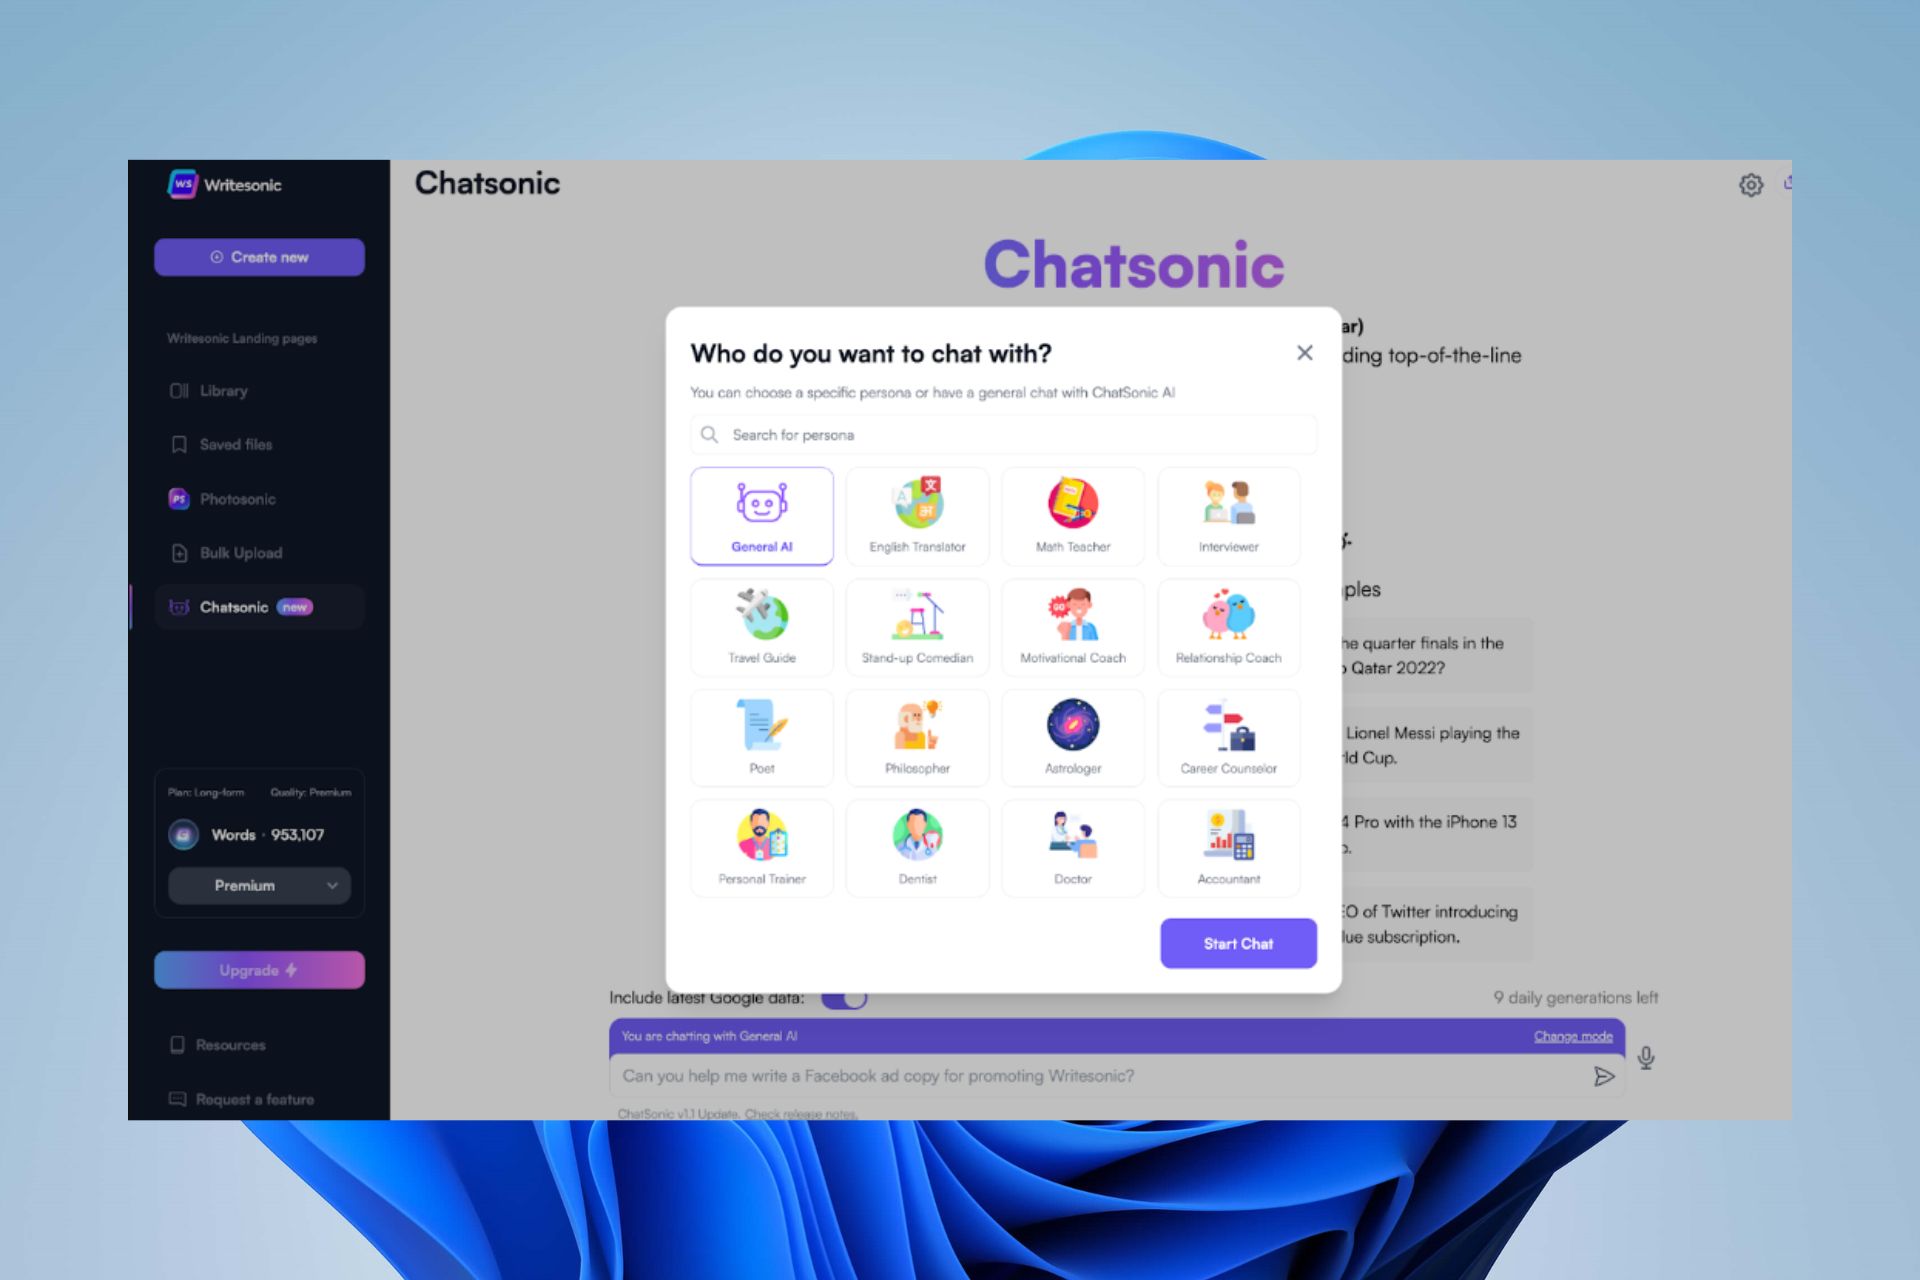
Chatsonic Network Error: How to Bypass it

Running into the Chatsonic network error while using the conversational chatbot prevents you from automating your text and image generation processes. It can occur due to several underlying factors. However, this article will discuss how to resolve the error.

Alternatively, you can read our article about what to do if Chatsonic is not working on your PC.

What causes Chatsonic network error?

  • Internet connection issues – Problems with your internet connection, such as a weak WiFi signal, network congestion, or ISP (Internet Service Provider) issues, can cause network errors. Network configuration issues can also disrupt network connectivity.
  • Server or service outages – The platform server may be under upgrade or maintenance, making the platform inaccessible.
  • Browser-related issues – Browser cache and cookies can cause issues with the websites you’re trying to access. The files can become corrupt, impeding the Chatsonic web app process.
  • Proxy or VPN Configuration – Using a proxy server or VPN can cause issues such as this one. Avoid issues by using reliable VPN software.
  • Firewall or antivirus restrictions – Overly strict firewall settings or antivirus software may block the network connection required by the application or service, causing it to run into issues.

Regardless of the cause of the issue on your computer, you can fix it by following the troubleshooting steps below.

How can I bypass the Chatsonic network error?

Before proceeding with any advanced steps, try the following preliminary checks:

  • Check your Internet connection – Test your connection by visiting other websites or using other internet-dependent applications to verify if the issue is specific to ChatSonic or a broader internet connectivity problem.
  • Check the server status and contact Chatsonic support – If this error pops up, check the server status to know if the issue is with them or your network failure.
  • Restart your Network devices –  Power cycle your modem, router, or other network devices. This can help refresh the router network connection and resolve any temporary Chatsonic issues.
  • Disable firewall or antivirus software – Temporarily disable your firewall or antivirus software and check if the security measures block the network connections required by Chatsonic.
  • Update network drivers – It will help update your network drivers and improve the network devices installed on your computer.

If you still can’t resolve the error, try the fixes below:

1. Clear the browser’s cache and cookies

  1. Launch the Google Chrome browser on your PC, then click three dots to open the Menu. Go to More Tools and click Clear browsing data.
  2. Select All time to delete everything. Check the boxes for Cookies and other site data, and Cached images and files, then click Clear data.
  3. Restart your browser and check if the error persists.

Clearing your browser caches and cookies will delete the corrupt files impeding Chatsonic from connection to the network.

2. Reset network configuration

  1. Press the Windows button, type cmd, and select Runs as administrator to open the Command Prompt.
  2. Type in the following command and press Enter: ipconfig /flushdns ipconfig /registerdns ipconfig /release ipconfig /renew netsh winsock reset
  3. Wait for the commands to be executed and reboot your PC.

The above steps will flush DNS and reset the network configuration, helping you fix network connectivity and performance issues. Check our complete guide on how to reset network settings in Windows.

3. Update your browser

  1. Launch the Google Chrome browser on your PC, then click three dots to open the Menu and go to Settings.
  2. Click About Chrome and click on Update Google Chrome. If there’s an update available, it’ll update automatically.
  3. Relaunch the browser and check if the Chatsonic network error persists.

Updating Google Chrome will fix bugs causing network issues and install new features to improve its performance.

In conclusion, you can check our article about what to do if you’re getting Windows 10 can’t connect to this network message on your PC.

Feel free to leave a comment if you have any suggestions or questions regarding this guide.

How to Use Netplwiz.exe to Create or Remove User Accounts

Netplwiz.exe is an efficient tool designed to manage user accounts on Windows 11. You can also modify the user membership from standard to administrator or guest using this applet.

This utility allows users with multiple accounts on a single computer to assign different profiles, such as Standard user, Administrator, or Guest. Its versatility makes it an essential component of any computer’s security.

How can I use netplwiz.exe to manage user accounts?

1. Create or remove a user account

  1. Hold the Windows + R keys simultaneously to open the run command.
  2. Now type in netplwiz.exe in the run command and hit OK.
  3. The moment the User Accounts Control Panel pops up, click on Add.
  4. Next simply follow the instructions to create a new account.

2. Reset your password with Netplwiz

  1. Press the Windows + R keys together to launch the run command.
  2. Input netplwiz.exe inside the run command and hit OK.
  3. To change your password, press Ctrl + Alt + Del and select change password.

As you can see, it’s pretty simple to reset any account’s password with this tool.

3. How to manage users with netplwiz.exe

  1. Press the Windows + R keys together to launch the run command.
  2. Enter netplwiz.exe inside the run command and hit OK.
  3. Double-click your user account name When the User Accounts Control Panel pops up.
  4. Click on the Group membership and input your settings.
  5. Lastly, click Apply and reboot your PC.

Exploring the possibility of enabling auto logins in Windows could provide you with a faster way to access your PC, so you might want to try that.

We already talked about this tool in our no checkbox in netplwiz guide, so you might want to check it out for more information.

What do you use this applet for? Let us know by dropping a comment down below.

Winsock Error 10048: How to Fix it

Winsock error 10048 is an error you may encounter when using the Internet. It occurs when a program or process tries to access the network but cannot connect with the server.

Similarly, we also have another Winsock error 10054, so be sure to check out our guide on the same. 

What does Winsock error mean?

A Winsock error is a specific kind of network error. It can happen in any operating system but is most commonly associated with Windows. 

Winsock refers to the Windows Sockets API, a set of functions built into Windows that allow applications to communicate over TCP/IP networks. These functions are used by programs to handle network connections and send data between computers on the Internet.

A Winsock error occurs when an application attempts to connect to another computer using the TCP/IP protocol but can’t establish a connection. This can happen for a variety of reasons, including:

  • Outdated drivers – Outdated drivers can also cause win socket errors on your computer as they might not be compatible with the latest operating systems or security updates released by Microsoft.
  • Incorrectly configured proxy settings – If you’re using a proxy server and have recently updated your computer’s network settings, it’s possible that you’ve accidentally disabled them. 
  • Firewall settings – A firewall or antivirus application may be blocking the connection between your computer and the server you are trying to connect with.
  • Faulty hardware – Another possible cause of this error could be faulty hardware, such as a bad network card or bad cables. 
  • Virus infection – You may have a virus or malware on your computer preventing you from connecting to the internet.

How do I fix Winsock error 10048?

When you get a Winsock error message, it can be difficult to diagnose the problem. The message you see depends on the type of error your computer is experiencing.

The following are some common basic troubleshooting steps you can try your luck with:

1. Disable your antivirus temporarily 

  1. Hit the Start menu icon, type Windows Security in the search bar, and click Open.
  2. Click on Firewall & network protection, then select Public network.league of legends black screen after champion select
  3. Locate Microsoft Defender Firewall and toggle the off button.turning off Microsoft Defender Firewall Windows

Firewalls are used to block unauthorized access to your computer from the Internet. If you have a firewall enabled, it may be blocking access to the Internet or preventing your computer from connecting properly to websites and servers on the Internet.

If so, then configure your firewall settings properly so as not to block access to services.

2. Update the network driver

  1. Hit the Windows key, type Device Manager in the search bar, and click Open.device manager w11
  2. Navigate to Network adapters and click to expand. Right-click on the driver, then click Update driver from the drop-down.
  3. Select the Search automatically for drivers option and wait till the update finishes.
  4. Restart your PC and check if the error persists.

Consequently, you can also use an automatic driver updater tool for secure and fast driver processes.

It will make your work easier as it scans your system for any outdated, incompatible, and corrupt drivers and then replaces them with the correct ones.

⇒ Get Outbyte Driver Updater

3. Disable your Proxy 

  1. Press the Windows key and select Settings.settings windows 11
  2. Click on Network & Internet on the left pane, then scroll down and click Proxy on the right pane.Network proxy settings
  3. Select Edit next to Use a proxy server option in the Manual proxy setup section, toggle off Use a proxy server and click on Save.Disable proxy server

4. Reset TCP/IP

  1. Click on the Start Menu icon, type cmd in the search bar, and click Open.cmd-run-admin-w11 unexpected kernel mode trap windows 11
  2. Type in the following commands and press Enter after each one: netsh winsock reset catalog netsh int ipv4 reset reset.log netsh int ipv6 reset reset.log
  3. Now restart your PC and see if the error is still there.

To sum up, if you’ve encountered a Winsock error 10048 and have no idea how to fix it, we hope this guide has helped you get back on track. With the right information, any Winsock error can be fixed.

You can check our comprehensive catalog, as we have covered several Windsock errors and their fixes. For instance, if you come across the Winsock error 10061, feel free to check out our guide for its fixes.

That’s it from us but don’t hesitate to reach out if you have further questions or any additional thoughts on this matter.

What is Runtime Error 53 & How to Quickly Fix it

Like any runtime error, you’ll be unable to open the specific app and get a pop-up instead. The runtime error 53 is no different. It mostly occurs in most Office suite apps, but Microsoft Word seems to be the most affected.

This indicates that there’s something wrong with how your computer is set up, preventing you from running the program you wanted. Below, we share how to resolve this issue.

What is error code 53 in Office install?

Runtime error 53 is a common error when you try to open a program or an application. This error can also occur if you try to run an application that does not support your version of Windows or Mac.

Some of the reasons behind runtime error 53 include the following:

  • Damaged registry – When you get this error, it is possible that the program cannot be started because its configuration data in the registry is missing or damaged.
  • Incompatible software – Other incompatible software, such as antivirus programs or firewalls, can cause this error message to appear.
  • Missing DLLs – Most programs call upon DLL files to run, so if these files are missing, you’ll be unable to open the said program.
  • Improper program installation/uninstallation – This happens when you cannot install an app or uninstall it until all the components are properly removed from your system and registry. If a component remains on your system after uninstalling, it will trigger this error. 
  • Bugs in software – If you’re using an outdated version of the software, it might contain bugs that may lead to runtime error code 53 or other errors like this one.

How do I fix run time error 53?

Attempt the following basic fixes before moving on to the slightly advanced steps:

1. Delete the linkcreation.dotm file

  1. Hit the Windows + E keys to launch File Explorer.
  2. Navigate to the following location: C:\Users[user name]\AppData\Roaming\Microsoft\Templates or /Library/Application Support/Microsoft/Office/User Templates/
  3. Find the linkcreation.dotm file and delete it.

The linkcreation.dotm is related to the Adobe software and can be traced back to an add-in in Word. The most common reason why it’s causing this runtime error 53 is that it is outdated.

If you don’t find it in the above location, you probably don’t have it in your system, so move on to the next solution.

2. Scan for viruses

  1. Press the Start Menu icon, search Windows Security, and click Open.
  2. Select Virus & threat protection.
  3. Next, press Quick scan under Current threats.
  4. If you don’t find any threats, proceed to perform a full scan by clicking on Scan options just below Quick scan.Scan options
  5. Click on Full scan, then Scan now to perform a deep scan of your PC.Full Scan Scan Now
  6. Wait for the process to finish and restart your system.

3. Reinstall Office

  1. Hit the Windows key, type Control Panel in the search bar, and click Open.control-panel-search fallout new vegas runtime error
  2. Click on Uninstall a program under Programs.going uninstall program control panel
  3. Find Microsoft Office and click Uninstall. If there’s more than one copy, proceed to uninstall them too.Microsoft Office Uninstall
  4. Download Office and follow the on-screen prompts to complete the installation.

4. Perform a System Restore

  1. Press the Windows + R keys, type rstui, and hit Enter.
  2. The System Restore window will open. Click on Next.
  3. Select the restore point you wish to revert to and click on Next.
  4. Now click on Finish.

A System Restore should be the last option if everything else has failed. This could indicate that your system has been corrupted, and the only way to restore it is to return to its last known good position.

Since you can never anticipate when runtime errors might occur, we encourage you to equip your system with one of the runtime error repair tools.

These tools will scan and automatically repair your PC for any issues, so you don’t have to worry about doing it manually.

And that’s how you fix the runtime error 53. If you have any additional thoughts or comments on this topic, don’t hesitate to leave them in the comment box below.

Fix: Generative Fill not Showing/Working in Photoshop

If you’re one of the many affected by the generative fill not working in Adobe Photoshop, we provide this guide to cover practical solutions so that you may begin to enjoy AI on your favorite tool.

Why is generative fill greyed out in Photoshop?

  • You’re using an outdated Photoshop app.
  • Generative Fill is an experimental feature, so if it is not enabled, you may be unable to use it.
  • The Generative Fill feature requires you to make a closed selection, or it will not fill the required area.
  • If the selection is too large, it may not complete processing.

What do I do if Generative Fill is not working in Photoshop?

1. Install the Beta app

  1. Launch Adobe Creative Cloud.
  2. On the left pane, click on Beta apps, then click Install in front of Photoshop (Beta).
    generative fill not working in adobe photoshop
  3. Once the installation is complete, click on the 3 dots after the Open button and select Other versions.
  4. Verify that your downloaded version is not lower than 24.6, as the feature is unavailable in later updates. Now open the newly downloaded Beta version, and you should have the Generative Fill working in Adobe Photoshop.

2. Update Adobe Photoshop

  1. Launch Adobe Creative Cloud.
  2. On the left pane, click on Beta apps, click on the 3 dots next to Photoshop (Beta), and select Uninstall.
    generative fill not working in adobe photoshop
  3. After the uninstallation, click Updates on the left pane of the Adobe Creative Cloud interface.
    generative fill not working in adobe photoshop
  4. Click on Check for updates in the right top corner.
  5. Now follow the steps in Solution 1 to install Photoshop Beta, and it should fix Generative Fill not working in Adobe Photoshop.

3. Update the age on your Adobe profile

  1. Sign out of the Creative Cloud Desktop and Photoshop (beta) apps and sign back into both.
  2. On your browser, navigate to Behance, log in with your Adobe ID, then input your Date of Birth.
  3. If you would rather sign in with a social account or Gmail, ensure they are registered with your date of birth, indicating you are 18 or older.

This final step may be helpful because you cannot use the Generative Fill feature if you are not at least 18.

And that will be all for this guide. If you have read this far, we believe you are now enjoying the many wonders of the Generative Fill in Adobe Photoshop.

If you are a first-timer to the app, we have an extensive guide that details how to download Adobe Photoshop.

Lastly, let us know if you have more questions in the comment section below.

Please Wait for the GPSVC: How to Fix This Error

We have received multiple error reports from our readers that they are facing the Please wait for the gpsvc error message on their PC when they try to launch the Group Policy Client.

In this guide, we will give you a list of solutions that will help you resolve the Please wait for the gpsvc error. Let us check out the solutions and resolve the problem.

What is GPSVC?

GPSVC is also known as Group Policy Client, an account management utility. It controls all the accounts on your computer.

When you log in with your credentials on your Windows PC, some important processes will run in the background, the GPSVC is a part of these programs.

What causes Please wait for the gpsvc error?

Here are a few common reasons why you are getting the Please wait for the gpsvc error:

  • Presence of corrupt system files: Corrupt system files related to the Group Policy Client might be causing the problem on your PC.
  • The GPSVC.dll file might be corrupt: Chances are that the GPSVC.dll file itself is corrupt, and the error is genuine.
  • The GPSVC service isn’t running: Since it is an important system process, the GPSVC service should be running, and in case it isn’t, you will face multiple issues.
  • GPSVC registry file is incorrectly configured: Important registry files shouldn’t be tweaked or, if tweaked should be correctly done as this may be the reason behind Please wait for the gpsvc error.

Let us go through the solution and resolve the Please wait for the gpsvc error.

How can I resolve the Please wait for the gpsvc error?

1. Run SFC and DISM commands

  1. Press the Win key to open the Start menu.
  2. Type Command Prompt and open it as an administrator.
  3. Type the below command and press Enter.sfc /scannow
  4. Let the process complete and fix corrupt system files.
  5. Type the below commands and press Enter after each one.Dism /Online /Cleanup-Image /CheckHealth Dism /Online /Cleanup-Image /ScanHealth Dism /Online /Cleanup-Image /RestoreHealth
  6. Reboot your PC.

Fixing the corrupt system files will help you resolve the Please wait for the gpsvc error on your PC as this has helped several of our readers resolve the problem.

2. Restart/Enable the GPSVC service

  1. Press the Win + R keys to open the Run dialogue.
  2. Type services.msc and press Enter.
  3. Locate Group Policy Client, right-click on it, and select Properties.
  4. Change the Startup type to Automatic.
  5. Hit the Start button.
  6. Click Apply and OK for the changes to take effect.
  7. Restart your PC.

You should ensure that the Group Policy Client service is running and is set to Automatic so that it runs automatically on your PC. Try this solution and check if this fixes the Please wait for the gpsvc error.

3. Use a dedicated DLL fixer

You will have multiple DLL-related issues on your PC, whether at the system level or related to a third-party program.

However, you cannot just go ahead and download the DLL file and resolve the issue at your end, as the source you are downloading could be malicious.

In such a case, we suggest you check out our dedicated guide that lists down some of the best DLL fixers that will help you resolve DLL-related problems swiftly.

4. Tweak the GPSVC registry

  1. Press the Win + R keys to open the Run dialogue.
  2. Type regedit and press OK.
  3. Navigate to the below path and press Enter. Computer\HKEY_LOCAL_MACHINE\SOFTWARE\Microsoft\Windows NT\CurrentVersion\Svchost
  4. Right-click on the Svchost folder, select New, and click on Key.
  5. Name the new key GPSvcGroup.
  6. Right-click on the empty space on the right, select New and click on DWORD (32-bit Value).
  7. Rename it to AuthenticationCapabilities.
  8. Open the AuthenticationCapabilities key, choose Base as Decimal, change the value to 12320 and click OK.
  9. Right-click on the empty space on the right, select New and click on DWORD (32-bit Value).
  10. Name this second key as CoInitializeSecurityParam.
  11. Change the Value data to 1 and click OK.

Tweaking the registry, as shown above, has helped several users resolve the Please wait for the gpsvc error. You can also check our list of some of the best registry cleaners to try to remove unwanted or corrupt registry files from your PC.

That is it from us in this guide. Feel free to share any other solution you applied to fix the Please wait for the gpsvc error.

Black Squares Behind Folder Icons? 6 Ways to Remove Them

Some users have been complaining of unusual black squares behind the folder icons on Desktop and Windows Explorer. In worst cases, the black squares cover the folder icons completely

This usually happens after uninstalling and installing apps on Windows PC. Fortunately, there are proven fixes for this issue, irrespective of severity, and we will detail them in this guide.

Why is there a black box behind my folder icon?

Listed below are some of the potential reasons there might be black squares behind your folder icon on Windows 10 and 11:

  • Corrupt icon cache: Oftentimes, this issue can be caused by problems with your icon cache. A quick way to fix this is to clear the cache and delete its folder.
  • Faulty graphics driver: If the black box is behind all your folder icons, the problem might be due to your display driver. You need to update your driver to fix the issue.
  • Corrupt system files: At times, the black background behind your folders on Windows 11 might be due to issues with your system files. Repairing and restoring these files should get the job done.

How do I get rid of black squares behind my folder icons?

1. Change the folder icon to default

  1. Right-click the folder with the black square and select the Properties option.
  2. Click the Customize tab at the top.
  3. Now, click the Change icon button.
    change icon black squares behind folder icons
  4. Click OK, followed by Apply on the Customize page.
    ok
  5. Next, right-click the faulty folder again and select Properties.
  6. Select Customize at the top and click the Restore Default button.
    restore default
  7. Finally, click the Apply button, followed by OK.

Sometimes, black squares appear behind your folder icons because you transferred the files over a network between an old OS and a newer one. In this case, you need to restore the folder icon to default to solve the problem.

2. Run Disk Cleanup

  1. Press the Windows key, type cleanmgr, and select the Disk Cleanup option.
    disk clean up black squares behind folder icons
  2. Check the box for Thumbnails.
  3. Finally, click the OK button to complete the process.
    thumbnails

Corrupt cache thumbnails can sometimes cause the black squares behind your folder icons. To fix this, you need to run the Disk Cleanup tool to get rid of the junk files.

3. Delete the icon cache

  1. Press the Windows key + E to launch File Explorer and click View > Show.
  2. Select the Hidden items option.
    hidden items
  3. Now, navigate to the path (replace <username> with your user account name) below: C:\Users\<username>\AppData\Local
  4. Delete the IconCache.db file.
    iconcache black squares behind folder icons
  5. Next, go to the path below: C:\Users\<username>\AppData\Local\Microsoft\Windows\Explorerexplorer
  6. Finally, delete the contents of the Explorer folder and restart your PC.

A faulty thumbnail cache can be the cause of the black squares behind folder icons issue. Resetting the thumbnail cache can do the trick here.

4. Repair system files

  1. Press the Windows key, type cmd, and select Run as administrator under Command Prompt.
    cmd admin black squares behind folder icons
  2. Type the command below and hit Enter to run it: DISM /online /cleanup-image /restorehealthdism restore
  3. Wait for the command to finish running. Now, run the command below: sfc /scannowsfc
  4. Finally, wait for the command to finish running and restart your PC.

Faulty or corrupt system files are among the leading causes of the black square behind folder icons issue. Running the DISM and SFC scans should do the trick here.

5. Edit your registry

  1. Press the Windows key + R, type regedit, and click the OK button.
    regedit black squares behind folder icons
  2. Navigate to the below in the left pane: HKEY_LOCAL_MACHINE\SOFTWARE\Microsoft\Windows\CurrentVersion\Explorer\Shell Icons
  3. Now, right-click the 29 key and select the Delete option.
  4. Finally, close the Registry Editor and restart your PC.

If there are black squares behind your folder icons, especially on older OS like Windows 7, it might be because the icon path is wrong in your registry. You need to delete the key pointing to the wrong path to solve this problem.

6. Update the driver

  1. Press the Windows key + X and select the Device Manager option.
    device manager
  2. Double-click the Display adapters section and right-click the driver under it.
  3. Now, select the Update driver option.
    update driver
  4. Finally, choose Search automatically for drivers and install any available updates.
    search auto black squares behind folder icons

In cases where the black squares appear behind all your folder icons, it is likely due to problems with your graphics driver. What you need to do here is to update the driver to the latest version and restart your PC.

We have reached the end of this guide on fixing the black squares appearing behind folder icons issue. Hopefully, you will be able to solve the problem before exhausting the solutions on our list.

Similarly, if your Desktop icons are blank, check our article on the topic to fix them.

Feel free to let us know the solution that helped you fix this issue in the comments below.

Install Google Bard on Windows in 2 Simple Steps

Google Bard is one of the leading AI tools gaining traction in a short space of time. So, it is no wonder many users are looking for ways to download and install Google Bard on Windows PC.

This guide will explain the possibility of doing this and provide detailed steps on the potential ways to go about it. Read on!

Is Google Bard available on Windows?

Google Bard, like most other AI tools, is only available on the web. It does not have a standalone app for Windows and can only be used on your browser.

However, there are ways to install Google Bard on Windows 10 and 11 and make it function like an app. And we will explore this in the ensuing section.

How do I download and install Google Bard on Windows?

1. Use Google Chrome

  1. Launch Google Chrome and visit the official Bard website.
  2. Click the Try Bard button and log in with your Google account.
    try install google bard windows
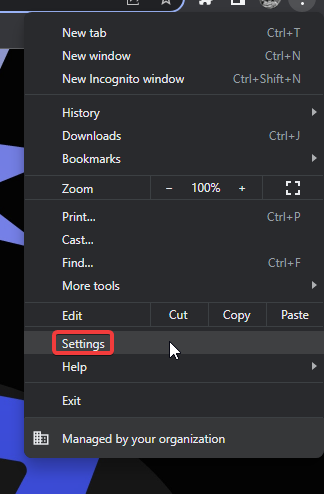
  3. On the home page, click the menu button (three vertical dots) in the top right corner.
  4. Now, select the More tools option.
  5. Choose the Create shortcut option.
    create shortcut
  6. Next, click Open as window.
  7. Finally, click the Create button.
    create

One of the few workarounds to install Google Bard on Windows 10 or 11 is to create a shortcut from Chrome. This will function like an app on your PC and can be used to access the tool quickly.

Another benefit of this is that the shortcut will be available on the Start Menu, making it easy to use it.

If you ever need to uninstall the created shortcut, follow the steps below:

  1. Launch Chrome, type chrome://apps in the address bar, and press the Enter key.
    address install google bard windows
  2. Now, locate and right-click Google Bard.
  3. Finally, click Remove from Chrome.
    remove from

Another option to uninstall the Google Bard is to follow the steps below:

  1. Press the Windows key + I to open the Settings app and select the Apps option in the left pane.
  2. Select the Apps & features option.
    app and
  3. Click Google Bard, and select Uninstall.
    uninstall install google bard windows
  4. Finally, click the Remove button.
    remove settings

With this, you can remove the Google Bard shortcut you installed on Windows, like every other app.

2. Use Microsoft Edge

  1. Launch Edge and visit the Google Bard website.
  2. Log in with your Google account and click the menu button in the top right corner.
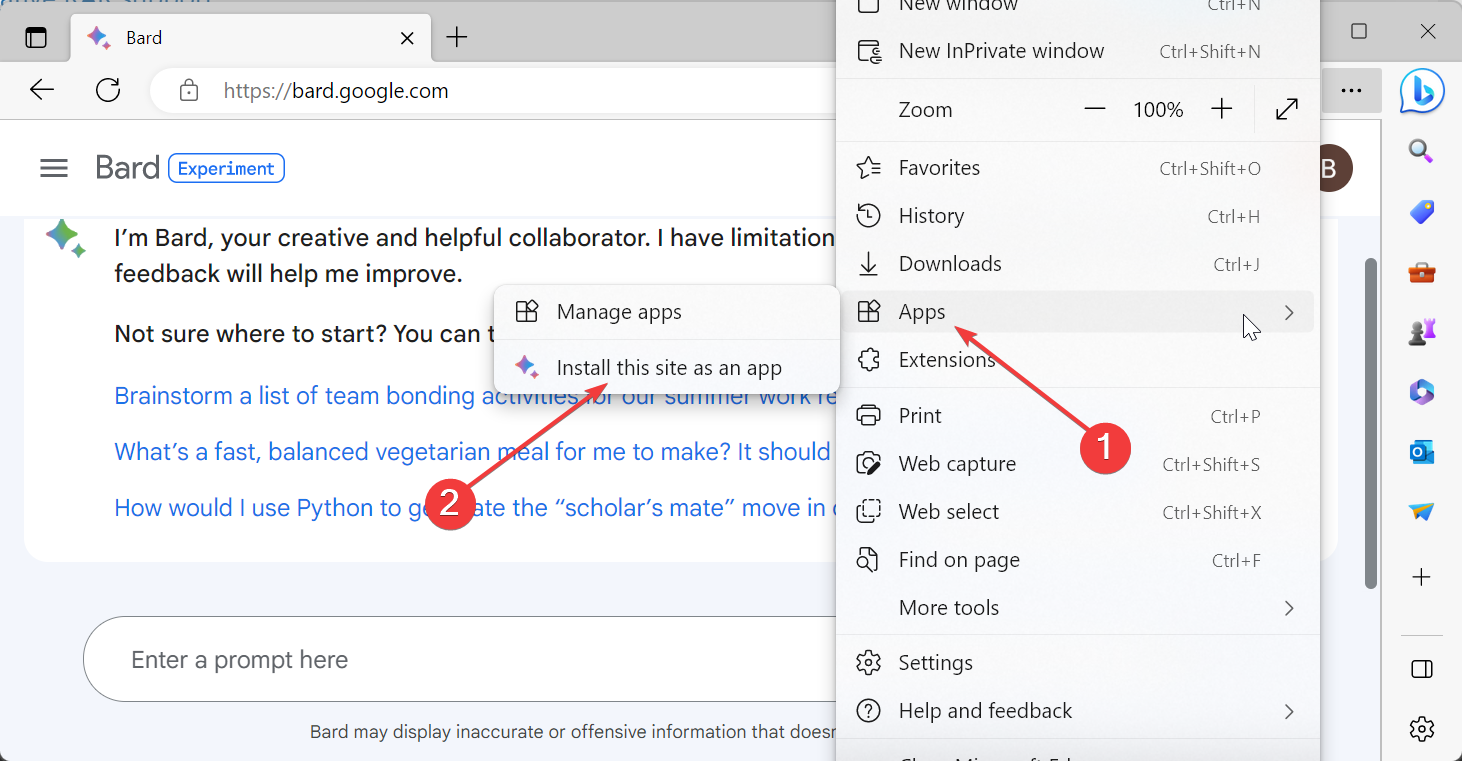
  3. Now, select the Apps option.
  4. Next, choose the Install this site as an app option.
    install site as
  5. Finally, click Install.
    install edge install google bard windows

If you don’t want to use Chrome to install Google Bard on your Windows PC, you can also use Microsoft Edge. The result is the same: you will get a shortcut that will function as an app on your system.

If you want to remove the app after some time, follow the steps below:

  1. Launch Edge and click the Menu button.
  2. Choose the Apps option.
  3. Now, select Manage apps.
    manage apps
  4. Click the Details button for Google Bard under the Installed apps section.
    details
  5. Finally, select the Uninstall button.
    uninstall edge

Alternatively, you can uninstall Google Bard like every other app via the settings app. So, there are multiple options available to you.

There you have everything you need to download and install Google Bard on Windows. The process should now be effortless, provided you follow the steps above.

If you need a detailed comparison between ChatGPT and Google Bard, we have you covered in our comprehensive guide.

Were you able to download the app? Feel free to share your experience in the comments below.

How to Repair Windows 10 Using a USB [Easy Steps]

There are times your PC encounters issues like the dreaded BSOD, and you might find it hard to boot it. In this case, you are left with no option but to try to repair Windows 10 with a USB.

While this process might seem complex, it is actually straightforward with little guidance. In this guide, we will show provide you with detailed steps to follow to repair and restore your PC using a USB drive.

Can I repair Windows 10 corrupted files with USB?

More often than not, issues with Windows 10 are caused by problems with your system files. Fortunately, there are different options available to repair your system files, even with a USB drive.

You only need to run commands like the usual DISM or SFC scans or, in some cases, the bootrec command to fix your boot files. However, you still need to know how to go about this, and we will show you how to do it.

How to repair Windows 10 from USB?

1. Download and create the installation media

  1. Visit the official Windows 10 download website on another PC.
  2. Click the Download Now button under the Create Windows 10 installation media section.
    download windows 10 repair usb
  3. Now, open File Explorer, go to the Downloads folder and run the downloaded file.
  4. Next, click the Accept button on the Agreement and license page.
    accept
  5. Tick the radio button for Create installation media (USB flash drive, DVD, or ISO file) for another PC and click the Next button.
    create media
  6. Select your language, PC architecture, and other important information, and click the Next button.
    next lang windows 10 repair usb
  7. Next, insert a USB flash drive (at least 8GB).
  8. Finally, choose the USB flash drive option, select your flash drive, and follow the onscreen instruction to complete the process.
    flash drive

The first thing to do in the quest to repair your Windows 10 PC using a USB drive is to create an installation media. However, you need to get a working system for this task.

Also, your USB drive should have at least 8GB of free space. Using a new and clean drive is advisable because this process will wipe the drive’s content.

2. Repair your PC

  1. Insert the Windows 10 installation media inside your PC and power it on. Your PC should boot from it automatically. If this does not happen, you need to enter your BIOS and change the boot order.
  2. Select your language and other information, and click the Next button.
    language windows 10 repair usb
  3. Now, choose the Repair your computer option in the bottom left corner.
    repair
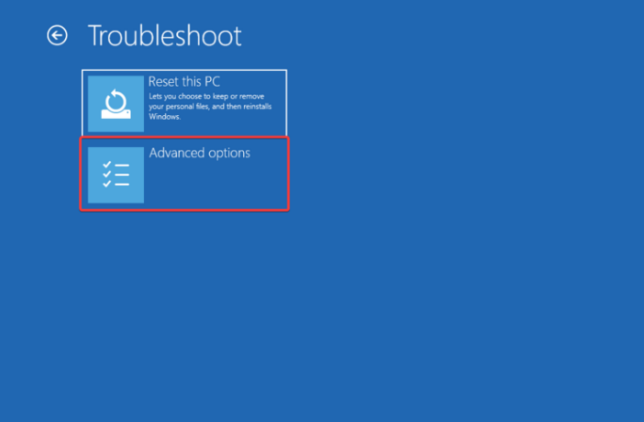
  4. Next, select Troubleshoot.
    troubleshoot windows 10 repair usb
  5. Choose Advanced options on the next page.
    advanced options
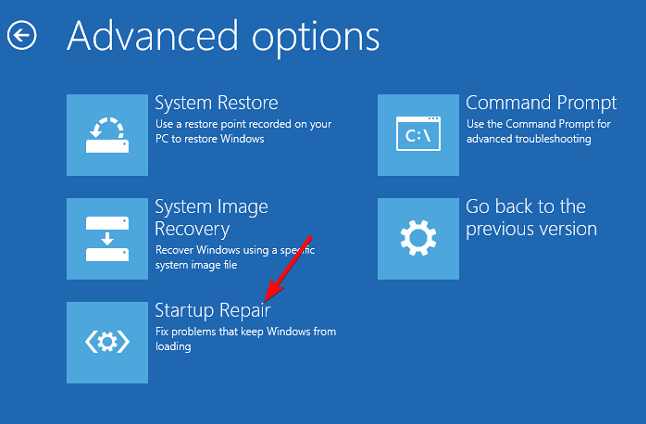
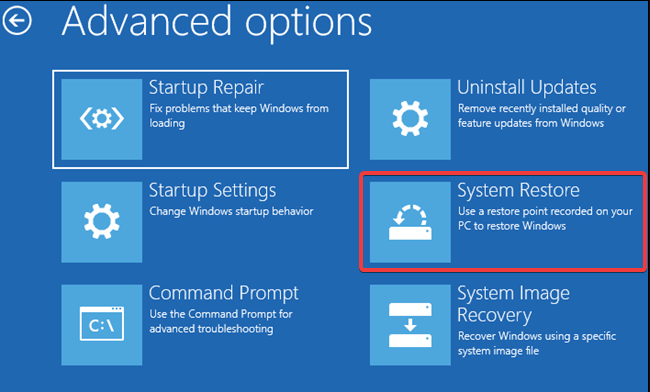
  6. Finally, you will be presented with different repair options.
    repair menu

At this stage, you can now choose from the repair options available to repair Windows 10. One option is to use Command Prompt to run some commands to repair your system files.

Also, you can use the System Restore option to restore your PC, while the Startup Repair option can help you fix startup-related problems.

Lastly, if you want to boot into Safe Mode, you can select the Startup Settings option and follow the onscreen instructions to complete the process.

How to repair Windows 10 from USB using Command Prompt?

  1. Follow the steps in the solution above and select the Command Prompt option in Step 6.
    command prompt
  2. To repair corrupt system files, type the command below and hit Enter to run it: DISM /online /cleanup-image /restorehealth
  3. Wait for the command to finish running. Now, run the command below: sfc /scannow
  4. If you want to repair your boot records, type the commands below and hit Enter after each: bootrec /RebuildBcd bootrec /fixMbr bootrec /fixboot
  5. Finally, to repair bad disk sectors, run the command (replace C with your drive letter) below: chkdsk c: /f /r

That is how you can repair corrupt system files on Windows 10 from USB using Command Prompt. While we have listed the major forms of repairs you can perform, there is still so much more you can do.

With this, we can now conclude this guide on how to repair Windows 10 using USB. You should now be able to restore your PC and fix most issues with the details in this article.

If you want to know how to perform Windows 10 repair upgrade, check our detailed guide to do it quickly.

Feel free to let us know in the comments below if you encounter any issues performing the steps above.

Recenv.exe: What is it & How to Fix Its Errors

Recenv.exe is a process associated with the Microsoft Windows Recovery Environment. It is a part of the Recovery Console and loads in case you need to recover your system from serious errors or problems.

However, users seem to be experiencing some issues while booting their PCs, and recenv.exe file is behind all these errors. If you’re facing a similar issue, we offer some tested solutions below.

What is the recenv.exe file? 

This file appears alongside a Blue Screen error when you attempt to boot your system. Your PC may fail to boot or will be stuck in a loop preventing you from doing anything.

Reasons behind such errors include:

  • Hardware changes – If you have recently changed critical components of your PC, such as the motherboard or CPU, you may experience this issue because it is struggling to recognize your hardware components.
  • Software conflicts – Installing a new program on your PC can also cause this issue if it interferes with the startup process.
  • Corrupted/damaged registry entries – Related entries to recenv.exe and other files in your system’s registry can also cause this error message to appear when starting your computer.

Some common recenv.exe errors you may encounter include:

  • RecEnv.exe is missing
  • Fault in Software Path: RecEnv.exe
  • RecEnv.exe not working
  • Invalid Win32 Program: RecEnv.exe
  • RecEnv.exe needs to close
  • Error starting program: RecEnv.exe
  • RecEnv.exe can’t be located
  • Cannot find RecEnv.exe
  • RecEnv.exe Program Error
  • RecEnv.exe failure

How do I fix recenv.exe errors?

1. Run the CHKDSK command

  1. If you’re having trouble booting your PC, start in Safe Mode, then proceed with the following steps.
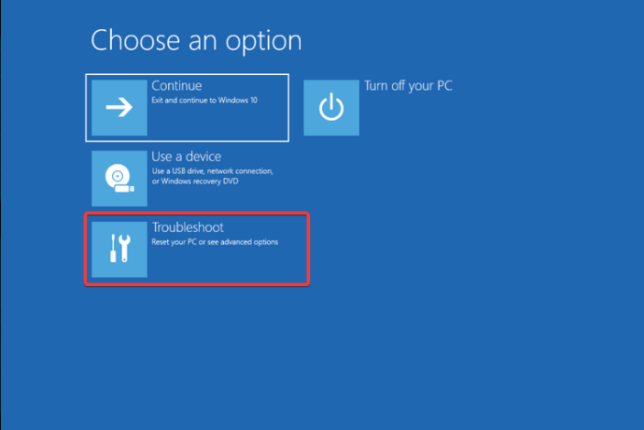
  2. Click on Troubleshoot.Choose an option - Troubleshoot-secure boot enabled but not active windows 11
  3. Select Advanced options.Advanced options
  4. Click on Command Prompt.
  5. Type in the following command and hit Enter. Remember to replace C with the letter of the drive in question: chkdsk C: /f /r /x

2. Run DISM and SFC scans

  1. While still in Safe Mode, hit the Start Menu icon, type cmd in the search bar, and click Run as administrator.cmd-run-admin-w11 unexpected kernel mode trap windows 11
  2. Type the following commands and press Enter after each one:DISM.exe /Online /Cleanup-Image /Restorehealth sfc /scannow

This technical process might work or not on your PC. Regardless, you can fix Windows errors for good with a tailored BSOD fixer.

3. Perform a clean boot

  1. Hit the Windows key, type msconfig, and open System Configuration.
  2. Switch to the Services tab and select Hide all Microsoft services.
  3. Click on the Disable all button, then hit the Apply button to save the changes.
  4. Go back and click on the Startup tab, select Open Task Manager then click OK.
  5. In the Startup tab of the Task Manager, Disable all the Enabled startup items.
  6. Close Task Manager and restart your PC.

4. Run Startup repair

  1. Still in Safe Mode, navigate to the Advanced option from the blue screen and press the Enter key.
  2. Press the Troubleshoot button.Choose an option - Troubleshoot-secure boot enabled but not active windows 11
  3. Select Advanced options.Advanced options
  4. Choose the Startup Repair option.windows 11 startup repair

5. Perform a System Restore

  1. Still in Safe Mode, click on Troubleshoot.Choose an option - Troubleshoot-secure boot enabled but not active windows 11
  2. Click on Advanced options.Advanced options
  3. Next, click on System Restore.

The solutions above can help you fix the blue screen error brought about by the recenv.exe file. If all prove futile, the issue is likely a software conflict, and reinstalling Windows is your next best bet to address this problem.

If that’s a success, we recommend you consider installing Windows 11 repair tools to help you address such hiccups in the future.

Such tools can fix a myriad of issues automatically and come with a few advanced features that help keep your PC performing at its peak at all times.

If there’s any solution that helped you bypass this issue but missing from our list, we’d love to hear about it. Drop us a comment below.

Want to create easy visuals in Teams? We’ve got a good news

Want more good news on Microsoft Teams besides the AI-powered Intelligent Recap, GroupMe video call, and the QR codes to book meeting room features? We’ve got you covered, as Microsoft finally rolled out that its Designer app is also coming to the popular teleconferencing app. 

Microsoft notes,

We’re excited to announce support for Microsoft Designer (Preview) in Teams on Windows 11. Powered by generative AI technology, Designer allows you to craft unique and personalized designs effortlessly. By describing your idea’s vision in words or utilizing an uploaded image, you can create captivating one-of-a-kind visuals. Simply create an announcement post in communities to design your own banner with Designer.

Just like how it works with Bing Image Creator, Designer, which arrived not too long ago in the Preview, will let you create visual banners for your social media or any other purposes by simply putting word prompts. Of course, the file size and everything else is still customizable. 

How will the AI-driven Designer work in Teams?

Designer simplifies the design process by allowing users like you to craft your banners for announcement posts in communities within Teams. This innovative feature unlocks a world of creativity, making it easy to design visually appealing and engaging content without requiring extensive design skills or experience.

To access Designer in Teams on Windows 11, you can simply create an announcement post within the communities feature. From there, you can utilize Designer to design your own banners, adding a personalized touch to your announcements and enhancing the overall visual appeal of your content.

With the introduction of Microsoft Designer (Preview), Teams on Windows 11 becomes a versatile platform that not only enables smooth communication and collaboration, but also nurtures creativity and self-expression. 

What do you think about Microsoft Designer in Teams? Let us know in the comments!

You’ll soon be able to book a room on Teams with QR code

Are you a Microsoft Teams user? If so, here’s some good news. A nice little touch to the value of Teams Panels is coming soon as Microsoft is planning to work on a QR code feature that lets you easily book a meeting room through Teams’ mobile app. 

As we’ve spotted from Microsoft 365 Roadmap site under Feature ID 129366, the feature is coming to general availability real soon. 

Microsoft notes, 

Microsoft Teams: QR code to reserve a room on Teams Panels. This feature lets users easily book a room for meetings now, in the future, or as part of a scheduled meeting by scanning a QR code on the scheduling panel with their mobile device. Requires the Teams mobile app on an Android or iOS mobile device.

That means, with the introduction of QR codes on Teams Panels, you can effortlessly book a room for current or future meetings, or as part of a scheduled meeting by simply scanning the QR code displayed on the scheduling panel using their Android or iOS mobile device.

Booking a room in Teams has never been easier

More excitingly, this feature will not be limited to the preview channel, allowing users like you to take it for a spin immediately upon its release.

As we’ve noted from the roadmap note, it will be compatible with Teams and Surface Devices, as well as Android devices. The release phase for this feature is set as General Availability, ensuring widespread availability and accessibility for all Teams users despite not being enrolled to the preview channel for insiders. 

The rollout of the QR code feature for room reservations on Teams Panels is scheduled to begin in August 2023. This feature will be available in various cloud instances, including GCC High, GCC, and Worldwide (Standard Multi-Tenant).

Besides, there are also a lot of exciting features coming to Teams: the AI-based Intelligent Recap, Microsoft Mesh for Teams, and more. 

Have you tried booking a room in Teams? What do you think about the latest addition of QR codes? Let us know in the comments!

Atlibusbdfu.dll Not Found: How to Fix or Download it Again

The atlibusbdfu.dll file is a critical component for your computer. This component can configure the USB controller, an important part of your computer’s hardware.

In this article, we share some tips for how to fix the atlibusbdfu.dll not found error message or download it again if it was missing.

What is the atlibusbdfu.dll file?

The altibusbdfu.dll file is a piece of driver software that belongs to Atmel FLIP. This small, low-cost development board allows you to create custom circuits for embedded applications.

It is a USB bootloader that gives you control over how to program your microcontroller. You can program the chip using a USB interface.

With this development board, you can program your custom firmware and upload it onto the FLIP using any computer with a USB port.

Since it uses the USB port, if the altibusbdfu.dll is missing or cannot be found for some reason, you cannot perform any debugging. You must first replace the missing DLL file.

What can I do if atlibusbdfu.dll not found error appears on my PC?

1. Use a DLL-Fixer

Since the atlibusbdfu.dll is a non-Windows file, the error of it not being found is most probably due to compatibility issues. The driver for its corresponding app probably became outdated, or you accidentally downloaded the wrong version.

As such, you will need a dedicated DLL repair tool capable of addressing these compatibility issues and reinstating the DLL file to its once-working position.

2. Run DISM and SFC scans

  1. Hit the Start Menu icon, type cmd in the search bar, and click Run as administrator.cmd-run-admin-w11 unexpected kernel mode trap windows 11
  2. Type the following commands and press Enter after each one:DISM.exe /Online /Cleanup-Image /Restorehealth sfc /scannow

3. Scan for viruses

  1. Press the Windows key, search Windows Security, and click Open.
  2. Select Virus & threat protection.
  3. Next, press Quick scan under Current threats.
  4. If you don’t find any threats, proceed to perform a full scan by clicking on Scan options just below Quick scan.Scan options
  5. Click on Full scan, then Scan now to perform a deep scan of your PC.Full Scan Scan Now
  6. Wait for the process to finish and restart your system.

Because Windows Defender is a basic antivirus, it may not do a great job of getting rid of viruses and malware even with a deep scan. That’s why we recommend a third-party antivirus.

TotalAV is our fighter, and it is easy to see why. It offers real-time protection against all types of viruses, Trojans, and other malware.

⇒ Get TotalAV

4. Download the file manually

  1. Navigate to your browser and download the atlibusbdfu.dll file from a trusted third-party site such as DLL-files.com.
  2. Do not install the file from the setup file. Extract the files in the zip folder and locate the atlibusbdfu.dll file.
  3. Cut and copy it to the following location or the location where the Arduino file is located (Arduino is the microcontroller device driver): C:/ProgramFiles(x86)/Atmel/Flip 3.4.7/usb
  4. Next, hit the Windows key, type Device Manager in the search bar, and click Open.device manager w11
  5. Navigate to Ports and check that the Arduino is listed.
  6. Right-click on it and select Update driver. Note that the Arduino port may also be listed as an Unknown device.
  7. Select Browse my computer for driver software and navigate to the location listed in 3 above to install the atlibusbdfu.dll file you pasted in 3 above.
  8. Confirm installation in the next prompt.
  9. The atlibusbdfu.dll error should disappear.

5. Perform a System Restore

  1. Press the Windows + R keys, type rstui, and hit Enter.
  2. The System Restore window will open. Click on Next.
  3. Select the restore point you wish to revert to and click on Next.
  4. Now click on Finish.

That’s how to restore the DLL if it was missing. If none of these methods worked for you, we suggest running a registry cleaner or performing a clean install as a last resort.

We also have a more comprehensive article on how to find missing DLL files in Windows 10, so you may want to check that out too.

As always, we appreciate it when you interact with us, so leave any additional thoughts in the comment section below.

Remoting_host.exe: What is it & How to Remove it

Remoting_host.exe is an executable file that belongs to the Chrome Remote Desktop service. It allows you to connect to your computer from another device remotely.

Non-system processes like remoting_host.exe originate from software you installed on your system. If you spot it in your Task Manager, no need to be alarmed. However, if it is causing issues, you’ll find this article insightful in helping you to get rid of it.

How do I disable RDP in Chrome?

1. Disable Chrome Remote Desktop extension 

  1. Navigate to your Chrome browser and go to the following location: chrome://extensions/
  2. Find the Chrome Remote Desktop extension and toggle it Off.

Disabling the extension can help make your Chrome browser faster and more responsive if it was making your browsing experience feel sluggish.

2. Perform a scan in Chrome

  1. Open your Chrome browser and click on the three vertical ellipses at the top right corner.
  2. Select Settings.
  3. Next, click on Reset and cleanup then select Clean up computer on the right.
  4. Hit the Find button next to Find harmful software.
  5. Wait for the scan to finish and remove any recommended software.

If your PC has been infected by a virus causing issues with the remoting_host.exe file, an in-browser scan will not be sufficient to weed out all potential malware. 

As such, we recommend you also include a deep scan of your Windows 11 either using Windows Defender or a comprehensive third-party antivirus.

3. Uninstall the Chrome Remote Desktop app 

  1. Click on the Start Menu icon, type Control Panel in the search bar, and click Open.control-panel-search fallout new vegas runtime error
  2. Select Uninstall a program under Programs.going uninstall program control panel
  3. Find the Chrome Remote Desktop Host and click on it then select Uninstall at the top.
  4. Confirm uninstallation in the next prompt.

Don’t forget to clear out any remaining junk from software leftovers that may affect system performance way after you have uninstalled the program.

4. Run a command

  1. Hit the Windows key, type cmd in the search bar, and click Run as administrator.cmd-run-admin-w11 unexpected kernel mode trap windows 11
  2. Type in the following command and hit Enter: net stop chromoting

And that’s how to remove remoting_host.exe from your PC safely. Hopefully, you notice improved performance in your PC after its removal.

Removing Chrome’s Remote Desktop app should not be the end of your journey when accessing PCs remotely. 

In fact, we have an exciting list of the best remote desktop apps for Windows 11 packed with modern features and perfect for both advanced and novice users, so ensure you check that out.

How do I access another computer using Chrome Remote Desktop? 

Chrome Remote Desktop is a free service that lets you remotely access another computer through Chrome. It’s useful if you want to help someone fix their computer or if you need to access your own machine from afar.

To get started with Chrome Remote Desktop, ensure the computer you want to use is connected to the internet and has the Chrome browser installed.

1. Download Chrome Remote Desktop

  1. On your browser, navigate to the Chrome Remote Desktop page and click the download icon.
  2. Once the download is complete, click on Accept & Install.
  3. Click on the installer file and hit Run.
  4. Wait for Windows to finish the configuration.
  5. Create a name for your PC, or use the default one.
  6. Enter a PIN that will allow you to access the PC remotely.
  7. To access another PC, follow similar steps to set up, and when sharing, you’ll be asked to generate a code as the other user will need it to access your screen. The same applies to when you want to access their screen.
  8. You can stop sharing your screen at any time.
  9. Note that both computers must be connected to the Internet for Chrome Remote Desktop to work.

2. Add extension

  1. Launch your Chrome browser, and in a new tab, go to the following location: chrome.google.com/webstore/category/extensions
  2. In the search bar at the top left, type Chrome Remote Desktop and hit Enter.
  3. Click on Add to Chrome.
  4. Confirm by clicking Add extension.

While the process is fairly easy to set up, you must beware that it can take a toll on your system resources, especially if you’re operating older hardware. Your CPU and memory will be under pressure. 

Consequently, your registry may also be at risk of getting corrupted. Since most applications store data in your system’s registry, it will likely suffer fragmentation and accumulate invalid entries over time, which can affect your PC’s performance.

Other times, Chrome Remote Desktop may not be working. If so, the next step is to disable or completely remove the remoting_host.exe process. Below, we explore various ways to remove it from your PC.

Do let us know if there is a solution that helped you remove the file but missing from our list.

Still using the ChatGPT-powered Bing? We’ve got a good news

It’s that time again. Microsoft, few months after unleashing ChatGPT-powered Bing to the world for the first time, has just announced a plethora of nice updates for the search engine. 

As noted from the company’s blog post, the desktop and mobile versions of Bing will become more feature-rich with the inclusion of videos, Knowledge Cards, graphs, improved formatting, and social sharing capabilities within the chat. 

And, chat history will now be available on both desktop and mobile, so you can effortlessly access recent activity by simply clicking on the clock-inspired icon.

Starting from now on, users like you can also take full advantage of the extended turn limits of 30 per conversation and 300 per day to engage in more extensive and engaging conversations within the platform.

The Bing app will now allow you to add a Bing Chat widget to your home screen, providing timely information and easy access to chat features. 

Moreover, you will appreciate the convenience of seamlessly continuing your conversations between desktop and mobile devices. By scanning a QR code, you can effortlessly transition from your desktop search to your mobile device, guaranteeing a consistent and uninterrupted experience.

As part of the ongoing collaboration between Microsoft and OpenAI, the company responsible for the highly sought-after AI tool, Bing has also been designated as the default search engine for ChatGPT.

Is there any other notable update coming to the ChatGPT-powered Bing?

The popularity of the new Bing mobile app continues to soar, with daily downloads witnessing an astonishing 8x increase since its launch. To further enhance the mobile experience, Microsoft is introducing a host of new features for the Bing, SwiftKey, Edge, and Skype apps.

Did we say SwiftKey? Yes, the AI-powered keyboard, is also receiving noteworthy updates.

The Compose feature within SwiftKey will draft messages based on user-defined parameters, taking into account subject matter, tone, format, and length. 

This feature aims to simplify administrative tasks, so you can delegate the heavy lifting to AI. Furthermore, SwiftKey will integrate a built-in translator, so you can communicate effortlessly with friends and family across language barriers.

Edge, Microsoft’s web browser, is not to be left behind in the AI revolution. 

With the introduction of contextual chat, you can ask Bing Chat questions related to the content they are viewing or request a summary of the page. The selected text actions feature in Edge allows you to gain deeper insights into any highlighted text by engaging in a conversation with Bing, complete with cited sources and summarized information.

Skype, the renowned communication platform, now incorporates AI-powered Bing in all group chats. By simply tagging @Bing, you can leverage Bing’s capabilities to generate lists of discussed options or generate new ideas within a group chat.

Not too long ago, the Redmond-based tech giant also announced that the waitlist for the Bing AI chatbot is gone and everyone can access it alongside more updates including the DALL-E-powered Bing Image Creator that supports 100 languages and the Actions feature that allow you to browse through the chat mode without switching tabs. 

Have you used the ChatGPT-powered Bing AI chatbot? Let us know in the comment!

5 Quick Ways to Unlock Grayed-Out Menus in Excel

There are many readers that are asking questions about how to unlock grayed-out menus in Excel. Because of this problem, they are unable to use commands and actions.

In this guide, we will share with you some effective ways that will answer your how to unlock grayed-out menus in Excel query. Let us check out the solutions.

Why is the Excel menu grayed-out?

We did our research and found out some of the common reasons why the menus in Microsoft Excel are grayed-out for you.

  • Someone is editing the cell: Often when someone is editing or working on a cell, because of which the Excel sheet is in the Edit mode.
  • The spreadsheet is protected: You might have locked the spreadsheet or you might have opened a locked spreadsheet which is there to prevent any foreign edits.
  • The workbook is protected: Someone might have protected the workbook to avoid moving, hiding, and deletion of worksheets.
  • The Excel options might be hidden: Chances are that the show all Excel options feature might be disabled within the Excel settings menu.

Let us now check out the solutions regarding how to unlock grayed-out menus in Excel.

How do I unlock a grayed-out menu in Excel?

1. Press Enter to unlock the grayed-out menu

You will see that when you are editing a cell in the spreadsheet, the menu items will be locked or grayed-out.

To unlock the grayed-out menu in the Excel spreadsheet, you need to press the Enter button after editing is complete. This will unlock the grayed-out menu items.

Often we overlook some of our actions when editing the Excel workbook and think that it is an issue of the program. But a simple press of the Enter button can unlock the grayed-out menu items.

2. Unprotect the worksheet

  1. Launch the worksheet.
  2. Click on the Review tab at the top menu bar.
  3. Under the Changes section, click on Unprotect Sheet.
  4. Enter the password to unprotect the worksheet and click OK.
  5. The grayed-out menus will be unlocked.

If the worksheet is password protected, then you need to enter the password to unlock it. This will allow you to edit the worksheet as well as unlock the grayed-out menu items in Excel.

Just like you unprotected the worksheet, you can also check if the entire workbook is protected or not. If so, then you should choose the Unprotect Workbook option and enter the password and unlock the grayed-out menu items.

3. Ungroup sheets to unlock menus

  1. Launch the workbook.
  2. Right-click on the worksheet and select Select all sheets.
  3. Right-click again on a worksheet and select Ungroup Sheets.
  4. This will activate or unlock the grayed-out menu items.

If the sheets are in a group, then you won’t be able to use the menu items and apply further actions on your worksheet.

For that, you need to follow the above steps and ungroup the worksheets and then this will solve the how to unlock grayed-out menus in Excel query.

4. Tweak the Advanced Options

  1. Launch the workbook.
  2. Click on File from the top menu.
  3. Select Options from the left pane.
  4. Click on Advanced.
  5. Scroll down and locate the Display options for this workbook section.
  6. Under the For objects show selection box, select All.
  7. Click OK to complete the action.

Some people have reported that for them the For objects show option was set to Nothing (hide objects), because of which the menu items weren’t showing for them in the Excel book. Simply change that to All and check if this resolves the issue or not.

5. Convert the workbook to a compatible version

For some users, Excel doesn’t show any menu items when they are opened in compatibility mode. This is because some features might be compatible with the new version of the file, and if the file is of some old version, then you won’t see these menu items.

In such a case, you need to convert the Excel file to the version installed on your PC to unlock the menu items that are currently locked for the workbook.

That is it from us in this guide. Many of our readers have reported that the Excel toolbar is missing for them. This issue is prominent among Excel users and you can easily resolve it by following the solutions mentioned in our guide. You can also learn how to unlock an Excel sheet if you forget the password.

For more information on Excel, don’t miss our latest article on how to apply formula to entire column in Excel.

Feel free to let us know in the comments below, which one of the above solutions resolved your query on how to unlock grayed-out menus in Excel.

How to make Microsoft Teams video calls inside GroupMe

Just like what Microsoft is doing by revamping users’ experience in Teams 2.0, the latest & newest generation of the teleconferencing app, the Redmond-based tech giant is also integrating GroupMe within the app. Soon, users like you will be able to make Teams video calls inside GroupMe, so you won’t have to bother with moving apps back and forth.

GroupMe, known for its ability to connect groups of all sizes, is particularly favored among student and university groups on college and university campuses. 

By enabling group calls within the familiar GroupMe environment, that means you can also effortlessly engage in video conferences powered by Microsoft Teams, fostering seamless and efficient communication.

Being a new feature, however, also means that you may experience a few hiccups here and there, so patience is a virtue. If you’re still curious, here’s how you can make Teams calls inside GroupMe.

How to make Microsoft Teams video calls inside GroupMe

1. Open the GroupMe app on your device.

2. Select the group chat where you want to start a call.

3. Tap on the call icon within the group chat on the top right of your screen.

4. Choose Microsoft Teams as your calling option, then start the call.

5. If the call has already been started, you can tap Join on the top right of your screen to hop on.

Besides GroupMe, Teams is also seeing a lot of exciting improvements in the pipeline. That includes support for Microsoft Designer within the app, the video capture tool for mobile users, and featured communities.

What do you think about Microsoft Teams integration in GroupMe? Let us know in the comments!

Drag Clicking: What is It & How to do It on Any Mouse (Clearing drafts)

Drag clicking has become an extremely popular technique among PC gamers. This is because it helps improve your clicks per second (CPS), and overall game performance.

If you’ve been searching for a way to up your Roblox or Minecraft playing style by improving your CPS, this article will provide you with a comprehensive guide on drag clicking and show you how to do it on any mouse.

What is drag clicking and how does it help?

Drag clicking, also known as Fazer clicking, is a mouse technique that involves forcefully dragging your fingers across the left or right buttons of a mouse. The technique is facilitated by the help of friction between the mouse, buttons, and the player’s finger.

The main purpose of this is to trick the mouse into recording more clicks per second, which is very useful while playing fast action PC games. 

An average gamer has 6.5-8 clicks per second. While this is decent, it may prove insufficient in games like Minecraft where the CPS rate makes a lot of difference.

Hence, by drag-clicking, you can bump up your click-per-second rate to 30+ per second; which is an incredible leap above what an average gamer can think of.

How can I drag click on any mouse?

Drag clicking may sound like an easy thing to do but learning how to do it efficiently and consistently on any mouse takes lots of patience. However, before you can start drag-clicking, here are a couple of preparations you should make:

  • Ensure your mouse is clean to prevent disruptions caused by dirt or any external material.
  • Place your hand comfortably on the mouse.

How do I drag click?

  1. Position your hand above the mouse with your finger of choice hanging down towards the mouse button with the tip/pad of the finger lightly contacting the mouse button.
  2. Flick your wrist at an angle and press the button in a downward direction.
  3. Glide your fingers along the base of your mouse button towards the top. Keep varying the pressure gently until you feel the skip skip sound along the clicks. Then, maintain the movement smooth and steady.

To verify that your drag clicks are working, you can employ the help of Click Counter software. You can find tons of them online by simply searching Click Counter in your web browser and making use of any of the tools displayed on the Google search results.

Tips and tricks to improve drag clicking?

  • Use electric tape to improve the friction between your fingers and the mouse buttons.
  • Wipe your hands thoroughly to avoid your finger slipping off the mouse.
  • Use a wireless mouse or trackpad.

Drag clicking isn’t a common concept to most Windows users but it’s a very trendy topic among PC gamers. This is because a high click per second (CPS) is one of the most effective strategies to win games like Roblox and Minecraft.

Once you learn the technique involved with it, you’ll see an instant boost in your in-game performance and overall scores. All it takes is a little practice and patience to help you master the art of Drag Clicking.

Windows 11 Insider Canary Channel build 25381 adds security requirements

Microsoft has released Windows 11 Insider build 25381 for the Canary Channel, with one “what’s new” item and one change. First up, the SMB signing requirement changes: Microsoft is going to now require SMB signing by default for all connections for Enterprise editions of the software.

Currently, SMB signing is off by default for all except connections to SYSVOL and NETLOGON shares, but this will change, as “part of a campaign to improve the security of Windows and Windows Server for the modern landscape.” Administrators will have to change 3rd party SMB servers to support SMB singing, although Microsoft apparently offers a workaround while at the same time discouraging it:

Do not disable SMB signing in Windows or use SMB1 to work around this behavior (SMB1 supports signing but does not enforce it). An SMB device that does not support signing allows interception and relay attacks from malicious parties.

SMB signing can reduce the performance of SMB copy operations. You can mitigate this with more physical CPU cores or virtual CPUs as well as newer, faster CPUs.

In addition, Canary Channel build 25381 includes a single item under “Changes and Improvements:”

  • If a camera streaming issue is detected such as a camera failing to start or a closed camera shutter, a pop-up dialog will appear with the recommendation to launch the automated Get Help troubleshooter to resolve the issue.

You can learn a little more about SMB signing and the Windows Insider Canary Channel by checking out the Windows Insider blog post.


3 Ways to Bypass Windows 11 System Requirements

Ever since Windows announced its latest Windows 11 upgrade several users who have upgraded their operating system have been complaining of compatibility issues. This is because of the strict Windows 11 system requirements.

If your device doesn’t meet the minimum system requirements for Windows 11, you can find useful steps you can take to bypass Windows 11 requirements in this guide.

What are the minimum Windows 11 system requirements?

Before you can install the Windows 11 update, your computer must meet the following operating system requirements:

  • Your processor must be operating at 1 Gigahertz or faster and must be an Intel, AMD, or Qualcomm dual-core 64-bit processor.
  • Supported and enabled UEFI Secure Boot.
  • A minimum of 4GB of RAM and at least 64GB of storage.
  • A Trusted Platform Module (TPM), version 2.0.
  • The graphics card needs to be supported by DirectX 12 or later and should be using WDDM 2.0 drivers
  • High definition (720p) display, a 9-inch or larger monitor, 8 bits per color channel

The system requirements for the latest Windows 11 version are too strict for many users of an older computer, hence the need to bypass Windows 11 requirements.

You can also explore our detailed guide on the complete checklist for 2023 Windows 11 system requirements to see other Windows 11 specifications, features, and computer requirements.

How can I bypass Windows 11 system requirements?

1. Bypass Windows 11 requirements using the Registry Editor

  1. Press the Windows + R keys to open the Run dialog box. Type regedit in the text field and press Enter.
  2. Navigate to the path below: HKEY_LOCAL_MACHINE\SYSTEM\Setup
  3. Right-click on any space and select New to create a DWORD (32-bit) Value.
  4. Now, set its name as AllowUpgradesWithUnsupportedTPMOrCPU if it isn’t already there.
  5. Change its Value data field to 1 and click OK to save changes.
  6. Close the regedit and restart your PC.

Before making registry changes, make sure your important files and applications have been safely backed up in case the process isn’t successful or satisfactory enough.

2. Bypass Windows 11 requirements using the Media Creation Tool

  1. Create a bootable Windows 10 USB disk by using the Media Creation Tool.
  2. Now, navigate to the directory of the Windows 10 USB disk and delete the install.esd or install.wim files. (You are likely to find only one of these files inside the directory).
  3. After deleting the file, mount the Windows 11 ISO.
  4. Now, go to the same directory again and copy the install.wim file to your clipboard.
  5. Then, paste the install.wim file you previously copied from Windows 11 ISO to the Windows 10 USB stick.
  6. Finally, boot your system from the modified Windows 10 USB stick and install Windows 11.

The Media Creation Tool also allows you to bypass Windows 11 requirements of TPM 2.0 and Secure Boot. However, this only works for NTFS-formatted operating system partitions.

3. Bypass all Windows 11 system requirements

  1. Visit the official Microsoft website to download Windows 11 ISO.
  2. Download the latest version of Rufus and run it.
  3. Select your USB flash drive and click on the Select button.
  4. In the Rufus dialog, expand the dropdown menu under Image and select the Extended Windows 11 Installation (No TPM/no Secure Boot/8GB- RAM) option.
  5. By choosing this option, you will skip Windows 11’s secure boot and TPM 2.0 requirements, along with the minimum demand for 8GB of RAM.
  6. Finally, to create Windows 11 installation media, click Start.
  7. Click OK and wait for the process to finish.

By using the Rufus app, you will be able to bypass some of the Windows 11 requirements except for the CPU requirement. You can however try other methods.

Windows 11 has specific requirements regarding the processor, RAM, storage, graphics card, and other hardware components.

If your system does not meet the minimum requirements for Windows 11, you can use the latest version of Rufus, Registry Editor, or Media Creation Tool to bypass it.

And that’s it on how to bypass Windows 11 requirements. For specific directions on how to bypass TPM 2.0, check our detailed guide on how to install Windows 11 without TPM.

If you have any questions or you know of any other method which has worked for you, do not hesitate to use the comments section below.

Fix: Firefox Border Radius Not Working

Firefox is definitely a winner when it comes to users’ personal preferences – just take a look at how it stands to Safari, Chrome, or Brave. There’s every reason to love this browser, from enhanced privacy to comprehensive dev tools. That said, it’s not flawless and cases of Firefox border radius not working are starting to pile up.

What is Moz border radius, you ask? Don’t worry, we’ll tell you all about it soon enough. Firefox even offers a Developer Edition for users familiar with programming and code. But while the border radius CSS property works fine for browsers like Chrome and Opera, it fails miserably in Firefox.

Thinking about cuttings corners? Well, if you prefer to simply ditch the troubleshooting boat now and go for a quicker solution, we don’t blame you. ➡️ You can choose to switch to Opera right now and enjoy all its customization options, including CSS-related.

However, if you’d like to keep going and see why won’t border radius work in Firefox, we’ve also got your back, so read on.

What is Moz border radius in CSS?

The border radius CSS property allows users to round element corners and customize them to their liking. It applies to the entire background and has up to four length or percentage values, one for each corner.

Firefox border radius.

Users can adjust these values to get elliptical corners. In short, they can alter the percentage value to adjust the dimensions of the border box.

The border radius CSS is compatible with most, if not all browsers, including Google Chrome, Microsoft Edge, and Opera. And speaking of that, you are likely to encounter this issue in more than one place:

  • CSS image border radius not working
  • border-top-left-radius not working in Firefox
  • Firefox border not showing
  • border radius not working on Chrome, Edge, Safari, Outlook, React Native
  • border radius not working on top, table, image

How can I fix border radius not working in Firefox?

1. Double-check the code

Double-check the code to make sure everything was entered properly, and the syntax is correct. Firefox’s developer page provides helpful references for CSS properties, including border radius code and syntax.

Users can easily copy and paste the code to make sure it’s exact.

If you have a -moz or -webkit prefix, then you may encounter errors with Firefox 13 and newer as the latest versions of browsers now use CSS3 syntax. If you are using prefixed code, also add code without the prefix.

Also, if the syntax is off then you will have issues, refer to Firefox’s syntax reference to double-check.

Firefox border radius not working.

2. Check for Beta updates

If using the Beta version of Firefox, check for any Beta updates. Firefox Beta allows users to test out future versions of the browser and report any bugs or feedback.

Mozilla regularly releases notes for the beta on their website, so checking those may also provide a solution. Here users can see if there are any reported bugs or if there are any changes made.

Firefox Beta release notes.

3. Input individual values

Users report that Firefox does not return borderRadius the same as other browsers, which is why the code works in Chrome but not in Firefox.

Input individual values to fix firefox border radius.

Firefox does not support getPropertyValue on getComputedStyle of shorthand properties. Many users report needing to input a value for each corner of the element for the border radius to work in Firefox.

This is an ongoing issue, we know, but we hope our solutions proved useful. So if you have another suggestion on how to fix the Firefox border radius not working problem, let us know in the comments.

Uplay Unable to Start Your Download: 4 Ways to Fix it

Some of our readers reported encountering the Uplay unable to start your download error message whenever they try to install or update a Ubisoft game. This has been quite frustrating for several users.

Not to worry. We have compiled in this article some potential fixes that have worked for other users who have encountered similar problems. Ensure that you follow the steps carefully to fix the issue.

Why is Uplay unable to start your download?

  • Server issues – There could be a temporary downtime on Ubisoft’s server which is affecting the download process. In a case such as this, there is nothing to do but wait for the problem to be resolved on Ubisoft’s end.
  • DNS issues – DNS issues are related to your network settings. If your internet connection is unstable or experiencing disruptions, Uplay may not be able to establish a connection to initiate the download.
  • Firewall or antivirus interference – Your firewall or antivirus software may be blocking Uplay’s access to the internet or flagging it as a potential threat, preventing the download from starting.
  • Permission issues – Uplay may require administrative privileges to initiate the download. If it doesn’t have the necessary permissions, it may encounter errors.

How can I fix Uplay unable to start your download?

1. Switch to Uplay’s Preview version

  1. Double-click on the icon of the Uplay client on the desktop to open it.
  2. Click the menu button and then select the Settings option.
  3. Navigate to the General tab and check the Try out Preview Versions box.  
  4. Now, close the client and re-open it to see if the issue is resolved.

If the issue persists on Uplay’s client, you can check to see if Uplay has released a fix in the preview version for the error.  

2. Use Google’s DNS address

  1. Press the Start button, type control panel in the search bar, and open it.
  2. Select View by: Small icons and click Network and Sharing Center.
  3. Click on Change adapter settings, right-click the current network adapter that you are using, and click Properties.
  4. Under This connection uses the following items: section, click on Internet Protocol Version 4 (TCP/IPv4) and click Properties.
  5. Check the Use the following DNS server addresses box to put 8.8.8.8 as the Preferred DNS server and put 8.8.4.4 as the Alternate DNS server.
  6. Check the Validate settings upon the exit box and click on OK.
  7. Now, reopen Uplay and check if the error is fixed.

If the problem is with your DNS address settings, you can follow the steps above to switch to using Google’s free DNS.

3. Flush the DNS and reset TCP/IP

  1. Press the Windows key to open the Start menu. Type the command prompt and select Run as administrator.
  2. Type the following in the command prompt and press Enter: ipconfig /flushdns
  3. Next, type the following reset and press Enter: netsh int ip
  4. Now check if the problem is fixed.

If using Google’s DNS address didn’t fix the issue, you can try using TCP/IP which serves as an extension of the previous method.

4. Reinstall the Uplay client

  1. Press the Windows + I keys to open the Settings app.
  2. Click on Apps and locate Uplay from the list of Installed apps.
  3. Right-click the Uplay entry and click on Uninstall.
  4. Follow the on-screen instructions to uninstall Uplay.

Now, download the latest version from the official Uplay website and reinstall it. Once reinstalled, try downloading any game and see if the issue is resolved.

You may also:

That’s it for how to fix the Uplay unable to start your download error. Hopefully, one or more of the methods provided in this guide will help you fix the issue.

Troubleshooting Uplay_r164.dll Not Found or Untrusted System File issues? Check out our comprehensive guide on resolving Uplay compatibility errors.

In case your Uplay download button is not working, you should check out this guide on how to fix it.

If you have any questions or suggestions, please use the comments section below.

Fix: Explorer.exe not Starting on Windows Startup

Have you ever experienced a blank screen when trying to log in to your computer? Although there may be several reasons for this, the major one is frequently Explorer.exe failing to launch on startup. The desktop and File Explorer GUI are controlled by the Explorer.exe Windows service.

As a result, Windows Explorer not starting on startup will affect your wallpaper, icons, and taskbar, leaving you with a blank screen and only a cursor. Fortunately, we have compiled some potential fixes to troubleshoot the issue in this article.

Why is Windows Explorer not starting on startup?

There could be several reasons why Windows Explorer is not starting on Windows startup. Here are some possible causes:

  • Incorrect startup settings – It is possible that Windows Explorer is not set to start automatically during system startup. You can check the startup settings to ensure it is enabled.
  • Corrupted user profile – Sometimes, a corrupted user profile can prevent Windows Explorer from starting. To resolve this, you can create a new user account and see if the issue persists.
  • Third-party software interference – Another possible reason is that some third-party software installed on your system is conflicting with Windows Explorer. Try performing a clean boot to identify if any software is causing the issue.
  • System file corruption – Corrupted system files can also cause issues with Windows Explorer. You can run the System File Checker (SFC) tool to scan for and repair any corrupted files.

Now that you know some of the possible reasons behind the Windows Explorer not starting on startup, the next section will provide you with simplified steps on how to fix the issue.

What can I do if the Explorer is not starting on Windows startup?

Before engaging in any troubleshooting or settings tweaks, you should consider observing the following preliminary checks:

Having confirmed the above checks, and if you still require further assistance, you can explore the advanced solutions provided below.

1. Set Explorer to start automatically on startup

  1. Right-click on the Start menu and select Task Manager.
  2. In the Task Manager window, click on the More details option if available.
  3. Navigate to the Startup tab and look for Windows Explorer in the list. If it’s disabled, right-click on it and select Enable.

Some users reported that having set Explorer.exe to start automatically on startup the black screen errors stopped. You can check it out too.

2. Perform a clean boot

  1. Press the Windows + R keys to open the Run dialog. Type msconfig in the dialog box and press Enter.
  2. In the System Configuration window, navigate to the Services tab. Check the Hide all Microsoft services box and click on Disable all.
  3. Then, go to the Startup tab and click on Open Task Manager.
  4. In the Task Manager window, disable all startup items by right-clicking on each and selecting Disable.
  5. Close the Task Manager and click on OK in the System Configuration window.
  6. Finally, restart your computer.

After performing a clean boot, now check if Windows Explorer starts properly. If it does, you can begin to enable services and startup items one after the other to identify the conflicting software.

3. Create a new user profile

  1. Press the Windows + I keys to open the Settings app.
  2. Navigate to Accounts and select Family & other users or Other users (depending on your Windows version).
  3. Under Other users, click on Add someone else to this PC.
  4. Follow the on-screen instructions to create a new user account.
  5. Log in to the new account and check if Windows Explorer starts correctly.

If your user profile is corrupted, it can trigger your Windows Explorer not starting on startup error.

4. Run the SFC tool

  1. Press the Windows + X keys to open the Quick Settings menu. Select Windows PowerShell (Admin).
  2. In the command prompt, type the following in the text field and press Enter: sfc /scannow
  3. Wait for the scan to complete.
  4. Once completed, restart your PC and this should fix any corruption found.

By running the SFC scanner, the Windows utility will identify and attempt to repair any corrupted system files found.

5. Perform a System Restore

  1. Press the Windows + R key to open the Run dialog box. Type rstrui in the dialog box and open it.
  2. Select the System Protection and click on System Restore.
  3. Click Next in the new window.
  4. Now, select the desired restore point and click Next.
  5. Click on the button and then Finish.

If the issue started recently, you can try using System Restore to revert your computer to a previous state when explorer.exe was working fine.

If none of these solutions resolve the issue, it may be helpful to seek further assistance from Microsoft Support or other Windows support forums, as there could be more specific causes related to your system configuration.

For further assistance, if you encounter an explorer.exe application error, work your way through any of the 8 fixes provided in this guide.

If you have any questions or suggestions, please let us know by using the comments section below.

Computer Started Using the Windows Installation Media [Fix]

Recently, some of our readers complained of an error on their Windows PC which states that the computer started using the Windows installation media. This often occurs when you’re trying to install or reinstall the Operating system on your PC.

When you see this message, it means that the computer is attempting to boot from the Windows installation media rather than from its internal hard drive. In this article, we will take you through the causes and how to fix the error.

Why did the computer started using the Windows installation media?

From several users’ experiences, if your computer has started using the Windows installation media unexpectedly, it could be due to several reasons. Below are some of them:

  • Incorrect boot order – The boot order in your computer’s BIOS or UEFI settings may be misconfigured. If the Windows installation media is set as the first boot device, the computer will attempt to boot from it instead of the internal hard drive.
  • Removable media connected – Your computer may be set by default to boot from removable media such as USB drives or DVDs. If any of these media are connected to your computer while starting up, the system might try to boot from them.
  • Damaged or corrupt boot loader – The boot loader may be damaged or corrupted. This can happen due to various reasons, such as improper shutdowns, disk errors, or malware infections.
  • Hardware or connection issues – In some cases, hardware problems or faulty connections can cause the computer to incorrectly detect or prioritize boot devices, leading to the error message.

The above are common reasons behind computer started using the Windows installation media. The next section will provide you with simplified steps on how to fix the issue.

What can I do if the computer started using the Windows installation media?

Try the following preliminary checks before using the advanced solutions provided for this error:

  • Restart your computer.
  • Check for hardware or connection issues.
  • Disconnect all peripheral devices.
  • Re-insert your Laptop’s battery – Several people who use Laptops have confirmed that this fix works for them and that is why this method is worth a shot at.

Having confirmed the above checks, the next section will take you through detailed steps on how to fix the computer that started using the Windows installation media error.

1. Delete a Registry key

  1. Press the Windows + R keys to open the Run command dialog. Type regedit in the dialog box and press Enter.
  2. Navigate to the following registry key: HKEY_LOCAL_MACHINE\SYSTEM\CurrentControlSet\Control
  3. Under the Control key, right-click on the key named MiniNT, and click on Permissions.
  4. Select your username under the Users or Groups section, check the Full Control checkbox under Permissions for…, and apply the changes you have made.
  5. Now, right-click on the MiniNT key and click on Delete.
  6. Confirm the dialog box which will appear and restart your computer to apply the changes.
  7. Finally, try installing Windows again.

If you’ve been getting the computer started using the Windows installation media error while trying to install Windows regularly, you can easily fix this problem by deleting the registry key.

2. Format the external drive used for installation

  1. Insert the installation media and boot the computer.
  2. Set up the language, time and date settings, etc.
  3. Next, enter your Windows activation key. But, if you don’t have it, click on I don’t have a product key below.
  4. Follow the setup process normally until you see the Which type of installation do you want? screen.
  5. Then. select the Custom option to perform a Clean install.
  6. You will now see the Where do you want to install Windows? screen with the partitions you have active.
  7. Choose each one with the current Operating system’ system files on it and click on Delete.
  8. Finally, choose the one where you want to install Windows and follow the on-screen instructions to complete the process.

This should fix the problem. However, if the issue persists after trying these methods, try to seek further assistance from a professional technician or Microsoft support.

For further assistance, check out our detailed guide on what to do if you can’t install Windows on a USB flash drive using setup.

If you have any questions or suggestions, please use the comments section below.

Fix: Kodi not Working or Crashing in Windows 10 & 11

The Kodi app is one of the best multimedia players with many different features, add-ons, and an amazing interface. It provides users with their entertainment needs.

However, the app is not without errors as users have recently posted on Kodi’s support forum about the Kodi crashing Windows 10 & 11 errors. Although this can be quite frustrating, we have compiled some potential fixes for this error.

Why is Kodi not working in Windows 10/11?

There can be several reasons why users are experiencing Kodi crashing Windows Windows 10 & 11. Below are some of the possible reasons:

  • Corrupted Kodi configuration – One of the major reasons behind this error is that Kodi’s configuration files have become corrupted, causing instability and crashes. Try using one of the dedicated tools to fix the issue.
  • Incompatible add-ons or plug-ins – Certain add-ons or plugins installed in Kodi may not be compatible with Windows 10 & 11, leading to crashes. These add-ons could be outdated or have conflicts with the operating system.
  • Outdated Kodi version – Using an outdated version of Kodi can lead to compatibility issues with Windows 10 & 11. The older version may not be optimized to work well with the latest operating systems, causing crashes.
  • Insufficient system resources – If your computer doesn’t meet the minimum system requirements to run Kodi smoothly, it may crash due to a lack of resources.

Now that you know some of the possible reasons behind the Kodi crashing Windows 10 & 11 error, let’s proceed to what fixes to apply.

How can I fix Kodi if it’s not working or it’s crashing?

Before attempting any of the advanced solutions provided in this guide, users should ensure they perform the following preparatory checks:

  • Restart your PC.
  • Close unnecessary applications running in the background.
  • Disable or remove problematic addons or plugins.
  • Update your graphics card to the latest version.

Having confirmed the above checks and none of them fixes the problem, you can explore the advanced solutions provided below to know what works for you.

1. End all unnecessary tasks running in the background

  1. Press Ctrl + Shift + Esc shortcut keys to open Task Manager on Windows.
  2. Locate all processes consuming either the system resources.
  3. Select each one individually and click on the End Task button.
  4. Terminate all these but do not kill a critical process or one that you need.

Ending non-critical processes in your Task Manager should fix the issue. Once done, try to run the Kodi app again to see if the Kodi crashing Windows error is fixed.

2. Disable hardware acceleration on Kodi

  1. Launch the Kodi app. On the left sidebar, click on the gear icon.
  2. Under Settings, choose the Player option.
  3. Next, disable Allow hardware acceleration – DXVA2 by turning off the toggle in the video section.
  4. Now, restart the Kodi application.

Although it is recommended to keep the hardware acceleration option enabled in Kodi, however, it can also cause incompatibility issues on Windows PC.

3. Download the latest version of DirectX

  1. Press the Windows + R keys to open the Run command dialog box. Type dxdiag in the text field and press Enter to open the DirectX Diagnostic Tool window.
  2. Check if the current DirectX version on your PC is not DirectX 12 or above. If so, then you will have to go through the update process.
  3. Then, open your preferred web browser and visit Microsoft’s official website to download the latest DirectX.
  4. Now, run the setup and follow the prompts to complete the installation process.
  5. After the installation, restart your computer.

By updating to the latest version of DirectX, it should have fixed any DirectX-related issues causing Kodi to crash Windows error automatically.

4. Reinstall Kodi on Windows 11 PC

  1. Press the Windows key to open the Start menu. Type control panel in the search box and press Enter.
  2. Firstly, click on Uninstall a program under Programs section.
  3. Then, locate and click Kodi in the Program and Features window and choose Uninstall.
  4. Restart your PC and visit the official Kodi website to download its Windows 11 version.

And that’s it on how to fix Kodi if it’s not working or crashing on Windows 10 and 11 PC. Hopefully, one of the methods provided in this guide will help you fix the issue.

Have you been experiencing system crash issues but you don’t know what fix to apply? Check our detailed guide on Windows 11 keeps crashing for 9 methods to stop it.

Additionally, check here to fix Kodi if it’s not working or opening on Windows 10 & 11, and also fix items that fail to play on Kodi.

If you have any questions or suggestions, please let us know by using the comments section below.

Fix: Service did not Respond in a Timely Fashion (Error 1053)

Some of our readers have recently reported that they encountered Error 1053 with an error message that says the service did not respond in a timely fashion. This error occurs typically when a Windows service fails to start or stop within the expected timeframe.

There are variations to this error message such as issues in Windows services to inability to launch custom services (including games and other third-party software). We have therefore compiled potential fixes for this error.

Why did the service did not respond in a timely fashion?

From the results gathered from users, if you come across Error 1053: the service did not respond in a timely fashion, there can be several reasons why you’re getting the error message. Below are some of them:

Now that you know some of the possible reasons behind Error 1053, the next section will provide you with simplified steps on how to fix the issue.

How can I fix the service did not respond in a timely fashion?

Before trying any of the troubleshooting or settings tweaks, you should consider observing the following preliminary checks:

  • Restart your computer.
  • Ensure that you are logged in as an administrator on your computer.
  • Make sure you are properly connected to the Internet.
  • Ensure that your system resources are not overloaded.
  • Gain access to use the application – Ensure the service has appropriate privileges to access the required resources. Grant necessary permissions to the service account in Windows 11 if needed.

Having confirmed the above checks, you can work your way through any of the advanced solutions provided below.

1. Increase service timeout in Windows Registry

  1. Press the Windows + R keys to open the Run command dialog. Type regedit in the dialog box and press Enter.
  2. Navigate to the following registry key: HKEY_LOCAL_MACHINE\SYSTEM\CurrentControlSet\Control
  3. Create a new DWORD value called ServicesPipeTimeout if it doesn’t already exist.
  4. Right-click on the newly created DWORD value and select Modify.
  5. Set the Value to the number of milliseconds you want to wait (e.g., 60000 for 60 seconds). Click OK to save changes and exit.
  6. Restart the computer for the changes to take effect.

Windows allows 30 seconds for a service to start or stop. To avoid getting error 1053, try increasing this timeout value in your Registry Editor to provide more time for the service to respond.

2. Run the SFC scan

  1. Press the Windows key to open the Start menu. Type command prompt in the search box and select Run as administrator.
  2. In the command prompt, type the following and press Enter: sfc /scannow
  3. Wait for the scan to complete.
  4. Once completed, restart your PC and this should have fixed any missing or corrupted system files found.

The System File Checker checks all your system file structures and compares the structure with that of a fresh copy present online. If there is any discrepancy, the files will be replaced accordingly.

3. Disable conflicting services or programs

  1. Press Ctrl + Shift + Esc shortcut keys to open Task Manager on Windows.
  2. Locate all processes consuming either the system resources. Select each one individually and click on the End Task button.
  3. Terminate all these but do not kill any Microsoft or Windows essential process.
  4. Restart your PC.

Temporarily disable conflicting processes or services in your Task Manager to fix the service that did not respond in a timely fashion error. Once done, try to run the service that triggered the error again and see if it is fixed.

And that’s it on how to fix the service did not respond in a timely fashion error code 1053. If the issue persists, consult the documentation or support resources provided by the service or application vendor.

In case you need the list of available Windows services and how to access them accordingly, check our expert guide for that.

If you have any questions or suggestions, please let us know by using the comments section below.

Windows 11 in React: Everything You Need to Know

In case you’re new to React, it is one of the best front-end development technology, an open-source JavaScript library for building user interfaces for web applications. Some of our readers have recently requested to know about Windows 11 in React.

In this article, we will tell you everything you need to know about Windows 11 in React including how to install React.js on your Windows 11 PC.

Can I install React on Windows 11?

Yes, you can install React on Windows 11. React is a JavaScript library that can be used with any operating system that supports JavaScript.

However, installing React on Windows 11 requires that you download and install some additional software —Node.js and Node Package Manager (npm)— from GitHub which are necessary for React to work properly on your Windows 11 PC.

Node.js is a JavaScript runtime environment that allows you to run JavaScript code outside of a web browser while npm is a package manager for Node.js which allows users to easily install and manage packages like React.

How to install React.js on Windows 11?

 1. Install Node.js from its official website

  1. Open your browser and visit the official Node.js website.
  2. Select Windows Installer to download the 64-bit installer automatically or manually download the 32-bit installer.
  3. Once the download is complete, double-click the file to run the installer.
  4. Follow the on-screen instructions to complete the installation.
  5. Now, press the Windows + X keys to open the Quick Settings menu. Select Terminal (Admin) from the list.
  6. Run the following command in the text field and press Enter: npx create-react-app my-react-app 
  7. This will create a new React app in a folder named: my-app
  8. Next, navigate to the React app and enter the cd my-app to change your current directory to the latest React app folder.
  9. Now, run the command below to start the React app: npm start 
  10. This will launch the app in your default browser.

By running this command, you should now have a working React project running on your Windows 11 computer. In case you encounter any problem with PowerShell, check our expert guide to fix it quickly.

2. Install React.js using the script tag in HTML

  1. Follow the steps mentioned in method 1 to install Node.js on your Windows 11 computer.
  2. Open a text editor app such as Notepad or Visual Studio Code and create a new HTML file.
  3. Save the file with a .html extension, (my-react-app.html).
  4. Add the following script tags to your HTML file’s head section: <script src="https://unpkg.com/react/umd/react.development.js"></script> <script src="https://unpkg.com/react-dom/umd/react-dom.development.js"></script>
  5. Add a script tag after the above two script tags in your HTML file.
  6. Define your React component using JavaScript.
  7. In the body section of your HTML file, add a div element with the id “root”: <body>  <div id="root"></div> </body>
  8. Now, save the HTML file and open it in your default browser.

Following the instructions correctly using the script tag in HTML, you should see Hello, React! displayed on the page. And that’s it on how to install React.js on Windows 11 PC.

Can I recreate Windows 11 in React?

Yes, it is technically possible to recreate the visual appearance and some functionalities of Windows 11 in React.

However, to achieve that, you would need to break down the various components and visual elements of the operating system and build them using React components.

This would involve designing and implementing the Windows 11 management system, taskbar, start menu, system tray, and other UI elements.

Hopefully, the methods provided in this article have helped you to install React.js on Windows 11. In case you encounter a module not found: can’t resolve react-router-dom, check out our detailed guide to fix the issue.

If you have any questions or suggestions, do not hesitate to use the comments section below.

Fnplicensingservice.exe: What is it & Should you Disable it?

fnplicensingservice.exe is an Activation Licensing service published by FLEXnet. The process usually runs once launch tools that recommend or need license activation.

However, the process can also be disguised as malware or slow down your PC if there are multiple running instances. This article briefly discusses the fnplicensingservice.exe and shows you how to fix or disable it.

What is fnplicensingservice.exe?

fnplicensingservice.exe is an executable file responsible for the 32-bit licensing service provided by FLEXNet Publisher. It is used primarily by corporations to provide licensing services for users of applications developed by these corporations.

The process is not known to cause any damage to your PC, so you don’t have to worry about the security implications of the file/process. However, malware can also disguise itself as an executable file to elude antivirus scans. 

How can I fix fnplicensingservice.exe?

The fnplicensingservice.exe isn’t considered an error that requires fixing, but sometimes, you’d want to disable the process if you suspect it to be malware or if the process is memory intensive. The following are ways to fix the fnplicensingservice.exe:

1. Run the Uninstaller of the Parent Software

  1. Press the Windows key + E to open File Explorer.
  2. In the File Explorer window, navigate to the following path: C:\Program Files\Macrovision Europe\FLEXnet Publisher\Activation Licensing Service
  3. Once you’ve located the folder, find the FNPLicensingService.exe_uninstall.exe, and double-click on it to run the Uninstaller.
  4. Follow the onscreen instructions to complete the uninstallation and restart your PC.

Every software installed on your PC has an uninstaller package that you can run to help remove the app from your PC. You should run the uninstaller if you’d like to remove the fnplicensingservice.exe. 

2. Remove using the Settings App

  1. Press the Windows key + I to open the Settings app.
  2. In the Settings app, click Apps and click Installed Apps in the next window.
  3. Click on the search bar on the right pane, and type FLEXnet Publisher or Macrovision Europe to locate the software.
  4. Once you’ve located the app, Click Uninstall and then click it again to confirm the uninstallation.
  5. Close the Settings app and restart your PC.

3. Disable Using the Task Manager

  1. Press the Ctrl + Alt + Del keys to open the Task Manager.
  2. In the Task Manager window, please navigate to the Processes tab, locate fnplicensingservice.exe, click on it, and select End Task.
  3. Then, repeat this step to disable all running instances of fnplicensingservice.exe.

If you can’t delete the fnplicensingservice.exe, the last option is to disable the process from running; this way, even if the software is installed, the process will be unable to start. 

Like most executable files, the fnplicensingservice.exe usually accompanies third-party software installed on your PC. However, the process is critical, especially when running on the Windows OS.

If, for whatever reason, you’d like to disable or remove the process/file, you should be very careful and ensure you have a functional backup of your PC in case you break something on your PC.

Should you have further questions or suggestions regarding this guide, kindly drop them in the comments section.

0x80092004: How to Fix this Windows Update Error

Security and performance are two vital aspects of any device, and the same applies to Windows. But the Windows update errors often act as a barrier, preventing users from installing the latest security patches and driver updates. One such that many reported is 0x80092004.

The 0x80092004 error with .Net Framework 3.5 and 4.8 is common, but other updates, too, are affected. And the occurrences of it have witnessed a tremendous increase in recent months, with KB5022729 being hit the worst. So, let’s find out all about the error!

What is error code 0x80092004?

The error code 0x80092004 indicates, Cannot find object or property. In simple words, Windows couldn’t find the right cryptographic value and, in turn, rejected the update. Here are a few reasons for it:

  • Issues with the update: When the error widely affects a specific update, it points to an issue with the update itself. Maybe Microsoft didn’t verify things or missed a few aspects before releasing it.
  • Corrupt system files: One of the common reasons behind issues with the update process is corrupt system files on the PC. This also affects the performance and triggers a bunch of other errors, including Blue Screen of Death.
  • Misconfiguration in the update components: The Windows Update Components play a vital role in updating the OS, and any misconfiguration or corrupt files here can lead to the error.
  • Problems with the Software Distribution folder: Though rare, this, too, could be an underlying cause when you get the update error.

How do I fix error 0x80092004?

Before we head to the slightly tricky solutions, here are a few ones to try:

  • Restart the computer.
  • Disconnect any additional drives from the PC and verify whether the 0x80092004 error is fixed.

If none work, move to the solutions listed next.

1. Run the Windows update troubleshooter

  1. Press Windows + I to open Settings, and click on Troubleshoot on the right.troubleshooter
  2. Click on Other troubleshooters.other troubleshooters
  3. Click the Run button next to Windows Update.troubleshooter to fix 0x80092004
  4. Wait for the troubleshooter to identify the problem and make the recommended changes, if any.troubleshooter

When it comes to problems with Windows, the built-in dedicated troubleshooters should usually be the primary approach, and they helped many with the 0x80092004 error. These identify problems (already known to Microsoft) and make the required changes.

2. Repair the corrupt system files

  1. Press Windows + R to open Run, type cmd, and hit Ctrl + Shift + Enter.cmd
  2. Click Yes in the UAC prompt.
  3. Paste the following commands individually and hit Enter after each:DISM /Online /Cleanup-Image /CheckHealth DISM /Online /Cleanup-Image /ScanHealth DISM /Online /Cleanup-Image /RestoreHealth
  4. Once done, run the following command for the SFC scan:sfc /scannowsfc scan to fix 0x80092004
  5. Finally, restart the computer after the two scans.

If it’s the corrupt system files to blame for the 0x80092004 Windows Update error, running the DISM tool and SFC scan should get things up and running.

If you’re not sure about proceeding with the manual steps and want to avoid further issues, we recommend a specialized tool.

3. Clear the SoftwareDistribution folder

  1. Press Windows + E to open File Explorer, paste the following path in the address bar, and hit Enter:C:\Windows\SoftwareDistributionsoftware distribution
  2. Now, press Ctrl + A to select all the files here, and hit Delete to clear them.clear files to fix 0x80092004
  3. Choose the appropriate response in case a confirmation prompt appears.

4. Uninstall the faulty update

  1. Press Windows + I to open Settings, go to Windows Update from the navigation pane, and click on Update history.windows update
  2. Scroll down and click on Uninstall updates.uninstall updates to fix 0x80092004
  3. Click Uninstall next to the update last installed. It was KB5022502 that triggered the error for most.uninstall to fix 0x80092004
  4. Again, click Uninstall in the confirmation prompt and wait for the process to complete.uninstall
  5. Once done, launch Command Prompt as an administrator and run the following command:dism/online /cleanup-image /StartComponentCleanupdism to fix 0x80092004
  6. Finally, check again for the update that was throwing the error, and it should now install.

Often, it’s a problematic previously installed version that doesn’t allow newer ones to install. And a quick fix is to identify and uninstall the update to fix 0x80092004.

5. Perform an in-place upgrade

Tip icon Tip
The steps listed here are to perform an in-place upgrade on Windows 11. In case you are running the previous iteration, download the Windows 10 Media Creation Tool, and run it to repair the PC.
  1. Go to Microsoft’s official website, choose the correct edition and product language, then download the Windows 11 ISO.windows iso
  2. Double-click the downloaded ISO file and click Open in the prompt.
  3. Now, run the setup.exe file.setup.exe
  4. Click on Next to proceed.next
  5. Click Accept to agree to Microsoft’s license terms.accept to fix 0x80092004
  6. Finally, verify the setup reads Keep personal files and apps, and click on Install to start the repair process.in-place upgrade to fix 0x80092004

An in-place upgrade basically reinstalls Windows without affecting the stored apps and files. The process takes a few hours but is often the best troubleshooting method for any error, including 0x80092004.

When facing such issues, you can also always manually install the affected update from the Microsoft Update Catalog. Just identify the KB number, search for it, download the setup, and install the update.

Tip icon Tip
If nothing here worked, the update is likely bugged, and the ideal approach would be to wait while Microsoft fixes things. You do not need to reinstall Windows, as some recommend unless you are absolutely sure the problem lies with the PC.

Before you leave, check some quick tips to boost Windows performance and the best security settings to enforce.

For any queries or to share which solution worked for you, comment below.

wsmprovhost.exe: What is it & How to Stop its High CPU Usage

Windows is one of the best operating systems for PCs and is highly customizable, making it the preferred choice for many. Yet it, too, is not free of errors. Instead, there are several every day if you were to check the error logs. But some are trickier than others, particularly wsmprovhost.exe.

Many users found several instances of wsmprovhost.exe in the Task Manager, which led to high CPU usage, thereby affecting the PC’s performance. The problem is commonly encountered on Windows Server, with there being no reliable information available. So, let’s find out!

What is wsmprovhost.exe used for?

The wsmprovhost.exe process indicates that a Windows Remote PowerShell session is active and generally appears when entering a remote session. The process is created on the server, and more such are added when you run other processes in the remote session.

For those of you wondering, is wsmprovhost.exe safe, the answer is yes. Though there have been cases where it was triggered by malware. So, while the process itself is safe, you still need to verify what’s triggering it.

Here are a few reasons users face wsmprovhost.exe high CPU usage:

  • Multiple processes running in remote sessions: Upon starting a process in the remote session, another instance will be created in the Task Manager, which will, after a while, lead to increased resource consumption. Due to this, some also reported wsmprovhost.exe high memory usage.
  • Users running PowerShell scripts: The process is also triggered when running PowerShell scripts, so you will have to verify whether users who are a part of the domain are doing so.
  • System infected with malware: Another likely reason behind the problem is malware or virus infection.

How do I fix wsmprovhost.exe high CPU usage?

Before we move to the trickier ones, try these quick tricks:

  • Restart the computer and verify whether the CPU usage spikes again. If not, it may have been a one-off thing.
  • Check for available OS updates and install them.

If none work, move to the fixes listed next.

1. Uninstall third-party apps

  1. Press Windows + R to open Run, type appwiz.cpl in the text field, and hit Enter.appwiz.cpl
  2. Select any recent application after installing which the error first appeared, and click Uninstall.uninstall app to fix wsmprovhost.exe
  3. Follow the on-screen instructions to complete the process.
  4. Once done, restart the computer for the changes to come into effect.

Many domain administrators reported that it was a third-party app that triggered the wsmprovhost.exe attack. For some, it was PRTG, a network performance management software. So, uninstall the app, whichever it is, and things should be up and running.

2. Scan your PC for malware

  1. Press Windows + S to open Search, type Windows Security in the field, and click on the relevant result.windows security
  2. Click on Virus & threat protection.virus & threat protection
  3. Click on Scan options.scan options
  4. Now, select Full scan from the available options, and then click on Scan now.full scan to fix wsmprovhost.exe
  5. Wait for the scan to complete, and then restart the computer.

In case it’s malware or virus responsible for the problem, running a full scan with the built-in Windows Security should do.

However, you could use an effective antivirus software to run a deeper scan. Besides, this will also fix things in case you find Faulting application name: wsmprovhost.exe.

3. Repair corrupt system files

  1. Press Windows + R to open Run, type cmd, and hit Ctrl + Shift + Enter.cmd
  2. Click Yes in the UAC prompt.
  3. Paste the following commands individually and hit Enter after each:DISM /Online /Cleanup-Image /CheckHealth DISM /Online /Cleanup-Image /ScanHealth DISM /Online /Cleanup-Image /RestoreHealth
  4. Once done, execute this command for the SFC scan: sfc /scannowsfc scan to fix wsmprovhost.exe
  5. Finally, restart the computer.

In the case of corrupt system files, it’s usually recommended to run the DISM tool and SFC scan. Both, when run together, will identify and repair the system files triggering the issue.

4. Disable startup apps

  1. Press Ctrl + Shift + Esc to open the Task Manager, and navigate to the Startup apps tab.startup apps
  2. Now, look for any apps that read Enabled under the Status column, select each individually, and click on Disable towards the top right. Just make sure not to disable any critical startup app.disable startup app to fix wsmprovhost.exe
  3. Once done, restart the computer, and the CPU usage should remain low.

Another reason behind wsmprovhost.exe high CPU is that a startup app automatically creates instances of the process. And a viable solution here is to disable the startup apps.

In case nothing helps fix the wsmprovhost.exe high CPU consumption, the last option is to reset Windows to factory defaults. Make sure to use a reliable backup tool or copy the critical files to an external USB beforehand to avoid data loss.

Before you leave, check the best security settings in Windows and configure them today for a safer experience!

Tell us which fix worked for you in the comments section below.

Microsoft lawyers could be examining Plan B to close Activision deal without CMA approval

Unsurprisingly, it seems Microsoft may be exploring a Plan B option if their appeal of the UK’s Competition and Markets Authorities vote to block the Activision deal doesn’t play out in the company’s favor.

While Microsoft filed its formal appeal of the CMAs decision to block its acquisition of Activision Blizzard last week, a report from MLex, a lawyers’ news source, posits the idea that the company is actively working on an end-around to both the initial decision as well as the subsequent interim ultimatum the regulatory body dished out.

For now, Microsoft is publicly pursing the appeals process and has not stated any different, “Our priority is pursuing the appeal process in the UK, and we remain committed to constructive dialogue and solutions to address regulatory concerns,” according to a company spokesperson.

However, MLex understands that Microsoft has retained additional lawyers to examine possible ways for the company to close the deal in the face of an official veto from the CMA.

Some alternative paths for the closing Microsoft’s acquisition bid in spite of the CMA’s current decision is to have Activision leave the UK for “another European country”, and remove itself from CMA jurisdiction. Another option being bandied about by lawyers is Microsoft extending the same licensing concessions it gave the European Commission unilaterally across the UK.

Microsoft is also looking into the legality of the CMA to issue a global ban as it pertains to localized issues within UK markets. Microsoft and Activision could present a case that the CMA needs to narrow its ultimatum ban to only UK regions and thus allowing Microsoft to close wherever else it’s gotten approval.

Lastly, Microsoft could forge ahead with a close on the deal and when sued by the CMA for “violating” its global veto, take the matter to court on grounds of illegality.

Whatever the case may be, the Microsoft and Activision deal is still an active merger and could remain one even with a failed appeal to the Competition Appeals Tribunal.

For now, Microsoft has the next few weeks to purse the path of least resistance with an appeal to the CTA, and perhaps, nudging the tribunal into various conflicts of interest CMA directors may have knowingly or unknowingly engaged with during the investigatory process.

Via Twitter

How to Disable Efficiency Mode on Windows 11

Efficiency mode, also known as power-saving mode or low-power mode, is a feature available in Windows 11 that helps optimize your device’s performance by conserving battery power and minimizing resource usage.

When enabled, Efficiency mode frees up resources used by inactive apps running in the background and prioritizes resources for other active apps.

However, efficiency mode may limit app performance, causing them to perform slowly and in some circumstances, making the apps unusable or even crash completely. 

What is the efficiency mode in Windows 11?

Efficiency mode in the Task Manager is a new feature that lets you limit how much an app uses your device’s resources, such as the CPU, memory, disk, network, and background running time. It also helps decrease the CPU’s thermal footprint, reduces fan noise, and improves battery life.

Not all applications and processes in Task Manager have access to this feature. You can only enable or disable efficiency mode for supported processes. Some applications don’t support this feature because enabling it reduces their priority in using system resources.

How do I turn off efficiency mode in Windows 11?

  1. Right-click the Taskbar and select Task Manager from the menu. Task Manager
  2. In the Task Manager window, select the Processes tab.Go to Processes tab
  3. Now, locate and click on the desired process from the list of processes.
  4. If you can’t find the process, click on Status at the top of the Task Manager window, and it will show you a list of all the processes running in Efficiency mode.Use Status
  5. Once you have selected the process, right-click on the process and uncheck the Efficiency mode option from the context menu.Uncheck efficiency mode
  6. That’s it! Efficiency mode will be turned off for the selected process.
  7. If you want to disable Efficiency mode for other processes, repeat the same steps for each desired process.

To disable efficiency mode for certain processes, you may need to disable it individually for each sub-process.

However, efficiency mode is permanently enabled for apps like Chrome and Edge, meaning you cannot turn it off. You can temporarily disable efficiency mode for these apps, but they will automatically be re-enabled upon the next restart.

Apps like Chrome and Edge have their own efficiency mode and battery saver options that can be turned off to improve the performance of the respective apps.

If you have any more questions, please leave them in the comments section below.