If you’re among those unable to charge their laptop battery above 80%, keep reading. We’ll explain how to fix it and why it happens.
How do I fix my laptop battery if not charging above 80%?
1. Disable the battery limiter
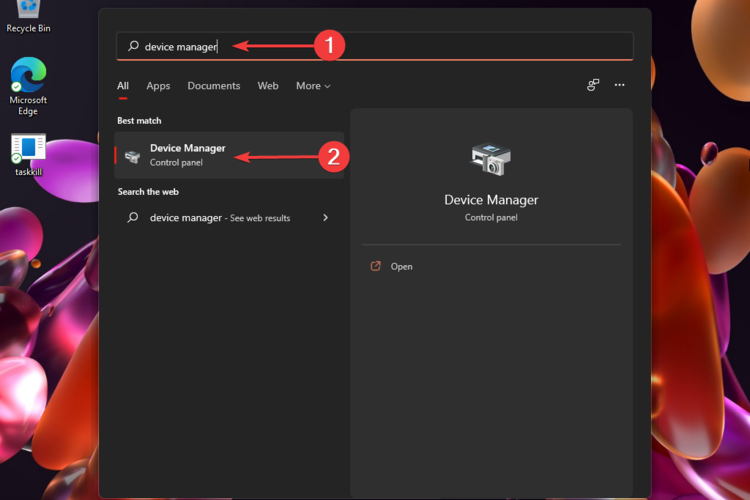
Click on Start and search for your laptop manufacturer application, then hit Enter.
Under System Tools, select Power or battery settings.
Under Battery warranty & settings, make sure Conservation Mode is not enabled.
We used a Lenovo laptop, but most brands have a similar tool with a familiar UI.
2. Calibrate your battery
Recalibrating your laptop battery is easy, simply let the battery drain from its full capacity to nearly dead.
If your battery won’t charge further than 80%, try plugging it in for a couple of hours before allowing it to drain. Once it reaches a dangerously low percentage, plug it back in and charge it full.
3. Run power troubleshooter
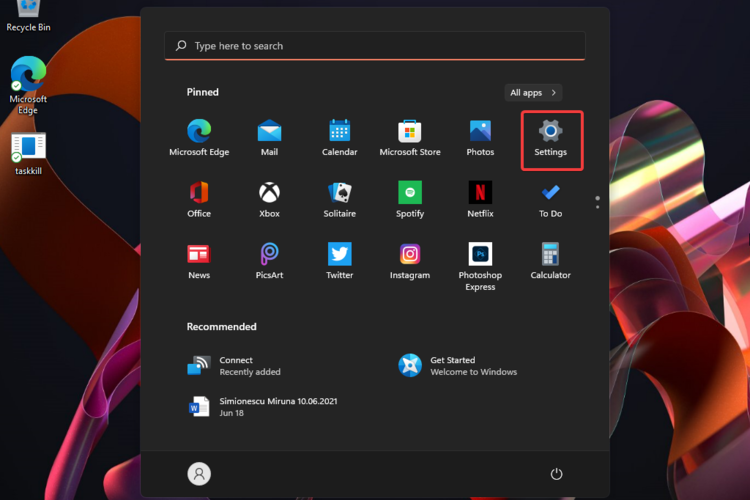
Click on Start and open Settings (or press Windows + I).
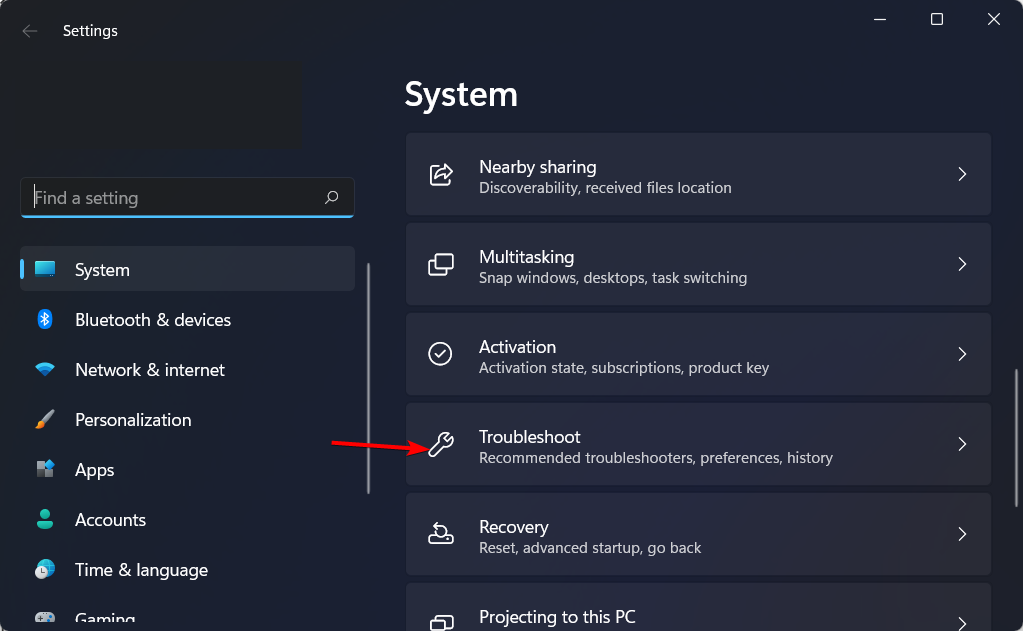
Under System, scroll down and select Troubleshoot.
Click Other troubleshooter.
Under Other, click Run next to Power.
Allow the troubleshooter to run and fix any issues.
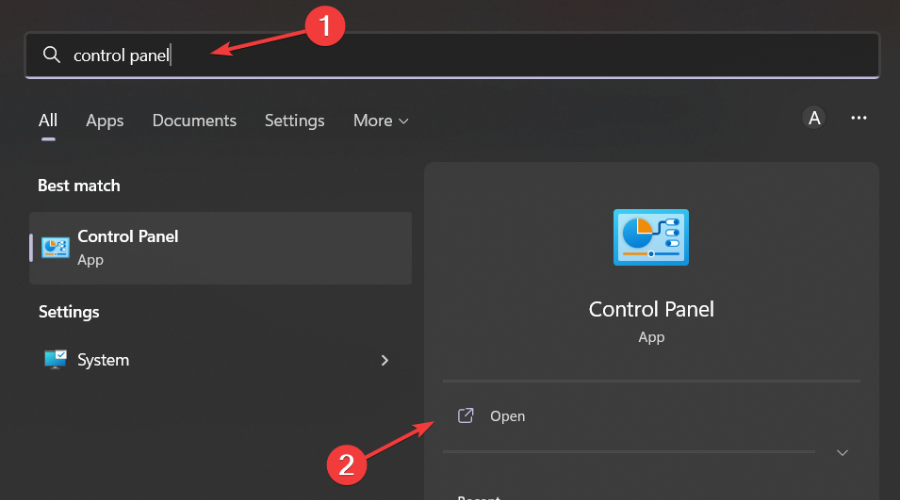
Click on Start and search for Control Panel, then hit Enter.
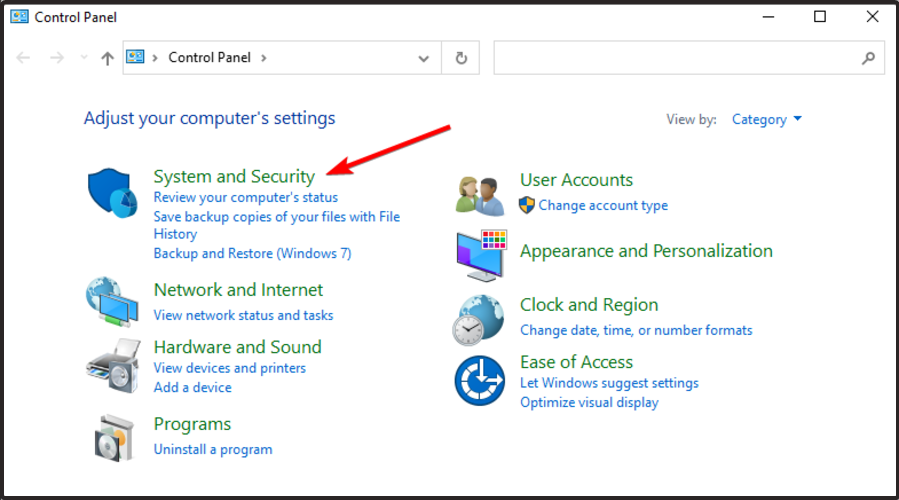
Click on Hardware and Sound, then select Device Manager.
Select Batteries to reveal the dropdown.
Right-click on Microsoft ACPI-Compliant Control Method Battery and select Update driver.
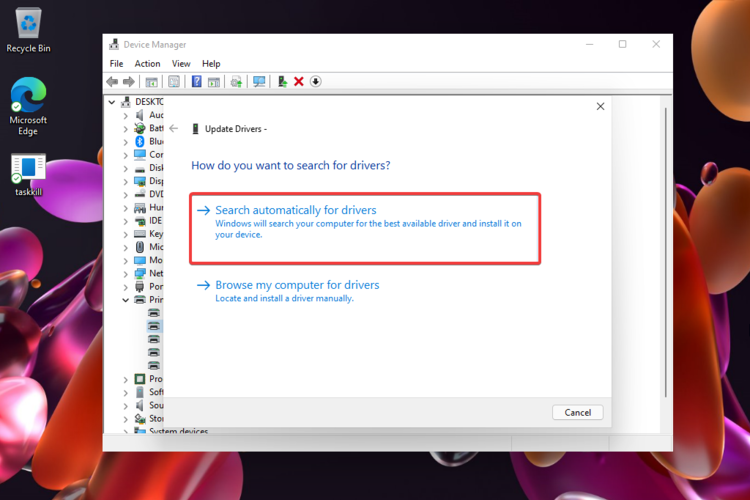
Select Search automatically for drivers.
5. Uninstall and re-install the battery driver
Click on Start and search for Control Panel, then hit Enter.
Select Hardware and Sound, then click on Device Manager.
Click on Batteries to reveal the dropdown.
Right-click on Microsoft ACPI-Compliant Control Method Battery and select Uninstall driver.
Select Uninstall again.
Restart your PC.
6. Replace the battery
If you’ve tried every solution and nothing has fixed your laptop battery, it may be a good indication that it needs to be replaced. This is most likely the case for older laptops or ones with detachable batteries.
Users can bring their laptops to a computer repair store or purchase one from the manufacturer’s website.
If you have a newer laptop that is still within its warranty, you can run a battery report to provide proof of an issue with your battery.
How do I change power modes in Windows 11?
Click on Start and open Settings (or press Windows + I).
Under System, select Power & battery.
Under Power, change the power mode by clicking the dropdown menu next to Power mode.
You can choose between the best power efficiency, balanced, and performance power modes.
If you want to prioritize the life of your battery over performance, then change the power mode to the best power efficiency. Adjust the mode to the best performance to prioritize performance over the battery.
Why does my laptop battery stop charging at 80%?
Misconfigured battery settings: If the power settings are misconfigured, for instance, the Batter Life Extender is enabled, the battery won’t charge beyond 80%.
Requires calibration: When the battery has not been calibrated for long, it doesn’t correctly judge the charge percentage, and, as a result, the HP laptop battery stops charging at 80. This is also the reason your laptop keeps switching between AC and battery when gaming.
Hardware issues: Batteries physically damaged or ones with a hardware malfunction, too, show such errors.
Calibration needed: If the battery hasn’t been calibrated recently, your system may misread the charge percentage, causing the battery to stop charging at 80%.
We hope one of the above solutions helped you fix your laptop battery if it’s not charging above 80%. If you’re having difficulties with your laptop not charging after a Windows 10 update, we have a guide.
Let us know in the comments below which solution worked for you or if you have a different suggestion.
Based on the classic video game series of the same name, Castlevania is widely regarded as one of the very best video game-to-television adaptations ever. And it is the show that kickstarted the current trend of bringing video games to TV.
Backstory
Originally conceived as a film, Castlevania was written by British comic book writer and screenwriter Warren Ellis, and produced by Powerhouse Animation Studios. After years of development purgatory, the show was picked up by Netflix in 2015. Upon release in 2017, the first season was well-received and garnered praise for its writing, visuals and voice acting.
By the second season, the show had an estimated viewership surpassing 30 million viewers and became one of Netflix’s most successful animated series to date.
Reception
As critics have put it: “Castlevania sinks its fangs into vampiric lore during a devilishly fun second season that benefits from an expanded sense of scale and episode tally that allows the series to fully spread its leathery wings.” Castlevania currently enjoys a 94% “average tomatometer” score and an 89% average audience score on Rotten Tomatoes. It was the first video game television adaptation to get a “Fresh” rating on the site.
Premise
Castlevania follows the story of an outcast vampire hunter named Trevor Belmont. Along with the mage Sypha Belnades and the dhampir Alucard, Trevor sets out to destroy the vampire Count Vlad Dracula Țepeș, who declares war on the people of Wallachia when his wife, Lisa, is mistakenly executed as a witch.
The show’s excellent cast includes Richard Armitage (The Hobbit) as Trevor; James Callis (Battlestar Galactica) as Alucard; veteran voice actress Alejandra Reynoso as Sypha; and Graham McTavish (also of The Hobbit fame) as Dracula.
Season 1(Released: July 7, 2017)
The last surviving member of a disgraced clan fights to save Eastern Europe from Dracula. Inspired by the classic video game series.
Season 2 (Released: October 26, 2018)
As Dracula and his legion of vampires prepare to rid the world of humanity’s stain, an unlikely trio of heroes dares to stand in their way.
Season 3 (Released: March 5, 2020)
Belmont and Sypha settle into a village with sinister secrets, Alucard mentors a pair of admirers, and Isaac embarks on a quest to locate Hector.
Season 4 (Released: May 13, 2021)
Dracula’s influence looms large as Belmont and Sypha investigate plans to resurrect the notorious vampire. Alucard struggles to embrace his humanity.
Wrap up
If you haven’t checked out Castlevania by now, you should hop on over to Netflix and remedy that immediately. And you don’t need prior knowledge of the long-running video game series to enjoy it.
A follow-up series to be titled Castlevania: Nocturne, is officially in production.
All we know at the present is that the show will feature characters Richter Belmont and Maria Renard, and will reportedly be set against the backdrop of the French Revolution in the late 18th century. It appears as though Warren Ellis will not be returning as script writer, nor will Castlevania showrunner Adi Shankar be reprising his role as executive producer for the sequel.
Microsoft’s partner NVIDIA seemed to be caught a bit flat-footed by Microsoft’s roll out of the Windows 11 2022 Update last week as the GPU manufacturer scrambles this week to release patches to address performance issues sparked by the recent upgrade.
While most mainstream devices on the market house some version of Intel or AMD’s discrete GPU chips, there is a sizeable niche of users whose configurations include NVIDIA GPUs such as Surface Laptop Studio owners or desktop gamers. Following the Windows 11 2022 Update, some devices powered by NVIDIA GPUs started incurring performance issues that include a failure to update to the latest version, unstable framerates, stuttering or full-scale screen crashes.
According to NVIDIA, the new debugging tools that accompanied the Windows 11 2022 Update and their default nature were accidentally triggering responses from the company’s GeForce Experience.
Fortunately, NVIDIA wasn’t one to linger and has since issued a new GFE beta update that should hit systems as version 3.26 and help correct any immediate display issues.
NVIDIA is encouraging users to grab the update either through the normal downloader application or to push it manually after first collecting the download from the web.
It’s early days since the beta update for GFE has been live and we can’t say how effective NVIDIA solutions has been, but it appears fairly quiet from the crowd that were initially experiencing issues.
Problem with hardware – When you start witnessing mouse delays, chances are that the hardware itself is beginning to tear down. In such cases, only a mouse replacement may do the trick.
Regardless of the cause, this is one problem you should be able to solve in a few clicks. So we will introduce you to our top solution recommendations.
How can I fix the mouse lag in CSGO?
1. Update your mouse driver
Ensuring that you have installed the official driver of your mouse is the first thing we suggest you do. After that, you can do it manually via the Settings panel of your PC or the manufacturer’s official website.
However, the most reliable recommendation is to use dedicated software to ensure a clean and correct mouse driver installation.
2. Disable the V-Sync within CSGO
Right-click your desktop and select NVIDIA Control Panel.
Under 3D Settings, click Manage 3D settings.
Under Global Settings, scroll down to Vertical sync; from the dropdown options, select Off.
When V-sync is enabled in CSGO, the game synchronizes the frame rate with your monitor’s refresh rate to provide better stability.
Although enhanced stability is desirable, this doesn’t always mean the game’s performance improves and may lead to mouse lag in CSGO.
By disabling the V-sync, the frame rate cap will be unlocked, and the screen tearing along with the input lag.
3. Run the Hardware and Device troubleshooter
Press Windows + R to launch the Run command, type the following command in the text field, and hit Enter: msdt.exe -id DeviceDiagnostic
Now, follow the on-screen instructions to complete the troubleshooting process.
Troubleshooters are one of the easiest ways to identify and eliminate issues automatically. And if the mouse lags in CSGO, there’s just one for you. Once done, play the game and verify if the mouse lag is fixed.
4. Change the repeat rate
Press Windows + R to open the Run command, enter Control in the text field, and click OK.
Select Large icons from the View by dropdown menu.
Now, select Keyboard here.
Next, change the Repeat delay and Repeat rate settingsto match the settings from the image below.
Click Apply and then OK to save the changes.
Once done, verify if the mouse lag in CSGO is fixed. If not, head to the following method.
5. Disable the automatic turn off
Type Device Manager in the Search bar, then click on the relevant search result.
Locate and double-click the Universal Serial Bus controllers option.
Right-click on the first USB Root Hub and click on Properties.
Next, click on the Power Management tab and untick the box for Allow the computer to turn of this device to save power.
Click on OK to save the changes.
Repeat the same steps for all the USBRoot Hubs that are listed.
If the power led to mouse lag in CSGO, things should now be working fine, and you would have eliminated the problem.
If you are trying to connect from a remote desktop and are getting an error that the connection has been denied, then this is most likely because you have not authenticated yet.
When you start a Remote Desktop Connection, it will prompt you to enter the credentials of the computer you are connecting to. You cannot proceed before your authentication details have been verified.
The reason it requires authentication is that RDP is intended to be used by an administrator. An administrator can connect to any computer on the network and manage it remotely. If it were left unsecured, anyone could connect to your computer and use it.
This would put the user’s data at risk as anyone with access could take advantage of their details for unscrupulous activities. Sometimes, you may encounter an RDP authentication error because of your settings.
Why won’t my remote desktop connection connect?
There are a few reasons why your remote desktop connection won’t connect. Here are the most common ones:
Not enough permissions – The most common reason is that the computer you are trying to connect from does not have the correct permissions to access the target computer. This can happen if you are using a domain account with too low of a permission level, or if your account has been locked out for some reason.
Your firewall is blocking the connection – Make sure that any firewalls you have installed on your computer, such as Windows Firewall or any other third-party firewall software, aren’t blocking access to Remote Desktop.
The remote computer is offline or not responding – This can happen if a user turns off the remote computer or disconnects it from the network. Also, an intermittent network connection can cause such problems.
Unsupported version – If you’re using an unsupported version of Windows Remote Desktop, you will need to upgrade to the latest version that is supported by your current OS.
Poor network connection – You don’t need a strong internet connection for Remote Desktop. However, you do need a connection between your device and the remote computer. If you’re using a wired connection, make sure it’s plugged in and working properly.
If you suspect any of the above could be the cause of the error, proceed to our advanced troubleshooting steps.
How can I fix the you cannot proceed because authentication is required error?
1. Check your network connection
Make sure that your computer is connected to the Internet. If it’s not, then your remote desktop session may not be able to connect.
Your connection may also be temporarily unavailable or experiencing issues. Check the status of your connection and try again.
2. Update software
If you are getting this error, it means that your RDP connection is using a version of the RDP protocol that is not supported by the server.
To fix this problem, you will need to update the RDP protocol on your computer. You can install a newer version of the Microsoft Remote Desktop Connection Client software on your computer from the Windows Update or Microsoft website.
3. Disable firewalls
When you get you cannot proceed because authentication is required errors, it’s usually because of a firewall. The most common firewall is Windows Firewall and the second most common are third-party firewalls.
Your firewall may be preventing remote access. Try to disable your firewalls and antivirus software, and then check if the issue persists. If you are able to access the website after disabling the firewall, then add exceptions for RDP.
Navigate to the following location: HKEY_LOCAL_MACHINE\SYSTEM\CurrentControlSet\Control\Terminal Server\WinStations\RDP-Tcp
Right-click on SecurityLayer, select Modify DWORD and edit the Value data to 0 then click OK.
5. Uninstall recent Windows updates
Whereas it is always recommended to keep up with the latest Windows updates as soon as they are available, they can sometimes cause problems.
Some updates cause more problems than they fix. One such problem is the RDP authentication error. If you have recently installed new updates, reverse the action and see whether the error persists.
How do I disable Remote Desktop Network Level Authentication?
By default, network-level authentication is enabled on the Remote Desktop client. This means that all of your users must have a valid domain account in order to connect to a remote computer.
If you have not configured your environment to use network-level authentication, you can disable it by following these steps:
Hit the Windows key, type Control Panel in the search bar and click Open.
Select System and Security.
Click on Allow remote access.
Hit the Remote tab, under Remote Desktop, uncheck the Allow connections only from computers running Remote Desktop with Network Level Authentication.
And that’s how to solve the remote desktop you cannot proceed because authentication is required error. You may also come across the local security authority cannot be contacted error but our detailed guide gives you a step-by-step process to bypass this issue.
As Microsoft bluntly puts it, error 0xc0000225 can be related to drivers, OS, or third parties. While we cannot argue with this perfectly valid information, we feel a bit of context is required in order to understand why this happens and what can be done to fix it.
Follow along as we have put together a detailed list of solutions that you can implement in order to fix this issue, right after we see what some common causes of it are. Keep up with us!
What causes error 0xc0000225?
First of all, error 0xc0000225 is a BSOD that will prevent your PC from booting, whether we’re talking about Windows 10 or more recently, Windows 11 and it generally occurs after an unsuccessful upgrade or update attempt.
Incomplete/failed/pending update files (This usually happens when the PC shutdowns during the installation of a Windows update and leads to an incomplete setup due to missing update files)
Disk errors (Frequently when using the third-party partition manager from EaseUS or when cloning/resizing the hard disk of your operating system)
Malware or virus infection affecting system files
Faulty hardware, unsigned drivers, or programs recently installed (Windows cannot verify the digital signature)
Now, the error code usually appears after you try to reboot your Windows 10 or Windows 11 PC. And alongside the error code 0xc000025, you will get the message Your PC needs to be repaired.
The given options are Press Enter to try again, Press F8 for startup settings, and Press Esc for UEFI firmware settings. Sadly, none of them works as intended.
Most common scenarios accompanying the error code 0xc0000225:
Windows failed to start. A recent hardware or software change might be the cause 0xc0000225
The operating system couldn’t be loaded because a critical system driver is missing or contains errors
The boot selection failed because a required device is inaccessible (This variation is also possible: A required device isn’t connected or can’t be accessed. Error code: 0xc0000225)
The operating system couldn’t be loaded because the system registry file is missing or contains errors
Your PC needs to be repaired. Error code: 0xc0000225
The operating system couldn’t be loaded because the digital signature of a file couldn’t be verified. Error code: 0xc0000225
Windows 11 not booting because of windows\system32\winload.efi with 0xc0000225 error
How can I fix error code 0xc0000225 in Windows 10?
1. Perform an automatic repair
Restart your PC a few times during the boot sequence.
Now you should see a list of options. Select Troubleshoot > Advanced options > Startup Repair.
The repair process will now start.
Once the repair process is finished, check if the problem is resolved.
For more accurate results, we recommend you use dedicated PC repair software. This is a completely safe utility that fixes all system-related issues and also includes registry error prevention.
It will scan your PC and can repair all sorts of system errors, damaged DLLs, it removes spyware, and it can also scan your hardware’s performance and optimize your CPU usage.
2. Perform System Restore
Restart your PC a few times during the boot sequence and choose Troubleshoot > Advanced options > System Restore.
When System Restore opens, click on Next.
A list of available restore points will appear. If available, check Show more restore points option. Select the desired restore point and click on Next.
Now follow the instructions on the screen to complete the restoration process.
Before attempting the steps above, we suggest you make a backup copy of the applications and programs you have installed in your Windows 10.
Once your PC is restored to the previous state, check if the problem still persists.
3. Repair your boot sector
Restart your PC a few times during the boot sequence. By doing so you’ll enter Advanced Boot Mode.
You’ll see a list of options. Select Advanced options > Command Prompt.
Command Prompt will now start. Now you need to enter the following commands: bootrec /fixboot bootrec /fixmbr bootrec /rebuildbcd
Sometimes you might encounter error 0xc000025 if your boot sector is damaged. To fix this problem, you need to repair your boot sector.
After running these commands, close Command Prompt and restart your PC. If you can’t run Command Prompt, follow the steps from our guide, and Working in Command Prompt will be like a child’s play.
4. Use diskpart tool
Start Command Prompt as we showed you in the previous solution.
Run the following commands: diskpart list volume
A list of all volumes will appear. Now you need to select volume that is labeled as ESP or EFI. To do that enter select volume X. Be sure to replace X with the number that represents the volume.
Now enter the following commands: assign letter=Z exit bcdboot C:windows /s Z: /f UEFI
After running these commands, close Command Prompt and restart your PC and the problem should be resolved. For a smoother experience, you can also use dedicated partition manager software.
5. Perform a quick chkdsk scan
Start Command Prompt as we showed you in the previous solution.
When Command Prompt opens, enter chkdsk /f X:. Be sure to replace X with the actual letter that represents your system partition. By default, it should be C, but it’s usually different when you start Command Prompt outside of Windows.
Chkdsk scan can take 20 minutes or more depending on the size of your partition, so be sure not to interrupt it.
Once the scan is finished, start your PC again and check if everything is in order.
Error 0xc000025 is usually related to your hard drive, and if the files on your hard drive are corrupted, you’ll encounter this error.
To make things even worse, you won’t be able to boot to Windows 10 or 11 at all. Several users reported that they managed to fix this problem by performing a chkdsk scan.
Tip
Corruption can take many shapes and one particular form is caused by malware infection.
➡ The vermin targeting the boot sector can be particularly elusive and just as vicious, which is why we recommend you choose an antivirus with boot scan capabilities and run a full and in-depth system check-up. ➡ ESET HOME Security is the perfect choice to help you remove hidden malware. ➡ You can quickly enable the boot sector scanning and master boot scanning by using the /scanboot+ and /scanmbr+ commands.
6. Check the boot order in BIOS
If you’re unable to boot to Windows 10 due to error 0xc000025, the problem might be your boot order. To fix that, you need to enter your BIOS and check if your hard drive is set as the first boot device.
Many users reported that this problem occurred because they set the wrong hard drive as the boot device. To see how to enter BIOS and how to change the boot order, be sure to check your motherboard manual for instructions.
Sometimes error 0xc000025 can occur if your BIOS is out of date. To fix that problem, you might want to try updating your BIOS.
We have to warn you that BIOS update is an advanced procedure, so be extra cautious while updating your BIOS. BIOS updates can cause permanent damage to your PC, so keep in mind that you’re updating BIOS at your own risk.
To see how to properly update your BIOS, be sure to check your motherboard manual and follow the instructions carefully. If you need more information, you might want to check our article on how to flash your BIOS.
8. Restore your BIOS settings to default
In some cases, you might encounter 0xc000025 errors due to your BIOS configuration. Sometimes individual settings can interfere with the boot sequence and cause this error to appear.
However, you can fix that simply by resetting BIOS to default. Every version of BIOS is different, and in order to see how to reset your BIOS to default, we recommend you check your motherboard manual for detailed instructions.
9. Check your hardware
If this error still appears on your PC, the problem might be your hardware. Several users reported that this problem occurred because their RAM modules were faulty.
To see if your RAM is the problem, you need to test your RAM modules one by one. The best way to do that is to use the MemTest86+ tool or the newer AIDA64 Extreme.
In order to perform a detailed scan, it’s advised to run the scan for a couple of hours.
Keep in mind that you’ll need to scan all your RAM modules one by one or in groups if you want to find the faulty module.
Other hardware can also cause this problem, and a few users reported that their issue was caused due to loose cables. According to them, their hard drive wasn’t properly connected, and that caused the issue to appear.
If you’re having the same problem, be sure to check if your cables are tightly connected.
How can I fix error 0xc0000225 in Windows 11?
Windows 11 is the latest OS to join the Microsoft family and it has a lot to offer in terms of looks and functionality enhancements. However, it cannot shake off its legacy, which sometimes implies update errors such as 0xc0000225.
Obviously, preparing the boot files (BCD) is a good place to start and all the methods described above are just as useful to help troubleshoot and fix error code 0xc0000225 in Windows 11 as well.
Here’s a little something on top.
How to disable driver signature verification in Windows 11?
Click on the Start button and select Settings.
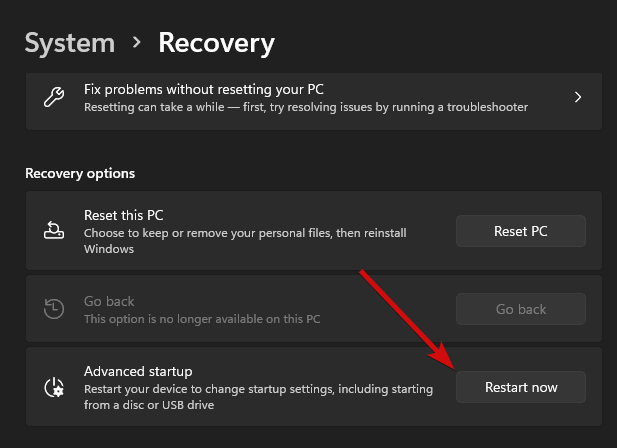
From the System section (available in the left pane), select Recovery.
Under Advanced startup, click the Restart now button.
When you get to the boot options, select Troubleshoot.
Now click on Advanced options. You will have two steps to complete from this screen.
First, select the UEFI Firmware settings option.
When the BIOS menu opens, click Security, then select Secure Boot. (If you don’t find it here, check the Boot Options section as well or check your user manual).
Now toggle the option next to Secure Boot to Off and save the changes before exiting BIOS.
Reboot your PC and follows steps 1-5 to return to the Advanced options screen.
This time, select Command Prompt.
In the typing field, insert the following commands in this precise order: bcdedit -set loadoptions DISABLE_INTEGRITY_CHECKSbcdedit -set TESTSIGNING ON
Finally, one more reboot and you should be good to go.
Drivers are obviously very important for the well-being of your entire system and you need to keep them up to date and make sure you don’t run obsolete or even worse, corrupted versions.
Usually, drivers are automatically upgraded to the latest version along with the Windows update packages that you (hopefully) download and install regularly.
But sometimes, third-party drivers may be harder to tackle and unattended ones can easily trigger the booting error in 0xc000025.
We suggest you use a professional driver fixer and updater tool such as Outbyte Driver Updater that will automatically take care of this time-consuming task for you.
We have reached the end of our article regarding the Windows 10 or Windows 11 issue with error code 0xc000025. If you do run into trouble along the way, don’t be shy to reach out to the comments section.
This is the first official trailer for the The Last of Us HBO series; previously we had only a still image to go on, featuring stars Pedro Pascal (as Joel) and Bella Ramsey (playing Ellie). We know that the two Game of Thrones alums will be joined by video game voice acting veterans Troy Baker and Ashley Johnson in some fashion, though further details aren’t known.
The show will premiere sometime in 2023, though an exact release date has not been given. It will apparently be an HBO Max exclusive. Will “The Last of Us” take its place among the excellent video game-to-television adaptations of recent years? We’ll have to wait until 2023 to find out.
If you want to know about the methods to fix An Unexpected error has occurred in the Chromebook recovery utility, go through this article.
Some people prefer using Chrome OS because it’s so lightweight, but unfortunately, problems with Chrome OS can also appear, and many users reported Chrome OS Recovery unexpected error messages.
Why is Chromebook Recovery Utility not working?
Your Chromebook recovery utility may not work for any other following reasons:
Problematic removable storage or device that contains Chrome OS
The recovery media doesn’t contain the actual OS
For internal error, Chromebook can’t detect the recovery image
You may find other reasons. But, these three mentioned above are the most common ones.
This problem will prevent your laptop from booting, and in today’s article, we’re going to show you how to fix this problem once and for all.
How do I fix an unexpected error has occurred in Chrome OS recovery?
1. Press Tab during the boot
Power down your laptop, but don’t close the lid.
Now start the laptop again.
When the warning screen appears, press the Tab key.
After doing that, you should be able to see the direct cause of this issue. Although this method won’t fix your problem, it will give you some insight into why Unexpected error while installing Chrome OS appears.
2. Verify that the hard drive is tightly connected
NOTE
This method will most likely void your warranty, so it might be best to send your laptop to a certified repair center.
Disconnect the laptop from the power outlet, unplug the charger, and remove the battery.
Now remove the back cover.
Locate the hard drive and SSD and make sure that it’s tightly connected.
Several users reported that this method worked for them, and after connecting their hard drives properly, the Chrome OS Recovery unexpected error was gone.
Sometimes, your hard drive or SSD may be damaged, so you’ll need to replace it.
3. Disable verification
Enable the Developer mode when the error message appears and turn off the verification.
Restore the OS.
After doing that, turn off the Developer mode.
This solution only works if you had Developer mode enabled, but it might help you fix an unexpected error has occurred in Chromebook recovery on HP/Asus/Acer/Lenovo or any other brands.
4. Try to boot the device multiple times
Connect the device to the charger.
Now reboot it a couple of times. Few users reported that it took them about 30 reboots for the device to boot properly.
Once the device boots, charge it completely.
Many users reported that this issue occurs once the battery is completely drained on Dell devices, but you can try this solution on other models as well.
5. Try creating a USB recovery drive in Safe Mode
Hold the power key until the Power off icon appears.
Press and hold the power icon until the Safe Mode option appears.
Then, select Safe Mode.
In safe mode, format the flash drive.
Set the file system to FAT32 and click the start button.
Once the drive is formatted, try to create a recovery drive again.
Identify or select the Chromebook model and click on Continue.
Insert the USB drive on your computer and select it in the recovery utility.
Click on Create now.
This way, you can easily create a recovery USB drive for Chromebook. However, make sure that your recovery storage has a minimum of 4 GB of capacity.
We recommend that you check out our post on the 7 best hard drive recovery software, so that you can find out one that will work with Chrome OS and save your data.
If your Chromebook keeps restarting itself, it could be due to Power settings or an overheating device; read this guide to learn more.
Chrome OS Recovery unexpected errors can be problematic, but we hope you managed to fix them using one of our solutions. If you have any questions, feel free to let us know in the comment box.
Device Manager helps identify the various peripherals connected to the computer. These are listed under various categories. But, many reported that Device Manager showed multiple keyboards.
First, there’s nothing to be concerned about. Having multiple keyboards listed is perfectly normal, and it doesn’t affect the system’s performance.
Let’s find out all about having multiple keyboards listed and the best solutions for it.
Why do I have multiple keyboards in Device Manager?
Before we get to that, you need to understand what the N-key rollover is. It is the ability of the keyboard to read multiple keystrokes at once. N here stands for the number of keys that can be effectively pressed together.
To achieve that, manufacturers configure the keyboard to run multiple versions of itself. If you have been wondering Why do I have so many HID-compliant devices (or duplicate Human Interface Devices) in Windows 10, this is the reason.
How do I find my keyboard in Device Manager?
To find it in the Device Manager, simply double-click on the Keyboards entry, and all these will now be listed.
How do I get rid of multiple keyboards in Device Manager?
1. Disconnect additional keyboards
Many gamers who use a laptop often have an external gaming keyboard connected, which takes the total number to two. And then comes the HID Keyboard Device, leading to multiple keyboard entries.
Simply disconnect the other keyboards from the computer and restart it. You wouldn’t have 2 keyboards in Device Manager now.
2. Verify your keyboard drivers with a dedicated tool
You can also use a driver utility that detects your actual keyboard hardware and verifies its drivers. These tools are secure and very easy to use.
Before running the utility, we recommend you keep any additional keyboards disconnected (as presented above). You can also uninstall all the keyboards in Device Manager.
3. Permanently remove HID keyboard
Launch the Device Manager and double-click on the Keyboards entry.
Right-click on HID Keyboard Device and select Uninstall device.
Confirm the action and do this for other similar entries.
Now, press Windows + R to launch Run, type gpedit.msc, and click on OK.
Double-click on Administrative Templates and then on System.
Next, double-click on Device Installation Restrictions under Device Installation, and then on Prevent installation of devices not described by other policy settings policy on the right.
Select the option for Enable and click on OK at the bottom to save the changes.
Windows should no longer install multiple keyboards and subsequently, these wouldn’t appear in Device Manager. Also, find out how to check Device Manager logs in Windows 11.
Tell us which fix worked for you in the comments section below.
When you use Remote Desktop to connect to a remote computer, it’s a good idea to close the session when you’re done. This ensures no one can access your details and helps you avert any security risks.
The Remote Desktop Protocol (RDP) is the standard that allows users to connect to Microsoft Windows computers using Remote Desktop Connection.
If the administrator restarts the PC or when they terminate the session, a user can be logged off. Sometimes the RDP protocol can be slow hence the need to restart.
This can be problematic if you are using the RDP client on a laptop that you take with you around the office, as it will not be able to log back in automatically if your computer is rebooted or shut down.
How do I disconnect a user from Remote Desktop?
The Remote Desktop Connection client is a useful tool for remotely connecting to and working with an application or computer. When you log off the Remote Desktop Services session, the session is disconnected.
The user can no longer access the server remotely. However, in some cases, the session doesn’t disconnect properly and remains connected to the server. This can lead to security risks and data loss.
You might also want to end an active remote desktop session because it’s not needed anymore, such as when an employee is leaving work for the day or has completed their assignment and doesn’t need the system anymore.
Some of the common reasons why you are unable to disconnect include:
You have not logged off your computer before connecting to another computer. RDP connections have a limited number of simultaneous users.
A network connection failure or network connectivity issue occurs when you try to disconnect from an RDP session.
You have recently reconnected your computer to a domain controller that was unavailable at first.
Another reason could be that you are not using an administrator account to disconnect a user.
To disconnect a user from Remote Desktop, follow the steps below:
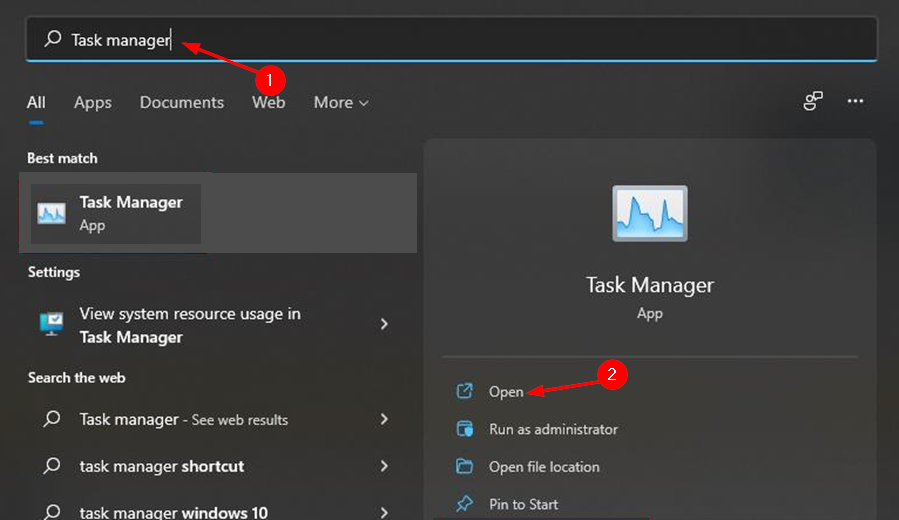
Hit the Windows key, type Task Manager in the search bar and click Open.
Click on the Users tab.
Select the user you’d like to disconnect, right-click and click on Disconnect.
What can I do if the Remote Desktop is not logging off a user?
1. Close programs running in the background
If you have multiple programs running in the background while using a remote desktop, they could be the cause of this issue. There may be an unresponsive application or process running in the background and you may not even be aware of it.
You can close these programs manually by going into Task Manager and ending each one individually by clicking End Task button found next to each process.
2. Check your network connection
If you have a slow or intermittent internet connection, it can cause problems when logging out a user from the Remote Desktop Connection client.
Make sure that you have an active Internet connection and that your computer is connected to the network. If there’s no connection, it won’t work as expected.
3. Check firewall settings
If your computer has a firewall enabled, it might be blocking Remote Desktop connections by default because it classifies it as a threat.
Check its settings to make sure they aren’t blocking Remote Desktop connections. You can also add an exception for Remote Desktop in Windows Firewall.
4. Delete saved credentials
If you have multiple devices accessing the same remote computer, it can be difficult to tell which one is causing problems. Saving credentials in Remote Desktop Connection is convenient because it saves you from having to enter your password every time you connect.
However, if you find that you have trouble logging off a user, try deleting the cached credentials as storing passwords creates a security risk.
Press the Windows + R keys simultaneously to open the Run command.
Type in service.msc in the dialog box and press Enter.
Locate Remote Desktop Services, right-click and click Restart.
6. Restart the server
If your remote desktop isn’t logging off, restarting the server can sometimes solve this problem. This will clear any temporary files that may be causing issues with your system.
Also, if other users are experiencing problems with their sessions after restarting their computers, this could indicate an issue with your networking software or hardware itself rather than just one user’s computer.
7. Uninstall and reinstall Remote Desktop Protocol
Your RDP could be giving you problems because it is an outdated version. You can uninstall and reinstall it again.
This ensures that any corrupted files are deleted and you can get a newer and more stable version void of any issues.
How do I force a user to log off?
If you have a user that is stuck in a remote session and cannot log off by themselves, you might need to force a logoff. You can use a log-off remote desktop command line.
If a remote desktop user is already logged in, you need to approach this method with caution because if they have any unsaved work, it may be lost once you kick them off the session.
Follow the steps below to force a user to logoff:
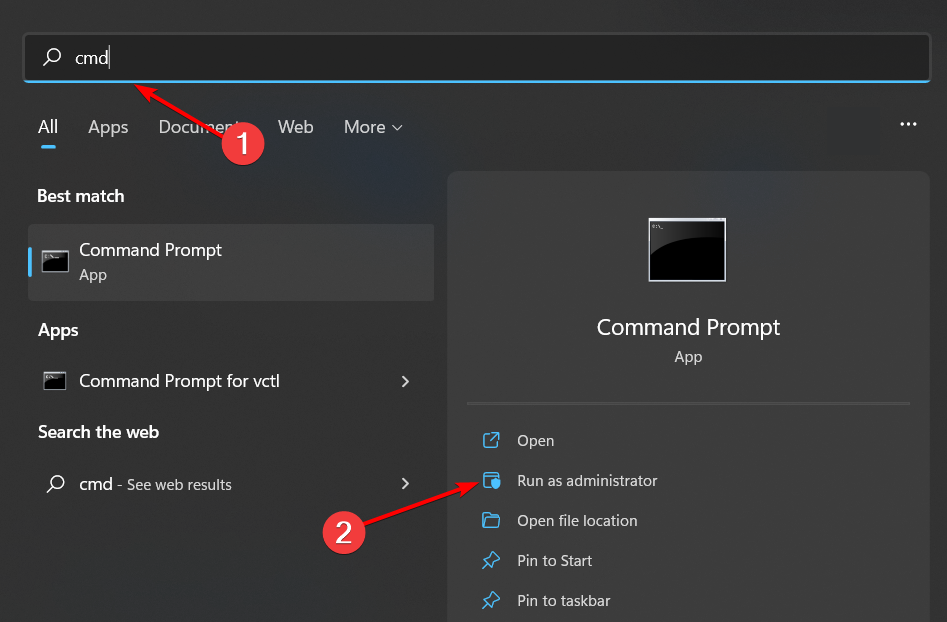
Hit the Windows key, type cmd in the search bar, and click Run as administrator.
Type in the following command then press Enter: Query session
Take note of the user ID you would like to log off.
Next, type in the following command followed by the ID taken down in (3): logoff ID
Firefox is one of the best browsers in the market today. It has countless features that deliver the best Internet service to its users. However, a feature people complain about is the middle click not working on Firefox.
Although, it has a customizable interface that allows users to arrange tabs to their taste. Several functions work for Firefox. For instance, keypad functions, mouse functions, and lots more. The browser is also good for its security and privacy.
There are many causes of this issue ranging from hardware problems, connection issues, and mouse driver issues.
This article will cover what a middle click is and explain why it is not working. Also, we’ll provide solutions for the middle click not working on Firefox difficulties.
What is the middle click?
The middle click is the function key attached to the middle button of a mouse. It can perform numerous functions in different applications depending on what you set it to do. Whenever you press the middle button on a mouse or mouse pad, it prompts a task on your computer.
Why is my middle click not working?
1. Missing or outdated mouse drivers
These drivers are responsible for running the mouse functions, ensuring it functions as it should. However, whenever these drivers are not up-to-date or are not available to power the mouse, the middle click might not work.
2. Incorrect mouse settings in the Registry Editor
Incorrect mouse settings in the Registry Editor can cause the middle click scroll not to work in Firefox. The registry contains the configurations that control how the mouse works. So, it is essential to take note of the settings of every component of the computer as it can cause issues.
3. Check your hardware connection
There are different connections for hardware like the computer mouse. Some mice use the wired connection while some are connected to the computer wirelessly. However, if there’s an issue with the connection, it can lead to.
Quick Tip:
If Firefox keeps causing problems, instead of trying to troubleshoot and find the root cause, you can simply use another browser. We recommend Opera One.
This browser is a great alternative because it’s lightweight and uses a lower amount of system resources. It’s suitable for lower-end and older PCs. It also comes with great built-ins, such as VPN, Ad Blocker and AI.
Opera One
Enjoy the web to its full potential and say goodbye to annoying errors and bugs thanks to Opera One.
What can I do if the middle click is not working on Firefox?
1. Troubleshoot hardware issue
Troubleshooting your hardware connections will help discover where the issue is from. You can do this by unplugging the mouse from your computer or disconnecting it, then connecting it to another device to see if it works fine.
If the mouse does not function properly on another computer, the problem is most likely with the mouse itself and it should be changed. In case the mouse functions normally on a different computer, the problem is with your computer, and you can proceed with the solutions below.
Press the Windows+R keys simultaneously to prompt the Run box.
Type in Regedit and click OK.
In the Registry Editor, locate: HKEY_CURRENT_USER\Control Panel\Desktop
Click any area in the right pane, and press the Arrow Up and Arrow Down keys to locate WheelScrollLines.
Double click WheelScrollLines, then change the Value data to 3.
Click OK to save.
Afterward, close the Registry Editor and restart your device. The Firefox left click not working should be fixed.
How do I turn on the middle click?
Click the Windows button and go to Settings.
Select Devices.
Click on the Mouse option and set the function you want for the middle button.
The middle click function is accessible for devices across different operating systems. However, you can learn how to middle-click to dismiss in Windows 10’s Action Center. Also, users can read about the mouse double clicks on Windows PCs and how to solve the issue in no time.
The Dell XPS 15 has been showing signs of issues, including that with the network connectivity. Several users have reported that Dell XPS is not connecting to Wi-Fi.
Dell has been including the Killer wireless network adapters in the XPS series, which has led to a lot of connectivity-related issues for users.
While many replace the adapter and use another brand instead, it’s not always the right approach. We have taken up both its advantages and disadvantages later to help you make a decision.
So, let’s see what you can do if Dell XPS is not connecting to Wi-Fi.
Why is my Dell laptop not finding my Wi-Fi?
It’s possible that this problem was caused by an incompatible driver or one that was simply out of date. In addition, there might be other parameters for the Wi-Fi network that are incorrectly set up.
After making the necessary adjustments to the Wi-Fi adapter using the steps outlined below, you may move on to implementing alternative solutions.
This being said, let’s jump into the list of methods that you can apply in order to fix the Dell XPS not connecting to the Wi-Fi issue. Follow along!
What do I do if Dell XPS 15 is not connecting to Wi-Fi?
1. Re-enable the Wi-Fi adapter
Press Windows + R to launch the Run command, enter ncpa.cpl in the text field, and either click OK or hit Enter to launch the Network Connections window.
Right-click on the Wi-Fi adapter and select Disable from the context menu.
Once done, again right-click on it and select Enable.
After making the changes, check if Dell XPS is now connecting to Wi-Fi.
In most cases, simply re-enabling the Wi-Fi adapter worked for most, and you should try this method before moving on to the more intricate ones.
2. Update the Wi-Fi adapter driver
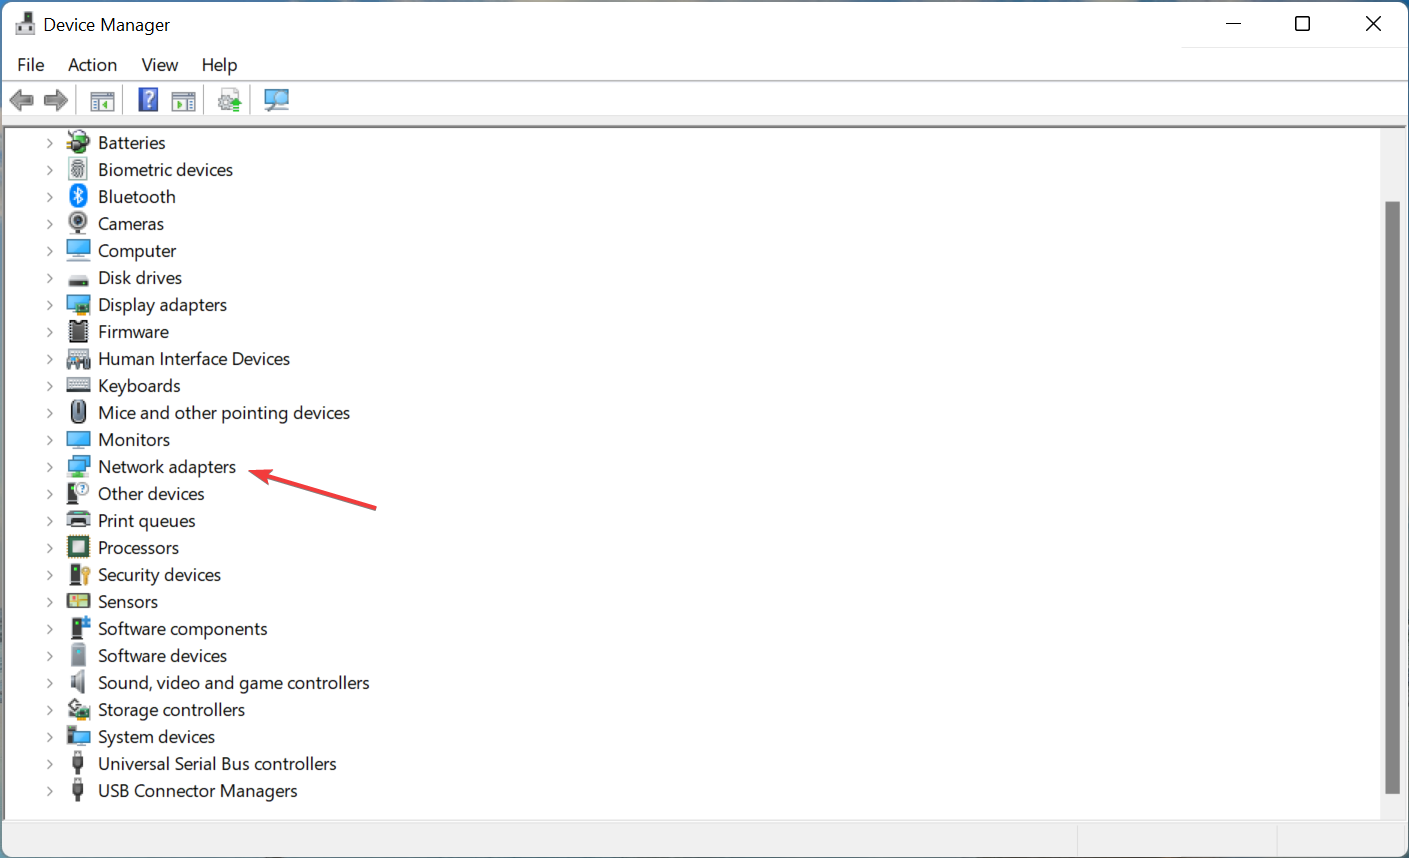
Press Windows + S to launch the Search menu, enter Device Manager in the text field, and click on the relevant search result that appears.
Double-click on the Network adapters entry here to expand and view the devices under it.
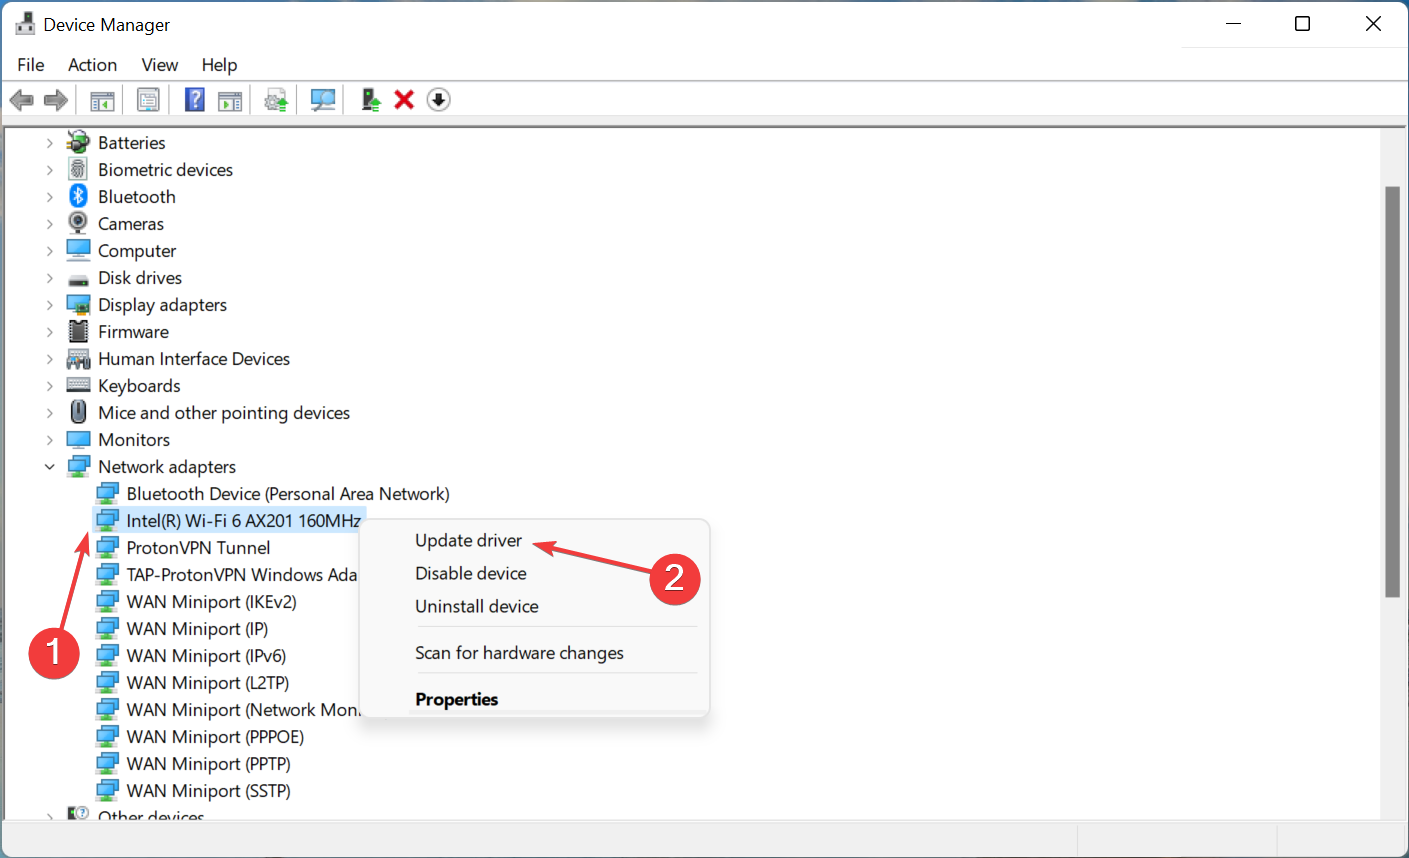
Right-click on the Wi-Fi adapter and select Update driver from the context menu.
Next, select Search automatically for drivers from the two options in the Update Drivers window.
Once the Wi-Fi driver is updated, check if the Dell XPS not connecting to the Wi-Fi issue is fixed. In case, you were unable to update this way, learn how to manually install the driver in Windows 11.
Also, to keep things simple, you could use a reliable third-party app. We recommend a dedicated driver updating tool that ensures automatic installation of the latest driver versions for all those available on your PC.
3. Modify network adapter settings
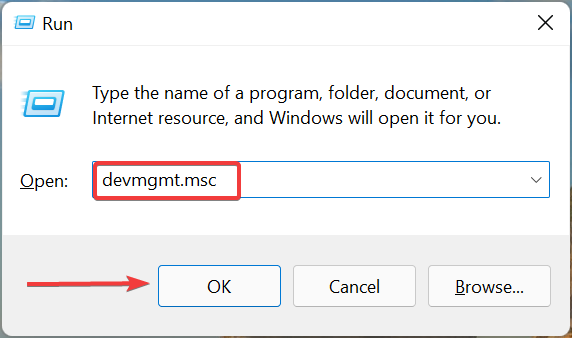
Press Windows + R to launch the Run command, enter devmgmt.msc in the text field, and click on OK to launch the Device Manager.
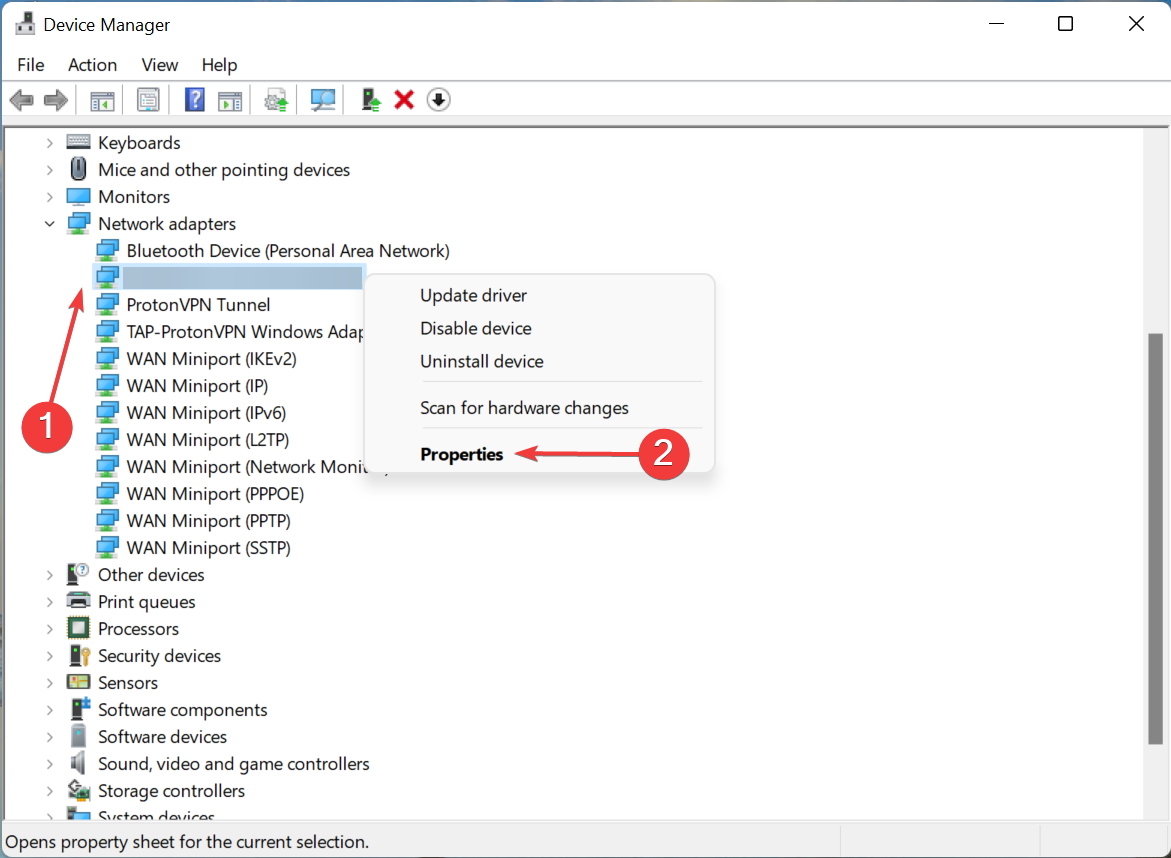
Double-click on the Network adapters entry.
Right-click on the Wi-Fi adapter and select Properties from the context menu.
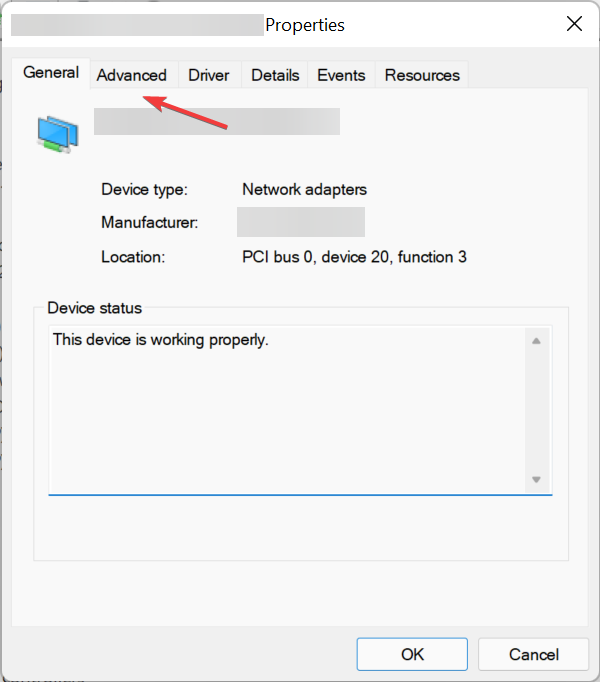
Go to the Advanced tab.
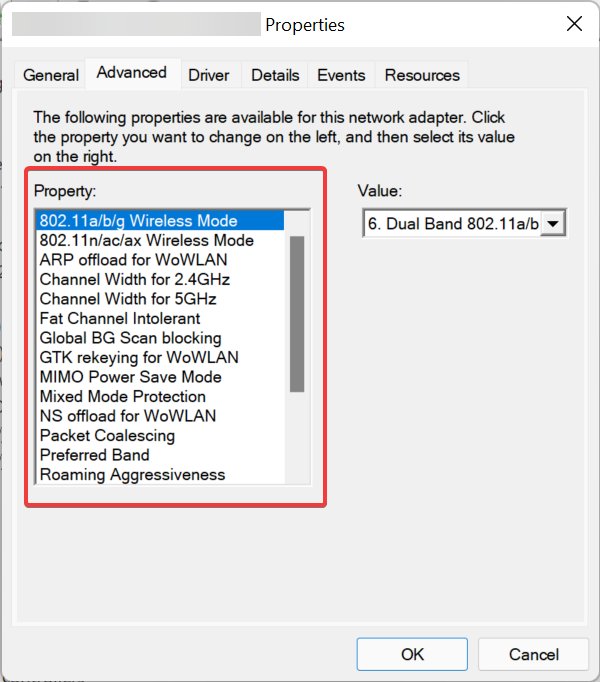
Click Wireless mode under Property on the left.
Now, select the 08-11 a/b/g/n option from the Value dropdown menu.
If the Dell XPS 15 Wi-Fi keeps disconnecting, making these changes could really help. But, remember that this method is only applicable for the Killer wireless network adapters.
If none of the three fixes listed above have worked, you can replace the network adapter itself. Removing the Killer wireless adapter and using another reliable brand has helped fix the issue for most users. Also, this has led to an increase in the Internet speed for many.
Killer Wireless Wi-Fi card
This is a tricky affair, and if done incorrectly, you may end up damaging the hardware. Also, replacing the hardware might nullify the warranty.
But, if you have made up your mind, there are several YouTube videos available to help do it yourself. Or you can even take the Dell XPS laptop to a repair center and get the Killer Wireless adapter replaced by a professional.
Where is the Wi-Fi switch on my Dell laptop?
After you have pressed and held the Fn key, proceed to press the F2 key. By doing this several times, you can turn the wireless antenna on and off.
If for some reason, it doesn’t work for you, you can still change your Wi-Fi by going into your PC’s settings.
That’s all there is to the problem! Though in all likelihood, the need to replace the adapter should not arise and the other methods should help eliminate the Dell XPS not connecting to the Wi-Fi issue.
Browser games are increasingly becoming popular, with airplane games among the leading ones. This is because they are mostly free and require no download to get going.
The Air Traffic Control (ATC) simulator offers more real-life benefits beyond the fun. Like the best browser flight simulator games, they are played by professionals and beginners with many real challenges to overcome.
To ensure the time you spend gaming is well worth it, we have selected the best browser ATC simulators to play to improve organizational and traffic control skills.
What is an ATC simulator?
An ATC simulator is a game aimed at recreating the activities and tasks of an air traffic controller. These games are good for people looking to learn the ropes of air traffic control.
There are different ATC simulator games, from options with voice recognition and multiplayer to play on PC and basic ones to play online on your browser.
This is a top-notch browser ATC simulator that requires no extra plug-in or software to play. It puts your air traffic control knowledge and skills to the ultimate test with real-life situations.
ATC-Sim allows you to select an airport of your choice. Also, you can choose between different airline codes and set the difficulty level and realism.
If you’re looking to get in the skin of an air traffic controller, you should definitely try Openscope.
You can actually see all the flight parameters of the virtual airplanes, give them direct commands, and supervise traffic without getting in trouble.
Being extremely realistic, the action in Openscope happens in real-time, but you can speed up the simulation or pause it so you can find the correct decisions.
You also have a tutorial and some very clear instructions on how to use it but without any knowledge, we made a mess of everything.
The tool is obviously created for professionals or for training purposes and it’s not just a game.
Here are some of its key features:
Realistic functions and display
Pause and speed up the simulation
Give written commands to any plane in your airspace
ATC Manager 2 is a web-based air traffic control game but it looks like more than just a game to us.
You don’t need to download anything and the goal is to manage the airspace of busy airports like Schiphol or Heathrow in a very realistic simulation.
The web app is very complex as you can even change the whole appearance of the window and colors.
Then, you also have settings for game speed and difficulty. On the right, you will see the list of planes you can control, and on top, you will even see the wind speed.
Air Traffic Controller is a cool ATC browser simulator game where you direct aircraft on the ground. It also gives you the experience from the tower, as you control airplanes through controlled airspace.
The ultimate goal in this game is to manage the airport successfully to avoid any collision or delay. Your task is all the more complicated as you must watch for planes in the air and on the ground.
Tracon Air Traffic Control Simulator is the game to play if you want to get up to speed with tracking multiple events simultaneously. The game requires you to keep airplanes far from each other as much as possible to prevent a collision.
You will get warning signs on your controller whenever the aircraft comes closer than normal. And the game ends when there is a mid-air crash.
Airport Rush is a classic ATC browser simulator that tests your organizational skills. It is ideal for players with prior experience in air traffic control.
Your task in this game is to manage the flow of airplanes into the airport. You must remain alert when an aircraft is about to land and either grant or deny the request.
This game provides you with three terminals to choose from. Note that each has a different number of landing and take-off strips. So, only choose what you can handle.
The last but certainly not the least in our recommendation of browser ATC simulator games to play is Airport Control. In this game, you earn your livelihood by ensuring aircraft land and depart safely.
You take care of everything required in the airport, from sending planes to the landing strip and dropping off passengers. Also, you ensure to get them filled up with fuel before they depart again.
In high-level flight simulators, you must communicate with the ATC to keep progressing. In some games, this feature might be automated.
However, you can set them manually in top games like Microsoft Flight Simulator.
Browser ATC simulator games are free resources to quickly improve your air traffic control and organizational skills. You can play any of the games in the guide to easily get acquainted with the tasks at hand.
Are you looking to add action to things a bit with the best tower defense games? Then, check our guide for the top free ones to choose from.
Feel free to let us know which game you enjoyed playing the most in the comments below.
Want to unlock your PC with just a glance? If Windows Hello face recognition isn’t working on your Windows 11 device, you might be missing the right driver.
In this quick guide, we’ll show you how to download and install the face driver for Windows 11, including the helloface.inf file, so you can get facial recognition up and running in no time.
How can I install the Windows Hello Face in Windows 11?
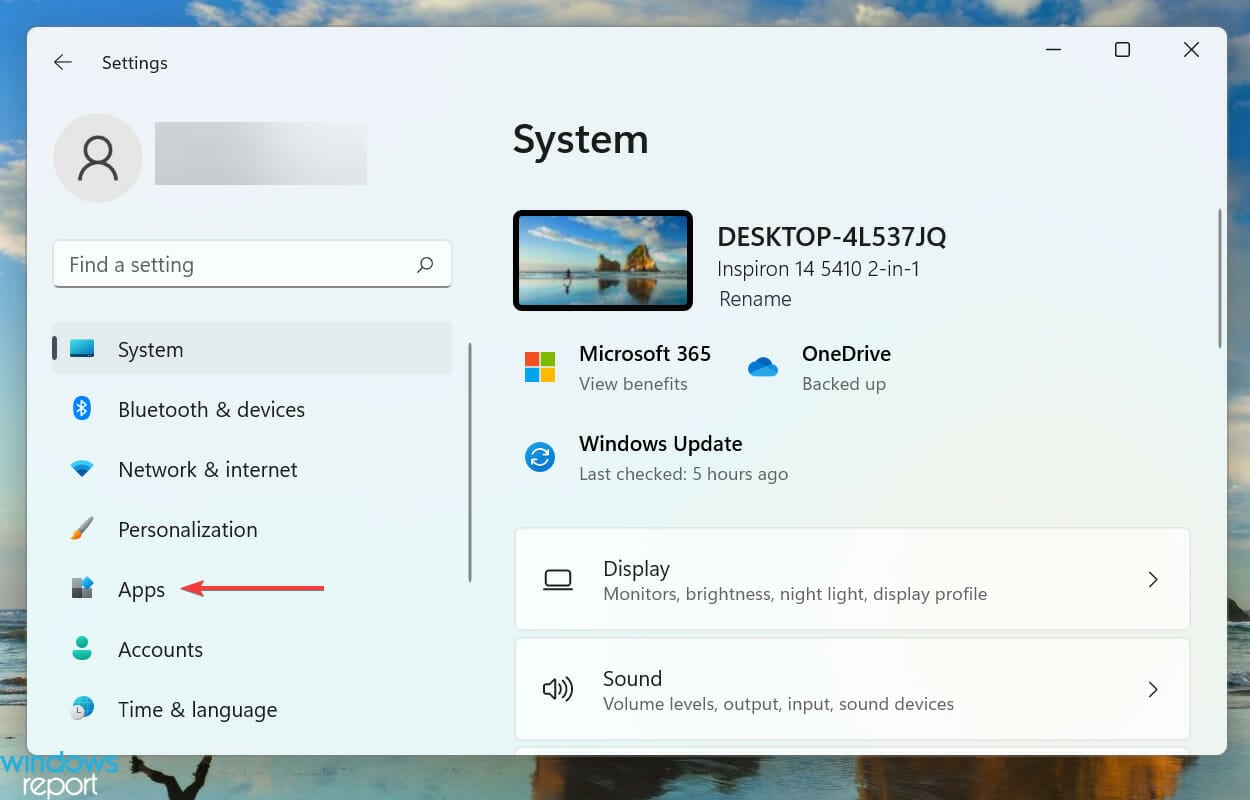
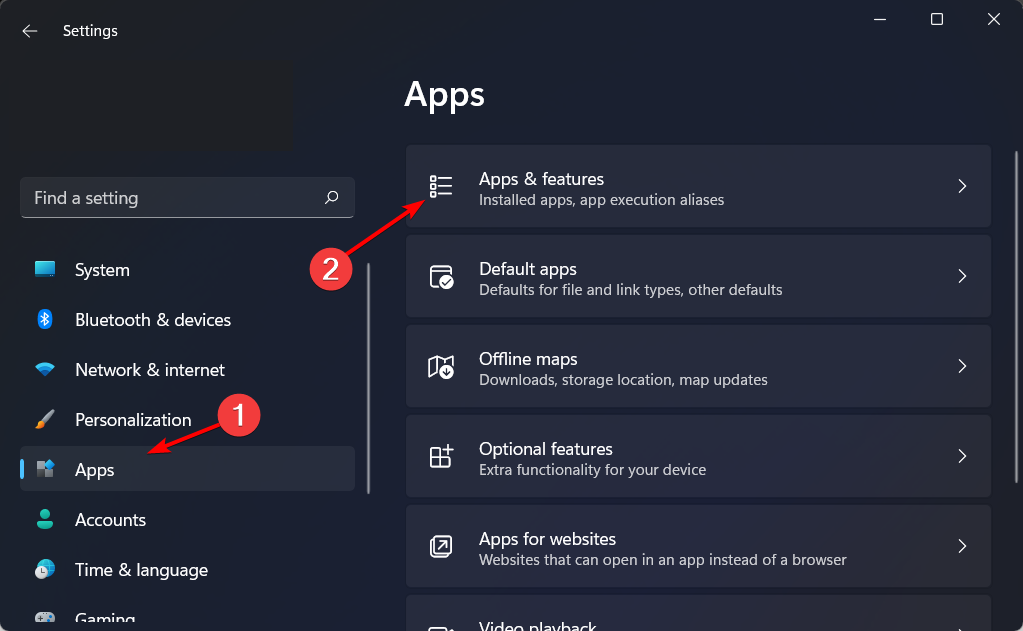
Press Windows + I to launch the Settings, and then select Apps from the list of tabs in the left navigation pane.
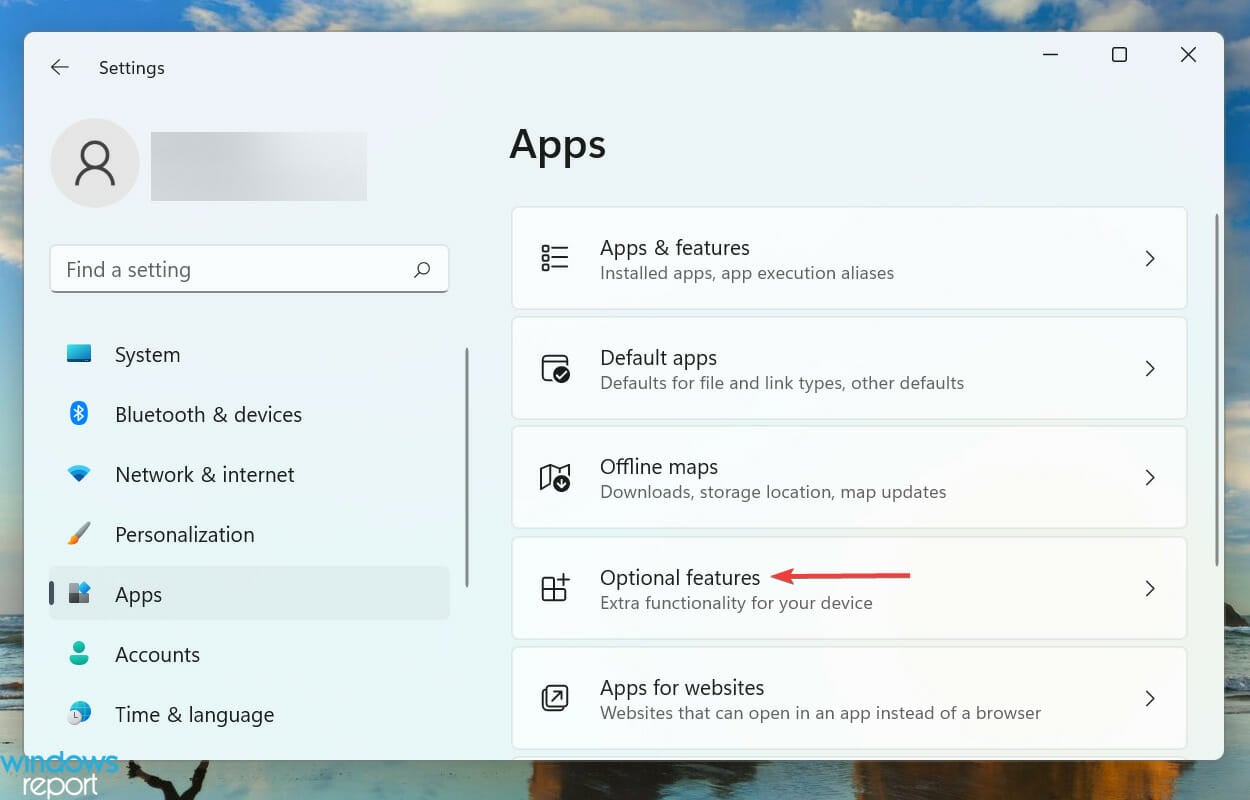
Click on Optional features on the right.
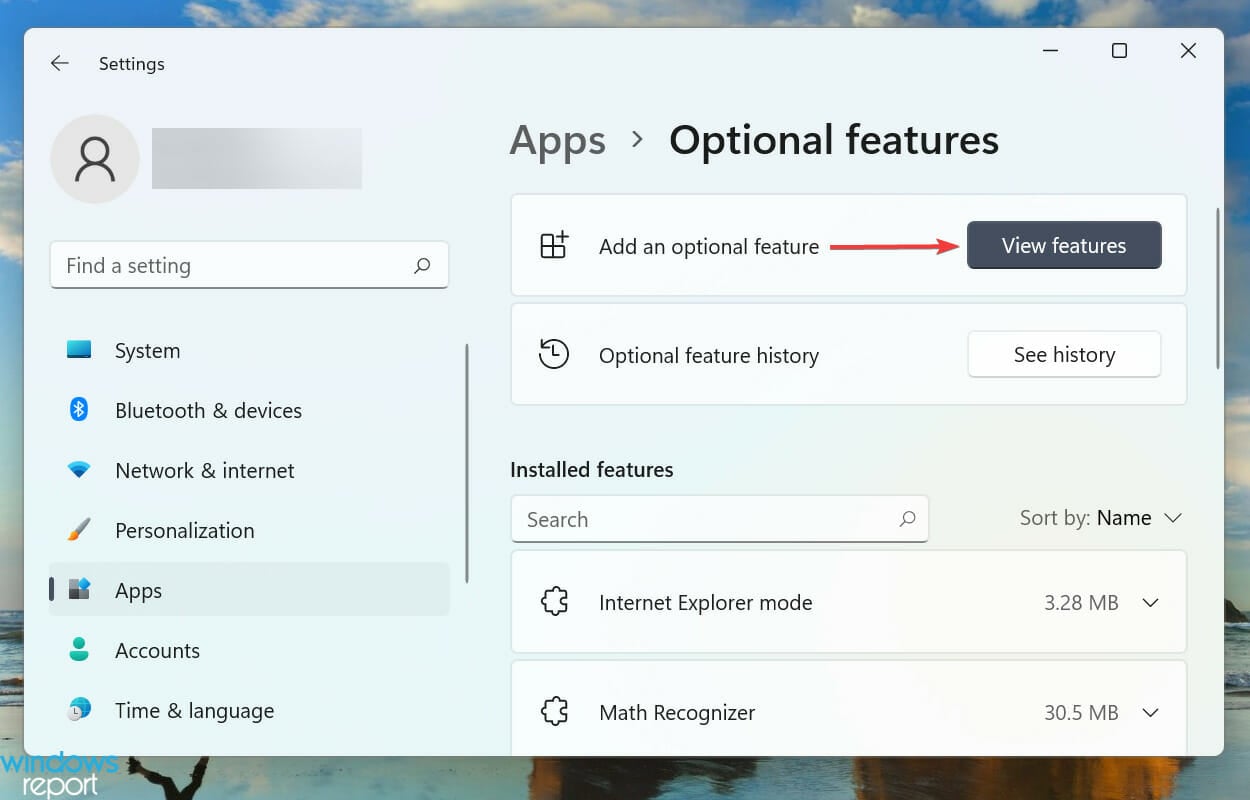
Next, click the View features button next to the Add an optional feature option.
Enter Windows Hello Face in the text field at the top, tick the checkbox for the appropriate option, and click on Next at the bottom.
Next, click on Install and wait for the process to complete.
After you have installed Windows Hello Face in Windows 11, restart the computer for the changes to come into effect.
Once your device is connected, Windows should have detected it and automatically installed the drives. You can check by going to Device Manager> Cameras and identify your compatible device – usually tagged 3D Camera or IR Camera.
Suppose your device is missing the relevant driver. In that case, you can look up the Hello face driver for Windows 11 on the manufacturer’s official website or try specialized driver updating software, which automatically scans your PC for missing or outdated drivers and updates them.
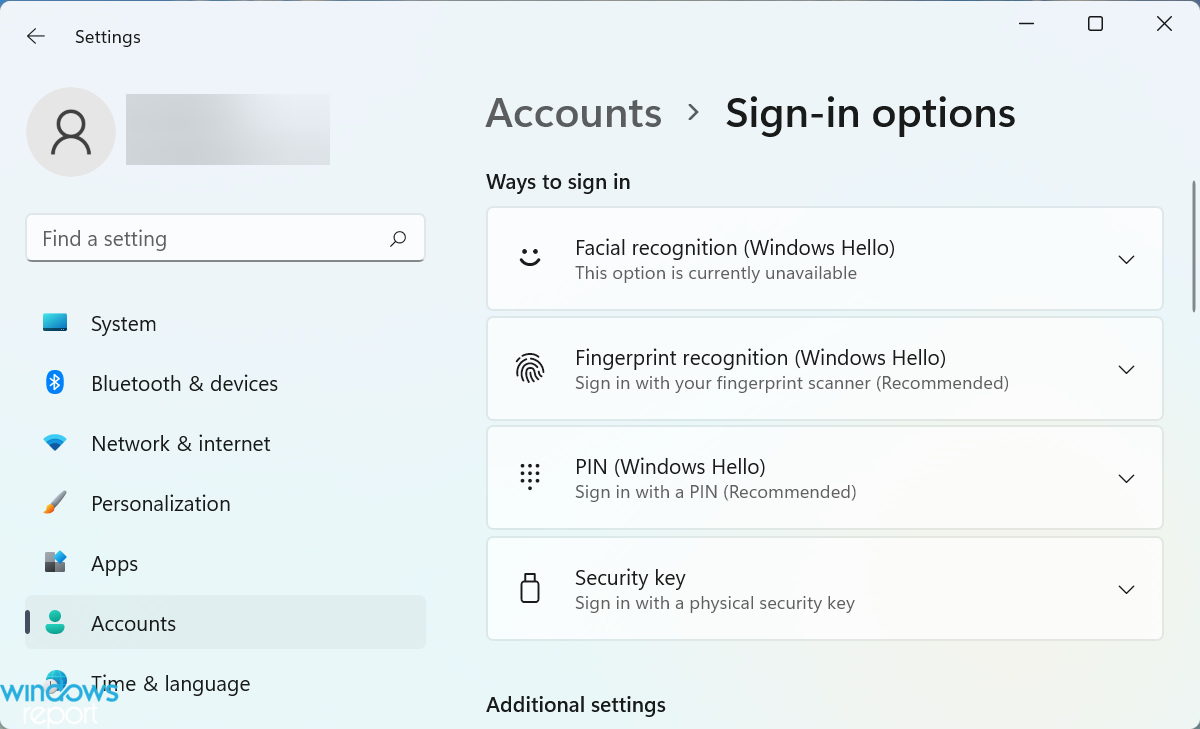
If you check the Windows Hello sign-in options, it will list Facial recognition, Fingerprint recognition, and PIN. But you can’t set up the first two without configuring the last one, though the PIN alone can be configured and used to log in.
Windows Hello sign-in options
Making the PIN mandatory for using biometric means to sign in to your device ensures that you are never locked out.
Say you received an injury on your face or finger. It’s likely to affect the recognition process, and thus the need for a PIN arises.
Apart from that, your PIN is only associated with one device, not the others, where you may have used the same Microsoft account. This, in turn, ensures high security because even if one device is compromised, the others will remain secure.
Does Windows Hello work with Windows 11?
Windows Hello is one of the sign-in options on Windows 11. It works well, provided you have set it up correctly.
But to set it up, you need to install it foremost. And that is what we will discuss in detail in this article’s ensuing section.
What camera is required for Windows Hello Face?
Regular cameras for online meetings and all do not meet the requirements for Windows Hello Face. You need cameras like an Intel RealSense or a 3D camera to use this feature.
If your camera does not meet this requirement, it is not compatible with the Windows Hello Face feature. Hence, you might get we couldn’t find a camera compatible with windows hello face windows 11 notification.
How do I fix issues with Windows Hello in Windows 11?
Several users who have set up biometrics as a medium to sign in have reported that Windows Hello is not working in Windows 11. This could be due to outdated or corrupt drivers, or missing PINs, among other issues.
We went through several forums and identified many users who came across this problem, along with many posting the best solutions for it. So, do not hesitate to check out our dedicated guide to fix the Windows 11 Hello Face recognition not working issue.
How do I automatically sign in to a Windows 11 device?
Another common question by users is whether they can automatically sign in to Windows 11 without any authentication. There are several built-in ways to do that and use dedicated third-party tools.
Check this guide to find out how to auto-log into Windows 11. But, we do not recommend disabling the authentication if you share the computer with others or if there are critical data stored on it. Though if you use it as a standalone device, go ahead.
That’s all there’s to Windows Hello Facial recognition in Windows 11. You now know how to enable the feature, the various troubleshooting techniques in case it’s throwing errors, and automatically log in to the system.
No matter how advanced it is, technology can potentially take a nasty turn, and you may be one step away from losing your files.
With digital content becoming crucial for business and personal assets, including videos, photos, and music, it’s obvious that protecting everything with backup software has become more critical than ever.
So, you must know the easy ways to use the Windows 11 backup settings and improve on it with some of the best software. This guide contains the list of the best backup software to use on Windows 11 today.
Why should I use backup software?
There are many reasons why you need to use backup software. For example, your device can be stolen, your hard drive can unexpectedly crash, or you could become a malware victim.
If you don’t want to risk losing all your data, consider using backup software, preferably a cloud-based one, as they’re a safer choice than a physical backup device.
Nowadays, there are a lot of backup programs that can help you automatically copy all of your information in the background while you’re working.
So, whether you’re running a business or just a personal PC user, using some form of backup for all your documents and data is vital.
Is Windows backup good enough?
The Windows backup feature is good enough to save your files. Also, it is secure, and you can trust it.
However, you can not compare it to dedicated backup tools as most of them offer advanced features which in turn give you more control over the whole process
Paragon Backup & Recovery Advanced is a consumer-friendly tool, and it comes with Wizards to take you through the most common backup scenarios.
Note that the company aggressively updates it so now it reached its Advanced version that supports Windows 11.
The software also comes with more advanced features targeted at enthusiast users, and these include Paragon’s powerful disk-management tools and scheduling options for your backup: daily, on-demand, weekly, and one backup.
If you will try to restore an entire system, the software will warn you that it’s best to do this with external recovery media.
You know that any backup process takes time but with this tool, you will be able to see the estimated time so you can do something else in-between.
However, the software is pretty fast. It can create a backup of 15 GB in around 5 minutes but that also depends on the speed of your drive.
Take a look at the best features included:
The tool comes with huge improvements in usability and performance compared to previous versions
Its interface has been totally revamped, and now it’s easier than ever
The interface comes with three tabs, Home, Main, and X-View
During the backup creation, you will get an estimated backup time
For the backup, Paragon creates a virtual hard drive with all the data
Paragon Backup & Recovery Advanced
Schedule your backup and enjoy a simple interface to secure your data with just a few clicks.
Stellar Data Recovery makes it easy to recover lost or deleted files from your computer’s hard drive or any other external storage device.
One of the most effective features of this tool is file search. It allows you to search them by name, type, target folder, or target folder on a logical drive while checking the option Erased files / Existing files.
It’s got two levels of scanning: fast and thorough. If the tool cannot find the information sought after the quick scan, it automatically goes into deep scan mode.
And that’s not all, it can perform data recovery from CF cards, flashcards, SD cards (mini SD, micro SD, and SDHC), and minidisks.
While we’re on this subject, you also have the possibility to recover data from portable devices like your photo or video camera as long as the data is stored on a memory card inside.
The tool supports over 300 file types so it’s hard to challenge it with some unidentifiable data along the way.
If you want a cherry on top, know that Stellar Data Recovery will also perform e-mail recovery, a precious feature for anyone who has come across this situation. It is indeed an ideal backup and restore tool for Windows 11.
Zinstall FullBack is a complete, always-on, easy-to-use backup solution for your entire computer.
Unlike other backups, FullBack can actually restore everything, not just files, even to completely different computer hardware with a different Windows version. For example, you can restore a Windows 10 HP desktop backup to a Windows 11 Dell laptop.
It doesn’t just give you your files back; it recovers your applications, along with their configurations and accounts, your profiles, emails, passwords, and everything else. You get back to work as if nothing happened. This unique capability alone makes FullBack worth serious consideration.
Of course, you can also just recover a file with a click, such as, for example, when you accidentally delete an important document that you were working on.
With all that powerful technology under the hood, FullBack is nevertheless super simple to use.
It is designed to do its job without asking technical questions and doesn’t require any technical knowledge – while still delivering first-class protection.
FullBack can store your backups pretty much anywhere: from a simple USB drive to network / NAS to 3rd party Cloud storage such as Amazon S3 or Backblaze B2, and even in OneDrive / Dropbox.
It also allows you to backup to multiple targets at the same time, so you can keep a local backup for quick access, and a Cloud backup in case your office burns down—a proper implementation of the 1-2-3 backup rule.
Oh, and it even allows you to go back in time to any point in the past: you can restore a file as it was an hour ago, yesterday, a week ago, a month ago, and so on.
It is truly a backup powerhouse that is still easy to use for anyone.
Here are some its key features:
Automatic backup for your entire Windows 11 PC
Stores your backups anywhere, including NAS or cloud storage
It recovers your applications, along with their configurations and accounts
Backup to multiple locations at the same time
Full restoration of any file
Zinstall FullBack
Powerful, automatic, super easy to use, and restores everything to anywhere.
Acronis provides one of the best user-friendly and feature-packed backup programs for home users.
Its solution, Cyber Protect Home Office service formerly known as True Image, is able to create full disk-image copies for ultimate protection from disasters.
Acronis True Image combines backup, disk-cloning, rescue-disk creation, and many more system utilities and disk tools.
The program brings some unique capabilities to backup software including mobile backup and Facebook as well.
It comes with the most accessible interface, and on the other hand, it allows experts to dig into some really detailed backup options.
The learning curve for this solution is very steep because the interface is modern, friendly, and straightforward and everything is a click away.
This program also comes with a tool for archiving and analyzing large files and you can access it from its dedicated button on the interface.
Moreover, there’s an option to encrypt your backup with a password so you can be sure that only you have access to that backup.
Check out its best features for protecting your system:
By default, this tool selects the Entire PC as the source of your backup
You will be able to change to specified drives, files, partitions, or folders
Get an estimate of the space required for the selected backup
You also have the option of encrypting your backup with a password
After the backup is complete, you get two options, Recover PC and Recover Files
Acronis Cyber Protect Home Office
Back up your system safely with a friendly and fast tool and secure your data with a password.
AOMEI Backupper is one of the best backup software tools available on the market which aims to protect your important files as well as your operating system.
You should know that AOMEI is constantly improving its services and products, offering you with each new version more advanced and more effective features.
It’s possible to choose a network drive as a destination and simultaneously select multiple files on a NAS as a backup source.
You can resume the computer from the sleep or wake mode to perform scheduled tasks and optimize the USB-connected window when the system is in high resolution.
There’s also an option to optimize the calculation method of the Run app once a day to synchronize the calculation time with the computer time.
As you can see, the solution is highly customizable, and you can even optimize the backup scheme to automatically delete old backups according to the defined parameters.
It all sounds complicated but when it’s down to the interface, you will discover a simple and friendly UI that you can access intuitively.
Here are its most important features:
Backup and restore system, partition, hard drive, files
Clone your hard drive or partition
Resume the PC from sleep/wake mode for scheduled tasks
Manage incremental backup and automatic backup
Simple and friendly interface
AOMEI Backupper Professional
If the backup process seems complicated, get this great tool from AOMEI to make things easier.
If you’re looking for reliable backup software for personal and business data, you can’t go wrong with Uranium Backup.
Even on its free version, this tool helps you carry out full files and folders backup, incremental backup, and even differential backup.
It is a really efficient powerhouse with automatic backup features that is also compatible with Windows Server.
The solution will allow you to copy data from the local drives or network on any mass storage device.
And if you’re worried about security, don’t! That’s because Uranium Backup can apply an AES 256-bit encryption to store your data safely.
It can also run a Zip64 compression when backing up your files so you will save plenty of space on your backup drives.
If you have lots of sources to back up, performing them manually would be very hard. However, with the scheduling system from this solution, you can program the operation automatically for any date and time.
For any advanced features like cloud backup, file, and folder synchronization, or Drive Image backup, you will need to purchase a superior version like Uranium Backup Base.
In fact, there are no less than seven versions that offer different levels of complexity and services so go ahead and check their website to see what’s the best for your needs.
Just so you know, there is no need for registration or credit card for the free trial version so you can test it right away. If you are looking for the best free auto-backup software for Windows 11, Uranium is your go-to option.
Take a look at Uranium Backup’s best features:
Automatic and scheduled backup
Full AES 256-bit data encryption
Backs up all the data on your local or network sources on any external mass storage device
With the Base version, you are able to store your backups in the cloud and perform file & folder synchronization and Drive Image Backup
Very friendly interface that can be used by anyone
Uranium Backup
Use this complex backup solution to secure all your data with AES 256-bit encryption on any support.
FBackup is a backup solution that features easy scheduling and simple modes so it’s very easy to use by anyone.
Even though it doesn’t have many features, like other backup tools from this list, it is a pretty capable backup utility.
You’ll be able to back up your files in no time with the help of the Where/What/How/When backup wizard which will make things way easier for beginners.
A great feature of this tool is that you can use many backup destinations, including external drives or you can even store it online. This makes it the best backup tool to back up Windows 11 on an external drive.
Of course, for that, you will also need a cloud storage service like Google Drive or Dropbox but as you most likely already use one, the integration will be a breeze.
And once you’ve performed the backup, this tool also has a restoration wizard that will guide you to get the data back with just a few clicks.
Lastly, although it doesn’t have abundant features, it’s free so you can give it a try without any budget implications.
Here are the most important FBackup features:
Exact copies of files using the Mirror Backup option
Protection against ransomware
Easy to use interface with helpful wizards
Multiple backup destinations, including external drives, CDs/DVDs, online
Backups in the cloud directly to Google Drive or Dropbox
Using backup software is the safer choice, but you may also back up your data using file history, a Windows 11 setting.
Go to Star and click on Settings from the menu.
Select the Accounts section from the left and choose Windows backup from the right.
By default, OneDrive is already set up as the backup option, but you can click on Manage sync settings to tweak the settings.
You will be able to decide which folders to sync the frequency of the backups and how much time to keep the files before deletion.
File History is now archiving your data. This Windows setting offers you the possibility to change the backup options based on your needs, such as how often you want to back up your files, or which folders you want to be backed up.
However, File History can only be used with external hard drives or network locations, and it can only backup whole folders, so when it comes down to it, choosing backup software is the smarter choice.
How do I back up my entire computer?
To back up your entire Windows computer, you can use the built-in backup tool. We have shown how to do this in the section above.
So, make sure you implement the steps carefully.
Install either one of these programs and save copies of your most important photos, music, and more files to your drive or on the cloud if you prefer an extra layer of security for your data.
A new Astro Gaming ad had gamers talking this week after, what seemed to be, a white Xbox Series X console was spotted in the background of one scene.
The white console (see top image) only appears for a second or so but it’s clearly an Xbox Series X. Naturally, this got people excited as currently Microsoft’s Xbox Series X console is only available in black. The sister console, Xbox Series S, is available in white, however, but that’s not what’s used in the ad.
While this could have been a sneak preview at an upcoming white Xbox Series X console, the reality is that this was simply a regular black Xbox Series X console with a white skin placed over it. This was confirmed by the head of communications for gaming at Logitech, David Perez, who told The Verge as such.
There have been a variety of extremely limited edition Xbox Series X consoles with special designs released but the vast majority of models available to consumers is the basic black model. A white model could be possible sometime in the future but it’s worth pointing out that the regular black model is still selling out in many regions due to supply limits (Editor’s note: I personally know someone’s who’s on a waiting list for one here in Australia.) There’s not really a need to promote the console with a new alternative mainstream design at this point.
Nowadays, there are many great gaming laptops, but some users reported that their laptop is overheating when playing games.
This can be a big problem; in some cases, it can cause reduced performance and hardware damage. Fortunately, it is not the most challenging issue to fix with the correct information.
This guide will show you how to prevent the laptop from overheating while gaming issue. You only need to follow the steps in this guide, and things should be back to normal.
Why is my laptop overheating while gaming?
Laptop overheating can be a severe problem, and this issue usually occurs while performing stressful tasks such as playing games on your laptop. Speaking of overheating, are the variations of the problem that users reported:
Laptop overheats and shuts down when playing games: This issue usually occurs if your computer exceeds the overheating limit. To fix the problem, be sure to clean your laptop from dust or try using a cooling pad.
New laptop overheating: If a new laptop is experiencing overheating issues, it’s possible that your settings are causing it. Adjust your power settings and check if that solves the problem.
Laptop overheating while gaming and charging: This is another problem that can occur with your laptop, and if you experience this issue, be sure to try all of our solutions.
Laptop keeps overheating and crashing: Many users tend to overclock their hardware, but that can sometimes lead to various issues such as overheating. To fix the problem, disable overclock settings or underclock your hardware and check if that helps.
Is it OK if my laptop gets hot while gaming?
Gaming is a strenuous activity that takes a toll on your laptop. While gaming laptops are designed to handle this stress perfectly, it is normal for them to get hot while playing games.
The good thing about these laptops is that they have built-in cooling fans. So, you can reduce the heat by ensuring that they are well-ventilated.
How do I fix a laptop if it’s overheating when gaming?
1. Try connecting your laptop to the charger
Many users reported overheating issues on their laptops while playing games. According to users, these issues can occur since some games are intensive in terms of hardware power, and if your laptop can’t provide enough energy, you might experience this issue.
Users suggest connecting your laptop to the charger during gaming sessions to fix the problem. This will provide enough power for your computer so you won’t experience any overheating issues.
This is a workaround, but it might be helpful until you find a permanent solution.
2. Install a gaming browser
When playing games in your browser or browsing, you should manage how much RAM, CPU, and network bandwidth is consumed. The award-winning gaming browser Opera GX is one such application that was designed to address more than simply laptop overheating.
One of these benefits is the GX Control Panel, which is a method that allows you to restrict browser access to computer resources such as CPU and RAM.
The idea is that while the browser is used, it does not consume a lot of RAM and CPU capacity. This allows you to run Opera GX alongside online gaming or other resource-intensive programs.
It keeps the laptop from overheating and also saves battery life when you navigate on Opera GX. In addition, if you have a Discord account, you can log in right from the sidebar and on Twitch from speed dial, with no additional add-ons needed to be installed.
Opera GX
Control resource consumption for your browser, and set limiters to prevent laptop overheating.
3. Try using integrated graphics instead of dedicated
All gaming laptops have dedicated and integrated graphics, and if your laptop is overheating, your dedicated graphics may be the problem.
Dedicated graphics uses more power, thus creating more heat, and if you’re playing a hardware-intensive game, you might cause your laptop to overheat.
Users suggest using integrated graphics as a temporary workaround to fix this problem. However, integrated graphics don’t use the same amount of power as your dedicated graphics, so it doesn’t produce the same amount of heat.
However, the integrated graphics don’t offer the same performance as your dedicated graphics processor, so you might not get the best results in certain games.
If your laptop is overheating when playing games, perhaps the problem is insufficient cooling. However, you can fix this problem simply by purchasing a cooling pad.
These devices are pretty helpful and will provide extra cooling to your laptop and help you reduce your laptop temperature.
If you don’t want to purchase a cooling pad, you can try using your laptop on a clean, flat surface. However, placing your laptop on your bed or your lap is a bad practice since its fans can get filled with dust and dirt, and that will cause your laptop’s temperature to rise.
5. Replace your charger
According to users, if you’re having overheating issues when playing games, the problem might be caused by your charger.
Several users reported that their charger was faulty, and that caused the issue of overheating to appear. Once you replace your charger, check if the problem is still there.
6. Try limiting your FPS
While gaming, all users try to achieve a high FPS. Higher FPS means a smoother gaming experience, but sometimes high FPS in games can cause your system to overheat. If your laptop is overheating while playing games, perhaps your gaming performance is causing it.
For example, if you’re getting 100 frames per second in a specific game, your laptop may be using too much of your hardware resources, thus increasing the temperature.
Some users suggest limiting your FPS to a lower value, such as 60. Doing so will put less stress on your graphics card and cause it to heat less.
7. Underclock your graphics card
Many users tend to overclock their graphics cards to achieve better performance. However, overclocking stress your hardware, causing it to generate more heat.
Eventually, overclocking can cause your laptop to overheat during gaming sessions. If your hardware is overclocked, that might cause overheating, so be sure to disable all overclock settings and revert to the default values.
If the problem appears while using the default values, perhaps you want to try underclocking your hardware.
To underclock your hardware, you need to lower its settings to reduce energy consumption and heat production. Remember that underclocking your device will cause reduced performance, but at least it will prevent your laptop from overheating.
Press the Windows key + S and type power settings.
Now select Power & sleep settings from the search results.
In the right pane, go to the Related settings section and click Additional power settings.
The Power Options window will now appear. Locate your currently selected power plan and click the Change plan settings.
Now, click on Change advanced power settings.
Expand the Processor power management section and set the Maximum processor state to a lower value. For example, if your current value is set to 100, set it to 95 or lower.
Do the same for the Minimum processor state.
After making these changes, click Apply and OK to save changes.
According to users, if your laptop is overheating when playing games, your power settings may be causing the problem. However, several users reported that they managed to fix this problem by changing their power settings, so you might want to try doing that.
After changing these settings, the CPU utilization should be altered, and your laptop won’t overheat during the gaming sessions.
9. Try elevating your laptop
According to users, sometimes the ASUS laptop overheats while gaming issues can occur if you don’t have good airflow. Your laptop sucks the air from your room and uses that air to cool other components. However, issues with your laptop can occur if you’re blocking the airflow.
One way to fix this problem is to elevate your laptop. Put your computer onto something while using it on a flat surface to allow air to flow better. You can use almost anything to upgrade your laptop if you don’t cover the fans.
For the best results, it’s advised that you elevate your laptop 1 to 1.5 inches off the surface.
This is a crude workaround, but it works according to users, so you might want to try it out.
10. Clean your laptop
If you’re still having overheating issues with your laptop, it’s advised that you clean it from dust. Your fans will get covered with dust over time, and that will cause your temperature to rise.
Therefore, it’s advised that you clean your laptop from dust. You can try opening the bottom of your computer and using the pressurized air to clean the fans and heatsinks.
Bear in mind that opening your laptop will void your warranty, so if your device is still under warranty, perhaps it would be best to take it to the official repair center.
If you don’t want to open your laptop, you can use the pressurized air and clean the fans without opening the laptop. This should help you get out at least some of the dust from your laptop. After doing that, check if the problem is still there.
How hot is too hot for a laptop?
Laptops are programmed to work within a specified safe temperature range. According to consensus, this range is between 10 to 35 degrees C (50 to 95 degrees F).
If your laptop is starting to operate at about 70 degrees C (160 degrees F) while gaming, it is getting too hot and can cause damage. Anything above this threshold is dangerous, and you must quickly shut down your PC to prevent any damage to your hardware.
Laptop overheating issues can be pretty problematic, but in most cases, these issues are caused by overclocking or dust in your device. Hopefully, you were able to fix this problem with one of the solutions in this guide.
OpenVPN is an open-source virtual private network system that provides users with both server and client applications.
A lot of people rely on OpenVPN, as it’s one of the most popular protocols thanks to its speed, flexibility, and security.
It’s also optimized to run on additional devices other than desktop computers or laptops, including routers, consoles, and even smart TVs.
However, despite its popularity and versatility, sometimes you may notice that OpenVPN is not changing your IP address.
Given that IP address spoofing is one of the essential operations that a VPN needs to perform, that can be quite alarming.
Not to worry, though; our comprehensive guide will teach you how to troubleshoot OpenVPN if it stops changing your IP address.
Does OpenVPN change your IP address?
Most probably, you should be able to switch to other IP addresses using OpenVPN and mask your online identity.
There are instances when this is not working either because your VPN is not configured correctly or the version you’re using doesn’t allow you.
You can face various scenarios where OpenVPN doesn’t respond and give certain error messages like these:
OpenVPN connected but IP not changed
OpenVPN public IP not changing
OpenVPN not changing IP Mac, Linux, Windows 10, iPad, iPhone, Android
OpenVPN still shows my IP warning: DNS server address is not a public
IP address and is not being routed through the VPN
OpenVPN not working over IPv6
That being said, you can run into such issues while using OpenVPN but not to worry. With the following practical guide, you’ll be able to establish a strong VPN connection.
Quick Tip:
If you’re using OpenVPN for privacy protection purposes, you might be better off turning to a professional VPN tool.
ExpressVPN can keep your privacy safe and has numerous IP addresses in 94 countries with the latest encryption, or split tunneling for next-gen protection.
ExpressVPN
This complex VPN offers you OpenVPN protocols with countless IPs in different regions.
A lot of processes and programs on your Windows computer require certain privileges in order to run as intended.
The quickest way of assuring that you’ve granted OpenVPN the appropriate rights to run on your PC is to run it with administrator privileges.
Just right-click the GUI and select Run as administrator to get that out of the way.
If OpenVPN is still not changing your IP address, jump to our next recommended fix.
2. Reinstall OpenVPN
If your version of OpenVPN is outdated, or you installed a modified version, you could experience connectivity issues.
Although OpenVPN can connect you to the VPN server you pointed it to, you may notice that your IP still stays the same.
For that reason, you should download OpenVPN from the official website and reinstall it on your PC, but not before uninstalling the old version.
Just a quick note before starting the installation process: right-click the installation executable and run it as an administrator.
3. Check security software
If you recently installed a firewall or modify settings in your existing one, there’s a chance you might’ve messed up OpenVPN’s functionality.
Not to worry, though, there’s nothing that a good old troubleshooting session can’t fix.
Press the Win key on your keyboard and type Firewall.
Select Windows Defender Firewall with Advanced Security.
Go to the Inbound Rules section.
Locate OpenVPN and remove all restrictions (if any).
Head to the Outbound Rules section.
Repeat step 5.
Launch your antivirus.
Make sure OpenVPN is not blacklisted or restricted in any manner
Restart your PC and launch OpenVPN and check the connection.
It’s quite common for security software to conflict with various other programs on your PC, which is why checking it for restrictions is an important step.
4. Configure OpenVPN properly
This one requires you to get your hands dirty, but if everything failed so far, this is the golden ticket right here.
Without further ado, here’s what you have to do:
➡️ How do I connect to OpenVPN client?
Close your OpenVPN client
Launch the Task Manager and make sure that OpenVPN is closed
Locate your OpenVPN’s client configuration (.conf) file
Open it with any text editor (with admin rights)
Add redirect-gateway def1 to your conf file on a new line
Save the configuration file
➡️ How do I connect to OpenVPN server?
Close your OpenVPN server
Launch your Task Manager and make sure that OpenVPN has been closed
Open your OpenVPN’s server .conf file with any text editor
Add push “redirect-gateway def1” on an empty line (quotes included)
Save the configuration file
Now you can launch both the server and the client and you should notice that your IP changes without a hiccup.
Note that if the server’s IP changes periodically (dynamic IP), you may need to perform additional configuration to your .conf files.
You could avoid that by using a dynamic DNS service such as No-IP.
This will bind your IP address to a domain and will detect any IP changes automatically.
Shortly, this particular VPN software can protect you by assigning other IP addresses in a dynamic way, so you get different IPs based on different locations.
Once connected to the Access Server on this VPN, your IP address is masked and dynamically receives other addresses.
To wrap it up, if you notice that OpenVPN is no longer changing your IP address, it’s time to step up.
Most of the time, restarting the service or reinstalling it should take care of this issue in no time.
However, if nothing seems to work, you might be better off switching to a commercial VPN.
The Access denied error code 16issue is not an uncommon one, as many users encountered it at least once in their browsers.
If you get this error, it means that accessing certain websites is currently impossible for you.
Fortunately, there are a few things you could try to fix this issue without breaking a sweat and this guide will help you do just that.
However, the Access denied error code 16 is not the only 16-signed issue you could encounter on your Windows 10 PC.
What is error 16 access denied?
This happens for a wide range of reasons. Most commonly, the website is restricted in your location, or your antivirus is blocking access to it because it’s blacklisted.
Check out the list below for more related error code 16 situations:
Incapsula access denied error code 16 – occurs if your ISP blocks Incapsula, but can be fixed by using a good VPN
Error code 16 website, Chrome – happens when you try to access certain websites but can be usually fixed by disabling your antivirus
Error code 16 this request was blocked by the security rules Chrome can occur due to your browser settings and can be fixed by either resetting its configuration or switching to a different browser
Access denied error 16 Imperva – firewall blocking access to the website
Error 16 website/ Chrome/ Cineplex, Siriusxm/ Gameloop/ Experian – the issue occurs on pretty much any platform
Access denied Android/ iPhone/ macOS – access denied 16 can happen on any device
As you can see, this type of issue isn’t specific to any app, website, or device. Some of the most common scenarios encountered by users are mentioned above, and following we’ll focus on how to solve them.
Using a VPN is the most common fix you can apply if you notice that certain websites aren’t available to you.
Whether your ISP restricts your access to the websites, or you may be in a region where the site is not available, a VPN such as ExpressVPNcan take care of it.
Additionally, a VPN will also encrypt your traffic and re-route it, shielding it from potential attackers, hackers, spies, and even your ISP.
ExpressVPN
Fix error code 16 in any website or app using ExpressVPN!
Sometimes security software on your computer, including but not limited to your firewall or antivirus, may limit your access to various resources.
If, say, your firewall was to blacklist certain websites on your computer, you would be unable to access them without removing the firewall rules.
Therefore, it’s not impossible that you’re receiving Error Code 16 because of an overzealous firewall or antivirus piece of software.
Fortunately, that’s quite easy to fix. You just have to look into your security software’s configuration and make sure it doesn’t limit your Internet access.
3. Use another device
Sometimes, your device may not be properly configured to access certain websites, in which case it will become restricted.
To rule out anything wrong with the device you’re receiving the Access denied Error Code 16 on, just try using another device.
However, make sure you stay within the same network as the original device.
If you can access the websites normally on the second device, at least you’ll know there’s something wrong with the original one.
You can also try using another network, to rule out any network-based limitations.
4. Update your Windows
Open the Settings app (Windows Key + I).
Navigate to the Update & Security section.
Click the Check for updates button.
Microsoft releases updates for its popular OS (Windows) on a regular basis, and making sure they’re always installed is actually great.
There’s a good reason why these updates get released so often, so you might as well apply them.
Not only is an up-to-date Windows machine more secure against all kinds of threats, it’s also less prone to issues such as the Access denied error code 16 one.
Therefore, make sure you’ve applied the latest batch of updates, restart your PC, and check if the error is still there.
5. Use a different web browser
Sometimes Access denied error code 16 can be related to your browser and its configuration.
To check if your browser is the problem, we advise accessing the website using a different browser.
Microsoft Edge could be a good choice, but if the problem is related to your system, it’s rather likely that the issue will manifest itself in Edge as well.
Therefore, it might be better to use a third-party browser such as Opera One in order to troubleshoot this issue.
If you don’t encounter the issue while using a different browser, it’s rather likely that your default browser’s configuration is what’s causing it.
So you might want to either adjust your settings, reset your browser, or replace it altogether.
6. Check your system date and time
Many services perform date and time checks on your system before giving you the green light to access them.
So it wouldn’t be the craziest thing if you wouldn’t be able to access a specific website because your date and time are not set correctly.
We know this may sound a bit far-stretched, but trust us, it’s happened to other users.
Therefore, we recommend you to check if your date and time are set correctly.
If not, you can easily take care of this issue by setting the time and timezone to Auto.
As long as you’re connected to the Internet, your date and time should never be wrong again.
This is perhaps the most overlooked suggestion ever.
If contacting the ISP could be avoided, many would gladly follow any other suggestion, no matter how absurd.
However, this is in fact one of the most effective ways to solve any connectivity issue that’s not related to your PC (or any PC component).
It’s a known fact that ISPs can block various websites, and this may be exactly why you’re getting that annoying Error Code 16 in the first place.
Call them and ask if they’re actively blocking the website that prompts you with that error. If they do, you can rule out any PC-related problems.
Don’t be disappointed, there are still ways to get around this limitation. Using a VPN, for instance, can easily circumvent ISP website blocks.
All things considered, the Access denied error code 16 issue can prevent you from accessing some of your favorite websites, but there are ways to fix it.
If you encounter this problem, make sure to try our solutions and remember that simply using a VPN can fix the problem in most cases.
Most VPN connection failures are brought about by something that blocks the connection to the VPN servers.
If IPVanish won’t connect in Windows 10, Mac, or FireStick, there are some issues that could be causing it.
IPVanish is one of the fastest VPNs for Windows 10, which owns and operates all 1400 of its servers in countries across the globe, for better security and privacy, plus a less congested connection.
Why is IPVanish not connecting?
If you experience this undesirable result with IPVanish VPN software, you might need to fix it with quick but reliable methods.
Before doing this, you should know about the reasons why you have connecting errors on this VPN. Firstly, verify your main Internet connection to see if it’s working properly.
If this is not the cause, it may be due to your current server locations so try another server instead. In addition to that, you can switch the VPN protocol that works for your type of network.
Moreover, there are users that have similar issues with this VPN, and you can recognize them by such messages:
IPVanish connection failed
IPVanisherror fetching IP address
IPVanishconnection error
IPVanishstuck on logging in
IPVanishwon’t open
Users usually complain about IPVanish not connecting on:
➡️ FireStick – your VPN is supposed to allow you to connect at speeds that will make buffering a thing of the past on FireStick. If it doesn’t work, take into consideration that your location could be blocking PPTP VPN connections.
➡️ Android – in this case, you should get in touch with your ISP and check if the mobile carrier supports PPTP connections on different devices.
➡️ Mac – if that’s your problem, you may temporarily disable security software such as firewalls or antivirus and retry the connection. You may also reboot your computer.
➡️ Fire TV – a quick IPVanish update often solves the problem on your Amazon Fire TV.
➡️ iPhone – having this VPN issue on your iPhone requires you to change the DNS address to automatic.
➡️ Windows 11 – IPVanish can be fixed on this platform in different ways, like changing the VPN protocol.
While these are some of the possible scenarios, others may be specific to your situation, but there are some solutions you can use if IPVanish won’t connect.
Quick Tip:
Unlike IPVanish, there are great VPNs that help to keep your IP private all the time without an unstable connection.
ExpressVPN is the optimal software that includes a high-speed connection on the web, unblocking tools for censored websites, and multiple protocols for different networks.
ExpressVPN
Connect easily on all devices like PC or mobiles to navigate at lightning speeds without interruption.
You can try and reboot your devices before opening any other apps on your computer, as this is one of the main issues why IPVanish won’t connect in Windows 10.
You can also check your password and ensure the username and password are both typed correctly. Also confirm that your Internet connection is working while disconnected from the VPN.
2. Ping the VPN server
You can check whether you can reach the server you’re going to connect to by pinging it.
Click Start and type CMD in the search bar.
Click Command Prompt.
Type ping 8.8.8 (you can replace it with the address you wish to ping) and press Enter.
3. Disable UAC
Disabling UAC helps you confirm if it will allow OpenVPN and PPTOP connections to work. Here’s how to do this:
Click Start.
Select Control Panel.
Type UAC in the control panel search box.
Click on Turn User Account Control (UAC) on/off.
Uncheck the box for Use User Account Control (UAC) and press enter or click OK.
Restart your device and try to connect again.
Other solutions
Try connecting with another computer. Some VPNs work well with other computers, so get a different computer and try IPVanish VPN on it just to see whether it works. If it does, the issue is with your own computer.
Verify that the server you’re trying to connect to is online, and available, by checking the server status page.
Try changing ports and/or protocols, to find one that works best for you by doing the following: Open the IPVanish app on your Windows device, log in with your IPVanish username and password, and click the Settings menu icon on the left and then select the Connection tab.
Click on the Active Protocol drop-down menu to select your preferred VPN protocol. Retry the connection and repeat these steps with different port/protocol combinations to achieve the desired result.
Test with a different Internet connection as some types like public hotspots, cellular, and hotel Internet connections may be problematic.
Make sure that if you are using a wireless or cellular data connection you have a consistently strong signal that isn’t being interrupted. This is often overlooked as any device with a motor (fan, treadmill, refrigerator, etc.) can disrupt a wireless signal enough to cause intermittent problems.
Attempt to connect to the closest server to your present location; servers further away are subject to more hops which include more chances for packet loss.
Try to use a TCP-based connection (PPTP/OpenVPN-TCP) as UDP connections do not have the same error correction and can be less stable.
Verify that your security software is not causing a bottleneck when scanning inbound and outbound traffic for Trojans/viruses. If necessary, exclude the relevant ports. OpenVPN = TCP and UDP ports 443 and 1194; PPTP = ports TCP/1723 & GRE; L2TP = ports UDP/500, UDP/1701 & UDP/4500 & ESP.
Reboot your equipment – modem, router, and computer in that order. A stuck process could be causing delays in processing, and you’d never know about it.
If you are presented with a message saying Authentication Failed either by any IPVanish VPN apps or in one of the VPN logs, then your username and password were not accepted for three reasons:
The account has expired, either deliberately due to having been canceled or unintentionally due to a failed payment. You can log in to the IPVanish VPN website to find out the status of your account. Only active accounts will allow you to log into a VPN server.
The username and password you are trying to use are not correct. Make sure you can log in to the IPVanish website. If you’re having trouble logging in, reset your password.
There’s a server issue. Contact IPVanish for server-related support and solutions.
Conclusion
Therefore, you can solve unpleasant connection issues with IPVanish using these useful resolutions that can be applied to many devices without advanced technical know-how.
You can find plenty of other quick fixes to apply in times of need in VPN Errors & Solutions. Since VPNs are our specialty, don’t hesitate to visit our VPN Guides Hub too for the best solutions.
Did any of these solutions help fix IPVanish’s won’t connect to Windows 10 issue? Let us know in the comments section below.
Frequently Asked Questions
Why won’t my IPVanish connect? Sometimes, little things are the ones making a difference. Inaccurate Time and Date settings on your computer or the Internet connection can cause problems like yours.
How do I know if my IPVanish is working? To make sure your IPVanish is working, look for a change in the IP address.
Fortnite and Apex are at the top of the food chain when discussing games. But they’re not without their faults. Let’s take; for example, the Game security violation detected error message.
While this error is standard, you may encounter it not only in Fortnite and Apex but in many other triple-A titles.
This can completely ruin your interest in the game. To fix this, you must find out what’s causing it.
The error may prevent you from playing your favorite games like Fortnite and many other games with Steam, Ubisoft, etc.
This error is usually accompanied by a combination of special characters and digits. For example, it can look like this:
# character followed by seven zeros and a letter or a digit – e.g. #0000000d, #00000001.
You can use the easy steps described in this article to fix this error message when playing Fortnite, Apex, etc., on Windows 10.
Why does the game security violation detected message appear?
Low specifications or other hardware issues are common causes of games crashing. However, the game’s error message for the security breach is different. If you receive this message, there is an issue with the Easy Anti-Cheat service.
Today’s multiplayer games frequently employ Easy Anti-Cheat to stop cheating, trendy ones like Fortnite, Halo, and Apex Legends.
The game is automatically stopped when a player attempts to hack or cheat on the computer. It does a decent job at that, but it also has a propensity to respond to things that aren’t cheating.
Easy Anti-Cheat errors occur when this tool wrongly classifies software as a security violation. You can prevent these mistakes by eliminating the programs producing the misunderstanding from the equation.
How can I fix the Game security violation detected?
1. Close the lighting control software
Right-click your Start menu, and select Task Manager.
Close the programs you use to customize LED lighting (your RGB program, Lightservices.exe, SelLedV2.exe, mycolor2.exe, etc.) by clicking then and the End Task button.
Relaunch your game.
The LED lighting on your graphics card or motherboard is controlled by software like the ones mentioned in the second step. So if there are LED lights on your rig, this is probably the cause of the error.
To fix this, you can update your drivers by visiting the PC manufacturer’s website or just end the task before you play. If you want this process automated, a great tool you can use is Outbyte Driver Updater, professional software that will safely update your drivers.
2. Uninstall the RGB software
Press the Windows key +R.
Type control and press Enter.
Under View by, click Category.
Select Uninstall a program.
Right-click yourRGB software, then selectUninstall.
Relaunch your game.
If the error message shows an executable name, a simple solution is to uninstall the RGB software.
To avoid junk and root files after uninstalling, you can use CCleaner. CCleaner is a great tool that removes all associated files of uninstalled programs.
CCleaner
A clean uninstall is essential for safely reinstalling the software.
Game security violation usually means the Easy Anti-Cheat service is terminated, usually caused by antivirus software.
Ensure the service is installed correctly and isn’t blocked on your PC or your connection.
A botched software update of your antivirus program may cause compatibility problems. An update may therefore be helpful. However, we suggest trying a different antivirus software if the problem persists.
The market has dedicated antivirus tools for gaming PCs that will most likely not interfere with your gaming while keeping your system fully protected.
These antiviruses can help you prioritize gaming and pause unnecessary apps while playing. On top of that, most have built-in gaming modes that temporarily disable intrusive notifications while you are in a game.
Another frequent source of game security breach detection problems is VPNs. Since these apps can relocate your network, the game’s anti-cheating software frequently flags them as potentially malicious.
Before starting the game, disconnect your VPN, which should fix the issue. After disconnecting the VPN, it could occasionally be essential to restart Windows.
What games uses Easy Anti-Cheat?
There are so many popular games that use this software. However, the list is not limited to these but includes 3on3 FreeStyle, 7 Days to Die, 3on3 FreeStyle: Rebound, Absolver, Rainbow Six Siege, Halo: The Master Chief Collection, and Epic’s own Fortnite.
This game security violation detected error is standard in New World, Steam, Brawlhalla, Apex Steam, Dead by Daylight, LED keeper, Lost Ark, Rust, Fall guys, and the lightingservice.exe. So you should take note.
It’s always a good idea to keep your game or game launcher software (Epic, Steam, Ubisoft Uplay) up to date. Most games update it automatically, but it’s a good practice to check this out.
If you have more questions or suggestions, let us know by using the comments section below.
You may already know that, but ZoneAlarm Firewall is an advanced PC protection solution. It’s basically a firewall, but one that lets you perform in-depth configuration of its rules and permissions.
ZoneAlarm Firewall is comparable to Windows’ built-in firewall, but the former has more features than the latter. As a result, it draws the attention of many users who are seeking more elbow room in regards to configuration.
However, the fact that it offers a more extensive set of configurable rules also means it’s more complicated to operate. This goes especially for using several security tools along with ZoneAlarm Firewall, such as an antivirus or a VPN.
Doez ZoneAlarm have a VPN?
ZoneAlarm isn’t just a firewall, although this is the utility they’re probably best known for. ZoneAlarm has several security programs fit for almost every need on its belt, but unfortunately, a VPN isn’t one of them.
Currently, the only programs you can benefit from in the security bundle are the firewall, an anti-ransomware utility, and an antivirus.
It’s worth mentioning that each of them works great, and they work even better when you team them up.
Will a VPN work with ZoneAlarm?
Essentially and ideally, no firewall, including ZoneAlarm, should block VPN traffic. However, in reality, things are quite different. By default, ZoneAlarm offers you the possibility to configure VPNs automatically.
If you’ve generated a set of advanced firewall rules (even by accident) that block VPN protocols, ZoneAlarm won’t be able to detect your VPN automatically every time you try to establish a connection.
As a result, you’ll need to undo the settings and make sure every VPN-related component is outside the blacklist and can access the Internet without restrictions.
Therefore, to answer the original question: yes, VPNs usually work with ZoneAlarm, if you don’t explicitly block them.
How to configure a VPN with ZoneAlarm
1. Use automatic VPN configuration
As we’ve mentioned above, ZoneAlarm integrates automatic VPN recognition features. As a result, you can install the VPN client on your computer as usual, without giving a thought to the firewall.
The next time you’ll establish a VPN connection, ZoneAlarm might promptly notify you with an alert. However, you must understand that these alerts are usually normal whenever a new connection is detected.
And since connecting to a VPN server is deemed as a new connection, we’ll let you do the math.
2. Perform manual configuration for your VPN
There are a few cases where ZoneAlarm doesn’t detect your VPN connection automatically. Therefore, you’ll need to configure your VPN manually so the firewall won’t block it on the spot.
Don’t worry, though, ZoneAlarm has a habit of letting you know whenever manual assistance is required. Usually, manual configuration only requires 4 steps:
Adding VPN resources such as the gateway, DNS servers, and local subnets to the Trusted Zone
Removing VPN gateways from blocked subnets or ranges
Modify ZoneAlarm settings to allow VPN protocols
Allow VPN software to run on your computer (under ZoneAlarm firewall)
3. Make sure your VPN protocols are supported
In ZoneAlarm, navigate to the Advanced Firewall section. Click the Settings button, then select Advanced Settings.
Once you’re here, check the Allow VPN protocols box to make ZoneAlarm accept common VPN protocols. Currently, ZoneAlarm only provides support for a few protocols. Namely:
AH
ESP
GRE
IKE
IPsec
L2TP
LDAP
PPTP
SKIP
If your VPN runs on a protocol other than the ones we’ve listed above, you will need to perform additional configuration.
Head back to the same menu as above, and make sure the Allow uncommon protocols at high security box is checked.
4. How to allow VPN software in ZoneAlarm
Click the Application Control button.
Select View programs.
Choose your VPN client in the programs section.
Click the ? icons in the Inbound and Outbound sections.
Select Allow from the menu.
Make sure your programs is on the list, in the first place, otherwise you won’t be able to modify any inbound and outbound traffic settings. If your VPN isn’t on the list, you can use the Add button to insert it manually.
5. Grant permission to VPN components
Click Application Control.
Select View Components.
Choose the VPN components you want to allow from the column.
Click the ? icons in the Outbound and Inbound columns.
Select Allow in the context menu.
Note that VPN-related settings might not be available in the free version of the firewall.
Is ZoneAlarm free version safe to use?
If you’re using the free version of ZoneAlarm Security, you’ll have absolutely no issue using a VPN on your computer. The free version has no VPN configuration options, but it still prompts you with some notifications.
We’ve used ExpressVPN during our tests, and we encountered absolutely zero issues while using it with the free version of ZoneAlarm Security.
You’ll notice that ZoneAlarm will ask you a bunch of times if you want to allow or block the VPN client, service, and daemon. If you use the notifications to allow your VPN client, everything should be a-ok.
ExpressVPN
Looking for a VPN that works with ZoneAlarm Security? Give ExpressVPN a try.
All things considered, if you’re worried about compatibility issues between your VPN service and ZoneAlarm, you can rest assured.
ZoneAlarm Security has several VPN configuration options, and most of them are set to run automatically, so if you have a ZoneAlarm VPN problem, check your configuration.
Even if you’ve tampered with the firewall’s settings, creating rules to allow VPN traffic and whitelisting the VPN software on your computer couldn’t be easier.
Furthermore, ZoneAlarm supports numerous common VPN protocols such as PPTP, IPsec, L2TP, and OpenVPN, but also provides support for less-common ones.
Windows 11 crashing is a major problem since it will prevent you from using your PC properly, plus you can lose important information and unsaved data.
Luckily, this can be fixed, and today, we’re going to show you the best ways to do that, so keep reading.
Why does Windows 11 keep crashing?
Listed below are the common reasons that may cause the Windows 11 keeps crashing issue, and the previous iterations as well:
Malfunctioning drivers or issues with third-party apps
Issues with the storage drive or RAM
System infected with malware or virus
Overheating or problems with power supply
Corrupt system files or damaged registry
What do I do to fix Windows 11’s desktop crashing issue?
1. Check for issues with RAM and storage drive
Press Windows + R to launch the Run command.
Type mdsched.exe in the text field and click OK to launch the Windows Memory Diagnostic tool.
Click on Restart now and check for problems to run the scan.
If there’s an issue with your RAM, you might need to replace it.
2. Uninstall a recent Windows update
Press Windows + I to launch the Settings app.
Select Windows Update from the tabs listed in the navigation pane on the left.
Click on Update history.
Select Uninstall updates.
Select the recent update from the list, and click Uninstall to remove it.
Click Yes in the confirmation prompt that appears.
3. Update the graphics driver
Press Windows + S to launch the Search menu.
Enter Device Manager in the text field at the top, and click on the relevant search result.
Double-click on Display adapters to view the devices listed under it.
Double-click on your graphics card.
Next, go to Driver tab and click the Update Driver button.
Next, select Search for drivers from the two options in the Update Driver window to let the system automatically scan for the best available driver on the computer.
For more information, we have a guide on how to update drivers on Windows 11, so be sure to check it out for more information.
You can always go for third-party utilities if that sounds like too much trouBut. Instead, we recommend using Outbyte Driver Updater. This dedicated tool scans the web for the latest version and automatically installs it, keeping the installed drivers up-to-date.
Outbyte Driver Updater
This tool allows you to automatically update your drivers safely and quickly.
Make sure that the power supply is correctly connected to all the components.
You might want to consider replacing your power supply unit if it is.
7. Scan for malware or virus
Press Windows + S to launch the Search menu.
Type Windows Security in the text field and click on the relevant search result that appears to launch the app.
Next, click on Virus & threat protection from the options listed here.
Click on Scan options under Current threats.
Select the Full scan option and click on the Scan now button to scan all the files stored on the computer.
Wait for the scan to finish and check if the error is fixed.
While the Windows Security feature does a good job detecting and eliminating viruses, Microsoft is not a security technology firm. So, to perform a deep and thorough scan, we recommend using dedicated antivirus software in ESET NOD32.
This tool does not wait for viruses to affect your PC before it gets rid of them. Instead, it detects the viruses early and eliminates them before they can cause damage.
This is all thanks to its cutting-edge security technology that it uses to protect millions of users digital with ease.
Click on Display on the right in the System tab that opens by default.
Next, click on the dropdown menu for Display resolution under Scale & layout.
Select a display resolution that maintains that 16:9 aspect ratio. Some of the options are listed below:
3840×2160
2560×1440
1920×1080
1600×900
Choose one from the above list for your computer.
9. Run SFC scan
Press Windows + X and choose Terminal (Admin).
Click on the downward arrow at the top, and select Command Prompt to open it in a new tab. Alternatively, you can press Ctrl + Shift + 2 to launch the Command Prompt.
Type/paste the following command and hit Enter to run the SFC scan:sfc /scannow
Then, wait for the scan to complete, restart the computer, and check if the Windows 11 desktop crashing problem is fixed.
Alternatively, you can use a third-party repair tool to fix the broken files. This kind of tool checks for these files quickly and replaces them with a suitable one to keep your PC running smoothly.
Also, it saves you the stress of running a command and waiting a long time for the scan to complete.
What do I do if File Explorer keeps crashing in Windows 11?
PCs come in a wide range of specifications that make them different. A significant feature of the computer is its RAM. RAM is a computer memory that can be read and changed. It stores working data and machine code.
Depending on how much data you have on your computer memory, your disk space can become filled up. It can also display warnings about low disk space.
However, it is annoying to see Windows low disk space warnings constantly. So, we’ll show you some ways to turn off the low disk space warning in Windows 10 & 11.
Why does the low disk space warning keep popping up?
A low disk space warning alert usually pops up when you boot the computer or access the hard drive.
Likewise, the disk space alert script for Windows may pop up when you try to perform some tasks on your PC. However, the message may show in two ways:
You are running out of disk space on the Local Disk (D:). Click here to see if you can free space on this drive. – It indicates that your local drive is low on storage and may not be able to store any more data.
You’re running out of space on this PC. Manage storage to view usage and free up some space. – This error is associated with the C:\Windows\Temp folder getting full. It prompts the low disk alert to appear on Windows startup.
Furthermore, users complain about the low disk space warning popping but nothing to delete.
Even though you have freed up some space in your disk and cleared the recycle bin on your disk, the low disk space warning may pop up. It can be because of the temp and prefetch file on your PC.
How can I stop the low disk space warning on Windows 10 & 11?
1. Delete the temporary and prefetch file
Press the Windows + Rkeys to prompt the Run window.
Type %temp% in the text box and press Enter.
Please select all the files and press the Delete button to delete them.
Type prefetch in the text box and press Enter.
Please select all the files and press the Delete button to delete them.
Deleting the temporary and prefetch files from your PC is safe and won’t affect your PC.
2. Adjust settings in Local Group Policy
Press the Windows + Rkeys to prompt the Run window.
Type gpedit.msc in the search space, and press Enter to open the Local Group Policy.
The MMC (Microsoft Management Console) will launch in the Local Group Policy Editor.
Expand the Computer Configuration option and expand Administrative Templates.
Expand the System option and expand Troubleshooting and Diagnostics.
Click on Windows Resource Exhaustion Detection and Resolution.
Right-click on Configure Scenario Execution Level in the console window and select Properties.
Click on Disabled on the Settings tab and click OK.
Disabling the Windows resources exhaustion detection and resolution option in the Local Group Policy will prevent low disk space warnings.
Users should note that the steps in the solution above don’t free up memory space. It stops warning alerts from interrupting your activities on the PC.
Right-click on the C: drive and select Properties from the drop-down.
Navigate to the General tab and click on Disk Cleanup to open the app.
Check the boxes for the file you want to delete, then click OK.
Freeing up disk space on your PC automatically eliminates local disk-free space issues. Since your disk space is free, the low disk warning should stop popping up.
Why is C drive filled without files?
The C drive can be filled without having any files consuming the space. However, if the hard drive’s file system gets corrupted, it can display it as complete.
Also, duplicate files on your computer take up significant disk space. So, you can use an external tool to clean it up.
With a tool like CCleaner, you can clean the entire PC and remove the unnecessary files that are consuming the space on your C drive.
CCleaner
Clear all junk files and free up space for important data.
Everyone wants to enjoy Windows 11, and many users are complaining about receiving the error saying This PC can’t run Windows 11 error while checking if their PC is compatible.
Sadly, this happens even for machines that genuinely respect the minimum system requirements asked by Microsoft.
We’ve also checked this on a cutting-edge Dell XPS 17 machine, with monster system requirements, and we can say that the reports are valid.
Even though the PC has powerful hardware specs to move mountains, the PC Health Check application says Windows 11 is incompatible.
The problem rarely lies with the machine’s hardware itself, but more with a TPM 2.0 chip on the motherboard and a BIOS setting that needs to be enabled, called Secure Boot.
What does the PC can’t run Windows 11 error message mean?
This PC can’t run Windows 11 message means your computer does not meet the official requirement to use the latest OS. So, you might need to upgrade your PC to install it officially.
However, if you are facing the issue on a PC that meets all the formal requirements, it might be because of the absence of a feature on your motherboard. Also, it might be because you have not enabled the correct settings.
We will show you to fix this in the subsequent sections of this guide.
Run the downloaded file, which will install the PC Health Check app.
After it installs, click Finish to open the app.
Now click on the Check now button.
Hopefully, you will get a message saying that This PC meets Windows 11 requirements. In addition, you can now click on See all results or Device specifications to see which installed apps are compatible with the new OS.
Unfortunately, you can also see this great message from the PC Health Check app to get the bad news that your PC is not ready when you try to install the OS.
That’s why we prepared a few solutions to bypass this PC can’t run Windows 11 problem and install the OS as soon as possible.
How can I fix the error saying This PC will not run Windows 11?
1. Check if your PC has a TPM 2.0 chip
1.1. Start the Trusted Platform Module console
Press the Windows key + R to start Run, type tpm.msc, and press Enter or click OK.
In the TPM Manufacturer Information screen, check the value of the Specification Version. This should be equal to 2.0, as in our screenshot.
If you receive an error with the Compatible TPM is not found message, then the TPM chip is unavailable on your motherboard or disabled in BIOS.
So, you don’t know yet if your PC has a TPM 2.0 chip. You need to check that on your BIOS and activate the TPM Support to find out for sure. This is the first step to this PC can’t run Windows 11 using a bootable USB or fresh install.
1.2. Enter BIOS and enable TPM Support
Restart your PC and enter BIOS. Usually, it would be best to press an F (function) or Del keys on your keyboard before Windows boots up, but it’s different for each manufacturer. Check your manual in that regard.
Now, go to the Advanced options on your BIOS, find the TPM Support option, and enable it.
Save and exit BIOS. You can usually do that by pressing the F10 key, which may be different for your PC.
If you don’t find any TPM-related in the BIOS options, your PC doesn’t have a TPM 2.0 chip and can’t run Windows 11. However, you can still avoid the TPM check so follow the steps in our guide on how to install Windows 11 without TPM.
Look for the appraiserres.dll file in the Windows 10 kit, right-click on it, and select Copy.
Mount the Windows 11 ISO.
After mounting or extracting the ISO, go to the Sources folder and delete the appraiserres.dll file inside the folder.
Now paste the appraiserres.dll file you copied from the Windows 10 kit in the Windows 11 Sources folder.
Try installing Windows 11 on your PC again.
The Windows 10 OS doesn’t check if a computer has a TPM 2.0 chip, so you force it to bypass this process by replacing the file with the one in Windows 11.
3. Check if Secure Boot is enabled
Restart the PC and enter BIOS by pressing an F or Del keys according to the manual of your PC before Windows boots up.
Search through the BIOS menu to find the location of the Secure Boot option and switch it on. You can usually find it under the Security settings, but this differs for each BIOS.
Microsoft claims that Windows 11 requires a Secure Boot capable machine, but this feature needs to be switched On. Not that straightforward, right?
You can check again with the PC Health Check Utility at the end of the procedure, and you should now receive a confirmation message.
What can I do if I still get the This PC doesn’t meet the requirements error?
Unfortunately, apart from the false-positive message we talked about at the beginning of this article, there is also a possibility of getting a false-negative message.
That means your PC meets all the requirements to upgrade to Windows 11, but when you visit the Windows Update section, you see the message that you can’t upgrade.
Windows 11 update false-negative message
The complete message says that This PC doesn’t currently meet all the system requirements for Windows 11. Get the details and see if there are things you can do in the PC Health Check app.
While Microsoft is working on a solution for this problem, you can still upgrade to Windows 11 using the ISO file or the Windows 11 Installation Assistant.
You can get into a mess where your system won’t boot up because no operating systems have been detected.
In that case, you will need to use a disk converter to switch your disk from the Master Boot Record (MBR) to the GUID Partition Table (GPT) partition style without modifying or deleting data.
Although it says you won’t lose any data, we strongly suggest creating a backup of your data before doing that. However, after you convert your disk to GPT, disable the Legacy or CSM boot from BIOS before booting.
How do I bypass system requirements in Windows 11?
All hope is not lost if your PC does not meet the system requirements to run Windows 11. You can install Windows 11 on an unsupported PC by downloading the ISO file from the official website.
Fallout 4 is the fourth game in the Fallout series. It is a first-person shooter game that features action role-playing in an ambitious RPG saga. It is one of the most ambitious games and the next generation of open-world gaming.
Regardless of the accolades, Fallout 4 struggles with a couple of issues that affect the game’s performance. Fallout 4 audio stutter and delay are common problems users encounter in the game.
However, Fallout audio can be stuck in slow motion for several reasons, for example, outdated audio driver issues, operating system issues, hardware issues, etc.
The causes may vary in different user systems. Nonetheless, you need not worry about the Fallout 4 sound issues.
This article will guide you through all you need to fix the issue and enjoy a better gaming experience.
Why is the audio glitching on Fallout 4?
Issues with the sound driver: The sound driver on your computer is responsible for sound-related features. It controls the performance of your audio system and also in-game audio performance. However, you can experience glitches with your audio output if the audio driver isn’t working correctly. It may be an outdated driver issue or a broken audio driver causing the concern.
Outdated operating system: An outdated system may cause more problems than users know. It impedes the ability of the computer to detect and fix bugs affecting it, likewise improving its performance. So, not keeping the OS up-to-date makes Fallout 4 sound to keep cutting out.
Network issues: Fallout needs to be connected to the internet to connect with its servers. However, you may experience glitches in your audio and other parts if you don’t have a stable network connection.
Issues with the audio hardware: If you use an external audio device, you can experience issues if it is not working correctly. It may affect the game’s audio output and cause it to stutter and lag.
How can I fix the audio stuttering when playing Fallout 4?
1. Update your sound drivers
Press the Windows + Rkeys to prompt the Run dialog.
Type in devmgmt.msc and press Enter.
Click the drop-down button beside the Sound, Video, and game controller option.
Right-click on the audio service driver and select Update driver.
Select the Search automatically for driver software option.
Your PC will automatically search for driver updates and install them. Updating your sound drivers will fix bugs or problems that may cause audio stuttering or lag when playing Fallout 4.
If Windows doesn’t find the necessary drivers, you can use automated software to find all outdated drivers and update them.
2. Update Windows OS
Click on the Start button.
Select Settings from the options.
Click on Windows Update and select Check for updates.
Windows will automatically search and download updates if there are any available. You can read about game audio stops working on Windows 10/11 for the guide on fixing the problem.
3. Run the game in compatibility mode
Launch the Steam client on your PC and navigate to Fallout 4.
Right-click on the game and select Properties.
Navigate to Local Files and click on Verify Integrity of Game Cache.
Return to the Local Files tab and click the Browse Local Files.
Right-click on Fallout4.exe, then select Properties from the list.
Navigate to the Compatibility tab and select Run this software in compatibility mode.
Ensure you check the box for Run as Administrator.
Click on Apply, then OK to save the changes.
4. Download the latest Fallout 4 update
Launch the Steam client on your PC and navigate to Fallout 4.
Right-click on the game and select Properties.
Check for the latest update to download and install.
After the update is complete, close your game and relaunch it to check if the Fallout 4 sound issue persists.
Ensure your sound input/output devices are connected.
Press the X button in the top-right corner to close the game.
Right-click on the Sound icon and open Sound from the contextual menu.
Select the Playback tab.
Right-click on your audio device and set it as default.
How much is audio latency good for gaming?
The ideal amount of latency for gaming is not more than 40ms. It makes it unnoticeable. So, to get a good latency for your gaming activities, we recommend 40ms and below.
These are the best fixes for the Fallout 4 audio stutter issue. If you follow all the steps strictly, you can fix the issue.
For even more audio options, you can try using Fallout 4 mods that enhance sound effects, add immersive ambient sounds, or introduce new voice lines for characters.
Unfortunately, most VPNs (Virtual Private Network) don’t work for unblocking Netflix anymore. If you know where to look for them, you’ll find a few that still do.
We want to help our readers, and that’s why we made a list of the best free VPN services that work with Netflix.
Every Netflix VPN service that we’ll present in this list below is able to overcome the Netflix proxy ban. For example, you can watch Star Trek: Discovery on Netflix with a VPN if it’s not available in your country.
So, check out the best free VPN services that allow you to watch Netflix and get the one that has the ideal set of features for your needs.
Most VPNs have that 30-day money-back guarantee that allows you to watch Netflix through these VPNs for an entire month.
Are free VPNs safe to use for Netflix?
Honestly speaking, a free VPN cannot maintain the same level of advanced security and functionality as a premium paid VPN.
Some of the factors which define a free VPN as insecure are the limited capacity to unblock restricted content, poor digital security, allowing tracking ads, or slowing down your internet speed.
On the other side, you may find suitable tools that offer powerful online anonymity and secures your browsing.
And after trying the VPN product, you can always upgrade for paid features to get unrestricted content on Netflix.
What are the best free VPN services that work with Netflix?
It is critical for your peace of mind to be able to access Netflix using a fast and trustworthy VPN when streaming and downloading.
For what it’s worth, depending on the region, TV programs and movies are each distinctive in their own way, due to different cultures and cinematic approaches.
ExpressVPN is one of the best options on the market concerning speed and data encryption, with no activity or connection records.
With the Network Lock feature, ExpressVPN halts any traffic going through until the internet connection is reestablished
Explore ExpressVPN’s features to determine whether it’s right for you:
ISP throttling may be annoying in terms of having great video quality
Unlimited bandwidth for your downloads
Reinforced DNS to avoid third-party hijacks
Lightway protocol boosts your device with the hyper-speed
Zero-logging in terms of IP addresses
The Internet test speed helps you to see download capacity
ExpressVPN
Watch everything around the world with lightspeed in the freest from harmful environment.
Among the best services, we also included CyberGhost. Even if it’s not really free, its impressive set of features makes it worthwhile mentioning as well.
Using this Kape Technologies product, you will be able to replace your original IP address with one from the service’s network, and this will make it impossible for third parties to track you online
You can also make sure that nobody pries into your personal conversations, online transactions, and browsing history even when you’re using public Wi-Fi.
With this VPN, you can get simultaneous protection for up to seven devices. Hackers will need thousands of years to get access to your data if you’re using CyberGhost.
You can get the free version on the official website. You can also check a plan proposed by Cyberghost for using Netflix anytime sound like music to your ears.
Just check out a few of its significant advantages:
You will not have to struggle with censored or geo-restricted content anymore
You’ll be able to gain access to content from all over the world and watch all the latest Netflix series without a care
256-AESbit technology
Multiple streaming platforms access
Dedicated IP addresses
CyberGhost VPN
Looking for a sturdy VPN that works with Netflix? CyberGhost VPN may be what you need.
ProtonVPN is among the best-suited tool that can grant you free access to streaming platforms like Netflix with fun content to watch.
This VPN is covered by Swiss privacy regulations and comes with a strict user data policy. Beyond that, you have the quickest internet speed without any data limits.
With a completely free connection, you have secure streaming tools that hide your traffic and get you a green card for multiple streaming services like Netflix.
Using this free VPN gives you 3 different countries to connect with and mask your IP address in order to watch your shows with no trouble.
In addition, you may upgrade anytime for premium plans that offer the full advantage of advanced VPN protocols or 64 server locations.
Some of the ProtonVPN key features you may enjoy:
Browsing without tracking
Swiss policy against log data
1 Gbps to 10 Gbps bandwidth speed
Connect for 10 devices at once (premium)
Peer-to-peer support for sharing files
ProtonVPN
Use this privacy expert VPN with entirely free usage and awesome features to access streaming content.
Finding the best VPN to give you access to Netflix is no easy task. Chances are you’re no stranger to Private Internet Access, assuming that you’ve wanted to browse anonymously before.
Netflix is particularly aggressive at blocking VPN users. However, you gain instant Netflix unblocking with a robust VPN service like this one.
Connecting through a VPN often leads to the same not available in your region Netflix error message.
That’s clearly out of the question if you choose Private Internet Access. It’s really one of the few VPN choices that provide reliable access and incredibly fast speeds any time you want to enjoy Netflix.
The balance between passing the ultimate test of buffer-free Netflix streaming and making you completely anonymous online makes it a top choice.
Some of the Private Internet Access key features you may enjoy:
Minimal lag even when unblocking Netflix and other popular streaming channels
It easily unblocks any protocol filters
Offers extensions for Chrome, Opera, and Firefox
Allows up to no less than 10 simultaneous connections
Supports P2P, so feel free to use torrents from any location, with no bandwidth limits
The only proven no-log VPN service worldwide
Private Internet Access
Private Internet Access easily unblocks Netflix. Now available at a major discount!
Hotspot Shield is an amazing VPN service packed with lots of cool features that allow you to watch Netflix.
Now, more than 500 million users access the Internet securely via this VPN service developed by AnchorFree.
The patented VPN protocol is integrated with 70% of the world’s largest security companies, and it managed to pass lots of security audits.
With Hotspot Shield you can enhance the security of your identity, finance, health, and family data whenever you are searching, browsing, shopping, making payments, and so on.
Your data will be encrypted, and the service will not keep any records of your individual activities.
Try out the service for free or unlock more of its functions with the paid version.
Just take a look at the most exciting features that are included in this service below:
Hotspot Shield offers users secure and private access to a free and open Internet
You’ll be able to access social networks, audio, sports, video streaming, news, gaming, and more websites
Using HotspotShield, you will be able to browse the web safely because you’ll be protected at all times
This VPN service protects your identity, and it also encrypts your data at home, your work, and even in public
You will get secure access to your all-time favorite sites and apps when you’re traveling as well
Hotspot Shield
Obtain instant access to your preferred Netflix titles with this practical VPN.
Surfshark is a relatively new VPN on the market. In spite of that, its services make it more popular day by day.
This is a great VPN for those who want to be so secure that not even their Internet provider could say if they are using a VPN or not.
If we talk about Netflix, this Surfshark LTD service is one of the best, giving you full access to 8 extensive Netflix libraries: (US, UK, NL, JP, IN, IT, CA, DE), way more than its competitors.
It is based in more than 60 countries including China and Russia and has over 1700 servers. You can be sure that you can access Netflix even from these countries.
Surfshark allows you to bypass certain apps or programs that you do not want to be filtered.
Another feature that you will need is multiple VPN connections, which will connect you via multiple servers and countries at once thus making your IP untraceable.
Speaking about its price, you can use it for free for one month by using the 30-day money-back guarantee.
But even if it comes to an end, you have great price plans that are the cheapest on the market.
Some of the key features of Surfshark:
Supports unlimited devices with one account
CleanWeb to stop tracking ads
Private DNS
Leak protection for online data
NoBorders mode for unblocked streaming content
Surfshark
Tired of using a VPN that’s not compatible with Netflix? Try Surfshark.
Still have not decided about a free VPN? Hide.Me will stop your reservation due to free VPN support for streaming with a 10Gbps connection speed.
This VPN software should be your choice because it offers premium benefits at no cost. You have high-speed servers, optimized servers in 5 locations, and a P2P connection for file sharing.
You have no internet throttling while you browse or watch the evening movies on Netflix, plus protect any other digital information stored online.
It’s essential that you have a stable network connection to stay away from buffering or disconnections. Hide.Me gives you 99.9% uptime to stay connected anytime it’s needed.
At the same time, there are no tracking ads or log data that store your user information. With that, you’re free to use personal data freely without safety worries.
In addition, you get unlimited bandwidth with lifetime free usage. So you’re never out of data and navigate as long as you want.
Some of the key features you may enjoy:
IP leak protection
AES-256 encryption
Advanced VPN protocols
Supports all major operating systems
DNS without censorship
Fastest proxy tools
Hide.Me
Utilize this full-benefit VPN entirely free to have various Netflix content without restrictions.
TunnelBear provides simple, private access to your favorite websites. You will also be able to spend as much time as you please binging on your beloved series on Netflix if you decide to use TunnelBear.
You can set the VPN to launch at startup, and you will not have to worry about reconnecting every time you restart your system.
Using this VPN service, you will be able to enjoy lightning-fast speeds and browse with confidence while you’re connected to public Wi-Fi as well.
The VPN service allows you to add up to five devices to cover your whole network and stay secure. Is this number high enough for you?
Check out the most impressive features that are packed into this McAfee VPN service:
If your connection gets lost for some reason, TunnelBear will block all unsecured traffic until the connection is safely re-established
TunnelBear does not log any activity of customers connected to the service
You can connect to the fastest server in more than 20 countries on TunnelBear’s virtual private network
TunnelBear uses robust AES 256-bit encryption, and you can defeat VPN blocking with GhostBeat
You can try TunnelBear for free with 500MB of data
TunnelBear
Want to watch Netflix but your VPN gets blocked? Consider this TunnelBear solution.
Should I use a free or paid VPN for watching Netflix?
There is no universal response for this, as it depends on the user’s need. For the paid VPN software, of course, you have enhanced privacy tools and advanced streaming services.
In any case, you’re welcome to utilize a free VPN for Netflix purposes as long as you know the consequences. Let’s see the ups and downs of every free software presented here:
ProtonVPN
✅ Pros:
High-speed streaming
Practical VPN interface
Supports different locations
No registration needed
❌ Cons:
Limited server location in 3 locations
No throttling features
Doesn’t offer obfuscation
Potential slowing down
Hide.Me
✅ Pros:
Super fast connection
Server locations in 5 countries
Unlimited bandwidth
No buffering online
❌ Cons:
Fixed streaming benefits
Lack of split tunneling
Basic encryption
No VPN traffic protection
Hotspot Shield
✅ Pros:
Secured web navigation
Data encryption tools
No ISP throttling
Trusted by millions of users
❌ Cons:
Limited data usage
No tracking ads protection
Access for a few locations
Only available for 1 device
All these VPN services will allow you to Netflix and chill as long as you like. Check out their complete sets of features and functionalities before you decide which one is the best for you.
QUICK NOTE: According to our in-depth research, there isn’t a single free VPN that truly works consistently with Netflix.
For example, AVG VPN for Netflix isn’t a good combination, although the VPN has a free trial.
If we ever find a free VPN that truly does what you’re looking for, rest assured we’ll update this
The newest Microsoft OS is improved and should work fine in any situation. In these terms, it should allow you to use hardware devices such as the best printers or scanners in optimal conditions.
However, some users claimed that the printer is not working on Windows 11, and this is how they describe the problem on the Reddit forums:
Even if my computer finds the printer it will just give me an error every time I try to print something.
Of course, there are cases when the printer is not working or recognized by the OS.
Why can I not print from Windows 11?
There are several areas to check if you can’t print on Windows 11. One of the chief causes of the issue is an outdated operating system. This can affect printing and cause other errors on your PC.
Also, you can face printer issues on Windows 11 if some related drivers are outdated. Regardless of the cause, you will find a proper fix in this guide.
What are other common printer problems?
1. Poor print quality
Sometimes, you might notice that your device prints fuzzy or blurry lines across the text or other annoying stuff.
If you encounter this problem, the first thing to do is to check if you have the media type selected on the printer.
In addition, make sure that the paper in the tray matches the type selected in the print driver, and verify the ink cartridges to ensure that there isn’t any damage or related issue.
2. Nothing gets printed
You might sometimes notice that nothing gets printed by your device. If you have more than one printer available on your PC, ensure you’ve selected the right one for the process.
Also, verify if the printer is connected correctly to the Wi-Fi network, USB, or Ethernet connection.
Because this might be a temporary random bug, you should try shutting down the printer, wait a few minutes, and turn it back on.
3. Wi-Fi printing takes too long
If your Wi-Fi printing takes too long, ensure the Wi-Fi router is close to your printer. Also, ensure there aren’t big objects that might harm the connection.
As an additional suggestion, we recommend manually switching your wireless router’s channel.
We understand how annoying each issue can be, so we’re here to fix it once and forever with some specialized methods that guarantee your success. Read this article entirely and find out the best solutions to consider.
What can I do if my printer is not working on Windows 11?
1. Check for Windows updates
Open Settings.
Go to Windows Update.
Select Check for updates.
2. Run the Printer troubleshooter
Open Settings.
Go to System, then select Troubleshoot.
Select Other troubleshooters.
Look at the Printer section, then click on the Run button.
This option and the previous one are the most straightforward methods. Moreover, both have high chances of solving hardware and software general issues like touchpad settings missing. Thus, it would help if you considered them the first solutions to fix your printer problem.
Click on the Search button, type Device Manager, then select it.
Expand the Print queues section, right-click on the needed one, and select Update driver.
Click on Search automatically for drivers.
Updating the related drivers might be one of the most efficient solutions for printer problems.
We firmly admit it, considering that device drivers are the most critical components that allow you to use your peripherals properly, for automatic scans of missing or outdated drivers, do not hesitate to use Outbyte Driver Updater.
It will scan your computer and safely update all those outdated drivers. Using its database of millions of driver files that are updated regularly, you are sure to solve this issue.
Outbyte Driver Updater
This tool fixes issues, keeps all drivers up to date, and keeps your system in top shape.
Press the Windows key, then type Windows Defender Firewall, and select it.
Choose Turn Windows Defender Firewall on or off from the left window pane.
Select the twoTurn off Windows Defender Firewall.
Press theOK button.
This option might help, considering that sometimes an antivirus or firewall may be too secure. Thus, it can prevent peripherals (such as your printer) from communicating effectively.
NOTE
At this point, Windows 11 is still in development. Thus, it is possible that some drivers won’t be compatible with the OS.
If the driver worked fine when you were running Windows 10, but now it just doesn’t fit with the Windows 11 OS, you should wait a bit more for new improvements.
Do all printers work with Windows 11?
Your printer should work on Windows 11, provided it worked fine on Windows 10. This is because the latest operating system is based on the solid foundation laid by Windows 10, with some differences and many similarities, as stated by Microsoft.
Also, there are no minimum requirements for printers working on Windows 11. So, if you have used it with Windows 10, it should work well with the latest OS.
Check out this new and improved Windows 11 Universal Print driver
Before anything else, you should know that Universal Print represents a functional print solution that organizations can use primarily to manage their print infrastructure.
However, it is also an efficient option for individual users, so ensure you all look at the information listed below.
Microsoft added some eco-friendly functionality to the already updated Universal Print driver. In these terms, we talk about being able to add a PIN to a print job.
How does it help? The job will not be printed until the user enters the same PIN on the printer.
Also, consider that Windows 11 Universal Print driver can be extended by your printer manufacturer and MPS solutions with additional custom features and workflows.
The printing machine has become necessary for our homes and offices in the contemporary technological era. There are numerous printer brands, with Canon being the most well-known. However, the problem with the Canon printer not turning off is expected.
Many cutting-edge features are available on Canon printers, along with quick print, copy, and scan speeds.
However, it is also true that printers, like all other devices, occasionally experience technological problems, such as a Canon printer not turning off.
The ideal course of action is to keep your Canon printer drivers updated, but at that moment, to handle your printer issues is to must work with knowledgeable computer gurus.
Additionally, you can read our blog post because we have covered how to resolve the issue of your Canon printer not shutting off, its causes, and some of the common Canon printer errors.
Why is the Canon printer not turning off?
There are several reasons why your Canon printer won’t turn off. Error messages, such as Printer error 5B00 that can be evidenced by flashing lights, could be a reason your Canon printer refuses to turn off.
Fuser heating issues may also be to blame. A blown heater element or a problem with the temperature-detecting circuitry may be to blame for this.
As a safety precaution against potential overheating and fire risk, Canon machines typically lock out the device, and it cannot be switched off. You can solve this issue by following the fixes below;
How do I fix the Canon printer if it’s not turning off?
1. Clear all print commands
Click the Windows Start button and type Printers and Scanners.
Select the desired printer – Canon Printer to expand it.
Click on Open queue.
Right-click the desired print jobs in the queue to cancel them.
2. Long press the stop button
Press and hold the Stop button for 5-7 seconds.
Wait and see if the issue gets resolved.
After doing this, your printer will reset to default.
3. Remove the ink cartridges
Open your printer’s cover.
Press the front of the empty cartridge down until it clicks, and then pull it towards you. Don’t pull before you hear the click because you shouldn’t need to use any force.
Remove the protective tape covering the print nozzle in order to see your new cartridge.
Insert it with the rear at a modest upward angle and lift the front a little; you should hear a slight click to mean it is in. Close the printer.
Check to see if your issue has been resolved.
4. Disconnect your printer from the power source
Unplug the printer’s power cord from the wall socket and the printer’s rear and let it remain in that state for around 10 minutes.
Reconnect the printer’s power cord to its back once the estimated length of time has passed, then plug it directly into a separate wall socket.
Activate the printer through your computer.
5. Disable the DRX settings
Press the Menu Button in your printer.
Go to Setup then to Device settings.
Choose LAN Settings then Other settings.
Go down to Wired LAN DRX setting or Wireless LAN DRX setting if you’re using Wi-Fi, and select OK. Next, choose Disable.
Select Copy after the machine has verified to have changed the settings.
What are some of the most common errors with Canon printers?
When operating your Canon printer, there may occasionally be several problems. We have thus gathered information and fixes for error codes that apply to your Canon equipment.
Your machine informs you to replace empty cartridges with a U162 error code. This notice might appear when aligning print cartridges. You can fix the problem by locating the STOP/RESET/RESUME button on your Canon printer, pushing it, and holding it down for 10 seconds.
This tells the printer that you are aware of the message but still want to print. You may print in the usual manner.
E13 indicates that your ink cartridges might lack ink. With some consumables compatible with your system, replace the empty ink cartridges.
E16 indicates that your ink cartridges are empty. Close the paper output lid and replace your empty ink cartridges.
A quick check of the cartridge codes and a new installation should fix the issue since the error code 1487 typically denotes incorrectly inserted ink cartridges.
Make one call to Canon’s always-open helpline number if you need additional assistance with your printer issues without wasting any of your valuable time.
A member of their knowledgeable staff will connect with you right away over the phone and advise you on how to solve your issue. We sincerely hope this information has been very beneficial to you.
Canon printer not turning off is an unusual issue, but we hope that you managed to solve it using the solutions from this guide.
Issues with Canon printers can occur, and if you’re having additional problems, our Windows 11 not detecting Canon printer guide is a great place to start.
Did you manage to fix this problem with our solutions? Let us know in the comments section below!
ExpressVPN is one of the leaders in the expanding niche of VPN solutions. However, as the case has shown so many times, programs that are dependent on too many various factors, often bump into a problem.
One of the repeating issues that plagued numerous users is the inability to connect to a remote VPN server of your choice. The connection bar just stops in the middle of the process and it gets stuck.
Different online use cases necessitate varying internet speeds and bandwidths. In general, web browsing and email require only 5 to 10 Mbps.
Depending on the type of streaming and the number of devices connected to the same network, streaming, online gaming, and downloads necessitate faster internet speeds.
Why won’t ExpressVPN connect?
Failure to immediately search the internet, thus after some time, you are unable to browse the internet while connected to ExpressVPN is a result of interference with certain VPN protocols by ISP.
If you can browse the internet again after connecting to a different VPN server location, there may have been a temporary problem with the previous VPN server location.
Keep in mind that ExpressVPN works in China but there are a few things to consider before using the Hong Kong route through ExpressVPN.
Insufficient connectivity at the chosen VPN server location results in outgoing packet transmission interference from your antivirus or online security application.
Also, check whether you are using the latest version of the ExpressVPN app, it’s important to have the latest updates with your trusted VPN provider for your designated device.
In order to fix this, we offer a few possible solutions below. So, if ExpressVPN gets stuck with every new try, make sure to check them out.
How can I fix ExpressVPN stuck while connecting?
1. Check the Internet connection
Run the Windows Troubleshooter. Right-click on the Wireless or LAN icon in the notification area and click on Troubleshoot problems.
If you’re using the Wireless connection, try using the wired connection instead.
Restart your PC and router/modem.
Reset modem/router settings to default values.
Update the router/modem firmware.
First things first. Probably the most obvious thing you’ll need to check in order to unstuck ExpressVPN is the connection.
ExpressVPN cannot detect internet connection because there’s a bridge broken between your device and the network itself.
Make sure that your PC is able to connect to the Internet without ExpressVPN. If you’re unable to do so, follow the above instructions in order to repair the connection.
On the other hand, if you’re able to connect to the Internet but the problem solely applies to ExpressVPN, make sure to continue with the steps below.
2. Switch to another VPN with stable connections
The tool recommended below is not only one of the oldest virtual private network providers on the market but also one of the best choices when it comes to connection stability.
This solution offers client applications for mainstream operating systems. It’s up to you to grab any of these apps since you’ll want to protect as many devices as you’re allowed on a single account.
Being able to connect from 10 different gadgets is quite a major advantage. After all, with most popular VPN clients, you can only connect using five or seven at most.
No less important, this Kape Technologies VPN solution is also remarkably inexpensive when compared to other VPN providers around. It’s only up to you to try it out.
Private Internet Access
Private Internet Access is your top alternative when ExpressVPN is stuck on connecting. Enjoy the best deal right away!
Right-click on the ExpressVPN desktop shortcut and open Properties.
Open the Compatibility tab.
Check the Run this program as an administrator box and confirm changes.
In order to avoid possible limitations imposed by Windows, you should run the ExpressVPN desktop client with administrative permissions.
This should bypass the blockage and enable you to connect to the dedicated servers you’ve chosen.
This seems to be the case with various third-party programs that are fairly limited or even blocked by Windows due to quite strict UAC (User Account Control) settings.
If you’re not sure how to run ExpressVPN as an admin in Windows 10, make sure to check the instructions above.
4. Change the protocol and server
Open ExpressVPN.
Click on the 3-line menu and open Options.
Select the Protocol tab.
Choose one of the 5 protocols and confirm changes.
Try to connect again.
There are various protocols ExpressVPN utilizes in order to connect to a VPN server. These protocols are basically different methods and they differ in speed and security traits.
By default, ExpressVPN selects active protocol automatically, but that’s not always the most reliable way. When ExpressVPN still trying to connect automatically and it’s not responding try setting up the connection manually.
So, in order to fix the halt while connecting to a remote VPN server, make sure to switch between protocols manually. One of them might just work.
In addition, you’ll probably want to shift between the available servers until you reach the one that works. Due to heavy load, certain servers might be down or a lot slower than intended.
5. Disable antivirus and firewall temporarily
Right-click on the antivirus icon in the notification bar and disable Real-time protection.
In the Windows Search bar, type Firewall and open Windows Firewall.
Click on the Turn Windows Firewall on or off.
Disable Windows Firewall for both Public and Private networks.
Confirm changes and run ExpressVPN again.
If there’s one thing that keeps messing up various VPN and proxy solutions, that’s the third-party antivirus. Moreover, besides the antivirus, we can’t overlook the Windows Firewall.
Both security assets are strict towards the VPN solutions and can cause a halt within the program. So, you have two options here:
To temporarily disable antivirus and firewall.
To manually add exceptions for ExpressVPN.
Either way, that should eliminate stalls and you should be able to continue with the seamless use. If you decide to disable antivirus and firewall temporarily, follow these steps:
On the other hand, you can create an exception within the antivirus and Windows Firewall, respectively. That way, security software won’t suppress ExpressVPN.
6. Contact the support team
Finally, if none of the aforementioned solutions worked for you, make sure to contact the support team that’s available 24/7 through live chat.
ExpressVPN is marketed and advertised as a great VPN with premium support. So, make sure to use your given right as a customer and find out about the problem resolution firsthand.
The protocol that you currently using, the antivirus, and the Internet connection itself may all affect the way ExpressVPN connects.
Is ExpressVPN legal?
Yes, ExpressVPN is legal. However, do keep in mind that P2P torrenting itself is illegal in a few countries, so make sure you know the laws in your country before employing in these activities.
While ExpressVPN is perfectly legal, using it for illegal activity will only cause problems in the long run.
It’s a valid point that they’re not sending the links or storing anything on a server. Nonetheless, they appear to be constant targets for legal threats and accusations, and many of them are short-lived.
Regardless of how you feel about the software you use and what you do online, it is better to stay legal than to risk anything that could be perceived as illegal.
To make sure the VPN is working as it should, don’t hesitate to connect to ExpressVPN and check your IP address. You have no reason to worry about it if it is secured.
Moreover, take a closer look at some of the most common VPN errors and their solutions for quick tips like the ones above.
That should do it. In case you have an alternative solution or questions regarding the ones we already posted, make sure to tell us in the comments section below.
Microsoft Edge is a fast browser that allows you to navigate the Internet easily. It is installed by default, but you can also get it free from the Microsoft Store.
Edge is the default browser for Windows 11. Even though many people want to change it to other browsers like Chrome, Firefox, or Opera One, the Microsoft-created browser is a decent option.
However, after upgrading their operating system to the latest version, some users reported troubles with the browser.
Why is my Microsoft Edge not working?
Older versions of Microsoft Edge can have problems, such as the browser being unable to open or respond to commands. Thus updating it is an adamant solution that you need to implement.
Problems with Microsoft Edge may be brought on by websites not supported by the browser, concurrently opening an excessive number of online pages, or using an outdated version of an extension for Microsoft Edge.
What issues does Microsoft Edge have in Windows 11?
Various manifestations indicate problems with Windows 11 Microsoft Edge. However, even though they come in different shapes and sizes, the effect is still the same, so the solutions are similar.
From what users describe, the most common ones are the following:
Microsoft Edge doesn’t open at all – So the first aspect to consider is that your browser might not open at all. Usually, this occurs when Microsoft Edge is oversaturated with cached data and history
Closes randomly – This one may appear as a consequence. After opening abnormally, Microsoft Edge can close by itself. Note that this one can also happen because of caches
Microsoft Edge is not able to open specific web pages – Happening randomly; some pages simply refuse to open at all
The browser takes a lot of time to load – Most of the time, this means that it will run extremely slow, taking a long time to open completely
Microsoft Edge won’t open from Taskbar – If you try to access Microsoft Edge from the taskbar and it doesn’t work, the problem is generally caused by a bug or a malfunction.
Microsoft Edge is not responding in Windows 11 – Make an effort to upgrade Edge so that you can be certain you are on the most recent version available.
This guide is here to support you completely. We selected the best methods to help you fix Microsoft Edge problems in no time. However, if you want a more reliable browser overall, we recommend you try Opera One, which is highly customizable and has fewer errors.
How do I fix Microsoft Edge issues in Windows 11?
1. Make sure that Microsoft Edge is up to date
Click the Microsoft Edge icon to open it.
Choose the three horizontal dots, then click Settings.
Click the three horizontal lines, and select About Microsoft Edge.
If there are any available updates, they’ll be automatically applied.
This option is the simplest, the quickest, and the most efficient. Usually, your apps need to be updated entirely so they won’t get you into problems.
However, this one will work only if you can open Microsoft Edge. We suggest you keep reading for those who can’t open the browser.
2. Reset the browser’s settings
Open Edge and select the Menu option, shown as three dots, followed by Settings.
Select the Reset settings option from the left side, followed by Restore settings to their default values.
Make sure you read the pop-up message thoroughly so that you won’t end up with unknown changes, then click Reset.
Some of the Microsoft Edge problems on Windows 11 might be caused due to some random bugs. Settings will need to be refreshed, so we recommend you reset the browser’s default values.
3. Clear the browsing data
Open Edge and click the three-dot menu, then select Settings.
Navigate to Cookies and site permissions from the left menu, followed by Manage and delete cookies and site data on the right side.
Choose See all cookies and site data.
Click Remove all, followed by Clear, and you are done!
As mentioned before, an oversaturated browser can cause serious troubles, such as not being able to open it or load certain web pages. Thus, clearing browsing data should help fix most Microsoft Edge problems and one of the significant steps to stop Edge from importing data.
Press the Windows key + I simultaneously, then scroll down to the Troubleshoot section and click it.
Select the Other troubleshooters option from the right side.
Scroll down until you wind the Windows Store Apps section, then click the Run button next to it. The Windows 11 Edge problems will be solved afterward.
With this option, you’ll have an automatic expert to locate and fix the problem. Thus, you don’t have to bother yourself with making adjustments.
5. Repair Microsoft Edge
Press Windows + I to open Settings, then navigate to Apps, followed by Apps and features.
Search for Microsoft Edge from the apps list, click the three vertical dots next to it, and select Modify.
Choose Yes when you’re asked if Do you want to allow this app to make changes to your device?
Ensure you’re connected to the Internet, then click the Repair button. The Windows 11 Edge problems that you encountered will now be fixed.
Note that after performing these steps, the repair shouldn’t affect your browser data and settings.
When a program is repaired, all files in the application’s folder are reviewed, and any corrupted or missing files are restored. This ensures that the software continues to function correctly.
In addition, the entries in the Registry may be examined and fixed up if that becomes essential. Finally, it will run through the program’s installation procedure once more, but it will make every effort to preserve any settings you have previously personalized.
We made sure to conduct thorough research through the most popular forums. Thus, this guide only offered valuable solutions to fix Microsoft Edge issues in Windows 11.
Why does Edge keep crashing in Windows 11?
The Microsoft Edge web browser frequently freezes or closes unexpectedly due to insufficient available resources or excessive processing activity.
We may fix the crashing problem by erasing the history and turning off any browser extensions that may be installed.
Check out our post on how to fix Edge crashes in Windows 11 to find a detailed, step-by-step guide that will walk you through the most efficient solutions.
Prevent Windows 11 Microsoft Edge from running into troubles
As you can see, there are various explanations for why your browser may get into problems in Windows 11, but there are also solutions for each kind of trouble.
However, we properly consider presenting a few suggestions to prevent it from crashing again.
Constantly update your browser – Internet browsers regularly release important updates to improve both the design and security.
Disable Add-Ons in a regular manner – It is true that add-ons enhance your online experience, but there is also no doubt that incompatible add-ons can get your browser into trouble. Thus, you should constantly disable them.
Clear data and history – As you can notice, an oversaturated browser is one of the most common reasons why it can not work properly. Thus, deleting data and history should be a regular process.
Make sure you always check for viruses and malware – Like any hardware or software component, Microsoft Edge might be harmed by various threats. Thus, it is always a good idea to ensure your system’s security.
Even though Microsoft made it more difficult for consumers to modify the default browser settings on Windows 11 in August of 2021, the pushback from customers has caused the Redmond giant to reevaluate its attitude on this issue.
Users could change the default browser to something other than Edge for the first time in Windows 11 build 22509, the first version of this operating system to offer this functionality.
Because we want to simplify your choice, check out these best browsers for Windows 11 that are highly customizable.
To change your Epic games name, the email address, you must first verify your identity using the credential.
And if you always play on a PlayStation, Switch, or Xbox, you must upgrade your account to a full Epic Gamesaccount to change your display name.
Immediately after you change your display name, your friends will begin to see the new name online and in games. Moreover, the name change on your Epic Gamesaccount reflects on Fornite and other Epic Games.
How do I change my Epic Games name?
1. Ensure that you’ve verified the email address that you use for Epic Games. If not, go verify it first.
2. Visit the Epic Games website, and log in to your account using your username and password.
3. Go to yourAccount Infopage.
4. In theGeneralSettings, click on thepencil icon.
5. Enter your desired display name in the provided field.
6. Confirm your name by entering it again.
7. Check the box to accept the terms.
8. Click the Confirm button at the bottom of the screen to confirm the name change.
If you no longer like your Epic Games name, you can change it for free every two weeks. After you decided what other name you want to change yours to, all you got to do is hop on the official Epic Games website and change it.
Name changes in Epic Games are free of charge. This means that you don’t get to use V-Bucks or money to them.
Changing your Fortnite name on a PS4 or Xbox One is different. It is because these consoles make use of your PSN ID or Xbox Gamertag, not your Epic Games name.
It costs $10 each time you change your Fortnite name on a PlayStation 4 or Xbox One. This is because you’re not only changing your Fortnite name but your console ID entirely to reflect across all games.
However, your first name change on these platforms is free of charge.
A change in Epic name doesn’t have any effect on your Xbox Live Gamertag or PlayStation Network display name. If those are what you want to change, you may reach out to Xbox or PlayStation support.
We hope that you managed to perform a name change. Let us know in the comments section below if our solutions helped you out.
A common complaint from users is about FPS (Frames Per Second) dropping in games. Smite’s random Frame rate drop when playing the game, may be caused by a weaker PC configuration, an outdated graphics card or running multiple apps in the background.
First, you may find turning off the FPS counter in Smite a very good idea. Capping your FPS in the Spite game may help you improve your game performance.
What can I do to stop FPS drops on Smite?
1. Update graphics drivers
Press Windows + Rkeys to prompt the Run window.
Type devmgmt.msc into the search space and click OK.
In the search results, click on the Display adapters, and select the driver from the drop-down menu.
Click the Update driver software option, and click on Search automatically for drivers.
Restart your computer and check if the FPS drop in your game persists. If there is no improvement, an alternative is to use software specialized in driver updates.
2. Check your system’s requirements
Experiencing the FPS drop issue on Smite may be because your device doesn’t meet up to the requirements for the game.
On the Windows update page, select Check for updates. (If there’s an update available, Windows will automatically search for it and install it)
4. Disable Game DVR
Press Windows + Rkeys on your keyboard to open the Run window.
Type Regedit in the search space and press the Ctrl + Shift + Enterkeys to prompt the Registry Editor.
Click on the Game DVR option, double-click on the AppCaptureEnabled option, then select Modify.
In the Edit DWORD (32-bit) Value tab, change the Value data to 0, then Click OK.
Launch your game and check if your FPS is stable.
5. End tasks for unimportant programs
Click on the Taskbar and select Task Manager.
Select the CPU and Memory usage in the Task Manager tab.
Click on the applications consuming lots of CPU and memory space on your PC.
Click on the End Task from the drop-down that pops up.
Creating more system resources and RAM will help Smite run smoothly. Also, read how to fix your PC’s GPU memory full message.
Can CPU/GPU affect FPS on Smite?
The GPU and CPU performance can significantly affect the FPS on Smite. Also, the CPU on your computer determines the performance of other elements of game processing.
So, if the GPU and CPU are not working smoothly or consume more RAM, it can affect the FPS on Smite.
Increasing your ping rate to over 150 milliseconds can affect your game’s performance and cause lag or stuttering. However, a good ping speed or rate should be under 60ms.
Are you interested in customizing your own keyboard layouts or starting the layouts from scratch for any kind of reason, like setting the keyboard to a language Microsoft systems don’t have support for or including a symbol of your liking just by pressing a keyboard button?
In the tutorial below, we will see exactly how we can set an input method, remove an input method from our keyboard layouts and use the Microsoft Keyboard Layout Creator to customize the keyboard on Windows Windows 10 to our preferences.
How can I create a custom keyboard layout in Windows 10?
This tutorial shows how to add or remove keyboard input from Control Panel.
Move the mouse cursor to the right side of the screen.
In the search box type Control Panel.
Click (left click) on the Control Panel icon that shows after the search is completed.
After the Control Panel window opens click (left click) on the Language icon.
Double click (left click) on Add a language situated in the middle side of the window you opened.
Under the Input Method field click (left click) on Add an input method.
Double click (left click) on an input method you prefer to add or just choose an input method and click on Add.
You can repeat the two steps above to add another input language if you want.
When you are finished you just need to click (left click) on Save on the lower side of the window.
After you add an input method you will just need to switch the methods from the lower right side of the screen where it says what language is your keyboard set to operate.
2. Change keyboard input methods
You can also add or remove input methods using the PC settings feature in Windows 10, 8.1 as shown below:
Open PC Settings by going with the mouse on the charms bar.
Click (left click) on Settings.
Or another way to open PC settings is by pressing and holding Windows and I buttons.
Click (left click) on General situated on the left of the screen.
Click (left click) on the Language Preferences link situated under the Language section on the right side of the screen.
From here you can follow the steps presented in the first tutorial.
5. Choose the layout that you want to customize from the list.
6. Customize your keyboard layout by navigating to Project > Properties. From there, you can choose whichever options you want: a keyboard name, description, and language, as well as custom hotkeys.
If you’re looking to create a custom keyboard layout on Windows 10, look no further than the Microsoft Keyboard Layout Creator app.
All you need to do is download Microsoft Keyboard Layout Creator and then you can create your own keyboard layouts from scratch using it.
In the past, this application used to say that it did not support Windows 10, but nevertheless it worked just fine if you installed it. Now, it is fully optimized for Windows 10 and is perfectly safe to use.
Speaking of keyboards, there are various technical issues that you may encounter after connecting your keyboard to your computer or after enabling certain settings. We have various guides on our website that you can check out.
The three ways above showed you how you can customize the keyboard input in Windows 10. All you have to do now is go and try it for yourself.
Please write us below for any new ideas on how to customize your keyboard.
Want to include the bash shell option in the folder (right-click) context menu so that you can access it quickly?
It is possible, and here in this article, you will check the detailed guide on how to do that.
What is Bash Shell?
Windows 10 Anniversary update introduced lots of useful and new features to make the operating system more productive for normal users as well as developers.
In this update, the company introduced the dark mode accompanied by Bash Shell, a Linux command-line tool produced specifically by keeping developers in mind, and it is really a big deal.
Here in this article, we will show all the steps that help in adding a new option in the right-click context menu to run the Bash on the desired folder using the Registry Editor.
How can I add Bash to Windows 10?
1. Edit the Registry
By default, Ubuntu Bash is disabled, and users who want to use it on Windows 10 need to enable it manually.
Once the Ubuntu Bash shell is enabled one can easily launch it right from the Start menu. In case, you’re a developer and use it frequently; then you will definitely love to have it in the folder right-click the context menu so that you can quickly launch the Bash console in any folder with one click.
Before following the steps in the upcoming line make sure that the Bash Console is enabled and configured already. Bash Shell is only available in the Windows 10 Update 1607 and above build.
1. Press the Start button on the taskbar to open the search box and type regedit in it, then click on the first result to open the Registry Editor window.
2. In the registry editor, you need to head over to the following key:HKEY_CURRENT_USER\SOFTWARE\Classes\Directory
3. Here in this directory, you need to make a right-click on Directory > New > Key in order to create a new key, and then name it shell.
4. Under Shell, you need to create another subkey and name it runbashshellhere.
5. Now select the newly created subkey i.e. runbashshellhere and head over to the right pane.
Here double click on the default value (unnamed) under runbashshellheresubkey and under Value Data, set its data to Run Bash Shell Here.
6. Underrunbashshellheresubkey, you need to create a new Expandable String Value.
7. Now double click on the icon (Expandable String Value) and Set its value data to the following data: %USERPROFILE%\AppData\Local\lxss\bash.ico
8. Now under runbashshellherekey, you need to create a new key and name it command.
9. Here double click on the default value (unnamed) under the command subkey and under Value Data, set its data to: cmd.exe /c cd /d "%V" && bash.exe
10. You have successfully added Bash to Windows 10.
In case, you’re not comfortable editing the registry keys, then don’t worry. There is also an alternative method available to run the Bash Shell without touching a single registry quickly. Here is what you need to do:
Simply launch File Explorer and head over to the folder of your choice.
Type Bash in the Address bar of the File Explorer and hit Enter.
For example, if you are in C:\Windows, and use the address bar for the same, then the bash shell will launch on /mnt/c/Windows.
That’s about it. Hope you are now able to Add Bash Shell to Windows 10.
Why don’t you give a try to this amazing trick and let us know if you find it useful or not? If you have any queries drop them in the comments.
Craigslist blocks numerous IP addresses daily. That’s because people try to post too many times or write ads targeted at other locations than their own.
Your IP might also get banned if you try to scrape Craigslist for email addresses using automated software solutions that make too many requests from your location.
It’s an automated mechanism that protects Craigslist from spammers and bots, which is also used by other websites. Usually, the IP block is temporary, so you just have to wait a bit until you can post new ads again.
However, to fix this issue, you might have to hide your IP address. Speaking of which, we covered this issue in our how to hide IP address on the local network guide, so be sure to check it out.
This problem affects a lot of home users, but it’s particularly troublesome for business owners because they can’t post ads on Craigslist in many locations from the same account.
However, there are ways to fix it.
Does Craigslist ban IP addresses?
Yes, Craiglist bans IP addresses, especially if you violate its terms of service. If you get banned, you probably won’t be able to access it anymore.
If that happens, your only option might be to contact the administrators and ask them to unban you from the website. These are the most common situations when Craigslist IP is blocked:
Craigslist credibility check failed
Craigslist your request has been blocked
Craigslist this posting is being blocked
Why am I blocked from Craigslist?
This happens if you violate Craigslist’s terms of service. Usually, users get banned because they post too many ads, and that is seen as spamming.
Also, you can get banned if you send too many connections from your device. These are just the two most common reasons, but there are many others.
Find Opera One’s VPN feature in the top left corner and toggle the button to enable it.
Click on the dropdown list and choose a VPN server location.
Go to Craigslist again. You should be able to access it.
Opera One is the best browser with a built-in VPN, which is completely free to use. As such, you can turn to its help if you want to bypass the IP ban on Craigslist and post ads as usual.
Using Opera One is an excellent choice if you’re looking for a free VPN. However, it doesn’t bring the same level of online privacy and digital security as a premium VPN like ExpressVPN.
Opera One offers great features, and it’s a perfect choice if you need to avoid too many requests and messages on Craigslist.
Opera One
Switch to this awesome web browser and use its totally free VPN to unblock Craigslist.
Tor is a free and open-source anonymous network that hides your IP address and location to help you access any restricted content on the web.
If Craigslist is blocking your IP, Tor might be the best way to circumvent this issue.
The best part about the Tor Browser is that you don’t have to configure any special settings. After the quick setup at the first launch, it makes you anonymous as soon as you fire it up.
You can’t control your location, though. However, you can pair Tor with a VPN to maximize your online security and privacy if your Internet connection is stable enough. It works great with ExpressVPN, for example.
*If you want to post an ad on Craigslist in another location than your real one, make sure to connect to a VPN server from that location.
We recommend using ExpressVPN because it’s the best VPN for unblocking websites, including Craigslist when it bans your IP address. Owned by Kape Technologies, ExpressVPN has more than 3,000 VPN servers in 94 countries.
Besides accessing Craigslist, you can use ExpressVPN to watch Netflix US anywhere in the world, along with Hulu and other media streaming services. It has exclusive DNS servers and uses OpenVPN to encrypt your data.
Furthermore, you can set up ExpressvPN on all popular platforms, including Windows, Mac, Linux, Android, iOS, and even routers if you want to share your VPN account with all connected devices. It allows up to 5 simultaneous connections.
ExpressVPN offers amazing features, and it’s a perfect Craigslist VPN for all your needs.
4. Use a proxy server or Internet circumvention tool
Open the tool and head over to Settings and select Psiphon Server Region.
Choose a preferred location and click Apply Changes.
Go to Craigslist using any web browser.
Psiphon is a free and open-source Internet circumvention tools, as well as one of the best proxy servers for unblocking websites. You can safely use it to bypass IP blocks on Craigslist. Plus, it lets you pick a preferred country.
On the other hand, you can’t choose a specific city when concealing your geo-location with Psiphon, unlike a reliable VPN like ExpressVPN. Plus, you can’t count on a proxy server to encrypt your data traffic the same way a VPN can.
Despite these minor flaws, this is still a great tool that can help you with Too many requests errors on Craigslist.
How do you find out who flagged you on Craigslist?
On Craigslist, you simply cannot find out who flagged you. Craigslist will not tell you anything, and their system is not open to debate or arguing your rights unless you are posting paid ads, which should not be flagged in the first place.
The most common reason for flagging is posting ads too quickly, posting the same or very similar ad, and sounding insincere in your ad.
Is there a posting limit on Craigslist?
There is a 48-hour waiting period if it is not the same thing or in the same posting area, and there is no limit on posts on Craigslist if you are not using automated posting software to post repeatedly.
There is no limit to the number of live ads you can have on Craigslist. However, if you are a rental company and want to post 50 apartments for rent ads in a row, the situation may be slightly different.
How long does craigslist block your IP?
This can vary greatly depending on which rule you broke. Certain bans can last a day or two, while others can last for weeks.
If you made a major infraction, then you might get your account permanently banned.
In conclusion, Craigslist regularly blocks IP addresses, but the ban is usually temporary. If you can’t afford to waste time, however, check out the solutions above to easily change your IP and geo-location, in order to start posting new ads again.
The four types of tools above might seem similar, but they will help you if your request has been blocked on Craigslist. If you have trouble deciding what’s the best choice for you and your business, we suggest picking a trustworthy VPN like ExpressVPN.
In case you’re having more issues, you might want to visit our error 1005 access denied article to see how to fix it for good.
In addition to unblocking websites, ExpressVPN keeps you safe online from hackers and other online dangers. It’s the best in the business when it comes to torrenting, streaming, gaming, and secure browsing.